Assist.lec. Ahmed Basim Complete Denture 3 rd Year 1 Impression material Week 1 A dental impression : is defined as the negative record of the tissues of the mouth . It is used to reproduce the form of the teeth and surrounding tissues. Complete denture impression : A complete denture impression is a negative registration of the entire denture bearing, stabilizing and border seal areas present in the edentulous mouth. Diagnostic impression :The negative replica of the oral tissues used to prepare a diagnostic cast. used for study purposes like measuring the undercuts, locating the path of insertion. Is made as a part of treatment plan and to estimate the amount of pre- prosthetic surgery. Preliminary impression (primary impression) :A preliminary impression is an impression made for the purpose of diagnosis or for the construction of a tray final impression. Final impression is an impression for making the master cast. Impression material : Any substance or combination of substances used for making an impression or negative reproduction Requirements of impression materials: 1. Must be a semi-liquid material that will flow and adapt itself around the structure of interest. 2. It must set and harden into a solid that is rigid enough to be removed from the mouth without becoming deformed. 3. Copy details accurately. 4. Dimensional stability after removal from the mouth appropriate working time (from the start of mix). 5. Appropriate time to harden in the mouth (setting time). 6. Bio-compatibility/Aesthetic, odor/taste acceptable. 7. Chemically compatible with material used to pour cast. 8. Can be disinfected without any changes of properties. 9. Economic or not expensive. 10. Adequate shelf life for storage.

Welcome message from author
This document is posted to help you gain knowledge. Please leave a comment to let me know what you think about it! Share it to your friends and learn new things together.
Transcript
Assist.lec. Ahmed Basim Complete Denture 3rd Year
1
Impression material
Week 1
A dental impression : is defined as the negative record of the tissues of the mouth . It
is used to reproduce the form of the teeth and surrounding tissues.
Complete denture impression : A complete denture impression is a negative
registration of the entire denture bearing, stabilizing and border seal areas present in
the edentulous mouth.
Diagnostic impression :The negative replica of the oral tissues used to prepare a
diagnostic cast. used for study purposes like measuring the undercuts, locating the path
of insertion. Is made as a part of treatment plan and to estimate the amount of pre-
prosthetic surgery.
Preliminary impression (primary impression) :A preliminary impression is an impression
made for the purpose of diagnosis or for the construction of a tray final impression.
Final impression is an impression for making the master cast.
Impression material: Any substance or combination of substances used for making an
impression or negative reproduction
Requirements of impression materials:
1. Must be a semi-liquid material that will flow and adapt itself around the structure
of interest.
2. It must set and harden into a solid that is rigid enough to be removed from the
mouth without becoming deformed.
3. Copy details accurately.
4. Dimensional stability after removal from the mouth appropriate working time
(from the start of mix).
5. Appropriate time to harden in the mouth (setting time).
6. Bio-compatibility/Aesthetic, odor/taste acceptable.
7. Chemically compatible with material used to pour cast.
8. Can be disinfected without any changes of properties.
9. Economic or not expensive.
10. Adequate shelf life for storage.
Assist.lec. Ahmed Basim Complete Denture 3rd Year
2
Impressions (classification)
There are many types of classification, the most common classification used in
complete denture construction is based on type of impression and area of use :
1. Primary :Impression compound and Alginate.
2. Secondary: Zinc Oxide Eugenol (ZOE) , Elastomers for CD and Plaster of paris.
Primary impression
The primary impression, taken in an edentulous stock tray, is needed to record enough
detail for a special tray to be made. The primary impression should reproduce Certain
anatomical landmark which indicates the correct extension of the special tray (eg
maxillary tuberosity and retromolar pads. It is usually taken in impression compound
or impression plaster (not suitable if undercuts present).
Final impression Objectives
To obtain an impression from which a retentive, stable and comfortable denture base
can be constructed. To record as accurately as possible the shape of the mucosa
overlying the alveolar ridges and hard palate together with functional depth and width
of sulci.
Classification of impression materials
1- Non-elastic impression
a. Plaster of Paris
b. Impression Compound
c. Zinc oxide eugenol and.
d.Wax. Must not have undercuts
2. Elastic: can be used in undercut (Hydrocolloids)
Hydrocolloids (Hydro=water kola=glue Oid=like)
Assist.lec. Ahmed Basim Complete Denture 3rd Year
3
a. Reversible (agar)……solution ↔ gel (temperature) physical reaction
b. Irreversible (alginate)…..solution.→ gel Chemical reaction
c. Elastomers Polysulfide (PS) set by polymerization Silicon rubber (AS and CS)
Polyethers (PE).
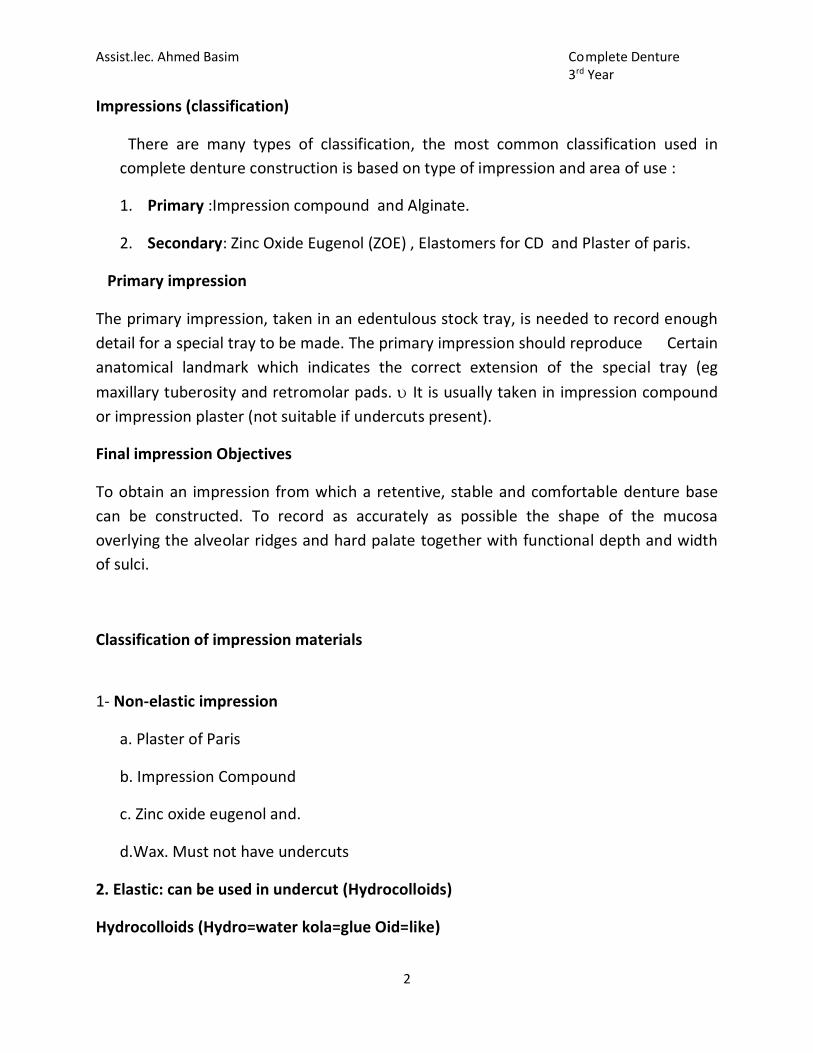
Impression plaster
Impression plaster: Rarely used these days because it’s brittle and fractures very easily.
advantages
1- Easy to mix Working time 2-3 min Setting time 2-3 min
2- Good dimensional stability and accuracy
3- Cheap
Impression plaster Disadvantages
1- Low strength
2- Rough surface
3- Poor abrasion resistance
4- Rigid once set
5- Dry sensation in the mouth .
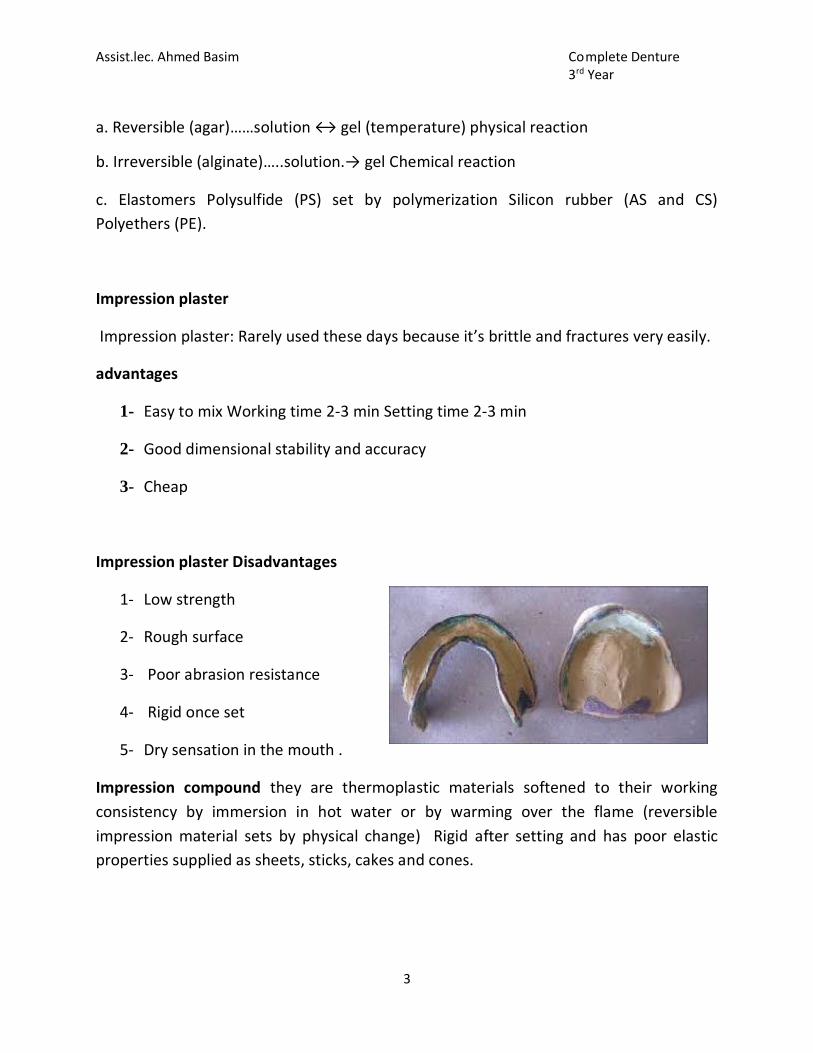
Impression compound they are thermoplastic materials softened to their working
consistency by immersion in hot water or by warming over the flame (reversible
impression material sets by physical change) Rigid after setting and has poor elastic
properties supplied as sheets, sticks, cakes and cones.
Assist.lec. Ahmed Basim Complete Denture 3rd Year
4
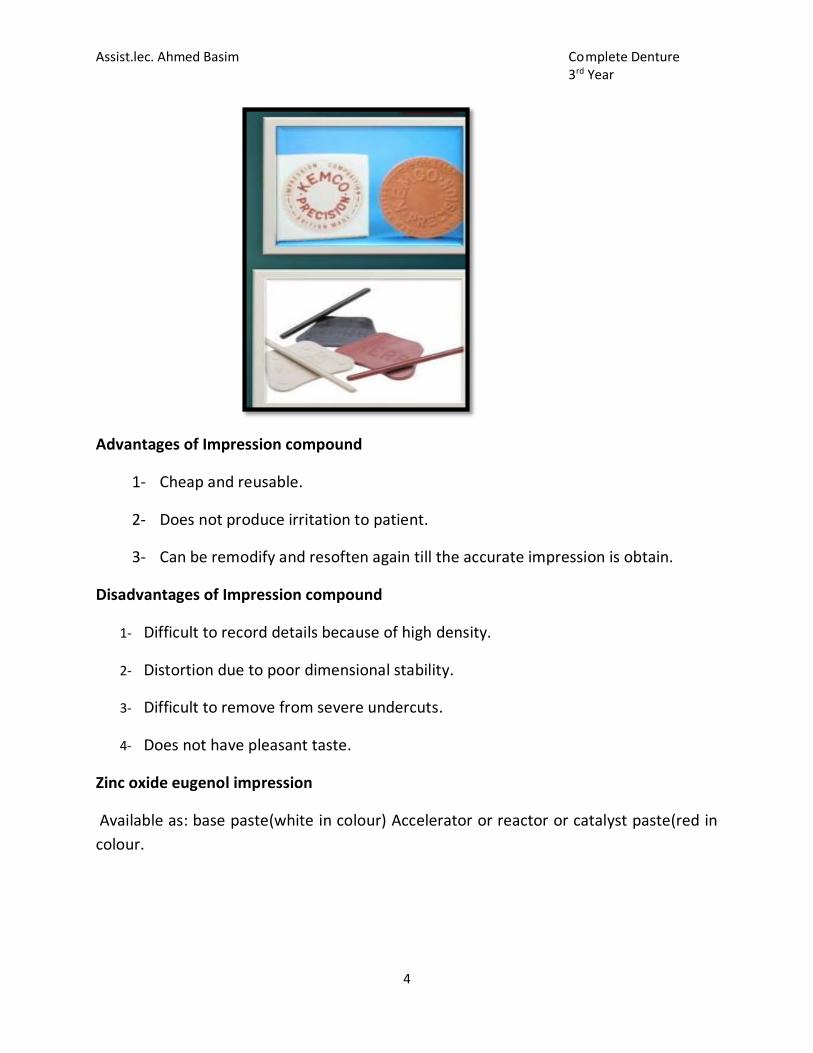
Advantages of Impression compound
1- Cheap and reusable.
2- Does not produce irritation to patient.
3- Can be remodify and resoften again till the accurate impression is obtain.
Disadvantages of Impression compound
1- Difficult to record details because of high density.
2- Distortion due to poor dimensional stability.
3- Difficult to remove from severe undercuts.
4- Does not have pleasant taste.
Zinc oxide eugenol impression
Available as: base paste(white in colour) Accelerator or reactor or catalyst paste(red in
colour.
Assist.lec. Ahmed Basim Complete Denture 3rd Year
5
Properties:
1. Good consistency and flow.
2. Detail reproduction.
3. Rigid and having good strength
4. Good dimensional stability.
Advantages:
1. It has enough working time to complete border moulding.
2. It can be checked in mouth repeatedly without deforming.
3. It registers accurate surface details.
4. It is dimensionally stable.
Disadvantages:
1. Requires special tray for impression making.
2. Sticky in nature and adheres to tissues.
3. Burning sensation of eugenol causes tissue irritation.
4. Highly inelastic in nature.
Non-eugenol pastes are developed to overcome the burning sensation caused by
eugenol used in eugenol irritant patients.
Impression waxes
Impression waxes are rarely used to record complete impressions but are normally
used to correct small imperfections in other impressions.
Elastomeric impression material
Polysulfide rubber impression material has a polysulfide polymer base that reacts
with sulfur with the help of a catalyst. This impression material has good elastic
property and excellent tear strength. However, this impression material has
unpleasant smell. It is available in different consistencies. Condensation-cured
silicones consist of a base material and a catalyst. The base material is a dimethyl
siloxane with 35-70% silica filler.
Assist.lec. Ahmed Basim Complete Denture 3rd Year
6
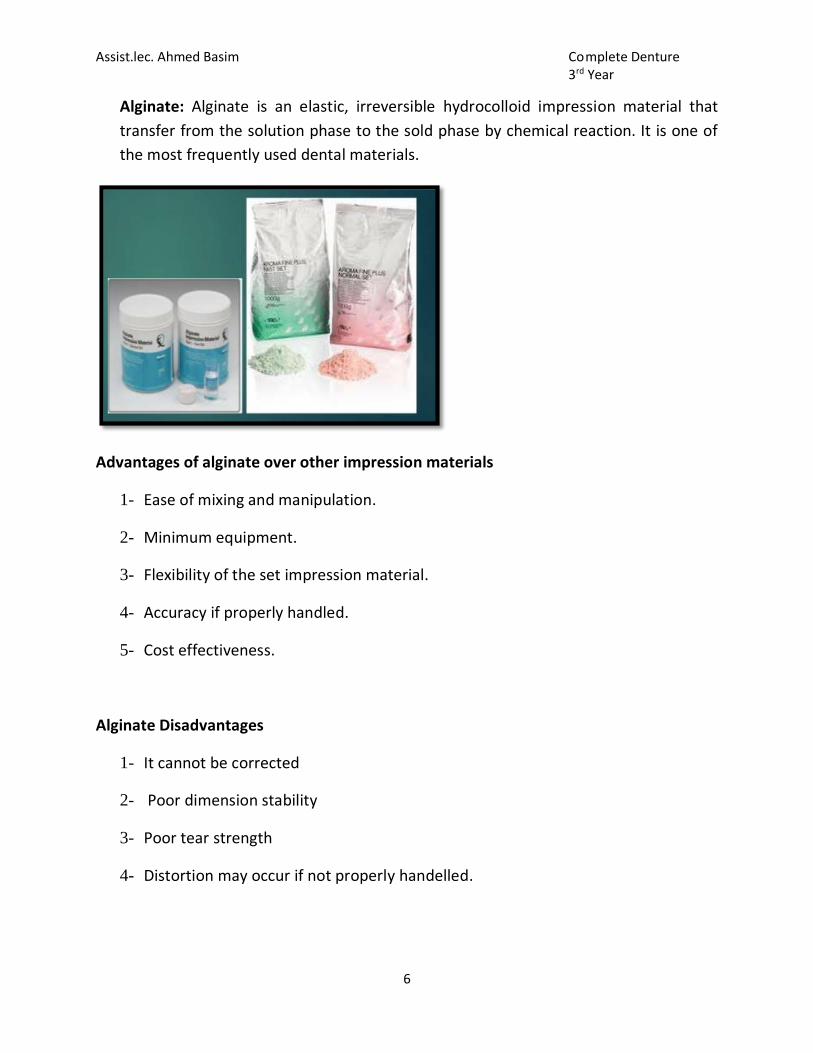
Alginate: Alginate is an elastic, irreversible hydrocolloid impression material that
transfer from the solution phase to the sold phase by chemical reaction. It is one of
the most frequently used dental materials.
Advantages of alginate over other impression materials
1- Ease of mixing and manipulation.
2- Minimum equipment.
3- Flexibility of the set impression material.
4- Accuracy if properly handled.
5- Cost effectiveness.
Alginate Disadvantages
1- It cannot be corrected
2- Poor dimension stability
3- Poor tear strength
4- Distortion may occur if not properly handelled.
Assist.lec. Ahmed Basim Complete Denture 3rd Year
1
Anatomical landmarks
Week 2
The anatomy of edentulous ridges in the maxilla and mandible is very important
for the design of the complete denture, the total area of support from the
mandible is significantly less than from the maxilla.
Important terms:
Limiting structures-they determine and confine extent of dentures .
Supporting structures- these are the load bearing areas- They show minimal
ridge resorption even under constant load.
Relief areas- these areas resorb under constant load or contain fragile structures
within
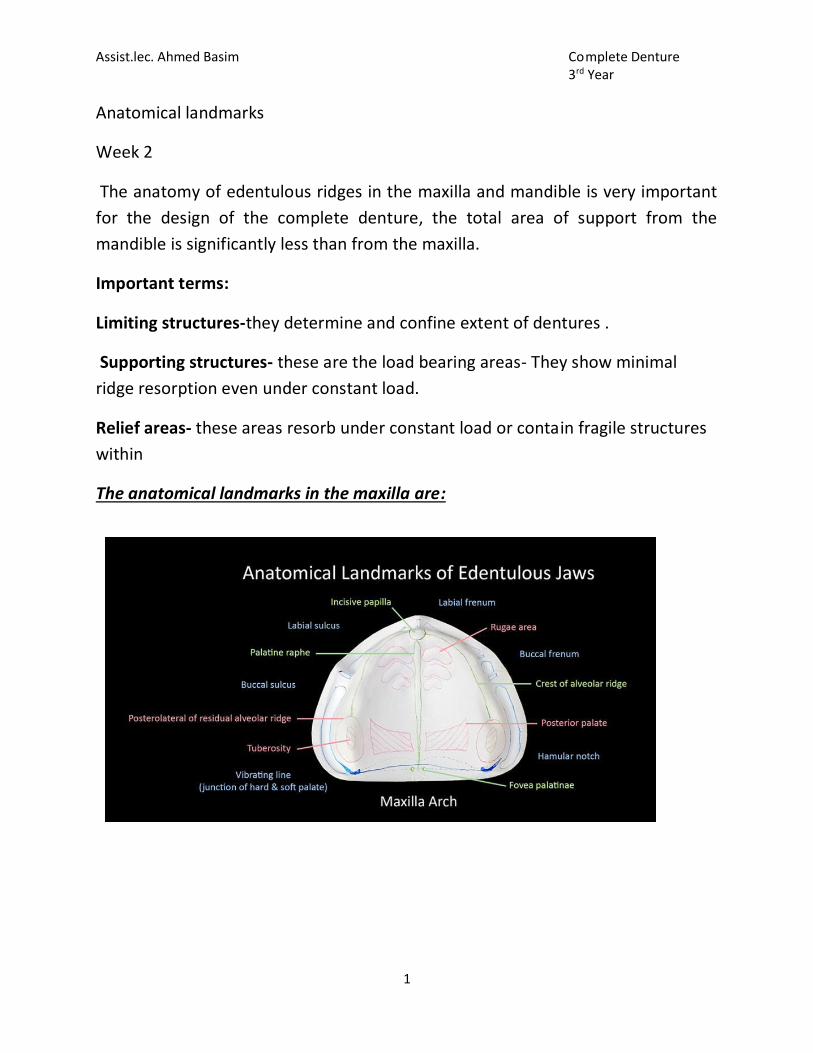
The anatomical landmarks in the maxilla are:
Assist.lec. Ahmed Basim Complete Denture 3rd Year
2
Limiting structures:
1. Labial frenum
2. Labial vestibule
3.Buccal frenum
4. Buccal vestibule
5.Hamular notch
6.Posterior palatal seal area
Supporting Structures
Primary stress bearing areas:
1∙ Hard palate
2 ∙ Postero- lateral slopes of residual alveolar ridge.
Secondary stress bearing areas
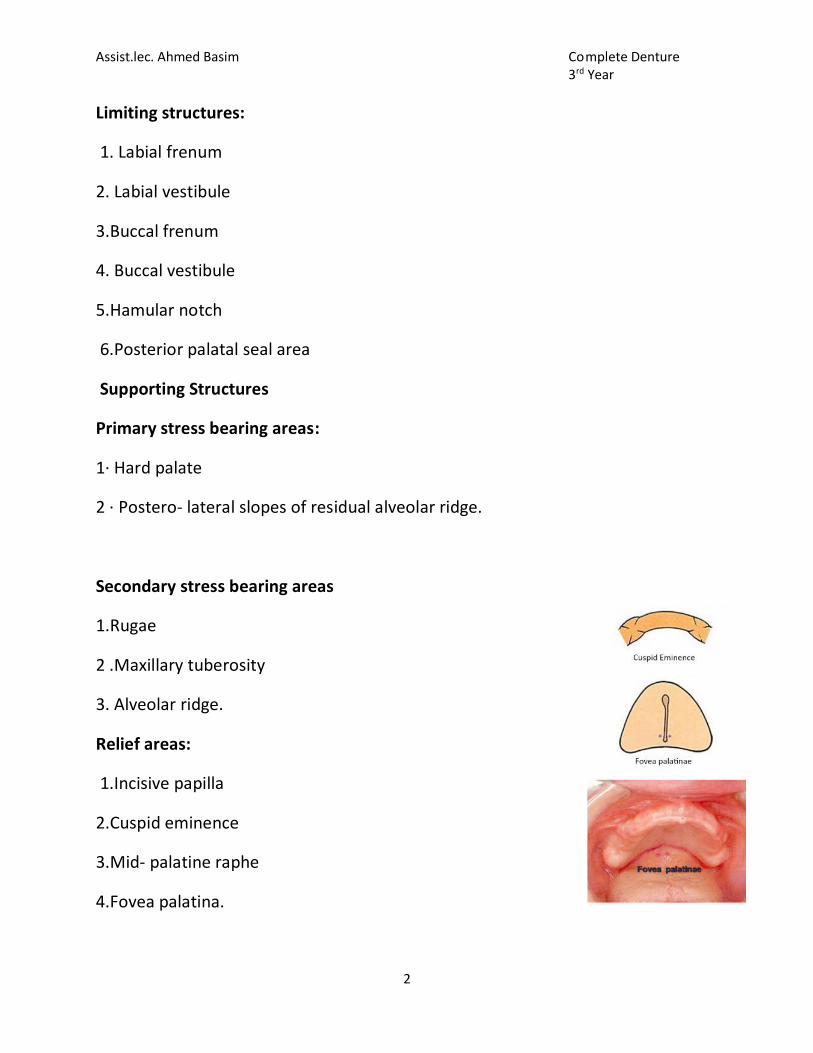
1.Rugae
2 .Maxillary tuberosity
3. Alveolar ridge.
Relief areas:
1.Incisive papilla
2.Cuspid eminence
3.Mid- palatine raphe
4.Fovea palatina.
Assist.lec. Ahmed Basim Complete Denture 3rd Year
3
SUPPORT FORTHE MAXILLARY DENTURE The ultimate support for the maxillary denture is the bone of the two maxillae and the palatine bone. The palatine processes of the maxillae are joined together at the midline in the median suture.
RESIDUAL RIDGE: The shape and size of the alveolar ridges change when the
natural teeth are removed. The alveoli become mere holes in the jawbone and
begin to fill up with new bone, but at the same time the bone around the margins
of the tooth sockets begin to shrink away. This shrinkage, or resorption, is rapid
at first, but it continues at a resorbed rate throughout life.
Labial frenum: The maxillary labial frenum is a fold of mucous membrane at the
median line. (No muscle attachment). This band of tissue starts superiorly in a fan
shape and converges as it descends to its terminal attachment on the labial side
of ridge.
Labial Vestibule: This anterior region of maxillary basal seat extends from one
buccal frenum to the other on the labial side. The major muscle in this area is(
orbicularis oris). Three objectives are apparent: The impression must supply
sufficient support to the upper lip to restore the relaxed contour. The labial
flange of the impression must have sufficient height to reach the reflecting
mucous membrane of the labial vestibular space. There must be no interference
of the labial flange with the action of lip in function.
Buccal Frenum: The buccal frenum is sometimes a single fold of mucous
membrane, sometimes double, and in some mouths, broad and fan shaped.
Associated muscles are: ∙ Buccinator , Orbicularis oris and Levator anguli oris.
Buccal Vestibule: The buccal vestibule extends from the buccal frenum to the
hamular notch. It is influenced by the buccinator and the modiolus. And distally
by the coronoid process of mandible.
Hamular Notch: Is a displaceable area about 2mm wide , between the
tuberosity of the maxilla and the hamulus of the pterygoid plate.
Assist.lec. Ahmed Basim Complete Denture 3rd Year
4
Vibrating line of the palate: This is an area at or distal to the junction of hard and
soft palate where movement occurs when patient says “ah”. The area may also
be identified by “Valsalva maneuver ” by asking the patient to close his nose using
his fingers and asking him to blow gently through the nose . Posterior vibrating
line That is 4-12mm or on an average is 8.2 mm dorsally to the hard and soft
palate junction. In most instances the denture should end 1 or 2mm posterior to
the vibratory line.
Maxillary Tuberosity: The maxillary tuberosities are the distal aspects of the
posterior ridges.
Assist.lec. Ahmed Basim Complete Denture 3rd Year
5
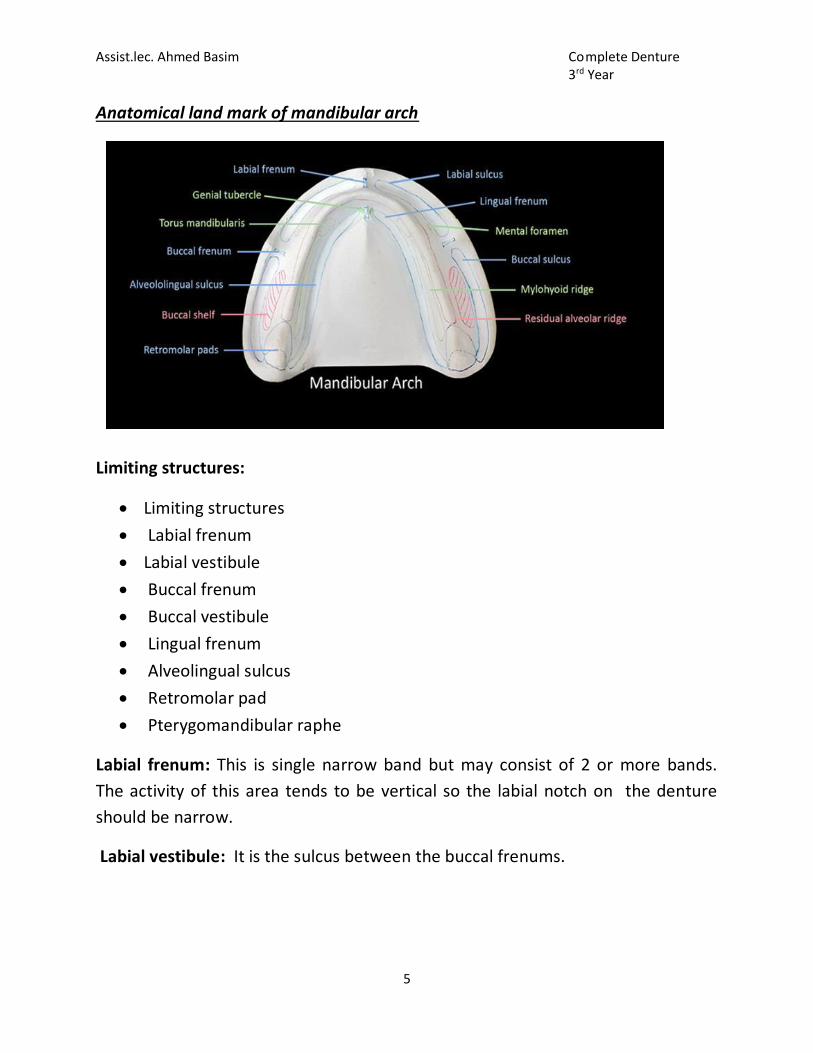
Anatomical land mark of mandibular arch
Limiting structures:
Limiting structures
Labial frenum
Labial vestibule
Buccal frenum
Buccal vestibule
Lingual frenum
Alveolingual sulcus
Retromolar pad
Pterygomandibular raphe
Labial frenum: This is single narrow band but may consist of 2 or more bands.
The activity of this area tends to be vertical so the labial notch on the denture
should be narrow.
Labial vestibule: It is the sulcus between the buccal frenums.
Assist.lec. Ahmed Basim Complete Denture 3rd Year
6
Buccal frenum: This is usually in the area of 1st pre molar. The oral activities in
these area are horizontal as well as vertical (ex. Grinning and puckering) thus
needing wider clearance.
Buccal vestibule: The buccal vestibule extends from the buccal frenum posteriorly
to the outside back corner of the retromolar pad and from the crest of the
residual alveolar ridge to the cheek.
Lingual frenum: It is a fold of mucous membrane existing when the tip of the
tongue is elevated.
Alveololingual sulcus: Extends from lingual frenum to retromylohyoid curtain
Divided into 3 parts:- anterior, middle and posterior
Anterior region- from lingual frenum to premylohyoid fossa Flange is shorter
anteriorly and should touch the floor of the mouth when tip of tongue touches
upper incisors.
Middle- extends from premylohyoid fossa to distal end of mylohyoid ridge
Shallower due to prominence of mylohyoid ridge and action of mylohyoid muscle
Posterior- retromylohyoid fossa Typical S form of lingual sulcus .
Retromolar pad: Pear shaped of triangular keratinized soft pad of tissue at distal
end of ridge, bounded posteriorly by tendons of temporalis, laterally by
buccinators and medially by pterygomandibular raphe and superior constrictor,
its the posterior seal of mandibular denture.
Supporting structures
Buccal shelf area
Residual alveolar ridge
Buccal shelf area: The area between the mandibular buccal frenum and the
anterior edge of the masseter is known as the buccal shelf . It is bounded
medially by the crest of the residual ridge , anteriorly by the buccal frenum ,
laterally by the external oblique line and distally by retromolar pad. The buccal
Assist.lec. Ahmed Basim Complete Denture 3rd Year
7
shelf forms the primary support for the mandibular denture as it is made
primarily of cortical type of bone(dense bone type) and lies at right angles to
occlusal forces.
Residual alveolar ridge: edentulous mandible may become flat with concave
denture bearing surface in such cases, structures attaching on lingual side of ridge
attach over the ridge due to resorption mandible inclines outwards and becomes
progressively wider.
Relief area:
Mental foramen
Genial tubercle
Mylohyoid ridge
Mandibular tori
Mental foramen: It lies between the 1st and 2nd premolar region. Due to ridge
resorption, it may lie close to the ridge. It should be relieved in these areas as
pressure over the nerve passing through it can get compressed by denture base
leading to paraesthesia (numbness) of lower lip.
Genial tubercle: the genial tubercle are a pair of dense prominences at the
inferior border of the mandible at the lingual midline.
Mylohyoid ridge: the mylohyoid ridge is a bony prominence along the lingual
aspect of the mandible Soft tissue usually hides the sharpness of the mylohyoid
ridge anteriorly, this ridge with mylohyoid muscle is close to the inferior surface
of the mandible Posteriorly, after resorption, it often flushes with the residual
ridge.The mucosa membrane overlying the sharp or irregular mylohyoid ridge
needs to be relieved because denture base might easily traumatize it.
Mandibular tori : These are the abnormal bony prominence found bilaterally on
the lingual side, near the premolar region but they may extend posteriorly to the
molar area, It is covered by thin mucosa.
Assist.lec. Ahmed Basim Complete Denture 3rd Year
1
Special tray
A special tray is a custom made device prepared for a particular patient which is
used to carry, confine and control an impression material while making an
impression.
Ideal Requirement
It should be well adapted to the primary cast.
It should be dimensionally stable on the cast and in the mouth.
The tissue surface should be free of voids or projections.
It should be at least 2 mm thick in the palatal area and lingual flange for
adequate rigidity.
It should be rigid even in thin sections.
It should be easy to remove.
It should not react with the impression material.
It should have a contrasting color to make its margins appear prominent.
Customized tray materials
1. Light-cure resins.
2. Auto polymerizing acrylic resin.
3. Vacuum-form poly vinyl.
4. Thermoplastic materials.
Types of Special Tray Design
1. Close-fitting special tray.
2. Spaced special tray.

Assist.lec. Ahmed Basim Complete Denture 3rd Year
2
1) Close-fitting trays
Where the majority of the denture-
bearing area is free from large undercuts,
closefitting trays should be used. They allow
pressure to be exerted on the denture-
bearing area during the impression-taking
procedure. Usually used with impression
materials that are non elastic or rigid once
set, typically zinc oxide eugenol paste.
2) Spaced trays
When a large undercut areas prohibit the use of close-fitting trays as removal
from the mouth without causing distortion would be difficult and removal from
the cast model would cause fracture of the cast. This type of custom tray can be
used with alginate, elastomeric and impression plaster impression materials.
The spacing between the tray and the tissues should be increased according to
the depth of undercut, tear strength and elastic limit of the impression material.
Alginate has low tear strength and requires adequate bulk to remain intact on
removal. Trays for alginate are
perforated to allow mechanical retention
to retain alginate in the tray. It is
important not to place the perforations
too close to the edge of the tray. If the
clinician needs to adjust any
overextension of the tray they may grind
into the perforations.
An extraoral handle is placed anteriorly
and includes a step to ensure that it exits the mouth between the lips without
displacing them.
Assist.lec. Ahmed Basim Complete Denture 3rd Year
3
Fabrication of the Special tray
Firstly should be determine the peripheral extension made by using the primary
model.
Maxilla extension identification:
identify the junction between the hard and soft palate (fovea palatinae)
and use this landmark as the periphery of the tray
ensuring that the entire tuberosities are included
the distal extension of maxillary impression trays should extend to the
fovea palatine and extend beyond the tuberosities to the hamular notches.
Mandible extension identification:
include the retromolar pad
extend into the lingual sulcus such that the periphery is just short of the mylohyoid ridge
buccally to be just short of the external oblique ridge.
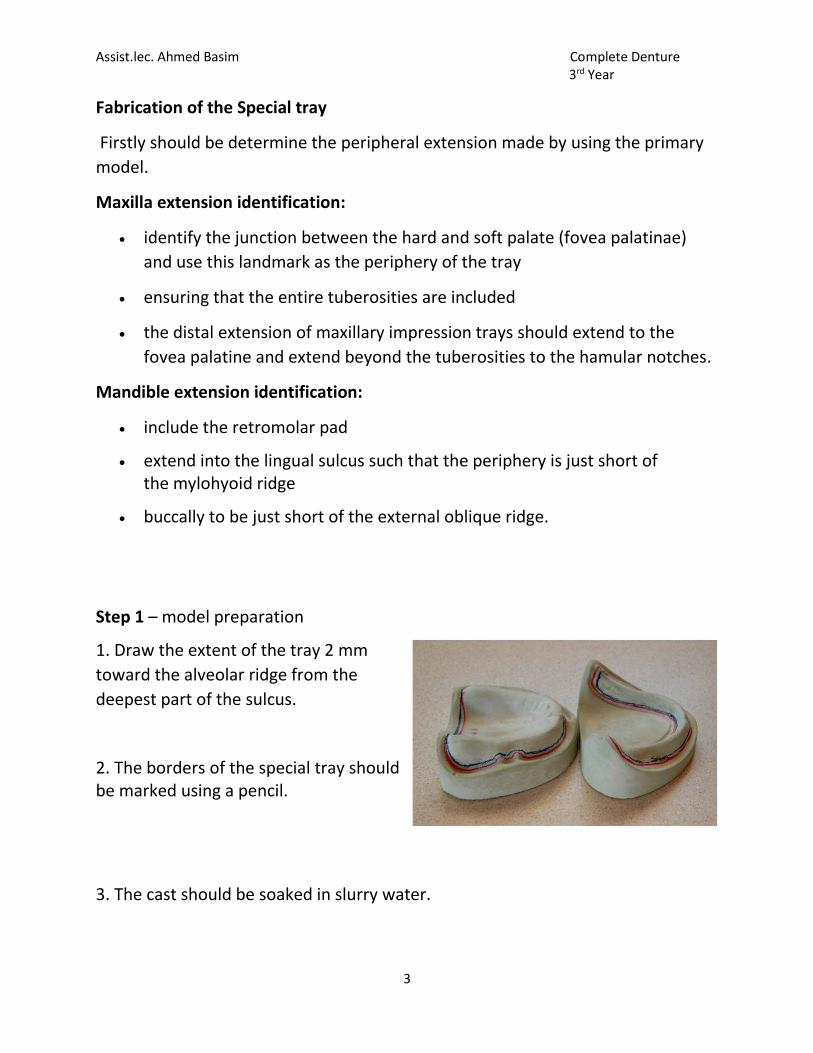
Step 1 – model preparation
1. Draw the extent of the tray 2 mm
toward the alveolar ridge from the
deepest part of the sulcus.
2. The borders of the special tray should be marked using a pencil.
3. The cast should be soaked in slurry water.
Assist.lec. Ahmed Basim Complete Denture 3rd Year
4
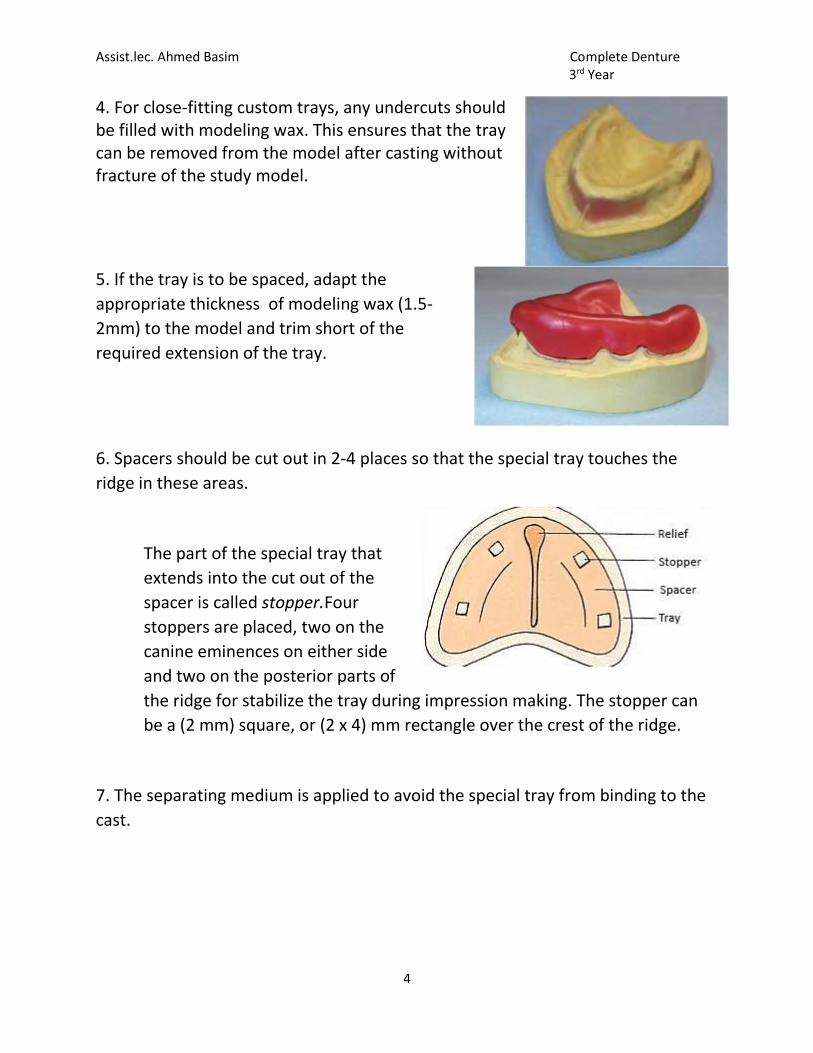
4. For close-fitting custom trays, any undercuts should be filled with modeling wax. This ensures that the tray can be removed from the model after casting without fracture of the study model.
5. If the tray is to be spaced, adapt the
appropriate thickness of modeling wax (1.5-
2mm) to the model and trim short of the
required extension of the tray.
6. Spacers should be cut out in 2-4 places so that the special tray touches the
ridge in these areas.
The part of the special tray that
extends into the cut out of the
spacer is called stopper.Four
stoppers are placed, two on the
canine eminences on either side
and two on the posterior parts of
the ridge for stabilize the tray during impression making. The stopper can
be a (2 mm) square, or (2 x 4) mm rectangle over the crest of the ridge.
7. The separating medium is applied to avoid the special tray from binding to the
cast.
Assist.lec. Ahmed Basim Complete Denture 3rd Year
5
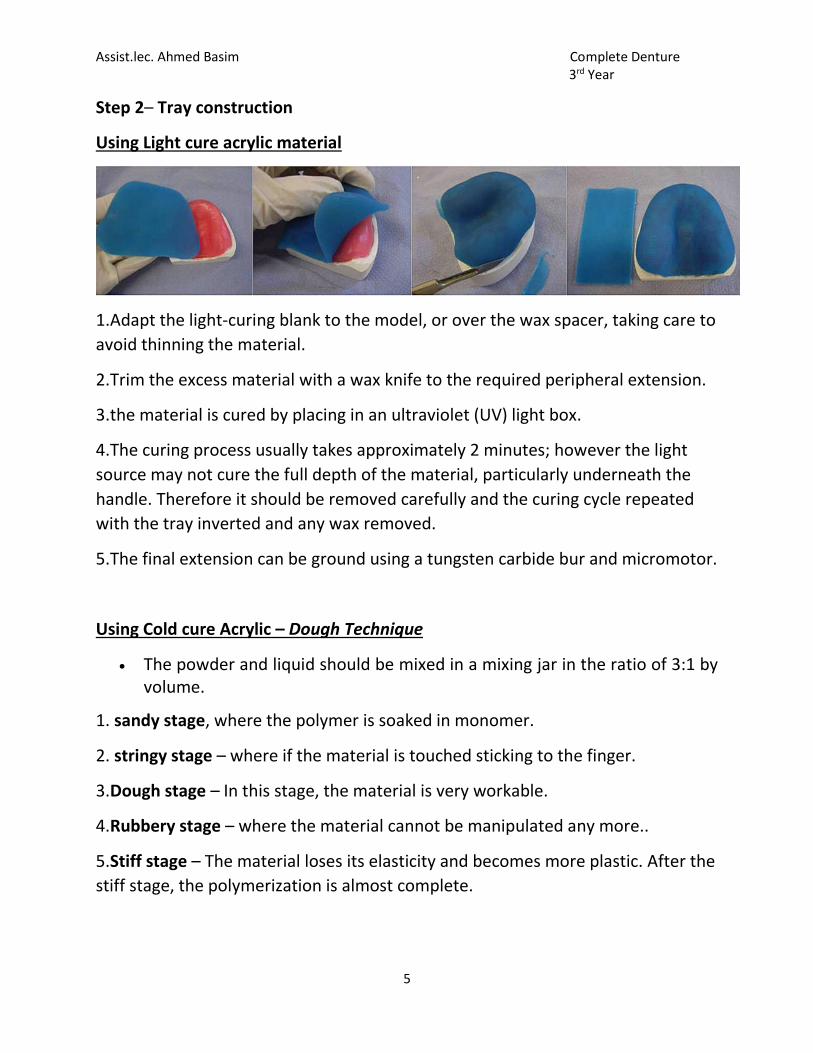
Step 2– Tray construction
Using Light cure acrylic material
1.Adapt the light-curing blank to the model, or over the wax spacer, taking care to
avoid thinning the material.
2.Trim the excess material with a wax knife to the required peripheral extension.
3.the material is cured by placing in an ultraviolet (UV) light box.
4.The curing process usually takes approximately 2 minutes; however the light
source may not cure the full depth of the material, particularly underneath the
handle. Therefore it should be removed carefully and the curing cycle repeated
with the tray inverted and any wax removed.
5.The final extension can be ground using a tungsten carbide bur and micromotor.
Using Cold cure Acrylic – Dough Technique
The powder and liquid should be mixed in a mixing jar in the ratio of 3:1 by volume.
1. sandy stage, where the polymer is soaked in monomer.
2. stringy stage – where if the material is touched sticking to the finger.
3.Dough stage – In this stage, the material is very workable.
4.Rubbery stage – where the material cannot be manipulated any more..
5.Stiff stage – The material loses its elasticity and becomes more plastic. After the
stiff stage, the polymerization is almost complete.
Assist.lec. Ahmed Basim Complete Denture 3rd Year
6
Procedure:
Manipulation is done in the late stringy and the dough stages. The material is kneaded in the hand, to achieve a homogenous mix.
Then the material is shaped into a 2 mm thick sheet. Flattening the dough can be done using a roller or a plaster mould or by pressing the material between two glass slabs.
The rolled sheet of acrylic is adapted over the cast from the center to the periphery. This prevents the formation of wrinkles.
Care should be taken not to apply excessive pressure on the ridge areas as it might lead to the thinning of the tray.
The excess material should be cut out with a wax knife before the material
sets.
The set material is then trimmed to obtain a smooth surface with smooth
margins.
The handle is fabricated using the excess dough material.
Step 3 – Finishing the tray
Finishing the special tray with acrylic bur by micromotor.
Final smoothing may be achieved using a sandpaper mandrel.
Base plate
base plate, record base: Is a temporary substance representing the base of the
denture which is used for making maxillo-mandibular relation record and for
arrangement of the teeth.

Assist.lec. Ahmed Basim Complete Denture 3rd Year
7
Ideal Requirement of Base Plate
A base plate should be rigid.
Dimensionally stable at working temperatures.
Extend over the entire denture-bearing area.
Allow adjustment to the periphery chairside.
Materials Used for the Fabrication of Base Plate
Light-cured acrylic
Cold cure acrylic
Heat cure acrylic
Wax
Shellac base plate is the most suitable material. If wax or shellac are used, consideration should be given to the possible distortion in the mouth due to an increase in temperature.
Fabrication of a Denture Base
The method of making a denture base is similar to the special tray but it is made without spacer and without handle.
The difference between fabricating the base of the special tray and the denture base is where the border for base plate should extend till the depth of sulcus.
Occlusal Rim
Occlusal Rim Occluding surface built on temporary denture base for the purpose of making maxillo-mandibular relation and for arranging artificial teeth to form the trial denture. They usually fabricated to larger size so that they can be reduced as needed.After the fabrication of denture base, it is followed by the formation of occlusal rim.
Assist.lec. Ahmed Basim Complete Denture 3rd Year
8
Purpose of Occlusal Rim
1. To record various maxillo-mandibular relationship.
2. To record lip line.
3. To record horizontal and vertical overlaps.
Dimensions used to fabricate a standard occlusal rim
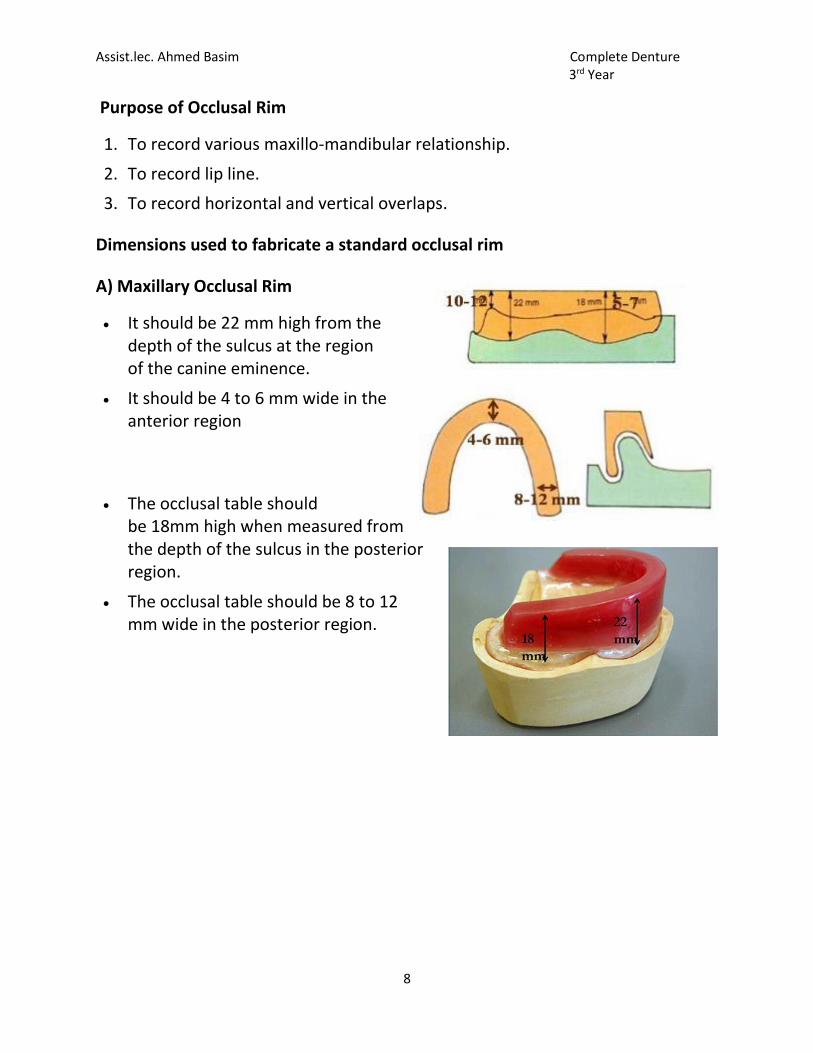
A) Maxillary Occlusal Rim
It should be 22 mm high from the depth of the sulcus at the region of the canine eminence.
It should be 4 to 6 mm wide in the anterior region
The occlusal table should be 18mm high when measured from the depth of the sulcus in the posterior region.
The occlusal table should be 8 to 12 mm wide in the posterior region.
Assist.lec. Ahmed Basim Complete Denture 3rd Year
9
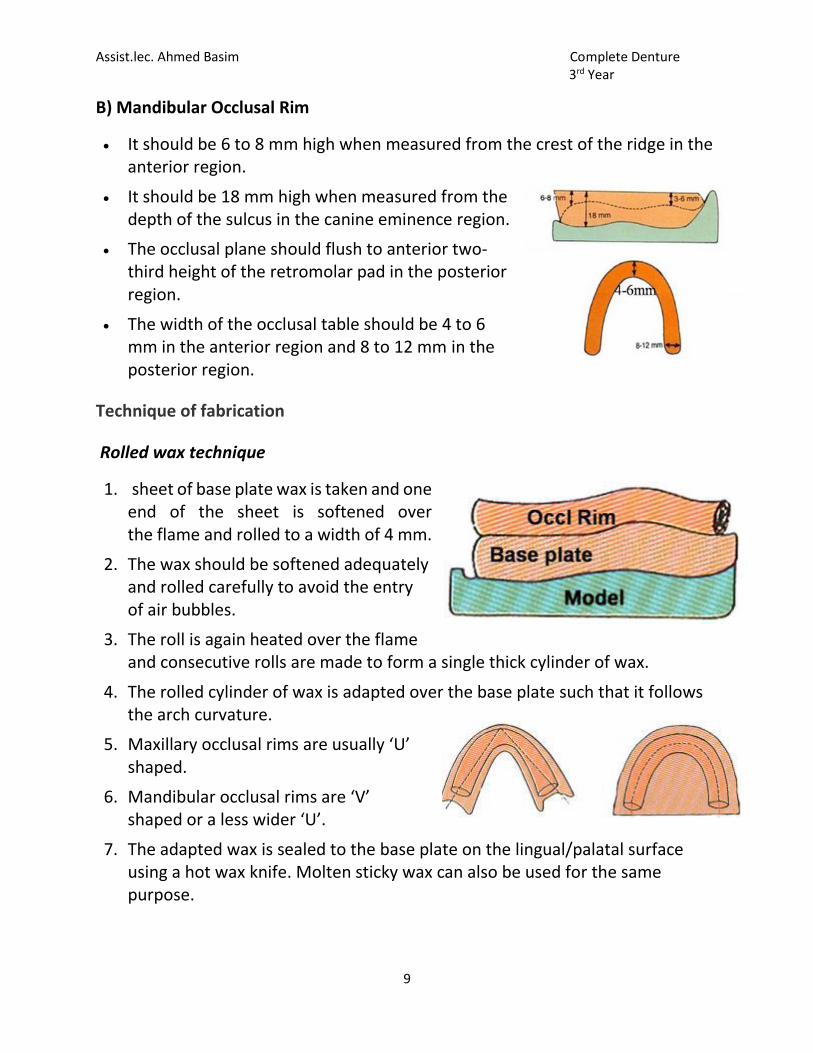
B) Mandibular Occlusal Rim
It should be 6 to 8 mm high when measured from the crest of the ridge in the anterior region.
It should be 18 mm high when measured from the depth of the sulcus in the canine eminence region.
The occlusal plane should flush to anterior two-third height of the retromolar pad in the posterior region.
The width of the occlusal table should be 4 to 6 mm in the anterior region and 8 to 12 mm in the posterior region.
Technique of fabrication
Rolled wax technique
1. sheet of base plate wax is taken and one end of the sheet is softened over the flame and rolled to a width of 4 mm.
2. The wax should be softened adequately and rolled carefully to avoid the entry of air bubbles.
3. The roll is again heated over the flame and consecutive rolls are made to form a single thick cylinder of wax.
4. The rolled cylinder of wax is adapted over the base plate such that it follows the arch curvature.
5. Maxillary occlusal rims are usually ‘U’ shaped.
6. Mandibular occlusal rims are ‘V’ shaped or a less wider ‘U’.
7. The adapted wax is sealed to the base plate on the lingual/palatal surface using a hot wax knife. Molten sticky wax can also be used for the same purpose.
Assist.lec. Ahmed Basim Complete Denture 3rd Year
10
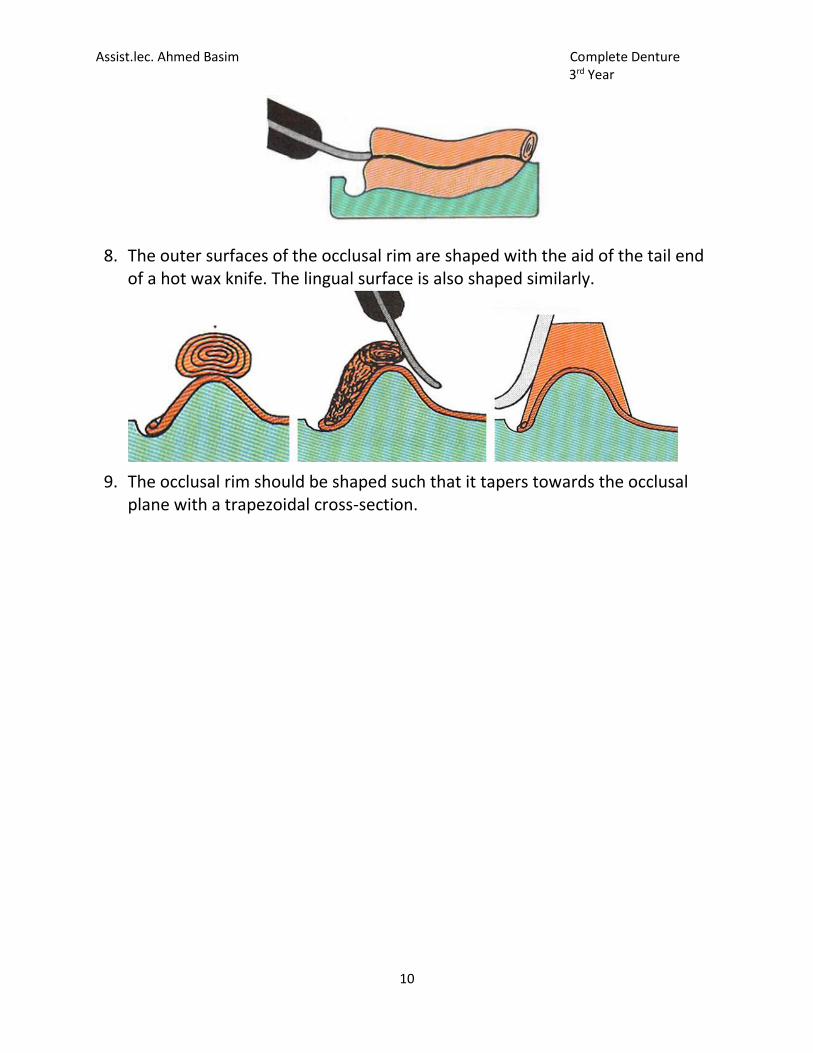
8. The outer surfaces of the occlusal rim are shaped with the aid of the tail end of a hot wax knife. The lingual surface is also shaped similarly.
9. The occlusal rim should be shaped such that it tapers towards the occlusal plane with a trapezoidal cross-section.
Assist.lec. Ahmed Basim Complete Denture 3rd Year
1
Week 4
Maxillo-mandibular relationship
any spatial relationship of the mandible to the maxilla. Also called jaw relations.
Three types of maxillomandibular relations:
1. Orientation relation
2. Vertical relation
3. Horizontal relation.
Classification of Jaw Relation
Orientation Relation
Vertical Relation
a.Vertical dimension at rest
b. Vertical dimension at occlusion
Horizontal Relation
a.Centric Relation
b.Eccentric Relation
Orientation relation: Relations of the jaws to references in the cranium.
Physiologic rest position
The postural position of the mandible when an individual is resting
comfortably in an upright position and the associated muscles are in a state of
minimal contractual activity.
Assist.lec. Ahmed Basim Complete Denture 3rd Year
2
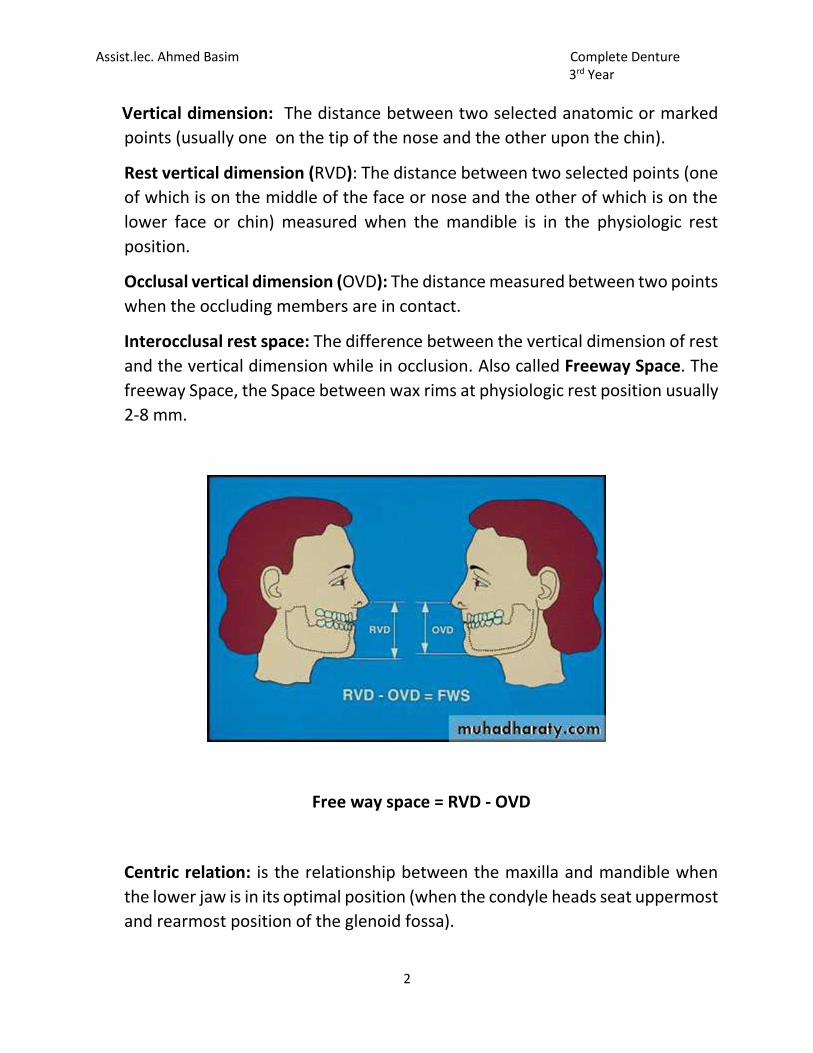
Vertical dimension: The distance between two selected anatomic or marked
points (usually one on the tip of the nose and the other upon the chin).
Rest vertical dimension (RVD): The distance between two selected points (one
of which is on the middle of the face or nose and the other of which is on the
lower face or chin) measured when the mandible is in the physiologic rest
position.
Occlusal vertical dimension (OVD): The distance measured between two points
when the occluding members are in contact.
Interocclusal rest space: The difference between the vertical dimension of rest
and the vertical dimension while in occlusion. Also called Freeway Space. The
freeway Space, the Space between wax rims at physiologic rest position usually
2-8 mm.
Free way space = RVD - OVD
Centric relation: is the relationship between the maxilla and mandible when
the lower jaw is in its optimal position (when the condyle heads seat uppermost
and rearmost position of the glenoid fossa).
Assist.lec. Ahmed Basim Complete Denture 3rd Year
3
The most commonly used method to position the mandible in centric
relation is to ask the patient to curl the tip of the tongue to the soft palate,
encouraging the condyles to seat.
Importance of centric jaw relation:
1. It is learnable, repeatable, and recordable position which remains
constant throughout life.
2. It is a reference position from which the mandible can move to any
eccentric position and return back involuntarily.
3. It is the start point for developing occlusion.
4. Functional movements like chewing and swallowing are performed in this
position, because it is the most unstrained position.
5. It is a reliable jaw relation, because it is bone to bone relation.
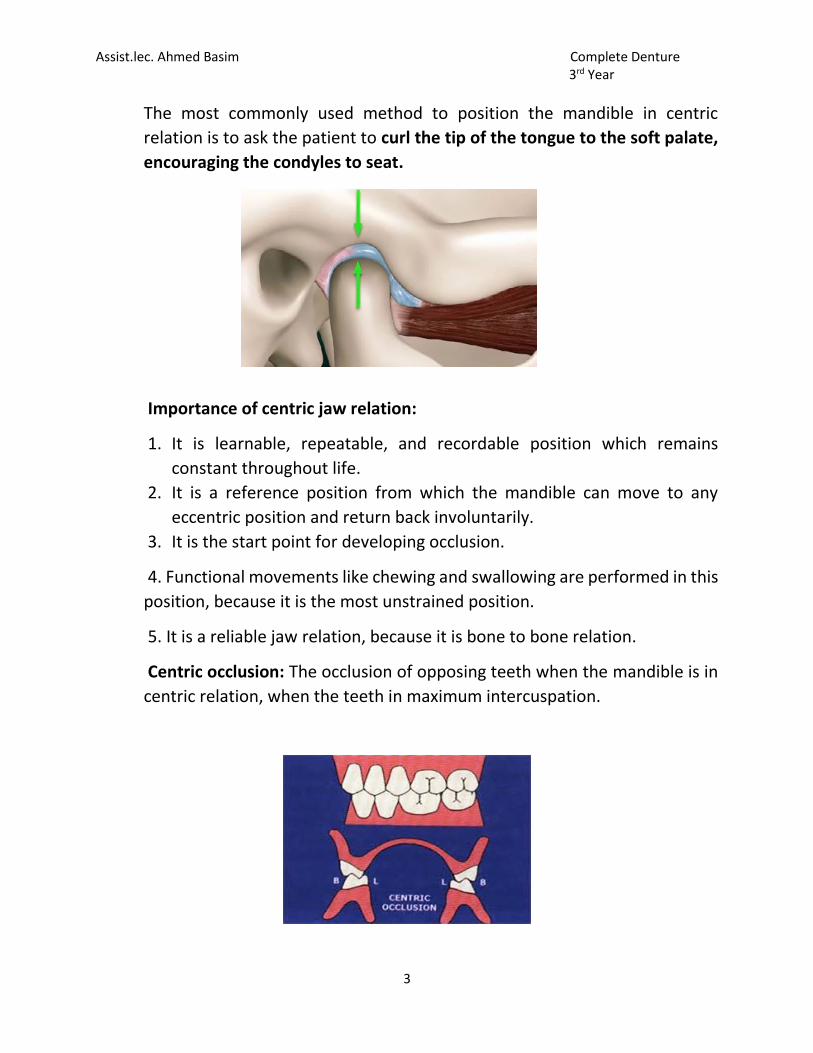
Centric occlusion: The occlusion of opposing teeth when the mandible is in
centric relation, when the teeth in maximum intercuspation.
Assist.lec. Ahmed Basim Complete Denture 3rd Year
4
Eccentric relation: It’s any relationship of the mandible to the maxilla other
than centric relation. Eccentric jaw relation two type:
a-Protruded or forward relation.
b-Left or right lateral relation.
Protrusive relation: The relation of the mandible to the maxillae when the
mandible is thrust forward.
Lateral relation: The relation of the mandible to the maxilla when the lower
jaw is in a position to either side of centric relation.
While the working side the side towards which the mandible moves in a
lateral excursion, and nonworking side that side of the mandible that moves
toward the median line in a lateral excursion. The condyle on that side is
referred to as the nonworking side condyle.
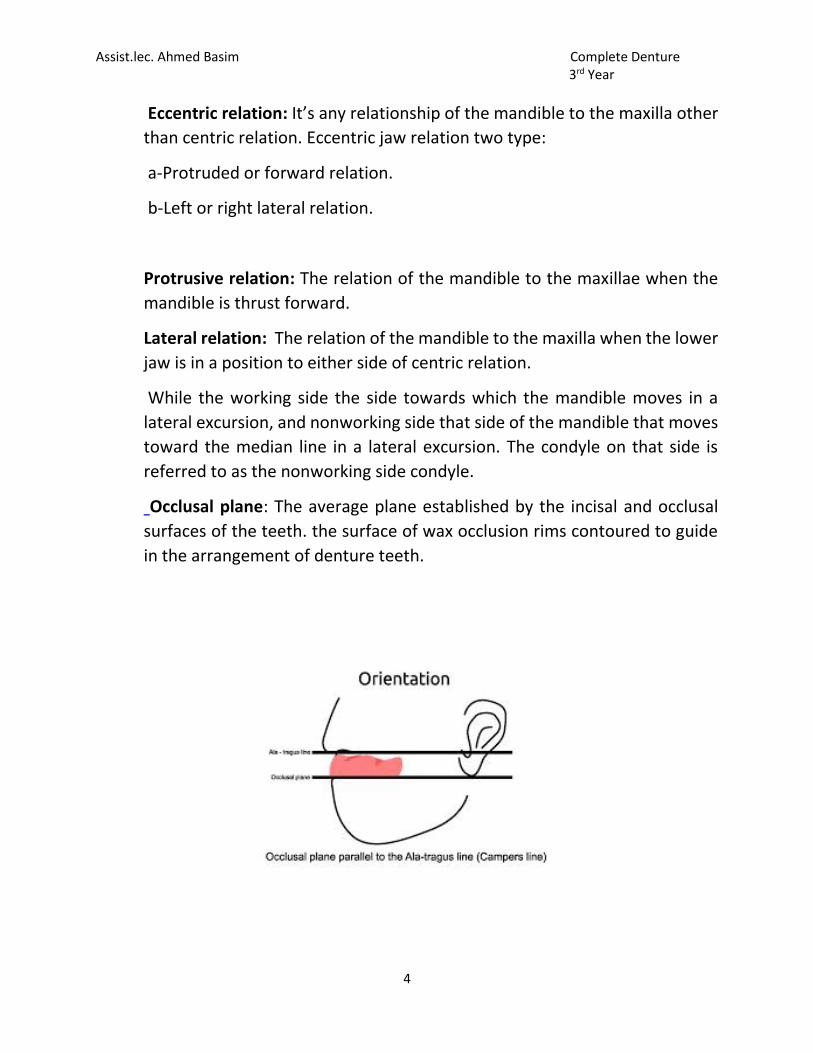
Occlusal plane: The average plane established by the incisal and occlusal
surfaces of the teeth. the surface of wax occlusion rims contoured to guide
in the arrangement of denture teeth.
Assist.lec. Ahmed Basim Complete Denture 3rd Year
1
Week 5
Mounting: It is the procedure of attaching the maxillary and mandibular casts
to the articulator in their recorded jaw relation. It is also called articulation.
The maxillary cast is first articulated, and then the mandibular cast is
articulated after recording the vertical and centric jaw relations.
Zeroing or resetting the articulator before the mounting
1. The articulator should be clean from any remnant of previous plaster.
2. The movable surfaces of the articulator should move freely without any
hindrance.
3. The incisal pin should be flushed with the top of upper member of articulator
to give zero reading.
4. The mounting table should be properly fixed to the articulator.
Prepration the casts for mounting
1. Determine the midline of the cast according to the midline of incisive papilla
and continue this line posteriorly all around the cast.
2. The casts should be placed in slurry water for better adhesion of the casts to
the mounting plaster.
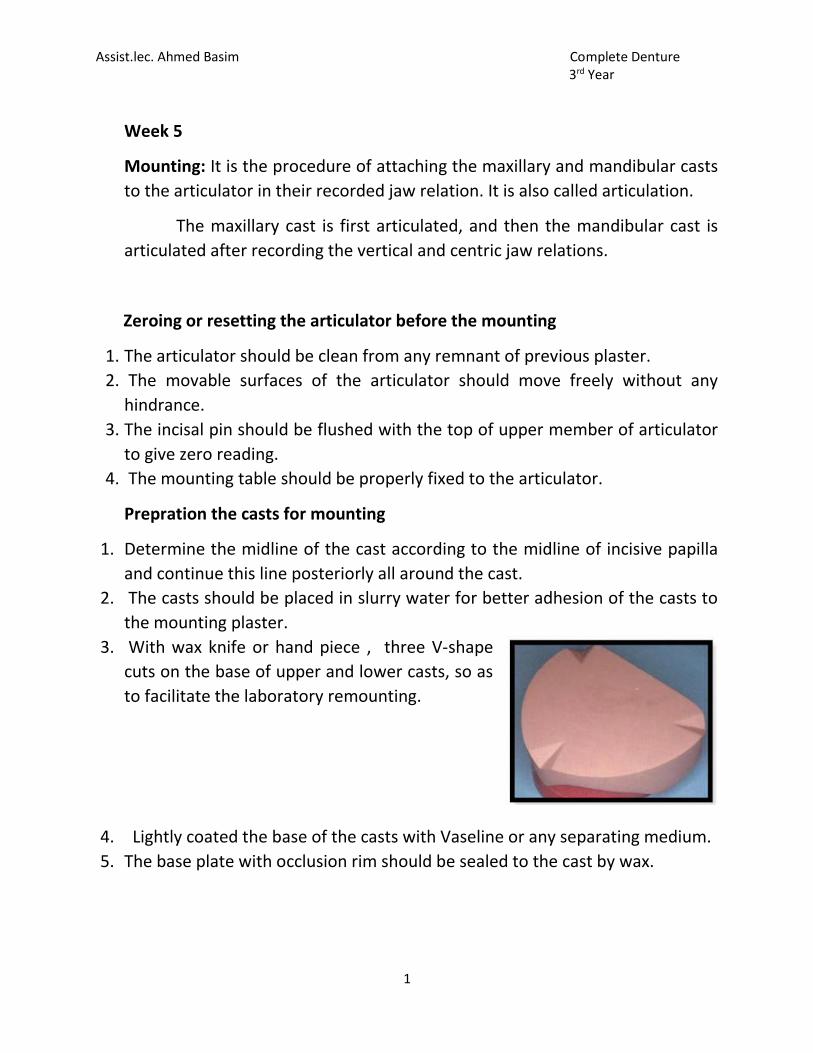
3. With wax knife or hand piece , three V-shape
cuts on the base of upper and lower casts, so as
to facilitate the laboratory remounting.
4. Lightly coated the base of the casts with Vaseline or any separating medium.
5. The base plate with occlusion rim should be sealed to the cast by wax.
Assist.lec. Ahmed Basim Complete Denture 3rd Year
2
Mounting of the maxillary cast
The maxillary cast is first attached to the upper member of the articulator after
orientation jaw relation by using the face-bow with adjustable type of
articulators, while for the mean value articulator use the mounting table to
support the maxillary occlusion rim in its position during mounting. The
mandibular cast is articulated after recording the vertical and centric jaw
relations .After recording the orientation jaw relation.
The following steps are carried out:
1. Enough space should be present between the base of the cast and the upper
member of the articulator to accommodate for the plaster material over the
cast. If there is not enough space trimming should be done to the base of the
cast.
2. Alignment of the midline of the maxillary occlusion rim to the center of the
cross midline which found on the mounting table anteriorly and posteriorly, so
that the cast will be centralized to the mounting table and the occlusal rim fixed
to the mounting table by wax.
3. Plaster is mixed, then the plaster is poured over the base of the cast and the
upper member is closed until the incisal pin touches the incisal table.
4. Smoothing and polishing of the plaster is done. The mounting should be
cleaned and any debris removed from the articulator and mounting table.
Assist.lec. Ahmed Basim Complete Denture 3rd Year
3
Mounting the mandibular cast
The mandibular cast is mounted after recording the tentative vertical and
centric jaw relations.
1.The mandibular occlusion rim should be well secured to the mandibular cast
with it record base by using wax, also sealing should be done between the
maxillary and mandibular rims after making tentative centric jaw relation.
2. Care should be taken that there is no posterior interference between the
maxillary and mandibular casts.
3. The articulator with the mounted maxillary cast is inverted to aid in the
mounting the mandibular cast.
4. The maxillary occlusal rim with mandibular occlusal rim (centric record) placed
on the maxillary cast.
5. The mandibular cast is placed on the mandibular occlusal rim (It should be
soaked in slurry water before mounting).
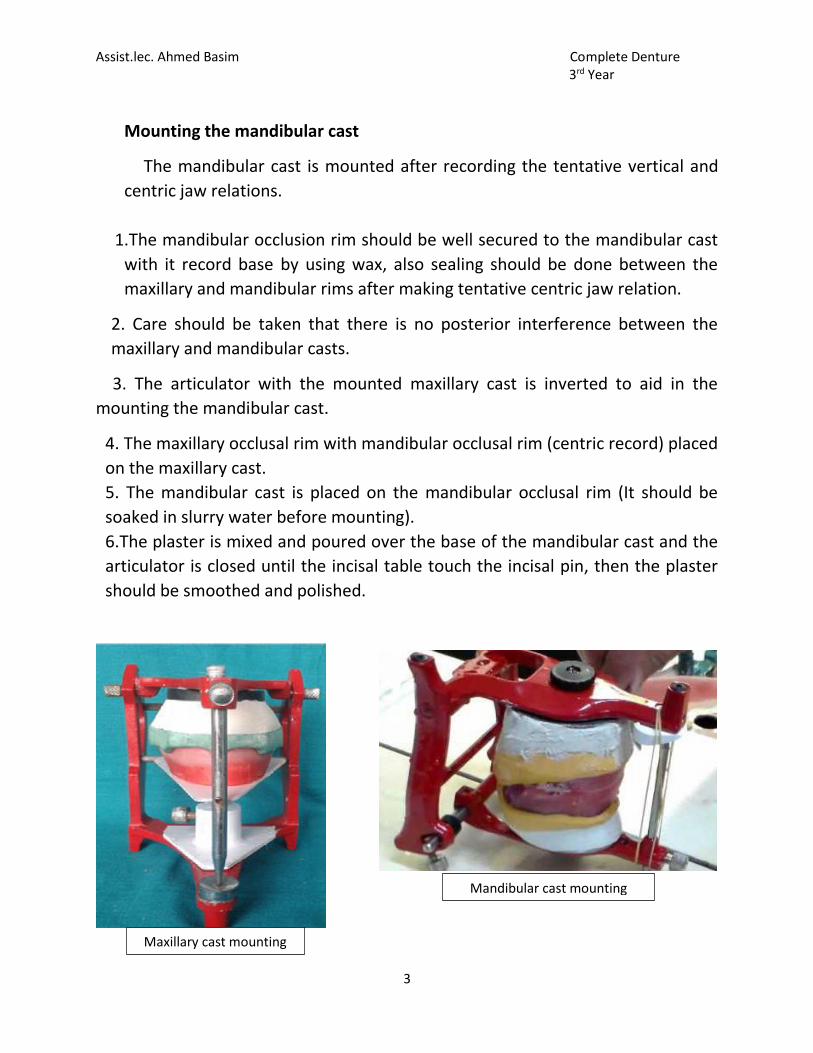
6.The plaster is mixed and poured over the base of the mandibular cast and the
articulator is closed until the incisal table touch the incisal pin, then the plaster
should be smoothed and polished.
Mandibular cast mounting
Maxillary cast mounting
Assist.lec. Ahmed Basim Complete Denture 3rd Year
4
Checking the mounting
1. The midline of maxillary cast should be coincided with the midline of
mandibular cast and midline of articulator.
2. Centralization of maxillary cast with upper member of articulator then the
centralization of lower cast which depend on accuracy of the maxillary cast.
3. Incisal pin checked if it does not touch the incisal table.
Errors may be occurred during mounting
1. The record base not properly secured to the cast.
2. Checked if there is any contact between the maxillary and mandibular casts
Interference of the casts posteriorly.
3. The incisal pin does not touch the incisal table.
4. The incisal pin is not properly screwed.
5. Wrong transference of the midline of the articulator with that of the casts
(shifting of the midline).
6. Movement of the casts during mounting.
7. Maxillary and mandibular rims are not properly fixed after making centric
record.
8. Dimensional changes in the plaster material.
Assist.lec. Ahmed Basim Complete Denture 3rd Year
1
Articulator: It is a mechanical instrument that represents the temporomandibular
joints and jaw members, to which maxillary and mandibular casts may be attached
to simulate some or all- mandibular movements.
Functions
1. It allows most of the prosthetic work to be done in the absence of the patient
(diagnosis, treatment planning, setting –up of teeth and development of balanced
articulation and waxing-up of dentures).
2. Maintain jaw relation record during setting-up of teeth.
3. Denture remounting after processing for correction of occlusal disharmony
Types of articulators
1-Simple hinge articulators.
2-Fixed or mean value condylar path articulators.
3-Adjustable condylar path articulators.
a.Semi-adjustable condylar path articulators.
b.Fully-adjustable condylar path articulators.
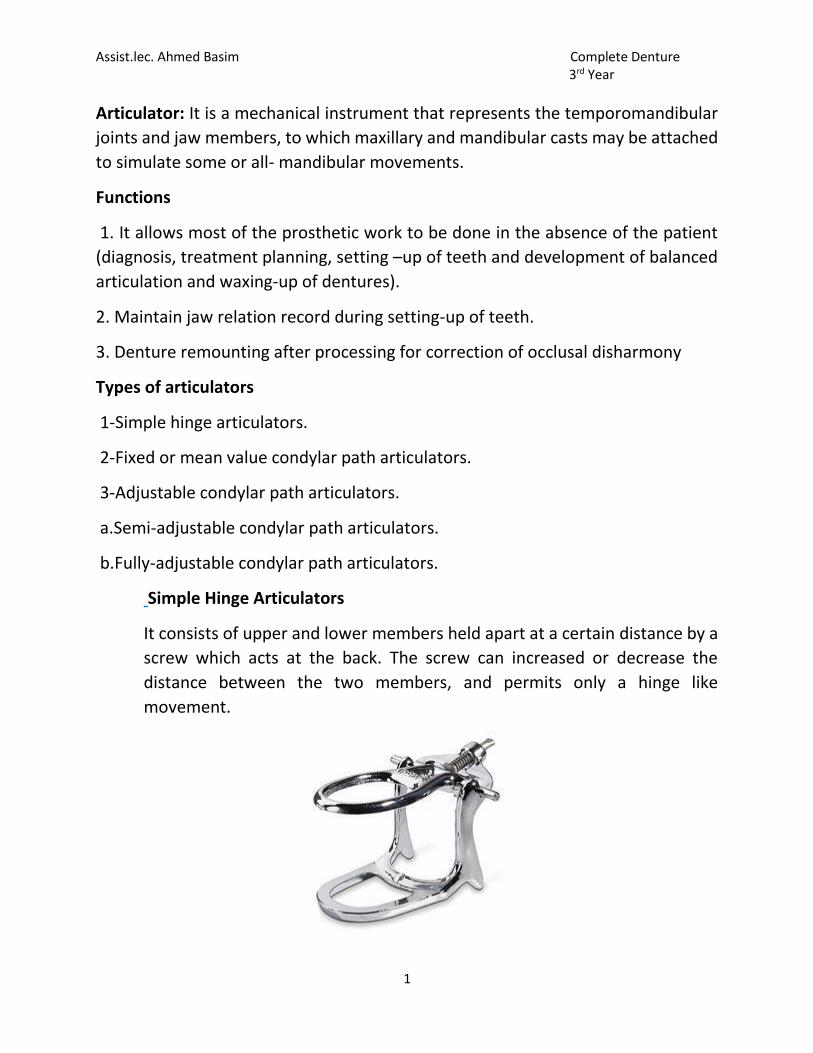
Simple Hinge Articulators
It consists of upper and lower members held apart at a certain distance by a
screw which acts at the back. The screw can increased or decrease the
distance between the two members, and permits only a hinge like
movement.
Assist.lec. Ahmed Basim Complete Denture 3rd Year
2
Possible movements: This type of articulators gives only opening and closing
movements.
Records required:
a. Vertical dimension of occlusion.
b. Centric relation records.
Disadvantages: These articulators do not represent the temporomandibular
joint and the dynamic mandibular movements.
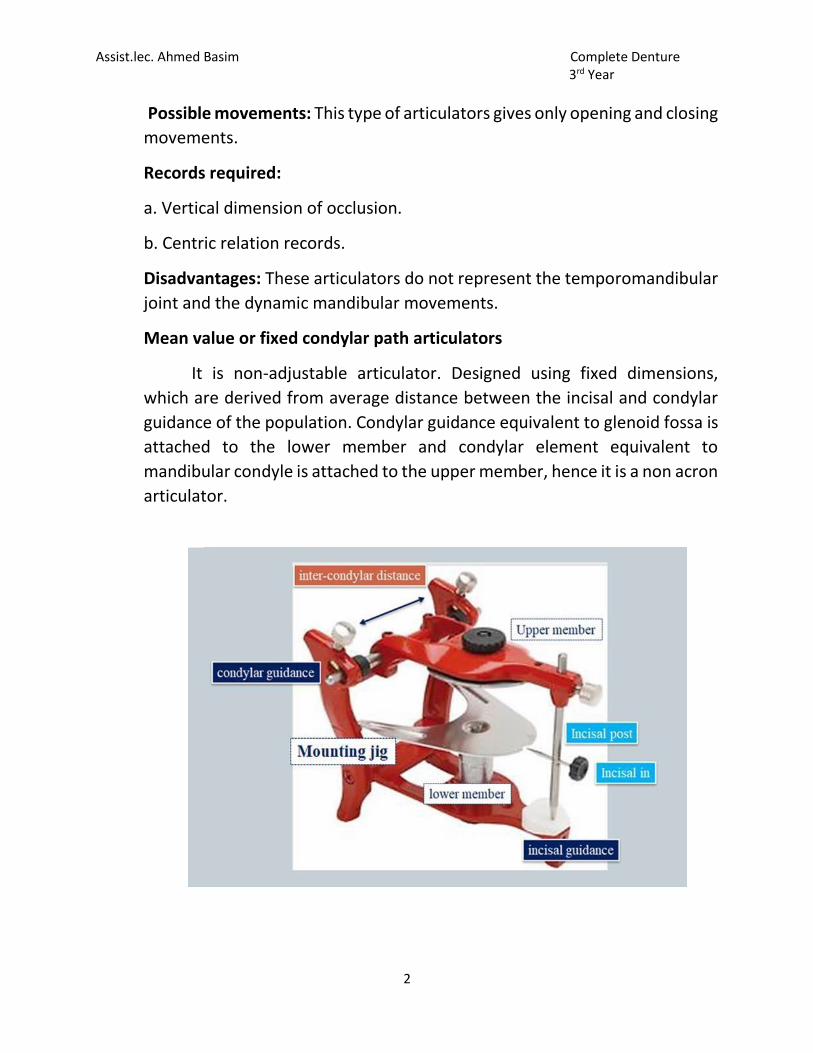
Mean value or fixed condylar path articulators
It is non-adjustable articulator. Designed using fixed dimensions,
which are derived from average distance between the incisal and condylar
guidance of the population. Condylar guidance equivalent to glenoid fossa is
attached to the lower member and condylar element equivalent to
mandibular condyle is attached to the upper member, hence it is a non acron
articulator.
Assist.lec. Ahmed Basim Complete Denture 3rd Year
3
Components of articulator
1. Upper member: It is a triangular frame with the base of the triangle placed
posteriorly. The apex of triangle contains a provision to accommodate the
incisal pin. Two condylar elements are seen projecting on either side of the
base of the triangle. They articulate with the condylar guidance of the lower
member. The maxillary cast is attached to the upper member during
articulation.
2. Lower member: L shaped frame with horizontal and vertical arm.The
horizontal arm is triangular in shape and corresponds to the upper member.
The apex of the triangle of the horizontal arm contains the incisal guide table.
The vertical arm is rectangular containing the condylar guidance slot at the
upper position.
3. Incisal guide table: It is defined as „that part of the articulator which
maintians the incisal guide angle.
4. Incisal pin: It helps to keep a fixed distance between the upper and lower
members at the anterior end. The vertical rod has a pointed tip, which should
rest on the centre of the incisal guide table during articulation.
Possible movements
1-Opening and closing.
2-Protrusive movement at a fixed horizontal condylar path angle.
Assist.lec. Ahmed Basim Complete Denture 3rd Year
4
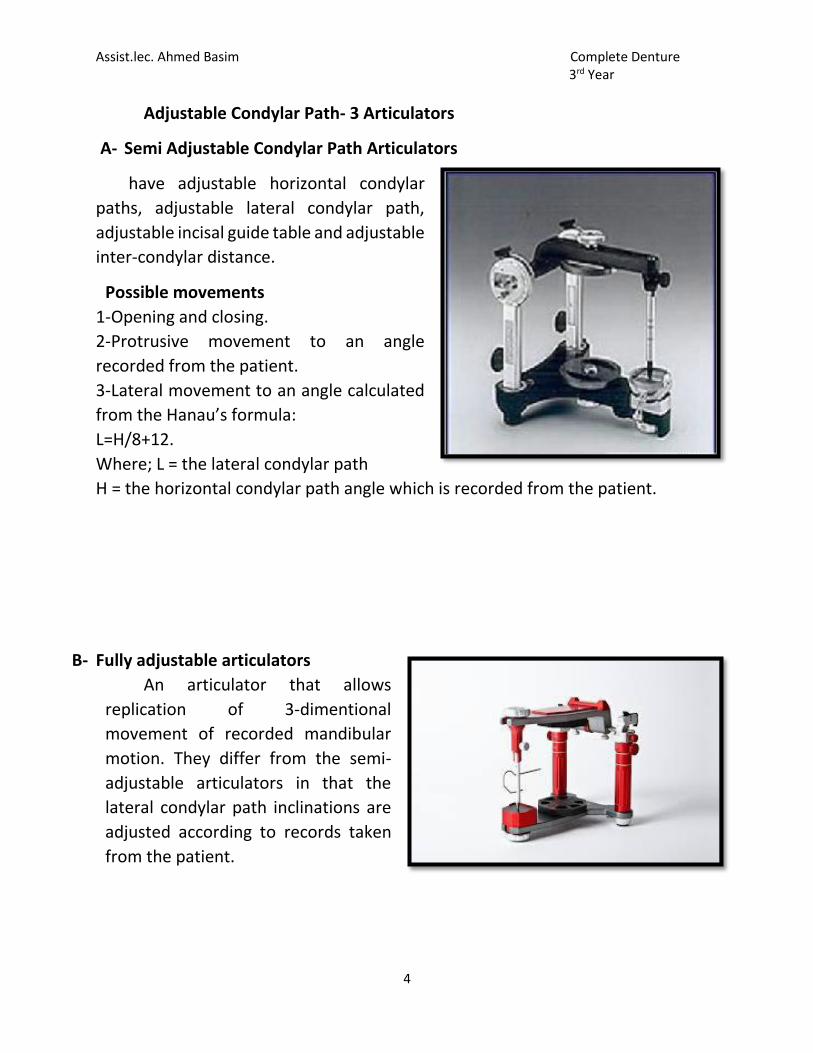
Adjustable Condylar Path- 3 Articulators
A- Semi Adjustable Condylar Path Articulators
have adjustable horizontal condylar
paths, adjustable lateral condylar path,
adjustable incisal guide table and adjustable
inter-condylar distance.
Possible movements
1-Opening and closing.
2-Protrusive movement to an angle
recorded from the patient.
3-Lateral movement to an angle calculated
from the Hanau’s formula:
L=H/8+12.
Where; L = the lateral condylar path
H = the horizontal condylar path angle which is recorded from the patient.
B- Fully adjustable articulators
An articulator that allows
replication of 3-dimentional
movement of recorded mandibular
motion. They differ from the semi-
adjustable articulators in that the
lateral condylar path inclinations are
adjusted according to records taken
from the patient.

Assist.lec. Ahmed Basim Complete Denture 3rd Year
1
Week 7
Face-bow: The face-bow is a caliper- like device that is used to record the
relationship of the maxilla to the temporomandibular joints or the opening axis of
the jaws and to orient the casts in this same relationship to the opening axis of the
articulators.
The face-bow consist of :
1. U -shaped frame It forms the main frame of the face bow. All other components
are attached to this frame It extends from the region of TMJ on one side to the
other side without contacting the face.
2. Condylar rods Two small metallic rods on either side of the free end of the U
shaped frame that contact the skin over the TMJ .They are used to locate the hinge
axis and transfer it to the articulator Some face bows have ear piece that fit into
the external auditory meatus instead of condylar rods.
3. Bite fork “U” shaped plate, which is attached to the occlusal rims, while recording
the orientation relation. It is attached to the frame with the help of a rod called the
stem.
4. Locking device This part of the face bow helps to fix the bite fork to the U-shaped
frame firmly after recording the orientation jaw relation.
Assist.lec. Ahmed Basim Complete Denture 3rd Year
2
5. Third reference point It is used to orient the face bow assembly to an anatomical
reference point on the face along with the two condylar reference points. It varies
in the different face bows, example orbital pointer-orbitale, Nose piece – Nasion
etc.
Types of face-bow
There are two basic types of face-bow;
1. The kinematic, and
2. The maxillary.
1. The kinematic ( mandibular, hinge axis locator) face-bow: It is used to locate
the kinematic (true or terminal) transverse hinge axis. The transverse hinge axis is
an imaginary line, in which the mandible rotates during opening and closing for
about 20 mm.
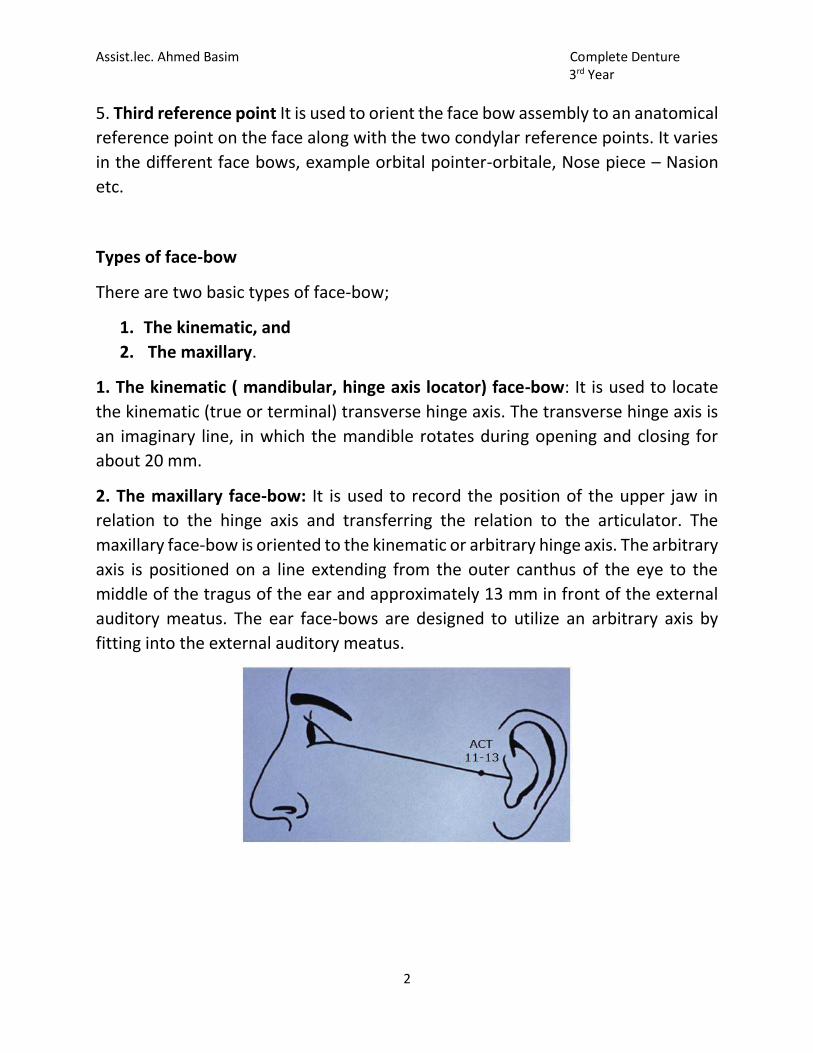
2. The maxillary face-bow: It is used to record the position of the upper jaw in
relation to the hinge axis and transferring the relation to the articulator. The
maxillary face-bow is oriented to the kinematic or arbitrary hinge axis. The arbitrary
axis is positioned on a line extending from the outer canthus of the eye to the
middle of the tragus of the ear and approximately 13 mm in front of the external
auditory meatus. The ear face-bows are designed to utilize an arbitrary axis by
fitting into the external auditory meatus.
Assist.lec. Ahmed Basim Complete Denture 3rd Year
3
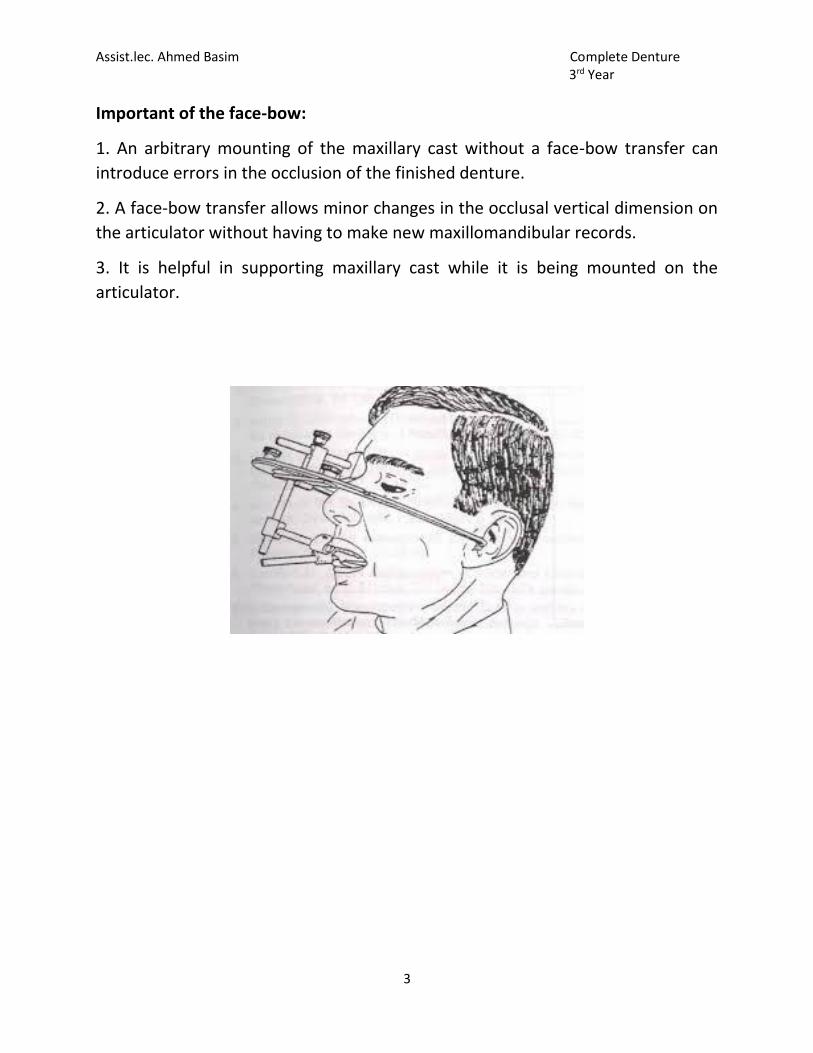
Important of the face-bow:
1. An arbitrary mounting of the maxillary cast without a face-bow transfer can
introduce errors in the occlusion of the finished denture.
2. A face-bow transfer allows minor changes in the occlusal vertical dimension on
the articulator without having to make new maxillomandibular records.
3. It is helpful in supporting maxillary cast while it is being mounted on the
articulator.

Assist.lec. Ahmed Basim Complete Denture 3rd Year
1
Week 8
Occlusion
Occlusion is a concept that is pertinent to all dental patients whether they have
their own teeth or not.
Occlusion: It is a term used to describe the contact relationship between the upper
and lower teeth, when the teeth contact, they exert forces that are either
distributed via the periodontal membrane, for those with natural teeth, or through
the supporting mucosa for those with removable type prosthesis.
So occlusion is bringing the mandibular teeth up into contact with the
maxillary teeth. This is a static position when the jaws are centrically or
eccentrically related. The occlusal schemes provided for complete dentures differ
significantly from those found in most natural
dentitions. The dentate occlusion is often canine
guided or demonstrates group function. In each case
the teeth contact on the working side but usually
disclude on the non-working side in lateral
excursions. Similarly, the posterior teeth disclude in
protrusive excursions (Christensen's phenomenon).
Dentures are different; the occlusion is designed to provide stability.
Therefore the non-working side teeth also contact in lateral excursions to prevent
the denture from tipping, giving rise to the term balancing side. The posterior teeth
also contact in protrusive excursions.
Centric occlusion: is the occlusion of opposing teeth when the mandible is in centric
relation. This may or may not coincide with the
maximal intercuspal position.
Centric jaw relation: is the most posterior relation of the lower to the upper jaw
from which lateral movements can be made at a given vertical dimension.
Assist.lec. Ahmed Basim Complete Denture 3rd Year
2
Goals of complete denture occlusion
1. Minimize trauma to the supporting structures.
2. Preserve remaining structures.
3. Enhance stability of the denture.
4. Facilitate esthetic and speech.
5. Restore masticatory efficiency to a reasonable level.
Types of complete denture occlusion:
1. Bilateral balance occlusion.
2. neutro centric occlusion (monoplane occlusion).
3. lingualized occlusion.
Bilateral balance occlusion
Concept means the simultaneous contacting of the upper and lower teeth on the
right and left sides and in the interior and posterior occlusal surfaces. It’s a
modification of the balanced occlusion.
In centric and eccentric positions. Teeth should be arrange tightly in centric
occlusion that the facial cusps of the mandibular teeth contact the central fossae
of the maxillary teeth while the lingual cusps of maxillary teeth fit into the central
fossa of the mandibular teeth, this facial overlap prevents check biting when the
dentures are completed. There two types of balance occlousion:
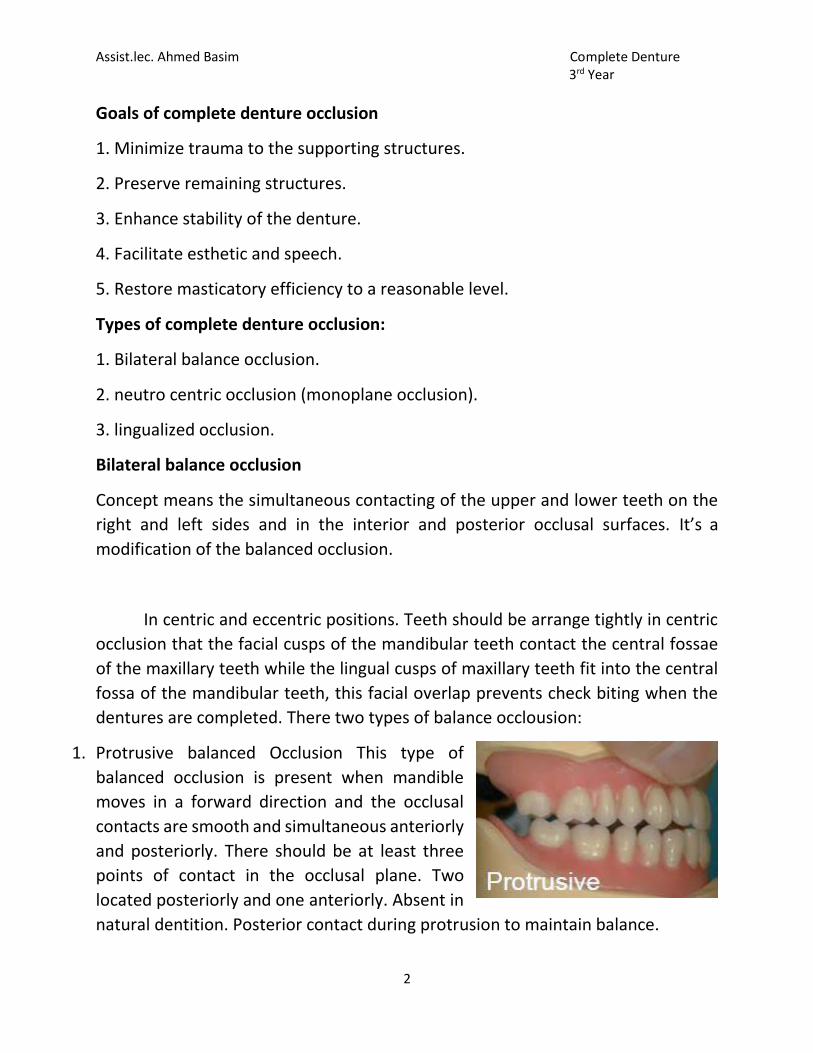
1. Protrusive balanced Occlusion This type of
balanced occlusion is present when mandible
moves in a forward direction and the occlusal
contacts are smooth and simultaneous anteriorly
and posteriorly. There should be at least three
points of contact in the occlusal plane. Two
located posteriorly and one anteriorly. Absent in
natural dentition. Posterior contact during protrusion to maintain balance.
Assist.lec. Ahmed Basim Complete Denture 3rd Year
3
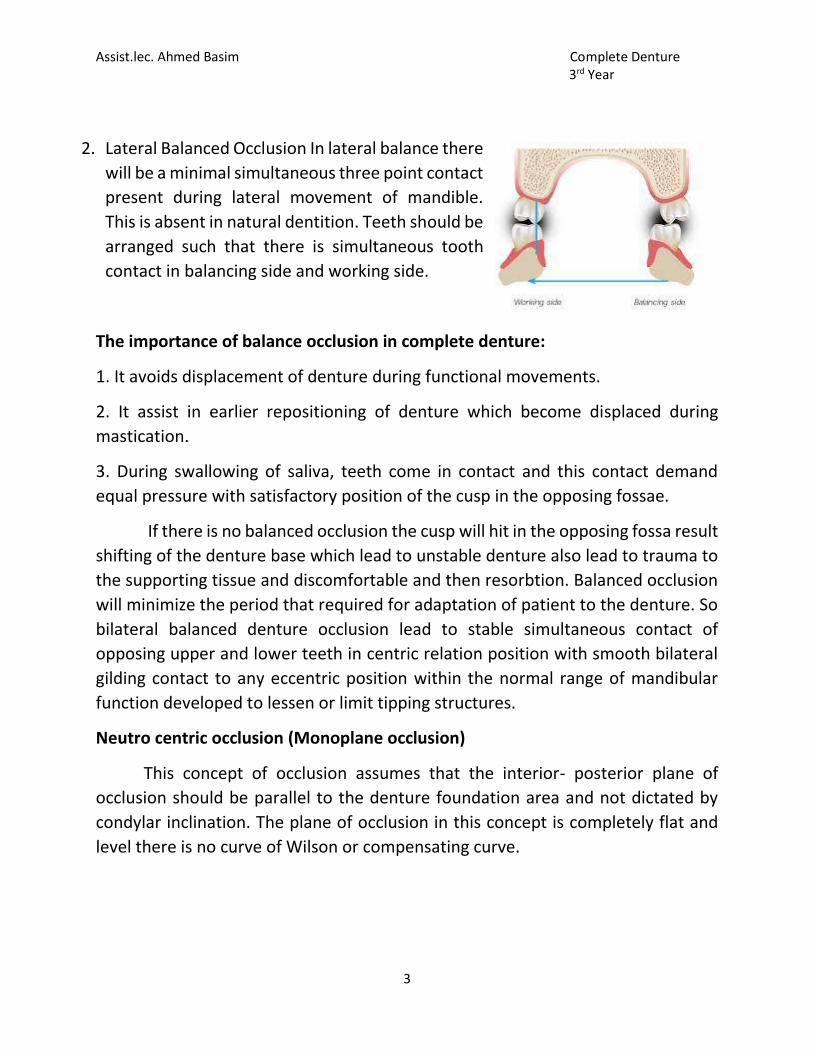
2. Lateral Balanced Occlusion In lateral balance there
will be a minimal simultaneous three point contact
present during lateral movement of mandible.
This is absent in natural dentition. Teeth should be
arranged such that there is simultaneous tooth
contact in balancing side and working side.
The importance of balance occlusion in complete denture:
1. It avoids displacement of denture during functional movements.
2. It assist in earlier repositioning of denture which become displaced during
mastication.
3. During swallowing of saliva, teeth come in contact and this contact demand
equal pressure with satisfactory position of the cusp in the opposing fossae.
If there is no balanced occlusion the cusp will hit in the opposing fossa result
shifting of the denture base which lead to unstable denture also lead to trauma to
the supporting tissue and discomfortable and then resorbtion. Balanced occlusion
will minimize the period that required for adaptation of patient to the denture. So
bilateral balanced denture occlusion lead to stable simultaneous contact of
opposing upper and lower teeth in centric relation position with smooth bilateral
gilding contact to any eccentric position within the normal range of mandibular
function developed to lessen or limit tipping structures.
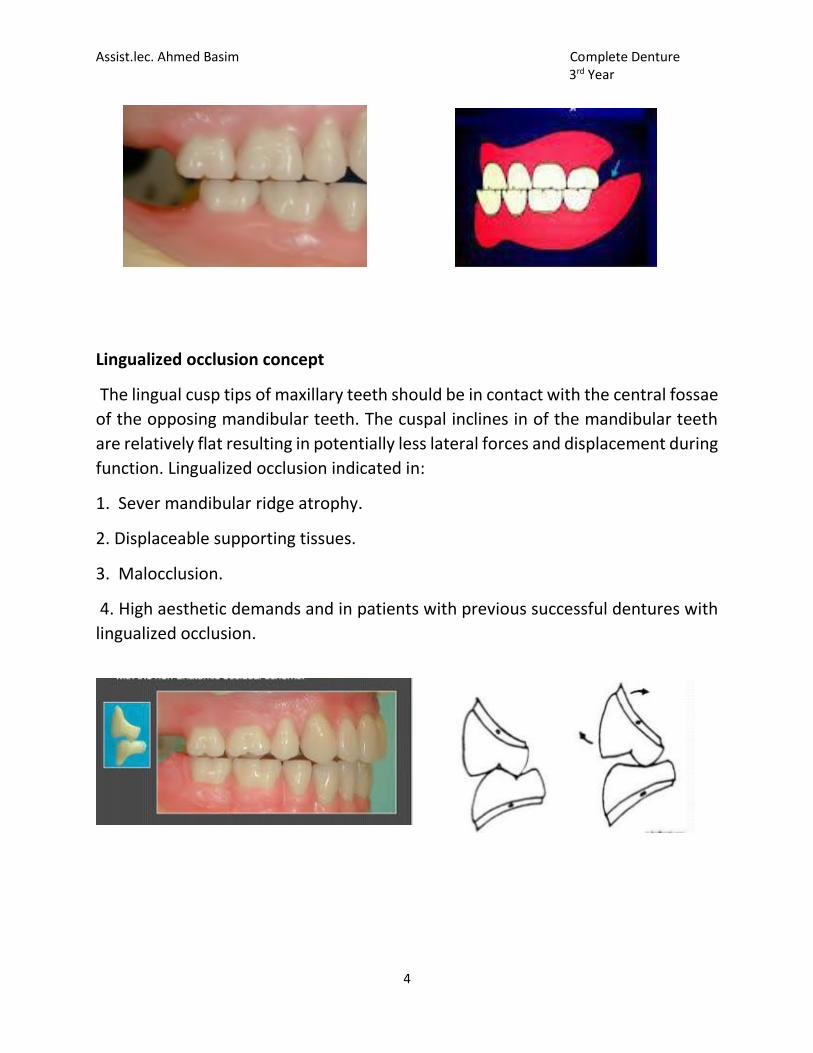
Neutro centric occlusion (Monoplane occlusion)
This concept of occlusion assumes that the interior- posterior plane of
occlusion should be parallel to the denture foundation area and not dictated by
condylar inclination. The plane of occlusion in this concept is completely flat and
level there is no curve of Wilson or compensating curve.
Assist.lec. Ahmed Basim Complete Denture 3rd Year
4
Lingualized occlusion concept
The lingual cusp tips of maxillary teeth should be in contact with the central fossae
of the opposing mandibular teeth. The cuspal inclines in of the mandibular teeth
are relatively flat resulting in potentially less lateral forces and displacement during
function. Lingualized occlusion indicated in:
1. Sever mandibular ridge atrophy.
2. Displaceable supporting tissues.
3. Malocclusion.
4. High aesthetic demands and in patients with previous successful dentures with
lingualized occlusion.
Assist.lec. Ahmed Basim Complete Denture 3rd Year
1
Week 9
Temporo-mandibular join t(TMJ): It is the articulation between the temporal
bone and the mandible. It is a bilateral joint. It is the articulation between
the mandible and the cranium .
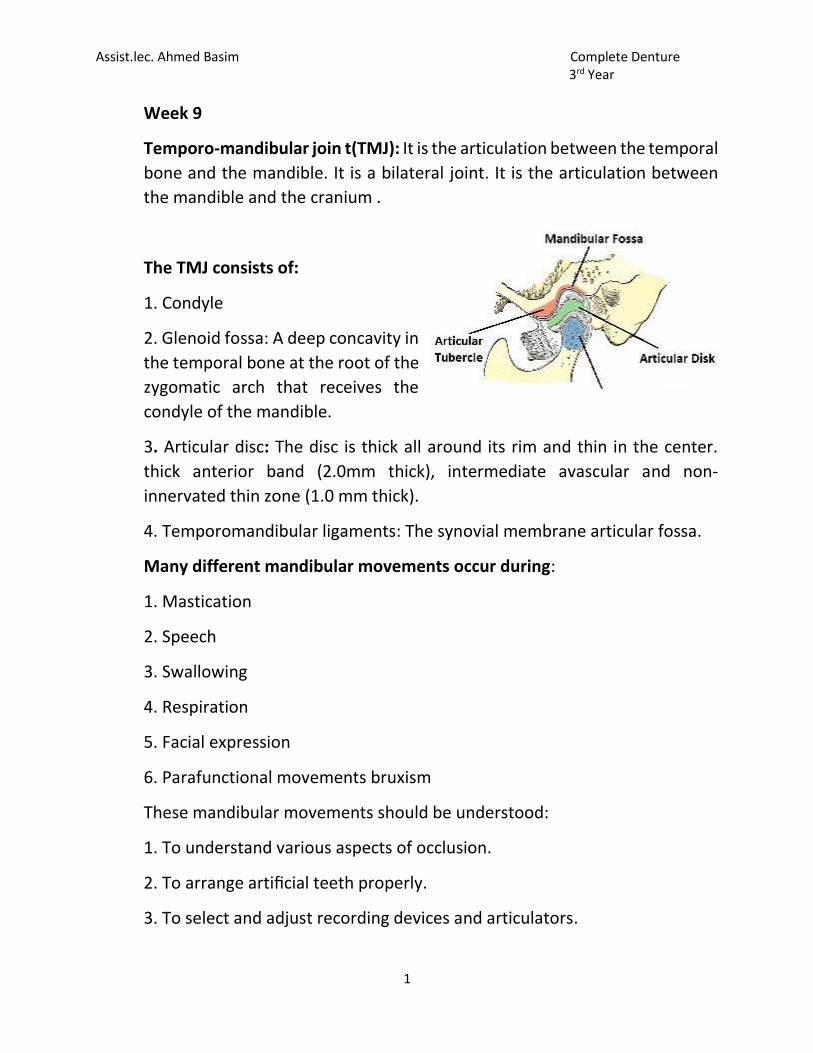
The TMJ consists of:
1. Condyle
2. Glenoid fossa: A deep concavity in
the temporal bone at the root of the
zygomatic arch that receives the
condyle of the mandible.
3. Articular disc: The disc is thick all around its rim and thin in the center.
thick anterior band (2.0mm thick), intermediate avascular and non-
innervated thin zone (1.0 mm thick).
4. Temporomandibular ligaments: The synovial membrane articular fossa.
Many different mandibular movements occur during:
1. Mastication
2. Speech
3. Swallowing
4. Respiration
5. Facial expression
6. Parafunctional movements bruxism
These mandibular movements should be understood:
1. To understand various aspects of occlusion.
2. To arrange artificial teeth properly.
3. To select and adjust recording devices and articulators.
Assist.lec. Ahmed Basim Complete Denture 3rd Year
2
Basic Mandibular Movements
Understanding mandibular movements is of great importance in complete
denture occlusion and service when balanced occlusion with cuspid or noncuspid
teeth is desirable. The starting position is the centric relation from which the
mandible can move into:
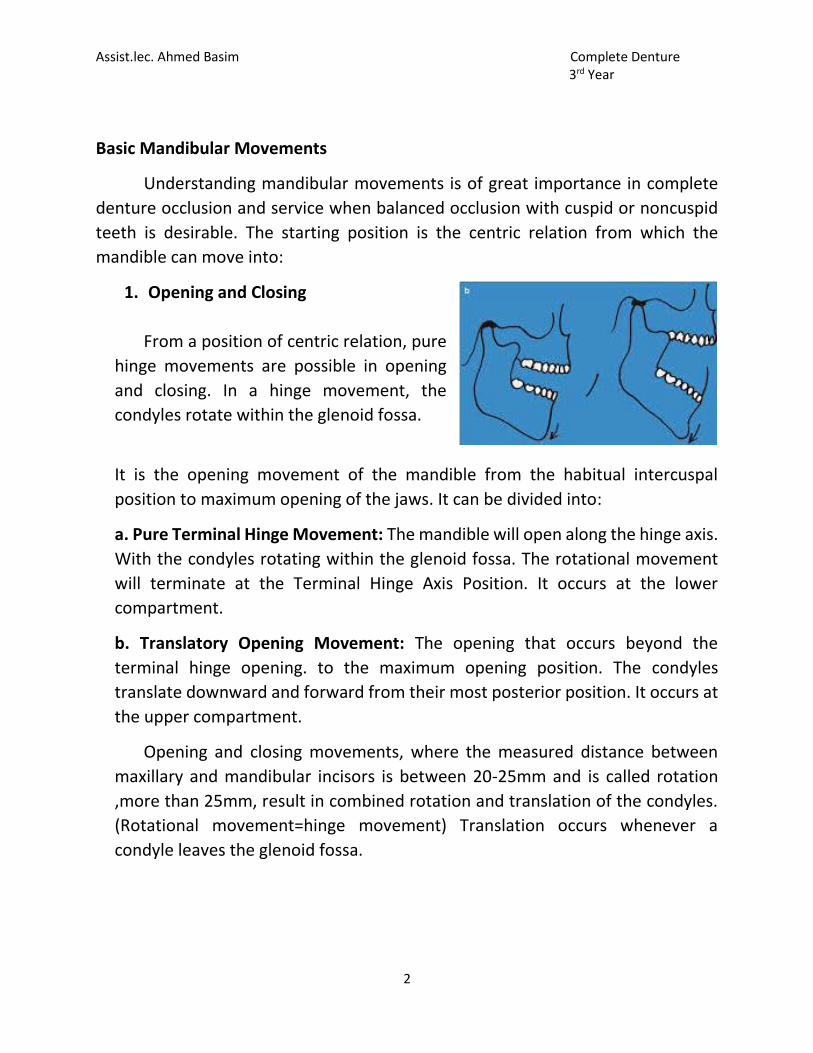
1. Opening and Closing
From a position of centric relation, pure
hinge movements are possible in opening
and closing. In a hinge movement, the
condyles rotate within the glenoid fossa.
It is the opening movement of the mandible from the habitual intercuspal
position to maximum opening of the jaws. It can be divided into:
a. Pure Terminal Hinge Movement: The mandible will open along the hinge axis.
With the condyles rotating within the glenoid fossa. The rotational movement
will terminate at the Terminal Hinge Axis Position. It occurs at the lower
compartment.
b. Translatory Opening Movement: The opening that occurs beyond the
terminal hinge opening. to the maximum opening position. The condyles
translate downward and forward from their most posterior position. It occurs at
the upper compartment.
Opening and closing movements, where the measured distance between
maxillary and mandibular incisors is between 20-25mm and is called rotation
,more than 25mm, result in combined rotation and translation of the condyles.
(Rotational movement=hinge movement) Translation occurs whenever a
condyle leaves the glenoid fossa.
Assist.lec. Ahmed Basim Complete Denture 3rd Year
3
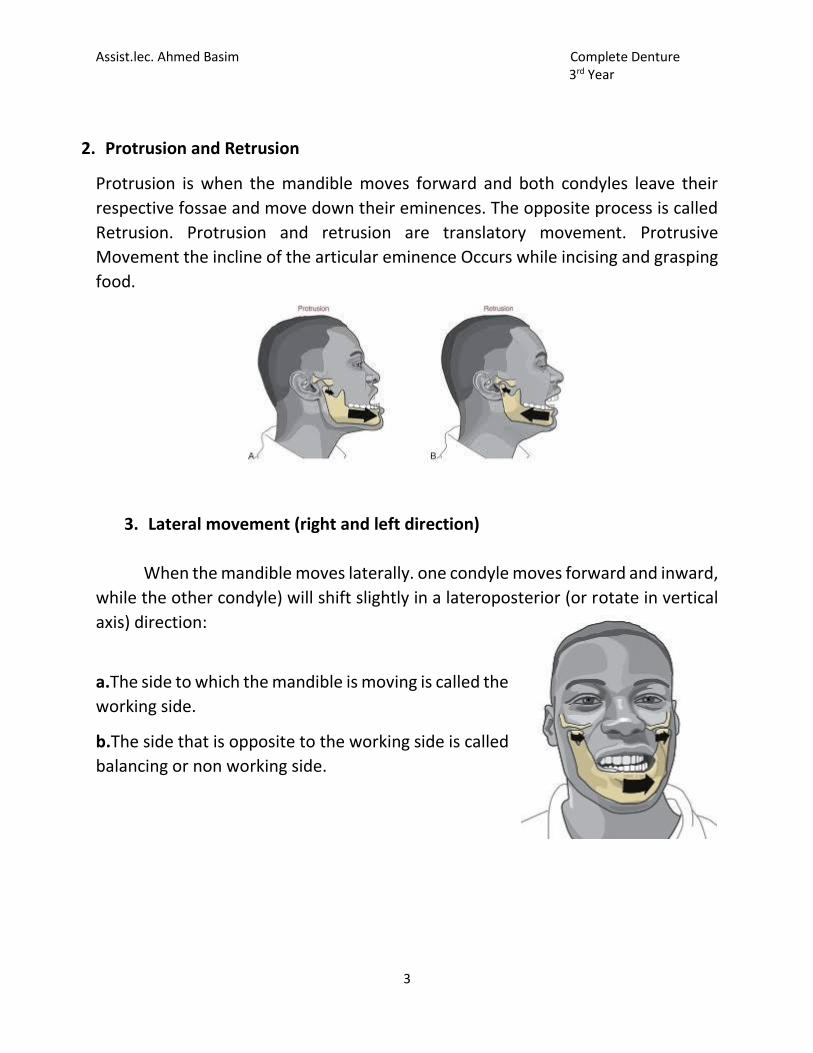
2. Protrusion and Retrusion
Protrusion is when the mandible moves forward and both condyles leave their
respective fossae and move down their eminences. The opposite process is called
Retrusion. Protrusion and retrusion are translatory movement. Protrusive
Movement the incline of the articular eminence Occurs while incising and grasping
food.
3. Lateral movement (right and left direction)
When the mandible moves laterally. one condyle moves forward and inward,
while the other condyle) will shift slightly in a lateroposterior (or rotate in vertical
axis) direction:
a.The side to which the mandible is moving is called the
working side.
b.The side that is opposite to the working side is called
balancing or non working side.
Assist.lec. Ahmed Basim Complete Denture 3rd Year
4
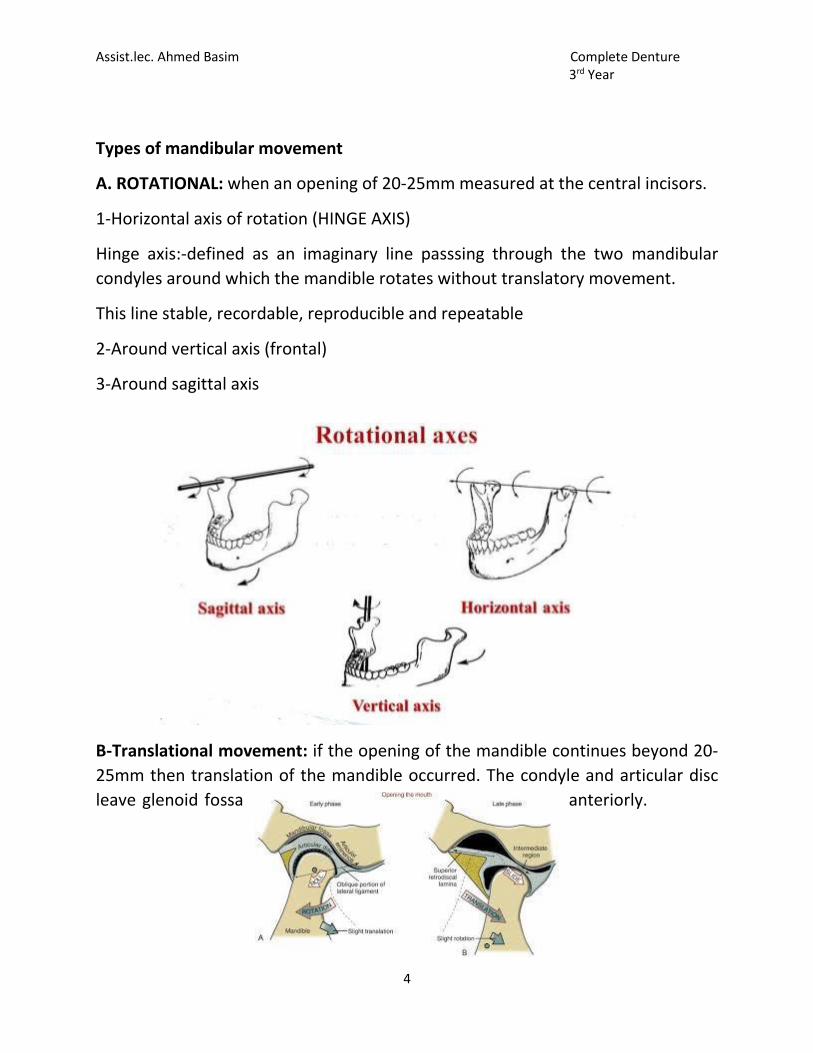
Types of mandibular movement
A. ROTATIONAL: when an opening of 20-25mm measured at the central incisors.
1-Horizontal axis of rotation (HINGE AXIS)
Hinge axis:-defined as an imaginary line passsing through the two mandibular
condyles around which the mandible rotates without translatory movement.
This line stable, recordable, reproducible and repeatable
2-Around vertical axis (frontal)
3-Around sagittal axis
B-Translational movement: if the opening of the mandible continues beyond 20-
25mm then translation of the mandible occurred. The condyle and articular disc
leave glenoid fossa anteriorly.
Assist.lec. Ahmed Basim Complete Denture 3rd Year
5
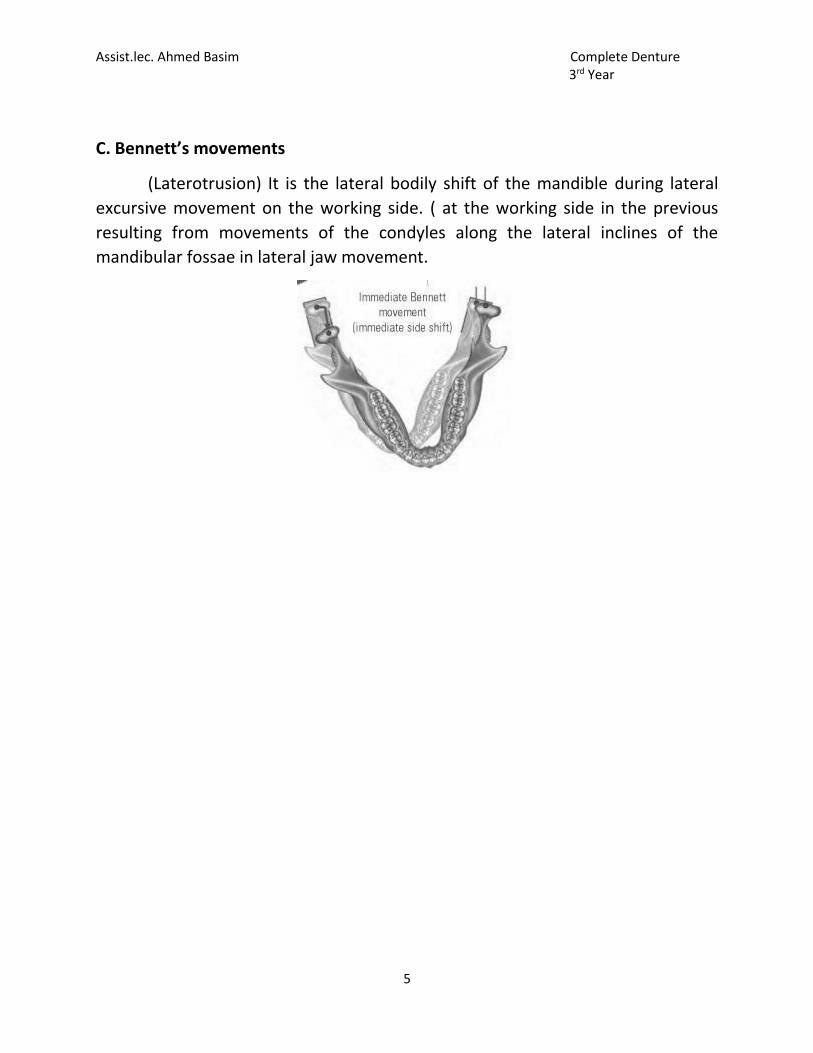
C. Bennett’s movements
(Laterotrusion) It is the lateral bodily shift of the mandible during lateral
excursive movement on the working side. ( at the working side in the previous
resulting from movements of the condyles along the lateral inclines of the
mandibular fossae in lateral jaw movement.
Assist.lec. Ahmed Basim Complete Denture 3rd Year
1
Compensating curve Week 10
The determination of the occlusal plane is one of the most important
steps in prosthodontic rehabilitation of edentulous patients. The position of
the occlusal plane forms the basis for ideal tooth arrangement.
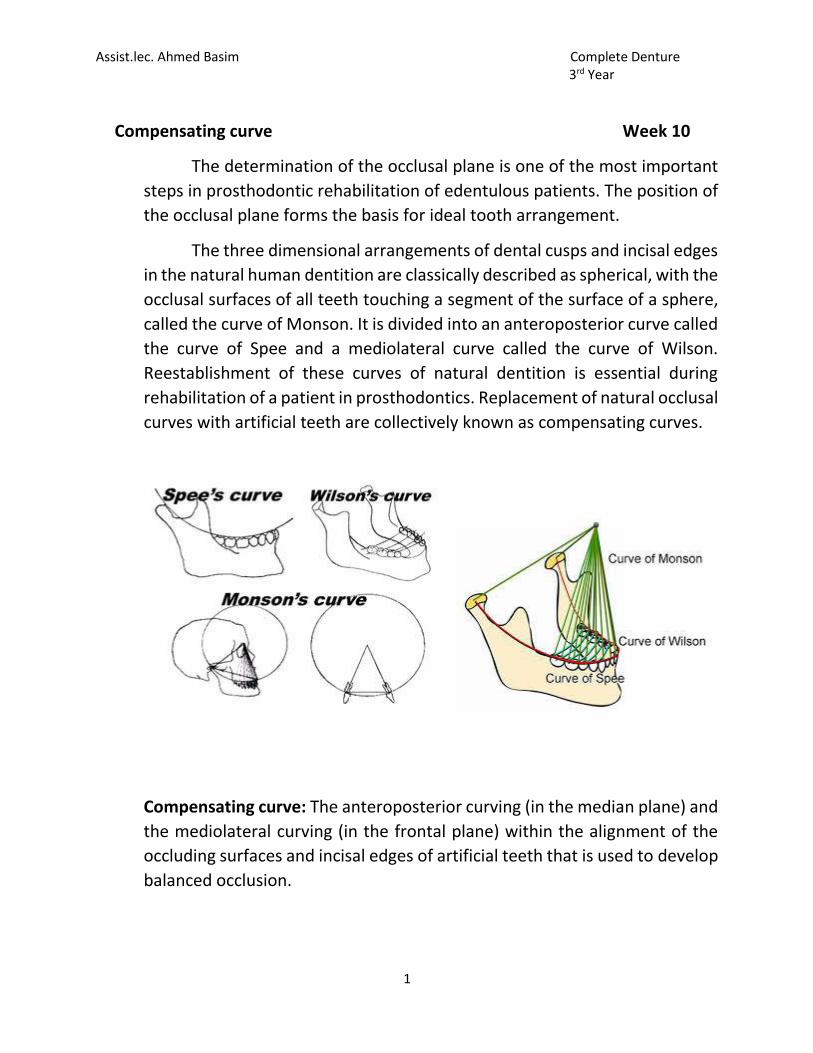
The three dimensional arrangements of dental cusps and incisal edges
in the natural human dentition are classically described as spherical, with the
occlusal surfaces of all teeth touching a segment of the surface of a sphere,
called the curve of Monson. It is divided into an anteroposterior curve called
the curve of Spee and a mediolateral curve called the curve of Wilson.
Reestablishment of these curves of natural dentition is essential during
rehabilitation of a patient in prosthodontics. Replacement of natural occlusal
curves with artificial teeth are collectively known as compensating curves.
Compensating curve: The anteroposterior curving (in the median plane) and
the mediolateral curving (in the frontal plane) within the alignment of the
occluding surfaces and incisal edges of artificial teeth that is used to develop
balanced occlusion.
Assist.lec. Ahmed Basim Complete Denture 3rd Year
2
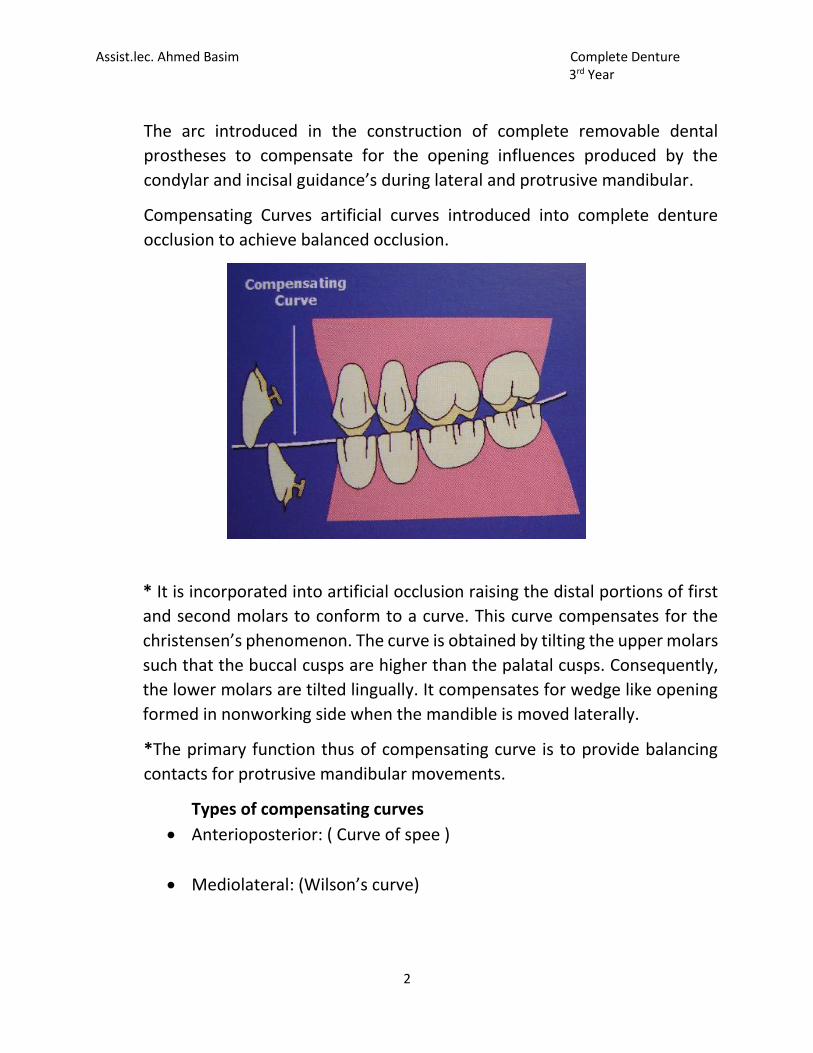
The arc introduced in the construction of complete removable dental
prostheses to compensate for the opening influences produced by the
condylar and incisal guidance’s during lateral and protrusive mandibular.
Compensating Curves artificial curves introduced into complete denture
occlusion to achieve balanced occlusion.
* It is incorporated into artificial occlusion raising the distal portions of first
and second molars to conform to a curve. This curve compensates for the
christensen’s phenomenon. The curve is obtained by tilting the upper molars
such that the buccal cusps are higher than the palatal cusps. Consequently,
the lower molars are tilted lingually. It compensates for wedge like opening
formed in nonworking side when the mandible is moved laterally.
*The primary function thus of compensating curve is to provide balancing
contacts for protrusive mandibular movements.
Types of compensating curves
Anterioposterior: ( Curve of spee )
Mediolateral: (Wilson’s curve)
Assist.lec. Ahmed Basim Complete Denture 3rd Year
3
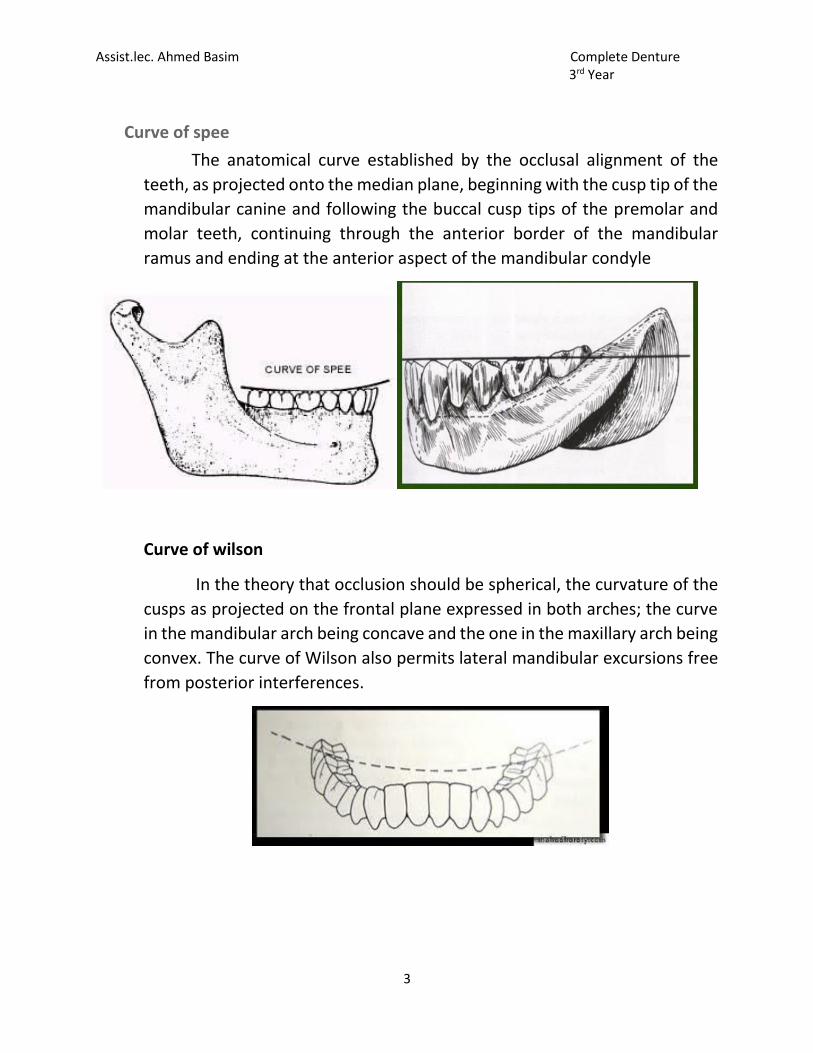
Curve of spee
The anatomical curve established by the occlusal alignment of the
teeth, as projected onto the median plane, beginning with the cusp tip of the
mandibular canine and following the buccal cusp tips of the premolar and
molar teeth, continuing through the anterior border of the mandibular
ramus and ending at the anterior aspect of the mandibular condyle
Curve of wilson
In the theory that occlusion should be spherical, the curvature of the
cusps as projected on the frontal plane expressed in both arches; the curve
in the mandibular arch being concave and the one in the maxillary arch being
convex. The curve of Wilson also permits lateral mandibular excursions free
from posterior interferences.

Assist.lec. Ahmed Basim Complete Denture 3rd Year
4
The curve of Wilson results from lingual inclination of the mandibular
posterior teeth, making the lingual cusps lower than buccal cusps on the
mandibular arch; the buccal cusps are higher than palatal cusps on the
maxillary arch because of the buccal inclination of maxillary posterior teeth.
Assist.lec. Ahmed Basim Complete Denture 3rd Year
1
Arrangement of the artificial teeth (Class I) week 11
It’s the placement of the teeth on a denture with definite objective in mind or it’s the setting of teeth on temporary bases.
Guide lines of arrangement artificial teeth
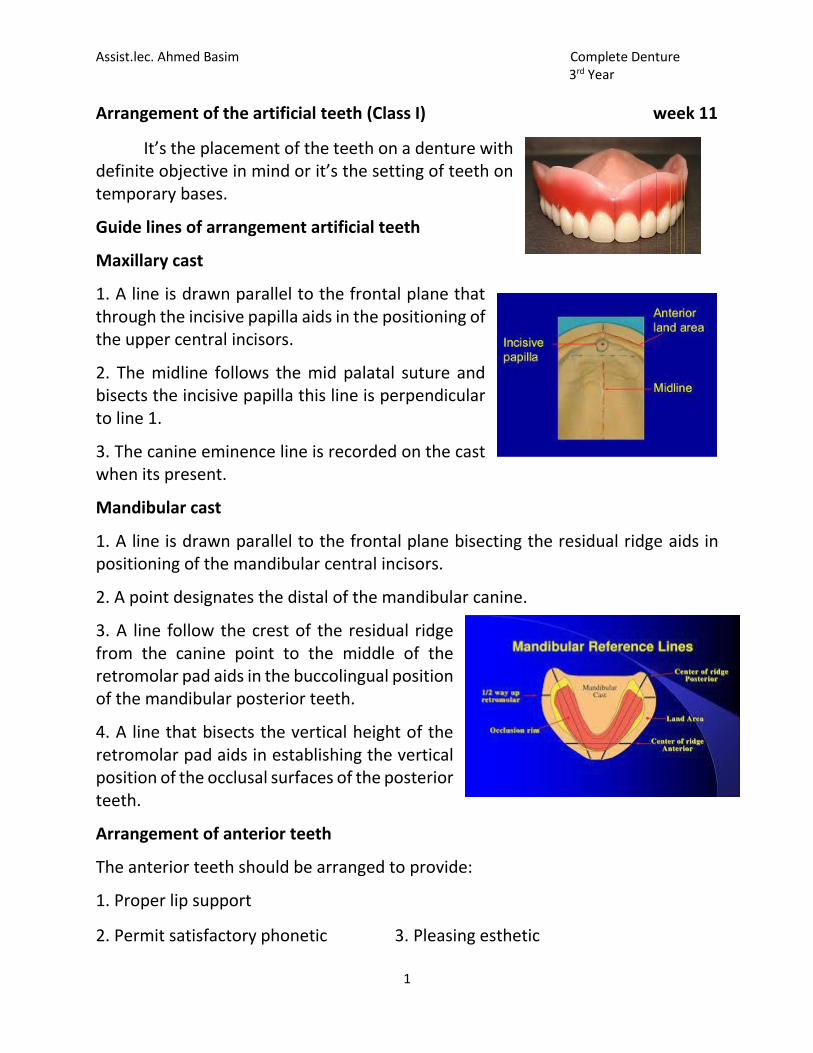
Maxillary cast
1. A line is drawn parallel to the frontal plane that through the incisive papilla aids in the positioning of the upper central incisors.
2. The midline follows the mid palatal suture and bisects the incisive papilla this line is perpendicular to line 1.
3. The canine eminence line is recorded on the cast when its present.
Mandibular cast
1. A line is drawn parallel to the frontal plane bisecting the residual ridge aids in positioning of the mandibular central incisors.
2. A point designates the distal of the mandibular canine.
3. A line follow the crest of the residual ridge from the canine point to the middle of the retromolar pad aids in the buccolingual position of the mandibular posterior teeth.
4. A line that bisects the vertical height of the retromolar pad aids in establishing the vertical position of the occlusal surfaces of the posterior teeth.
Arrangement of anterior teeth
The anterior teeth should be arranged to provide:
1. Proper lip support
2. Permit satisfactory phonetic 3. Pleasing esthetic
Assist.lec. Ahmed Basim Complete Denture 3rd Year
2
A. arrangement of the upper anterior teeth
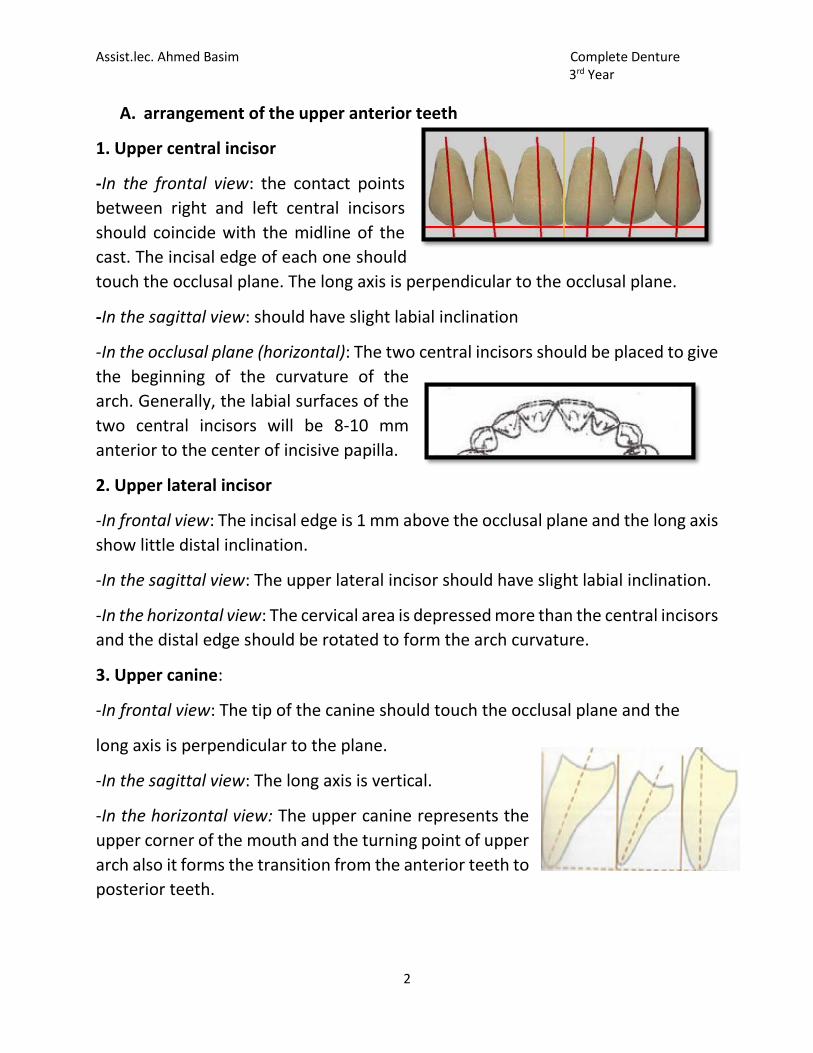
1. Upper central incisor
-In the frontal view: the contact points
between right and left central incisors
should coincide with the midline of the
cast. The incisal edge of each one should
touch the occlusal plane. The long axis is perpendicular to the occlusal plane.
-In the sagittal view: should have slight labial inclination
-In the occlusal plane (horizontal): The two central incisors should be placed to give
the beginning of the curvature of the
arch. Generally, the labial surfaces of the
two central incisors will be 8-10 mm
anterior to the center of incisive papilla.
2. Upper lateral incisor
-In frontal view: The incisal edge is 1 mm above the occlusal plane and the long axis
show little distal inclination.
-In the sagittal view: The upper lateral incisor should have slight labial inclination.
-In the horizontal view: The cervical area is depressed more than the central incisors
and the distal edge should be rotated to form the arch curvature.
3. Upper canine:
-In frontal view: The tip of the canine should touch the occlusal plane and the
long axis is perpendicular to the plane.
-In the sagittal view: The long axis is vertical.
-In the horizontal view: The upper canine represents the
upper corner of the mouth and the turning point of upper
arch also it forms the transition from the anterior teeth to
posterior teeth.
Assist.lec. Ahmed Basim Complete Denture 3rd Year
3
B. Arrangement of the lower anterior teeth
1. Lower central incisor
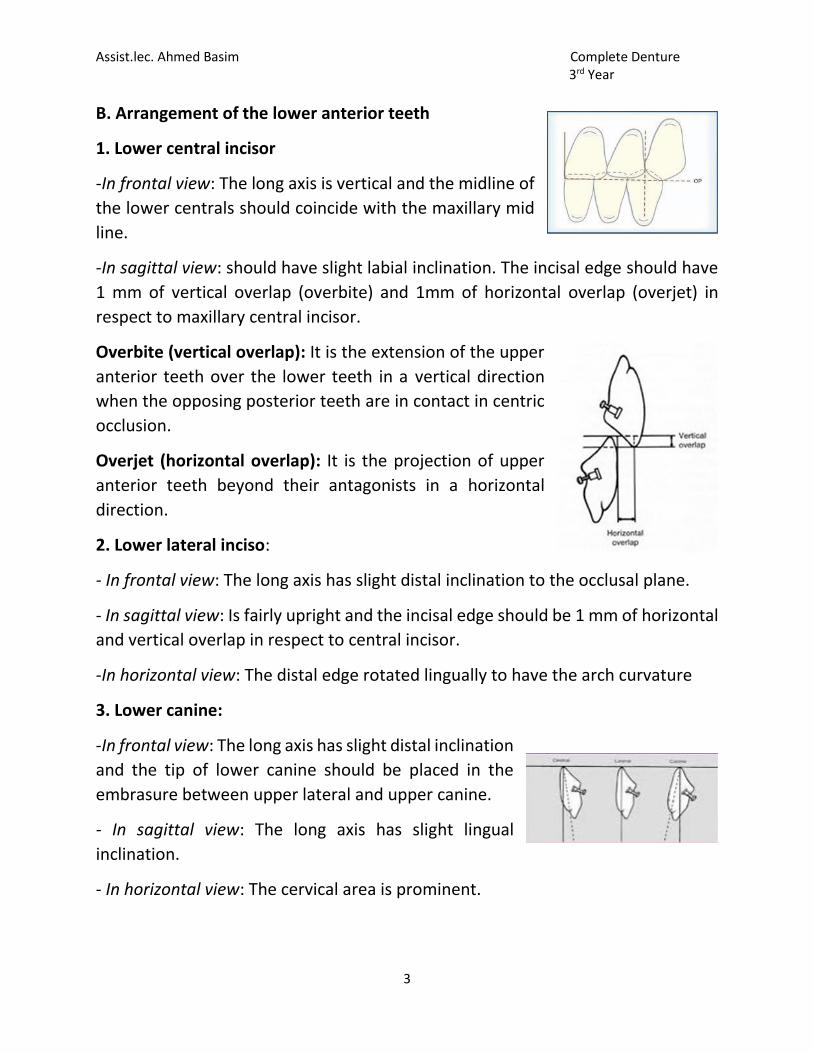
-In frontal view: The long axis is vertical and the midline of
the lower centrals should coincide with the maxillary mid
line.
-In sagittal view: should have slight labial inclination. The incisal edge should have
1 mm of vertical overlap (overbite) and 1mm of horizontal overlap (overjet) in
respect to maxillary central incisor.
Overbite (vertical overlap): It is the extension of the upper
anterior teeth over the lower teeth in a vertical direction
when the opposing posterior teeth are in contact in centric
occlusion.
Overjet (horizontal overlap): It is the projection of upper
anterior teeth beyond their antagonists in a horizontal
direction.
2. Lower lateral inciso:
- In frontal view: The long axis has slight distal inclination to the occlusal plane.
- In sagittal view: Is fairly upright and the incisal edge should be 1 mm of horizontal
and vertical overlap in respect to central incisor.
-In horizontal view: The distal edge rotated lingually to have the arch curvature
3. Lower canine:
-In frontal view: The long axis has slight distal inclination
and the tip of lower canine should be placed in the
embrasure between upper lateral and upper canine.
- In sagittal view: The long axis has slight lingual
inclination.
- In horizontal view: The cervical area is prominent.
Assist.lec. Ahmed Basim Complete Denture 3rd Year
4
*The arrangement of anterior teeth should follow the form of the arch which
is either square, tapered or ovoid.
** Lower anterior teeth should be positioned to create an arbitrary 1-2mm overjet
and Overbite where possible.
Arrangement of the posterior teeth
Correct placement of posterior teeth is important for the retention and stability of
both dentures. In arrangement of the posterior teeth we must understand and
applied the Compensating curve (Curve of spee and Curve of Wilson) which is
related to posterior teeth arrangement.
1. Arrangement of maxillary posterior teeth
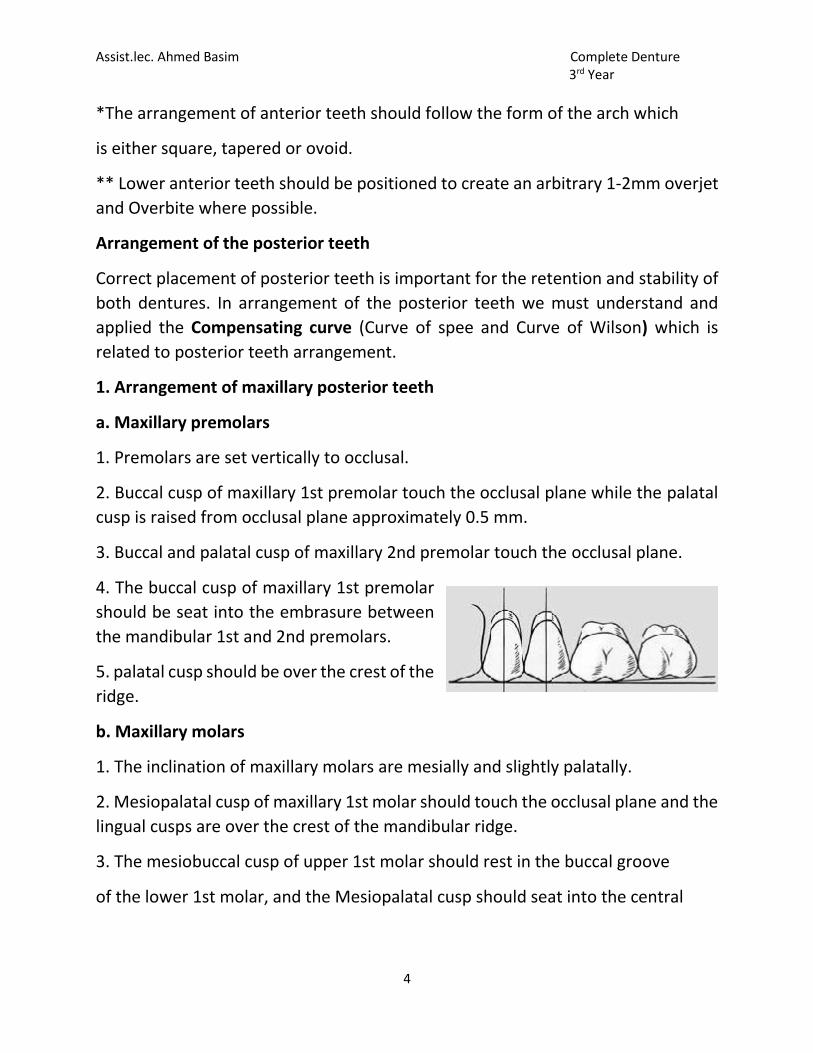
a. Maxillary premolars
1. Premolars are set vertically to occlusal.
2. Buccal cusp of maxillary 1st premolar touch the occlusal plane while the palatal
cusp is raised from occlusal plane approximately 0.5 mm.
3. Buccal and palatal cusp of maxillary 2nd premolar touch the occlusal plane.
4. The buccal cusp of maxillary 1st premolar
should be seat into the embrasure between
the mandibular 1st and 2nd premolars.
5. palatal cusp should be over the crest of the
ridge.
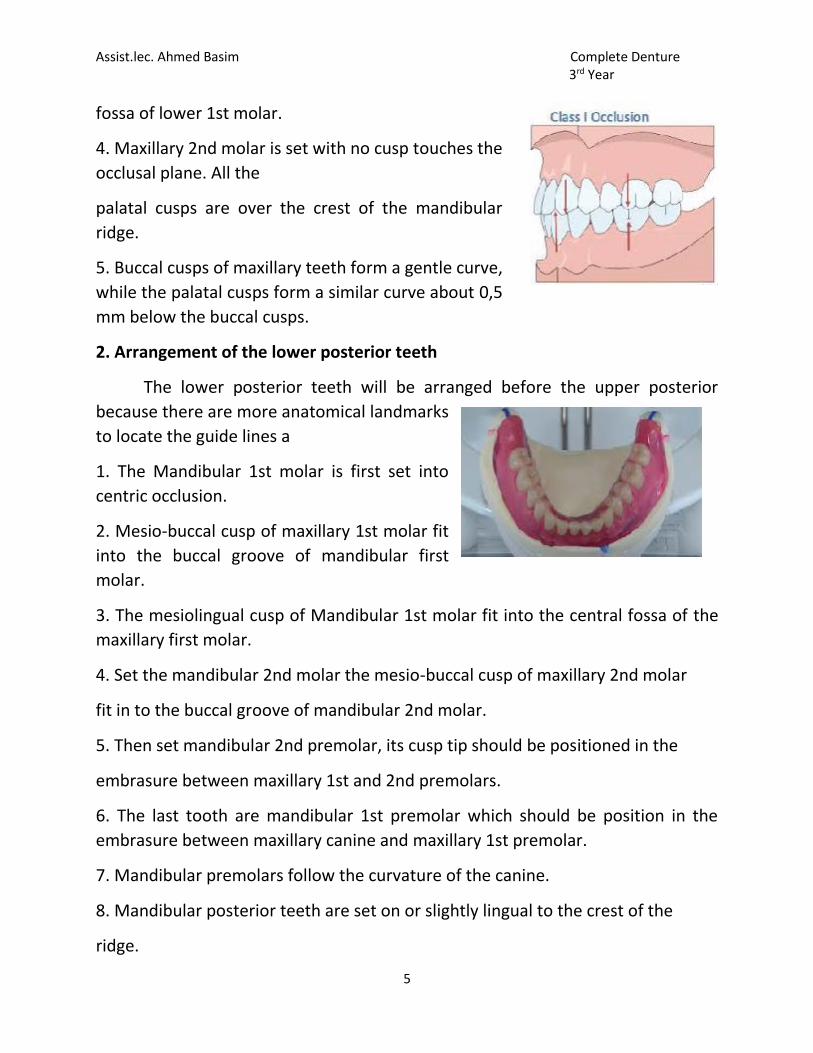
b. Maxillary molars
1. The inclination of maxillary molars are mesially and slightly palatally.
2. Mesiopalatal cusp of maxillary 1st molar should touch the occlusal plane and the
lingual cusps are over the crest of the mandibular ridge.
3. The mesiobuccal cusp of upper 1st molar should rest in the buccal groove
of the lower 1st molar, and the Mesiopalatal cusp should seat into the central
Assist.lec. Ahmed Basim Complete Denture 3rd Year
5
fossa of lower 1st molar.
4. Maxillary 2nd molar is set with no cusp touches the
occlusal plane. All the
palatal cusps are over the crest of the mandibular
ridge.
5. Buccal cusps of maxillary teeth form a gentle curve,
while the palatal cusps form a similar curve about 0,5
mm below the buccal cusps.
2. Arrangement of the lower posterior teeth
The lower posterior teeth will be arranged before the upper posterior
because there are more anatomical landmarks
to locate the guide lines a
1. The Mandibular 1st molar is first set into
centric occlusion.
2. Mesio-buccal cusp of maxillary 1st molar fit
into the buccal groove of mandibular first
molar.
3. The mesiolingual cusp of Mandibular 1st molar fit into the central fossa of the
maxillary first molar.
4. Set the mandibular 2nd molar the mesio-buccal cusp of maxillary 2nd molar
fit in to the buccal groove of mandibular 2nd molar.
5. Then set mandibular 2nd premolar, its cusp tip should be positioned in the
embrasure between maxillary 1st and 2nd premolars.
6. The last tooth are mandibular 1st premolar which should be position in the
embrasure between maxillary canine and maxillary 1st premolar.
7. Mandibular premolars follow the curvature of the canine.
8. Mandibular posterior teeth are set on or slightly lingual to the crest of the
ridge.
Assist.lec. Ahmed Basim Complete Denture 3rd Year
1
Arrangement of artificial teeth (class II) week 12
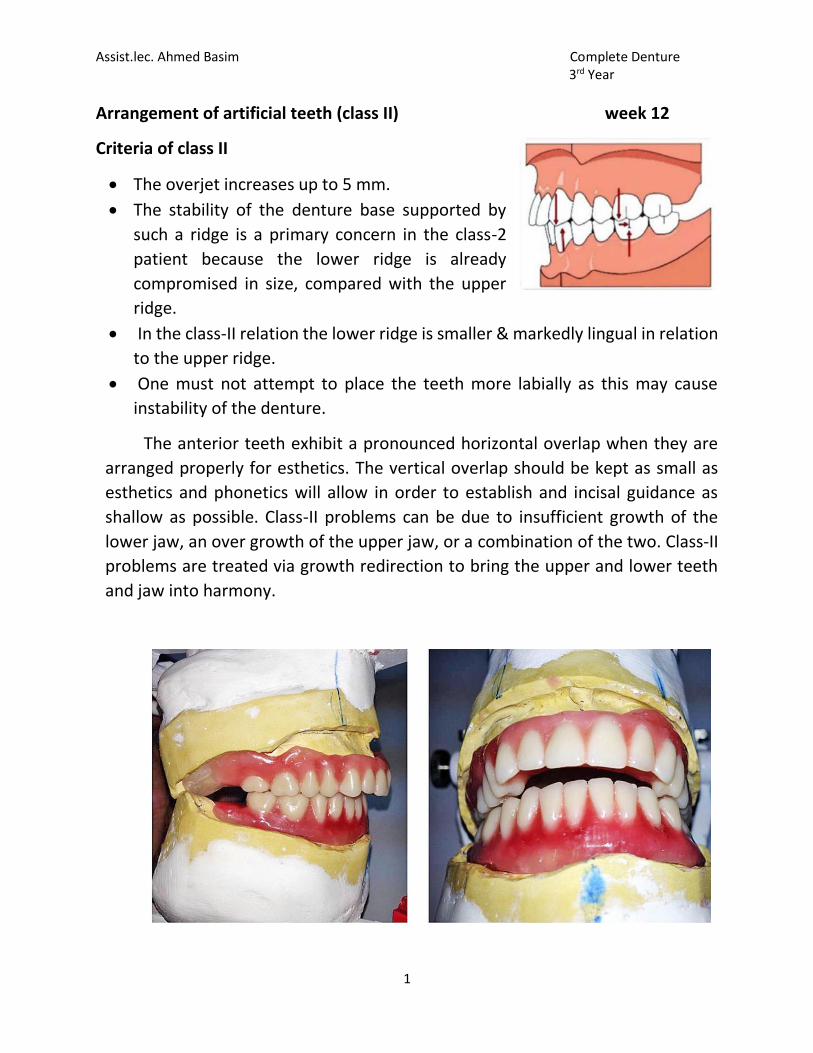
Criteria of class II
The overjet increases up to 5 mm.
The stability of the denture base supported by
such a ridge is a primary concern in the class-2
patient because the lower ridge is already
compromised in size, compared with the upper
ridge.
In the class-II relation the lower ridge is smaller & markedly lingual in relation
to the upper ridge.
One must not attempt to place the teeth more labially as this may cause
instability of the denture.
The anterior teeth exhibit a pronounced horizontal overlap when they are
arranged properly for esthetics. The vertical overlap should be kept as small as
esthetics and phonetics will allow in order to establish and incisal guidance as
shallow as possible. Class-II problems can be due to insufficient growth of the
lower jaw, an over growth of the upper jaw, or a combination of the two. Class-II
problems are treated via growth redirection to bring the upper and lower teeth
and jaw into harmony.
Assist.lec. Ahmed Basim Complete Denture 3rd Year
2
Features of the class-II arrangement
1. A pronounced horizontal overlap.
2. Canine relation more posterior and lingual when compared to that of class-
I relationship.
3. Because of the reduced space on the lower ridge, the premolars may be
ground mesiodistally or one premolar on either side may be removed
entirely.
4. Nonanatomic teeth or teeth with shallow inclines are selected to reduce the
stress on the weaker.
5. The buccal cusp of the upper and lower premolars are flattened to provide a
stable centric occlusal contact.
6. The molars are not affected much usually and the normal functional and
nonfunctional cusp relations are maintained.
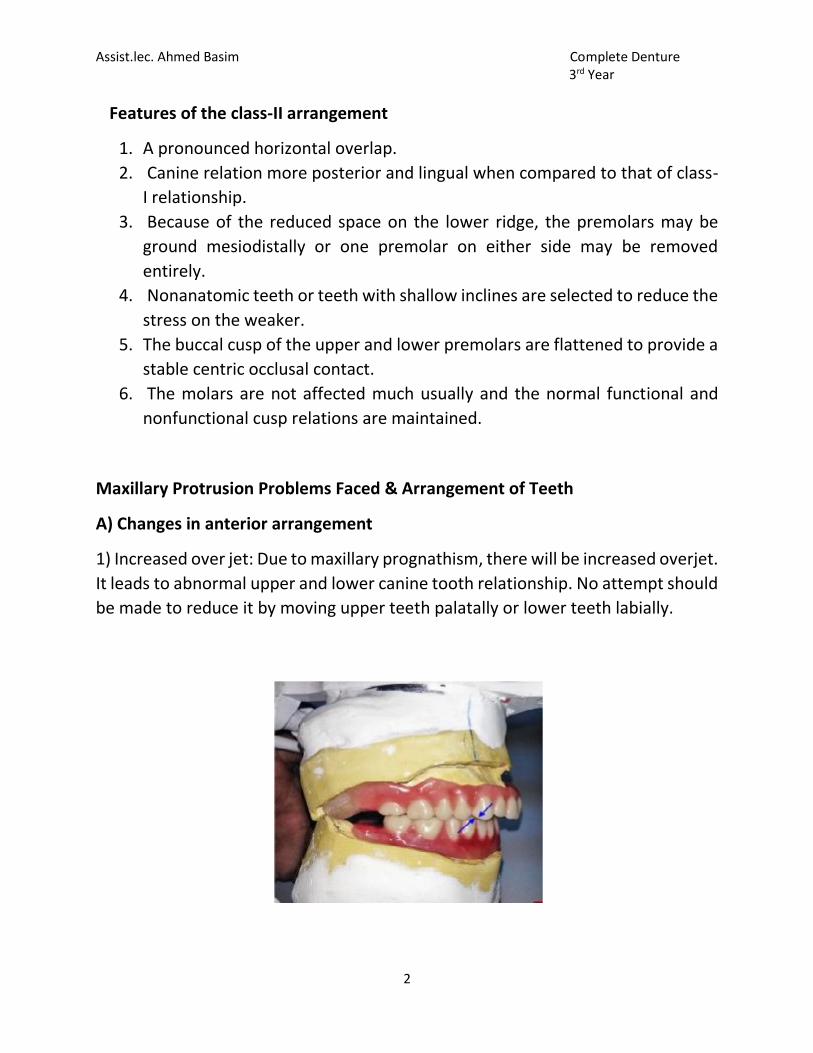
Maxillary Protrusion Problems Faced & Arrangement of Teeth
A) Changes in anterior arrangement
1) Increased over jet: Due to maxillary prognathism, there will be increased overjet.
It leads to abnormal upper and lower canine tooth relationship. No attempt should
be made to reduce it by moving upper teeth palatally or lower teeth labially.

Assist.lec. Ahmed Basim Complete Denture 3rd Year
3
2) Changes in canine relationship: Normally, the distal surface of lower canine tooth
(located at) tip of the cusp of upper canine, whereas in maxillary prognathism it
leads to the lower canine tooth finishing anywhere from the tip to distal surface of
upper canine. Excessive prognathism leads to distal incline of cusp of lower canine
posterior to distal surface of upper canine tooth.
Setting Upper Posterior Teeth in Class-II Relation
Upper first premolar setting
If necessary, the palatal cusps of the 1st premolar is flattened.
This is done to get good intercuspation with lower premolar.
Upper second premolar setting
Upper 2nd premolar is set with its flattened lingual cusp occluding with the
flattened buccal cusp of the lower second premolar.
There is less buccal overlap and a larger area of contact is possible between
this teeth.
Setting upper molars
Upper molars are set in normal relation as done in (class I) teeth
arrangement.
Setting Lower Anterior Teeth in Class 2 Relation
Lower anteriors are set according to normal principles. The overbite is maintained
at 2mm. However, there will be increased overjet (4-5mm).

Assist.lec. Ahmed Basim Complete Denture 3rd Year
4
Setting of Lower Posteriors
The lower first molar in Class I relation. (Key of Occlusion).
The remaining space for premolar is assessed. Usually there will be space for
only 1 premolar. The lower premolar is set in the remaining space. The buccal
cusp of lower premolar occludes with the palatal cusp of upper second
premolar.
The lower second molar is set in normal relation with the upper second
molar.
Assist.lec. Ahmed Basim Complete Denture 3rd Year
1
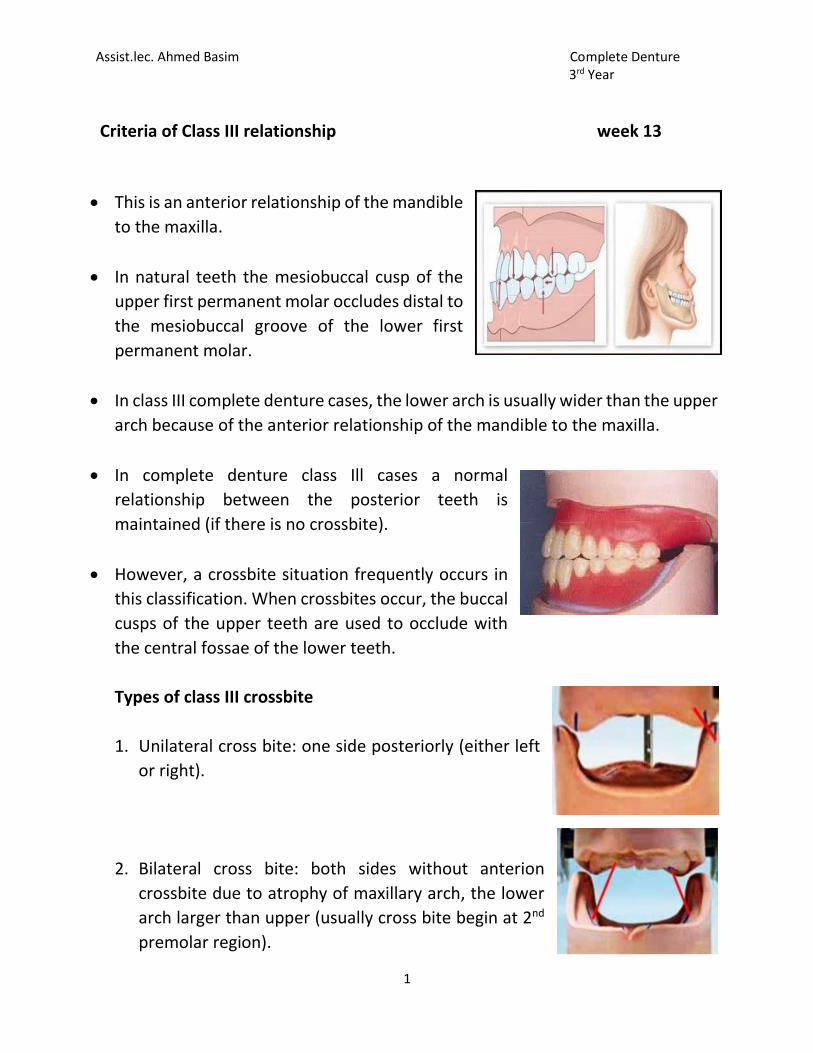
Criteria of Class III relationship week 13
This is an anterior relationship of the mandible
to the maxilla.
In natural teeth the mesiobuccal cusp of the
upper first permanent molar occludes distal to
the mesiobuccal groove of the lower first
permanent molar.
In class III complete denture cases, the lower arch is usually wider than the upper
arch because of the anterior relationship of the mandible to the maxilla.
In complete denture class Ill cases a normal
relationship between the posterior teeth is
maintained (if there is no crossbite).
However, a crossbite situation frequently occurs in
this classification. When crossbites occur, the buccal
cusps of the upper teeth are used to occlude with
the central fossae of the lower teeth.
Types of class III crossbite
1. Unilateral cross bite: one side posteriorly (either left
or right).
2. Bilateral cross bite: both sides without anterion
crossbite due to atrophy of maxillary arch, the lower
arch larger than upper (usually cross bite begin at 2nd
premolar region).
Assist.lec. Ahmed Basim Complete Denture 3rd Year
2
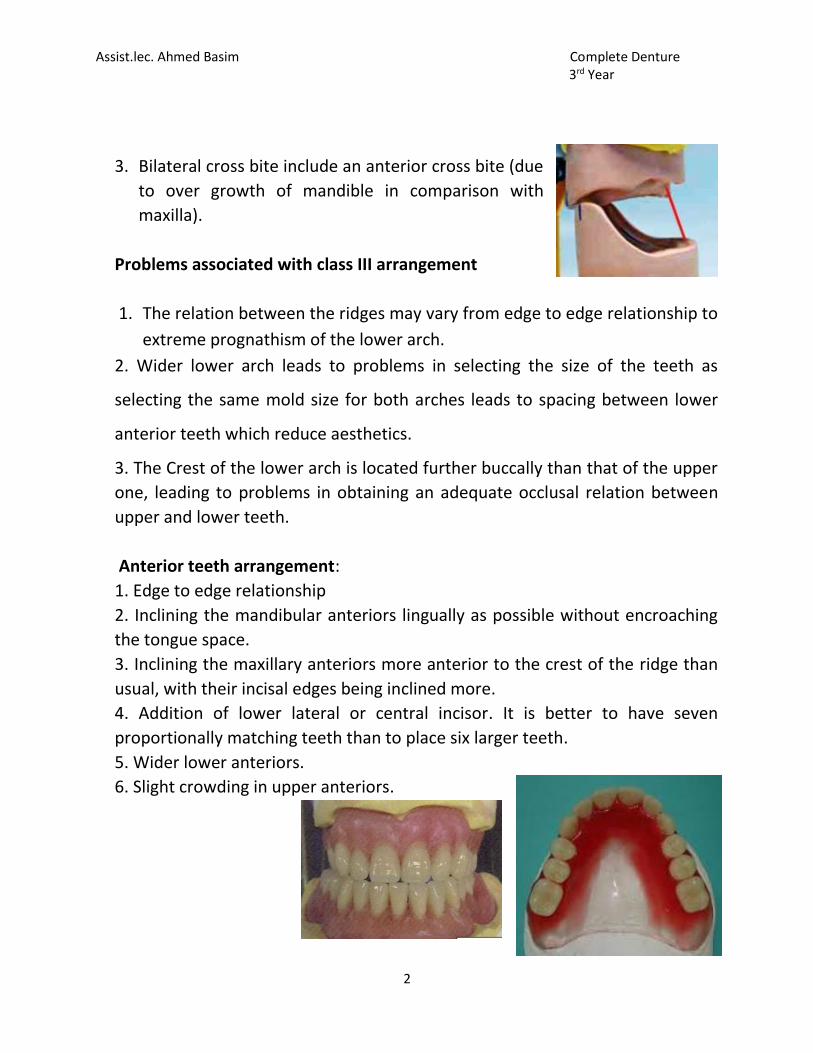
3. Bilateral cross bite include an anterior cross bite (due
to over growth of mandible in comparison with
maxilla).
Problems associated with class III arrangement
1. The relation between the ridges may vary from edge to edge relationship to
extreme prognathism of the lower arch.
2. Wider lower arch leads to problems in selecting the size of the teeth as
selecting the same mold size for both arches leads to spacing between lower
anterior teeth which reduce aesthetics.
3. The Crest of the lower arch is located further buccally than that of the upper
one, leading to problems in obtaining an adequate occlusal relation between
upper and lower teeth.
Anterior teeth arrangement:
1. Edge to edge relationship
2. Inclining the mandibular anteriors lingually as possible without encroaching
the tongue space.
3. Inclining the maxillary anteriors more anterior to the crest of the ridge than
usual, with their incisal edges being inclined more.
4. Addition of lower lateral or central incisor. It is better to have seven
proportionally matching teeth than to place six larger teeth.
5. Wider lower anteriors.
6. Slight crowding in upper anteriors.
Assist.lec. Ahmed Basim Complete Denture 3rd Year
3
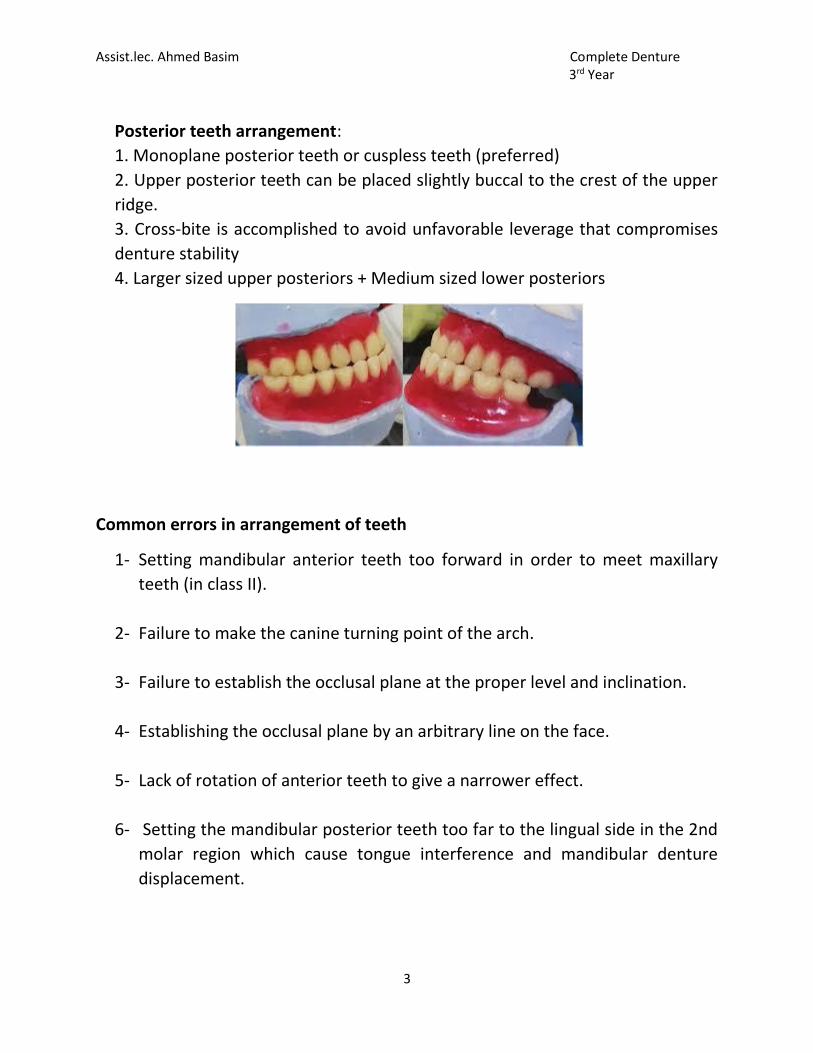
Posterior teeth arrangement:
1. Monoplane posterior teeth or cuspless teeth (preferred)
2. Upper posterior teeth can be placed slightly buccal to the crest of the upper
ridge.
3. Cross-bite is accomplished to avoid unfavorable leverage that compromises
denture stability
4. Larger sized upper posteriors + Medium sized lower posteriors
Common errors in arrangement of teeth
1- Setting mandibular anterior teeth too forward in order to meet maxillary
teeth (in class II).
2- Failure to make the canine turning point of the arch.
3- Failure to establish the occlusal plane at the proper level and inclination.
4- Establishing the occlusal plane by an arbitrary line on the face.
5- Lack of rotation of anterior teeth to give a narrower effect.
6- Setting the mandibular posterior teeth too far to the lingual side in the 2nd
molar region which cause tongue interference and mandibular denture
displacement.
Assist.lec. Ahmed Basim Complete Denture 3rd Year
1
Week 14
Waxing: It is the contouring of the wax base of trial denture into the desired form.
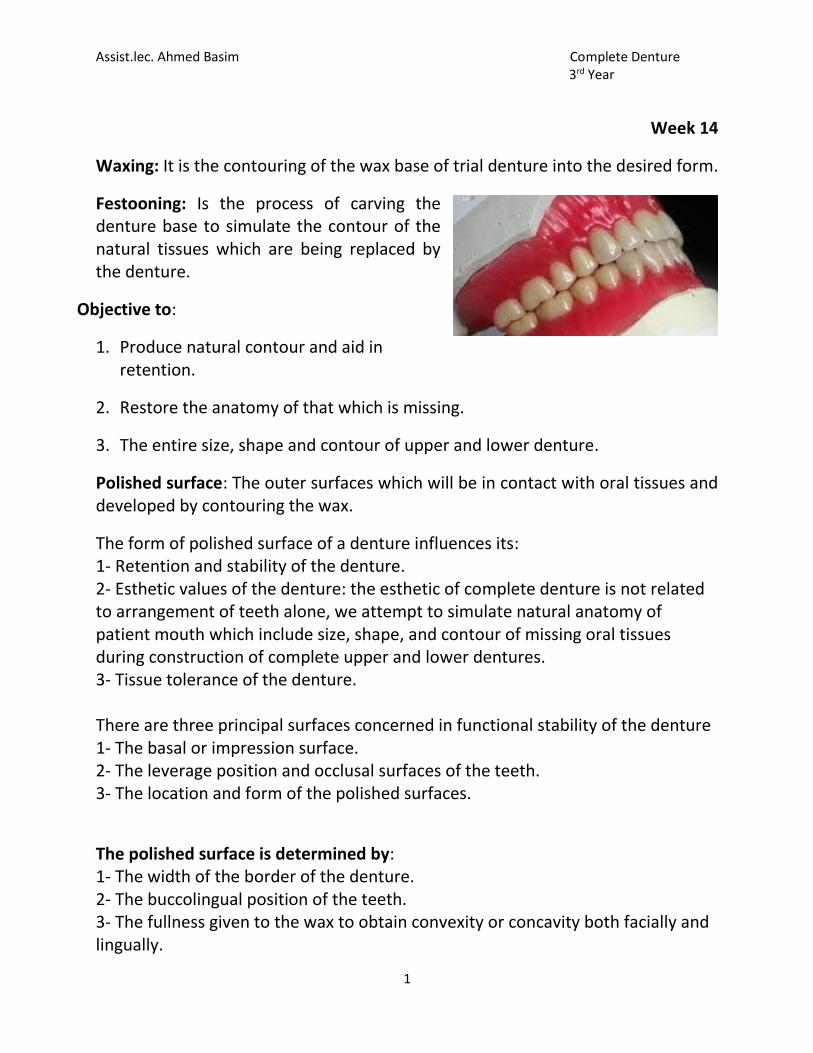
Festooning: Is the process of carving the denture base to simulate the contour of the natural tissues which are being replaced by the denture.
Objective to:
1. Produce natural contour and aid in retention.
2. Restore the anatomy of that which is missing.
3. The entire size, shape and contour of upper and lower denture.
Polished surface: The outer surfaces which will be in contact with oral tissues and developed by contouring the wax.
The form of polished surface of a denture influences its: 1- Retention and stability of the denture. 2- Esthetic values of the denture: the esthetic of complete denture is not related to arrangement of teeth alone, we attempt to simulate natural anatomy of patient mouth which include size, shape, and contour of missing oral tissues during construction of complete upper and lower dentures. 3- Tissue tolerance of the denture. There are three principal surfaces concerned in functional stability of the denture 1- The basal or impression surface. 2- The leverage position and occlusal surfaces of the teeth. 3- The location and form of the polished surfaces.
The polished surface is determined by: 1- The width of the border of the denture. 2- The buccolingual position of the teeth. 3- The fullness given to the wax to obtain convexity or concavity both facially and lingually.
Assist.lec. Ahmed Basim Complete Denture 3rd Year
2
The inclined plane action of the muscles of the check and tongue, this horizontal force exert in the direction of the occlusal plane by the tongue and cheek can act either a placing or displacing agent, depending on the shape of the polished surface. When the lingual and buccal borders of a mandibular denture are being shaped, they can be made concave so that the tongue and cheek will grip and tend to seat the denture. In the opposite case where the lingual and the buccal surfaces are made convex by waxing and a narrow impression base used, the inclined plane forces resulting from pressures of the tongue and cheeks will tend to unseat the denture. The buccolingual position of the teeth is important because a buccal position of the teeth would necessity shaping the surface of the denture base in such a manner that the muscle action of the cheeks would tend to unseat the mandibular denture. Requirements of waxing the polished surface 1- They should duplicate the covered soft tissues as accurately as possible realistic, not exaggerated. 2- The borders, both labial and buccal should full the vestibules. 3- Notches should be provided to accommodate the mucous membrane attachment (frenum), both in size and direction. 4- The contour of the facial flanges should be compatible with the cheek and lips. 5- The contour of the lingual flanges should be compatible with the tongue. 6- The palatal section of the maxillary denture should be nearly a reproduction of the patient palate and rugae. 7- Avoid a bulky wax-up. The additional bulk of acrylic resin may contribute to porosity and dimensional processing error.
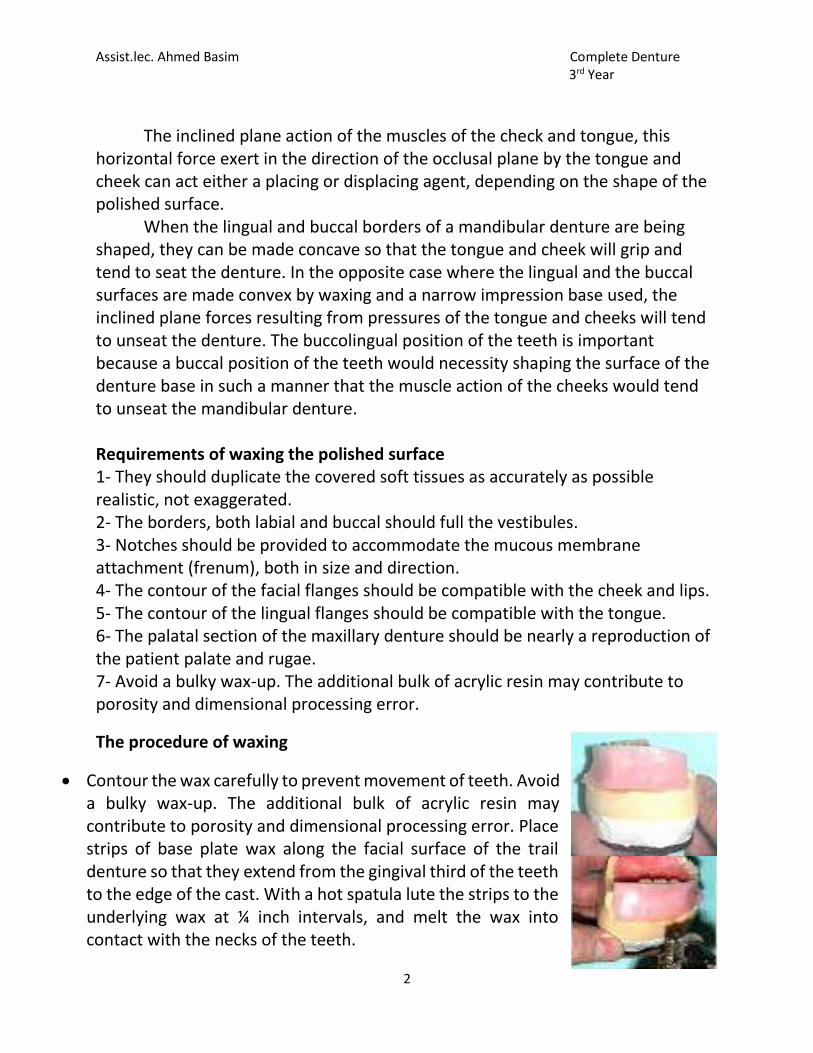
The procedure of waxing
Contour the wax carefully to prevent movement of teeth. Avoid a bulky wax-up. The additional bulk of acrylic resin may contribute to porosity and dimensional processing error. Place strips of base plate wax along the facial surface of the trail denture so that they extend from the gingival third of the teeth to the edge of the cast. With a hot spatula lute the strips to the underlying wax at ¼ inch intervals, and melt the wax into contact with the necks of the teeth.

Assist.lec. Ahmed Basim Complete Denture 3rd Year
3
After the wax has cooled, carve the interdental papillae. They vary with the age of patient. Develop the margin by the carving with a lacron carver at 45º angle to the neck of the teeth. The posterior area should have a marked fullness. Wax the lingual flange of the mandible denture thickly enough to full all depressions and to slop down from the necks of the teeth and inward toward the tongue. The slop of the flange should be free from the undercuts and very slightly concave at or near the lower border.
Contour the wax around the necks of the maxillary posterior artificial teeth to form part of clinical crowns and to make these teeth more natural in size and more compatible to the toungue the palatal surface of maxillary denture should be waxed to a uniform thickness of 2.5mm, when the processed resin is smoothed and polished, the palate will be as thin as possible and yet sufficiently thick to provide adequate strength.
Stippling of the wax: an alternative to gingival contouring some people stipple the wax and this procedure a finished denture, whose surface shows an (orange-peal) effect, produces a very pleasing result. This may be produced by tapping the surface of the wax with a bristles of a tooth brush after first warming the surface soften the wax or by running over the surface of the wax with a small burnishing bur rotating in a hand piece.
Disadvantages of stippling is that it produced a denture which is more liable to contamination by calculus deposits. If it done it should be confined to the area of the denture which can be seen when the patient grains broadly. After the wax has been contoured, smooth it by flaming and then polished it with we cotton.
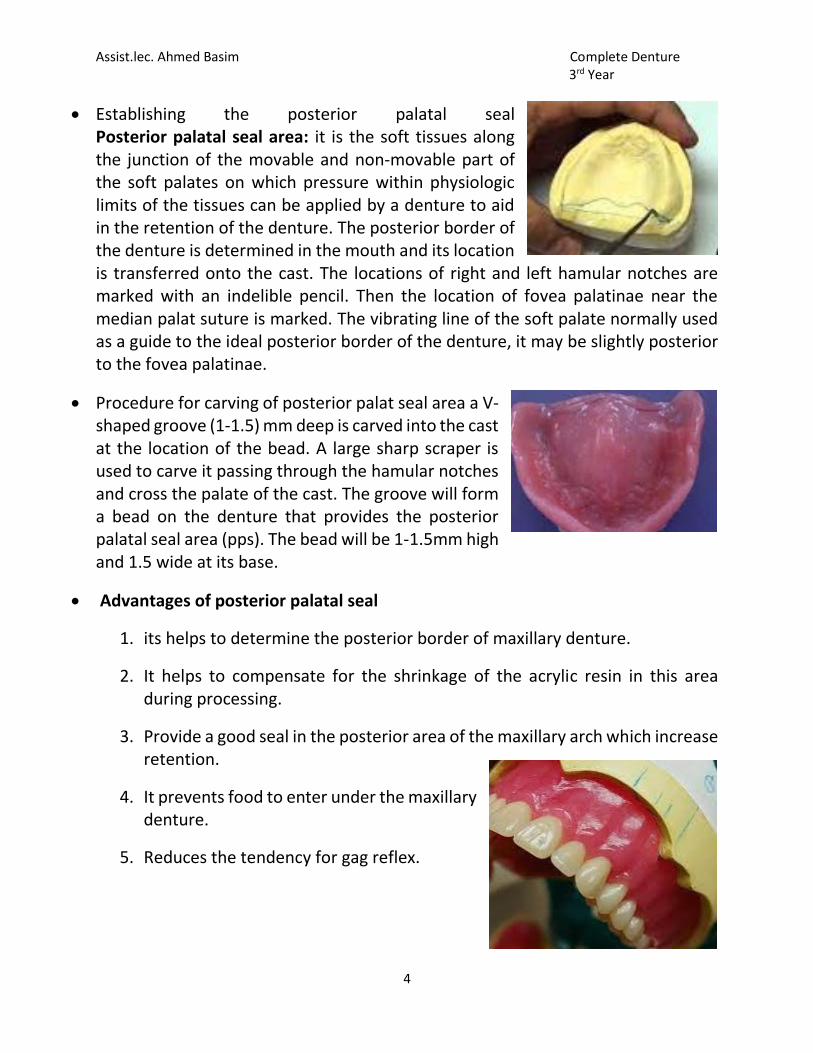
Assist.lec. Ahmed Basim Complete Denture 3rd Year
4
Establishing the posterior palatal seal Posterior palatal seal area: it is the soft tissues along the junction of the movable and non-movable part of the soft palates on which pressure within physiologic limits of the tissues can be applied by a denture to aid in the retention of the denture. The posterior border of the denture is determined in the mouth and its location is transferred onto the cast. The locations of right and left hamular notches are marked with an indelible pencil. Then the location of fovea palatinae near the median palat suture is marked. The vibrating line of the soft palate normally used as a guide to the ideal posterior border of the denture, it may be slightly posterior to the fovea palatinae.
Procedure for carving of posterior palat seal area a V-shaped groove (1-1.5) mm deep is carved into the cast at the location of the bead. A large sharp scraper is used to carve it passing through the hamular notches and cross the palate of the cast. The groove will form a bead on the denture that provides the posterior palatal seal area (pps). The bead will be 1-1.5mm high and 1.5 wide at its base.
Advantages of posterior palatal seal
1. its helps to determine the posterior border of maxillary denture.
2. It helps to compensate for the shrinkage of the acrylic resin in this area during processing.
3. Provide a good seal in the posterior area of the maxillary arch which increase retention.
4. It prevents food to enter under the maxillary denture.
5. Reduces the tendency for gag reflex.
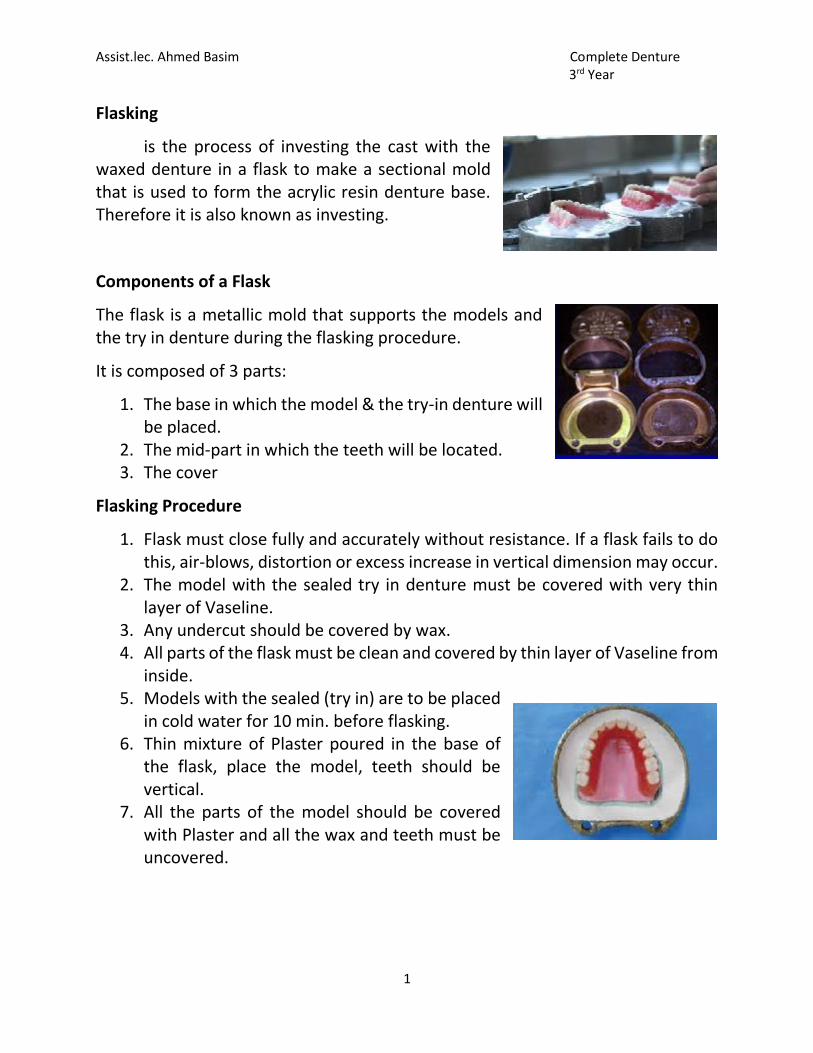
Assist.lec. Ahmed Basim Complete Denture 3rd Year
1
Flasking
is the process of investing the cast with the waxed denture in a flask to make a sectional mold that is used to form the acrylic resin denture base. Therefore it is also known as investing.
Components of a Flask
The flask is a metallic mold that supports the models and the try in denture during the flasking procedure.
It is composed of 3 parts:
1. The base in which the model & the try-in denture will be placed.
2. The mid-part in which the teeth will be located. 3. The cover
Flasking Procedure
1. Flask must close fully and accurately without resistance. If a flask fails to do this, air-blows, distortion or excess increase in vertical dimension may occur.
2. The model with the sealed try in denture must be covered with very thin layer of Vaseline.
3. Any undercut should be covered by wax. 4. All parts of the flask must be clean and covered by thin layer of Vaseline from
inside. 5. Models with the sealed (try in) are to be placed
in cold water for 10 min. before flasking. 6. Thin mixture of Plaster poured in the base of
the flask, place the model, teeth should be vertical.
7. All the parts of the model should be covered with Plaster and all the wax and teeth must be uncovered.
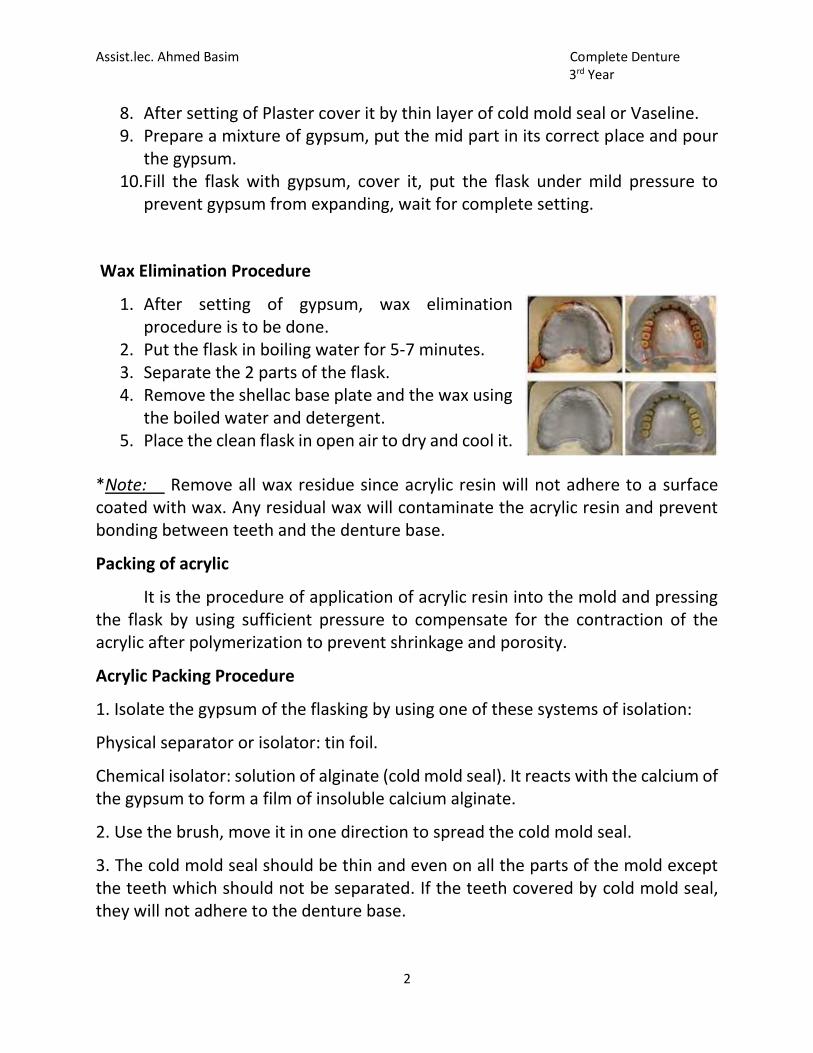
Assist.lec. Ahmed Basim Complete Denture 3rd Year
2
8. After setting of Plaster cover it by thin layer of cold mold seal or Vaseline. 9. Prepare a mixture of gypsum, put the mid part in its correct place and pour
the gypsum. 10. Fill the flask with gypsum, cover it, put the flask under mild pressure to
prevent gypsum from expanding, wait for complete setting.
Wax Elimination Procedure
1. After setting of gypsum, wax elimination procedure is to be done.
2. Put the flask in boiling water for 5-7 minutes. 3. Separate the 2 parts of the flask. 4. Remove the shellac base plate and the wax using
the boiled water and detergent. 5. Place the clean flask in open air to dry and cool it.
*Note: Remove all wax residue since acrylic resin will not adhere to a surface coated with wax. Any residual wax will contaminate the acrylic resin and prevent bonding between teeth and the denture base.
Packing of acrylic
It is the procedure of application of acrylic resin into the mold and pressing the flask by using sufficient pressure to compensate for the contraction of the acrylic after polymerization to prevent shrinkage and porosity.
Acrylic Packing Procedure
1. Isolate the gypsum of the flasking by using one of these systems of isolation:
Physical separator or isolator: tin foil.
Chemical isolator: solution of alginate (cold mold seal). It reacts with the calcium of the gypsum to form a film of insoluble calcium alginate.
2. Use the brush, move it in one direction to spread the cold mold seal.
3. The cold mold seal should be thin and even on all the parts of the mold except the teeth which should not be separated. If the teeth covered by cold mold seal, they will not adhere to the denture base.
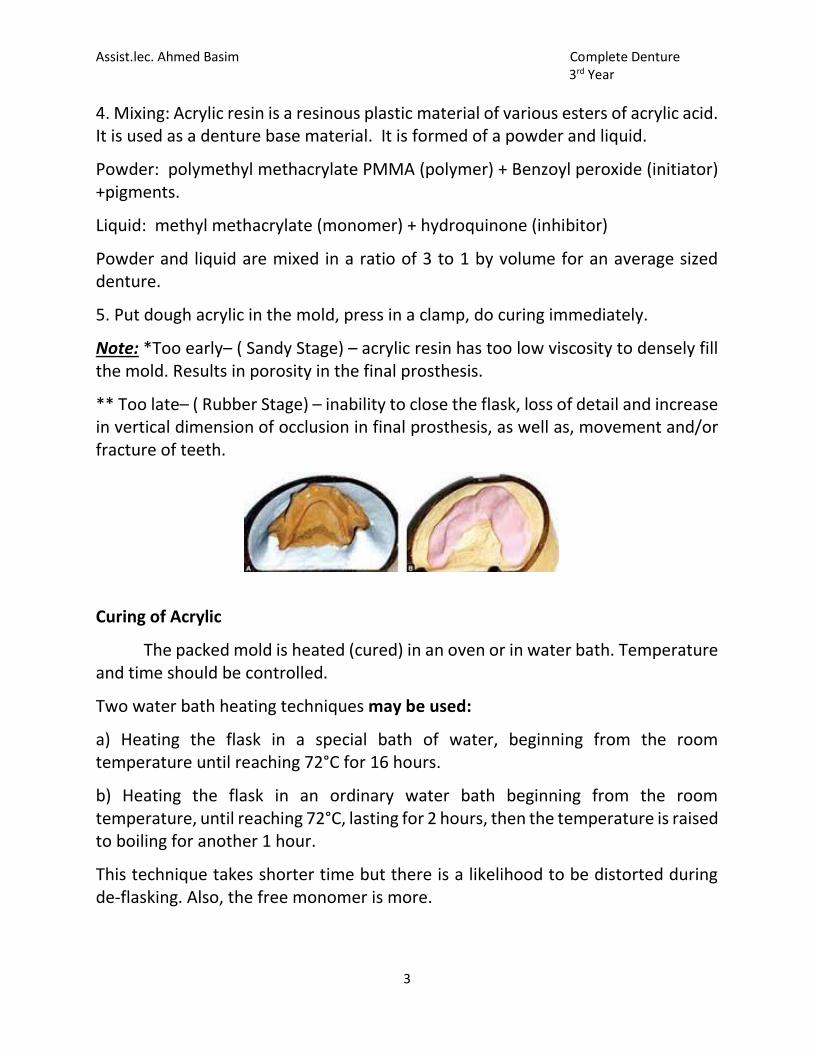
Assist.lec. Ahmed Basim Complete Denture 3rd Year
3
4. Mixing: Acrylic resin is a resinous plastic material of various esters of acrylic acid. It is used as a denture base material. It is formed of a powder and liquid.
Powder: polymethyl methacrylate PMMA (polymer) + Benzoyl peroxide (initiator) +pigments.
Liquid: methyl methacrylate (monomer) + hydroquinone (inhibitor)
Powder and liquid are mixed in a ratio of 3 to 1 by volume for an average sized denture.
5. Put dough acrylic in the mold, press in a clamp, do curing immediately.
Note: *Too early– ( Sandy Stage) – acrylic resin has too low viscosity to densely fill the mold. Results in porosity in the final prosthesis.
** Too late– ( Rubber Stage) – inability to close the flask, loss of detail and increase in vertical dimension of occlusion in final prosthesis, as well as, movement and/or fracture of teeth.
Curing of Acrylic
The packed mold is heated (cured) in an oven or in water bath. Temperature and time should be controlled.
Two water bath heating techniques may be used:
a) Heating the flask in a special bath of water, beginning from the room temperature until reaching 72°C for 16 hours.
b) Heating the flask in an ordinary water bath beginning from the room temperature, until reaching 72°C, lasting for 2 hours, then the temperature is raised to boiling for another 1 hour.
This technique takes shorter time but there is a likelihood to be distorted during de-flasking. Also, the free monomer is more.
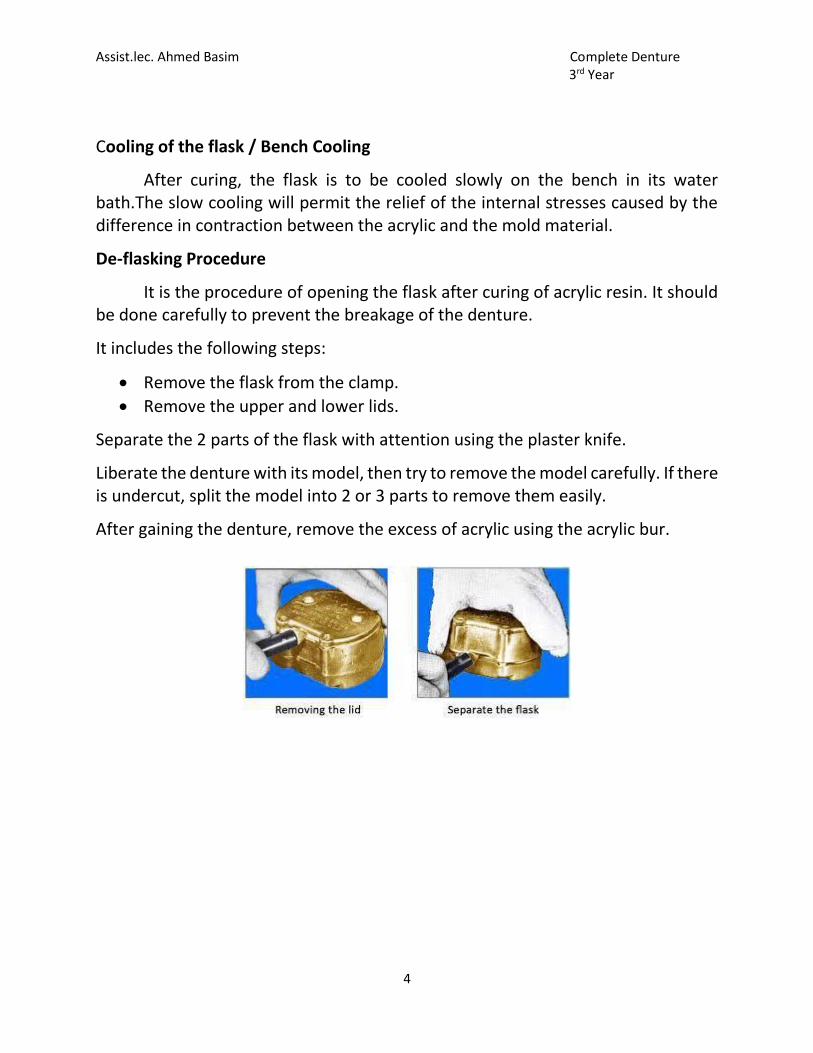
Assist.lec. Ahmed Basim Complete Denture 3rd Year
4
Cooling of the flask / Bench Cooling
After curing, the flask is to be cooled slowly on the bench in its water bath.The slow cooling will permit the relief of the internal stresses caused by the difference in contraction between the acrylic and the mold material.
De-flasking Procedure
It is the procedure of opening the flask after curing of acrylic resin. It should be done carefully to prevent the breakage of the denture.
It includes the following steps:
Remove the flask from the clamp.
Remove the upper and lower lids.
Separate the 2 parts of the flask with attention using the plaster knife.
Liberate the denture with its model, then try to remove the model carefully. If there is undercut, split the model into 2 or 3 parts to remove them easily.
After gaining the denture, remove the excess of acrylic using the acrylic bur.
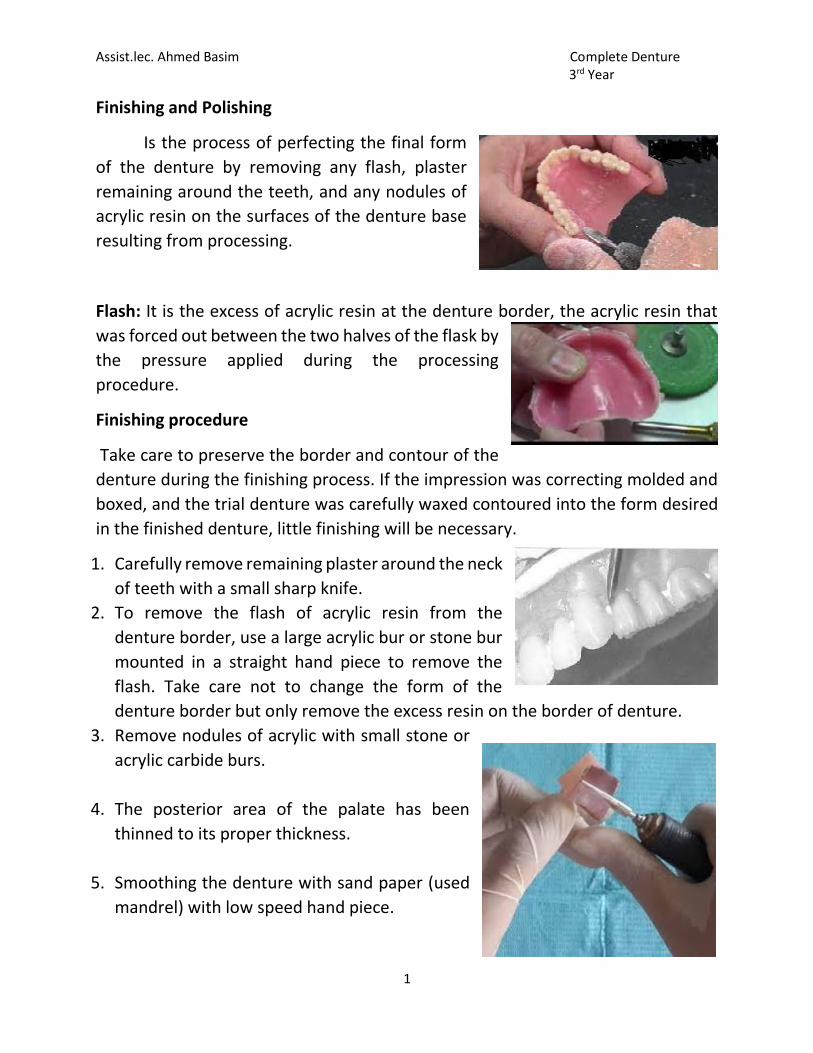
Assist.lec. Ahmed Basim Complete Denture 3rd Year
1
Finishing and Polishing
Is the process of perfecting the final form
of the denture by removing any flash, plaster
remaining around the teeth, and any nodules of
acrylic resin on the surfaces of the denture base
resulting from processing.
Flash: It is the excess of acrylic resin at the denture border, the acrylic resin that
was forced out between the two halves of the flask by
the pressure applied during the processing
procedure.
Finishing procedure
Take care to preserve the border and contour of the
denture during the finishing process. If the impression was correcting molded and
boxed, and the trial denture was carefully waxed contoured into the form desired
in the finished denture, little finishing will be necessary.
1. Carefully remove remaining plaster around the neck
of teeth with a small sharp knife.
2. To remove the flash of acrylic resin from the
denture border, use a large acrylic bur or stone bur
mounted in a straight hand piece to remove the
flash. Take care not to change the form of the
denture border but only remove the excess resin on the border of denture.
3. Remove nodules of acrylic with small stone or
acrylic carbide burs.
4. The posterior area of the palate has been
thinned to its proper thickness.
5. Smoothing the denture with sand paper (used
mandrel) with low speed hand piece.
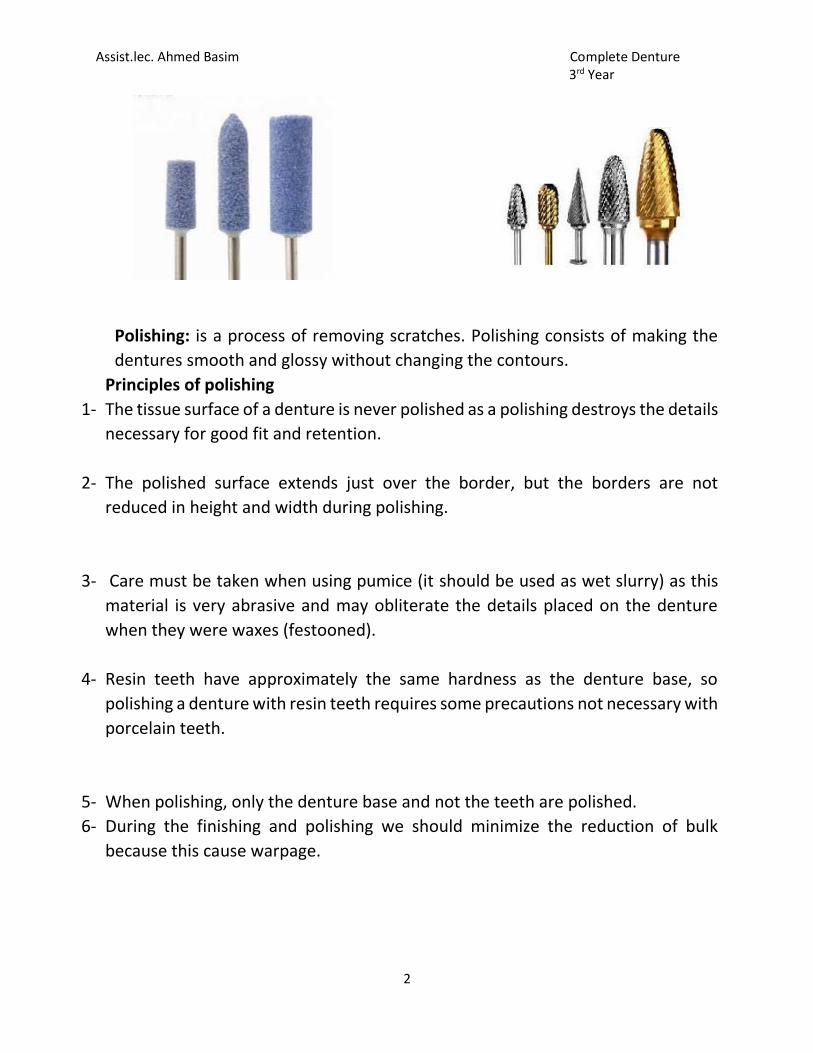
Assist.lec. Ahmed Basim Complete Denture 3rd Year
2
Polishing: is a process of removing scratches. Polishing consists of making the
dentures smooth and glossy without changing the contours.
Principles of polishing
1- The tissue surface of a denture is never polished as a polishing destroys the details
necessary for good fit and retention.
2- The polished surface extends just over the border, but the borders are not
reduced in height and width during polishing.
3- Care must be taken when using pumice (it should be used as wet slurry) as this
material is very abrasive and may obliterate the details placed on the denture
when they were waxes (festooned).
4- Resin teeth have approximately the same hardness as the denture base, so
polishing a denture with resin teeth requires some precautions not necessary with
porcelain teeth.
5- When polishing, only the denture base and not the teeth are polished.
6- During the finishing and polishing we should minimize the reduction of bulk
because this cause warpage.
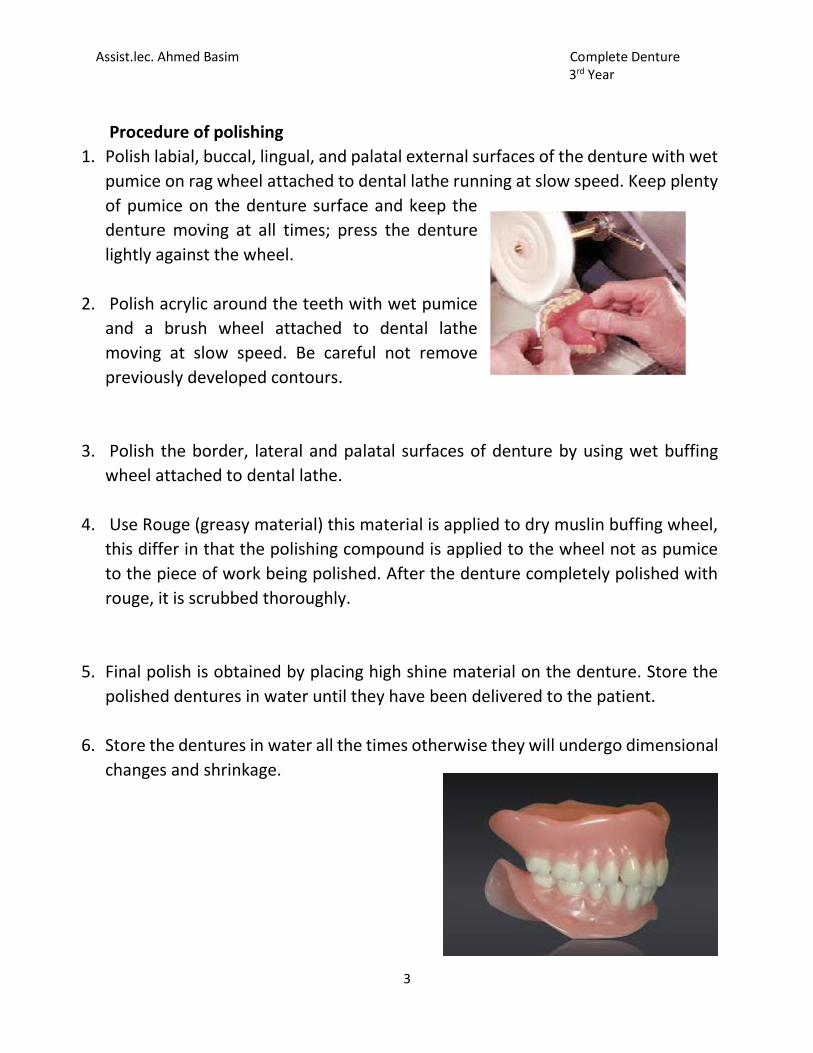
Assist.lec. Ahmed Basim Complete Denture 3rd Year
3
Procedure of polishing
1. Polish labial, buccal, lingual, and palatal external surfaces of the denture with wet
pumice on rag wheel attached to dental lathe running at slow speed. Keep plenty
of pumice on the denture surface and keep the
denture moving at all times; press the denture
lightly against the wheel.
2. Polish acrylic around the teeth with wet pumice
and a brush wheel attached to dental lathe
moving at slow speed. Be careful not remove
previously developed contours.
3. Polish the border, lateral and palatal surfaces of denture by using wet buffing
wheel attached to dental lathe.
4. Use Rouge (greasy material) this material is applied to dry muslin buffing wheel,
this differ in that the polishing compound is applied to the wheel not as pumice
to the piece of work being polished. After the denture completely polished with
rouge, it is scrubbed thoroughly.
5. Final polish is obtained by placing high shine material on the denture. Store the
polished dentures in water until they have been delivered to the patient.
6. Store the dentures in water all the times otherwise they will undergo dimensional
changes and shrinkage.
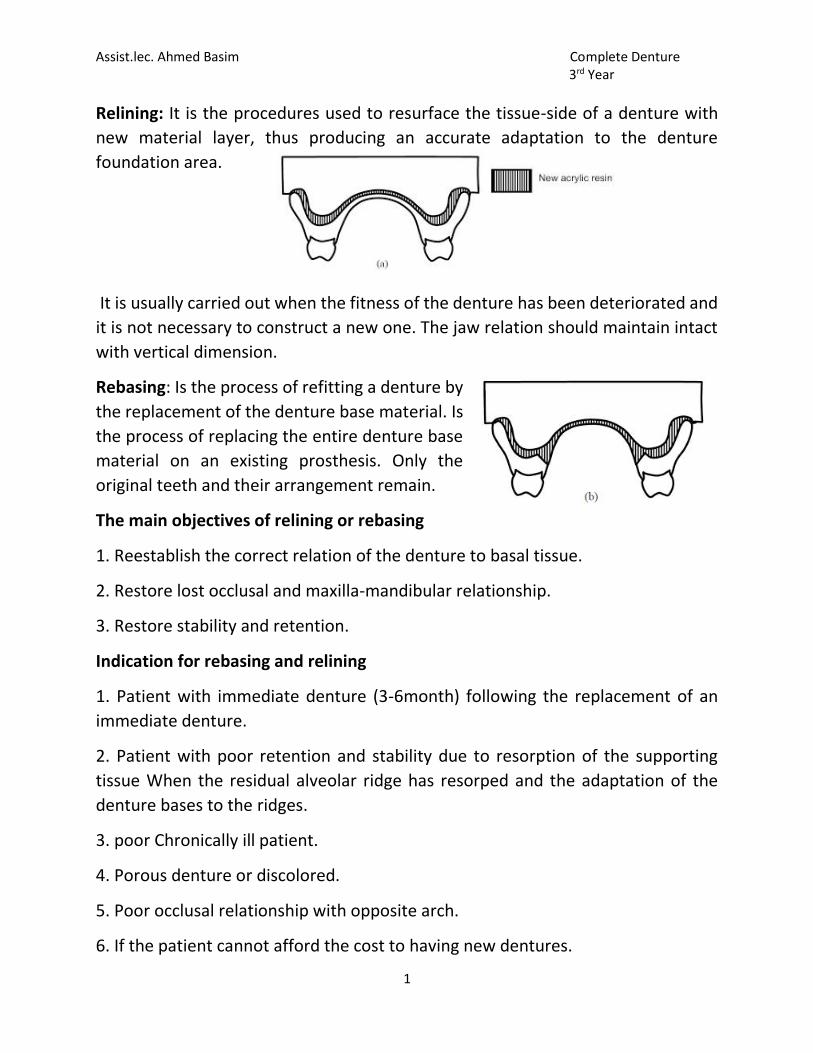
Assist.lec. Ahmed Basim Complete Denture 3rd Year
1
Relining: It is the procedures used to resurface the tissue-side of a denture with
new material layer, thus producing an accurate adaptation to the denture
foundation area.
It is usually carried out when the fitness of the denture has been deteriorated and
it is not necessary to construct a new one. The jaw relation should maintain intact
with vertical dimension.
Rebasing: Is the process of refitting a denture by
the replacement of the denture base material. Is
the process of replacing the entire denture base
material on an existing prosthesis. Only the
original teeth and their arrangement remain.
The main objectives of relining or rebasing
1. Reestablish the correct relation of the denture to basal tissue.
2. Restore lost occlusal and maxilla-mandibular relationship.
3. Restore stability and retention.
Indication for rebasing and relining
1. Patient with immediate denture (3-6month) following the replacement of an
immediate denture.
2. Patient with poor retention and stability due to resorption of the supporting
tissue When the residual alveolar ridge has resorped and the adaptation of the
denture bases to the ridges.
3. poor Chronically ill patient.
4. Porous denture or discolored.
5. Poor occlusal relationship with opposite arch.
6. If the patient cannot afford the cost to having new dentures.
Assist.lec. Ahmed Basim Complete Denture 3rd Year
2
Contra indication
1. If the dentures have poor esthetic or unsatisfactory jaw relationship.
2. When an excessive amount of resorption has taken place making it difficult to
Position the denture properly on the ridge.
3. If the dentures create a major Speech problem due to in correct vertical
dimension.
4. When abused soft tissue are present. The relining is delayed until the tissues
recover and return as closely as possible to normal form.
Advantage of the reline and rebasing
1-Economical for the patient.
2-Improve fit of the denture
Disadvantage
1. Cannot correct occlusal or jaw relation.
2. Cannot correct occlusal arrangement.
3. Cannot be used when excessive resorption has occurred.
4. Likelihood of altering the jaw relationship during the process.
Materials used in relining and rebasing
1-PMMA Heat cured acrylic resin. Cold cured acrylic resin.
2-Modification of PMMA. -Butyl meth acrylate.
3-Soft liners\tissue conditioners.
Procedure of relining
There are two methods for relining
1. Direct (chair side): its done inside clinic by cold cure acrylic.
2. In direct (laboratory).

Assist.lec. Ahmed Basim Complete Denture 3rd Year
3
Procedure of indirect relining
1. The fitting surface is cleaned, the undercuts are removed and the flanges are
shortened.
2. Minor defects and extensions can be corrected.
3. A wash impression by zinc oxide eugenol is making with the old denture, with
the patient in light occlusal contact……..(This three steps done inside clinic)
Labrotory work
1. The denture and the cast are not
separated, but any excess
impression on the teeth or facial
surfaces of the base is removed,
then the denture flasked in the usual
manner.
2. Beading and boxing of the
impression, then pouring the boxed
impression with stone material.
3. (Zinc oxide eugenol) elimination in hot water for 5 minutes; then separated and
all the impression material is cleaned from the cast and the denture base.
4. Painting the cast with a separating medium.
5. Paint the surface of the denture with cotton pellet moistened with monomer.
6. Mix the heat acrylic resin and place it in the flask (the new relining material
should be compatible with the old denture base material chemically and
esthetically).
7. Curing the heat cured resin.
8. The denture deflasked and the cast removed from the denture then finish and
polish the denture; the relined denture is ready to be inserted in the patient mouth.

Assist.lec. Ahmed Basim Complete Denture 3rd Year
4
Rebasing procedure
Rebasing procedure is the same as those for relining with some differences:
1. Impression is made and a cast is poured in the denture as in relining procedure.
2. The denture with the cast is mounted on an instrument as Hooper duplicator or
Hanau articulator with mounting jig that maintains the relationship of teeth to the
cast.
3. The old denture base is cut and removed.
4. The original teeth are re-waxed in their previous positions on the cast.
5. The denture is then processed in the laboratory as for relining.
6 The denture deflasked and the cast removed from the denture then finished and
polish the denture; the rebased denture is ready to be inserted in the patient
mouth.
Related Documents


