Assessment Specialist Portal User Guide Page 1 Assessment Specialist Portal User Guide

Welcome message from author
This document is posted to help you gain knowledge. Please leave a comment to let me know what you think about it! Share it to your friends and learn new things together.
Transcript

Assessment Specialist Portal User Guide Page 1
Assessment Specialist
Portal User Guide
Assessment Specialist Portal User Guide Page 2
Contents Overview ................................................................................................................................................. 3
How to log in & navigate around the portal ........................................................................................... 4
Amending your profile details .............................................................................................................. 11
How to edit your profile picture ....................................................................................................... 11
How to update your personal information ....................................................................................... 15
How to update your additional contact number .............................................................................. 18
How to add and update your email addresses ................................................................................. 21
How to update your willingness to travel, passport details & next of kin ........................................ 23
How to update your employment history ........................................................................................ 26
How to update your higher education .............................................................................................. 29
How to update your additional languages ........................................................................................ 32
Add & update your attached documents ......................................................................................... 35
How to update your relevant experience ......................................................................................... 38
How to update any conflicts of interest ........................................................................................... 41
Viewing your training details, product capabilities & commission details ....................................... 44
How to update your permanent address – UK ..................................................................................... 46
How to update your permanent address – Non-UK ............................................................................. 49
How to update your temporary address – UK ...................................................................................... 52
How to update your temporary address – Non-UK .............................................................................. 55
How to update your bank account details – UK ................................................................................... 58
How to enter your unavailability .......................................................................................................... 60
How to update your unavailability ........................................................................................................ 63
How to enter repeat unavailability ....................................................................................................... 65
How to delete your unavailability ......................................................................................................... 67
Assessment Specialist Portal User Guide Page 3
Overview This portal has been designed to help and support you, the Assessment Specialist. The portal will enable you to keep your details up to date and let Cambridge Assessment know when you are unavailable for work.
We hope you find the Portal useful and that it supports you in your role as an Assessment Specialist (AS) with Cambridge Assessment.
Assessment Specialist Portal User Guide Page 4
How to log in & navigate around the portal Browser & Device Compatibility The Assessment Specialist (AS) Portal is compatible with the following browsers;
• Internet Explorer 8 (Vista / Windows 7) • Internet Explorer 9 (Vista) • Internet Explorer 10 (Windows 2012) • Mozilla Firefox (Vista / Windows 7&8) • Google Chrome Safari (only supported with Mac Systems)
The AS Portal is only compatible with a Desktop. The AS Portal will be accessible via mobile devices (e.g. Android, Apple, and IOS) however; it will only be shown with a desktop view (e.g. a normal website) and not with mobile compatibility (e.g. similar to a mobile app). You will receive an email containing the link to the AS Portal. This section details how to login to the AS Portal. You will be presented with the AS Portal home page when you login using your AS ID and password. Your AS ID is your 6 digit Cambridge Assessment creditor ID. If the portal registration link has expired, you can click on the Forgotten Password link, enter your email address and you will be sent a link to reset your password. After resetting the password you can login with your Assessment Specialist ID and the new password.
If your login details are entered incorrectly three times you will be locked out of the Portal for 30 minutes, an error message is displayed to this effect. If you are logged on to the Portal and are inactive for 30 minutes, the Portal will automatically log you out in which case you will need to login again to continue working. Assessment Specialist Portal Logon Password Policy The portal will request that you change your password every 3 months. Your password must follow the rules outlined below;
• Must be a minimum length of 8 characters and a maximum of 14 characters
• Must contain mixed case letters
• Must contain alphanumeric characters
• Must contain at least one special character e.g. *,!, >
• You will be unable to use the last previous password used
Assessment Specialist Portal User Guide Page 5
Fields marked with a * red asterisk within the portal are mandatory and must be completed to continue or to save any updates.
Note: Many fields are visible to add/change details if needed, however you will not be required to use most of the fields. In this case you can leave the fields blank.
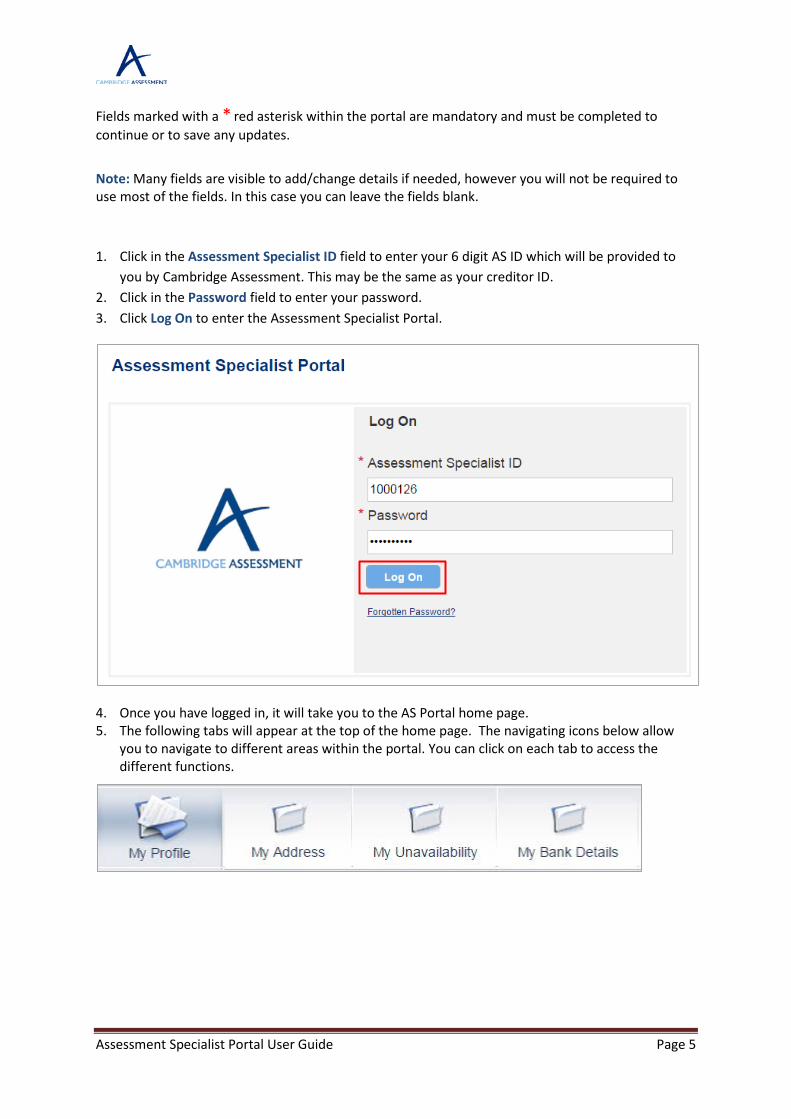
1. Click in the Assessment Specialist ID field to enter your 6 digit AS ID which will be provided to
you by Cambridge Assessment. This may be the same as your creditor ID. 2. Click in the Password field to enter your password. 3. Click Log On to enter the Assessment Specialist Portal.
4. Once you have logged in, it will take you to the AS Portal home page. 5. The following tabs will appear at the top of the home page. The navigating icons below allow
you to navigate to different areas within the portal. You can click on each tab to access the different functions.
Assessment Specialist Portal User Guide Page 6
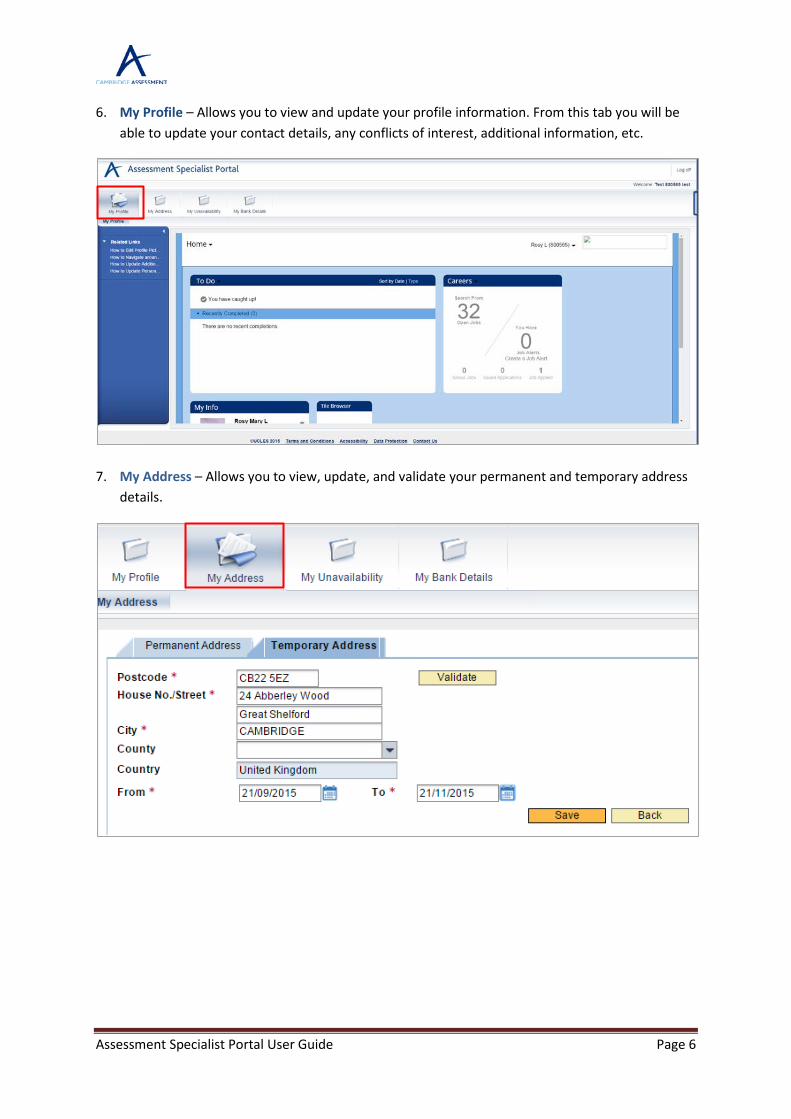
6. My Profile – Allows you to view and update your profile information. From this tab you will be able to update your contact details, any conflicts of interest, additional information, etc.
7. My Address – Allows you to view, update, and validate your permanent and temporary address
details.
Assessment Specialist Portal User Guide Page 7
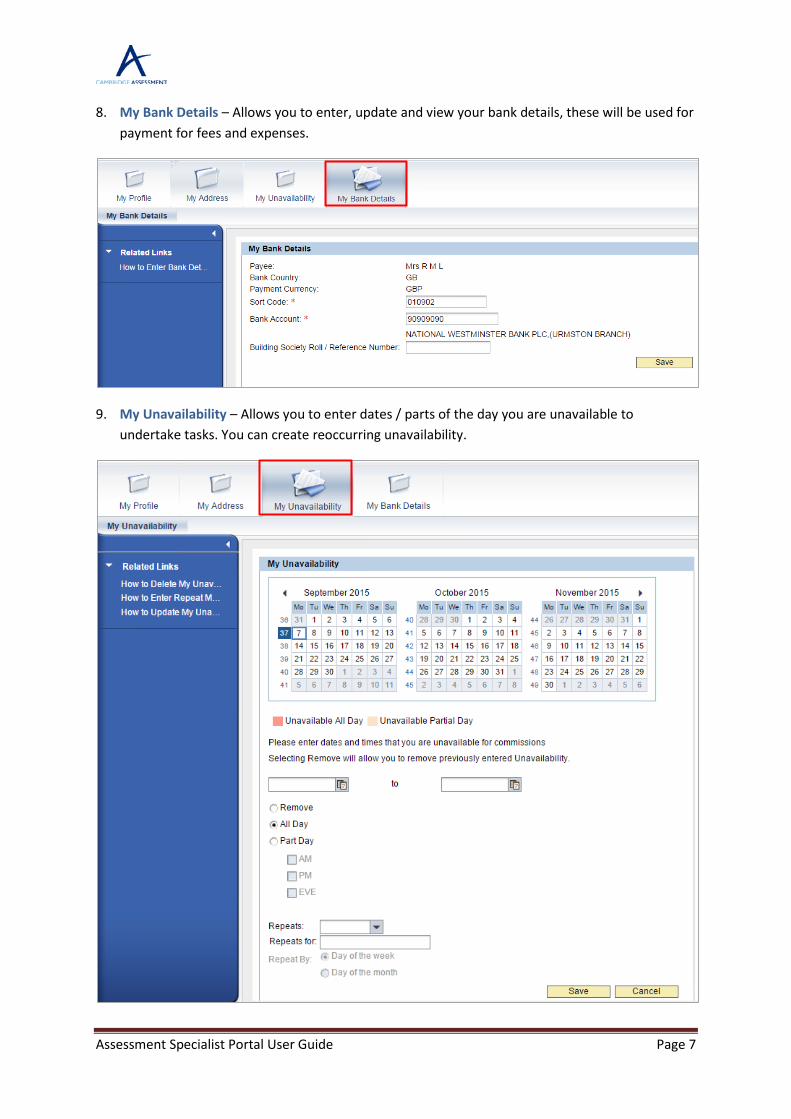
8. My Bank Details – Allows you to enter, update and view your bank details, these will be used for payment for fees and expenses.
9. My Unavailability – Allows you to enter dates / parts of the day you are unavailable to undertake tasks. You can create reoccurring unavailability.
Assessment Specialist Portal User Guide Page 8
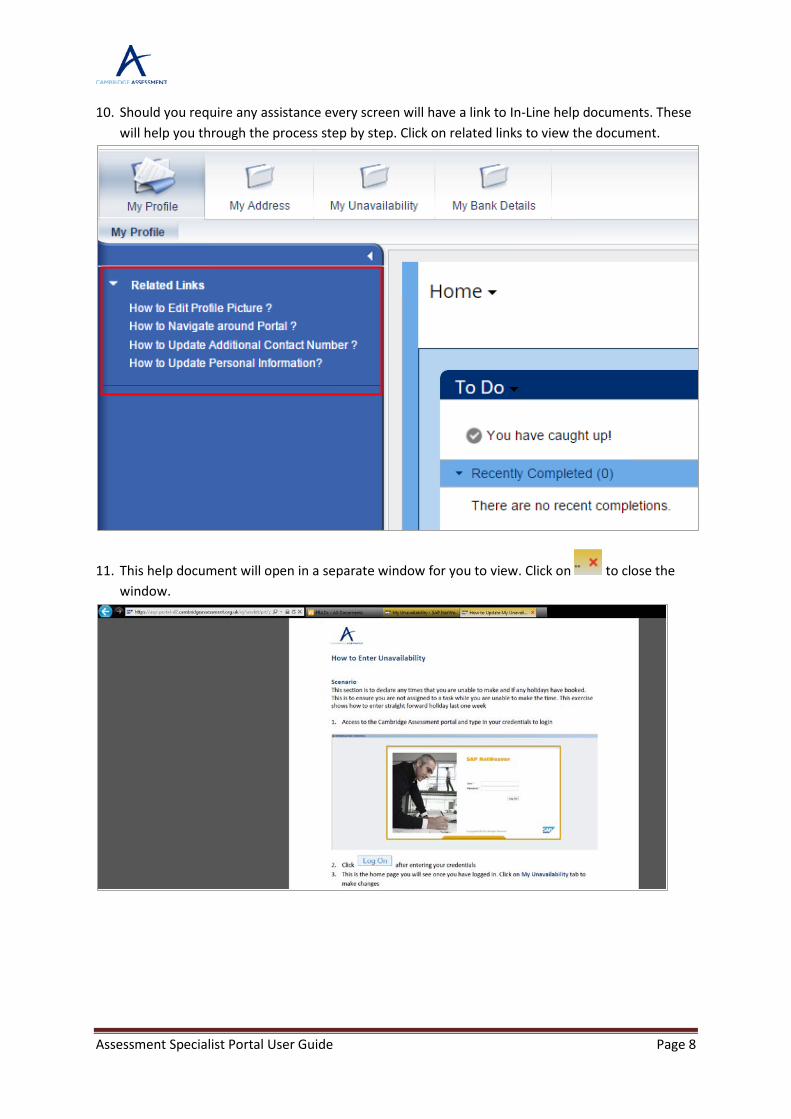
10. Should you require any assistance every screen will have a link to In-Line help documents. These will help you through the process step by step. Click on related links to view the document.
11. This help document will open in a separate window for you to view. Click on to close the window.
Assessment Specialist Portal User Guide Page 9
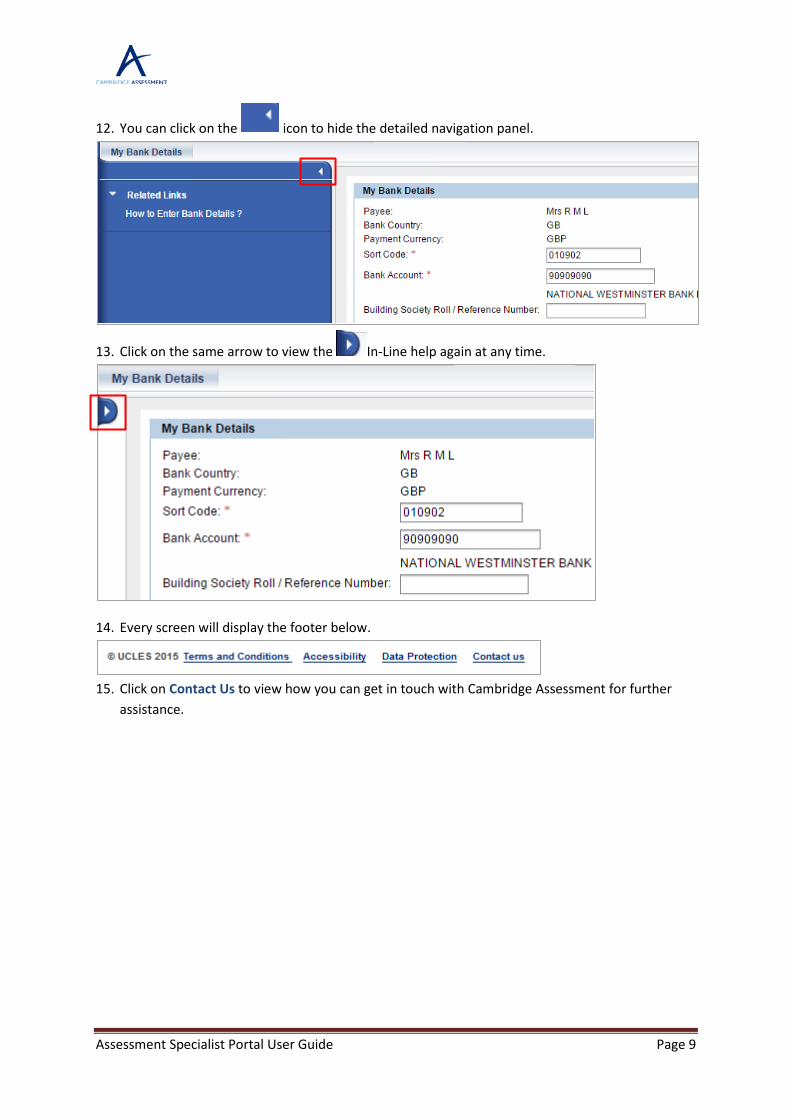
12. You can click on the icon to hide the detailed navigation panel.
13. Click on the same arrow to view the In-Line help again at any time.
14. Every screen will display the footer below.
15. Click on Contact Us to view how you can get in touch with Cambridge Assessment for further
assistance.
Assessment Specialist Portal User Guide Page 10
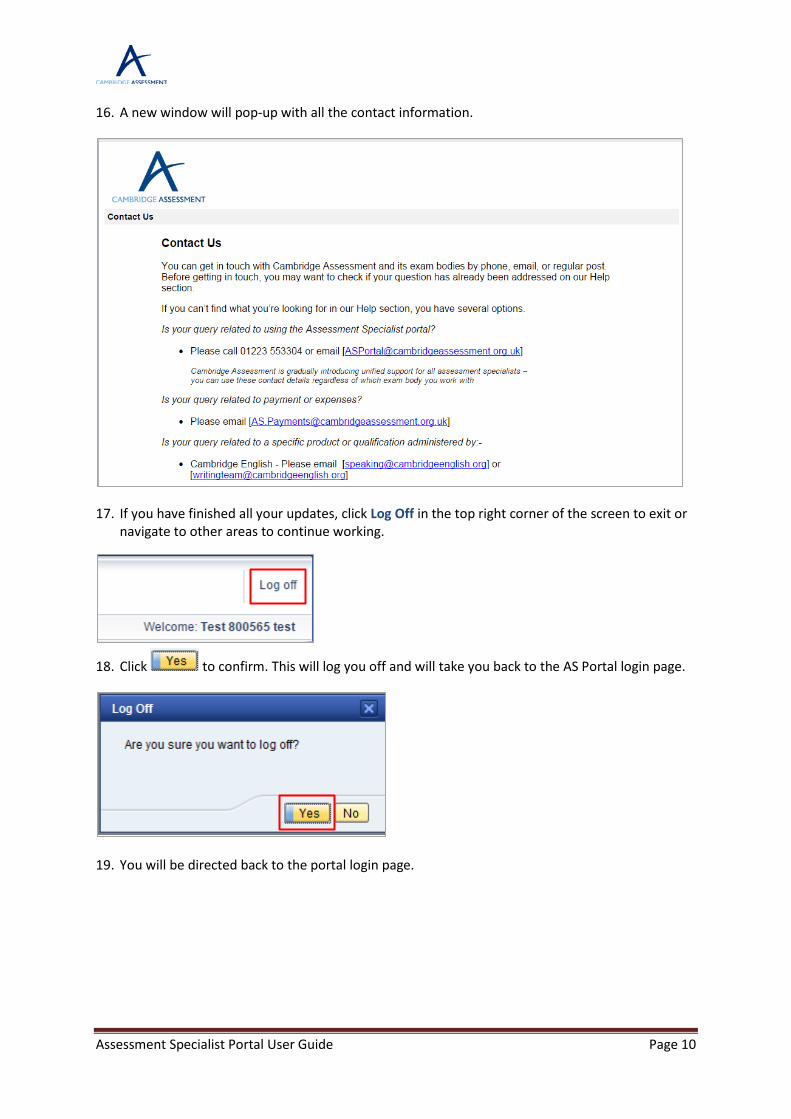
16. A new window will pop-up with all the contact information.
17. If you have finished all your updates, click Log Off in the top right corner of the screen to exit or navigate to other areas to continue working.
18. Click to confirm. This will log you off and will take you back to the AS Portal login page.
19. You will be directed back to the portal login page.
Assessment Specialist Portal User Guide Page 11
Amending your profile details
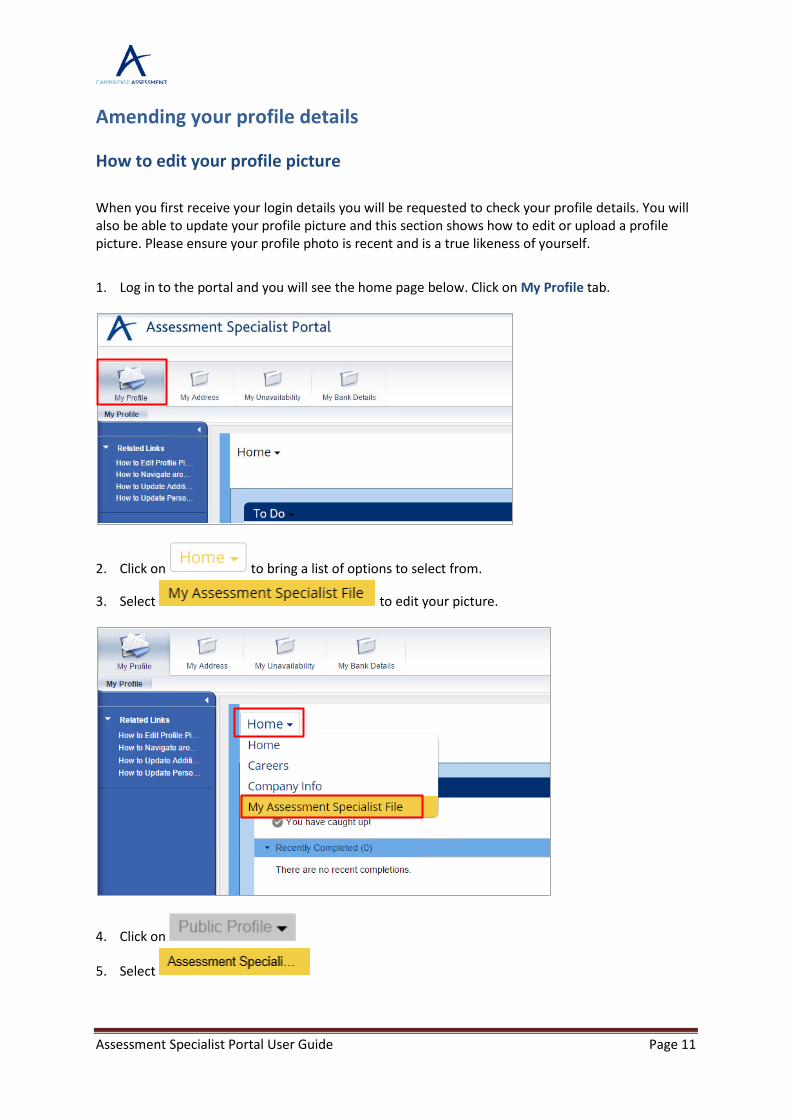
How to edit your profile picture When you first receive your login details you will be requested to check your profile details. You will also be able to update your profile picture and this section shows how to edit or upload a profile picture. Please ensure your profile photo is recent and is a true likeness of yourself.
1. Log in to the portal and you will see the home page below. Click on My Profile tab.
2. Click on to bring a list of options to select from.
3. Select to edit your picture.
4. Click on
5. Select
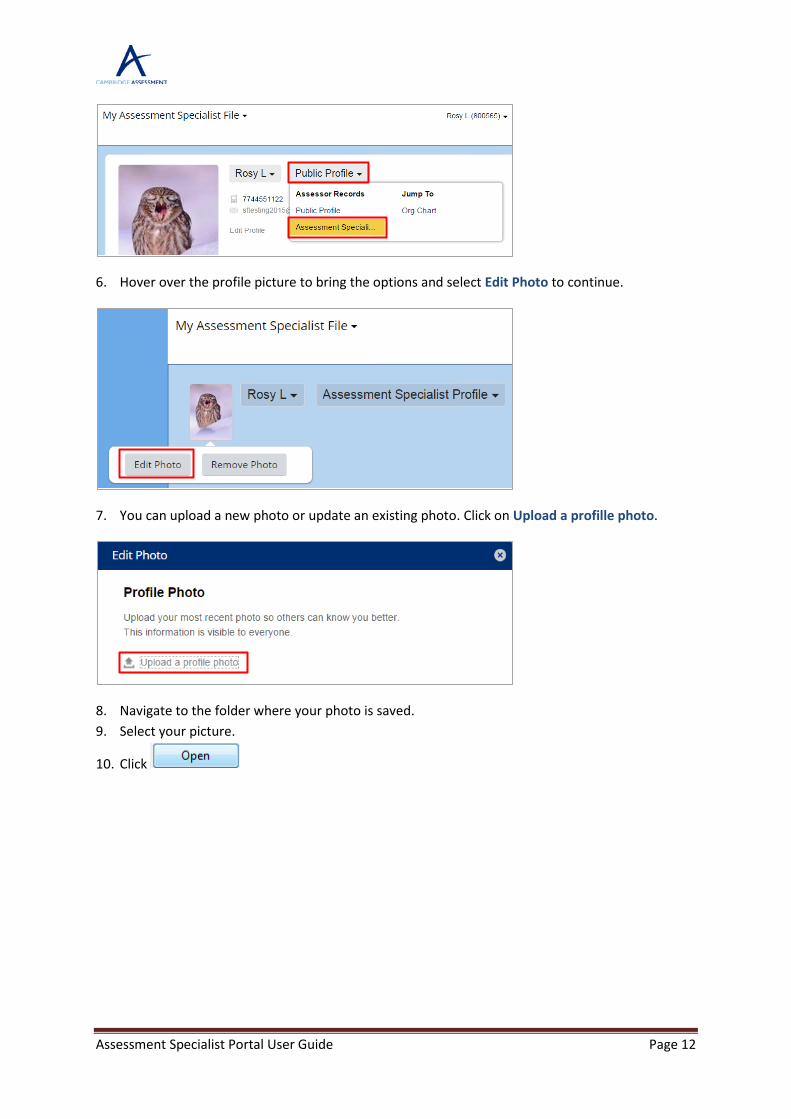
Assessment Specialist Portal User Guide Page 12
6. Hover over the profile picture to bring the options and select Edit Photo to continue.
7. You can upload a new photo or update an existing photo. Click on Upload a profille photo.
8. Navigate to the folder where your photo is saved. 9. Select your picture.
10. Click
Assessment Specialist Portal User Guide Page 13
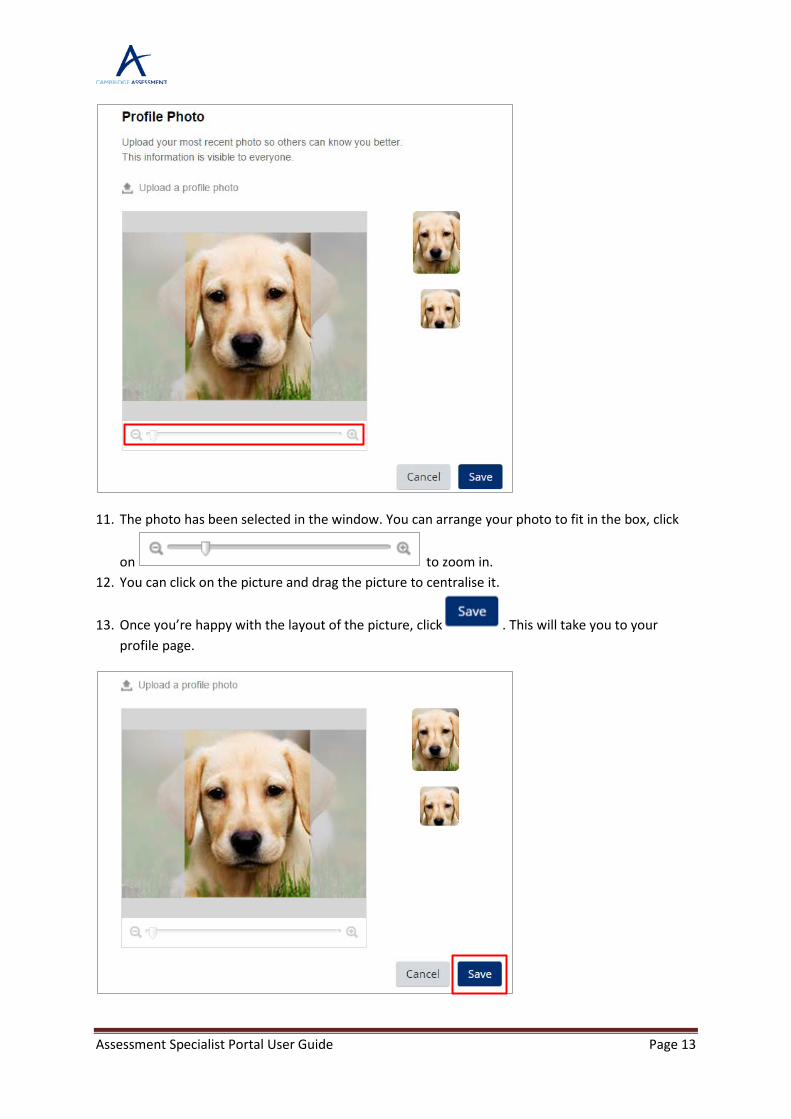
11. The photo has been selected in the window. You can arrange your photo to fit in the box, click
on to zoom in. 12. You can click on the picture and drag the picture to centralise it.
13. Once you’re happy with the layout of the picture, click . This will take you to your profile page.
Assessment Specialist Portal User Guide Page 14
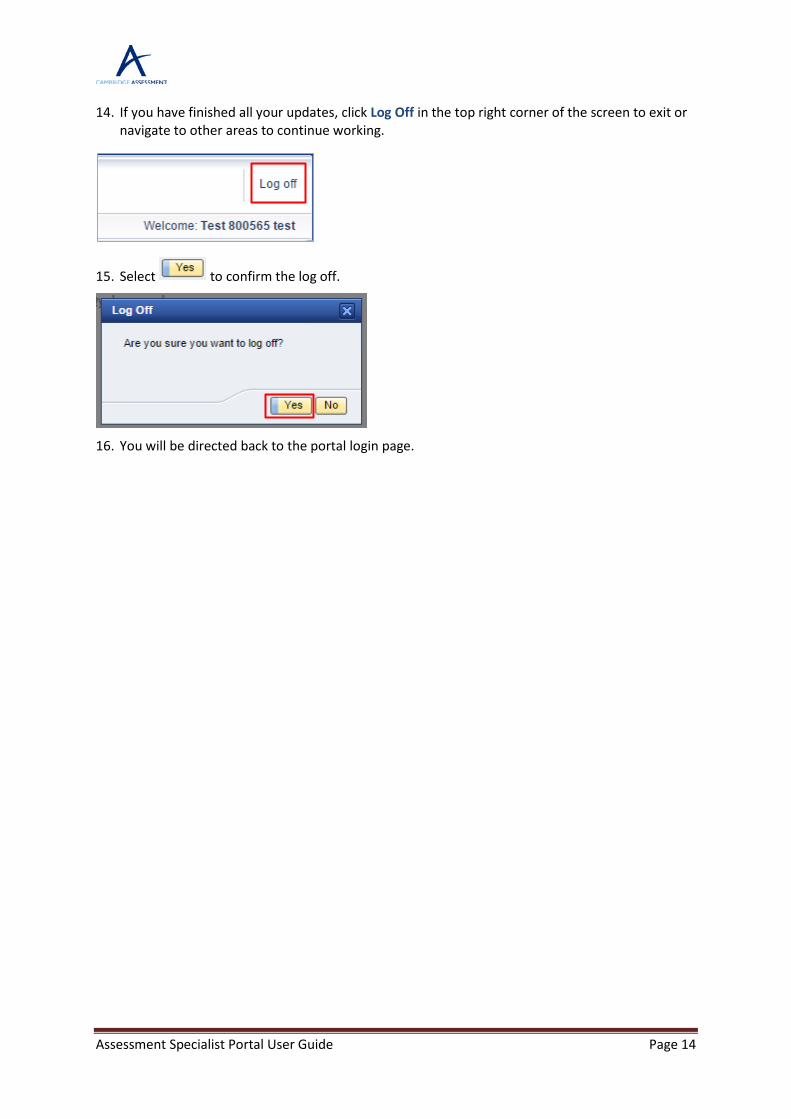
14. If you have finished all your updates, click Log Off in the top right corner of the screen to exit or navigate to other areas to continue working.
15. Select to confirm the log off.
16. You will be directed back to the portal login page.
Assessment Specialist Portal User Guide Page 15
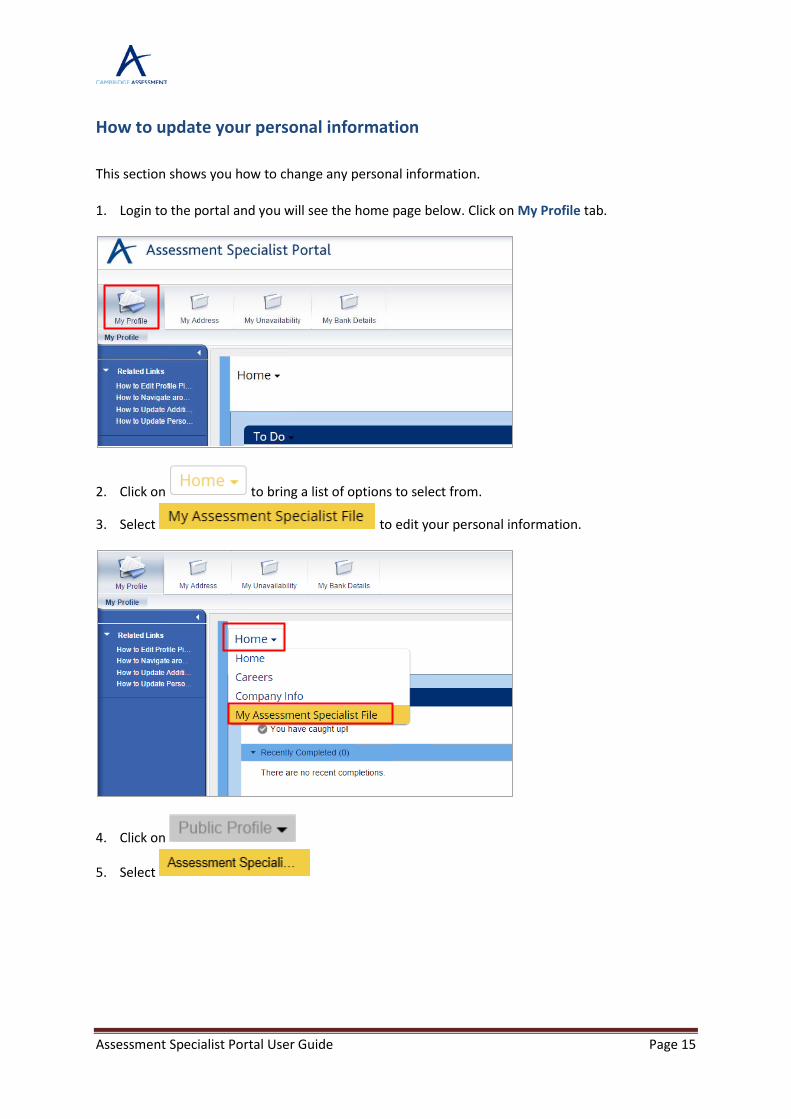
How to update your personal information This section shows you how to change any personal information.
1. Login to the portal and you will see the home page below. Click on My Profile tab.
2. Click on to bring a list of options to select from.
3. Select to edit your personal information.
4. Click on
5. Select

Assessment Specialist Portal User Guide Page 16
6. To update your personal information click on Personal Information.
7. All fields marked with (*) asterisks are mandatory and must be completed in order to save.
8. Complete the necessary field within the section and click to make the changes. If any mandatory fields have not been completed you will see an error message.
9. If you have finished all your updates, click Log Off in the top right corner of the screen to exit or navigate to other areas to continue working.

Assessment Specialist Portal User Guide Page 17
10. Select to confirm the log off.
11. You will be directed to the AS portal login page.

Assessment Specialist Portal User Guide Page 18
How to update your additional contact number This section shows you how to input or change an additional contact telephone number.
1. Login to the portal and you will see the home page below. Click on My Profile tab.
2. Click on to bring a list of options to select from.
3. Select to edit your additional contact number.
4. Click on
5. Select

Assessment Specialist Portal User Guide Page 19
6. Scroll down the page to Additional contact number and click
7. You can update your additional contact number or add another contact number. Click on
Add a row icon to enable the fields.
8. Complete the following fields under the Additional contact number section to continue.
• Phone type – select the type of number i.e. Home phone, work phone or mobile.
• Country Code – this field is mandatory and you need to enter the country code.
• Area Code – this is a default field and should only be completed if you have selected 'Landline' or 'Work phone' option.
• Phone number – enter your phone number in the field.
• Extension – enter an extension number, if applicable.
• Last Modified_CON – this field is automatically updated showing the history when the field was last updated.
9. Click to keep your changes.
10. If you have finished all your updates, click Log Off in the top right corner of the screen to exit or navigate to other areas to continue working.
11. Select to confirm the log off.
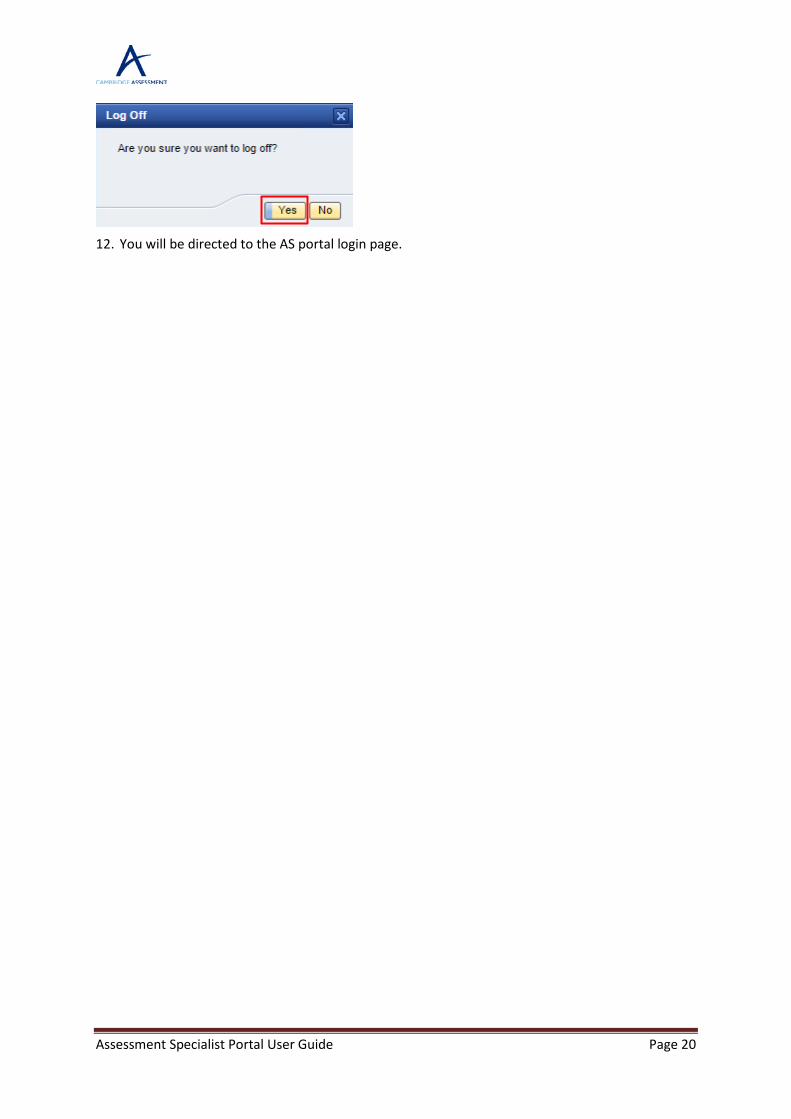
Assessment Specialist Portal User Guide Page 20
12. You will be directed to the AS portal login page.

Assessment Specialist Portal User Guide Page 21
How to add and update your email addresses This section shows how to add and update your email addresses.
1. Login to the portal and you will see the home page below. Click on My Profile tab.
2. Click on to bring a list of options to select from.
3. Select to edit your email address.
4. Click on
5. Select
Assessment Specialist Portal User Guide Page 22
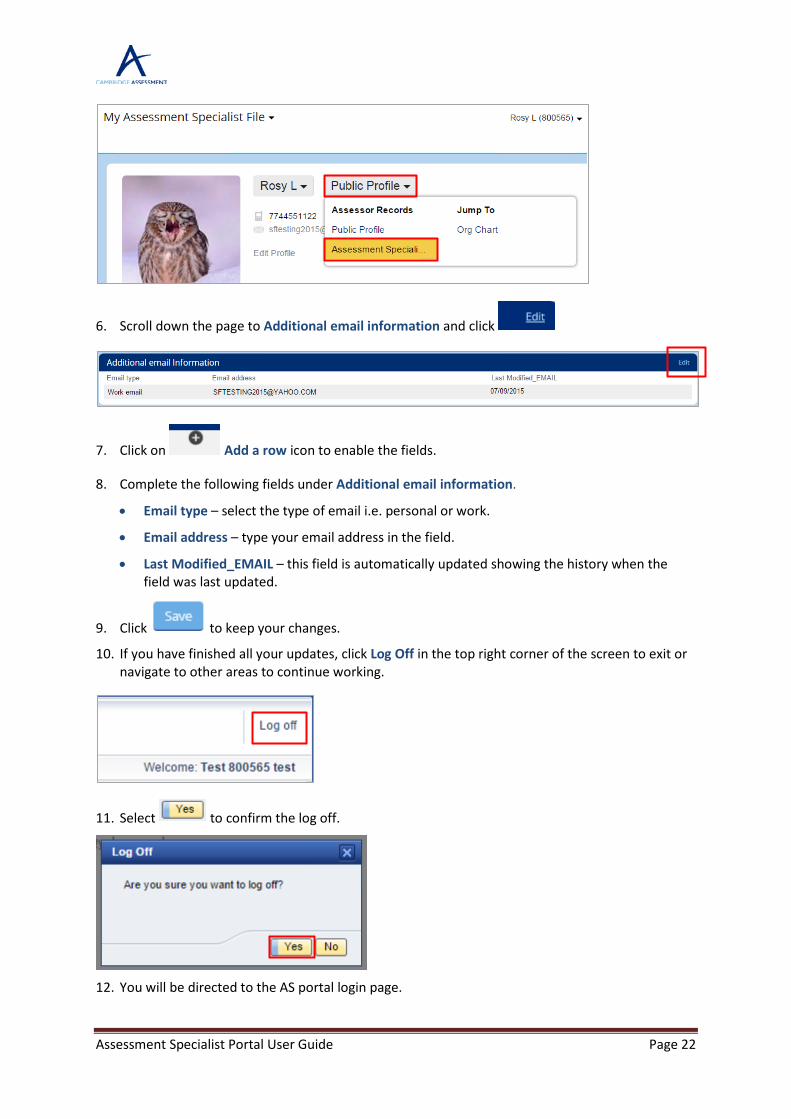
6. Scroll down the page to Additional email information and click
7. Click on Add a row icon to enable the fields.
8. Complete the following fields under Additional email information.
• Email type – select the type of email i.e. personal or work.
• Email address – type your email address in the field.
• Last Modified_EMAIL – this field is automatically updated showing the history when the field was last updated.
9. Click to keep your changes.
10. If you have finished all your updates, click Log Off in the top right corner of the screen to exit or navigate to other areas to continue working.
11. Select to confirm the log off.
12. You will be directed to the AS portal login page.
Assessment Specialist Portal User Guide Page 23
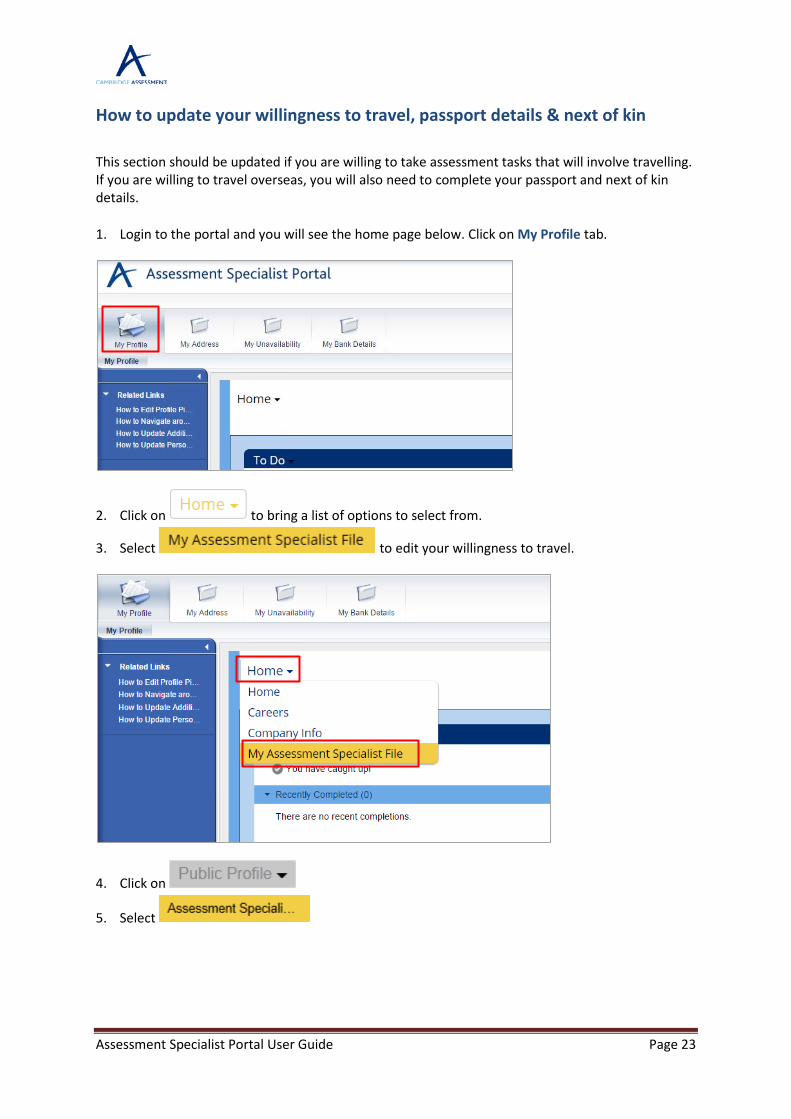
How to update your willingness to travel, passport details & next of kin This section should be updated if you are willing to take assessment tasks that will involve travelling. If you are willing to travel overseas, you will also need to complete your passport and next of kin details.
1. Login to the portal and you will see the home page below. Click on My Profile tab.
2. Click on to bring a list of options to select from.
3. Select to edit your willingness to travel.
4. Click on
5. Select
Assessment Specialist Portal User Guide Page 24
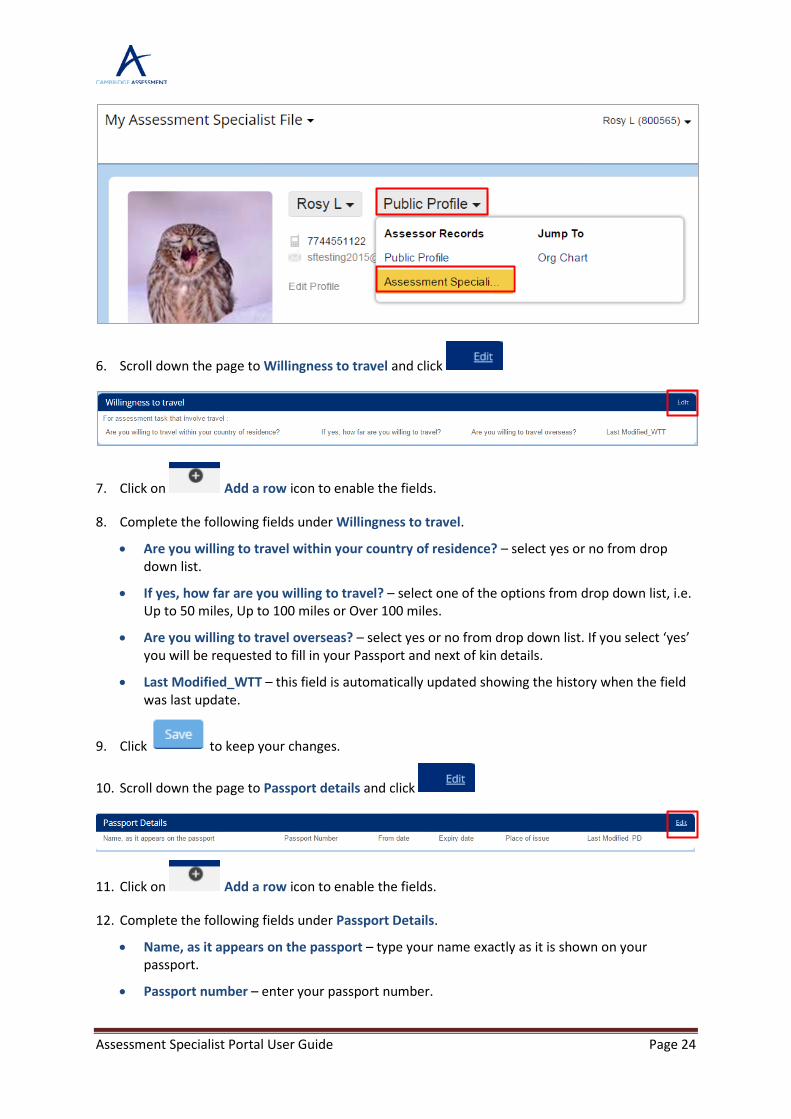
6. Scroll down the page to Willingness to travel and click
7. Click on Add a row icon to enable the fields.
8. Complete the following fields under Willingness to travel.
• Are you willing to travel within your country of residence? – select yes or no from drop down list.
• If yes, how far are you willing to travel? – select one of the options from drop down list, i.e. Up to 50 miles, Up to 100 miles or Over 100 miles.
• Are you willing to travel overseas? – select yes or no from drop down list. If you select ‘yes’ you will be requested to fill in your Passport and next of kin details.
• Last Modified_WTT – this field is automatically updated showing the history when the field was last update.
9. Click to keep your changes.
10. Scroll down the page to Passport details and click
11. Click on Add a row icon to enable the fields.
12. Complete the following fields under Passport Details.
• Name, as it appears on the passport – type your name exactly as it is shown on your passport.
• Passport number – enter your passport number.
Assessment Specialist Portal User Guide Page 25
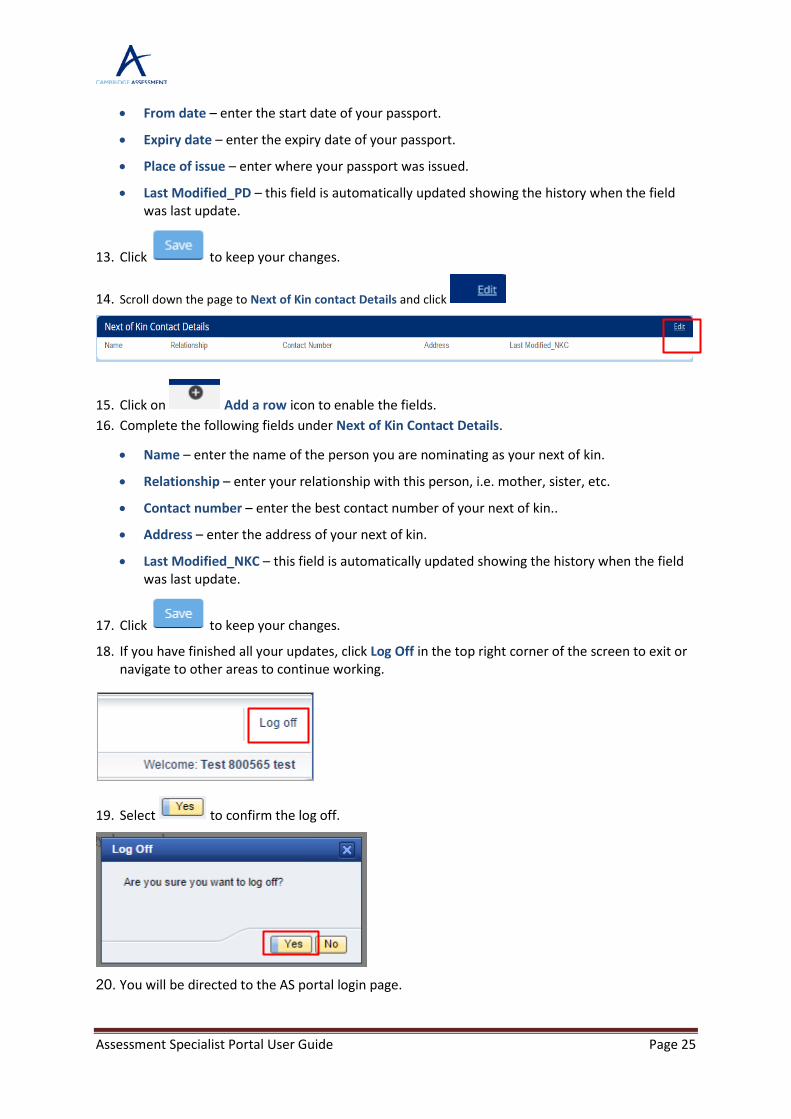
• From date – enter the start date of your passport.
• Expiry date – enter the expiry date of your passport.
• Place of issue – enter where your passport was issued.
• Last Modified_PD – this field is automatically updated showing the history when the field was last update.
13. Click to keep your changes.
14. Scroll down the page to Next of Kin contact Details and click
15. Click on Add a row icon to enable the fields. 16. Complete the following fields under Next of Kin Contact Details.
• Name – enter the name of the person you are nominating as your next of kin.
• Relationship – enter your relationship with this person, i.e. mother, sister, etc.
• Contact number – enter the best contact number of your next of kin..
• Address – enter the address of your next of kin.
• Last Modified_NKC – this field is automatically updated showing the history when the field was last update.
17. Click to keep your changes.
18. If you have finished all your updates, click Log Off in the top right corner of the screen to exit or navigate to other areas to continue working.
19. Select to confirm the log off.
20. You will be directed to the AS portal login page.

Assessment Specialist Portal User Guide Page 26
How to update your employment history Within your profile there is an employment history section. You can add as many rows as you require to for each employment history and this section shows exactly how to add employment history information. This information could be used when deciding which task you can undertake.
1. Login to the portal and you will see the home page below. Click on My Profile tab.
2. Click on to bring a list of options to select from.
3. Select to edit your employment history.
4. Click on
5. Select
Assessment Specialist Portal User Guide Page 27
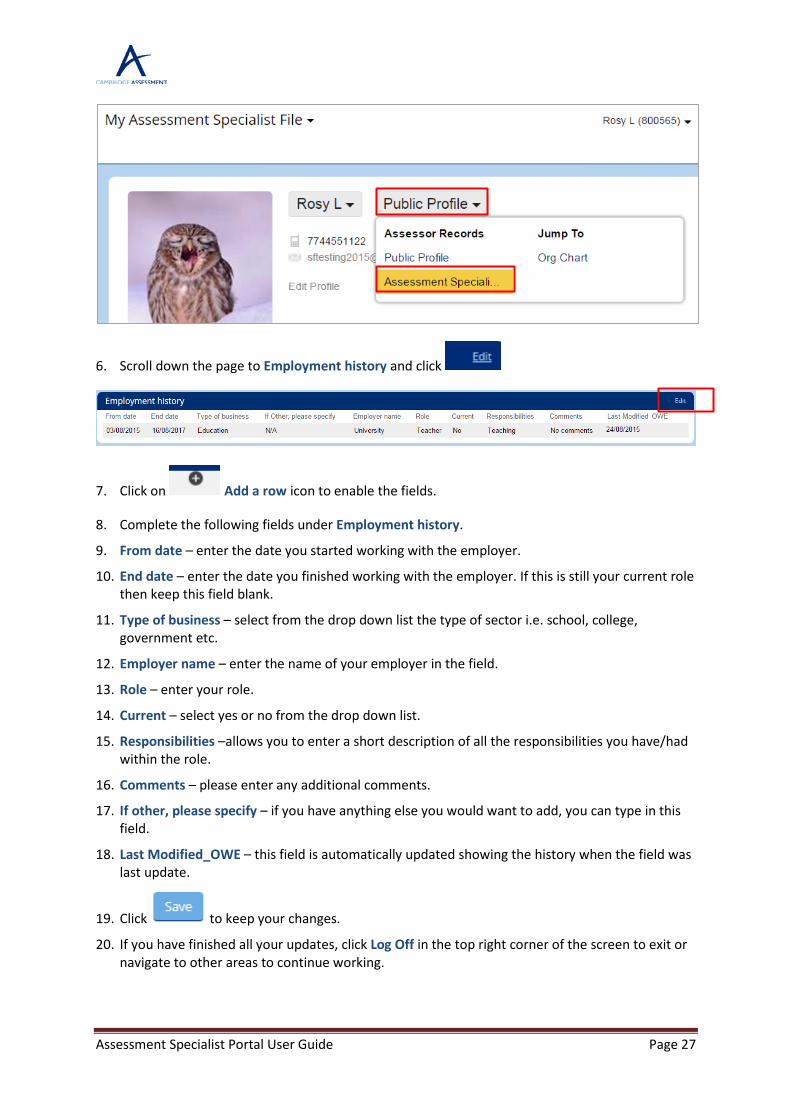
6. Scroll down the page to Employment history and click
7. Click on Add a row icon to enable the fields.
8. Complete the following fields under Employment history.
9. From date – enter the date you started working with the employer.
10. End date – enter the date you finished working with the employer. If this is still your current role then keep this field blank.
11. Type of business – select from the drop down list the type of sector i.e. school, college, government etc.
12. Employer name – enter the name of your employer in the field.
13. Role – enter your role.
14. Current – select yes or no from the drop down list.
15. Responsibilities –allows you to enter a short description of all the responsibilities you have/had within the role.
16. Comments – please enter any additional comments.
17. If other, please specify – if you have anything else you would want to add, you can type in this field.
18. Last Modified_OWE – this field is automatically updated showing the history when the field was last update.
19. Click to keep your changes.
20. If you have finished all your updates, click Log Off in the top right corner of the screen to exit or navigate to other areas to continue working.

Assessment Specialist Portal User Guide Page 28
21. Select to confirm the log off.
22. You will be directed to the AS portal login page.

Assessment Specialist Portal User Guide Page 29
How to update your higher education You must complete your Higher Education as it is a mandatory section. You can add multiple rows to enter the information. This information could be used when deciding which tasks you can undertake.
1. Login to the portal and you will see the home page below. Click on My Profile tab.
2. Click on to bring a list of options to select from.
3. Select to edit your higher education.
4. Click on
5. Select
Assessment Specialist Portal User Guide Page 30
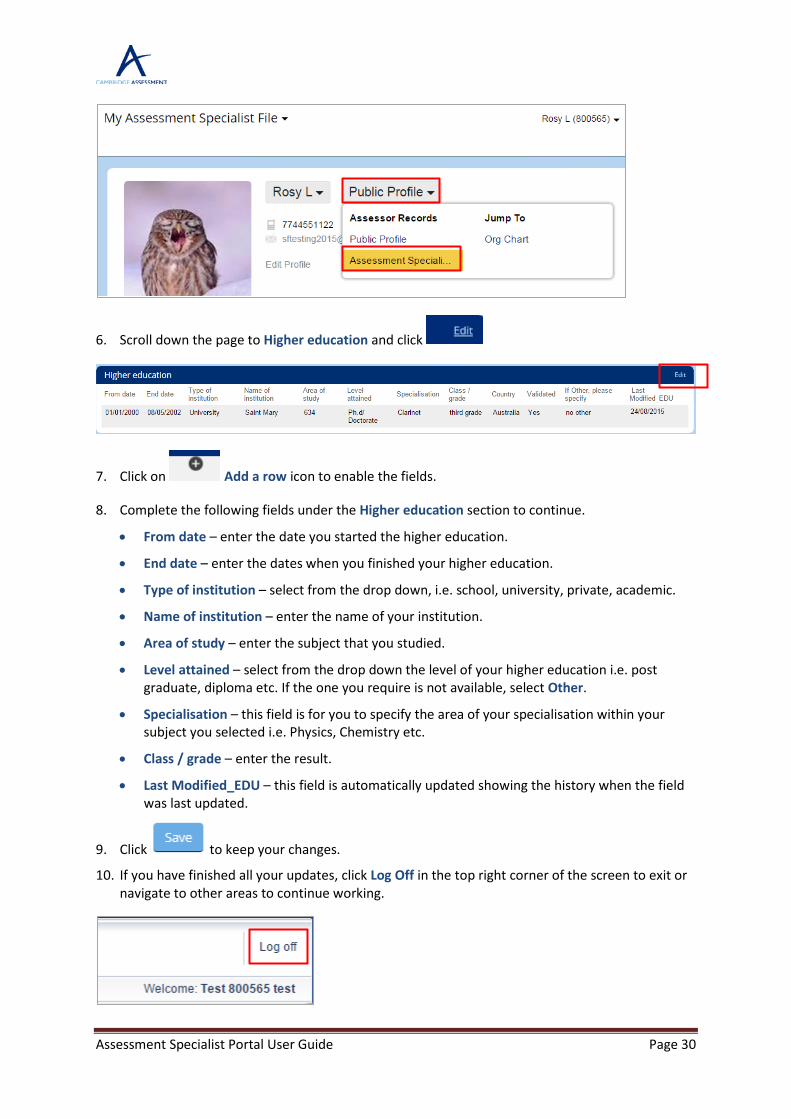
6. Scroll down the page to Higher education and click
7. Click on Add a row icon to enable the fields.
8. Complete the following fields under the Higher education section to continue.
• From date – enter the date you started the higher education.
• End date – enter the dates when you finished your higher education.
• Type of institution – select from the drop down, i.e. school, university, private, academic.
• Name of institution – enter the name of your institution.
• Area of study – enter the subject that you studied.
• Level attained – select from the drop down the level of your higher education i.e. post graduate, diploma etc. If the one you require is not available, select Other.
• Specialisation – this field is for you to specify the area of your specialisation within your subject you selected i.e. Physics, Chemistry etc.
• Class / grade – enter the result.
• Last Modified_EDU – this field is automatically updated showing the history when the field was last updated.
9. Click to keep your changes.
10. If you have finished all your updates, click Log Off in the top right corner of the screen to exit or navigate to other areas to continue working.

Assessment Specialist Portal User Guide Page 31
11. Select to confirm the log off.
12. You will be directed to the AS portal login page.

Assessment Specialist Portal User Guide Page 32
How to update your additional languages
The additional languages section can be updated as and when you require. This is to show which languages you know and at which level. This information could be used when deciding which task you can undertake.
1. Login to the portal and you will see the home page below. Click on My Profile tab.
2. Click on to bring a list of options to select from.
3. Select to edit your additional languages.
4. Click on
5. Select
Assessment Specialist Portal User Guide Page 33
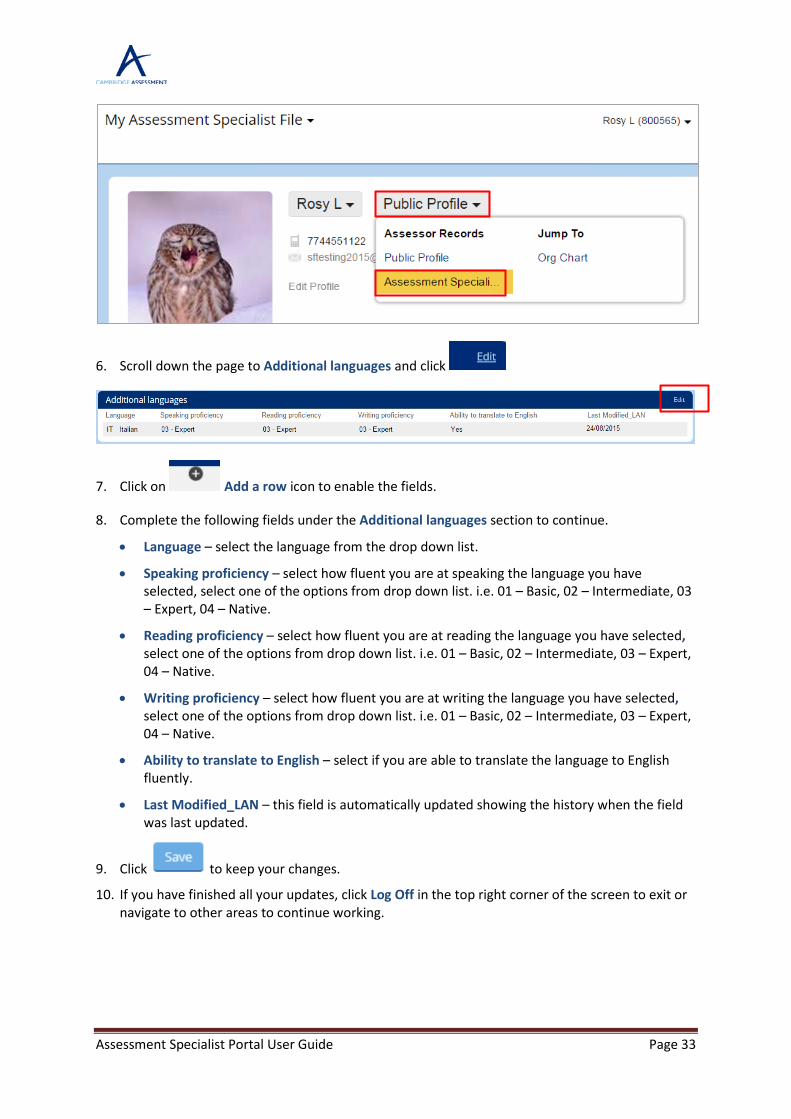
6. Scroll down the page to Additional languages and click
7. Click on Add a row icon to enable the fields.
8. Complete the following fields under the Additional languages section to continue.
• Language – select the language from the drop down list.
• Speaking proficiency – select how fluent you are at speaking the language you have selected, select one of the options from drop down list. i.e. 01 – Basic, 02 – Intermediate, 03 – Expert, 04 – Native.
• Reading proficiency – select how fluent you are at reading the language you have selected, select one of the options from drop down list. i.e. 01 – Basic, 02 – Intermediate, 03 – Expert, 04 – Native.
• Writing proficiency – select how fluent you are at writing the language you have selected, select one of the options from drop down list. i.e. 01 – Basic, 02 – Intermediate, 03 – Expert, 04 – Native.
• Ability to translate to English – select if you are able to translate the language to English fluently.
• Last Modified_LAN – this field is automatically updated showing the history when the field was last updated.
9. Click to keep your changes.
10. If you have finished all your updates, click Log Off in the top right corner of the screen to exit or navigate to other areas to continue working.

Assessment Specialist Portal User Guide Page 34
11. Select to confirm the log off.
12. You will be directed to the AS portal login page.
Assessment Specialist Portal User Guide Page 35
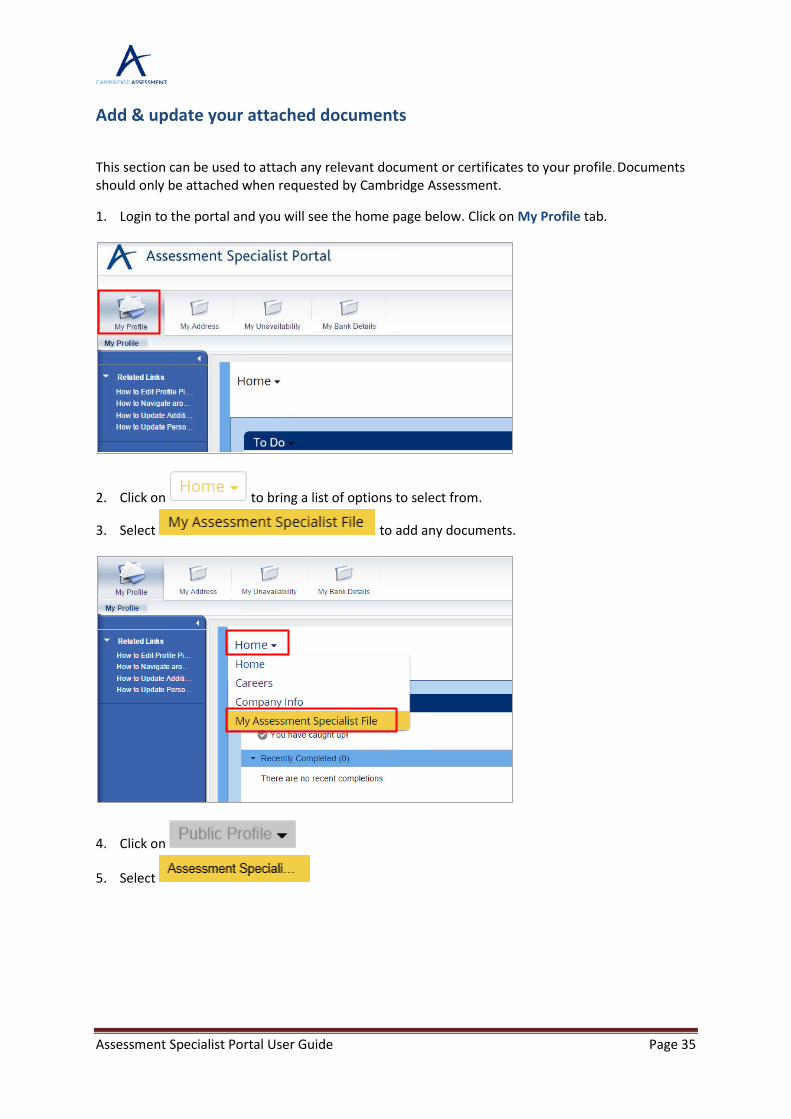
Add & update your attached documents
This section can be used to attach any relevant document or certificates to your profile. Documents should only be attached when requested by Cambridge Assessment.
1. Login to the portal and you will see the home page below. Click on My Profile tab.
2. Click on to bring a list of options to select from.
3. Select to add any documents.
4. Click on
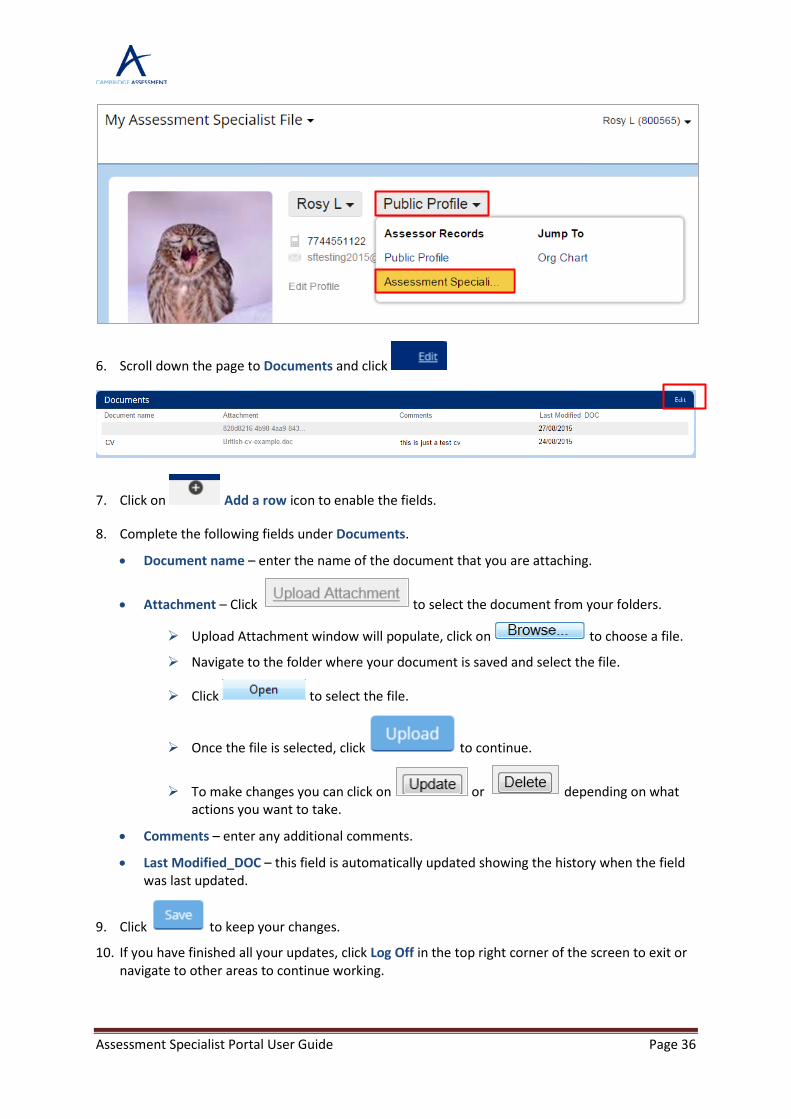
5. Select
Assessment Specialist Portal User Guide Page 36
6. Scroll down the page to Documents and click
7. Click on Add a row icon to enable the fields.
8. Complete the following fields under Documents.
• Document name – enter the name of the document that you are attaching.
• Attachment – Click to select the document from your folders.
Upload Attachment window will populate, click on to choose a file.
Navigate to the folder where your document is saved and select the file.
Click to select the file.
Once the file is selected, click to continue.
To make changes you can click on or depending on what actions you want to take.
• Comments – enter any additional comments.
• Last Modified_DOC – this field is automatically updated showing the history when the field was last updated.
9. Click to keep your changes.
10. If you have finished all your updates, click Log Off in the top right corner of the screen to exit or navigate to other areas to continue working.
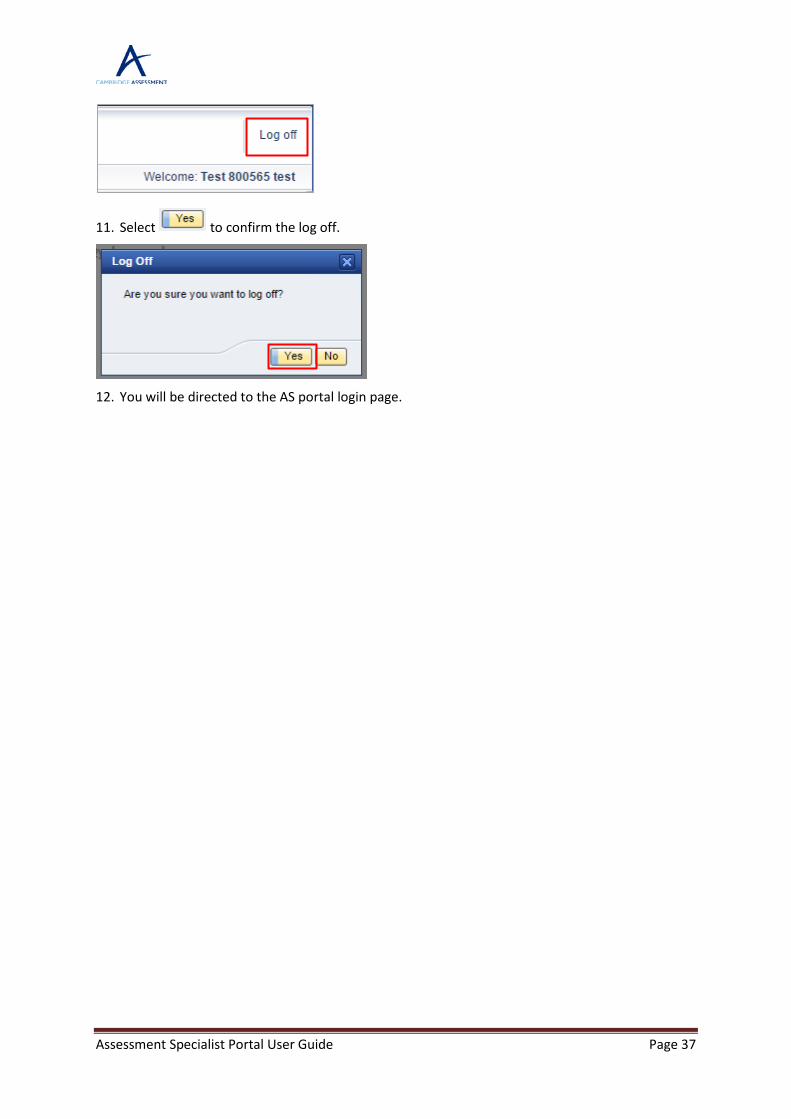
Assessment Specialist Portal User Guide Page 37
11. Select to confirm the log off.
12. You will be directed to the AS portal login page.
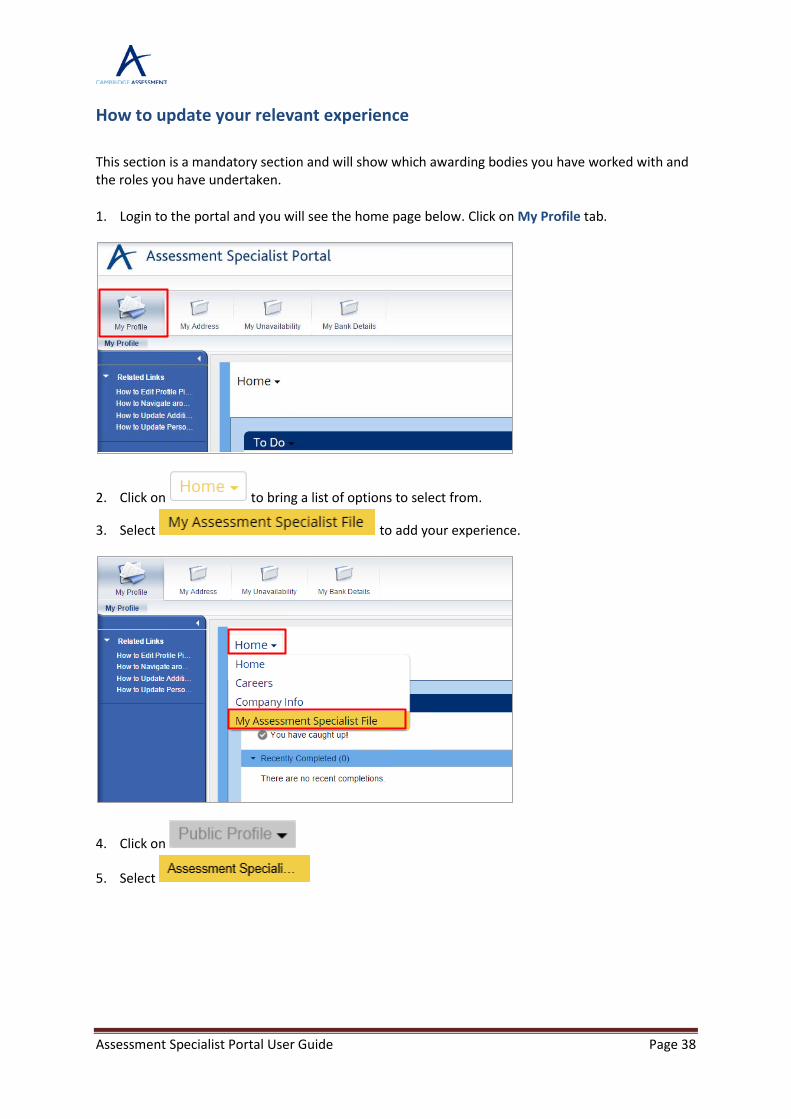
Assessment Specialist Portal User Guide Page 38
How to update your relevant experience This section is a mandatory section and will show which awarding bodies you have worked with and the roles you have undertaken.
1. Login to the portal and you will see the home page below. Click on My Profile tab.
2. Click on to bring a list of options to select from.
3. Select to add your experience.
4. Click on
5. Select
Assessment Specialist Portal User Guide Page 39
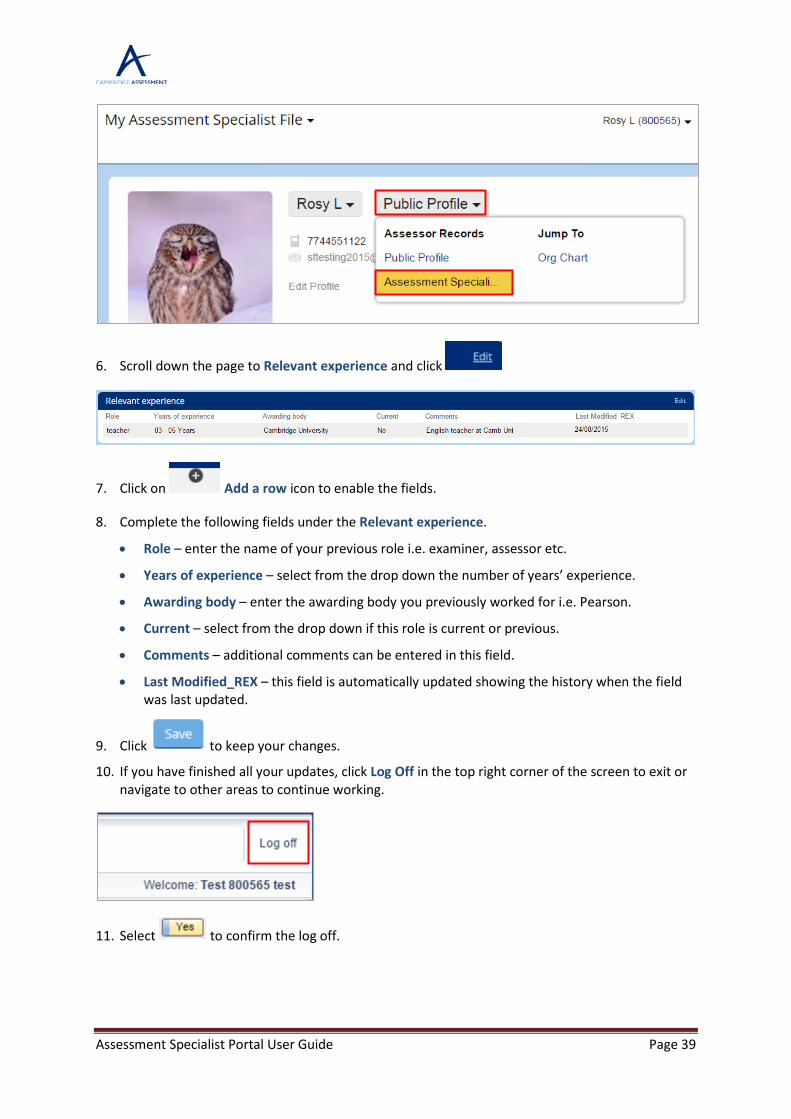
6. Scroll down the page to Relevant experience and click
7. Click on Add a row icon to enable the fields.
8. Complete the following fields under the Relevant experience.
• Role – enter the name of your previous role i.e. examiner, assessor etc.
• Years of experience – select from the drop down the number of years’ experience.
• Awarding body – enter the awarding body you previously worked for i.e. Pearson.
• Current – select from the drop down if this role is current or previous.
• Comments – additional comments can be entered in this field.
• Last Modified_REX – this field is automatically updated showing the history when the field was last updated.
9. Click to keep your changes.
10. If you have finished all your updates, click Log Off in the top right corner of the screen to exit or navigate to other areas to continue working.
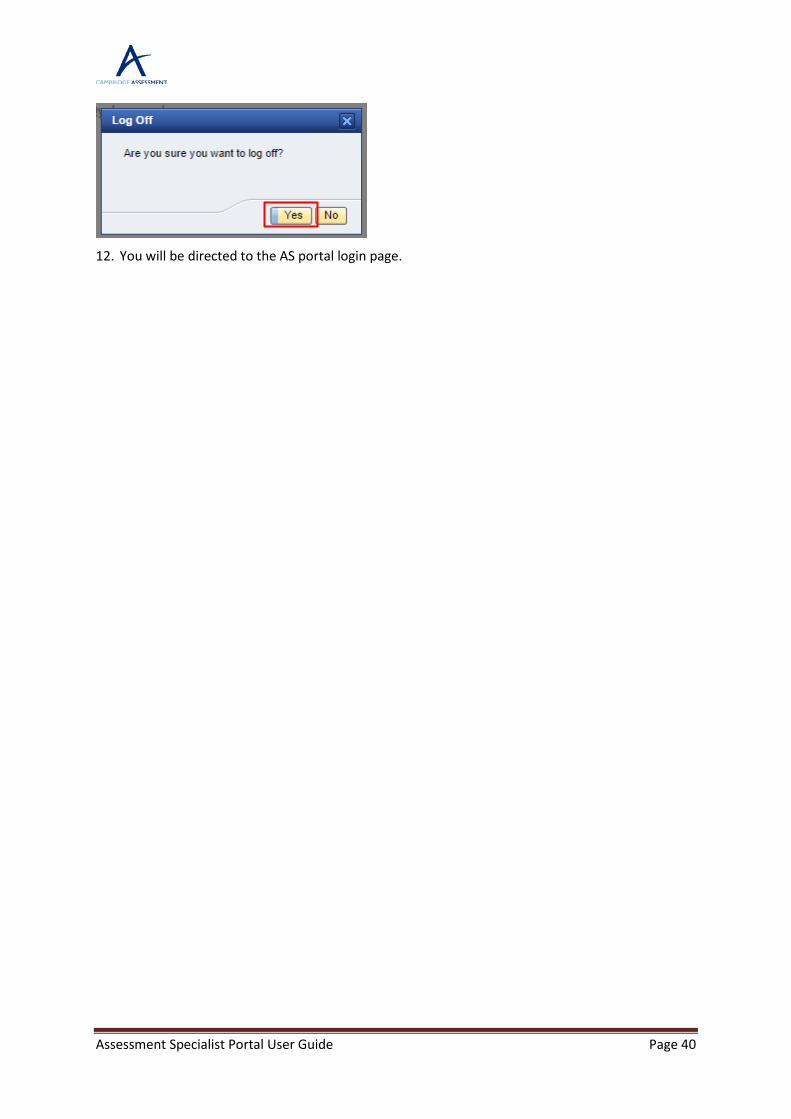
11. Select to confirm the log off.
Assessment Specialist Portal User Guide Page 40
12. You will be directed to the AS portal login page.
Assessment Specialist Portal User Guide Page 41
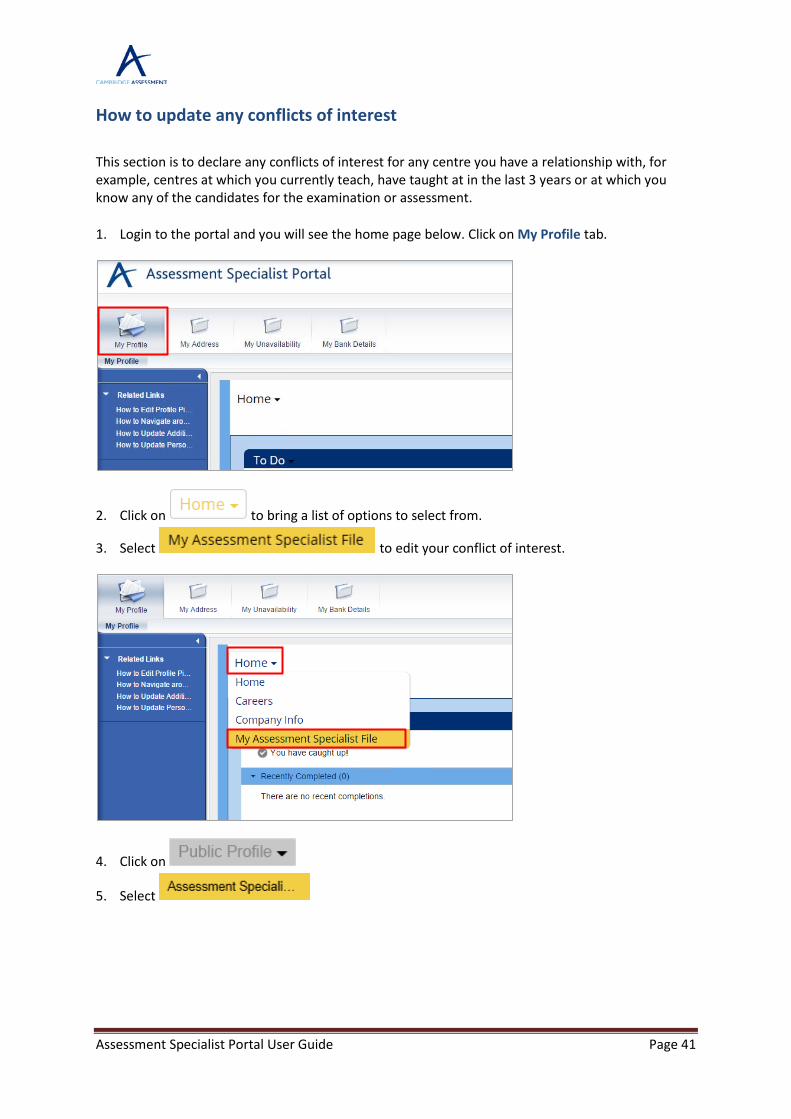
How to update any conflicts of interest This section is to declare any conflicts of interest for any centre you have a relationship with, for example, centres at which you currently teach, have taught at in the last 3 years or at which you know any of the candidates for the examination or assessment.
1. Login to the portal and you will see the home page below. Click on My Profile tab.
2. Click on to bring a list of options to select from.
3. Select to edit your conflict of interest.
4. Click on
5. Select
Assessment Specialist Portal User Guide Page 42
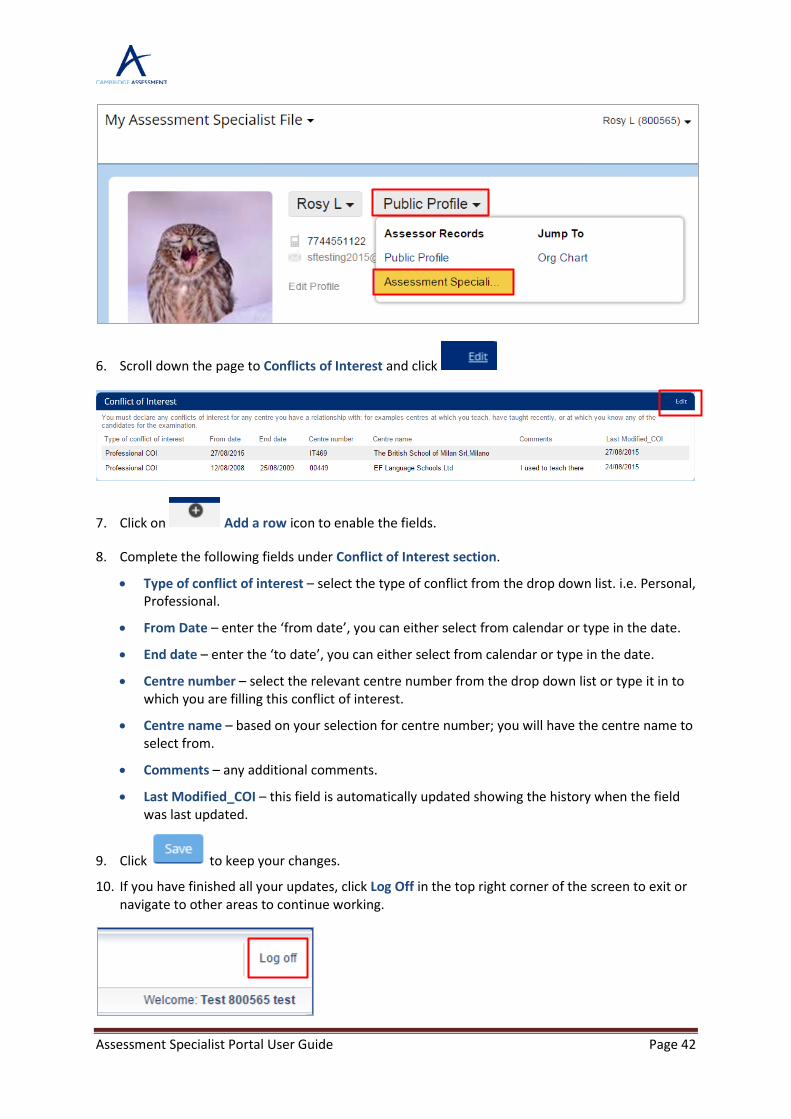
6. Scroll down the page to Conflicts of Interest and click
7. Click on Add a row icon to enable the fields.
8. Complete the following fields under Conflict of Interest section.
• Type of conflict of interest – select the type of conflict from the drop down list. i.e. Personal, Professional.
• From Date – enter the ‘from date’, you can either select from calendar or type in the date.
• End date – enter the ‘to date’, you can either select from calendar or type in the date.
• Centre number – select the relevant centre number from the drop down list or type it in to which you are filling this conflict of interest.
• Centre name – based on your selection for centre number; you will have the centre name to select from.
• Comments – any additional comments.
• Last Modified_COI – this field is automatically updated showing the history when the field was last updated.
9. Click to keep your changes.
10. If you have finished all your updates, click Log Off in the top right corner of the screen to exit or navigate to other areas to continue working.
Assessment Specialist Portal User Guide Page 43
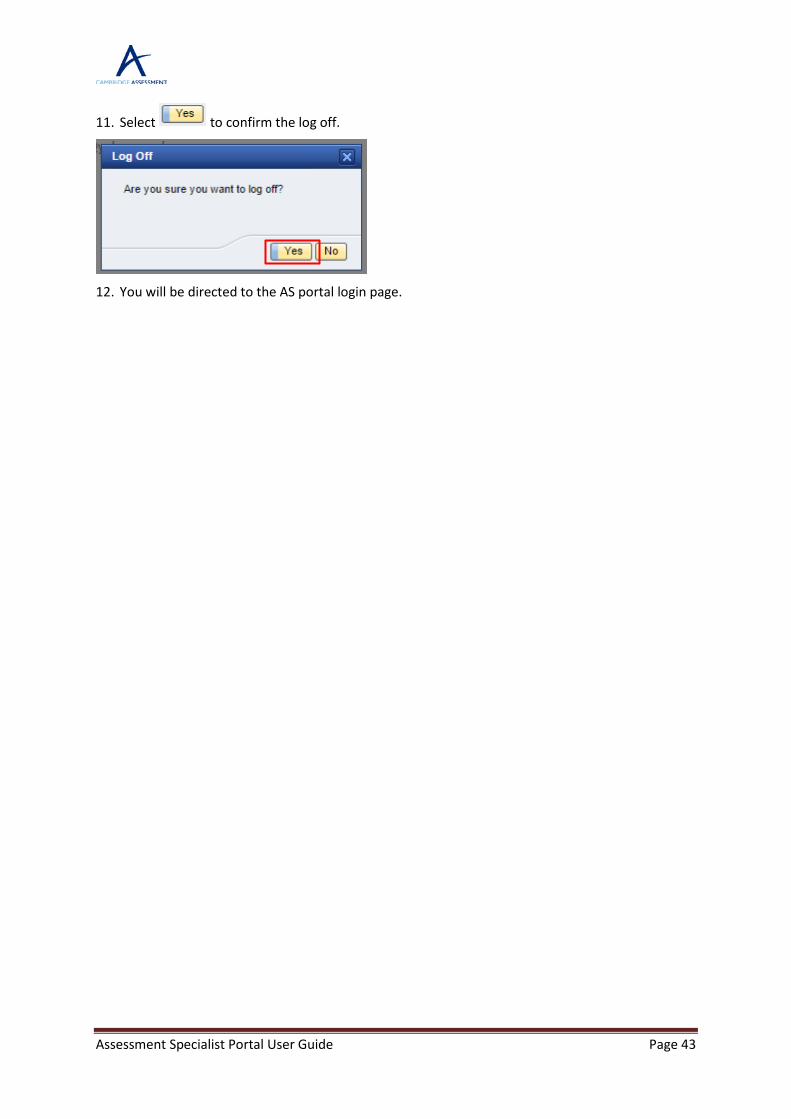
11. Select to confirm the log off.
12. You will be directed to the AS portal login page.
Assessment Specialist Portal User Guide Page 44
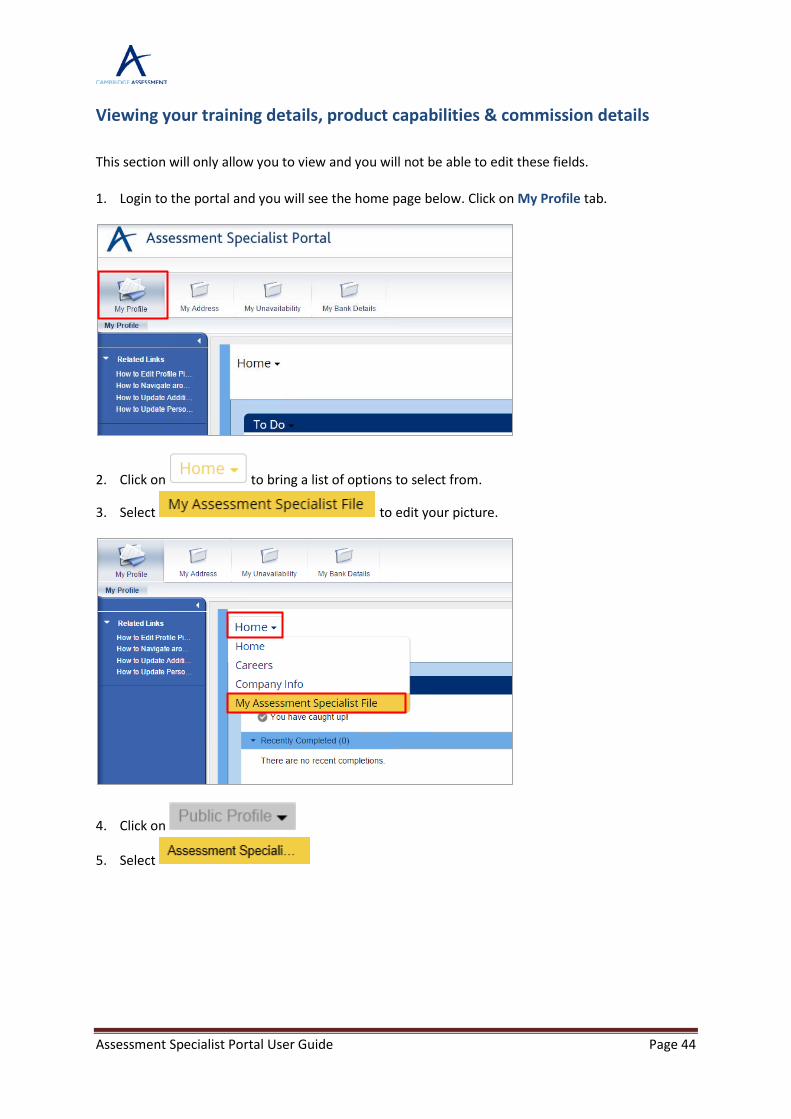
Viewing your training details, product capabilities & commission details This section will only allow you to view and you will not be able to edit these fields.
1. Login to the portal and you will see the home page below. Click on My Profile tab.
2. Click on to bring a list of options to select from.
3. Select to edit your picture.
4. Click on
5. Select

Assessment Specialist Portal User Guide Page 45
6. Scroll down the page to Training details. This section will show all the training you have completed with Cambridge Assessment.
7. Scroll down the page to Product capabilities. This section will show all the qualification/s you are capable of undertaking and work.
8. Scroll down the page to Commission details. This section will show all the work completed by you. Rating will show how well you have performed against this task.
9. If you have finished all your updates, click Log Off in the top right corner of the screen to exit or navigate to other areas to continue working.
10. Select to confirm the log off.
11. You will be directed to the portal login page.
Assessment Specialist Portal User Guide Page 46
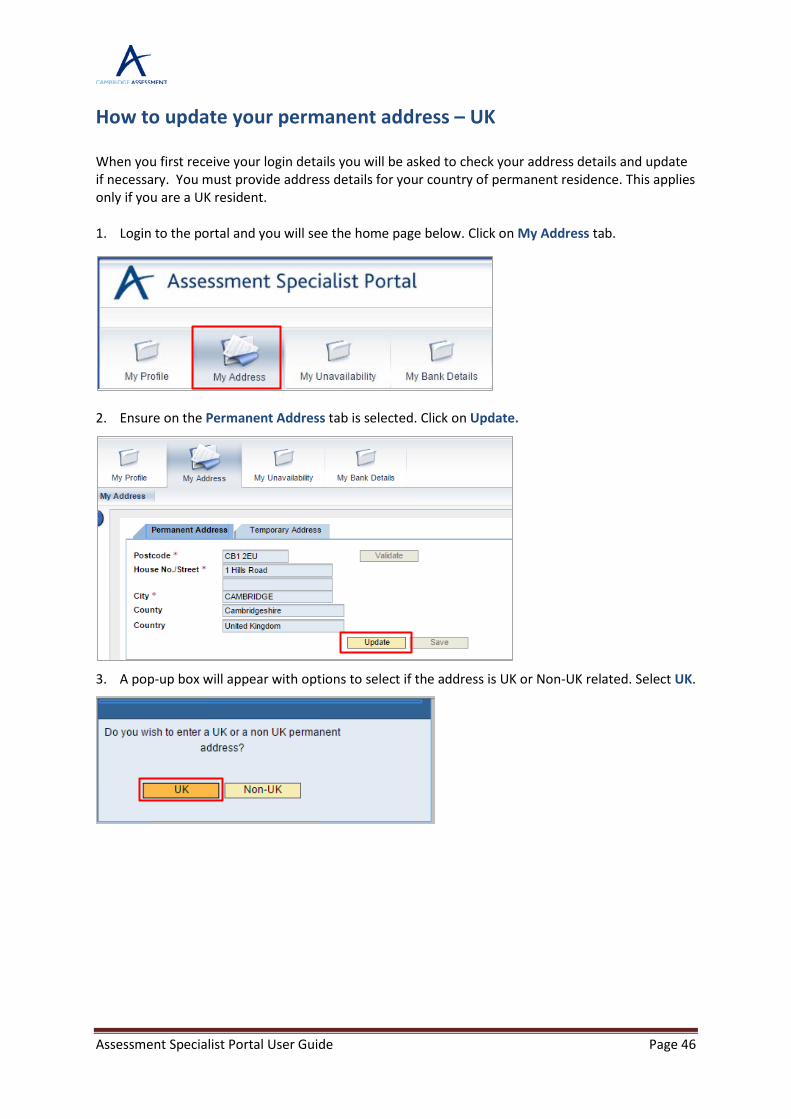
How to update your permanent address – UK When you first receive your login details you will be asked to check your address details and update if necessary. You must provide address details for your country of permanent residence. This applies only if you are a UK resident. 1. Login to the portal and you will see the home page below. Click on My Address tab.
2. Ensure on the Permanent Address tab is selected. Click on Update.
3. A pop-up box will appear with options to select if the address is UK or Non-UK related. Select UK.
Assessment Specialist Portal User Guide Page 47
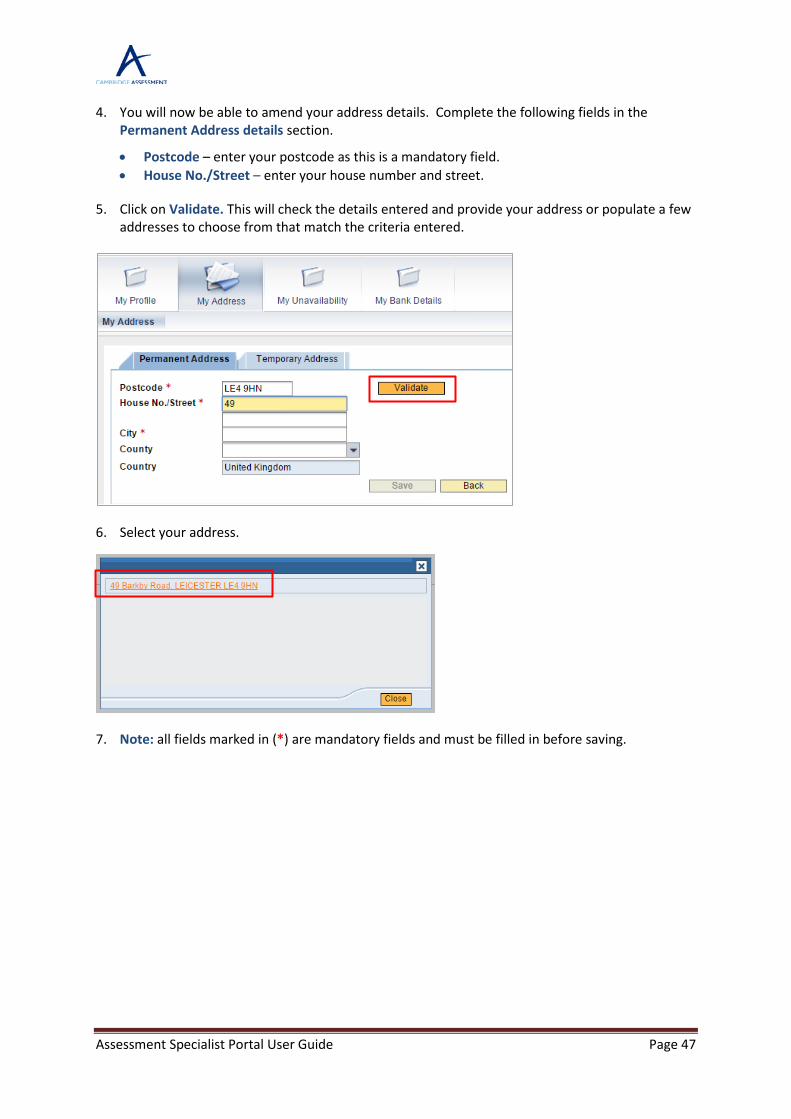
4. You will now be able to amend your address details. Complete the following fields in the Permanent Address details section.
• Postcode – enter your postcode as this is a mandatory field. • House No./Street – enter your house number and street.
5. Click on Validate. This will check the details entered and provide your address or populate a few addresses to choose from that match the criteria entered.
6. Select your address.
7. Note: all fields marked in (*) are mandatory fields and must be filled in before saving.
Assessment Specialist Portal User Guide Page 48
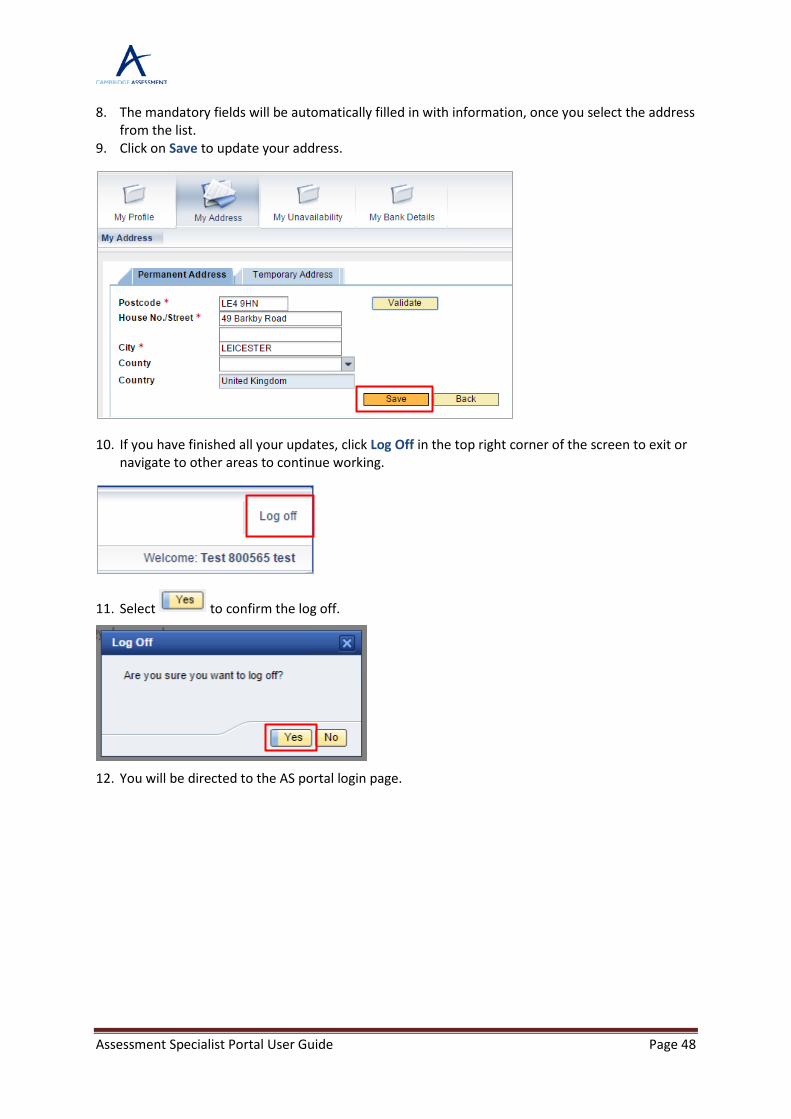
8. The mandatory fields will be automatically filled in with information, once you select the address from the list.
9. Click on Save to update your address.
10. If you have finished all your updates, click Log Off in the top right corner of the screen to exit or navigate to other areas to continue working.
11. Select to confirm the log off.
12. You will be directed to the AS portal login page.
Assessment Specialist Portal User Guide Page 49
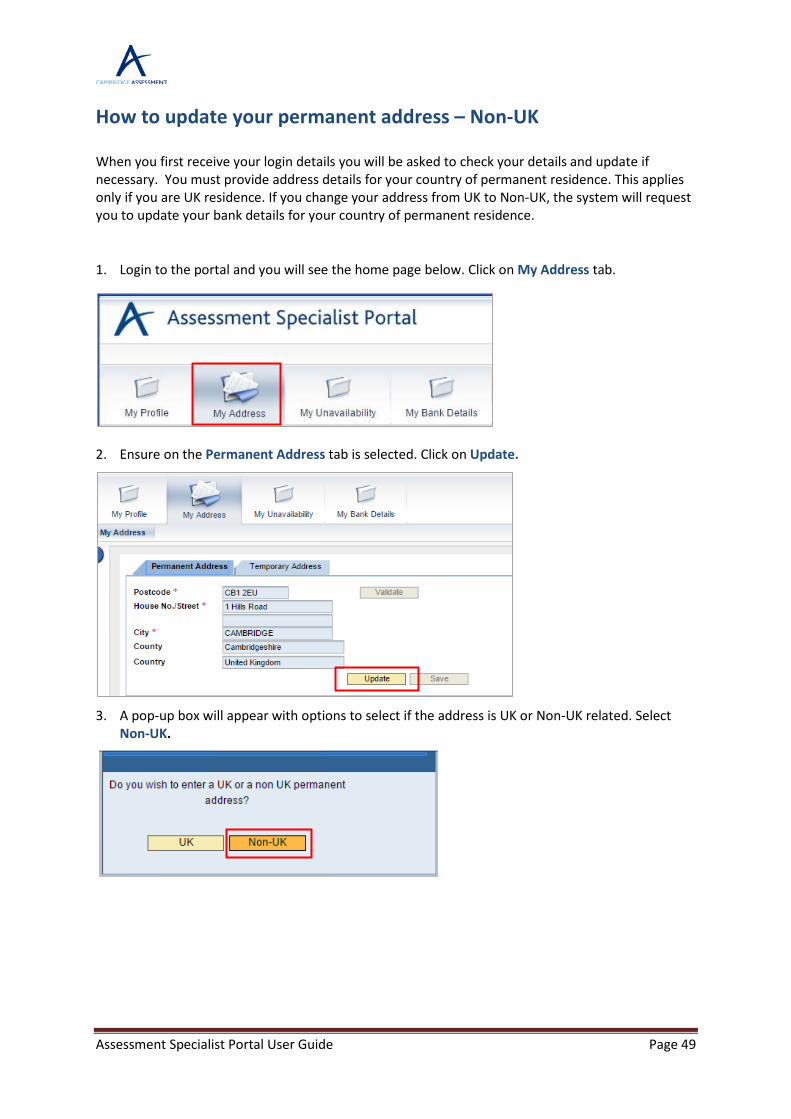
How to update your permanent address – Non-UK When you first receive your login details you will be asked to check your details and update if necessary. You must provide address details for your country of permanent residence. This applies only if you are UK residence. If you change your address from UK to Non-UK, the system will request you to update your bank details for your country of permanent residence.
1. Login to the portal and you will see the home page below. Click on My Address tab.
2. Ensure on the Permanent Address tab is selected. Click on Update.
3. A pop-up box will appear with options to select if the address is UK or Non-UK related. Select Non-UK.
Assessment Specialist Portal User Guide Page 50
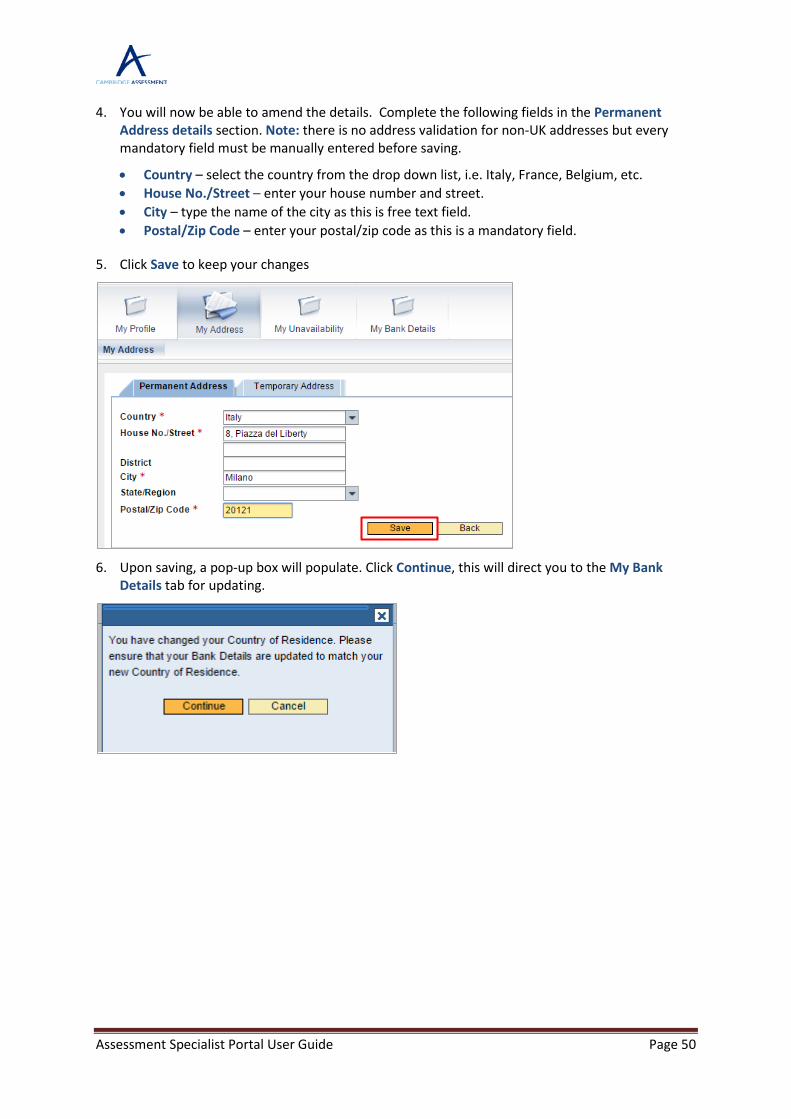
4. You will now be able to amend the details. Complete the following fields in the Permanent Address details section. Note: there is no address validation for non-UK addresses but every mandatory field must be manually entered before saving.
• Country – select the country from the drop down list, i.e. Italy, France, Belgium, etc. • House No./Street – enter your house number and street. • City – type the name of the city as this is free text field. • Postal/Zip Code – enter your postal/zip code as this is a mandatory field.
5. Click Save to keep your changes
6. Upon saving, a pop-up box will populate. Click Continue, this will direct you to the My Bank Details tab for updating.

Assessment Specialist Portal User Guide Page 51
7. Complete the following fields in the My Bank details tab. Note: every field must be manually entered before saving.
• Bank Key – enter the bank key as the system will validate if an incorrect bank key has been entered.
• Bank Account – enter your account number. • Payee – this will default to your name and cannot be changed in this screen. • Bank Country – this will default from the address you entered in previous screen. • Payment Currency – this will default from country you entered in the address screen.
8. Click Save to keep your changes.
9. A message will appear at the top of the screen.
10. If you have finished all your updates, click Log Off in the top right corner of the screen to exit or navigate to other areas to continue working.
11. Select to confirm the log off.
12. You will be directed to the AS portal login page.
Assessment Specialist Portal User Guide Page 52
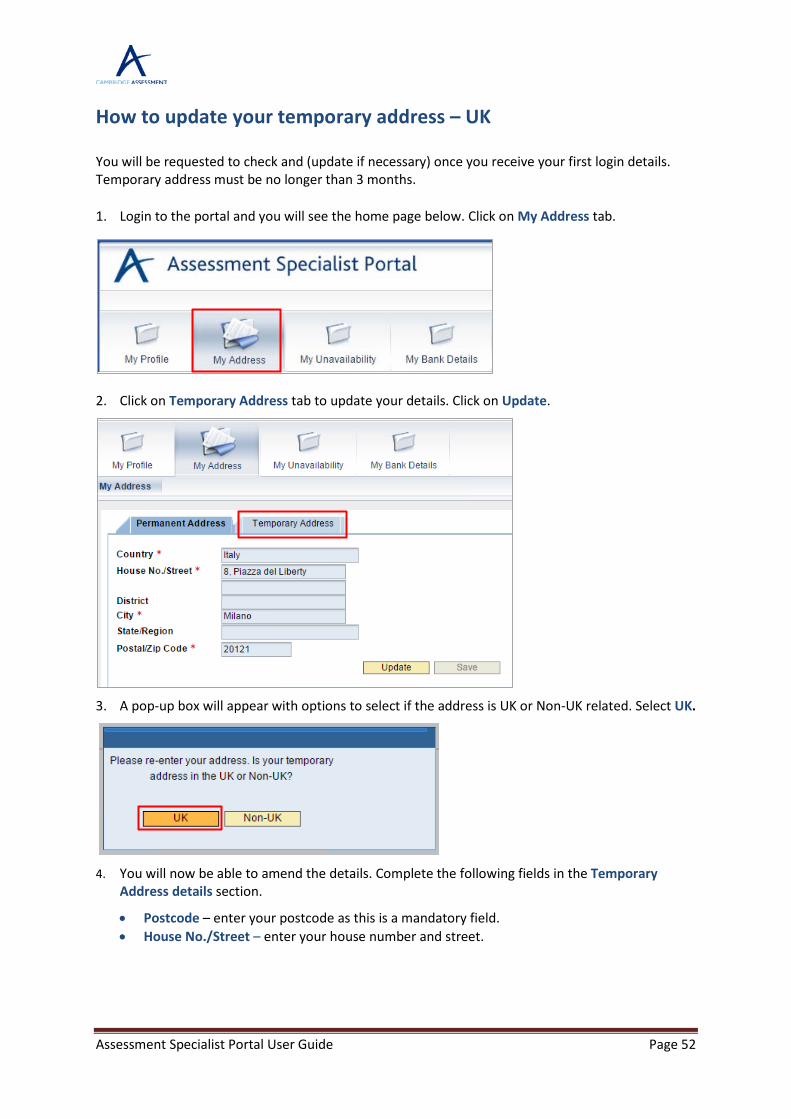
How to update your temporary address – UK You will be requested to check and (update if necessary) once you receive your first login details. Temporary address must be no longer than 3 months.
1. Login to the portal and you will see the home page below. Click on My Address tab.
2. Click on Temporary Address tab to update your details. Click on Update.
3. A pop-up box will appear with options to select if the address is UK or Non-UK related. Select UK.
4. You will now be able to amend the details. Complete the following fields in the Temporary Address details section.
• Postcode – enter your postcode as this is a mandatory field. • House No./Street – enter your house number and street.
Assessment Specialist Portal User Guide Page 53
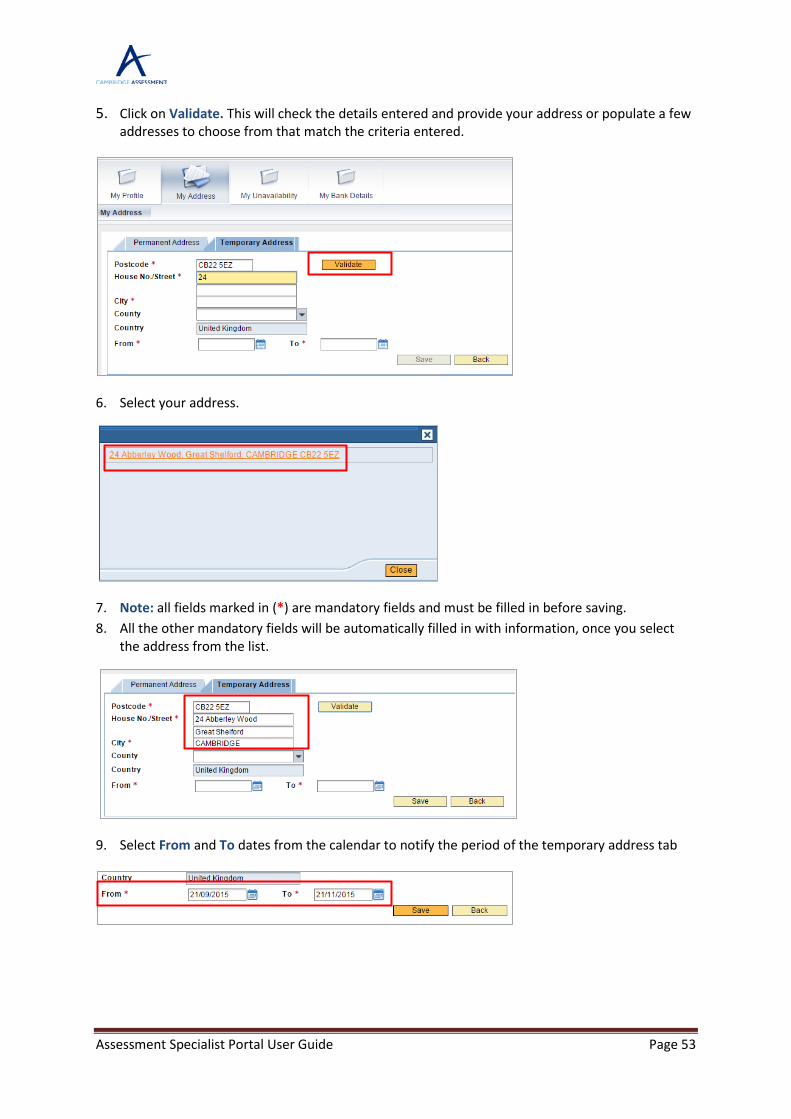
5. Click on Validate. This will check the details entered and provide your address or populate a few addresses to choose from that match the criteria entered.
6. Select your address.
7. Note: all fields marked in (*) are mandatory fields and must be filled in before saving. 8. All the other mandatory fields will be automatically filled in with information, once you select
the address from the list.
9. Select From and To dates from the calendar to notify the period of the temporary address tab
Assessment Specialist Portal User Guide Page 54
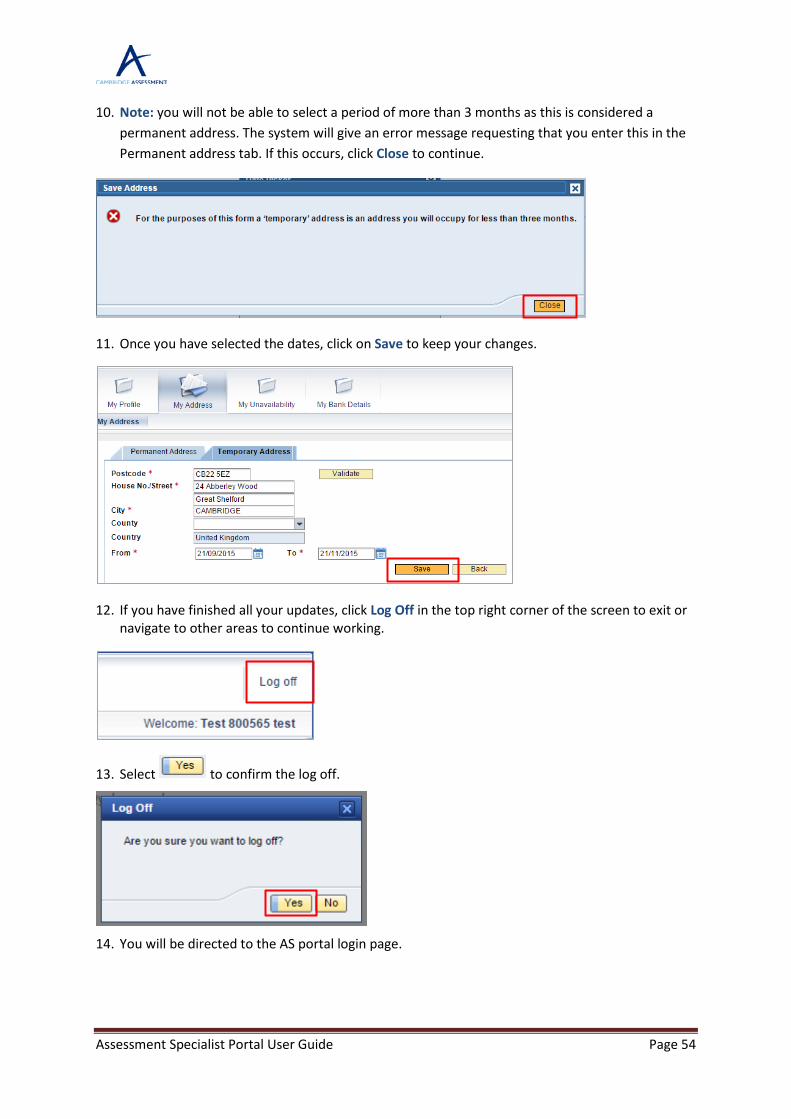
10. Note: you will not be able to select a period of more than 3 months as this is considered a permanent address. The system will give an error message requesting that you enter this in the Permanent address tab. If this occurs, click Close to continue.
11. Once you have selected the dates, click on Save to keep your changes.
12. If you have finished all your updates, click Log Off in the top right corner of the screen to exit or navigate to other areas to continue working.
13. Select to confirm the log off.
14. You will be directed to the AS portal login page.
Assessment Specialist Portal User Guide Page 55
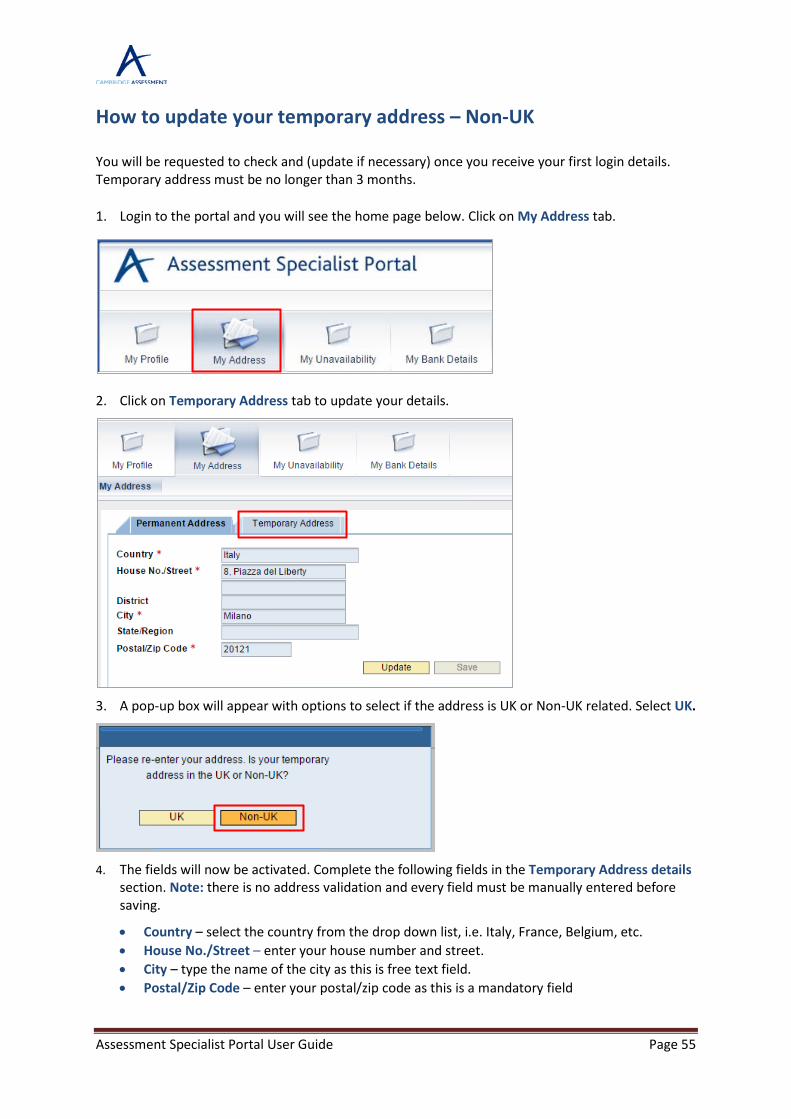
How to update your temporary address – Non-UK You will be requested to check and (update if necessary) once you receive your first login details. Temporary address must be no longer than 3 months.
1. Login to the portal and you will see the home page below. Click on My Address tab.
2. Click on Temporary Address tab to update your details.
3. A pop-up box will appear with options to select if the address is UK or Non-UK related. Select UK.
4. The fields will now be activated. Complete the following fields in the Temporary Address details
section. Note: there is no address validation and every field must be manually entered before saving.
• Country – select the country from the drop down list, i.e. Italy, France, Belgium, etc. • House No./Street – enter your house number and street. • City – type the name of the city as this is free text field. • Postal/Zip Code – enter your postal/zip code as this is a mandatory field
Assessment Specialist Portal User Guide Page 56
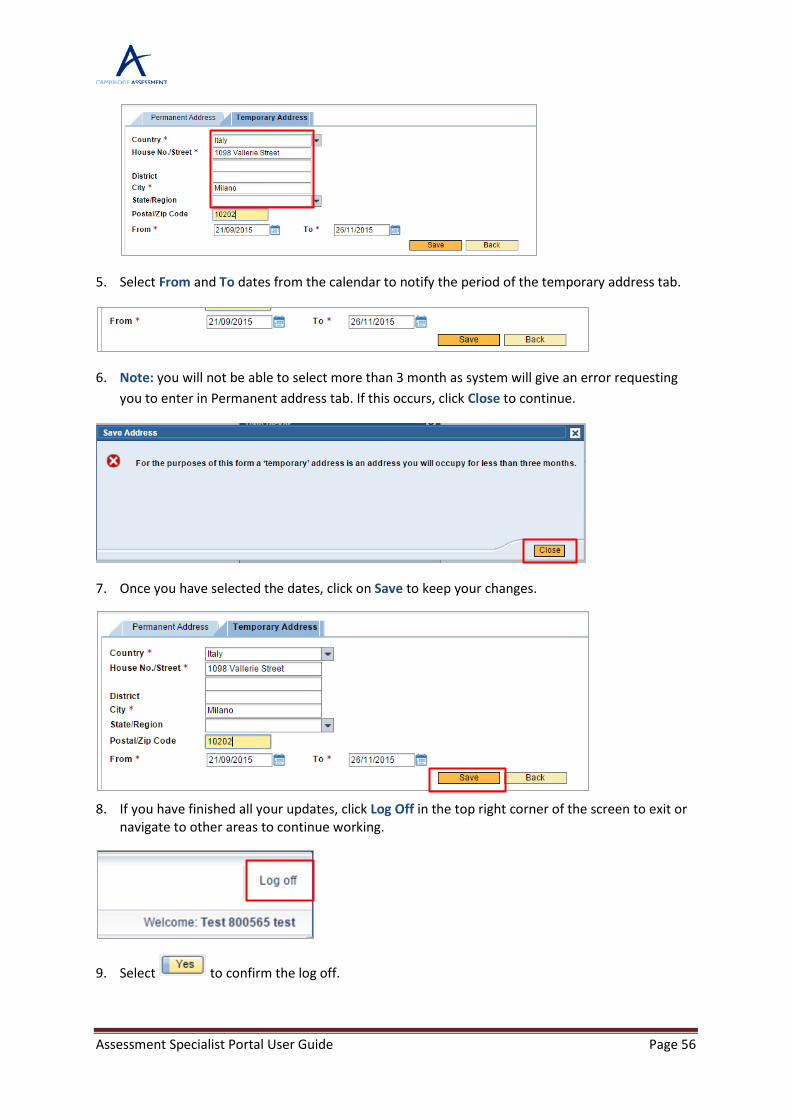
5. Select From and To dates from the calendar to notify the period of the temporary address tab.
6. Note: you will not be able to select more than 3 month as system will give an error requesting you to enter in Permanent address tab. If this occurs, click Close to continue.
7. Once you have selected the dates, click on Save to keep your changes.
8. If you have finished all your updates, click Log Off in the top right corner of the screen to exit or
navigate to other areas to continue working.
9. Select to confirm the log off.

Assessment Specialist Portal User Guide Page 57
10. You will be directed to the AS portal login page.
Assessment Specialist Portal User Guide Page 58
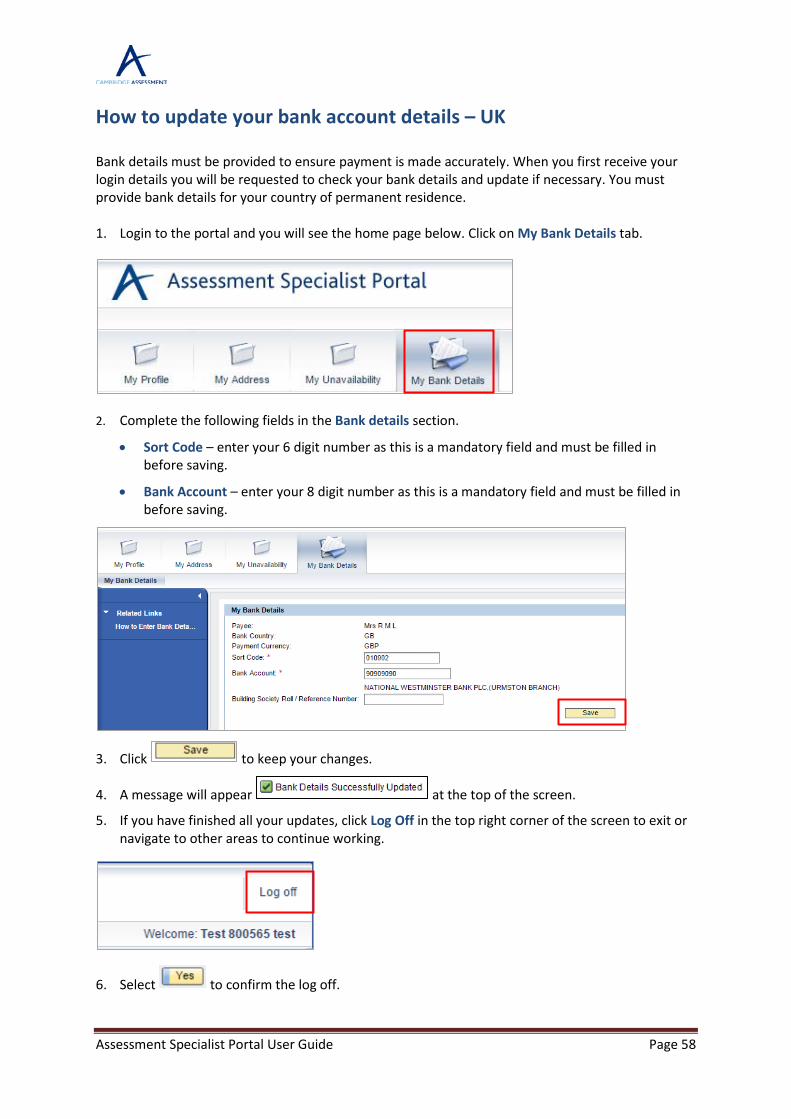
How to update your bank account details – UK Bank details must be provided to ensure payment is made accurately. When you first receive your login details you will be requested to check your bank details and update if necessary. You must provide bank details for your country of permanent residence. 1. Login to the portal and you will see the home page below. Click on My Bank Details tab.
2. Complete the following fields in the Bank details section.
• Sort Code – enter your 6 digit number as this is a mandatory field and must be filled in before saving.
• Bank Account – enter your 8 digit number as this is a mandatory field and must be filled in before saving.
3. Click to keep your changes.
4. A message will appear at the top of the screen.
5. If you have finished all your updates, click Log Off in the top right corner of the screen to exit or navigate to other areas to continue working.
6. Select to confirm the log off.

Assessment Specialist Portal User Guide Page 59
7. You will be directed to the AS portal login page.
Assessment Specialist Portal User Guide Page 60
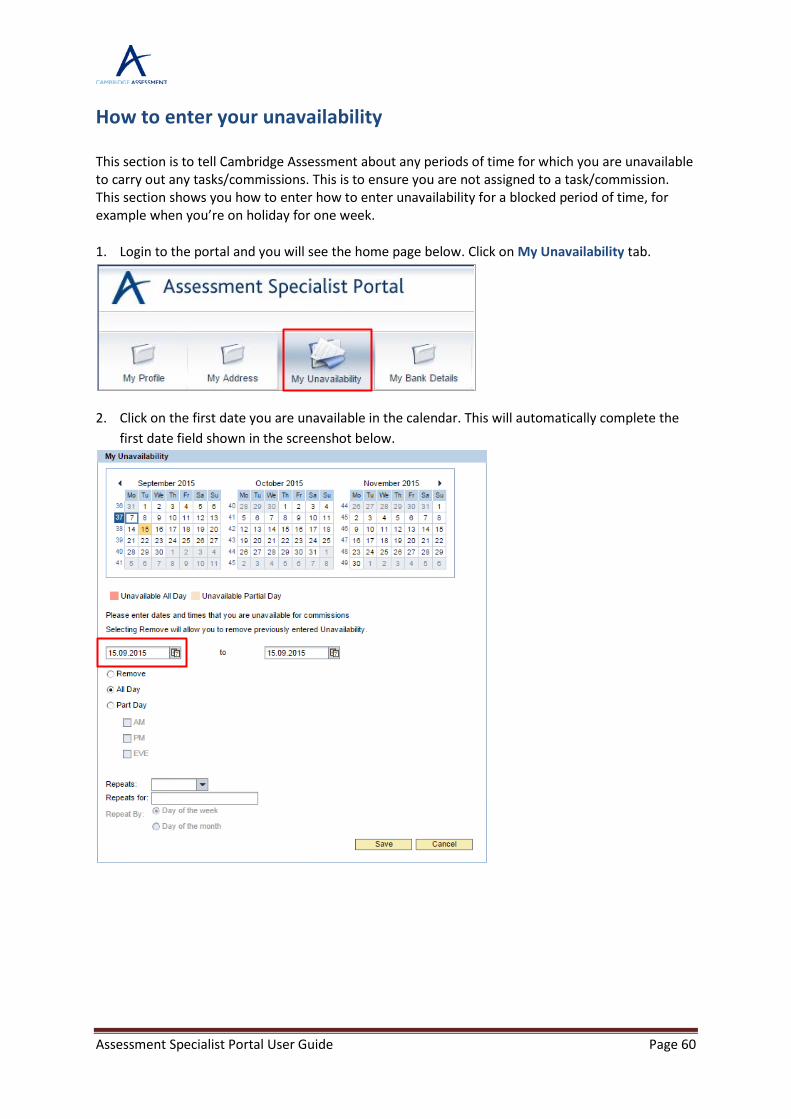
How to enter your unavailability This section is to tell Cambridge Assessment about any periods of time for which you are unavailable to carry out any tasks/commissions. This is to ensure you are not assigned to a task/commission. This section shows you how to enter how to enter unavailability for a blocked period of time, for example when you’re on holiday for one week.
1. Login to the portal and you will see the home page below. Click on My Unavailability tab.
2. Click on the first date you are unavailable in the calendar. This will automatically complete the first date field shown in the screenshot below.

Assessment Specialist Portal User Guide Page 61
3. Click in the second date field to open the calendar and select the End date.
4. Select one of the options e.g. All Day or Part Day.
5. Once you have made the selection, click to keep your changes.
6. Click to confirm your changes in the Create Absence window.
7. The next message is to notify your changes have been saved, click to acknowledge.
8. Once your unavailability is saved the dates will change colour. If there is no change of colour your unavailability has not been saved.
9. If you have finished all your updates, click Log Off in the top right corner of the screen to exit or navigate to other areas to continue working.

Assessment Specialist Portal User Guide Page 62
10. Select to confirm the log off.
11. You will be directed to the AS portal login page.
Assessment Specialist Portal User Guide Page 63
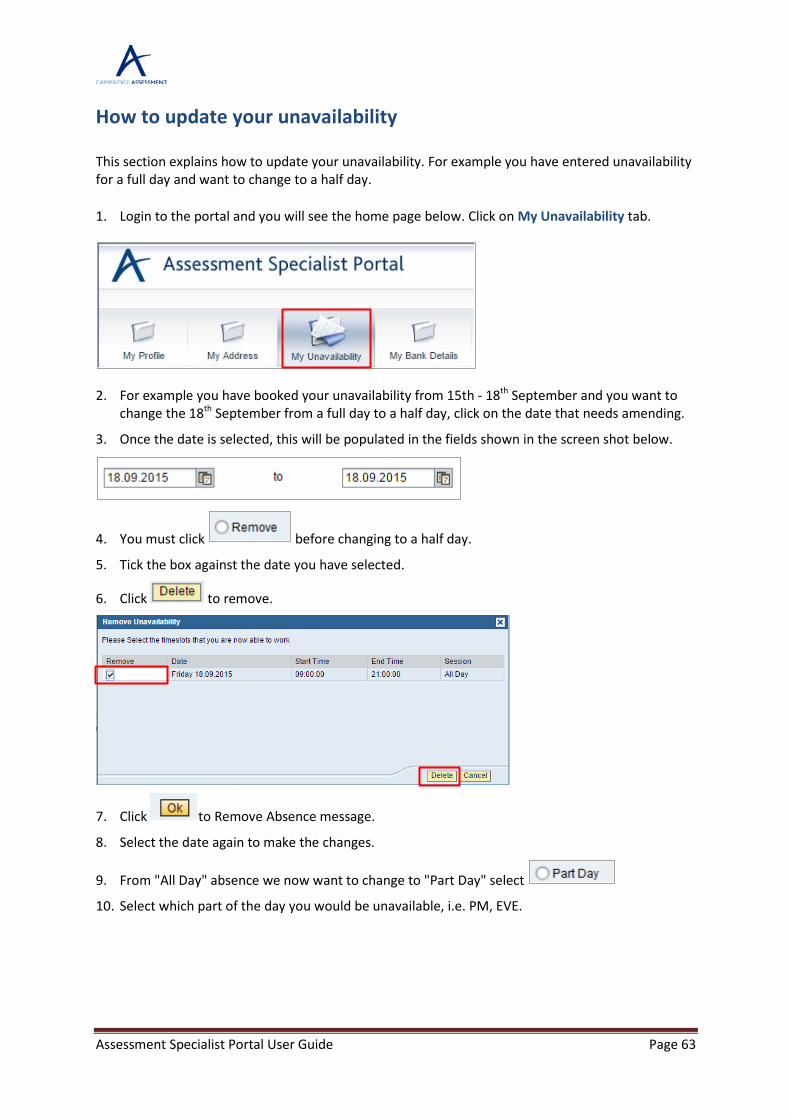
How to update your unavailability This section explains how to update your unavailability. For example you have entered unavailability for a full day and want to change to a half day.
1. Login to the portal and you will see the home page below. Click on My Unavailability tab.
2. For example you have booked your unavailability from 15th - 18th September and you want to change the 18th September from a full day to a half day, click on the date that needs amending.
3. Once the date is selected, this will be populated in the fields shown in the screen shot below.
4. You must click before changing to a half day.
5. Tick the box against the date you have selected.
6. Click to remove.
7. Click to Remove Absence message. 8. Select the date again to make the changes.
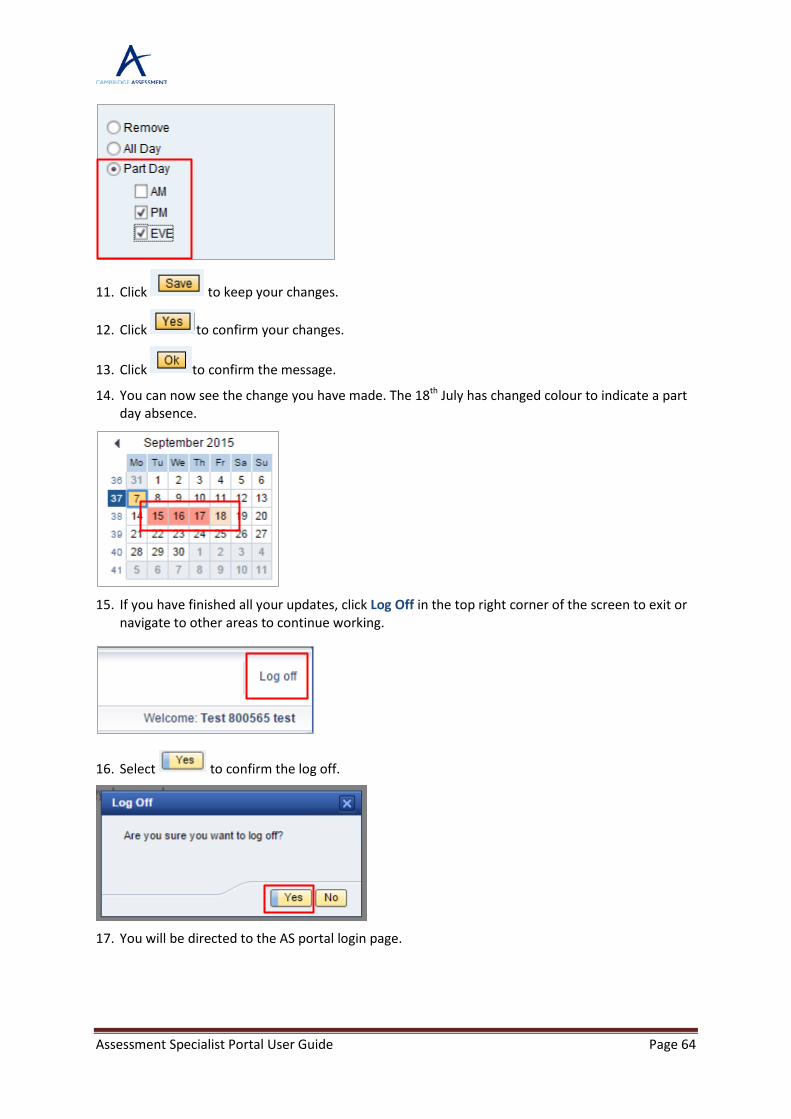
9. From "All Day" absence we now want to change to "Part Day" select 10. Select which part of the day you would be unavailable, i.e. PM, EVE.
Assessment Specialist Portal User Guide Page 64
11. Click to keep your changes.
12. Click to confirm your changes.
13. Click to confirm the message.
14. You can now see the change you have made. The 18th July has changed colour to indicate a part day absence.
15. If you have finished all your updates, click Log Off in the top right corner of the screen to exit or
navigate to other areas to continue working.
16. Select to confirm the log off.
17. You will be directed to the AS portal login page.
Assessment Specialist Portal User Guide Page 65
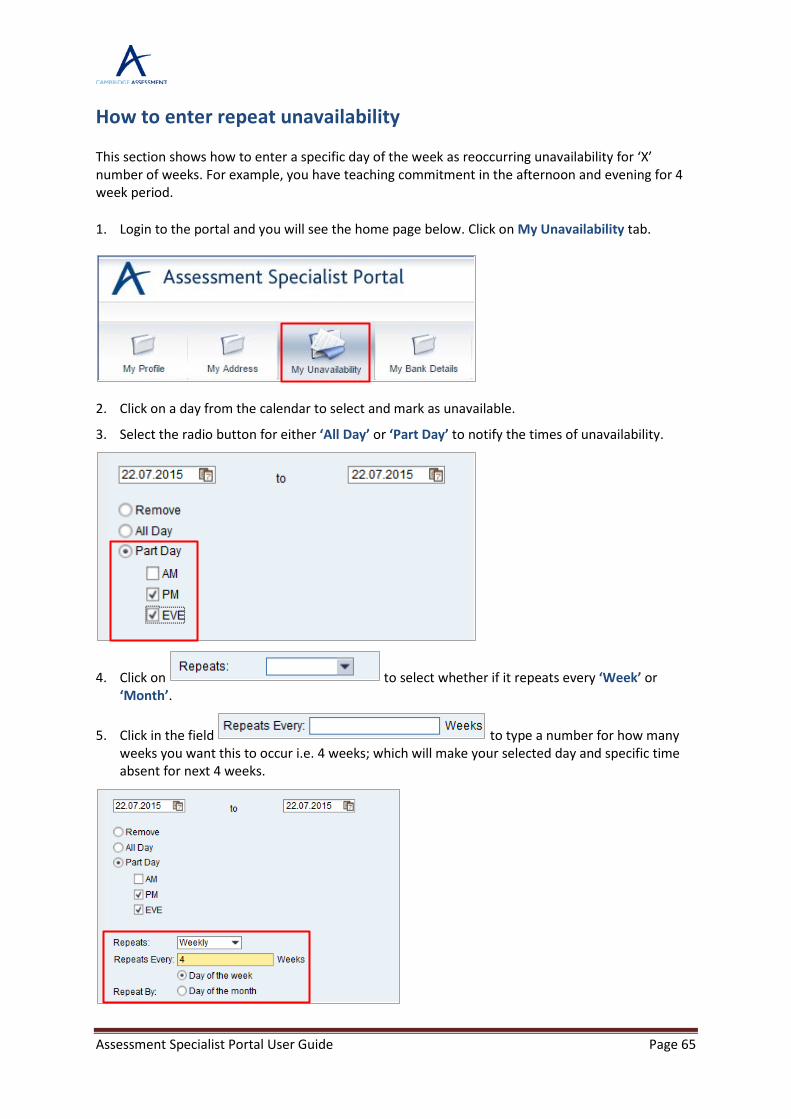
How to enter repeat unavailability This section shows how to enter a specific day of the week as reoccurring unavailability for ‘X’ number of weeks. For example, you have teaching commitment in the afternoon and evening for 4 week period.
1. Login to the portal and you will see the home page below. Click on My Unavailability tab.
2. Click on a day from the calendar to select and mark as unavailable.
3. Select the radio button for either ‘All Day’ or ‘Part Day’ to notify the times of unavailability.
4. Click on to select whether if it repeats every ‘Week’ or ‘Month’.
5. Click in the field to type a number for how many weeks you want this to occur i.e. 4 weeks; which will make your selected day and specific time absent for next 4 weeks.

Assessment Specialist Portal User Guide Page 66
6. Click to keep your changes.
7. Click to confirm the changes.
8. Click to the message. 9. You can see the changes and the dates are now marked as Half Day absent for 4 weeks.
10. If you have finished all your updates, click Log Off in the top right corner of the screen to exit or
navigate to other areas to continue working.
11. Select to confirm the log off.
12. You will be directed to the AS portal login page.
Assessment Specialist Portal User Guide Page 67
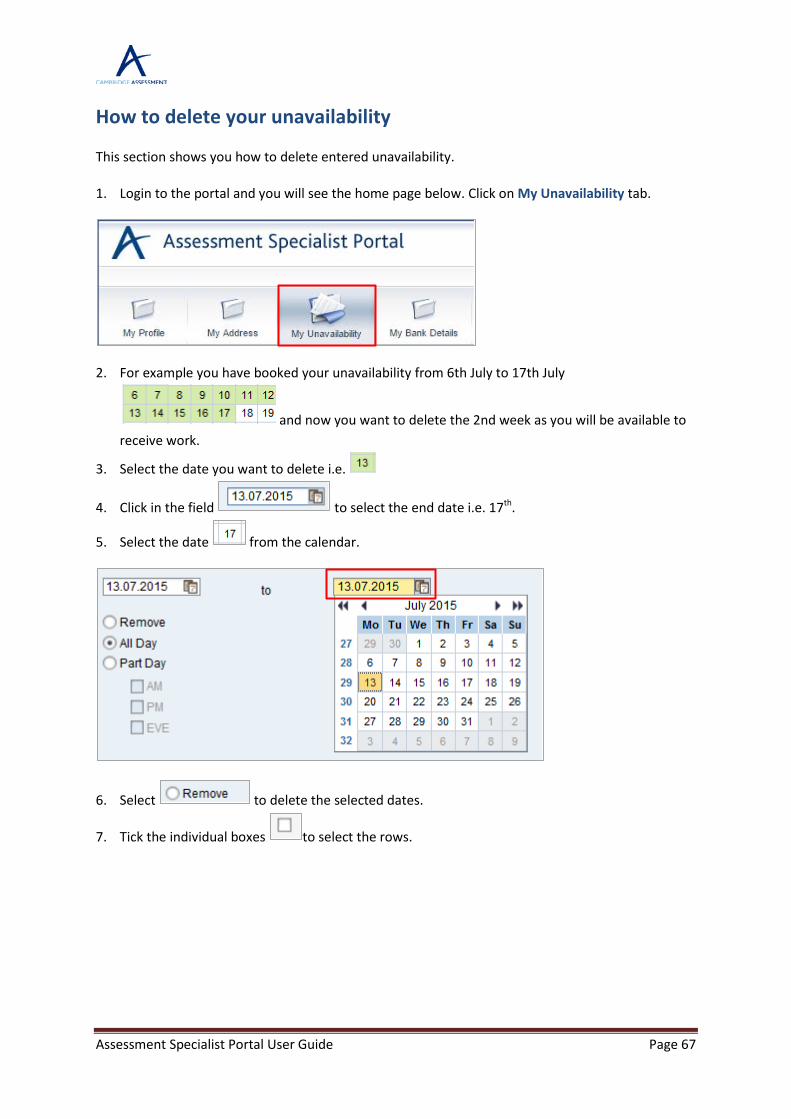
How to delete your unavailability This section shows you how to delete entered unavailability.
1. Login to the portal and you will see the home page below. Click on My Unavailability tab.
2. For example you have booked your unavailability from 6th July to 17th July
and now you want to delete the 2nd week as you will be available to receive work.
3. Select the date you want to delete i.e.
4. Click in the field to select the end date i.e. 17th.
5. Select the date from the calendar.
6. Select to delete the selected dates.
7. Tick the individual boxes to select the rows.
Assessment Specialist Portal User Guide Page 68
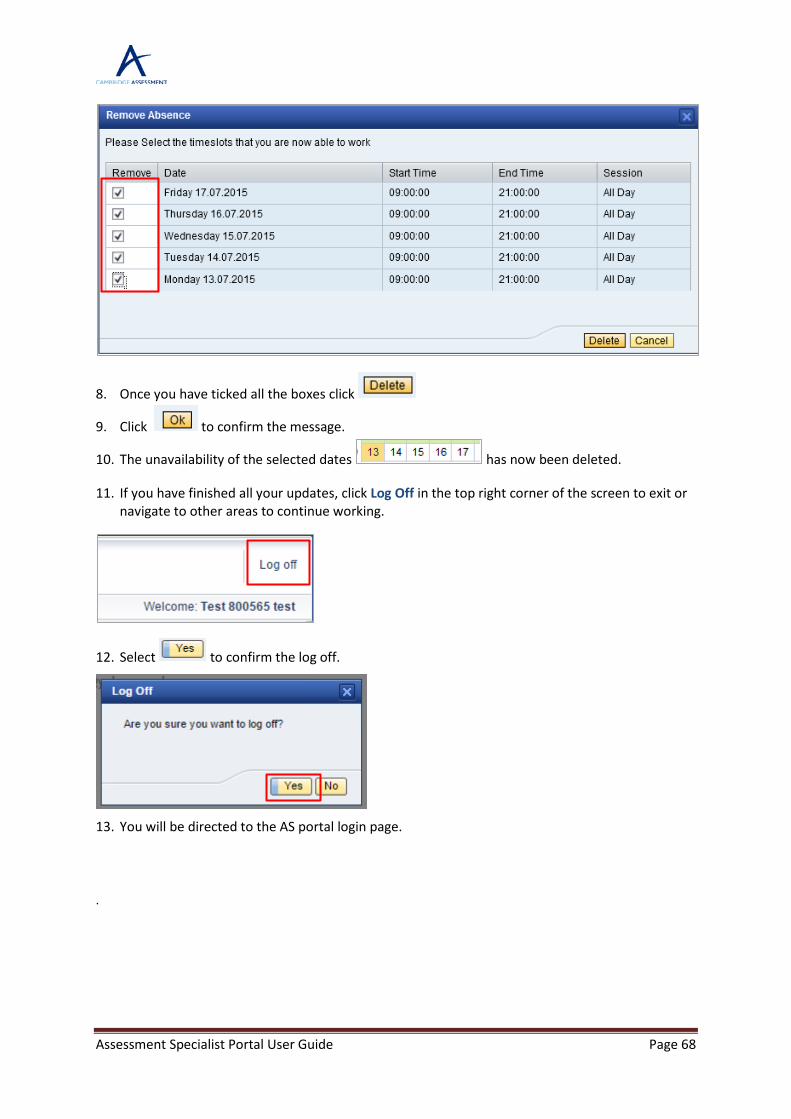
8. Once you have ticked all the boxes click
9. Click to confirm the message.
10. The unavailability of the selected dates has now been deleted.
11. If you have finished all your updates, click Log Off in the top right corner of the screen to exit or navigate to other areas to continue working.
12. Select to confirm the log off.
13. You will be directed to the AS portal login page.
.
Related Documents