Assembly Instructions Bella 8'x8'- TwinWall Glazing Approx. Dim. 244L x 244W x 219H cm / 96.1L"x 96.1W"x 86.2H" Bella 4' Extension Module Approx. Dim. 119L x 244W x 219H cm / 46.8"L x 96.1"W x 86.2"H Ax2 8'x8' 8'x1 2' (8'x8'+ Extension) Snow Load 1 00kg/m2 201bs/ft2 Wind Resistant (.3V 1 00km/hr 60m1/hr After Sale Service Email: [email protected] USA 877-627-8476 England 01302-380775 France 0169-791-094 Canada 1 800-866-5749 Germany 0180-522-8778 International +972 4-848-6942 www.palramapplications.com

Welcome message from author
This document is posted to help you gain knowledge. Please leave a comment to let me know what you think about it! Share it to your friends and learn new things together.
Transcript

Assembly Instructions
Bella 8'x8'- TwinWall Glazing Approx. Dim.
244L x 244W x 219H cm / 96.1L"x 96.1W"x 86.2H"
Bella 4' Extension Module Approx. Dim.
119L x 244W x 219H cm / 46.8"L x 96.1"W x 86.2"H
Ax2
8'x8' 8'x1 2' (8'x8'+ Extension)
Snow Load 1 00kg/m2 201bs/ft2
Wind Resistant (.3V 1 00km/hr
60m1/hr
After Sale Service Email: [email protected]
USA 877-627-8476 England 01302-380775 France 0169-791-094 Canada 1 800-866-5749 Germany 0180-522-8778 International +972 4-848-6942
www.palramapplications.com

IMPORTANT Please read these instructions carefully before you start to assemble this greenhouse. Keep these instructions in a safe place for future reference.
» Customer Service For assistance with assembly or for replacement parts - please log onto our website or call our service line (number is on the title page).
Additional information can be found at our website: www.palramapplications.com
» Safety Advice It is of utmost importance to assemble all of the parts according to the directions. Do not skip any step.
We strongly recommend using work gloves during panels' sliding.
Always wear shoes and safety goggles when working with extruded aluminium. If using a step ladder or power tools make sure that you follow the manufacturer's safety advice.
Do not touch overhead power cables with the aluminium profiles.
Do not attempt to assemble the greenhouse in windy or wet conditions.
Dispose of all plastic bags. Keep them out of reach of small children.
Keep children away from the assembly area.
Do not lean against or push the greenhouse during construction.
Do not position your greenhouse in an area exposed to excessive winds.
Do not attempt to assemble this greenhouse if you are tired, have taken drugs or alcohol or if you are prone to dizzy spells.
Hot items such as recently used grills, blowtorches etc. must not be stored in the greenhouse. Make sure there are no hidden pipes or cables in the ground before inserting the pegs.
This product is designed to be used as a greenhouse only.
Note: You should anchor the greenhouse directly to a solid foundation; Make sure that there are no obstructions between the assembly area and the final position.
» Care & Maintenance When your greenhouse needs to be cleaned, use a mild detergent solution and rinse with cold clean water.
DO NOT use acetone, abrasive cleaners or other special detergents to clean the clear panels.
» Tools & Equipment Work gloves
Phillips head screwdriver
Adjustable Spanner /Wrench
Leveler
Tape measure
Step ladder
Scissors
Electric screwdriver ( lOmm, 7mm, Phillips)
Lubricant (Optional)
T001 - Special tool for Screws 411 and nuts 412
Before Assembly v Selecting a site:
- The greenhouse must be positioned and fixed on a flat level surface.
- Choose a sunny position away from overhanging trees.
V We strongly recommend this greenhouse to be secured directly to a solid concrete foundation.
V This is a multi-part assembly best achieved by two people. Allow at least half a day for the assembly process.
V Take all components & parts out of the packages. Sort the parts and check against the content parts list.
Parts should be laid out close at hand. Keep all small parts (screws etc.) in a bowl so they do not get lost.
I Please note multi-sided profiles are used in this greenhouse. As a result some holes in the profiles are not used during assembly.
Please review entire instructions before starting. Carry out the assembly steps in exact order.
IR The drawings in this manual are designed for 8'x 8'greenhouse + 4'Extension Kit. Please note that content list refers only for 8x8 greenhouse.
Note: all the extension module steps are marked with a dashed outline, should be performed during the greenhouse assembly process.

8'x8' 4' Ext. Wx12'
Model Base Length No. of Packages
Bella (8' x 8') 244 cm / 96.1" 1
Bella + 4' Ext. (8'x 12') 363 cm / 142.9" 2
Bella + 4' Ext. x 2 (8' x 16') 482 cm / 189.8" 3
Bella + 4' Ext. x 3 (8' x 20') 601 cm / 236.6" 4
» During Assembly Make sure the base is square by measuring the diagonals and level by using a spirit level.
Peel the film covering the panel. Make sure you install it with the UV protected side out.
You may use Silicon lubricant spray in order to help you slide the panels into the profiles.
Do not spray the Polycarbonate panels.
Use a rubber mallet if necessary.
All panels with the stamped words THIS SIDE OUT must be facing out to create full UV protection. Remove plastic sticker as panels are locked in place.
During assembly you will encounter the information icon, please refer to the relevant assembly step for additional comments and assistance.
This icon indicates that the installer should be inside the product.
This icon indicates that 11 the installer should be
outside the product.
Step 7: Roof window can be located only on one of the two central roof panels.
If you assemble the greenhouse with an extension module, the roof windows must be placed on panels only as specified in the manual.
* Note: The selected placing will affect the next assembly steps.
Step 8: Please make sure you place profile and screws according to the window location (Step 7)
Step 41: In case the window is not closed properly, please go to Step 40b, release the screws, adjust the profile and tighten the screw.
Step 44: Peel the film covering the panel. Make sure you install it with the UV protected side out.
Step 53: Choose the appropriate anchoring according to the existing base. Screws and masonry anchors are not supplied.
A\ Important Recommendations Firmly connect the greenhouse to a level surface immediately after completion of the assembly.
Anchoring this product to the ground is essential to its stability and rigidity. It is required to complete this stage in order for your warranty to be valid.
Tighten all screws once assembly is completed.
Screws 411 and nuts 412 are used throughout the assembly process.
Screws 411 are to be assembled from the outside and nuts 412 from the inside of the greenhouse.
If not specified otherwise, do not fasten screws and nuts (411 & 412) for more than 2-3 turns. Do not tighten them until completion of the panels'assembly. These 2 icons indicate if screw's tightening is required or not. However, in some steps, temporary tightening of a few screws may be needed to prevent a
profile from sliding out.

IMPORTANT!
Veuillez lire attentivement ces instructions avant de commencer a monter votre serre. Conservez ces instructions en lieu sur pour toute consultation ulterieure.
» Service clientele Pour toute assistance concernant le montage de la serre ou ses pieces de rechange - veuillez consulter notre site Internet ou appeler notre service technique (dont le numero de telephone figure sur la couverture de la brochure).Pour en savoir plus,
n'hesitez pas a visiter notre site Internet : www.palramapplications.com
» Consignes de securite Tres important !Veuillez suivre scrupuleusement les instructions de cette brochure et realiser les etapes dans l'ordre enonce.
Nous recommandons vivement le port de gants de protection pendant le montage.
Portez toujours des chaussures de travail et des lunettes de protectrion lorsque vous travaillez des pieces en aluminium extrude.
Lors de ('utilisation d'une echelle ou d'outils electriques, assurez-vous de bien suivre les consignes de securite du fabricant.
Veillez a ne pas toucher de cables aeriens avec les profiles en aluminium.
N'essayez pas de monter la serre s'il y a du vent ou s'il fait humide.
Jetez tous les sacs en plastique en appliquant les regles de securite et maintenez-les hors de portee des jeunes enfants.
Eloignez les enfants de la zone d'assemblage.
Ne vous appuyez pas contre la serre et ne la poussez pas pendant le montage.
Ne positionnez pas la serre dans un endroit trop exposé au vent.
N'essayez pas de monter la serre si vous etes fatigue, si vous etes sous l'effet de drogues, de medicaments ou d'alcool ou encore si vous etes sujet aux vertiges.
Les objets chauds tels qu'un barbecue, un chalumeau ou autre article ayant ete recemment utilises, ne doivent pas etre ranges dans la serre.
Avant de planter les piquets, assurez-vous qu'aucun tuyau ni cable nest enterre a
('endroit selectionne pour ('installation.
Ce produit est concu pour servir de serre exclusivement.
Remarque: Vous devez ancrer le serre de jardin directement a une fondation solide ;
assurez-vous qu'il n'y a pas d'obstacles entre la zone de montage et la position finale.
» Entretien & Maintenance Pour nettoyer votre serre, utilisez une solution detergente douce et rincez a l'eau claire et froide.
NE PAS utiliser d'acetone ni de produits nettoyants ou autres detergents speciaux pour nettoyer les panneaux clairs.
» Outils & Equipement (non fournis) Gants de travail
Tournevis cruciforme
Cle a molette / Cle
Niveleur
Ruban a mesurer
Escabeau
» Avant le montage Choisir un endroit :
Ciseaux
Tournevis electrique (10 mm, 7 mm, Cruciforme)
Lubrifiant (Facultatif)
T001 - Outil special pour vis 411 et ecrous 412
`W.
- La serre doit etre positionnee et fixee sur une surface plane et horizontale.
- Choisissez un endroit ensoleille loin des arbres en saillie.
IR Nous vous recommandons fortement de securiser cette serre directement a une fondation en beton solide. Utilisez les trous pre-perces dans la base metallique au moment de le faire.
IR II s'agit thun assemblage multi parties qu'il vaut mieux realiser a deux. Comptez au moins une demi journee pour le processus de montage.
Retirez tous les composants des paquets.Triez les elements et verifiez la liste. Les
elements doivent se trouver a portee de main.
Gardez touts les petits elements (vis etc.) dans un bol pour ne pas les perdre.
Veuillez noter que des coupes multi faces sont utilisees dans cette serre. Cest pourquoi certains trous dans les coupes ne sont pas utilises pendant le montage.
Veuillez verifier toutes les instructions avant de commencer. Procedez aux etapes de montage dans I>ordre exact.
IR Les schernas de ce manuel sont concus pour un serre de jardin 8'x 8' + Kit d'extension 4'. Veuillez noter que la liste de contenu se !Were uniquement aux serres de jardin 8'x8' .
Remarque :Toutes les etapes de module d'extension sont marquees avec un contour en pointilles dans l'integralite du processus d'assemblage du serre de jardin.

8'x8' 4' Ext. Wx12'
Modele Longueur de la base Nombre de packs
Bella (8' x 8') 244 cm / 96.1" 1
Bella + 4' Ext. (8'x 12') 363 cm / 142.9" 2
Bella + 4' Ext. x 2 (8' x 16') 482 cm / 189.8" 3
Bella + 4' Ext. x 3 (8' x 20') 601 cm / 236.6" 4
» Durant ('assemblage Assurez-vous que la base soit bien carree en mesurant les diagonales et le nivelage a
l'aide d'un niveau a bulle.
Assurez-vous que cette face est bien tournee vers le haut lors de l'installation, car c'est la seule a etre enduite d'un vernis anti-UVs.
Vous pouvez utiliser un spray de silicone lubrifiant afin de vous aider a glisser les
panneaux dans les profils.
Ne pulverisez pas les panneaux en polycarbonate.
Utilisez un maillet en caoutchouc si necessaire.
Tous les panneaux estampilles "CE COTVERS L'EXTYilEUR" doivent etre orientes vers l'exterieur pour assurer une protection UV integrale. Retirez les stickers en plastique alors que les panneaux sont verrouilles en place.
Pendant le montage, vous verrez name dinformation, veuillez-vous referer a la phase de montage correspondante pendant des commentaires et une assistance supplementaires.
Cette lame indique que l'installateur doit etre a l'interieur du produit
Cette lame indique que l'installateur dolt etre en dehors du produit.
Etape 7 : La fenetre du toit peut etre placee uniquement sur l'un des deux panneaux centraux du toit.
Si vous assemblez le serre de jardin avec un module d'extension, les fenetres de toit doivent etre placees sur des panneaux seulement comme specifie dans le manuel.
* Remarque : L'emplacement selectionne aura des consequences sur les prochaines etapes de montage.
Etape 8: Veillez a bien placer le profit et les vis selon ('emplacement de la fenetre (etape 7).
Etape 41 : Au cas ou la fenetre ne ferme pas correctement, referez-vous a l'etape 40b, veuillez relacher les vis, ajustez la coupe et serrez les vis.
Etapes 44: Assurez-vous que cette face est bien tournee vers le haut lors de l'installation, car c'est la
seule a etre enduite d'un vernis anti-UVs.
Etape 53 : Fixer la serre peut egalement etre effectue en percant les coupes de base et en la fixant au sol en utilisant des vis de terre (vis non fournies).
Recommandations Importantes Connectez le serre de jardin fermement a une surface nivelee apres l'achevement de ('assemblage.
Cette etape d'ancrage du produit au sol est essentielle a sa stabilite et a sa rigidite, elle est de plus necessaire pour assurer la validite de votre garantie. Serrez toutes les vis une fois ('assemblage termine.
Les vis 411 et emus 412 servent tout au long de la procedure.
Les vis 411 se placent l'exterieur et les emus 412 a l'interieur de la serre.
Ne serrez les vis et emus (411 & 412) que de 2 a 3 tours, pas plus. Ne les serrez pas tant que ('assemblage nest pas completement termine, sauf indication contraire.
Cependant, la realisation de certaines etapes peut necessiter le serrage provisoire de quelques vis pour empecher un profile de tomber en attendant gull soit entierement integre a ('ensemble de la structure dans les etapes suivantes.
(NI >1 (NI O 1/40

WICHTIG Bitte lesen Sie diese Anweisungen sorgfaltig durch, bevor Sie mit dem Aufbau des Gewachshauses beginnen. Heben Sie diese Anweisungen an einem sicheren Ort auf, urn spater auf sie zuruckgreifen zu konnen.
» Kundendienst FOr Hilfe bei dem Aufbau oder fur Ersatzteile - konnen Sie sich entweder auf unserer Webseite einloggen oder unseren Kundendienst anrufen (die Nummer steht auf der Titelseite). www.palramapplications.com
» Sicherheitshinweise Es ist von grosster Wichtigkeit, alle Teile genau gemass den Anweisungen zusammenzubauen.Lassen Sie keinen Schritt aus.
Wir empfehlen warmstens, wahrend des Aufbaus Arbeitshandschuhe zu tragen.
Tragen Sie immer Schuhe und eine Schutzbrille, wenn Sie mit stranggepresstem Aluminium arbeiten.
Wenn Sie eine Stufenleiter oder Elektrowerkzeuge benutzen, achten Sie darauf, die Sicherheitshinweise des Herstellers zu befolgen.
Beruhren Sie mit den Aluminiumprofilen keine Oberleitungen.
Versuchen Sie nicht, das Gewachshaus bei windigem oder regnerischem Wetter zusammenzubauen.
Entsorgen Sie alle Plastiktuten sicher und bewahren sie ausserhalb der Reichweite von kleinen Kindern auf.
Halten Sie Kinder vom Aufbaubereich fern.
Wahrend des Aufbaus sollten Sie sich nicht gegen das Gewachshaus lehnen oder es
drucken.
Bauen Sie Ihr Gewachshaus nicht an Orten mit hoher Windbelastung auf.
Versuchen Sie nicht, dieses Gewachshaus aufzubauen wenn Sie mude sind, unter dem Einfluss von Drogen oder Alkohol stehen oder zu Schwindelanfallen neigen.
Heisse Gerate wie kurzlich benutzte Grills, Schneidbrenner usw. durfen nicht im Gewachshaus gelagert werden. Vergewissern Sie sich vor Einsetzen der Pflocke, dass sich keine versteckten Rohre oder Kabel im Boden befinden.
Dieses Produkt ist nur fur den Einsatz als Gewachshaus geeignet.
Hinweis: Sie sollten das Gewachshaus direkt in einem stabilen Fundament verankern. Sorgen Sie daftir, dass sich zwischen dem Montage- und dem Aufstellort des Gewachshauses keine Hindernisse befinden.
» Pflege &Wartung Wenn Ihr Gewachshaus gereinigt werden muss, verwenden Sie ein mildes Reinigungsmittel und spOlen Sie mit kaltem, sauberem Wasser nach.
Verwenden Sie zur Reinigung der durchsichtigen Elemente KEIN Aceton und auch keine anderen scheuernden Reinigungsmittel oder andere Spezialreiniger.
»Werkzeuge & Ausrustung Arbeitshandschuhe
Kreuzschlitz-Schraubendreher
Rollgabelschlussel /Schraubenschlussel
Wasserwaage
MaBband
Stehleiter
Schere
Akku-Schraubendreher (10 mm, 7 mm, Kreuzschlitz)
Schmiermittel (optional)
T001 - Spezialwerkzeug fur Schrauben 411 und Muttern 412
» Vor dem Zusammenbau Einen Aufstellungsort auswahlen:
- Das Gewachshaus muss auf einem flachen Untergrund aufgestellt und befestigt werden.
- Wahlen Sie eine sonnige Position abseits von Oberhangenden Baumen.
Wir empfehlend dringend, dieses Gewachshaus direkt auf einem soliden Betonfundament zu befestigen.Verwenden Sie dabei die vorgebohrten Locher in der Metallbasis.
IR Dieser mehrteilige Bausatz sollte am besten von zwei Personen aufgebaut werden. Nehmen Sie
sich fur den Zusammenbau mindestens einen halben Tag Zeit.
Entpacken Sie alle Bauteile. Sortieren Sie die Teile und vergleichen Sie sie mit der StOckliste. Die Teile sollten griffbereit ausgelegt werden.
Bewahren Sie alle kleinen Teile (Schrauben usw.) in einer Schussel, urn zu verhindern, dass sie verlorengehen.
Beachten Sie bitte, dass bei diesem Gewachshaus mehrseitige Profile verwendet werden. Wahrend des Zusammenbaus werden daher einige Locher in den Profilen nicht verwendet.
Lesen Sie bitte vor dem Zusammenbau die gesamte Anleitung durch. Befolgen Sie beim Zusammenbau die genaue Reihenfolge.
Die Zeichnungen in diesem Handbuch sind fur 8'x 8' Gewachshaus + 4 'Extension Kit entwickelt. Bitte beachten Sie, dass der Inhalt Liste bezieht sich nur fur 8x8-Gewachshaus.
Hinweis: alle Erweiterungsmodul Schritte sind mit gestrichelter Umriss markiert sein sollte
im Gewachsmontageprozess durchgefuhrt wird.

8'x8' 4' Ext. Wx12'
Modell Basislange Packungsanzahl
Bella (8' x 8') 244 cm / 96.1" 1
Bella + 4' Ext. (8'x 12') 363 cm / 142.9" 2
Bella + 4' Ext. x 2 (8' x 16') 482 cm / 189.8" 3
Bella + 4' Ext. x 3 (8' x 20') 601 cm / 236.6" 4
» Wahrend der Montage Vergewissern Sie sich, dass die Basis sowohl quadratisch als auch waagrecht ist, indem Sie die Diagonalen messen und die Basis mit einerWasserwaage prufen.
Diese Seite soli nach oben zeigend angebracht werden. Sie ist die Einzige mit einer UV- Schutz Lackierung.
Urn das Einfuhren der einzelnen Platten in die Profile zu vereinfachen, konnen Sie Silikon- Gleitspray verwenden.
Bespruhen Sie nicht die Polycarbonat-Platten.
Nehmen Sie - falls notig - einen Gummihammer zur Hilfe.
Alle mit den Worten THIS SIDE OUT versehenen Platten mussen nach auBen zeigen, damit der voile UV-Schutz garantiert werden kann.
(I)
Beim Aufbau wird lhnen das Informationssymbol begegnen. Fur zusatzliche Kommentare und Unterstutzung beziehen Sie sich bitte auf die entsprechende Aufbaustufe.
Dieses Symbol zeigt an, dass sich die installierende Person sich im Inneren des Produktes befinden sollte.
Dieses Symbol zeigt an, dass
.11 die installierende Person sich auBerhalb des Produktes befinden sollte.
Schritt 7: Dachfenster kann nur auf einem der beiden mittleren Dachpaneele angeordnet sein.
Wenn Sie das Gewachshaus mit einem Erweiterungsmodul montieren, mussen die Dachfenster auf Panels nur, wie im Handbuch angegeben platziert werden.
* Hinweis: Die zur Befestigung gewahlte Platte beeinflusst die folgenden Montageschritte.
Schritt 8: Bitte stellen Sie sicher, dass Sie die Profile und die Schrauben entsprechend der Position des Fensters legen. (Schritt 7)
Schritt 41: Falls das Fenster nicht richtig schlieBen sollte, folgen Sie Schritt 40b, losen Sie bitte die Schrauben, stellen Sie die Profile erneut ein und ziehen Sie die Schrauben zusammen.
Schritt 44: Diese Seite soli nach oben zeigend angebracht werden. Sie ist die Einzige mit einer UV-Schutz Lackierung.
Schritt 53: Das Gewachshaus kann auch verankert werden, indem man die Sockelprofile anbohrt und am Boden mit Bodenschrauben und Krampen festmacht (Schrauben und Spikes werden nicht mitgeliefert).
Wichtige Hinweise
Befestigen Sie das Gewachshaus sofort nach Fertigstellung der Montage auf einem geraden Untergrund. Die Verankerung dieses Produkts im Untergrund ist wesentlich fur seine Stabilitat und Festigkeit. Sie ist unablasslich, urn diesen Arbeitsschritt zu beenden, damit Ihre Garantie gultig bleibt. Ziehen Sie alle Schrauben fest, sobald die Montage beendet ist.
In manchen Fallen kann es jedoch notig sein, einige Schrauben vorubergehend festzuziehen, urn das Umfallen eines Profils zu vermeiden. (466)
Ziehen Sie die Schrauben und Muttern (411 und 466) nicht mit mehr als 2 -3 Umdrehungen fest. Ziehen Sie sie erst nach Beendigung derVerglasung weiter fest, falls dies nicht ausdrucklich anders festgelegt ist.
Bei einigen Schritten mussen allerdings eventuell ein paar Schrauben vorubergehend angezogen werden, urn zu vermeiden dass ein Profil fallt.

IMPORTANTE Por favor, lea estas instrucciones cuidadosamente antes de empezar a montar este invernadero.
Mantenga estas instrucciones en un lugar seguro para referencia futura.
» Seryicio de Ayuda al Cliente Para obtener ayuda con el montaje o para las piezas de recambio - por favor entre a nuestro sitio web o Ilame a nuestra linea de servicio (el numero esta en la pagina de titulo).
Informacion adicional se puede encontrar en nuestro sitio web: www.palramapplications.com
» Consejo de Seguridad Es de suma importancia montar todas las partes de acuerdo con las instrucciones. No se salte ningun paso.
Recomendamos firmemente el use de guantes de trabajo durante el montaje.
Use siempre zapatos y gafas de seguridad al trabajar con aluminio extruido.
Al usar una escalera plegable o herramientas electricas asegurese de que sigue las instrucciones de seguridad de los fabricantes.
No toque los cables electricos aereos con los perfiles de aluminio.
No intente montar el invernadero en dias de viento o dias con humedad.
Disponga todas las bolsas plasticas en lugar seguro - guardelas fuera del alcance de ninos.
Mantenga a los ninos fuera del area de montaje.
No se apoye ni empuje el invernadero durante la construccion.
No coloque su invernadero en un area expuesta al viento excesivo.
No intente montar este invernadero si usted esta cansado, ha tornado drogas o alcohol o si usted es propenso a ataques de mareo.
Articulos calientes recientemente usados tales como parrillas, sopletes etc. no deben ser almacenados en el invernadero. Asegurese de que no haya ninguna tuberia o cables ocultos en la tierra antes de insertar las clavijas.
Este producto es designado a ser usado solamente como invernadero.
Nota: debe anclar el invernadero directamente a una base solida; Asegurese de que no hay obstaculos entre el area de montaje y la posicion final.
Cuidados & Mantenimiento Cuando su invernadero necesite limpieza, utilice una solucion detergente suave y enjuague con agua limpia fria.
NO UTILICE acetona, limpiadores abrasivos u otros detergentes especiales para limpiar los paneles. Se recomienda comprobar periodicamente que los paneles del techo >tapones (parte de plastico 329 y perfil 981) estan colocados en el lugar.
Herramientas & Equipos Guantes de trabajo
Destornillador Phillips
Llave ajustable/Llave
Nivelador
Cinta metrica
Escalera
Tijeras
Destornillador electrico (de 10 mm, 7 mm, Phillips)
Lubricante (opcional)
T001 - Herramienta especial para tornillos 411 y tuercas 412
» Antes del Montaje Seleccionar un lugar:
- El invernadero debe colocarse y fijarse en una superficie plana y nivelada.
- Escoja una ubicacion soleada y apartada de arboles que la cubran.
Recomendamos encarecidamente que el invernadero se fije directamente sobre cimientos de cemento solido. Para hacer esto, utilice los agujeros previamente taladrados en la base de metal.
IR Este montaje consta de varias partes y seria optima que lo realizasen dos personas. El proceso de montaje Ilevara alrededor de medio dia.
Extraiga todas las piezas de componentes de sus embalajes. Ordene las piezas y compruebe que estan todas usando la lista de contenidos. Las piezas deberian colocarse cerca y tenerlas a mano. Ponga las piezas pequenas (p. ej. tornillos) en un bol para no perderlas.
Por favor, tenga en cuenta que este invernadero incluye perfiles con multiples superficies. Como resultado, algunos de los agujeros de los perfiles no se utilizan durante el montaje.
Por favor, revise todas las instrucciones antes de empezar. Siga los pasos del montaje en el orden exacto.
IR Los dibujos de este manual estan disenados para invernaderos de 8 ' x 8' + Kit de extension de 4 '.Tenga en cuenta que la lista de contenido se refiere solo a invernaderos 8x8.
Nota: todos los pasos del modulo de extension estan marcados con un contorno de trazos, y deben ser realizados durante el proceso de montaje del invernadero.

8'x8' 4' Ext. Wx12'
Modelo Longitud base Numero de paquetes
Bella (8'x 8') 244 cm / 96.1" 1
Bella + 4' Ext. (8'x 12') 363 cm / 142.9" 2
Bella + 4' Ext. x 2 (8'x 16') 482 cm / 189.8" 3
Bella + 4' Ext. x 3 (8'x 20') 601 cm / 236.6" 4
» Durante el montaje Asegurese de que la base es cuadrada, midiendo las diagonales y el nivel mediante el use de un nivel de burbuja.
Pele la pelicula que cubre el panel. Asegurese de instalarla con el lado con proteccion UV haaa afuera.
Es posible utilizar un aerosol lubricante de silicona con el fin de ayudar a deslizar los paneles en los perfiles.
No pulverice los paneles de policarbonato.
Utilice un martillo de goma si es necesario.
Todos los paneles con las palabras estampadas ESTE LADO HACIA AFUERA deben estar mirando hacia afuera para crear una proteccion UV completa. Quite la etiqueta de plastico a medida que bloquee los paneles en su lugar.
Cuando yea el icono de informacion, por favor, acuda al paso de montaje correspondiente para ver comentarios y asistencia adicional.
Este icono indica que el instalador debe estar dentro del producto.
Este icono indica que el instalador debe estar fuera del producto.
Paso 7: la ventana del tejado puede estar situada solamente en uno de los dos paneles centrales del techo.
Si monta el invernadero con un modulo de extension, las ventanas del tejado deben ser colocadas en los paneles solo como se especifica en el manual.
* Nota: la colocacion seleccionada afectara a los proximos pasos del montaje.
Paso 8: Por favor, asegurese de colocar el perfil y los tornillos de acuerdo con la ubicacion de la
ventana (Paso 7)
Paso 41: en caso de que la ventana no se cierre correctamente, por favor vaya al Paso 40b, afloje los tornillos, ajuste el perfil y apriete el tornillo.
Pasos 44: Pele la pelicula que cubre el panel. Asegurese de instalarla con el lado con proteccion UV hacia afuera.
Paso 53: seleccione el anclaje adecuado en fund& de la base existente. Los tornillos y anclajes de mamposteria no estan incluidos.
LLImportant Recommendations Ajuste firmemente el invernadero en una posicion nivelada inmediatamente despues de completar su montaje. Por favor, tenga en cuenta: Anclar este producto al suelo es esencial para su estabilidad y rigidez. Es necesario completar esta fase para que su garanda sea valida.
Apriete todos los tornillos de montaje al completar.
Los tornillos 411 y tuercas 412 se utilizan en todo el proceso de montaje. Los tornillos 411 se deben atornillar desde el exterior y las tuercas 412 desde el interior del invernadero. Si no se especifica lo contrario, no apriete los tornillos y las tuercas (411 y 412) mas de 2-3 vueltas.
No los apriete hasta la finalizacion del montaje de los paneles. Estos 2 iconos indican si se requiere apretar el tornillo o no.
Sin embargo, en algunos pasos, se puede necesitar el apriete temporal de algunos tornillos para evitar que un perfil se deslice fuera.
(NI >1 (NI O 1/40

TARKEAA Lue ensin huolellisesti nama ohjeet ennen kasvihuoneen asentamista
Saityta nama ohjeet turvassa vastaisuuden varalta
» Asiakas palvelu Jos tarvitset apua / neuvoja asennukseen tai osien vaihtoon - kaanny meidan kotisivujen, sahkopostin puoleen tai soita jalkimarkkinointiimme (tiedot loytyvat kansilehdesta).
Lisainformaatiota loydat valmistajan sivuilta www.palramapplications.com
» Turvallisuus ohje Ensisijaisen tarkeata on noudattaa asennusohjeen jarjestysta ja ohjeita - ala jaata mitaan tekematta.
Suosittelemme suojakasineiden kayttoa asennustyossa.
Kayta aina tukevia kenkia ja suojalaseja tydskennellassasi metallituotteiden kanssa.
Jos kaytat tikkaita , apuvalineita , akkuporakonetta - varmista aina myos tyokalu valmistajan kayttoohjeet.
Ala kosketa sahkojohtoja tai lahteita metallisten esineiden kanssa.
Ala yrita pystyttaa / asentaa kasvihuonetta tuulisella , sateisella tai huonolla saalla.
Havita huolellisesti kaikki muoviset pakkaustuotteet ja varmista ettei ne paase pienten lasten lahettyville.
Pida lapset loitolla tyoskentely alueelta ja pida myos alue aina siistina.
Ala tyonna tai nojaa kasvihuoneen rakenteisiin asennusvaiheen aikana.
Valitse huolella kasvihuoneen sijainti , siten ettei se ole alttiina kovalle tuulelle tai ylimaaraisille lumikuormille.
Ala yrita asentaa tata kasvihuonetta puolikuntoisena , vasyneena , paihteiden taikka laakityksen vaikutuksen alaisena.
Kuumat tuotteet kuten grillit , polttotyokalut , terassilammittimet tulee sailoa mualla kuin kasvihuoneessa. Varmista etta maahankiinnitys on turvallista ja ettei maaperassa ole putkia tai sahkojohtoja.
Tama tuote on suunniteltu ainoastaan kasvihuoneeksi.
Huomaa: kasvihuone on kiinnitettava suoraan kiintealle perustalle; varmista, etta kokoamisalueen ja lopullisen sijainnin valilla ei ole esteita.
» Huolto & yllapito Kun kasvihuoneesi kaipaa pesua & puhdistusta, kayta ainoastaan mietoa saippuavetta ja huuhtele runsaalla kylmalla vedella. ALA KAYTA acetoonia, liuottimia tai muita voimakkaita puhdistusaineita - ei myoskaan mantyoljypohjaisia aineita. On suositeltavaa etta asennuksen kunto tarkistetaan saannollisesti , kattolevyt > kiinnikkeet (muoviset osat 329 & profiilit 981) ovat paikoillaan.
» Tyokalut &Valineet Tyokasineet
Phillipsin ruuvimeisseli
Saadettava kiintoavain
Tasoitin
Mittanauha
Tasotikkaat
Ennen kokoamista:
Sakset
Sahkoruuvimeisseli ( 10 mm, 7 mm, Phillips)
Voiteluaine (Valinnainen)
T001 - Erityistyokalu ruuveille 411 ja muttereille 412
Sijainnin valinta:
- Kasvihuone tulee asettaa ja kiinnittaa tasaiselle alustalle.
- Valitse aurinkoinen paikka, jonka ylla ei roiku oksia.
Suosittelemme, etta tama kasvihuone kiinnitetaan suoraan kiinteaan betonialustaan. Talloin voit kayttaa metallipohjaan valmiiksi ruuvattuja reikia.
Kokoaminen on moniosainen tyo, jonka suorittaa parhaiten kaksi henkiloa. Varaa ainakin puoli paivaa kokoamisprosessille.
I Ota kaikki osat ulos pakkauksistaan. Lajittele osat ja tarkista sisallysluettelosta, etta ne ovat kaikki tallella. Osat tulee asetella kaden ulottuville. Pida pienet osat (ruuvit yms.) kulhossa, jotta ne eivat katoa.
Huomaa, etta tassa kasvihuoneessa kaytetaan monisivuisia tukirankoja, joten kaikkia niissa olevia reikia ei kayteta kokoamiseen.
Lue koko kayttoohje ennen aloittamista. Suorita kokoamisvaiheet tarkassa jarjestyksessa.
IR Taman ohjekirjan piirustukset on suunniteltu 8'x 8'-kasvihuoneelle + 4' -laajennussarjalle. Huomioithan, etta pakkaussisallolla viitataan ainoastaan 8x8- kasvihuoneeseen.
Huomaa: kaikki laajennusmoduulin vaiheet on merkitty aariviivoin, ja ne tulisi suorittaa kasvihuoneen kokoamisen yhteydessa.

8'x8' 4' Ext. Wx12'
Malli Pohjan pituus Pakkausten lukumaara
Bella (8' x 8') 244 cm / 96.1" 1
Bella + 4' Ext. (8'x 12') 363 cm / 142.9" 2
Bella + 4' Ext. x 2 (8' x 16') 482 cm / 189.8" 3
Bella + 4' Ext. x 3 (8' x 20') 601 cm / 236.6" 4
» Kokoamisen aikana Varmista, etta pohja on suorakulmainen mittaamalla kulmat, ja tasaa kayttaen vatupassia
Kuori kalvo paneelin paalta. Varmista, etta asennat sen UV-suojattu puoli ulospain.
. Voit kayttaa silikonisprayta apuna paneelien liu'uttamisessa profiileihin.
. Ala kayta sprayta polykarbonaattipaneeleihin.
. Kayta tarvittaessa kumivasaraa.
Kaikkien "TAMA PUOLI YLOSPAIN" -tekstilla varustettujen paneelien on osoitettava ulospain tayden UV-suojan takaamiseksi. Poista muovitarra, kun paneelit on lukittu paikoilleen.
Asennuksen aikana tulet kohtaamaan tietokuvake katso asiaa kokoonpanoon askel lisakommentteja ja apua.
Tama kuvake osoittaa, etta asentaja pitaisi olla tuotteen ulkopuolella
Tama kuvake osoittaa Ietta asentajan pitaisi olla tuotteen sisalla
Vaihe 7: Kattoikkuna voi olla vain toisessa katon keskipaneeleista.
Jos kokoat kasvihuoneen laajennusmoduulilla, kattoikkunat on sijoitettava paneeleihin vain ohjekirjassa maaritetylla tavalla.
* Huomaa: valittu sijoitus vaikuttaa seuraaviin kokoamisvaiheisiin.Vaihe 8: varmistathan, etta sijoitat profiilin ja ruuvit ikkunan sijainnin mukaan
Vaihe 8: varmistathan, etta sijoitat profiilin ja ruuvit ikkunan sijainnin mukaan (Vaihe 7)
Vaihe 41: mikali ikkunaa ei ole suljettu kunnolla, siirry kohtaan 40b, avaa ruuvit, saada profiilia ja kirista taas ruuvit.
Vaihe 44: kuori kalvo paneelin paalta. Varmista, etta asennat sen UV-suojattu puoli ulospain.
Vaihe 53: valitse sopiva kiinnitystapa olemassa olevan pohjan mukaan. Pakkauksessa ei ole mukana ruuveja eika betonikiinnikkeita.
A Tarkeita suosituksia Kiinnita kasvihuone tukevasti vaakasuoralle alustalle heti kokoamisen jalkeen. tuotteen ankkurointi maahan on valttamatonta sen vakauden ja jaykkyyden kannalta. Se vaaditaan tassa vaiheessa, jotta takuu olisi voimassa.
Kirista kaikki ruuvit tayttaessaan kokoonpano.
Ruuveja 411 ja muttereita 412 kaytetaan lapi kokoamisprosessin. Ruuvit 411 tulee ki innittaa kasvihuoneen ulkopuolelta ja mutterit 412 sen sisapuolelta. Ellei toisin ole maaritelty, ala kirista ruuveja ja muttereita (411 &412) enempaa kuin 2-3 kierrosta. Ala kirista niita ennen kuin paneelien kokoaminen on suoritettu loppuun. Nama 2 symbolia kertovat, tuleeko ruuvit kiristaa vai ei.
Joissakin vaiheissa kuitenkin muutaman ruuvin kiristaminen valiaikaisesti voi olla tarpeen, jotta estettaisiin profiilin liukuminen ulos.
(NI >1 (NI O 1/40

Viktigt Las noga igenom dessa instruktioner innan ni beirjar montera vaxthuset. Feirvara dessa instruktioner pa en saker plats for framtida referenser.
» Kundservice For radgivning av montering eller byte av delar - vanligen kontakta ass via e-mail
eller telefon (nummer finns pa forstasidan).
Ytterligare information finns pa producentens hemsida: www.palramapplications.com
» Sakerhetsforeskrifter Folj monteringsanvisningarna i den ordning som anvisas i instruktionerna, hoppa inte Over nagot steg.
Vi rekommenderar att handskar, skor och skyddsglasogon alltid anyands cla man arbetar med metallprofiler.
Vid anvandning av stege, redskap och borrmaskin, folj tillverkarens sakerhetsrad.
Var noga med att inte komma i kontakt med elkablar cla metallprofiler hanteras.
Undvik att montera vaxthuset i daligt, blasigt vader eller regn.
Ta val hand om all plastpasar och se till att de ar utom rackhall for barn.
LM inte barn vistas pa monteringsplatsen och hall omgivningen snygg.
Luta eller tryck inte pa vaxthuset under montering.
Valj omsorgsfullt platsen for vaxthuset sa att det inte pafrestas av kraftig vind eller extra sno.
Forsok inte att satta ihop denna produkt om du ar tram har tagit droger, druckit alkohol eller om du brukar ha yrselattacker.
Heta foremal som en nyligen anvand grill, blaslampa eller dylikt far inte forvaras i vaxthuset. Forsakra att det inte finns nagra dolda ror eller kablar i marken innan du slat- ner metallfastena for att forankra vaxthuset.
Denna produkt ar endast aysedd for att anvandas som vaxthus.
Obs: Du bar forankra vaxthuset direkt pa en fast grund; Se till att det inte finns nagra hinder mellan monteringsomradet och den slutliga positionen.
» Underh611 & skotsel Nar vaxthuset behover rengoras skall du anvanda ett milt rengoringsmedel och skolja rikligt med kallt och rent vatten.
Am/and inte aceton, slipande rengoringsmedel eller andra specialmedel for att rengora panelerna. Vi rekommenderar att man tidvis kontrollerar takpanelernas faste (aven plastfasten 329 och profiler 981) och forsakrar deras ratta position.
» Verktyg & redskap Arbetshandskar
Stjarnskruvmejsel
Skiftnyckel/Skruvnyckel
Utjamnare
Mattband
Trappstege
Sax
Elskruvmejsel ( 10 mm, 7 mm, stjarn)
Smorjmedel (Valfritt)
T001 - Specialverktyg for Skruvar 411 och muttrar 412
Fore montering IR Val av plats:
- Vaxthuset maste placeras pa en fast och plant underlag.
- Valj en solig plats utan overhangande trad.
Vi rekommenderar absolut att detta vaxthus sakras direkt pa en solid cementgrund. Nar detta gars bar man anvanda de forborrade halen i metallramen..
Detta ar en monteringa av flera delar och gars bast av tva personer. Rakna med minst en halv dag for monteringsprocessen.
Ta ut alla komponenter ur forpackningen. Sortera delarna och kontrollera mot komponentlistan. Delarna bar laggas ut nara dig. Ha alla sma delar (skruvar etc.) i en skal sa att de inte forsvinner.
Lagg marke till att flerkantsprofiler anyands i vaxthuset. Ett resultat av detta ar att nagra av halen inte anyands under monteringen.
LAs igenom instruktionerna innan du startar. Utfor monteringsstegen i exakt ordning.
Ritningarna i denna manual ar utformade for 8'x 8'vaxthus + 4' utbyggnadssats. Observera att innehallslistan endast hanvisar till 8x8 vaxthus.
Obs: alla stegen for utbyggnadsmodulen ar markerade med en streckad kontur och skall utforas under vaxthusets monteringsprocess.

8'x8' 4' Ext. Wx12'
Modell Baslangd Antal paket
Bella (8' x 8') 244 cm / 96.1" 1
Bella + 4' Ext. (8'x 12') 363 cm / 142.9" 2
Bella + 4' Ext. x 2 (8' x 16') 482 cm / 189.8" 3
Bella + 4' Ext. x 3 (8' x 20') 601 cm / 236.6" 4
» Under montering . Se till att basen ar kvadratisk genom att mata diagonalerna och jamna ut med hjalp av
ett vattenpass.
. Skala av filmen som tacker panelen. Se till att du installerar den med den UV-skyddade sidan utat.
. Du kan anvanda silikonsmorjsprej for att hjalpa dig att skjuta in panelerna i profilerna.
. Spreja inte polykarbonatpanelerna.
. Am/and en gummiklubba om sa behovs.
. Alla paneler med de stamplade orden DENNA SIDA UT maste vara vanda utat for att skapa fullt UV-skydd. Ta bort plastetikett nar paneler ar lasta pa plats.
Nar man patraffar informationsikonen, se motsvarande monteringssteg for ytterligare kommentarer och hjalp
Denna ikon anger att installatoren bor befinna sig inne i produkten.
Denna ikon anger attinstallatoren bor befinna sig utanfor produkten.
Steg 7: Takfonster kan endast placeras pa en av de tva centrala takpanelerna.
Om du monterar vaxthuset med en utbyggnadsmodul, maste takfonstren placeras pa paneler endast pa det satt som anges i manualen.
* Obs: Den valda placeringen kommer att paverka de efterfoljande monteringsstegen.
Steg 8: Se till att du placerar profil och skruvar enligt fonsterplaceringen (Steg 7)
Steg 41: Om fonstret inte ar ordentligt stangt, var god ga till Steg 40b, lossa skruvarna, justera profilen och dra M skruven.
Steg 44: Skala av filmen som tacker panelen. Se till att du installerar den med den UV-skyddade sidan utat.
Steg 53: Valj ratt forankring beroende pa den befintliga basen. Skruvar och murverksforankringar medfoljer inte.
Viktiga rekommendationer Satt fast vaxhuset pa ett horisontellt plant underlag efter att monteringen Sr klar. Forankring av denna produkt pa marken Sr nocivandigt for stabilitet och styvhet. Det Sr nocivandigt att slutfora det har steget for att din garanti ska galla. Dra at alla skruvar nar du sluff& monteringen.
Skruvar 411 och muttrar 412 am/ands i hela monteringsprocessen. Skruvar 411 ska monteras fran utsidan och muttrar 412 fran insidan av vaxthuset. Om inget annat anges, skruva inte at skruvar och muttrar (411 och 412) mer an 2-3 vary.
Skruva inte M dem feirran monteringen av panelerna slutfeirts.
Dessa 2 ikoner indikerar om skruvatdragning krays eller inte. I vissa steg kan dock Stdragning av nagra skruvar beheivas for att feirhindra att en profil glider ut.
(NI >1 (NI O 1/40

TAHTIS Palun lugege kasutusjuhised hoolikalt labi enne kui hakkate oma kasvuhoonet kokku panema. Hoidke need juhised turvalised kohas edaspidiseks kasutamiseks
Klienditeenindus Abiks kokkupanemisel Kokkupanekul abisaamiseks kirjutage tiitellehel naidatud emailile.
Lisainformatsiooni Voib leida veebilehelt: www.palramapplications.com
» Ohutusjuhised Soovitame tungivalt kasutada kokkupanekul tookindaid.
Kandke alati jalanousid ja kaitseprille kui tootate pressitud alumiiniumiga.
Kasutades redelit voi elektritooriistu, veenduge, et jargite tootjapoolseid ohutusjuhiseid.
Arge Oritage kasvuhoonet kokku panna tuulistes voi niisketes tingimustes.
Visake koik plastikkotid Ohutuse eesmargil visake plastikkotid koheselt ara, need pole sobilikud lastele mangimiseks- volvad pohjustada lambumisohtu.
Hoidke lapsed kokkupanemisalast eemal.
Arge nojatuge kasvuhoone vastu Voilukake seda kokkupanekul.
Arge asetage oma kasvuhoonet Arge paigaldage kasvuhoonet tuulisesse kohta.
Arge Oritage kasvuhoonet kokku panna kui olete vasinud, kasutate ravimeid, olete tarbinud alkoholi voi olete uimane.
Kuumad esemed, nagu hiljuti kasutatud grill, leeklamp jm ei tohi hoida kasvuhoones. Veenduge, et varjatud torusid Voi kaablit poleks maapinnas enne vaiade sisestamist.
See toode on moeldud kasutamiseks ainult kasvuhoonena.
Markus: kasvuhoone tuleks kinnitada otse kovale pinnale; veenduge, et kokkupaneku- ja paigalduskoha vahel pole takistusi
Hooldus ja korrashoid Kui Teie kasvuhoone vajab puhastamist, kasutage pehmet puhastusvahendit ja loputage kulma, puhta veega.
ARGE KASUTAGE atsetooni, abrasiivseid puhastusaineid voi teisi lahuseid paneelide puhastamiseks. On perioodiliselt soovitav kontrollida, et katusepaneelide vahed (plastosad 329 ja profiil 981) oleksid omal kohal.
Tooriistad ja varustus tookindad
Phillipsi lamepeakruvikeeraja
tellitav mutrivoti
load
moodulint
treppredel
kaarid
elektriline kruvikeeraja (10 mm, 7 mm, Phillips)
maardeaine (valikuline)
T001 - spetsiaalne tooriist kruvidele 411 ja mutritele 412
Enne paigaldamist
Koha valimine:
- Kasvuhoone tuleb paigaldada ja kinnitada tasasele pinnale.
- Vali paikseline asukoht, kus ei oleks varjuheitvaid puid.
Soovitame kinnitada kasvuhoone kindlale betoonist vundamendile. Selleks kasutage
metallpohjas olevaid eelnevalt valmis puuritud auke.
See on mitmest osast koosnev struktuur, mille paigaldamist on parim teha kahe inimesega. Paigaldamine votab aega vahemalt pool paeva.
I Vota koik komponendid pakendist valja. Sorteeri detailid ning kontrolli detailide nimekirja alusel, kas koik on olemas. Soovitame asetada detailid kaeulatusse.
Hoia vaikeseid osi (kruvisid jms) kausis, et need ara ei kaoks.
IR' Pea silmas, et selles kasvuhoones kasutatakse mitme kuljega profiile. Seetottu jaavad paigaldamisel maned augud kasutamata.
Enne alustamist loe koik juhised labi. Paigaldamist tee tapselt juhendist toodud jarjekorras.
Selle kasutusjuhendi joonised vastavad 8'x 8' kasvuhoonele + 4' pikenduskomplektile. Pange tahele, et osade loetelu kehtib ainult 8 x 8 kasvuhoonele.
Markus: koik pikendusmooduli sammud on margitud katkendjoonega ja tuleks teha enne kasvuhoone kokkupanekut.

8'x8' 4' Ext. Wx12'
Mudel Aluse pikkus Pakendite an,
Bella (8'x 8') 244 cm / 96.1" 1
Bella + 4' Pikend (8'x 12') 363 cm / 142.9" 2
Bella + 4' Pikend x 2 (8'x 16') 482 cm / 189.8" 3
Bella + 4' Pikend x 3 (8'x 20') 601 cm / 236.6" 4
» Kokkupaneku ajal Veenduge, et alus on ruudukujuline; selleks mootke diagonaalid ja tasapind, kasutades vesiloodi.
Tommake paneelilt kile. Veenduge, et paigaldamisel jaab UV-kaitsega pool valjapoole.
Et paneelide libistamine profiilidesse oleks holpsam, voite kasutada silikoonmaarde spreid.
Arge pihustage polukarbonaatpaneelidele.
Vajadusel kasutage kummivasarat.
Koigi paneelide THIS SIDE OUT templiga margistatud pool peab jaama valjapoole, et tagada taielik UV-kaitse. Kui paneelid on paigas, siis eemaldage plastkleepsud. ds
Kui markate informatsiooniikooni, vaadake taiendavaid markuseid ja juhiseid vastava paigaldussammu alt.
See ikoon viitab sellele, et paigaldaja peaks paiknema toote sees.
See ikoon viitab sellele, et paigaldaja peaks paiknema valjaspool toodet.
Samm 7: katuseakent saab paigutada ainult Ohele kahest kesksest katusepaneelist.
Kui panete kasvuhoone kokku koos pikendusmooduliga, siis peate paigutama katuseaknad ainult nii, nagu juhendis on naidatud.
* Markus: valitud paigutus mojutab jargmisi kokkupanekusamme.
Samm 8: veenduge, et asetate profiilid ja kruvid vastavalt akna asukohale (Samm 7)
Samm 42: kui aken pole korralikult suletud, siis minge tagasi sammu 40b juurde, vabastage kruvid, kohandage profiili ja pingutage kruvi.
Sammud 41: eemaldage paneelilt kattekile. Veenduge, et paigaldate selle, UV-kaitsega kulg valjapoole.
Samm 53: valige pohjaga sobivad kinnitusankrud. Kruvid ja mOuritise ankrud ei kuulu komplekti.
Olulised soovitused Kinnita kasvuhoone kindlalt tasasele pinnale kohe peale selle kokkupanemist. Tahelepanu: toote pinnasesse ankurdamine on stabiilsuse ja jaikuse tagamiseks valtimatu. Selle etapi teostamine on garantii kehtimiseks kohustuslik. Pinguldage kruvid alles siis kui kasvuhoone on komplekteeritud.
Kruvisid 411 ja mutreid 412 kasutatakse terve kokkupaneku valtel. Kruvid 411 tuleb asetada kasvuhoone valjapoolt ja mutrid 412 seestpoolt. Kui pole maaratud teisiti, siis arge kinnitage kruvisid ja mutreid (411 & 412) tugevamini kui 2-3 pooret. Arge pingutage neid enne, kui paneelid on kokku pandud. Need kaks ikooni naitavad, kas kruvide pingutamine on noutav Vol mitte. Siiski voib monede sammude puhul olla kruvide ajutine pingutamine vajalik, et valtida profiili valjalibisemist.
(NI >1 (NI O 1/40


Contents
Item Qty.
8405
8414
8406
8407
8452
8451
8433
8400
8401
8437
6
4
1
1
5
2
3
1
1
1
Item Qty. Item Qty.
8403
8402
8404
8399
989
992
991
8421
8363
7599
8420
586
8417
8416
8415
8418
8419
8434

Contents
Item
288
7065
8454
8411
t )
99
22
7009
Qty.
4
1
4
4
318
3017
7271
. - .
. .
. - . e %
i t
, I
8
2
1
8254
8255
7908
7602
Qty. Item
462
464
463
422
465 vo
4
8
4
16 (+2)
16 (+2)
7083
7084
7085
7086
7088
423
8230
7871
7870
1
45)
c a/ ® o
2
2
2
411
8192
466
412
4008
7335
450
7442
Ii
f
7066
TO01
Qty.
87 (+8)
4
81 (+8)
10
20 (+2)
24 (+2)
6
20 (+2)

Contents
Item r I
I 7601
I
1 7597 I
I
8405
I
I
I
I 8429
I
I
I
I 8430 I
I
I
I
I 8453 I
L r I 1 586
I
I
I 8418 I
I
I 1 8419
I
1.
Extension Kit
. Qty. Item 9 r
o e
I I
2 I I 989
I I
2 I I I
II 991 I
4 11 11 I 1 992 I I
1 1 I
11 I 8421 I
1 I I I I
I
I 7039 I
I
I
I I 7931
I
I
. --- I
1 4 I
..._.- - I _a - - -1
11 1 1 I
11 I I 8455
3 I I
I I
I I
I 1
I 288
I I . 1 L
o :)
Qty. 9 r I I
Item
1 1 I I 411
i I I
I I
I I 466
1 I I
L
4008 I
I I
1 2
I I
I 1
4045
I I
I I 7442
li
i
1
I 1
I I
I I 3017 I 1
I I
1 I L I . I I
I I 99 I I
1 1 I
I I
I I
I I
4 I I
I I
I I 22 I I
I I 2
I I 7009
I I a 1. . .
- Qty. I
I
I 4 I
I
16 I (+2) I
I
2 1
.
..te, III IWO
'illig
,o?
I
I . 1
9 I
1 I
I
I
I
I
I
I
I
2 I
I
I
2 1
(+1) 1 - - - - a

1
[ 8437 1 8254 1 8255 1 450
8255

2
[
8363
...
I,
I
I
.. ... - .0
2 7442 4 8192 4 466 4

3 For Extension Kit Only
7599
-
-
Extension
7601 2
7597
Kit 8'x1
(8'x8,+ Extension)
Ix2I
(8'x8,+ Extensions)
2
7442
2
16
7442
a

4
7602 4 7599 3 7442 16
7599
e - s e s.
C) 1' N.
... ... .0
I
I
s. .. ... .0
E ,
Extension Kit

5
411 COP
9 466 9
Extension Kit
1
411 +4 I
466 +4

6
8407 1 411 10 466 10

7
Extension Kit
8'x12' (8'x8'+ Extension)
a

8405 2 411 8
A
8
."........ x2

../
9
1 411 2
-

../
10
8405 3 411 6

LExtension Kit
11 For Extension Kit Only
r
8430
-%
1 7039 1
411
466
4
4
In
I.
- --
8'rx1 2' (8'x8'+ Extension)
I
4
4 466
4
4
.0
I
I
I
I
I
I
I
I
I
I
I
I
I
I
I
I
I
I
I
I
I a

12
/r-
L
r I
I
I
I
I Extension Kit
For Extension Kit Only
8405
I
I
I
I
I
I
I
I
I
I
I
I
I
I
I
I
I
I
2 411 8
../

13
/r-
.
r
For Extension Kit Only
8405
I._
Extension Kit
2 411 4
../
,

A
14
8411 4 411 8 466 8
8411

15
8414 4 7335 8
O 8414

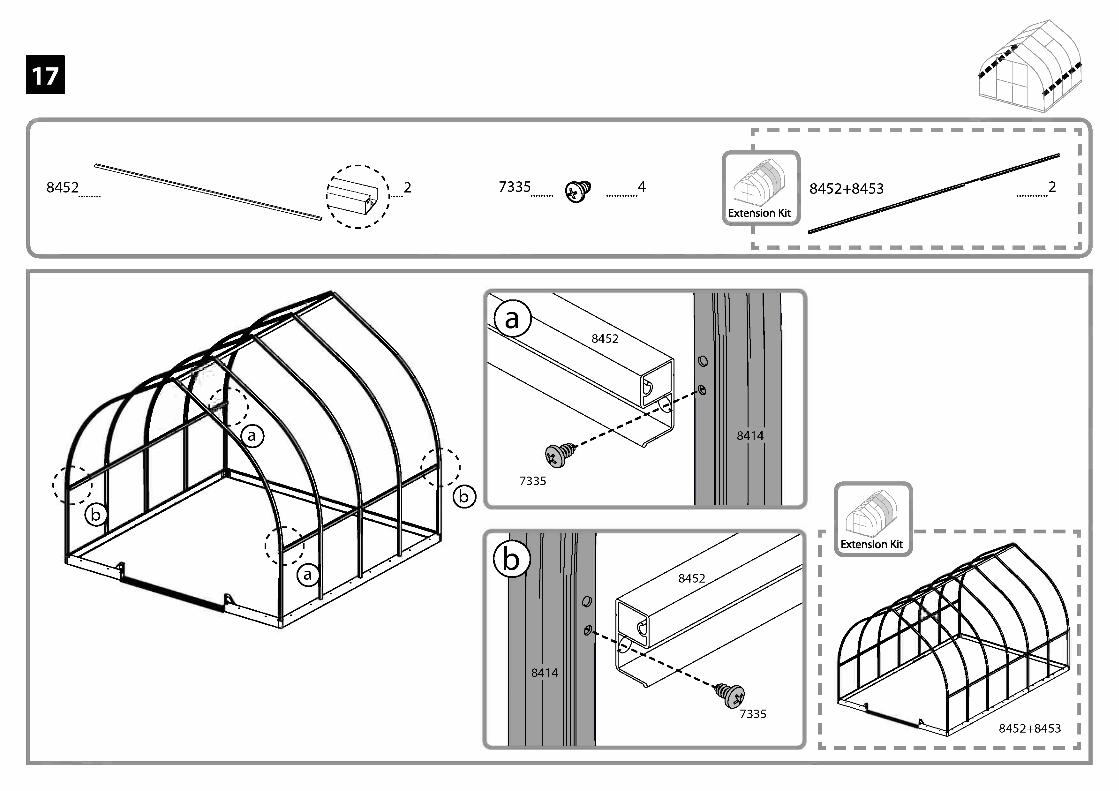
16 For Extension Kit Only
8452
8453
r9 I
I
I
I
I
I
I
I
I
I
I
I
I
I
I
I
I
I
I
I
I
I
I
I 1.
..,
Extension Kit
e 2
I 2
8452
0,
8455
8'x1 2' (8'x8'+ Extension)
I
2
8453
4045 8
I
)
Cr 4045
6 cm ---......._ _...4.....,,
"cfr-2 cm 'Q 2.36
0.8" 4045
I
8455
- 9 7 1
x2_11 I 1
I
1
I 1
I I 1
I I I I I I I I I I I I J
4-
: 2 cmi I 0.8"1 6 cm I 1 2.36" 1
ci.-4,1
1* ifi 0c),,
WC 4045
4045
41
1
I 2 1
1
I . . . a,
17
L.
8452 7335 4
[Extension Kith I I.
o
8414

18
466 6
I'
Extension Kit
1
I.
I I
466 +4 I
I I
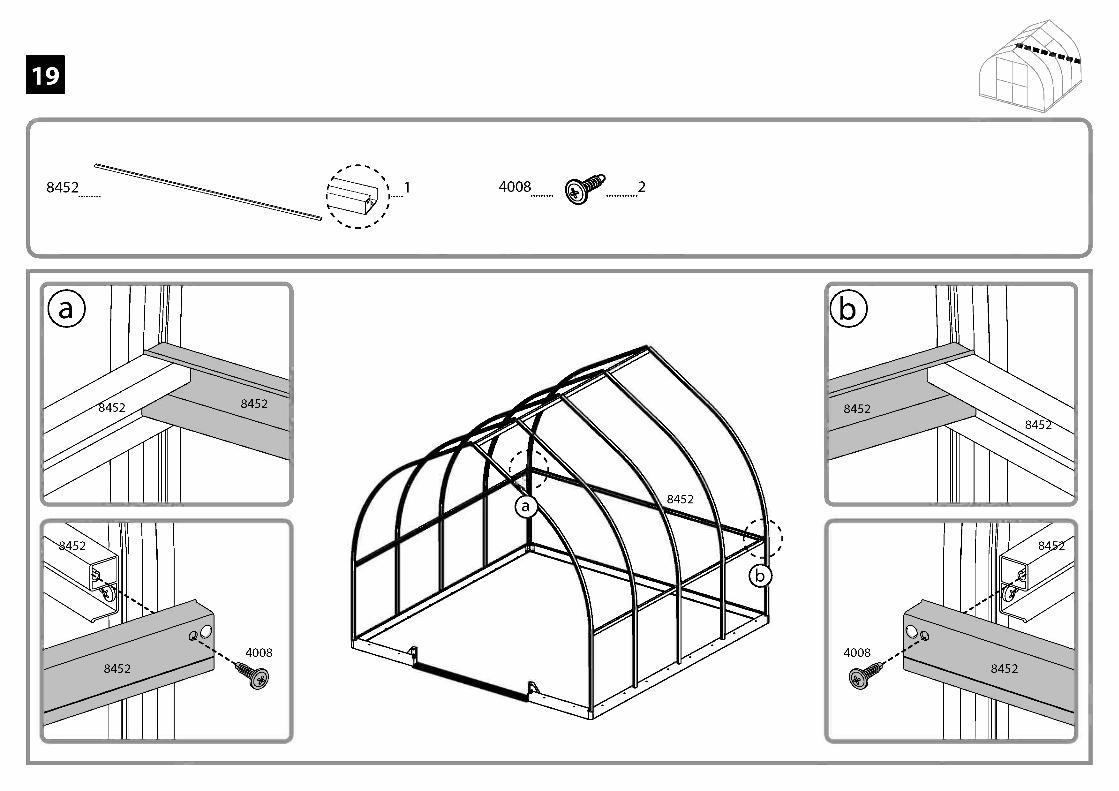
19
... .... "*. I s
4008
1 4008 2
4008

../
20
r
8433 2
8415
8416
1 411
1 466
2
2
This side out
411
1 1

,
21
,
,
8434 2 8433 1
411
466
1
1
411

22
r8403
../
1
411
466
3
3

23
8420 318
This side out This side out This side out
318 318
318
24
.
8451 2 4008 2
4008

../
25
r
8415
8416
8402 2
This side out

,/
26
/
411 2 466 2

27
8403 1 411 COP
2 466 2

28
.
8420 318
This side out
-
-ml

29 For Extension Kit Only
8452
8453
r9 I
I
I
I
I
I
I
I
I
I
I
I
I
I
I
I
I
I
I
I
I
I
I
I 1.
..,
Extension Kit
e 2
I 2
8452
0,
8455
8'x1 2' (8'x8'+ Extension)
I /
2
8453
4045
cr6 cm ,4.....hs
4045 "c17)2 cm 'Q 2.36
0.8" 4045
8455
1
8
- 9 7 1
x2 1
I
1
I
1
I
1
I
I
1
I
I
I
I
I
I
I
I
I
I
I
I J

30
2
8454.... 4
4008 4
r . . . .
Extension Kit
8452+8453 I
2 1
1
I I 7 MI
Extension Kit_,
4008

../
31
r 7335 12

466 6
A
32

, I
I
8419 +1 I
I
I
a,
33
1
r
Extension Kit
1
I.
Extension Kit
I
I
I
I
I
L
34
8418 3
Extension Kit
I
I
8418 +3
I
I
I
I
I
I
I
[ Extension Kit 0
1 I
I
I
I
I
I
I
I
I
I
I I

../
35
4
36 For Extension Kit Only
8429
Extension Kit
I
7931 1
411
466
8406 AO 411

37
L.
1
411
466
5
5 [Extension Kith I

38
E 1 288 2
411
466
LIP 2
6 Extension Kit
8421
288
411
466

39
586 1
992
3017
I 2 989
2 991
i . 1
1
4008 4

I
I +2 I
I
I 'm
MIA
40
7009 2
r
Extension Kit
1
I.
7009

_I
41
L.
99 1 22 2

../
42
464
--------..........._
8 465 16 422 16
14111--
465
464 .0
422
A.
liii ir
465 or', 1111111 illi
464
422
0
b422 ir-,' st,
.111
464_,
ION 422 0% s % a 465
...
% a ...
I
46 Li ' '.° `40 465
41 I

4008 4
1
43
8404
8399
4
. , , 7066 ..... - 2
8404 8404
8404 8404
. 8399
0/. I ... %
I
! I
I a. /
O .. .
% SC tior::\ %
.... ... 1Q-..11))

r
44
8417 4
8400
8401
1 411
1 318
4
4
This side out
(i!) - 318
318 O
8400/8401
411
This side out
8417
I I I
8417
11111111 1111110

45
411 19 8399 2 4008 4
0 I - I I ...
..,
I - . 0 ® . - . %
I NI 1/4 /
1 . .
I o
'-' /

46
8230 2
7870
7871
2
2
411 4 466 8
8230 7871
411 -0
o
c?)
411 0....... .:,
O d
.., i s _
8230
, L. 466
78710 7870.8
7870
1 8401

288 2 7065 1 466 9
A
47
/ /
,
48
462 4 412 8
II III I
412
412

49
7083
7084
7085
7086
1
1
1
1
7088 1
423 1
412 2
16-
I
423

1
50
7271 1
401' 111,
7271
I
7271
I

51
463 4
463

A
r
N
i

mas
ter_
Bel
la+
ext_
GH
_V2-
1
Ui
W
Related Documents