LTRSEC-3001 – Deep Dive Lab: ASA and Firepower NGFW in ACI 1| Page ASA and FTD Integration in ACI Deep Dive Lab 4.0 Guide Developers and Lab Proctors This lab was created by: Goran Saradzic (Security TME) and Minako Higuchi (ACI TME) Lab proctors: Goran Saradzic, Minako Higuchi, and Alan Cottom.

Welcome message from author
This document is posted to help you gain knowledge. Please leave a comment to let me know what you think about it! Share it to your friends and learn new things together.
Transcript
LTRSEC-3001 – Deep Dive Lab: ASA and Firepower NGFW in ACI 1| P a g e
ASA and FTD Integration in ACI Deep Dive Lab 4.0 Guide
Developers and Lab Proctors This lab was created by: Goran Saradzic (Security TME) and Minako Higuchi (ACI TME)
Lab proctors: Goran Saradzic, Minako Higuchi, and Alan Cottom.
LTRSEC-3001 – Deep Dive Lab: ASA and Firepower NGFW in ACI 2| P a g e
Lab Overview DC Security 4.0 lab demonstrates how Cisco Security protections can be quickly deployed in the ACI fabric, using dynamic policies, and rapid containment of threats. You will work with ASA5525 contexts and Firepower NGFWv (a.k.a. FTDv, a VM running Firepower Threat Defense image), and their managed Service Graphs. We start the lab with a scripted build-out of a full Tenant with security services. Tenant has three EPGs (web, app, db), one VRFs and a host on outside campus. NGFWv VMs are first registered to FMCv using a API script. Then, a demo script called build-demo1.bash, combines a number of python scripts to create three working service graphs and their contracts. All contracts uses FTDv (out-to-web, web-to-app and app-to-db) with FMCv (Firepower Management Center) as a device manager. The Super-PuTTY application gets you access to all the EPs, outside host, security services, and api-client VM that runs all the scripts with your Tenant.
Your lab guide is also available at: http://cs.co/acisec-lab-guide Jumpbox login credentials are provided inside your dCloud portal.
After completing exercise 1, exercises 2,3,6, and 7 can be performed in any order. Exercises 4 and 5 must be completed in that order.
Lab Exercises This lab guide starts with a full orchestration exercise, related to FTD device packages:
Demo1 Exercises
• Lab Exercise 1: Connect and run scripts to build-out your Tenant with FTD security services with ACI managed mode PBR
• Lab Exercise 2: Apply malware protection to FTDv service graph on app-to-db contract
• Lab Exercise 3: Run Rapid Threat Containment with APIC Firepower remediation package
Demo2 Exercises
• Lab Exercise 4: Reset pod and run scripts to build-out your Tenant with ASA and FTD security services with ACI managed mode PBR
• Lab Exercise 5: Enable Dynamic update to EPG feature on out-to-web contract
• Lab Exercise 6: Study the mechanics and benefits of the ASA PBR service graph

LTRSEC-3001 – Deep Dive Lab: ASA and Firepower NGFW in ACI 3| P a g e
• Lab Exercise 7: Change FTDv service graph to unmanaged PBR (option)
Lab Topology and Access Student POD includes a jumpbox, api-client linux box, four test linux boxes for host/web/app/db segments, dedicated FMCv and two FTDv instances, plus shared components: APIC, ACI fabric, and vCenter.
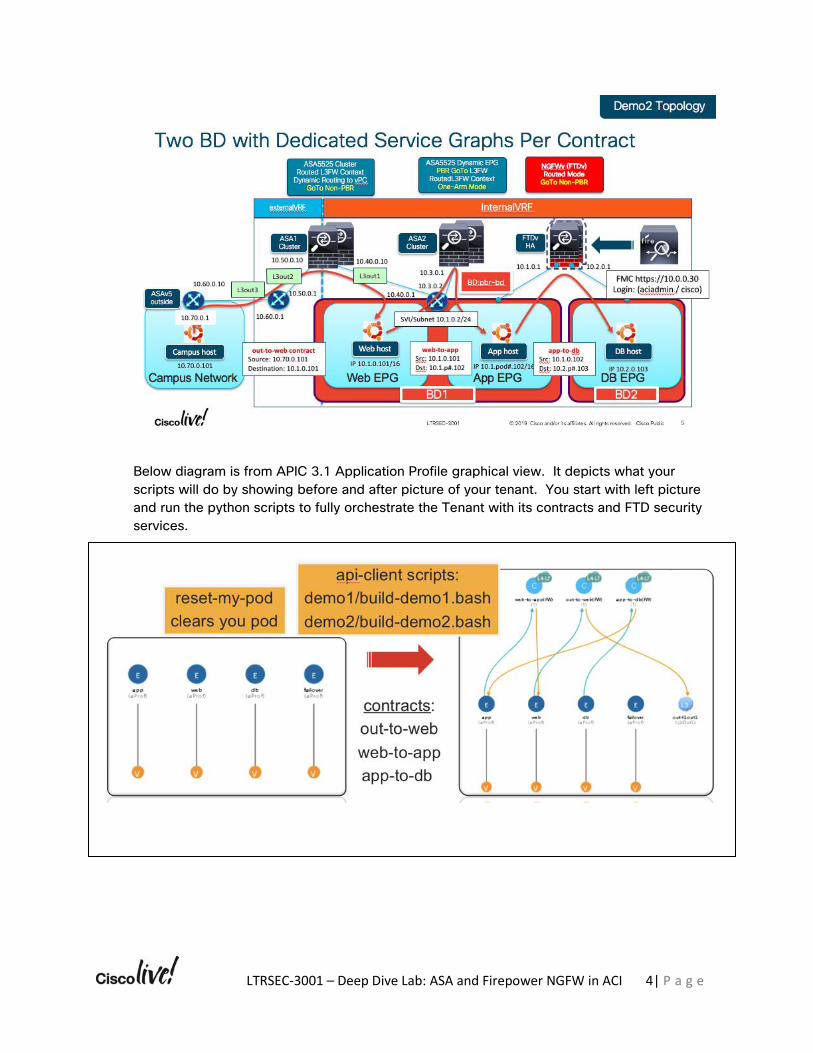
Lab Topology These are the POD topology used for ASA and FTD in the training lab. It shows all IP information for devices on outside network, and web/app/db EPGs. Notice that web & app EPGs are in the same subnet and BD. Demo1 is focused on routed mode FTD with PBR that is shared by multiple contracts.
In addition to Demo1, Demo2 is available. Demo2 is focused on ASA and FTD with different types of insertion methods: use of L3out, PBR and use of firewall as the gateway of server.
LTRSEC-3001 – Deep Dive Lab: ASA and Firepower NGFW in ACI 4| P a g e
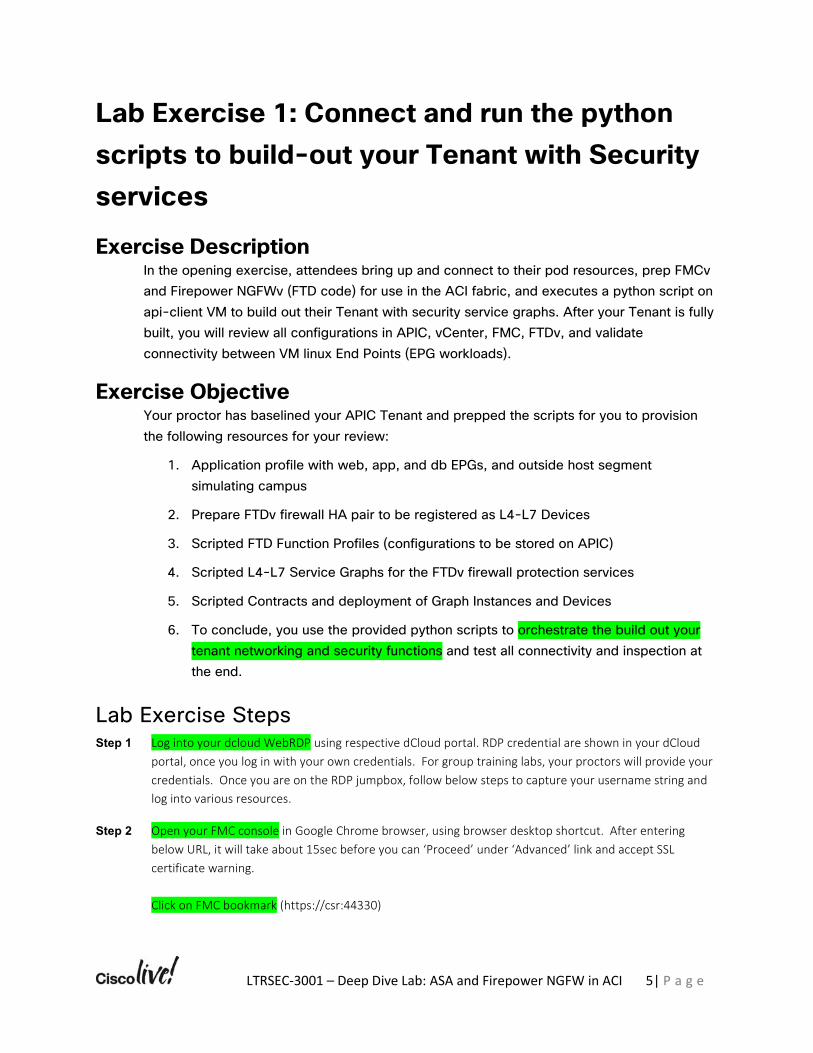
Below diagram is from APIC 3.1 Application Profile graphical view. It depicts what your scripts will do by showing before and after picture of your tenant. You start with left picture and run the python scripts to fully orchestrate the Tenant with its contracts and FTD security services.
LTRSEC-3001 – Deep Dive Lab: ASA and Firepower NGFW in ACI 5| P a g e
Lab Exercise 1: Connect and run the python scripts to build-out your Tenant with Security services
Exercise Description In the opening exercise, attendees bring up and connect to their pod resources, prep FMCv and Firepower NGFWv (FTD code) for use in the ACI fabric, and executes a python script on api-client VM to build out their Tenant with security service graphs. After your Tenant is fully built, you will review all configurations in APIC, vCenter, FMC, FTDv, and validate connectivity between VM linux End Points (EPG workloads).
Exercise Objective Your proctor has baselined your APIC Tenant and prepped the scripts for you to provision the following resources for your review:
1. Application profile with web, app, and db EPGs, and outside host segment simulating campus
2. Prepare FTDv firewall HA pair to be registered as L4-L7 Devices
3. Scripted FTD Function Profiles (configurations to be stored on APIC)
4. Scripted L4-L7 Service Graphs for the FTDv firewall protection services
5. Scripted Contracts and deployment of Graph Instances and Devices
6. To conclude, you use the provided python scripts to orchestrate the build out your tenant networking and security functions and test all connectivity and inspection at the end.
Lab Exercise Steps Step 1 Log into your dcloud WebRDP using respective dCloud portal. RDP credential are shown in your dCloud
portal, once you log in with your own credentials. For group training labs, your proctors will provide your credentials. Once you are on the RDP jumpbox, follow below steps to capture your username string and log into various resources.
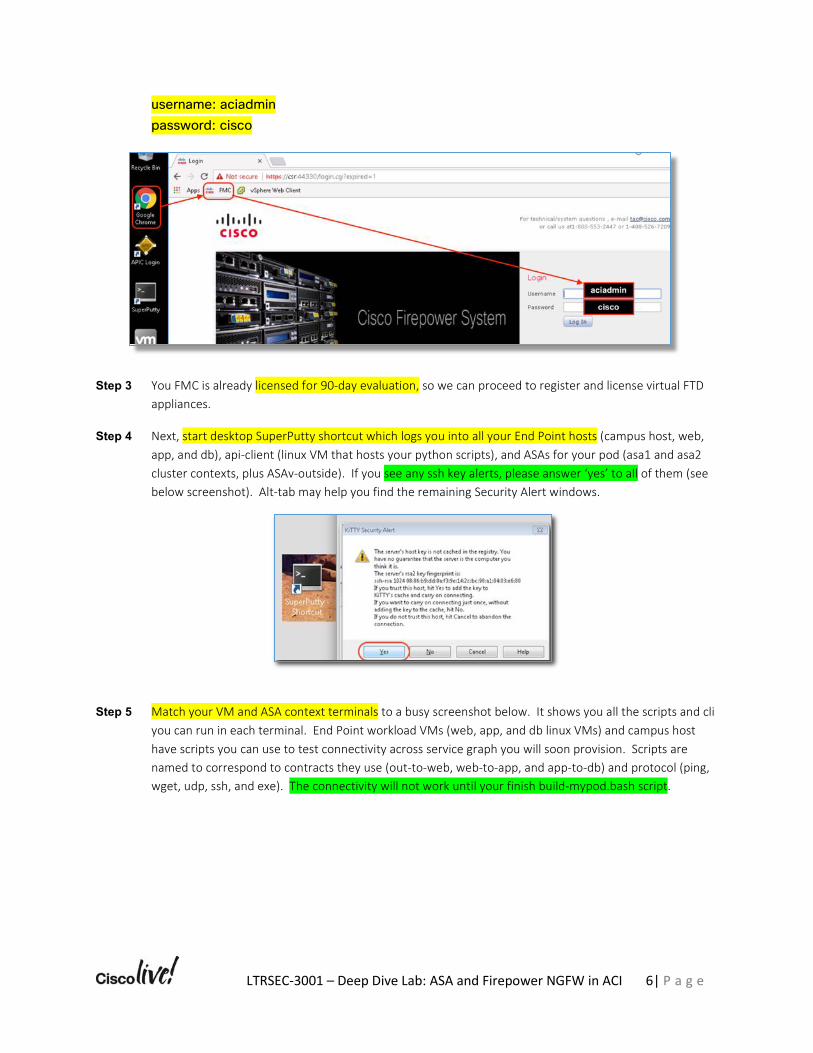
Step 2 Open your FMC console in Google Chrome browser, using browser desktop shortcut. After entering below URL, it will take about 15sec before you can ‘Proceed’ under ‘Advanced’ link and accept SSL certificate warning. Click on FMC bookmark (https://csr:44330)
LTRSEC-3001 – Deep Dive Lab: ASA and Firepower NGFW in ACI 6| P a g e
username: aciadmin password: cisco
Step 3 You FMC is already licensed for 90-day evaluation, so we can proceed to register and license virtual FTD appliances.
Step 4 Next, start desktop SuperPutty shortcut which logs you into all your End Point hosts (campus host, web, app, and db), api-client (linux VM that hosts your python scripts), and ASAs for your pod (asa1 and asa2 cluster contexts, plus ASAv-outside). If you see any ssh key alerts, please answer ‘yes’ to all of them (see below screenshot). Alt-tab may help you find the remaining Security Alert windows.
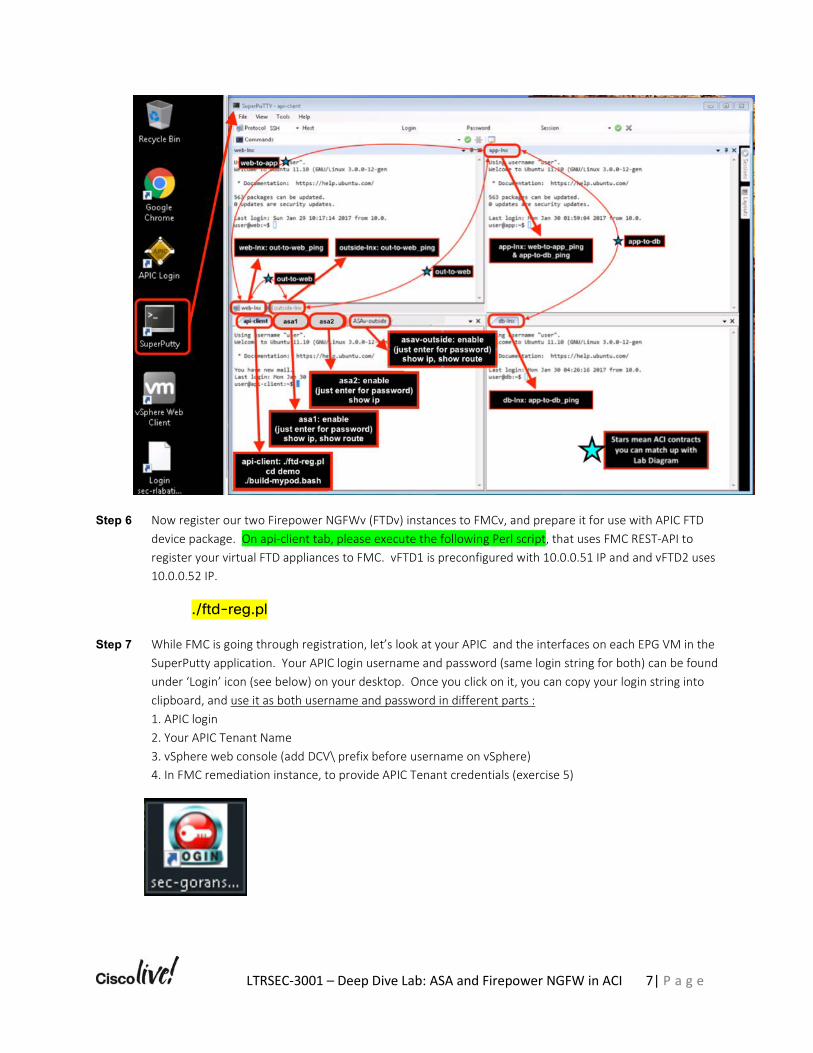
Step 5 Match your VM and ASA context terminals to a busy screenshot below. It shows you all the scripts and cli you can run in each terminal. End Point workload VMs (web, app, and db linux VMs) and campus host have scripts you can use to test connectivity across service graph you will soon provision. Scripts are named to correspond to contracts they use (out-to-web, web-to-app, and app-to-db) and protocol (ping, wget, udp, ssh, and exe). The connectivity will not work until your finish build-mypod.bash script.
LTRSEC-3001 – Deep Dive Lab: ASA and Firepower NGFW in ACI 7| P a g e
Step 6 Now register our two Firepower NGFWv (FTDv) instances to FMCv, and prepare it for use with APIC FTD device package. On api-client tab, please execute the following Perl script, that uses FMC REST-API to register your virtual FTD appliances to FMC. vFTD1 is preconfigured with 10.0.0.51 IP and and vFTD2 uses 10.0.0.52 IP.
./ftd-reg.pl
Step 7 While FMC is going through registration, let’s look at your APIC and the interfaces on each EPG VM in the SuperPutty application. Your APIC login username and password (same login string for both) can be found under ‘Login’ icon (see below) on your desktop. Once you click on it, you can copy your login string into clipboard, and use it as both username and password in different parts : 1. APIC login 2. Your APIC Tenant Name 3. vSphere web console (add DCV\ prefix before username on vSphere) 4. In FMC remediation instance, to provide APIC Tenant credentials (exercise 5)
LTRSEC-3001 – Deep Dive Lab: ASA and Firepower NGFW in ACI 8| P a g e
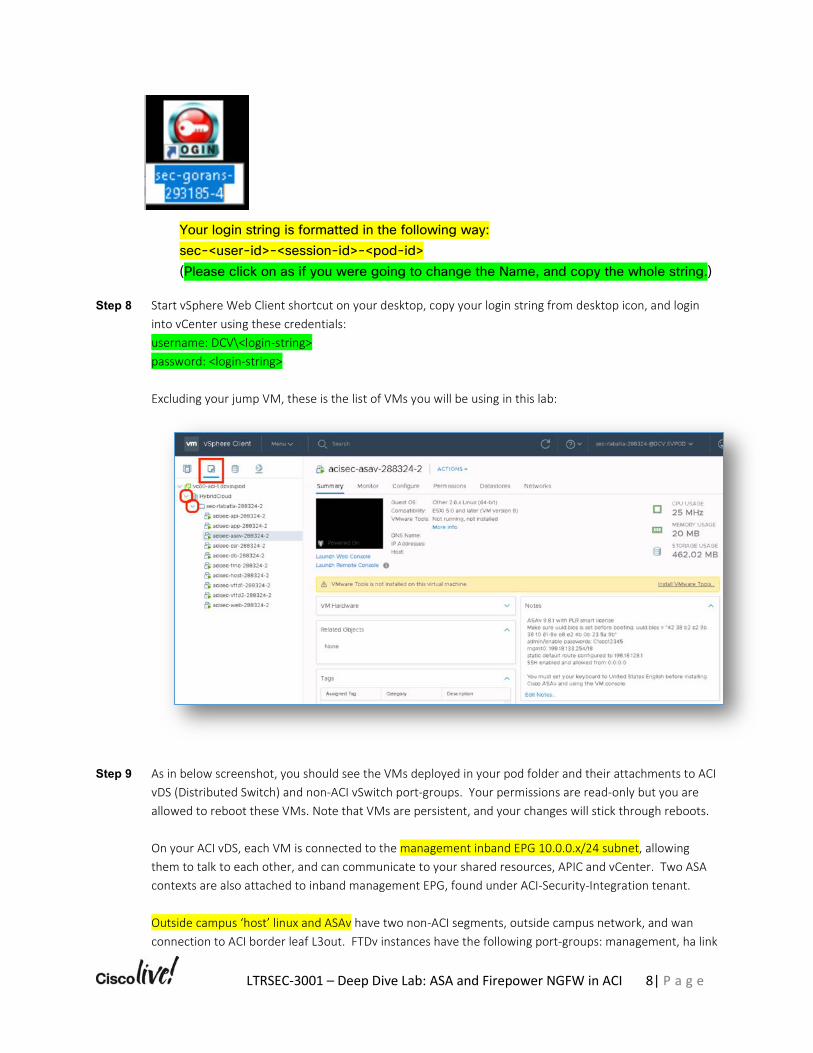
Your login string is formatted in the following way: sec-<user-id>-<session-id>-<pod-id> (Please click on as if you were going to change the Name, and copy the whole string.)
Step 8 Start vSphere Web Client shortcut on your desktop, copy your login string from desktop icon, and login into vCenter using these credentials: username: DCV\<login-string> password: <login-string> Excluding your jump VM, these is the list of VMs you will be using in this lab:
Step 9 As in below screenshot, you should see the VMs deployed in your pod folder and their attachments to ACI vDS (Distributed Switch) and non-ACI vSwitch port-groups. Your permissions are read-only but you are allowed to reboot these VMs. Note that VMs are persistent, and your changes will stick through reboots. On your ACI vDS, each VM is connected to the management inband EPG 10.0.0.x/24 subnet, allowing them to talk to each other, and can communicate to your shared resources, APIC and vCenter. Two ASA contexts are also attached to inband management EPG, found under ACI-Security-Integration tenant. Outside campus ‘host’ linux and ASAv have two non-ACI segments, outside campus network, and wan connection to ACI border leaf L3out. FTDv instances have the following port-groups: management, ha link
LTRSEC-3001 – Deep Dive Lab: ASA and Firepower NGFW in ACI 9| P a g e
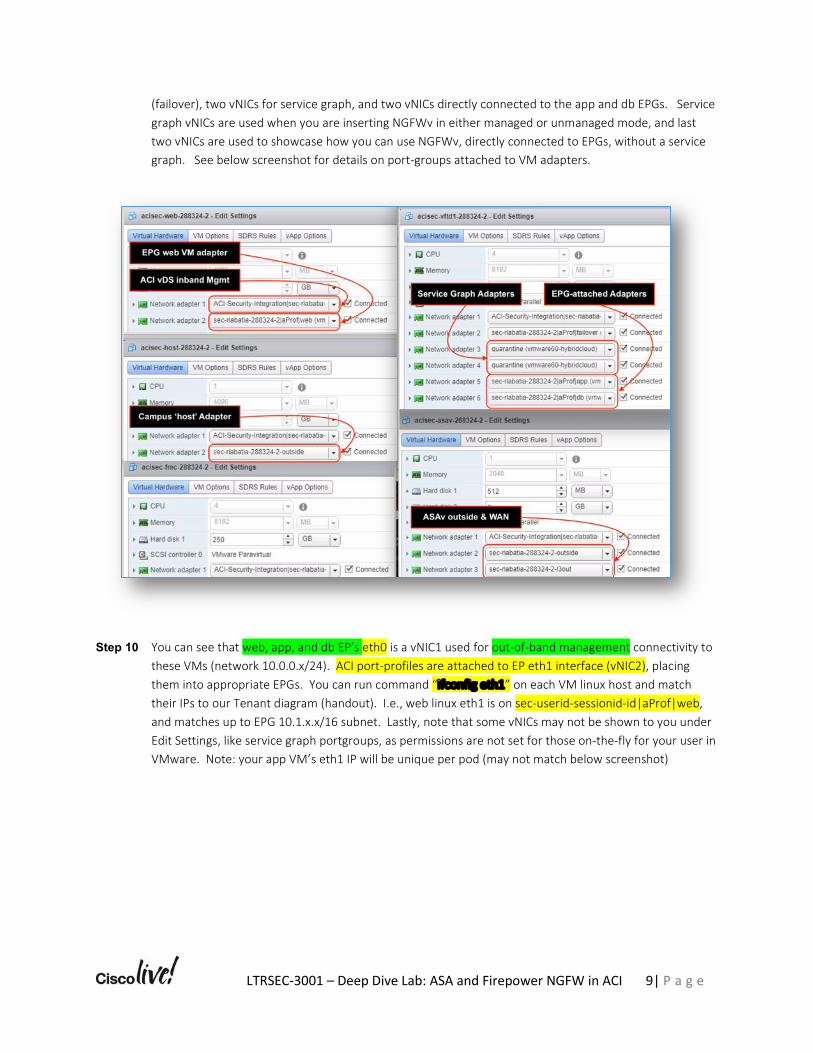
(failover), two vNICs for service graph, and two vNICs directly connected to the app and db EPGs. Service graph vNICs are used when you are inserting NGFWv in either managed or unmanaged mode, and last two vNICs are used to showcase how you can use NGFWv, directly connected to EPGs, without a service graph. See below screenshot for details on port-groups attached to VM adapters.
Step 10 You can see that web, app, and db EP’s eth0 is a vNIC1 used for out-of-band management connectivity to these VMs (network 10.0.0.x/24). ACI port-profiles are attached to EP eth1 interface (vNIC2), placing them into appropriate EPGs. You can run command “ifconfig eth1” on each VM linux host and match their IPs to our Tenant diagram (handout). I.e., web linux eth1 is on sec-userid-sessionid-id|aProf|web, and matches up to EPG 10.1.x.x/16 subnet. Lastly, note that some vNICs may not be shown to you under Edit Settings, like service graph portgroups, as permissions are not set for those on-the-fly for your user in VMware. Note: your app VM’s eth1 IP will be unique per pod (may not match below screenshot)

LTRSEC-3001 – Deep Dive Lab: ASA and Firepower NGFW in ACI 10| P a g e
Step 11 Open your APIC console using desktop shortcut icon. It will take again about 15sec before you can ‘Proceed’ under ‘Advanced’ link and accept SSL certificate warning.
You login and password will be the same and can be copied from the desktop icon. username: sec-<user-id>-<session-id>-<pod-id> password: sec-<user-id>-<session-id>-<pod-id> (Please click on ‘Close’ on a pop-up message you may see after logging in)
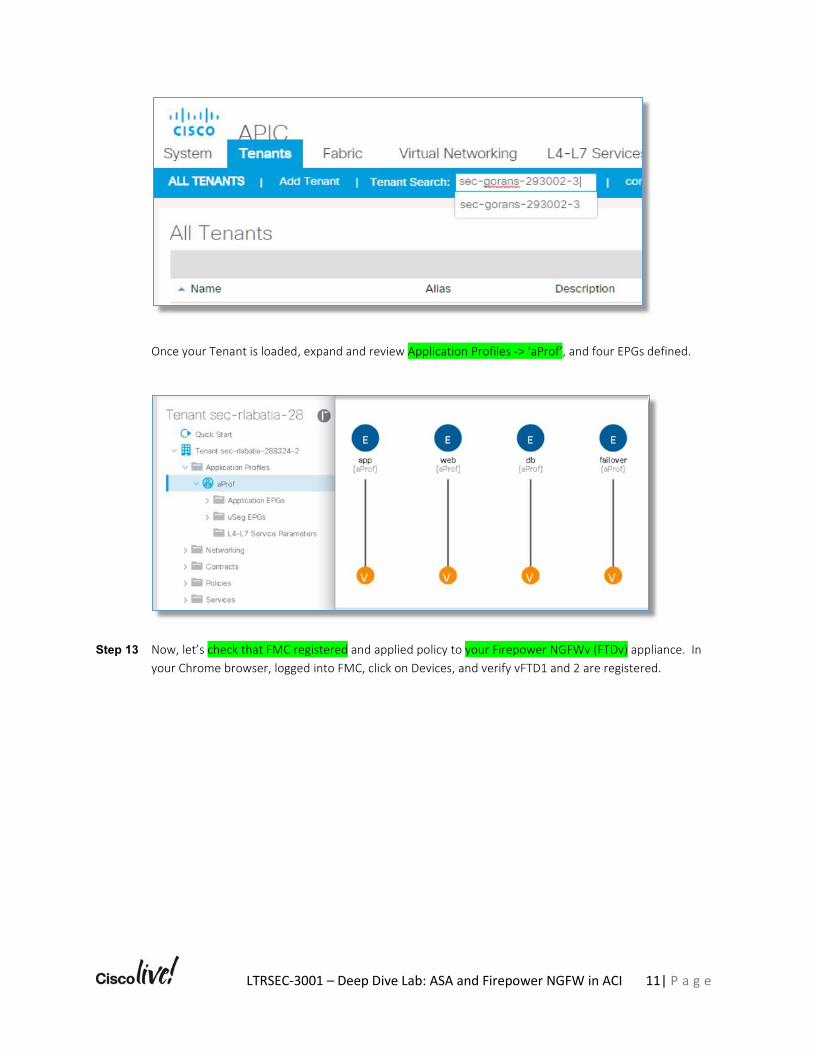
Step 12 Get into your Tenant, and take your time to review the following items in your APIC Tenant. Click on ‘Tenants’ tab on top, then click on the Tenant Search field ‘Enter name, alias, descr’, and paste in your username string here. You should see and click on your Tenant listed below search field. As you can see, your Tenant is named the same way as your username string.
LTRSEC-3001 – Deep Dive Lab: ASA and Firepower NGFW in ACI 11| P a g e
Once your Tenant is loaded, expand and review Application Profiles -> ‘aProf’, and four EPGs defined.
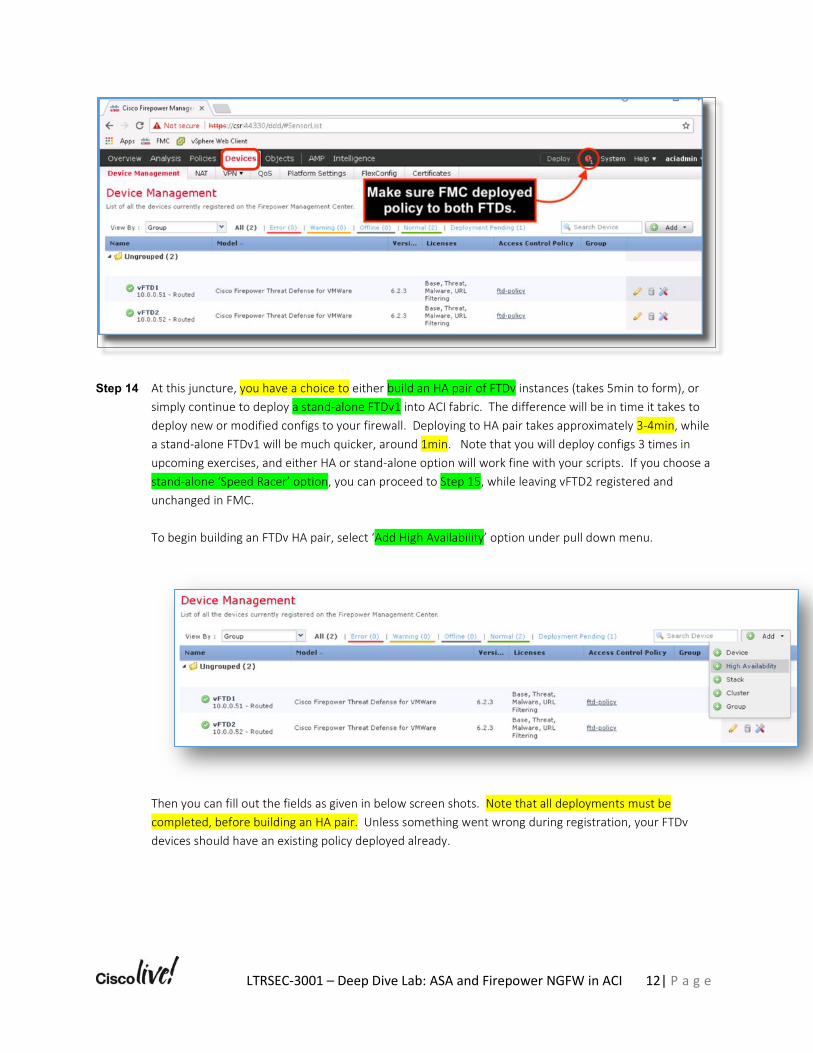
Step 13 Now, let’s check that FMC registered and applied policy to your Firepower NGFWv (FTDv) appliance. In your Chrome browser, logged into FMC, click on Devices, and verify vFTD1 and 2 are registered.
LTRSEC-3001 – Deep Dive Lab: ASA and Firepower NGFW in ACI 12| P a g e
Step 14 At this juncture, you have a choice to either build an HA pair of FTDv instances (takes 5min to form), or simply continue to deploy a stand-alone FTDv1 into ACI fabric. The difference will be in time it takes to deploy new or modified configs to your firewall. Deploying to HA pair takes approximately 3-4min, while a stand-alone FTDv1 will be much quicker, around 1min. Note that you will deploy configs 3 times in upcoming exercises, and either HA or stand-alone option will work fine with your scripts. If you choose a stand-alone ‘Speed Racer’ option, you can proceed to Step 15, while leaving vFTD2 registered and unchanged in FMC. To begin building an FTDv HA pair, select ‘Add High Availability’ option under pull down menu.
Then you can fill out the fields as given in below screen shots. Note that all deployments must be completed, before building an HA pair. Unless something went wrong during registration, your FTDv devices should have an existing policy deployed already.
LTRSEC-3001 – Deep Dive Lab: ASA and Firepower NGFW in ACI 13| P a g e
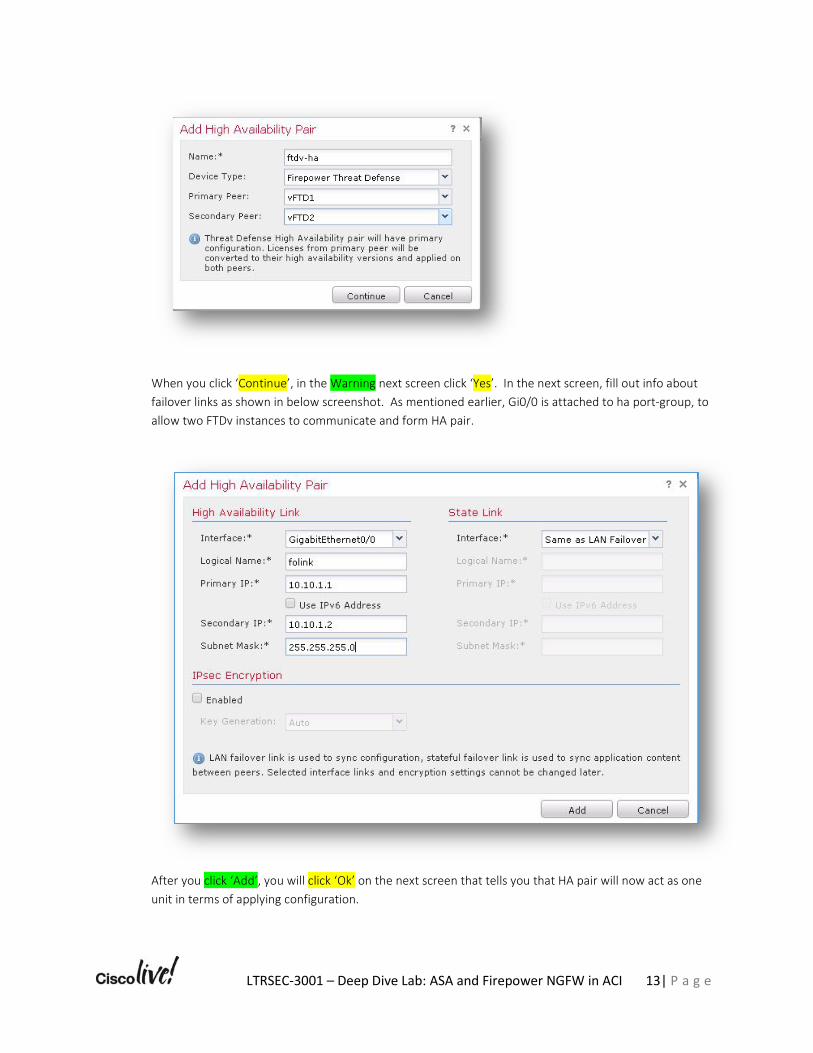
When you click ‘Continue’, in the Warning next screen click ‘Yes’. In the next screen, fill out info about failover links as shown in below screenshot. As mentioned earlier, Gi0/0 is attached to ha port-group, to allow two FTDv instances to communicate and form HA pair.
After you click ‘Add’, you will click ‘Ok’ on the next screen that tells you that HA pair will now act as one unit in terms of applying configuration.
LTRSEC-3001 – Deep Dive Lab: ASA and Firepower NGFW in ACI 14| P a g e
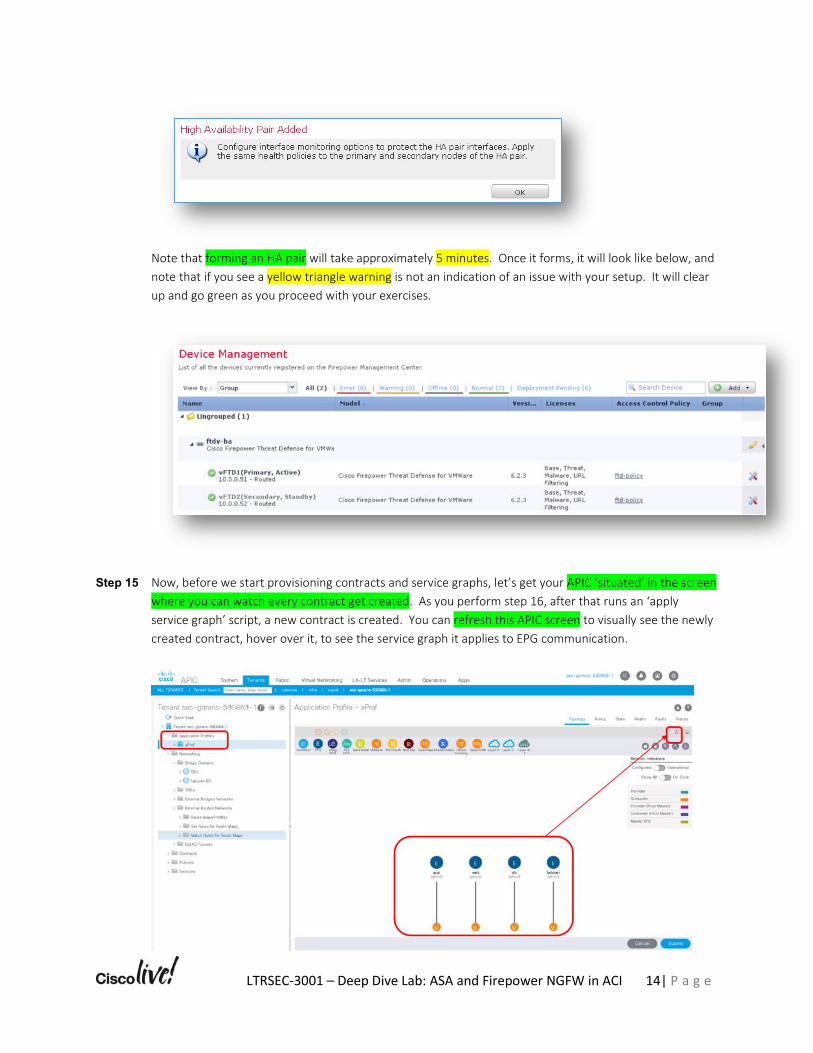
Note that forming an HA pair will take approximately 5 minutes. Once it forms, it will look like below, and note that if you see a yellow triangle warning is not an indication of an issue with your setup. It will clear up and go green as you proceed with your exercises.
Step 15 Now, before we start provisioning contracts and service graphs, let’s get your APIC ‘situated’ in the screen where you can watch every contract get created. As you perform step 16, after that runs an ‘apply service graph’ script, a new contract is created. You can refresh this APIC screen to visually see the newly created contract, hover over it, to see the service graph it applies to EPG communication.
LTRSEC-3001 – Deep Dive Lab: ASA and Firepower NGFW in ACI 15| P a g e
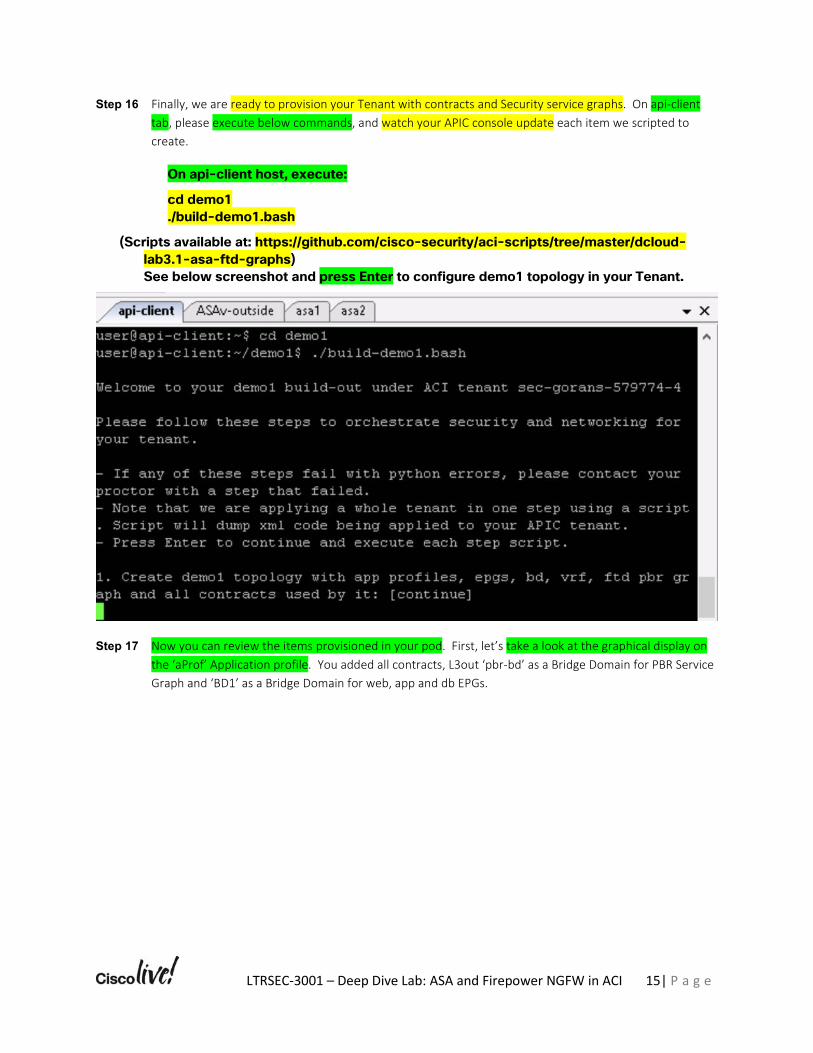
Step 16 Finally, we are ready to provision your Tenant with contracts and Security service graphs. On api-client tab, please execute below commands, and watch your APIC console update each item we scripted to create.
On api-client host, execute:
cd demo1 ./build-demo1.bash
(Scripts available at: https://github.com/cisco-security/aci-scripts/tree/master/dcloud-lab3.1-asa-ftd-graphs) See below screenshot and press Enter to configure demo1 topology in your Tenant.
Step 17 Now you can review the items provisioned in your pod. First, let’s take a look at the graphical display on the ‘aProf’ Application profile. You added all contracts, L3out ‘pbr-bd’ as a Bridge Domain for PBR Service Graph and ‘BD1’ as a Bridge Domain for web, app and db EPGs.

LTRSEC-3001 – Deep Dive Lab: ASA and Firepower NGFW in ACI 16| P a g e
Step 18 Here are all the registered security devices, their configuration (aka. Function Profiles), and service graph template. You can match function profile configs to FTD using CLI in corresponding SuperPutty tabs.
LTRSEC-3001 – Deep Dive Lab: ASA and Firepower NGFW in ACI 17| P a g e
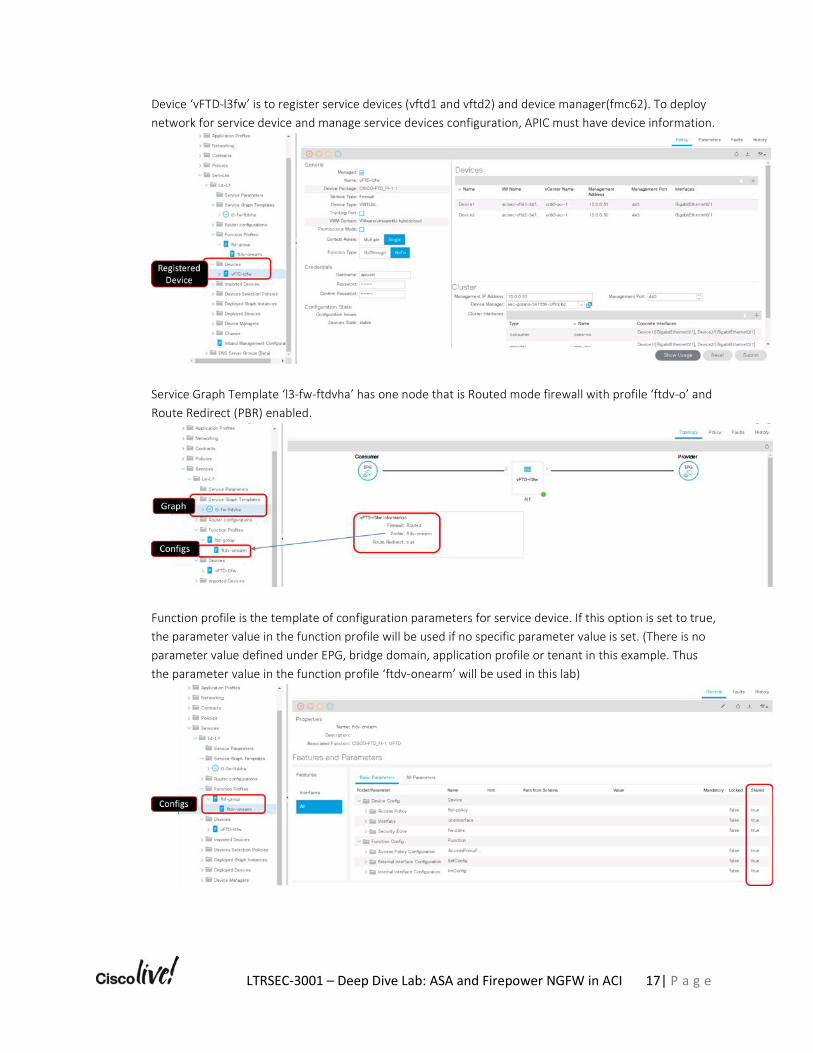
Device ‘vFTD-l3fw’ is to register service devices (vftd1 and vftd2) and device manager(fmc62). To deploy network for service device and manage service devices configuration, APIC must have device information.
Service Graph Template ‘l3-fw-ftdvha’ has one node that is Routed mode firewall with profile ‘ftdv-o’ and Route Redirect (PBR) enabled.
Function profile is the template of configuration parameters for service device. If this option is set to true, the parameter value in the function profile will be used if no specific parameter value is set. (There is no parameter value defined under EPG, bridge domain, application profile or tenant in this example. Thus the parameter value in the function profile ‘ftdv-onearm’ will be used in this lab)
LTRSEC-3001 – Deep Dive Lab: ASA and Firepower NGFW in ACI 18| P a g e
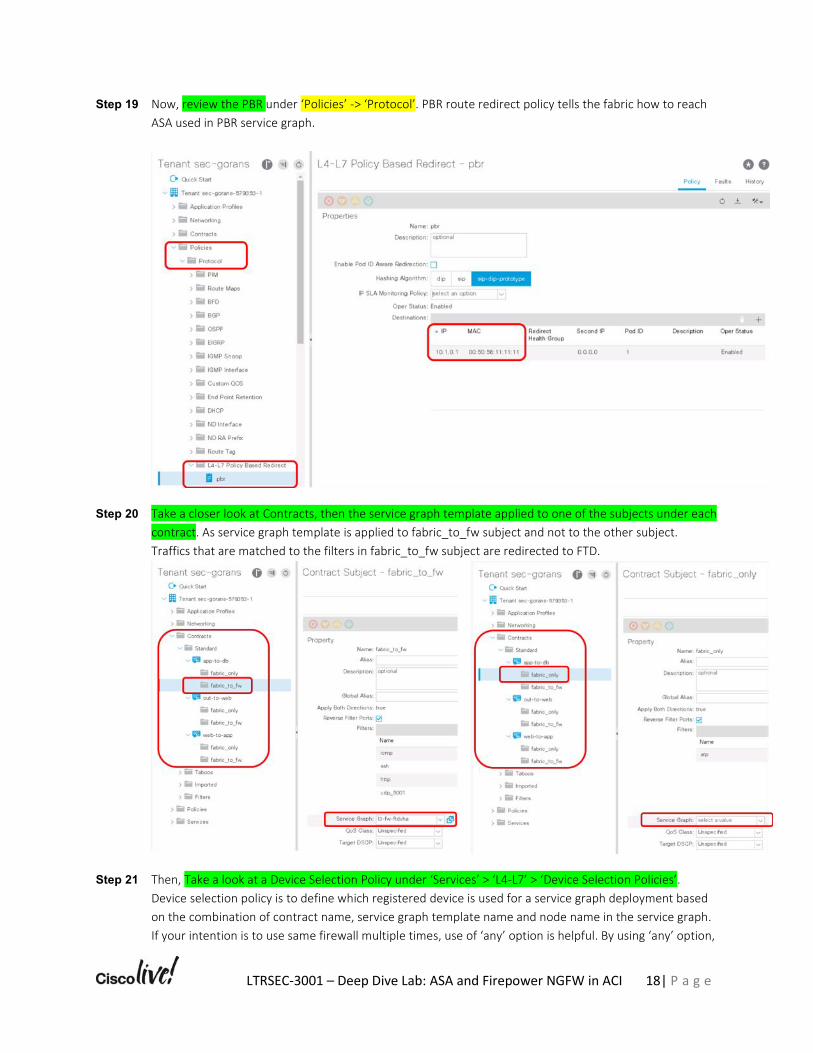
Step 19 Now, review the PBR under ‘Policies’ -> ‘Protocol’. PBR route redirect policy tells the fabric how to reach ASA used in PBR service graph.
Step 20 Take a closer look at Contracts, then the service graph template applied to one of the subjects under each contract. As service graph template is applied to fabric_to_fw subject and not to the other subject. Traffics that are matched to the filters in fabric_to_fw subject are redirected to FTD.
Step 21 Then, Take a look at a Device Selection Policy under ‘Services’ > ‘L4-L7’ > ‘Device Selection Policies’. Device selection policy is to define which registered device is used for a service graph deployment based on the combination of contract name, service graph template name and node name in the service graph. If your intention is to use same firewall multiple times, use of ‘any’ option is helpful. By using ‘any’ option,
LTRSEC-3001 – Deep Dive Lab: ASA and Firepower NGFW in ACI 19| P a g e
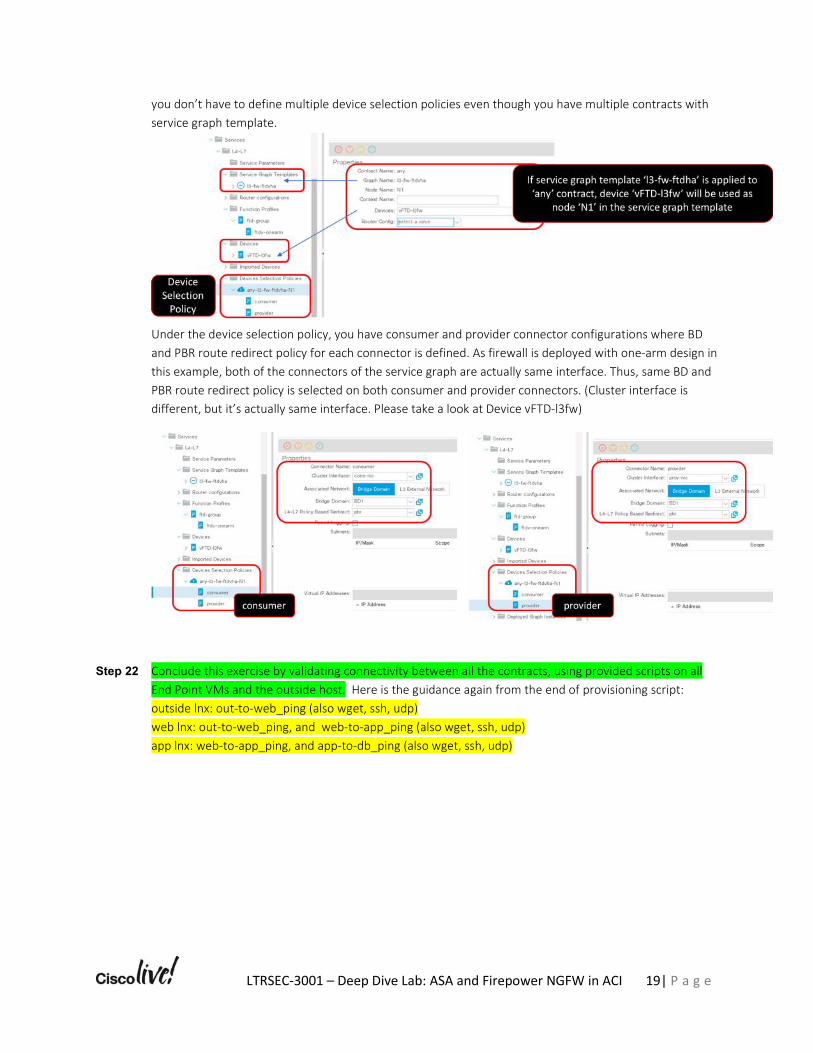
you don’t have to define multiple device selection policies even though you have multiple contracts with service graph template.
Under the device selection policy, you have consumer and provider connector configurations where BD and PBR route redirect policy for each connector is defined. As firewall is deployed with one-arm design in this example, both of the connectors of the service graph are actually same interface. Thus, same BD and PBR route redirect policy is selected on both consumer and provider connectors. (Cluster interface is different, but it’s actually same interface. Please take a look at Device vFTD-l3fw)
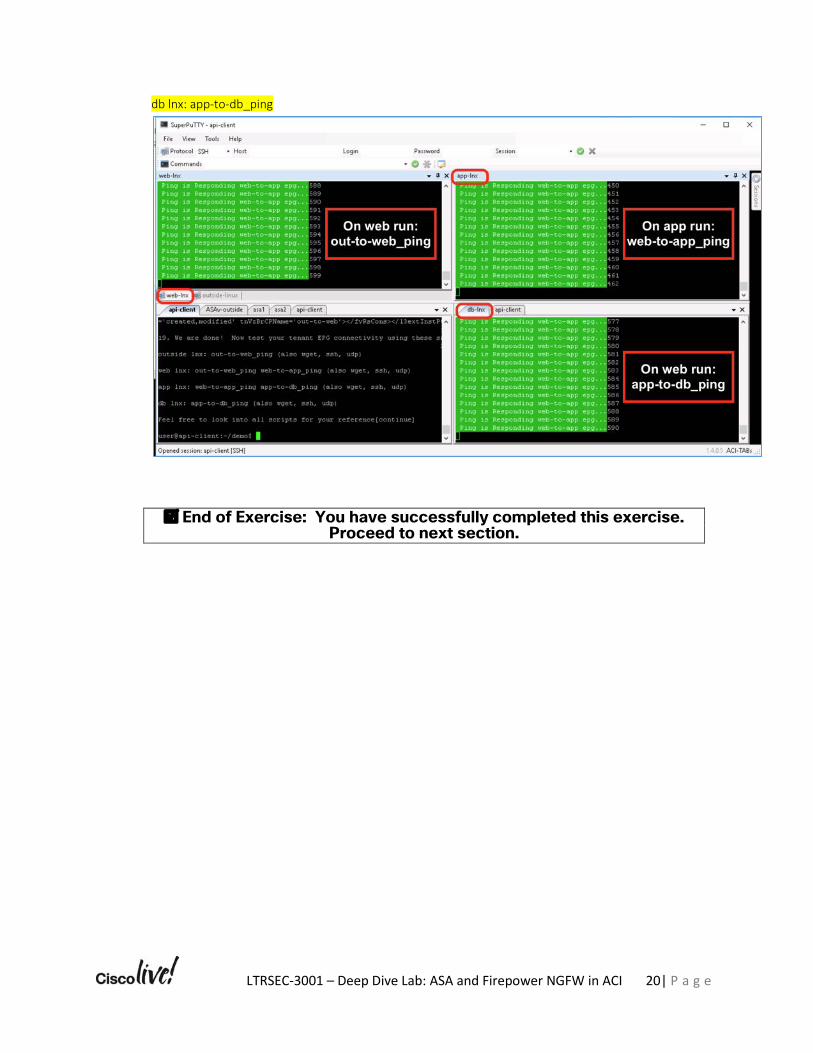
Step 22 Conclude this exercise by validating connectivity between all the contracts, using provided scripts on all End Point VMs and the outside host. Here is the guidance again from the end of provisioning script: outside lnx: out-to-web_ping (also wget, ssh, udp) web lnx: out-to-web_ping, and web-to-app_ping (also wget, ssh, udp) app lnx: web-to-app_ping, and app-to-db_ping (also wget, ssh, udp)
LTRSEC-3001 – Deep Dive Lab: ASA and Firepower NGFW in ACI 20| P a g e
db lnx: app-to-db_ping
þ End of Exercise: You have successfully completed this exercise. Proceed to next section.
LTRSEC-3001 – Deep Dive Lab: ASA and Firepower NGFW in ACI 21| P a g e
Lab Exercise 2: Apply malware protection to FTDv service graph on app-to-db contract
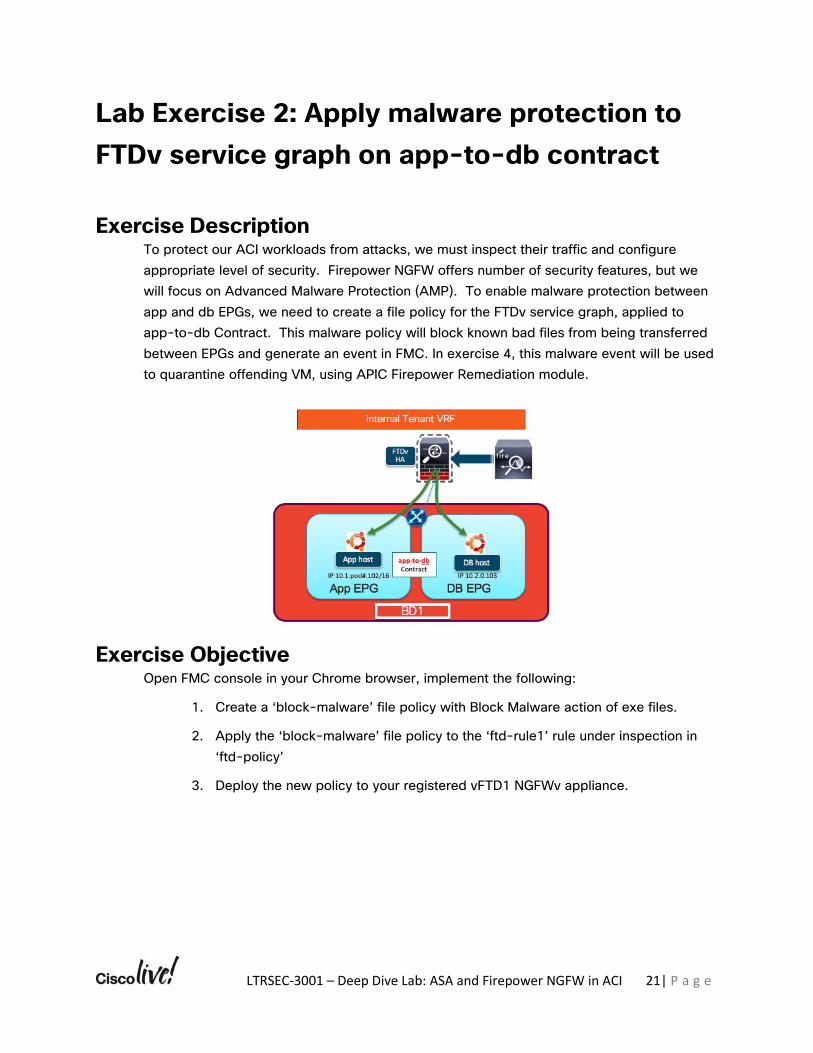
Exercise Description To protect our ACI workloads from attacks, we must inspect their traffic and configure appropriate level of security. Firepower NGFW offers number of security features, but we will focus on Advanced Malware Protection (AMP). To enable malware protection between app and db EPGs, we need to create a file policy for the FTDv service graph, applied to app-to-db Contract. This malware policy will block known bad files from being transferred between EPGs and generate an event in FMC. In exercise 4, this malware event will be used to quarantine offending VM, using APIC Firepower Remediation module.
Exercise Objective
Open FMC console in your Chrome browser, implement the following:
1. Create a ‘block-malware’ file policy with Block Malware action of exe files.
2. Apply the ‘block-malware’ file policy to the ‘ftd-rule1’ rule under inspection in ‘ftd-policy’
3. Deploy the new policy to your registered vFTD1 NGFWv appliance.
LTRSEC-3001 – Deep Dive Lab: ASA and Firepower NGFW in ACI 22| P a g e
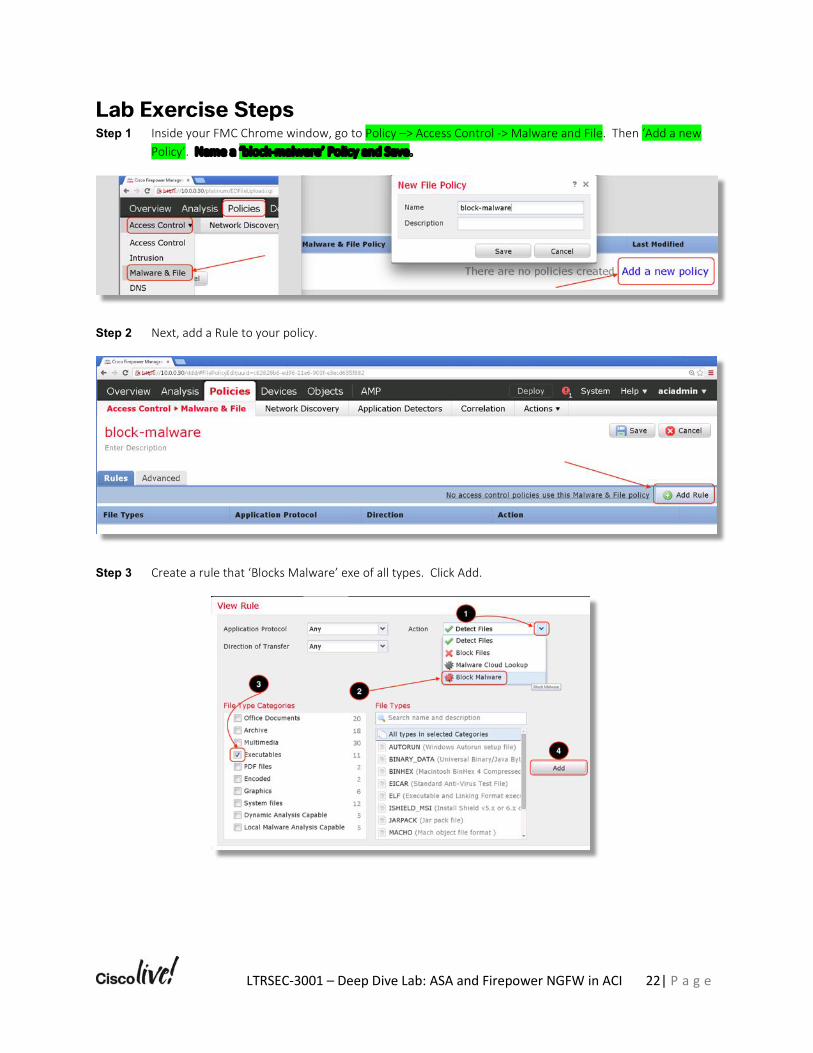
Lab Exercise Steps Step 1 Inside your FMC Chrome window, go to Policy –> Access Control -> Malware and File. Then ‘Add a new
Policy’. Name a ‘block-malware’ Policy and Save.
Step 2 Next, add a Rule to your policy.
Step 3 Create a rule that ‘Blocks Malware’ exe of all types. Click Add.
LTRSEC-3001 – Deep Dive Lab: ASA and Firepower NGFW in ACI 23| P a g e
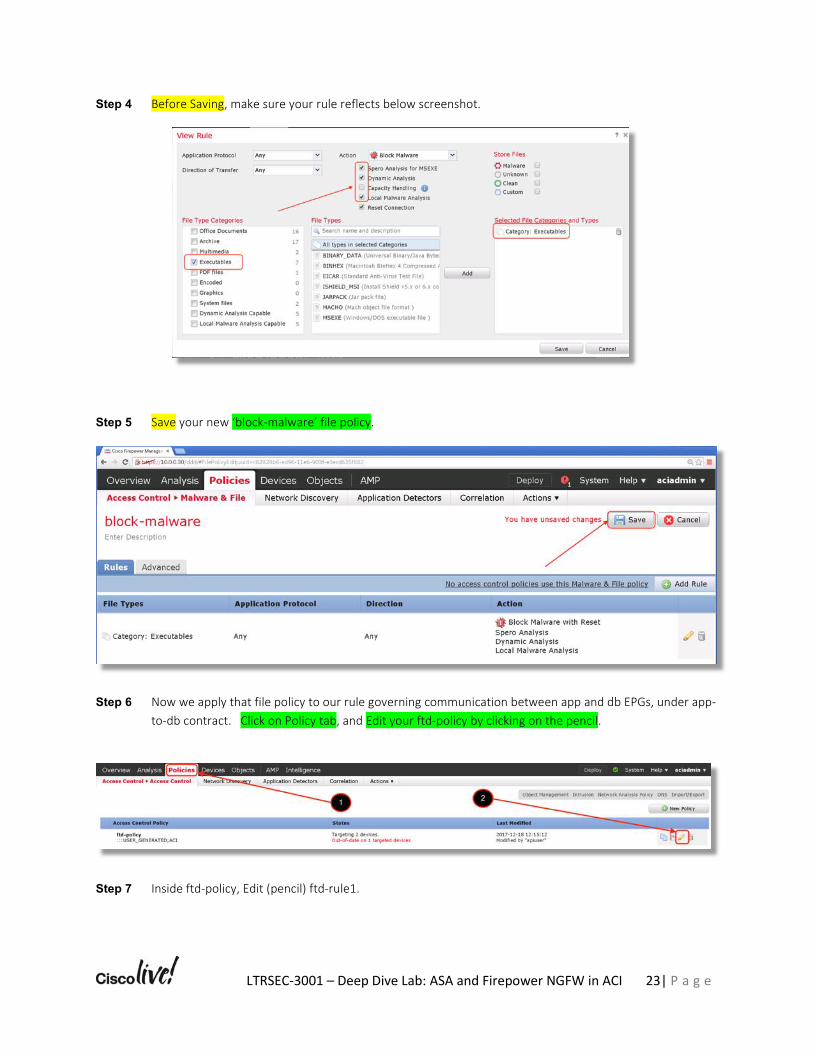
Step 4 Before Saving, make sure your rule reflects below screenshot.
Step 5 Save your new ‘block-malware’ file policy.
Step 6 Now we apply that file policy to our rule governing communication between app and db EPGs, under app-to-db contract. Click on Policy tab, and Edit your ftd-policy by clicking on the pencil.
Step 7 Inside ftd-policy, Edit (pencil) ftd-rule1.
LTRSEC-3001 – Deep Dive Lab: ASA and Firepower NGFW in ACI 24| P a g e
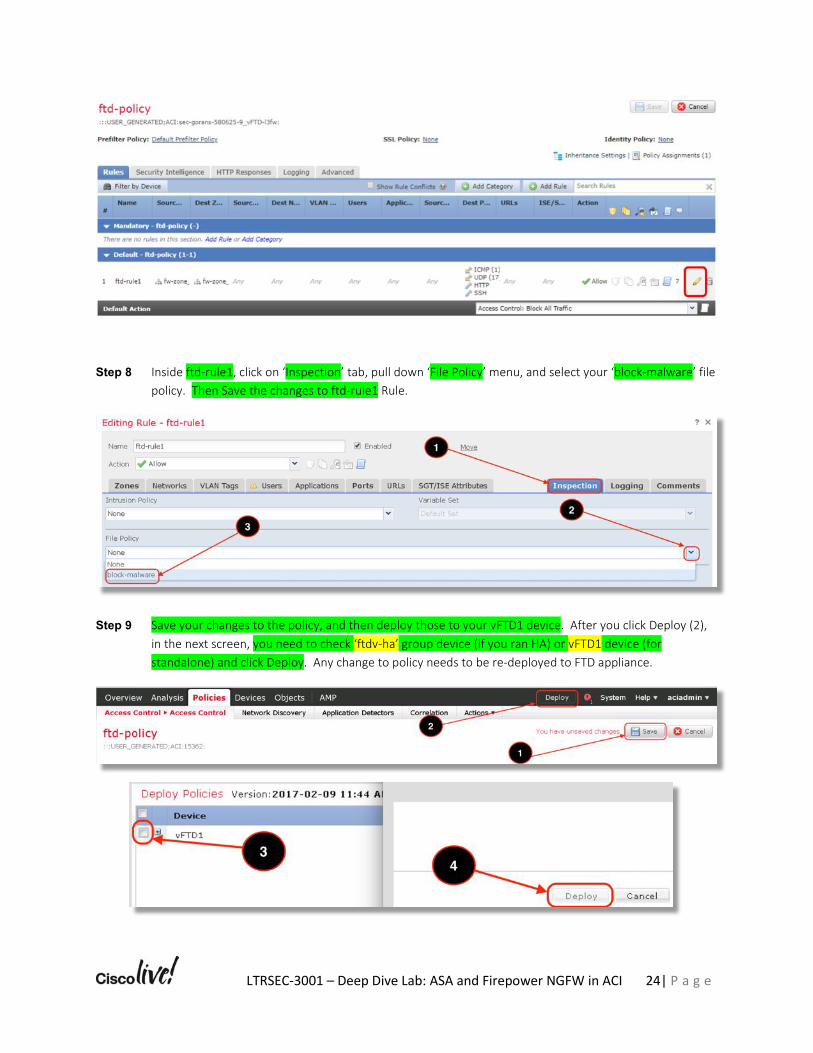
Step 8 Inside ftd-rule1, click on ‘Inspection’ tab, pull down ‘File Policy’ menu, and select your ‘block-malware’ file policy. Then Save the changes to ftd-rule1 Rule.
Step 9 Save your changes to the policy, and then deploy those to your vFTD1 device. After you click Deploy (2), in the next screen, you need to check ‘ftdv-ha’ group device (if you ran HA) or vFTD1 device (for standalone) and click Deploy. Any change to policy needs to be re-deployed to FTD appliance.
LTRSEC-3001 – Deep Dive Lab: ASA and Firepower NGFW in ACI 25| P a g e
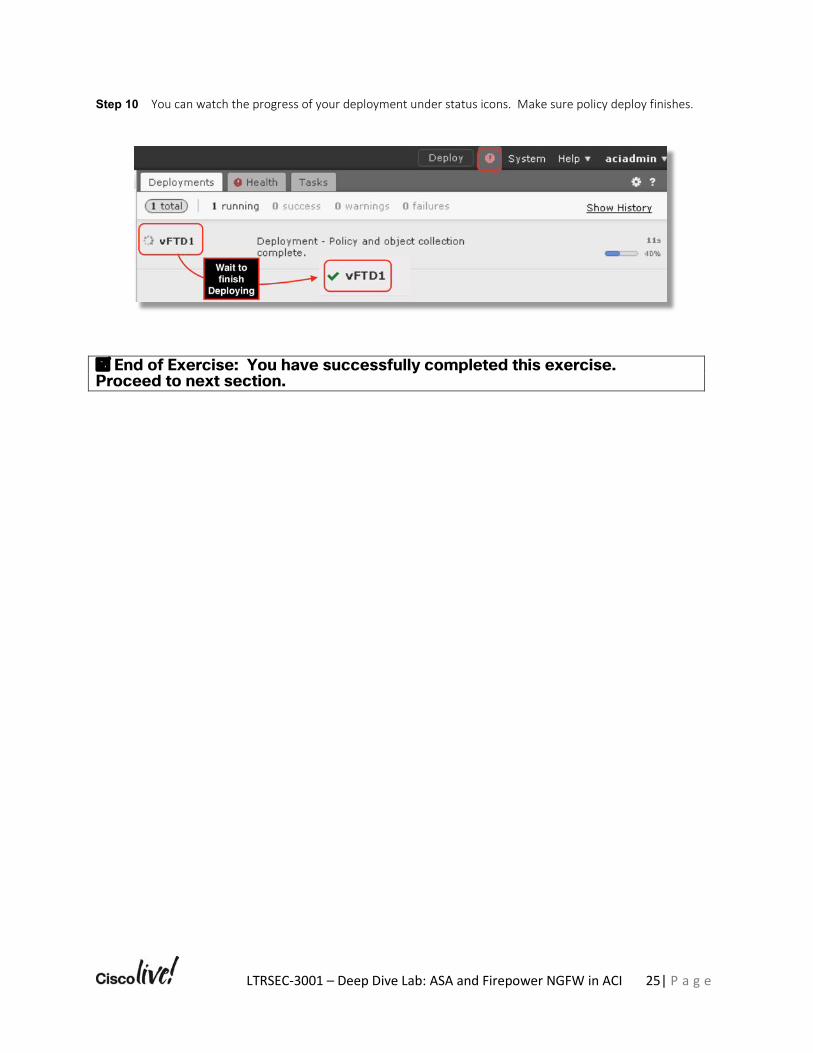
Step 10 You can watch the progress of your deployment under status icons. Make sure policy deploy finishes.
þ End of Exercise: You have successfully completed this exercise. Proceed to next section.
LTRSEC-3001 – Deep Dive Lab: ASA and Firepower NGFW in ACI 26| P a g e
Lab Exercise 3: Rapidly Contain/Quarantine Threats with APIC Firepower remediation package
Exercise Description In this exercise, you are setting up and FMC remediation instance and correlation policy/rule to complete the quarantine use case with FMC to APIC. You will leverage the ‘block-malware’ file policy from exercise 2, to trigger remediation on FMC and talk to APIC via Northbound-API. We provided a known malware sample exe file for your convenience, please do not transfer this file anywhere but between your EP workload VMs, protected by Firepower NGFWv (FTDv). Note that your proctor has already installed the APIC remediation package, available from cisco.com.
Exercise Objective Open FMC console in your Chrome browser, implement the following:
1. Create an FMC remediation instance, using previously installed FMC to APIC remediation package.
2. Create a correlation policy and rule that trigger on known disposition network-based malware event.
3. Enable the correlation policy.
4. Test the successful quarantine of a VM by issuing app-to-db_exe script on app End Point, which does a wget of this file from db End Point.
5. Test also this transfer on db End Point, noting the need for attacker VM to have a unique IP in the fabric.
LTRSEC-3001 – Deep Dive Lab: ASA and Firepower NGFW in ACI 27| P a g e
Lab Exercise Steps
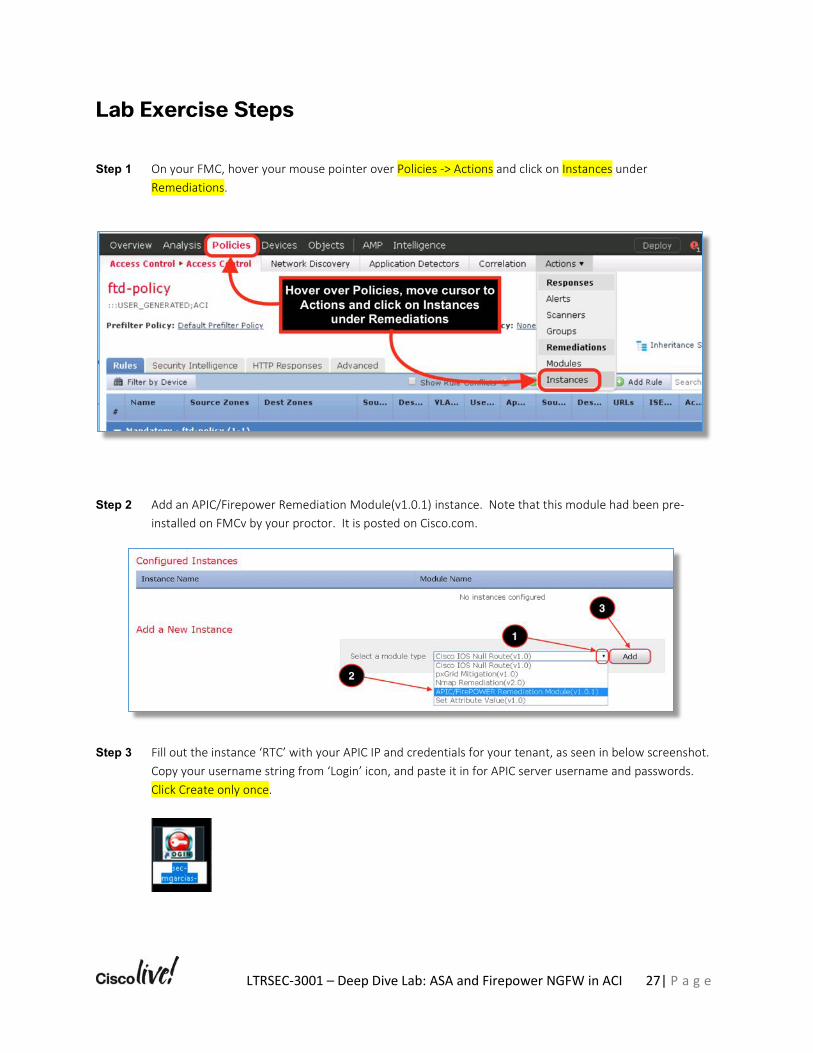
Step 1 On your FMC, hover your mouse pointer over Policies -> Actions and click on Instances under Remediations.
Step 2 Add an APIC/Firepower Remediation Module(v1.0.1) instance. Note that this module had been pre-installed on FMCv by your proctor. It is posted on Cisco.com.
Step 3 Fill out the instance ‘RTC’ with your APIC IP and credentials for your tenant, as seen in below screenshot. Copy your username string from ‘Login’ icon, and paste it in for APIC server username and passwords. Click Create only once.
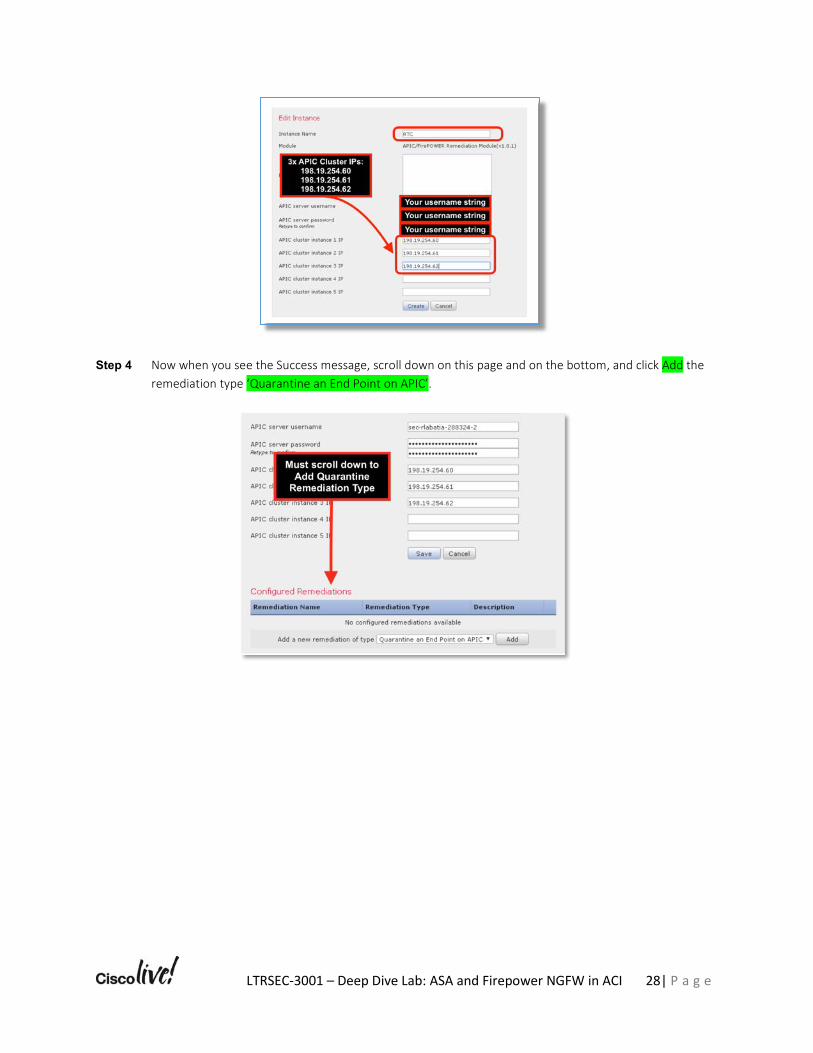
LTRSEC-3001 – Deep Dive Lab: ASA and Firepower NGFW in ACI 28| P a g e
Step 4 Now when you see the Success message, scroll down on this page and on the bottom, and click Add the remediation type ‘Quarantine an End Point on APIC’.
LTRSEC-3001 – Deep Dive Lab: ASA and Firepower NGFW in ACI 29| P a g e
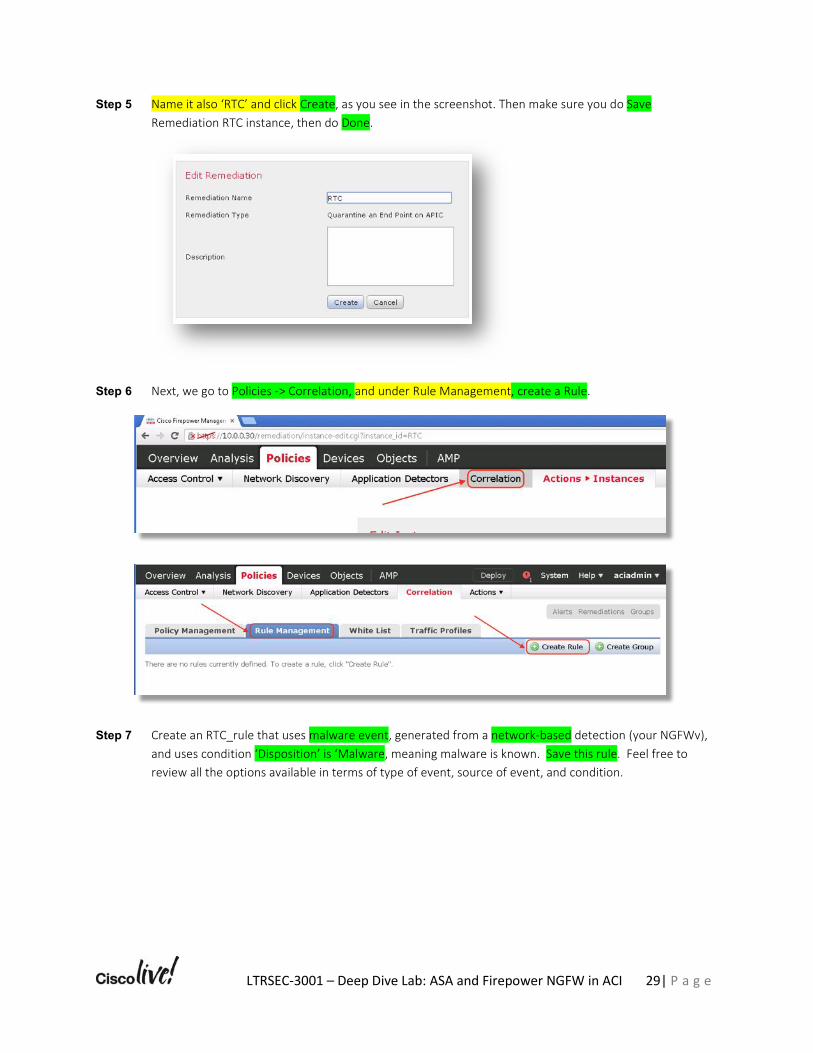
Step 5 Name it also ‘RTC’ and click Create, as you see in the screenshot. Then make sure you do Save Remediation RTC instance, then do Done.
Step 6 Next, we go to Policies -> Correlation, and under Rule Management, create a Rule.
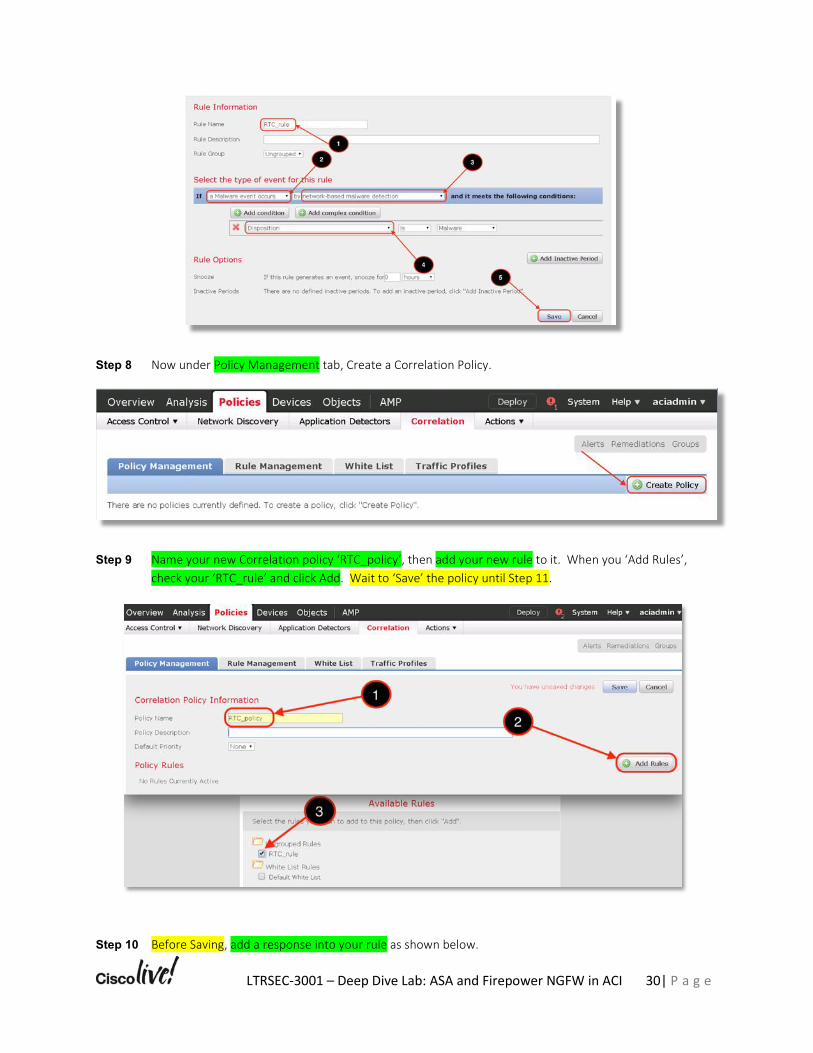
Step 7 Create an RTC_rule that uses malware event, generated from a network-based detection (your NGFWv), and uses condition ‘Disposition’ is ‘Malware, meaning malware is known. Save this rule. Feel free to review all the options available in terms of type of event, source of event, and condition.
LTRSEC-3001 – Deep Dive Lab: ASA and Firepower NGFW in ACI 30| P a g e
Step 8 Now under Policy Management tab, Create a Correlation Policy.
Step 9 Name your new Correlation policy ‘RTC_policy’, then add your new rule to it. When you ‘Add Rules’, check your ‘RTC_rule’ and click Add. Wait to ‘Save’ the policy until Step 11.
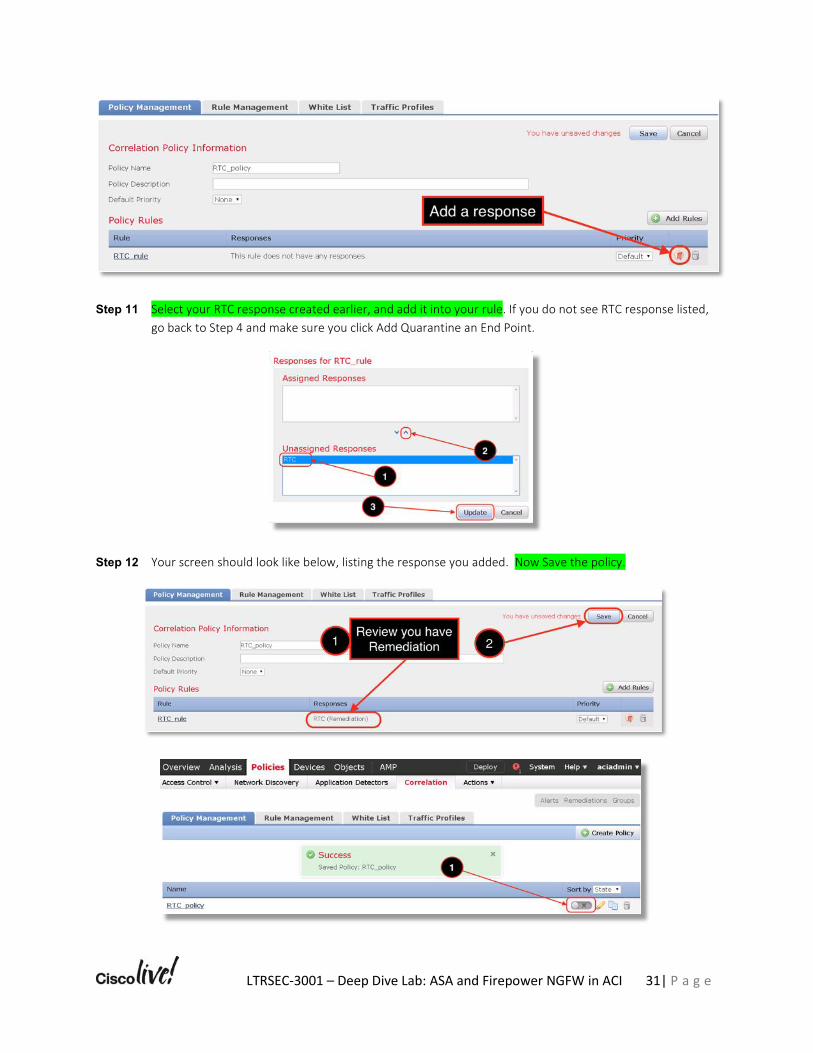
Step 10 Before Saving, add a response into your rule as shown below.
LTRSEC-3001 – Deep Dive Lab: ASA and Firepower NGFW in ACI 31| P a g e
Step 11 Select your RTC response created earlier, and add it into your rule. If you do not see RTC response listed, go back to Step 4 and make sure you click Add Quarantine an End Point.
Step 12 Your screen should look like below, listing the response you added. Now Save the policy.
LTRSEC-3001 – Deep Dive Lab: ASA and Firepower NGFW in ACI 32| P a g e
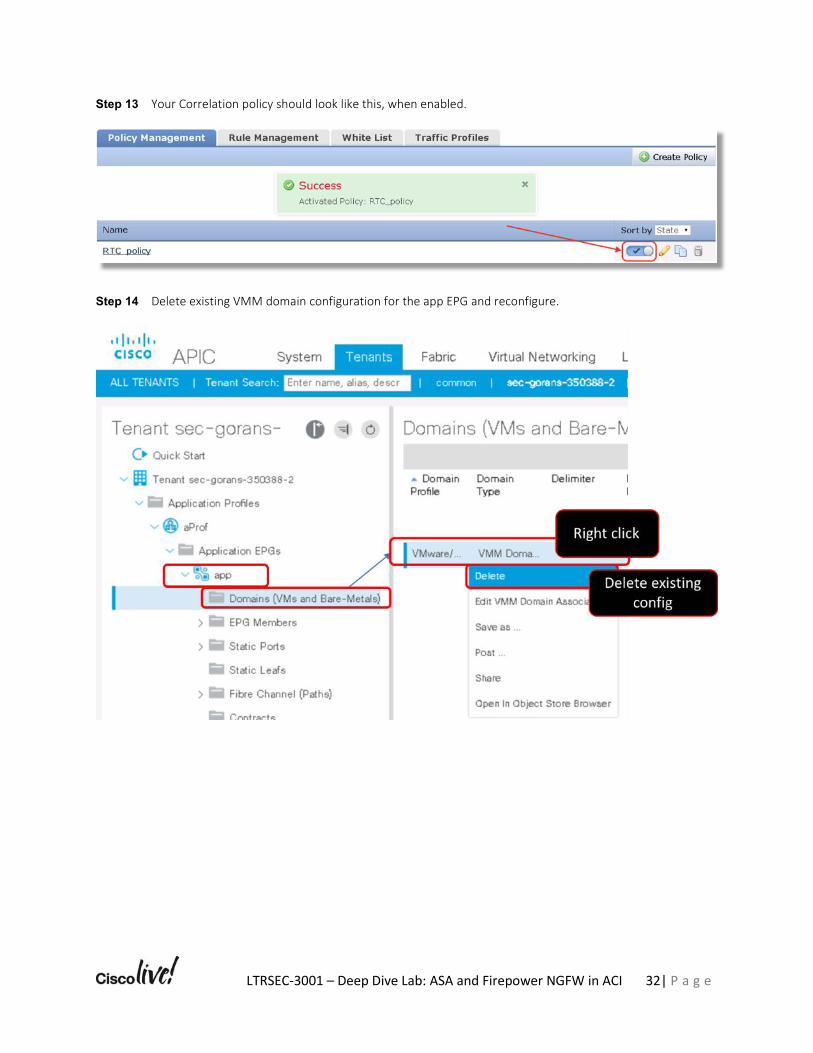
Step 13 Your Correlation policy should look like this, when enabled.
Step 14 Delete existing VMM domain configuration for the app EPG and reconfigure.
LTRSEC-3001 – Deep Dive Lab: ASA and Firepower NGFW in ACI 33| P a g e
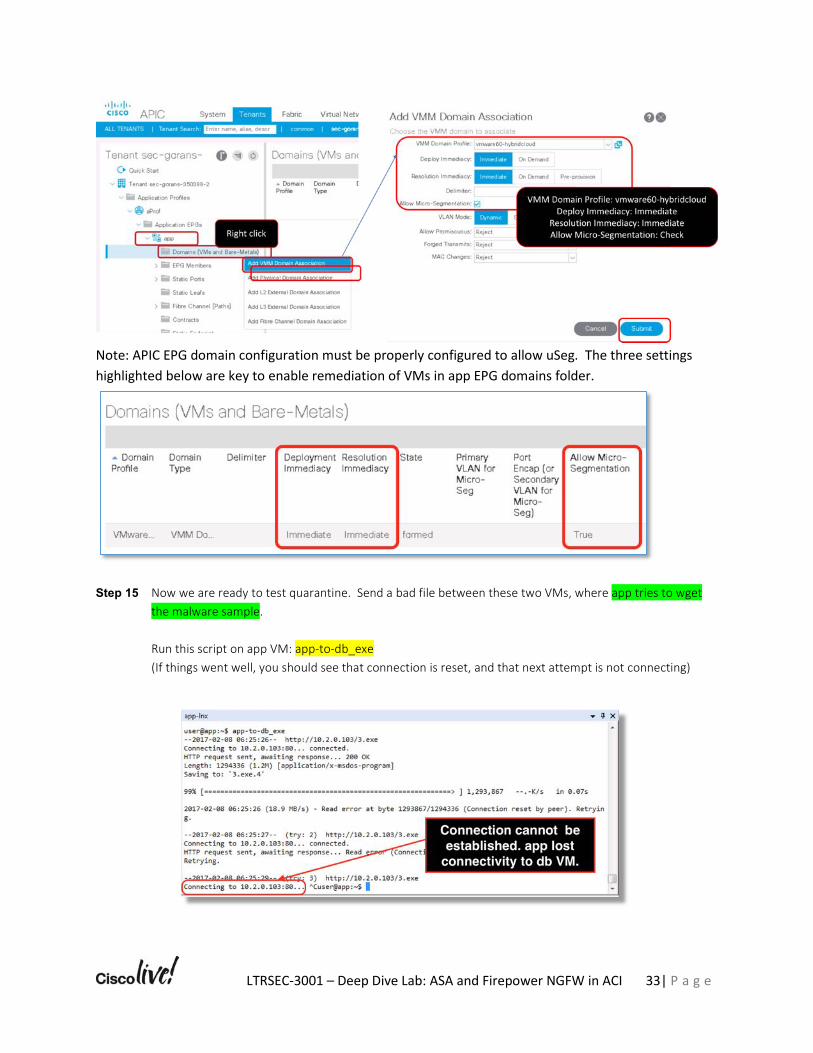
Note: APIC EPG domain configuration must be properly configured to allow uSeg. The three settings
highlighted below are key to enable remediation of VMs in app EPG domains folder.
Step 15 Now we are ready to test quarantine. Send a bad file between these two VMs, where app tries to wget the malware sample. Run this script on app VM: app-to-db_exe (If things went well, you should see that connection is reset, and that next attempt is not connecting)
LTRSEC-3001 – Deep Dive Lab: ASA and Firepower NGFW in ACI 34| P a g e
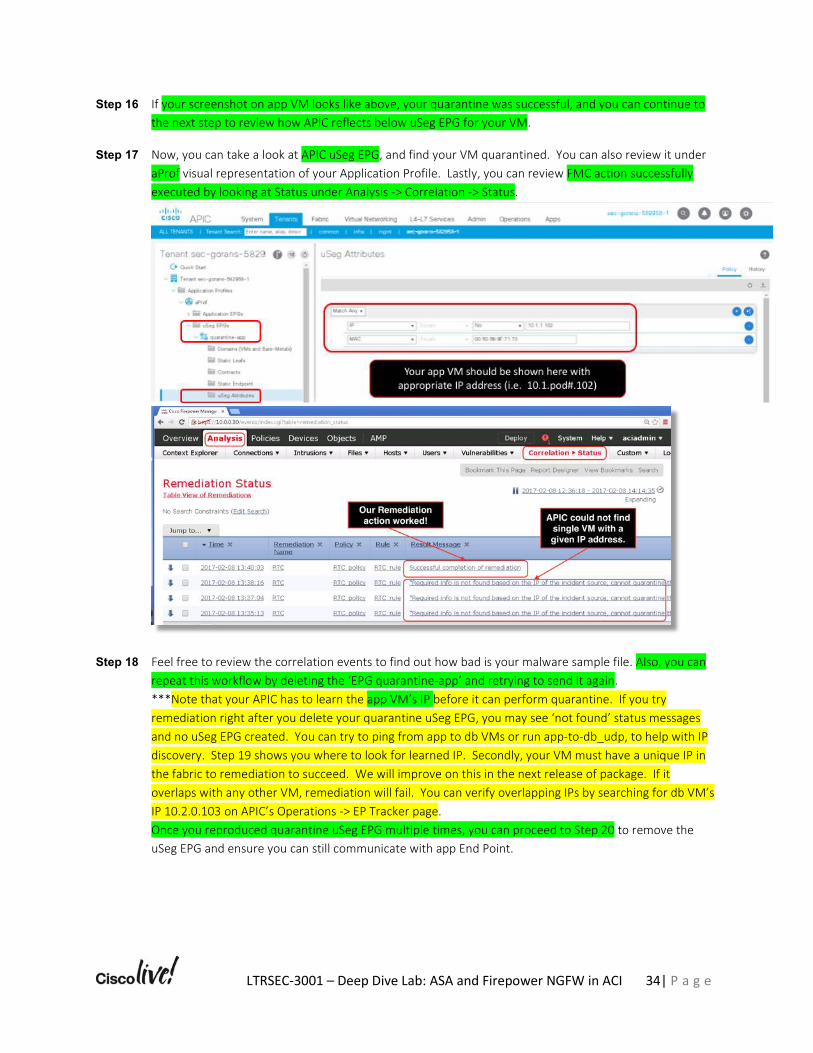
Step 16 If your screenshot on app VM looks like above, your quarantine was successful, and you can continue to the next step to review how APIC reflects below uSeg EPG for your VM.
Step 17 Now, you can take a look at APIC uSeg EPG, and find your VM quarantined. You can also review it under aProf visual representation of your Application Profile. Lastly, you can review FMC action successfully executed by looking at Status under Analysis -> Correlation -> Status.
Step 18 Feel free to review the correlation events to find out how bad is your malware sample file. Also, you can repeat this workflow by deleting the ‘EPG quarantine-app’ and retrying to send it again. ***Note that your APIC has to learn the app VM’s IP before it can perform quarantine. If you try remediation right after you delete your quarantine uSeg EPG, you may see ‘not found’ status messages and no uSeg EPG created. You can try to ping from app to db VMs or run app-to-db_udp, to help with IP discovery. Step 19 shows you where to look for learned IP. Secondly, your VM must have a unique IP in the fabric to remediation to succeed. We will improve on this in the next release of package. If it overlaps with any other VM, remediation will fail. You can verify overlapping IPs by searching for db VM’s IP 10.2.0.103 on APIC’s Operations -> EP Tracker page. Once you reproduced quarantine uSeg EPG multiple times, you can proceed to Step 20 to remove the uSeg EPG and ensure you can still communicate with app End Point.
LTRSEC-3001 – Deep Dive Lab: ASA and Firepower NGFW in ACI 35| P a g e
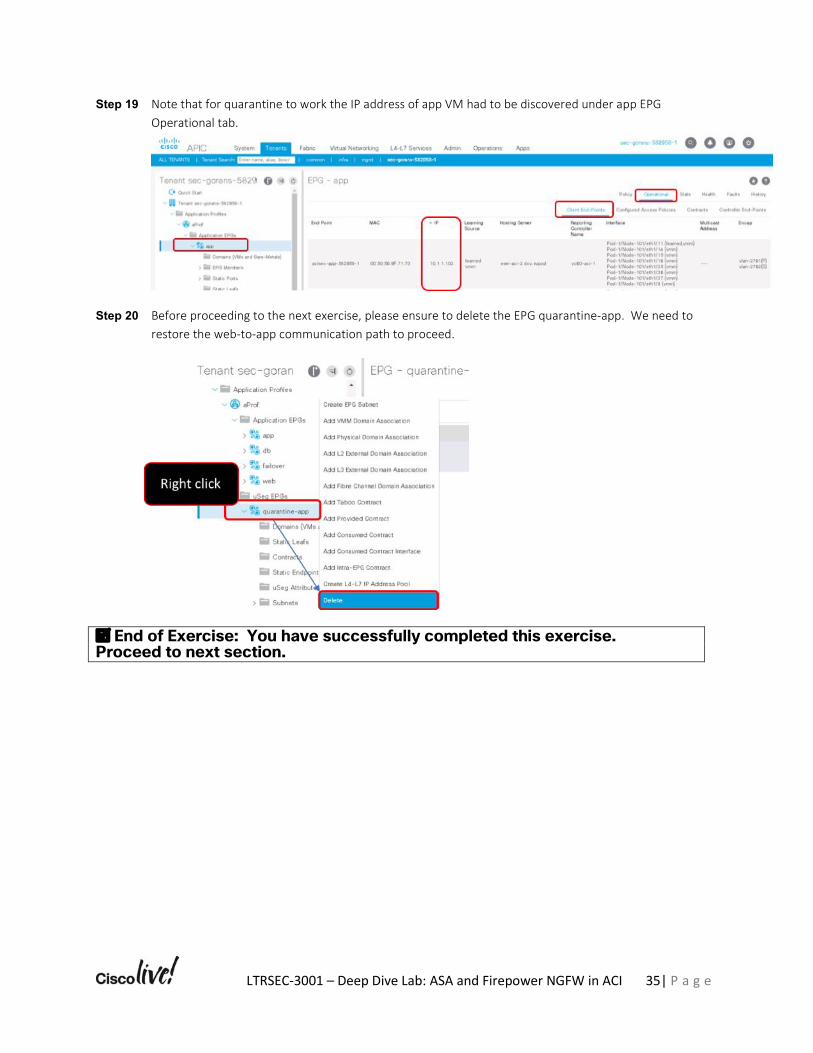
Step 19 Note that for quarantine to work the IP address of app VM had to be discovered under app EPG Operational tab.
Step 20 Before proceeding to the next exercise, please ensure to delete the EPG quarantine-app. We need to restore the web-to-app communication path to proceed.
þ End of Exercise: You have successfully completed this exercise. Proceed to next section.
LTRSEC-3001 – Deep Dive Lab: ASA and Firepower NGFW in ACI 36| P a g e
Lab Exercise 4: Reset pod and run scripts to build-out your Tenant with ASA and FTD security services with ACI managed mode PBR
Exercise Description In the opening exercise, attendees bring up and connect to their pod resources, prep FMCv and Firepower NGFWv (FTD code) for use in the ACI fabric, and executes a python script on api-client VM to build out their Tenant with security service graphs. After your Tenant is fully built, you will review all configurations in APIC, vCenter, ASA contexts, FMC, FTDv, and validate connectivity between VM linux End Points (EPG workloads).
Exercise Objective Your proctor has baselined your APIC Tenant and prepped the scripts for you to provision the following resources for your review:
1. Application profile with web, app, and db EPGs, and outside host segment simulating campus
2. ASA cluster contexts are ready to be registered as L4-L7 Devices
3. Scripted ASA and FTD Function Profiles (configurations to be stored on APIC)
4. Scripted L4-L7 Service Graphs for the ASA and FTDv firewall protection services
5. Scripted Contracts and deployment of Graph Instances and Devices
6. To conclude, you use the provided python scripts to orchestrate the build out your tenant networking and security functions and test all connectivity and inspection at the end.
Lab Exercise Steps Step 1 If you have demo1 setup, you need to run a reset script, you will need to wait for configs to clear and
deploy on FTD, before proceeding with the next demo2 build. Here is the cli you need to run on your api-client, to reset your tenant to baseline: reset-my-tenant (enter ‘cisco’ at password prompt) Now, APIC will interact with FMC/FTD to clear their graph configurations. APIC configs will be cleared instantly, while FMCv deployment will take approximately 6min. Once deploy is complete, you start a new run of the build-demo2.bash.
LTRSEC-3001 – Deep Dive Lab: ASA and Firepower NGFW in ACI 37| P a g e
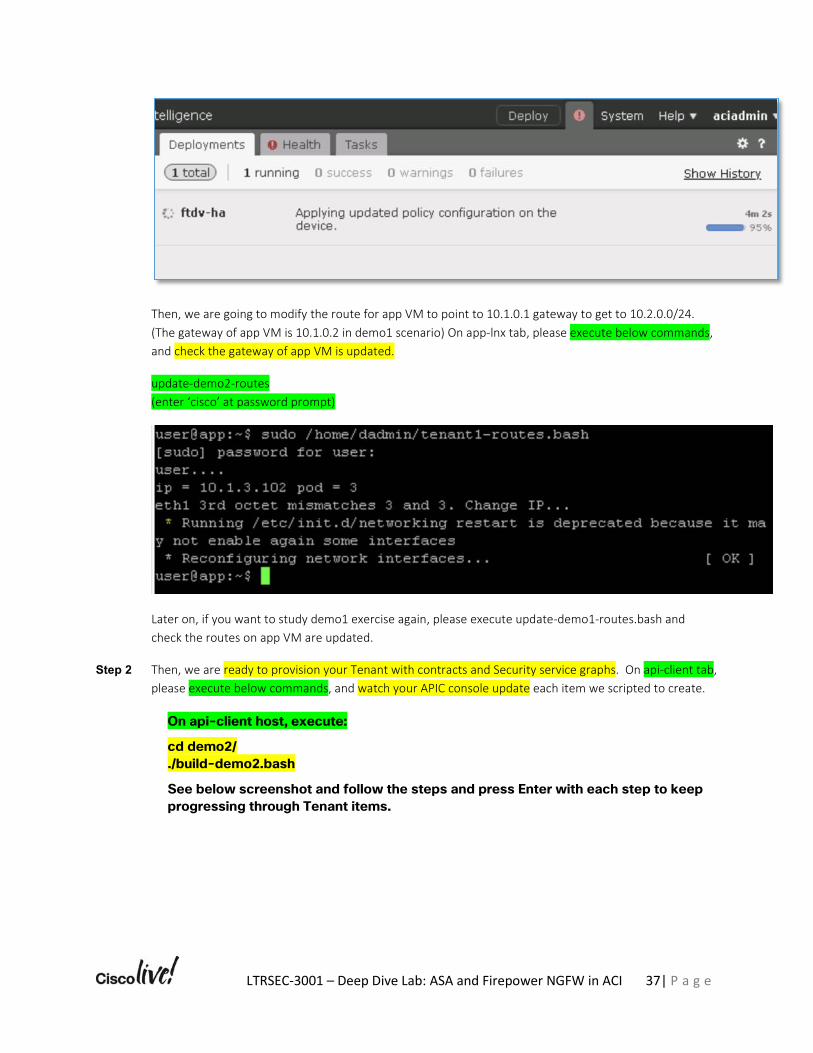
Then, we are going to modify the route for app VM to point to 10.1.0.1 gateway to get to 10.2.0.0/24. (The gateway of app VM is 10.1.0.2 in demo1 scenario) On app-lnx tab, please execute below commands, and check the gateway of app VM is updated.
update-demo2-routes (enter ‘cisco’ at password prompt)
Later on, if you want to study demo1 exercise again, please execute update-demo1-routes.bash and check the routes on app VM are updated.
Step 2 Then, we are ready to provision your Tenant with contracts and Security service graphs. On api-client tab, please execute below commands, and watch your APIC console update each item we scripted to create.
On api-client host, execute:
cd demo2/ ./build-demo2.bash
See below screenshot and follow the steps and press Enter with each step to keep progressing through Tenant items.
LTRSEC-3001 – Deep Dive Lab: ASA and Firepower NGFW in ACI 38| P a g e
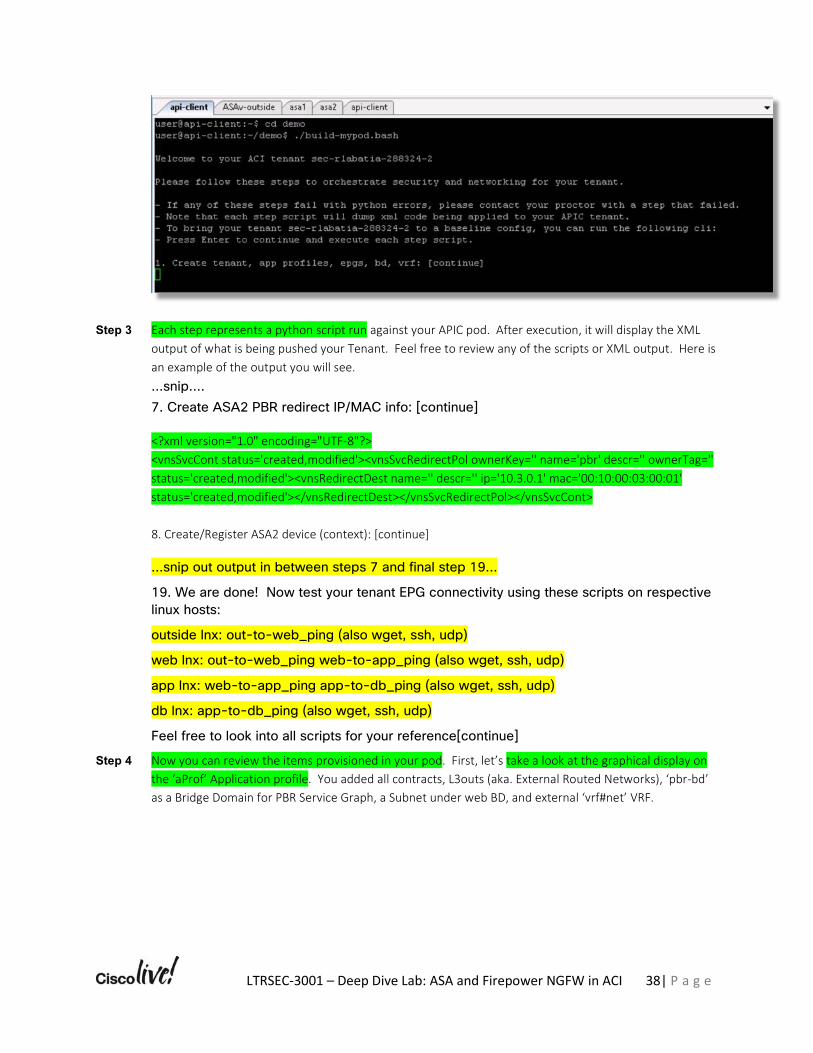
Step 3 Each step represents a python script run against your APIC pod. After execution, it will display the XML output of what is being pushed your Tenant. Feel free to review any of the scripts or XML output. Here is an example of the output you will see. …snip…. 7. Create ASA2 PBR redirect IP/MAC info: [continue]
<?xml version="1.0" encoding="UTF-8"?> <vnsSvcCont status='created,modified'><vnsSvcRedirectPol ownerKey='' name='pbr' descr='' ownerTag='' status='created,modified'><vnsRedirectDest name='' descr='' ip='10.3.0.1' mac='00:10:00:03:00:01' status='created,modified'></vnsRedirectDest></vnsSvcRedirectPol></vnsSvcCont> 8. Create/Register ASA2 device (context): [continue]
…snip out output in between steps 7 and final step 19…
19. We are done! Now test your tenant EPG connectivity using these scripts on respective linux hosts:
outside lnx: out-to-web_ping (also wget, ssh, udp)
web lnx: out-to-web_ping web-to-app_ping (also wget, ssh, udp)
app lnx: web-to-app_ping app-to-db_ping (also wget, ssh, udp)
db lnx: app-to-db_ping (also wget, ssh, udp)
Feel free to look into all scripts for your reference[continue]
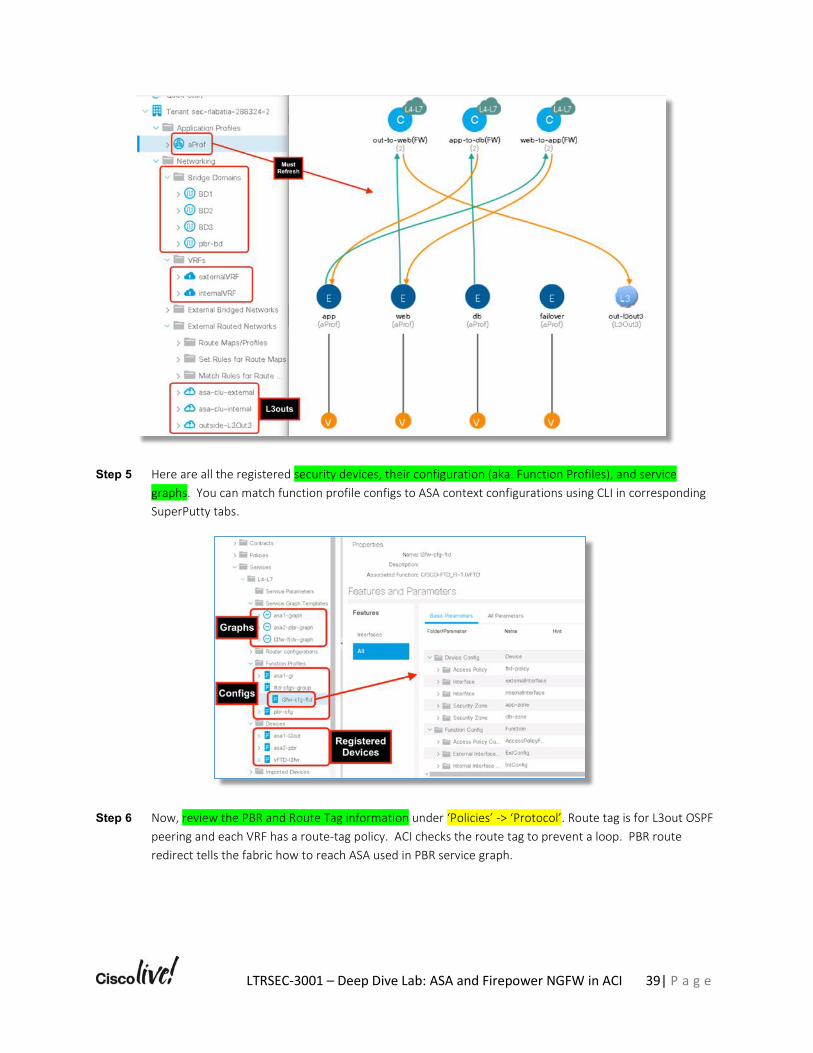
Step 4 Now you can review the items provisioned in your pod. First, let’s take a look at the graphical display on the ‘aProf’ Application profile. You added all contracts, L3outs (aka. External Routed Networks), ‘pbr-bd’ as a Bridge Domain for PBR Service Graph, a Subnet under web BD, and external ‘vrf#net’ VRF.
LTRSEC-3001 – Deep Dive Lab: ASA and Firepower NGFW in ACI 39| P a g e
Step 5 Here are all the registered security devices, their configuration (aka. Function Profiles), and service graphs. You can match function profile configs to ASA context configurations using CLI in corresponding SuperPutty tabs.
Step 6 Now, review the PBR and Route Tag information under ‘Policies’ -> ‘Protocol’. Route tag is for L3out OSPF peering and each VRF has a route-tag policy. ACI checks the route tag to prevent a loop. PBR route redirect tells the fabric how to reach ASA used in PBR service graph.
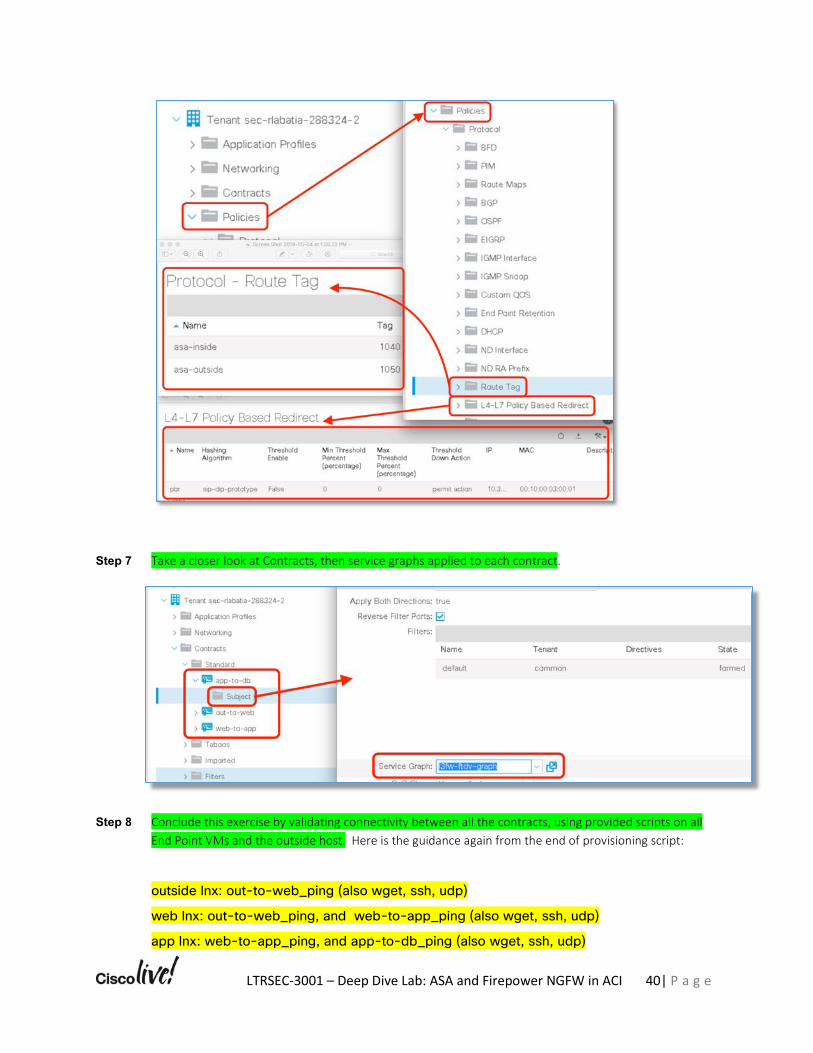
LTRSEC-3001 – Deep Dive Lab: ASA and Firepower NGFW in ACI 40| P a g e
Step 7 Take a closer look at Contracts, then service graphs applied to each contract.
Step 8 Conclude this exercise by validating connectivity between all the contracts, using provided scripts on all End Point VMs and the outside host. Here is the guidance again from the end of provisioning script:
outside lnx: out-to-web_ping (also wget, ssh, udp)
web lnx: out-to-web_ping, and web-to-app_ping (also wget, ssh, udp)
app lnx: web-to-app_ping, and app-to-db_ping (also wget, ssh, udp)
LTRSEC-3001 – Deep Dive Lab: ASA and Firepower NGFW in ACI 41| P a g e
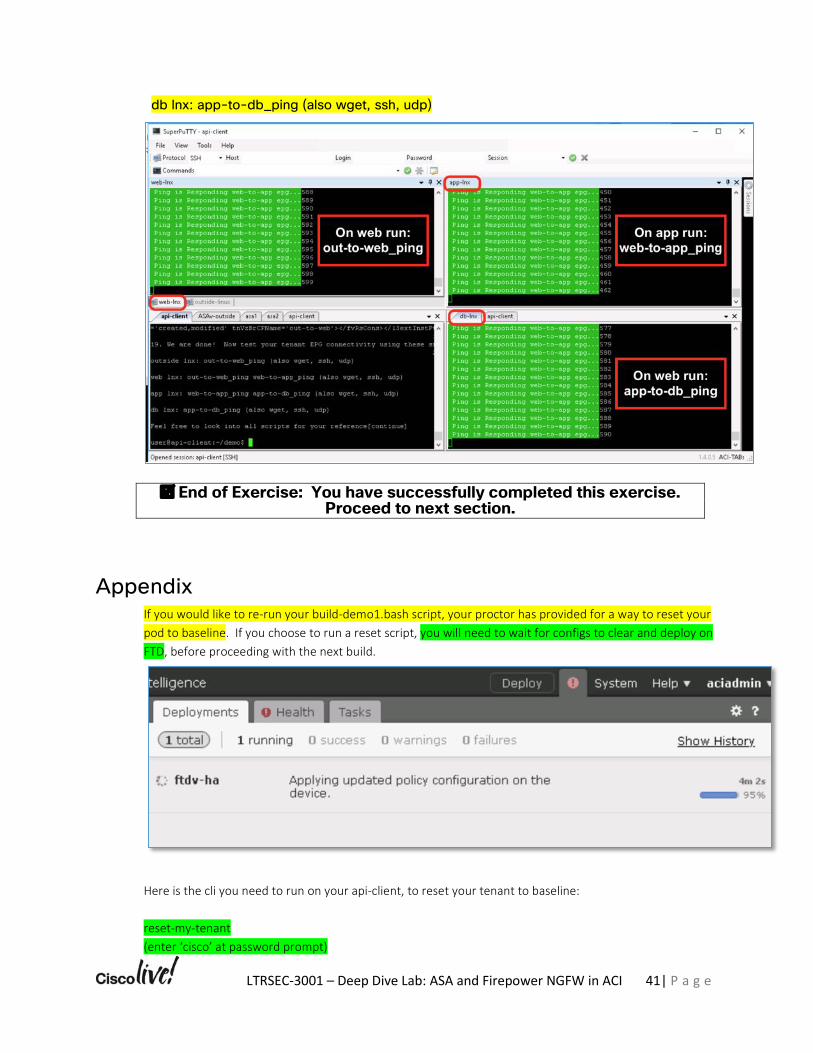
db lnx: app-to-db_ping (also wget, ssh, udp)
þ End of Exercise: You have successfully completed this exercise. Proceed to next section.
Appendix If you would like to re-run your build-demo1.bash script, your proctor has provided for a way to reset your pod to baseline. If you choose to run a reset script, you will need to wait for configs to clear and deploy on FTD, before proceeding with the next build.
Here is the cli you need to run on your api-client, to reset your tenant to baseline: reset-my-tenant (enter ‘cisco’ at password prompt)

LTRSEC-3001 – Deep Dive Lab: ASA and Firepower NGFW in ACI 42| P a g e
Now, APIC will interact with FMC/FTD to clear their graph configurations. APIC configs will be cleared instantly, while FMCv deployment will take approximately 6min. Once deploy is complete, you start a new run of the build-demo1.bash.
LTRSEC-3001 – Deep Dive Lab: ASA and Firepower NGFW in ACI 43| P a g e
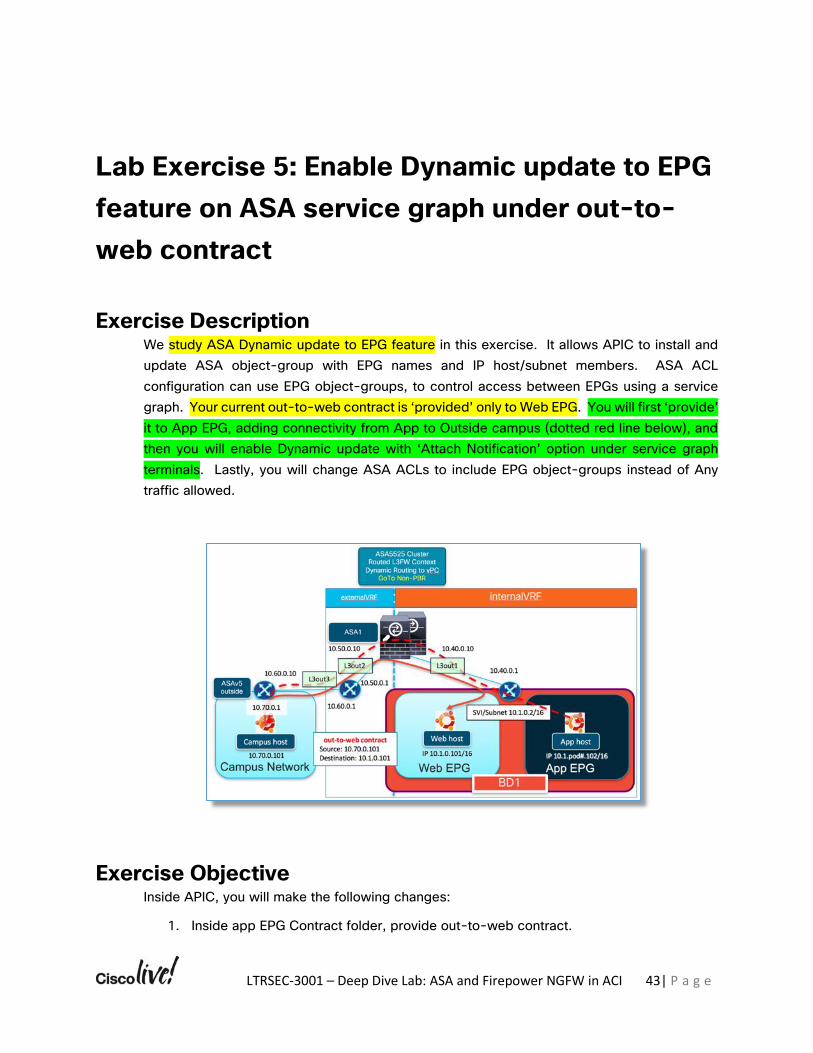
Lab Exercise 5: Enable Dynamic update to EPG feature on ASA service graph under out-to-web contract
Exercise Description We study ASA Dynamic update to EPG feature in this exercise. It allows APIC to install and update ASA object-group with EPG names and IP host/subnet members. ASA ACL configuration can use EPG object-groups, to control access between EPGs using a service graph. Your current out-to-web contract is ‘provided’ only to Web EPG. You will first ‘provide’ it to App EPG, adding connectivity from App to Outside campus (dotted red line below), and then you will enable Dynamic update with ‘Attach Notification’ option under service graph terminals. Lastly, you will change ASA ACLs to include EPG object-groups instead of Any traffic allowed.
Exercise Objective Inside APIC, you will make the following changes:
1. Inside app EPG Contract folder, provide out-to-web contract.
LTRSEC-3001 – Deep Dive Lab: ASA and Firepower NGFW in ACI 44| P a g e
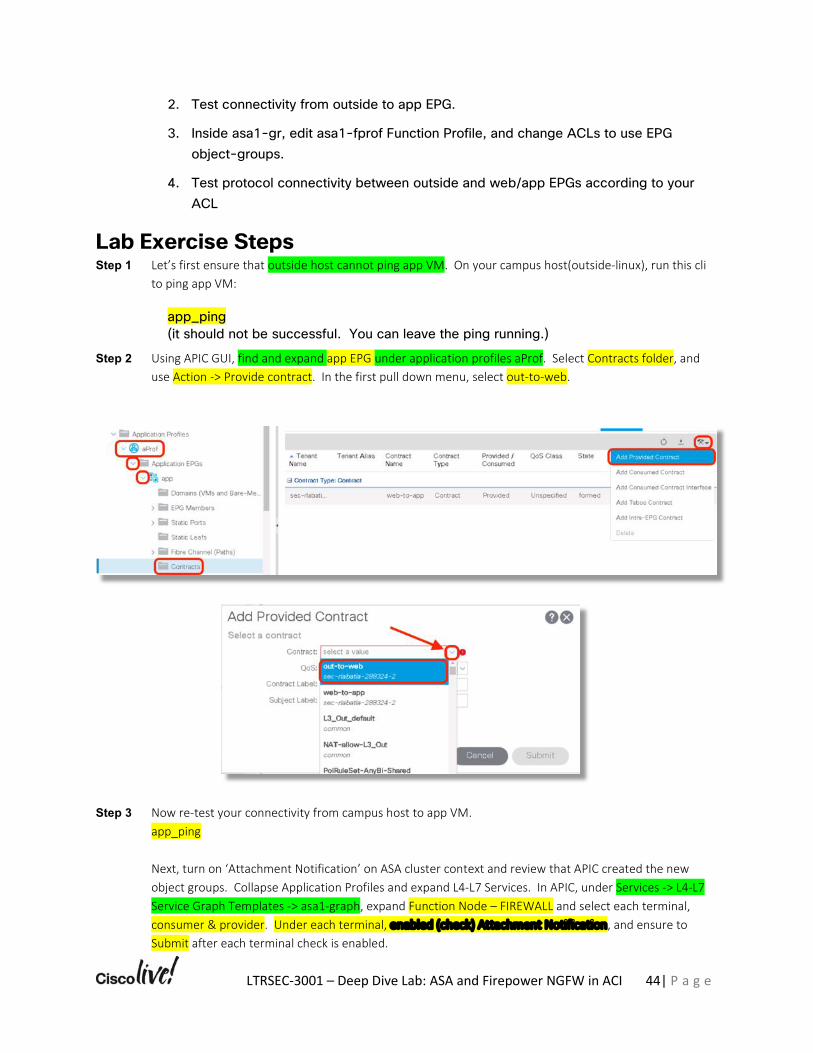
2. Test connectivity from outside to app EPG.
3. Inside asa1-gr, edit asa1-fprof Function Profile, and change ACLs to use EPG object-groups.
4. Test protocol connectivity between outside and web/app EPGs according to your ACL
Lab Exercise Steps Step 1 Let’s first ensure that outside host cannot ping app VM. On your campus host(outside-linux), run this cli
to ping app VM:
app_ping (it should not be successful. You can leave the ping running.)
Step 2 Using APIC GUI, find and expand app EPG under application profiles aProf. Select Contracts folder, and use Action -> Provide contract. In the first pull down menu, select out-to-web.
Step 3 Now re-test your connectivity from campus host to app VM. app_ping Next, turn on ‘Attachment Notification’ on ASA cluster context and review that APIC created the new object groups. Collapse Application Profiles and expand L4-L7 Services. In APIC, under Services -> L4-L7 Service Graph Templates -> asa1-graph, expand Function Node – FIREWALL and select each terminal, consumer & provider. Under each terminal, enabled (check) Attachment Notification, and ensure to Submit after each terminal check is enabled.
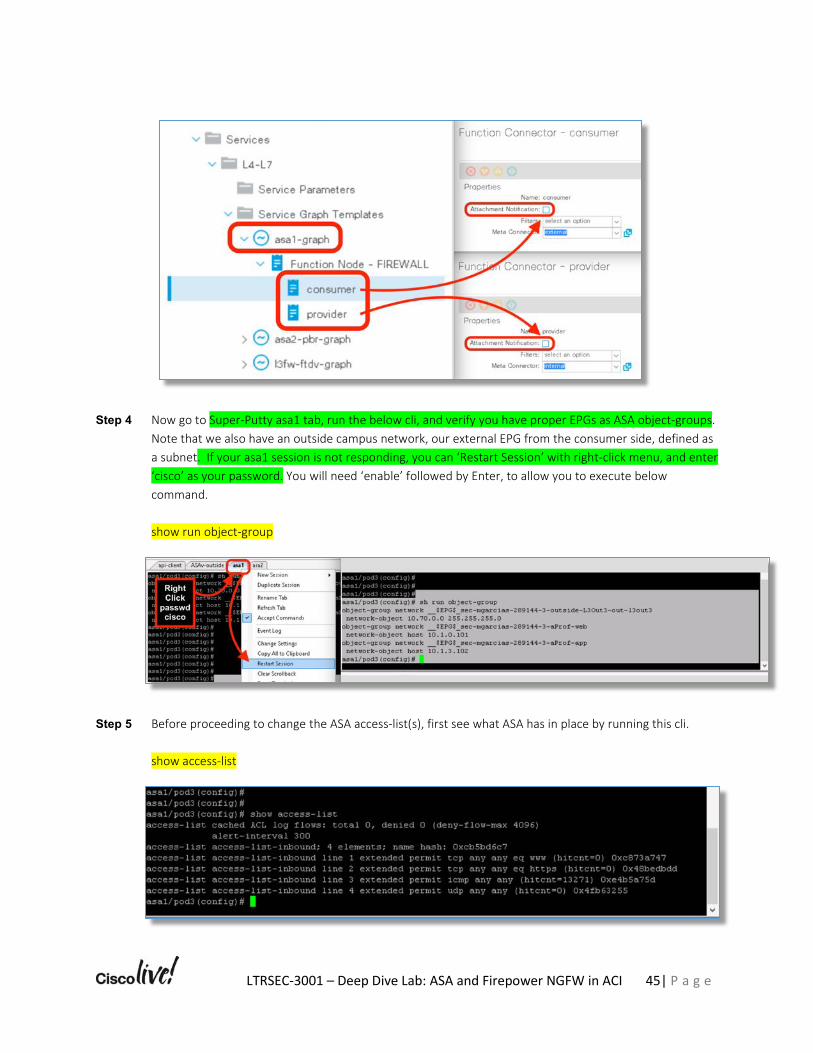
LTRSEC-3001 – Deep Dive Lab: ASA and Firepower NGFW in ACI 45| P a g e
Step 4 Now go to Super-Putty asa1 tab, run the below cli, and verify you have proper EPGs as ASA object-groups. Note that we also have an outside campus network, our external EPG from the consumer side, defined as a subnet. If your asa1 session is not responding, you can ‘Restart Session’ with right-click menu, and enter ‘cisco’ as your password. You will need ‘enable’ followed by Enter, to allow you to execute below command. show run object-group
Step 5 Before proceeding to change the ASA access-list(s), first see what ASA has in place by running this cli. show access-list
LTRSEC-3001 – Deep Dive Lab: ASA and Firepower NGFW in ACI 46| P a g e
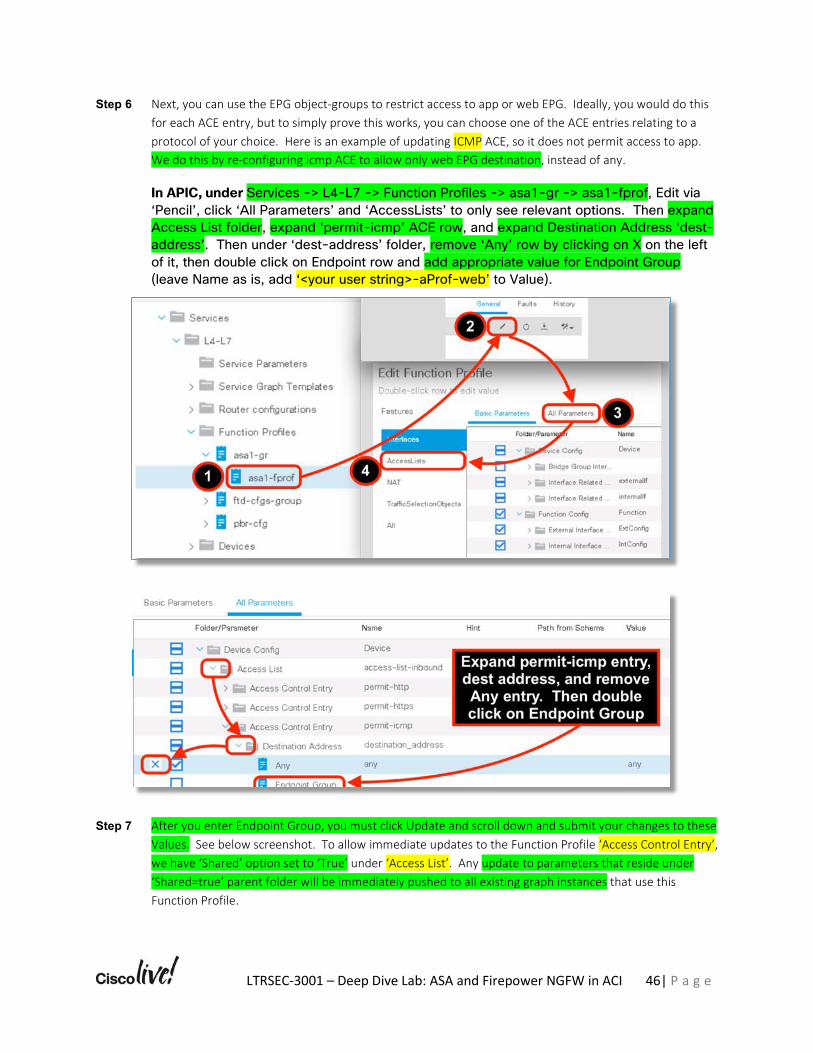
Step 6 Next, you can use the EPG object-groups to restrict access to app or web EPG. Ideally, you would do this for each ACE entry, but to simply prove this works, you can choose one of the ACE entries relating to a protocol of your choice. Here is an example of updating ICMP ACE, so it does not permit access to app. We do this by re-configuring icmp ACE to allow only web EPG destination, instead of any.
In APIC, under Services -> L4-L7 -> Function Profiles -> asa1-gr -> asa1-fprof, Edit via ‘Pencil’, click ‘All Parameters’ and ‘AccessLists’ to only see relevant options. Then expand Access List folder, expand ‘permit-icmp’ ACE row, and expand Destination Address ‘dest-address’. Then under ‘dest-address’ folder, remove ‘Any’ row by clicking on X on the left of it, then double click on Endpoint row and add appropriate value for Endpoint Group (leave Name as is, add ‘<your user string>-aProf-web’ to Value).
Step 7 After you enter Endpoint Group, you must click Update and scroll down and submit your changes to these Values. See below screenshot. To allow immediate updates to the Function Profile ‘Access Control Entry’, we have ‘Shared’ option set to ‘True’ under ‘Access List’. Any update to parameters that reside under ‘Shared=true’ parent folder will be immediately pushed to all existing graph instances that use this Function Profile.

LTRSEC-3001 – Deep Dive Lab: ASA and Firepower NGFW in ACI 47| P a g e
Step 8 Once you submitted this change to APIC, you can verify ACE for icmp (or your chosen protocol) has updated on ASA, and you can test ICMP connectivity from outside to web and app. show access-list (run this cli on asa1 tab)

LTRSEC-3001 – Deep Dive Lab: ASA and Firepower NGFW in ACI 48| P a g e
app_ping (from outside host, to confirm it is now failing) Remaining protocols that have permit ‘any’ should still work to app.
þ End of Exercise: You have successfully completed this exercise. Proceed to next section.
LTRSEC-3001 – Deep Dive Lab: ASA and Firepower NGFW in ACI 49| P a g e
te
Lab Exercise 6: Study the mechanics and benefits of the ASA PBR service graph
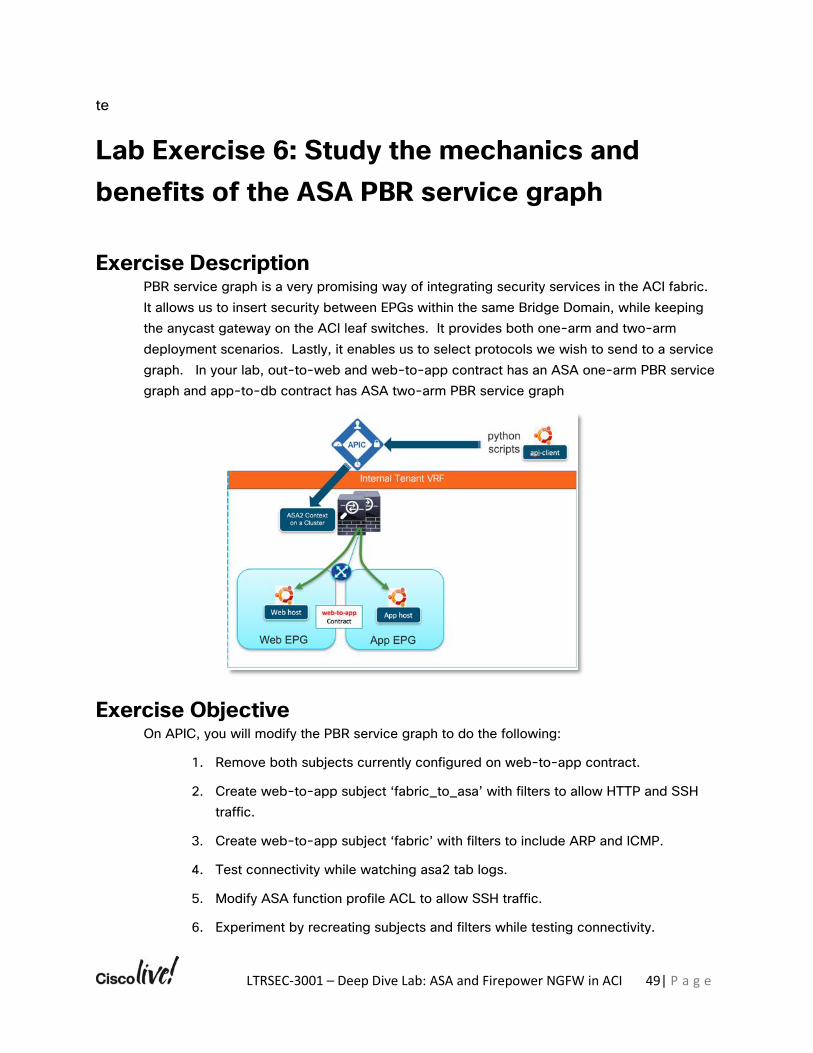
Exercise Description PBR service graph is a very promising way of integrating security services in the ACI fabric. It allows us to insert security between EPGs within the same Bridge Domain, while keeping the anycast gateway on the ACI leaf switches. It provides both one-arm and two-arm deployment scenarios. Lastly, it enables us to select protocols we wish to send to a service graph. In your lab, out-to-web and web-to-app contract has an ASA one-arm PBR service graph and app-to-db contract has ASA two-arm PBR service graph
Exercise Objective On APIC, you will modify the PBR service graph to do the following:
1. Remove both subjects currently configured on web-to-app contract.
2. Create web-to-app subject ‘fabric_to_asa’ with filters to allow HTTP and SSH traffic.
3. Create web-to-app subject ‘fabric’ with filters to include ARP and ICMP.
4. Test connectivity while watching asa2 tab logs.
5. Modify ASA function profile ACL to allow SSH traffic.
6. Experiment by recreating subjects and filters while testing connectivity.

LTRSEC-3001 – Deep Dive Lab: ASA and Firepower NGFW in ACI 50| P a g e
LTRSEC-3001 – Deep Dive Lab: ASA and Firepower NGFW in ACI 51| P a g e
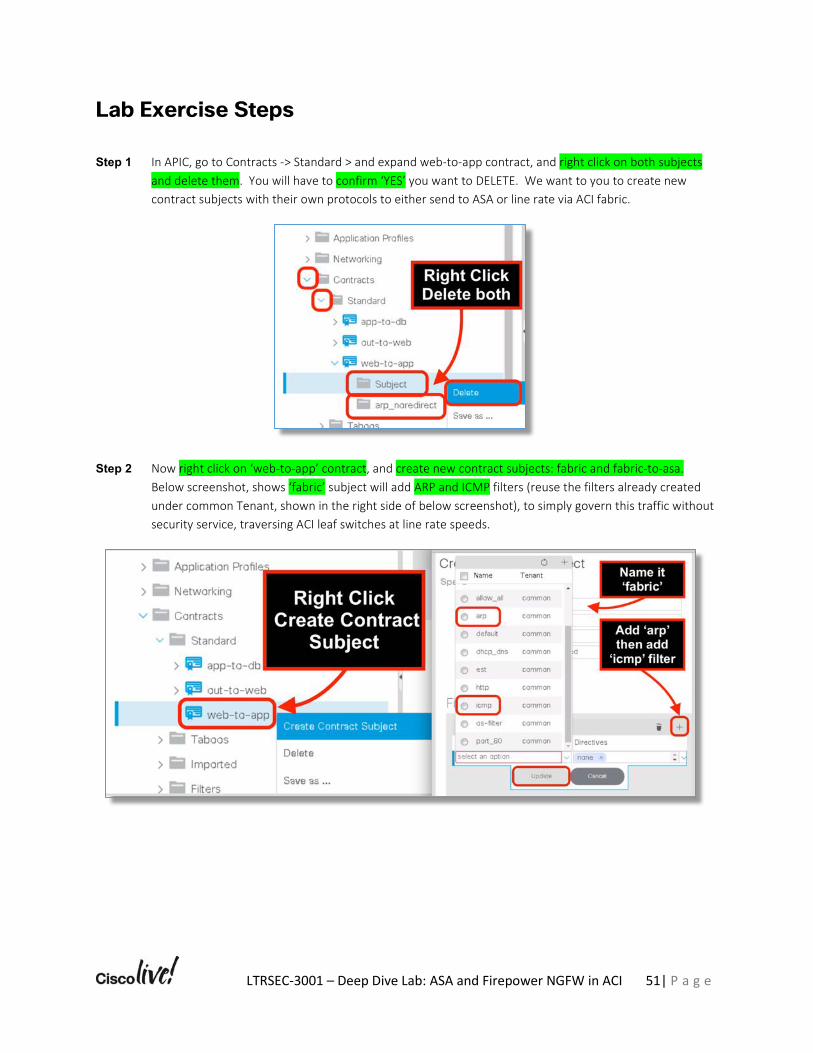
Lab Exercise Steps Step 1 In APIC, go to Contracts -> Standard > and expand web-to-app contract, and right click on both subjects
and delete them. You will have to confirm ‘YES’ you want to DELETE. We want to you to create new contract subjects with their own protocols to either send to ASA or line rate via ACI fabric.
Step 2 Now right click on ‘web-to-app’ contract, and create new contract subjects: fabric and fabric-to-asa. Below screenshot, shows ‘fabric’ subject will add ARP and ICMP filters (reuse the filters already created under common Tenant, shown in the right side of below screenshot), to simply govern this traffic without security service, traversing ACI leaf switches at line rate speeds.
LTRSEC-3001 – Deep Dive Lab: ASA and Firepower NGFW in ACI 52| P a g e
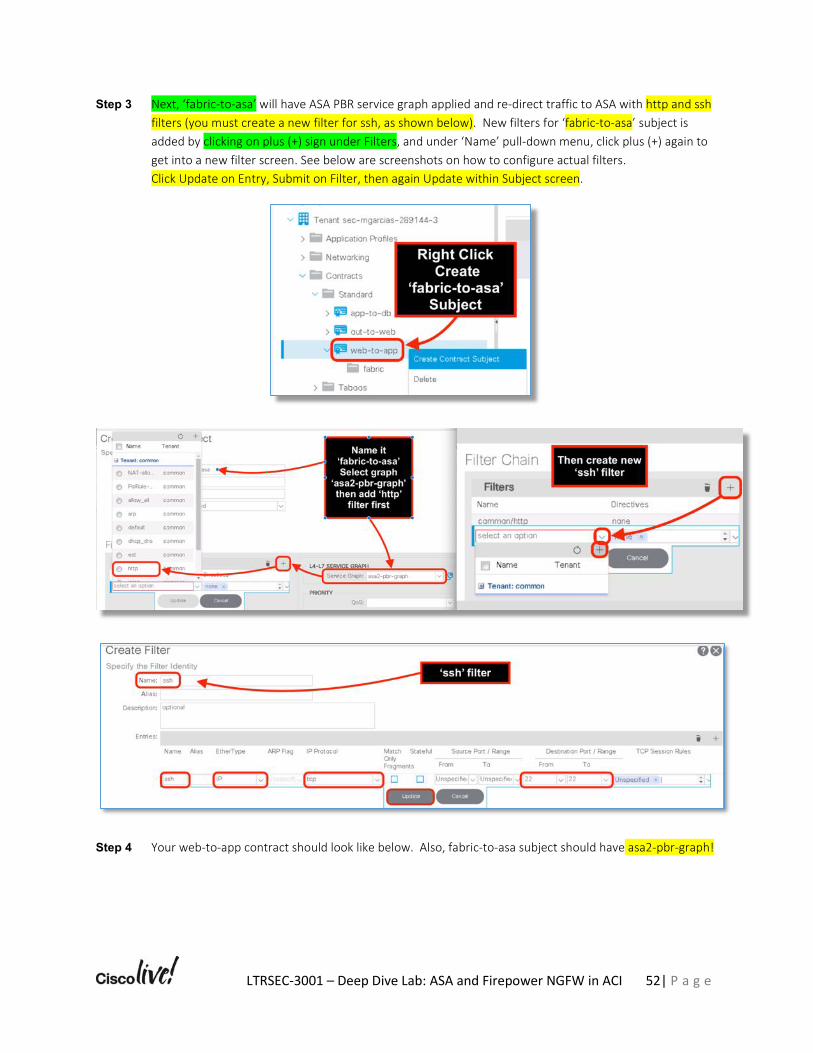
Step 3 Next, ‘fabric-to-asa’ will have ASA PBR service graph applied and re-direct traffic to ASA with http and ssh filters (you must create a new filter for ssh, as shown below). New filters for ‘fabric-to-asa’ subject is added by clicking on plus (+) sign under Filters, and under ‘Name’ pull-down menu, click plus (+) again to get into a new filter screen. See below are screenshots on how to configure actual filters. Click Update on Entry, Submit on Filter, then again Update within Subject screen.
Step 4 Your web-to-app contract should look like below. Also, fabric-to-asa subject should have asa2-pbr-graph!
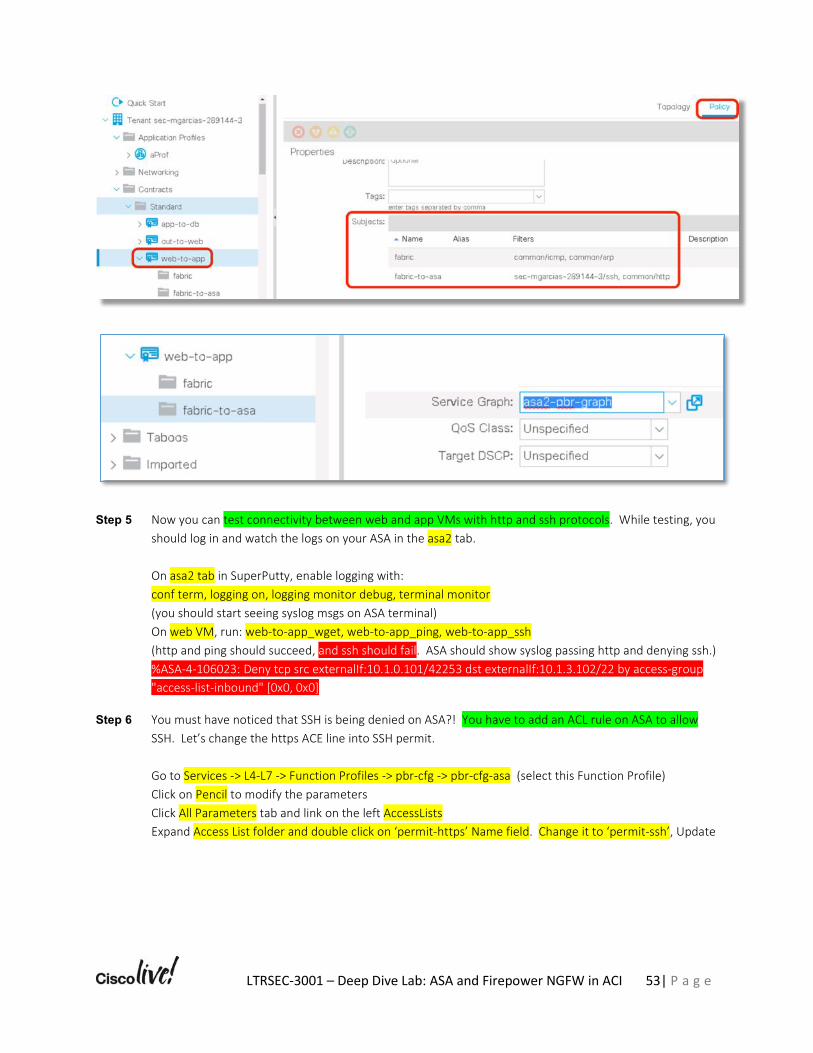
LTRSEC-3001 – Deep Dive Lab: ASA and Firepower NGFW in ACI 53| P a g e
Step 5 Now you can test connectivity between web and app VMs with http and ssh protocols. While testing, you should log in and watch the logs on your ASA in the asa2 tab. On asa2 tab in SuperPutty, enable logging with: conf term, logging on, logging monitor debug, terminal monitor (you should start seeing syslog msgs on ASA terminal) On web VM, run: web-to-app_wget, web-to-app_ping, web-to-app_ssh (http and ping should succeed, and ssh should fail. ASA should show syslog passing http and denying ssh.) %ASA-4-106023: Deny tcp src externalIf:10.1.0.101/42253 dst externalIf:10.1.3.102/22 by access-group "access-list-inbound" [0x0, 0x0]
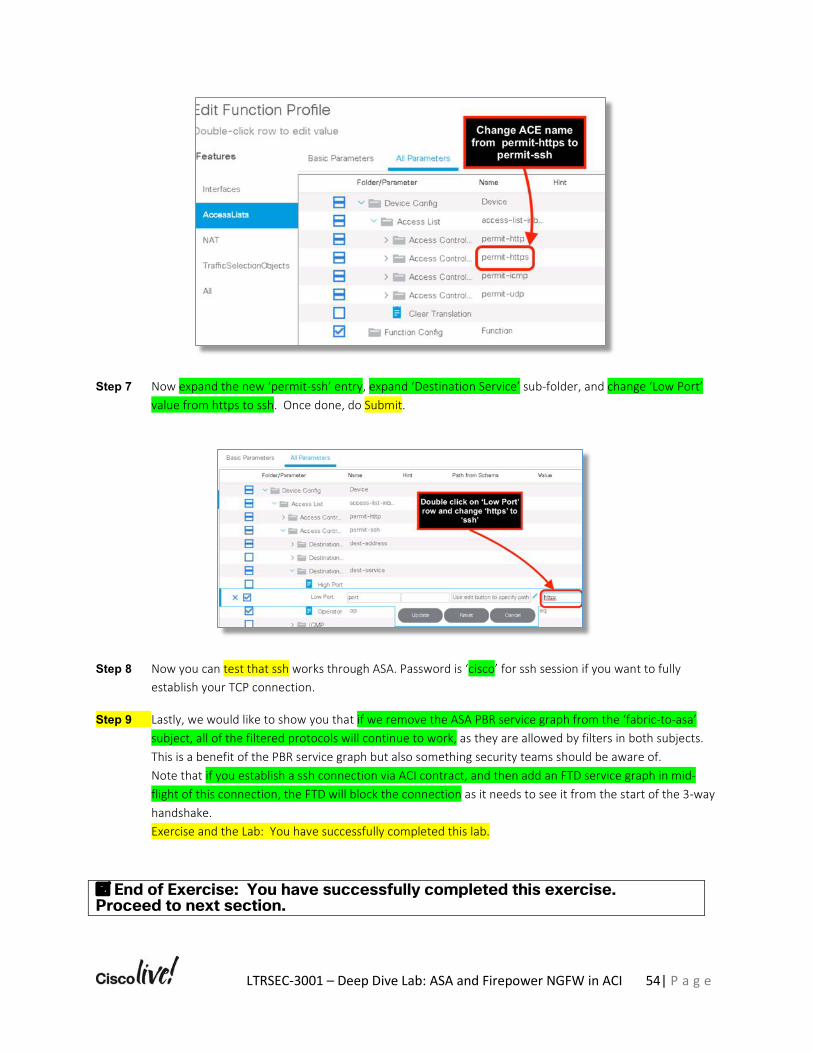
Step 6 You must have noticed that SSH is being denied on ASA?! You have to add an ACL rule on ASA to allow SSH. Let’s change the https ACE line into SSH permit. Go to Services -> L4-L7 -> Function Profiles -> pbr-cfg -> pbr-cfg-asa (select this Function Profile) Click on Pencil to modify the parameters Click All Parameters tab and link on the left AccessLists Expand Access List folder and double click on ‘permit-https’ Name field. Change it to ‘permit-ssh’, Update
LTRSEC-3001 – Deep Dive Lab: ASA and Firepower NGFW in ACI 54| P a g e
Step 7 Now expand the new ‘permit-ssh’ entry, expand ‘Destination Service’ sub-folder, and change ‘Low Port’ value from https to ssh. Once done, do Submit.
Step 8 Now you can test that ssh works through ASA. Password is ‘cisco’ for ssh session if you want to fully establish your TCP connection.
Step 9 Lastly, we would like to show you that if we remove the ASA PBR service graph from the ‘fabric-to-asa’ subject, all of the filtered protocols will continue to work, as they are allowed by filters in both subjects. This is a benefit of the PBR service graph but also something security teams should be aware of. Note that if you establish a ssh connection via ACI contract, and then add an FTD service graph in mid-flight of this connection, the FTD will block the connection as it needs to see it from the start of the 3-way handshake. Exercise and the Lab: You have successfully completed this lab.
þ End of Exercise: You have successfully completed this exercise. Proceed to next section.
LTRSEC-3001 – Deep Dive Lab: ASA and Firepower NGFW in ACI 55| P a g e
Lab Exercise 7: Change FTDv Service Graph to Unmanaged on app-to-db Contract
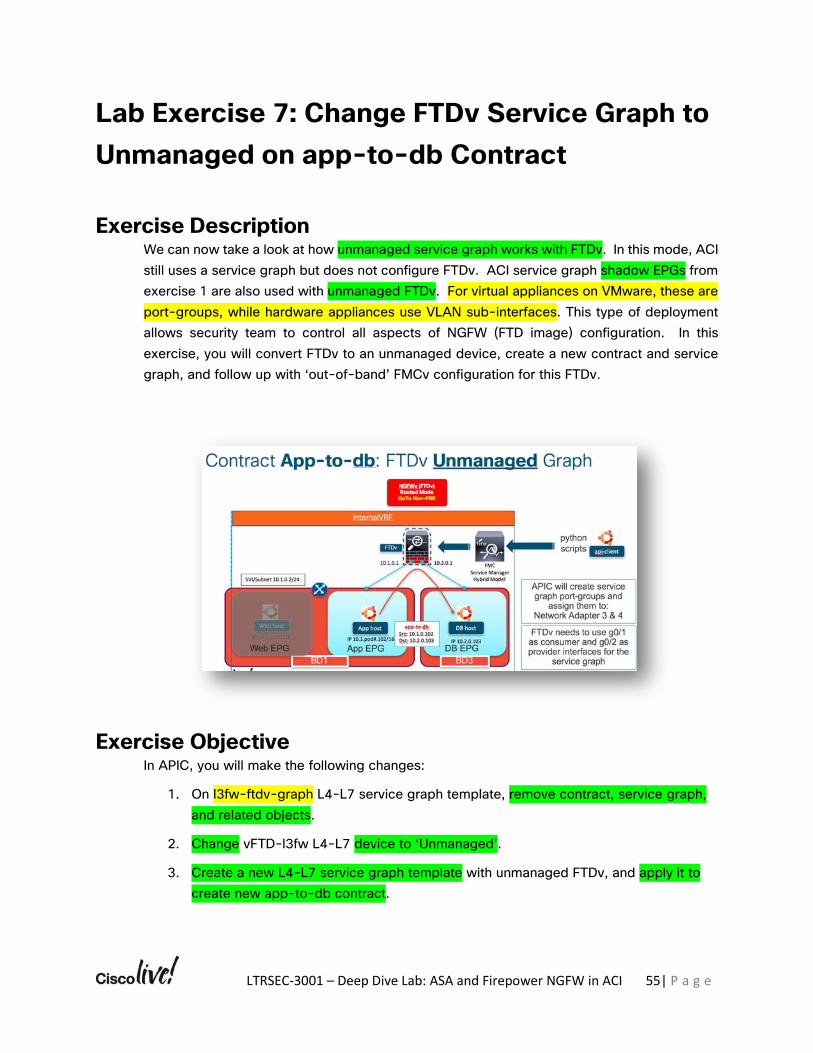
Exercise Description We can now take a look at how unmanaged service graph works with FTDv. In this mode, ACI still uses a service graph but does not configure FTDv. ACI service graph shadow EPGs from exercise 1 are also used with unmanaged FTDv. For virtual appliances on VMware, these are port-groups, while hardware appliances use VLAN sub-interfaces. This type of deployment allows security team to control all aspects of NGFW (FTD image) configuration. In this exercise, you will convert FTDv to an unmanaged device, create a new contract and service graph, and follow up with ‘out-of-band’ FMCv configuration for this FTDv.
Exercise Objective In APIC, you will make the following changes:
1. On l3fw-ftdv-graph L4-L7 service graph template, remove contract, service graph, and related objects.
2. Change vFTD-l3fw L4-L7 device to ‘Unmanaged’.
3. Create a new L4-L7 service graph template with unmanaged FTDv, and apply it to create new app-to-db contract.
LTRSEC-3001 – Deep Dive Lab: ASA and Firepower NGFW in ACI 56| P a g e
4. Run manual-devpkg configure script with g0/1 and g0/2 interfaces to complete firewall config. This script uses FTD device package, to manually apply config to ‘vFTD1’ device (or HA) via FMCv.
5. Deploy manual config from FMCv to your FTD device.
6. Test connectivity from app to db EPGs.
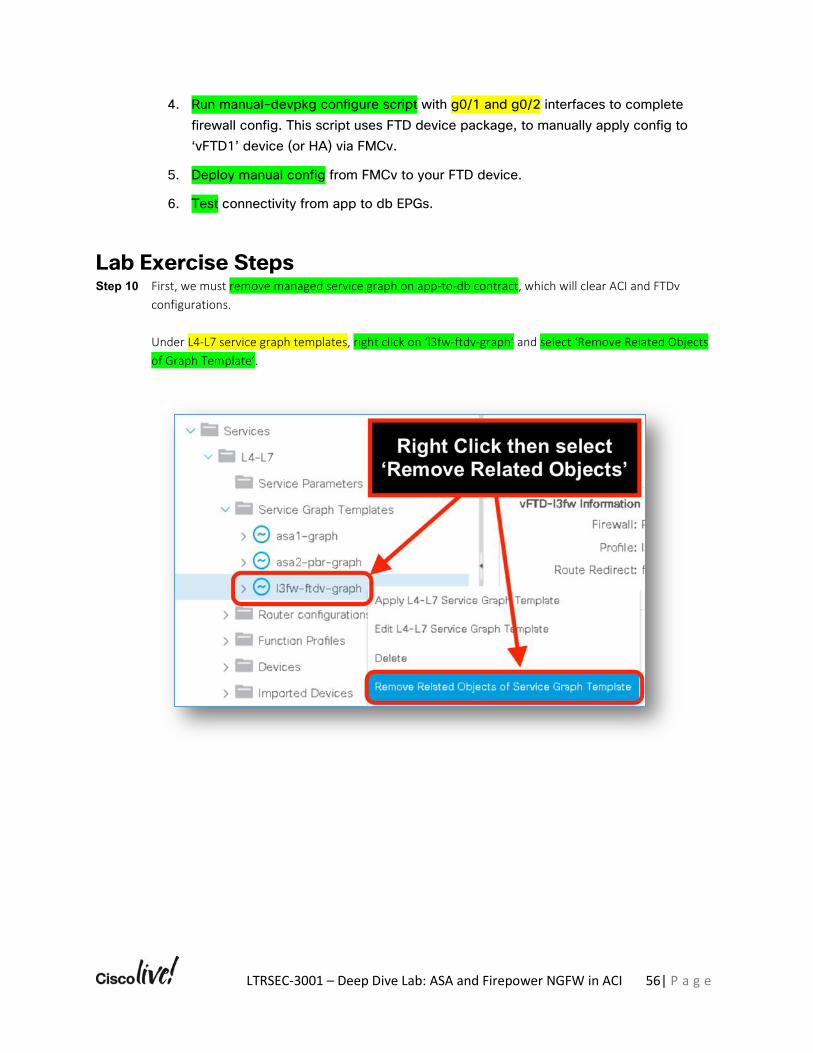
Lab Exercise Steps Step 10 First, we must remove managed service graph on app-to-db contract, which will clear ACI and FTDv
configurations. Under L4-L7 service graph templates, right click on ‘l3fw-ftdv-graph’ and select ‘Remove Related Objects of Graph Template’.

LTRSEC-3001 – Deep Dive Lab: ASA and Firepower NGFW in ACI 57| P a g e
In the next screen, select given ‘Contract’, ‘Provider EPG’, relations options, and both check marks.
Once you ‘Submit’, APIC will start removing all configs related to this service graph, and use APIs to clear FTD configuration from FMC, following up with a deploy of cleared configuration. Follow progress of this deploy on FMC and once deployment is complete, proceed to the next step. Note that FMC GUI requires you to switch back and forth from ‘Devices’ to ‘Policies’ tabs, in order to pick up the new configuration.
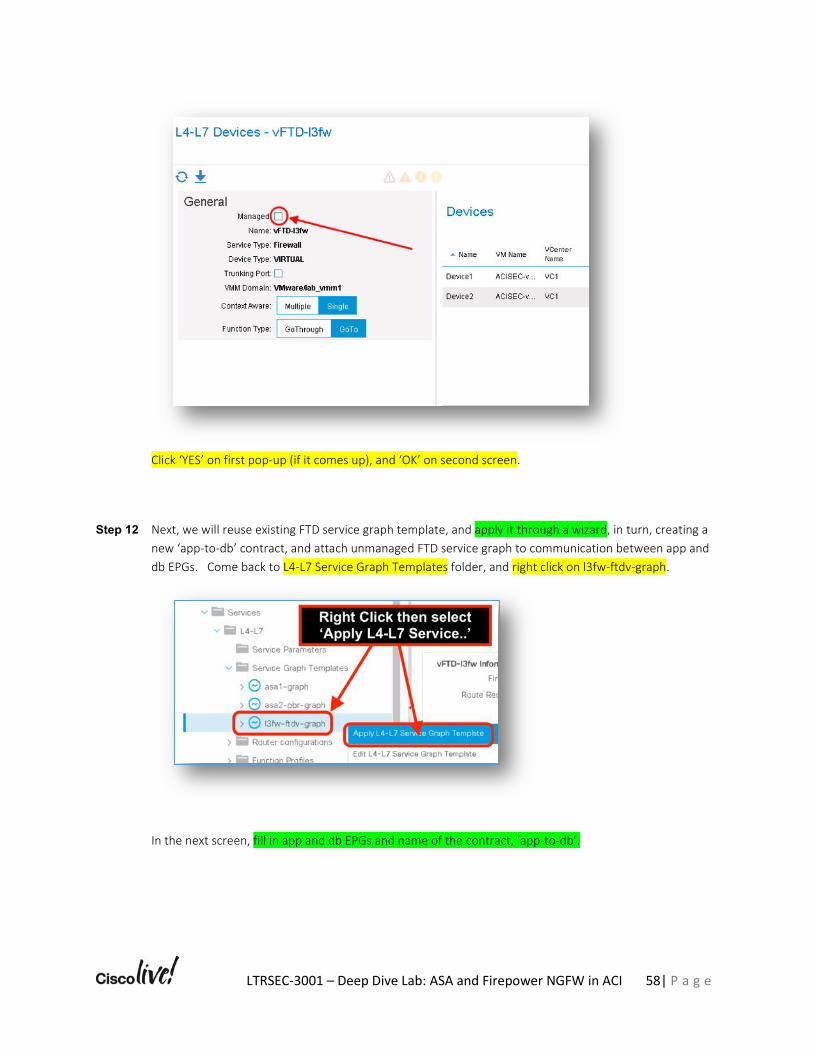
Step 11 You can now change the registered FTD device to unmanaged. Go to Services, L4-L7, Devices, select vFTD-l3fw, and uncheck Managed. The pop-up screen will let you confirm you want to do this action.
LTRSEC-3001 – Deep Dive Lab: ASA and Firepower NGFW in ACI 58| P a g e
Click ‘YES’ on first pop-up (if it comes up), and ‘OK’ on second screen.
Step 12 Next, we will reuse existing FTD service graph template, and apply it through a wizard, in turn, creating a new ‘app-to-db’ contract, and attach unmanaged FTD service graph to communication between app and db EPGs. Come back to L4-L7 Service Graph Templates folder, and right click on l3fw-ftdv-graph.
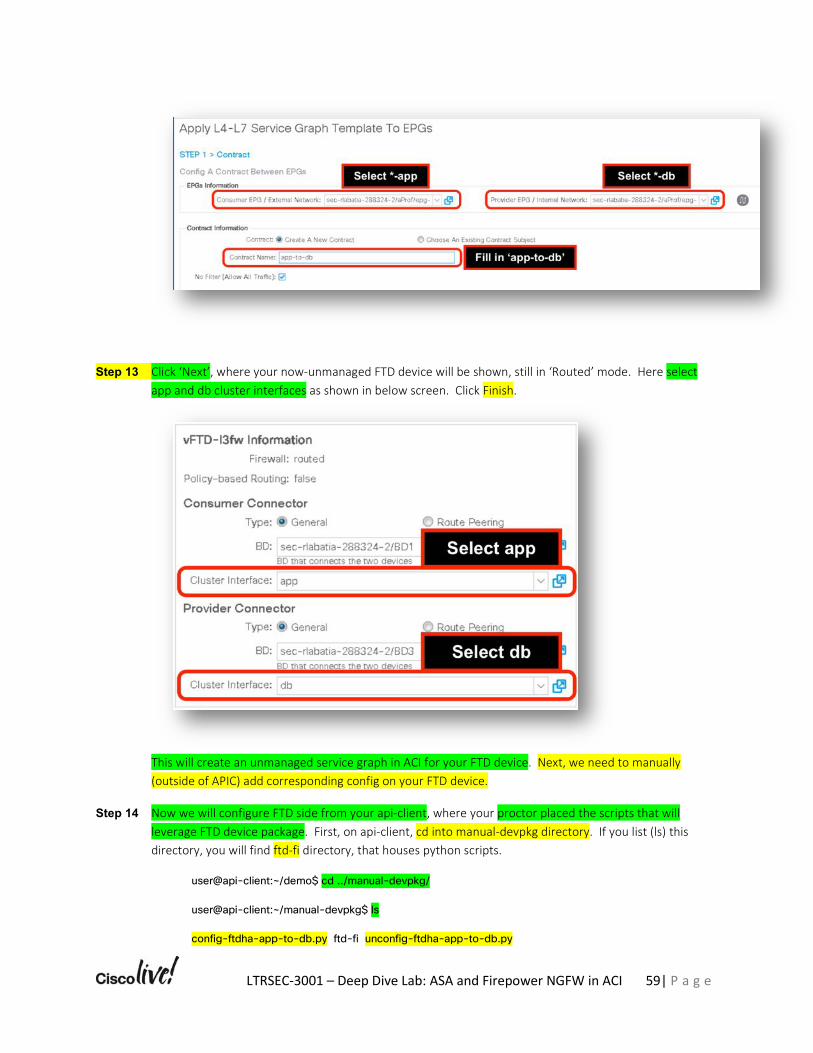
In the next screen, fill in app and db EPGs and name of the contract, ‘app-to-db’.
LTRSEC-3001 – Deep Dive Lab: ASA and Firepower NGFW in ACI 59| P a g e
Step 13 Click ‘Next’, where your now-unmanaged FTD device will be shown, still in ‘Routed’ mode. Here select app and db cluster interfaces as shown in below screen. Click Finish.
This will create an unmanaged service graph in ACI for your FTD device. Next, we need to manually (outside of APIC) add corresponding config on your FTD device.
Step 14 Now we will configure FTD side from your api-client, where your proctor placed the scripts that will leverage FTD device package. First, on api-client, cd into manual-devpkg directory. If you list (ls) this directory, you will find ftd-fi directory, that houses python scripts.
user@api-client:~/demo$ cd ../manual-devpkg/ user@api-client:~/manual-devpkg$ ls config-ftdha-app-to-db.py ftd-fi unconfig-ftdha-app-to-db.py
LTRSEC-3001 – Deep Dive Lab: ASA and Firepower NGFW in ACI 60| P a g e
user@api-client:~/manual-devpkg$
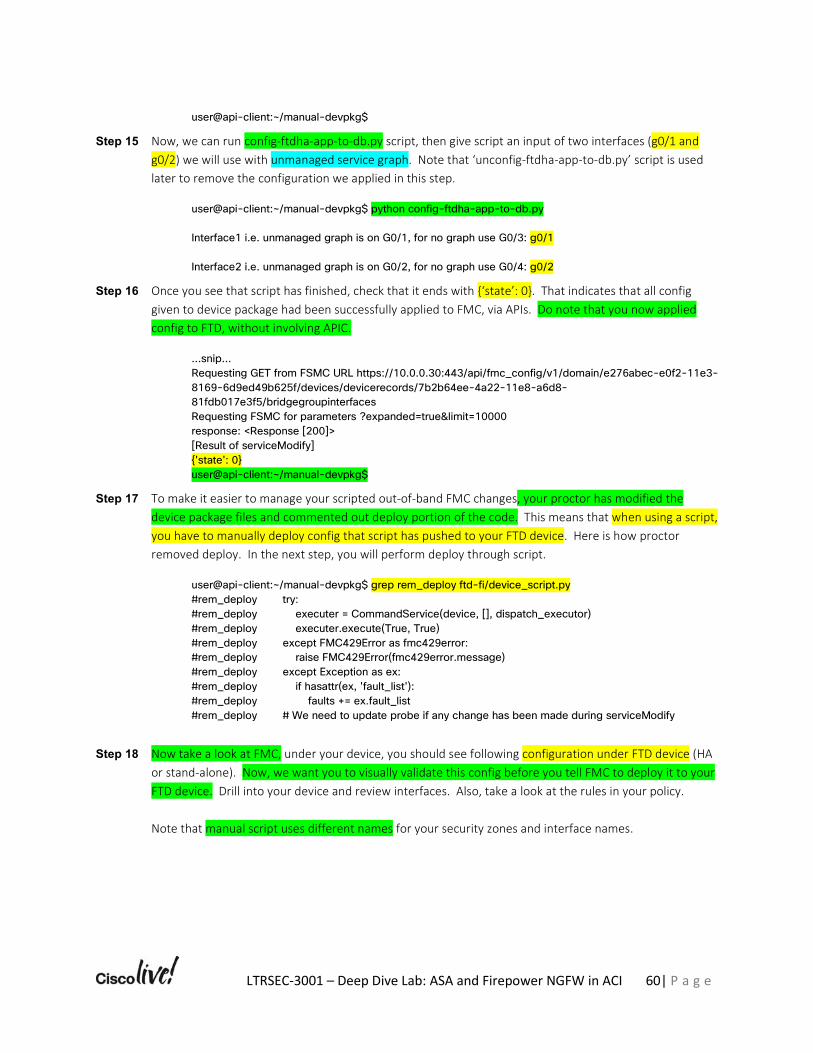
Step 15 Now, we can run config-ftdha-app-to-db.py script, then give script an input of two interfaces (g0/1 and g0/2) we will use with unmanaged service graph. Note that ‘unconfig-ftdha-app-to-db.py’ script is used later to remove the configuration we applied in this step.
user@api-client:~/manual-devpkg$ python config-ftdha-app-to-db.py Interface1 i.e. unmanaged graph is on G0/1, for no graph use G0/3: g0/1 Interface2 i.e. unmanaged graph is on G0/2, for no graph use G0/4: g0/2
Step 16 Once you see that script has finished, check that it ends with {‘state’: 0}. That indicates that all config given to device package had been successfully applied to FMC, via APIs. Do note that you now applied config to FTD, without involving APIC.
…snip… Requesting GET from FSMC URL https://10.0.0.30:443/api/fmc_config/v1/domain/e276abec-e0f2-11e3-8169-6d9ed49b625f/devices/devicerecords/7b2b64ee-4a22-11e8-a6d8-81fdb017e3f5/bridgegroupinterfaces Requesting FSMC for parameters ?expanded=true&limit=10000 response: <Response [200]> [Result of serviceModify] {'state': 0} user@api-client:~/manual-devpkg$
Step 17 To make it easier to manage your scripted out-of-band FMC changes, your proctor has modified the device package files and commented out deploy portion of the code. This means that when using a script, you have to manually deploy config that script has pushed to your FTD device. Here is how proctor removed deploy. In the next step, you will perform deploy through script.
user@api-client:~/manual-devpkg$ grep rem_deploy ftd-fi/device_script.py #rem_deploy try: #rem_deploy executer = CommandService(device, [], dispatch_executor) #rem_deploy executer.execute(True, True) #rem_deploy except FMC429Error as fmc429error: #rem_deploy raise FMC429Error(fmc429error.message) #rem_deploy except Exception as ex: #rem_deploy if hasattr(ex, 'fault_list'): #rem_deploy faults += ex.fault_list #rem_deploy # We need to update probe if any change has been made during serviceModify
Step 18 Now take a look at FMC, under your device, you should see following configuration under FTD device (HA or stand-alone). Now, we want you to visually validate this config before you tell FMC to deploy it to your FTD device. Drill into your device and review interfaces. Also, take a look at the rules in your policy. Note that manual script uses different names for your security zones and interface names.
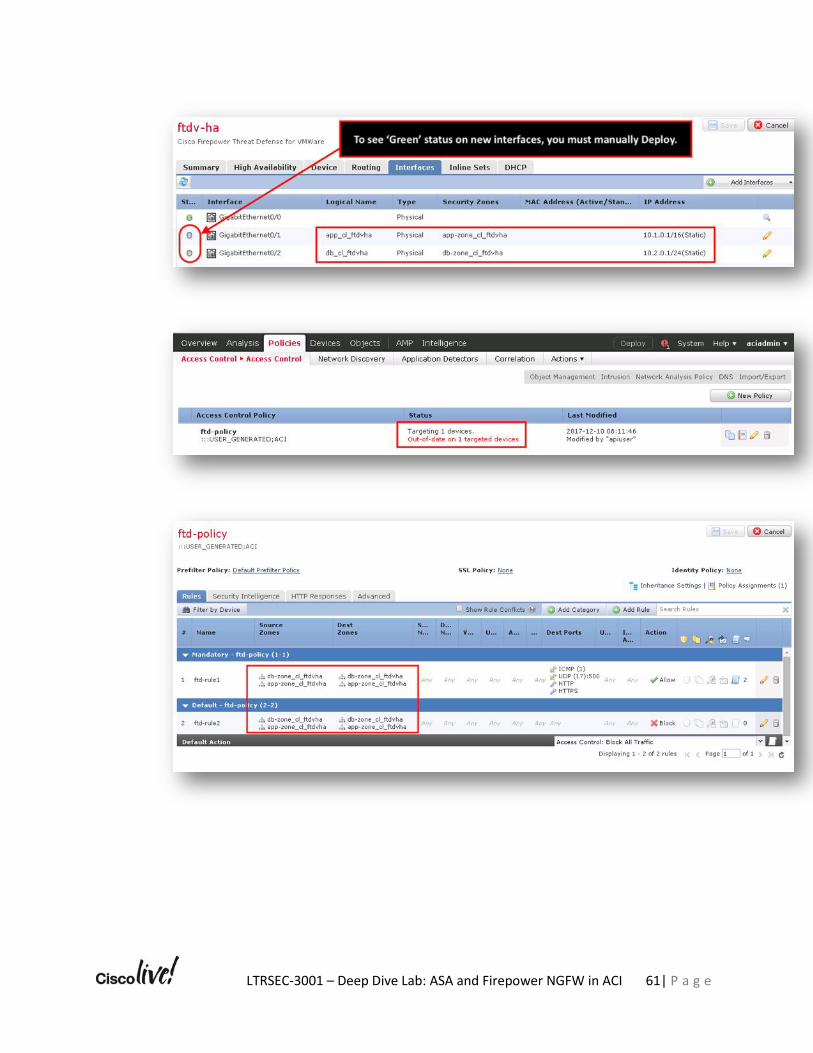
LTRSEC-3001 – Deep Dive Lab: ASA and Firepower NGFW in ACI 61| P a g e
LTRSEC-3001 – Deep Dive Lab: ASA and Firepower NGFW in ACI 62| P a g e
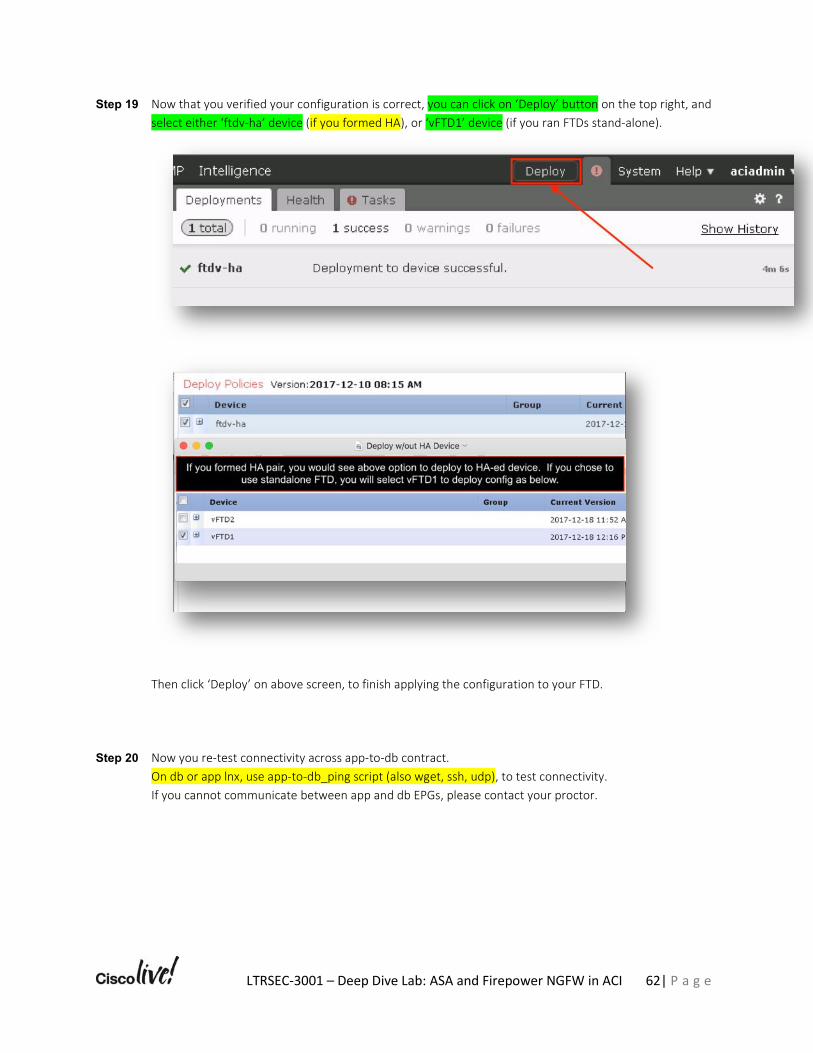
Step 19 Now that you verified your configuration is correct, you can click on ‘Deploy’ button on the top right, and select either ‘ftdv-ha’ device (if you formed HA), or ‘vFTD1’ device (if you ran FTDs stand-alone).
Then click ‘Deploy’ on above screen, to finish applying the configuration to your FTD.
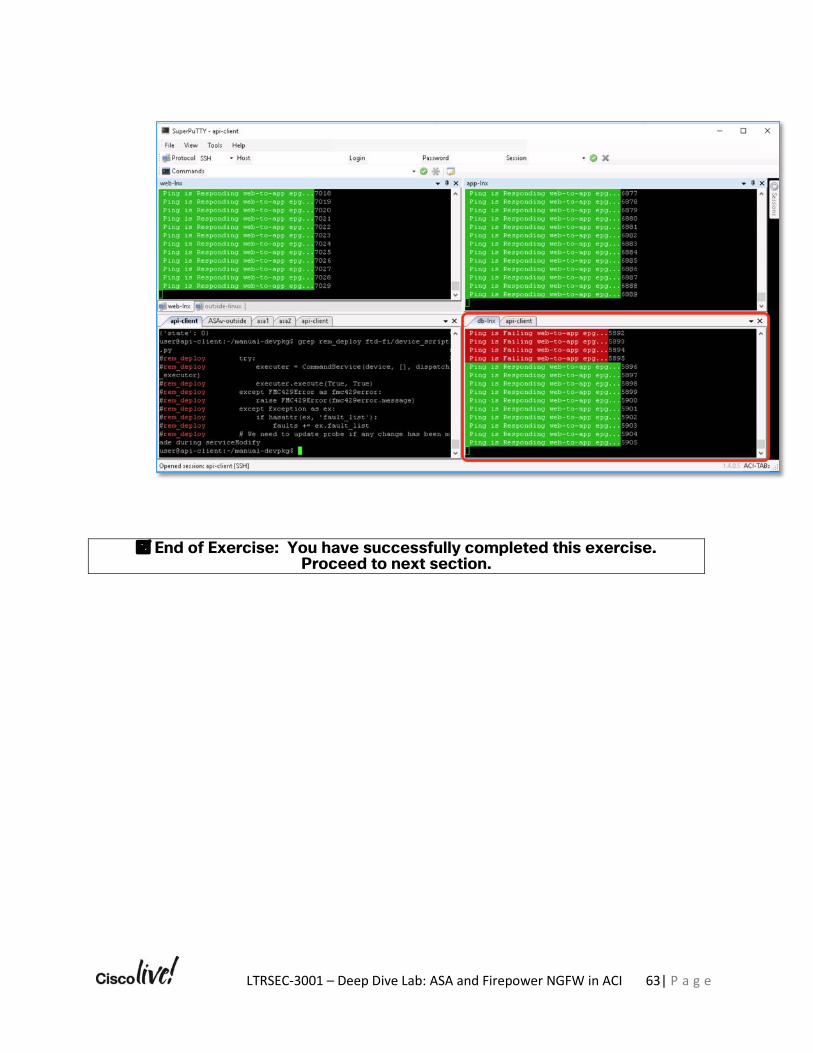
Step 20 Now you re-test connectivity across app-to-db contract. On db or app lnx, use app-to-db_ping script (also wget, ssh, udp), to test connectivity. If you cannot communicate between app and db EPGs, please contact your proctor.
LTRSEC-3001 – Deep Dive Lab: ASA and Firepower NGFW in ACI 63| P a g e
þ End of Exercise: You have successfully completed this exercise.
Proceed to next section.
LTRSEC-3001 – Deep Dive Lab: ASA and Firepower NGFW in ACI 64| P a g e
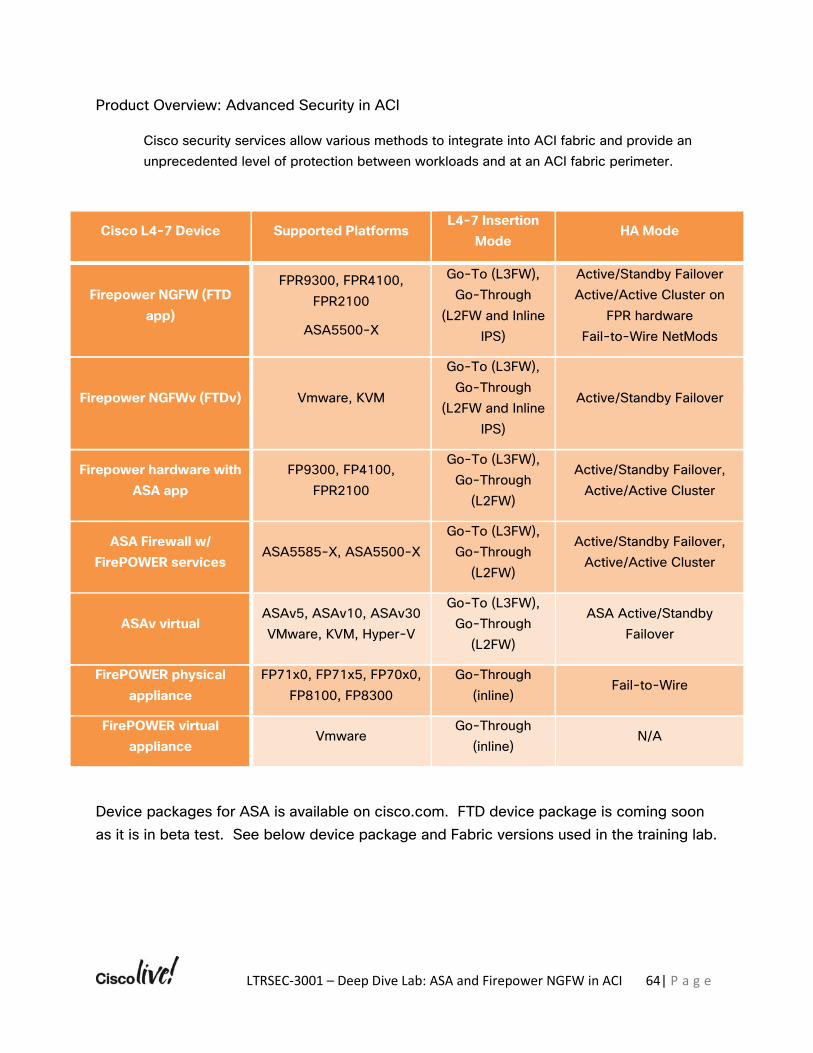
Product Overview: Advanced Security in ACI
Cisco security services allow various methods to integrate into ACI fabric and provide an unprecedented level of protection between workloads and at an ACI fabric perimeter.
Cisco L4-7 Device Supported Platforms L4-7 Insertion
Mode HA Mode
Firepower NGFW (FTD app)
FPR9300, FPR4100, FPR2100
ASA5500-X
Go-To (L3FW), Go-Through
(L2FW and Inline IPS)
Active/Standby Failover Active/Active Cluster on
FPR hardware Fail-to-Wire NetMods
Firepower NGFWv (FTDv) Vmware, KVM
Go-To (L3FW), Go-Through
(L2FW and Inline IPS)
Active/Standby Failover
Firepower hardware with ASA app
FP9300, FP4100, FPR2100
Go-To (L3FW), Go-Through
(L2FW)
Active/Standby Failover, Active/Active Cluster
ASA Firewall w/ FirePOWER services
ASA5585-X, ASA5500-X Go-To (L3FW),
Go-Through (L2FW)
Active/Standby Failover, Active/Active Cluster
ASAv virtual ASAv5, ASAv10, ASAv30 VMware, KVM, Hyper-V
Go-To (L3FW), Go-Through
(L2FW)
ASA Active/Standby Failover
FirePOWER physical appliance
FP71x0, FP71x5, FP70x0, FP8100, FP8300
Go-Through (inline)
Fail-to-Wire
FirePOWER virtual appliance
Vmware Go-Through
(inline) N/A
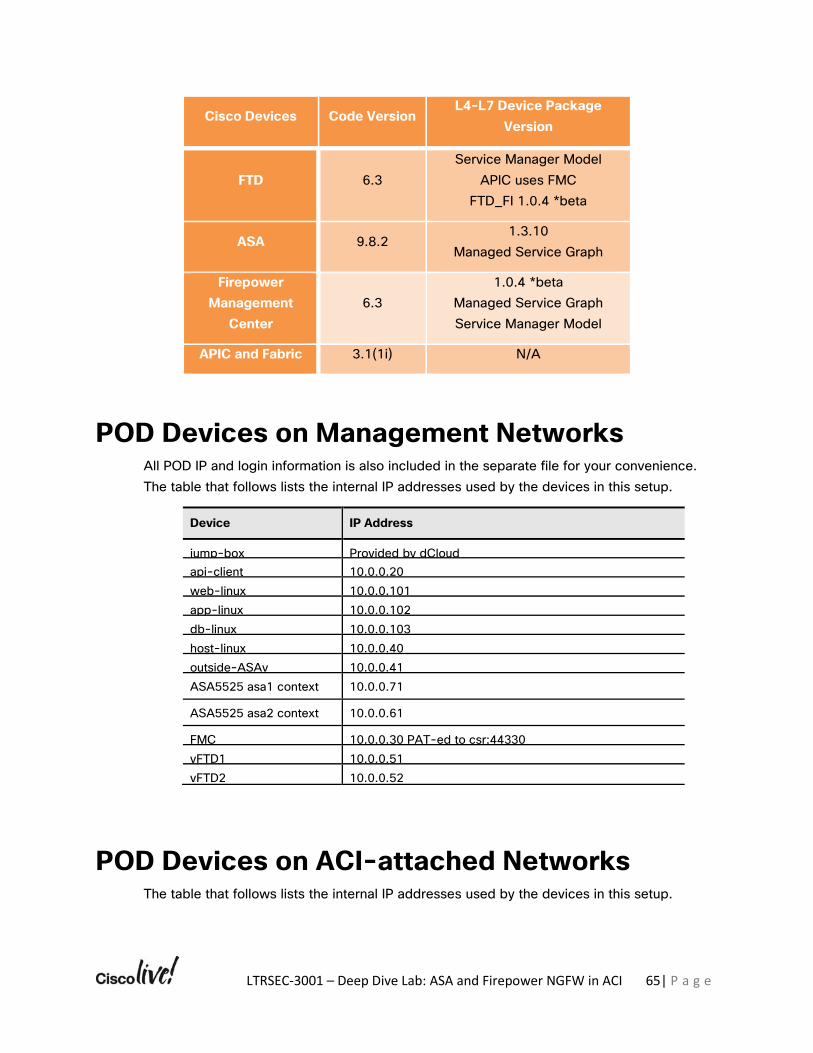
Device packages for ASA is available on cisco.com. FTD device package is coming soon as it is in beta test. See below device package and Fabric versions used in the training lab.
LTRSEC-3001 – Deep Dive Lab: ASA and Firepower NGFW in ACI 65| P a g e
Cisco Devices Code Version L4-L7 Device Package
Version
FTD 6.3 Service Manager Model
APIC uses FMC FTD_FI 1.0.4 *beta
ASA 9.8.2 1.3.10
Managed Service Graph
Firepower Management
Center 6.3
1.0.4 *beta Managed Service Graph Service Manager Model
APIC and Fabric 3.1(1i) N/A
POD Devices on Management Networks All POD IP and login information is also included in the separate file for your convenience. The table that follows lists the internal IP addresses used by the devices in this setup.
Device IP Address
jump-box Provided by dCloud api-client 10.0.0.20 web-linux 10.0.0.101 app-linux 10.0.0.102 db-linux 10.0.0.103 host-linux 10.0.0.40 outside-ASAv 10.0.0.41 ASA5525 asa1 context
10.0.0.71
ASA5525 asa2 context 10.0.0.61
FMC 10.0.0.30 PAT-ed to csr:44330 vFTD1 10.0.0.51 vFTD2 10.0.0.52
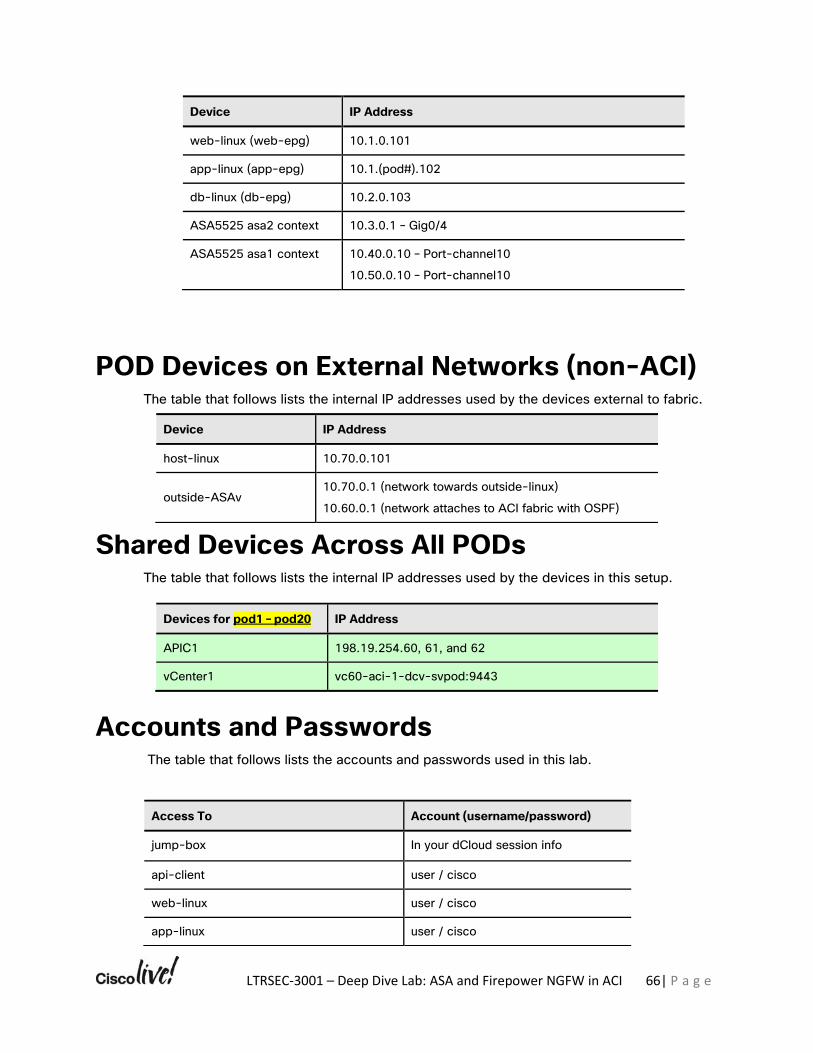
POD Devices on ACI-attached Networks The table that follows lists the internal IP addresses used by the devices in this setup.
LTRSEC-3001 – Deep Dive Lab: ASA and Firepower NGFW in ACI 66| P a g e
Device IP Address
web-linux (web-epg) 10.1.0.101
app-linux (app-epg) 10.1.(pod#).102
db-linux (db-epg) 10.2.0.103
ASA5525 asa2 context 10.3.0.1 – Gig0/4
ASA5525 asa1 context 10.40.0.10 – Port-channel10
10.50.0.10 – Port-channel10
POD Devices on External Networks (non-ACI) The table that follows lists the internal IP addresses used by the devices external to fabric.
Shared Devices Across All PODs The table that follows lists the internal IP addresses used by the devices in this setup.
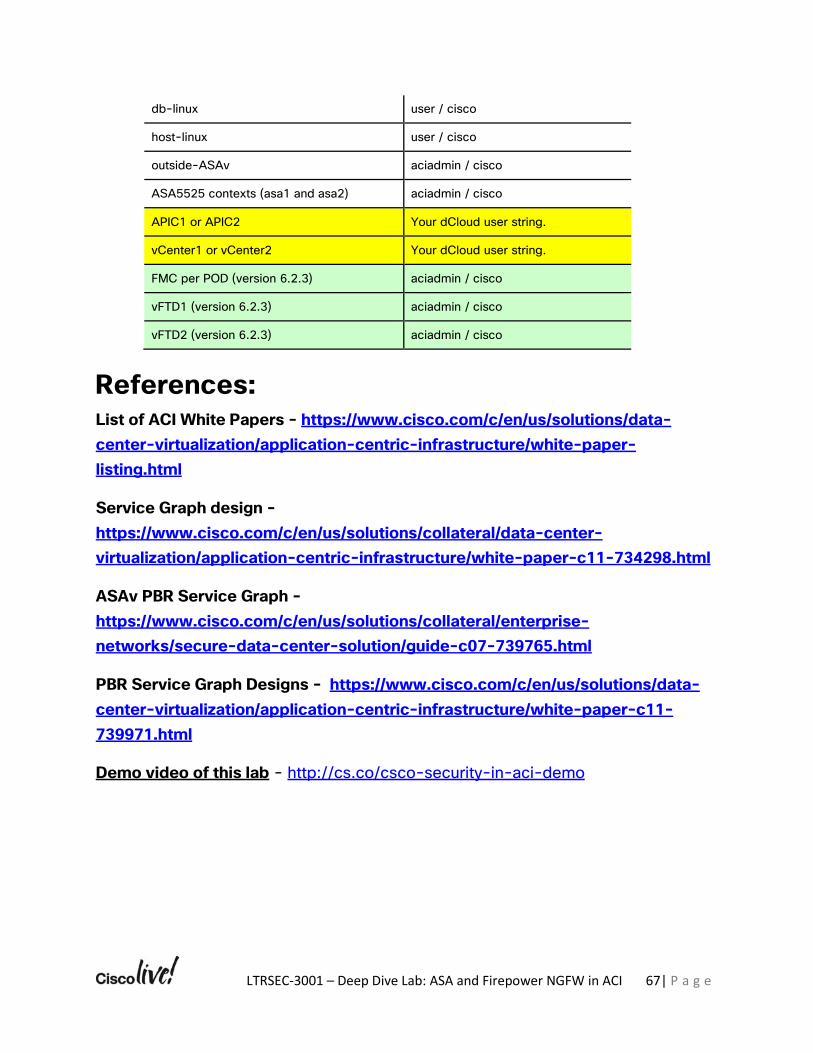
Accounts and Passwords The table that follows lists the accounts and passwords used in this lab.
Device IP Address
host-linux 10.70.0.101
outside-ASAv 10.70.0.1 (network towards outside-linux)
10.60.0.1 (network attaches to ACI fabric with OSPF)
Devices for pod1 – pod20 IP Address
APIC1 198.19.254.60, 61, and 62
vCenter1 vc60-aci-1-dcv-svpod:9443
Access To Account (username/password)
jump-box In your dCloud session info
api-client user / cisco
web-linux user / cisco
app-linux user / cisco
LTRSEC-3001 – Deep Dive Lab: ASA and Firepower NGFW in ACI 67| P a g e
References: List of ACI White Papers - https://www.cisco.com/c/en/us/solutions/data-center-virtualization/application-centric-infrastructure/white-paper-listing.html
Service Graph design - https://www.cisco.com/c/en/us/solutions/collateral/data-center-virtualization/application-centric-infrastructure/white-paper-c11-734298.html
ASAv PBR Service Graph - https://www.cisco.com/c/en/us/solutions/collateral/enterprise-networks/secure-data-center-solution/guide-c07-739765.html
PBR Service Graph Designs - https://www.cisco.com/c/en/us/solutions/data-center-virtualization/application-centric-infrastructure/white-paper-c11-739971.html
Demo video of this lab - http://cs.co/csco-security-in-aci-demo
db-linux user / cisco
host-linux user / cisco
outside-ASAv aciadmin / cisco
ASA5525 contexts (asa1 and asa2) aciadmin / cisco
APIC1 or APIC2 Your dCloud user string.
vCenter1 or vCenter2 Your dCloud user string.
FMC per POD (version 6.2.3) aciadmin / cisco
vFTD1 (version 6.2.3) aciadmin / cisco
vFTD2 (version 6.2.3) aciadmin / cisco
LTRSEC-3001 – Deep Dive Lab: ASA and Firepower NGFW in ACI 68| P a g e
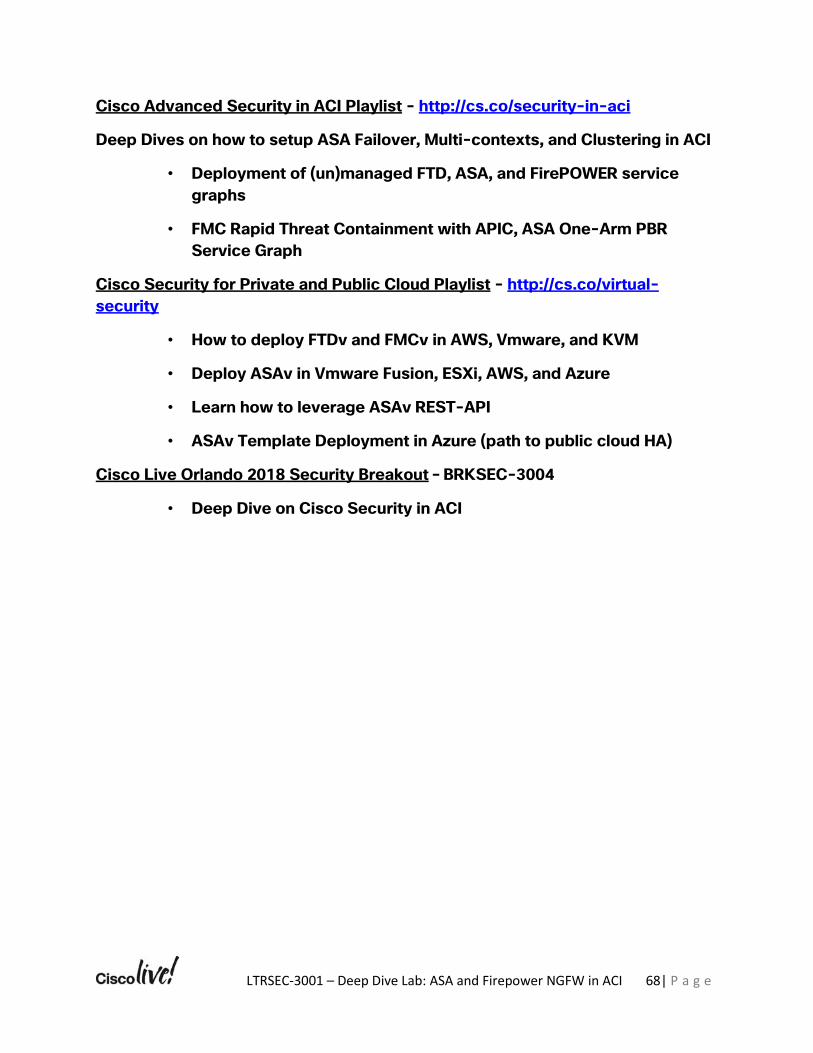
Cisco Advanced Security in ACI Playlist - http://cs.co/security-in-aci
Deep Dives on how to setup ASA Failover, Multi-contexts, and Clustering in ACI
• Deployment of (un)managed FTD, ASA, and FirePOWER service graphs
• FMC Rapid Threat Containment with APIC, ASA One-Arm PBR Service Graph
Cisco Security for Private and Public Cloud Playlist - http://cs.co/virtual-security
• How to deploy FTDv and FMCv in AWS, Vmware, and KVM
• Deploy ASAv in Vmware Fusion, ESXi, AWS, and Azure
• Learn how to leverage ASAv REST-API
• ASAv Template Deployment in Azure (path to public cloud HA)
Cisco Live Orlando 2018 Security Breakout – BRKSEC-3004
• Deep Dive on Cisco Security in ACI
Related Documents