SERIES EXPERIENCE ELEVATED 3-Manual Organs 589 599 599T OWNER'S MANUAL ARTIST

Welcome message from author
This document is posted to help you gain knowledge. Please leave a comment to let me know what you think about it! Share it to your friends and learn new things together.
Transcript

S E R I E S
E X P E R I E N C E E L E V AT E D
3-Manual Organs 589 599 599T
OWNER'S MANUAL
A R T I S T

1
CAUTIONRISK OF ELECTRIC SHOCK
DO NOT OPEN
ATTENTION: RISQUE DE CHOC ELECTRIQUE NE PAS OUVRIR
CAUTION: TO REDUCE THE RISK OF ELECTRIC SHOCK,DO NOT REMOVE COVER (OR BACK).
NO USER-SERVICEABLE PARTS INSIDE.REFER SERVICING TO QUALIFIED SERVICE PERSONNEL.
The lightning flash with arrowhead symbol, within an equilateral triangle, is intended to alert the user to the presence of uninsulated “dangerous voltage” within the product’s enclosure that may be of sufficient magnitude to constitute a risk of electric shock to persons.
The exclamation point within an equilateral triangle is intended to alert the user to the presence of important operating and maintenance (servicing) instructions in the literature accompanying the product.
INSTRUCTIONS PERTAINING TO A RISK OF FIRE, ELECTRIC SHOCK, OR INJURY TO PERSONS.
IMPORTANT SAFETY INSTRUCTIONSSAVE THESE INSTRUCTIONS
WARNING - When using electric products, basic precautions should always be followed, including the following:
1. Read these instructions.2. Keep these instructions.3. Heed all warnings.4. Follow all instructions.5. Do not use this apparatus near water.6. Clean only with a dry cloth.7. Do not block any of the ventilation openings. Install in
accordance with the manufacturers instructions.8. Do not install near any heat sources such as radiators,
heat registers, stoves, or other apparatus (includingamplifiers) that produce heat.
9. Do not defeat the safety purpose of the polarized orgrounding-type plug. A polarized plug has two blades withone wider than the other. A grounding type plug has twoblades and a third grounding prong. The wide blade or thethird prong are provided for your safety. If the provided plugdoes not fit into your outlet, consult an electrician forreplacement of the obsolete outlet.
WARNING:IMPORTANT:
As the colours of the wires in the mains lead of this apparatus may not correspond with the coloured markings identifying the terminals in your plug, proceed as follows:
The wire which is coloured GREEN-AND-YELLOW must be connected to the terminal in the plug which is marked by the letter E or by the safety earth symbol or coloured GREEN or GREEN-AND-YELLOW.
The wire which is coloured BLUE must be connected to the terminal which is marked with the letter N or coloured BLACK.The wire which is coloured BROWN must be connected to the terminal which is marked with the letter L or coloured RED.
THIS APPARATUS MUST BE EARTHEDTHE WIRES IN THIS MAINS LEAD ARE COLOURED IN ACCORDANCE WITH THE FOLLOWING CODE.GREEN-AND-YELLOW: EARTH, BLUE: NEUTRAL, BROWN: LIVE
For the U.K.
10. Protect the power cord from being walked on or pinchedparticularly at plugs, convenience receptacles, and thepoint where they exit from the apparatus.
11. Only use attachments/accessories specifiedby the manufacturer.
12. Unplug this apparatus during lightning storms or whenunused for long periods of time.
13. Refer all servicing to qualified service personnel. Servicingis required when the apparatus has been damaged in anyway, such as power-supply cord or plug is damaged, liquidhas been spilled or objects have fallen into the apparatus,the apparatus has been exposed to rain or moisture, doesnot operate normally, or has been dropped.
WARNING: To reduce the risk of fire or electric shock, do not expose this apparatus to rain or moisture.
Before using this unit, carefully read the sections entitled: “IMPORTANT SAFETY INSTRUCTIONS” (p. 1), “USING THE UNIT SAFELY” (p. 2), and “IMPORTANT NOTES” (p. 3). These sections provide important information concerning the proper operation of the unit. Additionally, in order to feel assured that you have gained a good grasp of every feature provided by your new unit, Owner’s Manual should be read in its entirety. The manual should be saved and kept on hand as a convenient reference.
1

2
1.1
CAUTIONRISK OF ELECTRIC SHOCK
DO NOT OPEN
ATTENTION: RISQUE DE CHOC ELECTRIQUE NE PAS OUVRIR
ATTENTION : POUR RÉDUIRE LE RISQUE D’ÉLECTROCUTION, NE PAS
RETIRER LE COUVERCLE (OU LE PANNEAU ARRIÈRE). AUCUNE PIÈCE
RÉPARABLE PAR L'UTILISATEUR. CONFIER L'ENTRETIEN
AU PERSONNEL DE SERVICE COMPÉTENT.
Le symbole de l'éclair fléché dans un triangle équilatéral prévient l'utilisateur de la présence d'une « tension dangereuse » non isolée à l’intérieur de l’appareil, qui peut être suffisamment élevée pour présenter un risque d'électrocution.
Le point d'exclamation dans un triangle équilatéral prévient l'utilisateur de la présence d'instructions d'emploi et d'entretien importantes dans la documentation qui accompagne l'appareil.
INSTRUCTIONS RELATIVES AU RISQUE D'INCENDIE, D’ÉLECTROCUTION OU DE BLESSURE.
CONSIGNES DE SÉCURITÉ IMPORTANTESCONSERVEZ CES INSTRUCTIONS
AVERTISSEMENT – Lors de l’utilisation d’un appareil électrique, toujours prendre des précautions de base, y compris les suivantes :
AVERTISSEMENT : Pour réduire le risque d'incendie ou d’électrocution, ne pas exposer cet appareil à la pluie ou à l'humidité.
1. Lire ces instructions. 2. Conserver ces instructions. 3. Tenir compte de tous les avertissements. 4. Suivre toutes les instructions. 5. Ne pas utiliser cet appareil près de l'eau. 6. Nettoyer uniquement avec un chiffon sec. 7. Éviter d'obstruer les ouvertures de ventilation. Installer l'appareil conformément aux instructions du fabricant.8. Ne pas installer l'appareil à proximité de sources de chaleur telles que radiateurs, grilles à registre, poêles ou autres appareils qui émettent de la chaleur (y compris les amplificateurs).9. Ne pas supprimer la fonction de sécurité de la fiche polarisée ou de mise à la terre. Une fiche polarisée comporte deux lames, dont l'une est plus large que l'autre. Une fiche de mise à la terre comporte deux lames, plus une broche de mise à la terre. La lame la plus large et la troisième broche assurent votre sécurité. Si la fiche fournie n’entre pas dans la prise de courant, demander à un électricien de remplacer la prise obsolète.
10. Protéger le cordon d'alimentation de façon à éviter de marcher dessus ou de le pincer, en particulier au niveau des fiches, des prises de courant et du point de sortie de l'appareil.11. Utiliser uniquement les accessoires spécifiés par le fabricant.12. Débrancher cet appareil pendant les orages ou s'il reste longtemps inutilisé.13. Confier toute réparation à un technicien compétent. L'appareil doit être réparé lorsqu’il est endommagé de quelque manière que ce soit, par exemple si le cordon d'alimentation ou la fiche est endommagée, si un liquide a été renversé ou des objets sont tombés dans l'appareil, si l'appareil a été exposé à la pluie ou à l'humidité, s’il ne fonctionne pas normalement, ou s’il est tombé sur le sol.
Avant d’utiliser cet appareil, lire attentivement les sections intitulées : « CONSIGNES DE SÉCURITÉ IMPORTANTES » (p. 1.1), « UTILISATION SÉCURITAIRE DE L’APPAREIL » (p. 2.1) et « REMARQUES IMPORTANTES » (p. 3.1). Ces sections donnent des renseignements importants sur le fonctionnement de l’appareil. En outre, pour bien comprendre chaque fonctionnalité de votre nouvel appareil, vous devez prendre soin de lire intégralement le Manuel du propriétaire. Conserver le manuel à portée de la main aux fins de référence.
3
USING THE UNIT SAFELY
WARNINGMake sure that the power cord is groundedConnect mains plug of this model to a mains socket outlet with a protective earthing connection.
Do not disassemble or modify by yourselfDo not open or perform any internal modifications on the unit.
Do not repair or replace parts by yourselfDo not attempt to repair the unit, or replace parts within it (except when this manual provides specific instructions directing you to do so). Refer all servicing to your retailer, or Rodgers Instruments US LLC, as listed on the “Notice to Users” (p. 5).
Do not use or store in the following types of locations• Subject to temperature extremes
(e.g., direct sunlight in an enclosed vehicle, near a heating duct, on top of heat-generating equipment); or are
• Damp (e.g., baths, washrooms, on wet floors); or are
• Exposed to steam or smoke; or are
• Subject to salt exposure; or are
• Humid; or are
• Exposed to rain; or are
• Dusty or sandy; or are
• Subject to high levels of vibration and shakiness.
Indoor use only.
Connect the power cord to an outlet of the correct voltageThe unit should be connected to a power supply only of the type described as marked under the keyboard deck of unit.
WARNINGDo not bend the power cord or place heavy objects on itDo not excessively twist or bend the power cord, nor place heavy objects on it. Doing so can damage the cord, producing severed elements and short circuits. Damaged cords are fire and shock hazards!
Avoid extended use at high volumeThis unit, either alone or in combination with an amplifier and headphones or speakers, may be capable of producing sound levels that could cause permanent hearing loss. Do not operate for a long period of time at a high volume level, or at a level that is uncomfortable. If you experience any hearing loss or ringing in the ears, you should immediately stop using the unit, and consult an audiologist.
Don’t allow foreign objects or liquids to enter unit; never place containers with liquid on unitDo not place containers containing liquid (flower vases) on this product. Never allow foreign objects (e.g., flammable objects, coins, wires) or liquids (e.g., water or juice) to enter this product. Doing so may cause short circuits, faulty operation, or other malfunctions.
Adults must provide supervision in places where children are presentWhen using the unit in locations where children are present, be careful so no mishandling of the unit can take place. An adult should always be on hand to provide supervision and guidance.
WARNING
• The power-supply cord or the plug has been damaged; or
• If smoke or unusual odor occurs; or
• Objects have fallen into, or liquid has been spilled onto the unit; or
• The unit has been exposed to rain (or otherwise has become wet); or
• The unit does not appear to operate normally or exhibits a marked change in performance.
Do not drop or subject to strong impactProtect the unit from strong impact.
(Do not drop it!)
Do not share an outlet with an unreasonable number of other devicesDo not force the unit’s power-supply cord to share an outlet with an unreasonable number of other devices. Be especially careful when using extension cords—the total power used by all devices you have connected to the extension cord’s outlet must never exceed the power rating (watts/amperes) for the extension cord. Excessive loads can cause the insulation on the cord to heat up and eventually melt through.
Do not use overseasBefore using the unit in a foreign country, consult with your retailer, or Rodgers Instruments US LLC, as listed on the “Notice to Users” (p. 5).
Used for instructions intended to alert the user to the risk of injury or material damage should the unit be used improperly.
* Material damage refers to damage or other adverse effects caused with respect to the home and all its furnishings, as well to domestic animals or pets.
Used for instructions intended to alert the user to the risk of death or severe injury should the unit be used improperly.
The symbol alerts the user to things that must be carried out. The specific thing that must be done is indicated by the design contained within the circle. In the case of the symbol at left, it means that the power-cord plug must be unplugged from the outlet.
The symbol alerts the user to important instructions or warnings.The specific meaning of the symbol is determined by the design contained within the triangle. In the case of the symbol at left, it is used for general cautions, warnings, or alerts to danger.
The symbol alerts the user to items that must never be carried out (are forbidden). The specific thing that must not be done is indicated by the design contained within the circle. In the case of the symbol at left, it means that the unit must never be disassembled.
About WARNING and CAUTION Notices About the Symbols
ALWAYS OBSERVE THE FOLLOWING
2
2
Turn off the unit if an abnormality or malfunction occursImmediately turn the unit off, remove the power cord from the outlet, and request servicing by your retailer, or Rodgers Instruments US LLC, as listed on the “Notice to Users” (p. 5) page when:

4
UTILISATION SÉCURITAIRE DE L’APPAREIL
AvertissementVérifier que le cordon d’alimentation est relié à la terreBrancher la fiche principale de ce modèle dans une prise de courant mise à la terre.
Ne pas démonter ni modifier Ne pas ouvrir l’appareil ni tenter de le modifier.
Ne pas réparer ni remplacer soi-même les pièces Ne pas tenter de réparer l’appareil, ni d’en remplacer les pièces (sauf si le présent manuel fournit des instructions précises en ce sens). Confiez toute réparation à un technicien en vous adressant à votre revendeur ou à Rodgers Instruments US LLC (voir l’« Avis aux utilisateurs », p. 5).
Ne pas utiliser ni ranger dans des endroits présentant les caractéristiques suivantes :• des températures extrêmes (p. ex.
exposition directe au soleil dans un véhicule fermé, à proximité d’un conduit de chauffage, au-dessus d’un appareil qui émet de la chaleur);
• présence d’eau (p. ex. salle de bain ou de toilettes, sols mouillés);
• exposition à la vapeur ou à la fumée;
• risque d’exposition au sel;
• humidité;
• exposition à la pluie;
• exposition à la poussière ou au sable;
• exposition à de fortes vibrations ou secousses..
Utilisation intérieure seulement..
AvertissementBrancher le cordon d’alimentation dans une prise de tension appropriéeL’appareil doit être branché à une source d’alimentation du type indiqué sous le clavier.
Ne pas plier le cordon d’alimentation ni poser d’objet lourd dessusNe pas tordre ni plier excessivement le cordon d’alimentation, et ne pas poser d’objet lourd dessus, ce qui risquerait d’endommager le cordon, de rompre ses composants et de provoquer un court-circuit. Les cordons endommagés posent des risques d’incendie et d’électrocution!
Éviter l’utilisation prolongée à volume élevéCet appareil, seul ou combiné avec un amplificateur et un casque ou des enceintes, peut générer des niveaux sonores susceptibles d’occasionner une perte auditive permanente. Ne pas faire fonctionner longtemps à niveau sonore élevé ou inconfortable. Si vous constatez une perte auditive ou des bourdonnements d’oreille, cessez immédiatement d’utiliser l’appareil et consultez un audiologiste.
Éviter que des objets étrangers ou des liquides pénètrent dans l’appareil; ne jamais placer de récipients contenant du liquide sur l’appareilNe pas poser de récipients contenant du liquide (vases) sur cet appareil.
Ne jamais laisser d’objets étrangers (p. ex. objets inflammables, pièces de monnaie, fils) ni de liquides (p. ex. eau ou jus) pénétrer dans l’appareil. La présence d’objets étrangers ou de liquide risque de provoquer un court-circuit, un défaut de fonctionnement ou d’autres défectuosités.
Ne pas laisser les enfants sans surveillance en présence de l’appareil Si l’appareil est utilisé en présence d’enfants, veiller à le protéger de toute manipulation incorrecte. Un adulte doit toujours être présent pour assurer la supervision et expliquer le fonctionnement de l’appareil.
AvertissementÉteindre l’appareil en cas d’anomalie ou de défectuositéÉteindre immédiatement l’appareil, débrancher le cordon d’alimentation et demander l’intervention d’un technicien en vous adressant à votre revendeur ou à Rodgers Instruments US LLC (voir l’« Avis aux utilisateurs », p. 5), dans les situations suivantes :
• le cordon d’alimentation ou la fiche est endommagée;
• l’appareil émet de la fumée ou une odeur inhabituelle;
• un objet est tombé ou du liquide a pénétré dans l’appareil;
• l’appareil a été exposé à la pluie (ou s’est mouillé d’une autre manière);
• l’appareil ne semble pas fonctionner normalement ou présente un rendement significativement altéré.
Éviter de laisser tomber l’appareil ou de le soumettre à un choc important Protéger l’appareil des impacts. (Ne pas le laisser tomber!).
Ne pas brancher l’appareil dans une prise de courant déjà occupée par un trop grand nombre d’appareils Éviter de brancher un trop grand nombre d’appareils dans la même prise de courant. User de prudence dans l’emploi de rallonges : la puissance totale utilisée par l’ensemble des appareils branchés sur la rallonge ne doit jamais dépasser la puissance nominale (watts/ampères) de la rallonge. Les charges excessives peuvent faire surchauffer et fondre l’isolation de la rallonge.
Ne pas utiliser l’appareil à l’étrangerAvant d’utiliser l’appareil dans un pays étranger, consulter votre détaillant ou Rodgers Instruments US LLC (voir l’« Avis aux utilisateurs », p. 5).
Utilisé pour les instructions visant à prévenir l'utilisateur d’un risque de blessure ou de dommages matériels en cas d’utilisation incorrecte de l’appareil.
* Par dommages matériels, on entend les dommages ou les autres conséquences préjudiciables relatives au domicile et à son ameublement, de même qu’aux animaux de compagnie.
Utilisé pour les instructions visant à prévenir l'utilisateur d’un danger de mort ou d’un risque de blessure grave en cas d’utilisation incorrecte de l’appareil.
Le symbole attire l’attention de l'utilisateur sur une obligation. L’action obligatoire est représentée à l’intérieur du cercle. Le symbole présenté à gauche, par exemple, indique que le cordon d'alimentation doit être débranché de la prise de courant.
Le symbole attire l’attention de l'utilisateur sur des instructions ou des avertissements importants. L’image représentée à l’intérieur du triangle indique la signification précise du symbole. Le symbole présenté à gauche est utilisé pour des mises en garde, des avertissements ou des alertes de nature générale signalant des dangers.
Le symbole attire l’attention de l'utilisateur sur des manipulations interdites. La manipulation interdite est représentée à l’intérieur du cercle. Le symbole présenté à gauche, par exemple, indique l’interdiction de démonter l’appareil.
À propos des symboles
TOUJOURS OBSERVER LES CONSIGNES SUIVANTES
INSTRUCTIONS POUR PRÉVENIR LES INCENDIES, LES CHOCS ÉLECTRIQUES ET LES BLESSURES
À propos des messages de type AVERTISSEMENT et ATTENTION
AVERTISSEMENT
ATTENTION
2.1

5
UTILISATION SÉCURITAIRE DE L’APPAREILUSING THE UNIT SAFELY
CAUTIONPlace in a well ventilated locationThe unit should be located so that its location or position does not interfere with its proper ventilation.
Grasp the plug when connecting or disconnecting the power cordAlways grasp only the plug on the power-supply cord when plugging into, or unplugging from, an outlet.
Periodically clean the power cord’s plugAt regular intervals, you should unplug the power plug and clean it by using a dry cloth to wipe all dust and other accumulations away from its prongs. Also, disconnect the power plug from the power outlet whenever the unit is to remain unused for an extended period of time. Any accumulation of dust between the power plug and the power outlet can result in poor insulation and lead to fire.
Manage cables for safetyTry to prevent cords and cables from becoming entangled. Also, all cords and cables should be placed so they are out of the reach of children.
Avoid climbing on top of the unit, or placing heavy objects on itNever climb on top of, nor place heavy objects on the unit.
CAUTIONDo not connect or disconnect the power cord with wet handsNever handle the power cord or its plugs with wet hands when plugging into, or unplugging from, an outlet.
Cautions when moving this unitSince this product is very heavy, you must make sure that a sufficient number of people are on hand to help, so you can lift and move it safely, without causing strain. Make sure to have a firm grip, to protect yourself from injury and the instrument from damage. If you need to move the instrument, consult with your retailer, or Rodgers Instruments US LLC, as listed on the “Notice to Users” (p. 5).
Unplug the power cord from the outlet before cleaningBefore cleaning the unit, turn it off and unplug the power cord from the outlet.
If there is a possibility of lightning strike, disconnect the power cord from the outletWhenever you suspect the possibility of lightning in your area, pull the plug on the power cord out of the outlet.
Take care not to get fingers pinched by lidBe careful so you don’t get your fingers pinched when you handle any moving parts such as the following:
• Lid
Adult supervision is recommended whenever small children use the unit.
CAUTIONPrecautions concerning use of benchWhen using the bench, please observe the following points:
• Do not allow two or more persons to sit on the bench.
• Do not adjust the height while sitting on the bench.
Do not remove the speaker grille and speakerDo not remove the speaker grille and speaker by any means. Speaker not user replaceable. Shock hazardous voltages and currents are present inside the enclosure.
Disconnect power from AC mainsTo completely disconnect this apparatus from the AC mains, disconnect the power supply cord from the AC receptacle.
The power supply cord must be accessible.The mains plug of the power supply cord shall remain readily accessible.
WARNING
2.2
6
UTILISATION SÉCURITAIRE DE L’APPAREIL
2.3
ATTENTIONPlacer dans un endroit bien aéréL’appareil doit être placé d’une manière qui n’interfère pas avec sa propre ventilation.
Saisir la fiche pour brancher ou débrancher le cordon d’alimentationToujours saisir uniquement la fiche du cordon d’alimentation au moment de brancher ou de débrancher l’appareil.
Nettoyer régulièrement la fiche du cordon d’alimentationÀ intervalles réguliers, débrancher la fiche d’alimentation et nettoyer avec un chiffon sec pour enlever toutes les poussières et autres saletés des broches. Veiller également à débrancher l’appareil lorsqu’il reste longtemps inutilisé. L’accumulation de poussière entre la fiche et la prise de courant peut entraîner une isolation insuffisante et un risque d’incendie.
Gérer les câbles avec précautionEssayer d’éviter que les câbles ne s’emmêlent, et garder tous les câbles hors de la portée des enfants.
Ne pas monter sur l’appareil, ni poser d’objets lourds dessusNe jamais grimper sur l’appareil; éviter d’y poser des objets lourds.
ATTENTIONNe pas brancher ni débrancher le cordon d’alimentation avec des mains mouilléesNe jamais manipuler le cordon d’alimentation ni les fiches avec des mains mouillées au moment de brancher ou de débrancher l’appareil.
Précautions à prendre lors du transport de l’appareilCet appareil est très lourd. Veiller à disposer d’un nombre suffisant de personnes pour le soulever et le déplacer en toute sécurité, sans forcer indûment. Il faut disposer d’une prise solide, afin d’éviter de se blesser et d’endommager l’instrument. Avant de déménager l’instrument, consultez votre détaillant ou Rodgers Instruments US LLC (voir l’« Avis aux utilisateurs », p. 5).
Débrancher le cordon d’alimentation avant de nettoyer l’appareilÉteindre l’appareil et débrancher le cordon d’alimentation de la prise de courant avant de nettoyer l’appareil.
Débrancher le cordon d'alimentation s’il y a risque de foudre. Chaque fois qu’il y a risque d’orage dans la région, débrancher le cordon d'alimentation de la prise de courant.
Veiller à ne pas se pincer les doigts sous le couvercleUser de prudence pour éviter de se coincer les doigts en manipulant des pièces mobiles, comme les suivantes :
Le couvercle
La surveillance d’un adulte est recommandée lorsque de jeunes enfants utilisent l’appareil.
ATTENTIONPrécautions concernant l’utilisation du bancRespecter les consignes suivantes lors de l’utilisation du banc :
• Ne pas laisser deux personnes ou plus s’asseoir sur le banc.
• Ne pas régler la hauteur tandis que quelqu’un est assis sur le banc.
Ne pas enlever la grille du haut-parleur ni le haut-parleur Ne pas tenter d’aucune façon d’enlever la grille du haut-parleur ni le haut-parleur. Le haut-parleur ne peut être remplacé par l’utilisateur. L’intérieur du boîtier présente des risques d’électrocution, ainsi que des tensions et des courants dangereux.
Débranchement du cordon d’alimentation de la prise secteur
Pour enlever toute alimentation électrique de l'appareil, débrancher le cordon d'alimentation de la prise de courant.
Garder le cordon d’alimentation accessible
La fiche principale du cordon d’alimentation doit rester facilement accessible.
Avertissement
UTILISATION SÉCURITAIRE DE L’APPAREIL

73
Power Supply
• Do not connect this unit to same electrical outlet that is being used by an electrical appliance that is controlled by an inverter or a motor (such as a refrigerator, washing machine, microwave oven, or air conditioner). Depending on the way in which the electrical appliance is used, power supply noise may cause this unit to malfunction or may produce audible noise. If it is not practical to use a separate electrical outlet, connect a power supply noise filter between this unit and the electrical outlet.
• To prevent malfunction and equipment failure, always make sure to turn off the power on all your equipment before you make any connections.
• Although the LCD and LEDs are switched off when the unit is turned off, this does not mean that the unit has been completely disconnected from the source of power. If you need to turn off the power completely, first turn off the unit’s switch, then unplug the power cord from the power outlet. For this reason, the outlet into which you choose to connect the power cord’s plug should be one that is within easy reach and readily accessible.
• With the factory settings, the power will automatically be switched off 240 minutes after you stop playing or operating the unit. If you don’t want the unit to turn off automatically, change the “Auto Off” (p. 19) setting to “OFF” as described on “Making Settings in the Menus” (p. 14).
NOTEThe settings you were editing will be lost when the unit is turned off. If you want to keep your settings, you must save your settings before turning the unit off.
Placement
• Using the unit near power amplifiers (or other equipment containing large power transformers) may induce hum. To alleviate the problem, change the orientation of this unit; or move it farther away from the source of interference.
• This device may interfere with radio and television reception. Do not use this device in the vicinity of such receivers.
• Noise may be produced if wireless communications devices, such as cell phones, are operated in the vicinity of this unit. Such noise could occur when receiving or initiating a call, or while conversing. Should you experience such problems, you should relocate such wireless devices so they are at a greater distance from this unit, or switch them off.
• Do not expose the unit to direct sunlight, place it near devices that radiate heat, or otherwise subject it to temperature extremes. Also, do not allow lighting devices that normally are used while their light source is very close to the unit (such as a piano light), or powerful spotlights to shine upon the same area of the unit for extended periods of time. Excessive heat can deform or discolor the unit.
• Do not allow rubber, vinyl, or similar materials to remain on this unit for long periods of time. Such objects can discolor or otherwise harmfully affect the finish.
• Do not allow objects to remain on top of the keyboard or pedal board. This can be the cause of malfunction, such as keys ceasing to produce sound.
• Do not paste stickers, decals, or the like to this instrument. Peeling such matter off the instrument may damage the exterior finish.
• Do not put anything that contains water on this unit. Also, avoid the use of insecticides, perfumes, alcohol, nail polish, spray cans, etc., near the unit. Swiftly wipe away any liquid that spills on the unit using a dry, soft cloth.
Maintenance
• To clean the unit, use a dry, soft cloth; or one that is slightly dampened. Try to wipe the entire surface using an equal amount of strength, moving the cloth along with the grain of the wood. Rubbing too hard in the same area can damage the finish.
• Never use benzine, thinners, alcohol or solvents of any kind, to avoid the possibility of discoloration and/or deformation.
Repairs and Data
• Please be aware that all data contained in the unit’s memory may be lost when the unit is sent for repairs. Important data should always be backed up the USB flash drive, or written down on paper (when possible). During repairs, due care is taken to avoid the loss of data. However, in certain cases (such as when circuitry related to memory itself is out of order), we regret that it may not be possible to restore the data, and Rodgers assumes no liability concerning such loss of data.
Additional Precautions
• Please be aware that the contents of memory can be irretrievably lost as a result of a malfunction, or the improper operation of the unit. To protect yourself against the risk of loosing important data, we recommend that you periodically save a backup copy of important data you have stored in the USB flash drive.
• Unfortunately, it may be impossible to restore the contents of data that was stored in the unit’s memory or USB flash drive once it has been lost. Rodgers US LLC assumes no liability concerning such loss of data.
• Use a reasonable amount of care when using the unit’s buttons, sliders, or other controls; and when using its jacks and connectors. Rough handling can lead to malfunctions.
• Never strike or apply strong pressure to the display.
• When disconnecting all cables, grasp the connector itself—never pull on the cable. This way you will avoid causing shorts, or damage to the cable’s internal elements.
• A small amount of heat will radiate from the unit during normal operation.
• To avoid disturbing others nearby, try to keep the unit’s volume at reasonable levels. You may prefer to use headphones, so you do not need to be concerned about those around you.
• When you need to transport the unit, pack it in shock-absorbent material. Transporting the unit without doing so can cause it to become scratched or damaged, and could lead to malfunction.
• Do not apply undue force to the music stand while it is in use.
• Some connection cables contain resistors. Do not use cables that incorporate resistors for connecting to this unit. The use of such cables can cause the sound level to be extremely low, or impossible to hear. For information on cable specifications, contact the manufacturer of the cable.
• Due to the structural design of this instrument, small pets or other animals could end up getting trapped inside it. If such a situation is encountered, you must immediately turn off the unit and disconnect the power cord from the outlet. You should then consult with the retailer from whom the instrument was purchased, or contact Rodgers Instruments US LLC, as listed on the “Notice to Users” (p. 5).
• When opening or closing the lid, please be careful not to get your fingers pinched between the movable part and the panel.
• The explanations in this manual include illustrations that depict what should typically be shown by the display.
Note, however, that your unit may incorporate a newer, enhanced version of the system (e.g., includes newer sounds), so what you actually see in the display may not always match what appears in the manual.
Before Using External Memories
Using External Memories
• Carefully insert the USB flash drive all the way in—until it is firmly in place.
• Never touch the terminals of the USB flash drive. Also, avoid getting the terminals dirty.
• USB flash drive is constructed using precision components; handle the cards carefully, paying particular note to the following.
• To prevent damage to the cards from static electricity, be sure to discharge any static electricity from your own body before handling the cards.
• Do not touch or allow metal to come into contact with the contact portion of the cards.
• Do not bend, drop, or subject cards to strong shock or vibration.
• Do not keep cards in direct sunlight, in closed vehicles, or other such locations.
• Do not allow cards to become wet.
• Do not disassemble or modify the cards.
IMPORTANT NOTES

8 3.1
Alimentation
• Ne pas brancher cet appareil dans une prise de courant déjà utilisée par un appareil électrique contrôlé par un onduleur (réfrigérateur, lessiveuse, four micro-ondes, climatiseur, etc.) ou comportant un moteur. Suivant le mode d’utilisation de l’appareil électrique, le bruit induit peut nuire au fonctionnement de l’instrument ou produire un bruit audible. Si, pour des raisons pratiques, il est impossible d’utiliser une prise distincte, brancher un filtre de bruit induit entre cet appareil et la prise de courant.
• Avant de brancher l’appareil à d’autres appareils, mettre l’ensemble des appareils hors tension, de façon à éviter d’endommager les haut-parleurs et les autres périphériques.
• Bien que l’écran et les voyants s’éteignent lorsqu’on éteint l’appareil, celui-ci peut rester activé par la source d’alimentation. S’il faut désactiver l’alimentation complètement, appuyer d’abord sur le commutateur pour désactiver l’appareil, puis débrancher le cordon d’alimentation de la prise de courant. C’est pourquoi la prise de courant choisie pour brancher le cordon d’alimentation doit être facilement accessible.
• Selon les paramètres de réglage en usine, l’alimentationest coupée automatiquement après 240 minutes lorsque l’appareil est inutilisé. Pour désactiver l’arrêt automatique, régler le paramètre « Auto Off » (p. 19) à « OFF », conformément aux instructions de paramétrage des menus (Making Settings in the Menus, p. 14).
NOTESi l’appareil est éteint pendant la modification des paramètres, les nouveaux réglages seront perdus. Pour les conserver, il faut les enregistrer avant de l’éteindre.
Emplacement
• Lorsque l’appareil est utilisé à proximité d’amplificateurs de puissance (ou de tout autre équipement contenant d’importants transformateurs de puissance), un bourdonnement peut se faire entendre. Pour atténuer le problème, changer l’orientation de l’appareil ou l’éloigner de la source d’interférence.
• Cet appareil peut interférer avec la réception radio et télévision. Ne pas l’utiliser à proximité de ce type de récepteurs.
• Un bruit peut se faire entendre si des appareils de communication sans fil, tels que des téléphones cellulaires, sont utilisés à proximité de l’appareil. Ce type de bruit peut se produire lors de la réception ou de l’émission d’un appel, ou pendant une conversation téléphonique. En cas de problème de ce genre, éteindre les appareils sans fil concernés ou les déplacer de façon à les éloigner suffisamment de l’appareil.
• Éviter d’exposer l’appareil à la lumière directe du soleil, de le placer à proximité d’appareils qui émettent de la chaleur, de le laisser à l’intérieur d’un véhicule fermé et de le soumettre de quelque manière que ce soit à des températures extrêmes. Éviter en outre de laisser les appareils d’éclairage dont l’utilisation normale place la source lumineuse très près de l’appareil (comme une lampe de piano) ou de puissants projecteurs éclairer longtemps la même partie de l’appareil. Une chaleur excessive peut déformer ou décolorer l’appareil.
• Ne pas laisser d’objets de caoutchouc, de vinyle ou de matériaux semblables sur l’appareil pendant longtemps. Ces objets peuvent décolorer ou abîmer la finition de l’appareil.
• Ne pas laisser d’objets sur le clavier ou le pédalier. Le poids de ces objets risque de provoquer des défectuosités, par exemple des touches qui ne produisent aucun son.
• Ne pas coller d’autocollants, de décalcomanies ou autres images sur l’appareil. Au moment de les enlever, la finition risque de s’abîmer.
• Ne jamais placer sur l’appareil quelque chose qui contient de l’eau. Éviter en outre d’utiliser des insecticides, des parfums, de l’alcool, du vernis à ongles, des vaporisateurs, etc., à proximité de l’appareil. Si du liquide est renversé sur l’appareil, l’essuyer rapidement avec un linge sec et doux.
Entretien
• Pour nettoyer l’appareil, utiliser un chiffon sec et doux ou un chiffon légèrement imbibé d’eau. Essayer d’essuyer toute la surface en appuyant également, dans le sens des fibres du bois. Ne pas frotter trop fort en un seul endroit, pour éviter d’endommager la finition.
• Ne jamais utiliser de benzine, de diluant, d’alcool ni de solvants afin d’éviter tout risque de décoloration ou de déformation.
Réparations et données
• Veuillez prendre note que toutes les données enregistrées dans la mémoire de l’appareil peuvent se perdre lorsque l’appareil est envoyé pour réparation. Il est important de toujours sauvegarder les données sur une clé de mémoire USB, ou de les inscrire sur papier (si possible). Durant les réparations, les techniciens prennent soin d’éviter toute perte de données. Malheureusement, dans certains cas (comme un bris des circuits de mémoire), il peut s’avérer impossible de récupérer les données, et Rodgers ne peut assumer aucune responsabilité quant aux données perdues.
Précautions Supplémentaires
• Il est important de savoir que le contenu dela mémoire peut être définitivement perdu en cas d’erreur techniqueou de défectuosité de l’appareil. Pour prévenir le risque de perte des données importantes, nous recommandons aux utilisateurs de faire régulièrement des copies de sauvegarde de ce qui se trouve dans la mémoire de l’appareil et sur la clé de mémoire USB.
• Malheureusement, si le contenu de la mémoirede l’appareil ou de la clé USB est perdu, sa récupération pourrait s’avérer impossible, et Rodgers ne peut pas assumer la responsabilité des données perdues.
• Manipuler avec un soin raisonnable les boutons, index et autres commandes de l’appareil, de même que les prises audio et les connecteurs. Une manipulation non soignée peut entraîner des dysfonctionnements.
• Ne jamais frapper l’écran ou y appliquer une fortepression.
• Pour débrancher un câble, le saisir par le connecteur – ne jamais tirer sur le câble lui-même, de façon à éviter de causer des mauvais contacts ou d’endommager ses éléments internes.
• Il est normal que l’appareil dégage un peu de chaleur pendant qu’il fonctionne.
• Pour éviter de déranger les gens à proximité, essayer de garder le volume à un niveau raisonnable. Il est aussi possible d’utiliser des écouteurs pour ne pas avoir à s’en soucier.
• Si l’appareil doit être transporté, le protéger d’abord avec un emballage antichoc. Autrement, il risque d’être égratigné ou endommagé, et un dysfonctionnement pourrait s’ensuivre.
• Éviter d’appliquer une trop grande force sur le lutrin lorsqu’il est en cours d’utilisation.
• Certains câbles de connexion contiennent des résisteurs; aux fins de connexion à cet appareil, éviter d’utiliser ces câbles, qui peuvent rendre le son extrêmement faible, voire inaudible. Pour obtenir lescaractéristiques techniques de câbles en particulier, prière de communiquer avec le fabricant concerné.
• En raison de la conception structurelle de cet instrument, il pourrait arriver que des petits animaux domestiques ou autres se retrouvent coincés à l’intérieur. En pareille situation, éteindre immédiatement l’appareil et le débrancher de la prise de courant. Ensuite, consulter le détaillant qui avendu l’instrument ou communiquer avec Rodgers Instruments aux coordonnées indiquées dans l’avis aux utilisateurs (Notice to Users, p. 5).
• En ouvrant ou en refermant le couvercle, faire attention de ne pas se coincer les doigts entre la partie mobile et le panneau.
• Les explications fournies dans ce manuel comprennent des illustrations qui indiquent ce qui apparaît habituellement à l’écran.
Il est toutefois à noter que l’appareil pourrait comporter une version mise à jour ou améliorée du système (p. ex. une banque sonore renouvelée), de telle sorte que l’affichage à l’écran peut ne pas correspondre à ce qui est montré dans le manuel.
Avant d’utiliser une mémoire externe
Pour l’utilisation d’une mémoire externe
• Insérer soigneusement la clé de mémoire USB jusqu’au fond, en s’assurant qu’elle tient bien en place.
• Ne pas appliquer de force excessive sur la clé USB lorsqu’elle est branchée.
• Les clés USB sont des instruments de précision; il faut les manipuler avec précaution, en veillant à ce qui suit :
• L’électricité statique peut endommager une clé USB. Prendre soin de décharger le corps de son électricité statique avant de manipuler une clé USB.
• Ne pas toucher la partie de contact de la clé USB, ni la mettre en contact avec du métal.
• Éviter de plier et de faire tomber les clés USB, et de lessoumettre à des vibrations ou à des chocs violents.
• Éviter de laisser des clés USB exposées à la lumière directe du soleil, dans des véhicules fermés ou dans d’autres lieux semblables.
• Garder les clés USB à l’abri de l’humidité.
• Ne jamais essayer de démonter ou de modifier une clé USB.
REMARQUES IMPORTANTES

4
Contents
IMPORTANT SAFETY INSTRUCTIONS . . . . . . . . . . . . . . . . . . . . . . . 1
USING THE UNIT SAFELY . . . . . . . . . . . . . . . . . . . . . . . . . . . . . . . . . . 2
IMPORTANT NOTES . . . . . . . . . . . . . . . . . . . . . . . . . . . . . . . . . . . . . . . 3
ABOUT THE PERFORMANCE TOUCH KEYBOARDS . . . . . . . . . . . 5
Quick Tour . . . . . . . . . . . . . . . . . . . . . . . . . . . . . . . . . . . . . . . . . . . . . . . 6About the Display . . . . . . . . . . . . . . . . . . . . . . . . . . . . . . . . . . . . . . . . . . . . . . . . 9
Contents of the Main Screen . . . . . . . . . . . . . . . . . . . . . . . . . . . . . . . . 9About Pistons . . . . . . . . . . . . . . . . . . . . . . . . . . . . . . . . . . . . . . . . . . . . . . . . . . . 10
About Toe Pistons . . . . . . . . . . . . . . . . . . . . . . . . . . . . . . . . . . . . . . . . . 11Display and Panel . . . . . . . . . . . . . . . . . . . . . . . . . . . . . . . . . . . . . . . . . . . . . . . 11External Connectors . . . . . . . . . . . . . . . . . . . . . . . . . . . . . . . . . . . . . . . . . . . . . 11
List of Preset Songs/Demo Songs . . . . . . . . . . . . . . . . . . . . . . . . . 12
Making Settings in the Menus . . . . . . . . . . . . . . . . . . . . . . . . . . . . 14Menu List . . . . . . . . . . . . . . . . . . . . . . . . . . . . . . . . . . . . . . . . . . . . . . . . . . . . . . . 14
Demo . . . . . . . . . . . . . . . . . . . . . . . . . . . . . . . . . . . . . . . . . . . . . . . . . . . . . 14USB Memory . . . . . . . . . . . . . . . . . . . . . . . . . . . . . . . . . . . . . . . . . . . . . . 14Hymn Player . . . . . . . . . . . . . . . . . . . . . . . . . . . . . . . . . . . . . . . . . . . . . . 15Song Recorder . . . . . . . . . . . . . . . . . . . . . . . . . . . . . . . . . . . . . . . . . . . . 15Pitch/Tuning . . . . . . . . . . . . . . . . . . . . . . . . . . . . . . . . . . . . . . . . . . . . . . 16Room Modeling . . . . . . . . . . . . . . . . . . . . . . . . . . . . . . . . . . . . . . . . . . . 16LIBRARY/MIDI Coupler . . . . . . . . . . . . . . . . . . . . . . . . . . . . . . . . . . . . . 17Console . . . . . . . . . . . . . . . . . . . . . . . . . . . . . . . . . . . . . . . . . . . . . . . . . . . 18Tremulant . . . . . . . . . . . . . . . . . . . . . . . . . . . . . . . . . . . . . . . . . . . . . . . . . 19Exp. Pedal . . . . . . . . . . . . . . . . . . . . . . . . . . . . . . . . . . . . . . . . . . . . . . . . . 19Crescendo . . . . . . . . . . . . . . . . . . . . . . . . . . . . . . . . . . . . . . . . . . . . . . . . 20Audio . . . . . . . . . . . . . . . . . . . . . . . . . . . . . . . . . . . . . . . . . . . . . . . . . . . . . 20MIDI . . . . . . . . . . . . . . . . . . . . . . . . . . . . . . . . . . . . . . . . . . . . . . . . . . . . . . 21Save/Load (USB) . . . . . . . . . . . . . . . . . . . . . . . . . . . . . . . . . . . . . . . . . . . 22Utility . . . . . . . . . . . . . . . . . . . . . . . . . . . . . . . . . . . . . . . . . . . . . . . . . . . . . 22
Storing Your Settings (Customize) . . . . . . . . . . . . . . . . . . . . . . . . . . . . . . . . 22
Selecting Stops (Sounds) . . . . . . . . . . . . . . . . . . . . . . . . . . . . . . . . . 23Selecting a Sound Variation (Voice Palette) . . . . . . . . . . . . . . . . . . . . . . . 23
List of Voices (Stops) . . . . . . . . . . . . . . . . . . . . . . . . . . . . . . . . . . . . . 24CHOIR Division (1st Keyboard) . . . . . . . . . . . . . . . . . . . . . . . . . . . . . . . . . . . 24GREAT Division (2nd Keyboard) . . . . . . . . . . . . . . . . . . . . . . . . . . . . . . . . . . 24SWELL Division (3rd Keyboard) . . . . . . . . . . . . . . . . . . . . . . . . . . . . . . . . . . 24PEDAL Division (Pedalboard) . . . . . . . . . . . . . . . . . . . . . . . . . . . . . . . . . . . . 25LIBRARY/MIDI Voices . . . . . . . . . . . . . . . . . . . . . . . . . . . . . . . . . . . . . . . . . . . . 25
Organ . . . . . . . . . . . . . . . . . . . . . . . . . . . . . . . . . . . . . . . . . . . . . . . . . . . . . 25Orchestra . . . . . . . . . . . . . . . . . . . . . . . . . . . . . . . . . . . . . . . . . . . . . . . . . 26
Storing a Combination of Stops . . . . . . . . . . . . . . . . . . . . . . . . . . 27Storing or Recalling a Registration . . . . . . . . . . . . . . . . . . . . . . . . . . . . . . . 27
Storing a Registration . . . . . . . . . . . . . . . . . . . . . . . . . . . . . . . . . . . . . 27Recalling a Registration . . . . . . . . . . . . . . . . . . . . . . . . . . . . . . . . . . . . 27
Resetting the Sound Settings (General Cancel) . . . . . . . . . . . . . . . . . . . 27Using Memory Banks . . . . . . . . . . . . . . . . . . . . . . . . . . . . . . . . . . . . . . . . . . . . 28
Storing the Combination of Memory Pistons as a Memory Bank . . . . . . . . . . . . . . . . . . . . . . . . . . . . . . . . . . . . . . . . . . . . . . . . . . . . . . 28Recalling a Registration from a Different Memory Bank . . . . . 28
Recalling Registrations Successively. . . . . . . . . . . . . . . . . . . . . . . . . . . . . . 28Using Memory Banks with USB Memory . . . . . . . . . . . . . . . . . . . . . . . . . 29
Preparing USB Flash Drive . . . . . . . . . . . . . . . . . . . . . . . . . . . . . . . . . 29Selecting USB Memory Folder . . . . . . . . . . . . . . . . . . . . . . . . . . . . . 29Storing the Combination of Memory Pistons as a Memory Bank to USB Memory . . . . . . . . . . . . . . . . . . . . . . . . . . . . . . . . . . . . . . 29Recalling a Registration from a Different Memory Bank from USB Memory . . . . . . . . . . . . . . . . . . . . . . . . . . . . . . . . . . . . . . . . . . . . . . 29
Changing the Settings for FULL ORGAN . . . . . . . . . . . . . . . . . . . 30Setting the Sound to be Played When the [FULL ORGAN] Piston is Pressed . . . . . . . . . . . . . . . . . . . . . . . . . . . . . . . . . . . . . . . . . . . 30Setting Whether Drawknob Illumination is On/Off When the [FULL ORGAN] Piston is Pressed . . . . . . . . . . . . . . . . . . . . . . . . . . . . 30
Changing the Settings for Crescendo . . . . . . . . . . . . . . . . . . . . . 30
Changing ORGAN TYPE . . . . . . . . . . . . . . . . . . . . . . . . . . . . . . . . . . 30
Practicing Along with a Preset Song or Performance Data . 31Selecting and Playing Back a Song . . . . . . . . . . . . . . . . . . . . . . . . . . . . . . . 31
Muting a Specific Division During Playback . . . . . . . . . . . . . . . . . 32Playing Back a Specific Division as a Guide Tone . . . . . . . . . . . . 32
Recording Your Performances . . . . . . . . . . . . . . . . . . . . . . . . . . . . 33Recording a Song . . . . . . . . . . . . . . . . . . . . . . . . . . . . . . . . . . . . . . . . . . . . . . . 33Play Back the Recorded Song . . . . . . . . . . . . . . . . . . . . . . . . . . . . . . . . . . . . 33Saving a Recorded Song . . . . . . . . . . . . . . . . . . . . . . . . . . . . . . . . . . . . . . . . . 33Deleting a Recorded Song . . . . . . . . . . . . . . . . . . . . . . . . . . . . . . . . . . . . . . . 34Copying a Saved Song . . . . . . . . . . . . . . . . . . . . . . . . . . . . . . . . . . . . . . . . . . . 35
Hymn Player . . . . . . . . . . . . . . . . . . . . . . . . . . . . . . . . . . . . . . . . . . . . 36Selecting Hymn or Prelude . . . . . . . . . . . . . . . . . . . . . . . . . . . . . . . . . . . . . . 36
Selecting Hymn Number . . . . . . . . . . . . . . . . . . . . . . . . . . . . . . . . . . 36Playing Hymn . . . . . . . . . . . . . . . . . . . . . . . . . . . . . . . . . . . . . . . . . . . . . . . . . . . 36Playing Prelude . . . . . . . . . . . . . . . . . . . . . . . . . . . . . . . . . . . . . . . . . . . . . . . . . 36Changing Hymn Book . . . . . . . . . . . . . . . . . . . . . . . . . . . . . . . . . . . . . . . . . . . 36Hymn Player Song List . . . . . . . . . . . . . . . . . . . . . . . . . . . . . . . . . . . . . . . . . . . 37
Saving and Loading Settings on USB Flash Drive . . . . . . . . . . 39Formatting USB Flash Drive . . . . . . . . . . . . . . . . . . . . . . . . . . . . . . . . . . . . . . 39Deleting a Memory Bank from USB Flash Drive . . . . . . . . . . . . . . . . . . . 39Copying a Memory Bank . . . . . . . . . . . . . . . . . . . . . . . . . . . . . . . . . . . . . . . . 39Saving and Loading Voice Setup . . . . . . . . . . . . . . . . . . . . . . . . . . . . . . . . . 40
Saving to USB Flash Drive . . . . . . . . . . . . . . . . . . . . . . . . . . . . . . . . . . 40Loading a Voice Setup . . . . . . . . . . . . . . . . . . . . . . . . . . . . . . . . . . . . . 40Deleting a Voice Setup . . . . . . . . . . . . . . . . . . . . . . . . . . . . . . . . . . . . 40
Backing Up Data/Performing an Initialization . . . . . . . . . . . . . 41Returning all Settings to the Factory-Set State (Factory Reset). . . . . 41Backing Up/Loading Data . . . . . . . . . . . . . . . . . . . . . . . . . . . . . . . . . . . . . . . 41Displaying the Version . . . . . . . . . . . . . . . . . . . . . . . . . . . . . . . . . . . . . . . . . . . 41
List of Shortcuts . . . . . . . . . . . . . . . . . . . . . . . . . . . . . . . . . . . . . . . . . 41
Specifications . . . . . . . . . . . . . . . . . . . . . . . . . . . . . . . . . . . . . . . . . . . 42
Limited Warranty Certificate

5
Notice to UsersInformation in this document is subject to change without notice. No part of this manual may be translated into any language, stored in a retrieval system, reproduced or transmitted in any form or by any means, electronic or mechanical, including photocopying and recording, for any purpose without the express written permission of Rodgers Instruments US LLC.
For generations, organ key tops were made from the best materials – ivory (for white keys) and ebony (for black keys). The Performance Touch keyboards use the latest technologies to reproduce the touch and feel of these materials.
• Surfaces incorporate stripes of moisture-absorbing material for improved touch and playability.
• Keys feature a subtle gloss and understated coloring, enhancing the look and elegance.
• White keys are finished with a slight yellowish tinge for the look of real ivory.
ಞ Note: — To Ensure Usage in Optimal Conditions —
Handling…• Do not write on the keyboard with any pen or other implement, and do not stamp or place any marking on the instrument. Ink will seep into the surface
lines and become unremovable.
• Do not affix stickers on the keyboard. You may be unable to remove stickers that use strong adhesives, and the adhesive may cause discoloration.
Care and Maintenance…Please note the following points. Failure to do so may result in scratches on the surface finish, damaged gloss, or other discoloration or deformation.
• Gently wipe dirt and grime with soft cloth; do not rub the surfaces forcefully.
• To remove more serious grime, use a commercial keyboard cleaner not containing abrasives.
• Do not use benzene, paint thinner, or alcohol on the keys.
ABOUT THE PERFORMANCE TOUCH KEYBOARDS
RODGERS INSTRUMENTS US LLC21333 NW Jacobson Rd., Bldg. 7, Suite D-200
Hillsboro, Oregon 97124 (503) 648-4181
http://www.rodgersinstruments.com/
RODGERS IN CANADA5480 Parkwood Way
Richmond, B.C. V6V 2M4 Toll Free (877) 676-5263
Rodgers instruments are manufactured and protected under one or more of the following U.S. patents: 4,622,878, 5,060,179, 5,087,798, 5,091,613, 5,225,619, 5,262,581, 5,508,472, 6,369,310, 6,399,868
©Copyright 2016. Rodgers Instruments US LLC. All rights reserved. Printed in the United States of America.
Rodgers®, Rodgers Classic Organs®, Rodgers Infinity Series™, Rodgers Artist Series™, Rodgers Classic Series™, Performance Touch™, Library Access™, Natural Pipe Realism™, Pipe Dimensional Imaging™, Dimensional Sound Modeling®, Parallel Digital Imaging®, Voice Palette™, PDI™, are trademarks or registered trademarks of Rodgers Instruments US LLC, Hillsboro, Oregon.

6
Expression Pedals
LCD WindowPower Switch
Music Rest
USB MemoryConnector
Headphone Jack
Organ Bench
Tablets
Keyboard Cover
Control Knobs
Pistons
Toe Pistons
Pedalboard
589 Quick Tour
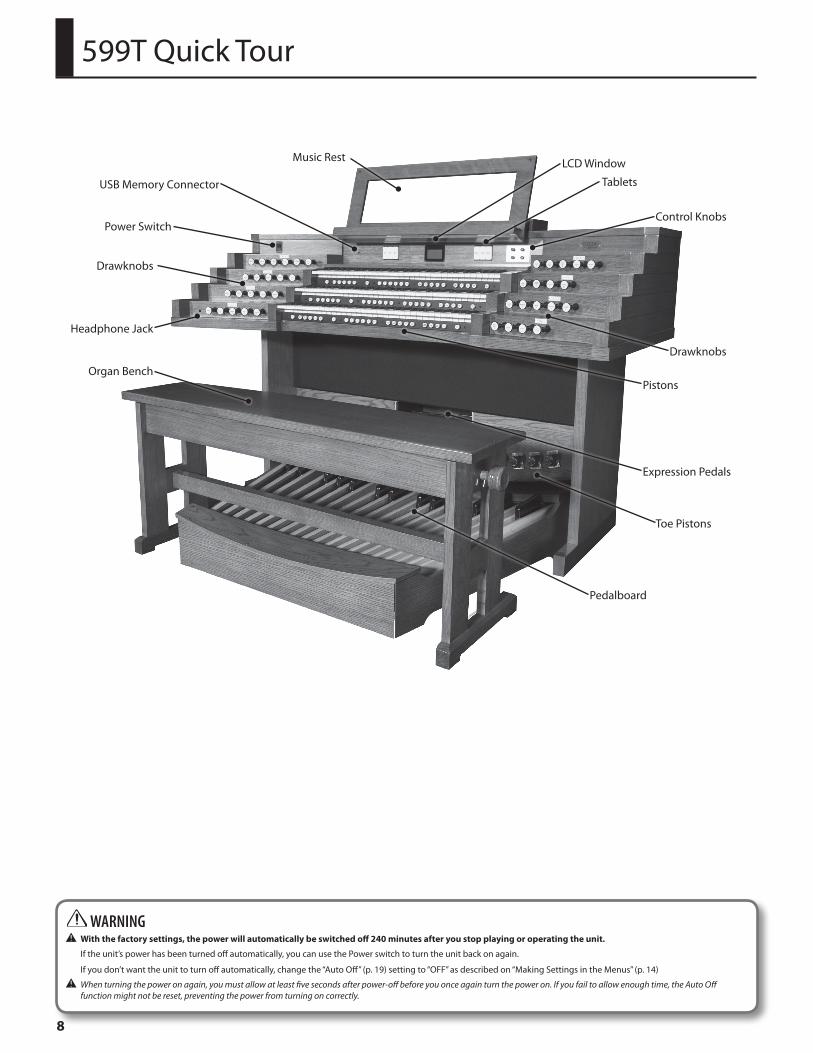
WARNING ಞ With the factory settings, the power will automatically be switched off 240 minutes after you stop playing or operating the unit.
If the unit’s power has been turned off automatically, you can use the Power switch to turn the unit back on again.
If you don’t want the unit to turn off automatically, change the “Auto Off” (p. 19) setting to “OFF” as described on “Making Settings in the Menus” (p. 14)
ಞ When turning the power on again, you must allow at least five seconds after power-off before you once again turn the power on. If you fail to allow enough time, the Auto Off function might not be reset, preventing the power from turning on correctly.

7
599 Quick Tour
WARNING ಞ With the factory settings, the power will automatically be switched off 240 minutes after you stop playing or operating the unit.
If the unit’s power has been turned off automatically, you can use the Power switch to turn the unit back on again.
If you don’t want the unit to turn off automatically, change the “Auto Off” (p. 19) setting to “OFF” as described on “Making Settings in the Menus” (p. 14)
ಞ When turning the power on again, you must allow at least five seconds after power-off before you once again turn the power on. If you fail to allow enough time, the Auto Off function might not be reset, preventing the power from turning on correctly.
Expression Pedals
LCD Window
Power Switch
Music Rest
USB MemoryConnector
Drawknobs
Headphone Jack
Organ Bench
Tablets
Keyboard Cover
Control Knobs
Drawknobs
Pistons
Toe Pistons
Pedalboard
8
WARNING ಞ With the factory settings, the power will automatically be switched off 240 minutes after you stop playing or operating the unit.
If the unit’s power has been turned off automatically, you can use the Power switch to turn the unit back on again.
If you don’t want the unit to turn off automatically, change the “Auto Off” (p. 19) setting to “OFF” as described on “Making Settings in the Menus” (p. 14)
ಞ When turning the power on again, you must allow at least five seconds after power-off before you once again turn the power on. If you fail to allow enough time, the Auto Off function might not be reset, preventing the power from turning on correctly.
599T Quick Tour
Expression Pedals
LCD Window
Power Switch
Music Rest
USB Memory Connector
Drawknobs
Headphone Jack
Organ Bench
Tablets
Control Knobs
Drawknobs
Pistons
Toe Pistons
Pedalboard

9
589, 599 & 599T Quick Tour
About the Display
Contents of the Main Screen
1 7
6
89
2
345
1. General memory bank number
2. General memory piston number
3. Keyboard transposition status
Range (semitones)
-6–+5
4. Reference pitch (master tuning)
Available Settings (Hz)
392: VERSAIL (VERSAILLES)
415: BAROQUE
440: MODERN (standard)
465: VENETIA (VENETIAN)
MEMOYou can also adjust this tuning within the range of the reference pitch.
5. Temperament
Available Settings
EQUAL, WERCK., KIRN.1, KIRN.3, VALLO., MEAN.D, MEAN.E, PYTHG., M.BACH
6. Displayed when the MIDI Visual Control function is on .
7. Crescendo pedal status
8. Volume of the SWELL expression pedal
9. Volume of the CHOIR expression pedal

10
589, 599 & 599T Quick Tour
Piston Explanation
1 [ZIMBEL] Piston This piston allows you to play Zimbelstern voice.
2 [ORGAN TYPE] Piston This piston allows you to select Organ Type.
3 [SET] PistonThis stores a combination of sounds (registration) to a general memory piston or a division memory piston.
4 General Memory Pistons
Each of these pistons can store the combination of sounds (registration) for the entire organ.
5 LIBRARY/MIDI Coupler Pedal
This piston allows you to play LIBRARY/MIDI coupler. Refer to “LIBRARY/MIDI Coupler” (p. 17)
6Memory Bank Select [M–] Piston/[M+] Piston [M1] Piston
Use these pistons when you want to switch memory banks. [M1] piston allows you to switch memory bank 1.
7 PEDAL Division Coupler Piston
This piston causes the pedalboard to play the sound of the Swell, Great and Choir divisions. It has the same function as the PEDAL division coupler tablets.
8 Division Memory Pistons
Each of these pistons can store the sound (registration) for the SWELL, GREAT and CHOIR divisions.
9 Tremulant PistonsThe tremulant effect adds vibrato (cyclic modulation) to the sound of SWELL, GREAT and CHOIR divisions. Refer to “Tremulant” (p. 19).
10 Flute Tremulant ALT Piston
This tremulants find best use in gospel, theatre and evangelical music; the Flute Vibrato affects Flute voices.
This Organ is equipped with two independent Flute Tremulant settings, a Standard Flute Tremulant and an Alternate Flute Tremulant. Pressing the [FLT TEM ALT] reversible piston so that it lights engages the Alternate Flute Tremulant. Refer to “Tremulant” (p. 19).
11
[PIPES OFF] Piston
When the [PIPES OFF] piston is engaged, the wind-blown pipe ranks are silenced.
ಞ This is used when an optional pipe system has been connected.
[ANC ON] Piston
When an [ANC ON] piston is engaged, digital voices play from the stops which normally control pipe voices. These digital voices are often referred to as the “Ancillary.”
ಞ This is used when an optional pipe system has been connected.
Piston Explanation
12 LIBRARY/MIDI Coupler SW, GT, CH
This piston allows you to play LIBRARY/MIDI coupler. Refer to “LIBRARY/MIDI Coupler” (p. 17).
13 GREAT & PEDAL Enclosed Piston
Turn this piston on if you want to use the expression pedal to adjust the volume of GREAT division and PEDAL division.
14 GREAT Division Coupler Piston
This piston causes the 2nd manual to play the sound of the CHOIR and SWELLdivisions. It has the same function as the GREAT division coupler tablets.
15 [NEXT] PistonThis successively load the registration stored at the next general memory piston; e.g., 1 g 2 g 3 ([NEXT] piston).
16 [DFLT STOPS] Piston
Press this piston; the settings will be reset to a state in which no sound is selected and the variation settings will also be reset for all drawknobs, restoring the basic variation VP0 (Default Voice Palette). Refer to “Selecting a Sound Variation (Voice Palette)” (p. 23)
17 CHOIR Division Coupler Piston
This piston causes the 1st manual to play the sound of the SWELL division. It has the same function as the CHOIR division coupler tablets.
18
[INT AUDIO OFF] Piston Turn this piston if you want to mute internal speakers.
[MAIN OFF] Piston This piston silences the main organ system.
[ANT ON] Piston
This piston activate an antiphonal speaker system. An antiphonal speaker system is so named because it is normally installed a substantial distance from the main organ. This difference in physical placement allows for a variety of effects.
19 All Expression Shoe SWELL Piston
Turn this piston on if you want to assign CHOIR GREAT and PEDAL divisions to SWELL expression shoe.
20 [ALT CRESC] Piston
This Organ is equipped with two independent Crescendo sequences, a Standard Crescendo and an Alternate Crescendo. Pressing the [ALT CRESC] reversible piston so that it lights engages the Alternate Crescendo sequence. Refer to “Changing the Settings for Crescendo” (p. 30).
21 [CHIMES] Piston This piston allows you to play Chimes voice.
22
Bass Coupler [BASS] Piston
This causes the lowest note played on the 2nd manual to be sounded by the PEDAL division sound.
Melody Coupler [MEL SW] Piston
This causes the highest note played on the 2nd manual to be sounded by the SWELL division sound.
Melody Coupler [MEL CH] Piston
This causes the highest note played on the 2nd manual to be sounded by the CHOIR division sound.
About Pistons
ZIMBEL
HYMNPLAYER
ORGANTYPE
USERMIDIP A
USERMIDIP B
M1 TREM
TREM
TREM FLTTREM
ALT
DFLTSTOPS
USERMIDI
A B
USERMIDI
A
USERMIDI
A
USERMIDI
B
USERMIDI
B
USERMIDI
ALTCRESC
ALLEXPR
1
3 7 9213
16
124
5 6 8
10 11
1415 17
19 20
2122
23 24 25 26
ZIMBEL
HYMNPLAYER
ORGANTYPE
PEDLIB/MIDI
A
PEDMIDI
BM1
FLTTREM
ALT
DFLTSTOPS
ALTCRESC
CHTO
PED
GTTO
PED
SWTO
PED
TREM
TREM
TREM
GT/PEDENCL
SWTOGT
CHTOGT
CHLIB/MIDI
A
CHLIB/MIDI
B
SWTOCH
GTLIB/MIDI
B
GTLIB/MIDI
A
SWLIB/MIDI
B
SWLIB/MIDI
A
ALLEXPRSW
MELSW
MELCH
7 8 9 14 15 16 17 2122
23 24 25 26
1 4 11 1810 1912 20
2 3 5
136

11
589, 599 & 599T Quick Tour
Piston Explanation
23 [HYMN PLAYER] Piston This piston allows you to play a Hymn.
24
[STOP] Piston This stops playback or recording of a song.
[PLAY/PAUSE] Piston This starts or pauses playback of a song.
[REC] Piston Use this when you want to record your playing.
25 General Cancel [0] Piston
This sets the organ to the condition in which all drawknobs, tablets and couplers are cancelled, so that no sounds are selected. It’s convenient to use this piston when you want to specify a combination of sounds from scratch.
26 [FULL ORGAN] PistonFULL ORGAN controls allow you to engage full organ quickly without canceling the registration which is set.
About Toe Pistons1 2
3
Pedal/Piston Explanation
1 Expression PedalThe volume of CHOIR/GREAT/PEDAL is adjusted with the left pedal, and the center pedal is used to adjust the volume of Swell.
2 Crescendo Pedal This shoe gradually adds a predetermined selection of stops as it is pressed forward.
3 10 x Toe Pistons
General Memory Piston 1–5
PEDAL Division Coupler Piston
This piston causes the pedalboard to play the sound of the GREAT, SWELL or CHOIR division.
Full Organ Piston
Display and Panel
1
3
5
2
4
1. Display
Various information is shown here.
2. [Select/Menu] Knob/[Satellite Volume] Knob
Turn: Adjusts the volume of the satellite speakers. When you’re in a menu screen for making detailed settings, turn this knob to select the item you want to operate.
Press: Takes you to a menu screen, or finalizes a setting item.
MEMOThe settings for the volume balance of the organ’s speakers and the satellite speakers can be stored in memory. For details, refer to “Storing Your Settings (Customize)” (p. 22).
3. [Value/Exit Menu] Knob
Turn: Adjusts a setting.
Press: Returns you to the previous menu, or cancels an operation.
4. [Master Volume] Knob
This adjusts the volume of the entire organ.
5. [Reverb] Knob
This adjusts the depth of reverberation.
External Connectors
1 2 3
1. OUTPUT L/MONO, R (Output) Jacks
You can connect an external amplified speaker system here so that the sound of the organ is played from the connected speakers.
2. INPUT L/MONO, R (Input) Jacks
You can connect an external sound module or similar device here so that its sounds are heard from the organ’s speakers.
3. MIDI IN, OUT Connectors
You can connect external MIDI devices here to exchange performance data with the organ.
ಞ To prevent malfunction and equipment failure, always turn down the volume, and turn off all the units before making any connections.
ಞ Carefully insert the USB flash drive all the way in-until it is firmly in place.
ಞ This unit is equipped with a protection circuit. A brief interval (a few seconds) after turning the unit on is required before it will operate normally.
ಞ Before turning the unit on/off, always be sure to turn the volume down. Even with the volume turned down, you might hear some sound when switching the unit on/off. However, this is normal and does not indicate a malfunction.
ಞ If you need to turn off the power completely, first turn off the unit, then unplug the power cord from the power outlet. Refer to “Power Supply” (p. 3).

12
List of Preset Songs/Demo Songs
• Please refer to page 14 for information to access each title.
• All rights reserved. Unauthorized use of this material for purposes other than private, personal enjoyment is a violation of applicable laws.
• No data for the music that is played will be output from MIDI OUT.
• If you play back in the “Song Recorder” screen, you’ll be able to individually mute the performance of each division.
Sound Tour:
Song Title Display Composer Memo
Principals - - - Principals Welsh Folk Melody
Flutes - - - Flutes Welsh Folk Melody
Strings - - - Strings Welsh Folk Melody
Reeds - - - Reeds Welsh Folk Melody
Full Organ - - - Full Organ Welsh Folk Melody
Special:
Song Title Display Composer Memo
Noel Suisse - - - Noel Suisse Claude Daquin
Fanfare - - - Fanfare Jacques-Nicolas Lemmens
Bach Chorales (Bach Chorale): Various chorales composed by J .S . Bach
Song Title Display Composer Memo
Chorale “Jesus, bleibet meine Freude” BWV 147 Bach BWV147 J.S. Bach
Chorale “Liebster Jesu, wir sind hier” BWV 731 Bach BWV731 J.S. Bach Famous melody with impressive sound
Chorale “Nun Komm’ der Heiden Heiland” BWV 599 Bach BWV599 J.S. Bach Beautiful positiv organ sound
Chorale “Gott, durch dein Güte” BWV 600 Bach BWV600 J.S. Bach “Trompete” reed melody by pedals
Chorale “Herr Gott, nun schleuss den Himmel auf” BWV 617 Bach BWV617 J.S. Bach Reed sound with soft tremulant
Chorale “Chris Lag in Todesbanden” BWV 625 Bach BWV625 J.S. Bach Principal chorus sound
Chorale “Wo soll ich fliehen hin” BWV 646 Bach BWV646 J.S. Bach 4’ reed melody by pedals
Baroque Organ Works (Baroque):Various organ tunes with Baroque sound
Song Title Display Composer Memo
Toccata and Fugue in D Minor BWV 565 T&F BWV565 J.S. Bach
Prelude and Fugue No.4 in F Major (Harpsichord) BWV 556 PreFugueB556 J.S. Bach
Concerto “The Cuckoo and the Nightingale” HWV 295 ConcertoH295 G.F. Haendel Various stops simulating the birds
Prelude in Eb Major BWV 552 Prelude B552 J.S. Bach Rich pipe sound with full organ
Noel Etranger No.8 - - - NoelEtranger L.C. d’Aquin Various reed and flue pipes with French voicing
Trumpet Voluntary I in D Major - - - Trumpet Vol. W. Boyce Trumpet reed sound without pedals
Fugue in G Minor BWV 578 Fugue B578 J.S. Bach Simple stop for famous fugue by Bach
Romantic Organ Works (Romantic): Various organ tunes with Romantic sound
Song Title Display Composer Memo
from “Prelude, Fugue and Variation” Op.18 PreludeFranc C. Franck
Toccata from “Suite Gothique” Op.25 Toccata L. Böellman
Sonata No.2 Op. 65-2 Sonata No.2 F. Mendelssohn Symphonic organ sound
Andantino - - - Andantino C. Franck Simple but beautiful tune
Trumpet Voluntary - - - Tp Voluntary H. Purcell & J. Clarke With orchestral trumpet
Trumpet Tune and Air - - - Tp Tune&Air H. Purcell With orchestral trumpet
European Organ Tour (European Org): A tour to visit small churches in Europe and their beautiful organs .
Song Title Display Composer Memo
Malle Sijmen - - - Netherlands J.P. Sweelinck
Germany: Chorale “Werde munter, mein Gemuete” - - - Germany J. Pachelbel Chorale with positiv sound
France: “Dialogue Sur la grand clavier et la positif” - - - France F. Couperin Trumpet reed with French positiv sound
Italy: “Toccata per lélevatione” - - - Italy G. Frescobaldi Positiv stop with tremulant without pedals
Belgium: from “Psalm 24” - - - Belgium A.V. Noordt Simple stop with pedals
Spain: “Tiento de 1 tono de mano derecha” - - - Spain P. Bruna Without pedals
England: “Upon la mi re” - - - England Unknown Without pedals
Germany: “Passacaglia” BWV 582 Bach BWV582 J.S. Bach Finally back to Germany for Bach Organ
List of Preset Songs/Demo Songs

13
599 Quick Tour
Ceremony Organ Works (Ceremony): Selected organ works for wedding ceremonies
Song Title Display Composer Memo
Ave Verum Corpus in D Major KV 618 AveVermKV618 W.A. Mozart
“Largo” from Opera “Xerxes” - - - Largo G.F. Haendel Celeste choruses mp-f
“Rigaudon” from “Idomeneus” - - - Rigaudon A. Campra Rich pipe sound, alternating organ and harpsichord, full organ
“Salut d’Amour” - - - Salut d’Amor E. Elgar With orchestral oboe
“Wedding March” from “Midsummer Night’s Dream” - - - MendelWeddin F. Mendelssohn Famous tune for wedding ceremonies
“Bridal Chorus” from “Lohengrin: Act III” - - - WagnerWeddin R. Wagner Originally a choir with orchestra
Hymn:
Song Title Display Composer Memo
Morecambe - - - Morecambe Frederick Atkinson A meditative hymn played in a Prelude-style features many quiet ensembles and solo stops.
St. Elizabeth - - - St Elizabeth UncertainCommonly known as “Beautiful Savior,” this arrangement features celestes and solo stops ranging from pianissimo to mezzo-forte.
Merton - - - Merton W. H. Monk This Advent hymn demonstrates many Principal choruses beginning with 8’ only then the addition of 4’, 2’, and Mixtures.
Grosser Gott - - - Grosser Gott Uncertain Commonly known as “Holy God, We Praise Thy Name, ” we hear organ ensembles ranging from 8’, 4’, 2’ to nearly full organ.
Nicaea - - - Nicaea John B. DykesCommonly known as “Holy, Holy, Holy,” this hymn is played in traditional English worship style featuring solo reeds during the second stanza, culminating with full organ.
Hanover - - - Hanover William Croft
Commonly known as “O Worship the King,” this hymn is played in traditional American (Western) worship style with a large registration for stanza 1, a reduced registration for stanza 2, and full organ for stanza 3.
List of Preset Songs/Demo Songs
14
Making Settings in the Menus
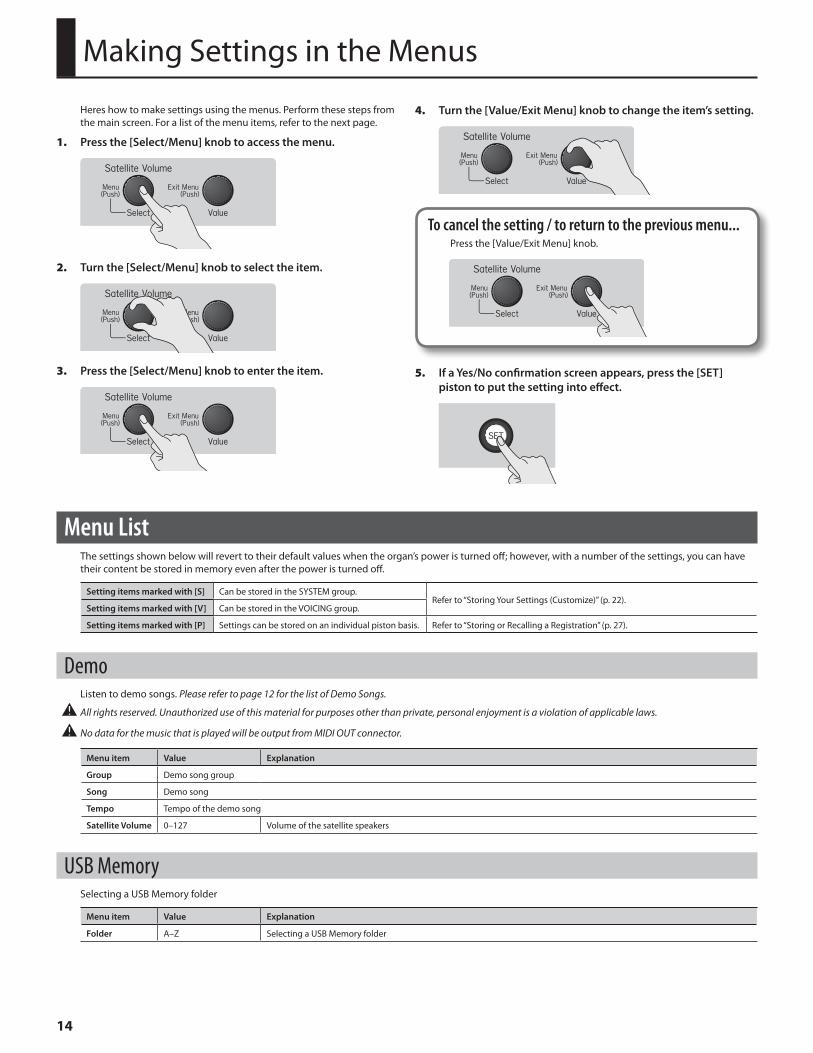
Heres how to make settings using the menus. Perform these steps from the main screen. For a list of the menu items, refer to the next page.
1. Press the [Select/Menu] knob to access the menu .
2. Turn the [Select/Menu] knob to select the item .
3. Press the [Select/Menu] knob to enter the item .
4. Turn the [Value/Exit Menu] knob to change the item’s setting .
To cancel the setting / to return to the previous menu...Press the [Value/Exit Menu] knob.
5. If a Yes/No confirmation screen appears, press the [SET] piston to put the setting into effect .
Menu ListThe settings shown below will revert to their default values when the organ’s power is turned off; however, with a number of the settings, you can have their content be stored in memory even after the power is turned off.
Setting items marked with [S] Can be stored in the SYSTEM group.Refer to “Storing Your Settings (Customize)” (p. 22).
Setting items marked with [V] Can be stored in the VOICING group.
Setting items marked with [P] Settings can be stored on an individual piston basis. Refer to “Storing or Recalling a Registration” (p. 27).
DemoListen to demo songs. Please refer to page 12 for the list of Demo Songs.
ಞ All rights reserved. Unauthorized use of this material for purposes other than private, personal enjoyment is a violation of applicable laws.
ಞ No data for the music that is played will be output from MIDI OUT connector.
Menu item Value Explanation
Group Demo song group
Song Demo song
Tempo Tempo of the demo song
Satellite Volume 0–127 Volume of the satellite speakers
USB MemorySelecting a USB Memory folder
Menu item Value Explanation
Folder A–Z Selecting a USB Memory folder

15
Making Settings in the Menus
Hymn PlayerPlay back Hymn and Prelude
Menu item Value Explanation
Mode – Select Hymn or Prelude
Hymn number – Select Hymn number
Next Intro, Verse Select to play introduction or verse
Play Mode [S]VAR. Prelude begins at a random selection and plays continuously
FIXED Prelude begins at a predetermined selection and plays continuously
Tempo 20-240 Tempo of the Hymn
Volume [S] 0%-100% The volume of Hymn
Transpose -6 – +5 Change the key of the song in semitone steps
Book [S] – Select Hymn book
Song RecorderRecording, play back song, saving, deleting, and copying song data
Menu item Value Explanation
Source
USB Play back song data from USB flash drive.
INTERNAL Play back song data from internal memory.
PRESET Play back built-in preset song (demo song).
Song Name of the song
Tempo Refer to “Beat” (p. 15) Tempo of the song
Measure Measure of the song
[Division Mute] Refer to “Muting a Specific Division During Playback” and “Playing Back a Specific Division as a Guide Tone” (p. 32).
MAN-II MUTE, GUIDE, PLAY
Select the division that you want to mute.MAN-I MUTE, GUIDE, PLAY
Pedal MUTE, GUIDE, PLAY
Guide Volume [S] 1–10 Adjust the volume of the guide tone.
Guide Tone [S]
F16, P16, R16, F8, P8, R8, F4, P4, R4
F: Flute, P: Principal, R: Reed, Number: Footage
Choose the guide tone.
Playback Transpose -6 – +5 The transpose function lets you shift the pitch in semitone steps.
Play ModeOFF Play back only the selected song.
CHAIN Consecutively play back all the songs on the selected media.
Metronome Volume OFF, 1–10 Volume of the metronome. Turn this “OFF” if you don’t want the metronome to sound.
Beat
Beat of the song or metronome
The range within which the tempo can be set will vary depending on the setting for Beat.
Beat Tempo range
2/2 10–120
0/4, 2/4, 3/4, 4/4, 5/4, 6/4, 7/4 20–240
3/8 40–480
6/8, 9/8, 12/8 13–160
[Save Song] Refer to “Saving a Recorded Song” (p. 33).
[Delete Song] Refer to “Deleting a Recorded Song” (p. 34).
[Copy Song] Refer to “Copying a Saved Song” (p. 35).

16
Making Settings in the Menus
Pitch/TuningSettings for pitch, Temperament, Tuning, and Transpose
Menu item Value Explanation
Pitch
The reference pitch can be changed from “A=440.0 Hz” to “A=415.0 Hz” (Baroque pitch) or “A=392.0 Hz” (Versailles pitch).
VERSAILLES 392 (Hz)
BAROQUE 415 (Hz)
MODERN 440 (Hz)
VENETIAN 465 (Hz)
Temperament
Historical styles of music such as baroque can be played in the tunings that were used during that time.
EQUAL (Equal temperament)
This temperament divides the octave into twelve equal intervals. Modulating to a different key will not affect the sonority of the chords.
WERCK. (Werckmeister)
This temperament combines the meantone temperament and the Pythagorean temperament. It allows playing in all keys (method 1, number 3).
KIRN.1 (Kirnberger 1)
This is an improvement of meantone temperament and just intonation to allow greater freedom of modulation. It allows playing in all keys (method 1).
KIRN.3 (Kirnberger 3) This is a variation of Kirnberger 1 (method 3).
VALLO. (Vallotti)
This is a relatively recent temperament. It is close to equal temperament but has a certain amount of just intonation, making it easier to stay in tune with other instruments, and is thus frequently used for ensembles.
MEAN.D (Meantone temperament)
This temperament is a partial compromise from just intonation in order to allow a certain degree of modulation. Preference is given to the sonority in D#.
MEAN.E (Meantone temperament)
This temperament is a partial compromise from just intonation in order to allow a certain degree of modulation. Preference is given to the sonority in Eb.
PYTHG. (Pythagorean tuning)
This is a system of tuning attributed to the philosopher Pythagoras, in which the fourth and fifth are pure. Chords including the third will not sound smooth, but the melody will sound good.
M.BACH (Modern Bach) This is one of the recently researched temperaments from the era of Bach. It allows playing in all keys.
Tuning ±100 cents You can adjust this in a range of ±100 cents (a semitone) centered on the selected pitch.
Transpose -6–+5
The transpose function lets you shift the pitch in semitone steps without changing the keys you play on the keyboard.
MEMOFrom the main screen, while holding the [SET] piston, turn the [Value/Exit Menu] knob to change the transpose. From the main screen, press [0] piston, transpose will also be turned off.
Room ModelingReverb settings
Menu item Value Explanation
Room Type [S]
By changing the type of reverberation you can experience the sensation of performing in a variety of locations.
CHAMBER The reverberation of a pipe chamber
HALL The reverberation of a hall
CHURCH The reverberation of a church
CATHEDRAL The reverberation of a cathedral
Wall Type [S]
You can make additional changes to the reverberation by changing the wall type (the material out of which the wall is constructed).
DRAPERY Pleated curtains
WOOD Wood
BRICK Brick
MARBLE Marble

17
Making Settings in the Menus
LIBRARY/MIDI Coupler• Selecting sounds that are not available via the drawknobs and stops
• MIDI coupler settings
• Adjusting sounds
Menu item Value
Division CHOIR A, CHOIR B, GREAT A, GREAT B, PEDAL A, PEDAL B
ಞ Details of the available items will depend on the Source/MIDI CH setting.
Menu item Value Explanation
Source/MIDI CH [V] [P]
LIBRARY Internal sound generator
CH1–16 MIDI transmit channel
The range will depend on the division that is selected.
Source/MIDI CH = LIBRARYMenu item Value Explanation
Name [V] [P] Name of sound Select by sound name
Volume [V] [P] OFF, 0–127 Specifies the volume of the sound assigned to the [LIBRARY/MIDI] coupler.
Octave [V] [P] -2–+2, NORMAL Specifies the octave of the sound assigned to the [LIBRARY/MIDI] coupler.
Coarse Tune [V] [P] -12–+12 Adjusts the pitch in semitone steps.
Fine Tune [V] [P] -50–+50 Adjusts the pitch in a range of ±50 cents
Warmth [V] [P] -10–10 Adjusts the low-frequency tone for the sound assigned to the [LIBRARY/MIDI] coupler.
Presence [V] [P] -10–10 Adjust the mid-frequency tone for the sound assigned to the [LIBRARY/MIDI] coupler.
Brilliance [V] [P] -10–10 Adjusts the high-frequency tone for the sound assigned to the [LIBRARY/MIDI] coupler.
Reverb [V] [P] OFF, 0–127Tweak the reverb depth for the sound assigned to the [LIBRARY/MIDI] coupler.
Normally set this “OFF.”
Velocity [V] [P]
KBD The keyboard’s velocity will be used
EXP The expression pedal’s position will be used
2–127 The specified value will be used as the velocity
ಞ Velocity can be applied only to orchestral sounds
Source/MIDI CH = CH1–16Menu item Value Explanation
Name [V] [P] Name of sound Select by sound name (refer to “Tone Name [S]” (p. 21))
PC Number [V] [P] OFF, 001–128 Program change number
Bank MSB [V] [P] OFF, 000–127 Bank select MSB
Bank LSB [V] [P] OFF, 000–127 Bank select LSB
Volume [V] [P] OFF, 0–127 Specifies the volume
Octave [V] [P] -2–+2, NORMAL Specifies the octave (pitch)
Reverb [V] [P] OFF, 0–127 Specifies the depth of reverb
Chorus [V] [P] OFF, 0–127 Specifies the depth of chorus
Velocity [V] [P]
KBD The keyboard’s velocity will be used
EXP The expression pedal’s position will be used
2–127 The specified value will be used as the velocity
Expression [V] [P] OFF, ON Expression Pedal

18
Making Settings in the Menus
About MIDI transmit channelsWhen the [LIBRARY/MIDI] coupler is on
To avoid a conflict between the MIDI transmit channels of the various [LIBRARY/MIDI] couplers, the MIDI transmit channels are fixed as follows.
Division (keyboard) Piston name MIDI transmit channel
CHOIR (1st)LIBRARY MIDI A CH4 (fixed)
LIBRARY MIDI B CH8 (fixed)
GREAT (2nd)LIBRARY MIDI A CH1–CH16
LIBRARY MIDI B CH5 (fixed)
SWELL (3rd)LIBRARY MIDI A CH2 (fixed)
LIBRARY MIDI B CH6 (fixed)
PEDAL (pedalboard)LIBRARY MIDI A CH3 (fixed)
LIBRARY MIDI B CH7 (fixed)
When the [LIBRARY/MIDI] coupler is offEven when the [LIBRARY/MIDI] coupler is off, the performance data from each division is transmitted on the following MIDI channels.
As appropriate, you’ll need to change the MIDI reception settings on the MIDI device that’s connected.
Division (keyboard) MIDI transmit channel
CHOIR (1st) CH15 (fixed)
GREAT(2nd) CH12 (fixed)
SWELL (3rd) CH13 (fixed)
PEDAL (pedalboard) CH14 (fixed)
ಞ When using a [LIBRARY/MIDI] coupler to control an external MIDI sound module, we recommend that you set your external MIDI device to not receive messages on channels 12–15.
Console• Screen contrast
• MEL and BASS coupler settings, and other settings
Menu item Value Explanation
Display Contrast [S] 0–30
Adjust the Display Contrast
ಞ This setting will return to the default value when you turn off the power, but you can store the setting so that it will be remembered even after the power is turned off. For details, refer to “Storing Your Settings (Customize)” (p. 22).
Bass Split [S]
You are free to change the range in which the bass coupler will operate. The specified note and those below it will use the bass coupler.
Top key of the Bass coupler range
Bass coupler
Mel Split Swell[S]
Mel Split Choir[S]
You are free to change the range in which the melody coupler will operate. The specified note and those above it will use the melody coupler, and notes below it will not.
Melody coupler
Bottom key of the Melody coupler range
Blind [S]
BLIND When the [FULL ORGAN] piston is pressed or Crescendo pedal is activated, drawknob illumination is turned off.
VISIBLE When the [FULL ORGAN] piston is pressed or Crescendo pedal is activated, drawknob illumination is turned on.
OPERATE When the [FULL ORGAN] piston is pressed or Crescendo pedal is activated, drawknob illumination is turned on. Also you can operate the drawknobs.

19
Making Settings in the Menus
Menu item Value Explanation
Auto Off [S] OFF, 10 min, 30 min, 240 min
If this is set to “240 min,” the power will automatically turn off 240 minutes after the Organ was last operated.
NOTEAfter Auto Off shut down, turn the power switch off. Wait at least five seconds, then turn the power switch on again.
WARNINGWith the factory settings, the power will automatically be switched off 240 minutes after you stop playing or operating the unit.
If you don’t want the unit to turn off automatically, change the “Auto Off” setting to “OFF.”
Music Rest Lamp [S} OFF, 1–16 Setting Music Rest and Pedalboard Lamp.
Piston lamp [S} 1–16 Setting Piston Drawknob Lamp.
KBD Transfer [S] OFF, ON Exchange 1st keyboard and 2nd keyboard, it allows you to use French type Organ.
Pedal F# Sustain OFF, ON Pedal F# 19 functions as a Sustain Switch for Orchestral Voices only.
TremulantThe tremulant effect adds vibrato (cyclic modulation) to the sound.
Menu item Value Explanation
Division
CHOIR Sets the tremulant for CHOIR.
GREAT Sets the tremulant for GREAT.
SWELL Sets the tremulant for SWELL.
CH FLUTE Sets the flute tremulant forCHOIR.
GR FLUTE Sets the flute tremulant for GREAT.
SW FLUTE Sets the flute tremulant for SWELL.
CH FLUTE2 Sets the flute tremulant 2 for CHOIR.
GR FLUTE2 Sets the flute tremulant 2 for GREAT.
SW FLUTE2 Sets the flute tremulant 2 for SWELL.
Depth [S] 0–127 With a setting of “0,” no tremulant will be applied. Increasing this value will make the tremulant deeper.
Rate [S] 0–127 A slow tremulant will be applied with a setting of “0,” and this will become faster as you increase the value.
Exp. PedalExpression pedal settings
Menu item Value Explanation
GREAT/Pedal [P]OFF Not affected by the expression pedal
ON Great and Pedal division are affected by the expression pedal
SWELL[P]OFF Not affected by the expression pedal
ON Swell division is affected by the expression pedal
Shutter [S]
You can adjust the minimum volume that will be in effect when the expression pedal is at the minimum position.
PPPP Least volume
PPP Low volume
PP Somewhat higher volume
UNENCL Not affected by the expression pedal
Kick SW [S]
The kick switch is located on the side of the expression pedal. You can assign a function to the kick switch.
OFF The kick switch will be off.
NEXT This has the same function as the [NEXT] piston. It will switch to the adjacent general memory piston. Each time you press the kick switch, the general memory piston will switch to the next higher number.
PREV This has the same function as the [PREV] piston. It will switch to the adjacent general memory piston. Each time you press the kick switch, the general memory piston will switch to the next lower number.
SUSTAIN
Sustain will be applied while you are pressing the switch.
ಞ Sustain can be applied only to some of the [LIBRARY/MIDI] coupler sounds and to the sounds of an external MIDI sound module.
ಞ Sustain will not be applied to the sounds of the organ.
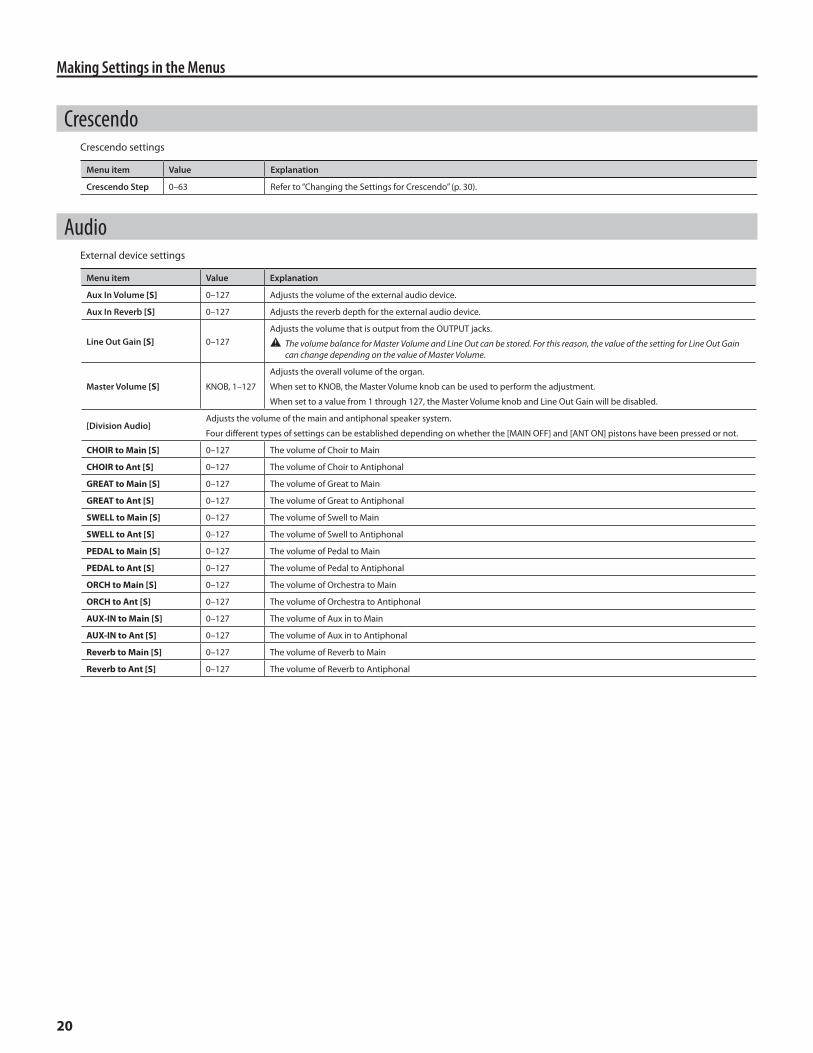
20
Making Settings in the Menus
CrescendoCrescendo settings
Menu item Value Explanation
Crescendo Step 0–63 Refer to “Changing the Settings for Crescendo” (p. 30).
AudioExternal device settings
Menu item Value Explanation
Aux In Volume [S] 0–127 Adjusts the volume of the external audio device.
Aux In Reverb [S] 0–127 Adjusts the reverb depth for the external audio device.
Line Out Gain [S] 0–127 Adjusts the volume that is output from the OUTPUT jacks.
ಞ The volume balance for Master Volume and Line Out can be stored. For this reason, the value of the setting for Line Out Gain can change depending on the value of Master Volume.
Master Volume [S] KNOB, 1–127
Adjusts the overall volume of the organ.
When set to KNOB, the Master Volume knob can be used to perform the adjustment.
When set to a value from 1 through 127, the Master Volume knob and Line Out Gain will be disabled.
[Division Audio] Adjusts the volume of the main and antiphonal speaker system.
Four different types of settings can be established depending on whether the [MAIN OFF] and [ANT ON] pistons have been pressed or not.
CHOIR to Main [S] 0–127 The volume of Choir to Main
CHOIR to Ant [S] 0–127 The volume of Choir to Antiphonal
GREAT to Main [S] 0–127 The volume of Great to Main
GREAT to Ant [S] 0–127 The volume of Great to Antiphonal
SWELL to Main [S] 0–127 The volume of Swell to Main
SWELL to Ant [S] 0–127 The volume of Swell to Antiphonal
PEDAL to Main [S] 0–127 The volume of Pedal to Main
PEDAL to Ant [S] 0–127 The volume of Pedal to Antiphonal
ORCH to Main [S] 0–127 The volume of Orchestra to Main
ORCH to Ant [S] 0–127 The volume of Orchestra to Antiphonal
AUX-IN to Main [S] 0–127 The volume of Aux in to Main
AUX-IN to Ant [S] 0–127 The volume of Aux in to Antiphonal
Reverb to Main [S] 0–127 The volume of Reverb to Main
Reverb to Ant [S] 0–127 The volume of Reverb to Antiphonal
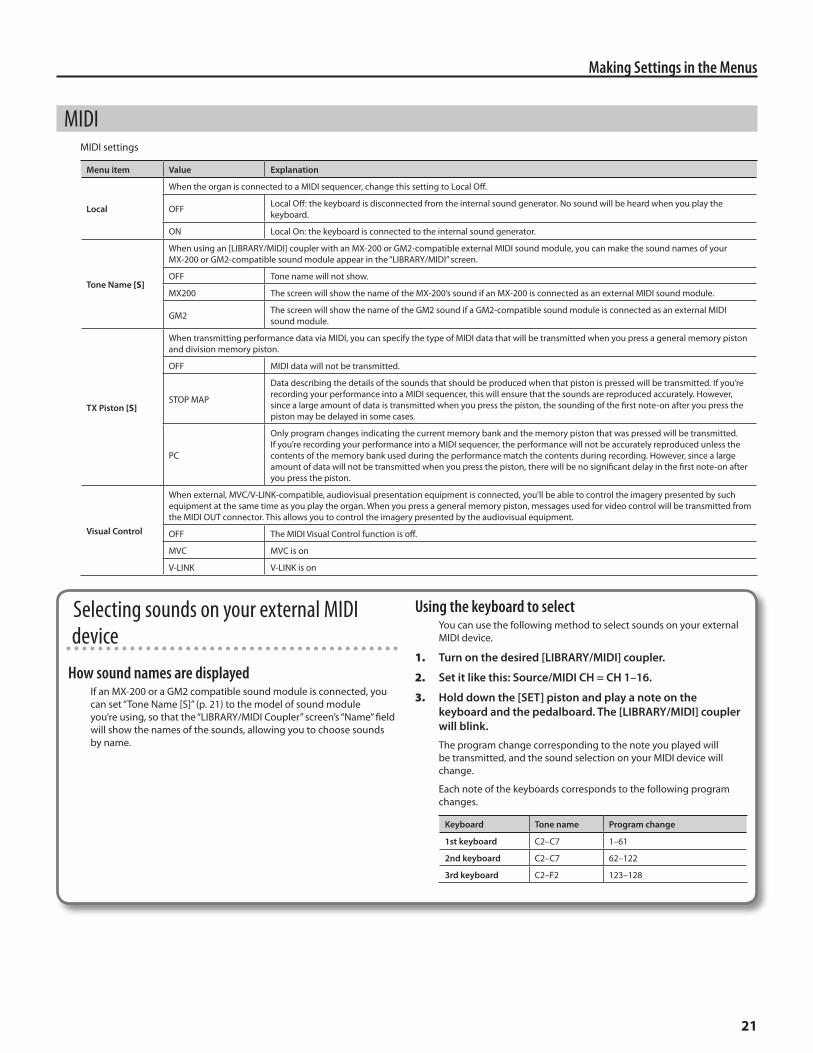
21
Making Settings in the Menus
MIDIMIDI settings
Menu item Value Explanation
Local
When the organ is connected to a MIDI sequencer, change this setting to Local Off.
OFF Local Off: the keyboard is disconnected from the internal sound generator. No sound will be heard when you play the keyboard.
ON Local On: the keyboard is connected to the internal sound generator.
Tone Name [S]
When using an [LIBRARY/MIDI] coupler with an MX-200 or GM2-compatible external MIDI sound module, you can make the sound names of your MX-200 or GM2-compatible sound module appear in the “LIBRARY/MIDI” screen.
OFF Tone name will not show.
MX200 The screen will show the name of the MX-200’s sound if an MX-200 is connected as an external MIDI sound module.
GM2 The screen will show the name of the GM2 sound if a GM2-compatible sound module is connected as an external MIDI sound module.
TX Piston [S]
When transmitting performance data via MIDI, you can specify the type of MIDI data that will be transmitted when you press a general memory piston and division memory piston.
OFF MIDI data will not be transmitted.
STOP MAP
Data describing the details of the sounds that should be produced when that piston is pressed will be transmitted. If you’re recording your performance into a MIDI sequencer, this will ensure that the sounds are reproduced accurately. However, since a large amount of data is transmitted when you press the piston, the sounding of the first note-on after you press the piston may be delayed in some cases.
PC
Only program changes indicating the current memory bank and the memory piston that was pressed will be transmitted. If you’re recording your performance into a MIDI sequencer, the performance will not be accurately reproduced unless the contents of the memory bank used during the performance match the contents during recording. However, since a large amount of data will not be transmitted when you press the piston, there will be no significant delay in the first note-on after you press the piston.
Visual Control
When external, MVC/V-LINK-compatible, audiovisual presentation equipment is connected, you’ll be able to control the imagery presented by such equipment at the same time as you play the organ. When you press a general memory piston, messages used for video control will be transmitted from the MIDI OUT connector. This allows you to control the imagery presented by the audiovisual equipment.
OFF The MIDI Visual Control function is off.
MVC MVC is on
V-LINK V-LINK is on
Selecting sounds on your external MIDI device
How sound names are displayedIf an MX-200 or a GM2 compatible sound module is connected, you can set “Tone Name [S]” (p. 21) to the model of sound module you’re using, so that the “LIBRARY/MIDI Coupler” screen’s “Name” field will show the names of the sounds, allowing you to choose sounds by name.
Using the keyboard to selectYou can use the following method to select sounds on your external MIDI device.
1. Turn on the desired [LIBRARY/MIDI] coupler .
2. Set it like this: Source/MIDI CH = CH 1–16 .
3. Hold down the [SET] piston and play a note on the keyboard and the pedalboard . The [LIBRARY/MIDI] coupler will blink .
The program change corresponding to the note you played will be transmitted, and the sound selection on your MIDI device will change.
Each note of the keyboards corresponds to the following program changes.
Keyboard Tone name Program change
1st keyboard C2–C7 1–61
2nd keyboard C2–C7 62–122
3rd keyboard C2–F2 123–128
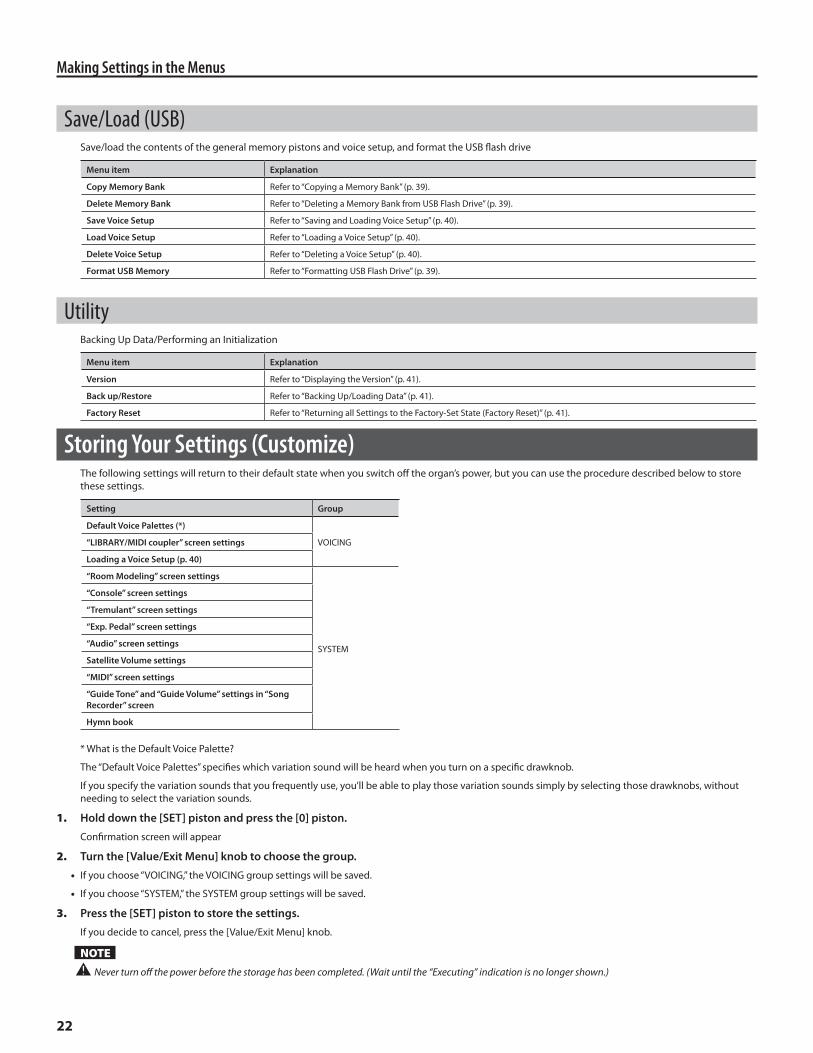
22
Making Settings in the Menus
Save/Load (USB)Save/load the contents of the general memory pistons and voice setup, and format the USB flash drive
Menu item Explanation
Copy Memory Bank Refer to “Copying a Memory Bank” (p. 39).
Delete Memory Bank Refer to “Deleting a Memory Bank from USB Flash Drive” (p. 39).
Save Voice Setup Refer to “Saving and Loading Voice Setup” (p. 40).
Load Voice Setup Refer to “Loading a Voice Setup” (p. 40).
Delete Voice Setup Refer to “Deleting a Voice Setup” (p. 40).
Format USB Memory Refer to “Formatting USB Flash Drive” (p. 39).
UtilityBacking Up Data/Performing an Initialization
Menu item Explanation
Version Refer to “Displaying the Version” (p. 41).
Back up/Restore Refer to “Backing Up/Loading Data” (p. 41).
Factory Reset Refer to “Returning all Settings to the Factory-Set State (Factory Reset)” (p. 41).
Storing Your Settings (Customize)The following settings will return to their default state when you switch off the organ’s power, but you can use the procedure described below to store these settings.
Setting Group
Default Voice Palettes (*)
VOICING“LIBRARY/MIDI coupler” screen settings
Loading a Voice Setup (p . 40)
“Room Modeling” screen settings
SYSTEM
“Console” screen settings
“Tremulant” screen settings
“Exp . Pedal” screen settings
“Audio” screen settings
Satellite Volume settings
“MIDI” screen settings
“Guide Tone” and “Guide Volume” settings in “Song Recorder” screen
Hymn book
* What is the Default Voice Palette?
The “Default Voice Palettes” specifies which variation sound will be heard when you turn on a specific drawknob.
If you specify the variation sounds that you frequently use, you’ll be able to play those variation sounds simply by selecting those drawknobs, without needing to select the variation sounds.
1. Hold down the [SET] piston and press the [0] piston .
Confirmation screen will appear
2. Turn the [Value/Exit Menu] knob to choose the group .
• If you choose “VOICING,” the VOICING group settings will be saved.
• If you choose “SYSTEM,” the SYSTEM group settings will be saved.
3. Press the [SET] piston to store the settings .
If you decide to cancel, press the [Value/Exit Menu] knob.
NOTE ಞ Never turn off the power before the storage has been completed. (Wait until the “Executing” indication is no longer shown.)
23
Selecting Stops (Sounds)
By pulling the drawknobs you can play a variety of pipe organ sounds. The sounds assigned to the drawknobs are called “stops.”
The drawknobs are organized into groups called “divisions.” If the indicator of a drawknob is lit, you’ll be able to play the corresponding stop.
Selecting a Sound Variation (Voice Palette)
1. From the main screen, pull a drawknob (599, 599T) or turn on a stop tab (589) .
The “Voice Palette” screen will appear, showing the variation of the selected stop.
ಞ If the indicator blinks momentarily when you pull a drawknob, a variation is already selected for the stop.
ಞ If the “Voice Palette” screen is not shown, return to the main screen (press the [Value/Exit Menu] knob a number of times) and perform the procedure from step 1.
2. Turn the [Value/Exit Menu] knob .
You can choose from four sound variations: VP0 through VP3.
The list of voice s(stops) appears on the next page.
24
CHOIR Division (1st Keyboard)Drawknob/Tablet (VP0) VP1 VP2 VP3
Diapason 8' Prestant 8' Montre 8' English Diapason 8'
Holzgedackt 8' Flöte 8' Flûte Traversière 8' Gedackt 8'
Unda Maris II 8' Quintaden 8' Viola Céleste II 8' Erzähler Céleste II 8'
Principal 4' Rohrflöte 4' Flûte d'Amour 4' Koppelflöte 4'
Oktav 2' Flöte 2' Doublette 2' Waldflöte 2'
Larigot 1-1/3' Sifflöte 1' Cornet III Sesquialtera II
Rauschwerk IV Klein MIxtur III Plein Jeu Harmonique V Zimbel IV
Corno di Bassetto 16’ Rankett 16’ Neuvieme 8/9’ English Horn 8’
Clarinet 8' Dulzian 8' Cromorne 8' Schalmei 8'
Fanfare Trumpet 8' Tromba II 16’+8' Trompette en Chamade 8' Royal Tuba 8'
GREAT Division (2nd Keyboard)Drawknob/Tablet (VP0) VP1 VP2 VP3
Violone 16' Bordun 16' Montre 16' Quintaton 16'
Principal 8' Prinzipal 8' Montre 8' Open Diapason 8'
Bourdon 8' Rohrgedackt 8' Flûte Harmonique 8' Stopped Diapason 8'
Gemshorn 8' Viola di Gamba 8' Salicional 8' Clarabella 8'
Octave 4' Oktave 4' Flûte Harmonique 4' Open Flute 4'
Quinte 2-2/3' Cornet V Octave 8' Dulciana Céleste II 8'
Super Octave 2' Oktave 2' Doublette 2' Cymbel IV
Fourniture IV Rauschwerk IV Fourniture V Tierce Mixture V
Waldhorn 8' Trompete 8' Trompette Harmonique 8' French Horn 8’
SWELL Division (3rd Keyboard)Drawknob/Tablet (VP0) VP1 VP2 VP3
Geigen Principal 8' Viola 8' Salicional 8' Aeoline 8'
Bourdon 8' Gedeckt 8' Flûte Harmonique 8' Lieblich Gedackt 8'
Viola Céleste II 8' Schwebung II 8' Voix Céleste 8' Flûte Céleste II 8'
Prestant 4' Prinzipal 4' Unda Maris II 4' Violins II 4'
Flute Traverse 4' Nachthorn 4' Flûte Céleste II 4' Orchestral Flute 4'
Nazard 2-2/3' Vox Humana 8' Voix Humaine 8' Twelfth 2-2/3’
Block Flute 2' Oktave 2' Piccolo Harmonique 2' Fifteenth 2’
Tierce 1-3/5' Scharff III Cornet III Cymbal VI
Plein Jeu IV Mixtur V Clairon 4’ Fourniture XI
Trombone 16' Fagott 16' Bombarde 16' Hautbois 8’
Trumpet 8' Oboe 8' Trompette 8' Baryton 8'
List of Voices (Stops)

25
PEDAL Division (Pedalboard)Drawknob/Tablet (VP0) VP1 VP2 VP3
Contra Bourdon 32' Untersatz 32' Contra Violon 32' Double Open Wood 32'
Principal 16' Violone 16' Contrebasse 16' Open Wood 16'
Subbass 16' Gedecktbass 16' Bourdon Doux 16' Bourdon 16'
Octave 8' Oktave 8' Violoncelle 8' Gemshorn 8'
Bass Flute 8' Dulciana 8' Violoncelle Céleste II 8' Unda Maris II 8'
Choral Bass 4' Nachthorn 4' Quinte 10-2/3’ Unda Maris II 4’
Bombarde 16' Posaune 16' Basson 16' Fagotto 16'
Trumpet 8' Dulzian 8' Trompette 8' Tuba 8'
Clarion 4' Schalmei 4' Clairon 4' Mixture IV
LIBRARY/MIDI VoiceSounds for user settings can be assigned to the [LIBRARY/MIDI] couplers and played together with the organ sounds of each division.
The sounds that are available as user settings consist of “organ sounds” and “orchestral sounds.” The organ sounds and orchestral sounds differ as follows in the way that reverb and tremulant will operate.
Organ sounds• Organ sounds will have the same reverb as the organ sounds of the other ordinary tablets. For this reason, the Reverb setting shown in the LIBRARY/MIDI
screen is ignored. The default setting for Reverb will be “OFF.”
• The tremulant effect will be applied for each division. If the expression pedal is enabled, the expression pedal will affect these organ sounds along with the sounds of the other tablets.
• The velocity settings ignored.
Orchestral sounds• Orchestral sounds will have their own dedicated reverb. In the LIBRARY/MIDI screen, the default Reverb setting will be “100.”
• The tremulant effect will not be applied.
• The velocity can be fixed.
OrganNo . Display Name Voice Name Feet
1 32 Principal PRINCIPAL 32’
2 32 ContGeign CONTRA GEIGEN 32’
3 32 ContBordn CONTRA BOURDON 32’
4 16 SpitzPriz SPITZ PRINZIPAL 16’
5 16 LibGedakt LIEBLICH GEDACKT 16’
6 16 Dulciana DULCIANA 16’
7 16 CellCélII CELLOS CÉLESTES II 16’
8 16 ErzCél II ERZHALER CÉLESTES II 16’
9 8 Montre MONTRE 8’
10 8 Bach Princ BACH PRINCIPAL 8’
11 8 Gemshorn GEMSHORN 8’
12 8 Gamba GAMBA 8’
13 8 Dulciana DULCIANA 8’
14 8 HolzGedakt HOLZGEDACKT 8’
15 8 GrossFlute GROSS FLUTE 8’
16 8 2nd FlHarm 2nd FLUTE HARMONIQUE 8’
17 8 CélesteIII CÉLESTES III 8’
18 8 UndMrs UNDA MARIS III 8’
No . Display Name Voice Name Feet
19 4 Principal PRINCIPAL 4’
20 4 Open Flute OPEN FLUTE 4’
21 4 Chim Flute CHIMNEY FLUTE 4’
22 2 2/3 Quinte QUINTE 2-2/3’
23 2 2/3 Nazard NAZARD 2-2/3’
24 2 Gemshorn GEMSHORN 2’
25 2 Piccolo PICCOLO 2’
26 1 3/5 Tierce TIERCE 1-3/5’
27 1 1/3 Larigt LARIGOT 1-1/3’
28 1 1/7 Sept SEPTIÈME 1-1/7’
29 1 Sifföte SIFFLÖTE 1’
30 IIJeudeCloch JEU DE CLOCHETTE II
31 II Quartane QUARTANE II
32 II Scharf SCHARF II
33 V GablCornet GABLER CORNET V V
34 VI Ped Mix PEDAL GRAND MIXTUR VI
35 IV Grave Mix GRAVE MIXTUR IV
36 IV 2ndGrvMix 2nd GRAVE MIXTUR IV

26
No . Display Name Voice Name Feet
37 IV Fournitur FOURNITURE SS IV-VI
38 VI T Fournit TIERCE FOURNITURE VI
39 VIIIGrandMix GRAND MIXTUR VIII
40 32 Ophiclide DOUBLE OPHICLEIDE 32’
41 32 Bombarde CONTRE BOMBARDE 32’
42 32 Bassoon CONTRE BASSOON 32’
43 16 2ndBombrd 2nd BOMBARDE 16’
44 16 Contre Tp CONTRE TROMPETTE 16’
45 16 Rankette RANKETT 16’
46 8 Trumpet TROMPET 8’
47 8 Trompette TROMPETTE 8’
48 8 2ndTrompet 2nd TROMPETTE 8’
49 8 StatTrumpt STATE TRUMPET 8’
50 8 Chamade CHAMADES 8’
51 8 Dulzian DULZIAN 8’
52 8 Cromorne CROMORNE 8’
53 8 Baryton BARYTON 8’
54 8 CorD’Amour COR D’AMOUR 8’
55 8 Regal REGAL 8’
56 8 Vox Humana VOX HUMANA 8’
57 8 VoxHumaine VOX HUMAINE 8’ 8’
58 8 VoxHumainT VOX HUMAINE T 8’
59 4 Clarion CLARION 4’
60 4 Clairon CLAIRON 4’
61 4 2ndClairon 2nd CLAIRON 4’
62 4 RohrSchalm ROHRSCHALMEI 4’
63 8+4+2 Princ PRINCIPALS III 8+4+2
64 842Mix Princ PRINCIPALS+MIXTURS 8+4+2+IV
No . Display Name Voice Name Feet
65 16+4 FlCélIV FLUTE CÉLESTES IV 16+4
66 16+4 Cél IV CÉLESTES IV 16’+4’
67 16+8+4 CélVI CÉLESTES VI 16+8+4
68 16+8+4+VxCél CÉLESTES VII 16’+8’+4’+Vox
69 16+8 VoxesII VOXES II 16+8
70 16+4 VoxesII VOXES II 16+4
71 Full Swell FULL SWELL 16+8+4+Reeds
72 8 Tibia TIBIA 8’
73 4 Tibia TIBIA 4’
74 8 VDO II VDO CELESTE 8’
75 8 VDO II T VDO CELESTE T 8’
76 8 Tuba T TUBA T 8’
77 8 CornopeanT CORNOPEAN T 8’
78 Tib168+Vx168 TIBIAS 16’ + 8’+ VOX 16’ + 8’
79 Tib16842+Str FULL TIBIAS+STRS 8’+4’
80 Tib84+Q+Vx+C VOX & STR 16’ + TIB 2’ + QUINT
81 Vx16+8+Cel VOX 16’+8’+CELESTES 8’
82 Tib84+VDOCel TIBIAS 8’, 4’ + STR
83 Tib84+Vx+Cel TIBIAS 8’, 4’ + STR + VOX
84 Tib84Cel+Tub TIBIAS 8’, 4’ + TUBA 8’
85 Tib4+Cel8 TIBIA 4’ + CELESTES 8’
86 Tib42+Str168 TIBIAS 4’, 2’ + STR 16’, 8’
87 Tib4+Kinura TIBIA 4’ + KINURA 8’
88 Str8+T2+Glck STR 8’ + TIBIAS 2’ + GLOCKEN
89 Tib4+Glock TIBIA 4’ + GLOCKENSPIEL
90 Organ Harp ORGAN HARP 8’
91 Chrysoglott CHRYSOGLOTT 4’
92 Action Noise TRACKER/BARKER NOISE
OrchestraNo . Display Name Voice Name Feet
200 Grand Piano GRAND PIANO
201 Elec Piano ELECTRIC PIANO
202 Harpsi 8-I HARPSICHORD 8 I
203 Harpsi 8 II HARPSICHORD 8 II
204 Harpsi 4’ HARPSICHORD 4
205 Harpsi Lute HARPSICHORD LUTE
206 Harpsi 8+8 HARPSICHORD 8+8
207 Harpsi 8+4 HARPSICHORD 8+4
208 Celesta CELESTA
209 Orch Harp ORCHESTRAL HARP
210 Drawbar 1 DRAWBAR ORGAN 1
211 Drawbar 2 DRAWBAR ORGAN II
212 Guitar ACOUSTIC GUITAR
213 Acous Bass ACOUSTIC BASS
214 String Ensem STRING ENSEMBLE
215 Slow Strings SLOW STRINGS
No . Display Name Voice Name Feet
216 OcatveStrngs OCTAVE STRINGS
217 Violin/Cello SOLO VIOLIN/CELLO
218 Saxophone SAXOPHONE
219 Orch Trumpet ORCHESTRAL TRUMPET
220 Brass Ensemb BRASS ENSEMBLE
221 Fr Horn Solo SOLO FRENCH HORN
222 Orch Flute ORCHESTRAL FLUTE
223 Orch Oboe ORCHESTRAL OBOE
224 OrchClarinet ORCHESTRAL CLARINET
225 Choir Aahs CHOIR AAHS
226 Choir Oohs CHOIR OOHS
227 Organ Chimes ORGAN CHIMES
228 Tubular Bells TUBULAR BELL
229 Tower Chimes TOWER CHIMES
230 Handbells HANDBELLS
231 Timpani TIMPANI
27
Storing a Combination of Stops
About the general memory pistonsThe general memory pistons can store the stop, coupler, and tremulant settings. The stored settings are maintained even when the power is turned off.
There are 10 general memory pistons, 1 through 10, and each piston can store one registration. The combination of general memory pistons 1–10 is stored as a “bank.” For example there are 10 pistons and 20 banks, this means that you can store a total of 200 registrations.
Registrations are a convenient way to store favorite combinations of sounds, or to switch between combinations of sounds while you perform.
About the division memory pistonsWhile the general memory pistons store a combination of sounds for the entire organ, the division memory pistons store only the combination of sounds for each division.
The combination of division memory pistons is stored as a “bank.”
Storing or Recalling a Registration
Storing a Registration1. Set the stops so that you hear the combination of sounds you want to store .
2. While holding down the [SET] piston, press one of the general memory pistons or division memory pistons .
• If you press a general memory piston, the state of the stops for all divisions, the couplers, and the tremulant will be stored.
• If you press one of the division memory piston, the state of the stops and the tremulant for the division will be stored at that piston.
Recalling a Registration1. Press one of the general memory pistons or division memory pistons .
Resetting the Sound Settings (General Cancel)1. Press the general cancel [0] piston .
The illumination for all stops and pistons will turn off.
If you also want to reset the stop variationsPress and hold the general cancel [0] piston for several seconds; the settings will be reset to a state in which no sound is selected, and the variation settings will also be reset for all drawknobs, restoring the basic variation (Default Voice Palette).

28
Storing a Combination of Stops
Using Memory BanksThe state of the general memory pistons and the division memory pistons can be stored as a “memory bank.”
M02
M01
Storing the Combination of Memory Pistons as a Memory Bank1. Use the memory bank select [M–]/[M+] pistons to select the memory bank number to be used for storage .
2. While holding the [SET] piston, press one of the general memory pistons or division memory pistons .
NOTE ಞ Please be aware that the information that was previously stored in the memory bank will be overwritten and lost.
Recalling a Registration from a Different Memory Bank1. From the main screen, use the memory bank select [M–]/[M+] pistons to select the number of the memory bank that you want to
recall .
MEMOIf you hold down the memory bank select [M–]/[M+] piston, the memory bank number will continue changing consecutively.
NOTE ಞ Simply pressing a memory bank select [M–]/[M+] piston will not recall a registration.
2. Press one of the general memory pistons or division memory pistons .
Recalling Registrations SuccessivelySimply by pressing the [NEXT] piston, you can successively recall the registrations that are stored at the general memory pistons.
For example, if you will be performing a recital, you can use the memories to store your registrations in the order in which you will be using them, and then smoothly switch to the next registration while you perform.
Each press recalls the next registration
M01 M02

29
Storing a Combination of Stops
Using Memory Banks with USB Memory
Preparing USB Flash Drive1. For preparing the USB Memory, refer to “Formatting USB Flash Drive” (p . 39) .
Selecting USB Memory FolderThe capacity of an external memory device is much greater than that of the organ’s internal combination memory. In order to make easy use of this additional capacity, Rodgers uses the concept of memory folders. Like a file folder, a memory folder is used to store groups of information on the memory device. Each folder can contain a copy of each console memory bank, plus a copy of the Crescendo sequence, and Full Organ. Folders on a memory device are labeled A through Z.
This means that a single device can contain up to 26 different copies of all Memory Banks, Crescendo Sequences, and Full Organ.
1. Connect your USB flash drive to the USB memory connector .
2. From the main screen, press the [Select/Menu] knob .
3. Turn the [Select/Menu] knob to select “USB Memory .”
4. Press the [Select/Menu] knob to access the “USB Memory .”
5. Turn the [Value/Exit Menu] knob to select a USB Memory folder A-Z .
Storing the Combination of Memory Pistons as a Memory Bank to USB Memory1. Use the memory bank select [M–]/[M+] pistons to select the memory bank number to be used for storage .
2. While holding the [SET] piston, press one of the general memory pistons or division memory pistons .
NOTE ಞ Please be aware that the information that was previously stored in the memory bank will be overwritten and lost.
Recalling a Registration from a Different Memory Bank from USB Memory1. From the main screen, use the memory bank select [M–]/[M+] pistons to select the number of the memory bank that you want to
recall .
MEMOIf you hold down the memory bank select [M–]/[M+] piston, the memory bank number will continue changing consecutively.
NOTE ಞ Simply pressing a memory bank select [M–]/[M+] piston will not recall a registration.
2. Press one of the general memory pistons or division memory pistons .
30
Changing the Settings for FULL ORGAN
Setting the Sound to be Played When the [FULL ORGAN] Piston is Pressed1. While holding down the [SET] piston, press the [FULL ORGAN] piston .
The drawknobs set for FULL ORGAN will light.
2. Pull a drawknob, and select the stop you want to be sounded .
ಞ You can’t select a tremulant piston.
3. Press the [SET] piston to save your settings .
MEMOIf you connect USB Flash Drive, your setting is saved to USB Memory.
Setting Whether Drawknob Illumination is On/Off When the [FULL ORGAN] Piston is PressedRefer to “Blind [S]” (p. 18).
1. From the main screen, press the [Select/Menu] knob .
2. Turn the [Select/Menu] knob to select “Crescendo .”
3. Press the [Select/Menu] knob to access the “Crescendo .”
4. Turn the [Value/Exit Menu] knob to select Crescendo Step 0–63 .
5. Pull a drawknob, and select the stop you want to be sounded .
ಞ You can’t select a tremulant piston.
6. Press the [SET] piston to save your settings .
ಞ You can’t save your settings at Step 0.
MEMOYou can have two independent Crescendo sequences, a Standard Crescendo and an Alternate Crescendo. Pressing the [ALT CRESC] reversible piston so that it lights engages the Alternate Crescendo sequence.
MEMOIf you connect USB Flash Drive, your setting is saved to USB Memory.
Organ type allows you to select “Voice Palettes” that specifies which variation sound will be heard when you turn on a specific drawknob.
1. Press [ORGAN TYPE] piston .
2. Turn the [Select/Menu] knob to select “Organ Type .”
Menu item Explanation
American Eclectic Transparency and clarity of tone, eclectic specification characteristic of modern 20th century American organ builders
German Baroque Articulate and bright tonal spectrum in the North German style of 17th-century Arp Schnitger organs
French Romantic Warm 8’ ensemble and bright, fiery reeds characteristic of 19th-century Cavaillé-Coll tonal style
English Cathedral Broad 8’ fundamental tone and smooth dark reeds typical of Willis and Harrison & Harrison organs
3. Press [ORGAN TYPE] piston again to return to the main screen .
NOTEPress and hold the general cancel [0] piston for several seconds, the settings will be reset to “Default Voice Palettes.”
Changing ORGAN TYPE
Changing the Settings for Crescendo
31
Practicing Along with a Preset Song or Performance Data
You can practice by playing along with preset songs (demo songs) that are built into the organ, or with performance data that you’ve recorded from your own playing.
MEMOSongs can also be played back in succession. Start from the state where playback is stopped. Then, using the [Select/Menu] knob, select “Play Mode.” Next, turn the [Value/Exit Menu] knob to change the setting to “CHAIN.”
Setting Explanation
OFF Play back only the selected song
CHAIN Consecutively play back all the songs on the selected media
Selecting and Playing Back a Song1. If you want to play back a song from USB flash drive, connect your USB flash drive to the USB memory connector .
2. From the main screen, press the [STOP] piston to access the “Song Recorder” screen .
3. Turn the [Select/Menu] knob to select “Source .”
4. Turn the [Value/Exit Menu] knob to select the media on which the song is stored .
Setting Explanation
USB Play back song data from USB flash drive
INTERNAL Play back song data from internal memory
PRESET Play back built-in preset song (demo song)
5. Turn the [Select/Menu] knob to select “Song .”
6. Turn the [Value/Exit Menu] knob to choose the song that you want to play back .
If a screen like the following appearsIf internal memory contains performance data that has not been saved, the following message will appear when you attempt to select a saved song.
• If you want to discard the performance data without saving it, press the [SET] piston.
• If you don’t want to erase the performance data, press the [Value/Exit Menu] knob. Save the performance data as described in “Saving a Recorded Song” (p. 33).
7. Press the [PLAY/PAUSE] piston to play back the song data .
• “PU” is shown as the measure number if the song starts on a weak (“pick up”) beat.
• You can pause the playback. Press the [PLAY/PAUSE] piston. Playback will resume from the same location when you press the [PLAY/PAUSE] piston once again.
8. To stop playback, press the [STOP] piston .
32
Practicing Along with a Preset Song or Performance Data
Muting a Specific Division During PlaybackWhen playing back a song, you can individually mute (silence) the performances of each division.
1. From the main screen, press the [STOP] piston to access the “Song Recorder” screen .
2. Choose the song that you want to play back .
3. Turn the [Select/Menu] knob to select “Division Mute .”
4. Press the [Select/Menu] knob to access the “Division Mute” screen .
5. Turn the [Select/Menu] knob to select the division that you want to mute .
6. Turn the [Value/Exit Menu] knob to change the setting from “PLAY” to “MUTE .”
7. Press the [PLAY/PAUSE] piston to play back the song .
You can play along on the muted division(s) while listening to the recorded performance.
ಞ When you reselect the performance data, muting will be cancelled for all divisions.
Playing Back a Specific Division as a Guide Tone1. From the main screen, press the [STOP] piston to access the “Song Recorder” screen .
2. Choose the song that you want to play back .
3. Turn the [Select/Menu] knob to select “Division Mute .”
4. Press the [Select/Menu] knob to access the “Division Mute” screen .
5. Turn the [Select/Menu] knob to select the division that you want to play back as a guide tone .
6. Turn the [Value/Exit Menu] knob to change the setting from “PLAY” to “GUIDE .”
7. Turn the [Select/Menu] knob to select the “Guide Volume .”
8. Turn the [Value/Exit Menu] knob to adjust the volume of the guide tone .
Setting
1–10
9. Turn the [Select/Menu] knob to select the “Guide Tone .”
10. Turn the [Value/Exit Menu] knob to select the guide tone .
You can choose one of the following nine types of tone for the guide tone.
Setting Explanation
F16, P16, R16, F8, P8, R8, F4, P4, R4
F: Flute
P: Principal
R: Reed
Number: Footage
11. Press the [PLAY/PAUSE] piston to play back .
ಞ When you reselect the performance data, all divisions will sound using their original tone.
MEMOThese settings will return to the default value when you turn off the power, but you can store the Guide volume and the Guide Tone setting so that it will be remembered even after the power is turned off. For details, refer to “Storing Your Settings (Customize)” (p. 22).
33
Recording Your Performances
Recording a Song1. From the main screen, press the [STOP] piston to access the “Song Recorder” screen .
MEMOYou can also access the “Song Recorder” screen by Quick Menu.
2. Press the [REC] piston; the [REC] piston will light .
The [PLAY/PAUSE] piston will blink, and the organ will enter recording-standby mode.
MEMOIf desired, you can sound the metronome while you record.
3. When you play the keyboard, the [PLAY/PAUSE] piston will light and recording will start automatically .
MEMOYou can also start recording by pressing the [PLAY/PAUSE] piston. In this case, recording will begin after two measures have passed. If you’re using the metronome, the metronome will sound.
4. Press the [STOP] piston to stop recording .
The [PLAY/PAUSE] piston’s light will go out.
Play Back the Recorded Song1. Press the [STOP] piston to return to the first measure of the song you recorded .
2. Press the [PLAY/PAUSE] piston to play back the recorded song .
MEMOPress the [PLAY/PAUSE] piston, you can pause the playback. Playback will resume from the same location when you press the [PLAY/PAUSE] piston once again.
3. To stop playback, press the [STOP] piston .
Saving a Recorded SongThe song you recorded will be lost when you switch off the organ’s power. If you want to keep the recorded song, you must save it to USB flash drive or to the organ’s internal memory.
1. If you want to save to USB flash drive, connect your USB flash drive to the USB memory connector (p . 29) .
2. From the main screen, press the [STOP] piston to access the “Song Recorder” screen .
3. Turn the [Select/Menu] knob to select “Save Song .”
4. Press the [Select/Menu] knob to access the “Save Song” screen .
5. Turn the [Select/Menu] knob to select “Save to,” and turn the [Value/Exit menu] knob to choose the desired save destination .
Save to Explanation
INTERNAL The song will be saved to internal memory.
USB The song will be saved to USB flash drive. Shown only if USB flash drive is connected to the USB memory connector.
6. Turn the [Select/Menu] knob to select “Name,” and press the [Select/MENU] knob to assign a name to the song .
For details on how to assign a name, refer to “If you want to name the data you’re saving” (p. 35).
MEMOThe song you recorded will automatically be given the name “New Song.”
7. Turn the [Select/Menu] knob to select “No .”, and turn the [Value/Exit menu] knob to choose the save-destination number .
8. Press the [SET] piston; the data will be saved .
When saving is finished, the name of the newly saved song data will appear.
9. Press the [Value/Exit Menu] knob twice to return to the main screen .

34
Recording Your Performances
If a screen like the following appearsIf the save destination already contains data, the following message will appear.
• Press the [SET] piston if you want to overwrite the data; i.e., replace the previous contents of the song. The existing data will be erased, and the performance data you recorded will be saved.
• If you decide that you want to keep the performance data that’s currently in the save-destination, press the [Value/Exit Menu] knob. The Save operation will be cancelled, and you’ll return to the previous screen. Select a different save-destination.
Deleting a Recorded SongMEMO
You can’t erase a preset song.
1. If you want to delete a song that’s saved on USB flash drive, connect your USB flash drive to the USB memory connector .
2. From the main screen, press the [STOP] piston to access the “Song Recorder” screen .
3. Turn the [Select/Menu] knob to select “Delete Song .”
4. Press the [Select/Menu] knob to access the “Delete Song” screen .
5. Turn the [Select/Menu] knob to select “Delete from”, and turn the [Value/Exit Menu] knob to select the appropriate media .
Setting Explanation
INTERNAL Delete a song from internal memory.
USB Delete a song from USB flash drive. Shown only if USB flash drive is connected to the USB memory connector.
6. Turn the [Select/Menu] knob to select “No .”, and turn the [Value/Exit Menu] knob to specify the song that you want to delete .
7. Press the [SET] piston; a confirmation screen will appear .
8. Press the [SET] piston once again to delete the song .
If you decide to cancel, press the [Value/Exit Menu] knob.
NOTE ಞ Do not disconnect the USB flash drive or turn off the power before the deletion has been completed. Otherwise, you risk damaging the USB flash drive or the organ’s internal memory, rendering it unusable.
9. Press the [Value/Exit Menu] knob three times to return to the main screen .

35
Recording Your Performances
Copying a Saved SongMEMO
• You can’t copy a preset song.
• Up to 99 songs can be saved in internal memory, and up to 999 songs can be saved in one USB flash drive unit.
1. Connect your USB flash drive to the USB memory connector .
2. From the main screen, press the [STOP] piston to access the “Song Recorder” screen .
3. Turn the [Select/Menu] knob to select “Copy Song .”
4. Press the [Select/Menu] knob to access the “Copy Song” screen .
5. Turn the [Select/Menu] knob to select “Copy from,” and then turn the [Value/Exit Menu] knob to select the media that contains the data you want to copy .
Setting Explanation
INTERNAL Copy song data from the organ’s internal memory to the USB flash drive.
USB Copy song data from USB flash drive to the internal memory.
6. Turn the [Select/Menu] knob to select the “Name” field, and turn the [Value/Exit Menu] knob to select the song that you want to copy .
MEMOIn the “Name” field, choose “Copy All” if you want to copy all of the performance data. If you choose “Copy All,” select a copy-destination number that will allow all of the data to be copied. For example, if you are copying the 10 songs saved in internal memory to USB flash drive, choose number 990 or lower as the copy-destination number.
7. Turn the [Select/Menu] knob toward the right to select the “No .” field, and turn the [Value/Exit Menu] knob to select the desired copy-destination number .
8. Press the [SET] piston to execute the copy .
If you decide to cancel, press the [Value/Exit Menu] knob.
NOTE ಞ Never disconnect the USB flash drive or turn off the power before the copy has been completed. Otherwise, you risk damaging the USB flash drive or the organ’s internal memory, rendering it unusable.
9. When copying is finished, the song name will change to the copy-source song name .
10. Press the [Value/Exit Menu] knob twice to return to the main screen .
If you want to name the data you’re savingYou can assign a name to the performance data, memory banks, and voice setup data.
1. At the “Name” item, press the [Select/Menu] knob .
2. Turn the [Select/Menu] knob to move the cursor to left or right, and turn the [Value/Exit Menu] knob to change the character at the cursor location .
3. Press the [SET] piston to finalize the name .
You can use the following characters.
(space)
Operation Explanation
Press [M–] piston Deletes a character.
Press [M+] piston Inserts a space.

36
Hymn Player
Selecting Hymn or Prelude1. Press the [HYMN PLAYER] piston .
2. Turn the [Select/Menu] knob to move the cursor to Mode .
3. Turn the [Value/Exit Menu] knob to select Hymn or Prelude .
Selecting Hymn Number1. Press the [HYMN PLAYER] piston .
2. Turn the [Select/Menu] knob to move the cursor to Hymn number .
3. Turn the [Value/Exit Menu] knob to select Hymn number .
Or while holding the [HYMN PLAYER] or [STOP] piston, press number with the general memory pistons.
Playing Hymn1. Press the [PLAY] piston .
An introduction will play for the selected hymn.
2. When the introduction has finished, press [PLAY] piston again and the verse will begin . At the conclusion of each verse simply press [PLAY] piston again to hear as many additional verses as desired .
If NO introduction to the hymn is desired, turn the [Select/Menu] knob to Next, and turn the [Value/Exit Menu] knob to select Verse.
Press [PLAY] piston and the hymn will play the verse only.
Playing Prelude1. Press the [HYMN PLAYER] piston .
2. Turn the [Select/Menu] knob to move the cursor to Mode .
3. Turn the [Value/Exit Menu] knob to select Prelude .
4. Press the [PLAY] piston .
Automatically selected Prelude will play continuously.
MEMOPress the [STOP] piston; the [PLAY/PAUSE] piston will blink, and Prelude will stop automatically at end of the Prelude. To stop Prelude, press the [STOP] piston again.
Changing Hymn Book1. Press [HYMN PLAYER] piston .
2. Turn the [Select/Menu] knob to select “Book” .
3. Turn the [Value/Exit Menu] knob to select Hymn book .
This setting will return to the default value when you turn off the power, but you can store the setting so that it will be remembered even after the power is turned off. For details, refer to “Storing Your Settings (Customize)” (p. 22).
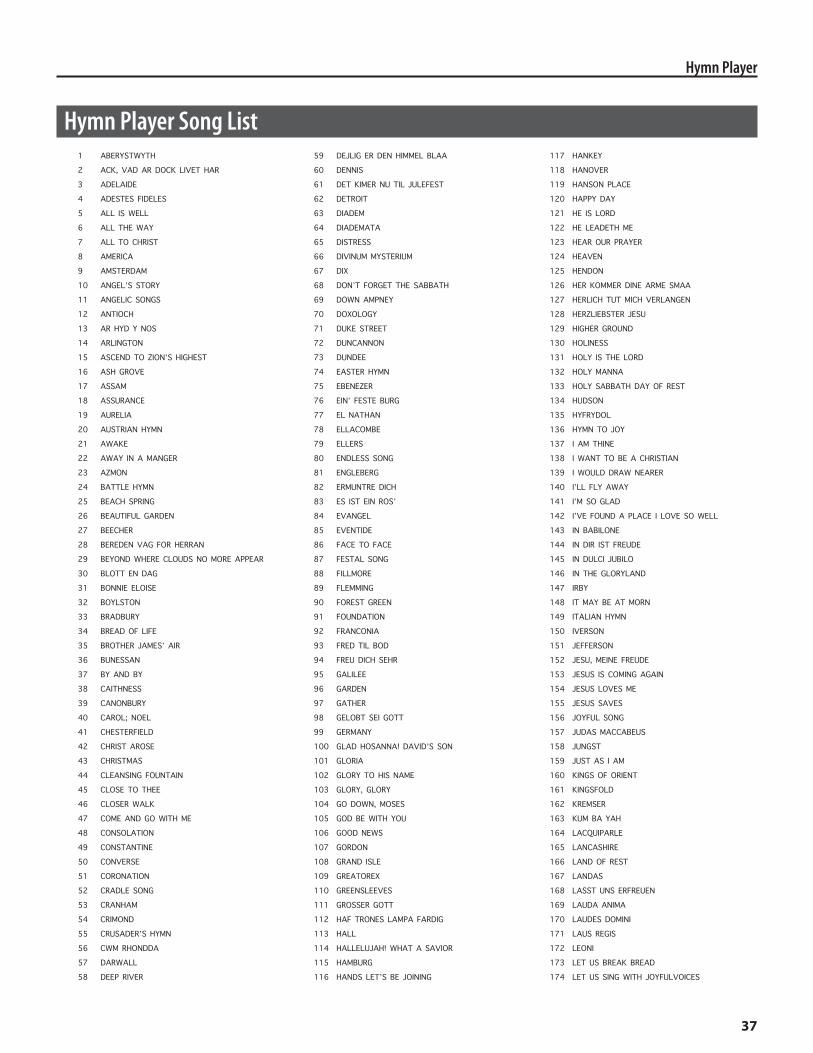
37
Hymn Player
1 ABERYSTWYTH
2 ACK, VAD AR DOCK LIVET HAR
3 ADELAIDE
4 ADESTES FIDELES
5 ALL IS WELL
6 ALL THE WAY
7 ALL TO CHRIST
8 AMERICA
9 AMSTERDAM
10 ANGEL’S STORY
11 ANGELIC SONGS
12 ANTIOCH
13 AR HYD Y NOS
14 ARLINGTON
15 ASCEND TO ZION’S HIGHEST
16 ASH GROVE
17 ASSAM
18 ASSURANCE
19 AURELIA
20 AUSTRIAN HYMN
21 AWAKE
22 AWAY IN A MANGER
23 AZMON
24 BATTLE HYMN
25 BEACH SPRING
26 BEAUTIFUL GARDEN
27 BEECHER
28 BEREDEN VAG FOR HERRAN
29 BEYOND WHERE CLOUDS NO MORE APPEAR
30 BLOTT EN DAG
31 BONNIE ELOISE
32 BOYLSTON
33 BRADBURY
34 BREAD OF LIFE
35 BROTHER JAMES’ AIR
36 BUNESSAN
37 BY AND BY
38 CAITHNESS
39 CANONBURY
40 CAROL; NOEL
41 CHESTERFIELD
42 CHRIST AROSE
43 CHRISTMAS
44 CLEANSING FOUNTAIN
45 CLOSE TO THEE
46 CLOSER WALK
47 COME AND GO WITH ME
48 CONSOLATION
49 CONSTANTINE
50 CONVERSE
51 CORONATION
52 CRADLE SONG
53 CRANHAM
54 CRIMOND
55 CRUSADER’S HYMN
56 CWM RHONDDA
57 DARWALL
58 DEEP RIVER
59 DEJLIG ER DEN HIMMEL BLAA
60 DENNIS
61 DET KIMER NU TIL JULEFEST
62 DETROIT
63 DIADEM
64 DIADEMATA
65 DISTRESS
66 DIVINUM MYSTERIUM
67 DIX
68 DON’T FORGET THE SABBATH
69 DOWN AMPNEY
70 DOXOLOGY
71 DUKE STREET
72 DUNCANNON
73 DUNDEE
74 EASTER HYMN
75 EBENEZER
76 EIN’ FESTE BURG
77 EL NATHAN
78 ELLACOMBE
79 ELLERS
80 ENDLESS SONG
81 ENGLEBERG
82 ERMUNTRE DICH
83 ES IST EIN ROS’
84 EVANGEL
85 EVENTIDE
86 FACE TO FACE
87 FESTAL SONG
88 FILLMORE
89 FLEMMING
90 FOREST GREEN
91 FOUNDATION
92 FRANCONIA
93 FRED TIL BOD
94 FREU DICH SEHR
95 GALILEE
96 GARDEN
97 GATHER
98 GELOBT SEI GOTT
99 GERMANY
100 GLAD HOSANNA! DAVID’S SON
101 GLORIA
102 GLORY TO HIS NAME
103 GLORY, GLORY
104 GO DOWN, MOSES
105 GOD BE WITH YOU
106 GOOD NEWS
107 GORDON
108 GRAND ISLE
109 GREATOREX
110 GREENSLEEVES
111 GROSSER GOTT
112 HAF TRONES LAMPA FARDIG
113 HALL
114 HALLELUJAH! WHAT A SAVIOR
115 HAMBURG
116 HANDS LET’S BE JOINING
117 HANKEY
118 HANOVER
119 HANSON PLACE
120 HAPPY DAY
121 HE IS LORD
122 HE LEADETH ME
123 HEAR OUR PRAYER
124 HEAVEN
125 HENDON
126 HER KOMMER DINE ARME SMAA
127 HERLICH TUT MICH VERLANGEN
128 HERZLIEBSTER JESU
129 HIGHER GROUND
130 HOLINESS
131 HOLY IS THE LORD
132 HOLY MANNA
133 HOLY SABBATH DAY OF REST
134 HUDSON
135 HYFRYDOL
136 HYMN TO JOY
137 I AM THINE
138 I WANT TO BE A CHRISTIAN
139 I WOULD DRAW NEARER
140 I’LL FLY AWAY
141 I’M SO GLAD
142 I’VE FOUND A PLACE I LOVE SO WELL
143 IN BABILONE
144 IN DIR IST FREUDE
145 IN DULCI JUBILO
146 IN THE GLORYLAND
147 IRBY
148 IT MAY BE AT MORN
149 ITALIAN HYMN
150 IVERSON
151 JEFFERSON
152 JESU, MEINE FREUDE
153 JESUS IS COMING AGAIN
154 JESUS LOVES ME
155 JESUS SAVES
156 JOYFUL SONG
157 JUDAS MACCABEUS
158 JUNGST
159 JUST AS I AM
160 KINGS OF ORIENT
161 KINGSFOLD
162 KREMSER
163 KUM BA YAH
164 LACQUIPARLE
165 LANCASHIRE
166 LAND OF REST
167 LANDAS
168 LASST UNS ERFREUEN
169 LAUDA ANIMA
170 LAUDES DOMINI
171 LAUS REGIS
172 LEONI
173 LET US BREAK BREAD
174 LET US SING WITH JOYFULVOICES
Hymn Player Song List

38
Hymn Player
175 LIFT EVERY VOICE
176 LIGHT OF MINE
177 LIGHTBEAMS
178 LLANFAIR
179 LO DESEMBRE CONGELAT
180 LOBE DEN HERREN
181 LOBT GOTT, IHR CHRISTEN
182 LONDONDERRY AIR
183 LORD MY SAVIOR AND MY SHEPHERD
184 LYONS
185 MARCHING TO ZION
186 MARION
187 MARTIN
188 MARTYRDOM
189 MARYTON
190 MATERNA
191 McDANIEL
192 McKEE
193 MEINEKE
194 MELITA
195 MENDELSSOHN
196 MESSAGE
197 METERNA
198 MIT FREUDEN ZART
199 MOODY
200 MORECAMBE
201 MORNING STAR
202 MORRIS
203 MUNICH
204 MY JESUS IS MY DEAREST FRIEND
205 MY SAVIOR’S LOVE
206 NAAR MIT OIE
207 NATIONAL ANTHEM
208 NATIONAL HYMN
209 NEAR THE CROSS
210 NEED
211 NETTLETON
212 NEUMARK
213 NEW BRITAIN
214 NICEA
215 NOEL NOUVELET
216 NUN DANKET ALLE GOTT
217 NUN KOMM, DER HEIDEN HEILAND
218 O CANADA
219 O DU LIEBE MEINER LIEBE
220 O FILII ET FILIAE
221 O HOW I LOVE JESUS
222 O PERFECT LOVE
223 O QUANTA QUALIA
224 O STORE GUD
225 OLD 100th
226 OLD RUGGED CROSS
227 OLD TIME RELIGION
228 OLIVET
229 OMNI DIE
230 OPEN MY EYES
231 OVER MY HEAD
232 PARK STREET
233 PASS ME NOT
234 PASSION CHORALE
235 PATMOS
236 PENITENCE
237 PEVENSEY
238 PICARDY
239 POWER IN THE BLOOD
240 PRAISE, MY SOUL
241 PRECIOUS LORD
242 PROMISED LAND
243 PROMISES
244 PUER NOBIS
245 QUAM DILECTA
246 QUEM PASTORES LAUDAVERE
247 RATHBUN
248 RATISBON
249 REDEEMED
250 REDHEAD
251 REGENT SQUARE
252 REPTON
253 REST
254 REVIVE US AGAIN
255 RHOSYMEDRE
256 ROCKINGHAM OLD
257 RUSINGTON
258 RUSSIAN HYMN
259 SABBATH
260 SAGINA
261 ST. AGNES
262 ST. ANNE
263 ST. CATHERINE
264 ST. CHRISTOPHER
265 ST. CLEMENT
266 ST. COLUMBA
267 ST. DENIO
268 ST. GEORGE’S, WINDSOR
269 ST. GERTRUDE
270 ST. LEONARDS
271 ST. LOUIS
272 ST. MAGNUS
273 ST. MARGARET
274 ST. PETER
275 ST. THOMAS
276 SAKURA
277 SALZBURG
278 SCHMUCKE DICH
279 SCHOLFIELD
280 SCHUMANN
281 SHOWALTER
282 SICILIAN MARINERS
283 SINE NOMINE
284 SIYAHAMBA
285 SLANE
286 SOFTLY AND TENDERLY
287 SOLID ROCK
288 SPIRITUS VITAE
289 STILLE NACHT
290 SUFFERER
291 SURRENDER
292 SUSSEX CAROL
293 SWEET HOUR
294 TACK O GUD
295 TALLIS’ CANON
296 TERRA BEATA
297 THAXTED
298 THE ASH GROVE
299 THE CALL
300 THE FATHER’S HOUSE IS OUR DELIGHT
301 THE FIRST NOEL
302 THE LORD IN ZION REIGNETH
303 THERE IS A GLORIOUS LAND
304 TIDINGS
305 TO GOD BE THE GLORY
306 TOA-SIA
307 TOKYO
308 TOPLADY
309 TOULON
310 TRENTHAM
311 TRURO
312 TRUST AND OBEY
313 TRUST IN JESUS
314 TRUST IN THE LORD
315 TRYGGARE KAN INGEN VARA
316 TWENTY-FOURTH
317 UNSER HERRSCHER
318 UTTINGEN
319 VARINA
320 VENI EMMANUEL
321 VILLE DU HAVRE
322 VINEYARD HAVEN
323 VON HIMMEL HOCH
324 VRUECHTEN
325 W ZLOBIE LEZY
326 WACHET AUF
327 WALK WITH ME
328 WAREHAM
329 WE SOLL ICH DICH EMPFANGEN
330 WEBB
331 WELLESLEY
332 WEM IN LEIDENSTAGEN
333 WERE YOU THERE
334 WESTMINSTER ABBEY
335 WHEN THE SAINTS
336 WHEN THE STORMS OF LIFE ARE RAGING
337 WHOLE WORLD
338 WIE LIEBLICH IST DER MAIEN
339 WIE SCHON LEUCHTET
340 WINCHESTER NEW
341 WIR HATTEN GEBAUET
342 WIR PFLUGEN
343 WONDERFUL GRACE
344 WONDROUS LOVE
345 WOODWORTH
346 WORDS OF LIFE
347 WUNDERBARER KONIG
348 WYE VALLEY
349 YIELD NOT
350 ZION

39
Saving and Loading Settings on USB Flash Drive
Formatting USB Flash DriveThe process of preparing USB flash drive for use by the organ is called “Formatting.”
If the USB flash drive is not in the correct format for the organ, it cannot be used by the organ.
ಞ Before you use USB flash drive for the first time with the organ, you must format the USB flash drive on the organ.
ಞ When you format USB flash drive, all songs or settings that have been stored on that USB flash drive will be lost. Once they’re erased, the songs cannot be recovered, so be sure to check the contents before you execute formatting.
1. Connect your USB flash drive to the USB memory connector .
2. From the main screen, press the [Select/Menu] knob .
3. Turn the [Select/Menu] knob to select “Save/Load (USB) .”
4. Press the [Select/Menu] knob to access the “Save/Load (USB)” screen .
5. Turn the [Select/Menu] knob to select “Format USB Memory .”
6. Press the [Select/Menu] knob .
A confirmation screen will appear.
If you decide to cancel the format operation, press the [Value/Exit Menu] knob.
7. Press the [SET] piston to execute formatting .
NOTE ಞ Never disconnect the USB flash drive before formatting has been completed. Always wait until the “Executing” indication is no longer shown.
8. Press the [Value/Exit Menu] knob to return to the main screen .
Deleting a Memory Bank from USB Flash Drive
1. Connect your USB flash drive to the USB memory connector .
2. From the main screen, press the [Select/Menu] knob .
3. Turn the [Select/Menu] knob to select “Save/Load (USB) .”
4. Press the [Select/Menu] knob to access the “Save/Load (USB)” screen .
5. Turn the [Select/Menu] knob to select “Delete Memory Bank .”
6. Press the [Select/Menu] knob to access the “Delete Memory Bank” screen .
7. At “Delete Bank” turn the [Value/Exit Menu] knob to select the sound settings (registration) that you want to delete .
8. Press the [SET] piston to delete the settings .
A confirmation screen will appear.
If you decide to cancel, press the [Value/Exit Menu] knob.
9. Press the [SET] piston; the sound settings (registration) will be deleted .
NOTE ಞ Never disconnect the USB flash drive or turn off the power before the sound settings have been deleted.
Copying a Memory BankHere’s how a specific bank saved in internal memory or USB flash drive can be copied to another bank of the organ’s internal memory.
You can also return a specific bank of the organ’s internal memory to the factory-set state.
As an example, we’ll show how to load a specific memory bank from USB flash drive into the organ’s internal memory.
1. As a precaution, save the internal memory banks to USB flash drive . Refer to “Using Memory Banks with USB Memory” (p . 29) .
When doing so, choose a number that indicates (Empty).
2. Connect your USB flash drive to the USB memory connector .
3. From the main screen, press the [Select/Menu] knob .
4. Turn the [Select/Menu] knob to select “Save/Load (USB) .”
5. Press the [Select/Menu] knob to access the “Save/Load (USB)” screen .
6. Turn the [Select/Menu] knob to select “Copy Memory Bank .”
7. Press the [Select/Menu] knob to access the “Copy Memory Bank” screen .
8. Turn the [Select/Menu] knob to select “Copy from,” and turn the [Value/Exit Menu] knob to change to “USB .”
Select the “Copy from” setting as appropriate.
Setting Explanation
FACTORY Return the specified bank to the factory-set state
INTERNAL Copy the specified internal bank to another bank
USB From the memory banks saved on USB flash drive, load only the specified bank into internal memory
9. Turn the [Select/Menu] knob to select the “Copy From Bank” field, and turn the [Value/Exit Menu] knob to select the memory bank that you want to copy .
10. Turn the [Select/Menu] knob to select the “Copy to INT Bank” field, and turn the [Value/Exit Menu] knob to select the desired copy-destination bank number .
11. Press the [SET] piston .
A confirmation screen will appear.
If you decide to cancel, press the [Value/Exit Menu] knob.
12. Press the [SET] piston; the memory bank will be copied .

40
Saving and Loading Settings on USB Flash Drive
Saving and Loading Voice SetupA “Voice Setup” contains data that specifies the volume balance of each sound (stop), its brightness, and various adjustments for parameters.
ಞ Up to 999 sets of voice setups can be saved on one USB flash drive device.
Saving to USB Flash Drive1. Connect your USB flash drive to the USB memory connector .
2. From the main screen, press the [Select/Menu] knob .
3. Turn the [Select/Menu] knob to select “Save/Load (USB) .”
4. Press the [Select/Menu] knob to access the “Save/Load (USB)” screen .
5. Turn the [Select/Menu] knob to select “Save Voice Setup .”
6. Press the [Select/Menu] knob to access the “Save Voice Setup” screen .
7. Turn the [Select/Menu] knob to select the “Name” field, and press the [Select/Menu] knob to assign a name to the voice setup you want to save .
For details on how to assign a name, refer to”If you want to name the data you’re saving” (p. 35).
8. Turn the [Select/Menu] knob to select the “No .” field, and turn the [Value/Exit Menu] knob to choose the desired save-destination number .
If you don’t want to overwrite an existing voice setup, choose a save destination that’s indicated as “Empty.”
If you decide to cancel, press the [Value/Exit Menu] knob.
9. Press the [SET] piston .
The currently used voice setup will be saved to USB flash drive.
NOTE ಞ To prevent malfunction, never disconnect the USB flash drive or turn off the power while a voice setup is being saved to USB flash drive.
Loading a Voice Setup1. If you want to load a voice setup from USB flash drive,
connect your USB flash drive to the USB memory connector .
2. From the main screen, press the [Select/Menu] knob .
3. Turn the [Select/Menu] knob to select “Save/Load (USB) .”
4. Press the [Select/Menu] knob to access the “Save/Load (USB)” screen .
5. Turn the [Select/Menu] knob to select “Load Voice Setup .”
6. Press the [Select/Menu] knob to access the “Load Voice Setup” screen .
7. Turn the [Value/Exit Menu] knob to select the name of the voice setup that you want to use .
8. Press the [SET] piston .
A confirmation screen will appear.
If you decide to cancel, press the [Value/Exit Menu] knob.
9. Press the [SET] piston .
The organ’s voice setup will switch to the voice setup you loaded.
ಞ This setting will return to the default value when you turn off the power, but you can store the setting so that it will be remembered even after the power is turned off. For details, refer to “Storing Your Settings (Customize)” (p. 22).
NOTE ಞ To prevent malfunction, never turn off the power while the voice setup is being switched.
Deleting a Voice Setup1. If you want to deleting a voice setup from USB flash drive,
connect your USB flash drive to the USB memory connector .
2. From the main screen, press the [Select/Menu] knob .
3. Turn the [Select/Menu] knob to select “Save/Load (USB) .”
4. Press the [Select/Menu] knob to access the “Save/Load (USB)” screen .
5. Turn the [Select/Menu] knob to select “Delete Voice Setup .”
6. Press the [Select/Menu] knob to access the “Delete Voice Setup” screen .
7. Turn the [Select/Menu] knob to select “No .” field, and turn the [Value/Exit Menu] knob to select the voice setup that you want to delete .
8. Press the [SET] piston .
A confirmation screen will appear.
If you decide to cancel, press the [Value/Exit Menu] knob.
9. Press the [SET] piston; the voice setup will be deleted .
NOTE ಞ Never disconnect the USB flash drive or turn off the power until the voice setup have been deleted.

41
Backing Up Data/Performing an Initialization
Returning all Settings to the Factory-Set State (Factory Reset)
All settings stored in the organ can be reset to their factory-set condition. This operation is called “Factory Reset.”
NOTE ಞ Factory reset will cause all of the recorded songs, the general memory pistons, division memory pistons, and all settings stored in the organ to return to their factory settings. Please copy your settings to USB flash drive before you proceed.
• “Backing Up/Loading Data” (p. 41)
1. From the main screen, press the [Select/Menu] knob .
2. Turn the [Select/Menu] knob to select “Utility .”
3. Press the [Select/Menu] knob to access the “Utility” screen .
4. Turn the [Select/Menu] knob to select “Factory Reset .”
5. Press the [Select/Menu] knob .
Confirmation screen will appear.
If you decide to cancel, press the [Value/Exit Menu] knob.
6. Press the [SET] piston to execute Factory Reset .
NOTE ಞ The Factory Reset will be executed. Do not turn off the power while “Executing” is displayed.
7. Turn the power off, then on again .
Backing Up/Loading DataHere’s how to back up and load data.
1. Connect your USB flash drive to the USB memory connector .
2. From the main screen, press the [Select/Menu] knob .
3. Turn the [Select/Menu] knob to select “Utility .”
4. Press the [Select/Menu] knob to access the “Utility” screen .
5. Turn the [Select/Menu] knob to select “Backup/Restore .”
6. Press the [Select/Menu] knob to access the “Backup/Restore” screen .
7. Turn the [Select/Menu] knob to select “Direction,” then turn the [Value/Exit Menu] knob to select either backup or load .
Setting Explanation
BACK UP Selected to back up data.
RESTORE Selected to load data.
8. Press the [SET] piston to carry out the data backup or load procedure .
If you decide to cancel, press the [Value/Exit Menu] knob.
Displaying the VersionHere’s how to check the software version being used.
1. From the main screen, press the [Select/Menu] knob .
2. Turn the [Select/Menu] knob to select “Utility .”
3. Press the [Select/Menu] knob to access the “Utility” screen .
4. Turn the [Select/Menu] knob to select “Version .”
5. Press the [Select/Menu] knob to access the “Version ” screen .
List of Shortcuts
By using these shortcuts you can directly access a desired screen without going through a menu screen.
To access the screen Shortcut
Demo screen
While holding in the [SET] piston
Press the [PLAY/PAUSE] piston
Pitch/Tuning screen Press any key
Expression Pedal screenOperate the expression pedal
Operate the kick switch
Edit parameter save confirmation screen Press the general cancel piston [0]
Audio screen Turn the [Master Volume] knob
Room Modeling screen Turn the [Reverb] knob
Console screenPress the bass coupler [BASS] piston
Press the melody coupler [MEL I] or [MEL III] piston
Song Recorder screen Press the [STOP] piston
To access the Transpose Shortcut
From Main Screen While holding in the [SET] piston Turn the [Value/Exit Menu] knob
ಞ All shortcut operations must be performed from the main screen.
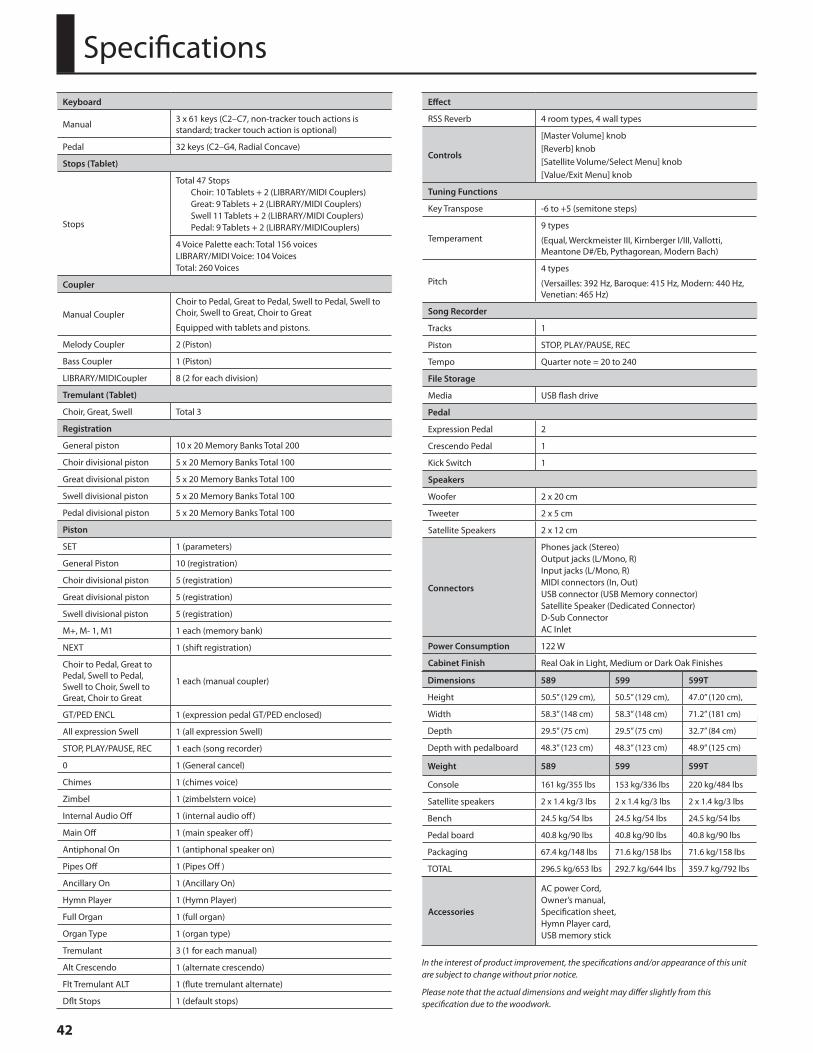
Keyboard
Manual 3 x 61 keys (C2–C7, non-tracker touch actions is standard; tracker touch action is optional)
Pedal 32 keys (C2–G4, Radial Concave)
Stops (Tablet)
Stops
Total 47 StopsChoir: 10 Tablets + 2 (LIBRARY/MIDI Couplers)Great: 9 Tablets + 2 (LIBRARY/MIDI Couplers)Swell 11 Tablets + 2 (LIBRARY/MIDI Couplers)Pedal: 9 Tablets + 2 (LIBRARY/MIDICouplers)
4 Voice Palette each: Total 156 voicesLIBRARY/MIDI Voice: 104 VoicesTotal: 260 Voices
Coupler
Manual CouplerChoir to Pedal, Great to Pedal, Swell to Pedal, Swell to Choir, Swell to Great, Choir to Great
Equipped with tablets and pistons.
Melody Coupler 2 (Piston)
Bass Coupler 1 (Piston)
LIBRARY/MIDICoupler 8 (2 for each division)
Tremulant (Tablet)
Choir, Great, Swell Total 3
Registration
General piston 10 x 20 Memory Banks Total 200
Choir divisional piston 5 x 20 Memory Banks Total 100
Great divisional piston 5 x 20 Memory Banks Total 100
Swell divisional piston 5 x 20 Memory Banks Total 100
Pedal divisional piston 5 x 20 Memory Banks Total 100
Piston
SET 1 (parameters)
General Piston 10 (registration)
Choir divisional piston 5 (registration)
Great divisional piston 5 (registration)
Swell divisional piston 5 (registration)
M+, M- 1, M1 1 each (memory bank)
NEXT 1 (shift registration)
Choir to Pedal, Great to Pedal, Swell to Pedal, Swell to Choir, Swell to Great, Choir to Great
1 each (manual coupler)
GT/PED ENCL 1 (expression pedal GT/PED enclosed)
All expression Swell 1 (all expression Swell)
STOP, PLAY/PAUSE, REC 1 each (song recorder)
0 1 (General cancel)
Chimes 1 (chimes voice)
Zimbel 1 (zimbelstern voice)
Internal Audio Off 1 (internal audio off)
Main Off 1 (main speaker off)
Antiphonal On 1 (antiphonal speaker on)
Pipes Off 1 (Pipes Off )
Ancillary On 1 (Ancillary On)
Hymn Player 1 (Hymn Player)
Full Organ 1 (full organ)
Organ Type 1 (organ type)
Tremulant 3 (1 for each manual)
Alt Crescendo 1 (alternate crescendo)
Flt Tremulant ALT 1 (flute tremulant alternate)
Dflt Stops 1 (default stops)
Effect
RSS Reverb 4 room types, 4 wall types
Controls
[Master Volume] knob[Reverb] knob[Satellite Volume/Select Menu] knob[Value/Exit Menu] knob
Tuning Functions
Key Transpose -6 to +5 (semitone steps)
Temperament9 types
(Equal, Werckmeister III, Kirnberger I/III, Vallotti, Meantone D#/Eb, Pythagorean, Modern Bach)
Pitch4 types
(Versailles: 392 Hz, Baroque: 415 Hz, Modern: 440 Hz, Venetian: 465 Hz)
Song Recorder
Tracks 1
Piston STOP, PLAY/PAUSE, REC
Tempo Quarter note = 20 to 240
File Storage
Media USB flash drive
Pedal
Expression Pedal 2
Crescendo Pedal 1
Kick Switch 1
Speakers
Woofer 2 x 20 cm
Tweeter 2 x 5 cm
Satellite Speakers 2 x 12 cm
Connectors
Phones jack (Stereo)Output jacks (L/Mono, R)Input jacks (L/Mono, R)MIDI connectors (In, Out)USB connector (USB Memory connector)Satellite Speaker (Dedicated Connector)D-Sub ConnectorAC Inlet
Power Consumption 122 W
Cabinet Finish Real Oak in Light, Medium or Dark Oak Finishes
Dimensions 599
Console Height 50.5” (129 cm), width 58.3” (148 cm) and depth 29.5” (75 cm), 48.3” (123 cm) with pedalboard
Weight
Console 153 kg/336 lbs
Satellite speakers 2 x 1.4 kg/3 lbs
Bench 24.5 kg/54 lbs
Pedal board 40.8 kg/90 lbs
Packaging 67.4 kg/148 lbs
TOTAL 288 kg/634 lbs
Accessories
AC power Cord,Owner’s manual,Specification sheet,Hymn Player card,USB memory stick
In the interest of product improvement, the specifications and/or appearance of this unit are subject to change without prior notice.
Please note that the actual dimensions and weight may differ slightly from this specification due to the woodwork.
Specifications
Dimensions 589 599 599T
Height 50.5” (129 cm), 50.5” (129 cm), 47.0” (120 cm),
Width 58.3” (148 cm) 58.3” (148 cm) 71.2” (181 cm)
Depth 29.5” (75 cm) 29.5” (75 cm) 32.7” (84 cm)
Depth with pedalboard 48.3” (123 cm) 48.3” (123 cm) 48.9” (125 cm)
Weight 589 599 599T
Console 161 kg/355 lbs 153 kg/336 lbs 220 kg/484 lbs
Satellite speakers 2 x 1.4 kg/3 lbs 2 x 1.4 kg/3 lbs 2 x 1.4 kg/3 lbs
Bench 24.5 kg/54 lbs 24.5 kg/54 lbs 24.5 kg/54 lbs
Pedal board 40.8 kg/90 lbs 40.8 kg/90 lbs 40.8 kg/90 lbs
Packaging 67.4 kg/148 lbs 71.6 kg/158 lbs 71.6 kg/158 lbs
TOTAL 296.5 kg/653 lbs 292.7 kg/644 lbs 359.7 kg/792 lbs
42
This product complies with the requirements of EMCD 2004/108/EC and LVD 2006/95/EC.
For EU Countries
This Class B digital apparatus meets all requirements of the Canadian Interference-Causing Equipment Regulations.
Cet appareil numŽrique de la classe B respecte toutes les exigences du Règlement sur le matŽriel brouilleur du Canada.
NOTICE
AVIS
For the USA
FEDERAL COMMUNICATIONS COMMISSIONRADIO FREQUENCY INTERFERENCE STATEMENT
This equipment has been tested and found to comply with the limits for a Class B digital device, pursuant to Part 15 of the FCC Rules. These limits are designed to provide reasonable protection against harmful interference in a residential installation. This equipment generates, uses, and can radiate radio frequency energy and, if not installed and used in accordance with the instructions, may cause harmful interference to radio communications. However, there is no guarantee that interference will not occur in a particular installation. If this equipment does cause harmful interference to radio or television reception, which can be determined by turning the equipment off and on, the user is encouraged to try to correct the interference by one or more of the following measures:
Ð Reorient or relocate the receiving antenna.Ð Increase the separation between the equipment and receiver.Ð Connect the equipment into an outlet on a circuit different from that to which the receiver is connected.Ð Consult the dealer or an experienced radio/TV technician for help.
This device complies with Part 15 of the FCC Rules. Operation is subject to the following two conditions: (1) this device may not cause harmful interference, and (2) this device must accept any interference received, including interference that may cause undesired operation.
This equipment requires shielded interface cables in order to meet FCC class B limit.Any unauthorized changes or modifications not expressly approved by the party responsible for compliance could void the userÕs authority to operate the equipment.
For Canada
WARNINGThis product contains chemicals known to cause cancer, birth defects and other reproductive harm, including lead.
For C.A. US (Proposition 65)

For EU Countries
For China

Onl
ine
war
rant
y re
gist
ratio
n av
aila
ble
at w
ww
.rodg
ersi
nstru
men
ts.c
om
PN 1
9054
06 R
evD
LIM
ITED
WA
RR
AN
TYRo
dger
s Ins
trum
ents
US
LLC
Mus
ical
Inst
rum
ent,
Spea
ker a
nd A
mpl
ifier
Par
ts W
arra
nty
Rodg
ers I
nstru
men
ts U
S LL
C w
arra
nts o
nly
to th
e or
igin
al P
urch
aser
of t
his p
rodu
ct th
at a
ll th
e pa
rts c
onta
ined
in th
is p
rodu
ct w
ill b
e fre
e fro
m d
efec
ts in
mat
eria
ls a
nd/o
r w
orkm
ansh
ip fo
r a p
erio
d of
ten
(10)
yea
rs fr
om th
e da
te o
f pur
chas
e. A
ny re
paire
d or
repl
aced
par
ts in
you
r pro
duct
will
be
war
rant
ed fo
r the
une
xpire
d po
rtion
of t
his p
arts
w
arra
nty.
All
trans
porta
tion
and
freig
ht c
harg
es sh
all b
e pa
id b
y Pu
rcha
ser.
Rodg
ers I
nstru
men
ts U
S LL
C is
not
resp
onsi
ble
for a
ny la
bor f
or th
is p
rodu
ct.
Co
nd
itio
ns,
Lim
itat
ion
s an
d R
estr
icti
on
s o
f th
is W
arra
nty
The W
arra
nty
for t
his p
rodu
ct d
oes n
ot a
pply
to th
e fo
llow
ing:
A
.A
ny p
rodu
ct th
at w
as n
ot p
urch
ased
dire
ctly
from
an
Aut
horiz
ed R
odge
rs D
eale
r;B.
Any
def
ects
or d
amag
e th
at o
ccur
red
as a
resu
lt of
abu
se o
r mis
use,
neg
lect
or a
bnor
mal
serv
ice
or h
andl
ing;
C.
Any
def
ects
or d
amag
e th
at w
as c
ause
d by
inst
alla
tion,
repa
irs o
r ser
vice
, inc
ludi
ng th
e us
e of
impr
oper
par
ts, p
rovi
ded
or a
ttem
pted
by
anyo
ne w
ho is
not
au
thor
ized
by
Rodg
ers I
nstru
men
ts U
S LL
C;
D.
Any
def
ects
or d
amag
e th
at m
ay h
ave
been
cau
sed,
eith
er d
irect
ly o
r ind
irect
ly, b
y th
e us
e of
ano
ther
pro
duct
;E.
Any
def
ects
or d
amag
e th
at o
ccur
red
beca
use
the
prod
uct h
as b
een
alte
red
or m
odifi
ed in
any
way
;F.
Any
def
ects
or d
amag
es w
hich
may
hav
e be
en c
ause
d by
an
Act
of G
od, s
uch
as fi
re, f
lood
, ear
thqu
ake,
ligh
tnin
g, ra
in, w
ind,
hur
rican
e, e
tc.,
whi
ch a
re b
eyon
d th
e co
ntro
l of R
odge
rs In
stru
men
ts U
S LL
C;
G.
Any
def
ects
or d
amag
es w
hich
may
hav
e oc
curr
ed b
y or
dina
ry w
ear a
nd te
ar;
H.
Any
and
all
acce
ssor
ies,
per
iphe
ral p
rodu
cts o
r oth
er e
quip
men
t. I.
Any
def
ects
or d
amag
e th
at re
sulte
d fro
m c
omm
erci
al u
se o
f the
pro
duct
.
IN N
O E
VEN
T SH
ALL
RO
DG
ERS
INST
RUM
ENTS
US
LLC
BE
LIA
BLE
FOR
AN
Y D
IREC
T, IN
CID
ENTA
L, C
OLL
ATER
AL,
EXE
MPL
ARY
, PU
NIT
IVE,
CO
NSE
QU
ENTI
AL
OR
SPEC
IAL
DA
MA
GES
OR
LOSS
ES A
RISI
NG
OU
T O
F YO
UR
PURC
HA
SE O
F TH
IS P
ROD
UC
T A
ND
/OR
OU
T O
F TH
IS W
ARR
AN
TY, I
NC
LUD
ING
WIT
HO
UT
LIM
ITAT
ION
, LO
SS O
F U
SE,
PRO
FITS
, GO
OD
WIL
L O
R SA
VIN
GS
OR
LOSS
OF
DAT
A, M
USI
C, E
LEC
TRO
NIC
FIL
ES, O
R PR
OG
RAM
S TH
AT M
AY H
AVE
BEEN
STO
RED
BY
A U
SER
OF T
HIS
PRO
DU
CT
EVEN
IF
ROD
GER
S IN
STRU
MEN
TS U
S LL
C H
AS
BEEN
AD
VISE
D O
F TH
E PO
SSIB
ILIT
Y O
F SU
CH
DA
MA
GES
OR
CLA
IMS.
SO
ME
STAT
ES D
O N
OT
ALL
OW
THE
EXC
LUSI
ON
OR
LIM
ITAT
ION
OF
INC
IDEN
TAL,
PU
NIT
IVE
OR
CO
NSE
QU
ENTI
AL
DA
MA
GES
, SO
THE
ABO
VE L
IMIT
ATI
ON
OR
EXC
LUSI
ON
MAY
NO
T A
PPLY
TO YO
U.
Whe
re a
pplic
able
, if y
ou q
ualif
y as
a “
cons
umer
” un
der t
he M
agnu
son-
Mos
s War
rant
y Act
, the
n yo
u sh
all b
e en
title
d to
any
impl
ied
war
rant
ies a
llow
ed b
y la
w fo
r the
per
iod
of th
e Li
mite
d W
arra
nty
as se
t for
th a
bove
. So
me
stat
es d
o no
t allo
w li
mita
tions
on
how
long
an
impl
ied
war
rant
y la
sts,
so th
e ab
ove
limita
tion
may
not
app
ly to
you
. EX
CEP
T A
S ST
ATED
A
BOVE
, TH
E FO
REG
OIN
G W
ARR
AN
TIES
ARE
IN L
IEU
OF
ALL
OTH
ER C
ON
DIT
ION
S O
R W
ARR
AN
TIES
, EXP
RESS
, IM
PLIE
D O
R ST
ATU
TORY
INC
LUD
ING
WIT
HO
UT
LIM
ITAT
ION
, A
N IM
PLIE
D C
ON
DIT
ION
OR W
ARR
AN
TY O
F M
ERC
HA
NTA
BILI
TY O
R FI
TNES
S FO
R A
PA
RTIC
ULA
R PU
RPO
SE A
ND
OF A
NY
OTH
ER W
ARR
AN
TY O
BLIG
ATIO
N O
N TH
E PA
RT O
F RO
DG
ERS
INST
RUM
ENTS
US
LLC
. RO
DG
ERS
INST
RUM
ENTS
US
LLC
DO
ES N
OT
ASS
UM
E O
R A
UTH
ORI
ZE A
SSU
MPT
ION
OF
LIA
BILI
TY F
OR
IT O
R A
NY
OTH
ER W
ARR
AN
TY,
EITH
ER E
XPRE
SS O
R IM
PLIE
D. T
HIS
LIM
ITED
WA
RRA
NTY
GIV
ES U
.S. P
URC
HA
SERS
SPE
CIF
IC L
EGA
L RI
GH
TS A
ND
YO
U M
AY A
LSO
HAV
E O
THER
RIG
HTS
WH
ICH
VARY
FRO
M
STAT
E TO
STA
TE.
RO
DG
ER
S IN
STR
UM
EN
TS U
S LL
C2
133
3 N
W Ja
cob
son
Road
, Bui
ldin
g 7
, Sui
te D
-20
0, H
illsb
oro,
OR
97
124
5
03
.64
8.4
181
© 2
016
Rodg
ers I
nstru
men
ts U
S LL
C
bnatkin
Typewritten Text
bnatkin
Typewritten Text

1PS1905474 B00 Copyright 2016 Rodgers Instruments US LLC. All rights reserved.
D E D I C AT E D T O M O V I N G H E A R T S A N D S O U L S
Since 1958, Rodgers has been committed to heightening the spiritual experience of audiences with the transformational
power of music. Rodgers organs not only capture the essence of American pipe organ sound, they have led the way in
making organs more accessible to places of worship, universities, music schools, and enthusiasts around the world.
RODGERS INSTRUMENTS US LLC 21333 NW Jacobson Road, Building 7, Suite D-200, Hillsboro, OR 97124
phone 503.648.4181 web rodgersinstruments.com
Related Documents