TEXTRON AVIATION INC. AIRCRAFT DIVISION WICHITA, KANSAS 67277 ARTEX ELT 1000 Emergency Locator Transmitter ICA Supplement MODEL NO: 172 SUPPLEMENT NO: ICA-172-25-00001 SUPPLEMENT DATE: SEP 28/2021 © TEXTRON AVIATION INC. Form 2261 Rev 1

Welcome message from author
This document is posted to help you gain knowledge. Please leave a comment to let me know what you think about it! Share it to your friends and learn new things together.
Transcript

TEXTRON AVIATION INC.AIRCRAFT DIVISION
WICHITA, KANSAS 67277
ARTEX ELT 1000 Emergency Locator Transmitter
ICA Supplement
MODEL NO: 172
SUPPLEMENT NO: ICA-172-25-00001 SUPPLEMENT DATE: SEP 28/2021
© TEXTRON AVIATION INC.Form 2261 Rev 1

TEXTRON AVIATION INC.AIRCRAFT DIVISION
WICHITA, KANSAS 67277
REVISIONS
ICA-172-25-00001 Rev: - Date: SEP 28/2021
ICA Summary Pages 1-6
Manuals Affected Description Title25-60-03 page 1 ARTEX ELT 1000 Emergency Locator Transmitter -
Description and Operation
• Added document for description and operation of new ELT installation.
25-60-03 pages101-102
ARTEX ELT 1000 Emergency Locator Transmitter -Troubleshooting
• Added document for troubleshooting procedures for new ELTinstallation.
25-60-03 pages201-204
ARTEX ELT 1000 Emergency Locator Transmitter -Maintenance Practices
• Added document for removal/installation of new ELT and associatedsystem components.
25-60-03 pages601-605
ARTEX ELT 1000 Emergency Locator Transmitter -Inspection/Check
Maintenance Manual
• Added document for inspections of the new ELT system.
Appendix A: Illustrated PartsCatalog
See Appendix A See Attached Parts Table
25-60-03(Figure 01,Sheet 1) pages1-3
Artex ELT Adapter Harness
• See attached wiring diagrams.
25-60-04(Figure 02,Sheet 1) pages1-3
Artex ELT Provisions - With NAVIIIAppendix B: Wiring DiagramManual
• See attached wiring diagrams.
1. Export ComplianceA. This publication contains technical data and is subject to U.S. export regulations. This information has
been exported from the United States in accordance with export administration regulations. Diversioncontrary to U.S. law is prohibited.ECCN: 9E991
2. Revision BarsA. Revision bars in this ICA supplement identify new ICAs and/or changes to the current ICAs in the
released maintenance manual.
© TEXTRON AVIATION INC.ICA-172-25-00001
Page 1 of 6
SEP 28/2021 Form 2261 Rev 1

TEXTRON AVIATION INC.AIRCRAFT DIVISION
WICHITA, KANSAS 67277
• New ICAs that are not in the current maintenance manual will have a revision bar from top tobottom along the left margin.
• ICAs that are in the current maintenance manual and have information added, deleted or revisedwill have a revision bar(s) in the left margin adjacent to the added, deleted or revised information.
• New or changed illustrations will have a change bar for the entire length of the page.
3. Page NumberingA. The page number system for ICA included in this supplement have three-element numbers that are
separated by dashes. The three-element number is found at the bottom right corner of the page, leftof the page number. The date is found below the page number.
B. When the chapter/system element number is followed with zeros in the section/subsystem andsubject/unit element number (28-00-00), the information is applicable to the entire system.
C. When the section/subsystem element number is followed with zeros in the subject/unit elementnumber (28-21-00), the information is applicable to the subsystems in the system.
D. The subject/unit element number is used to identify information applicable to units in the subsystems.The subject/unit element number continues in sequence from the number -01- with the number ofsubsystem units in which maintenance information is necessary.
E. All system/subsystem/unit (chapter/section/subject) maintenance data is separated into specifiedtypes of information: Description and Operation, Troubleshooting, Maintenance Practices, etc.Blocks of page numbers that are in sequence are used to identify the type of information:(1) Description and Operation or Troubleshooting information may not be included if the procedure
is easy. When subtopics are short, they may be put together into the Maintenance Practicessection. Maintenance Practices can have a mix of subtopics that includes information to service,remove, install, adjust, test, clean, paint or do approved repairs.
(2) Longer procedures that are not as easy to do may be included in a specified section.Page 1 through 99 - Description and OperationPage 101 through 199 - TroubleshootingPage 201 through 299 - Maintenance PracticesPage 301 through 399 - ServicingPage 401 through 499 - Removal/InstallationPage 501 through 599 - Adjustment/TestPage 601 through 699 - Inspection/CheckPage 701 through 799 - Cleaning/PaintingPage 801 through 899 - Approved Repairs
F. A typical page number:
Page 2 of 6
SEP 28/2021© TEXTRON AVIATION INC.
ICA-172-25-00001 Form 2261 Rev 1

TEXTRON AVIATION INC.AIRCRAFT DIVISION
WICHITA, KANSAS 67277
G. Illustrations use the same figure numbers as the page block in which they appear. For example, Figure202 would be the second figure in a Maintenance Practices section.
4. Supplement RevisionsA. Revisions to this supplement may be accomplished if changes to this supplement are required after
release of the original issue and prior to incorporation into the manuals listed in the REVISIONS table.B. All revisions to this supplement will have changes identified in detail in the revision block(s) above.C. All pages in this ICA supplement will have the same date and are valid as of the date shown.
5. ICA Incorporation into Applicable Manuals
NOTE: Most ICA supplements will be incorporated in the next available revision to the manualslisted above and should be used in conjunction with those manuals until the next availablerevision is released.
A. The ICA Supplement List located in the Introduction section of each manual listed in the REVISIONStable will indicate the incorporation status as of the release date of the published revision.
B. The manual revision level of the supplement incorporation will be listed in the "Manual IncorporationStatus" column in the ICA Supplement List, when those ICAs associated with that manual have beenincorporated. After ICAs are incorporated, the manual that they are incorporated in must now be usedfor those ICAs instead of the supplement.• Based on revision cycle times for the affected manuals, MM ICAs, WDM ICAs, etc. in this
supplement may be incorporated in the manuals at different times.• There will not be a revision to this supplement to indicate incorporation in the manuals. Users are
required to check the ICA Supplement List for each manual affected to determine incorporationstatus.
C. This supplement will be completely superseded by the manuals listed in the REVISIONS table whenit has been incorporated in all of the manuals.
Page 3 of 6
SEP 28/2021© TEXTRON AVIATION INC.
ICA-172-25-00001 Form 2261 Rev 1

TEXTRON AVIATION INC.AIRCRAFT DIVISION
WICHITA, KANSAS 67277
INTRODUCTION
1. PurposeA. The purpose of this Supplement is to provide the maintenance technician with the information
necessary to ensure the correct functionality and performance of the ARTEX ELT 1000 EmergencyLocator Transmitter on the Cessna Model 172 until this information gets incorporated into the nextrevision to the manuals listed in the "REVISIONS" section of this supplement.
B. This ICA supplement is designed to satisfy the requirements of 14 CFR 23.1529 "Instructions forContinued Airworthiness" associated with this installation. This document is a supplement to theModel 172 (Series 1996 and On) Maintenance Manual and will be incorporated in the next revision tothe manual.
C. When this information is incorporated in the next revision to the manuals listed in the "REVISIONS"section, those manuals shall take precedence over this supplemental document. Refer to the "ICASupplement List" in the "Introduction" section of the respective manual for the status of all applicableICA Supplements.
D. Revisions to this supplement may occur if there is a change to any of the ICAs in this supplementprior to incorporation into all of the affected manuals.
NOTE: This document must be placed with the aircraft operator's Technical Library CD-ROMor Model 172 (Series 1996 and On) Maintenance Manual and incorporated into theoperator's scheduled maintenance program.
2. EffectivityA. These Instructions for Continued Airworthiness (ICA) are effective for the following aircraft model and
serialization.
Model Beginning Effectivity Ending Effectivity
172S 12745 and ON
3. Complete ICA DocumentsA. The following document(s), in conjunction with this supplement, constitute the Instructions for
Continued Airworthiness for the ARTEX ELT 1000 Emergency Locator Beacon on the Cessna Model172. All items must be available to the operator at initial delivery.(1) Model 172 (Series 1996 and On) Maintenance Manual(2) Model 172 (Series 1996 and On) Wire Diagram Manual(3) Model 172 (Series 1996 and On) Illustrated Parts Catalog
4. System ComponentsA. Refer to Appendix A: Illustrated Parts Catalog
© TEXTRON AVIATION INC.ICA-172-25-00001
Page 4 of 6
SEP 28/2021 Form 2261 Rev 1

TEXTRON AVIATION INC.AIRCRAFT DIVISION
WICHITA, KANSAS 67277
LIST OF INSTRUCTIONS FOR CONTINUED AIRWORTHINESS
1. Model 172 (Series 1996 and On) Maintenance ManualA. Chapter 25 - Equipment/Furnishings
(1) ATA 25-60-03 - ARTEX ELT 1000 Emergency Locator Transmitter - Description and Operation(2) ATA 25-60-03 - ARTEX ELT 1000 Emergency Locator Transmitter - Troubleshooting(3) ATA 25-60-03 - ARTEX ELT 1000 Emergency Locator Transmitter - Maintenance Practices(4) ATA 25-60-03 - ARTEX ELT 1000 Emergency Locator Transmitter - Inspection/Check
2. Model 172 (Series 1996 and On) Wiring Diagram ManualA. Chapter 25 - Equipment/Furnishing
(1) Refer to Appendix B, 25-60-03 (Figure 01, Sheet 1) ARTEX ELT Adapter Harness wiringdiagram.
(2) Refer to Appendix B, 25-60-04 (Figure 02, Sheet 1) ARTEX ELT Provisions - With NAV III wiringdiagram.
Page 5 of 6
SEP 28/2021© TEXTRON AVIATION INC.
ICA-172-25-00001 Form 2261 Rev 1

TEXTRON AVIATION INC.AIRCRAFT DIVISION
WICHITA, KANSAS 67277
INSPECTION PROGRAM AND AIRWORTHINESS LIMITATIONS
1. Continuous Inspection ProgramA. This ICA Supplement does not affect the current inspection program.
2. Airworthiness LimitationsA. Cessna Aircraft Company Model 172 (Series 1996 and On) Maintenance Manual, Chapter 4,
Airworthiness Limitations, contains the system and airframe limitations for the Model 172.
NOTE: The Airworthiness Limitations section is FAA-approved and specifies maintenancerequired under Section 43.16 and 91.403 of Title 14 Code of Federal Regulations, unlessan alternative program has been FAA approved.
(1) There are no new (or additional) airworthiness limitations associated with this equipment and/orinstallation.
© TEXTRON AVIATION INC.ICA-172-25-00001
Page 6 of 6
SEP 28/2021 Form 2261 Rev 1
CESSNA®MODEL 172 (SERIES 1996 AND ON)
MAINTENANCE MANUAL
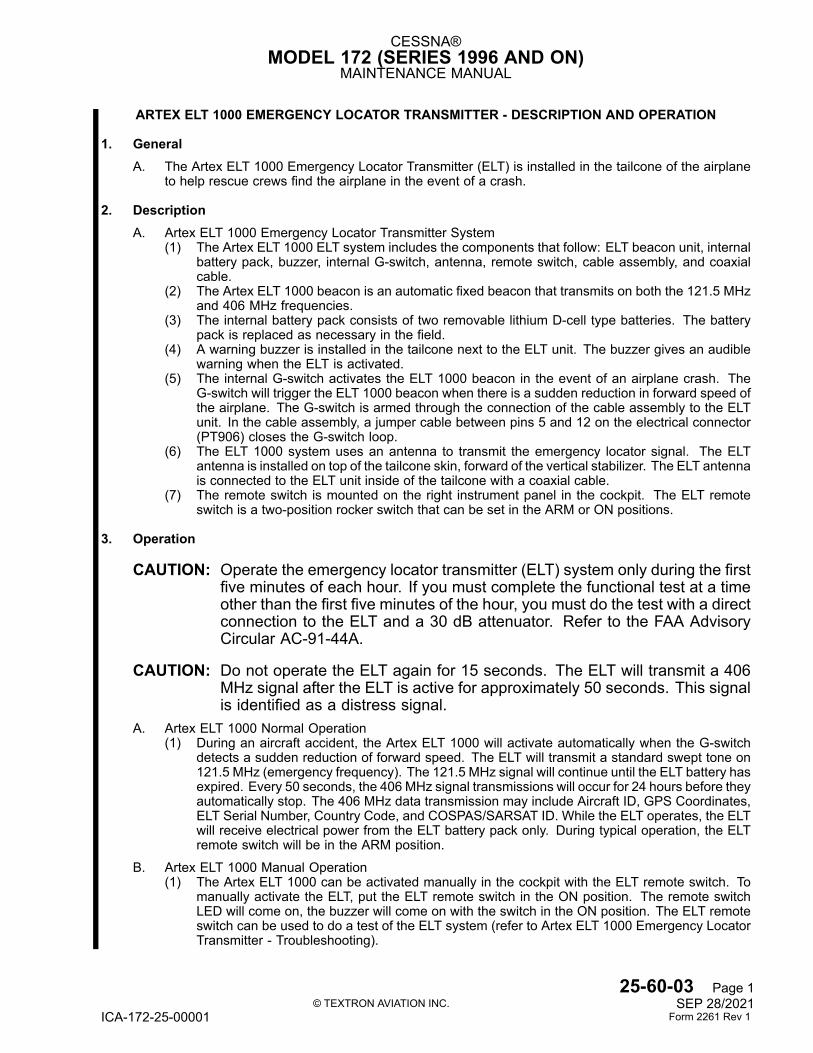
ARTEX ELT 1000 EMERGENCY LOCATOR TRANSMITTER - DESCRIPTION AND OPERATION
1. GeneralA. The Artex ELT 1000 Emergency Locator Transmitter (ELT) is installed in the tailcone of the airplane
to help rescue crews find the airplane in the event of a crash.
2. DescriptionA. Artex ELT 1000 Emergency Locator Transmitter System
(1) The Artex ELT 1000 ELT system includes the components that follow: ELT beacon unit, internalbattery pack, buzzer, internal G-switch, antenna, remote switch, cable assembly, and coaxialcable.
(2) The Artex ELT 1000 beacon is an automatic fixed beacon that transmits on both the 121.5 MHzand 406 MHz frequencies.
(3) The internal battery pack consists of two removable lithium D-cell type batteries. The batterypack is replaced as necessary in the field.
(4) A warning buzzer is installed in the tailcone next to the ELT unit. The buzzer gives an audiblewarning when the ELT is activated.
(5) The internal G-switch activates the ELT 1000 beacon in the event of an airplane crash. TheG-switch will trigger the ELT 1000 beacon when there is a sudden reduction in forward speed ofthe airplane. The G-switch is armed through the connection of the cable assembly to the ELTunit. In the cable assembly, a jumper cable between pins 5 and 12 on the electrical connector(PT906) closes the G-switch loop.
(6) The ELT 1000 system uses an antenna to transmit the emergency locator signal. The ELTantenna is installed on top of the tailcone skin, forward of the vertical stabilizer. The ELT antennais connected to the ELT unit inside of the tailcone with a coaxial cable.
(7) The remote switch is mounted on the right instrument panel in the cockpit. The ELT remoteswitch is a two-position rocker switch that can be set in the ARM or ON positions.
3. Operation
CAUTION: Operate the emergency locator transmitter (ELT) system only during the firstfive minutes of each hour. If you must complete the functional test at a timeother than the first five minutes of the hour, you must do the test with a directconnection to the ELT and a 30 dB attenuator. Refer to the FAA AdvisoryCircular AC-91-44A.
CAUTION: Do not operate the ELT again for 15 seconds. The ELT will transmit a 406MHz signal after the ELT is active for approximately 50 seconds. This signalis identified as a distress signal.
A. Artex ELT 1000 Normal Operation(1) During an aircraft accident, the Artex ELT 1000 will activate automatically when the G-switch
detects a sudden reduction of forward speed. The ELT will transmit a standard swept tone on121.5 MHz (emergency frequency). The 121.5 MHz signal will continue until the ELT battery hasexpired. Every 50 seconds, the 406 MHz signal transmissions will occur for 24 hours before theyautomatically stop. The 406 MHz data transmission may include Aircraft ID, GPS Coordinates,ELT Serial Number, Country Code, and COSPAS/SARSAT ID. While the ELT operates, the ELTwill receive electrical power from the ELT battery pack only. During typical operation, the ELTremote switch will be in the ARM position.
B. Artex ELT 1000 Manual Operation(1) The Artex ELT 1000 can be activated manually in the cockpit with the ELT remote switch. To
manually activate the ELT, put the ELT remote switch in the ON position. The remote switchLED will come on, the buzzer will come on with the switch in the ON position. The ELT remoteswitch can be used to do a test of the ELT system (refer to Artex ELT 1000 Emergency LocatorTransmitter - Troubleshooting).
© TEXTRON AVIATION INC.ICA-172-25-00001
25-60-03 Page 1 SEP 28/2021
Form 2261 Rev 1

CESSNA®MODEL 172 (SERIES 1996 AND ON)
MAINTENANCE MANUAL
ARTEX ELT 1000 EMERGENCY LOCATOR TRANSMITTER - TROUBLESHOOTING
1. GeneralA. This section gives the information to troubleshoot the Artex ELT 1000 Emergency Locator Transmitter
(ELT) and perform the Artex ELT 1000 Self-Test.
2. Artex ELT 1000 Emergency Locator Transmitter Self-Test
CAUTION: Operate the emergency locator transmitter (ELT) system only during the firstfive minutes of each hour. If you must complete the functional test at a timeother than the first five minutes of the hour, you must do the test with a directconnection to the ELT and a 30 dB attenuator. Refer to the FAA AdvisoryCircular AC-91-44A.
CAUTION: Do not operate the emergency locator transmitter (ELT) for more than fiveseconds at a time. Do not operate the ELT again for 15 seconds. The ELTwill transmit a 406 MHz signal after the ELT is active for approximately 50seconds. This signal is identified as a distress signal.
A. Prepare the airplane for the Artex ELT 1000 Emergency Locator Transmitter Self-Test.(1) Put the BATTERY switch in the ON position.(2) Tune an AM radio receiver to 121.5 MHz to monitor the self-test.
B. Do the Artex ELT 1000 Emergency Locator Transmitter Self-Test.
NOTE: The self-test checks critical functions of the ELT system.
(1) Put the ELT remote switch on the right instrument panel in the ON position for approximately1 second, then return the switch to the ARMED position. Check the AM receiver for the 121.5MHz 2 cycle burst that indicates a self-test.
NOTE: If the ELT is left activated for longer than 2 seconds, no self-test will be performedon turn off.
(2) Results of the self-test are displayed by a series of flash codes where the local LED, remoteswitch LED, and buzzer activate for 1/2 second ON followed by 1/2 second OFF. Refer to thelist of codes that follows to determine the error on your ELT.(a) One flash - Shows that the system is operational and that no error conditions were found.
This message is suppressed if there are errors.(b) Four flashes - Shows an open or a short condition on the antenna output or cable. Use the
list below to isolate and repair the problem:1 Make sure the coaxial cable is connected and in good condition. Do a continuity
check of the center conductor and shield. Examine for a shorted cable.2 Examine for an intermittent connection in the coaxial cable.3 If error code persists, examine the antenna installation. This can be examined with a
VSWR meter. Examine the antenna for opens, shorts, and a resistive ground-planeconnection.
(c) Five flashes - Shows that no position data is present. Check that the navigation system isON. If the navigation system is on, check the integrity of the wiring and the connection thatgoes to the ELT. Repair wiring or connection as necessary.
(d) Six flashes - Shows that there is no G-switch loop present between pins 5 and 12. Inspectpins 5 and 12 of the ELT electrical connector for less than 1 ohm of resistance. If there ismore than 1 ohm, repair wiring as necessary.
(e) Seven flashes - Shows that battery operating time is less than 1 hour. Replace the batterypack.
© TEXTRON AVIATION INC.ICA-172-25-00001
25-60-03 Page 101 SEP 28/2021
Form 2261 Rev 1

CESSNA®MODEL 172 (SERIES 1996 AND ON)
MAINTENANCE MANUAL
C. Return the airplane to service.(1) Put the BATTERY switch in the OFF position.
© TEXTRON AVIATION INC.ICA-172-25-00001
25-60-03 Page 102 SEP 28/2021
Form 2261 Rev 1

CESSNA®MODEL 172 (SERIES 1996 AND ON)
MAINTENANCE MANUAL
ARTEX ELT 1000 EMERGENCY LOCATOR TRANSMITTER - MAINTENANCE PRACTICES
1. GeneralA. This section gives the maintenance practices for the Artex ELT 1000 Emergency Locator Transmitter
system. Components in the ELT 1000 system include the ELT, antenna, remote switch, and buzzer.
2. Artex ELT 1000 Emergency Locator Transmitter Removal/InstallationA. Remove the Emergency Locator Transmitter (Refer to Figure 201).
(1) Make sure the MASTER switch is in the OFF position.(2) Get access to the ELT through the baggage compartment door on the left side.
(a) Remove the access panel from the baggage area (Zone 240). Refer to Airplane Zoning -Description and Operation .
(3) Make sure the ON/ARM switch on the ELT in the ARM position.
CAUTION: Although the ELT is off with the electrical connector removed, theELT can be activated if the switch on the front is moved to the ONposition. Be careful not to move the switch to the ON position.
(4) Disconnect the BNC connector (PT1029) and the electrical connector (PT906) from the ELT.
NOTE: The ELT is off when the electrical connector is removed from the ELT.
(5) Open the strap that holds the ELT to the mounting tray.(6) Remove the ELT from the airplane.
B. Install the Emergency Locator Transmitter (Refer to Figure 201).
NOTE: The ELT is off when the electrical connector is removed from the ELT.
CAUTION: Although the ELT is off with the electrical connector removed, the ELTcan be activated if the switch on the front is moved to the ON position.Be careful not to move the switch to the ON position.
(1) Put the ELT in the mounting tray at an angle to engage the lock mechanism at the opposite endof the ELT.
(2) Push the ELT down into the mounting tray until it is fully installed in the tray.(3) Connect the strap that holds the ELT firmly to the mounting tray.(4) Connect the BNC connector and the electrical connector to the ELT.(5) Make sure the ON/ARM switch is in the ARM position.(6) Complete a functional test of the ELT system to make sure the installation is correct. Refer to
Artex ELT 1000 Emergency Locator Transmitter - Inspection/Check.(7) Install the access panel from the baggage area (Zone 240). Refer to Airplane Zoning -
Description and Operation .
3. ELT Buzzer Removal/InstallationA. Remove the ELT Buzzer (Refer to Figure 201).
(1) Get access to the buzzer through the baggage compartment door on the left side.(a) Remove the closeout from the baggage area (Zone 240). Refer to Airplane Zoning -
Description and Operation .(2) Make sure that the ELT master switch on the ELT transmitter is in the ARM position.(3) Tag the wires and terminals for identification.(4) Remove the screws that attach the electrical wire to the terminals to the buzzer.(5) Loosen the black retainer ring on the outboard side of the buzzer.(6) Remove the buzzer from the bracket.
© TEXTRON AVIATION INC.ICA-172-25-00001
25-60-03 Page 201 SEP 28/2021
Form 2261 Rev 1

CESSNA®MODEL 172 (SERIES 1996 AND ON)
MAINTENANCE MANUAL
Artex ELT 1000 Emergency Locator Transmitter System InstallationFigure 201 (Sheet 1)
© TEXTRON AVIATION INC.ICA-172-25-00001
25-60-03 Page 202 SEP 28/2021
Form 2261 Rev 1

CESSNA®MODEL 172 (SERIES 1996 AND ON)
MAINTENANCE MANUAL
Artex ELT 1000 Emergency Locator Transmitter System InstallationFigure 201 (Sheet 2)
© TEXTRON AVIATION INC.ICA-172-25-00001
25-60-03 Page 203 SEP 28/2021
Form 2261 Rev 1

CESSNA®MODEL 172 (SERIES 1996 AND ON)
MAINTENANCE MANUAL
B. Install the ELT Buzzer (Refer to Figure 201).(1) Put the buzzer in the bracket.(2) Install the black retainer ring on the outboard face of the buzzer.(3) Remove the tags from the wires and terminals.(4) Connect the electrical wires to the buzzer with the screws.(5) Do a check of the ELT system. Refer to Refer to Artex ELT 1000 Emergency Locator Transmitter
- Inspection/Check.(6) Install the closeout in the baggage area (Zone 240). Refer to Airplane Zoning - Description and
Operation.
4. Remote Switch Removal/InstallationA. Remove the Remote Switch.
(1) Remove electrical power from the aircraft.(2) Get access to the ELT through the baggage compartment door on the left side.
(a) Remove the closeout from the baggage area (Zone 240). Refer to Airplane Zoning -Description and Operation .
(3) Disconnect the electrical connector (PT906) from the ELT.(4) Remove the screws from the front of the remote switch.(5) Pull the remote switch from the panel to get to the electrical connector.
(a) Disconnect the connector from the back of the switch.B. Install the Remote Switch.
(1) Connect the electrical connector to the back of the switch.(2) Put the remote switch into the panel.
(a) Install the screws that attach switch to the panel.(3) Connect the electrical connector to the ELT.(4) Complete a functional test of the ELT system to make sure the installation is correct. Refer to
Artex ELT 1000 Emergency Locator Transmitter - Inspection/Check.(5) Install the closeout in the baggage area (Zone 240). Refer to Airplane Zoning - Description and
Operation.
5. ELT Antenna Removal/InstallationA. Remove the ELT Antenna (Refer to Figure 201).
(1) Remove the screws that attach the antenna to the fuselage.(2) Pull the antenna upward from fuselage and disconnect the BNC connector (PT1030) from
antenna.(3) Remove the antenna from the airplane.(4) Remove sealant from antenna and airplane.
B. Install the ELT Antenna (Refer to Figure 201).(1) Put the antenna near the mounting position and connect the BNC connector (PT1030) to the
antenna.(2) Install the screws that attach the antenna to the fuselage.(3) Make sure that there is a correct electrical bond between the antenna and the airplane structure.
(a) Remove one screw.(b) With an ohmmeter, measure the electrical resistance from the antenna base metal insert
to the structure at the screw position.
NOTE: The maximum allowable resistance (in ohms) at each of the four measuredpositions is 0.0025.
(c) Install the screw and remove and install each of the remaining screws in turn as youmeasure the electrical resistance at each screw hole.
(4) Apply a fillet seal around the antenna with Type I Class B Sealant. Do not cover the screwhead with the sealant. Refer to Chapter 20, Fuel, Weather and High-Temperature Sealing -Maintenance Practices.
(5) Do a functional test of the ELT system. Refer to Artex ELT 1000 Emergency Locator Transmitter- Inspection/Check.
© TEXTRON AVIATION INC.ICA-172-25-00001
25-60-03 Page 204 SEP 28/2021
Form 2261 Rev 1

CESSNA®MODEL 172 (SERIES 1996 AND ON)
MAINTENANCE MANUAL
6. Artex ELT 1000 Emergency Locator Transmitter Configuration
NOTE: This procedure is only necessary if you install an Artex ELT 1000 unit that is new to the aircraftand has not been programmed with the correct 15-Digit Hex Code ID, Country Code, andAircraft Identification Number. Check the placard on the ELT to determine configuration.
A. Artex ELT 1000 Emergency Locator Transmitter Configuration(1) Remove the ELT 1000 from the aircraft. Refer to the Artex ELT 1000 Emergency Locator
Transmitter Removal procedure in this document.(2) Connect the Artex Test & Programmer Set P/N 8715 and included interface cable to the ELT.(3) Select PROGRAM on the Artex programmer menu.(4) Select ELT 1000 on the model selection menu.(5) Select the program protocol. Long message program protocols should be selected for the Artex
ELT 1000. Refer to Table 201, Accepted Program Protocols by Country, to determine whichprogram protocol to select based on the country of aircraft certification.
NOTE: If the table is blank for the country of your aircraft's certification, therecommended default protocol for the ELT 1000 is STD LOCATION /AIRCRAFT 24 BIT ADDRESS (LONG).
(a) For the AVIATION ELT / TAIL NUMBER / LOCATION (LONG) program protocol, enter thecountry code and tail number of the aircraft.
(b) For the STD LOCATION / AIRCRAFT 24 BIT ADDRESS (LONG) program protocol, enterthe country code and enter the 24-bit address. Make sure you select the desired numbersystem (octal or hex) to match the format of the address.
Table 201. Accepted Program Protocols by Country
CountryCoun-try
CodeAviation ELT / Tail Number /
Location (Long)STD Location / Aircraft 24 Bit
Address (Long)
Albania 201
Argentina 701 X X
Armenia 216
Australia 503 X X
Austria 203 X
Bangladesh 405
Belgium 205 X
Bermuda 310 X
Brazil 710 X X
Bulgaria 207
Canada 316 X
CaymanIslands 319 X
Chile 725 X X
Columbia 730 X
Costa Rica 321
Croatia 238
© TEXTRON AVIATION INC.ICA-172-25-00001
25-60-03 Page 205 SEP 28/2021
Form 2261 Rev 1

CESSNA®MODEL 172 (SERIES 1996 AND ON)
MAINTENANCE MANUAL
Table 201. Accepted Program Protocols by Country (continued)
CountryCoun-try
CodeAviation ELT / Tail Number /
Location (Long)STD Location / Aircraft 24 Bit
Address (Long)
Cyprus 209 X X
CzechRepublic 270
Denmark 219 X
Ecuador 735
Egypt 622 X
Estonia 276
Finland 230 X
France 227 X
Germany 218 X X
Greece 237 X
Hong Kong 477 X
Hungary 243 X
Iceland 251 X
India 419 X X
Indonesia 525 X
Ireland 250 X
Israel 428
Italy 247 X
Japan 431 X X
Kenya 634
Latvia 275
Lithuania 277 X
Luxembourg 253 X
Macedonia 274
Malaysia 533
Malta 249 X
Mexico 345 X
Moldova 214
Monaco 254
Netherlands 244 X
NewZealand 512 X X
Nigeria 657 X
Norway 257 X
© TEXTRON AVIATION INC.ICA-172-25-00001
25-60-03 Page 206 SEP 28/2021
Form 2261 Rev 1

CESSNA®MODEL 172 (SERIES 1996 AND ON)
MAINTENANCE MANUAL
Table 201. Accepted Program Protocols by Country (continued)
CountryCoun-try
CodeAviation ELT / Tail Number /
Location (Long)STD Location / Aircraft 24 Bit
Address (Long)
Paraguay 755
Philippines 548
Poland 261 X
Portugal 263 X
Romania 264
Russia 273 X
SaudiArabia 403 X
SlovakRepublic 267 X
Slovenia 278 X
South Africa 601 X
South Korea 440 X
Spain 224 X
Sweden 265 X
Switzerland 269 X X
Thailand 567
Turkey 271 X
United ArabEmirates 470
Ukraine 272
UnitedKingdom 232 X X
UnitedStates 366 X X
Uruguay 770
Venezuela 775
Zambia 678(6) Select ENTER on the screen.(7) Select PROGRAM to install the entered data onto the ELT.(8) Make sure that the screen shows the message PROGRAMMING SUCCESSFUL VERIFY ELT
USING SARCALC.(9) Touch the SARCALC button. The Artex programmer screen will show the message WAITING
FOR DATA.(10) Put the ELT switch to ON for one second then put the switch back to ARM. Once a valid message
is received from the ELT unit, all encoded data is displayed on the programmer screen.(11) Make sure that tests completed by the SARSAT test passed and that the Country code, 15-Digit
Hex ID, GPS coordinates and country the data you entered into the ELT.
© TEXTRON AVIATION INC.ICA-172-25-00001
25-60-03 Page 207 SEP 28/2021
Form 2261 Rev 1

CESSNA®MODEL 172 (SERIES 1996 AND ON)
MAINTENANCE MANUAL
(12) Select DONE to save message and complete the ELT configuration.
NOTE: Because the ELT placard must match the information configured into the ELT, a new15-Digit Hex Code placard must replace the old one.
(13) Create a new placard for the ELT 1000 unit that matches to new information installed into theELT 1000.
NOTE: The settings on your label maker can be different from the settings called out inTable 202. Placards that are clear and legible are acceptable to use on the ELTnameplate.
(a) With label maker and the settings called out in Table 202, Label Maker Settings, create anew placard for the ELT 1000. Make sure the placard contains the information that follows:• 15-Digit Hex ID• Country• Country Code
(b) Install the placard on the ELT nameplate.
Table 202. Label Maker Settings
Font: F1 (HELSINKI) Underline Format: NoneSize: 12 PT Format Horizontal Alignment: CenterWidth: Normal Format Vertical Alignment: CenterStyle: Bold
(14) Disconnect the Artex Test & Programmer Set P/N 8715 and interface cable from the ELT.(15) Install the ELT into the aircraft. Refer to the Artex ELT 1000 Emergency Locator Transmitter
Installation procedure in this document.(16) Do the Artex ELT 1000 Emergency Locator Transmitter Functional Test. Refer to Chapter 25,
Artex ELT 1000 Emergency Locator Transmitter - Inspection/Check.
© TEXTRON AVIATION INC.ICA-172-25-00001
25-60-03 Page 208 SEP 28/2021
Form 2261 Rev 1

CESSNA®MODEL 172 (SERIES 1996 AND ON)
MAINTENANCE MANUAL
ARTEX ELT 1000 EMERGENCY LOCATOR TRANSMITTER - INSPECTION/CHECK
1. GeneralA. This section gives the procedures that are necessary to do the inspection and operational checks
necessary to comply with 14 CFR 91.207, for the Artex ELT1000 Emergency Locator Transmittersystem. The system transmits on two frequencies. The 121.5 MHz frequency has the standard swepttone that rescue personnel can follow to the source. The other frequency is 406 MHz and is used toactivate a satellite tracking system. The 406 MHz frequency includes other information such as thecountry code of the airplane, the aircraft identification beacon serial number, the 24-bit address, thetail number, or other identification.
2. Tools and EquipmentA. For information on tools and equipment, refer to Equipment/Furnishing - General.
3. Artex ELT 1000 Emergency Locator Transmitter (ELT) InspectionA. Get access to the ELT.
(1) Get access to the ELT through the baggage compartment door on the left side.(a) Remove the bolts, tiedowns, and plastic closeout from the lower baggage area (Zone 240).
Refer to Airplane Zoning - Description and Operation.B. Do an inspection of the ELT, mounting tray, antenna, and the ELT battery for condition and correct
installation.(1) Make sure that the ELT switch, found on the forward end of the ELT, is set to the ARM position.(2) Remove the ELT from the mounting tray. Refer to Artex ELT 1000 Emergency Locator
Transmitter - Maintenance Practices.
CAUTION: Do not use solvents to clean the ELT, mounting tray, or electricalcontacts. Solvents used in these areas can cause damage to theELT housing.
(3) Examine the ELT and the mounting tray for correct installation, cleanliness, cracks, or otherdamage.
(4) Examine the ELT battery for corrosion.(5) Look at the battery expiration date.
(a) Make sure that the battery life limit is not expired.(b) Make sure that the battery expiration date is shown correctly in the Maintenance Records.
NOTE: The battery manufacturer puts a mark on the battery to show the battery lifelimit. When you install a new battery in an ELT, make sure a record of theexpiration date is put in the space given on the ELT name and data plate.
(6) If you have to replace the ELT battery, refer to Artex Maintenance Manual A3-06-2749-1.(7) You must replace the ELT battery with a new battery if one or more of the conditions that follow
occur:• Use of the ELT battery in an emergency• Operation for an unknown amount of time• Use for more than one hour of cumulative time• Replacement date shown on the battery label has expired
(8) Examine the ELT antenna for correct installation and cracks or other damage.(9) Install the ELT into the mounting tray. Refer to Artex ELT 1000 Emergency Locator Transmitter
- Maintenance Practices.
© TEXTRON AVIATION INC.ICA-172-25-00001
25-60-03 Page 601 SEP 28/2021
Form 2261 Rev 1
CESSNA®MODEL 172 (SERIES 1996 AND ON)
MAINTENANCE MANUAL
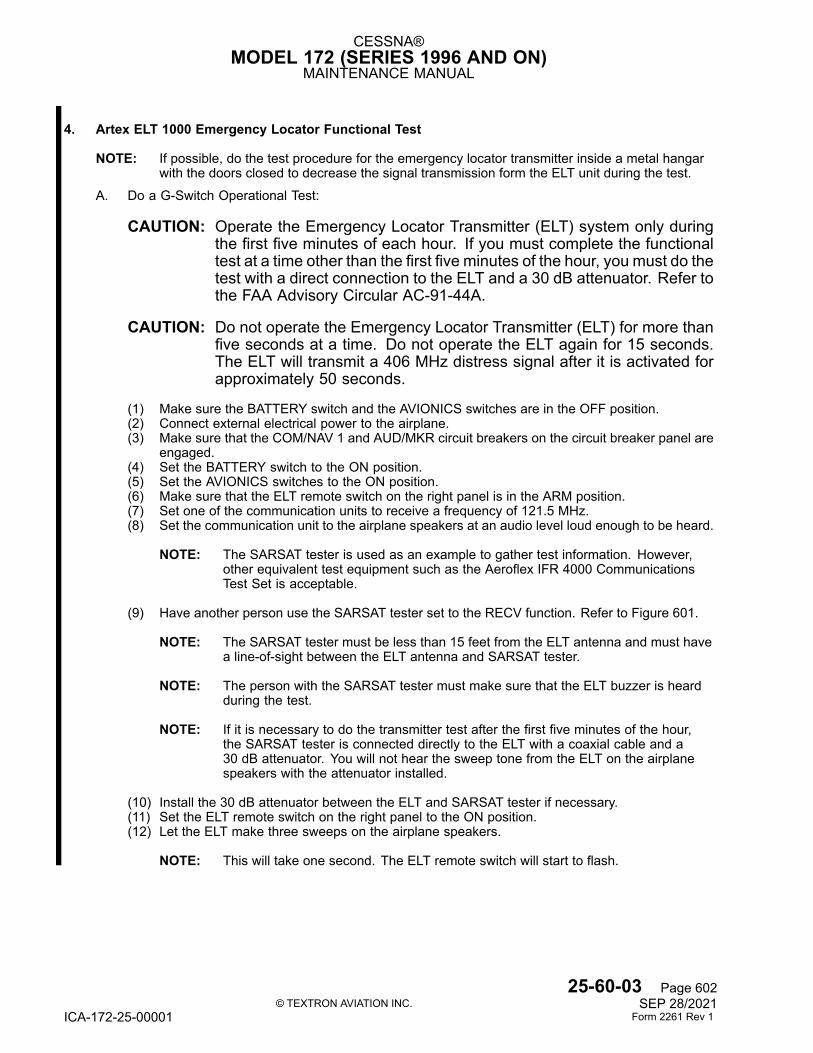
4. Artex ELT 1000 Emergency Locator Functional Test
NOTE: If possible, do the test procedure for the emergency locator transmitter inside a metal hangarwith the doors closed to decrease the signal transmission form the ELT unit during the test.
A. Do a G-Switch Operational Test:
CAUTION: Operate the Emergency Locator Transmitter (ELT) system only duringthe first five minutes of each hour. If you must complete the functionaltest at a time other than the first five minutes of the hour, you must do thetest with a direct connection to the ELT and a 30 dB attenuator. Refer tothe FAA Advisory Circular AC-91-44A.
CAUTION: Do not operate the Emergency Locator Transmitter (ELT) for more thanfive seconds at a time. Do not operate the ELT again for 15 seconds.The ELT will transmit a 406 MHz distress signal after it is activated forapproximately 50 seconds.
(1) Make sure the BATTERY switch and the AVIONICS switches are in the OFF position.(2) Connect external electrical power to the airplane.(3) Make sure that the COM/NAV 1 and AUD/MKR circuit breakers on the circuit breaker panel are
engaged.(4) Set the BATTERY switch to the ON position.(5) Set the AVIONICS switches to the ON position.(6) Make sure that the ELT remote switch on the right panel is in the ARM position.(7) Set one of the communication units to receive a frequency of 121.5 MHz.(8) Set the communication unit to the airplane speakers at an audio level loud enough to be heard.
NOTE: The SARSAT tester is used as an example to gather test information. However,other equivalent test equipment such as the Aeroflex IFR 4000 CommunicationsTest Set is acceptable.
(9) Have another person use the SARSAT tester set to the RECV function. Refer to Figure 601.
NOTE: The SARSAT tester must be less than 15 feet from the ELT antenna and must havea line-of-sight between the ELT antenna and SARSAT tester.
NOTE: The person with the SARSAT tester must make sure that the ELT buzzer is heardduring the test.
NOTE: If it is necessary to do the transmitter test after the first five minutes of the hour,the SARSAT tester is connected directly to the ELT with a coaxial cable and a30 dB attenuator. You will not hear the sweep tone from the ELT on the airplanespeakers with the attenuator installed.
(10) Install the 30 dB attenuator between the ELT and SARSAT tester if necessary.(11) Set the ELT remote switch on the right panel to the ON position.(12) Let the ELT make three sweeps on the airplane speakers.
NOTE: This will take one second. The ELT remote switch will start to flash.
© TEXTRON AVIATION INC.ICA-172-25-00001
25-60-03 Page 602 SEP 28/2021
Form 2261 Rev 1

CESSNA®MODEL 172 (SERIES 1996 AND ON)
MAINTENANCE MANUAL
(13) Set the ELT remote switch back to the ARM position and monitor the LED.
NOTE: The ELT will do a self-test. The LED will stay on for one second and the ELT sweepsare not audible on the airplane speakers if the ELT operation is normal.
NOTE: The ELT does not transmit a 406 MHz test signal to the SARSAT tester until the ELTremote switch is set back to the ARM position.
(14) If the LED continues to flash, refer to Artex ELT 1000 Emergency Locator Transmitter -Troubleshooting.
(15) If the SARSAT tester did not receive a 406 MHz signal and the ELT remote switch LED does notshow a transmitter problem, do the test again.
(16) When the SARSAT tester receives a 406 MHz signal, scroll the pages on the tester and makesure of the information that follows:(a) Make sure the information shown by the SARSAT tester agrees with the placard on the
ELT.
NOTE: The information that follows must match the data on the ELT placard.
• COUNTRY Code• 15-digit Hex code ID• Aircraft identification number
(b) Make sure that the SARSAT tester shows the messages that follow:• S'TEST OK• Frequency - PASS• Homing frequency• Message format (short)
NOTE: When ownership of an aircraft is transferred within the same country, the ELT1000 should be reregistered with the applicable authority. When an aircraftwith an ELT 1000 changes tail number or country registration, the ELT willneed to have the new identification data entered. The ELT will also need to beregistered with the applicable authority.
(17) Install the bolts, tiedowns, and plastic closeout to the lower baggage area (Zone 240). Refer toAirplane Zoning - Description and Operation.
© TEXTRON AVIATION INC.ICA-172-25-00001
25-60-03 Page 603 SEP 28/2021
Form 2261 Rev 1

CESSNA®MODEL 172 (SERIES 1996 AND ON)
MAINTENANCE MANUAL
Artex ELT 1000 Emergency Locator Transmitter System InstallationFigure 601 (Sheet 1)
© TEXTRON AVIATION INC.ICA-172-25-00001
25-60-03 Page 604 SEP 28/2021
Form 2261 Rev 1

CESSNA®MODEL 172 (SERIES 1996 AND ON)
MAINTENANCE MANUAL
Artex ELT 1000 Emergency Locator Transmitter System InstallationFigure 601 (Sheet 2)
© TEXTRON AVIATION INC.ICA-172-25-00001
25-60-03 Page 605 SEP 28/2021
Form 2261 Rev 1

TEXTRON AVIATION INC.AIRCRAFT DIVISION
WICHITA, KANSAS 67277
SUPPLEMENT NO: ICA-172-25-00001
APPENDIX A: ILLUSTRATED PARTS CATALOG
Nomeclature Part Number QuantityELT 1000 A3-06-2749-1 1.0
Mount Tray A3-06-2758-1 1.0
Screw MS24694-C7 4.0
Screw MS27039C0810 4.0
Washer NAS1149CN832R 4.0
Screw S3484-6-8B 4.0
C406-N ELT Rod Antenna 110-338 1.0
C/A ELT1000 Adapter 3929155-2 1.0
Buzzer 452-6505 1.0
Remote Switch Kit 455-6195 1.0
Battery Pack 452-6504-1 1.0
© TEXTRON AVIATION INC.Form 2261 Rev 1

TEXTRON AVIATION INC.AIRCRAFT DIVISION
WICHITA, KANSAS 67277
SUPPLEMENT NO: ICA-172-25-00001
APPENDIX B: WIRING DIAGRAM MANUAL
© TEXTRON AVIATION INC.Form 2261 Rev 1

25-60-03
ARTEX ELT ADAPTER HARNESS
AIRPLANES (172S) 12745 & ON
CESSNA®
MODEL 172 (SERIES 1996 AND ON)WIRING DIAGRAM MANUAL
©TEXTRON AVIATION INC.
25-60-03
Figure 01Page 1
SEP 28/2021

NOTES:1. ALL WIRES ARE 22GA UNLESS OTHERWISE SPECIFIED.
2 ANTENNA CABLE INSTALLED AS PART OF ELT PROVISION INSTL.
87
512261314
ELT1000 ELT
127
JT907
HORN POWERGROUND
G-SWITCH LOOPG-SWITCH LOOPLIGHTRESET 1RESET 2EXTERNAL ON
3456
PT1029 PT10302
ANTENNA
PT906
87512261314
ME406 ELT
127
JT907
HORN POWERGROUNDG-SWITCH LOOPG-SWITCH LOOPLIGHTRESET 1RESET 2EXTERNAL ON
3456
PT1029 PT10302
ANTENNA
PT906
1 C/A ME406 ADAPTER
2 C/A ELT1000 ADAPTERA1
NAV DATA IN 9 11(WHT)
A2
3929155A1
ARTEX ELT ADAPTER HARNESSFigure 01. (Sheet 1)
CESSNA®
MODEL 172 (SERIES 1996 AND ON)WIRING DIAGRAM MANUAL
©TEXTRON AVIATION INC.
25-60-03
Figure 01Page 2
SEP 28/2021
c19240
Text Box

ARTEX ELT ADAPTER HARNESS - STANDARD, NAV I, NAV II
AIRPLANES (172S) 0001 & ON
REF DES PART NUMBER
NOMENCLATURE
EFFECTIVITY
UNITS
PER
ASSY1 2 3 4 5 6 7
JT907 S3070-10 CONNECTOR KIT 49367 (172S) 0001 & ON 01
PT1029 UG88C/U CONNECTOR 07688 (172S) 0001 & ON 01
PT1030 UG913A/U CONNECTOR - COAX 07688 (172S) 0001 & ON 01
PT906 S2340-15 CONNECTOR - ELT (172S) 0001 & ON 01
S2492-2 . CLIP ASSEMBLY 02
S2341-1 . CONTACT 28198 AR
CESSNA®
MODEL 172 (SERIES 1996 AND ON)WIRING DIAGRAM MANUAL
©TEXTRON AVIATION INC.
25-60-03
Figure 01Page 3
SEP 28/2021

This Page Intentionally Left Blank.

25-60-04
ARTEX ELT PROVISIONS - WITH NAV III
AIRPLANES (172S) 12745 & ON
CESSNA®
MODEL 172 (SERIES 1996 AND ON)WIRING DIAGRAM MANUAL
©TEXTRON AVIATION INC.
25-60-04
Figure 02Page 1
SEP 28/2021

AVN CB PNL DISC
3
8
SI302 ARTEX ELT SWITCH
POWER IN
LIGHT
7170
PT304 NO. 1 GIA 63 INTEGRATED AVIONICS
ARINC 429 OUT 1 AARINC 429 OUT 1 B
(WHT)(BLU)
B
R UT901 SONALERT BUZZER
5 RESET 12 RESET 27 EXTERNAL ON6 GROUND
12
HC901
GIA-63 #1 (16)
AC900
22
JC023AVN CB PNL DISC
PT1030PT1029
2
(RG142B/U)
GS906
ELT ANTENNA
1
PT907
2
34567
89
10
ARTEX ELT
4
JC023
(16)
3
2 C/A ARTEX ELT PROVISIONS - 172B1
(WHT) 49 RS232 OUT 311
1P603
NOTES:1. ALL WIRES 22 GAUGE UNLESS OTHERWISE SPECIFIED.
2
PART OF ARTEX ELT REMOTE SWITCH INSTL KIT 455-6196.
MAKE WIRE LENGTH FROM 1HC901 TO SPLICE AT 4JC023, 2" ± .5.
3
*** REFER TO 91-10-01 FOR GROUND INFORMATION.
3929157B2
ARTEX ELT PROVISIONS - WITH NAV IIIFigure 02. (Sheet 1)
CESSNA®
MODEL 172 (SERIES 1996 AND ON)WIRING DIAGRAM MANUAL
©TEXTRON AVIATION INC.
25-60-04
Figure 02Page 2
SEP 28/2021

ARTEX ELT PROVISIONS - WITH NAV III
AIRPLANES (172S) 0001 & ON
REF DES PART NUMBER
NOMENCLATURE
EFFECTIVITY
UNITS
PER
ASSY1 2 3 4 5 6 7
AC900 SPLICE RF
GS906 GROUND RF
HC901 S3491-2 FUSE - ASSEMBLY (172S) 0001 & ON 01
JC023 S2350-10 CONNECTOR - CIRCUIT BREAKER PANEL (ZONE 224) (172R) 81241 & ON
(172S) 9810 & ON
01
S2353-5 . PIN AR
PT1029 UG88C/U CONNECTOR 07688 (172S) 0001 & ON 01
PT1030 UG913A/U CONNECTOR - COAX 07688 (172S) 0001 & ON 01
PT304 - INTEGATED AVIONICS BOX 1 RF
PT907 S3070-9 CONNECTOR 49367 (172S) 0001 & ON 01
LMS01T-TL . SPLICE CONNECTOR 49367 01
SI302 455-6196 ELT REMOTE SWITCH - INSTALLATION KIT 60253 (172S) 0001 & ON 01
UT901 BUZZER - SONALERT RF
CESSNA®
MODEL 172 (SERIES 1996 AND ON)WIRING DIAGRAM MANUAL
©TEXTRON AVIATION INC.
25-60-04
Figure 02Page 3
SEP 28/2021

This Page Intentionally Left Blank.
Related Documents