Aero Image Library What's new www.aeroillustra ons.com art@aeroillustra .com May 2011 The complete artwork library catalogue can be downloaded from m Armstrong Whitworth Siskin III Armstrong Whitworth Siskin Royal Air Force, 111 Squadron J7152 III, Royal Air Force, 111 Squadron circa 1926 Duxford, UK. SISKN061 Drawing code: 111 Squadron operated the Siskin III from June 1924 l November 1926, at which me the Siskin IIIA entered service. The black bar was the Squadron's marking and the red wheel covers and spinner denoted "A" Flight. When the Siskin III first entered service with 111 Squadron the squadron marking comprised of a thick black bar that only ran forward of the roundel. Later this was changed to a narrow bar that ran from just under the tailplane and extended over the metal cowlings. There were some individual and although the black bar extended the full length of the fuselage on J7152, this was not always the case. SISKN0612 Drawing code: (ground tude) © Juanita Franzi 2011. All artworks are copyright Juanita Franzi and are protected under interna onal copyright law. Artworks may not be reproduced without permission. www.aeroillustra s.com

Welcome message from author
This document is posted to help you gain knowledge. Please leave a comment to let me know what you think about it! Share it to your friends and learn new things together.
Transcript

Aero Image Library
What's new
www.aeroillustra ons.comart@aeroillustra .com
May 2011The complete artwork library catalogue can be downloaded from
m
Armstrong Whitworth Siskin
IIIArmstrong Whitworth Siskin
Royal Air Force, 111 SquadronJ7152 III, Royal Air Force, 111 Squadroncirca 1926 Duxford, UK.
SISKN061Drawing code:
111 Squadron operated the Siskin III from June 1924 l November 1926, at which me the Siskin IIIA entered service. The black bar was the Squadron's marking and the red wheel covers and spinner denoted "A" Flight.When the Siskin III first entered service with 111 Squadron the squadron marking comprised of a thick black bar that only ran forward of the roundel.Later this was changed to a narrow bar that ran from just under the tailplane and extended over the metal cowlings.There were some individual and although the black bar extended the full length of the fuselage on J7152, this was not always the case.
SISKN0612Drawing code:
(ground tude)
© Juanita Franzi 2011. All artworks are copyright Juanita Franzi and are protected under interna onal copyright law. Artworks may not be reproduced without permission. www.aeroillustra s.com
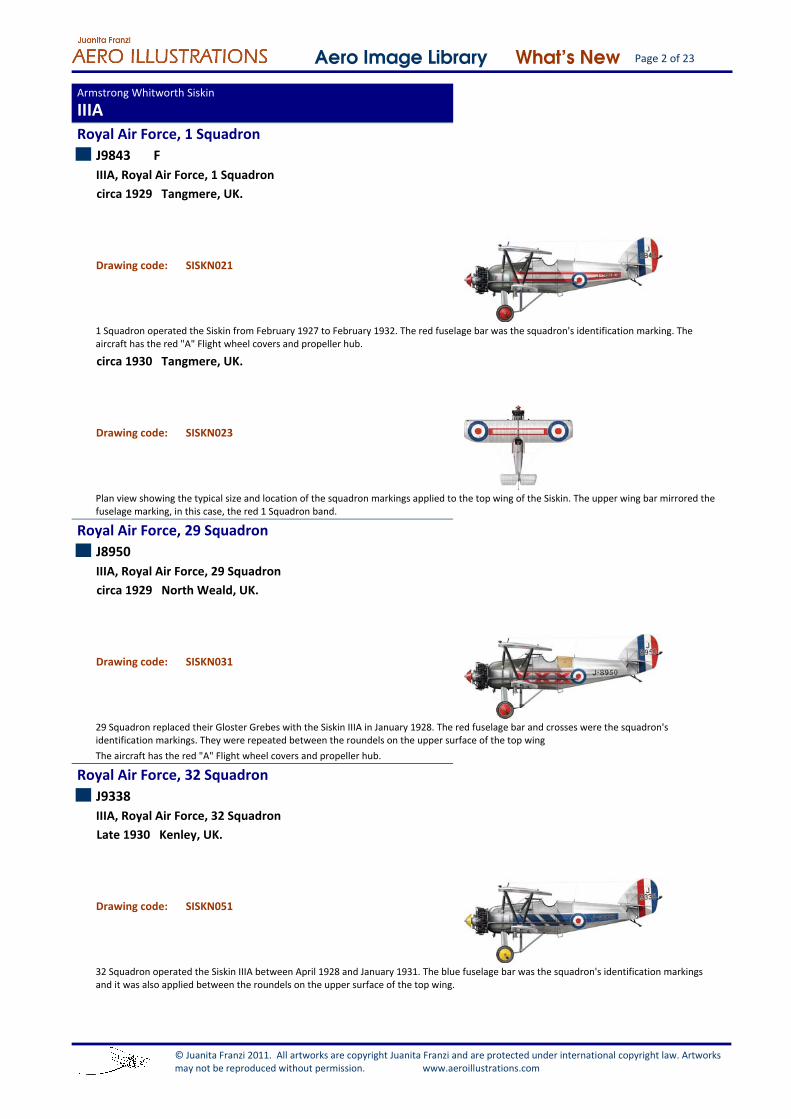
Page 2 of 23Aero Image Library What's New
IIIAArmstrong Whitworth Siskin
Royal Air Force, 1 Squadron
J9843 F
IIIA, Royal Air Force, 1 Squadron
circa 1929 Tangmere, UK.
SISKN021Drawing code:
1 Squadron operated the Siskin from February 1927 to February 1932. The red fuselage bar was the squadron's identification marking. The aircraft has the red "A" Flight wheel covers and propeller hub.
circa 1930 Tangmere, UK.
SISKN023Drawing code:
Plan view showing the typical size and location of the squadron markings applied to the top wing of the Siskin. The upper wing bar mirrored the fuselage marking, in this case, the red 1 Squadron band.
Royal Air Force, 29 Squadron
J8950
IIIA, Royal Air Force, 29 Squadron
circa 1929 North Weald, UK.
SISKN031Drawing code:
29 Squadron replaced their Gloster Grebes with the Siskin IIIA in January 1928. The red fuselage bar and crosses were the squadron's identification markings. They were repeated between the roundels on the upper surface of the top wingThe aircraft has the red "A" Flight wheel covers and propeller hub.
Royal Air Force, 32 Squadron
J9338
IIIA, Royal Air Force, 32 Squadron
Late 1930 Kenley, UK.
SISKN051Drawing code:
32 Squadron operated the Siskin IIIA between April 1928 and January 1931. The blue fuselage bar was the squadron's identification markings and it was also applied between the roundels on the upper surface of the top wing.
© Juanita Franzi 2011. All artworks are copyright Juanita Franzi and are protected under international copyright law. Artworks may not be reproduced without permission. www.aeroillustrations.com
Page 3 of 23Aero Image Library What's New
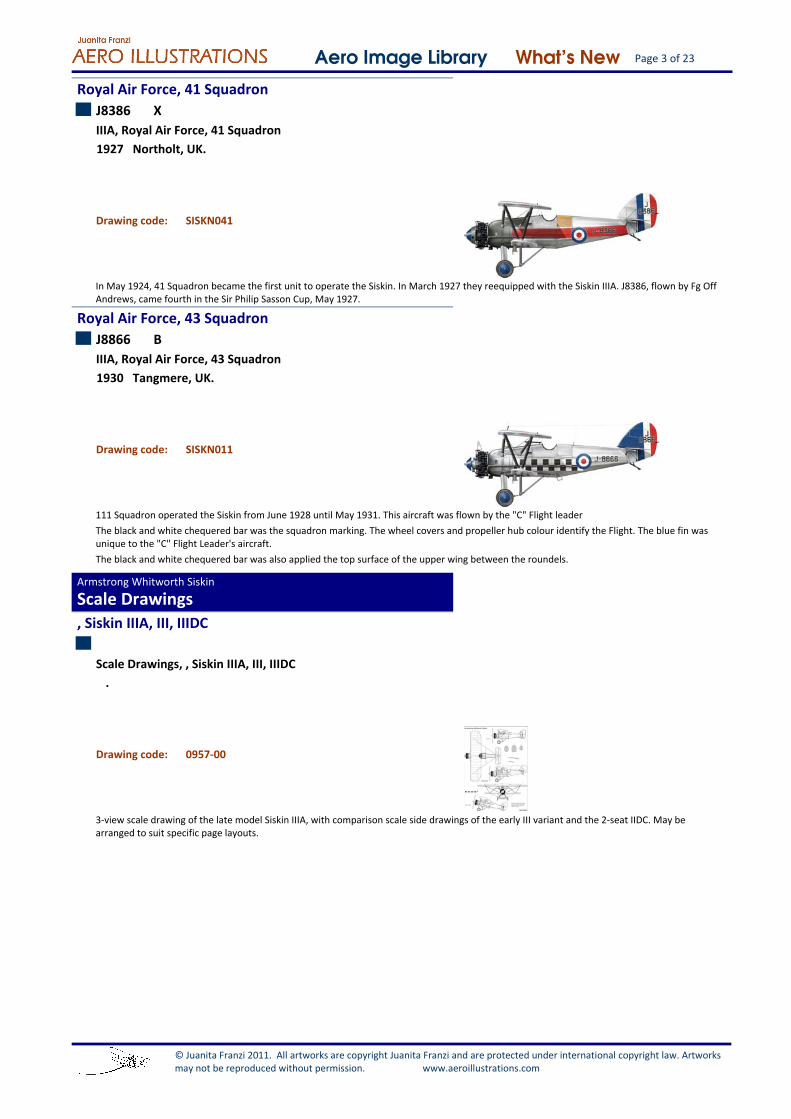
Royal Air Force, 41 Squadron
J8386 X
IIIA, Royal Air Force, 41 Squadron
1927 Northolt, UK.
SISKN041Drawing code:
In May 1924, 41 Squadron became the first unit to operate the Siskin. In March 1927 they reequipped with the Siskin IIIA. J8386, flown by Fg Off Andrews, came fourth in the Sir Philip Sasson Cup, May 1927.
Royal Air Force, 43 Squadron
J8866 B
IIIA, Royal Air Force, 43 Squadron
1930 Tangmere, UK.
SISKN011Drawing code:
111 Squadron operated the Siskin from June 1928 until May 1931. This aircraft was flown by the "C" Flight leaderThe black and white chequered bar was the squadron marking. The wheel covers and propeller hub colour identify the Flight. The blue fin was unique to the "C" Flight Leader's aircraft.The black and white chequered bar was also applied the top surface of the upper wing between the roundels.
Scale DrawingsArmstrong Whitworth Siskin
, Siskin IIIA, III, IIIDC
Scale Drawings, , Siskin IIIA, III, IIIDC
.
0957‐00Drawing code:
3‐view scale drawing of the late model Siskin IIIA, with comparison scale side drawings of the early III variant and the 2‐seat IIDC. May be arranged to suit specific page layouts.
© Juanita Franzi 2011. All artworks are copyright Juanita Franzi and are protected under international copyright law. Artworks may not be reproduced without permission. www.aeroillustrations.com
Page 4 of 23Aero Image Library What's New
OtherArmstrong Whitworth Siskin
Royal Air Force, Siskin Squadron Colours
Other, Royal Air Force, Siskin Squadron Colours
.
0957‐05Drawing code:
Colour page showing examples of the colourful squadron markings applied to RAF Siskins.
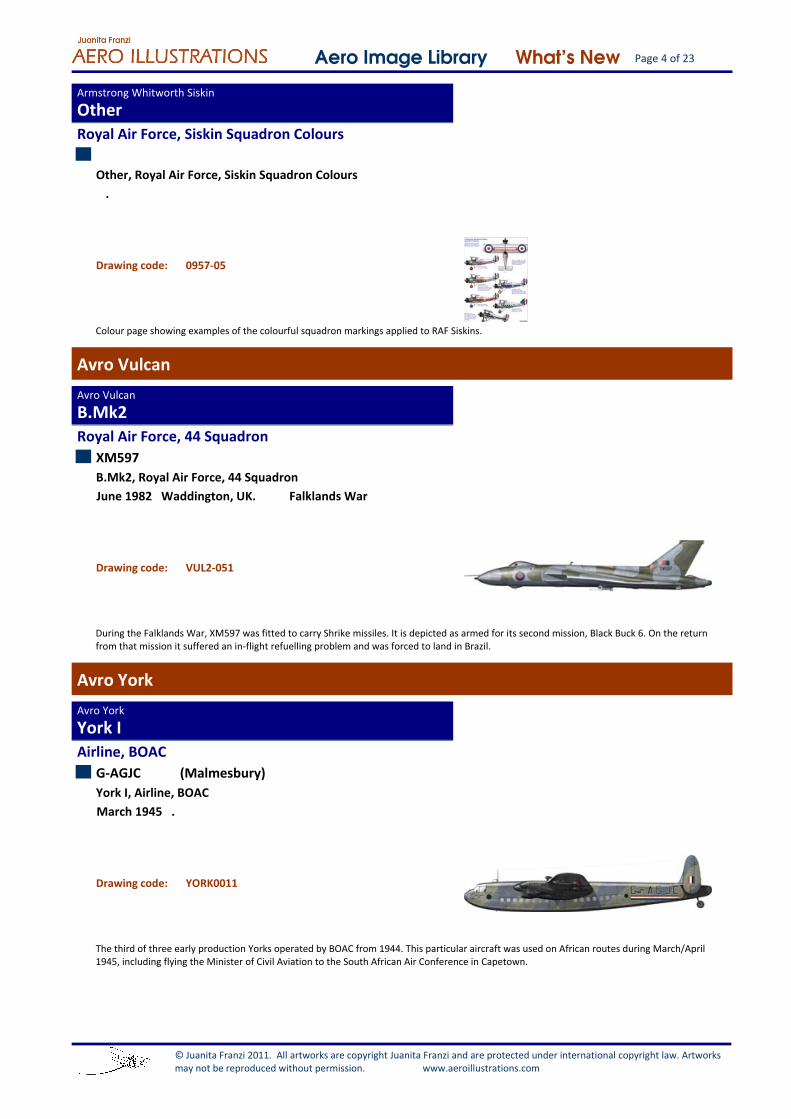
Avro Vulcan
B.Mk2Avro Vulcan
Royal Air Force, 44 Squadron
XM597
B.Mk2, Royal Air Force, 44 Squadron
June 1982 Waddington, UK. Falklands War
VUL2‐051Drawing code:
During the Falklands War, XM597 was fitted to carry Shrike missiles. It is depicted as armed for its second mission, Black Buck 6. On the return from that mission it suffered an in‐flight refuelling problem and was forced to land in Brazil.
Avro York
York IAvro York
Airline, BOAC
G‐AGJC (Malmesbury)
York I, Airline, BOAC
March 1945 .
YORK0011Drawing code:
The third of three early production Yorks operated by BOAC from 1944. This particular aircraft was used on African routes during March/April 1945, including flying the Minister of Civil Aviation to the South African Air Conference in Capetown.
© Juanita Franzi 2011. All artworks are copyright Juanita Franzi and are protected under international copyright law. Artworks may not be reproduced without permission. www.aeroillustrations.com

Page 5 of 23Aero Image Library What's New
Scale DrawingAvro York
, York C Mk I (late), C Mk I (early), Prototype
Scale Drawing, , York C Mk I (late), C Mk I (early), Prototype
.
0946‐00Drawing code:
3‐view scale drawing of post war model York C Mk I, with comparative side view of the prototype and an early production C Mk I.
Boeing B‐17 Flying Fortress
Fortress II (B‐17F)Boeing B‐17 Flying Fortress
Royal Air Force, 206 Squadron, Coastal Command
FA705 1‐U
Fortress II (B‐17F), Royal Air Force, 206 Squadron, Coastal Command
Jan 1944 Lagen, Azores. WW2 (Europe)
B17F‐061Drawing code:
FA705 joined 206 Sqn at Benbecula in March 1943 and was lost the following January 1944 while attacking U‐boat U‐270. Aircraft is illustrated at the time of its loss.FA705 was coded 'O' until the squadron arrived in the Azores in October 1943.On 6 January 1944, while on patrol about 400 miles northeast of the Azores Capt F/Lt Anthony Pinhorn and his crew came across U‐270. On their third strafing attack anti‐aircraft fire from the submarine set fire to the inboard starboard engine.
B17F‐063Drawing code:
B17F‐064Drawing code:
© Juanita Franzi 2011. All artworks are copyright Juanita Franzi and are protected under international copyright law. Artworks may not be reproduced without permission. www.aeroillustrations.com

Page 6 of 23Aero Image Library What's New
B‐17G FortressBoeing B‐17 Flying Fortress
USAAF, 336th Bomb Squadron 95th Bomb Group
42‐97844 B, R
B‐17G Fortress, USAAF, 336th Bomb Squadron 95th Bomb Group
Sept 1944 Harham, UK. WW2 (Europe)
B17G101Drawing code:
B‐17G‐35‐VE, 42‐97844 was shot down over Germany on 9 March 1944 and crash landed near Mainz‐Kastel. It is finished in typical 336 Squadron markings.
Fortress III (B‐17G)Boeing B‐17 Flying Fortress
Royal Air Force, 220 Squadron, Coastal Command
HB791 ZZ‐T
Fortress III (B‐17G), Royal Air Force, 220 Squadron, Coastal Command
Late 1944 Lagen, Azores. WW2 (Europe)
B17G‐071Drawing code:
220 Squadron was tasked with anti‐submarine and meteorological flights. In late 1944 the B‐24 began replacing the units B‐17s. Three Fortress IIIs, including HB791, soldiered on with the squadron until the spring of 1945.
Boeing F/A‐18 Super Hornet
F/A‐18FBoeing F/A‐18 Super Hornet
Royal Australian Air Force, 1 Squadron
A44‐202 202
F/A‐18F, Royal Australian Air Force, 1 Squadron
2010 Australia.
FA18F061Drawing code:
One of the aircraft in the first RAAF Super Hornets delivery flight. Shown at the time of its delivery flight, January 2010.
© Juanita Franzi 2011. All artworks are copyright Juanita Franzi and are protected under international copyright law. Artworks may not be reproduced without permission. www.aeroillustrations.com

Page 7 of 23Aero Image Library What's New
Bristol Beaufighter
Mk VIFBristol Beaufighter
USAAF, 416th Night Fighter Squadron
KV912
Mk VIF, USAAF, 416th Night Fighter Squadron
Nov 1943 Italy. WW2 (Mediterranean)
BUFG6021Drawing code:
The USAAF 12th Air Force had four squadrons operating Beaufighter night‐fighters in the Mediterranean theatre in 1943. The 416th NFS scored four victories while flying the Beaufighter.
British Aerospace/McDonnell Douglas Harrier/AV‐8
Harrier T.4British Aerospace/McDonnell Douglas Harrier/AV‐8
Royal Air Force, 3 Squadron
XZ145 AT
Harrier T.4, Royal Air Force, 3 Squadron
1981 RAF Gütesloh, Germany.
HART4011Drawing code:
ZX145 was first aircraft of the third T4 production batch to be delivered. It's first flight was in January 1976 and it was received by the RAF on 8 March 1976. The aircraft served with 3 Squadron during the late 1970s, into the early 1980s.During this time 3 Squadron was operating the Harrier GR 3 from RAF Gütesloh, Germany.
Scale DrawingBritish Aerospace/McDonnell Douglas Harrier/AV‐8
, Harrier GR.1
Scale Drawing, , Harrier GR.1
.
0954‐02Drawing code:
Scale 3‐view drawing of the GR.1 (3‐view), includes cross sections. Maybe arranged to suit specific page layouts
© Juanita Franzi 2011. All artworks are copyright Juanita Franzi and are protected under international copyright law. Artworks may not be reproduced without permission. www.aeroillustrations.com
Page 8 of 23Aero Image Library What's New
, Harrier GR.1, GR.3, T.2
Scale Drawing, , Harrier GR.1, GR.3, T.2
.
0954‐01Drawing code:
Scale drawing page featuring the GR.1 (3‐view), with comparative side views of the GR.3 (with LRMTS) and the T.2 (two‐seater). Includes cross sections.
, Harrier T.2
Scale Drawing, , Harrier T.2
.
0954‐04Drawing code:
Scale side view of the Harrier T.2 with the standard tall‐fin.
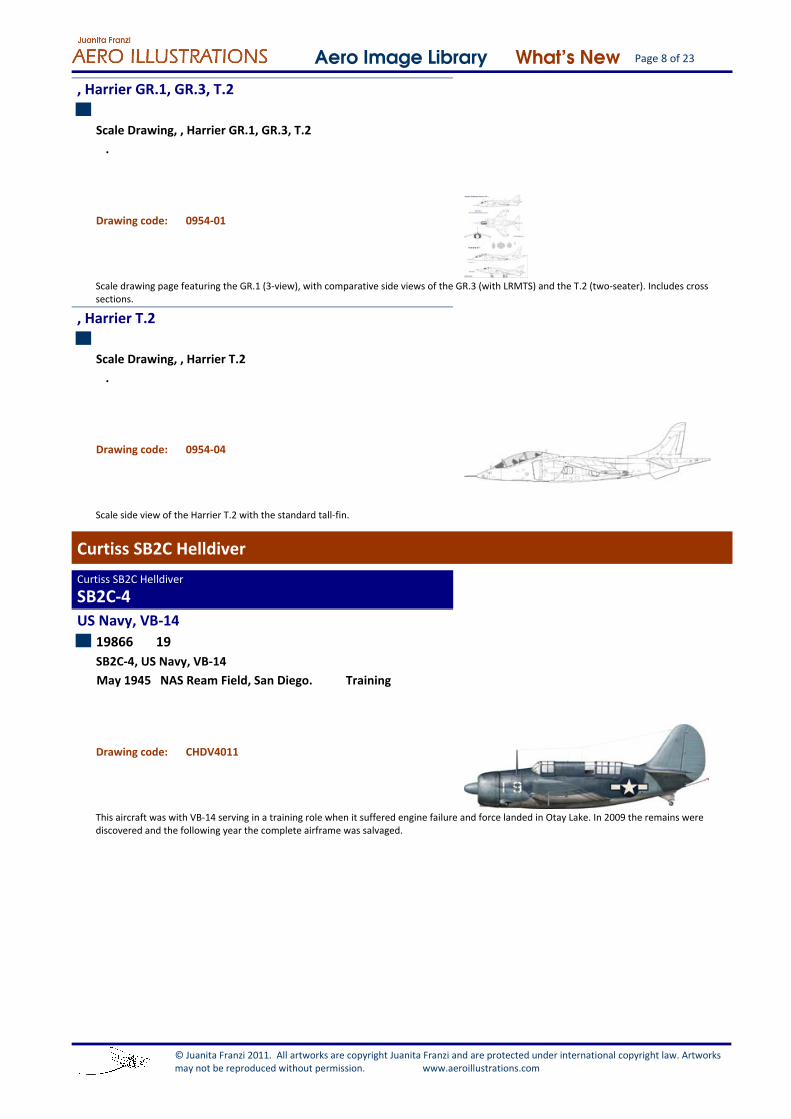
Curtiss SB2C Helldiver
SB2C‐4Curtiss SB2C Helldiver
US Navy, VB‐14
19866 19
SB2C‐4, US Navy, VB‐14
May 1945 NAS Ream Field, San Diego. Training
CHDV4011Drawing code:
This aircraft was with VB‐14 serving in a training role when it suffered engine failure and force landed in Otay Lake. In 2009 the remains were discovered and the following year the complete airframe was salvaged.
© Juanita Franzi 2011. All artworks are copyright Juanita Franzi and are protected under international copyright law. Artworks may not be reproduced without permission. www.aeroillustrations.com
Page 9 of 23Aero Image Library What's New
DeHavilland D.H. 1
Airco DH 1DeHavilland D.H. 1
Royal Flying Corps, 19 Reserve Squadron
A1629
Airco DH 1, Royal Flying Corps, 19 Reserve Squadron
1916 Hounslow, UK. Training
DH1‐051Drawing code:
A1629 is finished in the typical style of early production D.H. 1 trainers.
Royal Flying Corps, 99 Depot Squadron
A1657
Airco DH 1, Royal Flying Corps, 99 Depot Squadron
1917 East Retford. Training
DH1‐041Drawing code:
99 Depot Squadron was a training squadron based at East Retford.
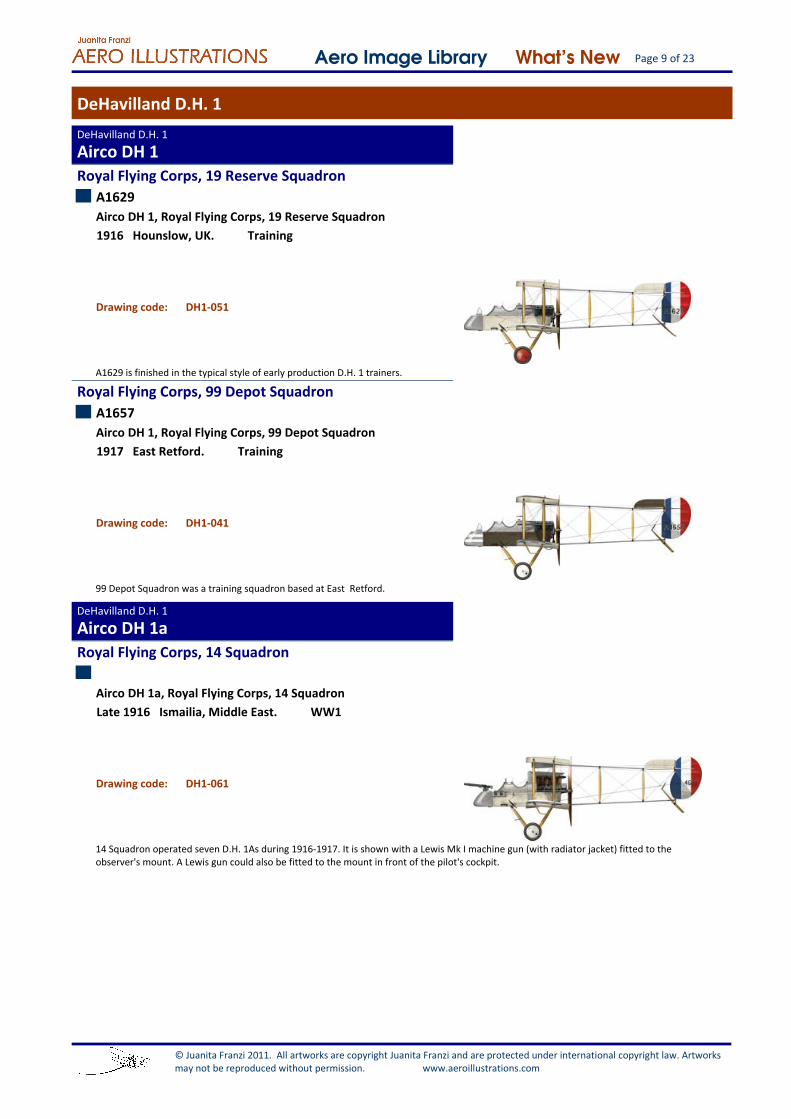
Airco DH 1aDeHavilland D.H. 1
Royal Flying Corps, 14 Squadron
Airco DH 1a, Royal Flying Corps, 14 Squadron
Late 1916 Ismailia, Middle East. WW1
DH1‐061Drawing code:
14 Squadron operated seven D.H. 1As during 1916‐1917. It is shown with a Lewis Mk I machine gun (with radiator jacket) fitted to the observer's mount. A Lewis gun could also be fitted to the mount in front of the pilot's cockpit.
© Juanita Franzi 2011. All artworks are copyright Juanita Franzi and are protected under international copyright law. Artworks may not be reproduced without permission. www.aeroillustrations.com
Page 10 of 23Aero Image Library What's New
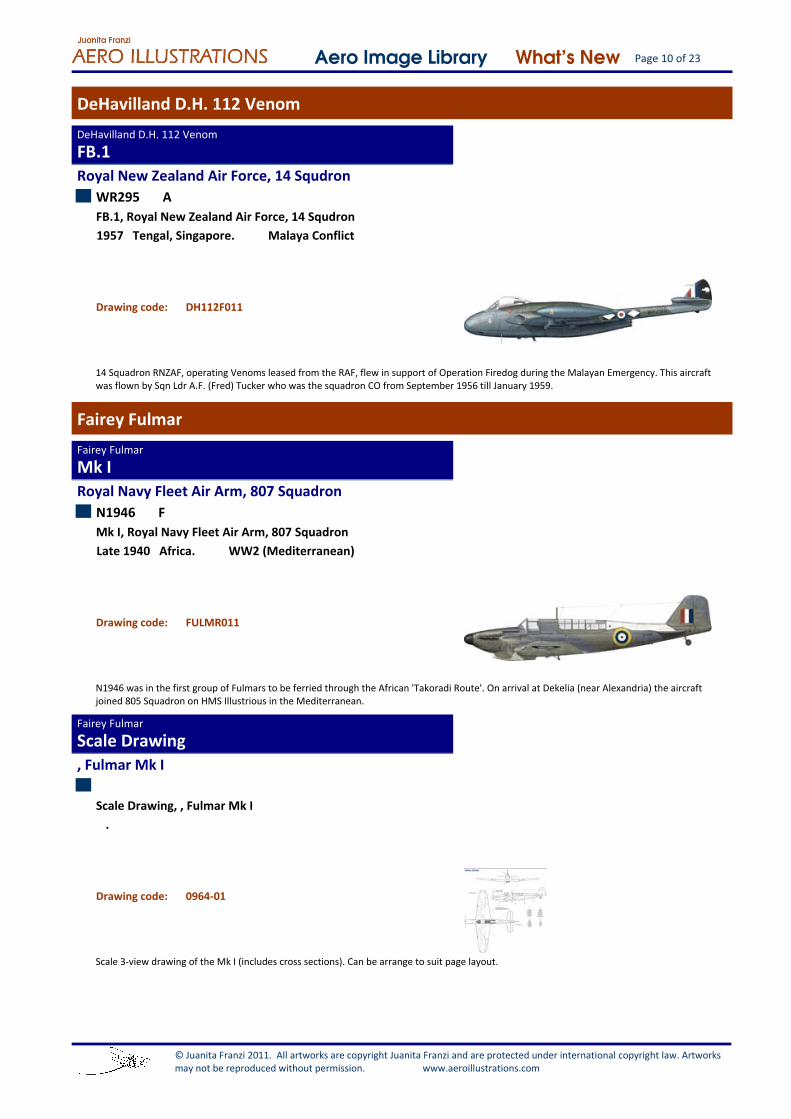
DeHavilland D.H. 112 Venom
FB.1DeHavilland D.H. 112 Venom
Royal New Zealand Air Force, 14 Squdron
WR295 A
FB.1, Royal New Zealand Air Force, 14 Squdron
1957 Tengal, Singapore. Malaya Conflict
DH112F011Drawing code:
14 Squadron RNZAF, operating Venoms leased from the RAF, flew in support of Operation Firedog during the Malayan Emergency. This aircraft was flown by Sqn Ldr A.F. (Fred) Tucker who was the squadron CO from September 1956 till January 1959.
Fairey Fulmar
Mk IFairey Fulmar
Royal Navy Fleet Air Arm, 807 Squadron
N1946 F
Mk I, Royal Navy Fleet Air Arm, 807 Squadron
Late 1940 Africa. WW2 (Mediterranean)
FULMR011Drawing code:
N1946 was in the first group of Fulmars to be ferried through the African 'Takoradi Route'. On arrival at Dekelia (near Alexandria) the aircraft joined 805 Squadron on HMS Illustrious in the Mediterranean.
Scale DrawingFairey Fulmar
, Fulmar Mk I
Scale Drawing, , Fulmar Mk I
.
0964‐01Drawing code:
Scale 3‐view drawing of the Mk I (includes cross sections). Can be arrange to suit page layout.
© Juanita Franzi 2011. All artworks are copyright Juanita Franzi and are protected under international copyright law. Artworks may not be reproduced without permission. www.aeroillustrations.com

Page 11 of 23Aero Image Library What's New
, Fulmar Mk I, Mk II, NF Mk II
Scale Drawing, , Fulmar Mk I, Mk II, NF Mk II
.
0964‐00Drawing code:
Scale 3‐view drawing of the Mk I (includes cross sections), with comparative side views of the Mk II (with long‐range tanks, with/without air filters) and NF Mk II. Can be arrange to suit page layout.
, Fulmar Mk II
Scale Drawing, , Fulmar Mk II
.
0964‐02Drawing code:
Scale side view drawings of the Mk II, one with long‐range tanks, the other with air‐filters and ice guards. Both are shown with anti‐glare shields installed near the exhaust pipes.
, Fulmar NF Mk II
Scale Drawing, , Fulmar NF Mk II
.
0964‐03Drawing code:
Scale side view drawing of the NF Mk II (night‐fighter). It is shown with AI radar installation, late style exhaust, anti‐glare shields and air‐filters/ice guards.
© Juanita Franzi 2011. All artworks are copyright Juanita Franzi and are protected under international copyright law. Artworks may not be reproduced without permission. www.aeroillustrations.com

Page 12 of 23Aero Image Library What's New
General Dynamics F‐111
F‐111CGeneral Dynamics F‐111
Aircraft Manufacturer,
A8‐125
F‐111C, Aircraft Manufacturer,
1968 Forth Worth, Texas.
F111C041Drawing code:
A8‐125 is shown in the scheme carried by the RAAF aircraft just prior to the official handover ceremony, 4 September 1968. The scheme was the same as specified for the USAF aircraft: SEA upper camouflage and white underside.In July 1968, A8‐125 was test flown by General Dynamics and become the first of the RAAF aircraft to fly.It is reported that A8‐127 masqueraded as A8‐125 at the 1968 handover ceremony. Apparently A8‐125's finish was no longer considered sufficiently pristine to take the lead role.
Royal Australian Air Force,
A8‐114 (Sizzling Hot)
F‐111C, Royal Australian Air Force,
1985 USA.
F111C061Drawing code:
A8‐114 was the last F‐111A converted to C status. It was one of the ex‐USAF aircraft purchased as attribution replacements by the RAAF. It is shown with the temporary nose markings it wore at the handover prior to its ferry flight to Australia.
A8‐125
F‐111C, Royal Australian Air Force,
1998 Amberley, Qld, Australia.
F111C12ADrawing code:
To celebrate 25 years of RAAF F‐111 service A8‐125, the first of the type received by the RAAF, was given these special tail markings.
© Juanita Franzi 2011. All artworks are copyright Juanita Franzi and are protected under international copyright law. Artworks may not be reproduced without permission. www.aeroillustrations.com

Page 13 of 23Aero Image Library What's New
Royal Australian Air Force, 1 Squadron
A8‐125
F‐111C, Royal Australian Air Force, 1 Squadron
1985 RAAF Amberley, Qld.
F111C151Drawing code:
The yellow lightning bold was applied to the tail of 1 Squadron aircraft during the early 1980s.
A8‐132
F‐111C, Royal Australian Air Force, 1 Squadron
2002 Amberley, Qld, Australia.
F111C11ADrawing code:
This markings was applied to the F‐111s attending Red Flag 2002, Nellis AFB, USA. It was retained for several years after the event.
A8‐138
F‐111C, Royal Australian Air Force, 1 Squadron
1984 Amberley, Qld, Australia.
F111C0911Drawing code:
A8‐138 was the first F‐111 to be fitted with the AN/AVQ‐26 Pave Tack pod. It carries the early style yellow 'lightning bolt' tail marking of 1 Squadron and is shown loaded with the AGM‐84 Harpoon missile.
F111C0912Drawing code:
A8‐138 was the first F‐111 to be fitted with the AN/AVQ‐26 Pave Tack pod. It carries the early style yellow 'lightning bolt' tail marking of 1 Squadron. It is shown loaded with the AGM‐84 Harpoon missile and the undercarriage in the down position.
F111C093Drawing code:
Plan view of A8‐138 illustrates the typical camouflage pattern and stencils applied to RAAF aircraft.
© Juanita Franzi 2011. All artworks are copyright Juanita Franzi and are protected under international copyright law. Artworks may not be reproduced without permission. www.aeroillustrations.com

Page 14 of 23Aero Image Library What's New
A8‐144
F‐111C, Royal Australian Air Force, 1 Squadron
1992 Amberley, QLD Australia.
F111C021Drawing code:
From 1990 until about 1993, the 1 Squadron 'flagship' aircraft carried tail markings featuring a kookaburra imposed on a large yellow '1'.This artwork was referred to as the 'Supersonic Kookaburra'. It was applied to A8‐142 and A8‐144 for their appearance at the 1990 Royal International Air Tattoo held at Boscombe Down, UK.
F111C0211Drawing code:
Same as above but with wings in the 52 degree sweep back position and with two inboard wing pylons.
F111C02ADrawing code:
From 1990 until about 1993, the 1 Squadron 'flagship' aircraft carried tail markings featuring a kookaburra imposed on a large yellow '1'. The artwork was referred to as the 'Supersonic Kookaburra'.
A8‐147
F‐111C, Royal Australian Air Force, 1 Squadron
2002 RAAF Amberley, QLD.
F111C011Drawing code:
This tail marking, incorporating a kookaburra imposed over the Cross of Jerusalem, was applied to the six 1 Squadron aircraft deployed to Nevada for Red Flag 02‐4 (February‐March 2002). The tail marking were retained for several years.
Royal Australian Air Force, 6 Squadron
A8‐113
F‐111C, Royal Australian Air Force, 6 Squadron
c 2005 RAAF Amberley, Qld, Australia.
F111C0311Drawing code:
A8‐113 with a colourful version of the 6 Squadron tail markings. Shown carrying six Mk‐82 low drag bombs.
© Juanita Franzi 2011. All artworks are copyright Juanita Franzi and are protected under international copyright law. Artworks may not be reproduced without permission. www.aeroillustrations.com

Page 15 of 23Aero Image Library What's New
A8‐125
F‐111C, Royal Australian Air Force, 6 Squadron
2007 Amberley, Qld, Australia.
F111C10ADrawing code:
Special tail scheme to mark the 90th anniversary of the establishment of 6 Squadron, AFC.
A8‐148
F‐111C, Royal Australian Air Force, 6 Squadron
2008 Amberley, Qld, Australia.
F111C071Drawing code:
The low visibility grey scheme was introduced with the arrival of F‐111Gs. A8‐148 is shown loaded with an AGM‐142 Raptor missile. The guidance pod was carried under the starboard wing.
Royal Australian Air Force, 6 Squadron?
A8‐131
F‐111C, Royal Australian Air Force, 6 Squadron?
2003 Amberley, Qld, Australia.
F111C13ADrawing code:
Special tail markings applied to A8‐131 to celebrate 30 years of F‐111 service in the RAAF.
Royal Australian Air Force, ARDU
A8‐127
F‐111C, Royal Australian Air Force, ARDU
1986 Edinburgh, South Australia.
F111C14ADrawing code:
Temporary 'shark mouth' artwork applied to the nose of A8‐127 while it was on loan to ARDU. There are 2 known versions of this artwork.
© Juanita Franzi 2011. All artworks are copyright Juanita Franzi and are protected under international copyright law. Artworks may not be reproduced without permission. www.aeroillustrations.com
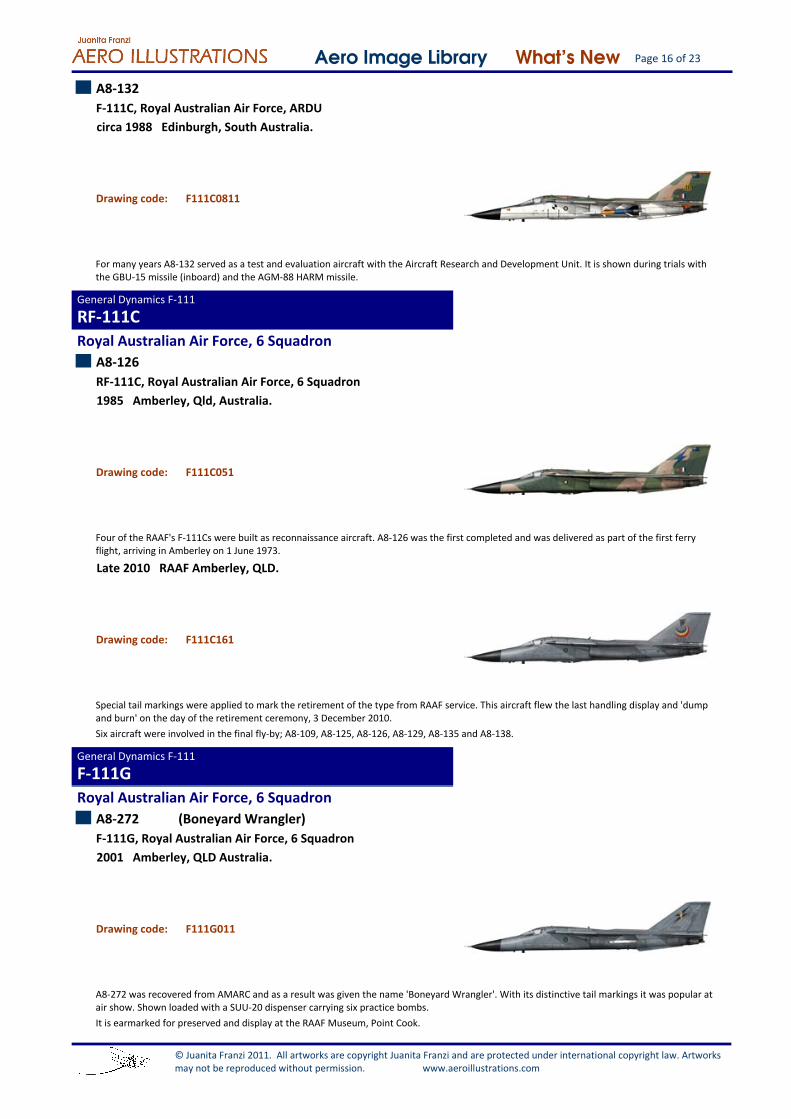
Page 16 of 23Aero Image Library What's New
A8‐132
F‐111C, Royal Australian Air Force, ARDU
circa 1988 Edinburgh, South Australia.
F111C0811Drawing code:
For many years A8‐132 served as a test and evaluation aircraft with the Aircraft Research and Development Unit. It is shown during trials with the GBU‐15 missile (inboard) and the AGM‐88 HARM missile.
RF‐111CGeneral Dynamics F‐111
Royal Australian Air Force, 6 Squadron
A8‐126
RF‐111C, Royal Australian Air Force, 6 Squadron
1985 Amberley, Qld, Australia.
F111C051Drawing code:
Four of the RAAF's F‐111Cs were built as reconnaissance aircraft. A8‐126 was the first completed and was delivered as part of the first ferry flight, arriving in Amberley on 1 June 1973.
Late 2010 RAAF Amberley, QLD.
F111C161Drawing code:
Special tail markings were applied to mark the retirement of the type from RAAF service. This aircraft flew the last handling display and 'dump and burn' on the day of the retirement ceremony, 3 December 2010.Six aircraft were involved in the final fly‐by; A8‐109, A8‐125, A8‐126, A8‐129, A8‐135 and A8‐138.
F‐111GGeneral Dynamics F‐111
Royal Australian Air Force, 6 Squadron
A8‐272 (Boneyard Wrangler)
F‐111G, Royal Australian Air Force, 6 Squadron
2001 Amberley, QLD Australia.
F111G011Drawing code:
A8‐272 was recovered from AMARC and as a result was given the name 'Boneyard Wrangler'. With its distinctive tail markings it was popular at air show. Shown loaded with a SUU‐20 dispenser carrying six practice bombs.
It is earmarked for preserved and display at the RAAF Museum, Point Cook.
© Juanita Franzi 2011. All artworks are copyright Juanita Franzi and are protected under international copyright law. Artworks may not be reproduced without permission. www.aeroillustrations.com
Page 17 of 23Aero Image Library What's New
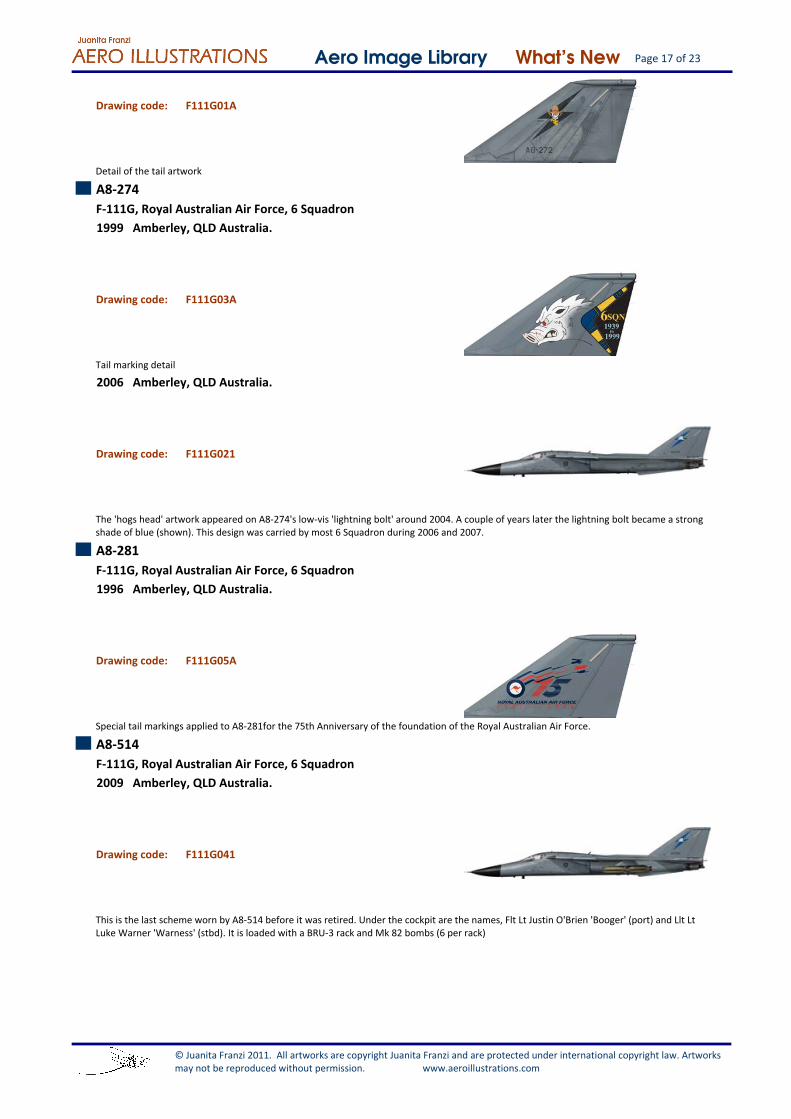
F111G01ADrawing code:
Detail of the tail artwork
A8‐274
F‐111G, Royal Australian Air Force, 6 Squadron
1999 Amberley, QLD Australia.
F111G03ADrawing code:
Tail marking detail
2006 Amberley, QLD Australia.
F111G021Drawing code:
The 'hogs head' artwork appeared on A8‐274's low‐vis 'lightning bolt' around 2004. A couple of years later the lightning bolt became a strong shade of blue (shown). This design was carried by most 6 Squadron during 2006 and 2007.
A8‐281
F‐111G, Royal Australian Air Force, 6 Squadron
1996 Amberley, QLD Australia.
F111G05ADrawing code:
Special tail markings applied to A8‐281for the 75th Anniversary of the foundation of the Royal Australian Air Force.
A8‐514
F‐111G, Royal Australian Air Force, 6 Squadron
2009 Amberley, QLD Australia.
F111G041Drawing code:
This is the last scheme worn by A8‐514 before it was retired. Under the cockpit are the names, Flt Lt Justin O'Brien 'Booger' (port) and Llt Lt Luke Warner 'Warness' (stbd). It is loaded with a BRU‐3 rack and Mk 82 bombs (6 per rack)
© Juanita Franzi 2011. All artworks are copyright Juanita Franzi and are protected under international copyright law. Artworks may not be reproduced without permission. www.aeroillustrations.com
Page 18 of 23Aero Image Library What's New
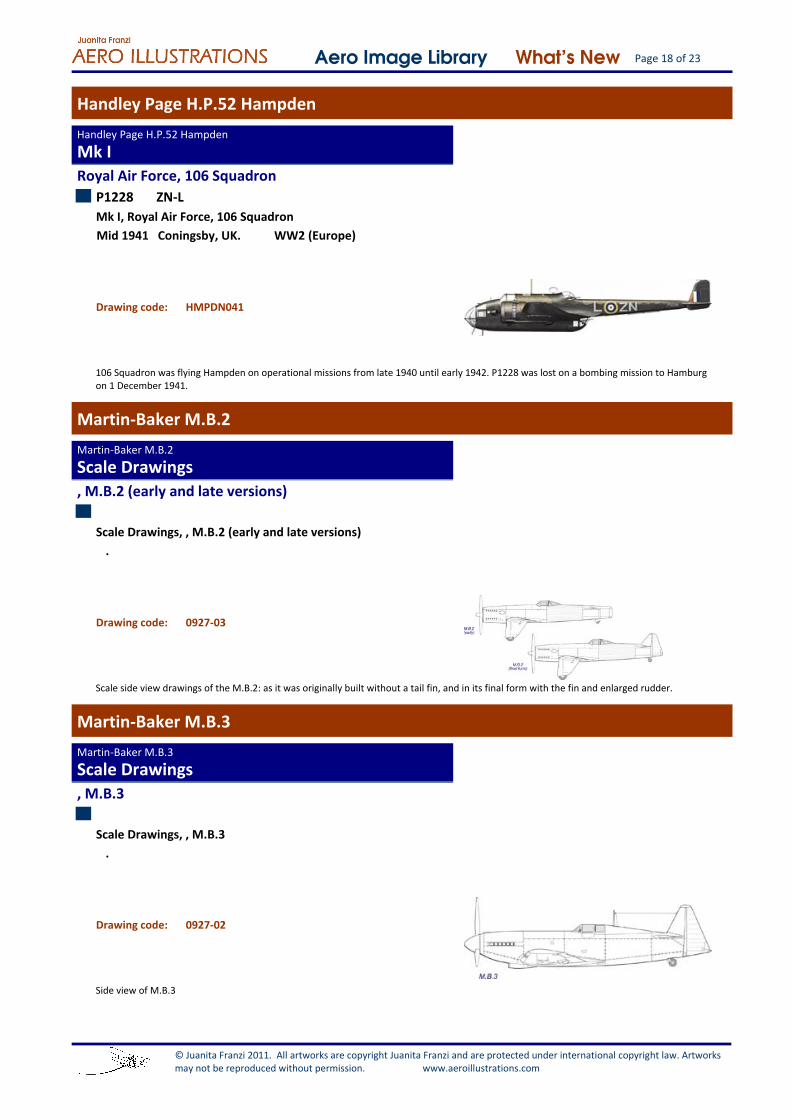
Handley Page H.P.52 Hampden
Mk IHandley Page H.P.52 Hampden
Royal Air Force, 106 Squadron
P1228 ZN‐L
Mk I, Royal Air Force, 106 Squadron
Mid 1941 Coningsby, UK. WW2 (Europe)
HMPDN041Drawing code:
106 Squadron was flying Hampden on operational missions from late 1940 until early 1942. P1228 was lost on a bombing mission to Hamburg on 1 December 1941.
Martin‐Baker M.B.2
Scale DrawingsMartin‐Baker M.B.2
, M.B.2 (early and late versions)
Scale Drawings, , M.B.2 (early and late versions)
.
0927‐03Drawing code:
Scale side view drawings of the M.B.2: as it was originally built without a tail fin, and in its final form with the fin and enlarged rudder.
Martin‐Baker M.B.3
Scale DrawingsMartin‐Baker M.B.3
, M.B.3
Scale Drawings, , M.B.3
.
0927‐02Drawing code:
Side view of M.B.3
© Juanita Franzi 2011. All artworks are copyright Juanita Franzi and are protected under international copyright law. Artworks may not be reproduced without permission. www.aeroillustrations.com
Page 19 of 23Aero Image Library What's New
Martin‐Baker M.B.5
M.B.5Martin‐Baker M.B.5
Aircraft Manufacturer, Martin‐Baker
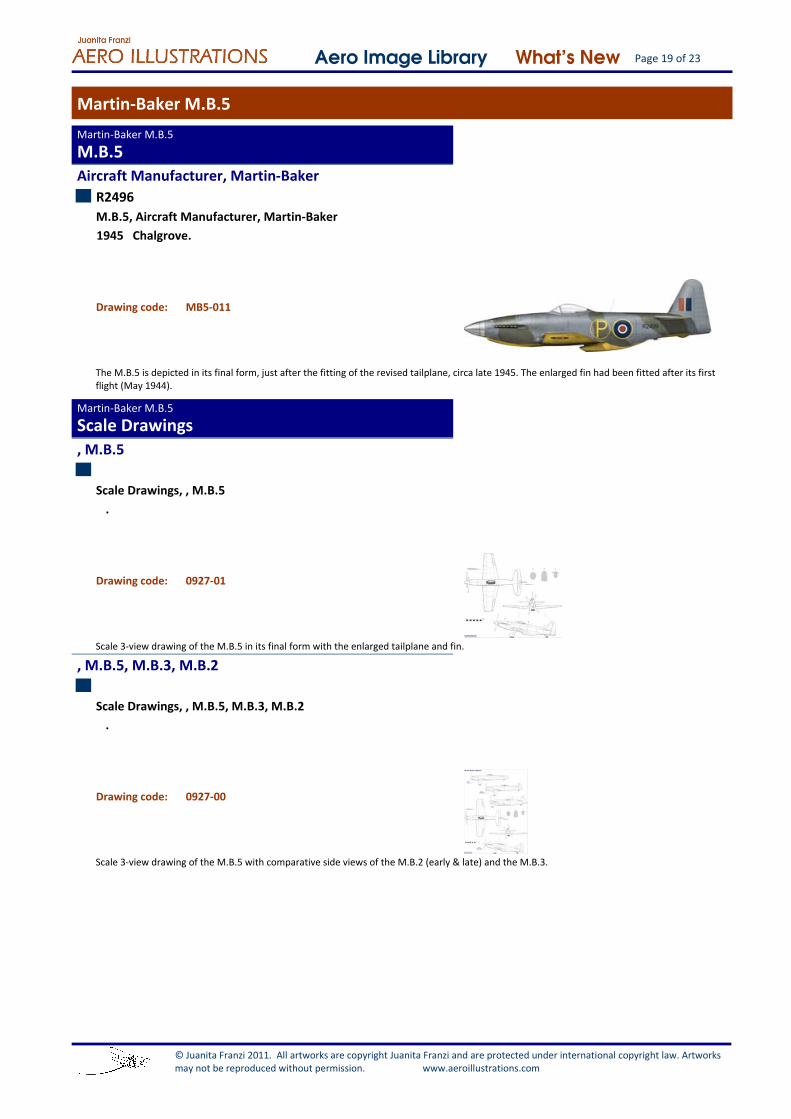
R2496
M.B.5, Aircraft Manufacturer, Martin‐Baker
1945 Chalgrove.
MB5‐011Drawing code:
The M.B.5 is depicted in its final form, just after the fitting of the revised tailplane, circa late 1945. The enlarged fin had been fitted after its first flight (May 1944).
Scale DrawingsMartin‐Baker M.B.5
, M.B.5
Scale Drawings, , M.B.5
.
0927‐01Drawing code:
Scale 3‐view drawing of the M.B.5 in its final form with the enlarged tailplane and fin.
, M.B.5, M.B.3, M.B.2
Scale Drawings, , M.B.5, M.B.3, M.B.2
.
0927‐00Drawing code:
Scale 3‐view drawing of the M.B.5 with comparative side views of the M.B.2 (early & late) and the M.B.3.
© Juanita Franzi 2011. All artworks are copyright Juanita Franzi and are protected under international copyright law. Artworks may not be reproduced without permission. www.aeroillustrations.com
Page 20 of 23Aero Image Library What's New
McDonnell Douglas F/A‐18 Hornet
F/A‐18AMcDonnell Douglas F/A‐18 Hornet
Royal Australian Air Force, 3 Squadron
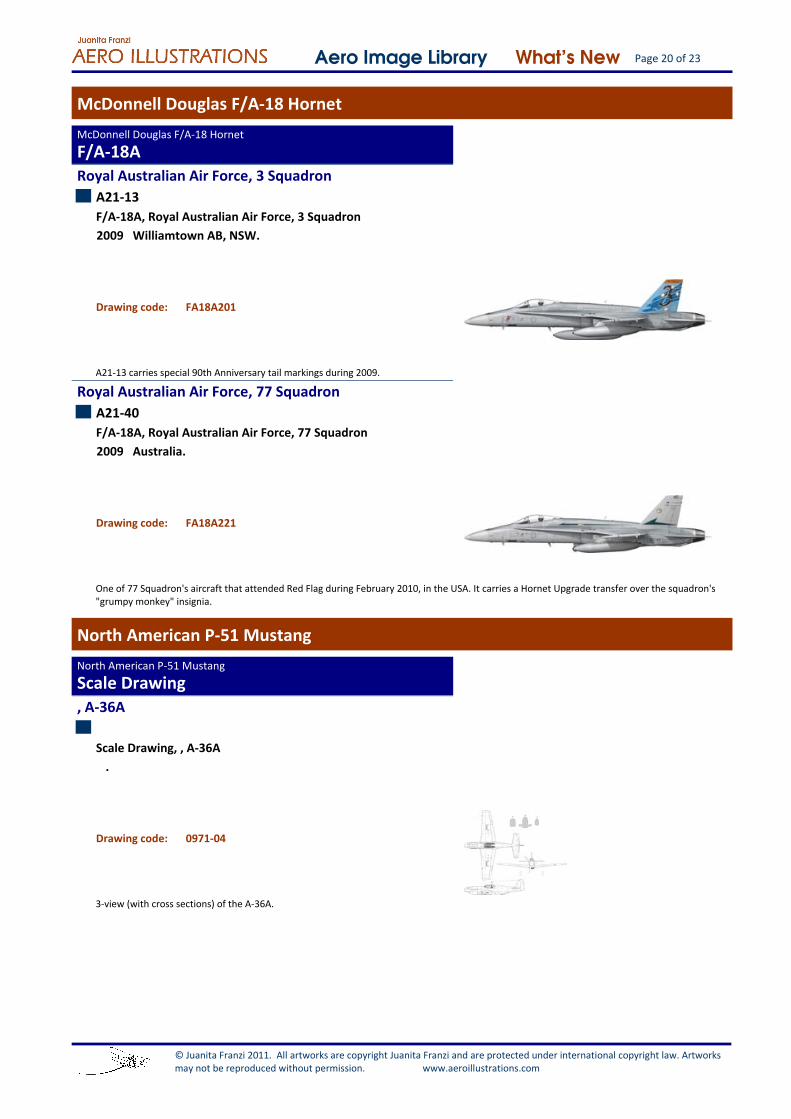
A21‐13
F/A‐18A, Royal Australian Air Force, 3 Squadron
2009 Williamtown AB, NSW.
FA18A201Drawing code:
A21‐13 carries special 90th Anniversary tail markings during 2009.
Royal Australian Air Force, 77 Squadron
A21‐40
F/A‐18A, Royal Australian Air Force, 77 Squadron
2009 Australia.
FA18A221Drawing code:
One of 77 Squadron's aircraft that attended Red Flag during February 2010, in the USA. It carries a Hornet Upgrade transfer over the squadron's "grumpy monkey" insignia.
North American P‐51 Mustang
Scale DrawingNorth American P‐51 Mustang
, A‐36A
Scale Drawing, , A‐36A
.
0971‐04Drawing code:
3‐view (with cross sections) of the A‐36A.
© Juanita Franzi 2011. All artworks are copyright Juanita Franzi and are protected under international copyright law. Artworks may not be reproduced without permission. www.aeroillustrations.com

Page 21 of 23Aero Image Library What's New
, Allison‐powered Mustangs
Scale Drawing, , Allison‐powered Mustangs
.
0971‐00Drawing code:
Scale drawing featuring the P‐51/Mustang IA (3 view and cross sections). Included are comparison side view drawings on the Mustang I, A‐36A (plan and side view), and P51A/Mustang II.
, Mustang I
Scale Drawing, , Mustang I
.
0971‐02Drawing code:
Scale side view of the Mustang I as delivered to the RAF.
, P‐51/Mustang IA
Scale Drawing, , P‐51/Mustang IA
.
0971‐01Drawing code:
Scale drawing of the P‐51/Mustang IA. Includes side view, plan, front view and cross sections. Can be arranged to suit specific requirements.
, P‐51A/Mustang II
Scale Drawing, , P‐51A/Mustang II
.
0917‐03Drawing code:
Scale side view of the P‐51A/Mustang II.
© Juanita Franzi 2011. All artworks are copyright Juanita Franzi and are protected under international copyright law. Artworks may not be reproduced without permission. www.aeroillustrations.com
Page 22 of 23Aero Image Library What's New
Supermarine Scimitar
F.Mk 1Supermarine Scimitar
Royal Aircraft Establishment, RAE Weapons Flight
XD229
F.Mk 1, Royal Aircraft Establishment, RAE Weapons Flight
mid 1960s West Freugh, UK.
SCMT‐041Drawing code:
XD229, an early production F.I, was used for testing and trials. It joined the Weapons Flight in June 1958 until retired in October 1966. Shown in its non‐standard light blue scheme carrying 28lb practice bombs.
XD229 was delivered in June 1957 and was used in "Red Beard" trials. Early 1958 it was involved in release trails, drop tank handing and low altitude bomb system trials.After being transferred to the Weapons Flight the bomb drop trials continued. The 28lb practice bombs (as illustrated) replicated the fall characteristics of a nuclear weapon.
Vickers Wellington
Mk ICVickers Wellington
Royal Air Force, 301 (Polish) Squadron
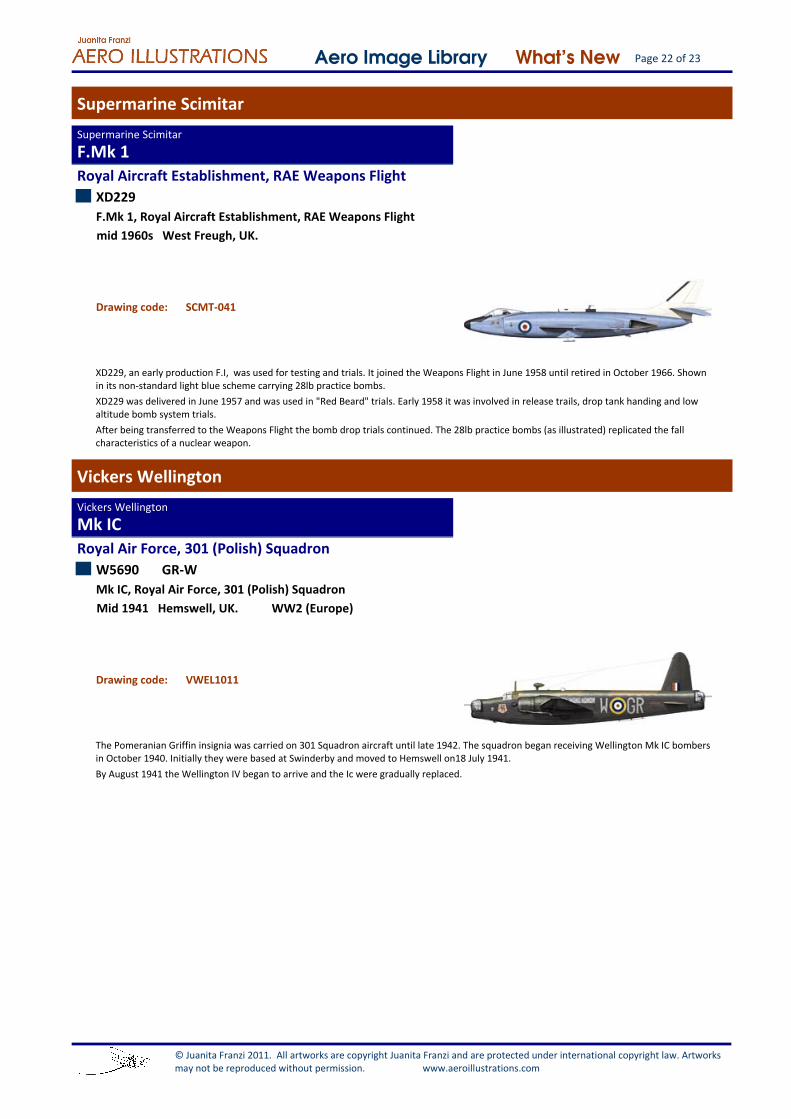
W5690 GR‐W
Mk IC, Royal Air Force, 301 (Polish) Squadron
Mid 1941 Hemswell, UK. WW2 (Europe)
VWEL1011Drawing code:
The Pomeranian Griffin insignia was carried on 301 Squadron aircraft until late 1942. The squadron began receiving Wellington Mk IC bombers in October 1940. Initially they were based at Swinderby and moved to Hemswell on18 July 1941.By August 1941 the Wellington IV began to arrive and the Ic were gradually replaced.
© Juanita Franzi 2011. All artworks are copyright Juanita Franzi and are protected under international copyright law. Artworks may not be reproduced without permission. www.aeroillustrations.com

Page 23 of 23Aero Image Library What's New
Vought F4U Corsair
F4U‐1Vought F4U Corsair
US Navy, Carrier Qualification Training Unit
02465 F‐21
F4U‐1, US Navy, Carrier Qualification Training Unit
June 1943 NAS Glenview, Illinois. Training
VF4U1041Drawing code:
This aircraft was being used by CQTU to train pilots for carrier landings. In June 1943, during a practice landing on USS Wolverine, in Lake Michigan, the aircraft crashed overboard. In 2010 the aircraft was recovered for preservation.
© Juanita Franzi 2011. All artworks are copyright Juanita Franzi and are protected under international copyright law. Artworks may not be reproduced without permission. www.aeroillustrations.com
Related Documents