Armonía Training Days Remo Orsoni Application Engineer

Armonía Training Days Remo Orsoni Application Engineer.
Dec 26, 2015
Welcome message from author
This document is posted to help you gain knowledge. Please leave a comment to let me know what you think about it! Share it to your friends and learn new things together.
Transcript

ArmoníaTraining Days
Remo OrsoniApplication Engineer


Armonía Training Day, Program
Basic Setup >
Advanced Setup>
Go Live >
Sound Check >
Exercise >
Introducing the Armonía Pro Audio Suite environment.
Total control of the system: fine tuning.
Let your virtual venue come alive.
Armonía: your first partner at the sound check!
On air!
Ready for the next show.Maintenance >
Basic Setup

Basic Setup: Designing the system from scratch> Add background images
Drag and drop the item image (from the ribbon menu) into the workspace. Load an image.

Basic Setup: Designing the system from scratch> Add devices
Drag and drop all the devices on the workspace.

Basic Setup: Designing the system from scratch> Add other items
Adding racks and speakers to the workspace.

Basic Setup: Designing the system from scratch> The final draw
The system is designed on screen!

Basic Setup: Grouping the system> System Subdivison
Starting system view.

Select the group , then drag & drop it into the workspace.
Basic Setup: Grouping the system> System Subdivison

Place the group into the workspace.
Basic Setup: Grouping the system> System Subdivison

Associate a channel to a group by clicking: 1 – Assign 2 - Click on the channel rectangle.
Basic Setup: Grouping the system> System Subdivison

View of the system.
Basic Setup: Grouping the system> System Subdivison

The basic group ALL is selected, note the belonging channel.
Basic Setup: Grouping the system> System Subdivison
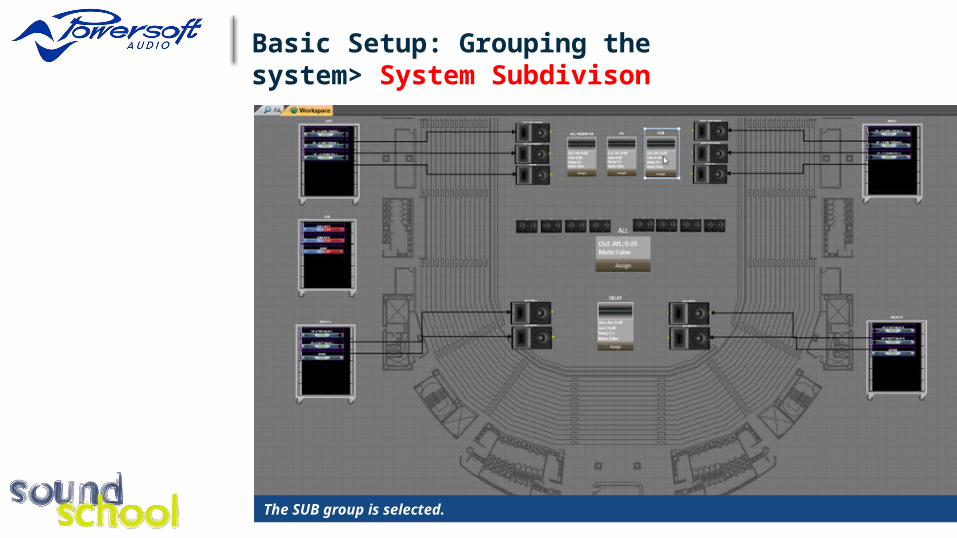
The SUB group is selected.
Basic Setup: Grouping the system> System Subdivison

Basic system, with an horizontal sub array with a 80° main lobe width.
Basic Setup: Grouping the system> Sub array steering subdivison

Group overview with the system steering. note the different delay values applied on every channel.
Basic Setup: Grouping the system> Sub array steering subdivison

Complete system with sub control and array shaping.
Basic Setup: Grouping the system> Array shaping subdivison

Basic system and its advanced groups.
Basic Setup: Grouping the system> Group Overview

3- Click on “Events Console”.
Basic Setup: Events Handle> Activate events
2 - Click on “Events”.
1 - Choose “View” tab from Armonía main ribbon.

4 - “Events Console” shows actual events that are occurring.
Basic Setup: Events Handle> Monitoring overview
3 - “Events Console” filters section: decide which type of real time events you would like to monitor.
1 - Switch from “Registry” (monitor) and “Notify” (config). 2 - “Registry” shows the history of the events occurred.

Basic Setup: Events> Configuration and setup
1 - Change mailing and modem configuration..

Basic Setup: Events Handle> Configuration and setup
2 - “Events” configuration, choose which monitor and which and how send them.

3 – Managing contacts.
Basic Setup: Events Handle> Configuration and setup

4 – Active contact list.
Basic Setup: Events Handle> Configuration and setup

Basic Setup: Events Handle> Events on Living Workspace
2 - Amplifiers tooltip will show the reasons of red background.
1 - Amplifiers “active background” will turn to red.

Basic Setup: Events Handle> Special events setup: GPO
2 - Gpo has an amplifier details tab that allows to set up all thresholds.
1 - Amplifiers overview alarms led will turn on and his tooltip will show the reasons.

Basic Setup: Saving system file
2 – Select save.
1 – Click the ribbon.
Save the paw:
Advanced SetupTotal control of the system: fine tuningAdvanced tools: how to edit all system features quickly

Advanced Setup> Source Selection
The device tab will appears . Goes into tab general and click on the input routing button.

Advanced Setup> Source Selection
Clicking on the source you can find all the possible option for that device.

Advanced Setup> Analog Backup
2 – Select the trim gain.
1 – Select the analog backup mode.

Advanced Setup> AESOP routing
A typical Data plus Audio connection.In green the signal path, in red the audio path.

Advanced Setup> AESOP routing
Select the KAESOP routing.

Advanced Setup> Routing selection> K Series
Clicking on the source you can find all the possible routing for that device.

Advanced Setup> Routing selection> M Series
Goes in the preset tab.

Advanced Setup> Routing selection> M Series
Select the layout in the combo box.

Advanced Setup> Routing selection> M Series
Press the mono mix button to activate the mono mix.
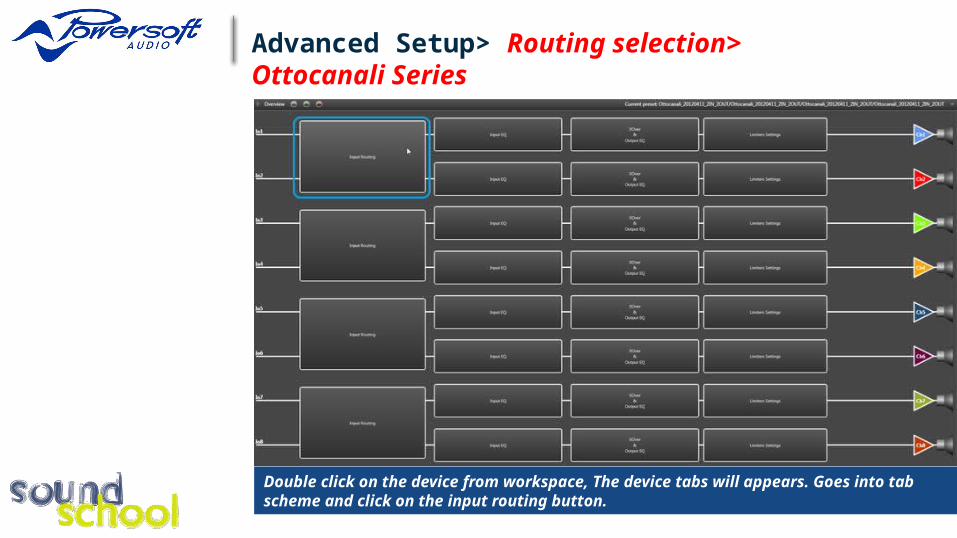
Advanced Setup> Routing selection> Ottocanali Series
Double click on the device from workspace, The device tabs will appears. Goes into tab scheme and click on the input routing button.

Advanced Setup> Routing selection> Ottocanali Series
Clicking on the source you can find all the possible routing for that device.

Advanced Setup> Output processing
3 – Limiters.
1 – Output eq.
2 – Damping.

Advanced Setup> Eq
1 – Enable/disable the filter. 2 – Set filter type. 3 – Set frequency.4 – Set Q. 5- Set gain.

Advanced Setup> Eq
1 – Enable/disable the xover. 2 – Set xover type. 3 – Set Frequency.4 – Set polarity. 5 - Set output Gain.

Advanced Setup> Eq
1 – Import the .csv file. 2 – Select the FIR filter 3 – Send the filter to the device memory. 4 – Enable/disable the filter. 5 – Edit the taps with a spreadsheet. 6 – Refresh the curve and the taps on the device (ie after an editing.)7 - Remove the curve (a flat Eq will be applied.)

Advanced Setup> Damping
1 – Enable/disable the damping.
2 – Set the resistance to add.
3 – Conversion tool, to calculate the cable lenght.

Advanced Setup> Limiter
1 – Enable/disable the limiter. 2 – Set the trheshold Voltage.3 – Set the attack time 4 - Set the release time.

Advanced Setup> Limiter> K Series
1 – Enable/disable the limiter 2 – Select the limiter type. 3 – Select the threshold in W.
4 – Set the attack time. 5 - Set the release time. 6 – Enable/diasble the soft knee. 7 – Actual GR and GR history.

Advanced Setup> Limiter> M Series
1 – Enable/disable the limiter 2 – Enable/disable the frequency shaping. 3 – Select the threshold in W. 4 – Set the attack time. 5 - Set the hold time. 6 – Set the release time.7 – Enable/disable frequency shaping. 8 – Filters for the frequency shaping.

Advanced Setup> Editing the system> Device - Clipboard
1 – Right-click on amplifier icon to access main menu and choose “Device” sub-menu. 2 – Copy amplifier settings in the clipboard.
3 – Paste amplifier settings from the clipboard.

Advanced Setup> Editing the system> Device - *.pam
1 – Right-click on amplifier icon to access main menu and choose “Preset” sub-menu. 2 – Save amplifier settings on a pam file..
3 – Load amplifier settings from a pam file.

Advanced Setup> Editing the system> Channels - *.chp
2 – Copy channel settings in the clipboard..
1 – Right-click on channel icon to access management menu.
3 – Paste channel settings from the clipboard.
4 – Load channel settings from a chp file.
5 – Save channel settings on a chp file.

Advanced Setup> Editing the system> Input Eq - *.iqp
2 – Load equalization from a iqp file.
1 – Save equalization on a iqp file.
3 – Copy equalization in the clipboard.
4 – Paste equalization from the clipboard.

Advanced Setup> Editing the system> Output Eq - *.oqp
2 – Load equalization from a oqp file.
1 – Save equalization on a oqp file.
3 – Copy equalization in the clipboard.
4 – Paste equalization from the clipboard.

Advanced Setup> Save on board the presets> K Series
Goes in the preset tab.

Advanced Setup> Save on board the presets> K Series
Select the preset slot you want modify, insert the name and click save.

Advanced Setup> Save on board the presets> M Series
MxxD has a single DSP module.

Advanced Setup> Save on board the presets> M Series
MxxQ has two DSP modules; both slots must be recalled in two seperate operations.

Go Live!Let your virtual venue come aliveDiagnostic tools: how to solve problems quickly moving from a virtual project to a real live show

Go Live: Preset Loading> Import preset file .pam
The .pam import/export operation from the workspace. Note the blue rectangle on the selected device.

Go Live: Preset Loading> Recall preset from the device> K Series
Select the preset using the arrows.

Go Live: Preset Loading> Recall preset from the device> M Series
Rear preset selection.

Go Live: Associate Devices> Discovery the device
Click on the discovery button to start the discovery process.

Verify all the network is online. The first number represents the device online, the second number represents the all device was online during the .paw session. Use this number to identify the missing devices.
Go Live: Associate Devices> Discovery the device
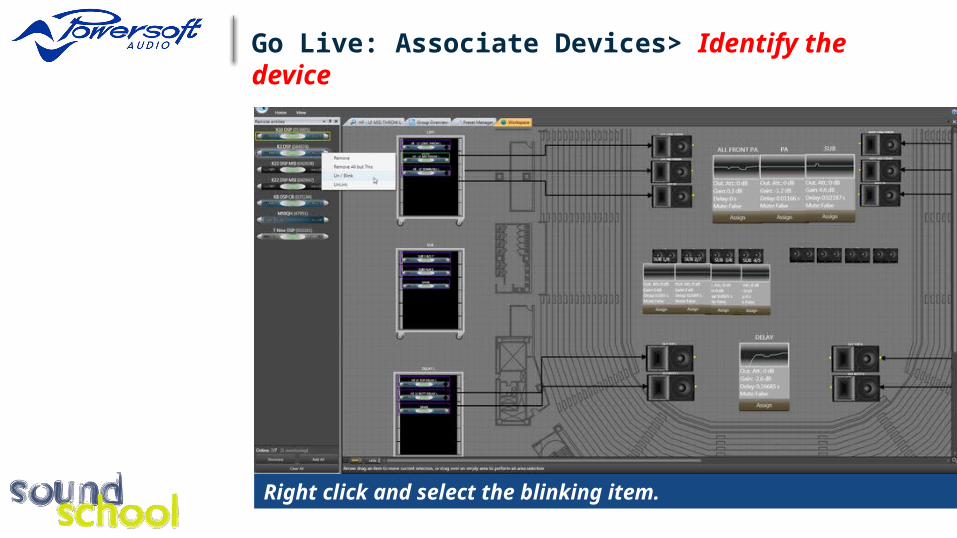
Right click and select the blinking item.
Go Live: Associate Devices> Identify the device

Drag and drop, be sure the arrow appears.
Go Live: Associate Devices> Associate the real device to the physical device
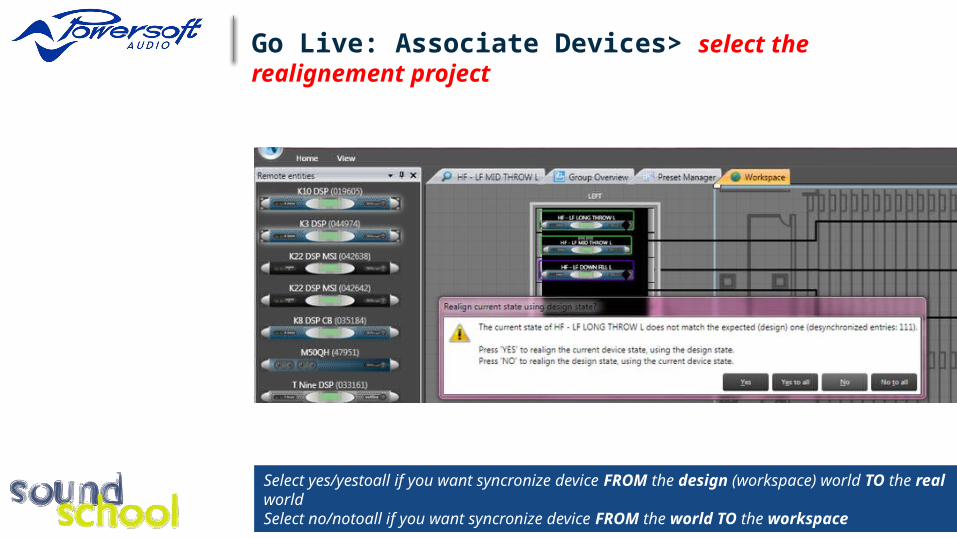
Select yes/yestoall if you want syncronize device FROM the design (workspace) world TO the real worldSelect no/notoall if you want syncronize device FROM the world TO the workspace
Go Live: Associate Devices> select the realignement project

Drag and drop, be sure the arrow appears.
Go Live: Associate Devices> is the selection correct?

Go Live: How to realign device> Main menù - *.paw management
2 – Recent Documents quick access, from top to bottom, from newest to oldest.
1 – Create New empty paw or Open an existing one.
3 – Save your paws on your local drive.
4 – Open the Options window, this will focus on the General tab (see below).
5 – Armonía has a special workspace (paw) auto save mechanism, you’ll find them:UserFolder\AppData\Roaming\Powersoft\Armonía\AutoSaves\

Go Live: How to realign device> Realign Message - Deal with desynchronization
2 – Choose “Yes” if you want that what is on your design (sw) is going to be send to the amplifier (hw).
1 – Number of elements that are desynchronized.
3 – Choose “Yes To All” if you want that the previous behaviour is reflected on all the amplifiers that Armonía detected as desynchronized.4 – Choose “No” if you want that what is on your amplifier (hw) is reading from your design (sw).5 – Choose “No To All” if you want that the previous behaviour is reflected on all the amplifiers that Armonía detected as desynchronized.
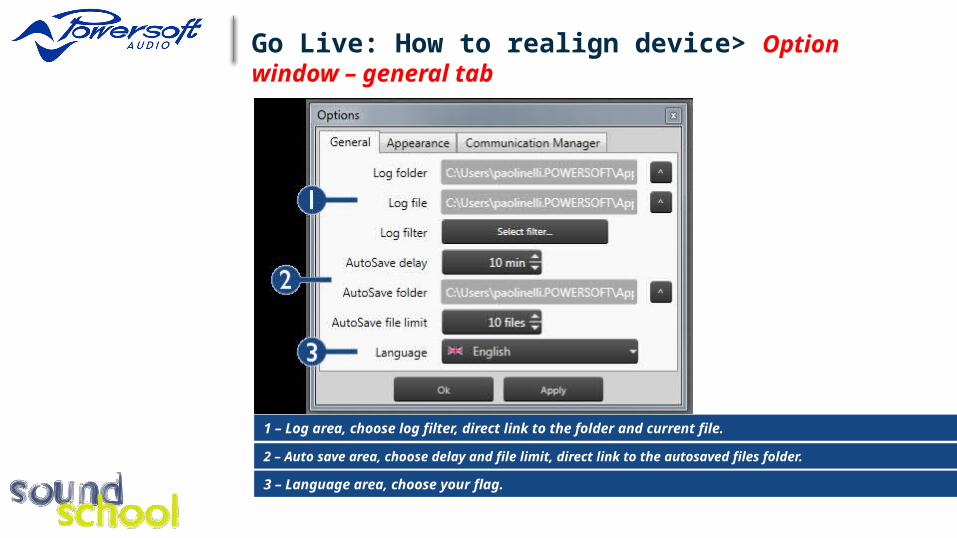
Go Live: How to realign device> Option window – general tab
2 – Auto save area, choose delay and file limit, direct link to the autosaved files folder.
1 – Log area, choose log filter, direct link to the folder and current file.
3 – Language area, choose your flag.

Go Live: How to realign device> Log file - Catch desynchronization details
2 – List of the desynchronized elements with the difference between the UI value and the Remote state: User Interface != Amplifier.
1 – Desynch message in the log file, with the total number of elements desynchronized: useful trick is to search “desynch“ word to reach easily this entry.

Go Live: network management> Communication Manager - Deal with network interfaces
2 – Commands column, refresh your list and decide on which board scan for amplifiers.
1 – List of available network interfaces, their IP and the Armonía state (active or not).
3 – Serial port management, refresh list and choose on which COM scan for amplifiers.

Sound CheckArmonía: your first partner at the sound check! Experience powerful software solutions: a panel of options beyond setup operations.

Sound Check: test your system> Access the system list
Select the system list.

Sound Check: test your system> Access the system list
Mute all from the sys list, all the channels will be muted.

Sound Check: test your system> Verify the signal presence
From sys list verify the signal presence.
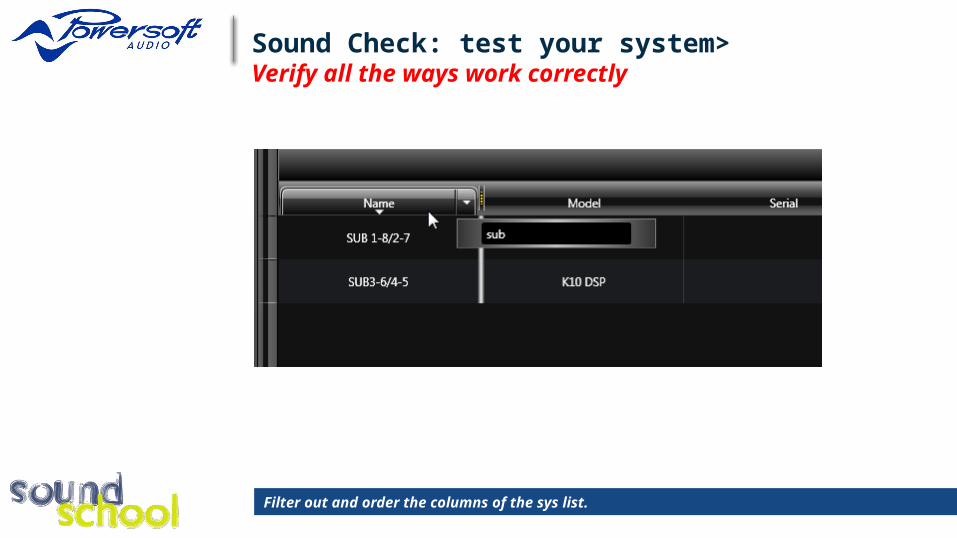
Sound Check: test your system> Verify all the ways work correctly
Filter out and order the columns of the sys list.

Sound Check: test your system> Verify all the ways work correctly
Mute/unmute the amps from the sys list.

Sound Check: learn to use the system Eq> Insert a filter
Select a filter and drag in the Eq view.

Sound Check: learn to use the system Eq> Set filter values
2 – Enable/disable the filters.
1 – Drag and drop the filter.
3 – Set frequency.
4 – Set slopes.
5– Set gain.

Sound Check: learn to use the system Eq> Enable/disable all the filter's layer
Enable disable the sole filter's layer.

Sound Check: learn to use the system Eq> Import/export layer
(Re)Load the whole layer, in this way you can create your own snapshot.

Sound Check: tune the system
The basic system.

Sound Check: tune the system>Array shaping
1 - Choose your gain by moving fader or inserting value.
2 - Insert the delay.

Sound Check: tune the system>Array shaping
Double click on the view.

Sound Check: tune the system>Array shaping
The same grouping in the grouping Eq view.

Sound Check: tune the system>Array shaping
Select a filter and drag in the Eq view.

Sound Check: tune the system>Gain & Time alignment
1 – Choose your gain moving fader or inserting value.2 – Insert the delay.

Sound Check: tune the system> Eq’s
Select the group and drag and drop into the workspace.

Sound Check: tune the system> Eq’s
Select a filter and drag in the Eq. view.

Exercise: system list vs living workspace

Exercise: collecting information

Exercise: locating information
System listyou can try to assign a name that identify the area related to that amplifier.
Living Workspaceyou can place map of the venue / installation so you could drag and drop each loud speaker and racks to their real position and have a direct feedback on which part of the system has a problem.

Exercise: quick control

MaintenanceReady for the next show: Armonía saves all previously created configurations and gives you a startingpoint for future setups.

Maintenance: preset manager> deal with the preset list

Maintenance: preset manager> Step by step
1 – Status of the operations that the Preset Manager is currently doing on the amplifier.
2 – Click on Preset Manager tab in the amplifier detail to activate this view.

Maintenance: preset manager> On board preset manager
1 – Choose presets list source (available only in K Series).2 – Refresh amplifiers reset list.
3 – Preset information: index, locking state and name.4 – On board preset management column, load, save or delete what is on your amplifier memory5 – Click on Presets tab in the amplifier detail to activate this view.

Sign up for our Armonía Support Forumhttp://www.powersoft-audio.com/en/armonia-forum

www.powersoft-audio.com
Powersoft S.r.l.Via E. Conti, 550018 Scandicci (Firenze), ItalyPhone +39 055 735 0230
Related Documents


