Arduino and DS18B20 Hans-Petter Halvorsen https://www.halvorsen.blog 1-Wire Temperature Sensor

Welcome message from author
This document is posted to help you gain knowledge. Please leave a comment to let me know what you think about it! Share it to your friends and learn new things together.
Transcript

Arduino and DS18B20
Hans-Petter Halvorsen
https://www.halvorsen.blog
1-Wire Temperature Sensor

• Introduction to Arduino• DS18B20 Temperature Sensor• Arduino Examples– Read Temperature Data from
DS18B20 Sensor– Write Temperature Data to
ThingSpeak
Contents

Arduino
Hans-Petter Halvorsen
https://www.halvorsen.blog
Table of Contents

• Arduino is an open-source electronics platform based on easy-to-use hardware and software.
• It's intended for anyone making interactive projects, from kids to grown-ups.
• You can connect different Sensors, like Temperature, etc.
• It is used a lots in Internet of Things projects• Homepage:
https://www.arduino.cc
Arduino

Arduino• Arduino is a Microcontroller• Arduino is an open-source platform
with Input/Output Pins (Digital In/Out, Analog In and PWM)• Price about $20• Arduino Starter Kit ~$40-80
with Cables, Wires, Resistors, Sensors, etc.

Arduino UNO
1
2
3
External Power Supply
USB for PCconnection
Digital ports (2-13)
Analog In ports (0-5)
Reset button
4 5
6
5V, GND

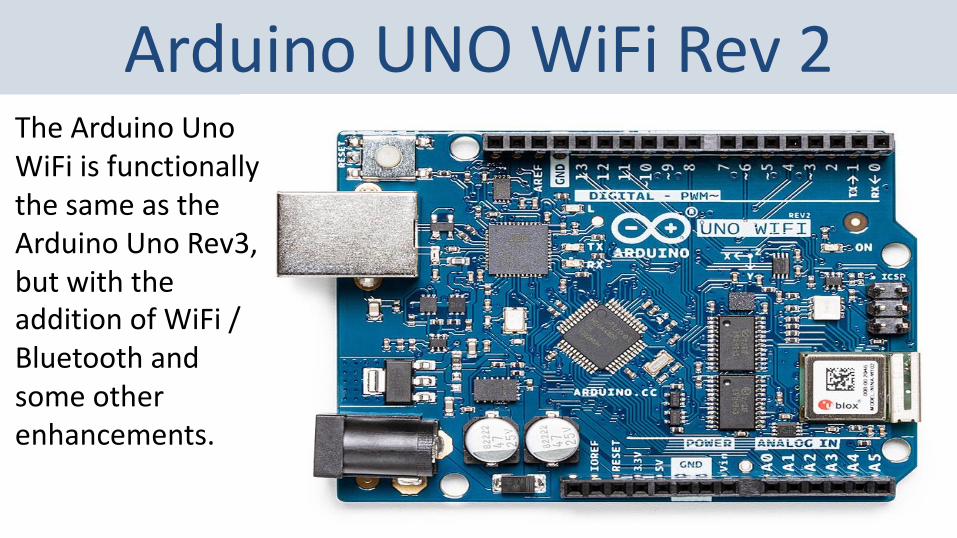
Arduino UNO WiFi Rev 2The Arduino Uno WiFi is functionally the same as the Arduino Uno Rev3, but with the addition of WiFi / Bluetooth and some other enhancements.

Arduino Software
In this window you create your
Program
Compile and Check if Code is OK
Creates a New Code Window
Open existing Code
Upload Code to Arduino Board Save
Open Serial Monitor
Error Messages can be seen herewww.arduino.cc
The software can be downloaded for free:

DS18B20
Hans-Petter Halvorsen
https://www.halvorsen.blog
Table of Contents
1-Wire Temperature Sensor

DS18B20 1-Wire Temperature Sensor
2cm
0.5cm

DS18B20 1-Wire Temperature Sensor
GND Data 5V
1 2 3
DS18B20
The Data pin goes to a Digital Input pin on the Arduino
• DS18B20 is a 1-Wire Digital Temperature Sensor, this means the Sensor only need 1 Pin for Communication (+ one pin for GND and one pin for 5V)
• Accuracy +/−𝟎. 𝟓• 9 to 12-bit resolution (Programmable)• Temperature range −𝟓𝟓°𝐂 to +𝟏𝟐𝟓°𝐂• Price: About $4• Datasheet:
https://datasheets.maximintegrated.com/en/ds/DS18B20.pdf
Digital vs. Analog Temperature Sensors• Digital temperature sensors like the DS18B20 differ from analog thermistors in several important ways. • In thermistors, changes in temperature cause changes in the resistance of a ceramic or polymer
semiconducting material. • Usually, the thermistor is set up in a voltage divider, and the voltage is measured between the
thermistor and a known resistor. • The voltage measurement is converted to resistance and then converted to a temperature value by the
microcontroller.• Digital temperature sensors are typically silicon based integrated circuits. • They contain the temperature sensor, an analog to digital converter (ADC), memory to temporarily
store the temperature readings, and an interface that allows communication between the sensor and a microcontroller.
• Unlike analog temperature sensors, calculations are performed by the sensor, and the output is an actual temperature value (in degrees Celsius) – so no conversion is needed.
• The DS18B20 communicates with the “One-Wire” communication protocol, a proprietary serial communication protocol that uses only one wire to transmit the temperature readings to the microcontroller.
https://www.circuitbasics.com/raspberry-pi-ds18b20-temperature-sensor-tutorial/

Arduino Examples
Hans-Petter Halvorsen
https://www.halvorsen.blog
Table of Contents

Read Temperature Data
Hans-Petter Halvorsen
https://www.halvorsen.blog
Table of Contents
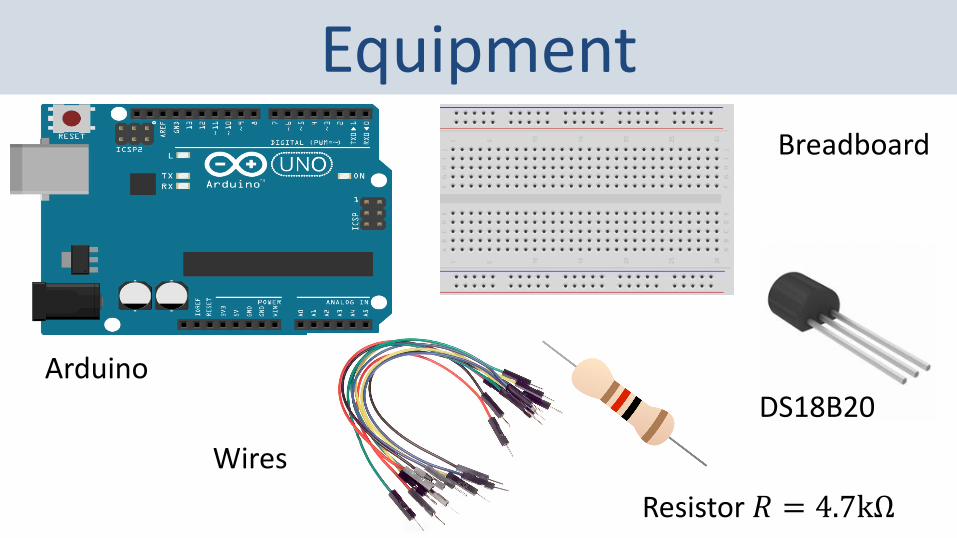
Equipment
Arduino
Wires
Breadboard
Resistor 𝑅 = 4.7kΩ
DS18B20
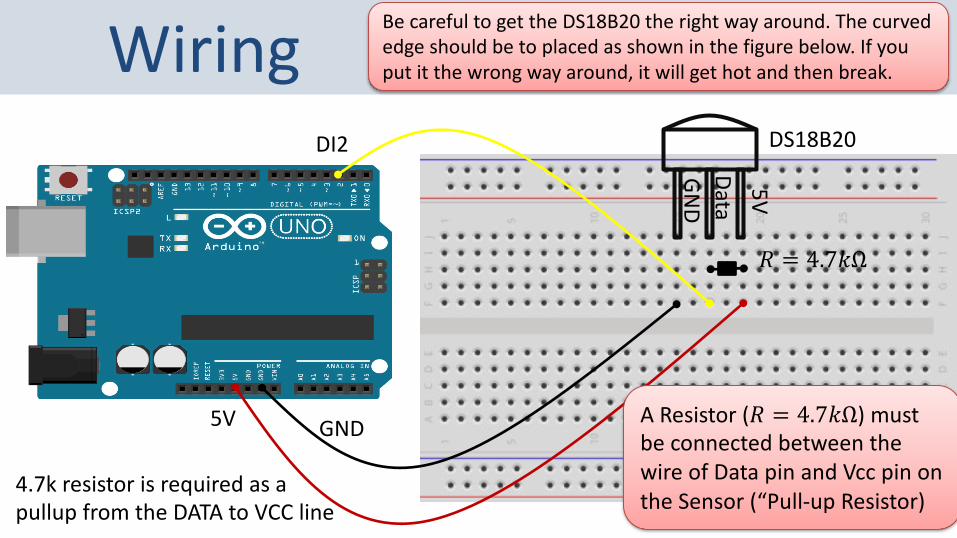
Wiring
𝑅 = 4.7𝑘Ω
DS18B20
5V GND
DI2
4.7k resistor is required as a pullup from the DATA to VCC line
GND
5VData
A Resistor (𝑅 = 4.7𝑘Ω) must be connected between the wire of Data pin and Vcc pin on the Sensor (“Pull-up Resistor)
Be careful to get the DS18B20 the right way around. The curved edge should be to placed as shown in the figure below. If you put it the wrong way around, it will get hot and then break.

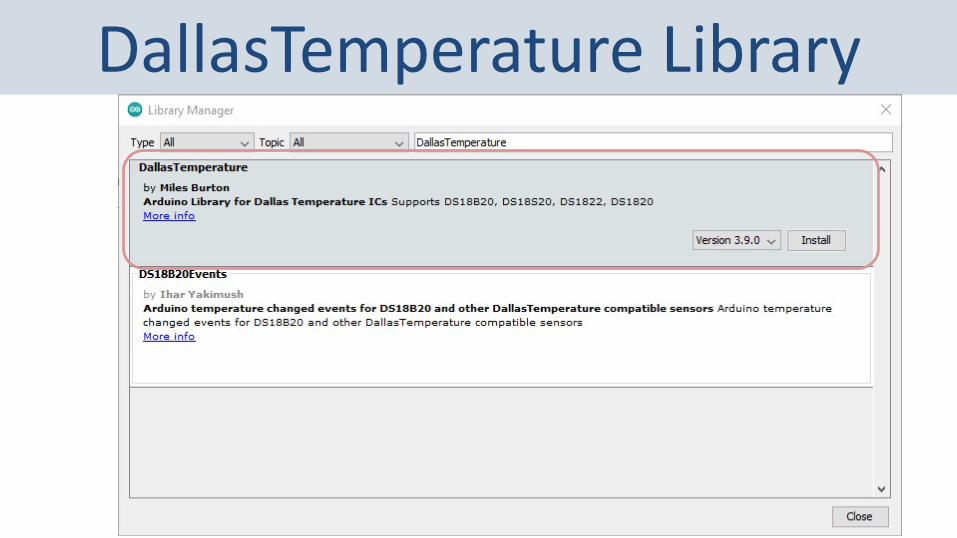
• We use some existing Libraries–OneWire Library–DallasTemperature Library
• By using these Libraries, it requires just a few lines of code in order to get the Temperature Value in degrees Celsius
Arduino Code Example
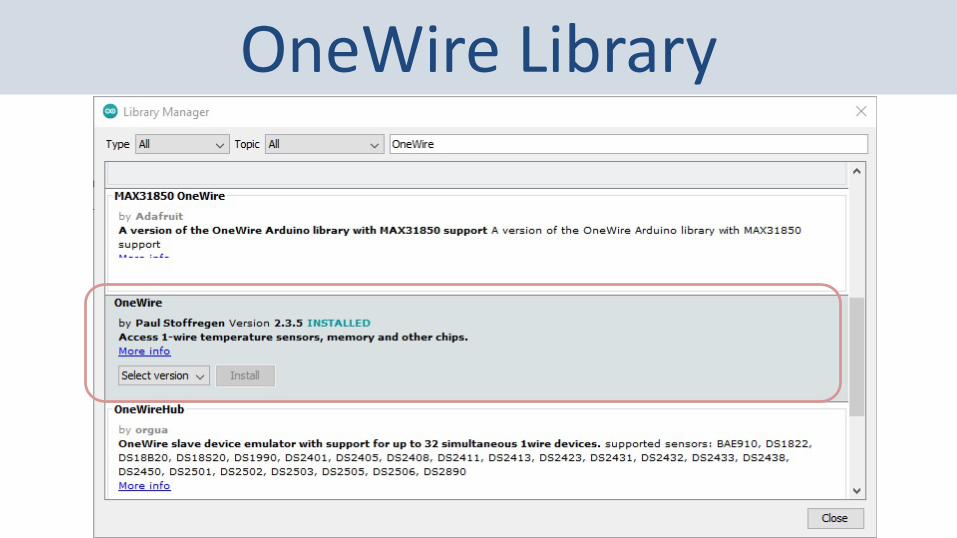
OneWire Library
DallasTemperature Library

ExampleWe use the built-in Example
as a starting point

Arduino Code#include <OneWire.h>#include <DallasTemperature.h>
#define ONE_WIRE_BUS 2
OneWire oneWire(ONE_WIRE_BUS);
DallasTemperature sensors(&oneWire);
float tempCelcius=0;
void setup(void)
Serial.begin(9600);sensors.begin();
void loop(void)
sensors.requestTemperatures(); tempCelcius = sensors.getTempCByIndex(0);Serial.print("T = ");Serial.print(tempCelcius);Serial.println("ºC");
delay(1000);

Serial Monitor

Log Sensor Data to ThingSpeak
Hans-Petter Halvorsen
https://www.halvorsen.blog
Table of Contents

Log Data to ThingSpeak• In this Example we will read Temperature data
from the DS18B20 Sensor• Then we will the Temperature data to the
ThingSpeak Cloud Service

• ThingSpeak is an IoT analytics platform service that lets you collect and store sensor data in the cloud and develop Internet of Things (IoT) applications.
• ThingSpeak has a free Web Service (REST API) that lets you collect and store sensor data in the cloud and develop Internet of Things applications.
• It works with Arduino, Raspberry Pi, MATLAB and LabVIEW, Python, etc.
https://thingspeak.com
ThingSpeak

Arduino UNO WiFi Rev 2The Arduino Uno WiFi is functionally the same as the Arduino Uno Rev3, but with the addition of WiFi / Bluetooth and some other enhancements.

ThingSpeak Library

Arduino Example
We use the built-in Example as a starting point

Arduino Code#include <OneWire.h>#include <DallasTemperature.h>#include "ThingSpeak.h"#include <WiFiNINA.h>#include "secrets.h"
#define ONE_WIRE_BUS 2OneWire oneWire(ONE_WIRE_BUS);DallasTemperaturesensors(&oneWire);
float tempCelcius=0;WiFiClient client;int wait = 20000;
void setup(void)
Serial.begin(9600);sensors.begin();CheckWiFi();ThingSpeak.begin(client);
void loop(void)
ConnectWiFi();ReadSensorData();ThingSpeakWrite();delay(wait);
Here you see the main code structure:
We have created separate Functions for:• CheckWiFi()• ConnectWiFi()• ReadSensorData()• ThingSpeakWrite()
The Functions are presented on the next pages.

Arduino Codevoid CheckWiFi()// check for the WiFi module:if (WiFi.status() == WL_NO_MODULE) Serial.println("Communication with WiFi module failed!");// don't continuewhile (true);
String fv = WiFi.firmwareVersion();if (fv != "1.0.0") Serial.println("Please upgrade the firmware");
void ConnectWiFi()char ssid[] = SECRET_SSID; char pass[] = SECRET_PASS;
if(WiFi.status() != WL_CONNECTED)Serial.print("Attempting to connect to SSID: ");Serial.println(SECRET_SSID);while(WiFi.status() != WL_CONNECTED)WiFi.begin(ssid, pass);Serial.print(".");delay(5000);
Serial.println("\nConnected.");
#define SECRET_SSID "xxxxxx" #define SECRET_PASS "xxxxxx"
#define SECRET_CH_ID xxxxxx#define SECRET_WRITE_APIKEY "xxxxxx"
Secrets.h

Arduino Codevoid ReadSensorData()sensors.requestTemperatures(); tempCelcius = sensors.getTempCByIndex(0);Serial.print("T = ");Serial.print(tempCelcius,1);Serial.println("ºC");

Arduino Code
void ThingSpeakWrite()
unsigned long myChannelNumber = SECRET_CH_ID;const char * myWriteAPIKey = SECRET_WRITE_APIKEY;
int channelField = 1;
int x = ThingSpeak.writeField(myChannelNumber, channelField, tempCelcius, myWriteAPIKey);if(x == 200)
Serial.println("Channel update successful.");else
Serial.println("Problem updating channel. HTTP error code " + String(x));
#define SECRET_SSID "xxxxxx" #define SECRET_PASS "xxxxxx"
#define SECRET_CH_ID xxxxxx#define SECRET_WRITE_APIKEY "xxxxxx"
Secrets.h

Serial Monitor

ThingSpeak
• https://create.arduino.cc/projecthub/TheGadgetBoy/ds18b20-digital-temperature-sensor-and-arduino-9cc806
• https://create.arduino.cc/projecthub/iotboys/how-to-use-ds18b20-water-proof-temperature-sensor-2adecc
• https://lastminuteengineers.com/ds18b20-arduino-tutorial/
References

Hans-Petter Halvorsen
University of South-Eastern Norwaywww.usn.no
E-mail: [email protected]: https://www.halvorsen.blog
Related Documents


