Studying the east face of the Allt na Fearna Mor bridge Archaeological survey of two possible Thomas Telford bridges, A836, between Invershin and Lairg, Sutherland Janet Hooper ARCH Archaeology for Communities in the Highlands January 2015 Archaeology for Communities in the Highlands (ARCH) is a registered Scottish charity No. SCO40624 and a Company Limited by Guarantee No. 353054. This project funded from the E.ON Rosehall Community Fund managed by Foundation Scotland, and by the Robertson Trust.

Welcome message from author
This document is posted to help you gain knowledge. Please leave a comment to let me know what you think about it! Share it to your friends and learn new things together.
Transcript

Studying the east face of the Allt na Fearna Mor bridge
Archaeological survey of two possible Thomas Telford bridges,
A836, between Invershin and Lairg, Sutherland
Janet Hooper
ARCH Archaeology for Communities in the Highlands
January 2015
Archaeology for Communities in the Highlands (ARCH) is a registered Scottish charity No. SCO40624 and a Company Limited by Guarantee No. 353054. This project funded from the E.ON Rosehall
Community Fund managed by Foundation Scotland, and by the Robertson Trust.

2
Introduction On 27th and 28th September, 2014, as part of an ARCH (Archaeology for Communities in the Highlands) course examining the work of Thomas Telford around the Kyle of Sutherland, 17 people came together to learn about the principles and techniques of building survey. The focus of the two days were two, previously unrecorded, arched stone bridges, located about 5km south of Lairg and bypassed by the present line of the A836 in the early 1990s. The larger of the two bridges, crosses the Allt na Fearna Mor, which forms the boundary between the parishes of Creich and Lairg. This bridge has features which suggest that it was built to Thomas Telford’s specification, as part of the road -finished in 1819 - linking his iron bridge at Bonar Bridge with the north coast at Tongue (Haldane 1995, 188-9). Just to the north, a smaller bridge, crossing the Allt na Fearna Beag, has fewer distinguishing features, but provides an interesting contrast. In the field below this bridge, a number of features associated with water management may be linked to the road, but perhaps more likely to the railway, which opened in 1868 and which runs along the west side of the field. The condition of the bridges - particularly the poor state of the Allt na Fearna Mor bridge - precluded detailed measured survey; nonetheless a wealth of material has been produced enabling a more accurate assessment of both bridges.

3
Allt na Fearna Mor bridge (NC 58371 01670)
Long view of the bridge. The hollow way on its north side is visible, with the group standing in it
(John Wombell) The bridge over the Allt na Fearna Mor has a slightly splayed approach, though the parapets and roadway are level - and the parapets parallel over the arch. Its battered abutments, approximately 5m long, terminate at vertical spandrels, which mean that the spandrel itself is recessed. All these features ensure that the Allt na Fearna Mor bridge matches Curtis’s description of a Telford Type 3 bridge (1981, 489-90). The span of the arch is c. 4.85m wide at the base. The roadway itself is 3.6m (11’8”) wide in the centre of the bridge, which equates well with Telford’s specification that the ‘breadth of the Roadway between the Parapets to be Twelve Feet in the narrowest part’ (quoted in Curtis 1981, 488).

4
View of bridge along W face, taken from the S, showing curve and profile of spandrel, with the repaired section of parapet in the foreground (Susan Kruse)
Recording the W side of the bridge. The revetment on the south bank of the burn and the profile are
the spandrel are very clear (Janet Hooper)

5
Sketch plan of Allt na Fearna Mor bridge, showing location of possible hollow ways. Areas of trees are hatched in green
Offset plan of Allt na Fearna Mor bridge The footings of the bridge clearly rest on bedrock, most obviously on the north bank of the river, but it is not clear whether or not it has been modified in order to support the bridge. The base of the abutment on its south side is close to the normal height of the river (making it 7.25m high), but on the north side it is c. 0.8m above normal water levels (the abutment is 6.63m high). This height difference does perhaps imply that the bedrock has not been quarried to shape; interestingly, it is the north side of the bridge which is in poorer condition. Revetment walls extend c. 3m east and west of the bridge, on both the north and south banks of the burn. These revetments, which are about 1m high, clearly abut the stonework of the bridge, but it is not possible to determine whether this is a feature of the way in which the bridge has been constructed or whether it reflects the fact that they are later in date. On the east side of the bridge, a hollow way appears to lead down to the burn on each bank, crossing it just below a waterfall. This area is covered in deep heather, but the hollow way on the north side is clearly visible as it contours around the slope on a shallow arc towards the burn. A large borrow pit is visible on the east side of the road to the north of the bridge. The stonework of the bridge is generally intact, but a large area (around 1.2m wide) of severe weathering has removed the facing at the base of the spandrel at the south-west corner of the arch - and some of the red sandstone blocks used to define the arch and recessed spandrels are delaminating, removing the simple rebated moulding which provides their only architectural distinction. Pressure cracks are particularly visible in blocks close to the base of the spandrel on the south-west and south-east sides of the arch. Some damage is clearly very recent – and has been exacerbated by the fierce storm at the end of August 2014. The stonework of the bridge consists of squared blocks of (local) grey stone, laid in regular courses and well faced, though their definition has largely been lost because of much more recent cement pointing. This heavy cement rendering now stands proud of many of the upper edges of the sandstone blocks forming the arch. Underneath the arch, though many of the joints have been washed out, the bridge seems solid.

6
The top of the recessed spandrel is 2-3 courses below the parapet coping, where it survives on the east side of the bridge - but this is also the case on the west side, where the cope stones are clearly visible lying in the burn, confirming that on this side the parapet has been rebuilt. An area of concrete blocks at the south west end of the bridge provides corroboration; the damage apparently occurred around 1990 (Jock MacDonald, pers. comm.). The cope stones on the east side of the bridge average 0.45m deep by 0.30m high, but vary between 0.35m and 0.75m in length. The top of the parapet is 0.72m above present road level; the width of the parapet and of the cope stones again accord with Telford’s specification (Curtis 1981, 488). The blocks in the burn on the west side of the bridge, though some have been damaged in the fall, have remarkably similar dimensions.
E face of the bridge (John Wombell)

7
Detail of E face of bridge. Areas obscured by vegetation are hatched in green and weathered areas in blue
W face of the bridge (John Wombell)
Detail of W face of bridge. Areas obscured by vegetation are hatched in green and weathered areas in blue
The spandrels project 0.35m from the face of the wall at the base, tapering in gradually towards the top - what Curtis terms plumb and batter (1981, 489-90). This design has made these areas of the bridge particularly vulnerable to weathering, as vegetation has found a footing on the padstone from which the arch springs at the base of the south-east and north-west spandrels. The rebate of the spandrels on the south-east and south-west sides of the bridge has eroded away. There are four courses of stonework between the top of the arch and the base of the cope stones (the rise of the arch to the top of the coping measures 1.57m). The voussoirs are square red sandstone blocks, which

8
slightly narrow towards the top of the arch. The keystone of the arch is not distinguished. Unlike the very neat voussoirs, the cope stones of the parapet seem to be relatively roughly dressed. In many respects, the simplicity and quality of the detailing of this bridge recalls the (much larger and grander) Invershin Bridge. This was built in 1822 to a design by Joseph Mitchell, which had been slightly amended by Telford (Bangor-Jones 1990). Here the only ‘fine work’ allowed was a ‘coping of Free stone to be neatly Chizzel-drafted’, the stone to come from the Tain quarries. It is possible that this was the source - and ethos - used a few years earlier at Allt na Fearna Mor.
Damage to SW spandrel of bridge (Tom
McCourt)
Detail of padstone, with rebated moulding, at base of NW spandrel (Janet Hooper)

9
Detail of voussoirs showing impact of cement re-pointing (Jock MacDonald)
Dressed red sandstone blocks, which once formed the coping on the west side of the bridge, lying on
the bed of the Allt na Fearna Mor (Janet Hooper) Allt na Fearna Beag bridge (NC 58229 01991) The much smaller bridge over the Allt na Fearna Beag has also suffered the indignity of being slathered in cement. This means it is virtually impossible to see much of the original stonework, though it appears to be similar to that of the larger bridge - however, red sandstone has not been used for the voussoirs or the coping. The bridge does have a slight splay, visible at both ends on the east side, but only present at the southern end on the west side. The faces of the bridge also have a very slight batter. The bridge is 5.25m long, while it is 3.5m wide between the parapets; the latter does mean that the roadway is of similar width to that of the Allt na Fearna Mor bridge and, therefore, also close to Telford’s specification.
10
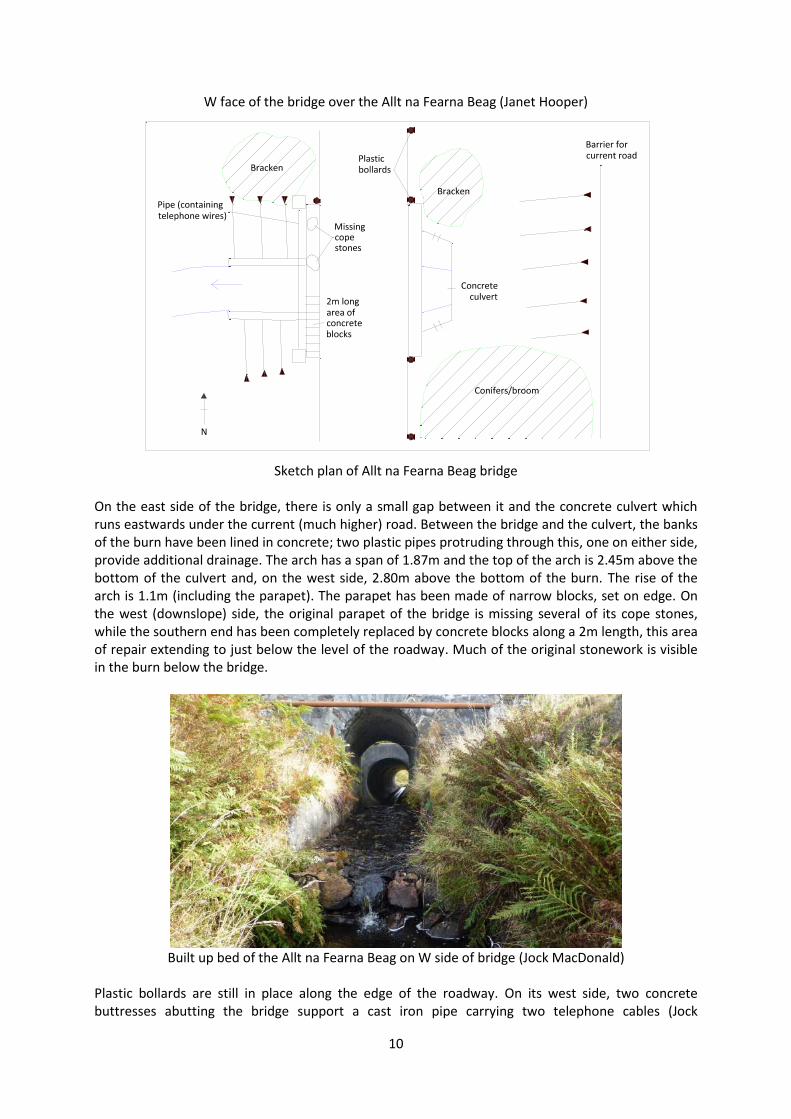
W face of the bridge over the Allt na Fearna Beag (Janet Hooper)
Sketch plan of Allt na Fearna Beag bridge
On the east side of the bridge, there is only a small gap between it and the concrete culvert which runs eastwards under the current (much higher) road. Between the bridge and the culvert, the banks of the burn have been lined in concrete; two plastic pipes protruding through this, one on either side, provide additional drainage. The arch has a span of 1.87m and the top of the arch is 2.45m above the bottom of the culvert and, on the west side, 2.80m above the bottom of the burn. The rise of the arch is 1.1m (including the parapet). The parapet has been made of narrow blocks, set on edge. On the west (downslope) side, the original parapet of the bridge is missing several of its cope stones, while the southern end has been completely replaced by concrete blocks along a 2m length, this area of repair extending to just below the level of the roadway. Much of the original stonework is visible in the burn below the bridge.
Built up bed of the Allt na Fearna Beag on W side of bridge (Jock MacDonald)
Plastic bollards are still in place along the edge of the roadway. On its west side, two concrete buttresses abutting the bridge support a cast iron pipe carrying two telephone cables (Jock

11
MacDonald, pers. comm.). Corrosion of the pipe has resulted in staining of the face of the bridge. There are stone built revetments on each side of the burn on this side of the bridge. The bed of the burn has clearly been raised and levelled and a small weir marks the end of the revetments.
Buttress supporting pipe containing telephone cables on west side of bridge (Jock MacDonald)
Features in the surrounding landscape In the field below the bridge over the Allt na Fearna Beag are a number of features, many of which appear to be part of a system of water management. There are also a number of settlement features, brief notes on which have been included as Appendix 1. Below the bridge, the burn has clearly been canalised; it now heads south west to join the Allt na Fearna Mor, not far from where the latter runs under the railway. Its original course, apparent as a marshy hollow in late September, runs in a westerly direction, down the slope and more directly towards the railway. Both burns are shown on the First edition of the Ordnance Survey map (Sheets CII and CIII, 1874 (1879)), suggesting that the canalisation might relate to the construction of the railway in 1868. Two borrow pits at the top of this hollow, on its south side, are likely to have provided stone for the bridge and the road. Where the canalised section diverges from the original line of the burn, its north bank has been revetted. The eastern half of the revetment now has a pronounced curve, as does the burn itself, though the slope of the ground suggests that both may have once run on a much straighter line. If the eastern part of the revetment has been washed away, this does seem to explain the contrast between the two halves of the revetment. The eastern part is made of roughly coursed rounded boulders, which stand in the burn itself, while the western half consists of large dressed squared blocks, set back from the edge of the burn; both halves are approximately 9m in length. Though only two courses in height (c. 0.75m high), the western half of the revetment is remarkable for the quality of the stonework, the size of the grey stone blocks (avg. 0.5m long by 0.4m high), and the neatness of the joints between the blocks. In the centre of its length, the large blocks of the upper course are separated by smaller stones, but the significance of this is not clear. Several of the blocks have dynamite holes, the presence of which suggests that they must post-date the construction of the railway - perhaps because it was found necessary to control the flow of the burns running down towards it. It appears noteworthy that similar dressed blocks with dynamite holes were used in the construction of the railway bridge over the Allt na Fearna Mor. While its eastern end projects slightly into the burn, confirming it has been truncated, the dressed half of the revetment has a slight curve at its western end, which does imply that it was always intended to terminate at this point.

12
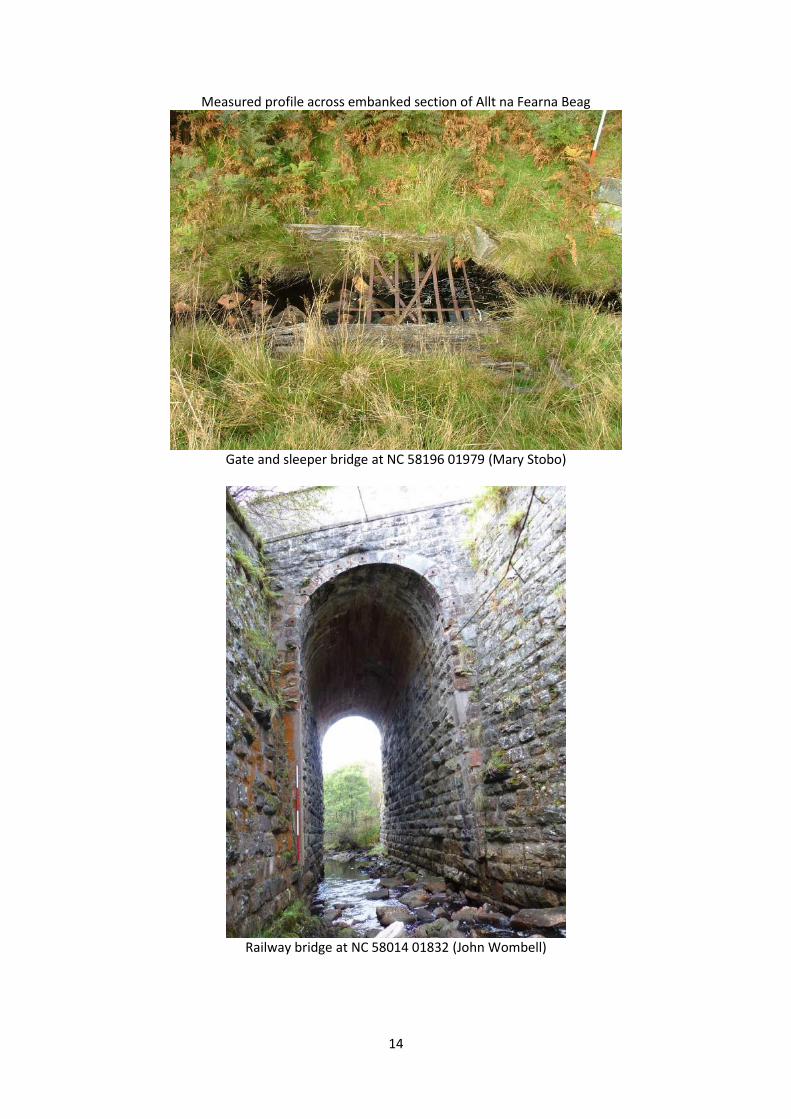
As the burn flows down the slope, it continues between grassy embankments, which are clearly artificial. At the start of the embanked section, is a rough bridge made out of a metal five bar gate and four sleepers (NC 58196 01979), while there is a second bridge, formed from sleepers resting on a large boulder in the bottom of the burn, further to the west (NC 58166 01930). The canalised section of the Allt na Fearna Beag eventually runs into the Allt na Fearna Mor, continuing under a high arched bridge through the railway embankment (NC 58014 01832) to join the River Shin. There is also a substantial culvert under the railway on the original line of the Allt na Fearna Beag (NC 57973 01992).
Sketch plan of area to W of Allt na Fearna Beag bridge

13
Detail sketch plan of revetment walls
Dressed stone revetment on N bank of canalised burn (Janet Hooper)
Replacement stone revetment to E of dressed stone section of revetment (Janet Hooper)
14
Measured profile across embanked section of Allt na Fearna Beag
Gate and sleeper bridge at NC 58196 01979 (Mary Stobo)
Railway bridge at NC 58014 01832 (John Wombell)

15
Conclusions This part of Achany Glen is dominated by the routeways - river, railway and road - which run parallel to each other between Invershin and Lairg. These two bridges, though much modified since they were first erected - perhaps as part of Thomas Telford’s initial scheme for the construction of the road to the north coast - reflect the importance of these routeways over time. The bridge over the Allt na Fearna Beag appears to be in a stable condition at present, though perhaps vulnerable because of its position at the base of the embankment for the current line of the road. The case is not the same for the Allt na Fearna Mor bridge; the loss of many of the facing stones, particularly at the base of the spandrels on the south side, has allowed water to penetrate into the core of the bridge and more rapid deterioration seems now to be inevitable. A regular programme of photographic monitoring to document the condition of the bridge, alongside further documentary research in order to confirm whether or not it formed part of Telford’s original scheme, seems essential if a case is to be made for its consolidation and preservation. Even if definite evidence for the date of the bridge cannot be found, its simple elegance makes it an important element in the road network which was so critical to the opening up of the Highlands in the nineteenth century; the fact that it remained in use until the early 1990s is testament to this. Acknowledgements The wealth of material generated over the two days of the building survey workshops is the result of the hard work of Margaret Aitchison, Michael Baird, Nigel Baird, Alasdair Cameron, Anne Coombs, Jonie Guest, Richard Guest, Susan Kruse, Gregor Laing, Jock MacDonald, Tom McCourt, Marlyn Price, Marion Ruscoe, Mary Stobo, Malcolm Standring, Gary Thompson, and John Wombell, who very kindly brought his camera and pole to enable ‘aerial’ photos of the bridge. The report was compiled by Janet Hooper. Access to the bridges was by courtesy of Mr and Mrs Macdonald, who also provided interesting background to the site. Bibliography Bangor-Jones, M., 1990. ‘The Making of the Road to Lochinver’. The Northern Times, March 30, 1990. Curtis, G. R., 1981. ‘Roads and bridges in the Scottish Highlands: the route between Dunkeld and
Inverness, 1725-1925’. Proceedings of the Society of Antiquaries of Scotland 110 (1978-80), 475-96.
Haldane, A.R.B., 1995. New Ways Through the Glens. Colonsay: House of Lochar. Appendix 1 Cairn NC 57993 01951 An oval cairn of stones, measuring 16m by 9m and standing 1.2m high. Building centred on NC 57954 02064 JW1 The severely truncated and wasted remains of a sub-rectangular building, measuring 7m NW-SE by 3m NE-SW internally. The building is defined by stone and turf walls standing to about 0.5m high and spread to approximately 3m in width. It appears to have had rounded corners both internally and externally. The building is located on higher ground north of the Allt na Fearna Mor and has been cut across by the fence on the east side of the railway. John Wombell photos P1000957-P1000959

16
Taken from the N
Building centred on NC 58165 01950 JW2 The wasted remains of a possible sub-rectangular longhouse, measuring c. 12m NW-SE by 2.5m NE- SW internally, with a compartment measuring c. 2.5m square internally at the north-west end and another, c. 5m long, at the opposite end, which is set into the slope. There is a central outshot, measuring c. 4m long by c.3m wide externally, on the west side. It has low turf covered stone walls spread to c. 1.5m wide and standing up to 0.3m high. The south-east end of the building has been truncated by the canalised Allt na Fearna Beag. John Wombell photo P1000961 Drawing 20 Highland Council Historic Environment Record MHG19399, Farmstead. There are two buildings/enclosures shown on the Ordnance Survey First edition map which would seem to relate to the building footings recognised on the ground (Sheets CII and CIII, 1874 (1879)). These lie to the north and north east of an enclosed area of improved ground, truncated by the railway on the west side, which may also explain the low stone and turf dykes noted on Drawing 23. The building and enclosure recorded at NC 58165 01950 has been identified as a farmstead on the basis of the First edition map (HER MHG19399). A settlement, called Aultfearn, is visible on two maps of Sutherland, published in 1820, that of William Forbes (NLS Sutherland Papers, Dep.313/3600) and John Thomson and William Johnson (NLS EMS.s.712(26)). Appendix 2 Concordances Appendix 2.1 Drawing List
Sheet No Description Scale Date Author
1 1 Sketch elevation of E face of Allt na Fearna Mor bridge
Not to scale 27/9/2014 Anne Coombs
2 Sketch elevation of W face of Allt na Fearna Mor bridge
Not to scale 27/9/2014 AC

17
Sheet No Description Scale Date Author
3 Sketch plan of Allt na Fearna Mor bridge
Not to scale 27/9/2014 AC
2 4 Sketch elevation of E face of Allt na Fearna Mor bridge
Not to scale 27/9/2014 John Wombell
3 5 Sketch elevation of E face of Allt na Fearna Mor bridge, plus detail of abutment (Dwg 5a)
Not to scale 27/9/2014 Marlyn Price
6 Dimensioned elevation of E face of Allt na Fearna Mor bridge
Not to scale 27/9/2014 MP
4 7 Sketch elevation of E face of Allt na Fearna Mor bridge, plus measured detail of construction (Dwgs 7a-c)
Not to scale 27/9/2014 Richard Guest
8 Dimensioned plan of Allt na Fearna Mor bridge
Not to scale 27/9/2014 RG
5 9 Dimensioned elevation of E face of Allt na Fearna Mor bridge
Not to scale 27/9/2014 Nigel Baird
6 10 Dimensioned elevation of E face of Allt na Fearna Mor bridge
Not to scale 27/9/2014 Michael Baird
7 11 Sketch elevation of E face of Allt na Fearna Mor bridge
Not to scale 27/9/2014 Jock MacDonald
8 12 Sketch elevation of W face of Allt na Fearna Mor bridge, with profile of abutment (Dwg 12a)
Not to scale 27/9/2014 Tom McCourt
13 Sketch plan of Allt na Fearna Mor bridge
Not to scale 27/9/2014 TM
9 14 Sketch elevation of E face of Allt na Fearna Mor bridge
Not to scale 27/9/2014 Mary Stobo
10 15 Sketch elevation of E face of Allt na Fearna Mor bridge
Not to scale 27/9/2014 Marion Ruscoe
11 16 Sketch elevation of E face of Allt na Fearna Mor bridge
Not to scale 27/9/2014 Margaret Aitchison
12 17 Sketch elevation of E face of Allt na Fearna Mor bridge
Not to scale 27/9/2014 Malcolm Standring
13 18 Dimensioned elevation of E face of Allt na Fearna Mor bridge (1 of 2)
Not to scale 27/9/2014 MP/MR/SK/MStobo/ MB/NB
14 18 Dimensioned profile of Allt na Fearna Mor bridge parapet (2 of 2)
Not to scale 27/9/2014 MP/MR/SK/MStobo/ MB/NB
15 19 Dimensioned elevation of W face of Allt na Fearna Mor bridge (1 of 2)
Not to scale 27/9/2014 RG/TM/MA/JM/ Gary Thompson
16 19 Dimensioned elevation of W face of Allt na Fearna Mor bridge (2 of 2)
Not to scale 27/9/2014 RG/TM/MA/JM/GT
17 20 Offset plan of Allt na Fearna Mor bridge
1:100 27/9/2014 AC/JW/JG/MR/ MStandring

18
Sheet No Description Scale Date Author
18 21 Sketch plan of dressed stonework in burn on W side of Allt na Fearna Mor bridge
Not to scale 27/9/2014 TM
19 22 Dimensioned detail of W elevation of Allt na Fearna Mor bridge
Not to scale 27/9/2014 TM
20 23 Dimensioned elevation of Allt na Fearna Beag bridge
Not to scale 28/9/2014 AC/MStandring
24 Dimensioned plan of Allt na Fearna Beag bridge
Not to scale 28/9/2014 AC/MStandring
25 Sketch plan of house and enclosure
Not to scale 28/9/2014 AC
21 26 Dimensioned elevation of Allt na Fearna Beag bridge
Not to scale 28/9/2014 MStandring
27 Measured profile of canalised Allt na Fearna Beag
1:100 28/9/2014 MStandring, MA, JH
22 28 Sketch plan of canalised Allt na Fearna Beag
Not to scale 28/9/2014 RG/MB
29 Sketch elevation of walling Not to scale 28/9/2014 RG/MB
23 30 Sketch plan of canalised Allt na Fearna Beag and associated features
Not to scale 28/9/2014 TM
24 31 Sketch plan of canalised Allt na Fearna Beag
Not to scale 28/9/2014 Gregor Laing/GT
25 32 Sketch plan of canalised Allt na Fearna Beag
Not to scale 28/9/2014 JM
26 33 Sketch plan showing location of features along Allt na Fearna Beag and Allt na Fearna Mor
Not to scale 28/9/2014 MR
27 34 Measured elevation of dressed stone wall (1 of 2)
1:10 28/9/2014 RG/MB
28 34 Measured elevation of dressed stone wall (1 of 2)
1:10 28/9/2014 RG/MB
Appendix 2.2 Photographs
No Description From Date Taken by
100_1268 Long view of E facing elevation of Allt na Fearna Mor bridge
E 27/9/2014 Margaret Aitchison
100_1269 Detail of SW spandrel of Allt na Fearna Mor bridge
NW 27/9/2014 MA
100_1270 W facing elevation of Allt na Fearna Mor bridge
NW 27/9/2014 MA
100_1271 Fallen masonry below abutment on SW side of Allt na Fearna Mor bridge
NW 27/9/2014 MA
100_1272 Abutment on SW side of Allt na Fearna Mor bridge
NW 27/9/2014 MA
100_1273 Parapet on W side of Allt na Fearna Mor N 27/9/2014 MA

19
No Description From Date Taken by
bridge
100_1274 Detail of NE spandrel of Allt na Fearna Mor bridge
W and above 27/9/2014 MA
100_1275 Detail of SW spandrel of Allt na Fearna Mor bridge
N and above 27/9/2014 MA
100_1277 Detail of NW spandrel of Allt na Fearna Mor bridge
S and above 27/9/2014 MA
100_1278 Abutment on SW side of Allt na Fearna Mor bridge
N and above 27/9/2014 MA
100_1279 Abutment on SW side of Allt na Fearna Mor bridge
NW 27/9/2014 MA
100_1280 Fallen masonry block within the Allt na Fearna Mor on W side of bridge
27/9/2014 MA
DSCN0001 Long view of E facing elevation of Allt na Fearna Mor bridge
NE 27/9/2014 Michael Baird
DSCN0009 E facing elevation of Allt na Fearna Mor bridge NE 27/9/2014 MB
DSCN0017 Recording the E facing elevation of Allt na Fearna Mor bridge
NE 27/9/2014 MB
DSCN0018 W facing elevation of Allt na Fearna Mor bridge
NW 27/9/2014 MB
DSCN0019 Fallen masonry within Allt na Fearna Mor on W side of bridge
NW 27/9/2014 MB
DSCN0020 Gate and sleeper bridge across Allt na Fearna Beag
SW 28/9/2014 MB
DSCN0021 Revetment on N bank of the Allt na Fearna Beag
SW 28/9/2014 MB
DSCN0022 Revetment on N bank of the Allt na Fearna Beag
SW 28/9/2014 MB
DSCN0023 Rebuilt revetment on N bank of the Allt na Fearna Beag
SE 28/9/2014 MB
DSCN0024 Bank between canalised Allt na Fearna Beag and its old line
NE 28/9/2014 MB
DSCN0025 Bank between canalised Allt na Fearna Beag and its old line
SW 28/9/2014 MB
DSCN0026 Old line of Allt na Fearna Beag SE 28/9/2014 MB
DSCN0027 Rebuilt revetment on N bank of the Allt na Fearna Beag
NE 28/9/2014 MB
DSCN0028 Revetment on N bank of the Allt na Fearna Beag
NE 28/9/2014 MB
Standing buildings 099
E facing elevation of Allt na Fearna Mor bridge NE 27/9/2014 Anne Coombs
Standing buildings 100
E facing elevation of Allt na Fearna Mor bridge E 27/9/2014 AC
Standing buildings 101
E facing elevation of Allt na Fearna Mor bridge E 27/9/2014 AC
SANY0338 Recording features along the Allt na Fearna Beag
NE 28/9/2014 Richard Guest
SANY0339 Recording features along the Allt na Fearna S 28/9/2014 RG

20
No Description From Date Taken by
Beag
SANY0340 Revetment on N bank of the Allt na Fearna Beag
S 28/9/2014 RG
IMG_5403 Fallen masonry within the Allt na Fearna Mor on W side of bridge
E and above 29/7/2014 Janet Hooper
IMG_5404 Detail of fallen masonry within the Allt na Fearna Mor on W side of bridge
E and above 29/7/2014 JH
IMG_5405 W facing elevation of Allt na Fearna Mor bridge
NW 29/7/2014 JH
IMG_5406 W facing elevation of Allt na Fearna Mor bridge
NW 29/7/2014 JH
IMG_5407 Detail of NW spandrel of Allt na Fearna Mor bridge
W 29/7/2014 JH
IMG_5408 Detail of SW spandrel of Allt na Fearna Mor bridge
NW and below
29/7/2014 JH
IMG_5409 Detail of NW spandrel of Allt na Fearna Mor bridge
W 29/7/2014 JH
IMG_5410 E facing elevation of Allt na Fearna Beag bridge
SE 29/7/2014 JH
IMG_5411 Mouth of culvert under road above Allt na Fearna Beag bridge
SW and above
29/7/2014 JH
IMG_5412 W facing elevation of Allt na Fearna Beag bridge
W 29/7/2014 JH
IMG_5413 Fallen masonry in burn below Allt na Fearna Beag bridge
SW and above
29/7/2014 JH
IMG_5414 Long view of Allt na Fearna Beag bridge W 29/7/2014 JH
IMG_6525 Sketching the E facing elevation of Allt na Fearna Mor bridge
W 27/9/2014 JH
IMG_6526 Sketching the E facing elevation of Allt na Fearna Mor bridge
E 27/9/2014 JH
IMG_6527 Sketching the E facing elevation of Allt na Fearna Mor bridge
NE 27/9/2014 JH
IMG_6528 Photographing the E facing elevation of Allt na Fearna Mor bridge
NE 27/9/2014 JH
IMG_6530 Damage to SW spandrel of Allt na Fearna Mor bridge
NW 27/9/2014 JH
IMG_6531 Examining the W facing elevation of Allt na Fearna Mor bridge
NE 27/9/2014 JH
IMG_6532 Examining the W facing elevation of Allt na Fearna Mor bridge
NE 27/9/2014 JH
IMG_6533 Examining the W facing elevation of Allt na Fearna Mor bridge
NE 27/9/2014 JH
IMG_6534 Fallen masonry within the Allt na Fearna Mor on W side of bridge
N 27/9/2014 JH
IMG_6535 Fallen masonry within the Allt na Fearna Mor on W side of bridge
N 27/9/2014 JH
IMG_6536 Fallen masonry within the Allt na Fearna Mor on W side of bridge
N 27/9/2014 JH
IMG_6537 Fallen masonry within the Allt na Fearna Mor NW 27/9/2014 JH

21
No Description From Date Taken by
on W side of bridge
IMG_6538 Fallen masonry within the Allt na Fearna Mor on W side of bridge
NW 27/9/2014 JH
IMG_6539 Fallen masonry within the Allt na Fearna Mor on W side of bridge
N 27/9/2014 JH
IMG_6541 Fallen masonry within the Allt na Fearna Mor on W side of bridge
NW 27/9/2014 JH
IMG_6542 Fallen masonry within the Allt na Fearna Mor on W side of bridge
N 27/9/2014 JH
IMG_6543 Fallen masonry within the Allt na Fearna Mor on W side of bridge
NW 27/9/2014 JH
IMG_6545 Detail of NW abutment of Allt na Fearna Mor bridge
W 27/9/2014 JH
IMG_6546 Measuring the W facing elevation of Allt na Fearna Mor bridge
S and above 27/9/2014 JH
IMG_6547 Measuring the W facing elevation of Allt na Fearna Mor bridge
S and above 27/9/2014 JH
IMG_6548 Planning the bridge (or fighting the undergrowth!)
NW 27/9/2014 JH
IMG_6552 W facing elevation of Allt na Fearna Mor bridge
W 27/9/2014 JH
IMG_6555 W facing elevation of Allt na Fearna Mor bridge
NW 27/9/2014 JH
IMG_6558 Overall view of the revetment on N side of Allt na Fearna Beag
S 28/9/2014 JH
IMG_6559 Examining the revetment on N side of Allt na Fearna Beag
SW 28/9/2014 JH
IMG_6560 W end of revetment on N side of Allt na Fearna Beag
S 28/9/2014 JH
IMG_6561 Central section of revetment on N side of Allt na Fearna Beag
S 28/9/2014 JH
IMG_6562 Examining the revetment on N side of Allt na Fearna Beag
SW 28/9/2014 JH
IMG_6564 Central section of revetment on N side of Allt na Fearna Beag
S 28/9/2014 JH
IMG_6565 Central section of revetment on N side of Allt na Fearna Beag
S 28/9/2014 JH
IMG_6566 Recording features along the Allt na Fearna Beag
NE 28/9/2014 JH
IMG_6567 Central section of revetment on N side of Allt na Fearna Beag
S 28/9/2014 JH
IMG_6568 E end of revetment on N side of Allt na Fearna Beag
S 28/9/2014 JH
IMG_6569 Detail of E end of revetment on N side of Allt na Fearna Beag
S 28/9/2014 JH
IMG_6570 E end of revetment on N side of Allt na Fearna Beag
S 28/9/2014 JH
IMG_6571 Rebuilt revetment on N side of Allt na Fearna Beag
S 28/9/2014 JH

22
No Description From Date Taken by
IMG_6572 Recording features along the Allt na Fearna Beag
E 28/9/2014 JH
IMG_6573 W facing elevation of Allt na Fearna Beag bridge
W 28/9/2014 JH
IMG_6574 Recording features along the Allt na Fearna Beag
E 28/9/2014 JH
IMG_6576 Recording the Allt na Fearna Beag bridge W 28/9/2014 JH
IMG_6577 HAF walk: gathering at Bonar Bridge 28/9/2014 JH
IMG_6578 HAF walk: gathering at Bonar Bridge 28/9/2014 JH
IMG_6579 HAF walk: gathering at Bonar Bridge 28/9/2014 JH
IMG_6581 HAF walk: in the shadow of the new bridge 28/9/2014 JH
IMG_6582 HAF walk: in the shadow of the new bridge 28/9/2014 JH
IMG_6584 HAF walk: in the shadow of the new bridge 28/9/2014 JH
IMG_6585 HAF walk: in the shadow of the new bridge 28/9/2014 JH
IMG_6586 HAF walk: incised cross on Invercharron Bridge
28/9/2014 JH
IMG_6587 HAF walk: incised cross on Invercharron Bridge
28/9/2014 JH
IMG_6588 HAF walk: on Invercharron Bridge 28/9/2014 JH
IMG_6589 HAF walk: under Invercharron Bridge 28/9/2014 JH
IMG_6590 HAF walk: under Invercharron Bridge 28/9/2014 JH
IMG_6591 HAF walk: under Invercharron Bridge 28/9/2014 JH
IMG_6595 HAF walk: admiring Invershin Bridge 28/9/2014 JH
IMG_6597 HAF walk: admiring Invershin Bridge 28/9/2014 JH
IMG_6598 HAF walk: Invershin Bridge 28/9/2014 JH
IMG_6600 HAF walk: Invershin Bridge 28/9/2014 JH
IMG_1057 Recording the Allt na Fearna Mor bridge SW 27/9/2014 Susan Kruse
IMG_1059 John recording the Allt na Fearna Mor bridge NW 27/9/2014 SK
IMG_1060 Fallen masonry within the Allt na Fearna Mor on W side of bridge
NE 27/9/2014 SK
IMG_1061 Parapet on W side of Allt na Fearna Mor bridge
N 27/9/2014 SK
IMG_1064 W facing elevation of Allt na Fearna Mor bridge
S 27/9/2014 SK
IMG_1067 Fallen masonry within the Allt na Fearna Mor on W side of bridge
NW 27/9/2014 SK
DSCN0124 Jock recording the Allt na Fearna Mor bridge NE 27/9/2014 SK
DSCN0125 W facing elevation of Allt na Fearna Mor bridge
SW 27/9/2014 SK
DSCN0127 W facing elevation of Allt na Fearna Mor bridge
NW 27/9/2014 SK
DSCN0131 Recording the E side of the bridge S 27/9/2014 SK
DSCN0132 Talking about the bridge! E and above 27/9/2014 SK
DSCN0135 Planning the bridge (or fighting the undergrowth!)
N 27/9/2014 SK
DSCN0136 Planning the bridge (or fighting the N 27/9/2014 SK

23
No Description From Date Taken by
undergrowth!)
DSCN0137 Recording features along the Allt na Fearna Beag
NE 28/9/2014 SK
DSCN0138 Recording features along the Allt na Fearna Beag
SE 28/9/2014 SK
DSCN0139 Recording features along the Allt na Fearna Beag
NE 28/9/2014 SK
DSCN0140 Recording features along the Allt na Fearna Beag
NE 28/9/2014 SK
DSCN0142 Embankment on S side of Allt na Fearna Beag NW 28/9/2014 SK
DSCN0143 Recording features along the Allt na Fearna Beag
SW 28/9/2014 SK
DSCN0144 Allt na Fearna Beag NE 28/9/2014 SK
DSCN0145 Allt na Fearna Beag SW 28/9/2014 SK
DSCN0146 Recording features along the Allt na Fearna Beag
SW 28/9/2014 SK
DSCN0148 View towards confluence of Allt na Fearna Beag and Allt na Fearna Mor
NW 28/9/2014 SK
DSCN0149 Recording structure JW1 N 28/9/2014 SK
DSCN0151 View along railway embankment, towards old line of Allt na Fearna Beag
S 28/9/2014 SK
DSCN0153 Cast iron fencepost along railway embankment
28/9/2014 SK
DSCN0154 Culvert under railway embankment SE 28/9/2014 SK
DSCN0155 Invercharron Bridge 28/9/2014 SK
DSCN0156 Invercharron Bridge 28/9/2014 SK
L1000919 E facing elevation of Allt na Fearna Mor bridge NE 27/9/2014 Jock Macdonald
L1000920 Detail of SE spandrel of Allt na Fearna Mor bridge
NE 27/9/2014 JM
L1000921 Detail of voussoirs NE and below
27/9/2014 JM
L1000922 E facing elevation of Allt na Fearna Mor bridge NE 27/9/2014 JM
L1000923 Abutment on SE side of Allt na Fearna Mor bridge
NE 27/9/2014 JM
L1000924 Detail of SE spandrel of Allt na Fearna Mor bridge
NE 27/9/2014 JM
L1000925 Detail of NE spandrel of Allt na Fearna Mor bridge
E 27/9/2014 JM
L1000926 Junction of bridge and abutment on SW side of Allt na Fearna Mor bridge
NE 27/9/2014 JM
L1000927 Abutment on SE side of Allt na Fearna Mor bridge
NE 27/9/2014 JM
L1000928 Detail of NE spandrel of Allt na Fearna Mor bridge
W and above 27/9/2014 JM
L1000929 Detail of SE spandrel of Allt na Fearna Mor bridge
N and above 27/9/2014 JM
L1000930 Detail of SW spandrel of Allt na Fearna Mor W and above 27/9/2014 JM

24
No Description From Date Taken by
bridge
L1000931 Detail of SW spandrel of Allt na Fearna Mor bridge
W and above 27/9/2014 JM
L1000932 Detail of NW spandrel of Allt na Fearna Mor bridge
above 27/9/2014 JM
L1000933 Detail of NW spandrel of Allt na Fearna Mor bridge
S 27/9/2014 JM
L1000934 Detail of SW spandrel of Allt na Fearna Mor bridge
N 27/9/2014 JM
L1000935 W facing elevation of Allt na Fearna Mor bridge
N and above 27/9/2014 JM
L1000936 Parapet on W side of Allt na Fearna Mor bridge
SE 27/9/2014 JM
L1000937 Detail of SW spandrel of Allt na Fearna Mor bridge
NW 27/9/2014 JM
L1000938 W facing elevation of Allt na Fearna Mor bridge
NW 27/9/2014 JM
L1000939 Underside of arch on S side of Allt na Fearna Mor bridge
NW 27/9/2014 JM
L1000940 Abutment on SW side of Allt na Fearna Mor bridge
NW 27/9/2014 JM
L1000941 Detail of concrete 27/9/2014 JM
L1000942 W facing elevation of Allt na Fearna Mor bridge
SW 27/9/2014 JM
L1000943 Detail of SW spandrel of Allt na Fearna Mor bridge
SW 27/9/2014 JM
L1000944 Detail of stonework 27/9/2014 JM
L1000945 Detail of stonework 27/9/2014 JM
L1000946 Footings of N side of bridge SW 27/9/2014 JM
L1000947 Pressure crack in stone on underside of arch 27/9/2014 JM
L1000948 Detail of bedrock 27/9/2014 JM
L1000949 Detail of masonry block within the Allt na Fearna Mor
27/9/2014 JM
L1000950 Detail of masonry block within the Allt na Fearna Mor
27/9/2014 JM
L1000951 Detail of NW spandrel of Allt na Fearna Mor bridge
S 27/9/2014 JM
L1000952 Detail of NW spandrel of Allt na Fearna Mor bridge
S 27/9/2014 JM
L1000953 Detail of NW spandrel of Allt na Fearna Mor bridge
27/9/2014 JM
L1000955 Recording features along the Allt na Fearna Beag
SW 28/9/2014 JM
L1000956 Recording features along the Allt na Fearna Beag
SW 28/9/2014 JM
L1000957 Allt na Fearna Beag E 28/9/2014 JM
L1000958 Embankment on N side of Allt na Fearna Beag SE 28/9/2014 JM
L1000959 Embankment on N side of Allt na Fearna Beag SE 28/9/2014 JM

25
No Description From Date Taken by
L1000960 View NW across Allt na Fearna Beag SE 28/9/2014 JM
L1000961 Old line of Allt na Fearna Beag SE 28/9/2014 JM
L1000962 Old line of Allt na Fearna Beag; possible borrow pit
SE 28/9/2014 JM
L1000963 Old line of Allt na Fearna Beag SE 28/9/2014 JM
L1000964 Old line of Allt na Fearna Beag SE 28/9/2014 JM
L1000965 Possible encloure wall N 28/9/2014 JM
L1000966 View through Allt na Fearna Beag bridge W 28/9/2014 JM
L1000967 View through Allt na Fearna Beag bridge W 28/9/2014 JM
L1000968 Buttress supporting pipe containing telephone cables on SW side of bridge
W 28/9/2014 JM
L1000969 Buttress supporting pipe containing telephone cables on NW side of bridge
SW 28/9/2014 JM
L1000970 Relationship between E face of Allt na Fearna Beag bridge and concrete culvert
NE and above
28/9/2014 JM
L1000971 Detail of E facing elevation of Allt na Fearna Beag bridge
E and above 28/9/2014 JM
L1000972 Detail of E facing elevation of Allt na Fearna Beag bridge
E and above 28/9/2014 JM
L1000973 Relationship between E face of Allt na Fearna Beag bridge and concrete culvert
SE and above 28/9/2014 JM
L1000974 Parapet on E side of Allt na Fearna Beag bridge
S and above 28/9/2014 JM
DSCF3404 Approaching the Allt na Fearna Mor bridge from the N
N 27/9/2014 Tom McCourt
DSCF3405 Allt na Fearna Mor on E side of bridge NW 27/9/2014 TM
DSCF3407 E facing elevation of Allt na Fearna Mor bridge NE 27/9/2014 TM
DSCF3409 Abutment on SE side of Allt na Fearna Mor bridge
NE 27/9/2014 TM
DSCF3411 Repaired parapet at SW corner of Allt na Fearna Mor bridge
SW 27/9/2014 TM
DSCF3413 Fallen masonry within the Allt na Fearna Mor on W side of bridge
SW 27/9/2014 TM
DSCF3415 Detail of NW spandrel of Allt na Fearna Mor bridge
W 27/9/2014 TM
DSCF3416 Detail of NW spandrel of Allt na Fearna Mor bridge
W 27/9/2014 TM
DSCF3417 Detail of NW spandrel of Allt na Fearna Mor bridge
SE 27/9/2014 TM
DSCF3418 Detail of NW spandrel of Allt na Fearna Mor bridge
SE 27/9/2014 TM
DSCF3419 Detail of NW spandrel of Allt na Fearna Mor bridge
SE 27/9/2014 TM
DSCF3420 Detail of SW spandrel of Allt na Fearna Mor bridge
NW 27/9/2014 TM
DSCF3421 Detail of SW spandrel of Allt na Fearna Mor bridge
NW 27/9/2014 TM
DSCF3422 Detail of SW spandrel of Allt na Fearna Mor NW 27/9/2014 TM

26
No Description From Date Taken by
bridge
DSCF3423 Abutment on SW side of Allt na Fearna Mor bridge
N 27/9/2014 TM
DSCF3424 Abutment on SW side of Allt na Fearna Mor bridge
NW 27/9/2014 TM
DSCF3425 Fallen masonry within the Allt na Fearna Mor on W side of bridge
NW 27/9/2014 TM
DSCF3426 Fallen masonry within the Allt na Fearna Mor on W side of bridge
N 27/9/2014 TM
DSCF3428 Fallen masonry within the Allt na Fearna Mor on W side of bridge
NW 27/9/2014 TM
DSCF3430 Embankment along canalised Allt na Fearna Beag
SE 28/9/2014 TM
DSCF3431 View along canalised Allt na Fearna Beag W 28/9/2014 TM
DSCF3432 View through Allt na Fearna Beag bridge W 28/9/2014 TM
DSCF3433 View through Allt na Fearna Beag bridge W 28/9/2014 TM
DSCF3434 W facing elevation of Allt na Fearna Beag bridge
W 28/9/2014 TM
DSCF3435 Culvert on E side of Allt na Fearna Beag bridge SW 28/9/2014 TM
DSCF3436 Repaired parapet on W side of Allt na Fearna Beag bridge
S 28/9/2014 TM
DSCF3437 Original parapet on W side of Allt na Fearna Beag bridge
SE 28/9/2014 TM
DSCF3438 Recording features along the Allt na Fearna Beag
E 28/9/2014 TM
DSCF3439 Recording features along the Allt na Fearna Beag
SE 28/9/2014 TM
DSCF3440 Fallen masonry within the Allt na Fearna Beag on W side of bridge
S 28/9/2014 TM
DSC02811 Talking about the bridge! NE 27/9/2014 Marlyn Price
DSC02812 Looking at the Allt na Fearna Mor NW 27/9/2014 MP
DSC02813 Talking about the bridge! NE 27/9/2014 MP
DSC02814 Talking about the bridge! NE 27/9/2014 MP
DSC02815 Talking about the bridge! E 27/9/2014 MP
DSC02816 Talking about the bridge! E 27/9/2014 MP
DSC02817 E facing elevation of Allt na Fearna Mor bridge E 27/9/2014 MP
DSC02818 E facing elevation of Allt na Fearna Mor bridge NE 27/9/2014 MP
DSC02819 Abutment on SE side of Allt na Fearna Mor bridge
NE 27/9/2014 MP
DSC02820 Parapet on E side of Allt na Fearna Mor bridge W 27/9/2014 MP
DSC02821 Parapet on E side of Allt na Fearna Mor bridge E 27/9/2014 MP
DSC02822 Talking about the bridge! E and above 27/9/2014 MP
DSC02823 Talking about the bridge! E and above 27/9/2014 MP
DSC02824 Measuring the E facing elevation of Allt na Fearna Mor bridge
E 27/9/2014 MP
DSC02826 Measuring the E facing elevation of Allt na NE 27/9/2014 MP

27
No Description From Date Taken by
Fearna Mor bridge
DSC02827 Measuring the E facing elevation of Allt na Fearna Mor bridge
NE 27/9/2014 MP
DSC02828 E facing elevation of Allt na Fearna Mor bridge NE 27/9/2014 MP
DSC02829 Fallen masonry within the Allt na Fearna Mor on W side of bridge
S and above 27/9/2014 MP
DSC02830 Allt na Fearna Mor on E side of bridge N and above 27/9/2014 MP
DSC02831 Allt na Fearna Mor on E side of bridge N and above 27/9/2014 MP
DSC02832 W facing elevation of Allt na Fearna Beag bridge
W 28/9/2014 MP
001 Long view of E facing elevation of Allt na Fearna Mor bridge
E 27/9/2014 Marion Ruscoe
002 Long view of E facing elevation of Allt na Fearna Mor bridge
E 27/9/2014 MR
003 W facing elevation of Allt na Fearna Mor bridge
NW 27/9/2014 MR
004 W facing elevation of Allt na Fearna Mor bridge
NW 27/9/2014 MR
006 E facing elevation of Allt na Fearna Mor bridge E 27/9/2014 MR
007 E facing elevation of Allt na Fearna Mor bridge E 27/9/2014 MR
008 Abutment on SE side of Allt na Fearna Mor bridge
NE 27/9/2014 MR
009 E facing elevation of Allt na Fearna Mor bridge NE 27/9/2014 MR
010 Parapet on W side of Allt na Fearna Mor bridge
N 27/9/2014 MR
013 Roadway on S side of Allt na Fearna Mor bridge
N 27/9/2014 MR
014 Parapet on W side of Allt na Fearna Mor bridge
S 27/9/2014 MR
015 Parapet on W side of Allt na Fearna Mor bridge
S 27/9/2014 MR
DSCF3004 E facing elevation of Allt na Fearna Mor bridge NE 27/9/2014 Mary Stobo
DSCF3005 Allt na Fearna Mor on E side of bridge E 27/9/2014 MS
DSCF3006 E facing elevation of Allt na Fearna Mor bridge NE 27/9/2014 MS
DSCF3007 E facing elevation of Allt na Fearna Mor bridge NE 27/9/2014 MS
DSCF3008 Long view of E facing elevation of Allt na Fearna Mor bridge
NE 27/9/2014 MS
DSCF3009 E facing elevation of Allt na Fearna Mor bridge NE 27/9/2014 MS
DSCF3010 E facing elevation of Allt na Fearna Mor bridge NE 27/9/2014 MS
DSCF3011 Underside of arch of Allt na Fearna Mor bridge NE 27/9/2014 MS
DSCF3012 Detail of SE spandrel of Allt na Fearna Mor bridge
NE 27/9/2014 MS
DSCF3013 Detail of SE spandrel of Allt na Fearna Mor bridge
NE 27/9/2014 MS
DSCF3015 Detail of SE spandrel of Allt na Fearna Mor bridge
NE 27/9/2014 MS
DSCF3016 Allt na Fearna Mor on W side of bridge NE 27/9/2014 MS
28
No Description From Date Taken by
DSCF3017 Detail of SW spandrel of Allt na Fearna Mor bridge
NW 27/9/2014 MS
DSCF3018 Abutment on SW side of Allt na Fearna Mor bridge
NW 27/9/2014 MS
DSCF3019 Talking about the bridge! W 27/9/2014 MS
DSCF3020 Detail of NW spandrel of Allt na Fearna Mor bridge
W 27/9/2014 MS
DSCF3022 Detail of NW spandrel of Allt na Fearna Mor bridge
W 27/9/2014 MS
DSCF3024 Detail of NW spandrel of Allt na Fearna Mor bridge
W 27/9/2014 MS
DSCF3025 Detail of NW spandrel of Allt na Fearna Mor bridge
W 27/9/2014 MS
DSCF3026 Abutment on SW side of Allt na Fearna Mor bridge
NW 27/9/2014 MS
DSCF3027 Fallen masonry within Allt na Fearna Mor on W side of bridge
N 27/9/2014 MS
DSCF3030 Abutment on SW side of Allt na Fearna Mor bridge
NW 27/9/2014 MS
DSCF3031 Detail of SW spandrel of Allt na Fearna Mor bridge
NW 27/9/2014 MS
DSCF3032 Detail of SW spandrel of Allt na Fearna Mor bridge
NW 27/9/2014 MS
DSCF3039 Marion recording the canalised Allt na Fearna Beag
W 28/9/2014 MS
DSCF3040 Rebuilt revetment on N bank of Allt na Fearna Beag
SE 28/9/2014 MS
DSCF3041 Bed of Allt na Fearna Beag S and above 28/9/2014 MS
DSCF3042 Recording the revetment on the N bank of Allt na Fearna Beag
S 28/9/2014 MS
DSCF3043 Recording the revetment on the N bank of Allt na Fearna Beag
SW 28/9/2014 MS
DSCF3044 Recording the revetment on the N bank of Allt na Fearna Beag
SW 28/9/2014 MS
DSCF3045 Gate and sleeper bridge on Allt na Fearna Beag
S and above 28/9/2014 MS
DSCF3046 View along canalised Allt na Fearna Beag NE 28/9/2014 MS
DSCF3047 View along canalised Allt na Fearna Beag SW 28/9/2014 MS
DSCF3048 View along canalised Allt na Fearna Beag NE 28/9/2014 MS
DSCF3049 Recording the sleeper bridge on Allt na Fearna Beag
SE 28/9/2014 MS
DSCF3050 Recording the sleeper bridge on Allt na Fearna Beag
NE 28/9/2014 MS
DSCF3051 Recording the sleeper bridge on Allt na Fearna Beag
SE 28/9/2014 MS
DSCF3052 Sleeper bridge on Allt na Fearna Beag SE 28/9/2014 MS
DSCF3053 Recording the canalised Allt na Fearna Beag SW 28/9/2014 MS
DSCF3054 View along canalised Allt na Fearna Beag SW 28/9/2014 MS

29
No Description From Date Taken by
DSCF3055 View along canalised Allt na Fearna Beag SW 28/9/2014 MS
DSCF3056 View along canalised Allt na Fearna Beag SW 28/9/2014 MS
DSCF3060 Plotting the line of the Allt na Fearna Beag NE 28/9/2014 MS
DSCF3061 Plotting the line of the Allt na Fearna Beag NE 28/9/2014 MS
DSCF3062 Allt na Fearna Mor, close to the railway W 28/9/2014 MS
DSCF3065 Allt na Fearna Mor, close to the railway W 28/9/2014 MS
DSCF3068 Dynamite holes on Allt na Fearna Mor railway bridge
28/9/2014 MS
DSCF3069 Recording the Allt na Fearna Mor railway bridge
NE 28/9/2014 MS
DSCF3075 Recording Structure JW1 N 28/9/2014 MS
DSCF3077 Cast iron fencepost along railway embankment
28/9/2014 MS
DSCF3078 Recording culvert running under railway embankment
SE 28/9/2014 MS
DSCF3079 Recording culvert running under railway embankment
SE 28/9/2014 MS
DSCF3080 Cast iron fencepost along railway embankment
28/9/2014 MS
P1000144 E facing elevation of Allt na Fearna Mor bridge E 27/9/2014 Gary Thompson
P1000145 Long view of E facing elevation of Allt na Fearna Mor bridge
E 27/9/2014 GT
P1000147 Allt na Fearna Mor on E side of bridge W 27/9/2014 GT
P1000148 Detail of SW spandrel of Allt na Fearna Mor bridge
NW 27/9/2014 GT
P1000149 Detail of NW spandrel of Allt na Fearna Mor bridge
W 27/9/2014 GT
P1000150 W facing elevation of Allt na Fearna Mor bridge
W 27/9/2014 GT
P1000151 Abutment on SW side of Allt na Fearna Mor bridge
NW 27/9/2014 GT
P1000152 Detail of NW spandrel of Allt na Fearna Mor bridge
S 27/9/2014 GT
P1000153 Detail of NW spandrel of Allt na Fearna Mor bridge
W 27/9/2014 GT
P1000923 E facing elevation of Allt na Fearna Mor bridge E 27/9/2014 John
Wombell
P1000924 Long view of E facing elevation of Allt na Fearna Mor bridge SE
27/9/2014 JW
P1000925 E facing elevation of Allt na Fearna Mor bridge SE 27/9/2014 JW
P1000926 E facing elevation of Allt na Fearna Mor bridge SE 27/9/2014 JW
P1000927 E facing elevation of Allt na Fearna Mor bridge (4m pole) E
28/9/2014 JW
P1000928 E facing elevation of Allt na Fearna Mor bridge (4m pole) E
28/9/2014 JW
P1000929 E facing elevation of Allt na Fearna Mor bridge (4m pole) SE
28/9/2014 JW

30
No Description From Date Taken by
P1000931 E facing elevation of Allt na Fearna Mor bridge (4m pole) NE
28/9/2014 JW
P1000933 E facing elevation of Allt na Fearna Mor bridge (6m pole) E
28/9/2014 JW
P1000935 E facing elevation of Allt na Fearna Mor bridge (6m pole) SE
28/9/2014 JW
P1000936 E facing elevation of Allt na Fearna Mor bridge (6m pole) E
28/9/2014 JW
P1000938 E facing elevation of Allt na Fearna Mor bridge (6m pole) W
28/9/2014 JW
P1000940 W facing elevation of Allt na Fearna Mor bridge (6m pole) NW
28/9/2014 JW
P1000941 W facing elevation of Allt na Fearna Mor bridge (6m pole) SW
28/9/2014 JW
P1000943 W facing elevation of Allt na Fearna Mor bridge (6m pole) W
28/9/2014 JW
P1000944 W facing elevation of Allt na Fearna Mor bridge (6m pole) W
28/9/2014 JW
P1000945 W facing elevation of Allt na Fearna Mor bridge (6m pole) NW
28/9/2014 JW
P1000946 W facing elevation of Allt na Fearna Mor bridge (6m pole) SW
28/9/2014 JW
P1000947 E facing elevation of Allt na Fearna Mor railway bridge E
28/9/2014 JW
P1000948 E facing elevation of Allt na Fearna Mor railway bridge E
28/9/2014 JW
P1000949 E facing elevation of Allt na Fearna Mor railway bridge E
28/9/2014 JW
P1000950 Detail of part of N abutment wall of Allt na Fearna Mor railway bridge S
28/9/2014 JW
P1000951 Detail of N abutment wall of Allt na Fearna Mor railway bridge SW
28/9/2014 JW
P1000952 Underneath of arch of Allt na Fearna Mor railway bridge below
28/9/2014 JW
P1000953 Underneath of arch of Allt na Fearna Mor railway bridge below
28/9/2014 JW
P1000954 View through railway culvert (with flash) E 28/9/2014 JW
P1000955 View through railway culvert (without flash) E 28/9/2014 JW
P1000956 View of E side of railway culvert E 28/9/2014 JW
P1000957 Structure JW1 NE 28/9/2014 JW
P1000958 Structure JW1 NE 28/9/2014 JW
P1000959 Structure JW1 N 28/9/2014 JW
P1000960 Structure JW2, showing truncation by canalised Allt na Fearna Beag SE
28/9/2014 JW
Related Documents