aquatherm 500 S 500 W | Lindon, UT | 84042 | 801.805.6657 [email protected] www.aquatherm.com 10.15 4 Edition Printed in USA INSTALLER MANUAL 4th EDITION This manual is designed to accompany the Aquatherm Installer Training Course and act as a reference for trained installers. It is not a substitute for taking the Installer Training Course. aquatherm INSTALLER MANUAL © 2015 aquatherm NA L.C. All rights reserved 4 ed.

Welcome message from author
This document is posted to help you gain knowledge. Please leave a comment to let me know what you think about it! Share it to your friends and learn new things together.
Transcript

aquatherm500 S 500 W | Lindon, UT | 84042 | 801.805.6657
10.154 EditionPrinted in USA
INSTALLER MANUAL4th EDITION
This manual is designed to accompany the Aquatherm Installer Training Course and act as a reference for trained installers. It is not a substitute for taking the Installer Training Course.
aquatherm IN
STA
LLER
MA
NU
AL
© 2015 aquatherm NA L.C. All rights reserved
4 ed.

- -
Owner
Installer Number
Trainer Name
Trainer Contact Info.

Aquatherm Installer ManualFor the proper installation of PP-R pipe
and fittings manufactured exclusively by Aquatherm
Required for the Aquatherm Installer and Aquatherm Butt Welding Courses
© 2015 aquatherm NA L.C. All rights reserved

This manual was produced by Aquatherm NA L.C. and is intended strictly for the North American market. It combines information published by Aquatherm GmbH with accepted fusion practices in the USA and Canada. Aquatherm GmbH assumes no responsibility for the content of this manual beyond what they have specifically published. Aquatherm NA L.C. does not warranty the completeness or accuracy of the information contained herein. In the event of a discrepancy between this manual and information published by Aquatherm GmbH, the information published by Aquatherm GmbH will be considered correct. Also, in the event of a discrepancy between this manual and the Aquatherm NA L.C. catalog, the information published in the catalog will be considered correct. The information in this manual is superseded by any subsequent editions of this manual. Aquatherm NA L.C. retains the right to modify the proper installation procedures at any time via technical bulletins.
Contents
ContentsChapter 1
Welcome to Aquatherm 1.1Getting started 1.2Working with PP-R 1.3Aquatherm innovations 1.4The world leader in PP-R pipe 1.5Material handling 1.6Pipe sizes 1.8Wall thickness 1.9Identification 1.10Hot water aquatherm green pipe® MF 1.11Cold water aquatherm green pipe® S 1.12Thick-wall aquatherm blue pipe® MF 1.13Thin-wall aquatherm blue pipe® MF 1.14aquatherm lilac pipe® S 1.15Molded fittings 1.16
Segmented fittings 1.17Flow rates and sizing 1.18Operating pressures 1.19Compressed air 1.19Weights and capacities 1.20Listings and approvals, reference standards 1.22
Chapter 2Heat fusion 2.1Safety 2.2Cutting the pipe 2.3Inspecting the cut 2.5How heat fusion works 2.6Socket fusion 2.7Welding heads 2.8Welding irons 2.9Welding iron safety 2.10Tool assembly 2.12Marking the pipe 2.13

Socket fusion heating and cooling times 2.14Socket fusion instructions 2.16Large diameter socket fusion 2.18Mechanically assisted fusions 2.19Inspection 2.20Avoiding improper fusions 2.21Troubleshooting bad connections 2.22Ovality in machine-assisted fusions 2.23Fusion outlets 2.24Fusion outlet instructions 2.25Electrofusion 2.28Electrofusion instructions 2.29Butt welding 2.32Explanation of butt welding 2.33Butt welding pressures 2.34Butt welding phases 2.35McElroy adjustment and welding pressures 2.36Ritmo adjustment and welding pressure 2.38
Rothenberger adjustment and welding pressure 2.40Widos adjustment and welding pressures 2.42Adjustment bead height 2.44Butt welding heating and cooling times 2.45Butt welding instructions: 2.47Reducing cooling times 2.53Fusing dissimilar SDRs 2.54Internal alignment 2.55Repairs 2.56
Chapter 3Productivity 3.1Getting started 3.2Crew mix 3.3Tooling 3.4Hand irons 3.5Socket fusion machines 3.6Four-jaw butt fusion machines 3.8Modified machine configurations 3.9

Manual butt fusion machines 3.10Larger crew vs. more tools 3.11Work example 3.12 Joining spools: 3.24
Chapter 4Planning 4.1Technical bulletins 4.2Clamps and hangers 4.3Anchors and guides 4.4Support intervals and hanger spacing 4.5Support intervals 4.6Increased hanger spacing 4.8Fire rating 4.9Linear expansion 4.10Expansion controls 4.14Chemical compatibility 4.20Integration with copper tubing 4.21PP-R to copper transition fittings 4.22
Connecting to a boiler 4.23Bushings, reducers, and reducing couplings 4.24Large PP-R ball valve 4.25Threaded connections 4.26Brass identification 4.27Flanges 4.28Butterfly valves 4.30Branch lines 4.31Buried applications 4.32Maximum pull force 4.33Bending Aquatherm pipe 4.34Insulation sizing, thrust blocking, noise generation, and vibration isolation 4.35UV protection and painting 4.36Fusing UV pipe 4.37Flushing, grounding, and freeze protection 4.38Warranty claims 4.39Pressure testing 4.40

Chapter 5Pipe and fittings 5.1aquatherm green pipe® SDR 7.4 MF 5.2aquatherm green pipe® SDR 7.4/11 S 5.2aquatherm green pipe® SDR 7.4 MF UV 5.3aquatherm blue pipe® SDR 7.4/11 MF 5.4aquatherm blue pipe® SDR 17.6 MF 5.5aquatherm blue pipe® SDR 7.4/11 MF UV 5.6aquatherm blue pipe® SDR 17.6 MF UV 5.6aquatherm lilac pipe® SDR 7.4/11 S 5.7Coupling 5.8Reducing couplings 5.8Cross-over 5.9Street 45° 5.9Street 90° 5.9Bushing 5.10Cross 5.10
Butt weld reducer 5.11Elbow 90° (Socket) 5.12Elbow 90° (Butt-weld) 5.13molded 5.13Elbow 45° (Socket) 5.14Elbow 45° (Butt-weld) 5.15(molded) 5.15End cap (Socket) 5.16aquatherm green pipe® Wye (Lateral 45) 5.18aquatherm blue pipe® Wye (Lateral 45) 5.18Tee (Socket) 5.19Tee (Butt-weld) molded 5.20Reducing tee (Socket) 5.21aquatherm blue pipe® - Reducing tee (Butt-weld) 5.24Fusion outlet (Socket) 5.28Fusion outlet (Butt-weld) 5.29Flange ring 5.30Flange adapter 5.31

Union 5.32Wing back 90° elbow 5.34Electrofusion coupling 5.34Back plate elbow 5.35ISO plug for pressure tests 5.35ISO transition piece 5.36Transition piece 5.37NPT transition piece (female) 5.37NPT transition elbow (female) 5.39NPT transition street elbow (male/female) 5.39NPT transition tee 5.40Draining branch 5.40Flow meter well 5.40Stub out 5.41Straight stub out 5.41PEX adaptor (crimp) 5.42PEX adaptor (expansion) 5.42PP-R to grooved transition 5.42
Transition elbow (male) 5.43Transition tee (female) 5.43NPT fusion outlet hex (female) 5.44Distribution block plumbing 5.47Distribution pipe 5.47Distributor end piece 5.48Screw-down stop globe valve 5.48Concealed valve (standard) 5.49Stop valve body ISO 5.50Inclined valve 5.50Inclined check valve 5.51Ball valve 5.51Ball valve 5.51Repair plug 5.54Temperature protective gloves 5.54Welding heads 5.54Drill bit 5.55Fusion outlet welding heads 5.56


WELCO
ME TO
AQ
UATH
ERM1.1
This manual has been compiled to help ensure safe and consistent installation of Aquatherm’s piping materials. Please read all instructions before beginning installation. Installers must take the appropriate training course from an authorized Aquatherm trainer before beginning installation.
Welcome to AquathermChapter 1:
This training will teach you the proper techniques for fast, reliable heat fusion connections and help you take full advantage of Aquatherm’s many benefits.

WEL
COM
E TO
AQ
UAT
HER
M1.
2Getting started
Before you get started, you should know a little about the pipe you are installing. Aquatherm’s pipes and fittings are made from an engineered variation of polypropylene-random copolymer, or PP-R.
Aquatherm PP-R offers many benefits over metals and other plastics, such as durability, longevity, and chemical purity.
Aquatherm’s polypropylene pipes and fittings are produced in Germany and have been used around the world for over four decades. The pipe and fittings are made to the highest
international standards of quality, so you can trust the material every time you install it. If the pipe and fittings don’t have Aquatherm labels, return them and don’t install them. Only genuine Aquatherm products are protected by Aquatherm’s warranty and decades of expertise with PP-R.
If you have not worked with Aquatherm’s fusible pipe before, it is best not to rush and get ahead of yourself. Just as you were not able to make perfect welds your first day as an apprentice, it will also take you some time to become proficient
at heat fusion. Fortunately, you’ll find that learning fusion is quick and easy. This manual will act as your guide while you learn, and as you continue to fuse pipe for years to come.

WELCO
ME TO
AQ
UATH
ERM1.3
Working with PP-R
Polypropylene is a thermoplastic, similar to polyethylene pipe. It is made from an oil by-product, so it naturally repels water.This makes it ideal for a piping material, as it does not affect, and is not affected by, the water it carries.
PP is made from chains of hydrogen and carbon, so there are no toxic chemicals that can affect drinking water.
PP-R is polypropylene copolymerized (combined) with a small amount of ethylene. This combination, enhanced by Aquatherm’s proprietary formula,
gives the material a balance of durability, rigidity and flexibility. PP-R is connected using heat fusion, which involves heating and cooling the pipe to join it to an identical material. This is covered in detail in Chapter 2.
All of Aquatherm’s pipes and fittings are made from PP-R, so they will have the same properties. They can be heat fused together without any strength loss, and have the same densities, durability, and resistances.
Aquatherm’s PP-R has been engineered for improved performance and should not be mixed with other types of PP-R. PP-R should never be fused to PP, PVDF, PE, CPVC, or any other type of plastic. Never use solvent cements on Aquatherm’s PP-R, as they may damage the pipe and won’t bind properly.
WEL
COM
E TO
AQ
UAT
HER
M1.
4 Aquatherm’s Fusiolen PP-RNormal plastic
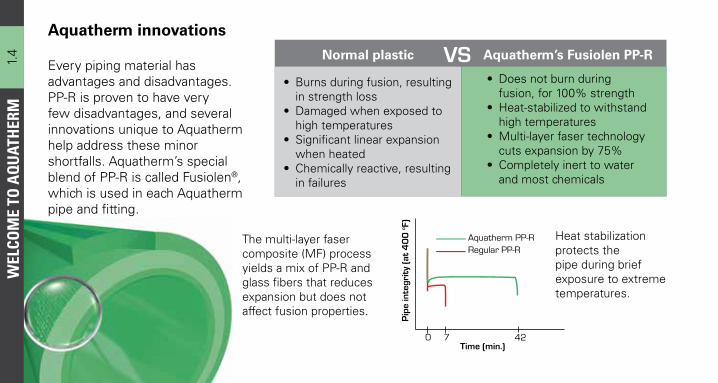
Aquatherm innovations
Every piping material has advantages and disadvantages. PP-R is proven to have very few disadvantages, and several innovations unique to Aquatherm help address these minor shortfalls. Aquatherm’s special blend of PP-R is called Fusiolen®, which is used in each Aquatherm pipe and fitting.
• Does not burn during fusion, for 100% strength
• Heat-stabilized to withstand high temperatures
• Multi-layer faser technology cuts expansion by 75%
• Completely inert to water and most chemicals
• Burns during fusion, resulting in strength loss
• Damaged when exposed to high temperatures
• Significant linear expansion when heated
• Chemically reactive, resulting in failures
The multi-layer faser composite (MF) process yields a mix of PP-R and glass fibers that reduces expansion but does not affect fusion properties.
Heat stabilization protects the pipe during brief exposure to extreme temperatures.
VS
Time (min.)420
Aquatherm PP-R
Pip
e in
tegr
ity
(at
40
0 o F
)
Regular PP-R
7

WELCO
ME TO
AQ
UATH
ERM1.5
The world leader in PP-R pipe
Aquatherm is the world leader in PP-R pressure piping systems. When you work with our products, you have decades of research and experience backing you up. All Aquatherm products are thoroughly tested before, during, and after production by the best equipment and experts in the industry. This quality control helps ensure consistency in every Aquatherm pipe and fitting.
Aquatherm backs its products with a 10-year manufacturer’s warranty that doesn’t just cover replacement parts — it also covers the replacement labor, incidental damages, medical
Note: The Aquatherm warranty only applies to systems that are properly installed by an Aquatherm-trained installer. Improper installation or fusing to non-Fusiolen parts will void the warranty for those connections. Following all the procedures in this manual will minimize the risk of material failure and help ensure coverage in the event of a problem. Pressure testing is required to verify proper installation.
costs, and financial loss, giving you and your customers real peace of mind. Coverage begins upon submission of a successful pressure test record for the current coverage amount. Exact coverage amounts are subject to the exchange rate with the Euro at the time coverage is awarded.
PP-R is durable, both physically and chemically, and is more resilient against oils, freezing, impact, etc. than other plastics and even metals.
Proper care should be taken when working with Aquatherm pipes and fittings. The Aquatherm
warranty does not cover damage caused by post-factory mishandling, jobsite abuse, UV damage, or improper installation. Full details of Aquatherm’s warranty coverage can be found at Aquatherm.com/warranty.

WEL
COM
E TO
AQ
UAT
HER
M1.
6Material handling
Keep the pipe on a flat surface or close supports to avoid bowing. Use at least 3 supports for 13’ pipes and 4 for 19’ pipes.
Don’t fuse damaged pipe. Remove damaged sections and install the remaining pipe. Follow your distributor’s policy for returns.
Inspect pipe upon receiving it. Aquatherm does not accept responsibility for damage that occurs after the pipe is shipped.
: Do
Keep the pipe in its protective bag or wrap until you are ready to install it. The bag protects the pipe from dirt, scratches, and UV rays.
Handle the pipe carefully, especially in freezing weather. Plastic may become brittle at cold temperatures, so treat it accordingly.
Cover unbagged pipe with a light-colored tarp if storing it outside. A dark tarp generates heat and may cause warping.

WELCO
ME TO
AQ
UATH
ERM1.7
Material handling: Don’t
Don’t drop the pipe or handle it roughly. PP-R can handle most impacts without issue, but there is no reason to risk damaging it.
Don’t insert sharp or unpadded objects into the ends of the pipe. These can gouge the inside of the pipe and create weak spots.
Don’t run over the pipe with any type of vehicle or crush the ends. This is the most common cause of pipe damage.
Keep the fittings in their bags until you use them. Bagged fittings will be easier to identify and protected from contaminants.
Don’t store pipe outside for more than 6 months uncovered. The pipe should be stored under a tarp or shade, or in its factory packaging.
Don’t use damaged pipe that is gouged deeper than 10% of the wall thickness on the outside or 5% on the inside.

WEL
COM
E TO
AQ
UAT
HER
M1.
8Pipe sizes
Aquatherm pipe is made to metric sizes (millimeters). This is part of its design and listings, but it is easy to learn the matching imperial sizes (inches).
This chart gives the matching sizes between metric and imperial. These sizes are based on factory settings and closest nominal diameters. Use the nominal size when switching from imperial pipe if gpm requirements are not available. Use the actual OD for sizing clamps and insulation.
Aquatherm pipes use standard dimension ratios (SDR) instead of schedules. This means that the wall thickness is proportional to the diameter of the pipe. From a performance standpoint, this makes the pressure rating of the pipe consistent through each size.
½” – 4” pipes come in 13 ft (4 meter) lengths. 6” – 24” pipes come in 19 ft (5.8 meter) lengths.
Factorymetric OD
Nominal diameter
20 mm ½”
25 mm ¾”
32 mm 1”
40 mm 1 ¼”
50 mm 1 ½”
63 mm 2”
75 mm 2 ½”
90 mm 3”
110 mm 3 ½”
125 mm 4”
Factorymetric OD
Nominal diameter
160 mm 6”
200 mm 8”
250 mm 10”
315 mm 12”
355 mm 14”
400 mm 16”
450 mm 18”
500 mm 20”
560 mm 22”
630 mm 24”
Socket fusion Butt welding
4” SDR 11 and SDR 17.6 may be butt welded.

WELCO
ME TO
AQ
UATH
ERM1.9
SDR 7.4
1/7.4 total diameter
SDR 11
1/11 total diameter
A heavy wall provides increased pressure and temperature ratings for high-stress applications such as hot water system piping.
aquatherm green pipe® MF
A balanced wall thickness provides higher flow rates while maintaining high pressures. Suitable for most applications.
aquatherm green pipe® Saquatherm blue pipe® MFaquatherm lilac pipe® S
A thinner wall provides maximum flow rate while minimizing material weight, cost, and fusion times. For lower pressure systems such as chilled, cooling, or condenser applications.
aquatherm blue pipe® MF
SDR 17.6
1/17.6 total diameter
Wall thickness

WEL
COM
E TO
AQ
UAT
HER
M1.
10
Aquatherm Green pipe® faser-composite pipe 63x8.6mm (2” N.D.) PP-R80 SDR 11 cNSF CSA b137.11 ASTM F2389 ICC ESR-1613 Made in Germany
Identification
Aquatherm has several lines of pipe that are specifically engineered for certain applications. Stripes and color indicate the type of pipe.
Pipe name(only genuine Aquatherm pipe and fittings are backed by our 10-year warranty)
Expansion control label (not present on non-MF pipes)
Production size and nominal diameter
Material
Wall thickness (based on pipe diameter)
Relevant code listings (varies by pipe type)
Additional information(incl. timestamp)
aquatherm green pipe® MF aquatherm blue pipe® MF aquatherm green pipe® S aquatherm lilac pipe® S
Aquatherm Green pipe® faser-composite pipe 63x8.6mm (2” N.D.) PP-R80 SDR 11 cNSF CSA b137.11 ASTM F2389 ICC ESR-1613 Made in Germany

WELCO
ME TO
AQ
UATH
ERM1.11
Hot water aquatherm green pipe® MF
Color: Green
Stripes: Dark green
Wall thickness: SDR 7.4
Size range: ½” - 14”
Multi-layer construction (expansion-controlled): Yes
Maximum operating pressure at 50 °F: 380 psi
Maximum operating pressure at 180 °F: 100 psi
Recommended applications: Domestic (potable) hot water, food processing, light-hazard fire sprinkler (NFPA 13D)
Acceptable applications: Domestic (potable) cold water, heating, cooling, compressed air, chemical transport, and any other application suitable for PP-R

WEL
COM
E TO
AQ
UAT
HER
M1.
12
Cold water aquatherm green pipe® S
Color: Green
Stripes: Light blue
Wall thickness: SDR 11, 7.4 (¾” or smaller only)
Size range: ½” - 18”
Multi-layer construction (expansion-controlled): No
Maximum operating pressure at 50 °F: 195 psi
Maximum operating pressure at 140 °F: 95 psi
Recommended applications: Domestic (potable) cold water, food processing
Acceptable applications: Cooling, chemical transport, and any other lower temperature application suitable for PP-R

WELCO
ME TO
AQ
UATH
ERM1.13
Thick-wall aquatherm blue pipe® MF
Color: Blue
Stripes: Green
Wall thickness: SDR 11, 7.4 (¾” or smaller only)
Size range: ½” - 18”
Multi-layer construction (expansion-controlled): Yes
Maximum operating pressure at 50 °F: 325 psi
Maximum operating pressure at 180 °F: 62 psi
Recommended applications: Heating and cooling distribution, compressed air, chemical transport, swimming pools (verify treatment levels), in-floor heating
Acceptable applications: Irrigation and any other non-potable piping applications

WEL
COM
E TO
AQ
UAT
HER
M1.
14
Thin-wall aquatherm blue pipe® MF
Color: Blue
Stripes: Green
Wall thickness: SDR 17.6
Size range: 4”- 24”
Multi-layer construction (expansion-controlled): Yes
Maximum operating pressure at 50 °F: 160 psi
Maximum operating pressure at 140 °F: 70 psi
Recommended applications: Geothermal, district cooling, low-pressure cooling distribution, condenser water piping to cooling towers
Acceptable applications: Any non-potable, low pressure, low temperature applications suitable for PP-R

WELCO
ME TO
AQ
UATH
ERM1.15
aquatherm lilac pipe® S
Color: Purple
Stripes: None
Wall thickness: SDR 11
Size range: ½” - 10”
Multi-layer construction (expansion-controlled): No
Maximum operating pressure at 50 °F: 195 psi
Maximum operating pressure at 100 °F: 135 psi
Recommended applications: Rainwater, greywater, reclaimed water, irrigation

WEL
COM
E TO
AQ
UAT
HER
M1.
16Molded fittings
• Single piece
• ½” - 4” fittings socket fuse over the pipe wall
• 6”- 24” fittings butt weld in-line with the pipe
• All pipes use the same PP-R fittings
• Minimal markings on the fittings
• Full labeling on the bag
• Keep fittings in their bags until ready for use
• Pressure rating meets or exceeds the pressure rating of the pipe

WELCO
ME TO
AQ
UATH
ERM1.17
Segmented fittings
• Usually 2 - 4 fused pieces
• Butt weld in-line with the pipe
• 6” - 24” (elbows & tees)
• Made from aquatherm green pipe® or aquatherm blue pipe® to match piping system
• Size marked on label
• Stamped on the side to indicate origin
• aquatherm green pipe® fittings may be used with aquatherm blue pipe installations -- do not use aquatherm blue pipe fittings in aquatherm green pipe installations
• Pressure rating meets the pressure rating of the pipe

WEL
COM
E TO
AQ
UAT
HER
M1.
18Flow rates and sizing
For most applications, use the same size Aquatherm pipe as you use for other piping materials. The lower friction and higher flow speed of PP-R compensates for the smaller ID which occurs in some sizes. The following table gives the
Nominal diameter
GPM SDR 7.4
GPM SDR 11
GPM SDR 17.6
½” 6 8 -
¾” 9 12 -
1” 16 20 -
1 ¼” 24 32 -
1 ½” 40 50 -
2” 60 80 -
2 ½” 90 110 -
3” 130 160 -
3 ½” 190 240 -
4” 240 300 350
Nominal diameter
GPM SDR 7.4
GPM SDR 11
GPM SDR 17.6
6” 400 500 600
8” 800 1000 1100
10” 1200 1500 1800
12” 2400 3000 3400
14” 3000 3800 4500
16” - 4500 5750
18” - 6000 7250
20” - - 10000
22” - - 13000
24” - - 16000
recommended GPM based on flow speed and head loss. The maximum GPM may be higher in some cases. Aquatherm pipe does not have internal corrosion or ID loss, so downsizing may be possible in some cases, at the discretion of the engineer.

WELCO
ME TO
AQ
UATH
ERM1.19
Operating pressures
Systems with constant operating parameters (60-year expected minimum)
Temperature
aquatherm green pipe®
aquatherm lilac pipe®SDR 11 (S)
aquatherm green pipe® SDR 7.4 (MF)
aquatherm blue pipe® SDR 11 (MF)
aquatherm blue pipe®
SDR 17.6 (MF)
Permissible working pressure (psi)
50 °F 195 380 325 160
80 °F 170 320 255 125
100 °F 135 255 210 95
120 °F 110 215 180 80
140 °F 95 180 150 70
160 °F - 120 100 45
180 °F - 100 62 30
200 °F - 45 30 15
Compressed air
aquatherm green pipe® SDR 7.4 (MF)
aquatherm blue pipe®
SDR 11 (MF)SDR Pressure SDR Pressure
7.4 200 11 125
11 125 17.6 50
This table assumes constant operation using water or a water/glycol mix. Seasonal operation or use of different mediums may impact the pressure rating of the pipe. Aquatherm pipe is not intended for use below -5 °F.
(assumes air temp < 100 °F)

WEL
COM
E TO
AQ
UAT
HER
M1.
20
aquatherm green pipe® SDR 7.4 MF
weights and capacities
PipeND
Capacitygal/ft
Weight lb/ft
w/water lb/ft
½” 0.01 0.11 0.22¾” 0.02 0.17 0.34
1” 0.03 0.26 0.51
1 ¼” 0.05 0.41 0.83
1 ½” 0.08 0.64 1.31
2” 0.13 1.00 2.08
2 ½” 0.19 1.42 3.00
3” 0.27 2.03 4.28
3 ½” 0.40 3.04 6.37
4” 0.52 4.17 8.50
6” 0.85 6.54 13.62
8” 1.33 10.06 21.14
10” 2.08 15.74 33.07
12” 3.34 20.71 48.53
14” 4.24 26.29 61.61
aquatherm green pipe® pipe SDR 7.4 S / SDR 11 S aquatherm lilac pipe® SDR 7.4 S / SDR 11 S
PipeND
Capacitygal/ft
Weightlb/ft
w/water lb/ft
½” 0.02 0.10 0.24
¾” 0.03 0.16 0.38
1” 0.04 0.18 0.51
1 ¼” 0.07 0.28 0.86
1 ½” 0.11 0.43 1.35
2” 0.17 0.68 2.10
2 ½” 0.24 0.95 2.95
3” 0.34 1.37 4.20
3 ½” 0.51 2.10 6.35
4” 0.66 2.63 8.13
6” 1.08 4.30 13.308” 1.70 6.70 20.86
PipeND
Capacitygal/ft
Weightlb/ft
w/water lb/ft
10” 2.65 10.42 32.49
12” 4.20 17.24 52.23
14” 5.34 20.99 65.47
16“ 6.79 27.77 84.33
18“ 8.57 35.15 106.54
The following items are supplied in coils
½” 0.01 0.07 0.15
¾” 0.03 0.11 0.36
1” 0.04 0.17 0.50
aquatherm green pipe and aquatherm lilac pipe®

WELCO
ME TO
AQ
UATH
ERM1.21aquatherm blue pipe® SDR 7.4 MF / SDR 11 MF
aquatherm blue pipe® weights and capacities
PipeND
Capacitygal/ft
Weightlb/ft
w/ waterlb/ft
½” 0.01 0.11 0.22
¾” 0.02 0.16 0.36
1” 0.04 0.19 0.55
1 ¼” 0.07 0.29 0.85
1 ½” 0.11 0.45 1.32
2” 0.17 0.71 2.10
2 ½” 0.24 1.00 2.97
3” 0.34 1.44 4.30
3 ½” 0.51 2.13 6.39
4” 0.66 2.76 8.27
6” 1.08 4.51 13.52
8” 1.69 7.03 21.12
10” 2.65 10.93 32.97
PipeND
Capacitygal/ft
Weightlb/ft
w/ water lb/ft
4” 0.78 1.80 8.30
6” 1.27 2.92 13.52
8” 1.99 4.56 21.10
10” 3.11 7.09 32.95
12” 4.93 11.23 52.30
14” 6.27 14.23 66.43
16“ 7.95 18.06 84.30
18“ 10.07 22.82 106.69
20“ 12.42 28.22 131.70
22“ 15.60 32.25 162.16
24“ 19.73 44.63 209.01
PipeND
Capacitygal/ft
Weightlb/ft
w/ waterlb/ft
12” 4.20 17.24 52.23
14” 5.39 22.16 67.03
16“ 6.79 27.77 84.31
18“ 8.57 35.15 106.56
The following items are supplied in coils
½” 0.02 0.07 0.21
¾” 0.03 0.11 0.33
1” 0.04 0.17 0.53
aquatherm blue pipe® SDR 17.6 MF

WEL
COM
E TO
AQ
UAT
HER
M1.
22listings and approvals Reference standards
• NSF 14, 51 (Green Pipe only), 61 (Green Pipe only)
• CFIA A508 (Green Pipe only)
• ICC ESR-1613/PMG Listing 1014
• IPC 2009 Section 605 (Green Pipe, Lilac Pipe)
• IMC 2009 Chapter 12
• IRC 2009 Chapter 21 & 56
• UMC 2009 Chapter 12
• UPC 2012 Chapter 6 (Green Pipe, Lilac Pipe)
• IAPMO File M-6022
• IAPMO File 5053 (Green Pipe, Lilac Pipe)
• FM 1635 (Green Pipe 7.4 only)
• BNQ 3660-950 (Green Pipe only)
Aquatherm
• CSA B137.11
• CSA B214
• ISO 15874
• ASTM F 2023
• ASTM D 635
• NFPA 13 D (Green Pipe 7.4 only)
• DIN EN ISO 14001
• DIN EN ISO 9001
• ASTM F 2389

2.1H
EAT FUSIO
NHeat fusion
Aquatherm is a rigid piping system, similar to copper and steel. Proper training helps ensure proper connections. Your own care and attention to detail will yield impressive results, whereas sloppy workmanship will yield poor results. This chapter will cover the basic techniques for heat fusing pipe.
Chapter 2
Socket fusion
Outlet fusionButt fusion
Electrofusion
:
Once you learn how to heat fuse, it will be up to you to provide the quality labor that makes each installation a work of art.

2.2
HEA
T FU
SIO
NSafety
There are procedures that should be followed to work safely with Aquatherm pipe. These include:
Take proper precautions around electrical equipment and follow all instructions.
Follow Aquatherm-specific guidelines for proper material installation.
Wear OSHA-approved steel-toe shoes.
Wear a properly rated hard hat at all times.
Wear safety glasses.
Wear heat-resistant gloves while handling welding irons.
Be careful when handling hot irons.

2.3H
EAT FUSIO
NCutting the pipe
These are recommended cutting methods, but you may use any method that doesn’t damage the pipe. Cuts should be as square as possible (never more than 5° off) and without jagged edges. Check for longitudinal cracks on the pipe wall after each cut.
Use ratchet cutters with a sharp, pointed blade for smaller sizes. The pointed blade prevents the pipe from ovaling during the cut.
Don’t use ratchet cutters with a dull or flat blade. Dull or flat blades can oval the pipe and cause it to crack.
Use tube cutters with a wheel taller than the pipe wall. Smaller wheels might not reach through the entire pipe wall.
Hand saws are a safe alternative, even in cold weather. Dry chain saws can be used to cut larger pipe, but will produce a jagged face.
Support the pipe while cutting to yield square ends and prevent bouncing or snapping.
: manual

2.4
HEA
T FU
SIO
NCutting the pipe: power
When using hand saws, use plastic or metal-safe teeth. With
powered saws, blades that are intended for hardwood will yield the best results. Avoid jagged or angled cuts, as these require additional prep to fuse. Don’t use any tool or method that causes damage to the pipe.
Use a circular hardwood blade (60-100T) with carbide teeth. This will produce a cut that needs little to no clean-up.
Band and reciprocating saws are safe to use. The thinner blades leave a smooth cut, but you will also have some shavings to clean up.
A wide-toothed blade (24-40T) will produce a jagged cut that is rough and not desirable for socket fusion.
A fine-toothed blade (180T) will overheat the pipe, as will cutting too slowly. Make your cut as quickly and squarely as possible.
Don’t use power cutters if the pipe is 40 °F or colder. Cold pipe can crack and split. Warm the pipe before cutting it.

2.5H
EAT FUSIO
NInspecting the cut
Upon receiving the pipe, and after cutting it, inspect the ends for cracks or damage. Mark and remove damaged sections, cutting a few inches past the damage. Fusing pipe that is cracked will result in joints that leak.
White stress marks and cracks indicate damage. Reassess any cutting tools that leave cracks. You may need to squeeze the end of the pipe to see small cracks.
Remove standing dirt and oil using an isopropyl alcohol-based cleaner (70% by volume or greater). Dirty pipe will not form proper beads during fusion. Be careful not to wipe off the printed label.
Remove any debris left from cutting the pipe. This is common with powered saws. Often, you can simply pull them out by hand. You may need to carefully cut them away with a blade or reaming tool.
A good cut is smooth, square, and has no cracks or stress marks inside or outside the pipe.

2.6
HEA
T FU
SIO
NHow heat fusion works
PP-R plastic is made up of small chains of hydrogen and carbon. When cold, the chains are closed and won’t react or bind with most common chemicals.
When they cool, the chains close again, forming a connection that is identical to the original material. This makes for a perfect connection with no foreign materials or leak path.
As the pipe is heated, the chains open and can be pressed together to form a connection. Pressure causes the chains to cross the gap, eliminating any leak path.
2.7H
EAT FUSIO
N
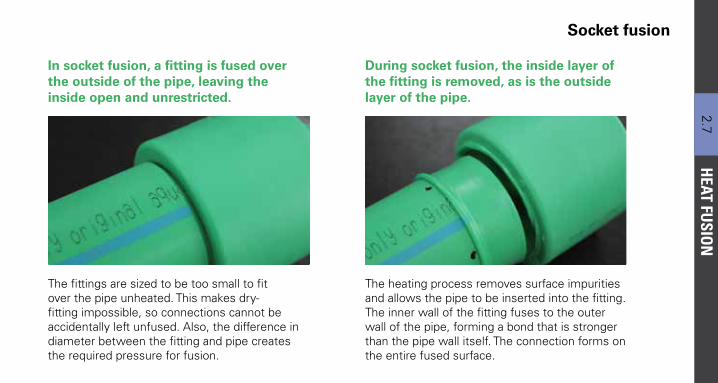
In socket fusion, a fitting is fused over the outside of the pipe, leaving the inside open and unrestricted.
Socket fusion
During socket fusion, the inside layer of the fitting is removed, as is the outside layer of the pipe.
The heating process removes surface impurities and allows the pipe to be inserted into the fitting. The inner wall of the fitting fuses to the outer wall of the pipe, forming a bond that is stronger than the pipe wall itself. The connection forms on the entire fused surface.
The fittings are sized to be too small to fit over the pipe unheated. This makes dry-fitting impossible, so connections cannot be accidentally left unfused. Also, the difference in diameter between the fitting and pipe creates the required pressure for fusion.

2.8
HEA
T FU
SIO
N
Heads store inside each other to avoid scratches.
Fitting (male) sidePipe (female) side
Teflon-coated
Taper for easier fusionSize markings
Threaded bolt
Stopline
Socket fusions are made using welding heads. Welding heads are specifically sized to match the pipe and fittings for a perfect fit. Different welding head sets are required for each size of pipe. Only use heads from an approved tool manufacturer.
Welding heads
Before setting up the iron, clean the welding heads with rubbing alcohol or a similar non-corrosive agent if they are dirty.

2.9H
EAT FUSIO
N
Never carry a welding iron by its power cord!
Welding irons
The welding heads can be interchangeably attached to a welding iron, which provides the heat for the fusions.
1-inch iron 4-inch iron 2-inch iron
Power cord
Heat cycle indicator(turns on while iron is heating, turns off when iron reaches preset temperature)
Power indicator
Neck brace
Heat sink
Heating plate
Heat shield
Welding heads

2.10
HEA
T FU
SIO
NWelding iron safety
Wear heat-resistant gloves while handling the iron. Few gloves are heat-proof, so know the limitations of your gloves.
After use, return the iron to its case for storage. The case will protect the iron from impact and damage.
Keep the cord away from the heat surfaces. Some cords are heat-resistant, but it’s best to keep everything away from the heating surface.
Post a sign near irons to warn that they are hot. Irons can remain hot for up to 30 minutes after being turned off.
Be aware of where other people are at all times while fusing. Make sure they are clear before you move the hot iron around.
Compared to open flames or noxious glues, a welding iron
is fairly safe to use. However, the iron is hot enough to burn on contact and can remain hot for 30 minutes after it is unplugged. Take care in its use and handling. Never use water to cool an iron or head.
: Do

2.11H
EAT FUSIO
NWelding iron safety: Don’t
Don’t leave the iron unattended. Passers-by may not know if the iron is hot and could accidentally burn themselves.
Don’t drop the iron or hold it by its cord. The cord is not intended to hold weight and dropping the irons may break them.
Don’t touch the iron with bare hands unless you are certain the iron has cooled. Assume irons and heads are hot until tested.
Don’t store multiple irons in a single box. Irons can easily damage each other and should be stored separately.
Don’t let the iron touch flammable or meltable surfaces. This is a fire hazard and can damage the plate or heads.
Don’t use the welding iron if the plate or heads are dirty. Clean the plate with a soft wire wheel and the heads with a cloth.

2.12
2
34
1
HEA
T FU
SIO
NTool assembly
Plug in the iron early, as it will take 5-10 minutes to heat up. Make sure that you have sufficient power for the iron. Low-gauge extension cords can be used to deliver power over long distances if needed. Be aware of other devices drawing power if you are using a limited power source, as this can cause fluctuations in temperature. Use a compatible power source for your iron. A surge protector will protect the iron from on-site power surges. Set welding heads loosely in place while the iron
heats up. The plate will expand as it heats and leave indentations if the heads are too tight.
When the iron is hot, tighten the welding heads for full contact. Full contact will ensure uniform heating of the welding head.
Check the temperature using a digital thermometer. Test on the inside of the welding heads (at close range if using an infrared thermometer). The temperature for socket fusion should always be around 500 °F (+/- 18 °F). If the iron constantly cycles on and off, or if the heating phase takes a long time, there may be a power supply issue. If the iron does not reach 500 °F or exceeds it, the thermometer may be faulty. Use a contact thermometer if you are unsure.

2.13H
EAT FUSIO
NMarking the pipe
The marking guide helps ensure proper insertion depth. The green marking guide (½” - 4”) is ideal for smaller pipes and the blue marking guide is designed for larger pipes (2 - 4”). Marking on several sides can help you line up the connection.
When using the blue marking guide, insert the fitting to the beginning of the mark, not the middle. The bead may roll over during fusion and cover the initial mark, so the tail shows that the pipe was properly marked upon inspection.
Over-inserting will form a bead inside the fitting, causing a restriction in the pipe.
Under-inserting will weaken the connection by reducing the amount of fusing surface.
If the cut is slightly angled (but not enough to prohibit fusion), make only one mark on the long side. Use this mark to prevent over-insertion. Inserting to a mark on the shorter side will leave a partial bead in the pipe. Inserting to the long side will leave a slight internal gap, but this will not affect the connection strength.

2.14
HEA
T FU
SIO
NSocket fusion heating and cooling times
Column A: Nominal diameter in inchesThis is the size of standard pipe that the Aquatherm pipe normally replaces. In some cases, it may be possible to use a smaller diameter Aquatherm pipe based on flow rate.
Column B: Metric OD in mmThis is the manufactured size of the pipe.
Column C: Actual OD in inchesThis is the actual size of the pipe in inches. Use this for sizing clamps and penetrations.
Column D: Welding depth in inchesThis is the depth the pipe should be inserted into the socket fitting. Use this for planning the length of a cut and if no marker is available.
Column E: Heating time for normal weatherUsually 40 - 100 °F. Reduce this time slightly if working in extreme heat (100 °F+). Never use less than 80% of the heat time in these circumstances.
When using SDR 11 non-faser pipe in small sizes (½” & ¾”), reduce the observed time by 1 second to avoid overheating and collapsing the pipe wall. Insert the pipe into the fitting as quickly as possible.
Column F: Heating time for cold weatherFor 40 °F or colder, use these times. You may also use these times if you are having a hard time inserting the pipe all the way into the fitting within the welding time (G) but be careful not to overheat the pipe.
Column G: Welding timeThis is the window of time between removing the PP-R from the welding iron and inserting the pipe completely into the fitting before it cools. If you exceed this time, you risk having the connection cool off, which could cause an incomplete insertion. If you cannot fully insert the pipe into the fitting in this time, get another installer or a fusion machine to help you.
Column H: Cooling timePipe should not be pressurized or stressed during this time. You will need to fully immobilize the pipe for up to ¼ of this time while the connection sets.

2.15H
EAT FUSIO
NSocket fusion heating and cooling times
Pipediameter
Weldingdepth
Heatingtime in sec.
Weldingtime
Coolingtime
ND(inch)
OD (mm)
Actual OD(inch) inch above
40 °Fbelow 40 °F sec. min.
A B C D E F G H
½” 20 0.79 9⁄16” (14.5mm) 5 8 4 2
¾” 25 0.98 5⁄8” (16mm) 7 11 4 2
1” 32 1.26 11⁄16” (18mm) 8 12 6 4
1 ¼” 40 1.57 13⁄16” (20.5mm) 12 18 6 4
1 ½” 50 1.97 15⁄16” (23.5mm) 18 27 6 4
2” 63 2.48 1 1⁄16” (27.5mm) 24 36 8 6
2 ½” 75 2.95 1 3⁄16” (30mm) 30 45 8 8
3” 90 3.54 1 5⁄16” (33mm) 40 60 8 8
3 ½” 110 4.33 1 7⁄16” (37mm) 50 75 10 8
4” 125 4.92 1 9⁄16” (40mm) 60 90 10 8

2.16
3 4
1 2
HEA
T FU
SIO
NSocket fusion instructions (page 1 of 2)
In socket fusion, you are heating the outside of the pipe and fusing it to the inside of the fitting. This creates a large joining surface with no leak path, so proper connections will never leak or blow off.
You must use the properly sized welding heads for a proper fusion. These heads are available through Aquatherm and approved tool manufacturers.
The heating times (column E or F) begin when the pipe and fitting are fully inserted onto the welding head.
Stop the pipe when you hit the mark (column D). Over-insertion will cause a restriction in the pipe and lower performance.
Stop the fitting when you reach the stopline (page 2.8). Tapered heads will offer little resistance until just before the stop.
Clean the pipe (if needed) and insert the pipe and fitting into the iron. Pushing both sides at the same time helps hold the iron steady.
Observe the heating time (column E or F). A bead will form and become shiny as the fusion nears readiness.

2.17
5 6
7 8
HEAT FU
SION
Align the pipe and observe cooling time (column H). You will need to provide full support for at least ¼ of the cooling time.
Do not touch the face of the pipe to the edge of the fitting. This flattens the beads and can cause an improper connection.
Remove fitting and pipe from welding heads. Use a clamped stand or an extra hand to hold the iron in place.
Immediately* insert the pipe into the fitting. Push the pipe until the rings meet within the welding time (column G).
Once the rings meet, you will have 5 to 15 seconds to make adjustments to the alignment, depending on the pipe size. Do not twist during adjustment, alignment, or insertion.
*You will normally have 5-10 seconds to begin joining the connection after you remove it from the iron. This time will vary with pipe size and conditions. Waiting too long will let the pipe surface cool and make fusion impossible.
Socket fusion instructions (page 2 of 2)

2.18
HEA
T FU
SIO
NLarge diameter socket fusion
Fusing pipe larger than 2” is difficult without help. There are several tips for assisted (two man) fusions:
• Increase the heating time by up to 50% if needed. It can take longer to fuse the pipe and fitting by hand, so overheating them makes the connection easier and prevents it from sticking midfusion. The ideal amount of overheating depends on the ambient temperature, the size of the pipe, and the strength of the installers. Use your best judgment to prevent the pipe from becoming too soft.
• Don’t waste time. Once the pipe and fitting are removed from the iron, push them together immediately.
• PP-R doesn’t burn while heating, so you can put the pipe and fitting back on the welding heads and start again if the connection is underheated. Pipes and fittings may be safely reheated once after the initial heating.
• Ensure that the pipe end is cut square and mark the pipe on several sides. This will help you line up the fitting squarely.
• If you can’t push the pipe or fitting all the way onto the iron, allow the heat to melt the PP-R and then continue.
• Remember that the fitting welding heads are tapered; they will not offer much resistance until the fitting is almost entirely on.

2.19H
EAT FUSIO
NMechanically assisted fusions
For larger fittings, it is generally faster and more accurate to use a fusion machine. Fusion machines act as an additional set of hands during the fusion, aligning the pipe and fitting while providing a mechanical advantage.
There are many different types of fusion machines. Some lighter machines are easier to operate overhead, but may not offer additional support or have a fixed heating iron. Heavier bench-style machines offer increased stability and accuracy, but are less mobile.
Other fusion processes, such as butt welding and electrofusion, require special tools to complete them.
These, as well as the tools for socket fusion, are available from Aquatherm’s approved tool manufacturers. These manufacturers supply properly sized tools for Aquatherm’s piping systems and have an established history of providing excellent support to Aquatherm installers.
A complete list of these manufacturers can be found starting on page 2.36. Do not use fusion tools from an unapproved manufacturer.
2.20
HEA
T FU
SIO
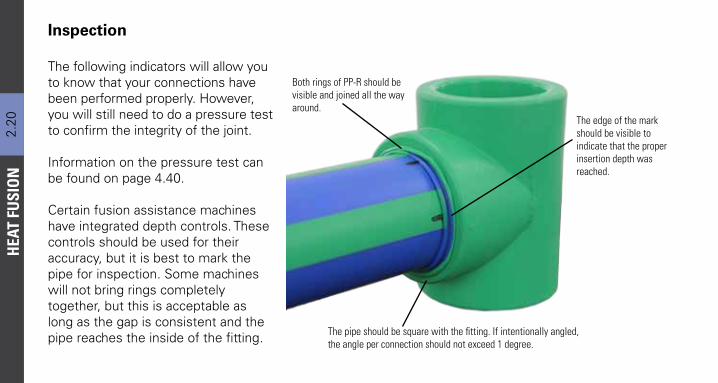
NInspection
The following indicators will allow you to know that your connections have been performed properly. However, you will still need to do a pressure test to confirm the integrity of the joint.
Information on the pressure test can be found on page 4.40.
Certain fusion assistance machines have integrated depth controls. These controls should be used for their accuracy, but it is best to mark the pipe for inspection. Some machines will not bring rings completely together, but this is acceptable as long as the gap is consistent and the pipe reaches the inside of the fitting.
Both rings of PP-R should be visible and joined all the way around.
The edge of the mark should be visible to indicate that the proper insertion depth was reached.
The pipe should be square with the fitting. If intentionally angled, the angle per connection should not exceed 1 degree.

2.21H
EAT FUSIO
NAvoiding improper fusions
Don’t twist the fitting
Never twist a fusion connection. Twisting breaks the chains while they cool and will lead to a weakened connection. You may make some minor adjustments early in the cooling process, but avoid turning the fitting more than 2 degrees.
Use enough heat/Don’t wait to fuse
Insufficient heat will cause the chains to close early, preventing a full connection. This can be caused by the iron being too cold, an extended delay after removing from the iron, or insufficient heat time. Make sure that you follow all the instructions while fusing and that your iron has sufficient power.
Prevent water contact
Like oil, PP-R is hydrophobic and repels water. Any water contact on the fusion area will cause the chains to close and prevent a proper fusion. Make sure the pipe is dry before beginning the fusion and that moisture cannot reach the fusion surfaces.

2.22
Pipe won’t fully insert into fitting
Welding heads are too cold Extended delay after removing from iron
Insufficient heating time
Verify marking depth and stop just before the marks
Hold pipe squarely for at least 25% of the cooling time
Reduce heating time slightly
Fuse immediately after heat timeIncrease heating
time by up to 50% Double-check machine settingsMake sure temp > 475 °F
Fusion machine depth control is set to the wrong size
Marks no longer visible/internal bead Fitting does not look square
Over-insertion Fitting was overheatedInsufficient support during cooling
Clean pipe before fusing Make sure both sides are heated
The pipe sheets back instead of forming a bead No ring visible
Pipe too dirty for fusion Only one side heated
HEA
T FU
SIO
NTroubleshooting bad connections

2.23H
EAT FUSIO
N
The welding heads are designed to operate under very specific tolerances, and compressing the end of the fitting can prevent proper contact, and thus proper fusion. This is referred to as ovaling.
Ovaling occurs when the clamps of a fusion machine exert too much force on the mouth of a fitting and bend it out of round. To prevent this issue, avoid over-tightening the clamp that holds the front of the fitting. The clamps should be snug, but not so tight that they distort the fitting.
Ovality in machine-assisted fusions
To prevent the fitting from slipping, use a backstop, or support the fitting with your hand during insertion. Giving the iron time to heat the pipe and fitting can also reduce the chances of slippage.
To determine if your machine and technique are causing ovaling, inspect the finished connection for two complete beads all the way around. If the beads are present on two sides, and absent on two sides, this may indicate that the fitting was ovaled during fusion. Ovaled fittings are not at full strength and may leak.

2.24
HEA
T FU
SIO
N
Using a technique similar to socket fusion, branches and outlets can be easily added to the walls of the pipe. This technique helps save time and money while providing flexibility for expansion following installation.
Drilling bore Guide bit
Pipe-side welding head
Fitting-sidewelding head
Curvature matches pipe wall
Fusion outletMain size
Branch size
Pipe-wall insert
Fusion outlets

2.25
2
HEAT FU
SION
When drilling out a fusion outlet hole, there are two important things to remember:
1. Make sure to remove the material from the hole so it will not clog the main line.
2. The hole needs to be 1-3 mm (1⁄24” - 1⁄8”) smaller than the OD of the branch line.
Fusion outlet instructions (page 1 of 3)
Set up the welding iron following normal socket procedures, found on page 2.16.
Don’t forget to tighten the welding heads after the plate is hot and check the temperature before starting.
The welding head should not stick out past the iron. This will lead to uneven heat transfer and can prevent proper fusion.
1 2
Aquatherm’s boring tools are properly sized and designed to remove the shavings. The smaller bores use a hand-held drill with a 1/2” chuck. Bores over 2 inches require a drill press with a Morse Taper shank. You may also use hole saws or bores provided by other manufacturers, as long as they can cut a smooth, even, and properly-sized hole.
Getting a properly-sized hole is crititcal. An oversized hole will result in an incomplete fusion and cause leaks. An undersized hole will make it difficult to insert the welding head and can create a larger internal bead, reducing flow performance.

2.26
3 5Mark the pipe where you want the outlet. Once you begin drilling you cannot move the hole, so be sure of your placement.
Use the guide bit to start the hole to ensure accurate positioning. Drill at a right angle to the pipe. Quickly drill out the hole.
The bore should pull the shavings out so that they don’t fall into the pipe. Clear away any excess debris. Flush any leftover shavings.
6 7
4
HEA
T FU
SIO
N
Rather than putting excessive force on the neck of the iron, you may use a dowel or a board to help push the iron into the pipe.
Insert the welding head into the hole and fitting into the head. Push down gently to keep the iron in contact with the PP-R.
Fusion outlet instructions (page 2 of 3)
Pro tip:For branches smaller than 2”, don’t use the fitting to push the iron into the pipe. This overheats the fitting. Instead, push the welding head into the pipe, and then set the fitting on the iron. For larger sizes, you may use the fitting to push the welding head into the pipe.

2.27
8 9
10 11
HEAT FU
SION
Pro tip:Make sure the welding head you are using matches the pipe and fitting. In an emergency, it is possible to use a head with the wrong curvature, but you must have the right branch size. Tilting the welding head slightly from side to side can help ensure contact at all points.
Look for a bead to form around the fitting. This does not take much pressure. Too much pressure will cause internal restriction.
Level and square the fitting as it cools. Like the socket fittings, you only have a few seconds before the fitting sets.
Set the fitting in the hole and hold in place. Use only enough pressure to maintain contact between the heated surfaces.
Ensure the welding head makes a full impression on the pipe. Check and adjust the head until the ring is complete.
If the welding head has not made a full impression, do not set the fusion outlet into the hole. It will not form a proper fusion.
Fusion outlet instructions (page 3 of 3)

2.28
HEA
T FU
SIO
NElectrofusion
Electrofusion is another technique for fusing a socket onto a pipe. Rather than using contact heat, electrofusion uses electrical resistance heat from a copper coil inside the fitting. The fitting is attached to an electrofusion machine using a pair of leads, and a set voltage is applied to the coil for a set time. The time and voltage can be found on the label of the fitting. Electrofusion
is particularly useful for situations where there is not enough space or mobility to perform a traditional socket fusion. However, electrofusion has more steps and is more difficult to visually inspect. Therefore, the choice to use electrofusion over traditional socket fusion depends on the physical restrictions of the installation and the installer’s preferences. Electrofusions may
be integrated with traditional socket fusion and butt welding if necessary.
Electrofusion machines are available from approved tool manufacturers.
It is best to plug in the machine and familiarize yourself with the controls and interface before beginning the electrofusion process.

2.29
1 2
3 4 5
HEAT FU
SION
Make sure the pipe is cut exactly square to ensure proper contact. Chamfer or ream the pipe to remove any rough edges.
Use a peeling tool or paint scraper to remove the outside of the pipe. Peel back at least half the length of the coupling being fused.
Don’t open the fitting bag until you are ready to fuse the connection. This helps keep dirt off of the fusion surface.
Repeat with the other pipe. If you are using the fitting as a slip coupling, peel one side back the entire length of the coupling.
Clean the outside of the pipes with an isopropyl alcohol wipe. Avoid touching those surfaces after cleaning them.
Pro tip:Multiple passes may be necessary. Peeling tools are available from approved manufacturers. Make sure that you use metric or metric-compatible peelers. Avoid over-peeling the pipe. You can always make one more pass, but you cannot unpeel the pipe.
Electrofusion instructions (page 1 of 3)

2.30
6 7
8
HEA
T FU
SIO
NElectrofusion instructions (page 2 of 3)
Mark the pipe at half the depth of the fitting. The two pipe sections will meet in the middle of the fitting.
Do not touch the peeled pipe or inside the fitting. Any oils, dirt, dust, or other contaminants may ruin the connection.
Insert pipe into the fitting. The pipes should fit snugly, but without any force. You should be able pull them apart.
Pro tip:If the fitting cannot be pushed into the coupling without a significant amount of force, make another pass with the peeling tool. Remember to wipe the welding surface with rubbing alcohol, as the peeler may be dirty. Make sure there is no gap in the middle. You
won’t be able to see the gap, so use your depth marks.
Attach the leads to the fitting. Most leads slide in with little resistance, so don’t force them. Be careful not to bend them.

2.31
9 10 11
12
HEAT FU
SION
Electrofusion instructions (page 3 of 3)
Make sure both sides of the pipe and fitting are fully supported
for the entire fusion process. The fitting will become extremely soft after it is heated and will lose its shape if subject to any stresses.
Scan the tag on the fitting. Rescan if needed. On smaller couplings, the tag can be removed and laid flat for better reading.
Verify that the display matches the sticker. If the label and the machine don’t match, rescan the fitting label or input manually.
Remove leads when heating is finished. The pipe and fitting will get hotter before cooling down again.
Follow the directions on the machine. Verify your prep work and then begin heating upon confirmation.
The black indicator on the top of the fitting will drop in after the connection is done heating, as long as the electrical leads are pointing up. You will only be able to verify the fusion during the pressure test. All electrofusion sockets are rated to 300 psi.

2.32
HEA
T FU
SIO
N
Inserts for clamps(not shown)
Hydraulic cylinders
ClampsHydraulic hoses
CompressorUnit controls (vary by manufacturer)
Carriage
Butt welding
Butt welding is the process of using heat and pressure to join the faces of two pieces of pipe together. This eliminates the need for a socket-type fitting while maintaining the full strength of the connection. As with any fusion, the primary elements are heat and pressure. Therefore, a butt welding machine is designed to provide both, as well as support the pipe and prepare the pipe face for fusion.
Aquatherm supports butt welding on sizes 6” and larger on all SDRs as well as 4” on SDR
17.6 and 11. Installers may decide to butt weld smaller sizes at their own risk.

2.33H
EAT FUSIO
N
Facing: Facing is performed to square the ends of the pipe. In doing so, it also produces a contaminant-free surface on which the fusion will occur.
Adjusting: Building the adjustment bead against the iron ensures full contact of the pipe face and also sets the size of the resulting fusion bead.
Heating: Commonly referred to as the “heat soak”, this step fills the PP-R with heat, energizing the molecules for fusion.
Fusing: Using the prescribed pressure, push the two pipe faces together and let them cool under pressure.
Explanation of butt weldingThe basic steps to successful butt welding are: facing, adjusting, heating and fusing.

2.34
HEA
T FU
SIO
NButt welding pressures
Each phase of butt welding requires a specific pressure. The four pressures you will need to know are drag pressure, interfacial pressure, welding pressure, and full pressure. Calculate these pressures before starting your fusion.
Drag Pressure: Drag pressure is the minimum hydraulic pressure needed to overcome the carriage’s inertia. You identify the drag pressure by slowly increasing the pressure control until the carriage begins to move. Drag pressure varies by machine design, machine orientation, and pipe size.
Interfacial pressure: Interfacial pressure is the force needed at the point of fusion to create a weld. Aquatherm PP-R butt welding always requires 14.5 pounds of pressure per square inch of surface area being fused.
Welding Pressure: Welding pressure is the force needed by the machine to achieve proper interfacial pressure. This varies by machine cylinder size and pipe dimension. Welding pressures are available from the manufacturer and are included in this manual as well. Welding pressure is measured by the machine’s pressure gauge.
Full Pressure: The drag pressure and welding pressure are added together to create full pressure, which will be used twice during the fusion process. Full pressure should be set on the machine during your post-facing alignment inspection.

2.35H
EAT FUSIO
N
Each phase in the butt welding process takes the basic steps of facing, adjusting, heating and fusing and applies the previously calculated pressures to form a completed weld. Each phase has a required time or visual cue to let you know when that phase is done.
Facing Phase: The pressure for facing will vary based on the pipe size and condition of the blades. Starting at drag pressure, gradually increase the pressure between the pipe and the facing machine until two 360o continuous ribbons are removed from the pipe on both sides.
Adjustment Phase: This phase pushes the exposed pipe surface out of the connection by pressing the pipe face against the heating iron at full pressure. This phase is complete when the displaced material forms a visible bead (see page 2.44).
Heating Phase: During heating, the pipe remains in contact with the heating iron under low pressure. This allows the heat to soak into the pipe without displacing the PP-R material. Heating times (and all other reference times) can be found on pages 2.45 and 2.46.
Welding Phase: After removing the iron, the two heat-soaked pipe surfaces are brought together under full pressure. The pipes must be brought together within the transition time and brought to full pressure within the build-up time.
Cooling Phase: As the fusion occurs, keep the joint under full pressure for a minimum of half of the cooling time. After this, the joint may be removed from the jaws but must remain supported for the remainder of the cooling time. Unsupported pipe must remain under pressure for the full cooldown.
Butt welding phases

2.36
HEA
T FU
SIO
NMcElroy adjustment and welding pressures
Dimension ND (OD mm) SDR
Pitbull 2615” Lever
28 Low Force Acrobat 160 DM 250 EP 412 & 618
Low Force824 & 1236Low Force
Adjustment pressure (psi)
4” (125 x 7.1) 17.6 5 ft-lbs 34 66 - - -
4” (125 x 11.4) 11 8 ft-lbs 53 101 - - -
6” (160 x 9.1) 17.6 9 ft-lbs 60 108 60 32 -
6” (160 x 14.6) 11 14 ft-lbs 93 167 93 49 -
6” (160 x 21.9) 7.4 20 ft-lbs 132 236 132 70 -
8” (200 x 11.4) 17.6 - 94 - 94 50 17
8” (200 x 18.2) 11 - 145 - 145 77 26
8” (200 x 27.4) 7.4 - 207 - 207 109 36
10” (250 x 14.2) 17.6 - - - 142 78 26
10” (250 x 22.7) 11 - - - 218 120 40
10” (250 x 34.2) 7.4 - - - 309 170 56
12” (315 x 17.9) 17.6 - - - - 124 41
12” (315 x 28.6) 11 - - - - 191 63
12” (315 x 43.1) 7.4 - - - - 270 90
Installers should always use the operator’s manual included with the butt welding machine, or the manufacturer’s online information, to calculate the adjustment pressure. This table is based on the information available to Aquatherm at the time of this manual’s printing and may not be complete, accurate, or current. If there is a discrepancy between this table and any information provided by the tool manufacturer, the tool manufacturer’s information shall be considered correct.

2.37H
EAT FUSIO
NMcElroy adjustment and welding pressures
Dimension ND (OD mm) SDR
412 & 618 Low Force
824 & 1236 Low Force
Adjustment pressure (psi)
14” (355 x 20.1) 17.6 157 52
14” (355 x 32.2) 11 242 81
14” (355 x 48.0) 7.4 343 114
16” (400 x 22.7) 17.6 199 66
16” (400 x 36.3) 11 308 102
18” (450 x 25.5) 17.6 252 84
18” (450 x 40.9) 11 389 129
20” (500 x 28.4) 17.6 - 104
22” (560 x 31.7) 17.6 - 130
24” (630 x 35.7) 17.6 - 164

2.38
HEA
T FU
SIO
NRitmo adjustment and welding pressure
Dimension ND (OD mm) SDR
Gamma 160
Delta Dragon 160
Delta Dragon 250B
Delta Dragon 315B
Delta Dragon 355B
[N] Adjustment pressure (psi)
4” (125 x 7.1) 17.6 263 - - -
4” (125 x 11.4) 11 407 - - -
6” (160 x 9.1) 17.6 431 247 116 102 44
6” (160 x 14.6) 11 667 392 189 160 73
6” (160 x 21.9) 7.4 950 551 276 232 102
8” (200 x 11.4) 17.6 - - 189 160 73
8” (200 x 18.2) 11 - - 290 261 102
8” (200 x 27.4) 7.4 - - 421 363 160
10” (250 x 14.2) 17.6 - - 305 261 102
10” (250 x 22.7) 11 - - 464 406 160
10” (250 x 34.2) 7.4 - - 653 566 232
12” (315 x 17.9) 17.6 - - - 406 174
12” (315 x 28.6) 11 - - - 638 261
12” (315 x 43.1) 7.4 - - - 914 377
Installers should always use the operator’s manual included with the butt welding machine, or the manufacturer’s online information, to calculate the adjustment pressure. This table is based on the information available to Aquatherm at the time of this manual’s printing and may not be complete, accurate, or current. If there is a discrepancy between this table and any information provided by the tool manufacturer, the tool manufacturer’s information shall be considered correct.

2.39H
EAT FUSIO
N
Dimension ND (OD mm) SDR
Delta Dragon 355B Delta Dragon 500 Delta Dragon 630
Adjustment pressure (psi)
14” (355 x 20.1) 17.6 218 - 73
14” (355 x 32.2) 11 334 - 102
14” (355 x 48.0) 7.4 479 - 160
16” (400 x 22.7) 17.6 - 174 87
16” (400 x 36.3) 11 - 276 131
18” (450 x 25.5) 17.6 - 218 116
18” (450 x 40.9) 11 - 334 174
20” (500 x 28.4) 17.6 - 276 145
22” (560 x 31.7) 17.6 - - 174
24” (630 x 35.7) 17.6 - - 218
Ritmo adjustment and welding pressure

2.40
HEA
T FU
SIO
NRothenberger adjustment and welding pressure
Dimension ND (OD mm) SDR
ROWELD® P 160 Saniline
ROWELD® P 250 A
ROWELD® P 160 B
ROWELD® P 250 B & P355 B
ROWELD® P 500 B & P630 B
Adjustment pressure (N) Adjustment pressure (bar)
4" 17.6 263 394 7.4 4.2 -
4" 11 407 610 11.5 6.5 -
4" 7.4 580 869 16.4 9.3 -
6" 17.6 431 431 12.2 6.9 -
6" 11 667 667 18.9 10.7 -
6" 7.4 - 950 26.9 15.2 -
8" 17.6 - 675 - 10.8 4.8
8" 11 - 1039 - 16.6 7.4
8" 7.4 - - - 23.7 10.5
10" 17.6 - 1052 - 16.8 7.4
10" 11 - - - 25.9 11.5
10" 7.4 - - - 37.0 16.4
Installers should always use the operator’s manual included with the butt welding machine, or the manufacturer’s online information, to calculate the adjustment pressure. This table is based on the information available to Aquatherm at the time of this manual’s printing and may not be complete, accurate, or current. If there is a discrepancy between this table and any information provided by the tool manufacturer, the tool manufacturer’s information shall be considered correct.
800-545-7698www.rothenberger-usa.com

2.41H
EAT FUSIO
N
Dimension ND (OD mm) SDR
ROWELD® P 250 B & P355 B
ROWELD® P 500 B & P630 B
Adjustment pressure (bar)
12" 17.6 26.7 11.8
12" 11 41.1 18.2
12" 7.4 58.8 26.1
14" 17.6 33.8 15.0
14" 11 52.2 23.1
14" 7.4 74.6 33.1
16" 17.6 - 19.0
16" 11 - 37.2
18" 17.6 - 24.1
18" 11 - 37.2
20" 17.6 - 29.7
22" 17.6 - 37.2
24" 17.6 - 47.2
Rothenberger adjustment and welding pressure

2.42
HEA
T FU
SIO
NWidos adjustment and welding pressures
Dimension ND (OD mm) SDR
Maxiplast WI4400
WI 4600
WI 4900
WI 5100 & 5500
WI 6100
lbs Adjustment pressure (bar)
4” (125 x 7.1) 17.6 58 11 6 - - -
4” (125 x 11.4) 11 89 17 8 - - -
6” (160 x 9.1) 17.6 94 18 9 8 - -
6” (160 x 14.6) 11 145 27 13 12 - -
6” (160 x 21.9) 7.4 207 39 19 17 - -
8” (200 x 11.4) 17.6 - - 13 12 5 -
8” (200 x 18.2) 11 - - 20 18 8 -
8” (200 x 27.4) 7.4 - - 29 26 11 -
10” (250 x 14.2) 17.6 - - 21 18 8 -
10” (250 x 22.7) 11 - - 32 28 12 -
10” (250 x 34.2) 7.4 - - 45 40 17 -
12” (315 x 17.9) 17.6 - - - 29 12 10
12” (315 x 28.6) 11 - - - 44 19 15
12” (315 x 43.1) 7.4 - - - 62 26 *
Installers should always use the operator’s manual included with the butt welding machine, or the manufacturer’s online information, to calculate the adjustment pressure. This table is based on the information available to Aquatherm at the time of this manual’s printing and may not be complete, accurate, or current. If there is a discrepancy between this table and any information provided by the tool manufacturer, the tool manufacturer’s information shall be considered correct.
[email protected] www.widoswelding.com

2.43H
EAT FUSIO
NWidos adjustment and welding pressures
Dimension ND (OD mm) SDR
WI 5100 & 5500 WI 6100
Adjustment pressure (bar)
14” (355 x 20.1) 17.6 15 13
14” (355 x 32.2) 11 24 19
14” (355 x 48.0) 7.4 37 *
16” (400 x 22.7) 17.6 20 16
16” (400 x 36.3) 11 30 24
18” (450 x 25.5) 17.6 25 20
18” (450 x 40.9) 11 38 31
20” (500 x 28.4) 17.6 30 25
22” (560 x 31.7) 17.6 - 31
24” (630 x 35.7) 17.6 - 39
* Contact manufacturer for pressure

2.44
1 mm 1.5 mm 2 mm 2.5 mm
HEA
T FU
SIO
N
The height of the bead is important during the fusion, as too small of a bead may lead to an improper connection, whereas too large of a bead can create a flow restriction and may also indicate a problem with fusion pressure. You will need to carefully watch the bead during the adjustment phase and reduce the pressure once the bead reaches its required height.
Remember that 1 mm is only 1/25th of an inch and is difficult to measure. Generally, when you can first see the bead, that is when it is at the 1 mm height. If your final bead (when the connection is all finished) looks too large, try reducing the size of your adjustment bead slightly.
Size SDR 7.4 SDR 11 SDR 17.6
4” (125 mm) - 0.04” (1.0 mm) 0.04” (1.0 mm)
6” (160 mm) 0.06” (1.5 mm) 0.04” (1.0 mm) 0.04” (1.0 mm)
8” (200 mm) 0.08” (2.0 mm) 0.04” (1.0 mm) 0.04” (1.0 mm)
10” (250 mm) 0.08” (2.0 mm) 0.06” (1.5 mm) 0.04” (1.0 mm)
12” (315 mm) 0.1” (2.5 mm) 0.08” (2.0 mm) 0.04” (1.0 mm)
14” (355 mm) 0.1” (2.5 mm) 0.08” (2.0 mm) 0.06” (1.5 mm)
16” (400 mm) - 0.08” (2.0 mm) 0.06” (1.5 mm)
18” (450 mm) - 0.1” (2.5 mm) 0.06” (1.5 mm)
20” (500 mm) - - 0.08” (2.0 mm)
22” (560 mm) - - 0.08” (2.0 mm)
24” (630 mm) - - 0.08” (2.0 mm)
(4” - 24”)Adjustment bead height
Bead height reference

2.45H
EAT FUSIO
N
Dimension Heating Welding (Fusion) Cooling
ND (OD x Wall thickness in mm) SDR Heating time Max. transition time Time of pressure build-up Cooling time
4” (125 x 11.4) 17.6 2 min. 56 sec 6 sec. 7 sec. 12 min.
4” (125 x 7.1) 11 3 min. 57 sec 7 sec. 11 sec. 19 min.
6” (160 x 9.1) 17.6 3 min. 24 sec. 6 sec. 9 sec. 15 min.
6” (160 x 14.6) 11 4 min. 37 sec. 8 sec. 13 sec. 24 min.
6” (160 x 21.9) 7.4 6 min. 1 sec. 10 sec. 19 sec. 34 min.
8” (200 x 11.4) 17.6 3 min. 57 sec. 7 sec. 11 sec. 19 min.
8” (200 x 18.2) 11 5 min. 20 sec. 9 sec. 16 sec. 29 min.
8” (200 x 27.4) 7.4 6 min. 52 sec. 11 sec. 23 sec. 42 min.
10” (250 x 14.2) 17.6 4 min. 32 sec. 8 sec. 13 sec. 23 min.
10” (250 x 22.7) 11 6 min. 8 sec. 10 sec. 20 sec. 35 min.
10” (250 x 34.2) 7.4 7 min. 46 sec. 13 sec. 30 sec. 52 min.
12” (315 x 17.9) 17.6 5 min. 17 sec. 9 sec. 16 sec. 28 min.
12” (315 x 28.6) 11 7 min. 12 sec. 24 sec. 44 min.
12” (315 x 43.1) 7.4 8 min. 40 sec. 15 sec. 37 sec. 62 min.
Butt welding heating and cooling times (4” - 12”)

2.46
HEA
T FU
SIO
N
Dimension Heating Welding (Fusion) Cooling
ND (OD x Wall thickness in mm) SDR Heating time Max. transition time Time of pressure build-up Cooling time
14” (355 x 20.1) 17.6 5 min. 41 sec. 9 sec. 18 sec. 32 min.
14” (355 x 32.2) 11 7 min. 28 sec. 13 sec. 28 sec. 48 min.
14” (355 x 48.0) 7.4 9 min. 25 sec. 17 sec. 42 sec. 70 min.
16” (400 x 22.7) 17.6 6 min. 7 sec. 10 sec. 20 sec. 35 min.
16” (400 x 36.3) 11 8 min. 14 sec. 31 sec. 54 min.
18” (450 x 25.5) 17.6 6 min. 35 sec. 11 sec. 22 sec. 39 min.
18” (450 x 40.9) 11 8 min. 28 sec. 15 sec. 36 sec. 59 min.
20” (500 x 28.4) 17.6 6 min. 59 sec. 12 sec 24 sec 43 min.
22” (560 x 31.7) 17.6 7 min. 24 sec. 12 sec. 27 sec. 48 min.
24” (630 x 35.7) 17.6 7 min. 55 sec. 14 sec. 31 sec. 53 min.
Butt welding heating and cooling times (14” - 24”)

2.47
1.1
1.3 1.5
1.2
1.4
HEAT FU
SION
Butt welding instructions:
Cut the pipe at least 1/2” longer than your intended final length, or longer if your cut is not perfectly square.
Set up and inspect the machine. Follow all of the manufacturer’s directions. Perform any maintenance if needed.
Check and tighten seals if needed. Release any air bubbles by bringing the machine to full pressure and slowly releasing it.
Maintenance should only be performed by trained persons,
the manufacturer or authorized dealer. Only refill the hydraulic oil according to the manufacturer’s specifications. Make sure that your power supply is fully compatible with the machine you are using.
Set in the correct metric inserts, if needed. The manufacturer will know which clamps and inserts are compatible.
Inspect welding iron and turn it on. Make sure that the iron is clean and set to 410 °F (210 °C) +/- 18 °F.
1. Setup

2.48
2.2 2.32.1
2.4 2.5
HEA
T FU
SIO
NButt welding instructions: 2. Alignment
Check alignment of pipe by running your finger or the end of a pen across the gap. If one side is higher than the other, tighten it down.
Set pipe and/or fitting into the clamps. If possible, use at least 2 clamps for each pipe length. Adjust configuration as needed.
Leave a lip of 1/2” - 1” (more if cut is uneven). A thumb’s width is normally a good measurement. Leave enough room for the facer.
Reposition clamps to accommodate fittings if needed. Some clamps slide and others can be removed entirely.
Drag Pressure: Find the drag pressure by increasing the pressure control until the carriage beings to move. Drag pressure varies by machine design and orientation, and pipe size.
Welding Pressure: Look up the welding pressure in the operating manual (or in this book if no manual is available). Welding pressure varies by OD and SDR.
Full Pressure: Add the drag and welding pressures to get the full pressure.
Tighten clamps and bring the pipe ends together. Make sure all hands are clear of the carriage while it is in motion.

2.49
3.1 3.2 3.3
3.53.4
HEAT FU
SION
Butt welding instructions: 3. Facing
Open the carriage set and lock in facing tool. Turn on facer and let it reach full speed. Never turn on the facer if it is pinched between pipes.
Close pipes on facer. Increase the pressure until the facer begins shaving off ribbons of PP-R. Don’t use excessive pressure.
Drive the carriage forward whenever the pressure drops or the facer stops facing. Replace the blades if they are too dull.
Pro tip:If one side begins facing before the other one, try opening and closing the jaws again to give the facer a “bump.” You can also try inserting wood blocks between the clamps and the planing tool in order to force the facer to shave the opposite side. Facing to a pre-marked point can ensure proper length of the finished connection.
Proper facing will produce 360o, full-width strips on both sides. At this point, open pipes. Adjust the facer if one side is ready before the other.
Switch off and remove facer. Don’t turn off the facer while the carriage is still closed, as this can leave nicks on the pipe face.

2.50
HEA
T FU
SIO
NButt welding instructions: 4. Adjustment
Close carriage and check for gaps. Reface or realign if needed. Wipe down the pipe face with rubbing alcohol.
Open carriage and insert the heating iron. Make sure your heating iron is at or near 410 °F (210 °C).
Set your max pressure level (welding + drag). Controls vary by manufacturer. Don’t change this pressure after setting it.
Close the pipes onto the heating iron under full pressure to initiate construction of the adjustment bead.
Build your adjustment bead to the specified height. The guide is on page 2.44. Do not let your bead get larger than required.
4.1 4.2
4.3 4.4 4.5
Pro tip:
Make sure that the two pieces being connected are still approximately 1/4” longer than your desired final length. You will lose roughly 1/8” off each side of the connection during the adjustment and welding phases. Measure and track your average loss to increase accuracy.

2.51
5.1 5.2
5.3 5.4
HEAT FU
SION
Butt welding instructions: 5. Welding
Adjustment bead complete, drop the system to drag pressure. If necessary to maintain contact, add up to 10% of welding pressure.
The heating phase requires as little pressure as possible. Some
machines lock in place only requiring the drag pressure. Others require a slight positive pressure to keep them in place, but never more than drag + 10% welding pressure. Excessive pressure during the heating phase can create a restriction in the pipe.
Open carriage and remove iron. Make sure you have a safe place to set it down immediately if you can’t hold it in one hand.
Observe the entire heating time (use a timer). Too little time will create an improper connection. Do not exceed the heating time.
Bring pipes together within the transition time and ensure the machine achieves full pressure within the pressure build-up time.

2.52
6.1
6.2 6.3
HEA
T FU
SIO
NButt welding instructions: 6. Cooling
Observe the full cooling time. Do not try and shorten the cooling time by pouring water on the connection.
The final bead should look like one solid piece. A bad PP-R fusion will have a split bead with two distinct sides.
Release pressure and undo clamps. Don’t loosen the clamps until pressure has been fully released.
The cooling time can vary with the size and support of the pipe
being fused. Short sections and long sections that are properly supported can use a reduced cooling time. Long sections that are not supported must use the full time. A visual guide can be found on the next page.
Remove the connection from the machine. Remember to keep the pipe supported if you have reduced the cooling time.

2.53
C o r r e c t
C o r r e c t
Incorrect
Incorrect
Incorrect
HEAT FU
SION
Reducing cooling times
Butt welded connections need to cool under pressure to ensure a proper connection. Cooling times for butt-welded connections can be reduced by up to 50% if the joint is properly supported for the remainder of the cooling time. For example, the cooling time for 6” SDR 11 pipe can be
Whether on hangers or blocks, the pipe should be supported on either side of the connection, as well as further down the line to prevent deflection.
The pipe can also lay flat on the ground or a similar level surface.
Failure to support the pipe near the connection can result in undue stress on the bottom of the joint.
Failure to support the pipe further away from the connection can result in undue stress at the top of the joint.
Failure to support the pipe on both sides of the connection can cause undue stress across the joint.
reduced from 24 minutes to 12 minutes if the joint is not subjected to any undue stress for the remaining 12 minutes. The following images show proper and improper support for the pipe.

2.54
HEA
T FU
SIO
N
In order to fuse pipes with different SDRs, you will need to make the following modifications to your fusion process:
1. Use the heat time from the lower SDR (thicker wall) pipe or fitting.
2. Use the pressure from the higher SDR (thinner wall) pipe or fitting.
3. Use the average bead height of the two SDRs.
The external bead should appear normal. The internal bead will appear lop-sided, but this is not an issue. The system will have the pressure rating of the
Fusing dissimilar SDRs
highest SDR (thinnest wall) material that is fused into the section.
As a general rule, you should avoid butt fusing different SDRs unless it is necessary.
You should never attempt to butt fuse pipes with different ODs.

2.55
1.5”
1.75”
0.25”
HEAT FU
SION
Internal alignment
Due to gravity and the physics of extrusion, larger pipes tend to be slightly thicker on the bottom than they are on the top. However, the top will always be at least as thick as the production SDR, so there is no concern over pressure and temperature ratings.
This difference is not enough to cause problems with the flow calculations or to require a change in fusion pressures. The only concern is simply an aesthetic one, where the internal bead will be misshapen if a thinner top is fused to a thicker bottom. To avoid this, line up the tops and bottoms of the pipe before fusing them. The easiest way to align the pipes is using the printed label
on the side, as the label is always in the same relative position to the top of the pipe. Aligning the labels will help eliminate internal misalignment. If aligning the labels does not fix this issue, use your best judgment when aligning the pipe. The issue does not affect the outer wall of the pipe, which will always be consistent.

2.56
HEA
T FU
SIO
N
2
3 4 5
1
Repairs
For small holes in the pipe, such as holes from nails or screws, you can use the repair pin shown here. For larger holes, install and cap an outlet or remove the pipe and fuse in a new section. If the hole is too small, carefully drill it out. Use
a 1/4” bit for the 5/16” head, and a 3/8” bit for the 7/16” head.
Remove the pin from the head and the welding head from the pipe. Insert the pin into the pipe wall. Do not overinsert the pin.
Once the pin has set, you may use cutters to remove the rest of the pin. Pressure test the system to ensure a proper repair.
Insert the repair head into the iron and insert the repair pin into the repair head. Heat for 5 seconds.
Attach the repair head to a welding iron. Heads are available in 5/16” and 7/16” sizes. Use a size that is larger than the hole.

PROD
UCTIVITY
3.1ProductivityChapter 3:
Heat fusion is a fast and consistent way to join pipe, but overall productivity depends on the build strategy being used.
Having the right crew and tooling mix will greatly increase the speed of your installation. Proper prefabrication and field techniques can help you work even faster. This chapter will help you apply the fusion techniques you’ve learned in faster, more productive ways.
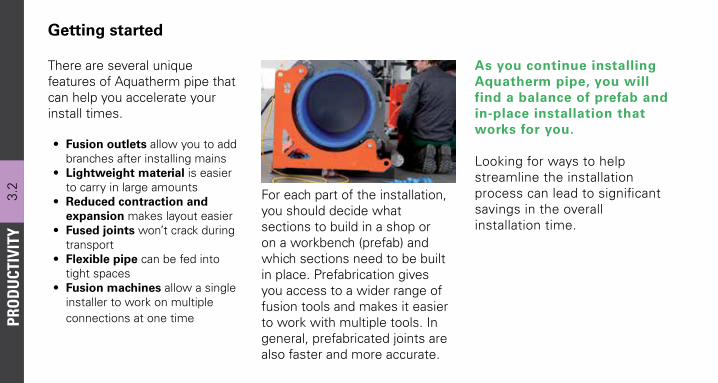
PRO
DU
CTIV
ITY
3.2
Getting started
There are several unique features of Aquatherm pipe that can help you accelerate your install times.
• Fusion outlets allow you to add branches after installing mains
• Lightweight material is easier to carry in large amounts
• Reduced contraction and expansion makes layout easier
• Fused joints won’t crack during transport
• Flexible pipe can be fed into tight spaces
• Fusion machines allow a single installer to work on multiple connections at one time
For each part of the installation, you should decide what sections to build in a shop or on a workbench (prefab) and which sections need to be built in place. Prefabrication gives you access to a wider range of fusion tools and makes it easier to work with multiple tools. In general, prefabricated joints are also faster and more accurate.
As you continue installing Aquatherm pipe, you will find a balance of prefab and in-place installation that works for you.
Looking for ways to help streamline the installation process can lead to significant savings in the overall installation time.

PROD
UCTIVITY
3.3Crew mix
An installer can become proficient at heat fusion in a very short period of time, which can help make your less experienced installers more productive.
However, more advanced concepts like build strategy and layout are best managed by more experienced installers. Therefore, a typical crew installing Aquatherm will have a few masters or journeymen (primary) assisted by multiple apprentices and laborers (support).
Primary:Focuses on the order of assembly, complicated fusion work, connection alignment, and directing the support crew.
The primary uses experience and planning to make the installation fast and efficient.
Support:Focuses on handling, measurement and cutting, tool movement and set-up, and simple fusion work.
The support focuses on maximizing the productivity of the primary installer(s).

PRO
DU
CTIV
ITY
3.4
Tooling
Fusing Aquatherm pipe requires tools that meet certain criteria. The tools must comply with dimensional, temperature, and
pressure requirements that are suitable for Aquatherm’s PP-R pipe. Aquatherm’s core focus is on pipe and fittings, not tools, so Aquatherm works with several tool manufacturers to promote the development and availability of these tools.
For better selection, pricing, and support, installers are encouraged to use tools from an approved tool manufacturer.
As of the printing of this edition, Aquatherm has approved tool lines from McElroy, Ritmo, Rothenberger, and Widos.
Contact information for these manufacturers can be found starting on page 2.36.
Each manufacturer has its own approach when it comes to tool function and design. We recommend exploring your options and finding the tools that are the best fit for you, your company, and the job you are working on.

PROD
UCTIVITY
3.5Hand irons
½”-2” socket fusion:You will need ½”-2” iron to do socket fusion work on 2” pipe and smaller. When working in the air, it’s easiest to use the smallest suitable welding iron. 1” irons are also available for fusing small pipes in confined spaces.
½”-4” socket fusion:A ½”- 4” iron can do all socket connections 4” and smaller. Its weight and power usage make it better suited to prefab and connections that can’t be done with a smaller iron.
2” iron
1” iron
4” iron

PRO
DU
CTIV
ITY
3.6
Socket fusion machines
A jig-style fusion machine eliminates the need for a second installer on 2”-4” connections. Designed for in-air fusion, it is minimalistic and nimble, and requires a hand iron for use.
Prisma Jig
Spider

PROD
UCTIVITY
3.7Socket fusion machines
A bench-style fusion machine eliminates the need for a second installer on 2”-4” connections. With its larger frame and fixed iron, it is not suitable for in-air connections, but does provide immense support and is very productive and efficient for fabrication.
Prisma 125Widos 3511

PRO
DU
CTIV
ITY
3.8
Four-jaw butt fusion machines
Full-size butt fusion machines have two jaws on each side of the fusion (2x2), reducing the time spent loading and aligning the pipe.
Acrobat 160
Delta Dragon 315B
W 4400

PROD
UCTIVITY
3.9Modified machine configurations
Most four-jaw machines can be modified to accommodate different fusion situations. Some machines allow a clamp to be removed (2x1), reducing weight and size. Others allow for a 3x1 set-up to accommodate shorter sections. Clamping with a single jaw generally requires additional alignment time.
Acrobat 160
W 4400

PRO
DU
CTIV
ITY
3.10
Manual butt fusion machines
Pit Bull® 26
Widos Maxiplast
Ritmo Gamma 160Manual machines lack a hydraulic system, and instead use a mechanical device to generate the force required for fusion. They can be advantageous in tight spaces and on smaller jobs.

PROD
UCTIVITY
3.11Larger crew vs. more tools
Tools should be viewed as a means to increase productivity, rather than as an additional cost. For example, socket fusions from 2”-4” are difficult to do with one installer and may require a second installer. However, a socket fusion machine makes larger socket fusions a one-person job, doubling productivity.
For larger sizes of pipe (6” and up), cooling times occupy the time of the machine, but not necessarily the installer. With proper set-up and planning, a single installer can perform several fusions at once, using
multiple machines. This can double or triple the output of an installer, or team of installers.
The ratio of machines to installers will depend on the skill of the crew, the worksite conditions, and the nature of the installation. Having too few tools will slow down the job, and leave installers standing around with nothing to do. A good balance lets the crew stay engaged on productive work (no waiting around) while the fusion equipment is always being used on connections (no idle machines).
Having the right number of tools will greatly impact your installation time.
To find the correct number of tools for the job, evaluate the size and mix of the crew being used. Each person fusing pipe will need at least one tool suitable for fusing the size of pipe being installed. Some installers may be able to operate multiple tools, while installers in supporting roles may not need tools at all. This next section will give you examples of tool selection and crew mix, based on the type of work being done.

PRO
DU
CTIV
ITY
3.12
Work example
Crew: 1 primary, 1 support
Tools: 1 benchtop, 1 iron, 1 jig, saw
Goal: Maximize connections per hour and eliminate unproductive time through specialization.
Process: Support measures and cuts pipe to length, cleans and preps edges for fusion. Primary uses benchtop machine to perform fusions on the main spool, uses iron and jig to fuse on additional pipe, fittings, and outlets while the benchtop connection cools. OPTIMIZED TEAM
Fusion
Preparation
Unproductive time
SINGLE INSTALLER 3
8FUSIONS PER HOUR
FUSIONS PER HOUR
(Time spent moving around the jobsite, setting up equipment, waiting for cooling, etc.)
Note: The “Fusions per hour” in the examples are just for comparison. Your actual productivity rates will vary with pipe size and installer experience.
#1: Socket prefabrication (shop)
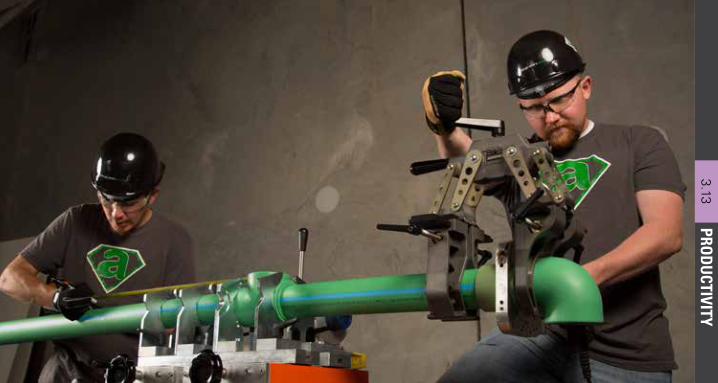
PROD
UCTIVITY
3.13

PRO
DU
CTIV
ITY
3.14
Work example #2: Butt fusion prefabrication (shop)
Crew: 1 primary, 1 support
Tools: 2-3 butt fusion machines
Goal: Maximize connection per hour by eliminating downtime for the cooling phases.
Process: Primary performs the hot work (alignment, facing, bead-up, heating, and welding) on first machine while Support preps the second machine for fusion.
Primary then performs the hot work on the second machine while the first connection cools. If two machines are being used, Support preps a
second connection for the first machine. If three machines are being used, Support sets up the third machine during this time. The cycle continues so that the Primary is always performing hot work on a fusion machine.
The decision to use 2 or 3 machines depends on the skill of the Primary and the duration of the cool-down time. A longer cool down allows for more simultaneous fusions.
OPTIMIZED TEAM
SINGLE INSTALLER 2
6FUSIONS PER HOUR
FUSIONS PER HOUR
Fusion Preparation Unproductive time

PROD
UCTIVITY
3.15

PRO
DU
CTIV
ITY
3.16
Crew: 1 primary, 2-3 support
Tools: 1 benchtop, 2-3 irons, 2-3 jigs, saw
Goal: Minimize in-air connections by building on the ground as much as possible.
Process: One Support measures and cuts pipe to length, cleans and preps edges for fusion. Primary uses benchtop machine to perform fusions on the main spool, uses iron and jig to fuse on additional pipe, fittings, and outlets while the benchtop connection cools. Simple straight lengths of pipe
can have a socket coupling added to them to reduce the number of in-air connections. The remaining Supports take the fabricated sections to their intended locations and install them as directed. Fabbed
Work example #3: Socket fusion prefabrication (onsite)
sections could also be installed by a second Primary.
The exact mix and tasks of this crew depend on the skill of the Primary(ies) and Support(s) and the layout of the jobsite.
OPTIMIZED TEAM
SINGLE INSTALLER 2
9FUSIONS PER HOUR
FUSIONS PER HOUR
Fusion Preparation Unproductive time

PROD
UCTIVITY
3.17

PRO
DU
CTIV
ITY
3.18
Work example #4: Butt fusion prefabrication (onsite)
Crew: 1 primary, 1-3 support
Tools: 2-3 butt fusion machines, welding irons and jigs if needed
Goal: Maximize connections per hour by eliminating downtime for the cooling phases and minimize in-air connections.
Process: Primary performs the hot work (alignment, facing, bead-up, heating, and welding) on first machine while one Support preps the second machine for fusion. Primary then performs the hot work on the second machine while the first connection cools.
If two machines are being used, Support preps a second connection for the first machine. If three machines are being used, Support sets up the third machine during this time. The cycle continues so that the
Primary is always performing hot work on a fusion machine.
Support can also work on adding outlets and other connections as needed or take finished sections and install them as directed.
OPTIMIZED TEAM
SINGLE INSTALLER 2
9FUSIONS PER HOUR
FUSIONS PER HOUR
Fusion Preparation Unproductive time

PROD
UCTIVITY
3.19

PRO
DU
CTIV
ITY
3.20
Work example #5: Socket fusion (Linear)
Crew: 1 primary, 1-2 support
Tools: 1 iron, 2 jigs, ladders or lift
Goal: Keep the single iron fusing pipe as much as possible by removing downtime.
Process: Support sets up first jig and then Primary performs the actual fusion. While Primary is performing the fusion, Support sets up the second jig. Primary then performs the second connection while Support detaches the first jig and sets it up on another connection. A second Support may be needed to carry and hang pipe.
This process can also be done on the ground, at which point the crew can lift the entire length into the air. Branch outlets can be added later.
Fusion Preparation Unproductive time
OPTIMIZED TEAM
SINGLE INSTALLER 3
8FUSIONS PER HOUR
FUSIONS PER HOUR

PROD
UCTIVITY
3.21

PRO
DU
CTIV
ITY
3.22
Work example #6: Butt fusion (linear)
Crew: 1 primary, 1-2 support
Tools: 2-3 butt fusion machines
Goal: Maximize connections per hour by eliminating downtime for the cooling phases.
Process: Primary performs the hot work (alignment, facing, bead-up, heating, and welding) on first machine while 1-2 Support prep the second machine for fusion. Primary then performs the hot work on the second machine while 1-2 Support set up the third machine. Pipe in the air may require the full cooldown time, so three machines will be
needed to minimize downtime.
If the pipe is fused on the ground and hoisted into place, two machines and one Support may be sufficient. Branch outlets can be added later.
OPTIMIZED TEAM
SINGLE INSTALLER 2
6FUSIONS PER HOUR
FUSIONS PER HOUR
Fusion Preparation Unproductive time
This process can also be done on the ground, at which point the crew can lift the entire length into the air. Branch outlets can be added later.

PROD
UCTIVITY
3.23

PRO
DU
CTIV
ITY
3.24
As part of using prefabrication, you will need to have a plan for installing the spools once they are built. Time saved by using prefabrication can be lost trying to rework sections that aren’t easy to join together.
Joining spools:
Traditional fusion methods (socket and butt welding) require a few inches of lateral movement. If that movement is available, then socket and butt fusion will be the most cost-effective and secure means of joining
the spools. For straight lengths, leave the moving spool unclamped until the fusion is complete.
Places where the pipe changes direction (such as elbows) allow the installer to take advantage of the pipe’s
flexibility. (See pages 4.16 and 4.17 for safe bending lengths). Using a fusion machine, the installer can force the pipe to bend, perform the fusion, and bring the pipe and fitting together for a square connection (See series above).
Socket and butt fusion

PROD
UCTIVITY
3.25Joining spools: Electrofusion
In areas where lateral movement is not possible, but fusion welding is still the preferred method, electrofusion couplings can join sections up to 10” without lateral movement.
One side of the pipe is peeled back far enough for the electrofusion socket to be used as a slip coupling (right). Once the spool is in place, the coupling is slid back to center (below).

PRO
DU
CTIV
ITY
3.26
Flange adaptors can join the pipe to itself or another material. Aquatherm flange connections consist of two parts: the adaptor and the ring (see page 4.26). Flange adaptors are a common connection method in areas where traditional fusion is difficult or impossible. Flange transitions are available up to 24”.
Planning for flanged spools will include considerations for the thickness of the gasket and for any equipment (such as valves) being installed between the spools. This affects both build-length of the spool and the length of the bolts.
Joining spools: Flanges

PLAN
NIN
G4.1
PlanningChapter 4:
Beyond heat fusion, there are a number of differences between installing Aquatherm pipe and installing other systems. Your skill in planning and layout can help you take advantage of these differences, and avoid common pitfalls. This chapter will discuss important installation details, such as pipe sizing, hanger spacing, expansion controls, insulation, and pressure testing.
Remember that, when using an engineered system like PP-R, planning and finesse will yield better results than brute force.

PLA
NN
ING
4.2
Technical bulletins
Aquatherm works hard to deliver the best training and most accurate product information available to you, the installer.
However, due to the wide variety of applications that Aquatherm pipe is used in, and the ongoing development of third-party tools, clamps, insulations, and other solutions, staying up on the best practices requires a small bit of effort.
In order to keep you informed of new techniques and requirements, Aquatherm frequently releases technical
bulletins to fill in the gaps between editions of the installer manual. Technical bulletins also give more detailed explanations of installation techiques than will fit in the installer manual.
As a result, in the event of a discrepancy between this installer manual and the current technical bulletins on the Aquatherm website, the bulletins should be considered correct.
Aquatherm recommends reading the technical bulletins in addition to this manual.
Notifications regarding new technical bulletins can be found at: http://aquatherm.com/technical-bulletins

PLAN
NIN
G4.3
Clamps and hangers
If you are installing metal clamps, use only rubber- or felt-lined clamps, like the one shown here. You may use tape to pad the space between the PP-R and the metal on non-clamping hangers, such as clevis hangers. Plastic clamps are safe without additional padding.
Metal clamps (even plastic-safe clamps) can damage hot water pipes, and can condense when used on cold water pipe. When installing chilled water lines in high-humidity areas, use a non-crushable pipe shield (pictured above).
Rubber-lined clamp
Metal that is in direct contact with Aquatherm pipe may sweat in certain chilled applications, even if the pipe itself shows no signs of condensation.

PLA
NN
ING
4.4
Anchors and guides
For the purposes of dealing with linear expansion, there are two types of supports: anchors and guides. Anchors are tight against the pipe and prevent movement through that point. Guides support the pipe, but are loose and allow movement through the joint.
The table on page 4.35 provides the best match of CTS and IPS sizes.
Guide Anchor
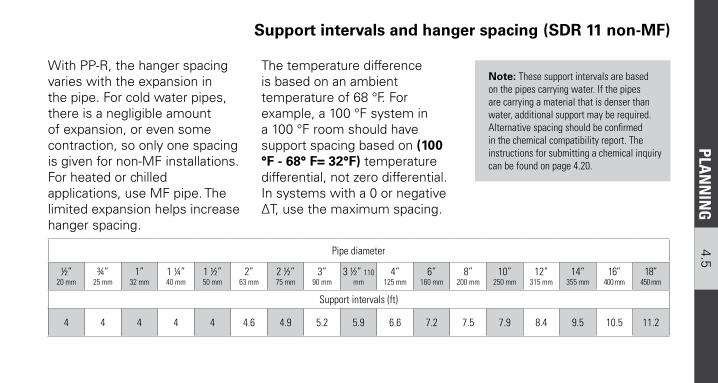
PLAN
NIN
G4.5Support intervals and hanger spacing
With PP-R, the hanger spacing varies with the expansion in the pipe. For cold water pipes, there is a negligible amount of expansion, or even some contraction, so only one spacing is given for non-MF installations. For heated or chilled applications, use MF pipe. The limited expansion helps increase hanger spacing.
Pipe diameter
½” 20 mm
¾” 25 mm
1” 32 mm
1 ¼”40 mm
1 ½” 50 mm
2” 63 mm
2 ½” 75 mm
3” 90 mm
3 ½” 110 mm
4” 125 mm
6” 160 mm
8” 200 mm
10” 250 mm
12” 315 mm
14” 355 mm
16”400 mm
18”450 mm
Support intervals (ft)
4 4 4 4 4 4.6 4.9 5.2 5.9 6.6 7.2 7.5 7.9 8.4 9.5 10.5 11.2
The temperature difference is based on an ambient temperature of 68 °F. For example, a 100 °F system in a 100 °F room should have support spacing based on (100 °F - 68° F= 32°F) temperature differential, not zero differential. In systems with a 0 or negative ∆T, use the maximum spacing.
Note: These support intervals are based on the pipes carrying water. If the pipes are carrying a material that is denser than water, additional support may be required. Alternative spacing should be confirmed in the chemical compatibility report. The instructions for submitting a chemical inquiry can be found on page 4.20.
(SDR 11 non-MF)

PLA
NN
ING
4.6
(SDR 7.4 and 11 MF)
∆T
Pipe diameter
½” 20 mm
¾” 25 mm
1” 32 mm
1 ¼”40 mm
1 ½” 50 mm
2” 63 mm
2 ½” 75 mm
3” 90 mm
3 ½” 110 mm
4” 125 mm
6” 160 mm
8” 200 mm
10” 250 mm
12” 315 mm
14” 355 mm
16”400 mm
18”450 mm
Difference in temp. Support intervals (ft)
0 °F (0 °C) 4 4.6 5.2 5.9 6.7 7.5 8 8.5 9.5 10.5 11.2 11.3 11.5 12.5 13.5 15 16
36 °F (20 °C) 4 4 4 4.4 5.1 5.7 6.1 6.4 7.1 7.9 8.9 9 9.2 10.1 11 14 15
54 °F (30 °C) 4 4 4 4.4 5.1 5.7 6.1 6.4 6.9 7.4 8 8.2 8.4 9.2 10 12 13
72 °F (40 °C) 4 4 4 4.1 4.8 5.4 5.7 6.1 6.6 7.1 7.7 7.9 8 8.7 9.5 11 12
90 °F (50 °C) 4 4 4 4.1 4.8 5.4 5.7 6.1 6.2 6.4 6.7 6.9 7.1 7.8 8.5 10 11
108 °F (60 °C) 4 4 4 4 4.4 5.1 5.4 5.7 5.9 6.1 6.4 6.6 6.7 7.1 7.5 9 10
126 °F (70 °C) 4 4 4 4 4.3 4.8 5.1 5.4 5.6 5.7 6.1 6.2 6.4 6.7 7 8 8
Support intervals

PLAN
NIN
G4.7
Support intervals (SDR 17.6 MF)
∆T
Pipe diameter
4” 125 mm
6” 160 mm
8” 200 mm
10” 250 mm
12” 315 mm
14” 355 mm
16” 400 mm
18” 450 mm
20”500 mm
22”560 mm
24”630 mm
Difference in temp. Support intervals (ft)
0 °F (0 °C) 8.4 8.5 8.7 9.0 9.2 9.4 9.7 10.0 10.3 10.7 10.8
36 °F (20 °C) 6.1 6.2 6.6 6.7 6.9 7.1 7.5 7.9 8.4 8.9 9.2
54 °F (30 °C) 5.7 5.9 6.2 6.4 6.6 6.7 7.2 7.5 8.0 8.5 9.0
72 °F (40 °C) 5.6 5.7 5.9 6.2 6.2 6.4 6.9 7.4 7.7 8.2 8.7
90 °F (50 °C) 5.2 5.4 5.7 5.9 6.1 6.1 6.6 7.1 7.5 7.9 8.4
108 °F (60 °C) 4.9 5.1 5.4 5.6 5.7 5.7 6.1 6.6 7.1 7.5 7.9
126 °F (70 °C) 4.6 4.8 5.1 5.2 5.6 5.7 5.7 6.2 6.7 7.2 7.5

PLA
NN
ING
4.8
Increased hanger spacing
In some applications, the positioning of hangers is determined by outside factors, such as a retrofit with hangers from previous metal pipes. In order to accommodate for these variations, installers may use an in-line support, like the one shown here.
The supported distance can be added to the hanger spacing. For example, a pipe with a 6 ft spacing requirement can be hung on 8 ft spacers if 2 ft of the pipe is supported in-line.
The supports must clip securely to the pipe without damaging
the outer wall. In-line supports will need to be installed under the insulation, but still need a non-metallic barrier layer (such as tape) between the metal surface of the in-line support and the pipe. Approved in-line supports* are available through Walraven.
*Other manufacturers may provide a similar product that was not approved by Aquatherm at the time of printing. These supports, if acceptable, can be approved by Aquatherm upon request.

PLAN
NIN
G4.9
Fire rating
For fire-rated assemblies, such as return-air plenums, Aquatherm pipe will need to be protected by a fire-rated insulation or wrap. If the pipe needs to be insulated (HW, HWR, CHW), any material that meets the fire/smoke requirements of ASTM E84 or CAN/UL S102.2 can be used. If insulation is not required (DCW), a simple wrap meeting the fire/smoke requirements may be installed over the pipe.
In areas requiring a listed system, recent changes to the model mechanical codes (2012 IMC and UMC) have made it
clear that any product which is listed and labeled as meeting the flame and smoke requirements of ASTM E84 and CAN/UL S102.2 may be used to protect the pipe. Always obtain approval of your local authority having jurisdiction before installing any pipe insulation/wrap. Although the updated building codes allow for the use of any plenum-rated insulation to protect the pipe, it should be noted that the fittings will be required to be wrapped as well as the pipe in order to meet the fire/smoke standards. Again, confirm local authority approval before beginning.
For fire-rated partition/assembly penetrations, Aquatherm recommends that installers work with the fire stopping manufacturer. The current list can be found at Aquatherm.com/firestopping.
By allowing the use of multiple materials to be installed with our product, the decision for insulation, flame/smoke wraps, and fire stopping can be made by the installer, engineer, and owner based on their preferences and the most cost-effective solutions for the project.

PLA
NN
ING
4.10
Linear expansion
Linear expansion occurs when the pipe is heated. The amount of expansion is determined by the difference in temperature. It is important to know how much expansion will occur during system operation and plan for it. Aquatherm’s MF pipes use a combination of glass fibers and PP-R to reduce linear expansion and contraction by 75%.
MF pipes can be fused without any special tools, treatment, or prep work. Fuse MF pipes using the same techniques as non-MF pipe.
The MF extrusion process produces a middle layer with expansion-inhibiting properties. The percentage of PP-R is high enough to ensure a proper bonding between the layers, so the middle layer cannot be separated from the inner and outer layers.
For hot water, heating, and chilled applications, use a MF pipe, such as aquatherm green pipe® SDR 7.4 or aquatherm blue pipe® SDR 17.6 or 11.
For ambient-temperature applications, such as gray water or DCW, use a non-MF pipe, such as aquatherm green pipe SDR 11 or aquatherm lilac pipe®.

PLAN
NIN
G4.11
Calculating expansion
In order to deal with expansion properly, you will need to know how much expansion to expect. Expansion is based on the following factors:
L = the length of pipe Ti = the temperature of the pipe at the time the pipe is clamped downTw = the temperature of the water inside the pipes during operation∆T = the difference between the working temperature (Tw) and the installation temperature (Ti): α = the coefficient of expansion = 0.0002367 in/ft °F for MF pipe = 0.001008 in/ft °F for non-MF pipe
Multiply the length of the pipe (L) by the temperature difference (∆T), and again by the expansion coefficient (α), as shown here:
L x ∆T x α = ∆L (Linear Expansion or change in length)
This will give you the expected expansion in inches. The tables on the next two pages provide some of these calculations. Note that the length of expansion is the same for all diameters of pipe.

PLA
NN
ING
4.12
Linear expansion
Pipelength
Difference in temperature ∆T = Toperating temperature - Tinstallation temperature
10 °F 20 °F 30 °F 40 °F 50 °F 60 °F 80 °F 100 °F
Linear expansion ∆L (in)
10 ft 0.1 0.2 0.3 0.4 0.5 0.6 0.8 1.0
20 ft 0.2 0.4 0.6 0.8 1.0 1.2 1.6 2.0
30 ft 0.3 0.6 0.9 1.2 1.5 1.8 2.4 3.0
40 ft 0.4 0.8 1.2 1.6 2.0 2.4 3.2 4.0
50 ft 0.5 1.0 1.5 2.0 2.5 3.0 4.0 5.0
60 ft 0.6 1.2 1.8 2.4 3.0 3.6 4.8 6.0
70 ft 0.7 1.4 2.1 2.8 3.5 4.2 5.6 7.0
80 ft 0.8 1.6 2.4 3.2 4.0 4.8 6.4 8.0
90 ft 0.9 1.8 2.7 3.6 4.5 5.4 7.2 9.0
100 ft 1.0 2.0 3.0 4.0 5.0 6.0 8.0 10.0
150 ft 1.5 3.0 4.5 6.0 7.5 9.0 12.0 14.9
200 ft 2.0 4.0 6.0 8.0 10.0 12.0 15.9 19.9
for non-MF pipe

PLAN
NIN
G4.13
Linear expansion for MF pipe
Pipelength
Difference in temperature ∆T = Toperating temperature - Tinstallation temperature
10 °F 20 °F 30 °F 40 °F 50 °F 60 °F 80 °F 100 °F
Linear expansion ∆L (in)
10 ft 0.0 0.0 0.1 0.1 0.1 0.1 0.2 0.2
20 ft 0.0 0.1 0.1 0.2 0.2 0.3 0.4 0.5
30 ft 0.1 0.1 0.2 0.3 0.3 0.4 0.5 0.7
40 ft 0.1 0.2 0.3 0.4 0.5 0.5 0.7 0.9
50 ft 0.1 0.2 0.3 0.5 0.6 0.7 0.9 1.1
60 ft 0.1 0.3 0.4 0.5 0.7 0.8 1.1 1.4
70 ft 0.2 0.3 0.5 0.6 0.8 1.0 1.3 1.6
80 ft 0.2 0.4 0.5 0.7 0.9 1.1 1.5 1.8
90 ft 0.2 0.4 0.6 0.8 1.0 1.2 1.6 2.1
100 ft 0.2 0.5 0.7 0.9 1.1 1.4 1.8 2.3
150 ft 0.3 0.7 1.0 1.4 1.7 2.1 2.7 3.4
200 ft 0.5 0.9 1.4 1.8 2.3 2.7 3.6 4.6

PLA
NN
ING
4.14
Linear isolation: For vertical installations, expansion can be contained to each floor, leaving each 10 ft space with a fraction of an inch of expansion. This will cause a slight bowing of the pipe, which can be minimized using a midfloor guide.
Note: Only MF pipes can absorb their expansion. Non-MF pipes in heated applications must have
other expansion controls installed every 30 ft. Expansion should be handled by the engineer in the design documents and those documents must be followed. The information here is for reference and verification only.
Expansion controls
To control linear expansion, you will need to isolate and direct the expansion in a safe way. Expansion will move away from anchors and through guides until it reaches your expansion control or another anchor. On long runs, you should use an expansion control every 120 ft. Remember that branches and other fittings cannot expand through an anchor or guide. Common expansion controls include:
Sliding elbow: Expansion is directed to where the pipe changes direction. The force of the expansion is absorbed by the flexibility of the bending side.
Expanding sideBending side

PLAN
NIN
G4.15
Expansion controls
Expansion loop: Used on long, straight runs. Two distant anchors direct expansion to a central loop. The loop can even be pre-stressed to accommodate additional expansion, or to give a square appearance during operation.
Sliding end: Used for short distances where the pipe ends with a cap. The distance between the end of the pipe and the wall (or other obstruction) must be less than the expansion. The pipe should be supported as closely to the end as possible.
Expanding side Expanding side
Bending side without pre-stress Bending side with pre-stress

PLA
NN
ING
4.16
Length of bending side
Pipe dimension in inches (mm)
Linear expansion in inches (”)
1” 2” 3” 4” 5” 6” 7” 8” 9” 10” 11” 12”
Length of bending side (in)
½” (20) 13 19 23 27 30 33 35 38 40 42 44 46
¾” (25) 15 21 26 30 34 37 40 42 45 47 50 52
1” (32) 17 24 29 34 38 42 45 48 51 54 56 59
1¼” (40) 19 27 33 38 42 46 50 54 57 60 63 66
1 ½” (50) 21 30 37 42 47 52 56 60 64 67 70 73
2” (63) 24 34 41 48 53 58 63 67 71 75 79 82
2 ½” (75) 26 37 45 52 58 64 69 73 78 82 86 90
3” (90) 28 40 49 57 64 70 75 80 85 90 94 99
3 ½” (110) 31 44 54 63 70 77 83 89 94 99 104 109
4” (125) 34 47 58 67 70 82 89 95 101 106 111 116
The following table gives the minimum distance between the elbow of the bending side and the first support on that pipe. The force of expansion can safely bend the pipe over this distance.

PLAN
NIN
G4.17
Length of bending side
Pipe dimension in inches (mm)
Linear expansion in inches (”)
1” 2” 3” 4” 5” 6” 7” 8” 9” 10” 11” 12”
Length of bending side (in)
6” (160) 38 54 66 76 85 93 100 107 114 120 126 131
8” (200) 42 60 73 85 95 104 112 120 127 134 141 147
10” (250) 47 67 82 95 106 116 125 134 142 150 157 164
12” (315) 53 75 92 106 119 130 141 151 160 168 177 184
14” (355) 56 79 97 112 126 138 149 159 168 178 186 194
16” (400) 60 84 103 119 133 146 158 169 179 188 198 206
18” (450) 63 89 109 126 141 155 167 178 190 200 210 219
20” (500) 67 94 115 133 149 163 176 188 200 211 221 231
22” (560) 71 100 122 141 158 173 187 199 212 223 234 244
24” (630) 75 106 130 150 167 183 198 212 224 237 248 259

PLA
NN
ING
4.18
Length of bending side with pre-stress
Pipe dimension in inches
(mm)
Linear expansion in inches (”)
1” 2” 3” 4” 5” 6” 7” 8” 9” 10” 11” 12”
Length of bending side (in)
½” (20) 9 13 16 19 21 23 25 27 28 30 31 33
¾” (25) 11 15 18 21 24 26 28 30 32 34 35 37
1” (32) 12 17 21 24 27 29 32 34 36 38 40 42
1¼” (40) 13 19 23 27 30 33 35 38 40 42 44 46
1 ½” (50) 15 21 26 30 34 37 40 42 45 47 50 52
2” (63) 17 24 29 34 38 41 45 48 51 53 56 58
2 ½” (75) 18 26 32 37 41 45 49 52 55 58 61 64
3” (90) 20 28 35 40 45 49 53 57 60 64 67 70
3 ½” (110) 22 31 39 44 50 54 59 63 67 70 74 77
4” (125) 24 34 41 47 53 58 63 67 71 75 79 82
The following table gives the minimum distance between the elbow of the pre-stressed bending side and the first support on that pipe, splitting the expansion. Use the first table if you are pre-stressing for a square finish.

PLAN
NIN
G4.19
Length of bending side with pre-stress
Pipe dimension in inches
(mm)
Linear expansion in inches (”)
1” 2” 3” 4” 5” 6” 7” 8” 9” 10” 11” 12”
Length of bending side (in)
6” (160) 27 38 46 54 60 66 71 76 80 85 89 93
8” (200) 30 42 52 60 67 73 79 85 90 95 99 104
10” (250) 34 47 58 67 75 82 89 95 101 106 111 116
12” (315) 38 53 65 75 84 92 100 106 113 119 125 130
14” (355) 40 56 69 79 89 97 105 112 119 126 132 138
16” (400) 42 60 73 84 94 103 112 119 126 133 140 146
18” (450) 45 63 77 89 100 109 118 126 134 141 148 155
20” (500) 47 67 82 94 105 115 125 133 141 149 156 163
22” (560) 50 71 86 100 112 122 132 141 150 158 165 173
24” (630) 53 75 92 106 118 130 140 150 159 167 175 183

PLA
NN
ING
4.20
Chemical compatibility
PP-R is safe with most chemicals, in most environments, and with nearly any quality of water.
However, there are a few applications, such as high chlorine concentrations, that have adverse effects on the pipe and fittings. If you are installing the pipe in a chemically corrosive application, the engineer on the job should have already submitted a chemical compatibility report. If no report was submitted, go to Aquatherm.com/compatibility and follow the directions provided there.
Inquiries are submitted to Aquatherm’s testing laboratories in Germany for verification normally within 24-48 hours.
Many common applications are pre-approved, and may be answered on the same day.Aquatherm pipes are safe to use with propylene and ethylene glycols at any concentration.
Be aware that even if the Aquatherm pipe is compatible with the chemical being transported, other materials in the system may not be. Make sure that all parts of the system are compatible with the medium being carried before installing them. And, while Aquatherm pipe does not require treatment to protect it from corrosion, ferrous metals in the system will. Do not mix Aquatherm pipe with other piping systems in conditions that will cause the other system to fail.

PLAN
NIN
G4.21
Integration with copper tubing
When integrating Aquatherm piping systems with other systems, make sure that the operating parameters for PP-R won’t damage the other materials. When there is extensive use of copper piping in conjunction with PP-R, care should be taken to ensure the operating conditions will not cause dissolution or corrosion of the copper.
Aquatherm recommends following the Copper Development Agency’s guidelines for sizing, temperature and flow speed in copper pipe. This will also help
ensure that the copper levels in the water do not approach the regulatory action levels.
Sustained high levels of copper ions in a water system can damage wetted surfaces within the system, even PP-R. Damage caused by unregulated copper ions may void the warranty.
Alternatively, you can avoid using large amounts of new copper upstream of the PP-R in hot water recirculation lines. If the copper fails, it may degrade the PP-R as well, shortening its service life. Small amounts of copper from valves and other
equipment will generally not cause an issue. For maximum longevity, recirculation lines for domestic hot water should not exceed a flowspeed of 4 ft/s unless the piping is all PP-R.
If you are adding PP-R to an existing copper system, the level of free copper in the water should be tested. These levels should not exceed 0.5 P.P.M., and are considered actionable by the EPA at 1.3 P.P.M. High levels of free copper indicate that the copper pipe is eroding due to system and/or water conditions.

PLA
NN
ING
4.22
To facilitate transitions to fixture units or copper components, Aquatherm offers a PP-R to copper stub out, intended for use with angle stops, flush valves, and other terminations. It is compatible with both compression and solder-type connections.
These fittings are combination of a custom Aquatherm PP-R socket with a gasket and copper stub added by Sioux Chief Manufacturing. The fused PP-R portion is covered under Aquatherm’s warranty. The copper portion and gasket are covered under a warranty from Sioux Chief.
PP-R to copper transition fittings
Instructions are included with the fitting. Always follow those directions to avoid damaging the fitting. PP-R to copper transitions are available in ½”, ¾”, and 1” sizes.

PLAN
NIN
G4.23
Aquatherm piping is required to pass a system malfunction test of 8,760 hours (~1 year) at 230°F. This does not mean the piping is intended to be operated at this condition, but rather that it can withstand temperatures above 180°F were this to occur due to a boiler malfunction. This allows Aquatherm pipe to be connected directly to a boiler in many cases.
Some codes may require a minimum of 18” of copper tubing from the boiler to the Aquatherm PP-R. (Note: this is not enough copper tubing to create an issue with copper ions as long as the copper is properly sized).
Connecting to a boiler
It is safest to complete all heat-producing connections, such as soldering, before making the Aquatherm piping connections to the copper piping. When this is not a possibility, one solution is to install a copper union that can be uncoupled until the soldering is complete. In any case, do not expose any PP-R piping and transition fittings to temperatures in excess of 170 °F during the copper soldering process. Excessive heat may distort and deform any O-ring seals and fitting connections, resulting in a leak during testing or after system start-up.
Perform all solder joints on copper piping at the following minimum distances from the PP-R piping along the copper tube:
10” from a ½” or ¾” PP-R fitting or pipe;18” from a 1” or 1¼” PP-R fitting or pipe;20” from a 1½” PP-R Pipe fitting or pipe;22” from a 2” (or larger) PP-R fitting or pipe.
For additional safety, use a water soaked cloth or commercial heat blocking agent between the solder joint and the PP-R piping and immediately cool the copper tube and the transition fitting after the soldering is completed.

PLA
NN
ING
4.24
Bushings, reducers, and reducing couplings
To help limit the number of reducing fittings that a wholesaler must stock, Aquatherm uses bushings which are designed to be inserted into another fitting, such as a socket, tee, or elbow. When reducing, the side being reduced from is male and acts like a piece of pipe in that size. The side being reduced to is female and acts like a socket in the smaller size.
The female side (smaller pipe size) is labeled with the fitting dimension and has a stop on the inside, just like a regular socket fitting. The male side (larger pipe size) has a bevel on the face
male side female side
and a thicker wall than a normal socket connection. Bushings run from 4” down to 1/2”.
Reducers are used with larger pipes and are butt welded on both sides. They may go directly to a pipe or to a fitting.
Bushing
Aquatherm also provides reducing couplings to reduce the pipe during a straight run. Sizes under 4” are socket fused on both ends. Sizes that reduce from above 4” to 4” or smaller will butt fuse on the larger size and socket fuse on the smaller size.

PLAN
NIN
G4.25
Large PP-R ball valve
The benefits of an all polypropylene system can be realized up through 6” with the large diameter PP-R ball valves available from Aquatherm. The valves flange in-line, and can be installed quickly and easily as long as the following items are addressed:
• Be aware that the bolt hole pattern is built to the ISO (European) standard. Therefore, flange rings and full face gaskets will need to match the pattern. Aquatherm rings do match, and the dimensions are available on the website.
• The nuts inset in the valve are a coarse metric thread, and do require metric bolting. For bolt dimensions, see page 5.49.
(3”-6”)
• At the time of print, Aquatherm does not source gaskets or bolts. We intend to add them to our product line in the near future.
456
B
C
D
l
h1h2
z
123
B
C
D
D
d

PLA
NN
ING
4.26
Aquatherm offers a wide range of threaded transitions to connect with non-fusible system components. These transitions have a machined brass or stainless steel thread mold-injected into a PP-R base for maximum strength.
Use stainless steel fittings in chemically aggressive applications. Lead-free brass is available for potable applications. Industrial brass fittings are available for all other non-potable applications. Do not use the industrial transition fittings in applications that call for lead-free brass.
Threaded connections
Male Round SS
Female Hex Brass
Male Hex Brass
When installing these threaded connections, there are a few important things to remember:• 1-2 turns past hand-tight,
do not bottom out. Tape only, not pipe dope unless absolutely necesary. Do NOT bottom out in threaded fitting.
• Your sealant needs to be compatible with brass or stainless steel, as you are not threading to the PP-R.
• Always apply counter pressure on the fitting when tightening the connection. If the fitting has a hex head, place your wrench there (a
crescent wrench may give you a more secure fit). For fittings without a hex head, use a pipe wrench on the PP-R body of the fitting. This will scratch up the fitting, but will not cause structural damage.

PLAN
NIN
G4.27
Brass identification
To comply with the new Reduction of Lead in Drinking Water Act, Aquatherm offers two lines of brass fittings: lead-free (potable) and industrial (non-potable). The two lines are identified by separate part numbers and the following distinctive visual cues:
Lead-free• A single groove (face of
the female, interior of the male) etched in the metal.
• “cNSF us-pw-G” printed on the body.
Industrial• A double groove (face of
the female, interior of the male) etched in the metal.
• “cNSF us-ind” printed on the body.
ind ind pwpw
ind pw

PLA
NN
ING
4.28
1
2
3 4
5
6
7
8
Flanges
To transition to other piping systems and mechanical equipment, Aquatherm provides a full range of flange adapters. Aquatherm’s flange rings are uniquely designed to have a metric center and an ANSI bolt pattern. For a flange transition, you will need both the adapter (fusible fitting) and the ring.
Aquatherm recommends using a full face rubber (black EPDM or red SBR) gasket with its flanges. Viton® gaskets may also be used if needed for chemical resistance. For lower pressure systems, and smaller diameters (4” and down), ring gaskets may be used but there may be blow-outs during pressure testing. Ring gaskets are also more susceptible to leaks if the flanges and connected piping are not aligned properly during installation. The gasket should have an inside diameter consistent with the ID of the flange adapter (see page 5.28).
Bolt tightening should follow the “star” pattern regardless of flange size and number of bolts (see example). Tighten all bolts to a third of the torque rating, and repeat until fully tightened.Do not overtighten the bolts. Bolt length will depend on the thickness of gasket and flange ring being used.

PLAN
NIN
G4.29
Aquatherm flange bolt torque and size
Nominal pipe sizeTorque Bolts
N-m ft-lb Number Diameter Washers
½” (20mm) 9 7 4 1/2 Yes
¾” (25mm) 14 10 4 1/2 Yes
1” (32mm) 20 15 4 1/2 Yes
1 ¼” (40mm) 20 15 4 1/2 Yes
1 ½” (50 mm) 34 25 4 1/2 Yes
2” (63mm) 41 30 4 5/8 Yes
2 ½” (75mm) 54 40 4 5/8 Yes
3” (90mm) 54 40 8 5/8 Yes
3 ½” (110mm) 54 40 8 5/8 Yes
4” (125mm) 54 40 8 5/8 Yes
Nominal pipe sizeTorque Bolts
N-m ft-lb Number Diameter Washers
6” (160mm) 75 55 8 3/4 Yes
8” (200mm) 102 75 8 3/4 Yes
10” (250mm) 122 90 12 7/8 Yes
12” (315 mm) 142 105 12 7/8 Yes
14” (355 mm) 203 150 12 1 Yes
16” (400 mm) 203 150 16 1 Yes
18” (450 mm) 237 175 16 1-1/8 Yes
20” (500 mm) 237 175 20 1-1/8 Yes
24” (630 mm) 305 225 20 1-1/8 Yes
Note: These are typical values for rubber gaskets with lubricated (lightly greased) or plated bolts. Values may be increased for harder gaskets or plain/un-plated bolts.

PLA
NN
ING
4.30
Butterfly valves
Aquatherm produces modified flange adapters for use with ANSI butterfly valves. The part numbers for these are distinguished by adding a “BV” to the end. Note that these are available only for sizes 6” and above, excluding 22”, as the ANSI and DIN dimensions overlap in smaller sizes. The part numbers can be found on page 5.28.
Tolerances with some butterfly valves may be very tight. Opening the valve before bolting it in place can help center the valve and ensure proper actuation.
Modified flange adapter

PLAN
NIN
G4.31
Branch lines
There are two ways to install branch lines on Aquatherm pipe: tees and outlets. Tees are full-sized fittings that either socket fuse or butt fuse in-line. These are usually used for branches that are within two sizes of the main line. Tees can be found on page 5.17 and reducing tees on page 5.19.
Outlets are smaller fittings that use outlet fusion to attach to the side of the pipe (see page 2.24). The table on the left gives the available branches for each pipe size. Fusion outlets are listed on page 5.26.
The table on the far left shows the available outlets with metal threads, listed on page 5.41.
Pipe size Outlets available
1 ¼” ½” — ¾”
1 ½” ½” — ¾”
2” ½” — 1”
2 ½” ½” — 1 ¼”
3” ½” — 1 ¼”
3 ½” ½” — 1 ½”
4” ½” — 2”
6” ½” — 3”
8” ½” — 4”
10” ½” — 4”
12” 2” — 6”
14” 2” — 8”
16” 2” — 10”
18” — 24” 2” — 12”
Pipesize
Thread size
½” ¾” 1”
1 ¼” M/F M/F
1 ½” M/F M/F
2” M/F M/F
2 ½” M/F M/F F
3” M/F M/F F
3 ½” M/F M/F F
4” M/F M/F F
6” M/F M/F F
8” F F F
10” F F F

PLA
NN
ING
4.32
Buried applications
Unlike many other piping materials, PP-R is able to absorb the stress caused by expansion within certain limits. The multi-layer faser (MF) construction helps keep the pipe within these limits for most applications.
In cases where the pipe needs to be buried in soil, sand, or concrete, PP-R is safe, non-leaching, and resistant to crushing or damage. Aquatherm pipe is also suitable for directional boring, if a properly sized pulling head is used.
Buried installations generally do not require additional consideration for the expansion of MF pipes. Resistance to movement from the concrete or backfill will restrict the natural expansion or contraction of the pipe. The expansive force of PP-R is much lower than metal pipes.
Aquatherm pipe is safe to use with insulating backfills. Due to the thermal resistance of PP-R, dry sand is often acceptable as a backfill for insulation purposes. Six inches of dry sand equates to roughly one inch of fiberglass insulation. When penetrating through concrete on an application where the pipe can expand and contract regularly, a shield or protective layer must be used and should be installed per local codes. It is best to anchor the pipe at that location.

PLAN
NIN
G4.33
Maximum pull force
The following table gives the maximum pull force for directional boring or similar applications. Make sure that the pull heads you are using are compatible with metric PP-R pipe. Pull forces include a 40% safety factor.
Pipe diameterMax pull force (lb)
SDR 7.4 SDR 11 SDR 17.66” — 160 mm 16055 11353 7362
8” — 200 mm 25087 17739 11503
10” — 250 mm 39198 27718 17973
12” — 315 mm 62230 44005 28534
14” — 355 mm 79038 55890 36241
16” — 400 mm - 70958 46012
18” — 450 mm - 89806 58233
20” — 500 mm - - 71893
22” — 560 mm - - 90183
24” — 630 mm - - 114137

PLA
NN
ING
4.34
In general Aquatherm does not recommend bending Aquatherm pipe as a means of making a change in direction or going around obstacles. However, there are instances when the pipe is required to bend, such as buried and trenchless applications.
The pipe may be bent or bowed a maximum of 5° off straight in a 20-foot section or to a bending radius of 100 x the pipe outside diameter. For an 8” SDR 11 pipe with an outside diameter of 200 mm (or 7.87 inches), the bending radius is 787 inches or 66 feet.
This applies for all SDR’s and pipe diameters for the Green and the Blue pipe, with and without faser. The only exceptions to this are Aquatherm’s coiled tubing products.
When using coiled Aquatherm products for radiant floor, snow melt, field/turf warming or similar applications, the bending radius should be no less than 8 times the outside diameter of the tubing being used. For example, ½” tubing (OD = 20 mm) 8 x 20 = 160 mm bending radius. 160 mm = 6.3 inches bending radius or 12 inches on center.
Always bend the tubing in the coil direction and use a bending guide to prevent the tube from kinking.
Please note that considerable force may be required to field bend the pipe, and the pipe may spring back forcibly if the restraints slip or are inadvertently released while bending or after installation. Observe appropriate safety precautions during field bending.
Bending Aquatherm pipe

PLAN
NIN
G4.35
Insulation sizing, thrust blocking, noise generation, and vibration isolation
Insulation sizing: Aquatherm’s pipes are made using a metric OD, so standard insulations do not always fit over the pipe. The table on the right gives the best (closest) fit between IPS and CTS sizes, and then the best fit using only the more common IPS size. These sizes also work for clamps and hangers. Insulations with metric IDs and imperial ODs will use Aquatherm’s ND.
Thrust blocking: Due to the inherent strength and integrity of fused connections, thrust blocking is never required in buried applications.
Pre-formed insulation
Aquatherm ND Best fit Best IPS fit
½” ½” IPS ½”
¾” ¾” IPS ¾”
1” 1” IPS 1”
1 ¼” 1 ½” CTS 1 ¼”
1 ½” 1 ½” IPS 1 ½”
2” 2” IPS 2”
2 ½” 2 ½” 2 ½”
3” 3” CTS 3”
3 ½” 4” IPS 4”
4” 5” CTS 5”
6” 6” IPS 6”
8” 8” CTS 8”
10” 10” CTS 10”
12” 12” IPS 12”
Noise generation: Due to the natural noise attenuation and the ability to absorb forces of water hammer, the flow velocity of Aquatherm pipe can be higher (between 8 and 14 ft/s, based on size) because noise generation is not an issue. At the higher flow velocity, the design engineer must still account for surge pressures and design accordingly.
Vibration isolation: Due to Fusiolen® PP-R’s natural ability to absorb vibration, isolators are not required if the pipe has some limited mobility on either side of the pump.

PLA
NN
ING
4.36
UV protection and painting
UV radiation can damage and weaken PP-R chains over time. Avoid exposing Aquatherm pipe and fittings to UV radiation.
Transport and storage: Aquatherm pipes come in UV-resistant bags for storage and transport. Leave the pipes in these bags until you are ready to install them.
Installation: Aquatherm offers its pipes with an extruded UV protective layer. This upgrade is ideal for UV protection because it does not require maintenance. However, extra preparation is needed for installation (see 4.38).
Another option is to paint the pipe. Painted pipe may need to be recoated or maintained. Aquatherm recommends using an elastomeric paint, which will expand and contract with the pipes. Visit aquatherm.com/ancillary-products for paint options.
You may also paint the pipe for non-UV reasons. Standard acrylic, enamel, epoxy, and latex paints do not harm the pipe.Painting the pipe is considered an aftermarket modification and Aquatherm does not assume any responsibility for the performance of the paint.

PLAN
NIN
G4.37
2
3 4 5
1
Fusing UV pipe
In order to fuse the Aquatherm UV protected pipe, you will need to remove the outer layer. The outer layer is a black polyethylene and it is factory extruded over the top of normal aquatherm green pipe® and aquatherm blue pipe® pipes. You will still need to cover or paint the fittings.
Mark the pipe one size up from its actual size. This will protect the black layer from the heat fusion process.
Cut around the outside of the pipe through just the black layer. A rolling cutter works well. Do not cut into the pipe wall.
Cut from the mark to the edge of the pipe. Wear protective gloves and mind your fingers.
Use a knife to pry up the edge of the black layer. Re-score the cuts if they are not deep enough.
Peel back and remove the black layer. Fuse the pipe following the normal guidelines.

PLA
NN
ING
4.38
Flushing, grounding, and freeze protection
Flushing: Before beginning operation, flush the system to remove dust, pipe shavings, and other particles that may have fallen into the pipe. Make sure the system is flushed in a safe manner that doesn’t damage or clog any components. Unless otherwise required, water is sufficient for flushing out the system.
Grounding: Most building codes require that grounding be provided for all conductive components inside the structure. It is important to note that Aquatherm pipes do not carry electrical currents and cannot
be used to provide grounding. Where metal pipes are replaced by PP-R pipes, the ground cannot be created by the piping system. An alternative ground system must be installed.
Freeze protection: Aquatherm piping systems can be installed in applications and conditions where freezing may occur. Generally, freezing the pipes and the water in them will not cause problems for the piping materials, but they should not be frozen intentionally. Maintaining a minimum flow can prevent the pipes from freezing solid.
All freeze protection products must be used in accordance with the manufacturer’s recommendations, the product listings, and in compliance with all applicable local codes. When using any type of external heat source applied to the piping such as heat tape or heating cables, the product must be suitable for use with plastic piping. Additionally, the heat system must be self-regulating and the surface temperature of the Aquatherm pipe and fittings must not exceed 160 °F (71 °C).
PLAN
NIN
G4.39
For any claims on the warranty, you will need to submit the following information using the Warranty Claim Form:
• The installer number(s) of the installer(s)
• A copy of the previously submitted pressure test or the submission date
• Pictures and/or samples of the damaged pipe (samples preferred)
• Information regarding operating pressures and temperatures leading up to the failure
• Additional information as specified on the Warranty Claim Form
This information will be submitted to Aquatherm NA, and after testing and review, be forwarded on to Aquatherm
Warranty claims
GmbH for final analysis. This process may take several weeks. Appropriate coverage will be determined and issued accordingly. Submission for analysis is not a guarantee of compensation. Please note that the Aquatherm warranty does not cover the following issues*:
• Improperly assembled transitions (threads, flanges, copper stub outs, PEX, etc.) unless the fitting was defective.
• Time lost due to poor planning, supplier issues, or failure to order the proper parts/tools.
• Connections that have not been properly fused according to Aquatherm’s requirements.
• Failures in systems that were not pressure tested before operation
(evaluated on a case-by-case basis).• Handling damage to pipe or fittings
after they have left Aquatherm’s possession.
• Use of defective tools and equipment to make welded joints or fittings connections.
*This list is not comprehensive.

PLA
NN
ING
4.40
Pressure testing
Aquatherm offers an extensive warranty to protect against damages caused by failure from manufacturer’s defect. Aquatherm requires that all installations be pressure tested in accordance with the following instructions and that proof of the pressure test be submitted to Aquatherm before the coverage can go into effect. Warranty coverage begins only after the pressure test is properly completed and submitted. Aquatherm’s warranty does not cover failures caused by improper installation, operation outside of the recommended parameters, or damage from mishandling after the pipe has left the manufacturer.
Step 1: Determine your testing pressure. In order to ensure the integrity of the heat fusion connections, a pressure test must be performed on the completed system. The amount of pressure used depends on the type of pipe and intended pressure of the application.
• If the piping system contains SDR 17.6 pipe and has an intended operating pressure of 65 psi or lower, the system must be tested at 100 psi. If the piping system has an intended operating pressure higher than 65 psi, the system must be tested at 150% of the intended operating pressure.
• If the system contains only SDR 11 or heavier-walled pipe (lower SDR) and has an intended operating pressure of 100 psi or less, the system must be tested at 150 psi. If the system has an intended operating pressure higher than 100 psi, the system must be tested at 150% of the intended operating pressure.
• If you have concerns regarding your testing pressure, please contact Aquatherm. Exceptions to the required pressure test must be submitted via letter to Aquatherm.
• If the piping system has a mixture of SDR pipe, the test should be performed to the higher SDR or thinner walled pipe testing requirements. For example, if the piping system contains SDR 17.6 pipe and SDR 11 piping, you should test to the requirements of the SDR 17.6 piping.
(page 1 of 13)

PLAN
NIN
G4.41
Pipe SDR
Operating Pressure
Test Pressure
SDR 17.6
>65 psi >100 psi
150% 150%100 psi 150 psi
< 65 psi < 100 psi
SDR 11 or lower
Choose One:
Pressure testing (page 2 of 13)

PLA
NN
ING
4.42
Step 2: Determine your testing medium. Water is the preferred medium for testing purposes, due to its incompressibility. However, in low pressure applications, air testing may also be suitable. You may use a different testing medium for different tests, as long as the medium is acceptable with the test pressure.
• If the system is intended for compressed air service, only compressed air may be used for the pressure test, regardless of the following restrictions.
• If the testing pressure is equal to or less than 150 psi, you may test with air only, water only, or with a water over air combination system.
• If the testing pressure exceeds 150 psi, the test must be performed using water only, or water with an air fill. Compressed air alone is not approved for systems with a testing pressure higher than 150 psi, unless those systems are intended for compressed air service.
Pressure testing (page 3 of 13)

PLAN
NIN
G4.43
Air Service
>150 psi
Test with water or water over air systemTest with air
< 150 psi
Water Service
Test Pressure
Operating Medium
Test Medium
Choose One:
Pressure testing (page 4 of 13)

PLA
NN
ING
4.44
Step 3: Observe safety protocols. The full Aquatherm warranty does not take effect until the pressure test is completed and submitted and the system is in operation. Therefore, it is important for the tester to observe all safety recommendations from Aquatherm and any other jobsite safey requirements until the testing is complete.
For all systems:
• Visually inspect the connections for signs of proper fusion, following the guidelines given in the Aquatherm Installer Manual. Socket connections should have two even rings of melted plastic, and a visible depth mark. Butt welded connections should have a single bead with a rounded top. This inspection is most easily done during the fusion process. The absence of these signs may be indicative of an improper fusion.
• Remove all fusion equipment from the system before starting the pressure test.
• Set your pressure gauge near the bottom of the system, where the pressure will be highest. This reduces the risk of over-pressurizing the system.
• Observe the joints during the test for any indications of leaks. If a leak is found, relieve all test pressure and repair the leak before continuing.
Pressure testing (page 5 of 13)

PLAN
NIN
G4.45
Step 3 (continued):
When using compressed air:
• Stand clear of the pipe during testing and warn others nearby to do the same. Take measures to secure loose sections of the pipe in case a rupture does occur.
• Do not perform the test if the ambient temperature is higher than 100 °F. Use water instead.
• Should any transition joints leak during testing, check the joints for proper assembly and repeat the test using water before replacing any of the fittings.
Pressure testing (page 6 of 13)

PLA
NN
ING
4.46
Step 4: Perform the test. Follow the steps as indicated below. Use a digital pressure test gauge or an analog gauge that is accurate to within 0.5 psi. Record the results on the pressure test form.
Preliminary test:
• Bring the system up to the test pressure. The system will expand slightly once it is up to pressure, so additional pressure may be required to help it stabilize.
• Once the system stabilizes, observe it for 30 minutes. The system should be able to hold the test pressure during that time.
• The loss of more than 9 psi (6 psi for SDR 17.6 systems) or steadily decreasing pressure during this test is indicative of a leak. If a leak occurs, identify the leak and repair the system then repeat this test.
• A successful version of this test must be completed before proceeding.
• Aquatherm recommends using this test for progressive testing, rather than completing the entire testing sequence. The entire testing sequence must be completed on the whole system when it is finished.
Pressure testing (page 7 of 13)

PLAN
NIN
G4.47
Pressure testing (page 8 of 13)
30 minStabilization
p max = 9 psi (0.6 bar)
p in
psi
(bar
)Test Pressure
Preliminary test
(Fail Point)
6 psi (0.4 bar) for SDR 17.6 systems

PLA
NN
ING
4.48
Step 4 (continued):
Principal test:
• If the system has lost any pressure during the preliminary test, bring the system back up to the test pressure.
• Observe the system for 120 minutes. The system should be able to hold the full test pressure during that time.
• The loss of more than 3 psi or steadily decreasing pressure during this test is indicative of a leak. Identify the leak and repair the system before repeating this test.
• A successful version of this test must be completed before proceeding.
Pressure testing (page 9 of 13)

PLAN
NIN
G4.49
120 min
p max = 3 psi (0.2 bar)p
in p
si (b
ar)
Test Pressure(Fail Point)
Pressure testing (page 10 of 13)
Principal Test

PLA
NN
ING
4.50
Step 4 (continued):
Final test:
• Release the pressure from the system.• Bring the system up to test pressure for two minutes. Reduce the system pressure to 15 psi for
two minutes.• Release the pressure from the system.• Bring the system up to test pressure for two minutes. Reduce the system pressure to 15 psi for
two minutes.• Release the pressure from the system.• Bring the system up to test pressure for two minutes. Reduce the system pressure to 15 psi for
two minutes.• Release the pressure from the system.• Bring the system up to test pressure for five minutes. Reduce the system pressure to 15 psi for
five minutes.• Release the pressure from the system.
Pressure testing (page 11 of 13)

PLAN
NIN
G4.51
t in min
15 psi
150 psi
2 min 4 min 5 min 10 min2 min 4 min 2 min 4 min
Pressure testing (page 12 of 13)

PLA
NN
ING
4.52
Pressure testing (page 13 of 13)
Step 5: Complete and submit the pressure test record.
• Submit the form to Aquatherm within 30 days of completing the pressure test.
• If you are testing a system in sections, save all the pressure test records and submit them together.
• Include the installer numbers of all the installers who fused connections on the system.
All information can be submitted electronically on Aquatherm’s website at http://www.aquatherm.com/pressure-test-submission.
A sample test record and set of instructions for recording in the field is also available on the submission page.

PIPE AN
D FITTIN
GS
5.1
This chapter includes all the parts that Aquatherm offers as part of its piping systems. This chapter only gives the nominal imperial size so as to avoid confusion. A table giving the metric conversions can be found on page 1.8.
Full dimensional data is not included in this manual. The dimensional data for all Aquatherm parts and fittings can be found on Aquatherm’s website.
Pipe and fittingsChapter 5:

PIPE
AN
D F
ITTI
NG
S5.
2
Part no. Dimension ND
0670708 ½”
0670710 ¾”
0670712 1”
0670714 1 ¼”
0670716 1 ½”
0670718 2”
0670720 2 ½”
0670722 3”
0670724 3 ½”
0670726 4”
aquatherm green pipe® SDR 7.4 MF
Part no. Dimension ND
0610808 ½” SDR 7.4 (non-MF)
0610810 ¾” SDR 7.4 (non-MF)
0610212 1”
0610214 1 ¼”
0610216 1 ½”
0610218 2”
0610220 2 ½”
0610222 3”
0610224 3 ½”
0610226 4”
0610226x2a 4” (Double Length)
0610226x3b 4” (Triple Length)
0610230 6”
0610230x2c 6” (Double Length)
aquatherm green pipe® SDR 7.4/11 S
Part no. Dimension ND
0670730 6”
0670730x2a 6” (Double Length)
0670734 8”
0670734x2b 8” (Double Length)
0670738 10”
0670738x2b 10” (Double Length)
0670742 12”
0670744 14”
aComes in 26 ft lengths.bComes in 38 ft lengths.
aPipe comes in 26 ft lengths. bPipe comes in 39 ft legnths. cPipe comes in 38 ft lenghts.

PIPE AN
D FITTIN
GS
5.3
Part no. Dimension ND
0610234 8”
0610234x2c 8” (Double Length)
0610238 10”
0610238x2c 10” (Double Length)
0010242 12”
0010242x2c 12” (Double Length)
0010244 14”
0010246d 16”
0010248d 18”
The following items are supplied in coils:
0010308 ½”
0010310 ¾”
0010312 1”dMechanically stabilized with a faser-composite layer in the center of the pipe.
Part no. Dimension ND
0670758 ½”
0670760 ¾”
0670762 1”
0670764 1 ¼”
0670766 1 ½”
0670768 2”
0670770 2 ½”
aquatherm green pipe® SDR 7.4 MF UV
Part no. Dimension ND
0670772 3”
0670774 3 ½”
0670776 4”
0670780 6”
0670784 8”
0670788 10”
aquatherm green pipe® SDR 7.4/11 S (continued)

PIPE
AN
D F
ITTI
NG
S5.
4
Part no. Dimension ND
SDR 7.4
2670708 ½”
2670710 ¾”
SDR 11
2670112 1”
2670114 1 ¼”
2670116 1 ½ ”
2670118 2”
2670120 2 ½”
2670122 3”
2670124 3 ½”
2670126 4”
2670126x2a 4” (Double Length)
2670126x3b 4” (Triple Length)
2670130 6”
Part no. Dimension ND
2670130x2c 6” (Double Length)
2670134 8”
2670134x2c 8” (Double Length)
2670138 10”
2670138x2c 10” (Double Length)
2070142 12”
207142x2c 12” (Double Length)
2070144 14”
2070144x2c 14” (Double Length)
2070146 16”
2070148 18”
The following items are supplied in coils (non-faser)
2010308 ½”
2010310 ¾”
2010312 1”
aquatherm blue pipe® SDR 7.4/11 MF
aPipe comes in 26 ft lengths.bPipe comes in 39 ft legnths.cPipe comes in 38 ft lenghts.
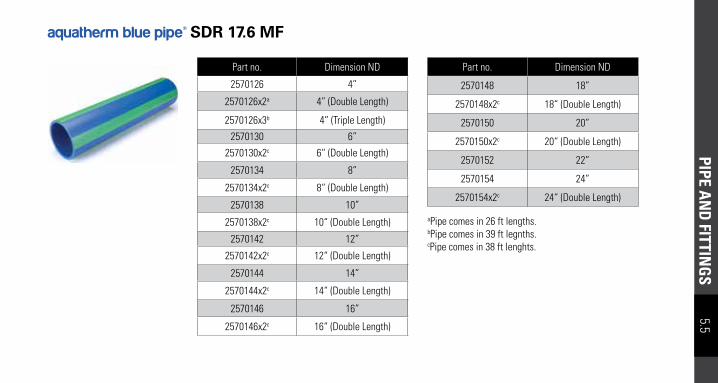
PIPE AN
D FITTIN
GS
5.5
Part no. Dimension ND
2570126 4”
2570126x2a 4” (Double Length)
2570126x3b 4” (Triple Length)
2570130 6”
2570130x2c 6“ (Double Length)
2570134 8”
2570134x2c 8“ (Double Length)
2570138 10”
2570138x2c 10“ (Double Length)
2570142 12”
2570142x2c 12“ (Double Length)
2570144 14”
2570144x2c 14“ (Double Length)
2570146 16”
2570146x2c 16“ (Double Length)
aquatherm blue pipe® SDR 17.6 MF
Part no. Dimension ND
2570148 18”
2570148x2c 18“ (Double Length)
2570150 20”
2570150x2c 20“ (Double Length)
2570152 22”
2570154 24”
2570154x2c 24“ (Double Length)
aPipe comes in 26 ft lengths.bPipe comes in 39 ft legnths.cPipe comes in 38 ft lenghts.

PIPE
AN
D F
ITTI
NG
S5.
6
Part no. Dimension ND
2670758 ½” — SDR 7.4
2670760 ¾” — SDR 7.4
2670162 1” — SDR 11
2670164 1 ¼” — SDR 11
2670166 1 ½” — SDR 11
2670168 2” — SDR 11
2670170 2 ½” — SDR 11
2670172 3” — SDR 11
Part no. Dimension ND
2570180 6”
2570184 8”
2570188 10”
2570192 12”
2570194 14”
2570196 16”
2570198 18”
2570200 20”
aquatherm blue pipe® SDR 7.4/11 MF UV aquatherm blue pipe® SDR 17.6 MF UV
Part no. Dimension ND
2670174 3 ½” — SDR 11
2670176 4” — SDR 11
2670180 6” — SDR 11
2670184 8” — SDR 11
2670188 10” — SDR 11
Part no. Dimension ND
2570202 22”
2570204 24”

PIPE AN
D FITTIN
GS
5.7
Part no. Dimension ND
SDR 7.4
9010808 ½”
9010810 ¾”
SDR 11
9010212 1”
9010214 1 ¼”
9010216 1 ½”
9010218 2”
aquatherm lilac pipe® SDR 7.4/11 S
Part no. Dimension ND
9010220 2 ½”
9010222 3”
9010224 3 ½”
9010226 4”
9010226x2a 4” (Double Length)
9010226x3b 4” (Triple Length)
9010230 6”
9010230x2c 6” (Double Length)
9010234 8”
9010238 10”
aPipe comes in 26 ft lengths.bPipe comes in 39 ft legnths.cPipe comes in 38 ft lenghts.

PIPE
AN
D F
ITTI
NG
S5.
8Coupling
Part no. Dimension ND
0111008 ½”
0111010 ¾”
0111012 1”
0111014 1¼”
0111016 1½”
0111018 2”
0111020 2½”
0111022 3”
0111024 3½”
0111026 4”
Reducing couplings
Part no. Dimension ND
0111222 1 ¼” to 1”
0111228 1 ½” to 1”
0111230 1 ½” to 1 ¼”
0111236 2” to 1 ¼”
0111238 2” to 1 ½”
0111240 2 ½” to 1 ½”
0111242 2 ½” to 2”
0111252 3” to 2”
female/female
Part no. Dimension ND
0111253 3” to 2 ½”
0111257 3 ½” to 2 ½”
0111259 3 ½” to 3”
0111263 4” to 3”
0111265 4” to 3 ½”

PIPE AN
D FITTIN
GS
5.9
Part no. Dimension ND
0116108 ½”
0116110 ¾”
0116112 1”
Cross-over
Part no. Dimension ND
0112708 ½”
0112710 ¾”
0112712 1”
0112714 1 ¼”
Street 45°female/male
Part no. Dimension ND
0112308 ½”
0112310 ¾”
0112312 1”
0112314 1 ¼”
Street 90°female/male

PIPE
AN
D F
ITTI
NG
S5.
10Bushing
Part no. Dimension ND
0111112 ¾” to ½”
0111114 1” to ½”
0111116 1” to ¾”
0111118 1 ¼” to ½”
0111120 1 ¼” to ¾”
0111122 1 ¼” to 1”
0111124 1 ½” to ½”
0111126 1 ½” to ¾”
0111128 1 ½” to 1”
Part no. Dimension ND
0111130 1 ½” to 1 ¼”
0111131 2” to ½”
0111132 2” to ¾”
0111134 2” to 1”
0111136 2” to 1 ¼”
0111138 2” to 1 ½”
0111143 2 ½” to ½”
0111144 2 ½” to ¾”
0111145 2 ½” to 1”
0111139 2 ½” to 1 ¼”
0111140 2 ½” to 1 ½”
0111142 2 ½” to 2”
0111151 3” to 1 ½”
0111152 3” to 2”
0111153 3” to 2 ½”
Part no. Dimension ND
0111155 3 ½” to 2”
0111157 3 ½” to 2 ½”
0111159 3 ½” to 3”
0111161 4” to 2 ½”
0111163 4” to 3”
0111165 4” to 3 ½”
Cross
Part no. Dimension ND
0113708 ½”
0113710 ¾”
0113712 1”
0113714 1 ¼”

PIPE AN
D FITTIN
GS
5.11Butt weld reducer
SDR Part no. Dimension ND
17.6
2511184 8” to 6” 2511188 10” to 6”2511190 10” to 8”2511193 12” to 8”2511195 12” to 10”2511197 14” to 10”2511199 14” to 12”2511201 16” to 10”2511203 16” to 12” 2511204 16” to 14” 2511206 18” to 12” 2511207 18” to 14” 2511208 18” to 16” 2511209 20” to 12” 2511210 20” to 14”
SDR Part no. Dimension ND
17.6
2511211 20” to 16” 2511212 20” to 18” 2511213 22” to 16” 2511214 22” to 18” 2511215 22” to 20” 2511216 24” to 16” 2511217 24” to 18” 2511218 24” to 20” 2511219 24” to 22”
SDR Part no. Dimension ND
7.4
0111184 8” to 6”
0111188 10” to 6”
0111190 10” to 8”
0111192 12” to 8”
0111194 12” to 10”
0111196 14” to 10”
0111198 14” to 12”
SDR Part no. Dimension ND
11
0111185 8” to 6”
0111189 10” to 6”
0111191 10” to 8”
0111193 12” to 8” 0111195 12” to 10”0111197 14” to 10”0111199 14” to 12”0111201 16” to 10”0111203 16” to 12”0111204 16” to 14”0111206 18” to 12”0111207 18” to 14”
0111208 18” to 16”

PIPE
AN
D F
ITTI
NG
S5.
12
SDR Part no. Dimension ND
7.4
0111174 6” to 3 ½”
0111176 6” to 4”
0111182 8” to 4”
110111175 6” to 3 ½”
0111177 6” to 4”0111183 8” to 4”
One side is socket welded and the other is butt welded.
Reducing couplingbutt weld/socket weld
SDR Part no. Dimension ND
17.6
2511174 6” to 3 ½”2511176 6” to 4”
2511182 8” to 4”
Elbow 90° (Socket)
Part no. Dimension ND
0112108 ½”
0112110 ¾”
0112112 1”
0112114 1 ¼”
0112116 1 ½”
0112118 2”
0112120 2 ½”
0112122 3”
0112124 3 ½”
0112126 4”

PIPE AN
D FITTIN
GS
5.13
SDR Part no. Dimension ND
7.4
7312130 6”
7312134 8”
7312138 10”
7312142 12”
7312144 14”
aquatherm green pipe® Elbow 90° SD (Butt-weld)
SDR Part no. Dimension ND
11
7112130 6”
7112134 8”
7112138 10”
7112142 12”
7112144 14”
7112146 16”
7112148 18”
SDR Part no. Dimension No.
7.4 0112130 6”
11 0112131 6”
Elbow 90° (Butt-weld)molded

PIPE
AN
D F
ITTI
NG
S5.
14
Part no. Dimension ND
0112508 ½”
0112510 ¾”
0112512 1”
0112514 1 ¼”
0112516 1 ½”
0112518 2”
0112520 2 ½”
0112522 3”
0112524 3 ½”
0112526 4”
Elbow 45° (Socket)
SDR Part no. Dimension ND
7.4
7312530 6”
7312534 8”
7312538 10”
7312542 12”
7312544 14”
aquatherm green pipe® Elbow 45° SD (Butt-weld)
SDR Part no. Dimension ND
11
7112530 6”
7112534 8”
7112538 10”
7112542 12”
7112544 14”
7112546 16”
7112548 18”

PIPE AN
D FITTIN
GS
5.15
SDR Part no. Dimension ND
11
7512130 6”
7512134 8”
7512138 10”
7512142 12“
7512144 14“
7512146 16“
7512148 18“
SDR Part no. Dimension ND
17.6
7412130 6”
7412134 8”
7412138 10”
7412142 12”
7412144 14”
7412146 16”
7412148 18”
7412150 20”
7412152 22”
7412154 24”
aquatherm blue pipe® Elbow 90° SD (Butt-weld)
SDR Part no. Dimension ND
7.4 0112530 6”
11 0112531 6”
Elbow 45° (Butt-weld) (molded)

PIPE
AN
D F
ITTI
NG
S5.
16
SDR Part no. Dimension ND
11
7512530 6”7512534 8”7512538 10”7512542 12”7512544 14”7512546 16”7512548 18”
aquatherm blue pipe® Elbow 45° SD (Butt-weld)
SDR Part no. Dimension ND
17.6
7412530 6”
7412534 8”
7412538 10”
7412542 12”
7412544 14”
7412546 16”
7412548 18”
7412550 20”
7412552 22”
7412554 24”
End cap (Socket)
Part no. Dimension ND
0114108 ½”
0114110 ¾”
0114112 1”
0114114 1 ¼”
0114116 1 ½”
0114118 2”
0114120 2 ½”
0114122 3”
0114124 3 ½”
0114126 4”

PIPE AN
D FITTIN
GS
5.17End cap (Butt-weld)
SDR Part no. Dimension ND
7.4
0114130 6”
0114134 8”
0114138 10”
0114142 12”
0114144 14”
SDR Part no. Dimension ND
17.6
2514130 6”
2514134 8”
2514138 10”
2514142 12”
2514144 14”
2514146 16”
2514148 18”
2514150 20”
2514152 22”2514154 24”
SDR Part no. Dimension ND
11
0114131 6”
0114135 8”0114139 10”0114143 12”0114145 14”0114147 16”0114149 18”

PIPE
AN
D F
ITTI
NG
S5.
18
SDR Part no. Dimension ND
7.4
2303726 4”
2303730 6”
2303734 8”
2303738 10”
aquatherm green pipe® Wye (Lateral 45)
SDR Part no. Dimension ND
11
2503126 4”
2503130 6”
2503134 8”
2503138 10”
aquatherm blue pipe® Wye (Lateral 45)
SDR Part no. Dimension ND
11
2103126 4”
2103130 6”
2103134 8”
2103138 10”
SDR Part no. Dimension ND
17.6
2403126 4”
2403130 6”
2403134 8”
2403138 10”

PIPE AN
D FITTIN
GS
5.19Tee (Socket)
Part no. Dimension ND
0113108 ½”
0113110 ¾”
0113112 1”
0113114 1 ¼”
0113116 1 ½”
0113118 2”
0113120 2 ½”
0113122 3”
0113124 3 ½”
0113126 4”
SDR Part no. Dimension ND
7.4
0113130MF 6”
0113134 8”
0113138 10”
0113142 12”
0113144 14”
aquatherm green pipe® Tee (Butt-weld)
SDR Part no. Dimension ND
11
0113131MF 6”
0113135 8”0113139 10”0113143 12”
0113145 14”
0113147a 16”0113149a 18”
aMechanically stabilized with a faser-composite layer in the center of the pipe.

PIPE
AN
D F
ITTI
NG
S5.
20Tee (Butt-weld) molded
SDR Part no. Dimension No.
7.40113130 6”
0113130LGa 6”
110113131 6”
0113131LGa 6”aComes with a 1-ft extension on each end.
aquatherm green pipe® Reducing tee (Butt-weld)
SDR Part no. Dimension ND
7.4
0113604 6“ x 6“ x 4“
0113618 8” x 8” x 6”
0113634 10” x 10” x 6”
0113640 10” x 10” x 8”
0113908 12” x 12” x 8”
0113910 12” x 12” x 10”
0113922 14” x 14” x 10”
0113924 14” x 14” x 12”
SDR Part no. Dimension ND
11
0113605 6“ x 6“ x 4“
0113619 8” x 8” x 6”
0113635 10” x 10” x 6”0113641 10” x 10” x 8”0113655 12” x 12” x 8”0113657 12” x 12” x 10”0113669 14” x 14” x 10”0113671 14” x 14” x 12”0113684a 16” x 16” x 12”0113685a 16” x 16” x 14”0113699a 18” x 18” x 14”0113700a 18” x 18” x 16”
aMechanically stabilized with a faser-composite layer in the center of the pipe.

PIPE AN
D FITTIN
GS
5.21Reducing tee (Socket)inlet, outlet, branch
Part no. Dimension ND
0113511 ½” x ½” x ¾”
0113520 ¾” x ½” x ½”
0113522 ¾” x ¾” x ½”
0113532 1” x ½” x ½”
0113534 1” x 1” x ½”
0113538 1” x ¾” x ¾”
0113540 1” x 1” x ¾”
0113542 1 ¼” x 1 ¼” x ½”
0113544 1 ¼” x 1 ¼” x ¾”
Part no. Dimension ND
0113546 1 ¼” x 1 ¼” x 1”
0113547 1 ½” x 1 ½” x ½”
0113548 1 ½” x 1 ½” x ¾”
0113550 1 ½” x 1 ½” x 1”
0113551 1 ½” x 1 ½” x 1 ¼”
0113552 2” x 2” x ½”
0113554 2” x 2” x ¾”
0113556 2” x 2” x 1”
0113558 2” x 2” x 1 ¼”
0113560 2” x 2” x 1 ½”
0113561 2 ½” x 2 ½” x ½”
0113562 2 ½” x 2 ½” x ¾”
0113564 2 ½” x 2 ½” x 1”
0113566 2 ½” x 2 ½” x 1 ¼”
Part no. Dimension ND
0113568 2 ½” x 2 ½” x 1 ½”
0113570 2 ½” x 2 ½” x 2”
0113576 3” x 3” x 1”
0113578 3” x 3” x 1 ¼”
0113580 3” x 3” x 1 ½”
0113582 3” x 3” x 2”
0113584 3’’ x 3” x 2 ½”
0113586 3 ½” x 3 ½” x 2”
0113588 3 ½” x 3 ½” x 2 ½”
0113590 3 ½” x 3 ½” x 3”
0113592 4” x 4” x 2 ½”
0113594 4” x 4” x 3”
0113596 4” x 4” x 3 ½”

PIPE
AN
D F
ITTI
NG
S5.
22
SDR Part no. Dimension ND
7.4
0113600 6” x 6” x 2 ½”
0113602 6” x 6” x 3”
0113608 8” x 8” x 2 ½”
0113610 8” x 8” x 3”
0113612 8” x 8” x 3 ½”
0113614 8” x 8” x 4”
0113624 10” x 10” x 2 ½”
0113626 10” x 10” x 3”
0113628 10” x 10” x 3 ½”
0113630 10” x 10” x 4”
0113904 12” x 12” x 4”
0113906a 12“ x 12“ x 6“
0113916 14” x 14” x 4”
0113918 14“ x 14“ x 6“
0113920a 14“ x 14“ x 8“
aquatherm green pipe® Reducing Tee (Socket)
SDR Part no. Dimension ND
11
0113601 6” x 6” x 2 ½”
0113603 6” x 6” x 3”
0113609 8” x 8” x 2 ½”
0113611 8” x 8” x 3”
0113613 8” x 8” x 3 ½”
0113615 8” x 8” x 4”
0113625 10” x 10” x 2 ½”0113627 10” x 10” x 3”0113629 10” x 10” x 3 ½”
a Branch outlet has a butt-weld connection.b Mechanically stabilized with a faser-composite layer in the center of the pipe.
SDR Part no. Dimension ND
11
0113631 10” x 10” x 4”0113651 12” x 12” x 4”0113653a 12” x 12” x 6”0113663 14” x 14” x 4”
0113665ab 14” x 14” x 6”0113667a 14” x 14” x 8”0113676b 16” x 16” x 4”0113678ab 16” x 16” x 6”0113680ab 16” x 16” x 8”0113682ab 16” x 16” x 10”0113690 18” x 18” x 4”
0113692ab 18” x 18” x 6”
0113694ab 18” x 18” x 8”0113696ab 18” x 18” x 10”0113698ab 18” x 18” x 12”
a Branch outlet has a butt-weld connection.

PIPE AN
D FITTIN
GS
5.23
SDR Part no. Dimension ND
11
2613131 6”
2613135 8”
2613139 10”
2013143 12“
2013145 14“
2013147 16“
2013149 18“
aquatherm blue pipe® Tee (Butt-weld)
SDR Part no. Dimension ND
17.6
2513130 6”
2513134 8”
2513138 10”
2513142 12”
2513144 14”
2513146 16”
2513148 18”
2513150 20”
2513152 22”
2513154 24”

PIPE
AN
D F
ITTI
NG
S5.
24
aquatherm blue pipe® - Reducing tee (Butt-weld)
SDR Part no. Dimension ND
11
2613605 6“ x 6“ x 4“
2613619 8” x 8” x 6”
2613635 10” x 10” x 6”
2613641 10” x 10” x 8”
2013655 12” x 12” x 8“
2013657 12” x 12” x 10”
2013669 14” x 14” x 10”
SDR Part no. Dimension ND
11
2013671 14” x 14” x 12”
2013684 16” x 16” x 12”
2013685 16” x 16” x 14”
2013699 18” x 18” x 14”
2013700 18” x 18” x 16”

PIPE AN
D FITTIN
GS
5.25
SDR Part no. Dimension ND
17.6
2513604a 6” x 6” x 4”
2513618 8” x 8” x 6”
2513634 10” x 10” x 6”
2513640 10” x 10” x 8”
2513657 12” x 12” x 10”
2513669 14” x 14” x 10”
2513671 14” x 14” x 12”
2513684 16” x 16” x 12”
aquatherm blue pipe® - Reducing tee (Butt-weld) (continued)
SDR Part no. Dimension ND
17.6
2513685 16” x 16” x 14”
2513699 18” x 18” x 14”
2513700 18” x 18” x 16”
2513813 20” x 20” x 14”
2513814 20” x 20” x 16”
2513815 20” x 20” x 18”
2513831 22” x 22” x 16”
2513832 22” x 22” x 18”
2513833 22” x 22” x 20”
2513849 24” x 24” x 16”
2513850 24” x 24” x 18”
2513851 24” x 24” x 20”
2513852 24” x 24” x 22”

PIPE
AN
D F
ITTI
NG
S5.
26
aquatherm blue pipe® Reducing tee (Socket)
SDR Part no. Dimension ND
11
2613601 6” x 6” x 2 ½”
2613603 6” x 6” x 3”
2613609 8” x 8” x 2 ½”
2613611 8” x 8” x 3”
2613613 8” x 8” x 3 ½”
2613615 8” x 8” x 4”
aBranch outlet has a butt-weld connection.
SDR Part no. Dimension ND
11
2613625 10” x 10” x 2 ½”
2613627 10” x 10” x 3”
2613629 10” x 10” x 3 ½
2613631 10” x 10” x 4”
2013651 12” x 12” x 4”
2013653a 12” x 12” x 6“
2013663 14” x 14” x 4”
2013665a 14” x 14” x 6”
2013667a 14” x 14” x 8”
2013676 16” x 16” x 4”
2013678a 16” x 16” x 6”
2013680a 16” x 16” x 8”
SDR Part no. Dimension ND
11
2013682a 16” x 16” x 10”
2013690 18” x 18” x 4”
2013692a 18” x 18” x 6”
2013694a 18” x 18” x 8”
2013696a 18” x 18” x 10”
2013698a 18” x 18” x 12”

PIPE AN
D FITTIN
GS
5.27aquatherm blue pipe® - Reducing tee (Socket) (continued)
SDR Part no. Dimension ND
17.6
2513600 6” x 6” x 2 ½”
2513602 6” x 6” x 3”
2513608 8” x 8” x 2 ½”
2513610 8” x 8” x 3”
2513612 8” x 8” x 3 ½”
2513614 8” x 8” x 4”
2513624 10” x 10” x 2 ½”
2513626 10” x 10” x 3”
2513628 10” x 10” 3 ½”
SDR Part no. Dimension ND
17.6
2513630 10” x 10” x 4”
2513651 12” x 12” x 4”
2513653a 12” x 12” x 6”
2513663 14” x 14” x 4”
2513665a 14” x 14” x 6”
2513667a 14” x 14” x 8”
2513676 16” x 16” x 4”
2513678a 16” x 16” x 6”
2513680a 16” x 16” x 8”
2513682a 16” x 16” x 10”
2513690 18” x 18” x 4”
2513692a 18” x 18” x 6”
2513694a 18” x 18” x 8”
2513696a 18” x 18” x 10”
2513698a 18” x 18” x 12”
SDR Part no. Dimension ND
17.6
2513804 20” x 20” x 4”
2513806a 20” x 20” x 6”
2513808a 20” x 20” x 8”
2513810a 20” x 20” x 10”
2513812a 20” x 20” x 12”
2513821 22” x 22” x 4”
2513839 24” x 24” x 4”
2513841a 24” x 24” x 6”
2513843a 24” x 24” x 8”
2513845a 24” x 24” x 10”
2513847a 24” x 24” x 12” aBranch outlet has a butt-weld connection.

PIPE
AN
D F
ITTI
NG
S5.
28
Part no. Dimension ND(pipe x outlet)
0115156 1 ¼” x ½”
0115158 1 ¼” x ¾”
0115160 1 ½” x ½”
0115162 1 ½” x ¾”
0115164 2 x ½”
0115166 2” x ¾”
0115168 2” x 1”
0115170 2 ½” x ½”
Fusion outlet (Socket)
Part no. Dimension ND(pipe x outlet)
0115172 2 ½” x ¾”
0115174 2 ½” x 1”
0115175 2 ½” x 1 ¼”
0115176 3” x ½”
0115178 3” x ¾’’
0115180 3” x 1”
0115181 3” x 1 ¼”
0115182 3 ½” x ½”
0115184 3 ½” x ¾”
0115186 3 ½” x 1”
0115188 3 ½” x 1 ¼”
0115189 3 ½” x 1 ½”
0115190 4” x ½”
0115192 4” x ¾”
Part no. Dimension ND(pipe x outlet)
0115194 4” x 1”
0115196 4” x 1 ¼”
0115197 4” x 1 ½”
0115198 4” x 2’’
0115206 6” x ½”
0115208 6” x ¾”
0115210 6” x 1”
0115212 6” x 1 ¼”
0115214 6” x 1 ½”
0115216 6” x 2”
0115218 6” x 2 ½”
0115220 6” x 3”
0115228 8 to 10” x ½”
0115229 8 to 10” x ¾”
Part no. Dimension ND(pipe x outlet)
0115230 8 to 10” x 1”
0115231 8” x 1 ¼”
0115232 8” x 1 ½”
0115233 8” x 2”
0115234 8” x 2 ½”
0115235 8” x 3”
0115236 8” x 3 ½”
0115237 8” x 4”
0115251 10” x 1 ¼”
0115252 10” x 1 ½”
0115253 10” x 2”
0115254 10” x 2 ½”
0115255 10” x 3”
0115256 10” x 3 ½”

PIPE AN
D FITTIN
GS
5.29
Part no. Dimension ND(pipe x outlet)
0115257 10” x 4”
0115260 12” to 14” x 2”
0115261 12” to 14” x 2 ½”
0115262 12” x 3”
0115263 12” x 3 ½”
0115264 12” x 4”
0115268 14” x 3”
0115269 14” x 3 ½”
0115270 14” x 4”
0115275 16” to 20” x 2 ½”
0115277 16” to 18” x 3 ½”
0115278 16” x 4”
0115288 16” to 20” x 3”
0115290 18” to 20” x 4”
0115300 16” to 24” x 2”
Part no. Dimension ND(pipe x outlet)
0115303 20” to 22” x 3 ½”
0115315 22” to 24” x 2 ½”
0115316 22” to 24” x 3”
0115318 22” to 24” x 4”
0115331 24” x 3 ½”
Part no. Dimension ND(pipe x outlet)
0115265 12“ x 6“
0115271 14“ x 6“
0115272 14“ x 8“
0115280 16“ x 6“ to 10“
0115292 18“ x 6“ to 10“
0115298 18“ x 12“
0115306 20“ x 6“ to 10“
0115312 20“ x 12“
0115334 24“ x 6“ to 10“
0115340 24“ x 12“
Fusion outlet (Butt-weld)

PIPE
AN
D F
ITTI
NG
S5.
30Flange ring
Part no. Nominal flange
size
Dimension ND
# of bolt holes
3315712 1” 1” 4
3315714 1 ¼” 1 ¼” 4
3315716 1 ½” 1 ½” 4
3315718 2” 2” 4
3315720 2 ½” 2 ½” 4
3315722 3” 3” 8
3315724 3 ½” 3 ½” 8
Part no. Nominal flange
size
Dimension ND
# of bolt holes
3315726 4” 4” 8
3315730 6” 6” 8
3315734 8” 8” 8
3315738 10” 10” 12
3315742 12” 12” 12
3315744 14” 14” 12
3315746 16” 16” 16
3315748 18” 18” 16
3315750 20” 20” 20
3315752 22” 22” 20
3315754 24” 24” 20

PIPE AN
D FITTIN
GS
5.31
Part no. Dimension ND
0115512 1”
0115514 1 ¼”
0115516 1 ½”
0115518 2”
0115520 2 ½”
0115522 3”
0115524 3 ½”
0115526a 4”
aPart no. 0115526 must be paired with a coupling (part no. 0111026, sold separately).
SDR Butterfly Valve Part no.
Dimension ND — OD
7.4
0115530BV 6”
0115530LBVb 6“
0115534BV 8”
0115538BV 10”
0115542BV 12”
0115544BV 14”
11
0115531BV 6”
0115531LBBVc 6”
115531LGBVb 6”
0115535BV 8”
0115539BV 10”
0115543BV 12”
0115545BV 14”
0115547BV 16”
0115549BV 18”
Flange adapter
SDR Part no. Dimension ND — OD
17.6
2915530BV 6”2915534BV 8”2915538BV 10”2915542BV 12”2915544BV 14”2915546BV 16”2915548BV 18”2915550BV 20”2915552d 22”
2915554BV 24”
bIncludes 1-ft extension of aquatherm green pipe.cIncludes 1-ft extension of aquatherm blue pipe.dNot butterfly valve compatible.

PIPE
AN
D F
ITTI
NG
S5.
32Pump flange adapter ringAmerican bolt pattern
Part no. Dimension ND — OD
55157121” (32 mm) pump flange ring - blue,
3-1/8” to 3-5/32” bolt centerused with #0115512
55157131.25” (40 mm) pump flange ring - black, 3-1/8” to
3-5/32” bolt centerused with #0115514
5515714
1.25” (40 mm) pump flange ring - green, 3-/16” to 3-1/2” bolt center
used with #0115514, fitted Grundfos model UP4375
Part no. Dimension ND
0115812 1”
0115814 1 ¼”
0115816 1 ½”
0115818 2”
0115820 2 ½”
Union Union with PP-R nut
Part no. Dimension ND
0115838 ½”
0115840 ¾”
0115842 1”
0115844 1 ¼”
0115846 1 ½”
0115848 2”
0115850 2 ½”
with brass nut

PIPE AN
D FITTIN
GS
5.33Flow through back plate elbow 90° Flow through back plate elbow parallel
Part No. Dimension
20197 20 mm x 1/2" IG x 20 mm
Part No. Dimension
20198 20 mm x 1/2" IG x 20 mm

PIPE
AN
D F
ITTI
NG
S5.
34Electrofusion coupling
Part no. Dimension ND
0117208 ½”
0117210 ¾”
0117212 1”
0117214 1 ¼”
0117216 1 ½”
0117218 2”
0117220 2 ½” aCannot be used in conjunction with UV pipe.
Wing back 90° elbow
Industrial brassPart no. (NPT)
Stainless steelPart no. (ISO)
Lead-free (potable) brass
Part no. (NPT)Dimension
0120158 0920158 0620158 20 mm x ½” F
Part no. Dimension ND
0117222 3”
0117224 3 ½”
0117226 4”
0117230a 6”
0117234a 8”
0117238a 10”

PIPE AN
D FITTIN
GS
5.35Back plate elbow
Industrial brassPart no. (NPT)
Stainless steelPart no. (ISO)
Lead-free (potable) brass
Part no. (NPT)
Dimension PP-R (ND) x thread type
0120108 0920108 0620108 ½” x ½” F
0120110 0920110 0620110 ½” x ¾” F
0120112 0920112 0620112 ¾” x ¾” F
0120113 0920113 0620113 ¾” x ½” F
threadedISO plug for pressure tests
Part no. Dimension
0050708 ½” M
0050710 ¾” M
with gasket

PIPE
AN
D F
ITTI
NG
S5.
36
ISO transition piece with counter nut, gasket and tension washer
Industrial brass
Part no. Dimension
0120204 20 mm x ½” F x ¾” M
ISO transition elbowwith counter nut, gasket and tension washer
Industrial brass
Part no. Dimension
0120208 20 mm x ½” F x ¾” M
0120209 25 mm x ½” F x ¾” M
ISO transition elbowfor dry construction
Industrial brass
Part no.
Dimension (ND — OD)
0120210 20 mm x ½” F x ¾” M

PIPE AN
D FITTIN
GS
5.37Transition pieceround (female)
Industrial brass
Part no. (NPT)
Stainless steel
Part no. (ISO)
Lead-free (potable) brass
Part no. (NPT)
Dimension PP-R (ND) x thread
type
0121008 0921008 0621008 ½” x ½” F
0121010 0921010 0621010 ½” x ¾” F
0121011 0921011 0621011 ¾” x ½” F
0121012 0921012 0621012 ¾” x ¾” F
0121013 0921013 0621013 1” x ¾” F
NPT transition piece (female)with hex-shaped threaded transition
Industrial brass
Part no. (NPT)
Stainless steel
Part no. (NPT)
Lead-free (potable) brass
Part no. (NPT)
Dimension PP-R (ND) x thread type
0121108 - 0621108 ½” x ½” F
0121110 - 0621110 ½” x ¾” F
0121111 - 0621111 ¾” x ½” F
0121112 - 0621112 ¾” x ¾” F
0121113 - 0621113 1” x ¾” F
0121114 1121114 0621114 1” x 1” F
0121115 1121115 0621115 1 ¼” x 1” F
0121116 1121116 0621116 1 ¼” x 1 ¼” F
0121117 1121117 0621117 1 ½” x 1 ¼” F
0121118 1121118 0621118 1 ½” x 1 ½” F
0121119 1121119 0621119 2” x 1 ½” F
0121120 - 0621120 2” x 2” F
0121122 - 0621122 2 ½” x 2” F

PIPE
AN
D F
ITTI
NG
S5.
38NPT transition piece (male)hex-shaped threaded transition
Industrial brassPart no. (NPT)
Lead-free (potable) brassPart no. (NPT)
Dimension PP-R (ND) x thread
0121308 0621308 ½” x ½” M
0121310 0621310 ½” x ¾”M
0121312 0621312 ¾” x ¾” M
0121314 0621314 1” x 1” M
0121316 0621316 1” x 1 ¼” M
0121317 0621317 1 ¼” x 1” M
0121318 0621318 1 ¼” x 1 ¼” M
0121319 0621319 1 ½” x 1 ¼” M
0121320 0621320 1 ½” x 1 ½” M
0121321 0621321 2” x 1 ½” M
0121322 0621322 2” x 2” M
0121323 0621323 2 ½” x 2” M
0121324 0621324 2 ½” x 2 ½” M
0121325 0621325 3” x 3” M
0121327 0621327 3 ½” x 4” M
Transition pieceround (male)
Industrial brass
Part no. (NPT)
Stainless steel
Part no. (ISO)
Lead-free (potable)
brassPart no. (NPT)
Dimension PP-R (ND) x thread type
0121208 0921208 0621208 ½” x ½” M
0121210 0921210 0621210 ½” x ¾” M
0121211 0921211 0621211 ¾” x ½” M
0121212 0921212 0621212 ¾” x ¾” M
0121213 0921213 0621213 1” x ¾” M

PIPE AN
D FITTIN
GS
5.39
Industrial brass
Part no. (NPT)
Stainless steel
Part no. (ISO)
Lead-free (potable) brass
Part no. (NPT)
Dimension PP-R (ND) x Thread type
0123008 0923008 0623008 ½” x ¾” F
0123010 0923010 0623010 ½” x ½” F
0123012 0923012 0623012 ¾” x ¾” F
0123014 0923014 0623014 ¾” x ½” F
0123016 0923016 0623016 1” x ¾” F
(NPT)
0123018 1123018 0623018 1” x 1” F
NPT transition elbow (female)
Industrial brassPart no. (NPT)
Lead-free (potable) brass
Part no. (NPT)
DimensionPP-R (ND) x Thread type
0123208 0623208 ½” x ½” F
NPT transition street elbow (male/female)

PIPE
AN
D F
ITTI
NG
S5.
40
Industrial brassPart no. (NPT)
Lead-free (potable) brass
Part no. (NPT)
Dimension ND
0125506 0625506 ½” x ½” M x ½”
NPT transition tee(male)
Industrial brass
Part no. Dimension ND
0041408 ½”
0041410 ¾”
0041412 1”
0041414 1 ¼”
0041416 1 ½”
0041418 2”
Draining branchto weld in valves
Flow meter wellMay also be used for thermometer well.
Lead-free (potable) brass
Part no. Dimension ND
0628480 2 to 2 ½” x 1 ¼” x 1 ¼” F
0628500 4” x 1 ½” x 1 ½” F
0628520 4” to 6” x 2” x 2” F

PIPE AN
D FITTIN
GS
5.41Stub out(PP-R to copper)
Part no. Dimension ND
AQ630P248E ½”
AQ630P368E ¾”
AQ630P41110 1”
Straight stub out(PP-R to copper)
Part no. Dimension ND
AQ638P211 ½”
AQ638P311 ¾”
AQ638P418 1”

PIPE
AN
D F
ITTI
NG
S5.
42
Lead-free (potable) brass
Part no.Dimension ND
0098840 ½” (20 mm) PP-R to ½” PEX
0098841 ¾” (25 mm) PP-R to ¾” PEX
0098842 1” (32 mm) PP-R to 1” PEX
PEX adaptor (expansion)ASTM F1960 standard with PP-R street connection.
Lead-free (potable) brass
Part no.Dimension ND
0627060 2 ½” (75 mm) PP-R to 2” grooved
PP-R to grooved transitionPEX adaptor (crimp)
Lead-free (potable) brass
Part no.Dimension ND
0099840 ½” (20 mm) PP-R to ½” PEX
0099841 ¾” (25 mm) PP-R to ¾” PEX
0099842 1” (32 mm) PP-R to 1” PEX
ASTM F1807 standard with PP-R socket connection.

PIPE AN
D FITTIN
GS
5.43
Industrial brass
Part no. (NPT)
Stainless steel
Part no. (ISO)
Lead-free (potable) brass
Part no. (NPT)
Dimension PP-R ND x thread type
0123506 0923506 0623506 ½” x ½” M
0123508 0923508 0623508 ½” x ¾” M
0123510 0923510 0623510 ¾” x ¾” M
0123512 0923512 0623512 1” x ¾” M
0123514 - 0623514 1” x 1” M
Transition elbow (male)
Industrial brass
Part no. (NPT)
Stainless steel
Part no. (ISO)
Lead-free (potable) brass
Part no. (NPT)
DimensionPP-R (ND) x thread type
0125006 0925006 0625006 ½” x ½” x ½” F
0125008 0925008 0625008 ½” x ½” x ¾” F
0125010 0925010 0625010 ¾” x ¾” x ½” F
0125012 0925012 0625012 ¾” x ¾” x ¾” F
0125014 0925014 0625014 1” x 1” x ¾” F
(NPT)
0125016 1125016 0625016 1” x 1” x 1” F
0125022 - 0625022 1 ½” x 1 ½” x 1” F
Transition tee (female)

PIPE
AN
D F
ITTI
NG
S5.
44
Industrial brassPart no. (NPT)
Stainless steelPart no. (ISO)
Lead-free (potable) brassPart no. (NPT)
Dimensionpipe x outlet (thread)
0128214 0928214 0628214 1 ¼” x ¾” (½” F)
0128216 0928216 0628216 1 ½” x ¾” (½” F)
0128218 0928218 0628218 2” x ¾” (½” F)
0128220 0928220 0628220 2 ½” x ¾” (½” F)
0128222 0928222 0628222 3” x ¾” (½” F)
0128224 0928224 0628224 3 ½” x ¾” (½” F)
0128226 0928226 0628226 4” x ¾” (½” F)
0128230 0928230 0628230 6” x ¾” (½” F)
0128232 0928232 0628232 8 to 10” x ¾” (½” F)
0128234 0928234 0628234 1 ¼” x ¾” (¾” F)
0128236 0928236 0628236 1 ½” x ¾” (¾” F)
0128238 0928238 0628238 2” x ¾” (¾” F)
0128240 0928240 0628240 2 ½” x ¾” (¾” F)
NPT fusion outlet hex (female)

PIPE AN
D FITTIN
GS
5.45
Industrial brassPart no. (NPT)
Stainless steelPart no. (ISO)
Lead-free (potable) brassPart no. (NPT)
Dimensionpipe x outlet (thread)
0128242 0928242 0628242 3” x ¾” (¾” F)
0128244 0928244 0628244 3 ½” x ¾” (¾” F)
0128246 0928246 0628246 4” x ¾” (¾” F)
0128250 0928250 0628250 6” x ¾” (¾” F)
0128254 0928254 0628254 8 to 10” x ¾” (¾” F)
(NPT)
0128260 1128260 0628260 2 ½” x 1” (1” F)
0128262 1128262 0628262 3” x 1” (1” F)
0128264 1128264 0628264 3 ½” x 1” (1” F)
0128266 1128266 0628266 4” x 1” (1” F)
0128270 1128270 0628270 6” x 1” (1” F)
0128274 1128274 0628274 8 to 10” x 1” (1” F)
NPT fusion outlet hex (female) (continued)

PIPE
AN
D F
ITTI
NG
S5.
46
Industrial brass
Part no. (NPT)
Lead-free (potable) brass
Part no. (NPT)
Dimension pipe x outlet (thread)
0128314 0628314 1 ” x ¾” (½” M)
0128316 0628316 1 ½” x ¾” (½” M)
0128318 0628318 2” x ¾” (½” M)
0128320 0628320 2 ½” x ¾” (½” M)
0128322 0628322 3” x ¾” (½” M)
0128324 0628324 3 ½” x ¾” (½” M)
NPT fusion outlet (male)
Industrial brass
Part no. (NPT)
Lead-free (potable) brass
Part no. (NPT)
Dimension pipe x outlet (thread)
0128326 0628326 4” x ¾” (½” M)
0128330 0628330 6” x ¾” (½” M)
0128334 0628334 1 ” x ¾” (¾” M)
0128336 0628336 1 ½” x ¾” (¾” M)
0128338 0628338 2” x ¾” (¾” M)
0128340 0628340 2 ½” x ¾” (¾” M)
0128342 0628342 3” x ¾” (¾” M)
0128344 0628344 3 ½” x ¾” (¾” M)
0128346 0628346 4” x ¾” (¾” M)
0128350 0628350 6” x ¾” (¾” M)
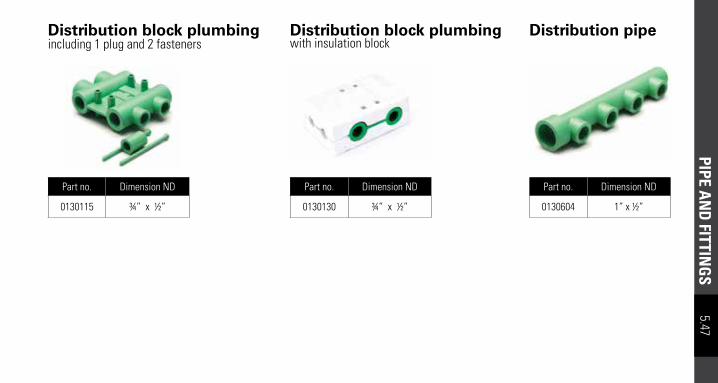
PIPE AN
D FITTIN
GS
5.47
Part no. Dimension ND
0130115 ¾” x ½”
Distribution block plumbingincluding 1 plug and 2 fasteners
Distribution block plumbingwith insulation block
Part no. Dimension ND
0130130 ¾” x ½”
Distribution pipe
Part no. Dimension ND
0130604 1” x ½”
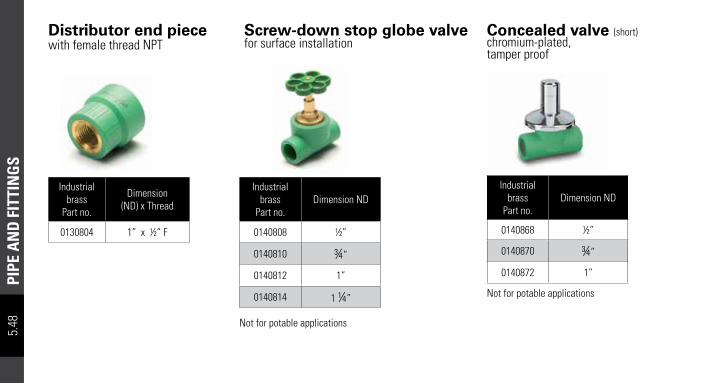
PIPE
AN
D F
ITTI
NG
S5.
48Distributor end piecewith female thread NPT
Industrial brass
Part no.
Dimension (ND) x Thread
0130804 1” x ½” F
Industrial brass
Part no. Dimension ND
0140808 ½”
0140810 ¾”
0140812 1”
0140814 1 ¼”
Screw-down stop globe valvefor surface installation
Not for potable applications
Industrial brass
Part no. Dimension ND
0140868 ½”
0140870 ¾”
0140872 1”
Concealed valve (short) chromium-plated, tamper proof
Not for potable applications

PIPE AN
D FITTIN
GS
5.49
Industrial brass
Part no. Dimension ND
0140878 ½”
0140880 ¾”
0140882 1”
Concealed valve (extended)chromium-plated
Not for potable applications
Industrial brass
Part no. Dimension ND
0140888 ½”
0140890 ¾”
0140892 1”
Concealed valve (standard length)chromium-plated, tamper proof
Not for potable applications
Industrial brass
Part no. Dimension ND
0140858 ½”
0140860 ¾”
0140862 1”
Concealed valve (standard)chromium-plated, tamper proof
Not for potable applications

PIPE
AN
D F
ITTI
NG
S5.
50
Part no. Dimension ND
0040900 Length = 3.2”
0040902 Length = 4.25”
Concealed valvechromium-plated for part no. 0040858-0040862
Industrial brass
Part no.
Dimension PP-R (ND) x Thread
0040908 ½” x ¾”F
0040910 ¾” x ¾”F
0040912 1” x 1”F
0040914 1 ¼” x 1 ¼”F
Stop valve body ISO
Industrial brass
Part no. Dimension ND
0041108 ½”
0041110 ¾”
0041112 1”
0041114 1 ¼”
Inclined valvewithout drain
Not for potable applications

PIPE AN
D FITTIN
GS
5.51Inclined check valvewithout drain
Industrial brass
Part no. Dimension ND
0041208 ½”
0041210 ¾”
0041212 1”
0041214 1 ¼”
Ball valvewithout drain
Industrial brass
Part no. Dimension ND
0041308 ½”
0041310 ¾”
0041312 1”
0041314 1 ¼”
0041316 1 ½”
0041318 2”
Not for potable applicationsNot for potable applicationsReplacement parts available
Industrial brass
Part no. Dimension ND
0078000 1” — M/F
Ball valve(male/female)
Replacement parts availableNot for potable applications

PIPE
AN
D F
ITTI
NG
S5.
52
Part no. Dimension ND
0041488 ½”
0041588a ½”
0041490 ¾”
0041590a ¾”
0041492 1”
0041592a 1”
0041494 1 ¼”
0041594a 1 ¼”
0041496 1 ½”
0041596a 1 ½”
0041498 2”
0041598a 2”
0041400 2 ½”
Ball valvepolypropylene
Part no. Dimension ND
0041602 3”
0041702a 3”
0041604b 3 ½” and 4”
0041704ab 3 ½” and 4”
0041607 6”
0041707a 6”
Ball valvePolypropylene with ISO bolt pattern
aPart comes with FKM/FPM O-ring in the color gray.

PIPE AN
D FITTIN
GS
5.53
Part no. Dimension ND x length
0041378 ½” to ¾”
0041382 1” to 1 ¼”
0041386 1 ½” to 2”
Extension for ball valve
0041378 suitable for part no. 0041308 / 0041310.0041382 suitable for part no. 0041312 / 0041314.0041386 suitable for part no. 0041316 / 0041318.

PIPE
AN
D F
ITTI
NG
S5.
54
Part no. Dimension
0050195 -
Temperature protective gloves
Welding heads
Part no. Dimension
0050206 3/8”
0050208 ½”
0050210 ¾”
0050212 1”
0050214 1 ¼”
0050216 1 ½”
0050218 2”
0050220 2 ½”
0050222 3”
0050224 3 ½”
0050226 4”
Repair plug
Part no. Dimension
0060600 7⁄ 16” x ¼”
to close pipe holes up to 7⁄16” (repair stick part no. 0060600)

PIPE AN
D FITTIN
GS
5.55
Part no. Dimension
0050940 ½” & ¾” for pipes 1¼” - 6”
0050941 ½” & ¾” for pipes 2” - 10”
0050942 1”
0050944 1 ¼”
0050946 1 ½”
Drill bitfor boring fusion outlet holes
aOnly fits into a drill press that can accommodate a Morse Taper shank.
Part no. Dimension
0050948 2”
0050950a 2 ½”
0050952a 3”
0050954a 3 ½”
0050956a 4”
0050958a 6”
0050960a 8”

PIPE
AN
D F
ITTI
NG
S5.
56Fusion outlet welding heads
Part no. Dimension
0050614 1 ¼” x ½” & ¾”
0050616 1 ½” x ½” & ¾”
0050619 2” x ½” & ¾”
0050620 2” x 1”
0050623 2 ½” x ½” & ¾”
0050624 2 ½” x 1”
0050625 2 ½” x 1 ¼”
0050627 3” x ½” & ¾”
0050628 3” x 1”
Part no. Dimension
0050629 3” x 1 ¼”
0050631 3 ½” x ½” & ¾”
0050632 3 ½” x 1”
0050634 3 ½” x 1 ¼”
0050635 3 ½” x 1 ½”
0050636 4” x ½” & ¾”
0050638 4” x 1”
0050640 4” x 1 ¼”
0050642 4” x 1 ½”
0050644 4” x 2”
0050648 6” x ½” & ¾”
0050650 6” x 1”
0050652 6” x 1 ¼”
0050654 6” x 1 ½”
0050656 6” x 2”
Part no. Dimension
0050657 6” x 2 ½”
0050658 6” x 3”
0050660 8” x ½” & ¾”
0050662 8” x 1”
0050664 8” x 1 ¼”
0050666 8” x 1 ½”
0050667 8” x 2 ½”
0050668 8” x 2”
0050669 8” x 3”
0050670 8” x 3 ½”
0050671 8” x 4”
0050672 10” x ½” &. ¾”
0050674 10” x 1”
0050676 10” x 1 ¼”

PIPE AN
D FITTIN
GS
5.57Fusion outlet welding heads (continued)
Part no. Dimension
0050678 10” x 1 ½”
0050680 10” x 2”
0050682 10” x 2 ½”
0050684 10” x 3”
0050686 10” x 3 ½”
0050688 10” x 4”
0050690 12” x 2”
0050692 12” x 2 ½”
0050694 12” x 3”
Part no. Dimension
0050696 12” x 3 ½”
0050698 12” x 4”
0050699 12” x 6”
0050712 14”x 2”
0050714 14” x 2 ½”
0050716 14” x 3”
0050718 14” x 3 ½”
0050720 14” x 4”
0050722 14” x 6”
0050724 14” x 8”
0050726 16” - 24” x 2”
0050728 16” - 20” x 2 ½”
0050730 22” - 24” x 2 ½”
0050732 16” - 20” x 3”
Part no. Dimension
0050734 22” - 24” x 3”
0050736 16” - 18” x 3 ½”
0050738 20” - 22” x 3 ½”
0050740 24” x 3 ½”
0050742 16” x 4”
0050744 18” - ½” x 4”
0050746 22” - 24” x 4”

Notes

Notes

Notes
Related Documents