Appointment Scheduling Module 3

Welcome message from author
This document is posted to help you gain knowledge. Please leave a comment to let me know what you think about it! Share it to your friends and learn new things together.
Transcript

Appointment Scheduling
Module 3

2
Table of Contents
Appointment Booking screen ................................................................................................................................. 3
Search Parameters Overview .................................................................................................................................. 3
Setting and Clearing Defaults ................................................................................................................................. 6
Appointment Scheduler Overview .......................................................................................................................... 8
Viewing the Schedule from a Day View: ........................................................................................................... 8
Viewing Multiple Schedules from a Day View: ................................................................................................. 9
Viewing Schedule(s) from a Week View: ........................................................................................................ 10
Viewing Schedule(s) From a Month View: ...................................................................................................... 11
Viewing Schedule From a Daily Schedule View: ............................................................................................ 12
Booking an Appointment ...................................................................................................................................... 13
Create a Patient Appointment screen: Demographics Tab ............................................................................... 14
Create a Patient Appointment screen: Appointment Summary Tab ................................................................. 21
Booking a New Patient Appointment ................................................................................................................... 22
When an Account has an Exception Code that Requires Override ...................................................................... 27
When an Account Requires Authorization ........................................................................................................... 28
Extending the Time Interval of an Appointment .................................................................................................. 31
Copying An Appointment ..................................................................................................................................... 32
Copying an Appointment within the same group ................................................................................................. 32
Copying an appointment from one Group to another Group ................................................................................ 33
Moving Appointments .......................................................................................................................................... 38
Moving an Appointment using the ‘Drag and Drop’ feature ............................................................................ 38
Moving an Appointment by ‘Cutting and Pasting’ ........................................................................................... 40
Canceling an Appointment ................................................................................................................................... 42
Updating Comment, Referring Doctor, or Reason Code ...................................................................................... 43
Creating a Work-In Appointment ......................................................................................................................... 44
Blocking and Unblocking Time Slots ................................................................................................................... 46
Searching for a Patient without Booking an Appointment ................................................................................... 51
Hovering over Appointment Slots ........................................................................................................................ 52
Wait List Feature................................................................................................................................................... 53
Canceling or moving an appointment ............................................................................................................... 53
When unblocking a time slot ............................................................................................................................ 54
Actions Tab ....................................................................................................................................................... 56
Rescheduling additional patients from the Wait List ........................................................................................ 57
Selecting a patient from the Wait List for a different doctor ............................................................................ 58
Selecting a patient from the Wait List for a different location ......................................................................... 59
Restricted Time Slot ......................................................................................................................................... 61
Adding or removing a patient from the Wait List by using the Update feature ............................................... 62
Adding a Patient to the ‘Wait List’ ................................................................................................................... 63

3
Appointment Booking screen
This is the main screen of the scheduler.
Search Parameters Overview
Calendar display
o The calendar displays the entire month and the current day is shaded blue.
o Navigate between months by selecting the forward and backward arrows, circled above.
o By selecting a date on the calendar, that date’s schedule displays.

4
NOTE: Dates with available time slots will display in yellow highlighting.
Current Day
o This returns to the current day’s schedule.
o Also available from the Actions Menu at the top left-hand corner of the screen by selecting Current Date.
Group Drop Down Menu
o Ability to search for appointments by group
o The group chosen will determine the departments, providers, locations, and reason codes displayed as
search criteria available for selection
Departments Drop Down Menu
o Search for appointments by specific department
o If a department is selected, only the doctors for that department will display
Days, Weeks and Months Fields
o Search for a future appointment by entering the number of days/weeks/months in these fields. For
example, if the provider wants the patient to follow up in three weeks, enter ‘3’ in the Weeks field
and the schedule will move directly to three weeks from the current day.
Providers
o This list displays all the providers in the group and/or department selected
o Select the provider whose schedule needs to display

5
o Hold your <Shift> key (sequential) or <Control> key (non-sequential) while selecting the providers to
display multiple schedules
o Select All at the top of the list to display all providers’ schedules
Locations Drop Down Menu
o To search for appointments by location
Reason Codes Drop Down Menu
o To search for appointments by reason code
o These reason codes are color coded in the drop down menu and on the schedule
o Colors are chosen by the client
Specialty Codes Drop Down Menu
o To search for appointments by specialty
Interval
o To search for appointments by a specific time interval
Type
o To search for appointments by all, next available, or booked appointments
Time
o To search by a specific time
o Enter the time in the field and then select either AM or PM.
o A user may also leave the time field blank and select either AM or PM to view only morning or
afternoon appointments
Day Drop Down Menu
o To search for appointments by a specific day of the week

6
o This option will display the next available selected day with available appointments and the calendar
will highlight all other days with available appointments. See example below when choosing Friday
from the drop down menu.
Search
o This will search for the appointments within the parameters chosen
Search Patient
o This will allow you to search for a patient without booking an appointment and display their basic
demographic information as well as view their appointments
Setting and Clearing Defaults
Users are given the ability to set their search parameters to default. This eliminates the need to select the same
parameters every time they search for a new appointment. The only parameters that can be set as defaults are: Group,
Providers, and Locations.
Choose the settings to default in the search parameters on the ‘Appointment Booking’ screen, shown below.
The options to default are circled.
Go to the Actions menu located at the top left of the ‘Appointment Booking’ screen and select Set Defaults.

7
The chosen selection(s) will automatically be defaulted every time you search, select Current Day, or move
through the scheduler
To clear the defaults chosen, go to the Actions menu and select Clear Defaults. The defaulted selections will
automatically clear

8
Appointment Scheduler Overview
Viewing the Schedule from a Day View:
This view displays the provider’s daily schedule.
o o These tabs enable you to view the schedule from a day, week, month, or daily schedule view.
o o Displays the date of the schedule being viewed.
o Navigation arrows to move forward and/or backward a day/week/month at a time depending on the
view
o The provider’s name will appear below the date
o Displays the number of booked, available and blocked slots for the day.
o Time intervals are displayed to the left of the schedule
o Intervals are set according to your doctor’s template (example above is fifteen minute intervals).
NOTE: When viewing more than one provider’s schedule, the time interval will display the shortest
increment of the appointments being accessed.
o

9
o A red indicator box has been added to the left of the doctor’s name in the day view, which if clicked
on will show any doctor’s comments that have been set up on MM11.4. The red doctor’s comments
box will only display if there are any comments set up on the ‘Doctor Comments’ screen, MM11.4,
for a specific date or date range.
Viewing Multiple Schedules from a Day View: Select ALL to view all of your providers’ schedules at once, or choose providers by holding down your Shift
key (sequential)/Ctrl key (non-sequential) while selecting.
The schedules will then display as below:
Note: The scheduler will display as many providers as needed, up to 7, at one time. The number that needs to
be displayed will need to be determined and discussed with a Client Manager in order to set in the database.
The providers will be displayed in numberical order on the scheduler screen. However; the order of the providers
displayed can be rearranged. To rearrange the order, the user will left click on the provider that needs to be displayed
in the first column of the scheduler and hold the mouse down and drag that provider number to the top of the
‘Providers’ list and repeat the process until the desired order is displayed.

10
o When you have selected more than the defaulted providers these navigational arrows appear to allow
you to move to the next/previous provider’s schedule
The time intervals on the left of the schedule may change if you view multiple providers with different
appointment intervals. Notice in the example below, the time intervals are in ten minutes.
The blue arrow on an appointment slot indicates that there are more appointments that cannot be seen,
depending on your view. Select this arrow to view the additional appointments.
Viewing Schedule(s) from a Week View: This view displays one provider’s weekly schedule at a time.

11
o Additional tab will appear that displays the provider’s name to indicate which provider’s schedule is
being shown.
o When moving to a different schedule, this tab will change to display the provider’s name of the schedule
being accessed.
o Navigational arrows appear when more than three providers are selected to allow you to view the
additional provider(s).
o These arrows allow you to view the next/previous week from the week view for the provider shown.
NOTE: These will also allow you to view the next/previous day from a day view, and the next/previous
month from the month view.
The blue arrow on an appointment slot indicates that there are more appointments that cannot be seen,
depending on your view. Select this arrow to view the additional appointments.
Viewing Schedule(s) From a Month View: This view displays one provider’s daily schedule at a time.

12
o Additional tab appears that displays the provider’s name to indicate which provider’s schedule is being
shown.
o When moving to a different schedule, this tab will change to display the provider’s name of the schedule
being accessed.
Each date will show the number of available, booked, and blocked appointments. To view the specifics of that
date, double-click on that box and that day’s schedule will be shown. The same information is displayed below
the provider name in the day view.
The blue arrow on an appointment slot indicates that there are more appointments that cannot be seen, depending
on your view. Select this arrow to view the additional appointments.
Viewing Schedule From a Daily Schedule View: This view will show a list of appointments by provider for the day selected in a report format. If multiple providers
are selected the user can click on the ‘Nxt Doc’ arrow to view the next doctor’s daily schedule.

13
Booking an Appointment
Double-click the available appointment time slot. An available slot will display the time, length of the
appointment, and reason code as defined in the schedule templates. See below.
The ‘Create a Patient Appointment’ screen will display, as shown below.

14
Details on the Wait List will be described in the ‘Wait List’ section.
Create a Patient Appointment screen: Demographics Tab
The demographics tab is used for booking appointments.

15
Demographics
Search for the patient you want to book.
You can search by entering date of birth, name, social security number, or account number and select
Selecting will clear your previous patient search parameters so you can search again.
If there is only one patient within that search criteria, their information will automatically be populated in the
fields.
o If there are multiple matches, the Name Help screen appears. You can either use your keyboard arrows or
your mouse to scroll through the matches to identify the correct patient. You can verify by the date of
birth, address, insurance, and/or phone number, shown at the bottom of the screen.

16
o Select once you have selected the correct patient.
o If the provider has set their reason codes with specific time intervals, which are different from how the
appointment schedule template was setup, the following screen will appear
o Highlight the reason code and select or {Enter} from your keyboard

17
o That patient’s information will display on the Demographics tab as shown below.
Patient Insurance and Account Information
This section displays the patient balance, account balance, copay, phone numbers, primary and secondary
insurance information, financial class, exception code, and primary care provider that populate as applicable for
that specific patient.
Appointment Information
This section shows basic appointment information for the selected time slot:
o Date, time, interval of appointment, provider’s name, specialty, and location
The interval field can be used to change the interval of an appointment when booking if necessary.

18
The reason code drop down menu can be used to change the reason for the visit if necessary.
o Note- users are able to type in the first letter of the reason code vs. selecting from the drop down menu
Displays referring doctor key code, if applicable. You may also enter a referring doctor as well, see next page.
Entering a referring doctor
o To enter a referring doctor you would either type in the referring doctor’s code or select to
display the ‘Doctor Codes Help’ screen, shown below.
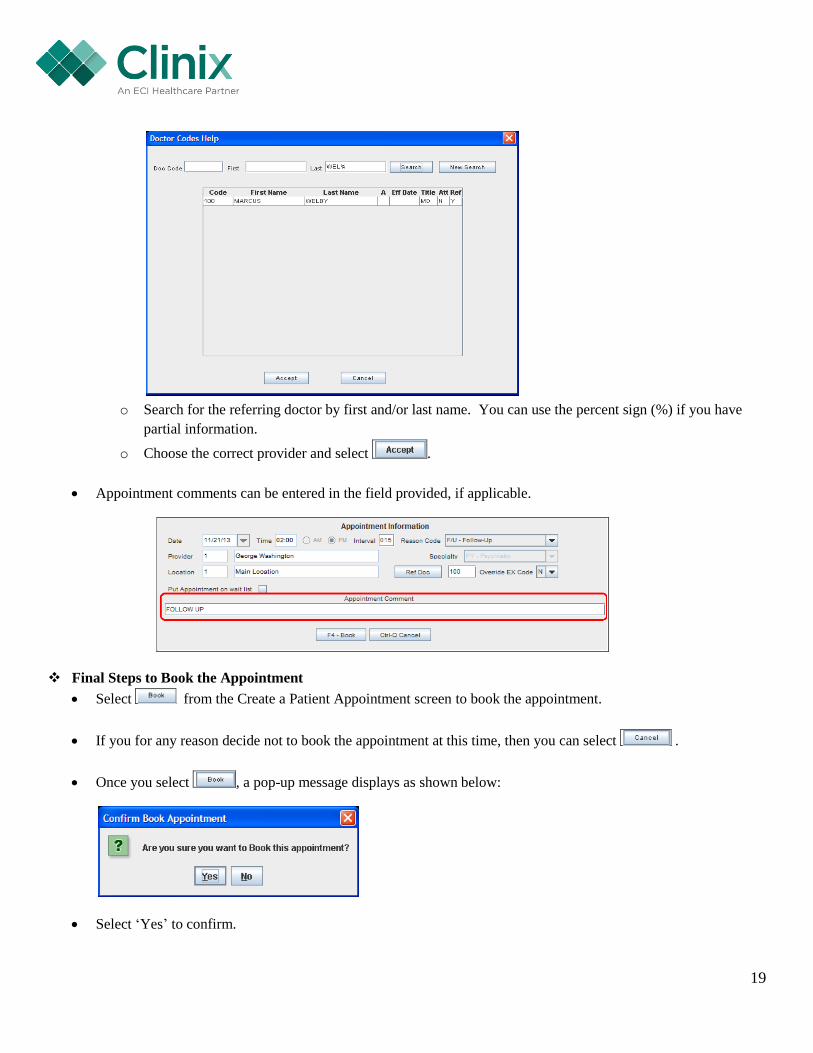
19
o Search for the referring doctor by first and/or last name. You can use the percent sign (%) if you have
partial information.
o Choose the correct provider and select .
Appointment comments can be entered in the field provided, if applicable.
Final Steps to Book the Appointment
Select from the Create a Patient Appointment screen to book the appointment.
If you for any reason decide not to book the appointment at this time, then you can select .
Once you select , a pop-up message displays as shown below:
Select ‘Yes’ to confirm.

20
The time slot will show the appointment time, interval, patient’s name, reason code and phone number in the time
slot chosen as seen below.
When booking an appointment for a patient, that has a recall set, the recall(s) will display on the appointment scheduler screen.
If a recall is selected at the time the appointment is being booked, it will automatically remove that recall if a frequency
is not set on the existing recall. Note: If the patient has multiple recalls set, all recalls will be displayed in order by the recall
date. If there are more than 3 recalls it will activate a scroll bar and the user can scroll down to see all recalls. A recall can only
be selected for the same provider that the appointment is currently being booked for.
21
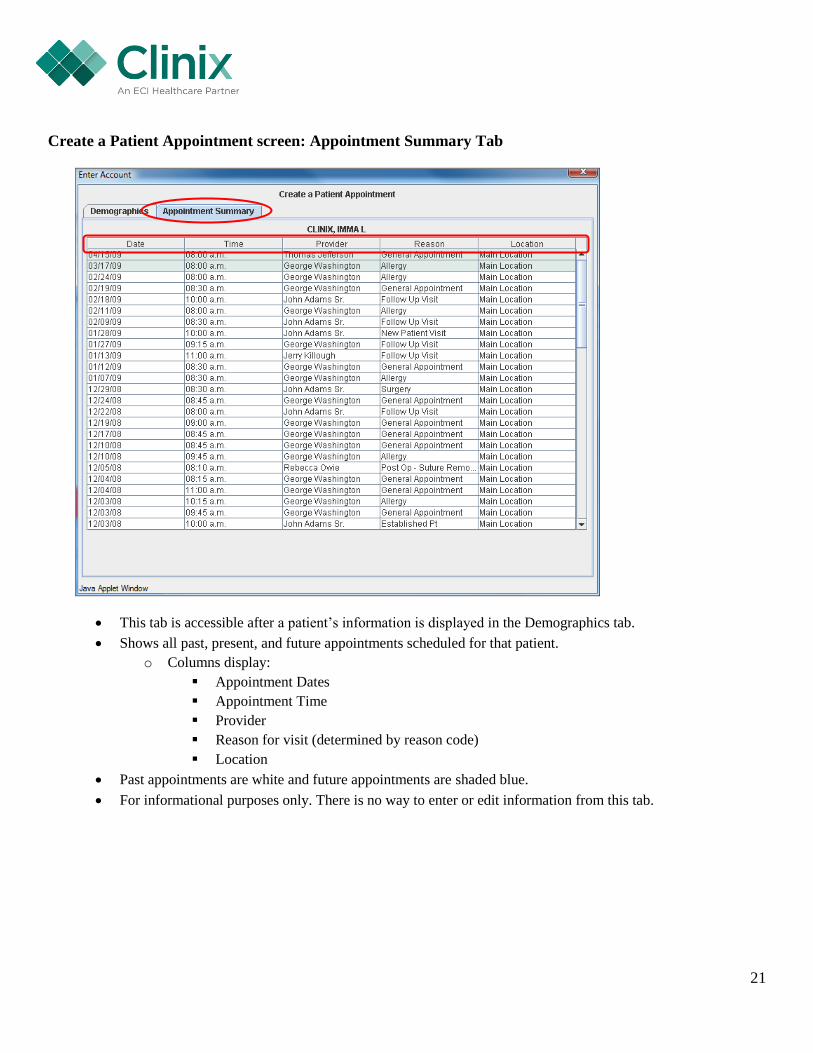
Create a Patient Appointment screen: Appointment Summary Tab
This tab is accessible after a patient’s information is displayed in the Demographics tab.
Shows all past, present, and future appointments scheduled for that patient.
o Columns display:
Appointment Dates
Appointment Time
Provider
Reason for visit (determined by reason code)
Location
Past appointments are white and future appointments are shaded blue.
For informational purposes only. There is no way to enter or edit information from this tab.

22
Booking a New Patient Appointment
Double-click the available time slot.
The ‘Create a Patient Appointment’ screen will appear:
Search for the patient by entering demographic information and selecting .
A pop-up message appears as below:
Select Yes to create the patient.
23
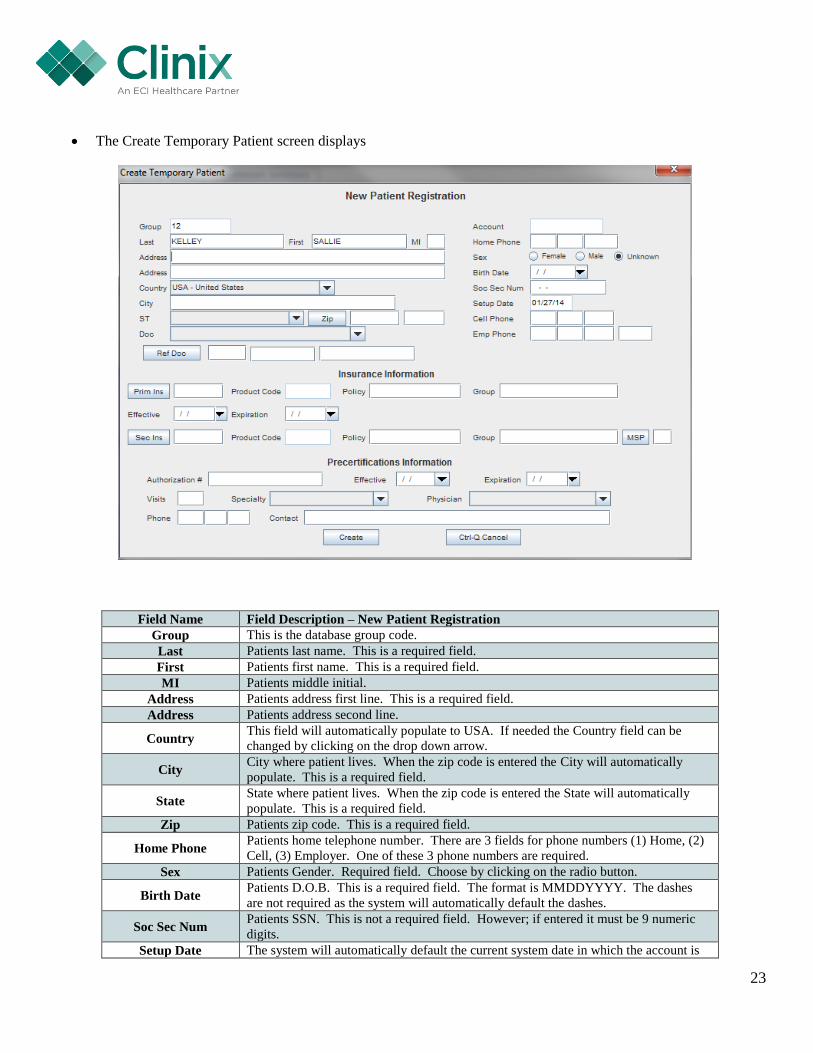
The Create Temporary Patient screen displays
Field Name Field Description – New Patient Registration
Group This is the database group code.
Last Patients last name. This is a required field.
First Patients first name. This is a required field.
MI Patients middle initial.
Address Patients address first line. This is a required field.
Address Patients address second line.
Country This field will automatically populate to USA. If needed the Country field can be
changed by clicking on the drop down arrow.
City City where patient lives. When the zip code is entered the City will automatically
populate. This is a required field.
State State where patient lives. When the zip code is entered the State will automatically
populate. This is a required field.
Zip Patients zip code. This is a required field.
Home Phone Patients home telephone number. There are 3 fields for phone numbers (1) Home, (2)
Cell, (3) Employer. One of these 3 phone numbers are required.
Sex Patients Gender. Required field. Choose by clicking on the radio button.
Birth Date Patients D.O.B. This is a required field. The format is MMDDYYYY. The dashes
are not required as the system will automatically default the dashes.
Soc Sec Num Patients SSN. This is not a required field. However; if entered it must be 9 numeric
digits.
Setup Date The system will automatically default the current system date in which the account is
24
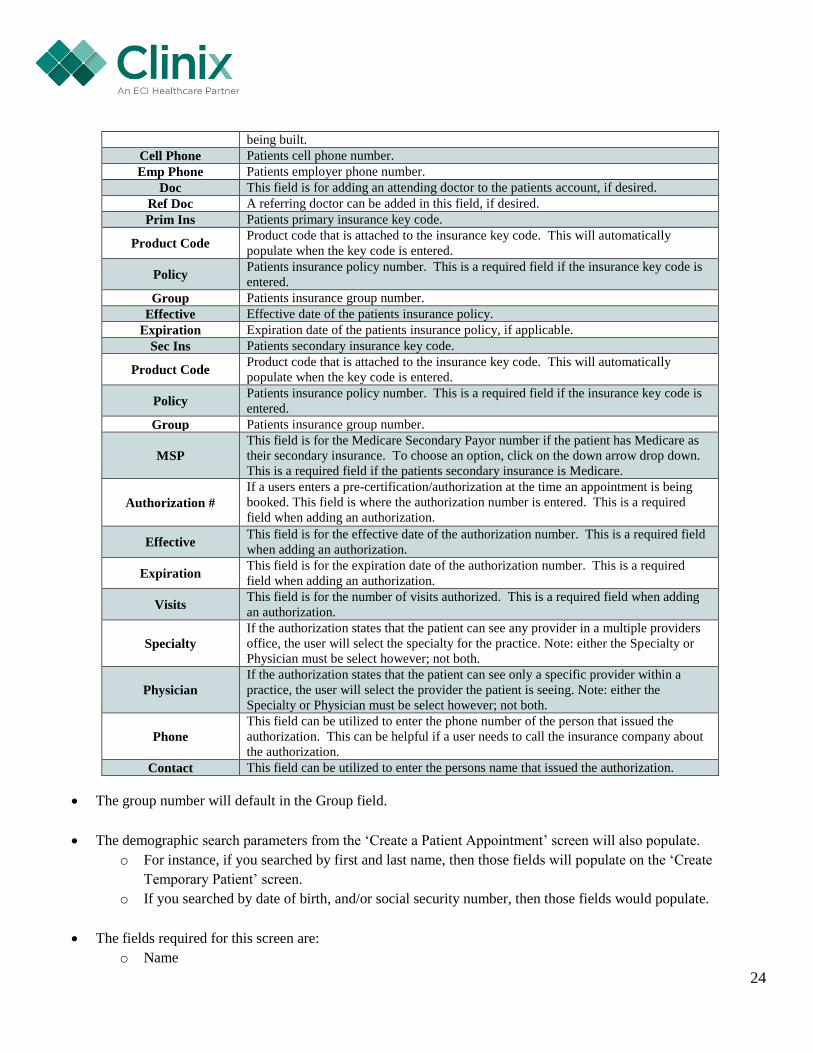
being built.
Cell Phone Patients cell phone number.
Emp Phone Patients employer phone number.
Doc This field is for adding an attending doctor to the patients account, if desired.
Ref Doc A referring doctor can be added in this field, if desired.
Prim Ins Patients primary insurance key code.
Product Code Product code that is attached to the insurance key code. This will automatically
populate when the key code is entered.
Policy Patients insurance policy number. This is a required field if the insurance key code is
entered.
Group Patients insurance group number.
Effective Effective date of the patients insurance policy.
Expiration Expiration date of the patients insurance policy, if applicable.
Sec Ins Patients secondary insurance key code.
Product Code Product code that is attached to the insurance key code. This will automatically
populate when the key code is entered.
Policy Patients insurance policy number. This is a required field if the insurance key code is
entered.
Group Patients insurance group number.
MSP
This field is for the Medicare Secondary Payor number if the patient has Medicare as
their secondary insurance. To choose an option, click on the down arrow drop down.
This is a required field if the patients secondary insurance is Medicare.
Authorization #
If a users enters a pre-certification/authorization at the time an appointment is being
booked. This field is where the authorization number is entered. This is a required
field when adding an authorization.
Effective This field is for the effective date of the authorization number. This is a required field
when adding an authorization.
Expiration This field is for the expiration date of the authorization number. This is a required
field when adding an authorization.
Visits This field is for the number of visits authorized. This is a required field when adding
an authorization.
Specialty
If the authorization states that the patient can see any provider in a multiple providers
office, the user will select the specialty for the practice. Note: either the Specialty or
Physician must be select however; not both.
Physician
If the authorization states that the patient can see only a specific provider within a
practice, the user will select the provider the patient is seeing. Note: either the
Specialty or Physician must be select however; not both.
Phone
This field can be utilized to enter the phone number of the person that issued the
authorization. This can be helpful if a user needs to call the insurance company about
the authorization.
Contact This field can be utilized to enter the persons name that issued the authorization.
The group number will default in the Group field.
The demographic search parameters from the ‘Create a Patient Appointment’ screen will also populate.
o For instance, if you searched by first and last name, then those fields will populate on the ‘Create
Temporary Patient’ screen.
o If you searched by date of birth, and/or social security number, then those fields would populate.
The fields required for this screen are:
o Name
25
o Date of Birth
o Address
o Zip Code
o At least one phone number (Home, Cell, or Employer)
o Sex- only if that medoption is chosen
o All other fields are optional.
To enter a Referring Doctor, either enter the Referring Doctor code, or select . This will display the
Doctor Codes Help screen to search for the appropriate doctor as explained on page 15.
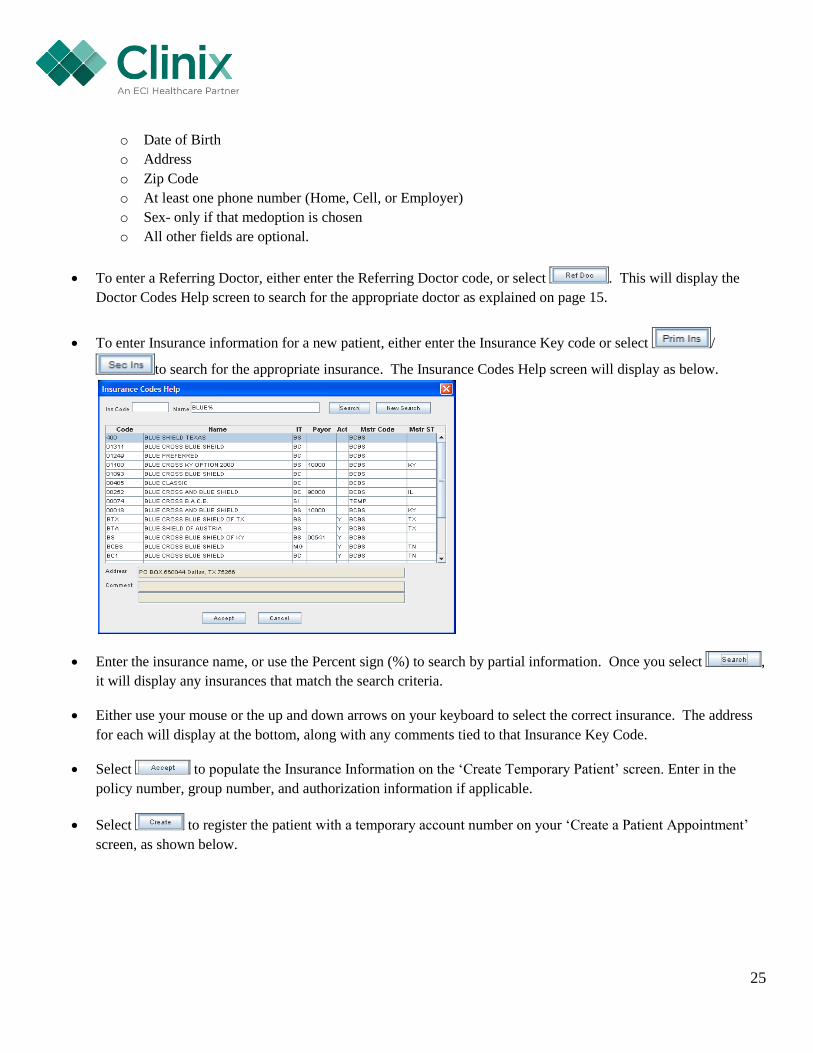
To enter Insurance information for a new patient, either enter the Insurance Key code or select /
to search for the appropriate insurance. The Insurance Codes Help screen will display as below.
Enter the insurance name, or use the Percent sign (%) to search by partial information. Once you select ,
it will display any insurances that match the search criteria.
Either use your mouse or the up and down arrows on your keyboard to select the correct insurance. The address
for each will display at the bottom, along with any comments tied to that Insurance Key Code.
Select to populate the Insurance Information on the ‘Create Temporary Patient’ screen. Enter in the
policy number, group number, and authorization information if applicable.
Select to register the patient with a temporary account number on your ‘Create a Patient Appointment’
screen, as shown below.

26
Select to book the appointment. It will appear in the chosen time slot as shown below.

27
When an Account has an Exception Code that Requires Override
The following message displays if you attempt to book an appointment without overriding the Exception Code.
o Select OK.
o In the ‘Create a Patient Appointment’ screen review the exception code (circled below) and make changes
if necessary.
o Use the drop down menu beside ‘Override EX Code’(also circled) to change to a Y to override.
o Select to book the appointment as normal.
28
When an Account Requires Authorization
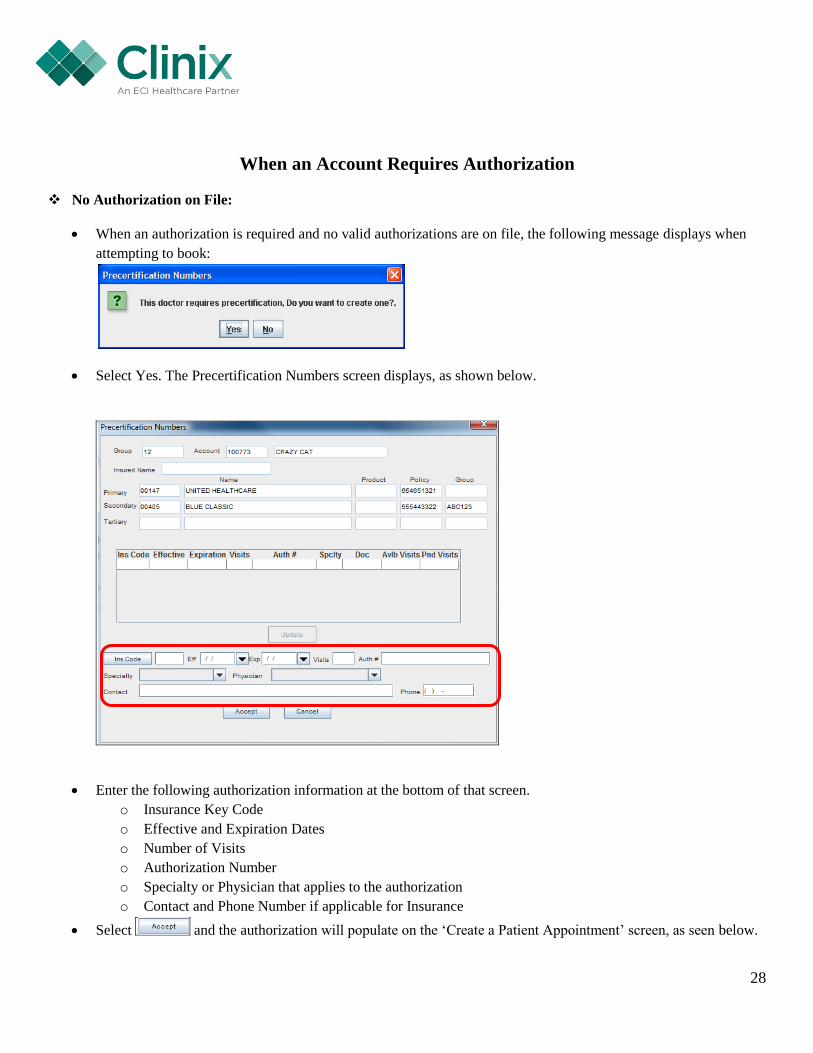
No Authorization on File:
When an authorization is required and no valid authorizations are on file, the following message displays when
attempting to book:
Select Yes. The Precertification Numbers screen displays, as shown below.
Enter the following authorization information at the bottom of that screen.
o Insurance Key Code
o Effective and Expiration Dates
o Number of Visits
o Authorization Number
o Specialty or Physician that applies to the authorization
o Contact and Phone Number if applicable for Insurance
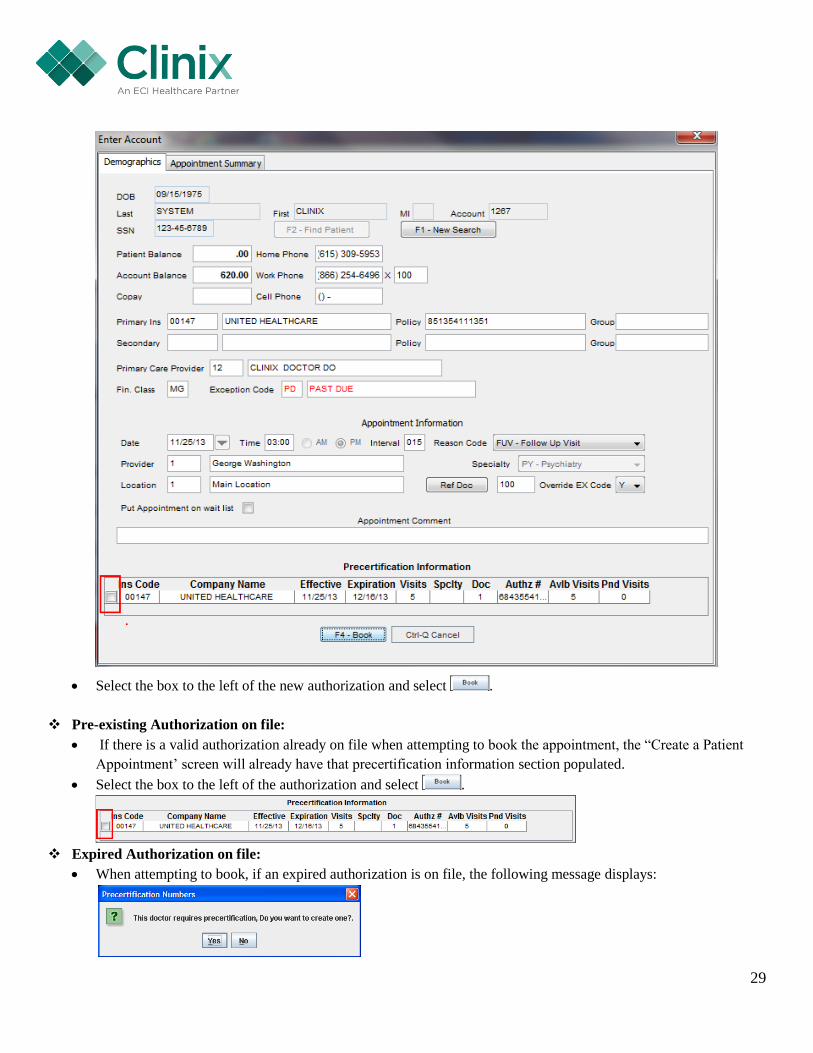
Select and the authorization will populate on the ‘Create a Patient Appointment’ screen, as seen below.
29
Select the box to the left of the new authorization and select .
Pre-existing Authorization on file:
If there is a valid authorization already on file when attempting to book the appointment, the “Create a Patient
Appointment’ screen will already have that precertification information section populated.
Select the box to the left of the authorization and select .
Expired Authorization on file:
When attempting to book, if an expired authorization is on file, the following message displays:

30
Select Yes. The Precertification Numbers screen will appear as below:
To update the expired authorization on file, simply highlight the row to update, circled above.
Select , which will now be an active button, and the expired authorization information will populate in
the fields as seen below. Update the necessary information in those fields. Select .
The ‘Create a Patient Appointment’ screen will then populate the updated authorization.
Select the box to the left of the updated authorization and select .
31
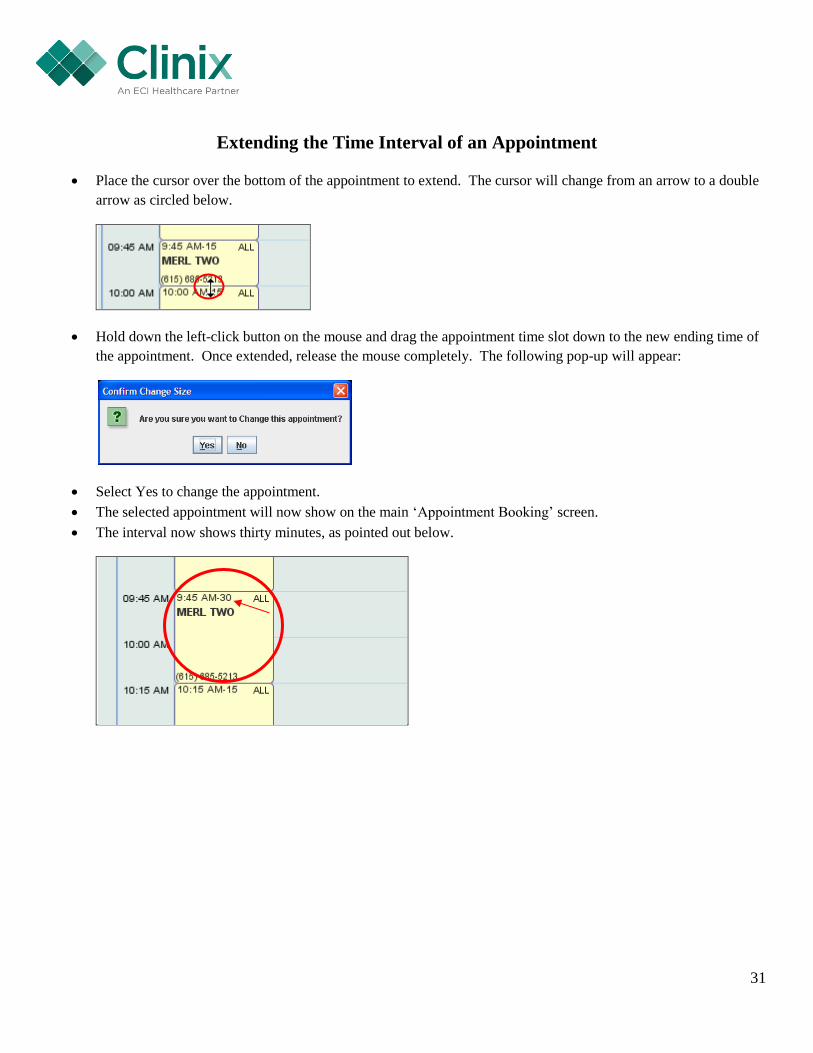
Extending the Time Interval of an Appointment
Place the cursor over the bottom of the appointment to extend. The cursor will change from an arrow to a double
arrow as circled below.
Hold down the left-click button on the mouse and drag the appointment time slot down to the new ending time of
the appointment. Once extended, release the mouse completely. The following pop-up will appear:
Select Yes to change the appointment.
The selected appointment will now show on the main ‘Appointment Booking’ screen.
The interval now shows thirty minutes, as pointed out below.

32
Copying An Appointment
Copying an Appointment within the same group
Right click on the patient’s appointment that you want to copy
Select ‘Copy Appointment’
Right click on the appointment slot where you want to copy the patient’s appointment to
Select Paste ‘Appointment’
If you are copying to a time slot that does not have the same reason code, you will then see this pop up
If you want to keep the same source reason code (code will be in parentheses), select ‘Yes’. If you select
‘Yes’, and the time slot that you are copying to is not a restricted time slot, the appointment will copy
and change the reason code.
If you do not want to keep the same source reason code, select ‘No’. If you select ‘No’, the reason code
will stay the same as the reason code in the time slot that you are copying the appointment to.
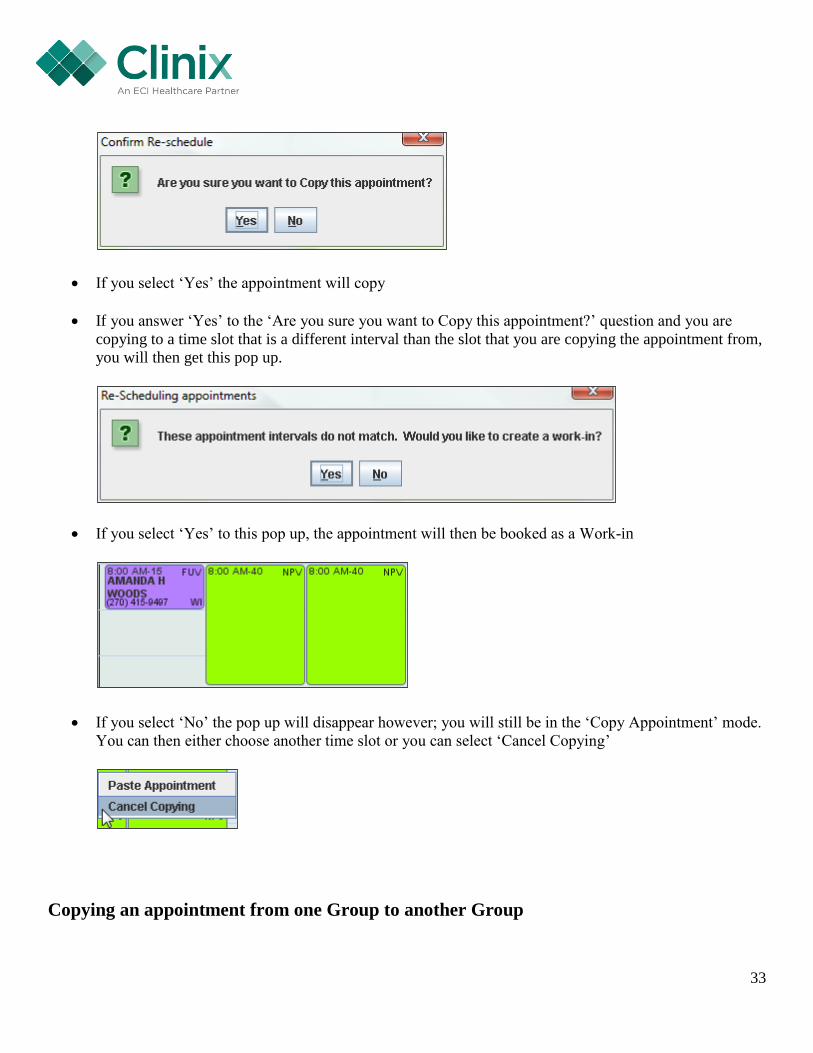
When you have selected either ‘Yes’ or ‘No’ you will then see this pop up
33
If you select ‘Yes’ the appointment will copy
If you answer ‘Yes’ to the ‘Are you sure you want to Copy this appointment?’ question and you are
copying to a time slot that is a different interval than the slot that you are copying the appointment from,
you will then get this pop up.
If you select ‘Yes’ to this pop up, the appointment will then be booked as a Work-in
If you select ‘No’ the pop up will disappear however; you will still be in the ‘Copy Appointment’ mode.
You can then either choose another time slot or you can select ‘Cancel Copying’
Copying an appointment from one Group to another Group

34
You can also copy an appointment from one Group to another Group. However, there will be additional
validations that will take place when copying from Group to Group. If you copy a patient’s appointment
to a different Group, the system will validate whether the patient is an existing patient in the Group that you are
copying the appointment to. It will validate on:
Patient’s last name
Patient’s first name
Patient’s DOB
Right click on the patient’s appointment that you want to copy to another Group
Select ‘Copy Appointment’
Choose the Group and Provider from the parameters that you want to copy the appointment to
Click on the ‘Search’ button to view the schedule for that Group
Right click on the time slot that you want to copy the patient’s appointment to
Select ‘Paste Appointment’
If the patient is not found in the Group, you will see the following popup
If you would like to create the patient, select ‘Yes’
You will then get the ‘Create Temporary Patient’ screen -
Note – the following fields will automatically populate:
Last name
First name

35
MI
Birth Date
Soc Sec Num (if it was in the patient’s account)
Enter the patient’s demographic information and click on ‘Create’
You will then get this popup screen
Select ‘Yes’ if you want to copy this patient’s appointment
If the appointment interval is different from the time slot that you are copying from, you will see the
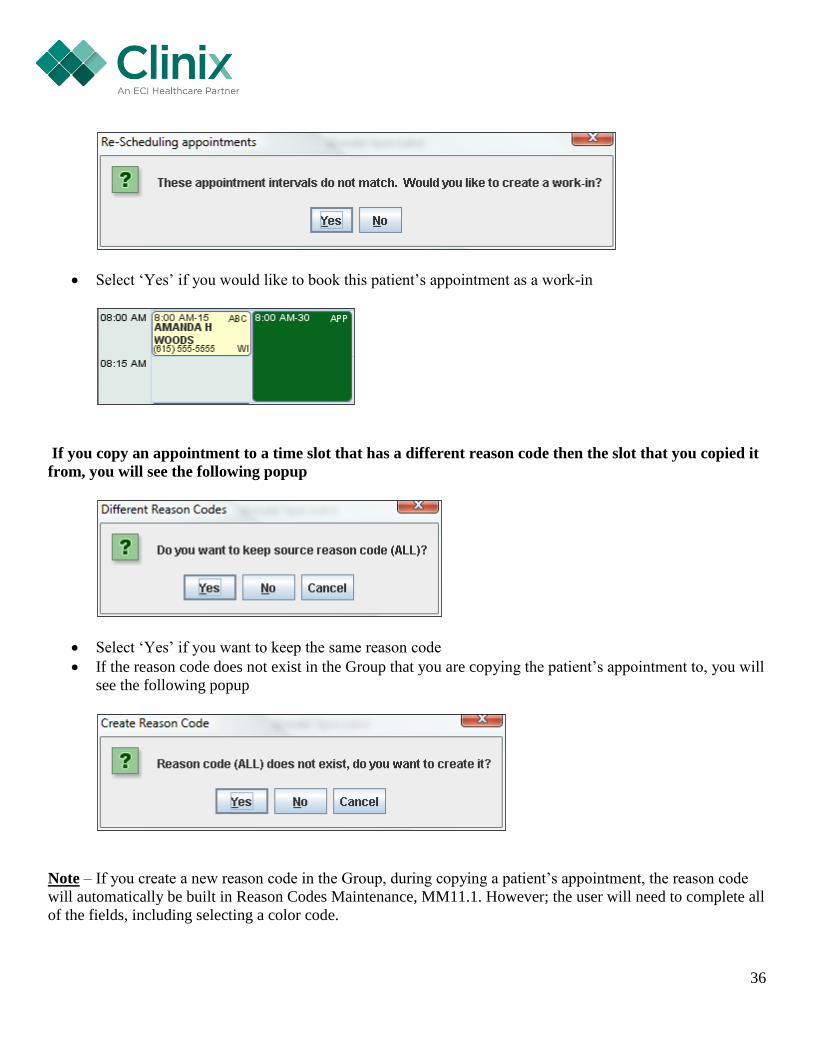
following popup
36
Select ‘Yes’ if you would like to book this patient’s appointment as a work-in
If you copy an appointment to a time slot that has a different reason code then the slot that you copied it
from, you will see the following popup
Select ‘Yes’ if you want to keep the same reason code
If the reason code does not exist in the Group that you are copying the patient’s appointment to, you will
see the following popup
Note – If you create a new reason code in the Group, during copying a patient’s appointment, the reason code
will automatically be built in Reason Codes Maintenance, MM11.1. However; the user will need to complete all
of the fields, including selecting a color code.

37
If you select ‘Yes’ to the creating a reason code question, you will get the following popup
Select ‘Yes’ if you want to copy this patient’s appointment
If the interval that you are copying the patient’s appointment from is different than the time slot that you
are copying the appointment to, you will see the following popup

38
Select ‘Yes’ if you want to create a work-in. The patient’s appointment will then be booked
Select ‘No’ if you do not want to book this patient’s appointment as a work-in
Note – if you select’ No’ the pop up will disappear however; you will still be in the copy mode.
If you want to cancel the copy altogether, right click on any appointment slot and choose ‘Cancel
Copying’
Note – All of the above steps for Copying a patient’s appointment will also apply with the
‘Move Appointment’ option, with the exception of retaining the original appointment.
Moving Appointments There are two ways you can move appointments in the scheduler.
The ‘Drag and Drop’ feature
The ‘Cutting and Pasting’ feature
Moving an Appointment using the ‘Drag and Drop’ feature
The scheduler allows moving appointments on the schedule to different times and/or different doctors using the
drag and drop feature as long as it is on the same day, (or week if you are on the Week tab of the schedule).
Left-click on the booked appointment to move. The time slot will now appear red.

39
While holding down the left-click button on the mouse, move the cursor to the new time slot to drag and drop the
appointment. You will need to move your cursor to the time slot that you want to reschedule the appointment for
before releasing the mouse, as pointed out below.
This pop-up message displays:
To block the old appointment slot, select Yes, otherwise select No.
Another pop-up message displays confirming the re-schedule:
Select Yes to confirm the change and the appointment will move to the new time slot, as shown below.

40
The original appointment time slot will now show available.
Moving an Appointment by ‘Cutting and Pasting’
Right-click on the appointment to move. A menu will appear as below. Select Move Appointment by left-
clicking the mouse.
It will ‘Cut’ the appointment from the schedule and require it be placed in a new time slot.
41
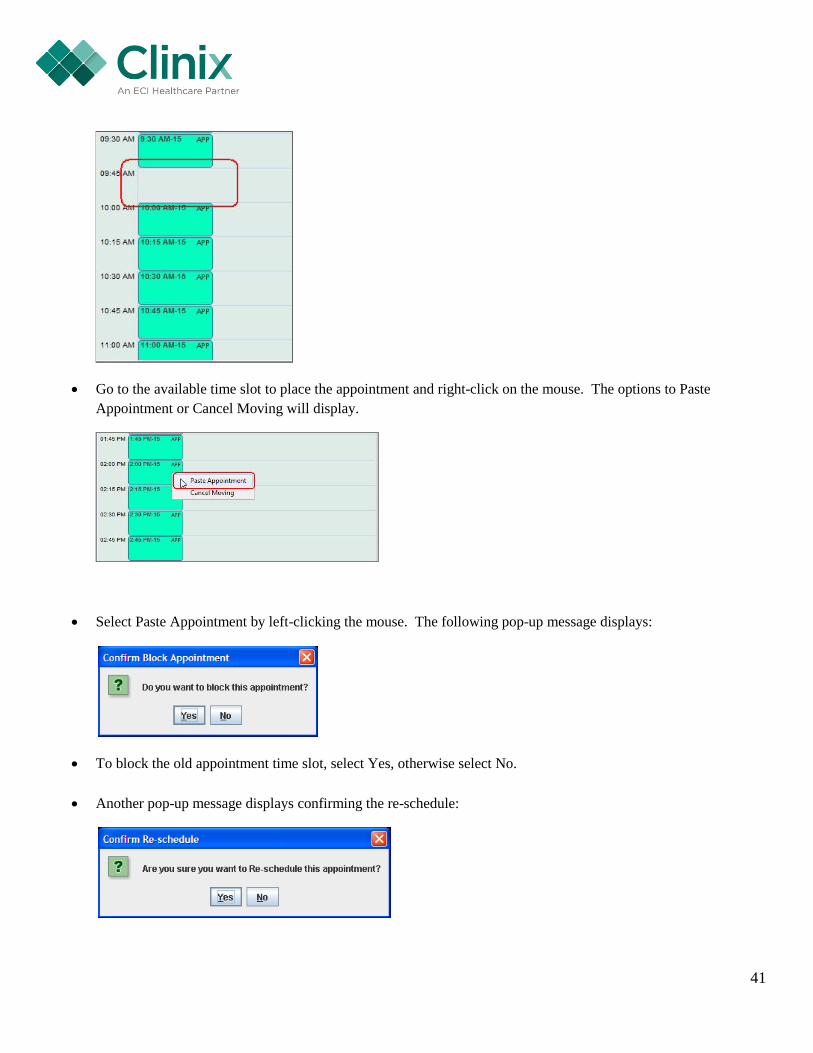
Go to the available time slot to place the appointment and right-click on the mouse. The options to Paste
Appointment or Cancel Moving will display.
Select Paste Appointment by left-clicking the mouse. The following pop-up message displays:
To block the old appointment time slot, select Yes, otherwise select No.
Another pop-up message displays confirming the re-schedule:

42
Select Yes to confirm the change and the appointment will now display in the new time slot, as shown below.
Canceling an Appointment
Right-click on the appointment to cancel. The following options will display:
Select Cancel Appointment which will make the original time slot available
Select Cancel and Block Appointment which will also block the appointment being canceled, shown below.
Regardless of which option is selected, a pop-up message will display requiring a reason for cancellation. Enter
the reason and select OK.
43
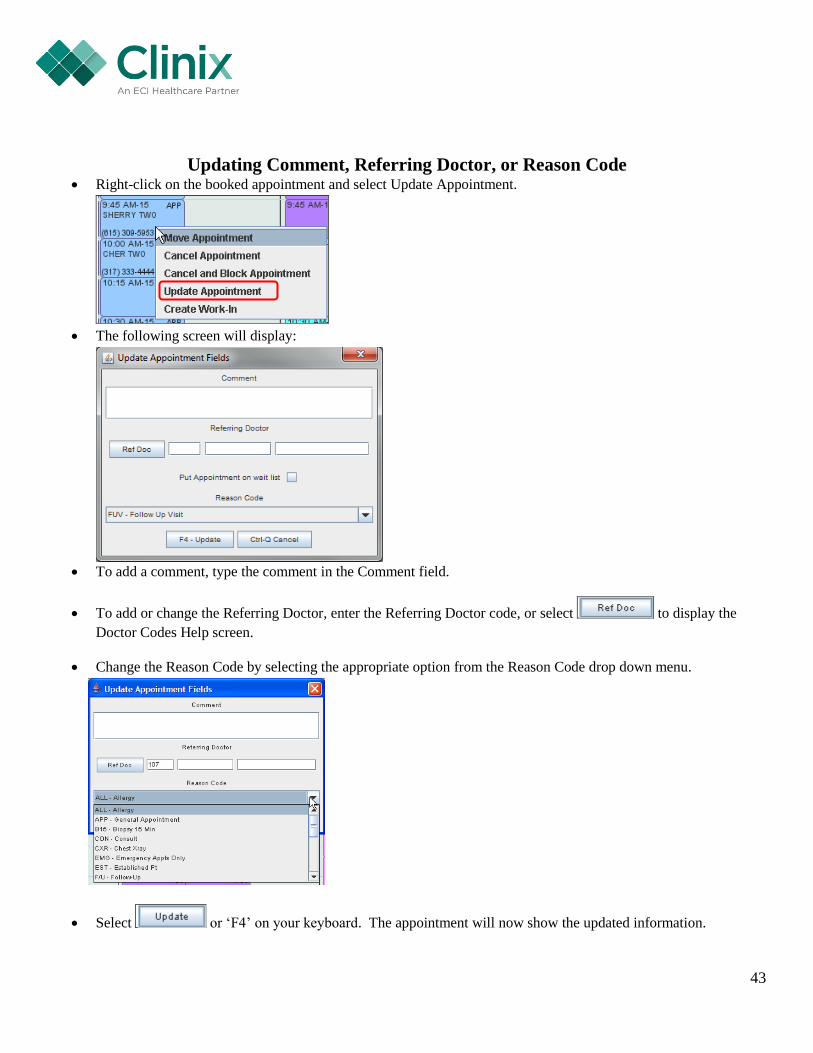
Updating Comment, Referring Doctor, or Reason Code Right-click on the booked appointment and select Update Appointment.
The following screen will display:
To add a comment, type the comment in the Comment field.
To add or change the Referring Doctor, enter the Referring Doctor code, or select to display the
Doctor Codes Help screen.
Change the Reason Code by selecting the appropriate option from the Reason Code drop down menu.
Select or ‘F4’ on your keyboard. The appointment will now show the updated information.

44
Creating a Work-In Appointment Right-click on the time slot to place the Work-In appointment. Select Create Work-in.
The ‘Create a Work-In Patient Appointment screen’ displays (same as ‘Create a Patient Appointment’ screen).
Search for the patient by date of birth, name, social security number, or account number and select
.
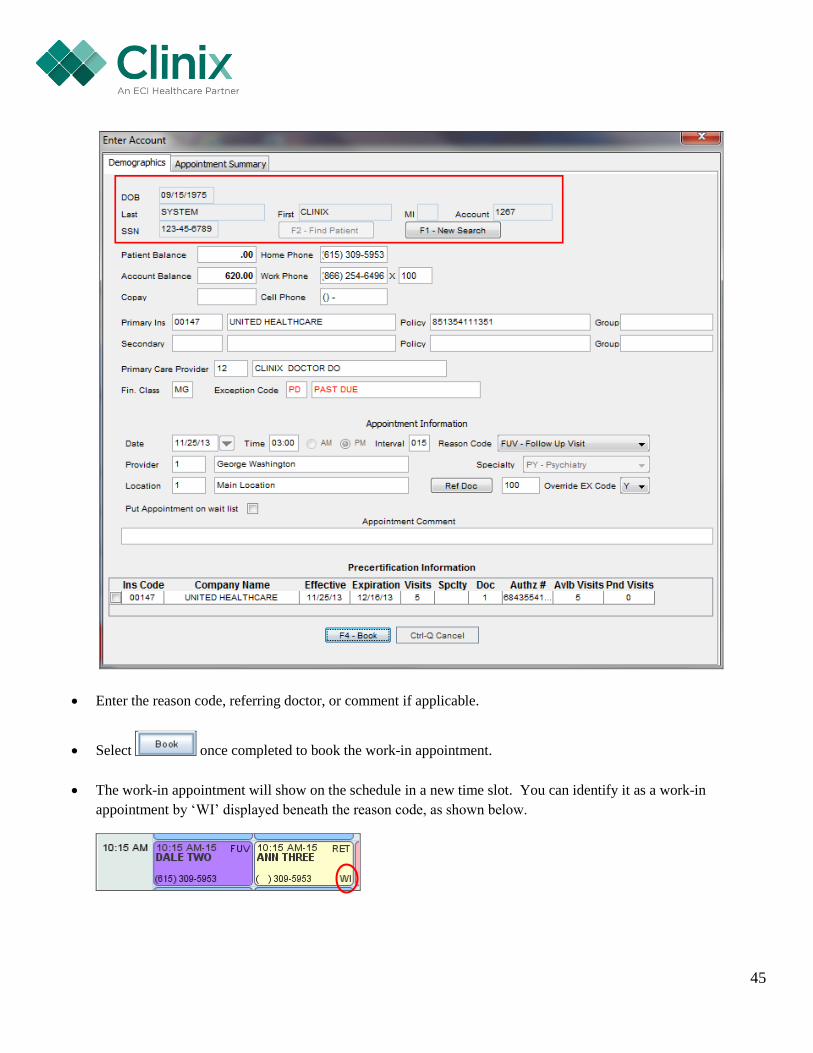
When the patient is found, the screen will populate that patient’s demographic information as shown below:
45
Enter the reason code, referring doctor, or comment if applicable.
Select once completed to book the work-in appointment.
The work-in appointment will show on the schedule in a new time slot. You can identify it as a work-in
appointment by ‘WI’ displayed beneath the reason code, as shown below.

46
Blocking and Unblocking Time Slots
There are two ways to block/unblock time slots in the calendar.
Selecting the slots directly from the calendar
o Left-click the available time slot to select.
o Right-click to Block and the following option displays:
o Select Block Slots
o A pop-up message displays requiring the reason for blocking the slot:
o Enter the reason and select OK.
o The scheduler will then display as a blocked appointment. See below.
o To select multiple time slots, hold down your Shift key while left-clicking each slot to block. All
selected slots will turn red. Right-click to block all of those slots at once and enter the reason.
o To unblock a time slot, left-click to select the slot.

47
o Right-click to Unblock.
o Select Unblock Slots.
o The blocked slot will then become available. The same applies for unblocking multiple slots by
holding down your Shift key while selecting the slots to unblock.
To block/unblock a range of time slots go to the Actions menu located at the top left of the ‘Appointment
Booking’ screen.
o Select Block/Unblock.
o The Block/Unblock Appointments screen displays.
Note: If the template has been changed
since the range of slots were blocked,
the system will delete/add slots to
match the current template
restrictions. If this occurs, you will
receive this popup message:

48
o Verify the group from the Group drop down menu.
o Select the doctor’s schedule to block from the Doctor drop down menu, if applicable.
o Select the location from the Location drop down menu, if applicable.
o Enter a Begin and End time and choose AM or PM. Users can select <Ctrl Enter> to mark the ‘AM’
or ‘PM’ radio button.
The cursor will need to be on either
one of the fields mentioned above
before you are able to select ‘AM’ or
‘PM’ using <Crtl Enter>.
49
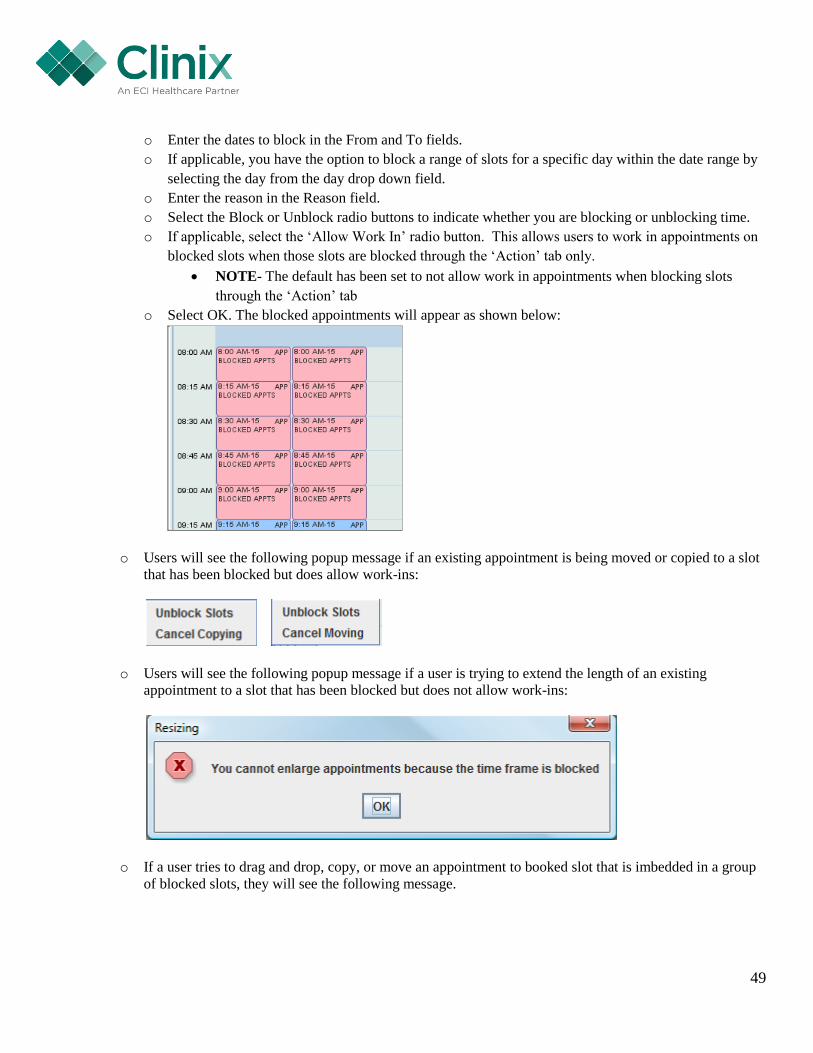
o Enter the dates to block in the From and To fields.
o If applicable, you have the option to block a range of slots for a specific day within the date range by
selecting the day from the day drop down field.
o Enter the reason in the Reason field.
o Select the Block or Unblock radio buttons to indicate whether you are blocking or unblocking time.
o If applicable, select the ‘Allow Work In’ radio button. This allows users to work in appointments on
blocked slots when those slots are blocked through the ‘Action’ tab only.
NOTE- The default has been set to not allow work in appointments when blocking slots
through the ‘Action’ tab
o Select OK. The blocked appointments will appear as shown below:
o Users will see the following popup message if an existing appointment is being moved or copied to a slot
that has been blocked but does allow work-ins:
o Users will see the following popup message if a user is trying to extend the length of an existing
appointment to a slot that has been blocked but does not allow work-ins:
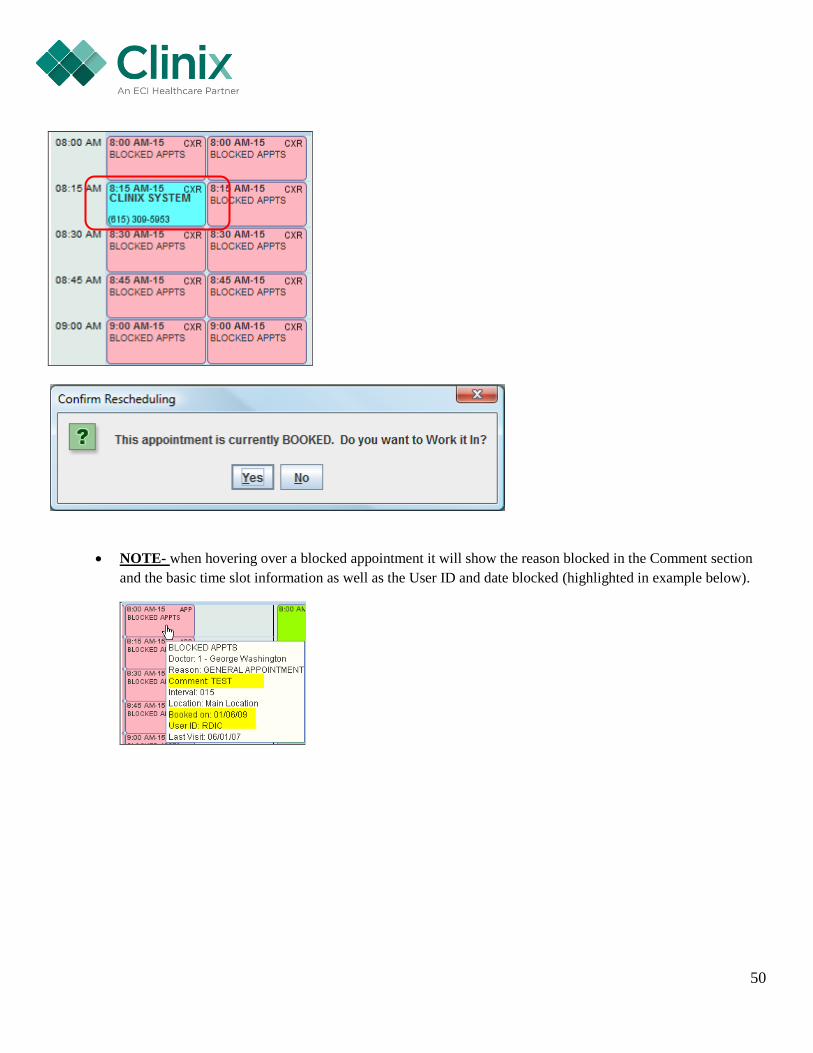
o If a user tries to drag and drop, copy, or move an appointment to booked slot that is imbedded in a group
of blocked slots, they will see the following message.
50
NOTE- when hovering over a blocked appointment it will show the reason blocked in the Comment section
and the basic time slot information as well as the User ID and date blocked (highlighted in example below).

51
Searching for a Patient without Booking an Appointment
From the ‘Appointment Booking’ Screen select .
The Patient Search screen will appear, allowing you to search for a patient to view basic demographic information
and view their appointments by selecting the Current Appointments tab. There is no way to book appointments
from this screen since it is used for informational purposes only.

52
Hovering over Appointment Slots
Booked Appointment slots
When the cursor is placed over a booked appointment, a summary box will appear with general information on
that specific appointment. It will display:
o Patient’s Name
o Account number
o Patient’s Date of Birth
o Doctor
o Doctor Comment (if applicable)
o Reason Code
o Comment (if applicable)
o Time Interval
o Referring Provider (if applicable)
o Location
o Department Code
o Patient phone number(s)
o Date appointment was booked
o Exception Code (if applicable)
o User ID of person that booked the appointment
o Last Visit
Available Appointment Slots
When the cursor is placed over an available appointment, a summary box will appear with general information on
that available time slot. It will display:
o Doctor
o Doctor Comment (if applicable)
o Reason
o Interval
o Location

53
Wait List Feature
This feature gives our users the opportunity to put patients on the Wait List if they would like to be notified if an earlier
appointment becomes available.
There are four (4) ways that the Wait List can be accessed.
Canceling an appointment
Moving an appointment
Unblocking an appointment slot
From the ‘Actions’ tab
When a patient is placed on the ‘Wait List’ and one of the above takes place, you will receive the ‘Wait List’ pop up that
will display the patients that have been added to the list.
Canceling or moving an appointment When an appointment is either canceled or moved and a time slot opens up, you will see the ‘Wait List’ popup.
To choose a patient:
Click on the patient that you want to schedule in the spot where the appointment was canceled/moved.
Once the patient is highlighted click on the ‘Accept’ button to book the patient’s appointment that you selected
from the Wait List.
54
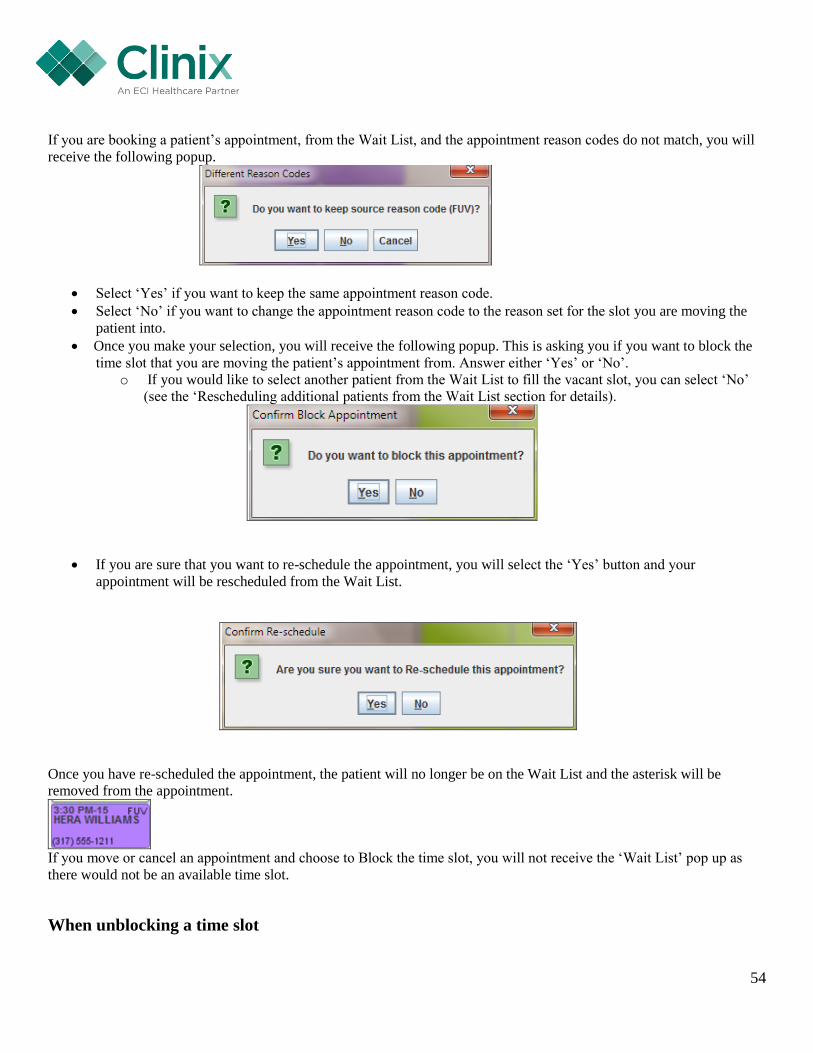
If you are booking a patient’s appointment, from the Wait List, and the appointment reason codes do not match, you will
receive the following popup.
Select ‘Yes’ if you want to keep the same appointment reason code.
Select ‘No’ if you want to change the appointment reason code to the reason set for the slot you are moving the
patient into.
Once you make your selection, you will receive the following popup. This is asking you if you want to block the
time slot that you are moving the patient’s appointment from. Answer either ‘Yes’ or ‘No’.
o If you would like to select another patient from the Wait List to fill the vacant slot, you can select ‘No’
(see the ‘Rescheduling additional patients from the Wait List section for details).
If you are sure that you want to re-schedule the appointment, you will select the ‘Yes’ button and your
appointment will be rescheduled from the Wait List.
Once you have re-scheduled the appointment, the patient will no longer be on the Wait List and the asterisk will be
removed from the appointment.
If you move or cancel an appointment and choose to Block the time slot, you will not receive the ‘Wait List’ pop up as
there would not be an available time slot.
When unblocking a time slot

55
When an appointment slot is unblocked, you will see the ‘Wait List’ popup
To choose a patient:
Click on the patient that you want to schedule in the spot where the appointment was unblocked.
Once the patient is highlighted click on the ‘Accept’ button to book the patient’s appointment that you selected
from the Wait List.
56
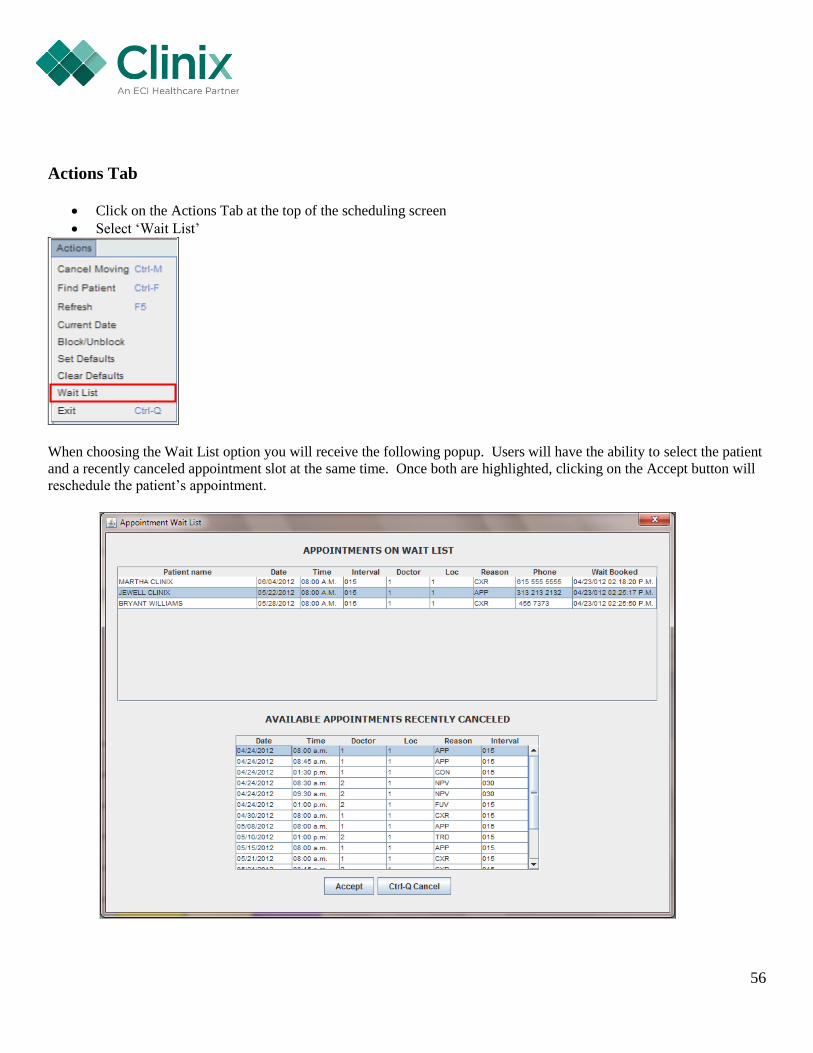
Actions Tab
Click on the Actions Tab at the top of the scheduling screen
Select ‘Wait List’
When choosing the Wait List option you will receive the following popup. Users will have the ability to select the patient
and a recently canceled appointment slot at the same time. Once both are highlighted, clicking on the Accept button will
reschedule the patient’s appointment.

57
Rescheduling additional patients from the Wait List When you reschedule a patient from the Wait List, and you have additional patients on the Wait List, you will receive a
pop up asking you if you would like to continue to book from the Wait List. If you answer Yes, this will allow you to fill
the vacant slot that just became available.
This would only occur if you have a patient on the Wait List that has an existing appointment date prior to the
appointment slot that became available.
When answering yes, the scheduler will take you to the date of the available appointment as well as display the physician.
This will give you the ability to view that days schedule to ensure that you would like to book another appointment. In
addition, you will see the available appointment information in the upper right hand corner of the Appointments on Wait
List pop up.
If a user would like to book the patient from the Wait List, click on the patients name and then click on the Accept
button. This will remove the patient from the Wait List and book them in the available time slot.
This process will continue in this cycle as long as you still have patients on the Wait List that have appointments
scheduled after to the date that you are currently rescheduling a patient on.
If at any time you do not wish to continue to book from the Wait List, you can select ‘No’ from the ‘Do you want to
continue booking from the Wait List’ pop up.

58
Selecting a patient from the Wait List for a different doctor When choosing a patient from the Wait List, users will have the ability to book the patient with another doctor within your
practice. In the example below a patient was booked for Doctor 1 prior to the appointment being cancelled.
At the time the appointment was canceled the highlighted patient was selected from the Wait List to be re-scheduled.
When the Accept button is selected, the below popup will appear.
Answer ‘Yes’ if you would like to book the patient for another doctor within your practice.
59
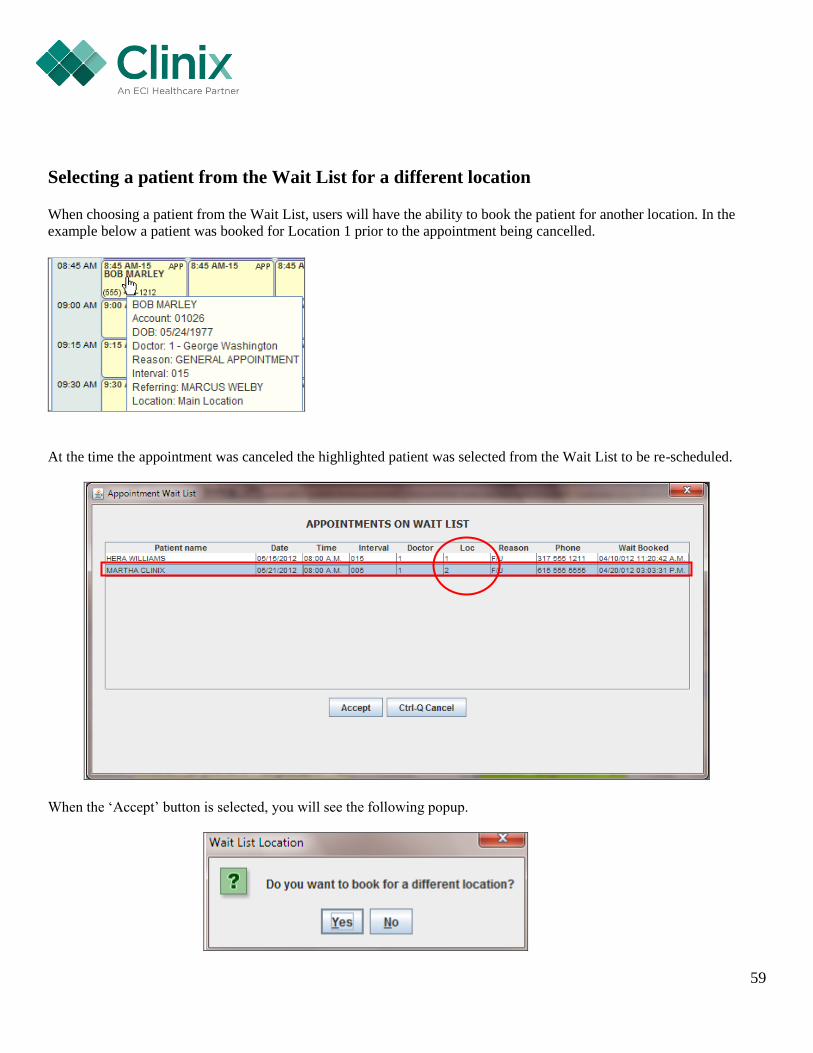
Selecting a patient from the Wait List for a different location When choosing a patient from the Wait List, users will have the ability to book the patient for another location. In the
example below a patient was booked for Location 1 prior to the appointment being cancelled.
At the time the appointment was canceled the highlighted patient was selected from the Wait List to be re-scheduled.
When the ‘Accept’ button is selected, you will see the following popup.
60
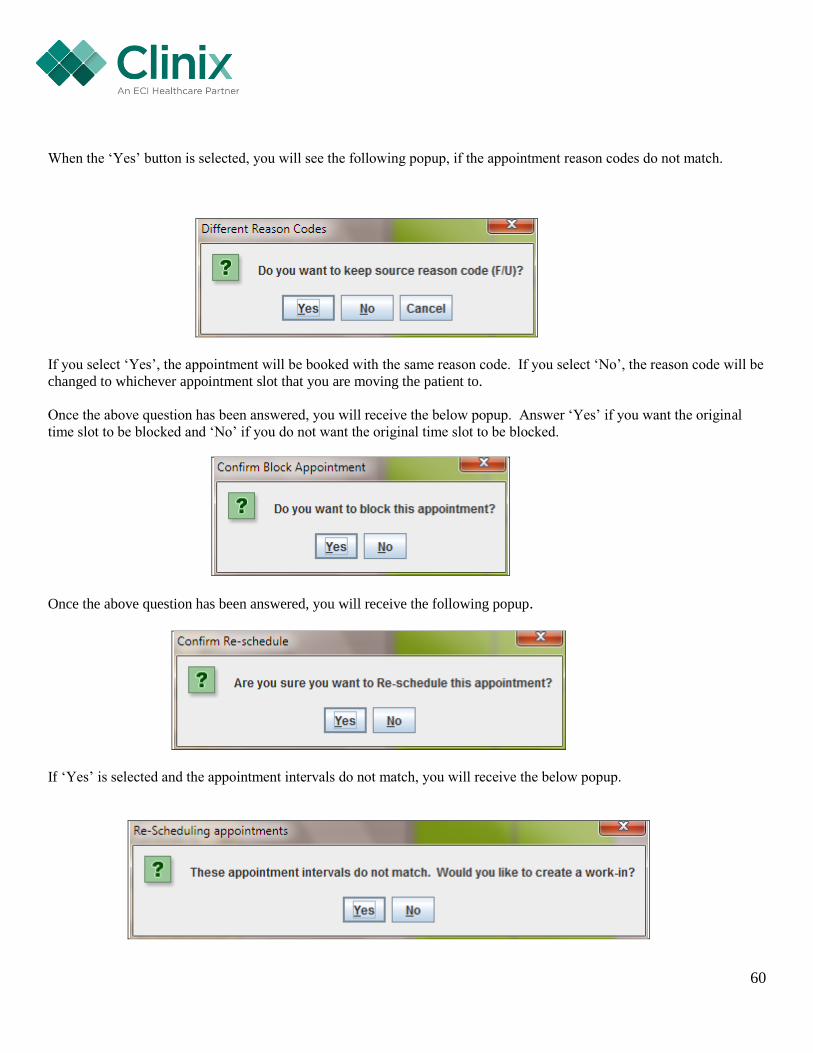
When the ‘Yes’ button is selected, you will see the following popup, if the appointment reason codes do not match.
If you select ‘Yes’, the appointment will be booked with the same reason code. If you select ‘No’, the reason code will be
changed to whichever appointment slot that you are moving the patient to.
Once the above question has been answered, you will receive the below popup. Answer ‘Yes’ if you want the original
time slot to be blocked and ‘No’ if you do not want the original time slot to be blocked.
Once the above question has been answered, you will receive the following popup.
If ‘Yes’ is selected and the appointment intervals do not match, you will receive the below popup.

61
If ‘Yes’ is selected, the appointment will be rescheduled as a Work-in.
Restricted Time Slot If the scheduling templates are setup with restricted appointment slots, the only patients that will appear on the Wait List
will be the ones that are booked for the same restriction.

62
Adding or removing a patient from the Wait List by using the Update feature You can add or remove a patient from the Wait List by right clicking on the appointment and choosing the Update feature.
This will open the below popup.
The system will automatically remove the patient from the Wait List once their scheduled appointment is no longer in the
future.
63
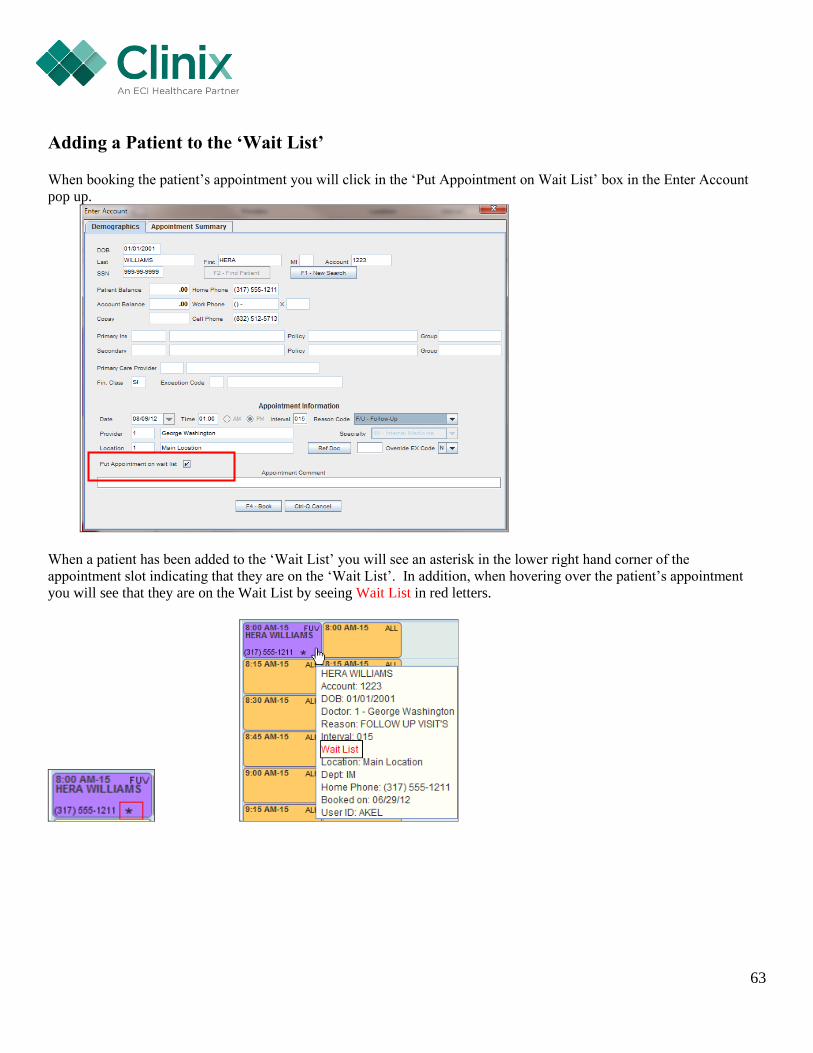
Adding a Patient to the ‘Wait List’ When booking the patient’s appointment you will click in the ‘Put Appointment on Wait List’ box in the Enter Account
pop up.
When a patient has been added to the ‘Wait List’ you will see an asterisk in the lower right hand corner of the
appointment slot indicating that they are on the ‘Wait List’. In addition, when hovering over the patient’s appointment
you will see that they are on the Wait List by seeing Wait List in red letters.

64
Exercises
1. Jan for a FUV around 9:00 today.
2. Bill for a FUV at 4:30 in the afternoon today, with Dr Welby as the referring doctor.
3. Dale for a TRD at 1:30 for today (search by using the Time parameter).
4. Jerry for a CON for tomorrow at 3:30 for 30 minutes and add him to the Wait List.
5. Work in Ann for a FUV today at the same time as Dale.
6. Darby for a 15 minute FUV for your doctor for today and a 60 minute CON for Doctor 13 for the same day.
(Search by using Provider parameters)
7. Jan called to reschedule for later in the morning. Please drag and drop her appointment to the afternoon.
8. Work in Dan for a FUV today at the same time as Bill.
9. Cancel Bill’s appointment. Use the Wait List to fill this slot
10. Sherry needs a FUV for today and her precertification has expired. Schedule her for 2:30 and add a precert.
11. Jerry will need an ALL (Allergy) in two months.
12. Your doctor will be at an AMA seminar the first Thursday of next month from 3-5pm, you will needto block his
schedule.
13. Resize the length of Jerry’s CON from 30 minutes to 60 minutes.
14. Sonny is a new patient who needs to be seen today. He has United Health HMO out of Utica, NY, Policy
#55544334301. His referring Doctor is Marcus Welby. His precert is #123342322 effective the first of this
month and expires in 3 months allowing for 6 visits.
15. Cher is a new patient who needs a NPV today. She is covered by Medicare of Nashville Policy #123456789A.
16. By using the cut and paste method move Jan’s appointment to another time slot.
17. Schedule Dan for a FUV in 3 weeks with Dr George Washington at 3:00 PM.
65
18. Perform a search for the following Doctors schedule for today; (1) George Washington, (2) John Adams SR, (3)
Thomas Jefferson, (4) James Madison. Schedule Jerry for an ALL for Dr James Madison at 2:00. Add a
comment that patient needs to pay his $30.00 copay.
19. Jan is booked as a FUV and she actually is coming in for an Allergy Shot, change her appointment reason code.
20. Jerry called and could not remember the date of his next appointment for his Allergy shot. What date is his next
appointment? Which doctor is his appointment with? (use Patient Search button)
21. Dan needs a return appointment for any day next month. By using the Month tab schedule Dan for a FUV at
1:00 PM.
22. Schedule Jerry for a FUV in 10 days.
23. Your Doctor needs to leave early and he has asked you to block his last appointment slot for the day. Block his
schedule as per his request.
66
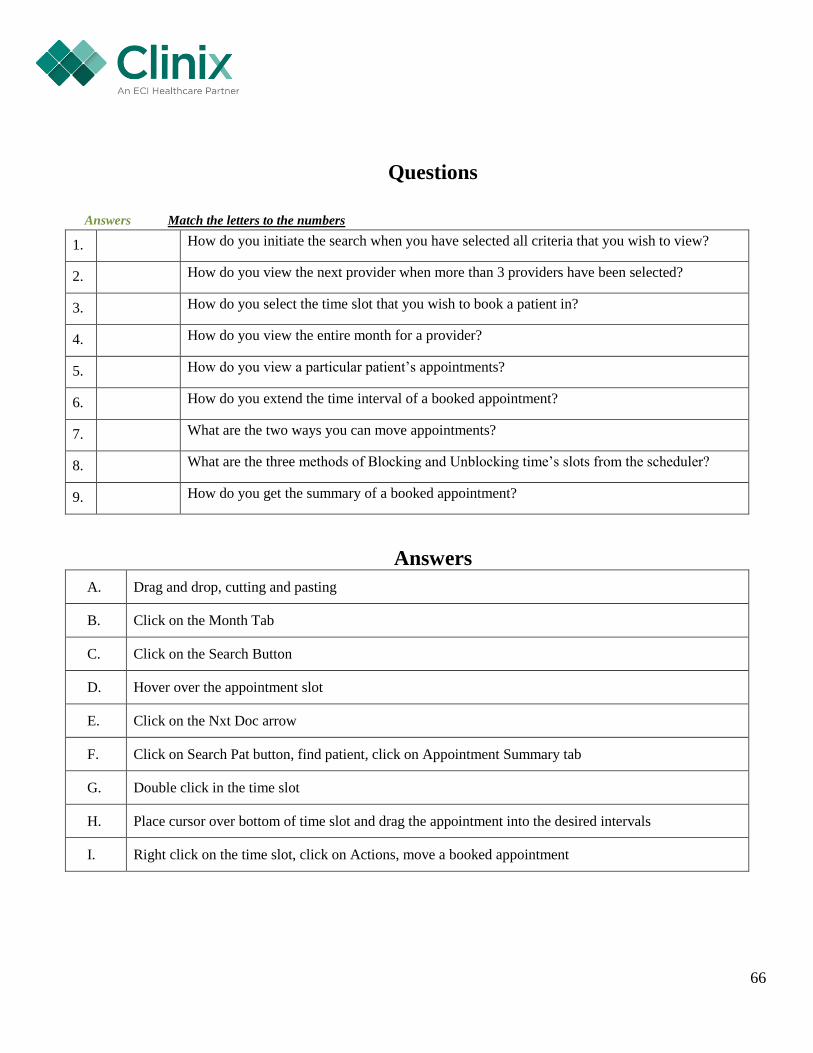
Questions
Answers Match the letters to the numbers
1. How do you initiate the search when you have selected all criteria that you wish to view?
2. How do you view the next provider when more than 3 providers have been selected?
3. How do you select the time slot that you wish to book a patient in?
4. How do you view the entire month for a provider?
5. How do you view a particular patient’s appointments?
6. How do you extend the time interval of a booked appointment?
7. What are the two ways you can move appointments?
8. What are the three methods of Blocking and Unblocking time’s slots from the scheduler?
9. How do you get the summary of a booked appointment?
Answers
A. Drag and drop, cutting and pasting
B. Click on the Month Tab
C. Click on the Search Button
D. Hover over the appointment slot
E. Click on the Nxt Doc arrow
F. Click on Search Pat button, find patient, click on Appointment Summary tab
G. Double click in the time slot
H. Place cursor over bottom of time slot and drag the appointment into the desired intervals
I. Right click on the time slot, click on Actions, move a booked appointment

67
ClinixPM Training Signoff
Name__________________________________
Date Training Completed__________________
Module 3 Appointment Scheduling
Check
Mark
Subject User’s Initials
Appointment Booking Screen
Search Parameters Overview
Setting and Clearing Defaults
Appointment Scheduler Overview
Booking an Appointment
Booking a New Patient Appointment
When an Account as an Exception Code that Requires Override
When and Account Requires Authorization
Extending the Time Intervals of an Appointment
Moving Appointments
Canceling an Appointment
Updating Comment, Referring Doctor, or Reason Code
Creating a Work-In Appointment
Blocking and Unblocking Time Slots
Searching for a Patient without Booking an Appointment
Hovering over Appointment Slots
Wait List Feature
Related Documents