MD; Reviewed: SPOC 07/01/2010 Solution & Interoperability Test Lab Application Notes ©2010 Avaya Inc. All Rights Reserved. 1 of 59 ACM2K-SM-CSE60 Avaya Solution & Interoperability Test Lab Application Notes for Interoperability Testing of AudioCodes Mediant 2000 Gateway to Provide Connectivity between the Public Switched Telephone Network (PSTN), Avaya Aura TM Session Manager and Avaya Aura TM Conferencing Standard Edition – Issue 1.0 Abstract These Application Notes describe the configuration steps required to integrate AudioCodes Mediant 2000 Gateway to provide connectivity between the Public Switch Telephone Network, Avaya Aura TM Session Manager and Aura TM Aura Conferencing Standard Edition. This configuration provides a rich set of conferencing options available on the Avaya Aura TM Conferencing Standard Edition to participants associated with the Public Switched Telephone Network.

Welcome message from author
This document is posted to help you gain knowledge. Please leave a comment to let me know what you think about it! Share it to your friends and learn new things together.
Transcript

MD; Reviewed: SPOC 07/01/2010
Solution & Interoperability Test Lab Application Notes ©2010 Avaya Inc. All Rights Reserved.
1 of 59 ACM2K-SM-CSE60
Avaya Solution & Interoperability Test Lab
Application Notes for Interoperability Testing of AudioCodes Mediant 2000 Gateway to Provide Connectivity between the Public Switched Telephone Network (PSTN), Avaya AuraTM Session Manager and Avaya AuraTM Conferencing Standard Edition – Issue 1.0
Abstract
These Application Notes describe the configuration steps required to integrate AudioCodes Mediant 2000 Gateway to provide connectivity between the Public Switch Telephone Network, Avaya AuraTM Session Manager and AuraTM Aura Conferencing Standard Edition. This configuration provides a rich set of conferencing options available on the Avaya AuraTM Conferencing Standard Edition to participants associated with the Public Switched Telephone Network.

MD; Reviewed: SPOC 07/01/2010
Solution & Interoperability Test Lab Application Notes ©2010 Avaya Inc. All Rights Reserved.
2 of 59 ACM2K-SM-CSE60
1. Introduction These Application Notes present a sample configuration for a network that uses Avaya AuraTM Session Manager to connect Avaya AuraTM Conferencing Standard Edition and AudioCodes Mediant 2000 Gateway using SIP trunks. SIP trunks connect Avaya AuraTM Conferencing Standard Edition and AudioCodes Mediant 2000 Gateway to Avaya AuraTM Session Manager, using its SM-100 (Security Module) network interface. All inter-system calls are carried over these SIP trunks. Avaya Aura™ Session Manager is managed by Avaya Aura™ System Manager via the management network interface. The AudioCodes Mediant 2000 Gateway serves as a gateway between TDM and IP networks. AudioCodes Mediant 2000 Gateway supports multiple hardware interfaces and control protocols. Capacity can be scaled upward by adding additional interface modules. During compliance testing, AudioCodes Mediant 2000 Gateway was configured as a SIP to line E1 gateway. Avaya Aura™ Conferencing Standard Edition is a fully integrated audio and data conferencing solution. Avaya AuraTM Conferencing Standard Edition consists of a number of components which provide booking engines, account management utilities, data sharing functionality, billing outputs, directory server integration capabilities, and audio management for all calls. In Avaya AuraTM Conferencing Standard Edition, the media server and the application server reside on a single server. Avaya AuraTM Conferencing Standard Edition is managed by either Avaya Aura™ Conferencing Manager or Avaya Aura™ System Manager, if one already exists. These Application Notes focus on TCP connectivity and alternative methods such as TLS is not covered in these Application Notes. These Application Notes do not describe how to install or license Avaya AuraTM Conferencing Standard Edition, installation and licensing details can be found in reference [1]. Ensure the Avaya AuraTM Conferencing Standard Edition has the latest released patches installed, details can be found in reference [4]. Using Avaya Aura™ Conferencing Manager or Avaya Aura™ System Manager the IP addresses of the Conferencing virtual machines need to be specified and connections between the virtual machines need to be established, details can be found in Chapter 3 of reference [1]. These Application Notes do not describe how to schedule a conference by Client Registration Server Front End, installation details can be found in reference [2].
MD; Reviewed: SPOC 07/01/2010
Solution & Interoperability Test Lab Application Notes ©2010 Avaya Inc. All Rights Reserved.
3 of 59 ACM2K-SM-CSE60
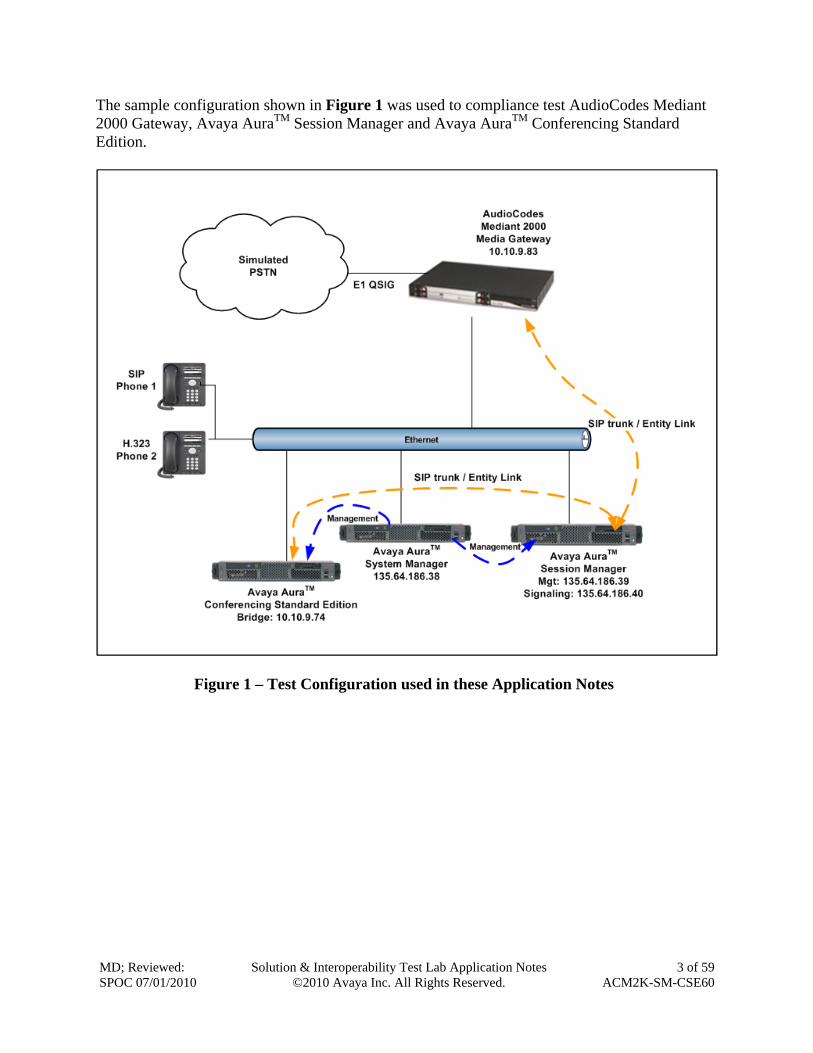
The sample configuration shown in Figure 1 was used to compliance test AudioCodes Mediant 2000 Gateway, Avaya AuraTM Session Manager and Avaya AuraTM Conferencing Standard Edition.
Figure 1 – Test Configuration used in these Application Notes
MD; Reviewed: SPOC 07/01/2010
Solution & Interoperability Test Lab Application Notes ©2010 Avaya Inc. All Rights Reserved.
4 of 59 ACM2K-SM-CSE60
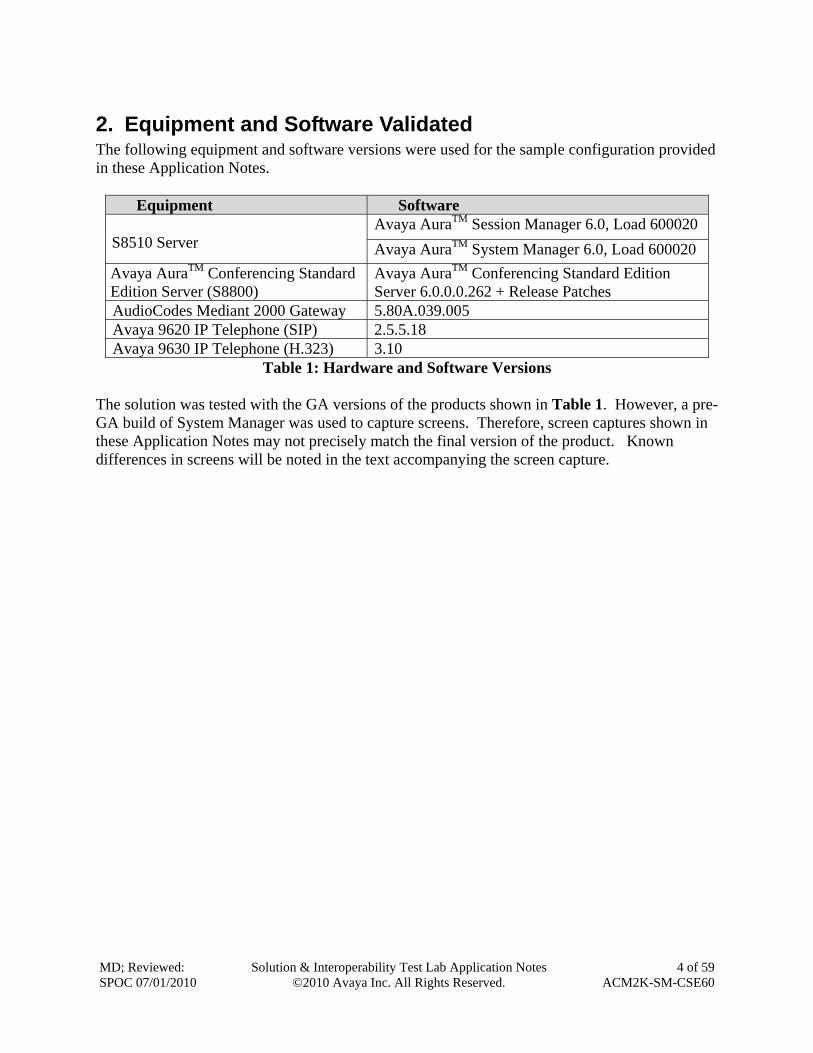
2. Equipment and Software Validated The following equipment and software versions were used for the sample configuration provided in these Application Notes.
Equipment Software S8510 Server
Avaya AuraTM Session Manager 6.0, Load 600020
Avaya AuraTM System Manager 6.0, Load 600020
Avaya AuraTM Conferencing Standard Edition Server (S8800)
Avaya AuraTM Conferencing Standard Edition Server 6.0.0.0.262 + Release Patches
AudioCodes Mediant 2000 Gateway 5.80A.039.005 Avaya 9620 IP Telephone (SIP) 2.5.5.18 Avaya 9630 IP Telephone (H.323) 3.10
Table 1: Hardware and Software Versions The solution was tested with the GA versions of the products shown in Table 1. However, a pre-GA build of System Manager was used to capture screens. Therefore, screen captures shown in these Application Notes may not precisely match the final version of the product. Known differences in screens will be noted in the text accompanying the screen capture.

MD; Reviewed: SPOC 07/01/2010
Solution & Interoperability Test Lab Application Notes ©2010 Avaya Inc. All Rights Reserved.
5 of 59 ACM2K-SM-CSE60
3. Configure Avaya AuraTM Conferencing Standard Edition This section describes the procedure for configuring the Conferencing Standard Edition to interoperate with Session Manager via SIP trunking. The procedures include the following areas:
Log in to Avaya AuraTM System Manager Configure SIP Connectivity Configure Dialout Map DNIS Entries
3.1. Log in to Avaya AuraTM System Manager Access the System Manager using a Web Browser and entering https://<ip-address>/smgr, where <ip-address> is the IP address of System Manager. Log in using appropriate credentials and accept the subsequent Copyright Legal Notice.

MD; Reviewed: SPOC 07/01/2010
Solution & Interoperability Test Lab Application Notes ©2010 Avaya Inc. All Rights Reserved.
6 of 59 ACM2K-SM-CSE60
3.2. Configuring SIP Connectivity Configure settings that enable SIP connectivity between the Conferencing bridge and other devices by configuring the SIP System Settings by selecting Elements Conferencing Media on the left panel menu. From the right panel menu select the media server to configure by selecting the tick box and select Configure.
From the right panel menu select Configuration.
From the right panel menu select SIP.
MD; Reviewed: SPOC 07/01/2010
Solution & Interoperability Test Lab Application Notes ©2010 Avaya Inc. All Rights Reserved.
7 of 59 ACM2K-SM-CSE60
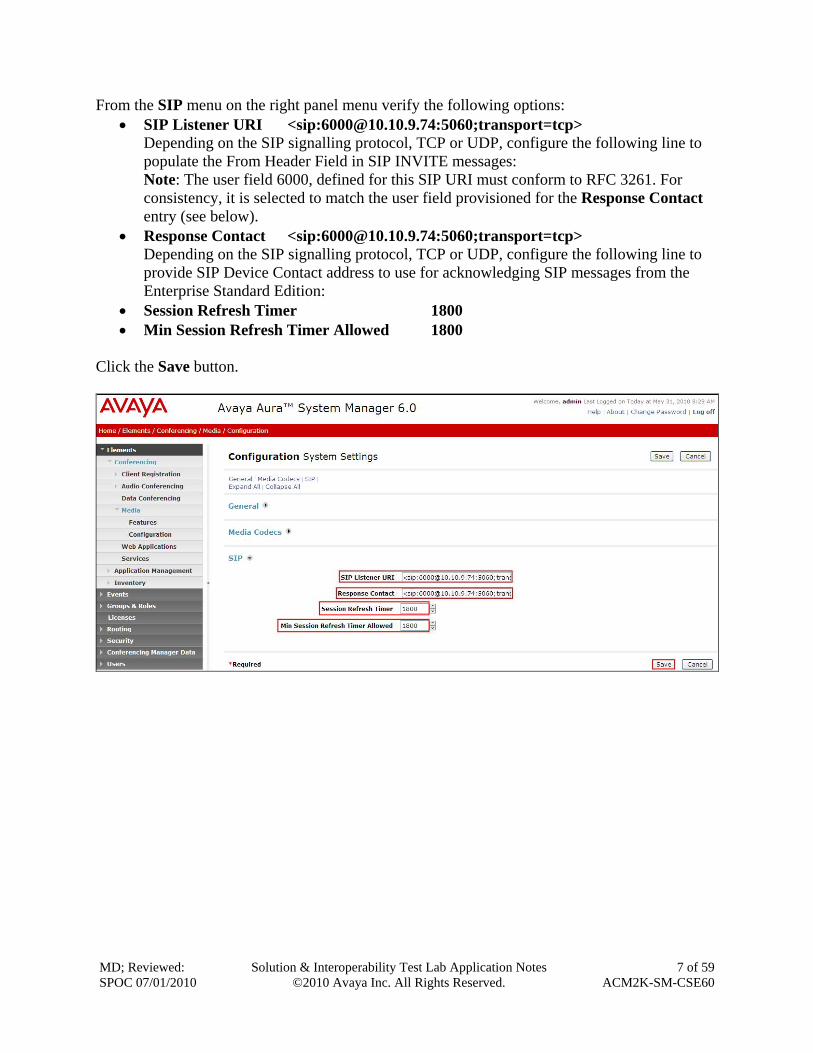
From the SIP menu on the right panel menu verify the following options: SIP Listener URI <sip:[email protected]:5060;transport=tcp>
Depending on the SIP signalling protocol, TCP or UDP, configure the following line to populate the From Header Field in SIP INVITE messages: Note: The user field 6000, defined for this SIP URI must conform to RFC 3261. For consistency, it is selected to match the user field provisioned for the Response Contact entry (see below).
Response Contact <sip:[email protected]:5060;transport=tcp> Depending on the SIP signalling protocol, TCP or UDP, configure the following line to provide SIP Device Contact address to use for acknowledging SIP messages from the Enterprise Standard Edition:
Session Refresh Timer 1800 Min Session Refresh Timer Allowed 1800
Click the Save button.
MD; Reviewed: SPOC 07/01/2010
Solution & Interoperability Test Lab Application Notes ©2010 Avaya Inc. All Rights Reserved.
8 of 59 ACM2K-SM-CSE60
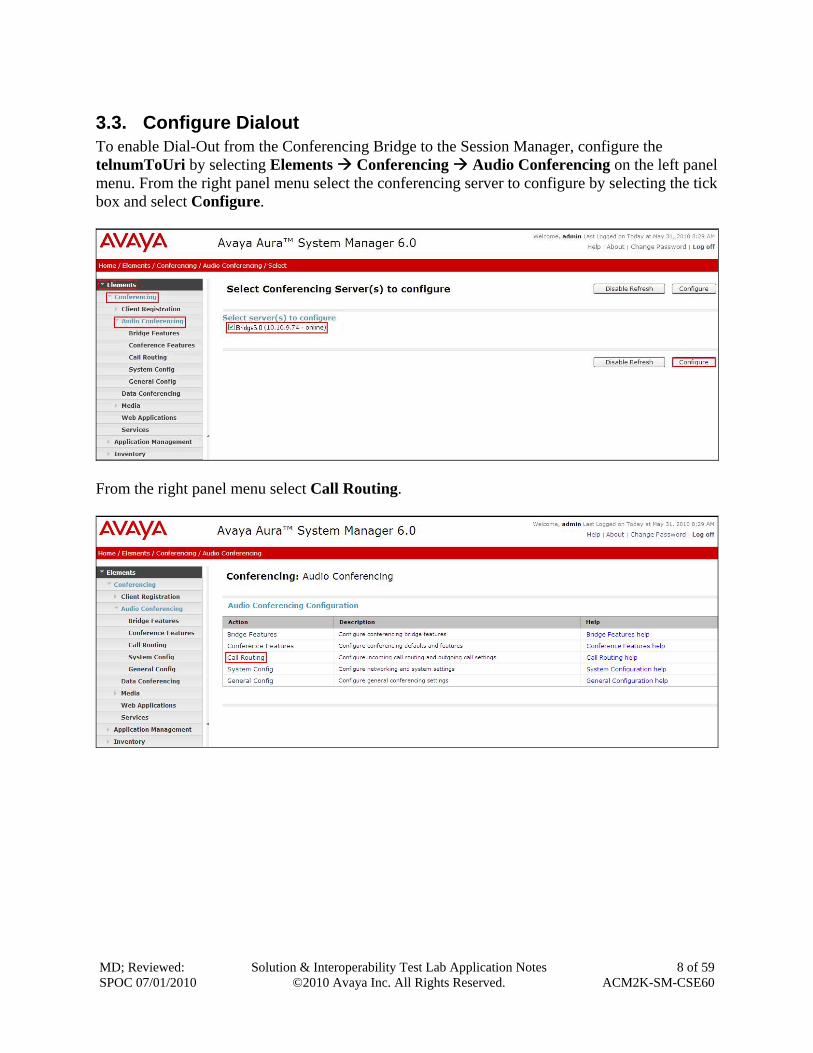
3.3. Configure Dialout To enable Dial-Out from the Conferencing Bridge to the Session Manager, configure the telnumToUri by selecting Elements Conferencing Audio Conferencing on the left panel menu. From the right panel menu select the conferencing server to configure by selecting the tick box and select Configure.
From the right panel menu select Call Routing.

MD; Reviewed: SPOC 07/01/2010
Solution & Interoperability Test Lab Application Notes ©2010 Avaya Inc. All Rights Reserved.
9 of 59 ACM2K-SM-CSE60
From the Call Routing menu on the right panel menu select the Edit button for Telnum to URI option.
From the right panel menu select the default Telnum to URI mappings and select Edit.

MD; Reviewed: SPOC 07/01/2010
Solution & Interoperability Test Lab Application Notes ©2010 Avaya Inc. All Rights Reserved.
10 of 59 ACM2K-SM-CSE60
From the right panel menu complete the following options; under Audio Conferencing: Telnum to URI Mapping.
Telnum * URI sip:[email protected]:5060;transport=tcp
To route outbound calls from the Conferencing to the Software Asset Card.
Comment A descriptive comment
Click the Save button.
From the right panel menu select Done.

MD; Reviewed: SPOC 07/01/2010
Solution & Interoperability Test Lab Application Notes ©2010 Avaya Inc. All Rights Reserved.
11 of 59 ACM2K-SM-CSE60
From the right panel menu select Save.
From the right panel menu select Apply Changes.

MD; Reviewed: SPOC 07/01/2010
Solution & Interoperability Test Lab Application Notes ©2010 Avaya Inc. All Rights Reserved.
12 of 59 ACM2K-SM-CSE60
To enable Dial-Out from the Conferencing Bridge to the Session Manager, configure the Originator Dial Out by selecting Elements Conferencing Audio Conferencing on the left panel menu. From the right panel menu select the conferencing server to configure by selecting the tick box and select Configure.
From the right panel menu select Conference Features.

MD; Reviewed: SPOC 07/01/2010
Solution & Interoperability Test Lab Application Notes ©2010 Avaya Inc. All Rights Reserved.
13 of 59 ACM2K-SM-CSE60
From the right panel menu select Conference Settings.
From the Conference Settings drop down menu on the right panel menu select the following parameter, leaving the remaining parameters at their default values.
Originator Dial Out Select All Click the Save button.

MD; Reviewed: SPOC 07/01/2010
Solution & Interoperability Test Lab Application Notes ©2010 Avaya Inc. All Rights Reserved.
14 of 59 ACM2K-SM-CSE60
From the right panel menu select Apply Changes.
MD; Reviewed: SPOC 07/01/2010
Solution & Interoperability Test Lab Application Notes ©2010 Avaya Inc. All Rights Reserved.
15 of 59 ACM2K-SM-CSE60
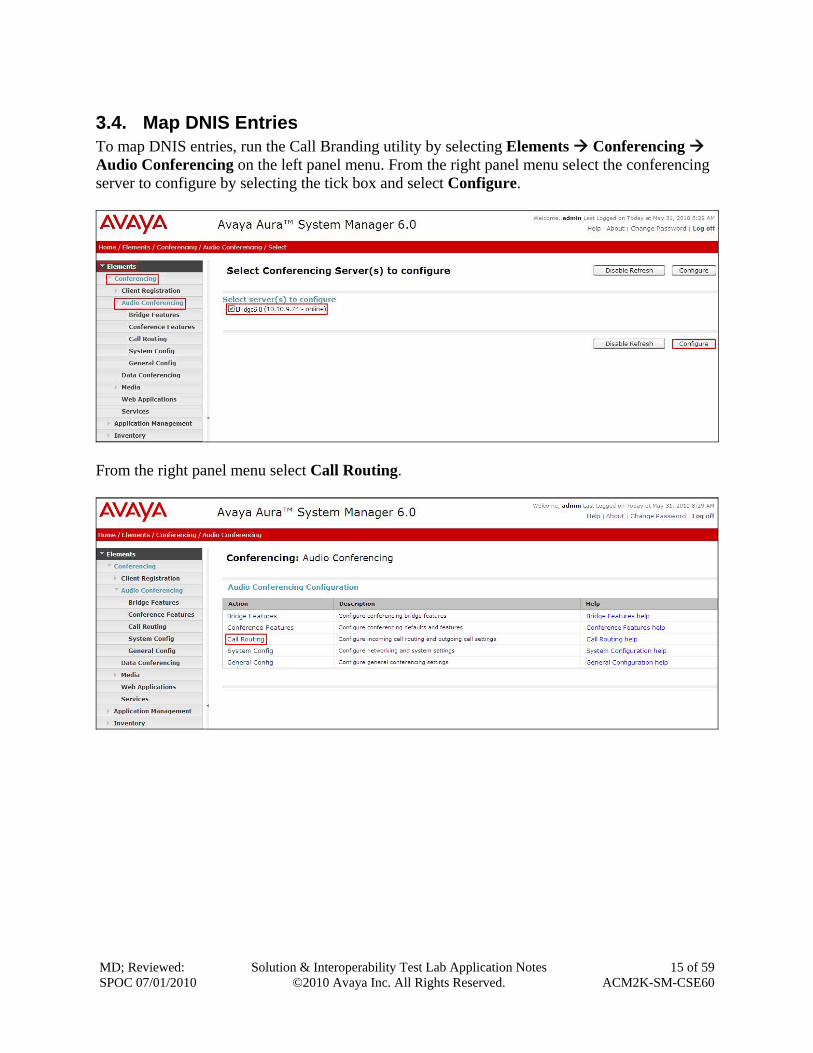
3.4. Map DNIS Entries To map DNIS entries, run the Call Branding utility by selecting Elements Conferencing Audio Conferencing on the left panel menu. From the right panel menu select the conferencing server to configure by selecting the tick box and select Configure.
From the right panel menu select Call Routing.
MD; Reviewed: SPOC 07/01/2010
Solution & Interoperability Test Lab Application Notes ©2010 Avaya Inc. All Rights Reserved.
16 of 59 ACM2K-SM-CSE60
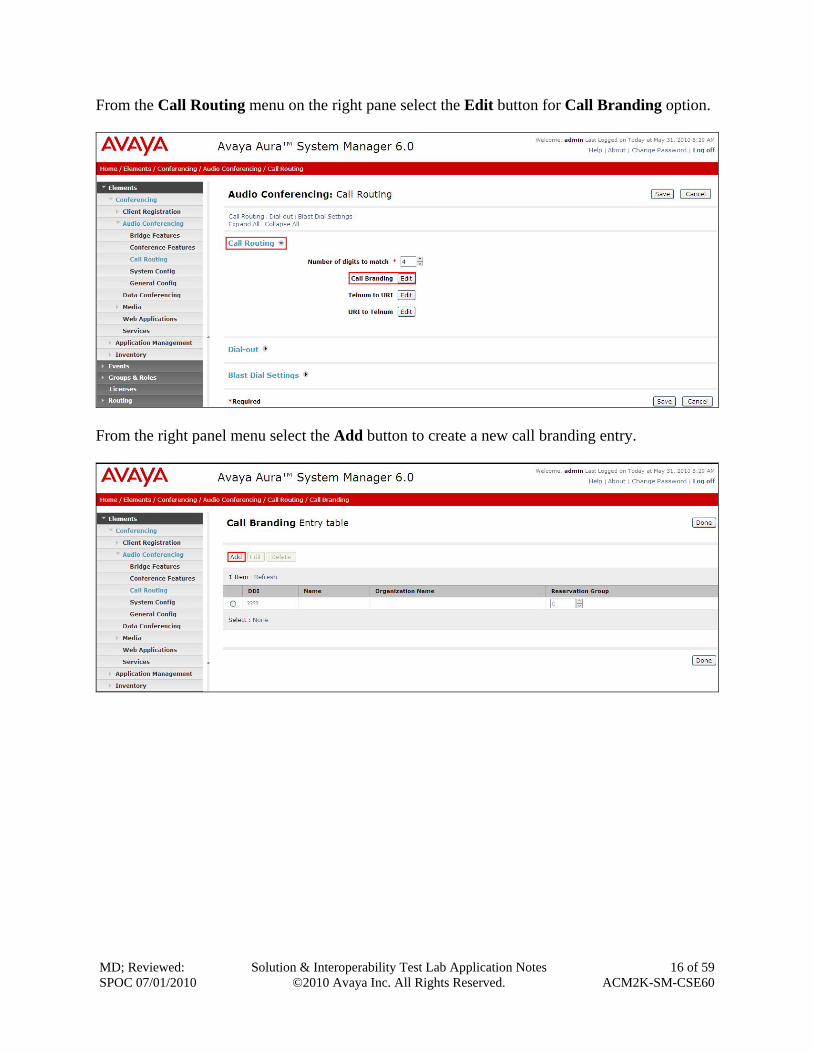
From the Call Routing menu on the right pane select the Edit button for Call Branding option.
From the right panel menu select the Add button to create a new call branding entry.

MD; Reviewed: SPOC 07/01/2010
Solution & Interoperability Test Lab Application Notes ©2010 Avaya Inc. All Rights Reserved.
17 of 59 ACM2K-SM-CSE60
In this sample configuration for Call Branding Details select the following parameters, leaving the remaining parameters at their default values. Under Call Branding Details
DDI 7111 Name A descriptive name Organisation Name A descriptive name On Entry Select Scan call flow from the drop down menu.
Click the Save button.
From the right panel menu select Done.

MD; Reviewed: SPOC 07/01/2010
Solution & Interoperability Test Lab Application Notes ©2010 Avaya Inc. All Rights Reserved.
18 of 59 ACM2K-SM-CSE60
From the right panel menu select Save.
From the right panel menu select Apply Changes.

MD; Reviewed: SPOC 07/01/2010
Solution & Interoperability Test Lab Application Notes ©2010 Avaya Inc. All Rights Reserved.
19 of 59 ACM2K-SM-CSE60
4. Configure Avaya Aura™ Session Manager This section provides the procedures for configuring Session Manager. Session Manager is configured via the System Manager. The procedures include the following areas:
Log in to Avaya AuraTM System Manager Administer SIP domain Administer SIP Entities Administer Entity Links Administer Time Ranges Administer Routing Policies Administer Dial Patterns Administer Session Manager
4.1. Log in to Avaya AuraTM System Manager Access Avaya Aura™ System Manager using a Web Browser and enter https://<ip-address>/SMGR, where <ip-address> is the IP address of System Manager. Log in using appropriate credentials and accept the subsequent Copyright Legal Notice.
MD; Reviewed: SPOC 07/01/2010
Solution & Interoperability Test Lab Application Notes ©2010 Avaya Inc. All Rights Reserved.
20 of 59 ACM2K-SM-CSE60
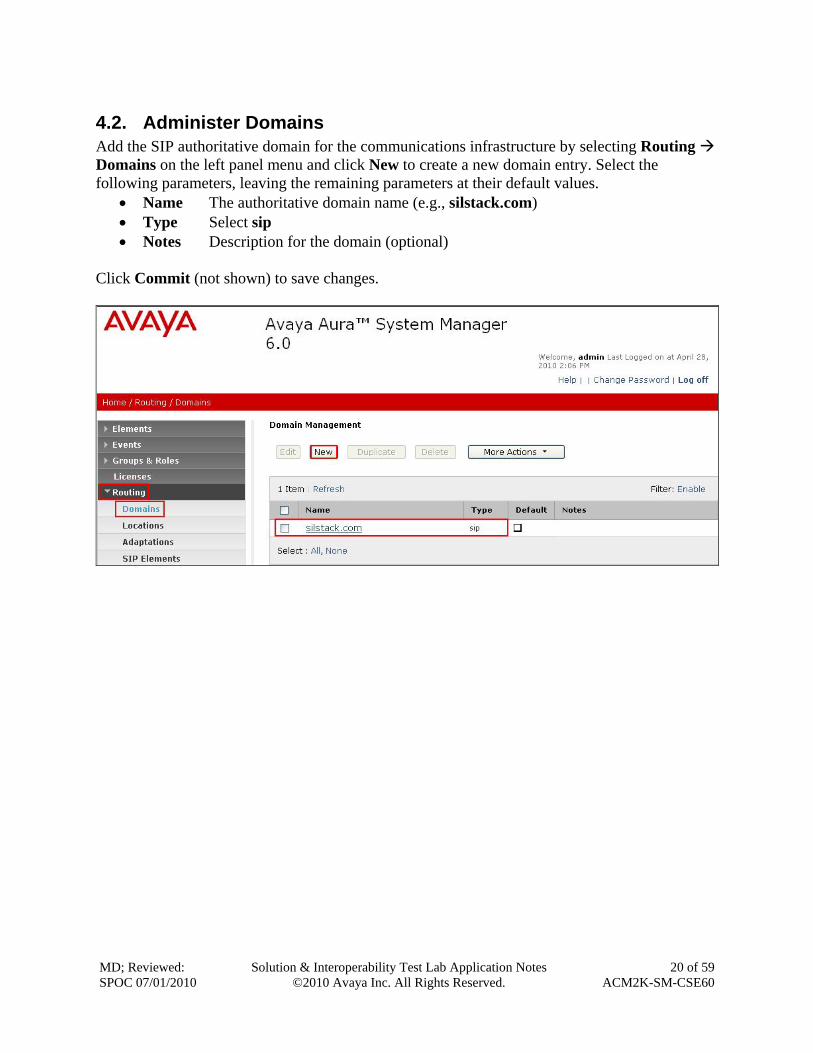
4.2. Administer Domains Add the SIP authoritative domain for the communications infrastructure by selecting Routing Domains on the left panel menu and click New to create a new domain entry. Select the following parameters, leaving the remaining parameters at their default values.
Name The authoritative domain name (e.g., silstack.com) Type Select sip Notes Description for the domain (optional)
Click Commit (not shown) to save changes.
MD; Reviewed: SPOC 07/01/2010
Solution & Interoperability Test Lab Application Notes ©2010 Avaya Inc. All Rights Reserved.
21 of 59 ACM2K-SM-CSE60
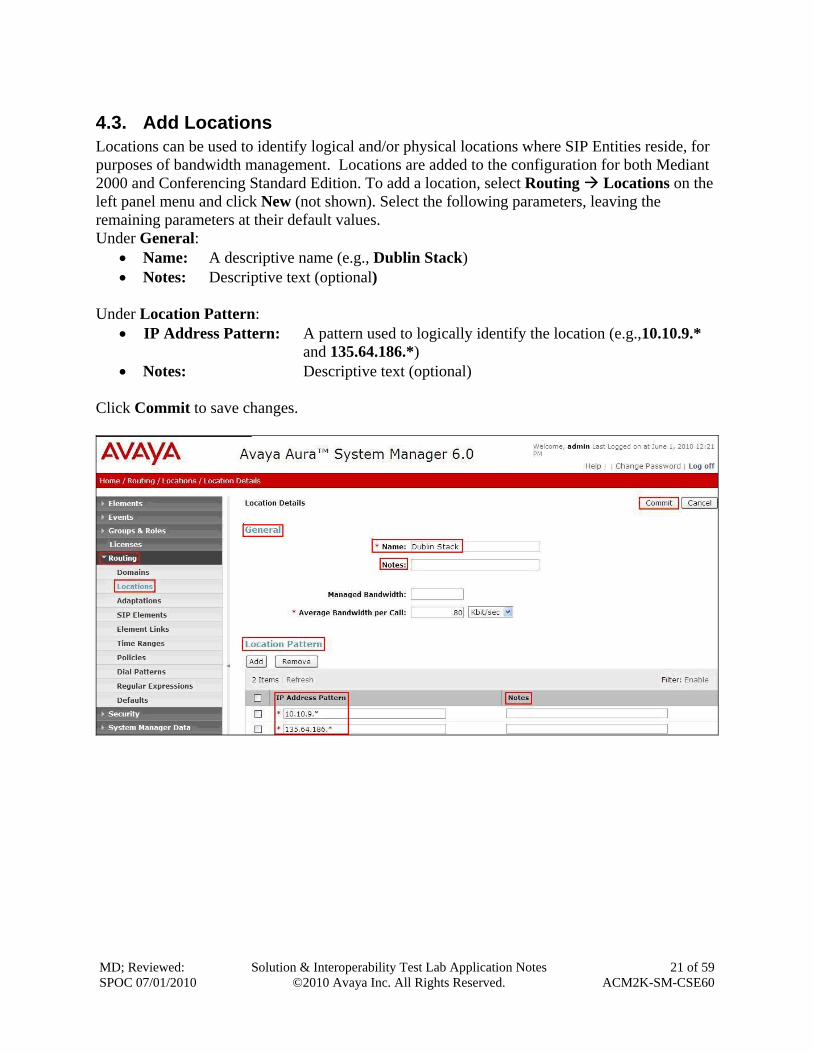
4.3. Add Locations Locations can be used to identify logical and/or physical locations where SIP Entities reside, for purposes of bandwidth management. Locations are added to the configuration for both Mediant 2000 and Conferencing Standard Edition. To add a location, select Routing Locations on the left panel menu and click New (not shown). Select the following parameters, leaving the remaining parameters at their default values. Under General:
Name: A descriptive name (e.g., Dublin Stack) Notes: Descriptive text (optional)
Under Location Pattern:
IP Address Pattern: A pattern used to logically identify the location (e.g.,10.10.9.* and 135.64.186.*)
Notes: Descriptive text (optional) Click Commit to save changes.

MD; Reviewed: SPOC 07/01/2010
Solution & Interoperability Test Lab Application Notes ©2010 Avaya Inc. All Rights Reserved.
22 of 59 ACM2K-SM-CSE60
4.4. Add SIP Elements Note that the “SIP Elements” menu option shown in the screen below was changed to “SIP Entities” in the GA release. For the purposes of these Application Notes, the terms “Element” and “Entity” are interchangeable. SIP Elements must be added for Session Manager and for each SIP-based telephony system supported by it using SIP trunks. In the sample configuration, a SIP Element is added for Session Manager and Mediant 2000. To add a SIP Element, select Routing SIP Elements on the left panel menu and click New (not shown). Select the following parameters, leaving the remaining parameters at their default values. Under General:
Name: A descriptive name. FQDN or IP Address: IP address of the Session Manager or the signaling interface on
the telephony system. Type: Select between SessionManager for Session Manager,
Gateway for Mediant 2000 and SIP Trunk for Conferencing Location: Select one of the locations defined previously. Time Zone: Time zone for this location.
The following screen shows addition of Session Manager. The IP address used is that of the Software Asset Card. Click Commit to save changes.

MD; Reviewed: SPOC 07/01/2010
Solution & Interoperability Test Lab Application Notes ©2010 Avaya Inc. All Rights Reserved.
23 of 59 ACM2K-SM-CSE60
Under Port, click Add, select the following parameters, leaving the remaining parameters at their default values. Note that the adding of ports only applies when the SIP Element is a Session Manager.
Port Port number on which the system listens for SIP requests. Protocol Transport protocol to be used to send SIP requests. Default Domain The domain used for the enterprise (e.g., silstack.com).
Click Commit (not shown) to save changes.
The following screen shows addition of Mediant 2000. Select the following parameters, leaving the remaining parameters at their default values. Under General:
Name: A descriptive name FQDN or IP Address: IP address of the Mediant 2000 Type: Select Gateway for Mediant 2000 Location: Select one of the locations defined previously
Click Commit to save changes.
MD; Reviewed: SPOC 07/01/2010
Solution & Interoperability Test Lab Application Notes ©2010 Avaya Inc. All Rights Reserved.
24 of 59 ACM2K-SM-CSE60
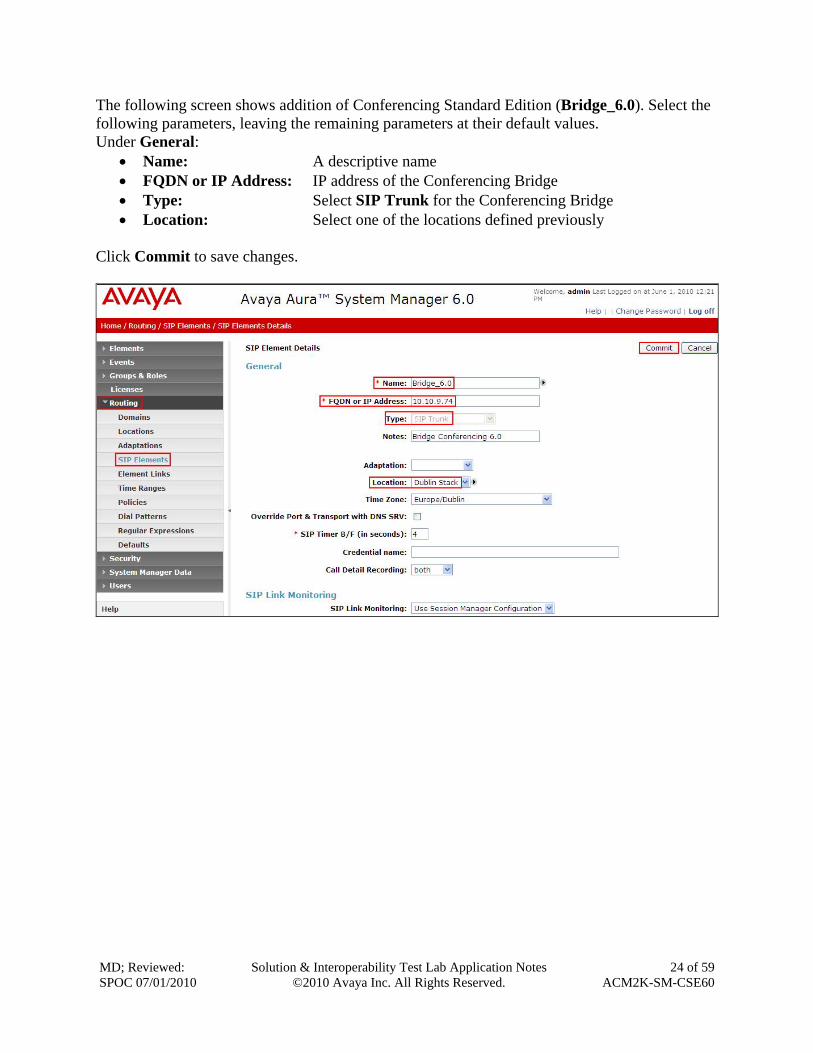
The following screen shows addition of Conferencing Standard Edition (Bridge_6.0). Select the following parameters, leaving the remaining parameters at their default values. Under General:
Name: A descriptive name FQDN or IP Address: IP address of the Conferencing Bridge Type: Select SIP Trunk for the Conferencing Bridge Location: Select one of the locations defined previously
Click Commit to save changes.

MD; Reviewed: SPOC 07/01/2010
Solution & Interoperability Test Lab Application Notes ©2010 Avaya Inc. All Rights Reserved.
25 of 59 ACM2K-SM-CSE60
4.5. Add Element Links Note that the “Element Links” menu option shown in the screen below was changed to “Entity Links” in the GA release. For the purposes of these Application Notes, the terms “Element” and “Entity” are interchangeable. A SIP trunk between a Session Manager and a telephony system is described by an Element Link. To add an Element Link, select Routing Element Links on the left panel menu and click New. Select the following parameters in the rows that are displayed:
Name An informative name SIP Element 1 Select SessionManager Protocol Transport protocol to be used to send SIP requests Port Port number to which the other system sends its SIP requests SIP Element 2 The other SIP Element for this link, created in Section 4.4 Port Port number to which the other system expects to receive SIP requests Trusted Whether to trust the other system
Click Commit to save changes. The following screen shows the Element Links used in the sample network.

MD; Reviewed: SPOC 07/01/2010
Solution & Interoperability Test Lab Application Notes ©2010 Avaya Inc. All Rights Reserved.
26 of 59 ACM2K-SM-CSE60
4.6. Administer Time Ranges Before adding routing policies (see next section), time ranges must be defined during which the policies will be active. In the sample configuration, one policy was defined that would allow routing to occur at any time. To add this time range, select Routing Time Ranges on the left panel menu, then click New. Select the following parameters, leaving the remaining parameters at their default values.
Name: A descriptive name (e.g. Always) Mo through Su Check the box under each of these headings Start Time Enter 00:00 End Time Enter 23:59
Click Commit to save this time range.

MD; Reviewed: SPOC 07/01/2010
Solution & Interoperability Test Lab Application Notes ©2010 Avaya Inc. All Rights Reserved.
27 of 59 ACM2K-SM-CSE60
4.7. Administer Routing Policies A routing policy must be created to direct how calls will be routed to a system. Note that the “Policies” menu option shown in the screen below was changed to “Routing Policies” in the GA release. To add a routing policy, select Routing Policies on the left panel menu and then click New (not shown). Select the following parameters, leaving the remaining parameters at their default values. Under General:
Name An informative name (e.g., Bridge 6.0) Note that the phrase “SIP Element as Destination” shown in the screen below was changed to “SIP Entity as Destination” in the GA release. For the purposes of these Application Notes, the terms “Element” and “Entity” are interchangeable. Under SIP Element as Destination, click Select, and then select the appropriate SIP Element to which this routing policy applies. Under Time of Day, click Add, and then select the time range configured in the previous step. The following screen shows the Routing Policy Details for Conferencing. Click Commit to save changes.

MD; Reviewed: SPOC 07/01/2010
Solution & Interoperability Test Lab Application Notes ©2010 Avaya Inc. All Rights Reserved.
28 of 59 ACM2K-SM-CSE60
Select the following parameters, leaving the remaining parameters at their default values. Under General:
Name An informative name (e.g., AudioCodesM2K) Under SIP Element as Destination, click Select, and then select the appropriate SIP Element to which this routing policy applies. Under Time of Day, click Add, and then select the time range configured in the previous step. The following screen shows the Routing Policy Details for Mediant 2000. Click Commit to save changes.

MD; Reviewed: SPOC 07/01/2010
Solution & Interoperability Test Lab Application Notes ©2010 Avaya Inc. All Rights Reserved.
29 of 59 ACM2K-SM-CSE60
4.8. Administer Dial Patterns A dial pattern must be defined that will direct calls to the appropriate telephony system. In the sample network, the 4-digit extension 7111 will be used as the number that resides on Conferencing. Select Routing Dial Patterns on the left panel menu and then click New (not shown). Select the following parameters, leaving the remaining parameters at their default values. Under General
Pattern Dialed number or prefix i.e. 7111 Min Minimum length of the dialed number i.e. 4 Max Maximum length of the dialed number i.e. 4 SIP Domain Select ALL Notes Comment on purpose of dial pattern
Navigate to Originating Locations and Routing Policies and select Add.

MD; Reviewed: SPOC 07/01/2010
Solution & Interoperability Test Lab Application Notes ©2010 Avaya Inc. All Rights Reserved.
30 of 59 ACM2K-SM-CSE60
Under Originating Location select all locations by checking the box next to ALL and under Routing Policies select the Routing Policy created in Section 4.7. Click Select to confirm the chosen options and return to the Dial Pattern screen (shown above). Click Commit to save changes shown in the previous screen.

MD; Reviewed: SPOC 07/01/2010
Solution & Interoperability Test Lab Application Notes ©2010 Avaya Inc. All Rights Reserved.
31 of 59 ACM2K-SM-CSE60
4.9. Administer Avaya AuraTM Session Manager To complete the configuration, adding the Session Manager will provide the linkage between System Manager and Session Manager. Select Elements Session Manager Session Manager Administration on the left panel menu. Then click Add (not shown) and fill in the following parameters, leaving the remaining parameters at their default values. Under General:
SIP Entity Name Select the name of the SIP Entity added for Session Manager Description Descriptive comment (optional) Management Access Point Host Name/IP
Enter the IP address of the Session Manager management interface Under Security Module:
SIP Entity IP Address IP Address of Software Asset card Network Mask Enter the network mask corresponding to the IP address of
Session Manager Default Gateway: Enter the IP address of the default gateway for Session
Manager Click Commit to add this Session Manager.

MD; Reviewed: SPOC 07/01/2010
Solution & Interoperability Test Lab Application Notes ©2010 Avaya Inc. All Rights Reserved.
32 of 59 ACM2K-SM-CSE60
4.10. Add Avaya AuraTM Communication Manager as a Feature Server In order for Communication Manager to provide configuration and Feature Server support to SIP phones when they register to Session Manager, Communication Manager must be added as an application.
4.10.1. Create an Application Entity Select Elements Inventory Manage Elements on the left panel menu. Click on New (not shown). Select the following parameters, leaving the remaining parameters at their default values.
Name A descriptive name i.e. FeatureServer Type Select CM Node Enter the IP address for CM SAT access
Navigate to the Attributes section and enter the following: Login Login used for SAT access Password Password used for SAT access Confirm Password Password used for SAT access
Click on Commit to save.

MD; Reviewed: SPOC 07/01/2010
Solution & Interoperability Test Lab Application Notes ©2010 Avaya Inc. All Rights Reserved.
33 of 59 ACM2K-SM-CSE60
4.10.2. Create a Feature Server Application Select Elements Session Manager Application Configuration Applications on the left panel menu. Click on New (not shown). Select the following parameters, leaving the remaining parameters at their default values.
Name A descriptive name SIP Entity Select the CM Application Entity defined in Section
4.10.1 CM System for SIP Entity Select the CM Application Entity defined in Section
4.10.1 Click on Commit to save.
MD; Reviewed: SPOC 07/01/2010
Solution & Interoperability Test Lab Application Notes ©2010 Avaya Inc. All Rights Reserved.
34 of 59 ACM2K-SM-CSE60
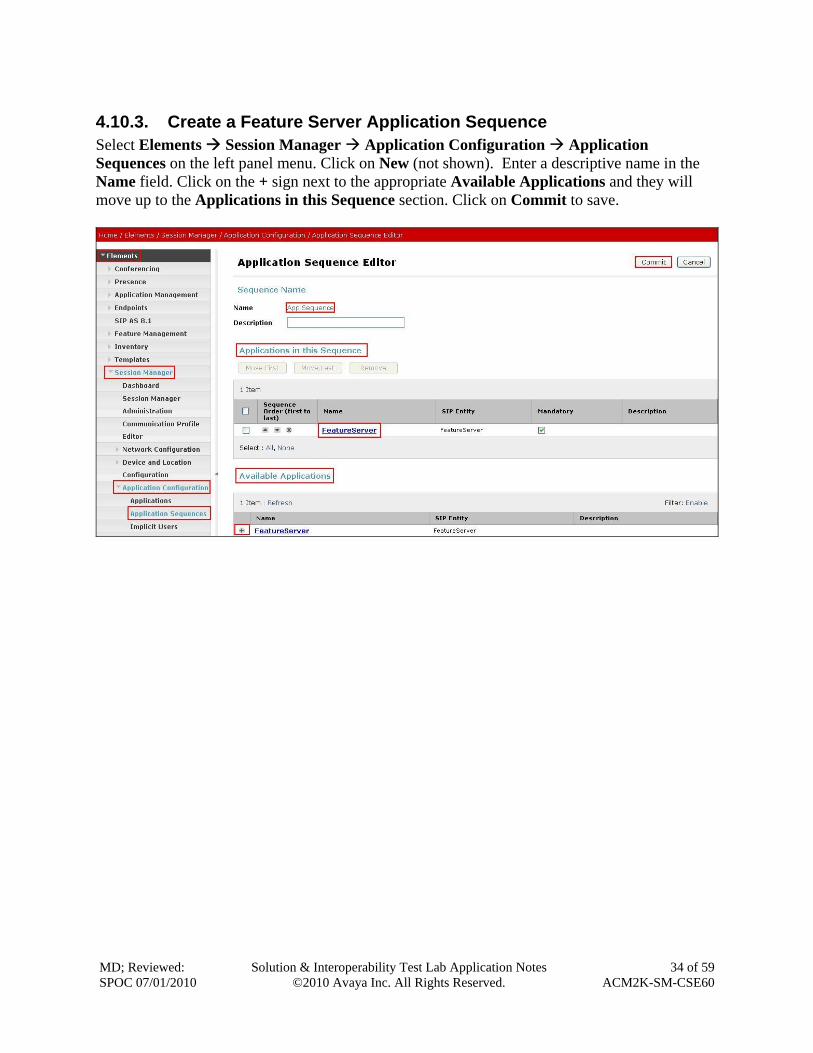
4.10.3. Create a Feature Server Application Sequence Select Elements Session Manager Application Configuration Application Sequences on the left panel menu. Click on New (not shown). Enter a descriptive name in the Name field. Click on the + sign next to the appropriate Available Applications and they will move up to the Applications in this Sequence section. Click on Commit to save.

MD; Reviewed: SPOC 07/01/2010
Solution & Interoperability Test Lab Application Notes ©2010 Avaya Inc. All Rights Reserved.
35 of 59 ACM2K-SM-CSE60
4.10.4. Synchronize Avaya AuraTM Communication Manager Data Select Elements Inventory Synchronization Communication System on the left panel menu. Select the appropriate Element Name from the list. Check the Initialize data for selected devices box. Then click on Now. This may take some time.

MD; Reviewed: SPOC 07/01/2010
Solution & Interoperability Test Lab Application Notes ©2010 Avaya Inc. All Rights Reserved.
36 of 59 ACM2K-SM-CSE60
4.11. Add Users for SIP Phones Users must be added via Session Manager and the details will be updated on Communication Manager. Select Users Manage Users on the left panel menu. Then click on New (not shown). Select the following parameters, leaving the remaining parameters at their default values. Under General:
Last Name Any name First Name Any name

MD; Reviewed: SPOC 07/01/2010
Solution & Interoperability Test Lab Application Notes ©2010 Avaya Inc. All Rights Reserved.
37 of 59 ACM2K-SM-CSE60
Navigate to the Identity section, select the following parameters, leaving the remaining parameters at their default values.
Login Name The desired phone-extension-number@domain where domain was defined in Section 4.2
Password Password for user to log into SMGR Shared Communication Profile Password
Password to be entered by the user when logging into the phone

MD; Reviewed: SPOC 07/01/2010
Solution & Interoperability Test Lab Application Notes ©2010 Avaya Inc. All Rights Reserved.
38 of 59 ACM2K-SM-CSE60
Navigate to and click on Communication Profile section to expand that section, use the default values. Then click on Communication Address to expand that section, click New and enter the following:
Type Select Avaya SIP Fully Qualified Address Enter the extension-number@domain
Click on Add.

MD; Reviewed: SPOC 07/01/2010
Solution & Interoperability Test Lab Application Notes ©2010 Avaya Inc. All Rights Reserved.
39 of 59 ACM2K-SM-CSE60
Navigate to and click on Session Manager Profile section to expand. Select the following parameters, leaving the remaining parameters at their default values.
Primary Session Manager Select SessionManager Origination Application Sequence Select App Sequence Termination Application Sequence Select App Sequence Home Location Select Dublin Stack
Click on Endpoint Profile to expand that section. Select the following parameters, leaving the remaining parameters at their default values.
System Select the CM Entity created in Section 4.11 Extension Enter a desired extension number Template Select a telephone type template
Click on Commit to save (not shown).

MD; Reviewed: SPOC 07/01/2010
Solution & Interoperability Test Lab Application Notes ©2010 Avaya Inc. All Rights Reserved.
40 of 59 ACM2K-SM-CSE60
5. Configure AudioCodes Mediant 2000 Gateway The following sections describe the configuration steps required to implement E1/PRI QSIG trunks on the Mediant 2000, using the web interface. It is assumed that basic hardware and software installation has been performed, details can be found in reference [10]. This section focuses on the following configuration areas:
Access Web Configuration Interface Administer TDM Bus Settings Administer PSTN Trunk Settings Administer SIP Protocol Parameters Administer Audio Codecs Administer DTMF Signaling Administer Proxy & Registration Administer Routing Tables Administer SIP General Parameters for TCP Save the Configuration
5.1. Access Web Configuration Interface Access the Mediant 2000 GUI using a Web Browser and entering http://<ip-address>, where <ip-address> is the IP address of Mediant 2000. Log in using appropriate credentials and accept the subsequent Copyright Legal Notice.

MD; Reviewed: SPOC 07/01/2010
Solution & Interoperability Test Lab Application Notes ©2010 Avaya Inc. All Rights Reserved.
41 of 59 ACM2K-SM-CSE60
The Mediant 2000 Home Page screen is displayed.
Select Configuration and set the mode to Full on the left panel menu. The menus on the left can be expanded as necessary to configure the appropriate features, as described in the following sections.
MD; Reviewed: SPOC 07/01/2010
Solution & Interoperability Test Lab Application Notes ©2010 Avaya Inc. All Rights Reserved.
42 of 59 ACM2K-SM-CSE60
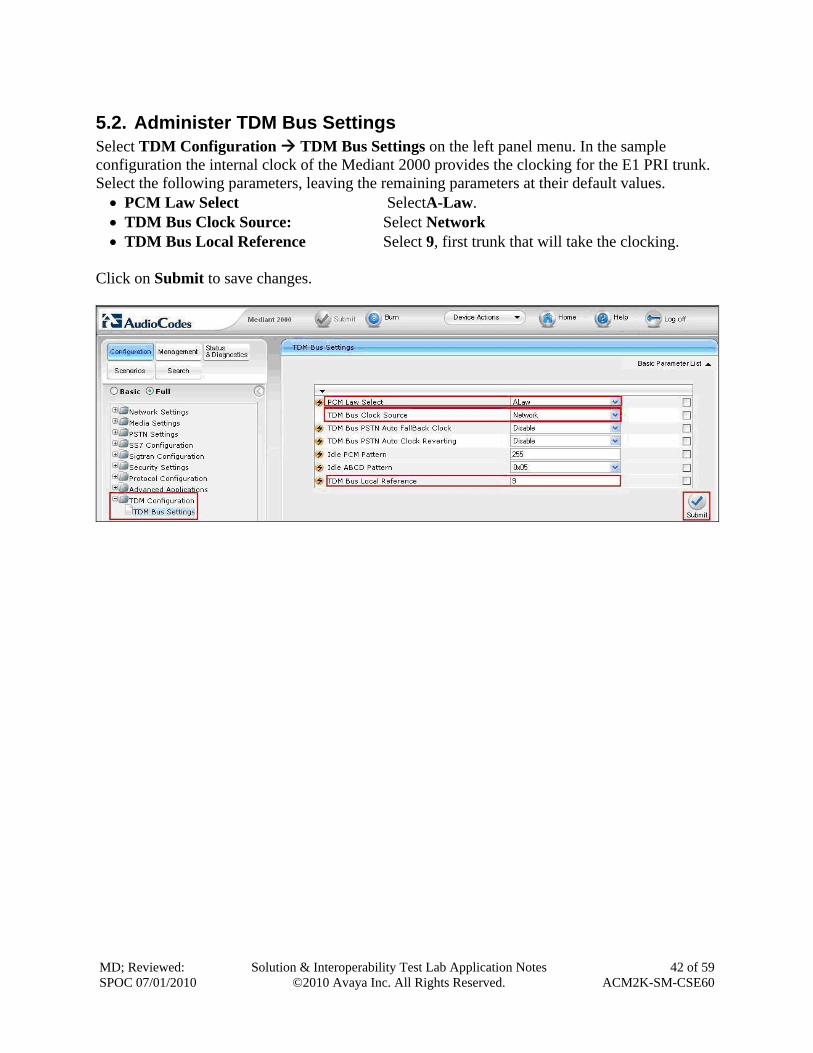
5.2. Administer TDM Bus Settings Select TDM Configuration TDM Bus Settings on the left panel menu. In the sample configuration the internal clock of the Mediant 2000 provides the clocking for the E1 PRI trunk. Select the following parameters, leaving the remaining parameters at their default values. PCM Law Select SelectA-Law. TDM Bus Clock Source: Select Network TDM Bus Local Reference Select 9, first trunk that will take the clocking.
Click on Submit to save changes.

MD; Reviewed: SPOC 07/01/2010
Solution & Interoperability Test Lab Application Notes ©2010 Avaya Inc. All Rights Reserved.
43 of 59 ACM2K-SM-CSE60
5.3. Administer PSTN Trunk Settings Select PSTN Settings Trunk Settings on the left panel menu. Click Stop Trunk, which will enable editing of the parameters.
Select the following parameters, leaving the remaining parameters at their default values. Under General Settings: Protocol Type: Select E1 QSIG

MD; Reviewed: SPOC 07/01/2010
Solution & Interoperability Test Lab Application Notes ©2010 Avaya Inc. All Rights Reserved.
44 of 59 ACM2K-SM-CSE60
Under Trunk Configuration: Clock Master: Select Recovered Line Code: Select HDB3 Framing Method: Select E1 Framing MFF CRC4 EXT
Under ISDN Configuration:
ISDN Termination Side: Select User side Q931 Layer Response Behavior: Select 0x0 Outgoing Calls Behavior: Select 0x400 Incoming Calls Behavior: Select 0x800 General Call Control Behavior Select 0x0

MD; Reviewed: SPOC 07/01/2010
Solution & Interoperability Test Lab Application Notes ©2010 Avaya Inc. All Rights Reserved.
45 of 59 ACM2K-SM-CSE60
Click on Apply Trunk Settings to save all of the above changes and put the trunk into service. Successful trunk configuration will be indicated by the green status indications for the trunk board, as shown in Section 5.1.
5.4. Administer SIP Protocol Parameters To configure SIP parameters used when signaling with Conference Standard Edition, select Protocol Configuration Protocol Definition SIP General Parameters on the left panel menu. Select the following parameters, leaving the remaining parameters at their default values. Under SIP General:
SIP Transport Type: Select TCP Click on Submit to save changes.

MD; Reviewed: SPOC 07/01/2010
Solution & Interoperability Test Lab Application Notes ©2010 Avaya Inc. All Rights Reserved.
46 of 59 ACM2K-SM-CSE60
5.5. Administer Audio Codecs Select Protocol Configuration Coders And Profile Definitions Coders on the left panel menu. Select the following parameters, leaving the remaining parameters at their default values. Configure Coder Name that is compatible with Conferencing Standard Edition. Conference Standard Edition only supports G.711A-law and G.711U-law. Note: The first coder is the highest priority coder and is used by the Mediant 2000 whenever possible. If the far end SIP User Agent cannot use the coder assigned as the first coder, the gateway attempts to use the next coder and so forth. Click on Submit to save changes.

MD; Reviewed: SPOC 07/01/2010
Solution & Interoperability Test Lab Application Notes ©2010 Avaya Inc. All Rights Reserved.
47 of 59 ACM2K-SM-CSE60
5.6. Administer DTMF Signaling To configure Out Of Band, select Protocol Configuration Protocol Definition DTMF & Dialing on the left panel menu. Select the following parameters, leaving the remaining parameters at their default values.
Declare RFC 2833 in SDP: Select Yes 1st Tx DTMF Option: Select RFC 2833 RFC 2833 Payload Type: Select 101
Click on Submit to save changes.
To configure In Band, select Protocol Configuration Protocol Definition DTMF & Dialing on the left panel menu. Select the following parameters, leaving the remaining parameters at their default values.
Declare RFC 2833 in SDP Select No Click on Submit to save changes.
MD; Reviewed: SPOC 07/01/2010
Solution & Interoperability Test Lab Application Notes ©2010 Avaya Inc. All Rights Reserved.
48 of 59 ACM2K-SM-CSE60
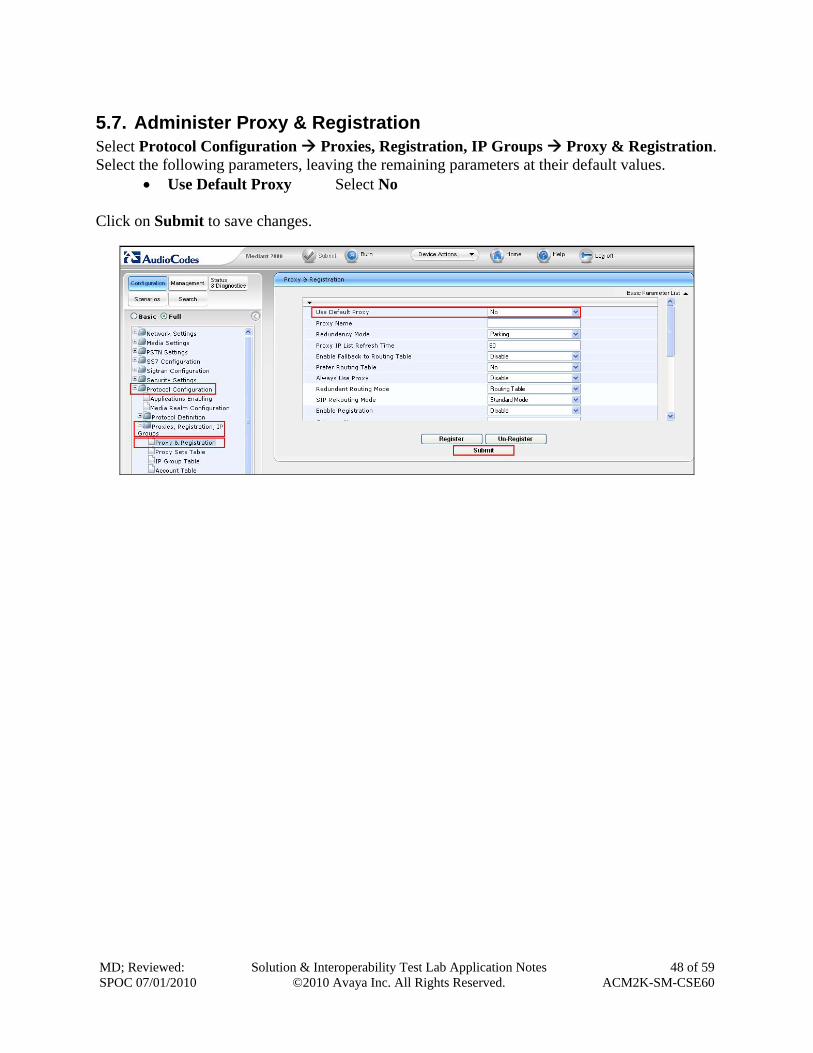
5.7. Administer Proxy & Registration Select Protocol Configuration Proxies, Registration, IP Groups Proxy & Registration. Select the following parameters, leaving the remaining parameters at their default values.
Use Default Proxy Select No Click on Submit to save changes.
MD; Reviewed: SPOC 07/01/2010
Solution & Interoperability Test Lab Application Notes ©2010 Avaya Inc. All Rights Reserved.
49 of 59 ACM2K-SM-CSE60
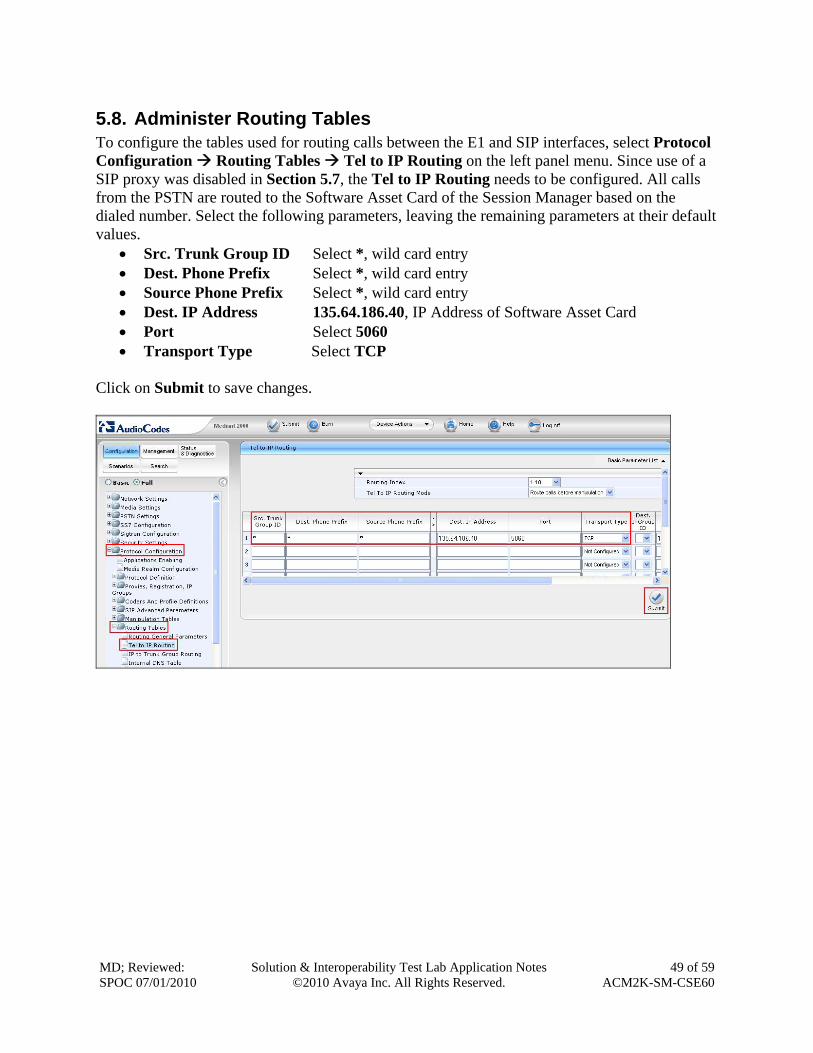
5.8. Administer Routing Tables To configure the tables used for routing calls between the E1 and SIP interfaces, select Protocol Configuration Routing Tables Tel to IP Routing on the left panel menu. Since use of a SIP proxy was disabled in Section 5.7, the Tel to IP Routing needs to be configured. All calls from the PSTN are routed to the Software Asset Card of the Session Manager based on the dialed number. Select the following parameters, leaving the remaining parameters at their default values.
Src. Trunk Group ID Select *, wild card entry Dest. Phone Prefix Select *, wild card entry Source Phone Prefix Select *, wild card entry Dest. IP Address 135.64.186.40, IP Address of Software Asset Card Port Select 5060 Transport Type Select TCP
Click on Submit to save changes.

MD; Reviewed: SPOC 07/01/2010
Solution & Interoperability Test Lab Application Notes ©2010 Avaya Inc. All Rights Reserved.
50 of 59 ACM2K-SM-CSE60
To configure routing from SIP to E1, select Protocol Configuration Routing Tables IP to Trunk Group Routing on the left panel menu. Select the following parameters, leaving the remaining parameters at their default values. These values specify that all SIP calls are to be routed to the E1 PRI interface.
Dest. Host Prefix: Select *, wild card entry * Source Host Prefix: Select *, wild card entry * Dest. Phone Prefix Select *, wild card entry * Source Phone Prefix: Select *, wild card entry * Source IP Address: Select *, wild card entry * Trunk Group ID Select 9, defined in Section 5.3
Click on Submit to save changes.

MD; Reviewed: SPOC 07/01/2010
Solution & Interoperability Test Lab Application Notes ©2010 Avaya Inc. All Rights Reserved.
51 of 59 ACM2K-SM-CSE60
5.9. Administer SIP General Parameters for TCP Select Protocol Configuration Protocol Definition SIP General Parameters on the left panel menu. Select the following parameters, leaving the remaining parameters at their default values.
SIP Transport Type Select TCP SIP TCP Local Port Select 5060 SIP Destination Port Select 5060
Click on Submit to save changes.
MD; Reviewed: SPOC 07/01/2010
Solution & Interoperability Test Lab Application Notes ©2010 Avaya Inc. All Rights Reserved.
52 of 59 ACM2K-SM-CSE60
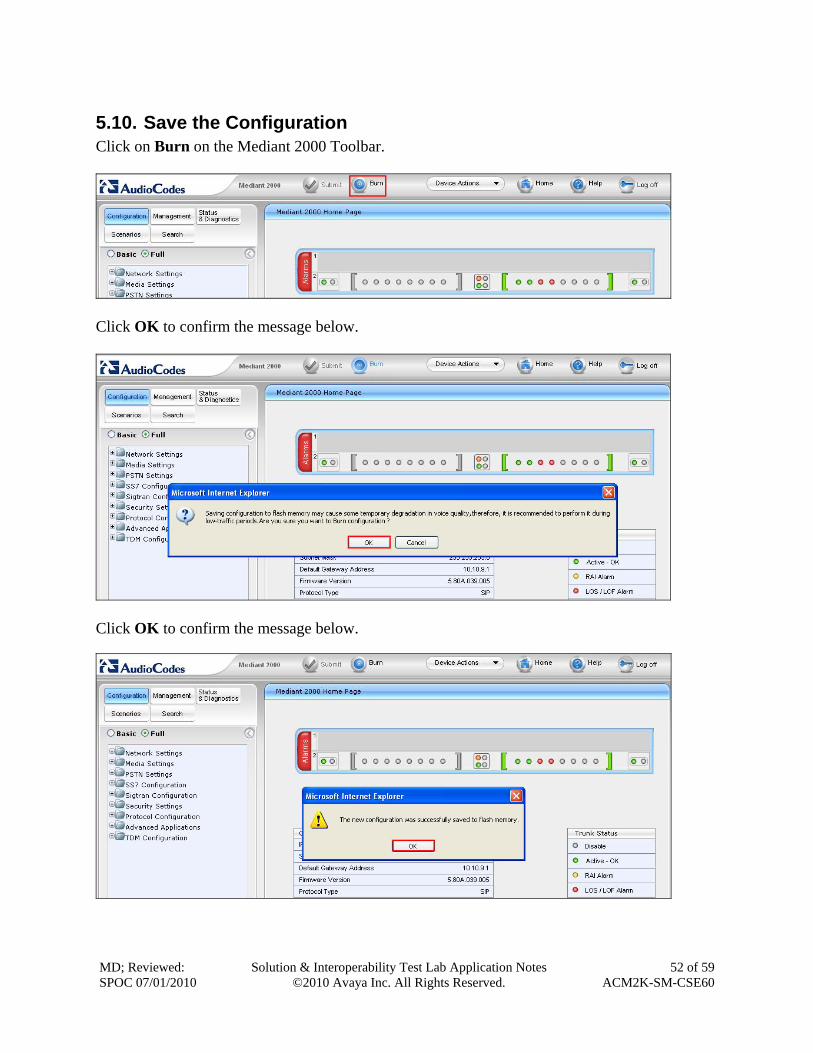
5.10. Save the Configuration Click on Burn on the Mediant 2000 Toolbar.
Click OK to confirm the message below.
Click OK to confirm the message below.
MD; Reviewed: SPOC 07/01/2010
Solution & Interoperability Test Lab Application Notes ©2010 Avaya Inc. All Rights Reserved.
53 of 59 ACM2K-SM-CSE60
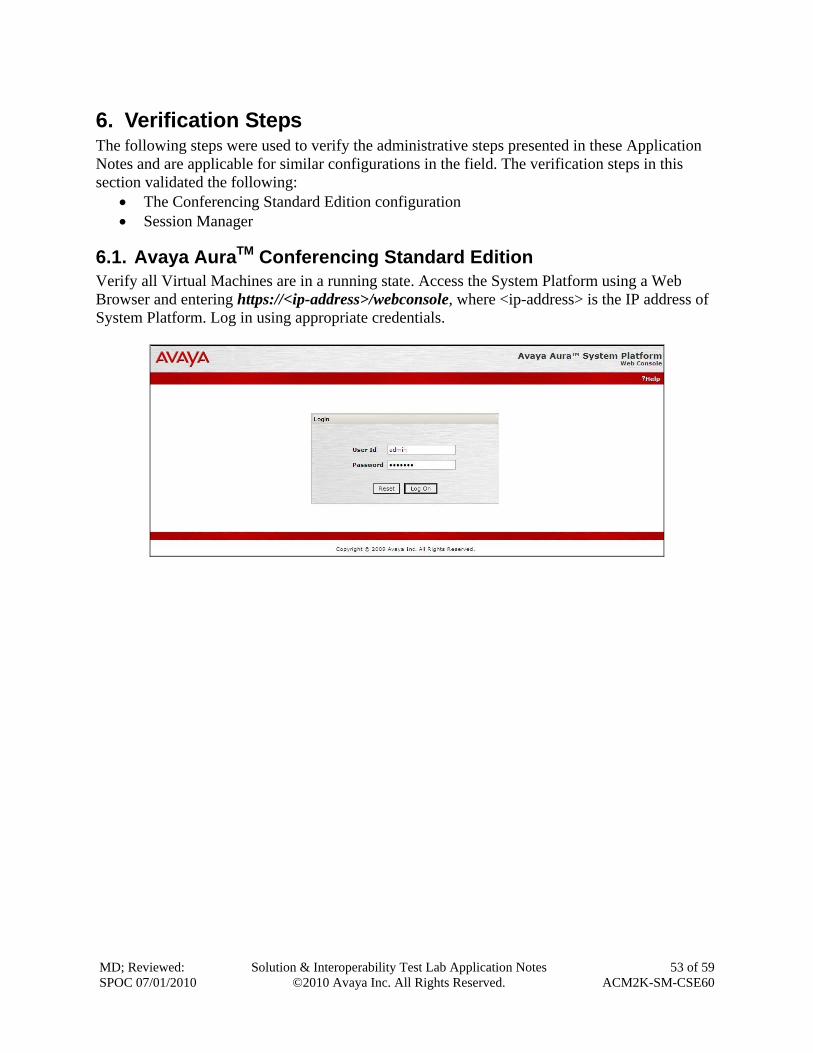
6. Verification Steps The following steps were used to verify the administrative steps presented in these Application Notes and are applicable for similar configurations in the field. The verification steps in this section validated the following:
The Conferencing Standard Edition configuration Session Manager
6.1. Avaya AuraTM Conferencing Standard Edition Verify all Virtual Machines are in a running state. Access the System Platform using a Web Browser and entering https://<ip-address>/webconsole, where <ip-address> is the IP address of System Platform. Log in using appropriate credentials.

MD; Reviewed: SPOC 07/01/2010
Solution & Interoperability Test Lab Application Notes ©2010 Avaya Inc. All Rights Reserved.
54 of 59 ACM2K-SM-CSE60
Verify all Virtual Machines are in a Running State.
6.1.1. Conferencing Standard Edition Services Using System Manager as shown below, check the Service State between the Conferencing bridge and other devices by configuring the SIP System Settings by selecting Elements Conferencing Services on the left panel menu. From the right panel menu ensure the Conferencing Services are in an Active Service State.

MD; Reviewed: SPOC 07/01/2010
Solution & Interoperability Test Lab Application Notes ©2010 Avaya Inc. All Rights Reserved.
55 of 59 ACM2K-SM-CSE60
6.2. SIP Monitoring on Avaya Aura™ Session Manager Verify that none of the links to the defined SIP entities are down, indicating that they are all reachable for call routing by selecting Elements Session Manager System Status SIP Entity Monitoring on the left panel menu. From the right panel menu select the SIP elements created in Section 4.4

MD; Reviewed: SPOC 07/01/2010
Solution & Interoperability Test Lab Application Notes ©2010 Avaya Inc. All Rights Reserved.
56 of 59 ACM2K-SM-CSE60
Click on the SIP Entity Name Bridge 6.0, shown in the previous screen, and verify that the Conn. Status and Link Status are Up.
Click on the SIP Entity Name AudioCodesM2K, and verify that the Conn. Status and Link Status are Up.

MD; Reviewed: SPOC 07/01/2010
Solution & Interoperability Test Lab Application Notes ©2010 Avaya Inc. All Rights Reserved.
57 of 59 ACM2K-SM-CSE60
6.3. Verification Scenarios Verify end to end signalling/media connectivity between the Mediant 2000 and Conferencing Standard Edition via the Session Manager, this is accomplished by:
Placing a call from two endpoints into conference ensuring one of the callers is a moderator.
Verify both callers are in the same conference and there is two way speech between the callers.
Initiate dial out by dialing *1 xxxx on the moderator phones touch pad, where xxxx is the extension for an endpoint. Follow the instructions provided by the Conferencing bridge.
After answering the call, on the moderator phone dial *2 to join the new participant into the conference.
Verify both callers are in the same conference and there is two way speech between the callers.

MD; Reviewed: SPOC 07/01/2010
Solution & Interoperability Test Lab Application Notes ©2010 Avaya Inc. All Rights Reserved.
58 of 59 ACM2K-SM-CSE60
7. Conclusion As illustrated in these Application Notes, Avaya Aura™ Conferencing Standard Edition can interoperate successfully with Avaya Aura™ Session Manager and AudioCodes Mediant 2000 Gateway.
8. Additional References This section references the product documentation relevant to these Application Notes. Avaya Aura™ Conferencing Standard Edition 6.0
[1] Implementing Avaya Aura™ Conferencing Standard Edition, Doc ID 04-603508, June 2010, available at http://support.avaya.com.
[2] Operating Avaya Aura™ Conferencing Standard Edition, Doc ID 04-603510, June 2010, available at http://support.avaya.com.
[3] Using Avaya Aura™ Conferencing Standard Edition, Doc ID 04-603509, June 2010, available at http://support.avaya.com.
[4] Avaya Aura™ Conferencing Standard Edition Release Notes, Doc ID 04-603528, June 2010, available at http://support.avaya.com
Avaya Aura™ Session Manager 6.0
[5] Avaya Aura™ Session Manager Overview, Doc ID 03-603323, available at http://support.avaya.com.
[6] Administering Avaya Aura™ Session Manager, Doc ID 03-603324 available at http://support.avaya.com.
[7] Installing and Upgrading Avaya Aura™ Session Manager 6.0, Doc ID 03-603324, available at http://support.avaya.com.
[8] Installing and Upgrading Avaya Aura™ System Manager 6.0, available at http://support.avaya.com.
[9] Maintaining and Troubleshooting Avaya Aura™ Session Manager 6.0, Doc ID 03-603321, available at http://support.avaya.com.
AudioCodes Mediant 2000 Gateway
[10] Technical support and System Deployment Guides are available at http://audiocodes.com

MD; Reviewed: SPOC 07/01/2010
Solution & Interoperability Test Lab Application Notes ©2010 Avaya Inc. All Rights Reserved.
59 of 59 ACM2K-SM-CSE60
©2010 Avaya Inc. All Rights Reserved. Avaya and the Avaya Logo are trademarks of Avaya Inc. All trademarks identified by ® and ™ are registered trademarks or trademarks, respectively, of Avaya Inc. All other trademarks are the property of their respective owners. The information provided in these Application Notes is subject to change without notice. The configurations, technical data, and recommendations provided in these Application Notes are believed to be accurate and dependable, but are presented without express or implied warranty. Users are responsible for their application of any products specified in these Application Notes. Please e-mail any questions or comments pertaining to these Application Notes along with the full title name and filename, located in the lower right corner, directly to the Avaya Solution & Interoperability Test Lab at [email protected]
Related Documents


