Written by Andy Glover ©2009 Vcomm Uk Ltd Testing conducted by Andy Glover (Vcomm) and Dean Jones (Westcon) Vcomm Solution & Interoperability Testing Application Notes for Configuring Ingate SIParator with an Avaya S8300 for SIP Trunking without SES – Issue 1.0 Abstract These application notes describe the configuration steps required for the Ingate SIParator version 4.6.2 SBC to successfully enable the Avaya S8300 Call Manager version 5.0 for SIP Trunking without the need for Avaya SIP Enablement Server (SES).

Welcome message from author
This document is posted to help you gain knowledge. Please leave a comment to let me know what you think about it! Share it to your friends and learn new things together.
Transcript
Written by Andy Glover ©2009 Vcomm Uk Ltd Testing conducted by Andy Glover (Vcomm) and Dean Jones (Westcon)
Vcomm Solution & Interoperability Testing
Application Notes for Configuring Ingate SIParator with an Avaya S8300 for SIP Trunking without SES – Issue 1.0
Abstract
These application notes describe the configuration steps required for the Ingate SIParator version 4.6.2 SBC to successfully enable the Avaya S8300 Call Manager version 5.0 for SIP Trunking without the need for Avaya SIP Enablement Server (SES).

Written by Andy Glover ©2009 Vcomm Uk Ltd Testing conducted by Andy Glover (Vcomm) and Dean Jones (Westcon)
1. Introduction With the introduction of software release 5.0 for the Avaya S8300 CM, it is now possible to talk directly over a sip trunk without the need for an SES server. This document will walk you through the set up of both Avaya CM and the Ingate SIParator. The Ingate SIParator is a session border controller that handles the ingress and egress of SIP messaging between two networks (i.e LAN and WAN). It also has basic proxy and far end NAT traversal functionality that could be put to use in certain deployment situations, but are not covered by this document. The SIParator was connected to the network in a DMZ –LAN scenario:
Please refer to the Ingate SIParator documentation for other deployment scenarios. The IP addresses used in this test were: Avaya S8300 172.17.124.10 Ingate SIParator LAN 172.17.124.21 DMZ 10.0.0.3 WAN 195.12.26.35 ITSP 88.215.60.14
Written by Andy Glover ©2009 Vcomm Uk Ltd Testing conducted by Andy Glover (Vcomm) and Dean Jones (Westcon)
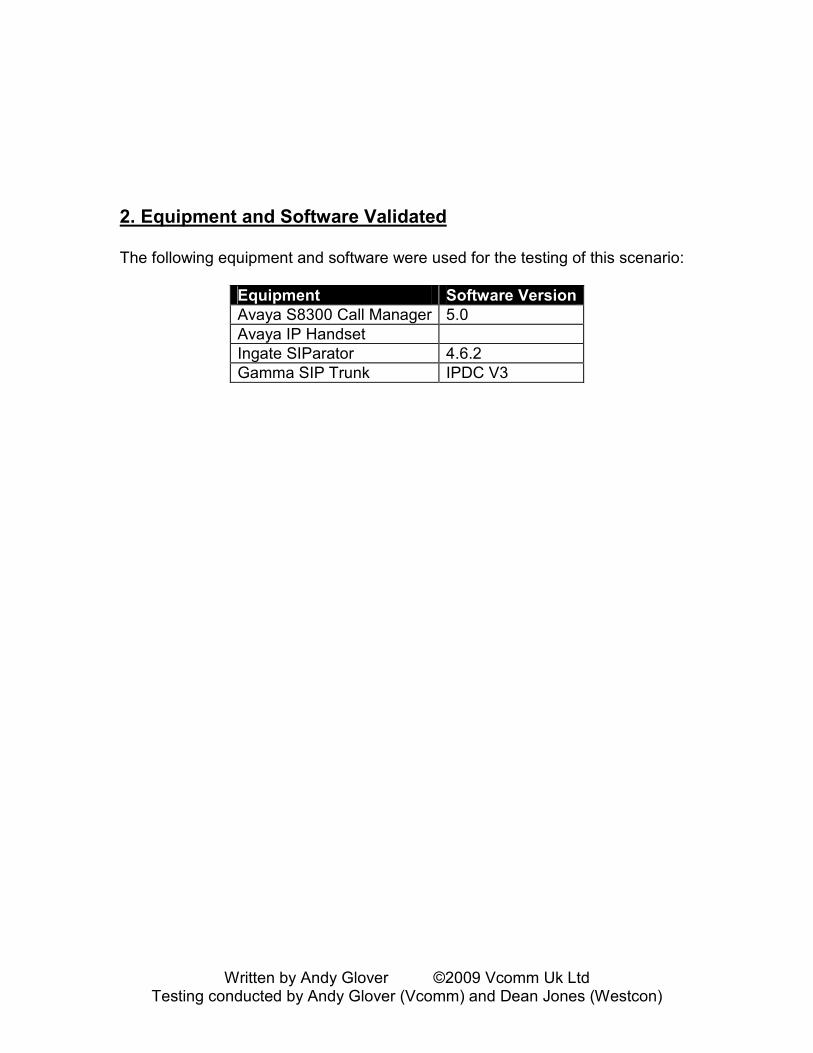
2. Equipment and Software Validated The following equipment and software were used for the testing of this scenario:
Equipment Software Version
Avaya S8300 Call Manager 5.0
Avaya IP Handset
Ingate SIParator 4.6.2
Gamma SIP Trunk IPDC V3

Written by Andy Glover ©2009 Vcomm Uk Ltd Testing conducted by Andy Glover (Vcomm) and Dean Jones (Westcon)
3. Configuring the Avaya S8300 For a detailed description of how to set up the Avaya S8300 please refer to the Avaya’s own manual. This guide will show you the necessary changes to this default configuration needed to make this scenario work. 3.1 Avaya Network Settings Access the Avaya S8300 network settings. Select Configure Server � Configure Interfaces. Enter the IP address of the Avaya into IP address server 1. Enter the IP address of the Ingate SIParator into Gateway. Enter the subnet mask into subnet mask.

Written by Andy Glover ©2009 Vcomm Uk Ltd Testing conducted by Andy Glover (Vcomm) and Dean Jones (Westcon)
3.2 Avaya Setup Screens The following screens show the specific changes needed to the basic programming for SIP trunking to work.

Written by Andy Glover ©2009 Vcomm Uk Ltd Testing conducted by Andy Glover (Vcomm) and Dean Jones (Westcon)

Written by Andy Glover ©2009 Vcomm Uk Ltd Testing conducted by Andy Glover (Vcomm) and Dean Jones (Westcon)

Written by Andy Glover ©2009 Vcomm Uk Ltd Testing conducted by Andy Glover (Vcomm) and Dean Jones (Westcon)
Written by Andy Glover ©2009 Vcomm Uk Ltd Testing conducted by Andy Glover (Vcomm) and Dean Jones (Westcon)
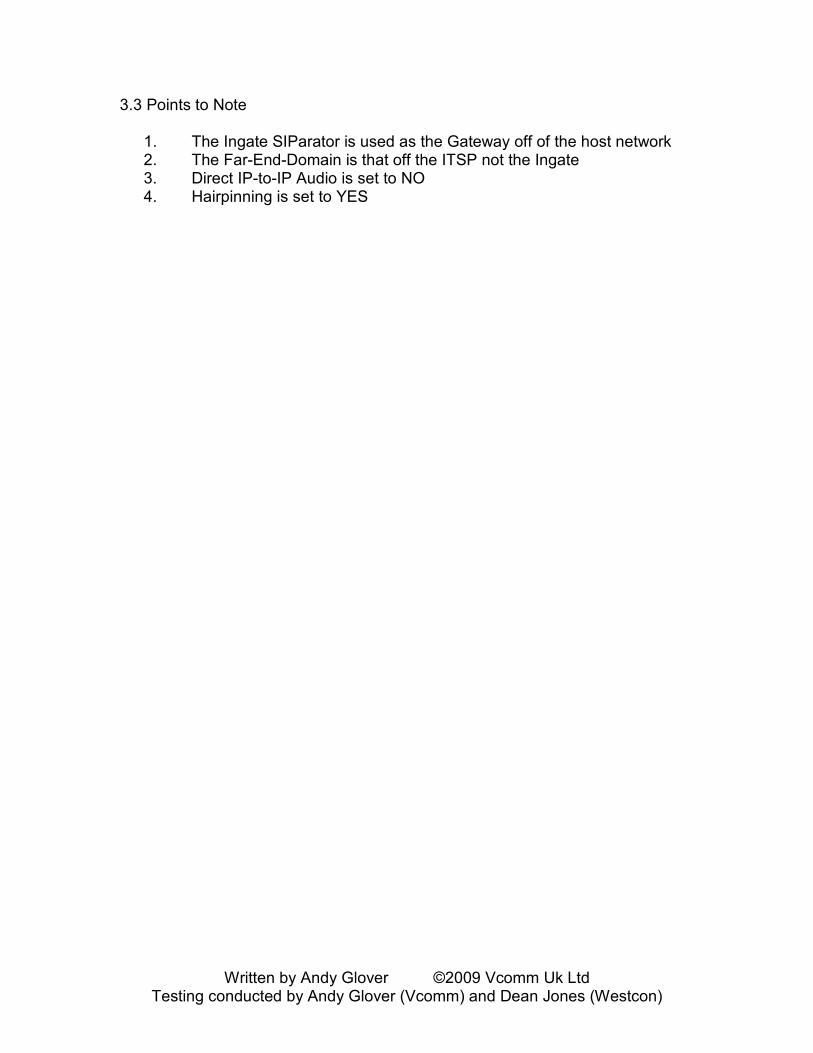
3.3 Points to Note
1. The Ingate SIParator is used as the Gateway off of the host network 2. The Far-End-Domain is that off the ITSP not the Ingate 3. Direct IP-to-IP Audio is set to NO 4. Hairpinning is set to YES

Written by Andy Glover ©2009 Vcomm Uk Ltd Testing conducted by Andy Glover (Vcomm) and Dean Jones (Westcon)
4. Setting up the Ingate SIParator 4.1 Basic Configuration Download and install the Ingate startup tool from www.ingate.com. Once installed run the program and connect to the Ingate. Enter the network settings.

Written by Andy Glover ©2009 Vcomm Uk Ltd Testing conducted by Andy Glover (Vcomm) and Dean Jones (Westcon)
Select the Avaya SES/CM and enter it’s IP Address
Written by Andy Glover ©2009 Vcomm Uk Ltd Testing conducted by Andy Glover (Vcomm) and Dean Jones (Westcon)
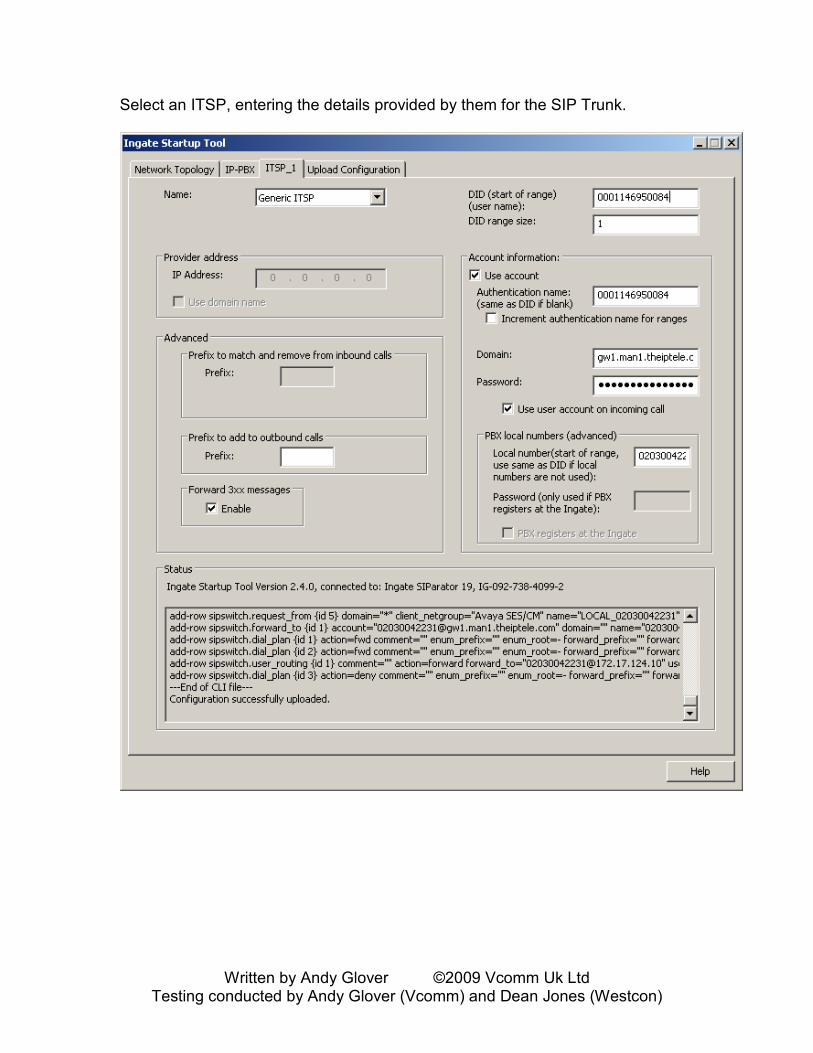
Select an ITSP, entering the details provided by them for the SIP Trunk.

Written by Andy Glover ©2009 Vcomm Uk Ltd Testing conducted by Andy Glover (Vcomm) and Dean Jones (Westcon)
Apply the configuration. This will then take you to the web interface of the Ingate.
Written by Andy Glover ©2009 Vcomm Uk Ltd Testing conducted by Andy Glover (Vcomm) and Dean Jones (Westcon)
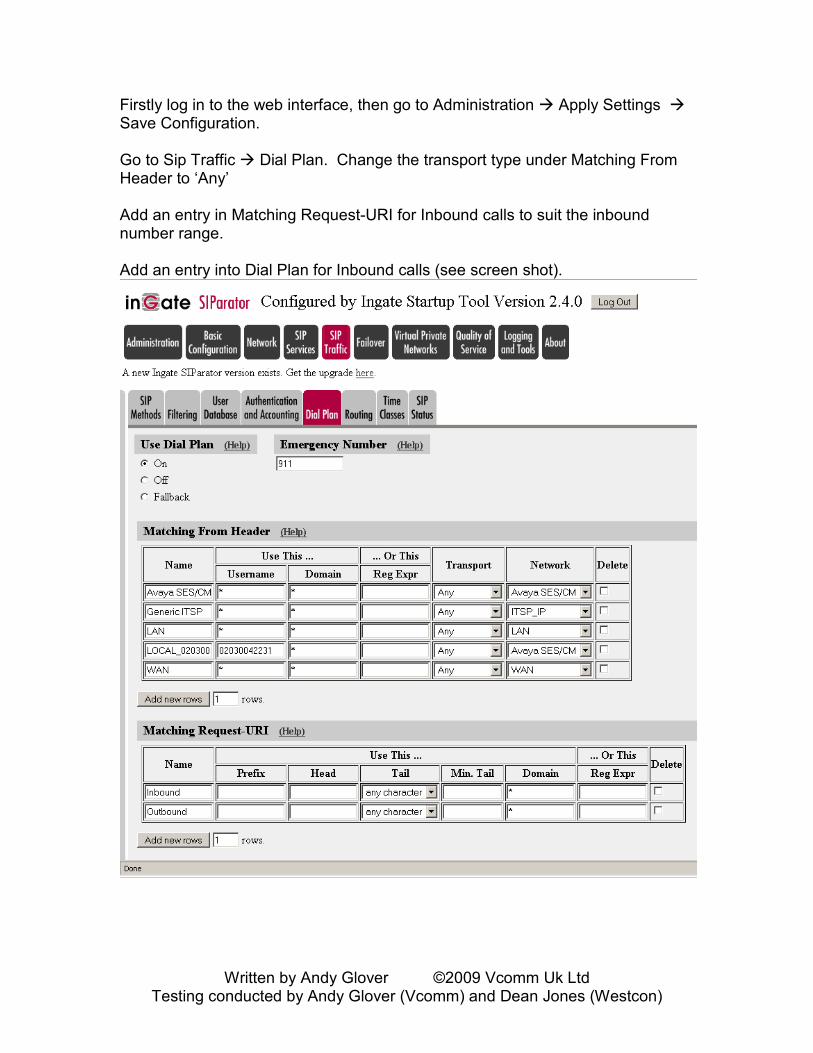
Firstly log in to the web interface, then go to Administration � Apply Settings � Save Configuration. Go to Sip Traffic � Dial Plan. Change the transport type under Matching From Header to ‘Any’ Add an entry in Matching Request-URI for Inbound calls to suit the inbound number range. Add an entry into Dial Plan for Inbound calls (see screen shot).

Written by Andy Glover ©2009 Vcomm Uk Ltd Testing conducted by Andy Glover (Vcomm) and Dean Jones (Westcon)

Written by Andy Glover ©2009 Vcomm Uk Ltd Testing conducted by Andy Glover (Vcomm) and Dean Jones (Westcon)
Under Sip Traffic � Routing, change the SIP Routing order as shown.
Written by Andy Glover ©2009 Vcomm Uk Ltd Testing conducted by Andy Glover (Vcomm) and Dean Jones (Westcon)
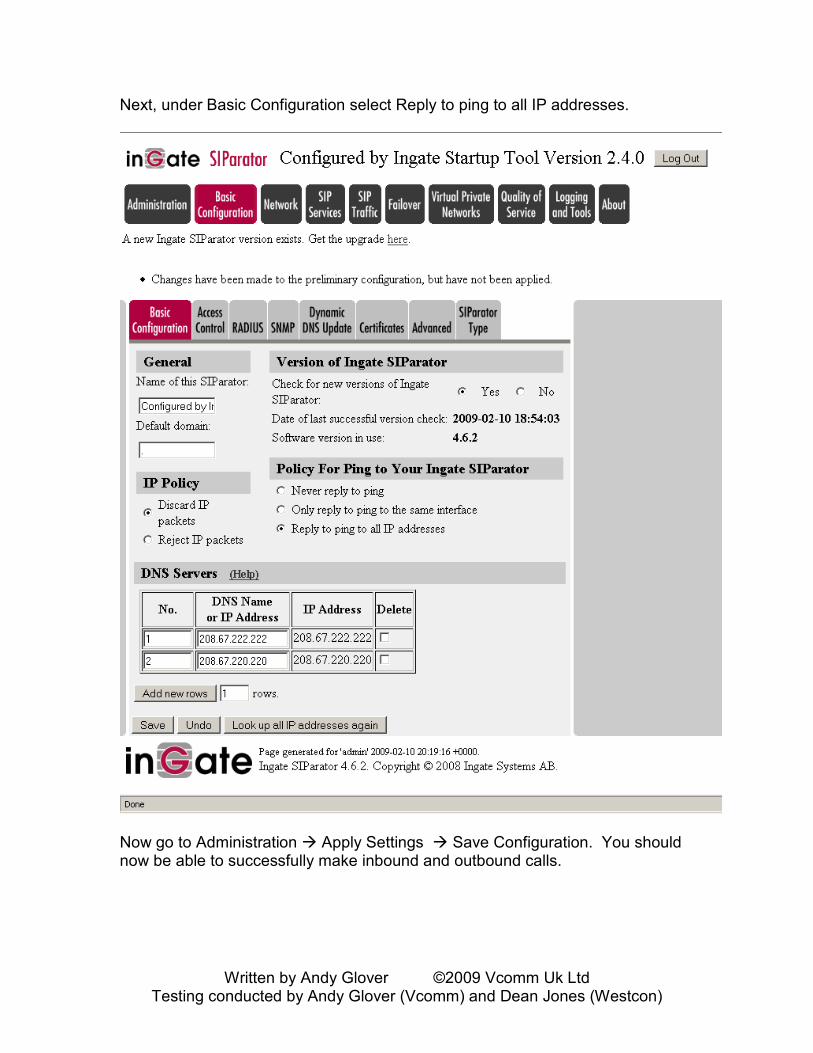
Next, under Basic Configuration select Reply to ping to all IP addresses.
Now go to Administration � Apply Settings � Save Configuration. You should now be able to successfully make inbound and outbound calls.

Written by Andy Glover ©2009 Vcomm Uk Ltd Testing conducted by Andy Glover (Vcomm) and Dean Jones (Westcon)
5. Interoperability Testing Features tested using this configuration were:
• Inbound calls
• Outbound calls
• Call hold
• Call transfer
• Conference Further features of the Avaya were not tested but should work. For further assistance in this please contact Vcomm UK Ltd or your Ingate partner. Vcomm UK Ltd Unit H Castle Ind Park Pear Tree Lane Newbury Berkshire RG14 2EZ www.vcomm.co.uk Tel: 01635 232430
Related Documents