CMN; Reviewed: SPOC 9/19/2018 Solution & Interoperability Test Lab Application Notes ©2018 Avaya Inc. All Rights Reserved. 1 of 36 Motto_IPO11 Avaya Solution & Interoperability Test Lab Application Notes for Configuring Avaya IP Office Release 11.0 to support Motto VoIP SIP Trunk Service – Issue 1.0 Abstract These Application Notes describe the procedures for configuring Session Initiation Protocol (SIP) trunking between Motto VoIP SIP Trunk service and Avaya IP Office R11.0. The Motto VoIP SIP Trunk service provides PSTN access via a SIP trunk connected to the Motto Voice Over Internet Protocol (VoIP) network as an alternative to legacy Analogue or Digital trunks. Motto VoIP is a member of the Avaya DevConnect Service Provider program. Readers should pay attention to Section 2, in particular the scope of testing as outlined in Section 2.1 as well as the observations noted in Section 2.2, to ensure that their own use cases are adequately covered by this scope and results. Information in these Application Notes has been obtained through DevConnect compliance testing and additional technical discussions. Testing was conducted via the DevConnect Program at the Avaya Solution and Interoperability Test Lab.

Welcome message from author
This document is posted to help you gain knowledge. Please leave a comment to let me know what you think about it! Share it to your friends and learn new things together.
Transcript
CMN; Reviewed:
SPOC 9/19/2018
Solution & Interoperability Test Lab Application Notes
©2018 Avaya Inc. All Rights Reserved.
1 of 36
Motto_IPO11
Avaya Solution & Interoperability Test Lab
Application Notes for Configuring Avaya IP Office Release
11.0 to support Motto VoIP SIP Trunk Service – Issue 1.0
Abstract
These Application Notes describe the procedures for configuring Session Initiation Protocol
(SIP) trunking between Motto VoIP SIP Trunk service and Avaya IP Office R11.0.
The Motto VoIP SIP Trunk service provides PSTN access via a SIP trunk connected to the
Motto Voice Over Internet Protocol (VoIP) network as an alternative to legacy Analogue or
Digital trunks. Motto VoIP is a member of the Avaya DevConnect Service Provider program.
Readers should pay attention to Section 2, in particular the scope of testing as outlined in
Section 2.1 as well as the observations noted in Section 2.2, to ensure that their own use cases
are adequately covered by this scope and results.
Information in these Application Notes has been obtained through DevConnect compliance
testing and additional technical discussions. Testing was conducted via the DevConnect
Program at the Avaya Solution and Interoperability Test Lab.
CMN; Reviewed:
SPOC 9/19/2018
Solution & Interoperability Test Lab Application Notes
©2018 Avaya Inc. All Rights Reserved.
2 of 36
Motto_IPO11
1. Introduction These Application Notes describe the procedures for configuring Session Initiation Protocol
(SIP) trunking between the Motto VoIP SIP Trunk service and Avaya IP Office 11.0. Customers
using this Avaya SIP-enabled enterprise solution with Motto VoIP’s SIP Trunk are able to place
and receive PSTN calls via a dedicated Internet connection and the SIP protocol. This converged
network solution is an alternative to traditional PSTN trunks. This approach generally results in
lower cost for the enterprise customer.
2. General Test Approach and Test Results The general test approach was to configure a simulated enterprise site using Avaya IP Office
11.0 Server to connect to the Motto VoIP SIP Trunk service. This configuration (shown in
Figure 1) was used to exercise the features and functionality listed in Section 2.1.
DevConnect Compliance Testing is conducted jointly by Avaya and DevConnect members. The
jointly-defined test plan focuses on exercising APIs and/or standards-based interfaces pertinent
to the interoperability of the tested products and their functionalities. DevConnect Compliance
Testing is not intended to substitute full product performance or feature testing performed by
DevConnect members, nor is it to be construed as an endorsement by Avaya of the suitability or
completeness of a DevConnect member’s solution.
Avaya recommends our customers implement Avaya solutions using appropriate security and
encryption capabilities enabled by our products. The testing referenced in this DevConnect
Application Note included the enablement of supported encryption capabilities in the Avaya
products. Readers should consult the appropriate Avaya product documentation for further
information regarding security and encryption capabilities supported by those Avaya products.
Support for these security and encryption capabilities in any non-Avaya solution component is
the responsibility of each individual vendor. Readers should consult the appropriate vendor-
supplied product documentation for more information regarding those products.
For the testing associated with this Application Note, the interface between Avaya systems and
the Motto VoIP SIP Trunk not include use of any specific encryption features.
CMN; Reviewed:
SPOC 9/19/2018
Solution & Interoperability Test Lab Application Notes
©2018 Avaya Inc. All Rights Reserved.
3 of 36
Motto_IPO11
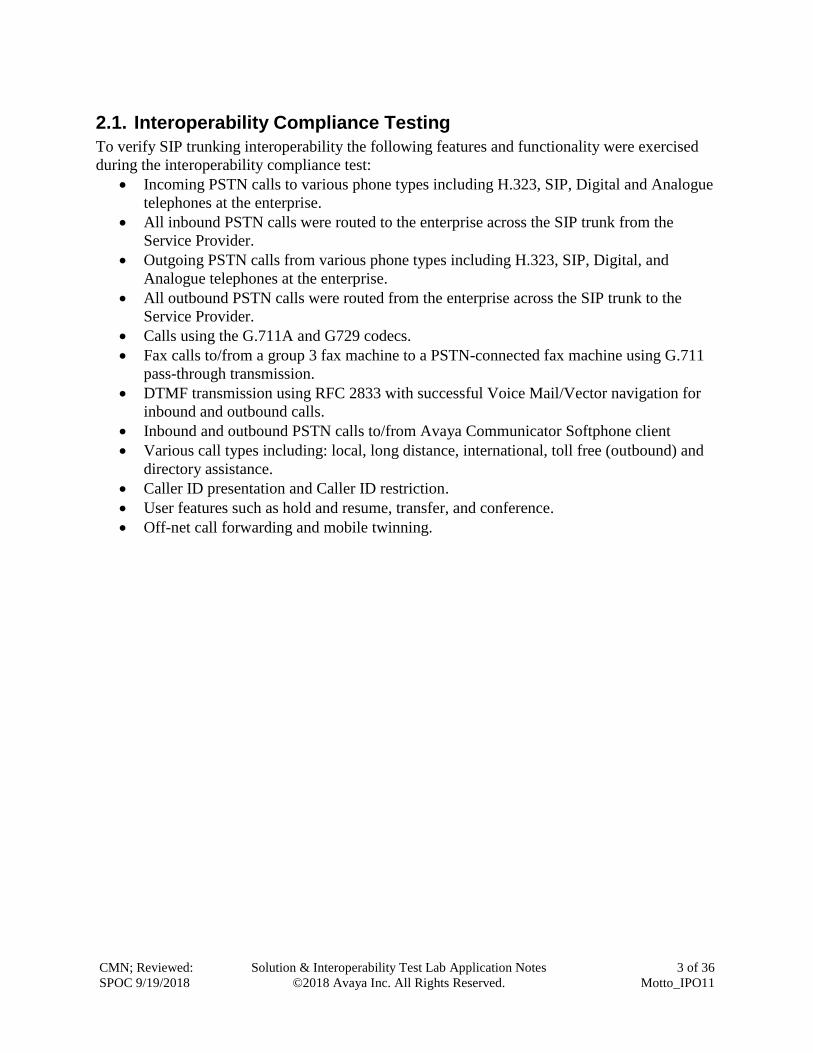
2.1. Interoperability Compliance Testing
To verify SIP trunking interoperability the following features and functionality were exercised
during the interoperability compliance test:
• Incoming PSTN calls to various phone types including H.323, SIP, Digital and Analogue
telephones at the enterprise.
• All inbound PSTN calls were routed to the enterprise across the SIP trunk from the
Service Provider.
• Outgoing PSTN calls from various phone types including H.323, SIP, Digital, and
Analogue telephones at the enterprise.
• All outbound PSTN calls were routed from the enterprise across the SIP trunk to the
Service Provider.
• Calls using the G.711A and G729 codecs.
• Fax calls to/from a group 3 fax machine to a PSTN-connected fax machine using G.711
pass-through transmission.
• DTMF transmission using RFC 2833 with successful Voice Mail/Vector navigation for
inbound and outbound calls.
• Inbound and outbound PSTN calls to/from Avaya Communicator Softphone client
• Various call types including: local, long distance, international, toll free (outbound) and
directory assistance.
• Caller ID presentation and Caller ID restriction.
• User features such as hold and resume, transfer, and conference.
• Off-net call forwarding and mobile twinning.
CMN; Reviewed:
SPOC 9/19/2018
Solution & Interoperability Test Lab Application Notes
©2018 Avaya Inc. All Rights Reserved.
4 of 36
Motto_IPO11
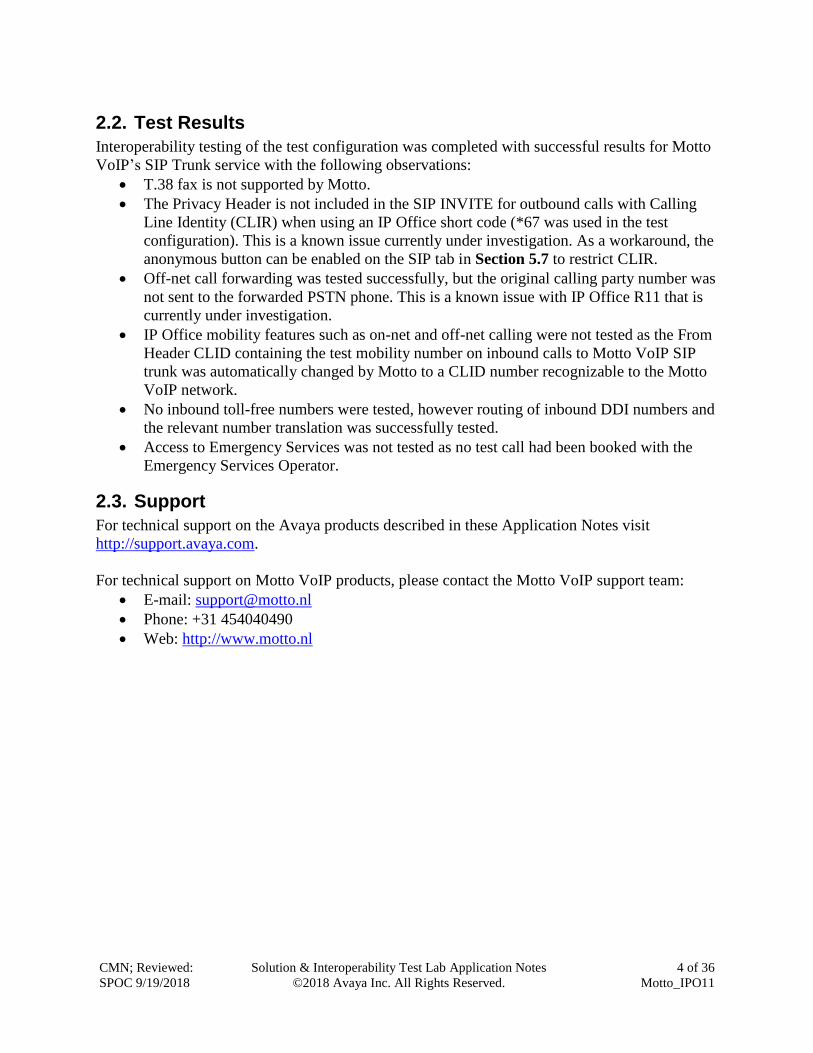
2.2. Test Results
Interoperability testing of the test configuration was completed with successful results for Motto
VoIP’s SIP Trunk service with the following observations:
• T.38 fax is not supported by Motto.
• The Privacy Header is not included in the SIP INVITE for outbound calls with Calling
Line Identity (CLIR) when using an IP Office short code (*67 was used in the test
configuration). This is a known issue currently under investigation. As a workaround, the
anonymous button can be enabled on the SIP tab in Section 5.7 to restrict CLIR.
• Off-net call forwarding was tested successfully, but the original calling party number was
not sent to the forwarded PSTN phone. This is a known issue with IP Office R11 that is
currently under investigation.
• IP Office mobility features such as on-net and off-net calling were not tested as the From
Header CLID containing the test mobility number on inbound calls to Motto VoIP SIP
trunk was automatically changed by Motto to a CLID number recognizable to the Motto
VoIP network.
• No inbound toll-free numbers were tested, however routing of inbound DDI numbers and
the relevant number translation was successfully tested.
• Access to Emergency Services was not tested as no test call had been booked with the
Emergency Services Operator.
2.3. Support
For technical support on the Avaya products described in these Application Notes visit
http://support.avaya.com.
For technical support on Motto VoIP products, please contact the Motto VoIP support team:
• E-mail: [email protected]
• Phone: +31 454040490
• Web: http://www.motto.nl
CMN; Reviewed:
SPOC 9/19/2018
Solution & Interoperability Test Lab Application Notes
©2018 Avaya Inc. All Rights Reserved.
5 of 36
Motto_IPO11
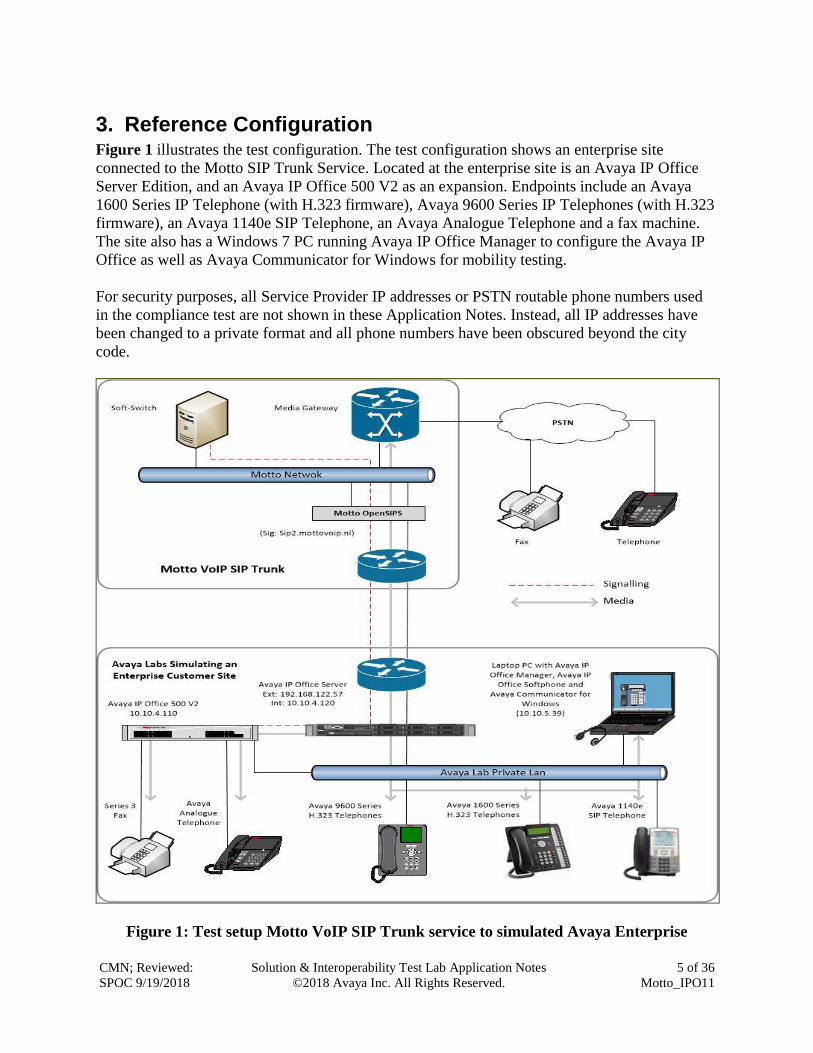
3. Reference Configuration Figure 1 illustrates the test configuration. The test configuration shows an enterprise site
connected to the Motto SIP Trunk Service. Located at the enterprise site is an Avaya IP Office
Server Edition, and an Avaya IP Office 500 V2 as an expansion. Endpoints include an Avaya
1600 Series IP Telephone (with H.323 firmware), Avaya 9600 Series IP Telephones (with H.323
firmware), an Avaya 1140e SIP Telephone, an Avaya Analogue Telephone and a fax machine.
The site also has a Windows 7 PC running Avaya IP Office Manager to configure the Avaya IP
Office as well as Avaya Communicator for Windows for mobility testing.
For security purposes, all Service Provider IP addresses or PSTN routable phone numbers used
in the compliance test are not shown in these Application Notes. Instead, all IP addresses have
been changed to a private format and all phone numbers have been obscured beyond the city
code.
Figure 1: Test setup Motto VoIP SIP Trunk service to simulated Avaya Enterprise

CMN; Reviewed:
SPOC 9/19/2018
Solution & Interoperability Test Lab Application Notes
©2018 Avaya Inc. All Rights Reserved.
6 of 36
Motto_IPO11
4. Equipment and Software Validated The following equipment and software were used for the sample configuration provided:
Equipment/Software Release/Version
Avaya
Avaya IP Office Server Edition Version 11.0.0.0.0 build 849
Avaya IP Office 500 V2 Version 11.0.0.0.0 build 849
Avaya Voicemail Pro Client Version 11.0.0.0.0
Avaya 1603 Phone (H.323) 1.3.7
Avaya 96x1 Series Phone (H.323) 6.6.0
Avaya 96x0 Series Phone (H.323) 6.6.0
Avaya Communicator for Windows (SIP) 2.1.1.74
Avaya 1140e (SIP) FW: 04.04.23.00.bin
Avaya 98390 Analogue Phone N/A
Motto VoIP
Proxy Servers OpenSIPS 2.2.1
Media Gateways Asterisk 11.14.0
Note – Testing was performed with IP Office Server Edition with 500 V2 Expansion R11.0.
Compliance Testing is applicable when the tested solution is deployed with a standalone IP
Office 500 V2 and also when deployed with all configurations of IP Office Server Edition. Note:
that IP Office Server Edition requires an Expansion IP Office 500 V2 to support analog or digital
endpoints or trunks, this includes T.38 fax.
CMN; Reviewed:
SPOC 9/19/2018
Solution & Interoperability Test Lab Application Notes
©2018 Avaya Inc. All Rights Reserved.
7 of 36
Motto_IPO11
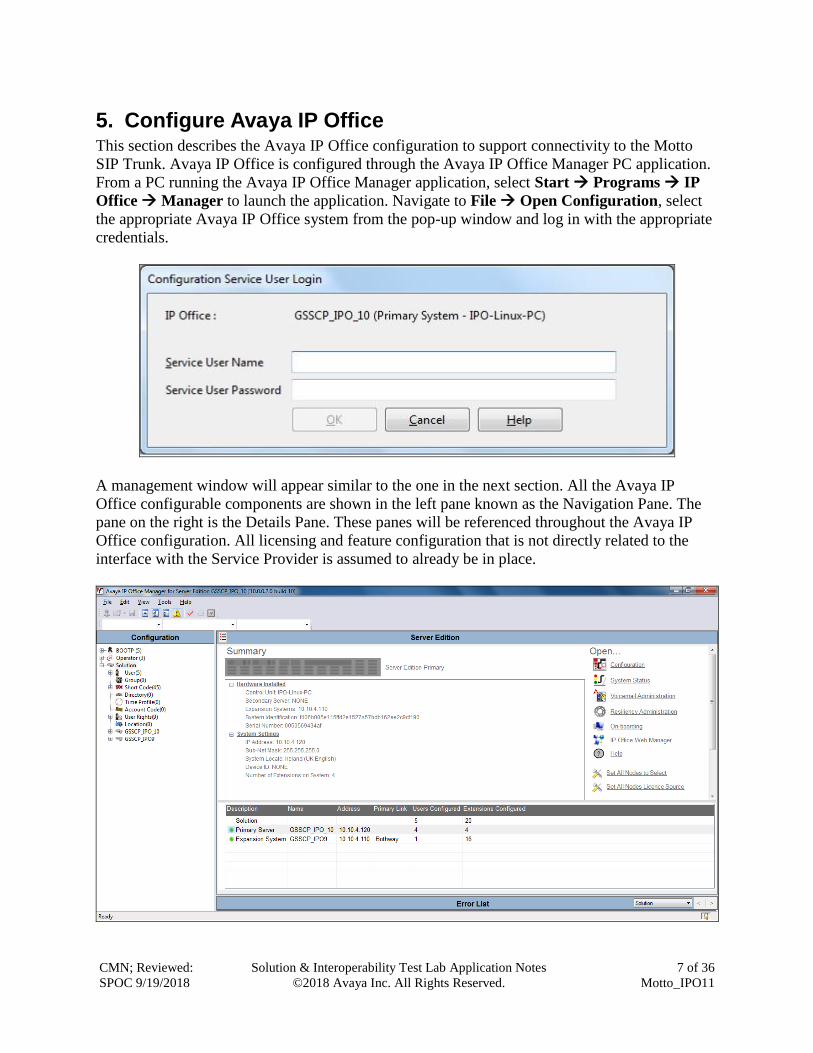
5. Configure Avaya IP Office This section describes the Avaya IP Office configuration to support connectivity to the Motto
SIP Trunk. Avaya IP Office is configured through the Avaya IP Office Manager PC application.
From a PC running the Avaya IP Office Manager application, select Start Programs IP
Office Manager to launch the application. Navigate to File Open Configuration, select
the appropriate Avaya IP Office system from the pop-up window and log in with the appropriate
credentials.
A management window will appear similar to the one in the next section. All the Avaya IP
Office configurable components are shown in the left pane known as the Navigation Pane. The
pane on the right is the Details Pane. These panes will be referenced throughout the Avaya IP
Office configuration. All licensing and feature configuration that is not directly related to the
interface with the Service Provider is assumed to already be in place.
CMN; Reviewed:
SPOC 9/19/2018
Solution & Interoperability Test Lab Application Notes
©2018 Avaya Inc. All Rights Reserved.
8 of 36
Motto_IPO11
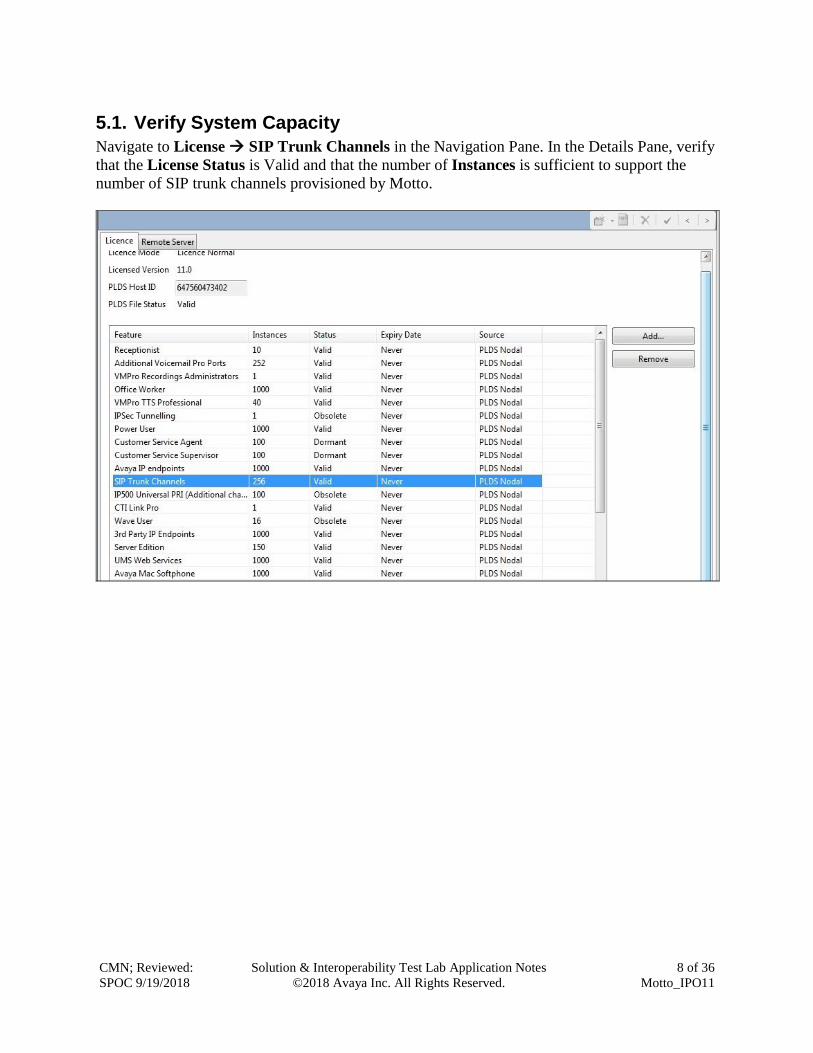
5.1. Verify System Capacity
Navigate to License SIP Trunk Channels in the Navigation Pane. In the Details Pane, verify
that the License Status is Valid and that the number of Instances is sufficient to support the
number of SIP trunk channels provisioned by Motto.
CMN; Reviewed:
SPOC 9/19/2018
Solution & Interoperability Test Lab Application Notes
©2018 Avaya Inc. All Rights Reserved.
9 of 36
Motto_IPO11
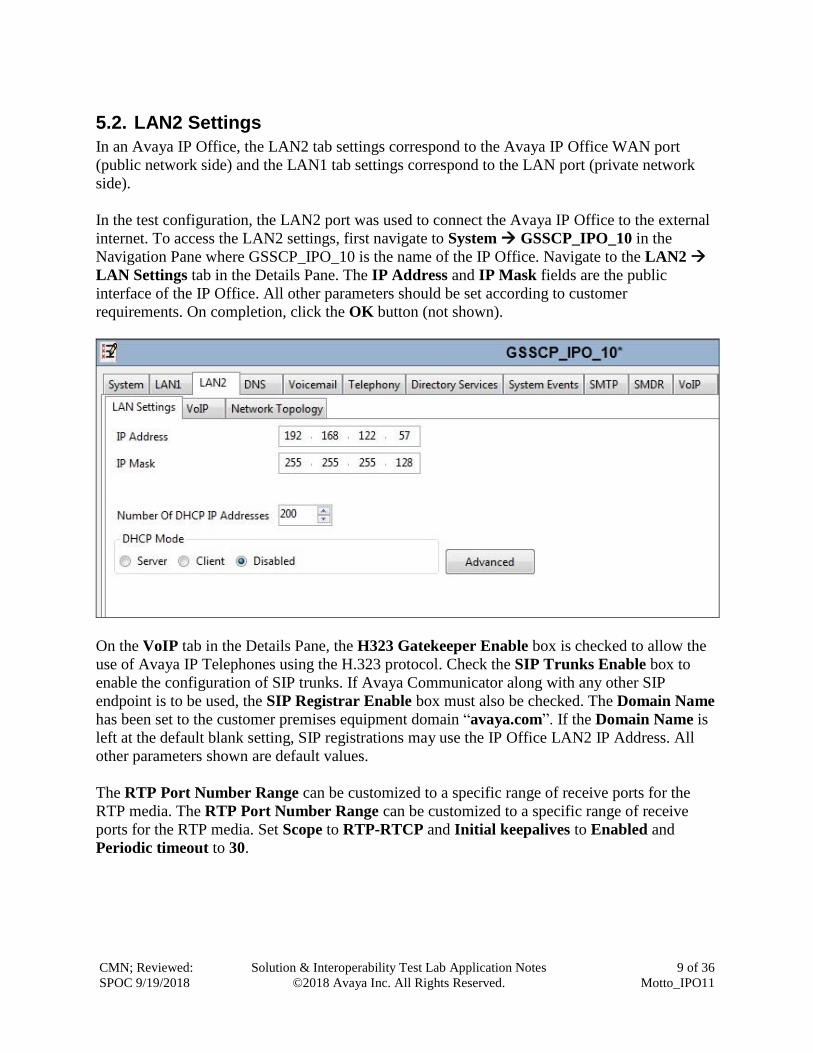
5.2. LAN2 Settings
In an Avaya IP Office, the LAN2 tab settings correspond to the Avaya IP Office WAN port
(public network side) and the LAN1 tab settings correspond to the LAN port (private network
side).
In the test configuration, the LAN2 port was used to connect the Avaya IP Office to the external
internet. To access the LAN2 settings, first navigate to System GSSCP_IPO_10 in the
Navigation Pane where GSSCP_IPO_10 is the name of the IP Office. Navigate to the LAN2
LAN Settings tab in the Details Pane. The IP Address and IP Mask fields are the public
interface of the IP Office. All other parameters should be set according to customer
requirements. On completion, click the OK button (not shown).
On the VoIP tab in the Details Pane, the H323 Gatekeeper Enable box is checked to allow the
use of Avaya IP Telephones using the H.323 protocol. Check the SIP Trunks Enable box to
enable the configuration of SIP trunks. If Avaya Communicator along with any other SIP
endpoint is to be used, the SIP Registrar Enable box must also be checked. The Domain Name
has been set to the customer premises equipment domain “avaya.com”. If the Domain Name is
left at the default blank setting, SIP registrations may use the IP Office LAN2 IP Address. All
other parameters shown are default values.
The RTP Port Number Range can be customized to a specific range of receive ports for the
RTP media. The RTP Port Number Range can be customized to a specific range of receive
ports for the RTP media. Set Scope to RTP-RTCP and Initial keepalives to Enabled and
Periodic timeout to 30.

CMN; Reviewed:
SPOC 9/19/2018
Solution & Interoperability Test Lab Application Notes
©2018 Avaya Inc. All Rights Reserved.
10 of 36
Motto_IPO11
Avaya IP Office can also be configured to mark the Differentiated Services Code Point (DSCP)
in the IP Header with specific values to support Quality of Services policies for both signalling
and media. The DSCP field is the value used for media and the SIG DSCP is the value used for
signalling. The specific values used for the compliance test are shown in the example below. All
other parameters should be set according to customer requirements. On completion, click the OK
button (not shown).
CMN; Reviewed:
SPOC 9/19/2018
Solution & Interoperability Test Lab Application Notes
©2018 Avaya Inc. All Rights Reserved.
11 of 36
Motto_IPO11
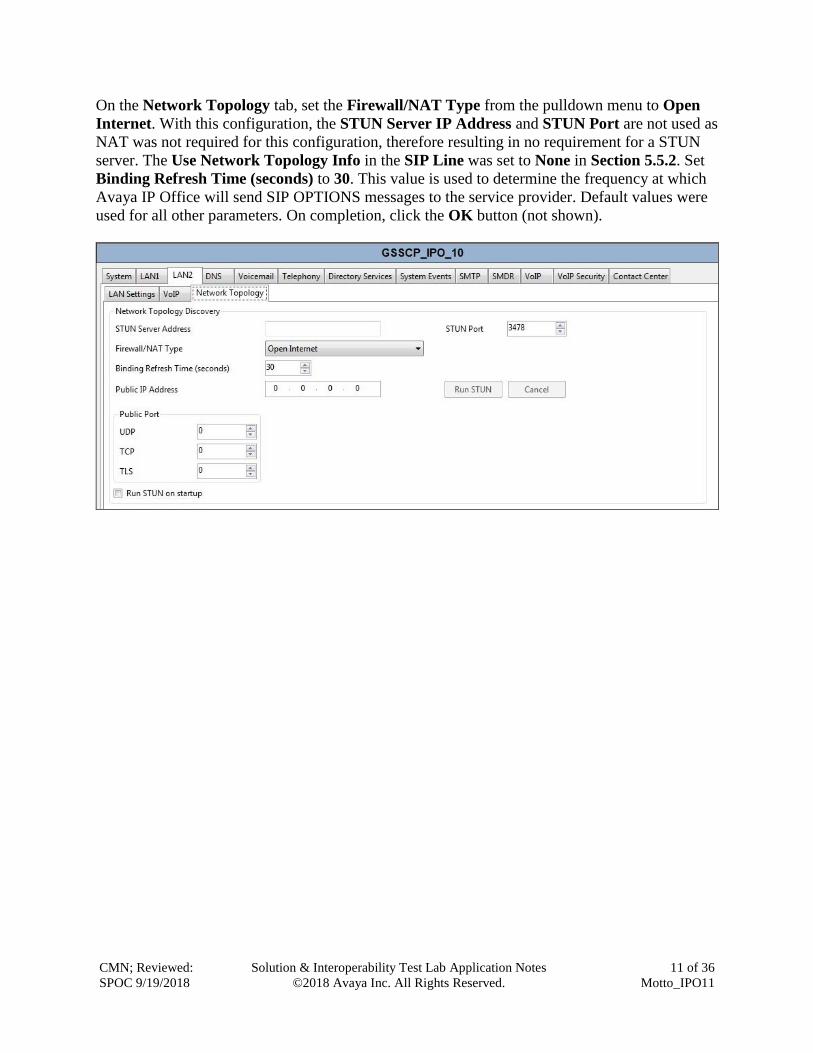
On the Network Topology tab, set the Firewall/NAT Type from the pulldown menu to Open
Internet. With this configuration, the STUN Server IP Address and STUN Port are not used as
NAT was not required for this configuration, therefore resulting in no requirement for a STUN
server. The Use Network Topology Info in the SIP Line was set to None in Section 5.5.2. Set
Binding Refresh Time (seconds) to 30. This value is used to determine the frequency at which
Avaya IP Office will send SIP OPTIONS messages to the service provider. Default values were
used for all other parameters. On completion, click the OK button (not shown).
CMN; Reviewed:
SPOC 9/19/2018
Solution & Interoperability Test Lab Application Notes
©2018 Avaya Inc. All Rights Reserved.
12 of 36
Motto_IPO11
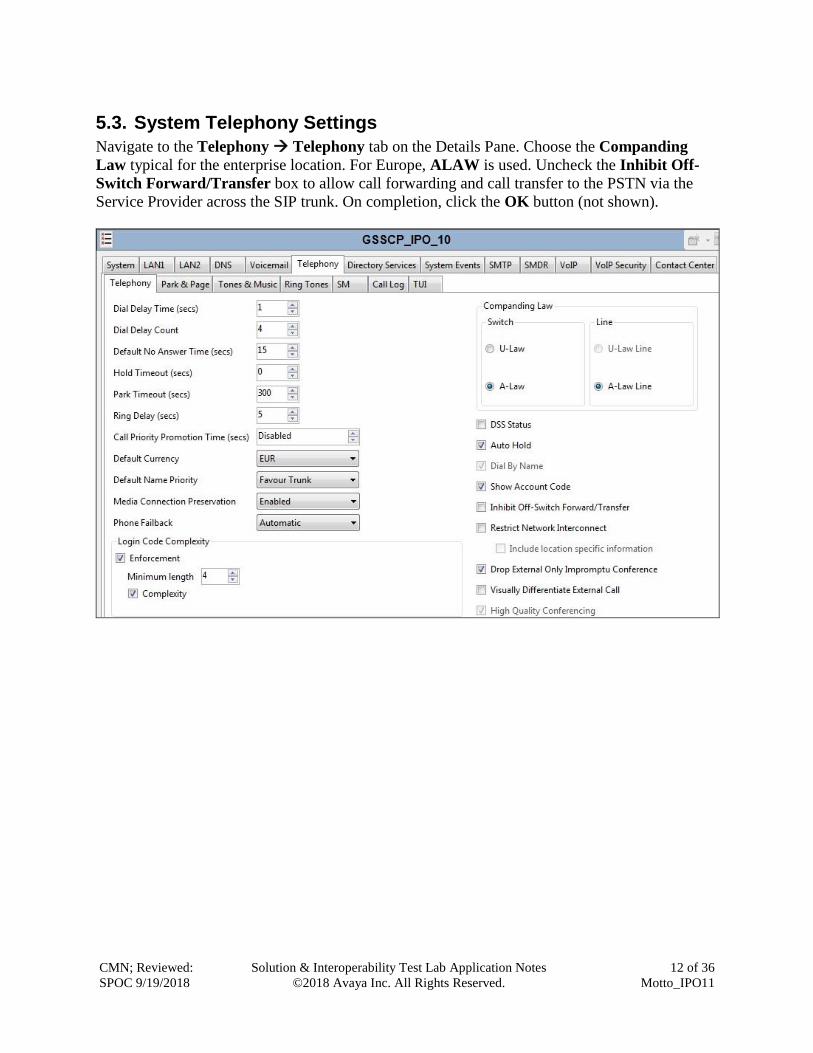
5.3. System Telephony Settings
Navigate to the Telephony Telephony tab on the Details Pane. Choose the Companding
Law typical for the enterprise location. For Europe, ALAW is used. Uncheck the Inhibit Off-
Switch Forward/Transfer box to allow call forwarding and call transfer to the PSTN via the
Service Provider across the SIP trunk. On completion, click the OK button (not shown).
CMN; Reviewed:
SPOC 9/19/2018
Solution & Interoperability Test Lab Application Notes
©2018 Avaya Inc. All Rights Reserved.
13 of 36
Motto_IPO11
5.4. VoIP Settings
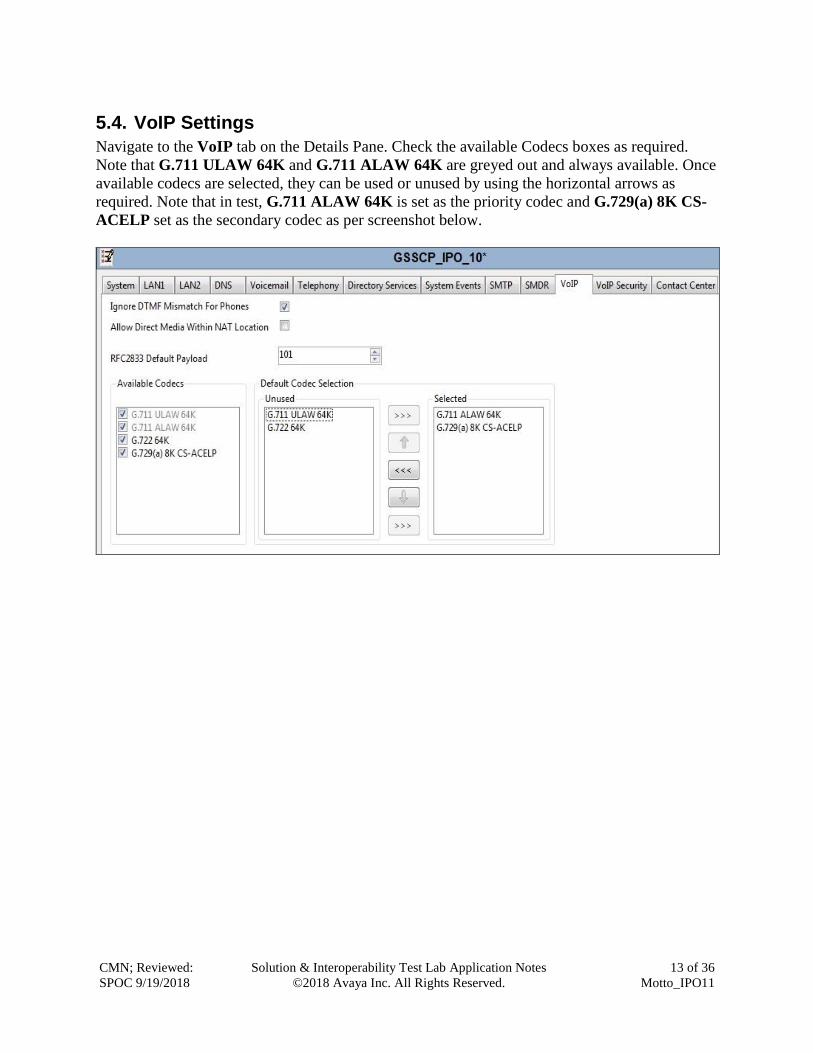
Navigate to the VoIP tab on the Details Pane. Check the available Codecs boxes as required.
Note that G.711 ULAW 64K and G.711 ALAW 64K are greyed out and always available. Once
available codecs are selected, they can be used or unused by using the horizontal arrows as
required. Note that in test, G.711 ALAW 64K is set as the priority codec and G.729(a) 8K CS-
ACELP set as the secondary codec as per screenshot below.
CMN; Reviewed:
SPOC 9/19/2018
Solution & Interoperability Test Lab Application Notes
©2018 Avaya Inc. All Rights Reserved.
14 of 36
Motto_IPO11
5.5. SIP Line
A SIP line is needed to establish the SIP connection between Avaya IP Office and the Motto
VoIP SIP Trunking service. The recommended method for configuring a SIP Line is to use the
template associated with these Application Notes. The template is an .xml file that can be used
by IP Office Manager to create a SIP Line. Follow the steps in Section 5.5.1 to create the SIP
Line from the template.
Some items relevant to a specific customer environment are not included in the template or may
need to be updated after the SIP Line is created. Examples include the following:
• IP addresses
• SIP Credentials (if applicable)
• SIP URI entries
• Setting of the Use Network Topology Info field on the Transport tab
Therefore, it is important that the SIP Line configuration be reviewed and updated if necessary
after the SIP Line is created via the template. The resulting SIP Line data can be verified against
the manual configuration shown in Section 5.5.2.
Also, the following SIP Line settings are not supported on Basic Edition:
• SIP Line – Originator number for forwarded and twinning calls
• Transport – Second Explicit DNS Server
• SIP Credentials – Registration Required
Alternatively, a SIP Line can be created manually. To do so, right-click Line in the Navigation
Pane and select New SIP Line. Then, follow the steps outlined in Section 5.5.2.
CMN; Reviewed:
SPOC 9/19/2018
Solution & Interoperability Test Lab Application Notes
©2018 Avaya Inc. All Rights Reserved.
15 of 36
Motto_IPO11
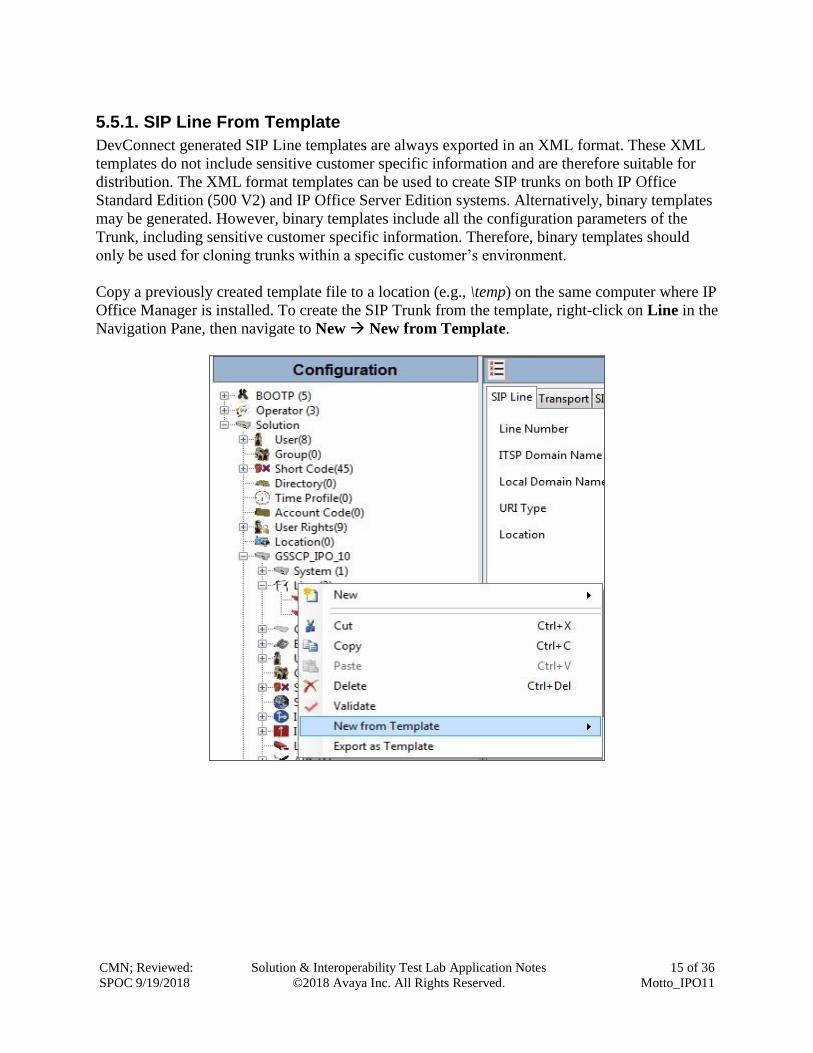
5.5.1. SIP Line From Template
DevConnect generated SIP Line templates are always exported in an XML format. These XML
templates do not include sensitive customer specific information and are therefore suitable for
distribution. The XML format templates can be used to create SIP trunks on both IP Office
Standard Edition (500 V2) and IP Office Server Edition systems. Alternatively, binary templates
may be generated. However, binary templates include all the configuration parameters of the
Trunk, including sensitive customer specific information. Therefore, binary templates should
only be used for cloning trunks within a specific customer’s environment.
Copy a previously created template file to a location (e.g., \temp) on the same computer where IP
Office Manager is installed. To create the SIP Trunk from the template, right-click on Line in the
Navigation Pane, then navigate to New New from Template.
CMN; Reviewed:
SPOC 9/19/2018
Solution & Interoperability Test Lab Application Notes
©2018 Avaya Inc. All Rights Reserved.
16 of 36
Motto_IPO11
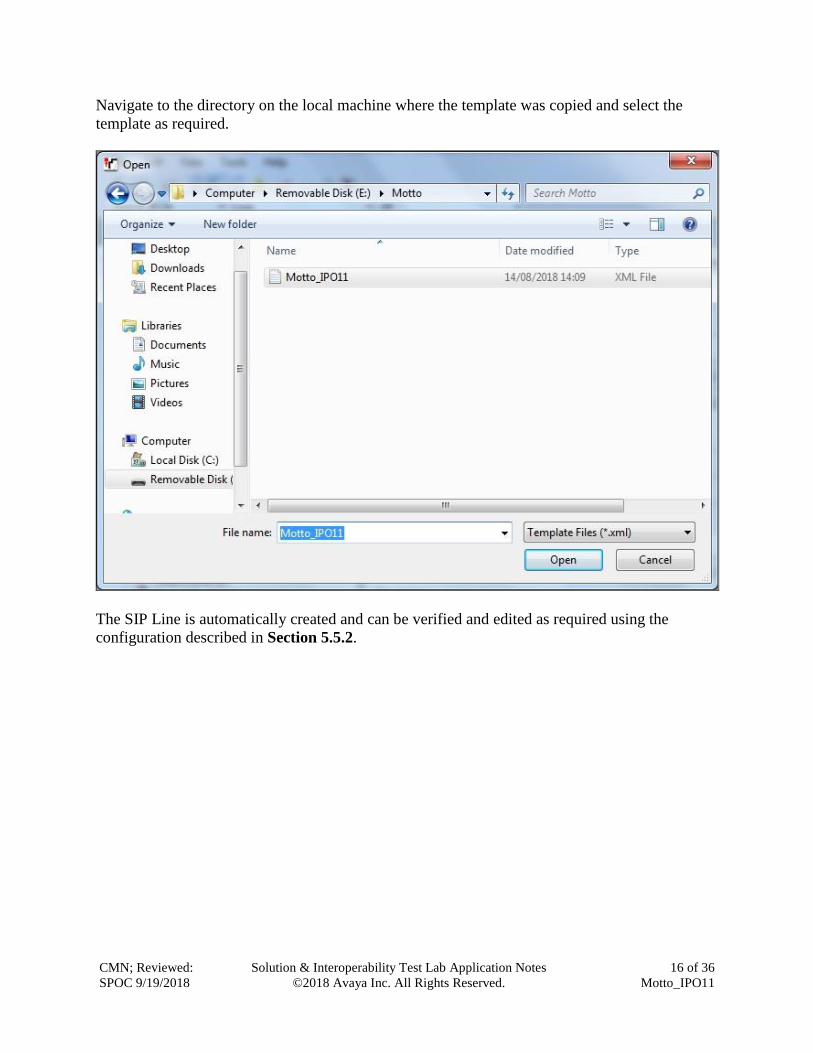
Navigate to the directory on the local machine where the template was copied and select the
template as required.
The SIP Line is automatically created and can be verified and edited as required using the
configuration described in Section 5.5.2.
CMN; Reviewed:
SPOC 9/19/2018
Solution & Interoperability Test Lab Application Notes
©2018 Avaya Inc. All Rights Reserved.
17 of 36
Motto_IPO11
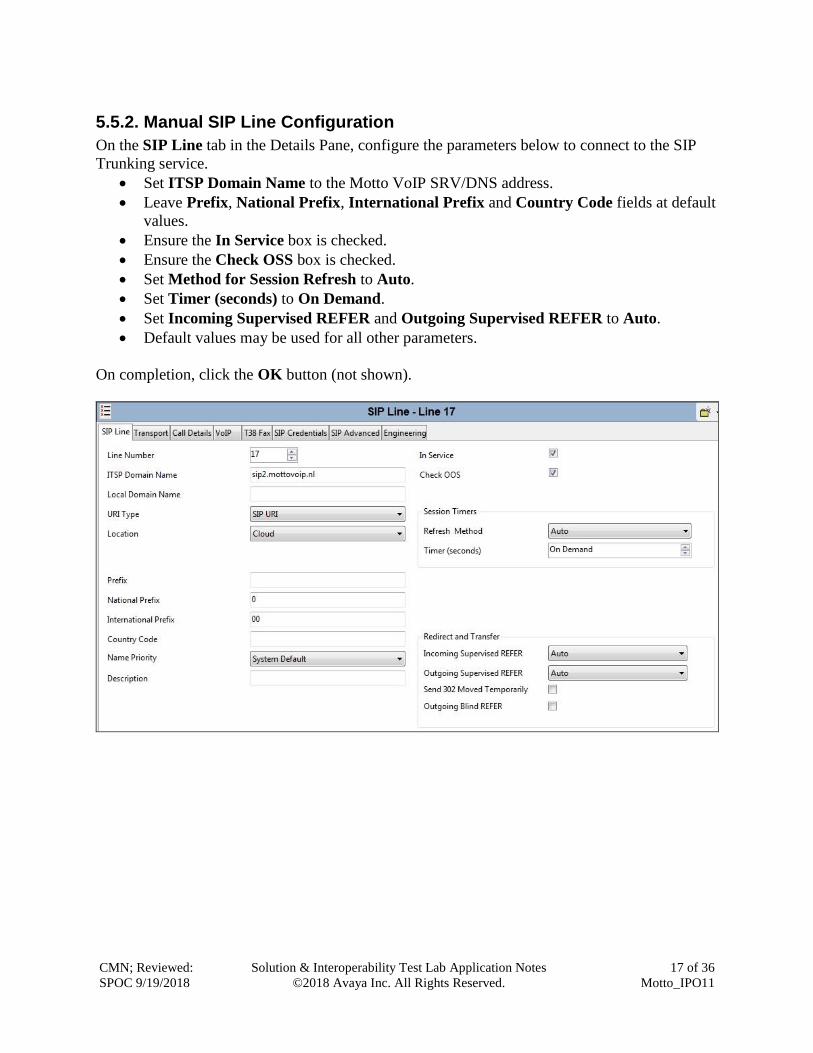
5.5.2. Manual SIP Line Configuration
On the SIP Line tab in the Details Pane, configure the parameters below to connect to the SIP
Trunking service.
• Set ITSP Domain Name to the Motto VoIP SRV/DNS address.
• Leave Prefix, National Prefix, International Prefix and Country Code fields at default
values.
• Ensure the In Service box is checked.
• Ensure the Check OSS box is checked.
• Set Method for Session Refresh to Auto.
• Set Timer (seconds) to On Demand.
• Set Incoming Supervised REFER and Outgoing Supervised REFER to Auto.
• Default values may be used for all other parameters.
On completion, click the OK button (not shown).
CMN; Reviewed:
SPOC 9/19/2018
Solution & Interoperability Test Lab Application Notes
©2018 Avaya Inc. All Rights Reserved.
18 of 36
Motto_IPO11
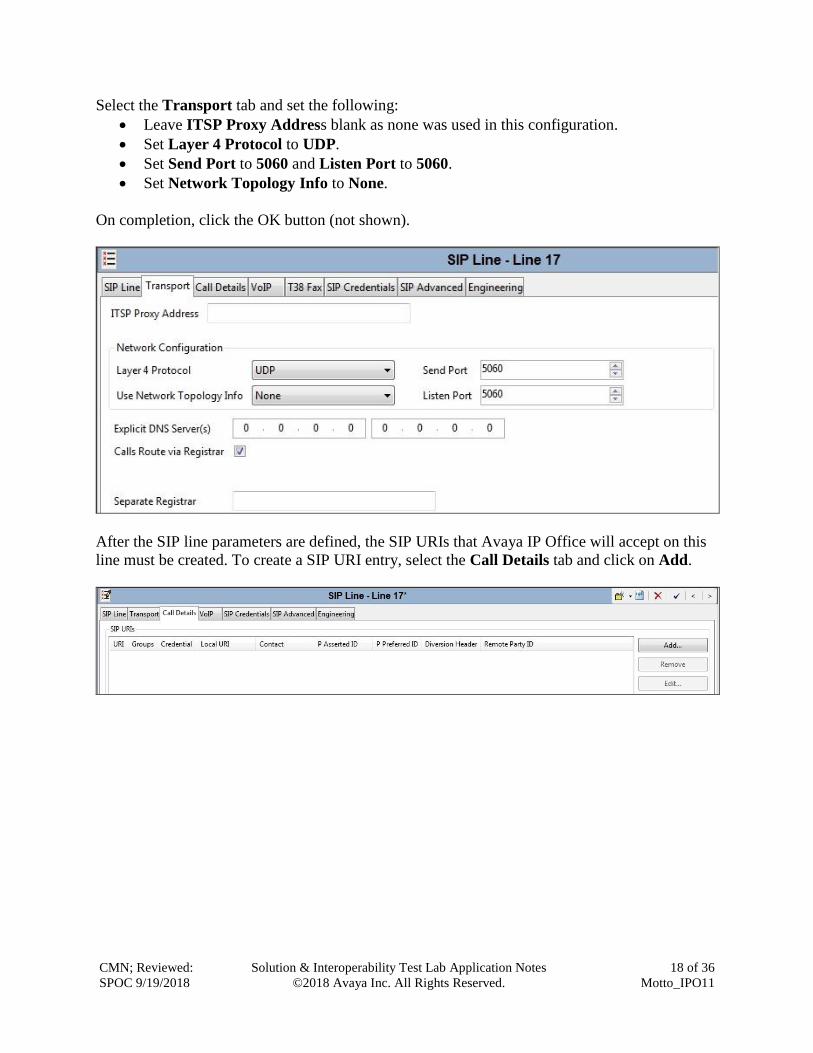
Select the Transport tab and set the following:
• Leave ITSP Proxy Address blank as none was used in this configuration.
• Set Layer 4 Protocol to UDP.
• Set Send Port to 5060 and Listen Port to 5060.
• Set Network Topology Info to None.
On completion, click the OK button (not shown).
After the SIP line parameters are defined, the SIP URIs that Avaya IP Office will accept on this
line must be created. To create a SIP URI entry, select the Call Details tab and click on Add.
CMN; Reviewed:
SPOC 9/19/2018
Solution & Interoperability Test Lab Application Notes
©2018 Avaya Inc. All Rights Reserved.
19 of 36
Motto_IPO11
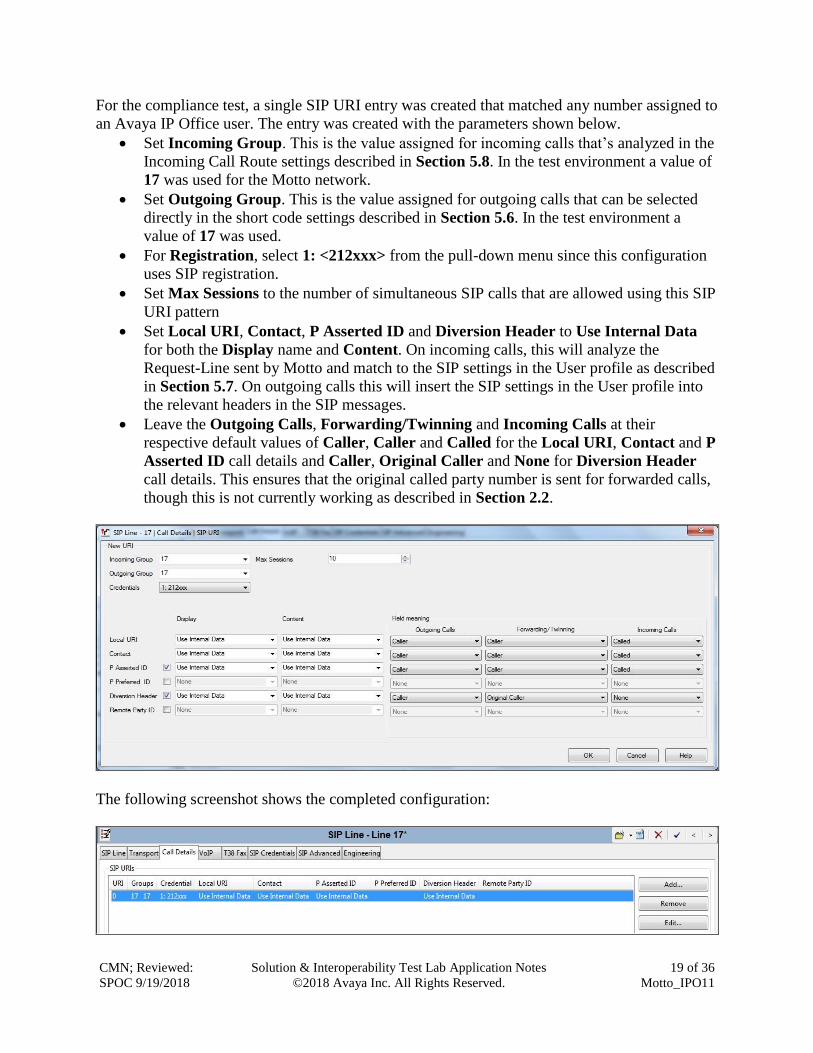
For the compliance test, a single SIP URI entry was created that matched any number assigned to
an Avaya IP Office user. The entry was created with the parameters shown below.
• Set Incoming Group. This is the value assigned for incoming calls that’s analyzed in the
Incoming Call Route settings described in Section 5.8. In the test environment a value of
17 was used for the Motto network.
• Set Outgoing Group. This is the value assigned for outgoing calls that can be selected
directly in the short code settings described in Section 5.6. In the test environment a
value of 17 was used.
• For Registration, select 1: <212xxx> from the pull-down menu since this configuration
uses SIP registration.
• Set Max Sessions to the number of simultaneous SIP calls that are allowed using this SIP
URI pattern
• Set Local URI, Contact, P Asserted ID and Diversion Header to Use Internal Data
for both the Display name and Content. On incoming calls, this will analyze the
Request-Line sent by Motto and match to the SIP settings in the User profile as described
in Section 5.7. On outgoing calls this will insert the SIP settings in the User profile into
the relevant headers in the SIP messages.
• Leave the Outgoing Calls, Forwarding/Twinning and Incoming Calls at their
respective default values of Caller, Caller and Called for the Local URI, Contact and P
Asserted ID call details and Caller, Original Caller and None for Diversion Header
call details. This ensures that the original called party number is sent for forwarded calls,
though this is not currently working as described in Section 2.2.
The following screenshot shows the completed configuration:
CMN; Reviewed:
SPOC 9/19/2018
Solution & Interoperability Test Lab Application Notes
©2018 Avaya Inc. All Rights Reserved.
20 of 36
Motto_IPO11
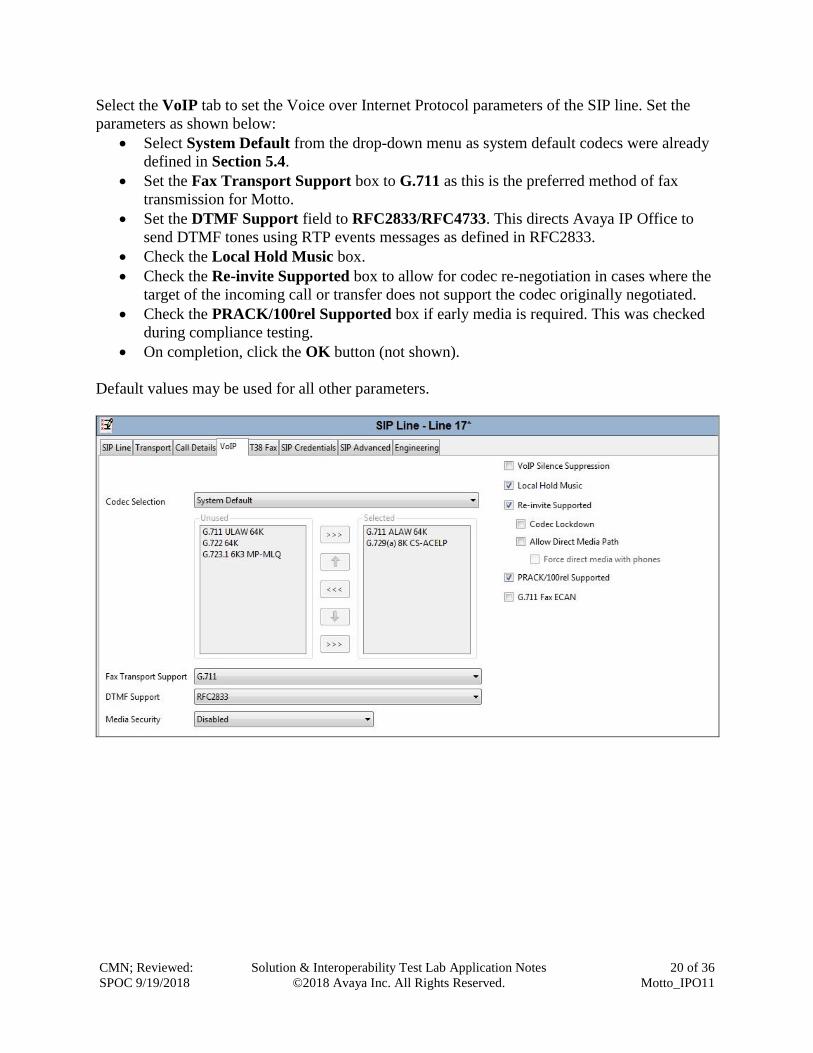
Select the VoIP tab to set the Voice over Internet Protocol parameters of the SIP line. Set the
parameters as shown below:
• Select System Default from the drop-down menu as system default codecs were already
defined in Section 5.4.
• Set the Fax Transport Support box to G.711 as this is the preferred method of fax
transmission for Motto.
• Set the DTMF Support field to RFC2833/RFC4733. This directs Avaya IP Office to
send DTMF tones using RTP events messages as defined in RFC2833.
• Check the Local Hold Music box.
• Check the Re-invite Supported box to allow for codec re-negotiation in cases where the
target of the incoming call or transfer does not support the codec originally negotiated.
• Check the PRACK/100rel Supported box if early media is required. This was checked
during compliance testing.
• On completion, click the OK button (not shown).
Default values may be used for all other parameters.

CMN; Reviewed:
SPOC 9/19/2018
Solution & Interoperability Test Lab Application Notes
©2018 Avaya Inc. All Rights Reserved.
21 of 36
Motto_IPO11
Select the SIP Credentials tab to administer registration details provided by Motto VoIP. This
allows the SIP Trunk to authenticate to the Motto VoIP SIP Trunk. Choose Add (not shown) and
enter the registration credentials provided by Motto VoIP as shown below. Click the OK button
to complete the SIP line administration.
CMN; Reviewed:
SPOC 9/19/2018
Solution & Interoperability Test Lab Application Notes
©2018 Avaya Inc. All Rights Reserved.
22 of 36
Motto_IPO11
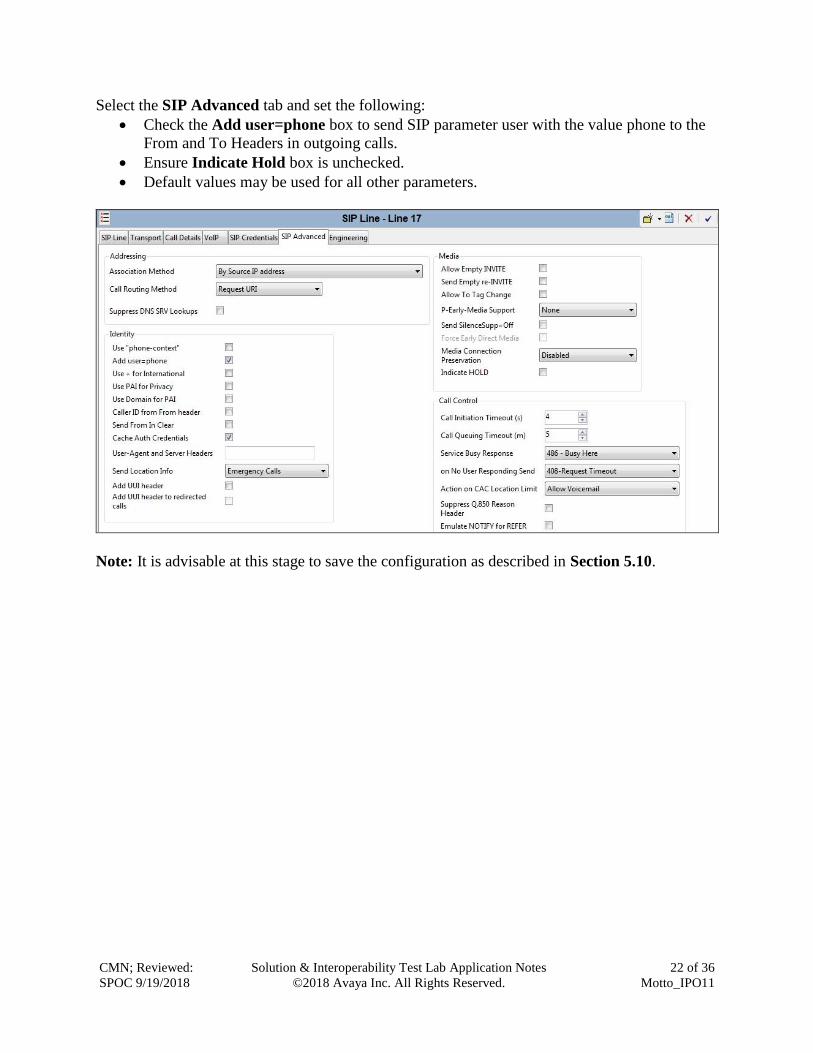
Select the SIP Advanced tab and set the following:
• Check the Add user=phone box to send SIP parameter user with the value phone to the
From and To Headers in outgoing calls.
• Ensure Indicate Hold box is unchecked.
• Default values may be used for all other parameters.
Note: It is advisable at this stage to save the configuration as described in Section 5.10.
CMN; Reviewed:
SPOC 9/19/2018
Solution & Interoperability Test Lab Application Notes
©2018 Avaya Inc. All Rights Reserved.
23 of 36
Motto_IPO11
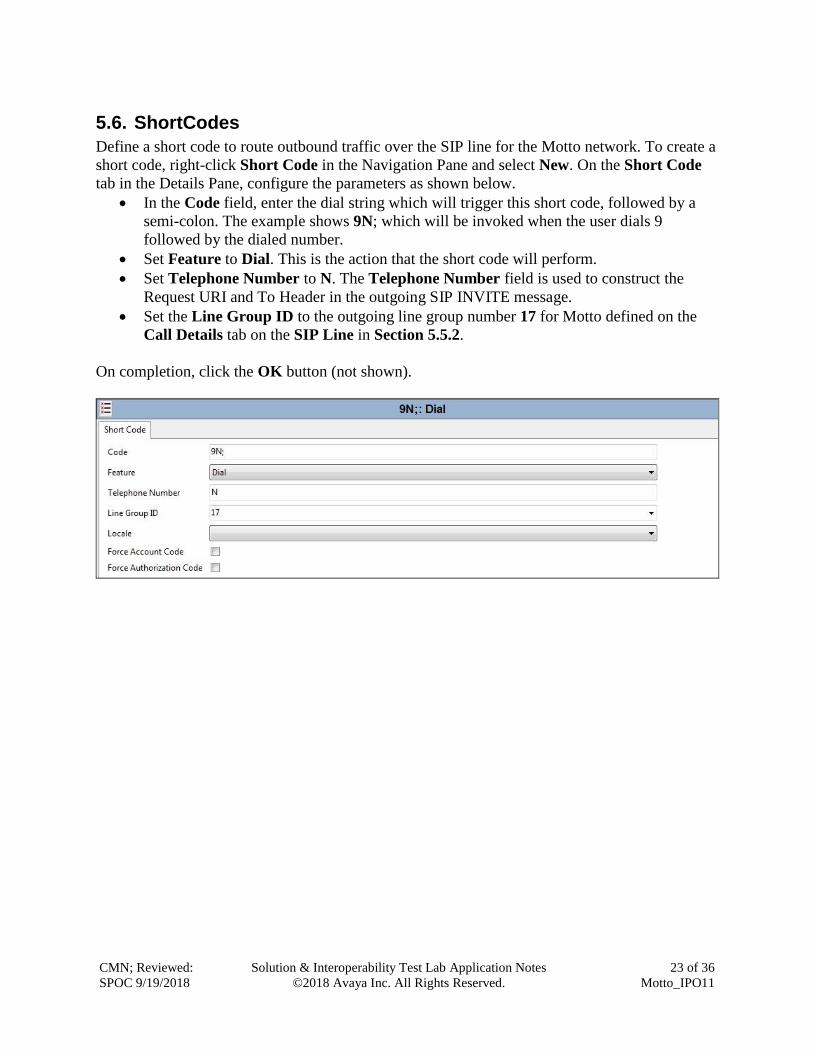
5.6. ShortCodes
Define a short code to route outbound traffic over the SIP line for the Motto network. To create a
short code, right-click Short Code in the Navigation Pane and select New. On the Short Code
tab in the Details Pane, configure the parameters as shown below.
• In the Code field, enter the dial string which will trigger this short code, followed by a
semi-colon. The example shows 9N; which will be invoked when the user dials 9
followed by the dialed number.
• Set Feature to Dial. This is the action that the short code will perform.
• Set Telephone Number to N. The Telephone Number field is used to construct the
Request URI and To Header in the outgoing SIP INVITE message.
• Set the Line Group ID to the outgoing line group number 17 for Motto defined on the
Call Details tab on the SIP Line in Section 5.5.2.
On completion, click the OK button (not shown).
CMN; Reviewed:
SPOC 9/19/2018
Solution & Interoperability Test Lab Application Notes
©2018 Avaya Inc. All Rights Reserved.
24 of 36
Motto_IPO11
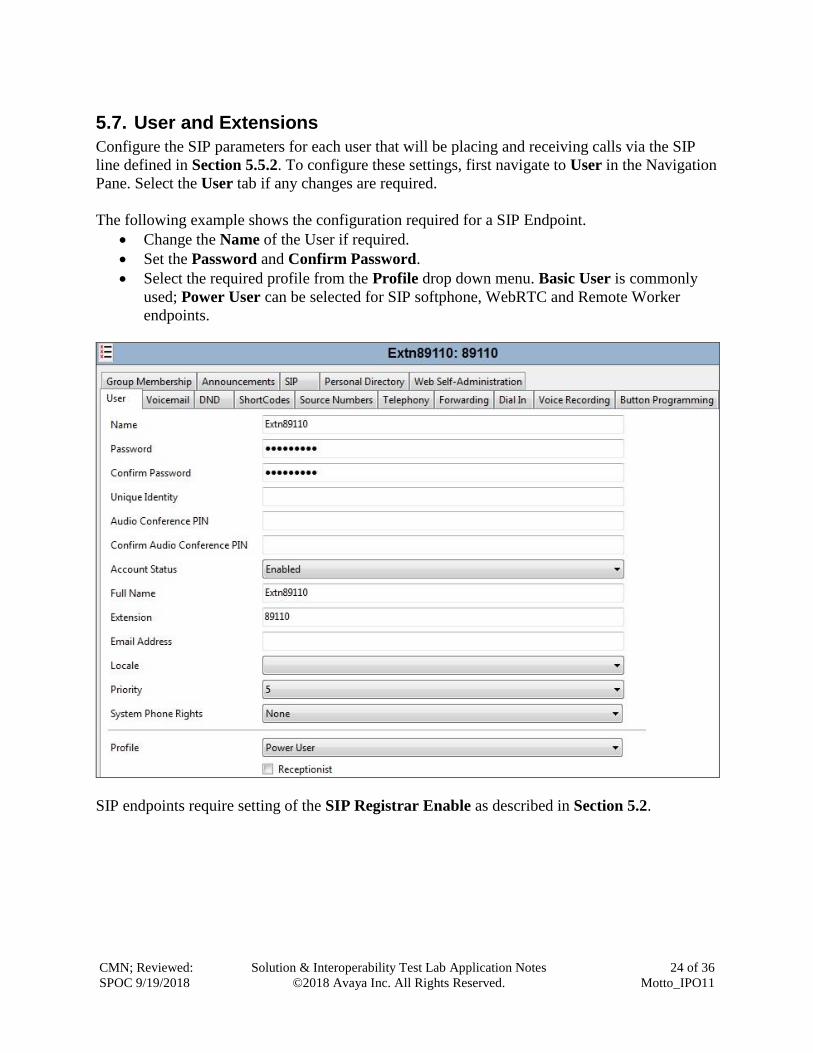
5.7. User and Extensions
Configure the SIP parameters for each user that will be placing and receiving calls via the SIP
line defined in Section 5.5.2. To configure these settings, first navigate to User in the Navigation
Pane. Select the User tab if any changes are required.
The following example shows the configuration required for a SIP Endpoint.
• Change the Name of the User if required.
• Set the Password and Confirm Password.
• Select the required profile from the Profile drop down menu. Basic User is commonly
used; Power User can be selected for SIP softphone, WebRTC and Remote Worker
endpoints.
SIP endpoints require setting of the SIP Registrar Enable as described in Section 5.2.
CMN; Reviewed:
SPOC 9/19/2018
Solution & Interoperability Test Lab Application Notes
©2018 Avaya Inc. All Rights Reserved.
25 of 36
Motto_IPO11
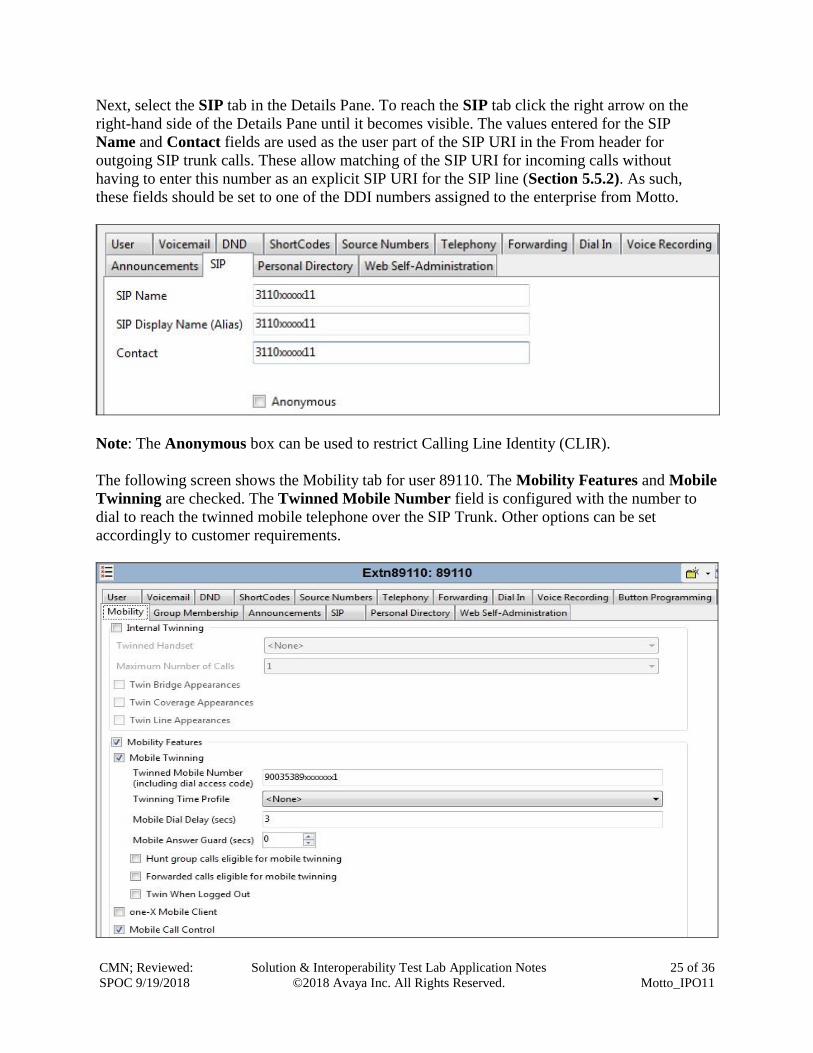
Next, select the SIP tab in the Details Pane. To reach the SIP tab click the right arrow on the
right-hand side of the Details Pane until it becomes visible. The values entered for the SIP
Name and Contact fields are used as the user part of the SIP URI in the From header for
outgoing SIP trunk calls. These allow matching of the SIP URI for incoming calls without
having to enter this number as an explicit SIP URI for the SIP line (Section 5.5.2). As such,
these fields should be set to one of the DDI numbers assigned to the enterprise from Motto.
Note: The Anonymous box can be used to restrict Calling Line Identity (CLIR).
The following screen shows the Mobility tab for user 89110. The Mobility Features and Mobile
Twinning are checked. The Twinned Mobile Number field is configured with the number to
dial to reach the twinned mobile telephone over the SIP Trunk. Other options can be set
accordingly to customer requirements.
CMN; Reviewed:
SPOC 9/19/2018
Solution & Interoperability Test Lab Application Notes
©2018 Avaya Inc. All Rights Reserved.
26 of 36
Motto_IPO11
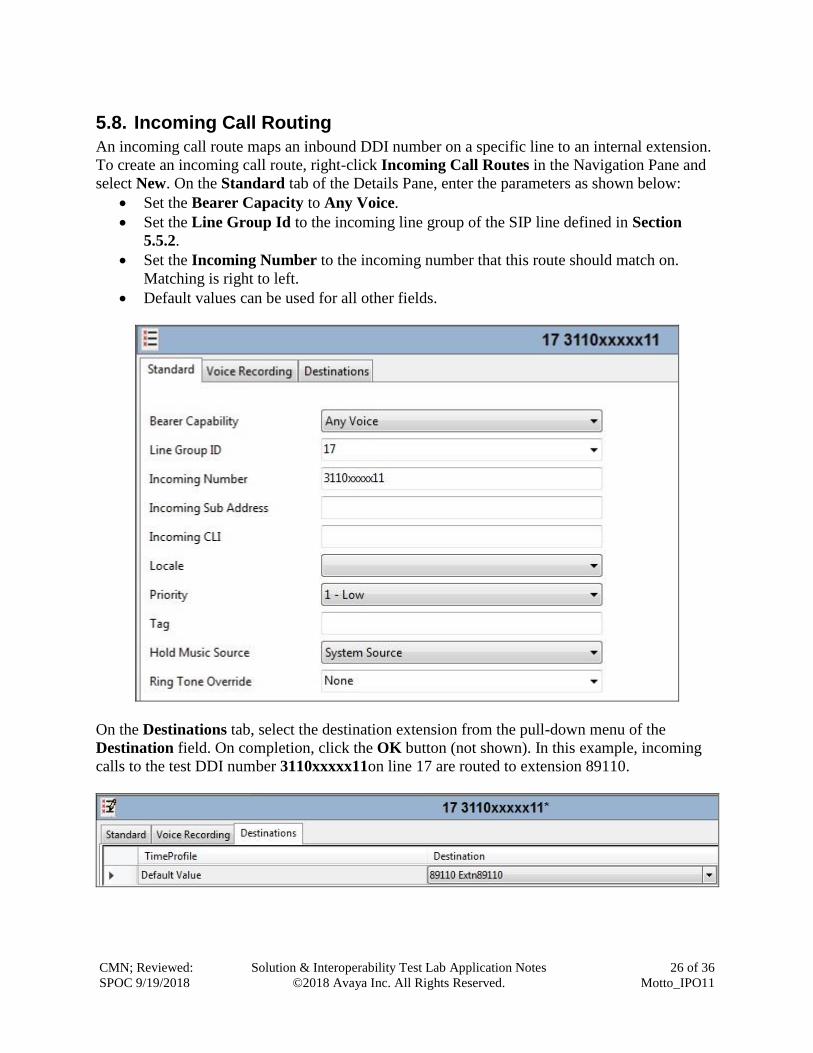
5.8. Incoming Call Routing
An incoming call route maps an inbound DDI number on a specific line to an internal extension.
To create an incoming call route, right-click Incoming Call Routes in the Navigation Pane and
select New. On the Standard tab of the Details Pane, enter the parameters as shown below:
• Set the Bearer Capacity to Any Voice.
• Set the Line Group Id to the incoming line group of the SIP line defined in Section
5.5.2.
• Set the Incoming Number to the incoming number that this route should match on.
Matching is right to left.
• Default values can be used for all other fields.
On the Destinations tab, select the destination extension from the pull-down menu of the
Destination field. On completion, click the OK button (not shown). In this example, incoming
calls to the test DDI number 3110xxxxx11on line 17 are routed to extension 89110.
CMN; Reviewed:
SPOC 9/19/2018
Solution & Interoperability Test Lab Application Notes
©2018 Avaya Inc. All Rights Reserved.
27 of 36
Motto_IPO11
5.9. G.711 Fax
At Release 11, both G.711 and T.38 Fax is supported on IP Office Server Edition when using an
IP Office Expansion (500 V2). The Motto VoIP SIP Trunk testing was carried out using this
configuration with only the analogue extension for the fax machine on the Expansion. In this
configuration, the G.711 fax settings are configured on the SIP line between the Expansion and
the Server.
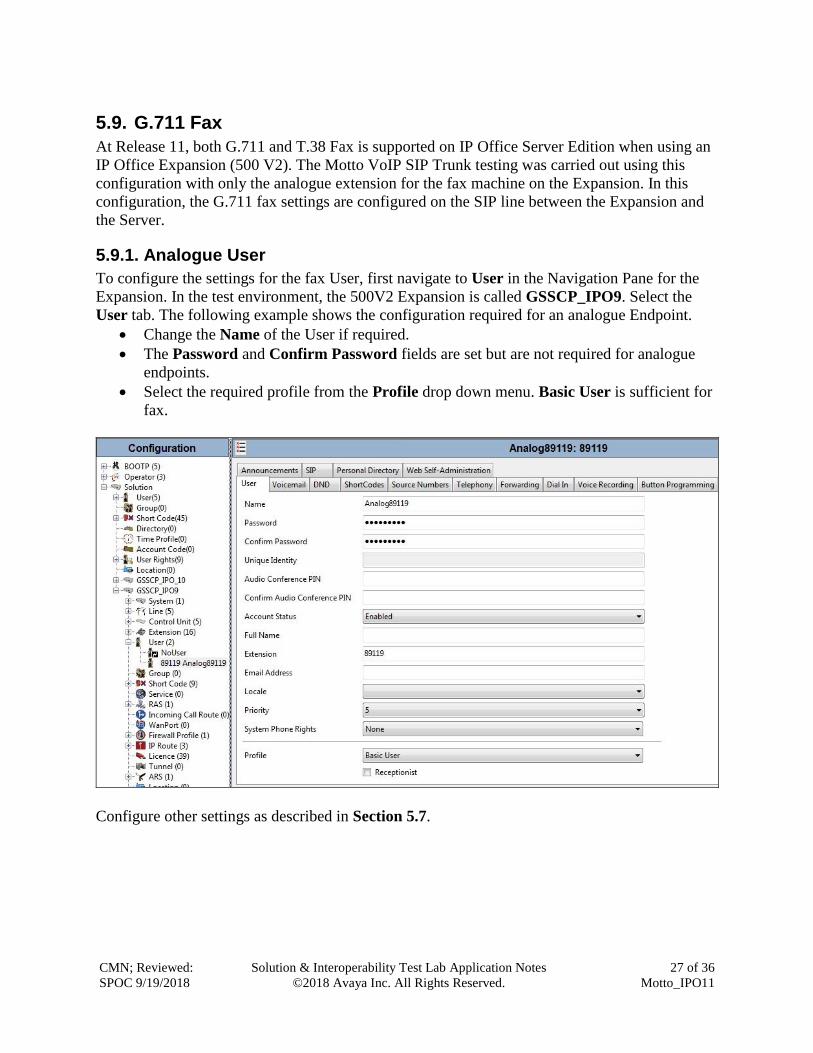
5.9.1. Analogue User
To configure the settings for the fax User, first navigate to User in the Navigation Pane for the
Expansion. In the test environment, the 500V2 Expansion is called GSSCP_IPO9. Select the
User tab. The following example shows the configuration required for an analogue Endpoint.
• Change the Name of the User if required.
• The Password and Confirm Password fields are set but are not required for analogue
endpoints.
• Select the required profile from the Profile drop down menu. Basic User is sufficient for
fax.
Configure other settings as described in Section 5.7.
CMN; Reviewed:
SPOC 9/19/2018
Solution & Interoperability Test Lab Application Notes
©2018 Avaya Inc. All Rights Reserved.
28 of 36
Motto_IPO11
5.9.2. G.711 Fax Settings
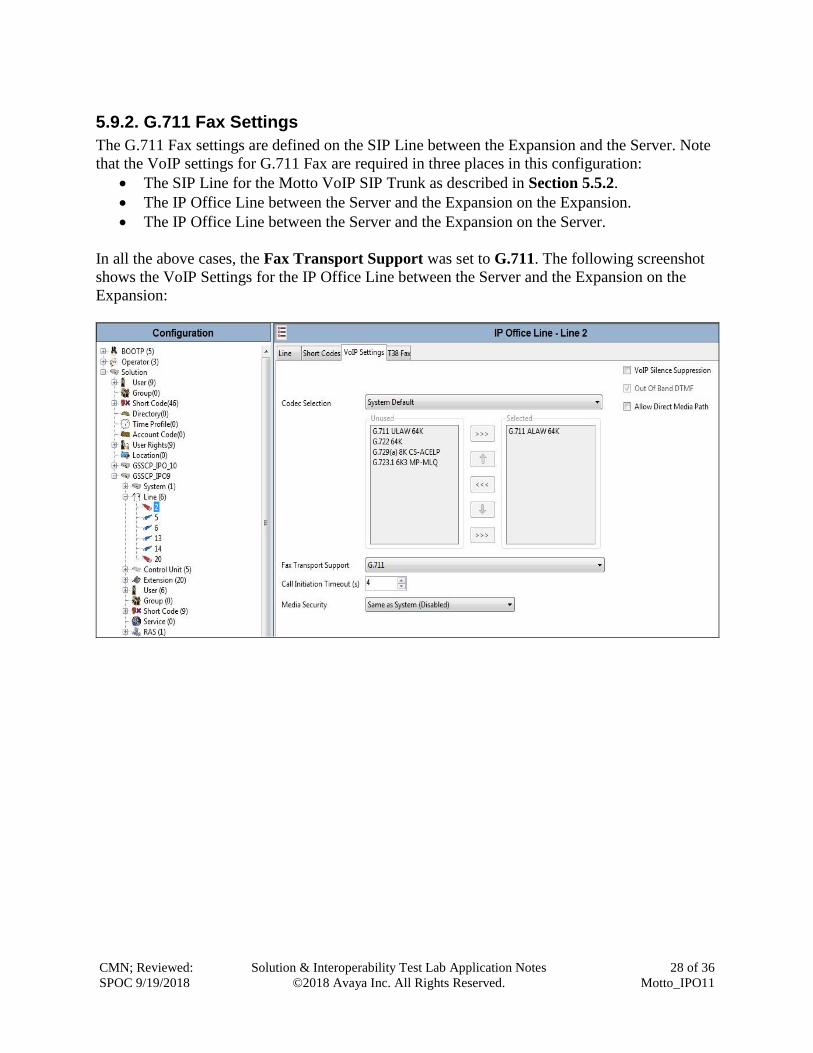
The G.711 Fax settings are defined on the SIP Line between the Expansion and the Server. Note
that the VoIP settings for G.711 Fax are required in three places in this configuration:
• The SIP Line for the Motto VoIP SIP Trunk as described in Section 5.5.2.
• The IP Office Line between the Server and the Expansion on the Expansion.
• The IP Office Line between the Server and the Expansion on the Server.
In all the above cases, the Fax Transport Support was set to G.711. The following screenshot
shows the VoIP Settings for the IP Office Line between the Server and the Expansion on the
Expansion:
CMN; Reviewed:
SPOC 9/19/2018
Solution & Interoperability Test Lab Application Notes
©2018 Avaya Inc. All Rights Reserved.
29 of 36
Motto_IPO11
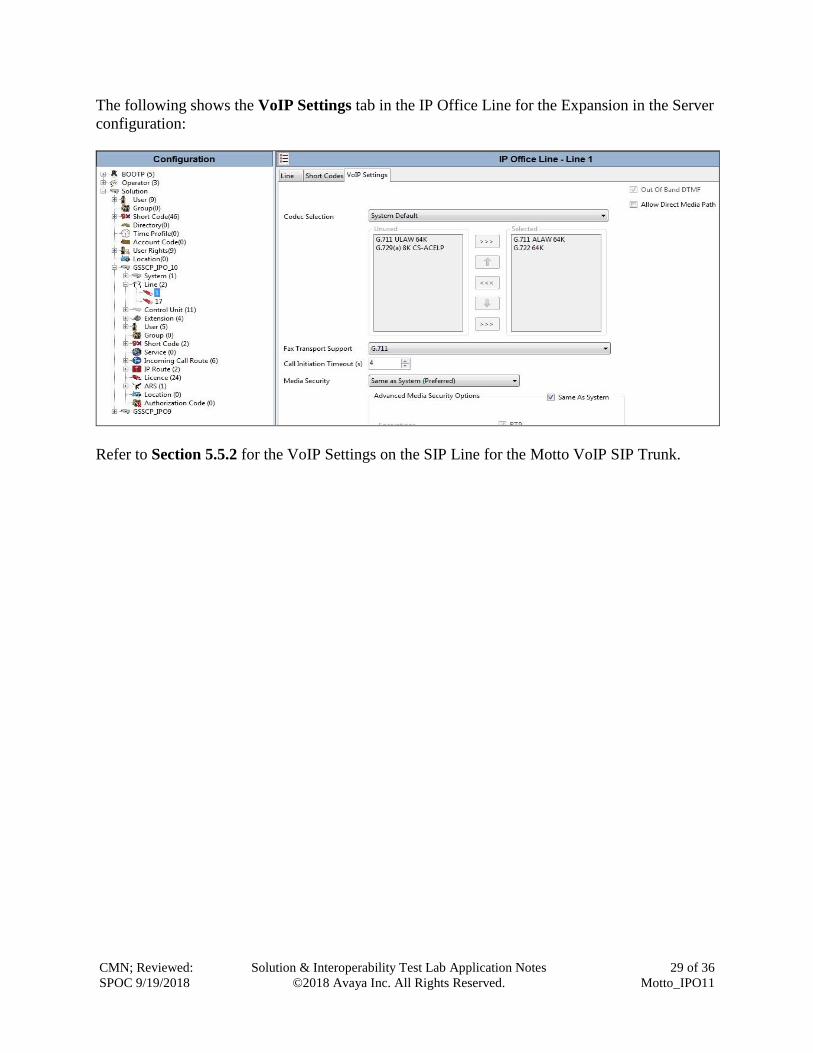
The following shows the VoIP Settings tab in the IP Office Line for the Expansion in the Server
configuration:
Refer to Section 5.5.2 for the VoIP Settings on the SIP Line for the Motto VoIP SIP Trunk.
CMN; Reviewed:
SPOC 9/19/2018
Solution & Interoperability Test Lab Application Notes
©2018 Avaya Inc. All Rights Reserved.
30 of 36
Motto_IPO11
5.10. Save Configuration
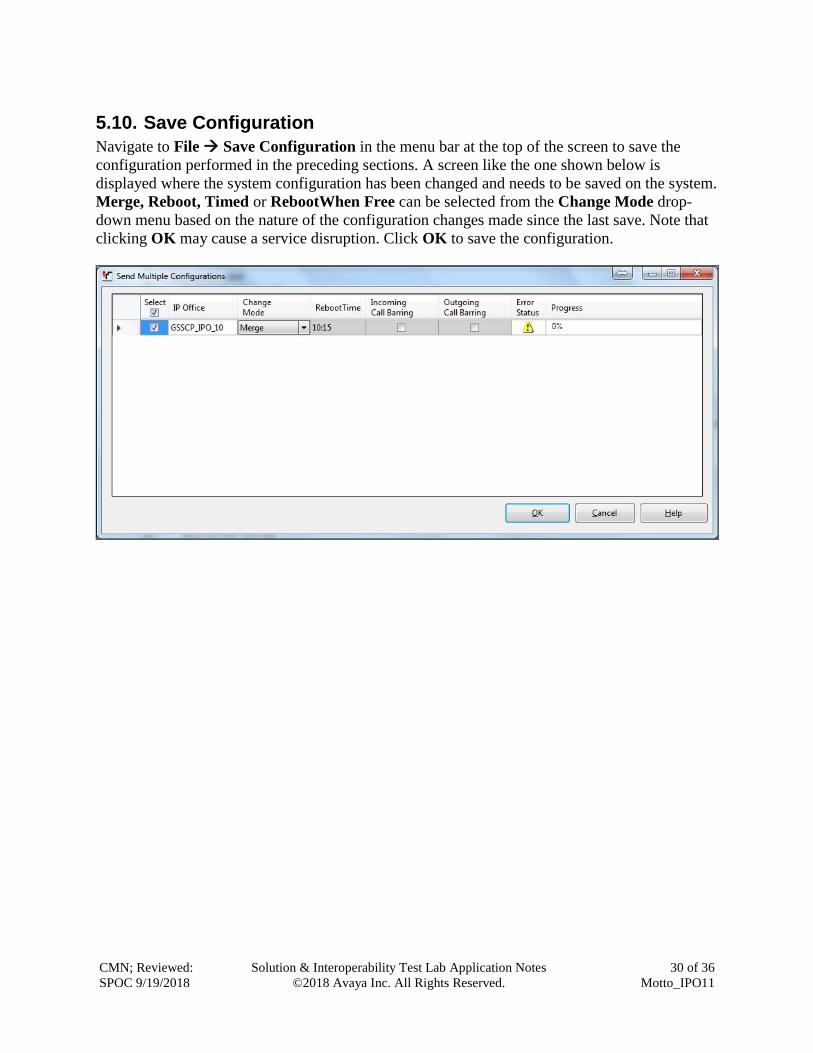
Navigate to File Save Configuration in the menu bar at the top of the screen to save the
configuration performed in the preceding sections. A screen like the one shown below is
displayed where the system configuration has been changed and needs to be saved on the system.
Merge, Reboot, Timed or RebootWhen Free can be selected from the Change Mode drop-
down menu based on the nature of the configuration changes made since the last save. Note that
clicking OK may cause a service disruption. Click OK to save the configuration.
CMN; Reviewed:
SPOC 9/19/2018
Solution & Interoperability Test Lab Application Notes
©2018 Avaya Inc. All Rights Reserved.
31 of 36
Motto_IPO11
6. Motto VoIP SIP Trunk Service Configuration Motto VoIP is responsible for the configuration of the SIP Trunk service. The customer will need
to provide the public IP address used to reach the Avaya IP Office at the enterprise. Motto VoIP
will provide the customer the necessary information to configure the SIP connection to the SIP
Trunking service including:
• IP address of SIP Trunking SIP proxy.
• Network SIP Domain.
• Supported codecs.
• DDI numbers.
• All IP addresses and port numbers used for signalling or media that will need access to
the enterprise network through any security devices.
7. Verification Steps This section includes steps that can be used to verify that the configuration has been done
correctly.
7.1. SIP Trunk status
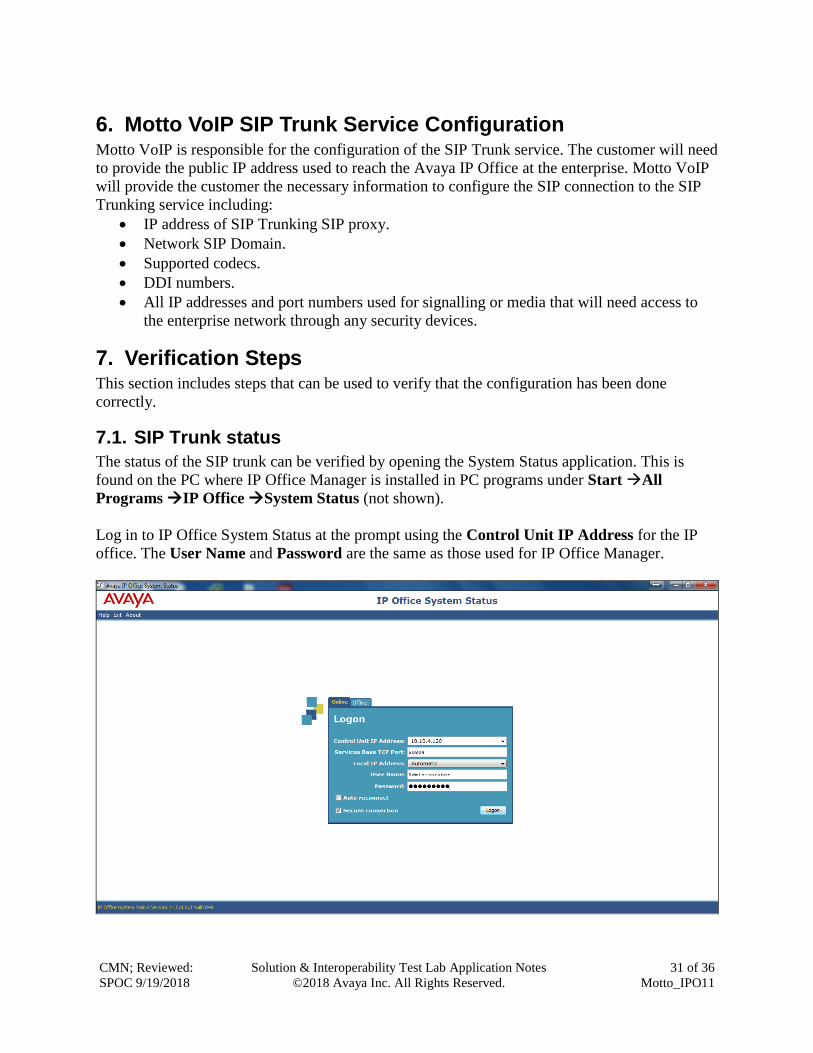
The status of the SIP trunk can be verified by opening the System Status application. This is
found on the PC where IP Office Manager is installed in PC programs under Start All
Programs IP Office System Status (not shown).
Log in to IP Office System Status at the prompt using the Control Unit IP Address for the IP
office. The User Name and Password are the same as those used for IP Office Manager.

CMN; Reviewed:
SPOC 9/19/2018
Solution & Interoperability Test Lab Application Notes
©2018 Avaya Inc. All Rights Reserved.
32 of 36
Motto_IPO11
From the left-hand menu expand Trunks and choose the SIP trunk (17 in this instance). The
status window will show the status as being idle and time in state if the Trunk is operational. The
IP address has been changed for security purposes.
7.2. Monitor
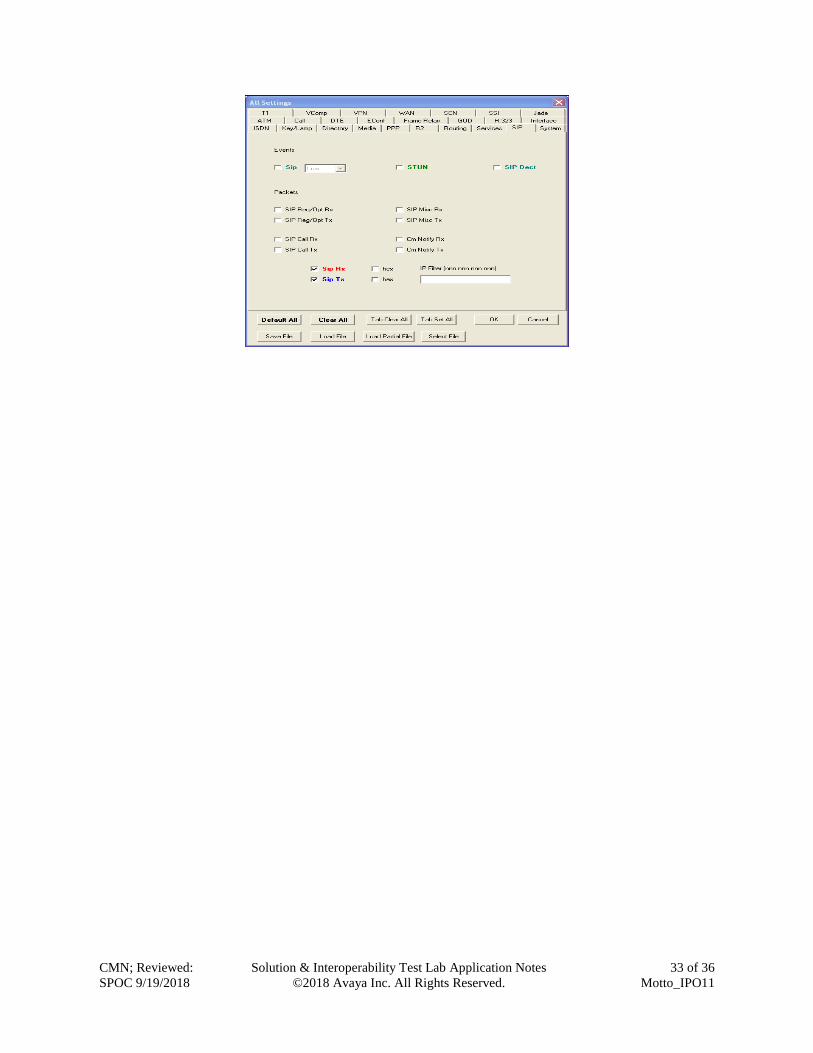
The Monitor application can also be used to monitor and troubleshoot IP Office. Monitor can
be accessed from Start Programs IP Office Monitor. The application allows the
monitored information to be customized. To customize, select the button that is third from the
right in the screen below, or select Filters Trace Options. The following screen shows the
SIP tab, allowing configuration of SIP monitoring. In this example, the SIP Rx and SIP Tx
boxes are checked. All SIP messages will appear in the trace with the colour blue. To
customize the color, right-click on SIP Rx or SIP Tx and select the desired color.
CMN; Reviewed:
SPOC 9/19/2018
Solution & Interoperability Test Lab Application Notes
©2018 Avaya Inc. All Rights Reserved.
33 of 36
Motto_IPO11
CMN; Reviewed:
SPOC 9/19/2018
Solution & Interoperability Test Lab Application Notes
©2018 Avaya Inc. All Rights Reserved.
34 of 36
Motto_IPO11
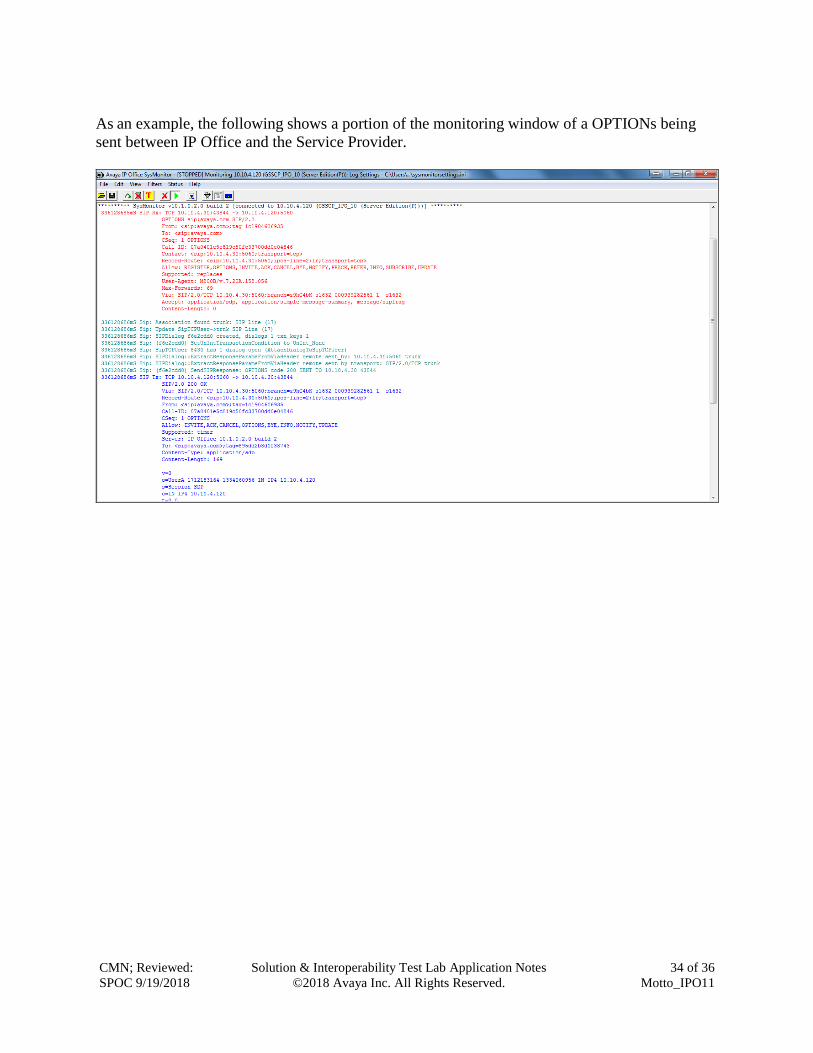
As an example, the following shows a portion of the monitoring window of a OPTIONs being
sent between IP Office and the Service Provider.
CMN; Reviewed:
SPOC 9/19/2018
Solution & Interoperability Test Lab Application Notes
©2018 Avaya Inc. All Rights Reserved.
35 of 36
Motto_IPO11
8. Conclusion These Application Notes describe the procedures required to configure the connectivity between
Avaya IP Office R11.0 and Motto VoIP SIP Trunk solution as shown in Figure 1.
The reference configuration shown in these Application Notes is representative of a basic
enterprise customer configuration and demonstrates Avaya IP Office can be configured to
interoperate successfully with Motto VoIP’s SIP Trunk service. Motto VoIP’s SIP Trunk service
is a SIP-based Voice over IP solution providing businesses a flexible, cost-saving alternative to
traditional hardwired telephony trunks. The service was successfully tested with a number of
observations listed in Section 2.2.
9. Additional References Product documentation for Avaya products may be found at http://support.avaya.com.
[1] Avaya IP Office™ Platform Start Here First, Release 11.0, May 2018.
[2] Avaya IP Office™ Platform Server Edition Reference Configuration, Release 11.0, May
2018.
[3] Deploying IP Office™ Platform Server Edition Solution, Release 11.0, May 2018.
[4] IP Office™ Platform 10.1, Deploying IP Office Essential Edition, Document number 15-
601042, May 2018.
[5] IP Office™ Platform 10.1 Installing and Maintaining the Avaya IP Office™ Platform
Application Server, Document number 15-601011, May 2018.
[6] Administering Avaya IP Office™ Platform with Web Manager, Release 11.0, May 2018.
[7] Administering Avaya IP Office™ Platform with Manager, Release 11.0, May 2018.
[8] IP Office™ Platform 10.1 Using Avaya IP Office™ Platform System Status, Document
number 15-601758, Apr 2018.
[9] IP Office™ Platform 11.0 Using IP Office System Monitor, Document number 15-601019,
May 2018.
[10] Using Avaya Communicator for Windows on IP Office, Release 10.0, Mar 2018.
[11] IP Office™ Platform 11.0 - Third-Party SIP Extension Installation Notes, Apr 2018.
[12] Avaya IP Office Knowledgebase, http://marketingtools.avaya.com/knowledgebase
CMN; Reviewed:
SPOC 9/19/2018
Solution & Interoperability Test Lab Application Notes
©2018 Avaya Inc. All Rights Reserved.
36 of 36
Motto_IPO11
©2018 Avaya Inc. All Rights Reserved.
Avaya and the Avaya Logo are trademarks of Avaya Inc. All trademarks identified by ® and
™ are registered trademarks or trademarks, respectively, of Avaya Inc. All other trademarks
are the property of their respective owners. The information provided in these Application
Notes is subject to change without notice. The configurations, technical data, and
recommendations provided in these Application Notes are believed to be accurate and
dependable, but are presented without express or implied warranty. Users are responsible for
their application of any products specified in these Application Notes.
Please e-mail any questions or comments pertaining to these Application Notes along with the
full title name and filename, located in the lower right corner, directly to the Avaya
DevConnect Program at [email protected].
Related Documents