AppGate® for AWS Step-by-Step Setup Guide Last revised April 28, 2017

Welcome message from author
This document is posted to help you gain knowledge. Please leave a comment to let me know what you think about it! Share it to your friends and learn new things together.
Transcript

AppGate® for AWS
Step-by-Step Setup Guide
Last revised April 28, 2017

AppGate for AWS Step-by-Step Guide Page 1
Contents Welcome & Overview ................................................................................................................................... 2
Getting Started .............................................................................................................................................. 3
Pre-Requisites ............................................................................................................................................... 4
But what about Security Groups? ............................................................................................................. 5
Browser Compatibility: ............................................................................................................................. 5
Step 1 AMI Instance Deployment ................................................................................................................. 6
Alternative method: AMI Creation with EC2 Console ................................................................................ 14
1.1 Create the EC2 instance for the AppGate system ....................................................................... 14
1.2 Configure Instance Details .......................................................................................................... 14
1.3 Create a new Security Group for the AppGate Server ................................................................ 17
TCP Port 443 ........................................................................................................................................ 17
TCP Port 444 ........................................................................................................................................ 18
TCP Port 22 .......................................................................................................................................... 18
1.4 Associate the Elastic IP address with the instance ........................................................................... 19
Step 2: AppGate Seeding ............................................................................................................................ 20
Step 3: Admin GUI Configuration ................................................................................................................ 25
3.1 Logging in as Admin .......................................................................................................................... 25
3.2 Create a Site ...................................................................................................................................... 27
3.3 Configure the Site and the Gateway in the Appliance ...................................................................... 29
3.4 Create (or Choose) an AWS Instance to Protect ............................................................................... 30
3.5 Create an Entitlement ....................................................................................................................... 31
3.6 Create a User ..................................................................................................................................... 35
3.7 Create a Filter .................................................................................................................................... 37
3.8 Create a Policy ................................................................................................................................... 38
Step 4: Install the Client .......................................................................................................................... 39
4.1 Log in with the Client ........................................................................................................................ 40
4.2 Test out Access! ................................................................................................................................ 43
What if it Didn’t Work? ....................................................................................................................... 43
4.3 Additional Things to Try .................................................................................................................... 44
Resources and Community ......................................................................................................................... 44

AppGate for AWS Step-by-Step Guide Page 2
Welcome & Overview Enterprises continue to rapidly embrace Amazon Web Services (AWS), but securing access to these
cloud-based workloads can be a challenge. AppGate is purpose-built for the AWS environment and
draws on user context to dynamically create a secure, encrypted network ‘segment of one’ that’s
tailored for each user session. It dramatically simplifies the cloud resource user access challenge and
eliminates IP-based over-entitled network access. AppGate provides a means for security teams to
efficiently and effectively control user access to EC2 resources.
AppGate is a distributed network access control system that creates a unique access filter for each
user/device combination. This patent pending access system dynamically matches the context
information from the user and device with the context information it polls in real-time from the cloud
provider. Users, devices, and their context can now be matched by the AppGate policy engine to allow
access to and only to the desired instances.
With simple policies in place, network access automatically adapts in real-time to changing conditions
on the client as well as on the cloud infrastructure side. For example, new EC2 server instances are
automatically detected, and user access is automatically granted if permitted by policy. No manual
intervention is required.
Let’s take a look at how we’re going to be setting up the AppGate server (designated by the icon in
the diagram below). AppGate acts as a dynamic network gateway between users and protected
resources running in AWS.
All user traffic is tunneled from their device (via a virtual network adapter, similar to a VPN client), and
passed through the AppGate gateway to the protected resources. All traffic to the AppGate gateway is
encrypted, so these resources can be securely accessed regardless of location. And the set of protected
resources is dynamically adjusted, automatically responding to changes in the AWS environment.
As you’ll see, this is much more dynamic and flexible than a firewall – we’ll be setting policies that
control user access based on user attributes, and on server attributes (such as AWS tags).
This Getting Started guide will take you through the steps necessary to set up and configure AppGate to
protect your AWS resources. We also have a video walkthrough of this step-by-step configuration,

AppGate for AWS Step-by-Step Guide Page 3
available on the AppGate for Amazon Web Services resources page here:
https://www.cryptzone.com/resources/aws-resources
The AppGate product documentation is available here:
Admin Guide: https://help.cryptzone.com/adminguide/index.html
Client User Guide: https://help.cryptzone.com/userguide
And finally…we’re here to help! Cryptzone has an online AppGate for AWS community here
https://cryptzone.vbulletin.net/
Getting Started There are four steps to getting your AppGate system running, plus some basic pre-requisites:
0. AWS Pre-requisites
1. Create the EC2 AMI instance for the AppGate system
2. Seed the AppGate server from the SSH command time
3. Configure the server through the AppGate administrative GUI
4. Install the client, and test it out!
The Pre-Requisites are noted below – in short, you’ll just need to be set up with a VPC that has an
appropriate subnet, and an available Elastic IP address.
Step 1 is very straightforward, and is something you’ve likely done dozens (if not hundreds) of times.
We’re including this for completeness, and because there are a couple small details that it’s important
to get right, in particular the security group.
Step 2 is also very straightforward – after securely logging in to the server via SSH, you’ll seed the
appliance with some basic configuration details such as the administrative passwords.
Step 3 is where it gets interesting, as you’ll be using the AppGate admin GUI to configure policies,
resources, and users. This is the bulk of the setup work, as we’ll be introducing you to the AppGate
policy and entitlement model.
And Step 4 is where it all comes together, and you can see AppGate in action, dynamically protecting
your AWS resources.
So let’s get started – in about 20 minutes you’ll have the system up and running, and will be playing with
different polices and user access rights!

AppGate for AWS Step-by-Step Guide Page 4
Pre-Requisites This document assumes that you’re familiar with AWS EC2, and have some experience creating AMIs,
and setting up a VPC, subnet, Internet Gateway, and Router within AWS. If not, or if you need a
refresher, please take a look readily available online resources, such as the AWS documentation here:
http://docs.aws.amazon.com/AmazonVPC/latest/UserGuide/VPC_Networking.html
Let’s briefly explain what you’ll need in your environment to set up AppGate to protect your resources:
VPC
You should have a Virtual Private Cloud (VPC) set up with its own subnet that the AppGate Gateway is
going to protect. This can be an existing VPC, or a new one. In any case, instances running in this VPC
must already be accessible from the internet with an Internet Gateway set up properly.
You probably already have multiple VPCs already set up, so just choose one of those to use for testing
out AppGate.
Note: Keep in mind that we’re going to route all traffic to all instances in the VPC through the AppGate
security appliance, so the VPC should be only be hosting development or test workloads – access will be
interrupted during this setup process, and will require use of the AppGate client after setup.
In this setup guide, we’re assuming that you have a subnet setup with a contiguous address space in
which the protected resources will be placed. In our example, we’re using 10.5.0.0/24, as shown below.
What’s important about this network setup is that it has an Internet Gateway set up in AWS with a
Route Table that allows traffic into it. If you can currently access resources within the VPC, you’re likely
already set up as in the below example.
Elastic IP Address
Because AppGate is a network security server, the instance requires a fixed IP address. A static IP
address is important, as the IP address is used in AppGate’s self-signed certificate generated by the
system. This certificate is used to establish trusted communications between appliances (peer-
interface) and between client and appliance (client-interface). Clients also cache the server’s IP address,
and a changing address will result in trust and connectivity problems.
If you’re using a Cloud Formation Template deployment approach (see below) you can choose to have it
automatically create a new ElasticIP address during the deployment process. If you’re using the EC2
Console to deploy AppGate, make sure that you have an Elastic IP address available to associate with it
or be prepared to re-associate one.
IAM Role for read-access to EC2
Likewise, AppGate will assume an IAM Role while running, which needs a policy attached to it to allow
read access within EC2. The Cloud Formation Template will automatically create a new IAM role for you.

AppGate for AWS Step-by-Step Guide Page 5
If you’re using the EC2 console, create a new role and choose the role type “Amazon EC2”, then attach
the existing policy “AmazonEC2ReadOnlyAccess” to it:
The role will be used later when launching the instance. The instance will then inherit the rights from the
role which are needed for the name-resolver to properly work.
But what about Security Groups? Good question! Of course both the AppGate server and the protected resources will need properly
configured security groups. We’ll create these during the setup process below.
Browser Compatibility: Note: Due to an issue with Internet Explorer’s support for sites using TLS1.2 and SHA-512 hashed
certificates, Internet Explorer is not compatible with the AppGate administrative console. Please use a
supported browser such as Chrome or Firefox for the administrative steps in the Admin GUI
Configuration section below.

AppGate for AWS Step-by-Step Guide Page 6
Step 1 AMI Instance Deployment Navigate to AppGate's product detail page on the AWS Marketplace to obtain the screen below. The
AMI instance can be delivered in two different ways. Make sure your account has appropriate
permissions within the AWS environment, to read and create EC2, S3, and networking components.
The preferred and easiest way is to use the Cloud Formation Template, denoted as the “Standalone
AppGate Deployment” in the Marketplace. The alternative method, “Single AMI” is the manual
deployment through a classic console instance deployment. If you wish to choose the “Single AMI”
method, you can skip this section and instead go to the “Alternative method: AMI Creation with EC2
Console” section later in this document.
In the drop down Delivery Methods choose “Standalone AppGate Deployment” and press

AppGate for AWS Step-by-Step Guide Page 7
Under the Launch settings, assure you have chosen the latest version and the Region you want to launch
into. Also, if you are creating this AMI for training or testing, make sure the “Hourly” Subscription Term
is selected.

AppGate for AWS Step-by-Step Guide Page 8
Verify the “Standalone AppGate Deployment” is selected:
Then go ahead and press:
On the screen verify the “Specify an Amazon S3 template URL” is selected and prefilled as to the image
below, then press next:

AppGate for AWS Step-by-Step Guide Page 9
Specify the Details as follows:
Edit the Stack Name to your liking
Make sure “AllocateElasticIP” is set to yes.
Select your desired Instance Type to determine the EC2 machine size
In the keyName field choose the EC2 key for which you have the private key (pem) at hand.
In the next three fields, enter a valid CIDR-format IP address for ports 443, 444, and 22. See below
for a full explanation. The IP address in our example is 50.235.77.114. Yours will be different.
o SourceLocation 443
o SourceLocation 444:
o SourceLocationSSH:
VPCId: select into what VPC AppGate should be deployed.
SubnetID: select a subnet belonging to the VPC
IP address ranges:
These must all be entered in CIDR format, for example:
50.235.77.114/32 to specify one IP address, or 0.0.0.0/0 to open the port to the entire internet.
Source Location 443
This is the port that the AppGate gateway uses to tunnel all client traffic through. AppGate decrypts the
traffic, and sends it on to its destination, which is one of the resources you will later define to protect.

AppGate for AWS Step-by-Step Guide Page 10
So, TCP port 443 should be open to all IP addresses that your users may be accessing your protected
resources from. You can start by opening the port for your current IP address (keeping in mind that you
may need to expand this list later, for example if you’re accessing your EC2 instances from home, or
from a different location).
The next two ports are used only for administrative access as follows:
Source Location 444
This port is used for the admin GUI, and needs to be opened to your IP address so you can operate the
admin console.
Source Location SSH (TCP Port 22)
This port is used one time, for you to SSH into the server to seed it. We need to enable it for now, but
can turn it off after our initial seeding.
Note: In a production environment, you would most likely want to carefully control which devices could
reach Port 444 or 22 on your Appliance as they are administrative ports.
On the options page, add a Name tag to identify the appliance. The IAM role should be left empty so
that the CloudFormation will create the appropriate IAM role. The role will have the correct read-only
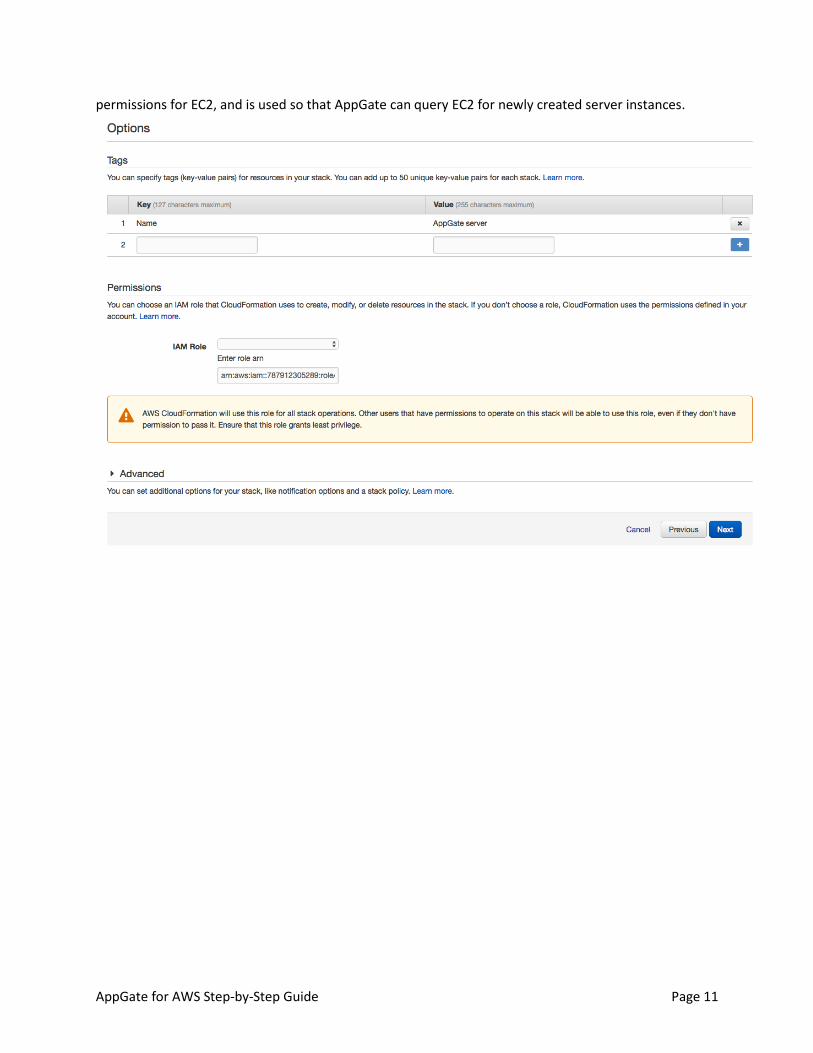
AppGate for AWS Step-by-Step Guide Page 11
permissions for EC2, and is used so that AppGate can query EC2 for newly created server instances.

AppGate for AWS Step-by-Step Guide Page 12
On the last page review the settings:

AppGate for AWS Step-by-Step Guide Page 13
Tick the check box at the bottom and then click on Create. This will take you to the CloudFormation
Dashboard in the AWS console (you may need to click the “refresh” button). Click on the Stack Name to
view the creation progress
When ready the status will show as follows – this typically completes within 5 minutes.
Once this is complete, proceed to page 19, AppGate Seeding for next steps.

AppGate for AWS Step-by-Step Guide Page 14
Alternative method: AMI Creation with EC2 Console In this Step, we’re going to launch the AMI for the AppGate server. The screenshots below follow the
launch process from within the EC2 console.
1.1 Create the EC2 instance for the AppGate system First, select the appropriate AppGate image in the AWS marketplace, and click Continue to begin the
launch process within the EC2 Console:
1.2 Configure Instance Details
Choose the Instance Type.

AppGate for AWS Step-by-Step Guide Page 15
We recommend using t2.large or larger for initial testing purposes. Production environments should be
sized according to anticipated user and network load – our typical recommended setup is to use the
m4.xlarge instance size. Visit the AppGate community site for further information.
Next, select the correct Network and Subnet as we discussed in the Pre-Requisites section. Also, the
auto-assign of Public IP should be off, since later we’re going to associate this with an Elastic IP address
instead. Choose the IAM role which you previously have created or create now the required one as
described here: AWS Pre-requisites.
Configure Instance Details
Leave the Network Interface as the default, with eth0 as the active device.

AppGate for AWS Step-by-Step Guide Page 16
Leave the Advanced Details blank; we’re not using them.
You can leave the Storage settings as default – 20GB is sufficient unless you’re going to be doing some
significant logging. Ensure that General Purpose SSD is selected.
Select a descriptive name in the Tag section

AppGate for AWS Step-by-Step Guide Page 17
1.3 Create a new Security Group for the AppGate Server Now, for an important step – configuring the Security Group for the AppGate server. Recall that
AppGate is a network gateway, which tunnels encrypted client traffic through it to the protected
resources. (We’ll set up the security group for the protected resources in a later step).
The AppGate security group only needs 3 ports open, and 2 of them only need to be accessed by you to
administer the Appliance. Take a look at the diagram below.
So we may only need three rules in our security group! Let’s set them up as follows:
TCP Port 443 This is the port that the AppGate gateway uses to tunnel all client traffic through. AppGate decrypts the
traffic, and sends it on to its destination, which is one of the resources you will later define to protect.
So, port 443 should be open to all IP addresses that your users may be accessing protected resources
from. You can start by opening it for your current IP address (keeping in mind that you may need to
expand this list later, for example if you’re accessing the AppGate Appliance from home, or from a
different location).

AppGate for AWS Step-by-Step Guide Page 18
The next two ports are used only for administrative access as follows:
TCP Port 444 This port is used for the admin GUI, and needs to be opened to your IP address so you can operate the
admin console.
TCP Port 22 This port is used one time, for you to SSH into the server to seed it. We need to enable it for now, but
can turn it off after our initial seeding.
Note: In a production environment, you would most likely want to carefully control which devices could
reach Port 444 or 22 on your Appliance as they are administrative ports.
So our security group should look as follows (with your IP address instead of the 173.76.247.254 in my
example setup, obviously):
Then, confirm the launch details, and click the Launch button to create the instance.
Important – choose an existing key pair, or create a new one appropriately. You will need this key pair in
order to SSH into the newly launched server and configure it.

AppGate for AWS Step-by-Step Guide Page 19
1.4 Associate the Elastic IP address with the instance While the server is launching, we need to associate an Elastic IP address with it, so that it has a fixed IP
address.
Click on Elastic IPs in the Network & Security section of the AWS console, select the unassociated Elastic
IP address (which was one of the pre-requisites), and associate it with this instance. Your configuration
should look something like the following:
Once the server has launched and initialized, we can proceed to the next step, which is seeding the
server.

AppGate for AWS Step-by-Step Guide Page 20
Step 2: AppGate Seeding
This step is straightforward, we just need to log in to the server via SSH, and run a simple menu-driven
setup tool. Amazon has some ssh guidance at their “Connect to Your Linux Instance page.”
Once the AWS instance has initialized in the steps above, which will take 1-2 minutes depending on the
instance size you chose, connect to it on the Elastic IP address with SSH, using the key pair you selected
above.
Important: Be sure to login with the username “cz”, which is the username that will match the key pair.
Once connected, you should see something like the following:
As displayed in the prompt, we’re going to run sudo cz-setup to configure the appliance.
cz-setup is a simple menu-driven configuration tool. While it has many options, we only need to set a
few for our AWS testing:
Hostname
Enable DHCP for our network adapter
Set password for the administrative account
o user admin is the primary administrative login for the AppGate GUI, and you’ll be using this login
a lot
o Note that user cz is only used for this SSH login, and utilizes your AWS key, not a password
Let’s get started: run sudo cz-setup to launch the setup tool, and you’ll see the menu-driven
configurator below. Use the up ↑ and down ↓ arrow keys to highlight items, and Enter to select them.
Select “Configure appliance as first Controller”

AppGate for AWS Step-by-Step Guide Page 21
Then, select “Hostnames”:
For internal hostname, enter the publicly resolvable name for the appliance (assigned by AWS if
you’re using their default DNS. This is the simplest approach, which we recommend for this
testing setup. If you have more complex networking or DNS setup questions, feel free to contact
us ). This will automatically be copied to the other two hostname rows, as shown below Your
internal hostname is set by your DNS.
Hit Esc to return to the top level menu, and then select Network Interfaces
And then Configure eth0:

AppGate for AWS Step-by-Step Guide Page 22
Confirm that your settings match what’s shown below:
Hit Esc twice to return to the top level menu, and then select DNS Servers, and Add DNS Server.
Enter 8.8.8.8, to use Google’s DNS.
\
Hit Esc to return to the main menu, and then select Administrator passwords.
Set the password for the admin user. Note that you’ll be using the admin login for the GUI console
starting in the next step.

AppGate for AWS Step-by-Step Guide Page 23
Hit Esc to return to the top-level menu, and then select Apply configuration:
Note that the server will give a warning message if your appliance has less than 8GB of memory free. For
testing purposes with fewer than 10 users, instances with 8GB of total memory will display this warning,
but will operate fine. For larger numbers of users, more memory will be required. Contact us for the
AppGate sizing guide.
You’ll see a status message like the following while the configuration is applied, which typically takes 1-2
minutes.
Once that completes, you’ll see a confirmation message, which shows the URL for the admin GUI. Make
a note of your URL, or copy & paste it into your browser for our next step.
Then, return to the main menu and select Exit to complete this configuration.

AppGate for AWS Step-by-Step Guide Page 24
Once you’ve returned to the SSH command line, you can exit from your SSH session, and proceed to the
next step, which uses the AppGate admin GUI. Note: Ignore the text regarding “cz” user in the window.

AppGate for AWS Step-by-Step Guide Page 25
Step 3: Admin GUI Configuration Note: Due to an issue with Internet Explorer’s support for sites using TLS1.2 and SHA-512 hashed
certificates, Internet Explorer is not compatible with the AppGate administrative console. Please use a
supported browser such as Chrome or Firefox.
3.1 Logging in as Admin Give the server about 1 minute to apply the configuration in the step above, and then open the URL
noted above – note that the format:
https://ec2-52-22-34-105.compute-1.amazonaws.com:444 uses https, but connects
on port 444. When you open your URL in your browser, you’ll likely see a security warning since the
connection uses HTTPS into an AWS domain, while the server uses a self-signed certificate. You can
safely ignore this warning and proceed to the login page.
Next, you should see the login screen for the admin console. With the Identity Provider on its default
“local” setting, enter the username “admin”, and the admin password you chose above in the
“Administrator passwords” configuration screen.

AppGate for AWS Step-by-Step Guide Page 26
Click Login, and you should be taken to the AppGate dashboard.
Take a moment to look at the interface, and we’ll take you through it one step at a time.
The right-hand side of the dashboard shows the current system status, including the number of
components in the overall AppGate system. The left side of the menu controls the Operations, which is
for management of user access to protected resources, and Configurations, which is for administrative
management of the Appliance itself.

AppGate for AWS Step-by-Step Guide Page 27
You can see that we have one Appliance, which currently has 0 Gateways, 1 Controller, and 1 LogServer.
The Controller is the “brain” for the system, the LogServer handles the logging, while the Gateway
manages all client traffic to protected resources.
To get started, we need to configure a Gateway for the system, which manages a Site, which in turn
protects resources (your AWS instances defined in the Site). As shown below, each Gateway is
associated with one Site, and within each Site are multiple Resources.
The Site is also where the resource name resolution is set up, to enable dynamic detection of newly
created AWS EC2 instances. Next, let’s get started with the Site.
3.2 Create a Site
Under the Configurations menu, select “Sites”, and click
Give it a friendly name like “AWS VPC Site”, and configure the sections as follows:
Network Subnets
Create a new subnet by clicking the + button, and entering the subnet in CIDR notation. It’s very
important that this subnet matches what you’ve already set up for your VPC! (Note that this subnet can
be smaller than your VPC’s subnet, but must be well-formed and have sufficient IP addresses for the
servers you’ll be protecting with AppGate).
User Tunneling
This section should remain as the default, shown below.

AppGate for AWS Step-by-Step Guide Page 28
Name Resolution
For this section, we’re just setting up an AWS resolver, and not using a DNS or Azure resolver.
Give this a friendly name, and leave the update interval at its default (this is how frequently the AppGate
server calls into AWS to check for server changes).
Make sure that Use IAM Role, HTTPS Verify Cert and VPC Auto Discovery are checked, and leave the
HTTPS Proxy empty. Click + to create a region, and enter your AWS region in the compact region format
such as us-east-1.
Official EC2 region names are shown here: http://docs.aws.amazon.com/general/latest/gr/rande.html
Click Save Changes to save the Site.

AppGate for AWS Step-by-Step Guide Page 29
3.3 Configure the Site and the Gateway in the Appliance Next up, we set the Appliance to use our newly created Site, and configure the Gateway. In the
“Configurations” menu, select “Appliances”, and then click the one appliance in the list to edit it.
First, in the Site dropdown in the Basic Settings section, select the Site we just created. Leave the rest
of the Basic Settings section unchanged, and proceed to the Gateway below.
Under the Gateway Section, make sure Enabled is checked. Then open the Allow Destinations section
under the User Tunneling (VPN) section. (Leave Weight at 100).
Under Allow Destinations, click + to create a new destination, and enter your subnet as shown.
Important: This subnet must match the subnet defined for the Site you defined above! Note that this
uses a slightly different format (not CIDR), with the netmask entered on a separate line. The NIC should
be eth0 (which should be the only NIC set up for the appliance).
Then click Save Changes to complete this step.

AppGate for AWS Step-by-Step Guide Page 30
3.4 Create (or Choose) an AWS Instance to Protect Now, select an existing AWS instance, or create a new one to test out access via AppGate. We
recommend using a simple preconfigured web server, such as Tomcat Powered by Bitnami. What’s
important is that the service you choose should have a web server running on port 80, since that’s what
we’ll be configuring our first policy to allow access to from a client we will setup.
You’re familiar with launching EC2 instances, so we’re not going to take you through this step-by-step,
but we are going to point out a few things that are important to set up correctly:
Subnet and VPC
o Make sure that this instance is assigned to the VPC and subnet that we configured AppGate to
protect
o This instance must not be allocated a public IP address so it is only accessible from the AppGate
network
AWS Tag
o We’re going to be using the AWS tag to resolve this instance, so give it the tag
app-type=employee-app as shown below.
Without this tag, our resolver won’t be able to find this resource.
Security Group
We need to make sure that this instance is only accessible from the AppGate server, so while launching,
create a new security group that allows all TCP and ICMP traffic, but only from the private IP address for
the AppGate server. In our example, its 10.5.0.85, but in your case, look at the running AppGate instance
in your EC2 console to find the internal IP address (it’ll be within the managed subnet address space).
Now, complete the launch process for the resource. It’ll launch and get assigned a private IP address
within the subnet. You won’t be able to access it, since there’s no network route for you yet.
In our next steps we’ll create the policy that will let you access this resource.

AppGate for AWS Step-by-Step Guide Page 31
3.5 Create an Entitlement Policies and Entitlements are the primary tools for provisioning and controlling user access to resources
protected by the Gateways. An Entitlement is the primary mechanism for defining what resources a
user will have access to on the protected network. Entitlements can be thought of as the actions users
will be able to do.
A Condition is an optional component within an Entitlement. Defining a Condition allows you to capture
use cases for statuses for a network connection that you expect may change while access via
Entitlement is in progress. Example transient statuses are:
Laptop moved from corporate environment to a non-trusted network connection (e.g., to a
hotspot or cafe wifi)
Contractor only needing access to resources during working hours
Anti-Virus becomes disabled
As shown in the diagram below, Entitlements are attached to Policies. Policies use Filters to control
which Entitlements are available to which users.
The diagram below shows the Policy and Entitlement that we’re going to be creating:
The Entitlement allows HTTP access to any server in our site that has the tag app-type=employee-app. Our
dynamic AWS resolver will automatically detect new EC2 instances in our VPC, and grant access if they have
this tag.
o In our example Entitlement, we chose not to define a Condition. Again, Conditions can be used to enforce
restrictions on network location, time of day, or to apply step-up authentication (we’re keeping it simple
for this example and not using any of those!). In our example, you can think of the lack of a Condition
being defined to mean “Always apply this Entitlement”.
The Policy binds the Entitlement to a Filter, which defines the set of users who can access this Entitlement. In
our example, we’re going to let any user with a tag employee get access. (The user tag is metadata within the
AppGate system, and is completely separate from the AWS tag used for EC2 instances).

AppGate for AWS Step-by-Step Guide Page 32
In our example, we need to create an Entitlement with the AWS resolver format:
Step 1: Create Entitlements to access target resources: AppGate supports IP access (TCP, UDP and ICMP v4 and v6). From the AppGate main Menu, select Entitlements Create Entitlement. Give it a name – in this case we have chosen the name AWS employee app type. Next, we’ll link the Entitlement to a Site and specify the Entitlement Action. For Site, select the site we created above from the drop-down list:
Click the + button under Actions to create a new action
Configure the Action as shown below:
Rule should be Allow
Protocol should be tcp up (meaning that it’s allowing TCP traffic initiated from the client up to the server. Return traffic is automatically allowed)
Port should be 80 for this example, since we’re permitting HTTP traffic
The Host specified as using our dynamic resolver syntax: aws://tag:app-type=employee-app
Note that each Entitlement can include a number of Actions, so you can use Entitlements to group Actions that relate to a particular Site. For this example, let’s just keep it simple with our one port 80 Action.

AppGate for AWS Step-by-Step Guide Page 33
Conditions: Each Entitlement can include one or more Conditions to provide real-time control over how the Entitlement is used. Conditions are evaluated at the time a user attempts to access a resource. Examples include only allowing access to a service during working hours, or requiring the user to re-enter their password before gaining access to sensitive resources. If no Condition is included in the Entitlement, the Entitlement Action is evaluates as Always by default. For this example, let’s leave the Conditions blank, so it always applies. Your example should like something like the following:

AppGate for AWS Step-by-Step Guide Page 34
Click Save Changes, and let’s move on to the next step…creating a User.

AppGate for AWS Step-by-Step Guide Page 35
3.6 Create a User
In order to create a User, you will need to select Identity Providers then click on ACTIONS Manage
Local Users
The following screen will appear. Click on NEW LOCAL USER.
Once you have clicked on New Local User, add a new user as shown in the next diagram.

AppGate for AWS Step-by-Step Guide Page 36
Note:
Make note of the username and password, since we’ll be using that to sign in from the AppGate
client in a later step.
The email address is required as a unique identifier, but the AppGate system doesn’t send any email
to the address.
Important: Make sure to add the employee tag to the user! This tag is how the Policy Filter will know to
grant Sally access to our Entitlements. To do this, type “employee” in the field labeled “Search for tags”,
and press the Tab key to apply the tag to the user. Then choose “Save Changes”.
Next, we create the Filter that picks up this employee tag.

AppGate for AWS Step-by-Step Guide Page 37
3.7 Create a Filter Before you create a Filter, it’s important to understand what they are. Filters are used by the Controller to assign Policies to a user, which in turn grant access Entitlements. Once the user has been authenticated, the Controller queries the Filters to identify whether a Policy is valid for that user. A Filter expression might use claims (user attributes) such as the username or AD group membership.
When the claims in the Filter expression are True, the Policy is assigned to the user and the Entitlements
within the Policy will be included in the user's Entitlement set. Now that you know what a Filter is, let’s
create a Filter.
From the main menu, select Filters, then +NEW FILTER.
Name the Filter Employee, and click the + to add a new expression. Click on the Choose one type
dropdown to display the set of attributes that can be used in the Filter. You can see that there’s a rich
set to choose from! For now, just select tags under User claims , and then enter employee in the
“empty” entry field. (This is how the Filter will pick up our newly created user, Sally, to whom we applied
the employee tag in an earlier step).

AppGate for AWS Step-by-Step Guide Page 38
Be sure to Save your changes, before we move to the next step.
3.8 Create a Policy Now we’ll create the Policy that allows our employee users to access employee-app Entitlements by
clicking on + NEW POLICY.
You will then see the Create Policy form below. In this example, we have named the Policy Employee
Access to Employee Apps.
In the Filters section, enter the name of the Employee ilter we created above – it’ll appear in the auto-
completion list for you to select.

AppGate for AWS Step-by-Step Guide Page 39
Likewise, enter the AWS-employee-app-type Entitlement. Once your Policy looks like the image below,
save it.
Step 4: Install the Client
The last step is to install the Client on a Windows or macOS machine of your choice.
Recall that the AppGate client installs a virtual network adapter, which provides remote, encrypted
access to resources. Because it works like a network adapter, it requires local admin privileges to install.
The client installer is available from either of these 2 methods:
Recommended: from the Cryptzone website at:
o https://www.cryptzone.com/downloadcenter/appgate
Or, directly from within AppGate server via the web browser console, at the following URL
o https://<<hostname>>:444/clients/
o For example, https://ec2-52-22-34-105.compute-1.amazonaws.com:444/clients/
Client installation is a straightforward process, and is not shown here.

AppGate for AWS Step-by-Step Guide Page 40
4.1 Log in with the Client The last step in setting up AppGate is to log into the Controller from the Client.

AppGate for AWS Step-by-Step Guide Page 41
The first time you’re logging in to the Controller, you’ll need to accept its certificate, as shown below.
Now choose the identity provider “local”, and click next:
Now enter the user name and password and click on connect.
Once connected, you should see the client look as follows:

AppGate for AWS Step-by-Step Guide Page 42
When minimized, the client will show as an AppGate icon the in the taskbar. On Windows, it looks as
follows:
Now, you’re ready to access the protected server through AppGate!

AppGate for AWS Step-by-Step Guide Page 43
4.2 Test out Access! Go ahead and open the protected resource, using the private IP address. It should work!
You are now using AppGate to protect your AWS resources! With simple policies in place, network
access automatically adapts in real time to changing conditions on the client as well as on the cloud
infrastructure side. You can be assured every new instance that is added or removed will now
automatically be traced and added or removed from the access filter, without the need of changing the
policies. It is now an automation-driven network access process that can be audited by the simple
policies you created. This means less work for you and the right protection for your resources!
What if it Didn’t Work? If you’re unable to load the Tomcat page (or the equivalent in your protected resource):
Double-check that it’s running, and has an IP address in the subnet that the Gateway is protecting
Make sure the Site and Gateway configurations are correct, as shown above
Double-check the security group settings
SSH into the AppGate server again, and try pinging the protected resource (because this isn’t going
through the AppGate Gateway, there’s no need to set up a policy for this Entitlement)
Make sure that your resource has the appropriate tag, and that the Entitlement resolver uses the
same tag (app-type=employee-app).
Make sure your user has the tag employee within AppGate, and that your access policy has the
corresponding filter set up.
If you’re still stuck, or have questions or comments, feel free to connect with us on the AppGate for
AWS Community site at: https://cryptzone.vbulletin.net/

AppGate for AWS Step-by-Step Guide Page 44
4.3 Additional Things to Try Now that you’ve gotten AppGate working with your first access policy, have some fun. Here are a few
things to try out:
Add an ICMP entitlement so that our user, Sally, can ping the Tomcat server
Try tagging a few more AWS instances with the app-type=employee-app tag, to see how user access
is automatically assigned
Try creating different Entitlements, Filters, and Policies
Resources and Community Cryptzone has an online AppGate for AWS community here https://cryptzone.vbulletin.net/
We encourage you to register and join the conversation! Here you will find information from other
AppGate for AWS users and the experiences they’ve had getting up and running as well as using it on a
day-to-basis.
In addition to the AppGate for AWS online community, you’ll find additional resources on the Cryptzone
website here: https://www.cryptzone.com/products/appgate/for-aws and a video walkthrough of this
step-by-step guide here: https://www.cryptzone.com/resources/aws-resources
And the AppGate product documentation is available here:
Admin Guide: https://help.cryptzone.com/adminguide/index.html
Client User Guide: https://help.cryptzone.com/userguide
Thank you, and we hope you find AppGate to be a valuable solution to your security challenges.
Related Documents