1 Anti-Spyware Enterprise Module software version 8.0 Guide What is the Anti-Spyware Enterprise Module? The McAfee ® Anti-Spyware Enterprise Module is an add-on to the VirusScan Enterprise 8.0i product that extends its ability to detect and take action on spyware and cookies. Where do I get the module? Anti-Spyware Enterprise Module 8.0 is available from the product CD or with a valid grant number, you can download the module from the McAfee download web site: https://secure.nai.com/us/forms/downloads/upgrades/login.asp What do these terms mean? Spyware definitions — These are signatures (similar to virus definitions) of spyware applications that are classified as potentially unwanted. Spyware definitions are included in the virus definitions (DAT) file and are used by VirusScan Enterprise to detect potentially unwanted spyware applications on your computer. Cookie definitions — These are Internet Explorer 4.0 or later version cookies that are classified as potentially unwanted. Cookie definitions are included in the virus definitions (DAT) file and are used by VirusScan Enterprise to detect potentially unwanted cookies in the cookies folder. How does the module work? The module installs as an add-on to VirusScan Enterprise 8.0i. Once installed and configured, it uses the on-access scanner and on-demand scan tasks to detect potentially unwanted spyware and cookies, then take action on detections. You can also add exclusions for files, registry values, and cookies that you want to exclude from detection. The scanners use the spyware and cookie definitions that have been added to the virus definitions (DAT) file to detect the potentially unwanted spyware and cookies. New spyware and cookie definitions will be added to the DAT file as they are identified, therefore we recommend that you perform regular DAT file updates to ensure that you have the most current spyware and cookie definitions. The module can be used directly from VirusScan Enterprise or managed via ePolicy Orchestrator. On-Access Scanner — The on-access scanner provides the primary protection from spyware by detecting potentially unwanted spyware files as they are accessed. It does not detect cookies. Detections — If the action is set to Clean files automatically, the scanner takes the action that is specified by the DAT file. This may include killing processes, removing injected .DLLs, deleting files, and/or deleting registry keys. In most cases with spyware, the end user will only notice that files have been deleted as they are the most visible. If the action is set to Delete files automatically, the detected file is deleted. Exclusions — If the module detects a file that you legitimately use, you can exclude it from detection. On-Demand Scan Tasks — In addition to file scanning, you can configure on-demand scan tasks to scan the registry for potentially unwanted spyware and the cookies folder for potentially unwanted cookies. New on-demand scan items have been added for the registry and cookies scans. Registry Scan — The registry scan detects potentially unwanted spyware-related registry entries that were not previously cleaned. Detections — If the action is set to Clean files, the scanner takes the action that is specified by the DAT file. This may include cleaning or deleting registry keys or values. If the action is set to Delete files, the detected registry key or value is deleted. All other actions are treated as Continue scanning. Exclusions — If the module detects a spyware-related registry entry that you legitimately use, you can exclude it from detection. Cookies Scan — The cookies scan detects potentially unwanted cookies in the cookies folder. Detections — If the action is set to Delete files or Move files to a folder, the entire cookie file will be deleted or moved. Clean files is treated the same as Delete files. Exclusions — If the module detects a cookie that you legitimately use, you can exclude it from detection. Contents What is the Anti-Spyware Enterprise Module? . . . . . . . . . . . . 1 Where do I get the module? . . . . . . . . . . . . . . . . . . . . . . . . . . . . . . . . 1 What do these terms mean? . . . . . . . . . . . . . . . . . . . . . . . . . . . . . . . . 1 How does the module work? . . . . . . . . . . . . . . . . . . . . . . . . . . . . . . . 1 Before you begin . . . . . . . . . . . . . . . . . . . . . . . . . . . . . . . . . . . . . . . . . . . . 2 Installing the module. . . . . . . . . . . . . . . . . . . . . . . . . . . . . . . . . . . . . . . . . 2 Confirming installation . . . . . . . . . . . . . . . . . . . . . . . . . . . . . . . . . . . . . . . 5 Configuring the module from VirusScan Enterprise . . . . . . . 6 Configuring the module via ePolicy Orchestrator . . . . . . . . . . 8 Performing scan tasks and viewing results . . . . . . . . . . . . . . . 11 Submitting samples to AVERT . . . . . . . . . . . . . . . . . . . . . . . . . . . . . 11 Removing the module . . . . . . . . . . . . . . . . . . . . . . . . . . . . . . . . . . . . . . 12 Getting more information. . . . . . . . . . . . . . . . . . . . . . . . . . . . . . . . . . . 12 Icon Conventions Note Caution Tip

Welcome message from author
This document is posted to help you gain knowledge. Please leave a comment to let me know what you think about it! Share it to your friends and learn new things together.
Transcript
Anti-Spyware Enterprise Module softwareversion 8.0 Guide
What is the Anti-Spyware Enterprise Module?The McAfee® Anti-Spyware Enterprise Module is an add-on to the VirusScan Enterprise 8.0i product that extends its ability to detect and take action on spyware and cookies.
Where do I get the module?Anti-Spyware Enterprise Module 8.0 is available from the product CD or with a valid grant number, you can download the module from the McAfee download web site:
https://secure.nai.com/us/forms/downloads/upgrades/login.asp
What do these terms mean?Spyware definitions — These are signatures (similar to virus definitions) of spyware applications that are classified as potentially unwanted. Spyware definitions are included in the virus definitions (DAT) file and are used by VirusScan Enterprise to detect potentially unwanted spyware applications on your computer.
Cookie definitions — These are Internet Explorer 4.0 or later version cookies that are classified as potentially unwanted. Cookie definitions are included in the virus definitions (DAT) file and are used by VirusScan Enterprise to detect potentially unwanted cookies in the cookies folder.
How does the module work?The module installs as an add-on to VirusScan Enterprise 8.0i. Once installed and configured, it uses the on-access scanner and on-demand scan tasks to detect potentially unwanted spyware and cookies, then take action on detections. You can also add exclusions for files, registry values, and cookies that you want to exclude from detection.
The scanners use the spyware and cookie definitions that have been added to the virus definitions (DAT) file to detect the potentially unwanted spyware and cookies. New spyware and cookie definitions will be added to the DAT file as they are identified, therefore we recommend that you perform regular DAT file updates to ensure that you have the most current spyware and cookie definitions.
The module can be used directly from VirusScan Enterprise or managed via ePolicy Orchestrator.
On-Access Scanner — The on-access scanner provides the primary protection from spyware by detecting potentially unwanted spyware files as they are accessed. It does not detect cookies.
Detections — If the action is set to Clean files automatically, the scanner takes the action that is specified by the DAT file. This may include killing processes, removing injected .DLLs, deleting files, and/or deleting registry keys. In most cases with spyware, the end user will only notice that files have been deleted as they are the most visible. If the action is set to Delete files automatically, the detected file is deleted.
Exclusions — If the module detects a file that you legitimately use, you can exclude it from detection.
On-Demand Scan Tasks — In addition to file scanning, you can configure on-demand scan tasks to scan the registry for potentially unwanted spyware and the cookies folder for potentially unwanted cookies. New on-demand scan items have been added for the registry and cookies scans.
Registry Scan — The registry scan detects potentially unwanted spyware-related registry entries that were not previously cleaned.
Detections — If the action is set to Clean files, the scanner takes the action that is specified by the DAT file. This may include cleaning or deleting registry keys or values. If the action is set to Delete files, the detected registry key or value is deleted. All other actions are treated as Continue scanning.
Exclusions — If the module detects a spyware-related registry entry that you legitimately use, you can exclude it from detection.
Cookies Scan — The cookies scan detects potentially unwanted cookies in the cookies folder.
Detections — If the action is set to Delete files or Move files to a folder, the entire cookie file will be deleted or moved. Clean files is treated the same as Delete files.
Exclusions — If the module detects a cookie that you legitimately use, you can exclude it from detection.
ContentsWhat is the Anti-Spyware Enterprise Module? . . . . . . . . . . . . 1
Where do I get the module? . . . . . . . . . . . . . . . . . . . . . . . . . . . . . . . . 1
What do these terms mean?. . . . . . . . . . . . . . . . . . . . . . . . . . . . . . . . 1
How does the module work? . . . . . . . . . . . . . . . . . . . . . . . . . . . . . . . 1
Before you begin . . . . . . . . . . . . . . . . . . . . . . . . . . . . . . . . . . . . . . . . . . . . 2
Installing the module. . . . . . . . . . . . . . . . . . . . . . . . . . . . . . . . . . . . . . . . . 2
Confirming installation . . . . . . . . . . . . . . . . . . . . . . . . . . . . . . . . . . . . . . . 5
Configuring the module from VirusScan Enterprise . . . . . . . 6
Configuring the module via ePolicy Orchestrator . . . . . . . . . . 8
Performing scan tasks and viewing results . . . . . . . . . . . . . . . 11
Submitting samples to AVERT . . . . . . . . . . . . . . . . . . . . . . . . . . . . . 11
Removing the module . . . . . . . . . . . . . . . . . . . . . . . . . . . . . . . . . . . . . . 12
Getting more information. . . . . . . . . . . . . . . . . . . . . . . . . . . . . . . . . . . 12
Icon Conventions
Note Caution Tip
1
Before you beginDescribes what to do before you start the installation process.
1 Verify that your computer meets these requirements:
A server or workstation that meets the system requirements as detailed in the VirusScan Enterprise 8.0i Installation Guide.
A server or workstation with an installed, licensed version of VirusScan Enterprise 8.0i.
2 Review the product release notes (README.TXT) for:
Special requirements
Known issues
Last minute additions or changes
3 Get the installation files:
a Retrieve the Anti-Spyware Enterprise Module 8.0 .ZIP file from the product CD or the McAfee download web site at:
https://secure.nai.com/us/forms/downloads/upgrades/login.asp
b Extract the files from the product .ZIP file to a temporary location on the hard drive where, depending on your method of installation:
The product .ZIP file includes these files:
Installing the moduleDescribes how to install the module using several different methods.
Install the module using one of these methods:
Stand alone
Command line
ePolicy Orchestrator
McAfee Installation Designer
We recommend that you review all of the installation methods before you choose one. Each method may have different installation results.
For example, using the stand-alone method results in changes to the VirusScan Enterprise configuration settings. These configuration setting changes are made automatically to ensure that you receive the full benefit of the module’s detection capabilities. If you want to install the module without making changes to VirusScan Enterprise configuration settings, you must use one of the other methods.
Caution
This release of Anti-Spyware Enterprise Module 8.0 does not work with earlier versions of VirusScan Enterprise.
VirusScan Enterprise 8.0i is already installed.
OR
ePolicy Orchestrator 3.0.1 or later version resides.
OR
McAfee Installation Designer can access the files.
PACKING.LST
VS800DET.MCS
VSE800.NAP
PKGCATALOG.Z
VSE80MAS.EXE
VSEMAS80.NAP
README.TXT (A file for each language)
2
Installing the module (continued)
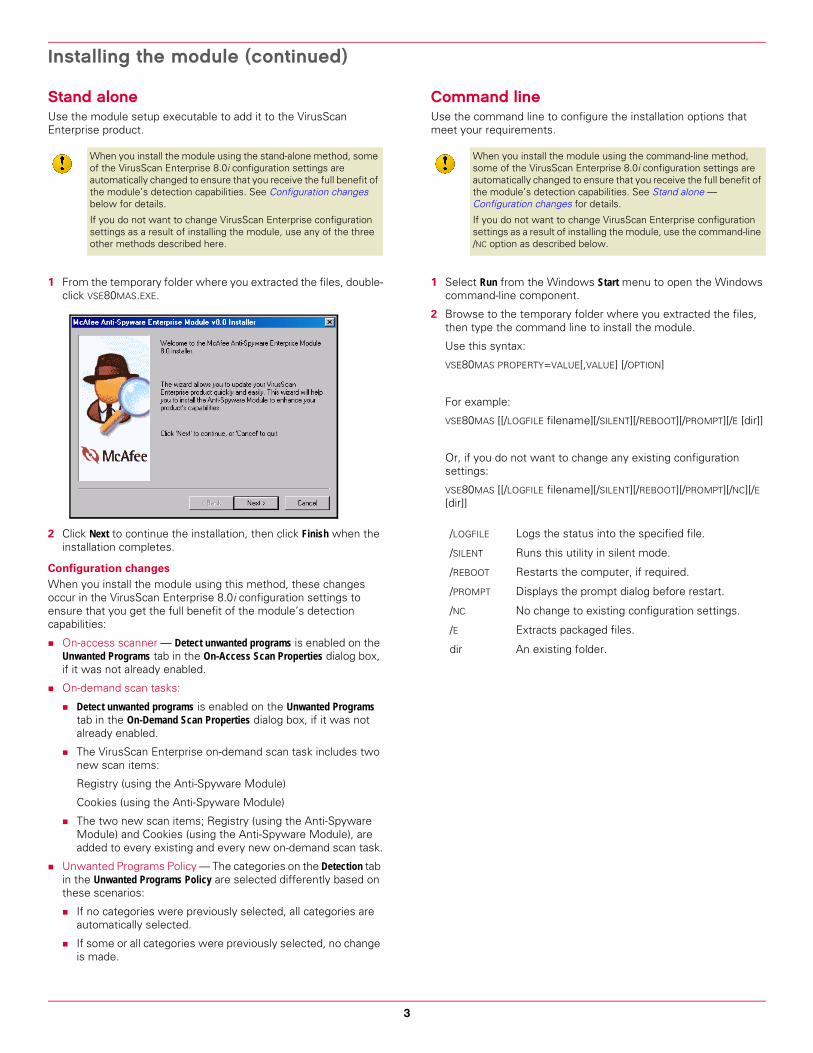
Stand aloneUse the module setup executable to add it to the VirusScan Enterprise product.
1 From the temporary folder where you extracted the files, double-click VSE80MAS.EXE.
2 Click Next to continue the installation, then click Finish when the installation completes.
Configuration changes
When you install the module using this method, these changes occur in the VirusScan Enterprise 8.0i configuration settings to ensure that you get the full benefit of the module’s detection capabilities:
On-access scanner — Detect unwanted programs is enabled on the Unwanted Programs tab in the On-Access Scan Properties dialog box, if it was not already enabled.
On-demand scan tasks:
Detect unwanted programs is enabled on the Unwanted Programs tab in the On-Demand Scan Properties dialog box, if it was not already enabled.
The VirusScan Enterprise on-demand scan task includes two new scan items:
Registry (using the Anti-Spyware Module)
Cookies (using the Anti-Spyware Module)
The two new scan items; Registry (using the Anti-Spyware Module) and Cookies (using the Anti-Spyware Module), are added to every existing and every new on-demand scan task.
Unwanted Programs Policy — The categories on the Detection tab in the Unwanted Programs Policy are selected differently based on these scenarios:
If no categories were previously selected, all categories are automatically selected.
If some or all categories were previously selected, no change is made.
Command lineUse the command line to configure the installation options that meet your requirements.
1 Select Run from the Windows Start menu to open the Windows command-line component.
2 Browse to the temporary folder where you extracted the files, then type the command line to install the module.
Use this syntax:
VSE80MAS PROPERTY=VALUE[,VALUE] [/OPTION]
For example:
VSE80MAS [[/LOGFILE filename][/SILENT][/REBOOT][/PROMPT][/E [dir]]
Or, if you do not want to change any existing configuration settings:
VSE80MAS [[/LOGFILE filename][/SILENT][/REBOOT][/PROMPT][/NC][/E [dir]]
Caution
When you install the module using the stand-alone method, some of the VirusScan Enterprise 8.0i configuration settings are automatically changed to ensure that you receive the full benefit of the module’s detection capabilities. See Configuration changes below for details.
If you do not want to change VirusScan Enterprise configuration settings as a result of installing the module, use any of the three other methods described here.
Caution
When you install the module using the command-line method, some of the VirusScan Enterprise 8.0i configuration settings are automatically changed to ensure that you receive the full benefit of the module’s detection capabilities. See Stand alone — Configuration changes for details.
If you do not want to change VirusScan Enterprise configuration settings as a result of installing the module, use the command-line /NC option as described below.
/LOGFILE Logs the status into the specified file.
/SILENT Runs this utility in silent mode.
/REBOOT Restarts the computer, if required.
/PROMPT Displays the prompt dialog before restart.
/NC No change to existing configuration settings.
/E Extracts packaged files.
dir An existing folder.
3

Installing the module (continued)
ePolicy OrchestratorAdd the module package and .NAP files to the ePolicy Orchestrator Repository.
1 Open the ePolicy Orchestrator 3.0.1 or later version console, then select Repository in the console tree.
2 Check the PKGCATALOG.Z in to the software repository.
a Select Check in package.
b Click Next, select Products or updates, then click Next again.
c Click Browse, navigate to the temporary folder where you extracted the files, select PKGCATALOG.Z, then click Open.
d Click Next, then click Finish to check the package in.
e Click Close when the package has been checked in.
3 Check these files in to the software repository.
VSE800.NAP — Contains new information, such as user interface and policy page changes, that are required to configure the module. This file replaces the previously installed VSE800.NAP.
VSEMAS80.NAP — Contains policies that are required to enable compliance reporting of the module.
a Select Repository in the console tree, then select Check in NAP.
b Select Add new software to be managed, then click Next.c Navigate to the temporary folder where you extracted the
files, select the .NAP file, then click Open to install it.
d Click Yes to replace a file that already exists.
e Repeat Step a through Step d for each .NAP file you want to check in.
4 Log on to the Reporting console using ePolicy Orchestrator authentication. If you are already logged in, you must log out, then log back in again.
a Under Reporting in the console tree, expand ePO Databases, then select the database for which you want to log on.
b Select Connect, then log on using ePolicy Orchestrator authentication.
c Click Yes to download the new reports.
5 Use the deployment task to install the module on the clients.
McAfee Installation DesignerUse McAfee Installation Designer to create an installation package.
1 Start McAfee Installation Designer 8.0.
2 Select the package type and any products that you want to include in the package, then click Next.
3 Specify the source folder, destination folder, and optimization option, then click Next.
4 In Programs, click Add, browse to the temporary folder where you extracted the files, then select VSE80MAS.EXE.
5 Click Finish then Save.
6 Deploy the installation package using the tool of your choice.
Note
When you install the module via ePolicy Orchestrator, no changes are made to the VirusScan Enterprise 8.0i configuration settings or to the existing on-demand scan tasks. However, all new on-demand scan tasks will have the registry and cookies scan items automatically added to the task.
Tip
Logging on with ePolicy Orchestrator authentication is required so that the console can recognize and collect the new information from the registry and/or cookies scan, then display the information in the reports.
Caution
When you install the module using the McAfee Installation Designer method, some of the VirusScan Enterprise 8.0i configuration settings are automatically changed to ensure that you receive the full benefit of the module’s detection capabilities. See Stand alone — Configuration changes on page 3 for details.
If you do not want to change VirusScan Enterprise configuration settings as a result of installing the module, use the command-line /NC option, as described in Command line on page 3, when you create the installation package.
4
Confirming installationDescribes how to confirm that the module successfully installed from both VirusScan Enterprise and ePolicy Orchestrator.
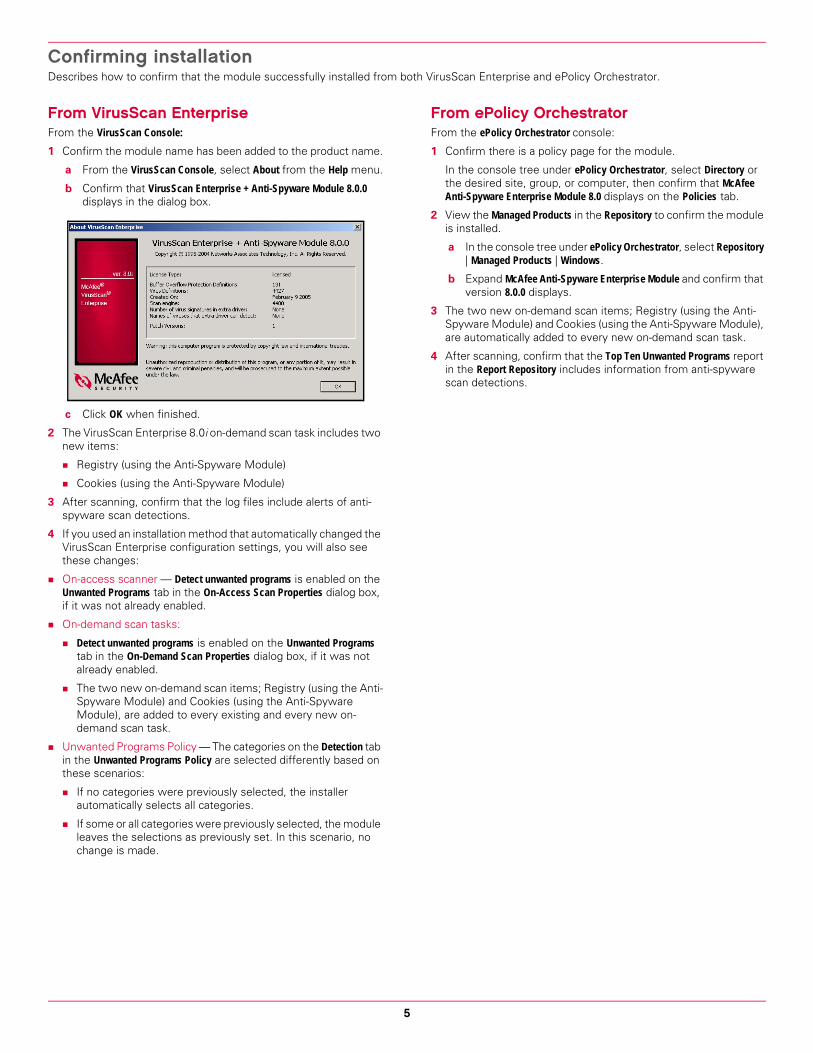
From VirusScan EnterpriseFrom the VirusScan Console:1 Confirm the module name has been added to the product name.
a From the VirusScan Console, select About from the Help menu.
b Confirm that VirusScan Enterprise + Anti-Spyware Module 8.0.0 displays in the dialog box.
c Click OK when finished.
2 The VirusScan Enterprise 8.0i on-demand scan task includes two new items:
Registry (using the Anti-Spyware Module)
Cookies (using the Anti-Spyware Module)
3 After scanning, confirm that the log files include alerts of anti-spyware scan detections.
4 If you used an installation method that automatically changed the VirusScan Enterprise configuration settings, you will also see these changes:
On-access scanner — Detect unwanted programs is enabled on the Unwanted Programs tab in the On-Access Scan Properties dialog box, if it was not already enabled.
On-demand scan tasks:
Detect unwanted programs is enabled on the Unwanted Programs tab in the On-Demand Scan Properties dialog box, if it was not already enabled.
The two new on-demand scan items; Registry (using the Anti-Spyware Module) and Cookies (using the Anti-Spyware Module), are added to every existing and every new on-demand scan task.
Unwanted Programs Policy — The categories on the Detection tab in the Unwanted Programs Policy are selected differently based on these scenarios:
If no categories were previously selected, the installer automatically selects all categories.
If some or all categories were previously selected, the module leaves the selections as previously set. In this scenario, no change is made.
From ePolicy OrchestratorFrom the ePolicy Orchestrator console:
1 Confirm there is a policy page for the module.
In the console tree under ePolicy Orchestrator, select Directory or the desired site, group, or computer, then confirm that McAfee Anti-Spyware Enterprise Module 8.0 displays on the Policies tab.
2 View the Managed Products in the Repository to confirm the module is installed.
a In the console tree under ePolicy Orchestrator, select Repository | Managed Products | Windows.
b Expand McAfee Anti-Spyware Enterprise Module and confirm that version 8.0.0 displays.
3 The two new on-demand scan items; Registry (using the Anti-Spyware Module) and Cookies (using the Anti-Spyware Module), are automatically added to every new on-demand scan task.
4 After scanning, confirm that the Top Ten Unwanted Programs report in the Report Repository includes information from anti-spyware scan detections.
5

Configuring the module from VirusScan EnterpriseDescribes how to configure the module from VirusScan Enterprise.
Update the definitions, enable unwanted programs detection, configure the on-access scanner, then create and configure on-demand scan tasks. You can also add user-defined detections for files that are not being detected and exclusions for items that you do not want to detect.
Update definitionsThe Anti-Spyware Enterprise Module uses the spyware and cookie definitions that have been added to the virus definitions file to detect potentially unwanted spyware and cookies. When you update the virus definitions file, you also get the latest spyware and cookie definitions.
1 Perform an update task immediately after installing the module to ensure that you have the most current spyware and cookie definitions.
From the VirusScan Console, right-click AutoUpdate, then click Start.2 Perform regular updates to keep your spyware and cookie
definitions current.
Unwanted Programs PolicyReview the category selections to ensure that you have selected all of the categories that you want to detect.
1 From the VirusScan Console, open the Unwanted Programs Policy dialog box.
2 On the Detection tab, review the category selections and make changes as required.
3 Click OK to save your settings and close the dialog box.
On-access scannerEnable unwanted programs detection and specify what actions to take when detections occur.
1 From the VirusScan Console, open the On-Access Scan Properties dialog box.
2 Enable unwanted programs detection.
a Select All Processes in the left pane.
b On the Unwanted Programs tab, select Detect unwanted programs, if it is not already selected.
You may also specify unwanted program detection individually for default, low-risk, and/or high-risk processes.
3 Review the actions on the Unwanted Programs tab to ensure they meet your needs.
If the action is set to Clean files automatically, the scanner takes the action that is specified by the DAT file. This may include killing processes, removing injected .DLLs, deleting files, and/or deleting registry keys. In most cases with spyware, the end user will only notice that files have been deleted as they are the most visible.
If the action is set to Delete files automatically, the detected file is deleted.
4 Click OK to save your settings and close the dialog box.
On-demand scan tasksEnable unwanted programs detection, specify what actions to take when detections occur, then create and configure the registry and cookies scan tasks.
Enabling unwanted programs detection1 From the VirusScan Console, open the On-Demand Scan Properties
dialog box.
2 On the Unwanted Programs tab, select Detect unwanted programs, if it is not already selected.
3 Review the actions on the Unwanted Programs tab to ensure they meet your needs.
For the registry scan:
If the action is set to Clean files, the scanner takes the action that is specified by the DAT file. This may include cleaning or deleting registry keys or values.
If the action is set to Delete files, the detected registry key or value is deleted.
All other actions are treated as Continue scanning.
For the cookies scan:
If the action is set to Delete files or Move files to a folder, the entire cookie file is deleted or moved.
Clean files is treated the same as Delete files.
4 Click OK to save your settings and close the dialog box.
Creating and configuring a registry scan task1 From the VirusScan Console, open the On-Demand Scan Properties
dialog box for an existing scan task, or create a new task.
2 On the Where tab, click Add.
a Select Registry (using the Anti-Spyware Module) from the drop-down list.
b Click OK.to return to the On-Demand Scan Properties dialog box. You see Registry (using the Anti-Spyware Module) in the Item Name list.
3 Configure the task as you would for any on-demand scan task with these exceptions:
The Heuristics options on the Advanced tab do not apply.
The options on the Actions tab do not apply.
4 When finished, click OK to save your settings and close the dialog box.
Note
The registry scan item is already added to the task if you installed the module using one of the methods that changed the configuration settings. If so, you can skip Step 2 and go to Step 3.
6

Configuring the module from VirusScan Enterprise (continued)
Creating and configuring a cookies scan task1 From the VirusScan Console, open the On-Demand Scan Properties
dialog box for an existing scan task, or create a new task.
2 On the Where tab, click Add.
a Select Cookies (using the Anti-Spyware Module) from the drop-down list.
b Click OK to return to the On-Demand Scan Properties dialog box. You see Cookies (using the Anti-Spyware Module) in the Item Name list.
3 Configure the task as you would for any on-demand scan task with these exceptions:
The Heuristics options on the Advanced tab do not apply.
The options on the Actions tab do not apply.
4 When finished, click OK to save your settings and close the dialog box.
User-defined detections or exclusionsAdd user-defined detections if you know of specific files that are not being detected.
Add exclusions for any items that you do not want to detect. For example, if you are using a specific program that is being detected as spyware or want to keep certain cookies, add them to the exclusion list.
Adding a user-defined detectionUser-defined detections apply only to files. They cannot be specified for registry keys/values, or cookies.
1 From the VirusScan Console, open the Unwanted Programs Policy dialog box.
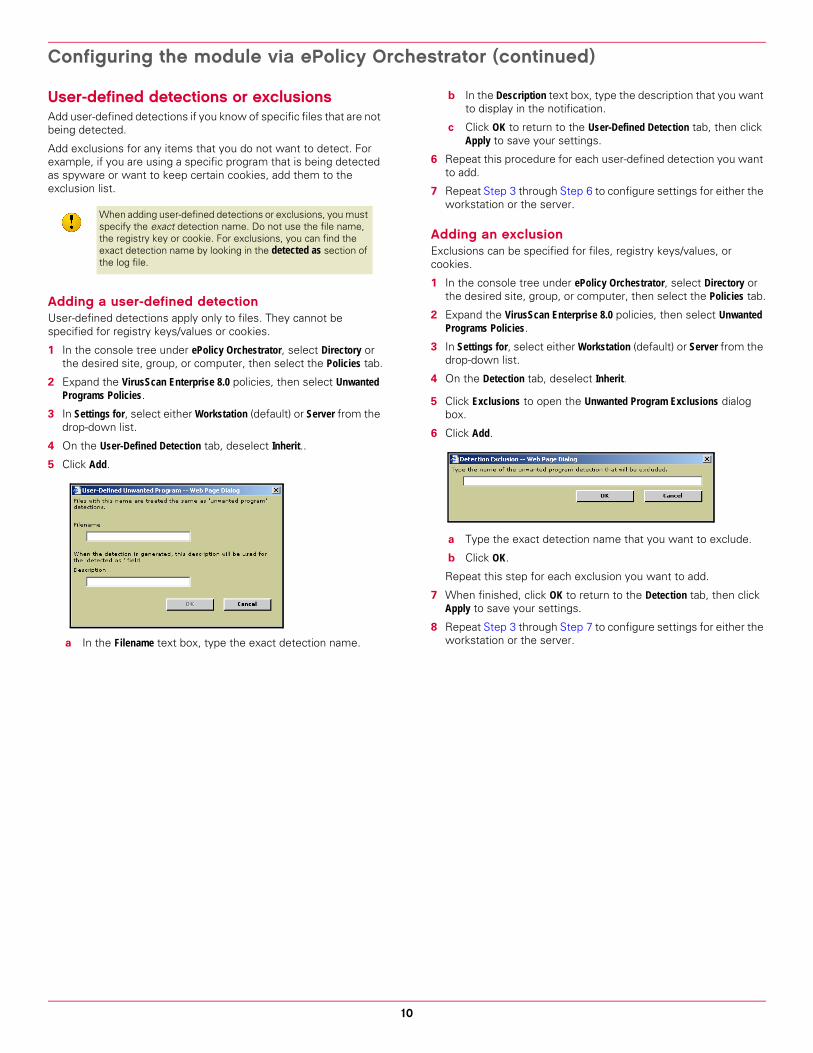
2 On the User-Defined Detection tab, click Add.
3 In the Filename text box, type the exact detection name.
4 In the Description text box, type the description that you want to display in the notification.
5 Click OK.
6 Repeat this procedure for each user-defined detection you want to add.
7 When finished, click OK to save your settings and close the dialog box.
Adding an exclusionExclusions can be specified for files, registry keys/values, or cookies.
1 From the VirusScan Console, open the Unwanted Programs Policy dialog box.
2 Click Exclusions on the Detection tab, then click Add..
3 Type the exact detection name, then click OK.
4 Repeat this procedure for each exclusion you want to add.
5 When finished, click OK to save your settings and close the dialog box.
Note
The cookies scan item is already added to the task if you installed the module using one of the methods that changed the configuration settings. If so, you can skip Step 2 and go to Step 3.
Tip
When adding user-defined detections or exclusions, you must specify the exact detection name. Do not use the file name, the registry key or cookie. For exclusions, you can find the exact detection name by looking in the detected as section of the log file.
7

Configuring the module via ePolicy OrchestratorDescribes how to configure the module from ePolicy Orchestrator.
Update the spyware and cookie definitions, configure the on-access scanner, then create and configure the on-demand scan tasks. You can also add user-defined detections for files that are not being detected and exclusions for items that you do not want to detect.
Update definitionsThe Anti-Spyware Enterprise Module uses the spyware and cookie definitions that have been added to the virus definitions file to detect potentially unwanted spyware and cookies. When you update the virus definitions file, you also get the latest spyware and cookie definitions.
1 Perform an ePolicy Orchestrator Agent — Update task to ensure that you have the most current spyware and cookies definitions.
a In the console tree under ePolicy Orchestrator, select Directory or the desired site, group, or computer, then select the Tasks tab in the upper details pane.
b Use the ePolicy Orchestrator Agent — Update task to perform the update.
2 Perform regular updates to keep your spyware and cookie definitions current.
Unwanted Programs PolicyReview the category selections to ensure that you have selected all of the categories that you want to detect.
1 In the console tree under ePolicy Orchestrator, select Directory or the desired site, group, or computer, then select the Policies tab in the upper details pane.
2 Expand the VirusScan Enterprise 8.0 policies, then select Unwanted Program Policies.
3 Deselect Inherit.4 On the Detection tab, review the category selections and make
changes as required.
5 Click Apply to save your settings.
On-access scanner policiesEnable unwanted programs detection and specify what actions to take when detections occur.
1 In the console tree under ePolicy Orchestrator, select Directory or the desired site, group, or computer, then select the Policies tab.
2 Expand the VirusScan Enterprise 8.0 policies, then select either On-Access Default Processes Policies, On-Access Low-Risk Processes Policies, or On-Access High-Risk Processes Policies
3 Select the Unwanted Programs tab.
4 In Settings for, select either Workstation (default) or Server from the drop-down list.
5 Deselect Inherit.6 Select Detect unwanted programs.
7 Review the actions on the Unwanted Programs tab to ensure they meet your needs.
If the action is set to Clean files automatically, the scanner takes the action that is specified by the DAT file. This may include killing processes, removing injected .DLLs, deleting files, and/or deleting registry keys. In most cases with spyware, the end user will only notice that files have been deleted as they are the most visible.
If the action is set to Delete files automatically, the detected file is deleted.
8 Click Apply to save your settings.
9 Repeat Step 4 through Step 8 to configure settings for either the workstation or the server and for default, low-risk, and high-risk processes.
On-demand scan task policiesCreate and configure registry and cookies scan tasks.
Creating a registry scan task1 In the console tree under ePolicy Orchestrator, right-click Directory
or the desired site, group, or computer, then select Schedule Task to create a new task.
2 Type the New Task Name for the registry scan.
3 Select VirusScan Enterprise 8.0 — On-Demand Scan from the Software — Task Type list, then click OK to create the task.
Tip
The Anti-Spyware Enterprise Module adds on to VirusScan Enterprise, therefore you configure the module’s policies from the VirusScan Enterprise 8.0 policy pages.
8

Configuring the module via ePolicy Orchestrator (continued)
Configuring the registry scan task polices1 On the Task tab in the upper details pane, right-click the task,
then select Edit Task to open the ePolicy Orchestrator Scheduler dialog box.
2 Click Settings.
3 Enable unwanted programs detection.
a On the Unwanted Programs tab, deselect Inherit.b Select Detect unwanted programs.
4 Review the actions on the Unwanted Programs tab to ensure they meet your needs.
If the action is set to Clean infected files, the scanner takes the action that is specified by the DAT file. This may include cleaning or deleting registry keys or values.
If the action is set to Delete infected files, the detected registry key or value is deleted.
All other actions are treated as Continue scanning.
5 On the Where tab, deselect Inherit, then click Add.
a Select Registry (using the Anti-Spyware Module) from the drop- down list.
b Click OK to return to the Task Settings dialog box. You see Registry (using the Anti-Spyware Module) in the item list.
6 Configure the options in the Task Settings dialog box as you would for any on-demand scan task with these exceptions:
The Heuristics options on the Advanced tab do not apply.
The options on the Actions tab do not apply.
7 Click OK to save your settings and return to the ePolicy Orchestrator Scheduler dialog box.
8 When finished, click OK to save your settings and close the dialog box.
Creating a cookies scan task1 In the console tree under ePolicy Orchestrator, right-click Directory
or the desired site, group, or computer, then select Schedule Task.
2 Type the New Task Name for the cookies scan.
3 Select VirusScan Enterprise 8.0 — On-Demand Scan from the Software — Task Type list, then click OK to create the task.
Configuring the cookies scan task policies1 On the Task tab in the upper details pane, right-click the task,
then select Edit Task to open the ePolicy Orchestrator Scheduler properties dialog box.
2 Click Settings.
3 Enable unwanted programs detection.
a On the Unwanted Programs tab, deselect Inherit.b Select Detect unwanted programs.
4 Review the actions on the Unwanted Programs tab to ensure they meet your needs.
If the action is set to Delete files or Move files to a folder, the entire cookie file is deleted or moved.
Clean files is treated the same as Delete files.
5 On the Where tab, deselect Inherit, then click Add.
a Select Cookies (using the Anti-Spyware Module) from the drop- down list.
b Click OK.to return to the Task Settings dialog box. You see Cookies (using the Anti-Spyware Module) in the item list.
6 Configure the options in the Task Settings dialog box as you would for any on-demand scan task with these exceptions:
The Heuristics options on the Advanced tab do not apply.
The options on the Actions tab do not apply.
7 Click OK to save your settings and return to the ePolicy Orchestrator Scheduler properties dialog box.
8 When finished, click OK to save your settings and close the dialog box.
Note
If you are creating a new task, the registry scan item is already added to the task. If so, you can skip Step 5 and go to Step 6.
Note
If you are creating a new task, the cookies scan item is already added to the task. If so, you can skip Step 5 and go to Step 6.
9
Configuring the module via ePolicy Orchestrator (continued)
User-defined detections or exclusionsAdd user-defined detections if you know of specific files that are not being detected.
Add exclusions for any items that you do not want to detect. For example, if you are using a specific program that is being detected as spyware or want to keep certain cookies, add them to the exclusion list.
Adding a user-defined detectionUser-defined detections apply only to files. They cannot be specified for registry keys/values or cookies.
1 In the console tree under ePolicy Orchestrator, select Directory or the desired site, group, or computer, then select the Policies tab.
2 Expand the VirusScan Enterprise 8.0 policies, then select Unwanted Programs Policies.
3 In Settings for, select either Workstation (default) or Server from the drop-down list.
4 On the User-Defined Detection tab, deselect Inherit..5 Click Add.
a In the Filename text box, type the exact detection name.
b In the Description text box, type the description that you want to display in the notification.
c Click OK to return to the User-Defined Detection tab, then click Apply to save your settings.
6 Repeat this procedure for each user-defined detection you want to add.
7 Repeat Step 3 through Step 6 to configure settings for either the workstation or the server.
Adding an exclusionExclusions can be specified for files, registry keys/values, or cookies.
1 In the console tree under ePolicy Orchestrator, select Directory or the desired site, group, or computer, then select the Policies tab.
2 Expand the VirusScan Enterprise 8.0 policies, then select Unwanted Programs Policies.
3 In Settings for, select either Workstation (default) or Server from the drop-down list.
4 On the Detection tab, deselect Inherit.
5 Click Exclusions to open the Unwanted Program Exclusions dialog box.
6 Click Add.
a Type the exact detection name that you want to exclude.
b Click OK.
Repeat this step for each exclusion you want to add.
7 When finished, click OK to return to the Detection tab, then click Apply to save your settings.
8 Repeat Step 3 through Step 7 to configure settings for either the workstation or the server.
Caution
When adding user-defined detections or exclusions, you must specify the exact detection name. Do not use the file name, the registry key or cookie. For exclusions, you can find the exact detection name by looking in the detected as section of the log file.
10

Performing scan tasks and viewing resultsDescribes how to run scan tasks and view results either from VirusScan Enterprise or using ePolicy Orchestrator.
From VirusScan EnterpriseOn-Access Scanner — The on-access scanner detects spyware as it is accessed, then takes the actions that you specified. View the results as follows:
The On-Access Scan Messages dialog box displays the results of the scan.
View the results of the completed task in the On-Access Scan Statistics dialog summary and the activity log.
On-Demand Scan Tasks — The registry and cookies scan tasks run as scheduled or you can start an immediate scan at any time. The cookies scan task always runs after other scans. View the results as follows:
The On-Demand Scan Progress dialog box displays the progress of the scan.
View the results of the completed task in the On-Demand Scan Statistics dialog summary and the activity log.
Using ePolicy OrchestratorOn-Access Scanner — The on-access scanner detects spyware as it is accessed and takes the actions that you specified.
On-Demand Scan Tasks — The registry and cookies scan tasks run as scheduled or you can start an immediate scan at any time. The cookies scan task always runs after other scans.
Reports — The results of scans performed by the Anti-Spyware Enterprise Module are reported under the VirusScan Enterprise product in the ePolicy Orchestrator reports. This is expected behavior. The module is an add-on to VirusScan Enterprise, so VirusScan Enterprise collects and reports the data.
Coverage Reports display an entry for the Anti-Spyware Enterprise Module, so you can see how many computers have it installed.
View the results of scans in the Top Ten Unwanted Programs report that is available in the Report Repository under Anti-Virus — VirusScan8.0. This report is one of the extended reports that were made available with the VirusScan Enterprise 8.0i product release.
Use the Data Filter feature when configuring the Top Ten Unwanted Programs report to filter the report results. For example, you can use the filter to just show cookies, or omit them from the report. Use this syntax to filter cookies in the report:
Data Filter = Detection Tab - Starting With (or Not Starting With) - Cookie
Submitting samples to AVERTIf you find a spyware application or cookie that is not being detected with the current DAT file, you can submit a sample of it to the Anti-Virus & Vulnerability Emergency Response Team (AVERT) through WebImmune. AVERT analyzes the sample and considers it for inclusion in the DAT file.
If the module detects something that you think it should not detect, you can also submit a sample of it to AVERT through WebImmune. They will analyze it and consider excluding it from the DAT file.
To submit a sample to AVERT:
WebImmune — This is the preferred method to submit samples to AVERT as it provides the fastest turnaround time on sample reviews, and provides historical information of all samples that you have submitted.
By accessing https:/ /www.webimmune.net/default.asp and creating a free account you will be able to upload files directly to AVERT’s automated systems for review. If the automated system is unable to determine a threat exists then the issue will be escalated to AVERT analysts.
More information about WebImmune can be found at https://www.webimmune.net/faqs.asp.
E-mail — You can send e-mails directly to AVERT’s automated systems for review. If the automated system is unable to determine a threat exists then the issue will be escalated to AVERT analysts.
When submitting the sample via e-mail, you can send it to the global e-mail address at [email protected], or you can get additional regional addresses from the WebImmune web site.
Standard Mail — This is the least preferred method. Submitting samples in this way causes the longest turnaround time for review of your sample.
Tip
When you submit samples to AVERT, they analyze those samples and use the information to improve the content of the DAT file.
11
Removing the moduleDescribes how to remove the module using the Windows Add/Remove Programs utility or from ePolicy Orchestrator.
Windows Add/Remove Programs utility1 Select Start | Settings | Control Panel, to open the Windows Control
Panel.
2 Select Add or Remove Programs.
3 Select McAfee Anti-Spyware Enterprise Module, then click Remove.
4 Close the Windows Control Panel.
From ePolicy Orchestrator1 In the console tree under ePolicy Orchestrator, expand the
Repository.
2 Select Managed Products | Windows | McAfee Anti-Spyware Enterprise Module.
3 Right-click the 8.0.0 folder, then select Remove.
Getting more information
Caution
Do not use the VirusScan Enterprise Repair Installation feature to remove the Anti-Spyware Enterprise Module. Using this feature may not remove all of the necessary files. You must use one of the methods described here.
What product documentation is available?The product documentation is available in PDF format on the product CD and also on the McAfee
download web site.
Anti-Spyware Enterprise Module 8.0Release Notes — ReadMe. Product information, any known issues, and last minute additions or changes to the product or its documentation.
Guide — This guide. Installation, configuration, and operating procedures.
VirusScan Enterprise 8.0iRelease Notes — ReadMe. Product information, resolved issues, any known issues, and last minute additions or changes to the product or its documentation.
Installation Guide — System requirements and instructions for installing and removing the software using the Setup utility and the command line.
Product Guide — Product introduction and features, detailed instructions for configuring the software, information on deployment, recurring tasks, and operating procedures.
Configuration Guide — For use with ePolicy Orchestrator. Configuring, deploying, and managing VirusScan Enterprise through ePolicy Orchestrator.
Quick Reference Card — First things to do after installation.
ePolicy Orchestrator 3.0.1, 3.0.2, or 3.5Release Notes — ReadMe. Product information, resolved issues, any known issues, and last minute additions or changes to the product or its documentation.
Product Guide — Product introduction and features, detailed instructions for configuring the software, information on deployment, recurring tasks, and operating procedures.
McAfee Installation Designer 8.0Release Notes — ReadMe. Product information, resolved issues, any known issues, and last minute additions or changes to the product or its documentation.
Product Guide — Product introduction and features, detailed instructions for configuring the software, information on deployment, recurring tasks, and operating procedures.
mcafee.com
Copyright © 2005 McAfee, Inc. All Rights Reserved.
12
DBN-006-EN
Related Documents