Android The WebKit Browser Notes are based on: Android Developers http://developer.android.com/index.html Google Maps Javascript API V3 Basics http://code.google.com/apis/maps/documentation/javascript/basics.html The Busy Coder's Guide to Android Development by Mark L. Murphy Copyright © 2008-2009 CommonsWare, LLC. ISBN: 978-0-9816780-0-9 10

Android The WebKit Browser Notes are based on: Android Developers Google Maps Javascript API V3 Basics .
Dec 14, 2015
Welcome message from author
This document is posted to help you gain knowledge. Please leave a comment to let me know what you think about it! Share it to your friends and learn new things together.
Transcript

Android The WebKit Browser
Notes are based on:
Android Developers http://developer.android.com/index.html
Google Maps Javascript API V3 Basicshttp://code.google.com/apis/maps/documentation/javascript/basics.html
The Busy Coder's Guide to Android Developmentby Mark L. MurphyCopyright © 2008-2009 CommonsWare, LLC.ISBN: 978-0-9816780-0-9
10
2
10. Android – UI – The WebKit Browser
WebKit Browser
2
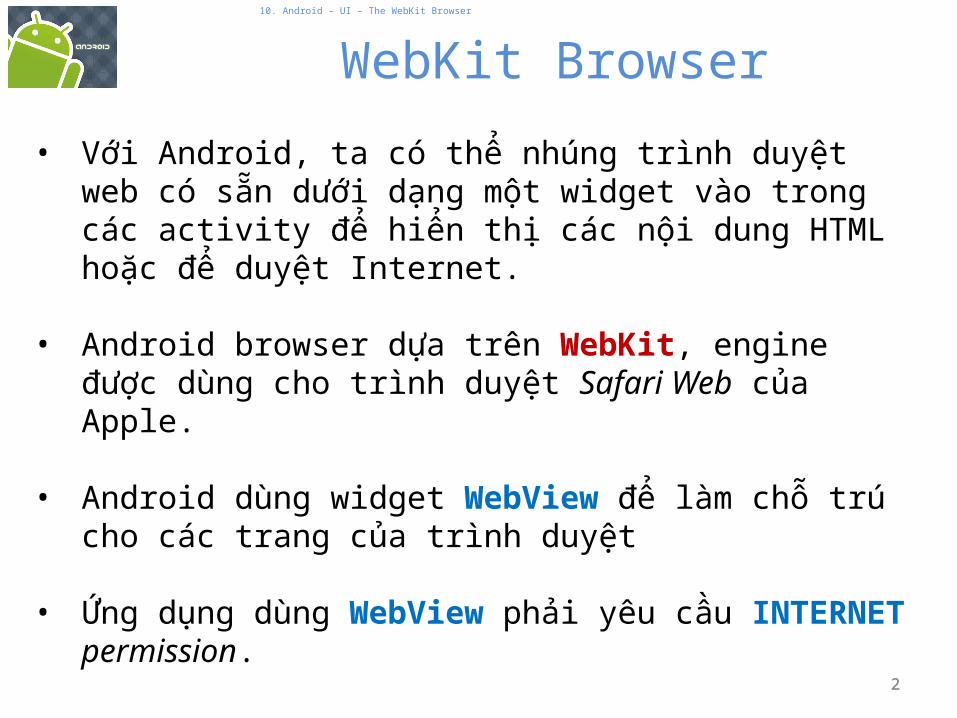
• Với Android, ta có thể nhúng trình duyệt web có sẵn dưới dạng một widget vào trong các activity để hiển thị các nội dung HTML hoặc để duyệt Internet.
• Android browser dựa trên WebKit, engine được dùng cho trình duyệt Safari Web của Apple.
• Android dùng widget WebView để làm chỗ trú cho các trang của trình duyệt
• Ứng dụng dùng WebView phải yêu cầu INTERNET permission.

3
10. Android – UI – The WebKit Browser
WebKit Browser
3
Browsing PowerBrowser sẽ truy nhập Internet bằng bất cứ cách nào mà từng thiết bị cụ thể cho phép (WiFi, mạng điện thoại, ...).
WebKit bao gồm các phương thức để
1. navigate forward and backward through a history, 2. zoom in and out, 3. perform text searches,4. load data5. stop loading and 6. more.

4
10. Android – UI – The WebKit Browser
WebKit Browser
4
Permission
Để Activity truy nhập được Internet và tải các trang web vào một WebView, ta phải bổ sung INTERNET permission và file Android Manifest:
<uses-permission android:name="android.permission.INTERNET" />
Dòng này phải là con của phần tử <manifest>.
(see next example)

5
10. Android – UI – The WebKit Browser
WebKit Browser
5
Example: A simple browsing experienceLet’s go e-shopping
<?xml version="1.0" encoding="utf-8"?><LinearLayout xmlns:android="http://schemas.android.com/apk/res/android" android:orientation="vertical" android:layout_width="fill_parent" android:layout_height="fill_parent" > <WebView android:id="@+id/webkit" android:layout_width="fill_parent" android:layout_height="fill_parent" /></LinearLayout>
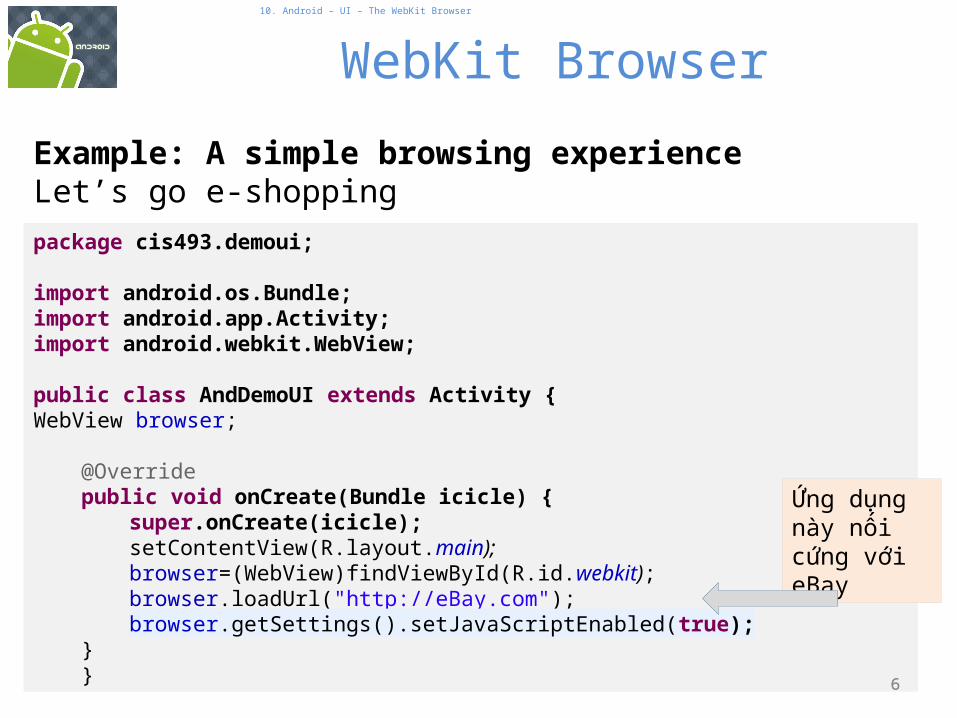
package cis493.demoui;
import android.os.Bundle;import android.app.Activity;import android.webkit.WebView;
public class AndDemoUI extends Activity {WebView browser;
@Overridepublic void onCreate(Bundle icicle) {
super.onCreate(icicle);setContentView(R.layout.main);browser=(WebView)findViewById(R.id.webkit);browser.loadUrl("http://eBay.com");browser.getSettings().setJavaScriptEnabled(true);
} } 6
10. Android – UI – The WebKit Browser
WebKit Browser
6
Example: A simple browsing experienceLet’s go e-shopping
Ứng dụng này nối cứng với eBay

<?xml version="1.0" encoding="utf-8"?><manifest xmlns:android="http://schemas.android.com/apk/res/android" package="cis493.demoui" android:versionCode="1" android:versionName="1.0">
<uses-permission android:name="android.permission.INTERNET" />
<application android:icon="@drawable/icon" android:label="@string/app_name"><activity android:name=".AndDemoUI" android:label="@string/app_name"><intent-filter> <action android:name="android.intent.action.MAIN" /> <category android:name="android.intent.category.LAUNCHER" /></intent-filter></activity> </application>
<uses-sdk android:minSdkVersion="3" />
</manifest> 7
10. Android – UI – The WebKit Browser
WebKit Browser
7
Example: A simple browsing experienceLet’s go e-shopping - Manifest

8
10. Android – UI – The WebKit Browser
WebKit Browser
8
Warning – cảnh báo
Nếu vào URL của một trang dùng Javascript, ta có thể thấy trang trắng trống không.
Trong các widget WebView, Javascript mặc định ở chế độ off.
Để bật Javascript, gọi :
myWebView.setSettings().setJavaScriptEnabled(true);
đối với đối tượng WebView.
To be discussed later in this chapter.

9
10. Android – UI – The WebKit Browser
WebKit Browser
9
WarningVới SDK 1.5, WebView có một Option Menu dựng sẵn
Using Go option Using More option
10
10. Android – UI – The WebKit Browser
WebKit Browser
10
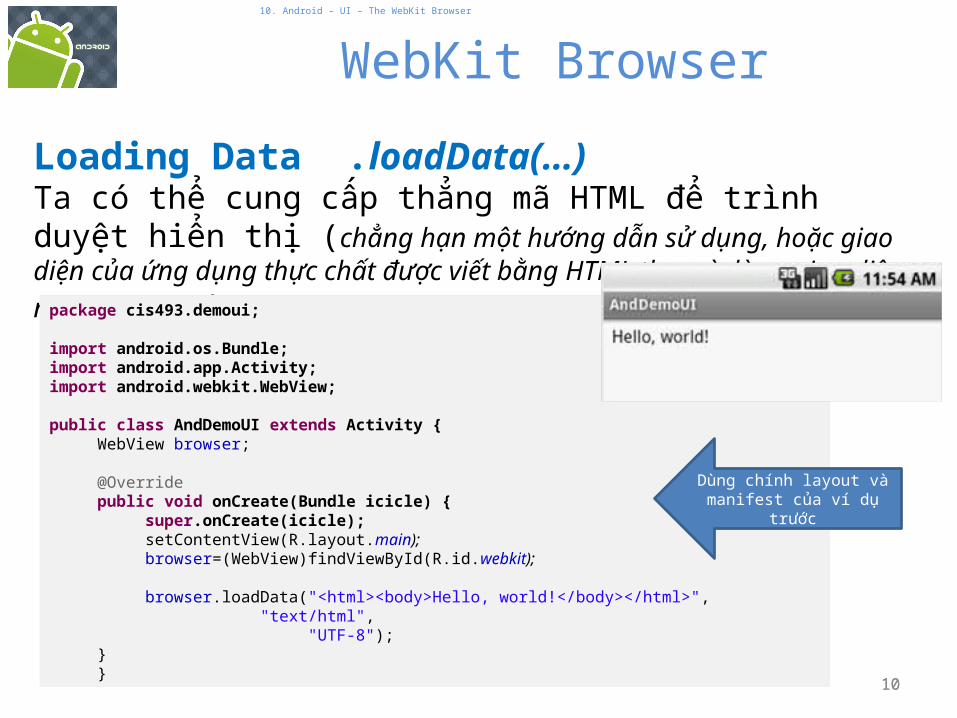
Loading Data .loadData(…)Ta có thể cung cấp thẳng mã HTML để trình duyệt hiển thị (chẳng hạn một hướng dẫn sử dụng, hoặc giao diện của ứng dụng thực chất được viết bằng HTML thay vì dùng giao diện native Android).package cis493.demoui;
import android.os.Bundle;import android.app.Activity;import android.webkit.WebView;
public class AndDemoUI extends Activity {WebView browser;
@Overridepublic void onCreate(Bundle icicle) {
super.onCreate(icicle);setContentView(R.layout.main);browser=(WebView)findViewById(R.id.webkit);
browser.loadData("<html><body>Hello, world!</body></html>", "text/html",
"UTF-8");}}
Dùng chính layout và manifest của ví dụ trước

11
10. Android – UI – The WebKit Browser
WebKit Browser
11
Browser CommandsKhông có navigation toolbar đi kèm mỗi WebView widget (tiết kiệm không gian). Ta có thể cung cấp UI – chẳng hạn tại menu – để phục vụ các thao tác sau:
• reload() to refresh the currently-viewed Web page• goBack() to go back one step in the browser history, and canGoBack() to
determine if there is any history to trace back• goForward() to go forward one step in the browser history, and
canGoForward() to determine if there is any history to go forward to• goBackOrForward() to go backwards or forwards in the browser history, where
negative/positive numbers represent a count of steps to go• canGoBackOrForward() to see if the browser can go backwards or forwards
the stated number of steps (following the same positive/negative convention as goBackOrForward())
• clearCache() to clear the browser resource cache and clearHistory() to clear the browsing history

12
10. Android – UI – The WebKit Browser
WebKit Browser
12
Using our running example:
browser.goBack();browser.goForward();browser.goBackOrForward(-2);browser.goBackOrForward(+2);browser.canGoBack();browser.canGoForward();browser.canGoBackOrForward(-2);browser.canGoBackOrForward(+2);browser.clearCache(true);browser.clearHistory(); browser.stopLoading();

13
10. Android – UI – The WebKit Browser
WebKit Browser
13
Combining HTML + JAVASCRIPT + ANDROID
Ưu điểm mà Android Development mang lại1. Truy nhập các dịch vụ native trên điện thoại, trong đó có các dịch vụ địa
điểm (location services)2. Vị trí tại Android Market3. Phát triển ứng dụng nhanh bằng Android SDK và Eclipse.
Lợi thế của Google Maps API4. Ứng dụng tồn tại ở một server chứ không phải bên trong một thiết bị.5. Nhanh chóng nâng cấp phiên bản, không cần yêu cầu người dùng tải về
và cài đặt phiên bản mới.6. Google thường xuyên có bổ sung tính năng mới và sửa lỗi.7. Tương thích giữa các platform compatibility: Dùng Maps API cho phép
ta tạo một map duy nhất nhưng chạy trên nhiều platform.8. Được thiết kế để nạp nhanh tại các thiết bị Android và iPhone.

14
10. Android – UI – The WebKit Browser
WebKit Browser
14
Combining HTML + JAVASCRIPT + ANDROID
Learning Strategy
• WebView2: Truyền các Object giữa Android và JS(goal: create interconnectivity)
• WebView3: Mapping a fixed location using Google Maps V3(Pure HTML + JS, just update the server -no need to upgrade ALL
devices carrying the application, portability, homogeneous design)
• WebView4: Passing a real location object to JS – draw a map centered at given location (mapping current location, combines two above).

15
10. Android – UI – The WebKit Browser
WebKit Browser
15
HTML + JAVASCRIPT + ANDROID
Trao đổi các object giữa Android & JS
Android OS
locater object
HTML
You pass an object whose methods you want to expose to JavaScript (class vars not visible)

16
10. Android – UI – The WebKit Browser
WebKit Browser
16
Part1. WebView2: Passing Objects between Android and JS
17
10. Android – UI – The WebKit Browser
WebKit Browser
17
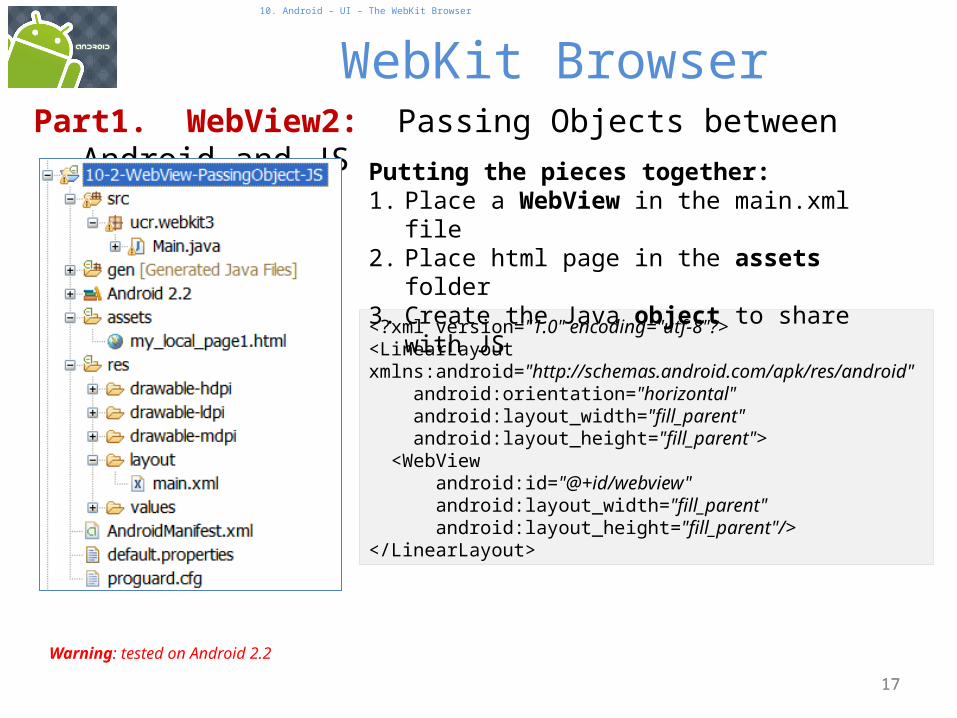
Part1. WebView2: Passing Objects between Android and JS
<?xml version="1.0" encoding="utf-8"?><LinearLayout xmlns:android="http://schemas.android.com/apk/res/android" android:orientation="horizontal" android:layout_width="fill_parent" android:layout_height="fill_parent"> <WebView android:id="@+id/webview" android:layout_width="fill_parent" android:layout_height="fill_parent"/></LinearLayout>
Putting the pieces together:1. Place a WebView in the main.xml file2. Place html page in the assets folder3. Create the Java object to share with JS
Warning: tested on Android 2.2

18
10. Android – UI – The WebKit Browser
WebKit Browser
18
Part1. WebView2: Passing Objects between Android and JS<!DOCTYPE HTML PUBLIC "-//W3C//DTD HTML 4.01 Transitional//EN"><html><head><title>Android_Passing_HTML_JS</title> <head><script language="javascript">function whereami() { // html asks android to provide data using object's GET methods
document.getElementById("lat").innerHTML=locater.getLatitude();document.getElementById("lon").innerHTML=locater.getLongitude();document.getElementById("myText").value = locater.getCommonData();}function talkBack2Android() { // bridge object used to send local (html) data to android app locater.setCommonData("Greetings from html"); var spyHtml = "Spy data coming from HTML\n" + "\n" + document.getElementById("myText").value + "\n" + document.getElementById("lat").innerHTML + "\n" + document.getElementById("lon").innerHTML; locater.htmlPassing2Android(spyHtml);}</script></head>
<body><p> You are at </p><table border="1" cellspacing="1" cellpadding="1"> <tr> <td bgcolor="#FFFFCC"> Latitude </td> <td><span id="lat"> (unknown) </span></td> </tr> <tr> <td bgcolor="#FFFFCC"> Longitude </td> <td><span id="lon"> (unknown) </span></td> </tr></table>
<p><a onClick="whereami()"><u> Click to Get Location </u></a></p>
<p> Enter some data here <input type="text" id="myText" /> <p> <input type="button" onclick= "talkBack2Android()" value="Talking to Android"></body></html>

19
10. Android – UI – The WebKit Browser
WebKit Browser
19
Part1. WebView2: Passing Objects between Android and JSpublic class Main extends Activity {
private WebView browser;MyLocater locater = new MyLocater();Location mostRecentLocation;
@Overridepublic void onCreate(Bundle icicle) { super.onCreate(icicle); setContentView(R.layout.main);
// get a location fix (lat, lon)mostRecentLocation = fakeGetLocation(); // set up the webview to show location resultsbrowser = (WebView) findViewById(R.id.webview);browser.getSettings().setJavaScriptEnabled(true);browser.addJavascriptInterface(locater, "locater");browser.loadUrl("file:///android_asset/my_local_page1.html");}
private Location fakeGetLocation() {// faking the obtaining of a location object (discussed later!)Location fake = new Location("fake");fake.setLatitude(9.938038);fake.setLongitude(-84.054430);return fake;}

20
10. Android – UI – The WebKit Browser
WebKit Browser
20
Part1. WebView2: Passing Objects between Android and JS// "MyLocater" dùng để gửi dữ liệu qua lại giữa Android và mã JS
public class MyLocater {private String commonData = "XYZ";
public double getLatitude() {if (mostRecentLocation == null) return (0);else return mostRecentLocation.getLatitude();
}
public double getLongitude() {if (mostRecentLocation == null) return (0);else return mostRecentLocation.getLongitude();
}
public void htmlPassing2Android(String dataFromHtml) {Toast.makeText(getApplicationContext(), "1\n" + commonData, 1).show();commonData = dataFromHtml;Toast.makeText(getApplicationContext(), "2\n" + commonData, 1).show();
}
public String getCommonData(){return commonData;
}public void setCommonData(String actualData){
commonData = actualData;}}//MyLocater}
21
10. Android – UI – The WebKit Browser
WebKit Browser
21
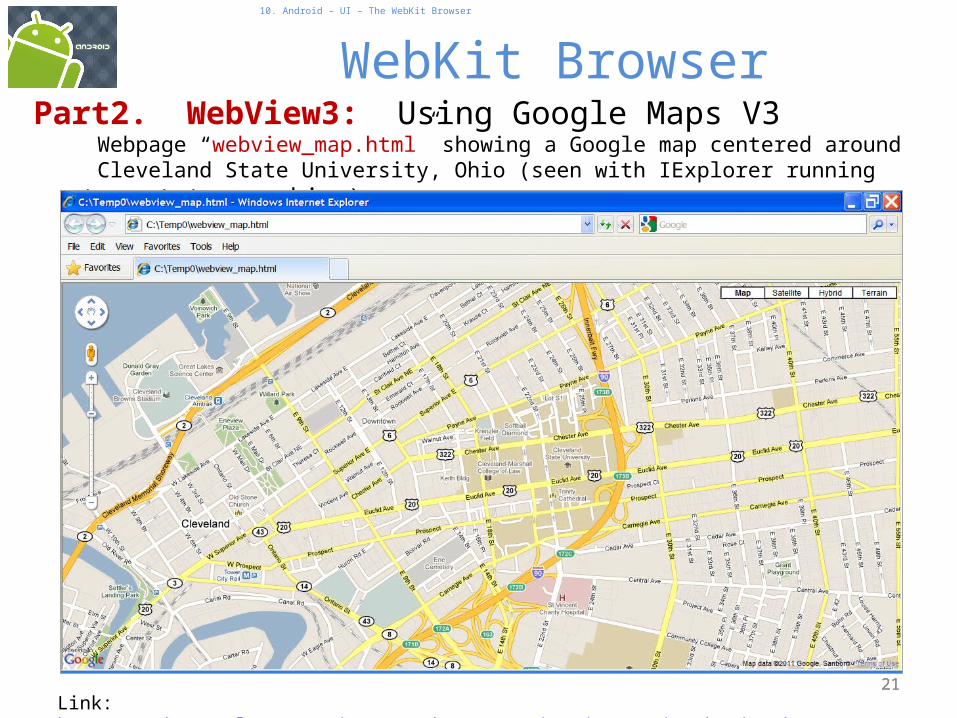
Part2. WebView3: Using Google Maps V3 Webpage “webview_map.html” showing a Google map centered around Cleveland State University, Ohio (seen with IExplorer running in a Windows machine)
Link: http://code.google.com/apis/maps/documentation/javascript/basics.html

<!DOCTYPE html><html>
<head><meta name="viewport" content="initial-scale=1.0, user-scalable=no" />
<style type="text/css"> html { height: 100% } body { height: 100%; margin: 0px; padding: 0px } #map_canvas { height: 100% }</style>
<script type="text/javascript" src="http://maps.google.com/maps/api/js?sensor=false"></script><script type="text/javascript"> function initialize() { var latlng = new google.maps.LatLng(41.5020952, -81.6789717); var myOptions = { zoom: 15, center: latlng, mapTypeId: google.maps.MapTypeId.ROADMAP }; var map = new google.maps.Map(document.getElementById("map_canvas"), myOptions); }
</script></head><body onload="initialize()"> <div id="map_canvas" style="width:100%; height:100%" ></div></body></html> 22
10. Android – UI – The WebKit Browser
WebKit Browser
22
Part2. WebView3: Passing Objects between Android and JSThis is the web page: webview_map.html

23
10. Android – UI – The WebKit Browser
WebKit Browser
23
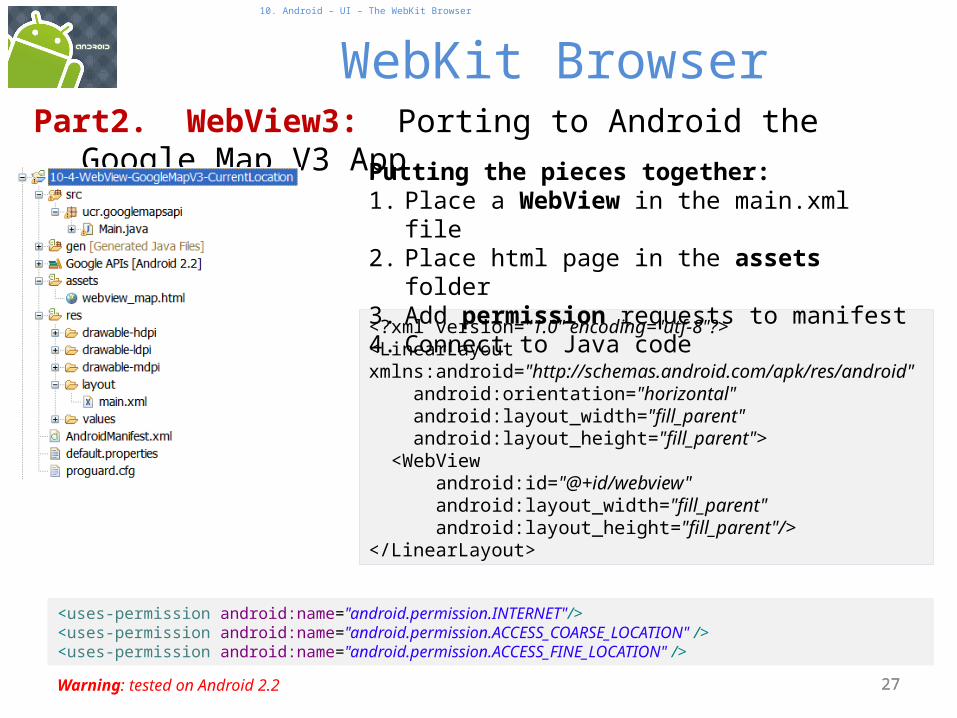
Part2. WebView3: Porting to Android the Google Map V3 App.
<?xml version="1.0" encoding="utf-8"?><LinearLayout xmlns:android="http://schemas.android.com/apk/res/android" android:orientation="horizontal" android:layout_width="fill_parent" android:layout_height="fill_parent"> <WebView android:id="@+id/webview" android:layout_width="fill_parent" android:layout_height="fill_parent"/></LinearLayout>
Putting the pieces together:1. Place a WebView in the main.xml file2. Place html page in the assets folder3. Add permission requests to manifest4. Connect to Java code
Warning: tested on Android 2.2

24
10. Android – UI – The WebKit Browser
WebKit Browser
24
Part2. WebView3: Porting to Android the Google Map V3 App.Add the following permission requests to the AndroidManifest.xml file<uses-permission android:name="android.permission.INTERNET"/><uses-permission android:name="android.permission.ACCESS_COARSE_LOCATION" /><uses-permission android:name="android.permission.ACCESS_FINE_LOCATION" />
Map image shown on an Android device

25
10. Android – UI – The WebKit Browser
WebKit Browser
25
Part2. WebView3: Porting to Android the Google Map V3 App.
public class Main extends Activity { WebView browser;
@Override public void onCreate(Bundle savedInstanceState) { super.onCreate(savedInstanceState); setContentView(R.layout.main);
// connect browser to local html file showing map browser = (WebView) findViewById(R.id.webview); browser.getSettings().setJavaScriptEnabled(true); browser.loadUrl("file:///android_asset/webview_map.html");
}
}

26
10. Android – UI – The WebKit Browser
WebKit Browser
26
Part3. WebView4: Android & Google Map V3 App (real locations)Ví dụ này kết hợp hai ví dụ trước:
• Mục tiêu là dùng một đối tượng Android để truyền dữ liệu ‘vị trí thực’ cho một trang html.
• Trang html chứa một đoạn mã JavaScript vẽ bản đồ có tâm là tọa độ đã cho.
Warning: Make sure your target is: Google APIs (API Level 8) or higher.
Vĩ độ (Latitude) và kinh độ (longitude) do thiết bị xác định.Ảnh chụp từ điện thoại Android.
27
10. Android – UI – The WebKit Browser
WebKit Browser
27
Part2. WebView3: Porting to Android the Google Map V3 App.
<?xml version="1.0" encoding="utf-8"?><LinearLayout xmlns:android="http://schemas.android.com/apk/res/android" android:orientation="horizontal" android:layout_width="fill_parent" android:layout_height="fill_parent"> <WebView android:id="@+id/webview" android:layout_width="fill_parent" android:layout_height="fill_parent"/></LinearLayout>
Putting the pieces together:1. Place a WebView in the main.xml file2. Place html page in the assets folder3. Add permission requests to manifest4. Connect to Java code
Warning: tested on Android 2.2
<uses-permission android:name="android.permission.INTERNET"/><uses-permission android:name="android.permission.ACCESS_COARSE_LOCATION" /><uses-permission android:name="android.permission.ACCESS_FINE_LOCATION" />

28
10. Android – UI – The WebKit Browser
WebKit Browser
28
Part3. WebView4: Android & Google Map V3 App (real locations)<!DOCTYPE html> <html> <head> <meta name="viewport" content="initial-scale=1.0, user-scalable=no" /> <meta http-equiv="content-type" content="text/html; charset=UTF-8"/> <title>Google Maps JavaScript API v3 Example: Marker Simple</title> <style type="text/css"> html { height: 100% } body { height: 100%; margin: 0px; padding: 0px } #map_canvas { height: 100% }</style> <script type="text/javascript" src="http://maps.google.com/maps/api/js?sensor=false"></script> <script type="text/javascript"> function initialize() { //var myLatlng = new google.maps.LatLng(41.5020952, -81.6789717); var myLatlng = new google.maps.LatLng(locater.getLatitude(), locater.getLongitude()); var myOptions = { zoom: 17, center: myLatlng, mapTypeId: google.maps.MapTypeId.ROADMAP } var map = new google.maps.Map(document.getElementById("map_canvas"), myOptions); var marker = new google.maps.Marker({ position: myLatlng, map: map }); }</script> </head> <body onload="initialize()"> <div id="map_canvas"></div> </body> </html>
Html page creates a map using ‘real’ coordinates passed in the ‘locater’ object

29
10. Android – UI – The WebKit Browser
WebKit Browser
29
Part3. WebView4: Android & Google Map V3 App (real locations)public class Main extends Activity implements LocationListener {private static final String MAP_URL = "http://gmaps-samples.googlecode.com/svn/trunk/articles-android-webmap/simple-android-map.html";private WebView browser;
//Location mostRecentLocation;LocationManager locationManager;
MyLocater locater = new MyLocater(); @Overrideprotected void onDestroy() {
super.onDestroy();// cut location service requestslocationManager.removeUpdates(this);
}
private void getLocation() {locationManager = (LocationManager)
getSystemService(Context.LOCATION_SERVICE);Criteria criteria = new Criteria();criteria.setAccuracy(Criteria.ACCURACY_FINE); // use GPS (you must
be outside)//criteria.setAccuracy(Criteria.ACCURACY_COARSE); // towers, wifiString provider = locationManager.getBestProvider(criteria, true);
// In order to make sure the device is getting the location, request// updates [wakeup after changes of: 1 sec. or 0 meter]locationManager.requestLocationUpdates(provider, 1, 0, this);locater.setNewLocation(locationManager.getLastKnownLocation(provider));}

30
10. Android – UI – The WebKit Browser
WebKit Browser
30
Part3. WebView4: Android & Google Map V3 App (real locations)@Overridepublic void onCreate(Bundle savedInstanceState) {
super.onCreate(savedInstanceState);setContentView(R.layout.main);getLocation();setupbrowser();this.setRequestedOrientation(ActivityInfo.SCREEN_ORIENTATION_PORTRAIT);}
/** Sets up the browser object and loads the URL of the page **/private void setupbrowser() {final String centerURL = "javascript:centerAt("
+ locater.getLatitude() + ","
+ locater.getLongitude() + ")";
// set up the browser to show location resultsbrowser = (WebView) findViewById(R.id.webview);browser.getSettings().setJavaScriptEnabled(true);browser.addJavascriptInterface(locater, "locater");
browser.loadUrl("file:///android_asset/webview_map.html");

31
10. Android – UI – The WebKit Browser
WebKit Browser
31
Part3. WebView4: Android & Google Map V3 App (real locations)// Wait for the page to load then send the location informationbrowser.setWebViewClient(new WebViewClient() {
@Overridepublic void onPageFinished(WebView view, String url) {browser.loadUrl(centerURL);}});}
@Overridepublic void onLocationChanged(Location location) {String lat = String.valueOf(location.getLatitude());String lon = String.valueOf(location.getLongitude());Toast.makeText(getApplicationContext(), lat + "\n" + lon, 1).show();locater.setNewLocation(location);}@Overridepublic void onProviderDisabled(String provider) {
// needed by Interface. Not used}@Overridepublic void onProviderEnabled(String provider) {
// needed by Interface. Not used}@Overridepublic void onStatusChanged(String provider, int status, Bundle extras) {// needed by Interface. Not used}

32
10. Android – UI – The WebKit Browser
WebKit Browser
32
Part3. WebView4: Android & Google Map V3 App (real locations)// ///////////////////////////////////////////////////////////////////// An object of type "MyLocater" will be used to pass data back and// forth between the Android app and the JS code behind the html page.// ///////////////////////////////////////////////////////////////////public class MyLocater {
private Location mostRecentLocation;
public void setNewLocation(Location newCoordinates){mostRecentLocation = newCoordinates;}
public double getLatitude() {if (mostRecentLocation == null) return (0); else return mostRecentLocation.getLatitude();}
public double getLongitude() {if (mostRecentLocation == null) return (0); else return mostRecentLocation.getLongitude();}}// MyLocater
}//class

3333
10. Android – UI – The WebKit Browser
WebKit Browser
33
Questions ?
Related Documents