Android Camera Imaging Test Suite / CTS Verifier Document version: 1.3 Document date: 16th November, 2014 1. Introduction 2. Setup 2.1. Device setup 2.2. Host machine setup 2.2.1. Software installation 2.2.1.1. Android SDK 2.2.1.2. Python 2.7 and numpy stack (Ubuntu) 2.2.1.3. Python 2.7 and numpy stack (Linux, Windows or Mac OS X) 2.2.2. Environment setup 2.3. Physical setup 2.3.1. Example equipment list 2.3.2. Desk-side test station setup 2.3.3. Scene as viewed by camera 2.3.4. Rear vs. front camera testing 3. Running the ITS tests under CTS Verifier 3.1. Invoking the tests 3.2. Collecting test debug output 3.3. Non-automated tests 3.3.1. Sensor fusion 3.3.2. DNG noise model 4. ITS framework details (for advanced users) 4.1. Python framework overview 4.2. Device control 4.3. Image processing and analysis 4.4. Tests 4.5. Test scenes 4.6. Target exposure 4.7. Docs 4.8. List of command line args 4.9. Known issues 1. Introduction The ITS is a framework for running tests on the images produced by an Android camera. The general goal of each test is to configure the camera in a desired manner and capture one or more shots, and then examine the shots to see if they contain the expected image data. Many

Welcome message from author
This document is posted to help you gain knowledge. Please leave a comment to let me know what you think about it! Share it to your friends and learn new things together.
Transcript
Android Camera Imaging Test Suite / CTS Verifier Document version: 1.3 Document date: 16th November, 2014
1. Introduction 2. Setup
2.1. Device setup 2.2. Host machine setup
2.2.1. Software installation 2.2.1.1. Android SDK 2.2.1.2. Python 2.7 and numpy stack (Ubuntu) 2.2.1.3. Python 2.7 and numpy stack (Linux, Windows or Mac OS X)
2.2.2. Environment setup 2.3. Physical setup
2.3.1. Example equipment list 2.3.2. Desk-side test station setup 2.3.3. Scene as viewed by camera 2.3.4. Rear vs. front camera testing
3. Running the ITS tests under CTS Verifier 3.1. Invoking the tests 3.2. Collecting test debug output 3.3. Non-automated tests
3.3.1. Sensor fusion 3.3.2. DNG noise model
4. ITS framework details (for advanced users) 4.1. Python framework overview 4.2. Device control 4.3. Image processing and analysis 4.4. Tests 4.5. Test scenes 4.6. Target exposure 4.7. Docs 4.8. List of command line args 4.9. Known issues
1. Introduction The ITS is a framework for running tests on the images produced by an Android camera. The general goal of each test is to configure the camera in a desired manner and capture one or more shots, and then examine the shots to see if they contain the expected image data. Many
of the tests will require that the camera is pointed at a specific target chart or be illuminated at a specific intensity. The ITS framework was located in the pdk/apps/ area of the Android source in the KitKat release, but was moved into the CTS Verifier test harness (under the cts/ area in the source) in Lollipop. It is required that devices pass a specific set of ITS tests as a part of Android CTS (for the camera frameworks). Users who only want to run the ITS tests to satisfy CTS Verifier requirements need only read Sections 2 and 3. Section 4 provides additional detail about the infrastructure for users who may want to write their own tests, or in general understand the components of this framework in greater detail.
2. Setup There are three things that must be set up correctly to run the ITS tests: the device itself, a host machine (e.g. a Linux desktop or laptop), and the physical scene that the camera will be photographing.
2.1. Device setup Connect the device over USB to a host machine, and grant permissions for the host to access the device over adb. Install the CtsVerifier.apk onto the device, following the instructions for using the CTS Verifier application. As a quick reference, when building from source directly on the attached host machine:
cd cts/apps/CtsVerifier mma j32 adb install r <OUTPUT_PATH>/CtsVerifier.apk
If you are installing this from a CTS Verifier bundle (androidctsverifier.zip) rather than from a full Android source tree, both CtsVerifier.apk and the CameraITS/ directory can be found at the top level of the zipped androidctsverifier folder. Any apps on the device that use the camera should be killed prior to running any ITS tests. The device’s camera app can be used to line up the camera and the scene, but it should be killed once this is done.
2.2. Host machine setup
The ITS tests require a host machine to be connected to the device under test via USB, and make use of adb for device control and communication.
2.2.1. Software installation
2.2.1.1. Android SDK The Android SDK must be installed, and adb must be in the executable path of the shell/terminal that is running on the host machine.
2.2.1.2. Python 2.7 and numpy stack (Ubuntu) Python 2.7 must be installed on the machine, along with the numpy/scipy/matplotlib/opencv stack and the Python Imaging Library. On an Ubuntu machine running Python 2.7, the following commands should suffice:
sudo aptget install pythonnumpy sudo aptget install pythonscipy sudo aptget install pythonmatplotlib sudo aptget install pythonopencv
If these instructions don’t work properly, and script errors (e.g. “import” errors) are observed, then it is recommended to instead use a bundled Python 2.7 distribution, as is described in the next section.
2.2.1.3. Python 2.7 and numpy stack (Linux, Windows or Mac OS X) Setting up a full numpy/scipy/matplotlib/opencv installation by installing the modules separately is possible, however it can be complicated and time-consuming, especially on a Windows machine. For this reason, it is highly recommended to install a bundled distribution of Python 2.7 that comes with these modules. Some different bundles are listed here: http://www.scipy.org/install.html. Of these, Anaconda has been verified to work with the ITS infrastructure, and it is available on Mac OS X, Linux, and Windows from here: http://continuum.io/downloads. After downloading and running the Anaconda installer, configure it with the following commands (in this specific order):
conda install opencv numpy=1.7 conda install anaconda numpy=1.7
After running these commands, the Anaconda installation should have versions of numpy, scipy, opencv, and matplotlib that work together, however the conda install mechanism may itself become broken. If other packages are needed, then re-install a fresh Anaconda
distribution, use conda install to get the needed packages, and then run the above commands. Note that the Anaconda Python executable's directory must be at the front of your PATH environment variable; the Anaconda installer may set this up for you automatically. Once this is installed (and the above commands have been run), you’ll see something like the following:
> python version Python 2.7.5 :: Anaconda 1.8.0 (x86_64)
2.2.2. Environment setup On Linux or Mac OS X, run the following command (in a terminal) from the CameraITS/ directory, from a bash shell:
source build/envsetup.sh This will do some basic sanity checks on your Python installation, and set up the PYTHONPATH environment variable. If no errors are printed to the terminal then the environment is ready to run the tests. On Windows, the bash script won't run (unless you have cygwin (which has not been tested)), but all you need to do is set your PYTHONPATH environment variable in your shell to point to the CameraITS/pymodules directory, giving an absolute path. Without this, you'll get "import" errors when running the test scripts.
2.3. Physical setup The high-level requirements for running the tests are:
● Device is in a tripod, pointed at a static scene containing a grey card in front of a white background
● A steady (non-fluctuating) light source is illuminating the scene (though illumination uniformity isn’t important). Don’t use a fluorescent light as this introduces flicker.
● The device is connected over USB to a host machine, and isn’t moved or jostled during the test run.
The remainder of this section details a particular example physical setup that works well, however any setup that satisfies the above requirements will suffice. Note that the ITS tests were designed to only require a simple, inexpensive physical setup, which can be easily replicated on the desk of any Android camera HAL engineer. No special labs are needed.
2.3.1. Example equipment list The following equipment list is used in the example setup described below.
● Light box: http://www.amazon.com/dp/B000PC4A0O ● LED desk lamp: http://www.amazon.com/dp/B00B0A18MI ● Tripod: http://www.amazon.com/dp/B0002J2TLC ● Tripod head: http://www.amazon.com/dp/B008VI7ORA ● Grey card: http://www.amazon.com/dp/B00290Y9K6
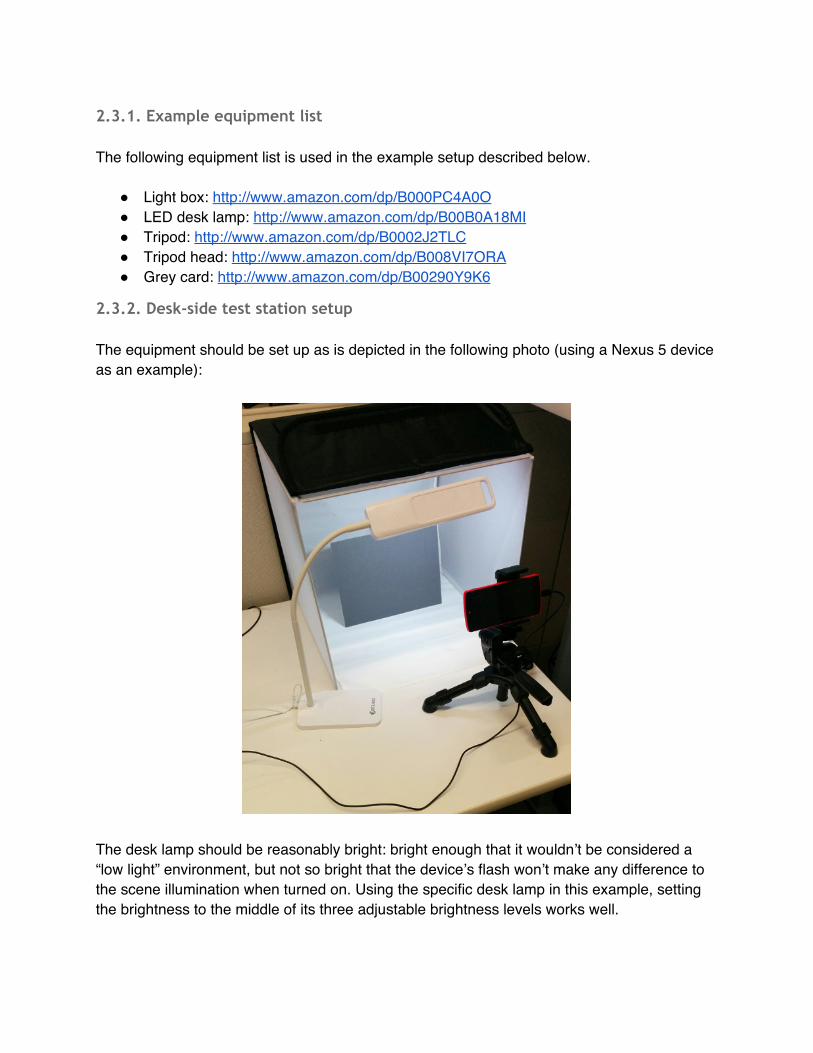
2.3.2. Desk‐side test station setup The equipment should be set up as is depicted in the following photo (using a Nexus 5 device as an example):
The desk lamp should be reasonably bright: bright enough that it wouldn’t be considered a “low light” environment, but not so bright that the device’s flash won’t make any difference to the scene illumination when turned on. Using the specific desk lamp in this example, setting the brightness to the middle of its three adjustable brightness levels works well.
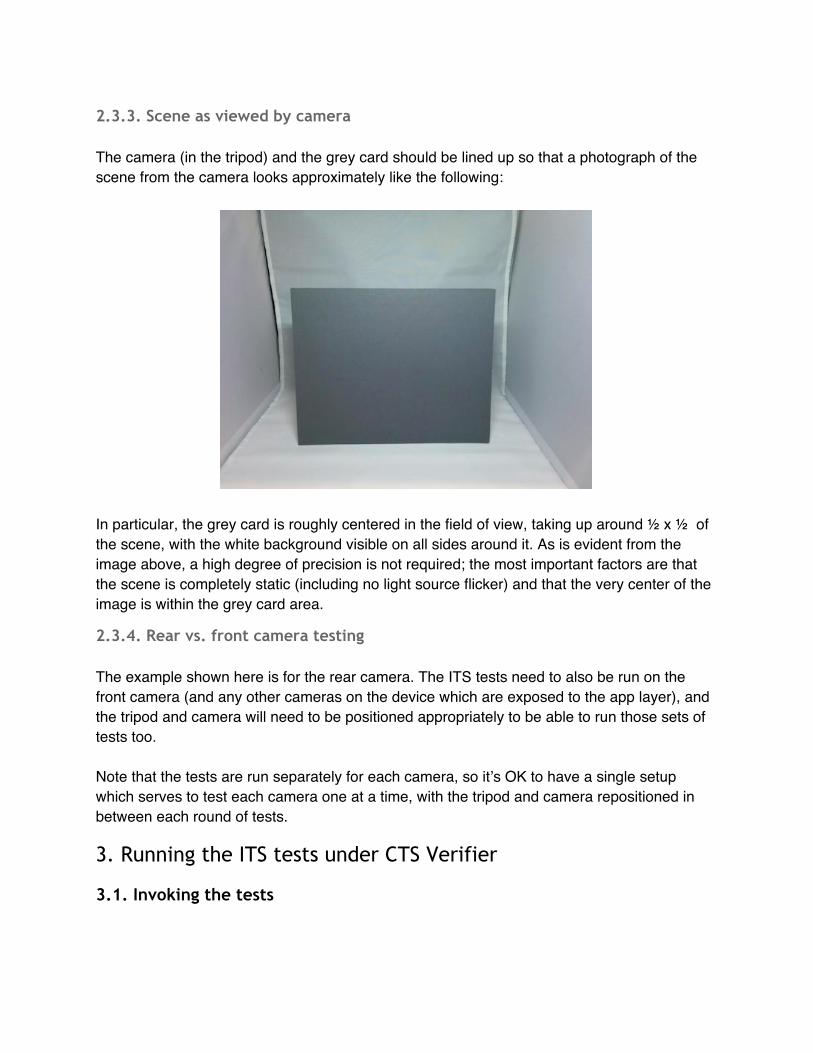
2.3.3. Scene as viewed by camera The camera (in the tripod) and the grey card should be lined up so that a photograph of the scene from the camera looks approximately like the following:
In particular, the grey card is roughly centered in the field of view, taking up around ½ x ½ of the scene, with the white background visible on all sides around it. As is evident from the image above, a high degree of precision is not required; the most important factors are that the scene is completely static (including no light source flicker) and that the very center of the image is within the grey card area.
2.3.4. Rear vs. front camera testing The example shown here is for the rear camera. The ITS tests need to also be run on the front camera (and any other cameras on the device which are exposed to the app layer), and the tripod and camera will need to be positioned appropriately to be able to run those sets of tests too. Note that the tests are run separately for each camera, so it’s OK to have a single setup which serves to test each camera one at a time, with the tripod and camera repositioned in between each round of tests.
3. Running the ITS tests under CTS Verifier
3.1. Invoking the tests
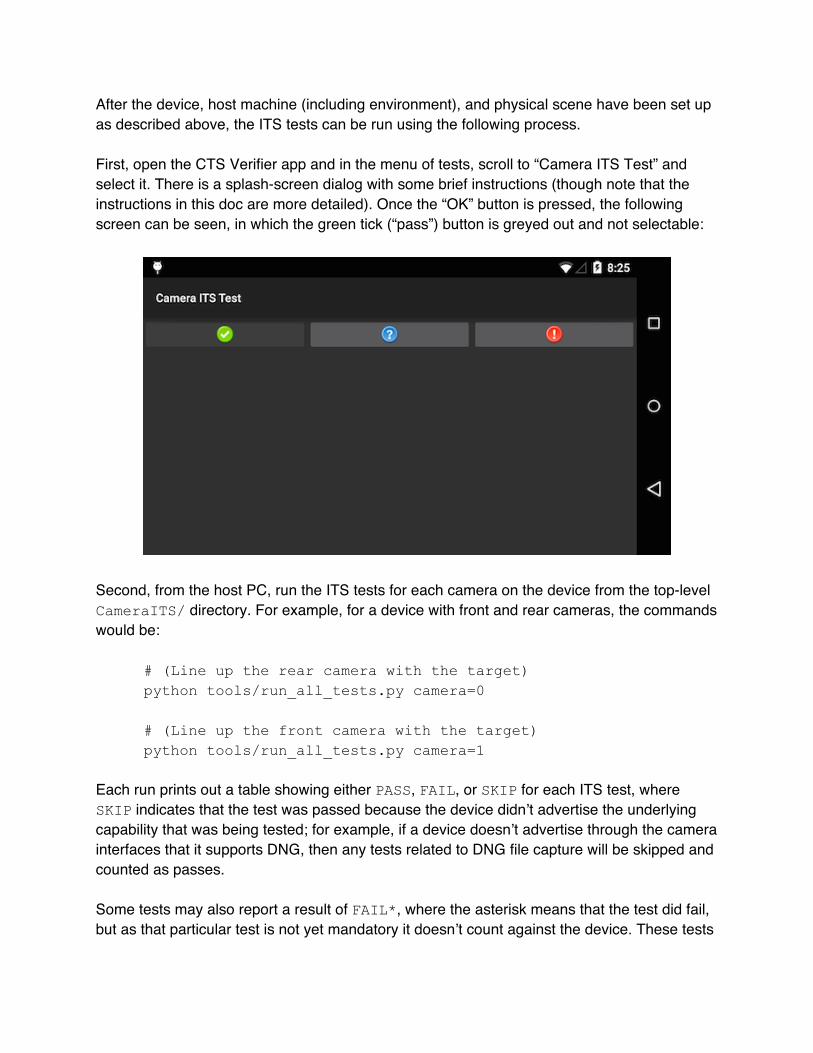
After the device, host machine (including environment), and physical scene have been set up as described above, the ITS tests can be run using the following process. First, open the CTS Verifier app and in the menu of tests, scroll to “Camera ITS Test” and select it. There is a splash-screen dialog with some brief instructions (though note that the instructions in this doc are more detailed). Once the “OK” button is pressed, the following screen can be seen, in which the green tick (“pass”) button is greyed out and not selectable:
Second, from the host PC, run the ITS tests for each camera on the device from the top-level CameraITS/ directory. For example, for a device with front and rear cameras, the commands would be:
# (Line up the rear camera with the target) python tools/run_all_tests.py camera=0 # (Line up the front camera with the target) python tools/run_all_tests.py camera=1
Each run prints out a table showing either PASS, FAIL, or SKIP for each ITS test, where SKIP indicates that the test was passed because the device didn’t advertise the underlying capability that was being tested; for example, if a device doesn’t advertise through the camera interfaces that it supports DNG, then any tests related to DNG file capture will be skipped and counted as passes. Some tests may also report a result of FAIL*, where the asterisk means that the test did fail, but as that particular test is not yet mandatory it doesn’t count against the device. These tests
are expected to become mandatory in some future Android release, however, so whatever HAL bugs are causing them to fail should be fixed if at all possible. Finally, if all tests on all cameras succeeded then the green tick “pass” button will become available to be tapped in the CTS Verifier app that is running on the device. Tap it, and the “Camera ITS Test” entry in the CTS Verifier menu of tests will become green.
3.2. Collecting test debug output Each run of the ITS tests generates a large amount of intermediate data, including many of the captured images that were used in the analysis as well as plots that are used to visualize the results of test runs. These files are all saved to a new temporary directory, the path of which is printed when the run_all_tests.py script begins. These output files will be invaluable for any developers who are debugging HAL bugs that are resulting in test failures.
3.3. Non‐automated tests Not all tests are currently fully automated. Automated tests are invoked by the run_all_tests.py script, however non-automated tests must be manually run, and manually verified to pass.
3.3.1. Sensor fusion The test for sensor fusion requires physical movement of the device in a constrained manner, in addition to a checkerboard target. The tests/sensor_fusion directory contains both the test as well as the PDF documentation for how to set up and run it. A device may only claim to support sensor fusion if this test is passed. Support for sensor fusion is advertised by returning 1 for the android.sensor.info.timestampSource static metadata (which corresponds to the REALTIME capability level for this setting). This test must be passed for each camera device that claims to support sensor fusion.
3.3.2. DNG noise model Devices which advertise the ability to capture RAW/DNG must also provide a noise profile in the capture result metadata of each raw shot. The tests/dng_noise_model directory contains a script (dng_noise_model.py) to generate this noise model along with some PDF documentation explaining how to set up and run it. The primary output of this script is a C code snippet than can be cut-and-pasted into the camera HAL, to implement the noise model for the device. Note that this is done per-camera-model, not per-unit, meaning that each
camera on a phone (e.g. Nexus 5 front-facing and rear-facing cameras) will have its own generated noise profile, and these noise profiles will be shared across all Nexus 5 units. Put another way, a vendor or OEM who is shipping an Android product that claims RAW/DNG support is expected to run the dng_noise_model.py script to generate the noise model that is embedded into the camera HAL, for each camera on the product that claims support (e.g. front + back). Separately, there is an automated ITS test that validates that the noise model provided by the camera HAL is correct; this is tests/scene1/test_dng_noise_model.py.
4. ITS framework details (for advanced users) This section goes into more detail about the ITS framework, and users who are only interested in running the ITS tests as a part of CTS Verifier need not read any further. The ITS infrastructure provides a very general framework for doing image-based testing of the device, by allowing arbitrary captures to be collected and analyzed using a powerful numerical framework (numpy). Users who are interested in learning how the tests work, or in writing their own tests, will find this section relevant.
4.1. Python framework overview The Python modules are under the pymodules/ directory, in the its package.
● its.device: Encapsulates communication with the ITS service included in the CTS Verifier APK that is running on the device
● its.objects: Contains a collection of functions for creating Python objects corresponding to the Java objects which the ITS service uses
● its.image: Contains a collection of functions (built on numpy arrays) for processing captured images
● its.error: The exception/error class used in this framework ● its.target: Functions to set and measure the exposure level to use for manual
shots in tests, to ensure that the images are exposed well for the target scene ● its.dng: Functions to work with DNG metadata ● its.caps: Functions to encapsulate querying for device capabilities
Some of these module have associated unit tests; to run the unit tests, execute the modules (rather than importing them).
4.2. Device control The its.device.ItsSession class encapsulates a session with a connected device
under test (which is running the CTS Verifier APK). The session is over TCP, which is forwarded over ADB. As an overview, the its.device.ItsSession.do_capture() function takes a Python dictionary object as an argument, converts that object to JSON, and sends it to the device over tcp which then deserializes from the JSON object representation to Camera2 Java objects (CaptureRequest) which are used to specify one or more captures. Once the captures are complete, the resultant images are copied back to the host machine (over TCP again), along with JSON representations of the CaptureResult and other objects that describe the shot that was actually taken. The Python capture request object(s) can contain key/value entries corresponding to any of the Java CaptureRequest object fields. The output surface's width, height, and format can also be specified. Currently supported formats are "jpg", "raw", "raw10", "dng", and "yuv", where "yuv" is YUV420 fully planar. The default output surface is a full sensor YUV420 frame. The metadata that is returned along with the captured images is also in JSON format, serialized from the CaptureRequest and CaptureResult objects that were passed to the capture listener, as well as the CameraCharacteristics object.
4.3. Image processing and analysis The its.image module is a collection of Python functions, built on top of numpy arrays, for manipulating captured images. Note that it's important to do heavy image processing using the efficient numpy ndarray operations, rather than writing complex loops in standard Python to process pixels. Refer to online docs and examples of numpy for information on this.
4.4. Tests The tests/ directory contains a number of self-contained test scripts. Most of the tests save various files in the current directory. To have all the output files put into a separate directory, run the script from that directory, for example:
mkdir out cd out python ../tests/scene1/test_linearity.py
Any test can be specified to reboot the camera prior to capturing any shots, by adding a reboot or reboot=N command line argument, where N is the number of seconds to wait after rebooting the device before sending any commands; the default is 30 seconds.
python tests/scene1/test_linearity.py reboot python tests/scene1/test_linearity.py reboot=20
It's possible that a test could leave the camera in a bad state, in particular if there are any bugs in the HAL or the camera framework. Rebooting the device can be used to get it into a known clean state again. By default, camera device id 0 is opened when the script connects to the unit, however this can be specified by adding a camera=1 or similar argument to the script command line. On a typical device, camera id 0 is the main (rear) camera, and camera id 1 is the front-facing camera.
python tests/scene1/test_linearity.py camera=1 The tools/run_all_tests.py script should be executed from the top-level CameraITS directory, and it will run all of the tests in an automated fashion, saving the generated output files along with the stdout and stderr dumps to a temporary directory.
python tools/run_all_tests.py This can be run with the camera, reboot and/or noinit arguments (see below), and in general any args provided to this command line will be passed to each script as it is executed.
python tools/run_all_tests.py camera=1 When running individual tests from the command line (as in the examples here), each test run will ensure that the ITS service is running on the device and is ready to accept TCP connections. When using a separate test harness to control this infrastructure, the noinit command line argument can be provided to skip this step; in this case, the test will just try to open a socket to the service on the device, and will fail if it's not running and ready.
python tests/scene1/test_linearity.py noinit
4.5. Test scenes The tests are grouped into scene folders: tests/scene0/, tests/scene1/, etc. Each assumes some specific details about the scene that the camera is pointing at while running those tests.
● Scene 0: No requirements. The camera camera be pointing at anything (including being face down on the desk, or using the same setup as scene 1).
● Scene 1: The camera is on a tripod pointing at a static scene containing a grey card and white background, under a constant (stable) relatively bright illumination source. This is the scene that is described above for the CTS Verifier physical setup.
The tests/inprog directory contains a mix of unfinished, in-progress, and incomplete tests. These may or may not be useful in testing a camera HAL implementation, and if and when these tests are completed they will be moved into the scene folders.
4.6. Target exposure The tools/config.py script is a wrapper for the its.target module, which is used to set an exposure level based on the scene that the camera is imaging. The purpose of this is to be able to have tests which use hard-coded manual exposure controls, while at the same time ensuring that the captured images are properly exposed for the test (and aren't clamped to white or black). If no argument is provided, the script will use the camera to measure the scene to determine the exposure level. An argument can be provided to hard-code the exposure level.
python tools/config.py python tools/config.py 16531519962
This creates a file named its.target.cfg in the current directory, storing the target exposure level. Tests that use the its.target module will be reusing this value, if they are run from the same directory and if they contain the target command line argument:
python tests/scene1/test_linearity.py target If the target argument isn't present, then the script won't use any cached its.target.cfg values that may be present in the current directory. In general, there will be no need for a developer/user to manually hard-code the exposure level and use the target argument as described here, except for when a camera HAL is in the early stage of bring-up and not enough of the functionality is complete yet for the full tests to be able to run. This mechanism allows some of the tests to still be run on such a device.
4.7. Docs The pydoc tool can generate docs for the ITS Python modules, using the following commands (where the -w option indicates that the docs should be saved in a HTML file):

pydoc its.device pydoc w its.device
There is also a tutorial script in the tests/ folder (named tutorial.py). It illustrates a number of the its.image and its.device primitives, and shows how to work with image data in general using this infrastructure. (Its code is commented with explanatory remarks.)
python tests/tutorial.py
4.8. List of command line args Just to summarize them in one place, the above document sections describe the following command line arguments that may be provided when running a test:
● reboot ● reboot=N ● target ● noinit ● camera=N
4.9. Known issues The Python test scripts don't work in a stand-alone fashion if multiple devices are connected to the host machine; currently, the its.device module uses a simplistic “adb d” approach to communicating with the device, assuming that there is only one device connected.
Related Documents