Andersen Lab COPAS Sorter Best Practices 1) Watch the polygon on sort days If the cloud is falling where it shouldn't (too large and dispersed, or too small and compact), then there is something wrong. Get Erik ASAP. The cloud should normally be near the lower bound of the polygon, with 20-50% of objects being sortable. Use the LED flashlight near the sorter to watch for objects being sorted. 2) Look at the bottom of the waste tray, and look for drops of liquid *outside* the waste tray. Water on the outside means that there is a clog of some sort. If there are drops, first make sure the waste tray is slid all the way to the right. If dripping continues, try cleaning the sorter and get Erik. Clean button Polygon windows for sorting drops from waste tray normally collect here

Welcome message from author
This document is posted to help you gain knowledge. Please leave a comment to let me know what you think about it! Share it to your friends and learn new things together.
Transcript
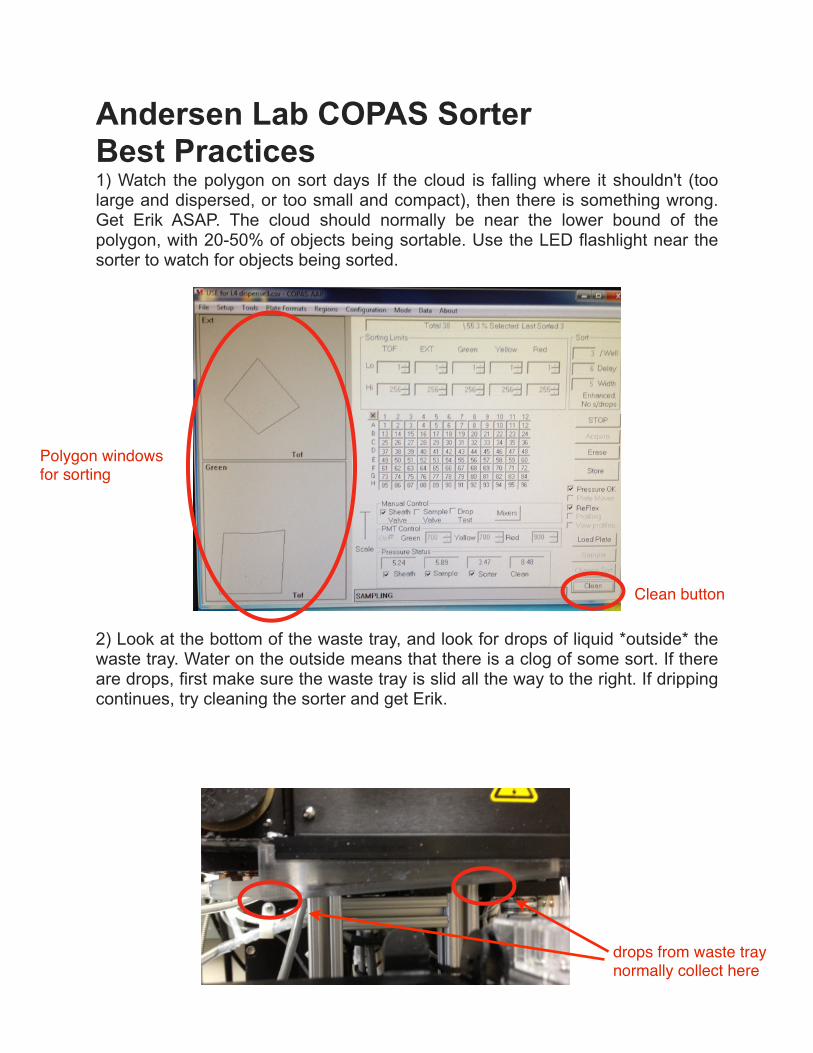
Andersen Lab COPAS Sorter Best Practices 1) Watch the polygon on sort days If the cloud is falling where it shouldn't (too large and dispersed, or too small and compact), then there is something wrong. Get Erik ASAP. The cloud should normally be near the lower bound of the polygon, with 20-50% of objects being sortable. Use the LED flashlight near the sorter to watch for objects being sorted.
2) Look at the bottom of the waste tray, and look for drops of liquid *outside* the waste tray. Water on the outside means that there is a clog of some sort. If there are drops, first make sure the waste tray is slid all the way to the right. If dripping continues, try cleaning the sorter and get Erik.
Clean button
Polygon windows for sorting
drops from waste tray normally collect here
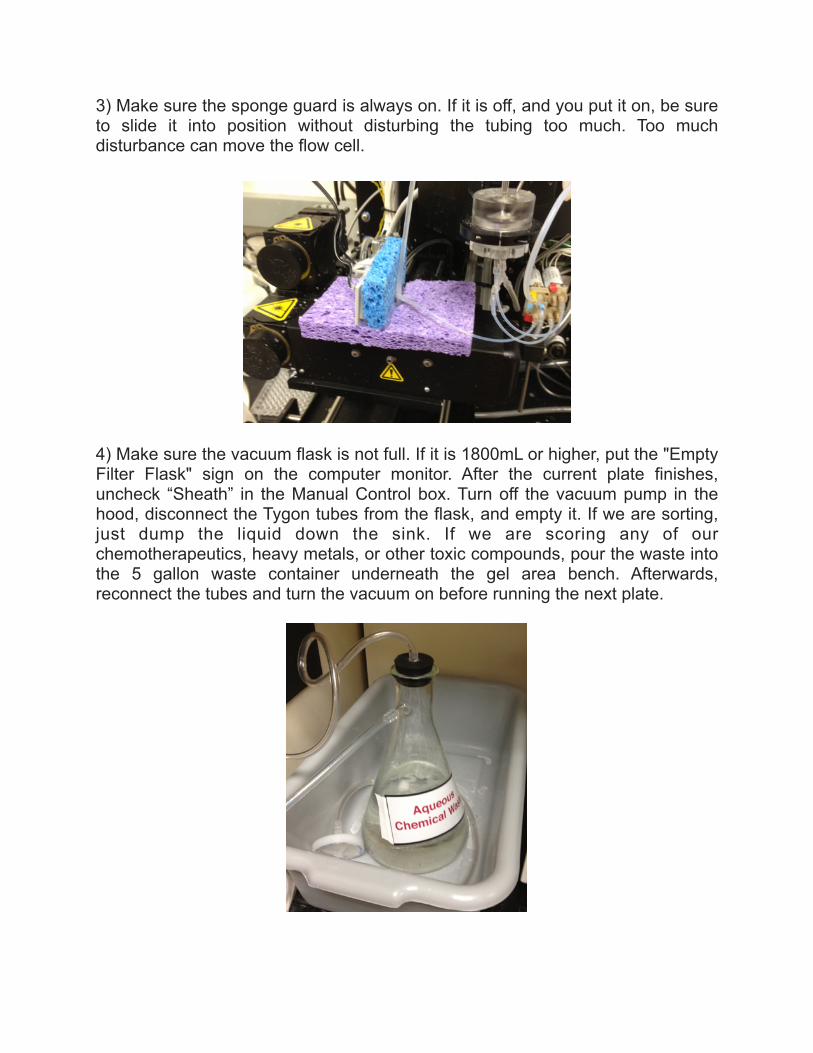
3) Make sure the sponge guard is always on. If it is off, and you put it on, be sure to slide it into position without disturbing the tubing too much. Too much disturbance can move the flow cell.
4) Make sure the vacuum flask is not full. If it is 1800mL or higher, put the "Empty Filter Flask" sign on the computer monitor. After the current plate finishes, uncheck “Sheath” in the Manual Control box. Turn off the vacuum pump in the hood, disconnect the Tygon tubes from the flask, and empty it. If we are sorting, just dump the liquid down the sink. If we are scoring any of our chemotherapeutics, heavy metals, or other toxic compounds, pour the waste into the 5 gallon waste container underneath the gel area bench. Afterwards, reconnect the tubes and turn the vacuum on before running the next plate.
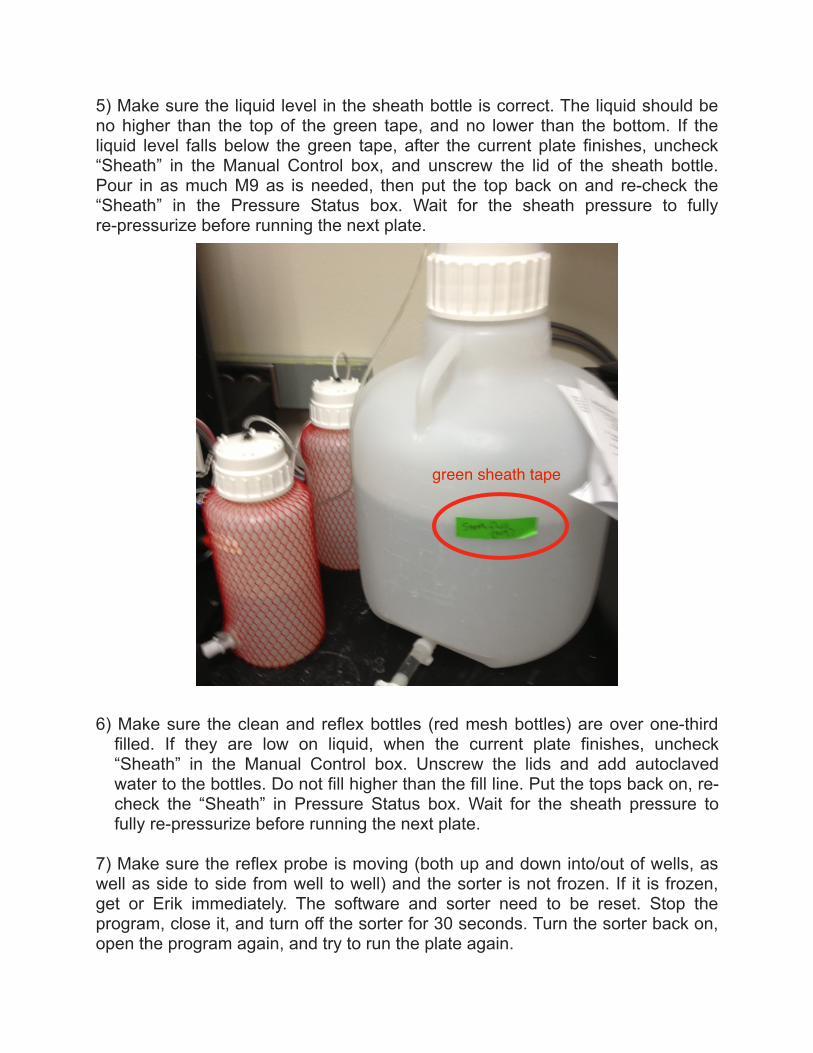
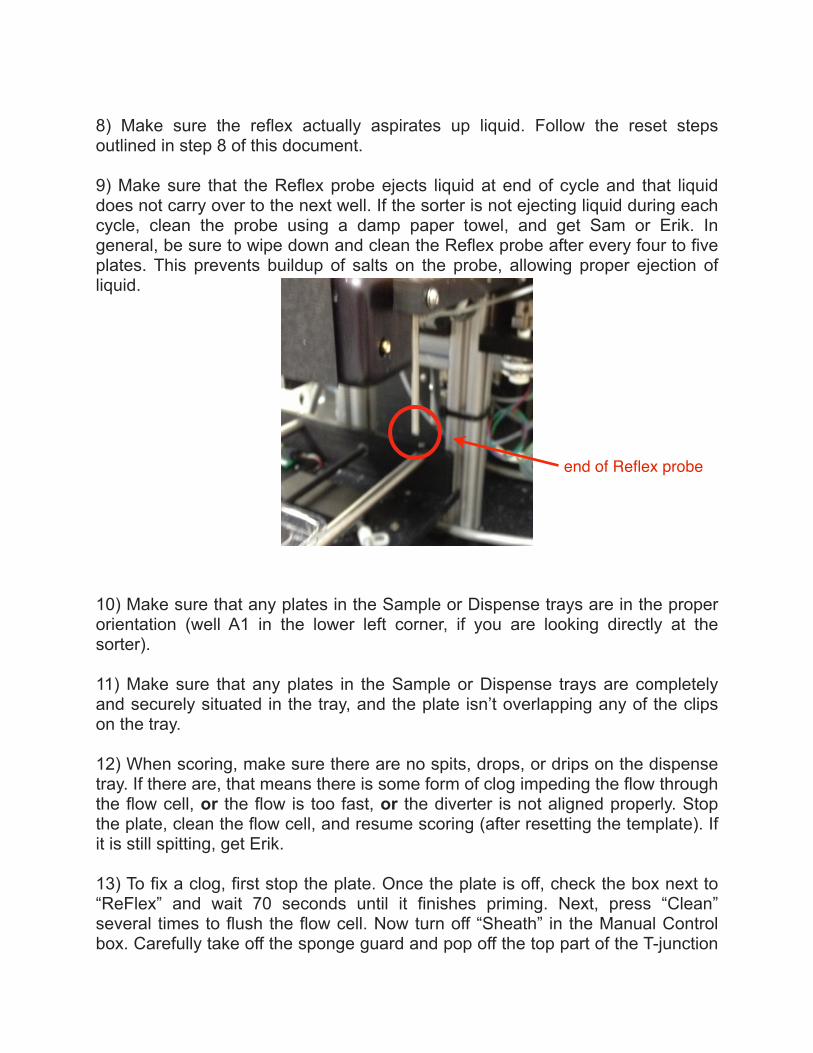
5) Make sure the liquid level in the sheath bottle is correct. The liquid should be no higher than the top of the green tape, and no lower than the bottom. If the liquid level falls below the green tape, after the current plate finishes, uncheck “Sheath” in the Manual Control box, and unscrew the lid of the sheath bottle. Pour in as much M9 as is needed, then put the top back on and re-check the “Sheath” in the Pressure Status box. Wait for the sheath pressure to fully re-pressurize before running the next plate.
6) Make sure the clean and reflex bottles (red mesh bottles) are over one-third filled. If they are low on liquid, when the current plate finishes, uncheck “Sheath” in the Manual Control box. Unscrew the lids and add autoclaved water to the bottles. Do not fill higher than the fill line. Put the tops back on, re-check the “Sheath” in Pressure Status box. Wait for the sheath pressure to fully re-pressurize before running the next plate.
7) Make sure the reflex probe is moving (both up and down into/out of wells, as well as side to side from well to well) and the sorter is not frozen. If it is frozen, get or Erik immediately. The software and sorter need to be reset. Stop the program, close it, and turn off the sorter for 30 seconds. Turn the sorter back on, open the program again, and try to run the plate again.
green sheath tape
8) Make sure the reflex actually aspirates up liquid. Follow the reset steps outlined in step 8 of this document.
9) Make sure that the Reflex probe ejects liquid at end of cycle and that liquid does not carry over to the next well. If the sorter is not ejecting liquid during each cycle, clean the probe using a damp paper towel, and get Sam or Erik. In general, be sure to wipe down and clean the Reflex probe after every four to five plates. This prevents buildup of salts on the probe, allowing proper ejection of liquid.
10) Make sure that any plates in the Sample or Dispense trays are in the proper orientation (well A1 in the lower left corner, if you are looking directly at the sorter).
11) Make sure that any plates in the Sample or Dispense trays are completely and securely situated in the tray, and the plate isn’t overlapping any of the clips on the tray.
12) When scoring, make sure there are no spits, drops, or drips on the dispense tray. If there are, that means there is some form of clog impeding the flow through the flow cell, or the flow is too fast, or the diverter is not aligned properly. Stop the plate, clean the flow cell, and resume scoring (after resetting the template). If it is still spitting, get Erik.
13) To fix a clog, first stop the plate. Once the plate is off, check the box next to “ReFlex” and wait 70 seconds until it finishes priming. Next, press “Clean” several times to flush the flow cell. Now turn off “Sheath” in the Manual Control box. Carefully take off the sponge guard and pop off the top part of the T-junction
end of Reflex probe
that is above the flow cell. Take the wire stylus (normally taped to the sorter), and run it through the T-junction, all the way through the flow cell, and out of the bottom of the waste tray. Move the stylus up and down and in circular motion to try to dislodge any debris. If the clog persists, proceed to Step 16 in this document.
14) In 2014, we started having some large clogs in the flow cell that were difficult to clear with the stylus or other means. The following procedure (now called a clean-out) is our best means to deal with difficult clogs.
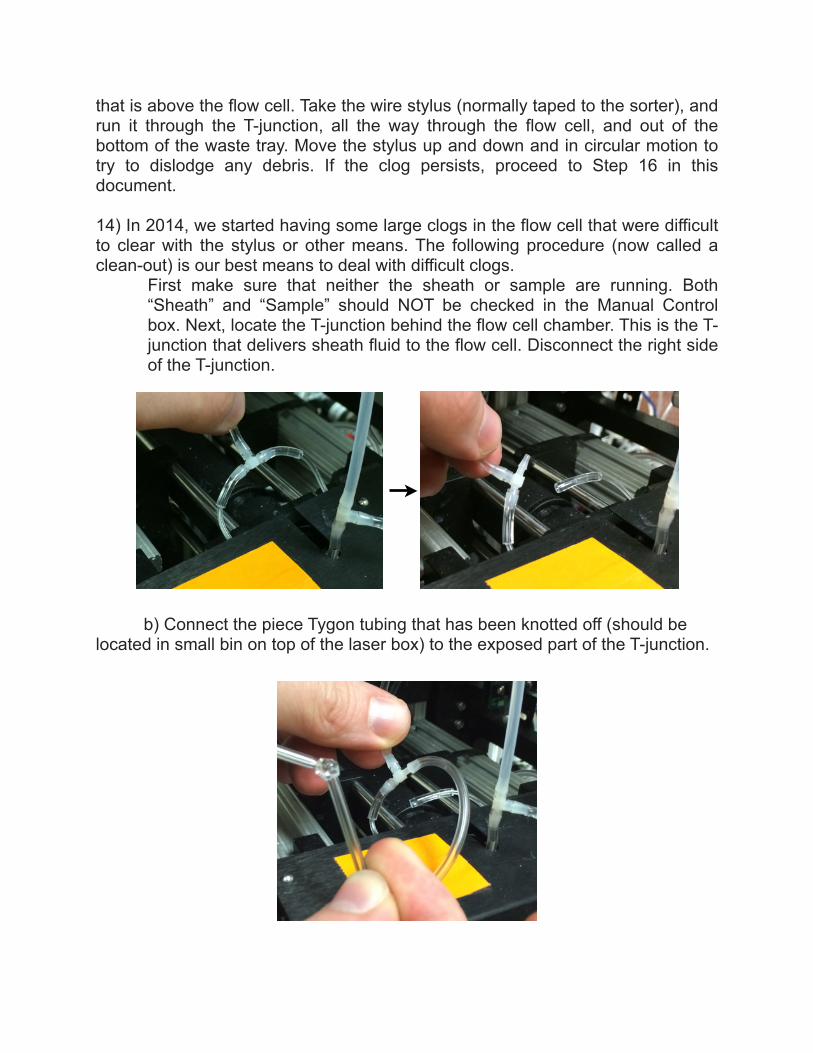
First make sure that neither the sheath or sample are running. Both “Sheath” and “Sample” should NOT be checked in the Manual Control box. Next, locate the T-junction behind the flow cell chamber. This is the T-junction that delivers sheath fluid to the flow cell. Disconnect the right side of the T-junction.
b) Connect the piece Tygon tubing that has been knotted off (should be located in small bin on top of the laser box) to the exposed part of the T-junction.
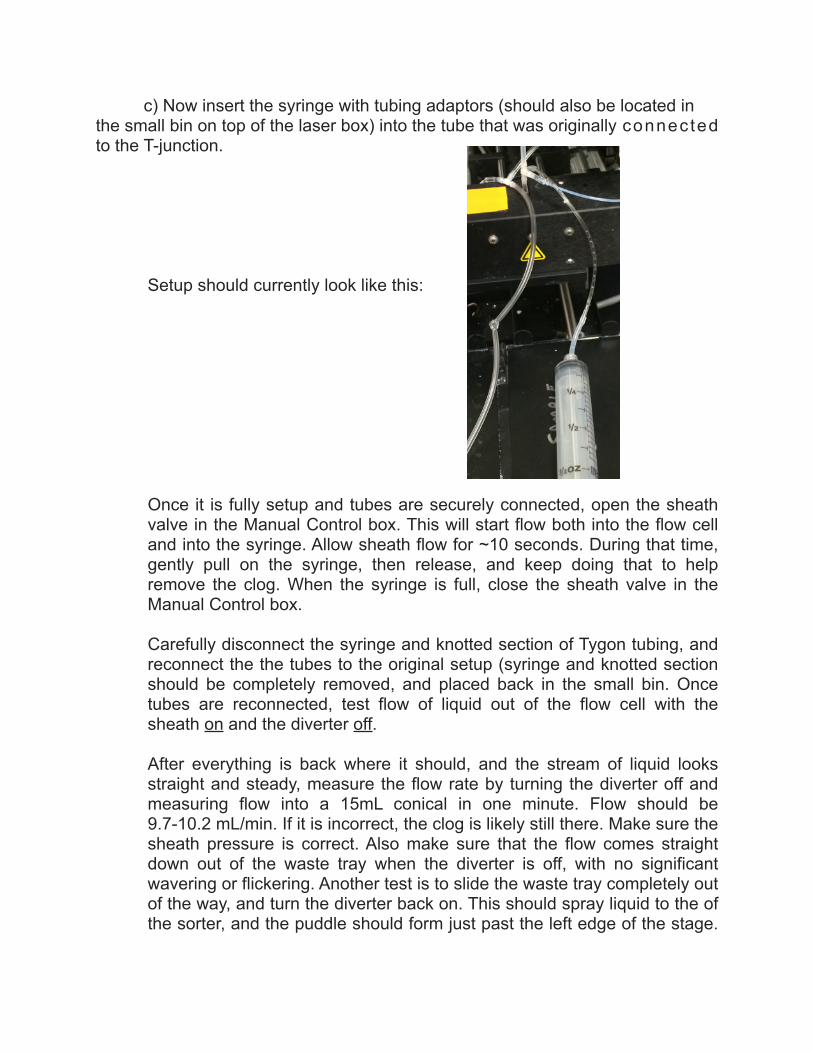
c) Now insert the syringe with tubing adaptors (should also be located in the small bin on top of the laser box) into the tube that was originally connected to the T-junction.
Setup should currently look like this:
Once it is fully setup and tubes are securely connected, open the sheath valve in the Manual Control box. This will start flow both into the flow cell and into the syringe. Allow sheath flow for ~10 seconds. During that time, gently pull on the syringe, then release, and keep doing that to help remove the clog. When the syringe is full, close the sheath valve in the Manual Control box.
Carefully disconnect the syringe and knotted section of Tygon tubing, and reconnect the the tubes to the original setup (syringe and knotted section should be completely removed, and placed back in the small bin. Once tubes are reconnected, test flow of liquid out of the flow cell with the sheath on and the diverter off.
After everything is back where it should, and the stream of liquid looks straight and steady, measure the flow rate by turning the diverter off and measuring flow into a 15mL conical in one minute. Flow should be 9.7-10.2 mL/min. If it is incorrect, the clog is likely still there. Make sure the sheath pressure is correct. Also make sure that the flow comes straight down out of the waste tray when the diverter is off, with no significant wavering or flickering. Another test is to slide the waste tray completely out of the way, and turn the diverter back on. This should spray liquid to the of the sorter, and the puddle should form just past the left edge of the stage.

Be sure to cover the bench and sorter circuit boards with paper towels in case of a spray in the wrong areas.
If any of these problems catches your eye, but you don’t feel comfortable messing with the sorter to try to fix it, that is completely fine! Get Sam or Erik, and we’ll do our best to help and make it work again.
Related Documents