AMQP Custom Filter Support Document © Axway, 2016 / Ref.: 20161102-121035-SQ AMQP Custom Filter Support Document Version 2.0 of Tuesday, December 11, 2018 Status: Issued

Welcome message from author
This document is posted to help you gain knowledge. Please leave a comment to let me know what you think about it! Share it to your friends and learn new things together.
Transcript
AMQP Custom Filter Support Document
© Axway, 2016 / Ref.: 20161102-121035-SQ
AMQP Custom Filter Support Document
Version 2.0 of Tuesday, December 11, 2018 Status: Issued
AMQP Custom Filter Support Document
© Axway, 2016 / Ref.: 20161102-121035-SQ 2/29
To
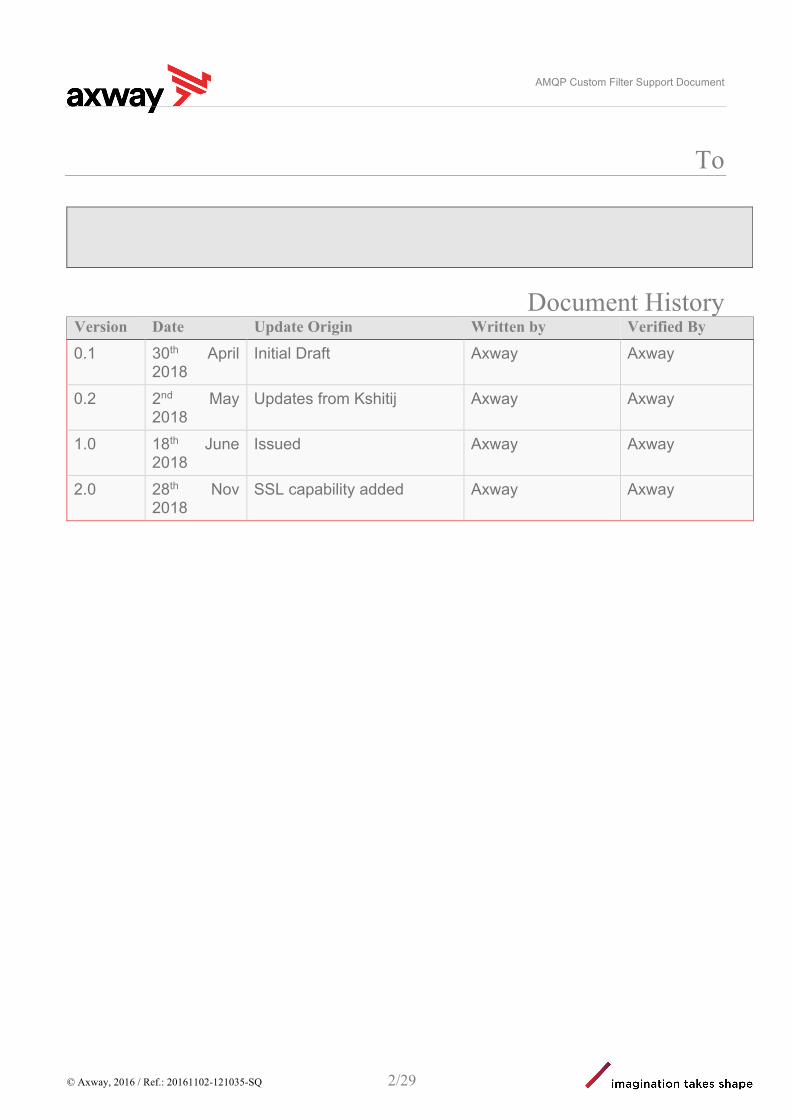
Document History Version Date Update Origin Written by Verified By
0.1 30th April 2018
Initial Draft Axway Axway
0.2 2nd May 2018
Updates from Kshitij Axway Axway
1.0 18th June 2018
Issued Axway Axway
2.0 28th Nov 2018
SSL capability added Axway Axway

AMQP Custom Filter Support Document
© Axway, 2016 / Ref.: 20161102-121035-SQ 3/29
Release Features This is release 2.0 of the RabbitMQ filter to support AMQP connectivity from Axway API Gateway, supporting -
• SSL capability added while creating connection to RabbitMQ server. Supports 2-way and server-side SSL handshake
• Single Connection creation using Loadable Module • Cosmetic changes in filter attribute to support use of variables to replace value

AMQP Custom Filter Support Document
© Axway, 2016 / Ref.: 20161102-121035-SQ 4/29
Contents 1 Introduction ....................................................................................................................................... 5
1.1 RabbitMQ Overview ................................................................................................................. 5
1.2 Implementation Options ............................................................................................................ 5
1.3 Integration Overview ................................................................................................................. 6
2 Environment setup ............................................................................................................................. 7
2.1 Install & Configure RabbitMQ .................................................................................................. 7
2.2 Download and configure AMQP Custom Filter ...................................................................... 11
2.3 Download and configure RabbitMQ Java Client .................................................................... 11
2.4 Policy Studio Configuration .................................................................................................... 11
2.4.1 Configure Runtime Dependencies ....................................................................................... 11
2.4.2 Import custom filter into Policy Studio ............................................................................... 12
3 Key Considerations ......................................................................................................................... 17
4 API Gateway AMQP Request/Response Pattern ............................................................................ 18
5 API Gateway as a Message Producer .............................................................................................. 21
6 API Gateway as a Message-Consumer ............................................................................................ 24
7 Mock Response Generator .............................................................................................................. 25
8 Limitations ....................................................................................................................................... 26
9 Appendix ......................................................................................................................................... 27
9.1 RabbitMQ Admin Console ...................................................................................................... 27
9.2 Performance Benchmark ......................................................................................................... 28
9.2.1 Test Configuration ............................................................................................................... 28
9.2.2 Test Settings ......................................................................................................................... 28
9.2.3 Test scenario ........................................................................................................................ 28
9.2.4 Test Results .......................................................................................................................... 29

AMQP Custom Filter Support Document
© Axway, 2016 / Ref.: 20161102-121035-SQ 5/29
1 Introduction
1.1 RabbitMQ Overview RabbitMQ is a lightweight, reliable, scalable and portable message broker. But unlike many message brokers familiar to Java developers, it's not based on JMS. Instead, your applications communicate with it via a platform-neutral, wire-level protocol: The Advanced Message Queuing Protocol (AMQP). RabbitMQ is a general-purpose messaging solution, often used to allow web servers to respond to requests quickly instead of being forced to perform resource-heavy procedures while the user waits for the result. It’s also good for distributing a message to multiple recipients for consumption or for balancing loads between workers under high load (20k+/sec). When your requirements extend beyond throughput, RabbitMQ has a lot to offer: features for reliable delivery, routing, federation, HA, security, management tools and other features. Scenarios suited to RabbitMQ, include:
• Your application needs to work with any combination of existing protocols like AMQP 0-9-1, STOMP, MQTT, AMQP 1.0.
• You need a finer-grained consistency control/guarantees on a per-message basis (dead letter queues, etc.) However, Kafka has recently added better support for transactions.
• Your application needs variety in point to point, request / reply, and publish/subscribe messaging
• Complex routing to consumers, integrate multiple services/apps with non-trivial routing logic
• Microservices Integration patterns The AMQP 0-9-1 Model has the following view of the world: messages are published to exchanges, which are often compared to post offices or mailboxes. Exchanges then distribute message copies to queues using rules called bindings. Then AMQP brokers either deliver messages to consumers subscribed to queues, or consumers fetch/pull messages from queues on demand.
1.2 Implementation Options

AMQP Custom Filter Support Document
© Axway, 2016 / Ref.: 20161102-121035-SQ 6/29
The Axway API Gateway currently has no out-of-the-box capability to integrate with RabbitMQ AMQP and to achieve this integration a couple of options were considered:
1. Integrate using a JMS client such as Apache Qpid (https://qpid.apache.org/) 2. Create a custom filter leveraging the RabbitMQ Java client
Option 1 was discounted, largely due to the preferences of a UK prospect who required this integration. They felt that Qpid was adding an extra layer of processing that wasn’t optimal. In any case, option 2 provides more flexibility to implement the integration as Axway see fit.
1.3 Integration Overview The API Gateway can act as both a Producer and Consumer, and custom filters have been created accordingly. In fact, 3 custom filters have been created:
1. AMQP Publish (Producer) 2. AMQP Consume (Consumer) 3. AMQP Request Reply (Producer and Consumer)
AMQP Request Reply implements an “RPC” style pattern in which the API Gateway publishes an AMQP message with a certain correlation id, and polls for a response with matching correlation Id. The figure below illustrates the Gateway acting as both a Message Producer and Message Consumer in the RPC style pattern.
AMQP Custom Filter Support Document
© Axway, 2016 / Ref.: 20161102-121035-SQ 7/29
2 Environment setup
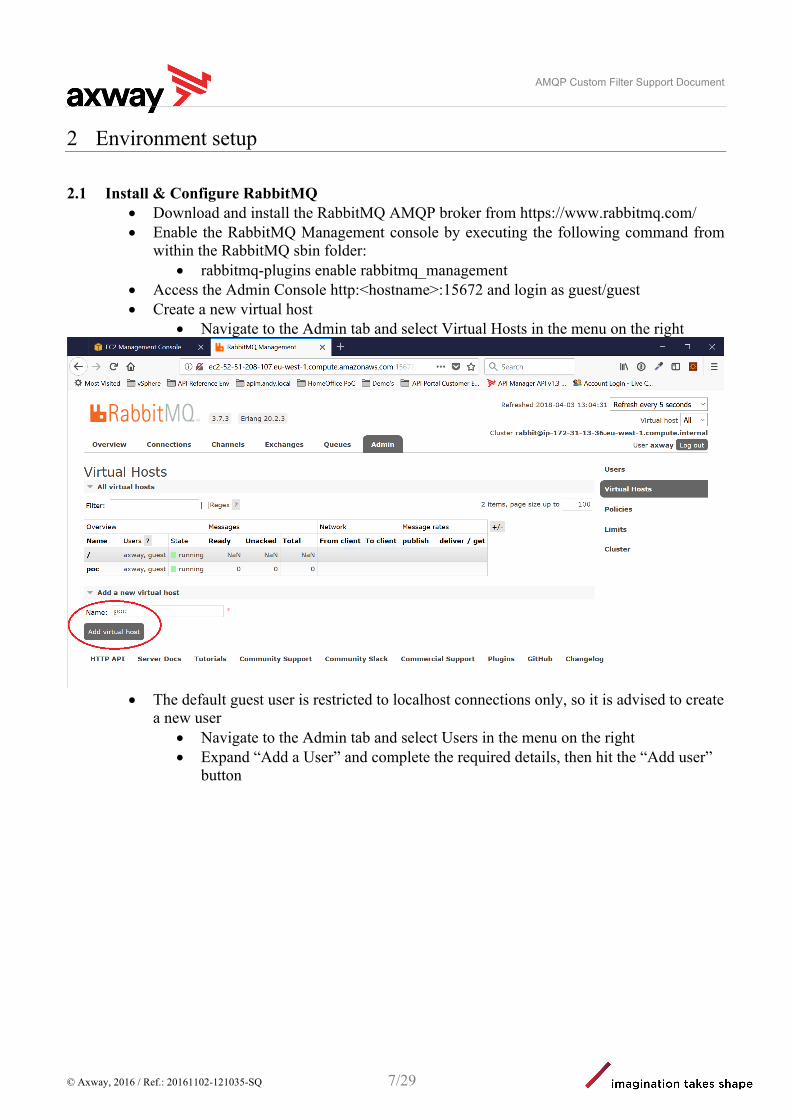
2.1 Install & Configure RabbitMQ • Download and install the RabbitMQ AMQP broker from https://www.rabbitmq.com/ • Enable the RabbitMQ Management console by executing the following command from
within the RabbitMQ sbin folder: • rabbitmq-plugins enable rabbitmq_management
• Access the Admin Console http:<hostname>:15672 and login as guest/guest • Create a new virtual host
• Navigate to the Admin tab and select Virtual Hosts in the menu on the right
• The default guest user is restricted to localhost connections only, so it is advised to create
a new user • Navigate to the Admin tab and select Users in the menu on the right • Expand “Add a User” and complete the required details, then hit the “Add user”
button

AMQP Custom Filter Support Document
© Axway, 2016 / Ref.: 20161102-121035-SQ 8/29
• Give user permissions to the default virtual host / and new vpoc host
• Select the new user
• Select the Virtual Host created earlier and hit “Set permission”

AMQP Custom Filter Support Document
© Axway, 2016 / Ref.: 20161102-121035-SQ 9/29
• Logout and then login again as the new user • Create queues
• From the Queues tab, complete the required details under “Add a new queue” and hit “Add queue” button once finished. Ensure the appropriate Virtual host is selected and “Durability” is set to “Durable”
• Create exchange
• In AMQP, producers send messages to Exchanges NOT queues. Exchanges route messages to the appropriate queue(s) according to the configured bindings.
• From the Exchanges tab, complete the required details under “Add a new exchange” and hit “Add exchange” button once finished. Ensure the appropriate Virtual host is selected and “Durability” is set to “Durable”

AMQP Custom Filter Support Document
© Axway, 2016 / Ref.: 20161102-121035-SQ 10/29
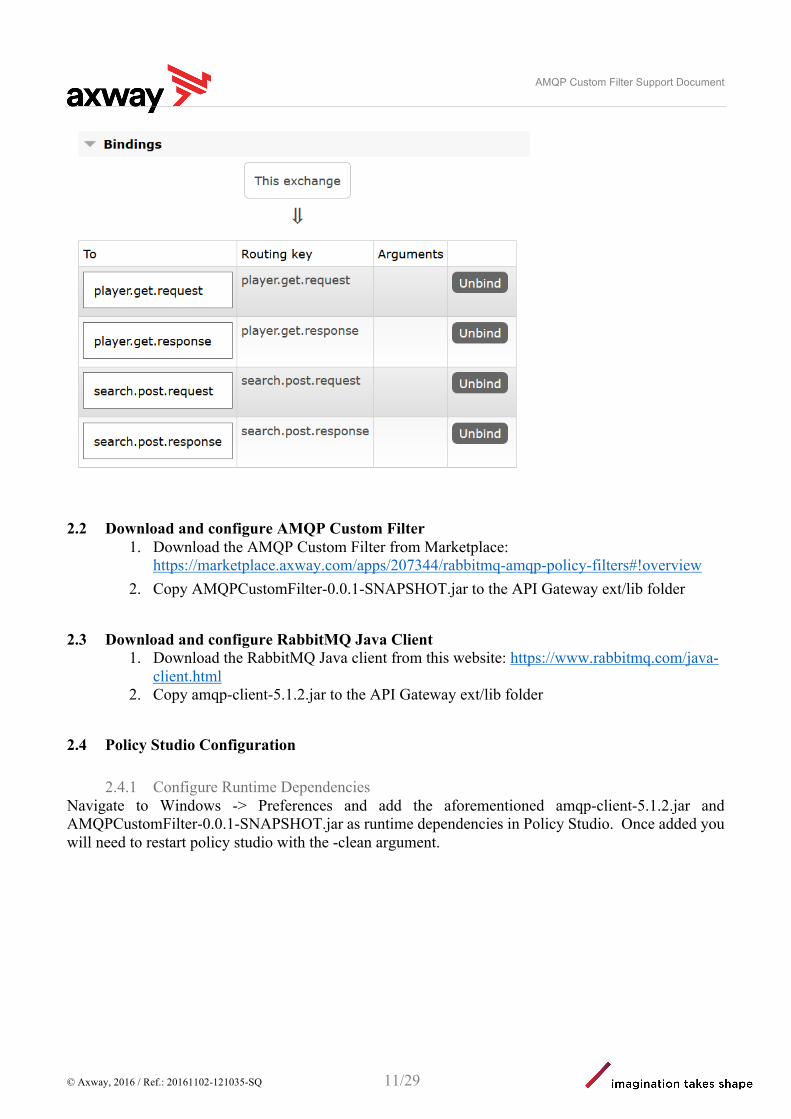
• Create binding
• From the Exchanges tab, select the Exchange created above, and provide bindings for each queue
• A binding should be created for each queue created earlier
AMQP Custom Filter Support Document
© Axway, 2016 / Ref.: 20161102-121035-SQ 11/29
2.2 Download and configure AMQP Custom Filter 1. Download the AMQP Custom Filter from Marketplace:
https://marketplace.axway.com/apps/207344/rabbitmq-amqp-policy-filters#!overview 2. Copy AMQPCustomFilter-0.0.1-SNAPSHOT.jar to the API Gateway ext/lib folder
2.3 Download and configure RabbitMQ Java Client 1. Download the RabbitMQ Java client from this website: https://www.rabbitmq.com/java-
client.html 2. Copy amqp-client-5.1.2.jar to the API Gateway ext/lib folder
2.4 Policy Studio Configuration
2.4.1 Configure Runtime Dependencies Navigate to Windows -> Preferences and add the aforementioned amqp-client-5.1.2.jar and AMQPCustomFilter-0.0.1-SNAPSHOT.jar as runtime dependencies in Policy Studio. Once added you will need to restart policy studio with the -clean argument.

AMQP Custom Filter Support Document
© Axway, 2016 / Ref.: 20161102-121035-SQ 12/29
2.4.2 Import custom filter into Policy Studio Navigate to File -> Import -> Custom Filters and import the “TypeSet” describing the custom filter from the Marketplace project. The TypeSet file can be found under the following project path:
• AMQPFilter v2.0/src/main/resources/AMQPTypeSet.xml
2.4.3 Create new RabbitMQ connection using ESexplorer Launch ESexplorer from <install directory>/apigateway/win of the product. Create new connection by pointing to config.xml file under the project opened in the policy studio. Follow below steps to create a new RabbitMQ connection with RabbitMQ Server-
1. In the tree, navigate to “RabbitMQ Connections Group” as shown below

AMQP Custom Filter Support Document
© Axway, 2016 / Ref.: 20161102-121035-SQ 13/29
2. Right click on “RabbitMQ Connections” group and click “Add a new RabbitMQConnection”
3. You will see a new connection appearing below “RabbitMQ Connections” group. On
right side of the plane you will find connection related fields. To create SSL based connection right click and add additional required fields. Add below fields by right clicking on plane –
a. Create a hostname b. Create a Username c. Create a password d. Create a sslTrustedCerts
AMQP Custom Filter Support Document
© Axway, 2016 / Ref.: 20161102-121035-SQ 14/29
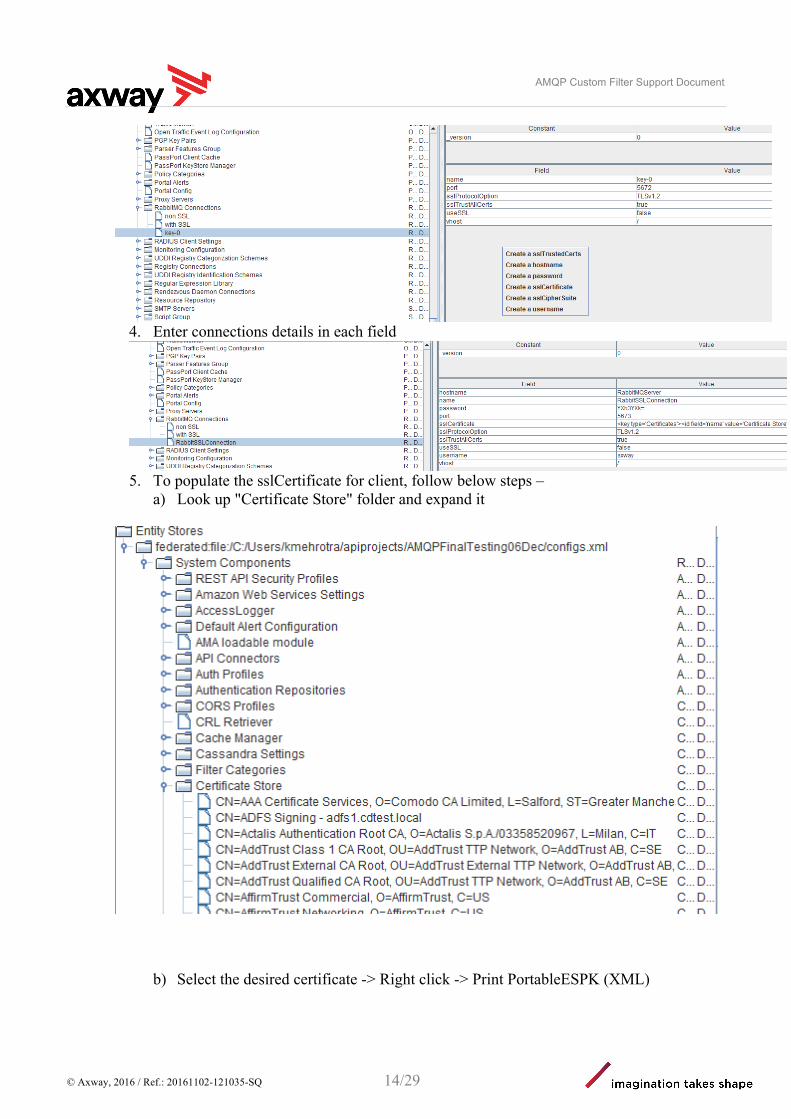
4. Enter connections details in each field
5. To populate the sslCertificate for client, follow below steps –
a) Look up "Certificate Store" folder and expand it
b) Select the desired certificate -> Right click -> Print PortableESPK (XML)

AMQP Custom Filter Support Document
© Axway, 2016 / Ref.: 20161102-121035-SQ 15/29
c) Copy the XML fragment from the console window on the right (<key type='Certificates'>...)
d) Paste the XML fragment into "sslCertificate" attribute value in RabbitMQConnection e) Complete by clicking Update button. f) Close ESexplorer
2.4.4 RaabitMQ connection for automation In case of automating the connection details for CI/CD you will need to update the Primarystore.xml file with updating values of fval xml elements for next project environment – <entity xmlns="http://www.vordel.com/2005/06/24/entityStore" xmlns:xsi="http://www.w3.org/2001/XMLSchema-instance" type="RabbitMQConnection" entityPK="-6922055224459511644" parentPK="-204239742122614442">
<fval name="hostname"><value>RabbitMQServerHost</value></fval> <fval name="name"><value>with SSL</value></fval> <fval name="password"><value>YXh3YXk=</value></fval> <fval name="port"><value>5673</value></fval> <fval name="sslCertificate"><value contentType="reference"> <key type='Certificates'><id field='name' value='Certificate Store'/><key type='Certificate'><id field='dname' value='[email protected],CN=Axway Gateway,OU=IT,O=Axway,L=London,ST=London,C=GB'/></key></key> </value></fval> <fval name="sslProtocolOption"><value>TLSv1.2</value></fval>
AMQP Custom Filter Support Document
© Axway, 2016 / Ref.: 20161102-121035-SQ 16/29
<fval name="useSSL"><value>1</value></fval> <fval name=""><value>axway</value></fval> <fval name="vhost"><value>/</value></fval>
</entity>
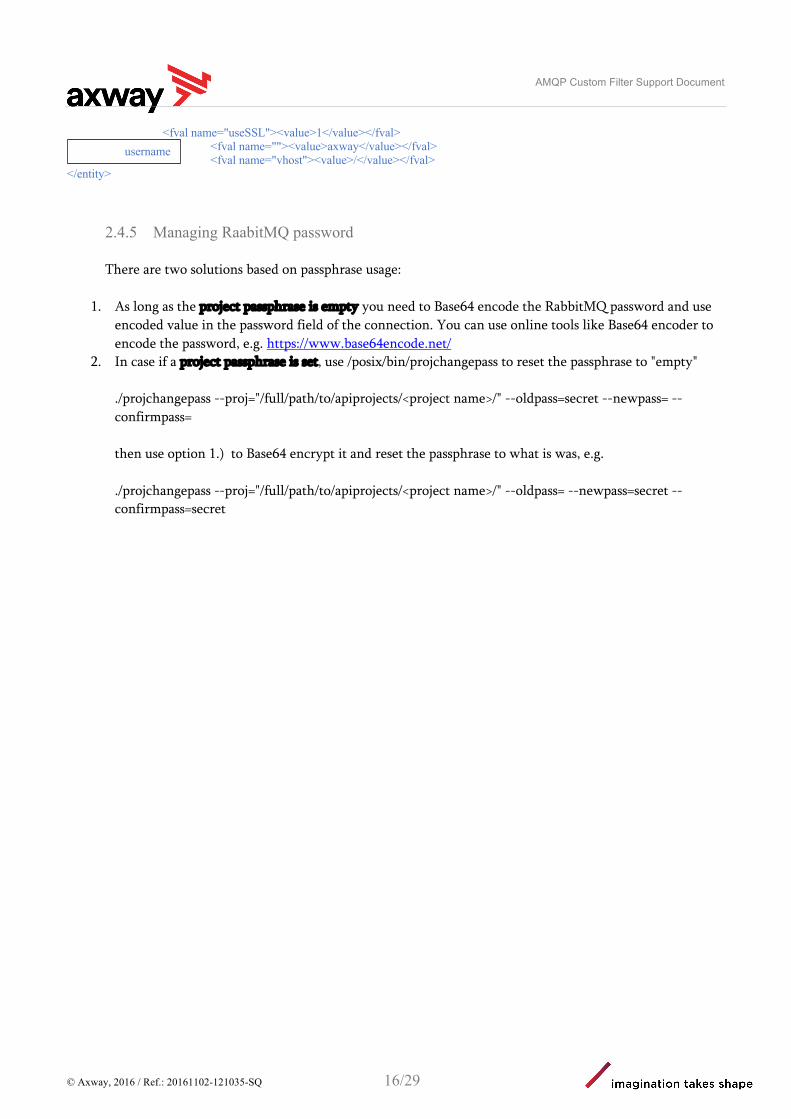
2.4.5 Managing RaabitMQ password
There are two solutions based on passphrase usage:
1. As long as the project passphrase is empty you need to Base64 encode the RabbitMQ password and use encoded value in the password field of the connection. You can use online tools like Base64 encoder to encode the password, e.g. https://www.base64encode.net/
2. In case if a project passphrase is set, use /posix/bin/projchangepass to reset the passphrase to "empty" ./projchangepass --proj="/full/path/to/apiprojects/<project name>/" --oldpass=secret --newpass= --confirmpass= then use option 1.) to Base64 encrypt it and reset the passphrase to what is was, e.g. ./projchangepass --proj="/full/path/to/apiprojects/<project name>/" --oldpass= --newpass=secret --confirmpass=secret
username

AMQP Custom Filter Support Document
© Axway, 2016 / Ref.: 20161102-121035-SQ 17/29
3 Key Considerations In a clustered environment each API Gateway instance should have a dedicated exchange/queue created on RabbitMQ. The RPC Request-Reply pattern is of a blocking nature and should be used with care. Delays in the backend cause connections to remain open and this could be an issue under load. Backend response time was observed to be the most performance impacting dimension during testing and therefore care should be taken to ensure backend processing times are optimized. Adjust timeout settings as necessary in the response field of the filter.
AMQP Custom Filter Support Document
© Axway, 2016 / Ref.: 20161102-121035-SQ 18/29
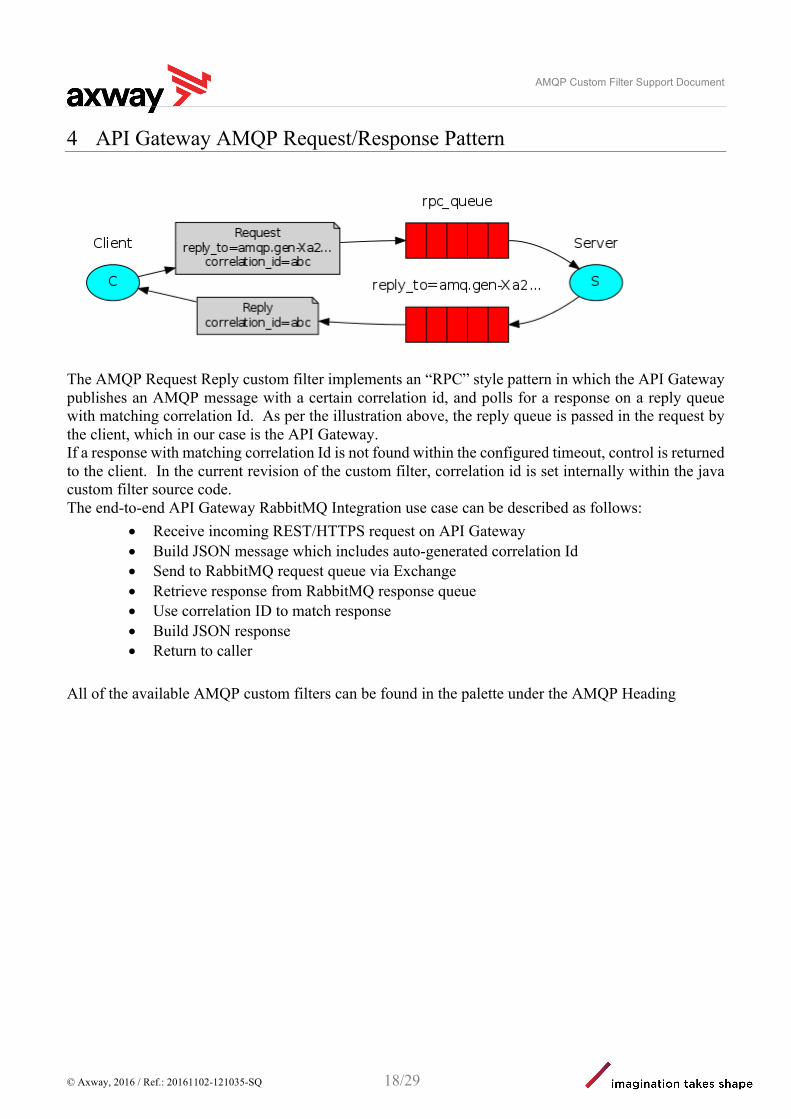
4 API Gateway AMQP Request/Response Pattern
The AMQP Request Reply custom filter implements an “RPC” style pattern in which the API Gateway publishes an AMQP message with a certain correlation id, and polls for a response on a reply queue with matching correlation Id. As per the illustration above, the reply queue is passed in the request by the client, which in our case is the API Gateway. If a response with matching correlation Id is not found within the configured timeout, control is returned to the client. In the current revision of the custom filter, correlation id is set internally within the java custom filter source code. The end-to-end API Gateway RabbitMQ Integration use case can be described as follows:
• Receive incoming REST/HTTPS request on API Gateway • Build JSON message which includes auto-generated correlation Id • Send to RabbitMQ request queue via Exchange • Retrieve response from RabbitMQ response queue • Use correlation ID to match response • Build JSON response • Return to caller
All of the available AMQP custom filters can be found in the palette under the AMQP Heading

AMQP Custom Filter Support Document
© Axway, 2016 / Ref.: 20161102-121035-SQ 19/29
The AMQP Request Reply filter is configured as per the example screenshot below. It should be noted that in the current revision of the custom filter, it is expected that RabbitMQ queues (both request and reply) already exist under the appropriate Exchange and VHost.

AMQP Custom Filter Support Document
© Axway, 2016 / Ref.: 20161102-121035-SQ 20/29
Select connection to be use from the connection drop down in the filter as shown below. That’s the change brought in with version 2.0 in all filters.
Removed in version 2.0

AMQP Custom Filter Support Document
© Axway, 2016 / Ref.: 20161102-121035-SQ 21/29
Implementation Note Unlike JMS, AMQP does not provide a message selector which allows consumers to draw messages from queues matching certain selection criteria. To achieve correlation Id matching, the filter consumes a message from the reply queue, then checks for a matching correlationId. If a match is found the gateway filter acknowledges receipts to RabbitMQ, otherwise a Negative Acknowledgement (“Nack”) is sent, which results in that message being available for consumption again. An alternative design pattern would be to consume all RabbitMQ response messages into Apache ActiveMQ on the Gateway, and perform correlation matching there instead. This pattern maybe considered for future implementations.
5 API Gateway as a Message Producer A custom filter is provided to publish messages from the API Gateway to the AMQP-Broker. Bear in mind that in AMQP we send messages NOT to a queue, but to an exchange.

AMQP Custom Filter Support Document
© Axway, 2016 / Ref.: 20161102-121035-SQ 22/29
The exchange is responsible for routing the message to the appropriate queue(s) according to the configured bindings.

AMQP Custom Filter Support Document
© Axway, 2016 / Ref.: 20161102-121035-SQ 23/29
The AMQP Publish custom filter simply publishes a message to the configured AMQP exchange, as per the example screenshot below:
Removed in version 2.0
AMQP Custom Filter Support Document
© Axway, 2016 / Ref.: 20161102-121035-SQ 24/29
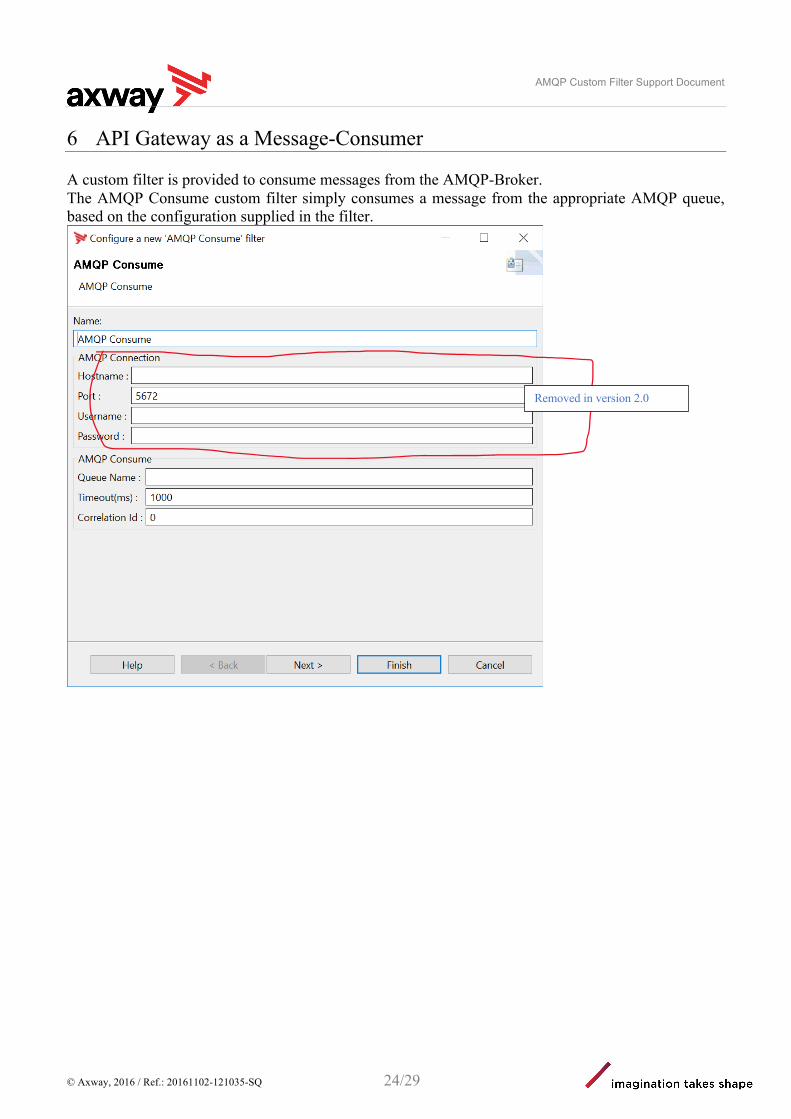
6 API Gateway as a Message-Consumer A custom filter is provided to consume messages from the AMQP-Broker. The AMQP Consume custom filter simply consumes a message from the appropriate AMQP queue, based on the configuration supplied in the filter.
Removed in version 2.0

AMQP Custom Filter Support Document
© Axway, 2016 / Ref.: 20161102-121035-SQ 25/29
7 Mock Response Generator We have provided a mock response generator to simulate the customer’s backend Application which consumes requests from RabbitMQ and publish responses. The mock response generator is provided as a jar file which can be run from the linux command line as follows:
• java -jar RabbitServer.jar -vhost <RabbitMQ Vhost> -exchange <RabbitMQ Exchange> -username <RabbitMQ username> -password <RabbitMQ password> -requestQueueName <RabbitMQ Request Queue> -sampleResponse <Path to sample response> -minDelay <Minimum delay in milliseconds> -maxDelay <Max delay in milliseconds>
Running the following example command will result in the mock response generator waiting for requests on “player.get.request” and publishing a canned response to the reply queue set in the AMQP request header (set by the API Gateway). The delay arguments allow us to introduce a delay in processing, in effect to mimic a slow backend Application.
• java -jar RabbitServer.jar -vhost poc -exchange master -username guest -password guest -requestQueueName player.get.request -sampleResponse sampleMsgs/player_response.json -minDelay 10 -maxDelay 1000
The mock response generator is presently single threaded, but multiple instances of the java process can be invoked (in their own JVM) in order to handle large volumes. We have provided an example bash script to control execution of the java processes, but take care only to run as many processes as the available memory on your server allows.

AMQP Custom Filter Support Document
© Axway, 2016 / Ref.: 20161102-121035-SQ 26/29
8 Limitations There are several limitations of the current solution, listed as follows: 1. TCP/IP connections are currently created on a per filter basis, used within policy. – Version
2.0 uses loadable module, so connection is created once not per filter anymore. 2. Connection recovery is defaulted and should in future be explicitly added to a loadable
module as a parameter. 3. The filters currently only handle connections to singe node RabbitMQ brokers. Provision for
RabbitMQ clusters may need to be added and should be incorporated into a Loadable module. –Use load Balancer in front of RabbitMQ server
4. SSL connections between API Gateway and RabbitMQ are not supported in this version – Addressed in version 2.0 of the release
AMQP Custom Filter Support Document
© Axway, 2016 / Ref.: 20161102-121035-SQ 27/29
9 Appendix
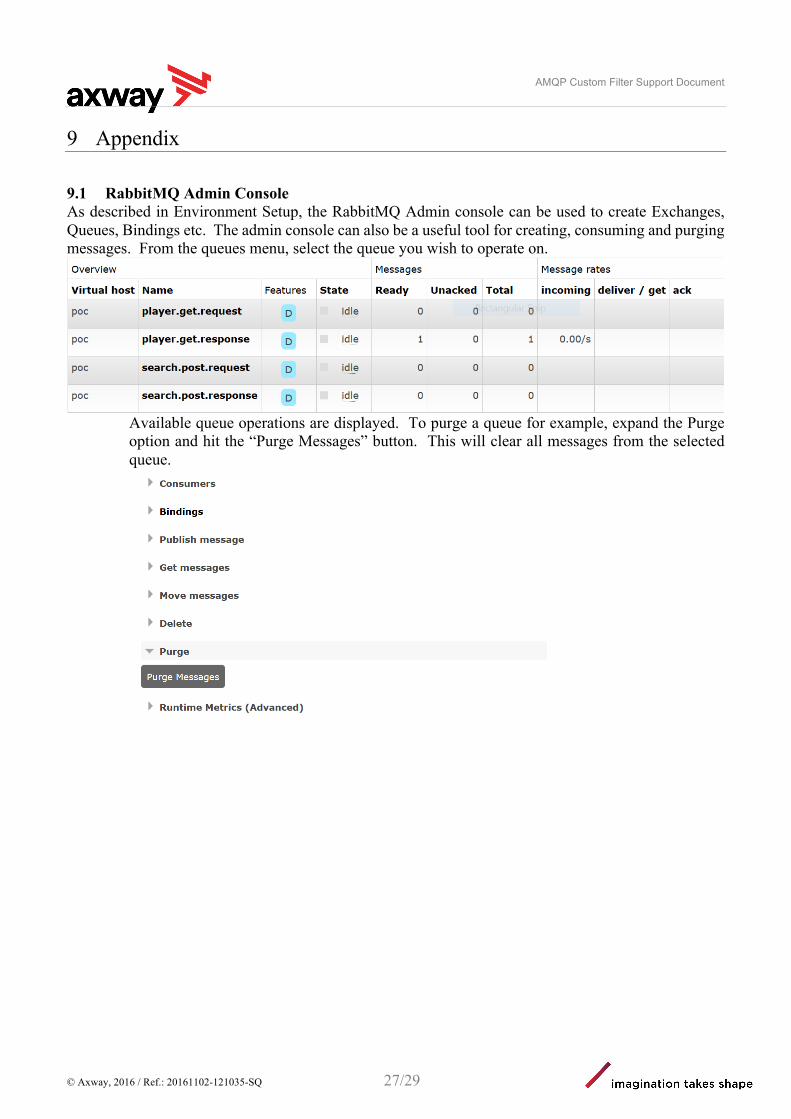
9.1 RabbitMQ Admin Console As described in Environment Setup, the RabbitMQ Admin console can be used to create Exchanges, Queues, Bindings etc. The admin console can also be a useful tool for creating, consuming and purging messages. From the queues menu, select the queue you wish to operate on.
Available queue operations are displayed. To purge a queue for example, expand the Purge option and hit the “Purge Messages” button. This will clear all messages from the selected queue.
AMQP Custom Filter Support Document
© Axway, 2016 / Ref.: 20161102-121035-SQ 28/29
9.2 Performance Benchmark
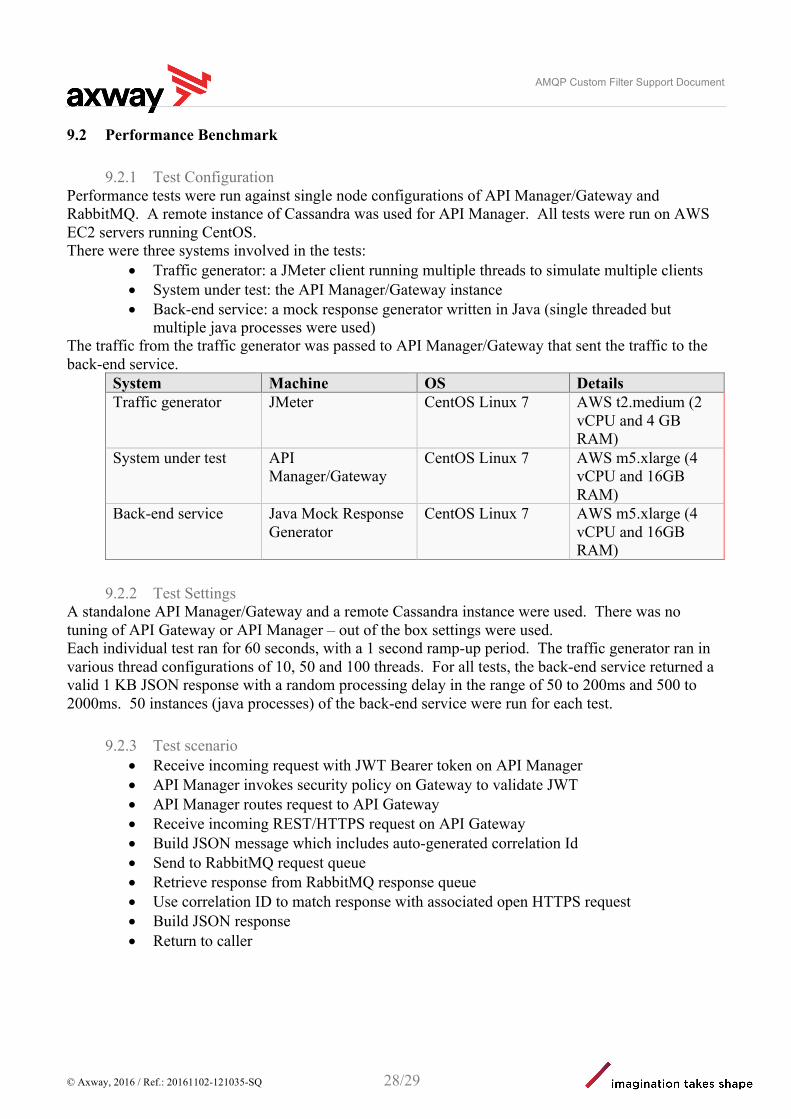
9.2.1 Test Configuration Performance tests were run against single node configurations of API Manager/Gateway and RabbitMQ. A remote instance of Cassandra was used for API Manager. All tests were run on AWS EC2 servers running CentOS. There were three systems involved in the tests:
• Traffic generator: a JMeter client running multiple threads to simulate multiple clients • System under test: the API Manager/Gateway instance • Back-end service: a mock response generator written in Java (single threaded but
multiple java processes were used) The traffic from the traffic generator was passed to API Manager/Gateway that sent the traffic to the back-end service.
System Machine OS Details Traffic generator JMeter CentOS Linux 7 AWS t2.medium (2
vCPU and 4 GB RAM)
System under test API Manager/Gateway
CentOS Linux 7 AWS m5.xlarge (4 vCPU and 16GB RAM)
Back-end service Java Mock Response Generator
CentOS Linux 7 AWS m5.xlarge (4 vCPU and 16GB RAM)
9.2.2 Test Settings A standalone API Manager/Gateway and a remote Cassandra instance were used. There was no tuning of API Gateway or API Manager – out of the box settings were used. Each individual test ran for 60 seconds, with a 1 second ramp-up period. The traffic generator ran in various thread configurations of 10, 50 and 100 threads. For all tests, the back-end service returned a valid 1 KB JSON response with a random processing delay in the range of 50 to 200ms and 500 to 2000ms. 50 instances (java processes) of the back-end service were run for each test.
9.2.3 Test scenario • Receive incoming request with JWT Bearer token on API Manager • API Manager invokes security policy on Gateway to validate JWT • API Manager routes request to API Gateway • Receive incoming REST/HTTPS request on API Gateway • Build JSON message which includes auto-generated correlation Id • Send to RabbitMQ request queue • Retrieve response from RabbitMQ response queue • Use correlation ID to match response with associated open HTTPS request • Build JSON response • Return to caller
AMQP Custom Filter Support Document
© Axway, 2016 / Ref.: 20161102-121035-SQ 29/29
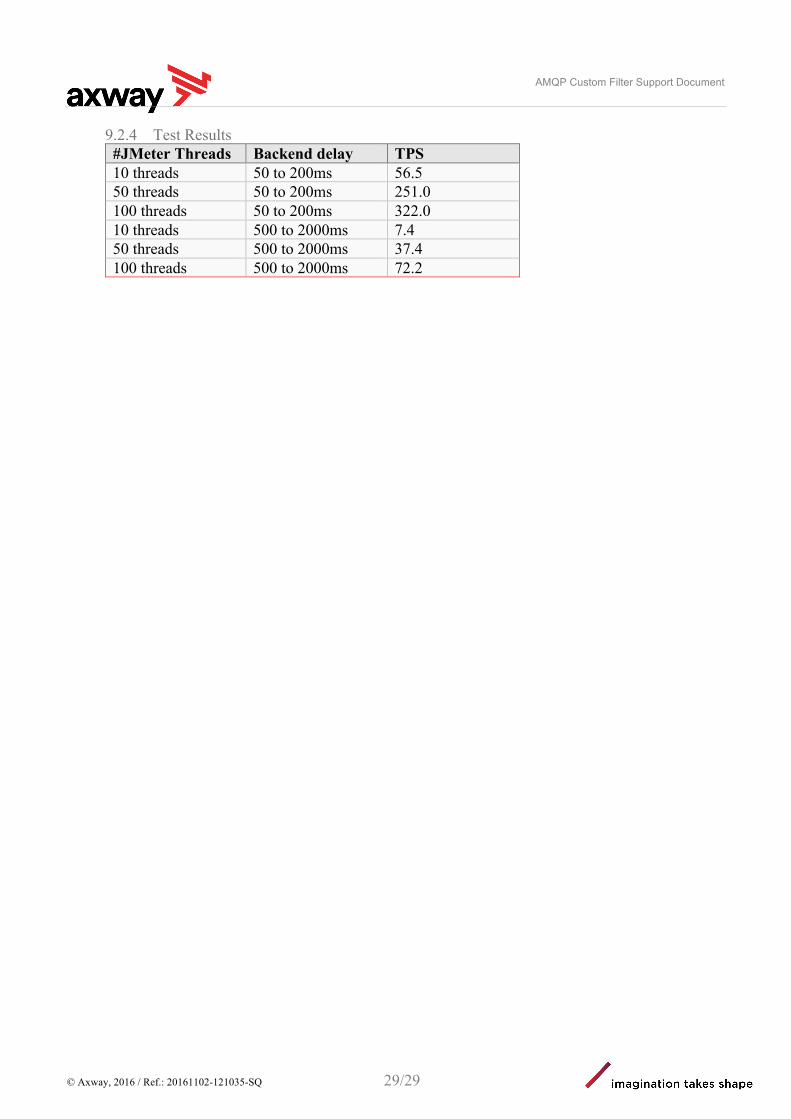
9.2.4 Test Results #JMeter Threads Backend delay TPS 10 threads 50 to 200ms 56.5 50 threads 50 to 200ms 251.0 100 threads 50 to 200ms 322.0 10 threads 500 to 2000ms 7.4 50 threads 500 to 2000ms 37.4 100 threads 500 to 2000ms 72.2
Related Documents