Alpha Pro Complete User Guide Alpha Pro Drone

Welcome message from author
This document is posted to help you gain knowledge. Please leave a comment to let me know what you think about it! Share it to your friends and learn new things together.
Transcript
1
Alpha Pro
Complete User GuideAlpha Pro Drone

Join the social movement and follow us on
DISCOVER: FREEDOM
Share your footage with us on social media
#KBdiscover
To view the entire Kaiser Baasproduct range visit:
www.kaiserbaas.com
Disclaimers And Warnings
Safety Warnings and Operating Guidelines
Alpha Pro Drone Features
Included Equipment
Your Drone
Remote Control Transmitter
Battery Guide
Battery Charging
Setup & Installation
Drone / Remote Control Transmitter Pairing
03
04
05
06
07
09
11
13
14
16
17
20
21
23
24
25
25
27
29
31
Contents
Drone Calibration
Pre-flight Checklist
Flight Operation Guide
Flight Modes
360° Flip
Return Mode
Headless Mode
FAQ
Specifications
Support
3 4
Disclaimers & WarningsPlease read this section carefully before using your Kaiser Baas Alpha Pro Drone. By operating this product, you hereby agree to these disclaimers and signify that you have read and understood the warnings and conditions fully.
THIS PRODUCT IS NOT SUITABLE FOR PEOPLE UNDER THE AGE OF 14.
Always observe the safe flying instructions within this User Guide, as well as the guidelines and regulations of your local aviation authorities. Above all, maintain a safe distance from people and property when operating your Alpha Pro Drone – a safe distance of 10m is recommended.
Kaiser Baas accepts no liability for damage(s) or injuries incurred directly or indirectly from the use of this product, including but not limited to the following conditions:
• Failure to follow the full instructions and cautions in the User Guide, pertaining to correct assembly and safe operation.
• Damage(s) or injuries caused by erratic operation or poor piloting decisions.
• Damage(s) or injuries caused by mechanical failures as a result of neglect, including the erosion and aging of product components.
• Damage(s) or injuries caused by the Drone being flown in the following conditions:
• Unfavourable lighting; where the Pilot’s ability to see the Drone clearly is diminished.
• Inclement weather; moderate to high winds, rain, snow or hail.
• Flying near electrical hazards, such as power lines or towers.
• Flying in or near fire, floods, tsunamis, ice, avalanche, landslide, earthquake, etc.
• Damage(s) or injuries incurred due to users under the influence of drugs or alcohol, suffering dizziness, fatigue, nausea and any other condition; physical or mental that could impair the Pilot’s ability to fly responsibly and within the boundaries of the law.
• Damage(s) or injuries caused by malfunctions or “hacks”, refits or the replacement of original components with non-Kaiser Baas provided accessories and/or parts.
• Damage(s) or injuries caused by the misuse or incorrect operation of the battery, protection circuits, Remote Control Transmitter or Battery Charger.
• Damage(s) or injuries caused by flying the Drone in abnormal conditions and allowing external substances to come into contact with the Drone e.g. water, oil, soil, sand or any other material that could enter the Drone and its internal compartments, including the battery.
• Damage(s) or injuries caused by flying in areas such as those with: magnetic interference, radio interference, government regulated no-fly zones or airports.
• Any other losses that are not covered by the scope of Kaiser Baas liability.
Kaiser Baas reserves the right to make changes to this User Guide if required. Please check the Kaiser Baas website for the most up to date version of this guide: www.kaiserbaas.com/support
The information within this manual is subject to change without notice.
Safety Warnings & Operating Guidelines
Even though the Alpha Pro Drone may look small and light, there are important safety considerations to bear in mind when operating this device. Always observe the following guidelines:
DO NOT fly the Drone within 10m of people anywhere. Consider your personal liability when you choose to operate your Drone.
DO NOT attempt to handle or catch the Drone while it is in operation.
DO NOT attempt to handle the Drone while the Rotor Blades are still spinning.
DO NOT allow others to approach the Drone while it is in operation and the Rotor Blades are in motion.
Always make sure that you have completely “disarmed” the Drone before handling.
Always maintain Visual Line-of-Sight (VLOS) with the Drone.
Always fly between official sunrise and official sunset, local time.
Never engage in careless or reckless manoeuvres. Consider the impact that reckless behaviour might have on other Drone enthusiasts and future Pilots.
Never operate your Drone when intoxicated or when you are incapacitated in any other way.
Always follow your local aviation authority’s guidelines.
5 6
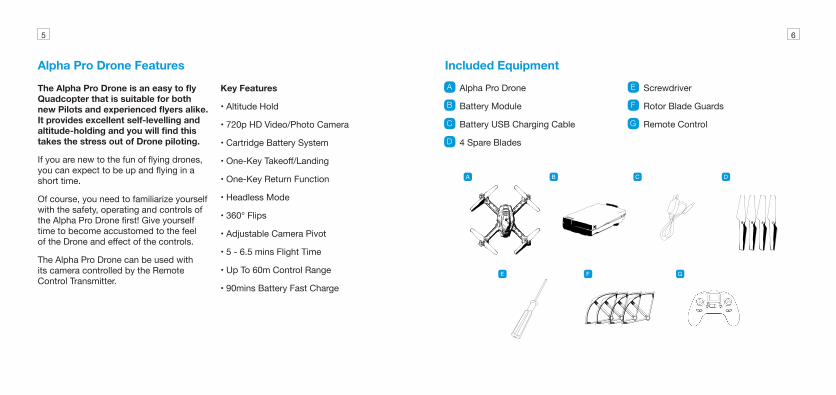
Alpha Pro Drone Features Included Equipment
The Alpha Pro Drone is an easy to fly Quadcopter that is suitable for both new Pilots and experienced flyers alike. It provides excellent self-levelling and altitude-holding and you will find this takes the stress out of Drone piloting.
If you are new to the fun of flying drones, you can expect to be up and flying in a short time.
Of course, you need to familiarize yourself with the safety, operating and controls of the Alpha Pro Drone first! Give yourself time to become accustomed to the feel of the Drone and effect of the controls.
The Alpha Pro Drone can be used with its camera controlled by the Remote Control Transmitter.
Key Features
• Altitude Hold
• 720p HD Video/Photo Camera
• Cartridge Battery System
• One-Key Takeoff/Landing
• One-Key Return Function
• Headless Mode
• 360° Flips
• Adjustable Camera Pivot
• 5 - 6.5 mins Flight Time
• Up To 60m Control Range
• 90mins Battery Fast Charge
Alpha Pro Drone
Battery Module
Battery USB Charging Cable
4 Spare Blades
Screwdriver
Rotor Blade Guards
Remote Control
A E
B F
C G
D
A B
E G
C D
F

7 8
Your Drone
Rotor Blade
Power Button
Camera
Battery Module
Motor
Landing Gear
Rotor Blade Guards
A D
B E
C F
G
A
C
D
E F
G
B
9 10
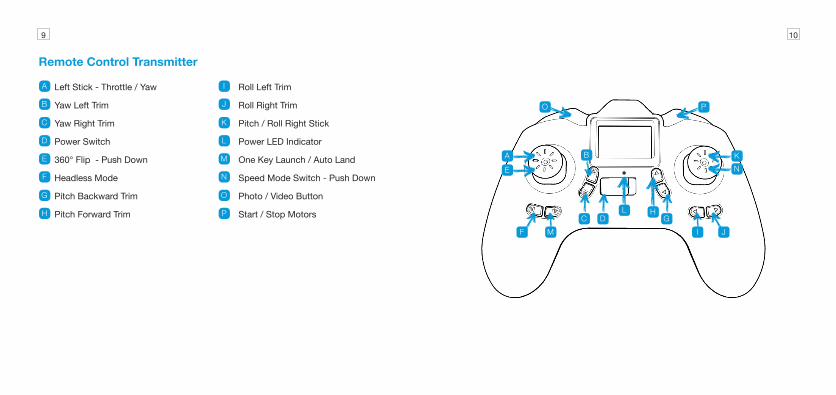
Remote Control Transmitter
Left Stick - Throttle / Yaw
Yaw Left Trim
Yaw Right Trim
Power Switch
360° Flip - Push Down
Headless Mode
Pitch Backward Trim
Pitch Forward Trim
Roll Left Trim
Roll Right Trim
Pitch / Roll Right Stick
Power LED Indicator
One Key Launch / Auto Land
Speed Mode Switch - Push Down
Photo / Video Button
Start / Stop Motors
A I
E M
B J
F N
C K
G O
D L
H P D G C L H
M
B
IF J
A E
K N
PO

11 12
Battery Guide
It is imperative that only a Kaiser Baas Alpha Pro Drone Battery is used inside the Alpha Pro Drone. DO NOT use any third-party or unknown accessories or batteries.
Always ensure your Drone battery is charged before flight.
Battery Safety Warnings:
DO NOT disassemble the battery.
DO NOT short-circuit the battery.
DO NOT ever poke or puncture the battery with any blunt or sharp instrument. WARNING There is a high risk of it igniting!
DO NOT ever leave the battery near an open flame or heat source.
DO NOT immerse the battery in water.
DO NOT charge the battery in direct sunlight.
Never leave a charging battery unattended.
Only remove the battery from its supplied charger when the charging cycle is complete.
DO NOT reverse charge or over-charge the battery.
Always charge the battery in a designated space, away from people and animals.
If the battery becomes bloated or appears to be inflated - DISCARD THE BATTERY IMMEDIATELY – Instructions: place the bloated battery in a bucket filled with salt water (200 grams salt to 1 Litre water) and leave the battery in the solution for three days. You may now dispose of the battery through your local recycling centre. Never use your battery after conducting the discard process.
If the battery has a high surface temperature, leave it to cool before you try to re-charge it.
Always ensure the battery is free from all damage and deformation before use.
If you see any sign of smoke coming from the Drone or battery area - STOP OPERATING IMMEDIATELY – when safe, disconnect and remove the drone battery.
DO NOT use the battery with unspecified equipment.
DO NOT touch a leaking battery directly. Never let battery contents touch your skin or clothing. If contact occurs, seek medical advice immediately.
DO NOT throw or cause any trauma to the battery.
DO NOT put the battery in a microwave or high pressure container.
DO NOT charge the battery if the ambient temperature is below 0°C or above 45°C.
Always use the supplied charger and observe charging requirements.
Always store the battery in a safe and cool place and never store the battery fully charged.
13 14
Battery Charging
To charge the Drone Battery
1. Remove the battery from the Drone by pressing the clip and sliding it out of the Drone battery compartment.
2. Connect the USB Charging Cable to the Battery Pin terminal located on the battery.*
3. Connect the USB Charging Cable to an electronic device such as a computer or USB charger.
4. The USB Charging Cable features a red LED indicator light that will turn on when charging is complete or there is no battery connected. While it is charging the light will be OFF.
5. A full charge cycle will take approximately 90mins with a 0.5A/1A charger.
Low Battery
The Drone LED Lights will flash when the drone is in Low Power Mode. When the LEDs are flashing you should bring the Drone to a complete stop. Failure to note the Low Battery signal may cause a sudden loss of power endangering persons, property and the Drone.
Running the Battery completely flat will impact the health and future flight time of your Drone.
*Note: If using a wall charger, ensure that it is a certified product for your region. AC Input: 100-240VAC 50/60Hz. DC Output: 5VDC 0.5A/1A.Only use a USB charger with suitable approval and certification. Do not charge in conditions outside
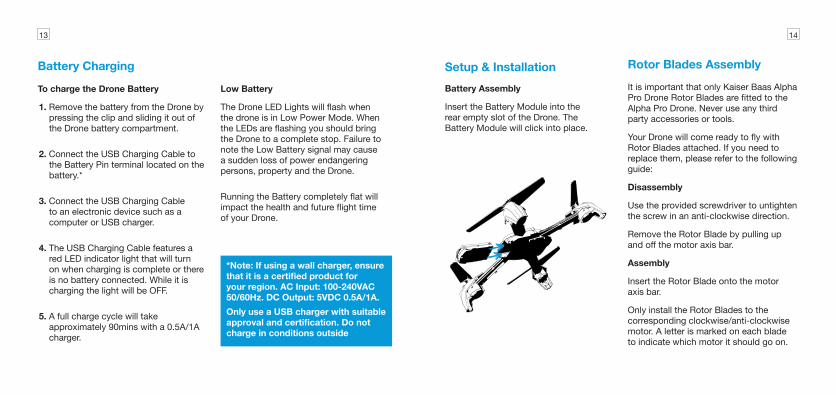
Setup & InstallationBattery Assembly
Insert the Battery Module into the rear empty slot of the Drone. The Battery Module will click into place.
Rotor Blades Assembly
It is important that only Kaiser Baas Alpha Pro Drone Rotor Blades are fitted to the Alpha Pro Drone. Never use any third party accessories or tools.
Your Drone will come ready to fly with Rotor Blades attached. If you need to replace them, please refer to the following guide:
Disassembly
Use the provided screwdriver to untighten the screw in an anti-clockwise direction.
Remove the Rotor Blade by pulling up and off the motor axis bar.
Assembly
Insert the Rotor Blade onto the motor axis bar.
Only install the Rotor Blades to the corresponding clockwise/anti-clockwise motor. A letter is marked on each blade to indicate which motor it should go on.
15 16
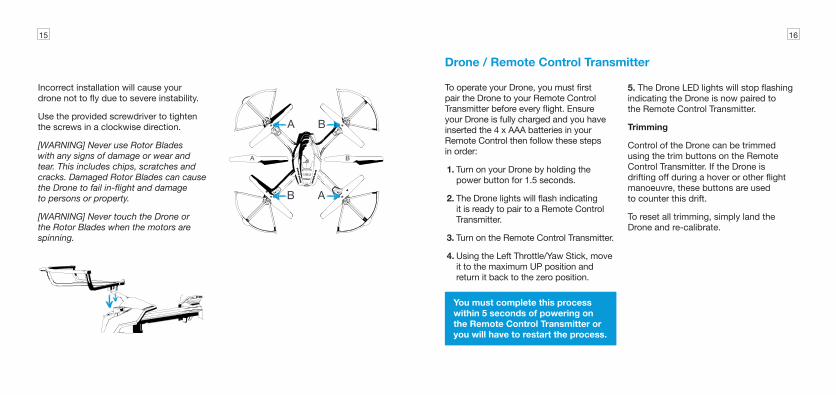
Incorrect installation will cause your drone not to fly due to severe instability.
Use the provided screwdriver to tighten the screws in a clockwise direction.
[WARNING] Never use Rotor Blades with any signs of damage or wear and tear. This includes chips, scratches and cracks. Damaged Rotor Blades can cause the Drone to fail in-flight and damage to persons or property.
[WARNING] Never touch the Drone or the Rotor Blades when the motors are spinning.
A B
A B
AB
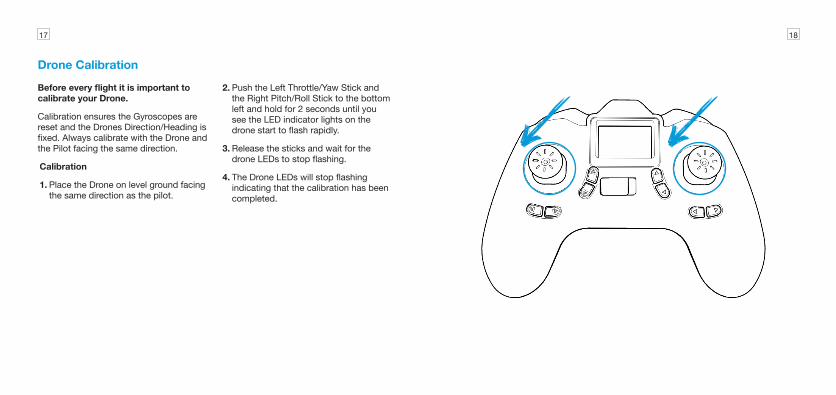
Drone / Remote Control Transmitter
To operate your Drone, you must first pair the Drone to your Remote Control Transmitter before every flight. Ensure your Drone is fully charged and you have inserted the 4 x AAA batteries in your Remote Control then follow these steps in order:
1. Turn on your Drone by holding the power button for 1.5 seconds.
2. The Drone lights will flash indicating it is ready to pair to a Remote Control Transmitter.
3. Turn on the Remote Control Transmitter.
4. Using the Left Throttle/Yaw Stick, move it to the maximum UP position and return it back to the zero position.
You must complete this process within 5 seconds of powering on the Remote Control Transmitter or you will have to restart the process.
5. The Drone LED lights will stop flashing indicating the Drone is now paired to the Remote Control Transmitter.
Trimming
Control of the Drone can be trimmed using the trim buttons on the Remote Control Transmitter. If the Drone is drifting off during a hover or other flight manoeuvre, these buttons are used to counter this drift.
To reset all trimming, simply land the Drone and re-calibrate.
17 18
Drone Calibration
Before every flight it is important to calibrate your Drone.
Calibration ensures the Gyroscopes are reset and the Drones Direction/Heading is fixed. Always calibrate with the Drone and the Pilot facing the same direction.
Calibration
1. Place the Drone on level ground facing the same direction as the pilot.
2. Push the Left Throttle/Yaw Stick and the Right Pitch/Roll Stick to the bottom left and hold for 2 seconds until you see the LED indicator lights on the drone start to flash rapidly.
3. Release the sticks and wait for the drone LEDs to stop flashing.
4. The Drone LEDs will stop flashing indicating that the calibration has been completed.
19 20
Pre-Flight Checklist
• Do a COMPLETE check of your surroundings; look for hazards above, in front and behind you.
• Be especially aware of things like power lines and nearby people and animals.
• If these hazards exist, DO NOT deploy your Drone and consider a new Take-off Location.
• DO NOT FLY in inclement weather or moderate to high winds.
• DO NOT FLY in populated areas as unforeseen flight hazards may occur.
• Remember YOU are the Pilot. Safety is YOUR responsibility.
• DO NOT FLY near airports/controlled airspace. Ensure that you are at least 5.5kms from any airfield and you are adhering to any regulations and laws laid out by your local aviation authority.
Remember checking your distance to these areas is YOUR responsibility
1. Never fly your Drone near large crowds or above unwilling spectators.
2. Make sure that you have the full permission of people within flying range of your Alpha Pro Drone and
3. DO NOT fly your Drone where people have not given permission or have requested that you not fly.
4. Ensure the Drone is orientated in the desired direction
FLYING THE
DRONE

21 22
Flight Operation Guide
When operating the Drone, it is important for new Pilots to ensure that the Drone’s heading is facing away from you.
The Remote Control Transmitter has two control sticks: Left stick (Throttle/Yaw) and Right stick (Pitch/Roll).
Flight Operation Guide
To Take-Off you must first bind the Drone to your Remote Control Transmitter. The Alpha Pro Drone comes equipped with a Take-Off and Landing function.
To Take-Off
Press the Start/Stop motors button to start the Drone. The Rotor Blades will start to spin indicating it is ready to fly. Push the Throttle/Yaw Left Stick slightly UP to fly. The Alpha Pro Drone features Auto-Hover, releasing the Throttle/Yaw stick will keep the drone at the same altitude. Pushing the Throttle/Yaw Left Stick UP or DOWN will ascend or descend the Drone respectively.
To Land
Simply reduce throttle whilst the Drone is in flight and allow it do descend gently. The Drone will then descend to the ground and idle.
Left Stick
The Left Stick is known as the Throttle. This controls the Drone’s Elevation and Yaw.
Right Stick
The Right Stick is also known as the Elevator/Aileron. This controls the forwards and backwards (Pitch) movement and the left and right (Roll) movement of the Drone.
In an emergency in which you need to stop the Drone motors immediately, HOLD the Take-Off/ Landing Button for 3 seconds to kill the motors completely.
Left Stick / Throttle Right Stick / Pitch

23 24
Note: When the flip is over you will need to be ready to control its direction. The Drone will fly up whilst performing this action.
360° FlipsPlease ensure that prior to using this function, you have a radius of 10m free of any persons or objects.
To flip the Drone in any direction:
1. Ascend the Drone to a height of 2m.
2. Press the 360° flip button (throttle).
3. The Remote Control Transmitter will beep continuously.
4. Push the Right Pitch/Roll Stick in any direction to flip.
5. The drone will flip respectively.
Flight Modes
The Drone features a number of Flight Modes and settings.
Speed Modes
There are 3 Speed modes on the Alpha Pro Drone. They can be cycled through on the Remote Control Transmitter by pressing the Speed Mode Button. Each mode is indicated by an increasing series of beeps.
Mode 1-Beginner Mode
This is the default operating mode that the Alpha Pro Drone initialises in. Please ensure that you use this mode in a large open space with no obstacles.
The sensitivity is very low and is suitable for beginner pilots. It is less responsive and more forgiving.
Mode 2-Intermediate Mode
To enable this mode, press the Speed Mode Button ONCE. The Remote Control Transmitter will beep twice indicating you are in Intermediate Mode. This mode is more responsive and flies faster.
Mode 3-Pro Mode
To enable this mode, press the Speed Mode Button TWICE. The Remote Control Transmitter will beep three times indicating you are in Pro Mode. This is the most responsive and fastest mode the Drone can operate in. This is only recommended for pilots with experience flying the Drone.
Note: Obstacle Avoidance Module will only operate in this mode.

25 26
2. Release the sticks and wait for the Drone LEDs to stop flashing.
3. The Drone LEDs will stop flashing, indicating that the calibration has been completed.
To enable Headless Mode, simply press the Headless Mode Button on the Remote Control Transmitter.
To avoid confusion, you should ensure the controls are correct from take-off.
You should arm the Drone while you are standing behind it, so that you and Drone are both facing in the same direction. Failure to do this will result in incorrect control.
Headless ModeHeadless Mode allows you to control the Drone relative to its direction from the take-off location. This means you can fly the drone without worrying which direction it is facing.
Before you use Headless Mode, ensure the Drone’s Direction/Heading is facing away from the pilot/operator and you calibrate the drone using the following steps:
Calibration
1. Push the Left Throttle/Yaw Stick and the Right Pitch/Roll Stick to the bottom left and hold for 2 seconds until you see the LED indicator lights on the drone start to flash rapidly.
Tip: Headless Mode can be turned on while in flight.
Return ModeReturn Mode is a simple function that puts the Alpha Pro Drone into reverse. It can be useful when flying in headless mode and you cannot determine the Drone’s orientation for it to return.
To enable Return Mode
Fly the Drone in front of you, ensuring the path to you is free of obstacles.
Press the Return Toggle.
The Drone will fly backwards towards you. Always keep control of the Drone’s altitude and speed using the Left Throttle/ Yaw Stick.
When it has reached your position or you want to stop, simply move the Pitch / Roll Right Stick Forward to cancel Return Mode.
Warning: This mode does not have any position data.
Normal ModeForward
ForwardHeadless Mode

27 28
5. The Drone is out of control and is difficult to fly. How can I make it easier?
a. Prior to every flight we recommend you calibrate the Drone.
To calibrate push the Left Throttle/Yaw Stick and the Right Pitch/Roll Stick to the bottom left and hold for 2 seconds until you see the LED indicator lights on the drone start to flash rapidly. The Drone LEDS will stop flashing when calibration is complete.
FAQ
1. The Drone LED lights are flashing. What does this mean?
a. The Drone is not paired with a Remote Control Transmitter. Refer to the Drone Setup/Installation section.
b. The Drone has insufficient battery power. Please charge the Drone battery.
2. The Drone’s Rotor Blades spin but the Drone does not take-off?
a. Insufficient Battery Power. If the Drone LEDs are flashing and the Drone Rotor blades are spinning without any lift, recharge the Drone battery.
b. The Rotor Blades are distorted. Replace them with only official Kaiser Baas replacement blades.
3. Why is the Drone is shaking and not stable in flight?
a. Please check to ensure the Rotor Blades are not damaged. Refer to the maintenance guide on Rotor Blade care.
b. Check that all the motors are spinning. Refer to the maintenance guide for more information.
4. My Drone keeps tipping when I take-off!
a. It is often difficult for new Pilots to get used to the take-off procedure. To take-off without tipping, give the Drone a smooth lift of power with the Throttle, rather than a quick movement. Once in the air, keep the Drone level using the Right Stick (Elevator/Aileron).
29 30
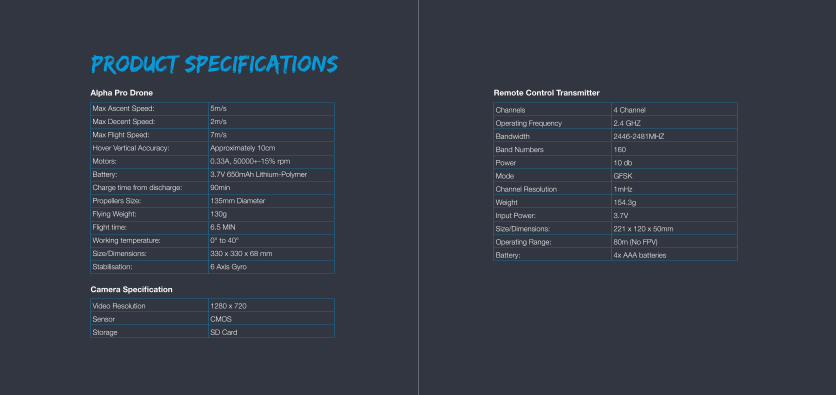
Max Ascent Speed: 5m/s
Max Decent Speed: 2m/s
Max Flight Speed: 7m/s
Hover Vertical Accuracy: Approximately 10cm
Motors: 0.33A, 50000+-15% rpm
Battery: 3.7V 650mAh Lithium-Polymer
Charge time from discharge: 90min
Propellers Size: 135mm Diameter
Flying Weight: 130g
Flight time: 6.5 MIN
Working temperature: 0° to 40°
Size/Dimensions: 330 x 330 x 68 mm
Stabilisation: 6 Axis Gyro
Channels 4 Channel
Operating Frequency 2.4 GHZ
Bandwidth 2446-2481MHZ
Band Numbers 160
Power 10 db
Mode GFSK
Channel Resolution 1mHz
Weight 154.3g
Input Power: 3.7V
Size/Dimensions: 221 x 120 x 50mm
Operating Range: 80m (No FPV)
Battery: 4x AAA batteries
Video Resolution 1280 x 720
Sensor CMOS
Storage SD Card
PRODUCT SPECIFICATIONSAlpha Pro Drone Remote Control Transmitter
Camera Specification

31 32
Got a question about your Kaiser Baas Drone?
Live Chat: www.kaiserbaas.com/support
Email: [email protected]
For further information please visit:www.kaiserbaas.com
Kaiser Baas Support

33
KBP15028-002 | A01
Related Documents