Session ID: Prepared by: All About EPMA: From Setup to Tips and Tricks 10305 @DeannaSunde Deanna Sunde .

Welcome message from author
This document is posted to help you gain knowledge. Please leave a comment to let me know what you think about it! Share it to your friends and learn new things together.
Transcript

Session ID:
Prepared by:
All About EPMA: From Setup
to Tips and Tricks
10305
@DeannaSunde
Deanna Sunde
.

Deanna Sunde
• Oracle ACE Associate
• 16 years with Hyperion and five years with Oracle
Financials
• 10 years in finance and accounting management
• MBA in Finance, a BS in Economics, Former CPA
• Hosted the Oracle Open World 2013 EPM Symposium
• Secretary and Member of Board of Directors, SROAUG
(Southwest Regional OAUG) (1998-2003)
• Former President, ODTUG Hyperion SIG (BOD 2012-14)
• Kscope14 Planning Track lead (member Kscope13-15)
2

Why EPMA

Reasons for Using EPMA
• Dimension sharing capability across applications
• Easier to manage hierarchies in one location
• Flexibility (hierarchies can be defined in data
warehouses, flat files, DRM, or the shared library)
• Automation
• Easy migration from Classic to EPMA
4

Why EPMA? - Pros
5
EPMA - Pros
• Centrally developed dimensions that can be shared with other applications
• Synchronization feature to transfer data from other sources such as Essbase, flat files, etc.
• EPMA batch client for automated dimension update process
• Direct integration with DRM
Classic - Cons
• Only allows dimension sharing within one application, causing maintenance on each individual application
• Requires use of load rules in EAS to load data (unless using HAL or ODI)
• No automated dimension update process
• No direct integration with DRM

Why EPMA? - Cons
6
EPMA - Cons
• Requires business
rules to be built with or
converted to the
calculation manager
• ODI does not work
directly with EPMA
Classic - Pros
• Supports business
rules created within
the business rule
module
• Works directly with
ODI for fast data
loading

Design Considerations
• For classic applications, the databases are created in
planning
• For EPMA applications, databases are created in EPMA
then deployed to planning
7

Shared and Local Libraries

Shared Library
• A shared member must be created in the shared library
before it can be used as a shared member in an
application
• To access the shared library, go to Navigate ->
Administer -> Dimension Library
9

Local Library
• Local members can only be updated within the local
library for a single application
• To access an application’s local library, go to Navigate ->
Administer -> Application Library
• Once in the application library, right click the application
you want to access and select “edit”
10

Shared vs. Local Dimensions
• Dimensions within an application can be marked as
(Shared) or (Local)
– Shared Dimensions
• Shared dimensions will be updated when any changes
are made in the shared library for all applications
containing that dimension and have it marked as shared
once deployed. A shared dimension must be created in
the shared library before it can be used as a shared
dimension in an application.
– Local Dimensions
• Local dimensions can only be updated within the local library
for a single application
11

Drag & Drop
• Within the Dimension Library, you can drag a
dimension from the Shared Library into an
application’s Local Library
12

Drag & Drop (cont.)
• Once you have dragged a dimension from the
Shared Library to an application’s Local Library, you
will receive a pop-up box with the option to mark the
dimension as a Local Dimension or a Shared
Dimension
13

Copy
• Within the Dimension Library, you can copy a
dimension from the Shared Library to another
application
• This method will default the dimension as a local
member
– To copy a dimension from one application to another,
right click the dimension -> Copy Dimension To ->
Application
14

Copy (cont.)
• After activating the copy feature, the user will
receive a pop-up box asking for a dimension name,
description, and which application to copy the
dimension to
• All applications will be available for selection in the
Application dropdown, including HFM, Planning,
Essbase BSO and Essbase ASO applications
15

Change Type
• Changing Local Dimensions to Shared Dimensions
– To change a local dimension to a shared one,
navigate to the application’s local library right click
the dimension select Share Dimension
16

Change Type (cont.)
• Changing Local Dimensions to Shared Dimensions– After a dimension has been selected to share, define if
the dimension, merged with an existing shared dimension in the shared library, or replaced with a dimension from the shared library
– Once complete the dimension will show as shared
– Note: To change a dimension from shared to local, use the same right-click process but select “Detach Dimension”
17

Excluding Members
• If a dimension within the Shared Library is used in
an application, the entire hierarchy does not need to
be included. The user has the option to exclude
members from the shared dimension if needed
– To exclude a member from a hierarchy from the
Shared Library, right click the member name select
“Exclude Member”
18

Creating a Flat File, Profile, and
Loading Metadata

Creating a Flat File
• Flat files contain the sections: Dimensions,
Dimension Associations, Members, Hierarchies, and
Property Array (these can be in any order)
• The beginning of the section is defined by an
exclamation point (!) that must be followed by the
section name. A single apostrophe (‘) defines a new
column for each section
• Column delimiters include Semicolons (;), commas
(,), pipes (|), spaces, and tabs
20

Creating a Flat File (cont.)
• The following examples were taken from the Oracle
Hyperion Enterprise Performance Management
Architect Administration Guide:
21

Creating a Profile
• To create an import profile, first go to the Dimension
Library (Navigate -> Administer -> Dimension
Library)
• Once in the Dimension Library, go to File -> Import -
-> Create Profile
22

Creating a Profile (cont.)
• Once you have gone in to create a profile, you will
be prompted to give a Profile Name, select an
Import Type (Flat File, Interface Tables, or Data
Relationship Management), enter an optional
description, and indicate whether you want to import
into the Dimension Library (Shared Library) or an
existing application
– Note: If your Import Type is Flat File you must Browse
for the appropriate flat file. If your Import Type is Data
Source, you must select the appropriate database.
23

Creating a Profile (cont.)
• Next you will enter the properties for the profile
– First, define the column delimiter
– You also have the option to Remove Quotes on
Strings, Remove White Spaces, and/or Suppress
Transaction Logs or not
24

Creating a Profile (cont.)
• The last step is to map the profile dimensions
• Chose your dimension mapping options
• The below screen is where you will decide what to
do with the newly loaded members
25

Creating a Profile (cont.)
• The final screen provides a few additional mapping
options
• Review the options and select “Finish” to complete
the profile
26

Loading Metadata Directly
• Importing Dimensions
• First, navigate to the dimension library (Navigate
Administer Dimension Library)
• Once in the dimension library, select File Import
Import Dimensions
27

Loading Metadata Directly (cont.)
• Importing Dimensions
– After going to Import Dimensions, select the
dimension you want to import, select the type of
import (Flat File, Interface Tables, or Data
Relationship Management)
• Note: If you select “Flat File” as your import type, you
will need to Browse for the file. If you select “Interface
Tables” you will need to enter or select the interface
load ID.
– Once all steps are completed, select Import
28

EPMA Batch Utility
• EPMA Batch Client
• Imports metadata using Profiles
• Deploy Applications
29

EPMA Batch Utility (cont.)
30

Upgrading Classic to EPMA

Overview
• You can upgrade a classic application to an EPMA
one using Financial Management Class
Administration, Planning Classic Administration, or
Essbase
• Once you have updated a class application into an
EPMA application, you cannot transform the
application back into a classic one
• Before changing:
– Remove any spaces in the names of attribute
members
– Ensure all users are logged off the application
– Make sure the Financial Management Application
Server has IIS installed
32

Steps
• Upgrading a Classic Application to Performance
Management Architect
• To transform a classic application, from the
workspace home page select Navigate
Administer Transform Classic to EPM Architect
33

Steps (cont.)
• Once you have selected Transform Classic to EPM
Architect, you will reach a welcome screen
• Select Next once you are finished reviewing
34
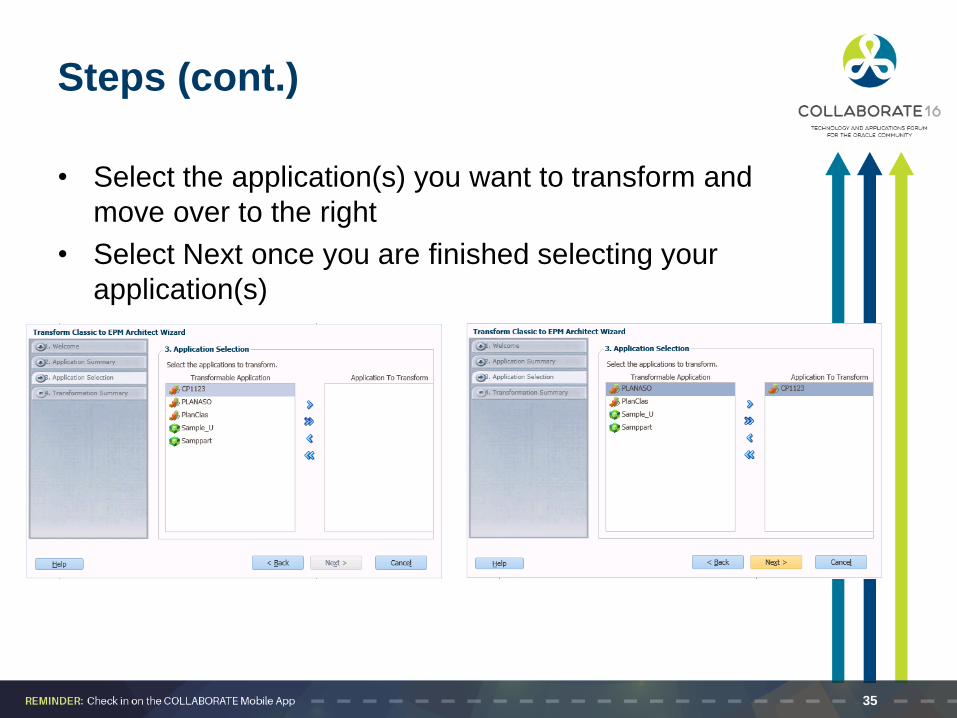
Steps (cont.)
• Select the application(s) you want to transform and
move over to the right
• Select Next once you are finished selecting your
application(s)
35

Steps (cont.)
• Review the transformation summary page and
select Finish
36

Steps (cont.)
• After selecting Finish, you will be taken to the Job
Console
• This page will show a summary of items such as the
user who ran the report and percentage status of
progress
37

Questions
38

Contact Information
39
Blog: deannasunde.com
Twitter: @deannasunde
LinkedIn: linkedin.com/in/deanna-sunde-2343564
Related Documents