Alice Tutorial 1 Welcome to Alice! Setting the Scene Before a director can make a movie, she needs to place the actors in an environment. This is called “setting the scene.” You will need to learn to set the scene for your Alice projects. • Open Alice on your computer. Choose FileÆNew World. • Choose “Templates” • Choose “Grass” • Click “Open” Look carefully at the screen that opens. With your partner, whisper for two minutes about the pieces of the screen. Together, make a hypothesis about what each piece does. Label the boxes below with your hypotheses. File Edit Tools Help Play Undo Redo (Trashcan) World --Camera --Lights --Ground Events [Create New Events] World’s details World.my first method Properties Methods Functions In the space below, list any terms that seem unfamiliar to you or that make you wonder what they do. Add Objects

Welcome message from author
This document is posted to help you gain knowledge. Please leave a comment to let me know what you think about it! Share it to your friends and learn new things together.
Transcript

Alice Tutorial 1
Welcome to Alice! Setting the Scene
Before a director can make a movie, she needs to place the actors in an environment. This is called “setting the scene.” You will need to learn to set the scene for your Alice projects.
• Open Alice on your computer. Choose File New World. • Choose “Templates” • Choose “Grass” • Click “Open”
Look carefully at the screen that opens. With your partner, whisper for two minutes about the pieces of the screen. Together, make a hypothesis about what each piece does. Label the boxes below with your hypotheses. File Edit Tools Help
Play Undo Redo (Trashcan)
World --Camera --Lights --Ground
Events [Create New Events]
World’s details
World.my first method
Properties Methods Functions
In the space below, list any terms that seem unfamiliar to you or that make you wonder what they do.
Add Objects

Alice Tutorial 1
Click on the green button labeled “Add Objects.” Briefly describe or quickly sketch the new screen that appears. Click on the “Animals” button to open this folder. What do you predict will happen if you click on the bunny? Write your prediction in the space below. Click on the bunny. What happened? Click on “Add instance to world” Three things have now changed on the screen. List them. (Hint…look on the left side of your screen.) Click on the bunny in your world. What do you think the yellow box is for? **Ignore the blue arrows for now. Find the row of buttons on the right-hand side of the screen. Sketch the buttons in the boxes below.
Click on the button next to the white arrow. Then drag the mouse in different directions while clicking on the bunny. Repeat this process with each of the buttons. When you have finished playing with each button, label your sketch above with a description of what it does. Use the “Undo” button to get your bunny back to its original size, shape, and position. (You will have to click it several times to get back to the original spot. If the bunny disappears, click on “Redo” to get it back again.”)
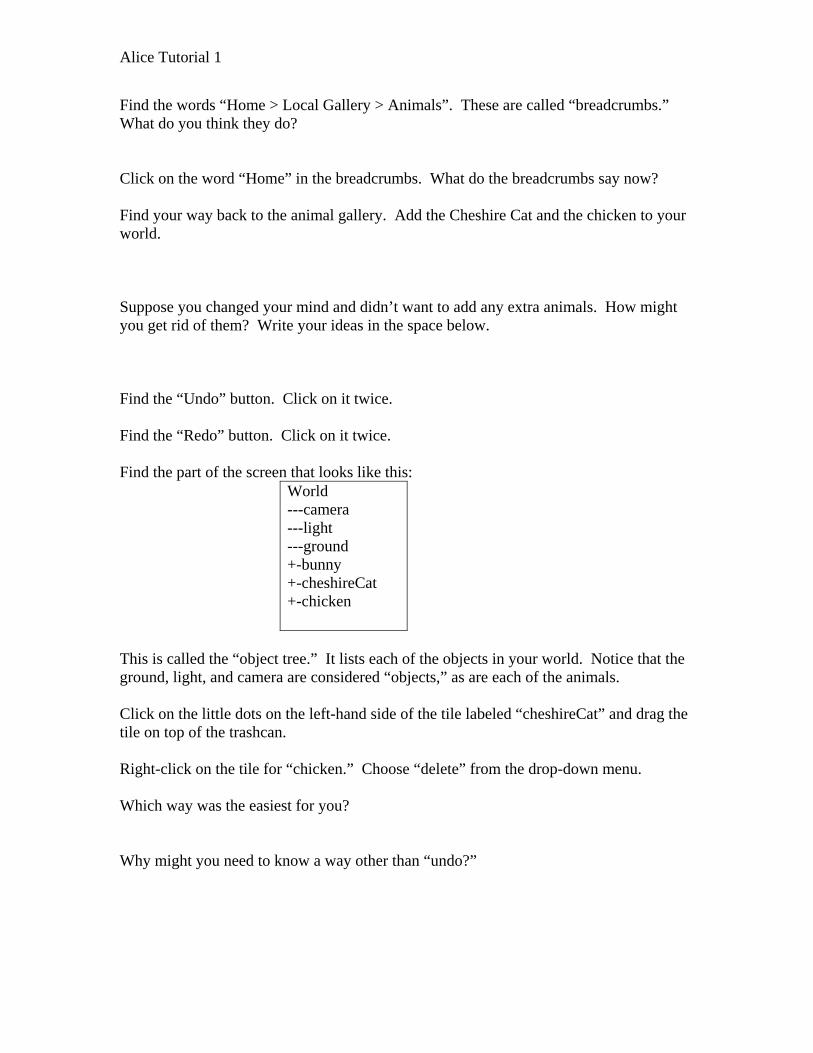
Alice Tutorial 1
Find the words “Home > Local Gallery > Animals”. These are called “breadcrumbs.” What do you think they do? Click on the word “Home” in the breadcrumbs. What do the breadcrumbs say now? Find your way back to the animal gallery. Add the Cheshire Cat and the chicken to your world. Suppose you changed your mind and didn’t want to add any extra animals. How might you get rid of them? Write your ideas in the space below. Find the “Undo” button. Click on it twice. Find the “Redo” button. Click on it twice. Find the part of the screen that looks like this:
World ---camera ---light ---ground +-bunny +-cheshireCat +-chicken
This is called the “object tree.” It lists each of the objects in your world. Notice that the ground, light, and camera are considered “objects,” as are each of the animals. Click on the little dots on the left-hand side of the tile labeled “cheshireCat” and drag the tile on top of the trashcan. Right-click on the tile for “chicken.” Choose “delete” from the drop-down menu. Which way was the easiest for you? Why might you need to know a way other than “undo?”
Alice Tutorial 1
Find the object tree in the upper-left hand corner. What do you think the + sign next to the bunny means? Click on the + sign. What happened? In Alice, the bunny has 13 parts. Identify the parts in the space below. The first has been done for you. (Hint: click on each of the bunny’s parts’ + signs.)1. bunny 2. 3. 4. 5.
6. 7. 8. 9. 10.
11. 12. 13.
Click on the – sign. Click on the bunny tile in the object tree. Look at the command tiles that have appeared in the “methods” tab. What do you think might be the definition for “method”? Click and drag the command tile “bunny move” onto the picture of your bunny. Choose up 1 meter. What happened? Without using “Undo,” return the bunny to its original position. List your steps in the space below. Click on the green “Done” button. Stop and think: In the space below, list all of the things you know how to do in order to set a scene in Alice. Look back over your work if you need reminders. Save your work as [YourName]Bunny.a2w (For example, my work would be MsBedellBunny.a2w)

Alice Tutorial 2
Welcome to Alice! Moving Objects
The script tells the actors in a movie how to interact (move, speak, etc.) You will need to create a script (“code”) for your Alice project. Open your “bunny” world. Click on the “Add objects” button to switch to the editing screen. Click on the “bunny” tile to select the bunny. Use the resize button (hint: look back at your notes from the first tutorial if you need a reminder) to make your bunny a little larger. When you are finished, click “Done” to return to “world.my first method.” Click on the “bunny” tile to select the bunny. What do you think will happen if you drag the “bunny move” command tile from the methods column into the box labeled with the tab “world.my first method” and choose up 1 meter? Try it. What actually happened? Find the “Play” button in the upper left corner. Click it. What happened? In what ways is “world.my first method” similar to or different from a movie script? Similar to Different from
Click on the “Stop” button to close the “Play” window. Drag the “bunny move” command tile from methods into “world.my first method.” This time, choose options to write a line of code that will make the bunny come down from its jump. Test your choice by using the “Play” button. How do you think we could get the bunny to say “Yippee!” after it jumps?

Alice Tutorial 2
Find the command for “bunny say” in its methods column. Drag the command into world.my first method. Choose “other…” from the drop-down menu. A box will appear that says “Enter a string.” Enter “Yippee!” in the box and press OK. Play your world by hitting the “Play” button. Suppose we wanted the bunny to say “Yippee!” as it jumped. In the space below, describe the commands we might need to use to make that happen. Look at the command tiles on the bottom of the box labeled with the tab “world.my first method.” Find the commands labeled “Do in order” and “Do together.” In the space below, predict what these commands might do. Drag a “Do in order” command and a “Do together” command into “world.my first method” so that “Do together” appears below “Do in order.” In what ways do these commands look similar to or different from the commands you used to make the bunny move and talk? In “world.my first method,” click on the line of code you created to move the bunny up 1 meter and drag that code onto the words “Do Nothing” in the box “Do in order.” Repeat this process with the line of code that moved the bunny back down and the line of code that made the bunny say “Yippee!” What do you think will happen when we play the world? Record your ideas here.

Alice Tutorial 2
Play the world. What happened? Why do you think this happened? Now, drag each line of code from the “Do in order” command to the “Do together” command. What do you think will happen when we play the world now? Play the world. What happened? Why do you think this happened? Drag the “Do in order” command into the “Do together” command. This is called “nesting.” Drag the code to move the bunny up and down into the “Do in order.” Leave the code to make the bunny say “Yippee!” in the “Do together.” Now what do you think will happen? Play the world. What happened? Why do you think this happened? In the space below, explain when you would want to use “Do in order,” when you would want to use “Do together,” and when you would want to nest one command inside the other.
Alice Tutorial 2
Suppose you wanted the bunny to spin once to the left after it landed. In the space below, briefly describe the commands you think you might need to use and the order in which you might need to use them for your program. Under the bunny’s methods, find the commands “bunny turn” and “bunny roll.” What do you think the difference might be? Drag “bunny roll” into world.my first method. Choose left 1 revolution. What do you think will happen? Play the world. Sketch bunny’s motion. Delete the “bunny roll” command. Drag “bunny turn” into world.my first method. Choose left 1 revolution. Play the world. Sketch the bunny’s motion. Delete “bunny turn.” Drag a new “bunny turn” command into world.my first method. This time, choose forward 1 revolution. Play the world. Sketch the bunny’s motion. Before saving your work, decide on the best code to make the bunny spin left 1 time after it lands. Make sure your work shows that line of code. In the space below, explain what you know at this point about making objects move in Alice.
Alice Tutorial Checkpoint 1
Checkpoint time! A shark swims into view from the right-hand side of the screen. The shark is facing left. It swims 4 meters forward, jumps up and does a back flip. At the same time as it swims off to the left, it says, “Just when you thought it was safe to go back in the water…” List the objects you will need: Quickly sketch how you want the opening scene to look. List the methods you will need to use: List the steps you will need to go through: Now give it a shot! Write the code to make the story happen. When you have finished the assignment, save it as [YourName]Checkpoint1.a2w

Alice Tutorial 5
Welcome to Alice! Moving Objects, Part II: Orientation and Methods
Open a new world. In your world, you need an igloo, a pharaoh, an Eskimo girl, and a mummy. The pharaoh, girl, and mummy should be next to each other facing the camera. The igloo should be in the background with the door facing to the right. What do you notice about the arms for the people? Imagine that the pharaoh, girl, and mummy are learning a new line dance. The dance starts by turning the right arm one complete revolution to the left. Next, the dancers need to turn their right arms forward one complete revolution. Finally, the dancers need to roll their right arms one complete revolution to the left. Because this is a line dance, all three dancers need to move in the same way at the same time. Talk with your partner for two minutes about the things that need to happen in order to make this work. Record your ideas below. In the space below, sketch what you predict will happen using your code.
Alice Tutorial 5
Play your world several times. In the space below, sketch what actually happened.
Did they move together in the same way at the same time? Why or why not? Drag a “Do together” ABOVE the commands you’ve already typed. In this new “Do together,” add commands to complete the following tasks:
• ROLL the girl’s Right Upper Arm right 0.15 revolutions. (To enter 0.15 as a value, choose “other” from the drop-down menu and type 0.15 on the calculator that appears.)
• ROLL the girl’s Right Lower Arm right 0.05 revolutions. • TURN the girl’s Right Upper Arm backwards 0.05 revolutions. • TURN the mummy’s Right Arm forward 0.15 revolutions. • ROLL the mummy’s Right Arm forward 0.15 revolutions.
What do you think will happen to the girl and mummy as a result of these commands? In the boxes below, sketch what you think will happen when you play your world now:
Play your world several times. In the boxes below, sketch what actually happened.

Alice Tutorial 5
Surprised? Part of the problem lies in what is known as “orientation.” In Alice, objects can move in three dimensions, just like you can. However, in Alice, every object has its own “orientation,” or idea about which way those dimensions face. “Up” for one object may not necessarily be “up” for another. Furthermore, objects are stubborn; they neither know nor care what the orientation is for any other objects with which they might interact. This is important to know because you may not be able to use the exact same code to create the same movements on different objects! Furthermore, as you saw, simply rearranging parts may not solve the problem. Instead, you will need to figure out the movements for each object separately. Delete all the code from “world.my first method.” Next, delete the pharaoh and the mummy from your world. Then add the Eskimo. Place him next to the Eskimo girl so that they are both facing the camera. You may need to adjust the characters on the screen a bit. What do you notice about the arms now? Think back to the original problem where characters were learning a new line dance. The dance starts by turning the right arm one complete revolution to the left. Next, the dancers need to turn their right arms forward one complete revolution. Finally, the dancers need to roll their right arms one complete revolution to the left. Because this is a line dance, all three dancers need to move in the same way at the same time. What do you predict will happen when you write the code to make the Eskimo and Eskimo girl to dance? Why? Write the code to make the dance happen. Play your world. What happened? Suppose that each of the characters has their own special dance step that you want to showcase several times throughout your movie. Instead of writing code for the same movements over and over again, you can actually teach the characters their special moves. Click on the Eskimo girl’s tile in the Object Tree. In methods, find the button that says “create new method.” What do you think will happen when you click this button?

Alice Tutorial 5
Click on the “create new method” button. Enter “Dance” in the box that opens and click OK. Describe what you see now on the screen. How do you think you might use this new tab? Find the command for the EskimoGirl to move. Drag it into “EskimoGirl.Dance” and choose left 1 meter. Add the commands needed to make her jump up 0.5 meters, land, and then move back to her original position. Now, click on the tab for “world.my first method.” Drag EskimoGirl.Dance to “world.my first method” and put it underneath the code you wrote earlier. What do you think will happen when you play the world now? Play your world. What happened? Create a “Dance” method for the boy Eskimo. He needs to turn 0.25 revolutions to the right, kick up his right leg, return to standing, and then turn back to his original position. Which commands will you need to use? Drag “Eskimo.Dance” into “world.my first method” and put it underneath EskimoGirl.Dance. Play your world. Does it work? What command would you need to use if you wanted the characters to show off their special moves at the same time? Make the characters show off their moves at the same time. Save your world as “[YourName]IglooDance.a2w”. For example, my world would be called “MsBedellIglooDance.a2w”. In the space below, list everything you now know about making characters move in Alice. Be sure to explain what “orientation” means and how to teach movements to objects.
Alice Tutorial 5
Welcome to Alice! Centers
In the box below, quickly sketch a person. Be sure to include the entire body so we can see from the feet to the head. Mark the center of the person with a “C.”
Open a new world in Alice with “dirt” for the ground. From the people folder, add the Mad Scientist and the Blue Ballerina and then click “Done”. Sketch the scene in the box below. Predict where the center is for each object (character). Mark your predicted centers with a “P.”
Now create code in “world.my first method” that asks each object to turn forward 1 revolution. Each object will turn around its own center. Mark the actual centers with a “C.” Save your work as “[YourName]SpecialEffects.a2w”. For example, my world would be “MsBedellSpecialEffects.a2w” What do you think is important to know about “center” with Alice? Why?

Alice Tutorial 6
Welcome to Alice! Special Effects: 3-D Text and Billboards
Open the world “[YourName]SpecialEffects.a2w”. Click on the green “Add Objects” button. From the toolbar at the top of the screen, choose “File” Add 3-D Text. In the box that opens, change “the quick brown fox” to your name. Click on “Font” to change the font to “Comic Sans MS”. Then click OK. What do you notice about the Object Tree? Whisper with your partner for 30 seconds about how you plan move the text so that it is in the sky above your characters and facing the screen. Record your ideas here. Move the text to the sky above your characters. In the Object Tree, click on the object that represents the text you added. For example, in my Object Tree, there is an object that says “Ms_Bedell”. Yours should say something different. To be consistent, we will refer to that object as the “Your_Name” object for the rest of this tutorial. Open the “properties” for “Your_Name” by clicking on the word “properties.” With your partner, decide on a possible definition for “properties.” Use the words on the command tiles that you recognize to help you create your definition. Write your definition here. Find the tile for “skin texture.” Click on the arrow next to the word “<None>” to open the drop-down box. Select “ground.Dirt.texture” What happened? Undo the texture. Whisper with your partner about how you might change the color of your name to purple. Record your ideas below.

Alice Tutorial 6
Click on the arrow to open the drop-down box for “color.” Change the color from “no color” to purple. Then, click “Done” to return to “world.my first method.” Drag the “color” tile into “world.my first method.” Set the color to green. What do you think will happen when you play your world? Play your world. What happened? Add a command to “world.my first method” to change the color from green back to purple. Play your world to make sure that your code works. Scroll down in the “properties” column for “Your_Name” to find the tile labeled “isShowing.” What do you think this means? Click on the drop-down arrow to change “isShowing = true” to “isShowing = false.” What happened? Change the “isShowing” property back to “true.” How could you use this property in an Alice world? Drag the “isShowing” tile in “world.my first method” and choose “false” in order to make “Your_Name” disappear after it turns back to purple. Play your world to make sure this works. Click on the “Add objects” button. Find the toolbar at the top of the screen. Click on File Make Billboard. From the Alice Tutorial Materials folder, select the file, “aliceRocks.gif” to add to your world as a billboard. Resize the new billboard so it is about 3 times its original size. Move it so that it is in the air behind the people. In the Object Tree, select the tile for “aliceRocks.” Open the properties tab and change the “isShowing” property to “false.” Click “Done” to return to “world.my first method.” Add a command to “world.my first method” to make “aliceRocks” appear after “Your_Name” disappears.
Alice Tutorial 6
Add a command to “world.my first method” to make “aliceRocks” turn 1 revolution to the left. Play your world several times. What do you notice about the billboard? Change the command to turn “aliceRocks” 0.25 revolutions. What do you think will happen to the billboard? Play your world. What happened? Why do you think this happened? Why might this be important to know? Change the command to turn “aliceRocks” to 2 revolutions. Play your world. Suppose you wished to change the speed at which “aliceRocks” turns. Find and click on the words “more…” on the code you wrote to make “aliceRocks” turn. From the drop-down box, choose “duration.” Set the duration to 2 seconds. Play your world again. Explain what you think “duration” means. Whisper with your partner about times when you might want to change the duration of a line of code. Record your ideas in the space below. Save your world as “[YourName]SpecialEffects.a2w”. For example, I would save my world as “MsBedellSpecialEffects.a2w”. In the space below, list everything you know about special effects in Alice.
Alice Tutorial 8
Welcome to Alice! Using Sound
Open the world you saved as “[YourName]SpecialEffects.a2w”. For example, I would open a world named “MsBedellSpecialEffects.a2w”. Suppose we wanted to add a sound when the “aliceRocks” billboard appears. Whisper with your partner about how you think you might accomplish this task. Record your ideas in the space below. Select “aliceRocks” in the Object Tree. Find the “play sound” command in the methods tab. Drag the “play sound” command into “world.my first method”. Choose “import a sound” from the menu. From the Alice Tutorial Materials folder, import the file “woohoo.wav”. **Important to know: you must follow all copyright laws. If music is copyrighted, fair use is limited to no more than 30 seconds or 10% of the file, whichever is smaller, even if you legally downloaded the music. What do you think will happen when you play the world? Play the world. What happened? What command would you need to use to make the sound happen at the same time as the billboard appears? Write the code to make the sound play at the same time as the billboard appears. Play the world. Save your world. In the space below, explain how to add sound to your Alice world.

Alice Tutorial 9
Welcome to Alice! Using Storyboards: A Reminder
A storyboard is a type of planning technique that shows the scenes in a movie or cartoon. Each “chunk” of action appears in its own box, similar to a comic strip. Consider the following story: As the movie starts, a cat is sitting on the sand. It looks right, then looks left, then looks back at the camera. “Where is everybody?” it asks. Then, it disappears, leaving only the empty sand. In order to create a storyboard, you need some information. 1. What is the setting? 2. What characters are needed? 3. How many scenes are needed? (Hint: draw a “/” in the story above every time something different happens.) 4. What other notes might be important for you to remember as you write the program? In the space below, explain how a storyboard is similar to or different from other types of planning you know and use already. In the space below, explain why a plan, such as a storyboard, is important. On the back of this sheet, create a possible storyboard for this story. You can look at some of the sample storyboards if you need.

Alice Checkpoint 2
It’s Checkpoint Time! In an outer space world, an alien (SciFi folder) is sitting on the moon. It rolls its head left 0.25 revolutions, right 0.5 revolutions, and then back to where it started. Then it spins one time to the right. Suddenly, a monkey (Animals folder) appears! The alien turns to face the monkey. The monkey turns right 0.25 revolutions, left 0.5 revolutions, jumps once, and turns back to the camera. The alien turns to face the camera. Suddenly, a billboard announcing a dance party appears in the sky. The alien and monkey repeat their moves together to music (everybodyDance.wav). The billboard disappears and the words “The End” appear. List the objects you will need: List the methods you will need to use. Include any methods you will need to create. List the steps you will need to go through: On the back of this sheet, create a storyboard for your world. Now write the code for your world. Play your world at each point to make sure it works. Save your world as “[YourName]Checkpoint2.a2w” . For example, I would save my world as “MsBedellCheckpoint2.a2w”.

Alice Tutorial 10
Welcome to Alice! Camera Controls and Quad View
Open a “water” world in Alice. Save your world as “[YourName]BeachWorld.a2w” Click on the green “Add objects button” to open the editor. Add the “BeachTerrain” from the “Beach” folder. What happened? Switch to quad view. Click on the magnifying glass. To zoom, click on the “Top View” box and push the mouse away from you. Zoom out until you see the beach. Compare the beach in your world to the beach shown in the folder. What do you notice? Click back on the arrow tool. Right-click on the “BeachTerrain” in the Object Tree. Choose “methods” ”move up” 5 meters. Next, right-click on the camera and move it up 5 meters. Right-click the camera and turn it left 1 revolution. Draw a map. Show where you believe the camera is located. On the right-hand side of the screen, find and click on the button labeled “more controls”. Click on the button labeled “Drop dummy at camera”. What do you notice about the Object Tree? Click on the “+” sign next to the “Dummy Objects” folder. Right-click on the object named “Dummy.” Choose “rename” from the drop-down menu. Rename the object “OriginalPosition”. Notice the yellow lines on the screen. These lines indicate that there is a dummy object. They will disappear when you play the world. Feel free to ignore them. Return to single view. Locate the blue arrows below the screen. What do you think they do?

Alice Tutorial 10
Play with the arrows. When you have discovered what each arrow does, label it on the diagram below.
After you have played a while, you should be far away from your original position. To return to your original position, right-click on the camera. Choose “set point of view to” “OriginalPosition.” What happened? How could this help you as you program? Add “BeachHouse1” to your beach. Right-click on the “BeachHouse1” command in the Object Tree. Choose “move to” ”BeachTerrain.” Use the camera controls to zoom out until you can see the entire house. Turn the house so that the steps are facing the ocean. In quad view, move the house until it is near the grass. Adjust the camera using the camera controls until the house is once again in view. Drop a dummy at this new spot. Rename the dummy, “FrontOfHouse”. Find the “OceanFloor” object in the “Ocean” folder of your local gallery. Add it to your world. Move the Ocean Floor down 10 meters. Right-click on the camera. Use the “move to” method to move the camera to the (entire) OceanFloor. Adjust the camera using the arrow controls until you can see the sand, water, and some of the corals. (Hint: you will probably need to move the camera up and backwards. You may also need to tilt the camera or adjust it left or right.)

Alice Tutorial 10
Once you are pleased with the shot, drop a dummy camera. Name the dummy “OceanBottom”. Return the camera to the FrontOfHouse position using the camera’s “move to” method. From the “People” folder, add the “Scuba Diver” to the world. Move the “Scuba Diver” to the “BeachHouse1”. Place the “Scuba Diver” on the steps facing forward. You may need to switch back and forth between single and quad view to make this happen. Save your work and click “Done”. Write code in world.myfirstmethod to make the Scuba Diver walk down the steps. (Hint: the steps are approximately 0.5m deep and 0.5m wide). At the bottom of the steps, write code in world.myfirstmethod to move the camera to the Scuba Diver’s regulator. At the same time, set the camera’s point of view to the Scuba Diver’s regulator. Add code to move the Scuba Diver to the “OriginalPosition” dummy. Predict what will happen when you play your world. Play the world. What happened? Did you notice that little blip on the bottom of the screen near the end of the world? That was the Scuba Diver. To make the camera move with the Scuba Diver, open the “properties” tab for the camera. Find the “vehicle” command. Drag the “vehicle” command into the code before you move the Scuba Diver and set the vehicle to the Scuba Diver’s regulator. Play your world. Once your Scuba Diver reaches “OriginalPosition,” add code to set the camera’s vehicle back to “world”. Next, make the Scuba Diver walk to the water (approximately 20 meters out). Finally, write code to make the Scuba Diver appear to swim under the water. Once the Scuba Diver has disappeared under the waves, move the camera to “OceanBottom.” You may also need to use the “set point of view” method to set the camera’s point of view to Ocean Bottom.

Alice Tutorial 10
If you want the transition to look “cleaner,” you can change the duration. Notice the word, “more” at the end of each line of code. Click on “more” ”duration”. Set the duration to 0.25 seconds. Play your world. Save your world. In the space below, list everything you know about camera controls. How could you use camera controls in future Alice worlds?

Estuary Project
Estuary Project Time to put your wonderful Alice knowledge to good use! You will create an example of a food web for an estuarine ecosystem. Open the file “EstuaryShell.a2w”. Save it as “[YourName]EstuaryProject.a2w”. For example, my work would be saved as “MsBedellEstuaryProject.a2w”. When you have finished this project, you will turn in the following items:
1. a storyboard that shows your planned Alice world, 2. a 1-page document that answers the Essential Questions for this unit, 3. your Work Planning sheet, and 4. an Alice world that you (and your partner, if applicable) have created.
Alice World Science Requirements: Your world needs to include
• at least two producers, • at least two primary consumers, • at least one secondary consumer, and • at least one decomposer.
Challenge: include at least one piece of evidence of human interaction with/impact on the ecosystem Once the scene is complete, you need to use Alice in order to demonstrate that you understand
• how plants and animals might interact in an estuarine food web, • how energy moves through an estuarine food web, and • how terrestrial and aquatic ecosystems can interact.
Challenge: demonstrate how human interaction with an ecosystem impacts the ecosystem, either positively or negatively. Focus particularly on the quality of water. For me to know that you understand these concepts, I will be looking for the following when I play your world:
1. at some point, each object you add (other than pure scenery) is clearly identified by its name and its role (producer, consumer, etc.).
2. at some point, each object you add demonstrates where it gets energy from Challenge: there is at least one moment when energy is passed from a “land” food web to an “aquatic” food web or vice-versa. (Hint: think about “what-eats-what”…) Super-Science-Challenge: Use your world to demonstrate what might happen if the ecosystem were to become unbalanced.

Estuary Project
Super-Alice-Challenge: if you are feeling confident with your Alice skills, see how far you can push your creativity. Feel free to experiment with layers of scenery, camera angles, and formats. Maybe you can create a video game or a quiz, or you might find another interesting way for us to learn the material demonstrated in your world. Alice commands that may be helpful as you program:
• move • say • Do together
• Do in order • isShowing • set vehicle to
• turn • resize • roll
You will probably want to use at least some of the commands listed above as you animate your food web. You may also want to use camera controls such as move, zoom, turn to face, etc. See me when you are stuck or have other questions. Timelines and Due Dates: Your initial storyboard is due on ______________________. You should plan to spend no more than _________________ setting up the scene. You will have ___________________ in class for animating your food web. If you need extra time, you may arrange an appointment with me or download Alice to work at home. Your Work Planning sheet is due on ________________. Your final Alice world is due on ___________________. Your Essential Questions are due on ________________. Grading: Please see the Estuary Project rubric and the Essential Questions rubric. You may use these rubrics to guide your work before you turn it in. I will use the same rubrics to grade your work.

Estuary Project
Estuary Project: For Super Alice Programmers Time to put your wonderful Alice knowledge to good use! You will create an example of a food web for an estuarine ecosystem. When you have finished this project, you will turn in the following items:
5. a storyboard that shows your planned Alice world, 6. a 1-page document that answers the Essential Questions for this unit, 7. your Work Planning sheet, and 8. an Alice world that you (and your partner, if applicable) have created.
Alice World Science Requirements: Your world needs to include
• A setting that demonstrates you understand what an estuary is. (Hint: look in the “beach,” “ocean,” and/or “environments” folders to find objects that can help you create the scene. You might even be able to use a world from the tutorials.)
• at least two producers, • at least two primary consumers, • at least one secondary consumer, and • at least one decomposer.
Challenge: include at least one piece of evidence of human interaction with/impact on the ecosystem Once the scene is complete, you need to use Alice in order to demonstrate that you understand
• how plants and animals might interact in an estuarine food web, • how energy moves through an estuarine food web, and • how terrestrial and aquatic ecosystems can interact.
Challenge: demonstrate how human interaction with an ecosystem impacts the ecosystem, either positively or negatively. Focus particularly on the quality of water. For me to know that you understand these concepts, I will be looking for the following when I play your world:
3. at some point, each object you add (other than pure scenery) is clearly identified by its name and its role (producer, consumer, etc.).
4. at some point, each object you add demonstrates where it gets energy from Challenge: there is at least one moment when energy is passed from a “land” food web to an “aquatic” food web or vice-versa. (Hint: think about “what-eats-what”…) Super-Science-Challenge: Use your world to demonstrate what might happen if the ecosystem were to become unbalanced.

Estuary Project
Super-Alice-Challenge: if you are feeling confident with your Alice skills, see how far you can push your creativity. Feel free to experiment with layers of scenery, camera angles, and formats. Maybe you can create a video game or a quiz, or you might find another interesting way for us to learn the material demonstrated in your world. Alice commands that may be helpful as you program:
• move • say • Do together
• Do in order • isShowing • set vehicle to
• turn • resize • roll
You will probably want to use at least some of the commands listed above as you animate your food web. You may also want to use camera controls such as move, set point of view, point at, etc. See me when you are stuck or have other questions. Timelines and Due Dates: Your initial storyboard is due on ______________________. You should plan to spend no more than _________________ setting up the scene. You will have ___________________ in class for animating your food web. If you need extra time, you may arrange an appointment with me or download Alice to work at home. Your Work Planning sheet is due on ________________. Your final Alice world is due on ___________________. Your Essential Questions are due on ________________. Grading: Please see the Estuary Project rubric and the Essential Questions rubric. You may use these rubrics to guide your work before you turn it in. I will use the same rubrics to grade your work.
Date: Work Planned: Work Accomplished: Reflection:

Continue on the back or add more pages as needed.
Strength: Challenge: Goal:
Strength: Challenge: Goal:
Strength: Challenge: Goal:
Strength: Challenge: Goal:
Strength: Challenge: Goal:
Related Documents


