Bull AIX 5L Web–based System Manager Administration Guide AIX 86 A2 52EM 00 ORDER REFERENCE

Welcome message from author
This document is posted to help you gain knowledge. Please leave a comment to let me know what you think about it! Share it to your friends and learn new things together.
Transcript
Bull AIX 5L Web–based System Manager
Administration Guide
AIX
86 A2 52EM 00
ORDER REFERENCE

Bull AIX 5L Web–based System Manager
Administration Guide
AIX
Software
July 2004
BULL CEDOC
357 AVENUE PATTON
B.P.20845
49008 ANGERS CEDEX 01
FRANCE
86 A2 52EM 00
ORDER REFERENCE

The following copyright notice protects this book under the Copyright laws of the United States of America
and other countries which prohibit such actions as, but not limited to, copying, distributing, modifying, and
making derivative works.
Copyright Bull S.A. 1992, 2004
Printed in France
Suggestions and criticisms concerning the form, content, and presentation of
this book are invited. A form is provided at the end of this book for this purpose.
To order additional copies of this book or other Bull Technical Publications, you
are invited to use the Ordering Form also provided at the end of this book.
Trademarks and Acknowledgements
We acknowledge the right of proprietors of trademarks mentioned in this book.
AIX� is a registered trademark of International Business Machines Corporation, and is being used under
licence.
UNIX is a registered trademark in the United States of America and other countries licensed exclusively through
the Open Group.
Linux is a registered trademark of Linus Torvalds.
The information in this document is subject to change without notice. Bull will not be liable for errors contained
herein, or for incidental or consequential damages in connection with the use of this material.
iiiPreface
About This Book
This book provides information on how to use Web–based System Manager to administersystems.
Who Should Use This BookThis book should be used by systems administrators who want to use Web–based SystemManager to administer their systems.
HighlightingThe following highlighting conventions are used in this book:
Indicator Description
Bold Identifies commands, subroutines, keywords, files, structures,directories, and other items whose names are predefined by thesystem. Also identifies graphical objects such as buttons, labels, andicons that the user selects.
Italics Identifies parameters whose actual names or values are to be suppliedby the user.
Monospace Identifies examples of specific data values, examples of text similar towhat you might see displayed, examples of portions of program codesimilar to what you might write as a programmer, messages from thesystem, or information you should actually type.
Case–Sensitivity in AIXEverything in the AIX operating system is case–sensitive, which means that it distinguishesbetween uppercase and lowercase letters. For example, you can use the ls command to listfiles. If you type LS, the system responds that the command is ”not found.” Likewise, FILEA,FiLea, and filea are three distinct file names, even if they reside in the same directory. Toavoid causing undesirable actions to be performed, always ensure that you use the correctcase.
ISO 9000ISO 9000 registered quality systems were used in the development and manufacturing ofthis product.
Related PublicationsThe following books contain information related to Web–based System Manager:
• AIX 5L Version 5.3 System Management Concepts: Operating System and Devices
• AIX 5L Version 5.3 System Management Guide: Operating System and Devices

iv Web–based System Manager Administration Guide
vPreface
Contents
About This Book iii. . . . . . . . . . . . . . . . . . . . . . . . . . . . . . . . . . . . . . . . . . . . . . . . . . . . . . . .
Who Should Use This Book iii. . . . . . . . . . . . . . . . . . . . . . . . . . . . . . . . . . . . . . . . . . . . . . .
Highlighting iii. . . . . . . . . . . . . . . . . . . . . . . . . . . . . . . . . . . . . . . . . . . . . . . . . . . . . . . . . . . . .
Case–Sensitivity in AIX iii. . . . . . . . . . . . . . . . . . . . . . . . . . . . . . . . . . . . . . . . . . . . . . . . . . .
ISO 9000 iii. . . . . . . . . . . . . . . . . . . . . . . . . . . . . . . . . . . . . . . . . . . . . . . . . . . . . . . . . . . . . . .
Related Publications iii. . . . . . . . . . . . . . . . . . . . . . . . . . . . . . . . . . . . . . . . . . . . . . . . . . . . .
Contents v. . . . . . . . . . . . . . . . . . . . . . . . . . . . . . . . . . . . . . . . . . . . . . . . . . . . . . . . . . . . . . .
Chapter 1. Introducing Web–based System Manager 1-1. . . . . . . . . . . . . . . . . . . . . .
Key Concepts of Web–based System Manager 1-2. . . . . . . . . . . . . . . . . . . . . . . . . . . . . .
Modes of Operation 1-4. . . . . . . . . . . . . . . . . . . . . . . . . . . . . . . . . . . . . . . . . . . . . . . . . . . . . .
Standalone Application Mode 1-5. . . . . . . . . . . . . . . . . . . . . . . . . . . . . . . . . . . . . . . . . . .
Client–Server Mode 1-6. . . . . . . . . . . . . . . . . . . . . . . . . . . . . . . . . . . . . . . . . . . . . . . . . . . .
Applet Mode 1-7. . . . . . . . . . . . . . . . . . . . . . . . . . . . . . . . . . . . . . . . . . . . . . . . . . . . . . . . . .
Remote Client Mode 1-7. . . . . . . . . . . . . . . . . . . . . . . . . . . . . . . . . . . . . . . . . . . . . . . . . . .
Custom Applications 1-9. . . . . . . . . . . . . . . . . . . . . . . . . . . . . . . . . . . . . . . . . . . . . . . . . . . . .
Chapter 2. Installing Web–based System Manager 2-1. . . . . . . . . . . . . . . . . . . . . . . .
Minimum Recommended System Requirements 2-2. . . . . . . . . . . . . . . . . . . . . . . . . . . . .
Installing Web–based System Manager 2-3. . . . . . . . . . . . . . . . . . . . . . . . . . . . . . . . . . . . .
Enabling Client–Server Mode 2-4. . . . . . . . . . . . . . . . . . . . . . . . . . . . . . . . . . . . . . . . . . . . . .
Assigning Port Values 2-4. . . . . . . . . . . . . . . . . . . . . . . . . . . . . . . . . . . . . . . . . . . . . . . . . .
Optional Filesets Available with Web–based System Manager 2-5. . . . . . . . . . . . . . . . .
Java Web Start Client Installation and Configuration 2-5. . . . . . . . . . . . . . . . . . . . . . . . . .
Installation of Java Web Start on Linux 2-5. . . . . . . . . . . . . . . . . . . . . . . . . . . . . . . . . . .
Installation of Java Web Start on Windows 2-6. . . . . . . . . . . . . . . . . . . . . . . . . . . . . . . .
Security for the Java Web Start Client 2-6. . . . . . . . . . . . . . . . . . . . . . . . . . . . . . . . . . . .
Installation Requirements to Support Applet Mode 2-7. . . . . . . . . . . . . . . . . . . . . . . . . . .
Configuring the Client (Browser) 2-7. . . . . . . . . . . . . . . . . . . . . . . . . . . . . . . . . . . . . . . . .
Installing Web–based System Manager Remote Client 2-7. . . . . . . . . . . . . . . . . . . . . . . .
Minimum Recommended System Requirements for Remote Client 2-8. . . . . . . . . . .
Installation Requirements to Support Remote Client Mode 2-8. . . . . . . . . . . . . . . . . .
Configuring an AIX Server for Remote Client Installation 2-8. . . . . . . . . . . . . . . . . . . .
Installing Web–based System Manager Remote Client on the Windows System 2-9
Uninstalling Web–based System Manager Remote Client from a Windows System 2-9. . . . . . . . . . . . . . . . . . . . . . . . . . . . . . . . . . . . . . . . . . . . . . . . . . . . . . . . . . . . . . .
Installing Web–based System Manager Remote Client on a Linux System 2-9. . . .
Uninstalling Web–based System Manager Remote Client from a Linux System 2-10
Installing Web–based System Manager Remote Client Security 2-10. . . . . . . . . . . . . . . .
Minimum Recommended System Requirements for Remote Client Security 2-11. . .
Installation Requirements to Support Remote Client Security 2-11. . . . . . . . . . . . . . . .
Configuring an AIX Server for Remote Client Security Installation 2-11. . . . . . . . . . . .
Installing Web–based System Manager Remote Client Security on the Windows System 2-12. . . . . . . . . . . . . . . . . . . . . . . . . . . . . . . . . . . . . . . . . . . . . . . . . . . . . . . . . . . . . . .
Uninstalling Web–based System Manager Remote Client Security from a WindowsSystem 2-12. . . . . . . . . . . . . . . . . . . . . . . . . . . . . . . . . . . . . . . . . . . . . . . . . . . . . . . . . . . . . . .
Installing Web–based System Manager Remote Client Security on a Linux System 2-12. . . . . . . . . . . . . . . . . . . . . . . . . . . . . . . . . . . . . . . . . . . . . . . . . . . . . . . . . . . . . . .
Uninstalling Web–based System Manager Remote Client Security from a Linux System 2-13. . . . . . . . . . . . . . . . . . . . . . . . . . . . . . . . . . . . . . . . . . . . . . . . . . . . . . . . . . . . . . .
vi Web–based System Manager Administration Guide
Installation Requirements for Secure Socket Layer Support 2-14. . . . . . . . . . . . . . . . . . .
Integrating Web–based System Manager into Tivoli Netview Management Console 2-15. . . . . . . . . . . . . . . . . . . . . . . . . . . . . . . . . . . . . . . . . . . . . . . . . . . . . . . . . . . . . . . .
Chapter 3. Using Web–based System Manager’s Console 3-1. . . . . . . . . . . . . . . . .
Navigation Area 3-2. . . . . . . . . . . . . . . . . . . . . . . . . . . . . . . . . . . . . . . . . . . . . . . . . . . . . . . . .
Contents Area 3-3. . . . . . . . . . . . . . . . . . . . . . . . . . . . . . . . . . . . . . . . . . . . . . . . . . . . . . . . . . .
Containers 3-3. . . . . . . . . . . . . . . . . . . . . . . . . . . . . . . . . . . . . . . . . . . . . . . . . . . . . . . . . . . .
Overviews 3-6. . . . . . . . . . . . . . . . . . . . . . . . . . . . . . . . . . . . . . . . . . . . . . . . . . . . . . . . . . . .
Launchers 3-6. . . . . . . . . . . . . . . . . . . . . . . . . . . . . . . . . . . . . . . . . . . . . . . . . . . . . . . . . . . .
Menu and Toolbar Actions 3-7. . . . . . . . . . . . . . . . . . . . . . . . . . . . . . . . . . . . . . . . . . . . . . . .
Changing Fonts and Colors 3-8. . . . . . . . . . . . . . . . . . . . . . . . . . . . . . . . . . . . . . . . . . . . . . .
Help Options 3-9. . . . . . . . . . . . . . . . . . . . . . . . . . . . . . . . . . . . . . . . . . . . . . . . . . . . . . . . . . . .
Tips Area 3-10. . . . . . . . . . . . . . . . . . . . . . . . . . . . . . . . . . . . . . . . . . . . . . . . . . . . . . . . . . . . . . .
Working Dialog 3-11. . . . . . . . . . . . . . . . . . . . . . . . . . . . . . . . . . . . . . . . . . . . . . . . . . . . . . . . . .
Status Bar 3-12. . . . . . . . . . . . . . . . . . . . . . . . . . . . . . . . . . . . . . . . . . . . . . . . . . . . . . . . . . . . . .
Console Workspace 3-13. . . . . . . . . . . . . . . . . . . . . . . . . . . . . . . . . . . . . . . . . . . . . . . . . . . . . .
Preference Files 3-14. . . . . . . . . . . . . . . . . . . . . . . . . . . . . . . . . . . . . . . . . . . . . . . . . . . . . . . . .
Error Handling for Loading or Saving Preference Files 3-15. . . . . . . . . . . . . . . . . . . . . .
Command Line Tools 3-16. . . . . . . . . . . . . . . . . . . . . . . . . . . . . . . . . . . . . . . . . . . . . . . . . . . . .
User–Editable Files 3-19. . . . . . . . . . . . . . . . . . . . . . . . . . . . . . . . . . . . . . . . . . . . . . . . . . . . . .
Keyboard Control of Web–based System Manager 3-20. . . . . . . . . . . . . . . . . . . . . . . . . . .
Using Mnemonics and Shortcuts 3-20. . . . . . . . . . . . . . . . . . . . . . . . . . . . . . . . . . . . . . . .
Navigating the Console with the Keyboard 3-20. . . . . . . . . . . . . . . . . . . . . . . . . . . . . . . .
Navigating Dialog Boxes with the Keyboard 3-21. . . . . . . . . . . . . . . . . . . . . . . . . . . . . . .
Accessing Help with the Keyboard 3-21. . . . . . . . . . . . . . . . . . . . . . . . . . . . . . . . . . . . . . .
Session Log 3-22. . . . . . . . . . . . . . . . . . . . . . . . . . . . . . . . . . . . . . . . . . . . . . . . . . . . . . . . . . . . .
Transaction Log 3-22. . . . . . . . . . . . . . . . . . . . . . . . . . . . . . . . . . . . . . . . . . . . . . . . . . . . . . . . .
Chapter 4. Configuring a Set of Managed Machines 4-1. . . . . . . . . . . . . . . . . . . . . . .
Adding a Machine to Web–based System Manager 4-2. . . . . . . . . . . . . . . . . . . . . . . . . .
Examples 4-2. . . . . . . . . . . . . . . . . . . . . . . . . . . . . . . . . . . . . . . . . . . . . . . . . . . . . . . . . . . .
Removing a Machine 4-4. . . . . . . . . . . . . . . . . . . . . . . . . . . . . . . . . . . . . . . . . . . . . . . . . . . . .
Chapter 5. Securing Web–based System Manager 5-1. . . . . . . . . . . . . . . . . . . . . . . . .
Installing Web–based System Manager Security 5-2. . . . . . . . . . . . . . . . . . . . . . . . . . . . .
Configuring Web–based System Manager Security 5-3. . . . . . . . . . . . . . . . . . . . . . . . . . .
Security Scenarios 5-3. . . . . . . . . . . . . . . . . . . . . . . . . . . . . . . . . . . . . . . . . . . . . . . . . . . . . . .
Using Ready–to–Go Key Ring Files 5-4. . . . . . . . . . . . . . . . . . . . . . . . . . . . . . . . . . . . . .
Administering Multiple Sites 5-7. . . . . . . . . . . . . . . . . . . . . . . . . . . . . . . . . . . . . . . . . . . . .
Avoiding Transfer of Private Keys 5-10. . . . . . . . . . . . . . . . . . . . . . . . . . . . . . . . . . . . . . . .
Using Another Certificate Authority 5-13. . . . . . . . . . . . . . . . . . . . . . . . . . . . . . . . . . . . . . .
Configuring for the SMGate Daemon 5-16. . . . . . . . . . . . . . . . . . . . . . . . . . . . . . . . . . . . . . .
Viewing Configuration Properties 5-17. . . . . . . . . . . . . . . . . . . . . . . . . . . . . . . . . . . . . . . . . .
Public Key Ring Content 5-17. . . . . . . . . . . . . . . . . . . . . . . . . . . . . . . . . . . . . . . . . . . . . . . .
Enabling Web–based System Manager Security 5-18. . . . . . . . . . . . . . . . . . . . . . . . . . . . .
Enabling the SMGate Daemon 5-19. . . . . . . . . . . . . . . . . . . . . . . . . . . . . . . . . . . . . . . . . . . .
Running Web–based System Manager Security 5-20. . . . . . . . . . . . . . . . . . . . . . . . . . . . .
Client–Server Mode 5-20. . . . . . . . . . . . . . . . . . . . . . . . . . . . . . . . . . . . . . . . . . . . . . . . . . . .
Remote Client Mode 5-20. . . . . . . . . . . . . . . . . . . . . . . . . . . . . . . . . . . . . . . . . . . . . . . . . . .
Applet Mode 5-20. . . . . . . . . . . . . . . . . . . . . . . . . . . . . . . . . . . . . . . . . . . . . . . . . . . . . . . . . .

viiPreface
Chapter 6. Web–based System Manager Accessibility 6-1. . . . . . . . . . . . . . . . . . . . .
Enabling Web–based System Manager’s Screen Reader 6-1. . . . . . . . . . . . . . . . . . . . .
Keyboard Accessibility 6-1. . . . . . . . . . . . . . . . . . . . . . . . . . . . . . . . . . . . . . . . . . . . . . . . . . . .
Logon Panel 6-2. . . . . . . . . . . . . . . . . . . . . . . . . . . . . . . . . . . . . . . . . . . . . . . . . . . . . . . . . .
Web–based System Manager Console Window 6-3. . . . . . . . . . . . . . . . . . . . . . . . . . .
Appendix A. Troubleshooting A-1. . . . . . . . . . . . . . . . . . . . . . . . . . . . . . . . . . . . . . . . . . . .
Troubleshooting Remote Machines A-2. . . . . . . . . . . . . . . . . . . . . . . . . . . . . . . . . . . . . . . . .
Troubleshooting Web–based System Manager in Applet Mode A-3. . . . . . . . . . . . . . . .
Troubleshooting Web–based System Manager in Remote Client Mode A-4. . . . . . . . .
Troubleshooting Security A-5. . . . . . . . . . . . . . . . . . . . . . . . . . . . . . . . . . . . . . . . . . . . . . . . . .
Index X-1. . . . . . . . . . . . . . . . . . . . . . . . . . . . . . . . . . . . . . . . . . . . . . . . . . . . . . . . . . . . . . . . . .

viii Web–based System Manager Administration Guide
1-1Introducing Web–based System Manager
Chapter 1. Introducing Web–based System Manager
Web–based System Manager is a system management application for administeringcomputers. It is installed by default on graphical systems.
Web–based System Manager features a system management console for administeringmultiple hosts. A plug–in architecture makes it easier to extend the suite. In addition,Web–based System Manager supports dynamic monitoring and administrator notification ofsystem events.
1-2 Web–based System Manager Administration Guide
Key Concepts of Web–based System ManagerWeb–based System Manager is a client–server application that gives the user a powerfulinterface to manage UNIX systems. Web–based System Manager uses its graphicalinterface to enable the user to access and manage multiple remote machines. This interfaceshows a Console Window containing two primary panels. The panel on the left displays themachines that the user can manage from the Console Window. This panel is referred to asthe Navigation Area. The panel on the right (the Contents Area) displays results based onthe item selected in the Navigation Area. You select the machine to perform managementoperations from the Navigation Area. As you navigate to the desired operation in theNavigation Area, the Contents Area is updated to show the allowable choices.
The following sequence of steps provides an example of how Web–based System Manageris used to modify the properties of a user:
1. Start Web–based System Manager in a graphics–capable AIX window by typing thefollowing:
/usr/websm/bin/wsm
2. From the Contents Area, double–click the Users icon.
The Contents Area will have the following categories:
– Administrative Roles
– All Groups
– All Users
– Overview and Tasks
3. Double–click the All Users icon. The Contents Area will list the users and whether eachis a basic user or an administrator.
4. Double–click the icon next to the name of the user whose properties you want to modify.Use this dialog to modify the properties of the selected user.
5. To save the changes, click OK. To cancel the changes, click Cancel.
The client portion of the Web–based System Manager application runs on the managingmachine. In the above example, it was not stated if the user being modified was a user onthe machine running Web–based System Manager (the client) or on a managed machine (aserver). To modify a user on a managed machine, select a machine from the NavigationArea. If this machine has not already been accessed, a dialog asking for your Host name,User name and Password appears. Use this dialog to log in to the managed machine. Afteryou have logged in to a machine, you can perform operations from the Web–based SystemManager console on another managed machine and return to the machine (by selecting itfrom the Navigation Area) without logging in again.
You will want to maintain a Web–based System Manager home machine. This homemachine should be used as the managing machine even if you start Web–based SystemManager from a machine other than the home machine. This is because the initialappearance of the console window is derived from a file on the managing machine. Thisenables you to start Web–based System Manager at a colleague’s desk, specify a personalhome machine as the managing machine, and thus create a console window with yoursaved preferences. For more information about saving preferences, see Preference Files onpage 3-14.
The most important portion of your saved preferences may be the machine ManagementEnvironment. The Management Environment is a powerful mechanism for defining andaccessing the set of machines for which you are responsible. When you select a machine inthe Management Environment, a Web–based System Manager server is started on theselected machine. This server provides the client (and indirectly the console window) withremote managed objects. The client portion of the application presents these remote

1-3Introducing Web–based System Manager
managed objects through windows and other standard graphical user interface (GUI)elements. By working with these GUI elements, the client side of the application can displayinformation about objects on the remote managed machine, as well as allow you to updatethis information.
After a machine in the Management Environment is active (this occurs through selecting amachine in the Management Environment and logging in to the machine), you can switchfrom managing one machine to managing another with a few mouse clicks.
The result is you can manage a large number of machines through one powerful interface.
1-4 Web–based System Manager Administration Guide
Modes of OperationWeb–based System Manager can be configured to run in a variety of operating modes. Theoperating environments in which Web–based System Manager can be started arestandalone application, client–server, applet, and remote client. These modes of operationare described in the following sections.
• Standalone Application Mode on page 1-5
• Client–Server Mode on page 1-6
• Applet Mode on page 1-7
• Remote Client Mode on page 1-7
1-5Introducing Web–based System Manager
Standalone Application ModeNo configuration is necessary to run Web–based System Manager in the standaloneapplication mode. From the command line, type the following command:
/usr/websm/bin/wsm
To start the Web–based System Manager Console from the Common Desktop Environment(CDE), do the following:
1. Select the Application Manager icon in the CDE front panel.
2. Select the System_Admin icon.
3. Select the Management Console icon.
By default, you can perform system management tasks on the machine you started theconsole on.
1-6 Web–based System Manager Administration Guide
Client–Server ModeYou can manage your local machine from the Web–based System Manager Console. Youcan also manage machines that have been configured for remote management (seeEnabling Client–Server Mode on page 2-4). You specify the machines you want to manageby adding them to the Management Environment (see Configuring a Set of ManagedMachines on page 4-1).
You can also select a different host than your local machine as the managing machine. Todo this, use the following command:
/usr/websm/bin/wsm –host [ managing machine host ]
The host you specify as [ managing machine host ] displays under the Navigation Area asthe first name under the list of hosts that can be managed. This host is also used to load theWeb–based System Manager user preference file ($HOME/WebSM.pref). Using the –hostargument displays the console to the machine you are using, but uses the preferences fileof the remote host you specify (see Preference Files on page 3-14).
Note: Any target host to be managed by Web–based System Manager must havethe Web–based System Manager server installed and configured. SeeEnabling Client–Server Mode on page 2-4 for more information.
1-7Introducing Web–based System Manager
Applet ModeApplet mode is similar to using Web–based System Manager in client–server mode whenusing the –host argument. In client–server mode, you use the following command:
/usr/websm/bin/wsm –host [ managing machine ]
while in applet mode, you point your browser to
http:// managing machine /wsm.html
In both cases, managing machine is the machine that contains the Web–based SystemManager application. The managed machine is the first machine to be listed in theManagement Environment.
Applet Mode versus Client–Server ModeThere is a significant difference between using applet mode and client–server mode. Inapplet mode, it is only possible to manage a set of machines that have the same version ofWeb–based System Manager installed. The reason for this is that applets in general arerestricted for security reasons to loading Java classes only from the HTTP server runningthe applet. While the Java classes needed to operate the Web–based System Managerconsole come from the managing machine, another set of Java classes is used to operatetasks on the managed machines. These classes must be loaded from the machine beingmanaged (this is different from the managing machine) in order for these classes to matchthe operating system being managed. In applet mode, this situation is not possible.
Remote Client ModeRemote Client mode allows you to run the Web–based System Manager console on aWindows or Linux system and manage remote AIX computers. This method is similar tousing Web–based System Manager in client–server mode when using the –host argument.There are several ways to start Remote Client. On a Linux system, be sure you are usingone of the following supported Linux distributions: Red Hat Enterprise Version 3, Suse 8.0,Suse 8.1, Suse 8.2, and Suse 9.0 using the KDE and GNOME only.
On a Windows system, complete the following steps:
• Double–click the Web–based System Manager Remote Client icon located on theWindows desktop to open the application.
• Click the Start button in the Task bar, then select Programs ––> Web–based SystemManager ––> Web–based System Manager Remote Client.
• From an MS–DOS prompt, run the wsm.bat command from the Remote Client bindirectory.
• Using Windows Explorer, double–click the wsm.bat icon in the Remote Client bin folder.
On a Linux system running the Gnome Desktop, complete the following steps:
• Click the Gnome menu button in the Task Bar, then select Programs ––> Web–basedSystem Manager Remote Client.
• From an xterm, run the wsm command from the Remote Client bin directory.
On a Linux system running the KDE Desktop, complete the following steps:
• Click the KDE menu button in the Task Bar, then select Programs ––> Web–basedSystem Manager Remote Client.
• From an xterm, run the wsm command from the Remote Client bin directory.
As with client–server mode, the systems listed in the Management Environment area aremanaged machines. However, Remote Client differs from client–server mode in that theWindows or Linux system running Remote Client is the managing machine and does notshow up in the Management Environment area.

1-8 Web–based System Manager Administration Guide
Security issues are identical to those found in client–server mode with regard to loadingclasses, as opposed to the limitations found in Applet mode, where it is only possible tomanage a set of machines that have the same version of Web–based System Managerinstalled. For more information on security issues, see Securing Web–based SystemManager on page 5-1.
For more information, see Client–Server Mode on page 1-6 and Applet Mode on page 1-7.
1-9Introducing Web–based System Manager
Custom ApplicationsYou can use the Custom Tools application to add existing commands and applicationsavailable on your AIX system to the Web–based System Manager environment, which canthen be executed directly from the Console Window.
If you would like more integration than the Custom Tools application provides, you canextend the power of Web–based System Manager by writing custom applications. Writingcustom applications requires knowledge of the Java programming language. If this is ofinterest to your organization, contact your sales representative.

1-10 Web–based System Manager Administration Guide
2-1Installing Web–based System Manager
Chapter 2. Installing Web–based System Manager
The following topics provide information on installing Web–based System Manager:
• Minimum Recommended System Requirements on page 2-2
• Enabling Client–Server Mode on page 2-4
• Optional Filesets Available with Web–based System Manager on page 2-5
• Java� Web Start Client Installation and Configuration on page 2-5
• Installation Requirements to Support Applet Mode on page 2-7
• Installing Web–based System Manager Remote Client on page 2-7
• Installing Web–based System Manager Remote Client Security on page 2-10
• Installation Requirements for Secure Socket Layer Support on page 2-14
• Integrating Web–based System Manager into Tivoli Netview Management Console onpage 2-15
2-2 Web–based System Manager Administration Guide
Minimum Recommended System RequirementsUsing Web–based System Manager effectively requires that the client computer have atleast the following characteristics:
• Operating System with:
– Base Operating System AIX 5.1 or later
– PC running Windows 2000 Professional version, Windows XP Professional version,or Windows Server 2003.
– PC running one of the following Linux distributions: Red Hat Enterprise Version 3,SLES 8, SLES 9, Suse 8.0, Suse 8.1, Suse 8.2, and Suse 9.0 using desktops KDE orGNOME only
• Attached graphics display
• 300 MB free disk space
• 512 MB of memory, minimum, though 1 GB is preferred
Note: You may require additional memory if you run multiple sessionssimultaneously, such as multiple Web–based System Manager sessionsrunning the Monitoring plug–in.
• 1 Ghz CPU
Versions of AIX earlier than 5.1.0.30 will not be able to manage, or be managed by, laterversions of AIX. For example, if the client was running AIX 4.3.3, a server running AIX 5.2would not be able to manage the client, however, a client from an AIX 5.1.0.30 machine willbe able to manage an AIX server running AIX 5.3. The same is true in the reverse situation.Certain plugins may be incompatible across versions of AIX and appropriate errormessages will occur when they are encountered. When such an incompatibility exists, theplugin will not load, but the rest of the plugins will be fully functional.
If you are using a Windows or Linux system to run Web–based System Manager in RemoteClient mode, see Minimum Recommended System Requirements for Remote Client onpage 2-8 for additional requirements.
While it is not absolutely necessary to have a computer that meets these requirements formemory and processor speed, the performance might be diminished on lesser machines.The minimum system requirements listed above apply primarily to the client computer. If theclient computer does not meet the minimum recommended system requirements, theperformance might be diminished.
Because the server machines do not involve displaying graphics to the user, it is not criticalthat they meet the minimum recommended system requirements. For details, read Modes ofOperation on page 1-4.
In applet and client–server modes, the client machine is not necessarily the machine onwhich you see the Web–based System Manager console.
Use of Web–based System Manager with X–emulators (such as those used on a PC) is notrecommended. The performance with these emulators is not satisfactory.
2-3Installing Web–based System Manager
Installing Web–based System ManagerTo use Web–based System Manager, it must be installed on the client and on any managedmachines. If you have graphics installed on your machine, you probably have Web–basedSystem Manager installed.
To verify this, type the following:
lslpp –h sysmgt.websm.framework
If Web–based System Manager is not installed, you will see a message similar to thefollowing:
lslpp: Fileset sysmgt.websm.framework not installed.
If Web–based System Manager is installed, you will see output similar to the following:
Fileset Level Action Status Date Time
–––––––––––––––––––––––––––––––––––––––––––––––––––––––––––––––––––––––––––
–
Path: /usr/lib/objrepos
sysmgt.websm.framework
5.2.0.0 COMMIT COMPLETE 03/09/01
17:30:14
Path: /etc/objrepos
sysmgt.websm.framework
5.2.0.0 COMMIT COMPLETE 03/09/01
17:35:31
If you do not have the sysmgt.websm.framework fileset installed, use the operatingsystem installation tools. To access the installation tools, type the following command(assuming the version AIX 5.3 CD is loaded to your CD drive):
/usr/lib/instl/sm_inst installp_cmd –a \
–d /dev/cd0 –f sysmgt.websm.framework –c –N –g –X
This action installs the required set of images needed to run Web–based System Manager.
2-4 Web–based System Manager Administration Guide
Enabling Client–Server ModeIn client–server mode (see Modes of Operation on page 1-4), the Web–based SystemManager client requests server services from a managed machine through inetd port 9090.Client–server mode needs to be enabled on the servers that are to be managed as remotemachines. Enabling and disabling a machine to act as a Web–based System ManagerServer can be done through the wsmserver command (see Command Line Tools on page3-16) as follows:
/usr/websm/bin/wsmserver –enable
To disable a machine so that it cannot be managed from a Web–based System Managerclient, type the following command:
/usr/websm/bin/wsmserver –disable
Assigning Port ValuesThere are two types of ports used with the Web–based System Manager Server: inetd portsand server socket ports. In some cases, the values of these port numbers must be changed.
inetd PortsThe inetd port can service more than one program on your system. If there is anotherprogram on your system that uses the inetd port number 9090, change the port number forthe Web–based System Manager Server connection with one of the following actions:
• set an alternative port number in the /etc/services file. If this is done, the –portargument would be used with the wsm command (see Command Line Tools on page3-16).
• use the following command:
wsmserver –enable –listenport port_number
where port_number is the new connection port for the Web–based System ManagerServer.
When you specify an inetd port number other than 9090, tell the client machine what thenew port number is so the client can connect to the server. To specify to the client machinean inetd port number other than 9090, add the host to the client’s realm with the followingformat:
host : port
where host is the name of the server or host machine, and port is the port number.
Server Socket PortsServer socket port numbers are chosen dynamically from a specified range by the system atruntime. Set the value range with the following command:
wsmserver –enable –portstart range_start –portend range_end
where range_start is the lowest allowable port number and range_end is the highestallowable port number. The Web–based System Manager Server will create sockets withinthis specified range. If you want multiple Web–based System Manager servers to run at thesame time, be sure to specify a port range that allows each server to have its own port.
2-5Installing Web–based System Manager
Optional Filesets Available with Web–based System ManagerThe following optional filesets can be installed to add additional function to Web–basedSystem Manager:
sysmgt.msg. Locale Language.websm.appsEnables the locale language to be used if the LANG environment variableis set or if the –lang argument is used with the wsm command.
sysmgt.websm.securityAdds support for Secure Socket Layer communication between client andserver. This fileset supports 40–bit encryption and is available on theExpansion Pack.
sysmgt.websm.security–usAdds support for Secure Socket Layer communication between client andserver. This fileset supports 128–bit encryption and is available on theExpansion Pack. Export and import laws could make this fileset unavailablein some countries.
The filesets in the preceding list are not installed by default as part of the base operatingsystem. However, they can be installed in a manner similar to the one described above forinstalling the core Web–based System Manager images. From the media containing thefileset, type the following command:
/usr/lib/instl/sm_inst installp_cmd –a –d /dev/cd0 \
–f desired_fileset_to_install –c –N –g –X
Java Web Start Client Installation and ConfigurationBeginning with this AIX 5.2.3.0, users of the Linux or Windows[ client now have the choiceof using Java Web Start instead of installing the client via Install Shield.
Note: Java Web Start must be installed on your system before downloading andinstalling the Web Based System Manager Remote Client.
Go to http://<hostname>/remote_client.html to download the remote client. You will havethe following two options:
Install Shield This remote client is installed via an Install Shield wizard and it mustbe re–installed to obtain updates. This client is useful when runningthe Web–based System Manager over a broadband connection(cable modem or DSL), because updates to the console are notautomatically downloaded.
Java Web Start This remote client is loaded by Java Web Start, which must beinstalled on the client system prior to installing the remote client. Thisversion of the remote client will check for updates on the serverevery time it is invoked and download updates automatically.
Installation of Java Web Start on LinuxWhen using the Mozilla browser on Linux to download the remote client files, make sure youare using Mozilla 1.6 or later.
After selecting the Java Web Start link from the browser, you will be prompted to install JavaWeb Start (if it is not already on your system) before you can download the remote client. Ifit appears to hang the browser window, it is trying to open the rpm rather than download it.Go back to the URL and right–click on the link, then select Save Link Target As ... andsave the rpm to disk.
2-6 Web–based System Manager Administration Guide
Once the image has been downloaded to the Linux system, type the following to install theJava Runtime Engine:
rpm –i ibm–linux–jre.i386.rpm
export PATH=$PATH:/opt/IBMJava2–142/jre/bin
cd/
/opt/IBMJava2–142/jre/javaws/updateSettings.sh
Java Web Start is now installed and the browser is configured to handle the jnlp URLs.
Installation of Java Web Start on WindowsIf Java Web Start is not already installed on the Windows system, you will be prompted toinstall it. After it is installed and you have selected and installed the Windows remote client,the following steps are necessary to create the desktop shortcut and icons:
• Open Java Web Start and view the Preferences from the File menu.
• Click the Shortcut Options tab. The default for creating shortcuts is ”prompt on thesecond launch”. Keep this default setting and click OK.
• Click View, then Downloaded Applications. Highlight ”Web–based System Manager”within the Applications: Downloaded Applications box and press Start. Web–basedSystem Manager will launch, creating the shortcuts.
Note: The only supported Web Start configuration is with the supplied JRE.
Security for the Java Web Start ClientFor the Web Start client, SSL support is automatically downloaded with the client if theWeb–based System Manager security file sets (sysmgt.websm.security,sysmgt.websm.security–us) are installed on the system that you downloaded the clientfrom. The certificate authority’s public key (SMPubkr.zip) is also automatically downloadedfrom the /usr/websm/codebase directory of this server. When you define the certificateauthority using the Web–based System Manager security configuration application, the CA’spublic key is written to SMpubkr.zip and SM.pubkr in /var/websm/security/tmp. CopySMpubkr.zip to the codebase directory (/usr/websm/codebase) of the serverwhere youdownloaded the Web Start client from.
When you install the security file sets, an empty SMpubkr.zip file is created in the codebasedirectory. This is necessary to avoid error messages during the Web Start client downloadbefore you have copied the SMpubkr.zip for the CAyou define. There is a script,/usr/websm/bin/wsmwebstartsslcfg which creates the empty SMpubkr.zip and sets thelinks to the jnlp files for downloading the appropriate SSL support. You can run this script torestore these links to a sane state if you think they are incorrect.
2-7Installing Web–based System Manager
Installation Requirements to Support Applet ModeNote: Using Web–based System Manager Remote Client for Java Web Start is
recommended over using Applet mode. For more information aboutWeb–based System Manager for Java Web Start, see Java Web StartClient Installation and Configuration on page 2-5.
In addition to the standard Web–based System Manager application mode, you need thesysmgt.websm.webaccess fileset to support applet mode. This fileset is automaticallyinstalled with the base operating system.
The machine to be used as the managing machine must be setup as an HTTP Server.This can be done by installing and configuring the HTTP Server of your choice. The HTTPServer is available on the AIX 5.3 Expansion Pack. Use the /usr/websm/bin/configassistcommand to automatically configure the HTTP Server.
Note: Applet mode is not supported on the POWER–based platform. See Modesof Operation on page 1-4 to see how to manage POWER–based machines.
To configure a server for applet mode, complete the following steps:
1. Install an HTTP Server on the machine where Web–based System Manager resides.The recommended Web server is HTTP Server. Refer to the documentation for eachproduct on how to install and configure the HTTP Server.
2. After the HTTP Server is running, you can configure Web–based System Manager to runfrom it with the following command:
/usr/websm/bin/configassist
3. In Configuration Assistant, proceed until you reach the main panel.
4. Select Configure a web server to run Web–based System Manager in a browser.
5. Click Next.
6. Follow the instructions on the subsequent panels to finish the configurations.
Configuring the Client (Browser)Requirements for the client are the following:
• PC running Windows 2000 Professional version, Windows XP Professional version, orWindows Server 2003.
• Internet Explorer 6.x.
• The Java 1.4 plug–in
You will be prompted to download the plug–in automatically. If you click yes, the plug–in isdownloaded and its installation script runs. If you click no, Web–based System Managerexits.
Installing Web–based System Manager Remote ClientWeb–based System Manager Remote Client security provides for secure operations inRemote Client mode
The following topics provide information about installing Web–based System ManagerRemote Client:
• Minimum Recommended System Requirements for Remote Client on page 2-8
• Installation Requirements to Support Remote Client Mode on page 2-8
• Configuring an AIX Server for Remote Client Installation on page 2-8
2-8 Web–based System Manager Administration Guide
• Installing Web–based System Manager Remote Client on the Windows System on page2-9
• Uninstalling Web–based System Manager Remote Client from a Windows System onpage 2-9
• Installing Web–based System Manager Remote Client on a Linux System on page 2-9
• Uninstalling Web–based System Manager Remote Client from a Linux System on page2-10
Minimum Recommended System Requirements for Remote ClientIf you are going to use a PC to run Web–based System Manager in Remote Client mode,your computer must have the following:
• PC running Windows 2000 Professional version, Windows XP Professional version, orWindows Server 2003.
• PC running one of the following Linux distributions: Red Hat Enterprise Version 3, SLES8, SLES 9, Suse 8.0, Suse 8.1, Suse 8.2, and Suse 9.0 using desktops KDE or GNOMEonly
• 100 MB of free disk space on the default drive for temporary use during the installprocedure
• 100 MB of free disk space on the drive you plan to use to install Web–based SystemManager Remote Client
• 1 GHz
• 512 MB of memory, minimum, but 1 GB of memory is recommended
Installation Requirements to Support Remote Client ModeTo install Web–based System Manager Remote Client over a network, you must have thesysmgt.websm.webaccess file set installed on at least one AIX system. This file set isinstalled automatically with the base operating system.
The machine used to install Web–based System Manager Remote Client must be set up asan HTTP Server. This is done by installing and configuring the HTTP Server of your choice.The HTTP Server is available on the AIX 5.3 Expansion Pack. Use the/usr/websm/bin/configassist command toautomatically configure the HTTP Server.
Configuring an AIX Server for Remote Client InstallationComplete the following steps to configure an AIX server for Web–based System ManagerRemote Client installation:
1. Install an HTTP Server on the server where Web–based System Manager resides. Therecommended Web server is HTTP Server. Refer to the documentation for each producton how to install and configure the HTTP Server.
2. After the HTTP Server is running, type the following command to configure Web–basedSystem Manager:/usr/websm/bin/configassist
3. Proceed in Configuration Assistant until you reach the main panel.
4. Select Configure the web server for Web–based System Manager remotemanagement.
5. Click Next.
6. Follow the instructions on the subsequent panels to finish the configurations.
2-9Installing Web–based System Manager
Installing Web–based System Manager Remote Client on the WindowsSystem
1. Uninstall any previous version of Web–based System Manager Remote Client. For moreinformation, see Uninstalling Web–based System Manager Remote Client from aWindows System on page 2-9.
2. Type the following address in your machine’s Web browser:
http:// hostname /remote_client.html
where hostname is the name of the AIX server configured for Web–based SystemManager Remote Client installation.
3. Click the Windows link that appears on the Web page. This downloads the setup.exefile to your machine.
4. After the download is complete, run the setup.exe file to begin the installation process.
5. When the Remote Client Installer panel displays, click Next to continue.
6. To install using the default location, click Next. Otherwise, type the desired location andclick Next.
7. A confirmation panel displays, showing you the install location, the package beinginstalled, and the approximate size of the install package. Click Next to start theinstallation. If any of the information shown is incorrect, click Back to make corrections.
8. A status panel displays error messages if errors occurred during the installation, or amessage that says the installation completed successfully. Click Finish to close thepanel.
Uninstalling Web–based System Manager Remote Client from aWindows System
1. From the task bar, select Start ––> Settings ––> Control Panel.
2. In the Control Panel, double–click the Add/Remove Programs icon.
3. Select Web–based System Manager Remote Client from the list of programs on theInstall/Uninstall tab, then click the Add/Remove button to start the Uninstall wizard.
Note: Earlier versions of Remote Client may appear as Web–based SystemManager PC Client.
4. Click Next in the initial panel.
5. Click Next in the Confirmation panel to uninstall Remote Client.
6. A status panel is displayed showing either that the installation completed successfully, orany messages if errors occurred during the installation. Click Finish to close the panel.
Installing Web–based System Manager Remote Client on a LinuxSystem
1. Uninstall any previous version of Web–based System Manager Remote Client on yourmachine. For more information, see Uninstalling Web–based System Manager RemoteClient from a Linux System on page 2-10.
2. Type the following address in your machine’s Web browser:
http:// hostname /remote_client.html
where hostname is the name of the AIX server configured for Web–based SystemManager Remote Client installation.
3. Click the Linux link that appears on the Web page. This will download thewsmlinuxclient.exe file to your machine.
2-10 Web–based System Manager Administration Guide
4. Run the wsmlinuxclient.exe file to begin the installation process. If the file will not run,modify the permissions on the file so that you have execute permissions. At a commandprompt, type the following:
chmod 755 wsmlinuxclient.exe
5. When the Remote Client Installer panel displays, click Next to continue.
6. To install using the default location, click Next. Otherwise, type the desired location andclick Next.
7. A confirmation panel displays, showing you the install location, the package beinginstalled, and the approximate size of the install package. Click Next to start theinstallation. If any of the information shown is incorrect, click Back to make corrections.
8. A status panel displays error messages if errors occurred during the installation, or amessage that says the installation completed successfully. Click Finish to close thepanel.
Note: If changes don’t take immediate effect, either log out of your currentsession and log in again, or source your. /etc/profile file.
Uninstalling Web–based System Manager Remote Client from a LinuxSystem
Run the following command to uninstall the Remote Client from a Linux System:
installdir /_uninst/uninstall
where installdir is the name of the directory where your Remote Client resides.
Installing Web–based System Manager Remote Client SecurityWeb–based System Manager Remote Client security provides for secure operations inRemote Client mode. You must install the Web–based System Manager Remote Client onyour client system before you install Web–based System Manager Remote Client Security.To install Web–based System Manager Remote Client Security, you must first install thesysmgt.websm.security and/or sysmgt.websm.security–us filesets on a Web–basedSystem Manager server. These filesets are available on the AIX Expansion Pack.
The following topics provide information about installing Web–based System ManagerRemote Client:
• Minimum Recommended System Requirements for Remote Client Security on page2-11
• Installation Requirements to Support Remote Client Security on page 2-11
• Configuring an AIX Server for Remote Client Security Installation on page 2-11
• Installing Web–based System Manager Remote Client Security on the Windows Systemon page 2-12
• Uninstalling Web–based System Manager Remote Client Security from a WindowsSystem on page 2-12
• Installing Web–based System Manager Remote Client Security on a Linux System onpage 2-12
• Uninstalling Web–based System Manager Remote Client Security from a Linux Systemon page 2-13
2-11Installing Web–based System Manager
Minimum Recommended System Requirements for Remote ClientSecurity
If you are going to use a PC to run Web–based System Manager in Secure Remote Clientmode, your computer must have the following:
• PC running Windows 2000 Professional version, Windows XP Professional version, orWindows Server 2003.
• PC running one of the following Linux distributions: Red Hat Enterprise Version 3, SLES8, SLES 9, Suse 8.0, Suse 8.1, Suse 8.2, and Suse 9.0 using desktops KDE or GNOMEonly
• 100 MB of free disk space on the default drive for temporary use during the installprocedure
• 100 MB of free disk space on the drive you plan to use to install Web–based SystemManager Remote Client
• 1 GHz CPU
• 512 MB of memory, minimum, but 1 GB of memory is recommended
Installation Requirements to Support Remote Client SecurityTo install Web–based System Manager Remote Client Security over a network, you mustfirst install the sysmgt.websm.security and/or sysmgt.websm.security–us file sets on aWeb–based System Manager server installed on at least one AIX system. For strongerencryption, install the sysmgt.websm.security–us file set also. These file sets areavailable on the AIX 5.3 Expansion Pack.
The machine used to install Web–based System Manager Remote Client must be set–up asan HTTP Server. This is done by installing and configuring the HTTP Server of your choice.The HTTP Server is available on the Expansion Pack. Use the/usr/websm/bin/configassist command to automatically configure the HTTP Server. Thisserver must also have the sysmgt.websm.security file set installed, though thesysmgt.websm.security–us file set is optional.
Configuring an AIX Server for Remote Client Security InstallationNote: If you have already configured an AIX server for Web–based System
Manager Remote Client installation, you can skip this section.
Complete the following steps to configure an AIX server for Web–based System ManagerRemote Client installation:
1. Install an HTTP Server on the server where Web–based System Manager resides. Therecommended Web server is HTTP Server. Refer to the documentation for each producton how to install and configure the HTTP Server.
2. After the HTTP Server is running, type the following command to configure Web–basedSystem Manager:/usr/websm/bin/configassist
3. Proceed in Configuration Assistant until you reach the main panel.
4. Select Configure the web server for Web–based System Manager remotemanagement.
5. Click Next.
6. Follow the instructions on the subsequent panels to finish the configurations.
2-12 Web–based System Manager Administration Guide
Installing Web–based System Manager Remote Client Security on theWindows System
1. Uninstall any previous version of Web–based System Manager Remote Client Security.For more information, see Uninstalling Web–based System Manager Remote ClientSecurity from a Windows System on page 2-12.
2. Type the following address in your machine’s Web browser:
http:// hostname /remote_client_security.html
where hostname is the name of the AIX server configured for Web–based SystemManager Remote Client Security installation.
3. Click the Windows link that appears on the Web page. This will download thesetupsec.exe file to your machine.
4. Run the setupsec.exe file to begin the installation process.
5. When the Remote Client Security Installer panel displays, click Next to continue.
6. To install using the default location, click Next. Otherwise, type the desired location andclick Next.
Note: Be sure the location you select in this step is the same location youselected in Step 6 of Installing Web–based System Manager RemoteClient on the Windows System on page 2-9.
7. A confirmation panel displays, showing you the install location, the package beinginstalled, and the approximate size of the install package. Click Next to start theinstallation. If any of the information shown is incorrect, click Back to make corrections.
8. A status panel displays error messages if errors occurred during the installation, or amessage that says the installation completed successfully. Click Finish to close thepanel.
Uninstalling Web–based System Manager Remote Client Security froma Windows System
1. From the task bar, select Start ––> Settings ––>Control Panel.
2. In the Control Panel, double–click the Add/Remove Programs icon.
3. Select Web–based System Manager Remote Client Security from the list of programson the Install/Uninstall tab, then click the Add/Remove button to start the Uninstallwizard.
Note: Earlier versions of Remote Client Security may appear as Web–basedSystem Manager PC Client Security.
4. Click Next in the initial panel.
5. Click Next in the Confirmation panel to uninstall Remote Client Security.
6. A status panel is displayed showing either that the installation completed successfully, orany messages if errors occurred during the installation. Click Finish to close the panel.
Installing Web–based System Manager Remote Client Security on aLinux System
1. Uninstall any previous version of Web–based System Manager Remote Client Securityon your machine. For more information, see Uninstalling Web–based System ManagerRemote Client Security from a Linux System on page 2-13.
2. Type the following address in your machine’s Web browser:
http:// hostname /remote_client_security.html
where hostname is the name of the AIX server configured for Web–based SystemManager Remote Client Security installation.
2-13Installing Web–based System Manager
3. Click the Linux link that appears on the Web page. This downloads the setupsecl.exefile to your machine.
4. After the download is complete, run the setupsecl.exe file to begin the installationprocess. If the file will not run, modify the permissions on the file so that you haveexecute permissions. At a command prompt, type the following:
chmod 755 setupsecl.exe
5. When the Remote Client Security Installer panel displays, click Next to continue.
6. To install using the default location, click Next. Otherwise, type the desired location andclick Next.
Note: Be sure the location you select in this step is the same location youselected in Step 6 of Installing Web–based System Manager RemoteClient on a Linux System on page 2-9.
7. A confirmation panel displays, showing you the install location, the package beinginstalled, and the approximate size of the install package. Click Next to start theinstallation. If any of the information shown is incorrect, click Back to make corrections.
8. A status panel displays error messages if errors occurred during the installation, or amessage that says the installation completed successfully. Click Finish to close thepanel.
Note: If changes do not take immediate effect, either log out of your currentsession and log in again, or re–source your. /etc/profile file.
Uninstalling Web–based System Manager Remote Client Security froma Linux System
Run the following command to uninstall the Remote Client Security from a Linux system:
installdir /_uninstssl/uninstallssl
where installdir is the name of the directory where your Remote Client resides.
2-14 Web–based System Manager Administration Guide
Installation Requirements for Secure Socket Layer SupportTo have Web–based System Manager operate in a secure mode (using SSL Sockets thatencrypt data transmitted over the network), the sysmgt.websm.security fileset must beinstalled on the server and security must be configured on both client and server machines.
For 128–bit encryption of data sent over the network, the sysmgt.websm.security–usfileset must be installed in addition to the sysmgt.websm.security file set. Configuration isdiscussed in detail in Securing Web–based System Manager on page 5-1.
2-15Installing Web–based System Manager
Integrating Web–based System Manager into Tivoli NetviewManagement Console
If you are using Tivoli NetView for AIX, you can integrate Web–based System Manager intothe console. This integration allows the AIX server systems appearing on the NetViewconsole to be managed using Web–based System Manager.
To integrate Web–based System Manager into Tivoli NetView, type the following command:
/usr/websm/bin/install_nv6k
Note: You must have Tivoli NetView installed and working correctly beforerunning this command.
To remove the Web–based System Manager from Tivoli NetView, type the followingcommand:
/usr/websm/bin/remove_nv6k

2-16 Web–based System Manager Administration Guide
3-1Using Web–based System Manager’s Console
Chapter 3. Using Web–based System Manager’sConsole
You can access the Web–based System Manager console from any system that is locallyattached to the console and is running a graphical desktop. Start Web–based SystemManager with one of the methods described in Modes of Operation on page 1-4.
The console has five distinct elements, consisting of the following:
• Navigation Area on page 3-2
• Contents Area on page 3-3
• Menu and Toolbar Actions on page 3-7
• Changing Fonts and Colors on page 3-8
• Tips Area on page 3-10
• Status Bar on page 3-12
3-2 Web–based System Manager Administration Guide
Navigation AreaThe Navigation Area displays a hierarchy of icons that represent collections of computers,individual computers, managed resources, and tasks. Each Navigation Area icon identifies aplug–in. At the highest point, or root of the tree, is the Management Environment. TheManagement Environment plug–in contains one or more host computer plug–ins that aremanaged by the console. Each computer plug–in contains multiple application plug–ins thatcontain managed objects, tasks, and actions for a related set of system entities orresources.
When you click on a plug–in icon in the Navigation Area, it opens to display its contents inthe Contents Area. Navigation Area icons that are preceded by a handle containing eitheran expansion symbol (plus sign or ’+’) or a collapse symbol (minus sign or ’–’). An expandsymbol indicates that the plug–in contains other plug–ins that are not visible. A collapsesymbol indicates that the plug–in has already been expanded to show the additionalplug–ins. Selecting the handle toggles the visibility of those additional plug–ins but does notaffect the Contents Area. A single–click on the Navigation Area icon causes the plug–in todisplay its lower–level plug–ins in the Contents Area, but does not expand the NavigationArea branch represented by the expansion symbol. By double–clicking on a Navigation Areaicon, the navigation branch expands and the Contents Area updates to display thelower–level plug–ins.
You can adjust the width of the Navigation Area with respect to the Contents Area byclicking and dragging the Navigation Area sash to the right or left. If you need to maximizethe space available for the Contents Area within the console, you can completely close offthe navigation area by dragging the sash all the way to the left. A single click on the sashalso causes the Navigation Area to close, and a subsequent click causes it to reopen to theprevious position.
3-3Using Web–based System Manager’s Console
Contents AreaThe contents area displays the contents of a plug–in. Three primary types of plug–ins aredefined by what is presented in the contents area:
• Containers on page 3-3
• Overviews on page 3-6
• Launchers on page 3-6
ContainersContainers or container plug–ins hold other plug–ins, icons that represent system resources(managed objects), or a mixture of managed objects and plug–ins. Containers are the mostcommon type of plug–in in the Web–based System Manager user interface. You can think ofthem as folders that hold other folders or information objects.
Containers allow you to view properties as well as create, delete, or perform other actionson system resources. They present resource objects in one or more views. Web–basedSystem Manager supports the following views:
• Large Icon
• Small Icon
• Details
• Tree
• Tree–Details
Filtering and Sorting ViewsThe Large Icon, Small Icon, and Details views allow you to decide which objects you want tosee in the view by filtering the view. Filtering the view can be helpful if a container has alarge number of objects and you only want to see certain objects or object types. Forexample, if you are managing users, you may want to view only administrative users.
• To filter objects, do the following:
1. Select the View menu.
2. Select Filter Icons. The Filter tab lets you define a list of objects to exclude from theview.
• To specify an object to hide, do the following:
1. Make sure the value of the Matching items option is set to hidden.
2. Type its name in the field to the right of the Add button.
3. Click the Add button.
Repeat this task for each object that you want to hide.
Alternatively, you can click the Browse button to display a list of objects that can behidden. Select those objects that you want to hide and click OK. They display in theHidden Objects list.
4. To remove the listed objects from the contents area, click either OK or Apply.
Note: Beginning with AIX 5.2, in addition to performing a substring match, theasterisk (*) wildcard character can be used to specify where characterscan be ignored, similar to the Korn shell. In AIX 5.1, a pattern of abcwould match any string that contained abc. You can specify that a stringbegins with abc by using the pattern abc*. You can use as many
3-4 Web–based System Manager Administration Guide
wildcard characters as you want, in any position. The character’s case isignored for the pattern match.
Alternatively, you can set the Matching items option to shown to see only the items thatmatch the filter criteria.
• The Advanced tab lets you define from one to three rules for hiding objects based onspecific attributes of those objects. For example, to hide all of the administrative usersfrom the All Users plug–in, do the following:
1. Open the filter dialog and select the Advanced tab. Make sure the Hide the objectscheck–box is checked.
2. Make sure the value of the Matching items option is set to hidden.
If you specify multiple rules for matching items, be aware of the following:
. The Match all rules value filters items that match all of the specified rules.
. The Match any rules value filters items that match at least one of the specifiedrules.
3. Select the Type property, and the = relationship.
4. Enter the matching value Administrator, and click OK or Apply.
All of the administrative users are removed from the view. You can supply additionalrules by clicking the Add Rule button. An additional rule definition row displays.Multiple rules are combined by an AND operation.
To remove rules, click on the Remove button to the right of the rule. To remove thelast rule, clear the matching value from the rule.
Alternatively, you can set the filter to show only the items that match the filter criteria bysetting the Matching items option to shown.
• In either tab of the filter dialog, you can disable the filter by checking the Disable allfiltering checkbox. The filter criteria remains and can be reactivated by unchecking theDisable all filtering checkbox.
The Large Icon, Small Icon, and Details views also allow you to change the order in whichobjects are listed in the view by sorting them. You can sort objects according to manydifferent attributes (or properties) of the object.
Note:: In Web–Based System Manager, the All Print Queues view for AIX remoteprinters can innaccurately indicate a problem with a remote queue. Checkthe actual status of the queue from the command line by typing thefollowing command:
enq –q –P
queue
You can sort in two ways:
• Details View
You can sort objects by clicking on the column heading that defines the attribute bywhich you want to sort. The column heading toggles between ascending and descendingsorts with each subsequent click.
Details view also allows you to change the order of columns and the width of individualcolumns. To change the position of a column, drag the column heading to the desiredposition (the leftmost column heading, typically the name of the objects, cannot bemoved). To change the width of a column, drag the line dividing two column headings tothe right or left.
3-5Using Web–based System Manager’s Console
• Tree View
The Tree and Details views are similar to the Icon and Details views except data ispresented in a tree fashion. Rows that have a handle marked with a plus sign (’+’) canbe expanded with a single click of the handle to show additional child rows. Rows whichhave a handle marked with a minus sign (’–’) can be collapsed by a single click of thehandle child rows. Sorting and filtering are not supported for Tree views.
• Icon View
You can sort the objects by selecting the View menu, then Arrange Icons. You then seea list of menu options for properties by which you can sort the view.
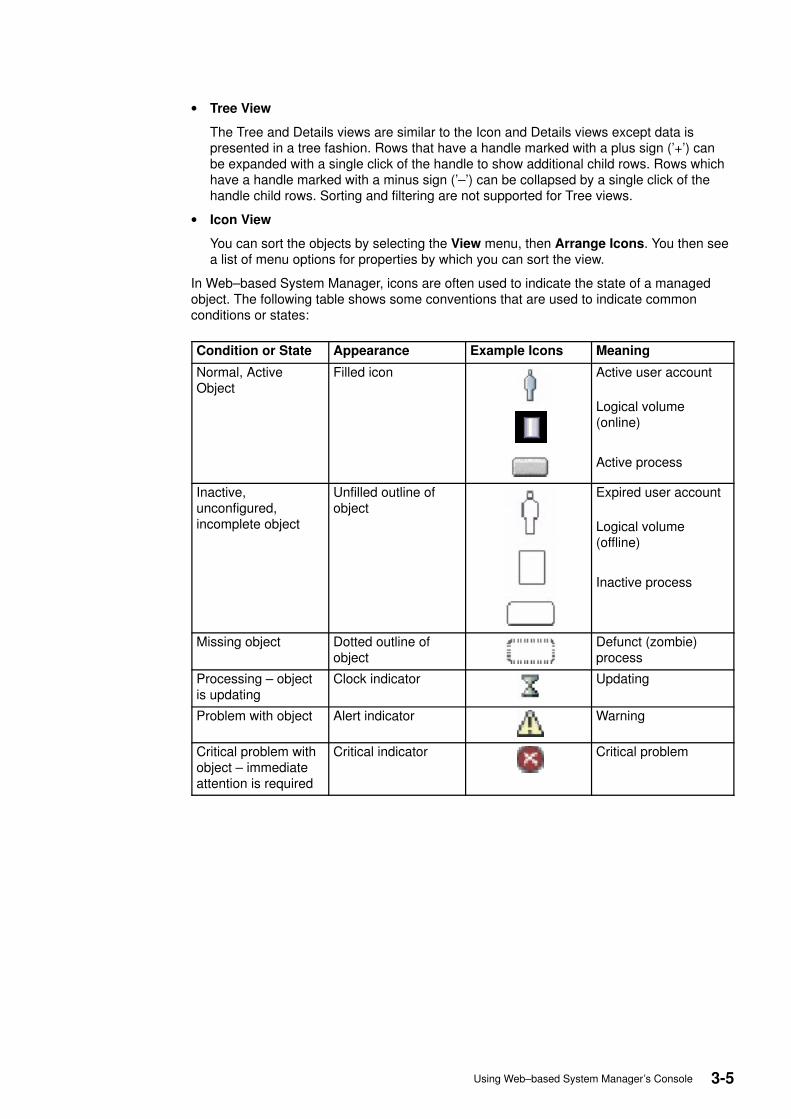
In Web–based System Manager, icons are often used to indicate the state of a managedobject. The following table shows some conventions that are used to indicate commonconditions or states:
Condition or State Appearance Example Icons Meaning
Normal, ActiveObject
Filled icon Active user account
Logical volume(online)
Active process
Inactive,unconfigured,incomplete object
Unfilled outline ofobject
Expired user account
Logical volume(offline)
Inactive process
Missing object Dotted outline ofobject
Defunct (zombie)process
Processing – objectis updating
Clock indicator Updating
Problem with object Alert indicator Warning
Critical problem withobject – immediateattention is required
Critical indicator Critical problem
3-6 Web–based System Manager Administration Guide
OverviewsOverview plug–ins, Web page–like interfaces that display in the contents area, do thefollowing:
• Explain the function provided by one or more plug–ins that constitutes an application
• Provide easy access to routine or getting started tasks
• Summarize the status of key resources managed by the application
Because overviews do not display objects, they can provide quicker and easier access tofrequently performed tasks. Overviews are also used when a management function is purelytask–based and does not need icons to represent system resources (for example, back upand restore).
LaunchersLaunch plug–ins resemble overviews. They are Web page–like panels that describe andprovide a launch point for applications that run in their own window outside the Web–basedSystem Manager console.
3-7Using Web–based System Manager’s Console
Menu and Toolbar ActionsThe console menu bar provides all of the operations performed on the console andmanaged objects. The menus are organized as follows:
Console Menu The Console Menu contains choices that control the console. It allows youto add and remove computers from the management environment, specifywhether to automatically attempt to log in to a host with a stored password,view the console session log, exit the console or save console preferencesincluding theme and font size (see Preference Files on page 3-14).
Object Menu The title of the Object Menu changes to indicate the type of resourcemanaged by the current plug–in. For example, when the plug–in thatmanages hardware devices is selected, the Object Menu title becomesDevices. The Object Menu contains general choices and actions for aplug–in that do not require the selection of specific objects to act on.Typically, actions for creating new resource objects are located in the ObjectMenu. The find function is also located in the Object Menu. The contents ofthe Object Menu are updated when a new plug–in is selected.
Selected Menu The Selected Menu contains those actions for a plug–in that require theuser to select which managed objects an action is to apply to, such asOpen, Properties, Copy, Delete, or Start. The contents of the SelectedMenu are updated when a new plug–in is selected. It is disabled whenOverview and Launch plug–ins are loaded.
View Menu The View Menu contains choices for navigating, such as Back, Forward,and Up One Level. It also includes choices for customizing the console inthe Show submenu. For example, you can select to show or hide the toolbar and status bar. When container plug–ins are loaded, the View Menuincludes options that control how objects are presented. For example, if theplug–in provides a choice of views, such as Large Icon, Small Icon, Details,and Tree, these choices are listed here. If the plug–in only supports a singleview, no view choices are listed. When a plug–in is displaying an icon orDetails view, the View Menu includes choices for sorting and filtering thecontainer.
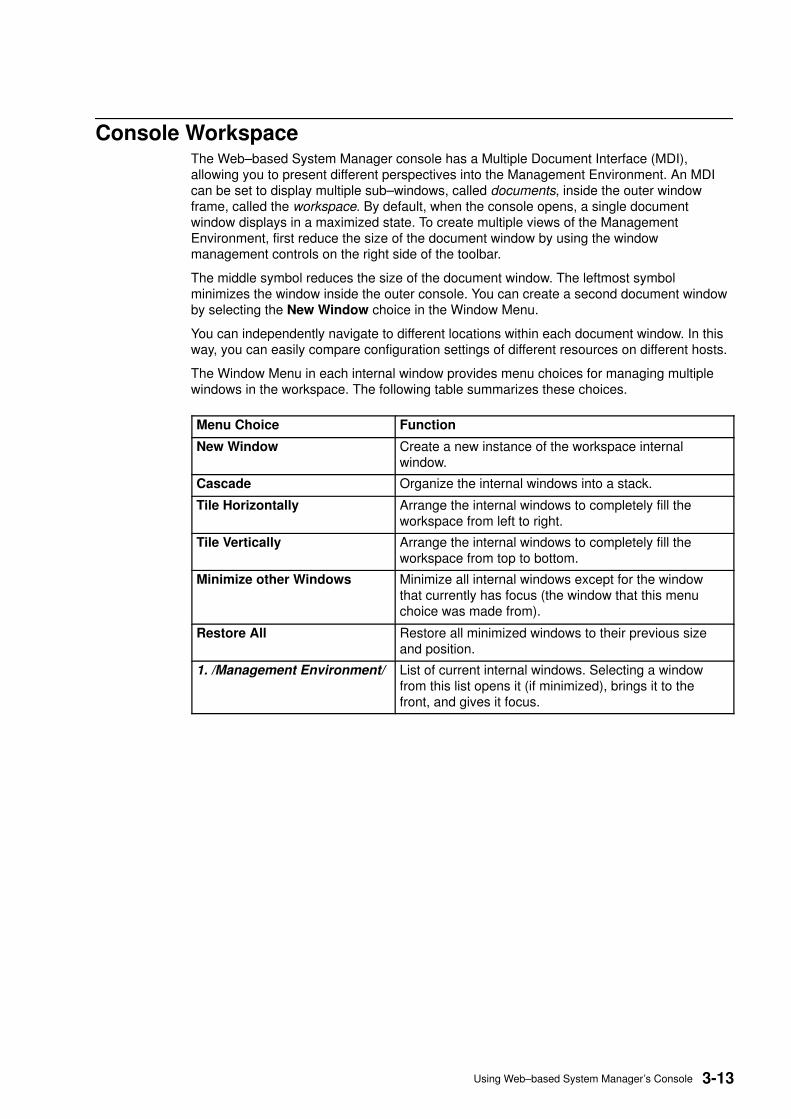
Window Menu The Window Menu contains actions for managing sub–windows in theconsole workspace. New Window creates a new console sub–window in theworkspace. Other choices control how all console sub–windows arepresented. For example, you can choose to have the windows completelycover the workspace like tiles, or have them stacked in a cascade fashion.
Help Menu The Help Menu lists your assistance choices. When the computer that isacting as the system management server is properly configured with anHTTP Server to act as the Documentation Server, extensive onlineinformation is accessible through a Web browser. Different choices allowyou to view help contents, search for help on a particular topic, and viewhelp information on shortcut keys.
Pop–up Menus Pop–up menus (sometimes called context menus) provide a quick way ofaccessing menu choices. To use pop–up menus with a mouse, right click anobject. The pop–up menu lists the actions found in the Selected and Objectmenus for the current object or objects.
Tool Bar The tool bar lists commonly used actions that are available when thecurrent plug–in is loaded. It includes navigation controls, Find, and Viewchoices (if available). The tool bar also provides tool tip help when themouse pointer remains over a tool bar icon for a few seconds.

3-8 Web–based System Manager Administration Guide
Changing Fonts and ColorsYou can change the console’s theme and font sizes from the Console pull–down menu. Inaddition to Classic and Titanium themes, the Windows client supports the Native themewhich causes the console to inherit color and font preferences from the desktop.
3-9Using Web–based System Manager’s Console
Help OptionsWeb–based System Manager provides a variety of ways of obtaining assistance andadditional information.
Hover Help Provides assistance for icons in the tool bar. Position the mouse pointerover a tool bar icon and wait for a couple of seconds. A text label displaysthe meaning of the icon.
Tips Provides assistance on common tasks performed with the currently activeplug–in. Tips are displayed between the menu and tool bars. Tips areprovided in the form of simple text instructions or hypertext links to Javahelp. The user can hide or show the tips area according to preference byusing the Show submenu in the View menu.
Context Help Provides assistance on the use of dialog windows. Access context help byclicking the Help button in the lower–right corner of the dialog. A smallcontext help window displays. When you click on individual controls in thedialog, assistance on the use of that control displays in the context helpwindow. When context help is running, you can only access the controls inthe dialog to view help. To use the controls, you must first close the contexthelp window either by clicking the Close button on the context help windowor clicking the Help button in the dialog that you sought help on.
Java Help Provides extensive information for tasks in the Java help system. To usethe Java help system, you must first have a document server configured.After the help server has been identified to the managed host, you canaccess Java help by making a selection from the Help menu in the menubar or by clicking on a link in a Tips area.

3-10 Web–based System Manager Administration Guide
Tips AreaThe Tips Area provides quick answers to frequent questions. A tip can be a simple one–lineinstruction, such as ”To add another host to manage, choose Console, then Add.” Morefrequently, however, tips are in the form of hypertext links. If browser–based help is correctlyconfigured, clicking on a hypertext tip will open your default Web browser on the topicdescribed in the link. You can choose to display or hide the Tips Bar by checking orunchecking the Tips Area option in the Show submenu under View.
3-11Using Web–based System Manager’s Console
Working DialogThe Working dialog displays when long–running actions are being performed on a managedcomputer. Depending upon the application, it can display as a simple dialog with ananimation to indicate that the action is progressing. When running in simple mode, thedialog can be expanded to display details of the action that is executing. To view details,click the Details button at the bottom of the dialog. You can view two types of details:
Commands The shell script that is currently executing.
Messages Information being displayed to standard output (stdout).
Conversely, when details are displayed, you can shrink the size of the dialog by clicking thesame button to hide details.
Depending on the nature of the application, the working dialog may automatically closewhen the action is finished. If the action fails, the dialog remains open and expands toreveal message details to assist in diagnosing the problem. For tasks in which it is importantyou review the results of a successfully completing action, the working dialog may remainopen.
3-12 Web–based System Manager Administration Guide
Status BarThe status bar displays at the lower edge of a console window. It has five fields fordisplaying status information, as follows:
• Padlock icon. When locked, the padlock icon indicates the console is running in securemode. In this case, communications between the client platform running the console andthe managed computer are encrypted using SSL. The padlock icon is open whensecure communications are not active.
• Plug–in loading status. When a plug–in is loaded, the text Ready is present. When aplug–in is in the process of loading, a graphic bounce bar displays.
• Number of objects visible in the contents area. Objects can be present on the managedhost but hidden from the view by the view filter.
• Number of objects selected in the contents area.
• Security context (user name and host name) the administrator is in for the currentlyactive plug–in.
The status bar can be hidden or shown by unchecking or checking the Status Bar option inthe Show submenu under View.
3-13Using Web–based System Manager’s Console
Console WorkspaceThe Web–based System Manager console has a Multiple Document Interface (MDI),allowing you to present different perspectives into the Management Environment. An MDIcan be set to display multiple sub–windows, called documents, inside the outer windowframe, called the workspace. By default, when the console opens, a single documentwindow displays in a maximized state. To create multiple views of the ManagementEnvironment, first reduce the size of the document window by using the windowmanagement controls on the right side of the toolbar.
The middle symbol reduces the size of the document window. The leftmost symbolminimizes the window inside the outer console. You can create a second document windowby selecting the New Window choice in the Window Menu.
You can independently navigate to different locations within each document window. In thisway, you can easily compare configuration settings of different resources on different hosts.
The Window Menu in each internal window provides menu choices for managing multiplewindows in the workspace. The following table summarizes these choices.
Menu Choice Function
New Window Create a new instance of the workspace internalwindow.
Cascade Organize the internal windows into a stack.
Tile Horizontally Arrange the internal windows to completely fill theworkspace from left to right.
Tile Vertically Arrange the internal windows to completely fill theworkspace from top to bottom.
Minimize other Windows Minimize all internal windows except for the windowthat currently has focus (the window that this menuchoice was made from).
Restore All Restore all minimized windows to their previous sizeand position.
1. /Management Environment/ List of current internal windows. Selecting a windowfrom this list opens it (if minimized), brings it to thefront, and gives it focus.
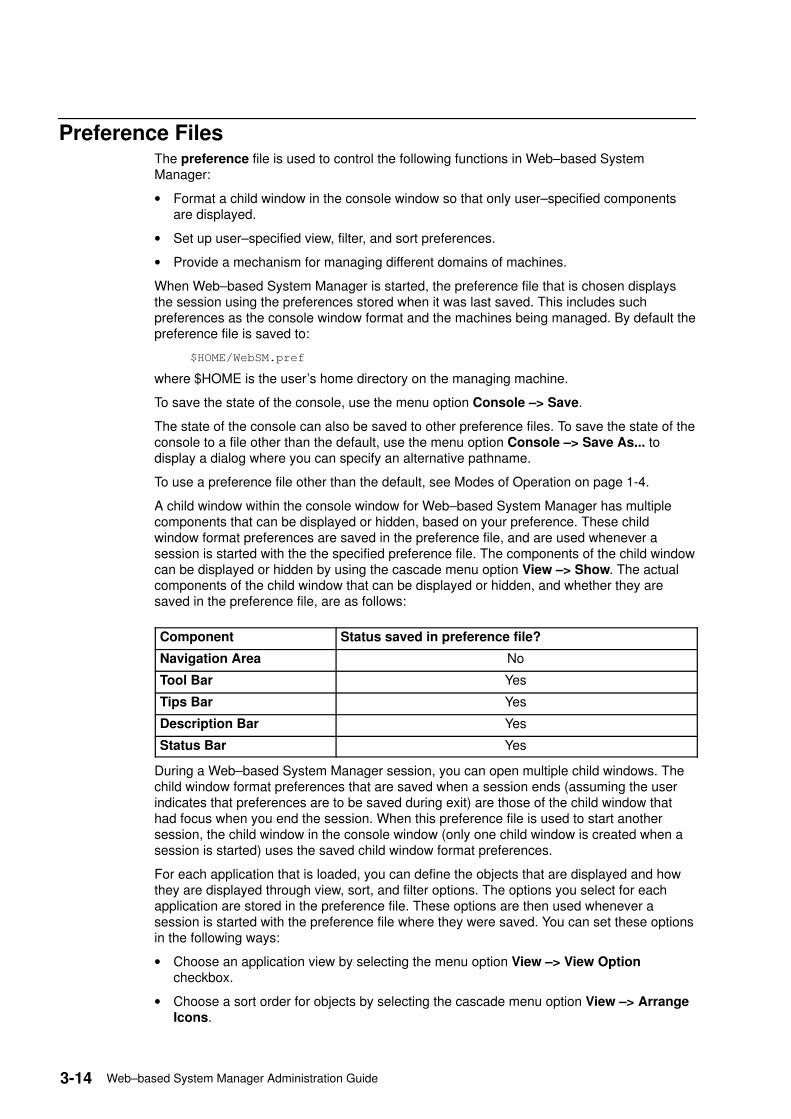
3-14 Web–based System Manager Administration Guide
Preference FilesThe preference file is used to control the following functions in Web–based SystemManager:
• Format a child window in the console window so that only user–specified componentsare displayed.
• Set up user–specified view, filter, and sort preferences.
• Provide a mechanism for managing different domains of machines.
When Web–based System Manager is started, the preference file that is chosen displaysthe session using the preferences stored when it was last saved. This includes suchpreferences as the console window format and the machines being managed. By default thepreference file is saved to:
$HOME/WebSM.pref
where $HOME is the user’s home directory on the managing machine.
To save the state of the console, use the menu option Console –> Save.
The state of the console can also be saved to other preference files. To save the state of theconsole to a file other than the default, use the menu option Console –> Save As... todisplay a dialog where you can specify an alternative pathname.
To use a preference file other than the default, see Modes of Operation on page 1-4.
A child window within the console window for Web–based System Manager has multiplecomponents that can be displayed or hidden, based on your preference. These childwindow format preferences are saved in the preference file, and are used whenever asession is started with the the specified preference file. The components of the child windowcan be displayed or hidden by using the cascade menu option View –> Show. The actualcomponents of the child window that can be displayed or hidden, and whether they aresaved in the preference file, are as follows:
Component Status saved in preference file?
Navigation Area No
Tool Bar Yes
Tips Bar Yes
Description Bar Yes
Status Bar Yes
During a Web–based System Manager session, you can open multiple child windows. Thechild window format preferences that are saved when a session ends (assuming the userindicates that preferences are to be saved during exit) are those of the child window thathad focus when you end the session. When this preference file is used to start anothersession, the child window in the console window (only one child window is created when asession is started) uses the saved child window format preferences.
For each application that is loaded, you can define the objects that are displayed and howthey are displayed through view, sort, and filter options. The options you select for eachapplication are stored in the preference file. These options are then used whenever asession is started with the preference file where they were saved. You can set these optionsin the following ways:
• Choose an application view by selecting the menu option View –> View Optioncheckbox.
• Choose a sort order for objects by selecting the cascade menu option View –> ArrangeIcons.
3-15Using Web–based System Manager’s Console
• Choose to filter displayed objects by selecting the menu option View –> Filter Icons.
The host computers that are managed during a Web–based System Manager session aresaved in the preference file. This allows you to manage different domains of machines bystarting sessions with different preference files. Thus you can have a preference file thatrepresents a group of machines that are HTTP Servers, and a preference file thatrepresents a group of machines that are transaction servers.
For a group of machines to be saved to a preference file, they must be added to theWeb–based System Manager Management Environment during a session. To addmachines to the Management Environment during a session, select the menu optionConsole –> Add –> Hosts.... This menu option displays a dialog where you can enterindividual host computers or a list of host computers from a file.
Error Handling for Loading or Saving Preference FilesThe following situations can cause errors to occur:
• You do not have read access to this file or this file contains bad data. If you do notspecify any preference file, the default $HOME/WebSM.pref file is used. A warningdialog displays and default settings are used. You can select another file with menuoption Console –> Save As..., or select the Save the state of the console for the nextsession option in the Exit Confirmation dialog when exiting a Web–based SystemManager session.
• You specify a preference file, but do not have read access to this file, or this file containsbad data. The same procedures as above apply to these situations. You do not havewrite access to the saving file. A warning dialog displays and you can select another filewith menu option Console –> Save As..., or exit without saving the preference file.
• If the preference–loading process fails, default settings will be used. During aWeb–based System Manager exit session, the Save the state... option will beunselected to prevent you from overwriting unintended data. You can select Save thestate... to overwrite the selected file.
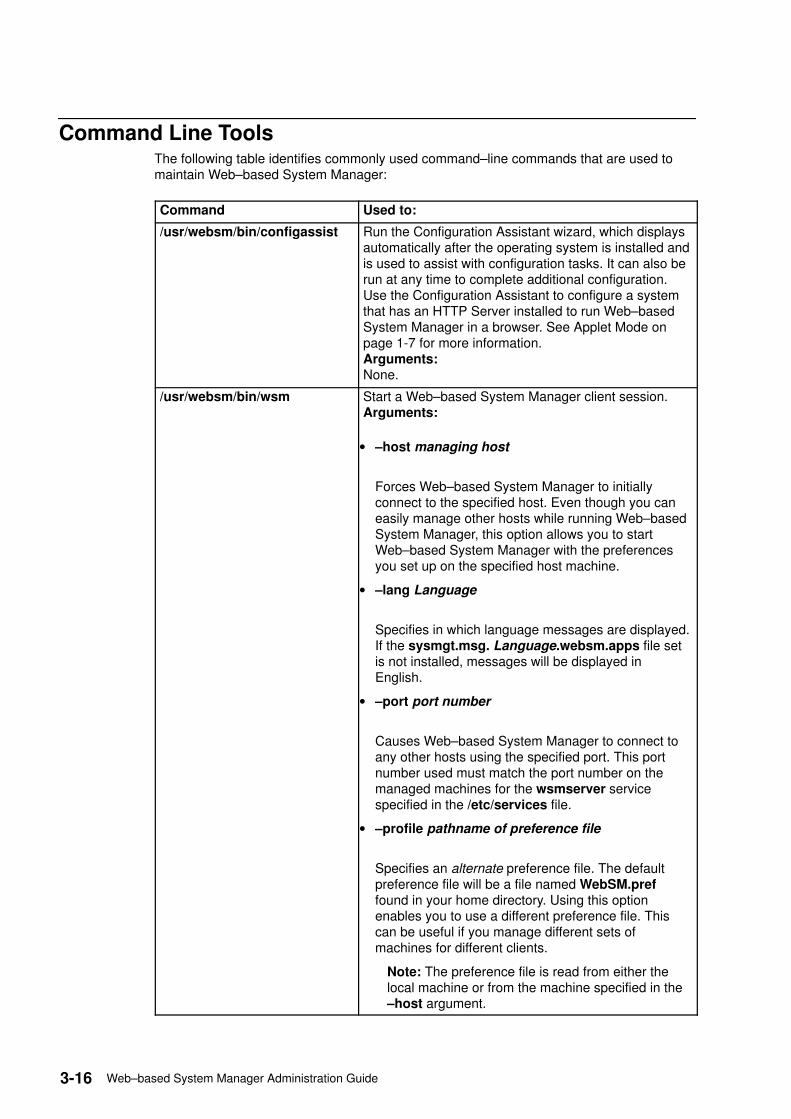
3-16 Web–based System Manager Administration Guide
Command Line ToolsThe following table identifies commonly used command–line commands that are used tomaintain Web–based System Manager:
Command Used to:
/usr/websm/bin/configassist Run the Configuration Assistant wizard, which displaysautomatically after the operating system is installed andis used to assist with configuration tasks. It can also berun at any time to complete additional configuration.Use the Configuration Assistant to configure a systemthat has an HTTP Server installed to run Web–basedSystem Manager in a browser. See Applet Mode onpage 1-7 for more information.Arguments:None.
/usr/websm/bin/wsm Start a Web–based System Manager client session.Arguments:
• –host managing host
Forces Web–based System Manager to initiallyconnect to the specified host. Even though you caneasily manage other hosts while running Web–basedSystem Manager, this option allows you to startWeb–based System Manager with the preferencesyou set up on the specified host machine.
• –lang Language
Specifies in which language messages are displayed.If the sysmgt.msg. Language.websm.apps file setis not installed, messages will be displayed inEnglish.
• –port port number
Causes Web–based System Manager to connect toany other hosts using the specified port. This portnumber used must match the port number on themanaged machines for the wsmserver servicespecified in the /etc/services file.
• –profile pathname of preference file
Specifies an alternate preference file. The defaultpreference file will be a file named WebSM.preffound in your home directory. Using this optionenables you to use a different preference file. Thiscan be useful if you manage different sets ofmachines for different clients.
Note: The preference file is read from either thelocal machine or from the machine specified in the–host argument.
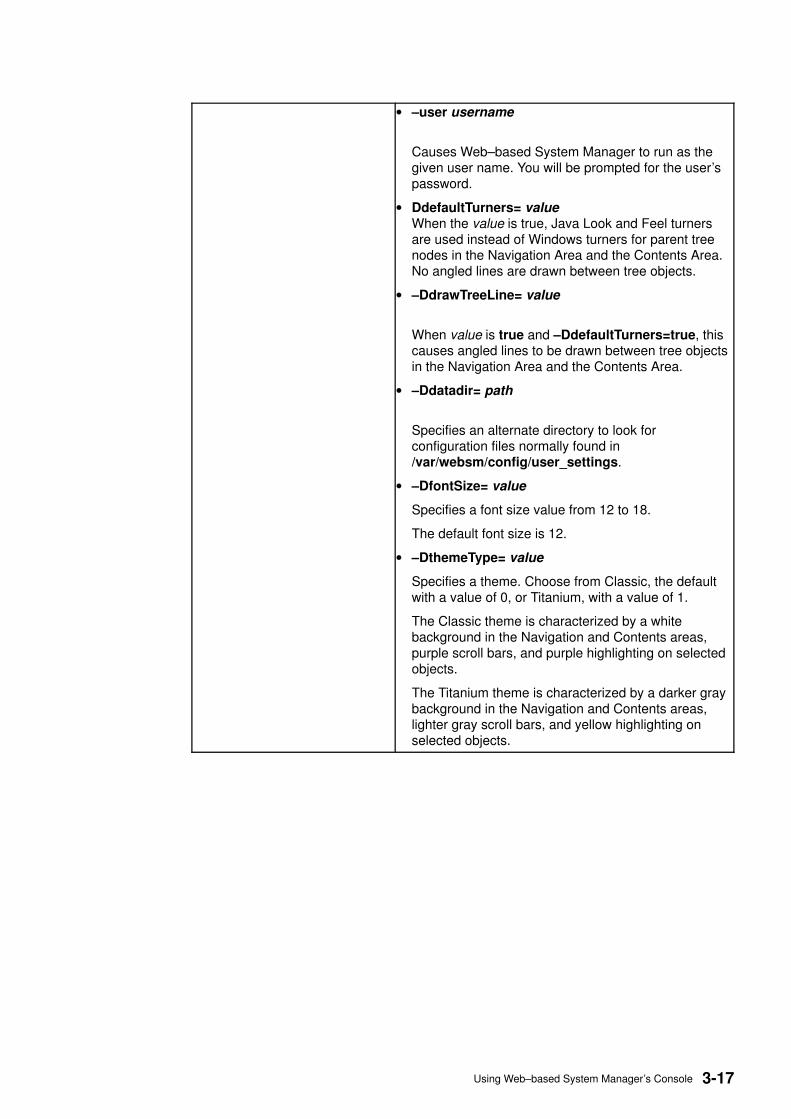
3-17Using Web–based System Manager’s Console
• –user username
Causes Web–based System Manager to run as thegiven user name. You will be prompted for the user’spassword.
• DdefaultTurners= valueWhen the value is true, Java Look and Feel turnersare used instead of Windows turners for parent treenodes in the Navigation Area and the Contents Area.No angled lines are drawn between tree objects.
• –DdrawTreeLine= value
When value is true and –DdefaultTurners=true, thiscauses angled lines to be drawn between tree objectsin the Navigation Area and the Contents Area.
• –Ddatadir= path
Specifies an alternate directory to look forconfiguration files normally found in/var/websm/config/user_settings.
• –DfontSize= value
Specifies a font size value from 12 to 18.
The default font size is 12.
• –DthemeType= value
Specifies a theme. Choose from Classic, the defaultwith a value of 0, or Titanium, with a value of 1.
The Classic theme is characterized by a whitebackground in the Navigation and Contents areas,purple scroll bars, and purple highlighting on selectedobjects.
The Titanium theme is characterized by a darker graybackground in the Navigation and Contents areas,lighter gray scroll bars, and yellow highlighting onselected objects.
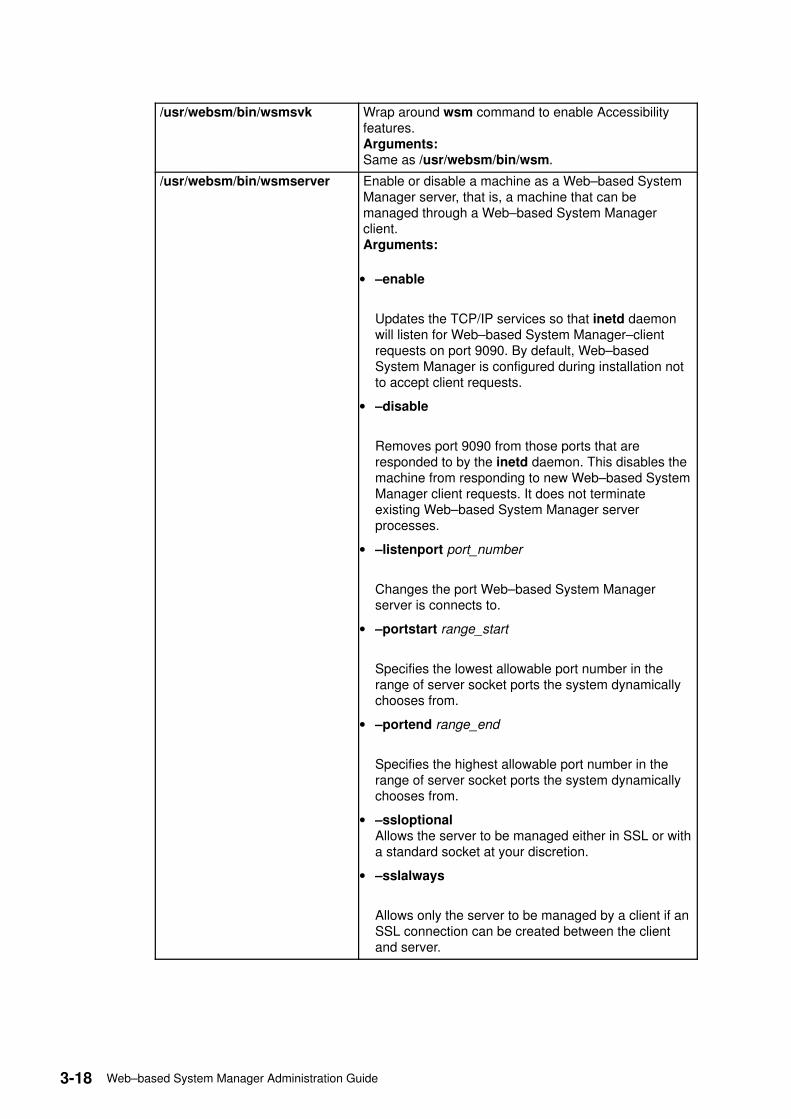
3-18 Web–based System Manager Administration Guide
/usr/websm/bin/wsmsvk Wrap around wsm command to enable Accessibilityfeatures.Arguments:Same as /usr/websm/bin/wsm.
/usr/websm/bin/wsmserver Enable or disable a machine as a Web–based SystemManager server, that is, a machine that can bemanaged through a Web–based System Managerclient.Arguments:
• –enable
Updates the TCP/IP services so that inetd daemonwill listen for Web–based System Manager–clientrequests on port 9090. By default, Web–basedSystem Manager is configured during installation notto accept client requests.
• –disable
Removes port 9090 from those ports that areresponded to by the inetd daemon. This disables themachine from responding to new Web–based SystemManager client requests. It does not terminateexisting Web–based System Manager serverprocesses.
• –listenport port_number
Changes the port Web–based System Managerserver is connects to.
• –portstart range_start
Specifies the lowest allowable port number in therange of server socket ports the system dynamicallychooses from.
• –portend range_end
Specifies the highest allowable port number in therange of server socket ports the system dynamicallychooses from.
• –ssloptionalAllows the server to be managed either in SSL or witha standard socket at your discretion.
• –sslalways
Allows only the server to be managed by a client if anSSL connection can be created between the clientand server.
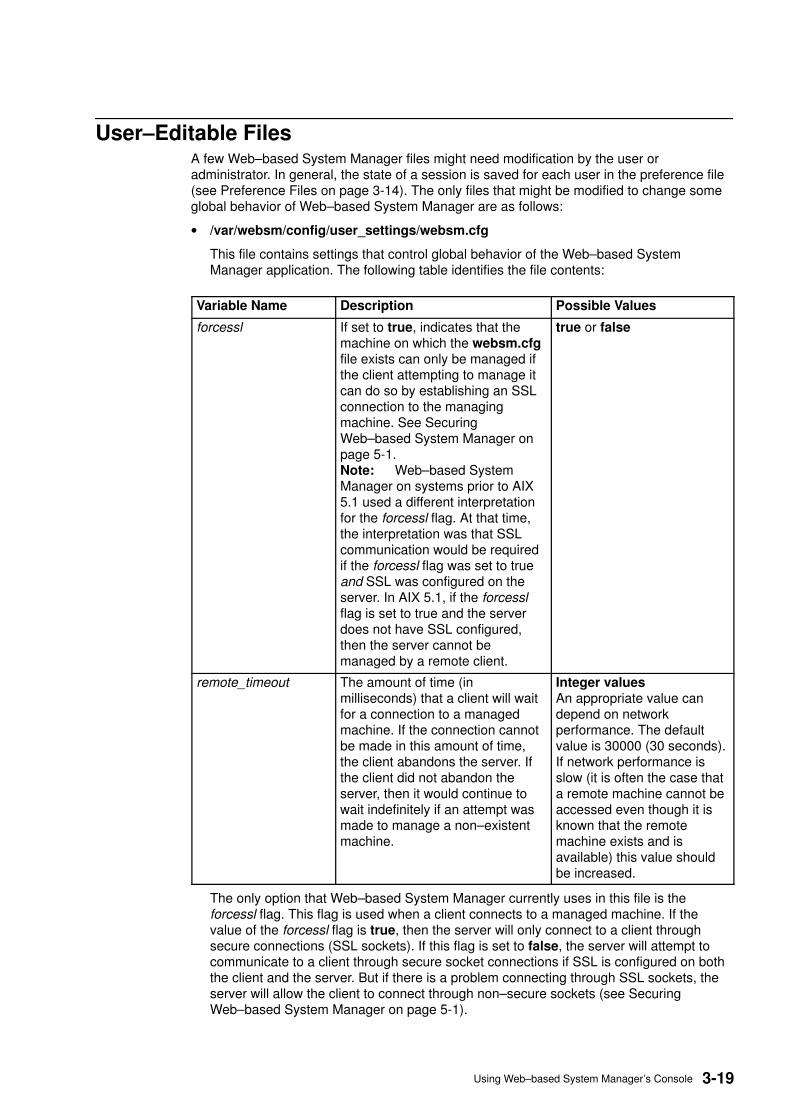
3-19Using Web–based System Manager’s Console
User–Editable FilesA few Web–based System Manager files might need modification by the user oradministrator. In general, the state of a session is saved for each user in the preference file(see Preference Files on page 3-14). The only files that might be modified to change someglobal behavior of Web–based System Manager are as follows:
• /var/websm/config/user_settings/websm.cfg
This file contains settings that control global behavior of the Web–based SystemManager application. The following table identifies the file contents:
Variable Name Description Possible Values
forcessl If set to true, indicates that themachine on which the websm.cfgfile exists can only be managed ifthe client attempting to manage itcan do so by establishing an SSLconnection to the managingmachine. See SecuringWeb–based System Manager onpage 5-1.Note: Web–based SystemManager on systems prior to AIX5.1 used a different interpretationfor the forcessl flag. At that time,the interpretation was that SSLcommunication would be requiredif the forcessl flag was set to trueand SSL was configured on theserver. In AIX 5.1, if the forcesslflag is set to true and the serverdoes not have SSL configured,then the server cannot bemanaged by a remote client.
true or false
remote_timeout The amount of time (inmilliseconds) that a client will waitfor a connection to a managedmachine. If the connection cannotbe made in this amount of time,the client abandons the server. Ifthe client did not abandon theserver, then it would continue towait indefinitely if an attempt wasmade to manage a non–existentmachine.
Integer valuesAn appropriate value candepend on networkperformance. The defaultvalue is 30000 (30 seconds).If network performance isslow (it is often the case thata remote machine cannot beaccessed even though it isknown that the remotemachine exists and isavailable) this value shouldbe increased.
The only option that Web–based System Manager currently uses in this file is theforcessl flag. This flag is used when a client connects to a managed machine. If thevalue of the forcessl flag is true, then the server will only connect to a client throughsecure connections (SSL sockets). If this flag is set to false, the server will attempt tocommunicate to a client through secure socket connections if SSL is configured on boththe client and the server. But if there is a problem connecting through SSL sockets, theserver will allow the client to connect through non–secure sockets (see SecuringWeb–based System Manager on page 5-1).
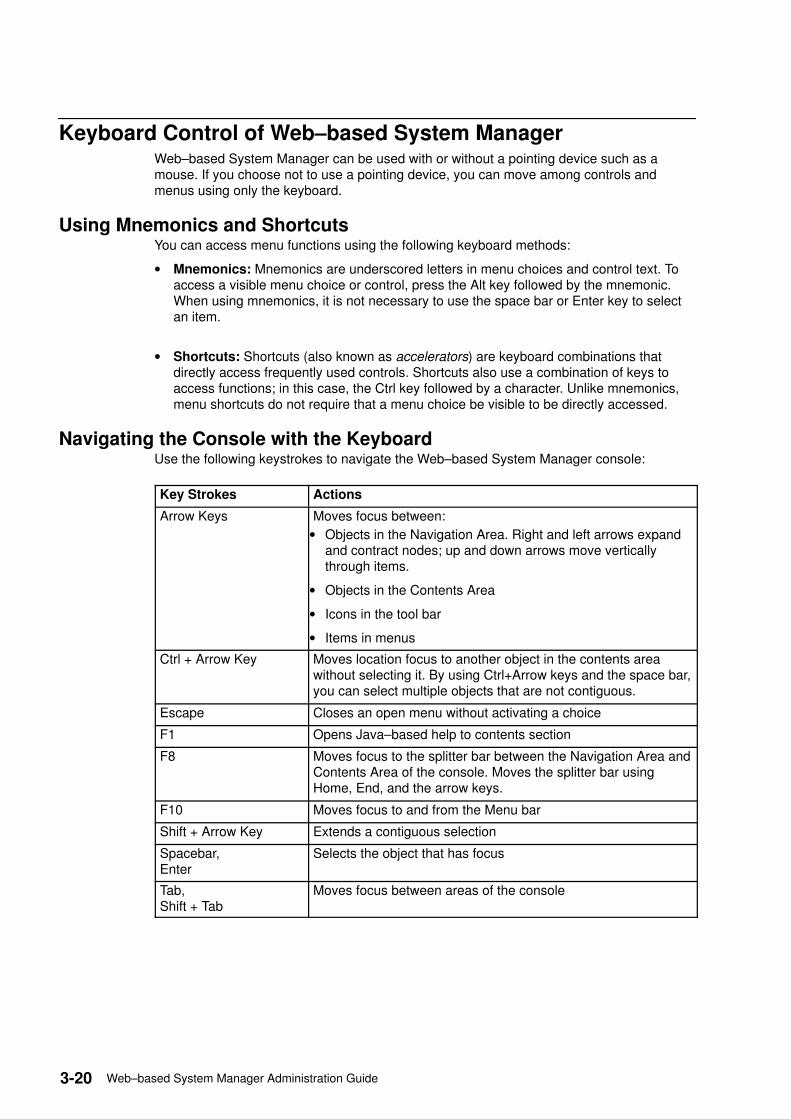
3-20 Web–based System Manager Administration Guide
Keyboard Control of Web–based System ManagerWeb–based System Manager can be used with or without a pointing device such as amouse. If you choose not to use a pointing device, you can move among controls andmenus using only the keyboard.
Using Mnemonics and ShortcutsYou can access menu functions using the following keyboard methods:
• Mnemonics: Mnemonics are underscored letters in menu choices and control text. Toaccess a visible menu choice or control, press the Alt key followed by the mnemonic.When using mnemonics, it is not necessary to use the space bar or Enter key to selectan item.
• Shortcuts: Shortcuts (also known as accelerators) are keyboard combinations thatdirectly access frequently used controls. Shortcuts also use a combination of keys toaccess functions; in this case, the Ctrl key followed by a character. Unlike mnemonics,menu shortcuts do not require that a menu choice be visible to be directly accessed.
Navigating the Console with the KeyboardUse the following keystrokes to navigate the Web–based System Manager console:
Key Strokes Actions
Arrow Keys Moves focus between:
• Objects in the Navigation Area. Right and left arrows expandand contract nodes; up and down arrows move verticallythrough items.
• Objects in the Contents Area
• Icons in the tool bar
• Items in menus
Ctrl + Arrow Key Moves location focus to another object in the contents areawithout selecting it. By using Ctrl+Arrow keys and the space bar,you can select multiple objects that are not contiguous.
Escape Closes an open menu without activating a choice
F1 Opens Java–based help to contents section
F8 Moves focus to the splitter bar between the Navigation Area andContents Area of the console. Moves the splitter bar usingHome, End, and the arrow keys.
F10 Moves focus to and from the Menu bar
Shift + Arrow Key Extends a contiguous selection
Spacebar,Enter
Selects the object that has focus
Tab,Shift + Tab
Moves focus between areas of the console
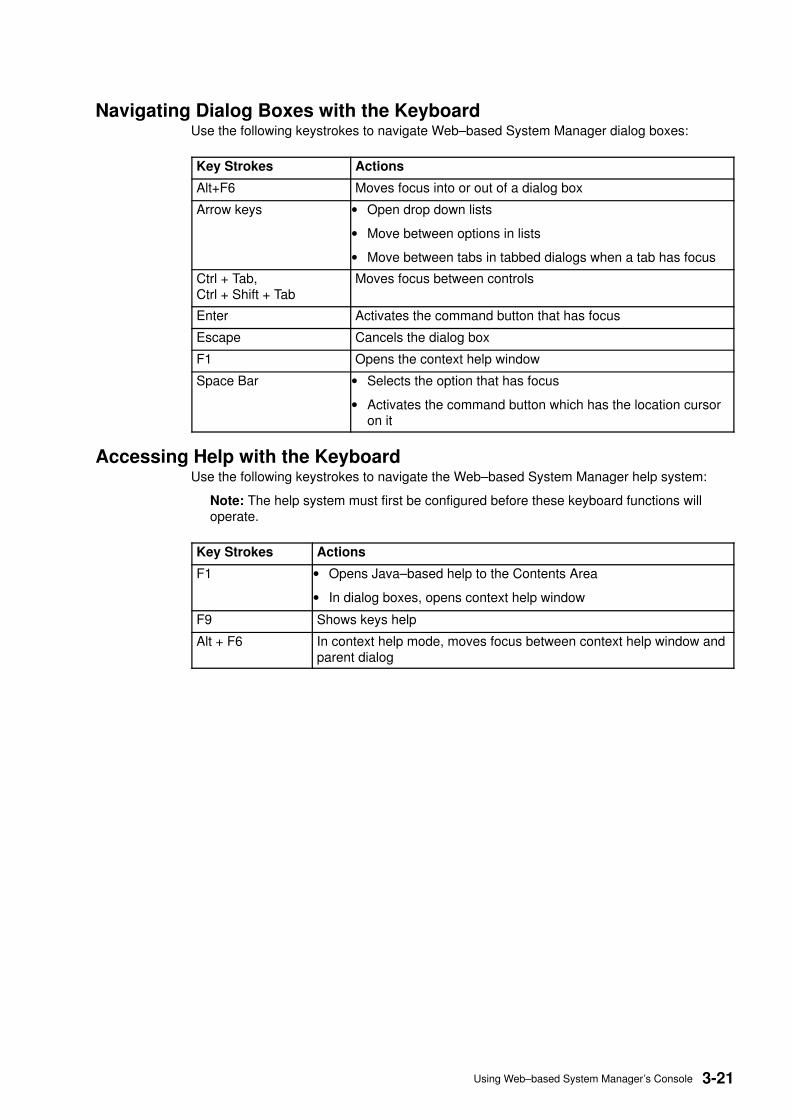
3-21Using Web–based System Manager’s Console
Navigating Dialog Boxes with the KeyboardUse the following keystrokes to navigate Web–based System Manager dialog boxes:
Key Strokes Actions
Alt+F6 Moves focus into or out of a dialog box
Arrow keys • Open drop down lists
• Move between options in lists
• Move between tabs in tabbed dialogs when a tab has focus
Ctrl + Tab,Ctrl + Shift + Tab
Moves focus between controls
Enter Activates the command button that has focus
Escape Cancels the dialog box
F1 Opens the context help window
Space Bar • Selects the option that has focus
• Activates the command button which has the location cursoron it
Accessing Help with the KeyboardUse the following keystrokes to navigate the Web–based System Manager help system:
Note: The help system must first be configured before these keyboard functions willoperate.
Key Strokes Actions
F1 • Opens Java–based help to the Contents Area
• In dialog boxes, opens context help window
F9 Shows keys help
Alt + F6 In context help mode, moves focus between context help window andparent dialog
3-22 Web–based System Manager Administration Guide
Session LogThe Session Log is a console facility that tracks changes made on managed hosts during aWeb–based System Manager session. Each time an administrator uses Web–basedSystem Manager to make a change on a host, an entry in the log is created. Entries mayalso be generated by applications to report intermediate results, warnings, or errorconditions.
Each entry includes the time and date of the change, the user who made the change, thehost where the change was made, and a short message. Double–click on a message to seethe complete message text. Click on the columns displayed in the log window to change thesort order of entries. For example, the entries can be sorted by time and date (defaultorder), host name, user name, and message.
The log window includes a Find capability to search for entries that include a particular textstring. The administrator can also manage the log by erasing the contents using the Clearbutton or saving the contents using the Save or Save As buttons.
To view the session log, select Console –> Session Log.
Transaction LogThe Transaction Log tracks the use of commands that can modify the Web–based SystemManager system and creates entries in a transaction file for each command. A similar file,known as a script file, is created to track the use of commands run in SMIT scripts. Thesecommands can then be gathered into a batch file and run at specific times of the day, ordistributed to other machines on the network.
Entries in the $HOME/websm1.transaction file show the following items:
• the name of the command
• a description of the command
• the time and date the command ran
4-1Configuring a Set of Managed Machines
Chapter 4. Configuring a Set of Managed Machines
The Management Environment is a set of machines you can manage and perform systemadministration tasks on from within the Web–based System Manager application. You canadd or delete members from this set. The Navigation Area and Contents Area in theWeb–based System Manager application window provide an interface to access thesemachines. The Web–based System Manager application provides you with two approachesto adding or deleting a machine. The first approach is through the Console menu. Thesecond approach is through the Web–based System Manager Management Environmentplug–in. Either approach guides you in adding or deleting a machine from the ManagementEnvironment.
In addition, the Web–based System Manager application provides you with a means to savea set of machines to a particular session. When Web–based System Manager is initiallylaunched, the only machine that is present in the Navigation Area and Contents Area is themanaging machine. After a machine is added, it can be preserved for future use if youselect to save preferences either through the Console menu or upon exiting the Web–basedSystem Manager application.
This section discusses the following processes and procedures related to configuring a setof managed machines:
• Adding a Machine to Web–based System Manager on page 4-2
• Removing a Machine on page 4-4
4-2 Web–based System Manager Administration Guide
Adding a Machine to Web–based System ManagerWeb–based System Manager identifies machines in the Management Environment by theexact name that you provide when the machine is added to the environment. This means amachine added with both a fully qualified host name, as well as an abbreviation for the fullyqualified host name, will be listed twice in the Management Environment, as if they are twodifferent computers.
For example, if your domain name is mycorp.com, you will be able to create a managedmachine in the Management Environment called machine_name, as well asmachine_name.mycorp.com. To Web–based System Manager, these are two differentmachines. A warning dialog that informs you another machine has the same first elementhostname appears, thus alerting you that both machine_name andmachine_name.mycorp.com will be added. If you do not intend to have both machinenames in the Management Environment, you can take preventive action.
You can use either of two methods to add a machine to Web–based System Manager:
Console menu:
1. Select Console in Web–based System Manager application menu.
2. Select Add.
3. Select Hosts.
Web–based System Manager Management Environment plug–in:
1. Select Management Environment in the Navigation Area.
2. Select Management Environment in Web–based System Manager application menu.
3. Select New.
4. Select Hosts.
After you have launched the add dialog, you can add the machine in one of two ways:
• Add a single host computer with the option to verify its existence on the network.
• Add a list of computers from a file.
ExamplesTo add a single machine called chocolate.austin.ibm.com:
1. Select Add the host computer with this name:
2. Type chocolate.austin.ibm.com in the text field.
3. Click Add.
The assigned computer name appears in the Navigation Area and Navigation Pane. Amessage below the progress bar states Successfully added...chocolate.austin.ibm.com.
To add a single machine and verify its existence on the network:
1. Select Add the host computer with this name:
2. Type coconut.austin.ibm.com in the text field.
3. Select Verify that the host is on the network.
4. Click Add.
The assigned computer name appears in Navigation Area and Navigation Pane. If the hostdoes not exist on the network, a Web–based System Manager error dialog displays, statingthat the following host cannot be contacted.

4-3Configuring a Set of Managed Machines
To add a list of machines from a file:
1. Select Add the host computers listed in this file:
2. Type the complete file path in the text field, or select Browse and then select file.
3. Select yes from the confirmation dialog to add a list of machines.
A message below the progress bar indicates which machine is currently being added. Afterit’s complete, a message displays stating Successfully completed. The addedcomputers appear in the Navigation Area and Navigation Pane.
4-4 Web–based System Manager Administration Guide
Removing a MachineThe Web–based System Manager application has two approaches to removing or deletingmachines from the Navigation Area:
Console menu:
1. Select Console in Web–based System Manager application menu.
2. Select Remove.
3. Select Hosts.
4. Select the machines to remove.
5. Click Remove.
6. Select yes in the confirmation dialog to remove the selected machines.
Management Environment plug–in:
1. Select Management Environment in the Navigation Area.
2. Select machines to delete from the Navigation Pane.
3. Select Selected in the Web–based System Manager application menu.
4. Select yes in the confirmation dialog to remove the selected machines.
5-1Securing Web–based System Manager
Chapter 5. Securing Web–based System Manager
Web–based System Manager Security provides for the secure operation of the Web–basedSystem Manager in client–server mode. In the Web–based System Manager secureoperation, the managed machines are servers, and the managing users are the clients. Thecommunication between the servers and clients is over the SSL protocol that providesserver authentication, data encryption, and data integrity. You manage the machine onWeb–based System Manager using an account on that machine and authenticate to theWeb–based System Manager server by sending the user ID and password over the securedSSL protocol.
Each Web–based System Manager server has its private key and a certificate of its publickey signed by a Certificate Authority (CA) that is trusted by the Web–based SystemManager clients. The private key and the server certificate are stored in the server’s privatekey ring file. The Web–based System Manager client has a public key ring file that containsthe certificates of the CAs that it trusts.
In applet mode (working from the browser), the client must be assured that the applet(.class files) arriving at the browser is coming from the intended server. Moreover, in thismode, the public key ring file resides on the server and is transferred to the client with therest of the applet.class files, because the browser does not allow applets to read local files.For sender authentication and integrity of these files. The client must use the SSLcapabilities of the browser and contact the server only with the HTTPS protocol(HTTPS://...). For this, you can use the SSL capability of the HTTP Server on eachmanaged machine, or you can use the SMGate daemon installed with Web–based SystemManager Security. The SMGate daemon serves as an SSL gateway between the clientbrowser and the web server.
This section discusses the following procedures and processes related to Security:
• Installing Web–based System Manager Security on page 5-2
• Configuring Web–based System Manager Security on page 5-3
• Configuring for the SMGate Daemon on page 5-16
• Security Scenarios on page 5-3
• Viewing Configuration Properties on page 5-17
• Enabling Web–based System Manager Security on page 5-18
• Enabling the SMGate Daemon on page 5-19
• Running Web–based System Manager Security on page 5-20
5-2 Web–based System Manager Administration Guide
Installing Web–based System Manager SecurityThe Web–based System Manager Security file set, sysmgt.websm.security, whereavailable, can be found on the AIX 5.3 Expansion Pack.
An additional file set, sysmgt.websm.security–us, with stronger encryption capabilities, isavailable on theAIX 5.3 Expansion Pack that ships in some countries. This file set requiresthat you have sysmgt.websm.security installed.
Web–based System Manager Remote Client Security must also be installed on theWindows or Linux clients. See Installing Web–based System Manager Remote ClientSecurity on page 2-10.
5-3Securing Web–based System Manager
Configuring Web–based System Manager SecurityWeb–based System Manager Security provides both a graphical interface and a commandline interface to configure for secure administration.
To access the graphical interface select Management Environment ––> hostname ––>System Manager Security ––> Overview and Status. These tasks are visible only in localmode. In different scenarios discussed below, they are referred to as the CertificateAuthority Overview and Server Security Overview. In these scenarios, the graphicalinterface is used. The corresponding command is listed for each step.
Security ScenariosConfiguration possibilities or scenarios are outlined in the following sections:
• Using Ready–to–Go Key Ring Files on page 5-4
• Administering Multiple Sites on page 5-7
• Avoiding Transfer of Private Keys on page 5-10
• Using Another Certificate Authority on page 5-13
5-4 Web–based System Manager Administration Guide
Using Ready–to–Go Key Ring FilesUsing the Ready–to–Go Key Ring Files is usually the fastest way to get into securityoperational state. In this scenario, use a single machine to define an internal CA (CertificateAuthority) and generate ready–to–go key ring files for all of your Web–based SystemManager servers and clients. This generates a public key ring file that you must copy to allof the servers and clients as well as a unique private key ring file for each server.
The following steps describe how to use Ready–to–Go Key Ring Files:
1. Define an Internal Web–based System Manager Certificate Authority.
You should use a safe system for the CA because its private key is the most sensitivedata in the Web–based System Manager security configuration.
Note: Do not use diskless or dataless workstations as Certificate Authorities,because the private key would be transferred over the network.
After the CA machine is chosen, log in locally as the root user and start Web–basedSystem Manager. The security configuration applications of Web–based SystemManager are not accessible if you are not logged in as the root user or if you are runningWeb–based System Manager in remote application or applet mode.
Select Management Environment ––> hostname ––> System Manager Security ––>Certificate Authority.
On the task list for Certificate Authority, select Configure this system as aWeb–based System Manager Certificate Authority. When the dialog opens, fill in thefollowing information:
– Certificate Authority distinguished nameType a descriptive name that helps you identify the CA machine and the instance ofthe CA; for example, the machine’s host name plus a sequence number. Blanks arepermitted in the name. If you redefine the CA, use a different sequence number soyou will be able to determine which instance of the CA a certificate is signed by. Thename should not be exactly the same as the full TCP/IP name, as this will not workwith the SMGate daemon.
– Organization nameType a descriptive name that identifies your company or your organization.
– ISO country code or region codeType your two–character ISO country code or region code or select it from the list.
– Expiration dateAfter the certificate expires, reconfigure Web–based System Manager security byredefining the CA and generating new private key ring files for all of your servers. Youcan change this date or accept the default value.
– Public key ring directoryThe public key ring containing the CA’s certificate is written to this directory. Copy thisfile to the Web–based System Manager codebase directory on all of the Web–basedSystem Manager servers and clients.
– PasswordThe CA’s private key ring file is encrypted with this password. You need to type thispassword each time you perform a task on this CA.
You can also define an internal CA from the command line with the/usr/websm/bin/smdefca command.
5-5Securing Web–based System Manager
2. Generate Private Key Ring Files for Your Web–based System Manager Servers.
Provide the full TCP/IP names of all of your Web–based System Manager servers.
On the task list for Certificate Authority, select Generate Servers’ Private Key RingFiles. In the CA password dialog, type the password that you specified when you definedthe CA. Then fill in the following information:
– List of serversAdd the names of your Web–based System Manager servers to the list. You can typethem in the dialog one at a time, or you can provide a file containing a list of yourservers, one per line. To get the server names from the file, type the file name in theFile containing list of servers entry field and click the Browse file button. Use theBrowse Server List File dialog to select some or all of the servers in the list.
Note: Do not use aliases as you will not be able to install a key or establish anSSL connection. Be sure to use the fully qualified hostname.
– Organization nameType a descriptive name that identifies your company or your organization.
– ISO country code or region codeType your two–character ISO country code or region code or select it from the list.
– Location for private key ring filesEnter the directory where you want the server private key ring files written. Later, youneed to distribute them to the servers and install them.
– Length in bits of server keysSelect a key length.
Note:: This field displays only if you have the sysmgt.websm.security–usfileset installed.
– Expiration dateAfter the certificate expires, you need to generate new private key ring files for yourservers. You can change this date or accept the default.
– Encrypt the server private key ring filesThis dialog creates a private key ring file for each server that you specified. Eachprivate key ring file contains the private key of a server and must always be keptprotected. You can protect the private key ring files by encrypting them. If you selectthis option, you are prompted for a password, which you need when you install theprivate key rings on the servers.
When you click OK, a private key ring file is created for each server that you specified.
You can also generate public key ring files from the command line with the/usr/websm/bin/smgenprivkr command.
3. Distribute the Public Key Ring File (SM.pubkr) to All Servers and Clients.
A copy of the CA public key ring file from the directory you specified in Step 1 must beplaced on your Web–based System Manager servers and clients in the directory youchose during installation, similar to the following:
– on an AIX client, use the /usr/websm/codebase directory
– on a Windows client, use the Program Files\websm\codebase directory
– on a Linux client, use the /opt/websm/codebase directory Notes:
a. This file must be copied in a binary format.
b. The content of this file is not secret. However, placing it on a client machine specifieswhich CA the client trusts. Thus, access to this file on the client machine should belimited. In applet mode, the client can trust the server to send over this file along withthe applet itself, provided the HTTPS protocol is used.
5-6 Web–based System Manager Administration Guide
c. If you plan to use the Java Web Start client, you must copy SMpubkr.zip from thedirectory you specified in Step 1 to the code base directory (/usr/websm/codebase)of the Web–based System Manager server from where you will download the client.
4. Distribute the Private Key Ring Files to All Servers.
Each server’s private key ring file must be installed on the server.
You can move the files to their targets in any secure way. Shared directory and disketteTAR methods are described here:
– Shared directory: Place all of the key ring files on a shared directory (for example,NFS or DFS) accessible to each server.
Note: For this method, you should have chosen to encrypt the serverprivate key ring files on the Generate Servers Private Key RingFiles dialog, because the files are transferred without encryption. It isalso recommended that you restrict the access rights to the shareddirectory to the administrator.
– Diskette TAR: Generate a diskette TAR containing all of the server private key ringfiles. The TAR archive should contain only the file names without the paths. To dothis, change directories to the directory containing the server private key ring files andrun the command tar –cvf /dev/fd0 *.privkr.
Install the server private key rings on each server.
a. Log on to each server as root user, start Web–based System Manager and selectManagement Environment ––> hostname ––> System Manager Security ––>Server Security.
b. From the task list, select Install the private key ring file for this server.
c. Select the source for the server private key ring files. If using a diskette, select tardiskette.
d. Insert the diskette.
e. Click OK.
If the key ring files are encrypted, you are asked for the password. The server’s privatekey is installed in /var/websm/security/SM.privkr.
Repeat this procedure on each server.
You can also distribute private key ring files to all servers from the command line with the/usr/websm/bin/sminstkey command.
5-7Securing Web–based System Manager
Administering Multiple SitesUse this scenario if you have multiple sites and do not want to distribute private key ring filesbetween sites. Suppose you have site A and site B, and you define your internalWeb–based System Manager Certificate Authority (CA) on a machine in site A. See Step 1of Using Ready–to–Go Key Ring Files on page 5-4 for directions on configuring a CA.
Note: For all clients and for site A servers, you can follow the instructions inUsing Ready–to–Go Key Ring Files on page 5-4.
For servers in site B, follow these steps:
1. Generate Private Keys and Certificate Requests for Your Web–based SystemManager Servers.
Provide the full TCP/IP names of all Web–based System Manager servers in site B. Youcan type them in the dialog one at a time, or you can provide a file containing a list ofyour servers, one per line.
On a server in site B, log in locally as root user and start Web–based System Manager.The security configuration applications of Web–based System Manager are notaccessible if you are not logged in as root user or if you are running the Web–basedSystem Manager in remote application or applet mode.
Select Management Environment ––> hostname ––> System Manager Security ––>Server Security.
On the task list for Server Security, select Generate Servers’ Private Keys andCertificate Requests. Fill in the following information:
– List of serversAdd the names of your Web–based System Manager servers in site B to the list. Youcan type them in the dialog one at a time or you can provide a file containing a list ofyour servers, one per line. To get the server names from the file, type the file name inthe File containing list of servers entry field and click the Browse file button. Usethe Browse Server List File dialog to select some or all of the servers in the list.
– Organization nameType a descriptive name that identifies your company or your organization.
– ISO country code or region codeType your two–character ISO country code or region code or select it from the list.
– Location for private key ring filesType the directory where you want the server private key ring files and certificaterequests written. In step 2, transfer the certificate request files to the CA in site A forsigning. In step 3, transfer the signed certificates from the CA in site A back to thisdirectory.
– Length in bits of server keysSelect a key length (this field displays only if you have thesysmgt.websm.security–us fileset installed).
– Encrypt the server private key ring filesThis dialog creates a private key ring file for each server you specified. Each privatekey ring file contains the private key of the server, and therefore, must always be keptprotected. You can protect the private key ring files by encrypting them. If you selectthis option, you are prompted for a password, which you need when you import thesigned certificates and when you install the private key rings on the servers.
When you click OK, a private key ring file and a certificate request is created for eachserver you specified.
You can also generate private keys and certificate requests from the command line withthe /usr/websm/bin/smgenkeycr command.
5-8 Web–based System Manager Administration Guide
2. Get the Certificates Signed by the CA in Site A.
Transfer the certificate request files to the CA in site A. The certificate requests do notcontain secret data. However, the integrity and authenticity during transfer must beensured.
Transfer a copy of the certificate request files from the server in site B to a directory onthe CA machine in site A.
Log in to the CA machine in site A locally as root user and start the Web–based SystemManager. The security configuration applications of the Web–based System Managerare not accessible if you are not logged in as root user or if you are running theWeb–based System Manager in remote application or applet mode.
Select Management Environment ––> hostname ––> System Manager Security ––>Certificate Authority.
On the task list for Certificate Authority, select Sign Certificate Requests. Fill in thefollowing information:
– Directory for certificate requestsType the directory containing the certificate requests. Then click the Update Listbutton. The certificate request list displays.
– Select certificate requests to signTo select individual certificate requests, click their names in the list box. To select allof the listed certificate requests, click the Select All button.
– Certificate expiration dateAfter the certificate expires, you need to repeat this process to generate new privatekey ring files for your servers. You can change this date or accept the default date.
When you click OK, a certificate file is created for each server you selected. Thecertificates are written to the directory containing the certificate requests.
You can also get the certificates signed by the CA by running the following commandfrom the command line: /usr/websm/bin/smsigncert.
3. Import the Signed Certificates to the Servers Private Key Ring Files.
In this step, transfer the certificates from the CA in site A back to the server in site B.Copy them to the directory containing the certificate requests and server private key filesyou created in step 1.
Then, on the server in site B from the Server Security task list, select Import SignedCertificates.
Fill in the following information:
– Directory for certificates and private keysType the directory containing the signed certificates and server private key files. ClickUpdate List. The list of servers for which there is a signed certificate and a privatekey file displays.
– Select one or more servers from the listTo select individual servers, click thier names in the list box. To select all of the listedservers, click the Select All button.
When you click OK, you are prompted for the password if the server private key fileswere encrypted in step 1. For each server you selected, the certificate is imported intothe private key file and the private key ring file is created.
You can import signed certificates from the command line with the/usr/websm/bin/smimpservercert command.
5-9Securing Web–based System Manager
4. Distribute the Private Key Ring Files to All Servers.
Each server’s private key ring file must be installed on the server.
You can move the files to their targets in any secure way. Shared directory and disketteTAR methods are described here:
– Shared directory: Place all of the key ring files on a shared directory (for example,NFS or DFS) accessible to each server.
Note: For this method, you should have chosen to encrypt the serverprivate key ring files on the Generate private keys and certificaterequests for this server or other servers dialog, because the filesare transferred without encryption. It is also recommended that yourestrict the access rights to the shared directory to the administrator.
– Diskette TAR: Generate a diskette TAR containing all of the server private key ringfiles. The TAR archive should contain only the file names without the paths. To dothis, go to the directory containing the server private key ring files and run thecommand tar –cvf /dev/fd0 *.privkr.
Install the server private key rings on each server.
a. Log in to each server as root user and start Web–based System Manager.
b. Select Management Environment ––> hostname ––> System Manager Security––> Server Security.
c. Select Install the private key ring files for this server.
d. Select the source for the server private key ring files. If using a diskette TAR, insertthe diskette.
e. Click OK.
If the key ring files are encrypted, you are asked for the password. The server’s privatekey is installed in /var/websm/security/SM.privkr. Repeat this procedure on eachserver.
You can also distribute the private key ring files from the command line with the/usr/websm/bin/sminstkey command.
5. Distributing the CA Public Key Ring File to All Servers and Clients in Site B.
A copy of the CA public key ring file from the directory you specified in Step 1 must beplaced on your Web–based System Manager servers and clients in the directory youchose during installation, similar to the following:
– on an AIX client, use the /usr/websm/codebase directory
– on a Windows client, use the Program Files\websm\codebase directory
– on a Linux client, use the /opt/websm/codebase directory Notes:
a. This file must be copied in a binary format.
b. The content of this file is not secret. However, placing it on a client machine specifieswhich CA the client trusts. Thus, make sure that you limit access to this file on theclient machine. In applet mode, the client can trust the server to send over this filealong with the applet itself, provided the HTTPS protocol is used.
c. If you plan to use the Java Web Start client, you must copy SMpubkr.zip from thedirectory you specified in Step 1 to the codebase directory (/usr/websm/codebase)of the Web–based System Manager server from where you will download the client.
5-10 Web–based System Manager Administration Guide
Avoiding Transfer of Private KeysUse this scenario if you want a private key to be generated on the server it belongs to,preventing it from being transferred (by network or diskette) to other systems. In thisscenario, you configure each server separately. The process must be repeated on eachserver.
Before you follow this scenario, configure your CA following the steps using UsingReady–to–Go Key Ring Files on page 5-4.
This scenario involves the following tasks:
1. Generate a Private Key and Certificate Request for Your Web–based SystemManager Server.
On the server, log in locally as root user and start Web–based System Manager. Thesecurity configuration applications of Web–based System Manager are not accessible ifyou are not logged in as root user or if you are running Web–based System Manager inremote application or applet mode.
Select Management Environment ––> hostname ––> System Manager Security ––>Server Security.
On the task list for Server Security, select Generate private keys and certificaterequests for this server and other servers. Fill in the following information:
– List of serversAdd the name of this Web–based System Manager server to the list. The servername is shown by default in the first text field. Click the Add to List button to add theserver to the list.
– Organization nameEnter a descriptive name that identifies your company or your organization.
– ISO country code or region codeEnter your two–character ISO country code or region code or select it from the list.
– Location for private key ring filesEnter the directory where you want the server private key ring file and certificaterequest written. In step 2, transfer the certificate request file to your CA for signing. Instep 3, transfer the signed certificate from the CA back to this directory.
– Length in bits of server keysSelect a key length (this field displays only if you have thesysmgt.websm.security–us fileset installed).
– Encrypt the server private key ring filesThis dialog creates a private key ring file for the server that you specified. The privatekey ring file contains the private key of the server, and therefore, must always be keptprotected. You can protect the private key file by encrypting it. If you select thisoption, you are prompted for a password, which you need when you import thesigned certificate and when you install the private key ring in this server.
When you click OK, a private key ring file and a certificate request is created for thisserver.
You can perform this task from the command line with the /usr/websm/bin/smgenkeycrcommand.
2. Get the Certificates Signed by the CA.
Transfer the certificate request file to your CA. The certificate request does not containsecret data. However, the integrity and authenticity during transfer must be ensured.
Transfer a copy of the certificate request file from the server to a directory on the CAmachine. To save time, you can transfer the certificate requests from all of your serversand have all of them signed by the CA in one step.
5-11Securing Web–based System Manager
Log in to your CA machine locally as root user and start Web–based System Manager.The security configuration applications of Web–based System Manager are notaccessible if you are not logged in as root user or if you are running Web–based SystemManager in remote application or applet mode.
Select Management Environment ––> hostname ––> System Manager Security ––>Certificate Authority.
On the task list for Certificate Authority, select Sign Certificate Requests. Fill in thefollowing information:
– Directory for certificate requestsEnter the directory containing the certificate requests. Then, click the Update Listbutton. The certificate request displays.
– Select certificate requests to signClick on your server’s certificate requests in the list box.
– Certificate Expiration DateAfter the expiration date, you need to repeat this process to generate a new privatekey ring file for your server. You can change this date or accept the default date.
When you click OK, a certificate file is created for each server that you selected. Thecertificate is written to the directory containing the certificate request.
You can perform this task from the command line with the /usr/websm/bin/smsigncertcommand.
3. Import the Certificates to the Private Key Files.
Transfer the certificate from the CA back to the server. Copy it to the directory containingthe certificate request and server private key file that you previously created in step 1.
Then, on the server, from the task list for Server Security, select Import SignedCertificates.
Fill in the following information:
– Directory for certificates and private keysEnter the directory containing the signed certificate and server private key file. Then,click the Update List button. The server displays in the list box.
– Select one or more servers from the listClick on your server’s name in the list box.
When you click OK, if the server private key file was encrypted in step 1, you areprompted for the password. Your server’s certificate is imported into the private key file,and the private key ring file is created in the directory containing the certificate requestand private key file.
You can perform this task from the command line with the/usr/websm/bin/smimpservercert command.
4. Install the Private Key on the Server.
On the task list for Server Security, select Install the private key ring file for thisserver. Select the Directory button and enter the directory containing the server’sprivate key ring file. If the key ring file was encrypted, you are asked for the password.The server’s private key is installed in /var/websm/security/SM.privkr.
You can perform this task from the command line with the /usr/websm/bin/sminstkeycommand.
5. Distribute the Public Key Ring File (SM.pubkr) to All Servers and Clients.
A copy of the CA public key ring file from the directory you specified in Step 1 must beplaced on your Web–based System Manager servers and clients in the directory youchose during installation, similar to the following:
5-12 Web–based System Manager Administration Guide
– on an AIX client, use the /usr/websm/codebase directory
– on a Windows client, use the Program Files\websm\codebase directory
– on a Linux client, use the /opt/websm/codebase directory Notes:
a. This file must be copied in a binary format.
b. The content of this file is not secret. However, placing it on a client machine specifieswhich CA the client trusts. Thus, make sure that you limit access to this file on theclient machine. In applet mode, the client can trust the server to send over this filealong with the applet itself, provided the HTTPS protocol is used.
c. If you plan to use the Java Web Start client, you must create a SMpubkr.zip filecontaining tha CA public key ring file, and copy it to the codebase directory(/usr/websm/codebase) of the Web–Based System Manager server from where youwill download the client.
5-13Securing Web–based System Manager
Using Another Certificate AuthorityUse this scenario if you do not want to use an internal Web–based System Manager CA, butinstead you want to use another internal CA product that may already be functioning onyour system. In this scenario, your certificate requests are signed by this other CA.
1. Generate Private Keys and Certificate Requests for Your Web–based SystemManager Servers.
Provide full TCP/IP names of all your Web–based System Manager servers. You canenter them in the dialog one at a time, or you can provide a file containing a list of yourservers, one per line.
On a server, log in locally as root user and start Web–based System Manager. Thesecurity configuration applications of Web–based System Manager are not accessible ifyou are not logged in as root user or if you are running Web–based System Manager inremote application or applet mode.
Select Management Environment ––> hostname ––> System Manager Security ––>Server Security.
On the task list for Server Security, select Generate private keys and certificaterequests for this server and other servers. Fill in the following information:
– List of serversAdd the names of your Web–based System Manager servers to the list. You canenter them in the dialog one at a time or you can provide a file containing a list of yourservers, one per line. To get the server names from the file, enter the file name in theFile containing list of servers entry field and click the Browse file button. Use theBrowse Server List File dialog to select some or all of the servers in the list.
– Organization nameEnter a descriptive name that identifies your company or your organization.
– ISO country code or region codeEnter your two–character ISO country code or region code or select it from the list.
– Location for private key ring filesEnter the directory where you want the server private key ring files and certificaterequests written. In step 2, transfer the certificate request files to the CA for signing.In step 3, transfer the signed certificates from the CA back to this directory.
– Length in bits of server keysSelect a key length (this field displays only if you have thesysmgt.websm.security–us fileset installed).
– Encrypt the server private key ring filesThis dialog creates a private key ring file for each server that you specified. Eachprivate key ring file contains the private key of a server, and therefore, must alwaysbe kept protected. You can protect the private key ring files by encrypting them. If youselect this option, you are prompted for a password, which you need when you importthe signed certificates and when you install the private key rings on the servers.
When you click OK, a private key file and a certificate request is created for each serverthat you specified.
You can perform this task from the command line with the /usr/websm/bin/smgenkeycrcommand.
2. Get the Certificates Signed by the CA.
Transfer the certificate request files to the CA. The certificate requests do not containsecret data. However, the integrity and authenticity during transfer must be ensured.
Transfer a copy of the certificate request files from the server to a directory on the CAmachine.
5-14 Web–based System Manager Administration Guide
Follow the instructions of your CA to generate the signed certificates out of the certificaterequests.
3. Import the Signed Certificates to the Server’s Private Key Ring Files.
Transfer the certificates from the CA back to the server. Copy them to the directorycontaining the certificate requests and server private key files that you created in step 1.This step requires that the certificate file of server S be named S.cert.
Then, on the server, from Server Security, select Import Signed Certificates.
Fill in the following information:
– Directory for certificates and private keysEnter the directory containing the signed certificates and server private key files.Then click the Update List button. The list of servers for which there is a signedcertificate and a private key file displays.
– Select one or more servers from the listTo select individual servers, click on them in the list box. To select all of the listedservers, click the Select All button.
When you click OK, if the server private key files were encrypted in step 1, you areprompted for the password. Then, for each server that you selected, the certificate isimported into the private key file and the private key ring file is created.
You can perform the above task from the command line with the/usr/websm/bin/smimpservercert command.
4. Distribute the Private Key Ring Files to All Servers.
Each server’s private key ring file must be installed on the server.
You can move the files to their targets in any secure way. Shared directory and disketteTAR methods are described here:
– Shared directory: Place all of the key ring files on a shared directory (for example,NFS or DFS) accessible to each server.
Note: For this method, you should have chosen to encrypt the serverprivate key ring files on the Generate private keys and certificaterequests for this server and other servers dialog, because thefiles are transferred in the clear. It is also recommended that yourestrict the access rights to the shared directory to the administrator.
– Diskette TAR: Generate a diskette TAR containing all of the server private key ringfiles. The TAR archive should contain only the file names without the paths. To dothis, change directories to the directory containing the server private key ring files andrun the command tar –cvf /dev/fd0 *.privkr.
Install the server private key rings on each server.
a. Log in to each server as root user and start Web–based System Manager.
b. Select Management Environment ––> hostname ––> System Manager Security––> Server Security.
c. Select Install Private Key Ring.
d. select the source for the server private key ring files. If using a diskette TAR, insertthe diskette.
e. Click OK.
If the key ring files are encrypted, you are asked for the password. The server’s privatekey is installed in /var/websm/security/SM.privkr. Repeat this procedure on eachserver.
You can perform this task from the command line with the /usr/websm/bin/sminstkeycommand.
5-15Securing Web–based System Manager
5. Import the Certificate Authority’s Certificate to the Public Key Ring File.
Receive the self–signed CA certificate of your CA. Copy it to a directory on the serveryou are working on.
Then, on the server, from the task list for Server Security, select Import CA Certificate.
Fill in the following information:
– Directory containing public key ring fileEnter a directory for the CA public key ring file. This file needs to be distributed to allof your servers and clients.
– Full path name of CA Certificate fileEnter the directory containing the self–signed certificate of your CA.
When you click OK, the public key ring file SM.pubkr is written to the directory youspecified.
You can perform the above task from the command line with the/usr/websm/bin/smimpcacert command.
6. Distribute the Public Key Ring File to All Clients and Servers.
A copy of the CA public key ring file from the directory you specified in Step 1 must beplaced on your Web–based System Manager servers and clients in the directory youchose during installation, similar to the following:
– on an AIX client, use the /usr/websm/codebase directory
– on a Windows client, use the Program Files\websm\codebase directory
– on a Linux client, use the /opt/websm/codebase directory Notes:
a. This file must be copied in a binary format.
b. The content of this file is not secret. However, placing it on a client machine specifieswhich CA the client trusts. Thus, access to this file on the client machine should belimited. In applet mode, the client can trust the server to send over this file along withthe applet itself, provided the HTTPS protocol is used.
c. If you plan to use the Java Web Start client, you must create a SMpubkr.zip filecontaining the CA public key ring file, and copy it to the codebase directory(/usr/websm/codebase) of the Web–based System Manager server from where youwill download the client.
5-16 Web–based System Manager Administration Guide
Configuring for the SMGate DaemonThe SMGate daemon installed with Web–based System Manager Security allows you to runin secure applet mode without having to configure security on each managed system.SMGate serves as an SSL gateway between the client browser and the local web server.
To use the SMGate daemon, install the certificate issued by the Certificate Authority (CA)onto each client browser, as follows:
1. Using the Web–based System Manager internal certificate authority, get the CAcertificate using the following procedure:
a. Log in to the CA machine as root user.
b. Start Web–based System Manager.
c. Open the Management Environment and select your local host.
d. Select Export Certificate Authority’s Certificate from the task list.
e. In the Export Certificate Authority’s Certificate dialog, type the full path namewhere the certificate is to be written.
f. Click OK.
Alternatively, from the command line, type:
/usr/websm/bin/smexpcacert
Note: If you are not using the Web–based System Manager internal certificateauthority, then use your certificate authority’s procedures for obtaining acopy of its certificate.
2. Copy the certificate to an HTTP Server directory so that you can access it from the clientbrowser. The MIME type sent by the HTTP Server must beapplication/x–x509–ca–cert. You may also copy the certificate to your client and open itusing a web browser.
3. In each of your client browsers, point the browser to the CA certificate file and follow yourbrowser’s procedure to accept it as a signer certificate.
Your browsers are now set up to connect to your servers through the SMGate daemon. Forinformation about enabling the SMGate daemon, see Enabling the SMGate Daemon onpage 5-19. For information about running through SMGate, see Applet Mode on page 5-20.
5-17Securing Web–based System Manager
Viewing Configuration PropertiesAfter the security configuration has been completed, you can view the properties of theCertificate Authority (CA), any server, and any client’s public key ring.
To view CA properties, do the following:
1. Open the Management Environment and select your local host.
2. Select Web–based System Manager Security.
3. Select Certificate Authority.
4. Select Properties from the task list.
5. Type the password.
Note: The dialog provides read–only information for the CA.
Detailed information on all operations executed by the CA (for example, key ring generationor certificate signing) can be found in the /var/websm/security/SMCa.log CA log file.
You can perform this task from the command line using the /usr/websm/bin/smcapropcommand.
To view a server’s properties, do the following:
1. Open the Management Environment and select your local host.
2. Select Web–based System Manager Security.
3. Select Server Security.
4. Select View properties for this server from the task list.
5. Type the password.
Note: The dialog provides read–only information for the server.
You can perform this task from the command line using the /usr/websm/bin/smserverpropcommand.
Public Key Ring ContentTo view the CA certificate included in the CA public key ring, use the/usr/websm/bin/smlistcerts command.
5-18 Web–based System Manager Administration Guide
Enabling Web–based System Manager SecurityOn each managed system, you can enable the security option that you want to enforce.
To enable security so the managed system accepts secure or unsecure connections, runthe wsmserver –ssloptional command. In this mode, you can select an option on theWeb–based System Manager login dialog to specify a secure or unsecure connection.
To enable a managed system to only accept secure connections, run the/usr/websm/bin/wsmserver –sslalways command.
5-19Securing Web–based System Manager
Enabling the SMGate DaemonThe SMGate daemon can only be enabled after the server’s private key ring has beeninstalled.
To enable SMGate, type the following command:
/usr/websm/bin/wsmserver –enablehttps
This command starts SMGate and adds an entry to the /etc/inittab file so that it isautomatically activated when the system is restarted. The default port for SMGate is 9092.Examine the /etc/services file to make sure this port is not being used by another service.You can configure SMGate to use a different port by typing:
/usr/websm/bin/wsmserver –enablehttps port
where port is the port number you want it to use.
If you change the server’s security configuration, you must disable SMGate. DisableSMGate by typing:
/usr/websm/bin/wsmserver –disablehttps
To configure the browser to work through SMGate, see Configuring for the SMGate Daemonon page 5-16.
5-20 Web–based System Manager Administration Guide
Running Web–based System Manager SecurityWeb–based System Manager runs in application mode when you use a machine as a clientto manage another machine.
Client–Server ModeTo activate client–server mode on the client, type the following command:
wsm –host hostname
where hostname is the name of the remote machine that you want to manage.
If the machine to be managed is configured to allow secure connections only (see EnablingWeb–based System Manager Security on page 5-18), then the client must have thesysmgt.websm.security fileset installed and must have a copy of the CA public key ringfile in the /usr/websm/codebase directory. In this mode, the Web–based System Managerlogin dialog indicates that security is required.
If the machine to be managed is configured to allow secure or unsecure connections (seeEnabling Web–based System Manager Security on page 5-18) and the client has a copy ofthe CA public key ring file in the /usr/websm/codebase directory, the Web–based SystemManager login dialog allows you to specify a secure or unsecure connection.
When running in client–server mode, security is indicated by a secure connectionmessage on the status line at the bottom of the window.
Remote Client ModeTo start Remote Client, see Remote Client Mode on page 1-7 and follow the steps for yourtype of machine.
If the machine to be managed is configured to allow secure connections only (see EnablingWeb–based System Manager Security on page 5-18), then the client must have RemoteClient Security installed and a copy of the CA public key ring file in the websm/codebasedirectory. In this mode, the Web–based System Manager login dialog indicates that securityis required.
If the machine to be managed is configured to allow secure or unsecure connections (seeEnabling Web–based System Manager Security on page 5-18), the Web–based SystemManager login dialog allows you to specify a secure or unsecure connection. To use asecure connection, client machines must have Remote Client Security installed and musthave a copy of the CA public key ring in the websm/codebase directory.
When running in client–server mode, security is indicated by a secure connectionmessage on the status line at the bottom of the window.
Applet ModeWeb–based System Manager runs in applet mode when you use a browser to connect tothe machine you want to manage. Applet mode adds another security consideration for thesecure transfer of the CA public key ring file and the applet’s.class files. For completesecurity in applet mode, the client must use the SSL capabilities of its browser and contactthe server only with the HTTPS protocol. This requires that the HTTP Server is configuredfor security or that SMGate is configured through one of the following options:
• One option is to use the SSL capability of the Web server on the managed machine. Forthis option, the Web server must be configured for security. Follow the instructionsprovided with your Web server. Then you can access Web–based System Manager onthe managed machine with the following Web address: https:// hostname /wsm.html,where hostname is the name of the remote machine you want to manage. In this option,the applet and the SM.pubkr public key ring are transferred securely from the Webserver on the managed machine to the client.
5-21Securing Web–based System Manager
• Another option is to use the SMGate daemon. SMGate runs on managed machines andserves as an SSL gateway between the client browser and the local Web server.SMGate responds to the HTTPS request of the client browser, and creates an SSLconnection with it by using the private key and certificate of the Web–based SystemManager server. Inside the managed machine, SMGate creates an unsecure connectionto the local Web server.
In this option, the applet and SM.pubkr public key ring are securely transferred fromSMGate on the managed machine to the browser client. Communications between themanaged machine and client are over SSL. When you are using SMGate, you canaccess Web–based System Manager on the managed machine with the following Webaddress: https:// hostname:9092/wsm.html, where hostname is the name of the remotemachine you want to manage.
Note: 9092 is the default port number for SMGate. If you enabled SMGatewith a different port number, then specify that number.
When you are running in applet mode, make sure the following security indicators arepresent:
• The browser’s HTTPS indication
• The secure connection message on the status line at the bottom of the Web–basedSystem Manager window.
If either indicator is missing, the connection is not completely secure.

5-22 Web–based System Manager Administration Guide
6-1Web–based System Manager Accessibility
Chapter 6. Web–based System Manager Accessibility
Web–based System Manager remote client provides voicing capability and keyboardaccessibility features.
Enabling Web–based System Manager’s Screen ReaderThe Web–based System Manager Windows PC–client comes with voicing support installed.To enable voicing, a different startup file must be used. If Web–based System Manager isinstalled in the default location (C:\Program Files\websm), then the startup file to enablevoicing is C:\Program Files\websm\bin\wsmsvk.bat.
Please refer to the Readme for Web–based System Manager for information about enablingVoicing for AIX and Linux as well as for further information about using the voicingcapability.
Note: Voicing support is not provided for any applications launched by Web–based SystemManager, such as a browser or terminal emulation program. Use JAWS, or similarvoicing application for these situations.
Keyboard AccessibilityThe goal of keyboard accessibility is for the user to be able to use the Web–based SystemManager without having to use a mouse. The following keyboard accessibility features areavailable:
• Menu mnemonics: All menu choices can be selected from the keyboard by typing theletter indicated in the menu title. To open the menu, type the underlined letter whilepressing the Alt key on the keyboard This is true only for opening the menu. Once themenu is open, release the Alt key.
For example, to select the P r operties option in the S elected menu, open the menu bytyping s while holding the Alt key, then release the Alt key and type r to select theProperties option. When using mnemonics of the Web–based System Manager menubar, be sure to move the mouse cursor into the console frame.
• Menu accelerators or shortcut keys: Key combinations are available for common actions.For example, Ctrl + Q to quit and F9 for Key Help.
• Dialog Accessibility Features: Mnemonics and accelerators are available for dialogbuttons. For example, pressing the Enter key activates the OK button and pressing Escactivates the Cancel button.
Keys Help (F9) provides a description of all keyboard shortcuts and accelerator keys. Othertypes of shortcuts include special keys for moving between console areas and expandingtree branches.
The following sections describe accessibility functions and keystrokes for two Web–basedSystem Manager dialogs:
• Logon Panel on page 6-2
• Web–based System Manager Console Window on page 6-3
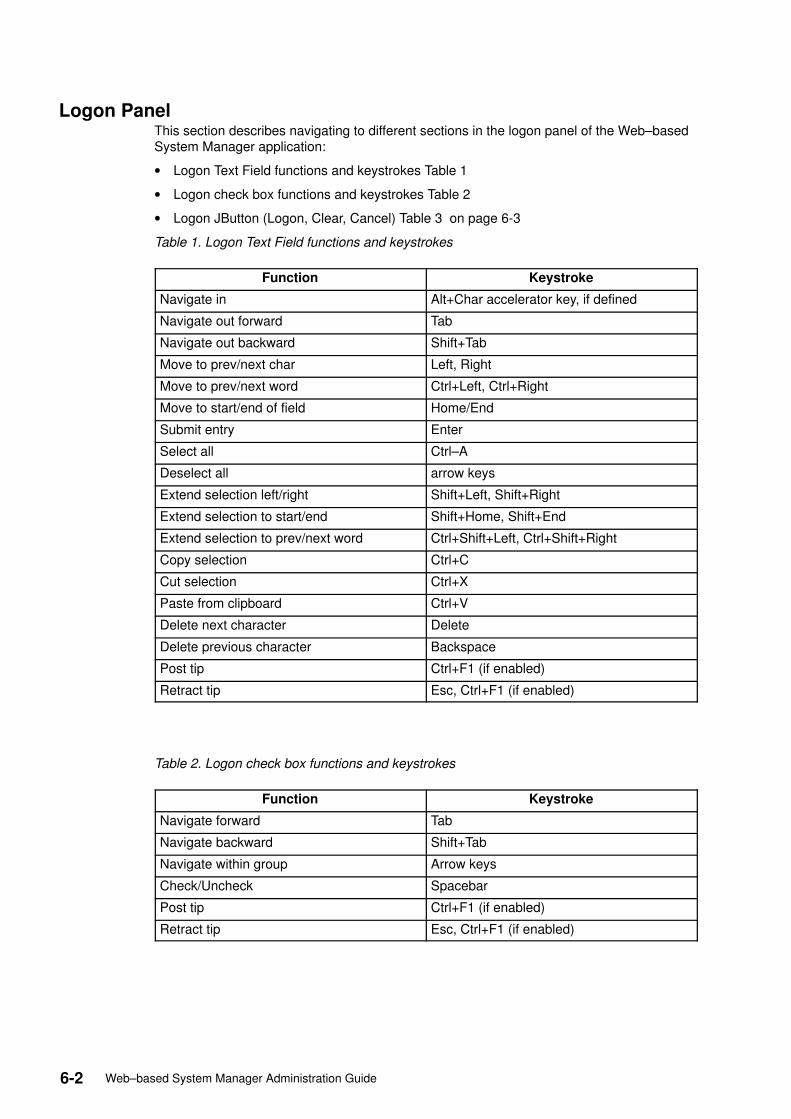
6-2 Web–based System Manager Administration Guide
Logon PanelThis section describes navigating to different sections in the logon panel of the Web–basedSystem Manager application:
• Logon Text Field functions and keystrokes Table 1
• Logon check box functions and keystrokes Table 2
• Logon JButton (Logon, Clear, Cancel) Table 3 on page 6-3
Table 1. Logon Text Field functions and keystrokes
Function Keystroke
Navigate in Alt+Char accelerator key, if defined
Navigate out forward Tab
Navigate out backward Shift+Tab
Move to prev/next char Left, Right
Move to prev/next word Ctrl+Left, Ctrl+Right
Move to start/end of field Home/End
Submit entry Enter
Select all Ctrl–A
Deselect all arrow keys
Extend selection left/right Shift+Left, Shift+Right
Extend selection to start/end Shift+Home, Shift+End
Extend selection to prev/next word Ctrl+Shift+Left, Ctrl+Shift+Right
Copy selection Ctrl+C
Cut selection Ctrl+X
Paste from clipboard Ctrl+V
Delete next character Delete
Delete previous character Backspace
Post tip Ctrl+F1 (if enabled)
Retract tip Esc, Ctrl+F1 (if enabled)
Table 2. Logon check box functions and keystrokes
Function Keystroke
Navigate forward Tab
Navigate backward Shift+Tab
Navigate within group Arrow keys
Check/Uncheck Spacebar
Post tip Ctrl+F1 (if enabled)
Retract tip Esc, Ctrl+F1 (if enabled)
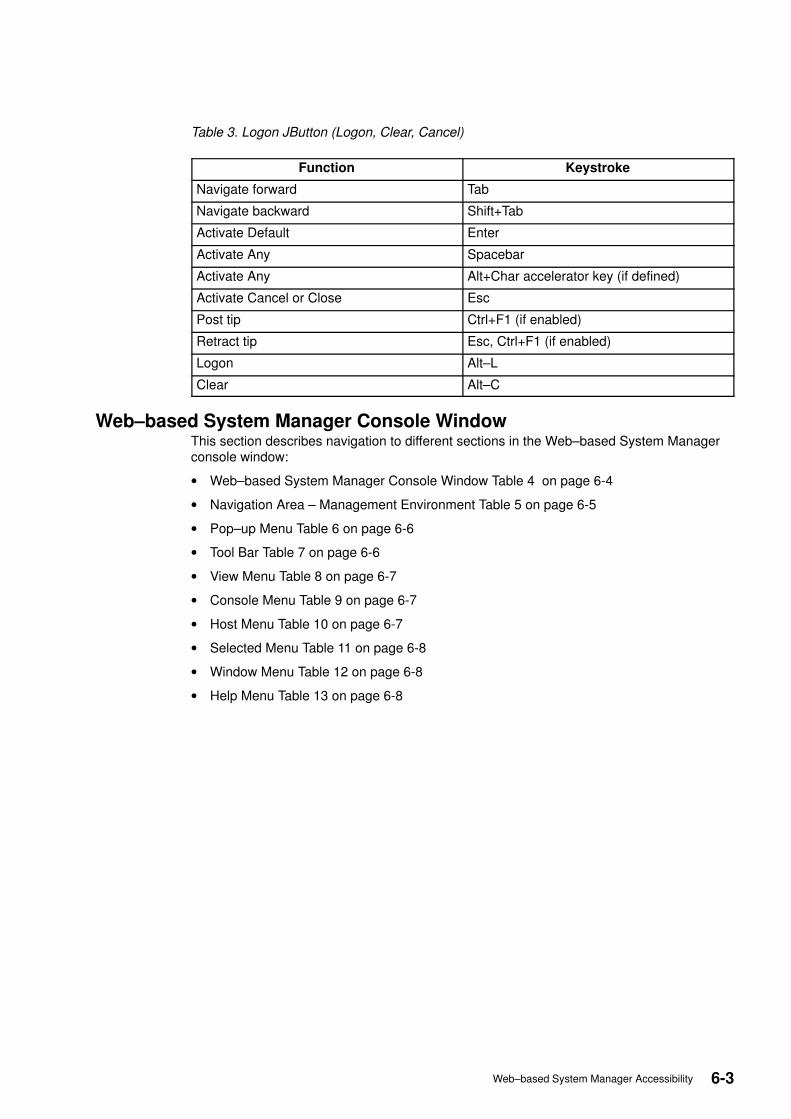
6-3Web–based System Manager Accessibility
Table 3. Logon JButton (Logon, Clear, Cancel)
Function Keystroke
Navigate forward Tab
Navigate backward Shift+Tab
Activate Default Enter
Activate Any Spacebar
Activate Any Alt+Char accelerator key (if defined)
Activate Cancel or Close Esc
Post tip Ctrl+F1 (if enabled)
Retract tip Esc, Ctrl+F1 (if enabled)
Logon Alt–L
Clear Alt–C
Web–based System Manager Console WindowThis section describes navigation to different sections in the Web–based System Managerconsole window:
• Web–based System Manager Console Window Table 4 on page 6-4
• Navigation Area – Management Environment Table 5 on page 6-5
• Pop–up Menu Table 6 on page 6-6
• Tool Bar Table 7 on page 6-6
• View Menu Table 8 on page 6-7
• Console Menu Table 9 on page 6-7
• Host Menu Table 10 on page 6-7
• Selected Menu Table 11 on page 6-8
• Window Menu Table 12 on page 6-8
• Help Menu Table 13 on page 6-8
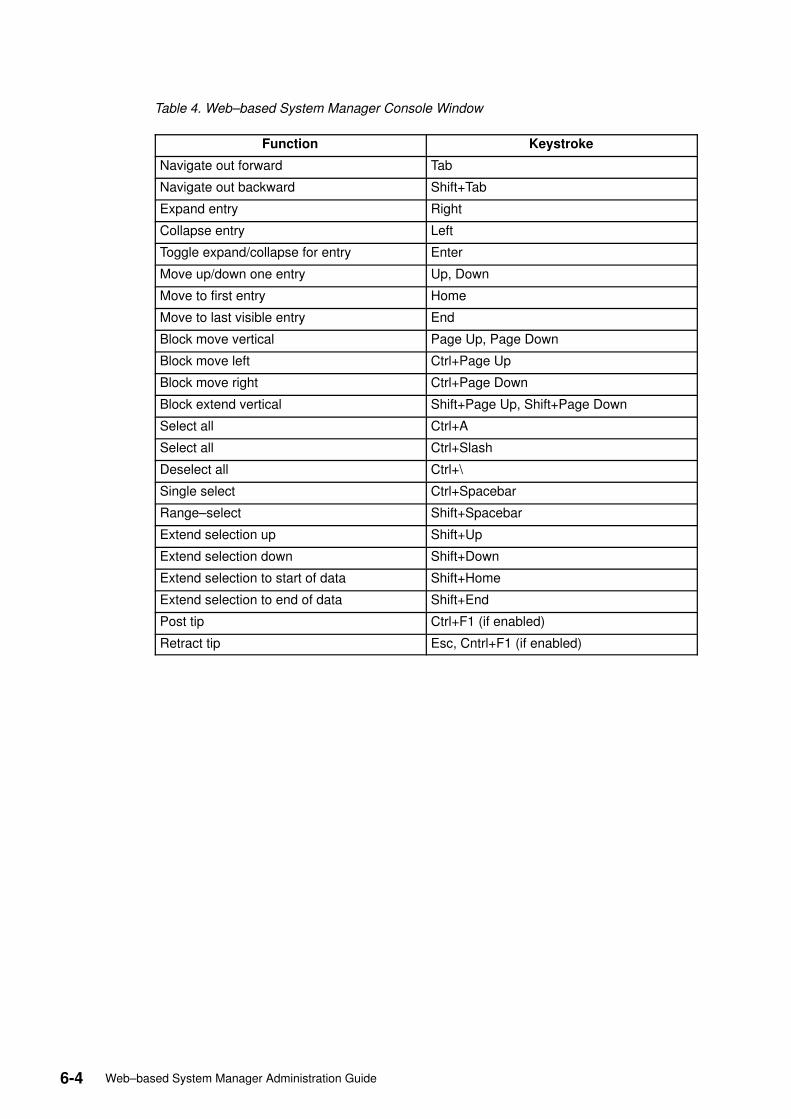
6-4 Web–based System Manager Administration Guide
Table 4. Web–based System Manager Console Window
Function Keystroke
Navigate out forward Tab
Navigate out backward Shift+Tab
Expand entry Right
Collapse entry Left
Toggle expand/collapse for entry Enter
Move up/down one entry Up, Down
Move to first entry Home
Move to last visible entry End
Block move vertical Page Up, Page Down
Block move left Ctrl+Page Up
Block move right Ctrl+Page Down
Block extend vertical Shift+Page Up, Shift+Page Down
Select all Ctrl+A
Select all Ctrl+Slash
Deselect all Ctrl+\
Single select Ctrl+Spacebar
Range–select Shift+Spacebar
Extend selection up Shift+Up
Extend selection down Shift+Down
Extend selection to start of data Shift+Home
Extend selection to end of data Shift+End
Post tip Ctrl+F1 (if enabled)
Retract tip Esc, Cntrl+F1 (if enabled)

6-5Web–based System Manager Accessibility
Table 5. Navigation Area – Management Environment
Function Keystroke
Navigate out forward Tab
Navigate out backward Shift+Tab
Expand entry Right
Collapse entry Left
Toggle expand/collapse for entry Enter
Move up/down one entry Up, Down
Move to first entry Home
Move to last visible entry End
Block move vertical Page Up, Page Down
Block move left Ctrl+Page Up
Block move right Ctrl+Page Down
Block extend vertical Shift+Page Up, Shift+Page Down
Select all Ctrl+A
Select all Ctrl+Slash
Deselect all Ctrl+\
Single select Ctrl+Spacebar
Range select Shift+Spacebar
Extend selection up Shift+Up
Extend selection down Shift+Down
Extend selection to start of data Shift+Home
Extend selection to end of data Shift+End
Post tip Ctrl+F1 (if enabled)
Retract tip Esc, Ctrl+F1 (if enabled)
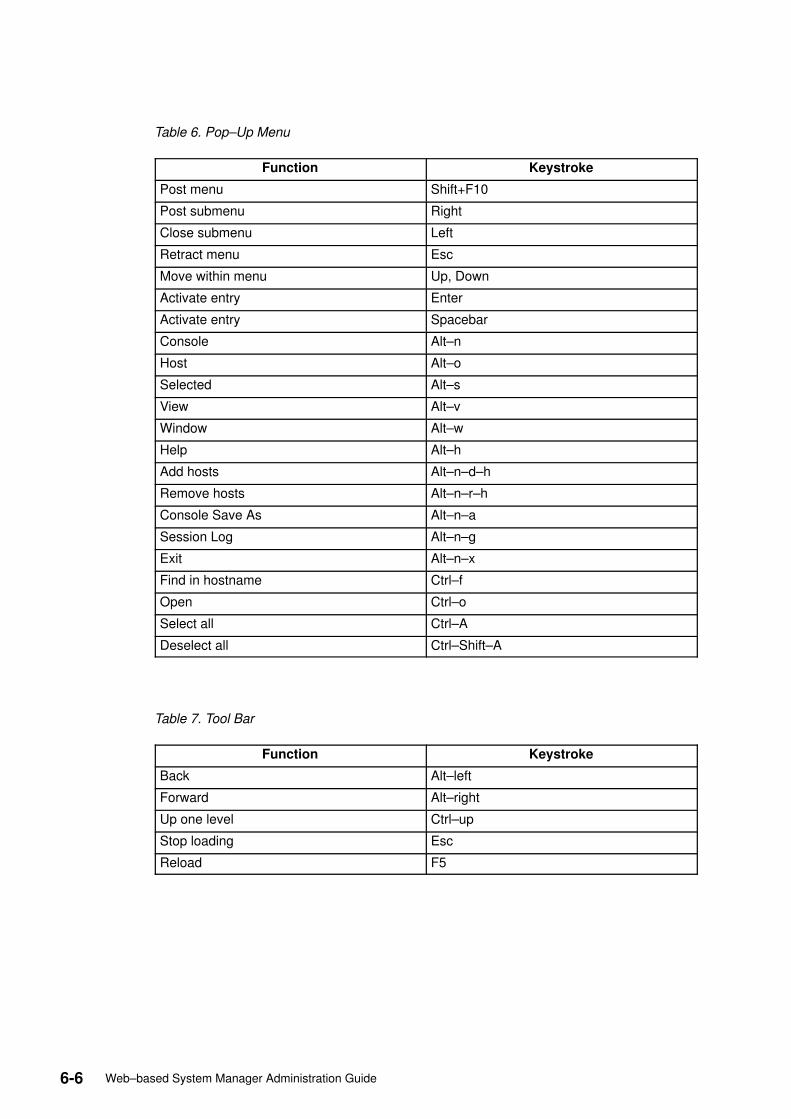
6-6 Web–based System Manager Administration Guide
Table 6. Pop–Up Menu
Function Keystroke
Post menu Shift+F10
Post submenu Right
Close submenu Left
Retract menu Esc
Move within menu Up, Down
Activate entry Enter
Activate entry Spacebar
Console Alt–n
Host Alt–o
Selected Alt–s
View Alt–v
Window Alt–w
Help Alt–h
Add hosts Alt–n–d–h
Remove hosts Alt–n–r–h
Console Save As Alt–n–a
Session Log Alt–n–g
Exit Alt–n–x
Find in hostname Ctrl–f
Open Ctrl–o
Select all Ctrl–A
Deselect all Ctrl–Shift–A
Table 7. Tool Bar
Function Keystroke
Back Alt–left
Forward Alt–right
Up one level Ctrl–up
Stop loading Esc
Reload F5
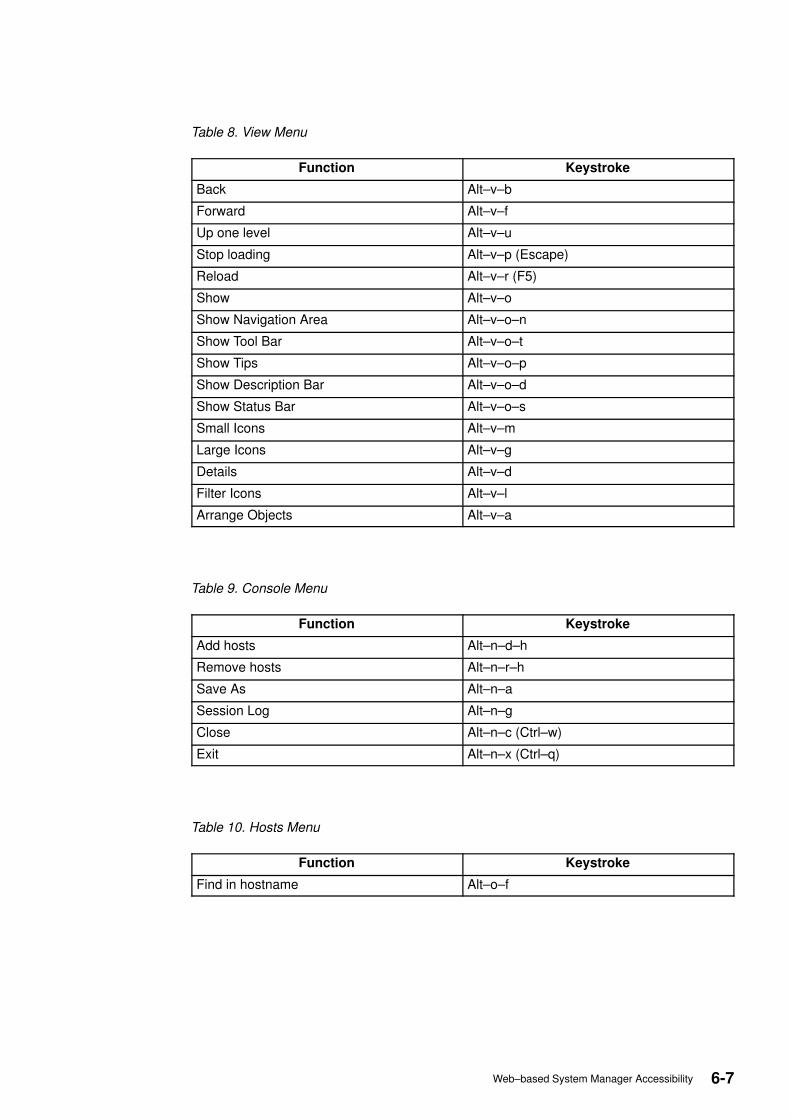
6-7Web–based System Manager Accessibility
Table 8. View Menu
Function Keystroke
Back Alt–v–b
Forward Alt–v–f
Up one level Alt–v–u
Stop loading Alt–v–p (Escape)
Reload Alt–v–r (F5)
Show Alt–v–o
Show Navigation Area Alt–v–o–n
Show Tool Bar Alt–v–o–t
Show Tips Alt–v–o–p
Show Description Bar Alt–v–o–d
Show Status Bar Alt–v–o–s
Small Icons Alt–v–m
Large Icons Alt–v–g
Details Alt–v–d
Filter Icons Alt–v–l
Arrange Objects Alt–v–a
Table 9. Console Menu
Function Keystroke
Add hosts Alt–n–d–h
Remove hosts Alt–n–r–h
Save As Alt–n–a
Session Log Alt–n–g
Close Alt–n–c (Ctrl–w)
Exit Alt–n–x (Ctrl–q)
Table 10. Hosts Menu
Function Keystroke
Find in hostname Alt–o–f
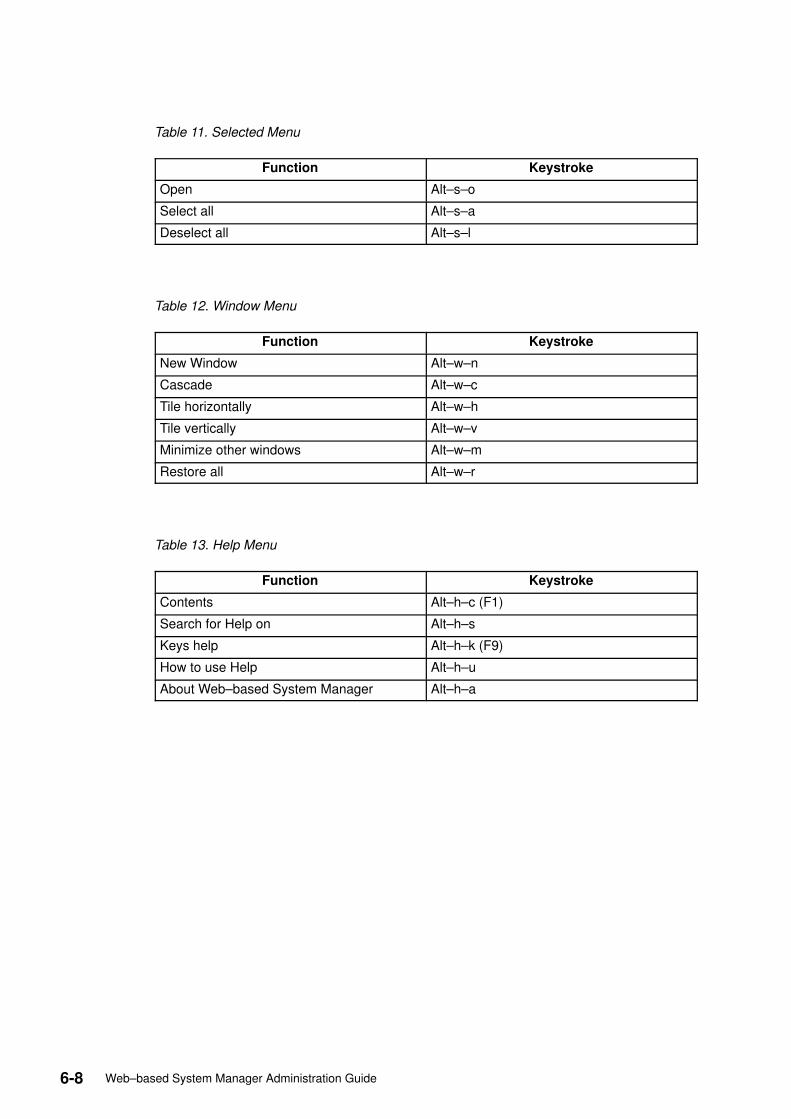
6-8 Web–based System Manager Administration Guide
Table 11. Selected Menu
Function Keystroke
Open Alt–s–o
Select all Alt–s–a
Deselect all Alt–s–l
Table 12. Window Menu
Function Keystroke
New Window Alt–w–n
Cascade Alt–w–c
Tile horizontally Alt–w–h
Tile vertically Alt–w–v
Minimize other windows Alt–w–m
Restore all Alt–w–r
Table 13. Help Menu
Function Keystroke
Contents Alt–h–c (F1)
Search for Help on Alt–h–s
Keys help Alt–h–k (F9)
How to use Help Alt–h–u
About Web–based System Manager Alt–h–a

A-1Troubleshooting
Appendix A. Troubleshooting
The following troubleshooting topics are available:
• Troubleshooting Remote Machines on page A-2
• Troubleshooting Web–based System Manager in Applet Mode on page A-3
• Troubleshooting Web–based System Manager in Remote Client Mode on page A-4
• Troubleshooting Security on page A-5
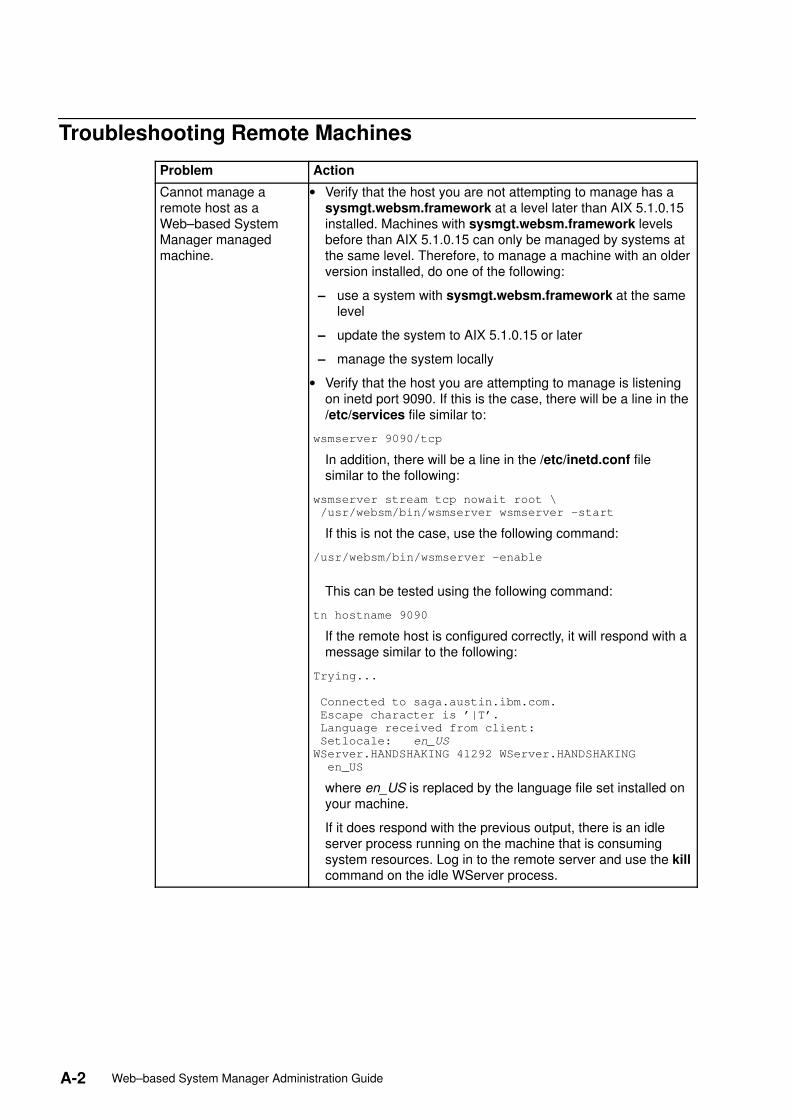
A-2 Web–based System Manager Administration Guide
Troubleshooting Remote Machines
Problem Action
Cannot manage aremote host as aWeb–based SystemManager managedmachine.
• Verify that the host you are not attempting to manage has asysmgt.websm.framework at a level later than AIX 5.1.0.15installed. Machines with sysmgt.websm.framework levelsbefore than AIX 5.1.0.15 can only be managed by systems atthe same level. Therefore, to manage a machine with an olderversion installed, do one of the following:
– use a system with sysmgt.websm.framework at the samelevel
– update the system to AIX 5.1.0.15 or later
– manage the system locally
• Verify that the host you are attempting to manage is listeningon inetd port 9090. If this is the case, there will be a line in the/etc/services file similar to:
wsmserver 9090/tcp
In addition, there will be a line in the /etc/inetd.conf filesimilar to the following:
wsmserver stream tcp nowait root \
/usr/websm/bin/wsmserver wsmserver –start
If this is not the case, use the following command:
/usr/websm/bin/wsmserver –enable
This can be tested using the following command:
tn hostname 9090
If the remote host is configured correctly, it will respond with amessage similar to the following:
Trying...
Connected to saga.austin.ibm.com.
Escape character is ’|T’.
Language received from client:
Setlocale: en_US
WServer.HANDSHAKING 41292 WServer.HANDSHAKING
en_US
where en_US is replaced by the language file set installed onyour machine.
If it does respond with the previous output, there is an idleserver process running on the machine that is consumingsystem resources. Log in to the remote server and use the killcommand on the idle WServer process.
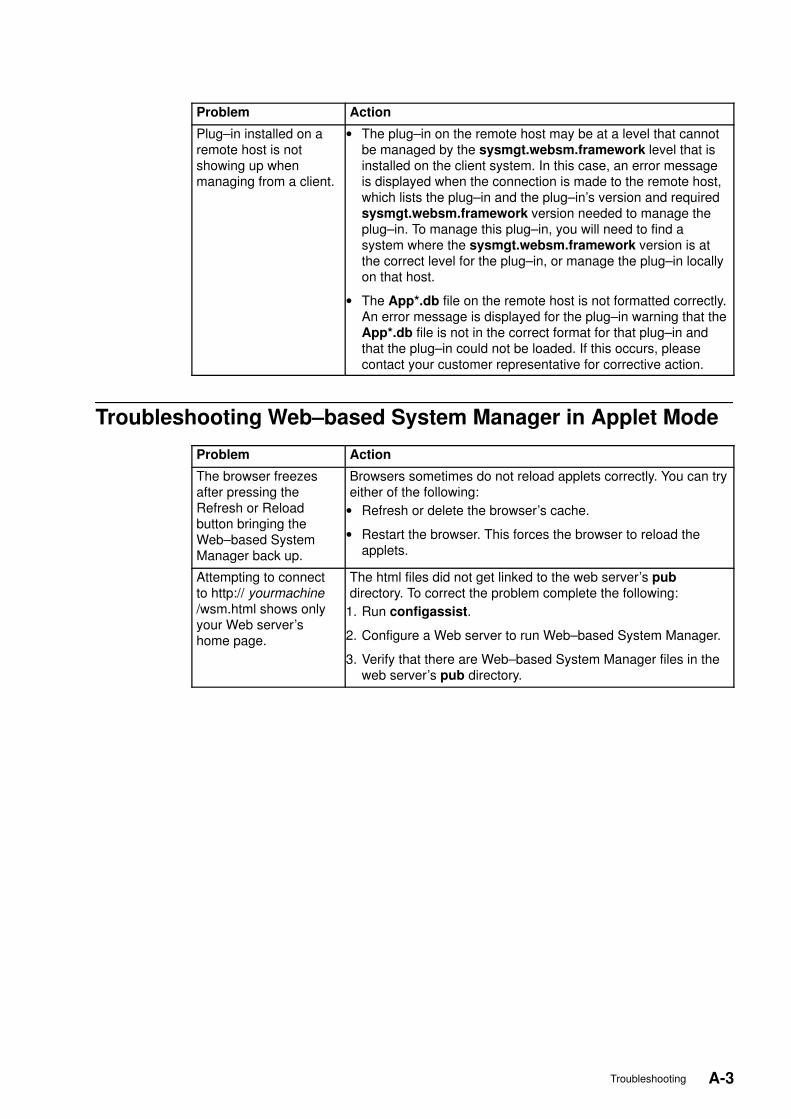
A-3Troubleshooting
Problem Action
Plug–in installed on aremote host is notshowing up whenmanaging from a client.
• The plug–in on the remote host may be at a level that cannotbe managed by the sysmgt.websm.framework level that isinstalled on the client system. In this case, an error messageis displayed when the connection is made to the remote host,which lists the plug–in and the plug–in’s version and requiredsysmgt.websm.framework version needed to manage theplug–in. To manage this plug–in, you will need to find asystem where the sysmgt.websm.framework version is atthe correct level for the plug–in, or manage the plug–in locallyon that host.
• The App*.db file on the remote host is not formatted correctly.An error message is displayed for the plug–in warning that theApp*.db file is not in the correct format for that plug–in andthat the plug–in could not be loaded. If this occurs, pleasecontact your customer representative for corrective action.
Troubleshooting Web–based System Manager in Applet Mode
Problem Action
The browser freezesafter pressing theRefresh or Reloadbutton bringing theWeb–based SystemManager back up.
Browsers sometimes do not reload applets correctly. You can tryeither of the following:
• Refresh or delete the browser’s cache.
• Restart the browser. This forces the browser to reload theapplets.
Attempting to connectto http:// yourmachine/wsm.html shows onlyyour Web server’shome page.
The html files did not get linked to the web server’s pubdirectory. To correct the problem complete the following:
1. Run configassist.
2. Configure a Web server to run Web–based System Manager.
3. Verify that there are Web–based System Manager files in theweb server’s pub directory.
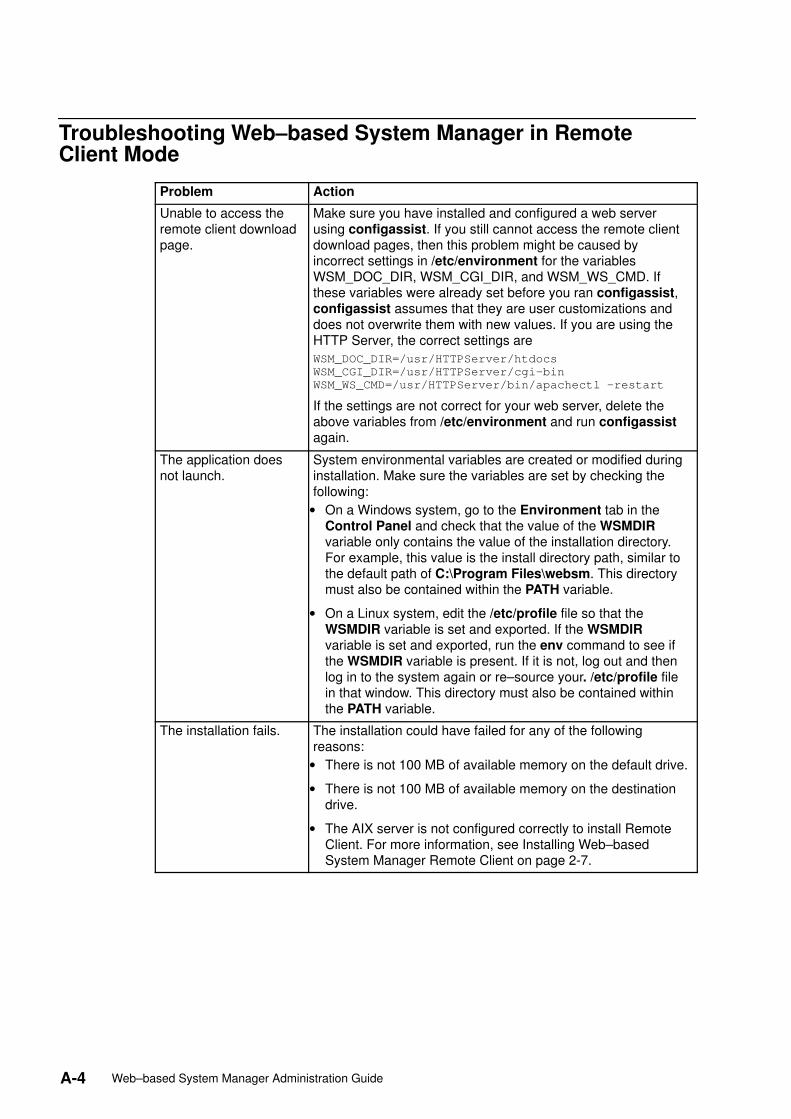
A-4 Web–based System Manager Administration Guide
Troubleshooting Web–based System Manager in RemoteClient Mode
Problem Action
Unable to access theremote client downloadpage.
Make sure you have installed and configured a web serverusing configassist. If you still cannot access the remote clientdownload pages, then this problem might be caused byincorrect settings in /etc/environment for the variablesWSM_DOC_DIR, WSM_CGI_DIR, and WSM_WS_CMD. Ifthese variables were already set before you ran configassist,configassist assumes that they are user customizations anddoes not overwrite them with new values. If you are using theHTTP Server, the correct settings are
WSM_DOC_DIR=/usr/HTTPServer/htdocs
WSM_CGI_DIR=/usr/HTTPServer/cgi–bin
WSM_WS_CMD=/usr/HTTPServer/bin/apachectl –restart
If the settings are not correct for your web server, delete theabove variables from /etc/environment and run configassistagain.
The application doesnot launch.
System environmental variables are created or modified duringinstallation. Make sure the variables are set by checking thefollowing:
• On a Windows system, go to the Environment tab in theControl Panel and check that the value of the WSMDIRvariable only contains the value of the installation directory.For example, this value is the install directory path, similar tothe default path of C:\Program Files\websm. This directorymust also be contained within the PATH variable.
• On a Linux system, edit the /etc/profile file so that theWSMDIR variable is set and exported. If the WSMDIRvariable is set and exported, run the env command to see ifthe WSMDIR variable is present. If it is not, log out and thenlog in to the system again or re–source your. /etc/profile filein that window. This directory must also be contained withinthe PATH variable.
The installation fails. The installation could have failed for any of the followingreasons:
• There is not 100 MB of available memory on the default drive.
• There is not 100 MB of available memory on the destinationdrive.
• The AIX server is not configured correctly to install RemoteClient. For more information, see Installing Web–basedSystem Manager Remote Client on page 2-7.
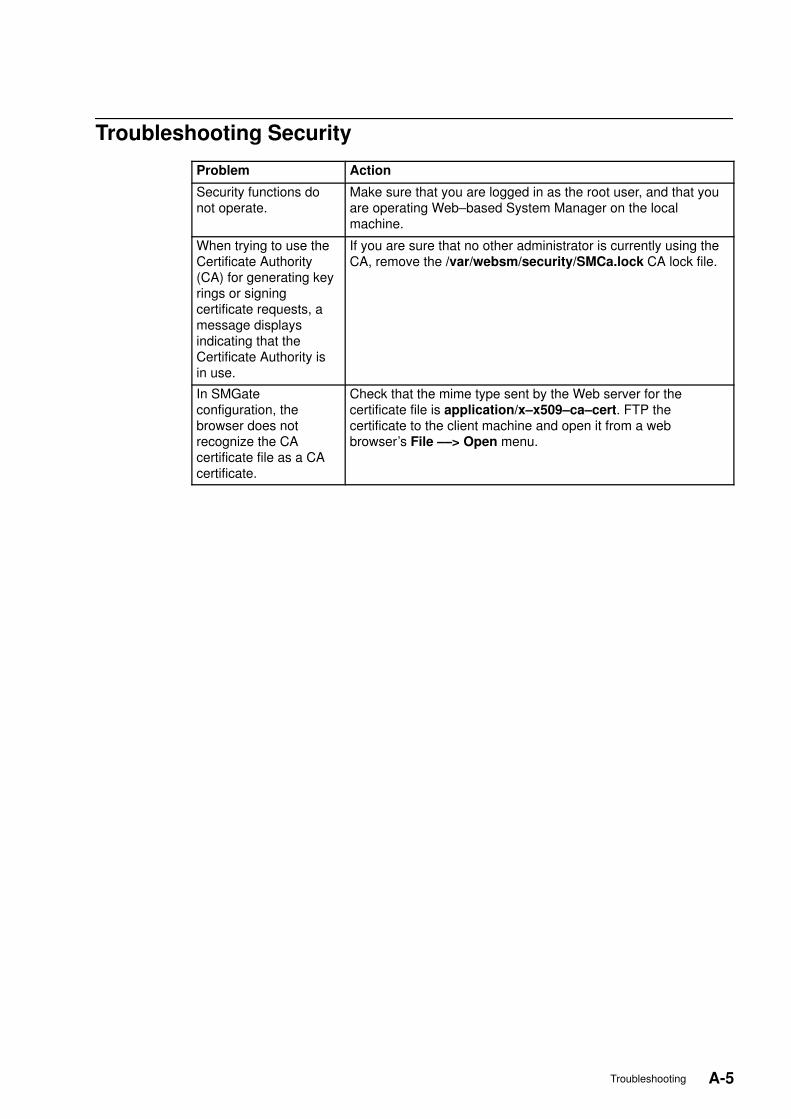
A-5Troubleshooting
Troubleshooting Security
Problem Action
Security functions donot operate.
Make sure that you are logged in as the root user, and that youare operating Web–based System Manager on the localmachine.
When trying to use theCertificate Authority(CA) for generating keyrings or signingcertificate requests, amessage displaysindicating that theCertificate Authority isin use.
If you are sure that no other administrator is currently using theCA, remove the /var/websm/security/SMCa.lock CA lock file.
In SMGateconfiguration, thebrowser does notrecognize the CAcertificate file as a CAcertificate.
Check that the mime type sent by the Web server for thecertificate file is application/x–x509–ca–cert. FTP thecertificate to the client machine and open it from a webbrowser’s File ––> Open menu.
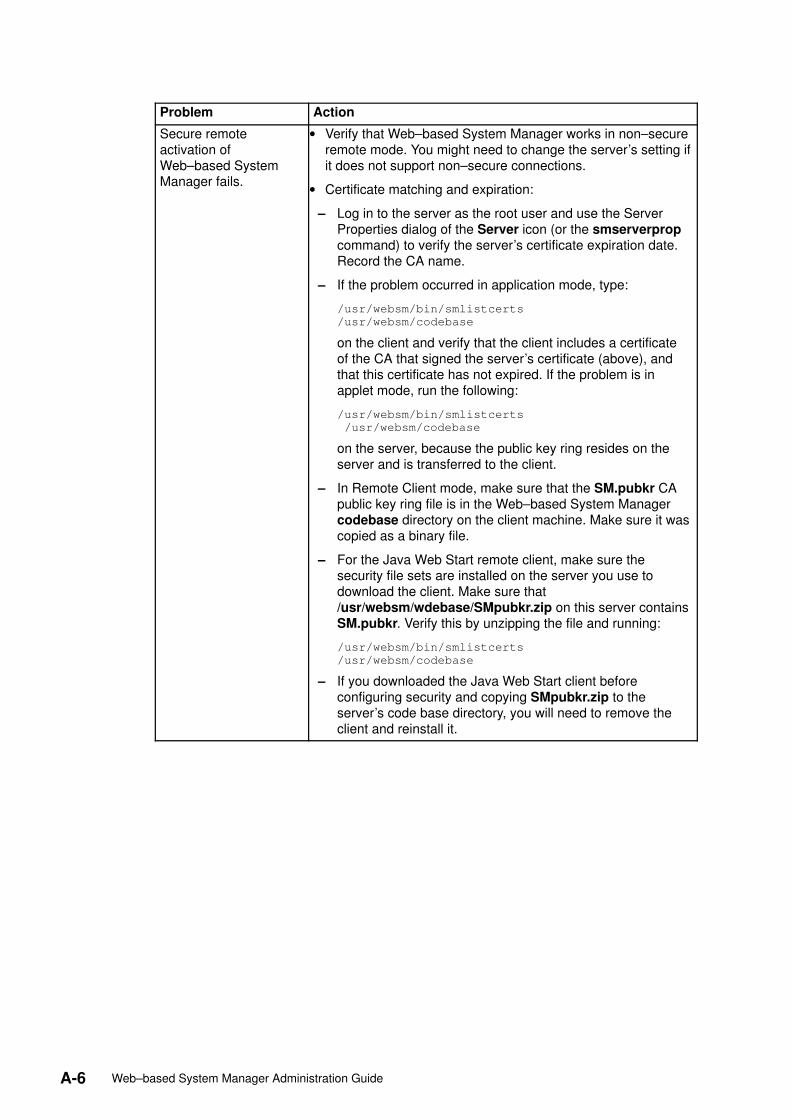
A-6 Web–based System Manager Administration Guide
Problem Action
Secure remoteactivation ofWeb–based SystemManager fails.
• Verify that Web–based System Manager works in non–secureremote mode. You might need to change the server’s setting ifit does not support non–secure connections.
• Certificate matching and expiration:
– Log in to the server as the root user and use the ServerProperties dialog of the Server icon (or the smserverpropcommand) to verify the server’s certificate expiration date.Record the CA name.
– If the problem occurred in application mode, type:
/usr/websm/bin/smlistcerts
/usr/websm/codebase
on the client and verify that the client includes a certificateof the CA that signed the server’s certificate (above), andthat this certificate has not expired. If the problem is inapplet mode, run the following:
/usr/websm/bin/smlistcerts
/usr/websm/codebase
on the server, because the public key ring resides on theserver and is transferred to the client.
– In Remote Client mode, make sure that the SM.pubkr CApublic key ring file is in the Web–based System Managercodebase directory on the client machine. Make sure it wascopied as a binary file.
– For the Java Web Start remote client, make sure thesecurity file sets are installed on the server you use todownload the client. Make sure that/usr/websm/wdebase/SMpubkr.zip on this server containsSM.pubkr. Verify this by unzipping the file and running:
/usr/websm/bin/smlistcerts
/usr/websm/codebase
– If you downloaded the Java Web Start client beforeconfiguring security and copying SMpubkr.zip to theserver’s code base directory, you will need to remove theclient and reinstall it.

Index X-1
Index
Aaccessibility, mnemonics, 6-1accessing help, 3-9adding machines, 4-2applet mode
installing requirements, 2-7multiple sites, 5-7operating, 1-7private key transfer, 5-10properties, viewing, 5-17public key ring, 5-17ready–to–go key ring, 5-4running security, 5-20SMGate daemon, 5-16using another, 5-13
CCertificate Authority (CA), 5-4client (browser) configuring, 2-7client–server mode, configuring, 1-6client–server mode, enabling, 2-4client–server mode, running, 5-20command line, 3-16configuring
AIX server for Remote Client, 2-8AIX server for Remote Client Security, 2-11client (browser), 2-7management environment, 4-1security, 5-3SMGate daemon, 5-16
consolecontents area, 3-3filtering and sorting views, 3-3keyboard control, 3-20menu, 3-7navigating with the keyboard, 3-20navigation area, 3-2session log, 3-22status bar, 3-12toolbar, 3-7window, 1-2workspace, 3-13
containersdetails view, 3-4icon view, 3-5icons, 3-5tree view, 3-5
contents areaconsole, 3-3launchers, 3-6
Ddialog, working, 3-11
Eenable client–server mode, 2-4
Ffiles
preferencechild window, 3-15errors saving and loading, 3-15
ready–to–go key ringCA (Certificate Authority), 5-4ISO country code, 5-4
user–editable, 3-19filesets, optional, 2-5filtering and sorting views, 3-3forcessl, 3-19
Hhelp
accessing, 3-9context sensitive, 3-9hover help, 3-9Java help, 3-9tips area, 3-9, 3-10
Iicons, 3-5inetd ports, 2-4install requirements, Web–based System Manager,
2-2installing
Remote Client, 2-7Remote Client on Linux, 2-9Remote Client on Windows, 2-8Remote Client security, 2-10Remote Client Security on Linux, 2-12Remote Client Security on Windows, 2-11requirements, applet mode, 2-7requirements, Remote Client, 2-8requirements, Remote Client Security, 2-11Web–based System Manager, 2-2
ISO country codemultiple sites, 5-7private key transfer, 5-10ready–to–go key ring, 5-4using another CA, 5-13
Kkeyboard navigating
console, 3-20mnemonics, 3-20, 6-1shortcuts, 3-20
keyboard shortcuts, 3-20adding, 4-2contents area, 3-6plug–ins, 3-6removing, 4-4
Web–based System Manager Administration GuideX-2
Mmanagement environment, configuring, 4-1menus, 3-7
console, 3-7help, 3-7object, 3-7pop–up, 3-7selected, 3-7view, 3-7window, 3-7, 3-13
mnemonicsaccessibility, 6-1keyboard, 3-20
modes of operationapplet, 1-7client–server mode, 1-6Remote Client, 1-7standalone application mode, 1-5
multiple document interface (MDI), 3-13multiple sites
CA (Cerificate Authority), 5-7ISO country code, 5-7
Nnavigation area, console, 3-2
Ooperating
applet mode, 1-7client–server mode, 1-6
optional filesets, 2-5
Ppadlock icon, 3-12plug–ins, launchers, 3-6ports
assigning values, 2-4inetd, 2-4server socket, 2-4
preference fileschild window, 3-14errors saving and loading, 3-14
private key transferCA (Certificate Authority), 5-10ISO country code, 5-10
properties, viewing CA (Certificate Authority), 5-17public key ring
CA (Certificate Authority), 5-17security, 5-17
Rready–to–go key ring
CA (Certificate Authority), 5-4ISO country code, 5-4
Remote Clientinstalling on Linux, 2-9uninstalling from Linux, 2-10
Remote Client modeconfiguring AIX, 2-8installing, 2-7
installing on Windows, 2-8operating, 1-7
Remote Client Securityconfiguring AIX, 2-11installing on Linux, 2-12installing on Windows, 2-11uninstalling from Linux, 2-13
Remote Client security, installing, 2-10remote_timeout, 3-19removing machines, 4-4
Sscenarios, security, 5-3security
configuring, 5-3enabling, 5-18padlock icon, 3-12public key ring, 5-17running
applet mode, 5-20application mode, 5-20
scenarios, 5-3SSL, install requirements, 2-14
server socket ports, 2-4session log, console, 3-22shortcuts, keyboard, 3-20SMGate daemon
configuring, 5-16enabling, 5-19
SSL (Secure Socket Layer)install requirements, 2-14secured protocol, 5-1
standalone application mode, 1-5status bar, console, 3-12
Ttips area, help, 3-10Tivoli Netview, integrating, 2-15toolbar, console, 3-7
Uuninstalling
Remote Client from Linux, 2-10Remote Client Security from Linux, 2-13
user–editable files, 3-19using another CA, 5-13
WWeb–based System Manager
installing, 2-2requirements, 2-2
windowconsole, 1-2managing multiple, 3-13sizing, 3-13
window menu, 3-13working dialog, 3-11workspace, console, 3-13
XX–emulators, 2-2
Vos remarques sur ce document / Technical publication remark form
Titre / Title : Bull AIX 5L Web–based System Manager Administration Guide
Nº Reférence / Reference Nº : 86 A2 52EM 00 Daté / Dated : July 2004
ERREURS DETECTEES / ERRORS IN PUBLICATION
AMELIORATIONS SUGGEREES / SUGGESTIONS FOR IMPROVEMENT TO PUBLICATION
Vos remarques et suggestions seront examinées attentivement.
Si vous désirez une réponse écrite, veuillez indiquer ci-après votre adresse postale complète.
Your comments will be promptly investigated by qualified technical personnel and action will be taken as required.
If you require a written reply, please furnish your complete mailing address below.
NOM / NAME : Date :
SOCIETE / COMPANY :
ADRESSE / ADDRESS :
Remettez cet imprimé à un responsable BULL ou envoyez-le directement à :
Please give this technical publication remark form to your BULL representative or mail to:
BULL CEDOC
357 AVENUE PATTON
B.P.20845
49008 ANGERS CEDEX 01
FRANCE
Technical Publications Ordering Form
Bon de Commande de Documents Techniques
To order additional publications, please fill up a copy of this form and send it via mail to:
Pour commander des documents techniques, remplissez une copie de ce formulaire et envoyez-la à :
BULL CEDOCATTN / Mr. L. CHERUBIN357 AVENUE PATTONB.P.2084549008 ANGERS CEDEX 01FRANCE
Phone / Téléphone : +33 (0) 2 41 73 63 96FAX / Télécopie +33 (0) 2 41 73 60 19E–Mail / Courrier Electronique : [email protected]
Or visit our web sites at: / Ou visitez nos sites web à:
http://www.logistics.bull.net/cedoc
http://www–frec.bull.com http://www.bull.com
CEDOC Reference #No Référence CEDOC
QtyQté
CEDOC Reference #No Référence CEDOC
QtyQté
CEDOC Reference #No Référence CEDOC
QtyQté
_ _ _ _ _ _ _ _ _ [ _ _ ] _ _ _ _ _ _ _ _ _ [ _ _ ] _ _ _ _ _ _ _ _ _ [ _ _ ]
_ _ _ _ _ _ _ _ _ [ _ _ ] _ _ _ _ _ _ _ _ _ [ _ _ ] _ _ _ _ _ _ _ _ _ [ _ _ ]
_ _ _ _ _ _ _ _ _ [ _ _ ] _ _ _ _ _ _ _ _ _ [ _ _ ] _ _ _ _ _ _ _ _ _ [ _ _ ]
_ _ _ _ _ _ _ _ _ [ _ _ ] _ _ _ _ _ _ _ _ _ [ _ _ ] _ _ _ _ _ _ _ _ _ [ _ _ ]
_ _ _ _ _ _ _ _ _ [ _ _ ] _ _ _ _ _ _ _ _ _ [ _ _ ] _ _ _ _ _ _ _ _ _ [ _ _ ]
_ _ _ _ _ _ _ _ _ [ _ _ ] _ _ _ _ _ _ _ _ _ [ _ _ ] _ _ _ _ _ _ _ _ _ [ _ _ ]
_ _ _ _ _ _ _ _ _ [ _ _ ] _ _ _ _ _ _ _ _ _ [ _ _ ] _ _ _ _ _ _ _ _ _ [ _ _ ]
[ _ _ ] : no revision number means latest revision / pas de numéro de révision signifie révision la plus récente
NOM / NAME : Date :
SOCIETE / COMPANY :
ADRESSE / ADDRESS :
PHONE / TELEPHONE : FAX :
E–MAIL :
For Bull Subsidiaries / Pour les Filiales Bull :
Identification:
For Bull Affiliated Customers / Pour les Clients Affiliés Bull :
Customer Code / Code Client :
For Bull Internal Customers / Pour les Clients Internes Bull :
Budgetary Section / Section Budgétaire :
For Others / Pour les Autres :
Please ask your Bull representative. / Merci de demander à votre contact Bull.


BULL CEDOC
357 AVENUE PATTON
B.P.20845
49008 ANGERS CEDEX 01
FRANCE
86 A2 52EM 00
ORDER REFERENCE
Utiliser les marques de découpe pour obtenir les étiquettes.
Use the cut marks to get the labels.
AIX
86 A2 52EM 00
AIX 5L Web–basedSystem Manager
AdministrationGuide
AIX
86 A2 52EM 00
AIX 5L Web–basedSystem Manager
AdministrationGuide
AIX
86 A2 52EM 00
AIX 5L Web–basedSystem Manager
AdministrationGuide

Related Documents