AIX 5L Security Guide ESCALA AIX REFERENCE 86 A2 22EG 01

Welcome message from author
This document is posted to help you gain knowledge. Please leave a comment to let me know what you think about it! Share it to your friends and learn new things together.
Transcript
AIX 5L
Security Guide
ESC
ALA
AIX
REFERENCE86 A2 22EG 01

ESCALA
AIX 5LSecurity Guide
AIX
May 2003
BULL CEDOC
357 AVENUE PATTON
B.P.20845
49008 ANGERS CEDEX 01
FRANCE
REFERENCE86 A2 22EG 01
Software
The following copyright notice protects this book under Copyright laws which prohibit such actions as, but notlimited to, copying, distributing, modifying, and making derivative works.
Copyright Bull SAS 1992, 2003
Printed in France
Suggestions and criticisms concerning the form, content, and presentation of thisbook are invited. A form is provided at the end of this book for this purpose.
To order additional copies of this book or other Bull Technical Publications, youare invited to use the Ordering Form also provided at the end of this book.
Trademarks and Acknowledgements
We acknowledge the right of proprietors of trademarks mentioned in this book.
AIX® is a registered trademark of International Business Machines Corporation, and is being used under licence.
UNIX® is a registered trademark in the United States of America and other countries licensed exclusively throughthe Open Group.
Linux® is the registered trademark of Linus Torvalds in the U.S. and other countries
The information in this document is subject to change without notice. Bull will not be liable for errors containedherein, or for incidental or consequential damages in connection with the use of this material.
Contents
About This Book . . . . . . . . . . . . . . . . . . . . . . . . . . . . . . . . viiWho Should Use This Book . . . . . . . . . . . . . . . . . . . . . . . . . . . . . viiHighlighting . . . . . . . . . . . . . . . . . . . . . . . . . . . . . . . . . . . viiCase-Sensitivity in AIX. . . . . . . . . . . . . . . . . . . . . . . . . . . . . . . viiISO 9000 . . . . . . . . . . . . . . . . . . . . . . . . . . . . . . . . . . . viiRelated Publications . . . . . . . . . . . . . . . . . . . . . . . . . . . . . . . viii
Part 1. Standalone System Security . . . . . . . . . . . . . . . . . . . . . . 1
Chapter 1. Installing and Configuring a Secure System. . . . . . . . . . . . . . . . . . 3Trusted Computing Base . . . . . . . . . . . . . . . . . . . . . . . . . . . . . . 3Controlled Access Protection Profile and Evaluation Assurance Level 4+ . . . . . . . . . . . . 8Login Control . . . . . . . . . . . . . . . . . . . . . . . . . . . . . . . . . . 18Managing X11 and CDE Concerns . . . . . . . . . . . . . . . . . . . . . . . . . . 21
Chapter 2. Users, Roles, and Passwords . . . . . . . . . . . . . . . . . . . . . . . 23Root Account . . . . . . . . . . . . . . . . . . . . . . . . . . . . . . . . . . 23Administrative Roles . . . . . . . . . . . . . . . . . . . . . . . . . . . . . . . 24User Accounts . . . . . . . . . . . . . . . . . . . . . . . . . . . . . . . . . 28Set Up Anonymous FTP with a Secure User Account . . . . . . . . . . . . . . . . . . . 31System Special User Accounts . . . . . . . . . . . . . . . . . . . . . . . . . . . 34Access Control Lists . . . . . . . . . . . . . . . . . . . . . . . . . . . . . . . 35Passwords . . . . . . . . . . . . . . . . . . . . . . . . . . . . . . . . . . . 40User Authentication . . . . . . . . . . . . . . . . . . . . . . . . . . . . . . . . 45Disk Quota System Overview . . . . . . . . . . . . . . . . . . . . . . . . . . . . 45
Chapter 3. Auditing . . . . . . . . . . . . . . . . . . . . . . . . . . . . . . . 49Auditing Subsystem . . . . . . . . . . . . . . . . . . . . . . . . . . . . . . . 49Event Selection . . . . . . . . . . . . . . . . . . . . . . . . . . . . . . . . . 50Auditing Subsystem Configuration . . . . . . . . . . . . . . . . . . . . . . . . . . 51Audit Logger Configuration . . . . . . . . . . . . . . . . . . . . . . . . . . . . . 52Setting Up Auditing . . . . . . . . . . . . . . . . . . . . . . . . . . . . . . . . 55
Chapter 4. LDAP Authentication Load Module . . . . . . . . . . . . . . . . . . . . . 61Setting Up an LDAP Security Information Server . . . . . . . . . . . . . . . . . . . . . 61Setting Up an LDAP Client . . . . . . . . . . . . . . . . . . . . . . . . . . . . . 62LDAP User Management. . . . . . . . . . . . . . . . . . . . . . . . . . . . . . 63LDAP Host Access Control . . . . . . . . . . . . . . . . . . . . . . . . . . . . . 64LDAP Security Information Server Auditing . . . . . . . . . . . . . . . . . . . . . . . 64LDAP Commands . . . . . . . . . . . . . . . . . . . . . . . . . . . . . . . . 65Related Information. . . . . . . . . . . . . . . . . . . . . . . . . . . . . . . . 73
Chapter 5. PKCS #11 . . . . . . . . . . . . . . . . . . . . . . . . . . . . . . . 75IBM 4758 Model 2 Cryptographic Coprocessor. . . . . . . . . . . . . . . . . . . . . . 75PKCS #11 Subsystem Configuration . . . . . . . . . . . . . . . . . . . . . . . . . 76PKCS #11 Usage . . . . . . . . . . . . . . . . . . . . . . . . . . . . . . . . 77
Chapter 6. X.509 Certificate Authentication Service and Public Key Infrastructure . . . . . . . 79Overview of Certificate Authentication Service . . . . . . . . . . . . . . . . . . . . . . 79Implementation of Certificate Authentication Service . . . . . . . . . . . . . . . . . . . . 81Planning for Certificate Authentication Service . . . . . . . . . . . . . . . . . . . . . . 91Packaging of Certificate Authentication Service . . . . . . . . . . . . . . . . . . . . . 93Installing and Configuring Certificate Authentication Service . . . . . . . . . . . . . . . . . 94
© Copyright IBM Corp. 2002, 2003 iii
Chapter 7. Pluggable Authentication Module . . . . . . . . . . . . . . . . . . . . . 107PAM Library . . . . . . . . . . . . . . . . . . . . . . . . . . . . . . . . . . 107PAM Modules . . . . . . . . . . . . . . . . . . . . . . . . . . . . . . . . . 108PAM Configuration File . . . . . . . . . . . . . . . . . . . . . . . . . . . . . . 109Adding a PAM Module . . . . . . . . . . . . . . . . . . . . . . . . . . . . . . 110Changing the /etc/pam.conf . . . . . . . . . . . . . . . . . . . . . . . . . . . . 110Enabling PAM Debug. . . . . . . . . . . . . . . . . . . . . . . . . . . . . . . 111Integrating PAM in AIX . . . . . . . . . . . . . . . . . . . . . . . . . . . . . . 111
Chapter 8. OpenSSH Software Tools . . . . . . . . . . . . . . . . . . . . . . . . 115Using OpenSSH with PAM. . . . . . . . . . . . . . . . . . . . . . . . . . . . . 116
Part 2. Network and Internet Security . . . . . . . . . . . . . . . . . . . . 119
Chapter 9. TCP/IP Security . . . . . . . . . . . . . . . . . . . . . . . . . . . . 121Operating System-Specific Security . . . . . . . . . . . . . . . . . . . . . . . . . 121TCP/IP Command Security . . . . . . . . . . . . . . . . . . . . . . . . . . . . 123Trusted Processes . . . . . . . . . . . . . . . . . . . . . . . . . . . . . . . 125Network Trusted Computing Base . . . . . . . . . . . . . . . . . . . . . . . . . . 127Data Security and Information Protection . . . . . . . . . . . . . . . . . . . . . . . 127User Based TCP Port Access Control with Discretionary Access Control for Internet Ports . . . . . 128
Chapter 10. Network Services . . . . . . . . . . . . . . . . . . . . . . . . . . . 131Identifying Network Services with Open Communication Ports . . . . . . . . . . . . . . . 131Identifying TCP and UDP Sockets . . . . . . . . . . . . . . . . . . . . . . . . . . 133
Chapter 11. Internet Protocol (IP) Security . . . . . . . . . . . . . . . . . . . . . . 135IP Security Overview . . . . . . . . . . . . . . . . . . . . . . . . . . . . . . . 135Installing the IP Security Feature . . . . . . . . . . . . . . . . . . . . . . . . . . 140Planning IP Security Configuration . . . . . . . . . . . . . . . . . . . . . . . . . . 141Configuring Internet Key Exchange Tunnels . . . . . . . . . . . . . . . . . . . . . . 149Working with Digital Certificates and the Key Manager . . . . . . . . . . . . . . . . . . 155Configuring Manual Tunnels . . . . . . . . . . . . . . . . . . . . . . . . . . . . 165Setting Up Filters . . . . . . . . . . . . . . . . . . . . . . . . . . . . . . . . 168Logging Facilities . . . . . . . . . . . . . . . . . . . . . . . . . . . . . . . . 174IP Security Problem Determination. . . . . . . . . . . . . . . . . . . . . . . . . . 178IP Security Reference . . . . . . . . . . . . . . . . . . . . . . . . . . . . . . 187
Chapter 12. Network Information Services (NIS) and NIS+ Security . . . . . . . . . . . . 189Operating System Security Mechanisms . . . . . . . . . . . . . . . . . . . . . . . 189NIS+ Security Mechanisms . . . . . . . . . . . . . . . . . . . . . . . . . . . . 191NIS+ Authentication and Credentials . . . . . . . . . . . . . . . . . . . . . . . . . 194NIS+ Authorization and Access . . . . . . . . . . . . . . . . . . . . . . . . . . . 196NIS+ Security and Administrative Rights . . . . . . . . . . . . . . . . . . . . . . . 200NIS+ Security Reference . . . . . . . . . . . . . . . . . . . . . . . . . . . . . 201
Chapter 13. Network File System (NFS) Security . . . . . . . . . . . . . . . . . . . 203NFS Authentication . . . . . . . . . . . . . . . . . . . . . . . . . . . . . . . 203Naming Network Entities for DES Authentication . . . . . . . . . . . . . . . . . . . . 205The /etc/publickey File . . . . . . . . . . . . . . . . . . . . . . . . . . . . . . 206Booting Considerations of Public Key Systems . . . . . . . . . . . . . . . . . . . . . 206Performance Considerations of Secure NFS . . . . . . . . . . . . . . . . . . . . . . 206Checklist for Administering Secure NFS . . . . . . . . . . . . . . . . . . . . . . . . 207Configuring Secure NFS . . . . . . . . . . . . . . . . . . . . . . . . . . . . . 207Exporting a File System Using Secure NFS . . . . . . . . . . . . . . . . . . . . . . 208Mounting a File System Using Secure NFS . . . . . . . . . . . . . . . . . . . . . . 209
iv AIX 5L Version 5.2: Security Guide

Chapter 14. Enterprise Identity Mapping . . . . . . . . . . . . . . . . . . . . . . . 211Managing Multiple User Registries . . . . . . . . . . . . . . . . . . . . . . . . . . 211Current Approaches . . . . . . . . . . . . . . . . . . . . . . . . . . . . . . . 211Using Enterprise Identity Mapping . . . . . . . . . . . . . . . . . . . . . . . . . . 212
Chapter 15. Kerberos . . . . . . . . . . . . . . . . . . . . . . . . . . . . . . 213Understanding the Secure Remote Commands . . . . . . . . . . . . . . . . . . . . . 213Authenticating to AIX Using Kerberos. . . . . . . . . . . . . . . . . . . . . . . . . 215KRB5A Authentication Load Module Questions and Troubleshooting Information . . . . . . . . . 220
Part 3. Appendixes . . . . . . . . . . . . . . . . . . . . . . . . . . . . . 225
Appendix A. Security Checklist . . . . . . . . . . . . . . . . . . . . . . . . . . 227
Appendix B. Security Resources . . . . . . . . . . . . . . . . . . . . . . . . . 229Security Web Sites . . . . . . . . . . . . . . . . . . . . . . . . . . . . . . . 229Security Mailing Lists. . . . . . . . . . . . . . . . . . . . . . . . . . . . . . . 229Security Online References . . . . . . . . . . . . . . . . . . . . . . . . . . . . 229
Appendix C. Summary of Common AIX System Services . . . . . . . . . . . . . . . . 231
Appendix D. Summary of Network Service Options . . . . . . . . . . . . . . . . . . 243
Appendix E. Notices . . . . . . . . . . . . . . . . . . . . . . . . . . . . . . 245Trademarks . . . . . . . . . . . . . . . . . . . . . . . . . . . . . . . . . . 246
Index . . . . . . . . . . . . . . . . . . . . . . . . . . . . . . . . . . . . 247
Contents v

vi AIX 5L Version 5.2: Security Guide
About This Book
This book provides system administrators with information about user and group, file, system, and networksecurity for the AIX operating system. This guide contains information about how to perform such tasks aschanging permissions, setting up authentication methods, and configuring the Trusted Computing Baseenvironment and Controlled Access Protection Profile (CAPP) with Evaluation Assurance Level 4+ (EAL4+)features.
The AIX 5L Version 5.2 Security Guide contains the following parts: Standalone System Security, Networkand Internet Security, and the appendixes.
v Part 1, ″Standalone System Security,″ provides a baseline of AIX security for standalone systems. Thescope of this part includes installing a standalone system with the Trusted Computing Baseenvironment, installing the CAPP/EAL4+ features, controlling login, enforcing adequate password rules,implementing proper user-security mechanisms, enabling system auditing, and monitoring file anddirectory access. Also covered in this part is security information regarding the X11, Common DesktopEnvironment (CDE), Lightweight Directory Access Protocol (LDAP), and more.
v Part 2, ″Network and Internet Security,″ provides information about network and Internet security. Thispart addresses concerns about configuring TCP/IP security, controlling network services, auditing andmonitoring network security, configuring IP Security, configuring Virtual Private Networks, E-mailSecurity, NFS security, name services, and Kerberos.
v Part 3 contains the appendixes, which include security checklists, information about security tools,online security resources, and reference information about network services and communications ports.
This edition supports the release of AIX 5L Version 5.2 with the 5200-01 Recommended Maintenancepackage. Any specific references to this maintenance package are indicated as AIX 5.2 with 5200-01.
Who Should Use This BookThis book is intended for system administrators and IT security managers.
HighlightingThe following highlighting conventions are used in this book:
Bold Identifies commands, subroutines, keywords, files, structures, directories, and other itemswhose names are predefined by the system. Also identifies graphical objects such as buttons,labels, and icons that the user selects.
Italics Identifies parameters whose actual names or values are to be supplied by the user.Monospace Identifies examples of specific data values, examples of text similar to what you might see
displayed, examples of portions of program code similar to what you might write as aprogrammer, messages from the system, or information you should actually type.
Case-Sensitivity in AIXEverything in the AIX operating system is case-sensitive, which means that it distinguishes betweenuppercase and lowercase letters. For example, you can use the ls command to list files. If you type LS, thesystem responds that the command is ″not found.″ Likewise, FILEA, FiLea, and filea are three distinct filenames, even if they reside in the same directory. To avoid causing undesirable actions to be performed,always ensure that you use the correct case.
ISO 9000ISO 9000 registered quality systems were used in the development and manufacturing of this product.
© Copyright IBM Corp. 2002, 2003 vii
Related PublicationsThe following publications contain related information:
v AIX 5L Version 5.2 System Management Guide: Operating System and Devices
v AIX 5L Version 5.2 System Management Concepts: Operating System and Devices
v AIX 5L Version 5.2 System Management Guide: Communications and Networks
v AIX 5L Version 5.2 Operating System Installation: Getting Started
v AIX 5L Version 5.2 Installation Guide and Reference
v AIX 5L Version 5.2 Commands Reference
v AIX 5L Version 5.2 Files Reference
v AIX 5L Version 5.2 General Programming Concepts: Writing and Debugging Programs
v AIX 5L Version 5.2 System User’s Guide: Operating System and Devices
v AIX 5L Version 5.2 System User’s Guide: Communications and Networks
v AIX 5L Version 5.2 Network Information Services (NIS and NIS+) Guide
v AIX 5L Version 5.2 Guide to Printers and Printing
viii AIX 5L Version 5.2: Security Guide

Part 1. Standalone System Security
Part 1 of this guide provides information about how to protect the standalone system regardless of networkconnectivity. These chapters describe how to install your system with security options turned on, and howto secure AIX against nonprivileged users gaining access to the system.
© Copyright IBM Corp. 2002, 2003 1

2 AIX 5L Version 5.2: Security Guide
Chapter 1. Installing and Configuring a Secure System
This chapter provides information about installing and configuring a secure system.
Topics in this chapter include:
v “Trusted Computing Base”
v “Controlled Access Protection Profile and Evaluation Assurance Level 4+” on page 8
v “Login Control” on page 18
v “Managing X11 and CDE Concerns” on page 21
Trusted Computing Base
The system administrator must determine how much trust can be given to a particular program. Thisdetermination includes considering the value of the information resources on the system in deciding howmuch trust is required for a program to be installed with privilege.
The Trusted Computing Base (TCB) is the part of the system that is responsible for enforcing systemwideinformation security policies. By installing and using the TCB, you can define user access to the trustedcommunication path, which allows for secure communication between users and the TCB. TCB featurescan only be enabled when the operating system is installed. To install TCB on an already installedmachine, you will have to perform a Preservation installation. Enabling TCB allows you to access thetrusted shell, trusted processes, and the Secure Attention Key (SAK).
This section discusses the following topics:
v “Installing a System with the Trusted Computing Base”
v “Checking the Trusted Computing Base” on page 4
v “Structure of the sysck.cfg file” on page 4
v “Using the tcbck Command” on page 5
v “Configuring Additional Trusted Options” on page 7
Installing a System with the Trusted Computing BaseThe TCB is the part of the system that is responsible for enforcing the information security policies of thesystem. All of the computer’s hardware is included in the TCB, but a person administering the systemshould be concerned primarily with the software components of the TCB.
If you install a system with the Trusted Computing Base option, you enable the trusted path, trusted shell,and system-integrity checking (tcbck command). These features can only be enabled during a baseoperating system (BOS) installation. If the TCB option is not selected during the initial installation, thetcbck command is disabled. You can use this command only by reinstalling the system with the TCBoption enabled.
To set the TCB option during a BOS installation, select More Options from the Installation and Settingsscreen. In the Installation Options screen, the default for the Install Trusted Computing Base selection isno. To enable the TCB, type 2 and press Enter.
Because every device is part of the TCB, every file in the /dev directory is monitored by the TCB. Inaddition, the TCB automatically monitors over 600 additional files, storing critical information about thesefiles in the /etc/security/sysck.cfg file. If you are installing the TCB, immediately after installing, back upthis file to removable media, such as tape, CD, or disk, and store the media in a secure place.
© Copyright IBM Corp. 2002, 2003 3
Checking the Trusted Computing Base
The tcbck command audits the security state of the Trusted Computing Base. The security of theoperating system is jeopardized when the TCB files are not correctly protected or when configuration fileshave unsafe values. The tcbck command audits this information by reading the /etc/security/sysck.cfgfile. This file includes a description of all TCB files, configuration files, and trusted commands.
The /etc/security/sysck.cfg file is not offline and, could therefore be altered by a hacker. Make sure youcreate an offline read-only copy after each TCB update. Also, copy this file from the archival media to diskbefore doing any checks.
Installing the TCB and using the tcbck command do not guarantee that a system is operating in aControlled Access Protection Profile (CAPP) and Evaluation Assurance Level 4+ (EAL4+) compliant mode.For information on the CAPP/EAL4+ option, see “Controlled Access Protection Profile and EvaluationAssurance Level 4+” on page 8.
Structure of the sysck.cfg fileThe tcbck command reads the /etc/security/sysck.cfg file to determine which files to check. Each trustedprogram on the system is described by a stanza in the /etc/security/sysck.cfg file.
Each stanza has the following attributes:
acl Text string representing the access control list for the file. It must be of the sameformat as the output of the aclget command. If this does not match the actual file ACL(access control list), the sysck command applies this value using the aclputcommand.
Note: The SUID, SGID, and SVTX attributes must match those specified for themode, if present.
class Name of a group of files. This attribute allows several files with the same class nameto be checked by specifying a single argument to the tcbck command. More than oneclass can be specified, with each class being separated by a comma.
group Group ID or name of the file group. If this does not match the file owner, the tcbckcommand sets the owner ID of the file to this value.
links Comma-separated list of path names linked to this file. If any path name in this list isnot linked to the file, the tcbck command creates the link. If used without the treeparameter, the tcbck command prints a message that there are extra links but doesnot determine their names. If used with the tree parameter, the tcbck command alsoprints any additional path names linked to this file.
mode Comma-separated list of values. The allowed values are SUID, SGID, SVTX, and TCB.The file permissions must be the last value and can be specified either as an octalvalue or as a 9-character string. For example, either 755 or rwxr-xr-x are valid filepermissions. If this does not match the actual file mode, the tcbck command appliesthe correct value.
owner User ID or name of the file owner. If this does not match the file owner, the tcbckcommand sets the owner ID of the file to this value.
program Comma-separated list of values. The first value is the path name of a checkingprogram. Additional values are passed as arguments to the program when it isexecuted.
Note: The first argument is always one of -y, -n, -p, or -t, depending on whichflag the tcbck command was used with.
source Name of a file this source file is to be copied from prior to checking. If the value isblank, and this is either a regular file, directory, or a named pipe, a new empty versionof this file is created if it does not already exist. For device files, a new special file iscreated for the same type device.
4 AIX 5L Version 5.2: Security Guide

symlinks Comma-separated list of path names symbolically linked to this file. If any path namein this list is not a symbolic link to the file, the tcbck command creates the symboliclink. If used with the tree argument, the tcbck command also prints any additional pathnames that are symbolic links to this file.
If a stanza in the /etc/security/sysck.cfg file does not specify an attribute, the corresponding check is notperformed.
Using the tcbck Command
The tcbck command is normally used to do the following:
v Ensure the proper installation of security-relevant files
v Ensure that the file system tree contains no files that clearly violate system security
v Update, add, or delete trusted files
The tcbck command can be used in the following ways:
v Normal use
– Noninteractive at system initialization
– With the cron command
v Interactive use
– Check out individual files and classes of files
v Paranoid use
– Store the sysck.cfg file offline and restore it periodically to check out the machine
Although not cryptographically secure, the TCB uses the sum command for checksums. The TCBdatabase can be set up manually with a different checksum command, for example, the md5sumcommand that is shipped in the textutils RPM Package Manager package with AIX Toolbox for LinuxApplications CD.
Checking Trusted Files
To check all the files in the tcbck database, and fix and report all errors, type:tcbck -y ALL
This causes the tcbck command to check the installation of each file in the tcbck database described bythe /etc/security/sysck.cfg file.
To perform this automatically during system initialization, and produce a log of what was in error, add theprevious command string to the /etc/rc command.
Checking the File System Tree
Whenever you suspect the integrity of the system might have been compromised, run the tcbck commandto check the file system tree:tcbck -t tree
When the tcbck command is used with the tree value, all files on the system are checked for correctinstallation (this could take a long time). If the tcbck command discovers any files that are potential threatsto system security, you can alter the suspected file to remove the offending attributes. In addition, thefollowing checks are performed on all other files in the file system:
v If the file owner is root and the file has the SetUID bit set, the SetUID bit is cleared.
Chapter 1. Installing and Configuring a Secure System 5
v If the file group is an administrative group, the file is executable, and the file has the SetGID bit set, theSetGID bit is cleared.
v If the file has the tcb attribute set, this attribute is cleared.
v If the file is a device (character or block special file), it is removed.
v If the file is an additional link to a path name described in /etc/security/sysck.cfg file, the link isremoved.
v If the file is an additional symbolic link to a path name described in /etc/security/sysck.cfg file, thesymbolic link is removed.
Note: All device entries must have been added to the /etc/security/sysck.cfg file prior to executionof the tcbck command or the system is rendered unusable. To add trusted devices to the/etc/security/sysck.cfg file, use the -l flag.
Attention: Do not run the tcbck -y tree command option. This option deletes and disables devices thatare not properly listed in the TCB, and might disable your system.
Adding a Trusted Program
To add a specific program to the /etc/security/sysck.cfg file, type:tcbck -a PathName [Attribute=Value]
Only attributes whose values are not deduced from the current state of the file need be specified on thecommand line. All attribute names are contained in the /etc/security/sysck.cfg file.
For example, the following command registers a new SetUID root program named /usr/bin/setgroups,which has a link named /usr/bin/getgroups:tcbck -a /usr/bin/setgroups links=/usr/bin/getgroups
To add jfh and jsl as administrative users and to add developers as an administrative group to beverified during a security audit of the file /usr/bin/abc, type:tcbck -a /usr/bin/abc setuids=jfh,jsl setgids=developers
After installing a program, you might not know which new files are registered in the/etc/security/sysck.cfg file. These files can be found and added with the following command:tcbck -t tree
This command string displays the name of any file that is to be registered in the /etc/security/sysck.cfgfile.
Deleting a Trusted ProgramIf you remove a file from the system that is described in the /etc/security/sysck.cfg file, you must alsoremove the description of this file from the /etc/security/sysck.cfg file. For example, if you have deletedthe /etc/cvid program, the following command string produces an error message:tcbck -t ALL
The resulting error message is as follows:3001-020 The file /etc/cvid was not found.
The description for this program remains in the /etc/security/sysck.cfg file. To remove the description ofthis program, type the following command:tcbck -d /etc/cvid
6 AIX 5L Version 5.2: Security Guide

Configuring Additional Trusted Options
This section provides information about how to configure additional options for the TCB.
Restricting Access to a TerminalThe getty and shell commands change the owner and mode of a terminal to prevent untrusted programsfrom accessing the terminal. The operating system provides a way to configure exclusive terminal access.
Using the Secure Attention Key
Attention: Use caution when using SAK because it kills all processes that attempt to access theterminal and any links to it (for example, /dev/console can be linked to /dev/tty0).
A trusted communication path is established by pressing the Secure Attention Key (SAK) reserved keysequence (Ctrl-X, and then Ctrl-R). A trusted communication path is established under the followingconditions:
v When logging in to the system
After you press the SAK:
– If a new login screen displays, you have a secure path.
– If the trusted shell prompt displays, the initial login screen was an unauthorized program that mighthave been trying to steal your password. Determine who is currently using this terminal by using thewho command and then log off.
v When you want the command you enter to result in a trusted program running. Some examples of thisinclude:
– Running as root user. Run as root user only after establishing a trusted communication path. Thisensures that no untrusted programs are run with root-user authority.
– Running the su -, passwd, and newgrp commands. Run these commands only after establishing atrusted communication path.
Configuring the Secure Attention Key
Each terminal can be independently configured so that pressing the Secure Attention Key (SAK) at thatterminal creates a trusted communication path. This is specified by the sak_enabled attribute in/etc/security/login.cfg file. If the value of this attribute is True, the SAK is enabled.
If a port is to be used for communications, (for example, by the uucp command), the specific port usedhas the following line in its stanza of the /etc/security/login.cfg file:sak_enabled = false
This line (or no entry in that stanza) disables the SAK for that terminal.
To enable the SAK on a terminal, add the following line to the stanza for that terminal:sak_enabled = true
Chapter 1. Installing and Configuring a Secure System 7
Controlled Access Protection Profile and Evaluation Assurance Level4+
Beginning in AIX 5.2, system administrators can install a system with the Controlled Access ProtectionProfile (CAPP) and Evaluation Assurance Level 4+ (EAL4+) option during a CD-ROM base operatingsystem (BOS) installation. A system with this option has restrictions on the software that is installed duringBOS installation, plus network access is restricted.
This section discusses the following topics:
v “CAPP/EAL4+ Compliant System Overview”
v “Installing a CAPP/EAL4+ System” on page 9
v “CAPP/EAL4+ Software Bundle” on page 9
v “Physical Environment for a CAPP/EAL4+ System” on page 10
v “Organizational Environment for a CAPP/EAL4+ System” on page 10
v “System Configuration for a CAPP/EAL4+ System” on page 11
CAPP/EAL4+ Compliant System OverviewA CAPP system is a system that has been designed and configured to meet the Controlled AccessProtection Profile (CAPP) for security evaluation according to the Common Criteria. The CAPP specifiesthe functional requirements for the system, similar to the earlier TCSEC C2 standard (also known as theOrange Book).
A Common Criteria (CC) Evaluated System is a system that has been evaluated according to the CommonCriteria, an ISO standard (ISO 15408) for the assurance evaluation of IT products. The systemconfiguration that meets these requirements is referred to as a CAPP/EAL4+ system in this guide.
If a system is evaluated according to the CC, the CC evaluation is valid only for a specific systemconfiguration (hardware and software). Changing the relevant security configuration results in anonevaluated system. This does not necessarily mean that the security of the system will be reduced, butonly indicates that the system is no longer in a certified configuration. Neither the CAPP nor the CC coverall possible security configuration options of AIX 5.2. Some features, such as IPsec or custom-passwordchecking modules, are not included, but can be used to enhance the security of the system.
The AIX 5.2 CAPP/EAL4+ system includes the base operating system on 64-bit POWER3 and POWER4Processors with the following:
v Logical Volume Manager (LVM) and the enhanced journaled file system (JFS2)
v The X-Windows system with the CDE interface
v Basic Internet Protocol version 4 (IPv4) network functions (Telnet, FTP, rlogin, rsh/rcp)
v Network File System (NFS)
A CAPP/EAL4+ system is considered to be in a secured state if the following conditions apply:
v If auditing is configured and the system is in multi-user mode, then auditing must be operational.
v The system accepts user logins and services network requests.
v For a distributed system, the administrative databases are NFS-mounted from the master server.
The AIX 5.2 CAPP/EAL4+ system runs on hardware platforms based on IBM eServer pSeries SymmetricMultiprocessor (SMP) systems using the POWER3-II CPU (p610) with 1 and 2 processors, SMP systemsusing the RS64 IV CPU (p660), and SMP systems using the POWER4 CPU (p690). Peripherals that aresupported are terminals and printers, hard disks and CD-ROM drives as storage devices, and streamersand floppy disk drives as backup devices. Supported network connector types are Ethernet and TokenRing.
8 AIX 5L Version 5.2: Security Guide
Note: Do not use the $HOME/.rhosts file for remote login and running commands. Administrators mustinform all users of the system not to use the $HOME/.rhosts file.
Installing a CAPP/EAL4+ SystemTo set the CAPP/EAL4+ option during a BOS installation, do the following:
1. In the Installation and Settings screen, select More Options.
2. In the More Options screen, type the number corresponding to the Yes or No choice for Enable CAPPand EAL4+ Technology. The default is set to No.
The Enable CAPP and EAL4+ Technology option is available only under the following conditions:
v The installation method is set to new and complete overwrite installation.
v The English language is selected.
v The 64-bit kernel is enabled.
v The enhanced journaled file system (JFS2) is enabled.
When the Enable CAPP and EAL4+ Technology option is set to yes, the Trusted Computing Baseoption is also set to yes, and the only valid Desktop choices are NONE or CDE.
If you are performing a nonprompted installation using a customized bosinst.data file, the INSTALL_TYPEfield must be set to CC_EVAL and the following fields must be set as follows:INSTALL_TYPE = CC_EVALINSTALL_METHOD = overwriteTCB = yesDESKTOP = NONE or CDE
A CAPP/EAL4+ system can also be installed using the Network Installation Management (NIM)environment. To install a CAPP/EAL4+ client, the NIM master must be a CAPP/EAL4+ system. Althoughboth systems can be on the building network, CAPP/EAL4+ systems can communicate only with otherCAPP/EAL4+ systems. To install a CAPP/EAL4+ client, a bosinst_data resource must be defined and thefields edited as described.
CAPP/EAL4+ Software BundleWhen the CAPP/EAL4+ option is selected, the contents of the/usr/sys/inst.data/sys_bundles/CC_EVAL.BOS.autoi installation bundle are installed.
You can optionally select to install the graphics software bundle and the documentation services softwarebundle with the CAPP/EAL4+ option selected. If you select the Graphics Software option with theCAPP/EAL4+ option, the contents of the /usr/sys/inst.data/sys_bundles/CC_EVAL.Graphics.bndsoftware bundle are installed. If you select the Documentation Services Software option with theCAPP/EAL4+ option, the contents of the /usr/sys/inst.data/sys_bundles/CC_EVAL.DocServices.bndsoftware bundle are installed.
After the Licensed Program Products (LPPs) have been installed, the system changes the defaultconfiguration to comply with the CAPP/EAL4+ requirements. The following changes are made to thedefault configuration:
v Remove /dev/echo from the /etc/pse.conf file.
v Instantiate streams devices.
v Allow only root to access removable media.
v Remove non-CC entries from the inetd.conf file.
v Change various file permissions.
v Register symbolic links in the sysck.cfg file.
v Register devices in the sysck.cfg file.
Chapter 1. Installing and Configuring a Secure System 9

v Set default user and port attributes.
v Configure the doc_search application for browser use.
v Remove httpdlite from the inittab file.
v Remove writesrv from the inittab file.
v Remove mkatmpvc from the inittab file.
v Remove atmsvcd from the inittab file.
v Disable snmpd in the /etc/rc.tcpip file.
v Disable hostmibd in the /etc/rc.tcpip file.
v Disable snmpmibd in the /etc/rc.tcpip file.
v Disable aixmibd in the /etc/rc.tcpip file.
v Disable muxatmd in the /etc/rc.tcpip file.
v NFS port (2049) is a privileged port.
v Add missing events to the /etc/security/audit/events file.
v Ensure that the loopback interface is running.
v Create synonyms for /dev/console.
v Enforce default X-server connection permissions.
v Change the /var/docsearch directory so that all files are world-readable.
v Add Object Data Manager (ODM) stanzas to set the console permissions.
v Set permissions on BSD-style ptys to 000.
v Disable .netrc files.
v Add patch directory processing.
Physical Environment for a CAPP/EAL4+ SystemThe CAPP/EAL4+ system has specific requirements for the environment in which it is run. Therequirements are as follows:
v Physical access to the systems must be restricted so that only authorized administrators can use thesystem consoles.
v The Service Processor is not connected to a modem.
v Physical access to the terminals is restricted to authorized users.
v The physical network is secure against eavesdropping and spoofing programs (also called Trojan horseprograms). When communicating over insecure lines, additional security measures, such as encryption,are needed.
v Communication with other systems that are not AIX 5.2 CAPP/EAL4+ systems, or are not under thesame management control, is not permitted.
v Only IPv4 is to be used when communicating with other CAPP/EAL4+ systems, IPv6 has not beenevaluated.
v Users must not be allowed to change the system time.
Organizational Environment for a CAPP/EAL4+ SystemThe following procedural and organizational requirements must be met for a CAPP/EAL4+ system:
v Only users authorized to work with the information on the systems are granted user IDs on the system.
v Users must use high-quality passwords (as random as possible and not affiliated with the user or theorganization). For information about setting up password rules, see “Passwords” on page 40.
v Users must not disclose their passwords to others.
v Administrators must have sufficient knowledge to manage security critical systems.
v Administrators must work in accordance with the guidance provided by the system documentation.
10 AIX 5L Version 5.2: Security Guide
v Administrators must log in with their personal ID and use the su - command to switch to superusermode for administration.
v Passwords generated for system users by administrators must be transmitted securely to the users.
v Those who are responsible for the system must establish and implement the necessary procedures forthe secure operation of the systems.
v Administrators must ensure that the access to security-critical system resources is protected byappropriate settings of permission bits and ACLs.
v The physical network must be approved by the organization to carry the most sensitive data held by thesystems.
v Maintenance procedures must include regular diagnostics of the systems.
v The administrators must have procedures in place that ensure a secure operation and recovery after asystem failure.
v The LIBPATH environment variable should not be changed, because this might result in a trustedprocess loading an untrusted library.
v Wiretapping and trace software (tcpdump, trace) must not be used on an operational system.
v Anonymous protocols such as HTTP may only be used for public information (for example, the onlinedocumentation).
v Only TCP-based NFS can be used.
v Access to removable media is not to be given to users. The device files are to be protected byappropriate permission bits or ACLs.
v Only root authority is used when administering AIX. None of the role-based and group-basedadministration-delegation features, nor the privilege mechanism of AIX, are included in the CAPP/EAL4+compliance.
System Configuration for a CAPP/EAL4+ SystemThis section provides information about the configuration of the subsystems involved in a CAPP/EAL4+system.
AdministrationAdministrators must log in with their personal user account and use the su command to become the rootuser for the administration of the system. To effectively prevent guessing the root account’s password,allow only authorized administrators to use the su command on the root account. To ensure this, do thefollowing:
1. Add an entry to the root stanza of the /etc/security/user file as follows:root:
admin = true...sugroups = SUADMIN
2. Define group in the /etc/group file containing only the user IDs of authorized administrators as follows:system:!:0:root,paulstaff:!:1:invscout,juliebin:!:2:root,bin...SUADMIN:!:13:paul
Administrators must also adhere to the following procedures:
v Establish and implement procedures to ensure that the hardware, software and firmware componentsthat comprise the distributed system are distributed, installed, and configured in a secure manner.
Chapter 1. Installing and Configuring a Secure System 11

v Ensure that the system is configured so that only an administrator can introduce new trusted softwareinto the system.
v Implement procedures to ensure that users clear the screen before logging off from serial login devices(for example, IBM 3151 terminals).
User and Port ConfigurationAIX configuration options for users and ports must be set to satisfy the requirements of the evaluation. Theactual requirement is that the probability of correctly guessing a password should be at least 1 in1,000,000, and the probability of correctly guessing a password with repeated attempts in one minuteshould be at least 1 in 100,000.
The recommended values for the /etc/security/user file are the following:default:
admin = falselogin = truesu = truedaemon = truerlogin = truesugroups = ALLadmgroups =ttys = ALLauth1 = SYSTEMauth2 = NONEtpath = nosakumask = 077expires = 0SYSTEM = "compat"logintimes =pwdwarntime = 5account_locked = falseloginretries = 3histexpire = 52histsize = 20minage = 0maxage = 8maxexpired = 1minalpha = 2minother = 2minlen = 8mindiff = 4maxrepeats = 2dictionlist = /usr/share/dict/wordspwdchecks =dce_export = false
root:rlogin = falselogin = false
The default settings in the /etc/security/user file should not be overwritten by specific settings for singleusers.
Note: Setting login = false in the root stanza prevents direct root login. Only user accounts that have suprivileges for the root account will be able to log in as the root account. If a Denial of Service attackis launched against the system that sends incorrect passwords to the user accounts, it could lockall the user accounts. This attack might prevent any user (including administrative users) fromlogging into the system. Once a user’s account is locked, the user will not be able to log in until thesystem administrator resets the user’s unsuccessful_login_count attribute in the/etc/security/lastlog file to be less than the value of the loginretries user attribute. If all theadministrative accounts become locked, you might need to reboot the system into maintenancemode and run the chsec command. For more information about using the chsec command, see“User Account Control” on page 29.
12 AIX 5L Version 5.2: Security Guide
The recommended values for the /etc/security/login.cfg file are the following:default:
sak_enabled = falselogintimes =logindisable = 4logininterval = 60loginreenable = 30logindelay = 5
Resource LimitsWhen setting resource limits in the /etc/security/limits file, make sure that the limits correspond to theneeds of the processes on the system. In particular, the stack and rss sizes should never be set tounlimited. An unlimited stack might overwrite other segments of the running process, and an unlimited rsssize allows a process to use all real memory, therefore creating resource problems for other processes.The stack_hard and rss_hard sizes should also be limited.
Audit SubsystemThe following procedures help protect the audit subsystem:
v Configure the audit subsystem to record all the relevent security activities of the users. To ensure thatthe file space needed for auditing is available and is not impaired by other consumers of file systemspace, set up a dedicated file system for audit data.
v Protect audit records (such as audit trails, bin files, and all other data stored in /audit) from non-rootusers.
v For the CAPP/EAL4+ system, bin mode auditing must be set up when the audit subsystem is used. Forinformation about how to set up the audit subsystem, refer to “Setting Up Auditing” on page 55.
v At least 20 percent of the available disk space in a system should be dedicated to the audit trail.
v If auditing is enabled, the binmode parameter in the start stanza in the /etc/security/audit/config fileshould be set to panic. The freespace parameter in the bin stanza should be configured at minimum toa value that equals 25 percent of the disk space dedicated to the storage of the audit trails. Thebytethreshold and binsize parameters should each be set to 65536 bytes.
v Copy audit records from the system to permanent storage for archival.
Network ConfigurationNetwork configuration must use Discretionary Access Control for Internet Ports (DACinet) to make surethat the X protocol (X11) and NFS cannot be used anonymously. For more information about the dacinetcommand, see “User Based TCP Port Access Control with Discretionary Access Control for Internet Ports”on page 128.
The dacinet command prevents the following conditions:
v A user from taking over another user’s desktop with X11.
v A user on a client from forging requests to an NFS server that would permit the user to become root.Normally, a user accesses a remote NFS server by making requests to the Logical File System on thelocal host, which then makes the request (as root) to the remote server. Setting an ACL for root onlyand not permitting this port to be bypassed ensures that the user cannot send direct protocol requeststo an NFS server.
Chapter 1. Installing and Configuring a Secure System 13
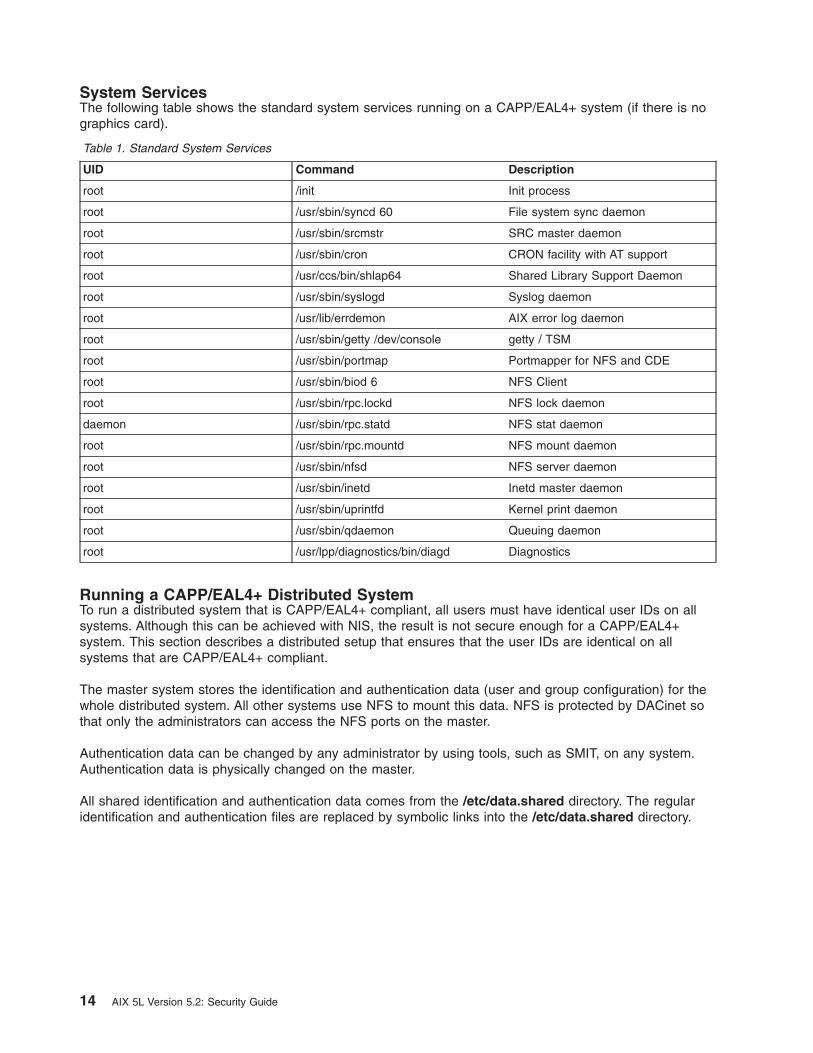
System ServicesThe following table shows the standard system services running on a CAPP/EAL4+ system (if there is nographics card).
Table 1. Standard System Services
UID Command Description
root /init Init process
root /usr/sbin/syncd 60 File system sync daemon
root /usr/sbin/srcmstr SRC master daemon
root /usr/sbin/cron CRON facility with AT support
root /usr/ccs/bin/shlap64 Shared Library Support Daemon
root /usr/sbin/syslogd Syslog daemon
root /usr/lib/errdemon AIX error log daemon
root /usr/sbin/getty /dev/console getty / TSM
root /usr/sbin/portmap Portmapper for NFS and CDE
root /usr/sbin/biod 6 NFS Client
root /usr/sbin/rpc.lockd NFS lock daemon
daemon /usr/sbin/rpc.statd NFS stat daemon
root /usr/sbin/rpc.mountd NFS mount daemon
root /usr/sbin/nfsd NFS server daemon
root /usr/sbin/inetd Inetd master daemon
root /usr/sbin/uprintfd Kernel print daemon
root /usr/sbin/qdaemon Queuing daemon
root /usr/lpp/diagnostics/bin/diagd Diagnostics
Running a CAPP/EAL4+ Distributed SystemTo run a distributed system that is CAPP/EAL4+ compliant, all users must have identical user IDs on allsystems. Although this can be achieved with NIS, the result is not secure enough for a CAPP/EAL4+system. This section describes a distributed setup that ensures that the user IDs are identical on allsystems that are CAPP/EAL4+ compliant.
The master system stores the identification and authentication data (user and group configuration) for thewhole distributed system. All other systems use NFS to mount this data. NFS is protected by DACinet sothat only the administrators can access the NFS ports on the master.
Authentication data can be changed by any administrator by using tools, such as SMIT, on any system.Authentication data is physically changed on the master.
All shared identification and authentication data comes from the /etc/data.shared directory. The regularidentification and authentication files are replaced by symbolic links into the /etc/data.shared directory.
14 AIX 5L Version 5.2: Security Guide
Shared Files in the Distributed System: The following files are shared in the distributed system.Typically, they come from the /etc/security directory.
/etc/security/.idsThe next available user and group ID
/etc/security/.profileThe default .profile file for new users
/etc/security/audit/bincmdsBin-mode auditing commands for this host
/etc/security/audit/configLocal audit configuration
/etc/security/audit/eventsList of audit events and formats
/etc/security/audit/objectsList of audited objects on this host
/etc/security/audit/streamcmdsStream-mode auditing commands for this host
/etc/security/environPer-user environmental variables
/etc/groupThe /etc/group file
/etc/passwdThe /etc/passwd file
/etc/security/groupExtended group information from the /etc/security/group file
/etc/hostsThe /etc/hosts file
/etc/security/limitsPer-user resource limits
/etc/security/passwdPer-user passwords
/etc/security/userPer-user and default user attributes
/etc/security/privPorts that are to be designated as privileged when the system starts are listed in the/etc/security/priv file
/etc/security/servicesPorts listed in the /etc/security/services file are considered exempt from ACL checks
/etc/security/aclThe /etc/security/acl file stores system-wide ACL definitions for protected services that will bereactivated at the next system boot by the /etc/rc.tcpip file.
Nonshared Files in the Distributed System: The following files in the /etc/security directory are not tobe shared in the distributed system, but are to remain host-specific:
/etc/security/failedloginLog file for failed logins per host
Chapter 1. Installing and Configuring a Secure System 15

/etc/security/lastlogPer-user information about the last successful and unsuccessful logins on this host
/etc/security/login.cfgHost-specific login characteristics for trusted path, login shells, and other login-related information
/etc/security/portlogPer-port information for locked ports on this host
The automatically generated backup files of the shared files are also nonshared. Backup files have thesame name as the original file, but have a lowercase letter o prepended.
Setting up the Distributed System (The Master System): On the master, a new logical volume iscreated that holds the file system for the identification and authentication data. The logical volume isnamed /dev/hd10sec and it is mounted on the master system as /etc/data.master. To generate thenecessary changes on the master system, run the mkCCadmin command with the IP address and hostname of the master, as follows:mkCCadmin -m -a ipaddress hostname
Setting up the Distributed System (All Systems): All data that is to be shared is moved to the/etc/data.shared directory. At startup, all systems will mount the master’s /etc/data.master directory overthe /etc/data.shared directory. The master itself uses a loopback mount.
Client systems are set up by running the following:mkCCadmin -a ipaddress hostname
To change the client to use a different master, use the chCCadmin command.
After a system has been integrated into the distributed identification and authentication system, thefollowing additional inittab entries are generated:
isCChostInitializes the system to CAPP/EAL4+ mode.
rcCC This clears all DACinet ACLs and opens only the ports needed for the portmapper and NFS. Itthen mounts the shared directory.
rcdacinetThis loads additional DACinet ACLs that the administrator might have defined.
Consider the following: When running the distributed system,
v Administrators must make sure that the shared data is mounted before changing shared configurationfiles to ensure that the shared data is seen on all systems.
v Changing the root password is the only administrative action that is permitted while the shared directoryis not mounted.
Using the DACinet Feature for User-Based and Port-Based Network AccessControlThe DACinet feature can be used to restrict the access of users to TCP ports. For more information aboutDACinet, see “User Based TCP Port Access Control with Discretionary Access Control for Internet Ports”on page 128. For example, when using DACinet to restrict access to port TCP/25 inbound to root onlywith the DACinet feature, only root users from CAPP/EAL4+ compliant hosts can access this port. Thissituation limits the possibility of regular users spoofing e-mail by using telnet to connect to port TCP/25 onthe victim.
16 AIX 5L Version 5.2: Security Guide
To activate the ACLs for TCP connections at boot time, the /etc/rc.dacinet script is run from /etc/inittab. Itwill read the definitions in the /etc/security/acl file and load ACLs into the kernel. Ports which should notbe protected by ACLs should be listed in the /etc/security/services file, which uses the same format asthe /etc/services file.
Assuming a subnet of 10.1.1.0/24 for all the connected systems, the ACL entries to restrict access to theroot user only for X (TCP/6000) in /etc/security/acl would be as follows:
6000 10.1.1.0/24 u:root
Installing Additional Software on a CAPP/EAL4+ Compliant SystemThe administrator can install additional software on the CAPP/EAL4+ compliant system. If the software isnot run by the root user or with root-user privileges, this will not invalidate the CAPP/EAL4+ compliance.Typical examples include office applications that are run only by regular users and have no SUIDcomponents.
Additionally, installed software that runs with root-user privileges invalidates the CAPP/EAL4+ compliance.This means, for example, drivers for the older JFS should not be installed, as they are running in kernelmode. Additional daemons that are run as root (for example, an SNMP daemon) also invalidates theCAPP/EAL4+ compliance.
A CAPP/EAL4+ compliant system is rarely used in the evaluated configuration, especially in a commercialenvironment. Typically, additional services are needed, so that the production system is based on anevaluated system, but does not comply with the exact specification of the evaluated system.
Chapter 1. Installing and Configuring a Secure System 17
Login ControlPotential hackers can get valuable information from the default AIX login screen, such as the host nameand the version of the operating system. This information would allow them to determine which exploitationmethods to attempt. For security reasons, you may want to change the login screen defaults as soon aspossible after a system installation. This section discusses the following topics:
v “Setting Up Login Controls”
v “Changing the Welcome Message on the Login Screen” on page 19
v “Changing the Login Screen for the Common Desktop Environment” on page 19
v “Setting up System Default Login Parameters” on page 19
v “Securing Unattended Terminals” on page 19
v “Enforcing Automatic Logoff” on page 19
The KDE and GNOME desktops share some of the same security issues. For more information about KDEand GNOME, refer to the AIX 5L Version 5.2 Installation Guide and Reference.
For information about users, groups, and passwords, see Chapter 2, “Users, Roles, and Passwords”, onpage 23.
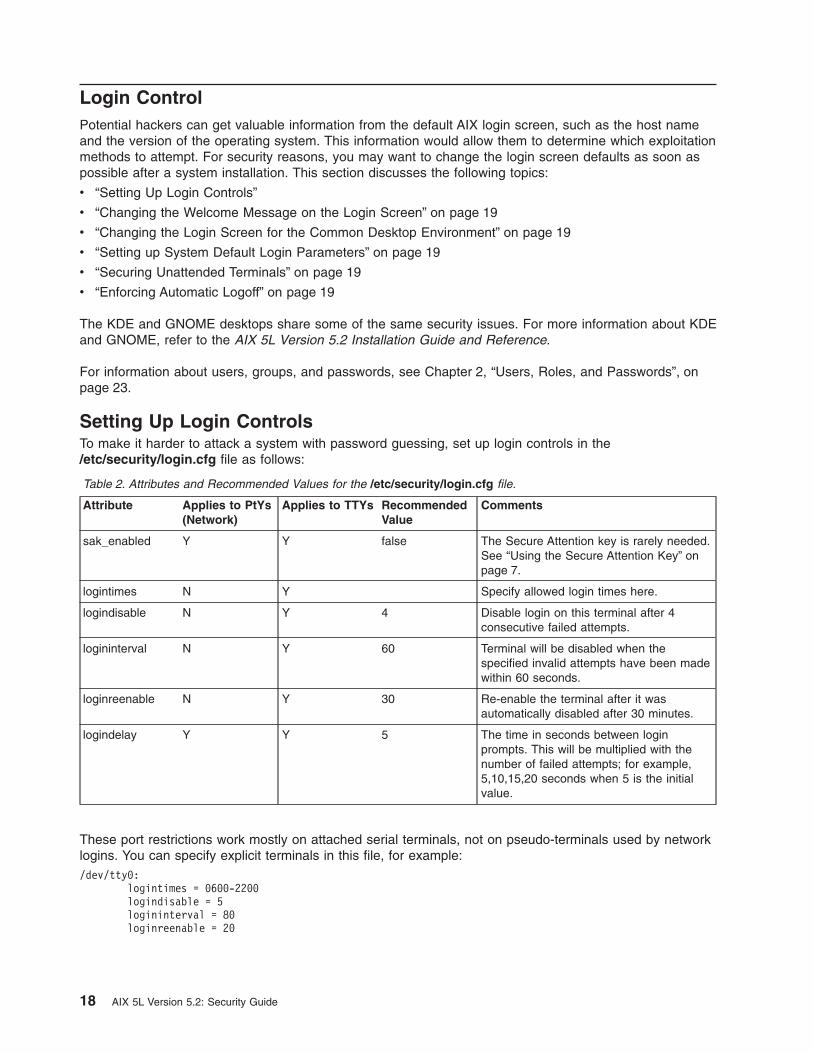
Setting Up Login ControlsTo make it harder to attack a system with password guessing, set up login controls in the/etc/security/login.cfg file as follows:
Table 2. Attributes and Recommended Values for the /etc/security/login.cfg file.
Attribute Applies to PtYs(Network)
Applies to TTYs RecommendedValue
Comments
sak_enabled Y Y false The Secure Attention key is rarely needed.See “Using the Secure Attention Key” onpage 7.
logintimes N Y Specify allowed login times here.
logindisable N Y 4 Disable login on this terminal after 4consecutive failed attempts.
logininterval N Y 60 Terminal will be disabled when thespecified invalid attempts have been madewithin 60 seconds.
loginreenable N Y 30 Re-enable the terminal after it wasautomatically disabled after 30 minutes.
logindelay Y Y 5 The time in seconds between loginprompts. This will be multiplied with thenumber of failed attempts; for example,5,10,15,20 seconds when 5 is the initialvalue.
These port restrictions work mostly on attached serial terminals, not on pseudo-terminals used by networklogins. You can specify explicit terminals in this file, for example:/dev/tty0:
logintimes = 0600-2200logindisable = 5logininterval = 80loginreenable = 20
18 AIX 5L Version 5.2: Security Guide
Changing the Welcome Message on the Login ScreenTo prevent displaying certain information on login screens, edit the herald parameter in the/etc/security/login.cfg file. The default herald contains the welcome message that displays with your loginprompt. To change this parameter, you can either use the chsec command or edit the file directly.
The following example uses the chsec command to change the default herald parameter:# chsec -f /etc/security/login.cfg -a default -herald"Unauthorized use of this system is prohibited.\n\nlogin: "
For more information about the chsec command, see the AIX 5L Version 5.2 Commands Reference,Volume 1.
To edit the file directly, open the /etc/security/login.cfg file and update the herald parameter as follows:default:herald ="Unauthorized use of this system is prohibited\n\nlogin:"sak_enable = falselogintimes =logindisable = 0logininterval = 0loginreenable = 0logindelay = 0
Note: To make the system more secure, set the logindisable and logindelay variables to a numbergreater than 0 (# > 0).
Changing the Login Screen for the Common Desktop EnvironmentThis security issue also affects the Common Desktop Environment (CDE) users. The CDE login screenalso displays, by default, the host name and the operating system version. To prevent this information frombeing displayed, edit the /usr/dt/config/$LANG/Xresources file, where $LANG refers to the locallanguage installed on your machine.
In our example, assuming that $LANG is set to C, copy this file into the /etc/dt/config/C/Xresourcesdirectory. Next, open the /usr/dt/config/C/Xresources file and edit it to remove welcome messages thatinclude the host name and operating system version.
For more information about CDE security issues, see “Managing X11 and CDE Concerns” on page 21.
Setting up System Default Login ParametersTo set up base defaults for many login parameters, such as those you might set up for a new user(number of login retries, login re-enable, and login internal), edit the /etc/security/login.cfg file.
Securing Unattended TerminalsAll systems are vulnerable if terminals are left logged in and unattended. The most serious problem occurswhen a system manager leaves a terminal unattended that has been enabled with root authority. Ingeneral, users should log out any time they leave their terminals. Leaving system terminals unsecureposes a potential security hazard. To lock your terminal, use the lock command. If your interface isAIXwindows, use the xlock command.
Enforcing Automatic LogoffAnother valid security concern results from users leaving their accounts unattended for a lengthy period oftime. This situation allows an intruder to take control of the user’s terminal, potentially compromising thesecurity of the system.
Chapter 1. Installing and Configuring a Secure System 19
To prevent this type of potential security hazard, you can enable automatic logoff on the system. To dothis, edit the /etc/security/.profile file to include an automatic logoff value for all users, as in the followingexample:TMOUT=600 ; TIMEOUT=600 ; export readonly TMOUT TIMEOUT
The number 600, in this example, is in seconds, which is equal to 10 minutes. However, this method willonly work from the shell.
While the previous action allows you to enforce an automatic logoff policy for all users, system users canbypass some restrictions by editing their individual .profile files. To completely implement an automaticlogoff policy, take authoritative action by providing users with appropriate .profile files, preventingwrite-access rights to these files.
20 AIX 5L Version 5.2: Security Guide
Managing X11 and CDE ConcernsThis section discusses potential security vulnerabilities involved with the X11 X server and the CommonDesktop Environment (CDE).
Removing the /etc/rc.dt FileAlthough running the CDE interface is convenient for users, security issues are associated with it. For thisreason, do not run CDE on servers that require a high level of security. The best solution is to avoidinstalling CDE (dt) file sets. If you have installed these file sets on your system, consider uninstalling them,especially /etc/rc.dt script, which starts CDE.
For more information about CDE, see the AIX 5L Version 5.2 System Management Guide: OperatingSystem and Devices.
Preventing Unauthorized Monitoring of Remote X ServerAn important security issue associated with the X11 server is unauthorized silent monitoring of a remoteserver. The xwd and xwud commands can be used to monitor X server activity because they have theability to capture keystrokes, which can expose passwords and other sensitive data. To solve this problem,remove these executable files unless they are necessary under your configuration, or, as an alternative,change access to these commands to be root only.
The xwd and xwud commands are located in the X11.apps.clients fileset.
If you do need to retain the xwd and xwud commands, consider using OpenSSH or MIT Magic Cookies.These third-party applications help prevent the risks that are created by running the xwd and xwudcommands.
For more information about OpenSSH and MIT Magic Cookies, refer to each application’s respectivedocumentation.
Enabling and Disabling Access ControlThe X server allows remote hosts to use the xhost + command to connect to your system. Ensure thatyou specify a host name with the xhost + command, because it disables access control for the X server.This allows you to grant access to specific hosts, which eases monitoring for potential attacks to the Xserver. To grant access to a specific host, run the xhost command as follows:# xhost + hostname
If you do not specify a host name, access will be granted to all hosts.
For more information about the xhost command, see the AIX Commands Reference, Volume 6.
Disabling User Permissions to Run the xhost CommandAnother way to ensure that the xhost command is being used appropriately is to restrict execution of thiscommand to root-user authority only. To do this, use the chmod command to change the permissions of/usr/bin/X11/xhost to 744, as follows:chmod 744/usr/bin/X11/xhost
Chapter 1. Installing and Configuring a Secure System 21

22 AIX 5L Version 5.2: Security Guide
Chapter 2. Users, Roles, and Passwords
This chapter describes how to manage AIX users and roles. The following topics are discussed:
v “Root Account”
v “Administrative Roles” on page 24
v “User Accounts” on page 28
v “Set Up Anonymous FTP with a Secure User Account” on page 31
v “System Special User Accounts” on page 34
v “Access Control Lists” on page 35
v “Passwords” on page 40
v “User Authentication” on page 45
v “Disk Quota System Overview” on page 45
Root Account
The root account has virtually unlimited access to all programs, files, and resources on a system. The rootaccount is the special user in the /etc/passwd file with the userid (UID) of 0 and is commonly given theuser name, root. It is not the user name that makes the root account so special, but the UID value of 0.This means that any user that has a UID of 0 also has the same privileges as the root user. Also, the rootaccount is always authenticated by means of the local security files.
The root account should always have a password, which should never be shared. The root account shouldbe given a password immediately after the system is installed. Only the system administrator should knowthe root password. System administrators should only operate as the root user to perform systemadministration functions that require root privileges. For all other operations, they should return to theirnormal user account.
Attention: Routinely operating as the root user can result in damage to the system because the rootaccount overrides many safeguards in the system.
Disabling Direct root LoginA common attack method of potential hackers is to obtain the root password.
To avoid this type of attack, you can disable direct access to your root ID and then require your systemadministrators to obtain root privileges by using the su - command. In addition to allowing you to removethe root user as a point of attack, restricting direct root access allows you to monitor which users gainedroot access, as well as the time of their action. You can do this by viewing the /var/adm/sulog file.Another alternative is to enable system auditing, which will report this type of activity.
To disable remote login access for your root user, edit the /etc/security/user file. Specify false as therlogin value on the entry for root.
Before you disable the remote root login, examine and plan for situations that would prevent a systemadministrator from logging in under a non-root user ID. For example, if a user’s home file system is full,the user would not be able to log in. If the remote root login were disabled and the user who could use thesu - command to change to root had a full home file system, root could never take control of the system.This issue can be bypassed by system administrators creating home file systems for themselves that arelarger than the average user’s file system.
For more information about controlling root login, see “System Configuration for a CAPP/EAL4+ System”on page 11.
© Copyright IBM Corp. 2002, 2003 23
Administrative Roles
You can assign portions of root-user authority to non-root users. Different root-user tasks are assigneddifferent authorizations. These authorizations are grouped into roles and assigned to different users.
This section covers the following topics:
v “Roles Overview”
v “Setting Up and Maintaining Roles Using SMIT”
v “Understanding Authorizations” on page 25.
Roles OverviewRoles consist of authorizations that allow a user to run functions that normally would require root-userpermission. The following is a list of valid roles:
Add and Remove Users Allows any user to act as the root user for thisrole. They are able to add and remove users,change information about a user, modify auditclasses, manage groups, and change passwords.Anyone who performs user administration must bein the security group.
Change Users Password Allows a user to change a passwords.Manage Roles Allows a user to create, change, remove and list
roles. The user must be in the security group.Backup and Restore Allows a user to back up and restore file systems
and directories. This role is not sufficient to enablea system backup and restore using mksysb andrequires proper authorizations.
Backup Only Allows a user only to back up file systems anddirectories. The user must have the properauthorization to enable a system backup.
Run Diagnostics Allows a user or service representative to rundiagnostics and diagnostic tasks. The user musthave system specified as the primary group andalso a group set that includes shutdown.Note: Users in the Run Diagnostics role canchange the system configuration, updatemicrocode, and so on. Users in this role must fullyunderstand the responsibility that the rolerequires.
System Shutdown Allows a user to shut down, reboot, or halt asystem.
Setting Up and Maintaining Roles Using SMIT
The following SMIT fast paths are available for implementing and maintaining roles:
Table 3. Setting Up and Maintaining Roles Tasks
Task SMIT Fast Path
Add a Role smit mkrole
Change Characteristics of a Role smit chrole
Show Characteristics of a Role smit lsrole
Remove a Role smit rmrole
List All Roles smit lsrole
24 AIX 5L Version 5.2: Security Guide
Understanding Authorizations
Authorizations are authority attributes for a user. These authorizations allow a user to do certain tasks. Thefollowing types of authorization exist:
Primary AuthorizationAllows a user to run a specific command. For example, RoleAdmin authorization is a primaryauthorization allowing a user administrator to run the chrole command. Without this authorization,the command terminates without modifying the role definitions.
Authorization modifierIncreases the capability of a user. For example, UserAdmin authorization is an authorizationmodifier that increases the capability of a user administrator belonging to the security group.Without this authorization, the mkuser command only creates non-administrative users. With thisauthorization, the mkuser command also creates administrative users.
The authorizations perform the following functions:
BackupPerforms a system backup. The following command uses the Backup authorization:
BackupBacks up files and file systems. The user administrator must have Backup authorization.
DiagnosticsAllows a user to run diagnostics. This authority is also required to run diagnostic tasks directlyfrom the command line. The following command uses the Diagnostics authorization:
diag Runs diagnostics on selected resources. If the user administrator does not haveDiagnostics authority, the command ends.
GroupAdminPerforms the functions of the root user on group data. The following commands use theGroupAdmin authorization:
chgroupChanges any group information. If the user does not have GroupAdmin authorization, theycan only change non-administrative group information.
chgrpmemAdministers all groups. If the group administrator does not have GroupAdminauthorization, they can only change the membership of the group they administer or auser in group security to administer any non-administrative group.
chsec Modifies administrative group data in the /etc/group and /etc/security/group files. Theuser can also modify the default stanza values. If the user does not have GroupAdminauthorization, they can only modify non-administrative group data in the /etc/group and/etc/security/group files.
mkgroupCreates any group. If the user does not have GroupAdmin authorization, the user can onlycreate non-administrative groups.
rmgroupRemoves any group. If the user does not have GroupAdmin authorization, the user canonly remove non-administrative groups.
ListAuditClassesViews the list of valid audit classes. The user administrator who uses this authorization does nothave to be the root user or in the audit group.
Chapter 2. Users, Roles, and Passwords 25
Use the smit mkuser or smit chuser fast path to list audit classes available to make or change auser. Enter the list of audit classes in the AUDIT classes field.
PasswdAdminPerforms the functions of the root user on password data. The following commands use thePasswdAdmin authorization:
chsec Modifies the lastupdate and flags attributes of all users. Without the PasswdAdminauthorization, the chsec command allows the user administrator to modify only thelastupdate and flags attribute of non-administrative users.
lssec Views the lastupdate and flags attributes of all users. Without the PasswdAdminauthorization, the lssec command allows the user administrator to only view thelastupdate and flags attribute of non-administrative users.
pwdadmChanges the password of all users. The user administrator must be in the security group.
PasswdManagePerforms password administration functions on non-administrative users. The following commanduses the PasswdManage authorization:
pwdadmChanges the password of a non-administrative user. The administrator must be in thesecurity group or have the PasswdManage authorization.
UserAdminPerforms the functions of the root user on user data. Only users with UserAdmin authorization canmodify the role information of a user. You cannot access or modify user auditing information withthis authorization. The following commands use the UserAdmin authorization:
chfn Changes any user general information (gecos) field. If the user does not have UserAdminauthorization but is in the security group, they can change any non-administrative usergecos field. Otherwise, users can only change their own gecos field.
chsec Modifies administrative user data in the /etc/passwd, /etc/security/environ,/etc/security/lastlog, /etc/security/limits, and /etc/security/user files, including the rolesattribute. The user administrator can also modify the default stanza values and the/usr/lib/security/mkuser.default file, excluding the auditclasses attributes.
chuserChanges any user’s information except for the auditclasses attribute. If the user does nothave UserAdmin authorization, they can only change non-administrative user information,except for the auditclasses and roles attributes.
mkuserCreates any user, except for the auditclasses attribute. If the user does not haveUserAdmin authorization, the user can only create non-administrative users, except for theauditclasses and roles attributes.
rmuserRemoves any user. If the user administrator does not have UserAdmin authorization, theycan only create non-administrative users.
UserAuditAllows the user to modify user-auditing information. The following commands use the UserAuditauthorization:
chsec Modifies the auditclasses attribute of the mkuser.default file for non-administrative users.If the user has UserAdmin authorization, they can also modify the auditclasses attribute ofthe mkuser.default file for administrative and non-administrative users.
26 AIX 5L Version 5.2: Security Guide
chuserModifies the auditclasses attribute of a non-administrative user. If the user administratorhas UserAdmin authorization, they can also modify the auditclasses attribute of all users.
lsuser Views the auditclasses attribute of a non-administrative user if the user is root user or inthe security group. If the user has UserAdmin authorization, they can also view theauditclasses attribute of all users.
mkuserCreates a new user and allows user administrator to assign the auditclasses attribute of anon-administrative user. If the user has UserAdmin authorization, they can also modify theauditclasses attribute of all users.
RoleAdminPerforms the functions of the root user on role data. The following commands use the RoleAdminauthorization:
chrole Modifies a role. If the user administrator does not have the RoleAdmin authorization, thecommand ends.
lsrole Views a role.
mkroleCreates a role. If the user administrator does not have the RoleAdmin authorization, thecommand ends.
rmroleRemoves a role. If the user administrator does not have the RoleAdmin authorization, thecommand ends.
RestorePerforms a system restoration. The following command uses the Restore authorization:
RestoreRestores backed-up files. The user administrator must have Restore authorization.
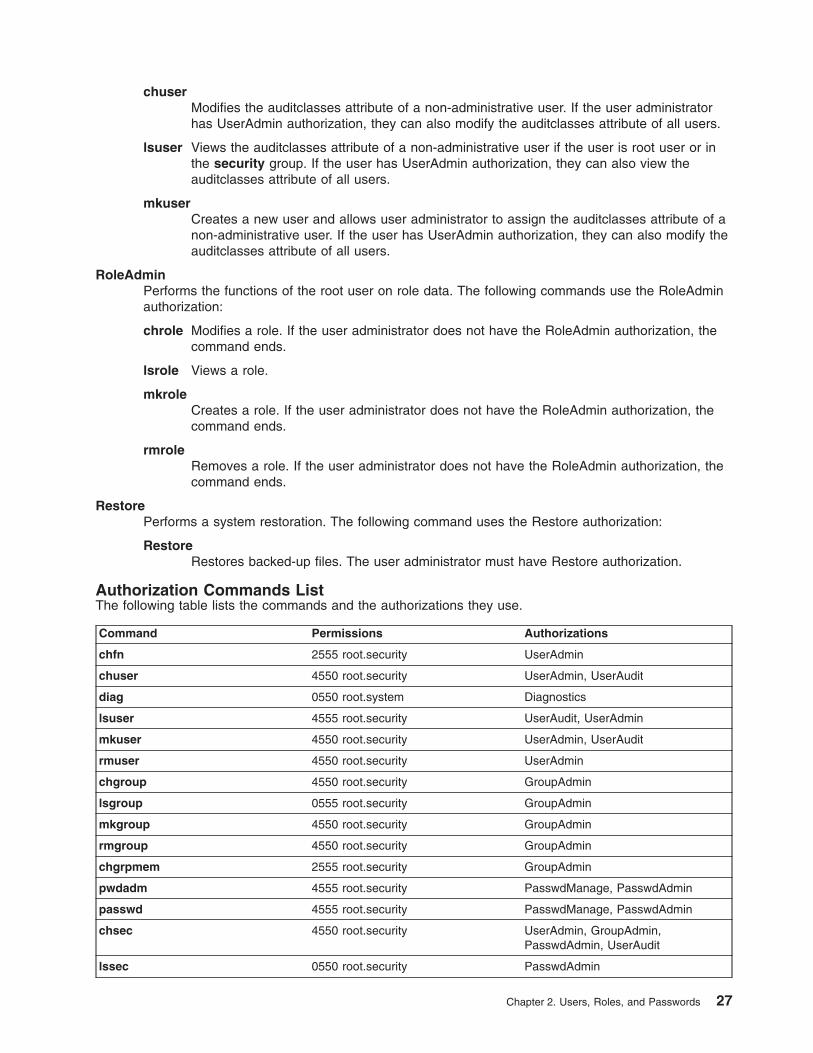
Authorization Commands ListThe following table lists the commands and the authorizations they use.
Command Permissions Authorizations
chfn 2555 root.security UserAdmin
chuser 4550 root.security UserAdmin, UserAudit
diag 0550 root.system Diagnostics
lsuser 4555 root.security UserAudit, UserAdmin
mkuser 4550 root.security UserAdmin, UserAudit
rmuser 4550 root.security UserAdmin
chgroup 4550 root.security GroupAdmin
lsgroup 0555 root.security GroupAdmin
mkgroup 4550 root.security GroupAdmin
rmgroup 4550 root.security GroupAdmin
chgrpmem 2555 root.security GroupAdmin
pwdadm 4555 root.security PasswdManage, PasswdAdmin
passwd 4555 root.security PasswdManage, PasswdAdmin
chsec 4550 root.security UserAdmin, GroupAdmin,PasswdAdmin, UserAudit
lssec 0550 root.security PasswdAdmin
Chapter 2. Users, Roles, and Passwords 27

Command Permissions Authorizations
chrole 4550 root.security RoleAdmin
lsrole 0550 root.security RoleAdmin
mkrole 4550 root.security RoleAdmin
rmrole 4550 root.security RoleAdmin
backup 4555 root.system Backup
restore 4555 root.system Restore
User Accountsv “Recommended User Attributes”
v “User Account Control” on page 29
v “Login User IDs” on page 30
v “Strengthening User Security with Access Control Lists” on page 30
v “PATH Environment Variable” on page 30
Recommended User AttributesUser administration consists of creating users and groups and defining their attributes. A major attribute ofusers is how they are authenticated. Users are the primary agents on the system. Their attributes controltheir access rights, environment, how they are authenticated, as well as how, when, and where theiraccounts can be accessed.
Groups are collections of users who can share the same access permissions for protected resources. Agroup has an ID and is composed of members and administrators. The creator of the group is usually thefirst administrator.
Many attributes can be set for each user account, including password and login attributes. For a list ofconfigurable attributes, refer to “Disk Quota System Overview” on page 45. The following attributes arerecommended:
v Each user should have a user ID that is not shared with any other user. All of the security safeguardsand accountability tools work only if each user has a unique ID.
v Give user names that are meaningful to the users on the system. Actual names are best, because mostelectronic mail systems use the user ID to label incoming mail.
v Add, change, and delete users using the Web-based System Manager or SMIT interface. Although youcan perform all of these tasks from the command line, these interfaces help reduce small errors.
v Do not give an initial password to a user account until the user is ready to log in to the system. If thepassword field is defined as an * (asterisk) in the /etc/passwd file, account information is kept, but noone can log in to that account.
v Do not change the system-defined user IDs that are needed by the system to function correctly. Thesystem-defined user IDs are listed in the /etc/passwd file.
v In general, do not set the admin parameter to true for any user IDs. Only the root user can changeattributes for users with admin=true set in the /etc/security/user file.
The operating system supports the standard user attributes usually found in the /etc/passwd and/etc/group files, such as:
Authentication Information Specifies the passwordCredentials Specifies the user identifier, principal group, and the
supplementary group IDEnvironment Specifies the home or shell environment.
28 AIX 5L Version 5.2: Security Guide
User Account Control
Each user account has a set of associated attributes. These attributes are created from default valueswhen a user is created by using the mkuser command. The attributes can be altered by using the chusercommand. The following are the user attributes that are not used to control aspects not related topassword quality:
account_locked If an account must be explicitly locked, this attribute can be set to true; the default is false.admin If set to true, this user can not change the password. Only the administrator can change it.admgroups Lists groups for which this user has administrative rights. For those groups, the user can add or
delete members.auth1 The authentication method that is used to grant the user access. Typically, it is set to SYSTEM,
which will then use newer methods.auth2 Method that runs after the user has been authenticated by whatever was specified in auth1. It
cannot block access to the system. Typically, it is set to NONE.daemon This boolean parameter specifies whether the user is allowed to start daemons or subsystems
with the startsrc command. It also restricts the use of the cron and at facilities.login Specifies whether this user is allowed to log in.logintimes Restricts when a user can log in. For example, a user might be restricted to accessing the
system only during normal business hours.registry Specifies the user registry. It can be used to tell the system about alternate registries for user
information, such as NIS, LDAP, or Kerberos.rlogin Specifies whether this user is allowed to log in by using rlogin or telnet.su Specifies whether other users can switch to this ID with the su command.sugroups Specifies which groups are allowed to switch to this user ID.ttys Limits certain accounts to physically secure areas.expires Manages student or guest accounts; also can be used to turn off accounts temporarily.loginretries Specifies the maximum number of consecutive failed login attempts before the user ID is locked
by the system. The failed attempts are recorded in the /etc/security/lastlog file.umask Specifies the initial umask for the user.
The complete set of user attributes is defined in the /etc/security/user, /etc/security/limits,/etc/security/audit/config and /etc/security/lastlog files. The default for user creation with the mkusercommand is specified in the /usr/lib/security/mkuser.default file. Only options that override the generaldefaults in the default stanzas of the /etc/security/user and /etc/securtiy/limits files, as well as auditclasses, must be specified in the mkuser.default file. Several of these attributes control how a user canlog in, and they can be configured to lock the user account (prevent further logins) automatically underspecified conditions.
After the user account has been locked by the system, the user is not able to log in until the systemadministrator resets the user unsuccessful_login_count attribute in the /etc/security/lastlog file to beless than the value of login retries. This can be done using the following chsec command, as follows:chsec -f /etc/security/lastlog -s username -aunsuccessful_login_count=0
The defaults can be changed by using the chsec command to edit the default stanza in the appropriatesecurity file, such as the /etc/security/user or /etc/security/limits files. Many of the defaults are definedto be the standard behavior. To explicitly specify attributes that are set every time that a new user iscreated, change the user entry in /usr/lib/security/mkuser.default.
For information on extended user password attributes, refer to “Passwords” on page 40.
Chapter 2. Users, Roles, and Passwords 29

Login User IDs
The operating system identifies users by their login user ID. The login user ID allows the system to traceall user actions to their source. After a user logs in to the system but before running the initial userprogram, the system sets the login ID of the process to the user ID found in the user database. Allsubsequent processes during the login session are tagged with this ID. These tags provide a trail of allactivities performed by the login user ID. The user can reset the effective user ID, real user ID, effectivegroup ID, real group ID, and supplementary group ID during the session, but cannot change the login userID.
Strengthening User Security with Access Control ListsTo achieve an appropriate level of security in your system, develop a consistent security policy to manageuser accounts. The most commonly used security mechanism is the access control list (ACL). Forinformation about ACLs and developing a security policy, see “Access Control Lists” on page 35.
PATH Environment VariableThe PATH environment variable is an important security control. It specifies the directories to be searchedto find a command. The default systemwide PATH value is specified in the /etc/profile file, and each usernormally has a PATH value in the user’s $HOME/.profile file. The PATH value in the .profile file eitheroverrides the systemwide PATH value or adds extra directories to it.
Unauthorized changes to the PATH environment variable can enable a user on the system to ″spoof″other users (including root users). Spoofing programs (also called Trojan horse programs) replace systemcommands and then capture information meant for that command, such as user passwords.
For example, suppose a user changes the PATH value so that the system searches the /tmp directory firstwhen a command is run. Then the user places in the /tmp directory a program called su that asks for theroot password just like the su command. Then the /tmp/su program mails the root password to the userand calls the real su command before exiting. In this scenario, any root user who used the su commandwould reveal the root password and not even be aware of it.
To prevent any problems with the PATH environment variable for system administrators and users, do thefollowing:
v When in doubt, specify full path names. If a full path name is specified, the PATH environment variableis ignored.
v Never put the current directory (specified by . (period)) in the PATH value specified for the root user.Never allow the current directory to be specified in /etc/profile.
v The root user should have its own PATH specification in his private .profile file. Typically, thespecification in /etc/profile lists the minimal standard for all users, whereas the root user might needmore or fewer directories than the default.
v Warn other users not to change their .profile files without consulting the system administrator.Otherwise, an unsuspecting user could make changes that allow unintended access. A user .profile fileshould have permissions set to 740.
v System administrators should not use the su command to gain root privilege from a user session,because the user’s PATH value specified in the .profile file is in effect. Users can set their own .profilefiles. System administrators should log in to the user’s machine as root user or preferably, using theirown ID and then use the following command:/usr/bin/su - root
This ensures that the root environment is used during the session. If a system administrator doesoperate as root in another user session, the system administrator should specify full path namesthroughout the session.
30 AIX 5L Version 5.2: Security Guide
v Protect the input field separator (IFS) environment variable from being changed in the /etc/profile file.The IFS environment variable in the .profile file can be used to alter the PATH value.
Set Up Anonymous FTP with a Secure User AccountThis scenario sets up an anonymous ftp with a secure user account, using the command line interfaceand a script.
Note: This scenario cannot be used on a system with the Controlled Access Protection Profile (CAPP)with Evaluation Assurance Level 4+ (EAL4+) feature.
1. Verify that the bos.net.tcp.client fileset is installed on your system, by typing the following command:lslpp -L | grep bos.net.tcp.client
If you receive no output, the fileset is not installed. For instructions on how to install it, see the AIX 5LVersion 5.2 Installation Guide and Reference.
2. Verify that you have at least 8 MB of free space available in the system’s /home directory, by typingthe following command:df -k /home
The script in step 4 requires at least 8 MB free space in the /home directory to install the requiredfiles and directories. If you need to increase the amount of available space, see the AIX 5L Version5.2 System Management Guide: Operating System and Devices.
3. With root authority, change to the /usr/samples/tcpip directory. For example:cd /usr/samples/tcpip
4. To set up the account, run the following script:./anon.ftp
5. When prompted with Are you sure you want to modify /home/ftp?, type yes. Output similar to thefollowing displays:Added user anonymous.Made /home/ftp/bin directory.Made /home/ftp/etc directory.Made /home/ftp/pub directory.Made /home/ftp/lib directory.Made /home/ftp/dev/null entry.Made /home/ftp/usr/lpp/msg/en_US directory.
6. Change to the /home/ftp directory. For example:cd /home/ftp
7. Create a home subdirectory, by typing:mkdir home
8. Change the permissions of the /home/ftp/home directory to drwxr-xr-x, by typing:chmod 755 home
9. Change to the /home/ftp/etc directory, by typing:cd /home/ftp/etc
10. Create the objrepos subdirectory, by typing:mkdir objrepos
11. Change the permissions of the /home/ftp/etc/objrepos directory to drwxrwxr-x, by typing:chmod 775 objrepos
12. Change the owner and group of the /home/ftp/etc/objrepos directory to the root user and the systemgroup, by typing:chown root:system objrepos
13. Create a security subdirectory, by typing:
Chapter 2. Users, Roles, and Passwords 31
mkdir security
14. Change the permissions of the /home/ftp/etc/security directory to drwxr-x---, by typing:chmod 750 security
15. Change the owner and group of the /home/ftp/etc/security directory to the root user and the securitygroup, by typing:chown root:security security
16. Change to the /home/ftp/etc/security directory, by typing:cd security
17. Add a user by typing the following SMIT fast path:smit mkuser
In this scenario, we are adding a user named test.
18. In the SMIT fields, enter the following values:User NAME [test]ADMINISTRATIVE USER? truePrimary GROUP [staff]Group SET [staff]Another user can SU TO USER? trueHOME directory [/home/test]
After you enter your changes, press Enter to create the user. After the SMIT process completes, exitSMIT.
19. Create a password for this user with the following command:passwd test
When prompted, enter the desired password. You must enter the new password a second time forconfirmation.
20. Change to the /home/ftp/etc directory, by typing:cd /home/ftp/etc
21. Copy the /etc/passwd file to the /home/ftp/etc/passwd file, using the following command:cp /etc/passwd /home/ftp/etc/passwd
22. Using your favorite editor, edit the /home/ftp/etc/passwd file. For example:vi passwd
23. Remove all lines from the copied content except those for the root, ftp, and test users. After your edit,the content should look similar to the following:root:!:0:0::/:/bin/kshftp:*:226:1::/home/ftp:/usr/bin/kshtest:!:228:1::/home/test:/usr/bin/ksh
24. Save your changes and exit the editor.
25. Change the permissions of the /home/ftp/etc/passwd file to -rw-r--r--, by typing:chmod 644 passwd
26. Change the owner and group of the /home/ftp/etc/passwd file to the root user and the securitygroup, by typing:chown root:security passwd
27. Copy the contents of the /etc/security/passwd file to the /home/ftp/etc/security/passwd file, usingthe following command:cp /etc/security/passwd /home/ftp/etc/security/passwd
28. Using your favorite editor, edit the /home/ftp/etc/security/passwd file. For example:vi ./security/passwd
29. Remove all stanzas from the copied content except the stanza for the test user.
32 AIX 5L Version 5.2: Security Guide

30. Remove the flags = ADMCHG line from the test user stanza. After your edits, the content should looksimilar to the following:test:
password = 2HaAYgpDZX3Twlastupdate = 990633278
31. Save your changes and exit the editor.
32. Change the permissions of the /home/ftp/etc/security/passwd file to -rw-------, by typing:chmod 600 ./security/passwd
33. Change the owner and group of the /home/ftp/etc/security/passwd file to the root user and thesecurity group, by typing:chown root:security ./security/passwd
34. Using your favorite editor, edit the /home/ftp/etc/security/group file. For example:vi ./security/group
35. Add the following lines to the file:system:*:0:staff:*:1:test
36. Save your changes and exit the editor.
37. Use the following commands to copy the appropriate content into the /home/ftp/etc/objreposdirectory:cp /etc/objrepos/CuAt ./objreposcp /etc/objrepos/CuAt.vc ./objreposcp /etc/objrepos/CuDep ./objreposcp /etc/objrepos/CuDv ./objreposcp /etc/objrepos/CuDvDr ./objreposcp /etc/objrepos/CuVPD ./objreposcp /etc/objrepos/Pd* ./objrepos
38. Change to the /home/ftp/home directory, by typing:cd ../home
39. Make a new home directory for your user, by typing:mkdir test
This will be the home directory for the new ftp user.
40. Change the owner and group of the /home/ftp/home/test directory to the test user and the staffgroup, by typing:chown test:staff test
41. Change the permissions of the /home/ftp/home/test file to -rwx------, by typing:chmod 700 test
At this point, you have ftp sublogin set up on your machine. You can test this with the following procedure:
1. Using ftp, connect to the host on which you created the test user. For example:ftp MyHost
2. Log in as anonymous. When prompted for a password, press Enter.
3. Switch to the newly created test user, by using the following command:user test
When prompted for a password, use the password you created in step 19 on page 32
4. Use the pwd command to verify the user’s home directory exists. For example:ftp> pwd
/home/test
The output shows /home/test as an ftp subdirectory. The full path name on the host is actually/home/ftp/home/test.
Chapter 2. Users, Roles, and Passwords 33
System Special User AccountsAIX provides a default set of system special user accounts that prevents the root and system accountsfrom owning all operating system files and file systems.
Attention: Use caution when removing a system special user account. You can disable a specificaccount by inserting an asterisk (*) at the beginning of its corresponding line of the /etc/security/passwdfile. However, be careful not to disable the root user account. If you remove system special user accountsor disable the root account, the operating system will not function.
The following accounts are predefined in the operating system:
adm The adm user account owns the following basic system functions:
v Diagnostics, the tools for which are stored in the /usr/sbin/perf/diag_tool directory.
v Accounting, the tools for which are stored in the following directories:
– /usr/sbin/acct
– /usr/lib/acct
– /var/adm
– /var/adm/acct/fiscal
– /var/adm/acct/nite
– /var/adm/acct/sum
bin The bin user account typically owns the executable files for most user commands. This account’sprimary purpose is to help distribute the ownership of important system directories and files so thateverything is not owned solely by the root and sys user accounts.
daemonThe daemon user account exists only to own and run system server processes and theirassociated files. This account guarantees that such processes run with the appropriate file accesspermissions.
nobodyThe nobody user account is used by the Network File System (NFS) to enable remote printing.This account exists so that a program can permit temporary root access to root users. Forexample, before enabling Secure RPC or Secure NFS, check the /etc/public key on the masterNIS server to find a user who has not been assigned a public key and a secret key. As root user,you can create an entry in the database for each unassigned user by entering:newkey -u username
Or, you can create an entry in the database for the nobody user account, and then any user canrun the chkey program to create their own entries in the database without logging in as root.
root The root user account, UID 0, through which you can perform system maintenance tasks andtroubleshoot system problems.
sys The sys user owns the default mounting point for the Distributed File Service (DFS) cache, whichmust exist before you can install or configure DFS on a client. The /usr/sys directory can alsostore installation images.
Removing Unnecessary Default User AccountsDuring installation of the operating system, a number of default user and group IDs are created.Depending on the applications you are running on your system and where your system is located in thenetwork, some of these user and group IDs can become security weaknesses, vulnerable to exploitation. Ifthese users and group IDs are not needed, you can remove them to minimize security risks associatedwith them.
34 AIX 5L Version 5.2: Security Guide
The following table lists the most common default user IDs that you might be able to remove:
Table 4. Common default user IDs that you might be able to remove.
User ID Description
uucp, nuucp Owner of hidden files used by uucp protocol. The uucp user account isused for the UNIX-to-UNIX Copy Program, which is a group ofcommands, programs, and files, present on most AIX systems, thatallows the user to communicate with another AIX system over adedicated line or a telephone line.
lpd Owner of files used by printing subsystem
imnadm IMN search engine (used by Documentation Library Search)
guest Allows access to users who do not have access to accounts
The following table lists common group IDs that might not be needed:
Table 5. Common group IDs that might not be needed.
Group ID Description
uucp Group to which uucp and nuucp users belong
printq Group to which lpd user belongs
imnadm Group to which imnadm user belongs
Analyze your system to determine which IDs are indeed not needed. There might also be additional userand group IDs that you might not need. Before your system goes into production, perform a thoroughevaluation of available IDs.
Access Control Lists
Access control consists of protected information resources that specify who can be granted access to suchresources. The operating system allows for need-to-know or discretionary security. The owner of aninformation resource can grant other users read or write access rights for that resource. A user who isgiven access to an object may create additional copies of the object and give access rights to a third partyto the newly created object. However, only the object owner can grant access rights to a third party to theoriginal object. The owner of an object and the root user are the only users that may change the accessrights to an object.
Users have user-based access only to the objects that they own. Typically, users receive either the grouppermissions or the default permissions for a resource. The major task in administering access control is todefine the group memberships of users, because these memberships determine the users’ access rights tothe files that they do not own.
Access control lists (ACLs) increase the quality of file access controls by adding extended permissions thatmodify the base permissions assigned to individuals and groups. With extended permissions, you canpermit or deny file access to specific individuals or groups without changing the base permissions.
Note: The ACL for a file cannot exceed one memory page (approximately 4096 bytes) in size.
Access control also involves managing protected resources using the setuid and setgid programs andhard-copy labeling. The operating system supports several types of information resources, or objects.These objects allow user processes to store or communicate information. The most important types ofobjects are as follows:
v Files and directories (used for information storage)
Chapter 2. Users, Roles, and Passwords 35

v Named pipes, message queues, shared memory segments, and semaphores (used for informationtransfer between processes)
Each object has an associated owner, group, and mode. The mode defines access permissions for theowner, group, and other users. The following are the direct access control attributes for the different typesof objects:
Owner The owner of a specific object controls its discretionary access attributes. The owner’s attributes are set tothe creating process’s effective user ID. For file system objects, the direct access control attributes for anowner cannot be changed without root authority.
For System V Interprocess Communication (SVIPC) objects, either the creator or owner can change theowner. SVIPC objects have an associated creator that has all the rights of the owner (including accessauthorization). However, the creator cannot be changed, even with root authority.
Group SVIPC objects are initialized to the effective group ID of the creating process. For file system objects, thedirect access control attributes are initialized to either the effective group ID of the creating process or thegroup ID of the parent directory (this is determined by the group inheritance flag of the parent directory).
The owner of an object can change the group; the new group must be either the effective group ID of thecreating process or the group ID of the parent directory. The owner of an object can change the group; thenew group must be either the effective group or in the supplementary group ID of the owner’s currentprocess. (As above, SVIPC objects have an associated creating group that cannot be changed and sharethe access authorization of the object group.)
To maintain ACLs, use the aclget, acledit, and the aclput commands.
The chmod command in numeric mode (with octal notations) can set base permissions and attributes.The chmod subroutine, which the command calls, disables extended permissions. If you use the numericmode of the chmod command on a file that has an ACL, extended permissions are disabled. Thesymbolic mode of the chmod command does not disable extended permissions. For information aboutnumeric and symbolic mode, refer to the chmod command.
Using setuid and setgid Programs
The permission bits mechanism allows effective access control for resources in most situations. But formore precise access control, the operating system provides the setuid and setgid programs.
Most programs execute with the user and group access rights of the user who invoked them. Programowners can associate the access rights of the user who invoked them by making the program a setuid orsetgid program; that is, a program with the setuid or setgid bit set in its permissions field. When thatprogram is executed by a process, the process acquires the access rights of the owner of the program. Asetuid program executes with the access rights of its owner, while a setgid program has the access rightsof its group, and both bits can be set according to the permission mechanism.
Although the process is assigned the additional access rights, these rights are controlled by the programbearing the rights. Thus, the setuid and setgid programs allow for user-programmed access controls inwhich access rights are granted indirectly. The program acts as a trusted subsystem, guarding the user’saccess rights.
Although these programs can be used with great effectiveness, there is a security risk if they are notdesigned carefully. In particular, the program must never return control to the user while it still has theaccess rights of its owner, because this would allow a user to make unrestricted use of the owner’s rights.
Note: For security reasons, the operating system does not support setuid or setgid calls within ashell script.
36 AIX 5L Version 5.2: Security Guide
Administrative Access Rights
The operating system provides privileged access rights for system administration. System privilege isbased on user and group IDs. Users with effective user or group IDs of 0 are recognized as privileged.
Processes with effective user IDs of 0 are known as root-user processes and can:
v Read or write any object
v Call any system function
v Perform certain subsystem control operations by executing setuid-root programs.
You can manage the system using two types of privilege: the su command privilege and setuid-rootprogram privilege. The su command allows all programs you invoke to function as root-user processes.The su command is a flexible way to manage the system, but it is not very secure.
Making a program into a setuid-root program means the program is a root-user-owned program with thesetuid bit set. A setuid-root program provides administrative functions that ordinary users can performwithout compromising security; the privilege is encapsulated in the program rather than granted directly tothe user. It can be difficult to encapsulate all necessary administrative functions in setuid-root programs,but it provides more security to system managers.
Base Permissions
Base permissions are the traditional file-access modes assigned to the file owner, file group, and otherusers. The access modes are: read (r), write (w), and execute/search (x).
In an ACL, base permissions are in the following format, with the Mode parameter expressed as rwx (witha hyphen (-) replacing each unspecified permission):base permissions:
owner(name): Modegroup(group): Modeothers: Mode
AttributesThe following attributes can be added to an ACL:
setuid (SUID)Set-user-ID mode bit. This attribute sets the effective and saved user IDs of the process to theowner ID of the file at run time.
setgid (SGID)Set-group-ID mode bit. This attribute sets the effective and saved group IDs of the process to thegroup ID of the file at run time.
savetext (SVTX)For directories, indicates that only file owners can link or unlink files in the specified directory.
These attributes are added in the following format:attributes: SUID, SGID, SVTX
Extended Permissions
Extended permissions allow the owner of a file to more precisely define access to that file. Extendedpermissions modify the base file permissions (owner, group, others) by permitting, denying, or specifyingaccess modes for specific individuals, groups, or user and group combinations. Permissions are modifiedthrough the use of keywords.
Chapter 2. Users, Roles, and Passwords 37
The permit, deny, and specify keywords are defined as follows:
permit Grants the user or group the specified access to the filedeny Restricts the user or group from using the specified access to the filespecify Precisely defines the file access for the user or group
If a user is denied a particular access by either a deny or a specify keyword, no other entry can overridethat access denial.
The enabled keyword must be specified in the ACL for the extended permissions to take effect. Thedefault value is the disabled keyword.
In an ACL, extended permissions are in the following format:extended permissions:
enabled | disabledpermit Mode UserInfo...:deny Mode UserInfo...:specify Mode UserInfo...:
Use a separate line for each permit, deny, or specify entry. The Mode parameter is expressed as rwx(with a hyphen (-) replacing each unspecified permission). The UserInfo parameter is expressed asu:UserName, or g:GroupName, or a comma-separated combination of u:UserName and g:GroupName.
Note: If more than one user name is specified in an entry, that entry cannot be used in an accesscontrol decision, because a process has only one user ID.
Access Control List Example
The following is an example of an ACL:attributes: SUIDbase permissions:
owner(frank): rw-group(system): r-xothers: ---
extended permissions:enabled
permit rw- u:dhsdeny r-- u:chas, g:systemspecify r-- u:john, g:gateway, g:mailpermit rw- g:account, g:finance
The ACL entries are described as follows:
v The first line indicates that the setuid bit is turned on.
v The next line, which introduces the base permissions, is optional.
v The next three lines specify the base permissions. The owner and group names in parentheses are forinformation only. Changing these names does not alter the file owner or file group. Only the chowncommand and the chgrp command can change these file attributes.
v The next line, which introduces the extended permissions, is optional.
v The next line indicates that the extended permissions that follow are enabled.
v The last four lines are the extended entries. The first extended entry grants user dhs read (r) and write(w) permission on the file.
v The second extended entry denies read (r) access to user chas only when he is a member of thesystem group.
38 AIX 5L Version 5.2: Security Guide
v The third extended entry specifies that as long as user john is a member of both the gateway group andthe mail group, he has read (r) access. If user john is not a member of both groups, this extendedpermission does not apply.
v The last extended entry grants any user in both the account group and the finance group read (r) andwrite (w) permission.
Note: More than one extended entry can apply to a process that is requesting access to acontrolled object, with restrictive entries taking precedence over permissive modes.
For the complete syntax, see the acledit command in the AIX 5L Version 5.2 Commands Reference.
Access AuthorizationThe owner of the information resource is responsible for managing access rights. Resources are protectedby permission bits, which are included in the mode of the object. The permission bits define the accesspermissions granted to the owner of the object, the group of the object, and for the others default class.The operating system supports three different modes of access (read, write, and execute) that can begranted separately.
When a user logs in to an account (using the login or su commands), the user IDs and group IDsassigned to that account are associated with the user’s processes. These IDs determine the access rightsof the process.
For files, directories, named pipes, and devices (special files), access is authorized as follows:
v For each access control entry (ACE) in the ACL, the identifier list is compared to the identifiers of theprocess. If there is a match, the process receives the permissions and restrictions defined for that entry.The logical unions for both permissions and restrictions are computed for each matching entry in theACL. If the requesting process does not match any of the entries in the ACL, it receives the permissionsand restrictions of the default entry.
v If the requested access mode is permitted (included in the union of the permissions) and is notrestricted (included in the union of the restrictions), access is granted. Otherwise, access is denied.
A process with a user ID of 0 is known as a root user process. These processes are generally allowed allaccess permissions. But if a root user process requests execute permission for a program, access isgranted only if execute permission is granted to at least one user.
The identifier list of an ACL matches a process if all identifiers in the list match the corresponding type ofeffective identifier for the requesting process. A USER-type identifier matches if it is equal to the effectiveuser ID of the process, and a GROUP-type identifier matches if it is equal to the effective group ID of theprocess or to one of the supplementary group IDs. For instance, an ACE with an identifier list such as thefollowing:USER:fred, GROUP:philosophers, GROUP:software_programmer
would match a process with an effective user ID of fred and a group set of:philosophers, philanthropists, software_programmer, doc_design
but would not match for a process with an effective user ID of fred and a group set of:philosophers, iconoclasts, hardware_developer, graphic_design
Note that an ACE with an identifier list of the following would match for both processes:USER:fred, GROUP:philosophers
In other words, the identifier list in the ACE functions is a set of conditions that must hold for the specifiedaccess to be granted.
Chapter 2. Users, Roles, and Passwords 39
All access permission checks for these objects are made at the system call level when the object is firstaccessed. Because System V Interprocess Communication (SVIPC) objects are accessed statelessly,checks are made for every access. For objects with file system names, it is necessary to be able toresolve the name of the actual object. Names are resolved either relatively (to the process’ workingdirectory) or absolutely (to the process’ root directory). All name resolution begins by searching one ofthese directories.
The discretionary access control mechanism allows for effective access control of information resourcesand provides for separate protection of the confidentiality and integrity of the information. Owner-controlledaccess control mechanisms are only as effective as users make them. All users must understand howaccess permissions are granted and denied, and how these are set.
Passwords
Guessing passwords is one of the most common attack methods that a system experiences. Therefore,controlling and monitoring your password-restriction policy is essential. AIX provides mechanisms to helpyou enforce a stronger password policy, such as establishing values for the following:
v Minimum and maximum number of weeks that can elapse before and after a password can be changed
v Minimum length of a password
v Minimum number of alphabetic characters that can be used when selecting a password
This section discusses how AIX stores and handles passwords, and how you can establish a strongpassword policy. Topics in this section include:
v “Establishing Good Passwords”
v “Using the /etc/passwd File” on page 41
v “Using the /etc/passwd File and Network Environments” on page 42
v “Hiding User Names and Passwords” on page 42
v “Setting Recommended Password Options” on page 42
v “Extending Password Restrictions” on page 44
Establishing Good PasswordsGood passwords are effective first lines of defense against unauthorized entry into a system if they are thefollowing:
v A mixture of both uppercase and lowercase letters
v A combination of alphabetic, numeric, or punctuation characters. Also, they may have special characterssuch as ~!@#$%^&*()-_=+[]{}|\;:’",.<>?/<space>
v Are not written down anywhere
v Are at least 7 to a maximum of 8 characters in length, if using the /etc/security/passwd file(authentication implementations that use registries, such as LDAP, can have passwords that exceed thismaximum length)
v Are not real words that can be found in any dictionary
v Are not patterns of letters on the keyboard, like qwerty
v Are not real words or known patterns spelled backwards
v Do not contain any personal information about yourself, family, or friends
v Do not follow the same pattern as a previous password
v Can be typed relatively quickly so someone nearby cannot determine your password
In addition to these mechanisms, you can further enforce stricter rules by restricting passwords so thatthey cannot include standard UNIX words, which can be guessed. This feature uses the dictionlist, whichrequires that you first have the bos.data and bos.txt file sets installed.
40 AIX 5L Version 5.2: Security Guide
To implement the previously defined dictionlist, edit the following line in the /etc/security/users file:dictionlist = /usr/share/dict/words
The /usr/share/dict/words file uses the dictionlist to prevent standard UNIX words from being used aspasswords.
Using the /etc/passwd FileTraditionally, the /etc/passwd file is used to keep track of every registered user that has access to asystem. The /etc/passwd file is a colon-separated file that contains the following information:
v User name
v Encrypted password
v User ID number (UID)
v User’s group ID number (GID)
v Full name of the user (GECOS)
v User home directory
v Login shell
The following is an example of an /etc/passwd file:root:!:0:0::/:/usr/bin/kshdaemon:!:1:1::/etc:bin:!:2:2::/bin:sys:!:3:3::/usr/sys:adm:!:4:4::/var/adm:uucp:!:5:5::/usr/lib/uucp:guest:!:100:100::/home/guest:nobody:!:4294967294:4294967294::/:lpd:!:9:4294967294::/:lp:*:11:11::/var/spool/lp:/bin/falseinvscout:*:200:1::/var/adm/invscout:/usr/bin/kshnuucp:*:6:5:uucp login user:/var/spool/uucppublic:/usr/sbin/uucp/uucicoimnadm:*:188:188::/home/imnadm:/usr/bin/kshpaul:!:201:1::/home/paul:/usr/bin/kshjdoe:*:202:1:John Doe:/home/jdoe:/usr/bin/ksh
AIX does not store encrypted passwords in the /etc/password file in the way that UNIX systems do, but inthe /etc/security/password file by default, which is only readable by the root user. The password filed in/etc/passwd is used by AIX to signify if there is a password or whether the account is blocked.
The /etc/passwd file is owned by the root user and must be readable by all the users, but only the rootuser has writable permissions, which is shown as -rw-r--r--. If a user ID has a password, then thepassword field will have an ! (exclamation point). If the user ID does not have a password, then thepassword field will have an * (asterisk). The encrypted passwords are stored in the /etc/security/passwdfile. The following example contains the last four entries in the /etc/security/passwd file based on theentries from the /etc/passwd file shown previously.guest:
password = *
nobody:password = *
lpd:password = *
paul:password = eacVScDKri4s6lastupdate = 1026394230flags = ADMCHG
Chapter 2. Users, Roles, and Passwords 41
The user ID jdoe does not have an entry in the /etc/security/passwd file because it does not have apassword set in the /etc/passwd file.
The consistency of the /etc/passwd file can be checked using the pwdck command. The pwdckcommand verifies the correctness of the password information in the user database files by checking thedefinitions for all of the users or for specified users.
Using the /etc/passwd File and Network EnvironmentsIn a traditional networked environment, a user must have had an account on each system to gain accessto that system. That typically meant that the user would have an entry in each of the /etc/passwd files oneach system. However, in a distributed environment, there is no easy way to ensure that every system hadthe same /etc/passwd file. To solve this problem, several methods make the information in the/etc/passwd file available over the network, including Network Information System (NIS) and NIS+.
For more information about NIS and NIS+, see Chapter 12, “Network Information Services (NIS) and NIS+Security”, on page 189.
Hiding User Names and PasswordsTo achieve a higher level of security, ensure that user IDs and passwords are not visible within the system.The .netrc files contain user IDs and passwords. This file is not protected by encryption or encoding, thusits contents are clearly shown as plain text. To find these files, run the following command:# find `awk -F: ’{print $6}’ /etc/passwd` -name .netrc -ls
After you locate these files, delete them. A more effective way to save passwords is by setting upKerberos. For more information about Kerberos, see Chapter 15, “Kerberos”, on page 213.
Setting Recommended Password OptionsProper password management can only be accomplished through user education. To provide someadditional security, the operating system provides configurable password restrictions. These allow theadministrator to constrain the passwords chosen by users and to force passwords to be changed regularly.Password options and extended user attributes are located in the /etc/security/user file, an ASCII file thatcontains attribute stanzas for users. These restrictions are enforced whenever a new password is definedfor a user. All password restrictions are defined per user. By keeping restrictions in the default stanza ofthe /etc/security/user file, the same restrictions are enforced on all users. To maintain password security,all passwords must be similarly protected.
Administrators can also extend the password restrictions. Using the pwdchecks attribute of the/etc/security/user file, an administrator can add new subroutines (known as methods) to the passwordrestrictions code. Thus, local site policies can be added to and enforced by the operating system. Formore information, see “Extending Password Restrictions” on page 44.
Apply password restrictions sensibly. Attempts to be too restrictive, such as limiting the password space,which makes guessing the password easier, or forcing the user to select passwords that are difficult toremember, which might then be written down, can jeopardize password security. Ultimately, passwordsecurity rests with the user. Simple password restrictions, coupled with sensible guidelines and anoccasional audit to verify that current passwords are unique, are the best policy.
The following table lists recommended values for some security attributes related to user passwords in the/etc/security/user file.
42 AIX 5L Version 5.2: Security Guide
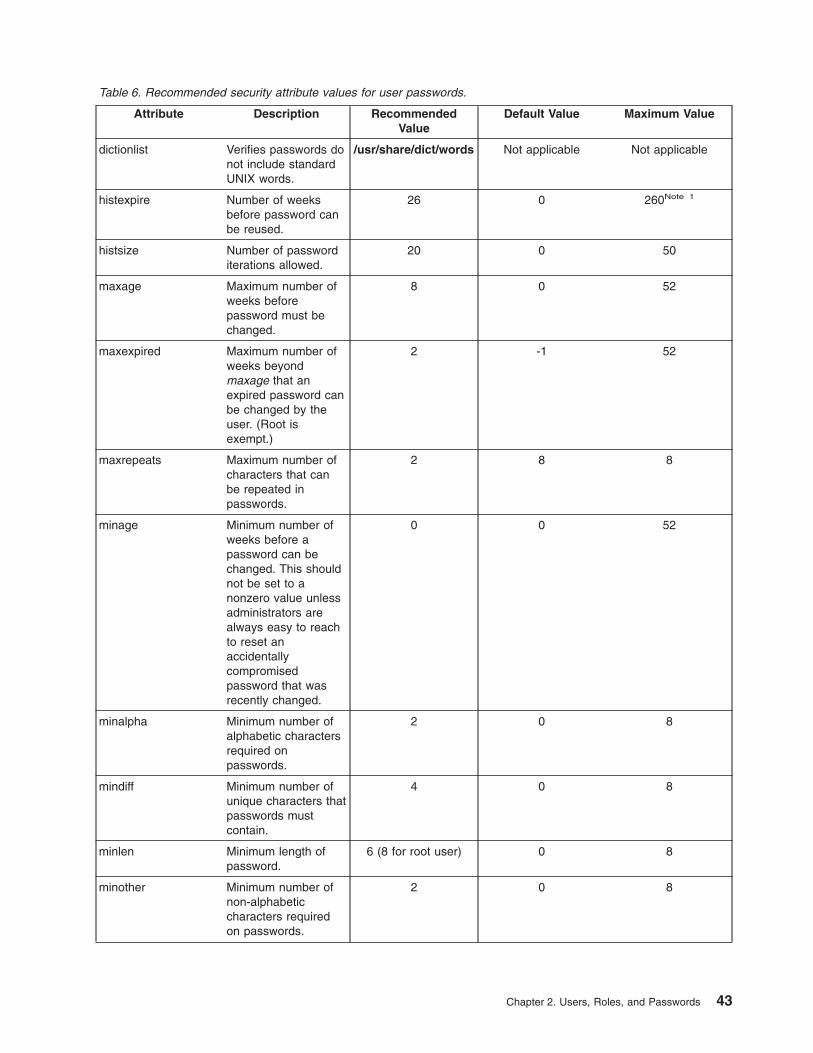
Table 6. Recommended security attribute values for user passwords.
Attribute Description RecommendedValue
Default Value Maximum Value
dictionlist Verifies passwords donot include standardUNIX words.
/usr/share/dict/words Not applicable Not applicable
histexpire Number of weeksbefore password canbe reused.
26 0 260Note 1
histsize Number of passworditerations allowed.
20 0 50
maxage Maximum number ofweeks beforepassword must bechanged.
8 0 52
maxexpired Maximum number ofweeks beyondmaxage that anexpired password canbe changed by theuser. (Root isexempt.)
2 -1 52
maxrepeats Maximum number ofcharacters that canbe repeated inpasswords.
2 8 8
minage Minimum number ofweeks before apassword can bechanged. This shouldnot be set to anonzero value unlessadministrators arealways easy to reachto reset anaccidentallycompromisedpassword that wasrecently changed.
0 0 52
minalpha Minimum number ofalphabetic charactersrequired onpasswords.
2 0 8
mindiff Minimum number ofunique characters thatpasswords mustcontain.
4 0 8
minlen Minimum length ofpassword.
6 (8 for root user) 0 8
minother Minimum number ofnon-alphabeticcharacters requiredon passwords.
2 0 8
Chapter 2. Users, Roles, and Passwords 43
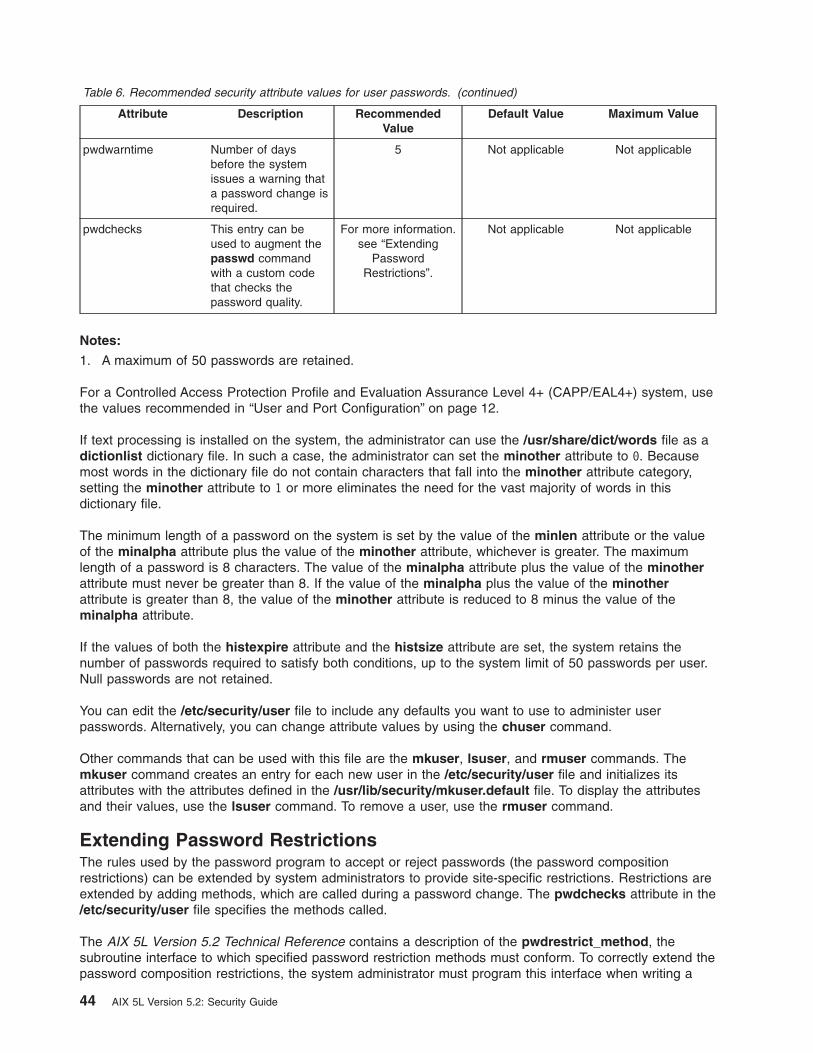
Table 6. Recommended security attribute values for user passwords. (continued)
Attribute Description RecommendedValue
Default Value Maximum Value
pwdwarntime Number of daysbefore the systemissues a warning thata password change isrequired.
5 Not applicable Not applicable
pwdchecks This entry can beused to augment thepasswd commandwith a custom codethat checks thepassword quality.
For more information.see “Extending
PasswordRestrictions”.
Not applicable Not applicable
Notes:
1. A maximum of 50 passwords are retained.
For a Controlled Access Protection Profile and Evaluation Assurance Level 4+ (CAPP/EAL4+) system, usethe values recommended in “User and Port Configuration” on page 12.
If text processing is installed on the system, the administrator can use the /usr/share/dict/words file as adictionlist dictionary file. In such a case, the administrator can set the minother attribute to 0. Becausemost words in the dictionary file do not contain characters that fall into the minother attribute category,setting the minother attribute to 1 or more eliminates the need for the vast majority of words in thisdictionary file.
The minimum length of a password on the system is set by the value of the minlen attribute or the valueof the minalpha attribute plus the value of the minother attribute, whichever is greater. The maximumlength of a password is 8 characters. The value of the minalpha attribute plus the value of the minotherattribute must never be greater than 8. If the value of the minalpha plus the value of the minotherattribute is greater than 8, the value of the minother attribute is reduced to 8 minus the value of theminalpha attribute.
If the values of both the histexpire attribute and the histsize attribute are set, the system retains thenumber of passwords required to satisfy both conditions, up to the system limit of 50 passwords per user.Null passwords are not retained.
You can edit the /etc/security/user file to include any defaults you want to use to administer userpasswords. Alternatively, you can change attribute values by using the chuser command.
Other commands that can be used with this file are the mkuser, lsuser, and rmuser commands. Themkuser command creates an entry for each new user in the /etc/security/user file and initializes itsattributes with the attributes defined in the /usr/lib/security/mkuser.default file. To display the attributesand their values, use the lsuser command. To remove a user, use the rmuser command.
Extending Password RestrictionsThe rules used by the password program to accept or reject passwords (the password compositionrestrictions) can be extended by system administrators to provide site-specific restrictions. Restrictions areextended by adding methods, which are called during a password change. The pwdchecks attribute in the/etc/security/user file specifies the methods called.
The AIX 5L Version 5.2 Technical Reference contains a description of the pwdrestrict_method, thesubroutine interface to which specified password restriction methods must conform. To correctly extend thepassword composition restrictions, the system administrator must program this interface when writing a
44 AIX 5L Version 5.2: Security Guide
password-restriction method. Use caution in extending the password-composition restrictions. Theseextensions directly affect the login command, the passwd command, the su command, and otherprograms. The security of the system could easily be subverted by malicious or defective code.
User Authentication
Identification and authentication establish a user’s identity. Each user is required to log in to the system.The user supplies the user name of an account and a password, if the account has one (in a securesystem, all accounts must either have passwords or be invalidated). If the password is correct, the user islogged in to that account; the user acquires the access rights and privileges of the account. The/etc/passwd and /etc/security/passwd files maintain user passwords.
Alternative methods of authentication are integrated into the system by means of the SYSTEM attributethat appears in /etc/security/user. For instance, the Distributed Computing Environment (DCE) requirespassword authentication but validates these passwords in a manner different from the encryption modelused in /etc/passwd and /etc/security/passwd. Users who authenticate by means of DCE can have theirstanza in /etc/security/user set to SYSTEM=DCE.
Other SYSTEM attribute values are compat, files, and NONE. The compat token is used when nameresolution (and subsequent authentication) follows the local database, and if no resolution is found, theNetwork Information Services (NIS) database is tried. The files token specifies that only local files are tobe used during authentication. Finally, the NONE token turns off method authentication. To turn off allauthentication, the NONE token must appear in the SYSTEM and auth1 lines of the user’s stanza.
Other acceptable tokens for the SYSTEM attribute can be defined in /usr/lib/security/methods.cfg.
Note: The root user is always authenticated by means of the local system security file. The SYSTEMattribute entry for the root user is specifically set to SYSTEM = ″compat″ in /etc/security/user.
See the AIX 5L Version 5.2 System User’s Guide: Operating System and Devices for more information onprotecting passwords.
Login User IDs
All audit events recorded for this user are labeled with this ID and can be examined when you generateaudit records. See the AIX 5L Version 5.2 System User’s Guide: Operating System and Devices for moreinformation about login user IDs.
Disk Quota System Overview
System administrators use the disk quota system to control the number of files and data blocks that canbe allocated to users or groups. The following sections provide further information about the disk quotasystem, its implementation, and use:
v “Understanding the Disk Quota System”
v “Recovering from Over-Quota Conditions” on page 46
v “Setting Up the Disk Quota System” on page 46
Understanding the Disk Quota SystemThe disk quota system, based on the Berkeley Disk Quota System, provides an effective way to controlthe use of disk space. The quota system can be defined for individual users or groups, and is maintainedfor each journaled file system.
Chapter 2. Users, Roles, and Passwords 45

The disk quota system establishes limits based on the following parameters that can be changed with theedquota command:
v User’s or group’s soft limits
v User’s or group’s hard limits
v Quota grace period
The soft limit defines the number of 1 KB disk blocks or files under which the user must remain. The hardlimit defines the maximum amount of disk blocks or files the user can accumulate under the establisheddisk quotas. The quota grace period allows the user to exceed the soft limit for a short period of time (thedefault value is one week). If the user fails to reduce usage below the soft limit during the specified time,the system will interpret the soft limit as the maximum allocation allowed, and no further storage isallocated to the user. The user can reset this condition by removing enough files to reduce usage belowthe soft limit.
The disk quota system tracks user and group quotas in the quota.user and quota.group files located inthe root directories of file systems enabled with quotas. These files are created with the quotacheck andedquota commands and are readable with the quota commands.
Recovering from Over-Quota ConditionsTo reduce file system usage when you have exceeded quota limits, you can use the following methods:
v Kill the current process that caused the file system to reach its limit, remove surplus files to bring thelimit below quota, and retry the failed program.
v If you are running an editor such as vi, use the shell escape sequence to check your file space, removesurplus files, and return without losing your edited file. Alternatively, if you are using the C or Kornshells, you can suspend the editor with the Ctrl-Z key sequence, issue the file system commands, andthen return with the fg (foreground) command.
v Temporarily write the file to a file system where quota limits have not been exceeded, delete surplusfiles, and then return the file to the correct file system.
Setting Up the Disk Quota System
Typically, only those file systems that contain user home directories and files require disk quotas. Considerimplementing the disk quota system under the following conditions:
v Your system has limited disk space.
v You require more file-system security.
v Your disk-usage levels are large, such as at many universities.
If these conditions do not apply to your environment, you might not want to create disk-usage limits byimplementing the disk quota system.
The disk quota system can be used only with the journaled file system.
Note: Do not establish disk quotas for the /tmp file system.
To set up the disk quota system, use the following procedure:
1. Log in with root authority.
2. Determine which file systems require quotas.
Note: Because many editors and system utilities create temporary files in the /tmp file system, itmust be free of quotas.
46 AIX 5L Version 5.2: Security Guide

3. Use the chfs command to include the userquota and groupquota quota configuration attributes in the/etc/filesystems file. The following example uses the chfs command to enable user quotas on the/home file system:chfs -a "quota = userquota" /home
To enable both user and group quotas on the /home file system, type:chfs -a "quota = userquota,groupquota" /home
The corresponding entry in the /etc/filesystems file is displayed as follows:/home:dev = /dev/hd1vfs = jfslog = /dev/hd8mount = truecheck = truequota = userquota,groupquotaoptions = rw
4. Optionally, specify alternate disk quota file names. The quota.user and quota.group file names arethe default names located at the root directories of the file systems enabled with quotas. You canspecify alternate names or directories for these quota files with the userquota and groupquotaattributes in the /etc/filesystems file.
The following example uses the chfs command to establish user and group quotas for the /home filesystem, and names the myquota.user and myquota.group quota files:chfs -a "userquota = /home/myquota.user" -a "groupquota = /home
/myquota.group" /home
The corresponding entry in the /etc/filesystems file is displayed as follows:/home:dev = /dev/hd1vfs = jfslog = /dev/hd8mount = truecheck = truequota = userquota,groupquotauserquota = /home/myquota.usergroupquota = /home/myquota.groupoptions = rw
5. If they are not previously mounted, mount the specified file systems.
6. Set the desired quota limits for each user or group. Use the edquota command to create each user orgroup’s soft and hard limits for allowable disk space and maximum number of files.
The following example entry shows quota limits for the davec user:Quotas for user davec:/home: blocks in use: 30, limits (soft = 100, hard = 150)
inodes in use: 73, limits (soft = 200, hard = 250)
This user has used 30 KB of the maximum 100 KB of disk space. Of the maximum 200 files, davechas created 73. This user has buffers of 50 KB of disk space and 50 files that can be allocated totemporary storage.
When establishing disk quotas for multiple users, use the -p flag with the edquota command toduplicate a user’s quotas for another user.
To duplicate the quotas established for user davec for user nanc, type:edquota -p davec nanc
Chapter 2. Users, Roles, and Passwords 47

7. Enable the quota system with the quotaon command. The quotaon command enables quotas for aspecified file system, or for all file systems with quotas (as indicated in the /etc/filesystems file) whenused with the -a flag.
8. Use the quotacheck command to check the consistency of the quota files against actual disk usage.
Note: It is recommended that you do this each time you first enable quotas on a file system andafter you reboot the system.
To enable this check and to turn on quotas during system startup, add the following lines at the end ofthe /etc/rc file:echo " Enabling filesystem quotas "/usr/sbin/quotacheck -a/usr/sbin/quotaon -a
48 AIX 5L Version 5.2: Security Guide
Chapter 3. Auditing
The auditing subsystem enables the system administrator to record security-relevant information, whichcan be analyzed to detect potential and actual violations of the system security policy.
This section discusses the following topics:
v “Auditing Subsystem”
v “Event Selection” on page 50
v “Auditing Subsystem Configuration” on page 51
v “Audit Logger Configuration” on page 52
v “Setting Up Auditing” on page 55
Auditing SubsystemThe auditing subsystem has the following functions:
v “Detecting Events”
v “Collecting Event Information”
v “Processing the Audit Trail Information” on page 50
The system administrator can configure each of these functions.
Detecting Events
Event detection is distributed throughout the Trusted Computing Base (TCB), both in the kernel (supervisorstate code) and the trusted programs (user state code). An auditable event is any security-relevantoccurrence in the system. A security-relevant occurrence is any change to the security state of the system,any attempted or actual violation of the system access control or accountability security policies, or both.The programs and kernel modules that detect auditable events are responsible for reporting these eventsto the system audit logger, that runs as part of the kernel and can be accessed either with a subroutine(for trusted program auditing) or within a kernel procedure call (for supervisor state auditing). Theinformation reported includes the name of the auditable event, the success or failure of the event, and anyadditional event-specific information that is relevant to security auditing.
Event detection configuration consists of turning event detection on or off, and specifiying which events areto be audited for which users. To activate event detection use the audit command to enable or disable theaudit subsystem. The /etc/security/audit/config file contains the events and users that are processed bythe audit subsystem.
Collecting Event Information
Information collection encompasses logging the selected auditable events. This function is performed bythe kernel audit logger, which provides both a system call and an intra-kernel procedure call interface thatrecords auditable events.
The audit logger is responsible for constructing the complete audit record, consisting of the audit header,that contains information common to all events (such as the name of the event, the user responsible, thetime and return status of the event), and the audit trail, which contains event-specific information. Theaudit logger appends each successive record to the kernel audit trail, which can be written in either (orboth) of two modes:
BIN modeThe trail is written into alternating files, providing for safety and long-term storage.
© Copyright IBM Corp. 2002, 2003 49
STREAM modeThe trail is written to a circular buffer that is read synchronously through an audit pseudo-device.STREAM mode offers immediate response.
Information collection can be configured at both the front end (event recording) and at the back end (trailprocessing). Event recording is selectable on a per-user basis. Each user has a defined set of audit eventsthat are logged in the audit trail when they occur. At the back end, the modes are individually configurable,so that the administrator can employ the back-end processing best suited for a particular environment. Inaddition, BIN mode auditing can be configured to generate an alert in case the file system space availablefor the trail is getting too low.
Processing the Audit Trail InformationThe operating system provides several options for processing the kernel audit trail. The BIN mode trail canbe compressed, filtered, or formatted for output, or any reasonable combination of these before archivalstorage of the audit trail, if any. Compression is done through Huffman encoding. Filtering is done withstandard query language (SQL)-like audit record selection (using the auditselect command), whichprovides for both selective viewing and selective retention of the audit trail. Formatting of audit trail recordscan be used to examine the audit trail, to generate periodic security reports, and to print a paper audit trail.
The STREAM mode audit trail can be monitored in real time, to provide immediate threat-monitoringcapability. Configuration of these options is handled by separate programs that can be invoked as daemonprocesses to filter either BIN or STREAM mode trails, although some of the filter programs are morenaturally suited to one mode or the other.
Event Selection
The set of auditable events on the system defines which occurrences can actually be audited and thegranularity of the auditing provided. The auditable events must cover the security-relevant events on thesystem, as defined previously. The level of detail you use for auditable event definition must maintain abalance between insufficient detail, which makes it difficult for the administrator to understand the selectedinformation, and too much detail, which leads to excessive information collection. The definition of eventstakes advantage of similarities in detected events. For the purpose of this discussion, a detected event isany single instance of an auditable event; for instance, a given event might be detected in various places.The underlying principle is that detected events with similar security properties are selected as the sameauditable event. The following list shows a classification of security policy events:
v Subject Events
– Process creation
– Process deletion
– Setting subject security attributes: user IDs, group IDs
– Process group, control terminal
v Object Events
– Object creation
– Object deletion
– Object open (including processes as objects)
– Object close (including processes as objects)
– Setting object security attributes: owner, group, ACL
v Import/Export Events
– Importing or exporting an object
v Accountability Events
– Adding a user, changing user attributes in the password database
– Adding a group, changing group attributes in the group database
50 AIX 5L Version 5.2: Security Guide
– User login
– User logoff
– Changing user authentication information
– Trusted path terminal configuration
– Authentication configuration
– Auditing administration: selecting events and audit trails, switching on or off, defining user auditingclasses
v General System Administration Events
– Use of privilege
– File system configuration
– Device definition and configuration
– System configuration parameter definition
– Normal system IPL and shutdown
– RAS configuration
– Other system configuration
v Security Violations (potential)
– Access permission refusals
– Privilege failures
– Diagnostically detected faults and system errors
– Attempted alteration of the TCB
Auditing Subsystem Configuration
The auditing subsystem has a global state variable that indicates whether the auditing subsystem is on. Inaddition, each process has a local state variable that indicates whether the auditing subsystem shouldrecord information about this process. Both of these variables determine whether events are detected bythe Trusted Computing Base (TCB) modules and programs. Turning TCB auditing off for a specific processallows that process to do its own auditing and not to bypass the system accountability policy. Permitting atrusted program to audit itself allows for more efficient and effective collection of information.
Collecting Auditing Subsystem InformationInformation collection addresses event selection and kernel audit trail modes. It is done by a kernelroutine that provides interfaces to log information, used by the TCB components that detect auditableevents, and configuration interfaces, used by the auditing subsystem to control the audit logging routine.
Audit Logging
Auditable events are logged by the following interfaces: the user state and supervisor state. The user stateportion of the TCB uses the auditlog or auditwrite subroutine, while the supervisor state portion of theTCB uses a set of kernel procedure calls.
For each record, the audit event logger prefixes an audit header to the event-specific information. Thisheader identifies the user and process for which this event is being audited, as well as the time of theevent. The code that detects the event supplies the event type and return code or status and optionally,additional event-specific information (the event tail). Event-specific information consists of object names(for example, files that are refused access or tty used in failed login attempts), subroutine parameters, andother modified information.
Events are defined symbolically, rather than numerically. This lessens the chances of name collisions,without using an event registration scheme. Because subroutines are auditable and the extendable kernel
Chapter 3. Auditing 51
definition has no fixed switched virtual circuit (SVC) numbers, it is difficult to record events by number. Thenumber mapping would have to be revised and logged every time that the kernel interface was extendedor redefined.
Audit Record Format
The audit records consist of a common header, followed by audit trails specific to the audit event of therecord. The structures for the headers are defined in the /usr/include/sys/audit.h file. The format of theinformation in the audit trails is specific to each base event and is shown in the /etc/security/audit/eventsfile.
The information in the audit header is generally collected by the logging routine to ensure its accuracy,while the information in the audit trails is supplied by the code that detects the event. The audit logger hasno knowledge of the structure or semantics of the audit trails. For example, when the login commanddetects a failed login, it records the specific event with the terminal on which it occurred and writes therecord into the audit trail using the auditlog subroutine. The audit logger kernel component records thesubject-specific information (user IDs, process IDs, time) in a header and appends this to the otherinformation. The caller supplies only the event name and result fields in the header.
Audit Logger Configuration
The audit logger is responsible for constructing the complete audit record. You must select the auditevents that you want to be logged.
Selecting Audit EventsAudit event selection has the following types:
Per-Process AuditingTo select process events efficiently, the system administrator can define audit classes. An auditclass is a subset of the base auditing events in the system. Auditing classes provide forconvenient logical groupings of the base auditing events.
For each user on the system, the system administrator defines a set of audit classes thatdetermine the base events that could be recorded for that user. Each process run by the user istagged with its audit classes.
Per-Object AuditingThe operating system provides for the auditing of object accesses by name; that is, the auditing ofspecific objects (normally files). By-name object auditing prevents having to cover all objectaccesses to audit the few pertinent objects. In addition, the auditing mode can be specified, sothat only accesses of the specified mode (read/write/execute) are recorded.
Kernel Audit Trail Modes
Kernel logging can be set to BIN or STREAM modes to define where the kernel audit trail is to be written.If the BIN mode is used, the kernel audit logger must be given (before audit startup) at least one filedescriptor to which records are to be appended.
BIN mode consists of writing the audit records into alternating files. At auditing startup, the kernel ispassed two file descriptors and an advisory maximum bin size. It suspends the calling process and startswriting audit records into the first file descriptor. When the size of the first bin reaches the maximum binsize, and if the second file descriptor is valid, it switches to the second bin and reactivates the callingprocess. The kernel continues writing into the second bin until it is called again with another valid filedescriptor. If at that point the second bin is full, it switches back to the first bin, and the calling process
52 AIX 5L Version 5.2: Security Guide
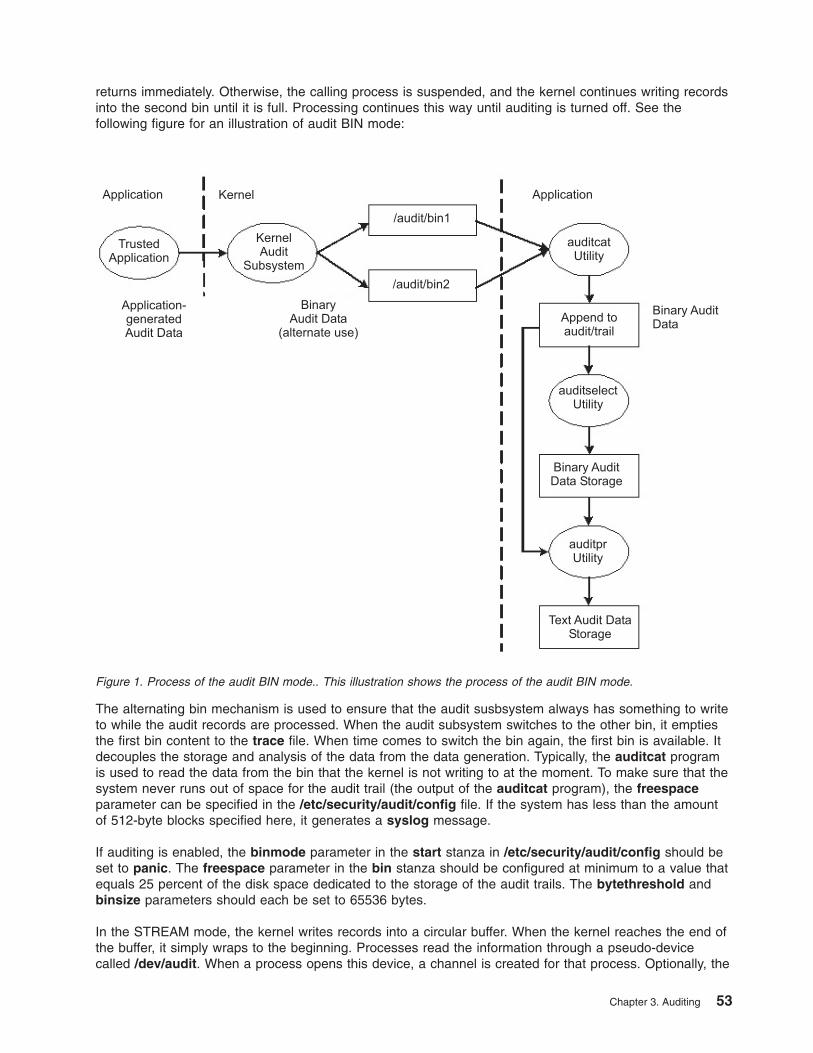
returns immediately. Otherwise, the calling process is suspended, and the kernel continues writing recordsinto the second bin until it is full. Processing continues this way until auditing is turned off. See thefollowing figure for an illustration of audit BIN mode:
The alternating bin mechanism is used to ensure that the audit susbsystem always has something to writeto while the audit records are processed. When the audit subsystem switches to the other bin, it emptiesthe first bin content to the trace file. When time comes to switch the bin again, the first bin is available. Itdecouples the storage and analysis of the data from the data generation. Typically, the auditcat programis used to read the data from the bin that the kernel is not writing to at the moment. To make sure that thesystem never runs out of space for the audit trail (the output of the auditcat program), the freespaceparameter can be specified in the /etc/security/audit/config file. If the system has less than the amountof 512-byte blocks specified here, it generates a syslog message.
If auditing is enabled, the binmode parameter in the start stanza in /etc/security/audit/config should beset to panic. The freespace parameter in the bin stanza should be configured at minimum to a value thatequals 25 percent of the disk space dedicated to the storage of the audit trails. The bytethreshold andbinsize parameters should each be set to 65536 bytes.
In the STREAM mode, the kernel writes records into a circular buffer. When the kernel reaches the end ofthe buffer, it simply wraps to the beginning. Processes read the information through a pseudo-devicecalled /dev/audit. When a process opens this device, a channel is created for that process. Optionally, the
Figure 1. Process of the audit BIN mode.. This illustration shows the process of the audit BIN mode.
Chapter 3. Auditing 53
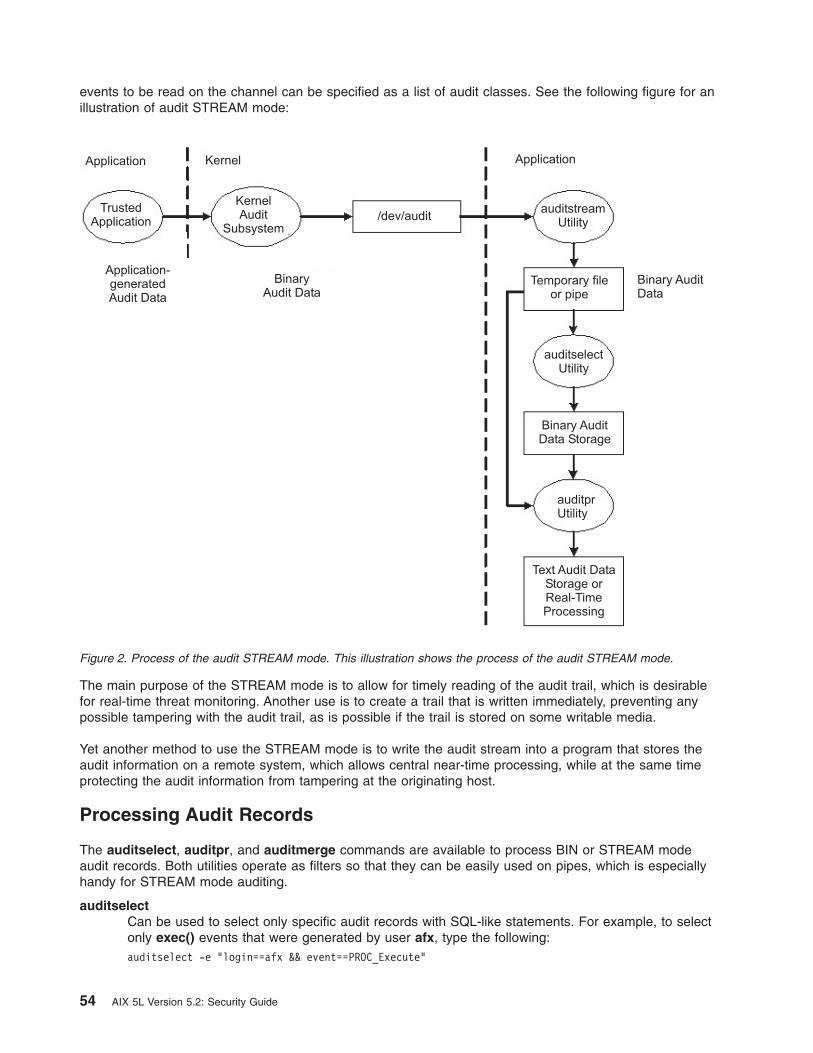
events to be read on the channel can be specified as a list of audit classes. See the following figure for anillustration of audit STREAM mode:
The main purpose of the STREAM mode is to allow for timely reading of the audit trail, which is desirablefor real-time threat monitoring. Another use is to create a trail that is written immediately, preventing anypossible tampering with the audit trail, as is possible if the trail is stored on some writable media.
Yet another method to use the STREAM mode is to write the audit stream into a program that stores theaudit information on a remote system, which allows central near-time processing, while at the same timeprotecting the audit information from tampering at the originating host.
Processing Audit Records
The auditselect, auditpr, and auditmerge commands are available to process BIN or STREAM modeaudit records. Both utilities operate as filters so that they can be easily used on pipes, which is especiallyhandy for STREAM mode auditing.
auditselectCan be used to select only specific audit records with SQL-like statements. For example, to selectonly exec() events that were generated by user afx, type the following:auditselect -e "login==afx && event==PROC_Execute"
Figure 2. Process of the audit STREAM mode. This illustration shows the process of the audit STREAM mode.
54 AIX 5L Version 5.2: Security Guide
auditprUsed to convert the binary audit records into a human-readable form. The amount of informationdisplayed depends on the flags specified on the command line. To get all the available information,run the auditpr command as follows:auditpr -v -hhelrtRpPTc
When the -v flag is specified, the audit tail which is an event specific string (see the/etc/security/audit/events file) is displayed in addition to the standard audit information that thekernel delivers for every event.
auditmergeUsed to merge binary audit trails. This is especially useful if there are audit trails from severalsystems that need to be combined. The auditmerge command takes the names of the trails onthe command line and sends the merged binary trail to standard output, so you still need to usethe auditpr command to make it readable. For example, the auditmerge and auditptr commandscould be run as follows:auditmerge trail.system1 trail.system2 | auditpr -v -hhelrRtpc
Using the Audit Susbystem for a Quick Security Check
To monitor a single suspicious program without setting up the audit susbsystm, the watch command canbe used. It will record either the requested or all events that are generated by the specified program. Forexample, to see all FILE_Open events when running vi /etc/hosts, type the following:watch -eFILE_Open -o /tmp/vi.watch vi /etc/hosts
The /tmp/vi.watch file displays all FILE_Open events for the editor session.
Setting Up Auditing
The following procedure shows you how to set up an auditing subsystem. For more specific information,refer to the configuration files noted in these steps.
1. Select system activities (events) to audit from the list in the /etc/security/audit/events file. If you haveadded new audit events to applications or kernel extensions, you must edit the file to add the newevents.
v You add an event to this file if you have included code to log that event in an application program(using the auditwrite or auditlog subroutine) or in a kernel extension (using the audit_svcstart,audit_svcbcopy, and audit_svcfinis kernel services).
v Ensure that formatting instructions for any new audit events are included in the/etc/security/audit/events file. These specifications enable the auditpr command to write an audittrail when it formats audit records.
2. Group your selected audit events into sets of similar items called audit classes. Define these auditclasses in the classes stanza of the /etc/security/audit/config file.
3. Assign the audit classes to the individual users and assign audit events to the files (objects) that youwant to audit, as follows:
v To assign audit classes to an individual user, add a line to the users stanza of the/etc/security/audit/config file. To assign audit classes to a user, you can use the chuser command.
v To assign audit events to an object (data or executable file), add a stanza for that file to the/etc/security/audit/objects file.
v You can also specify default audit classes for new users by editing the/usr/lib/security/mkuser.default file. This file holds user attributes that will be used whengenerating new user IDs. For example, use the general audit class for all new user IDs, as follows:
Chapter 3. Auditing 55
user:auditclasses = generalpgrp = staffgroups = staffshell = /usr/bin/kshhome = /home/$USER
To get all audit events, specify the ALL class. When doing so on even a moderately busy systrem, ahuge amount of data will be generated. It is typically more practical to limit the number of eventsthat are recorded.
4. In the /etc/security/audit/config file, configure the type of data collection that you want using BINcollection, STREAM collection, or both methods. Make sure that audit data does not compete withother data about file space by using a separate file system for audit data. This ensures that there isenough space for the audit data. Configure the type of data collection as follows:
v To configure BIN collection:
a. Enable the BIN mode collection by setting binmode = on in the start stanza.
b. Edit the binmode stanza to configure the bins and trail, and specify the path of the filecontaining the BIN mode back-end processing commands. The default file for back-endcommands is the /etc/security/audit/bincmds file.
c. Make sure that the audit bins are large enough for your needs and set the freespace parameteraccordingly to get an alert if the file system is filling up.
d. Include the shell commands that process the audit bins in an audit pipe in the/etc/security/audit/bincmds file.
v To configure STREAM collection:
a. Enable the STREAM mode collection by setting streammode = on in the start stanza.
b. Edit the streammode stanza to specify the path to the file containing the streammode processingcommands. The default file containing this information is the /etc/security/audit/streamcmdsfile.
c. Include the shell commands that process the stream records in an audit pipe in the/etc/security/audit/streamcmds file.
5. When you have finished making any necessary changes to the configuration files, you are ready to usethe audit start command option to enable the audit subsystem.
6. Use the audit query command option to see which events and objects are audited.
7. Use the audit shutdown command option to deactivate the audit subsystem again.
Selecting Audit EventsThe purpose of an audit is to detect activities that might compromise the security of your system. Whenperformed by an unauthorized user, the following activities violate system security and are candidates foran audit:
v Engaging in activities in the Trusted Computing Base
v Authenticating users
v Accessing the system
v Changing the configuration of the system
v Circumventing the auditing system
v Initializing the system
v Installing programs
v Modifying accounts
v Transferring information into or out of the system
The audit system does not have a default set of events to be audited. You must select events or eventclasses according to your needs.
56 AIX 5L Version 5.2: Security Guide
To audit an activity, you must identify the command or process that initiates the audit event and ensurethat the event is listed in the /etc/security/audit/events file for your system. Then you must add the eventeither to an appropriate class in the /etc/security/audit/config file, or to an object stanza in the/etc/security/audit/objects file. See the /etc/security/audit/events file on your system for the list of auditevents and trail formatting instructions. For a description of how audit event formats are written and used,see the auditpr command.
After you have selected the events to audit, you must combine similar events into audit classes. Auditclasses are then assigned to users.
Selecting Audit ClassesYou can facilitate the assignment of audit events to users by combining similar events into audit classes.These audit classes are defined in the classes stanza of the /etc/security/audit/config file.
Some typical audit classes might be as follows:
general Events that alter the state of the system and change user authentication. Audit attempts to circumventsystem access controls.
objects Write access to security configuration files.kernel Events in the kernel class are generated by the process management functions of the kernel.
An example of a stanza in the /etc/security/audit/config file is as follows:classes:
general = USER_SU,PASSWORD_Change,FILE_Unlink,FILE_Link,FILE_Renamesystem = USER_Change,GROUP_Change,USER_Create,GROUP_Createinit = USER_Login,USER_Logout
Selecting an Audit Data-Collection MethodYour selection of a data-collection method depends on how you intend to use the audit data. If you needlong-term storage of a large amount of data, select BIN collection. If you want to process the data as it iscollected, select STREAM collection. If you need both long-term storage and immediate processing, selectboth methods.
Bin collection Allows storage of a large audit trail for a long time. Audit records are written to a filethat serves as a temporary bin. After the file is filled, the data is processed by theauditbin daemon while the audit subsystem writes to the other bin file, and recordsare written to an audit trail file for storage.
Stream collection Allows processing of audit data as it is collected. Audit records are written into acircular buffer within the kernel, and are retrieved by reading /dev/audit. The auditrecords can be displayed, printed to provide a paper audit trail, or converted intobin records by the auditcat command.
Example of Real-Time File Modification Monitoring
The following example can be used to monitor file access to critical files in real time:
1. Set up a list of critical files to be monitored for changes, for example all files in /etc and configure themfor FILE_Write events in the objects file:find /etc -type f | awk ’{printf("%s:\n\tw = FILE_Write\n\n",$1)}’ >> /etc/security/audit/objects
2. Set up stream auditing to list all file writes. (This example lists all file writes to the console, but in aproduction environment you might want to have a backend that sends the events into an IntrusionDetection System.) The /etc/security/audit/streamcmds file is similar to the following:/usr/sbin/auditstream | /usr/sbin/auditselect -e "event == FILE_Write" |auditpr -hhelpPRtTc -v > /dev/console &
Chapter 3. Auditing 57
3. Set up STREAM mode auditing in /etc/security/audit/config, add a class for the file write events andconfigure all users that should be audited with that class:start:
binmode = offstreammode = on
stream:cmds = /etc/security/audit/streamcmds
classes:filemon = FILE_write
users:root = filemonafx = filemon...
4. Now run audit start. All FILE_Write events are displayed on the console.
Example of a Generic Audit Log Scenario
In this example, assume that a system administrator wants to use the audit subsystem to monitor a largemulti-user server system. No direct integration into an IDS is performed, all audit records will be inspectedmanually for irregularities. Only a few essential audit events are recorded, to keep the amount ofgenerated data to a manageable size.
The audit events that are considered for event detection are the following:
FILE_Write We want to know about file writes to configuraion files, so this event will be usedwith all files in the /etc tree.
PROC_SetUserIDs All changes of user idsAUD_Bin_Def Audit bin configurationUSER_SU The su commandPASSWORD_Change passwd commandAUD_Lost_Rec Notification in case there where lost recordsCRON_JobAdd new cron jobsAT_JobAdd new at jobsUSER_Login All loginsPORT_Locked All locks on terminals because of too many invalid attempts
The following is an example of how to generate a generic audit log:
1. Set up a list of critical files to be monitored for changes, such as, all files in /etc and configure them forFILE_Write events in the objectsfile as follows:find /etc -type f | awk ’{printf("%s:\n\tw = FILE_Write\n\n",$1)}’ >> /etc/security/audit/objects
2. Use the auditcat command to set up BIN mode auditing. The /etc/security/audit/bincmds file issimilar to the following:/usr/sbin/auditcat -p -o $trail $bin
3. Edit the /etc/security/audit/config file and add a class for the events we have interest. List all existingusers and specify the custom class for them.start:
binmode = onstreammode = off
bin:cmds = /etc/security/audit/bincmdstrail = /audit/trailbin1 = /audit/bin1bin2 = /audit/bin2
58 AIX 5L Version 5.2: Security Guide

binsize = 100000freespace = 100000
classes:custom = FILE_Write,PROC_SetUser,AUD_Bin_Def,AUD_Lost_Rec,USER_SU, \
PASSWORD_Change,CRON_JobAdd,AT_JobAdd,USER_Login,PORT_Locked
users:root = customafx = custom...
4. Add the custom audit class to the /usr/lib/security/mkuser.default file, so that new IDs willautomatically have the correct audit call associated:user:
auditclasses = custompgrp = staffgroups = staffshell = /usr/bin/kshhome = /home/$USER
5. Create a new file system named /audit by using SMIT or the crfs command. The file system shouldbe large enough to hold the two bins and a large audit trail.
6. Run the audit start command option and examine the /audit file. You should see the two bin files andan empty trail file initially. After you have used the system for a while, you should have audit records inthe trail file that can be read withauditpr -hhelpPRtTc -v | more
This example uses only a few events. To see all events, you could specify the classname ALL for allusers. This action will generate large amounts of data. You might want to add all events related to userchanges and privilege changes to your custom class.
Chapter 3. Auditing 59

60 AIX 5L Version 5.2: Security Guide
Chapter 4. LDAP Authentication Load Module
The Light Directory Access Protocol (LDAP) defines a standard method for accessing and updatinginformation in a directory (a database) either locally or remotely in a client-server model. The LDAPmethod is used by a cluster of hosts to allow centralized security authentication as well as access to userand group information. This functionality is intended to be used in a clustering environment to keepauthentication, user, and group information common across the cluster.
The LDAP exploitation of the security subsystem is implemented as the LDAP authentication load module.It is conceptually similar to the other load modules such as NIS, DCE, and Kerberos 5. The load modulesare defined in the /usr/lib/security/methods.cfg file. The implementation of the LDAP authentication loadmodule is at a low level and is handled by the libraries.
After the LDAP authentication load module is enabled to serve user and group information, most high-levelAPIs, commands, and system-management tools work in their usual manner. An -R flag is introduced formost high-level commands to work through different load modules. For example, to create an LDAP usernamed joe from a client machine, use the following command:mkuser -R LDAP joe
The client system checks whether the user is an LDAP user through the user’s SYSTEM attribute in the/etc/security/user file. If the user’s SYSTEM attribute is set to LDAP, that user can only authenticatethrough LDAP. If the SYSTEM attribute in the default stanza is set to LDAP, all users who do not have aSYSTEM attribute set are considered LDAP users. The LDAP keyword can be used with other SYSTEMattribute values as described in “User Authentication” on page 45. The client side communicates to theserver through the secldapclntd daemon. The daemon accepts requests from applications (through thelibrary APIs), queries the LDAP server, and returns data to the application. The secldapclntd daemon isalso responsible for caching.
Setting Up an LDAP Security Information Server
To set up a system as an LDAP security information server that serves authentication, user, and groupinformation through LDAP, the LDAP server and client packages must be installed. The LDAP server mustbe configured as a client as well as a server. A DB2 database is also required by the LDAP server. If theSecure Socket Layer (SSL) is required, the GSKit package must be installed. The system administratormust create a key using the ikeyman command. The certificate of the server key must be carried to theclients.
The mksecldap command can be used to set up an LDAP security information server. It sets up adatabase named ldapdb2, populates the database with the user and group information from the local host,and sets the LDAP server administrator DN (distinguished name) and password. Optionally, it can set upSSL for client/server communication. The mksecldap command adds an entry into the /etc/inittab file tostart the LDAP server at every reboot. The entire LDAP server setup is done through the mksecldapcommand, which updates the slapd.conf file (SecureWay® Directory Version 3.2 and 4.1) or slapd32.conffile (SecureWay Directory Version 3.2). There is no need to configure the LDAP Web managementinterface.
All users and groups from the local system are migrated to LDAP server during LDAP server setup. Selectone of the following LDAP schemas for this step:
AIX-specific schemaIncludes aixAccount and aixAccessGroup object class. This schema offers a full set of attributesfor AIX users and groups.
© Copyright IBM Corp. 2002, 2003 61
NIS schema (RFC 2307)Includes posixAccount, shadowAccount, and posixGroup object class and is used by severalvendors’ directory products. The NIS schema defines only a small subset of attributes that AIXuses.
NIS schema with full AIX supportIncludes posixAccount, shadowAccount, and posixGroup object classes plus theaixAusAccount and aixAusGroup object classes. The aixAusAccount and aixAuxGroup objectclasses provide the attributes which are used by AIX but not defined by the NIS schema. Settingup the LDAP server using NIS schema with full AIX support is recommended unless setting up anAIX-specific schema LDAP server for compatibility with the existing LDAP servers is necessary.
All the user and group information is stored under a common AIX tree (suffix). The default suffix is"cn=aixdata". The mksecldap command accepts a user-supplied suffix through the -d flag. If theuser-supplied suffix does not have "cn=aixdata" as its first RDN (Relative Distinguished Name), themksecldap command prefixes the user-supplied suffix with "cn=aixdata". This AIX tree is ACL (AccessControl List) protected. A client must bind as the LDAP server administrator to be able to access the AIXtree.
The mksecldap command works even if an LDAP server has been set up for other purposes; forexample, for user ID lookup information. In this case, mksecldap adds the AIX tree and populates it withthe AIX security information to the existing database. This tree is ACL-protected independently from othertrees. In this case, the LDAP server works as usual, in addition to serving as an AIX LDAP SecurityServer.
Note: It is recommended that you back up the existing database before running the mdsecldap commandto set up the security server to share the same database is recommended.
After the LDAP security information server is successfully set up, the same host must be set up as a clientso that LDAP user and group management can be completed and LDAP users can log in to this server.
If the LDAP security information server setup is not successful, you can undo the setup by running themksecldap command with the -U flag. This restores the slapd.conf (or slapd32.conf) file to its pre-setupstate. Run the mksecldap command with the -U flag after any unsuccessful setup attempt before trying torun the mksecldap command again. Otherwise, residual setup information might remain in theconfiguration file and cause a subsequent setup to fail. As a safety precaution, the undo option does notdo anything to the database or to its data, because the database could have existed before themksecldap command was run. Remove any database manually if it was created by the mksecldapcommand. If the mksecldap command has added data to a pre-existing database, decide what steps totake to recover from a failed setup attempt.
For more information on setting up an LDAP security information server, see the mksecldap command.
Setting Up an LDAP Client
Each client must have the LDAP client package installed. If the SSL is required, the GSKit must beinstalled, a key must be created, and the LDAP server SSL key certificate must be added to this key.
The mksecldap command can be used to set up the client. To have this client contact the LDAP securityinformation server, the server name must be supplied during setup. The server’s administrator DN andpassword are also needed for client access to the AIX tree on the server. The mksecldap commandsaves the server administrator DN, password, server name, AIX tree DN on the server, and the SSL keypath and password to the /etc/security/ldap/ldap.cfg file.
Multiple servers can be supplied to the mksecldap command during client setup. In this case, the clientcontacts the servers in the supplied order and establishes connection to the first server that the client can
62 AIX 5L Version 5.2: Security Guide
successfully bind to. If bad connection occurs between the client and the server, a reconnection request istried using the same logic. The Security LDAP exploitation model does not support referral. It is importantthat the replicate servers are kept synchronized.
The client communicates to the LDAP security information server through a client side daemon(secldapclntd). If the LDAP load module is enabled on this client, high-level commands eventually findthis daemon through the library APIs. The daemon queries the server and returns the information back tothe caller.
Other fine-tuning options can be supplied to the mksecldap command during client setup, such assettings for the number of threads used by the daemon, the cache entry size, and the cache expirationtimeout. These options are for experienced users only. For most environments, the default values aresufficient.
In the final steps of the client setup, the mksecldap command starts the client-side daemon and adds anentry in the /etc/inittab file so the daemon starts at every reboot. You can check whether the setup issuccessful by checking the secldapclntd process. Provided that the LDAP security information server issetup and running, this daemon will be running if the setup was successful.
LDAP User Management
You can manage users and groups on an LDAP security information server from any LDAP client by usinghigh-level commands. An -R flag added to most of the high-level commands can manage users andgroups using LDAP as well as other authentication load modules such as DCE, NIS, and Kerberos 5. Formore information concerning the use of the -R flag, refer to each of the user or group managementcommands.
To enable a user to authenticate through LDAP, run the chuser command to change the user’s SYSTEMattribute value to LDAP. By setting the SYSTEM attribute value according to the defined syntax, a user canbe authenticated through more than one load module (for example, compat and LDAP). For moreinformation on setting users’ authentication methods, see “User Authentication” on page 45 and theSYSTEM attribute syntax defined in the /etc/security/user file.
A user can become an LDAP user at client setup time by running the mksecldap command with the -uflag in either of the following forms:
1. Run mksecldap -c -u user1,user2,... , where user1,user2,... is a list of users. The users in this listcan be either locally defined or remotely LDAP-defined users. The SYSTEM attribute is set to LDAP ineach of the above users’ stanzas in the /etc/security/user file. Such users are only authenticatedthrough LDAP. The users in this list must exist on the LDAP security information server; otherwise,they can not log in from this host. Run the chuser command to modify the SYSTEM attribute andallow authentication through multiple methods (for example, both local and LDAP).
2. Run "mksecldap -c -u ALL" . This command sets the SYSTEM attribute to LDAP in each user’s stanzain the /etc/security/user file for all locally defined users. All such users only authenticate throughLDAP. The locally defined users must exist on the LDAP security information server; otherwise theycan not log in from this host. A user that is defined on the LDAP server but not defined locally cannotlog in from this host. To allow a remotely LDAP-defined user to log in from this host, run the chusercommand to set the SYSTEM attribute to LDAP for that user.
Alternatively, you can enable all LDAP users, whether they are defined locally or not, to authenticatethrough LDAP on a local host by modifying the ″default″ stanza of the /etc/security/user file to use″LDAP″ as its value. All users that do not have a value defined for their SYSTEM attribute must followwhat is defined in the default stanza. For example, if the default stanza has "SYSTEM = ″compat″" ,changing it to "SYSTEM = ″compat OR LDAP″" allows authentication of these users either through AIX or
Chapter 4. LDAP Authentication Load Module 63
LDAP. Changing the default stanza to "SYSTEM = ″LDAP″" enables these users to authenticateexclusively through LDAP. Those users who have a SYSTEM attribute value defined are not affected bythe default stanza.
LDAP Host Access ControlAIX provides user-level host access (login) control for a system. Administrators can configure LDAP usersto log in to an AIX system by setting their SYSTEM attribute to LDAP. The SYSTEM attribute is in the/etc/security/user file. The chuser command can be used to set its value, similar to the following:# chuser -R LDAP SYSTEM=LDAP registry=LDAP foo
Note: With this type of control, do not set the default SYSTEM attribute to LDAP, which allows all LDAPusers to login to the system.
This sets the LDAP attribute to allow user foo to log in to this system. It also sets the registry to LDAP,which allows the login process to log foo’s login attempts to LDAP, and also allows any user managementtasks done on LDAP.
The administrator needs to run such setup on each of the client systems to enable login by certain users.
Starting with AIX 5.2, AIX has implemented a feature to limit a LDAP user only to log in to certain LDAPclient systems. This feature allows centralized host access control management. Administrators canspecify two host access control lists for a user account: an allow list and a deny list. These two userattributes are stored in the LDAP server with the user account. A user is allowed access to systems ornetworks that are specified in the allow list, while he is denied access to systems or networks in the denylist. If a system is specified in both the allow list and the deny list, the user is denied access to the system.There are two ways to specify the access lists for a user: with the mkuser command when the user iscreated or with the chuser command for a existing user. For backward compatibility, if both the allow listand deny list do not exist for a user, the user is allowed to login to any LDAP client systems by default.Beginning in AIX 5.2, this host access control feature is available.
Examples of setting allow and deny permission lists for users are the following:# mkuser -R LDAP hostsallowedlogin=host1,host2 foo
This creates a user foo, and user foo is only allowed to log in to host1 and host2.# mkuser -R LDAP hostsdeniedlogin=host2 foo
This create user foo, and user foo can log in to any LDAP client systems except host2.# chuser -R LDAP hostsallowedlogin=192.9.200.1 foo
This sets user foo with permission to log in to the client system at address 192.9.200.1.# chuser -R LDAP hostsallowedlogin=192.9.200/24 hostsdeniedlogin=192.9.200.1 foo
This sets user foo with permission to log in to any client system within the 192.9.200/24 subnet, exceptthe client system at address 192.9.200.1.
For more information, see the chuser command.
LDAP Security Information Server Auditing
SecureWay Directory version 3.2 (and later) provides a default server audit logging function. Onceenabled, this default audit plugin logs LDAP server activities to a log file. See the LDAP documentation inPackaging Guide for LPP Installation for more information on this default audit plugin.
64 AIX 5L Version 5.2: Security Guide
An LDAP security information server auditing function has been implemented in AIX 5.1 and later, calledthe LDAP security audit plugin. It is independent of the SecureWay Directory default auditing service, sothat either one or both of these auditing subsystems can be enabled. The AIX audit plugin records onlythose events that update or query the AIX security information on an LDAP server. It works within theframework of AIX system auditing.
To accommodate LDAP, the following audit events are contained in the /etc/security/audit/event file:
v LDAP_Bind
v LDAP_Unbind
v LDAP_Add
v LDAP_Delete
v LDAP_Modify
v LDAP_Modifydn
v LDAP_Search
An ldapserver audit class definition is also created in the /etc/security/audit/config file that contains allof the above events.
To audit the LDAP security information server, add the following line to each user’s stanza in the/etc/security/audit/config file:ldap = ldapserver
Because the LDAP security information server audit plugin is implemented within the frame of the AIXsystem auditing, it is part of the AIX system auditing subsystem. Enable or disable the LDAP securityinformation server audit using system audit commands, such as audit start or audit shutdown. All auditrecords are added to the system audit trails, which can be reviewed with the auditpr command. For moreinformation, see Chapter 3, “Auditing”, on page 49.
LDAP Commands
The mksecldap CommandThe mksecldap command can be used to set up IBM SecureWay Directory servers and clients forsecurity authentication and data management. This command must be run on the server and all clients.
Notes:
1. The client (-c flag) and the server (-s flag) options cannot be run at the same time. When setting up aserver, the mksecldap command should be run twice on that machine. Once to set up the server, andagain to set up the client.
2. The SecureWay Directory server configuration file is /etc/slapd32.conf for AIX 3.2 or later. AIX 5.2only supports SecureWay Directory 3.2 and later.
For server setup, make sure that the ldap.server fileset is installed. When installing the ldap.serverfileset, the ldap.client fileset and the backend DB2 software are automatically installed as well. No DB2preconfiguration is required to run this command for LDAP server setup. When you run the mksecldapcommand to set up the server, the command will:
1. Create a DB2 instance with ldapdb2 as the default instance name.
2. Create a DB2 database with ldapdb2 as the default database name. If a database already exists,mksecldap will bypass the above two steps. (This is the case when the LDAP server has been setup for other usage.) The mksecldap command will use the existing database to store the AIXuser/group data.
3. Create the AIX tree DN (suffix). If no baseDN is supplied from the command line, the default suffix isset to cn=aixdata and the user/group data is placed to the cn=aixsecdb,cn=aixdata DN. This is the
Chapter 4. LDAP Authentication Load Module 65
recommended case. Otherwise, the mksecldap command takes the user-supplied DN and prefixes itwith cn=aixdata and makes the newly constructed DN the suffix. This behavior is shown in thefollowing table. The value within the brackets represents the optional user supplied DN fromcommand line.
CMD-line DN: [o=ibm]suffix: cn=aixdata[,o=ibm]sucurrity DN: cn=aixsecdb,cn=aixdata[,o=ibm]user DN: ou=aixuser,cn=aixsecdb,cn=aixdata[,o=ibm]group DN: ou=aixgroup,cn=aixsecdb,cn=aixdata[,o=ibm]
In case the LDAP server has already been setup in the local system, the mksecldap commandsearches for the cn=aixsecdb keyword from the suffixes defined in the slapd32.conf configurationfile and from the database. If it finds the keyword, it assumes that mksecldap has been run, andbypasses the base DN setup step and the user/group migration step, and exits.
If cn=aixsecdb is not found in the suffixes and the database, the mksecldap command checks forthe cn=aixdata keyword. cn=aixdata is a common base DN shared by various AIX LDAPcomponents. If the mksecldap command find the keyword, it compares it with the user supplied DN.If they are the same, the users/groups will be put under the cn=aixsecdb,cn=aixdata,[userDN]. Ifthey are different, the mksecldap command prints an error message warning the existence of thecn=aixdata,... DN, and it will not migrate the users/groups under the user supplied DN. You canchoose to use the existing cn=aixdata,... by running the mksecldap command again with thatexisting DN.
4. Migrates the data from the security database files from the local host into the LDAP database.Depending on the -S option, the mksecldap command migrates users/groups using one of the threeLDAP schemas:
v AIX - AIX schema (aixaccount and aixaccessgroup objectclasses)
v RFC2307 - RFC 2307 schema (posixaccount, shadowaccount, and posixgroup objectclasses)
v RFC2307AIX - RFC 2307 schema with full AIX support (posixaccount, shadowaccount, andposixgroup objectclasses, plus the aixauxaccount and aixauxgroup object classes).
Attention: Systems running AIX 4.3 and AIX 5.1 which are configured as LDAP clients will onlywork with servers of AIX schema type. They will not talk to ldap servers of RFC2307 orRFC2307AIX types.
5. Set the LDAP server administrator DN and password. This name/password pair is also used foraccess control of the AIX tree.
6. Set the SSL (secure socket layer) for secure data transfer between this server and the clients. Thissetup requires the GSKIT to be installed.
Note: If this option is used, the SSL key must be created before running the mksecldap command.Otherwise the server may not be able to start.
7. Installs the /usr/ccs/lib/libsecldapaudit.a, a LDAP server plug-in. This plugin supports AIX audit ofthe LDAP server.
8. Start/restart the LDAP server after all the above is done.
9. Add the LDAP server process (slapd) to /etc/inittab to have the LDAP server start after reboot.
10. With the -U option, undo a previous setup for the server configuration file. The first time you run themksecldap command, it saves two copies of the slapd32.conf server configuration file. One is savedto /etc/security/ldap/slap32.conf.save.orig and the other to /etc/ security/ldap/slapd32.conf.save.Each subsequent run of mksecldap, the current slapd32.conf is only saved to/etc/security/ldap/slapd32.conf.save file. The undo option restores the /etc/slapd32.conf serverconfiguration file with the /etc/security/ ldap/slapd32.conf.save copy.
Note: The undo option applies to the server configuration file only. It has no effect on the database.
66 AIX 5L Version 5.2: Security Guide
Note: All the LDAP configuration is saved into the /etc/slapd32.conf LDAP server configuration file.For client setup, make sure the LDAP server has been setup and is running. The mksecldap commanddoes the follows during for client setup:
1. Saves the LDAP server(s)’ host name.
2. Saves the user base DN and group base DN of the server. If no -d option is supplied from commandline, the mksecldap command searches the LDAP server for aixaccount, aixaccessgroup,posixaccount, posixgroup, and aixauxaccount objectclasses from the LDAP server, and set up thebase DNs accordingly. If the server has multiple user/group bases, you must supply the -d option witha RDN so that the mksecldap command can setup the base DNs to the ones within that RDN.
If the posixaccount objectclass is found during client setup, mksecldap will also try to search forbase DNs for these entities: hosts, networks, services, netgroups, protocols, and rpc from the serverand save any that is found.
3. Determines the schema type used by the LDAP server - AIX specific schema, RFC 2307 schema, orRFC 2307 schema with full AIX support (see objectclasses listed in step 2). It sets the objectclassesand attribute maps in the /etc/security/ldap/ ldap.cfg file accordingly. The mksecldap commanddoes not recognize other schema types, so clients must be setup manually.
4. Sets SSL for secure data transfer between this host and the LDAP server. This step requires that theclient SSL key and the key password are created in advance, and the server must be setup to useSSL for the client SSL to work.
5. Saves the LDAP server administrator DN and password. The DN/password pair must be the same asthe pair specified during server setup.
6. Sets the cache size in terms of the number of entries used by the client side daemon. Valid valuesare 100-10,000 for users and 10-1,000 for groups. The default value is 1,000 for users and 100 forgroups.
7. Sets the cache timeout of the client side daemon. Valid values are 60-3600 seconds. The default is300 seconds. Set this value to 0 to disable caching.
8. Sets the number of threads used by the client side daemon. Valid values are 1-1,000. The default is10.
9. Sets the time interval in seconds that the client daemon checks for the LDAP server status. Validvalue are 60-3,600 seconds. The default is 300.
10. Optionally sets the list of users or all users to use LDAP by modifying their SYSTEM line in the/etc/security/user file. For more information on enabling ldap login, see the following note.
11. Starts the client daemon process (secldapclntd).
12. Adds the client side daemon process to /etc/inittab to have this daemon start after a reboot.
13. With the -U option, undo a previous setup to the /etc/security/ldap/ldap.cfg file.
Note: The client configuration data is saved to the /etc/security/ldap/ldap.cfg file. Setting theSYSTEM to LDAP for the default stanza of /etc/security/user only allows LDAP users to loginto the system. Setting the SYSTEM to LDAP or compat allows both LDAP users and local usersto login to the system.
Examples1. To setup a LDAP server of AIX specific schema for users and groups, enter:
mksecldap -s -a cn=admin -p adminpwd -S aix
This sets up a LDAP server with LDAP server administrator DN being cn=admin, password beingadminpwd. User and group data is migrated from local files to the default cn=aixdata suffix.
2. To setup a LDAP server with a baseDN other than the default and with SSL secure communication ,enter:mksecldap -s -a cn=admin -p adminpwd -d o=mycompany,c=us -S rfc2307 \ -k /usr/ldap/serverkey.kdb-w keypwd
Chapter 4. LDAP Authentication Load Module 67
This sets up a LDAP server with LDAP server administrator DN being cn=admin, password beingadminpwd. User and group data is migrated from local files to the cn=aix-data,o=mycompany,c=ussuffix. The LDAP server uses SSL communications by using the key stored at/usr/ldap/serverkey.kdb. The password to the key, keypwd, must also be supplied. Users and groupsare migrated with the RFC 2307 schema.
3. To undo a previous server setup:mksecldap -s -U
This undoes the previous setup to the /etc/slapd32.conf server configuration file. For safety reasons,this does not remove any database entries or database created by a previous setup. If they are notneeded any more, remove the database entries/database manually.
4. To setup a client to use the server1.ibm.com and server2.ibm.com LDAP servers, enter:mksecldap -c -a cn=admin -p adminpwd -h server1.ibm.com,server2.ibm.com
The LDAP server adminstrator DN and password must be supplied for this client to authenticate to theserver. The mksecldap command contacts the LDAP server for schema type used, and sets up theclient accordingly. Without the -d option from the command line, the entire server DIT is searched forthe user base DN and the group base DN.
5. To setup the client to talk to the server3.ibm.com LDAP server using SSL, enter:mksecldap -c -a cn=admin -p adminpwd -h server3.ibm.com -d o=mycompany,c=us -k /usr/ldap/clientkey.kdb -w keypwd -u user1,user2
This sets up a LDAP client similar to case 3, but with SSL communication. The mksecldap commandsearches the o=mycompany,c=us RDN for user base DN and group base DN. Account user1 anduser2 are configured to authenticate through LDAP.
Note: The -u ALL option enables all LDAP users to login to this client.
6. To undo a previous client setup, enter:mksecldap -c -U
This undo the previous setup to the /etc/security/ldap/ldap.cfg file. This does not remove theSYSTEM=LDAP and registry=LDAP from the /etc/security/user file.
For more information on the mksecldap command, see mksecldap in the AIX 5L Version 5.2 CommandsReference.
The secldapclntd DaemonThe secldapclntd daemon accepts requests from the LDAP load module, forwards the request to theLDAP Security Information Server, and passes the result from the server back to the LDAP load module.This daemon reads the configuration information defined in the /etc/security/ldap/ldap.cfg file during itsstartup, and authenticates to the LDAP Security Information Server using the server administrator’sdistinguished name and password, and establishes a connection between the local host and the server.
If multiple servers are specified in the /etc/security/ldap/ldap.cfg file, the secldapclntd daemon connectsto all of the servers. At a specific time, however, it talks to only one of them. The secldapclntd daemoncan detect when the server it talks to is down, and automatically talks to another available server. It canalso detect when a server becomes available again, and re-establishes connection to that server (but itcontinues to talk to the server it was talking to). This auto-detect feature is done by the secldapclntddaemon checking on each of the servers periodically. The time interval between subsequent checkingdefaults to 300 seconds, and can be changed at the daemon startup time from command line or bymodifying the corresponding values of the /etc/ security/ldap/ldap.cfg file.
At startup, the secldapclntd daemon tries to establish a connection to the LDAP servers. If it cannotconnect to any of the servers, it goes to sleep, and tries again in 30 seconds. It repeats this process twice,and if it still cannot establish any connection, the secldapclntd daemon process exits.
68 AIX 5L Version 5.2: Security Guide
The secldapclntd daemon is a multi-threaded program. The default number of threads used by thisdaemon is 10. An administrator can fine-tune the system performance by adjusting the number of threadsused by this daemon.
The secldapclntd daemon caches information retrieved from the LDAP security information server forperformance purposes. If the requested data can be found in the cache and the cache entry is not expired,the data in the cache is handed back to the requester. Otherwise, the secldapclntd daemon makes arequest to the LDAP Security Information Server for the information.
The valid number of cache entries for users is in the range of 100 - 10,000, and that for groups is in therange of 10 - 1,000. The default is 1000 entries for users, and 100 entries for groups.
The cache timeout or TTL (time to live) can be from 60 seconds to 1 hour (60*60=3600 seconds). Bydefault, a cache entry expires in 300 seconds. If the cache timeout is set to 0, the caching feature isdisabled.
Examples1. To start the secldapclntd daemon, type:
/usr/sbin/secldapclntd
2. To start the secldapclntd with using 20 threads and cache timeout value of 600 seconds, type:/usr/sbin/secldapclntd -p 20 -t 600
It is recommended that you start the secldapclntd daemon by running the start-secldapclntd command.It is also recommended that you specify these values in the /etc/security/ldap/ldap.cfg file, so that thesevalues will be used each time you start the secldapclntd process.
For more information on the secldapclntd daemon, see secldapclntd in the AIX 5L Version 5.2Commands Reference.
LDAP Management Commands
start-secldapclntd CommandThe start-secldapclntd command starts the secldapclntd daemon if it is not running. It takes no action ifthe secldapclntd daemon is already running. The script also cleans the portmapper registration (if there isany) from any previous secldapclntd daemon process before it starts the secldapclntd daemon. Thisaction prevents the startup failure of the new daemon process from portmapper registration failure.
Examples:
1. To start the secldapclntd daemon, type:/usr/sbin/start-secldapclntd
2. To start the secldapclntd with using 20 threads and cache timeout value of 600 seconds, type:/usr/sbin/start-secldapclntd -p 20 -t 600
It is recommended that you specify these values in the /etc/security/ldap/ldap.cfg file, so that thesevalues will be used each time you start the secldapclntd process.
For more information on the start-secldapclntd command, see start-secldapclntd in the AIX 5L Version5.2 Commands Reference.
stop-secldapclntd CommandThe stop-secldapclntd command terminates the running secldapclntd daemon process. It returns anerror if the secldapclntd daemon is not running.
Example: To stop the running secldapclntd daemon process, type:/usr/sbin/stop-secldapclntd
Chapter 4. LDAP Authentication Load Module 69
For more information on the stop-secldapclntd command, see stop-secldapclntd in the AIX 5L Version5.2 Commands Reference.
restart-secldapclntd CommandThe restart-secldapclntd script stops the secldapclntd daemon if it is running, and then restarts it. If thesecldapclntd daemon is not running, it simply starts it.
Examples:
1. To restart the secldapclntd daemon, type:/usr/sbin/restart-secldapclntd
2. To restart the secldapclntd with using 30 threads and cache timeout value of 500 seconds, type:/usr/sbin/restart-secldapclntd -p 30 -t 500
For more information on the restart-secldapclntd command, see restart-secldapclntd in the AIX 5LVersion 5.2 Commands Reference.
ls-secldapclntd CommandThe ls-secldapclntd command lists the secldapclntd daemon status. The information returned includesthe following:
v The LDAP server the secldapclntd daemon is talking to
v The LDAP server port number
v The version of the LDAP protocol used
v User base DN
v Group base DN
v System (id) base DN
v User cache size
v User cache size used
v Group cache size
v Group cache size used
v Cache time out (time to live) value
v secldapclntd to LDAP server heart beat interval
v Number of thread used by secldapclntd daemon
v User objectclass used in the LDAP server
v Group objectclass used in the LDAP server
Example:
1. 1.To list the status of the secldapclntd daemon, type:/usr/sbin/ls-secldapclntd
For more information on the ls-secldapclntd command, see ls-secldapclntd in the AIX 5L Version 5.2Commands Reference.
flush-secldapclntd CommandThe flush-secldapclntd command clears the cache for the secldapclntd daemon process.
Example: To flush the secldapclntd daemon cache, type:/usr/sbin/flush-secldapclntd
For more information on the flush-secldapclntd command, see flush-secldapclntd in the AIX 5L Version5.2 Commands Reference.
70 AIX 5L Version 5.2: Security Guide

sectoldif CommandThe sectoldif command reads users and groups defined locally, and prints the result to standard output inldif format. If redirected to a file, the result can be added to a LDAP server with the ldapadd command orthe db2ldif command.
The -S option specifies the schema type used for the ldif output. The sectoldif command accepts thefollowing schema types:
v AIX - AIX schema (aixaccount and aixaccessgroup objectclasses)
v RFC2307 - RFC 2307 schema (posixaccount, shadowaccount, and posixgroup object classes)
v RFC2307AIX - RFC 2307 schema with full AIX support (posixaccount, shadowaccount , andposixgroup objectclasses, plus the aixauxaccount and aixauxgroup objectclasses).
The sectoldif command is called by the mksecldap command to migrate users and groups during LDAPserver setup. Be cautious when migrating additional users and groups from other systems to the LDAPserver using the sectoldif output. The ldapadd and db2ldif commands check only for entry name (username or group name) but not for the numeric id when adding entries, migrating users and groups frommultiple systems using sectoldif output may result in sharing of a numeric id by multiple accounts, whichis a security violation.
Examples:
1. To print all users and groups defined locally, enter the following:sectoldif -d cn=aixsecdb,cn=aixdata -S rfc2307aix
This prints all users and groups defined locally to standard output in ldif format. User entries andgroup entries are represented using the rfc2307aix schema type. The base DN is set to cn=aixsecdb,cn=aixdata.
2. To print only locally defined user foo, enter the following:sectoldif -d cn=aixsecdb,cn=aixdata -u foo
This prints locally defined user foo to standard output in ldif format. Without the -S option, the defaultAIX schema type is used to represent foo’s ldif output.
For more information on the sectoldif command, see sectoldif in the AIX 5L Version 5.2 CommandsReference.
The ldap.cfg File Format
The /etc/security/ldap/ldap.cfg file contains information for the secldapclntd daemon to start andfunction properly as well as information for fine tuning the daemon’s performance. The/etc/security/ldap/ldap.cfg file is updated by the mksecldap command at client setup.
The /etc/security/ldap/ldap.cfg file may contain the following fields:
ldapservers Specifies a comma separated LDAP Security Information Servers. These servers caneither be the primary server and/or replica of the primary server.
ldapadmin Specifies the administrator DN of the LDAP Security Information Server(s).ldapadmpwd Specifies the password of the administrator DN.useSSL Specifies whether to use SSL communication. Valid values are ON and OFF. The
default is OFF.Note: You will need the SSL key and the password to the key to enable this feature.
ldapsslkeyf Specifies the full path to the SSL key.ldapsslkeypwd Specifies the password to the SSL key.
Note: Uncomment this line to use stashed password. The password stash file mustreside in the same directory as the SSL key itself, and must have the same name asthe key file, but with an extension of .sth instead of .kdb.
Chapter 4. LDAP Authentication Load Module 71
userattrmappath Specifies the full path to the AIX-LDAP attribute map for users.groupattrmappath Specifies the full path to the AIX-LDAP attribute map for groups.idattrmappath Specifies the full path to the AIX-LDAP attribute map for IDs. These IDs are used by
the mkuser command when creating LDAP users.userbasedn Specifies the user base DN.groupbasedn Specifies the group base DN.idbasedn Specifies the ID base DN.hostbasedn Specifies the host base DN.servicebasedn Specifies the service base DN.protocolbasedn Specifies the protocol base DN.networkbasedn Specifies the network base DN.netgroupbasedn Specifies the netgroup base DN.rpcbasedn Specifies the RPC base DN.userclasses Specifies the object classes used for user entry.groupclasses Specifies the object classes used for group entry.ldapversion Specifies the LDAP server protocol version. Default is 3.ldapport Specifies the port that the LDAP server listens to. Default is 389.ldapsslport Specifies the SSL port that the LDAP server listens to. Default is 636.followaliase Specifies whether to follow aliases. Valid values are NEVER, SEARCHING, FINDING, and
ALWAYS. Default is NEVER.usercachesize Specifies the user cache size. Valid values are 100 - 10,000 entries. Default is 1,000.groupcachesize Specifies the group cache size. Valid values are 10 - 1,000 entries. Default is 100.cachetimeout Specifies the cache TTL (time to live). Valid values are 60 - 3,600 seconds. Default is
300. Set to 0 to disable caching.heartbeatinterval Specifies the interval in seconds that the client contacts the server for server status.
Valid values are 60 - 3,600 seconds. Default is 300.numberofthread Specifies the number of threads for the secldapclntd daemon. Valid values are 1 -
1,000. Default is 10.
For more information on the /etc/security/ldap/ldap.cfg file, see /etc/security/ldap/ldap.cfg in the AIX 5LVersion 5.2 Files Reference.
Mapping File Format for LDAP AttributesThese map files are used by the /usr/lib/security/LDAP module and the secldapclntd daemon fortranslation between AIX attribute names to LDAP attribute names. Each entry in a mapping file representsa translation for an attribute. An entry has four space-separated fields:AIX_Attribute_Name AIX_Attribute_Type LDAP_Attribute_Name LDAP_Value_Type
AIX_Attribute_Name Specifies the AIX attribute name.AIX_Attribute_Type Specifies the AIX attribute type. Values are SEC_CHAR, SEC_INT, SEC_LIST, and
SEC_BOOL.LDAP_Attribute_Name Specifies the LDAP attribute name.LDAP_Value_Type Specifies the LDAP value type. Values are s for single value and m for multi-value.
For more information on the LDAP attribute mapping file format, see LDAP attribute mapping file formatin the AIX 5L Version 5.2 Files Reference.
72 AIX 5L Version 5.2: Security Guide
Related InformationThe mksecldap, start-secldapclntd, stop-secldapclntd, restart-secldapclntd, ls-secldapclntd,sectoldif, and flush-secldapclntd commands.
The secldapclntd daemon.
The /etc/security/ldap/ldap.cfg file.
The LDAP attribute mapping file format.
Chapter 4. LDAP Authentication Load Module 73

74 AIX 5L Version 5.2: Security Guide
Chapter 5. PKCS #11
The PKCS #11 subsystem provides applications with a method for accessing hardware devices (tokens)regardless of the type of device. The content in this chapter conforms to Version 2.01 of the PKCS #11standard.
The PKCS #11 subsystem has been implemented using the following components:
v A slot manager daemon (pkcsslotd), which provides the subsystem with information regarding the stateof available hardware devices. This daemon is started automatically during installation and when thesystem is rebooted.
v An API shared object (/usr/lib/pkcs11/pkcs11_API.so) is provided as a generic interface to theadapters for which PKCS #11 support has been implemented.
v An adapter-specific library, which provides the PKCS #11 support for the adapter. This tiered designallows the user to use new PKCS #11 devices when they come available without recompiling existingapplications.
This chapter includes the following information:
v “IBM 4758 Model 2 Cryptographic Coprocessor”
v “PKCS #11 Subsystem Configuration” on page 76
v “PKCS #11 Usage” on page 77
IBM 4758 Model 2 Cryptographic CoprocessorThe IBM 4758 Model 2 Cryptographic Coprocessor provides a secure computing environment. Beforeattempting to configure the PKCS #11 subsystem, verify that the adapter has been properly configuredwith a supported microcode.
Verifying the IBM 4758 Model 2 Cryptographic Coprocessor for usewith the PKCS #11 SubsystemThe PKCS #11 subsystem is designed to automatically detect adapters capable of supporting PKCS #11calls during installation and at reboot. For this reason, any IBM 4758 Model 2 Cryptographic Coprocessorthat is not properly configured will not be accessible from the PKCS #11 interface and calls sent to theadapter will fail. To verify that your adapter is set up correctly, complete the following:
1. Ensure that the software for the adapter is properly installed by typing the following command:lsdev -Cc adapter | grep crypt
If the IBM 4758 Model 2 Cryptographic Coprocessor is not included in the resulting list, check that thecard is seated properly and that the supporting software is correctly installed.
2. Determine that the proper firmware has been loaded onto the card by typing the following:csufclu /tmp/l ST device_number_minor
Verify that the Segment 3 Image has the PKCS #11 application loaded. If it is not loaded refer to theadapter specific documentation to obtain the latest microcode and installation instructions.
Note: If this utility is not available, then the supporting software has not been installed.
© Copyright IBM Corp. 2002, 2003 75
PKCS #11 Subsystem ConfigurationThe PKCS #11 subsystem automatically detects devices supporting PKCS #11. However, in order forsome applications to use these devices, some initial set up is necessary. These tasks include:
v “Initializing the Token”
v “Setting the Security Officer PIN”
v “Initializing the User PIN”
These tasks can be performed through the API (by writing a PKCS #11 application) or by using the SMITinterface. The PKCS #11 SMIT options are accessed either through Manage the PKCS11 subsystemfrom the main SMIT menu, or by using the smit pkcs11 fast path.
Initializing the TokenEach adapter or PKCS #11 token must be initialized before it can be used successfully. This initializationprocedure involves setting a unique label to the token. This label allows applications to uniquely identifythe token. Therefore, the labels should not be repeated. However; the API does not verify that labels arenot re-used. This initialization can be done through a PKCS #11 application or by the system administratorusing SMIT. If your token has a Security Officer PIN, the default value is set to 87654321. To ensure thesecurity of the PKCS #11 subsystem, this value should be changed after initialization.
To initialize the token:
1. Enter the token management screen by typing smit pkcs11.
2. Select Initialize a Token .
3. Select a PKCS #11 adapter from the list of supported adapters.
4. Confirm your selection by pressing Enter.
Note: This will erase all information on the token.
5. Enter the Security Officer PIN (SO PIN) and a unique token label.
If the correct PIN is entered, the adapter will be initialized or reinitialized after the command has finishedrunning.
Setting the Security Officer PINIf your token has an SO PIN, you can change the PIN from its default value, as follows:
1. Type smit pkcs11.
2. Select Set the Security Officer PIN.
3. Select the initialized adapter for which you want to set the SO PIN.
4. Enter the current SO PIN and a new PIN.
5. Verify the new PIN.
Initializing the User PINAfter the token has been initialized, it might be necessary to set the user PIN to allow applications toaccess token objects. Refer to your device specific documentation to determine if the device requires auser to log in before accessing objects.
To initialize the user PIN:
1. Enter the token management screen typing smit pkcs11.
2. Select Initialize the User PIN.
3. Select a PKCS #11 adapter from the list of supported adapters.
4. Enter the SO PIN and the User PIN.
76 AIX 5L Version 5.2: Security Guide

5. Verify the User PIN.
6. Upon verification, the User PIN must be changed.
Resetting the User PINTo reset the user PIN, you can either reinitialize the PIN using the SO PIN or set the user PIN by usingthe existing user PIN. To do this:
1. Enter the token management screen by typing smit pkcs11.
2. Select Set the User PIN.
3. Select the initialized adapter for which you want to set the user PIN.
4. Enter the current user PIN and a new PIN.
5. Verify the new user PIN.
Setting the PKCS #11 Function Control VectorYour token might not support strong cryptographic operations without loading a function control vector.Please refer to your device specific documentation to determine if your token needs a function controlvector and where to locate it.
If a function control vector is required you should have a key file. To load the function control vector:
1. Enter the token management screen by typing smit pkcs11.
2. Select Set the function control vector.
3. Select the PKCS #11 slot for the token.
4. Enter the path to the function control vector file.
PKCS #11 UsageFor an application to use the PKCS #11 subsystem, the subsystem’s slot manager daemon must berunning and the application must load in the API’s shared object.
The slot manager is normally started at boot time by inittab calling the /etc/rc.pkcs11 script. This scriptverifies the adapters in the system before starting the slot manager daemon. As a result, the slot managerdaemon is not available before the user logs on to the system. After the daemon starts, the subsystemincorporates any changes to the number and types of supported adapters without intervention from thesystems administrator.
The API can be loaded either by linking in the object at runtime or by using deferred symbol resolution.For example, an application can get the PKCS #11 function list in the following manner:d CK_RV (*pf_init)();void *d;CK_FUNCTION_LIST *functs;
d = dlopen(e, RTLD_NOW);if ( d == NULL ) {
return FALSE;}
pfoo = (CK_RV (*)())dlsym(d, “C_GetFunctionList”);if (pfoo == NULL) {
return FALSE;}
rc = pf_init(&functs);
Chapter 5. PKCS #11 77

78 AIX 5L Version 5.2: Security Guide
Chapter 6. X.509 Certificate Authentication Service and PublicKey Infrastructure
Certificate Authentication Service provides the AIX 5.2 operating system with the ability to authenticateusers using X.509 Public Key Infrastructure (PKI) certificates and to associate certificates with processesas proof of a user’s identity. It provides this capability through the Loadable Authentication ModuleFramework (LAMF), the same extensible AIX mechanism used to provide DCE, Kerberos, and otherauthentication mechanisms.
This section discusses the following topics:
v “Overview of Certificate Authentication Service”
v “Implementation of Certificate Authentication Service” on page 81
v “Planning for Certificate Authentication Service” on page 91
v “Packaging of Certificate Authentication Service” on page 93
v “Installing and Configuring Certificate Authentication Service” on page 94
Overview of Certificate Authentication Service
Every user account participating in PKI authentication has a unique PKI certificate. The certificate inconjunction with a password is used to authenticate the user during login. PKI certificates are based onpublic key/private key technology. This technology uses two asymmetric keys to encrypt and decrypt data.Data encrypted using one key can only be decrypted using the other key. A user keeps one key private,called the private key, storing it in a private keystore while publishing the other key, called the public key,in the form of a certificate. Certificates are commonly maintained on a Lightweight Directory AccessProtocol (LDAP) server, either within an organization for intra-company usage or on the Internet forworld-wide usage.
For a user named John to send a user named Kathy data that only she can decrypt, John would obtainthe public key from Kathy’s published certificate, encrypt the data using Kathy’s public key, and send thedata to her. Kathy would decrypt the data from John using her private key located in her private keystore.
This technology is also used for digital signatures. If Kathy wants to send data to John that is digitallysigned by her, Kathy would use her private key to digitally sign the data and send the data and digitalsignature to John. John would obtain the public key from Kathy’s published certificate and use the publickey to verify the digital signature before using the data.
In both cases, Kathy’s private key is maintained in a private keystore. The many types of private keystoresinclude smart cards and files, but all keystore types protect private keys through the use of passwords orPersonal Identification Numbers (PINs). They typically provide storage for multiple private keys along withcertificates and other PKI objects. Users typically have their own keystores.
Certificate authentication service uses digital-signature technology to authenticate a user during login.Certificate authentication service locates the user’s certificate and keystore based off the user’s accountname, obtains the certificate’s matching private key from the user’s keystore using the user’s password,signs a data item with the user’s private key, and checks the signature using the user’s public key from thecertificate. After the user authenticates, the system stores the user’s certificate in protected memory,associating the certificate with every process created by the user. This in-memory association enablesquick access to the user’s certificate for any process owned by the user, as well as by the operatingsystem’s kernel.
© Copyright IBM Corp. 2002, 2003 79

CertificatesUnderstanding certificate authentication service requires a basic understanding of certificates, certificateformats, and certificate life-cycle management. Certificates are standardized objects that follow the X.509standard, of which version 3 (X.509v3) is the latest version. Certificates are created, signed, and issued bya Certificate Authority (CA) which is most commonly a software application that accepts and processescertificate requests. Certificates are comprised of several certificate attributes. Some of the attributes arerequired, but many are optional. Certificate attributes commonly used and discussed in this document are:
v Certificate Version - The X.509 version number (that is, 1, 2, or 3).
v Serial Number - A certificate serial number that uniquely distinguishes the certificate from all othercertificates issued by the same CA.
v Issuer Name - A name specifying the certificate’s issuing CA.
v Validity Period - The activation and expiration date of the certificate.
v Public Key - The public key.
v Subject Distinguished Name - A name specifying the certificate’s owner.
v Subject Alternate Name Email - The owner’s e-mail address.
v Subject Alternate Name URI - The owner’s Web site URI/URL.
Each certificate has a unique version number that indicates with which version of the X.509 standard itconforms. Each certificate has a serial number which uniquely distinguishes it from all other certificatesissued by the same CA. The serial number is unique only to the issuing CA. The certificate’s issuer nameidentifies the issuing CA.
Certificates are valid only between two specified dates: the ″Not Before″ date and the ″Not After″ date.Therefore, certificates may be created prior to their validity date and expire at some date in the future. It’scommon for certificates to have a life span of 3 months to 5 years.
The subject distinguished name specifies the certificate owner by using a specialized naming formatknown as a Distinguished Name (DN). A DN allows for the specification of the country, organization, city,state, owner name, and other attributes associated with the requesting entity (usually a person, but notlimited to a person). The subject alternate name e-mail allows for the specification of the owner’s emailaddress and the subject alternate name URI allows for the specification of the owner’s Web site URI/URL.
Certificate Authorities and CertificatesCertificate Authorities issue, store, and typically publish certificates. A common place to publish certificatesis on an LDAP server, since LDAP allows for easy access to community oriented data.
CAs also handle the revocation of certificates and the management of certificate revocation lists (CRLs).Revoking a certificate is the act of publishing the fact that a specific certificate is no longer valid due toreasons other than the expiration of the certificate’s validity period. Because copies of certificates can bemaintained and used outside the control of the issuing CA, CAs publish a list of revoked certificates in aCRL so that outside entities may query the list. This places the responsibility on entities using a copiedcertificate to compare the copied certificate against the issuing CA’s CRL. A CA may only revokecertificates that it creates or issues. It cannot revoke certificates issued by other CAs.
Administrative reasons for revoking a certificate include:
v Compromise of the certificate’s private key.
v Certificate owner left the company.
v Compromise of the CA.
CAs also have their own identifying certificate. This allows CAs to identify each other in peer-to-peercommunications among other uses (for example, chains of trust).
80 AIX 5L Version 5.2: Security Guide
Many CAs support the Certificate Management Protocol (CMP) for requesting and revoking certificates.The protocol supports multiple methods to establish a secure connection between a client (also known asan End Entity) and the CA, though not all clients and CAs support all methods. One common methodrequires each certificate creation and revocation request to use a reference number and passwordrecognized by the CA. Other data such as a special certificate recognized by the CA may also be required.Revocation requests may require the matching private key of the certificate being revoked.
Although CMP provides for certificate creation and revocation requests, it does not support CRL queryrequests. In fact, CRLs are often accessed through out-of-band methods. Since CRLs are often publishedon LDAP servers, software applications can obtain the CRL from an LDAP server and manually scan theCRL. Another emerging method is the Online Certification Status Protocol (OCSP), but not all CAs supportOCSP.
CAs are typically owned and operated by government organizations or trusted private organizations thatattempt to provide assurance that certificates issued by them correspond to the person who requested theissuance of the certificate. The phrase issuing a certificate means to create a certificate and is not thesame as requesting a copy of a published certificate.
Certificate Storage FormatThe most common format for storing individual certificates is in Abstract Syntax Notation version 1 (ASN.1)format using the Distinguished Encoding Rules (DER). This format is referred to as DER format.
KeystoresA keystore (sometimes called a keyset) contains a user’s private keys matching the public keys of theircertificates. A unique key label is assigned to every private key, usually by the user, for easy identification.Keystores are password-protected requiring a user to enter a password prior to accessing the keys oradding new keys. And typically, users have their own keystores. Keystores come in many different forms,for example: smart cards, LDAP-based, file-based, and so on. Not only do the forms vary, but so do themethods used to access them and the formats used to store the private key data. Certificate authenticationservice only supports file-based keystores.
Implementation of Certificate Authentication ServiceCertificate authentication service functions as a client/server model. The server side contains a CertificateAuthority (CA) for creating and maintaining X.509 version 3 certificates and certificate revocation lists(CRLs). (Typically, an organization uses one CA for the entire organization.) The client side contains thesoftware (commands, libraries, load modules, and configuration files) required by every systemparticipating in PKI authentication. The installation package for the server is cas.server and the installationpackage for the client is cas.client.
Creating PKI User AccountsTo create a PKI user account, use the AIX mkuser command. After it is created, each account has acertificate and a private keystore. (Existing accounts can be converted to PKI accounts too, but other stepsare required.) The administrator supplies the keystore passwords to the new users, and new users canthen log in to the system and change their keystore password.
User Authentication Data FlowThis section describes how a PKI user is authenticated. Users can have multiple certificates associatedwith their accounts. Each certificate has a unique, user defined tag value associated with it for easyidentification, but only one certificate can be specified as the authentication certificate. Certificateauthentication service uses a per-user attribute named auth_cert to specify which of the user’s certificatesis the user’s authentication certificate. The value of the auth_cert attribute is the certificate’s tag value.
The certificates, tags, matching keystore locations, matching key labels, and other related data aremaintained under LDAP on a per-user basis. The combination of the user name and tag allows certificate
Chapter 6. X.509 Certificate Authentication Service and Public Key Infrastructure 81
authentication service to locate the certificate under the LDAP server. For more information on the PKILDAP layer, see “PKI LDAP Layer (Certificate Storage)” on page 84.
At login, users supply a user name and password. Using the user name, the system retrieves the user’sauthentication certificate tag from the user’s auth_cert attribute. Combining the user name and tag, thesystem retrieves the user’s certificate, keystore location, and matching key label from LDAP. It checks thevalidity period values found in the certificate to determine if the certificate has expired or has not reachedits activation date. The system then retrieves the user’s private key by using the keystore location, keylabel, and supplied password. After the private key is retrieved, the system verifies that the private key andcertificate match using an internal signing process. If the two match, the user passes the PKIauthentication step of the login procedure. (This does not imply that the user is logged in. Several otheraccount checks are performed by the AIX system on a user account before allowing the user access to thesystem.)
For a certificate to be used as an authentication certificate, the certificate must be signed using a trustedsigning key. The signature is stored under LDAP with the certificate for later reference. The implementationrequires that a certificate have a signature before the tag can be assigned to auth_cert.
The authentication process does not compare a certificate against a CRL. This is due to performancereasons (CRLs take time to acquire and scan and may be temporarily unavailable), but also due topublishing delays of CRLs (CAs may delay an hour or more before publishing a revoked certificate througha CRL, making certificate revocation a poor substitute for disabling a user’s account).
It is also worth noting that authentication does not require a CA. The majority of the work is performedlocally by certificate authentication service, with the exception of retrieving data stored under LDAP.
Server ImplementationThe server side of certificate authentication service implements a CA written in Java and contains aRegistration Authority (RA) along with self-auditing features. It publishes certificates and CRLs that itcreates to an LDAP server. The CA is configurable through a set of configuration files (Java property files).It contains an administrative application called runpki that provides sub-commands to start and stop theserver among other functions and supports CMP for creating and revoking certificates. The CA requiresJava 1.3.1, the IBM DB2 7.1 database, and the IBM Directory 4.1. Due to DB2 requirements, the CA mustrun under a user account other than the root user.
The server contains the following commands to help install and manage the cas.server component:
mksecpkiThis command is used during installation to configure the AIX PKI server components. As part ofits tasks, the command creates a certificate authority user account for the certificate authority.
runpkiThis command allows the system administrator to start the server. If the JavaPKI daemons arerunning, they must first be stopped. The runpki command starts the daemon in the background byusing the lb flags combination. If the daemons need to be started in interactive mode, theadministrator can edit the runpki command and use the l flag instead of the lb flags.
The runpki command must be run after performing an su - operation to the user account underwhich the certificate authority is running. The command is located in the javapki directory underthe certificate authority user account’s home directory. (The mksecpki command creates thecertificate authority user account.)
For example, if the certificate authority user account is pkiinst, then with root authority, type thefollowing:
1. su - pkiinst
2. cd javapki
3. runpki
82 AIX 5L Version 5.2: Security Guide
Client ImplementationThe client side of certificate authentication service implements the user authentication, user administration,and user certificate management functions of certificate authentication service. After it is installed andconfigured on a system, certificate authentication service integrates into the existing user authenticationand administration functions (such as the mkuser, chuser, passwd, and login commands) through theuse of the AIX Loadable Authentication Module Framework (LAMF). It also adds several commands,libraries, and configuration files to help manage user certificates and keystores.
Certificate authentication service can be used in conjunction with either the AIX LDAP databasemechanism or the file-based database mechanism for storing standard AIX attributes. Certificateauthentication service always uses LDAP to maintain user certificates, even when the file-based databasemechanism is used. For limitations when using the file-based database, see “Planning for CertificateAuthentication Service” on page 91.
The client side of certificate authentication service contains the most user oriented software of the twoparts. For this reason, the following sections describe how certificate authentication service maintains anduses the data required for PKI authentication.
General Client FeaturesThe following list describes some of the general features of certificate authentication service:
v Provides user authentication via PKI certificates
v Provides commands to manage user certificates and keystores
v Supports multiple certificates per user
v Supports multiple CA’s simultaneously
v Integrates into existing AIX administration commands and authentication (for example, login, passwd,mkuser)
v Generate certificates at user creation time or add certificates after user creation
v Works with either an LDAP user database or the standard AIX file-based user database
v Configurable key sizes and algorithms
v Associates certificates with Process Authentication Groups (PAGs).
General Client ArchitectureThe client architecture of certificate authentication service takes a layered approach and is divided into thefollowing components:
v “Java Daemon”
v “Service Management Layer” on page 84
v “PKI LDAP Layer (Certificate Storage)” on page 84
v “The libpki.a Library” on page 84
v “Loadable Authentication Module Framework Layer” on page 85
v “Client Commands” on page 85
v “Process Authentication Group Commands” on page 86
v “User Administration Commands” on page 86
v “Configuration Files” on page 87
Java Daemon: At the foundation of the client side is a Java-based daemon using the JCE securitypackage. The daemon manages user keystores, creates key pairs, performs CMP communications, andprovides all hashing and encryption functions. Because APIs of PKI service provider packages are notstandardized for C applications, a wrapper layer API called the Service Management Layer (SML) providesa normalized API to application programs and daemons.
Chapter 6. X.509 Certificate Authentication Service and Public Key Infrastructure 83
Service Management Layer: The SML service for the Java daemon is named/usr/lib/security/pki/JSML.sml. SML creates certificates, and creates and manages keystores, but itdoesn’t manage certificate storage. Certificate storage is managed by the PKI LDAP Layer.
Private Key Storage Through SML: The Java daemon uses PKCS#12 formatted keystore files for storinguser keys. The keystores are protected by a single password used to encrypt all the keys in the keystore.The location of a keystore is specified as a URI. By default, certificate authentication service maintainskeystore files in the /var/pki/security/keys directory.
Keystores are typically limited in size, including file keystores. The SML Layer provides the API formanaging keystores.
Certificate authentication service supports only file keystores. It does not support smart card or LDAPkeystores. You can support roaming users by placing the file keystores on a shared file system under thesame mount point on all systems.
PKI LDAP Layer (Certificate Storage): Certificate authentication service stores certificates and othercertificate related information on a per user basis in LDAP through the PKI LDAP Layer. Certificateauthentication service maintains the certificate associations on a per user basis on an LDAP server. A useraccount can have multiple certificates associated with it. Each association has a unique, user-specified tagfor easy identification and lookup. Certificate authentication service uses the combination of the user’sname and the tag to locate a user’s certificate association in LDAP.
For performance versus disk space trade-offs, certificate authentication service can save either the entirecertificate under LDAP or just a URI reference to the certificate. If a URI reference is used instead of acertificate, certificate authentication service queries the reference to obtain the actual certificate.References are most commonly used in conjunction with a CA which publishes its certificates on an LDAPsever. The types of URI references currently supported by certificate authentication service are LDAPreferences. Certificate authentication service stores certificates in DER format and expects URI referencesto refer to DER formatted certificates.
Certificate authentication service also stores the type and location of each certificate’s matching keystoreand key label in the same record as the certificate association on the LDAP server. This allows users tohave more than one keystore and allows certificate authentication service to quickly find a certificate’smatching private key. To support roaming users, a user’s keystore must reside in the same location on allsystems.
Certificate authentication service maintains the auth_cert attribute in LDAP on a per-user basis. Thisattribute specifies the tag of the certificate used for authentication.
All LDAP information is readable by ordinary users, except for the auth_cert attribute which is restricted tothe LDAP ldappkiadmin account. Since the root user has access to the LDAP ldappkiadmin passwordthrough the acct.cfg file, applications running with the effective UID of root can access the auth_certattribute. (This applies to the accessibility of the URI reference value, not to the data referenced by theURI reference value. Typically, the data referenced by the URI reference value is public.) The API formanaging the certificate storage is contained in the libpki.a library.
The libpki.a Library: In addition to serving as the home of the SML APIs and the PKI LDAP Layer APIs,the libpki.a library houses several subroutines. The library includes APIs that do the following:
v Manage the new configuration files
v Access certificate specific attributes
v Combine multiple lower layer functions into higher level functions
v Are expected to be common among SML services
Note: The APIs are not published.
84 AIX 5L Version 5.2: Security Guide
Loadable Authentication Module Framework Layer: On top of the SML API and PKI LDAP API residesthe Loadable Authentication Module Framework (LAMF) layer. LAMF supplies AIX authentication and useradministration applications with common authentication and user administration APIs regardless of theunderlying mechanism (for example, Kerberos, LDAP, DCE, files). LAMF uses the SML API and the PKILDAP API as building blocks in implementing PKI authentication.
It does this through the use of load modules that map LAMF’s API to different authentication/databasetechnologies. Commands like login, telnet, passwd, mkuser, and others use the LAMF API to implementtheir functions; hence, these commands automatically support new authentication and databasetechnologies when new load modules for these technologies are added to the system.
Certificate authentication service adds a new LAMF load module to the system named/usr/lib/security/PKI. The module must be added by the system administrator to the/usr/lib/security/methods.cfg file before using PKI for authentication. The module must also be pairedwith a database type (for example, LDAP) in the methods.cfg file before it can be used for authentication.An example of the methods.cfg file containing the LAMF module and database definition can be found in“The methods.cfg File” on page 103.
Once the definitions are added to methods.cfg, the administrator can set the registry and SYSTEM userattributes (defined in the /etc/security/user file) to the new stanza value or values for PKI authentication.
Client Commands: Above all the API layers (LAMF, PKI LDAP, and SML) reside the commands. Besidesthe standard AIX authentication and user administration commands supporting certificate authenticationservice (through LAMF), several certificate authentication service specific commands exist. Thesecommands help the user manage certificates and keystores. Below is a list of the commands along with abrief description.
certaddAdds a certificate to the user’s account in LDAP and checks if the certificate is revoked.
certcreateCreates a certificate.
certdeleteDeletes a certificate from the user’s account (i.e., from LDAP).
certgetRetrieves a certificate from the user’s account (i.e., from LDAP).
certlinkAdds a link to a certificate that exists in a remote repository to the user’s account in LDAP andchecks if the certificate is revoked.
certlistLists the certificates associated with the user’s account contained in LDAP.
certrevokeRevokes a certificate.
certverifyVerifies the private key matches the certificate and performs trusted signing.
keyaddAdds a keystore object to a keystore.
keydeleteDeletes a keystore object from a keystore.
keylistLists the objects in a keystore.
Chapter 6. X.509 Certificate Authentication Service and Public Key Infrastructure 85
keypasswdChanges the password on a keystore.
For more information about these commands. see the AIX 5L Version 5.2 Commands Reference.
Process Authentication Group Commands: The Process Authentication Group (PAG) commands arenew to AIX. PAGs are data items that associate user-authentication data with processes. For certificateauthentication service, if the PAG mechanism is enabled, the user’s authentication certificate is associatedwith the user’s login shell. As the shell creates child processes, the PAG propagates to each child.
The PAG mechanism requires the /usr/sbin/certdaemon daemon to be enabled in order to provide thisfunctionality. By default, the mechanism is not enabled. Certificate authentication service does not requirethe PAG mechanism to be enabled, but works with the mechanism if it is enabled.
To enable the certdaemon daemon, add the following line to the /etc/inittab file:certdaemon:2:wait:/usr/sbin/certdaemon
A list of PAG commands along with brief descriptions follows:
paginitAuthenticates a user and creates a PAG association.
pagdelLists authentication information associated with the current process.
paglistRemoves existing PAG associations within the current process’ credentials.
For more information about these commands, see the AIX 5L Version 5.2 Commands Reference.
User Administration Commands: Similar to user-authentication, certificate authentication serviceintegrates with the AIX user-administration functions through the AIX LAMF. Commands like chuser,lsuser, mkuser, and passwd use the LAMF API to implement their functions. Therefore, these commandsautomatically support new authentication and database technologies when new load modules for thesetechnologies are added to the system.
The subsections below provide a more in-depth look at how PKI authentication affects the useradministration commands.
The following commands are affected by the PKI authentication process:
chuserThis command allows the administrator to modify the auth_cert user attribute. This attributespecifies the tag value of the certificate used for authentication. The certificate must be signed bythe trusted signing key in order to be used as the authentication certificate. (Certificate attributes,certificate storage attributes, and keystore attributes are not available through this command.)
lsuser This command lists the value of the user’s auth_cert attribute, as well as, the certificate attributeslisted below. The auth_cert attribute specifies the tag value of the certificate used forauthentication. (Other certificate attributes, certificate storage attributes, and keystore attributes arenot available through this command.)
The certificate attributes listed by the lsuser command are as follows:
subject-DNThe user’s subject distinguished name.
subject-alt-nameThe user’s subject alternate name email.
86 AIX 5L Version 5.2: Security Guide
valid-afterThe date the user’s certificate becomes valid.
valid-untilThe date the user’s certificate becomes invalid.
issuer The distinguished name of the issuer.
mkuserThis command provides an administrator the option of generating a certificate at user creationtime. An administrator can use the mkuser command to generate a certificate during user creationfor users who don’t already have an authentication certificate. Optionally, if a user already has anauthentication certificate, but no user account, the administrator can create the account withoutgenerating a certificate and add the certificate (and keystore) later. The default value for this optionis specified in the /usr/lib/security/pki/policy.cfg file in the newuser stanza by the cert attribute.
Many default values are required when automatically generating an authentication certificate for auser using the mkuser command. Many of these values are specified in the newuser stanza ofthe /usr/lib/security/pki/policy.cfg file. The newuser stanza provides administrative control overthese default values. Some of the default values are as follows:
v CA
v Value for the auth_cert attribute
v Location for the keystore
v Password for the keystore
v Private key label
v Domain name for the subject alternate name e-mail field
A behavioral difference between creating a PKI user account and a non-PKI user account is thatcreating a PKI user account requires a password to encrypt the private key if the mkusercommand generates an authentication certificate for the account. Since the mkuser command is anon-interactive command, the command obtains the password from the policy.cfg file and sets thekeystore password (the private key password) to this value; therefore, the account is immediatelyaccessible after creation. When creating a non-PKI user account, the mkuser command sets thepassword to an invalid value, preventing accessibility.
passwdThis command modifies the user’s keystore password when used on a PKI user account. Itenforces the password restriction rules found in the /etc/security/user file, it enforces the flagsattribute found in the /etc/security/passwd file, and it enforces any rules required by the PKIservice provider.
Because file-based keystores encrypt their private keys using the user’s password, the root usercannot reset a file-based keystore password without knowing the keystore’s current password. If auser forgets their keystore password, the root user will not be able to reset the password unlessroot knows the keystore’s password. If the password is unknown, a new keystore and newcertificates may have to be issued to the user.
Configuration Files: Certificate authentication service uses configuration files for configuring theclient-side: acct.cfg, ca.cfg, and policy.cfg. The SMIT interface provides support for these configurationfiles. The following sections provide information about the configuration files.
The acct.cfg File: The acct.cfg file consists of CA stanzas and LDAP stanzas. The CA stanzas containprivate CA information not suitable for the publicly readable ca.cfg file, such as CMP reference numbersand passwords. The LDAP stanzas contain private LDAP information not suitable for public access, suchas PKI LDAP administrative names and passwords.
For every CA stanza in the ca.cfg file, the acct.cfg file should contain an equivalently named CA stanza,and all CA stanzas must be uniquely named. The LDAP stanzas are all named ldap, and for this reason, a
Chapter 6. X.509 Certificate Authentication Service and Public Key Infrastructure 87
CA stanza cannot be named ldap. Also, no stanza can be named default. An LDAP stanza must exist,and at least one CA stanza, named local, must also exist.
CA stanzas contain the following attributes:
capasswdSpecifies the CA’s CMP password. The length of the password is specified by the CA.
carefnumSpecifies the CA’s CMP reference number.
keylabelSpecifies the label of the private key in the trusted keystore used to sign certificate requests.
keypasswdSpecifies the password for the trusted keystore.
rvpasswdSpecifies the revocation password used for CMP. The length of the password is specified by theCA.
rvrefnumSpecifies the revocation reference number used for CMP.
The LDAP stanza contains the following attributes:
ldappkiadminSpecifies the account name of the LDAP server listed in ldapservers.
ldappkiadmpwdSpecifies the password for the LDAP server’s account.
ldapserversSpecifies the LDAP server name.
ldapsuffixSpecifies the DN attributes added to a user’s certificate DN by the mkuser command.
The following is an example acct.cfg file:local:carefnum = 12345678capasswd = password1234rvrefnum = 9478371rvpasswd = password4321keylabel = "Trusted Key"keypasswd = joshua
ldap:ldappkiadmin = "cn=admin"ldappkiadmpwd = secretldapservers = "ldap.server.austin.ibm.com"ldapsuffix = "ou=aix,cn=us"
For more information, see the AIX 5L Version 5.2 Files Reference.
The ca.cfg File: The ca.cfg file consists of CA stanzas. The CA stanzas contain public CA informationused by certificate authentication service for generating certificate requests and certificate revocationrequests.
For every CA stanza in the ca.cfg file, the acct.cfg file should contain an equivalently named CA stanza.Each CA stanza name in the ca.cfg file must be unique. At least one stanza named local must exist. Nostanzas should be named ldap or default.
88 AIX 5L Version 5.2: Security Guide
CA stanzas contain the following attributes:
algorithmSpecifies the public key algorithm (for example, RSA).
crl Specifies the CA’s CRL URI.
dn Specifies the base DN used when creating certificates.
keysizeSpecifies the minimum key size in bits.
programSpecifies the PKI service module file name.
retriesSpecifies the number of retry attempts when contacting the CA.
server Specifies the CA’s URI.
signinghashSpecifies the hash algorithm used to sign certificates (for example, MD5).
trustedkeySpecifies the trusted keystore containing the trusted signing key used for signing authenticationcertificates.
url Specifies the default value for the subject alternate name URI.
The default CA stanza is named local. The following is an example ca.cfg file:local:program = /usr/lib/security/pki/JSML.smltrustedkey = file:/usr/lib/security/pki/trusted.p15server = "cmp://9.53.230.186:1077"crl = "ldap://dracula.austin.ibm.com/o=aix,c=us"dn = "o=aix,c=us"url = "http://www.ibm.com/"algorithm = RSAkeysize = 512retries = 5signinghash = MD5
For more information, see the AIX 5L Version 5.2 Files Reference.
The policy.cfg File: The policy.cfg file consists of four stanzas: newuser, storage, crl, and comm.These stanzas modify the behavior of some system administration commands. The mkuser commanduses the newuser stanza. The certlink command uses the storage stanza. The certadd and certlinkcommands use the comm and crl stanzas.
The newuser stanza contains the following attributes:
ca Specifies the CA used by the mkuser command when generating a certificate.
cert Specifies whether the mkuser command generates a certificate (new) or not (get) by default.
domainSpecifies the domain part of the certificate’s subject alternate name e-mail value used by themkuser command when generating a certificate.
keysizeSpecifies the minimum encryption key size in bits used by the mkuser command when generatinga certificate.
keystoreSpecifies the keystore URI used by the mkuser command when generating a certificate.
Chapter 6. X.509 Certificate Authentication Service and Public Key Infrastructure 89
keyusageSpecifies the certificate’s key usage value used by the mkuser command when generating acertificate.
label Specifies the private key label used by the mkuser command when generating a certificate.
passwdSpecifies the keystore’s password used by the mkuser command when generating a certificate.
subalturiSpecifies the certificate’s subject alternate name URI value used by the mkuser command whengenerating a certificate.
tag Specifies the auth_cert tag value used by the mkuser command when creating a user when cert= new.
validitySpecifies the certificate’s validity period value used by the mkuser command when generating acertificate.
versionSpecifies the version number of the certificate to be created. The value 3 is the only supportedvalue.
The storage stanza contains the following attributes:
replicateSpecifies whether the certlink command saves a copy of the certificate (yes) or just the link (no).
The crl stanza contains the check attribute, which specifies whether the certadd and certlink commandsshould check the CRL (yes) or not (no).
The comm stanza contains the timeout attribute which specifies the timeout period in seconds used bycertadd and certlink when requesting certificate information using HTTP (for example, retrieving CRLs).
The following is an example of the policy.cfg file:newuser:cert = newca = localpasswd = pkiversion = "3"keysize = 512keystore = "file:/var/pki/security/keys"validity = 86400
storage:replicate = no
crl:check = yes
comm:timeout = 10
For more information, see the AIX 5L Version 5.2 Files Reference.
Audit Log Events: The certificate authentication service client generates the following audit-log events:
v CERT_Create
v CERT_Add
v CERT_Link
v CERT_Delete
90 AIX 5L Version 5.2: Security Guide
v CERT_Get
v CERT_List
v CERT_Revoke
v CERT_Verify
v KEY_Password
v KEY_List
v KEY_Add
v KEY_Delete
Trace Events: The certificate authentication service client generates several new trace events in the 3B7and 3B8 range.
Planning for Certificate Authentication ServiceCertificate authentication service is available beginning with AIX 5.2. The minimum software requirementsfor certificate authentication service are a DB2 server, an IBM Directory server, and a certificateauthentication service server. All can be installed on one system or on a combination of systems. Eachenterprise must determine the best choice for their environment.
This section provides information on planning for certificate authentication service, as follows:
v “Certificate Considerations”
v “Keystore Considerations”
v “User Registry Considerations” on page 92
v “Configuration Considerations” on page 92
v “Security Considerations” on page 92
v “Other Certificate Authentication Service Considerations” on page 93
Certificate ConsiderationsCertificate authentication service supports X.509 version 3 certificates. It also supports several version 3certificate attributes, but not all certificate attributes. For a list of supported certificate attributes, see thecertcreate command and the ca.cfg file. Certificate authentication service contains limited support of theTeletex character set. Specifically, only 7-bit (ASCII subset of) Teletex is supported by certificateauthentication service.
Keystore ConsiderationsCertificate authentication service supports keystore files. Smart cards, LDAP keystores, and other types ofkeystores are not supported.
By default, user keystores are kept in the local file system under the /var/pki/security/keys directory.Because the keystores are local to the system, they cannot be accessed by other systems; thus, userauthentication will be restricted to the system containing the user’s keystore. To allow for roaming users,either copy the user’s keystore to the identical location with the same keystore name on other systems orplace the keystores on a distributed file system.
Note: Care must be taken to ensure that access permission to the user’s keystore remains unchanged.(In AIX, every certificate in LDAP contains the path name to the private keystore containing thecertificate’s private key. The keystore must exist at the path name specified in LDAP in order to beused for authentication.)
Chapter 6. X.509 Certificate Authentication Service and Public Key Infrastructure 91
User Registry ConsiderationsCertificate authentication service supports an LDAP user-registry. LDAP is also the recommended userregistry type to use with certificate authentication service.
Certificate authentication service also supports a file-based user registry. Certain restrictions must beenforced by the administrator for file-based PKI to work correctly. Specifically, identically named useraccounts on different systems participating in PKI authentication must refer to the same account.
For example, user Bob on system A and user Bob on system B must refer to the same user Bob. This isbecause certificate authentication service uses LDAP to store certificate information on a per user basis.The user name is used as the indexing key to access this information. Because file-based registries arelocal to each system and LDAP is global to all systems, the user names on all systems participating in PKIauthentication must map to unique user names in the LDAP namespace. If user Bob on system A isdifferent from user Bob on system B, either only one of the Bob’s can participate in PKI authentication oreach Bob account must use a different LDAP namespace/server.
Configuration ConsiderationsFor configuration simplicity, consider maintaining the three configuration files (acct.cfg, ca.cfg, andpolicy.cfg) on a distributed file system using symbolic links to avoid having to modify configuration files onevery system. Maintain proper access-control settings on these files. This situation may increase yoursecurity vulnerability because the information in these files will be transferred across your network.
Security Considerations
The acct.cfg FileThe acct.cfg file contains sensitive CA reference numbers and passwords (see the carefnum, capasswd,rvrefnum, and rvpasswd attribute descriptions for acct.cfg). These values are used solely for CMPcommunications with the CA when creating a certificate and revoking a certificate, respectively. Ifcompromised, the compromiser may be able to create certificates at will, and revoke anyone’s certificate atwill.
To limit the exposure, consider restricting certificate creation or revocation to a small number of systems.The carefnum and capasswd attribute values are required only on systems where certificates are created(either through the certcreate or mkuser commands). This may imply limiting user account creation to thesame set of systems.
Note: The mkuser command can be configured to automatically create a certificate during user creationor it can create an account without a certificate, whereby the administrator must create and add thecertificate at a later time.
Similarly, the rvrefnum and rvpasswd attribute values are required only on systems where certificates areto be revoked (through the certrevoke command).
The acct.cfg file also contains sensitive trusted signing key information (see the keylabel and keypasswdattribute descriptions for the acct.cfg file). These values are used solely for special certificate verificationoperations. If compromised, the compromiser may be able to forge verified certificates.
To limit the exposure, consider restricting certificate verification to a small number of systems. Thekeylabel and keypasswd attribute values of the acct.cfg file and the trustedkey attribute value of theca.cfg file are required only on systems where certificate verification is required. Specifically, on systemswhere the mkuser (with automatic certificate creation enabled) and certverify commands are required.
Active New AccountsWhen creating a PKI user account, if the cert attribute of the newuser stanza in the policy.cfg file is setto new, the mkuser command creates an active PKI account complete with a working certificate andpassword. The password on the account is specified by the passwd attribute in the newuser stanza.
92 AIX 5L Version 5.2: Security Guide
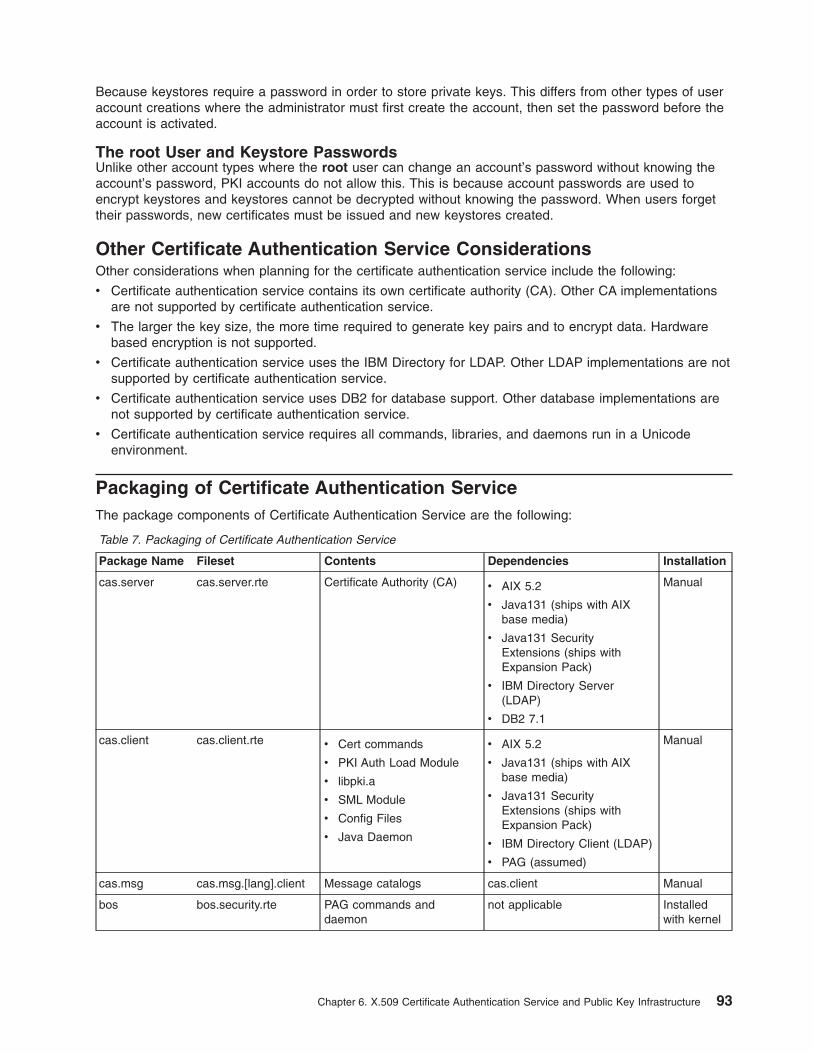
Because keystores require a password in order to store private keys. This differs from other types of useraccount creations where the administrator must first create the account, then set the password before theaccount is activated.
The root User and Keystore PasswordsUnlike other account types where the root user can change an account’s password without knowing theaccount’s password, PKI accounts do not allow this. This is because account passwords are used toencrypt keystores and keystores cannot be decrypted without knowing the password. When users forgettheir passwords, new certificates must be issued and new keystores created.
Other Certificate Authentication Service ConsiderationsOther considerations when planning for the certificate authentication service include the following:
v Certificate authentication service contains its own certificate authority (CA). Other CA implementationsare not supported by certificate authentication service.
v The larger the key size, the more time required to generate key pairs and to encrypt data. Hardwarebased encryption is not supported.
v Certificate authentication service uses the IBM Directory for LDAP. Other LDAP implementations are notsupported by certificate authentication service.
v Certificate authentication service uses DB2 for database support. Other database implementations arenot supported by certificate authentication service.
v Certificate authentication service requires all commands, libraries, and daemons run in a Unicodeenvironment.
Packaging of Certificate Authentication ServiceThe package components of Certificate Authentication Service are the following:
Table 7. Packaging of Certificate Authentication Service
Package Name Fileset Contents Dependencies Installation
cas.server cas.server.rte Certificate Authority (CA) v AIX 5.2
v Java131 (ships with AIXbase media)
v Java131 SecurityExtensions (ships withExpansion Pack)
v IBM Directory Server(LDAP)
v DB2 7.1
Manual
cas.client cas.client.rte v Cert commands
v PKI Auth Load Module
v libpki.a
v SML Module
v Config Files
v Java Daemon
v AIX 5.2
v Java131 (ships with AIXbase media)
v Java131 SecurityExtensions (ships withExpansion Pack)
v IBM Directory Client (LDAP)
v PAG (assumed)
Manual
cas.msg cas.msg.[lang].client Message catalogs cas.client Manual
bos bos.security.rte PAG commands anddaemon
not applicable Installedwith kernel
Chapter 6. X.509 Certificate Authentication Service and Public Key Infrastructure 93
The cas.server package contains the CA and installs in the /usr/cas/server and /usr/cas/clientdirectories. An organization typically uses only one CA, and therefore, this package is installed manually.This package prerequisites the IBM Directory server side, db2_07_01.client, Java131.rte, andJava131.ext.security. The Java131.rte package is installed by default when the AIX 5.2 operating systemis installed, but the other packages are manually installed.
In order for the db2_07_01.client package to work, the db2_07_01.server package must be installed on asystem that is on the network.
The cas.client package contains the files required for every client system supporting certificateauthentication service. Without this package, a system cannot participate in AIX PKI authentication.
Installing and Configuring Certificate Authentication ServiceInstallation of Certificate Authentication Services consists of performing the following procedures:
v “Install and Configure the LDAP Server”
v “Install and Configure Certificate Authentication Service Server” on page 97
v “Configure LDAP For Certificate Authentication Service Server” on page 97
v “Configure Certificate Authentication Service Client” on page 99
v “Administration Configuration Examples” on page 103
Install and Configure the LDAP ServerThe following scenarios are possible when installing and configuring LDAP for PKI user certificate data.
v If the LDAP Server software is not installed, perform the following procedures:
1. “LDAP Server Installation”
2. “LDAP Server Configuration” on page 95
3. “Configuring the LDAP Server for PKI” on page 95
v If the LDAP Server software is installed and configured, but not configured for PKI, perform “Configuringthe LDAP Server for PKI” on page 95.
LDAP Server InstallationDetailed instructions for installing the IBM Directory Server software can be found in the productdocumentation contained in the ldap.html.en_US.config fileset. After installing theldap.html.en_US.config fileset, the documentation can be viewed using a Web browser at the followingURL: file:/usr/ldap/web/C/getting_started.htm.
The LDAP Server installation procedure is as follows:
1. Login as the root user.
2. Place volume 1 of the AIX Base Operating System CDs in the CD-ROM drive.
3. Type smitty install_latest at the command line and press Enter
4. Select Install Software.
5. Select the input device or software directory containing the IBM Directory Server software and pressEnter.
6. Use the F4 key to list the install packages in the Software to Install field.
7. Select the ldap.server package and press Enter.
8. Verify that the AUTOMATICALLY install requisite software option is set to YES, and press Enter.This will install the LDAP server and client filesets and the DB2 backend database filesets.
The filesets installed include the following:
v ldap.client.adt (Directory Client SDK)
v ldap.client.dmt (Directory Client DMT)
94 AIX 5L Version 5.2: Security Guide
v ldap.client.java (Directory Client Java)
v ldap.client.rte (Directory Client Run-time Environment)
v ldap.server.rte (Directory Server Run-time Environment)
v ldap.server.admin (Directory Server)
v ldap.server.cfg (Directory Server Config)
v ldap.server.com (Directory Server Framework)
v db2_07_01.* (DB2 Run-time Environment and associated filesets)
The DB2 package, db2_07_01.jdbc, must also be installed. The DB2 package, db2_07_01.jdbc, islocated on the Expansion Pack CD. Use the installation procedure listed above to install thedb2_07_01.jdbc package.
LDAP Server ConfigurationAfter the LDAP and DB2 filesets have been installed, the LDAP server must be configured. Even thoughthe configuration can be done through the command line and file editing, for ease of administration andconfiguration, the LDAP web administrator is recommended. This tool requires a web server.
The Apache web server application is located on the AIX Toolbox for LINUX Applications CD. Use eitherthe SMIT interface or the geninstall command to install the Apache web server. Other web servers canalso be used, see the LDAP documentation for details.
Detailed instructions for configuring LDAP can be found in the product HTML documentation. Below is aconcise description of the configuration steps:
1. Use ldapcfg to set the admin DN and password for the LDAP database. The administrator is the rootuser of the LDAP database. To configure an administrator DN of cn=admin with a password of secret,type the following:# ldapcfg -u cn=admin -p secret
The DN and password will be required later when configuring each client. Specifically, the DN andpassword will be used as the ldappkiadmin and ldappkiadmpwd attributes of an ldap stanza in theacct.cfg file.
2. Configure the web administrator tool using the location of the web server configuration file, as follows:# ldapcfg -s apache -f /etc/apache/httpd.conf
3. Restart the web server. For the Apache server, use the command:# /usr/local/bin/apachectl restart
4. Access the web administrator using the URL http:// hostname/ldap. Then login using the LDAPadministrator DN and password configured in step 2.
5. Using the web administrator tool, follow the directions to configure the DB2 database backend andrestart the LDAP server.
Configuring the LDAP Server for PKICertificate authentication service requires two separate LDAP directory information trees. One tree is usedby the CA for publishing certificates and CRLs. The other tree is used by each client for storing andretrieving per-user PKI data. The following steps configure the LDAP directory information tree used forstoring and retrieving per-user PKI data.
1. Adding the LDAP Configuration Suffix Entry. The default suffix for the PKI data is cn=aixdata. Thisplaces the PKI certificate data below the default suffix for all AIX data. The default data root for the PKIdata is ou=pkidata,cn=aixdata. All PKI data is placed under this location.
PKI Data Suffix
cn=aixdataCommon suffix for all AIX data. May already exist if LDAP server is being used for otherAIX data.
Chapter 6. X.509 Certificate Authentication Service and Public Key Infrastructure 95
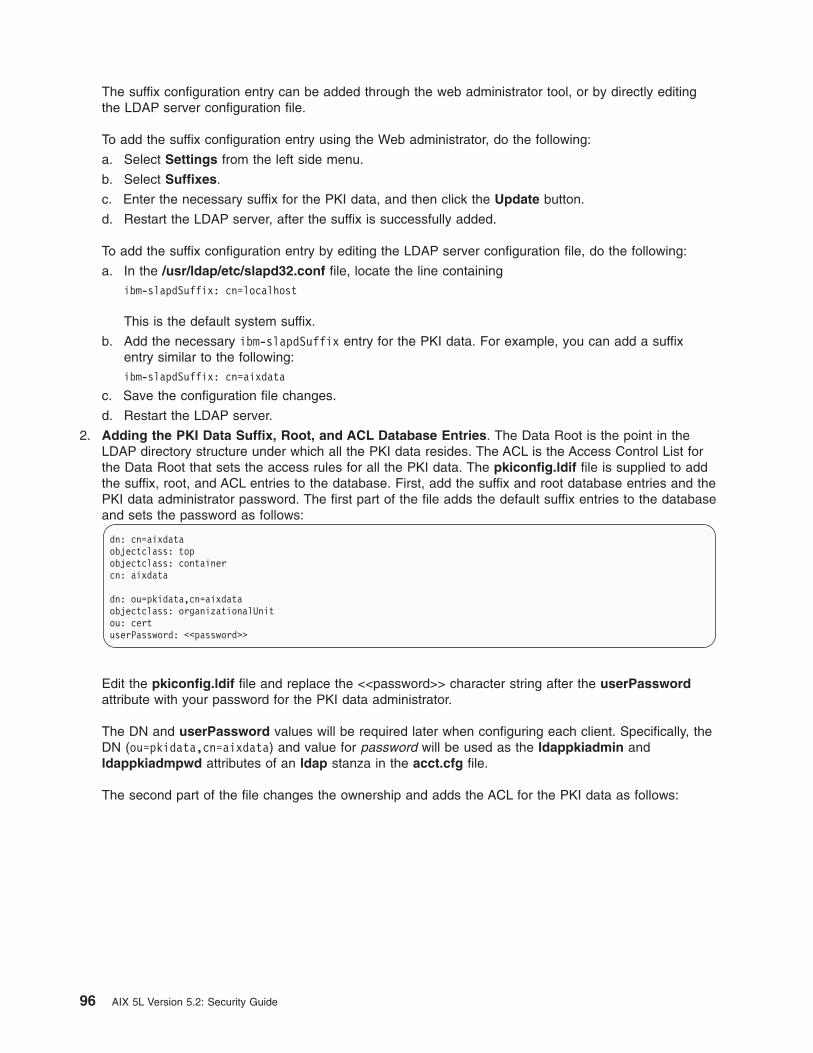
The suffix configuration entry can be added through the web administrator tool, or by directly editingthe LDAP server configuration file.
To add the suffix configuration entry using the Web administrator, do the following:
a. Select Settings from the left side menu.
b. Select Suffixes.
c. Enter the necessary suffix for the PKI data, and then click the Update button.
d. Restart the LDAP server, after the suffix is successfully added.
To add the suffix configuration entry by editing the LDAP server configuration file, do the following:
a. In the /usr/ldap/etc/slapd32.conf file, locate the line containingibm-slapdSuffix: cn=localhost
This is the default system suffix.
b. Add the necessary ibm-slapdSuffix entry for the PKI data. For example, you can add a suffixentry similar to the following:ibm-slapdSuffix: cn=aixdata
c. Save the configuration file changes.
d. Restart the LDAP server.
2. Adding the PKI Data Suffix, Root, and ACL Database Entries. The Data Root is the point in theLDAP directory structure under which all the PKI data resides. The ACL is the Access Control List forthe Data Root that sets the access rules for all the PKI data. The pkiconfig.ldif file is supplied to addthe suffix, root, and ACL entries to the database. First, add the suffix and root database entries and thePKI data administrator password. The first part of the file adds the default suffix entries to the databaseand sets the password as follows:
dn: cn=aixdataobjectclass: topobjectclass: containercn: aixdata
dn: ou=pkidata,cn=aixdataobjectclass: organizationalUnitou: certuserPassword: <<password>>
Edit the pkiconfig.ldif file and replace the <<password>> character string after the userPasswordattribute with your password for the PKI data administrator.
The DN and userPassword values will be required later when configuring each client. Specifically, theDN (ou=pkidata,cn=aixdata) and value for password will be used as the ldappkiadmin andldappkiadmpwd attributes of an ldap stanza in the acct.cfg file.
The second part of the file changes the ownership and adds the ACL for the PKI data as follows:
96 AIX 5L Version 5.2: Security Guide
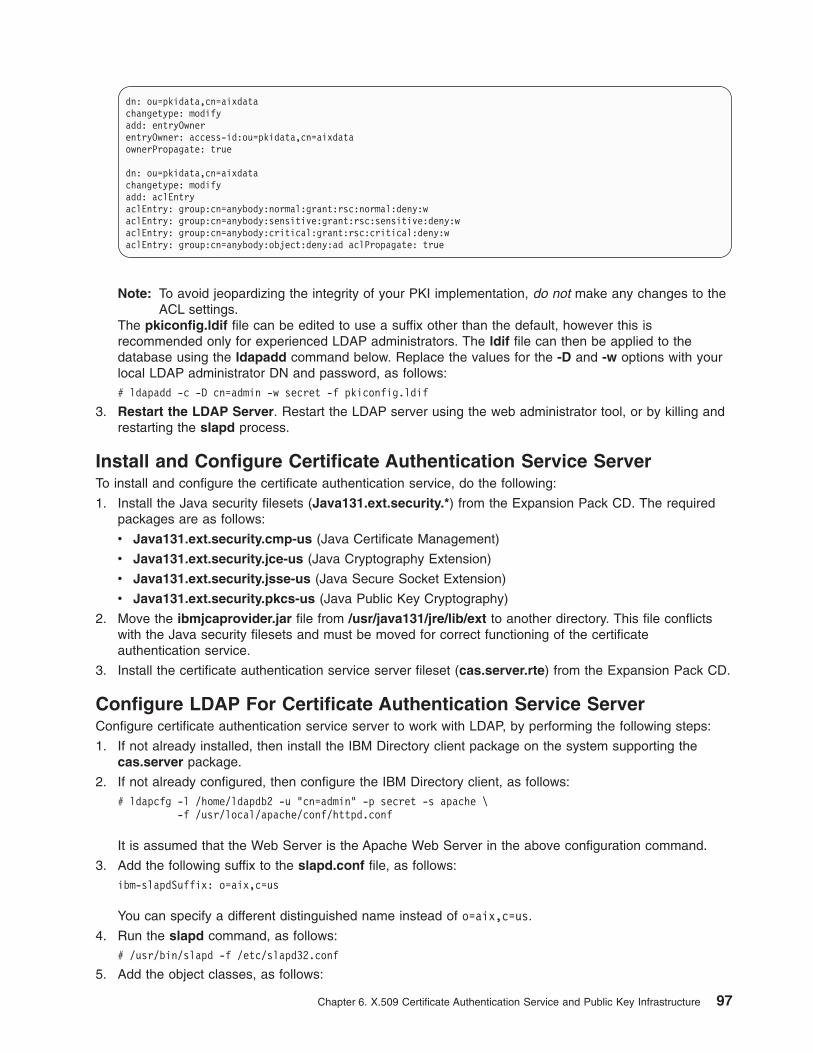
dn: ou=pkidata,cn=aixdatachangetype: modifyadd: entryOwnerentryOwner: access-id:ou=pkidata,cn=aixdataownerPropagate: true
dn: ou=pkidata,cn=aixdatachangetype: modifyadd: aclEntryaclEntry: group:cn=anybody:normal:grant:rsc:normal:deny:waclEntry: group:cn=anybody:sensitive:grant:rsc:sensitive:deny:waclEntry: group:cn=anybody:critical:grant:rsc:critical:deny:waclEntry: group:cn=anybody:object:deny:ad aclPropagate: true
Note: To avoid jeopardizing the integrity of your PKI implementation, do not make any changes to theACL settings.
The pkiconfig.ldif file can be edited to use a suffix other than the default, however this isrecommended only for experienced LDAP administrators. The ldif file can then be applied to thedatabase using the ldapadd command below. Replace the values for the -D and -w options with yourlocal LDAP administrator DN and password, as follows:# ldapadd -c -D cn=admin -w secret -f pkiconfig.ldif
3. Restart the LDAP Server. Restart the LDAP server using the web administrator tool, or by killing andrestarting the slapd process.
Install and Configure Certificate Authentication Service ServerTo install and configure the certificate authentication service, do the following:
1. Install the Java security filesets (Java131.ext.security.*) from the Expansion Pack CD. The requiredpackages are as follows:
v Java131.ext.security.cmp-us (Java Certificate Management)
v Java131.ext.security.jce-us (Java Cryptography Extension)
v Java131.ext.security.jsse-us (Java Secure Socket Extension)
v Java131.ext.security.pkcs-us (Java Public Key Cryptography)
2. Move the ibmjcaprovider.jar file from /usr/java131/jre/lib/ext to another directory. This file conflictswith the Java security filesets and must be moved for correct functioning of the certificateauthentication service.
3. Install the certificate authentication service server fileset (cas.server.rte) from the Expansion Pack CD.
Configure LDAP For Certificate Authentication Service ServerConfigure certificate authentication service server to work with LDAP, by performing the following steps:
1. If not already installed, then install the IBM Directory client package on the system supporting thecas.server package.
2. If not already configured, then configure the IBM Directory client, as follows:# ldapcfg -l /home/ldapdb2 -u "cn=admin" -p secret -s apache \
-f /usr/local/apache/conf/httpd.conf
It is assumed that the Web Server is the Apache Web Server in the above configuration command.
3. Add the following suffix to the slapd.conf file, as follows:ibm-slapdSuffix: o=aix,c=us
You can specify a different distinguished name instead of o=aix,c=us.
4. Run the slapd command, as follows:# /usr/bin/slapd -f /etc/slapd32.conf
5. Add the object classes, as follows:
Chapter 6. X.509 Certificate Authentication Service and Public Key Infrastructure 97
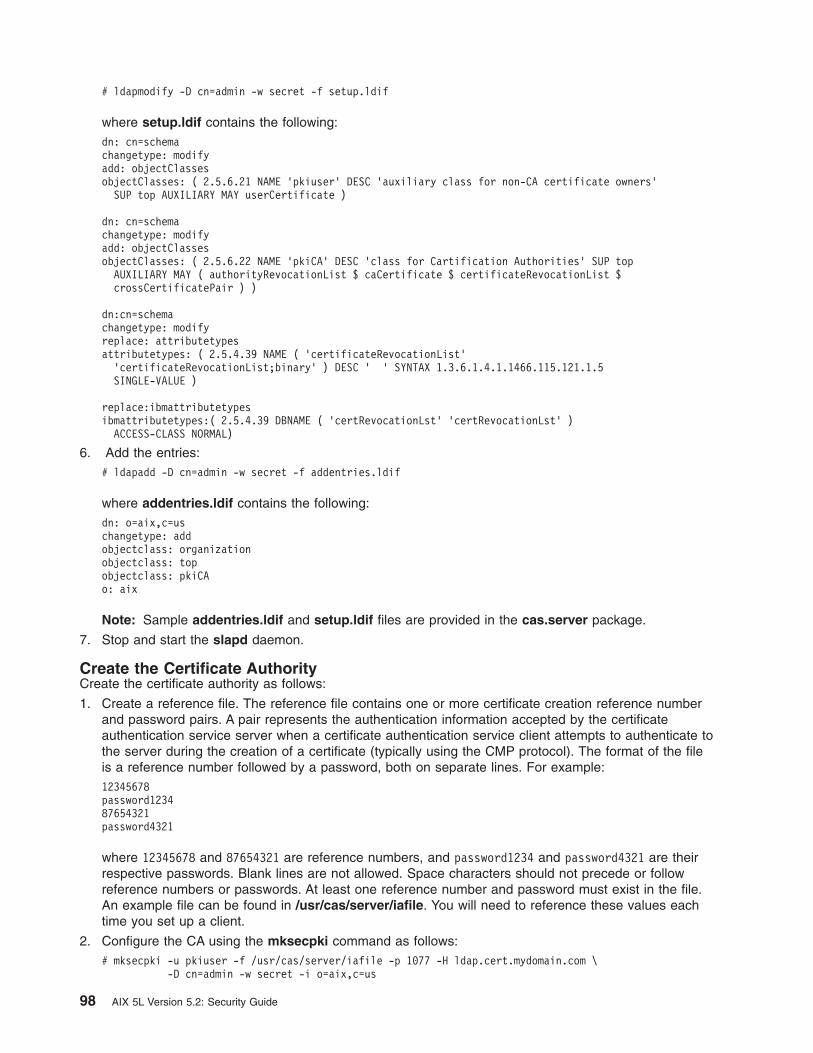
# ldapmodify -D cn=admin -w secret -f setup.ldif
where setup.ldif contains the following:dn: cn=schemachangetype: modifyadd: objectClassesobjectClasses: ( 2.5.6.21 NAME ’pkiuser’ DESC ’auxiliary class for non-CA certificate owners’
SUP top AUXILIARY MAY userCertificate )
dn: cn=schemachangetype: modifyadd: objectClassesobjectClasses: ( 2.5.6.22 NAME ’pkiCA’ DESC ’class for Cartification Authorities’ SUP top
AUXILIARY MAY ( authorityRevocationList $ caCertificate $ certificateRevocationList $crossCertificatePair ) )
dn:cn=schemachangetype: modifyreplace: attributetypesattributetypes: ( 2.5.4.39 NAME ( ’certificateRevocationList’
’certificateRevocationList;binary’ ) DESC ’ ’ SYNTAX 1.3.6.1.4.1.1466.115.121.1.5SINGLE-VALUE )
replace:ibmattributetypesibmattributetypes:( 2.5.4.39 DBNAME ( ’certRevocationLst’ ’certRevocationLst’ )
ACCESS-CLASS NORMAL)
6. Add the entries:# ldapadd -D cn=admin -w secret -f addentries.ldif
where addentries.ldif contains the following:dn: o=aix,c=uschangetype: addobjectclass: organizationobjectclass: topobjectclass: pkiCAo: aix
Note: Sample addentries.ldif and setup.ldif files are provided in the cas.server package.
7. Stop and start the slapd daemon.
Create the Certificate AuthorityCreate the certificate authority as follows:
1. Create a reference file. The reference file contains one or more certificate creation reference numberand password pairs. A pair represents the authentication information accepted by the certificateauthentication service server when a certificate authentication service client attempts to authenticate tothe server during the creation of a certificate (typically using the CMP protocol). The format of the fileis a reference number followed by a password, both on separate lines. For example:12345678password123487654321password4321
where 12345678 and 87654321 are reference numbers, and password1234 and password4321 are theirrespective passwords. Blank lines are not allowed. Space characters should not precede or followreference numbers or passwords. At least one reference number and password must exist in the file.An example file can be found in /usr/cas/server/iafile. You will need to reference these values eachtime you set up a client.
2. Configure the CA using the mksecpki command as follows:# mksecpki -u pkiuser -f /usr/cas/server/iafile -p 1077 -H ldap.cert.mydomain.com \
-D cn=admin -w secret -i o=aix,c=us
98 AIX 5L Version 5.2: Security Guide
Information on the mksecpki flags follows:
-u Specifies a user account name where the certificate authentication service server will beinstalled.
-f Specifies the reference file created in the previous step.
-p Specifies a port number for the LDAP server.
-H Specifies the LDAP server host name or IP address.
-D Specifies the LDAP administrator’s common name.
-w Specifies the LDAP administration password.
-i Specifies the LDAP branch where the user certificate data will reside.
The mksecpki command automatically generates the trusted signing key with a key label ofTrustedKey, the password of the CA user account, and places it in the/usr/lib/security/pki/trusted.pkcs12 keystore file. It’s not necessary to perform the steps in “Createthe Trusted Signing Key” unless you need to generate multiple keys or want a trusted signing key witha different key label and/or password.
Create the Trusted Signing KeyThe mksecpki command automatically generates a trusted signing key with a key label of TrustedKey,the password of the CA user account, and places it in the /usr/lib/security/pki/trusted.pkcs12 keystorefile. If you need to generate a new trusted signing key or multiple trusted signing keys, then this sectionprovides the steps needed to generate a trusted signing key.
All certificate authentication service clients where certificate creation and revocation are allowed require atrusted signing key for signing the user’s authentication certificate. The key is saved in a separate keystoreand is made available to all systems where certificates can be created. A single key can be used by allsystems or, for a more secure approach, multiple keys can be created and distributed.
To create a trusted key, use the /usr/java131/bin/keytool command. Use a file name of a non-existing file.The keytool command prompts for a keystore password and key password. Both the keystore passwordand key password must be identical for certificate authentication service to access the key in the keystore.Run the keytool command as follows:keytool -genkey -dname `cn=trusted key’ -alias `TrustedKey’ -keyalg RSA \
-keystore filename.pkcs12 -storetype pkcs12ks
In this example, the trusted key label is TrustedKey and the trusted keystore password is user-supplied.Remember these values, because you will need them when configuring the certificate authenticationservice clients. When configuring a certificate authentication service client, the keylabel and keypasswdattributes in the acct.cfg file will need to be set to the trusted key label and trusted keystore password,respectively.
For security reasons, make sure the keystore file (filename.pkcs12) is read and write protected. Only theroot user should have access to this file. The trusted key should be the only object in the keystore.
Configure Certificate Authentication Service ClientThere are many configuration options on the client side of certificate authentication service. The followingsections provide the configuration procedure required for each system participating in PKI authentication.
Install the Trusted Signing KeyCopy the trusted keystore containing the trusted signing key to the local system. For information oncreating the trusted signing key, see “Create the Trusted Signing Key”. The default location for the trustedkeystore is in the /usr/lib/security/pki directory.
Chapter 6. X.509 Certificate Authentication Service and Public Key Infrastructure 99
For security reasons, make sure the keystore file is read and write protected. Only the root user shouldhave access to this file.
Edit the acct.cfg FileRemove any ldap stanzas that may exist in the /usr/lib/security/pki/acct.cfg file using a text-based editorlike the vi command.
Configure the Certificate AuthorityMinimally, the local CA account must be configured. By default, the local CA account exists, but must bemodified to match your environment.
Certificate authentication service supports the use of multiple CA’s by a single system throughstanza-based configuration files. The default CA stanza name of local is used when a CA is not specifiedby a user or by the software. All systems must have a valid local stanza definition in the appropriatecertificate authentication service configuration files. Only one CA may have a stanza name of local. Allother CA’s must have a unique stanza name. CA stanza names cannot be ldap or default.
The following sections guide you through the SMIT configuration screens for configuring the local CA.
Change / Show a Certificate Authority:
1. Run PKI SMIT, as follows:smitty pki
2. Select Change / Show a Certificate Authority.
3. Type local for the Certificate Authority Name field and press enter.
4. Set the Service Module Name field to /usr/lib/security/pki/JSML.sml. This is the default SML loadmodule. This field maps to the program attribute in the /usr/lib/security/pki/ca.cfg file.
5. Ignore the Pathname of CA’s Certificate field. This field maps to the certfile attribute in the/usr/lib/security/pki/ca.cfg file.
6. Set the Pathname of CA’s Trusted Key field to a URI that is the location of the trusted keystore onthe local system. Only file-based keystores are supported. The typical location for the trusted keystoreis in the /usr/lib/security/pki directory. (See “Install the Trusted Signing Key” on page 99.) This fieldmaps to the trustedkey attribute in the /usr/lib/security/pki/ca.cfg file.
7. Set the URI of the Certificate Authority Server field to a URI that is the location of the CA(cmp://myserver:1077). This field maps to the server attribute in the /usr/lib/security/pki/ca.cfg file.
8. Ignore the Certificate Distribution Point field. This field maps to the cdp attribute in the/usr/lib/security/pki/ca.cfg file.
9. Set the Certificate Revocation List (CRL) URI field. This field specifies the URI that should be set tothe location of the certificate revocation list for this CA. This is typically an LDAP URI, for example:ldap://crlserver/o=XYZ,c=us
This field maps to the crl attribute in the /usr/lib/security/pki/ca.cfg file.
10. The Default Certificate Distinguished Name field specifies the baseline DN used when creatingcertificates (for example, o=XYZ,c=us). This field is not required. This field maps to the dn attribute inthe /usr/lib/security/pki/ca.cfg file.
11. The Default Certificate Subject Alternate Name URI field specifies the default subject alternatename URI used when creating certificates if a subject alternate name URI is not provided at creationtime. This field is not required. This field maps to the url attribute in the /usr/lib/security/pki/ca.cfgfile.
12. The Public Key Algorithm field specifies the public key algorithm used when creating a certificate.The choices are RSA and DSA. If neither are specified, the system defaults to RSA. This field mapsto the algorithm attribute in the /usr/lib/security/pki/ca.cfg file.
13. The Public Key Size (in bits) field specifies the bit size of the public key algorithm. This field is inbits, not bytes, and this value may be rounded up by the underlying public key mechanism to support
100 AIX 5L Version 5.2: Security Guide
the next feasible byte size. (Typically, rounding occurs when the number of bits is not a even multipleof 8). Example values are 512, 1024, and 2048. If this field is not specified, the system defaults to 1024bits. This field maps to the keysize attribute in the /usr/lib/security/pki/ca.cfg file.
14. The MAX. Communications Retries field specifies the number of times the system attempts tocontact the CA (when creating or revoking a certificate) before giving up. The system defaults to 5attempts. This field maps to the retries attribute in the /usr/lib/security/pki/ca.cfg file.
15. The Signing Hash Algorithm field specifies the hash algorithm used when signing an authenticationcertificate. The choices are MD2, MD5, and SHA1. The system defaults to MD5. This field maps tothe signinghash attribute in the /usr/lib/security/pki/ca.cfg file.
16. Press Enter to commit the changes.
Change / Show CA Accounts:
1. Run PKI SMIT, as follows:smitty pki
2. Select Change / Show CA Accounts.
3. Type local for the Certificate Authority Name field and press Enter.
4. The Certificate Creation Reference Number field specifies the CA’s reference number used increating a certificate. The creation reference number must be composed of all digits and be at least 7digits in length. The reference number is defined by the CA. (See “Create the Certificate Authority” onpage 98.) This field maps to the carefnum attribute in the /usr/lib/security/pki/acct.cfg file.
5. The Certificate Creation Password field specifies the CA’s reference password used when creatinga certificate. The creation password must be composed of 7-bit ASCII alpha-numerics and be at least12 characters in length. The creation password is defined at the CA and must be the matchingpassword to the creation reference number above. (See “Create the Certificate Authority” onpage 98.) This field maps to the capasswd attribute in the /usr/lib/security/pki/acct.cfg file.
6. The Certificate Revocation Reference Number field specifies the reference number used whenrevoking a certificate. The revocation reference number must be composed of all digits and be atleast 7 digits in length. The revocation reference number is sent to the CA during each certificatecreation and is associated with the certificate by the CA. To revoke a certificate, the same revocationreference number (and revocation password) must be sent during revocation as was sent whencreating the certificate. This field maps to the rvrefnum attribute in the /usr/lib/security/pki/acct.cfgfile.
7. The Certificate Revocation Password field specifies the reference password used when revoking acertificate. The revocation password must be composed of 7-bit ASCII alpha-numerics and be at least12 characters in length. The revocation password is sent to the CA during each certificate creationand is associated with the certificate by the CA. To revoke a certificate, the same revocationpassword (and revocation reference number) must be sent during revocation as was sent whencreating the certificate. This field maps to the rvpasswd attribute in the /usr/lib/security/pki/acct.cfgfile.
8. The Trusted Key Label field specifies the label (sometimes called alias) of the trusted signing keylocated in the trusted keystore. The trusted key label value is the value from “Create the TrustedSigning Key” on page 99. This field maps to the keylabel attribute in the/usr/lib/security/pki/acct.cfg file.
9. The Trusted Key Password field specifies the password of the trusted signing key located in thetrusted keystore. The trusted key password value is the value from “Create the Trusted Signing Key”on page 99. This field maps to the keypasswd attribute in the /usr/lib/security/pki/acct.cfg file.
10. Press Enter to commit the changes.
Add the CA LDAP Account:
1. Run PKI SMIT, as follows:smitty pki
2. Select Add an LDAP Account.
Chapter 6. X.509 Certificate Authentication Service and Public Key Infrastructure 101
3. The Administrative User Name field specifies the LDAP administrative account DN. Theadministrative user name for the CA LDAP account is the same name used in both “LDAP ServerConfiguration” on page 95 and “Configure LDAP For Certificate Authentication Service Server” onpage 97. The value should be cn=admin. It is used by the client side to communicate with the LDAPserver when accessing CA LDAP data. This field maps to the ldappkiadmin attribute in the/usr/lib/security/pki/acct.cfg file. For example:ldappkiadmin = "cn=admin"
4. The Administrative Password field specifies the LDAP administrative account password. Theadministrative password is the same password used in both “LDAP Server Configuration” on page 95and “Configure LDAP For Certificate Authentication Service Server” on page 97. This field maps to theldappkiadmpwd attribute in the /usr/lib/security/pki/acct.cfg file. For example:ldappkiadmpwd = secret
5. The Server Name field specifies the name of the LDAP server and must be defined in every LDAPstanza. The value is a single LDAP server name. This field maps to the ldapservers attribute in the/usr/lib/security/pki/acct.cfg file. For example:ldapservers = ldapserver.mydomain.com
6. The Suffix field specifies the DN suffix for the directory information tree where the data resides. Thesuffix is the value of the ibm-slapdSuffix attribute used in “Configure LDAP For CertificateAuthentication Service Server” on page 97. This attribute must be defined in every LDAP stanza. Thisfield maps to the ldapsuffix attribute in the /usr/lib/security/pki/acct.cfg file. For example:ldapsuffix = "ou=aix,cn=us"
7. Press Enter to commit the changes.
Add the PKI Per-User LDAP Account: Perform the same steps as in “Add the CA LDAP Account” onpage 101, except use the values used in the Adding the PKI Suffix and ACL Database Entries step in“Configuring the LDAP Server for PKI” on page 95. Use the following values:
v Administrative User Name (ou=pkidata,cn=aixdata),
v Administrative Password (password),
v Server Name (site specific),
v Suffix (ou=pkidata,cn=aixdata).
Press Enter to commit the changes.
Change / Show the Policy:
1. Run PKI SMIT, as follows:smitty pki
2. Select Change / Show the Policy.
v The Create Certificates for New Users field specifies whether the mkuser command generates acertificate and keystore for the new user (new), or if the administrator provides a certificate andkeystore after the user is created (get). This field maps to the cert attribute of the newuser stanza inthe /usr/lib/security/pki/policy.cfg file.
v The Certificate Authority Name field specifies the CA used by the mkuser command when generatinga certificate. The field value must be a stanza name found in the ca.cfg file; for example, local. Thisfield maps to the ca attribute of the newuser stanza in the /usr/lib/security/pki/policy.cfg file.
v The Initial User Password field specifies the password used by the mkuser command when creating auser’s keystore. This field maps to the passwd attribute of the newuser stanza in the/usr/lib/security/pki/policy.cfg file.
v The Certificate Version field specifies the certificate version used by the mkuser command whengenerating a certificate. Currently, the only supported value is 3, which represents X.509v3. This fieldmaps to the version attribute of the newuser stanza in the /usr/lib/security/pki/policy.cfg file.
102 AIX 5L Version 5.2: Security Guide
v The Public Key Size field specifies the size (in bits) of the public key used by the mkuser commandwhen generating a certificate. This field maps to the keysize attribute of the newuser stanza in the/usr/lib/security/pki/policy.cfg file.
v The Keystore Location field specifies the keystore directory in URI format used by the mkusercommand when creating a keystore. This field maps to the keystore attribute of the newuser stanza inthe /usr/lib/security/pki/policy.cfg file.
v The Validity Period field specifies the certificate’s requested validity period used by the mkusercommand when generating a certificate. The requested validity period may or may not be honored bythe CA when creating the certificate. The period can be specified in seconds, days, or years. If just anumber is provided, it is assumed to be in seconds. If the letter d immediately follows the number, it isinterpreted as days. If the letter y immediate follows the number, it is interpreted as years. Examplevalues are:
– 1y (for 1 year)
– 30d (for 30 days)
– 2592000 (for 30 days represented in seconds)
This field maps to the validity attribute of the newuser stanza in the /usr/lib/security/pki/policy.cfgfile.
v The Replicate Non-Local Certificates field specifies whether the certlink command saves a copy of acertificate (yes) or just the link to the certificate (no). This field maps to the replicate attribute of thestorage stanza in the /usr/lib/security/pki/policy.cfg file.
v The Check Certificate Revocation Lists field specifies whether the certadd and certlink commandscheck the CRL before performing their tasks (yes) or not (no). This field maps to the check attribute ofthe crl stanza in the /usr/lib/security/pki/policy.cfg file.
v The Default Communications Timeout field specifies the timeout period in seconds used by thecertadd and certlink commands when requesting certificate information using HTTP (for example,retrieving CRLs). This field maps to the timeout attribute of the comm stanza in the/usr/lib/security/pki/policy.cfg file.
The methods.cfg FileThe methods.cfg file specifies the definitions of the authentication grammar used by the registry andSYSTEM attributes. Specifically, this is where the authentication grammar for PKILDAP (for PKI usingLDAP) and FPKI (files PKI) must be defined and added by the system administrator.
Below is a typical methods.cfg definition. The stanza names PKI, LDAP, and PKILDAP are arbitrarynames and can be changed by the administrator. This section uses these stanza names throughout forconsistency.PKI:
program = /usr/lib/security/PKIoptions = authonly
LDAP:program = /usr/lib/security/LDAP
PKILDAP:options = auth=PKI,db=LDAP
To support roaming users, use the same methods.cfg stanza names and attribute values across allsystems that support roaming users.
Administration Configuration Examples
Create a New PKI User AccountTo create a new PKI user account, use the mkuser command and the appropriate/usr/lib/security/methods.cfg stanza name (PKILDAP). Depending on the attribute settings in the
Chapter 6. X.509 Certificate Authentication Service and Public Key Infrastructure 103
/usr/lib/security/pki/policy.cfg file, the mkuser command can automatically create a certificate for theuser. Below is a mkuser example that creates the user account bob:mkuser -R PKILDAP SYSTEM="PKILDAP" registry=PKILDAP bob
Convert a Non-PKI User Account to a PKI User AccountThere are a couple of different approaches for converting a non-PKI user account into a PKI user account.The first approach allows the system administrator access to the user’s private keystore initially, whichmay or may not be acceptable in a given environment, but is the quickest way to convert a user. Thesecond way requires interaction between the user and system administrator, which may take more time tosetup.
Both examples use the following assumptions:
v cas.server and cas.client are already installed, configured, and working.
v PKILDAP is defined in methods.cfg as shown in “The methods.cfg File” on page 103.
Example 1:
With root authority, the system administrator can perform the following commands for user account bob:certcreate -f cert1.der -l auth_lbl1 cn=bob bob # Create & save cert in cert1.der.certadd -f cert1.der -l auth_lbl1 auth_tag1 bob # Add cert to LDAP as auth_tag1.certverify auth_tag1 bob # Verify & sign the cert in LDAP.chuser SYSTEM="PKILDAP" registry=PKILDAP bob # Change account type to PKILDAP.chuser -R PKILDAP auth_cert=auth_tag1 bob # Set the user’s auth certificate.
Then, have user bob change his password on the keystore using the keypasswd command.
Example 2:
Have user bob execute the first 3 commands of example 1 above (certcreate, certadd, certverify),creating his own certificate and keystore. Then have the system administrator perform the last two chusercommands of example 1 above.
Create and Add an Authentication CertificateIf a PKI user requires a new authentication certificate, the user can create a new certificate and have thesystem administrator make it the user’s authentication certificate. Below is an example of user bob creatinga certificate and the system administrator making the certificate the authentication certificate.# Logged in as user account bob:certcreate -f cert1.der -l auth_lbl1 cn=bob # Create & save cert in cert1.der.certadd -f cert1.der -l auth_lbl1 auth_tag1 # Add cert to LDAP as auth_tag1.certverify auth_tag1 # Verify & sign the cert in LDAP.# As the system adminstrator:chuser -R PKILDAP auth_cert=auth_tag1 bob # Set the user’s auth certificate.
Change the Default New-Keystore PasswordEdit the passwd attribute value of the newuser stanza in the /usr/lib/security/pki/policy.cfg file to modifythe password used to create the keystores of new PKI users.
Handling a Compromised Trusted Signing KeyThe file that contains the trusted signing key needs to be replaced and the user authentication certificatesneed to be re-signed.
Handling a Compromised User Private KeyIf a user’s private key is compromised, the user or the administrator should revoke the certificate using theappropriate reason code, other users that use the public key should be notified of the compromise and,depending on the purpose of the private/public key, a new certificate should be issued. If the certificatewas used as the user’s authentication certificate, then another certificate (either the new certificate or anexisting non-promised certificate owned by the user) should be added as the new authentication certificate.
104 AIX 5L Version 5.2: Security Guide

Handling a Compromised Keystore or Keystore PasswordChange the password on the keystore. Revoke all the user’s certificates. Create new certificates for theuser including a new authentication certificate. The compromised private keys may still be useful to theuser for accessing previously encrypted data.
Moving a User’s Keystore or Changing the Name of a User’s KeystoreIf a user’s private key is compromised, the user or the administrator should revoke the certificate using theappropriate reason code, other users that use the public key should be notified of the compromise and,depending on the purpose of the private and public key, a new certificate should be issued. If thecertificate was used as the user’s authentication certificate, then another certificate (either the newcertificate or an existing non-promised certificate owned by the user) should be added as the newauthentication certificate.
Moving a User’s Keystore or Changing the Name of a User’s KeystoreEvery user certificate maintained in LDAP contains the keystore location of its matching private key. Tomove a user’s keystore from one directory to another or to change the name of the keystore, requireschanging the LDAP keystore location and name associated with the user’s certificates. If the user usesmultiple keystores, then extra care must be taken to change only the LDAP information of the certificatesaffected by the keystore change.
To move a keystore from /var/pki/security/keys/user1.p12 to /var/pki/security1/keys/user1.p12:# As root...
cp /var/pki/security/keys/user1.p12 /var/pki/security1/keys/user1.p12
# Retrieve a list of all the certificates associated with the user.certlist ALL user1
# For each certificate associated with the keystore, do the following:# A) Retrieve the certificate’s private key label and its "verified" status.# B) Retrieve the certificate from LDAP.# C) Replace the certificate in LDAP using the same private key label,# but the new keystore path name.# D) If the certificate was previously verified, it must verified again.# (Step D requires the password to the keystore.)
# Example modifying one certificate.# Assume:
# username: user1
# cert tag: tag1
# key label: label1
# Retrieve the certificate’s private key label.certlist -a label tag1 user1
# Retrieve the certificate from LDAP and place it in file cert.der.certget -f cert.der tag1 user1
# Replace the certificate in LDAP.certadd -r -f cert.der -p /var/pki/security1/keys/user1.p12 -l label1 tag1 user1
# Re-verify the certificate if it was previously verified.# (Need to know the keystore password.)certverify tag1 user1
Chapter 6. X.509 Certificate Authentication Service and Public Key Infrastructure 105

106 AIX 5L Version 5.2: Security Guide
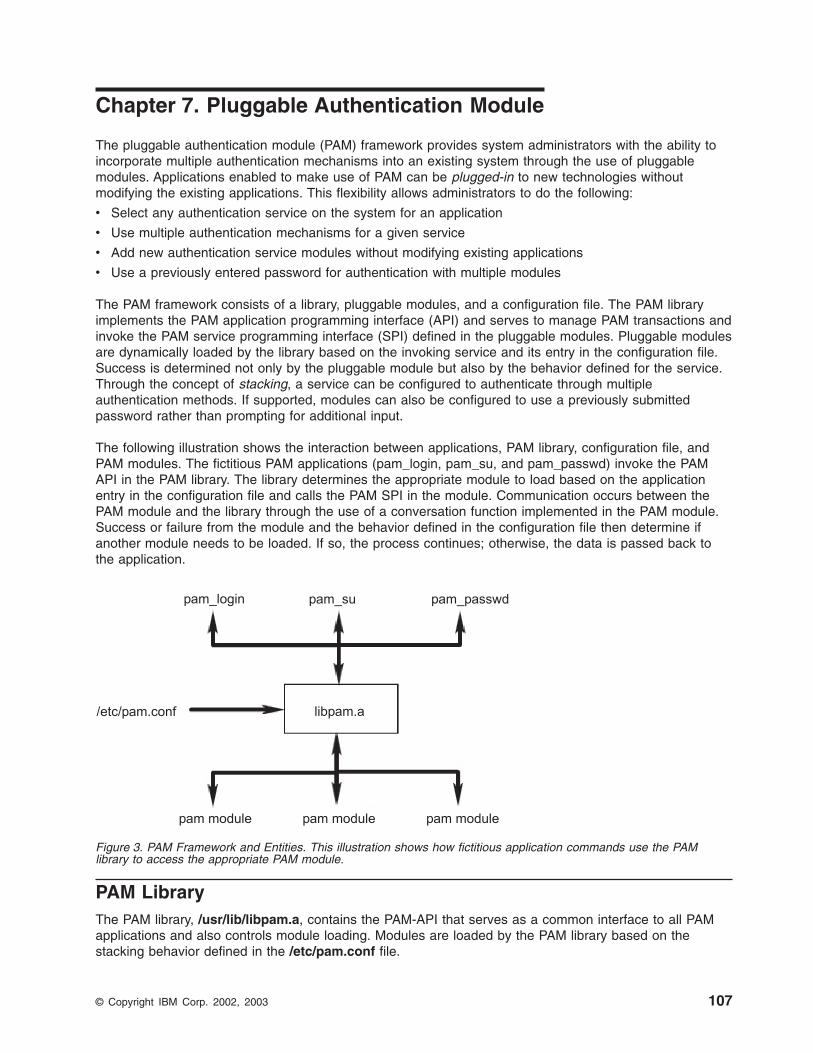
Chapter 7. Pluggable Authentication Module
The pluggable authentication module (PAM) framework provides system administrators with the ability toincorporate multiple authentication mechanisms into an existing system through the use of pluggablemodules. Applications enabled to make use of PAM can be plugged-in to new technologies withoutmodifying the existing applications. This flexibility allows administrators to do the following:
v Select any authentication service on the system for an application
v Use multiple authentication mechanisms for a given service
v Add new authentication service modules without modifying existing applications
v Use a previously entered password for authentication with multiple modules
The PAM framework consists of a library, pluggable modules, and a configuration file. The PAM libraryimplements the PAM application programming interface (API) and serves to manage PAM transactions andinvoke the PAM service programming interface (SPI) defined in the pluggable modules. Pluggable modulesare dynamically loaded by the library based on the invoking service and its entry in the configuration file.Success is determined not only by the pluggable module but also by the behavior defined for the service.Through the concept of stacking, a service can be configured to authenticate through multipleauthentication methods. If supported, modules can also be configured to use a previously submittedpassword rather than prompting for additional input.
The following illustration shows the interaction between applications, PAM library, configuration file, andPAM modules. The fictitious PAM applications (pam_login, pam_su, and pam_passwd) invoke the PAMAPI in the PAM library. The library determines the appropriate module to load based on the applicationentry in the configuration file and calls the PAM SPI in the module. Communication occurs between thePAM module and the library through the use of a conversation function implemented in the PAM module.Success or failure from the module and the behavior defined in the configuration file then determine ifanother module needs to be loaded. If so, the process continues; otherwise, the data is passed back tothe application.
PAM LibraryThe PAM library, /usr/lib/libpam.a, contains the PAM-API that serves as a common interface to all PAMapplications and also controls module loading. Modules are loaded by the PAM library based on thestacking behavior defined in the /etc/pam.conf file.
Figure 3. PAM Framework and Entities. This illustration shows how fictitious application commands use the PAMlibrary to access the appropriate PAM module.
© Copyright IBM Corp. 2002, 2003 107
The following PAM API functions invoke the corresponding PAM SPI provided by a PAM module. Forexample, the pam_authenticate API invokes the pam_sm_authenticate SPI in a PAM module.
v pam_authenticate
v pam_setcred
v pam_acct_mgmt
v pam_open_session
v pam_close_session
v pam_chauthtok
Also provided in the PAM library are several functions that enable an application to invoke PAM modulesand also to pass information to PAM modules. The following PAM framework APIs are implemented in AIX:
pam_start Establish a PAM sessionpam_end Terminate a PAM sessionpam_get_data Retrieve module-specific datapam_set_data Set module-specific datapam_get_item Retrieve common PAM informationpam_set_item Set common PAM informationpam_get_user Retrieve user namepam_strerror Get PAM standard error message
PAM ModulesPAM modules allow multiple authentication mechanisms to be used collectively or independently on asystem. A given PAM module must implement at least one of four module types. The module types aredescribed as follows, along with the corresponding PAM SPIs that are required to conform to the moduletype.
Authentication ModulesAuthenticate users and set, refresh, or destroy credentials. These modules identify user based ontheir authentication and credentials.
Authentication module functions:
v pam_sm_authenticate
v pam_sm_setcred
Account Management ModulesDetermine validity of the user account and subsequent access after identification fromauthentication module. Checks performed by these modules typically include account expirationand password restrictions.
Account management module function:
v pam_sm_acct_mgmt
Session Management ModulesInitiate and terminate user sessions. Additionally, support for session auditing may be provided.
Session management module functions:
v pam_sm_open_session
v pam_sm_close_session
Password Management ModulesPerform password modification and related attribute management.
Password management module functions:
v pam_sm_chauthtok
108 AIX 5L Version 5.2: Security Guide
PAM Configuration FileThe /etc/pam.conf configuration file consists of service entries for each PAM module type and serves toroute services through a defined module path. Entries in the file are composed of the followingwhitespace-delimited fields:service_name module_type control_flag module_path module_options
Where:
service_name Specifies the name of the service. The keyword OTHER isused to define the default module to use for applicationsnot specified in an entry.
module_type Specifies the module type for the service. Valid moduletypes are auth, account, session, or password.
control_flag Specifies the stacking behavior for the module. Supportedcontrol flags are required, sufficient, or optional.
module_path Specifies the path name to a library object thatimplements the service functionality. Entries formodule_path should start from the root (/) directory. If theentry does not begin with /, then /usr/lib/security will beprepended to the file name.
module_options Specifies a list of options that can be passed to theservice modules. Values for this field are dependent onthe options supported by the module defined in themodule_path field.
All fields defined above are required for each entry except for the module_options field, which is optional.Malformed entries or entries with invalid values for the module_type or control_flag fields are ignored bythe PAM library. Entries beginning with a number sign (#) character at the beginning of the line are alsoignored because this denotes a comment.
Stacking is implemented in the configuration file by creating multiple entries with the same module_typefield. The modules are invoked in the order in which they are listed in the file, with the final resultdetermined by the control_flag field specified for each entry. Valid values for the control_flag field and thecorresponding behavior in the stack are as follows:
required All required modules in a stack must pass for a successfulresult. If one or more of the required modules fail, all ofthe required modules in the stack will be attempted, butthe error from the first failed required module is returned.
sufficient If a module flagged as sufficient succeeds and noprevious required or sufficient modules have failed, allremaining modules in the stack are ignored and successis returned.
optional If none of the modules in the stack are required and nosufficient modules have succeeded, then at least oneoptional module for the service must succeed. If anothermodule in the stack is successful, a failure in an optionalmodule is ignored.
The following is an example /etc/pam.conf file that could be used on a system that has additional PAMmodules installed:## PAM configuration file /etc/pam.conf#
# Authentication Management
Chapter 7. Pluggable Authentication Module 109
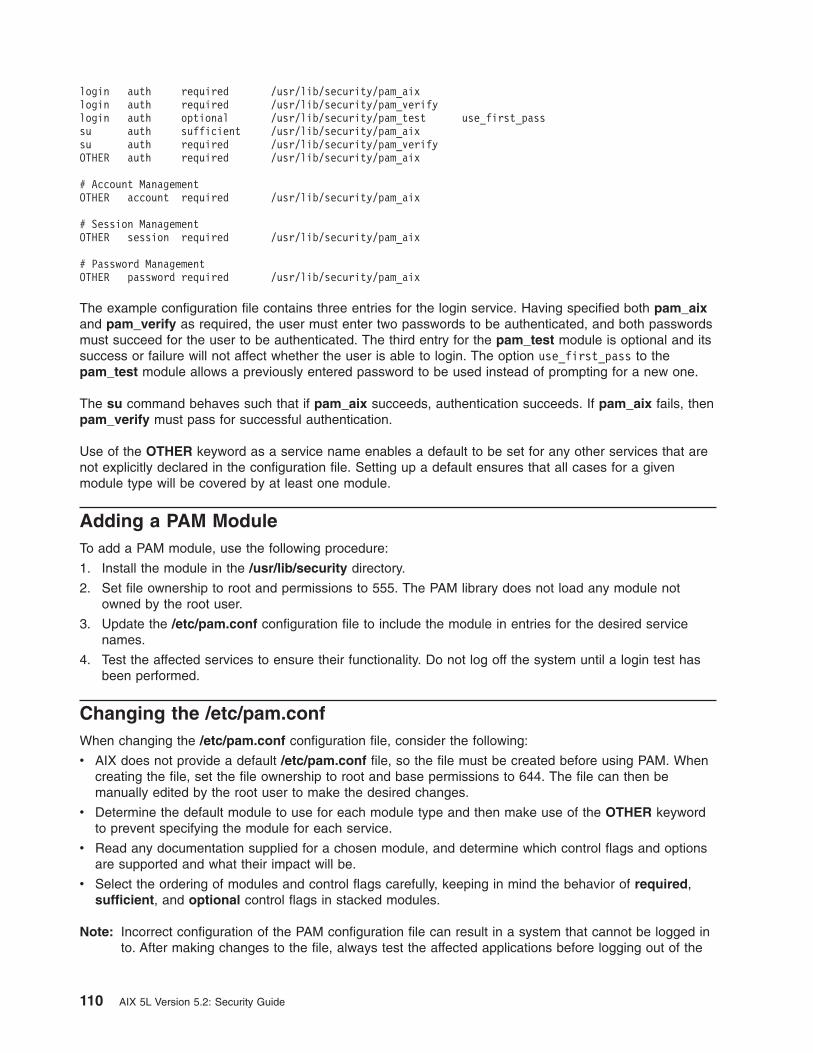
login auth required /usr/lib/security/pam_aixlogin auth required /usr/lib/security/pam_verifylogin auth optional /usr/lib/security/pam_test use_first_passsu auth sufficient /usr/lib/security/pam_aixsu auth required /usr/lib/security/pam_verifyOTHER auth required /usr/lib/security/pam_aix
# Account ManagementOTHER account required /usr/lib/security/pam_aix
# Session ManagementOTHER session required /usr/lib/security/pam_aix
# Password ManagementOTHER password required /usr/lib/security/pam_aix
The example configuration file contains three entries for the login service. Having specified both pam_aixand pam_verify as required, the user must enter two passwords to be authenticated, and both passwordsmust succeed for the user to be authenticated. The third entry for the pam_test module is optional and itssuccess or failure will not affect whether the user is able to login. The option use_first_pass to thepam_test module allows a previously entered password to be used instead of prompting for a new one.
The su command behaves such that if pam_aix succeeds, authentication succeeds. If pam_aix fails, thenpam_verify must pass for successful authentication.
Use of the OTHER keyword as a service name enables a default to be set for any other services that arenot explicitly declared in the configuration file. Setting up a default ensures that all cases for a givenmodule type will be covered by at least one module.
Adding a PAM ModuleTo add a PAM module, use the following procedure:
1. Install the module in the /usr/lib/security directory.
2. Set file ownership to root and permissions to 555. The PAM library does not load any module notowned by the root user.
3. Update the /etc/pam.conf configuration file to include the module in entries for the desired servicenames.
4. Test the affected services to ensure their functionality. Do not log off the system until a login test hasbeen performed.
Changing the /etc/pam.confWhen changing the /etc/pam.conf configuration file, consider the following:
v AIX does not provide a default /etc/pam.conf file, so the file must be created before using PAM. Whencreating the file, set the file ownership to root and base permissions to 644. The file can then bemanually edited by the root user to make the desired changes.
v Determine the default module to use for each module type and then make use of the OTHER keywordto prevent specifying the module for each service.
v Read any documentation supplied for a chosen module, and determine which control flags and optionsare supported and what their impact will be.
v Select the ordering of modules and control flags carefully, keeping in mind the behavior of required,sufficient, and optional control flags in stacked modules.
Note: Incorrect configuration of the PAM configuration file can result in a system that cannot be logged into. After making changes to the file, always test the affected applications before logging out of the
110 AIX 5L Version 5.2: Security Guide
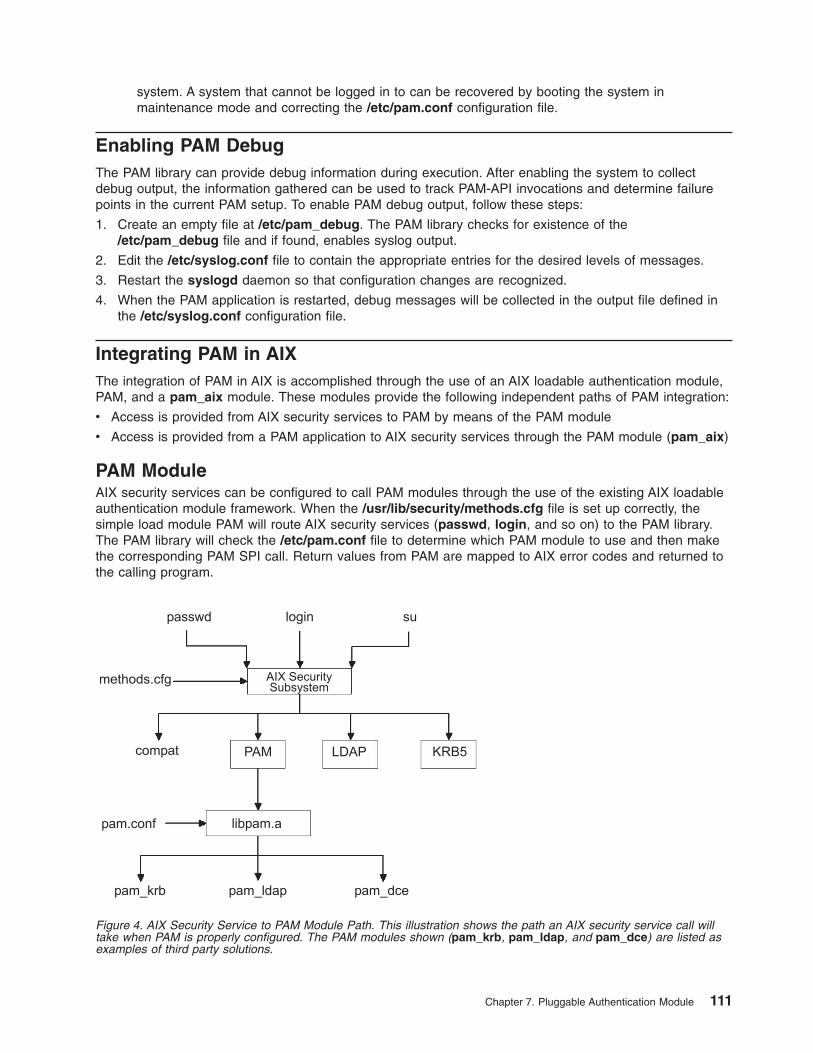
system. A system that cannot be logged in to can be recovered by booting the system inmaintenance mode and correcting the /etc/pam.conf configuration file.
Enabling PAM DebugThe PAM library can provide debug information during execution. After enabling the system to collectdebug output, the information gathered can be used to track PAM-API invocations and determine failurepoints in the current PAM setup. To enable PAM debug output, follow these steps:
1. Create an empty file at /etc/pam_debug. The PAM library checks for existence of the/etc/pam_debug file and if found, enables syslog output.
2. Edit the /etc/syslog.conf file to contain the appropriate entries for the desired levels of messages.
3. Restart the syslogd daemon so that configuration changes are recognized.
4. When the PAM application is restarted, debug messages will be collected in the output file defined inthe /etc/syslog.conf configuration file.
Integrating PAM in AIXThe integration of PAM in AIX is accomplished through the use of an AIX loadable authentication module,PAM, and a pam_aix module. These modules provide the following independent paths of PAM integration:
v Access is provided from AIX security services to PAM by means of the PAM module
v Access is provided from a PAM application to AIX security services through the PAM module (pam_aix)
PAM ModuleAIX security services can be configured to call PAM modules through the use of the existing AIX loadableauthentication module framework. When the /usr/lib/security/methods.cfg file is set up correctly, thesimple load module PAM will route AIX security services (passwd, login, and so on) to the PAM library.The PAM library will check the /etc/pam.conf file to determine which PAM module to use and then makethe corresponding PAM SPI call. Return values from PAM are mapped to AIX error codes and returned tothe calling program.
Figure 4. AIX Security Service to PAM Module Path. This illustration shows the path an AIX security service call willtake when PAM is properly configured. The PAM modules shown (pam_krb, pam_ldap, and pam_dce) are listed asexamples of third party solutions.
Chapter 7. Pluggable Authentication Module 111
PAM is a simple load module that is installed in the /usr/lib/security directory and is an authenticationonly module. The PAM module must be combined with a database to form a compound load module. Thefollowing example shows the stanzas that could be added to the methods.cfg file to form a compoundPAM module with a database called files. The BUILTIN keyword for the db attribute will designate thedatabase as UNIX files.PAM:
program = /usr/lib/security/PAM
PAMfiles:options = auth=PAM,db=BUILTIN
Creating and modifying users is then performed by using the -R option with the administration commandsand by setting the SYSTEM attribute when a user is created.mkuser -R PAMfiles SYSTEM=PAMfiles registry=PAMfiles pamuser
This act will inform further calls to AIX security services (login, passwd, and so on) to use the PAM loadmodule for authentication. While the files database was used for the compound module in this example,other databases, like LDAP, can also be used if they are installed. Creating users as previously describedwill result in the following mapping of AIX security to PAM API calls:
AIX PAM API===== =========authenticate --> pam_authenticatechpass --> pam_chauthtokpasswdexpired --> pam_acct_mgmtpasswdrestrictions --> No comparable mapping exists, success returned
Customizing the /etc/pam.conf file allows the PAM API calls to be directed to the desired PAM module forauthentication. Stacking can be implemented in order to further refine the authentication mechanism.
Data prompted for by an AIX security service is passed to PAM through the pam_set_item functionbecause it is not possible to accommodate user dialog from PAM. PAM modules written for integration withthe PAM module should retrieve all data with pam_get_item calls and should not attempt to prompt theuser to input data as this is handled by the security service.
Loop detection is provided to catch possible misconfiguration in which an AIX security service is routed toPAM and then a PAM module in turn attempts to call the AIX security service to perform the operation.Detection of this loop event will result in an immediate failure of the intended operation.
Note: The /etc/pam.conf file should NOT be written to make use of the pam_aix module when usingPAM integration from an AIX security service to a PAM module as this will result in a loop condition.
pam_aix ModuleThe pam_aix module is a PAM module that provides PAM-enabled applications access to AIX securityservices by providing interfaces that call the equivalent AIX services where they exist. These services arein turn performed by a loadable authentication module or AIX builtin function based on the users definitionand the corresponding setup in methods.cfg. Any error codes generated during execution of an AIXservice are mapped to the corresponding PAM error code.
112 AIX 5L Version 5.2: Security Guide
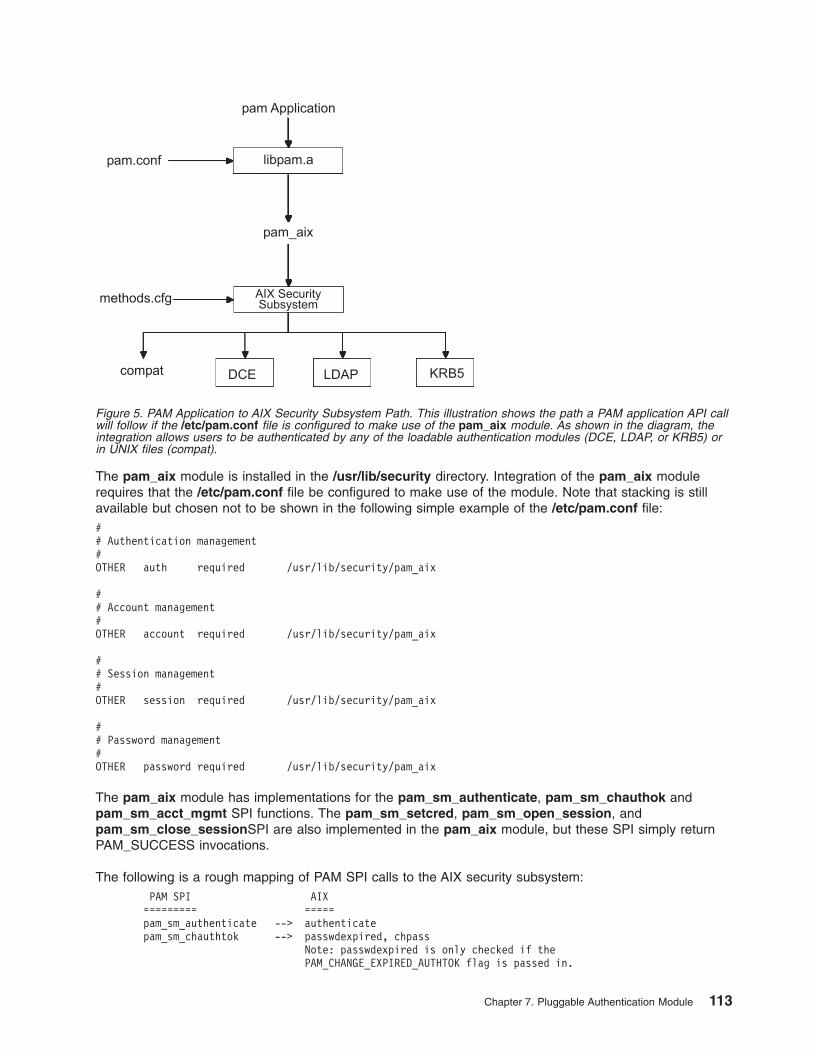
The pam_aix module is installed in the /usr/lib/security directory. Integration of the pam_aix modulerequires that the /etc/pam.conf file be configured to make use of the module. Note that stacking is stillavailable but chosen not to be shown in the following simple example of the /etc/pam.conf file:## Authentication management#OTHER auth required /usr/lib/security/pam_aix
## Account management#OTHER account required /usr/lib/security/pam_aix
## Session management#OTHER session required /usr/lib/security/pam_aix
## Password management#OTHER password required /usr/lib/security/pam_aix
The pam_aix module has implementations for the pam_sm_authenticate, pam_sm_chauthok andpam_sm_acct_mgmt SPI functions. The pam_sm_setcred, pam_sm_open_session, andpam_sm_close_sessionSPI are also implemented in the pam_aix module, but these SPI simply returnPAM_SUCCESS invocations.
The following is a rough mapping of PAM SPI calls to the AIX security subsystem:PAM SPI AIX
========= =====pam_sm_authenticate --> authenticatepam_sm_chauthtok --> passwdexpired, chpass
Note: passwdexpired is only checked if thePAM_CHANGE_EXPIRED_AUTHTOK flag is passed in.
Figure 5. PAM Application to AIX Security Subsystem Path. This illustration shows the path a PAM application API callwill follow if the /etc/pam.conf file is configured to make use of the pam_aix module. As shown in the diagram, theintegration allows users to be authenticated by any of the loadable authentication modules (DCE, LDAP, or KRB5) orin UNIX files (compat).
Chapter 7. Pluggable Authentication Module 113

pam_sm_acct_mgmt --> loginrestrictions, passwdexpiredpam_sm_setcred --> No comparable mapping exists, PAM_SUCCESS returnedpam_sm_open_session --> No comparable mapping exists, PAM_SUCCESS returnedpam_sm_close_session --> No comparable mapping exists, PAM_SUCCESS returned
Data intended to be passed to the AIX security subsystem may either be set using the pam_set_itemfunction prior to module use or the pam_aix module will prompt for data if it does not already exist.
114 AIX 5L Version 5.2: Security Guide
Chapter 8. OpenSSH Software Tools
OpenSSH software tools support the SSH1 and SSH2 protocols. The tools provide shell functions wherenetwork traffic is encrypted and authenticated. OpenSSH is based on client and server architecture.OpenSSH runs the sshd daemon process on the AIX host and waits for the connection from clients. Itsupports public-key and private-key pairs for authentication and encryption of channels to ensure securenetwork connections and host-based authentication. For more information about OpenSSH, see thefollowing Web site:http://www.openssh.org
The preceding Web site provides the man page information on the OpenSSH commands.
For more information about OpenSSH on AIX, see the following Web site, which has the latest installpformat packages for AIX 5L:http://oss.software.ibm.com/developerworks/projects/opensshi
This section explains how to install and configure OpenSSH on AIX. The OpenSSH software is shipped onthe AIX 5.2 Bonus Pack. This version of OpenSSH is compiled and packaged as installp packages usingthe openssh-3.4p1 level of source code. The OpenSSH program contained in the Bonus Pack CD-ROMmedia is licensed under the terms and conditions of the IBM International Program License Agreement(IPLA) for Non-Warranted Programs. OpenSSH is also available for AIX 4.3.3 in several RPM formatpackages, provided by the AIX toolbox for Linux applications.
Before installing the OpenSSH installp format packages, you must install the Open Secure Sockets Layer(OpenSSL) software. The OpenSSL software package contains the encrypted library. OpenSSL is providedin RPM packages in the AIX toolbox for Linux applications. The installation packages include the manpages and the translated message filesets.
1. Install the OpenSSL RPM package using the geninstall command, as follows:# geninstall -d/dev/cd0 R:openssl-0.9.6e
Output similar to the following displays:SUCCESSES---------openssl-0.9.6e-1
2. Next, install the OpenSSH installp packages using the geninstall comand as follows:# geninstall -I"Y" -d/dev/cd0 I:openssh.base
Use the Y flag to accept the OpenSSH license agreement.
Output similar to the following displays:Installation Summary--------------------Name Level Part Event Result-------------------------------------------------------------------------------openssh.base.client 3.4.0.5200 USR APPLY SUCCESSopenssh.base.server 3.4.0.5200 USR APPLY SUCCESSopenssh.base.client 3.4.0.5200 ROOT APPLY SUCCESSopenssh.base.server 3.4.0.5200 ROOT APPLY SUCCESS
You can also use the SMIT install_software fast path to install OpenSSL and OpenSSH.
The following OpenSSH binary files are installed as a result of the preceding procedure:
ssh Similar to the rlogin and rsh client programs
ssh-agent An agent that can store private keys
© Copyright IBM Corp. 2002, 2003 115
ssh-add Tool that adds keys to ssh-agent
sftp Similar to the FTP program that works over SSH1 and SSH2 protocol
scp File copy program similar to rcp
ssh-keygen Key generation tool
ssh-keyscan Utility for gathering public host keys from a number of hosts
ssh-keysign Utility for host-based authentication
sshd Daemon that permits you to log in
sftp-server SFTP server subsystem (started automatically by sshd daemon)
The following general information covers OpenSSH:
v The /etc/ssh/ssh_config directory contains the sshd daemon and the configuration files for the sshcommand.
v The /usr/openssh directory contains the readme file and the original OpenSSH open-source licensetext file.
v The sshd daemon is under AIX SRC control. You can start, stop, and view the status of the daemon byissuing the following commands:startsrc -s sshd OR startsrc -g ssh (group)stopsrc -s sshd OR stopsrc -g sshlssrc -s sshd OR lssrc -s ssh
You can also start and stop the daemon by issuing the following commands:/etc/rc.d/rc2.d/Ksshd start
OR/etc/rc.d/rc2.d/Ssshd start
/etc/rc.d/rc2.d/Ksshd stop
OR/etc/rc.d/rc2.d/Ssshd stop
v When the OpenSSH server fileset is installed, an entry is added to the directory /etc/rc.d/rc2.d. Anentry is in inittab to execute run level 2 processes (l2:2:wait:/etc/rc.d/rc 2), so the sshd daemonwill start automatically at boot time. To prevent the daemon from starting at boot time, remove the/etc/rc.d/rc2.d/Ksshd and /etc/rc.d/rc2.d/Ssshd files.
v OpenSSH software logs information to SYSLOG.
v The IBM Redbook, Managing AIX Server Farms, provides information about configuring OpenSSH inAIX and is available at the following Web site:http://www.redbooks.ibm.com
Using OpenSSH with PAMBeginning with AIX 5.2, OpenSSH is compiled with Pluggable Authentication Module (PAM) support. PAMis an alternate way of authenticating users. It provides an adaptable mechanism for authenticating AIXusers by allowing a user-written module to be added to the login process. A user can write his own moduleor use the pam_aix module provided with AIX. The pam_aix module provides interfaces to AIX securityservices.
The following is an example of the /etc/pam.conf configuration file using the pam_aix PAM module, butother modules may be used if installed on the system. Create the /etc/pam.conf file with the followinginformation in that file:
116 AIX 5L Version 5.2: Security Guide

sshd auth required /usr/lib/security/pam_aixOTHER auth required /usr/lib/security/pam_aixsshd account required /usr/lib/security/pam_aixOTHER account required /usr/lib/security/pam_aixsshd password required /usr/lib/security/pam_aixOTHER password required /usr/lib/security/pam_aixsshd session required /usr/lib/security/pam_aixOTHER session required /usr/lib/security/pam_aix
Chapter 8. OpenSSH Software Tools 117

118 AIX 5L Version 5.2: Security Guide

Part 2. Network and Internet Security
Part 2 of this guide provides information about network and Internet security measures. These chaptersdescribe how to install and configure IP Security; how to identify necessary and unecessary networkservices; auditing and monitoring network security, and more.
© Copyright IBM Corp. 2002, 2003 119

120 AIX 5L Version 5.2: Security Guide
Chapter 9. TCP/IP Security
If you installed the Transmission Control Protocol/Internet Protocol (TCP/IP) and Network File System(NFS) software, you can configure your system to communicate over a network. This guide does notdescribe the basic concepts of TCP/IP, but rather describes security-related concerns of TCP/IP. Forinformation on installing and the initial configuration of TCP/IP, refer to the Transmission ControlProtocol/Internet Protocol chapter in AIX 5L Version 5.2 System Management Guide: Communications andNetworks.
For any number of reasons, the person who administers your system might have to meet a certain level ofsecurity. For instance, the security level might be a matter of corporate policy. Or a system might needaccess to government systems and thus be required to communicate at a certain security level. Thesesecurity standards might be applied to the network, the operating system, application software, evenprograms written by the person who administers your system.
This chapter describes the security features provided with TCP/IP, both in standard mode and as a securesystem, and discusses some security considerations that are appropriate in a network environment.
After you install TCP/IP and NFS software, use the Web-based System Manager or the SystemManagement Interface Tool (SMIT) tcpip fast path, to configure your system.
This chapter discusses the following topics:
v “Operating System-Specific Security”
v “TCP/IP Command Security” on page 123
v “Trusted Processes” on page 125
v “Network Trusted Computing Base” on page 126
v “Data Security and Information Protection” on page 127
v “User Based TCP Port Access Control with Discretionary Access Control for Internet Ports” on page 128
Operating System-Specific Security
Many of the security features available for TCP/IP are based on those available through the operatingsystem. The following sections outline TCP/IP security.
Network Access Control
The security policy for networking is an extension of the security policy for the operating system, and itconsists of the following major components:
v User authentication is provided at the remote host by a user name and password in the same way aswhen a user logs in to the local system. Trusted TCP/IP commands, such as ftp, rexec, and telnet,have the same requirements and undergo the same verification process as trusted commands in theoperating system.
v Connection authentication is provided to ensure that the remote host has the expected InternetProtocol (IP) address and name. This prevents a remote host from masquerading as another remotehost.
v Data import and export security permits data at a specified security level to flow to and from networkinterface adapters at the same security and authority levels. For example, top-secret data can flow onlybetween adapters that are set to the top-secret security level.
© Copyright IBM Corp. 2002, 2003 121
Network Auditing
Network auditing is provided by TCP/IP, using the audit subsystem to audit both kernel network routinesand application programs. The purpose of auditing is to record those actions that affect the security of thesystem and the user responsible for those actions.
The following types of events are audited:
Kernel Eventsv Change configuration
v Change host ID
v Change route
v Connection
v Create socket
v Export object
v Import object
Application Eventsv Access the network
v Change configuration
v Change host ID
v Change static route
v Configure mail
v Connection
v Export data
v Import data
v Write mail to a file
Creation and deletion of objects are audited by the operating system. Application audit records suspendand resume auditing to avoid redundant auditing by the kernel.
Trusted Path, Trusted Shell, and Secure Attention Key (SAK)
The operating system provides the trusted path to prevent unauthorized programs from reading data froma user terminal. This path is used when a secure communication path with the system is required, such aswhen you are changing passwords or logging in to the system. The operating system also provides thetrusted shell (tsh), which executes only trusted programs that have been tested and verified as secure.TCP/IP supports both of these features, along with the secure attention key (SAK), which establishes theenvironment necessary for secure communication between you and the system. The local SAK is availablewhenever you are using TCP/IP. A remote SAK is available through the telnet command.
The local SAK has the same function in telnet that it has in other operating system application programs:it ends the telnet process and all other processes associated with the terminal in which telnet wasrunning. Inside the telnet program, however, you can send a request for a trusted path to the remotesystem using the telnet send sak command (while in telnet command mode). You can also define asingle key to initiate the SAK request using the telnet set sak command.
For more information about the Trusted Computing Base, see “Trusted Computing Base” on page 3.
122 AIX 5L Version 5.2: Security Guide
TCP/IP Command Security
Some commands in TCP/IP provide a secure environment during operation. These commands are ftp,rexec, and telnet. The ftp function provides security during file transfer. The rexec command provides asecure environment for running commands on a foreign host. The telnet function provides security forlogin to a foreign host.
The ftp, rexec, and telnet commands provide security during their operation only. That is, they do not setup a secure environment for use with other commands. For securing your system for other operations, usethe securetcpip command. This command gives you the ability to secure your system by disabling thenontrusted daemons and applications, and by giving you the option of securing your IP layer networkprotocol as well.
The ftp, rexec, securetcpip, and telnet commands provide the following forms of system and datasecurity:
ftp The ftp command provides a secure environment for transferring files.When a user invokes the ftp command to a foreign host, the user isprompted for a login ID. A default login ID is shown: the user’s current loginID on the local host. The user is prompted for a password for the remotehost.
The automatic login process searches the local user’s $HOME/.netrc file forthe user’s ID and password to use at the foreign host. For security, thepermissions on the $HOME/.netrc file must be set to 600 (read and writeby owner only). Otherwise, automatic login fails.
Note: Because use of the .netrc file requires storage of passwords ina nonencrypted file, the automatic login feature of the ftp command isnot available when your system has been configured with thesecuretcpip command. This feature can be reenabled by removingthe ftp command from the tcpip stanza in the /etc/security/configfile.
To use the file transfer function, the ftp command requires two TCP/IPconnections, one for the File Transfer Protocol (FTP) and one for datatransfer. The protocol connection is primary and is secure because it isestablished on reliable communicating ports. The secondary connection isneeded for the actual transfer of data, and both the local and remote hostverify that the other end of this connection is established with the samehost as the primary connection. If the primary and secondary connectionsare not established with the same host, the ftp command first displays anerror message stating that the data connection was not authenticated, andthen it exits. This verification of the secondary connection prevents a thirdhost from intercepting data intended for another host.
rexec The rexec command provides a secure environment for executingcommands on a foreign host. The user is prompted for both a login ID anda password.
An automatic login feature causes the rexec command to search the localuser’s $HOME/.netrc file for the user’s ID and password on a foreign host.For security, the permissions on the $HOME/.netrc file must be set to 600(read and write by owner only). Otherwise, automatic login fails.
Note: Because use of the .netrc file requires storage of passwords ina nonencrypted file, the automatic login feature of rexec is notavailable when your system is operating in secure. This feature canbe reenabled by removing the rexec entry from the tcpip stanza inthe /etc/security/config file.
Chapter 9. TCP/IP Security 123
securetcpip The securetcpip command enables TCP/IP security features. Access tocommands that are not trusted is removed from the system when thiscommand is issued. Each of the following commands is removed byrunning the securetcpip command:
v rlogin and rlogind
v rcp, rsh, and rshd
v tftp and tftpd
v trpt
The securetcpip command is used to convert a system from the standardlevel of security to a higher security level. After your system has beenconverted, you need not issue the securetcpip command again unless youreinstall TCP/IP.
telnet or tn The telnet (TELNET) command provides a secure environment for login toa foreign host. The user is prompted for both a login ID and a password.The user’s terminal is treated just like a terminal connected directly to thehost. That is, access to the terminal is controlled by permission bits. Otherusers (group and other) do not have read access to the terminal, but theycan write messages to it if the owner gives them write permission. Thetelnet command also provides access to a trusted shell on the remotesystem through the SAK. This key sequence differs from the sequence thatinvokes the local trusted path and can be defined within the telnetcommand.
Remote Command Execution Access (/etc/hosts.equiv)
Users on the hosts listed in the /etc/hosts.equiv file can run certain commands on your system withoutsupplying a password. The following table provides information about how to list, add, and remove remotehosts using Web-based System Manager, SMIT, or command line.
Remote command execution access tasks
Task SMIT fast pathCommand orfile Web-based System Manager Management Environment
List RemoteHosts That HaveCommandExecution Access
smitlshostsequiv
view/etc/hosts.equivfile
Software —> Network —> TCPIP (IPv4 and IPv6) —> TCPIPProtocol Configuration —> TCP/IP —> Configure TCP/IP—> Advanced Methods —> Hosts File —> Contents of/etc/hosts file.
Add a RemoteHost forCommandExecution Access
smitmkhostsequiv
edit/etc/hosts.equivfileNote 1
Software —> Network —> TCPIP (IPv4 and IPv6) —> TCPIPProtocol Configuration —> TCP/IP —> Configure TCP/IP—> Advanced Methods —> Hosts File. In Add/Change hostentry, complete the following fields: IP Address, Host name,Alias(es), and Comment. Click Add/Change Entry, and clickOK.
Remove aRemote Hostfrom CommandExecution Access
smitrmhostsequiv
edit/etc/hosts.equivfileNote 1
Software —> Network —> TCPIP (IPv4 and IPv6) —> TCPIPProtocol Configuration —> TCP/IP —> Configure TCP/IP—> Advanced Methods —> Hosts File. Select a host inContents of /etc/host file. Click Delete Entry —> OK.
Notes:
1. For more information about these file procedures, see the ″hosts.equiv File Format for TCP/IP″ in theAIX 5L Version 5.2 Files Reference.
124 AIX 5L Version 5.2: Security Guide
Restricted File Transfer Program Users (/etc/ftpusers)
Users listed in the /etc/ftpusers file are protected from remote FTP access. For example, suppose thatuser A is logged into a remote system, and he knows the password of user B on your system. If user B islisted in the /etc/ftpusers file, user A cannot FTP files to or from user B’s account, even though user Aknows user B’s password.
The following table provides information about how to list, add, and remove restricted users usingWeb-based System Manager, SMIT, or command line.
Remote FTP user tasks
Task SMIT fast path Command or fileWeb-based System Manager ManagementEnvironment
List RestrictedFTP Users
smit lsftpusers view/etc/ftpusers file
Software —> Users —> All Users.
Add a RestrictedUser
smit mkftpusers edit /etc/ftpusersfile
Note 1Software —> Users —> All Users —> Selected —>Add this User to Group. Select a group, and click OK.
Remove aRestricted User
smit rmftpusers edit /etc/ftpusersfile
Note 1Software —> Users —> All Users —> Selected —>Delete.
Notes:
1. For more information about these file procedures, see the ″ftpusers File Format for TCP/IP″ in the AIX5L Version 5.2 Files Reference.
Trusted Processes
A trusted program, or trusted process, is a shell script, a daemon, or a program that meets a particularstandard of security. These security standards are set and maintained by the U.S. Department of Defense,which also certifies some trusted programs.
Trusted programs are trusted at different levels. Security levels include A1, B1, B2, B3, C1, C2, and D,with level A1 providing the highest security level. Each security level must meet certain requirements. Forexample, the C2 level of security incorporates the following standards:
program integrity Ensures that the process performs exactly as intended.modularity Process source code is separated into modules that cannot
be directly affected or accessed by other modules.principle of least privilege States that at all times a user is operating at the lowest level
of privilege authorized. That is, if a user has access only toview a certain file, then the user does not inadvertently alsohave access to alter that file.
limitation of object reuse Keeps a user from, for example, accidentally finding a sectionof memory that has been flagged for overwriting but not yetcleared, and which might contain sensitive material.
TCP/IP contains several trusted daemons and many nontrusted daemons.
Examples of trusted daemons are as follows:
v ftpd
v rexecd
v telnetd
Examples of nontrusted daemons are as follows:
Chapter 9. TCP/IP Security 125
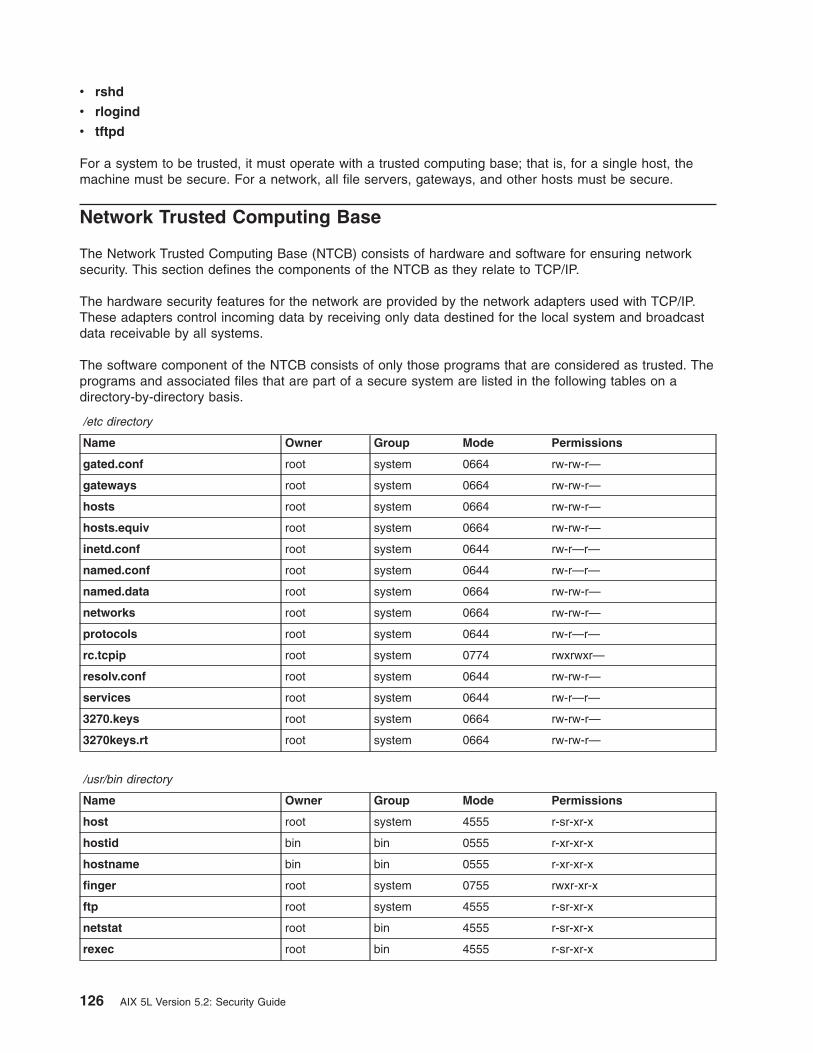
v rshd
v rlogind
v tftpd
For a system to be trusted, it must operate with a trusted computing base; that is, for a single host, themachine must be secure. For a network, all file servers, gateways, and other hosts must be secure.
Network Trusted Computing Base
The Network Trusted Computing Base (NTCB) consists of hardware and software for ensuring networksecurity. This section defines the components of the NTCB as they relate to TCP/IP.
The hardware security features for the network are provided by the network adapters used with TCP/IP.These adapters control incoming data by receiving only data destined for the local system and broadcastdata receivable by all systems.
The software component of the NTCB consists of only those programs that are considered as trusted. Theprograms and associated files that are part of a secure system are listed in the following tables on adirectory-by-directory basis.
/etc directory
Name Owner Group Mode Permissions
gated.conf root system 0664 rw-rw-r—
gateways root system 0664 rw-rw-r—
hosts root system 0664 rw-rw-r—
hosts.equiv root system 0664 rw-rw-r—
inetd.conf root system 0644 rw-r—r—
named.conf root system 0644 rw-r—r—
named.data root system 0664 rw-rw-r—
networks root system 0664 rw-rw-r—
protocols root system 0644 rw-r—r—
rc.tcpip root system 0774 rwxrwxr—
resolv.conf root system 0644 rw-rw-r—
services root system 0644 rw-r—r—
3270.keys root system 0664 rw-rw-r—
3270keys.rt root system 0664 rw-rw-r—
/usr/bin directory
Name Owner Group Mode Permissions
host root system 4555 r-sr-xr-x
hostid bin bin 0555 r-xr-xr-x
hostname bin bin 0555 r-xr-xr-x
finger root system 0755 rwxr-xr-x
ftp root system 4555 r-sr-xr-x
netstat root bin 4555 r-sr-xr-x
rexec root bin 4555 r-sr-xr-x
126 AIX 5L Version 5.2: Security Guide
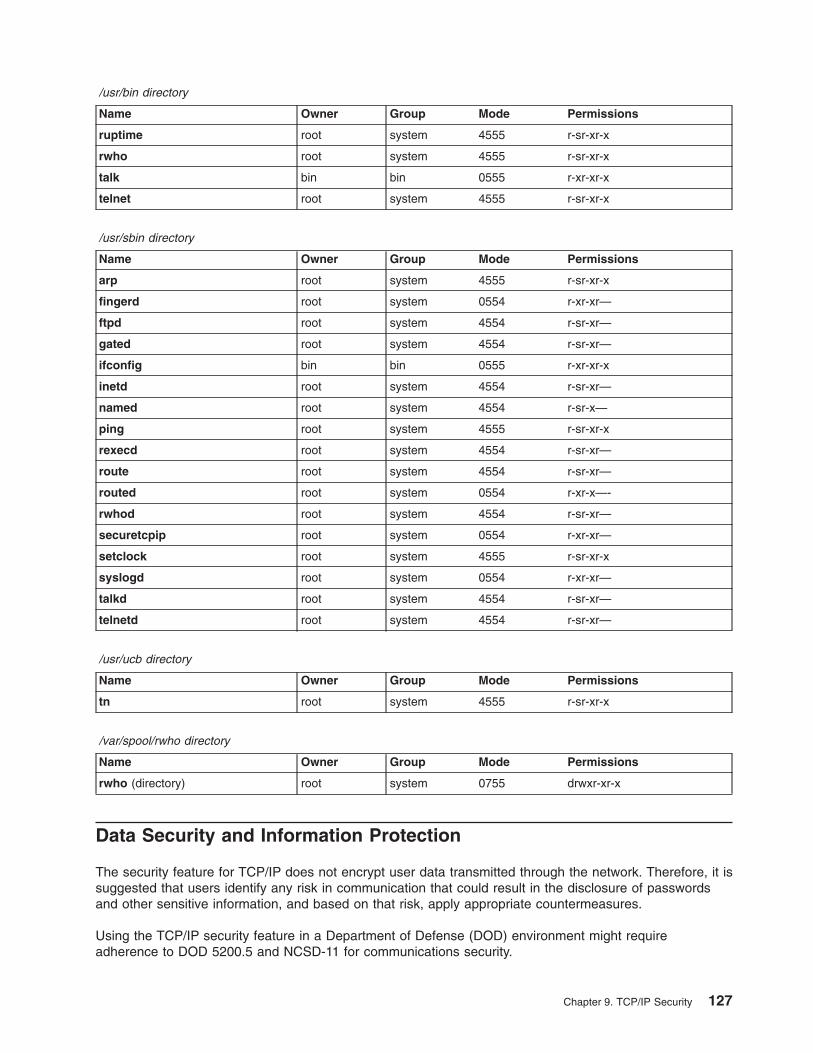
/usr/bin directory
Name Owner Group Mode Permissions
ruptime root system 4555 r-sr-xr-x
rwho root system 4555 r-sr-xr-x
talk bin bin 0555 r-xr-xr-x
telnet root system 4555 r-sr-xr-x
/usr/sbin directory
Name Owner Group Mode Permissions
arp root system 4555 r-sr-xr-x
fingerd root system 0554 r-xr-xr—
ftpd root system 4554 r-sr-xr—
gated root system 4554 r-sr-xr—
ifconfig bin bin 0555 r-xr-xr-x
inetd root system 4554 r-sr-xr—
named root system 4554 r-sr-x—
ping root system 4555 r-sr-xr-x
rexecd root system 4554 r-sr-xr—
route root system 4554 r-sr-xr—
routed root system 0554 r-xr-x—-
rwhod root system 4554 r-sr-xr—
securetcpip root system 0554 r-xr-xr—
setclock root system 4555 r-sr-xr-x
syslogd root system 0554 r-xr-xr—
talkd root system 4554 r-sr-xr—
telnetd root system 4554 r-sr-xr—
/usr/ucb directory
Name Owner Group Mode Permissions
tn root system 4555 r-sr-xr-x
/var/spool/rwho directory
Name Owner Group Mode Permissions
rwho (directory) root system 0755 drwxr-xr-x
Data Security and Information Protection
The security feature for TCP/IP does not encrypt user data transmitted through the network. Therefore, it issuggested that users identify any risk in communication that could result in the disclosure of passwordsand other sensitive information, and based on that risk, apply appropriate countermeasures.
Using the TCP/IP security feature in a Department of Defense (DOD) environment might requireadherence to DOD 5200.5 and NCSD-11 for communications security.
Chapter 9. TCP/IP Security 127
User Based TCP Port Access Control with Discretionary AccessControl for Internet PortsDiscretionary Access Control for Internet Ports (DACinet) features user based access control for TCP portsfor communication between AIX 5.2 hosts. AIX 5.2 can use an additional TCP header to transport user andgroup information between systems. The DACinet feature allows the administrator on the destinationsystem to control access based on the destination port, the originating user id and host.
In addition, the DACinet feature allows the administrator to restrict local ports for root only usage. UNIXsystems like AIX treat ports below 1024 as privileged ports which can only be opened by root. AIX 5.2allows you to specify additional ports above 1024 which can be opened only by root, therefore preventingusers from running servers on well known ports.
Depending on the settings a non-DACinet system may or may not be able to connect to a DACinetsystem. Access is denied in the initial state of the DACinet feature. Once DACinet has been enabled, thereis no way to disable DACinet.
The dacinet command accepts addresses which are specified as hostnames, dotted decimal hostaddresses, or network addresses followed by the length of the network prefix.
The following example specifies a single host which is known by the fully qualified host namehost.domain.org:host.domain.org
The following example specifies a single host which is known by the IP address 10.0.0.1:10.0.0.1
The following example specifies the entire network which has the first 24 bits (the length of the networkprefix) with a value of 10.0.0.0:10.0.0.0/24
This network includes all IP addresses between 10.0.0.1 and 10.0.0.254.
Access control for TCP based servicesDACinet uses the /etc/rc.dacinet startup file and the configuration files it used are /etc/security/priv,/etc/security/services, and /etc/security/acl.
Ports listed in /etc/security/services are considered exempt from the ACL checks. The file has the sameformat as /etc/services. The easiest way to initialize it is to copy the file from /etc to /etc/security andthen delete all the ports for which ACLs should be applied. The ACLs are stored in two places. Thecurrently active ACLs are stored in the kernel and can be read by running dacinet aclls. ACLs that will bereactivated at the next system boot by /etc/rc.tcpip are stored in /etc/security/acl. The following format isused:service host/prefix-length [user|group]
Where the service can be specified either numerically or as listed in /etc/services, the host can be giveneither as a host name or a network address with a subnet mask specification and the user or group isspecified with the u: or g: prefix. When no user or group is specified, then the ACL takes only the sendinghost into account. Prefixing the service with a - will disable access explicitly. ACLs are evaluated accordingto the first match. So you could specify access for a group of users, but explicitly deny it for a user in thegroup by placing the rule for this user in front of the group rule.
128 AIX 5L Version 5.2: Security Guide
The /etc/services file includes two entries with port number values which are not supported in AIX 5.2.The system administrator must remove both lines from that file prior to executing the mkCCadmincommand. Remove the following lines from the /etc/services file:sco_printer 70000/tcp sco_spooler # For System V print IPCsco_s5_port 70001/tcp lpNet_s5_port # For future use
Examples for DACinet UsageFor example, when using DACinet to restrict access to port TCP/25 inbound to root only with the DACinetfeature, then only root users from other AIX 5.2 hosts can access this port, therefore limiting thepossibilities of regular users to spoof e-mail by just telneting to port TCP/25 on the victim. The followingexample shows how to configure the X protocol (X11) for root only access. Make sure that the X11 entry in/etc/security/services is removed, so that the ACLs will apply for this service.
Assuming a subnet of 10.1.1.0/24 for all the connected systems, the ACL entries to restrict access to theroot user only for X (TCP/6000) in /etc/security/acl would be as follows:
6000 10.1.1.0/24 u:root
When limiting Telnet service to users in the group friends, no matter from which system they are comingfrom, use the following ACL entry after having removed the telnet entry from /etc/security/services:telnet 0.0.0.0/0 g:friends
Disallow user fred access to the web server, but allow everyone else access:-80 0.0.0.0/0 u:fred80 0.0.0.0/0
Privileged Ports for Running Local ServicesNormally any user can open any port above 1024. For example, a user could place a server at port 8080,which is quite often used to run Web proxies or at 1080 where one typically finds a SOCKS server. Toprevent regular users from running servers at specific ports, these ports can be designated as privileged.The dacinet setpriv command can be used to add privileged ports to the running system. Ports that areto be designated as privileged when the system starts have to be listed in /etc/security/priv.
Ports can be listed in this file either with their symbolic name as defined in /etc/services or by specifyingthe port number. The following entries would disallow non-root users to run SOCKS servers or Lotus Notesservers on their usual ports:1080lotusnote
Note: This feature does not prevent the user from running the programs. It will only prevent the user fromrunning the services at the well known ports where those services are typically expected.
For more information on the dacinet command, refer to the AIX 5L Version 5.2 Commands Reference.
Chapter 9. TCP/IP Security 129

130 AIX 5L Version 5.2: Security Guide
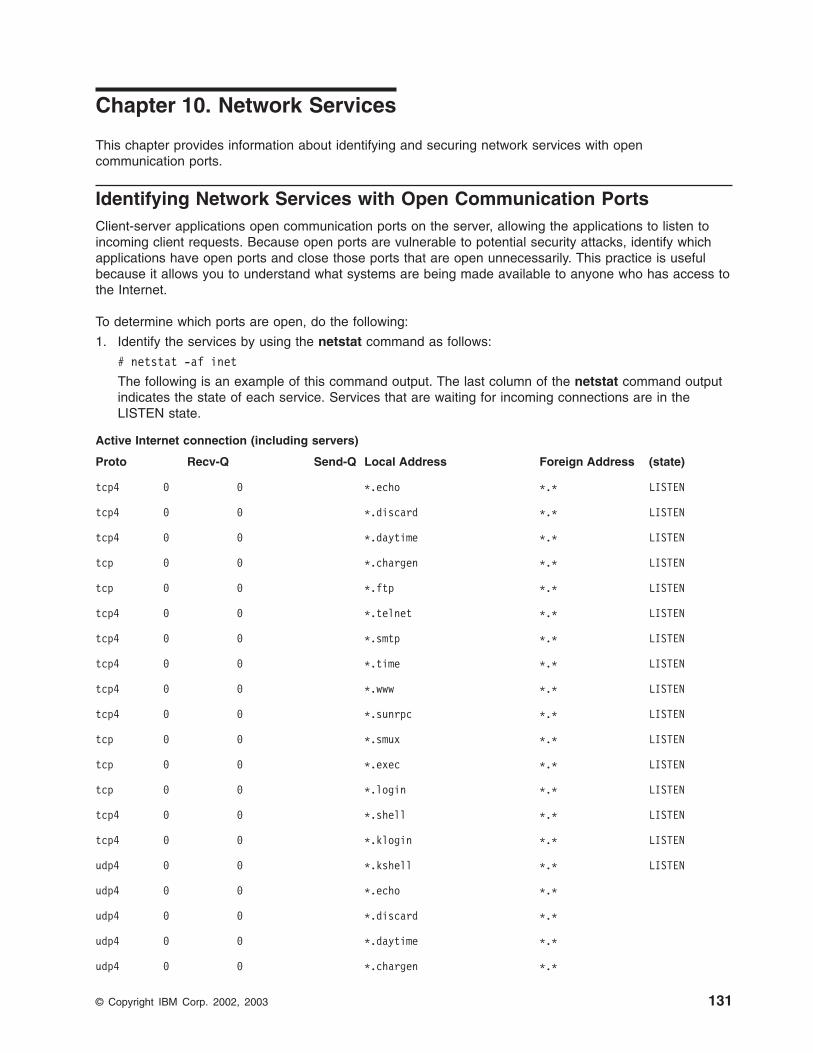
Chapter 10. Network Services
This chapter provides information about identifying and securing network services with opencommunication ports.
Identifying Network Services with Open Communication PortsClient-server applications open communication ports on the server, allowing the applications to listen toincoming client requests. Because open ports are vulnerable to potential security attacks, identify whichapplications have open ports and close those ports that are open unnecessarily. This practice is usefulbecause it allows you to understand what systems are being made available to anyone who has access tothe Internet.
To determine which ports are open, do the following:
1. Identify the services by using the netstat command as follows:
# netstat -af inet
The following is an example of this command output. The last column of the netstat command outputindicates the state of each service. Services that are waiting for incoming connections are in theLISTEN state.
Active Internet connection (including servers)
Proto Recv-Q Send-Q Local Address Foreign Address (state)
tcp4 0 0 *.echo *.* LISTEN
tcp4 0 0 *.discard *.* LISTEN
tcp4 0 0 *.daytime *.* LISTEN
tcp 0 0 *.chargen *.* LISTEN
tcp 0 0 *.ftp *.* LISTEN
tcp4 0 0 *.telnet *.* LISTEN
tcp4 0 0 *.smtp *.* LISTEN
tcp4 0 0 *.time *.* LISTEN
tcp4 0 0 *.www *.* LISTEN
tcp4 0 0 *.sunrpc *.* LISTEN
tcp 0 0 *.smux *.* LISTEN
tcp 0 0 *.exec *.* LISTEN
tcp 0 0 *.login *.* LISTEN
tcp4 0 0 *.shell *.* LISTEN
tcp4 0 0 *.klogin *.* LISTEN
udp4 0 0 *.kshell *.* LISTEN
udp4 0 0 *.echo *.*
udp4 0 0 *.discard *.*
udp4 0 0 *.daytime *.*
udp4 0 0 *.chargen *.*
© Copyright IBM Corp. 2002, 2003 131
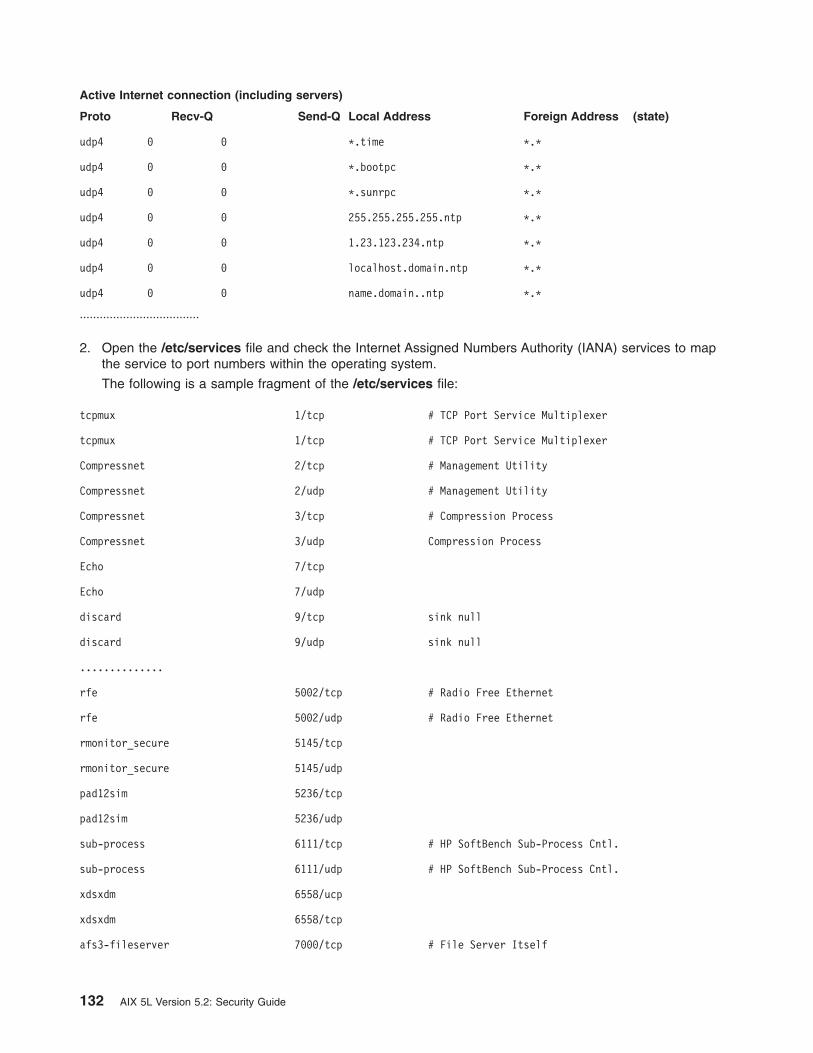
Active Internet connection (including servers)
Proto Recv-Q Send-Q Local Address Foreign Address (state)
udp4 0 0 *.time *.*
udp4 0 0 *.bootpc *.*
udp4 0 0 *.sunrpc *.*
udp4 0 0 255.255.255.255.ntp *.*
udp4 0 0 1.23.123.234.ntp *.*
udp4 0 0 localhost.domain.ntp *.*
udp4 0 0 name.domain..ntp *.*
....................................
2. Open the /etc/services file and check the Internet Assigned Numbers Authority (IANA) services to mapthe service to port numbers within the operating system.
The following is a sample fragment of the /etc/services file:
tcpmux 1/tcp # TCP Port Service Multiplexer
tcpmux 1/tcp # TCP Port Service Multiplexer
Compressnet 2/tcp # Management Utility
Compressnet 2/udp # Management Utility
Compressnet 3/tcp # Compression Process
Compressnet 3/udp Compression Process
Echo 7/tcp
Echo 7/udp
discard 9/tcp sink null
discard 9/udp sink null
..............
rfe 5002/tcp # Radio Free Ethernet
rfe 5002/udp # Radio Free Ethernet
rmonitor_secure 5145/tcp
rmonitor_secure 5145/udp
pad12sim 5236/tcp
pad12sim 5236/udp
sub-process 6111/tcp # HP SoftBench Sub-Process Cntl.
sub-process 6111/udp # HP SoftBench Sub-Process Cntl.
xdsxdm 6558/ucp
xdsxdm 6558/tcp
afs3-fileserver 7000/tcp # File Server Itself
132 AIX 5L Version 5.2: Security Guide
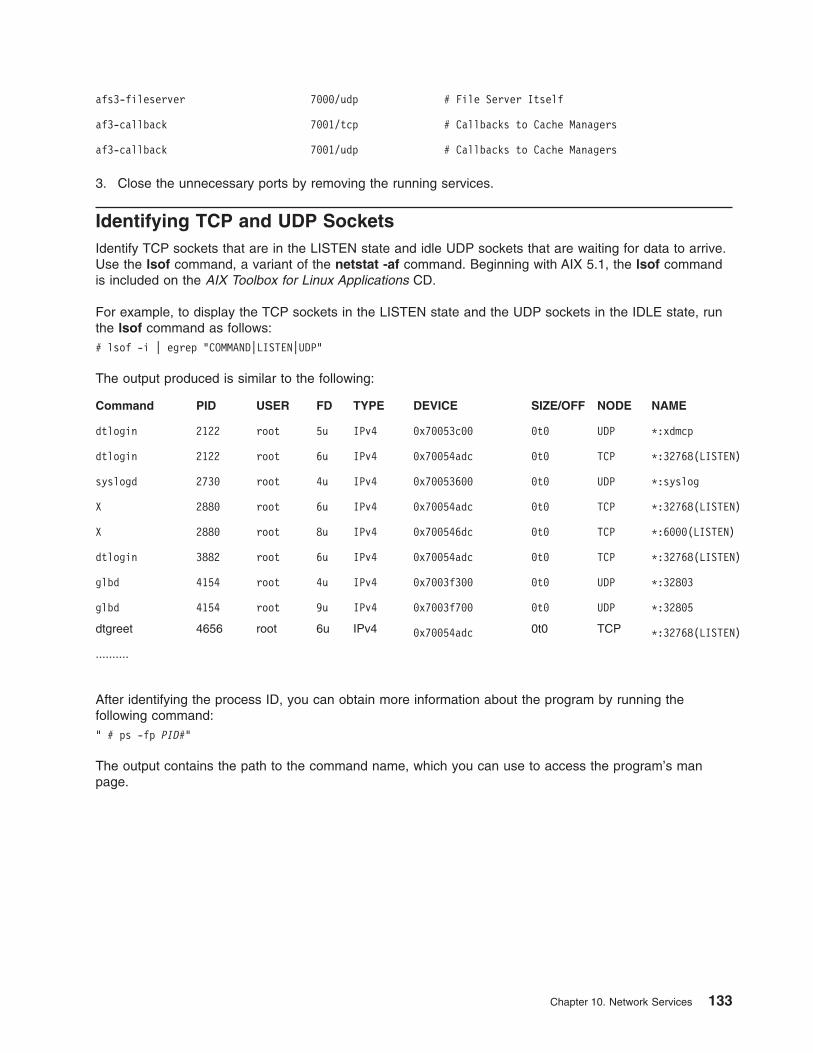
afs3-fileserver 7000/udp # File Server Itself
af3-callback 7001/tcp # Callbacks to Cache Managers
af3-callback 7001/udp # Callbacks to Cache Managers
3. Close the unnecessary ports by removing the running services.
Identifying TCP and UDP SocketsIdentify TCP sockets that are in the LISTEN state and idle UDP sockets that are waiting for data to arrive.Use the lsof command, a variant of the netstat -af command. Beginning with AIX 5.1, the lsof commandis included on the AIX Toolbox for Linux Applications CD.
For example, to display the TCP sockets in the LISTEN state and the UDP sockets in the IDLE state, runthe lsof command as follows:# lsof -i | egrep "COMMAND|LISTEN|UDP"
The output produced is similar to the following:
Command PID USER FD TYPE DEVICE SIZE/OFF NODE NAME
dtlogin 2122 root 5u IPv4 0x70053c00 0t0 UDP *:xdmcp
dtlogin 2122 root 6u IPv4 0x70054adc 0t0 TCP *:32768(LISTEN)
syslogd 2730 root 4u IPv4 0x70053600 0t0 UDP *:syslog
X 2880 root 6u IPv4 0x70054adc 0t0 TCP *:32768(LISTEN)
X 2880 root 8u IPv4 0x700546dc 0t0 TCP *:6000(LISTEN)
dtlogin 3882 root 6u IPv4 0x70054adc 0t0 TCP *:32768(LISTEN)
glbd 4154 root 4u IPv4 0x7003f300 0t0 UDP *:32803
glbd 4154 root 9u IPv4 0x7003f700 0t0 UDP *:32805
dtgreet 4656 root 6u IPv4 0x70054adc 0t0 TCP *:32768(LISTEN)
..........
After identifying the process ID, you can obtain more information about the program by running thefollowing command:" # ps -fp PID#"
The output contains the path to the command name, which you can use to access the program’s manpage.
Chapter 10. Network Services 133

134 AIX 5L Version 5.2: Security Guide
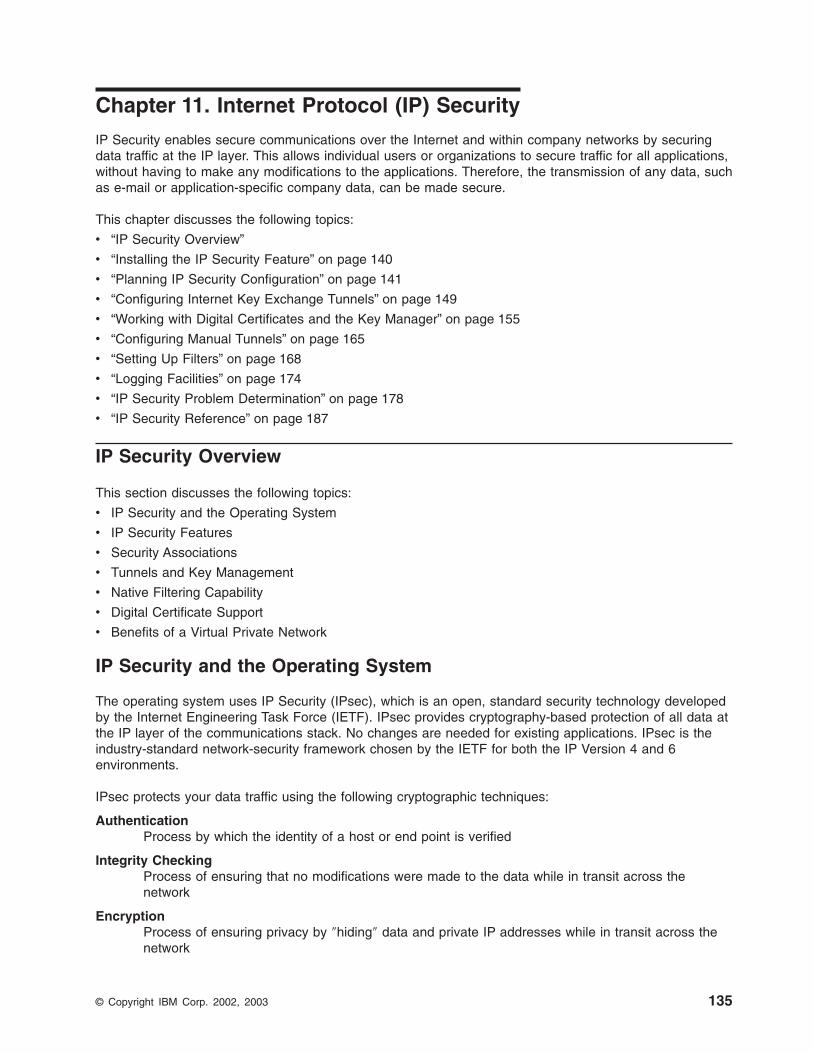
Chapter 11. Internet Protocol (IP) Security
IP Security enables secure communications over the Internet and within company networks by securingdata traffic at the IP layer. This allows individual users or organizations to secure traffic for all applications,without having to make any modifications to the applications. Therefore, the transmission of any data, suchas e-mail or application-specific company data, can be made secure.
This chapter discusses the following topics:
v “IP Security Overview”
v “Installing the IP Security Feature” on page 140
v “Planning IP Security Configuration” on page 141
v “Configuring Internet Key Exchange Tunnels” on page 149
v “Working with Digital Certificates and the Key Manager” on page 155
v “Configuring Manual Tunnels” on page 165
v “Setting Up Filters” on page 168
v “Logging Facilities” on page 174
v “IP Security Problem Determination” on page 178
v “IP Security Reference” on page 187
IP Security Overview
This section discusses the following topics:
v IP Security and the Operating System
v IP Security Features
v Security Associations
v Tunnels and Key Management
v Native Filtering Capability
v Digital Certificate Support
v Benefits of a Virtual Private Network
IP Security and the Operating System
The operating system uses IP Security (IPsec), which is an open, standard security technology developedby the Internet Engineering Task Force (IETF). IPsec provides cryptography-based protection of all data atthe IP layer of the communications stack. No changes are needed for existing applications. IPsec is theindustry-standard network-security framework chosen by the IETF for both the IP Version 4 and 6environments.
IPsec protects your data traffic using the following cryptographic techniques:
AuthenticationProcess by which the identity of a host or end point is verified
Integrity CheckingProcess of ensuring that no modifications were made to the data while in transit across thenetwork
EncryptionProcess of ensuring privacy by ″hiding″ data and private IP addresses while in transit across thenetwork
© Copyright IBM Corp. 2002, 2003 135
Authentication algorithms prove the identity of the sender and data integrity by using a cryptographic hashfunction to process a packet of data (with the fixed IP header fields included) using a secret key toproduce a unique digest. On the receiver side, the data is processed using the same function and key. Ifeither the data has been altered or the sender key is not valid, the datagram is discarded.
Encryption uses a cryptographic algorithm to modify and randomize the data using a certain algorithm andkey to produce encrypted data known as cyphertext. Encryption makes the data unreadable while intransit. After it is received, the data is recovered using the same algorithm and key (with symmetricencryption algorithms). Encryption must occur with authentication to verify the data integrity of theencrypted data.
These basic services are implemented in IPsec by the use of the Encapsulating Security Payload (ESP)and the Authentication Header (AH). ESP provides confidentiality by encrypting the original IP packet,building an ESP header, and putting the cyphertext in the ESP payload.
The AH can be used alone for authentication and integrity-checking if confidentiality is not an issue. WithAH, the static fields of the IP header and the data have a hash algorithm applied to compute a keyeddigest. The receiver uses its key to compute and compare the digest to make sure the packet is unalteredand the sender’s identity is authenticated.
IP Security Features
The IP Security feature of this operating system provides the following functions:
v Hardware acceleration with the 10/100 Mbps Ethernet PCI Adapter II.
v AH support using RFC 2402, and ESP support using RFC 2406.
v Certificate Revocation List support with retrieval using HTTP or LDAP servers.
v Automatic key refreshment with tunnels using IETF Internet Key Exchange (IKE) protocol.
v X.509 Digital Certificate and preshared key support in IKE protocol during key negotiation.
v Manual tunnels can be configured to provide interoperability with other systems that do not support theautomatic IKE key refreshment method, and for use of IP Version 6 tunnels.
v Tunnel mode and transport mode of encapsulation for host or gateway tunnels.
v Authentication algorithms of HMAC (Hashed Message Authentication Code) MD5 (Message Digest 5)and HMAC SHA (Secure Hash Algorithm).
v Encryption algorithms include 56 bit Data Encryption Standard (DES) Cipher Block Chaining (CBC) with64 bit initial vector (IV), Triple DES, DES CBC 4 (32 bit IV).
v Dual IP Stack Support (IP version 4 and IP version 6).
v Both IP Version 4 and IP Version 6 traffic can be encapsulated and filtered. Because the IP stacks areseparate, the IP Security function for each stack can be configured independently.
v IKE tunnels can be created using Linux configuration files (AIX 5.1 and later).
v Filtering of secure and nonsecure traffic by a variety of IP characteristics such as source anddestination IP addresses, interface, protocol, port numbers, and more.
v Automatic filter-rule creation and deletion with most tunnel types.
v Use of host names for the destination address when defining tunnels and filter rules. The host namesare converted to IP addresses automatically (as long as DNS is available).
v Logging of IP Security events to syslog.
v Use of system traces and statistics for problem determination.
v User-defined default action allows the user to specify whether traffic that does not match definedtunnels should be allowed.
136 AIX 5L Version 5.2: Security Guide
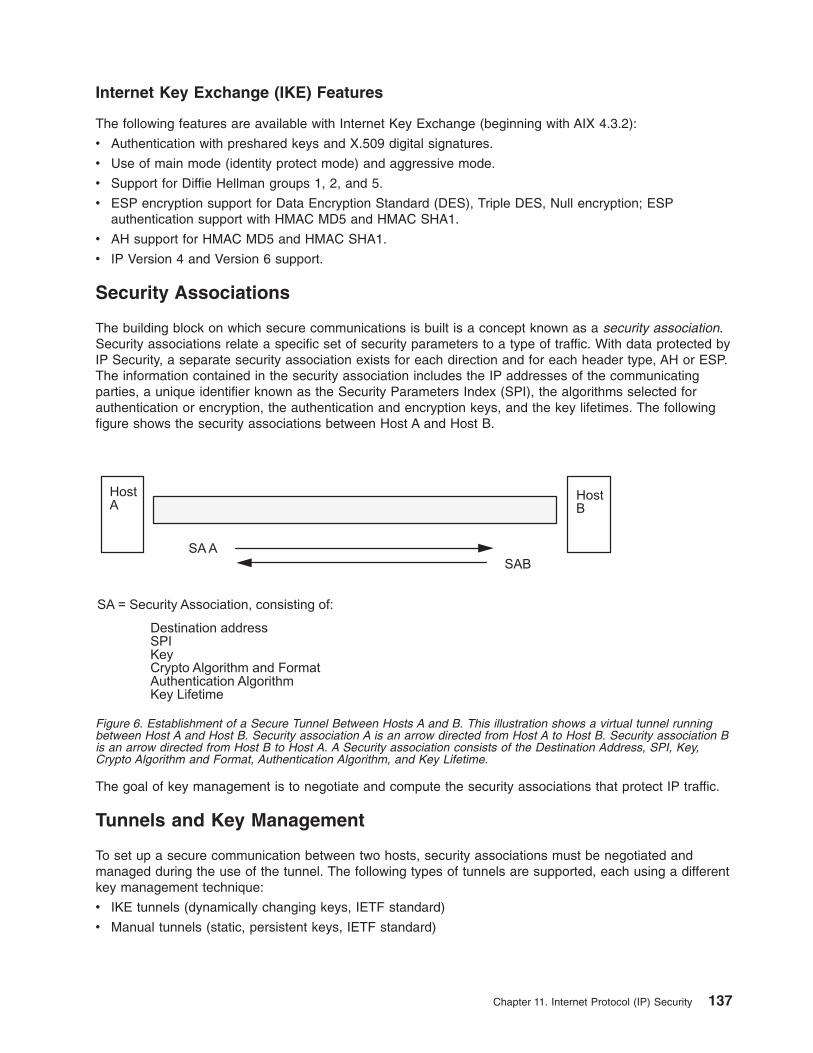
Internet Key Exchange (IKE) Features
The following features are available with Internet Key Exchange (beginning with AIX 4.3.2):
v Authentication with preshared keys and X.509 digital signatures.
v Use of main mode (identity protect mode) and aggressive mode.
v Support for Diffie Hellman groups 1, 2, and 5.
v ESP encryption support for Data Encryption Standard (DES), Triple DES, Null encryption; ESPauthentication support with HMAC MD5 and HMAC SHA1.
v AH support for HMAC MD5 and HMAC SHA1.
v IP Version 4 and Version 6 support.
Security Associations
The building block on which secure communications is built is a concept known as a security association.Security associations relate a specific set of security parameters to a type of traffic. With data protected byIP Security, a separate security association exists for each direction and for each header type, AH or ESP.The information contained in the security association includes the IP addresses of the communicatingparties, a unique identifier known as the Security Parameters Index (SPI), the algorithms selected forauthentication or encryption, the authentication and encryption keys, and the key lifetimes. The followingfigure shows the security associations between Host A and Host B.
The goal of key management is to negotiate and compute the security associations that protect IP traffic.
Tunnels and Key Management
To set up a secure communication between two hosts, security associations must be negotiated andmanaged during the use of the tunnel. The following types of tunnels are supported, each using a differentkey management technique:
v IKE tunnels (dynamically changing keys, IETF standard)
v Manual tunnels (static, persistent keys, IETF standard)
Figure 6. Establishment of a Secure Tunnel Between Hosts A and B. This illustration shows a virtual tunnel runningbetween Host A and Host B. Security association A is an arrow directed from Host A to Host B. Security association Bis an arrow directed from Host B to Host A. A Security association consists of the Destination Address, SPI, Key,Crypto Algorithm and Format, Authentication Algorithm, and Key Lifetime.
Chapter 11. Internet Protocol (IP) Security 137
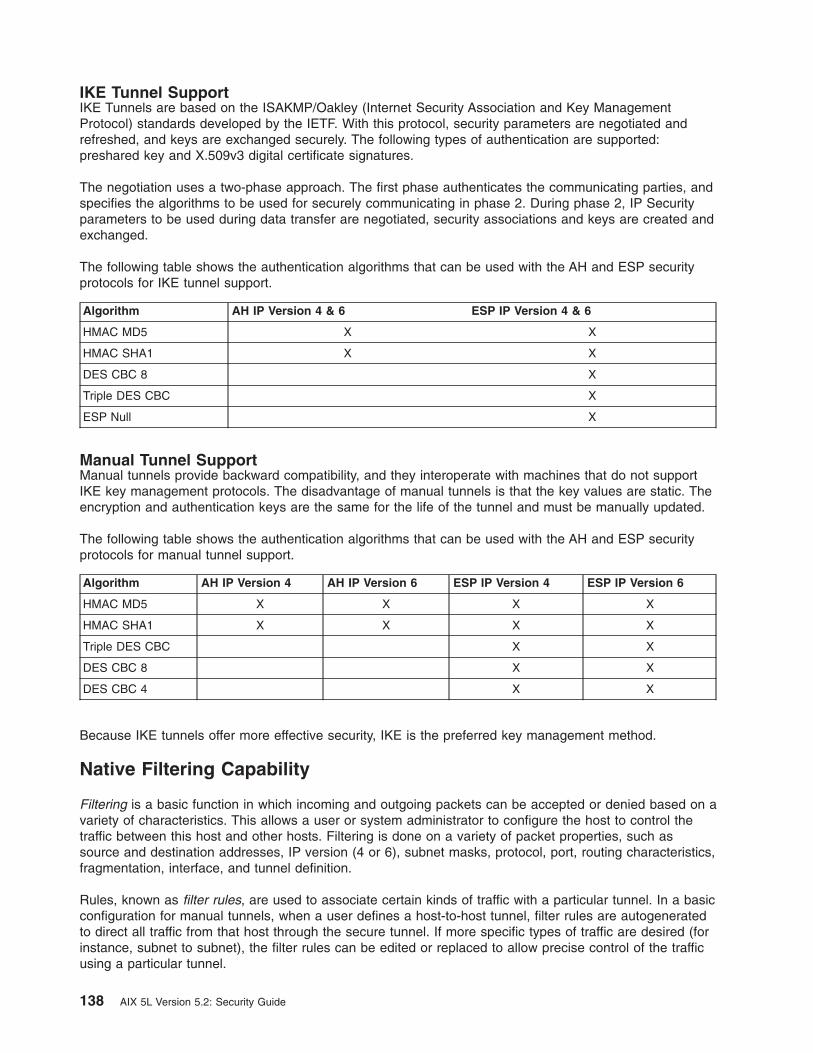
IKE Tunnel SupportIKE Tunnels are based on the ISAKMP/Oakley (Internet Security Association and Key ManagementProtocol) standards developed by the IETF. With this protocol, security parameters are negotiated andrefreshed, and keys are exchanged securely. The following types of authentication are supported:preshared key and X.509v3 digital certificate signatures.
The negotiation uses a two-phase approach. The first phase authenticates the communicating parties, andspecifies the algorithms to be used for securely communicating in phase 2. During phase 2, IP Securityparameters to be used during data transfer are negotiated, security associations and keys are created andexchanged.
The following table shows the authentication algorithms that can be used with the AH and ESP securityprotocols for IKE tunnel support.
Algorithm AH IP Version 4 & 6 ESP IP Version 4 & 6
HMAC MD5 X X
HMAC SHA1 X X
DES CBC 8 X
Triple DES CBC X
ESP Null X
Manual Tunnel SupportManual tunnels provide backward compatibility, and they interoperate with machines that do not supportIKE key management protocols. The disadvantage of manual tunnels is that the key values are static. Theencryption and authentication keys are the same for the life of the tunnel and must be manually updated.
The following table shows the authentication algorithms that can be used with the AH and ESP securityprotocols for manual tunnel support.
Algorithm AH IP Version 4 AH IP Version 6 ESP IP Version 4 ESP IP Version 6
HMAC MD5 X X X X
HMAC SHA1 X X X X
Triple DES CBC X X
DES CBC 8 X X
DES CBC 4 X X
Because IKE tunnels offer more effective security, IKE is the preferred key management method.
Native Filtering Capability
Filtering is a basic function in which incoming and outgoing packets can be accepted or denied based on avariety of characteristics. This allows a user or system administrator to configure the host to control thetraffic between this host and other hosts. Filtering is done on a variety of packet properties, such assource and destination addresses, IP version (4 or 6), subnet masks, protocol, port, routing characteristics,fragmentation, interface, and tunnel definition.
Rules, known as filter rules, are used to associate certain kinds of traffic with a particular tunnel. In a basicconfiguration for manual tunnels, when a user defines a host-to-host tunnel, filter rules are autogeneratedto direct all traffic from that host through the secure tunnel. If more specific types of traffic are desired (forinstance, subnet to subnet), the filter rules can be edited or replaced to allow precise control of the trafficusing a particular tunnel.
138 AIX 5L Version 5.2: Security Guide
For IKE tunnels, the filter rules are also automatically generated and inserted in the filter table once thetunnel is activated.
Similarly, when the tunnel is modified or deleted, the filter rules for that tunnel are automatically deleted,which simplifies IP Security configuration and helps reduce human error. Tunnel definitions can bepropagated and shared among machines and firewalls using import and export utilities, which is helpful inthe administration of a large number of machines.
Filter rules associate particular types of traffic with a tunnel, but data being filtered does not necessarilyneed to travel in a tunnel. This aspect of filter rules lets the operating system provide basic firewallfunctionality to those who want to restrict traffic to or from their machine in an intranet or in a network thatdoes not have the protection of a true firewall. In this scenario, filter rules provide a second barrier ofprotection around a group of machines.
After the filter rules are generated, they are stored in a table and loaded into the kernel. When packets areready to be sent or received from the network, the filter rules are checked in the list from top to bottom todetermine whether the packet should be permitted, denied, or sent through a tunnel. The criteria of therule is compared to the packet characteristics until a match is found or the default rule is reached.
The IP Security function also implements filtering of non-secure packets based on very granular,user-defined criteria, which allows the control of IP traffic between networks and machines that do notrequire the authentication or encryption properties of IP Security.
Digital Certificate Support
IP Security supports the use of X.509 Version 3 digital certificates. The Key Manager tool managescertificate requests, maintains the key database, and performs other administrative functions.
Digital certificates are described in Digital Certificate Configuration. The Key Manager and its functions aredescribed in Using the IBM Key Manager Tool
Virtual Private Networks and IP Security
A virtual private network (VPN) securely extends a private intranet across a public network such as theInternet. VPNs convey information across what is essentially a private tunnel through the Internet to andfrom remote users, branch offices, and business partners/suppliers. Companies can opt for Internet accessthrough Internet service providers (ISPs) using direct lines or local telephone numbers and eliminate moreexpensive leased lines, long-distance calls, and toll-free telephone numbers. A VPN solution can use theIPsec security standard because IPsec is the IETF-chosen industry standard network security frameworkfor both the IP Version 4 and 6 environments, and no changes are needed for existing applications.
A recommended resource for planning the implementation of a VPN in AIX is Chapter 9 of AComprehensive Guide to Virtual Private Networks, Volume III: Cross-Platform Key and PolicyManagement, ISBN SG24-5309-00. This guide is also available on the Internet World Wide Web athttp://www.redbooks.ibm.com/redbooks/SG245309.html.
Chapter 11. Internet Protocol (IP) Security 139
Installing the IP Security Feature
The IP Security feature in AIX is separately installable and loadable. The file sets that need to be installedare as follows:
v bos.net.ipsec.rte (The run-time environment for the kernel IP Security environment and commands)
v bos.msg.LANG.net.ipsec (where LANG is the desired language, such as en_US)
v bos.net.ipsec.keymgt
v bos.net.ipsec.websm
v bos.crypto-priv (The file set for DES and triple DES encryption)
The bos.crypto-priv file set is located on the Expansion Pack. For IKE digital signature support, you mustalso install the gskit.rte fileset (AIX Version 4) or gskkm.rte (AIX 5.1) from the Expansion Pack.
For IP Security support in Web-based System Manager, you must install the Java131.ext.xml4j fileset atlevel 1.3.1.1 or later.
After it is installed, IP Security can be separately loaded for IP Version 4 and IP Version 6, either by usingthe recommended procedure provided in “Loading IP Security” or by using the mkdev command.
Loading IP SecurityAttention: Loading IP Security enables the filtering function. Before loading, it is important to ensurethe correct filter rules are created. Otherwise, all outside communication might be blocked.
Use SMIT or Web-based System Manager to automatically load the IP security modules when IP Securityis started. Also, SMIT and Web-based System Manager ensure that the kernel extensions and IKEdaemons are loaded in the correct order.
If the loading completes successfully, the lsdev command shows the IP Security devices as Available.lsdev -C -c ipsec
ipsec_v4 Available IP Version 4 Security Extensionipsec_v6 Available IP Version 6 Security Extension
After the IP Security kernel extension has been loaded, tunnels and filters are ready to be configured.
140 AIX 5L Version 5.2: Security Guide
Planning IP Security Configuration
To configure IP Security, tunnels and filters must be configured. When a simple tunnel is defined for alltraffic to use, the filter rules can be automatically generated. If more complex filtering is desired, filter rulescan be configured separately.
You can configure IP Security using the Web-based System Manager Network plug-in, Virtual PrivateNetwork plug-in, or the System Management Interface Tool (SMIT). If using SMIT, the following fast pathsare available:
smit ips4_basicBasic configuration for IP version 4
smit ips6_basicBasic configuration for IP version 6
Before configuring IP Security for your site, you must decide what method you intend to use; for example,whether you prefer to use tunnels or filters (or both), which type of tunnel best suits your needs, and soon. The following sections provide information you must understand before making these decisions:
v Hardware Acceleration
v Tunnels versus Filters
v Tunnels and Security Associations
v Choosing a Tunnel Type
v Using IKE with DHCP or Dynamically Assigned Addresses
Hardware AccelerationThe 10/100 Mbps Ethernet PCI Adapter II (Feature code 4962) offers standards-based IP Security and isdesigned to offload IP Security functions from the AIX operating system. When the 10/100 Mbps EthernetPCI Adapter II is present in the AIX system, the IP Security stack uses the following capabilities of theadapter:
v Encryption and decryption using DES or Triple DES algorithms
v Authentication using the MD5 or SHA-1 algorithms
v Storage of the security-association information.
The functions on the adapter are used instead of the software algorithms. The 10/100 Mbps Ethernet PCIAdapter II is available for manual and IKE tunnels.
The IP Security hardware acceleration feature is available in the 5.1.0.25 or later level of thebos.net.ipsec.rte and devices.pci.1410ff01.rte file sets.
There is a limit on the number of security associations that can be offloaded to the network adapter on thereceive side (inbound traffic). On the transmit side (outbound traffic), all packets that use a supportedconfiguration are offloaded to the adapter. Some tunnel configurations can not be offloaded to the adapter.
The 10/100 Mbps Ethernet PCI Adapter II supports the following:
v DES, 3DES, or NULL encryption through ESP
v HMAC-MD5 or HMAC-SHA-1 authentication through ESP or AH, but not both. (If ESP and AH bothused, ESP must be performed first. This is always true for IKE tunnels, but the user can select the orderfor manual tunnels.)
v Transport and Tunnel mode
v Offload of IPV4 packets
Note: The 10/100 Mbps Ethernet PCI Adapter II cannot handle packets with IP options.
Chapter 11. Internet Protocol (IP) Security 141
To enable the 10/100 Mbps Ethernet PCI Adapter II for IP Security, you may have to detach the networkinterface and then enable the IPsec Offload feature.
To detach the network interface, do the following using the SMIT interface:
1. Login as the root user.
2. Type smitty inet at the command line and press Enter.
3. Select the Remove a Network Interface option and press Enter.
4. Select the network interface that corresponds to the 10/100 Mbps Ethernet PCI Adapter II and pressEnter.
To enable the IPsec Offload feature, do the following using the SMIT interface:
1. Login as the root user.
2. Type smitty eadap at the command line and press Enter.
3. Select the Change / Show Characteristics of an Ethernet Adapter option and press Enter.
4. Select the 10/100 Mbps Ethernet PCI Adapter II and press Enter.
5. Change the IPsec Offload field to yes and press Enter.
To detach the network interface, from the command line, type the following:# ifconfig enX detach
To enable the IPsec offload attribute, from the command line, type the following:# chdev -l entX -a ipsec_offload=yes
To verify that the IPsec offload attribute has been enabled, from the command line, type the following:# lsattr -El entX detach
To disable the IPsec offload attribute, from the command line, type the following:# chdev -l entX -a ipsec_offload=no
Use the enstat command to ensure that your tunnel configuration is taking advantage of the IPsec offloadattribute. The enstat command shows all the statistics of transmit and receive IPsec packets when theIPsec offload attribute is enabled. For example, if the Ethernet interface is ent1, type the following:# entstat -d ent1
The output will be similar to the following:...10/100 Mbps Ethernet PCI Adapter II (1410ff01) Specific Statistics:--------------------------------------------...Transmit IPsec packets: 3Transmit IPsec packets dropped: 0Receive IPsec packets: 2Receive IPsec packets dropped: 0
Tunnels Versus Filters
Two distinct parts of IP Security are tunnels and filters. Tunnels require filters, but filters do not requiretunnels.
v Filtering is a function in which incoming and outgoing packets can be accepted or denied based on avariety of characteristics called rules. This function allows a system administrator to configure the host
142 AIX 5L Version 5.2: Security Guide
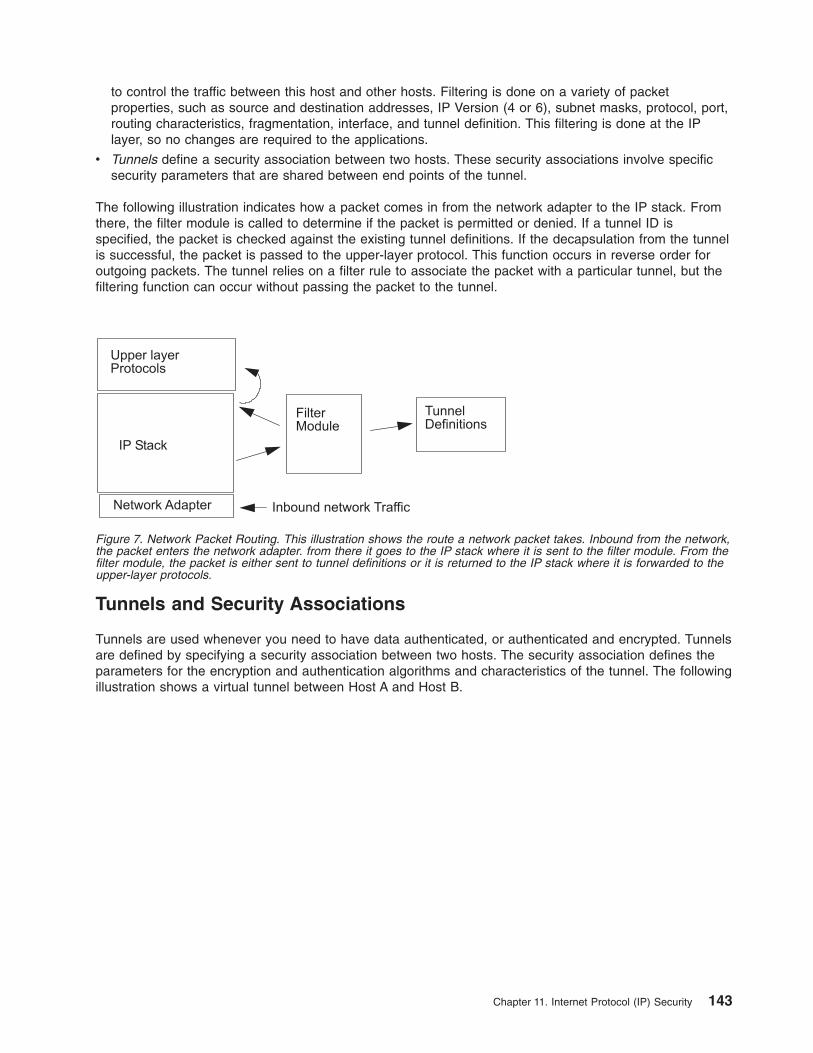
to control the traffic between this host and other hosts. Filtering is done on a variety of packetproperties, such as source and destination addresses, IP Version (4 or 6), subnet masks, protocol, port,routing characteristics, fragmentation, interface, and tunnel definition. This filtering is done at the IPlayer, so no changes are required to the applications.
v Tunnels define a security association between two hosts. These security associations involve specificsecurity parameters that are shared between end points of the tunnel.
The following illustration indicates how a packet comes in from the network adapter to the IP stack. Fromthere, the filter module is called to determine if the packet is permitted or denied. If a tunnel ID isspecified, the packet is checked against the existing tunnel definitions. If the decapsulation from the tunnelis successful, the packet is passed to the upper-layer protocol. This function occurs in reverse order foroutgoing packets. The tunnel relies on a filter rule to associate the packet with a particular tunnel, but thefiltering function can occur without passing the packet to the tunnel.
Tunnels and Security Associations
Tunnels are used whenever you need to have data authenticated, or authenticated and encrypted. Tunnelsare defined by specifying a security association between two hosts. The security association defines theparameters for the encryption and authentication algorithms and characteristics of the tunnel. The followingillustration shows a virtual tunnel between Host A and Host B.
Figure 7. Network Packet Routing. This illustration shows the route a network packet takes. Inbound from the network,the packet enters the network adapter. from there it goes to the IP stack where it is sent to the filter module. From thefilter module, the packet is either sent to tunnel definitions or it is returned to the IP stack where it is forwarded to theupper-layer protocols.
Chapter 11. Internet Protocol (IP) Security 143
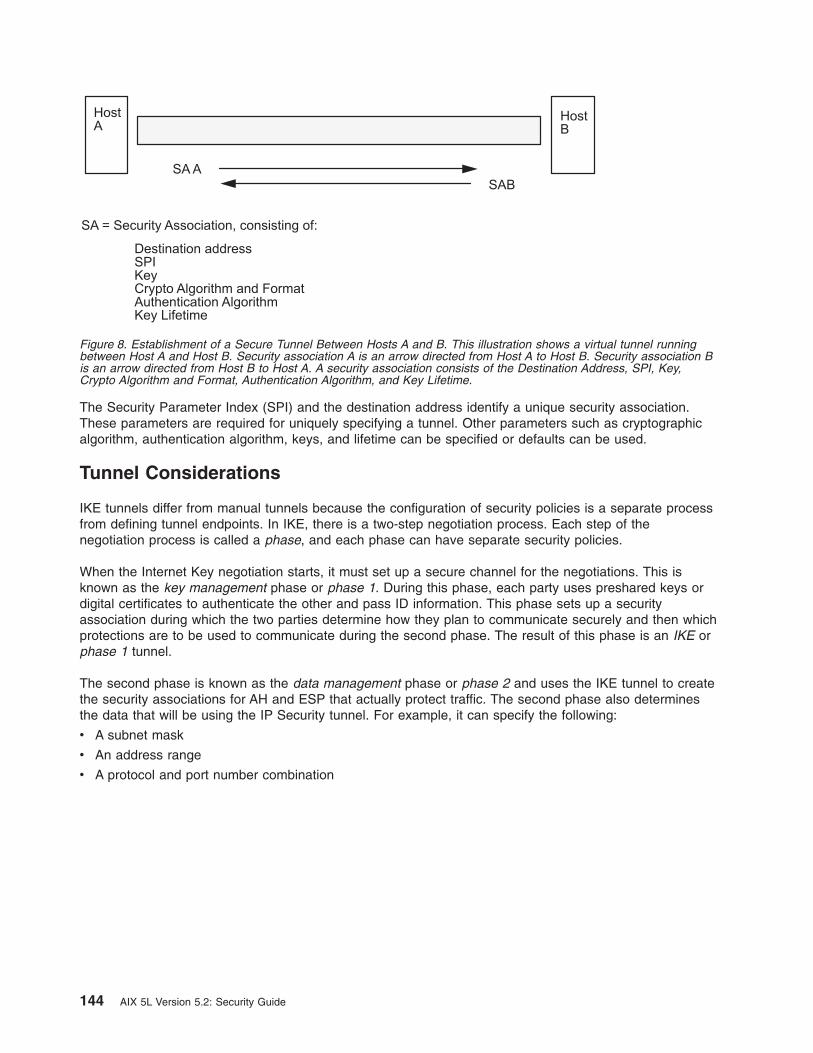
The Security Parameter Index (SPI) and the destination address identify a unique security association.These parameters are required for uniquely specifying a tunnel. Other parameters such as cryptographicalgorithm, authentication algorithm, keys, and lifetime can be specified or defaults can be used.
Tunnel Considerations
IKE tunnels differ from manual tunnels because the configuration of security policies is a separate processfrom defining tunnel endpoints. In IKE, there is a two-step negotiation process. Each step of thenegotiation process is called a phase, and each phase can have separate security policies.
When the Internet Key negotiation starts, it must set up a secure channel for the negotiations. This isknown as the key management phase or phase 1. During this phase, each party uses preshared keys ordigital certificates to authenticate the other and pass ID information. This phase sets up a securityassociation during which the two parties determine how they plan to communicate securely and then whichprotections are to be used to communicate during the second phase. The result of this phase is an IKE orphase 1 tunnel.
The second phase is known as the data management phase or phase 2 and uses the IKE tunnel to createthe security associations for AH and ESP that actually protect traffic. The second phase also determinesthe data that will be using the IP Security tunnel. For example, it can specify the following:
v A subnet mask
v An address range
v A protocol and port number combination
Figure 8. Establishment of a Secure Tunnel Between Hosts A and B. This illustration shows a virtual tunnel runningbetween Host A and Host B. Security association A is an arrow directed from Host A to Host B. Security association Bis an arrow directed from Host B to Host A. A security association consists of the Destination Address, SPI, Key,Crypto Algorithm and Format, Authentication Algorithm, and Key Lifetime.
144 AIX 5L Version 5.2: Security Guide

In many cases, the endpoints of the key management (IKE) tunnel will be the same as the endpoints ofthe data management (IP Security) tunnel. The IKE tunnel endpoints are the IDs of the machines carryingout the negotiation. The IP Security tunnel endpoints describe the type of traffic that will use the IPSecurity tunnel. For simple host-to-host tunnels, in which all traffic between two tunnels is protected withthe same tunnel, the phase 1 and phase 2 tunnel endpoints are the same. When negotiating parties aretwo gateways, the IKE tunnel endpoints are the two gateways, and the IP Security tunnel endpoints arethe machines or subnets (behind the gateways) or the range of addresses (behind the gateways) of thetunnel users.
Key Management Parameters and PolicyPhase 1 (the key management phase) sets the following parameters of an IKE tunnel configuration:
Key Management(Phase 1) Tunnel
Name of this IKE tunnel. For each tunnel, the endpoints of the negotiationmust be specified. These are the two machines that plan to send andvalidate IKE messages. The name of the tunnel may describe the tunnelendpoints such as VPN Boston or VPN Acme.
Host Identity Type ID type that will be used in the IKE exchange. The ID type and value mustmatch the value for the preshared key to ensure that proper key lookup isperformed. If a separate ID is used to search a preshared key value, thehost ID is the key’s ID and its type is KEY_ID. The KEY_ID type is useful ifa single host has more than one preshared key value.
Host Identity Value of the host ID represented as an IP address, a fully qualified domainname (FQDN), or a user at the fully qualified domain name (user@FQDN).For example, [email protected].
IP Address IP address of the remote host. This value is required when the host ID typeis KEY_ID or whenever the host ID type cannot be resolved to an IPaddress. For example, if the user name cannot be resolved with a localname server, the IP address for the remote side must be entered.
IKE Tunnel Setup Process
Key Management (Phase 1)
Data Management (Phase 2)
IKE SA Parameters
IP Sec Protocols (AH, ESP) Generate session keys
Exchange and authenticate IDs
Identify parties using IP Sec
Result: IP Sec (phase 2) tunnel
Use public key cryptography toestablish first shared secret
Exchange and authenticate IDs
Identify the negotiating parties
IKE (phase 1) tunnelResult:
AuthenticationHashKey Lifetime...
Encapsulation ModeEncapsulation AlgorithmAuthentication AlgorithmKey Lifetimes
Step 1: Negotiation Step 2: Key Exchange
Figure 9. IKE Tunnel Setup Process. This illustration shows the two-step, two-phase process for setting up an IKEtunnel.
Chapter 11. Internet Protocol (IP) Security 145

You can customize key-management policy by specifying the parameters to be used during IKEnegotiation. For example, there are key-management policies for preshared key or signature modeauthentication. For Phase 1, the user must determine certain key-management security properties withwhich to carry out the exchange.
Data Management Parameters and PolicyThe data management proposal parameters are set during phase 2 of an IKE tunnel configuration. Theyare the same IP Security parameters used in manual tunnels and describe the type of protection to beused for protecting data traffic in the tunnel. You can start more than one phase 2 tunnel under the samephase 1 tunnel.
The following endpoint ID types describe the type of data that uses the IP Security Data tunnel:
Host, Subnet, or Range Describes whether the data traffic traveling in the tunnel will be for aparticular host, subnet, or address range.
Host/Subnet ID Contains the host or subnet identity of the local and remote systemspassing traffic over this tunnel. Determines the IDs sent in the phase 2negotiation and the filter rules that will be built if the negotiation issuccessful.
Subnet mask Describes all IP addresses within the subnet (for example, host 9.53.250.96and mask 255.255.255.0)
Starting IP Address Range Provides the starting IP address for the range of addresses that will beusing the tunnel (for example, 9.53.250.96 of 9.53.250.96 to 9.53.250.93)
Ending IP Address Range Provides the ending IP address for the range of addresses that will be usingthe tunnel (for example, 9.53.250.93 of 9.53.250.96 to 9.53.250.93)
Port Describes data using a specific port number (for example, 21 or 23)
Protocol Describes data being transported with a specific protocol (for example, TCPor UDP). Determines the protocol sent in the phase 2 negotiation and thefilter rules that will be built if the negotiation is successful. The protocol forthe local endpoint must match the protocol for the remote end point.
Choosing a Tunnel TypeThe decision to use manual tunnels or IKE tunnels depends on the tunnel support of the remote end andthe type of key management desired. IKE tunnels are recommended (when available) because they offerindustry-standard secure key negotiation and key refreshment. They also take advantage of the IETF ESPand AH header types and support anti-replay protection. You can optionally configure signature mode toallow digital certificates.
If the remote end uses one of the algorithms requiring manual tunnels, manual tunnels should be used.Manual tunnels ensure interoperability with a large number of hosts. Because the keys are static anddifficult to change and might be cumbersome to update, they are not as secure. Manual tunnels can beused between a host running this operating system and any other machine running IP Security and havinga common set of cryptographic and authentication algorithms. Most vendors offer Keyed MD5 with DES, orHMAC MD5 with DES. This subset works with almost all implementations of IP Security.
The procedure used in setting up manual tunnels, depends on whether you are setting up the first host ofthe tunnel or setting up the second host, which must have parameters matching the first host setup. Whensetting up the first host, the keys can be autogenerated, and the algorithms can be defaulted. Whensetting up the second host, import the tunnel information from the remote end, if possible.
Another important consideration is determining whether the remote system is behind a firewall. If it is, thesetup must include information about the intervening firewall.
146 AIX 5L Version 5.2: Security Guide
Using IKE with DHCP or Dynamically Assigned AddressesOne common scenario for using IP Security with an operating system is when remote systems areinitiating IKE sessions with a server and their identity cannot be tied to a particular IP address. This casecan occur in a Local Area Network (LAN) environment, such as using IP Security to connect to a server ona LAN and wanting to encrypt the data. Other common uses involve remote clients dialing into a server,and using either a fully qualified domain name (FQDN) or e-mail address (user@FQDN) to identify theremote ID.
In order to make a policy decision based on explicit information about the remote identity, aggressivemode must be used. In this case, the identity is sent in the first message of the negotiation and can beused to do a policy lookup on the security policy database. This will ensure that only specifically namedremote identities will be able to negotiate using the IKE protocol.
For the Data Management phase (Phase 2), when the IP Security associations are being created toencrypt TCP or UDP traffic, a generic data manager tunnel can be configured. Therefore, any request thatwas authenticated during phase 1, will use the generic tunnel for defined Data Management phase if theIP address is not explicitly configured in the database. This allows any address to match the generictunnel and can be used as long as the rigorous public key-based security validation was successful inphase 1.
Using XML to Define a Generic Data Management TunnelYou can define a generic Data Management tunnel using the XML format understood by ikedb. See thesection entitled “Command Line Interface for IKE Tunnel Configuration” on page 151 for more informationon the IKE XML interface and the ikedb command. Generic Data Management tunnels are used withDHCP. The XML format uses the tag name IPSecTunnel for what Web-based System Manager calls aData Management tunnel. This is also referred to as a phase 2 tunnel in other contexts. A generic DataManagement tunnel is not a true tunnel, but an IPSecProtection that is used if an incoming DataManagement message (under a specific Key Management tunnel) does not match any Data Managementtunnel defined for that Key Management tunnel. It is only used in the case where the AIX system is theresponder. Specifying a generic Data Management tunnel IPSecProtection is optional.
The generic Data Management tunnel is defined in the IKEProtection element. There are two XMLattributes, called IKE_IPSecDefaultProtectionRef and IKE_IPSecDefaultAllowedTypes, that are used forthis.
First, you need to define an IPSecProtection that you would like to use as the default if no IPSecTunnels(Data Management tunnels) match. An IPSecProtection that is to be used as a default must have anIPSec_ProtectionName that begins with _defIPSprot_.
Now go to the IKEProtection that you would like to use this default IPSecProtection. Specify anIKE_IPSecDefaultProtectionRef attribute that contains the name of the default IPSec_Protection.
You must also specify a value for the IKE_IPSecDefaultAllowedTypes attribute in this IKEProtection. Itcan have one or more of the following values (if multiple values, they should be space-separated):Local_IPV4_AddressLocal_IPV6_AddressLocal_IPV4_SubnetLocal_IPV6_SubnetLocal_IPV4_Address_RangeLocal_IPV6_Address_RangeRemote_IPV4_AddressRemote_IPV6_AddressRemote_IPV4_SubnetRemote_IPV6_SubnetRemote_IPV4_Address_RangeRemote_IPV6_Address_Range
Chapter 11. Internet Protocol (IP) Security 147
These values correspond to the ID types specified by the initiator. In the IKE negotiation, the actual IDsare ignored. The specified IPSecProtection is used if the IKE_IPSecDefaultAllowedTypes attributecontains a string beginning with Local_ that corresponds to the initiator’s local ID type, and contains astring beginning with Remote_ that corresponds to the initiator’s remote ID type. In other words, you musthave at least one Local_ value and at least one Remote_ value in any IKE_IPSecDefaultAllowedTypesattribute in order for the corresponding IPSec_Protection to be used.
Example: An initiator sends the following to the AIX system in a phase 2 (Data Management) message:local ID type: IPV4_Addresslocal ID: 192.168.100.104
remote ID type: IPV4_Subnetremote ID: 10.10.10.2remote netmask: 255.255.255.192
The AIX system does not have a Data Management tunnel matching these IDs. But it does have anIPSecProtection with the following attributes defined:
IKE_IPSecDefaultProtectionRef="_defIPSprot_protection4"IKE_IPSecDefaultAllowedTypes="Local_IPV4_Address
Remote_IPV4_AddressRemote_IPV4_SubnetRemote_IPV4_Address_Range"
The local ID type of the incoming message, IPV4_Address, matches one of the Local_ values of theallowed types, Local_IPV4_Address. Also, the remote ID of the message, IPV4_Subnet, matches thevalue Remote_IPV4_Subnet. Therefore the Data Management tunnel negotiation will proceed with_defIPSprot_protection4 as the IPSecProtection.
The /usr/samples/ipsec/default_p2_policy.xml file is a full XML file defining a generic IPSecProtectionthat can be used as an example.
Using Web-based System Manager to Define a Generic Data Management TunnelTo define a generic Data Management tunnel using the Web-based System Manager interface do thefollowing:
1. Select a Key Management tunnel in the IKE Tunnels container, and select the action to Define a DataManagement Tunnel.
2. Select generic Data Management tunnel. The configuration panels are similar to the panels used todefine a Data Management tunnel. However, the choices for the ID types are different. Explicit IDs donot need to be specified. The ID types, which are IP v4 or v6 Address Only, IP v4 or v6 Subnet Only,and IP v4 or v6 Address or Subnet, cover all allowable cases of IDs.
3. Set the rest of the information the same way as in a Data Management Tunnel and click OK. Each KeyManagement tunnel can only have one associated Generic Tunnel.
Note: A Generic Data Management tunnel can only be used in the case where the AIX system is theresponder.
148 AIX 5L Version 5.2: Security Guide
Configuring Internet Key Exchange TunnelsThis section provides information on how to configure Internet Key Exchange (IKE) tunnels using theWeb-based System Manager interface, the System Management Interface Tool (SMIT), or the commandline.
Using Web-based System Manager to Configure IKE TunnelsThe “Using the Basic Configuration Wizard” provides an easy way to define an IKE tunnel with presharedkeys. For more advanced options, see “Advanced IKE Tunnel Configuration”.
Using the Basic Configuration WizardYou can define an IKE tunnel through Web-based System Manager using preshared keys or certificates asthe authentication method. The Web-based System Manager adds new key management and datamanagement IKE tunnels to the IP Security subsystem, allows you to input minimal data and choose someoptions, and makes use of common default values for such parameters as tunnel lifetime.
When using the basic configuration wizard, keep the following in mind:
v The wizard can be used only for initial tunnel configuration. To modify, delete, or activate a tunnel, usethe IKE Tunnel plug-in or task bar.
v The tunnel name must be unique on your system, but you can use the same name on the remotesystem. For example, on the local and remote systems, the tunnel name can be hostA_to_hostB, butthe Local IP Address and the Remote IP Address fields (endpoints) are switched.
v Phase 1 and phase 2 tunnels are defined with the same encryption and authentication algorithms.
v The preshared key must be entered in hexadecimal form (without a leading 0x) or ASCII text.
v If digital certificates are chosen as the authentication method, you must use the Key Manager tool tocreate a digital certificate.
v The host ID type can only be IP Address.
v The transforms and proposals you create are assigned names that end with the user-defined tunnelname. You can view the transforms and proposals in Web-based System Manager through VPN and theIKE Tunnel plug-in.
Use the following procedure to configure a new tunnel using the wizard:
1. Open Web-based System Manager using the wsm command from the command line.
2. Select the Network plug-in.
3. Select Virtual Private Networks (IP Security).
4. From the Console area, select the Overview and Tasks folder.
5. Select Configure a Basic Tunnel Configuration wizard.
6. Click on Next on the Step 1 Introduction panel, then follow the steps to configure an IKE tunnel.
Online help is available if you need it.
After a tunnel is defined using the wizard, the tunnel definition displays in the Web-based SystemManager IKE tunnels list and can be activated or modified.
Advanced IKE Tunnel ConfigurationYou can configure key management and data management tunnels separately, using the followingprocedures.
Configuring Key Management Tunnels: IKE tunnels are configured using Web-based System Manager.Use the following procedure to add a key management tunnel:
1. Open Web-based System Manager using the wsm command.
2. Select the Network plug-in.
3. Select Virtual Private Networks (IP Security).
Chapter 11. Internet Protocol (IP) Security 149
4. From the Console area, select Overview and Tasks.
5. Select Start IP Security. This action loads the IP Security kernel extensions and starts the isakmpd,tmd, and cpsd daemons.
A tunnel is created by defining the key management and data management endpoints and theirassociated security transforms and proposals.
v Key management is the authentication phase. It sets up a secure channel between the negotiatingparties needed before the final IP Security parameters and keys are computed.
v Data management describes the type of traffic that will be using a particular tunnel. It can beconfigured for a single host or group of hosts (with the use of subnets or IP ranges) along withspecified protocol and port numbers.
The same key management tunnel can be used to protect multiple data management negotiations andkey refreshes, as long as they take place between the same two endpoints; for example, between twogateways.
6. To define the key management tunnel endpoints, click Internet Key Exchange (IKE) Tunnels on theIdentification tab.
7. Enter information to describe the identities of the systems taking part in the negotiations. In mostcases, IP addresses are used, and a policy compatible with the remote side must be created.
On the Transforms tab, use matching transforms on both sides, or contact the administrator on theremote end to define a matching transform. A transform containing several choices can be created toallow flexibility when proposing or matching on a transform.
8. If using preshared keys for authentication, enter the preshared key under the key tab. This value mustmatch on both the remote and local machines.
9. Create a transform to be associated with this tunnel by using the Add button on the Transforms tab.
To enable digital certificates and signature mode support, choose an authentication method of RSASignature or RSA Signature with CRL Checking.
For more information about digital certificates, see “Working with Digital Certificates and the KeyManager” on page 155.
Configuring Data Management Tunnels: To set up data management tunnel endpoints and proposalsand to complete IKE tunnel setup, open Web-based System Manager, as described in “Configuring KeyManagement Tunnels” on page 149. A data management tunnel is created by doing the following:
1. Select a key management tunnel and define any unique options. Most data management options canremain as defined by the default.
2. Specify endpoint types (such as IP address, subnet, or IP address range) under the Endpoints tab.You can select a port number and protocol or accept the default.
3. On the Proposals panel, you can create a new proposal by clicking the Add button or clicking OK tocreate a proposal. If there are multiple proposals, you can use the Move Up or Move Down buttons tochange the search order.
Group Support: Beginning with AIX 5.1, IP security supports grouping IKE IDs in a tunnel definition toassociate multiple IDs with a single security policy without having to create separate tunnel definitions.Grouping is especially useful when setting up connections to several remote hosts, because you can avoidsetting up or managing multiple tunnel definitions. Also, if changes must be made to a security policy, youdo not need to change multiple tunnel definitions.
A group must be defined before using that group name in tunnel definition. The group’s size is limited to 1Kbyte. A group name can be used in both key management tunnel and data management tunneldefinitions, but it can be used only as a remote ID.
A group is composed of a group name and a list of IKE IDs and ID types. The IDs can all be the sametype or a mix of the following:
150 AIX 5L Version 5.2: Security Guide
v IPv4 addresses
v IPv6 addresses
v FQDN
v user@FQDN
v X500 DN types.
During a Security Association negotiation, the IDs in a group are searched linearly for the first match.
Web-based System Manager can be used to define a group that is to be used for the remote endpoint of aKey Management tunnel. Refer to the “Command Line Interface for IKE Tunnel Configuration” section forinformation on defining groups from the command line. To define a group using Web-based SystemManager, use the following procedure:
1. Selecting a Key Management tunnel in the IKE Tunnel container.
2. Open the properties dialog.
3. Select the Identification tab.
4. Select group ID definition for the remote host identity type.
5. Select the Configure Group Definition button and enter the group members in the window.
Using the SMIT Interface for IKE Tunnel ConfigurationYou can use the SMIT interface to configure IKE tunnels and perform basic IKE database functions. SMITuses underlying XML command functions to perform additions, deletions, and modifications to the IKEtunnel definitions. IKE SMIT is used in configuring IKE tunnels quickly and provides examples of the XMLsyntax used to create IKE tunnel definitions. The IKE SMIT menus also allow you to back up, restore, andinitialize the IKE database.
To configure an IPv4 IKE tunnel, use the smitty ike4 fast path. To configure an IPv6 IKE tunnel, use thesmitty ike6 fast path. The IKE database functions can be found in the Advanced IP Security Configurationmenu.
All IKE database entries added through SMIT can be viewed or modified through the Web-based SystemManager tool.
Command Line Interface for IKE Tunnel ConfigurationThe ikedb command, available in AIX 5.1 and later, allows a user to retrieve, update, delete, import, andexport information in the IKE database. using an XML interface. The ikedb command allows the user towrite to (put) or read from (get) the IKE database. The input and output format is an Extensible MarkupLanguage (XML) file. The format of an XML file is specified by its Document Type Definition (DTD). Theikedb command allows the user to see the DTD that is used to validate the XML file when doing a put.While entity declarations can be added to the DTD using the -e flag, this is the only modification to theDTD that can be made. Any external DOCTYPE declaration in the input XML file will be ignored and anyinternal DOCTYPE declaration might result in an error. The rules followed to parse the XML file using theDTD are specified in the XML standard. The /usr/samples/ipsec file has a sample of a typical XML filethat defines common tunnel scenarios. See the ikedb command description in the AIX 5L Version 5.2Commands Reference for syntax details.
You can use the ike command to start, stop, and monitor IKE tunnels. The ike command can also be usedto activate, remove, or list IKE and IP Security tunnels. See the ike command description in the AIX 5LVersion 5.2 Commands Reference for syntax details.
The following examples show how to use ike, ikedb, and several other commands to configure and checkthe status of your IKE tunnel:
1. To start a tunnel negotiation (activate a tunnel) or to allow the incoming system to act as a responder(depending on the role that is specified), use the ike command with a tunnel number, as follows:
Chapter 11. Internet Protocol (IP) Security 151

# ike cmd=activate numlist=1
You can also use remote id or IP addresses, as shown in the following examples:# ike cmd=activate remid=9.3.97.256# ike cmd=activate ipaddr=9.3.97.100, 9.3.97.256
Since it may take several seconds for the commands to complete, the command returns after thenegotiation is started.
2. To display the tunnel status, use the ike command, as follows:# ike cmd=list
The output looks similar to the following:Phase 1 Tunnel ID [1]Phase 2 Tunnel ID [1]
The output shows phase 1 and phase 2 tunnels that are currently active.
3. To get a verbose listing of the tunnel, use the ike command, as follows:# ike cmd=list verbose
The output looks similar to the following:Phase 1 Tunnel ID 1Local ID Type: Fully_Qualified_Domain_NameLocal ID: bee.austin.ibm.comRemote ID Type: Fully_Qualified_Domain_NameRemote ID: ipsec.austin.ibm.comMode: AggressiveSecurity Policy: BOTH_AGGR_3DES_MD5Role: InitiatorEncryption Alg: 3DES-CBCAuth Alg: Preshared KeyHash Alg: MD5Key Lifetime: 28800 SecondsKey Lifesize: 0 KbytesKey Rem Lifetime: 28737 SecondsKey Rem Lifesize: 0 KbytesKey Refresh Overlap: 5%Tunnel Lifetime: 2592000 SecondsTunnel Lifesize: 0 KbytesTun Rem Lifetime: 2591937 SecondsStatus: Active
Phase 2 Tunnel ID 1Local ID Type: IPv4_AddressLocal ID: 10.10.10.1Local Subnet Mask: N/ALocal Port: anyLocal Protocol: allRemote ID Type: IPv4_AddressRemote ID: 10.10.10.4Remote Subnet Mask: N/ARemote Port: anyRemote Portocol: allMode: Oakley_quickSecurity Policy: ESP_3DES_MD5_SHA_TUNNEL_NO_PFSRole: InitiatorEncryption Alg: ESP_3DESAH Transform: N/AAuth Alg: HMAC-MD5PFS: NoSA Lifetime: 600 SecondsSA Lifesize: 0 KbytesSA Rem Lifetime: 562 Seconds
152 AIX 5L Version 5.2: Security Guide

SA Rem Lifesize: 0 KbytesKey Refresh Overlap: 15%Tunnel Lifetime: 2592000 SecondsTunnel Lifesize: 0 KbytesTun Rem Lifetime: 2591962 SecondsAssoc P1 Tunnel: 0Encap Mode: ESP_tunnelStatus: Active
4. To display the filter rules in the dynamic filter table for the newly activated IKE tunnel, use the lsfiltcommand, as follows:# lsfilt -d
The output looks similiar to the following:1 permit 0.0.0.0 0.0.0.0 0.0.0.0 0.0.0.0 no udp eq 4001 eq 4001 both both no all
packets 0 all2 *** Dynamic filter placement rule *** no0 permit 0.0.0.0 0.0.0.0 0.0.0.0 0.0.0.0 yes all any 0 any 0 both both no all
packets 0 all
*** Dynamic table ***
0 permit 0.0.0.0 0.0.0.0 0.0.0.0 0.0.0.0 no udp eq 500 eq 500 local both no allpackets 0
0 permit 0.0.0.0 0.0.0.0 0.0.0.0 0.0.0.0 no ah any 0 any 0 both inbound no allpackets 0
0 permit 0.0.0.0 0.0.0.0 0.0.0.0 0.0.0.0 no esp any 0 any 0 both inbound no allpackets 0
1 permit 10.10.10.1 255.255.255.255 10.10.10.4 255.255.255.255 no all any 0 any0 both outbound yes all packets 1
1 permit 10.10.10.4 255.255.255.255 10.10.10.1 255.255.255.255 no all any 0 any0 both inbound yes all packets 1
This example shows a machine that has one IKE tunnel and no other tunnels. The dynamic filterplacement rule (rule #2 in this example output of the static table) can be moved by the user to controlplacement relative to all other user-defined rules. The rules in the dynamic table are constructedautomatically as tunnels are negotiated and corresponding rules are inserted into the filter table.These rules can be displayed, but not edited.
5. To turn on logging of the dynamic filter rules, set the logging option for rule #2 to yes, use the chfiltcommand, as shown in the following example:# chfilt -v 4 -n 2 -l y
For more details on logging of IKE traffic, see “Logging Facilities” on page 174.
6. To deactivate the tunnel, use the ike command, as follows:# ike cmd=remove numlist=1
7. To view tunnel definitions, use the ikedb command, as follows:# ikedb -g
8. To put definitions to the IKE database from an XML file that has been generated on a peer machineand overwrite any existing objects in the database with the same name, use the ikedb command, asfollows:# ikedb -pFs peer_tunnel_conf.xml
The peer_tunnel_conf.xml is the XML file generated on a peer machine.
9. To get the definition of the phase 1 tunnel named tunnel_sys1_and_sys2 and all dependent phase 2tunnels with respective proposals and protections, use the ikedb command, as follows:# ikedb -gr -t IKETunnel -n tunnel_sys1_and_sys2
10. To delete all preshared keys from the database, use the ikedb command, as follows:# ikedb -d -t IKEPresharedKey
Chapter 11. Internet Protocol (IP) Security 153
For general information on IKE tunnel group support, see the “Group Support” on page 150 section. Youcan use the ikedb command to define groups from the command line.
AIX IKE and Linux AffinityTo configure an AIX IKE tunnel using Linux configuration files (AIX 5.1 and later), use the ikedb commandwith the -c flag (conversion option), which lets you use the /etc/ipsec.conf and /etc/ipsec.secrets Linuxconfiguration files as IKE tunnel definitions. The ikedb command parses the Linux configuration files,creates an XML file, and optionally adds the XML tunnel definitions to the IKE database. You can thenview the tunnel definitions by using either the ikedb -g command or the Web-based System Manager.
IKE Tunnel Configuration ScenariosThe following scenarios describe the type of situations most customers encounter when trying to set uptunnels. These scenarios can be described as the branch office, business partner, and remote accesscases.
v In the branch office case, the customer has two trusted networks that they want to connecttogether—the engineering group of one location to the engineering group of another. In this example,there are gateways that connect to each other and all the traffic passing between the gateways use thesame tunnel. The traffic at either end of the tunnel is decapsulated and passes in the clear within thecompany intranet.
In the first phase of the IKE negotiation, the IKE security association is created between the twogateways. The traffic that passes in the IP Security tunnel is the traffic between the two subnets, andthe subnet IDs are used in the phase 2 negotiation. After the security policy and tunnel parameters areentered for the tunnel, a tunnel number is created. Use the ike command to start the tunnel.
v In the business partner scenario, the networks are not trusted, and the network administrator may wantto restrict access to a smaller number of hosts behind the security gateway. In this case, the tunnelbetween the hosts carries traffic protected by IP Security for use between two particular hosts. Theprotocol of the phase 2 tunnel is AH or ESP. This host-to-host tunnel is secured within agateway-to-gateway tunnel.
v In the remote access case, the tunnels are set up on demand and a high level of security is applied.The IP addresses may not be meaningful, therefore, fully qualified domain names or user@ fullyqualified domain names are preferred. Optionally, you can use KEYID to relate a key to a host ID.
154 AIX 5L Version 5.2: Security Guide
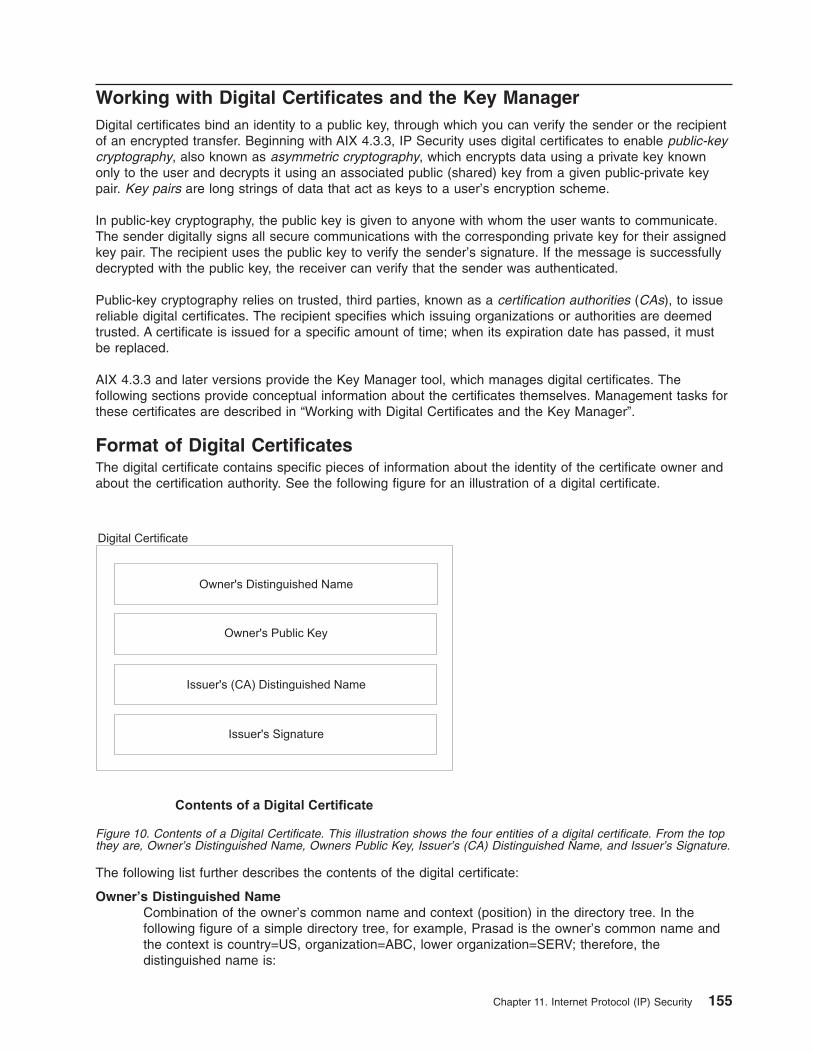
Working with Digital Certificates and the Key ManagerDigital certificates bind an identity to a public key, through which you can verify the sender or the recipientof an encrypted transfer. Beginning with AIX 4.3.3, IP Security uses digital certificates to enable public-keycryptography, also known as asymmetric cryptography, which encrypts data using a private key knownonly to the user and decrypts it using an associated public (shared) key from a given public-private keypair. Key pairs are long strings of data that act as keys to a user’s encryption scheme.
In public-key cryptography, the public key is given to anyone with whom the user wants to communicate.The sender digitally signs all secure communications with the corresponding private key for their assignedkey pair. The recipient uses the public key to verify the sender’s signature. If the message is successfullydecrypted with the public key, the receiver can verify that the sender was authenticated.
Public-key cryptography relies on trusted, third parties, known as a certification authorities (CAs), to issuereliable digital certificates. The recipient specifies which issuing organizations or authorities are deemedtrusted. A certificate is issued for a specific amount of time; when its expiration date has passed, it mustbe replaced.
AIX 4.3.3 and later versions provide the Key Manager tool, which manages digital certificates. Thefollowing sections provide conceptual information about the certificates themselves. Management tasks forthese certificates are described in “Working with Digital Certificates and the Key Manager”.
Format of Digital CertificatesThe digital certificate contains specific pieces of information about the identity of the certificate owner andabout the certification authority. See the following figure for an illustration of a digital certificate.
The following list further describes the contents of the digital certificate:
Owner’s Distinguished NameCombination of the owner’s common name and context (position) in the directory tree. In thefollowing figure of a simple directory tree, for example, Prasad is the owner’s common name andthe context is country=US, organization=ABC, lower organization=SERV; therefore, thedistinguished name is:
Figure 10. Contents of a Digital Certificate. This illustration shows the four entities of a digital certificate. From the topthey are, Owner’s Distinguished Name, Owners Public Key, Issuer’s (CA) Distinguished Name, and Issuer’s Signature.
Chapter 11. Internet Protocol (IP) Security 155
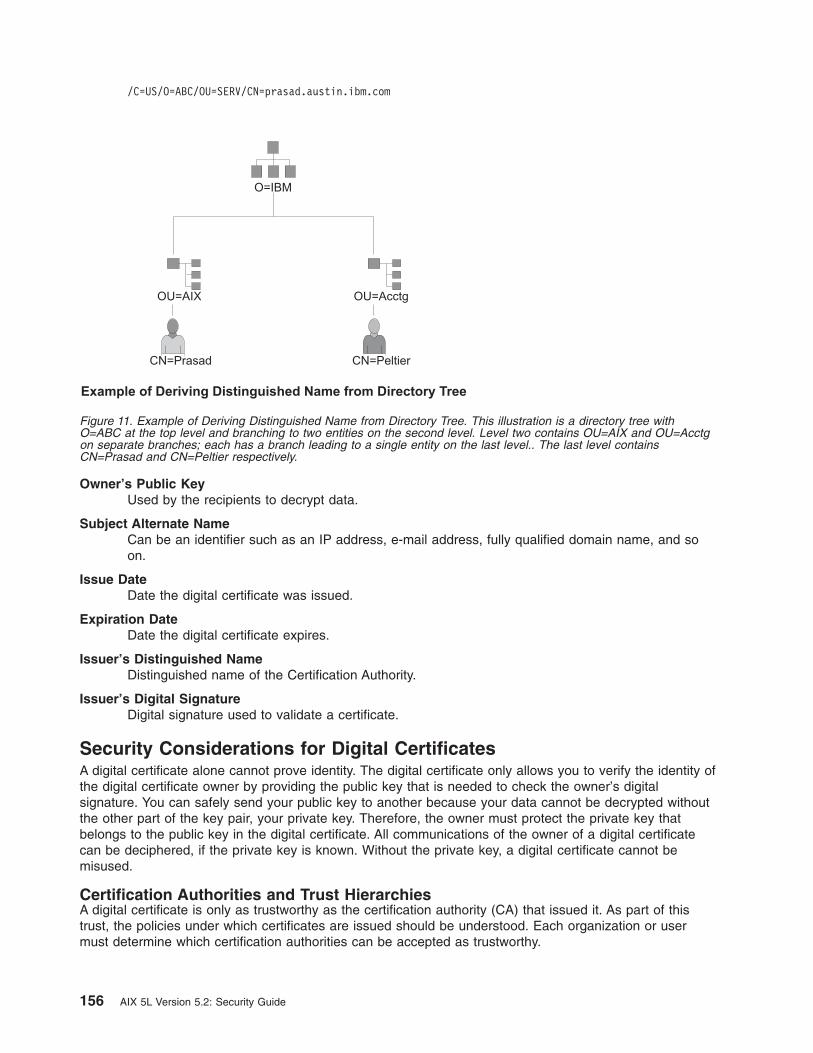
/C=US/O=ABC/OU=SERV/CN=prasad.austin.ibm.com
Owner’s Public KeyUsed by the recipients to decrypt data.
Subject Alternate NameCan be an identifier such as an IP address, e-mail address, fully qualified domain name, and soon.
Issue DateDate the digital certificate was issued.
Expiration DateDate the digital certificate expires.
Issuer’s Distinguished NameDistinguished name of the Certification Authority.
Issuer’s Digital SignatureDigital signature used to validate a certificate.
Security Considerations for Digital CertificatesA digital certificate alone cannot prove identity. The digital certificate only allows you to verify the identity ofthe digital certificate owner by providing the public key that is needed to check the owner’s digitalsignature. You can safely send your public key to another because your data cannot be decrypted withoutthe other part of the key pair, your private key. Therefore, the owner must protect the private key thatbelongs to the public key in the digital certificate. All communications of the owner of a digital certificatecan be deciphered, if the private key is known. Without the private key, a digital certificate cannot bemisused.
Certification Authorities and Trust HierarchiesA digital certificate is only as trustworthy as the certification authority (CA) that issued it. As part of thistrust, the policies under which certificates are issued should be understood. Each organization or usermust determine which certification authorities can be accepted as trustworthy.
Figure 11. Example of Deriving Distinguished Name from Directory Tree. This illustration is a directory tree withO=ABC at the top level and branching to two entities on the second level. Level two contains OU=AIX and OU=Acctgon separate branches; each has a branch leading to a single entity on the last level.. The last level containsCN=Prasad and CN=Peltier respectively.
156 AIX 5L Version 5.2: Security Guide

The Key Manager tool also allows organizations to create self-signed certificates, which can be useful fortesting or in environments with a small number of users or machines.
As a user of a security service, you need to know its public key to obtain and validate any digitalcertificates. Also, simply receiving a digital certificate does not assure its authenticity. To verify itsauthenticity, you need the public key of the certification authority that issued that digital certificate. If youdo not already hold an assured copy of the CA’s public key, then you might need an additional digitalcertificate to obtain the CA’s public key.
Certificate Revocation Lists (CRLs)A digital certificate is expected to be used for its entire validity period. If needed, however, a certificate canbe invalidated before its actual date of expiration. Invalidating the certificate may be necessary, forexample, if an employee leaves the company or if the certificate’s private key has been compromised. Toinvalidate a certificate, you must notify the appropriate Certificate Authority (CA) of the circumstances.When a CA revokes a certificate, it adds the invalid certificate serial number to a Certificate RevocationList (CRL).
CRLs are signed data structures that are issued periodically and made available in a public repository.CRLs can be retrieved from HTTP or LDAP servers. Each CRL contains a current time stamp and anextUpdate time stamp. Each revoked certificate in the list is identified by its certificate serial number.
When configuring an IKE tunnel and using digital certificates as your authentication method, you canconfirm the certificate has not been revoked by selecting RSA Signature with CRL Checking. If CRLChecking is enabled, the list is located and checked during the negotiation process to establish the keymanagement tunnel.
Note: To use this feature of IP Security, your system must be configured to use a SOCKS server(version 4 for HTTP servers), an LDAP server, or both. If you know which SOCKS or LDAP serveryou are using to obtain CRLs, you can make the necessary configuration selections by usingWeb-based System Manager. Select CRL Configuration from the Digital Certificates menu.
Uses for Digital Certificates in Internet ApplicationsInternet applications that use public-key cryptography systems must use digital certificates to obtain thepublic keys. There are many applications that use public-key cryptography, including the following ones:
Virtual Private Networks (VPN)Virtual Private Networks, also called secure tunnels, can be set up between systems such asfirewalls to enable protected connections between secure networks over unsecured communicationlinks. All traffic destined to these networks is encrypted between the participating systems.
The protocols used in tunneling follow the IP Security and IKE standards, which allow for a secure,encrypted connection between a remote client (for example, an employee working from home) anda secure host or network.
Secure Sockets Layer (SSL)SSL is a protocol that provides privacy and integrity for communications. It is used by Web serversfor secure connections between Web servers and Web browsers, by the Lightweight DirectoryAccess Protocol (LDAP) for secure connections between LDAP clients and LDAP servers, and byHost-on-Demand V.2 for connections between the client and the host system. SSL uses digitalcertificates for key exchange, server authentication, and, optionally, client authentication.
Secure Electronic MailMany electronic mail systems, using standards such as PEM or S/MIME for secure electronic mail,use digital certificates for digital signatures and for the exchange of keys to encrypt and decryptmail messages.
Chapter 11. Internet Protocol (IP) Security 157
Digital Certificates and Certificate RequestsA signed digital certificate contains fields for the owner’s distinguished name, the owner’s public key, theCA’s distinguished name and the CA’s signature. A self-signed digital certificate contains its owner’sdistinguished name, public key, and signature.
A certificate request must be created and sent to a CA to request a digital certificate. The certificaterequest contains fields for the requestor’s distinguished name, public key, and signature. The CA verifiesthe requestor’s signature with the public key in the digital certificate to ensure that:
v The certificate request was not modified in transit between the requestor and the CA.
v The requestor possesses the corresponding private key for the public key that is in the certificaterequest.
The CA is also responsible for verifying to some level the identity of the requestor. Requirements for thisverification can range from very little proof to absolute assurance of the owner’s identity.
The Key Manager ToolThe Key Manager tool manages digital certificates, and is located in the gskkm.rte file set on theExpansion Pack.
This section describes how to use Key Manager to do the following tasks:
1. Creating a Key Database
2. Adding a CA Root Digital Certificate
3. Establishing Trust Settings
4. Deleting a CA Root Digital Certificate
5. Requesting a Digital Certificate
6. Adding (Receiving) a New Digital Certificate
7. Deleting a Digital Certificate
8. Changing a Database Password
9. Creating IKE Tunnels using Digital Certificates
To set up digital certificates and signature support, at minimum you must do tasks 1, 2, 3, 4, 6, and 7.Then, use Web-based System Manager to create an IKE tunnel and associate a policy with the tunnel thatuses RSA Signature as the authentication method.
You can create and configure a key database from the Web-based System Manager VPN Overviewwindow by selecting the Managing Digital Certificates option, or by using the certmgr command to openthe Key Manager tool from the command line.
Creating a Key Database
A key database enables VPN endpoints to connect using valid digital certificates. The key database (*.kdb)format is used with IP Security VPNs.
The following types of CA digital certificates are provided with Key Manager:
v RSA Secure Server Certification Authority
v Thawte Personal Premium Certification Authority
v Thawte Personal Freemail Certification Authority
v Thawte Personal Basic Certification Authority
v Thawte Personal Server Certification Authority
v Thawte Server Certification Authority
v Verisign Class 1 Public Primary Certification Authority
158 AIX 5L Version 5.2: Security Guide

v Verisign Class 2 Public Primary Certification Authority
v Verisign Class 3 Public Primary Certification Authority
v Verisign Class 4 Public Primary Certification Authority
These signature digital certificates enable clients to attach to servers that have valid digital certificatesfrom these signers. After you create a key database, you can use it as created to attach to a server thathas a valid digital certificate from one of the signers.
To use a signature digital certificate that is not on this list, you must request it from the CA and add it toyour key database. See “Adding a CA Root Digital Certificate”.
To create a key database using the certmgr command, use the following procedure:
1. Start the Key Manager tool by typing:# certmgr
2. Select New from the Key Database File pull down menu.
3. Accept the default value, CMS key database file, for the Key database type field.
4. Enter the following file name in the File Name field:ikekey.kdb
5. Enter the following location of the database in the Location field:/etc/security
Note: The key database must be named ikekey.kbd and it must be placed in the /etc/securitydirectory. Otherwise, IP Security cannot function correctly.
6. Click OK. The Password Prompt screen is displayed.
7. Enter a password in the Password field, and enter it again in the Confirm Password field.
8. If you want to change the number of days until the password expires, enter the desired number ofdays in the Set expiration time? field. The default value for this field is 60 days. If you do not wantthe password to expire, clear the Set expiration time? field.
9. To save an encrypted version of the password in a stash file, select the Stash the password to afile? field and enter yes.
Note: You must stash the password to enable the use of digital certificates with IP Security.
10. Click OK. A confirmation screen displays, verifying that you have created a key database.
11. Click OK again and you return to the IBM Key Management screen. You can either perform othertasks or exit the tool.
Adding a CA Root Digital Certificate
After you have requested and received a root digital certificate from a CA, you can add it to yourdatabase. Most root digital certificates are of the form *.arm, such as the following:cert.arm
To add a CA root digital certificate to a database, use the following procedure:
1. Unless you are already using Key Manager, start the tool by typing:# certmgr
2. From the main screen, select Open from the Key Database File pull down menu.
3. Highlight the key database file to which you want to add a CA root digital certificate and click Open.
4. Enter the password and click OK. When your password is accepted, you are returned to the IBM KeyManagement screen. The title bar now shows the name of the key database file you selected,indicating that the file is now open and ready to be worked with.
5. Select Signer Certificates from the Personal/Signer Certificates pull down menu.
Chapter 11. Internet Protocol (IP) Security 159
6. Click Add.
7. Select a data type from the Data type pull down menu, such as:Base64-encoded ASCII data
8. Enter a certificate file name and location for the CA root digital certificate, or click Browse to selectthe name and location.
9. Click OK.
10. Enter a label for the CA root digital certificate, such as Test CA Root Certificate, and click OK. Youare returned to the Key Management screen. The Signer Certificates field now shows the label of theCA root digital certificate you just added. You can either perform more tasks or exit the tool.
Establishing Trust Settings
Installed CA certificates are set to trusted by default. To change the trust setting, do the following:
1. Unless you are already using Key Manager, start the tool by typing:# certmgr
2. From the main screen, select Open from the Key Database File pull down menu.
3. Highlight the key database file in which you want to change the default digital certificate and clickOpen.
4. Enter the password and click OK. After your password is accepted, you are returned to the IBM KeyManagement screen. The title bar shows the name of the key database file you selected, indicatingthat the file is now open.
5. Select Signer Certificates from the Personal/Signer Certificates pull down menu.
6. Highlight the certificate you want to change and click View/Edit, or double-click on the entry. The KeyInformation screen is displayed for the certificate entry.
7. To make this certificate a trusted root certificate, select the box next to Set the certificate as atrusted root and click OK. If the certificate is not trusted, clear the check box instead and click OK.
8. Click OK from the Signer Certificates screen. You are returned to the IBM Key Management screen.You can either perform other tasks or exit the tool.
Deleting a CA Root Digital Certificate
If you no longer want to support one of the CAs in your signature digital certificate list, you must delete theCA root digital certificate.
Note: Before deleting a CA root digital certificate, create a backup copy in case you later want tore-create the CA root.
To delete a CA root digital certificate from a database, use the following procedure:
1. Unless you are already using Key Manager, start the tool by typing:# certmgr
2. From the main screen, select Open from the Key Database File pull down menu.
3. Highlight the key database file from which you want to delete a CA root digital certificate and clickOpen.
4. Enter the password and click OK. After your password is accepted, you are returned to the KeyManagement screen. The title bar shows the name of the key database file you selected, indicatingthat the file is now open and ready to be edited.
5. Select Signer Certificates from the Personal/Signer Certificates pull down menu.
6. Highlight the certificate you want to delete and click Delete. The Confirm screen is displayed.
7. Click Yes. You are returned to the IBM Key Management screen. The label of the CA root digitalcertificate no longer appears in the Signer Certificates field. You can either perform other tasks or exitthe tool.
160 AIX 5L Version 5.2: Security Guide
Requesting a Digital Certificate
To acquire a digital certificate, generate a request using Key Manager and submit the request to a CA.The request file you generate is in the PKCS#10 format. The CA then verifies your identity and sends youa digital certificate.
To request a digital certificate, use the following procedure:
1. Unless you are already using Key Manager, start the tool by typing:# certmgr
2. From the main screen, select Open from the Key Database File pull down menu.
3. Highlight the /etc/security/ikekey.kdb key database file from which you want to generate the requestand click Open.
4. Enter the password and click OK. After your password is accepted, you are returned to the IBM KeyManagement screen. The title bar shows the name of the key database file you selected, indicatingthat the file is now open and ready to be edited.
5. Select Personal Certificate Requests from the Personal/Signer Certificates pull down menu (in AIXVersion 4) or select Create —> New Certificate Request (beginning in AIX 5.1).
6. Click New.
7. From the following screen, enter a Key Label for the self-signed digital certificate, such as:keytest
8. Enter a Common Name (the default is the host name) and Organization, and then select aCountry. For the remaining fields, either accept the default values, or choose new values.
9. Define the Subject Alternate name. The optional fields associated with Subject Alternate are emailaddress, IP address, and DNS name. For a tunnel type of IP address, type the same IP address thatis configured in the IKE tunnel into the IP address field. For a tunnel ID type of user@FQDN,complete the email address field. For a tunnel ID type of FQDN, type a fully qualified domain name(for example, hostname.companyname.com) in the DNS name field.
10. At the bottom of the screen, enter a name for the file, such as:certreq.arm
11. Click OK. A confirmation screen is displayed, verifying that you have created a request for a newdigital certificate.
12. Click OK. You are returned to the IBM Key Management screen. The Personal Certificate Requestsfield now shows the key label of the new digital certificate request (PKCS#10) created.
13. Send the file to a CA to request a new digital certificate. You can either perform other tasks or exit thetool.
Adding (Receiving) a New Digital Certificate
After you receive a new digital certificate from a CA, you must add it to the key database from which yougenerated the request.
To add (receive) a new digital certificate, use the following procedure:
1. Unless you are already using Key Manager, start the tool by typing:# certmgr
2. From the main screen, select Open from the Key Database File pull down menu.
3. Highlight the key database file from which you generated the certificate request and click Open.
4. Enter the password and click OK. After your password is accepted, you are returned to the IBM KeyManagement screen. The title bar shows the name of the key database file you selected, indicatingthat the file is now open and ready to be edited.
5. Select Personal Certificate Requests from the Personal/Signer Certificates pull down menu.
6. Click Receive (to add the newly received digital certificate to your database).
Chapter 11. Internet Protocol (IP) Security 161
7. Select the data type of the new digital certificate from the Data type pull down menu. The default isBase64-encoded ASCII data.
8. Enter the certificate file name and location for the new digital certificate, or click Browse to select thename and location.
9. Click OK.
10. Enter a descriptive label for the new digital certificate, such as:VPN Branch Certificate
11. Click OK. You are returned to the IBM Key Management screen. The Personal Certificates field nowshows the label of the new digital certificate you just added. You can either perform other tasks or exitthe tool.
If there is an error loading the certificate, check that the certificate file begins with the text ——-BEGINCERTIFICATE——- and ends with the text ——-END CERTIFICATE——-.
For example:-----BEGIN CERTIFICATE-----ajdkfjaldfwwwwwwwwwwadafdwkajf;kdsajkflasasfkjafdaffakdjf;ldasjkf;safdfdasfdaskaj;fdljk98dafdas43adfadfa-----END CERTIFICATE-----
If the text does not match, edit the certificate file so that it starts and ends appropriately.
Deleting a Digital Certificate
Note: Before deleting a digital certificate, create a backup copy in case you later want to re-create it.
To delete a digital certificate from your database, use the following procedure:
1. Unless you are already using Key Manager, start the tool by typing:# certmgr
2. From the main screen, select Open from the Key Database File pull down menu.
3. Highlight the key database file from which you want to delete the digital certificate and click Open.
4. Enter the password and click OK. After your password is accepted, you are returned to the IBM KeyManagement screen. The title bar shows the name of the key database file you selected, indicatingthat the file is now open and ready to be edited.
5. Select Personal Certificate Requests from the Personal/Signer Certificates pull down menu.
6. Highlight the digital certificate you want to delete and click Delete. The Confirm screen is displayed.
7. Click Yes. You are returned to the IBM Key Management screen. The label of the digital certificate youjust deleted no longer appears in the Personal Certificates field. You can either perform other tasks orexit the tool.
Changing a Database Password
To change the key database, use the following procedure:
1. Unless you are already using Key Manager, start the tool by typing:# certmgr
2. From the main screen, select Change Password from the Key Database File pull down menu.
3. Enter a new password in the Password field, and enter it again in the Confirm Password field.
4. If you want to change the number of days until the password expires, enter the desired number ofdays in the Set expiration time? field. The default value for this field is 60 days. If you do not wantthe password to expire, clear the Set expiration time? field.
5. To save an encrypted version of the password in a stash file, select the Stash the password to afile? field and enter yes.
162 AIX 5L Version 5.2: Security Guide
Note: You must stash the password to enable the use of digital certificates with IP Security.
6. Click OK. A message in the status bar indicates that the request completed successfully.
7. Click OK again and you return to the IBM Key Management screen. You can either perform other tasksor exit the tool.
Creating IKE Tunnels Using Digital Certificates
To create IKE tunnels that use digital certificates, you must use Web-based System Manager and the KeyManager tool.
To enable the use of digital certificates when defining the key management IKE tunnel policies, you mustconfigure a transform that uses signature mode. Signature mode uses an RSA signature algorithm forauthentication. IP Security provides the Web-based System Manager dialog ″Add/Change a Transform″ toallow you to select an authentication method of RSA Signature or RSA Signature with CRL Checking.
At least one endpoint of the tunnel must have a policy defined that uses a signature mode transform. Youcan also define other transforms using signature mode through Web-based System Manager.
The IKE key management tunnel types (the Host Identity Type field on the Identification tab) supportedby IP Security are as follows:
v IP address
v Fully Qualified Domain Name (FQDN)
v user@FQDN
v X.500 Distinguished Name
v Key identifier
Use Web-based System Manager to select host-identity types on the Key Management Tunnel Properties- Identification tab. If you select IP Address, FQDN, or user@FQDN, you must enter values in Web-basedSystem Manager and then provide these values to the CA. This information is used as the SubjectAlternate Name in the personal digital certificate.
For example, if you choose a host identity type of X.500 Distinguished Name from the Web-basedSystem Manager pull-down list on the Identification tab, and you enter the Host identity as/C=US/O=ABC/OU=SERV/CN=name.austin.ibm.com, the following are the exact values that you mustenter in Key Manager when creating a digital certificate request:
v Common name: name.austin.ibm.com
v Organization: ABC
v Organizational unit: SERV
v Country : US
The X.500 Distinguished Name entered is the name set up by your system or LDAP administrator.Entering an organizational unit value is optional. The CA then uses this information when creating thedigital certificate.
For another example, if you choose a host identity type of IP Address from the pull-down list, and youenter the host identity as 10.10.10.1, the following are the exact values you must enter in the digitalcertificate request:
v Common name: name.austin.ibm.com
v Organization: ABC
v Organizational unit: SERV
v Country : US
v Subject alternate IP address field: 10.10.10.1
Chapter 11. Internet Protocol (IP) Security 163
After you create the digital certificate request with this information, the CA uses this information to createthe personal digital certificate.
When requesting a personal digital certificate, the CA needs the following information:
v You are requesting a X.509 certificate.
v The signature format is MD5 with RSA encryption.
v Whether you are specifying Subject Alternate Name. Alternate name types are:
– IP address
– Fully qualified domain name (FQDN)
– user@FQDN
The following subject alternate-name information is included in the certificate request file.
v Your planned key use (the digital signature bit must be selected).
v The Key Manager digital certificate request file (in PKCS#10 format).
For specific steps using the Key Manager tool to create a certificate request, see “Requesting a DigitalCertificate” on page 161.
Before activating the IKE tunnel, you must add the personal digital certificate you received from the CAinto the Key Manager database, ikekey.kdb. For more information, see “Adding (Receiving) a New DigitalCertificate” on page 161.
IP Security supports the following types of personal digital certificates:
Subject DNThe Subject Distinguished Name must be in the following format and order:/C=US/O=ABC/OU=SERV/CN=name.austin.ibm.com
The Key Manager tool allows only one OU value.
Subject DN and Subject Alternate Name as an IP addressThe Subject Distinguished Name and Subject Alternate Name can be designated as an IPaddress, as shown in the following:
/C=US/O=ABC/OU=SERV/CN=name.austin.ibm.com and 10.10.10.1
Subject DN and Subject Alternate Name as FQDNThe Subject Distinguished Name and Subject Alternate Name can be designated as a fullyqualified domain name, as shown in the following:
/C=US/O=ABC/OU=SERV/CN=name.austin.ibm.com and bell.austin.ibm.com.
Subject DN and Subject Alternate Name as user@FQDNThe Subject Distinguished Name and Subject Alternate Name can be designated as a useraddress (user_ID@fully_qualified_domain_name), as shown in the following:
/C=US/O=ABC/OU=SERV/CN=name.austin.ibm.com and [email protected].
Subject DN and multiple Subject Alternate NamesThe Subject Distinguished Name can be associated with multiple Subject Alternate Names, asshown in the following:
/C=US/O=ABC/OU=SERV/CN=name.austin.ibm.com and bell.austin.ibm.com, 10.10.10.1, [email protected].
164 AIX 5L Version 5.2: Security Guide

Configuring Manual TunnelsThe following procedures configure IP Security to use manual tunnels.
Setting Up Tunnels and FiltersTo set up a manual tunnel, it is not necessary to separately configure the filter rules. As long as all trafficbetween two hosts goes through the tunnel, the necessary filter rules are automatically generated. Theprocess of setting up a tunnel is to define the tunnel on one end, import the definition on the other end,and activate the tunnel and filter rules on both ends. The tunnel is then ready to use.
Information about the tunnel must be made to match on both sides if it is not explicitly supplied. Forinstance, the encryption and authentication algorithms specified for the source will be used for thedestination if the destination values are not specified.
Creating a Manual Tunnel on the First HostYou can configure a tunnel using the Web-based System Manager Network application, theSMITips4_basic fast path (for IP Version 4) or the SMIT ips6_basic fast path (for IP version 6). You canalso create the tunnel manually use the following procedure.
The following is a sample of the gentun command used to create a manual tunnel:gentun -v 4 -t manual -s 5.5.5.19 -d 5.5.5.8 \
-a HMAC_MD5 -e DES_CBC_8 -N 23567
You can use the lstun -v 4 command to list the characteristics of the manual tunnel created by theprevious example. The output looks similar to the following:Tunnel ID : 1IP Version : IP Version 4Source : 5.5.5.19Destination : 5.5.5.8Policy : auth/encrTunnel Mode : TunnelSend AH Algo : HMAC_MD5Send ESP Algo : DES_CBC_8Receive AH Algo : HMAC_MD5Receive ESP Algo : DES_CBC_8Source AH SPI : 300Source ESP SPI : 300Dest AH SPI : 23576Dest ESP SPI : 23576Tunnel Life Time : 480Status : InactiveTarget : -Target Mask : -Replay : NoNew Header : YesSnd ENC-MAC Algo : -Rcv ENC-MAC Algo : -
To activate the tunnel, type the following:mktun -v 4 -t1
The filter rules associated with the tunnel are automatically generated.
To view the filter rules, use the lsfilt -v 4 command. The output looks similar to the following:Rule 4:Rule action : permitSource Address : 5.5.5.19Source Mask : 255.255.255.255Destination Address : 5.5.5.8
Chapter 11. Internet Protocol (IP) Security 165
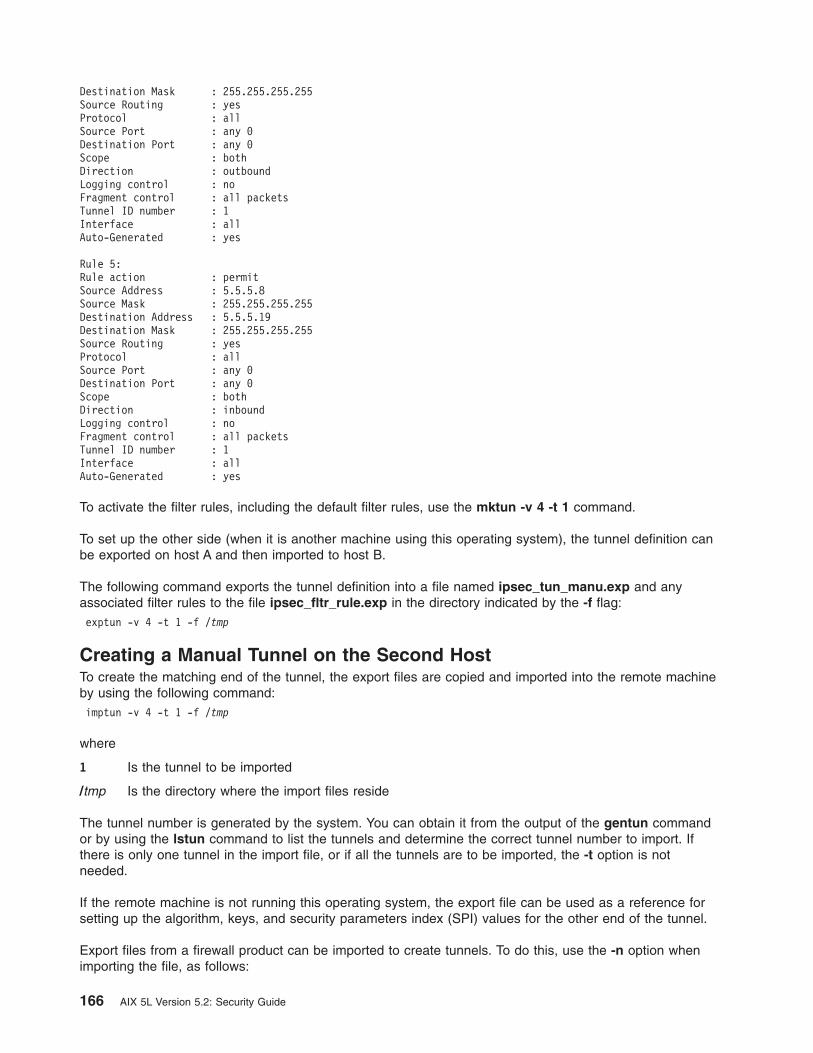
Destination Mask : 255.255.255.255Source Routing : yesProtocol : allSource Port : any 0Destination Port : any 0Scope : bothDirection : outboundLogging control : noFragment control : all packetsTunnel ID number : 1Interface : allAuto-Generated : yes
Rule 5:Rule action : permitSource Address : 5.5.5.8Source Mask : 255.255.255.255Destination Address : 5.5.5.19Destination Mask : 255.255.255.255Source Routing : yesProtocol : allSource Port : any 0Destination Port : any 0Scope : bothDirection : inboundLogging control : noFragment control : all packetsTunnel ID number : 1Interface : allAuto-Generated : yes
To activate the filter rules, including the default filter rules, use the mktun -v 4 -t 1 command.
To set up the other side (when it is another machine using this operating system), the tunnel definition canbe exported on host A and then imported to host B.
The following command exports the tunnel definition into a file named ipsec_tun_manu.exp and anyassociated filter rules to the file ipsec_fltr_rule.exp in the directory indicated by the -f flag:exptun -v 4 -t 1 -f /tmp
Creating a Manual Tunnel on the Second HostTo create the matching end of the tunnel, the export files are copied and imported into the remote machineby using the following command:imptun -v 4 -t 1 -f /tmp
where
1 Is the tunnel to be imported
/tmp Is the directory where the import files reside
The tunnel number is generated by the system. You can obtain it from the output of the gentun commandor by using the lstun command to list the tunnels and determine the correct tunnel number to import. Ifthere is only one tunnel in the import file, or if all the tunnels are to be imported, the -t option is notneeded.
If the remote machine is not running this operating system, the export file can be used as a reference forsetting up the algorithm, keys, and security parameters index (SPI) values for the other end of the tunnel.
Export files from a firewall product can be imported to create tunnels. To do this, use the -n option whenimporting the file, as follows:
166 AIX 5L Version 5.2: Security Guide

imptun -v 4 -f /tmp -n
Chapter 11. Internet Protocol (IP) Security 167

Setting Up Filters
Filtering can be set up to be simple, using mostly autogenerated filter rules, or can be customized bydefining very specific filter functions based on the properties of the IP packets. Matches on incomingpackets are done by comparing the source address and SPI value to those listed in the filter table.Therefore, this pair must be unique.
Each line in a filter table is known as a rule. A collection of rules determine what packets are accepted inand out of the machine and how they are directed. Filter rules can be control many aspects ofcommunications, including source and destination addresses and masks, protocol, port number, direction,fragment control, source routing, tunnel, and interface type.
The types of filter rules are as follows:
v “Static Filter Rules” are created in the filter table to be used for the general filtering of traffic or forassociating with manual tunnels. They can be added, deleted, modified, and moved. An optionaldescription text field can be added to identify a specific rule.
v “Autogenerated Filter Rules and User Specified Filter Rules” on page 171 (also called autogeneratedfilter rules) are a specific set of rules created for use of IKE tunnels. Both static and dynamic filter rulesare created based on data management tunnel information and on data management tunnel negotiation.
v “Predefined Filter Rules” on page 172 are generic filter rules that cannot be modified, moved, or deleted,such as the all traffic rule, the ah rule, and the esp rule. They pertain to all traffic.
Associated with these filter rules are Subnet masks, which group IDs that are associated with a filter rule,and the host-firewall-host configuration option. The following sections describe the different types of filterrules and their associated features.
Static Filter RulesEach static filter rule contains several space-separated fields. The following list provides the name of eachfield (an example of each field from rule 1 is shown in parentheses):
v Rule_number (1)
v Action (permit)
v Source_addr (0.0.0.0)
v Source_mask (0.0.0.0)
v Dest_addr (0.0.0.0)
v Dest_mask (0.0.0.0)
v Source_routing (no)
v Protocol (udp)
v Src_prt_operator (eq)
v Src_prt_value (4001)
v Dst_prt_operator (eq)
v Dst_prt_value (4001)
v Scope (both)
v Direction (both)
v Logging (no)
v Fragment (all packets)
v Tunnel (0)
v Interface (all).
Further explanation of static filter rules follows this example:
168 AIX 5L Version 5.2: Security Guide
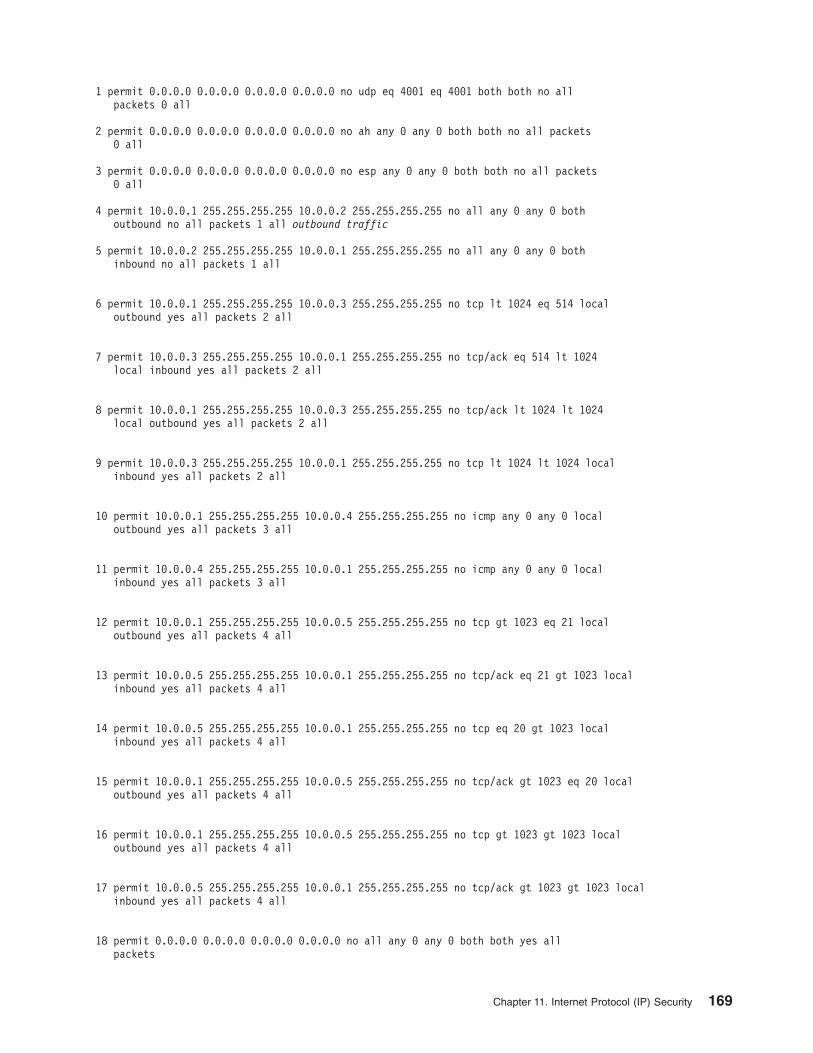
1 permit 0.0.0.0 0.0.0.0 0.0.0.0 0.0.0.0 no udp eq 4001 eq 4001 both both no allpackets 0 all
2 permit 0.0.0.0 0.0.0.0 0.0.0.0 0.0.0.0 no ah any 0 any 0 both both no all packets0 all
3 permit 0.0.0.0 0.0.0.0 0.0.0.0 0.0.0.0 no esp any 0 any 0 both both no all packets0 all
4 permit 10.0.0.1 255.255.255.255 10.0.0.2 255.255.255.255 no all any 0 any 0 bothoutbound no all packets 1 all outbound traffic
5 permit 10.0.0.2 255.255.255.255 10.0.0.1 255.255.255.255 no all any 0 any 0 bothinbound no all packets 1 all
6 permit 10.0.0.1 255.255.255.255 10.0.0.3 255.255.255.255 no tcp lt 1024 eq 514 localoutbound yes all packets 2 all
7 permit 10.0.0.3 255.255.255.255 10.0.0.1 255.255.255.255 no tcp/ack eq 514 lt 1024local inbound yes all packets 2 all
8 permit 10.0.0.1 255.255.255.255 10.0.0.3 255.255.255.255 no tcp/ack lt 1024 lt 1024local outbound yes all packets 2 all
9 permit 10.0.0.3 255.255.255.255 10.0.0.1 255.255.255.255 no tcp lt 1024 lt 1024 localinbound yes all packets 2 all
10 permit 10.0.0.1 255.255.255.255 10.0.0.4 255.255.255.255 no icmp any 0 any 0 localoutbound yes all packets 3 all
11 permit 10.0.0.4 255.255.255.255 10.0.0.1 255.255.255.255 no icmp any 0 any 0 localinbound yes all packets 3 all
12 permit 10.0.0.1 255.255.255.255 10.0.0.5 255.255.255.255 no tcp gt 1023 eq 21 localoutbound yes all packets 4 all
13 permit 10.0.0.5 255.255.255.255 10.0.0.1 255.255.255.255 no tcp/ack eq 21 gt 1023 localinbound yes all packets 4 all
14 permit 10.0.0.5 255.255.255.255 10.0.0.1 255.255.255.255 no tcp eq 20 gt 1023 localinbound yes all packets 4 all
15 permit 10.0.0.1 255.255.255.255 10.0.0.5 255.255.255.255 no tcp/ack gt 1023 eq 20 localoutbound yes all packets 4 all
16 permit 10.0.0.1 255.255.255.255 10.0.0.5 255.255.255.255 no tcp gt 1023 gt 1023 localoutbound yes all packets 4 all
17 permit 10.0.0.5 255.255.255.255 10.0.0.1 255.255.255.255 no tcp/ack gt 1023 gt 1023 localinbound yes all packets 4 all
18 permit 0.0.0.0 0.0.0.0 0.0.0.0 0.0.0.0 no all any 0 any 0 both both yes allpackets
Chapter 11. Internet Protocol (IP) Security 169
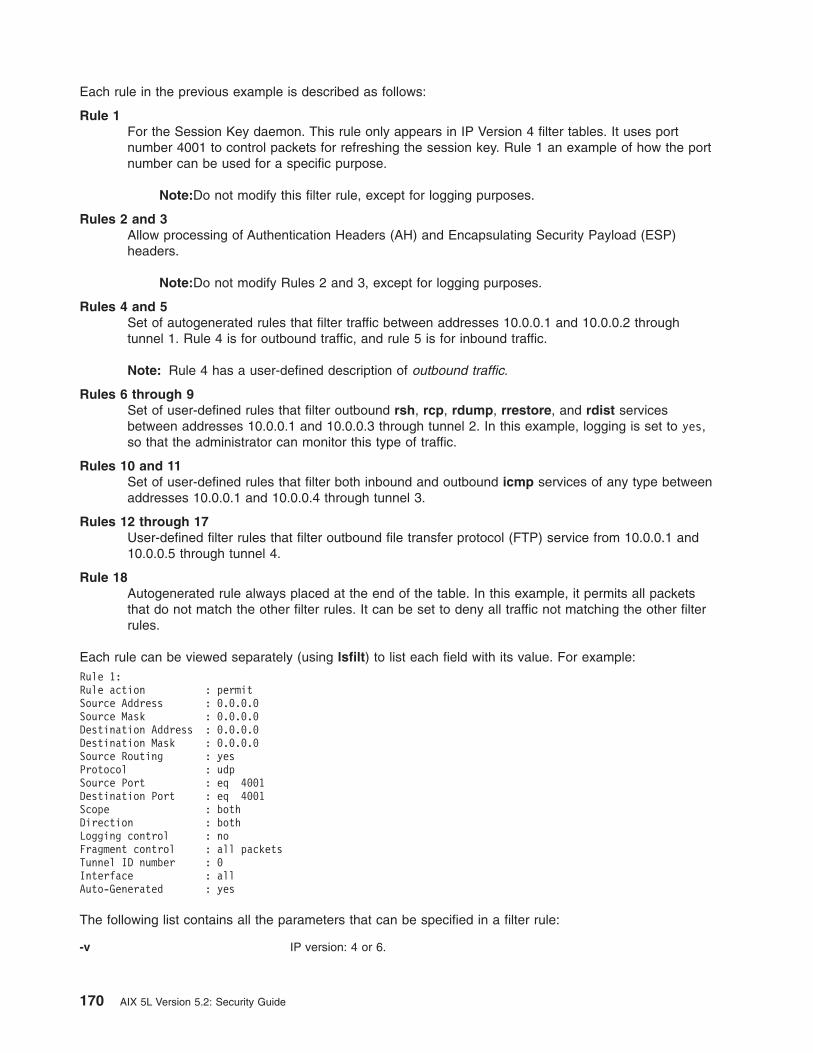
Each rule in the previous example is described as follows:
Rule 1For the Session Key daemon. This rule only appears in IP Version 4 filter tables. It uses portnumber 4001 to control packets for refreshing the session key. Rule 1 an example of how the portnumber can be used for a specific purpose.
Note:Do not modify this filter rule, except for logging purposes.
Rules 2 and 3Allow processing of Authentication Headers (AH) and Encapsulating Security Payload (ESP)headers.
Note:Do not modify Rules 2 and 3, except for logging purposes.
Rules 4 and 5Set of autogenerated rules that filter traffic between addresses 10.0.0.1 and 10.0.0.2 throughtunnel 1. Rule 4 is for outbound traffic, and rule 5 is for inbound traffic.
Note: Rule 4 has a user-defined description of outbound traffic.
Rules 6 through 9Set of user-defined rules that filter outbound rsh, rcp, rdump, rrestore, and rdist servicesbetween addresses 10.0.0.1 and 10.0.0.3 through tunnel 2. In this example, logging is set to yes,so that the administrator can monitor this type of traffic.
Rules 10 and 11Set of user-defined rules that filter both inbound and outbound icmp services of any type betweenaddresses 10.0.0.1 and 10.0.0.4 through tunnel 3.
Rules 12 through 17User-defined filter rules that filter outbound file transfer protocol (FTP) service from 10.0.0.1 and10.0.0.5 through tunnel 4.
Rule 18Autogenerated rule always placed at the end of the table. In this example, it permits all packetsthat do not match the other filter rules. It can be set to deny all traffic not matching the other filterrules.
Each rule can be viewed separately (using lsfilt) to list each field with its value. For example:Rule 1:Rule action : permitSource Address : 0.0.0.0Source Mask : 0.0.0.0Destination Address : 0.0.0.0Destination Mask : 0.0.0.0Source Routing : yesProtocol : udpSource Port : eq 4001Destination Port : eq 4001Scope : bothDirection : bothLogging control : noFragment control : all packetsTunnel ID number : 0Interface : allAuto-Generated : yes
The following list contains all the parameters that can be specified in a filter rule:
-v IP version: 4 or 6.
170 AIX 5L Version 5.2: Security Guide
-a Action:
d Deny
p Permit-s Source address. Can be an IP address or hostname.-m Source subnet mask.-d Destination address. Can be an IP address or hostname.-M Destination subnet mask.-g Source routing control: y or n.-c Protocol. Values can be udp, icmp, tcp, tcp/ack, ospf, pip, esp, ah and all.-o Source port or ICMP type operation.-p Source port or ICMP type value.-O Destination port or ICMP code operation.-P Destination port or ICMP code value.-r Routing:
r Forwarded packets
l Local destined/originated packets
b Both-l Log control.
y Include in log
n Do not include in log.-f Fragmentation.
y Applies to fragments headers, fragments, and non-fragments
o Applies only to fragments and fragment headers
n Applies only to non-fragments
h Applies only to non-fragments and fragment headers-t Tunnel ID.-i Interface, such as tr0 or en0.
For more information, see the genfilt and chfilt command descriptions.
Autogenerated Filter Rules and User Specified Filter RulesCertain rules are autogenerated for the use of the IP Security filter and tunnel code. Autogenerated rulesinclude:
v Rules for the session key daemon that refresh the IP version 4 keys in IKE (AIX 4.3.2 and later)
v Rules for the processing of AH and ESP packets.
Filter rules are also autogenerated when defining tunnels. For manual tunnels, autogenerated rules specifythe source and destination addresses and the mask values, as well as the tunnel ID. All traffic betweenthose addresses will flow through the tunnel.
For IKE tunnels, autogenerated filter rules determine protocol and port numbers during IKE negotiation.The IKE filter rules are kept in a separate table, which is searched after the static filter rules and beforethe autogenerated rules. IKE filter rules are inserted in a default position within the static filter table, butthey can be moved by the user.
Autogenerated rules permit all traffic over the tunnel. User-defined rules can place restrictions on certaintypes of traffic. Place these user-defined rules before the autogenerated rules, because IP Security usesthe first rule it finds that applies to the packet. The following is an example of user-defined filter rules thatfilter traffic based on ICMP operation.
Chapter 11. Internet Protocol (IP) Security 171
1 permit 10.0.0.1 255.255.255.255 10.0.0.4 255.255.255.255 no icmp any 8 any 0local outbound no all packets 3 all
2 permit 10.0.0.4 255.255.255.255 10.0.0.1 255.255.255.255 no icmp any 0 any 0 localinbound no all packets 3 all
3 permit 10.0.0.4 255.255.255.255 10.0.0.1 255.255.255.255 no icmp any 8 any 0 localinbound no all packets 3 all
4 permit 10.0.0.1 255.255.255.255 10.0.0.4 255.255.255.255 no icmp any 0 any 0 localoutbound no all packets 3 all
To simplify the configuration of a single tunnel, filter rules are autogenerated when tunnels are defined.This function can be suppressed by specifying the -g flag in the gentun. You can find a sample filter filewith genfilt commands to generate filter rules for different TCP/IP services in/usr/samples/ipsec/filter.sample.
Predefined Filter Rules
Several predefined filter rules are autogenerated with certain events. When the ipsec_v4 or ipsec_v6device is loaded, a predefined rule is inserted into the filter table and then activated. By default, thispredefined rule is to permit all packets, but it is user-configurable and you can set it to deny all packets.
Note: When configuring remotely, ensure that the deny rule is not enabled before the configuration iscomplete, to prevent your session from getting locked out of the machine. The situation can beavoided either by setting the default action to permit or by configuring a tunnel to the remote machinebefore activating IP Security.
Both IPv4 and IPv6 filter tables have a predefined rule. Either may be independently changed to deny all.This will keep traffic from passing unless that traffic is specifically defined by additional filter rules. The onlyother option to change on the predefined rules is chfilt with the -l option, which allows packets matchingthat rule to be logged.
To support IKE tunnels, a dynamic filter rule is placed in the IPv4 filter table. This is the position at whichdynamic filter rules are inserted into the filter table. This position can be controlled by the user by movingits position up and down the filter table. After the tunnel manager daemon and isakmpd daemon areinitialized to allow IKE tunnels to be negotiated, rules are automatically created in the dynamic filter tableto handle IKE messages as well as AH and ESP packets.
Subnet MasksSubnet masks are used to group a set of IDs that are associated with a filter rule. The mask value isANDed with the ID in the filter rules and compared to the ID specified in the packet. For example, a filterrule with a source IP address of 10.10.10.4 and a subnet mask of 255.255.255.255 specified that anexact match must occur of the decimal IP address, as shown in the following:
Binary Decimal
Source IP address 1010.1010.1010.0100 10.10.10.4
Subnet mask 1111.1111.1111.1111 255.255.255.255
A 10.10.10.x subnet is specified as 1111.1111.1111.0 or 255.255.255.0. An incoming address would havethe subnet mask appended to it, then the combination would be compared to the ID in the filter rule. Forexample, an address of 10.10.10.100 becomes 10.10.10.0 after the subnet mask is applied, whichmatches the filter rule.
A subnet mask of 255.255.255.240 allows any value for the last four bits in the address.
172 AIX 5L Version 5.2: Security Guide

Host-Firewall-Host ConfigurationThe host-firewall-host configuration option for tunnels allows you to create a tunnel between your host anda firewall, then automatically generate the necessary filter rules for correct communication between yourhost and a host behind the firewall. The autogenerated filter rules permit all rules between the twonon-firewall hosts over the tunnel specified. The default rules—for user datagram protocol (UDP),Authentication Headers (AH), and Encapsulating Security Payload (ESP) headers—should already handlethe host to firewall communication. The firewall will have to be configured appropriately to complete thesetup. You should use the export file from the tunnel you created to enter the SPI values and keys that thefirewall needs.
Figure 12. Host-Firewall-Host. This illustration shows a Host-Firewall-Host configuration. Host A has a tunnel runningthrough a local firewall and out to the internet. Then it goes to Remote Firewall B, and then on to Remote Host C.
Chapter 11. Internet Protocol (IP) Security 173
Logging Facilities
This section describes the configuration and format of system logs relating to IP Security. As hostscommunicate with each other, the transferred packets may be logged to the system log daemon, syslogd.Other important messages about IP Security also display. An administrator may choose to monitor thislogging information for traffic analysis and debugging assistance. The following are the steps for setting upthe logging facilities.
1. Edit the /etc/syslog.conf file to add the following entry:local4.debug var/adm/ipsec.log
Use the local4 facility to record traffic and IP Security events. Standard operating system prioritylevels apply. You should set the priority level of debug until traffic through IP Security tunnels and filtersshow stability and proper movement.
Note: The logging of filter events can create significant activity at the IP Security host and canconsume large amounts of storage.
2. Save /etc/syslog.conf.
3. Go to the directory you specified for the log file and create an empty file with the same name. In thecase above, you would change to /var/adm directory and issue the command:touch ipsec.log
4. Issue a refresh command to the syslogd subsystem:refresh -s syslogd
5. If using IKE tunnels, ensure the /etc/isakmpd.conf file specifies the desired isakmpd logging level.(See “IP Security Problem Determination” on page 178 for more information on IKE logging.)
6. While creating filter rules for your host, if you would like packets matching a specific rule to be logged,set the -l parameter for the rule to Y (yes) using the genfilt or the chfilt commands.
7. Turn on packet logging and start the ipsec_logd daemon using the following command:mkfilt -g start
You can stop packet logging by issuing the following command:mkfilt -g stop
The following sample log file contains traffic entries and other IP Security log entries:1. Aug 27 08:08:40 host1 : Filter logging daemon ipsec_logd (level 2.20)
initialized at 08:08:40 on 08/27/97A2. Aug 27 08:08:46 host1 : mkfilt: Status of packet logging set to Start
at 08:08:46 on 08/27/973. Aug 27 08:08:47 host1 : mktun: Manual tunnel 2 for IPv4, 9.3.97.244, 9.3.97.130
activated.4. Aug 27 08:08:47 host1 : mkfilt: #:1 permit 0.0.0.0 0.0.0.0 0.0.0.0 0.0.0.0
udp eq 4001 eq 4001 both both l=n f=y t=0 e= a=5. Aug 27 08:08:47 host1 : mkfilt: #:2 permit 0.0.0.0 0.0.0.0 0.0.0.0 0.0.0.0
ah any 0 any 0 both both l=n f=y t=0 e= a=6. Aug 27 08:08:47 host1 : mkfilt: #:3 permit 0.0.0.0 0.0.0.0 0.0.0.0 0.0.0.0
esp any 0 any 0 both both l=n f=y t=0 e= a=7. Aug 27 08:08:47 host1 : mkfilt: #:4 permit 10.0.0.1 255.255.255.255 10.0.0.2
255.255.255.255 icmp any 0 any 0 local outbound l=y f=y t=1 e= a=8. Aug 27 08:08:47 host1 : mkfilt: #:4 permit 10.0.0.2 255.255.255.255 10.0.0.1
255.255.255.255 icmp any 0 any 0 local inbound l=y f=y t=1 e= a=9. Aug 27 08:08:47 host1 : mkfilt: #:6 permit 0.0.0.0 0.0.0.0 0.0.0.0 0.0.0.0
all any 0 any 0 both both l=y f=y t=0 e= a=10. Aug 27 08:08:47 host1 : mkfilt: Filter support (level 1.00) initialized at
08:08:47 on 08/27/9711. Aug 27 08:08:48 host1 : #:6 R:p o:10.0.0.1 s:10.0.0.1 d:10.0.0.20 p:udp
sp:3327 dp:53 r:l a:n f:n T:0 e:n l:6712. Aug 27 08:08:48 host1 : #:6 R:p i:10.0.0.1 s:10.0.0.20 d:10.0.0.1 p:udp
174 AIX 5L Version 5.2: Security Guide
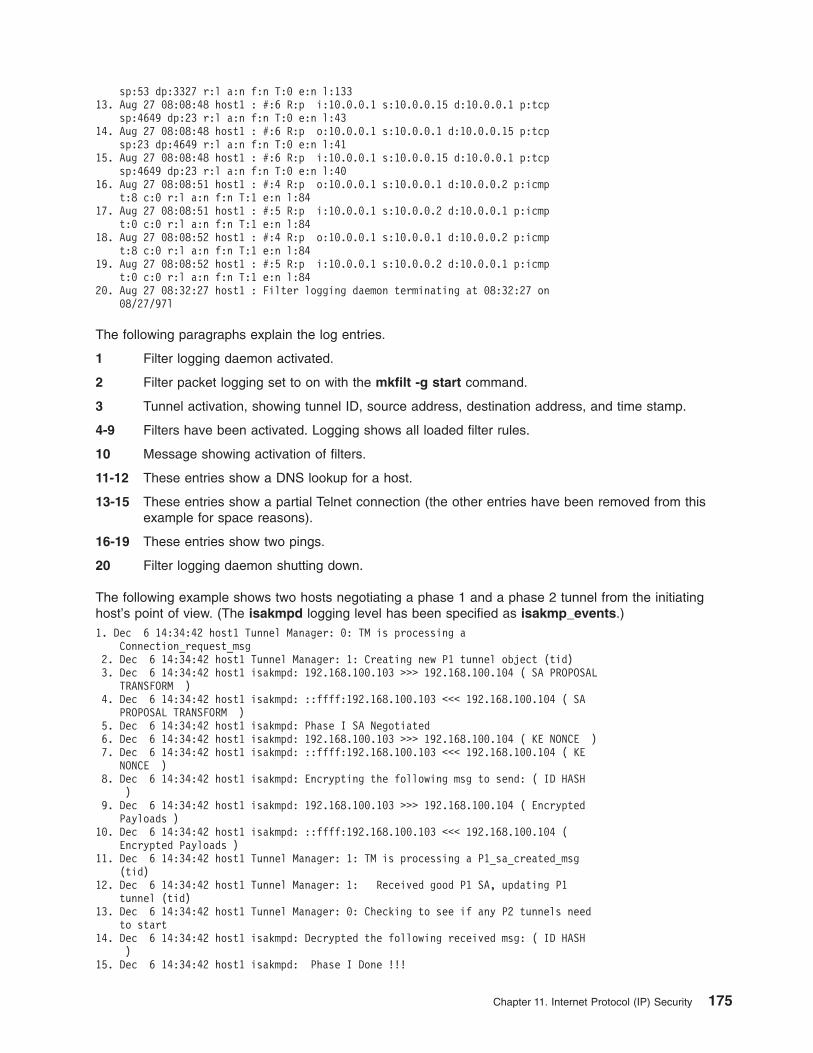
sp:53 dp:3327 r:l a:n f:n T:0 e:n l:13313. Aug 27 08:08:48 host1 : #:6 R:p i:10.0.0.1 s:10.0.0.15 d:10.0.0.1 p:tcp
sp:4649 dp:23 r:l a:n f:n T:0 e:n l:4314. Aug 27 08:08:48 host1 : #:6 R:p o:10.0.0.1 s:10.0.0.1 d:10.0.0.15 p:tcp
sp:23 dp:4649 r:l a:n f:n T:0 e:n l:4115. Aug 27 08:08:48 host1 : #:6 R:p i:10.0.0.1 s:10.0.0.15 d:10.0.0.1 p:tcp
sp:4649 dp:23 r:l a:n f:n T:0 e:n l:4016. Aug 27 08:08:51 host1 : #:4 R:p o:10.0.0.1 s:10.0.0.1 d:10.0.0.2 p:icmp
t:8 c:0 r:l a:n f:n T:1 e:n l:8417. Aug 27 08:08:51 host1 : #:5 R:p i:10.0.0.1 s:10.0.0.2 d:10.0.0.1 p:icmp
t:0 c:0 r:l a:n f:n T:1 e:n l:8418. Aug 27 08:08:52 host1 : #:4 R:p o:10.0.0.1 s:10.0.0.1 d:10.0.0.2 p:icmp
t:8 c:0 r:l a:n f:n T:1 e:n l:8419. Aug 27 08:08:52 host1 : #:5 R:p i:10.0.0.1 s:10.0.0.2 d:10.0.0.1 p:icmp
t:0 c:0 r:l a:n f:n T:1 e:n l:8420. Aug 27 08:32:27 host1 : Filter logging daemon terminating at 08:32:27 on
08/27/97l
The following paragraphs explain the log entries.
1 Filter logging daemon activated.
2 Filter packet logging set to on with the mkfilt -g start command.
3 Tunnel activation, showing tunnel ID, source address, destination address, and time stamp.
4-9 Filters have been activated. Logging shows all loaded filter rules.
10 Message showing activation of filters.
11-12 These entries show a DNS lookup for a host.
13-15 These entries show a partial Telnet connection (the other entries have been removed from thisexample for space reasons).
16-19 These entries show two pings.
20 Filter logging daemon shutting down.
The following example shows two hosts negotiating a phase 1 and a phase 2 tunnel from the initiatinghost’s point of view. (The isakmpd logging level has been specified as isakmp_events.)1. Dec 6 14:34:42 host1 Tunnel Manager: 0: TM is processing a
Connection_request_msg2. Dec 6 14:34:42 host1 Tunnel Manager: 1: Creating new P1 tunnel object (tid)3. Dec 6 14:34:42 host1 isakmpd: 192.168.100.103 >>> 192.168.100.104 ( SA PROPOSAL
TRANSFORM )4. Dec 6 14:34:42 host1 isakmpd: ::ffff:192.168.100.103 <<< 192.168.100.104 ( SA
PROPOSAL TRANSFORM )5. Dec 6 14:34:42 host1 isakmpd: Phase I SA Negotiated6. Dec 6 14:34:42 host1 isakmpd: 192.168.100.103 >>> 192.168.100.104 ( KE NONCE )7. Dec 6 14:34:42 host1 isakmpd: ::ffff:192.168.100.103 <<< 192.168.100.104 ( KE
NONCE )8. Dec 6 14:34:42 host1 isakmpd: Encrypting the following msg to send: ( ID HASH
)9. Dec 6 14:34:42 host1 isakmpd: 192.168.100.103 >>> 192.168.100.104 ( Encrypted
Payloads )10. Dec 6 14:34:42 host1 isakmpd: ::ffff:192.168.100.103 <<< 192.168.100.104 (
Encrypted Payloads )11. Dec 6 14:34:42 host1 Tunnel Manager: 1: TM is processing a P1_sa_created_msg
(tid)12. Dec 6 14:34:42 host1 Tunnel Manager: 1: Received good P1 SA, updating P1
tunnel (tid)13. Dec 6 14:34:42 host1 Tunnel Manager: 0: Checking to see if any P2 tunnels need
to start14. Dec 6 14:34:42 host1 isakmpd: Decrypted the following received msg: ( ID HASH
)15. Dec 6 14:34:42 host1 isakmpd: Phase I Done !!!
Chapter 11. Internet Protocol (IP) Security 175
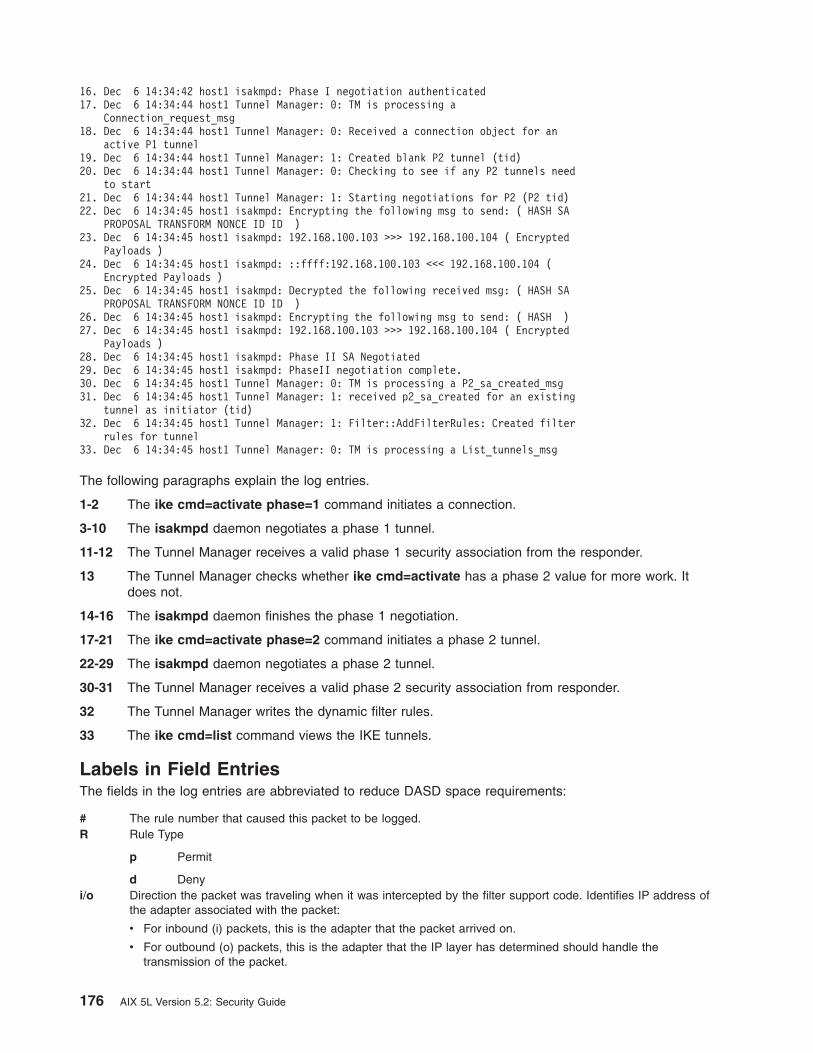
16. Dec 6 14:34:42 host1 isakmpd: Phase I negotiation authenticated17. Dec 6 14:34:44 host1 Tunnel Manager: 0: TM is processing a
Connection_request_msg18. Dec 6 14:34:44 host1 Tunnel Manager: 0: Received a connection object for an
active P1 tunnel19. Dec 6 14:34:44 host1 Tunnel Manager: 1: Created blank P2 tunnel (tid)20. Dec 6 14:34:44 host1 Tunnel Manager: 0: Checking to see if any P2 tunnels need
to start21. Dec 6 14:34:44 host1 Tunnel Manager: 1: Starting negotiations for P2 (P2 tid)22. Dec 6 14:34:45 host1 isakmpd: Encrypting the following msg to send: ( HASH SA
PROPOSAL TRANSFORM NONCE ID ID )23. Dec 6 14:34:45 host1 isakmpd: 192.168.100.103 >>> 192.168.100.104 ( Encrypted
Payloads )24. Dec 6 14:34:45 host1 isakmpd: ::ffff:192.168.100.103 <<< 192.168.100.104 (
Encrypted Payloads )25. Dec 6 14:34:45 host1 isakmpd: Decrypted the following received msg: ( HASH SA
PROPOSAL TRANSFORM NONCE ID ID )26. Dec 6 14:34:45 host1 isakmpd: Encrypting the following msg to send: ( HASH )27. Dec 6 14:34:45 host1 isakmpd: 192.168.100.103 >>> 192.168.100.104 ( Encrypted
Payloads )28. Dec 6 14:34:45 host1 isakmpd: Phase II SA Negotiated29. Dec 6 14:34:45 host1 isakmpd: PhaseII negotiation complete.30. Dec 6 14:34:45 host1 Tunnel Manager: 0: TM is processing a P2_sa_created_msg31. Dec 6 14:34:45 host1 Tunnel Manager: 1: received p2_sa_created for an existing
tunnel as initiator (tid)32. Dec 6 14:34:45 host1 Tunnel Manager: 1: Filter::AddFilterRules: Created filter
rules for tunnel33. Dec 6 14:34:45 host1 Tunnel Manager: 0: TM is processing a List_tunnels_msg
The following paragraphs explain the log entries.
1-2 The ike cmd=activate phase=1 command initiates a connection.
3-10 The isakmpd daemon negotiates a phase 1 tunnel.
11-12 The Tunnel Manager receives a valid phase 1 security association from the responder.
13 The Tunnel Manager checks whether ike cmd=activate has a phase 2 value for more work. Itdoes not.
14-16 The isakmpd daemon finishes the phase 1 negotiation.
17-21 The ike cmd=activate phase=2 command initiates a phase 2 tunnel.
22-29 The isakmpd daemon negotiates a phase 2 tunnel.
30-31 The Tunnel Manager receives a valid phase 2 security association from responder.
32 The Tunnel Manager writes the dynamic filter rules.
33 The ike cmd=list command views the IKE tunnels.
Labels in Field EntriesThe fields in the log entries are abbreviated to reduce DASD space requirements:
# The rule number that caused this packet to be logged.R Rule Type
p Permit
d Denyi/o Direction the packet was traveling when it was intercepted by the filter support code. Identifies IP address of
the adapter associated with the packet:
v For inbound (i) packets, this is the adapter that the packet arrived on.
v For outbound (o) packets, this is the adapter that the IP layer has determined should handle thetransmission of the packet.
176 AIX 5L Version 5.2: Security Guide

s Specifies the IP address of the sender of the packet (extracted from the IP header).d Specifies the IP address of the intended recipient of the packet (extracted from the IP header).p Specifies the high-level protocol that was used to create the message in the data portion of the packet. May
be a number or name, for example: udp, icmp, tcp, tcp/ack, ospf, pip, esp, ah, or all.sp/t Specifies the protocol port number associated with the sender of the packet (extracted from the TCP/UDP
header). When the protocol is ICMP or OSPF, this field is replaced with t, which specifies the IP type.dp/c Specifies the protocol port number associated with the intended recipient of the packet (extracted from the
TCP/UDP header). When the protocol is ICMP, this field is replaced with c, which specifies the IP code.- Specifies that no information is availabler Indicates whether the packet had any local affiliation.
f Forwarded packets
l Local packets
o Outgoing
b Bothl Specifies the length of a particular packet in bytes.f Identifies if the packet is a fragment.T Indicates the tunnel ID.i Specifies what interface the packet came in on.
Chapter 11. Internet Protocol (IP) Security 177
IP Security Problem Determination
This section includes some hints and tips that may assist you when you encounter a problem. It isrecommended that logging be set up when IPSec is first configured. Logs are very useful in determiningwhat occurs with the filters and tunnels. (For detailed log information, see “Logging Facilities” onpage 174.)
Troubleshooting Manual Tunnel Errors
Error: Issuing mktun command results in the following error:
insert_tun_man4(): write failed : The requested resource is busy.
Problem: The tunnel you requested to activate is already active or you have colliding SPI values.
To fix: Issue the rmtun command to deactivate, then issue the mktun command to activate. Check to seeif the SPI values for the failing tunnel match any other active tunnel. Each tunnel should have its ownunique SPI values.
Error: Issuing mktun command results in the following error:
Device ipsec_v4 is in Defined status.
Tunnel activation for IP Version 4 not performed.
Problem: You have not made the IP Security device available.
To fix: Issue the following command:
mkdev -l ipsec -t 4
You may have to change -t option to 6 if you are getting the same error for IP Version 6 tunnel activation.The devices must be in available state. To check the IP Security device state, issue the followingcommand:
lsdev -Cc ipsecError: Issuing a gentun command results in the following error:
Invalid Source IP address
Problem: You have not entered a valid IP address for the source address.
To fix: For IP Version 4 tunnels, check to see that you have entered an available IP Version 4 address forthe local machine. You cannot use host names for the source when generating tunnels, you may onlyuse host names for the destination.
For IP Version 6 tunnels, check to see that you entered an available IP Version 6 address. If you typenetstat -in and no IP Version 6 addresses exist, run /usr/sbin/autoconf6 (interface) for a link localautogenerated address (using MAC address) or use the ifconfig command to manually assign anaddress.
Error: Issuing a gentun command results in the following error:
Invalid Source IP address
Problem: You have not entered a valid IP address for the source address.
To fix: For IP Version 4 tunnels, check to see that you have entered an available IP Version 4 address forthe local machine. You cannot use host names for the source when generating tunnels, you may onlyuse host names for the destination.
For IP Version 6 tunnels, check to see that you entered an available IP Version 6 address. If you typenetstat -in and no IP Version 6 addresses exist, run /usr/sbin/autoconf6 (interface) for a link localauto-generated address (using MAC address) or use ifconfig to manually assign an address.
178 AIX 5L Version 5.2: Security Guide
Error: Issuing mktun command results in the following error:
insert_tun_man4(): write failed : A system call received a parameter that is not valid.
Problem: Tunnel generation occurred with invalid ESP and AH combination or without the use of the newheader format when necessary.
To fix: Check to see what authentication algorithms are in use by the particular tunnel in question.Remember that the HMAC_MD5 and HMAC_SHA algorithms require the new header format. The newheader format can be changed using the SMIT fast path ips4_basic or the -z parameter with the chtuncommand. Also remember that DES_CBC_4 cannot be used with the new header format.
Error: Starting IP Security from Web-based System Manager results in a Failure message.
Problem: The IP Security daemons are not running.
To fix: View which daemons are running by entering the ps -ef command. The following daemons areassociated with IP Security:
v tmd
v isakmpd
v cpsd
The cpsd daemon is active only if the digital certificate code is installed (the fileset named gskit.rte orgskkm.rte) and you have configured the Key Manager tool to contain digital certificates.
If the daemons are not active, stop IP Security using Web-based System Manager and then restart it,which automatically starts the appropriate daemons.
Error: Trying to use IP Security results in the following error:
The installed bos.crypto is back level and must be updated.
Problem: The bos.net.ipsec.* files have been updated to a newer version, but the correspondingbos.crypto.* files have not.
To fix: Update the bos.crypto.* files to the version that corresponds with the updated bos.net.ipsec.*files.
Troubleshooting IKE Tunnel ErrorsThe following sections describe errors that can occur when using IKE tunnels.
IKE Tunnel Process FlowThe IKE tunnels are set up by the communication of the ike command or the Web-based System ManagerVPN panels with the following daemons:
Table 8. Daemons used by IKE tunnels.
tmd Tunnel Manager daemon
isakmpd IKE daemon
cpsd Certificate proxy daemon
For IKE tunnels to be correctly set up, the tmd and isakmpd daemons must be running. If IP Security isset to start at reboot, these daemons start automatically. Otherwise, they must be started usingWeb-based System Manager.
The Tunnel Manager gives requests to the isakmpd command to start a tunnel. If the tunnel already existsor is not valid (for instance, has an invalid remote address), it reports an error. If negotiation has started, itmay take some time, depending on network latency, for the negotiation to complete. The ike cmd=listcommand can list the state of the tunnel to determine if the negotiation was successful. Also, the TunnelManager logs events to syslog to the levels of debug, event, and information, which can be used tomonitor the progress of the negotiation.
Chapter 11. Internet Protocol (IP) Security 179
The sequence is as follows:
1. Use Web-based System Manager or the ike command to initiate a tunnel.
2. The tmd daemon gives the isakmpd daemon a connection request for key management (phase 1).
3. The isakmpd daemon responds with SA created or an error.
4. The tmd daemon gives the isakmpd daemon a connection request for a data management tunnel(phase 2).
5. The isakmpd daemon responds with SA created or an error.
6. Tunnel parameters are inserted into the kernel tunnel cache.
7. Filter rules are added to the kernel dynamic filter table.
When the machine is acting as a responder, the isakmpd daemon notifies the Tunnel Manager tmddaemon that a tunnel has been negotiated successfully and a new tunnel is inserted into the kernel. Insuch cases, the process starts with step 3 and continues until step 7, without the tmd daemon issuingconnection requests.
IKE LoggingThe isakmpd, tmd and cpsd daemons log events to syslog. For the isakmpd daemon, logging isenabled using the ike cmd=log command. The /etc/isakmpd.conf configuration file can be set up tospecify the logging level. The level can be set to none, errors, isakmp_events, or information.
Note: In versions earlier than AIX 5.1, the isakmpd daemon logged to a separate file, which wasalso specified in /etc/isakmpd.conf file.
The configuration file parameter that can be set for logging is log_level. The IKE daemons use thefollowing levels of logging:
none No logging (the default)
error Only logging protocol and API errors
isakmp_eventsOnly logging IKE protocol events and errors
InformationLogging protocol and implementation information (recommended for debugging)
The syntax for this option is simply as follows:log_level
The isakmpd daemon code either initiates by sending a proposal or responds by evaluating a proposal. Ifthe proposal is accepted, a security association is created and the tunnel is set up. If the proposal is notaccepted or the connection times out before the negotiation completes, the isakmpd daemon indicates anerror. The entries in syslog from tmd indicate whether the negotiation succeeded. A failure caused by aninvalid certificate logs to syslog. To determine the exact cause of a failed negotiation, check the loggingfile specified in /etc/syslog.conf.
The syslog facility adds a prefix to each log line, noting the date and time, the machine, and the program.The following example uses googly as the machine name and isakmpd as the program name:Nov 20 09:53:50 googly isakmpd: ISAKMP_MSG_HEADERNov 20 09:53:50 googly isakmpd: Icookie : 0xef06a77488f25315, Rcookie :0x0000000000000000Nov 20 09:53:51 googly isakmpd: Next Payload : 1(SA), Maj Ver : 1, Min Ver : 0Nov 20 09:53:51 googly isakmpd: Xchg Type : 2 (ID protected), Flag= 0, Encr : No,COMMIT : NoNov 20 09:53:51 googly isakmpd: Msg ID : 0x00000000
To improve clarity, the grep command can be used to extract log lines of interest (such as all isakmpdlogging) and the cut command can be used to remove the prefix from each line. The isakmpd logexamples in the rest of this section have been tailored in a similar way.
180 AIX 5L Version 5.2: Security Guide
Parse Payload Logging FunctionThe security association (SA) between two end points is established by exchanging IKE messages. TheParse Payload function parses the messages in a human-readable format. The logging can be enabled byediting the /etc/isakmpd.conf file. The logging entry in the /etc/isakmpd.conf file looks similar to thefollowing:information
The type of IKE payloads that Parse Payload logs depends on the content of the IKE message. Examplesinclude SA Payload, Key Exchange Payload, Certificate Request Payload, Certificate Payload, andSignature Payload. The following is an example of a Parse Payload log in which anISAKMP_MSG_HEADER is followed by five payloads:ISAKMP_MSG_HEADER
Icookie : 0x9e539a6fd4540990, Rcookie : 0x0000000000000000Next Payload : 1(SA), Maj Ver : 1, Min Ver : 0Xchg Type : 4 (Aggressive), Flag= 0, Encr : No,COMMIT : NoMsg ID : 0x00000000len : 0x10e(270)
SA Payload:Next Payload : 4(Key Exchange), Payload len : 0x34(52)DOI : 0x1(INTERNET)bitmask : 1(SIT_IDENTITY_ONLY
Proposal Payload:Next Payload : 0(NONE), Payload len : 0x28(40)Proposal # : 0x1(1), Protocol-ID : 1(ISAKMP)SPI size : 0x0(0), # of Trans : 0x1(1)
Transform Payload:Next Payload : 0(NONE), Payload len : 0x20(32)Trans # : 0x1(1), Trans.ID : 1(KEY_IKE)Attr : 1(Encr.Alg ), len=0x2(2)Value=0x1(1),(DES-cbc)Attr : 2(Hash Alg ), len=0x2(2)Value=0x1(1),(MD5)Attr : 3(Auth Method ), len=0x2(2)Value=0x3(3),(RSA Signature)Attr : 4(Group Desc ), len=0x2(2)Value=0x1(1),(default 768-bit MODP group)Attr : 11(Life Type ), len=0x2(2)Value=0x1(1),(seconds)Attr : 12(Life Duration), len=0x2(2)Value=0x7080(28800)
Key Payload:Next Payload : 10(Nonce), Payload len : 0x64(100)
Key Data :33 17 68 10 91 1f ea da 38 a0 22 2d 84 a3 5d 5da0 e1 1f 42 c2 10 aa 8d 9d 14 0f 58 3e c4 ec a39f 13 62 aa 27 d8 e5 52 8d 5c c3 cf d5 45 1a 798a 59 97 1f 3b 1c 08 3e 2a 55 9b 3c 50 cc 82 2cd9 8b 39 d1 cb 39 c2 a4 05 8d 2d a1 98 74 7d 95ab d3 5a 39 7d 67 5b a6 2e 37 d3 07 e6 98 1a 6b
Nonce Payload:Next Payload : 5(ID), Payload len : 0xc(12)
Nonce Data:6d 21 73 1d dc 60 49 93
ID Payload:Next Payload : 7(Cert.Req), Payload len : 0x49(73)ID type : 9(DER_DN), Protocol : 0, Port = 0x0(0)
Certificate Request Payload:Next Payload : 0(NONE), Payload len : 0x5(5)Certificate Encoding Type: 4(X.509 Certificate - Signature)
Chapter 11. Internet Protocol (IP) Security 181
Within each payload, a Next Payload field points to the payload following the current payload. If thecurrent payload is the last one in the IKE message, the Next Payload field has the value of zero (None).
Each Payload in the example has information pertaining to the negotiations that are going on. Forexample, the SA payload has the Proposal and Transform Payloads, which in turn show the encryptionalgorithm, authentication mode, hash algorithm, SA life type, and SA duration that the initiator is proposingto the responder.
Also, the SA Payload consists of one or more Proposal Payloads and one or more Transform Payloads.The Next Payload field for Proposal Payload has a value of either 0 if it is the only Proposal Payload or avalue of 2 if it is followed by one more Proposal Payloads. Similarly, the Next Payload field for a TransformPayload has a value of 0 if it is the only Transform Payload, or a value of 3 if it is followed by one moreTransform Payloads, as shown in the following example:ISAKMP_MSG_HEADER
Icookie : 0xa764fab442b463c6, Rcookie : 0x0000000000000000Next Payload : 1(SA), Maj Ver : 1, Min Ver : 0Xchg Type : 2 (ID protected), Flag= 0, Encr : No,COMMIT : NoMsg ID : 0x00000000len : 0x70(112)
SA Payload:Next Payload : 0(NONE), Payload len : 0x54(84)DOI : 0x1(INTERNET)bitmask : 1(SIT_IDENTITY_ONLY
Proposal Payload:Next Payload : 0(NONE), Payload len : 0x48(72)Proposal # : 0x1(1), Protocol-ID : 1(ISAKMP)SPI size : 0x0(0), # of Trans : 0x2(2)
Transform Payload:Next Payload : 3(Transform), Payload len : 0x20(32)Trans # : 0x1(1), Trans.ID : 1(KEY_IKE)Attr : 1(Encr.Alg ), len=0x2(2)Value=0x5(5),(3DES-cbc)Attr : 2(Hash Alg ), len=0x2(2)Value=0x1(1),(MD5)Attr : 3(Auth Method ), len=0x2(2)Value=0x1(1),(Pre-shared Key)Attr : 4(Group Desc ), len=0x2(2)Value=0x1(1),(default 768-bit MODP group)Attr : 11(Life Type ), len=0x2(2)Value=0x1(1),(seconds)Attr : 12(Life Duration), len=0x2(2)Value=0x7080(28800)
Transform Payload:Next Payload : 0(NONE), Payload len : 0x20(32)Trans # : 0x2(2), Trans.ID : 1(KEY_IKE)Attr : 1(Encr.Alg ), len=0x2(2)Value=0x1(1),(DES-cbc)Attr : 2(Hash Alg ), len=0x2(2)Value=0x1(1),(MD5)Attr : 3(Auth Method ), len=0x2(2)Value=0x1(1),(Pre-shared Key)Attr : 4(Group Desc ), len=0x2(2)Value=0x1(1),(default 768-bit MODP group)Attr : 11(Life Type ), len=0x2(2)Value=0x1(1),(seconds)Attr : 12(Life Duration), len=0x2(2)Value=0x7080(28800)
The IKE Message Header of a Parse Payload log shows the exchange type (Main Mode or AggressiveMode), the length of the entire message, the message identifier, and so on.
182 AIX 5L Version 5.2: Security Guide

The Certificate Request Payload requests a certificate from the responder. The responder sends thecertificate in a separate message. The following example shows the Certificate Payload and SignaturePayload that are sent to a peer as a part of an SA negotiation. The certificate data and the signature dataare printed in hex format.ISAKMP_MSG_HEADER
Icookie : 0x9e539a6fd4540990, Rcookie : 0xc7e0a8d937a8f13eNext Payload : 6(Certificate), Maj Ver : 1, Min Ver : 0Xchg Type : 4 (Aggressive), Flag= 0, Encr : No,COMMIT : NoMsg ID : 0x00000000len : 0x2cd(717)
Certificate Payload:
Next Payload : 9(Signature), Payload len : 0x22d(557)Certificate Encoding Type: 4(X.509 Certificate - Signature)Certificate: (len 0x227(551) in bytes82 02 24 30 82 01 8d a0 03 02 01 02 02 05 05 8efb 3e ce 30 0d 06 09 2a 86 48 86 f7 0d 01 01 0405 00 30 5c 31 0b 30 09 06 03 55 04 06 13 02 4649 31 24 30 22 06 03 55 04 0a 13 1b 53 53 48 2043 6f 6d 6d 75 6e 69 63 61 74 69 6f 6e 73 20 5365 63 75 72 69 74 79 31 11 30 0f 06 03 55 04 0b13 08 57 65 62 20 74 65 73 74 31 14 30 12 06 0355 04 03 13 0b 54 65 73 74 20 52 53 41 20 43 4130 1e 17 0d 39 39 30 39 32 31 30 30 30 30 30 305a 17 0d 39 39 31 30 32 31 32 33 35 39 35 39 5a30 3f 31 0b 30 09 06 03 55 04 06 13 02 55 53 3110 30 0e 06 03 55 04 0a 13 07 49 42 4d 2f 41 4958 31 1e 30 1c 06 03 55 04 03 13 15 62 61 72 6e65 79 2e 61 75 73 74 69 6e 2e 69 62 6d 2e 63 6f6d 30 81 9f 30 0d 06 09 2a 86 48 86 f7 0d 01 0101 05 00 03 81 8d 00 30 81 89 02 81 81 00 b2 ef48 16 86 04 7e ed ba 4c 14 d7 83 cb 18 40 0a 3f55 e9 ad 8f 0f be c5 b6 6d 19 ec de 9b f5 01 a6b9 dd 64 52 34 ad 3d cd 0d 8e 82 6a 85 a3 a8 1c37 e4 00 59 ce aa 62 24 b5 a2 ea 8d 82 a3 0c 6fb4 07 ad 8a 02 3b 19 92 51 88 fb 2c 44 29 da 7241 ef 35 72 79 d3 e9 67 02 b2 71 fa 1b 78 13 bef3 05 6d 10 4a c7 d5 fc fe f4 c0 b8 b8 fb 23 70a6 4e 16 5f d4 b1 9e 21 18 82 64 6d 17 3b 02 0301 00 01 a3 0f 30 0d 30 0b 06 03 55 1d 0f 04 0403 02 07 80 30 0d 06 09 2a 86 48 86 f7 0d 01 0104 05 00 03 81 81 00 75 a4 ee 9c 3a 18 f2 de 5d67 d4 1c e4 04 b4 e5 b8 5e 9f 56 e4 ea f0 76 4ad0 e4 ee 20 42 3f 20 19 d4 25 57 25 70 0a ea 4181 3b 0b 50 79 b5 fd 1e b6 0f bc 2f 3f 73 7d dd90 d4 08 17 85 d6 da e7 c5 a4 d6 9a 2e 8a e8 517e 59 68 21 55 4c 96 4d 5a 70 7a 50 c1 68 b0 cf5f 1f 85 d0 12 a4 c2 d3 97 bf a5 42 59 37 be fe9e 75 23 84 19 14 28 ae c4 c0 63 22 89 47 b1 b6f4 c7 5d 79 9d ca d0
Signature Payload:Next Payload : 0(NONE), Payload len : 0x84(132)
Signature: len 0x80(128) in bytes9d 1b 0d 90 be aa dc 43 95 ba 65 09 b9 00 6d 67b4 ca a2 85 0f 15 9e 3e 8d 5f e1 f0 43 98 69 d85c b6 9c e2 a5 64 f4 ef 0b 31 c3 cb 48 7c d8 30e3 a2 87 f4 7c 9d 20 49 b2 39 00 fa 8e bf d9 b07d b4 8c 4e 19 3a b8 70 90 88 2c cf 89 69 5d 07f0 5a 81 58 2e 15 40 37 b7 c8 d6 8c 5c e2 50 c34d 19 7e e0 e7 c7 c2 93 42 89 46 6b 5f f8 8b 7d5b cb 07 ea 36 e5 82 9d 70 79 9a fe bd 6c 86 36
Chapter 11. Internet Protocol (IP) Security 183
Digital Certificate and Signature Mode Problems
Error: The cpsd (Certificate Proxy Server daemon) does not start. An entry similar to the following appears inthe log file:
Sep 21 16:02:00 ripple CPS[19950]: Init():LoadCaCerts() failed, rc=-12
Problem: The certificate database has not opened or has not been found.
To Fix: Ensure that the Key Manager certificate databases are present in /etc/security. The followingfiles make up the database: ikekey.crl, ikekey.kdb, ikekey.rdb, ikekey.sth.
If only the ikekey.sth file is missing, the stash password option was not selected when the Key Managerdatabase was created. The password must be stashed to enable using digital certificates with IPSecurity. (See Creating a Key Database for more information.)
Error: Key Manager gives the following error when receiving a certificate:
Invalid Base64-encoded data was found
Problem: Superfluous data has been found in the certificate file or else data was lost or corrupted.
To Fix: The ’DER’ Encoded Certificate should be contained within the following strings (shown below). Noother characters should precede or follow other than the BEGIN and END CERTIFICATE strings.
-----BEGIN CERTIFICATE-----MIICMTCCAZqgAwIBAgIFFKZtANowDQYJKoZIhvcNAQEFBQAwXDELMAkGA1UEBhMCRkkxJDAiBgNVBAoTG1NTSCBDb21tdW5pY2F0aW9ucyBTZWN1cml0eTERMA8GA1UECxMIV2ViIHRlc3QxFDASBgNVBAMTC1Rlc3QgUlNBIENBMB4XDTk5MDkyMTAwMDAwMFoXDTk5MTAyMTIzNTk1OVowOzELMAkGA1UEBhMCVVMxDDAKBgNVBAoTA0lCTTEeMBwGA1UEAxMVcmlwcGxlLmF1c3Rpbi5pYm0uY29tMIGfMA0GCSqGSIb3DQEBAQUAA4GNADCBiQKBgQC5EZqo6n7tZrpAL6X4L7mf4yXQSm+m/NsJLhp6afbFpPvXgYWCwq4pvOtvxgum+FHrE0gysNjbKkE4Y6ixC9PGGAKHnhM3vrmvFjnl1G6KtyEz58LzBWW39QS6NJ1LqqP1nT+y3+Xzvfv8Eonqzno8mglCWMX09SguLmWoU1PcZQIDAQABoyAwHjALBgNVHQ8EBAMCBaAwDwYDVR0RBAgwBocECQNhhzANBgkqhkiG9w0BAQUFAOBgQA6bgp4Zay34/fyAlyCkNNAYJRrN3Vc4NHN7IGjUziN6jK5UyB5zL37FERWhT9ArPLzK7yEZs+MDNvB0bosyGWEDYPZr7EZHhYcoBP4/cd0V5rBFmA8Y2gUthPiIoxpi4+KZGHYyLqTrm+8Is/DVJaQmCGRPynHK35xjT6WuQtiYg==-----END CERTIFICATE-----
The following options can help you diagnose and solve this problem.
v If data was lost or corrupted, recreate the Certificate
v Use an ASN.1 parser (available on the Internet World Wide Web) to check whether the certificate isvalid by parsing the certificate successfully.
Error: Key Manager gives the following error when receiving a personal certificate:
No request key was found for the certificate
Problem: A Personal Certificate Request does not exist for the personal certificate being received.
To Fix: Create the Personal Certificate Request again and request a new certificate.Error: Web-based System Manager gives the following error when you configure an IKE tunnel:
Error 171 in the Key Management (Phase 1) Tunnel operation:PUT_IRL_FAILED
Problem: One cause for this error is that the host identity type, which is configured on the IKE dialog(Identification tab), is invalid. This can happen when the host identity type selected from the pull-down listdoes not logically match the type entered in the Host Identity field. For example, if you select a hostidentity type of X500 Distinguished Name, you must to enter a properly formatted distinguished name inthe Host Identity field.
To Fix: Ensure the distinguished name you enter is correct for the type selected in the host identitypull-down list.
184 AIX 5L Version 5.2: Security Guide
Error: An IKE negotiation fails and an entry similar to the following appears in the log file:
inet_cert_service::channelOpen():clientInitIPC():error,rc =2(No such file or directory)
Problem: The cpsd is not running or has died
To Fix: Start IP Security using Web-based System Manager. This action also starts the appropriatedaemons.
Error: An IKE negotiation fails and an entry similar to the following appears in the log file:
CertRepo::GetCertObj: DN Does Not Match: ("/C=US/O=IBM/CN=ripple.austin.ibm.com")
Problem: The X.500 Distinguished Name (DN) entered while defining the IKE tunnel does not match theX.500 DN in the personal certificate.
To Fix: Change the IKE tunnel definition in Web-based System Manager to match the distinguished namein the certificate.
Error: While defining IKE tunnels in Web-based System Manager, the Digital certificate check box is disabledunder the Authentication Method tab.
Problem: The policy associated with this tunnel does not use RSA signature mode authentication.
To Fix: Change the transform of the associated policy to use the RSA signature authentication method.For example, you can choose IBM_low_CertSig as a key management policy when defining a IKE tunnel.
Tracing FacilitiesTracing is a debug facility for tracing kernel events. Traces can be used to get more specific informationabout events or errors occurring in the kernel filter and tunnel code.
The SMIT IP Security trace facility is available through the Advanced IP Security Configuration menu. Theinformation captured by this trace facility includes information on Error, Filter, Filter Information, Tunnel,Tunnel Information, Capsulation/Decapsulation, Capsulation Information, Crypto, and Crypto Information.By design, the error trace hook provides the most critical information. The info trace hook can generatecritical information and may have an impact on system performance. This tracing will provide clues as towhat a problem may be. Tracing information will also be required when speaking with a service technician.To access the tracing facility, use the SMIT fast path smit ips4_tracing (for IP Version 4) or smitips6_tracing (for IP Version 6).
ipsecstatYou can issue the ipsecstat command to generate the following sample report. This sample report showsthat the IP Security devices are in the available state, that there are three authentication algorithmsinstalled, three encryption algorithms installed, and that there is a current report of packet activity. Thisinformation may be useful to you in determining where a problem exists if you are troubleshooting your IPSecurity traffic.IP Security Devices:ipsec_v4 Availableipsec_v6 Available
Authentication Algorithm:HMAC_MD5 -- Hashed MAC MD5 Authentication ModuleHMAC_SHA -- Hashed MAC SHA Hash Authentication ModuleKEYED_MD5 -- Keyed MD5 Hash Authentication Module
Encryption Algorithm:CDMF -- CDMF Encryption ModuleDES_CBC_4 -- DES CBC 4 Encryption ModuleDES_CBC_8 -- DES CBC 8 Encryption Module3DES_CBC -- Triple DES CBC Encryption Module
Chapter 11. Internet Protocol (IP) Security 185
IP Security Statistics -Total incoming packets: 1106Incoming AH packets:326Incoming ESP packets: 326Srcrte packets allowed: 0Total outgoing packets:844Outgoing AH packets:527Outgoing ESP packets: 527Total incoming packets dropped: 12
Filter denies on input: 12AH did not compute: 0ESP did not compute:0AH replay violation:0ESP replay violation: 0
Total outgoing packets dropped:0Filter denies on input:0
Tunnel cache entries added: 7Tunnel cache entries expired: 0Tunnel cache entries deleted: 6
Note: Beginning with AIX 4.3.3, CDMF support has been removed because DES is now availableworldwide. Reconfigure any tunnels that use CDMF to use DES or Triple DES.
186 AIX 5L Version 5.2: Security Guide
IP Security Reference
List of Commands
ike cmd=activate Starts an Internet Key Exchange (IKE) negotiation (AIX 4.3.2 and later).ike cmd=remove Deactivates IKE tunnels (AIX 4.3.2 and later)ike cmd=list Lists IKE tunnels (AIX 4.3.2 and later)ikedb Provides the interface to the IKE tunnel database(AIX 5.1 and later)gentun Creates a tunnel definitionmktun Activates tunnel definition(s)chtun Changes a tunnel definitionrmtun Removes a tunnel definitionlstun Lists tunnel definition(s)exptun Exports tunnel definition(s)imptun Imports tunnel definition(s)genfilt Creates a filter definitionmkfilt Activates filter definition(s)mvfilt Moves a filter rulechfilt Changes a filter definitionrmfilt Removes a filter definitionlsfilt Lists filter definition(s)expfilt Exports filter definition(s)impfilt Imports filter definition(s)ipsec_convert Lists status of IP securityipsecstat Lists status of IP securityipsectrcbuf Lists the contents of IP security tracing bufferunloadipsec Unloads a crypto module
List of Methods
defipsec Defines an instance of IP Security for IP Version 4 or IP Version 6cfgipsec Configures and loads ipsec_v4 or ipsec_v6ucfgipsec Unconfigures ipsec_v4 or ipsec_v6
Chapter 11. Internet Protocol (IP) Security 187

188 AIX 5L Version 5.2: Security Guide
Chapter 12. Network Information Services (NIS) and NIS+Security
This chapter provides an overview of how NIS+ protects its namespace and includes the followingsections:
v “Operating System Security Mechanisms”
v “NIS+ Security Mechanisms” on page 191
v “NIS+ Authentication and Credentials” on page 194
v “NIS+ Authorization and Access” on page 196
v “NIS+ Security and Administrative Rights” on page 200
v “NIS+ Security Reference” on page 201
Operating System Security Mechanisms
Operating system security is provided by gates that users must pass through before entering the operatingsystem environment, and permission matrixes that determine what they are able to do once inside. Insome contexts, secure RPC passwords have been referred to as network passwords.
The overall system is composed of four gates and two permission matrixes:
Dialup gateTo access a given operating system environment from the outside through a modem and phoneline, you must provide a valid login ID and dial-up password.
Login gateTo enter a given operating system environment you must provide a valid login ID and userpassword.
Root gateTo gain access to root privileges, you must provide a valid root user password.
Secure RPC gateIn an NIS+ environment running at security level 2 (the default), when you try to use NIS+ servicesand gain access to NIS+ objects (servers, directories, tables, table entries, and so on) your identityis confirmed by NIS+, using the secure RPC process.
Entering the secure RPC gate requires presentation of a secure RPC password. Your secure RPCpassword and your login password normally are identical. When that is the case, you are passedthrough the gate automatically without having to re-enter your password. (In some contexts,secure RPC passwords have been referred to as network passwords. See the Secure RPCPassword versus Login Password section in the AIX 5L Version 5.2 Network Information Services(NIS and NIS+) Guide for information about handling two passwords that are not identical.)
A set of credentials is used to automatically pass your requests through the secure RPC gate. Theprocess of generating, presenting, and validating your credentials is called authentication becauseit confirms who you are and that you have a valid secure RPC password. This authenticationprocess is automatically performed every time you request NIS+ service.
In an NIS+ environment running in NIS-compatibility mode, the protection provided by the secureRPC gate is significantly weakened because everyone has read rights for all NIS+ objects andmodify rights for those entries that apply to them regardless of whether or not they have a validcredential (that is, regardless of whether or not the authentication process has confirmed theiridentity and validated their secure RPC password). Because this situation allows anyone to haveread rights for all NIS+ objects and modify rights for those entries that apply to them, an NIS+network running in compatibility mode is less secure than one running in normal mode. (In secure
© Copyright IBM Corp. 2002, 2003 189

RPC terminology, any user without a valid credential is considered a member of the nobody class.See “Authorization Classes” on page 196 for a description of the four classes.)
For details on how to administer NIS+ authentication and credentials, see the Administering NIS+Credentials section in the AIX 5L Version 5.2 Network Information Services (NIS and NIS+) Guide.
File and directory matrixOnce you have gained access to an operating system environment, your ability to read, execute,modify, create, and destroy files and directories is governed by the applicable permissions.
NIS+ objects matrixOnce you have been properly authenticated to NIS+, your ability to read, modify, create, anddestroy NIS+ objects is governed by the applicable permissions. This process is called NIS+authorization.
For details on NIS+ permissions and authorization, see the Administering NIS+ Access Rightssection in the AIX 5L Version 5.2 Network Information Services (NIS and NIS+) Guide.
190 AIX 5L Version 5.2: Security Guide
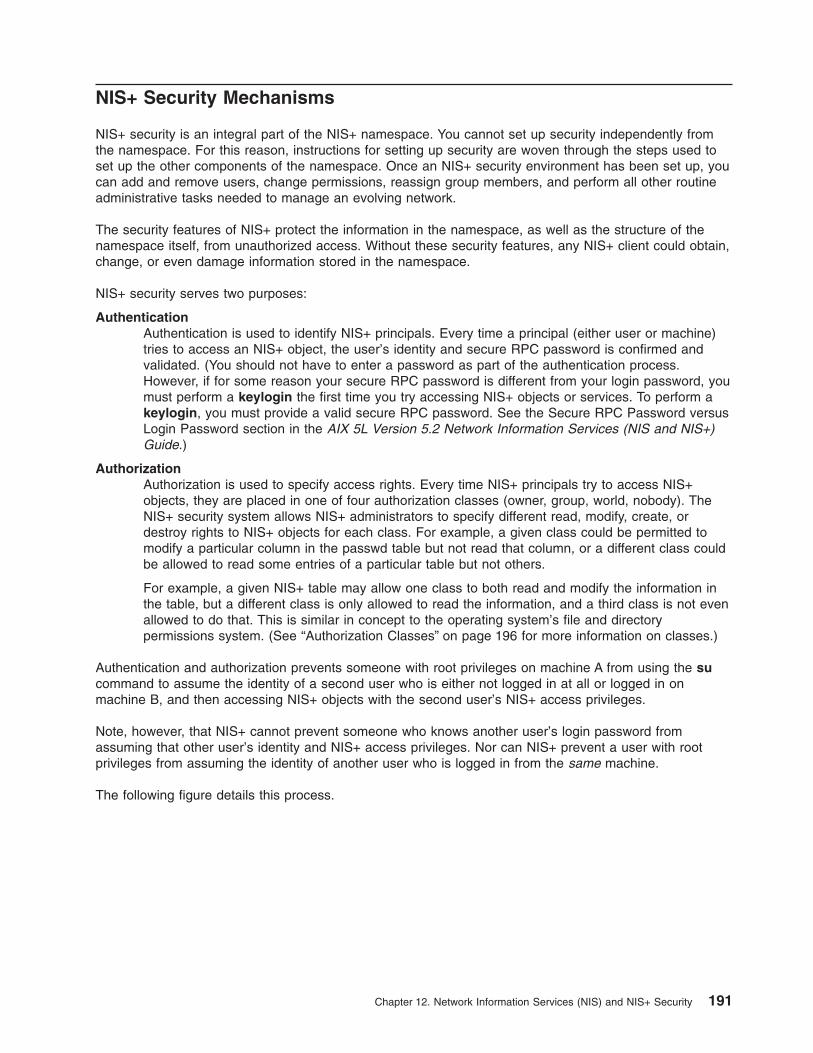
NIS+ Security Mechanisms
NIS+ security is an integral part of the NIS+ namespace. You cannot set up security independently fromthe namespace. For this reason, instructions for setting up security are woven through the steps used toset up the other components of the namespace. Once an NIS+ security environment has been set up, youcan add and remove users, change permissions, reassign group members, and perform all other routineadministrative tasks needed to manage an evolving network.
The security features of NIS+ protect the information in the namespace, as well as the structure of thenamespace itself, from unauthorized access. Without these security features, any NIS+ client could obtain,change, or even damage information stored in the namespace.
NIS+ security serves two purposes:
AuthenticationAuthentication is used to identify NIS+ principals. Every time a principal (either user or machine)tries to access an NIS+ object, the user’s identity and secure RPC password is confirmed andvalidated. (You should not have to enter a password as part of the authentication process.However, if for some reason your secure RPC password is different from your login password, youmust perform a keylogin the first time you try accessing NIS+ objects or services. To perform akeylogin, you must provide a valid secure RPC password. See the Secure RPC Password versusLogin Password section in the AIX 5L Version 5.2 Network Information Services (NIS and NIS+)Guide.)
AuthorizationAuthorization is used to specify access rights. Every time NIS+ principals try to access NIS+objects, they are placed in one of four authorization classes (owner, group, world, nobody). TheNIS+ security system allows NIS+ administrators to specify different read, modify, create, ordestroy rights to NIS+ objects for each class. For example, a given class could be permitted tomodify a particular column in the passwd table but not read that column, or a different class couldbe allowed to read some entries of a particular table but not others.
For example, a given NIS+ table may allow one class to both read and modify the information inthe table, but a different class is only allowed to read the information, and a third class is not evenallowed to do that. This is similar in concept to the operating system’s file and directorypermissions system. (See “Authorization Classes” on page 196 for more information on classes.)
Authentication and authorization prevents someone with root privileges on machine A from using the sucommand to assume the identity of a second user who is either not logged in at all or logged in onmachine B, and then accessing NIS+ objects with the second user’s NIS+ access privileges.
Note, however, that NIS+ cannot prevent someone who knows another user’s login password fromassuming that other user’s identity and NIS+ access privileges. Nor can NIS+ prevent a user with rootprivileges from assuming the identity of another user who is logged in from the same machine.
The following figure details this process.
Chapter 12. Network Information Services (NIS) and NIS+ Security 191
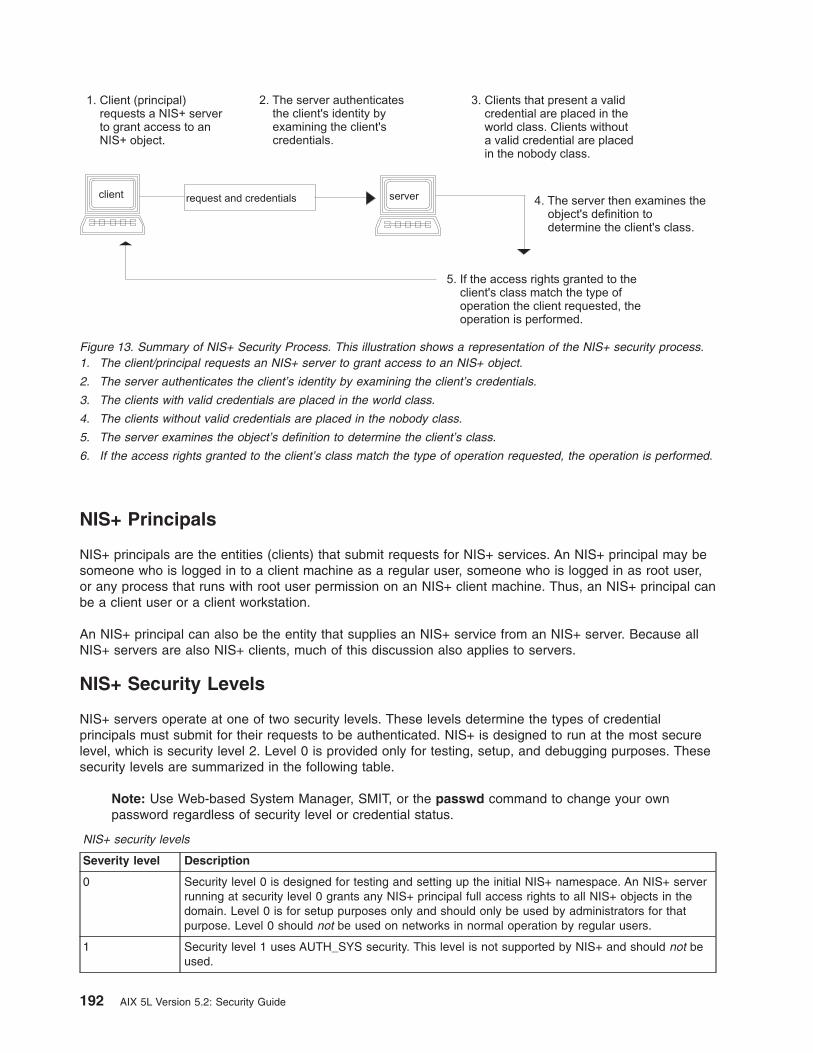
NIS+ Principals
NIS+ principals are the entities (clients) that submit requests for NIS+ services. An NIS+ principal may besomeone who is logged in to a client machine as a regular user, someone who is logged in as root user,or any process that runs with root user permission on an NIS+ client machine. Thus, an NIS+ principal canbe a client user or a client workstation.
An NIS+ principal can also be the entity that supplies an NIS+ service from an NIS+ server. Because allNIS+ servers are also NIS+ clients, much of this discussion also applies to servers.
NIS+ Security Levels
NIS+ servers operate at one of two security levels. These levels determine the types of credentialprincipals must submit for their requests to be authenticated. NIS+ is designed to run at the most securelevel, which is security level 2. Level 0 is provided only for testing, setup, and debugging purposes. Thesesecurity levels are summarized in the following table.
Note: Use Web-based System Manager, SMIT, or the passwd command to change your ownpassword regardless of security level or credential status.
NIS+ security levels
Severity level Description
0 Security level 0 is designed for testing and setting up the initial NIS+ namespace. An NIS+ serverrunning at security level 0 grants any NIS+ principal full access rights to all NIS+ objects in thedomain. Level 0 is for setup purposes only and should only be used by administrators for thatpurpose. Level 0 should not be used on networks in normal operation by regular users.
1 Security level 1 uses AUTH_SYS security. This level is not supported by NIS+ and should not beused.
Figure 13. Summary of NIS+ Security Process. This illustration shows a representation of the NIS+ security process.1. The client/principal requests an NIS+ server to grant access to an NIS+ object.
2. The server authenticates the client’s identity by examining the client’s credentials.
3. The clients with valid credentials are placed in the world class.
4. The clients without valid credentials are placed in the nobody class.
5. The server examines the object’s definition to determine the client’s class.
6. If the access rights granted to the client’s class match the type of operation requested, the operation is performed.
192 AIX 5L Version 5.2: Security Guide
NIS+ security levels
Severity level Description
2 Security level 2 is the default. The highest level of security currently provided by NIS+, itauthenticates only requests that use data encryption standard (DES) credentials. Requests withno credentials are assigned to the nobody class and have whatever access rights have beengranted to that class. Requests that use invalid DES credentials are retried. After repeated failureto obtain a valid DES credential, requests with invalid credentials fail with an authentication error.(A credential might not be valid for a variety of reasons, such as the principal making the requestis not logged in through keylogin on that machine, the clocks are out of sync, there is a keymismatch, and so on.)
Chapter 12. Network Information Services (NIS) and NIS+ Security 193
NIS+ Authentication and Credentials
NIS+ credentials authenticate the identity of each principal requesting an NIS+ service or access to anNIS+ object. The NIS+ credential/authorization process is an implementation of the Secure RPC system.
The credential/authentication system prevents someone from assuming another’s identity. That is, itprevents someone with root privileges on one machine from using the su command to assume the identityof a second user who is either not logged in at all or logged in on another machine and then accessingNIS+ objects with the second user’s NIS+ access privileges.
Note: NIS+ cannot prevent someone who knows another user’s login password from assuming thatother user’s identity and the other user’s NIS+ access privileges. Nor can NIS+ prevent a user withroot privileges from assuming the identity of another user who is currently logged in on the samemachine.
After a server authenticates a principal, it then checks the NIS+ object that the principal wants to access toverify what operations that principal is authorized to perform. (For further information about authorization,see “NIS+ Authorization and Access” on page 196.)
User and Machine CredentialsFor the basic types of principal, users and machines, the following different types of credentials exist:
User credentialsWhen someone is logged in to an NIS+ client as a regular user, requests for NIS+ services includethat person’s user credentials.
Machine credentialsWhen a user is logged in to an NIS+ client as root user, request for services use the clientworkstation’s credentials.
DES versus Local CredentialsNIS+ principals can have DES or local credentials.
DES Credentials
Data Encryption Standard (DES) credentials provide secure authentication. When this guide refers to NIS+checking a credential to authenticate an NIS+ principal, it is the DES credential that NIS+ is validating.
Note: Using DES credentials is only one method of achieving authentification. Do not equate DEScredentials with NIS+ credentials.
Each time a principal requests an NIS+ service or access to an NIS+ object, the software uses thecredential information stored for that principal to generate a credential for that principal. DES credentialsare generated from information created for each principal by an NIS+ administrator, as explained in theAdministering NIS+ Credentials section in the AIX 5L Version 5.2 Network Information Services (NIS andNIS+) Guide.
v When the validity of a principal’s DES credential is confirmed by NIS+, that principal is authenticated.
v A principal must be authenticated before being placed in the owner, group, or world authorizationclasses. In other words, you must have a valid DES credential in order to be placed in one of thoseclasses. (Principals without a valid DES credential are automatically placed in the nobody class.)
v DES credential information is always stored in the cred table of the principal’s home domain, regardlessof whether that principal is a client user or a client workstation.
194 AIX 5L Version 5.2: Security Guide
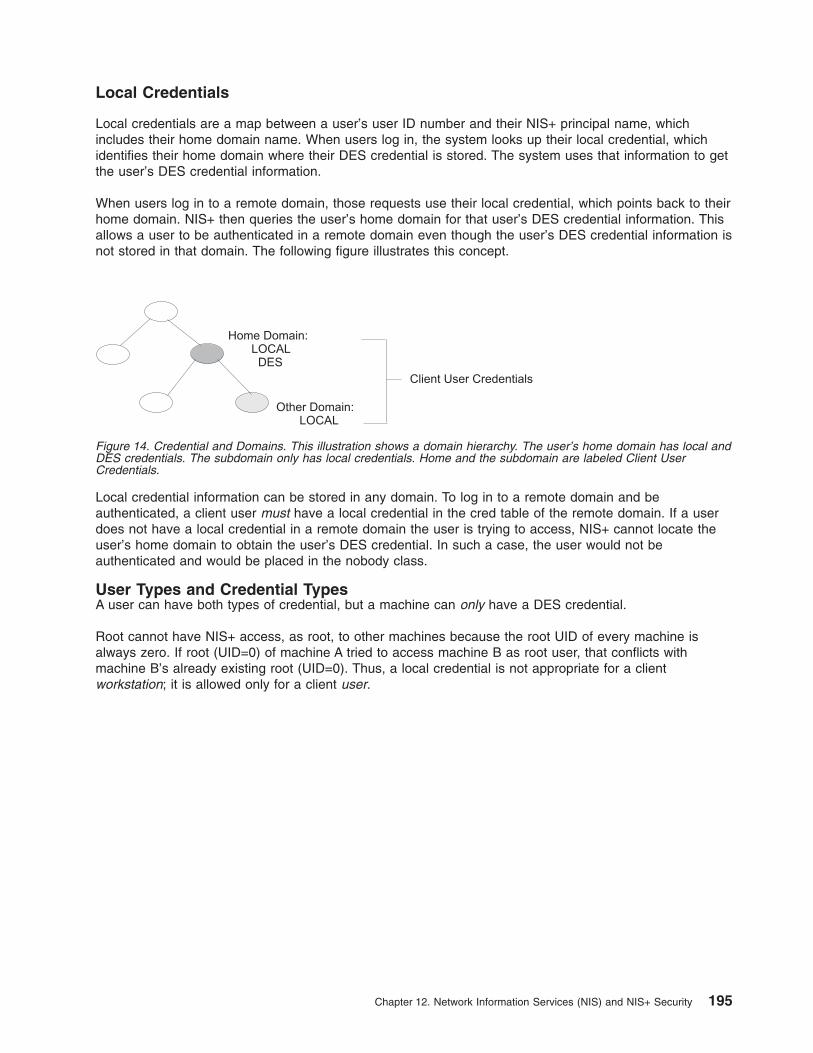
Local Credentials
Local credentials are a map between a user’s user ID number and their NIS+ principal name, whichincludes their home domain name. When users log in, the system looks up their local credential, whichidentifies their home domain where their DES credential is stored. The system uses that information to getthe user’s DES credential information.
When users log in to a remote domain, those requests use their local credential, which points back to theirhome domain. NIS+ then queries the user’s home domain for that user’s DES credential information. Thisallows a user to be authenticated in a remote domain even though the user’s DES credential information isnot stored in that domain. The following figure illustrates this concept.
Local credential information can be stored in any domain. To log in to a remote domain and beauthenticated, a client user must have a local credential in the cred table of the remote domain. If a userdoes not have a local credential in a remote domain the user is trying to access, NIS+ cannot locate theuser’s home domain to obtain the user’s DES credential. In such a case, the user would not beauthenticated and would be placed in the nobody class.
User Types and Credential TypesA user can have both types of credential, but a machine can only have a DES credential.
Root cannot have NIS+ access, as root, to other machines because the root UID of every machine isalways zero. If root (UID=0) of machine A tried to access machine B as root user, that conflicts withmachine B’s already existing root (UID=0). Thus, a local credential is not appropriate for a clientworkstation; it is allowed only for a client user.
Figure 14. Credential and Domains. This illustration shows a domain hierarchy. The user’s home domain has local andDES credentials. The subdomain only has local credentials. Home and the subdomain are labeled Client UserCredentials.
Chapter 12. Network Information Services (NIS) and NIS+ Security 195
NIS+ Authorization and Access
The basic purpose of NIS+ authorization is to specify the access rights that each NIS+ principal has foreach NIS+ object and service.
After the principal making an NIS+ request is authenticated, NIS+ places that principal in an authorizationclass. The access rights (permissions) that specify which operations a principal may do with a given NIS+object are assigned on a class basis. In other words, one authorization class may have certain accessrights while a different class has different rights.
Authorization classesThe following authorization classes exist: owner, group, world, and nobody. (See “AuthorizationClasses” for details.)
Access rightsThe following types of access rights (permissions) exist: create, destroy, modify, and read. (See“NIS+ Access Rights” on page 198 for details.)
Authorization Classes
NIS+ objects do not grant access rights directly to NIS+ principals. Instead, they grant access rights to thefollowing classes of principal:
OwnerThe principal who happens to be the object’s owner gets the rights granted to the owner class.
Group Each NIS+ object has one group associated with it. The members of an object’s group arespecified by the NIS+ administrator. The principals who belong to the object’s group class get therights granted to the group class. (In this context, groups refers to NIS+ groups, and not operatingsystem or net groups. For a description of NIS+ groups, see “Group Class” on page 197.
World The world class encompasses all NIS+ principals that a server has been able to authenticate.(That is, everyone who has been authenticated but who is not in either the owner or groupclasses.)
NobodyAll principals belong to the nobody class, including those who are not authenticated.
The following figure illustrates the class relationship:
196 AIX 5L Version 5.2: Security Guide

For any NIS+ request, the system determines which class the requesting principal belongs to and theprincipal can then use whatever access rights belong to that class.
An object can grant any combination of access rights to each of these classes. Normally, however, ahigher class is assigned the same rights as all the lower classes, as well as possible additional rights.
For instance, an object could grant read access to the nobody and world classes, both read and modifyaccess to the group class, and read, modify, create, and destroy access to the owner class.
The following describes the authorization classes in detail:
Owner ClassThe owner is a single NIS+ principal.
A principal making a request for access to an NIS+ object must be authenticated (present a valid DEScredential) before being granted owner-access rights.
By default, an object’s owner is the principal that created the object. However, an object’s owner can cedeownership to another principal by two different methods:
v The principal specifies a different owner at the time the object is created (see the Specifying AccessRights in Commands section in the AIX 5L Version 5.2 Network Information Services (NIS and NIS+)Guide).
v The principal changes the ownership of the object after it is created (see the Changing Ownership ofObjects and Entries section in the AIX 5L Version 5.2 Network Information Services (NIS and NIS+)Guide).
After a principal cedes ownership, that principal cedes all owner’s access rights to the object and keepsonly the rights the object assigns to either the group, the world, or nobody.
Group ClassThe object’s group is a single NIS+ group. (In this context, group refers to NIS+ groups, and not operatingsystem or net groups.)
A principal making a request for access to an NIS+ object must be authenticated (present a valid DEScredential) and belong to the group before being granted group-access rights.
Figure 15. Authorization Classes. This illustration shows a series of ovals within ovals that represents the relationshipbetween authorization classes. The smallest oval is Owner, encompassed by a larger oval labeled Group,encompassed by an oval labeled World, encompassed by an oval labeled Nobody.
Chapter 12. Network Information Services (NIS) and NIS+ Security 197
An NIS+ group is a collection of NIS+ principals, grouped together as a convenience for providing accessto the namespace. The access rights granted to an NIS+ group apply to all the principals that aremembers of that group. (An object’s owner, however, does not need to belong to the object’s group.)
When an object is created, the creator can opt for a default group. A nondefault group can be specifiedeither when the object is created or at any time later.
Information about NIS+ groups is stored in NIS+ group objects, under the groups_dir subdirectory ofevery NIS+ domain. (Note that information about NIS+ groups is not stored in the NIS+ group table. Thattable stores information about operating system groups.) Instructions for administering NIS+ groups areprovided in the Administering NIS+ Groups section in the AIX 5L Version 5.2 Network Information Services(NIS and NIS+) Guide.
World ClassThe world class contains all NIS+ principals that are authenticated by NIS+; that is, all members in theowner and group class, as well as all other principals who present a valid DES credential.
Access rights granted to the world class apply to all authenticated principals.
Nobody ClassThe nobody class contains all principals, even those without a valid DES credential.
Authorization Classes and the NIS+ Object HierarchyNIS+ security applies authorization classes independently to a hierarchy of objects. Directory objects arethe top level of the default hierarchy, then group or table objects, then columns, then entries. The followingdefinitions provide more information about each level:
Directory levelEach NIS+ domain contains two NIS+ directory objects: groups_dir and org_dir. Eachgroups_dir directory object contains various groups. Each org_dir directory object containsvarious tables.
Group or table levelGroups contain individual entries and possibly other groups. Tables contain both columns andindividual entries.
Column levelEach table has one or more columns.
Entry (row) levelEach group or table has one or more entries.
The four authorization classes apply at each level. Thus, a directory object has an owner and a group.Each table within a directory object has its own owner and group, which can be different from the ownerand group of the directory object. Within a table, a column or an entry can have its own owner or group,which can be different from the owner and group of the table as a whole or of the directory object as awhole.
NIS+ Access Rights
NIS+ objects specify access rights for NIS+ principals in the same way that operating system files specifypermissions for operating system users. Access rights specify the types of operations that NIS+ principalsare allowed to perform on NIS+ objects. (You can examine these by using the niscat -o command.)
NIS+ operations vary among different types of objects, but all operations fall into one of the followingaccess-rights categories: read, modify, create, and destroy.
Read A principal with read rights to an object can view the contents of that object.
198 AIX 5L Version 5.2: Security Guide

ModifyA principal with modify rights to an object can change the contents of that object.
DestroyA principal with destroy rights to an object can destroy or delete the object.
CreateA principal with create rights to a higher-level object can create new objects within that level. If youhave create rights to a NIS+ directory object, you can create new tables within that directory. If youhave create rights to a NIS+ table, you can create new columns and entries within that table.
Every communication from an NIS+ client to an NIS+ server is a request to perform one of theseoperations on a specific NIS+ object. For instance, when an NIS+ principal requests the IP address ofanother workstation, it is effectively requesting read access to the hosts table object, which stores thattype of information. When a principal asks the server to add a directory to the NIS+ namespace, it isactually requesting modify access to the directory’s parent object.
These rights logically evolve down from directory to table to table column and entry levels. For example, tocreate a new table, you must have create rights for the NIS+ directory object where the table will bestored. When you create that table, you become its default owner. As owner, you can assign yourselfcreate rights to the table, which allows you to create new entries in the table. If you create new entries in atable, you become the default owner of those entries. As table owner, you can also grant table-level createrights to others. For example, you can give your table’s group class table-level create rights. In that case,any member of the table’s group can create new entries in the table. The individual member of the groupwho creates a new table entry becomes the default owner of that entry.
Chapter 12. Network Information Services (NIS) and NIS+ Security 199

NIS+ Security and Administrative Rights
NIS+ does not enforce any requirement that there be a single NIS+ administrator. Whoever hasadministrative rights over an object (that is, the authority to create, destroy, and for some objects, modifyrights) is considered to be an NIS+ administrator for that object.
Whoever creates an NIS+ object sets the initial access rights to that object. If the creator restrictsadministrative rights to the object’s owner (initially the creator), only the owner has administrative powerover that object. On the other hand, if the creator grants administrative rights to the object’s group, theneveryone in that group has administrative power over that object.
Theoretically, you could grant administrative rights to the world class, or even the nobody class. Thesoftware allows you to do that. But granting administrative rights beyond the group class effectivelynullifies NIS+ security. Thus, if you grant administrative rights to either the world or the nobody class, youare, in effect, defeating the purpose of NIS+ security.
200 AIX 5L Version 5.2: Security Guide
NIS+ Security ReferenceUse the following commands to administer passwords, credentials, and keys (see the appropriatecommand descriptions for more information):
chkey Changes a principal’s secure RPC key pair. Unless you want to re-encrypt your current private keywith a new password, use the passwd command instead. The chkey command does not affectthe principal’s entry either in the passwd table or /etc/passwd file.
keyloginDecrypts and stores a principal’s secret key with the keyserv.
keylogoutDeletes stored secret key from keyserv.
keyservEnables the server for storing private encryption keys.
newkeyCreates a new key pair in public-key database.
nisaddcredCreates credentials for NIS+ principals.
nisupdkeysUpdates public keys in directory objects.
passwdChanges and administers principal’s password.
Chapter 12. Network Information Services (NIS) and NIS+ Security 201

202 AIX 5L Version 5.2: Security Guide

Chapter 13. Network File System (NFS) Security
In addition to the standard UNIX authentication system, the Network File System (NFS) provides a meansto authenticate users and machines in networks on a message-by-message basis. This additionalauthentication system uses Data Encryption Standard (DES) encryption and public key cryptography.
This chapter discusses the following topics:
v “NFS Authentication”
v “Naming Network Entities for DES Authentication” on page 205
v “The /etc/publickey File” on page 206
v “Booting Considerations of Public Key Systems” on page 206
v “Performance Considerations of Secure NFS” on page 206
v “Checklist for Administering Secure NFS” on page 207
v “Configuring Secure NFS” on page 207
v “Exporting a File System Using Secure NFS” on page 208
v “Mounting a File System Using Secure NFS” on page 209.
NFS AuthenticationNFS uses the DES algorithm for different purposes. NFS uses DES to encrypt a time stamp in the RemoteProcedure Call (RPC) messages sent between NFS servers and clients. This encrypted time stampauthenticates machines just as the ″token″ authenticates the sender.
Because NFS can authenticate every RPC message exchanged between NFS clients and servers, thisprovides an additional, optional level of security for each file system. By default, file systems are exportedwith the standard UNIX authentication. To take advantage of this additional level of security, you canspecify the secure option when you export a file system.
Public Key Cryptography for Secure NFS
Both the public key and the secret key of the user are are stored and indexed by net name in thepublickey.byname map. The secret key is DES-encrypted with the user login password. The keylogincommand uses the encrypted secret key, decrypts it with the login password, then gives it to a securelocal key server to save for use in future RPC transactions. Users are not aware of their public and secretkeys because the yppasswd command, in addition to changing the login password, generates the publicand secret keys automatically.
The keyserv daemon is an RPC service that runs on each NIS and NIS+ machine. For information onhow NIS+ uses keyserv, see AIX 5L Version 5.2 Network Information Services (NIS and NIS+) Guide.Within NIS, keyserv executes the following public key subroutines:
v key_setsecret subroutine
v key_encryptsession subroutine
v key_decryptsession subroutine
The key_setsecret subroutine tells the key server to store the secret key of the user (SKA) for future use;it is normally called by the keylogin command. The client program calls the key_encryptsessionsubroutine to generate the encrypted conversation key, which is passed in the first RPC transaction to aserver. The key server looks up the server public key and combines it with the secret key of the client (setup by a previous key_setsecret subroutine) to generate the common key. The server asks the key serverto decrypt the conversation key by calling the key_decryptsession subroutine.
© Copyright IBM Corp. 2002, 2003 203
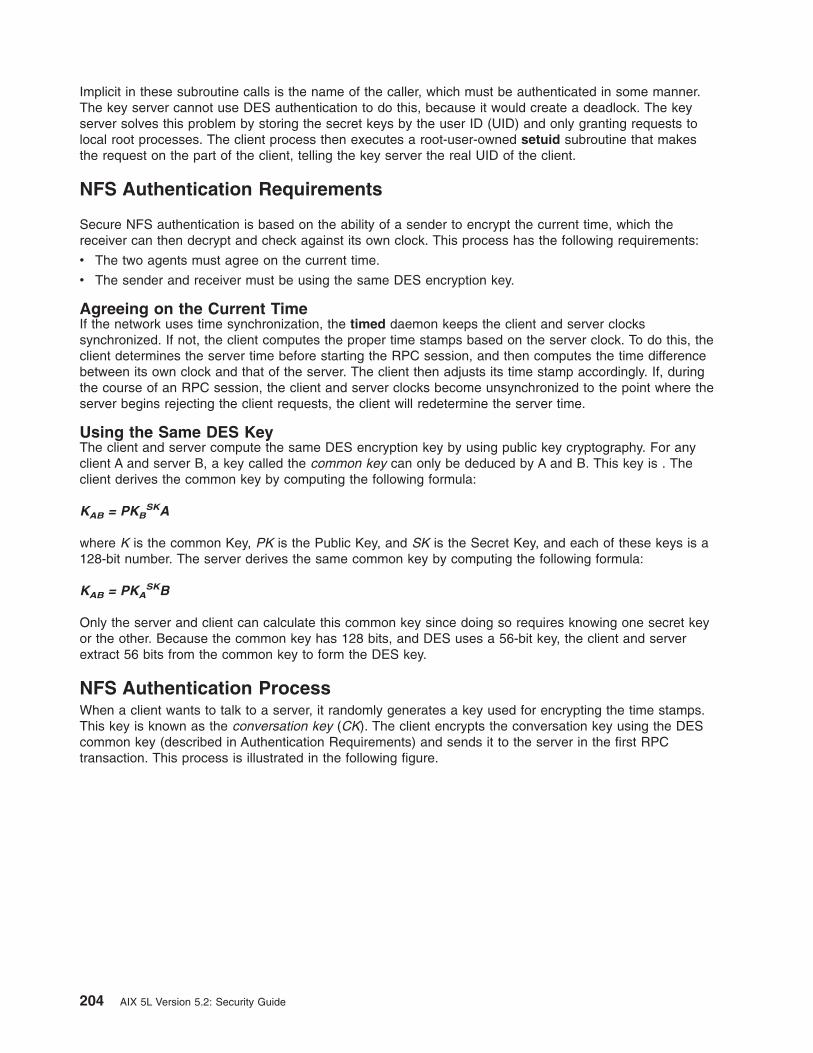
Implicit in these subroutine calls is the name of the caller, which must be authenticated in some manner.The key server cannot use DES authentication to do this, because it would create a deadlock. The keyserver solves this problem by storing the secret keys by the user ID (UID) and only granting requests tolocal root processes. The client process then executes a root-user-owned setuid subroutine that makesthe request on the part of the client, telling the key server the real UID of the client.
NFS Authentication Requirements
Secure NFS authentication is based on the ability of a sender to encrypt the current time, which thereceiver can then decrypt and check against its own clock. This process has the following requirements:
v The two agents must agree on the current time.
v The sender and receiver must be using the same DES encryption key.
Agreeing on the Current TimeIf the network uses time synchronization, the timed daemon keeps the client and server clockssynchronized. If not, the client computes the proper time stamps based on the server clock. To do this, theclient determines the server time before starting the RPC session, and then computes the time differencebetween its own clock and that of the server. The client then adjusts its time stamp accordingly. If, duringthe course of an RPC session, the client and server clocks become unsynchronized to the point where theserver begins rejecting the client requests, the client will redetermine the server time.
Using the Same DES KeyThe client and server compute the same DES encryption key by using public key cryptography. For anyclient A and server B, a key called the common key can only be deduced by A and B. This key is . Theclient derives the common key by computing the following formula:
KAB = PKBSKA
where K is the common Key, PK is the Public Key, and SK is the Secret Key, and each of these keys is a128-bit number. The server derives the same common key by computing the following formula:
KAB = PKASKB
Only the server and client can calculate this common key since doing so requires knowing one secret keyor the other. Because the common key has 128 bits, and DES uses a 56-bit key, the client and serverextract 56 bits from the common key to form the DES key.
NFS Authentication ProcessWhen a client wants to talk to a server, it randomly generates a key used for encrypting the time stamps.This key is known as the conversation key (CK). The client encrypts the conversation key using the DEScommon key (described in Authentication Requirements) and sends it to the server in the first RPCtransaction. This process is illustrated in the following figure.
204 AIX 5L Version 5.2: Security Guide
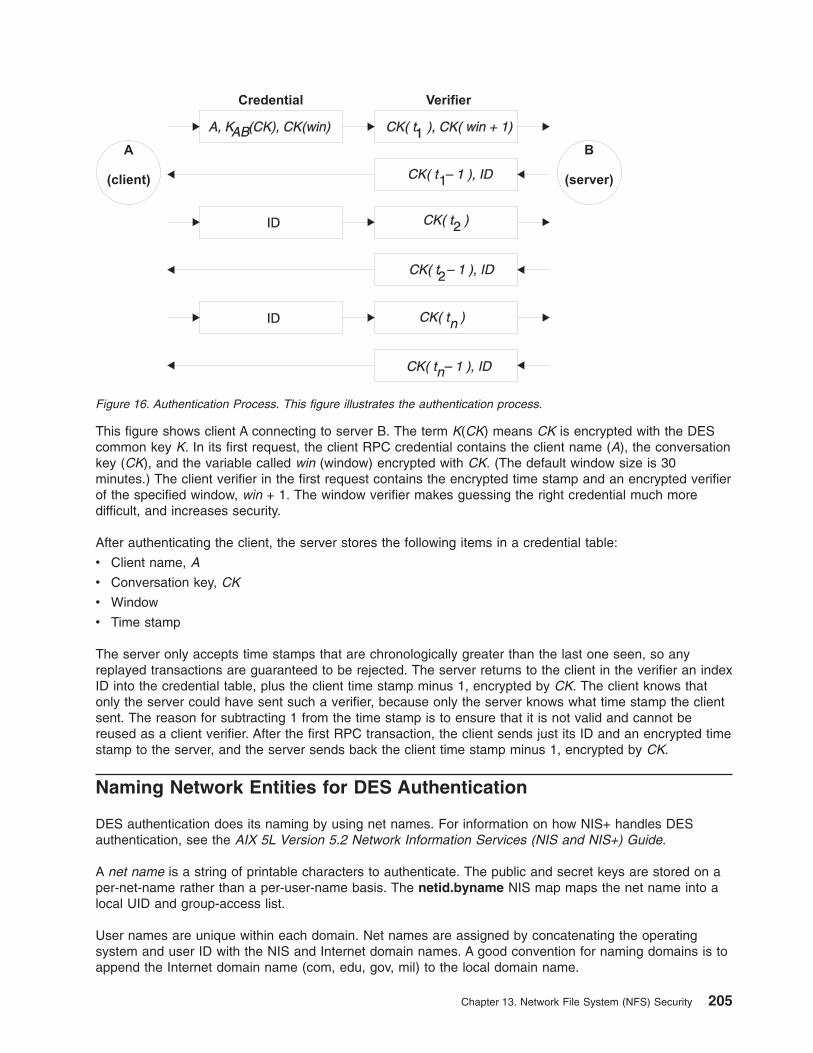
This figure shows client A connecting to server B. The term K(CK) means CK is encrypted with the DEScommon key K. In its first request, the client RPC credential contains the client name (A), the conversationkey (CK), and the variable called win (window) encrypted with CK. (The default window size is 30minutes.) The client verifier in the first request contains the encrypted time stamp and an encrypted verifierof the specified window, win + 1. The window verifier makes guessing the right credential much moredifficult, and increases security.
After authenticating the client, the server stores the following items in a credential table:
v Client name, A
v Conversation key, CK
v Window
v Time stamp
The server only accepts time stamps that are chronologically greater than the last one seen, so anyreplayed transactions are guaranteed to be rejected. The server returns to the client in the verifier an indexID into the credential table, plus the client time stamp minus 1, encrypted by CK. The client knows thatonly the server could have sent such a verifier, because only the server knows what time stamp the clientsent. The reason for subtracting 1 from the time stamp is to ensure that it is not valid and cannot bereused as a client verifier. After the first RPC transaction, the client sends just its ID and an encrypted timestamp to the server, and the server sends back the client time stamp minus 1, encrypted by CK.
Naming Network Entities for DES Authentication
DES authentication does its naming by using net names. For information on how NIS+ handles DESauthentication, see the AIX 5L Version 5.2 Network Information Services (NIS and NIS+) Guide.
A net name is a string of printable characters to authenticate. The public and secret keys are stored on aper-net-name rather than a per-user-name basis. The netid.byname NIS map maps the net name into alocal UID and group-access list.
User names are unique within each domain. Net names are assigned by concatenating the operatingsystem and user ID with the NIS and Internet domain names. A good convention for naming domains is toappend the Internet domain name (com, edu, gov, mil) to the local domain name.
Figure 16. Authentication Process. This figure illustrates the authentication process.
Chapter 13. Network File System (NFS) Security 205
Network names are assigned to machines as well as to users. A net name of a machine is formed muchlike that of a user. For example, a machine named hal in the eng.xyz.com domain has the net [email protected]. Correct authentication of machines is important for diskless machines that need fullaccess to their home directories over the network.
To authenticate users from any remote domain, make entries for them in two NIS databases. One is anentry for their public and secret keys; the other is for their local UID and group-access list mapping. Usersin the remote domain can then access all of the local network services, such as the NFS and remotelogins.
The /etc/publickey File
The /etc/publickey file contains names and public keys, which NIS and NIS+ use to create the publickeymap. The publickey map is used for secure networking. Each entry in the file consists of a network username (which refers to either a user or a host name), followed by the user public key (in hexadecimalnotation), a colon, and the user-encrypted secret key (also in hexadecimal notation). By default, the onlyuser in the /etc/publickey file is the user nobody.
Do not use a text editor to alter the /etc/publickey file because the file contains encryption keys. To alterthe /etc/publickey file, use either the chkey or newkey commands.
Booting Considerations of Public Key SystemsWhen restarting a machine after a power failure, all of the stored secret keys are lost, and no process canaccess secure network services, such as mounting an NFS. Root processes could continue if there weresomeone to enter the password that decrypts the secret key of the root user. The solution is to store theroot-user decrypted secret key in a file that the key server can read.
Not all setuid subroutine calls operate correctly. For example, if a setuid subroutine is called by owner A,and owner A has not logged into the machine since it started, the subroutine cannot access any securenetwork services as A. However, most setuid subroutine calls are owned by the root user, and the rootuser secret key is always stored at startup time.
Performance Considerations of Secure NFS
Secure NFS affects system performance in the following ways:
v Both the client and server must compute the common key. The time it takes to compute the commonkey is about one second. As a result, it takes about two seconds to establish the initial RPC connection,because both client and server have to perform this operation. After the initial RPC connection, the keyserver caches the results of previous computations, and so it does not have to recompute the commonkey every time.
v Each RPC transaction requires the folowing DES encryption operations:
1. The client encrypts the request time stamp.
2. The server decrypts it.
3. The server encrypts the reply time stamp.
4. The client decrypts it.
Because system performance can be reduced by secure NFS, weigh the benefits of increased securityagainst system-performance requirements.
206 AIX 5L Version 5.2: Security Guide
Checklist for Administering Secure NFS
Use the following checklist to help ensure that secure NFS operates correctly:
v When mounting a file system with the -secure option on a client, the server name must match theserver host name in the /etc/hosts file. If a name server is being used for host-name resolution, makesure the host information returned by the name server matches the entry in the /etc/hosts file.Authentication errors result if these names do not match because the net names for machines arebased on the primary entries in the /etc/hosts file and keys in the publickey map are accessed by netname.
v Do not mix secure and nonsecure exports and mounts. Otherwise, file access might be determinedincorrectly. For example, if a client machine mounts a secure file system without the secure option ormounts an nonsecure system with the secure option, users have access as nobody, rather than asthemselves. This condition also occurs if a user unknown to NIS or NIS+ attempts to create or modifyfiles on a secure file system.
v Because NIS must propagate a new map after each use of the chkey and newkey commands, usethese commands only when the network is lightly loaded.
v Do not delete the /etc/keystore file or the /etc/.rootkey file. If you reinstall, move, or upgrade amachine, save the /etc/keystore and /etc/.rootkey files.
v Instruct users to use the yppasswd command rather than the passwd command to change passwords.Doing so keeps passwords and private keys synchronized.
v Because the login command does not retrieve keys out of the publickey map for the keyserv daemon,the user must execute the keylogin command. You may want to place the keylogin command in eachuser profile file to execute the command automatically during login. The keylogin command requiresusers to enter their password again.
v When you generate keys for the root user at each host with either the newkey -h or chkey command,you must run the keylogin command to pass the new keys to the keyserv daemon. The keys arestored in the /etc/.rootkey file, which is read by the keyserv daemon each time the daemon is started.
v Periodically verify that the yppasswdd and ypupdated daemons are running on the NIS master server.These daemons are necessary for maintaining the publickey map.
v Periodically verify that the keyserv daemon is running on all machines using secure NFS.
Configuring Secure NFS
To configure secure NFS on NIS master and slave servers, use the Web-based System Manager Networkapplication or use the following procedure. For information about using NFS with NIS+, see AIX 5L Version5.2 Network Information Services (NIS and NIS+) Guide.
1. On the NIS master server, create an entry for each user in the NIS /etc/publickey file by using thenewkey command as follows:
v For a regular user, type:smit newkey
ORnewkey -u username
For a root user on a host machine, type:newkey -h hostname
v Alternatively, users can establish their own public keys by using the chkey or newkey commands.
2. Create the NIS publickey map by following the instructions in AIX 5L Version 5.2 Network InformationServices (NIS and NIS+) Guide. The corresponding NIS publickey.byname map resides only on theNIS servers.
3. Uncomment the following stanzas in the /etc/rc.nfs file:
Chapter 13. Network File System (NFS) Security 207
#if [ -x /usr/sbin/keyserv ]; then# startsrc -s keyserv#fi#if [ -x /usr/lib/netsvc/yp/rpc.ypupdated -a -d /etc/yp/`domainname` ]; then# startsrc -s ypupdated#fi#DIR=/etc/passwd#if [ -x /usr/lib/netsvc/yp/rpc.yppasswdd -a -f $DIR/passwd ]; then# startsrc -s yppasswdd#fi
4. Start the keyserv, ypupdated, and yppasswdd daemons by using the startsrc command.
To configure secure NFS on NIS clients, start the keyserv daemon by using the startsrc command.
Exporting a File System Using Secure NFS
You can export a secure NFS using the Web-based System Manager Network application or by using oneof the following procedures.
v To export a secure NFS file system using SMIT, do the following:
1. Verify that NFS is already running by running the lssrc -g nfs command. The output indicates thatthe nfsd and the rpc.mountd daemons are active.
2. Verify that the publickey map exists and that the keyserv daemon is running. For more information,see “Configuring Secure NFS” on page 207.
3. Run the smit mknfsexp fast path.
4. Specify the appropriate values for the PATHNAME of directory to export, MODE to export directory,and EXPORT directory now, system restart or both fields. Specify yes for the Use SECURE optionfield.
5. Specify any other optional characteristics, or accept the default values.
6. Exit SMIT. If the /etc/exports file does not exist, it will be created.
7. Repeat steps 3 through 6 for each directory you want to export.
v To export a secure NFS file system by using a text editor, do the following:
1. Open the /etc/exports file with your favorite text editor.
2. Create an entry for each directory to be exported, using the full path name of the directory. List eachdirectory to be exported starting in the left margin. No directory should include any other directorythat is already exported. See the /etc/exports file documentation for a description of the full syntaxfor entries in the /etc/exports file, including how to specify the secure option.
3. Save and close the /etc/exports file.
4. If NFS is currently running, type:/usr/sbin/exportfs -a
Using the -a option with the exportfs command sends all information in the /etc/exports file to thekernel.
v To export an NFS file system temporarily (that is, without changing the /etc/exports file), type:exportfs -i -o secure /dirname
where dirname is the name of the file system you want to export. The exportfs -i command specifiesthat the /etc/exports file is not to be checked for the specified directory, and all options are takendirectly from the command line.
208 AIX 5L Version 5.2: Security Guide
Mounting a File System Using Secure NFS
To mount a secure NFS directory explicitly, do the following:
1. Verify that the NFS server has exported the directory by running the command:showmount -e ServerName
where ServerName is the name of the NFS server. This command displays the names of the directoriescurrently exported from the NFS server. If the directory you want to mount is not listed, export thedirectory from the server.
2. Establish the local mount point by using the mkdir command. For NFS to complete a mountsuccessfully, a directory that acts as the mount point (or placeholder) of an NFS mount must bepresent. This directory should be empty. This mount point can be created like any other directory, andno special attributes are needed.
3. Verify that the publickey map exists and that the keyserv daemon is running. For more information,see “Configuring Secure NFS” on page 207.
4. Type:mount -o secure ServerName:/remote/directory /local/directory
where ServerName is the name of the NFS server, /remote/directory is the directory on the NFSserver you want to mount, and /local/directory is the mount point on the NFS client.
Note: Only the root user can mount a secure NFS.
Chapter 13. Network File System (NFS) Security 209

210 AIX 5L Version 5.2: Security Guide
Chapter 14. Enterprise Identity Mapping
Today’s network environments are made up of a complex group of systems and applications, resulting inthe need to manage multiple user registries. Dealing with multiple user registries quickly grows into a largeadministrative problem that affects users, administrators, and application developers. Enterprise IdentityMapping (EIM) allows administrators and application developers to address this problem.
This chapter describes the problems, outlines current industry approaches, and explains the EIMapproach.
Managing Multiple User RegistriesMany administrators manage networks that include different systems and servers, each with a unique wayof managing users through various user registries. In these complex networks, administrators areresponsible for managing each user’s identities and passwords across multiple systems. Additionally,administrators often must synchronize these identities and passwords. Users are burdened withremembering multiple identities and passwords and with keeping them synchronized. Because user andadministrator overhead in this environment is expensive, administrators often spend valuable timetroubleshooting failed login attempts and resetting forgotten passwords instead of managing the enterprise.
The problem of managing multiple user registries also affects application developers who want to providemultiple-tier or heterogeneous applications. Customers have important business data spread across manydifferent types of systems, with each system possessing its own user registries. Consequently, developersmust create proprietary user registries and associated security semantics for their applications. Althoughthis solves the problem for the application developer, it increases the overhead for users andadministrators.
Current ApproachesSeveral current industry approaches for solving the problem of managing multiple user registries areavailable, but they all provide incomplete solutions. For example, Lightweight Directory Access Protocol(LDAP) provides a distributed user registry solution. However, to use solutions such as LDAP,administrators must manage yet another user registry and security semantics or replace existingapplications that are built to use those registries.
Using this type of solution, administrators must manage multiple security mechanisms for individualresources, thereby increasing administrative overhead and potentially increasing the likelihood of securityexposures. When multiple mechanisms support a single resource, the chances of changing the authoritythrough one mechanism and forgetting to change the authority for one or more of the other mechanisms ismuch higher. For example, a security exposure can result when a user is appropriately denied accessthrough one interface, but allowed access through one or more other interfaces.
After completing this work, administrators find that they have not completely solved the problem. Generally,enterprises have invested too much money in current user registries and in their associated securitysemantics to make using this type of solution practical. Creating another user registry and associatedsecurity semantics solves the problem for the application provider, but not the problems for users oradministrators.
Another solution is to use a single sign-on approach. Several products are available that allowadministrators to manage files that contain all of a user’s identities and passwords. However, this approachhas several weaknesses:
v It addresses only one of the problems that users face. Although it allows users to sign on to multiplesystems by supplying one identity and password, the user is still required to have passwords on othersystems, or the need to manage these passwords.
© Copyright IBM Corp. 2002, 2003 211
v It introduces a new problem by creating a security exposure because clear-text or decryptablepasswords are stored in these files. Passwords should never be stored in clear-text files or be easilyaccessible by anyone, including administrators.
v It does not solve the problems of third-party application developers that provide heterogeneous,multiple-tier applications. They must still provide proprietary user registries for their applications.
Despite these weaknesses, some enterprises use these solutions because they provide some relief for themultiple user registry problems.
Using Enterprise Identity MappingThe EIM architecture describes the relationships between individuals or entities (such as file servers andprint servers) in the enterprise and the many identities that represent them within an enterprise. Inaddition, EIM provides a set of APIs that allow applications to ask questions about these relationships.
For example, given a person’s user identity in one user registry, you can determine which identity inanother user registry represents that same person. If the user has authenticated with one identity and youcan map that identity to the appropriate identity in another user registry, the user does not need to providecredentials for authentication again. You need only know which identity represents that user in anotheruser registry. Therefore, EIM provides a generalized identity-mapping function for the enterprise.
The ability to map between a user’s identities in different registries provides many benefits. Primarily,applications can have the flexibility of using one registry for authentication while using an entirely differentregistry for authorization. For example, an administrator could map an SAP identity to access SAPresources.
Identity mapping requires that administrators do the following:
1. Create EIM identifiers that represent people or entities in their enterprise.
2. Create EIM registry definitions that describe the existing user registries in their enterprise.
3. Define the relationship between the user identities in those registries to the EIM identifiers that theycreated.
No code changes are required to existing registries. Mappings are not required for all identities in a userregistry. EIM allows one-to-many mappings (in other words, a single user with more than one identity in asingle user registry). EIM also allows many-to-one mappings (in other words, multiple users sharing asingle identity in a single user registry, which although supported is not advised for security reasons). Anadministrator can represent any user registry of any type in EIM.
EIM does not require copying existing data to a new repository and trying to keep both copiessynchronized. The only new data that EIM introduces is the relationship information. Administratorsmanage this data in an LDAP directory, which provides the flexibility of managing the data in one placeand having replicas wherever the information is used.
For more information about Enterprise Identity Mapping, refer to the following Web sites:
v http://publib.boulder.ibm.com/eserver/
v http://www.ibm.com/servers/eserver/security/eim/
212 AIX 5L Version 5.2: Security Guide
Chapter 15. Kerberos
Kerberos is a network authentication service that provides a means of verifying the identities of principalson physically insecure networks. Kerberos provides mutual authentication, data integrity and privacy underthe realistic assumption that network traffic is vulnerable to capture, examination, and substitution.
Kerberos tickets are credentials that verify your identity. There are two types of tickets: a ticket-grantingticket and a service ticket. The ticket-granting ticket is for your initial identity request. When logging into ahost system, you need something that verifies your identity, such as a password or a token. After you havethe ticket-granting ticket, you can then use your ticket-granting ticket to request service tickets for specificservices. This two-ticket method is the called the trusted third-party of Kerberos. Your ticket-granting ticketauthenticates you to the Kerberos server, and your service ticket is your secure introduction to the service.
The trusted third-party or intermediary in Kerberos is called the Key Distribution Center (KDC). The KDCissues all the Kerberos tickets to the clients.
The Kerberos database keeps a record of every principal; the record contains the name, private key,expiration date of the principal, and some administrative information about each principal. The master KDCcontains the master copy of the database and passes it to slave KDCs.
This chapter contains the following Kerberos information:
v “Understanding the Secure Remote Commands”
v “Authenticating to AIX Using Kerberos” on page 215
v “KRB5A Authentication Load Module Questions and Troubleshooting Information” on page 220
Understanding the Secure Remote CommandsNotes:
1. Beginning with Distributed Computing Environment (DCE) version 2.2, the DCE security server canreturn Kerberos Version 5 tickets.
2. Beginning with AIX 5.2, all the secure remote commands (rcmds) use the Kerberos Version 5 libraryprovided by Network Authentication Service (NAS) version 1.3. In a DCE realm, the ftp command usesthe GSSAPI library from the libdce.a DCE library, and in a native realm, the ftp command uses theGSSAPI library from NAS version 1.3. NAS version 1.3 is located on the Expansion Pack CD. The onlyLPP that is required is the krb5.client.rte fileset.
3. If you are migrating to AIX 5.2 and had Kerberos Version 5 or Kerberos Version 4 installed, theinstallation scripts prompt the user to install krb5.client.rte.
The secure rcmds are rlogin, rcp, rsh, telnet, and ftp. These commands are known collectively as theStandard AIX method. (This method refers to the authentication method used by AIX 4.3 and priorreleases.) The additional methods provided are Kerberos Version 5 and Kerberos Version 4.
When using the Kerberos Version 5 authentication method, the client gets a Kerberos Version 5 ticket fromthe DCE security server or Kerberos server. The ticket is a portion of the user’s current DCE or localcredentials encrypted for the TCP/IP server with which they want to connect. The daemon on the TCP/IPserver decrypts the ticket. This action allows the TCP/IP server to absolutely identify the user. If the DCEor local principal described in the ticket is allowed access to the operating system user’s account, theconnection proceeds. The secure rcmds support Kerberos clients and servers from both Kerberos Version5 and DCE.
In addition to authenticating the client, Kerberos Version 5 forwards the current user’s credentials to theTCP/IP server. If the credentials are marked as forwardable, the client sends them to the server as a
© Copyright IBM Corp. 2002, 2003 213
Kerberos ticket-granting ticket (TGT). On the TCP/IP server side, if a user is communicating with a DCEsecurity server, the daemon upgrades the TGT into full DCE credentials using the k5dcecreds command.
The ftp command uses a different authentication method than the other secure rcmds. It uses the GSSAPIsecurity mechanism to pass the authentication between the ftp command and the ftpd daemon. Using theclear, safe, and private subcommands, the ftp client supports data encryption.
Between operating system clients and servers, the ftp command allows multiple byte transfers forencrypted data connections. The standards define only single byte transfers for encrypted dataconnections. When connected to third-party machines and using data encryption, the ftp command followsthe single byte transfer limit.
System ConfigurationFor all of the secure rcmds, a system-level configuration mechanism determines which authenticationmethods are allowed for that system. The configuration controls both outgoing and incoming connections.
The authentication configuration consists of the libauthm.a library and the lsauthent and chauthentcommands, that provide command line access to the get_auth_methods and set_auth_methods libraryroutines.
The authentication method defines which method is used to authenticate a user across a network. Thesystem supports the following authentication methods:
v Kerberos Version 5 is the most common method, as it is the basis for DCE.
v Kerberos Version 4 is used only by the rlogin, rsh, and rcp secure rcmds. It is provided to supportbackward compatibility only on SP systems. A Kerberos Version 4 ticket is not upgraded to DCEcredentials.
v Standard AIX is the authentication method that is used by AIX 4.3 and prior releases.
If more than one authentication method is configured and the first method fails to connect, the clientattempts to authenticate using the next authentication method configured.
Authentication methods can be configured in any order. The only exception is that Standard AIX must bethe final authentication method configured, because there is no fallback option. If Standard AIX is not aconfigured authentication method, password authentication is not attempted and any connection attemptusing this method is rejected.
You can configure the system without any authentication methods. In this case, the machine refuses allconnections from and to any machine using secure rcmds. Also, because Kerberos Version 4 is onlysupported with the rlogin, rsh, and rcp commands, a system configured to use only Kerberos Version 4does not allow connections using telnet, ftp.
Kerberos Version 5 User ValidationWhen using the Kerberos Version 5 authentication method, the TCP/IP client gets a service ticketencrypted for the TCP/IP server. When the server decrypts the ticket, it has a secure method of identifyingthe user (by DCE or local principal). However, the server still needs to determine if this DCE or localprincipal is allowed access to the local account. Mapping the DCE or local principal to the local operatingsystem account is handled by a shared library, libvaliduser.a, which has a single subroutine, calledkvalid_user. If a different method of mapping is preferred, the system administrator must provide analternative for the libvaliduser.a library.
DCE ConfigurationTo use the secure rcmds, two DCE principals must exist for every network interface to which they can beconnected. They are:
214 AIX 5L Version 5.2: Security Guide
host/FullInterfaceNameftp/FullInterfaceName
where:
FullInterfaceNameInterface name and domain name
Local ConfigurationTo use the secure rcmds, two local principals must exist for every network interface to which they can beconnected. They are:
host/FullInterfaceName@Realmnameftp/FullInterfaceName@Realmname
where:
FullInterfaceNameInterface name and domain name
RealmNameName of the local Kerberos Version 5 realm
Related Informationv The get_auth_method and set_auth_method subroutines in AIX 5L Version 5.2 Technical Reference:
Communications Volume 2
v The chauthent command in AIX 5L Version 5.2 Commands Reference, Volume 1
v The lsauthent command in AIX 5L Version 5.2 Commands Reference, Volume 3
Authenticating to AIX Using KerberosAIX provides the following Kerberos authentication load modules: KRB5 and KRB5A. Even though bothmodules do Kerberos authentication, the KRB5 load module performs Kerberos principal management,whereas the KRB5A load module does not. The KRB5 load module uses the IBM Network AuthenticationServices’ Kerberos database interface to manipulate the Kerberos identities and principals. Using theKRB5 load module, an AIX system administrator can manage Kerberos-authenticated users and theirassociated Kerberos principals by using the existing AIX user-administration commands without anychange. For example, to create an AIX user, as well as a Kerberos principal associated with that user, runthe mkuser command.
The KRB5A load module performs only authentication. The Kerberos principal management is doneseparately by using Kerberos principal-management tools. The KRB5A load module is used in anenvironment where Kerberos principals are stored on a non-AIX system and cannot be managed from AIXby using the Kerberos database interface. For example, you can have a Windows 2000 Active Directoryserver where Kerberos principal management is performed using the Active Directory accountmanagement tools and API’s.
Installing and Configuring the System for Kerberos Integrated LoginUsing KRB5Network Authentication Services (IBM Kerberos implementation) is shipped on the Expansion Pack. Toinstall the Kerberos Version 5 client package, install the krb5.client.rte fileset. To install the KerberosVersion 5 server package, install the krb5.server.rte fileset. To install the entire Kerberos Version 5package, install the krb5 package.
To avoid namespace collisions between DCE and Kerberos commands (that is, between the klist, kinit,and kdestroy commands), the Kerberos commands are installed in the /usr/krb5/bin and the
Chapter 15. Kerberos 215
/usr/krb5/sbin directories. You can add these directories to your PATH definition. Otherwise, to executethe Kerberos commands, you must specify fully qualified command path names.
Network Authentication Services documentation is provided in the krb5.doc.lang.pdf|html package, wherelang represents the supported language.
Configuring the Kerberos Version 5 KDC and kadmin ServersNotes:
1. It is not recommended that both DCE and Kerberos server software be installed on the same physicalsystem. If you must do so, the default operational internet port numbers must be changed for either theDCE clients and server or for the Kerberos clients and server. In either case, such a change can affectinteroperability with existing DCE and Kerberos deployments in your environment. For informationabout co-existence of DCE and Kerberos, refer to Network Authentication Services documentation.
2. Kerberos Version 5 is set up to reject ticket requests from any host whose clock is not within thespecified maximum clock skew of the KDC. The default value for maximum clock skew is 300 seconds(five minutes). Kerberos requires that some form of time synchronization is configured between theservers and the clients. It is recommended that you use the xntpd or timed daemons for timesynchronization. To use the timed daemon, do the following:
a. Set up the KDC server as a time server by starting the timed daemon, as follows:timed -M
b. Start the timed daemon on each Kerberos client.timed -t
To configure the Kerberos KDC and kadmin servers, run the mkkrb5srv command. For example,to configure Kerberos for the MYREALM realm, the sundial server, and the xyz.com domain, type thefollowing:mkkrb5srv -r MYREALM -s sundial.xyz.com -d xyz.com -a admin/admin
Wait a few minutes for the kadmind and krb5kdc commands to start from /etc/inittab.
Running the mkkrb5srv command results in the following actions:
1. Creates the /etc/krb5/krb5.conf file. Values for realm name, Kerberos admin server, and domain nameare set as specified on the command line. The /etc/krb5/krb5.conf file also sets the paths for thedefault_keytab_name, kdc, and admin_server log files.
2. Creates the /var/krb5/krb5kdc/kdc.conf file. The /var/krb5/krb5kdc/kdc.conf file sets the values forthe kdc_ports, kadmin_port, max_life, max_renewable_life, master_key_type, andsupported_enctypes variables. This file also sets the paths for the database_name, admin_keytab,acl_file, dict_file, and key_stash_file variables.
3. Creates the /var/krb5/krb5kdc/kadm5.acl file. Sets up the access control for admin, root, and hostprincipals.
4. Creates the database and one admin principal. You are asked to set a Kerberos master key and toname and set the password for a Kerberos administrative principal identity. For disaster-recoverypurposes, it is critical that the master key and administrative principal identity and password aresecurely stored away.
For more information, refer to “Sample Runs” on page 218 and “Error Messages and Recovery Actions” onpage 217.
Configuring the Kerberos Version 5 ClientsAfter Kerberos installation is complete, it is not apparent to normal users that the Kerberos technology is inuse. The login process to the operating system remains unchanged. However, users now have Kerberosticket-granting tickets (TGTs) associated with their running processes. To configure systems to useKerberos as the primary means of user authentication, run the mkkrb5clnt command with the followingparameters:
216 AIX 5L Version 5.2: Security Guide
mkkrb5clnt -c KDC -r realm -a admin -s server -d domain -A -i database -K -T
For example, to configure the sundial.xyz.com KDC with the MYREALM realm, sundial.xyz.com adminserver, the xyz.com domain, and the files database, type the following:mkkrb5clnt -c sundial.xyz.com -r MYREALM -s sundial.xyz.com -d xyz.com -A -i files -K -T
The previous example results in the following actions:
1. Creates the /etc/krb5/krb5.conf file. Values for realm name, Kerberos admin server, and domain nameare set as specified on the command line. Also, updates the paths for default_keytab_name, kdc, andkadmin log files.
2. The -i flag configures fully integrated login. The database entered is the location where Kerberosprincipals are stored.
3. The -K flag configures Kerberos as the default authentication scheme. This allows the users tobecome authenticated with Kerberos at login time.
4. The -A flag adds an entry in the Kerberos Database to make root an admin user for Kerberos.
5. The -T flag acquires the server admin TGT-based admin ticket.
If a system is installed that is located in a different DNS domain than the KDC, the following additionalactions must be performed:
1. Edit the /etc/krb5/krb5.conf file and add another entry after [domain realm].
2. Map the different domain to your realm.
For example, if you want to include a client that is in the abc.xyz.com domain into your MYREALM realm, the/etc/krb5/krb5.conf file includes the following additional entry:[domain realm]
.abc.xyz.com = MYREALM
Error Messages and Recovery ActionsErrors that can occur when using the mkkrb5srv command include the following:
v If the krb5.conf, kdc.conf, or kadm5.acl files already exist, the mkkrb5srv command does not modifythe values. You receive a message that the file already exists. Any of the configuration values can bechanged by editing the krb5.conf, kdc.conf, or kadm5.acl files.
v If you mistype something and no database is created, remove the configuration files created and rerunthe command.
v If there is inconsistency between the database and configuration values, remove the database from the/var/krb5/krb5kdc/* directory and rerun the command.
v Make sure the kadmind and the krb5kdc daemons are started on your machine. Use the ps commandto verify that the daemons are running. If these daemons have not started, check the log file.
Errors that can occur when using the mkkrb5clnt command include the following:
v Incorrect values for krb5.conf can be fixed by editing the /etc/krb5/krb5.conf file.
v Incorrect values for the -i flag can be fixed by editing the /usr/lib/security/methods.cfg file.
Files CreatedThe mkkrb5srv command creates the following files:
v /etc/krb5/krb5.conf
v /var/krb5/krb5kdc/kadm5.acl
v /var/krb5/krb5kdc/kdc.conf
The mkkrb5clnt command creates the following file:
v /etc/krb5/krb5.conf
Chapter 15. Kerberos 217
The mkkrb5clnt -i files option adds the following stanza to the /usr/lib/security/methods.cfg file:KRB5:
program =options =
KRB5files:options =
Sample RunsThe following is an example of the mkkrb5srv command:
# mkkrb5srv -r MYREALM -s sundial.xyz.com -d xyz.com -a admin/admin
Output similar to the following displays:Fileset Level State Description----------------------------------------------------------------------------
Path: /usr/lib/objreposkrb5.server.rte 1.3.0.0 COMMITTED Network Authentication Service
Server
Path: /etc/objreposkrb5.server.rte 1.3.0.0 COMMITTED Network Authentication Service
Server
The -s option is not supported.The administration server will be the local host.Initializing configuration...Creating /etc/krb5/krb5.conf...Creating /var/krb5/krb5kdc/kdc.conf...Creating database files...Initializing database ’/var/krb5/krb5kdc/principal’ for realm ’MYREALM’master key name ’K/M@MYREALM’You will be prompted for the database Master Password.It is important that you NOT FORGET this password.Enter database Master Password:Re-enter database Master Password to verify:WARNING: no policy specified for admin/admin@MYREALM;
defaulting to no policy. Note that policy may be overridden byACL restrictions.
Enter password for principal "admin/admin@MYREALM":Re-enter password for principal "admin/admin@MYREALM":Principal "admin/admin@MYREALM" created.Creating keytable...Creating /var/krb5/krb5kdc/kadm5.acl...Starting krb5kdc...krb5kdc was started successfully.Starting kadmind...kadmind was started successfully.The command completed successfully.Restarting kadmind and krb5kdc
The following is an example of the mkkrb5clnt command:mkkrb5clnt -r MYREALM -c sundial.xyz.com -s sundial.xyz.com \
-a admin/admin -d xyz.com -i files -K -T -A
Output similar to the following displays:Initializing configuration...Creating /etc/krb5/krb5.conf...The command completed successfully.Password for admin/admin@MYREALM:Configuring fully integrated loginAuthenticating as principal admin/admin with existing credentials.WARNING: no policy specified for host/diana.xyz.com@MYREALM;
218 AIX 5L Version 5.2: Security Guide
defaulting to no policy. Note that policy may be overridden byACL restrictions.
Principal "host/diana.xyz.com@MYREALM" created.
Administration credentials NOT DESTROYED.Authenticating as principal admin/admin with existing credentials.
Administration credentials NOT DESTROYED.Authenticating as principal admin/admin with existing credentials.Principal "kadmin/admin@MYREALM" modified.
Administration credentials NOT DESTROYED.Configuring Kerberos as the default authentication schemeMaking root a Kerberos administratorAuthenticating as principal admin/admin with existing credentials.WARNING: no policy specified for root/diana.xyz.com@MYREALM;
defaulting to no policy. Note that policy may be overridden byACL restrictions.
Enter password for principal "root/diana.xyz.com@MYREALM":Re-enter password for principal "root/diana.xyz.com@MYREALM":Principal "root/diana.xyz.com@MYREALM" created.
Administration credentials NOT DESTROYED.Cleaning administrator credentials and exiting.
Installing and Configuring the System for Kerberos Integrated LoginUsing KRB5AWhen the KRB5A load module is used for authentication, a series of steps, such as creation of Kerberosprincipals, must be performed.
The following section explains how to authenticate an AIX Network Authentication Service client against anActive Directory KDC.
Install the krb5.client.rte file set from the Expansion Pack.
Configuring the AIX Kerberos Version 5 Clients with a Windows 2000 ActiveDirectory ServerUse the config.krb5 command to configure an AIX Kerberos client. Configuring the client requiresKerberos Server information. If a Windows 2000 Active Directory server is chosen as the Kerberos server,the following options can be used with the config.krb5 command:-r realm = Windows 2000 Active Directory server domain name-d domain = Domain name of the machine hosting the Windows 2000 Active Directory server-c KDC = Host name of the Windows 2000 Server-s server = Host name of the Windows 2000 Server
1. Use the config.krb5 command as shown in the following example:config.krb5 -C -r MYREALM -d xyz.com -c w2k.xyz.com -s w2k.xyz.com
2. Windows 2000 supports DES-CBC-MD5 and DES-CBC-CRC encryption types. Change the krb5.conffile to contain information similar to the following:[libdefaults]
default_realm = MYREALMdefault_keytab_name = FILE:/etc/krb5/krb5.keytabdefault_tkt_enctypes = des-cbc-crc des-cbc-md5default_tgs_enctypes = des-cbc-crc des-cbc-md5
3. Add the following stanzas in the methods.cfg file:KRB5A:
program = /usr/lib/security/KRB5Aoptions = authonly
KRB5Afiles:options = db=BUILTIN,auth=KRB5A
Chapter 15. Kerberos 219
4. On a Windows 2000 Active Directory server, do the following:
a. Use the Active Directory Management tool to create a new user account for the krbtest AIX host,as follows:
1) Select the Users folder.
2) Use the mouse to right-click on New.
3) Choose user.
4) Type the name krbtest.
b. Use the Ktpass command from the command line to create a keytab file and set up the accountfor the AIX host. For example, to create a keytab file called krbtest.keytab, type:Ktpass -princ host/krbtest.xyz.com@MYREALM -mapuser krbtest -pass password -out krbtest.keytab
c. Copy the keytab file to the AIX host system.
d. Merge the keytab file into the /etc/krb5/krb5.keytab file as follows:$ ktutilktutil: rkt krbtest.keytabktutil: wkt /etc/krb5/krb5.keytabktutil: q
e. Create Windows 2000 domain accounts using the Active Directory user-management tools.
f. Create AIX accounts corresponding to the Windows 2000 domain accounts so that the loginprocess uses Kerberos authentication, as follows:
mkuser registry=KRB5Afiles SYSTEM=KRB5Afiles user0
KRB5A Authentication Load Module Questions and TroubleshootingInformationThe following section provides answers to KRB5A Authentication Load Module questions andtroubleshooting information.
How do I Configure an AIX Kerberos Client that Authenticates Againstan Active Directory Server KDCUse the config.krb5 command to configure an AIX Kerberos client. Configuring the client requiresKerberos Server information. If a Windows 2000 Active Directory server is chosen as the Kerberos server,then use the config.krb5 command with the following options:
-r realmActive Directory domain name
-d domainDomain name of the machine hosting the Active Directory directory service
-c KDCThe host name of the Windows 2000 server
-s serverThe host name of the Windows 2000 server
Use the config.krb5 command as shown in the following example:config.krb5 -C -r MYREALM -d xyz.com -c w2k.xyz.com -s w2k.xyz.com
Windows 2000 supports DES-CBC-MD5 and DES-CBC-CRC encryption types. Change the krb5.conf fileto contain information similar to the following:
220 AIX 5L Version 5.2: Security Guide
[libdefaults]default_realm = MYREALMdefault_keytab_name = FILE:/etc/krb5/krb5.keytabdefault_tkt_enctypes = des-cbc-crc des-cbc-md5default_tgs_enctypes = des-cbc-crc des-cbc-md5
Add the following stanzas in the methods.cfg file:KRB5A:
program = /usr/lib/security/KRB5Aoptions = authonly
KRB5Afiles:options = db=BUILTIN,auth=KRB5A
On the Active Directory server, do the following:
1. Use the Active Directory Management tool to create a new user account for the krbtest AIX host.
v Select The Users folder.
v Right-click with the mouse and select New.
v Choose user.
v Type the name krbtest.
2. Use the Ktpass command from the command line to create a krbtest.keytab file and set up theaccount for the AIX host as follows:Ktpass -princ host/krbtest.xyz.com@MYREALM -mapuser krbtest -pass password \
-out krbtest.keytab
3. Copy the krbtest.keytab file to the AIX host system.
4. Merge the krbtest.keytab file into the /etc/krb5/krb5.keytab file as follows:$ ktutilktutil: rkt krbtest.keytabktutil: wkt /etc/krb5/krb5.keytabktutil: q
5. Create Windows 2000 domain accounts using the Active Directory user management tools.
6. Create AIX accounts corresponding to the Windows 2000 domain accounts such that login process willknow to use Kerberos authentication, as follows:mkuser registry=KRB5Afiles SYSTEM=KRB5Afiles user0
How do I Modify AIX Configuration for Kerberos Integrated LoginTo enable Kerberos integrated login, modify the methods.cfg file. The compound load-module entry mustbe added to the methods.cfg file. The authentication side is KRB5A. The database side can be chosen aseither BUILTIN or LDAP. BUILTIN is the standard AIX user account repository that uses ASCII files. Forexample, if you choose BUILTIN as the AIX user account repository, then modify the methods.cfg file asfollows:Example: Local file system is chosen as the AIX user account repository.
KRB5A:program = /usr/lib/security/KRB5Aoptions=authonly
KRB5Afiles:options = db=BUILTIN,auth=KRB5A
Example: LDAP is chosen as the AIX user account repository.
KRB5A:program = /usr/lib/security/KRB5Aoptions=authonly
Chapter 15. Kerberos 221
LDAP:program = /usr/lib/security/LDAP
KRB5ALDAP:options = auth=KRB5A,db=LDAP
How do I Create an AIX User for Kerberos Integrated Login with theKRB5A Load ModuleTo create an AIX user for Kerberos integrated login with the KRB5A load module, use the mkusercommand as follows:
mkuser registry=KRB5Afiles SYSTEM=KRB5Afiles auth_domain=MYREALM foo
For information on the use of the auth_name and auth_domain attributes, refer to “What is the Purposeof the auth_name and auth_domain Attributes”.
How do I Create Kerberos Principals on Active DirectoryCreating Windows 2000 user accounts implicitly creates the principals. For example, if you create a useraccount named foo on Active Directory then the principal foo@MYREALM associated with the foo user is alsocreated. For information on creating users on Active Directory, see the Active Directory user managementdocumentation.
How do I Change the Password of Kerberos Authenticated UserTo change the password of a Kerberos authenticated user, use the passwd command, as follows:passwd -R KRB5Afiles foo
How do I Remove a Kerberos Authenticated UserTo remove a Kerberos authenticated user, use the rmuser command. However, this only removes the userfrom AIX. The user must also be removed from Active Directory using the Active Directory usermanagement tools.passwd -R KRB5Afiles foo
How do I Migrate an AIX User to a Kerberos Authenticated UserIf the user already has an account on Active Directory, then the chuser command converts the user intoan Kerberos authenticated user, as shown in the following example:chuser registry=KRB5Afiles SYSTEM=KRB5Afiles auth_domain=MYREALM foo
If the user does not have an account in Active Directory then create an account on Active Directory. Thenuse the chuser command. The Active Directory account may or may not have the same AIX user name. Ifa different name is chosen, then use the auth_name attribute to map to the Active Directory name. Forexample, to map the chris AIX user name to the christopher Active Directory user name, type thefollowing:chuser registry=KRB5Afiles SYSTEM=KRB5Afiles auth_name=christopher auth_domain=MYREALM chris
What do I do if the Password is ForgottenOn Active Directory, the password must be changed by the administrator. On AIX, the root user can not setthe password of a Kerberos principal.
What is the Purpose of the auth_name and auth_domain AttributesThe auth_name and auth_domain attributes are used to map AIX user names into Kerberos principalnames on Active Directory. For example, if the chris AIX user has auth_name=christopher and
222 AIX 5L Version 5.2: Security Guide
auth_domain=SOMEREALM, the Kerberos principal name is christopher@SOMEREALM. The SOMEREALM realmname is not the same as the MYREALM default realm name. This allows the chris user to authenticate to theSOMEREALM realm instead of to the MYREALM realm.
Can a Kerberos-Authenticated User Become Authenticated UsingStandard AIX AuthenticationThe answer is yes. Perform the following actions to authenticate the Kerberos-authenticated user usingAIX authentication:
1. The user sets the AIX password (/etc/security/passwd) using the passwd command, as follows:passwd -R files foo
2. Change the SYSTEM attribute of the user, as follows:chuser -R KRB5Afiles SYSTEM=compat foo.
This changes the authentication from Kerberos to crypt.
If you want to use crypt authentication as a backup mechanism, the SYSTEM attribute is changed asfollows:
chuser -R KRB5Afiles SYSTEM="KRB5Afiles or compat" foo.
Do I Need to Set up Kerberos Server (KDC) on AIX When Using aWindows 2000 Active Directory ServerNo, because users are authenticating against an Active Directory KDC, there is no need to configure theKDC on AIX. If you want to use AIX Network Authentication Services KDC as the Kerberos server instead,then the Kerberos server needs to be configured.
AIX Does not Accept my PasswordCheck that the password meets the requirements of AIX as well as Kerberos. KDC must also beconfigured and running correctly.
Cannot Log Into the Systemv Verify that the KDC is up and running.
– On AIX systems, type the following:ps -ef | grep krb5kdc
– On Windows 2000 systems, do the following:
1. In the Control Panel, double-click the Administrative Tools icon
2. Double-click the Services icon.
3. Verify that the Kerberos Key Distribution Center is in the Started state.
v On AIX systems, verify that the /etc/krb5/krb5.conf file points to the correct KDC, and has validparameters.
v On AIX systems, verify that client keytab file contains the host ticket. For example, assume you havethe /etc/krb5/krb5.keytab default keytab file. Type the following:$ ktutilktutil: rkt /etc/krb5/krb5.keytabktutil: l
slot KVNO Principal------ ------ ------------------------------------------------------
1 4 host/krbtest.xyz.com@MYREALM
ktutil: q
Chapter 15. Kerberos 223

v Verify that, if the auth_name and auth_domain attributes are set, they refer to a valid principal nameon the ADS KDC.
v Verify that the SYSTEM attribute is set for Kerberos login (KRB5Afiles or KRB5ALDAP).
v Verify that password is not expired.
224 AIX 5L Version 5.2: Security Guide

Part 3. Appendixes
© Copyright IBM Corp. 2002, 2003 225

226 AIX 5L Version 5.2: Security Guide
Appendix A. Security Checklist
This appendix provides a checklist of security actions to perform on a newly installed or existing system.Although this list is not a complete security checklist, it can be used as a foundation to build a securitychecklist for your environment.
v When installing a new system, install AIX from secure base media. Perform the following procedures atinstallation time:
– Do not install desktop software, such as CDE, GNOME, or KDE, on servers.
– Install required security fixes and any recommended maintenance level fixes. See the eServerpSeries Support Fixes website (http://techsupport.services.ibm.com/server/fixes?view=pSeries) forthe newest service bulletins, security advisories, and fix information.
– Back up the system after the initial installation and store the system backup in a secure location.
v Establish access control lists for restricted files and directories.
v Disable unneccessary user accounts and system accounts, such as daemon, bin, sys, adm, lp, anduucp. Deleting accounts is not recommended because it deletes account information, such as user IDsand user names, which may still be associated with data on system backups. If a user is created with apreviously deleted user ID and the system backup is restored on the system, the new user might haveunexpected access to the restored system.
v Review the /etc/inetd.conf, /etc/inittab, /etc/rc.nfs, and /etc/rc.tcpip files on a regular basis andremove all unnecessary daemons and services.
v Verify that the permissions for the following files are set correctly:
-rw-rw-r-- root system /etc/filesystems-rw-rw-r-- root system /etc/hosts-rw------- root system /etc/inittab-rw-r--r-- root system /etc/vfs-rw-r--r-- root system /etc/security/failedlogin-rw-rw---- root audit /etc/security/audit/hosts
v Disable the root account from being able to remotely log in. The root account should be able to log inonly from the system console.
v Enable system auditing. For more information, see Chapter 3, “Auditing”, on page 49.
v Enable a login control policy. For more information, see “Login Control” on page 18.
v Disable user permissions to run the xhost command. For more information, see “Managing X11 andCDE Concerns” on page 21.
v Prevent unauthorized changes to the PATH environment variable. For more information, see “PATHEnvironment Variable” on page 30.
v Disable telnet, rlogin, and rsh. For more information, see Chapter 9, “TCP/IP Security”, on page 121.
v Establish user account controls. For more information, see “User Account Control” on page 29.
v Enforce a strict password policy. For more information, see “Passwords” on page 40.
v Establish disk quotas for user accounts. For more information, see “Recovering from Over-QuotaConditions” on page 46.
v Allow only administrative accounts to use the su command. Monitor the su command’s logs in the/var/adm/sulog file.
v Enable screen locking when using X-Windows.
v Restrict access to the cron and at commands to only the accounts that need access to them.
v Use an alias for the ls command to show hidden files and characters in a file name.
v Use an alias for the rm command to avoid accidentally deleting files from the system.
v Disable unnecessary network services. For more information, see Chapter 10, “Network Services”, onpage 131.
v Perform frequent system backups and verify the integrity of backups.
© Copyright IBM Corp. 2002, 2003 227

v Subscribe to security-related e-mail distribution lists.
228 AIX 5L Version 5.2: Security Guide
Appendix B. Security Resources
This appendix provides information on various security-related resources.
Security Web SitesAIX Virtual Private Networks: http://www-1.ibm.com/servers/aix/products/ibmsw/security/vpn/index.html
CERIAS (Center for Education and Research in Information Assurance and Security):http://www.cerias.purdue.edu/
CERT (Computer Emergency Response Team, at Carnegie Mellon University): http://www.cert.org
CIAC (Computer Incident Advisory Capability): http://ciac.llnl.gov
Computer Security Resource Clearinghouse: http://csrc.ncsl.nist.gov/
FIRST (Forum of Incident Response and Security Teams): http://www.first.org/
IBM eServer Security Planner: http://www-1.ibm.com/servers/security/planner/
IBM Security Solutions: http://www-3.ibm.com/security/index.shtml
OpenSSH: http://www.openssh.org/
Security Mailing ListsCERT: http://www.cert.org/contact_cert/certmaillist.html
IBM Software Technical Mailings: http://techsupport.services.ibm.com/server/listserv
comp.security.unix: news:comp.security.unix
Security Online ReferencesCommon Criteria Concepts FAQ: http://www.radium.ncsc.mil/tpep/process/faq-sect3.html
Rainbow Series Library: http://www.radium.ncsc.mil/tpep/library/rainbow/
faqs.org: http://www.faqs.org/faqs/computer-security/
IBM eServer pSeries Information Center: http://publib16.boulder.ibm.com/pseries/en_US/infocenter/base
© Copyright IBM Corp. 2002, 2003 229

230 AIX 5L Version 5.2: Security Guide
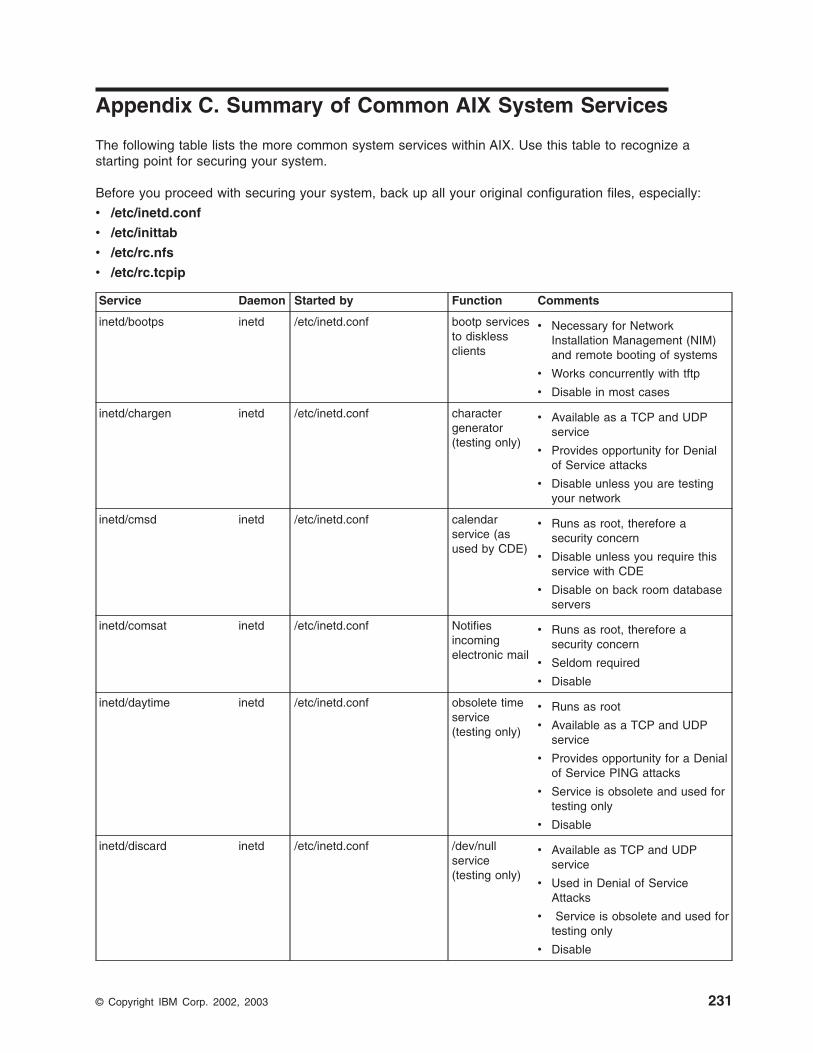
Appendix C. Summary of Common AIX System Services
The following table lists the more common system services within AIX. Use this table to recognize astarting point for securing your system.
Before you proceed with securing your system, back up all your original configuration files, especially:
v /etc/inetd.conf
v /etc/inittab
v /etc/rc.nfs
v /etc/rc.tcpip
Service Daemon Started by Function Comments
inetd/bootps inetd /etc/inetd.conf bootp servicesto disklessclients
v Necessary for NetworkInstallation Management (NIM)and remote booting of systems
v Works concurrently with tftp
v Disable in most cases
inetd/chargen inetd /etc/inetd.conf charactergenerator(testing only)
v Available as a TCP and UDPservice
v Provides opportunity for Denialof Service attacks
v Disable unless you are testingyour network
inetd/cmsd inetd /etc/inetd.conf calendarservice (asused by CDE)
v Runs as root, therefore asecurity concern
v Disable unless you require thisservice with CDE
v Disable on back room databaseservers
inetd/comsat inetd /etc/inetd.conf Notifiesincomingelectronic mail
v Runs as root, therefore asecurity concern
v Seldom required
v Disable
inetd/daytime inetd /etc/inetd.conf obsolete timeservice(testing only)
v Runs as root
v Available as a TCP and UDPservice
v Provides opportunity for a Denialof Service PING attacks
v Service is obsolete and used fortesting only
v Disable
inetd/discard inetd /etc/inetd.conf /dev/nullservice(testing only)
v Available as TCP and UDPservice
v Used in Denial of ServiceAttacks
v Service is obsolete and used fortesting only
v Disable
© Copyright IBM Corp. 2002, 2003 231
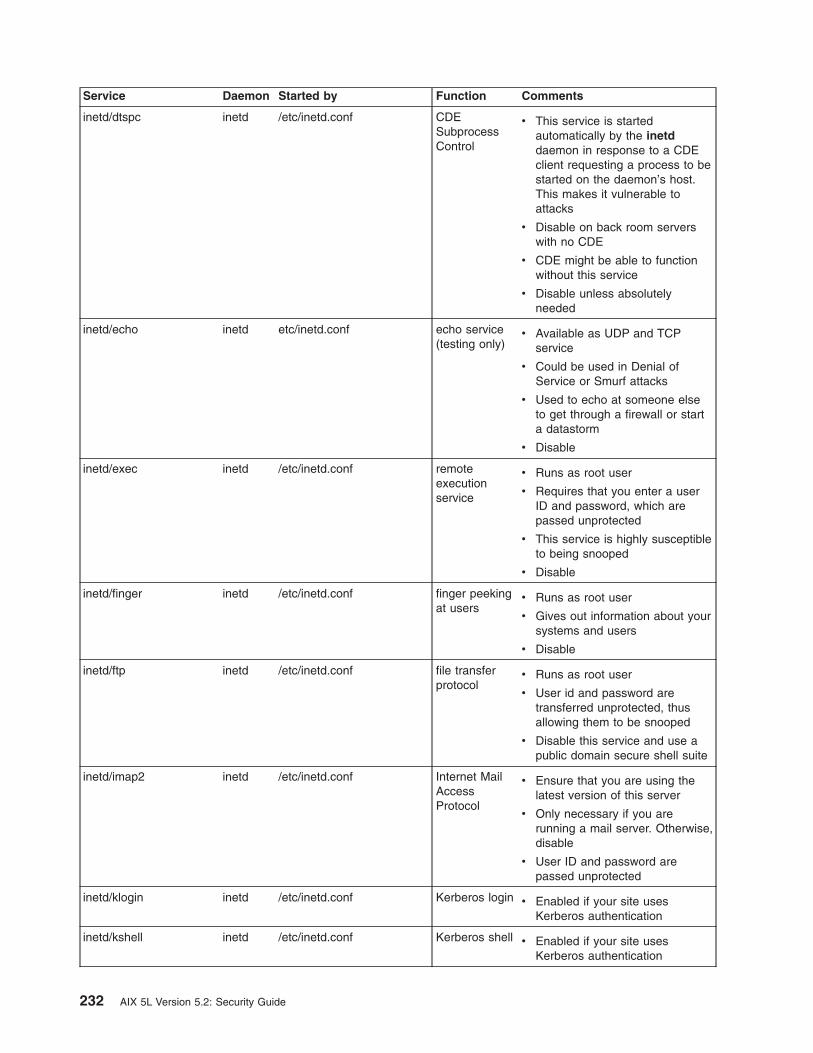
Service Daemon Started by Function Comments
inetd/dtspc inetd /etc/inetd.conf CDESubprocessControl
v This service is startedautomatically by the inetddaemon in response to a CDEclient requesting a process to bestarted on the daemon’s host.This makes it vulnerable toattacks
v Disable on back room serverswith no CDE
v CDE might be able to functionwithout this service
v Disable unless absolutelyneeded
inetd/echo inetd etc/inetd.conf echo service(testing only)
v Available as UDP and TCPservice
v Could be used in Denial ofService or Smurf attacks
v Used to echo at someone elseto get through a firewall or starta datastorm
v Disable
inetd/exec inetd /etc/inetd.conf remoteexecutionservice
v Runs as root user
v Requires that you enter a userID and password, which arepassed unprotected
v This service is highly susceptibleto being snooped
v Disable
inetd/finger inetd /etc/inetd.conf finger peekingat users
v Runs as root user
v Gives out information about yoursystems and users
v Disable
inetd/ftp inetd /etc/inetd.conf file transferprotocol
v Runs as root user
v User id and password aretransferred unprotected, thusallowing them to be snooped
v Disable this service and use apublic domain secure shell suite
inetd/imap2 inetd /etc/inetd.conf Internet MailAccessProtocol
v Ensure that you are using thelatest version of this server
v Only necessary if you arerunning a mail server. Otherwise,disable
v User ID and password arepassed unprotected
inetd/klogin inetd /etc/inetd.conf Kerberos login v Enabled if your site usesKerberos authentication
inetd/kshell inetd /etc/inetd.conf Kerberos shell v Enabled if your site usesKerberos authentication
232 AIX 5L Version 5.2: Security Guide
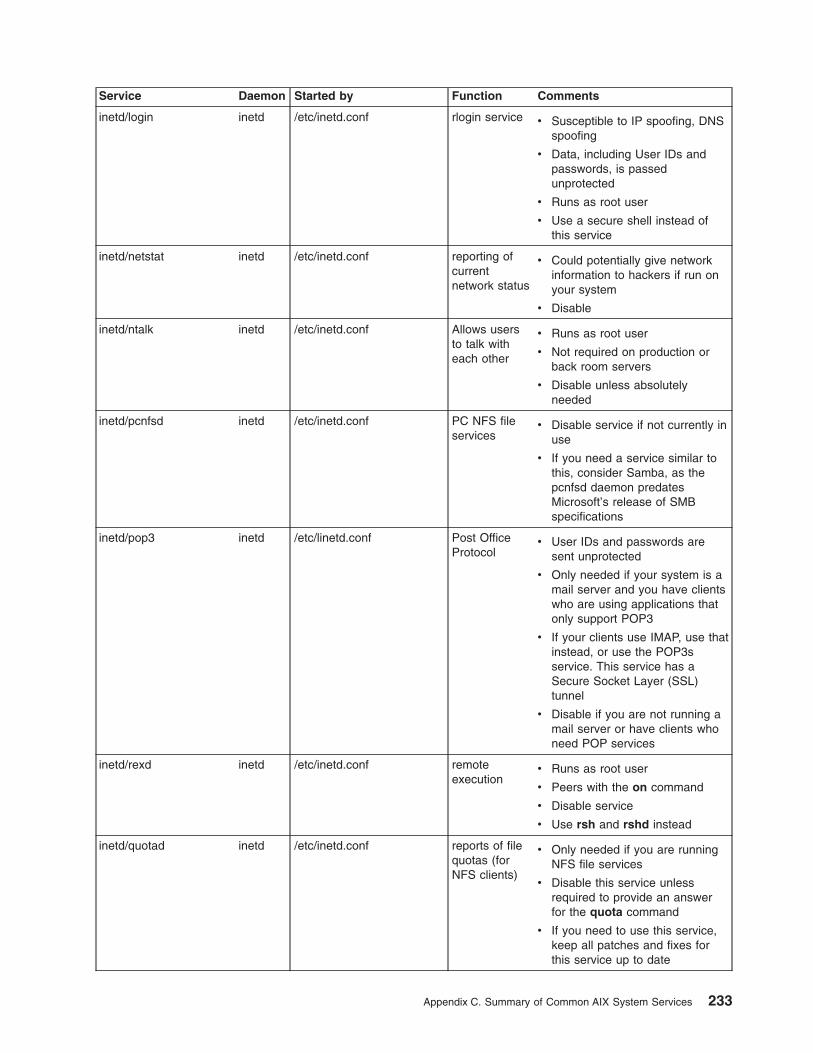
Service Daemon Started by Function Comments
inetd/login inetd /etc/inetd.conf rlogin service v Susceptible to IP spoofing, DNSspoofing
v Data, including User IDs andpasswords, is passedunprotected
v Runs as root user
v Use a secure shell instead ofthis service
inetd/netstat inetd /etc/inetd.conf reporting ofcurrentnetwork status
v Could potentially give networkinformation to hackers if run onyour system
v Disable
inetd/ntalk inetd /etc/inetd.conf Allows usersto talk witheach other
v Runs as root user
v Not required on production orback room servers
v Disable unless absolutelyneeded
inetd/pcnfsd inetd /etc/inetd.conf PC NFS fileservices
v Disable service if not currently inuse
v If you need a service similar tothis, consider Samba, as thepcnfsd daemon predatesMicrosoft’s release of SMBspecifications
inetd/pop3 inetd /etc/linetd.conf Post OfficeProtocol
v User IDs and passwords aresent unprotected
v Only needed if your system is amail server and you have clientswho are using applications thatonly support POP3
v If your clients use IMAP, use thatinstead, or use the POP3sservice. This service has aSecure Socket Layer (SSL)tunnel
v Disable if you are not running amail server or have clients whoneed POP services
inetd/rexd inetd /etc/inetd.conf remoteexecution
v Runs as root user
v Peers with the on command
v Disable service
v Use rsh and rshd instead
inetd/quotad inetd /etc/inetd.conf reports of filequotas (forNFS clients)
v Only needed if you are runningNFS file services
v Disable this service unlessrequired to provide an answerfor the quota command
v If you need to use this service,keep all patches and fixes forthis service up to date
Appendix C. Summary of Common AIX System Services 233
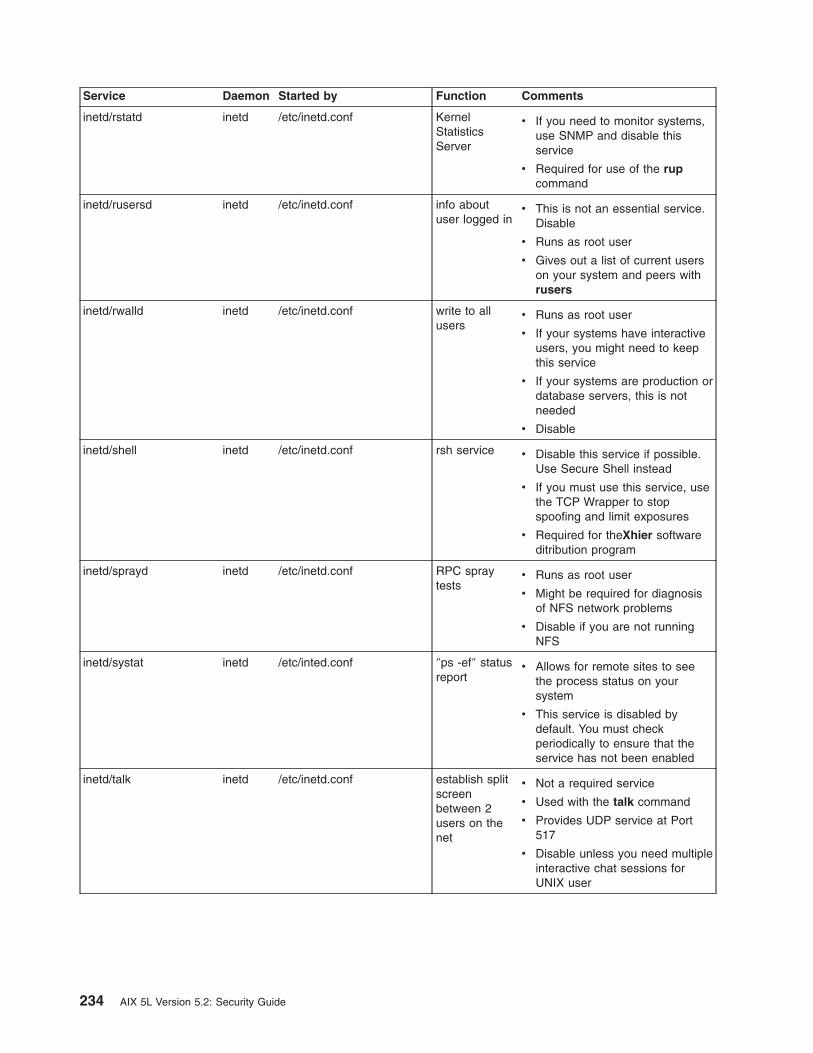
Service Daemon Started by Function Comments
inetd/rstatd inetd /etc/inetd.conf KernelStatisticsServer
v If you need to monitor systems,use SNMP and disable thisservice
v Required for use of the rupcommand
inetd/rusersd inetd /etc/inetd.conf info aboutuser logged in
v This is not an essential service.Disable
v Runs as root user
v Gives out a list of current userson your system and peers withrusers
inetd/rwalld inetd /etc/inetd.conf write to allusers
v Runs as root user
v If your systems have interactiveusers, you might need to keepthis service
v If your systems are production ordatabase servers, this is notneeded
v Disable
inetd/shell inetd /etc/inetd.conf rsh service v Disable this service if possible.Use Secure Shell instead
v If you must use this service, usethe TCP Wrapper to stopspoofing and limit exposures
v Required for theXhier softwareditribution program
inetd/sprayd inetd /etc/inetd.conf RPC spraytests
v Runs as root user
v Might be required for diagnosisof NFS network problems
v Disable if you are not runningNFS
inetd/systat inetd /etc/inted.conf ″ps -ef″ statusreport
v Allows for remote sites to seethe process status on yoursystem
v This service is disabled bydefault. You must checkperiodically to ensure that theservice has not been enabled
inetd/talk inetd /etc/inetd.conf establish splitscreenbetween 2users on thenet
v Not a required service
v Used with the talk command
v Provides UDP service at Port517
v Disable unless you need multipleinteractive chat sessions forUNIX user
234 AIX 5L Version 5.2: Security Guide
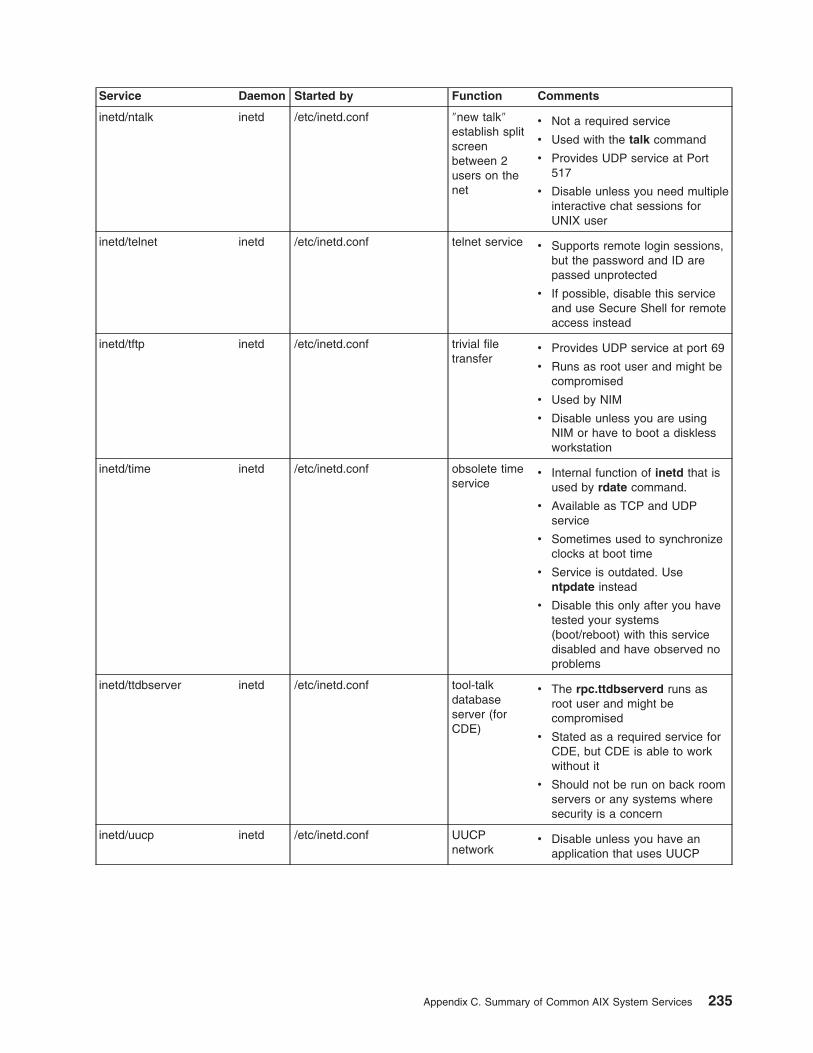
Service Daemon Started by Function Comments
inetd/ntalk inetd /etc/inetd.conf ″new talk″establish splitscreenbetween 2users on thenet
v Not a required service
v Used with the talk command
v Provides UDP service at Port517
v Disable unless you need multipleinteractive chat sessions forUNIX user
inetd/telnet inetd /etc/inetd.conf telnet service v Supports remote login sessions,but the password and ID arepassed unprotected
v If possible, disable this serviceand use Secure Shell for remoteaccess instead
inetd/tftp inetd /etc/inetd.conf trivial filetransfer
v Provides UDP service at port 69
v Runs as root user and might becompromised
v Used by NIM
v Disable unless you are usingNIM or have to boot a disklessworkstation
inetd/time inetd /etc/inetd.conf obsolete timeservice
v Internal function of inetd that isused by rdate command.
v Available as TCP and UDPservice
v Sometimes used to synchronizeclocks at boot time
v Service is outdated. Usentpdate instead
v Disable this only after you havetested your systems(boot/reboot) with this servicedisabled and have observed noproblems
inetd/ttdbserver inetd /etc/inetd.conf tool-talkdatabaseserver (forCDE)
v The rpc.ttdbserverd runs asroot user and might becompromised
v Stated as a required service forCDE, but CDE is able to workwithout it
v Should not be run on back roomservers or any systems wheresecurity is a concern
inetd/uucp inetd /etc/inetd.conf UUCPnetwork
v Disable unless you have anapplication that uses UUCP
Appendix C. Summary of Common AIX System Services 235
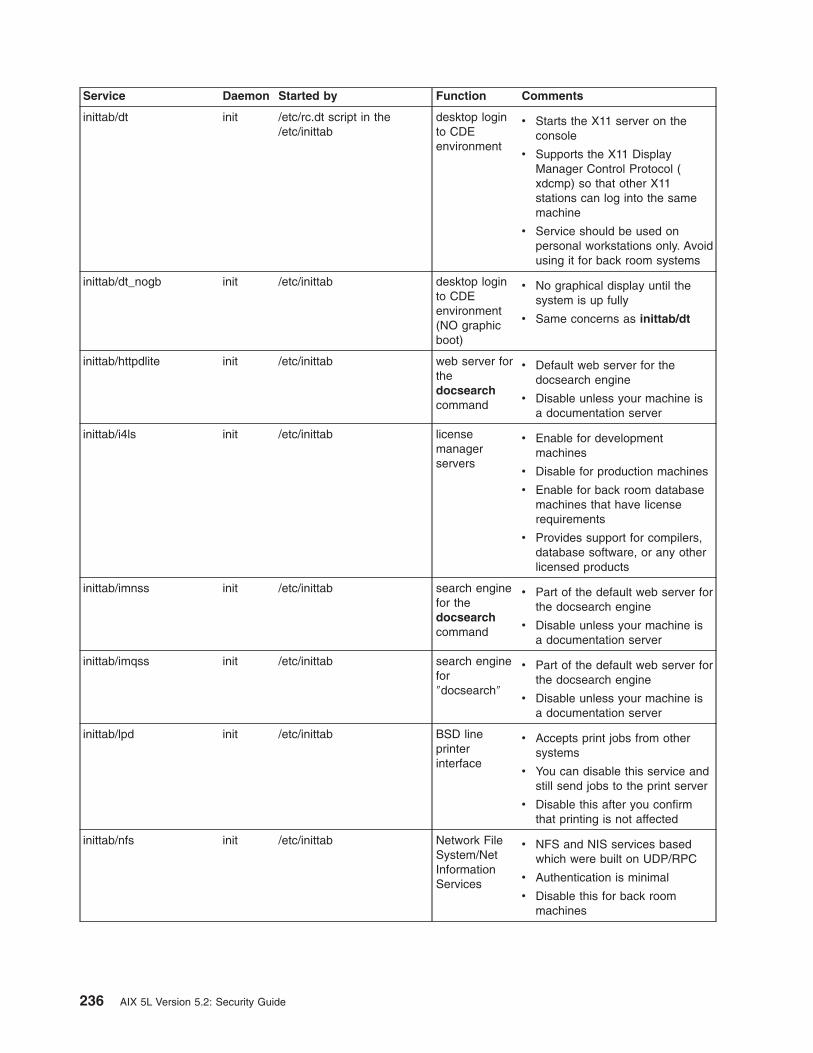
Service Daemon Started by Function Comments
inittab/dt init /etc/rc.dt script in the/etc/inittab
desktop loginto CDEenvironment
v Starts the X11 server on theconsole
v Supports the X11 DisplayManager Control Protocol (xdcmp) so that other X11stations can log into the samemachine
v Service should be used onpersonal workstations only. Avoidusing it for back room systems
inittab/dt_nogb init /etc/inittab desktop loginto CDEenvironment(NO graphicboot)
v No graphical display until thesystem is up fully
v Same concerns as inittab/dt
inittab/httpdlite init /etc/inittab web server forthedocsearchcommand
v Default web server for thedocsearch engine
v Disable unless your machine isa documentation server
inittab/i4ls init /etc/inittab licensemanagerservers
v Enable for developmentmachines
v Disable for production machines
v Enable for back room databasemachines that have licenserequirements
v Provides support for compilers,database software, or any otherlicensed products
inittab/imnss init /etc/inittab search enginefor thedocsearchcommand
v Part of the default web server forthe docsearch engine
v Disable unless your machine isa documentation server
inittab/imqss init /etc/inittab search enginefor″docsearch″
v Part of the default web server forthe docsearch engine
v Disable unless your machine isa documentation server
inittab/lpd init /etc/inittab BSD lineprinterinterface
v Accepts print jobs from othersystems
v You can disable this service andstill send jobs to the print server
v Disable this after you confirmthat printing is not affected
inittab/nfs init /etc/inittab Network FileSystem/NetInformationServices
v NFS and NIS services basedwhich were built on UDP/RPC
v Authentication is minimal
v Disable this for back roommachines
236 AIX 5L Version 5.2: Security Guide

Service Daemon Started by Function Comments
inittab/piobe init /etc/inittab printer IOBack End (forprinting)
v Handles the scheduling, spoolingand printing of jobs submitted bythe qdaemon
v Disable if you are not printingfrom your system because youare sending print job to a server
inittab/qdaemon init /etc/inittab queuedaemon (forprinting
v Submits print jobs to the piobedaemon
v If you are not printing from yoursystem, then disable
inittab/uprintfd init /etc/inittab kernelmessages
v Generally not required
v Disable
inittab/writesrv init /etc/inittab writing notesto ttys
v Only used by interactive UNIXworkstation users
v Disable this service for servers,back room databases, anddevelopment machines
v Enable this service forworkstations
inittab/xdm init /etc/inittab traditional X11DisplayManagement
v Do not run on back roomproduction or database servers
v Do not run on developmentsystems unless X11 displaymanagement is needed
v Acceptable to run onworkstations if graphics areneeded
rc.nfs/automountd /etc/rc.nfs automatic filesystems
v If you use NFS, enable this forworkstations
v Do not use the automounter fordevelopment or back roomservers
rc.nfs/biod /etc/rc.nfs Block IODaemon(required forNFS server)
v Enabled for NFS server only
v If not an NFS server, thendisable this along with nfsd andrpc.mountd
rc.nfs/keyserv /etc/rc.nfs Secure RPCKey server
v Manages the keys required forsecure RPC
v Important for NIS+
v Disable this if you are not usingNFS and NIS and NIS+
rc.nfs/nfsd /etc/rc.nfs NFS Services(required forNFS Server)
v Authentication is weak
v Can lend itself to stack framecrashing
v Enable if on NFS file servers
v If you disable this, then disablebiod, nfsd, and rpc.mountd aswell
Appendix C. Summary of Common AIX System Services 237
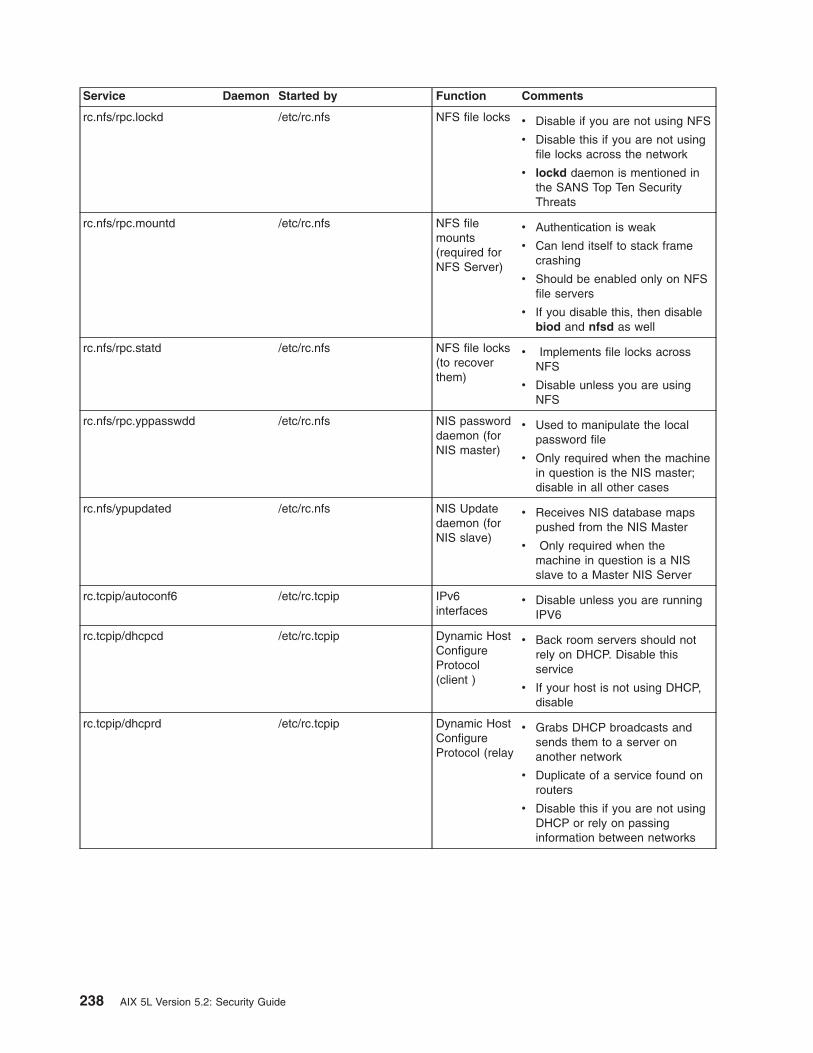
Service Daemon Started by Function Comments
rc.nfs/rpc.lockd /etc/rc.nfs NFS file locks v Disable if you are not using NFS
v Disable this if you are not usingfile locks across the network
v lockd daemon is mentioned inthe SANS Top Ten SecurityThreats
rc.nfs/rpc.mountd /etc/rc.nfs NFS filemounts(required forNFS Server)
v Authentication is weak
v Can lend itself to stack framecrashing
v Should be enabled only on NFSfile servers
v If you disable this, then disablebiod and nfsd as well
rc.nfs/rpc.statd /etc/rc.nfs NFS file locks(to recoverthem)
v Implements file locks acrossNFS
v Disable unless you are usingNFS
rc.nfs/rpc.yppasswdd /etc/rc.nfs NIS passworddaemon (forNIS master)
v Used to manipulate the localpassword file
v Only required when the machinein question is the NIS master;disable in all other cases
rc.nfs/ypupdated /etc/rc.nfs NIS Updatedaemon (forNIS slave)
v Receives NIS database mapspushed from the NIS Master
v Only required when themachine in question is a NISslave to a Master NIS Server
rc.tcpip/autoconf6 /etc/rc.tcpip IPv6interfaces
v Disable unless you are runningIPV6
rc.tcpip/dhcpcd /etc/rc.tcpip Dynamic HostConfigureProtocol(client )
v Back room servers should notrely on DHCP. Disable thisservice
v If your host is not using DHCP,disable
rc.tcpip/dhcprd /etc/rc.tcpip Dynamic HostConfigureProtocol (relay
v Grabs DHCP broadcasts andsends them to a server onanother network
v Duplicate of a service found onrouters
v Disable this if you are not usingDHCP or rely on passinginformation between networks
238 AIX 5L Version 5.2: Security Guide
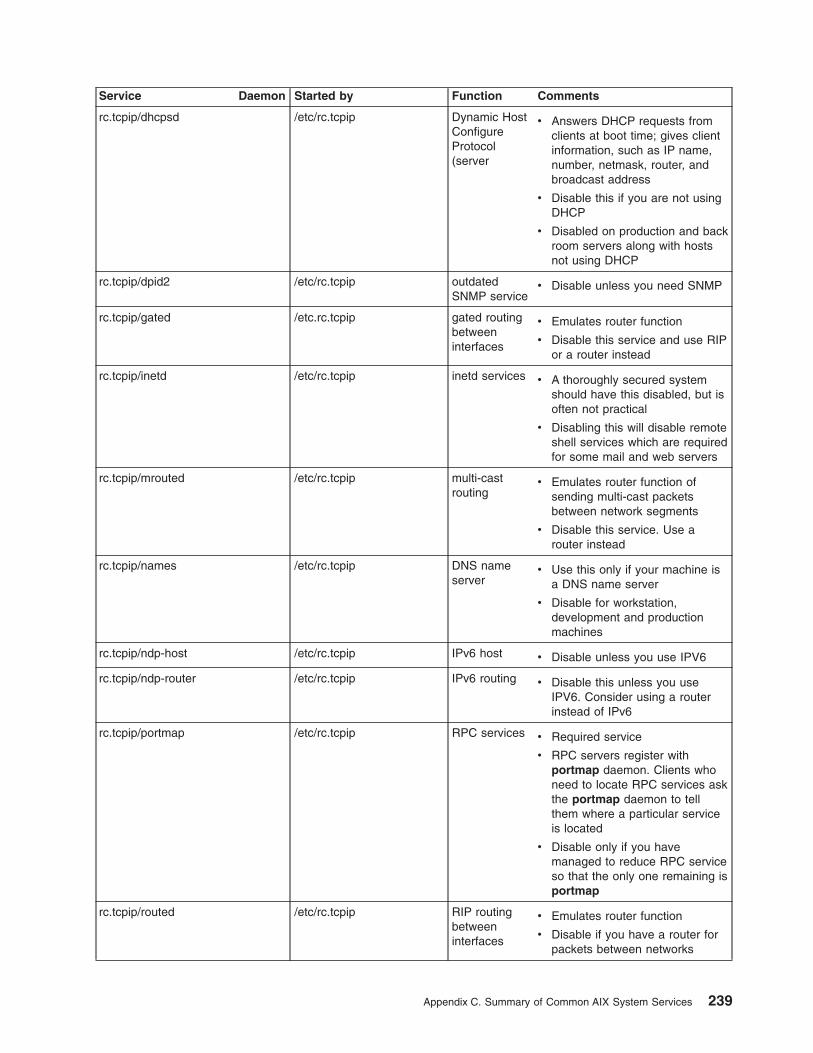
Service Daemon Started by Function Comments
rc.tcpip/dhcpsd /etc/rc.tcpip Dynamic HostConfigureProtocol(server
v Answers DHCP requests fromclients at boot time; gives clientinformation, such as IP name,number, netmask, router, andbroadcast address
v Disable this if you are not usingDHCP
v Disabled on production and backroom servers along with hostsnot using DHCP
rc.tcpip/dpid2 /etc/rc.tcpip outdatedSNMP service
v Disable unless you need SNMP
rc.tcpip/gated /etc.rc.tcpip gated routingbetweeninterfaces
v Emulates router function
v Disable this service and use RIPor a router instead
rc.tcpip/inetd /etc/rc.tcpip inetd services v A thoroughly secured systemshould have this disabled, but isoften not practical
v Disabling this will disable remoteshell services which are requiredfor some mail and web servers
rc.tcpip/mrouted /etc/rc.tcpip multi-castrouting
v Emulates router function ofsending multi-cast packetsbetween network segments
v Disable this service. Use arouter instead
rc.tcpip/names /etc/rc.tcpip DNS nameserver
v Use this only if your machine isa DNS name server
v Disable for workstation,development and productionmachines
rc.tcpip/ndp-host /etc/rc.tcpip IPv6 host v Disable unless you use IPV6
rc.tcpip/ndp-router /etc/rc.tcpip IPv6 routing v Disable this unless you useIPV6. Consider using a routerinstead of IPv6
rc.tcpip/portmap /etc/rc.tcpip RPC services v Required service
v RPC servers register withportmap daemon. Clients whoneed to locate RPC services askthe portmap daemon to tellthem where a particular serviceis located
v Disable only if you havemanaged to reduce RPC serviceso that the only one remaining isportmap
rc.tcpip/routed /etc/rc.tcpip RIP routingbetweeninterfaces
v Emulates router function
v Disable if you have a router forpackets between networks
Appendix C. Summary of Common AIX System Services 239

Service Daemon Started by Function Comments
rc.tcpip/rwhod /etc/rc.tcpip Remote ″who″daemon
v Collects and broadcasts data topeer servers on the samenetwork
v Disable this service
rc.tcpip/sendmail /etc/rc.tcpip mail services v Runs as root user
v Disable this service unless themachine is used as a mailserver
v If disabled, then do one of thefollowing:
– Place an entry in crontab toclear the queue. Use the/usr/lib/sendmail -qcommand
– Configure DNS services sothat the mail for your serveris delivered to some othersystem
rc.tcpip/snmpd /etc/rc.tcpip SimpleNetworkManagementProtocol
v Disable if you are not monitoringthe system via SNMP tools
v SNMP may be required oncritical servers
rc.tcpip/syslogd /etc/rc.tcpip system log ofevents
v Disabling this service is notrecommended
v Prone to denial of serviceattacks
v Required in any system
rc.tcpip/timed /etc/rc.tcpip Old TimeDaemon
v Disable this service and usexntp instead
rc.tcpip/xntpd /etc/rc.tcpip New TimeDaemon
v Keeps clocks on systems insync
v Disable this service.
v Configure other systems as timeservers and let other systemssynchronize to them with a cronjob that calls ntpdate
dt login /usr/dt/config/Xaccess unrestrictedCDE
v If you are not providing CDElogin to a group of X11 stations,you can restrict dtlogin to theconsole.
240 AIX 5L Version 5.2: Security Guide

Service Daemon Started by Function Comments
anonymous FTP service user rmuser -p<username>
anonymousftp
v Anonymous FTP ability preventsyou from tracing FTP usage to aspecific user
v Remove user ftp if that useraccount exists, as follows:rmuser -p ftp
v Further security can be obtainedby populating the /etc/ftpusersfile with a list of those whoshould not be able to ftp to yoursystem
anonymous FTP writes anonymousftp uploads
v No file should belong to ftp.
v FTP anonymous uploads allowthe potential for misbehavingcode to be placed on yoursystem.
v Put the names of those usersyou want to disallow into the/etc/ftpusers file
v Some examples ofsystem-created users you mightwant to disallow fromanonymously uploading via FTPto your system are: root,daemon, bin.sys, admin.uucp,guest, nobody, lpd, nuucp, ladp,imnadm
v Change the owner and grouprights to the ftpusers files asfollows: chown root:system/etc/ftpusers
v Change the permissions to theftpusers files to a stricter settingas follows: chmod 644/etc/ftpusers
ftp.restrict ftp to systemaccounts
v No user from the outside shouldbe allowed to replace root filesvia ftpusers file
root.access /etc/security/user rlogin/telnet toroot account
v Set the rlogin option in theetc/security/user file to false
v Anyone logging in as root shouldfirst log in under their own nameand then su to root; thisprovides an audit trail
snmpd.readWrite /etc/snmpd.conf SNMPreadWritecommunities
v If you are not using SNMP,disable the SNMP daemon.
v Disable community private andcommunity system in the/etc/snmpd.conf file
v Restrict ’public’ community tothose IP addresses that aremonitoring your system
Appendix C. Summary of Common AIX System Services 241

Service Daemon Started by Function Comments
syslog.conf configuresyslogd
v If you have not configured/etc/syslog.conf, then disablethis daemon
v If you are using syslog.conf tolog system messages, then keepenabled
242 AIX 5L Version 5.2: Security Guide
Appendix D. Summary of Network Service Options
To achieve a higher level of system security, there are several network options that you can change using0 to disable and 1 to enable. The following list identifies these parameters you can use with the nocommand.
Parameter Command Purpose
bcastping /usr/sbin/no -o bcastping=0 Allows response to ICMP echopackets to the broadcast address.Disabling this prevents Smurf attacks.
clean_partial_conns /usr/sbin/no -o clean_partial_conns=1 Specifies whether or not SYN(synchronizes the sequence number)attacks are being avoided.
directed_broadcast /usr/sbin/no -o directed_broadcast=0 Specifies whether to allow a directedbroadcast to a gateway. Setting to 0helps prevent directed packets fromreaching a remote network.
icmpaddressmask /usr/sbin/no -o icmpaddressmask=0 Specifies whether the systemresponds to an ICMP address maskrequest. Disabling this preventsaccess through source routingattacks.
ipforwarding /usr/sbin/no -o ipforwarding=0 Specifies whether the kernel shouldforward packets. Disabling thisprevents redirected packets fromreaching remote network.
ipignoreredirects /usr/sbin/no -o ipignoreredirects=1 Specifies whether to process redirectsthat are received.
ipsendredirects /usr/sbin/no -o ipsendredirects=0 Specifies whether the kernel shouldsend redirect signals. Disabling thisprevents redirected packets fromreaching remote network.
ip6srcrouteforward /usr/sbin/no -o ip6srcrouteforward=0 Specifies whether the systemforwards source-routed IPv6 packets.Disabling this prevents accessthrough source routing attacks.
ipsrcrouteforward /usr/sbin/no -o ipsrcrouteforward=0 Specifies whether the systemforwards source-routed packets.Disabling this prevents accessthrough source routing attacks.
ipsrcrouterecv /usr/sbin/no -o ipsrcrouterecv=0 Specifies whether the system acceptssource-routed packets. Disabling thisprevents access through sourcerouting attacks
ipsrcroutesend /usr/sbin/no -o ipsrcroutesend=0 Specifies whether applications cansend source-routed packets.Disabling this prevents accessthrough source routing attacks.
© Copyright IBM Corp. 2002, 2003 243

Parameter Command Purpose
nonlocsroute /usr/sbin/no -o nonlocsrcroute=0 Tells the Internet Protocol that strictlysource-routed packets may beaddressed to hosts outside the localnetwork. Disabling this preventsaccess through source routingattacks.
tcp_pmtu_discover /usr/sbin/no -o tcp_pmtu_discover=0 Disabling this prevents accessthrough source routing attacks.
udp_pmtu_discover /usr/sbin/no -o udp_pmtu_discover=0 Enables or disables path MTUdiscovery for TCP applications.Disabling this prevents accessthrough source routing attacks.
For more information about network-tunable options, see AIX 5L Version 5.2 Performance ManagementGuide.
244 AIX 5L Version 5.2: Security Guide

Appendix E. Notices
This information was developed for products and services offered in the U.S.A.
IBM may not offer the products, services, or features discussed in this document in other countries.Consult your local IBM representative for information on the products and services currently available inyour area. Any reference to an IBM product, program, or service is not intended to state or imply that onlythat IBM product, program, or service may be used. Any functionally equivalent product, program, orservice that does not infringe any IBM intellectual property right may be used instead. However, it is theuser’s responsibility to evaluate and verify the operation of any non-IBM product, program, or service.
IBM may have patents or pending patent applications covering subject matter described in this document.The furnishing of this document does not give you any license to these patents. You can send licenseinquiries, in writing, to:
IBM Director of LicensingIBM CorporationNorth Castle DriveArmonk, NY 10504-1785U.S.A.
The following paragraph does not apply to the United Kingdom or any other country where suchprovisions are inconsistent with local law: INTERNATIONAL BUSINESS MACHINES CORPORATIONPROVIDES THIS PUBLICATION "AS IS" WITHOUT WARRANTY OF ANY KIND, EITHER EXPRESS ORIMPLIED, INCLUDING, BUT NOT LIMITED TO, THE IMPLIED WARRANTIES OF NON-INFRINGEMENT,MERCHANTABILITY OR FITNESS FOR A PARTICULAR PURPOSE. Some states do not allow disclaimerof express or implied warranties in certain transactions, therefore, this statement may not apply to you.
This information could include technical inaccuracies or typographical errors. Changes are periodicallymade to the information herein; these changes will be incorporated in new editions of the publication. IBMmay make improvements and/or changes in the product(s) and/or the program(s) described in thispublication at any time without notice.
Licensees of this program who wish to have information about it for the purpose of enabling: (i) theexchange of information between independently created programs and other programs (including this one)and (ii) the mutual use of the information which has been exchanged, should contact:
IBM CorporationDept. LRAS/Bldg. 00311400 Burnet RoadAustin, TX 78758-3498U.S.A.
Such information may be available, subject to appropriate terms and conditions, including in some cases,payment of a fee.
The licensed program described in this document and all licensed material available for it are provided byIBM under terms of the IBM Customer Agreement, IBM International Program License Agreement or anyequivalent agreement between us.
For license inquiries regarding double-byte (DBCS) information, contact the IBM Intellectual PropertyDepartment in your country or send inquiries, in writing, to:
© Copyright IBM Corp. 2002, 2003 245
IBM World Trade Asia CorporationLicensing2-31 Roppongi 3-chome, Minato-kuTokyo 106, Japan
IBM may use or distribute any of the information you supply in any way it believes appropriate withoutincurring any obligation to you.
Information concerning non-IBM products was obtained from the suppliers of those products, theirpublished announcements or other publicly available sources. IBM has not tested those products andcannot confirm the accuracy of performance, compatibility or any other claims related to non-IBM products.Questions on the capabilities of non-IBM products should be addressed to the suppliers of those products.
Any references in this information to non-IBM Web sites are provided for convenience only and do not inany manner serve as an endorsement of those Web sites. The materials at those Web sites are not part ofthe materials for this IBM product and use of those Web sites is at your own risk.
This information contains examples of data and reports used in daily business operations. To illustratethem as completely as possible, the examples include the names of individuals, companies, brands, andproducts. All of these names are fictitious and any similarity to the names and addresses used by anactual business enterprise is entirely coincidental.
TrademarksThe following terms are trademarks of International Business Machines Corporation in the United States,other countries, or both:
AIX
AIX 5L
DB2
IBM
Lotus Notes
RS/6000
SecureWay
UNIX is a registered trademark of The Open Group in the United States and other countries.
Java and all Java-based trademarks and logos are registered trademarks of Sun Microsystems, Inc. in theUnited States, other countries, or both.
Microsoft, Active Directory, and Windows are trademarks of Microsoft Corporation in the United States,other countries, or both.
Other company, product, or service names may be trademarks or service marks of others.
246 AIX 5L Version 5.2: Security Guide

Index
Special characters/etc/publickey file 206/usr/lib/security/audit/config 123.netrc 123
Aaccess control
extended permissions 37lists 35, 38
access modesbase permissions 37
access rights 196, 198Active Directory 215, 219adding a CA root digital certificate 159administrative rights 200administrative roles 24
authorization 25backup 24maintaining 24overview 24passwords 24shutdown 24
auditrecord processing 54watch command 55
auditingcollecting event information 49configuration of 51detecting events 49event selection 50example, generic audit log scenario 58example, real-time file monitoring 57kernel audit trail 50kernel audit trail mode 52logging
event selection 52logging events
description of 51overview 49records format 52setting up 55
authentication 194authorization 196
and hierarchy 198classes 196
Bbackup
authorization 25role 24
base permissions 37
CCAPP/EAL4+ compliant system 8
Certificate Authentication Serviceoverview 79
Certification Authority (CA)adding root certificate to database 159deleting root certificate from database 160list of CAs 158receiving certificate from 161requesting certificate from 161trust settings 160
changing key database password 162Common Criteria 8Controlled Access Protection Profile and Evaluation
Assurance Level 4+ 8creating a key database 158creating IKE tunnels with digital certificates 163credentials 194
DES 194local 195
Ddacinet 128deleting a CA root digital certificate 160deleting a personal digital certificate 162DES credentials 194digital certificates
adding root 159creating IKE tunnels with 163creating key database 158deleting personal 162deleting root 160managing 158receiving 161requesting 161trust settings 160
disk quota systemoverview 45recovering from over-quota conditions 46setting up 46
EEIM
see also Enterprise Identity Mapping 211Enterprise Identity Mapping 211
current approach 212extended permissions 37
Ffilters
relationship to tunnels 142rules 138
filters, setting up 168flush-secldapclntd 70ftp 213
© Copyright IBM Corp. 2002, 2003 247

Ggeneric data management tunnel
using Web-based System Manager 148using XML 147
IIKE
features 137IKE tunnels
creatingusing digital certificates 163
Internet Engineering Task Force (IETF) 135Internet Key Exchange
see IKE 137Internet Protocol
security 135features 136IKE features 137operating system 135
Internet Protocol (IP) security 135configuration 168
planning 141installation 140logging 174predefined filter rules 172problem determination 178reference 187
IPsee Internet Protocol 135
IP securityfilters 138
and tunnels 142SAs 143security associations 137tunnels
and filters 142and SAs 143choosing which type 144
tunnels and key management 137IP Security
Digital Certificate Support 139IPv4
also see Internet Protocol (IP) security 135IPv6 135
KKerberos 213
authenticating users to AIX 215installing and configuring for Kerberos integrated
login using KRB5 215installing and configuring for Kerberos integrated
login using KRB5A 219secure rcmds
ftp 213rcp 213rlogin 213rsh 213telnet 213
key database, establishing trust settings for 160key management
and tunnels 137Key Manager 158keylogin command
secure NFS 203keys
changing database passw3ord 162creating a database 158
KRB5 215KRB5A 219
Lldap
mksecldap 65LDAP
AuditingSecurity Information Server 64
ClientSetting Up 62
Exploitation of the Security Subsystem 61Security Information Server
Setting Up 61User Management 63
LDAP Attribute Mapping 72ldap.cfg file format 71Light Directory Access Protocol (See LDAP) 61local credentials 195logging IP Security 174login control 18
changing the CDE login screen 19changing the welcome message 19enforcing automatic logoff 19securing unattended terminals 19setting up 18tightening system default login parameters 19
login user ID 30, 45ls-secldapclntd 70
Mmgrsecurity 23, 28, 40mksecldap 65mount command
secure NFSfile systems 209
NNetwork Authentication Service 215, 219Network Authentication Service (NAS) 213network trusted computing base 126NFS (Network File System)
/etc/publickey file 206secure NFS 203
administering 207authentication requirements 204configuring 207file systems 209how to export a file system 208
248 AIX 5L Version 5.2: Security Guide

NFS (Network File System) (continued)secure NFS (continued)
net name 205network entities 205performance 206public key cryptography 203
NIS+principals 192security 191
OOpenSSH
using with PAM 116operating system security 189
authentication 189gates 189secure RPC password 189
PPAM
adding a module 110changing the /etc/pam.conf file 110configuration file
/etc/pam.conf 109debug 111integrating into AIX 111introduction 107library 107modules 108using with OpenSSH 116
passwords 40/etc/password file 41authorization to change 24, 26establishing good passwords 40extending restrictions 44recommended password options 42secure RPC 189
permissionsbase 37extended 37
PKI 79principals
security 192public key cryptography
secure NFS 203Public Key Infrastructure 79
Qquota system
see disk quota system 45
Rrcp 213restart-secldapclntd 70restore
authorization 27
restore (continued)role 24
rlogin 213role 24
authorization 25backup 24maintaining 24overview 24passwords 24shutdown 24
root account 23disabling direct root login 23
root user processescapabilities of 37
rsh 213
SSAK 7secldapclntd 68sectoldif command 71secure attention key
configuring 7secure NFS 203secure RPC password 189security
Internet Protocol (IP) 135introduction 3
administrative tasks 28, 40authentication 45identification 45
NIS+ 191administrative rights 200authentication 191authorization 191, 196credentials 194levels 192principals 192
operating system 189root account 23TCP/IP 121
security associations (SA) 137relationship to tunnels 143
Security Parameters Index (SPI)and security associations 137
ServerSecurity Information
LDAP 61setgid program
use of 36setuid program
use of 36shutdown
authorization 24start-secldapclntd 69stop-secldapclntd 69
TTCB 3
Index 249

tcbck commandconfiguring 7using 5
TCP/IP/etc/ftpusers 125/etc/hosts.equiv 124/usr/lib/security/audit/config 123.netrc 123IP security
IKE features 137installation 140planning configuration 141predefined filter rules 172problem determination 178reference 187
IP Security 135security 121
data 127DOD 127NTCB 126operating system-specific 121, 122remote command execution access 124restricted FTP users 125SAK 122TCP/IP-specific 123, 125trusted shell 122
see Internet Protocol 136telnet 213trust settings for key database, establishing 160Trusted Communication Path
use of 7Trusted Computing Base
auditing of 51auditing the security state of 4checking with tcbck command 5file system
checking 5overview 3trusted files
checking 5trusted program 6
tunnelsand key management 137choosing which type 144relationship to filters 142relationship to SAs 143
Uuser 24, 26
adding 24, 26user account
control of 29User Management
LDAP 63
VVirtual Private Network (VPN) 135VPN
benefits 139
XXML 147, 148
250 AIX 5L Version 5.2: Security Guide

Technical publication remarks form
Title : ESCALA AIX 5L Security Guide
Reference Nº : 86 A2 22EG 01 Date: May 2003
ERRORS IN PUBLICATION
SUGGESTIONS FOR IMPROVEMENT TO PUBLICATION
Your comments will be promptly investigated by qualified technical personnel and action will be taken as required.If you require a written reply, please include your complete mailing address below.
NAME : Date :
COMPANY :
ADDRESS :
Please give this technical publication remarks form to your BULL representative or mail to:
Bull - Documentation Dept.
1 Rue de ProvenceBP 20838432 ECHIROLLES [email protected]

Technical publications ordering form
To order additional publications, please fill in a copy of this form and send it via mail to:
BULL CEDOC357 AVENUE PATTONB.P.2084549008 ANGERS CEDEX 01FRANCE
Phone: +33 (0) 2 41 73 72 66FAX: +33 (0) 2 41 73 70 66E-Mail: [email protected]
CEDOC Reference # Designation Qty
_ _ _ _ _ _ _ _ _ [ _ _ ]
_ _ _ _ _ _ _ _ _ [ _ _ ]
_ _ _ _ _ _ _ _ _ [ _ _ ]
_ _ _ _ _ _ _ _ _ [ _ _ ]
_ _ _ _ _ _ _ _ _ [ _ _ ]
_ _ _ _ _ _ _ _ _ [ _ _ ]
_ _ _ _ _ _ _ _ _ [ _ _ ]
_ _ _ _ _ _ _ _ _ [ _ _ ]
_ _ _ _ _ _ _ _ _ [ _ _ ]
_ _ _ _ _ _ _ _ _ [ _ _ ]
_ _ _ _ _ _ _ _ _ [ _ _ ]
_ _ _ _ _ _ _ _ _ [ _ _ ]
[ _ _ ] : The latest revision will be provided if no revision number is given.
NAME: Date:
COMPANY:
ADDRESS:
PHONE: FAX:
E-MAIL:
For Bull Subsidiaries:
Identification:
For Bull Affiliated Customers:
Customer Code:
For Bull Internal Customers:
Budgetary Section:
For Others: Please ask your Bull representative.


BULL CEDOC
357 AVENUE PATTON
B.P.20845
49008 ANGERS CEDEX 01
FRANCE
86 A2 22EG 01REFERENCE
Utiliser les marques de découpe pour obtenir les étiquettes.Use the cut marks to get the labels.
AIX
86 A2 22EG 01
AIX 5L SecurityGuide
AIX
86 A2 22EG 01
AIX 5L SecurityGuide
AIX
86 A2 22EG 01
AIX 5L SecurityGuide
Related Documents