1 Air Curtain Service Manual ACS Models PROBLEMS AND REPAIRING STEPS REPAIRING OPERATING Caution: Before repairing, please make sure that the air curtain’s power cord is disconnected and without electricity. Tools:Cross head of screw driver、Nipper pliers、Multimeter USUAL PROBLEMS POSSIBLE CAUSE REPARING STEPS The unit is Powered on but cannot working. The remote control’s lead cable possible loose. Please read the step A to open the faceplate to plug the lead cable tightly. The other lead cables possibly broken. Please read the step A to open the faceplate, to use the multimeter to test the lead cables broken or not, if yes, please replace the lead cables. The PCB or capacitor possible broken. Please read the step A to open the faceplate to check, if the PCB or capacitor is burnt, please see the step G, H to replace accordingly. The unit is running bad or working with noise. The wind wheel(s) possible bad. Please read the step A to step F to change the wind wheel. The motor’s shafts have rubbish. Please read from step A to step F to clean the unit’s body and the motor’s shafts. The motor and wind wheel’s screws possible loose. Please read step A and step B to check the screws of the motor and wind wheel whether loose, if yes, please retighten the screw. Warmly note: Other problems out of the above, please contact the factory for solutions. ©2015 Innovair Corporation. All Rights Reserved. www.innovair.com

Welcome message from author
This document is posted to help you gain knowledge. Please leave a comment to let me know what you think about it! Share it to your friends and learn new things together.
Transcript
1
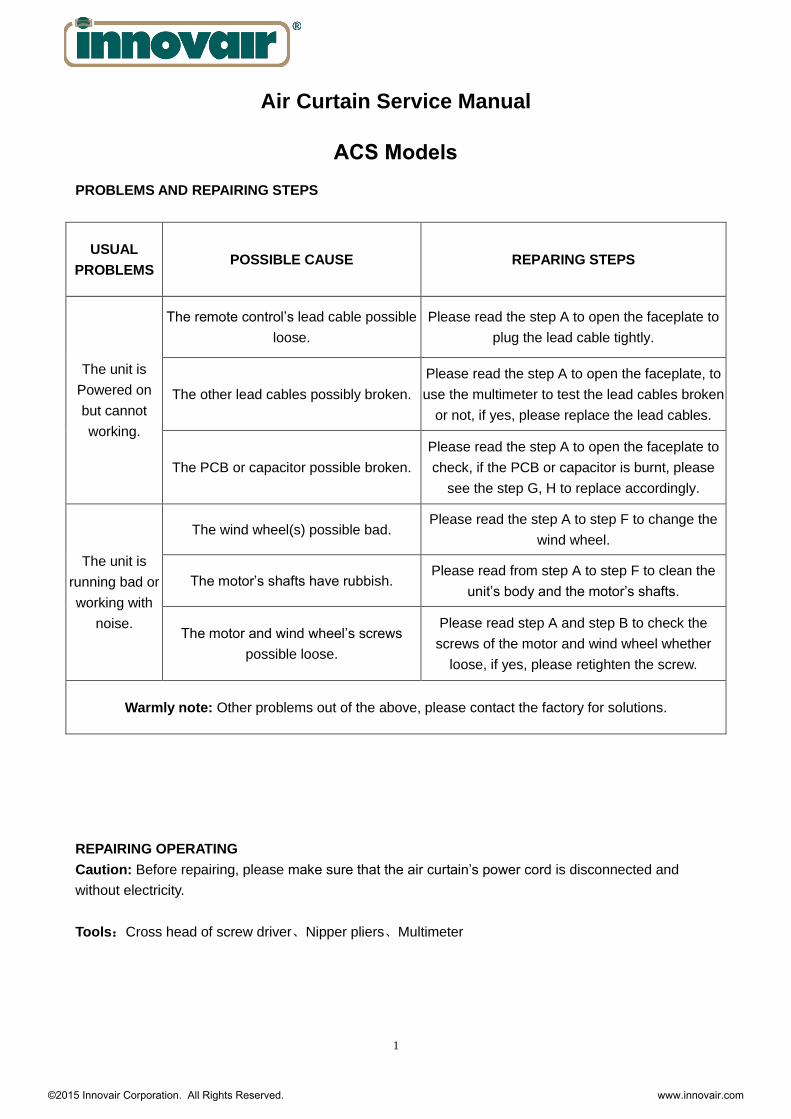
Air Curtain Service Manual
ACS ModelsPROBLEMS AND REPAIRING STEPS
REPAIRING OPERATING
Caution: Before repairing, please make sure that the air curtain’s power cord is disconnected and
without electricity.
Tools:Cross head of screw driver、Nipper pliers、Multimeter
USUAL
PROBLEMS POSSIBLE CAUSE REPARING STEPS
The unit is
Powered on
but cannot
working.
The remote control’s lead cable possible
loose.
Please read the step A to open the faceplate to
plug the lead cable tightly.
The other lead cables possibly broken.
Please read the step A to open the faceplate, to
use the multimeter to test the lead cables broken
or not, if yes, please replace the lead cables.
The PCB or capacitor possible broken.
Please read the step A to open the faceplate to
check, if the PCB or capacitor is burnt, please
see the step G, H to replace accordingly.
The unit is
running bad or
working with
noise.
The wind wheel(s) possible bad. Please read the step A to step F to change the
wind wheel.
The motor’s shafts have rubbish. Please read from step A to step F to clean the
unit’s body and the motor’s shafts.
The motor and wind wheel’s screws
possible loose.
Please read step A and step B to check the
screws of the motor and wind wheel whether
loose, if yes, please retighten the screw.
Warmly note: Other problems out of the above, please contact the factory for solutions.
©2015 Innovair Corporation. All Rights Reserved. www.innovair.com

2
REPAIRING
STEPS
REPAIRING
OPERATION DIAGRAMMATIZE
A.
How to take
down the
faceplate①
Firstly with the cross
head of screw driver to
take down the screws on
the faceplate in order to
loosen the faceplate from
the body, then turn over it
to find the head cable of
the receiver on the left
side and unplug it, after
that, remove the face
plate and put away.
B.
How to take
down the
faceplate②
Secondly to remove the
two small plastic covers
on the outlet, with a head
cross screw driver to
loosen the screws, then
to take down the
installation plate and put
it away.
C.
How to take
down the
motor
reinforcement.
To loosen the motor
reinforcement’s screws
on the body’s back by the
cross head of screw
driver, then to take down
the motor’s reinforcement
D.
How to take
down the wind
wheel①
Firstly to take down the
bearing holders of right
and left wind wheel by the
cross head of screws
driver.
Face plate
Installation plate
Motor reinforcement
Motor reinforcement’s
screws on the back
Bearing
holder
Plastic cover
©2015 Innovair Corporation. All Rights Reserved. www.innovair.com

3
E.
How to take
down the wind
wheel②
Secondly please turn
over the body, you can
see the 4pcs of screws
near the power cord,
please use the cross
head of screw driver to
take them down, then to
loose the motor on the
body(but don’t take the
motor directly because
the head cables still
connected).
F.
How to take
down the wind
wheel③
Thirdly the right and left
wind wheel’s side that
near the motor, each has
one screw inside, please
loose the screws and
hold up the motor lightly,
then to take down the two
wind wheels.
G.
How to take
down the
motor.
To open the insulated
terminals by the nipper
pliers and to loosen the
lead cables, then to take
down the motor.
H.
How to take
down the PCB
and the
capacitor.
To loosen the screws of
the PCB and the
capacitor, then you can
take down the PCB and
the capacitor.
I.
How to take
down the wind
deflector.
To loosen the wind
deflector supporter, then
to take down the wind
deflector.
The 4pcs of screws
Wind wheel’s
crews
Lead cables Insulated terminal
The 2pcs of screws of PCB.
Ground screw Capacitor
The crews of capacitor
PCB
The wind deflector
The wind deflector supporter
©2015 Innovair Corporation. All Rights Reserved. www.innovair.com
4
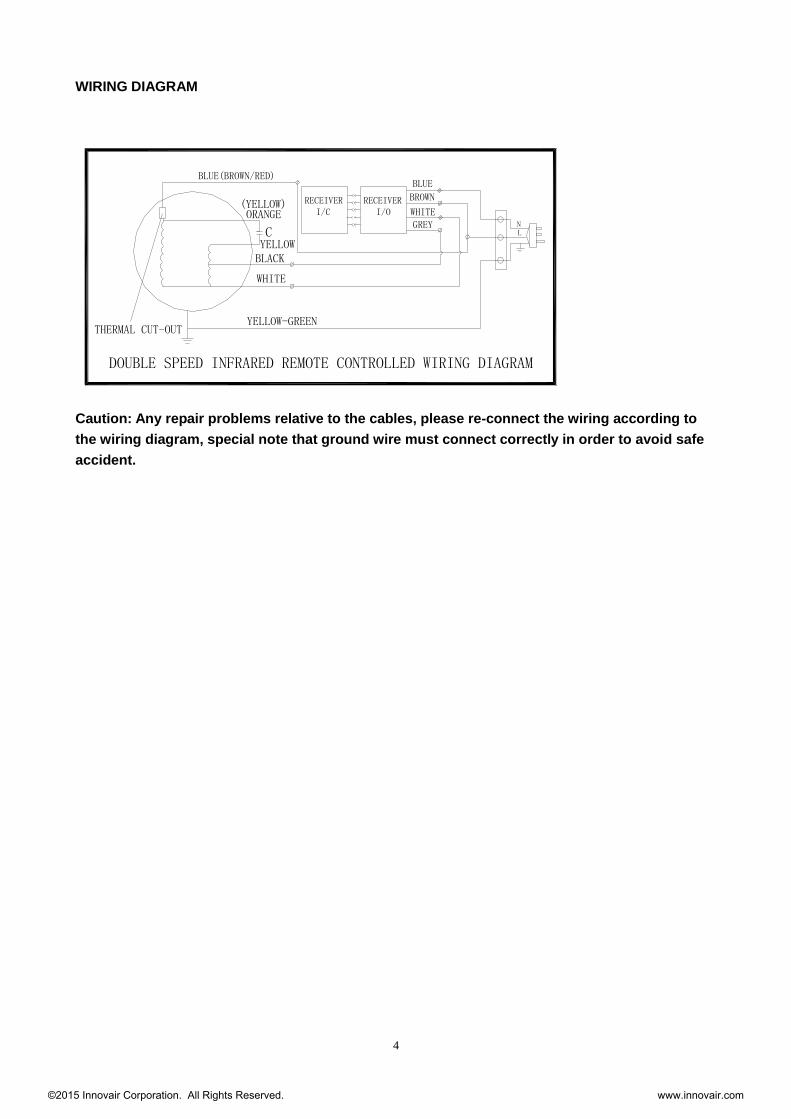
WIRING DIAGRAM
THERMAL CUT-OUT
DOUBLE SPEED SWITCH WIRING DIAGRAM
YELLOW-GREEN
(YELLOW)
BLACK
WHITE
BLUE(BROWN/RED)
YELLOW
ORANGEC
K2 OFF
3 HI
1 LO
LN
DOUBLE SPEED INFRARED REMOTE CONTROLLED WIRING DIAGRAM
THERMAL CUT-OUTYELLOW-GREEN
WHITE
RECEIVERI/O
BLUE(BROWN/RED)
CYELLOWBLACK
(YELLOW)ORANGE
RECEIVERI/C
GREYWHITE
NL
BROWN
BLUE
Caution: Any repair problems relative to the cables, please re-connect the wiring according to
the wiring diagram, special note that ground wire must connect correctly in order to avoid safe
accident.
©2015 Innovair Corporation. All Rights Reserved. www.innovair.com
Related Documents