AGRIBOARD INDUSTRIES Structural Insulated Panel Systems Agriboard Installation Guide Commercial Application Rev. 9 See 10-Year Warranty For More Information

Welcome message from author
This document is posted to help you gain knowledge. Please leave a comment to let me know what you think about it! Share it to your friends and learn new things together.
Transcript
AGRIBOARD INDUSTRIES
Structural Insulated Panel Systems
Agriboard
Installation Guide
Commercial Application Rev. 9
See 10-Year WarrantyFor More Information

A M E R I C A ’ S L E A D I N G D E V E L O P E R O F G R E E N B U I L D I N G S Y S T E M S
Contact Information for Assistance
For Construction Questions / Problems Contact: Paul Pittman, Plant Manager - (940) 495-3590 Ext. 20 Jim Murphy, Logistics Manager – (940) 495-3590 Ext. 31 For Technical Questions / Problems Contact: Dawn Morgan, Project Manager – (940) 495-3590 Ext. 42
AGRIBOARD INDUSTRIES A Ryan Development Company, L.C.
8301 E. 21st St. North Suite 320
Wichita, KS 67206 Toll Free 866.247.4267
Fax 316.636.9255
See 10-Year WarrantyFor More Information
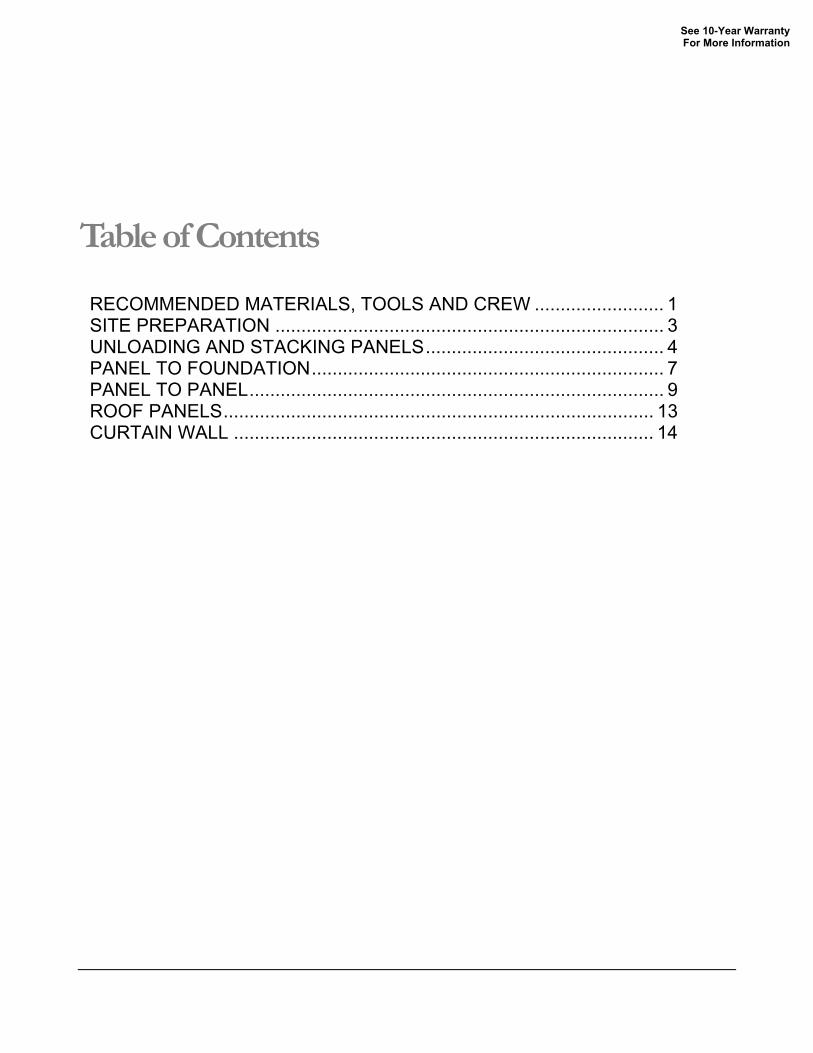
Table of Contents
RECOMMENDED MATERIALS, TOOLS AND CREW ......................... 1 SITE PREPARATION ........................................................................... 3 UNLOADING AND STACKING PANELS.............................................. 4 PANEL TO FOUNDATION.................................................................... 7 PANEL TO PANEL................................................................................ 9 ROOF PANELS................................................................................... 13 CURTAIN WALL ................................................................................. 14
See 10-Year WarrantyFor More Information

I S O M E T R I C P A N E L V I E W S
FIGURE 0.1
4-38" Agriboard Panel
Detail
FIGURE 0.2
7-78" Agriboard Panel
Detail
See 10-Year WarrantyFor More Information
R E C O M M E N D E D M A T E R I A L S , T O O L S A N D C R E W
1
RECOMMENDED MATERIALS, TOOLS AND CREW Items Supplied by Agriboard Industries:
1. Pressure treated sill plates, to be cut by installer for length. 2. All connecting keys, where required, to be cut to length by installer. 3. Construction adhesive, in 28 oz. tubes 4. 12/14 x 3-1/2” R4 Star Head screws, GRK Fasteners (4-3/8” Panels). 5. 12/14 x 4-3/4” R4 Star Head screws, GRK Fasteners (7-7/8” Panels). 6. 12/14 x 6-3/8” R4 Star Head screws, GRK Fasteners (To secure keys in panels). 7. Simpson Strong Tie connectors for corner and panel seams, i.e. corner straps, brackets and panel
seam straps. 8. Sill seal gaskets 9. T25 bits to fit R4 Star Head screws.
Items Supplied by Customer:
1. Concrete anchor bolts for sill plate attachment, as required by Engineer of Record. Epoxy bolts recommended.
2. For Red Iron Curtain Wall Systems: carriage bolts for attaching to red iron beams, as required by Engineer of Record.
3. Minimally expanding foam aerosol to seal Agriboard Panel lifting holes and electrical chase holes. 4. Incidental 2”x 4” studs as temporary braces to maintain a safe and level position when setting
panels. 5. Metal flashing – if required per customer’s specifications. 6. Exterior caulk – if required per customer’s specifications. 7. Fire caulk – 3M Fire Barrier CP 25WB or equivalent, if required per customer’s specifications. 8. All other Simpson Strong Tie connectors for racking, seismic or uplift, if required by customer’s
specifications. 9. Box extensions or plaster rings as required to make boxes flush with finished wall. 10. Panel lifting jig / device as detailed below. May be rented from Agriboard Industries.
Section
1 See 10-Year WarrantyFor More Information

R E C O M M E N D E D M A T E R I A L S , T O O L S A N D C R E W
2
Required Panel Lifting Jig / Device and hardware: Panel lifting jigs / devices may be fabricated by the customer per the attached description and sketch or may be rented from Agriboard. Lifting wall panels requires (see sketch Figure 3.1) May be rented from Agriboard Industries:
1. 2 pairs of ½” x 4” x 8” steel plates; each plate with a 7/8” hole located 1-½” in at each end. 2. 4 each ¾” x 10” grade 8 bolts, nuts and washers Supplied by crane operator, not included in rental from Agriboard Industries: (2) 2” X 6’ lifting straps, rated for a minimum of 1600 lbs. each, with loops at each end. (1) 4’ lifting strap (1) Shackle or Clevis
Lifting floor or roof panels require (see Figure 3.2) May be rented from Agriboard Industries:
1. 4 each 9” Crosby Group G-277 shoulder nut eye bolt with 1-9 thread @ 4” long. 2. 4 each 1” Fender flat washer 3. 4 each 7/8” screw pin shackle, rated for a minimum of 6,000 pounds. Supplied by crane operator, not included in rental from Agriboard Industries: 4 each 2” x 12’ or 14’, depending on panel length, lifting straps, rated for a minimum of 3000 lbs. each, with loops at each end.
Other Recommended Tools& Equipment Supplied by Customer
1. 2 each 6’ forklift extensions, to remove panels from truck & stage 2. 2 each pry bars @ 2’, 3’, and 4’ lengths. 3. 3 Screw guns, 15 amps Hitachi or equivalent. 4. 6 lb. sledge hammer to completely seat the profile keys into the panels 5. Drill and bits to drill and countersink wooden sill plates. 6. For Red Iron Curtain Wall Systems: Drill motor – ½” minimum for drilling red iron and high
speed, long shank drill bits to install 5/8” carriage bolts through panels and steel beams 7. Other misc. power tools – circular saw, reciprocating saw 8. 4 each large (28 oz) caulking guns 9. Scissor lift, one is sufficient two is desirable 10. 1 man lift and/or extension ladder 11. Sky Track – 10,000 lb with 56’ reach and front outriggers. 12. Crane for roof panels that a Sky Track cannot reach. 13. ½” Impact wrench with deep sockets for installing lag bolts in roof & anchors bolts in sill plate.
Recommended Crew Size
a. Laborers – 4 b. Sky Track or crane operator - 1 c. Supervisor - 1
See 10-Year WarrantyFor More Information
S I T E P R E P A R A T I O N
3
SITE PREPARATION 1) Items to inspect that may affect proper installation of panels:
a) Clean and level substrate (slab, etc.) b) Grade c) Other conditions that may interfere with construction, e.g. trees, high lines, removal of fences, etc. d) Permission for truck/crane to access through neighboring property. e) If required for project steel must be plumb & in correct location.
2) Adverse conditions should be reported to Agriboard in writing, at the earliest possible time, to allow
an engineered solution before construction begins. 3) Foundation poured and checked for level and squareness.
4) For site to be ready for panel installation, the following minimum standards must be meet:
a) Items 1, 2 & 3 complete. b) The area around the foundation should be level, compacted and backfilled to the foundation wall.
Trenches and entryways need to be backfilled, leveled and compacted to support a 65,000 lbs. load.
c) Septic tank, drainage or sewer lines, water lines, etc. need to be marked or flagged before delivery. d) Entry to the site should allow access of at least 14 feet high and 15 feet wide.
Important note: For correct panel installation the substrate /slab must be level within the recommended 1/8” specification. It may be necessary to install the panels to start adjacent to the substrate high spot or to shim / grind / cut portions of the panel or substrate to achieve straight and level connections. These adjustments are outside the scope of a standard/recommended installation. A level or transit should be used to ensure each panel is straight and level.
Section
2 See 10-Year WarrantyFor More Information
U N L O A D I N G A N D S T A C K I N G P A N E L S
4
UNLOADING AND STACKING PANELS
1) Panels are clearly labeled to match Agriboard layout drawings (attached). 2) When possible, panels may be loaded sequentially in order to minimize handling while
accommodating temporary staging or direct construction, depending on panel size. 3) The recommended method of unloading the panels from the flat bed truck:
a) Forklift or Skytrack with 6’ forks or 6’ fork extensions with at least 5’ carriage width. i) Panels can be unloaded up to 3 at a time, depending on fork lift capacity.
b) A crane can be used with following instructions: i) Unload panels one at a time. ii) Bolt panel lifting jig / device in holes provided in each panel. See Required Materials List –
page 2 and Panel Lifting Details, Figures 3.1 through 3.3. iii) Lifting straps are required with a minimum of 3,000 lbs. load capacity each, to be supplied by
crane operator.
4) If panels are stacked for staging, use the following directions: a) Panels should be placed on spacers so that they are at least 3” off the ground. The ground should
be as level and dry as possible. b) The spacers are placed between the panels similar to the shipping configuration to prevent
warpage. The distance between spacers should be no more than 8’ apart. c) Panels should be covered to prevent water and/or moisture damage prior to installation. d) CAUTION: Improper storage can cause damage to panels that may require replacement.
Section
3 See 10-Year WarrantyFor More Information

U N L O A D I N G A N D S T A C K I N G P A N E L S
5
WALL PANEL LIFTING DEVICE
See 10-Year WarrantyFor More Information

U N L O A D I N G A N D S T A C K I N G P A N E L S
6
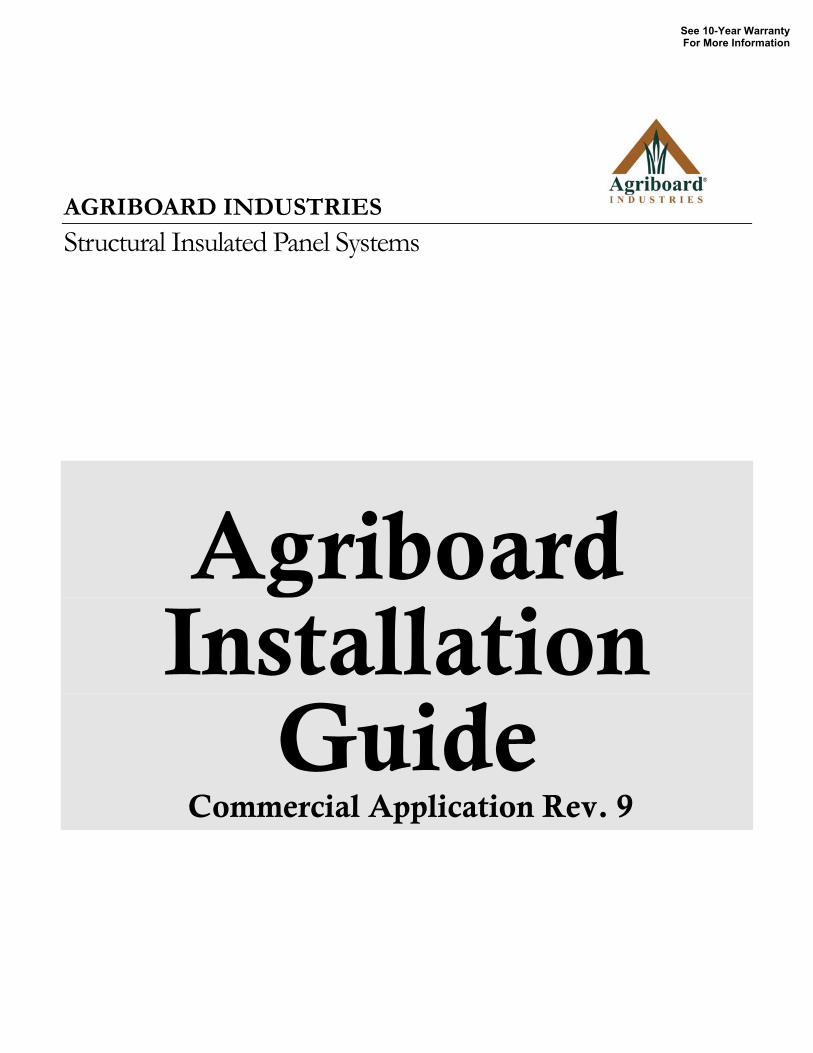
Crane hook
9" Crosby Group G-277Shoulder Nut Eye Boltwith 1-9 Thread @ 4" Longor equivalent
2", 12' or 14' lifting straps,rated for min. 3,000 lb. or equivalent,Not provided by Agriboard Ind.
1" Fender Flat Washer
Shackle
FIGURE 3.2Roof & Floor Detail
See 10-Year WarrantyFor More Information
P A N E L T O F L O O R
7
PANEL TO FOUNDATION
Slab-on-Grade: Figure 4.1 1) J-bolts or epoxy type anchor bolts, specified by a structural engineer, must be installed in the
foundation using the following instructions (See Figure 4.1): a) J-bolts or epoxy type anchor bolts must be installed with a MINIMUM thread height of
2-3/4”, see Figure 4.1, on the center line of the 4-3/8” or 7-7/8” panels. i) 4-3/8” panels: the j-bolts or epoxy type anchor bolts are to be 2-3/16” from the string line at
the edge of the foundation. If this measurement is not exact it may require removal and replacement with epoxy type anchor bolts to achieve proper dimensions. Bolt spacing per structural engineer’s specification.
ii) 7-7/8” panels, the j-bolts or epoxy type anchor bolts are to be 3-15/16” from the string line at the edge of the foundation. This measurement can be no more than 1” off, in either direction. Bolt spacing is per structural engineer’s specification.
2) Lay out the sill plate & panels with a chalk line. Ensure there are no sill plate seams at panel seams. 3) Sill seal gasket is applied to the bottom of the sill plate, in the field. 4) Drill the sill plate to match the diameter and location of the j-bolts or anchor bolts. Countersink the
bottom key to ¾” deep, see Figure 4.1, with a diameter to accept the washer and nut for the j-bolts or epoxy type anchor bolts.
5) Apply 3/8” bead adhesive to the top and both sides of the keyway on the sill plate or to the C-channel
on the panel before lowering the first panel into position. 6) It is recommended that 2 corner panels be set first to maintain stability. 7) If necessary for proper panel seating, the panels should be manually pushed together or seated using
man-power, pry bars, lifts or other means while being lowered into place. The gap between the panel and sill plate should be flush to minimal.
8) Support the panel with temporary 2 x 4 braces to maintain a safe and level position. Once the first
panel is in place, 12/14 R4 Star Head screws (3-1/2” for 4-3/8” panels or 4-3/4” for 7-7/8” panels) are used to secure panels to the sill plate per the following instructions and attached sketch: a) Screws to be on 12” centers on outside. b) Inside to be 12” centers offset 6” from outside. c) See Figure 4.1 for screw angle and offset.
Section
4 See 10-Year WarrantyFor More Information

P A N E L T O F L O O R
8
9) Panels should be installed with minimal gaps. 10) For panel to panel connection instructions see section. If attaching to “red iron”, see “Curtain Wall”
section for attachment. 11) When complete, fill the lifting holes on panel with minimally expanding foam insulation.
FIGURE 4.1Wall Panel to Slab on Grade
See 10-Year WarrantyFor More Information

P A N E L T O P A N E L
9
PANEL TO PANEL Side to Side Connection: Figure 5.1, 5.2
1) To install a wall panel to an adjacent wall panel already in place, use the following instructions.
a) Sill plates must be attached and bolted in place prior to joining side panels. b) The key should be first installed into one of the wall panels. Note: the side keys may be factory
installed to save time in the field. If the key is not already attached, apply 3/8” bead of adhesive to the bottom and sides of the C-channel.
c) Insert and seat the key and then secure with 12/14 x 6-3/8” R4 Star Head screws at the top, center and bottom of the key. See Figure 5.1.
d) With the key in place, secure the key to the sides of the C-channel with 12/14 R4 Star Head screws (3-1/2” for 4-3/8” panels and 4-3/4” for 7-7/8” panels). i) Screws to be on 12” center on outside. ii) Inside to be 12” on center offset 6” from outside. iii) See Figure 5.1 for screw angle and offset.
2) Apply adhesive to top and both sides of the exposed key and 3 sides of the bottom key. 3) Lift the next panel into place to engage keys, bottom and side. If necessary for proper panel seating,
the panels should be manually pushed together using man-power, pry bars or other means while being lowered into place. The gap between panels should be flush to minimal.
4) Install 12/14 R4 Star Head screws (3-1/2” for 4-3/8” panels or 4-3/4” for 7-7/8” panels) to secure
panel sides and sill plates, using the following instructions:
a) Screws to be on 12” centers on outside. b) Inside to be 12” centers offset 6” from outside. c) See Figure 5.1 for screw angle and offset.
5) Where two panels connect a key should be used to connect the two together, per panel to panel
instructions. 6) When complete, fill the lifting holes on panels with minimally expanding foam insulation.
Section
5 See 10-Year WarrantyFor More Information

P A N E L T O P A N E L
10
FIGURE 5.1Panel to PanelSide to Side Connection
NOTE: Use Panel to Panel Connection Instructions
Top Key
FIGURE 5.2Panel to PanelTop Panel Connection
See 10-Year WarrantyFor More Information

P A N E L T O P A N E L
11
Corner Connection: Figures 5.3, 5.4
1. Sill plates must be attached and bolted in place prior to joining panels at corner.
2. When installing one panel to a panel already in place at the corner , use the following instruction:
a. Apply adhesive to only one side of the special corner key i. 1-¾” x 1-¾” key for 4-3/8” wall panel.
ii. 1-¾” x 3-½” key for 7-7/8” wall panel. b. Attach special key, with adhesive, to the corner of the existing wall
i. 1-5/16” from edge per drawing for 4-3/8” wall panel. ii. 2-3/16” from edge per drawing for 7-7/8” wall panel.
iii. IMPORTANT: Align key top and bottom to fit within web pieces on top and bottom of adjacent panel to be installed!
iv. Screw key to the panel from top to bottom, using 12/14 x 3-½” R4 Star Head screws on 12” centers, screwed flush, per Figure 8.3. For 7-7/8” Agriboard Panels angle screws to connect with 3 ½” profile per Figure 5.3.
3. Follow Side to Side Instructions from Step 2 on, and then go to Step 4.
4. Secure corners top with Simpson Strong Tie Straps at 4’ OC. See Figure 5.4.
c. For 4-3/8” panels, use TP39 (3-1/8” x9”) d. For 7-7/8” panels, use TP311 (3-1/8” x 11)
FIGURE 5.3Panel to PanelCorner Connection
See 10-Year WarrantyFor More Information

P A N E L T O P A N E L
12
FIGURE 5.4Panel to PanelCorner Connection
Panel Stacking Connection: Figure 5.1
1. Apply adhesive to the bottom and sides of the C-channels on the adjacent panel. 2. Insert and seat the key and then secure key down the center line with three 12/14 x 6-3/8” R4 Star
Head screws. 3. Install 12/14 R4 Star Head screws (3-1/2” for 4-3/8” panels or 4-3/4” for 7-7/8” panels) to secure
panel sides to the key: a. Screws to be on 12” center for outside. b. Inside to be 12” on center offset 6” from outside. c. See Figure 5.1 for screw angle and offset.
4. Apply adhesive to the exposed keys or C-channels, bottom and sides. 5. Follow Side to Side Connection instructions from step 3 on, may use Figure 8.1 for this as well.
See 10-Year WarrantyFor More Information

R O O F P A N E L
13
ROOF PANELS Figure 6.1 1) Stage panels according to floor / roof panel unloading instructions and Figure 3.2.
2) Key to attachment can be done by either attaching the key to the roof panel first or setting the key into
the wall panels & setting the roof panel on top. Follow Panel to Panel Corner Connection instructions on placement of key onto roof panel.
3) Attachment to structural system to be determined by customer’s structural engineer. Typically, nailers
are added on top of the steel beam in order to attach with lag bolt through the panel to. 4) Lift roof panels according to Figure 3.2. Apply SF-565, or similar adhesive to the key. 5) Fasten roof panel to wall according to Figure 6.1. 6) When complete, fill the lifting holes on panels with minimally expanding foam insulation.
Agriboard Panel
Attach roof panel to wall panel using lag bolts, per EOR
Minimum 3" Penetrationinto wall panel.
Attache key per Panel to PanelCorner Connection detail instructions
FIGURE 6.1Roof Panel toWall Panel Connection
Section
6 See 10-Year WarrantyFor More Information
C U R T A I N W A L L
14
CURTAIN WALL
1) Sill plates must be attached first and bolted in place.
2) Apply adhesive per drawing and lift panels into place. For proper panel seating, the panels may be manually pushed together using man-power, pry bars or other means while being set into place. The gap between panels or panel and sill plate should be flush to no more than 1/16”.
3) Red Iron Installation (Figure 7.1):
a) Predrill the panel and red iron beam to install the 5/8” diameter carriage bolts. NOTE: Holes for carriage bolts should be drilled 2-1/2” from any edge of the Agriboard Panel in order for the bolt to penetrate the 3-1/2” inner profile timbers which frame every Agriboard Panel. Some designs stagger the Agriboard Panel tiers, so I-beam attachment points may not align with the vertical sides of the Agriboard Panels. Where possible, it is advisable to attach Agriboard Panels with carriage bolts to every I-beam.
b) Insert carriage bolts (5/8”x 6” for 4-3/8” panels or 5/8”x 10” for 7-7/8” panels) through panels so the threads extend beyond the red iron beam. Fasten with flat and lock washers and tighten bolt to 40-45 ft. lb. torque.
4) Timber Framed Installation (Figure 7.2):
a) Predrill the panel to install the lag screws. Timber frame to be predrilled per customer’s specifications. NOTE: Holes for lag screws should be drilled 2-1/2” from any edge of the Agriboard Panel in order for the bolt to penetrate the 3-1/2” inner profile timbers which frame every Agriboard Panel. Some designs stagger the Agriboard Panel tiers, so beam attachment points may not align with the vertical sides of the Agriboard Panels. Where possible, it is advisable to attach Agriboard Panels with lag screws to every Timber beam or column.
b) Insert lag screws through panels so there is a minimum 3” penetration into Timber. 5) Attach 12/14 R4 Star Head screws (3-1/2” for 4-3/8” panels or 4-3/4” for 7-7/8” panels) to secure
their keys, per the following instructions: a) Screws to be on 12” centers on outside. b) Inside to be 12” centers offset 6” from outside. c) See Figure 7.1 for screw angle and offset.
6) When complete, seal the lifting holes on the panels with minimally expanding foam insulation.
Section
7 See 10-Year WarrantyFor More Information

C U R T A I N W A L L
15
FIGURE 7.1Panel to Red Iron
FIGURE 7.2Panel to Timber Frame
See 10-Year WarrantyFor More Information
Related Documents