Agilent Technologies Agilent Genomic Workbench 6.5 SureSelect Quality Analyzer User Guide For Research Use Only. Not for use in diagnostic procedures.

Welcome message from author
This document is posted to help you gain knowledge. Please leave a comment to let me know what you think about it! Share it to your friends and learn new things together.
Transcript

Agilent Technologies
Agilent Genomic Workbench 6.5
SureSelect Quality Analyzer
User Guide
For Research Use Only. Not for use in diagnostic procedures.

SureSelect Quality Analyzer User Guide
Notices© Agilent Technologies, Inc. 2010, 2015
No part of this manual may be reproduced in any form or by any means (including elec-tronic storage and retrieval or translation into a foreign language) without prior agree-ment and written consent from Agilent Technologies, Inc. as governed by United States and international copyright laws.
RevisionG3800-90023
Revision A1, October 2015
Agilent Technologies, Inc.5301 Stevens Creek Blvd. Santa Clara, CA 95051 USA
Warranty
The material contained in this docu-ment is provided “as is,” and is sub-ject to being changed, without notice, in future editions. Further, to the max-imum extent permitted by applicable law, Agilent disclaims all warranties, either express or implied, with regard to this manual and any information contained herein, including but not limited to the implied warranties of merchantability and fitness for a par-ticular purpose. Agilent shall not be liable for errors or for incidental or consequential damages in connec-tion with the furnishing, use, or per-formance of this document or of any information contained herein. Should Agilent and the user have a separate written agreement with warranty terms covering the material in this document that conflict with these terms, the warranty terms in the sep-arate agreement shall control.
Technology Licenses The hardware and/or software described in this document are furnished under a license and may be used or copied only in accor-dance with the terms of such license.
Restricted Rights LegendU.S. Government Restricted Rights. Soft-ware and technical data rights granted to the federal government include only those rights customarily provided to end user cus-tomers. Agilent provides this customary commercial license in Software and techni-cal data pursuant to FAR 12.211 (Technical Data) and 12.212 (Computer Software) and, for the Department of Defense, DFARS 252.227-7015 (Technical Data - Commercial Items) and DFARS 227.7202-3 (Rights in Commercial Computer Software or Com-puter Software Documentation).
Safety Notices
CAUTION
A CAUTION notice denotes a haz-ard. It calls attention to an operat-ing procedure, practice, or the like that, if not correctly performed or adhered to, could result in damage to the product or loss of important data. Do not proceed beyond a CAUTION notice until the indicated conditions are fully understood and met.
WARNING
A WARNING notice denotes a hazard. It calls attention to an operating procedure, practice, or the like that, if not correctly per-formed or adhered to, could result in personal injury or death. Do not proceed beyond a WARNING notice until the indicated condi-tions are fully understood and met.
TrademarksAdobe® and Adobe® Reader® are regis-tered trademarks or trademarks of Adobe Systems Incorporated in the United States and/or other countries.
Microsoft® is a registered trademark of Microsoft Corporation in the United States and other countries.
Software RevisionThis guide is valid for 6.5 and later revisions of the Agilent Genomic Workbench soft-ware, until superseded.

SureSelect Quality Analyzer User Guide 3
In This Guide…This guide describes how to use the SureSelect Quality Analyzer program, which is part of the Agilent Genomic Workbench suite.
1 Getting Started
This chapter describes SureSelect Quality Analyzer and how it fits into the typical SureSelect Target Enrichment research flow. It gives instructions on how to start both the Quality Analyzer and Workflow programs, and includes two example exercises, one that leads you through a typical SureSelect QC analysis experiment and one that shows you how to set up and run a workflow to sequentially and automatically produce QC reports and enrichment analyses.
2 Using SureSelect Quality Analyzer Interactively
This chapter describes how to import and organize sequence read and target interval files into analysis experiments. It describes how to display and analyze the reads and target intervals, and how to create and display QC reports of several types, including summary QC metrics, and reports on read depth and enrichment analyses.
3 Setting Up and Running Workflows
This chapter gives instructions on how to set up and run workflows for producing QC reports sequentially and automatically using read files, chromosome mapping files and target interval files.
4 SureSelect Quality Analyzer Reference
This chapter describes the tabs, panes, commands, menus, shortcut menus, parameter panels and dialog boxes that can appear when you use the SureSelect Target Enrichment application, which includes the Quality Analyzer and Workflow programs. It also contains reference information on the reports that the program creates.

4 SureSelect Quality Analyzer User Guide
Contents
SureSelect Quality Analyzer User Guide 5
Contents
1 Getting Started 9
SureSelect Quality Analyzer 10
Agilent Genomic Workbench 12
Setting Up SureSelect Quality Analyzer 14
Before you use SureSelect Quality Analyzer 14To start the SureSelect Target Enrichment application 15To start SureSelect Quality Analyzer 18To select where data and results are stored 20
Example Exercise 1 – Interactive 21
Before you start the example exercise 21Step 1. Import data and create an experiment 22Step 2. Analyze data and display results 24
Setting Up SureSelect Quality Analyzer Workflows 28
To start the Workflow program 28
Example Exercise 2 – Workflow 31
Before you start the example exercise 31Step 1. Set up the workflow 32Step 2. Run the workflow and review results 35
Getting Help 36
To get help within Agilent Genomic Workbench 36To contact Agilent Technical Support 37To learn about Agilent products and services 37
2 Using SureSelect Quality Analyzer Interactively 39
Importing Files 40
To import sequence read files 40To import target genomic regions as a track 43To import a genome build 45
6 SureSelect Quality Analyzer User Guide
Contents
Setting Up QC Experiments 46
To create a new experiment 46To select an experiment for analysis 48To deselect an experiment 49To view the data in an experiment 49To view the intervals in a target interval track 52To export tracks 52To remove a track from the program 53To customize the appearance of an experiment in the Genomic Viewer 53To delete an experiment 56To save an experiment 56To copy what appears on your screen to the clipboard 56
Creating Target Enrichment QC Reports 57
To analyze read quality 57To view and save reports 58
3 Setting Up and Running Workflows 61
Creating and Managing Workflows 62
To create a new workflow 62To edit an existing workflow 62To save a workflow 63To save a workflow to a new name 63To delete a workflow 63To set a password for an existing workflow 63
Setting Up/Editing Workflows 64
To select target interval input 65To select sequencing input 67To select reports 69To rename the experiment 70
Running Workflows 71
To run a workflow 71
Contents
SureSelect Quality Analyzer User Guide 7
To run a series of workflows 72To monitor workflow runs 73To abort a single workflow 74To abort all workflows 74To display the results of a workflow 75
4 SureSelect Quality Analyzer Reference 77
SureSelect Target Enrichment Main Window 78
Switch Application menu 80SureSelect Target Enrichment tab bar 81Command ribbon – Home tab 82Command ribbon – Help tab 84
Quality Analyzer Tab Window 87
Command ribbon – Quality Analyzer tab 89Navigator overview 91Navigator – Experiment pane 92Genomic Viewer – overview 95Genomic Viewer – Genome View 97Genomic Viewer – Chromosome View 99Genomic Viewer – Gene View 101Genomic Viewer – Tab View 103
Workflow Tab Window 105
Command ribbon – Workflow tab 107Workflow Navigator 108Parameter Panels – Overview 110Experiment Parameter Panel 111Import ELID Parameter Panel 112Import Track Parameter Panel 113Select Imported Track Parameter Panel 114Sequencing Input Parameter Panel 115Text Summary Report Parameter Panel 118Workflow Run button 120
8 SureSelect Quality Analyzer User Guide
Contents
Summary Console/Progress tabs – Overview 121Summary Console tab 122Named workflow tabs 124
Dialog Boxes 126
Choose Track Color 126Create Experiment 130Create Workflow 132Export 133Export Tracks 134Go to Gene/Genomic Location 135Import Genome Build 136Import Track 137Open 138Provide Workflow Identifier 139Set Password 140Select SEQ Files 141Specify Input Information 142Track 145User Preferences – Miscellaneous tab 148User Preferences – Tracks tab 150View Preferences 153
Target Enrichment Reports 155
QC metrics 156Read depth distribution 158Enrichment analysis results – UCSC 159Enrichment analysis results – XLS report 160
9
Agilent Genomic Workbench 6.5 – SureSelect Quality Analyzer User Guide
Agilent Technologies
1Getting Started
SureSelect Quality Analyzer 10
Setting Up SureSelect Quality Analyzer 14
Example Exercise 1 – Interactive 21
Setting Up SureSelect Quality Analyzer Workflows 28
Example Exercise 2 – Workflow 31
Getting Help 36
This chapter describes SureSelect Quality Analyzer and how it fits into the typical SureSelect Target Enrichment research flow. It gives instructions on how to start the program, and describes the main program window. It describes the files that you must have before you can use the program, and includes an example exercise that leads you through a typical SureSelect QC analysis experiment.
In addition, this chapter shows how you can set up a workflow to sequentially and automatically produce QC reports and enrichment analyses from the required files. A second exercise helps you understand the Workflow process.
You can also find out how to get additional help on other Agilent Genomic Workbench programs.
For information on how to run a CGH or ChIP workflow, see the Workflow User Guide.
To find more information on all the Agilent Genomic Workbench programs, see the Product Overview Guide. Click the Open Application tab if it is not already open. Access to the guide is in the top right corner of the Open Application window.
1 Getting StartedSureSelect Quality Analyzer
10 SureSelect Quality Analyzer User Guide
SureSelect Quality Analyzer
SureSelect Quality Analyzer is a program that lets you assess the effectiveness of the pull-down of targeted genomic fragments when you use the Agilent SureSelect Target Enrichment system. This system uses libraries of biotinylated RNA oligonucleotide “baits” to harvest genomic DNA fragments of interest for sequencing. This forms the basis of a powerful selection method that lets you focus your sequencing efforts.
The selective nature of the process makes it ideal for targeted resequencing that uses next-generation sequencing technology. After you sequence the harvested fragments, you can use SureSelect Quality Analyzer to calculate statistical metrics and analyze read depth. You can also do an enrichment analysis, and display the results in the UCSC Genome Browser next to the annotation tracks of your choice.
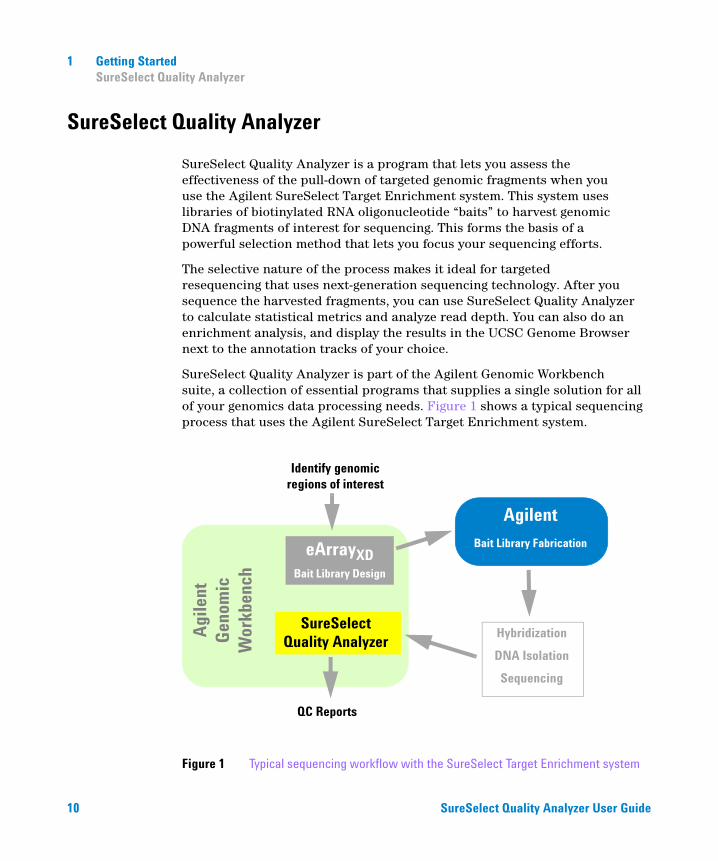
SureSelect Quality Analyzer is part of the Agilent Genomic Workbench suite, a collection of essential programs that supplies a single solution for all of your genomics data processing needs. Figure 1 shows a typical sequencing process that uses the Agilent SureSelect Target Enrichment system.
Figure 1 Typical sequencing workflow with the SureSelect Target Enrichment system
Identify genomic regions of interest
eArrayXDBait Library Design
SureSelectQuality Analyzer
Agi
lent
G
enom
ic
Wor
kben
ch
Agilent
Bait Library Fabrication
Hybridization
DNA Isolation
Sequencing
QC Reports
Getting Started 1SureSelect Quality Analyzer
SureSelect Quality Analyzer User Guide 11
After you identify the genomic regions of interest, you use the eArrayXD program within Agilent Genomic Workbench to design a library of oligonucleotide baits to the desired regions. You submit the library to Agilent, who supplies the biotinylated RNA oligonucleotides in the library to you in any desired quantity. You use the bait library to enrich your sample DNA for the desired target genomic regions, and sequence the resulting DNA fragments.
You import the sequence reads into Agilent Genomic Workbench, and use SureSelect Quality Analyzer to do several crucial quality-related analyses:
• QC metrics – Includes overall statistics, such as the percentage of reads in targeted regions, the overall fold enrichment, and the average read depth.
• Read depth analysis – Shows the overall distribution of reads over the targeted regions and targeted bases. Distributions are available both as tables and as graphs.
• Enrichment analysis – Shows the degree of enrichment for target intervals in the genome of interest. The program creates a WIG format file, and uploads it to the UCSC Genome Browser, where it appears graphically in the User Track area. For information on the WIG file format, go to genome.ucsc.edu/FAQ/FAQformat.
You can also create a text version of the enrichment analysis results as an *.xls file.
Like the CGH and ChIP applications, the SureSelect Target Enrichment application lets you set up and run workflows to sequentially and automatically import the required files and use them to produce reports from the quality-related analyses described above.
1 Getting StartedAgilent Genomic Workbench
12 SureSelect Quality Analyzer User Guide
Agilent Genomic Workbench
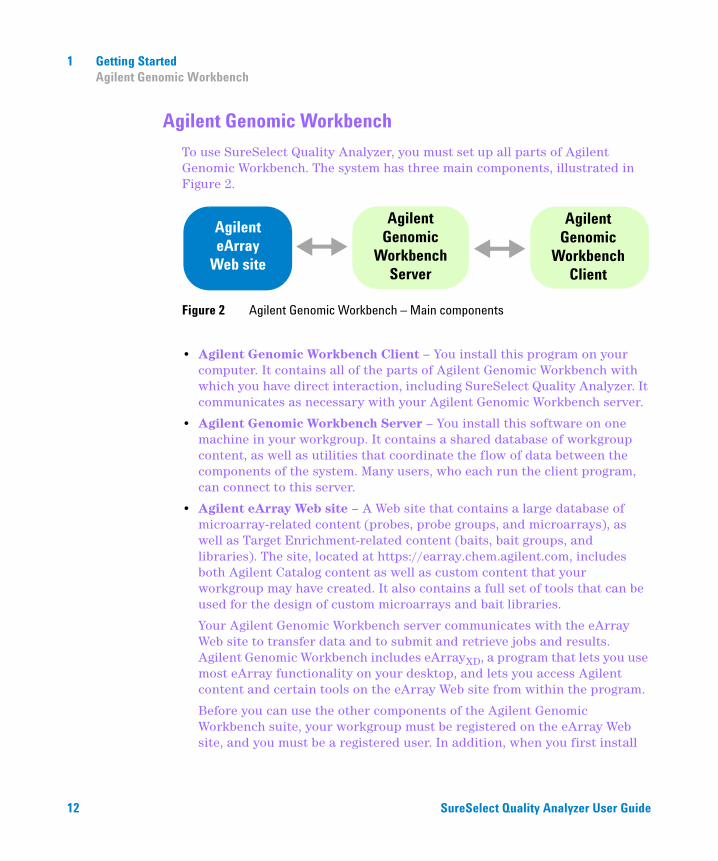
To use SureSelect Quality Analyzer, you must set up all parts of Agilent Genomic Workbench. The system has three main components, illustrated in Figure 2.
• Agilent Genomic Workbench Client – You install this program on your computer. It contains all of the parts of Agilent Genomic Workbench with which you have direct interaction, including SureSelect Quality Analyzer. It communicates as necessary with your Agilent Genomic Workbench server.
• Agilent Genomic Workbench Server – You install this software on one machine in your workgroup. It contains a shared database of workgroup content, as well as utilities that coordinate the flow of data between the components of the system. Many users, who each run the client program, can connect to this server.
• Agilent eArray Web site – A Web site that contains a large database of microarray-related content (probes, probe groups, and microarrays), as well as Target Enrichment-related content (baits, bait groups, and libraries). The site, located at https://earray.chem.agilent.com, includes both Agilent Catalog content as well as custom content that your workgroup may have created. It also contains a full set of tools that can be used for the design of custom microarrays and bait libraries.
Your Agilent Genomic Workbench server communicates with the eArray Web site to transfer data and to submit and retrieve jobs and results. Agilent Genomic Workbench includes eArrayXD, a program that lets you use most eArray functionality on your desktop, and lets you access Agilent content and certain tools on the eArray Web site from within the program.
Before you can use the other components of the Agilent Genomic Workbench suite, your workgroup must be registered on the eArray Web site, and you must be a registered user. In addition, when you first install
Figure 2 Agilent Genomic Workbench – Main components
Agilent Genomic
Workbench Client
Agilent Genomic
Workbench Server
AgilenteArray
Web site
Getting Started 1Agilent Genomic Workbench
SureSelect Quality Analyzer User Guide 13
the Agilent Genomic Workbench server software, you must wait for the eArray Web site to transfer the custom content of your workgroup to your server.
To use Agilent Genomic Workbench, you must set up all parts of the system. However, SureSelect Quality Analyzer runs almost entirely within the client program on your computer. By default, sequence read data, as well as analysis results are stored locally, and are not accessible to other users.

1 Getting StartedSetting Up SureSelect Quality Analyzer
14 SureSelect Quality Analyzer User Guide
Setting Up SureSelect Quality Analyzer
This section describes what you must do before you can use SureSelect Quality Analyzer, and explains how to start the program. It also includes a description of the main program window as it appears for the SureSelect Target Enrichment application type.
Before you use SureSelect Quality Analyzer
• You must be a registered user on the eArray Web site. For details, go to https://earray.chem.agilent.com, and click Help. Also, the Agilent Genomic Workbench client software that is installed on your computer must be linked to this user account. See the eArrayXD User Guide.
• You must have several types of files available before you can use SureSelect Quality Analyzer:
• Sequence read file – A gzipped or *.zip archive that contains the nucleotide sequences and locations of the fragments in your DNA sample, along with related header information. The program supports these read file types:
File Type Comments
Illumina GA Export Revised version of the ELAND file format that contains additional fields, including quality scores for all bases. You cannot import a multiplexed read file into Agilent Genomic Workbench. You must first separate the file into individual indexed sample files, then import these.
AB SOLiD ma Color space *.ma file produced by the Applied Biosystems SOLiD system. The AB SOLiD alignment software produces this CSFASTA format file, and places sequence alignment information in the FASTA headers. Color calls are converted to bases when the file is imported.
NOTE You can import sequence read files in the gzipped or *.zip formats, but not in the .zipx format. In addition, Agilent Genomic Workbench cannot handle a compressed file whose uncompressed file is greater than 4G. In this case, import the uncompressed file directly.
Getting Started 1To start the SureSelect Target Enrichment application
SureSelect Quality Analyzer User Guide 15
• Chromosome mapping file – A *.txt file that contains the names of the chromosomes that are referenced in the read file, correlated with the names of the chromosomes in the desired genome build of your species of interest. For details, see “To import sequence read files” on page 40.
• Target intervals file – A *.bed format track file that contains a list of the target genomic intervals. Typically, these are the target genomic intervals to which you designed your SureSelect Target Enrichment baits. If you used eArray to create the bait library, you can download this file from eArray when you download the library. You can also create the target intervals file manually.
To start the SureSelect Target Enrichment application
In Agilent Genomic Workbench, content as well as function are partitioned by experimental application type. When you select an application type, only the tools and content that are relevant to the selected type are accessible. The content and functionality for SureSelect Quality Analyzer are only available when you select SureSelect Target Enrichment as the application type.
1 Start Agilent Genomic Workbench.
If upon starting the program you see unfamiliar dialog boxes and don’t know how to proceed, please refer to “To start the Agilent Genomic Workbench user/client software” in the Installation Guide.
2 Click Switch Application.
3 Select SureSelect Target Enrichment.
The tools and content relevant to this application type become available.
For details on the other options that are available, see “Switch Application menu” on page 80.
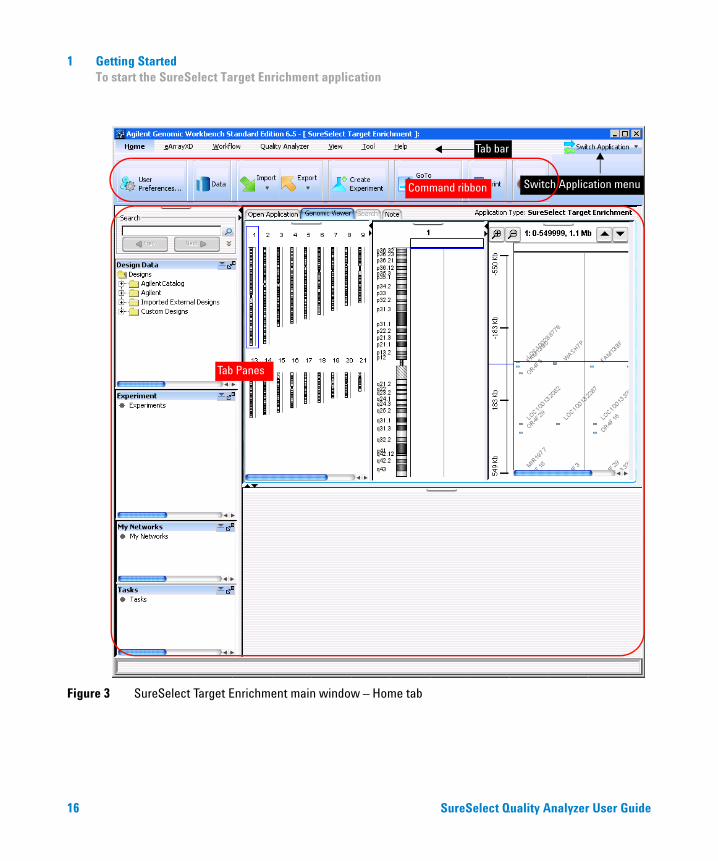
When you first switch the application to the SureSelect Target Enrichment application, you see the window on the next page for the Home tab.
The Tab bar and Switch Application button remain the same for every tab. But the Command ribbon changes for each tab, and the Tab panes may or may not stay the same (red).
1 Getting StartedTo start the SureSelect Target Enrichment application
16 SureSelect Quality Analyzer User Guide
Figure 3 SureSelect Target Enrichment main window – Home tab
Tab bar
Switch Application menu
Tab Panes
Command ribbon
Getting Started 1To start the SureSelect Target Enrichment application
SureSelect Quality Analyzer User Guide 17
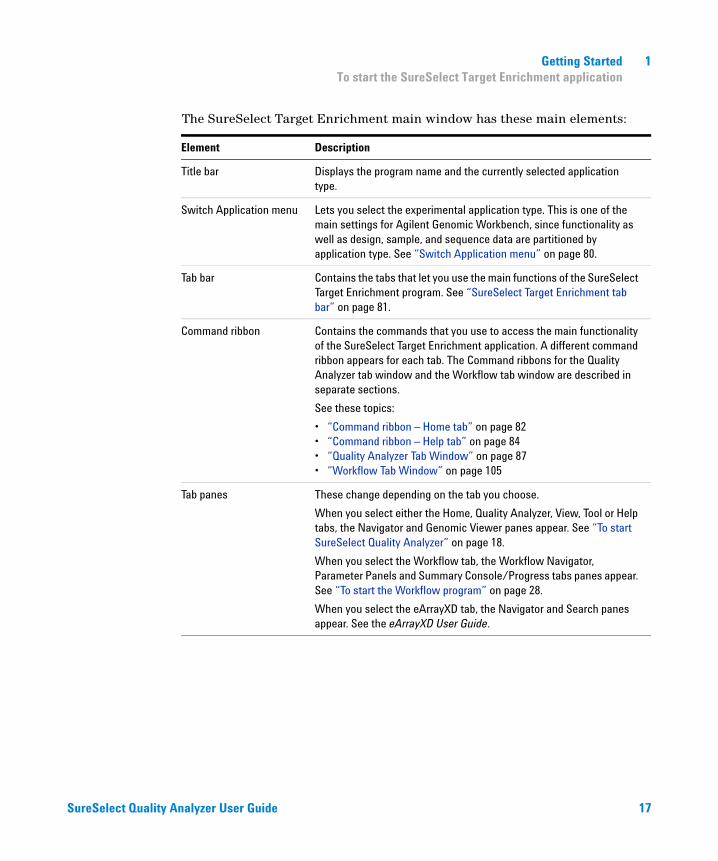
The SureSelect Target Enrichment main window has these main elements:
Element Description
Title bar Displays the program name and the currently selected application type.
Switch Application menu Lets you select the experimental application type. This is one of the main settings for Agilent Genomic Workbench, since functionality as well as design, sample, and sequence data are partitioned by application type. See “Switch Application menu” on page 80.
Tab bar Contains the tabs that let you use the main functions of the SureSelect Target Enrichment program. See “SureSelect Target Enrichment tab bar” on page 81.
Command ribbon Contains the commands that you use to access the main functionality of the SureSelect Target Enrichment application. A different command ribbon appears for each tab. The Command ribbons for the Quality Analyzer tab window and the Workflow tab window are described in separate sections.
See these topics:
• “Command ribbon – Home tab” on page 82• “Command ribbon – Help tab” on page 84• “Quality Analyzer Tab Window” on page 87• “Workflow Tab Window” on page 105
Tab panes These change depending on the tab you choose.
When you select either the Home, Quality Analyzer, View, Tool or Help tabs, the Navigator and Genomic Viewer panes appear. See “To start SureSelect Quality Analyzer” on page 18.
When you select the Workflow tab, the Workflow Navigator, Parameter Panels and Summary Console/Progress tabs panes appear. See “To start the Workflow program” on page 28.
When you select the eArrayXD tab, the Navigator and Search panes appear. See the eArrayXD User Guide.
1 Getting StartedTo start SureSelect Quality Analyzer
18 SureSelect Quality Analyzer User Guide
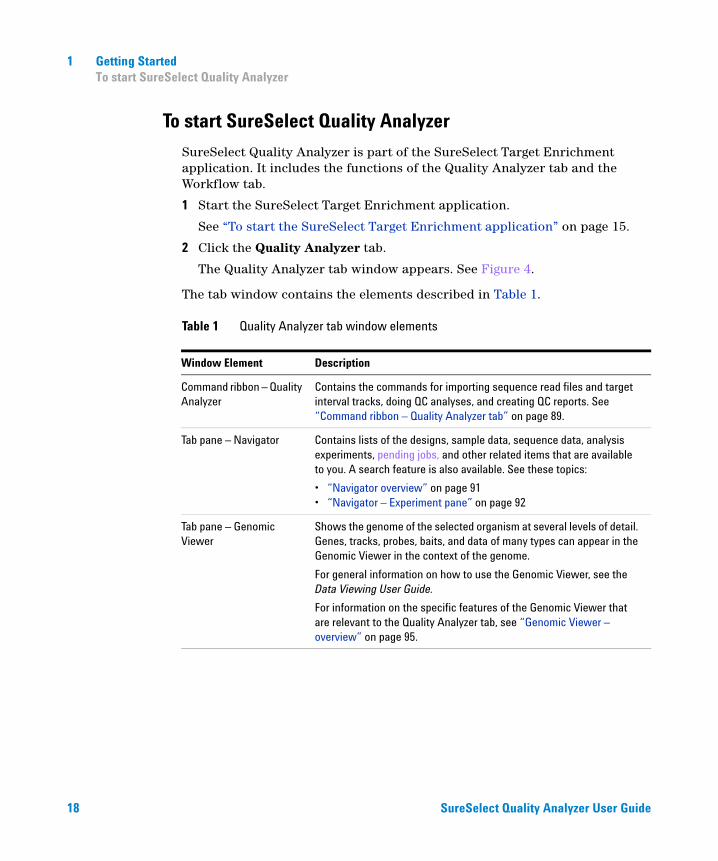
To start SureSelect Quality Analyzer
SureSelect Quality Analyzer is part of the SureSelect Target Enrichment application. It includes the functions of the Quality Analyzer tab and the Workflow tab.
1 Start the SureSelect Target Enrichment application.
See “To start the SureSelect Target Enrichment application” on page 15.
2 Click the Quality Analyzer tab.
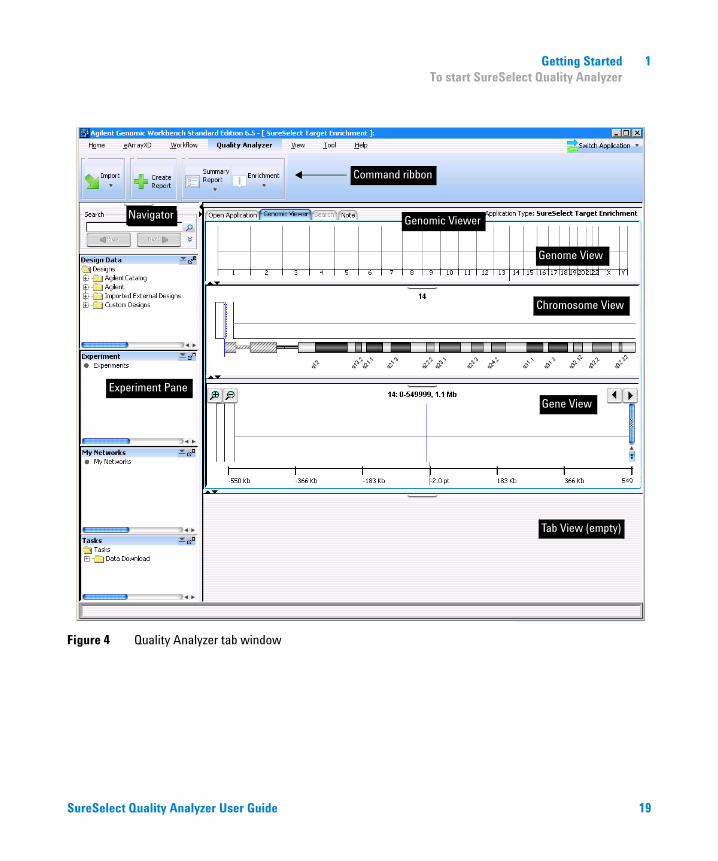
The Quality Analyzer tab window appears. See Figure 4.
The tab window contains the elements described in Table 1.
Table 1 Quality Analyzer tab window elements
Window Element Description
Command ribbon – Quality Analyzer
Contains the commands for importing sequence read files and target interval tracks, doing QC analyses, and creating QC reports. See “Command ribbon – Quality Analyzer tab” on page 89.
Tab pane – Navigator Contains lists of the designs, sample data, sequence data, analysis experiments, pending jobs, and other related items that are available to you. A search feature is also available. See these topics:
• “Navigator overview” on page 91• “Navigator – Experiment pane” on page 92
Tab pane – Genomic Viewer
Shows the genome of the selected organism at several levels of detail. Genes, tracks, probes, baits, and data of many types can appear in the Genomic Viewer in the context of the genome.
For general information on how to use the Genomic Viewer, see the Data Viewing User Guide.
For information on the specific features of the Genomic Viewer that are relevant to the Quality Analyzer tab, see “Genomic Viewer – overview” on page 95.
Getting Started 1To start SureSelect Quality Analyzer
SureSelect Quality Analyzer User Guide 19
Figure 4 Quality Analyzer tab window
Navigator Genomic Viewer
Genome View
Chromosome View
Gene ViewExperiment Pane
Command ribbon
Tab View (empty)
1 Getting StartedTo select where data and results are stored
20 SureSelect Quality Analyzer User Guide
To select where data and results are stored
By default, sequence data and analysis results are stored locally on your computer in the data folder, within the folder that contains the Agilent Genomic Workbench client program. You can change this location.
1 In the Home tab, click User Preferences.
The User Preferences dialog box appears.
2 Click the Miscellaneous tab.
The Miscellaneous tab appears. See “User Preferences – Miscellaneous tab” on page 148.
3 In Data Location, click Browse.
An Open dialog box appears.
4 Select the desired location, then click Open.
The selected location appears in Data Location.
5 Click OK.
Getting Started 1Example Exercise 1 – Interactive
SureSelect Quality Analyzer User Guide 21
Example Exercise 1 – Interactive
In this exercise, you create and view a PDF format QC report that contains summary QC statistics and the results of read depth analysis. You use the UCSC Genome Browser to view the results of enrichment analysis and the Genomic Viewer to view reads and target intervals.
Before you start the example exercise
• Your workgroup must be registered on the eArray Web site, and you must be a registered user on the site. For more information, see the online help at earray.chem.agilent.com. Also, the Agilent Genomic Workbench client software that is installed on your computer must be linked to this user account. See the eArrayXD User Guide.
• Download the example files for this exercise. Follow these steps:
a Go to earray.chem.agilent.com.
The login page of the eArray Web site appears. You do not need to log in.
b Under Additional Information, click Download Agilent Genomic Workbench.
A page of available Agilent Genomic Workbench files appears.
c Under Sample Data, next to Sample files for SureSelect Target Enrichment Quality Analyzer, right-click Download.
d Click Save Target As and save the file to your desktop.
The eArray Web site transfers a zip format file to your computer.
e Extract the zip file to your desktop.
The folder of example files appears on your desktop. Do not extract the zip format files within this folder.
• Familiarize yourself with the Agilent Genomic Workbench Quality Analyzer interface. See “To start SureSelect Quality Analyzer” on page 18 and “Quality Analyzer Tab Window” on page 87.
• Note that the main steps in the example exercises appear in the first column of the table. More detailed instructions appear in the second column. Additional notes and comments appear in the third column.

1 Getting StartedStep 1. Import data and create an experiment
22 SureSelect Quality Analyzer User Guide
Step 1. Import data and create an experiment
In this step you import the read and target interval files (track files) and then create an experiment to contain them.
Example Exercise 1 – Import data and create an experiment
Step Detailed Instructions Notes/Comments
1 Start SureSelect Quality Analyzer. a Start Agilent Genomic Workbench 6.5.The main window appears.
b Click Switch Application > SureSelect Target Enrichment.SureSelect Target Enrichment appears in Application Type. The appropriate tools and panes appear in the main window of the program.
c Click Quality Analyzer.The Quality Analyzer main window appears.
• If upon starting the program you see unfamiliar dialog boxes and don’t know how to proceed, please refer to “To start the Agilent Genomic Workbench user/client software” in the Installation Guide.
• You can use the SureSelect Target Enrichment application free of charge. You do not need to purchase or enter a license.
2 Import the read file and chromosome mapping file found in the sample files folder you downloaded.• Keep File Type as Illumina GA
Export.• Under Species Info, keep Select
Species set to H. sapiens, and Select Genome Build set to hg18.
a Click Import > Reads.A dialog box appears.
b In the folder of sample files that you extracted to your desktop, select the file s_1_1_export_top.zip.
c Click Open.The Specify Input Information dialog box appears.
d Under Read Info, in File Type, select Illumina GA Export.
e Under Map Chromosomes, in Chr Mapping File, click Browse.An Open dialog box appears.
f In the folder of sample files that you extracted to your desktop, select the file chrMapping.txt, then click Open.The name of the selected file appears in Chr Mapping File.
g Click Import.A progress bar appears.
• In this step, you import these files:• Read file – Contains header
information, and the sequence data to be analyzed. The program supports read files in several formats. See “To import sequence read files” on page 40.
• Chromosome mapping file – A *.txt file that associates the names of chromosomes in the read file with the names of chromosomes as they are specified in the selected genome build.
Getting Started 1Step 1. Import data and create an experiment
SureSelect Quality Analyzer User Guide 23
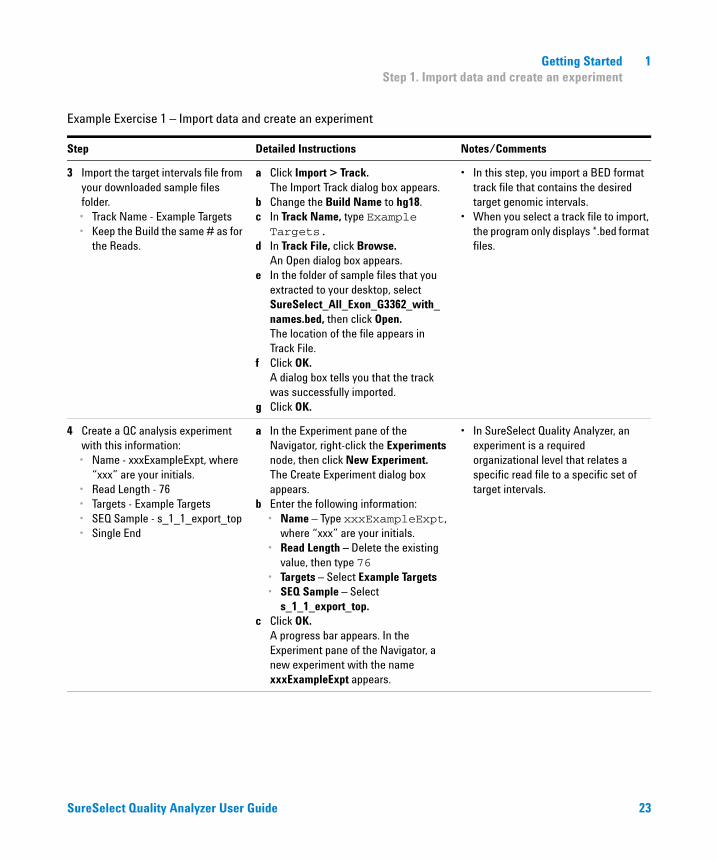
3 Import the target intervals file from your downloaded sample files folder.• Track Name - Example Targets• Keep the Build the same # as for
the Reads.
a Click Import > Track.The Import Track dialog box appears.
b Change the Build Name to hg18.c In Track Name, type Example
Targets.d In Track File, click Browse.
An Open dialog box appears.e In the folder of sample files that you
extracted to your desktop, select SureSelect_All_Exon_G3362_with_names.bed, then click Open.The location of the file appears in Track File.
f Click OK.A dialog box tells you that the track was successfully imported.
g Click OK.
• In this step, you import a BED format track file that contains the desired target genomic intervals.
• When you select a track file to import, the program only displays *.bed format files.
4 Create a QC analysis experiment with this information:• Name - xxxExampleExpt, where
“xxx” are your initials.• Read Length - 76• Targets - Example Targets• SEQ Sample - s_1_1_export_top• Single End
a In the Experiment pane of the Navigator, right-click the Experiments node, then click New Experiment.The Create Experiment dialog box appears.
b Enter the following information:• Name – Type xxxExampleExpt,
where “xxx” are your initials.• Read Length – Delete the existing
value, then type 76• Targets – Select Example Targets• SEQ Sample – Select
s_1_1_export_top.c Click OK.
A progress bar appears. In the Experiment pane of the Navigator, a new experiment with the name xxxExampleExpt appears.
• In SureSelect Quality Analyzer, an experiment is a required organizational level that relates a specific read file to a specific set of target intervals.
Example Exercise 1 – Import data and create an experiment
Step Detailed Instructions Notes/Comments
1 Getting StartedStep 2. Analyze data and display results
24 SureSelect Quality Analyzer User Guide
Step 2. Analyze data and display results
Once you have imported the read, chromosome mapping and target interval files and created a new experiment containing them, you analyze the data by selecting the experiment and creating reports.
Example Exercise 1 – Analyze data and display results
Step Detailed Instructions Notes/Comments
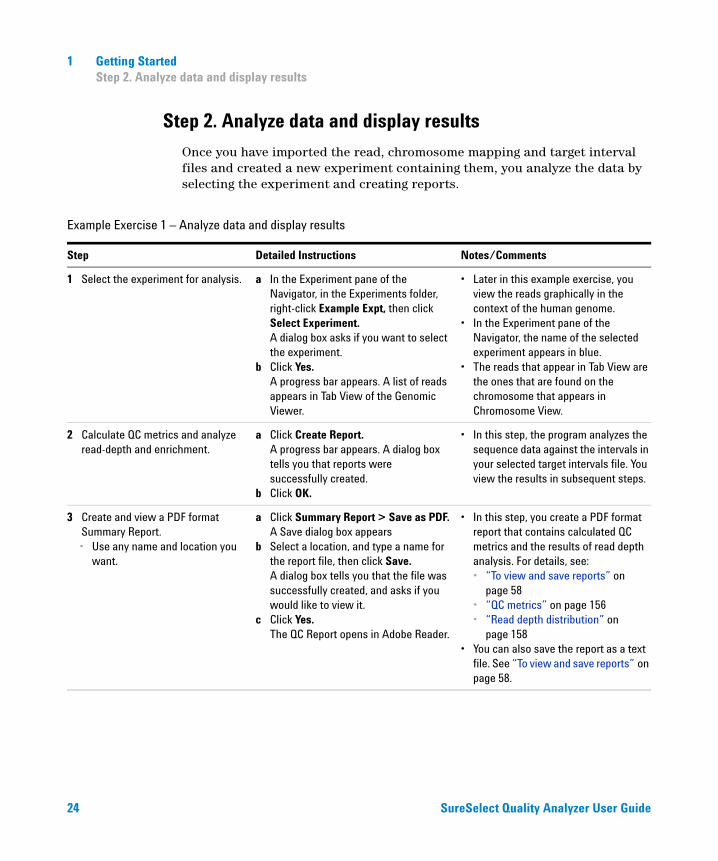
1 Select the experiment for analysis. a In the Experiment pane of the Navigator, in the Experiments folder, right-click Example Expt, then click Select Experiment.A dialog box asks if you want to select the experiment.
b Click Yes.A progress bar appears. A list of reads appears in Tab View of the Genomic Viewer.
• Later in this example exercise, you view the reads graphically in the context of the human genome.
• In the Experiment pane of the Navigator, the name of the selected experiment appears in blue.
• The reads that appear in Tab View are the ones that are found on the chromosome that appears in Chromosome View.
2 Calculate QC metrics and analyze read-depth and enrichment.
a Click Create Report.A progress bar appears. A dialog box tells you that reports were successfully created.
b Click OK.
• In this step, the program analyzes the sequence data against the intervals in your selected target intervals file. You view the results in subsequent steps.
3 Create and view a PDF format Summary Report.• Use any name and location you
want.
a Click Summary Report > Save as PDF.A Save dialog box appears
b Select a location, and type a name for the report file, then click Save.A dialog box tells you that the file was successfully created, and asks if you would like to view it.
c Click Yes.The QC Report opens in Adobe Reader.
• In this step, you create a PDF format report that contains calculated QC metrics and the results of read depth analysis. For details, see:• “To view and save reports” on
page 58• “QC metrics” on page 156• “Read depth distribution” on
page 158• You can also save the report as a text
file. See “To view and save reports” on page 58.

Getting Started 1Step 2. Analyze data and display results
SureSelect Quality Analyzer User Guide 25
4 Display enrichment analysis results in the first 20Mb of chromosome 1 in the UCSC Genome Browser.
a In the Genomic Viewer, in Genome View, click the center of the Chromosome 1 area.
b Click Enrichment > View in UCSC.Your Web browser opens.
c If a security message tells you that the browser has restricted scripts or ActiveX controls, follow the on-screen instructions to allow the blocked content.The UCSC Genome Browser opens in your Web browser.
d In position/search, delete the existing chromosomal location, then type chr1:1-20,000,000
e Click jump.Enriched peaks appear in the User Track area.
• In this step, you transfer enrichment analysis results for chromosome 1 to the UCSC Genome Browser, and view the enriched peaks in the first 20 Mb of that chromosome.
• You can display the enriched peaks next to your choice of annotation tracks. For instructions, see the online help that is available in the UCSC Genome Browser.
• You can also save the enrichment analysis results as a *.xls file. See “To view and save reports” on page 58.
Example Exercise 1 – Analyze data and display results
Step Detailed Instructions Notes/Comments
Enriched peaks
1 Getting StartedStep 2. Analyze data and display results
26 SureSelect Quality Analyzer User Guide
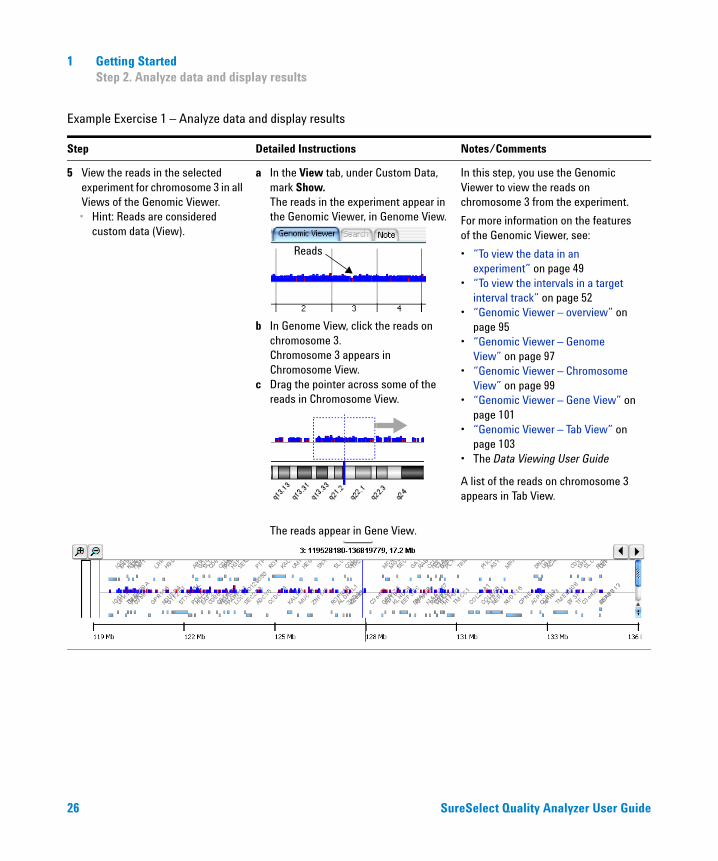
5 View the reads in the selected experiment for chromosome 3 in all Views of the Genomic Viewer.• Hint: Reads are considered
custom data (View).
a In the View tab, under Custom Data, mark Show.The reads in the experiment appear in the Genomic Viewer, in Genome View.
b In Genome View, click the reads on chromosome 3.Chromosome 3 appears in Chromosome View.
c Drag the pointer across some of the reads in Chromosome View.
The reads appear in Gene View.
In this step, you use the Genomic Viewer to view the reads on chromosome 3 from the experiment.
For more information on the features of the Genomic Viewer, see:
• “To view the data in an experiment” on page 49
• “To view the intervals in a target interval track” on page 52
• “Genomic Viewer – overview” on page 95
• “Genomic Viewer – Genome View” on page 97
• “Genomic Viewer – Chromosome View” on page 99
• “Genomic Viewer – Gene View” on page 101
• “Genomic Viewer – Tab View” on page 103
• The Data Viewing User Guide
A list of the reads on chromosome 3 appears in Tab View.
Example Exercise 1 – Analyze data and display results
Step Detailed Instructions Notes/Comments
Reads
Getting Started 1Step 2. Analyze data and display results
SureSelect Quality Analyzer User Guide 27
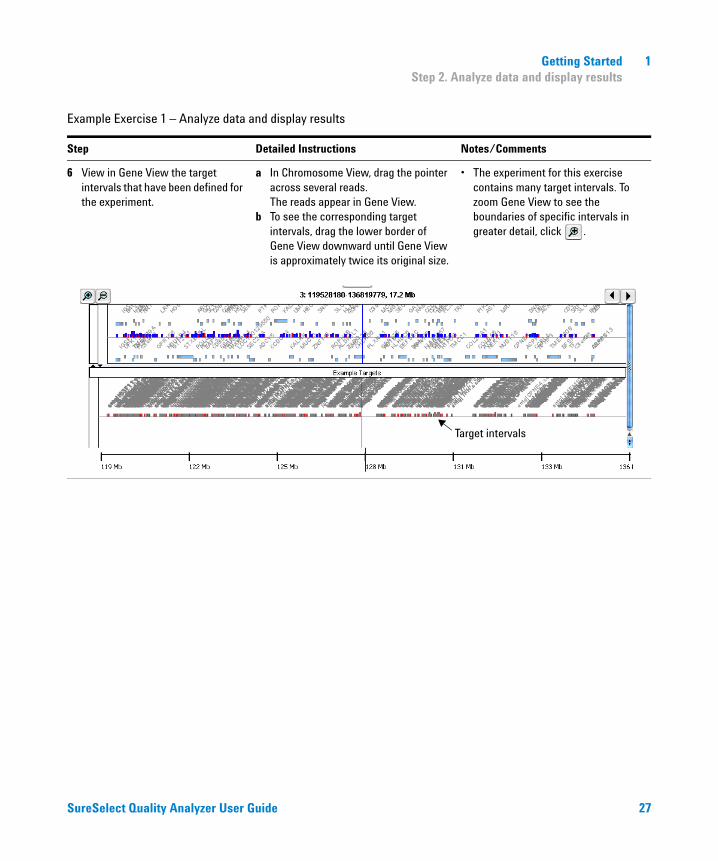
6 View in Gene View the target intervals that have been defined for the experiment.
a In Chromosome View, drag the pointer across several reads.The reads appear in Gene View.
b To see the corresponding target intervals, drag the lower border of Gene View downward until Gene View is approximately twice its original size.
• The experiment for this exercise contains many target intervals. To zoom Gene View to see the boundaries of specific intervals in greater detail, click .
Example Exercise 1 – Analyze data and display results
Step Detailed Instructions Notes/Comments
Target intervals
1 Getting StartedSetting Up SureSelect Quality Analyzer Workflows
28 SureSelect Quality Analyzer User Guide
Setting Up SureSelect Quality Analyzer Workflows
This section describes what you must do before you set up SureSelect Quality Analyzer workflows, and explains how to start the program. It also includes a description of the Workflow tab window as it appears for the SureSelect Target Enrichment application type.
If you are endeavoring to set up a workflow without first having created an experiment and analyzed the files interactively with Quality Analyzer, please first read “Before you use SureSelect Quality Analyzer” on page 14.
To start the Workflow program
The Workflow tab window for the SureSelect Quality Analyzer has a completely distinct user interface from the one for the other tabs for the SureSelect Target Enrichment application.
1 Start the SureSelect Target Enrichment application.
See “To start the SureSelect Target Enrichment application” on page 15.
2 Click the Workflow tab.
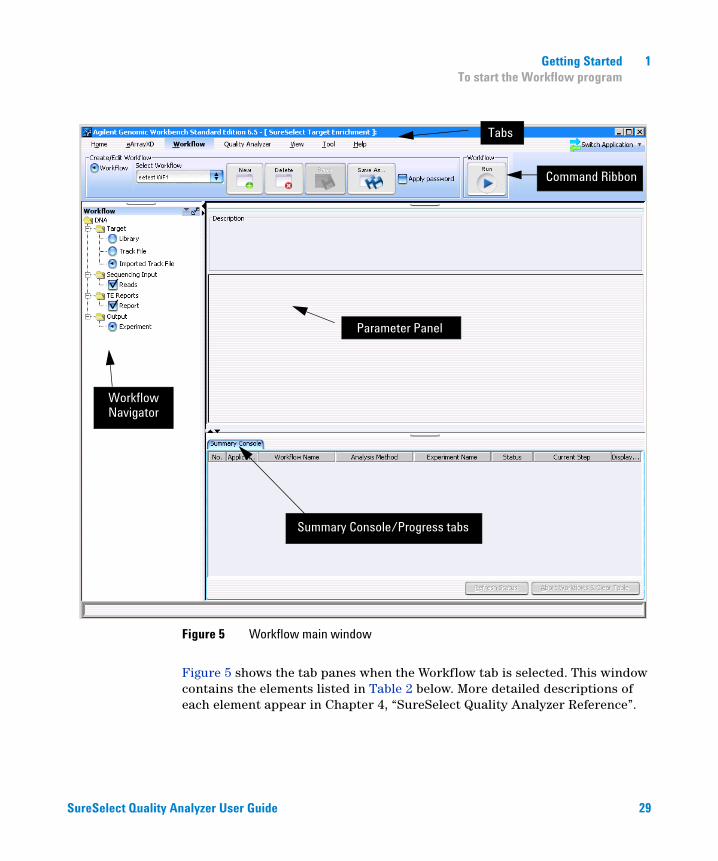
The Workflow tab window appears. See Figure 5.
The Workflow tab window presents a completely different set of panes than the Home, Quality Analyzer, View, Tool and Help tab windows do – Workflow Navigator, Parameter Panels and Summary Console.
Getting Started 1To start the Workflow program
SureSelect Quality Analyzer User Guide 29
Figure 5 shows the tab panes when the Workflow tab is selected. This window contains the elements listed in Table 2 below. More detailed descriptions of each element appear in Chapter 4, “SureSelect Quality Analyzer Reference”.
Figure 5 Workflow main window
Summary Console/Progress tabs
Parameter Panel
Command Ribbon
Tabs
WorkflowNavigator
1 Getting StartedTo start the Workflow program
30 SureSelect Quality Analyzer User Guide
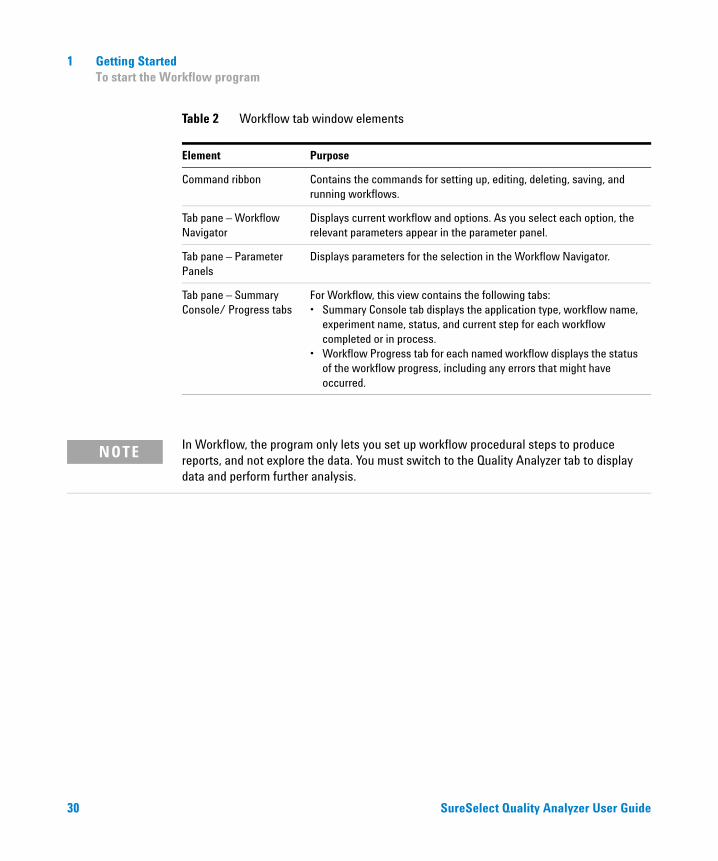
Table 2 Workflow tab window elements
Element Purpose
Command ribbon Contains the commands for setting up, editing, deleting, saving, and running workflows.
Tab pane – Workflow Navigator
Displays current workflow and options. As you select each option, the relevant parameters appear in the parameter panel.
Tab pane – Parameter Panels
Displays parameters for the selection in the Workflow Navigator.
Tab pane – Summary Console/ Progress tabs
For Workflow, this view contains the following tabs: • Summary Console tab displays the application type, workflow name,
experiment name, status, and current step for each workflow completed or in process.
• Workflow Progress tab for each named workflow displays the status of the workflow progress, including any errors that might have occurred.
NOTEl
In Workflow, the program only lets you set up workflow procedural steps to produce reports, and not explore the data. You must switch to the Quality Analyzer tab to display data and perform further analysis.
Getting Started 1Example Exercise 2 – Workflow
SureSelect Quality Analyzer User Guide 31
Example Exercise 2 – Workflow
In this example exercise, you set up a workflow to automatically perform the three primary steps in the process of producing QC reports on sequencing data. Then you run the workflow.
Before you start the example exercise
• Your workgroup must be registered on the eArray Web site, and you must be a registered user on the site. For more information, see the online help at earray.chem.agilent.com. Also, the Agilent Genomic Workbench client software that is installed on your computer must be linked to this user account. See the eArrayXD User Guide.
• Download the example files for this exercise. Follow these steps:
a Go to earray.chem.agilent.com.
The login page of the eArray Web site appears. You do not need to log in.
b Under Additional Information, click Download Agilent Genomic Workbench.
A page of available Agilent Genomic Workbench files appears.
c Under Sample Data, next to Sample files for SureSelect Target Enrichment Quality Analyzer, right-click Download, then click Save Target As.
d Save the file to your desktop.
The eArray Web site transfers a zip format file to your computer.
e Extract the zip file to your desktop.
The folder of example files appears on your desktop. Do not extract the zip format files within this folder.
• Familiarize yourself with the parts of the Workflow interface. See “To start the Workflow program” on page 28 and “Workflow Tab Window” on page 105.
• Note that the main steps in the example exercises appear in the first column of the table. More detailed instructions appear in the second column. Additional notes and comments appear in the third column.
1 Getting StartedStep 1. Set up the workflow
32 SureSelect Quality Analyzer User Guide
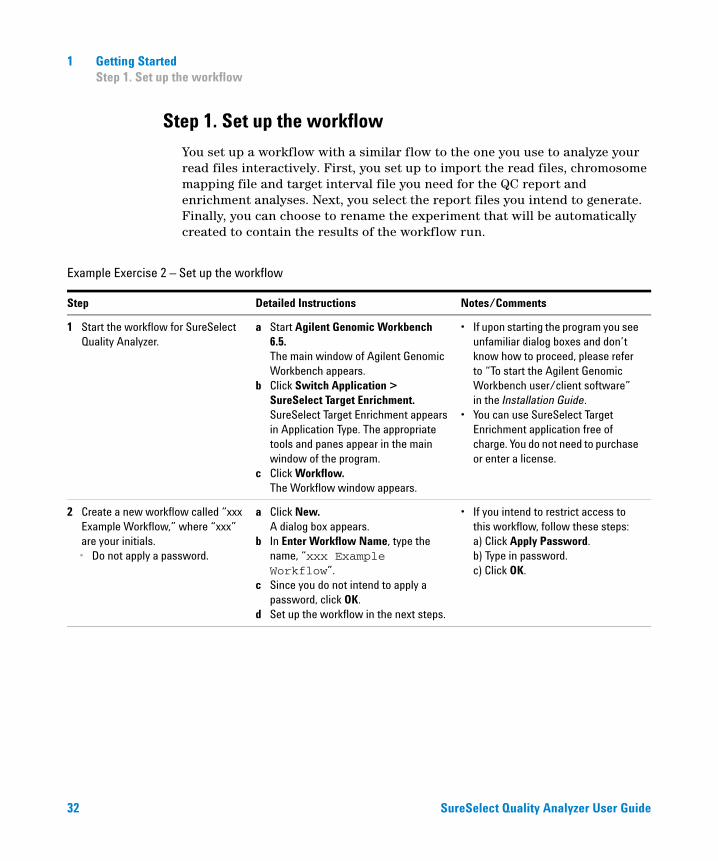
Step 1. Set up the workflow
You set up a workflow with a similar flow to the one you use to analyze your read files interactively. First, you set up to import the read files, chromosome mapping file and target interval file you need for the QC report and enrichment analyses. Next, you select the report files you intend to generate. Finally, you can choose to rename the experiment that will be automatically created to contain the results of the workflow run.
Example Exercise 2 – Set up the workflow
Step Detailed Instructions Notes/Comments
1 Start the workflow for SureSelect Quality Analyzer.
a Start Agilent Genomic Workbench 6.5.The main window of Agilent Genomic Workbench appears.
b Click Switch Application > SureSelect Target Enrichment.SureSelect Target Enrichment appears in Application Type. The appropriate tools and panes appear in the main window of the program.
c Click Workflow.The Workflow window appears.
• If upon starting the program you see unfamiliar dialog boxes and don’t know how to proceed, please refer to “To start the Agilent Genomic Workbench user/client software” in the Installation Guide.
• You can use SureSelect Target Enrichment application free of charge. You do not need to purchase or enter a license.
2 Create a new workflow called “xxx Example Workflow,” where “xxx” are your initials.• Do not apply a password.
a Click New.A dialog box appears.
b In Enter Workflow Name, type the name, “xxx Example Workflow”.
c Since you do not intend to apply a password, click OK.
d Set up the workflow in the next steps.
• If you intend to restrict access to this workflow, follow these steps:a) Click Apply Password.b) Type in password.c) Click OK.
Getting Started 1Step 1. Set up the workflow
SureSelect Quality Analyzer User Guide 33
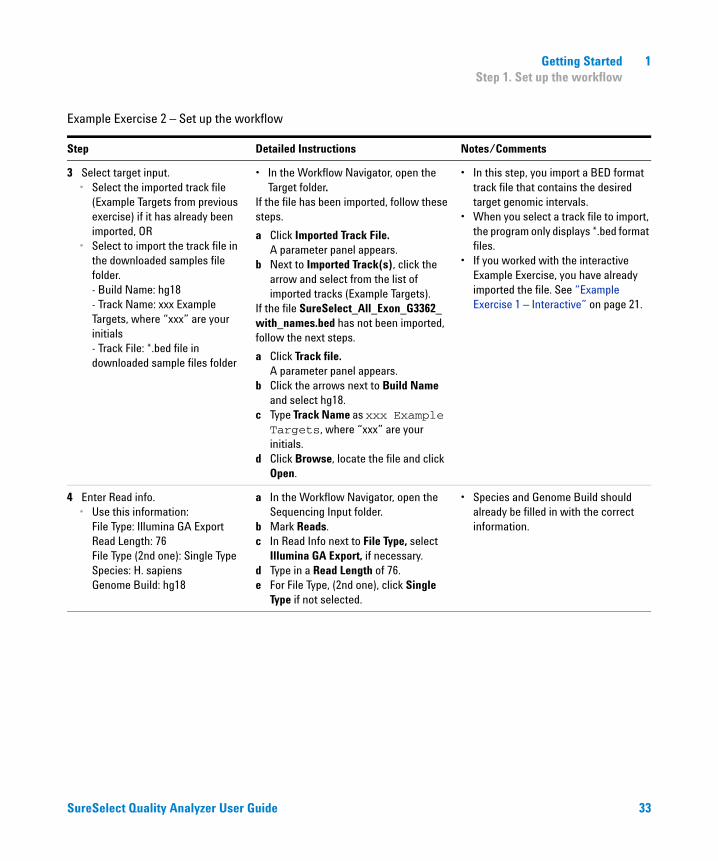
3 Select target input.• Select the imported track file
(Example Targets from previous exercise) if it has already been imported, OR
• Select to import the track file in the downloaded samples file folder.- Build Name: hg18- Track Name: xxx Example Targets, where “xxx” are your initials- Track File: *.bed file in downloaded sample files folder
• In the Workflow Navigator, open the Target folder.
If the file has been imported, follow these steps.
a Click Imported Track File.A parameter panel appears.
b Next to Imported Track(s), click the arrow and select from the list of imported tracks (Example Targets).
If the file SureSelect_All_Exon_G3362_with_names.bed has not been imported, follow the next steps.
a Click Track file.A parameter panel appears.
b Click the arrows next to Build Name and select hg18.
c Type Track Name as xxx Example Targets, where “xxx” are your initials.
d Click Browse, locate the file and click Open.
• In this step, you import a BED format track file that contains the desired target genomic intervals.
• When you select a track file to import, the program only displays *.bed format files.
• If you worked with the interactive Example Exercise, you have already imported the file. See “Example Exercise 1 – Interactive” on page 21.
4 Enter Read info.• Use this information:
File Type: Illumina GA ExportRead Length: 76File Type (2nd one): Single TypeSpecies: H. sapiensGenome Build: hg18
a In the Workflow Navigator, open the Sequencing Input folder.
b Mark Reads.c In Read Info next to File Type, select
Illumina GA Export, if necessary.d Type in a Read Length of 76.e For File Type, (2nd one), click Single
Type if not selected.
• Species and Genome Build should already be filled in with the correct information.
Example Exercise 2 – Set up the workflow
Step Detailed Instructions Notes/Comments
1 Getting StartedStep 1. Set up the workflow
34 SureSelect Quality Analyzer User Guide
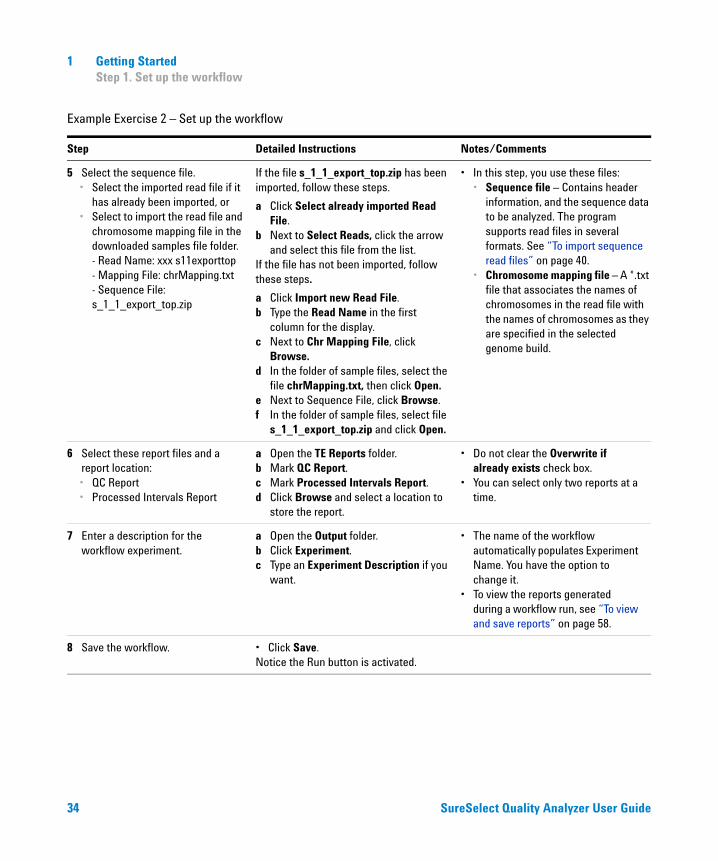
5 Select the sequence file.• Select the imported read file if it
has already been imported, or• Select to import the read file and
chromosome mapping file in the downloaded samples file folder.- Read Name: xxx s11exporttop- Mapping File: chrMapping.txt- Sequence File: s_1_1_export_top.zip
If the file s_1_1_export_top.zip has been imported, follow these steps.
a Click Select already imported Read File.
b Next to Select Reads, click the arrow and select this file from the list.
If the file has not been imported, follow these steps.
a Click Import new Read File.b Type the Read Name in the first
column for the display.c Next to Chr Mapping File, click
Browse.d In the folder of sample files, select the
file chrMapping.txt, then click Open.e Next to Sequence File, click Browse.f In the folder of sample files, select file
s_1_1_export_top.zip and click Open.
• In this step, you use these files:• Sequence file – Contains header
information, and the sequence data to be analyzed. The program supports read files in several formats. See “To import sequence read files” on page 40.
• Chromosome mapping file – A *.txt file that associates the names of chromosomes in the read file with the names of chromosomes as they are specified in the selected genome build.
6 Select these report files and a report location:• QC Report• Processed Intervals Report
a Open the TE Reports folder.b Mark QC Report.c Mark Processed Intervals Report.d Click Browse and select a location to
store the report.
• Do not clear the Overwrite if already exists check box.
• You can select only two reports at a time.
7 Enter a description for the workflow experiment.
a Open the Output folder.b Click Experiment.c Type an Experiment Description if you
want.
• The name of the workflow automatically populates Experiment Name. You have the option to change it.
• To view the reports generated during a workflow run, see “To view and save reports” on page 58.
8 Save the workflow. • Click Save.Notice the Run button is activated.
Example Exercise 2 – Set up the workflow
Step Detailed Instructions Notes/Comments
Getting Started 1Step 2. Run the workflow and review results
SureSelect Quality Analyzer User Guide 35
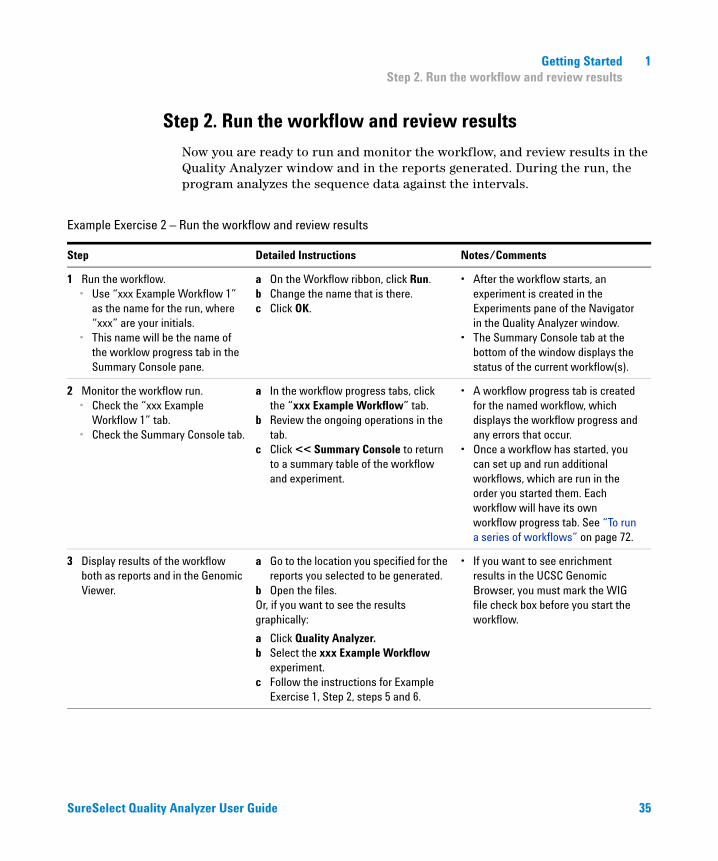
Step 2. Run the workflow and review results
Now you are ready to run and monitor the workflow, and review results in the Quality Analyzer window and in the reports generated. During the run, the program analyzes the sequence data against the intervals.
Example Exercise 2 – Run the workflow and review results
Step Detailed Instructions Notes/Comments
1 Run the workflow.• Use “xxx Example Workflow 1”
as the name for the run, where “xxx” are your initials.
• This name will be the name of the worklow progress tab in the Summary Console pane.
a On the Workflow ribbon, click Run.b Change the name that is there.c Click OK.
• After the workflow starts, an experiment is created in the Experiments pane of the Navigator in the Quality Analyzer window.
• The Summary Console tab at the bottom of the window displays the status of the current workflow(s).
2 Monitor the workflow run.• Check the “xxx Example
Workflow 1” tab.• Check the Summary Console tab.
a In the workflow progress tabs, click the “xxx Example Workflow” tab.
b Review the ongoing operations in the tab.
c Click << Summary Console to return to a summary table of the workflow and experiment.
• A workflow progress tab is created for the named workflow, which displays the workflow progress and any errors that occur.
• Once a workflow has started, you can set up and run additional workflows, which are run in the order you started them. Each workflow will have its own workflow progress tab. See “To run a series of workflows” on page 72.
3 Display results of the workflow both as reports and in the Genomic Viewer.
a Go to the location you specified for the reports you selected to be generated.
b Open the files.Or, if you want to see the results graphically:
a Click Quality Analyzer.b Select the xxx Example Workflow
experiment.c Follow the instructions for Example
Exercise 1, Step 2, steps 5 and 6.
• If you want to see enrichment results in the UCSC Genomic Browser, you must mark the WIG file check box before you start the workflow.
1 Getting StartedGetting Help
36 SureSelect Quality Analyzer User Guide
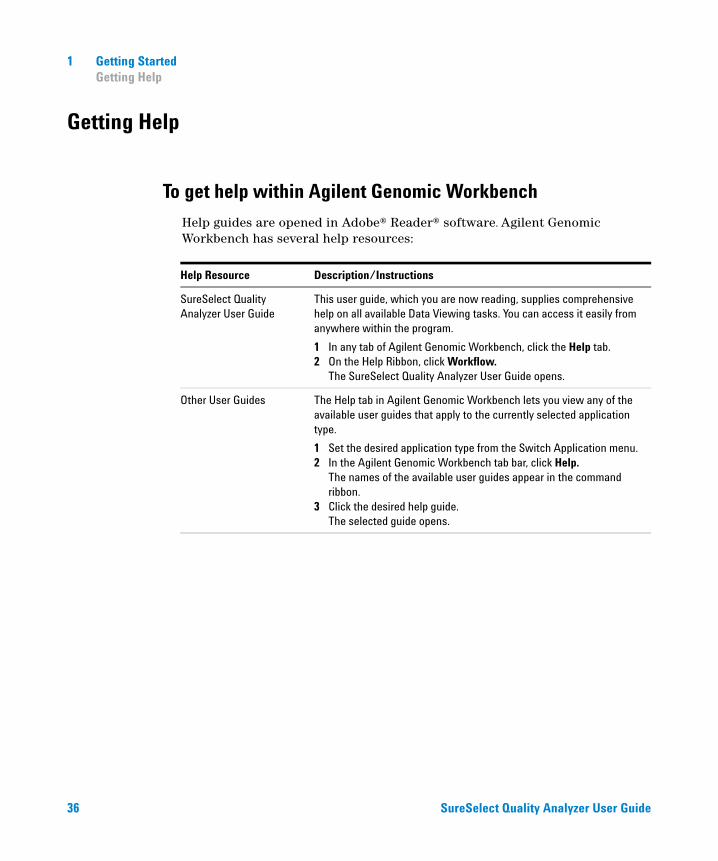
Getting Help
To get help within Agilent Genomic Workbench
Help guides are opened in Adobe® Reader® software. Agilent Genomic Workbench has several help resources:
Help Resource Description/Instructions
SureSelect Quality Analyzer User Guide
This user guide, which you are now reading, supplies comprehensive help on all available Data Viewing tasks. You can access it easily from anywhere within the program.
1 In any tab of Agilent Genomic Workbench, click the Help tab.2 On the Help Ribbon, click Workflow.
The SureSelect Quality Analyzer User Guide opens.
Other User Guides The Help tab in Agilent Genomic Workbench lets you view any of the available user guides that apply to the currently selected application type.
1 Set the desired application type from the Switch Application menu. 2 In the Agilent Genomic Workbench tab bar, click Help.
The names of the available user guides appear in the command ribbon.
3 Click the desired help guide.The selected guide opens.
Getting Started 1To contact Agilent Technical Support
SureSelect Quality Analyzer User Guide 37
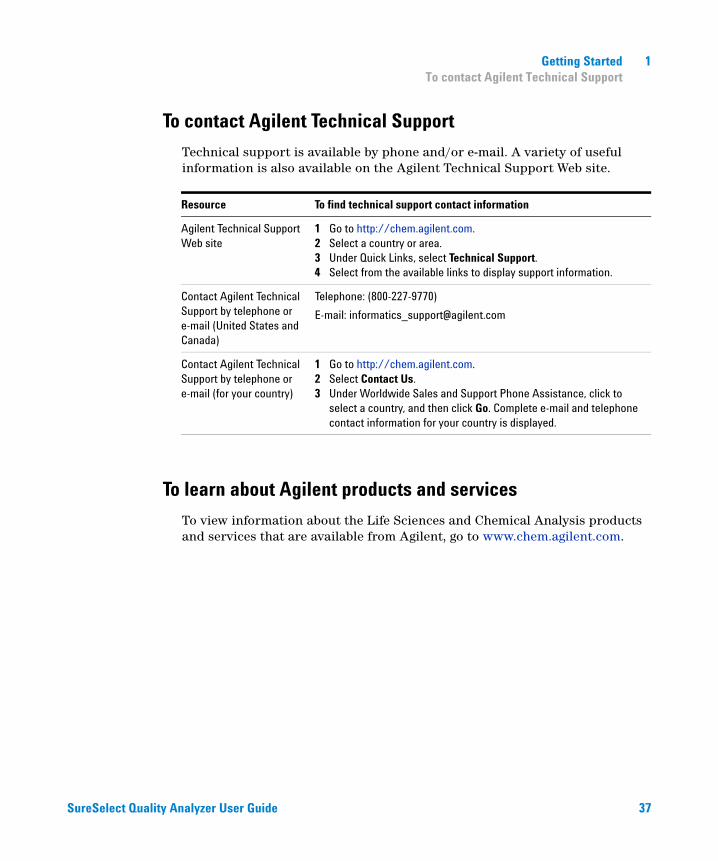
To contact Agilent Technical Support
Technical support is available by phone and/or e-mail. A variety of useful information is also available on the Agilent Technical Support Web site.
To learn about Agilent products and services
To view information about the Life Sciences and Chemical Analysis products and services that are available from Agilent, go to www.chem.agilent.com.
Resource To find technical support contact information
Agilent Technical Support Web site
1 Go to http://chem.agilent.com.2 Select a country or area.3 Under Quick Links, select Technical Support.4 Select from the available links to display support information.
Contact Agilent Technical Support by telephone or e-mail (United States and Canada)
Telephone: (800-227-9770)
E-mail: [email protected]
Contact Agilent Technical Support by telephone or e-mail (for your country)
1 Go to http://chem.agilent.com.2 Select Contact Us.3 Under Worldwide Sales and Support Phone Assistance, click to
select a country, and then click Go. Complete e-mail and telephone contact information for your country is displayed.

1 Getting StartedTo learn about Agilent products and services
38 SureSelect Quality Analyzer User Guide
39
Agilent Genomic Workbench 6.5 – SureSelect Quality Analyzer User Guide
Agilent Technologies
2Using SureSelect Quality Analyzer Interactively
Importing Files 40
Setting Up QC Experiments 46
Creating Target Enrichment QC Reports 57
This chapter gives detailed instructions on how to assess the effectiveness of the pull-down of DNA fragments when you use the SureSelect Target Enrichment system. It describes how to import the necessary files into the program, and how to organize the files into experiments for analysis. It also describes how to create and export SureSelect QC reports of several different types. In addition, it describes how to use the Genomic Viewer in the Quality Analyzer tab panes to display reads and target intervals in the context of your genome of interest.
2 Using SureSelect Quality Analyzer InteractivelyImporting Files
40 SureSelect Quality Analyzer User Guide
Importing Files
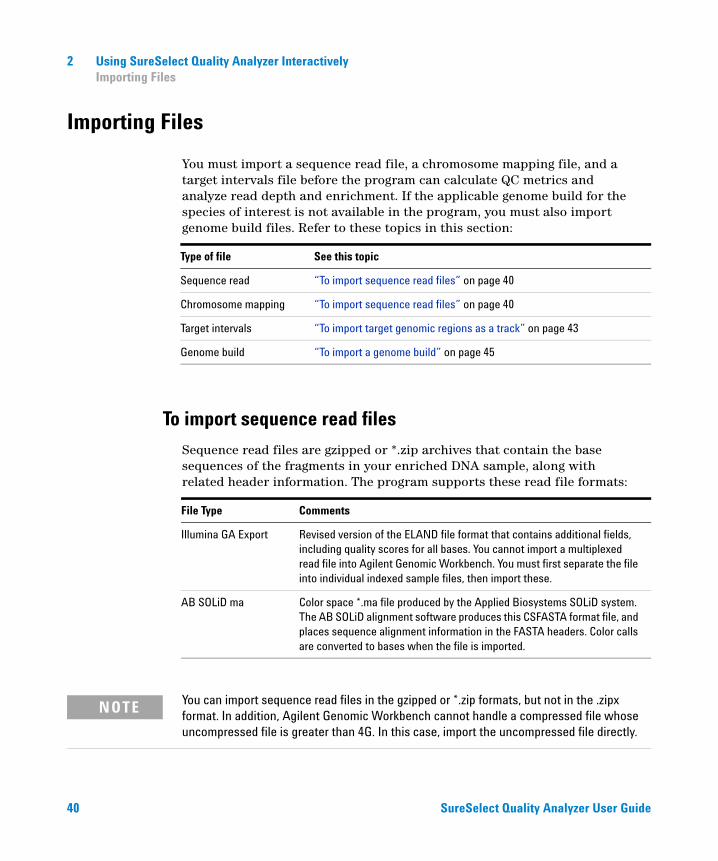
You must import a sequence read file, a chromosome mapping file, and a target intervals file before the program can calculate QC metrics and analyze read depth and enrichment. If the applicable genome build for the species of interest is not available in the program, you must also import genome build files. Refer to these topics in this section:
To import sequence read files
Sequence read files are gzipped or *.zip archives that contain the base sequences of the fragments in your enriched DNA sample, along with related header information. The program supports these read file formats:
Type of file See this topic
Sequence read “To import sequence read files” on page 40
Chromosome mapping “To import sequence read files” on page 40
Target intervals “To import target genomic regions as a track” on page 43
Genome build “To import a genome build” on page 45
File Type Comments
Illumina GA Export Revised version of the ELAND file format that contains additional fields, including quality scores for all bases. You cannot import a multiplexed read file into Agilent Genomic Workbench. You must first separate the file into individual indexed sample files, then import these.
AB SOLiD ma Color space *.ma file produced by the Applied Biosystems SOLiD system. The AB SOLiD alignment software produces this CSFASTA format file, and places sequence alignment information in the FASTA headers. Color calls are converted to bases when the file is imported.
NOTE You can import sequence read files in the gzipped or *.zip formats, but not in the .zipx format. In addition, Agilent Genomic Workbench cannot handle a compressed file whose uncompressed file is greater than 4G. In this case, import the uncompressed file directly.
Using SureSelect Quality Analyzer Interactively 2To import sequence read files
SureSelect Quality Analyzer User Guide 41
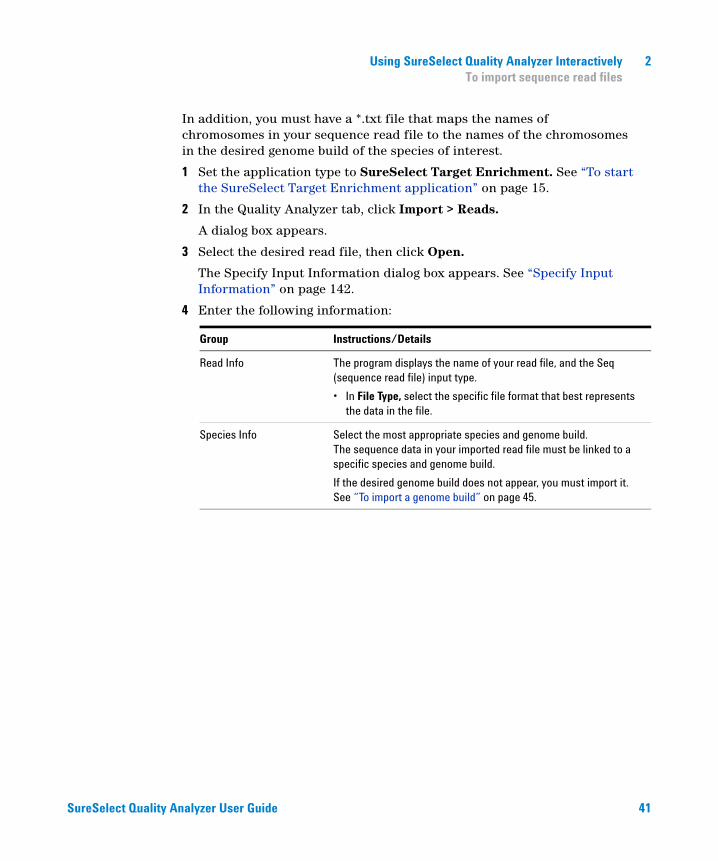
In addition, you must have a *.txt file that maps the names of chromosomes in your sequence read file to the names of the chromosomes in the desired genome build of the species of interest.
1 Set the application type to SureSelect Target Enrichment. See “To start the SureSelect Target Enrichment application” on page 15.
2 In the Quality Analyzer tab, click Import > Reads.
A dialog box appears.
3 Select the desired read file, then click Open.
The Specify Input Information dialog box appears. See “Specify Input Information” on page 142.
4 Enter the following information:
Group Instructions/Details
Read Info The program displays the name of your read file, and the Seq (sequence read file) input type.
• In File Type, select the specific file format that best represents the data in the file.
Species Info Select the most appropriate species and genome build.The sequence data in your imported read file must be linked to a specific species and genome build.
If the desired genome build does not appear, you must import it. See “To import a genome build” on page 45.
2 Using SureSelect Quality Analyzer InteractivelyTo import sequence read files
42 SureSelect Quality Analyzer User Guide
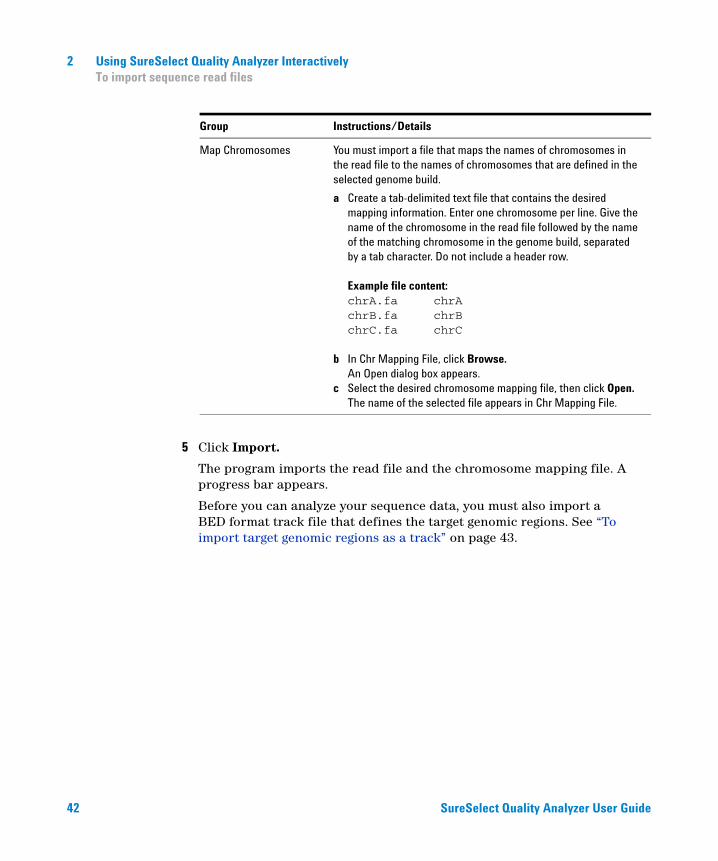
5 Click Import.
The program imports the read file and the chromosome mapping file. A progress bar appears.
Before you can analyze your sequence data, you must also import a BED format track file that defines the target genomic regions. See “To import target genomic regions as a track” on page 43.
Map Chromosomes You must import a file that maps the names of chromosomes in the read file to the names of chromosomes that are defined in the selected genome build.
a Create a tab-delimited text file that contains the desired mapping information. Enter one chromosome per line. Give the name of the chromosome in the read file followed by the name of the matching chromosome in the genome build, separated by a tab character. Do not include a header row.
Example file content:chrA.fa chrAchrB.fa chrBchrC.fa chrC
b In Chr Mapping File, click Browse.An Open dialog box appears.
c Select the desired chromosome mapping file, then click Open.The name of the selected file appears in Chr Mapping File.
Group Instructions/Details
Using SureSelect Quality Analyzer Interactively 2To import target genomic regions as a track
SureSelect Quality Analyzer User Guide 43
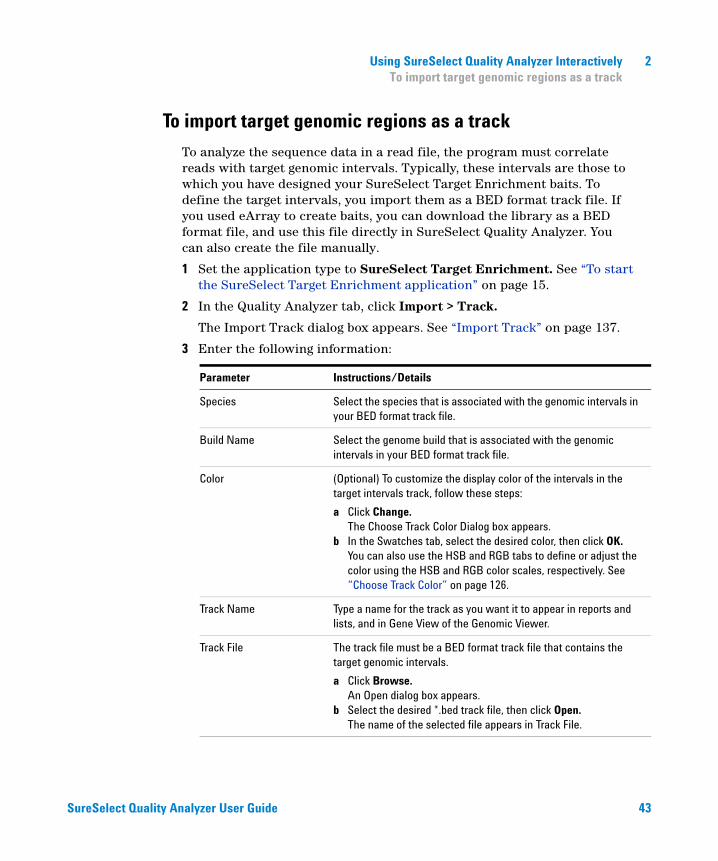
To import target genomic regions as a track
To analyze the sequence data in a read file, the program must correlate reads with target genomic intervals. Typically, these intervals are those to which you have designed your SureSelect Target Enrichment baits. To define the target intervals, you import them as a BED format track file. If you used eArray to create baits, you can download the library as a BED format file, and use this file directly in SureSelect Quality Analyzer. You can also create the file manually.
1 Set the application type to SureSelect Target Enrichment. See “To start the SureSelect Target Enrichment application” on page 15.
2 In the Quality Analyzer tab, click Import > Track.
The Import Track dialog box appears. See “Import Track” on page 137.
3 Enter the following information:
Parameter Instructions/Details
Species Select the species that is associated with the genomic intervals in your BED format track file.
Build Name Select the genome build that is associated with the genomic intervals in your BED format track file.
Color (Optional) To customize the display color of the intervals in the target intervals track, follow these steps:
a Click Change.The Choose Track Color Dialog box appears.
b In the Swatches tab, select the desired color, then click OK.You can also use the HSB and RGB tabs to define or adjust the color using the HSB and RGB color scales, respectively. See “Choose Track Color” on page 126.
Track Name Type a name for the track as you want it to appear in reports and lists, and in Gene View of the Genomic Viewer.
Track File The track file must be a BED format track file that contains the target genomic intervals.
a Click Browse.An Open dialog box appears.
b Select the desired *.bed track file, then click Open.The name of the selected file appears in Track File.
2 Using SureSelect Quality Analyzer InteractivelyTo import target genomic regions as a track
44 SureSelect Quality Analyzer User Guide
4 Click OK.
A dialog box tells you that the track was imported successfully.
5 Click OK.
NOTE • The name, species, genome build, description, and display color of the track can only be entered as you import the track. You cannot edit this information later.
• You can combine tracks to create a single merged track. Import the individual tracks, then export all of the desired tracks as a single *.zip file. See “To export tracks” on page 52. You can then import this merged file as the target intervals file.
Using SureSelect Quality Analyzer Interactively 2To import a genome build
SureSelect Quality Analyzer User Guide 45
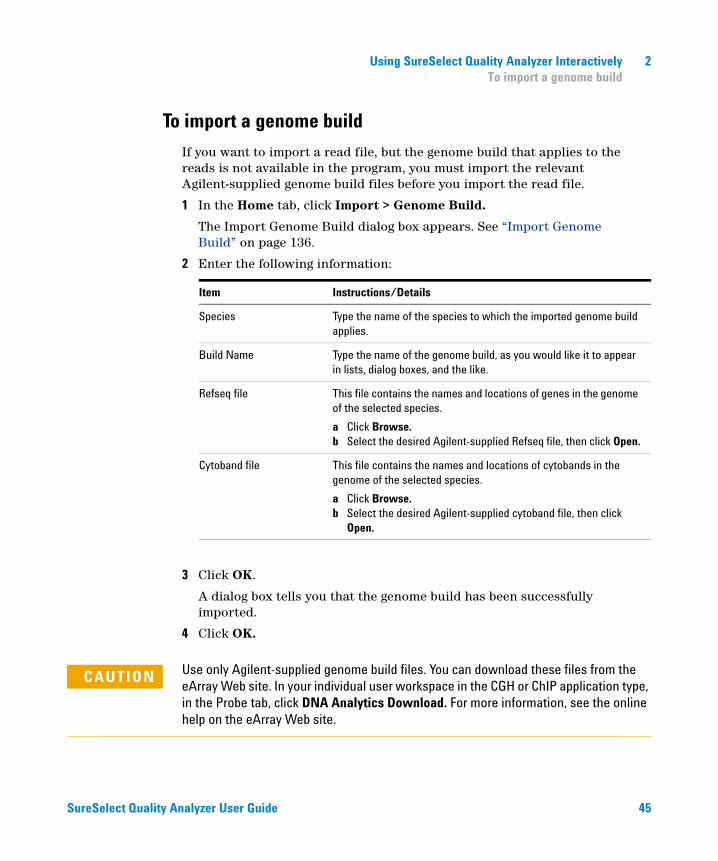
To import a genome build
If you want to import a read file, but the genome build that applies to the reads is not available in the program, you must import the relevant Agilent-supplied genome build files before you import the read file.
1 In the Home tab, click Import > Genome Build.
The Import Genome Build dialog box appears. See “Import Genome Build” on page 136.
2 Enter the following information:
3 Click OK.
A dialog box tells you that the genome build has been successfully imported.
4 Click OK.
Item Instructions/Details
Species Type the name of the species to which the imported genome build applies.
Build Name Type the name of the genome build, as you would like it to appear in lists, dialog boxes, and the like.
Refseq file This file contains the names and locations of genes in the genome of the selected species.
a Click Browse.b Select the desired Agilent-supplied Refseq file, then click Open.
Cytoband file This file contains the names and locations of cytobands in the genome of the selected species.
a Click Browse.b Select the desired Agilent-supplied cytoband file, then click
Open.
CAUTION Use only Agilent-supplied genome build files. You can download these files from the eArray Web site. In your individual user workspace in the CGH or ChIP application type, in the Probe tab, click DNA Analytics Download. For more information, see the online help on the eArray Web site.
2 Using SureSelect Quality Analyzer InteractivelySetting Up QC Experiments
46 SureSelect Quality Analyzer User Guide
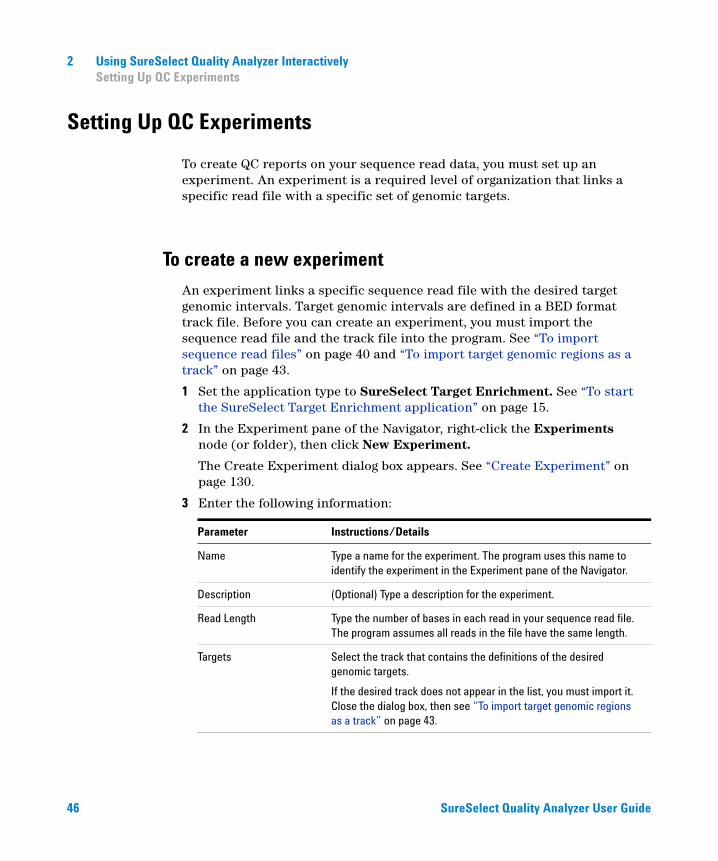
Setting Up QC Experiments
To create QC reports on your sequence read data, you must set up an experiment. An experiment is a required level of organization that links a specific read file with a specific set of genomic targets.
To create a new experiment
An experiment links a specific sequence read file with the desired target genomic intervals. Target genomic intervals are defined in a BED format track file. Before you can create an experiment, you must import the sequence read file and the track file into the program. See “To import sequence read files” on page 40 and “To import target genomic regions as a track” on page 43.
1 Set the application type to SureSelect Target Enrichment. See “To start the SureSelect Target Enrichment application” on page 15.
2 In the Experiment pane of the Navigator, right-click the Experiments node (or folder), then click New Experiment.
The Create Experiment dialog box appears. See “Create Experiment” on page 130.
3 Enter the following information:
Parameter Instructions/Details
Name Type a name for the experiment. The program uses this name to identify the experiment in the Experiment pane of the Navigator.
Description (Optional) Type a description for the experiment.
Read Length Type the number of bases in each read in your sequence read file. The program assumes all reads in the file have the same length.
Targets Select the track that contains the definitions of the desired genomic targets.
If the desired track does not appear in the list, you must import it. Close the dialog box, then see “To import target genomic regions as a track” on page 43.
Using SureSelect Quality Analyzer Interactively 2To create a new experiment
SureSelect Quality Analyzer User Guide 47
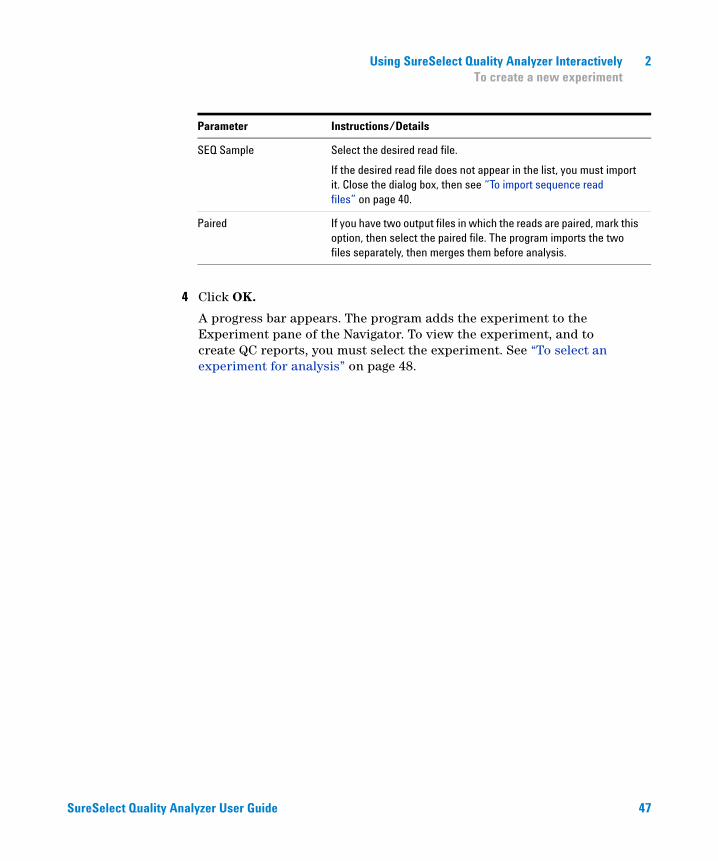
4 Click OK.
A progress bar appears. The program adds the experiment to the Experiment pane of the Navigator. To view the experiment, and to create QC reports, you must select the experiment. See “To select an experiment for analysis” on page 48.
SEQ Sample Select the desired read file.
If the desired read file does not appear in the list, you must import it. Close the dialog box, then see “To import sequence read files” on page 40.
Paired If you have two output files in which the reads are paired, mark this option, then select the paired file. The program imports the two files separately, then merges them before analysis.
Parameter Instructions/Details

2 Using SureSelect Quality Analyzer InteractivelyTo select an experiment for analysis
48 SureSelect Quality Analyzer User Guide
To select an experiment for analysis
To view and analyze the reads in an experiment, and to create QC reports, you must first select the desired experiment to make it active. Only one experiment can be active at a time.
1 Set the application type to SureSelect Target Enrichment. See “To start the SureSelect Target Enrichment application” on page 15.
2 Click Quality Analyzer.
SureSelect Quality Analyzer tab appears.
3 In the Experiments pane of the Navigator, in the Experiments folder, right-click the name of the desired experiment, then click Select Experiment.
A Confirm dialog box asks if you want to select the experiment.
4 Click Yes.
A progress bar appears. The program activates the experiment. In the Experiment pane of the Navigator, the name of the selected experiment appears in blue.
You can now also create and view reports based on the reads in the experiment. See “Creating Target Enrichment QC Reports” on page 57.
After you select an experiment, the reads in the experiment can appear in all views of the Genomic Viewer. See “To view the data in an experiment” on page 49.
Using SureSelect Quality Analyzer Interactively 2To deselect an experiment
SureSelect Quality Analyzer User Guide 49
To deselect an experiment
When you deselect an experiment, its reads no longer appear in the Genomic Viewer, and it is no longer activated for analysis and report creation. However, no files are deleted.
Do one of the following:
• In the Experiment pane of the Navigator, right-click the experiment that you want to deselect, then click Deselect.
• Select another experiment. See “To select an experiment for analysis” on page 48.
To view the data in an experiment
After you select an experiment, the reads in the experiment can appear in all views of the Genomic Viewer.
1 Set the application type to SureSelect Target Enrichment. See “To start the SureSelect Target Enrichment application” on page 15.
2 In the View tab, under Custom Data, mark Show.
3 Select the desired experiment. See “To select an experiment for analysis” on page 48.
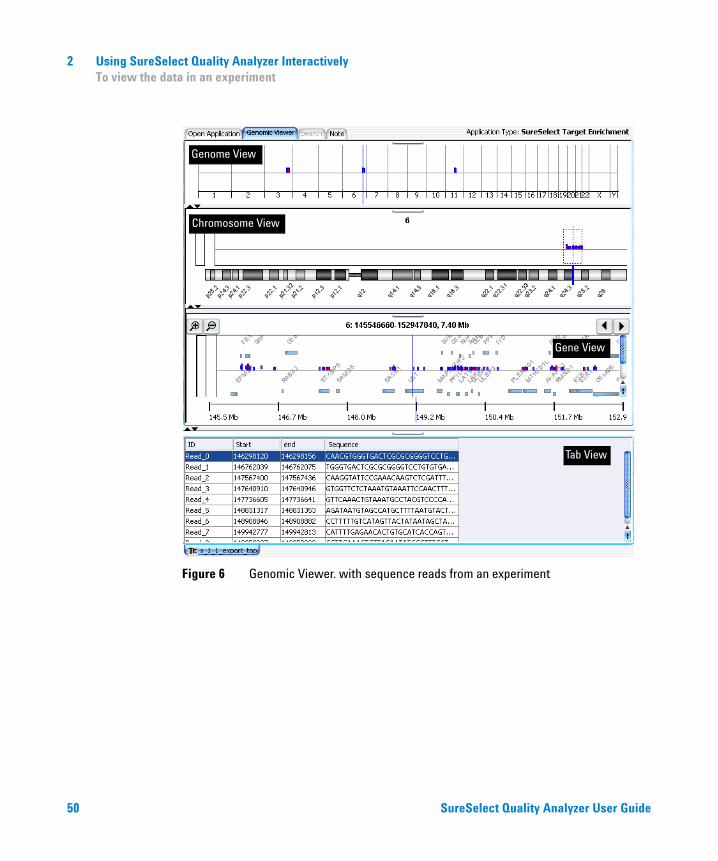
The sequence reads from the experiment appear in all views of the Genomic Viewer. Figure 6 shows the Genomic Viewer with reads on human chromosomes 3, 6, and 11.
2 Using SureSelect Quality Analyzer InteractivelyTo view the data in an experiment
50 SureSelect Quality Analyzer User Guide
Figure 6 Genomic Viewer. with sequence reads from an experiment
Chromosome View
Genome View
Gene View
Tab View
Using SureSelect Quality Analyzer Interactively 2To view the data in an experiment
SureSelect Quality Analyzer User Guide 51
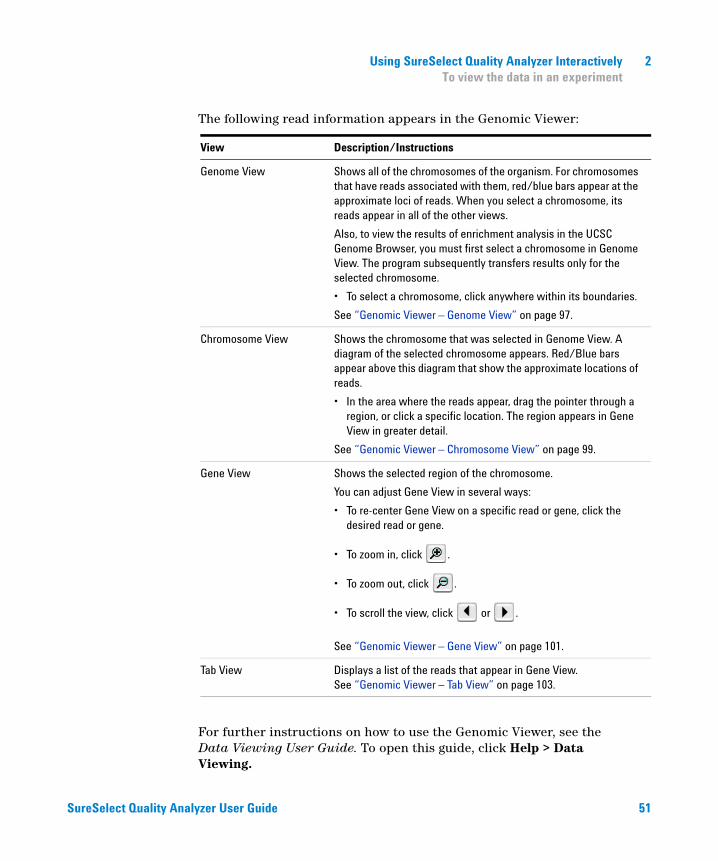
The following read information appears in the Genomic Viewer:
For further instructions on how to use the Genomic Viewer, see the Data Viewing User Guide. To open this guide, click Help > Data Viewing.
View Description/Instructions
Genome View Shows all of the chromosomes of the organism. For chromosomes that have reads associated with them, red/blue bars appear at the approximate loci of reads. When you select a chromosome, its reads appear in all of the other views.
Also, to view the results of enrichment analysis in the UCSC Genome Browser, you must first select a chromosome in Genome View. The program subsequently transfers results only for the selected chromosome.
• To select a chromosome, click anywhere within its boundaries.
See “Genomic Viewer – Genome View” on page 97.
Chromosome View Shows the chromosome that was selected in Genome View. A diagram of the selected chromosome appears. Red/Blue bars appear above this diagram that show the approximate locations of reads.
• In the area where the reads appear, drag the pointer through a region, or click a specific location. The region appears in Gene View in greater detail.
See “Genomic Viewer – Chromosome View” on page 99.
Gene View Shows the selected region of the chromosome.
You can adjust Gene View in several ways:
• To re-center Gene View on a specific read or gene, click the desired read or gene.
• To zoom in, click .
• To zoom out, click .
• To scroll the view, click or .
See “Genomic Viewer – Gene View” on page 101.
Tab View Displays a list of the reads that appear in Gene View.See “Genomic Viewer – Tab View” on page 103.
2 Using SureSelect Quality Analyzer InteractivelyTo view the intervals in a target interval track
52 SureSelect Quality Analyzer User Guide
To view the intervals in a target interval track
After you import a set of target intervals as a track, and link the track and a read file in an experiment, you can view the list of intervals in it.
1 In the Experiment pane of the Navigator, in the Experiments folder, double-click the name of an experiment that contains the desired target intervals track.
2 Right-click the name of the target intervals track, then click View Details.
The Track dialog box appears, with header information and a list of intervals. See “Track” on page 145.
To export tracks
You can export some or all of the tracks that are available in the program. The program exports all of the intervals in the selected tracks as a single BED format file. This makes it possible to combine tracks. You can then import the combined track and use it in an analysis experiment.
1 In the Home tab, click Export > Tracks.
The Export Tracks dialog box appears. See “Export Tracks” on page 134.
2 In Select Tracks, mark the tracks that you want to export.
3 Click OK.
An Export dialog box appears.
4 Select a location for the exported file, then click Export.
The program exports all selected tracks in a single BED format file. You can open the file in a compatible genome browser, and you can also import the BED file into Agilent Genomic Workbench as a new track. See “To import target genomic regions as a track” on page 43.
NOTE You can also use the Genomic Viewer to see the intervals in the genomic region that appears in Gene View. Drag the bottom border of Gene View downward until Gene View is approximately twice its original size. The target intervals track appears at the bottom of gene view.
Using SureSelect Quality Analyzer Interactively 2To remove a track from the program
SureSelect Quality Analyzer User Guide 53
To remove a track from the program
If you import a track in error, or if you no longer need one, you can permanently remove it from the program.
1 In the Home tab, click User Preferences.
The Tracks tab of the User Preferences dialog box appears. See “User Preferences – Tracks tab” on page 150.
2 In the list of tracks, in the Delete column, mark the track that you want to delete. You can mark as many tracks as you want.
3 Click the Delete button.
A dialog box asks if you are sure you want to delete the selected track(s).
4 Click Yes.
The program deletes the track.
5 Click OK.
To customize the appearance of an experiment in the Genomic Viewer
The table below describes options that can be useful when you view sequence reads in the Genomic Viewer:
CAUTION When you delete a track, you permanently remove it from the program. To restore a track, you must import it again.
Customization option Instructions/Details
To view a different chromosome in Chromosome, Gene, and Tab Views.
• In Genome View, click the desired chromosome.
To select a specific chromosomal region to view in Gene View
• In Chromosome View, in the plotting area where reads appear, drag the pointer across the desired region.
2 Using SureSelect Quality Analyzer InteractivelyTo customize the appearance of an experiment in the Genomic Viewer
54 SureSelect Quality Analyzer User Guide
To move the cursor to a specific genomic location
The cursor is a thin blue line that appears in Genome, Chromosome, and Gene Views, and indicates the center of the currently selected region.
a In the Home tab, click Go to Gene/Genomic Location.The Go to Gene/Genomic Location dialog box appears. See “Go to Gene/Genomic Location” on page 135.
b Do one of the following:• In RefSeq by Symbol, type a valid RefSeq gene symbol
(such as BRCA1 or CTSB), then click Go.• In Genomic Location, select a chromosome, type a base
location, then click Go.
To scroll Gene View • Click the scroll buttons at the top of Gene View, as desired.
– Scrolls Gene View left.
– Scrolls Gene View right.
Note: You can also click anywhere within the gene display area of Gene View to reposition the cursor to that location.
To show only certain chromosomes in Genome View
• Right-click anywhere within Genome View, then mark or clear the check boxes next to the names of the desired chromosomes.To close the chromosome selection menu, click anywhere outside of the menu.
To show or hide reads in Genome, Chromosome, and Gene Views.
• In the View tab, under Custom Data, mark or clear Show, as desired.
To show or hide genes in Gene View
a In the Home tab, click User Preferences.The User Preferences dialog box appears. See “User Preferences – Tracks tab” on page 150.
b In the Tracks tab, under Visualization Parameters, in Genes, mark or clear Show Gene Symbols in Gene View, as desired.
To show or hide the intervals in the target intervals track
a In the Home tab, click User Preferences.The User Preferences dialog box appears. See “User Preferences – Tracks tab” on page 150.
b In the Tracks tab, under Visualization Parameters, in Tracks, mark or clear Show Annotations, as desired.
c Click OK.
Customization option Instructions/Details
Using SureSelect Quality Analyzer Interactively 2To customize the appearance of an experiment in the Genomic Viewer
SureSelect Quality Analyzer User Guide 55
For additional information about the Genomic Viewer, see the topics referenced in the table above, and the Data Viewing User Guide.
To change the width of a column in Tab View.
You can change the width of any column, but it can be especially useful to expand the Sequence column to view the full sequence of reads.
• In the column heading row of Tab View, drag the right edge of the desired column to the left or to the right, as desired.
To increase the size of Gene View You can expand Gene View to see the target interval track, which can be hidden. Do one of the following:
• If Gene View appears horizontally, drag its bottom border down until you can see the target interval track.
• If Gene View appears vertically, drag the right border of the main program window to the right, or the left border of Gene View to the left.
To change the zoom level in Gene View
You can increase the zoom level in Gene View to see the boundaries of individual reads, and how they overlap other reads.
• To zoom in, click .
• To zoom out, click .
To switch between horizontal and vertical orientation
Because of the shape of most monitors, it can be more convenient to use the Genomic Viewier in its default (horizontal) orientation. However, you can use the Genomic Viewer in vertical orientation.
a In the View tab, click View Preferences.The View Preferences dialog box appears. See “View Preferences” on page 153.
b Under View Alignment, in Orientation, select Horizontal or Vertical, as desired.
c Click OK.
Customization option Instructions/Details
2 Using SureSelect Quality Analyzer InteractivelyTo delete an experiment
56 SureSelect Quality Analyzer User Guide
To delete an experiment
1 In the Experiment pane of the Navigator, right-click the name of the desired experiment, then click Delete.
A dialog box asks if you want to delete the experiment.
2 Click OK.
To save an experiment
The program automatically saves experiments as you create them. No additional action is required on your part.
To copy what appears on your screen to the clipboard
You can copy one or all parts of the main program window to the clipboard. You can then paste the copied image into a document in a word processing, graphics, or presentation program.
1 In the View tab, click Copy, then select the pane that you want to copy. To copy all panes, including the navigator, select All.
2 In a word processing, graphics, or presentation program, paste the contents of the clipboard into the desired document.
CAUTION When you delete an experiment, you permanently remove the link between the particular sequence read file and the target intervals file. To restore the experiment, you must create a new one. However, the program does not delete any data files that you have imported, or any reports that you have saved.
NOTE This procedure transfers the selected item as a bitmapped image. This image contains only what appears on your screen. It does not contain any hidden panes, or any areas to which you must scroll.
Using SureSelect Quality Analyzer Interactively 2Creating Target Enrichment QC Reports
SureSelect Quality Analyzer User Guide 57
Creating Target Enrichment QC Reports
SureSelect Quality Analyzer can calculate QC metrics and analyze read depth and enrichment, based on the sequence reads in the currently selected experiment.
This section contains the following topics:
• “To analyze read quality” on page 57
• “To view and save reports” on page 58
To analyze read quality
After you import read data and target intervals files, and set up and select an experiment, the program can calculate overall QC metrics, and can also analyze read depth and enrichment.
1 Set the application type to SureSelect Target Enrichment.
2 Import files and set up and activate an experiment as described in “Importing Files” on page 40 and “Setting Up QC Experiments” on page 46.
3 In the Quality Analyzer tab, click Create Report.
The program calculates QC metrics and analyzes read depth and enrichment. A dialog box tells you that reports were successfully created.
4 Click OK.
At this point, the program has created all reports internally. To view a report, you must request a specific report. See “To view and save reports” on page 58.
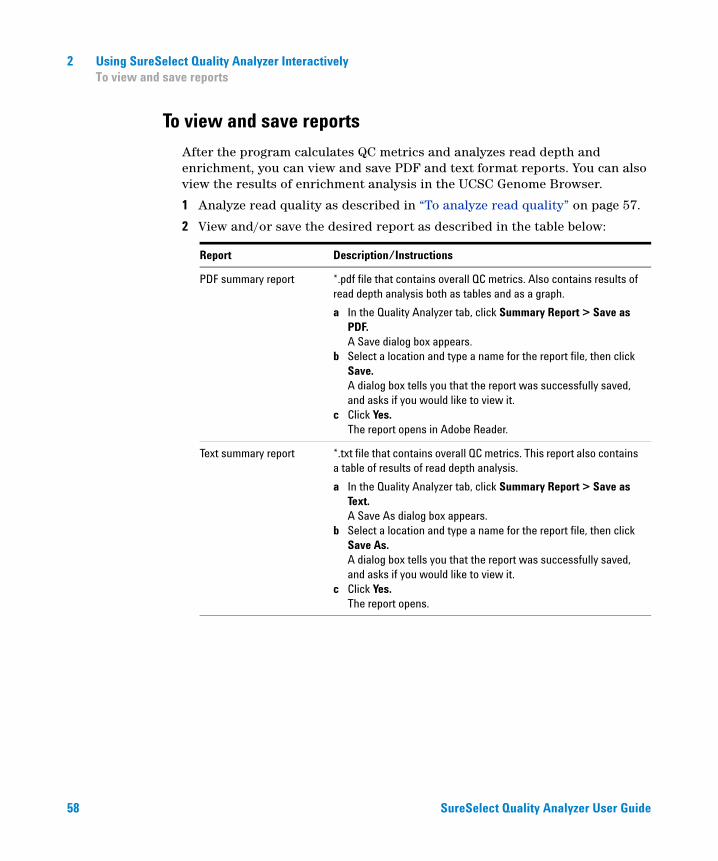
2 Using SureSelect Quality Analyzer InteractivelyTo view and save reports
58 SureSelect Quality Analyzer User Guide
To view and save reports
After the program calculates QC metrics and analyzes read depth and enrichment, you can view and save PDF and text format reports. You can also view the results of enrichment analysis in the UCSC Genome Browser.
1 Analyze read quality as described in “To analyze read quality” on page 57.
2 View and/or save the desired report as described in the table below:
Report Description/Instructions
PDF summary report *.pdf file that contains overall QC metrics. Also contains results of read depth analysis both as tables and as a graph.
a In the Quality Analyzer tab, click Summary Report > Save as PDF.A Save dialog box appears.
b Select a location and type a name for the report file, then click Save.A dialog box tells you that the report was successfully saved, and asks if you would like to view it.
c Click Yes.The report opens in Adobe Reader.
Text summary report *.txt file that contains overall QC metrics. This report also contains a table of results of read depth analysis.
a In the Quality Analyzer tab, click Summary Report > Save as Text.A Save As dialog box appears.
b Select a location and type a name for the report file, then click Save As.A dialog box tells you that the report was successfully saved, and asks if you would like to view it.
c Click Yes.The report opens.
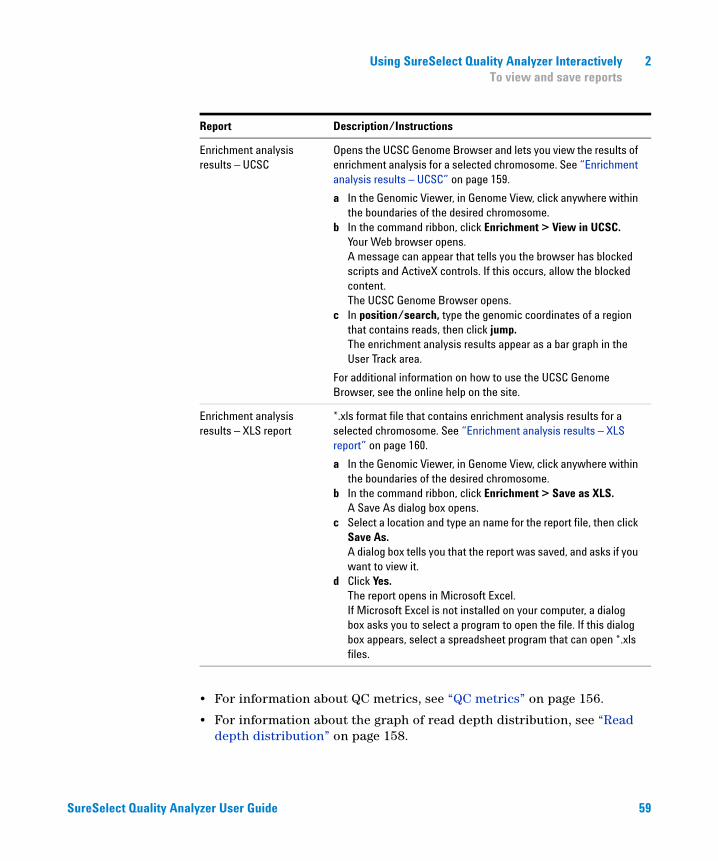
Using SureSelect Quality Analyzer Interactively 2To view and save reports
SureSelect Quality Analyzer User Guide 59
• For information about QC metrics, see “QC metrics” on page 156.
• For information about the graph of read depth distribution, see “Read depth distribution” on page 158.
Enrichment analysis results – UCSC
Opens the UCSC Genome Browser and lets you view the results of enrichment analysis for a selected chromosome. See “Enrichment analysis results – UCSC” on page 159.
a In the Genomic Viewer, in Genome View, click anywhere within the boundaries of the desired chromosome.
b In the command ribbon, click Enrichment > View in UCSC.Your Web browser opens. A message can appear that tells you the browser has blocked scripts and ActiveX controls. If this occurs, allow the blocked content.The UCSC Genome Browser opens.
c In position/search, type the genomic coordinates of a region that contains reads, then click jump.The enrichment analysis results appear as a bar graph in the User Track area.
For additional information on how to use the UCSC Genome Browser, see the online help on the site.
Enrichment analysis results – XLS report
*.xls format file that contains enrichment analysis results for a selected chromosome. See “Enrichment analysis results – XLS report” on page 160.
a In the Genomic Viewer, in Genome View, click anywhere within the boundaries of the desired chromosome.
b In the command ribbon, click Enrichment > Save as XLS.A Save As dialog box opens.
c Select a location and type an name for the report file, then click Save As.A dialog box tells you that the report was saved, and asks if you want to view it.
d Click Yes.The report opens in Microsoft Excel.If Microsoft Excel is not installed on your computer, a dialog box asks you to select a program to open the file. If this dialog box appears, select a spreadsheet program that can open *.xls files.
Report Description/Instructions

2 Using SureSelect Quality Analyzer InteractivelyTo view and save reports
60 SureSelect Quality Analyzer User Guide
61
Agilent Genomic Workbench 6.5 – SureSelect Quality Analyzer User Guide
Agilent Technologies
3Setting Up and Running Workflows
Creating and Managing Workflows 62
Setting Up/Editing Workflows 64
Running Workflows 71
This chapter gives instructions on how to set up and run workflows for producing QC reports sequentially and automatically, using read files, chromosome mapping files and target interval files. These workflows resemble those for the CGH and ChIP applications but do not require analytical methods.
3 Setting Up and Running WorkflowsCreating and Managing Workflows
62 SureSelect Quality Analyzer User Guide
Creating and Managing Workflows
In this section you learn to create, edit, save and delete workflows. For a detailed description of the window of the Workflow tab, see “Workflow Tab Window” on page 105, and for the command ribbon of the Workflow tab, see “Command ribbon – Workflow tab” on page 107.
To create a new workflow
1 Start the Workflow program.
See “To start the Workflow program” on page 28.
2 Click New.
The Create Workflow dialog box appears. See “Create Workflow” on page 132.
3 In Enter Workflow Name, type a name.
If you intend to restrict access to this workflow, mark Apply Password.
4 Click OK.
If you marked the Apply Password check box, the Set Password dialog box appears. See “Set Password” on page 140.
• Type a password and click OK.
5 Set up the workflow.
See “Setting Up/Editing Workflows” on page 64.
6 Click Save.
To edit an existing workflow
1 Next to the Select Workflow list, click the right arrow.
2 Select a workflow name from the list.
3 Edit the workflow.
See “Setting Up/Editing Workflows” on page 64.
Setting Up and Running Workflows 3To save a workflow
SureSelect Quality Analyzer User Guide 63
You can also create a new workflow from a selected one by saving it to another name. See “To save a workflow to a new name” on page 63.
To save a workflow
• In the command ribbon click Save.
To save a workflow to a new name
1 Next to the Select Workflow list, click the right arrow.
2 Select a workflow name from the list.
3 In the command ribbon click Save As.
4 Type the name of the workflow, and click OK.
To delete a workflow
1 Next to the Select Workflow list, click the right arrow.
2 Select a workflow name from the list.
3 Click Delete.
To set a password for an existing workflow
1 Next to the Select Workflow list, click the right arrow.
2 Select a workflow name from the list.
3 If you intend to restrict access to this workflow, mark Apply Password.
The Set Password dialog box appears. See “Set Password” on page 140.
4 Type a password and click OK.

3 Setting Up and Running WorkflowsSetting Up/Editing Workflows
64 SureSelect Quality Analyzer User Guide
Setting Up/Editing Workflows
This section describes how to set up/edit a workflow for automatic analysis of sequence read files. You can set up or edit a workflow in the Workflow Navigator. Note that the SSQA workflow consists of four parts: Target, Sequencing Input, TE Reports and Output.
Figure 7 Workflow Navigator
Setting Up and Running Workflows 3To select target interval input
SureSelect Quality Analyzer User Guide 65
To select target interval input
To analyze the sequence data in a read file, the program must correlate reads with target genomic intervals. Typically, these intervals are those to which you have designed your SureSelect Target Enrichment baits. To define the target intervals for the workflow, you import them as a BED format track file. If you used eArray to create baits, you can download the library as a BED format file.
When you set up a workflow, you must select its source of target interval data.
• In the Workflow Navigator, under Target, click the option button next to the source of target interval data.
See the tables below for a description of the available options.
To select an eArray ELID (Library) as Target input
1 Open the Target folder, and click Library.
The Import ELID parameter panel appears. See “Import ELID Parameter Panel” on page 112.
2 Type the ELID name to be used in the analysis.
If you cannot remember the name, search for it in the eArrayXD library.
3 Click Verify.
Click to confirm that the ELID you specified is in the local database. If it is, the name, its Genome Build and its status on eArray will appear in the table.
Table 3 Target Interval Input for SureSelect Quality Analyzer
Option Description
Library Lets you search and select the file from the eArrayXD library
Track file Lets you import a track file and use it as a target
Imported track Lets you select from already imported track files
3 Setting Up and Running WorkflowsTo select target interval input
66 SureSelect Quality Analyzer User Guide
To import a track file as target input
1 Open the Target folder, and click Track File.
The Import Track parameter panel appears. See “Import Track Parameter Panel” on page 113.
2 Enter the information in the table below.
To select an imported track file as target input
1 Open the Target folder, and click Imported Track File.
The Select Imported Track parameter panel appears. See “Select Imported Track Parameter Panel” on page 114.
2 From the Imported Track(s) list, select the imported track whose target intervals you intend to display.
Parameter Instructions/Details
Species Select the species that is associated with the genomic intervals in your BED format track file.
Build Name Select the genome build that is associated with the genomic intervals in your BED format track file.
Color (Optional) To customize the display color of the intervals in the target intervals track, follow these steps:
a Click Change.The Choose Track Color Dialog box appears.
b In the Swatches tab, select the desired color, then click OK.You can also use the HSB and RGB tabs to define or adjust the color using the HSB and RGB color scales, respectively. See “Choose Track Color” on page 126.
Track Name Type a name for the track as you want it to appear in reports and lists, and in Gene View of the Genomic Viewer.
Track File The track file must be a BED format track file that contains the target genomic intervals.
a Click Browse.An Open dialog box appears.
b Select the desired *.bed track file, then click Open.The name of the selected file appears in Track File.
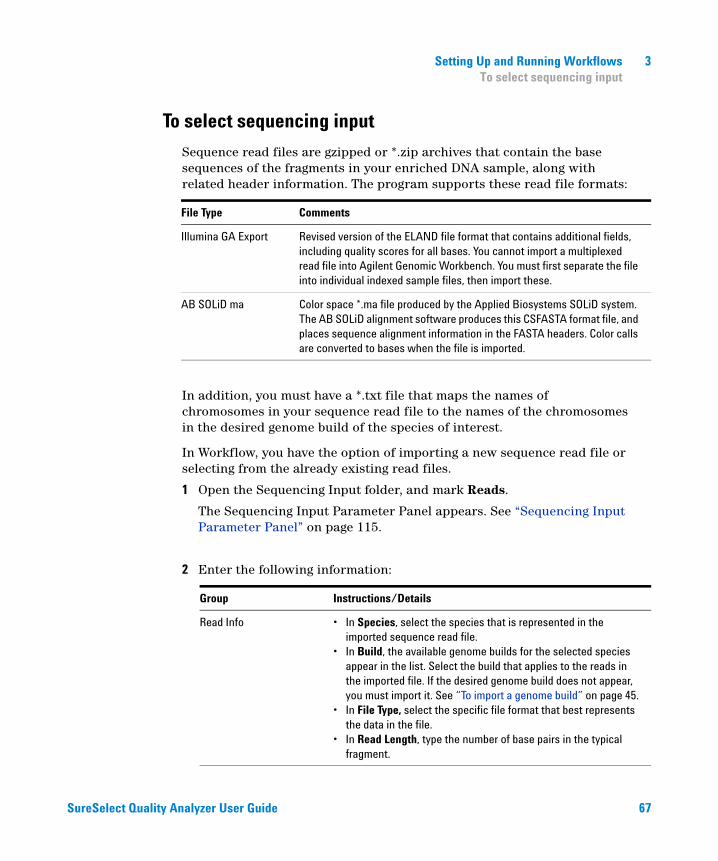
Setting Up and Running Workflows 3To select sequencing input
SureSelect Quality Analyzer User Guide 67
To select sequencing input
Sequence read files are gzipped or *.zip archives that contain the base sequences of the fragments in your enriched DNA sample, along with related header information. The program supports these read file formats:
In addition, you must have a *.txt file that maps the names of chromosomes in your sequence read file to the names of the chromosomes in the desired genome build of the species of interest.
In Workflow, you have the option of importing a new sequence read file or selecting from the already existing read files.
1 Open the Sequencing Input folder, and mark Reads.
The Sequencing Input Parameter Panel appears. See “Sequencing Input Parameter Panel” on page 115.
2 Enter the following information:
File Type Comments
Illumina GA Export Revised version of the ELAND file format that contains additional fields, including quality scores for all bases. You cannot import a multiplexed read file into Agilent Genomic Workbench. You must first separate the file into individual indexed sample files, then import these.
AB SOLiD ma Color space *.ma file produced by the Applied Biosystems SOLiD system. The AB SOLiD alignment software produces this CSFASTA format file, and places sequence alignment information in the FASTA headers. Color calls are converted to bases when the file is imported.
Group Instructions/Details
Read Info • In Species, select the species that is represented in the imported sequence read file.
• In Build, the available genome builds for the selected species appear in the list. Select the build that applies to the reads in the imported file. If the desired genome build does not appear, you must import it. See “To import a genome build” on page 45.
• In File Type, select the specific file format that best represents the data in the file.
• In Read Length, type the number of base pairs in the typical fragment.
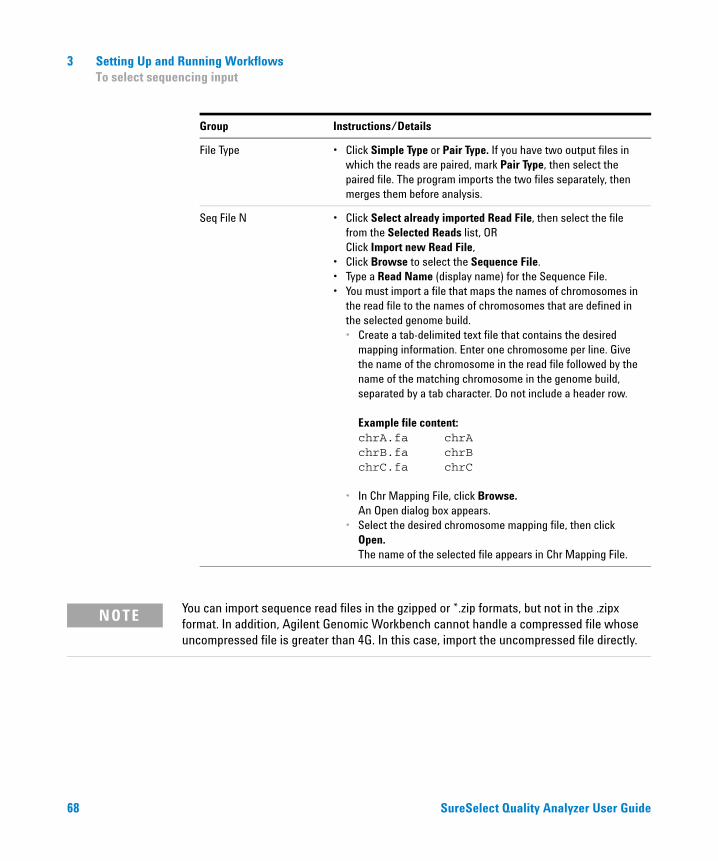
3 Setting Up and Running WorkflowsTo select sequencing input
68 SureSelect Quality Analyzer User Guide
File Type • Click Simple Type or Pair Type. If you have two output files in which the reads are paired, mark Pair Type, then select the paired file. The program imports the two files separately, then merges them before analysis.
Seq File N • Click Select already imported Read File, then select the file from the Selected Reads list, ORClick Import new Read File,
• Click Browse to select the Sequence File. • Type a Read Name (display name) for the Sequence File. • You must import a file that maps the names of chromosomes in
the read file to the names of chromosomes that are defined in the selected genome build.• Create a tab-delimited text file that contains the desired
mapping information. Enter one chromosome per line. Give the name of the chromosome in the read file followed by the name of the matching chromosome in the genome build, separated by a tab character. Do not include a header row.
Example file content:chrA.fa chrAchrB.fa chrBchrC.fa chrC
• In Chr Mapping File, click Browse.An Open dialog box appears.
• Select the desired chromosome mapping file, then click Open.The name of the selected file appears in Chr Mapping File.
Group Instructions/Details
NOTE You can import sequence read files in the gzipped or *.zip formats, but not in the .zipx format. In addition, Agilent Genomic Workbench cannot handle a compressed file whose uncompressed file is greater than 4G. In this case, import the uncompressed file directly.
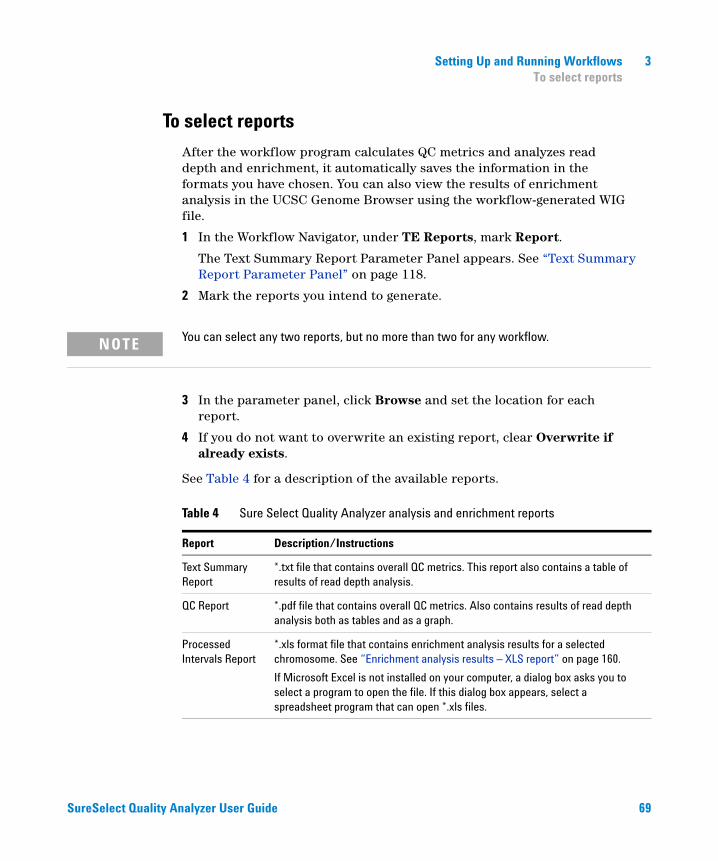
Setting Up and Running Workflows 3To select reports
SureSelect Quality Analyzer User Guide 69
To select reports
After the workflow program calculates QC metrics and analyzes read depth and enrichment, it automatically saves the information in the formats you have chosen. You can also view the results of enrichment analysis in the UCSC Genome Browser using the workflow-generated WIG file.
1 In the Workflow Navigator, under TE Reports, mark Report.
The Text Summary Report Parameter Panel appears. See “Text Summary Report Parameter Panel” on page 118.
2 Mark the reports you intend to generate.
3 In the parameter panel, click Browse and set the location for each report.
4 If you do not want to overwrite an existing report, clear Overwrite if already exists.
See Table 4 for a description of the available reports.
NOTE You can select any two reports, but no more than two for any workflow.
Table 4 Sure Select Quality Analyzer analysis and enrichment reports
Report Description/Instructions
Text Summary Report
*.txt file that contains overall QC metrics. This report also contains a table of results of read depth analysis.
QC Report *.pdf file that contains overall QC metrics. Also contains results of read depth analysis both as tables and as a graph.
Processed Intervals Report
*.xls format file that contains enrichment analysis results for a selected chromosome. See “Enrichment analysis results – XLS report” on page 160.
If Microsoft Excel is not installed on your computer, a dialog box asks you to select a program to open the file. If this dialog box appears, select a spreadsheet program that can open *.xls files.
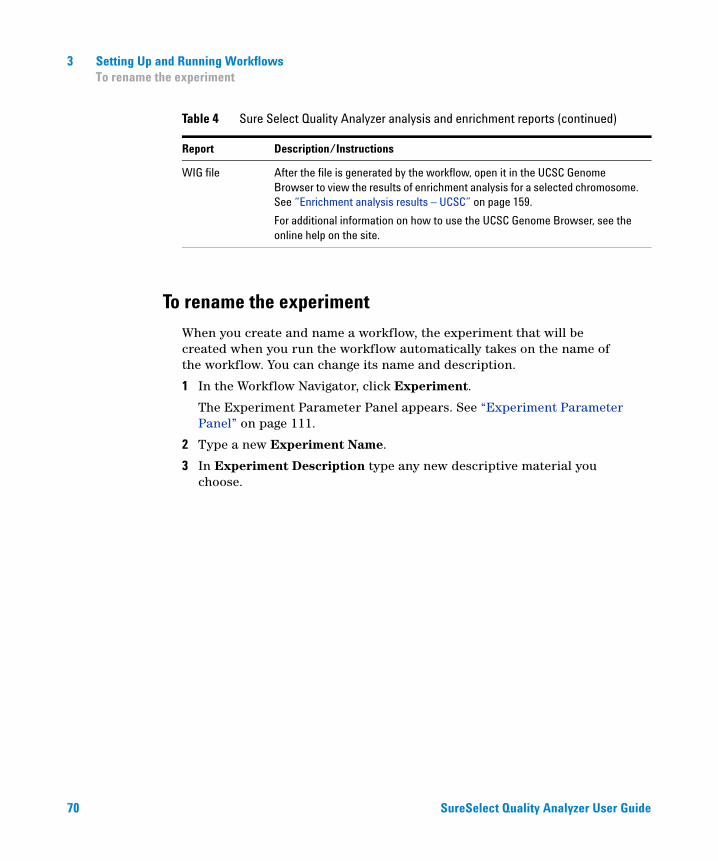
3 Setting Up and Running WorkflowsTo rename the experiment
70 SureSelect Quality Analyzer User Guide
To rename the experiment
When you create and name a workflow, the experiment that will be created when you run the workflow automatically takes on the name of the workflow. You can change its name and description.
1 In the Workflow Navigator, click Experiment.
The Experiment Parameter Panel appears. See “Experiment Parameter Panel” on page 111.
2 Type a new Experiment Name.
3 In Experiment Description type any new descriptive material you choose.
WIG file After the file is generated by the workflow, open it in the UCSC Genome Browser to view the results of enrichment analysis for a selected chromosome. See “Enrichment analysis results – UCSC” on page 159.
For additional information on how to use the UCSC Genome Browser, see the online help on the site.
Table 4 Sure Select Quality Analyzer analysis and enrichment reports (continued)
Report Description/Instructions
Setting Up and Running Workflows 3Running Workflows
SureSelect Quality Analyzer User Guide 71
Running Workflows
When you run a workflow, all of the selected reports are generated automatically, but to view the reads and target intervals graphically, you must use the Genomic View and UCSC Genomic Browser.
To run a workflow
1 Create a new workflow or select one from the list.
See “To create a new workflow” on page 62 or “To edit an existing workflow” on page 62.
2 On the Workflow ribbon, click Run.
3 At the prompt, type a name into the Provide Workflow Identifier dialog box, and then click OK.
This name becomes the name of the progress tab in the Summary Console/Progress tabs pane. The default name is the name of the workflow. Entering a new name does not change the name of the experiment or the workflow. See “Provide Workflow Identifier” on page 139.
An experiment is created in the Experiments pane of the Home tab Navigator. The experiment folder lists the Experiment Name you specified when you set up the workflow.
The Summary Console tab at the bottom of the window in the Summary Console/Progress tabs pane displays the status of the workflow run. See “Summary Console tab” on page 122.
A workflow progress tab is created in the Summary Console/Progress tabs pane for the named workflow and displays the progress of the run and any errors that occur. A not-yet-completed run has “running” displayed in its progress tab. A completed run has “completed” displayed in its progress tab. See “Named workflow tabs” on page 124.
NOTE The Summary Console and progress tabs include workflows for CGH, ChIP and SureSelect Target Enrichment. For information on the CGH and ChIP workflows, see the Workflow User Guide.
3 Setting Up and Running WorkflowsTo run a series of workflows
72 SureSelect Quality Analyzer User Guide
To run a series of workflows
Once a workflow run has started, you can set up and run additional workflows, which are run in the order in which you started them. Each workflow will have its own progress tab.
On 64-bit computers, you can run up to three workflows simultaneously. On 32-bit computers, workflows are processed sequentially, not simultaneously.
To run a series with different workflows
1 Run the first workflow.
Follow the instructions in “To run a workflow” on page 71.
2 Create a new workflow or select an existing one from the list.
See “To create a new workflow” on page 62 or “To edit an existing workflow” on page 62.
3 In Output, click Experiment.
4 Change the name of the experiment if the named experiment exists in the Experiment pane.
5 Save the workflow.
6 Click Run.
7 Repeat steps 2-5 until you are complete.
See “To monitor workflow runs” on page 73.
To run a series with the same workflow
1 Run the first workflow.
Follow the instructions in “To run a workflow” on page 71.
2 Click Run again.
An Input dialog box appears with the name of the experiment in the workflow plus an increment of 1. This will be the name of the experiment created for the second run of the same workflow. You can change the name if you want.
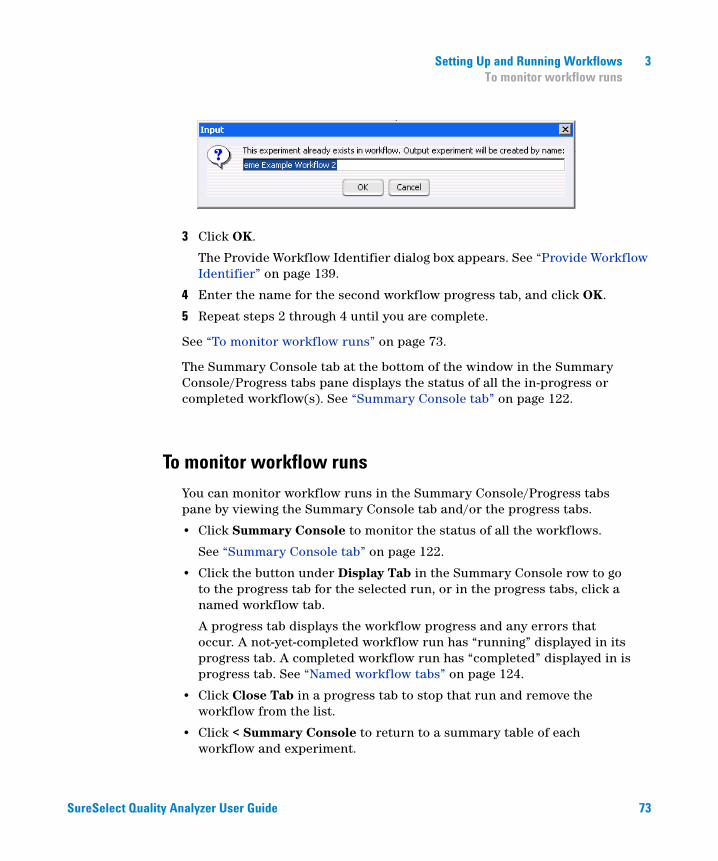
Setting Up and Running Workflows 3To monitor workflow runs
SureSelect Quality Analyzer User Guide 73
3 Click OK.
The Provide Workflow Identifier dialog box appears. See “Provide Workflow Identifier” on page 139.
4 Enter the name for the second workflow progress tab, and click OK.
5 Repeat steps 2 through 4 until you are complete.
See “To monitor workflow runs” on page 73.
The Summary Console tab at the bottom of the window in the Summary Console/Progress tabs pane displays the status of all the in-progress or completed workflow(s). See “Summary Console tab” on page 122.
To monitor workflow runs
You can monitor workflow runs in the Summary Console/Progress tabs pane by viewing the Summary Console tab and/or the progress tabs.
• Click Summary Console to monitor the status of all the workflows.
See “Summary Console tab” on page 122.
• Click the button under Display Tab in the Summary Console row to go to the progress tab for the selected run, or in the progress tabs, click a named workflow tab.
A progress tab displays the workflow progress and any errors that occur. A not-yet-completed workflow run has “running” displayed in its progress tab. A completed workflow run has “completed” displayed in is progress tab. See “Named workflow tabs” on page 124.
• Click Close Tab in a progress tab to stop that run and remove the workflow from the list.
• Click < Summary Console to return to a summary table of each workflow and experiment.
3 Setting Up and Running WorkflowsTo abort a single workflow
74 SureSelect Quality Analyzer User Guide
• Click Abort Workflows & Clear Table in the Summary Console tab to stop all workflow runs, and remove workflows and workflow experiments from the run list.
To abort a single workflow
1 In the Summary Console/Progress tabs pane, click the progress tab to abort that workflow.
2 Click Abort Workflow.
You are asked to confirm that you want to abort the workflow. Note that the Abort Workflow button will not appear unless the workflow is currently running.
The workflow is aborted, and the workflow progress tab and workflow status in the Summary Console tab are removed.
To abort all workflows
1 In the Summary Console/Progress tabs pane, click the Summary Console tab.
2 Click Abort Workflows & Clear Table.
You are asked to confirm that you want to abort all workflows.
3 Click Yes.
A warning that workflow information will be lost is displayed for each workflow.
4 Click Yes to confirm each.
All workflows are aborted and the Summary Console/Progress tabs pane is cleared of all workflow information.
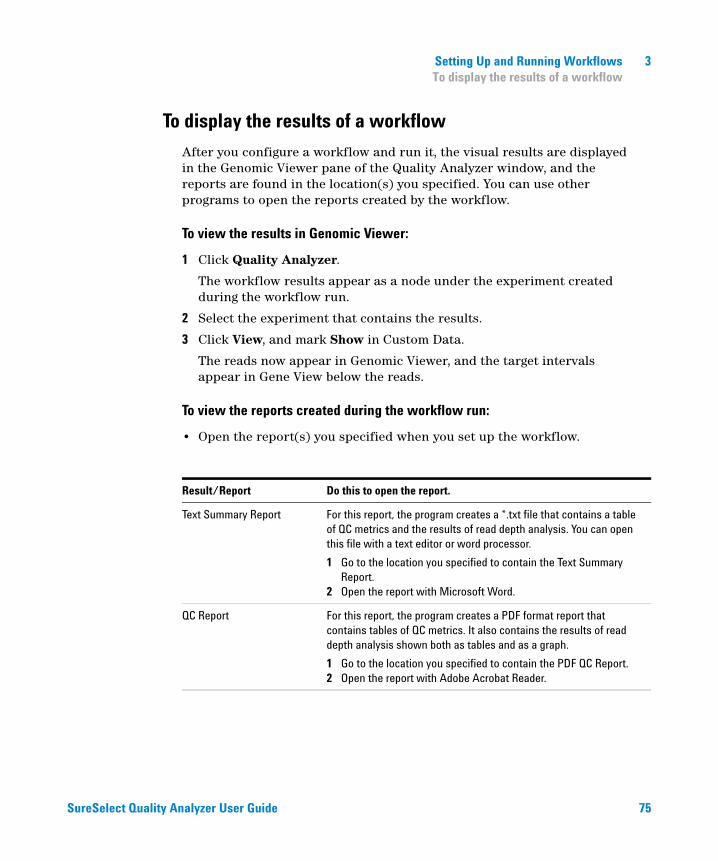
Setting Up and Running Workflows 3To display the results of a workflow
SureSelect Quality Analyzer User Guide 75
To display the results of a workflow
After you configure a workflow and run it, the visual results are displayed in the Genomic Viewer pane of the Quality Analyzer window, and the reports are found in the location(s) you specified. You can use other programs to open the reports created by the workflow.
To view the results in Genomic Viewer:
1 Click Quality Analyzer.
The workflow results appear as a node under the experiment created during the workflow run.
2 Select the experiment that contains the results.
3 Click View, and mark Show in Custom Data.
The reads now appear in Genomic Viewer, and the target intervals appear in Gene View below the reads.
To view the reports created during the workflow run:
• Open the report(s) you specified when you set up the workflow.
Result/Report Do this to open the report.
Text Summary Report For this report, the program creates a *.txt file that contains a table of QC metrics and the results of read depth analysis. You can open this file with a text editor or word processor.
1 Go to the location you specified to contain the Text Summary Report.
2 Open the report with Microsoft Word.
QC Report For this report, the program creates a PDF format report that contains tables of QC metrics. It also contains the results of read depth analysis shown both as tables and as a graph.
1 Go to the location you specified to contain the PDF QC Report.2 Open the report with Adobe Acrobat Reader.
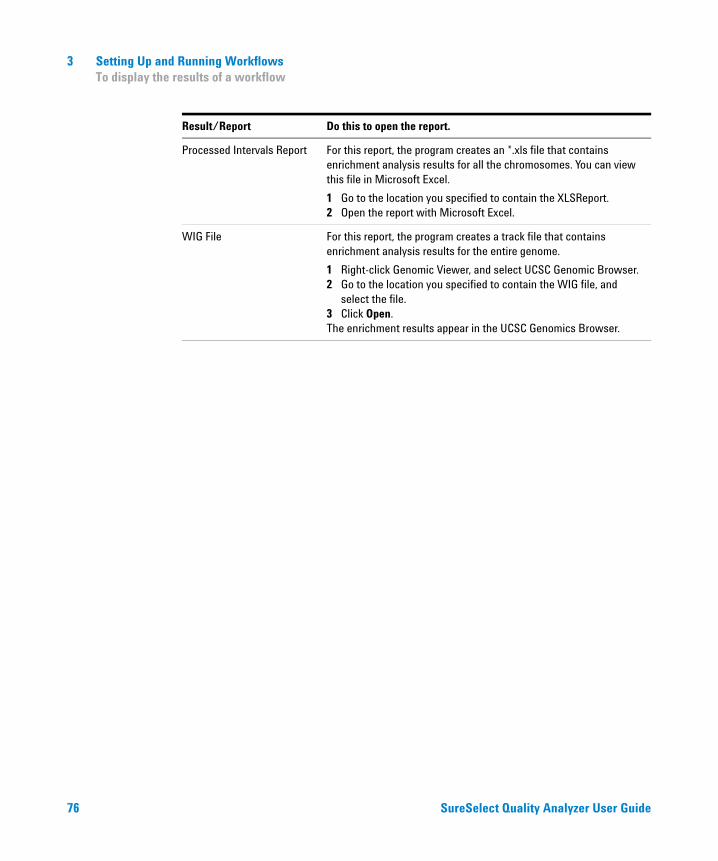
3 Setting Up and Running WorkflowsTo display the results of a workflow
76 SureSelect Quality Analyzer User Guide
Processed Intervals Report For this report, the program creates an *.xls file that contains enrichment analysis results for all the chromosomes. You can view this file in Microsoft Excel.
1 Go to the location you specified to contain the XLSReport.2 Open the report with Microsoft Excel.
WIG File For this report, the program creates a track file that contains enrichment analysis results for the entire genome.
1 Right-click Genomic Viewer, and select UCSC Genomic Browser.2 Go to the location you specified to contain the WIG file, and
select the file.3 Click Open.The enrichment results appear in the UCSC Genomics Browser.
Result/Report Do this to open the report.
77
Agilent Genomic Workbench 6.5 – SureSelect Quality Analyzer User Guide
Agilent Technologies
4SureSelect Quality Analyzer Reference
SureSelect Target Enrichment Main Window 78
Quality Analyzer Tab Window 87
Workflow Tab Window 105
Dialog Boxes 126
Target Enrichment Reports 155
This chapter describes the parts of the Agilent Genomic Workbench main window that are relevant to the SureSelect Target Enrichment application, including descriptions of both the Quality Analyzer tab and Workflow tab windows. It also describes the menus, shortcut menus, panes, and dialog boxes that can appear. In addition, it contains details about the reports the program can produce.
You can find more information on the Agilent Genomic Workbench programs in the Product Overview Guide. Click the Open Application tab if it is not already open. Access to the guide is in the top right corner of the Open Application window.
For general help with the Genomic Viewer and Navigator panes of the user interface, see the Data Viewing User Guide. In addition, separate user guides cover each of the main programs in Agilent Genomic Workbench. To view these other guides, select the relevant application type, then click the Help tab. You can view some of the applications only if you have purchased a license.

4 SureSelect Quality Analyzer ReferenceSureSelect Target Enrichment Main Window
78 SureSelect Quality Analyzer User Guide
SureSelect Target Enrichment Main Window
When you first switch the application to the SureSelect Target Enrichment application, you see this window for the Home tab. The Tab bar and Switch Application button remain the same for every click of a tab. But the Command ribbon changes for each tab, and the Tab panes may or may not stay the same (red). They change for the eArrayXD and Workflow tabs.
Figure 8 SureSelect Target Enrichment main window – Home tab
Tab bar
Switch Application menu
Tab Panes
Command ribbon
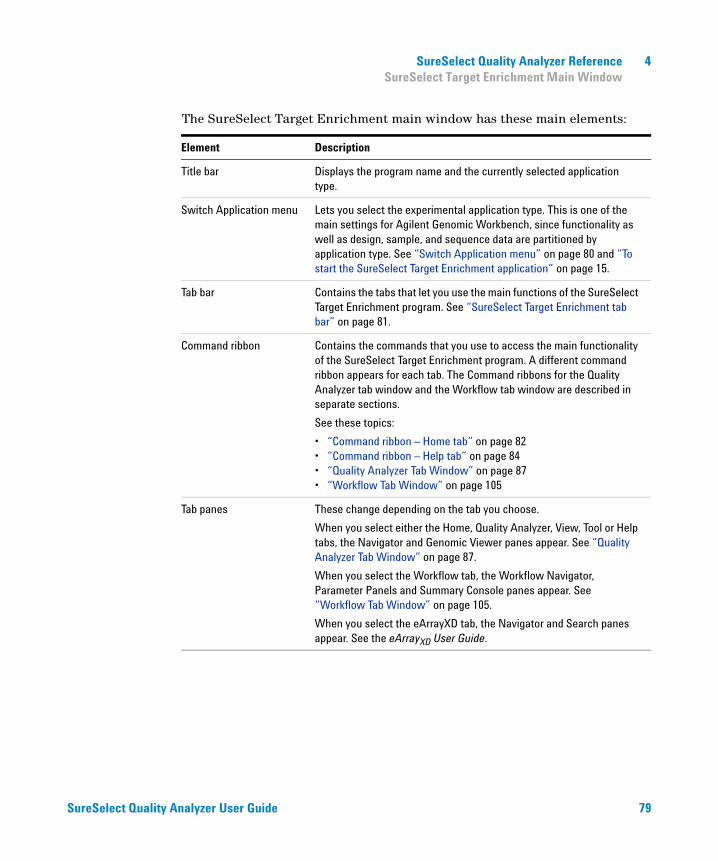
SureSelect Quality Analyzer Reference 4SureSelect Target Enrichment Main Window
SureSelect Quality Analyzer User Guide 79
The SureSelect Target Enrichment main window has these main elements:
Element Description
Title bar Displays the program name and the currently selected application type.
Switch Application menu Lets you select the experimental application type. This is one of the main settings for Agilent Genomic Workbench, since functionality as well as design, sample, and sequence data are partitioned by application type. See “Switch Application menu” on page 80 and “To start the SureSelect Target Enrichment application” on page 15.
Tab bar Contains the tabs that let you use the main functions of the SureSelect Target Enrichment program. See “SureSelect Target Enrichment tab bar” on page 81.
Command ribbon Contains the commands that you use to access the main functionality of the SureSelect Target Enrichment program. A different command ribbon appears for each tab. The Command ribbons for the Quality Analyzer tab window and the Workflow tab window are described in separate sections.
See these topics:
• “Command ribbon – Home tab” on page 82• “Command ribbon – Help tab” on page 84• “Quality Analyzer Tab Window” on page 87• “Workflow Tab Window” on page 105
Tab panes These change depending on the tab you choose.
When you select either the Home, Quality Analyzer, View, Tool or Help tabs, the Navigator and Genomic Viewer panes appear. See “Quality Analyzer Tab Window” on page 87.
When you select the Workflow tab, the Workflow Navigator, Parameter Panels and Summary Console panes appear. See “Workflow Tab Window” on page 105.
When you select the eArrayXD tab, the Navigator and Search panes appear. See the eArrayXD User Guide.
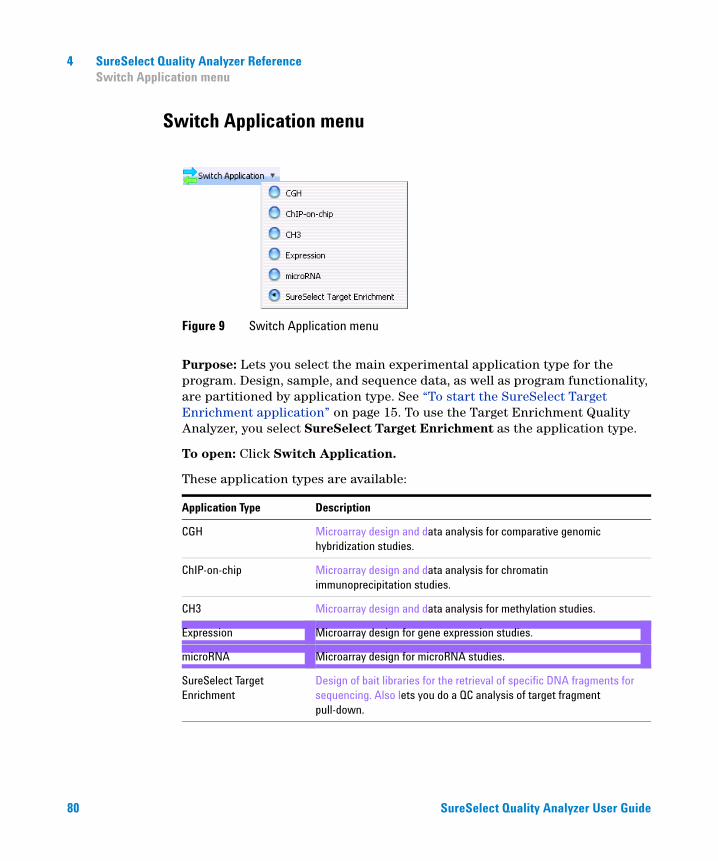
4 SureSelect Quality Analyzer ReferenceSwitch Application menu
80 SureSelect Quality Analyzer User Guide
Switch Application menu
Purpose: Lets you select the main experimental application type for the program. Design, sample, and sequence data, as well as program functionality, are partitioned by application type. See “To start the SureSelect Target Enrichment application” on page 15. To use the Target Enrichment Quality Analyzer, you select SureSelect Target Enrichment as the application type.
To open: Click Switch Application.
These application types are available:
Figure 9 Switch Application menu
Application Type Description
CGH Microarray design and data analysis for comparative genomic hybridization studies.
ChIP-on-chip Microarray design and data analysis for chromatin immunoprecipitation studies.
CH3 Microarray design and data analysis for methylation studies.
Expression Microarray design for gene expression studies.
microRNA Microarray design for microRNA studies.
SureSelect Target Enrichment
Design of bait libraries for the retrieval of specific DNA fragments for sequencing. Also lets you do a QC analysis of target fragment pull-down.
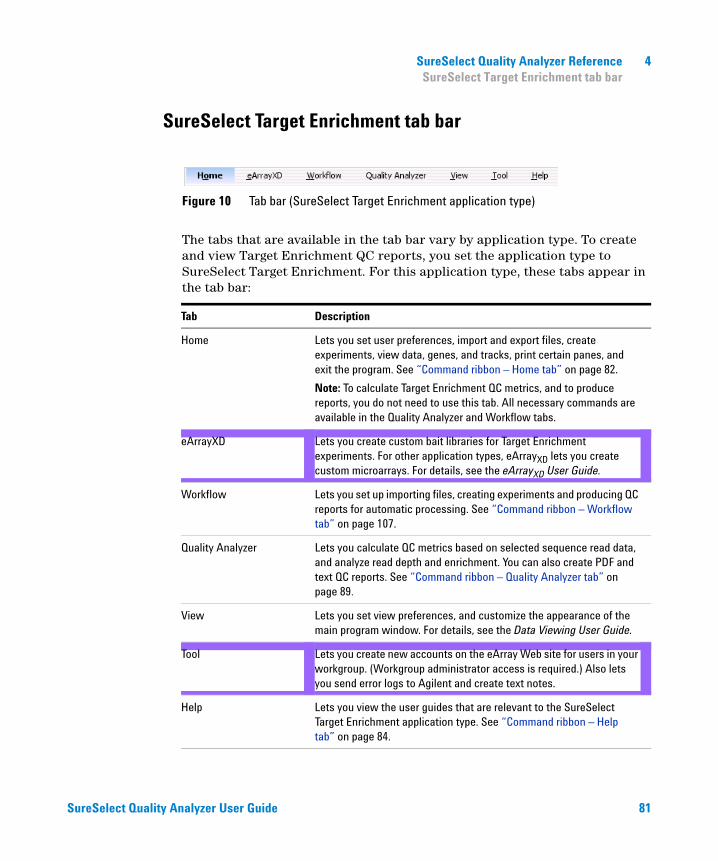
SureSelect Quality Analyzer Reference 4SureSelect Target Enrichment tab bar
SureSelect Quality Analyzer User Guide 81
SureSelect Target Enrichment tab bar
The tabs that are available in the tab bar vary by application type. To create and view Target Enrichment QC reports, you set the application type to SureSelect Target Enrichment. For this application type, these tabs appear in the tab bar:
Figure 10 Tab bar (SureSelect Target Enrichment application type)
Tab Description
Home Lets you set user preferences, import and export files, create experiments, view data, genes, and tracks, print certain panes, and exit the program. See “Command ribbon – Home tab” on page 82.
Note: To calculate Target Enrichment QC metrics, and to produce reports, you do not need to use this tab. All necessary commands are available in the Quality Analyzer and Workflow tabs.
eArrayXD Lets you create custom bait libraries for Target Enrichment experiments. For other application types, eArrayXD lets you create custom microarrays. For details, see the eArrayXD User Guide.
Workflow Lets you set up importing files, creating experiments and producing QC reports for automatic processing. See “Command ribbon – Workflow tab” on page 107.
Quality Analyzer Lets you calculate QC metrics based on selected sequence read data, and analyze read depth and enrichment. You can also create PDF and text QC reports. See “Command ribbon – Quality Analyzer tab” on page 89.
View Lets you set view preferences, and customize the appearance of the main program window. For details, see the Data Viewing User Guide.
Tool Lets you create new accounts on the eArray Web site for users in your workgroup. (Workgroup administrator access is required.) Also lets you send error logs to Agilent and create text notes.
Help Lets you view the user guides that are relevant to the SureSelect Target Enrichment application type. See “Command ribbon – Help tab” on page 84.
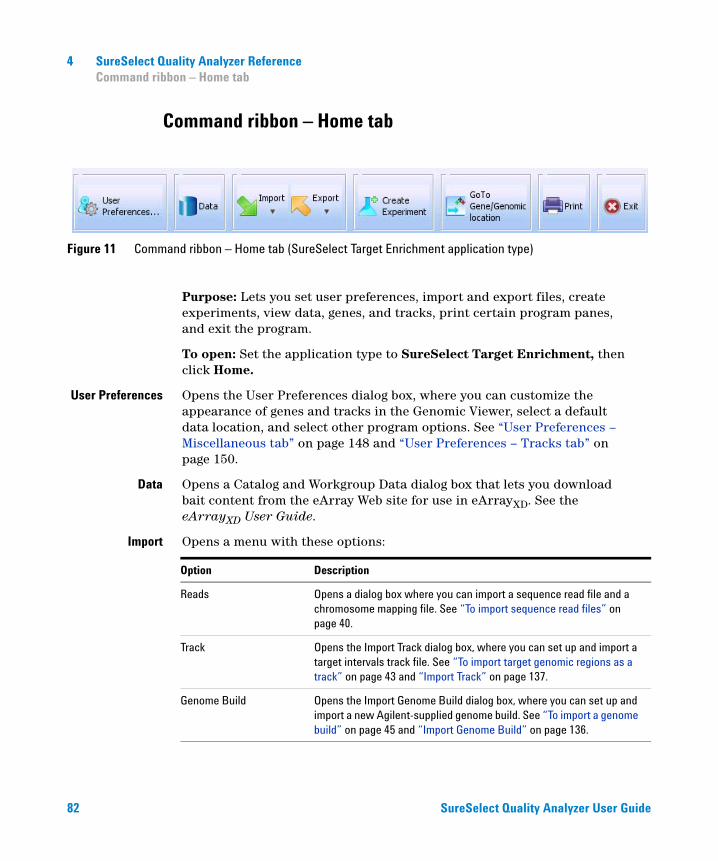
4 SureSelect Quality Analyzer ReferenceCommand ribbon – Home tab
82 SureSelect Quality Analyzer User Guide
Command ribbon – Home tab
Purpose: Lets you set user preferences, import and export files, create experiments, view data, genes, and tracks, print certain program panes, and exit the program.
To open: Set the application type to SureSelect Target Enrichment, then click Home.
User Preferences Opens the User Preferences dialog box, where you can customize the appearance of genes and tracks in the Genomic Viewer, select a default data location, and select other program options. See “User Preferences – Miscellaneous tab” on page 148 and “User Preferences – Tracks tab” on page 150.
Data Opens a Catalog and Workgroup Data dialog box that lets you download bait content from the eArray Web site for use in eArrayXD. See the eArrayXD User Guide.
Import Opens a menu with these options:
Figure 11 Command ribbon – Home tab (SureSelect Target Enrichment application type)
Option Description
Reads Opens a dialog box where you can import a sequence read file and a chromosome mapping file. See “To import sequence read files” on page 40.
Track Opens the Import Track dialog box, where you can set up and import a target intervals track file. See “To import target genomic regions as a track” on page 43 and “Import Track” on page 137.
Genome Build Opens the Import Genome Build dialog box, where you can set up and import a new Agilent-supplied genome build. See “To import a genome build” on page 45 and “Import Genome Build” on page 136.

SureSelect Quality Analyzer Reference 4Command ribbon – Home tab
SureSelect Quality Analyzer User Guide 83
Export Opens a menu with a Tracks option. This option opens the Export Tracks dialog box, where you can select one or more tracks to export as a single BED format file. See “To export tracks” on page 52 and “Export Tracks” on page 134.
CreateExperiment
Opens the Create Experiment dialog box, where you can begin the creation of a Target Enrichment QC analysis experiment. Experiments are required organizational units that link a read file with related files and information. See “Create Experiment” on page 130 and “To create a new experiment” on page 46.
Go toGene/Genomic
Location
Opens the Go to Gene/Genomic Location dialog box, where you can enter a gene symbol or genomic location. This lets you move the cursor of the Genomic Viewer to a specific locus. See “To customize the appearance of an experiment in the Genomic Viewer” on page 53 and “Go to Gene/Genomic Location” on page 135.
Print Opens a Print dialog box, where you can print the contents of several program panes. See the Data Viewing User Guide.
Exit Exits the program.
Bait Upload This option is used by eArrayXD, and is not applicable to SureSelect Quality Analyzer. See the eArrayXD User Guide.
Custom Genome for Tiling This option is used by eArrayXD, and is not applicable to SureSelect Quality Analyzer. See the eArrayXD User Guide.
Option Description
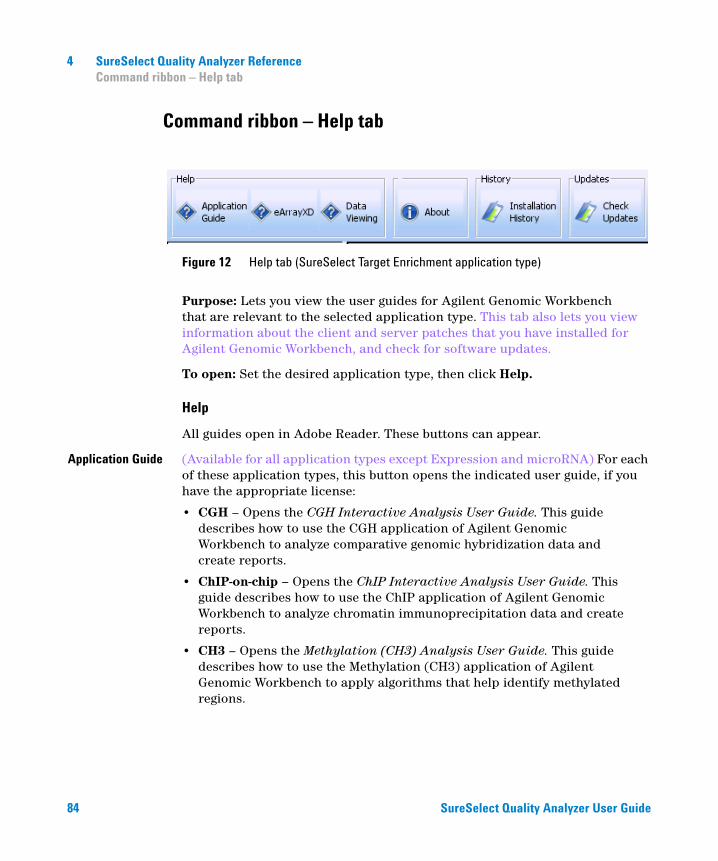
4 SureSelect Quality Analyzer ReferenceCommand ribbon – Help tab
84 SureSelect Quality Analyzer User Guide
Command ribbon – Help tab
Purpose: Lets you view the user guides for Agilent Genomic Workbench that are relevant to the selected application type. This tab also lets you view information about the client and server patches that you have installed for Agilent Genomic Workbench, and check for software updates.
To open: Set the desired application type, then click Help.
Help
All guides open in Adobe Reader. These buttons can appear.
Application Guide (Available for all application types except Expression and microRNA) For each of these application types, this button opens the indicated user guide, if you have the appropriate license:
• CGH – Opens the CGH Interactive Analysis User Guide. This guide describes how to use the CGH application of Agilent Genomic Workbench to analyze comparative genomic hybridization data and create reports.
• ChIP-on-chip – Opens the ChIP Interactive Analysis User Guide. This guide describes how to use the ChIP application of Agilent Genomic Workbench to analyze chromatin immunoprecipitation data and create reports.
• CH3 – Opens the Methylation (CH3) Analysis User Guide. This guide describes how to use the Methylation (CH3) application of Agilent Genomic Workbench to apply algorithms that help identify methylated regions.
Figure 12 Help tab (SureSelect Target Enrichment application type)
SureSelect Quality Analyzer Reference 4Command ribbon – Help tab
SureSelect Quality Analyzer User Guide 85
• SureSelect Target Enrichment – Opens the SureSelect Quality Analyzer User Guide. This guide describes how to use the SureSelect Quality Analyzer application (including Workflow) of Agilent Genomic Workbench to assess the effectiveness of fragment pull-down for target enrichment experiments. This application does not require a license.
eArrayXD (Available for all application types) Opens the eArrayXD User Guide. This guide describes how to design and submit custom microarray designs and SureSelect Target Enrichment bait libraries.
Sample Manager (Available for all application types except SureSelect Target Enrichment) Opens the Sample Manager User Guide. This guide describes how to use the Sample Manager application of Agilent Genomic Workbench to organize microarrays and edit their attributes. You can use Sample Manager for Feature Extraction without any of the analysis applications.
FeatureExtraction
(Available for all application types except SureSelect Target Enrichment) Opens a menu with these options:
• Quick Start – Opens the Feature Extraction Quick Start Guide. This guide gives an overview of how to use the Feature Extraction software to extract and generate QC reports for Agilent microarrays.
• User Guide – Opens the Feature Extraction User Guide. This guide shows you how to set up and run Feature Extraction to automatically extract a batch of image files. It also describes how to extract image files in real time.
• Reference Guide – Opens the Feature Extraction Reference Guide. This guide contains tables that contain lists of default parameter values and results for Feature Extraction analyses, and explanations of how Feature Extraction uses its algorithms to calculate results.
Quality Tools (Available for the CGH, ChIP-on-chip, and CH3 application types) Opens the Quality Tools User Guide. This guide describes how to query, filter, and evaluate microarray extractions within Agilent Genomic Workbench. It also describes how to visualize current and historical batch microarray extraction processes.
Workflow (Available for the CGH and ChIP-on-chip application types) Opens the Workflow User Guide. This guide describes how to use the workflow module of Agilent Genomic Workbench to extract image files with Agilent Feature Extraction software and/or automatically analyze Feature Extraction data with the CGH and ChIP analysis applications. Instructions and explanations for the SureSelect Target Enrichment Workflow application are found in the SureSelect Quality Analyzer Guide.
4 SureSelect Quality Analyzer ReferenceCommand ribbon – Help tab
86 SureSelect Quality Analyzer User Guide
Data Viewing (Available for all application types except Expression and microRNA) Opens the Data Viewing User Guide. This guide describes how to import, organize, manage, export, and display data and other content (experiments, gene lists, tracks) within Agilent Genomic Workbench. It is targeted for users who have no DNA Analytics application license(s).
An additional guide is available in the Open Application tab of the program. The Product Overview Guide gives an overview of the capabilities within Agilent Genomic Workbench. It also describes how to start each of the component programs and find help, and how to enter your license information. In addition, it helps you with system administration and troubleshooting. To open this guide, click the Open Application tab, then click Product Overview.
About Opens a dialog box that displays title, copyright, and version information for the program. It also lets you view the License Agreement. None is required for the SureSelect Target Enrichment application.
History
InstallationHistory
Opens a dialog box that displays the software updates that you have installed, and their installation histories. Both client and server updates appear in this dialog box.
Updates
Check Updates Connects the program to Agilent, and lets you download updates to the Agilent Genomic Workbench software.
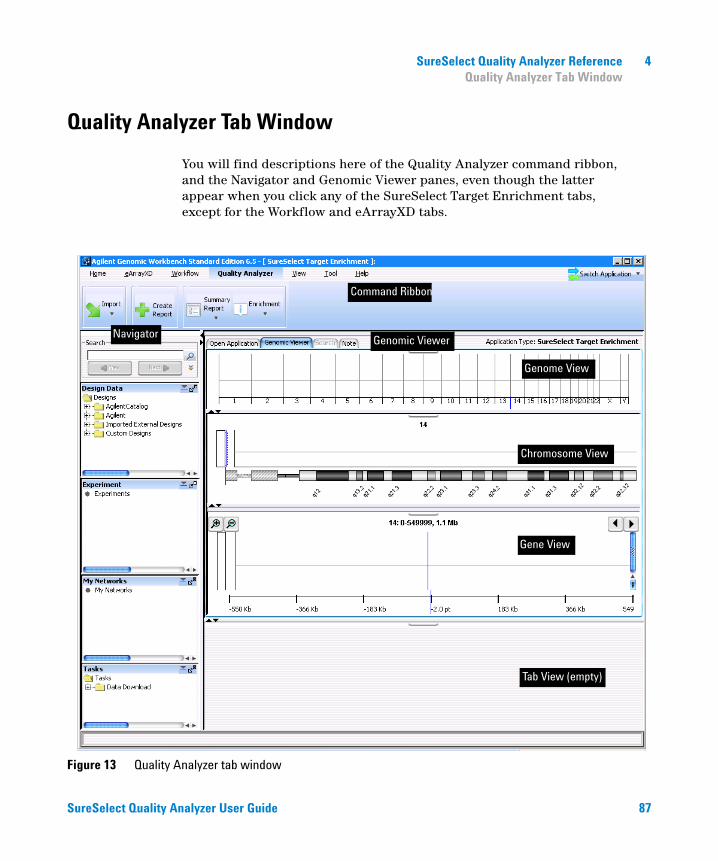
SureSelect Quality Analyzer Reference 4Quality Analyzer Tab Window
SureSelect Quality Analyzer User Guide 87
Quality Analyzer Tab Window
You will find descriptions here of the Quality Analyzer command ribbon, and the Navigator and Genomic Viewer panes, even though the latter appear when you click any of the SureSelect Target Enrichment tabs, except for the Workflow and eArrayXD tabs.
Figure 13 Quality Analyzer tab window
Genomic Viewer
Chromosome View
Gene View
Tab View (empty)
Command Ribbon
Navigator
Genome View
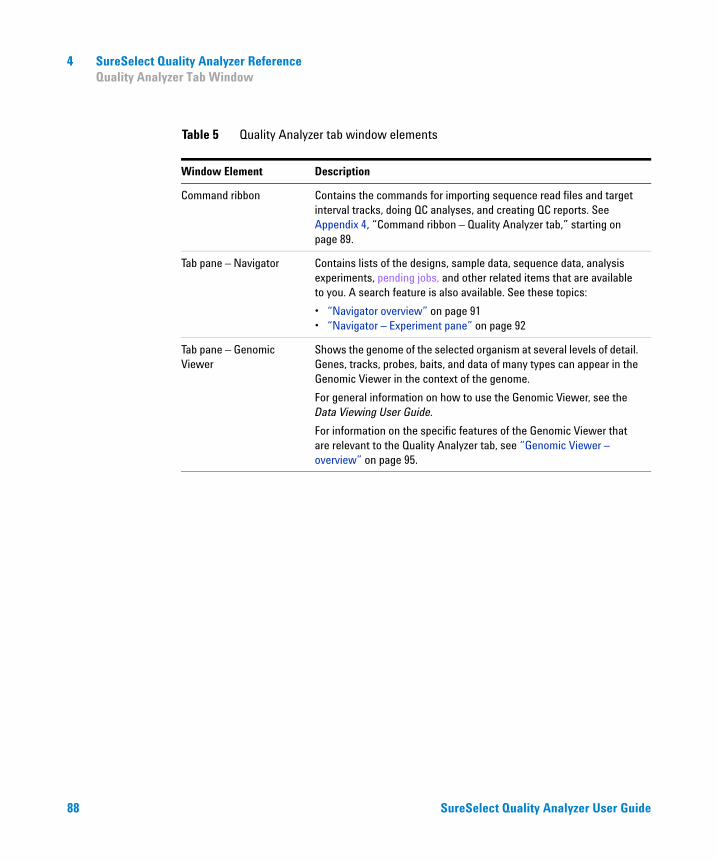
4 SureSelect Quality Analyzer ReferenceQuality Analyzer Tab Window
88 SureSelect Quality Analyzer User Guide
Table 5 Quality Analyzer tab window elements
Window Element Description
Command ribbon Contains the commands for importing sequence read files and target interval tracks, doing QC analyses, and creating QC reports. See Appendix 4, “Command ribbon – Quality Analyzer tab,” starting on page 89.
Tab pane – Navigator Contains lists of the designs, sample data, sequence data, analysis experiments, pending jobs, and other related items that are available to you. A search feature is also available. See these topics:
• “Navigator overview” on page 91• “Navigator – Experiment pane” on page 92
Tab pane – Genomic Viewer
Shows the genome of the selected organism at several levels of detail. Genes, tracks, probes, baits, and data of many types can appear in the Genomic Viewer in the context of the genome.
For general information on how to use the Genomic Viewer, see the Data Viewing User Guide.
For information on the specific features of the Genomic Viewer that are relevant to the Quality Analyzer tab, see “Genomic Viewer – overview” on page 95.
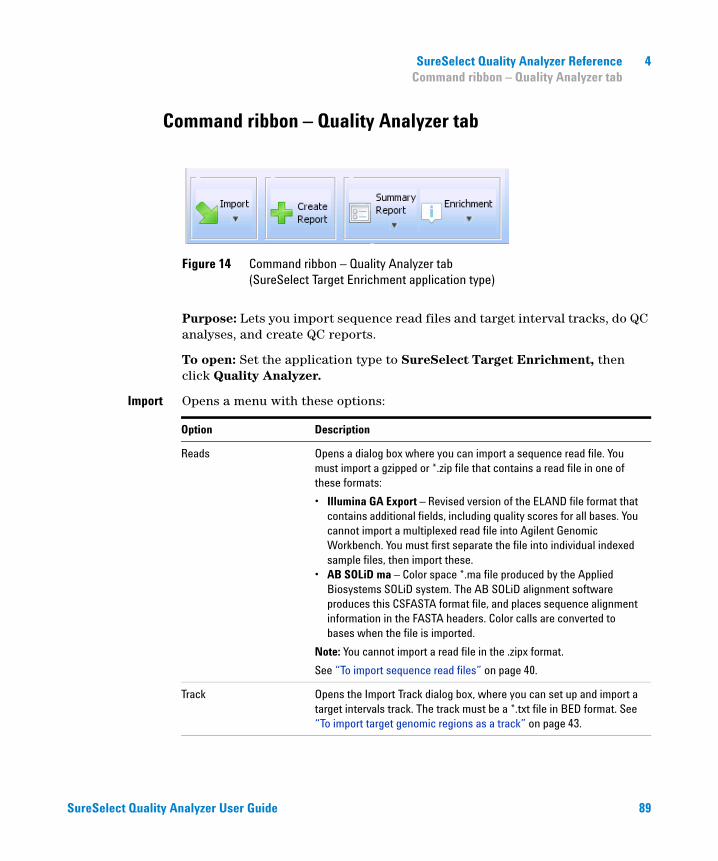
SureSelect Quality Analyzer Reference 4Command ribbon – Quality Analyzer tab
SureSelect Quality Analyzer User Guide 89
Command ribbon – Quality Analyzer tab
Purpose: Lets you import sequence read files and target interval tracks, do QC analyses, and create QC reports.
To open: Set the application type to SureSelect Target Enrichment, then click Quality Analyzer.
Import Opens a menu with these options:
Figure 14 Command ribbon – Quality Analyzer tab (SureSelect Target Enrichment application type)
Option Description
Reads Opens a dialog box where you can import a sequence read file. You must import a gzipped or *.zip file that contains a read file in one of these formats:
• Illumina GA Export – Revised version of the ELAND file format that contains additional fields, including quality scores for all bases. You cannot import a multiplexed read file into Agilent Genomic Workbench. You must first separate the file into individual indexed sample files, then import these.
• AB SOLiD ma – Color space *.ma file produced by the Applied Biosystems SOLiD system. The AB SOLiD alignment software produces this CSFASTA format file, and places sequence alignment information in the FASTA headers. Color calls are converted to bases when the file is imported.
Note: You cannot import a read file in the .zipx format.
See “To import sequence read files” on page 40.
Track Opens the Import Track dialog box, where you can set up and import a target intervals track. The track must be a *.txt file in BED format. See “To import target genomic regions as a track” on page 43.
4 SureSelect Quality Analyzer ReferenceCommand ribbon – Quality Analyzer tab
90 SureSelect Quality Analyzer User Guide
Create Report Analyzes the data in the currently selected experiment. To view the results, you use the Summary Report and Enrichment commands (see below).
Summary Report Opens a menu with these options:
Enrichment Opens a menu with these options:
Option Description
Save as PDF Opens a Save dialog box, where you can select a location for a PDF QC report file. This report contains calculated QC metrics. It also contains the results of read depth analysis both as tables and as a graph. See these topics:
• “To view and save reports” on page 58• “QC metrics” on page 156• “Read depth distribution” on page 158.
Save as Text Opens a Save As dialog box where you can select a location for a *.txt format report. This report contains calculated QC metrics. It also contains tables of the results of read depth analysis. See “To view and save reports” on page 58 and “QC metrics” on page 156.
Option Description
View in UCSC Opens the UCSC Genome Browser in your Web browser, and displays the results of enrichment analysis in the User Track area. This command lets you view these results one chromosome at a time. You must select the desired chromosome in Genome View of the Genomic Viewer before you click this command. See “To view and save reports” on page 58 and “Enrichment analysis results – UCSC” on page 159.
Save as XLS Opens a Save As dialog box, where you can select a location for a *.xls format report. This report contains the results of enrichment analysis for each target interval in the selected chromosome. You select the desired chromosome in Genome View of the Genomic View before you click this command. You can use a spreadsheet program to view this report.
NOTE To view or save summary or enrichment reports, you must first import a read file and a target intervals file, create and select an analysis experiment, and analyze the data in the selected experiment.
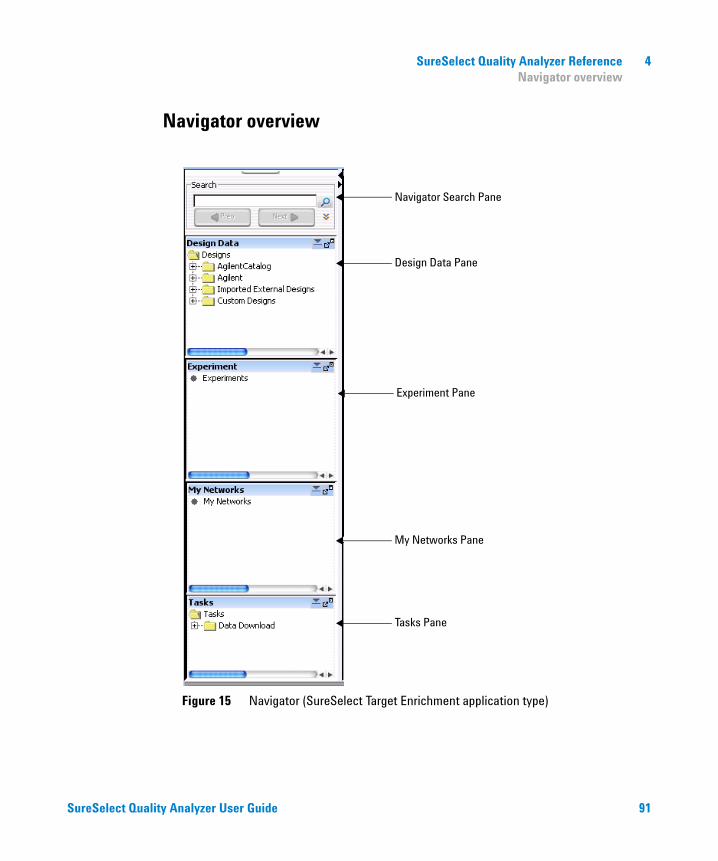
SureSelect Quality Analyzer Reference 4Navigator overview
SureSelect Quality Analyzer User Guide 91
Navigator overview
Figure 15 Navigator (SureSelect Target Enrichment application type)
Navigator Search Pane
Design Data Pane
Experiment Pane
Tasks Pane
My Networks Pane
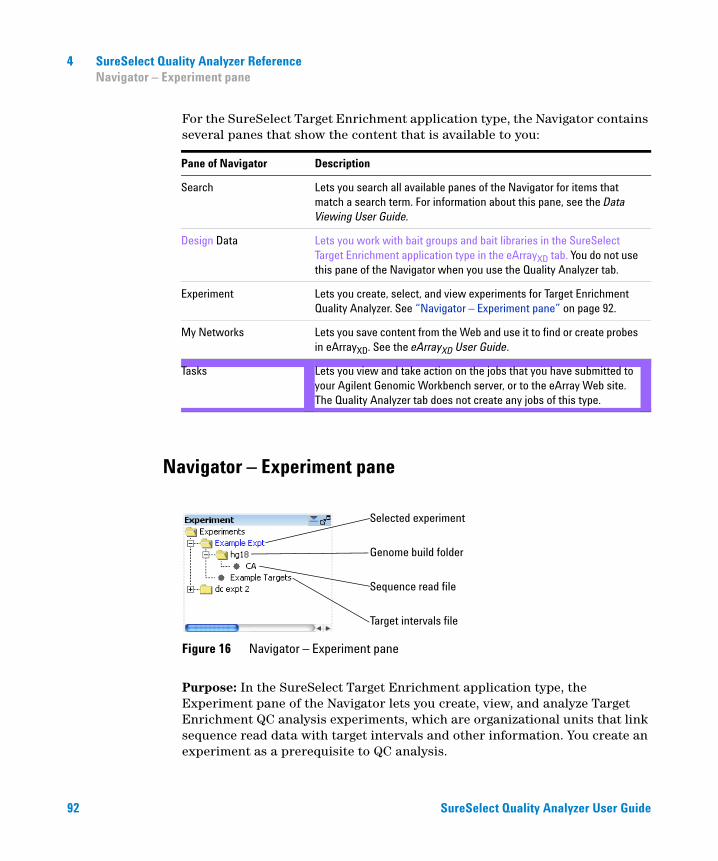
4 SureSelect Quality Analyzer ReferenceNavigator – Experiment pane
92 SureSelect Quality Analyzer User Guide
For the SureSelect Target Enrichment application type, the Navigator contains several panes that show the content that is available to you:
Navigator – Experiment pane
Purpose: In the SureSelect Target Enrichment application type, the Experiment pane of the Navigator lets you create, view, and analyze Target Enrichment QC analysis experiments, which are organizational units that link sequence read data with target intervals and other information. You create an experiment as a prerequisite to QC analysis.
Pane of Navigator Description
Search Lets you search all available panes of the Navigator for items that match a search term. For information about this pane, see the Data Viewing User Guide.
Design Data Lets you work with bait groups and bait libraries in the SureSelect Target Enrichment application type in the eArrayXD tab. You do not use this pane of the Navigator when you use the Quality Analyzer tab.
Experiment Lets you create, select, and view experiments for Target Enrichment Quality Analyzer. See “Navigator – Experiment pane” on page 92.
My Networks Lets you save content from the Web and use it to find or create probes in eArrayXD. See the eArrayXD User Guide.
Tasks Lets you view and take action on the jobs that you have submitted to your Agilent Genomic Workbench server, or to the eArray Web site. The Quality Analyzer tab does not create any jobs of this type.
Figure 16 Navigator – Experiment pane
Selected experiment
Genome build folder
Sequence read file
Target intervals file
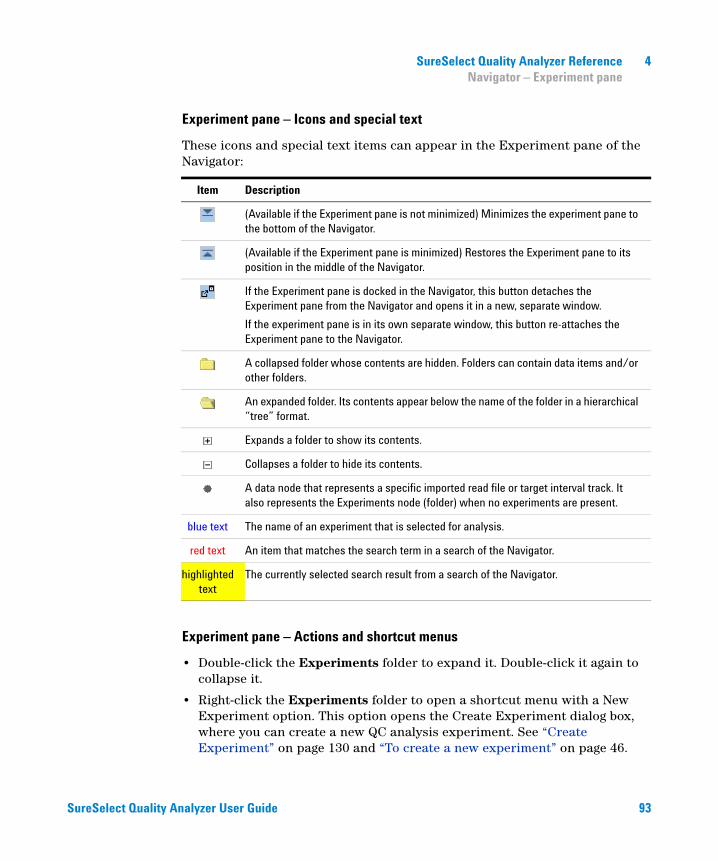
SureSelect Quality Analyzer Reference 4Navigator – Experiment pane
SureSelect Quality Analyzer User Guide 93
Experiment pane – Icons and special text
These icons and special text items can appear in the Experiment pane of the Navigator:
Experiment pane – Actions and shortcut menus
• Double-click the Experiments folder to expand it. Double-click it again to collapse it.
• Right-click the Experiments folder to open a shortcut menu with a New Experiment option. This option opens the Create Experiment dialog box, where you can create a new QC analysis experiment. See “Create Experiment” on page 130 and “To create a new experiment” on page 46.
Item Description
(Available if the Experiment pane is not minimized) Minimizes the experiment pane to the bottom of the Navigator.
(Available if the Experiment pane is minimized) Restores the Experiment pane to its position in the middle of the Navigator.
If the Experiment pane is docked in the Navigator, this button detaches the Experiment pane from the Navigator and opens it in a new, separate window.
If the experiment pane is in its own separate window, this button re-attaches the Experiment pane to the Navigator.
A collapsed folder whose contents are hidden. Folders can contain data items and/or other folders.
An expanded folder. Its contents appear below the name of the folder in a hierarchical “tree” format.
Expands a folder to show its contents.
Collapses a folder to hide its contents.
A data node that represents a specific imported read file or target interval track. It also represents the Experiments node (folder) when no experiments are present.
blue text The name of an experiment that is selected for analysis.
red text An item that matches the search term in a search of the Navigator.
highlighted text
The currently selected search result from a search of the Navigator.

4 SureSelect Quality Analyzer ReferenceNavigator – Experiment pane
94 SureSelect Quality Analyzer User Guide
• Right-click the name of an experiment to open a shortcut menu with these options:
• Double-click the name of an experiment to view its contents. Double-click the name of the experiment again to hide its contents. Each experiment contains a genome build folder that contains a link to the uploaded read file that has been selected for the experiment. It also contains a link to the target intervals track that has been selected for the experiment.
• Right-click the name of a target intervals file to open a shortcut menu with a View Details option. This option opens the Track dialog box, where you can view a list of the target intervals in the track, and header information. See “To view the intervals in a target interval track” on page 52 and “Track” on page 145.
Option Description
Select Experiment (Available for experiments other than the currently active one) Lets you view and analyze the data in the experiment. The reads and target intervals that are defined for the selected experiment can appear in the Genomic Viewer, and are used for QC analysis.
When you select an experiment, the program displays the name of the experiment in blue. You can only select one experiment at a time. See “To select an experiment for analysis” on page 48.
Deselect Experiment (Available for the currently selected experiment, if any) Removes the reads and target intervals that are defined in the experiment from the Genomic Viewer, and makes them unavailable for QC analysis. See “To deselect an experiment” on page 49.
If you deselect an experiment, you can select it again as needed.
Delete Experiment Removes the experiment from the Experiment pane of the Navigator. To restore a deleted experiment, you must create a new experiment. See “To delete an experiment” on page 56.
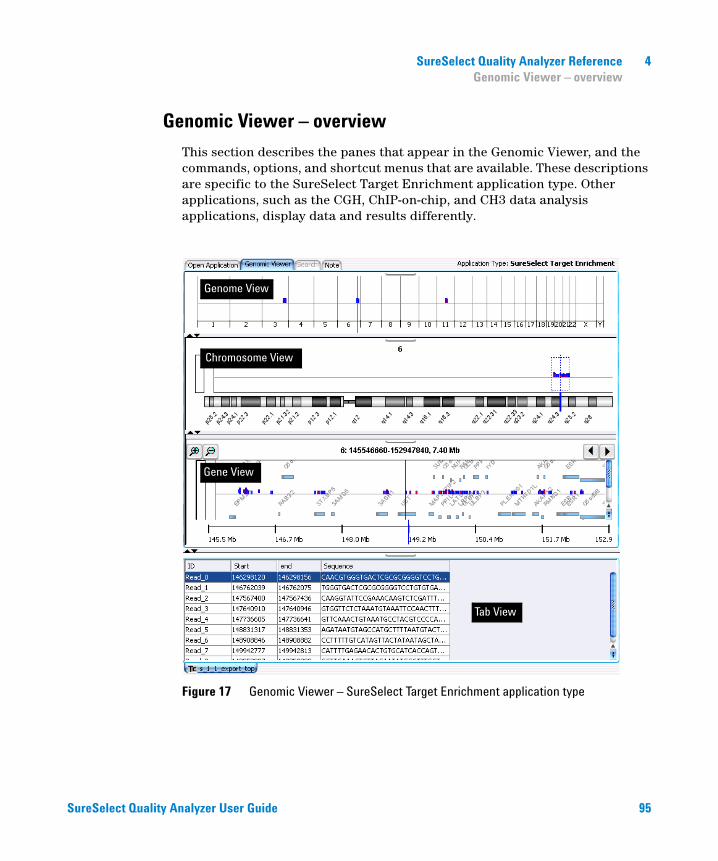
SureSelect Quality Analyzer Reference 4Genomic Viewer – overview
SureSelect Quality Analyzer User Guide 95
Genomic Viewer – overview
This section describes the panes that appear in the Genomic Viewer, and the commands, options, and shortcut menus that are available. These descriptions are specific to the SureSelect Target Enrichment application type. Other applications, such as the CGH, ChIP-on-chip, and CH3 data analysis applications, display data and results differently.
Figure 17 Genomic Viewer – SureSelect Target Enrichment application type
Chromosome View
Genome View
Gene View
Tab View
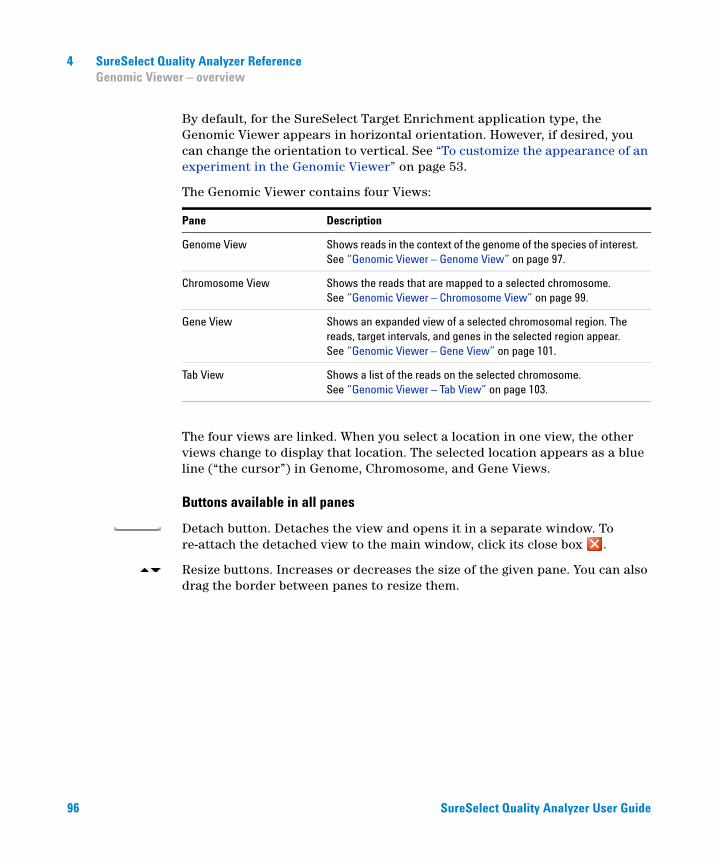
4 SureSelect Quality Analyzer ReferenceGenomic Viewer – overview
96 SureSelect Quality Analyzer User Guide
By default, for the SureSelect Target Enrichment application type, the Genomic Viewer appears in horizontal orientation. However, if desired, you can change the orientation to vertical. See “To customize the appearance of an experiment in the Genomic Viewer” on page 53.
The Genomic Viewer contains four Views:
The four views are linked. When you select a location in one view, the other views change to display that location. The selected location appears as a blue line (“the cursor”) in Genome, Chromosome, and Gene Views.
Buttons available in all panes
Detach button. Detaches the view and opens it in a separate window. To re-attach the detached view to the main window, click its close box .
Resize buttons. Increases or decreases the size of the given pane. You can also drag the border between panes to resize them.
Pane Description
Genome View Shows reads in the context of the genome of the species of interest. See “Genomic Viewer – Genome View” on page 97.
Chromosome View Shows the reads that are mapped to a selected chromosome. See “Genomic Viewer – Chromosome View” on page 99.
Gene View Shows an expanded view of a selected chromosomal region. The reads, target intervals, and genes in the selected region appear. See “Genomic Viewer – Gene View” on page 101.
Tab View Shows a list of the reads on the selected chromosome. See “Genomic Viewer – Tab View” on page 103.
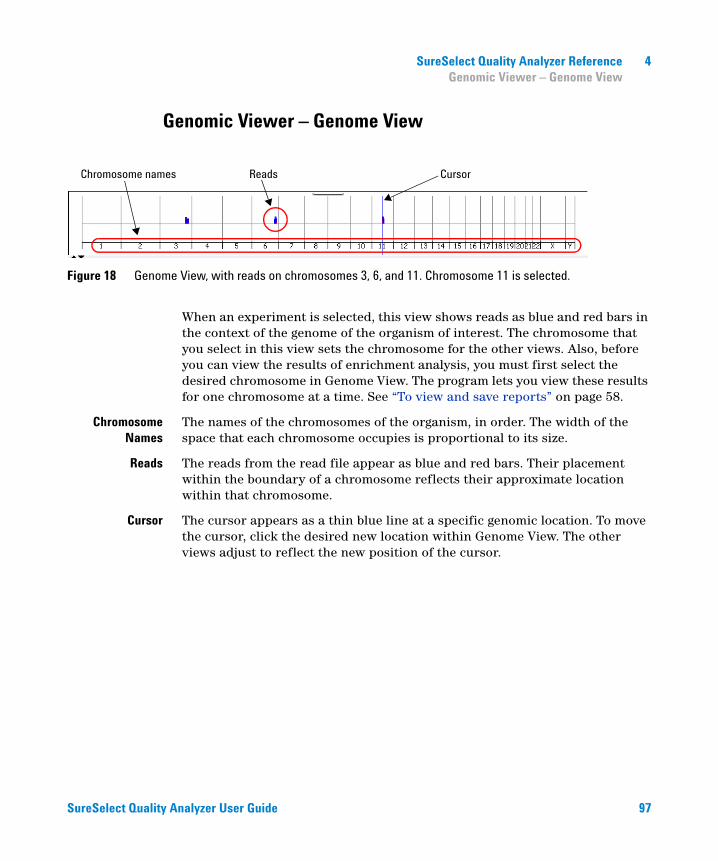
SureSelect Quality Analyzer Reference 4Genomic Viewer – Genome View
SureSelect Quality Analyzer User Guide 97
Genomic Viewer – Genome View
When an experiment is selected, this view shows reads as blue and red bars in the context of the genome of the organism of interest. The chromosome that you select in this view sets the chromosome for the other views. Also, before you can view the results of enrichment analysis, you must first select the desired chromosome in Genome View. The program lets you view these results for one chromosome at a time. See “To view and save reports” on page 58.
ChromosomeNames
The names of the chromosomes of the organism, in order. The width of the space that each chromosome occupies is proportional to its size.
Reads The reads from the read file appear as blue and red bars. Their placement within the boundary of a chromosome reflects their approximate location within that chromosome.
Cursor The cursor appears as a thin blue line at a specific genomic location. To move the cursor, click the desired new location within Genome View. The other views adjust to reflect the new position of the cursor.
Figure 18 Genome View, with reads on chromosomes 3, 6, and 11. Chromosome 11 is selected.
Chromosome names Reads Cursor
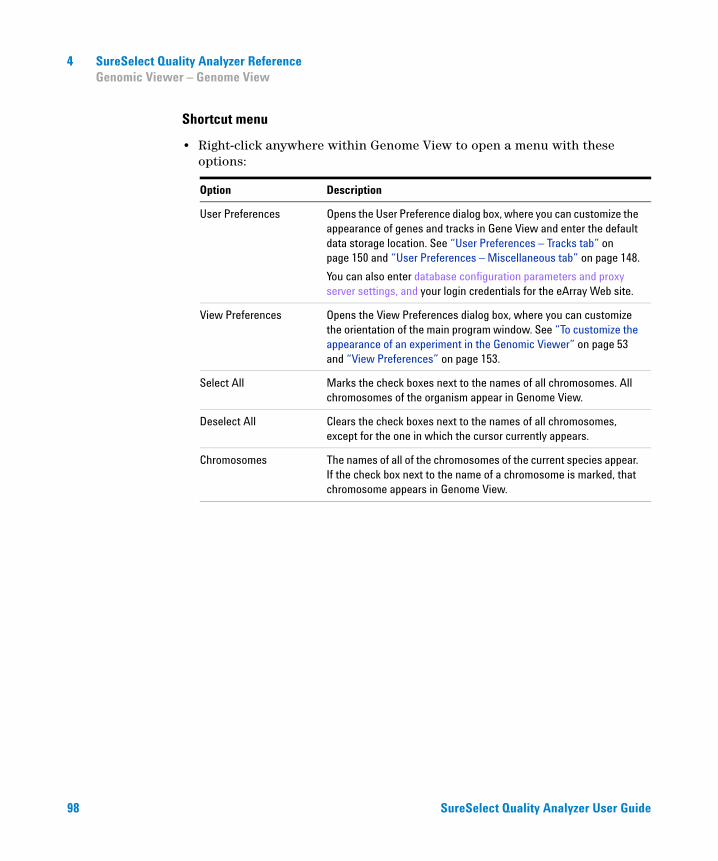
4 SureSelect Quality Analyzer ReferenceGenomic Viewer – Genome View
98 SureSelect Quality Analyzer User Guide
Shortcut menu
• Right-click anywhere within Genome View to open a menu with these options:
Option Description
User Preferences Opens the User Preference dialog box, where you can customize the appearance of genes and tracks in Gene View and enter the default data storage location. See “User Preferences – Tracks tab” on page 150 and “User Preferences – Miscellaneous tab” on page 148.
You can also enter database configuration parameters and proxy server settings, and your login credentials for the eArray Web site.
View Preferences Opens the View Preferences dialog box, where you can customize the orientation of the main program window. See “To customize the appearance of an experiment in the Genomic Viewer” on page 53 and “View Preferences” on page 153.
Select All Marks the check boxes next to the names of all chromosomes. All chromosomes of the organism appear in Genome View.
Deselect All Clears the check boxes next to the names of all chromosomes, except for the one in which the cursor currently appears.
Chromosomes The names of all of the chromosomes of the current species appear. If the check box next to the name of a chromosome is marked, that chromosome appears in Genome View.
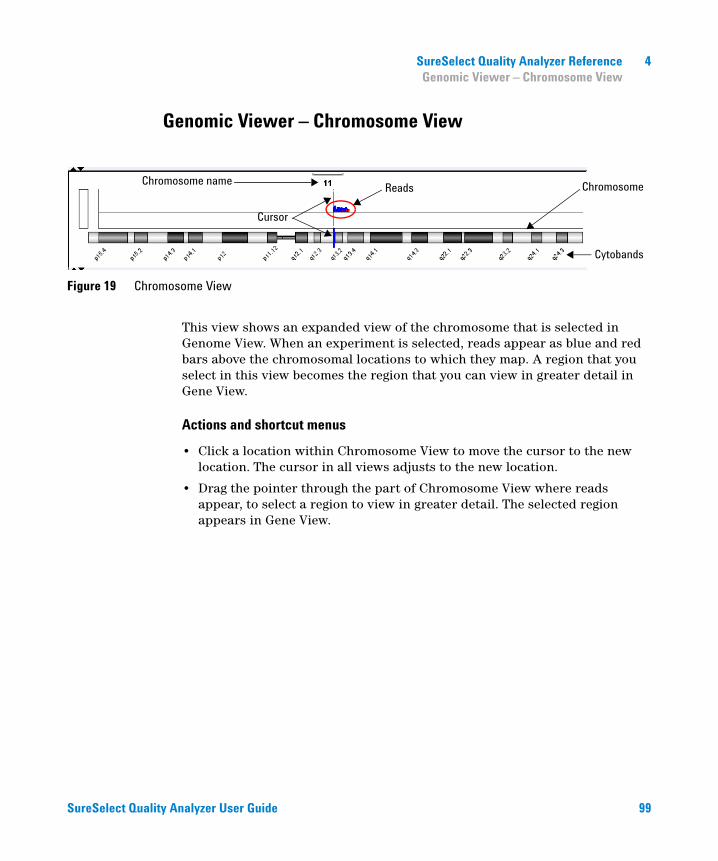
SureSelect Quality Analyzer Reference 4Genomic Viewer – Chromosome View
SureSelect Quality Analyzer User Guide 99
Genomic Viewer – Chromosome View
This view shows an expanded view of the chromosome that is selected in Genome View. When an experiment is selected, reads appear as blue and red bars above the chromosomal locations to which they map. A region that you select in this view becomes the region that you can view in greater detail in Gene View.
Actions and shortcut menus
• Click a location within Chromosome View to move the cursor to the new location. The cursor in all views adjusts to the new location.
• Drag the pointer through the part of Chromosome View where reads appear, to select a region to view in greater detail. The selected region appears in Gene View.
Figure 19 Chromosome View
Reads
Cytobands
Chromosome
Cursor
Chromosome name

4 SureSelect Quality Analyzer ReferenceGenomic Viewer – Chromosome View
100 SureSelect Quality Analyzer User Guide
• Right-click anywhere within Chromosome View to open a shortcut menu with these options:
Option Description
User Preferences Opens the User Preferences dialog box, where you can customize the appearance of genes and tracks in Gene View and enter the default data storage location. See “User Preferences – Tracks tab” on page 150 and “User Preferences – Miscellaneous tab” on page 148.
You can also enter database configuration parameters and proxy server settings, and your login credentials for the eArray Web site.
View Preferences Opens the View Preferences dialog box, where you can customize the orientation of the main program window. See “To customize the appearance of an experiment in the Genomic Viewer” on page 53 and “View Preferences” on page 153.
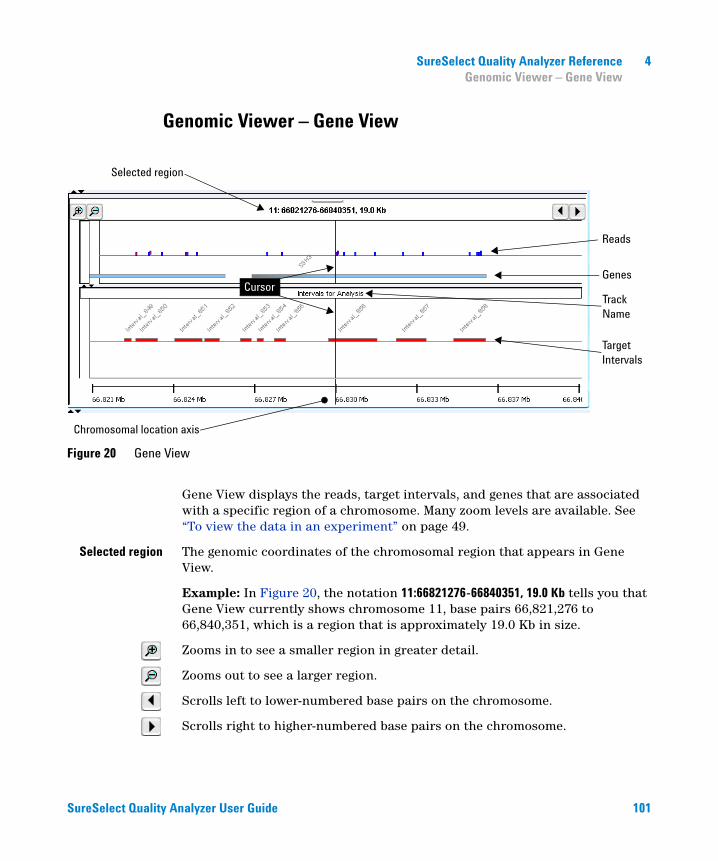
SureSelect Quality Analyzer Reference 4Genomic Viewer – Gene View
SureSelect Quality Analyzer User Guide 101
Genomic Viewer – Gene View
Gene View displays the reads, target intervals, and genes that are associated with a specific region of a chromosome. Many zoom levels are available. See “To view the data in an experiment” on page 49.
Selected region The genomic coordinates of the chromosomal region that appears in Gene View.
Example: In Figure 20, the notation 11:66821276-66840351, 19.0 Kb tells you that Gene View currently shows chromosome 11, base pairs 66,821,276 to 66,840,351, which is a region that is approximately 19.0 Kb in size.
Zooms in to see a smaller region in greater detail.
Zooms out to see a larger region.
Scrolls left to lower-numbered base pairs on the chromosome.
Scrolls right to higher-numbered base pairs on the chromosome.
Figure 20 Gene View
Reads
TargetIntervals
Genes
Chromosomal location axis
Selected region
TrackName
Cursor
4 SureSelect Quality Analyzer ReferenceGenomic Viewer – Gene View
102 SureSelect Quality Analyzer User Guide
Reads (Appear if an experiment is selected) The reads in the read file from the selected experiment appear as blue and red bars that are aligned with the genomic locations to which they map.
Genes The genes that map to the currently displayed chromosomal region. A light blue bar indicates the genomic region that is covered by each gene. By default, the name of each gene also appears.
Cursor The cursor is a thin blue line that indicates the center of the currently displayed chromosomal region. To change the location of the cursor, click one of the scroll buttons, or click anywhere within the gene display area of Gene View.
Track name (Appears if an experiment is selected) The name of the target intervals track from the currently selected experiment. To see the target intervals track, you must expand Gene View.
Target intervals (Appear if an experiment is selected) The target intervals from the selected experiment. By default, each target interval appears as a red bar that extends over the applicable genomic region. The name of each interval also appears.
Chromosomallocation axis
This axis applies to the reads, genes, and tracks that appear in Gene View. The values on the axis change as you zoom in or out, or go to different chromosomal locations.
Actions and shortcut menus
• Click anywhere within the gene display area of Gene View to move the cursor to a new location.
• Right-click anywhere within the gene display area of the Gene View to open a shortcut menu with these options:
Option Description
Create Gene List This option does not apply to SureSelect Quality Analyzer.
Show in UCSC Opens the View Coordinates in UCSC Browser dialog box, where you can create a user track based on the region that appears in Gene View. From this dialog box, the program can open the UCSC Genome Browser in your Web browser to view the region(s) that you defined. See the Data Viewing User Guide.
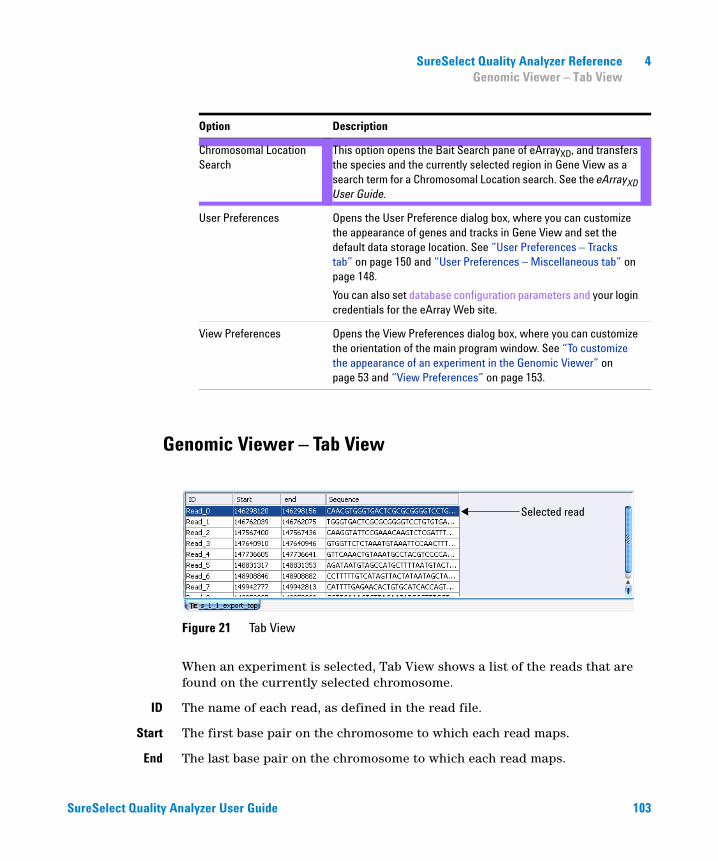
SureSelect Quality Analyzer Reference 4Genomic Viewer – Tab View
SureSelect Quality Analyzer User Guide 103
Genomic Viewer – Tab View
When an experiment is selected, Tab View shows a list of the reads that are found on the currently selected chromosome.
ID The name of each read, as defined in the read file.
Start The first base pair on the chromosome to which each read maps.
End The last base pair on the chromosome to which each read maps.
Chromosomal Location Search
This option opens the Bait Search pane of eArrayXD, and transfers the species and the currently selected region in Gene View as a search term for a Chromosomal Location search. See the eArrayXD User Guide.
User Preferences Opens the User Preference dialog box, where you can customize the appearance of genes and tracks in Gene View and set the default data storage location. See “User Preferences – Tracks tab” on page 150 and “User Preferences – Miscellaneous tab” on page 148.
You can also set database configuration parameters and your login credentials for the eArray Web site.
View Preferences Opens the View Preferences dialog box, where you can customize the orientation of the main program window. See “To customize the appearance of an experiment in the Genomic Viewer” on page 53 and “View Preferences” on page 153.
Option Description
Figure 21 Tab View
Selected read

4 SureSelect Quality Analyzer ReferenceGenomic Viewer – Tab View
104 SureSelect Quality Analyzer User Guide
Sequence The base sequence of each read.
Selected read To select a read, and move the cursor to its location, click anywhere in the row of the desired read. If you select a read, the program highlights it in blue.
Actions and shortcut menus
• Click anywhere within the row of a specific read to select it. When you select a read, the cursor location changes to the location of that read, and the other views adjust accordingly.
• Right-click anywhere in the column heading row to open a shortcut menu with a Scroll to Column option. This option opens the Scroll to Column dialog box, which lets you select a column, and scrolls Tab View so that the selected column is visible.
• In the column heading row, drag the right border of a column to increase or decrease the width of the column. This can be especially useful when you want to inspect the full base sequence of reads.
• Right-click any data item in Tab View to open a shortcut menu with these options:
Option Description
Find in Column Opens the Find in Column dialog box, where you can start a search for a text string in the column. See the Data Viewing User Guide.
Search Links Many links to databases such as LocusLink, PubMed, and the UCSC Genome Browser appear. Each link passes the data item that you right-clicked to the selected database as a search string.
Customize Link Opens the Customize Search Link dialog box, where you can create a new search link to include in the shortcut menu. See the Data Viewing User Guide.
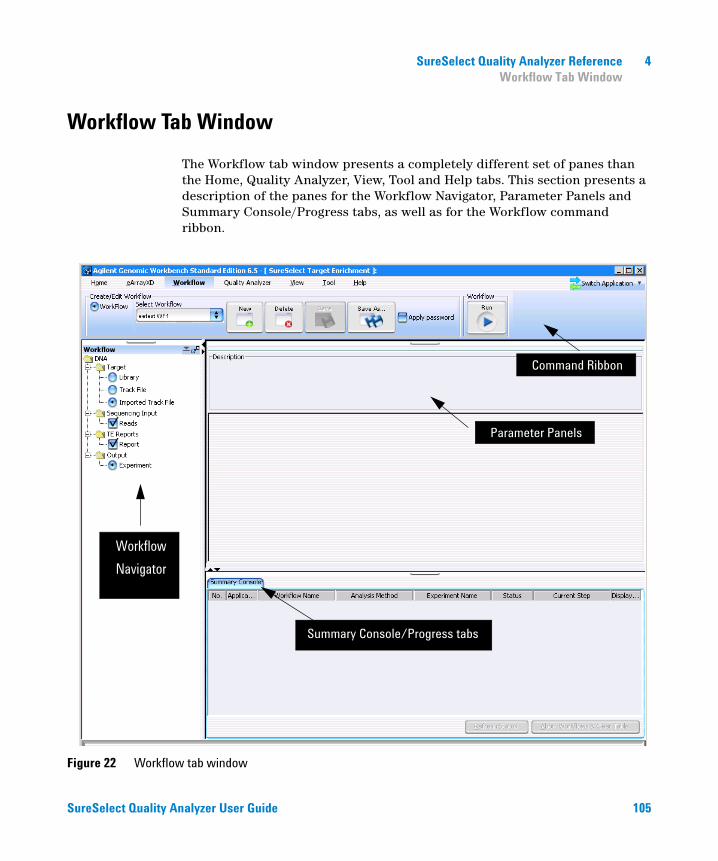
SureSelect Quality Analyzer Reference 4Workflow Tab Window
SureSelect Quality Analyzer User Guide 105
Workflow Tab Window
The Workflow tab window presents a completely different set of panes than the Home, Quality Analyzer, View, Tool and Help tabs. This section presents a description of the panes for the Workflow Navigator, Parameter Panels and Summary Console/Progress tabs, as well as for the Workflow command ribbon.
Figure 22 Workflow tab window
Summary Console/Progress tabs
Parameter Panels
Command Ribbon
Workflow
Navigator
4 SureSelect Quality Analyzer ReferenceWorkflow Tab Window
106 SureSelect Quality Analyzer User Guide
Figure 22 shows the tab panes when the Workflow tab is selected. This window contains the elements listed in Table 6 below. More detailed descriptions of each element appear later in this section.
Table 6 Workflow tab window elements
Element Purpose
Command ribbon Contains the commands for setting up, editing, deleting, saving, and running workflows. See “Command ribbon – Workflow tab” on page 107.
Tab pane – Workflow Navigator
Displays current workflow and options. As you select each option, the relevant parameters appear in the parameter panel. See “Workflow Navigator” on page 108.
Tab pane – Parameter Panels
Displays parameters for the selection in the Workflow Navigator. See “Parameter Panels – Overview” on page 110.
Tab pane – Summary Console/ Progress tabs
For Workflow, this view contains the following tabs: • Summary Console tab that displays the application type, workflow
name, experiment name, status, and current step for each workflow completed or in process. See “Summary Console tab” on page 122.
• Workflow Progress tab for each named workflow, that displays the status of the workflow progress, including any errors that might have occurred. See “Named workflow tabs” on page 124.
NOTEl
In Workflow, the program only lets you set up and run workflow procedural steps to produce reports, and not explore the data. You must switch to the Quality Analyzer tab to display data and perform further analysis.
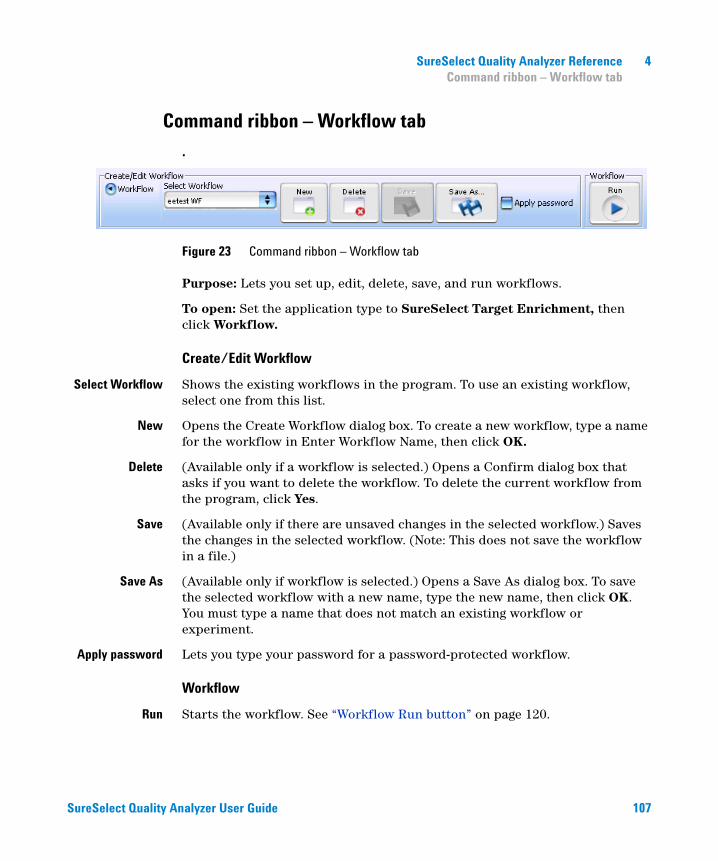
SureSelect Quality Analyzer Reference 4Command ribbon – Workflow tab
SureSelect Quality Analyzer User Guide 107
Command ribbon – Workflow tab
.
Figure 23 Command ribbon – Workflow tab
Purpose: Lets you set up, edit, delete, save, and run workflows.
To open: Set the application type to SureSelect Target Enrichment, then click Workflow.
Create/Edit Workflow
Select Workflow Shows the existing workflows in the program. To use an existing workflow, select one from this list.
New Opens the Create Workflow dialog box. To create a new workflow, type a name for the workflow in Enter Workflow Name, then click OK.
Delete (Available only if a workflow is selected.) Opens a Confirm dialog box that asks if you want to delete the workflow. To delete the current workflow from the program, click Yes.
Save (Available only if there are unsaved changes in the selected workflow.) Saves the changes in the selected workflow. (Note: This does not save the workflow in a file.)
Save As (Available only if workflow is selected.) Opens a Save As dialog box. To save the selected workflow with a new name, type the new name, then click OK. You must type a name that does not match an existing workflow or experiment.
Apply password Lets you type your password for a password-protected workflow.
Workflow
Run Starts the workflow. See “Workflow Run button” on page 120.
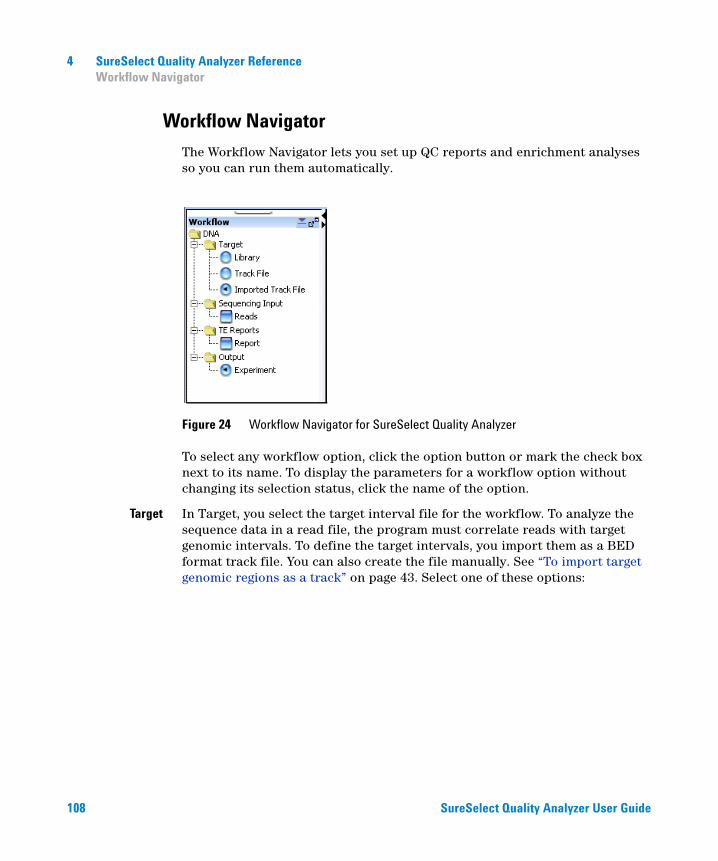
4 SureSelect Quality Analyzer ReferenceWorkflow Navigator
108 SureSelect Quality Analyzer User Guide
Workflow Navigator
The Workflow Navigator lets you set up QC reports and enrichment analyses so you can run them automatically.
Figure 24 Workflow Navigator for SureSelect Quality Analyzer
To select any workflow option, click the option button or mark the check box next to its name. To display the parameters for a workflow option without changing its selection status, click the name of the option.
Target In Target, you select the target interval file for the workflow. To analyze the sequence data in a read file, the program must correlate reads with target genomic intervals. To define the target intervals, you import them as a BED format track file. You can also create the file manually. See “To import target genomic regions as a track” on page 43. Select one of these options:
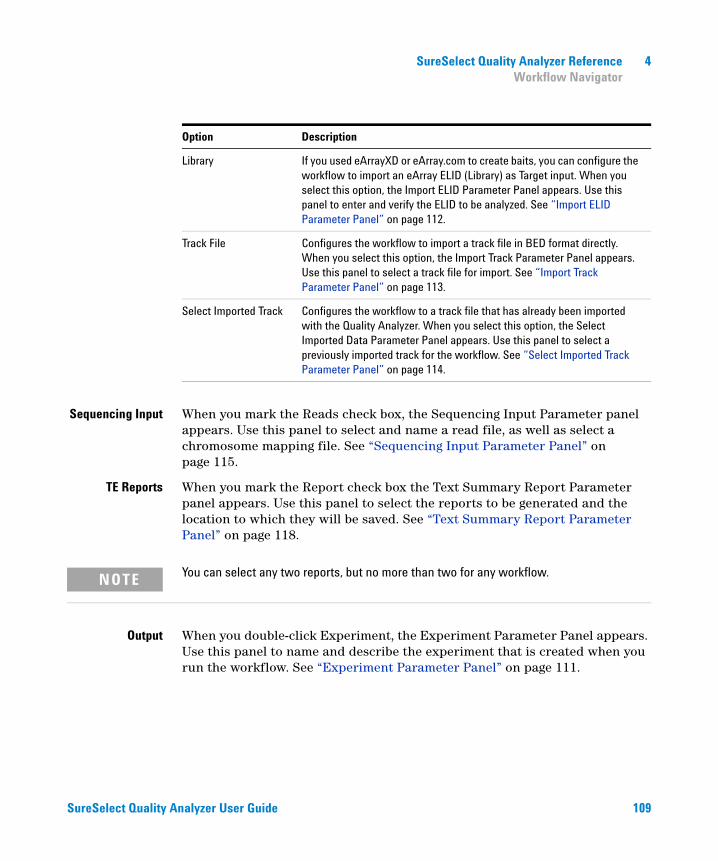
SureSelect Quality Analyzer Reference 4Workflow Navigator
SureSelect Quality Analyzer User Guide 109
Sequencing Input When you mark the Reads check box, the Sequencing Input Parameter panel appears. Use this panel to select and name a read file, as well as select a chromosome mapping file. See “Sequencing Input Parameter Panel” on page 115.
TE Reports When you mark the Report check box the Text Summary Report Parameter panel appears. Use this panel to select the reports to be generated and the location to which they will be saved. See “Text Summary Report Parameter Panel” on page 118.
Output When you double-click Experiment, the Experiment Parameter Panel appears. Use this panel to name and describe the experiment that is created when you run the workflow. See “Experiment Parameter Panel” on page 111.
Option Description
Library If you used eArrayXD or eArray.com to create baits, you can configure the workflow to import an eArray ELID (Library) as Target input. When you select this option, the Import ELID Parameter Panel appears. Use this panel to enter and verify the ELID to be analyzed. See “Import ELID Parameter Panel” on page 112.
Track File Configures the workflow to import a track file in BED format directly. When you select this option, the Import Track Parameter Panel appears. Use this panel to select a track file for import. See “Import Track Parameter Panel” on page 113.
Select Imported Track Configures the workflow to a track file that has already been imported with the Quality Analyzer. When you select this option, the Select Imported Data Parameter Panel appears. Use this panel to select a previously imported track for the workflow. See “Select Imported Track Parameter Panel” on page 114.
NOTE You can select any two reports, but no more than two for any workflow.
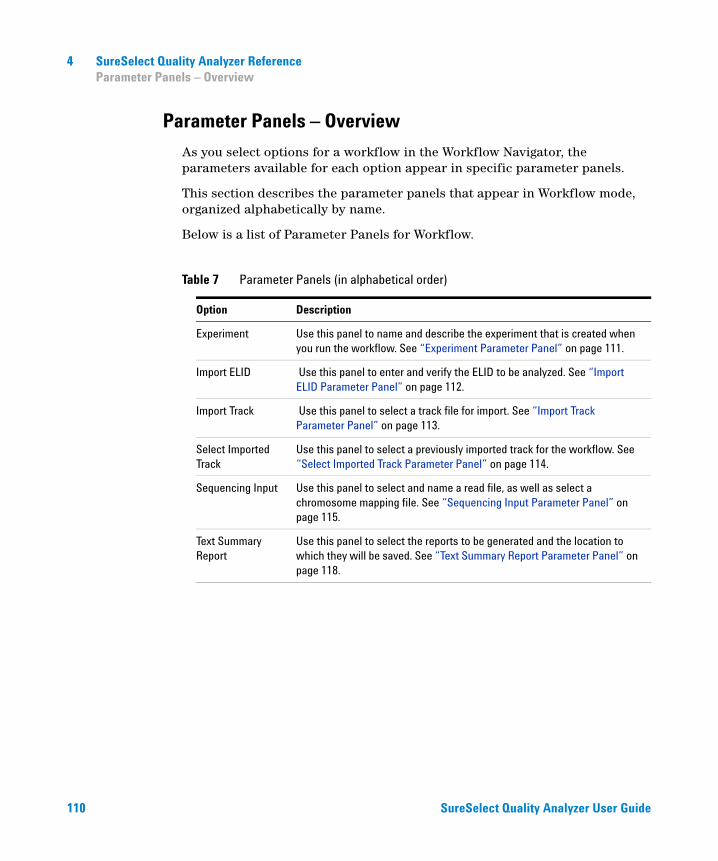
4 SureSelect Quality Analyzer ReferenceParameter Panels – Overview
110 SureSelect Quality Analyzer User Guide
Parameter Panels – Overview
As you select options for a workflow in the Workflow Navigator, the parameters available for each option appear in specific parameter panels.
This section describes the parameter panels that appear in Workflow mode, organized alphabetically by name.
Below is a list of Parameter Panels for Workflow.
Table 7 Parameter Panels (in alphabetical order)
Option Description
Experiment Use this panel to name and describe the experiment that is created when you run the workflow. See “Experiment Parameter Panel” on page 111.
Import ELID Use this panel to enter and verify the ELID to be analyzed. See “Import ELID Parameter Panel” on page 112.
Import Track Use this panel to select a track file for import. See “Import Track Parameter Panel” on page 113.
Select Imported Track
Use this panel to select a previously imported track for the workflow. See “Select Imported Track Parameter Panel” on page 114.
Sequencing Input Use this panel to select and name a read file, as well as select a chromosome mapping file. See “Sequencing Input Parameter Panel” on page 115.
Text Summary Report
Use this panel to select the reports to be generated and the location to which they will be saved. See “Text Summary Report Parameter Panel” on page 118.
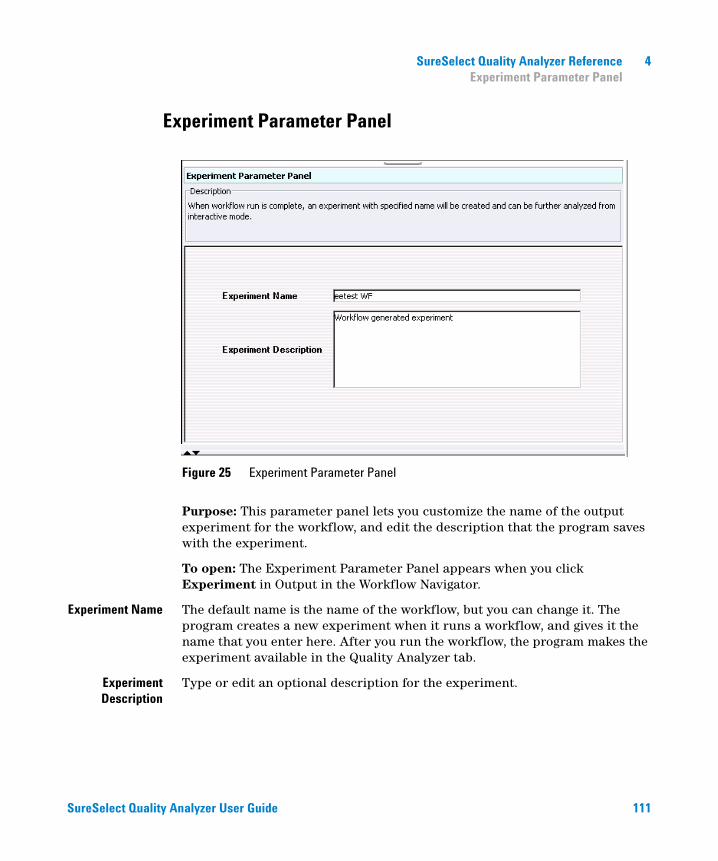
SureSelect Quality Analyzer Reference 4Experiment Parameter Panel
SureSelect Quality Analyzer User Guide 111
Experiment Parameter Panel
Purpose: This parameter panel lets you customize the name of the output experiment for the workflow, and edit the description that the program saves with the experiment.
To open: The Experiment Parameter Panel appears when you click Experiment in Output in the Workflow Navigator.
Experiment Name The default name is the name of the workflow, but you can change it. The program creates a new experiment when it runs a workflow, and gives it the name that you enter here. After you run the workflow, the program makes the experiment available in the Quality Analyzer tab.
ExperimentDescription
Type or edit an optional description for the experiment.
Figure 25 Experiment Parameter Panel
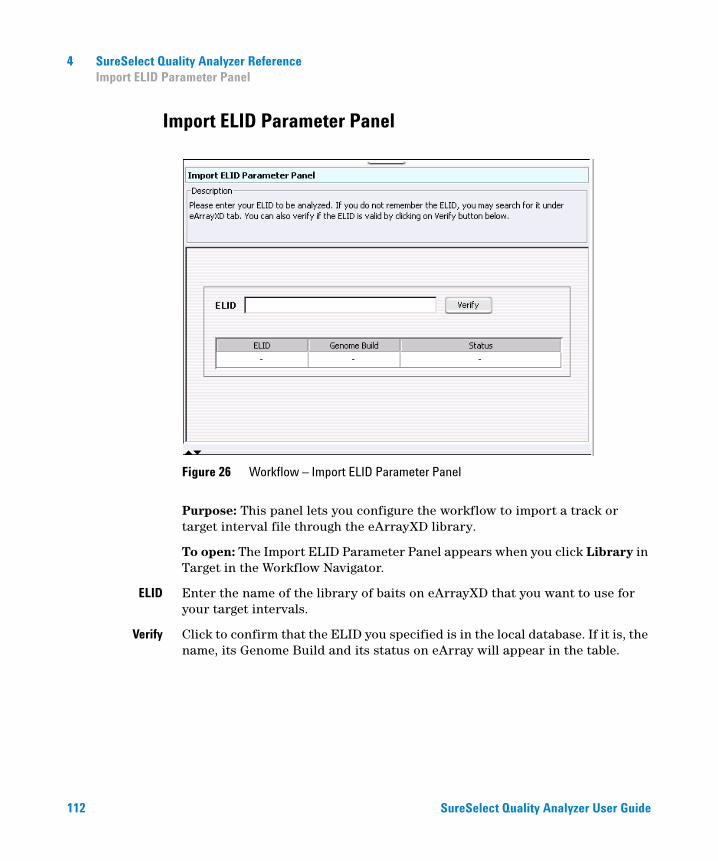
4 SureSelect Quality Analyzer ReferenceImport ELID Parameter Panel
112 SureSelect Quality Analyzer User Guide
Import ELID Parameter Panel
Purpose: This panel lets you configure the workflow to import a track or target interval file through the eArrayXD library.
To open: The Import ELID Parameter Panel appears when you click Library in Target in the Workflow Navigator.
ELID Enter the name of the library of baits on eArrayXD that you want to use for your target intervals.
Verify Click to confirm that the ELID you specified is in the local database. If it is, the name, its Genome Build and its status on eArray will appear in the table.
Figure 26 Workflow – Import ELID Parameter Panel
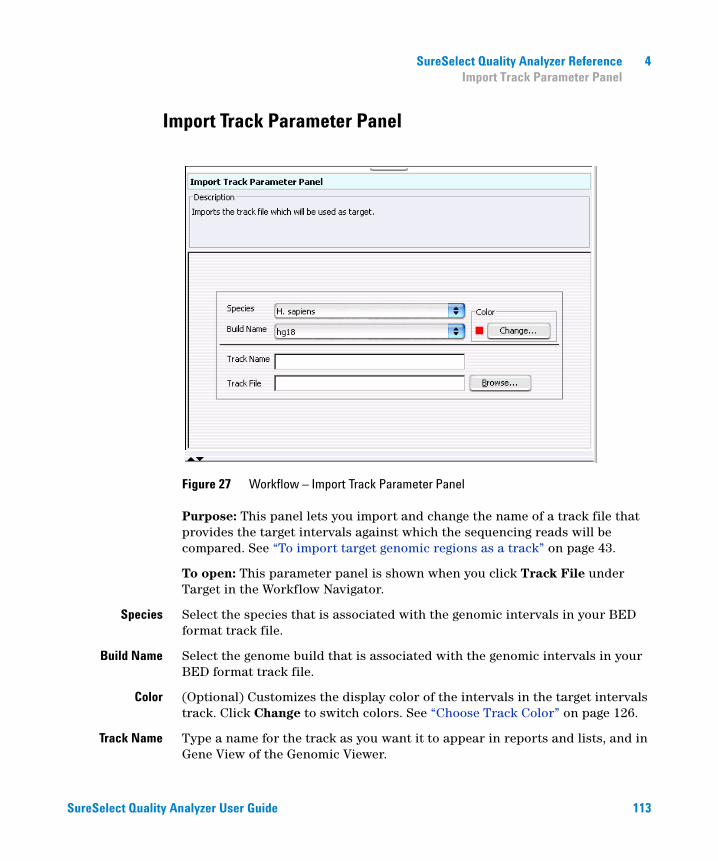
SureSelect Quality Analyzer Reference 4Import Track Parameter Panel
SureSelect Quality Analyzer User Guide 113
Import Track Parameter Panel
Figure 27 Workflow – Import Track Parameter Panel
Purpose: This panel lets you import and change the name of a track file that provides the target intervals against which the sequencing reads will be compared. See “To import target genomic regions as a track” on page 43.
To open: This parameter panel is shown when you click Track File under Target in the Workflow Navigator.
Species Select the species that is associated with the genomic intervals in your BED format track file.
Build Name Select the genome build that is associated with the genomic intervals in your BED format track file.
Color (Optional) Customizes the display color of the intervals in the target intervals track. Click Change to switch colors. See “Choose Track Color” on page 126.
Track Name Type a name for the track as you want it to appear in reports and lists, and in Gene View of the Genomic Viewer.

4 SureSelect Quality Analyzer ReferenceSelect Imported Track Parameter Panel
114 SureSelect Quality Analyzer User Guide
Track File The track file must be a BED format track file that contains the target genomic intervals. Click Browse to select the desired *.bed track file.
Select Imported Track Parameter Panel
Figure 28 Workflow – Select Imported Track Parameter Panel
Purpose: This parameter panel lets you select previously imported tracks as Target input for the workflow.
To open: The Select Imported Track Parameter Panel appears when you click Select Imported Track under Target in the Workflow Navigator.
Imported Track(s) Uses an already imported track for the target intervals. Select the track from the list.
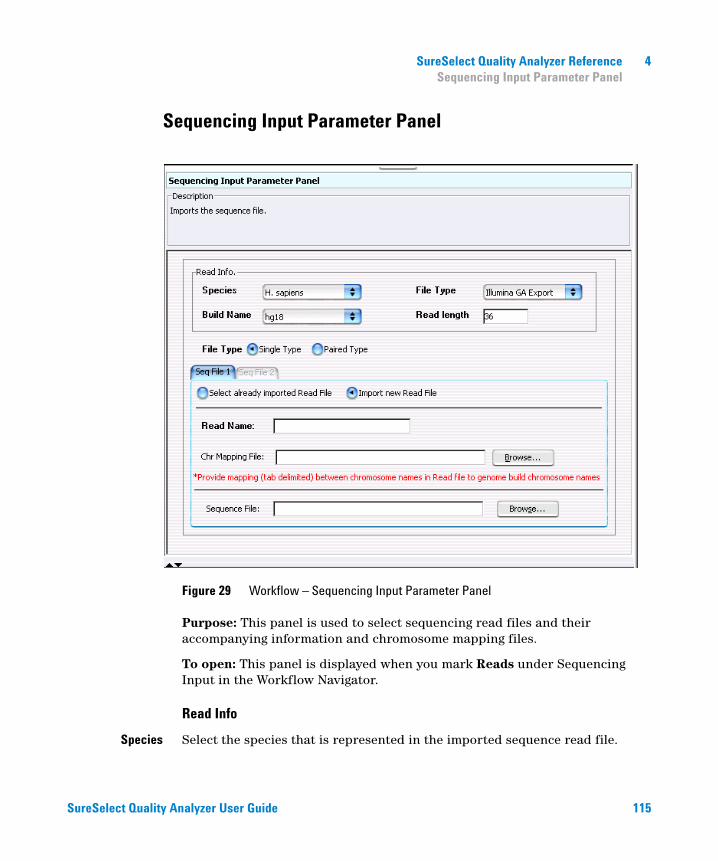
SureSelect Quality Analyzer Reference 4Sequencing Input Parameter Panel
SureSelect Quality Analyzer User Guide 115
Sequencing Input Parameter Panel
Figure 29 Workflow – Sequencing Input Parameter Panel
Purpose: This panel is used to select sequencing read files and their accompanying information and chromosome mapping files.
To open: This panel is displayed when you mark Reads under Sequencing Input in the Workflow Navigator.
Read Info
Species Select the species that is represented in the imported sequence read file.
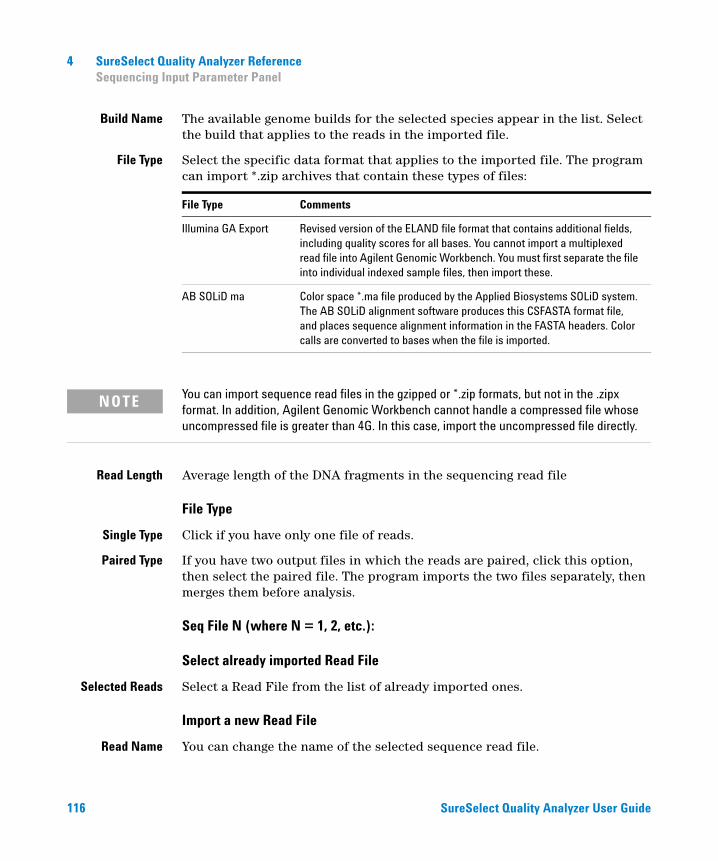
4 SureSelect Quality Analyzer ReferenceSequencing Input Parameter Panel
116 SureSelect Quality Analyzer User Guide
Build Name The available genome builds for the selected species appear in the list. Select the build that applies to the reads in the imported file.
File Type Select the specific data format that applies to the imported file. The program can import *.zip archives that contain these types of files:
Read Length Average length of the DNA fragments in the sequencing read file
File Type
Single Type Click if you have only one file of reads.
Paired Type If you have two output files in which the reads are paired, click this option, then select the paired file. The program imports the two files separately, then merges them before analysis.
Seq File N (where N = 1, 2, etc.):
Select already imported Read File
Selected Reads Select a Read File from the list of already imported ones.
Import a new Read File
Read Name You can change the name of the selected sequence read file.
File Type Comments
Illumina GA Export Revised version of the ELAND file format that contains additional fields, including quality scores for all bases. You cannot import a multiplexed read file into Agilent Genomic Workbench. You must first separate the file into individual indexed sample files, then import these.
AB SOLiD ma Color space *.ma file produced by the Applied Biosystems SOLiD system. The AB SOLiD alignment software produces this CSFASTA format file, and places sequence alignment information in the FASTA headers. Color calls are converted to bases when the file is imported.
NOTE You can import sequence read files in the gzipped or *.zip formats, but not in the .zipx format. In addition, Agilent Genomic Workbench cannot handle a compressed file whose uncompressed file is greater than 4G. In this case, import the uncompressed file directly.
SureSelect Quality Analyzer Reference 4Sequencing Input Parameter Panel
SureSelect Quality Analyzer User Guide 117
Chr Mapping File The name and location of the applicable chromosome mapping file. Because the names of chromosomes in the imported read file can differ from the names of chromosomes in the selected genome build, you must import a chromosome mapping file that relates the chromosome names in these two locations.
Browse – Opens an Open dialog box, where you can select the desired chromosome mapping file.
File format information: Create a tab-delimited text file (*.txt) that contains the desired mapping information. Enter one chromosome per line. Give the name of the chromosome in the read file followed by the name of the matching chromosome in the genome build, separated by a tab character. Do not include a header row.
Example file content:chrA.fa chrA
chrB.fa chrB
chrC.fa chrC
Sequence File Browse – Opens an Open dialog box, where you can select the desired sequence read file.
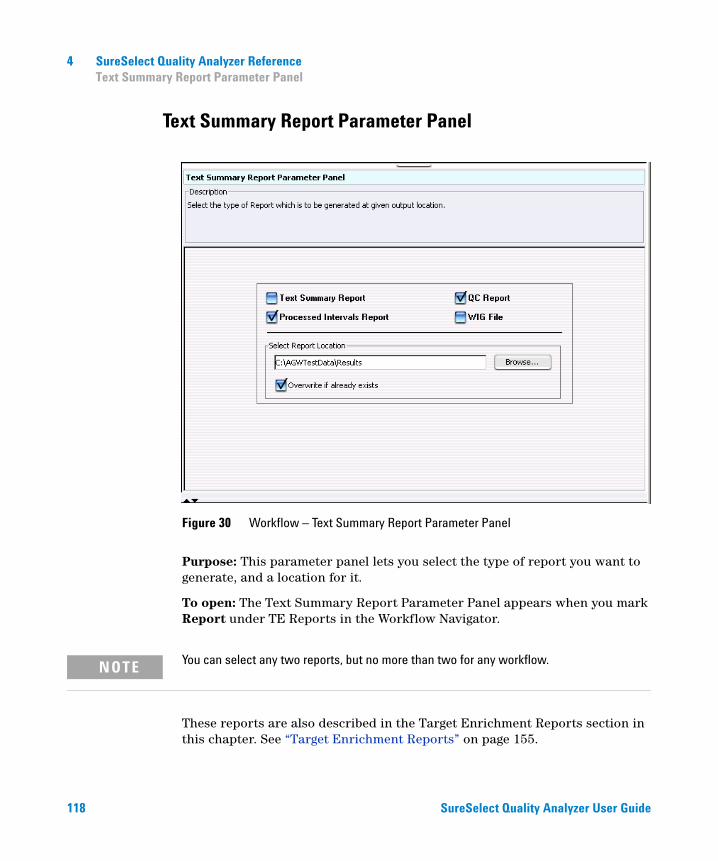
4 SureSelect Quality Analyzer ReferenceText Summary Report Parameter Panel
118 SureSelect Quality Analyzer User Guide
Text Summary Report Parameter Panel
Purpose: This parameter panel lets you select the type of report you want to generate, and a location for it.
To open: The Text Summary Report Parameter Panel appears when you mark Report under TE Reports in the Workflow Navigator.
These reports are also described in the Target Enrichment Reports section in this chapter. See “Target Enrichment Reports” on page 155.
Figure 30 Workflow – Text Summary Report Parameter Panel
NOTE You can select any two reports, but no more than two for any workflow.
SureSelect Quality Analyzer Reference 4Text Summary Report Parameter Panel
SureSelect Quality Analyzer User Guide 119
Text SummaryReport
For this report, the program creates a *.txt file that contains a table of QC metrics and the results of read depth analysis. You can open this file with a text editor or word processor.
QC Report For this report, the program creates a PDF format report that contains tables of QC metrics. It also contains the results of read depth analysis shown both as tables and as a graph.
ProcessedIntervals Report
For this report, the program creates a *.xls file that contains enrichment analysis results for all the chromosomes. You can view this file in Microsoft Excel.
WIG File The program creates a track file that contains enrichment analysis results for all the chromosomes. You must select one chromosome and then upload the file to the UCSC Genome Browser to see results.
Select ReportLocation
Click Browse to select a folder to contain the workflow-generated reports.
Overwrite ifalready existing
Clear if you intend to have new report files overwrite existing ones. (Marked check box is the default.)
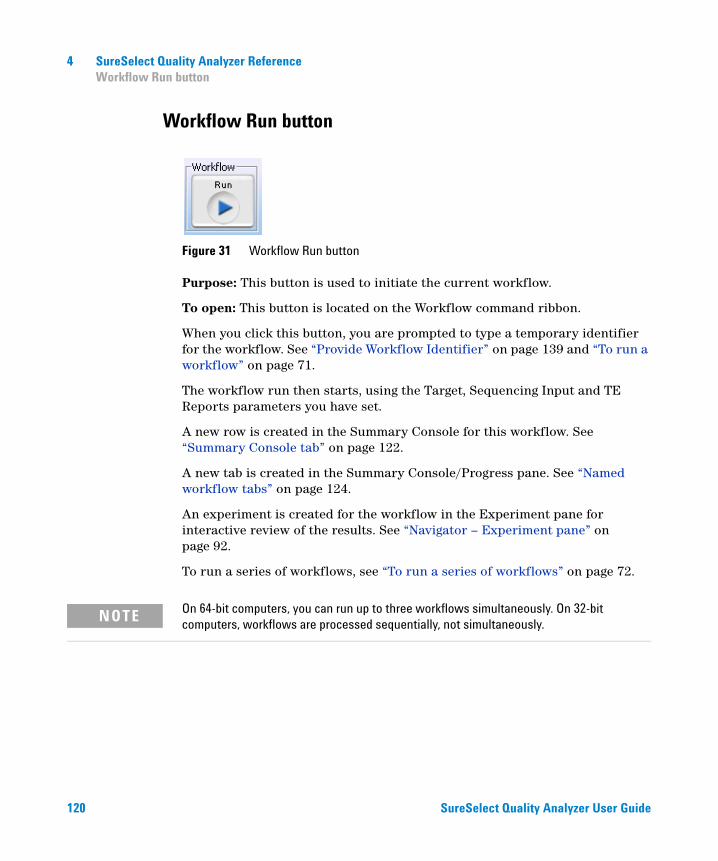
4 SureSelect Quality Analyzer ReferenceWorkflow Run button
120 SureSelect Quality Analyzer User Guide
Workflow Run button
Figure 31 Workflow Run button
Purpose: This button is used to initiate the current workflow.
To open: This button is located on the Workflow command ribbon.
When you click this button, you are prompted to type a temporary identifier for the workflow. See “Provide Workflow Identifier” on page 139 and “To run a workflow” on page 71.
The workflow run then starts, using the Target, Sequencing Input and TE Reports parameters you have set.
A new row is created in the Summary Console for this workflow. See “Summary Console tab” on page 122.
A new tab is created in the Summary Console/Progress pane. See “Named workflow tabs” on page 124.
An experiment is created for the workflow in the Experiment pane for interactive review of the results. See “Navigator – Experiment pane” on page 92.
To run a series of workflows, see “To run a series of workflows” on page 72.
NOTE On 64-bit computers, you can run up to three workflows simultaneously. On 32-bit computers, workflows are processed sequentially, not simultaneously.

SureSelect Quality Analyzer Reference 4Summary Console/Progress tabs – Overview
SureSelect Quality Analyzer User Guide 121
Summary Console/Progress tabs – Overview
In Workflow mode, workflow progress tabs provide information on the status of each workflow you run. The Summary Console tab displays the workflows you run, and the status of each. Named workflow tabs show information about each single workflow run and a running log of progress through the workflow.
Figure 32 Summary Console before run
For information on the Summary Console and Named workflow tabs during a run or runs, see “Summary Console tab” on page 122 and “Named workflow tabs” on page 124.
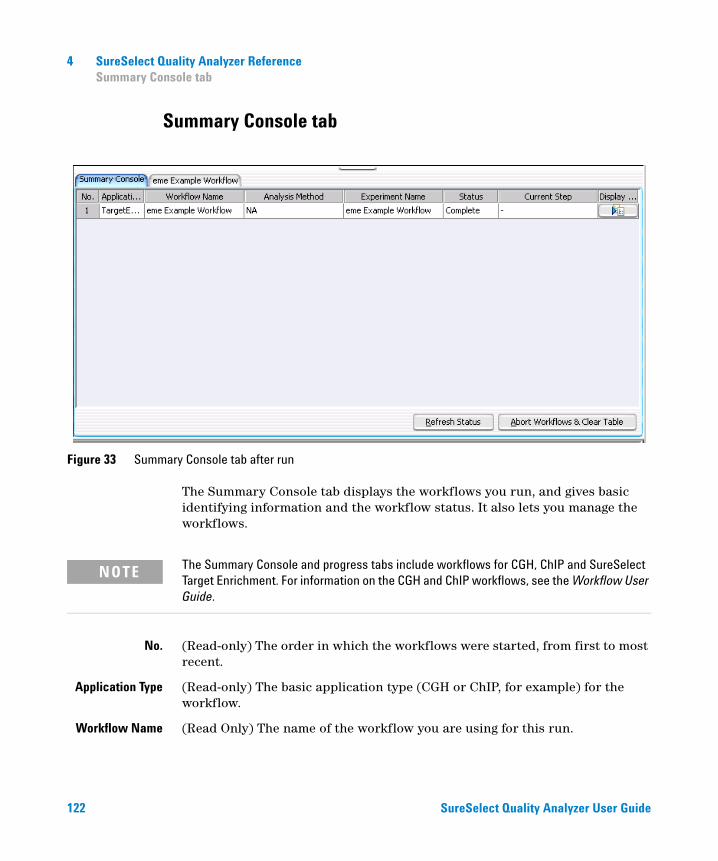
4 SureSelect Quality Analyzer ReferenceSummary Console tab
122 SureSelect Quality Analyzer User Guide
Summary Console tab
Figure 33 Summary Console tab after run
The Summary Console tab displays the workflows you run, and gives basic identifying information and the workflow status. It also lets you manage the workflows.
No. (Read-only) The order in which the workflows were started, from first to most recent.
Application Type (Read-only) The basic application type (CGH or ChIP, for example) for the workflow.
Workflow Name (Read Only) The name of the workflow you are using for this run.
NOTE The Summary Console and progress tabs include workflows for CGH, ChIP and SureSelect Target Enrichment. For information on the CGH and ChIP workflows, see the Workflow User Guide.
SureSelect Quality Analyzer Reference 4Summary Console tab
SureSelect Quality Analyzer User Guide 123
Analysis Method (Not applicable to Sure Select Quality Analyzer workflows. Only applicable to CGH or ChIP workflows.) If you are working in the SureSelect Quality Analyzer Workflow tab window and if you have started a CGH or ChIP workflow, you will see the information for the CGH or ChIP workflow in this console.
Experiment Name (Read-only) The name of the output experiment that the workflow generates. You look at the experiment, including its results, in the interactive tabs.
Status (Read-only) Indicates whether the workflow is Running or Complete.
Current Step (Read-only) For a workflow that is running, shows the progress through the steps of the workflow.
Display Tab In this column, in the row of the desired workflow, click to open the tab for the selected workflow. This lets you review information about the workflow.
Refresh Status Updates the status of all workflows. The program also updates the status of the workflows in the workflow list in real time.
Abort Workflows& Clear Table
Opens a Confirm dialog box that asks if you are sure you want to abort all workflows. If you click Yes, the program stops the execution of all workflows, and removes all workflows from the list. It also removes all named workflow tabs.
(Available if tabs are hidden past the left edge of the pane) Shifts the display of tabs to the left to reveal hidden tabs.
(Available if tabs are hidden past the right edge of the pane) Shifts the display of tabs to the right to reveal hidden tabs.
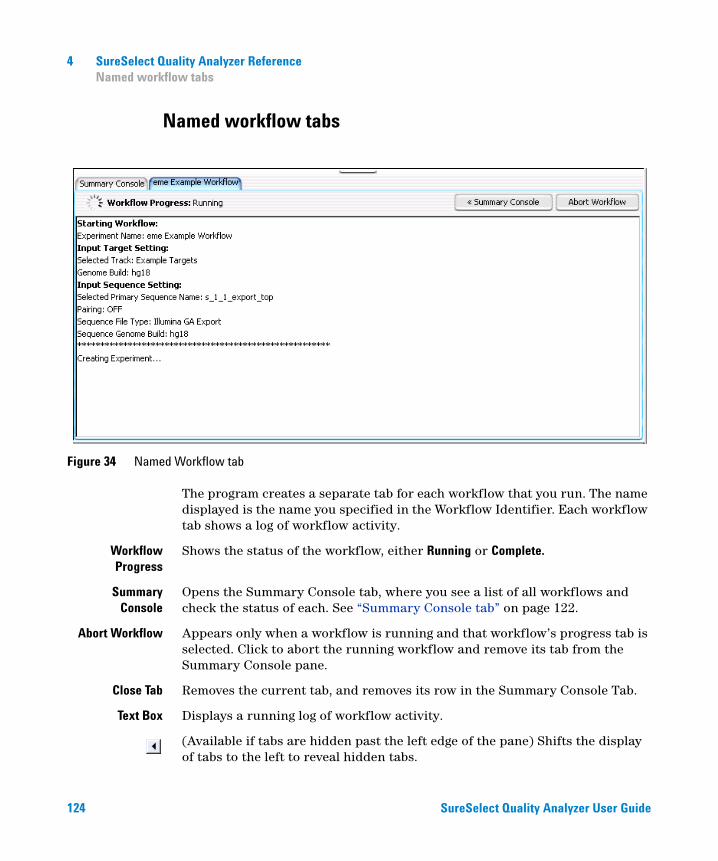
4 SureSelect Quality Analyzer ReferenceNamed workflow tabs
124 SureSelect Quality Analyzer User Guide
Named workflow tabs
Figure 34 Named Workflow tab
The program creates a separate tab for each workflow that you run. The name displayed is the name you specified in the Workflow Identifier. Each workflow tab shows a log of workflow activity.
WorkflowProgress
Shows the status of the workflow, either Running or Complete.
SummaryConsole
Opens the Summary Console tab, where you see a list of all workflows and check the status of each. See “Summary Console tab” on page 122.
Abort Workflow Appears only when a workflow is running and that workflow’s progress tab is selected. Click to abort the running workflow and remove its tab from the Summary Console pane.
Close Tab Removes the current tab, and removes its row in the Summary Console Tab.
Text Box Displays a running log of workflow activity.
(Available if tabs are hidden past the left edge of the pane) Shifts the display of tabs to the left to reveal hidden tabs.
SureSelect Quality Analyzer Reference 4Named workflow tabs
SureSelect Quality Analyzer User Guide 125
(Available if tabs are hidden past the right edge of the pane.) Shifts the display of tabs to the right to reveal hidden tabs.
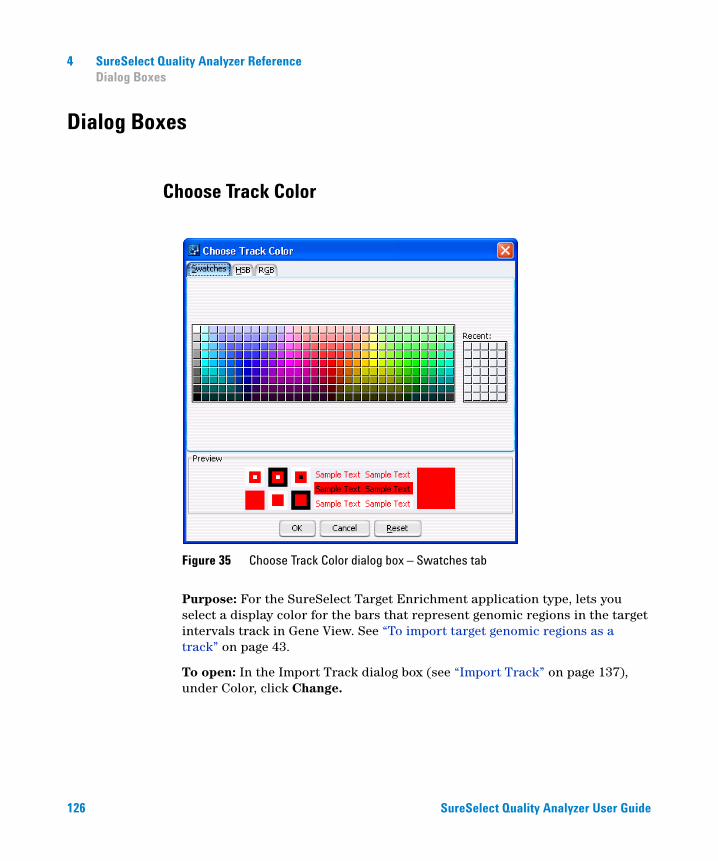
4 SureSelect Quality Analyzer ReferenceDialog Boxes
126 SureSelect Quality Analyzer User Guide
Dialog Boxes
Choose Track Color
Purpose: For the SureSelect Target Enrichment application type, lets you select a display color for the bars that represent genomic regions in the target intervals track in Gene View. See “To import target genomic regions as a track” on page 43.
To open: In the Import Track dialog box (see “Import Track” on page 137), under Color, click Change.
Figure 35 Choose Track Color dialog box – Swatches tab
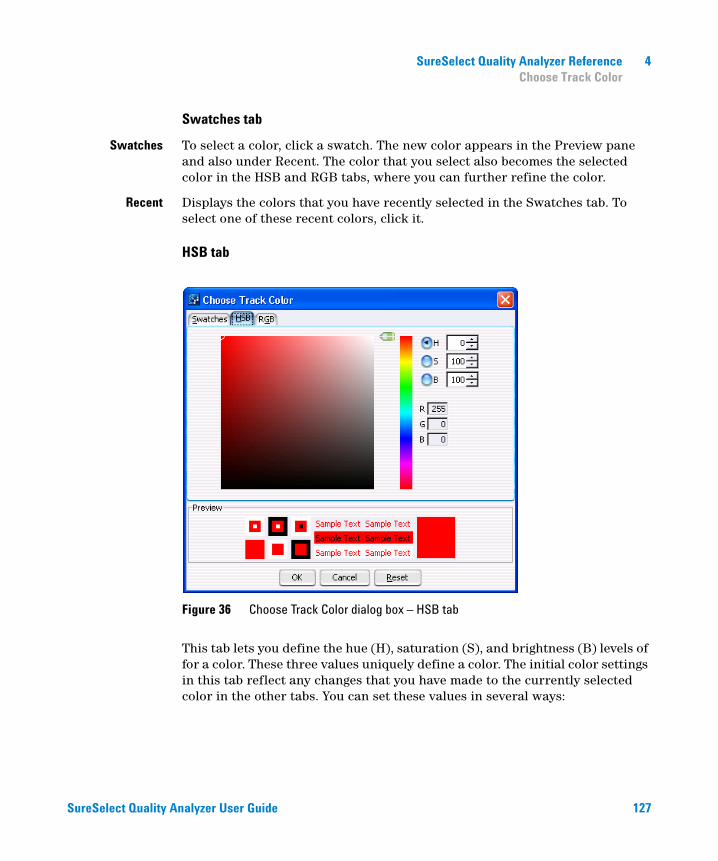
SureSelect Quality Analyzer Reference 4Choose Track Color
SureSelect Quality Analyzer User Guide 127
Swatches tab
Swatches To select a color, click a swatch. The new color appears in the Preview pane and also under Recent. The color that you select also becomes the selected color in the HSB and RGB tabs, where you can further refine the color.
Recent Displays the colors that you have recently selected in the Swatches tab. To select one of these recent colors, click it.
HSB tab
This tab lets you define the hue (H), saturation (S), and brightness (B) levels of for a color. These three values uniquely define a color. The initial color settings in this tab reflect any changes that you have made to the currently selected color in the other tabs. You can set these values in several ways:
Figure 36 Choose Track Color dialog box – HSB tab
4 SureSelect Quality Analyzer ReferenceChoose Track Color
128 SureSelect Quality Analyzer User Guide
• Directly edit the numbers in H, S, and B. You can also click the up or down button to the right of each value to increase or decrease it. In addition, to use the up and down arrow keys on your keyboard to change values, click the number that you want to change, then press the up or down arrow key, as desired.
• Use the green slider to change values. Select H, S, or B, as desired, then drag the slider up or down to change the selected value.
• Use the green slider and the large, square color selection box. Select H, S, or B, then drag the slider up or down to set the desired value. The color selection box shows all of the available colors given the particular setting of the slider. To select a color, click anywhere within the color selection box. This sets the remaining two HSB values.
H Hue – A number from 0 to 359 that represents the basic color. The color spectrum is a 360 degree color circle.
S Saturation – A number from 0 to 100 that represents the intensity of the color. A setting of 100 gives maximum color intensity. A setting of 0 gives no color, and reduces the available color spectrum to grayscale, only.
B Brightness – A number from 0 to 100 that represents the amount of black that is mixed in with the color. A setting of 100 gives maximum brightness, with no black added, and a setting of 0 results in the color black, without regard to the other settings.
R, G, B Each of these values shows the color settings of the selected color using the RGB (Red, Green, Blue) color model. You cannot directly edit the values from HSB tab, but they change when you select a different color. You can set specific RGB values in the RGB tab.
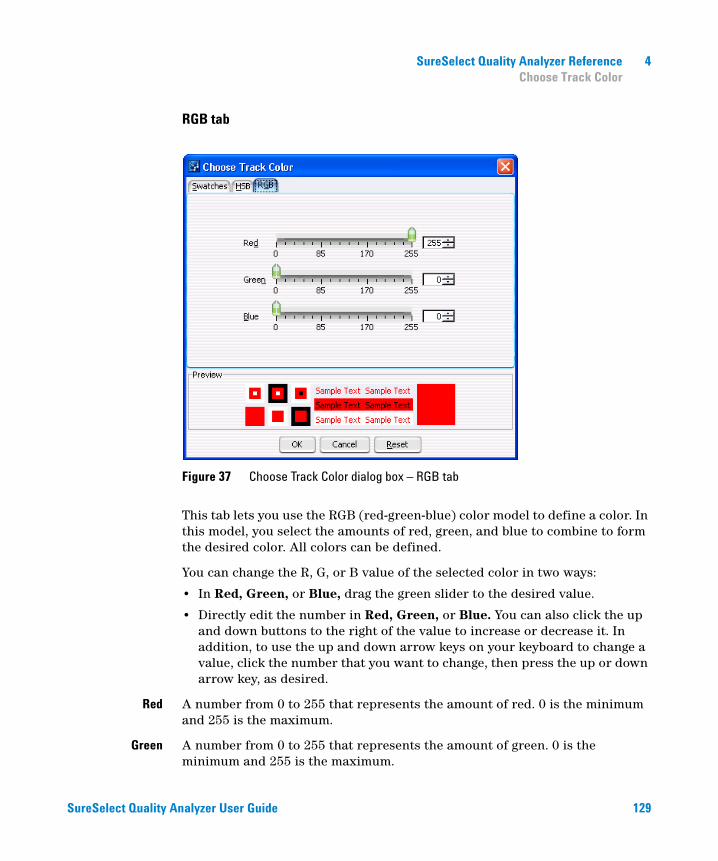
SureSelect Quality Analyzer Reference 4Choose Track Color
SureSelect Quality Analyzer User Guide 129
RGB tab
This tab lets you use the RGB (red-green-blue) color model to define a color. In this model, you select the amounts of red, green, and blue to combine to form the desired color. All colors can be defined.
You can change the R, G, or B value of the selected color in two ways:
• In Red, Green, or Blue, drag the green slider to the desired value.
• Directly edit the number in Red, Green, or Blue. You can also click the up and down buttons to the right of the value to increase or decrease it. In addition, to use the up and down arrow keys on your keyboard to change a value, click the number that you want to change, then press the up or down arrow key, as desired.
Red A number from 0 to 255 that represents the amount of red. 0 is the minimum and 255 is the maximum.
Green A number from 0 to 255 that represents the amount of green. 0 is the minimum and 255 is the maximum.
Figure 37 Choose Track Color dialog box – RGB tab

4 SureSelect Quality Analyzer ReferenceCreate Experiment
130 SureSelect Quality Analyzer User Guide
Blue A number from 0 to 255 that represents the amount of blue. 0 is the minimum and 255 is the maximum.
Items that appear in all tabs
Preview Shows the selected color in a number of contexts. The right-most diagram in this pane can show two colors:
• Top color – The color that is currently selected for the track.
• Bottom color – The color that is currently selected to replace it.
OK Accepts any changes that you made to the color, and closes the dialog box.
Cancel Closes the dialog box, and discards any changes that you made to the color.
Reset Restores the color settings in the dialog box to what they were before you made any changes. The dialog box remains open.
Create Experiment
Figure 38 Create Experiment dialog box
SureSelect Quality Analyzer Reference 4Create Experiment
SureSelect Quality Analyzer User Guide 131
Purpose: Lets you set up a QC analysis experiment. You use this dialog box to name the experiment, and to select a sequence read file and a set of target intervals for the analysis. See “To create a new experiment” on page 46.
To open: In the Home tab, click Create Experiment. Alternatively, in the Experiment pane of the Navigator, right-click the Experiments folder, then click New Experiment.
Name Type a name for the experiment. This name identifies the experiment in the Experiment pane of the Navigator.
Description (Optional) Type a brief description of the experiment.
Read Length Type the number of bases in each read in the selected read file. The program assumes all reads in the file have the same length.
Targets Shows a list of all of the annotation tracks that are available in the program. Select the track that contains the desired target intervals for analysis.
SEQ Sample Shows a list of the names of all imported sequence read files that are available for analysis. Select the desired sequence read file.
Paired If you have two output files in which the reads are paired, mark this option, then select the paired file. The program imports the two files separately, then merges them before analysis.
OK Creates a new experiment with the given name that contains links to the selected sequence read file and target interval track. Creates a new folder in the Experiment pane of the Navigator that bears the name of the experiment.
Cancel Closes the dialog box, but does not create a new experiment.
NOTE Before you create an experiment, you must import the desired sequence read file, target file, and chromosome mapping file into the program. See “Importing Files” on page 40.
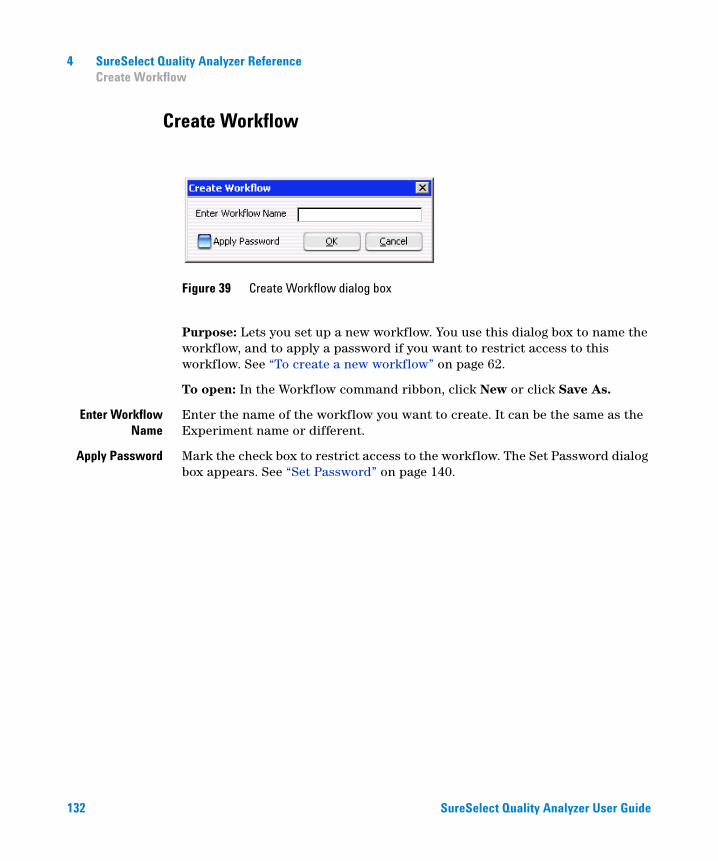
4 SureSelect Quality Analyzer ReferenceCreate Workflow
132 SureSelect Quality Analyzer User Guide
Create Workflow
Purpose: Lets you set up a new workflow. You use this dialog box to name the workflow, and to apply a password if you want to restrict access to this workflow. See “To create a new workflow” on page 62.
To open: In the Workflow command ribbon, click New or click Save As.
Enter WorkflowName
Enter the name of the workflow you want to create. It can be the same as the Experiment name or different.
Apply Password Mark the check box to restrict access to the workflow. The Set Password dialog box appears. See “Set Password” on page 140.
Figure 39 Create Workflow dialog box
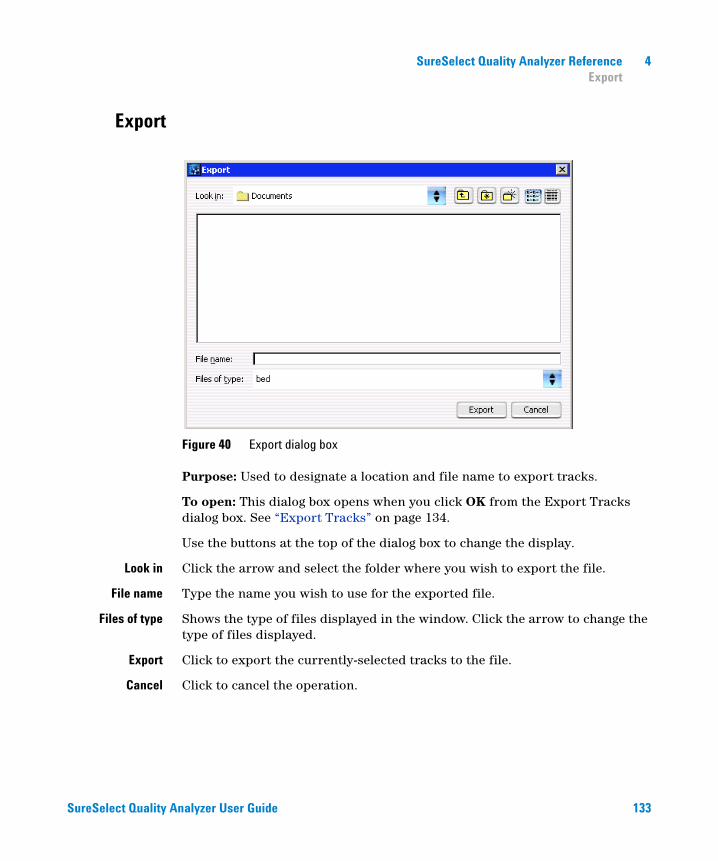
SureSelect Quality Analyzer Reference 4Export
SureSelect Quality Analyzer User Guide 133
Export
Figure 40 Export dialog box
Purpose: Used to designate a location and file name to export tracks.
To open: This dialog box opens when you click OK from the Export Tracks dialog box. See “Export Tracks” on page 134.
Use the buttons at the top of the dialog box to change the display.
Look in Click the arrow and select the folder where you wish to export the file.
File name Type the name you wish to use for the exported file.
Files of type Shows the type of files displayed in the window. Click the arrow to change the type of files displayed.
Export Click to export the currently-selected tracks to the file.
Cancel Click to cancel the operation.
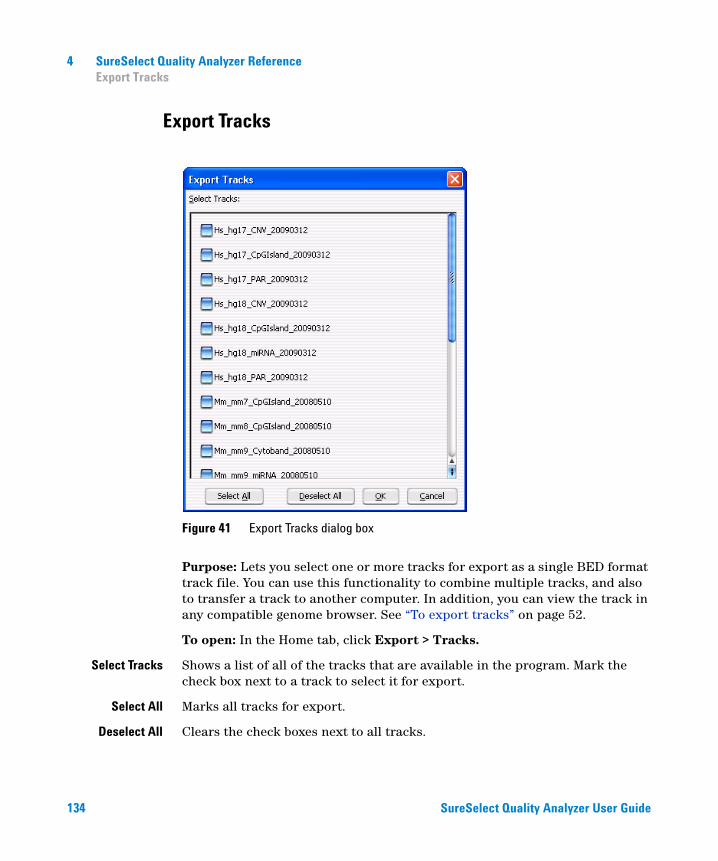
4 SureSelect Quality Analyzer ReferenceExport Tracks
134 SureSelect Quality Analyzer User Guide
Export Tracks
Purpose: Lets you select one or more tracks for export as a single BED format track file. You can use this functionality to combine multiple tracks, and also to transfer a track to another computer. In addition, you can view the track in any compatible genome browser. See “To export tracks” on page 52.
To open: In the Home tab, click Export > Tracks.
Select Tracks Shows a list of all of the tracks that are available in the program. Mark the check box next to a track to select it for export.
Select All Marks all tracks for export.
Deselect All Clears the check boxes next to all tracks.
Figure 41 Export Tracks dialog box
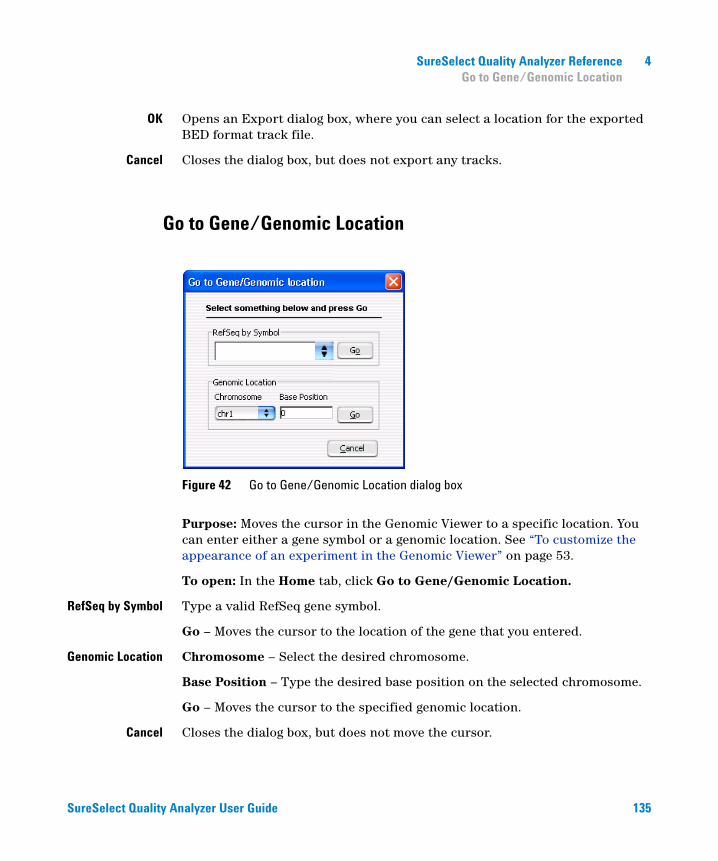
SureSelect Quality Analyzer Reference 4Go to Gene/Genomic Location
SureSelect Quality Analyzer User Guide 135
OK Opens an Export dialog box, where you can select a location for the exported BED format track file.
Cancel Closes the dialog box, but does not export any tracks.
Go to Gene/Genomic Location
Purpose: Moves the cursor in the Genomic Viewer to a specific location. You can enter either a gene symbol or a genomic location. See “To customize the appearance of an experiment in the Genomic Viewer” on page 53.
To open: In the Home tab, click Go to Gene/Genomic Location.
RefSeq by Symbol Type a valid RefSeq gene symbol.
Go – Moves the cursor to the location of the gene that you entered.
Genomic Location Chromosome – Select the desired chromosome.
Base Position – Type the desired base position on the selected chromosome.
Go – Moves the cursor to the specified genomic location.
Cancel Closes the dialog box, but does not move the cursor.
Figure 42 Go to Gene/Genomic Location dialog box
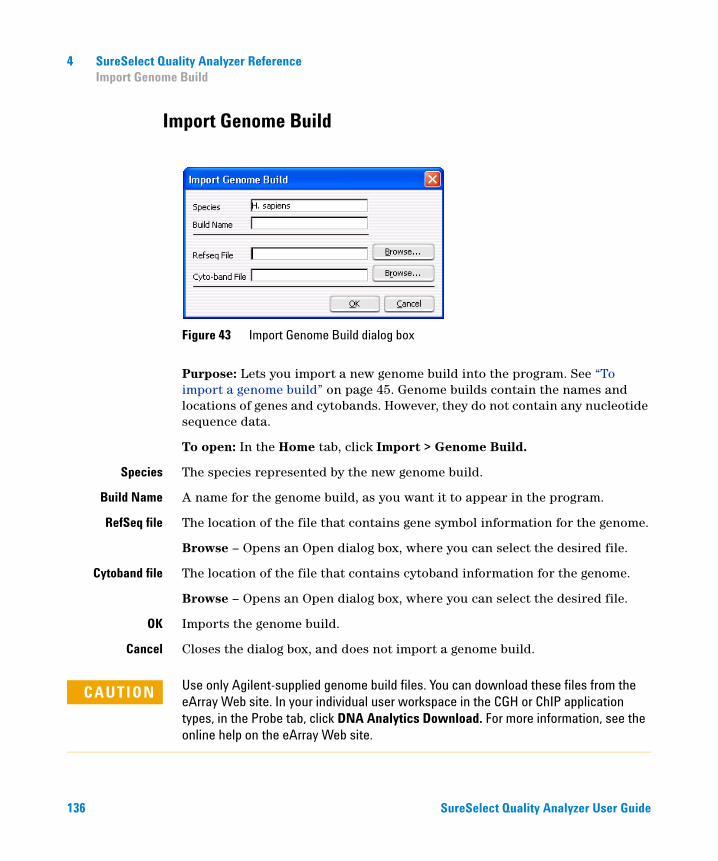
4 SureSelect Quality Analyzer ReferenceImport Genome Build
136 SureSelect Quality Analyzer User Guide
Import Genome Build
Purpose: Lets you import a new genome build into the program. See “To import a genome build” on page 45. Genome builds contain the names and locations of genes and cytobands. However, they do not contain any nucleotide sequence data.
To open: In the Home tab, click Import > Genome Build.
Species The species represented by the new genome build.
Build Name A name for the genome build, as you want it to appear in the program.
RefSeq file The location of the file that contains gene symbol information for the genome.
Browse – Opens an Open dialog box, where you can select the desired file.
Cytoband file The location of the file that contains cytoband information for the genome.
Browse – Opens an Open dialog box, where you can select the desired file.
OK Imports the genome build.
Cancel Closes the dialog box, and does not import a genome build.
Figure 43 Import Genome Build dialog box
CAUTION Use only Agilent-supplied genome build files. You can download these files from the eArray Web site. In your individual user workspace in the CGH or ChIP application types, in the Probe tab, click DNA Analytics Download. For more information, see the online help on the eArray Web site.

SureSelect Quality Analyzer Reference 4Import Track
SureSelect Quality Analyzer User Guide 137
Import Track
Purpose: Lets you import a BED format track file into the program. For SureSelect Quality Analyzer, this is how you import target genomic intervals for analysis experiments. See “To import target genomic regions as a track” on page 43.
To open: In the Quality Analyzer tab, click Import > Track.
Species Shows a list of the species for which genome builds are available in the program. Select the desired species.
Build Name Shows a list of the genome build(s) that are available for the selected species. Select the desired genome build. If the desired genome build does not appear in the list, you must import it. See “To import a genome build” on page 45.
Color The color swatch shows the currently selected display color for the bars that represent the target intervals in Gene View.
Change – Opens the Choose Track Color dialog box, where you can select a new color for the track. See “Choose Track Color” on page 126.
Track Name The program uses this name to identify the track in Gene View, and also in lists. Type a name for the new track.
Track File The location of the BED format track file to be imported.
Browse – Opens a dialog box, where you can import the file.
OK Imports the track and closes the dialog box.
Cancel Closes the dialog box, and does not import a track.
Figure 44 Import Track dialog box
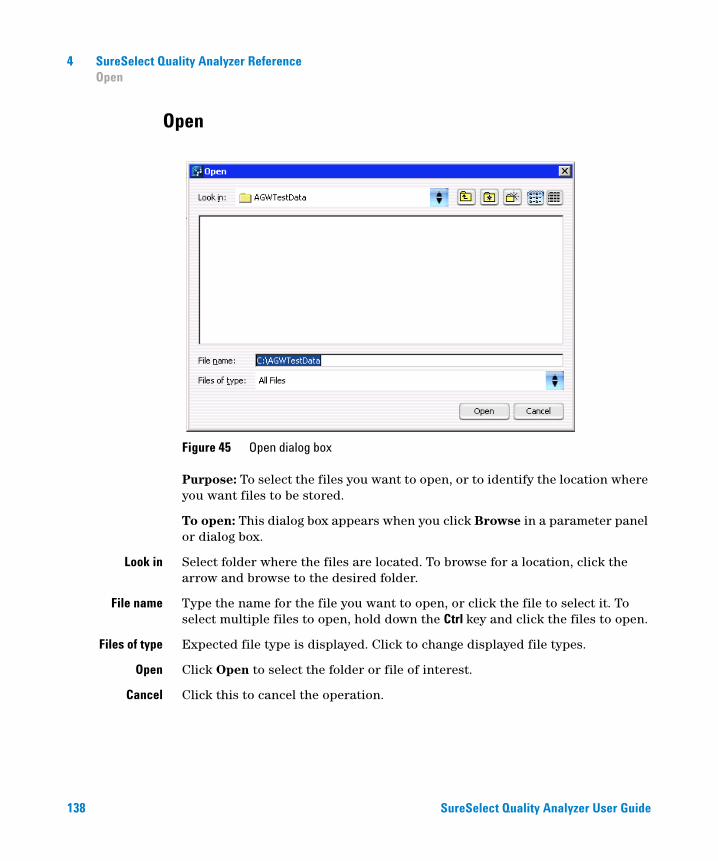
4 SureSelect Quality Analyzer ReferenceOpen
138 SureSelect Quality Analyzer User Guide
Open
Figure 45 Open dialog box
Purpose: To select the files you want to open, or to identify the location where you want files to be stored.
To open: This dialog box appears when you click Browse in a parameter panel or dialog box.
Look in Select folder where the files are located. To browse for a location, click the arrow and browse to the desired folder.
File name Type the name for the file you want to open, or click the file to select it. To select multiple files to open, hold down the Ctrl key and click the files to open.
Files of type Expected file type is displayed. Click to change displayed file types.
Open Click Open to select the folder or file of interest.
Cancel Click this to cancel the operation.
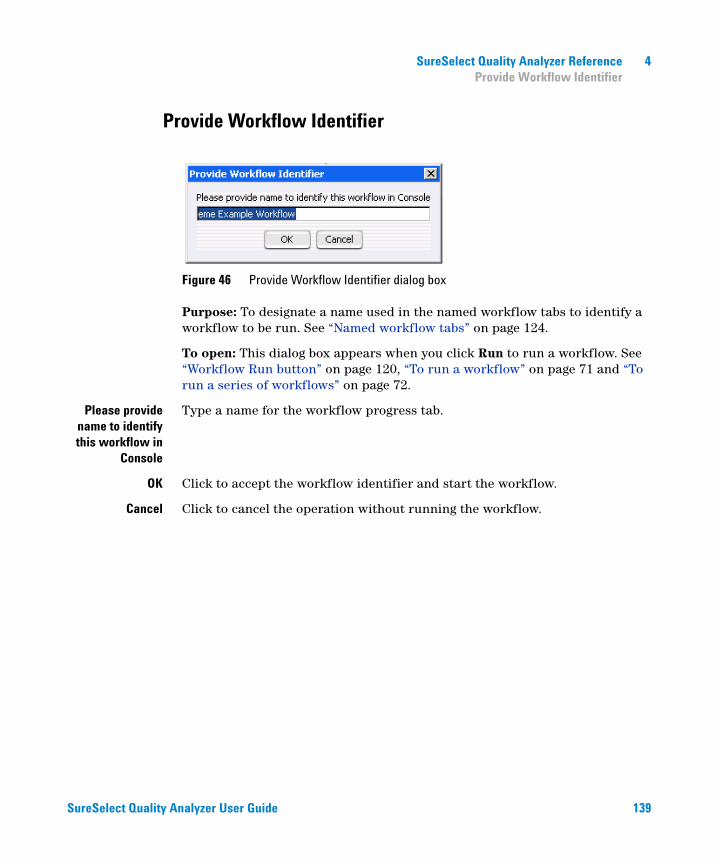
SureSelect Quality Analyzer Reference 4Provide Workflow Identifier
SureSelect Quality Analyzer User Guide 139
Provide Workflow Identifier
Figure 46 Provide Workflow Identifier dialog box
Purpose: To designate a name used in the named workflow tabs to identify a workflow to be run. See “Named workflow tabs” on page 124.
To open: This dialog box appears when you click Run to run a workflow. See “Workflow Run button” on page 120, “To run a workflow” on page 71 and “To run a series of workflows” on page 72.
Please providename to identifythis workflow in
Console
Type a name for the workflow progress tab.
OK Click to accept the workflow identifier and start the workflow.
Cancel Click to cancel the operation without running the workflow.

4 SureSelect Quality Analyzer ReferenceSet Password
140 SureSelect Quality Analyzer User Guide
Set Password
Figure 47 Set Password dialog box
Purpose: To restrict access to a workflow.
To Open: Mark Apply Password in the Workflow command ribbon or click New or Save As to bring up the Create Workflow dialog box, mark Apply Password, then click OK.
Password Type a password.
ConfirmPassword
Type the password again.
OK Click to set password.
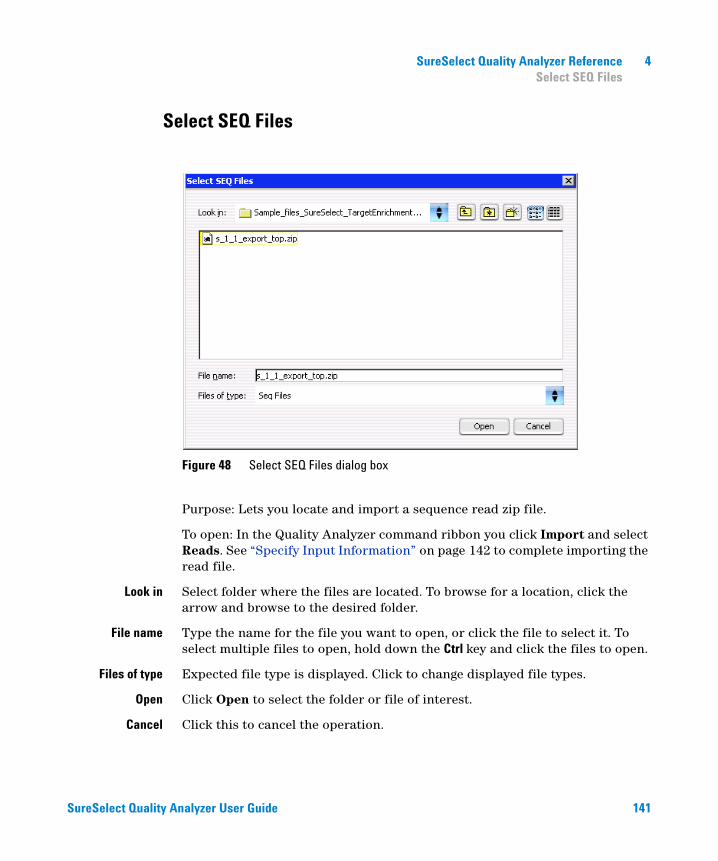
SureSelect Quality Analyzer Reference 4Select SEQ Files
SureSelect Quality Analyzer User Guide 141
Select SEQ Files
Purpose: Lets you locate and import a sequence read zip file.
To open: In the Quality Analyzer command ribbon you click Import and select Reads. See “Specify Input Information” on page 142 to complete importing the read file.
Look in Select folder where the files are located. To browse for a location, click the arrow and browse to the desired folder.
File name Type the name for the file you want to open, or click the file to select it. To select multiple files to open, hold down the Ctrl key and click the files to open.
Files of type Expected file type is displayed. Click to change displayed file types.
Open Click Open to select the folder or file of interest.
Cancel Click this to cancel the operation.
Figure 48 Select SEQ Files dialog box
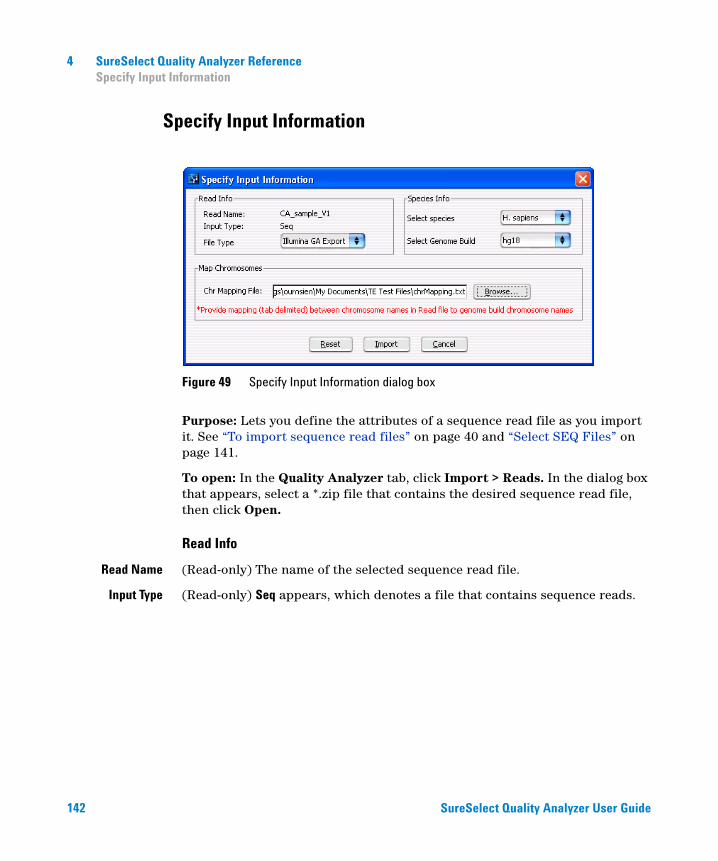
4 SureSelect Quality Analyzer ReferenceSpecify Input Information
142 SureSelect Quality Analyzer User Guide
Specify Input Information
Purpose: Lets you define the attributes of a sequence read file as you import it. See “To import sequence read files” on page 40 and “Select SEQ Files” on page 141.
To open: In the Quality Analyzer tab, click Import > Reads. In the dialog box that appears, select a *.zip file that contains the desired sequence read file, then click Open.
Read Info
Read Name (Read-only) The name of the selected sequence read file.
Input Type (Read-only) Seq appears, which denotes a file that contains sequence reads.
Figure 49 Specify Input Information dialog box
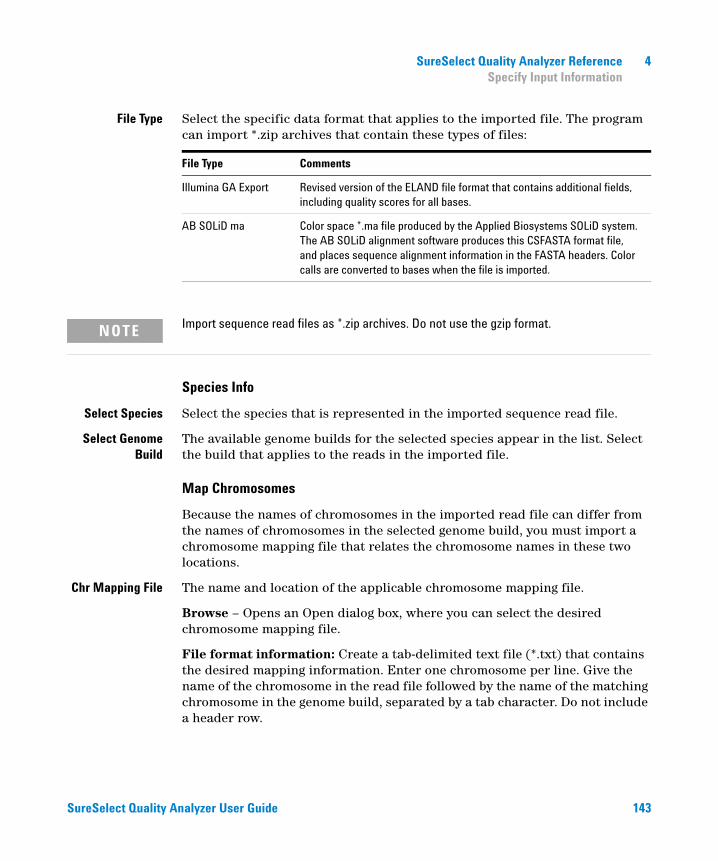
SureSelect Quality Analyzer Reference 4Specify Input Information
SureSelect Quality Analyzer User Guide 143
File Type Select the specific data format that applies to the imported file. The program can import *.zip archives that contain these types of files:
Species Info
Select Species Select the species that is represented in the imported sequence read file.
Select GenomeBuild
The available genome builds for the selected species appear in the list. Select the build that applies to the reads in the imported file.
Map Chromosomes
Because the names of chromosomes in the imported read file can differ from the names of chromosomes in the selected genome build, you must import a chromosome mapping file that relates the chromosome names in these two locations.
Chr Mapping File The name and location of the applicable chromosome mapping file.
Browse – Opens an Open dialog box, where you can select the desired chromosome mapping file.
File format information: Create a tab-delimited text file (*.txt) that contains the desired mapping information. Enter one chromosome per line. Give the name of the chromosome in the read file followed by the name of the matching chromosome in the genome build, separated by a tab character. Do not include a header row.
File Type Comments
Illumina GA Export Revised version of the ELAND file format that contains additional fields, including quality scores for all bases.
AB SOLiD ma Color space *.ma file produced by the Applied Biosystems SOLiD system. The AB SOLiD alignment software produces this CSFASTA format file, and places sequence alignment information in the FASTA headers. Color calls are converted to bases when the file is imported.
NOTE Import sequence read files as *.zip archives. Do not use the gzip format.
4 SureSelect Quality Analyzer ReferenceSpecify Input Information
144 SureSelect Quality Analyzer User Guide
Example file content:chrA.fa chrA
chrB.fa chrB
chrC.fa chrC
Other commands
Reset Opens a dialog box that asks if you are sure you want to reset the mapping. If you click Yes, the program restores the settings in the Specify Input Information dialog box to what they were before you made any changes.
Import Imports the sequence read file into the program, and makes it available for analysis.
Cancel Closes the dialog box, but does not import the read file.
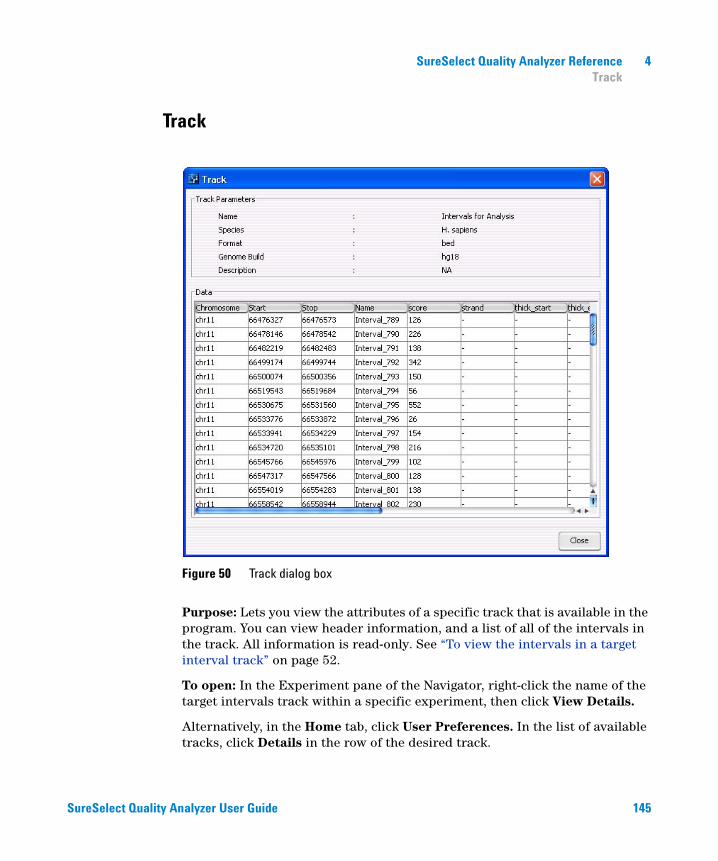
SureSelect Quality Analyzer Reference 4Track
SureSelect Quality Analyzer User Guide 145
Track
Purpose: Lets you view the attributes of a specific track that is available in the program. You can view header information, and a list of all of the intervals in the track. All information is read-only. See “To view the intervals in a target interval track” on page 52.
To open: In the Experiment pane of the Navigator, right-click the name of the target intervals track within a specific experiment, then click View Details.
Alternatively, in the Home tab, click User Preferences. In the list of available tracks, click Details in the row of the desired track.
Figure 50 Track dialog box
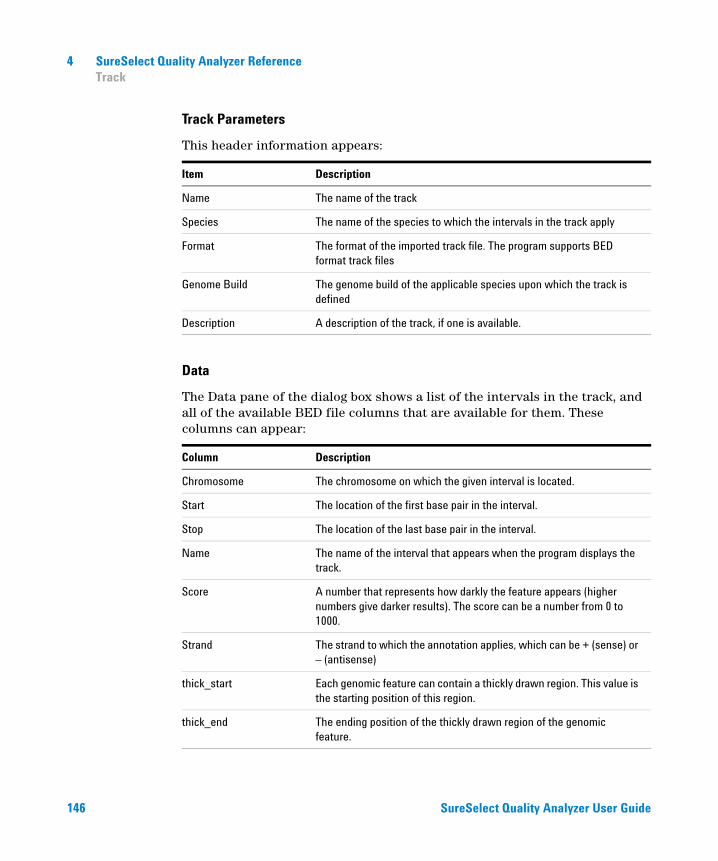
4 SureSelect Quality Analyzer ReferenceTrack
146 SureSelect Quality Analyzer User Guide
Track Parameters
This header information appears:
Data
The Data pane of the dialog box shows a list of the intervals in the track, and all of the available BED file columns that are available for them. These columns can appear:
Item Description
Name The name of the track
Species The name of the species to which the intervals in the track apply
Format The format of the imported track file. The program supports BED format track files
Genome Build The genome build of the applicable species upon which the track is defined
Description A description of the track, if one is available.
Column Description
Chromosome The chromosome on which the given interval is located.
Start The location of the first base pair in the interval.
Stop The location of the last base pair in the interval.
Name The name of the interval that appears when the program displays the track.
Score A number that represents how darkly the feature appears (higher numbers give darker results). The score can be a number from 0 to 1000.
Strand The strand to which the annotation applies, which can be + (sense) or – (antisense)
thick_start Each genomic feature can contain a thickly drawn region. This value is the starting position of this region.
thick_end The ending position of the thickly drawn region of the genomic feature.
SureSelect Quality Analyzer Reference 4Track
SureSelect Quality Analyzer User Guide 147
Close Closes the dialog box.
item_rgb The display color of the data for the interval. The color is defined in the RGB color space.
Example: An RGB value of 255, 0, 255 produces a bright fuchsia color.
block_count The number of separate blocks for the given region. Typically, blocks refer to exons.
block_size The size of each block. Multiple values are separated by commas.
block_starts The starting position of each block relative to the location defined in Start. Multiple values are separated by commas.
exp_countThese columns use experiment scores and IDs to set the colors of a track. They are not relevant to SureSelect Quality Analyzer.exp_Ids
exp_scores
Column Description
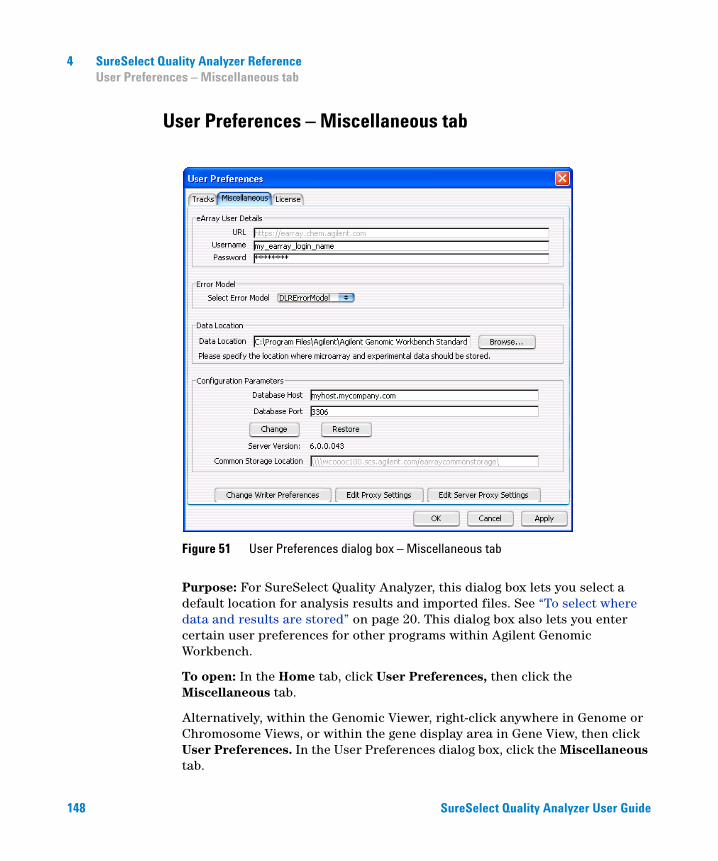
4 SureSelect Quality Analyzer ReferenceUser Preferences – Miscellaneous tab
148 SureSelect Quality Analyzer User Guide
User Preferences – Miscellaneous tab
Purpose: For SureSelect Quality Analyzer, this dialog box lets you select a default location for analysis results and imported files. See “To select where data and results are stored” on page 20. This dialog box also lets you enter certain user preferences for other programs within Agilent Genomic Workbench.
To open: In the Home tab, click User Preferences, then click the Miscellaneous tab.
Alternatively, within the Genomic Viewer, right-click anywhere in Genome or Chromosome Views, or within the gene display area in Gene View, then click User Preferences. In the User Preferences dialog box, click the Miscellaneous tab.
Figure 51 User Preferences dialog box – Miscellaneous tab
SureSelect Quality Analyzer Reference 4User Preferences – Miscellaneous tab
SureSelect Quality Analyzer User Guide 149
Data Location Shows the default location for imported sequence read data and related files. The program also stores microarray sample data and analysis results for the CGH, ChIP-on-chip, and CH3 applications in this location.
Browse – Opens an Open dialog box, where you can select a default location.
Other Options All other options in this dialog box let you enter installation and configuration options for Agilent Genomic Workbench as a whole, or options that are specific for parts of the program other than the Target Enrichment Quality Analyzer.
OK Accepts any changes, and closes the dialog box.
Cancel Closes the dialog box, but does not save any changes.
Apply (Available after you make change(s) to any tab of the Preferences dialog box) Applies the changes that you made in any tab of the dialog box, but keeps the dialog box open.
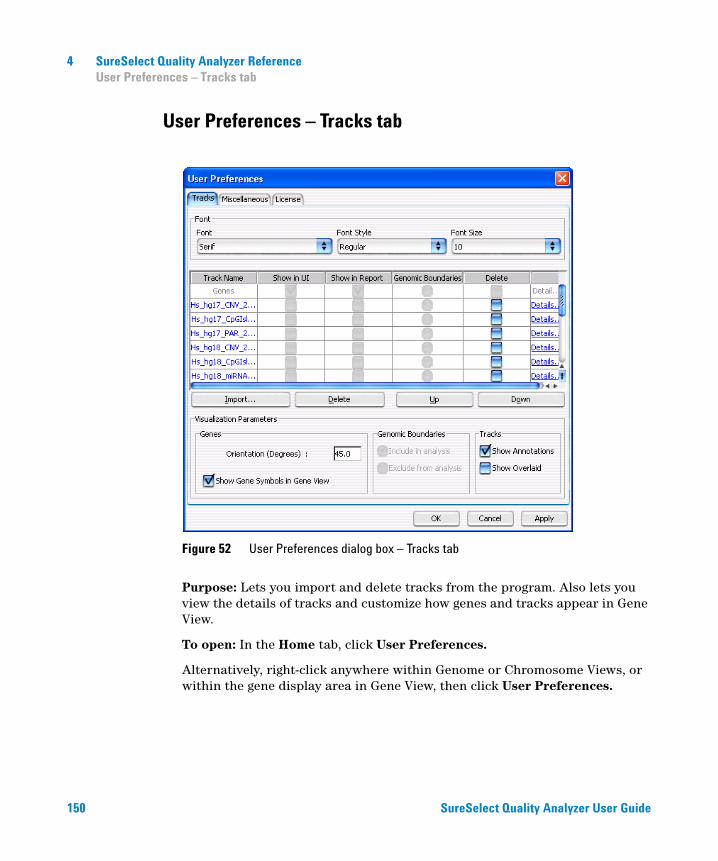
4 SureSelect Quality Analyzer ReferenceUser Preferences – Tracks tab
150 SureSelect Quality Analyzer User Guide
User Preferences – Tracks tab
Purpose: Lets you import and delete tracks from the program. Also lets you view the details of tracks and customize how genes and tracks appear in Gene View.
To open: In the Home tab, click User Preferences.
Alternatively, right-click anywhere within Genome or Chromosome Views, or within the gene display area in Gene View, then click User Preferences.
Figure 52 User Preferences dialog box – Tracks tab
SureSelect Quality Analyzer Reference 4User Preferences – Tracks tab
SureSelect Quality Analyzer User Guide 151
Font
Sets the font, style, and size of gene names and interval names in Gene View. These settings are available:
List of Tracks – Columns
Shows a list of the tracks that are available in the program.
Track Name The name of each track.
Show in UI For the SureSelect Target Enrichment application type, the check boxes in this column are unavailable. The program automatically marks only Genes and the target interval track that has been defined for the selected experiment.
Show in Report This column is not available for the SureSelect Target Enrichment application type.
GenomicBoundaries
The program automatically selects the target interval track that has been defined for the selected experiment.
Delete Mark a check box to select a given track for deletion. To delete the selected track(s), click Delete.
Details Opens the Track dialog box for the given track, where you can view a list of intervals in the track, as well as the header and other data that is associated with the track. See “Track” on page 145.
List of Tracks – Buttons
Import Opens the Import Track dialog box, where you can select a BED format track file, and configure the track before you import it. See “Import Track” on page 137.
Delete Permanently removes selected tracks from the program. To select a track for deletion, mark its check box in the Delete column of the list of tracks.
Setting Description
Font Select the desired font family.
Style Select Regular, Bold, Italic, or Bold Italic.
Size The size (in points) of gene and interval names. This is an absolute measure—the size of names does not change as you zoom in or out in Gene View.

4 SureSelect Quality Analyzer ReferenceUser Preferences – Tracks tab
152 SureSelect Quality Analyzer User Guide
Up, Down Changes the display order of tracks in Gene View. These commands are not relevant to the SureSelect Target Enrichment application type.
Visualization Parameters
Genes Orientation (Degrees) – The angle at which gene and interval names appear in Gene View. A value of 0° orients the names horizontally, and higher values rotate the name in a counterclockwise direction, up to a maximum of 360°.
Show Gene Symbols in Gene View – If you mark this option, the names of genes, as well as blue bars that show their genomic locations, appear in Gene View. If you clear this option, neither of these appears.
GenomicBoundaries
These options are not available for the SureSelect Target Enrichment application type.
Tracks Mark any of these options:
• Show Annotations – In the target intervals track, displays the names of target intervals along with bars that represent their genomic locations.
• Show Overlaid – This option is only relevant to other programs in Agilent Genomic Workbench that can display more than one track at a time.
Commands that appear in all tabs
OK Accepts the change(s) that you made in any tab of the dialog box, and closes the dialog box.
Cancel Closes the dialog box, but does not make any changes.
Apply (Available if you have made changes to one or more preferences) Applies any change(s) that you have made in any tab of the dialog box, and leaves the dialog box open.
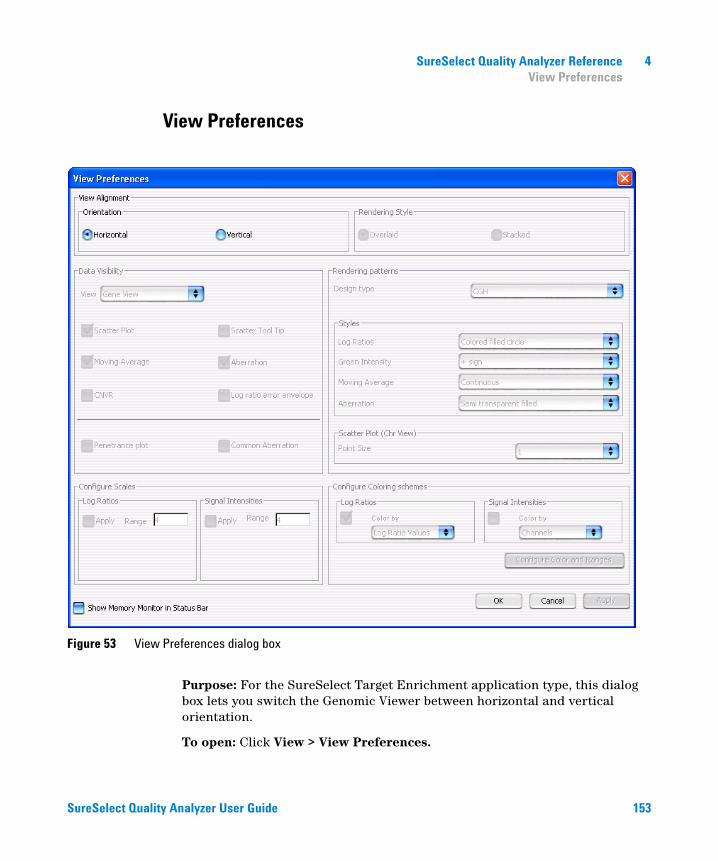
SureSelect Quality Analyzer Reference 4View Preferences
SureSelect Quality Analyzer User Guide 153
View Preferences
Purpose: For the SureSelect Target Enrichment application type, this dialog box lets you switch the Genomic Viewer between horizontal and vertical orientation.
To open: Click View > View Preferences.
Figure 53 View Preferences dialog box
4 SureSelect Quality Analyzer ReferenceView Preferences
154 SureSelect Quality Analyzer User Guide
View Alignment
Orientation The layout of Genome, Chromosome, and Gene Views. Select one of these options:
• Horizontal – Stacks the three views horizontally, from top to bottom. Because of the oblong shape of a typical monitor, Horizontal orientation can be somewhat more useful when you use the program to view sequence reads and the target interval track.
• Vertical – Stacks the three views vertically, from left to right.
In both cases, Tab view appears horizontally across the bottom of the Genomic Viewer.
Other commands
OK Accepts any changes you made, and closes the dialog box.
Cancel Closes the dialog box, but does not accept any changes.
Apply (Available only if you changed the orientation) Changes the orientation of the Genomic Viewer, and keeps the dialog box open.
No other options in this dialog box are applicable to the SureSelect Target Enrichment application type.
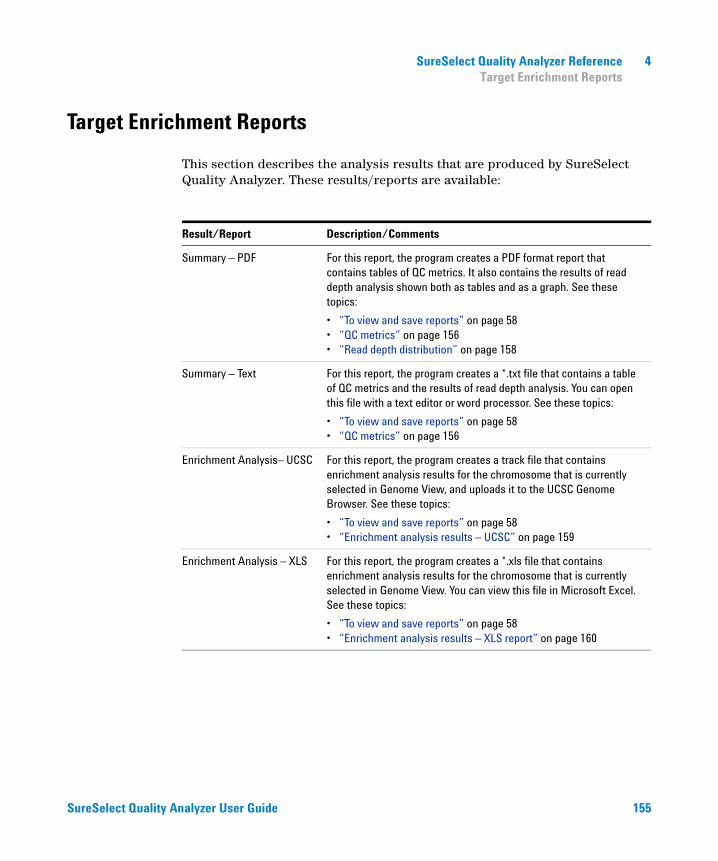
SureSelect Quality Analyzer Reference 4Target Enrichment Reports
SureSelect Quality Analyzer User Guide 155
Target Enrichment Reports
This section describes the analysis results that are produced by SureSelect Quality Analyzer. These results/reports are available:
Result/Report Description/Comments
Summary – PDF For this report, the program creates a PDF format report that contains tables of QC metrics. It also contains the results of read depth analysis shown both as tables and as a graph. See these topics:
• “To view and save reports” on page 58• “QC metrics” on page 156• “Read depth distribution” on page 158
Summary – Text For this report, the program creates a *.txt file that contains a table of QC metrics and the results of read depth analysis. You can open this file with a text editor or word processor. See these topics:
• “To view and save reports” on page 58• “QC metrics” on page 156
Enrichment Analysis– UCSC For this report, the program creates a track file that contains enrichment analysis results for the chromosome that is currently selected in Genome View, and uploads it to the UCSC Genome Browser. See these topics:
• “To view and save reports” on page 58• “Enrichment analysis results – UCSC” on page 159
Enrichment Analysis – XLS For this report, the program creates a *.xls file that contains enrichment analysis results for the chromosome that is currently selected in Genome View. You can view this file in Microsoft Excel. See these topics:
• “To view and save reports” on page 58• “Enrichment analysis results – XLS report” on page 160
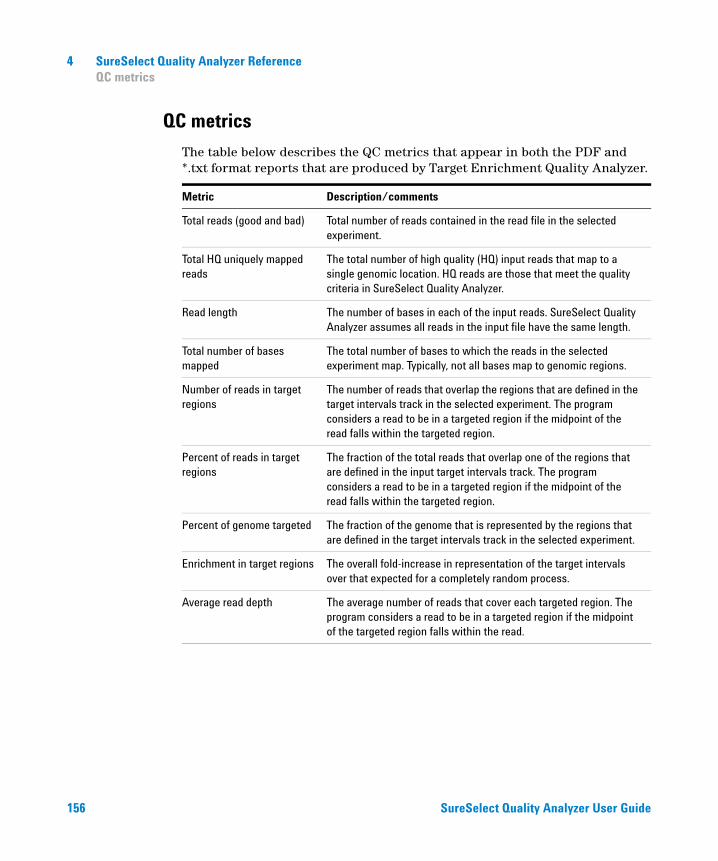
4 SureSelect Quality Analyzer ReferenceQC metrics
156 SureSelect Quality Analyzer User Guide
QC metrics
The table below describes the QC metrics that appear in both the PDF and *.txt format reports that are produced by Target Enrichment Quality Analyzer.
Metric Description/comments
Total reads (good and bad) Total number of reads contained in the read file in the selected experiment.
Total HQ uniquely mapped reads
The total number of high quality (HQ) input reads that map to a single genomic location. HQ reads are those that meet the quality criteria in SureSelect Quality Analyzer.
Read length The number of bases in each of the input reads. SureSelect Quality Analyzer assumes all reads in the input file have the same length.
Total number of bases mapped
The total number of bases to which the reads in the selected experiment map. Typically, not all bases map to genomic regions.
Number of reads in target regions
The number of reads that overlap the regions that are defined in the target intervals track in the selected experiment. The program considers a read to be in a targeted region if the midpoint of the read falls within the targeted region.
Percent of reads in target regions
The fraction of the total reads that overlap one of the regions that are defined in the input target intervals track. The program considers a read to be in a targeted region if the midpoint of the read falls within the targeted region.
Percent of genome targeted The fraction of the genome that is represented by the regions that are defined in the target intervals track in the selected experiment.
Enrichment in target regions The overall fold-increase in representation of the target intervals over that expected for a completely random process.
Average read depth The average number of reads that cover each targeted region. The program considers a read to be in a targeted region if the midpoint of the targeted region falls within the read.
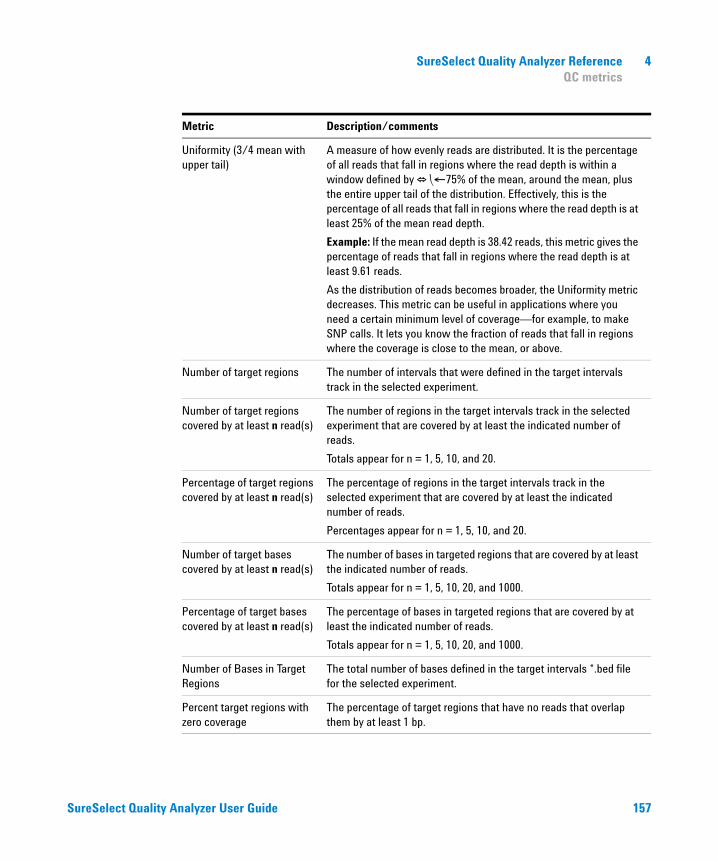
SureSelect Quality Analyzer Reference 4QC metrics
SureSelect Quality Analyzer User Guide 157
Uniformity (3/4 mean with upper tail)
A measure of how evenly reads are distributed. It is the percentage of all reads that fall in regions where the read depth is within a window defined by +/-75% of the mean, around the mean, plus the entire upper tail of the distribution. Effectively, this is the percentage of all reads that fall in regions where the read depth is at least 25% of the mean read depth.
Example: If the mean read depth is 38.42 reads, this metric gives the percentage of reads that fall in regions where the read depth is at least 9.61 reads.
As the distribution of reads becomes broader, the Uniformity metric decreases. This metric can be useful in applications where you need a certain minimum level of coverage—for example, to make SNP calls. It lets you know the fraction of reads that fall in regions where the coverage is close to the mean, or above.
Number of target regions The number of intervals that were defined in the target intervals track in the selected experiment.
Number of target regions covered by at least n read(s)
The number of regions in the target intervals track in the selected experiment that are covered by at least the indicated number of reads.
Totals appear for n = 1, 5, 10, and 20.
Percentage of target regions covered by at least n read(s)
The percentage of regions in the target intervals track in the selected experiment that are covered by at least the indicated number of reads.
Percentages appear for n = 1, 5, 10, and 20.
Number of target bases covered by at least n read(s)
The number of bases in targeted regions that are covered by at least the indicated number of reads.
Totals appear for n = 1, 5, 10, 20, and 1000.
Percentage of target bases covered by at least n read(s)
The percentage of bases in targeted regions that are covered by at least the indicated number of reads.
Totals appear for n = 1, 5, 10, 20, and 1000.
Number of Bases in Target Regions
The total number of bases defined in the target intervals *.bed file for the selected experiment.
Percent target regions with zero coverage
The percentage of target regions that have no reads that overlap them by at least 1 bp.
Metric Description/comments
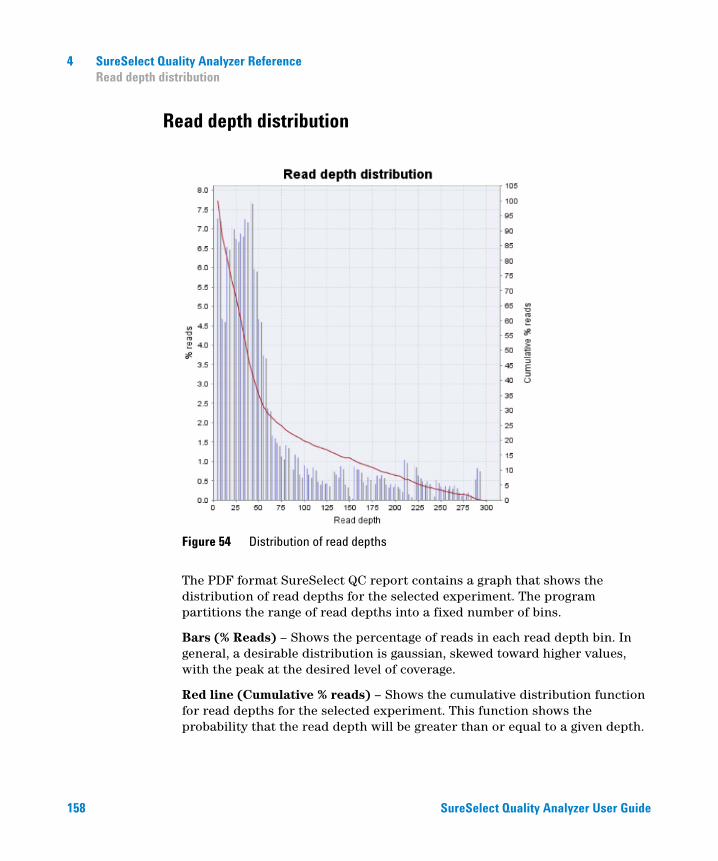
4 SureSelect Quality Analyzer ReferenceRead depth distribution
158 SureSelect Quality Analyzer User Guide
Read depth distribution
The PDF format SureSelect QC report contains a graph that shows the distribution of read depths for the selected experiment. The program partitions the range of read depths into a fixed number of bins.
Bars (% Reads) – Shows the percentage of reads in each read depth bin. In general, a desirable distribution is gaussian, skewed toward higher values, with the peak at the desired level of coverage.
Red line (Cumulative % reads) – Shows the cumulative distribution function for read depths for the selected experiment. This function shows the probability that the read depth will be greater than or equal to a given depth.
Figure 54 Distribution of read depths
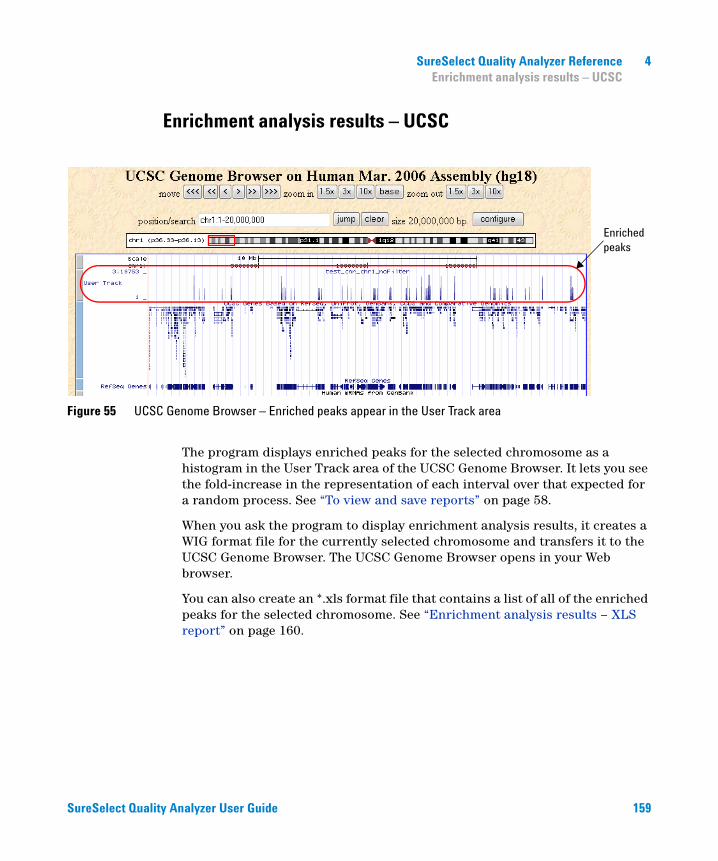
SureSelect Quality Analyzer Reference 4Enrichment analysis results – UCSC
SureSelect Quality Analyzer User Guide 159
Enrichment analysis results – UCSC
The program displays enriched peaks for the selected chromosome as a histogram in the User Track area of the UCSC Genome Browser. It lets you see the fold-increase in the representation of each interval over that expected for a random process. See “To view and save reports” on page 58.
When you ask the program to display enrichment analysis results, it creates a WIG format file for the currently selected chromosome and transfers it to the UCSC Genome Browser. The UCSC Genome Browser opens in your Web browser.
You can also create an *.xls format file that contains a list of all of the enriched peaks for the selected chromosome. See “Enrichment analysis results – XLS report” on page 160.
Figure 55 UCSC Genome Browser – Enriched peaks appear in the User Track area
Enriched peaks
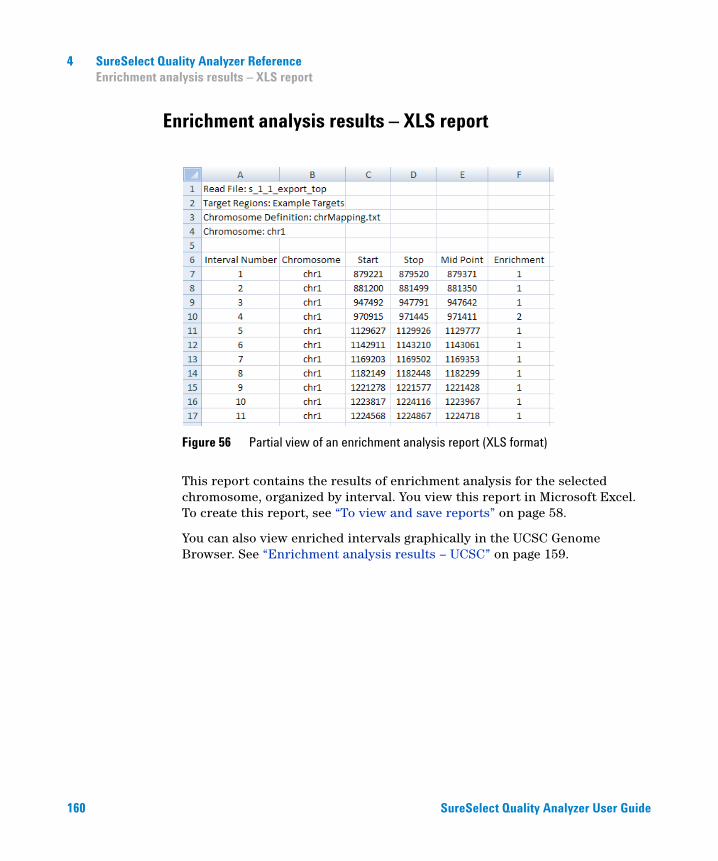
4 SureSelect Quality Analyzer ReferenceEnrichment analysis results – XLS report
160 SureSelect Quality Analyzer User Guide
Enrichment analysis results – XLS report
This report contains the results of enrichment analysis for the selected chromosome, organized by interval. You view this report in Microsoft Excel. To create this report, see “To view and save reports” on page 58.
You can also view enriched intervals graphically in the UCSC Genome Browser. See “Enrichment analysis results – UCSC” on page 159.
Figure 56 Partial view of an enrichment analysis report (XLS format)
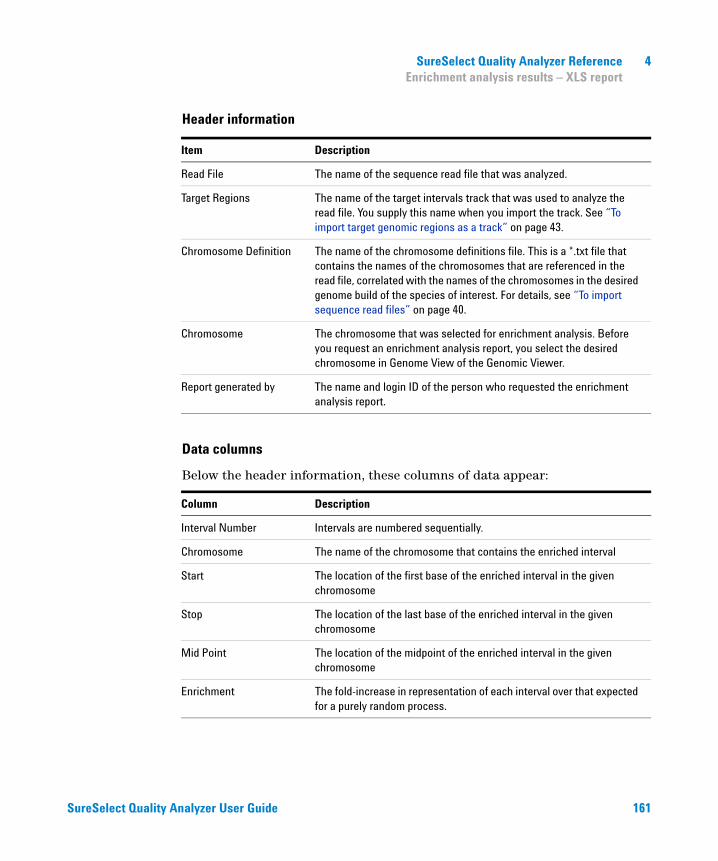
SureSelect Quality Analyzer Reference 4Enrichment analysis results – XLS report
SureSelect Quality Analyzer User Guide 161
Header information
Data columns
Below the header information, these columns of data appear:
Item Description
Read File The name of the sequence read file that was analyzed.
Target Regions The name of the target intervals track that was used to analyze the read file. You supply this name when you import the track. See “To import target genomic regions as a track” on page 43.
Chromosome Definition The name of the chromosome definitions file. This is a *.txt file that contains the names of the chromosomes that are referenced in the read file, correlated with the names of the chromosomes in the desired genome build of the species of interest. For details, see “To import sequence read files” on page 40.
Chromosome The chromosome that was selected for enrichment analysis. Before you request an enrichment analysis report, you select the desired chromosome in Genome View of the Genomic Viewer.
Report generated by The name and login ID of the person who requested the enrichment analysis report.
Column Description
Interval Number Intervals are numbered sequentially.
Chromosome The name of the chromosome that contains the enriched interval
Start The location of the first base of the enriched interval in the given chromosome
Stop The location of the last base of the enriched interval in the given chromosome
Mid Point The location of the midpoint of the enriched interval in the given chromosome
Enrichment The fold-increase in representation of each interval over that expected for a purely random process.
www.agilent.com
© Agilent Technologies, Inc. 2010, 2015
Revision A1, October 2015
*G3800-90023*
G3800-90023
Agilent Technologies
In this book
This User Guide describes how to use the SureSelect Quality Analyzer application of Agilent Genomic Workbench to assess the quality of fragment pull-down for target enrichment experiments, both interactively and through workflows.
Related Documents