Agilent Technologies Agilent G4900DA SureScan Microarray Scanner System Microarray Scan Control Software 9.1 User Guide December 2015 For Research Use Only. Not for use in diagnostic procedures.

Welcome message from author
This document is posted to help you gain knowledge. Please leave a comment to let me know what you think about it! Share it to your friends and learn new things together.
Transcript

Agilent G4900DASureScan Microarray Scanner System
Microarray Scan Control Software 9.1
User GuideDecember 2015
For Research Use Only. Not for use in diagnostic procedures.
Agilent Technologies

Notices© Agilent Technologies, Inc. 2011-2013,
2015
No part of this manual may be reproduced in
any form or by any means (including elec-
tronic storage and retrieval or translation
into a foreign language) without prior agree-
ment and written consent from Agilent
Technologies, Inc. as governed by United
States and international copyright laws.
Manual Part NumberG4900-90000
EditionDecember 2015
Printed in USA
Agilent Technologies, Inc.
5301 Stevens Creek Blvd.
WarrantyThe material contained in this docu-ment is provided “as is,” and is sub-ject to being changed, without notice, in future editions. Further, to the max-imum extent permitted by applicable law, Agilent disclaims all warranties, either express or implied, with regard to this manual and any information contained herein, including but not limited to the implied warranties of merchantability and fitness for a par-ticular purpose. Agilent shall not be liable for errors or for incidental or consequential damages in connec-tion with the furnishing, use, or per-formance of this document or of any information contained herein. Should Agilent and the user have a separate written agreement with warranty terms covering the material in this document that conflict with these terms, the warranty terms in the sep-arate agreement shall control.
Technology Licenses The hardware and/or software described in
this document are furnished under a license
and may be used or copied only in accor-
dance with the terms of such license.
Restricted Rights LegendU.S. Government Restricted Rights. Soft-
ware and technical data rights granted to
the federal government include only those
rights customarily provided to end user cus-
tomers. Agilent provides this customary
commercial license in Software and techni-
cal data pursuant to FAR 12.211 (Technical
Data) and 12.212 (Computer Software) and,
for the Department of Defense, DFARS
252.227-7015 (Technical Data - Commercial
Items) and DFARS 227.7202-3 (Rights in
Commercial Computer Software or Com-
puter Software Documentation).
Safety Notices
CAUTION
A CAUTION notice denotes a haz-
ard. It calls attention to an operat-
ing procedure, practice, or the like
that, if not correctly performed or
adhered to, could result in damage
to the product or loss of important
data. Do not proceed beyond a
CAUTION notice until the indicated
conditions are fully understood and
met.
WARNING
A WARNING notice denotes a hazard. It calls attention to an operating procedure, practice, or the like that, if not correctly per-formed or adhered to, could result in personal injury or death. Do not proceed beyond a WARNING notice until the indicated condi-tions are fully understood and met.
Santa Clara, CA 95051 USA
Windows ® is a U.S. registered trademark
of Microsoft Corporation.
This guide applies to the Microarray Scan
Control Software 9.1.3 or higher until super-
seded.
2 SureScan System User Guide

In This Guide…
SureScan System User Guide
This user guide contains instructions to get started with, use, troubleshoot, and maintain your Agilent SureScan microarray scanner system. The SureScan system is comprised of the Agilent SureScan microarray scanner, computer workstation, and control and analysis programs.
1
IntroductionThis chapter describes the microarray scanner and preparation for its operation.
2
Getting StartedIn this chapter, learn how to operate the SureScan scanner safely and learn how to set up and then scan slides with the Agilent Microarray Scan Control program.
3
Using the Scan Control ProgramThis chapter describes how you use the Scan Control program to set up and run the scanner.
4
Using Scan Control ToolsIn this chapter, learn how to use commands in the Scan Control Tools menu. This chapter includes how to set up scan protocols and scan regions, display log files, and select default settings for the program.
5
Maintaining and Troubleshooting Your SystemThis chapter describes maintenance procedures and tips, as well as error messages for troubleshooting your system.
6
ReferenceThis chapter includes descriptions of the Scan Control windows and dialog boxes. It also contains scanner and slide specifications and regulatory compliance information.
3

4
SureScan System User Guide
Contents
1 Introduction 11
A Powerful Tool for Microarray Analysis 12
System Description 13
Hardware and software features 13
Parts list 13
Computer system requirements 14
Scanner physical description 15
Site preparation 16
Safety symbols on scanner 16
Safety guidelines 17
Principles of Operation 18
Slide positioning 18
Laser excitation 18
Scanning 18
Fluorescence detection 19
Programs Installed on the Computer Workstation 20
2 Getting Started 21
Licensing 22
Redeeming your high-resolution scanning license 22
Installing your high-resolution scanning license 22
Operating the Scanner 23
Step 1. Turn on the SureScan scanner and start the Scan Control
program 23
Step 2. Insert slides into slide holders 26
Step 3. Load the slide holders into the cassette 29
SureScan System User Guide 5
Contents
Step 4. Set or change protocol scan settings 32
Step 5. Add slides to the scan queue 33
Step 6. Scan your slides 33
Step 7. Remove the slides 34
About Scan Protocols 35
Offline Mode 36
Turning Off the SureScan Scanner 37
3 Using the Scan Control Program 39
Using the Slot Table 40
To change a Slide ID 40
To set or change the scan protocol 41
To change the output folder for a scan 41
To apply a selection to multiple slides 41
To add a slide to the scan queue 42
To add all slides to the queue 42
To move a slide in the queue 42
To remove a slide from the scan queue 43
To remove all slides from the scan queue 43
To open the scanner door 43
To close the scanner door 44
To start a scan 44
Changing Slide Scan Settings 45
To change settings for a single slide 45
To change settings for multiple slides 46
To add a description for the slide 46
To add a user name 46
4 Using Scan Control Tools 49
Creating and Changing Scan Protocols 50
To create a scan protocol 50
6 SureScan System User Guide

Contents
To change an existing scan protocol 50
To export a scan protocol 51
To import a scan protocol 51
To remove a scan protocol 52
Creating and Changing Scan Regions 53
To create a scan region 53
Change an existing scan region for non-Agilent slides 53
To export a scan region 54
To import a scan region 55
To remove a scan region 55
Adding a Barcode 56
To add a barcode 56
Turning on Lasers Manually 58
To turn on lasers 58
Troubleshooting Tools 59
To display recent errors 59
To display log files 59
To create a snapshot of the instrument state 60
To reset calibration warnings 60
To run a self test 61
Setting up Scanner Defaults 62
To set the default scan data folder 62
To set the laser saver delay 62
To set the location of the Feature Extraction program 63
To select to run Feature Extraction after scanning 63
Mapping Scan Protocols to Designs 64
To map a scan protocol to a slide design 64
5 Maintaining and Troubleshooting Your System 65
Maintaining Your System 66
SureScan System User Guide 7
Contents
Scheduled software maintenance 66
Scheduled hardware maintenance 66
Tips to prevent problems 67
Troubleshooting Your System 69
Technical Support 69
Frequently Asked Questions (FAQs) 71
Hardware Troubleshooting 72
Software Troubleshooting 74
File locations 75
SureScan system error messages 76
Using the Diagnostic Display 83
Updating the Scanner Firmware and Scan Control Program 85
To check if an update is available 85
To update the Scan Control program and firmware 85
To verify the software installation 86
6 Reference 89
Scan Control Program Window Reference 90
Scan Control main window 90
Tools menu 92
Help menu 94
Slot table 95
Function buttons 99
Settings pane 100
Log tabs 101
Scan Control Program Dialog Box Reference 104
Agilent Installation Qualification Tool 104
Export Scan Protocol dialog box 105
Export Scan Region dialog box 106
Input Barcode dialog box 107
Scan Protocol Editor dialog box 108
8 SureScan System User Guide

Contents
Scan Region Editor dialog box 115
Self Test dialog box 117
Settings dialog box – General Settings 118
Settings dialog box – Design To Protocol Mapping 120
About Adding Slides 122
Performing Feature Extraction on Scanned Images 123
SureScan Scanner Specifications 124
Slide Specifications 126
Scan dimensions 126
Glass specifications 126
Barcode and barcode label specifications 127
Regulatory Information 130
Index 133
SureScan System User Guide 9

10
Contents
SureScan System User Guide

SureScan Microarray Scanner System Microarray Scan Control Software 9.1 User Guide
1Introduction
A Powerful Tool for Microarray Analysis 12
System Description 13
Principles of Operation 18
Programs Installed on the Computer Workstation 20
This chapter provides a general introduction to the SureScan system.
11Agilent Technologies

1 Introduction
A Powerful Tool for Microarray Analysis
12
The SureScan scanner is part of the SureScan system solution from Agilent Technologies. The SureScan scanner is a sophisticated laser-induced fluorescence scanner designed to read microarrays printed on standard 1 in 3 in slides.
The SureScan scanner measures the fluorescence intensity of labeled sample nucleic acid (DNA and RNA) bound to microarrays. Its ability to measure fluorescence from two dyes simultaneously facilitates all two-color microarray studies. This technology provides for rapid, high-quality, automated scanning of microarrays.
a
Figure 1 SureScan scanner
Each slide is scanned in minutes, and the files are prepared for feature extraction analysis.
SureScan System User Guide
Introduction 1 Hardware and software features
System Description
SureScan System User Guide
In this section you find listings of hardware and software features, parts, and computer requirements. A physical description of the SureScan scanner and information on site preparation and safety are also provided.
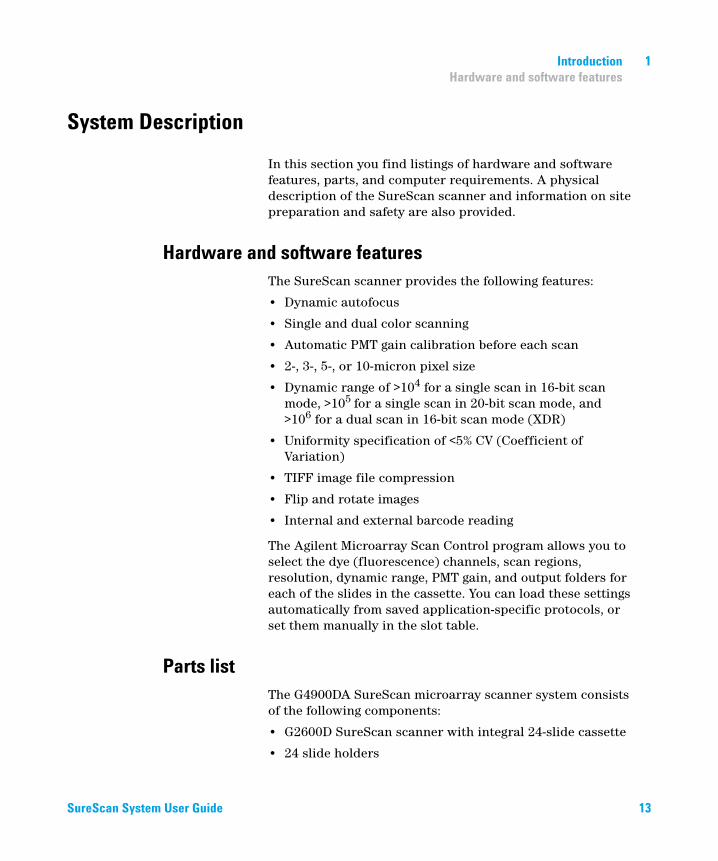
Hardware and software features
The SureScan scanner provides the following features:• Dynamic autofocus
• Single and dual color scanning
• Automatic PMT gain calibration before each scan
• 2-, 3-, 5-, or 10-micron pixel size
• Dynamic range of >104 for a single scan in 16-bit scan mode, >105 for a single scan in 20-bit scan mode, and >106 for a dual scan in 16-bit scan mode (XDR)
• Uniformity specification of <5% CV (Coefficient of Variation)
• TIFF image file compression
• Flip and rotate images
• Internal and external barcode reading
The Agilent Microarray Scan Control program allows you to select the dye (fluorescence) channels, scan regions, resolution, dynamic range, PMT gain, and output folders for each of the slides in the cassette. You can load these settings automatically from saved application-specific protocols, or set them manually in the slot table.
Parts list
The G4900DA SureScan microarray scanner system consists of the following components:• G2600D SureScan scanner with integral 24-slide cassette
• 24 slide holders
13

14
1 Introduction Computer system requirements
• Computer workstation with recovery software on CD
• Power cords and network cable
• Agilent Microarray Scan Control Software installed
• Agilent Feature Extraction Software installed
• Agilent Installation Qualification Tool Software installed
• Declaration of Conformity
The Microarray Scan Control Software 9.1 is designed for use with Feature Extraction Software (FE) 10.7.3 and higher.
Computer system requirements
The SureScan system comes with a computer that meets or exceeds the following configuration. Agilent Technologies supports only the computer provided with the SureScan system.Software
• Windows 7 64-bit Professional operating system
Hardware
• Intel Core 2 Duo E8500 3.16 GHz or equivalent
• 8 GB RAM
• Minimum 250-GB hard disk. (Proper disk maintenance is required to ensure that you always have available disk space for data generation. See Table 11 on page 110 for estimated sizes of scanned images.)
SureScan System User Guide

Introduction 1 Scanner physical description
Scanner physical description
SureScan System User Guide
Scanner front view
Power On/Off
Door
Status indicator light
Removable front panel
Figure 2 SureScan scanner, front view
15
16
1 Introduction Site preparation
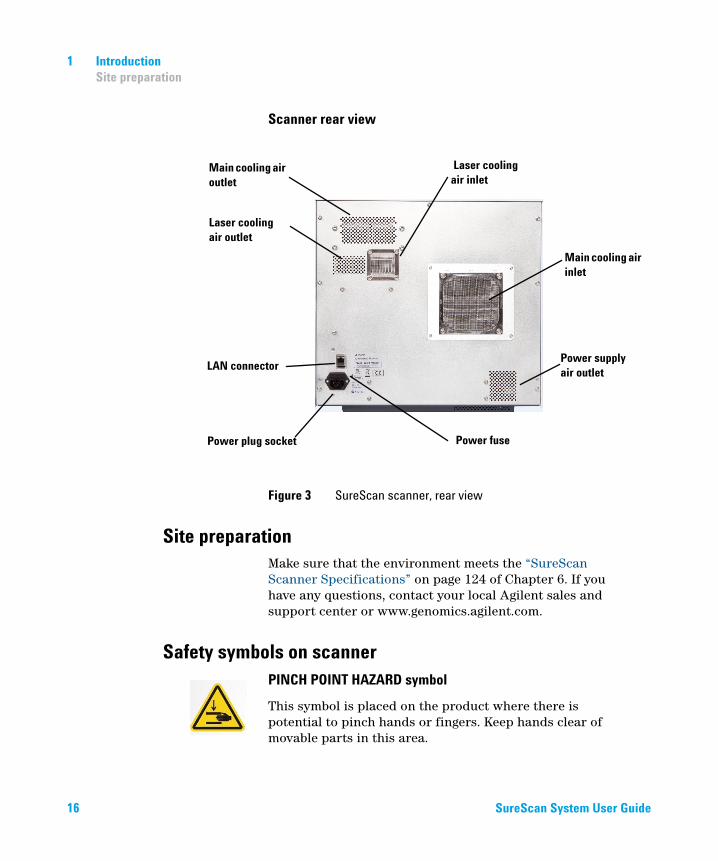
Scanner rear view
Power fuse Power plug socket
LAN connector
Laser cooling air outlet
Laser cooling air inlet
Main cooling air outlet
Main cooling air inlet
Power supply air outlet
Figure 3 SureScan scanner, rear view
Site preparation
Make sure that the environment meets the “SureScan Scanner Specifications” on page 124 of Chapter 6. If you have any questions, contact your local Agilent sales and support center or www.genomics.agilent.com.Safety symbols on scanner
PINCH POINT HAZARD symbolThis symbol is placed on the product where there is potential to pinch hands or fingers. Keep hands clear of movable parts in this area.
SureScan S
ystem User Guide
Introduction 1 Safety guidelines
Safety guidelines
SureScan System User Guide
The SureScan scanner is designed for safety and ease of use. Be sure that you understand and observe all the warnings and cautions before operating the SureScan scanner.
WARNING Do not attempt to repair or gain access to SureScan scanner internal components. You risk exposure to high voltage and harmful laser radiation. Removing the main cover voids the warranty.
WARNING Connect the SureScan scanner to a grounded power outlet. It relies on a protective earth ground for safety.
CAUTION In order to minimize vibration due to the rapid scanning of the laser
excitation across the microarray, install the scanner on a sturdy lab
bench or table. Do not install the scanner in proximity to other lab
equipment that might cause vibration.
CAUTION The SureScan scanner is sensitive to condensing humidity conditions.
Follow precautions stated in product documentation. See “Tips to
prevent problems” on page 67 of Chapter 5 and the relative humidity
specifications on page 124 of Chapter 6.
17

1 Introduction Slide positioning
Principles of Operation
18
This section describes the operating features of the SureScan scanner.
Slide positioning
The SureScan scanner holds up to 24 1 in 3 in slides in a nonremovable cassette. During scanning, the slides are sequentially transported into scanning position, scanned, and then returned to the cassette.Laser excitation
The SureScan scanner uses two lasers; a green diode-pumped solid-state laser (532 nm) and a red diode laser (640 nm). The lasers excite Cyanine-3 (Cy-3) and Cyanine-5 (Cy-5) labeled RNA or DNA to measure fluorescence after hybridization of the target nucleic acid to the microarray probes. Dyes similar to Cy-3 and Cy-5, such as Alexa 647, 555, and 660 dyes, can also be used.The SureScan scanner is optimized for high signal-to-noise performance in the Cy-3 (550 — 610 nm) and Cy-5 (650 — 750 nm) emission bands. It has a wide dynamic range and low spectral crosstalk, allowing for measurement of a broad range of target concentrations and for higher data confidence at lower signal levels.
Scanning
The laser excitation is scanned rapidly back and forth across the microarray. The dynamic autofocus ensures that the microarray is always positioned in the focal plane of the scan lens, resulting in a uniform and calibrated-intensity scan.SureScan System User Guide

Introduction 1 Fluorescence detection
Fluorescence detection
SureScan System User Guide
Fluorescence from the labeled samples is converted to an electrical signal by a high-performance PMT. Very low noise amplifiers and digital integrators process the PMT signal into a digital measurement that is recorded in the TIFF file.
19

1 Introduction Fluorescence detection
Programs Installed on the Computer Workstation
20
The computer that is included with your SureScan system has the following software programs preinstalled.
Agilent Microarray Scan Control program – used to set up and operate the scanner.
Agilent Feature Extraction program – automatically performs feature extraction using scanned image files created by the scanner. You can also run the Feature Extraction program manually to examine images and set up feature extraction options.
Agilent Installation Qualification Tool program – verifies that the Scan Control program was installed correctly and was not corrupted after installation. Produces an Installation Qualification Report for your records.
SureScan System User Guide

SureScan Microarray Scanner System Microarray Scan Control Software 9.1 User Guide
2Getting Started
Licensing 22
Redeeming your high-resolution scanning license 22
Installing your high-resolution scanning license 22
Operating the Scanner 23
Step 1. Turn on the SureScan scanner and start the Scan Control
program 23
Step 2. Insert slides into slide holders 26
Step 3. Load the slide holders into the cassette 29
Step 4. Set or change protocol scan settings 32
Step 5. Add slides to the scan queue 33
Step 6. Scan your slides 33
Step 7. Remove the slides 34
About Scan Protocols 35
Offline Mode 36
Turning Off the SureScan Scanner 37
This chapter describes how to operate the scanner, including how to set up and scan your slides quickly and easily.
If you have any problems, see Chapter 5 for troubleshooting information.
21Agilent Technologies

2 Getting Started Redeeming your high-resolution scanning license
Licensing
22
The SureScan system can be ordered in either of two configurations:
• the standard high-resolution configuration, or
• with the high-resolution capability deleted
Without the high-resolution license, you can select 10-micron, 5-micron, and 5-micron double-pass, but the 2-micron and 3-micron selections are not available.
If you purchased the high-resolution capability, you need the software license to make available this capability. In most cases, the scanner installation engineer installs the license for you. If not, or the capability is purchased later, follow the instructions described in the following section to redeem the software license.
Redeeming your high-resolution scanning license
To redeem your high-resolution scanning license:1 Locate the software entitlement certificate (SEC) that was shipped with the scanner.
2 Go to https://software.business.agilent.com/index.stm.
3 Select Click here to start software license redemption.
4 Follow the instructions to redeem your license.
Installing your high-resolution scanning license
When you have received your license via e-mail message, install the license as follows:1 Close the Scan Control program.
Locate the license file and place it in the program folder: C:\Program Files (x86)\Agilent\ScanControl
2 Restart the Scan Control program.
SureScan System User Guide

Getting Started 2 Step 1. Turn on the SureScan scanner and start the Scan Control program
Operating the Scanner
SureScan System User Guide
The following steps explain how to operate the scanner. For more information on how to use the Scan Control program, see Chapter 3, “Using the Scan Control Program”.
Step 1. Turn on the SureScan scanner and start the Scan Control program
1 Turn on the SureScan scanner using the power switch on the front of the instrument. After you turn on the scanner, the SureScan scanner loads and initializes its firmware.
To learn how to set up to turn the
lasers on and off automatically, see
“To set the laser saver delay” on
page 62.
2 Turn on the computer workstation and wait for it to boot up.
3 Double-click the Agilent Microarray Scan Control icon to start the Scan Control program.
Or
Select Start > All Programs > Agilent > Agilent Microarray Scan Control.
Figure 4 Agilent Microarray Scan Control icon
When the program starts, the Agilent Microarray Scan Control program main window opens and the scanner performs its initialization sequence. See “Scan Control main window” on page 90.
• The Scan Control program communicates with the scanner via the LAN cable, sending commands and parameters, and receiving status and data.
• The lasers turn on and start to warm up.
23
24
2 Getting Started Step 1. Turn on the SureScan scanner and start the Scan Control program
• The autoloader initializes and performs a slide eject cycle (to make sure that no slide is currently in the autofocus).
NOTE If the scanner has 24 slides loaded when you turn it on, the initialization
will fail because it cannot perform the slide eject cycle.
• The scanning system is initialized and the data acquisition system is calibrated.
After the initialization sequence finishes, the Open Door button is enabled and you can load slides.
For more information on the Scan Control program window, see “Scan Control Program Window Reference” on page 90.
SureScan System User Guide

Getting Started 2 Step 1. Turn on the SureScan scanner and start the Scan Control program
SureScan System User Guide
Figure 5 Agilent Microarray Scan Control program window – ready to add slides
The status of the scanner is indicated at the lower right corner of the Scan Control window, in the status bar.
Initialize
The scanner is initializing. When the initialization is finished, the Open Door button is enabled, and the lasers continue to warm up.25
2 Getting Started Step 2. Insert slides into slide holders
WarmUp
26
The lasers take up to 5 minutes to warm up. During warm-up, you can load slides, set protocols, and add slides to the queue. Once the lasers are warmed up, you can start scanning.
LasersOff
Indicates that the lasers are turned off.Ready
You can load slides or begin a scan.Step 2. Insert slides into slide holders
NOTE You cannot start scanning until both lasers are warmed up, at least one
slide is in the queue, and the scanner status is Ready.
A slide is inserted into a slide holder before loading it into the scanner.
Fingerprints cause errors in the
fluorescence detection. For
accurate readings, touch only the
edges of the slide and always use
gloves when handling slides.
Also, do not write on the slides
with markers or place any labels on
the slide other than an appropriate
barcode.
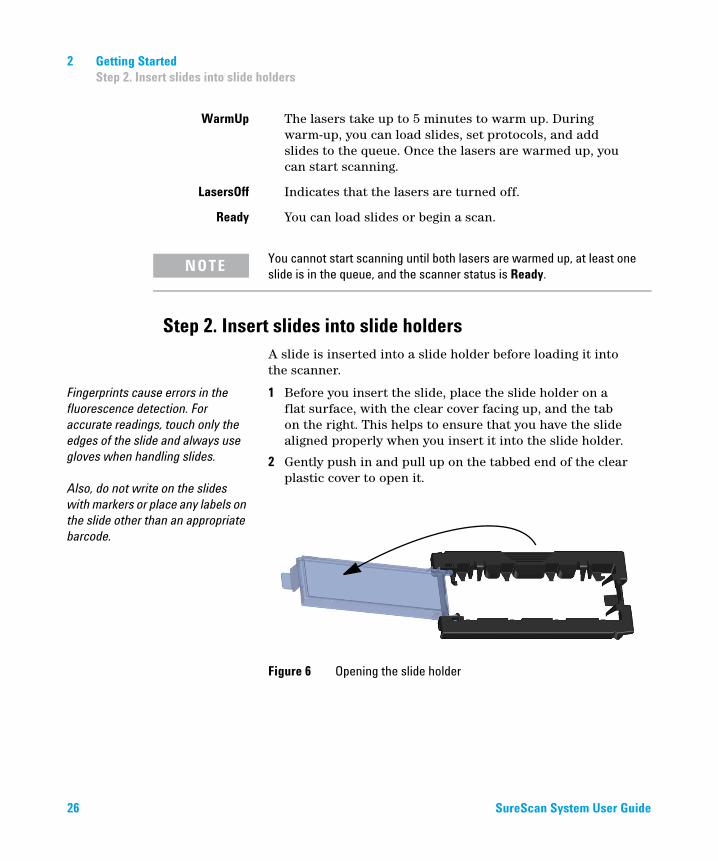
1 Before you insert the slide, place the slide holder on a flat surface, with the clear cover facing up, and the tab on the right. This helps to ensure that you have the slide aligned properly when you insert it into the slide holder.
2 Gently push in and pull up on the tabbed end of the clear plastic cover to open it.
Figure 6 Opening the slide holder
SureScan System User Guide

Getting Started 2 Step 2. Insert slides into slide holders
SureScan System User Guide
Figure 7 Inserting slide into the slide holder
3 Insert the slide into the holder, as follows:
a Hold the slide at the barcode end.
b Make sure that the active microarray surface faces up, toward the slide cover, with the barcode on the left.
c Carefully place the end of the slide without the barcode label onto the slide ledge. See Figure 7.
d Gently lower the slide into the slide holder. See Figure 8.
e Close the plastic slide cover, pushing on the tab end until you hear it “click”. This moves the slide into position in the holder.
f Gently push in and pull up on the tabbed end of the clear plastic cover to open it again and verify that the slide is correctly positioned.
Once inserted, the slide lies flat and matches up with the alignment points on the slide holder.
g Close the plastic slide cover, pushing on the tab end until you hear it “click”. See Figure 9.
Slide ledge
27

28
2 Getting Started Step 2. Insert slides into slide holders
Figure 8 Slide inserted in slide holder
Figure 9 Slide holder – closed with slide
For instructions on removing the slides, see “Step 7. Remove the slides” on page 34.
Agilent slides have two barcodes, one on each side of the glass. See Figure 10. Typically, non-Agilent slides have only one barcode. For both Agilent and non-Agilent slides, place the active microarray side of the slide facing toward the slide holder cover.
See “Barcode and barcode label
specifications” on page 127 to
apply a second readable barcode.
If you have a slide whose active surface is on the side opposite to the barcode, the scanner cannot read the barcode.
CAUTION An improperly inserted slide can damage the SureScan scanner.
SureScan System User Guide

Getting Started 2 Step 3. Load the slide holders into the cassette
SureScan System User Guide
Figure 10 Slide orientation
Step 3. Load the slide holders into the cassette
When the slides are properly inserted in the slide holders, you can load the slide holders into the cassette. The cassette and slide holders are designed to ensure that the slide holders are inserted correctly.Do not load slide holders that do not contain slides into the SureScan
NOTEscanner.29

30
2 Getting Started Step 3. Load the slide holders into the cassette
Arrow helps identifyscanner orientation
Finger-hold
Figure 11 Slide holder helps you to insert slides correctly
1 In the Scan Control program window, click Open Door to open the scanner door.
The correct way to open the scanner door is using the Open Door
CAUTIONbutton in the Scan Control program. Do not attempt to open the doormanually.
2 Pick up the slide holder using the finger hold. The arrow on top of the slide holder points to the left when you pick up the slide holder correctly. See Figure 11.
SureScan System User Guide

Getting Started 2 Step 3. Load the slide holders into the cassette
The SureScan scanner scans slides
in the order set in the scan queue.
The scanner skips over any
empty slots. See “To add a slide to
the scan queue” on page 42.
SureScan System User Guide
Insert a slide holder into any open slot. The slot numbers are clearly labeled on the slide cassette. Do not force the slide holder into the cassette; it inserts easily if properly aligned with the finger-hold on top and the arrow facing to the left.
Figure 12 Inserting slide holder into cassette
3 Make sure that the slide holder is seated in the bottom of the cassette slot.
The slot number for the loaded slide blinks blue.
4 Repeat steps 1 through 3 until all slide holders are loaded in the cassette.
The slide numbers next to the cassette and in the slot table of the Scan Control program window change color to indicate the state of the slot. For more information, see Table 8 on page 96.
5 In the Scan Control program, click Close Door. The
CAUTION Improper placement of the slide holder in the cassette can result in
severe damage to the SureScan scanner.
following events happen:
31

32
2 Getting Started Step 4. Set or change protocol scan settings
• The scanner door closes.
• The scanner reads the barcode for each slide.
• The barcode is displayed under Slide ID in the Scan Control software slot table.
• Default output folder is applied.
For information on how to map
scan protocols to slide designs,
see “To map a scan protocol to a
slide design” on page 64.
• For slides that have a scan protocol mapped to their design, the scan protocol is assigned in the Slot Table, and the slot State changes to “Ready for queue.”
For slides that do not have a scan protocol mapped to their design, the scan protocol remains empty and the slot State remains “Present”. Assign a scan protocol, as described in “Step 4. Set or change protocol scan settings”. For more information on the Scan Control program main window, see “Scan Control Program Window Reference” on page 90.
Step 4. Set or change protocol scan settings
NOTE You can add slides to the cassette while a scan is in process. See “About
Adding Slides” on page 122.
The current scan protocol settings
are displayed for each selected
slide in the right pane of the Scan
Control software main window. For
more information on these
settings, see “Scan Control
Program Window Reference” on
page 90.
The first time you set up to scan a slide, select a scan protocol to use. See “About Scan Protocols” on page 35. Once the slide is scanned, the program remembers that scan protocol and assigns it to all slides with the same microarray design. You can change these assignments later. You can also manually set scan settings for a selected slide.
1 For each slide in the slot table, click the Scan Protocol and select a scan protocol to use for scanning the slide. See “About Scan Protocols” on page 35 and “To set or change the scan protocol” on page 41.
2 (0ptional) For a selected slide, in the scan settings pane, change one or more scan settings to use for scanning only that slide. See “Changing Slide Scan Settings” on page 45.
SureScan System User Guide

Getting Started 2 Step 5. Add slides to the scan queue
Step 5. Add slides to the scan queue
Once you add a slide to the scanqueue, you cannot change its scan
settings. To change the scan
settings, remove the slide from the
queue.
SureScan System User Guide
1 In the Scan Control main window, click All to Queue to add all slides in the slot table with a State of “Ready for queue” to the scan queue.
A confirmation dialog box appears. Click Yes to add the slides to the queue.
OR
To add a slide to the scan queue, its
State must be “Ready for queue.”
In the Scan Control slot table, click the State cell for the first slide to scan and click Add to Queue.
2 For each additional slide you want to scan,
• Click the State cell and select Add to queue first to add the slide to the top of the scan queue.
or
• Click the State cell and select Add to queue last to add the slide to the bottom of the scan queue.
As each slide is added to the queue, its State indicates that it is in the queue and the order in which the slide is scanned. (In queue 1, In queue 2, for example.) The status indicator light changes to solid blue.
Step 6. Scan your slides
A scan refers to creating an image ofthe probes on a single slide.
1 If necessary, in the Scan Control main window, click Close Door.
Wait until the door closes and the Start Scan button is enabled.
2 In the Scan Control main window, click Start Scan to begin scanning the slides that were added to the queue. The scanner scans the slides in their order in the scan queue. See “Step 5. Add slides to the scan queue” on page 33.
During a scan, you see the following:
• The slot status indicator light for the current slide blinks green during the scan process, and the scan progress (for example, Scanning 50%) is displayed in the slot State.
33

34
2 Getting Started Step 7. Remove the slides
• The remaining scan time and required disk space are displayed at the bottom of the Scan Control main window. See “Scan Control Program Window Reference” on page 90.
• Events during the scan are logged in the Scan Log and Status Log. See “Log tabs” on page 101.
Step 7. Remove the slides
When the Open Door button is enabled, you can unload the slide holders from the cassette and then remove the slides from the slide holders.If the Open Door button is not
available, you cannot open the
door. Check to make sure that the
scanning process is finished.
1 In the Scan Control main window, click Open Door to open the scanner door.
2 Open the scanner door and remove the slide holders from the cassette.
3 Remove the slides from the slide holders, as follows:
a Hold the slide holder on the sides with the Agilent logo facing up.
b Gently push in and pull up on the tabbed end of the clear plastic cover to open it.
c Push up on the barcode end of the slide from underneath the slide holder to avoid fingerprints on the sample area.
d Grasp the slide from the sides and remove from the slide holder.
SureScan System User Guide

Getting Started 2 Step 7. Remove the slides
About Scan Protocols
SureScan System User Guide
A scan protocol is a collection of scan and image settings that, when selected, is applied to the slide as it is scanned.
Agilent supplies eight preloaded protocols for your selection and use with Agilent high density (HD) microarrays, Agilent G3 microarrays, and non-Agilent microarrays.
AgilentHD_GX_2Color
Agilent HD 2-color gene expression microarraysAgilentHD_GX_1Color
Agilent HD 1-color gene expression microarraysAgilentG3_GX_2Color
Agilent GX 2-color gene expression microarraysAgilentG3_GX_1Color
Agilent GX 1-color gene expression microarraysAgilentHD_CGH
Agilent HD CGH/CNV/ChIP microarraysAgilentG3_CGH
Agilent G3 CGH/CNV/ChIP microarraysAgilentHD_miRNA
Agilent HD miRNA microarraysAgilentG3_miRNA
Agilent G3 miRNA microarraysFor Agilent slides, you select the predefined protocol that applies to your type of Agilent microarray.
For non-Agilent slides it is necessary to change individual scan settings. Or, you can create a protocol from an existing one. For information on how to create a scan protocol or change an existing protocol, see “To create a scan protocol” on page 50 or “To change an existing scan protocol” on page 50.
35

2 Getting Started Step 7. Remove the slides
Offline Mode
36
If no instrument is available, the Scan Control program runs in “offline mode”. In this mode, you can create, import, and export scan protocols and scan regions. You can also open log files, display recent errors, set general settings, and map scan protocols to design IDs.
SureScan System User Guide

Getting Started 2 Step 7. Remove the slides
Turning Off the SureScan Scanner
SureScan System User Guide
1 In the Scan Control program window, make sure that the SureScan scanner is not scanning, ejecting, or loading a slide.
2 Click Open Door to open the scanner door.
3 Remove the slide holders from the scanner cassette.
4 Remove the slides from the slide holders.
5 Click Close Door.
CAUTION You cannot open the scanner door manually. Use the Open Door/Close
Door button in the Scan Control program to open and close the door.
6 In the Scan Control main window, click the red X at the upper right corner to close the program. The lasers are turned off automatically when you close the program.
7 Turn off the power switch on the front of the SureScan scanner.
37

38
2 Getting Started Step 7. Remove the slides
SureScan System User Guide

SureScan Microarray Scanner System Microarray Scan Control Software 9.1 User Guide
3Using the Scan Control Program
Using the Slot Table 40
Changing Slide Scan Settings 45
The Scan Control program is used to control all features of the SureScan scanner, including setting and changing scan settings and protocols, starting and stopping scans, reviewing scan status, and troubleshooting.
This chapter describes how you use the Scan Control program to set up and run the scanner. For information on how to use the Scan Control Tools to change protocols and scan regions, and to turn on and off the lasers, see Chapter 4, “Using Scan Control Tools”.
39Agilent Technologies

3 Using the Scan Control Program To change a Slide ID
Using the Slot Table
40
The slot table provides a display of the cassette and its contents. Once you load slides into the cassette and close the door, the Scan Control software reads the barcode for each slide and shows it as the Slide ID in the slot table. The numbers to the left of the table correspond to the slots in the scanner cassette. The color of the number indicates the status of the slot. For details on the Scan Control main window, see “Scan Control Program Window Reference” on page 90.
The topics in this section describe how to use the Scan Control slot table to prepare for scanning slides.
To change a Slide ID
The Slide ID is used in the image filename. By default, it is the slide barcode
read by the scanner. See “Barcode and
barcode label specifications” on
page 127 for information on barcodes.
Typically, the scanner automatically reads the barcode for a slide and displays it as the Slide ID in the slot table. To add or change the Slide ID in the table,
1 In the slot table, click the Slide ID cell for the slide you want to add or change. Cell editing is enabled only when the slot has a slide loaded and is not yet in the queue.
2 Type the new slide ID.
After you change the Slide ID, move your mouse cursor over the Slide ID
NOTEcell in the scan table to see the barcode for the slide. The barcode appearsin a tooltip.
SureScan System User Guide

Using the Scan Control Program 3 To set or change the scan protocol
To set or change the scan protocol
A scan protocol is a predefined set ofscan settings. Several default scan
protocols are provided with the
software. See “About Scan
Protocols” on page 35.
SureScan System User Guide
If no scan protocol is selected for a slide, or if you want to change the scan protocol,
1 In the slot table, click the Scan Protocol cell for the selected slide and then click again to show the list of available scan protocols.
2 Click a scan protocol from the drop-down list.
You cannot change scan protocols for slides in the queue.
To change the output folder for a scan
NOTE
The output folder is where the scanned
image files for a slide are saved. By
default, the output folder is
D:\ScanData.
1 In the slot table, click the Output Folder cell for a slide.
2 Click the browse icon.
The Browse For Folder dialog box opens.
3 Browse to the location where you want to save the scanned image files for this slide, and click OK.
To apply a selection to multiple slides
Within the slot table, you can select more than one slide and then make a selection for Scan Protocol and Output Folder.1 In the slot table, click to highlight the first slide.
2 To select multiple contiguous slides, hold down the Shift key and then select a second slide.
All slides between and including the selected slides are highlighted in the slot table.
OR
To select a series of noncontiguous slides, hold down the Ctrl key and then click additional slides you want to select. Selected slides are highlighted in the slot table.
3 Within the last selected slide, select the Scan Protocol or Output Folder cell.
The selection is applied to all highlighted slides.
41
42
3 Using the Scan Control Program To add a slide to the scan queue
To add a slide to the scan queue
NOTE You cannot make changes to slides in the queue.
1 In the slot table, click the State cell for the slide you want to add to the queue.
2 Click Add to queue (if no other slides are in the queue).
OR
Click Add to queue first to add the slide to the beginning of the queue.
OR
Click Add to queue last to add the slide to the end of the queue.
To add all slides to the queue
1 In the Scan Control main window, click All to Queue.A confirmation dialog box appears.
2 Click Yes.
All slides in the slot table with a State of “Ready for queue” are added to the queue, in the order they appear in the slot table.
To move a slide in the queue
1 In the slot table, click the State cell for the slide youwant to move.
2 Click again to show selections for the slide.
3 Click one of the following possible options to move the slide position in the queue:
Move to first — Move the slide to the first position
Move to last — Move the slide to the last position
SureScan System User Guide
Using the Scan Control Program 3 To remove a slide from the scan queue
SureScan System User Guide
Move up — Move the slide up one position
Move down — Move the slide down one position
To remove a slide from the scan queue
1 In the slot table, click the State cell for the slide youwant to remove from the queue.
2 Click again to show selections for the slide.
3 Click Remove from queue.
The slide is removed from the queue and its State changes to “Ready for queue.”
To remove all slides from the scan queue
1 In the Scan Control main window, click Empty Queue.A confirmation dialog box appears.
2 Click Yes.
All queued slides are removed from the queue, and the State changes to “Ready for queue.”
To open the scanner door
You must use the Scan Controlprogram to open the scanner door.
• In the Scan Control main window, click Open Door.
You cannot open the door while the
scanner is loading or ejecting a
slide.
43

3 Using the Scan Control Program To start a scan
To close the scanner door
You must close the door before you
can start a scan. After the scan
begins, you can open the door and
add or remove slides.
44
• In the Scan Control main window, click Close Door.
You must use the Scan Control
program to close the scanner door.
To start a scan
• In the Scan Control main window, click Start Scan.The slot status indicator light blinks green during the scan process. The scan progress (for example, Scanning 50%) is displayed in the slot State cell.
SureScan System User Guide
Using the Scan Control Program 3 To change settings for a single slide
Changing Slide Scan Settings
SureScan System User Guide
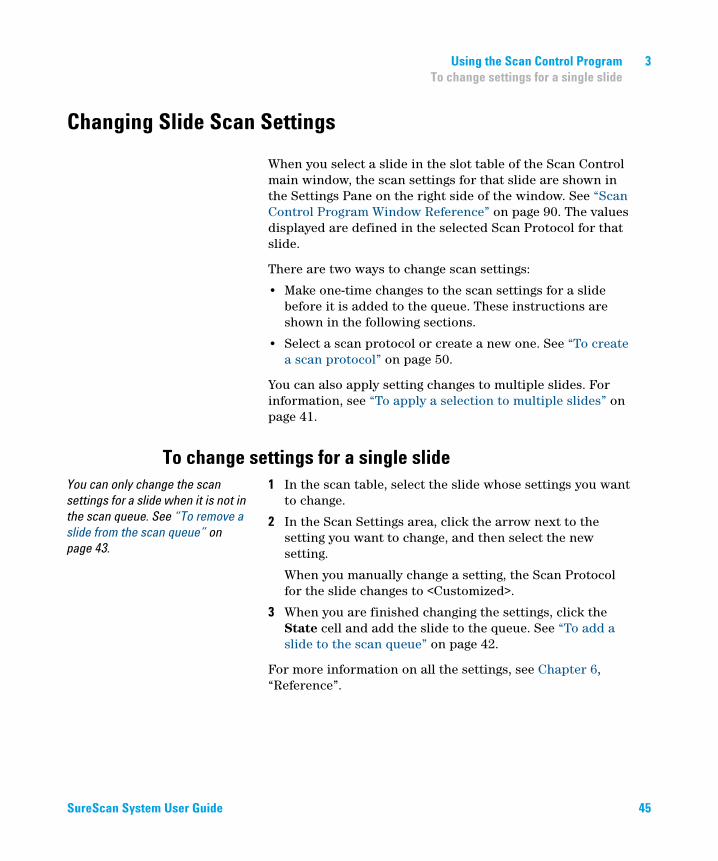
When you select a slide in the slot table of the Scan Control main window, the scan settings for that slide are shown in the Settings Pane on the right side of the window. See “Scan Control Program Window Reference” on page 90. The values displayed are defined in the selected Scan Protocol for that slide.
There are two ways to change scan settings:
• Make one-time changes to the scan settings for a slide before it is added to the queue. These instructions are shown in the following sections.
• Select a scan protocol or create a new one. See “To create a scan protocol” on page 50.
You can also apply setting changes to multiple slides. For information, see “To apply a selection to multiple slides” on page 41.
To change settings for a single slide
You can only change the scansettings for a slide when it is not in
the scan queue. See “To remove a
slide from the scan queue” on
page 43.
1 In the scan table, select the slide whose settings you want to change.
2 In the Scan Settings area, click the arrow next to the setting you want to change, and then select the new setting.
When you manually change a setting, the Scan Protocol for the slide changes to <Customized>.
3 When you are finished changing the settings, click the State cell and add the slide to the queue. See “To add a slide to the scan queue” on page 42.
For more information on all the settings, see Chapter 6, “Reference”.
45

3 Using the Scan Control Program To change settings for multiple slides
To change settings for multiple slides
You can only change the scansettings for a slide when it is not in
the scan queue. See “To remove a
slide from the scan queue” on
page 43.
46
1 In the scan table, click to select the first slide whose settings you want to change.
2 Hold down the Ctrl key and then click to select other slides.
OR
To select a contiguous block of slides, click to select the first slide, and then hold down the Shift key and then click the last slide.
3 In the Scan Settings area, click the arrow next to the setting you want to change, and then select the new setting.
When you manually change a setting, the Scan Protocol for the selected slides changes to <Customized>.
4 When you are finished changing the settings, add the slides to the queue. See “To add a slide to the scan queue” on page 42 or “To add all slides to the queue” on page 42.
To add a description for the slide
You can only change the slide scandescription for a slide when it is
not in the scan queue. See “To
remove a slide from the scan
queue” on page 43.
1 In the slot table, select the slide whose settings you want to change.
2 In the Scan Description area, type information about the slide and scan, as desired.
3 When you are finished typing the description, click the State cell and add the slide to the queue. (See “To add a slide to the scan queue” on page 42.)
To add a user name
You can only change the user namefor a slide when it is not in the scan
queue. See “To remove a slide from
the scan queue” on page 43.
1 In the slot table, select the slide whose settings you want to change.
2 In the User area, type user information.
3 When you are finished typing the user, click the State cell and add the slide to the queue. (See “To add a slide to
SureScan System User Guide

Using the Scan Control Program 3 To add a user name
SureScan System User Guide
the scan queue” on page 42.)
47

48
3 Using the Scan Control Program To add a user name
SureScan System User Guide

SureScan Microarray Scanner System Microarray Scan Control Software 9.1 User Guide
4Using Scan Control Tools
Creating and Changing Scan Protocols 50
Creating and Changing Scan Regions 53
Adding a Barcode 56
Turning on Lasers Manually 58
Troubleshooting Tools 59
Setting up Scanner Defaults 62
Mapping Scan Protocols to Designs 64
The Tools menu in the Scan Control program provides general settings and functions that help with troubleshooting. Scan control tools let you
• Create or change scanner protocols
• Change the scanning region for slides
• Input barcodes
• Switch on and off lasers
• Display recent errors and log files
• Create a “snapshot” file of the current scanner state
• Reset calibration warnings
• Perform a self test
• Set general scanner settings
• Map protocols to slide designs
This chapter describes how to use the tools available in the Scan Control program.
49Agilent Technologies

4 Using Scan Control Tools To create a scan protocol
Creating and Changing Scan Protocols
50
The Scan Control program comes with a default set of scan protocols that are designed to work with typical Agilent microarray slide designs. See “About Scan Protocols” on page 35. You cannot change these default scan protocols. However, you can create a scan protocol by saving an existing protocol using a different name. You can then change the new scan protocol.
To create a scan protocol
You cannot modify a scan protocolthat is currently assigned to a slide
in the slot table.
You can create a protocol from any existing protocol by saving the existing protocol with a new name.
1 Select Tools > Scan Protocol Editor.
2 Select an existing protocol that is similar to the scan protocol you want to create.
3 Click Save As to save the existing protocol with a new name.
The Save As New Name dialog box appears.
4 Type a new name for the protocol, and then click Save.
The scan protocol settings become active.
5 Change the scan and image settings as desired. For information on the available settings, see “Scan Protocol Editor dialog box” on page 108.
6 When you are finished, click Save.
To change an existing scan protocol
You cannot change the defaultscan protocols provided with the
scanner. To change one of these
scan protocols, save it with a
different name first,
1 Select Tools > Scan Protocol Editor.
2 Select an existing protocol you want to change.
3 In the Scan Protocol Editor dialog box, change one or more settings.
4 Click Save.
SureScan System User Guide

Using Scan Control Tools 4 To export a scan protocol
To export a scan protocol
SureScan System User Guide
You can export one or more scan protocols to a file on your hard disk, as a backup, or to import on another SureScan system.
1 Select Tools > Scan Protocol Editor.
The Scan Protocol Editor dialog box opens.
2 Click Export.
The Export Scan Protocol dialog box opens. A list of scan protocols in the program is displayed.
3 Click to select a scan protocol to export.
OR
To select a series of contiguous protocols to export, click to select a scan protocol, and then hold down the Shift key and click another scan protocol.
OR
Click to select a scan protocol, and then hold down the Ctrl key and select additional noncontiguous protocols to export.
4 Click Export.
The Save As dialog box appears.
5 Browse to the location where you want to save the exported protocols file.
6 Type a name for the exported protocols file, and click Save.
To import a scan protocol
If a scan protocol in the file has thesame name as an existing scan
protocol, the program does not
import it.
1 Select Tools > Scan Protocol Editor.
The Scan Protocol Editor dialog box opens.
2 Click Import.
The Open dialog box appears.
3 Browse to where the exported scan protocols file you want to import is located. Exported scan protocol files have .exp extensions.
51

52
4 Using Scan Control Tools To remove a scan protocol
4 Click to select the scan protocols file, and click Open.
The scan protocols in the file are imported.
To remove a scan protocol
You cannot remove any of thedefault scan protocols or any scan
protocols that are currently
assigned to a slide in the slot table.
1 Select Tools > Scan Protocol Editor.
The Scan Protocol Editor dialog box opens.
2 In the Scan Protocol list, select a scan protocol to remove.
3 Click Remove.
SureScan System User Guide

Using Scan Control Tools 4 To create a scan region
Creating and Changing Scan Regions
The scan region determines the area of
the slide that is scanned. The larger the
region, the longer the scan time.
SureScan System User Guide
If you use non-Agilent slides, you can create your own scan region or change a scan region, up to the maximum scan region of 71 mm x 21.6 mm. The new region appears as a selection in the slot table and in the Protocol Editor.
To create a scan region
Make sure that the scan region isat least 4 mm away from the
barcode label and does not overlap
any other opaque or translucent
areas of the slide.
1 In the Scan Control program menu bar, click Tools > Scan Region Editor.
The Scan Region Editor opens.
2 In the list next to Scan Region, select New Scan Region.
OR
To use an existing scan region as a template,
a In the list next to Scan Region, select one of the available scan regions.
b Select Save As.
The Save As New Name dialog box appears.
c Type the name for the new scan region, and then click OK.
The scan region settings become active.
3 Under Scan Region, type the measurements (in mm) for the region. If you type an invalid value, a red box appears around the measurement.
The red box at the top of the dialog box shows the scan region currently defined.
4 Click Save.
If no errors are found, the Scan Region Editor appears with the new region listed in the Scan Region Editor.
Change an existing scan region for non-Agilent slides
You can only change the scan regions that you created. You cannot change or remove the regions provided by Agilent.53
54
4 Using Scan Control Tools To export a scan region
When creating a scan region or using existing scan regions, make sure that the scan region is at least 4 mm away from the barcode label.
1 In the Scan Control program menu bar, click Tools > Scan Region Editor.
The Scan Region Editor opens.
2 In the list next to Scan Region, select the scan region you want to modify.
3 Change the measurements for the region, as desired. For more information on the settings available, see “Scan Region Editor dialog box” on page 115.
4 Click Save to save the changes for the selected scan region.
To export a scan region
1 In the Scan Control program menu bar, click Tools >Scan Region Editor.
The Scan Region Editor opens.
2 Click Export.
The Export Scan Region dialog box opens.
3 Click to select the scan region you want to export.
OR
To select noncontiguous scan regions to export, hold down the ctrl key and then click additional scan regions.
OR
To select a contiguous set of scan regions to export, click to select the first scan region, and then hold down the shift key and then click to select the last scan region to export.
4 Click Export.
5 The Save As dialog appears.
6 Browse to the location where you want to save the exported scan region file.
SureScan System User Guide

Using Scan Control Tools 4 To import a scan region
SureScan System User Guide
7 In File name, type the name for the exported scan region file.
8 Click Save.
To import a scan region
If a scan region in the file has thesame name as an existing scan
region, the program does not
import it.
1 In the Scan Control program menu bar, click Tools > Scan Region Editor.
The Scan Region Editor opens.
2 Click Import.
The Open dialog box appears.
3 Browse to where the exported scan regions file you want to import is located. Exported scan regions files have .exp extensions.
4 Click to select the scan regions file, and click Open.
To remove a scan region
You cannot remove any of thedefault scan regions or any scan
region that is currently used in a
scan protocol.
1 Select Tools > Scan Region Editor.
The Scan Region Editor dialog box opens.
2 In the Scan Region list, select a scan region to remove.
3 Click Remove.
55

4 Using Scan Control Tools To add a barcode
Adding a Barcode
56
Barcodes are the means by which microarray slides are identified, both physically and within the Scan Control program. In addition, the barcode is saved in the metadata of the TIFF image, and is displayed in Feature Extraction reports.
To add a barcode
NOTE By default, the scanner reads the barcode of a slide and displays it as the
Slide ID in the Scan Control program Scan Table. If you change the Slide ID,
you can still see the barcode of the slide by moving the mouse cursor over
its Slide ID. The barcode appears in a tooltip.
To add a barcode, you can use an
external barcode reader or your
keyboard to type the barcode.
If, for some reason, the barcode of a microarray slide is not readable by the scanner, you can add it manually. To add a barcode manually, at least one slot of the cassette must be available.
1 If the scanner door is not open, in the Scan Control program main window, click Open Door, and wait for the door to open.
2 (Optional) If the barcode for a slide already in a slot is unreadable, remove the slide holder that contains the slide from the cassette.
3 In the Scan Control main window, click Tools > Input Barcode.
The Input Barcode dialog box appears.
4 Use an external barcode reader or in the Barcode text box, type the barcode.
5 Insert the slide holder that contains the slide into the designated slot of the cassette.
6 Click Set.
In the Scan Table, the barcode is displayed in the Slide ID for that slot. The slot State changes to “Present.”
SureScan System User Guide

Using Scan Control Tools 4 To add a barcode
SureScan System User Guide
7 If desired, follow step 3 through step 6 to add another barcode.
8 When finished, click Close.
57

4 Using Scan Control Tools To turn on lasers
Turning on Lasers Manually
58
The lasers are turned on automatically when you start the Scan Control program, or when you add slides to the queue. They turn off automatically, based on the Laser Saver Delay settings. See “To set the laser saver delay” on page 62. This section describes how to turn on the lasers manually.
To turn on lasers
NOTE Once the lasers are turned on, it takes up to 5 minutes for them to warm up
before the instrument is ready to scan.
• In the Scan Control program window, click Tools > Switch on Lasers.
The lasers are turned on. The Status Log displays “Warming up lasers” and the status bar displays “Warming up.”
When the lasers are warmed up, the status bar displays “Ready.”
SureScan System User Guide

Using Scan Control Tools 4 To display recent errors
Troubleshooting Tools
SureScan System User Guide
To help with troubleshooting, you can display recent errors, or open log files that were generated for the scanner. You can also create a file that contains a “snapshot” of the current state of the instrument.
To display recent errors
NOTE The troubleshooting tools described in this section are typically used
when you are working with an Agilent technical support specialist.
• In the Scan Control program menu bar, click Tools > Show Recent Errors.
The LogMessages.txt file opens in Notepad (or your default text editor program).
To display log files
1 In the Scan Control program menu bar, click Tools > LogFiles.
The C:\ProgramData\Agilent\MicroArrayScanner\Logs folder opens with a list of log files:
ScanLog.csv – contains information about scan activity
SysLog-<datestamp>-<timestamp>.csv – contains information about system activity
ExceptionLog.txt – contains information about special conditions that affect the software execution
2 Double-click to select and open a log file.
Files with the .csv (comma-separated variable) extension are opened by default with an available spreadsheet program. These are read-only files. Files with the .txt extension are opened by default with an available text editor.
59

4 Using Scan Control Tools To create a snapshot of the instrument state
To create a snapshot of the instrument state
60
• In the Scan Control program menu bar, click Tools > State Snapshot.
A file is created in the C:\ProgramData\Agilent\MicroArrayScanner\Snapshots\StateSnapshots folder.
To reset calibration warnings
During typical operation, the SureScan scanner calibrates the PMTs before every scan. It also calibrates the lasers during system initialization. If the calibration is unsuccessful, or if the calibration changes significantly since the previous time it was performed, the scanner software records this information, and generates warnings in the Scan Log.The PMT calibration warning is set when the PMT gain changes by more than 20% from the previous calibration value.
The laser calibration warnings are set when the lasers cannot achieve their specified power within the warm-up period. If this problem occurs, the system sets the warning, and recalibrates the lasers at 80% of their specified power. The Scan Control program scales the TIFF file to compensate for the lower laser power.
If the next calibration is again unsuccessful, and the warnings reappear, contact your local Agilent sales and support center.
To reset calibration warnings,
• In the Scan Control menu bar, click Tools > Reset Calibration Warnings.
SureScan System User Guide
Using Scan Control Tools 4 To reset calibration warnings
To run a self test
To run a self test, remove all slide
holders from the scanner. The Self
Test command is enabled when the
scanner is “Ready” and the door is
closed.
SureScan System User Guide
1 In the Scan Control menu bar, click Tools > Self Test.
The Self Test dialog box opens.
2 Click Start.
The self-test does not test all
subsystems or specifications. For a
full retest, contact Agilent service
for a preventative maintenance and
scanner check.
The self test examines various scanner subsystems to check for out-of-specification behavior. After the self test is finished, a summary of the results is opened in your internet browser.
61
4 Using Scan Control Tools To set the default scan data folder
Setting up Scanner Defaults
To set the default scan data folder
By default, the scan data outputfolder is D:\ScanData.
62
This location is the default output folder where the image files generated by the scanner are deposited. This file is shown by default as the Output Folder in the slot table. You can change the output folder manually for a scan before it is added to the queue.
1 In the Scan Control program menu bar, click Tools > Settings.
The Settings dialog box appears.
2 Next to Default Scan Data Folder, type the path for the folder where you want to save the scan images.
OR
Click Browse and browse to the location where you want to save the scan images, and then click OK.
3 Click Save.
Changes to the scan data folder setting are not applied to slides with barcodes already read by the scanner. To change the default setting for slides already in the slot table, open and then close the scanner door so that the scanner reads the barcodes again.
To set the laser saver delay
The lasers turn on automaticallywhen you start the Scan Control
program, and after you add scans
to a queue. You can also turn them
on manually. See “Turning on
Lasers Manually” on page 58.
The laser saver delay is designed to turn off the lasers automatically when not in use, to maximize the lifetime of the lasers.
1 In the Scan Control program menu bar, click Tools > Settings.
The Settings dialog box appears.
2 Next to Laser Saver Delay, select a value for the number of minutes the scanner waits after the last scan before it turns off the lasers.
3 Click Save.
SureScan System User Guide

Using Scan Control Tools 4 To set the location of the Feature Extraction program
To set the location of the Feature Extraction program
SureScan System User Guide
If you want to run the Feature Extraction program automatically at the end of a scan, you must set the location where the Feature Extraction program is installed.
1 In the Scan Control program menu bar, click Tools > Settings.
The Settings dialog box appears.
2 Click Browse and browse to the folder where the Feature Extraction program is installed, select FENoWindows.exe, and then click OK.
By default, this location is C:\Program Files (x86)\Agilent\MicroArray\FeatureExtraction\FeNoWindows.exe.
3 Click Save.
To select to run Feature Extraction after scanning
You can select to run the Feature Extraction program automatically at the end of a scan. For more information, see “Settings dialog box – General Settings” on page 118 and “Performing Feature Extraction on Scanned Images” on page 123.1 In the Scan Control program menu bar, click Tools > Settings.
The Settings dialog box appears.
2 Next to Run Feature Extraction after scan is finished, select Yes.
3 Click Save.
63

4 Using Scan Control Tools To map a scan protocol to a slide design
Mapping Scan Protocols to Designs
64
The first time you scan a microarray of a given design, the Scan Control program assigns, or “maps” the selected protocol to that design. After that, any time the Scan Control program recognizes a slide with the same design, the Scan Control program automatically fills in that scan protocol for the slide in the slot table. You can also assign scan protocols to slide designs manually.
To map a scan protocol to a slide design
1 In the Scan Control program menu bar, click Tools >Settings.
The Settings dialog box appears.
2 Click the Design to Protocol Mapping tab.
3 Under Design ID, type the Design ID number for the design you want to assign to the scan protocol. The Design ID is determined from an Agilent slide barcode. All barcodes start with 25. The following five digits are the Design ID. For example, the Design ID for barcode 251727810298 is 17278.
4 Under Scan Protocol, select a scan protocol to use for slides for the selected design.
5 (Optional) Under Description, type information about the protocol or design, as desired.
6 Click Save.
Whenever you add a slide that was manufactured with the mapped design, the program automatically uses the selected scan protocol in the slot table.
SureScan System User Guide

SureScan Microarray Scanner System Microarray Scan Control Software 9.1 User Guide
5Maintaining and Troubleshooting Your System
Maintaining Your System 66
Scheduled software maintenance 66
Scheduled hardware maintenance 66
Tips to prevent problems 67
Troubleshooting Your System 69
Technical Support 69
Frequently Asked Questions (FAQs) 71
Hardware Troubleshooting 72
Software Troubleshooting 74
SureScan system error messages 76
Updating the Scanner Firmware and Scan Control Program 85
To check if an update is available 85
To update the Scan Control program and firmware 85
To verify the software installation 86
This chapter provides maintenance and troubleshooting information for the SureScan system.
65Agilent Technologies

5 Maintaining and Troubleshooting Your System Scheduled software maintenance
Maintaining Your System
66
Use proper care and maintenance to keep your SureScan scanner running trouble-free. When in doubt about the use or care of the SureScan scanner, contact your local Agilent sales and support center to answer your questions.
Scheduled software maintenance
Perform these tasks to help maintain the performance of your computer workstation and operating system:• At least once a week, check disk space and archive data as needed.
• Once a week delete any temporary files (*.mp, *.tmp files) from the C:\Temp folder.
• If sluggish performance is observed, defragment the hard disk using defragmentation software.
Scheduled hardware maintenance
The SureScan scanner contains no user-serviceable parts.Inspecting the vents
Good air flow through the SureScan scanner is essential to proper operation. Blocked vents can adversely affect performance.
Vents Check all vents weekly to ensure that they are not blocked by dust, debris, furniture, or other instrumentation.
SureScan System User Guide
Maintaining and Troubleshooting Your System 5 Scheduled hardware maintenance
Tips to prevent problems
SureScan System User Guide
Follow these tips to help you maintain the SureScan scanner and its performance.
Tips to avoid data loss
• Avoid running software programs that cause high CPU workload, that can affect the acquisition of data during scanning.
Tips to avoid damage to the scanner
• Keep liquids and vapors away from the SureScan scanner.
• Never place anything on the scanner or on the scanner door.
• Minimize and control temperature fluctuations.
Do not place the SureScan scanner in direct sunlight. Do not locate the SureScan scanner near windows even if they have blinds or window coverings. The hot sun can heat up the SureScan scanner housing in a nonuniform fashion, which can cause problems with the alignment of the optics.
Scan only when the laboratory temperature is consistent with the operating temperature specifications for the SureScan scanner. To assure optimal SureScan scanner performance, operate the scanner only in the specified temperature ranges. (See “SureScan Scanner Specifications” on page 124.)
• Control the humidity.
The SureScan scanner is sensitive to condensing humidity conditions. To ensure optimal performance, operate the SureScan scanner only in the specified humidity ranges. (See “SureScan Scanner Specifications” on page 124.) Always allow 12 hours thermal equilibration time on site before opening the shipping box.
• If the power cord needs to be replaced, use a power cord that is appropriately rated.
67
68
5 Maintaining and Troubleshooting Your System Scheduled hardware maintenance
Tips to maintain hardware performance
• Avoid moving the SureScan scanner.
If you must move the SureScan scanner, there is a chance for adverse affects on performance. Call your local Agilent sales and support center for assistance in moving the SureScan scanner.
• Place the SureScan scanner on a sturdy lab bench or table.
• Avoid leaning on the SureScan scanner.
• To extend the life of the lasers, set up your lasers to turn on and off automatically. See “To set the laser saver delay” on page 62.
• After turn-on, allow time for laser warm-up and stabilization. Typical warm-up time is less than five minutes.
• Do not use acetone or other solvents for cleaning.
WARNING Do not remove the main cover. Do not attempt to repair or gain access to internal components. You risk exposure to high voltage and harmful laser radiation.
SureScan System User Guide

Maintaining and Troubleshooting Your System 5 Technical Support
Troubleshooting Your System
SureScan System User Guide
The SureScan scanner was designed for low maintenance and high ease of use. If you cannot resolve a problem with the system, read this chapter. If the problem still exists, contact your local Agilent sales and support center.
Technical Support
Technical support is available for the SureScan system. Read the rest of this chapter before calling your local Agilent sales and support center.Use the web to reach technical support
The Help menu of the Scan Control program provides a link to Agilent technical support for the SureScan scanner.
• Click Help > Online Support.
Computer workstation support
If you have a problem with your computer workstation, see the documentation that came with the computer.
If you are still unable to resolve the problem, contact your local Agilent sales and support center or click Help > Online Support.
SureScan scanner support
If you have a problem with your SureScan scanner that requires assistance from your local Agilent sales and support center, be prepared to provide the latest diagnostic log files created by the Scan Control program. To open the folder that contains the log files, in the Scan Control program main window, click Tools > Log Files. Log files are located in the folder C:\ProgramData\Agilent\MicroArrayScanner\Logs.
69

70
5 Maintaining and Troubleshooting Your System Technical Support
Each SureScan scanner has a unique 10-character serial number. The serial number is located on the front of the instrument at the lower right and on the rear of the instrument.
When corresponding with your local Agilent sales and support center about your SureScan scanner, be sure to include the model number and 10-character serial number.
Make a note of the serial number of your SureScan scanner, the software version # and the installation date in the spaces shown (if you print this page) or on a sheet of paper that you keep close to your scanner.
Scanner information
Model #:
Serial #:
Installation Date:
Software Version#:
Software Update Version#/Date:
Software Update Version#/Date:
Find the version information for scanner software
1 Select Help > About from the menu bar to find version information.
2 To close the program, click OK.
SureScan System User Guide

Maintaining and Troubleshooting Your System 5 Technical Support
Frequently Asked Questions (FAQs)
SureScan System User Guide
The following are frequently asked questions (FAQs) that can help you operate and maintain the SureScan system and troubleshoot issues that occur.
Table 1 FAQs
FAQ Answer
I want to move the SureScan scanner to
another area.
The move can adversely affect scanner performance. Call your local Agilent
sales and support center for assistance in moving the scanner and assuring
proper operation afterward.
Can I save files over the network while
scanning?
Agilent recommends that you save your data files directly to the local hard disk.
You can also save data files to a network folder. If a network access problem is
experienced during the scan, data is saved to a temporary local folder, and a
warning is included in the scan log.
Where do I find support information,
such as drivers, guides, and
troubleshooting solutions, for my
computer workstation?
If you have a problem with your computer workstation, see the documentation
that came with the computer. If you are still unable to resolve the problem,
contact your local Agilent sales and support center.
Can I open the door to the scanner
manually?
No. You must use the Open Door/Close Door button in the Scan Control program
to open or close the scanner door.
The SureScan scanner is turned on and
the Scan Control program is open, but
the scanner does not scan.
1 Close and then restart the Scan Control program.
You must turn on the SureScan scanner before starting the Scan Control
program. If you started the Scan Control program first, the connection is not
made when the scanner is turned on.
2 Contact your local Agilent sales and support center.
I want to remove a slide from the
scanner, but the Scan Control program
will not let me open the door.
The Scan Control program prevents you from opening the door while it is loading
or ejecting a slide. Wait until the Open Door button is available to open the door.
If you continue to have problems, check the Status Log and contact Agilent
technical support.
71

5 Maintaining and Troubleshooting Your System Technical Support
Hardware Troubleshooting
72
Except for the power fuse, the SureScan scanner has no user-serviceable parts. The status indicator light on the front of the scanner indicates possible problems. You can also replace the fuses that protect the system. For any other problems, including jams, contact your local Agilent sales and support center.
If you are having a problem with your computer workstation, see “Computer workstation support” on page 69 for support information.
Troubleshooting with the status indicator light
The front panel has an indicator light that shows the status of the SureScan scanner.
Figure 13 Location of the status indicator light
Table 2 describes the possible states of the indicator light.
Status indicatorlight
SureScan System User Guide

Maintaining and Troubleshooting Your System 5 Technical Support
SureScan System User Guide
Checking and replacing scanner fuses
The SureScan scanner has two fuses for the power supply, on the rear of the SureScan scanner. The power supply fuses are directly above the power cord plug.
The fuses are ordered directly from Agilent Technologies.
Table 2 Scanner status indicator light states
Light state Meaning/action required
Yellow Scanner is initializing. The yellow light
appears after you turn on the scanner,
and also when the Scan Control
program connects and initializes
communication with the scanner.
Off Scanner is fully initialized
Green Scanning is in process.
Red An error has occurred. Check the Scan
Control Status log, Scan log, and list of
recent errors, and then contact Agilent
technical support.
WARNING Always disconnect the power cord before checking or replacing the fuses.
Checking and replacing the power supply fuses If you cannot turn on the SureScan scanner, even though the power outlet is active when tested, check, and replace the fuses if needed.
1 Disconnect the power cord.
2 Use a small flat-edge screwdriver to pry up the small plastic tab on the bottom edge of the fuse holder until it releases.
3 Pull out the fuse holder, and check the fuse integrity.
4 If a fuse is blown, replace the fuse with a T4A, 250 VAC rated fuse (part number 2110-1491).
73

74
5 Maintaining and Troubleshooting Your System Software Troubleshooting
5 Push the fuse holder back in until it clicks into place.
6 Plug in the power cord.
CAUTION Replace the fuses with only the same or equivalent rated fuses. If you
are unsure about the fuses, contact your local Agilent sales and
support center before installing.
Software Troubleshooting
Power supply fuse holder
In case you experience a computer failure or you want to reload the hard drive image that Agilent ships with the computer, Agilent supplies a recovery CD that lets you re-image the hard drive.
SureScan System User Guide
Maintaining and Troubleshooting Your System 5 File locations
File locations
SureScan System User Guide
The SureScan system uses the following folders:
Scan Control program files (installation folder)
C:\Program Files (x86)\Agilent\ScanControl
Log files
C:\ProgramData\Agilent\MicroarrayScanner\Logs
Scanned image files (default – otherwise as set in Scan Control Settings)
D:\ScanData
Scanned image files (in case of failure to find a network storage location)
If the Default Scan Data Folder set in Tools > Settings is not available, the program performs the following actions:
• Posts an error message in the Status Log
• Clears the Default Scan Data Folder set in Tools > Settings
• Sets the Output Folder in the Slot Table to C:\ProgramData\Agilent\MicroArrayScanner\Temp
75

5 Maintaining and Troubleshooting Your System File locations
SureScan system error messages
76
This section explains how to use error messages and error logs generated by the system.
Hardware monitoring
The SureScan scanner continuously monitors internal temperatures and fan speeds, as well as fault conditions on many subsystems.
• If the monitored parameters reach warning levels, a message is displayed in the status log, and the instrument goes into a “scanning suspended” state. In this state, the currently running scan finishes, but no new scan starts.
• If the monitored parameters reach alarm levels, the instrument immediately stops scanning, and reduces its power consumption as much as possible.
To display details of the fault that shut down the instrument, in the Scan Control program, click Tools > Show Recent Errors.
Where scanner error messages can appear
Error messages appear in the following places:
• Error messages appear in the Status Log in the Scan Control program main window. If the error can result in compromised data, it also appears in the Scan Log.
• Errors are also captured in greater detail in the system log file. System log files are saved as comma separated value files, with extension .csv. They can be opened with a text editor program (such as Notepad) or with Microsoft® Excel. To open the folder where system log files are located, click Tools > Log Files.
• To display the most recent errors, click Tools > Show Recent Errors. The recent errors are opened in Notepad.
SureScan System User Guide
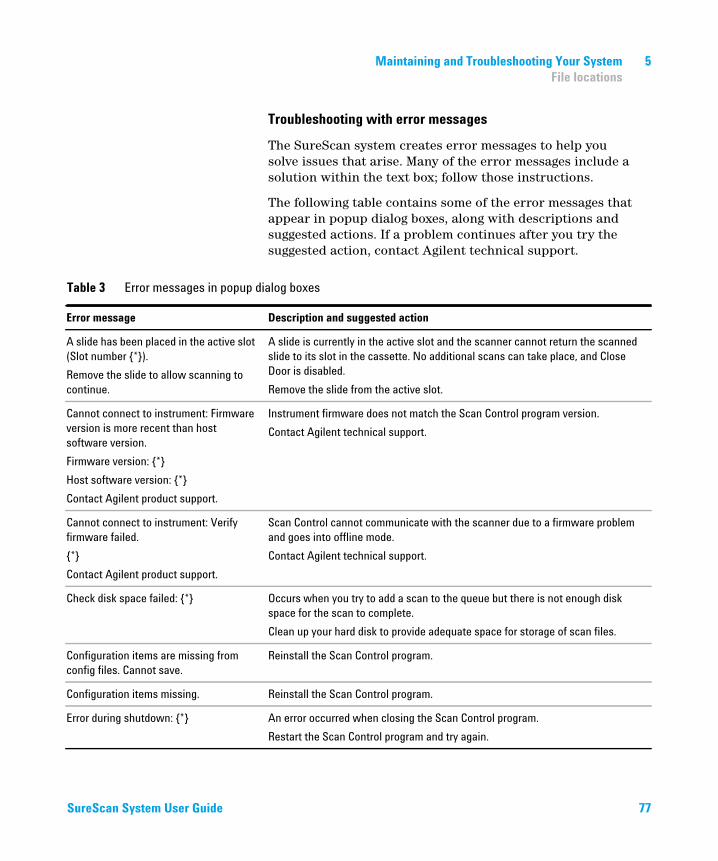
Maintaining and Troubleshooting Your System 5 File locations
SureScan System User Guide
Troubleshooting with error messages
The SureScan system creates error messages to help you solve issues that arise. Many of the error messages include a solution within the text box; follow those instructions.
The following table contains some of the error messages that appear in popup dialog boxes, along with descriptions and suggested actions. If a problem continues after you try the suggested action, contact Agilent technical support.
ialog boxes
Table 3 Error messages in popup dError message Description and suggested action
A slide has been placed in the active slot
(Slot number {*}).
Remove the slide to allow scanning to
continue.
A slide is currently in the active slot and the scanner cannot return the scanned
slide to its slot in the cassette. No additional scans can take place, and Close
Door is disabled.
Remove the slide from the active slot.
Cannot connect to instrument: Firmware
version is more recent than host
software version.
Firmware version: {*}
Host software version: {*}
Contact Agilent product support.
Instrument firmware does not match the Scan Control program version.
Contact Agilent technical support.
Cannot connect to instrument: Verify
firmware failed.
{*}
Contact Agilent product support.
Scan Control cannot communicate with the scanner due to a firmware problem
and goes into offline mode.
Contact Agilent technical support.
Check disk space failed: {*} Occurs when you try to add a scan to the queue but there is not enough disk
space for the scan to complete.
Clean up your hard disk to provide adequate space for storage of scan files.
Configuration items are missing from
config files. Cannot save.
Reinstall the Scan Control program.
Configuration items missing. Reinstall the Scan Control program.
Error during shutdown: {*} An error occurred when closing the Scan Control program.
Restart the Scan Control program and try again.
77

5 Maintaining and Troubleshooting Your System File locations
Find log files failed: {*} Close the Scan Control program and restart it. If the problem continues, reinstall
the Scan Control program.
Find recent errors failed: {*} Close the Scan Control program and restart it. If the problem continues, reinstall
the Scan Control program.
Get 'About' information failed: {*} Close the Scan Control program and restart it. If the problem continues, reinstall
the Scan Control program.
Initialize logger failed: {*} Log file is open in another application. Close the log file and restart the Scan
Control program.
Instrument is busy: Please wait for the
instrument to become idle.
Occurs when you attempt a command that cannot be completed while the
instrument is busy. Wait and try the action again.
Instrument self test failed: {*} Reinstall the Scan Control program.
Load application configuration failed: {*} Scan Control program installation is corrupt. Reinstall the Scan Control program.
Load instrument configuration failed: {*} Scan Control program installation is corrupt. Reinstall the Scan Control program.
Load scan configurations failed: {*} Scan Control program installation is corrupt. Reinstall the Scan Control program.
Load test script set failed: {*} Reinstall the Scan Control program.
Open Online Support website failed: {*} Web page is currently unavailable. Check your internet connection. Try again
later.
Open Scanner Home Page website failed:
{*}
Web page is currently unavailable. Check your internet connection. Try again
later.
Open Users Guide '{*}' failed: {*} Close the Scan Control program and restart it. If the problem continues, reinstall
the Scan Control program.
Recovering door jam failed: {*} An error occurred when the instrument tried to recover from a door jam.
Close the Scan Control software, restart the scanner, and then restart the Scan
Control program.
Save instrument state failed: {*} Close the Scan Control program and restart it. If the problem continues, reinstall
the Scan Control program.
Table 3 Error messages in popup dialog boxes (continued)
Error message Description and suggested action
78 SureScan System User Guide

Maintaining and Troubleshooting Your System 5 File locations
Show 'About' information failed: {*} Close the Scan Control program and restart it. If the problem continues, reinstall
the Scan Control program.
Update firmware failed: {*} Update of the instrument firmware failed.
Contact Agilent technical support.
Table 3 Error messages in popup dialog boxes (continued)
Error message Description and suggested action
* Detail added when the message
is generated
SureScan System User Guide
The following table shows error messages that appear in the Status Log or Scan Log. When an error occurs, to display additional information, click Tools > Show Recent Errors.
Table 4 Error message in logs
Error message Description and suggested action
{*} State Machine unknown error during
state '{*}': {*}.
Low-level error. Contact Agilent technical support.
Activity EjectSlide failed. Multiple possible causes. Try restarting the scanner and Scan Control program.
If the problem persists, contact Agilent technical support.
Activity InitLoader failed Multiple possible causes. Try restarting the scanner and Scan Control program.
If the problem persists, contact Agilent technical support.
Activity InitStages failed Multiple possible causes. Try restarting the scanner and Scan Control program.
If the problem persists, contact Agilent technical support.
Activity LaserWarmup completed with
warnings
Lasers failed to warm up at calibrated power.
Activity LaserWarmup failed. Lasers did not stabilize within a certain time.
Activity LoadSlide failed Multiple possible causes. Try restarting the scanner and Scan Control program.
If the problem persists, contact Agilent technical support.
AutoFocus hold percentage is more than
warning limit
Dirt or obstructions on the slide; slide not installed correctly in slide holder.
Data system calibration completed with
warnings
Indicates data system calibration failure. If the problem persists, call service.
79

5 Maintaining and Troubleshooting Your System File locations
Data system calibration failed Indicates data system calibration failure. If the problem persists call service.
Default scan data folder verification '{*}'
failed: {*}
The default folder has been removed or cannot be accessed. Recreate it or fix
the network connection.
Eject failed: unable to move slide into
cassette.
Restart the scanner to attempt to clear fault.
Failed to create FE project file This message indicates FE project file creation failed. Check to make sure the
Feature Extraction program is set up properly.
Failed to start FE application This message indicates the program failed to launch the Feature Extraction
application. Make sure the Feature Extraction program is installed properly.
Fanspeed error detected: Instrument
operation halted
Hardware problem — contact Agilent technical support.
Fanspeed warning cleared: Instrument
operation resuming
Hardware problem — contact Agilent technical support.
Fanspeed warning detected: Instrument
operation suspended.
Hardware problem — contact Agilent technical support.
Find focus failed Multiple possible causes. Try restarting the scanner and Scan Control program.
If the problem persists, contact Agilent technical support.
General communication failure. Check the LAN cable. Restart the scanner and the Scan Control program.
Green Laser power is not set to calibrated
value
Laser power has been reduced. Compensation was applied to the output TIFF.
The green laser may fail soon.
Green PMT calibration completed with
warnings
Indicates PMT calibration completed successfully, but some of the values it
calculated are not good.
Hardware error detected in subsystem
'{*}':Instrument operation halted
Low-level error. Contact Agilent Technical support.
Hardware warning detected in subsystem
'{*}':Instrument operation suspended
Low-level error. Check recent errors and contact Agilent technical support.
High temperature error detected:
Instrument operation halted
Check ventilation slots.
High temperature warning cleared:
Instrument operation resuming
Check ventilation slots.
Table 4 Error message in logs (continued)
Error message Description and suggested action
80 SureScan System User Guide

Maintaining and Troubleshooting Your System 5 File locations
High temperature warning detected:
Instrument operation suspended
Check ventilation slots.
PMT calibration failed Indicates PMT calibration failure. If the problem persists, call service.
Red Laser power is not set to calibrated
value
Laser power has been reduced. Compensation was applied to the output TIFF.
The red laser may fail soon.
Red PMT calibration completed with
warnings
Indicates PMT calibration issues. If the problem persists, call service.
Scan slide failed Multiple possible causes. Click Tools > Show Recent Errors for more
information. Try restarting the scanner and the Scan Control program. If the
problem persists, contact Agilent technical support.
State machine failure {*} Low-level software error. Contact Agilent technical support.
Status communication failure Check connection to instrument.
Suspending autoloader operation due to
autoloader errors
Click Tools > Show Recent Errors for more information.
Unable to access folder \"{*}\": Saving
output file in folder \"{*}\"
Destination folder was not available during the scan.
Watchdog communication failure: {*}. Low-level error. If the problem recurs, call Agilent technical support.
Table 4 Error message in logs (continued)
Error message Description and suggested action
* Detail added when the message
is generated
SureScan System User Guide
If an error message does not appear in the table
This table does not list all the possible error messages. If you have an error message that is not listed and you are unable to resolve the problem, do the following:
1 Write down the error message.
2 Restart the Scan Control program.
81

82
5 Maintaining and Troubleshooting Your System File locations
3 If step 2 does not solve the problem, do the following:
a Close the Scan Control program.
a Restart the computer workstation.
b Turn off the SureScan scanner, and then back on.
c Restart the Scan Control program.
4 If step 3 does not solve the problem, contact your local Agilent sales and support center.
SureScan System User Guide

Maintaining and Troubleshooting Your System 5 File locations
Using the Diagnostic Display
SureScan System User Guide
The SureScan scanner diagnostic display is used for advanced troubleshooting tasks. This display is located on the front of the instrument, behind the upper front cover. To open the cover, grasp the finger holds on the sides of the cover, and pull forward. You see the diagnostic display and a 4-way control switch.
NOTE Use the diagnostic display switch only when requested by Agilent
technical support.
Figure 14 Diagnostic display location
Upper front cover
Finger holds
4-way control switch
Diagnostic display
83
84
5 Maintaining and Troubleshooting Your System File locations
The diagnostic display control switch has the following capabilities:
• Before Scan Control connects to the instrument, the display shows the IP address of the scanner. If the IP address is not displayed, the firmware is not running.
• Toggle the switch Up to cycle through a menu, with the following choices:
• The first item lets you reset the IP address to factory default (10.0.0.2).
• The second item lets you reboot the firmware. (The firmware is also reset by power cycling the instrument.)
• To perform the selected operation, move the switch to the right (to the Select position).
• Once the Scan Control program connects to the instrument, the display reads “Client Connected”.
SureScan System User Guide

Maintaining and Troubleshooting Your System 5 To check if an update is available
Updating the Scanner Firmware and Scan Control Program
SureScan System User Guide
Agilent Technologies occasionally makes software updates available. Firmware updates (if necessary) are included with the Scan Control program update. This section describes how to update the scanner program and firmware.
To check if an update is available
If an update for the Scan Control program is available, an Information icon appears at the lower right of the Scan Control main window: Click the icon to display information about your installed version and the most recent version available.Figure 15 Update notification dialog box
To update the Scan Control program and firmware
1 From the Scan Control main window, click Help >Scanner Home Page.
The Agilent Technologies Genomics – High Resolution Scanner Overview web page opens.
2 In the web page, click Download Software.
3 Follow the instructions to read the Release Notes and Installation Notes
85
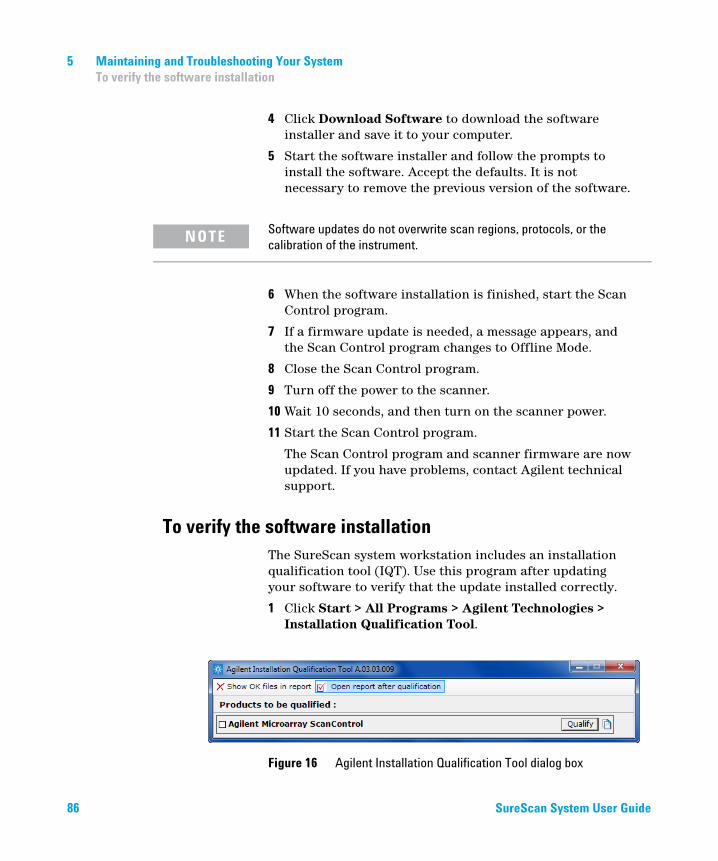
86
5 Maintaining and Troubleshooting Your System To verify the software installation
4 Click Download Software to download the software installer and save it to your computer.
5 Start the software installer and follow the prompts to install the software. Accept the defaults. It is not necessary to remove the previous version of the software.
NOTE Software updates do not overwrite scan regions, protocols, or the
calibration of the instrument.
6 When the software installation is finished, start the Scan Control program.
7 If a firmware update is needed, a message appears, and the Scan Control program changes to Offline Mode.
8 Close the Scan Control program.
9 Turn off the power to the scanner.
10 Wait 10 seconds, and then turn on the scanner power.
11 Start the Scan Control program.
The Scan Control program and scanner firmware are now updated. If you have problems, contact Agilent technical support.
To verify the software installation
The SureScan system workstation includes an installation qualification tool (IQT). Use this program after updating your software to verify that the update installed correctly.1 Click Start > All Programs > Agilent Technologies > Installation Qualification Tool.
Figure 16 Agilent Installation Qualification Tool dialog box
SureScan System User Guide
Maintaining and Troubleshooting Your System 5 To verify the software installation
SureScan System User Guide
2 Select the box next to Agilent Microarray Scan Control.
3 Under Products to be qualified, click Qualify.
The installation is verified, and an installation qualification report is generated. If you selected Open report after qualification, the installation qualification report opens in your internet browser.
4 When finished, click the close button in the upper right corner of the program dialog box.
87

88
5 Maintaining and Troubleshooting Your System To verify the software installation
SureScan System User Guide

SureScan Microarray Scanner System Microarray Scan Control Software 9.1 User Guide
6Reference
Scan Control Program Window Reference 90
Scan Control Program Dialog Box Reference 104
About Adding Slides 122
Performing Feature Extraction on Scanned Images 123
SureScan Scanner Specifications 124
Slide Specifications 126
Regulatory Information 130
This chapter includes descriptions of the Microarray Scan Control program windows and dialog boxes. It also contains specifications and regulatory information.
89Agilent Technologies

6 Reference Scan Control main window
Scan Control Program Window Reference
90
This section describes the main window of the Microarray Scan Control program and its contents.
Scan Control main window
Figure 17 Agilent Microarray Scan Control main window
Menu bar
Slot table
Function buttons
Settings pane
Logs
Status bar
Slot status indicators
Image processingstatus
SureScan System User Guide

Reference 6 Scan Control main window
SureScan System User Guide
The Microarray Scan Control window appears when you start the Microarray Scan Control Program. It has the following features:
Table 5 Scan Control window features
Feature Description
Menu bar Open tools menu and help.
Slot table Display status, scan protocols, and
output folders for microarray slides
currently in the scanner.
Settings pane Display settings for selected slide. For
slides not in the queue, you can
change settings from here.
Slot status indicators Indicates the status of the slot.
Matches the slot indicator lights on
the cassette.
Function buttons • Add and remove slides from the
scan queue
• Open and close the scanner door
• Start and stop a scan
Logs Display instrument and scan status
logs.
Status bar Show status of scanner, remaining
scan time, and disk space required for
the scan.
91

6 Reference Tools menu
Tools menu
92
Figure 18 Tools menu
The following functions are available on the Tools menu:
Table 6 Scan Control Tools commands
Tool Description
Scan Protocol Editor Opens the Scan Protocol Editor dialog
box, where you can create, change, or
remove scan protocols.
Scan Region Editor Opens the Scan Region Editor dialog
box, where you can create, change, or
remove custom slide scan regions.
Input Barcode Lets you use the keyboard or a
“keyboard emulation” barcode reader
to enter a barcode for a slide that does
not have a barcode, or a when the
scanner cannot read a barcode.
Switch on Lasers If the lasers are off, use this command
to turn on the scanner lasers.
SureScan System User Guide

Reference 6 Tools menu
SureScan System User Guide
Show Recent Errors Opens notepad (or your default text
editor) and displays details of the most
recent errors.
Log Files Opens the Logs folder, where you can
open any of the logs created by the
program.
State Snapshot Creates a file that contains the status
of the scanner at the time the
snapshot was created. This file is
helpful in troubleshooting.
Reset Calibration Warnings Laser calibration warnings are set
when the lasers cannot achieve their
specified power within the warm-up
period. If this problem occurs, the
system sets the warning, and
recalibrates the lasers at 80% of their
specified power. Use this function to
reset the warnings to default settings.
Self Test The self test examines various scanner
subsystems to check for
out-of-specification behavior. After the
self test is finished, a summary of the
results is opened in your internet
browser.
Settings Opens the Settings dialog box, where
you can set defaults and map scan
protocols to microarray designs.
Table 6 Scan Control Tools commands
Tool Description
93

6 Reference Help menu
Help menu
94
Figure 19 Scan Control Help menu
The following commands are available in the Help menu:
Table 7 Scan Control Help commands
Item Description
Users Guide Opens this guide in Adobe® Reader®.
Scanner Home Page Opens the Agilent Technologies
website for the SureScan scanner in
your internet browser.
Online support Opens the Agilent Technologies
Technical Support web page, where
you can find support information for
your scanner.
About Agilent Scan Control Displays version information for the
Scan Control program and the serial
number and model of your scanner.
SureScan System User Guide

Reference 6 Slot table
Slot table
SureScan System User Guide
Figure 20 Scan Control program slot table
The slot table is a virtual representation of the contents of your scanner cassette. It is used to set up, start/stop, and monitor the progress of scans.
Slot Status Indicator
Numbers to the left of the slot table are identical to the slot status indicator lights on the cassette. The color of the number changes to indicate the status of the slot and scan, as described in Table 8 on page 96.
Slide ID
The Slide ID used to name the scanned image file. After you load slides into the scanner cassette and close the scanner door, the program reads the barcode label for each slide in the cassette and displays it in this column. You can change95

96
6 Reference Slot table
the Slide ID to any text acceptable in a file name. The barcode for the slide is retained, and is shown when you move the mouse over its Slide ID in the Scan Table.
State
Displays the current state of the slot. Possible states and the color of the slot status indicator are shown in the following table.Table 8 Slot states and indicators
Slot status indicator State Meaning
Off Empty No slide is present in the cassette.
Blinks blue Present Slide is present in the cassette slot.
When barcode is read successfully, it
appears in Slide ID. Slide is not ready
to add to a queue because it has no
scan protocol assigned yet.
Blinks blue Ready for queue The slide is ready to add to a scan
queue.
Solid blue In queue x Slide is in the scan queue, in position
x, where x indicates the order in which
the slides are scanned.
Blinks green Scanning (x%) Slide is in the process of scanning,
where x% indicates the percent of
completion for the scan.
Solid green Complete Scan finished successfully.
Yellow Warning A warning was generated during the
scan.
Red Error An error occurred during the scan.
SureScan System User Guide

Reference 6 Slot table
Blinks yellow Removed A slide that was “Ready” or “In
Queue” was removed from the
cassette.
Blinks yellow Replaced A slide was placed into a slot whose
state was “Removed.”
• If the barcode matches the original
slide that was removed, the State is
changed back to “Ready” or “In
Queue.”
• If the barcode does not match the
slide that was removed, the Status
changes to “Ready” if a protocol is
mapped to the slide Design ID. It
changes to “Present” if no protocol
is mapped to the slide Design ID.
Table 8 Slot states and indicators (continued)
Slot status indicator State Meaning
SureScan System User Guide
Menu selections for State
For slides that are not scanning, commands are available that let you add or remove a slide from the queue. The selections available for a particular slide vary depending on the location of the slide in the queue, or if the slide is ready to add to the queue.
Table 9 Menu selections for State
Selection Description
Move to First Moves the slide to the first position in
the queue.
Move to Last Moves the slide to the last position in
the queue.
Move up Moves the slide one place up in the
scan queue.
Move down Moves the slide one place down in the
slide queue.
97

98
6 Reference Slot table
Remove from queue Removes the slide from the scan
queue and sets the State to Ready for
Queue.
Add to queue Available if no slides are in the scan
queue. Adds the selected slide to the
scan queue.
Add to queue first Adds slide to the first position in the
queue. If a scan is already in process,
the slide becomes the first slide to
scan after completion of the current
scan.
Add to queue last Adds the slide to the last position in
the queue.
Table 9 Menu selections for State (continued)
Selection Description
Scan Protocol
Displays the scan protocol to use for scanning the selected slide. Available scan protocols include the default Agilent-supplied scan protocols and any scan protocols that were created or imported. See “About Scan Protocols” on page 35.Output Folder
Displays the folder where image files created by the scanner are saved. By default, this location is D:\ScanData. You can change the default output folder in Tools > Settings. You can change the output folder for a slide before it is added to the queue. The Browse button lets you select a folder to store the data from each scan. Agilent recommends that the data be acquired to a local folder on a secondary hard drive. You can also select a network folder. If a network access problem is experienced during the scan, data is saved to a temporary local folder, and a warning is included in the scan log.SureScan System User Guide

Reference 6 Slot table
Function buttons
SureScan System User Guide
Buttons next to the slot table are available depending on the instrument status.
All to Queue
Adds all slides not currently in the slide queue to the slide queue. Slides are added to the queue in the order they appear in the slot table.Empty Queue
Removes all slides from the queue, except those currently scanning.Open Door/Close Door
Opens or closes the door on the scanner.Start Scan/Stop Scan
Starts or stops the scan. Slides are scanned in the order they appear in the scan queue.99

6 Reference Settings pane
Settings pane
100
Figure 21 Scan Control – settings pane
The settings pane lets you change individual settings for a selected slide. To change settings, the slide must not be in the scan queue. For more information on the settings available in this table, see “Scan Protocol Editor dialog box” on page 108.
SureScan System User Guide

Reference 6 Log tabs
Scan Settings
SureScan System User Guide
Displays scan settings from the assigned scan protocol. To change a setting, click next to the setting name and select a new value from the list. For more information, see “Scan Settings” on page 109.
Image Settings
Some data analysis programs have specific requirements for the images. This section lets you change how the image is created from the scan. For more information, see “Image Settings” on page 112.File Naming Settings
Shows selections for how the program names scan files. For more information, see “File Naming Settings” on page 113.
Scan Description
In this area, you can type information about the microarray slide or scan. This information becomes part of the file information that can be displayed in the Feature Extraction program.
User
In this area, you can type information about the operator who set up and performed the microarray scans. This information becomes part of the file information that can be displayed in the Feature Extraction program.Log tabs
The software documents instrument and scan status in log files that are saved in the C:\ProgramData\Agilent\MicroArrayScanner\Logs folder. These logs are also displayed in the Log tabs at the bottom of the Scan Control program window.Status Log tab
Figure 22 Status Log tab
101

102
6 Reference Log tabs
Displays information about the status of the instrument.
Scan Log tab
Figure 23 Scan Log tab
Displays information about the scans. When you start the Scan Control program, the Scan Log displays the scans from the previous 30 days.
Right-click in one of the log tabs to open a shortcut menu with the following options:
Table 10 Shortcut menu options for log tabs
Menu command Description
Clear Clears the contents of the tab. The
contents of the log file is not affected.
Copy Active after you hold down the mouse
button and drag to select a portion of
the log. Copies the selected region to
the Clipboard. You can paste the
selection into a text editor or program
of your choice.
SureScan System User Guide

Reference 6 Log tabs
SureScan System User Guide
Select all Selects all of contents of the log tab.
Auto Scroll Turns auto scrolling within the log on
or off. If autoscroll is on, when a new
message appears, the program
automatically scrolls to the bottom of
the log so you can see it easily. If
autoscroll is off, the pane does not
scroll when new messages appear.
Turning off autoscroll is useful if you
want to review the log while the
scanner is active.
Table 10 Shortcut menu options for log tabs
Menu command Description
103

6 Reference Agilent Installation Qualification Tool
Scan Control Program Dialog Box Reference
104
This section contains descriptions of the parameters available in the dialog boxes that appear when you use the Scan Control program. The dialog box descriptions appear in alphabetical order.
Agilent Installation Qualification Tool
Figure 24 Installation Qualification Tool dialog box
Purpose: Verifies that the Scan Control program was installed correctly and generates an Installation Qualification report.
To open: In the Windows Start menu, click All Programs > Agilent Technologies > Installation Qualification Tool.
Show OK files in report
When selected, the qualification report includes a list of all files verified as OK. (Default is not selected. Invalid files are always shown.)
Open report after
qualification
When selected, the qualification report opens in your web browser, after the installation qualification is finished.
Products to be qualified
Displays a list of Agilent software products that you can qualify with the tool.
Qualify
Starts the installation qualification for the selected product.Re-Qualify
Appears after installation qualification. Lets you requalify the installation. Requalify after you correct any problems, to generate a new installation qualification report.SureScan System User Guide

Reference 6 Export Scan Protocol dialog box
Report saved at
SureScan System User Guide
Appears after installation qualification is finished. Displays a link to the location of the qualification report. Click the link to open the report in your web browser.
Opens the IQT reports folder.
Export Scan Protocol dialog box
Figure 25 Export Scan Protocol dialog box
Purpose: Lets you select available scan protocols to export.
To open: In the Scan Protocol Editor dialog box, click Export.
105

6 Reference Export Scan Region dialog box
Export
106
When one or more scan protocols are selected, this command opens the Save As dialog box, where you select a location and file name for the exported protocols file.
Close
Closes the dialog box.Export Scan Region dialog box
Figure 26 Export Scan Region dialog box
Purpose: Displays available scan regions that you can select to export.
To open: In the Scan Regions Editor dialog box, click Export.
SureScan System User Guide
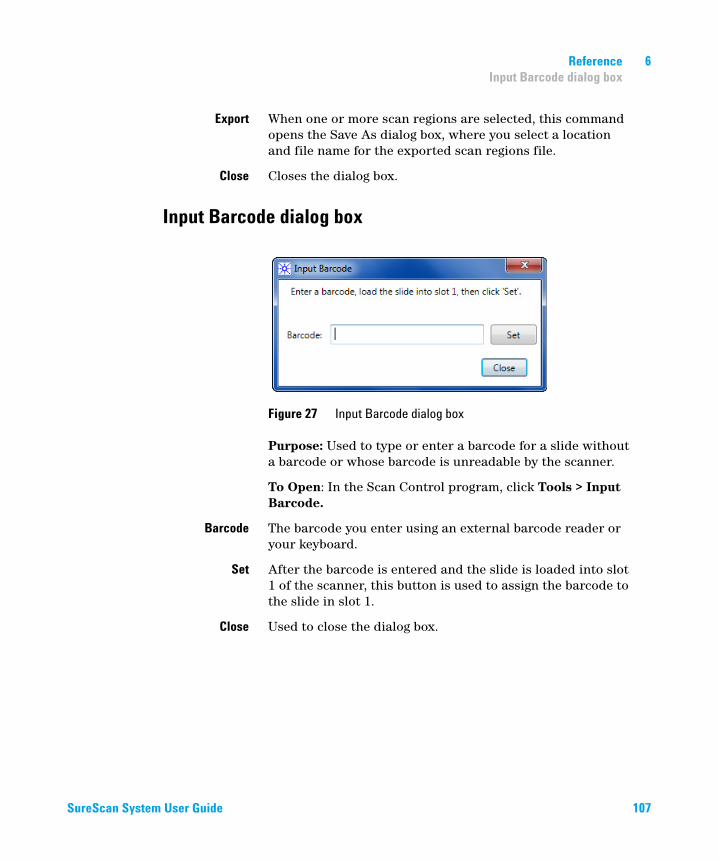
Reference 6 Input Barcode dialog box
Export
SureScan System User Guide
When one or more scan regions are selected, this command opens the Save As dialog box, where you select a location and file name for the exported scan regions file.
Close
Closes the dialog box.Input Barcode dialog box
Figure 27 Input Barcode dialog box
Purpose: Used to type or enter a barcode for a slide without a barcode or whose barcode is unreadable by the scanner.
To Open: In the Scan Control program, click Tools > Input Barcode.
Barcode
The barcode you enter using an external barcode reader or your keyboard.Set
After the barcode is entered and the slide is loaded into slot 1 of the scanner, this button is used to assign the barcode to the slide in slot 1.Close
Used to close the dialog box.107
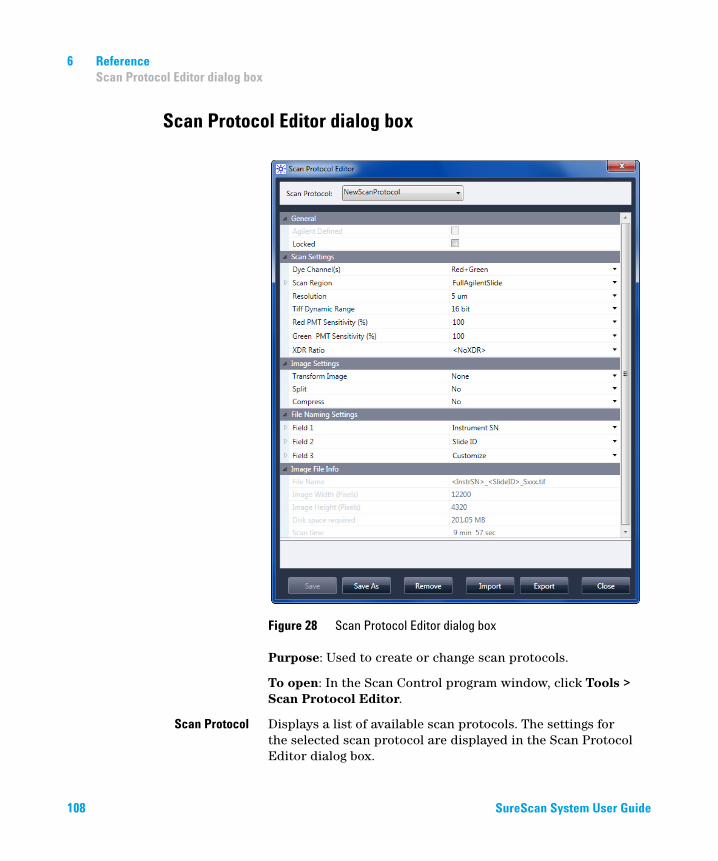
6 Reference Scan Protocol Editor dialog box
Scan Protocol Editor dialog box
108
Figure 28 Scan Protocol Editor dialog box
Purpose: Used to create or change scan protocols.
To open: In the Scan Control program window, click Tools > Scan Protocol Editor.
Scan Protocol
Displays a list of available scan protocols. The settings for the selected scan protocol are displayed in the Scan Protocol Editor dialog box.SureScan System User Guide

Reference 6 Scan Protocol Editor dialog box
SureScan System User Guide
General
Agilent Defined
A protocol provided by Agilent.Locked
When a protocol is locked, it cannot be changed.Scan Settings
Dye channel
Determines whether only red (for example, Cy-5 dye), only green (for example, Cy-3 dye), or both dye channel information is gathered. The selection has no effect on the scan time, but selecting only one dye channel does reduce file size up to a factor of 2.Scan region
The scan region determines the area of the slide that is scanned. It must be large enough to capture the entire print region of the microarray. It must be small enough to avoid scanning too close to the barcode or other nontransparent border areas of the slide and affecting the ability of the scanner to auto focus properly. Minimizing the scan region also reduces scan time and save storage space.Agilent provides a scan region suitable for all Agilent High Density and G3 slides, and another suitable for scanning full 1 x 3 slides without barcode labels.
For non-Agilent slides, you may need to use a custom scan region that better matches the printed region. See “Creating and Changing Scan Regions” on page 53.
Resolution
Sets the scan resolution (pixel size) to 2, 3, 5 or 10 microns.For 10-micron scans, each row of pixels in the TIFF image represents the average of two scan lines, one acquired in each direction. For 5-, 3- and 2-micron scans, you can select double-pass scanning to perform this averaging, or acquire only a single scan line for each image row.
A high-sensitivity scan mode is also available at all scan resolutions. The high-sensitivity mode provides sensitivity comparable to the double-pass mode but with scan times reduced by 25%. The high-sensitivity mode can be selected in the Resolution pull-down menu of the Scan Protocol Editor.
109

110
6 Reference Scan Protocol Editor dialog box
If you do not have a high-resolution license, 2- and 3- micron settings are not available.
TIFF Dynamic Range
Sets the dynamic range to 16-bit or 20-bit. The G4900DA scanner has extended the dynamic range of the PMT and signal processing electronics. When you select the 20-bit TIFF file option, you can access this extended range, enabling quantitation of high and low signal features in a single scan. If you do not have a high-resolution license, the 20-bit option is not available.
The Scan Control software still enables conventional XDR 16-bit scanning, as described below.
NOTE If 20-bit option is selected, no XDR option is allowed; if an XDR option is
selected already, it is reset automatically.
Table 11 shows the storage space and scan time for single and double pass scans for each resolution selected, for either a 16-bit TIFF dynamic range or a 20-bit range. The Scan Region is 61 X 21.6 mm.
The status bar at the bottom of the Scan Control main window shows an estimate of the storage space and run time required for the current queue of slides.
Table 11 Storage space and scan time
Resolution Storage Space, Mb, 16-bit
Storage Space, Mb, 20-bit
Scan Time, min.
2-micron single pass 1300 1600 24
3-micron single pass 620 760 16
5-micron single pass 200 300 10
10-micron single pass 52 115 10
2-micron double pass 1300 1600 46
3-micron double pass 620 760 31
5-micron double pass 200 300 19
SureScan System User Guide

Reference 6 Scan Protocol Editor dialog box
SureScan System User Guide
Double pass scans do not require more storage space than single pass scans, but they take twice as long to finish.
2-micron high-sensitivity 1300 1600 36
3-micron high-sensitivity 620 760 24
5-micron high-sensitivity 200 300 15
10-micron high-sensitivity 52 115 15
Table 11 Storage space and scan time (continued)
Resolution Storage Space, Mb, 16-bit
Storage Space, Mb, 20-bit
Scan Time, min.
Red PMT Sensitivity (%)
and Green PMT
Sensitivity (%)
Sets the sensitivity level of the red channel and green channel PMTs. The PMT detects fluorescence emitted by the microarray.
The default output level (100%) sets the gain to the factory-calibrated level; this setting is recommended for Agilent microarrays. You can reduce each color channel setting independently to as low as 1%.
If a microarray is so bright that the upper end of the output signal is saturated, the PMT sensitivity level can be lowered to a sensitivity range that allows all the information to be read.
XDR Ratio
Before 20-bit TIFF file dynamic range was available, the eXtended Dynamic Range function was used on both the scanner and Feature Extraction program to capture all the data scanned between very low signal features and very high signal features. Now, instead of using XDR, you can select the 20-bit TIFF file dynamic range to capture the wide dynamic range of data.NOTE If 20-bit option is selected, no XDR option is allowed.
With the XDR function turned on, the scanner automatically scans the same slide twice, at two different PMT sensitivity levels. It generates two linked images that Feature Extraction
111
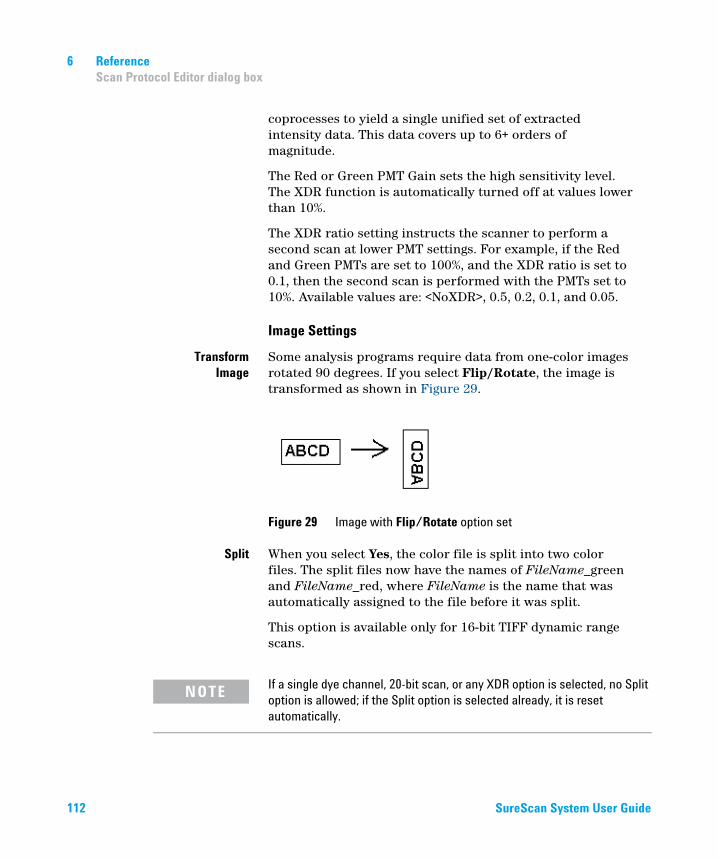
112
6 Reference Scan Protocol Editor dialog box
coprocesses to yield a single unified set of extracted intensity data. This data covers up to 6+ orders of magnitude.
The Red or Green PMT Gain sets the high sensitivity level. The XDR function is automatically turned off at values lower than 10%.
The XDR ratio setting instructs the scanner to perform a second scan at lower PMT settings. For example, if the Red and Green PMTs are set to 100%, and the XDR ratio is set to 0.1, then the second scan is performed with the PMTs set to 10%. Available values are: <NoXDR>, 0.5, 0.2, 0.1, and 0.05.
Image Settings
Transform Image
Some analysis programs require data from one-color images rotated 90 degrees. If you select Flip/Rotate, the image is transformed as shown in Figure 29.
Figure 29 Image with Flip/Rotate option set
Split
When you select Yes, the color file is split into two color files. The split files now have the names of FileName_green and FileName_red, where FileName is the name that was automatically assigned to the file before it was split.This option is available only for 16-bit TIFF dynamic range scans.
If a single dye channel, 20-bit scan, or any XDR option is selected, no Split
NOTEoption is allowed; if the Split option is selected already, it is resetautomatically.
SureScan System User Guide

Reference 6 Scan Protocol Editor dialog box
Compress
SureScan System User Guide
When you select Yes, the program reduces the final amount of storage space occupied by scan images by compressing the TIFF files. The compression algorithm used, LZW, reduces the storage space by 20 to 70 percent.
File Naming Settings
Field 1, Field 2, and Field 3
Displays the settings used for naming TIFF image files created by the scanner. Choices are shown in Table 12.
Scan files are named using the following rules.
Table 12 Choices for file naming fields
Choice Description
<none> The field is not included in the image
file name.
Instrument SN Includes the serial number of the
scanner in the image file name.
Slide ID Includes the slide identification
number (barcode) in the image file
name.
Scan DateTime Includes the date and time of the scan
in the image file name.
Customize Lets you type custom information to
include in the image file name. After
you select Customize, double-click
Field X. (Where X = the field number 1,
2, or 3.) In the adjacent box, type the
custom information to include in the
file name.
For standard scans, the Scan Control program uses up to three user-defined name prefixes to compose the file name. These prefixes are defined in the scan protocol.
Field1_Field2_Field3_ScanNumber.tif
113

114
6 Reference Scan Protocol Editor dialog box
For XDR scans, an additional segment (either _H or _L) is added to the file name to distinguish the XDR Hi image from the XDR Lo image:
Field1_Field2_Field3_ScanNumber_H.tif Field1_Field2_Field3_ScanNumber_L.tif
The Scan Control program automatically assigns the Scan Number.
The program compares the file name of a new scan with file names in the selected data folder.
If Field1_Field2_Field3 is unique, the scan number is set to S01.
If a match is found, the scan number is increased until the file name is unique.
Example
US4510PP02_251485023883_S03.tif
• Instrument Serial # = US4510PP02
• Slide ID = 251485023883
• ScanNumber = S03. Indicates the third scan file in the folder with the same Instrument Serial # and Slide ID.
Image File Info
This section is a read-only area that displays information about the image file name, geometry of the slide, disk space required for the file, and estimated time to finish the scan.
SureScan System User Guide

Reference 6 Scan Region Editor dialog box
Scan Region Editor dialog box
SureScan System User Guide
Figure 30 Scan Region Editor dialog box
Purpose: Lets you adjust or define the area of the slide that is scanned.
To open: In the Scan Control program menu bar, click Tools > Scan Region Editor.
115

116
6 Reference Scan Region Editor dialog box
General
Agilent Defined
A protocol provided by Agilent.Locked
When a protocol is locked, it cannot be changed.Scan Region
TopLeft X
X-axis measurement for the upper left corner. Type this measurement and that of the Y-axis in mm to position the region on the slide.TopLeft Y
Y-axis measurement for the upper left corner.Width
Width of the scan region measured from the end of the x-axis measurement in the upper left corner.Height
Height of the scan region measured from the end of the Y-axis measurement in the upper left corner.Chip Package
A chip package describes the maximum size of the scan region for slides of a designated type. This read-only area displays the default scan region for the selected chip package. There are two types of chip packages; Full Agilent for Agilent slides with barcode labels, and Full Standard for slides without barcode labels.
Save
Saves the current scan region values in the current slide scan region.Save As
Opens the Save As New Name dialog box, where you can save the current scan region with a new name.Remove
Removes the selected scan region.Import
Opens the Open dialog box, where you select an exported scan region file to import to the program.Export
Opens the Export Scan Region dialog box, where you select one or more scan regions to export.Close
Closes the dialog box.SureScan System User Guide

Reference 6 Self Test dialog box
Self Test dialog box
SureScan System User Guide
Figure 31 Self Test dialog box
Purpose: Examines various scanner subsystems to check for out-of-specification behavior. After the self test is finished, a summary of the results is opened in your internet browser. The test results are also saved in the C:\ProgramData\Agilent\MicroArrayScanner\SelfTestReport folder.
To open:
Start/Stop
Starts or stops the self-test.Show Last Results
If more than one self test was run without closing this dialog box, this command opens your internet browser with the results.
Close
Closes the Self Test dialog box and reinitializes the scanner.117

6 Reference Settings dialog box – General Settings
Settings dialog box – General Settings
118
Figure 32 Settings dialog box – General Settings tab
Browse
For settings that require a folder location, lets you browse to the folder and select it, rather than typing the path.Save
Saves the settings. If you change settings and want to save them, select this button before you close the dialog box.Close
Closes the dialog box without saving changes.Timeouts
Laser Saver Delay
When no scan or scan queue is running, the lasers automatically turn off after this amount of time (in minutes).
SureScan System User Guide
Reference 6 Settings dialog box – General Settings
SureScan System User Guide
Data
Default Scan Data Folder
Displays the folder where images created by the scanner are stored by default. You can change this folder for a scan in the Scan Table.
Feature Extraction
Location of Feature
Extraction
The path to the FENoWindows.exe program file. By default, this location is C:\Program Files (x86)\Agilent\MicroArray\FeatureExtraction\FeNoWindows.exe.
Run Feature Extraction
when scan is complete
When selected, slides are feature extracted automatically after they are scanned. To run Feature Extraction automatically, the design files for all images must already be present in the Feature Extraction database.
NOTE To use Agilent CytoGenomics in auto-processing mode, do not select Run Feature Extraction when scan is complete. (The Agilent CytoGenomics
program is not included with the SureScan system.)
119

6 Reference Settings dialog box – Design To Protocol Mapping
Settings dialog box – Design To Protocol Mapping
120
Figure 33 Settings dialog box - Design To Protocol Mapping tab
Purpose: Used to assign default scan protocols to microarray slide Design IDs. Whenever the scanner recognizes a slide that has a scan protocol mapped to its design, the program automatically fills in the mapped scan protocol in the Slot Table.
To open: In the Scan Control program menu bar, click Tools > Settings and then click Design To Protocol Mapping.
Design ID
For Agilent microarray slides, you can determine the Design ID from the barcode. All barcodes start with 25; the next five digits represent the Design ID. For example, the Design ID for barcode 251727810298 is 17278.SureScan System User Guide

Reference 6 Settings dialog box – Design To Protocol Mapping
Scan Protocol
SureScan System User Guide
The scan protocol that is assigned to the Design ID. This scan protocol is automatically assigned in the Slot Table whenever the scanner recognizes a slide with the associated Design ID.
Description
An area where you can type information about the mapped scan protocol.121

6 Reference Settings dialog box – Design To Protocol Mapping
About Adding Slides
122
You can add slides to the SureScan scanner even when it is scanning. Use the following guidelines when adding slides to the scanner.
• You can add slides (in slide holders) to the cassette even when scanning is in process. If a slide is actively loading or unloading, you cannot open the door. Wait approximately 30 seconds for the loading or unloading process to finish.
• When the door is open, the scanner waits to eject a slide that is currently scanning.
• If the door is left open with no activity for 5 minutes, a message appears to warn you that the door is about to close, and then the door closes automatically.
• If you place a slide into the slot for a slide that is currently scanning, the slot status indicator turns red, and a message appears instructing you to remove the slide.
• If the door jams while closing (due to an incorrectly inserted slide holder, for example) a dialog is displayed that asks you to clear the jam and then click OK to try again.
SureScan System User Guide

Reference 6 Settings dialog box – Design To Protocol Mapping
Performing Feature Extraction on Scanned Images
SureScan System User Guide
There are a number of ways you can do feature extraction on the scanned image files created by your scanner:
The Feature Extraction program is
preinstalled on your scanner
workstation.
• Set up the Scan Control program to run Feature Extraction automatically as the slides are scanned. See “To set the location of the Feature Extraction program” on page 63 and “To select to run Feature Extraction after scanning” on page 63. The Scan Control program automatically creates a project file that is used to feature extract the image after it is scanned. The Feature Extraction database must contain the design (grid) for the image, or you must have the Feature Extraction program configured to use the eArray server during extraction.
• Run the Feature Extraction program manually after the scanned images are created. For information on using the Feature Extraction program, see the documentation provided with the program.
The Agilent CytoGenomics
program is not included with the
SureScan system.
• To use Agilent CytoGenomics to feature extract the images, set the output folder to the auto-processing TIFF image folder configured in the Agilent CytoGenomics program. The CytoGenomics program picks up the images automatically and then feature extracts and analyzes them. For more information, see the Agilent CytoGenomics program documentation.
123

6 Reference Settings dialog box – Design To Protocol Mapping
SureScan Scanner Specifications
124
The SureScan scanner operates within the following specifications:
Approximate dimensions
Height: 42 cm (16.5 in)
Width: 43 cm (17 in)
Depth: 67 cm (26 in)
Weight
56.8 kg (125 lbs)Power input
100 – 240 Vac, 50 - 60 Hz, 250-VA max.Fuses
Two power supply fuses: T4A, 250 VAC (part# 2110-1491)Temperature range
Operating: 15 ° to 30 °C
Storage: –40 ° to +50 °C
Humidity
Operating: 15% to 85% RH at 30 °CPotentially sensitive to condensing humidity conditions. Follow precautions stated in “Tips to avoid damage to the scanner” on page 67. Always allow 12 hours thermal equilibration time on site before opening the shipping box.
Altitude
Operating maximum: 4,600 m (15,000 ft)Storage maximum: 9,200 m (30,000 ft) at –40 °C
Usage
Indoor useLaser information
Wavelengths:
• Green solid-state laser: 532 nm
• Red solid-state laser: 640 nm
Power: both controlled to 13 mW
Maximum scan region
71 mm x 21.6 mm
Suggested microarray
print region
1 mm smaller than scan region on the right, 2 mm on the left, and 0.6 mm on the top and bottom. For non-Agilent slides, the print region is smaller than this by an amount equal to the array printing tolerance.
SureScan System User Guide

Reference 6 Settings dialog box – Design To Protocol Mapping
Dyes supported
SureScan System User Guide
Cyanine-3 (Cy-3) and cyanine-5 (Cy-5) and dyes similar to Cy-3 and Cy-5 and Alexa 647, 555, and 660 dyes
Resolution (pixel size)
2, 3, 5 or 10 microns
Pixel placement error
< 1 pixel at 5-micron resolution
Uniformity
5% CV global non uniformity, average local nonuniformity is typically 1% based upon 100um features.Scan time
Table 13 Scan Time for Single and Double Pass Scans for Agilent HDScan Region 61 x 21.6 mm
Resolution Scan Time, min.
2-micron single pass 24
3-micron single pass 16
5-micron single pass 10
10-micron single pass 10
2-micron double pass 46
3-micron double pass 31
5-micron double pass 19
2-micron high-sensitivity 36
3-micron high-sensitivity 24
5-micron high-sensitivity 15
10-micron high-sensitivity 15
Dynamic range
Single scan 16-bit dynamic range >104Single scan 20-bit dynamic range >105
Dual scan extended dynamic range (XDR) >106
125

6 Reference Scan dimensions
Slide Specifications
Scan dimensions
126
The scan region for a standard Agilent microarray is specified in Figure 34. All dimensions are in millimeters and the reference point is the lower right side of the glass.
Figure 34 Default scan region for G4900DA scanner
Glass specifications
The SureScan scanner uses slide holders to move the microarrays in and out of the cassette. These slide holders are designed to accept a 1 in 3 in nominal piece of glass.The detailed specifications of the glass are as follows:
• 1 inch wide (25.4 mm, –0.45 mm, or +0.7 mm)
• 3 inches long (76.2 mm, +0.25 mm, or –1.4 mm)
• 1 mm thick (+/-0.1 mm)
• No mirrored slides
• High quality with low intrinsic fluorescence
• Index of refraction from 1.510 to 1.515
SureScan System User Guide

Reference 6 Barcode and barcode label specifications
Barcode and barcode label specifications
SureScan System User Guide
Barcode specifications for Agilent slides
The G4900DA scanner reads barcodes placed on the active side of the slide.
For backwards compatibility with the G2565AA model scanners, Agilent microarrays continue to have barcodes on both sides. The label with the text “Agilent” denotes the active side; the label with the numeric value is the inactive side.
Figure 35 Agilent slide barcode orientation vs. microarray surface
Barcode specifications for non-Agilent slides
• The barcode label maximum thickness is 0.2 mm. Make sure that there are no bubbles in the label. Do not add labels on top of old labels or replace labels that are beginning to peel off.
• Do not place barcode labels on slides whose scan region exceeds 61 mm. Enter the slide identifier or barcode manually for slides whose scan regions exceed 61 mm.
127

128
6 Reference Barcode and barcode label specifications
• For a barcoded slide, the distance between the edge of the microarray scan region and the edge of the barcode label can be no less than 4 mm.
Figure 36 Barcode label location on non-Agilent slide
• The barcode label width should be about 6 mm; the recommended barcode label width is for use with the 61-mm scan region. Larger or longer barcode labels can be used by decreasing the scan region proportionally.
• Barcode labels should be narrow enough so as not to interfere with the slide holder tabs.
• Maximum allowable tilt in the placement of the barcode label on the slide is ±3 °.
The barcode must meet the following requirements:
• The minimum quiet zone (the region between the edge of the label and the start or end of the barcode) is ten times the X-dimension on each side of the barcode.
• Barcode lines must be parallel to the long edge of the slide within tilt tolerance of ±3 °.
• Agilent supports the following barcode formats:
• Code 128: Non-Agilent barcodes with 12 digits must not start with 2
• CODABAR: Maximum of eight digits; minimum line thickness = 6 mils
>4 mm
Bar
code
labe
l are
a
Nominal scan region
Sur
eScan System User Guide
Reference 6 Barcode and barcode label specifications
SureScan System User Guide
• Code 39: Maximum of eight digits; minimum line thickness = 6 mils
• Code 93: Maximum of eight digits; minimum line thickness = 6 mils
• Minimum height of barcode must be
• Code 128: 15% of barcode length for Code 128
• Code 39, Code 93, CODABAR: 5 mm or 15% of barcode length, whichever is greater
129
6 Reference Barcode and barcode label specifications
Regulatory Information
130
This section lists regulatory information for the SureScan system, which includes the G2600D SureScan microarray scanner, computer workstation, and control software.
For research use only
The SureScan system is intended for RESEARCH USE ONLY.
Acoustic noise information
Manufacturer’s Declaration:
English
This statement is provided to comply with the requirements of the German Sound Emission Directive, from 18 January 1991. Sound Pressure Lp < 70 dB(A), at operator’s position, normal operation, according to EN 27779/ISO 7779 (Type Test).Deutsch
Die folgende Information wird in Übereinstimmung mit den Anforderungen der Maschinenlärminformationsverordnung vom 18. Januar 1991 erteilt. Schalldruckpegel am Arbeisplatz bei normalem Betrieb, Lp < 70 dB(A), nach EN 27779/ISO 7779 (Typprüfung).Recycling and disposal
Contact Agilent Technologies for
more information on recycling and
disposal.
This device is designed to accommodate recycling at the end of its useful life. Please dispose of this device in accordance with local regulations.
Electromagnetic interference
The scanner is intended for use with shielded cables only.
Emissions
Complies with the emissions limits for Class A, Group 1 equipment specified in CISPR 11/EN5011 as required in IEC 61326-1 for Class A equipment. This equipment is not intended for use in residential areas.SureScan System User Guide

Reference 6 Barcode and barcode label specifications
Immunity
SureScan System User Guide
This device complies with the immunity levels required in IEC 61326-2-6 for a non-controlled, electromagnetic environment. This equipment is not intended for use in residential or industrial environment. See accompanying Declaration of Conformity for specific levels.
Canada
This ISM (Industrial-Scientific-Medical) device complies with Canadian ICES-001.Cet appareil ISM est conforme a la norme NMB-001 du Canada.
Safety information
This scanner complies with the following safety standards:
• Pollution Degree: 2
• Installation Category: II
• Class I Equipment; requires a grounding system
CAN/CSA-. C22.2
No. 61010-1 - 04
Safety Requirements for Electrical Equipment for
Measurement, Control, and Laboratory Use, Part
1: General Requirements
UL Std No. 61010-1 (2nd
Edition)
Safety Requirements for Electrical Equipment for
Measurement, Control, and Laboratory Use: Part
1: General Requirements
IEC 61010-1:2001 Safety Requirements for Electrical Equipment for
Measurement, Control, and Laboratory Use,
Part 1: General Requirements
EN 61010-1:2001 Safety Requirements for Electrical Equipment for
Measurement, Control, and Laboratory Use – Part
1: General Requirements
IEC 60825-1:2007 Safety of laser products Part 1: Equipment
classification and requirements
EN60825-1:2007 Safety of Laser Product – Part 1: Equipment
Classification and Requirements
131

132
6 Reference Barcode and barcode label specifications
• Class 1 Laser Product
• CSA and NRTL Certified Product
SureScan System User Guide

Index
AAll to Queue, 99archiving data, 34, 66automatic file naming, 113
Bbarcode formats, 128barcodes
specifications, 127
Ccarousel
loading slide holders into, 29Close Door, 99create scan region, non-Agilent slides, 53
Ddata
archiving, 66dye channel setting, 109dynamic range
16-bit or 20-bit, 110TIFF file, 110
EEmpty Queue, 99error messages, 76
not appearing in table, 81table in alphabetical order, 77where and when they appear, 76
FFAQs (frequently asked questions), 71Feature Extraction, 20, 123file naming, automatic, 113firmware update, 85
SureScan System User Guide
fluorescence detection, 19frequently asked questions (FAQs), 71front view of scanner, 15fuses
power supply, 73
Gglass slide, specifications, 126
Hhigh resolution scanning license, 22humidity, 67
Iindicator lights, 15initialization process, 25Inspecting the vents, 66installation qualification tool (IQT), 86
Llaser excitation, 18lasers
turning off automatically, 37Licensing, 22licensing
high resolution scanning, 22
Mmapping design to scan protocol, 64, 120moving scanner, cautions, 68
Nnaming files, automatic, 113network drive, 71, 98non-Agilent slides
creating scan region, 53
OOpen Door, 99operating principles, 18operating scanner, 23output folder, selecting, 98output path setting, 98
Pparts, list of, 13power supply fuses, 73preparation of site, 16principles of operation, 18
fluorescence detection, 19laser excitation, 18scanning, 18slide positioning, 18
Rrear view of scanner, 16recycling and disposal, 130regulatory information
acoustic noise, 130electromagnetic interference, 130recycling and disposal, 130
removing scanner covers, 68removing slides, 34
Ssafety
guidelines, 17regulations, 131symbols for scanner, 16
safety symbols, 16scan dimensions, 126
133

Index
scan regionarea, 109changing for non-Agilent slides, 53creating for non-Agilent slides, 53definition, 53
Scan Region Editor, 53editing existing scan regions, 53
scan regionsediting, 53
scan settingsautomatic file naming, 113
scan settings table, 100scan table settings
dye channels, 109red and green PMT gain, 111scan region, 109sensitivity level (PMT), 111TIFF file dynamic range, 110XDR ratio, 111
scan time, 125scan, definition, 33scanner
electromagnetic interference, 130initializing, 23maintenance tasks, 66moving, 68specifications, 124turning on, 23warning on removing covers, 68
scanning, 18scanning slides, 33scans
storage space and scan time table, 110sensitivity level (PMT) setting, 111serial number, scanner, 69, 70shortcuts menu for Log tabs, 102signal-to-noise performance, 18site preparation, 16Slide ID, 95slide positioning, 18slide specifications
glass slide, 126scan dimensions, 126
slidesinserting into slide holders, 26removing, 34scanning, 33specifications, 126
slot state, 96
134
slot status indicator, 95slot table settings
output path, 98software
icon, 23maintenance, 66starting, 23
specifications, 16barcodes, 127Microarray Scanner, 124
startingsoftware, 23
status indicator lights, 15support, technical, 69system requirements, 14
Ttechnical support, 69
changing URL to reach, 69technical support, calling, 69temperature considerations, 67The, 71TIFF file dynamic range, 110Troubleshooting
indicator lights, 72troubleshooting
error messages, 76 to 81hardware, 72replacing fuses, 73technical support, 69
Uupdate firmware, 85
Vversion information, finding, 70
XXDR ratio, 111
SureScan System User Guide

Index
SureScan System User Guide
135
www.agilent.com
Information, descriptions and specifications are
subject to change without notice. For updated
information on Agilent products, please go to
http://genomics.agilent.com.
Agilent Technologies, Inc. 2011-2013,
2015
December 2015
*G4900-90000*G4900-90000
Revision A3
Agilent Technologies
Related Documents