Private and Confidential, Internal Use Only, Not for External Distribution 5/20/2015 | 1 of 19 Requirements Escalation Process 2 Troubleshooting Reminders/Tips 2 Citrix Login Instructions 3 Log Off Instructions 8 APPENDIX Multiple Monitor Setup 9 Logging in to Avaya One-X Agent 11 CryptoCard Soft Token Initialization (Install Locally) 13 CryptoCard Soft Token Initialization (Install Smart Phone) 16 IE 11 Settings Troubleshooting 18 Agent at Home Quick Start

Welcome message from author
This document is posted to help you gain knowledge. Please leave a comment to let me know what you think about it! Share it to your friends and learn new things together.
Transcript

Private and Confidential, Internal Use Only, Not for External Distribution 5/20/2015 | 1 of 19
Requirements
Escalation Process 2
Troubleshooting Reminders/Tips 2
Citrix
Login Instructions 3
Log Off Instructions 8
APPENDIX
Multiple Monitor Setup 9
Logging in to Avaya One-X Agent 11
CryptoCard Soft Token Initialization (Install Locally) 13
CryptoCard Soft Token Initialization (Install Smart Phone) 16
IE 11 Settings Troubleshooting 18
Agent at Home Quick Start

Agent at Home Quick Start
Private and Confidential, Internal Use Only, Not for External Distribution 5/20/2015 | 2 of 19
REQUIREMENTS
ESCALATION PROCESS
Agents at home are required to use their existing escalation process for all issues.
TROUBLESHOOTING REMINDERS/TIPS
Logging Off: It is essential that you use the log off process provided in this job aid. Failing to properly log off after being in the Citrix environment can cause system issues.
Disconnecting: Never disconnect from either the virtual machine or the Citrix connection.
USB Devices: Users must NOT have USB devices plugged into their computer. Devices may inhibit home system performance.
Helpdesk: When discussing your system information with the Helpdesk, refer to your system information located in the lower right corner of your desktop.

Agent at Home Quick Start
Private and Confidential, Internal Use Only, Not for External Distribution 5/20/2015 | 3 of 19
CITRIX LOGIN INSTRUCTIONS
Agent @home requires Internet Explorer version 8 or version 11.
1. Have your CryptoCard key
fob ready(hard token). Note: If you
have a soft token, enter your PIN only
on the soft token and then take the
code it displays and enter that into the
CryptoCard Password field without the
PIN.
2. Open up Internet Explorer.
3. Navigate to athome.percepta.com to
access the Percepta Agent @home
portal.
4. The new window provides three links:
Click “Launch @Home Portal” to
launch Citrix Access Gateway, The
Quick Start Guide, Documentation
(Help and System Requirements).
5. Citrix Access Gateway displays in a
new window. Enter the following
information:
Windows Username- Percepta
domain user name
(firstname.lastname)
Windows Password- Windows
domain password
CryptoCard Password- 4 or 5
digit PIN + 8 digits displayed on the
CryptoCard key fob
firstname.lastname
Make sure you
press the key
fob button.

Agent at Home Quick Start
Private and Confidential, Internal Use Only, Not for External Distribution 5/20/2015 | 4 of 19
6. The first time you access Agent
@home, install the Citrix Receiver
software.
Click the ”I agree with the Citrix
license agreement” box, and
Click the “Install” button.
7. Click the “Run” button.
8. The Citrix Receiver software will
download and may take several
minutes depending on your internet
connection speed.
9. Once Citrix is received, click the
“Install” button.
10. It may take a few minutes for the Citrix
Receiver to be installed.
Agent at Home Quick Start
Private and Confidential, Internal Use Only, Not for External Distribution 5/20/2015 | 5 of 19
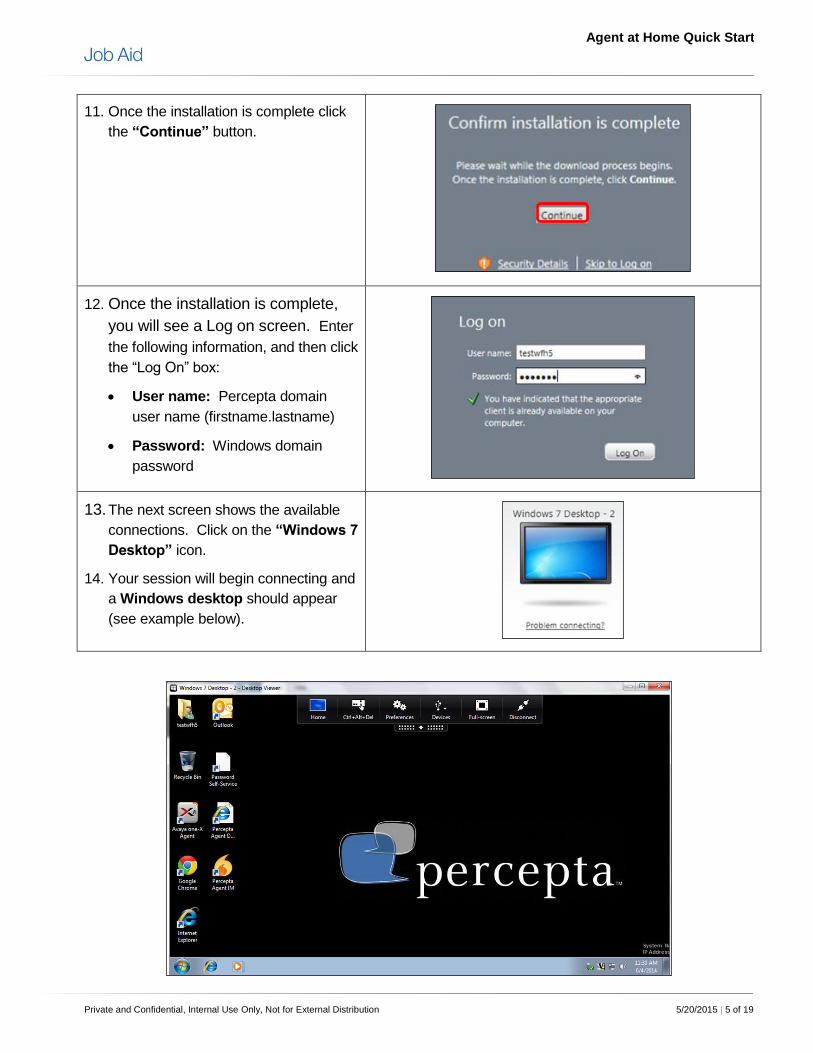
11. Once the installation is complete click
the “Continue” button.
12. Once the installation is complete,
you will see a Log on screen. Enter
the following information, and then click
the “Log On” box:
User name: Percepta domain
user name (firstname.lastname)
Password: Windows domain
password
13. The next screen shows the available
connections. Click on the “Windows 7
Desktop” icon.
14. Your session will begin connecting and
a Windows desktop should appear
(see example below).

Agent at Home Quick Start
Private and Confidential, Internal Use Only, Not for External Distribution 5/20/2015 | 6 of 19
15. MESSAGES: If the windows desktop does not appear, you may receive one of two messages. If you receive either message, do the following:
Message 1: Check the
“Do not show me
warnings for this
program again” box and
press the “Allow” button.
Message 2: Click on “I
will enter the URL later.”
The Logon box will then
appear.
16. When the windows desktop appears, click on the pull down icon to display the Citrix tool bar.
Note: The pull down icon can be repositioned
anywhere along the top of the screen.
17. On the tool bar, click on the “Preferences” icon.
18. Click on the “Flash” icon.
19. Click on the box for “Optimize
content” and then click on the
“OK” button.
Agent at Home Quick Start
Private and Confidential, Internal Use Only, Not for External Distribution 5/20/2015 | 7 of 19
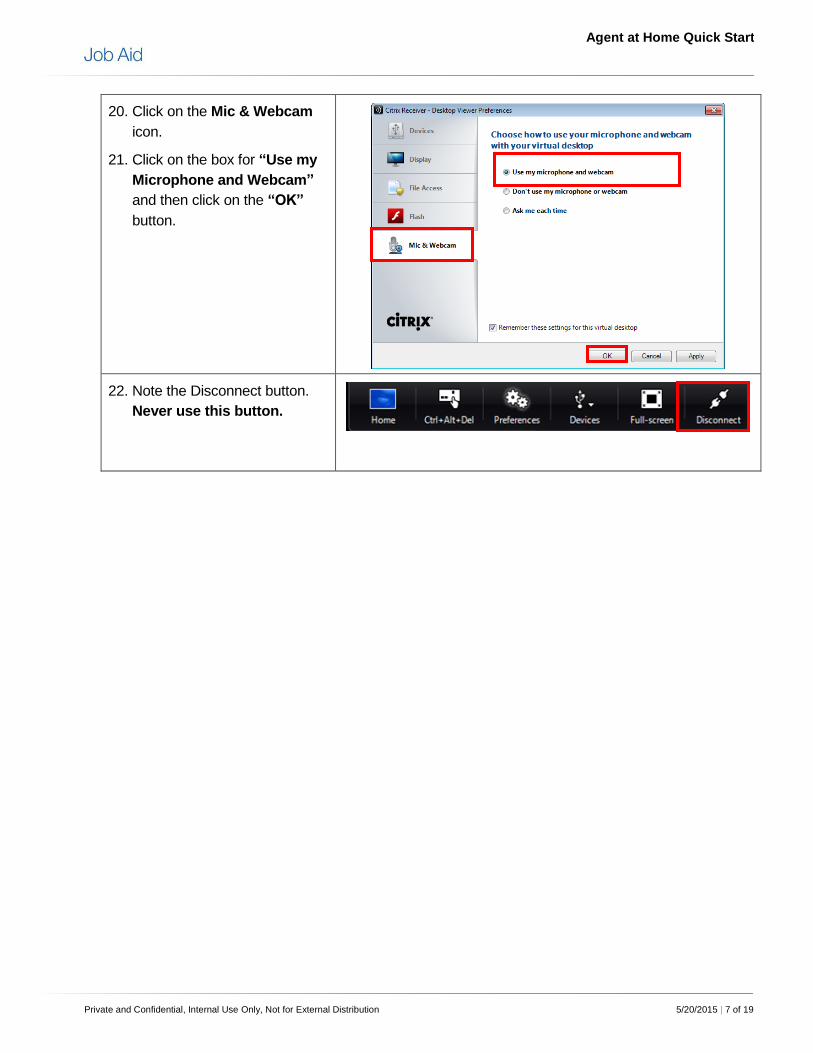
20. Click on the Mic & Webcam
icon.
21. Click on the box for “Use my
Microphone and Webcam”
and then click on the “OK”
button.
22. Note the Disconnect button.
Never use this button.
Agent at Home Quick Start
Private and Confidential, Internal Use Only, Not for External Distribution 5/20/2015 | 8 of 19
CITRIX LOG OFF INSTRUCTIONS
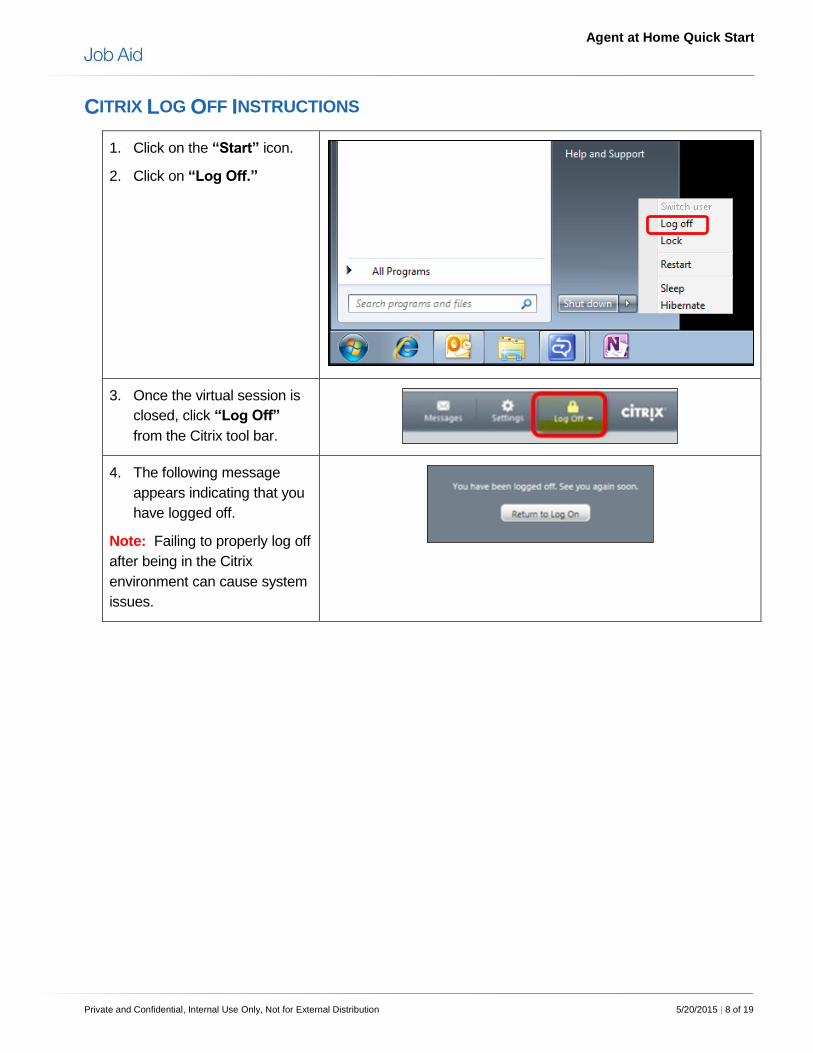
1. Click on the “Start” icon.
2. Click on “Log Off.”
3. Once the virtual session is
closed, click “Log Off”
from the Citrix tool bar.
4. The following message
appears indicating that you
have logged off.
Note: Failing to properly log off
after being in the Citrix
environment can cause system
issues.
Agent at Home Quick Start
Private and Confidential, Internal Use Only, Not for External Distribution 5/20/2015 | 9 of 19
MULTIPLE MONITOR SETUP
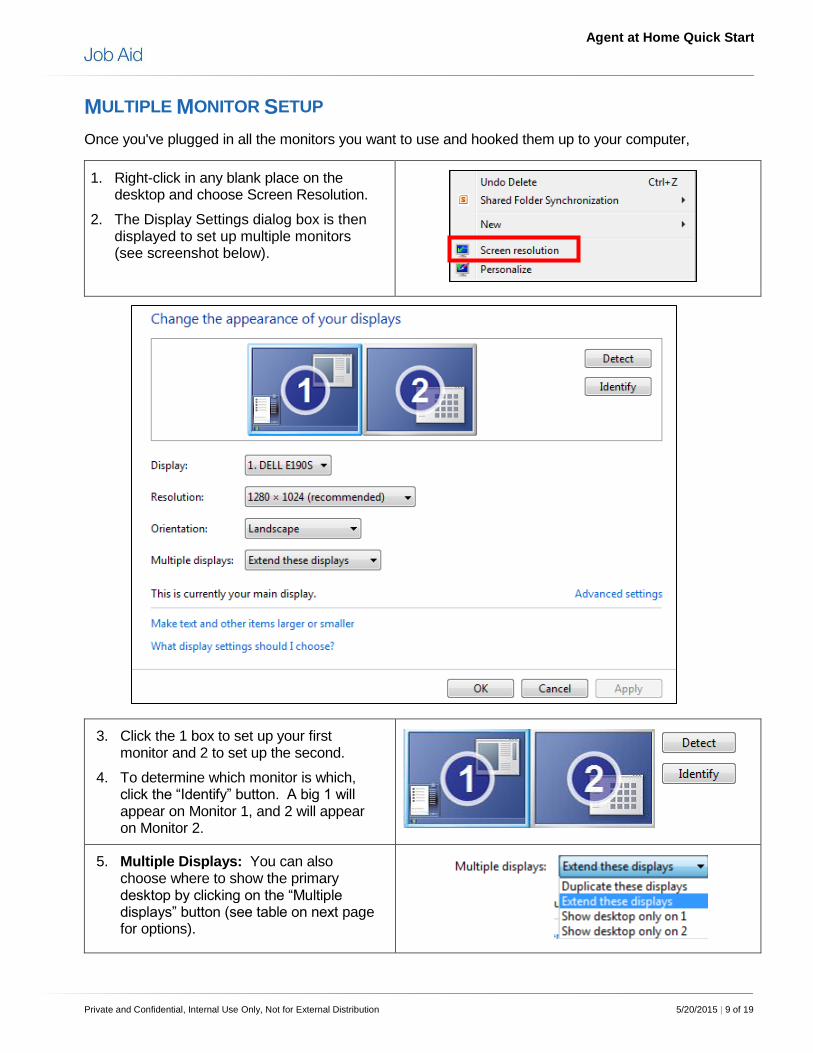
Once you've plugged in all the monitors you want to use and hooked them up to your computer,
1. Right-click in any blank place on the desktop and choose Screen Resolution.
2. The Display Settings dialog box is then displayed to set up multiple monitors (see screenshot below).
3. Click the 1 box to set up your first monitor and 2 to set up the second.
4. To determine which monitor is which, click the “Identify” button. A big 1 will appear on Monitor 1, and 2 will appear on Monitor 2.
5. Multiple Displays: You can also choose where to show the primary desktop by clicking on the “Multiple displays” button (see table on next page for options).

Agent at Home Quick Start
Private and Confidential, Internal Use Only, Not for External Distribution 5/20/2015 | 10 of 19
Setting Name Shown on Monitor 1 Shown on Monitor 2
Duplicate These Displays The usual Windows desktop Exactly the same as Monitor 1
Extend These Displays The usual Windows desktop A blank area where you can drag and drop anything you like; behaves as though it’s to the right of Monitor 1
Show Desktop Only on 1 The usual Windows desktop Nothing
Show Desktop Only on 2 Nothing The usual Windows desktop
6. Orientation: To change the orientation of one of the monitors, click the desired monitor and select the desired orientation from the drop-down box.
7. The desktop allows you to have one monitor in typical landscape view and the other rotated to portrait view, which is particularly handy for document viewing.
8. Resolution: To change the resolution on either display, click the desired monitor and then adjust the resolution using the vertical slider.
Note: If the desktop properly identified your monitor and you have a sufficiently powerful video card, this dialog box should already show the monitor’s native resolution.
9. Click the Apply button.
Note: The desktop changes the display’s resolution and opens a dialog box that asks whether you want to keep the new settings.
10. Click the Keep Changes button to keep the new settings or click Revert to return to the old ones.
Note: If the display becomes unreadable, press Esc to return to the old settings. Another option is to wait 15 seconds and the desktop will return to the old settings automatically. If you can’t read the screen, you chose a resolution that your monitor can’t display.
11. When you’re done, click the OK button
to close the Display Settings dialog box.

Agent at Home Quick Start
Private and Confidential, Internal Use Only, Not for External Distribution 5/20/2015 | 11 of 19
Logging in to AVAYA ONE-X AGENT
1 – Select the Avaya one-X Agent shortcut on the desktop.
2 – The Agent ID number should auto populate. Select Log in. There is no password needed to log in.
3 – The Avaya one-x Agent splash screen will appear.

Agent at Home Quick Start
Private and Confidential, Internal Use Only, Not for External Distribution 5/20/2015 | 12 of 19
4 – From the Welcome screen select OK to begin log in.
For information on using Avaya, please refer to the Avaya One-X Soft Phone Job Aid. This can be found
in the Support section of the Agent @ Home portal.

Agent at Home Quick Start
Private and Confidential, Internal Use Only, Not for External Distribution 5/20/2015 | 13 of 19
CRYPTOCARD SOFT TOKEN INITIALIZATION (INSTALL LOCALLY)
1. Open the email you received
from the BlackShield server.
Click the URL at the bottom to
open the self-enrollment
website.
2. Select from the drop down
menu how you want to install
the token (i.e., locally or on a
smart phone).
3. Once a selection has been
made, click on the “Next”
button.
4. If you do NOT have the
Software Tools installed, click
on the appropriate link to
download and install them:
x86 Software Tools for 32
bit windows
x64 Software Tools for 64
bit windows
5. Click the “Next” button when
finished.

Agent at Home Quick Start
Private and Confidential, Internal Use Only, Not for External Distribution 5/20/2015 | 14 of 19
6. On the next page click the
“Download” button to save
the token to your local
machine.
7. Click on the “Open with”
option.
8. Select “BlackShield token
(default)” from the drop down
menu.
9. Click the “OK” button.
10. After the download is
complete, click the “Next”
button on the web page.
11. A “PIN Required” box will
open after the token
download. The next page on
the website will display your
temporary PIN and an OTP
box.
12. Enter the temporary PIN into
the PIN Required window.
13. Click “OK” to start the OTP
generation process.
14. In the “Change PIN” window,
enter your temporary pin in the
“Current PIN” field.
15. Enter your “New PIN” and
verify it in the next field.
16. Click on the “OK” button.

Agent at Home Quick Start
Private and Confidential, Internal Use Only, Not for External Distribution 5/20/2015 | 15 of 19
17. In the “Token” window, a
“Token Code” is provided.
This code will be used for the
“OTP” field on the next
screen.
18. Click on the “Generate Token
Code” button.
19. Enter the “Token Code” into
the “OTP” field.
20. Click on the “Next” button.
21. The following message will
confirm the token activation.
Agent at Home Quick Start
Private and Confidential, Internal Use Only, Not for External Distribution 5/20/2015 | 16 of 19
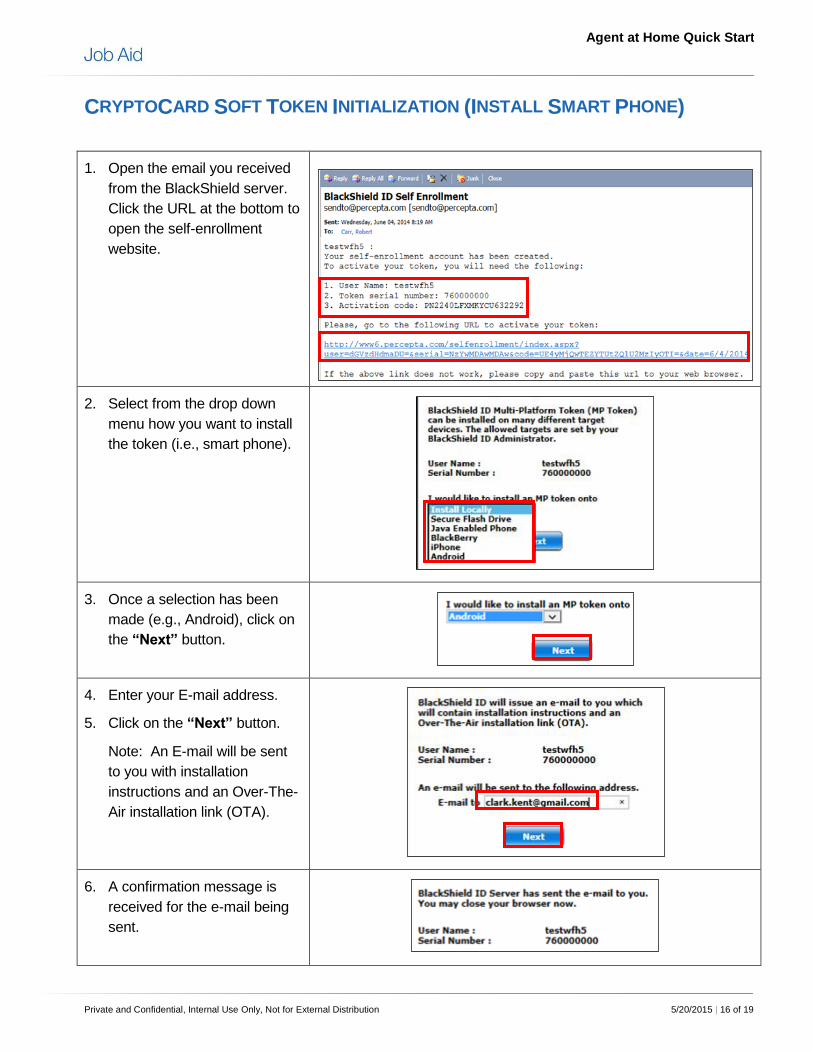
CRYPTOCARD SOFT TOKEN INITIALIZATION (INSTALL SMART PHONE)
1. Open the email you received
from the BlackShield server.
Click the URL at the bottom to
open the self-enrollment
website.
2. Select from the drop down
menu how you want to install
the token (i.e., smart phone).
3. Once a selection has been
made (e.g., Android), click on
the “Next” button.
4. Enter your E-mail address.
5. Click on the “Next” button.
Note: An E-mail will be sent
to you with installation
instructions and an Over-The-
Air installation link (OTA).
6. A confirmation message is
received for the e-mail being
sent.

Agent at Home Quick Start
Private and Confidential, Internal Use Only, Not for External Distribution 5/20/2015 | 17 of 19
7. Step 1: Open the OTA email
and complete Step 1 by
clicking on the “MP-1” icon.
8. In the Apps window click on
the “Install” button.
9. Complete the action by
clicking on the “MP-1” icon.
10. Click on the “Just once”
button.
11. Step 2: Click on the URL link
to install the MP-1 token
profile.

Agent at Home Quick Start
Private and Confidential, Internal Use Only, Not for External Distribution 5/20/2015 | 18 of 19
IE 11 SETTINGS TROUBLESHOOTING
MICROSOFT INTERNET EXPLORER 11 - CITRIX WORKAROUNDS
THE FOLLOWING ARE THE KNOWN ISSUES ALONG WITH THE RESPECTIVE WORKAROUNDS WE NEED TO
IMPLEMENT FOR ANY USER USING IE11 WITH CITRIX.
Description Workaround
Server to Client URL redirection
feature fails after upgrading to
Internet Explorer 11.
After installing Internet Explorer 11, the 64-bit version of Internet
Explorer is set as default in some cases and URL redirection does
not work with 64-bit version of Internet Explorer. Complete the
following steps to resolve this issue:
1. Open 32-bit Internet Explorer located at C:\Program Files
(x86)\Internet Explorer\iexplore.exe.
2. Go to Tools > Internet Options > Programs and click Make
Internet Explorer the default browser.
1. a) A Log on Type drop-
down option on the main
Web Interface Login page,
which allows users to pick
the log on method is not
available.
2. b) After installing Internet
Explorer 11 or upgrading
Internet Explorer 9 or 10 to
11 an Internet Explorer
security warning message
might be noticed while
connecting to Citrix Web
Interface.
1. To resolve this issue:
In Internet Explorer Options > Security tab, add the Web
Interface site to Trusted Sites.
2. Enable compatibility view for the site under Internet Options
> Tools > Compatibility View Settings and add
Citrix.percepta.com and *.percepta.com to Compatibility View.
3. In Internet Explorer Options > Security tab, Trusted Sites
move the security level slider to Low.
Agent at Home Quick Start
Private and Confidential, Internal Use Only, Not for External Distribution 5/20/2015 | 19 of 19
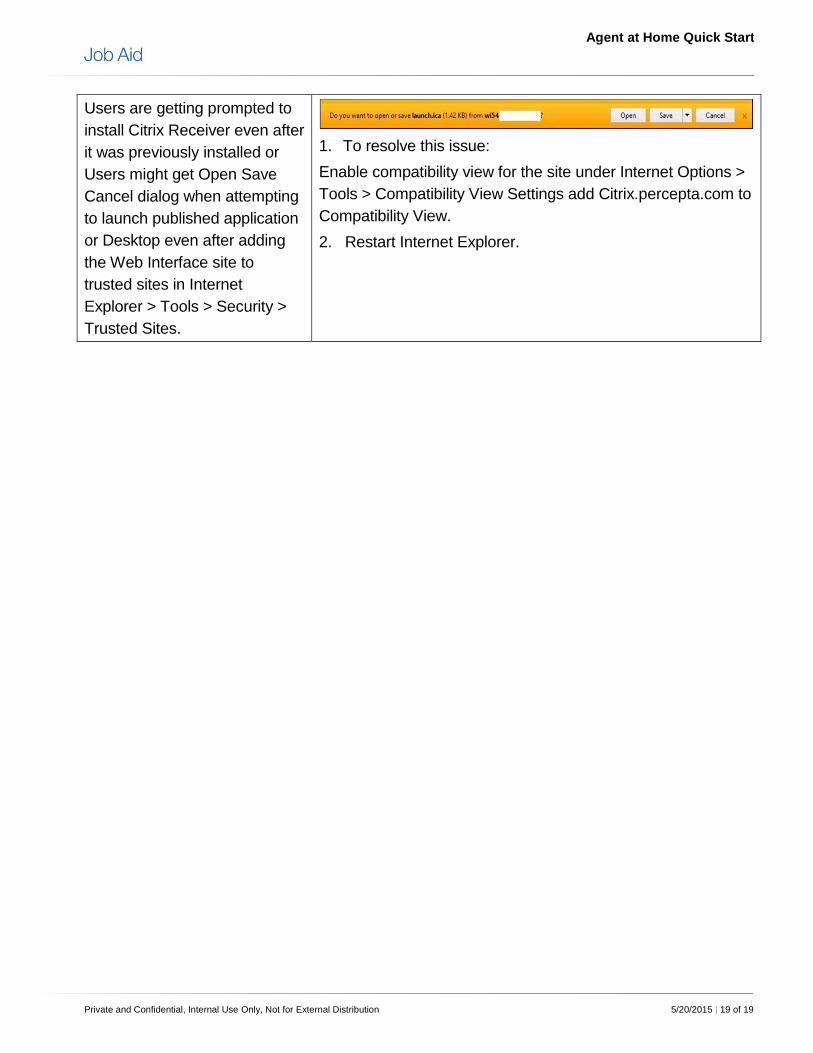
Users are getting prompted to
install Citrix Receiver even after
it was previously installed or
Users might get Open Save
Cancel dialog when attempting
to launch published application
or Desktop even after adding
the Web Interface site to
trusted sites in Internet
Explorer > Tools > Security >
Trusted Sites.
1. To resolve this issue:
Enable compatibility view for the site under Internet Options >
Tools > Compatibility View Settings add Citrix.percepta.com to
Compatibility View.
2. Restart Internet Explorer.
Related Documents


![2016 퀵리모트 소개서 v2.1.ppt [호환 모드] - QUICK …quickremote.co.kr/2016_quickRemote_guide_2_1.pdf매니저및에이전트프로그램의설치(No Agent)가필요없고장소에구애를받지않는(AnyWhere)](https://static.cupdf.com/doc/110x72/5e43586be9cc6545643227a5/2016-ee-oeeoeoe-v21ppt-eeoe-quick-eeeeoeeeno.jpg)


