Advanced Owner's Manual

Welcome message from author
This document is posted to help you gain knowledge. Please leave a comment to let me know what you think about it! Share it to your friends and learn new things together.
Transcript

Advanced Owner's Manual

Advanced ManualIntroductionThis manual is your step-by-step guide to all the advanced features found on your G-DEC 3 amplifier. For information on using Fender® FUSE™, Ableton® Live or Amplitube®, please see the separate manuals for each product on the G-DEC 3 DVD or log on to www.fender.com/support.
Table of ContentsNavigating the G-DEC 3 . . . . . . 2Using the encoder knob and the soft-keys
Start-Stop Button . . . . . . . . 3Band track playback
Quick Access . . . . . . . . . . 3Quick track audition and quick access presets
Amp Menus. . . . . . . . . . . 4Selecting amp types and advanced amp settings
FX Menus . . . . . . . . . . . 5Selecting effects and advanced effect settings
Save Button . . . . . . . . . . 6Saving presets, copying and renaming presets
Tap/Tuner Button . . . . . . . . 6Tapping delay intervals and the built-in instrument tuner
Band Menus . . . . . . . . . . 7Selecting band tracks and advanced band settings
Phrase Sampler . . . . . . . . . 8Phrase recording, overdubbing and phrase menus
Phrase Menus . . . . . . . . . . 9Overdub menus and advanced phrase sampler settings
Utility Menus . . . . . . . . . . 10Amplifier settings and quick access preset assignment
SD Card Slot . . . . . . . . . . 11External storage of tracks and presets
USB Port . . . . . . . . . . . . 11Connecting the G-DEC 3 to your computer
Footswitch . . . . . . . . . . . 12Remote functions using the Fender ULT-4 footswitch
FAQ . . . . . . . . . . . . . 12Where to go to ask questions, read threads and FAQs
NavigationThere are just a few basics of G-DEC 3 navigation that you should know before you explore any further...
Encoder KnobThe big encoder knob always controls the highlighted item on screen. In play mode, the current Preset is highlighted, so turning the big knob will select presets. In other modes, turn-ing the encoder knob will control everything from selecting effects to amplifier tone.
����������
�����������
�����������
�� ��
���
������������
����
���
Soft-KeysThe four plain keys below the display are called "soft-keys" and their functions are software defined. The display above each soft-key shows you the current function of each key. From play mode, for example, the soft-keys will take you to other modes, such as AMP, FX, BAND and PHRASE:
Once you have entered a G-DEC 3 mode, the two soft-keys on the ends will take you to different menus within that mode. For instance, in Phrase mode, the two end soft-keys will take you to the DELETE and UNDO menus (3–or–4):
♫ Sometimes, two soft-keys will have the same function, such as COMMIT, as shown above. Other times a soft-key may have no function at all.
Now you are ready to go wherever the music and your G-DEC 3 take you!
Encoder KnobHighlighted item
Soft keys
Soft key functions
Next menu 43 Previous menu
2 fender.com
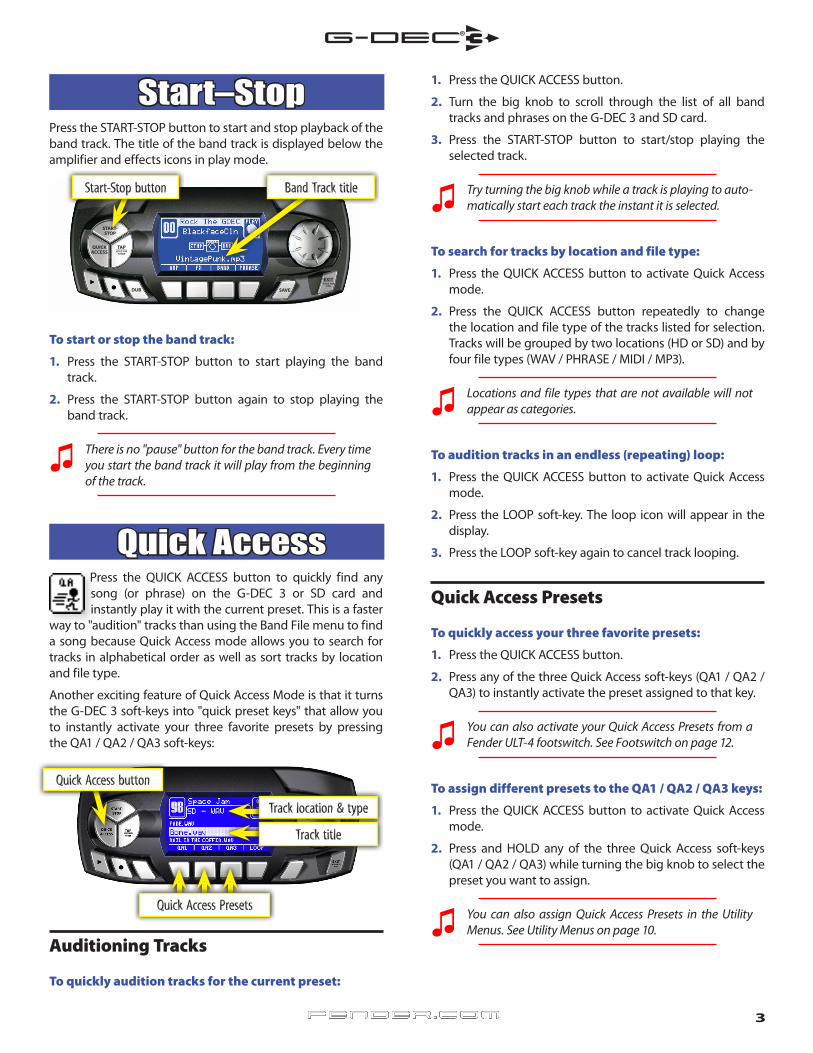
Start–StopPress the START-STOP button to start and stop playback of the band track. The title of the band track is displayed below the amplifier and effects icons in play mode.
����������
�����������
�����������
�� ��
���
������������
����
���
To start or stop the band track:
1. Press the START-STOP button to start playing the band track.
2. Press the START-STOP button again to stop playing the band track.
♫ There is no "pause" button for the band track. Every time you start the band track it will play from the beginning of the track.
Quick AccessPress the QUICK ACCESS button to quickly find any song (or phrase) on the G-DEC 3 or SD card and instantly play it with the current preset. This is a faster
way to "audition" tracks than using the Band File menu to find a song because Quick Access mode allows you to search for tracks in alphabetical order as well as sort tracks by location and file type.
Another exciting feature of Quick Access Mode is that it turns the G-DEC 3 soft-keys into "quick preset keys" that allow you to instantly activate your three favorite presets by pressing the QA1 / QA2 / QA3 soft-keys:
Auditioning Tracks
To quickly audition tracks for the current preset:
1. Press the QUICK ACCESS button.
2. Turn the big knob to scroll through the list of all band tracks and phrases on the G-DEC 3 and SD card.
3. Press the START-STOP button to start/stop playing the selected track.
♫ Try turning the big knob while a track is playing to auto-matically start each track the instant it is selected.
To search for tracks by location and file type:
1. Press the QUICK ACCESS button to activate Quick Access mode.
2. Press the QUICK ACCESS button repeatedly to change the location and file type of the tracks listed for selection. Tracks will be grouped by two locations (HD or SD) and by four file types (WAV / PHRASE / MIDI / MP3).
♫ Locations and file types that are not available will not appear as categories.
To audition tracks in an endless (repeating) loop:
1. Press the QUICK ACCESS button to activate Quick Access mode.
2. Press the LOOP soft-key. The loop icon will appear in the display.
3. Press the LOOP soft-key again to cancel track looping.
Quick Access Presets
To quickly access your three favorite presets:
1. Press the QUICK ACCESS button.
2. Press any of the three Quick Access soft-keys (QA1 / QA2 / QA3) to instantly activate the preset assigned to that key.
♫ You can also activate your Quick Access Presets from a Fender ULT-4 footswitch. See Footswitch on page 12.
To assign different presets to the QA1 / QA2 / QA3 keys:
1. Press the QUICK ACCESS button to activate Quick Access mode.
2. Press and HOLD any of the three Quick Access soft-keys (QA1 / QA2 / QA3) while turning the big knob to select the preset you want to assign.
♫ You can also assign Quick Access Presets in the Utility Menus. See Utility Menus on page 10.
Band Track titleStart-Stop button
Quick Access button
Track location & type
Track title
Quick Access Presets
3fender.com
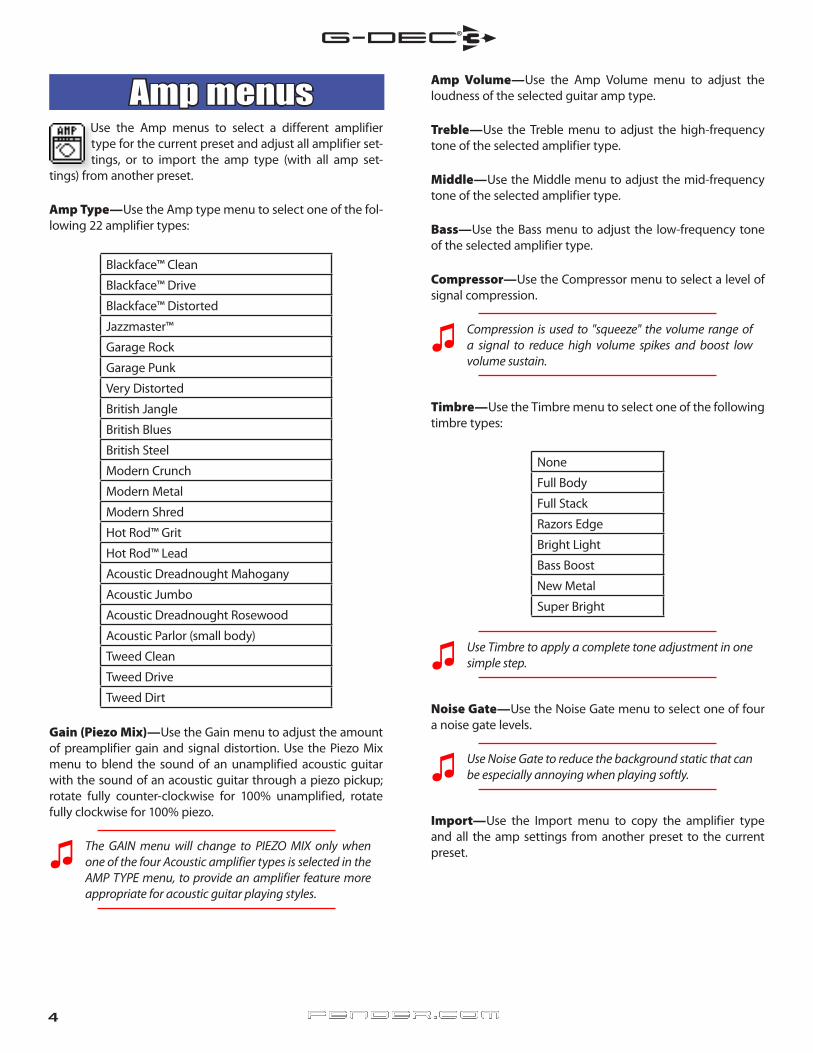
Amp menusUse the Amp menus to select a different amplifier type for the current preset and adjust all amplifier set-tings, or to import the amp type (with all amp set-
tings) from another preset.
Amp Type—Use the Amp type menu to select one of the fol-lowing 22 amplifier types:
Blackface™ Clean
Blackface™ Drive
Blackface™ Distorted
Jazzmaster™
Garage Rock
Garage Punk
Very Distorted
British Jangle
British Blues
British Steel
Modern Crunch
Modern Metal
Modern Shred
Hot Rod™ Grit
Hot Rod™ Lead
Acoustic Dreadnought Mahogany
Acoustic Jumbo
Acoustic Dreadnought Rosewood
Acoustic Parlor (small body)
Tweed Clean
Tweed Drive
Tweed Dirt
Gain (Piezo Mix)—Use the Gain menu to adjust the amount of preamplifier gain and signal distortion. Use the Piezo Mix menu to blend the sound of an unamplified acoustic guitar with the sound of an acoustic guitar through a piezo pickup; rotate fully counter-clockwise for 100% unamplified, rotate fully clockwise for 100% piezo.
♫ The GAIN menu will change to PIEZO MIX only when one of the four Acoustic amplifier types is selected in the AMP TYPE menu, to provide an amplifier feature more appropriate for acoustic guitar playing styles.
Amp Volume—Use the Amp Volume menu to adjust the loudness of the selected guitar amp type.
Treble—Use the Treble menu to adjust the high-frequency tone of the selected amplifier type.
Middle—Use the Middle menu to adjust the mid-frequency tone of the selected amplifier type.
Bass—Use the Bass menu to adjust the low-frequency tone of the selected amplifier type.
Compressor—Use the Compressor menu to select a level of signal compression.
♫ Compression is used to "squeeze" the volume range of a signal to reduce high volume spikes and boost low volume sustain.
Timbre—Use the Timbre menu to select one of the following timbre types:
None
Full Body
Full Stack
Razors Edge
Bright Light
Bass Boost
New Metal
Super Bright
♫ Use Timbre to apply a complete tone adjustment in one simple step.
Noise Gate—Use the Noise Gate menu to select one of four a noise gate levels.
♫ Use Noise Gate to reduce the background static that can be especially annoying when playing softly.
Import—Use the Import menu to copy the amplifier type and all the amp settings from another preset to the current preset.
4 fender.com
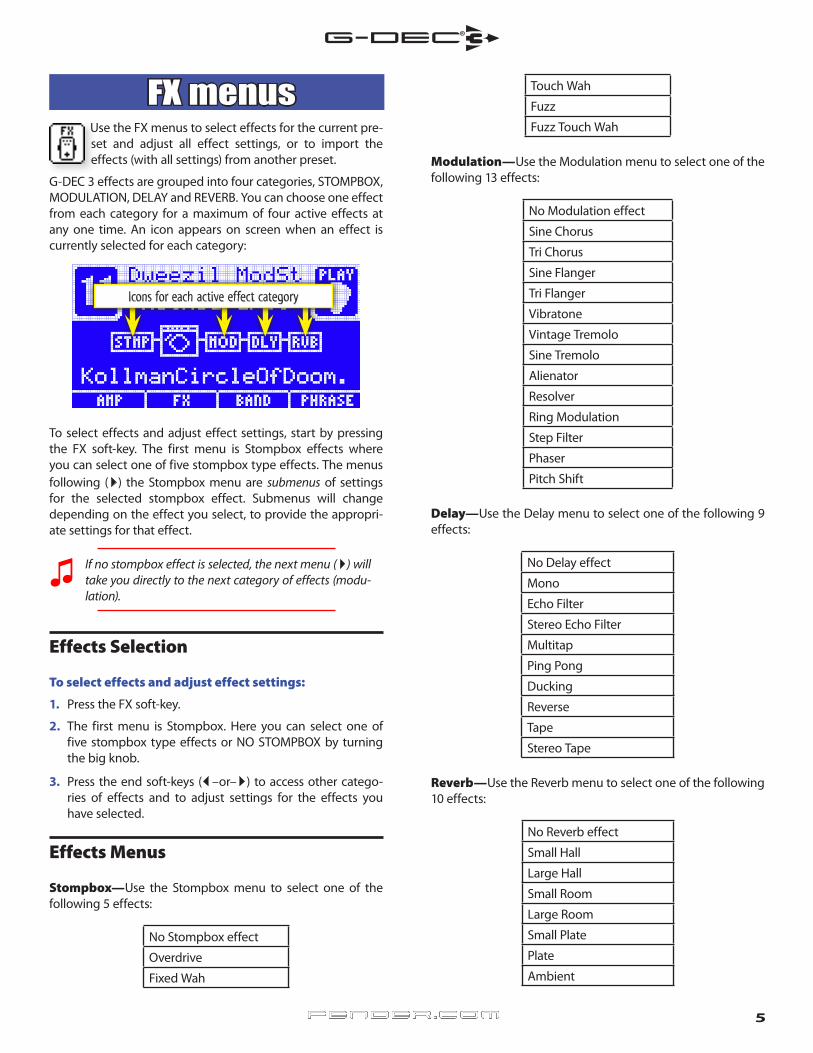
FX menusUse the FX menus to select effects for the current pre-set and adjust all effect settings, or to import the effects (with all settings) from another preset.
G-DEC 3 effects are grouped into four categories, STOMPBOX, MODULATION, DELAY and REVERB. You can choose one effect from each category for a maximum of four active effects at any one time. An icon appears on screen when an effect is currently selected for each category:
To select effects and adjust effect settings, start by pressing the FX soft-key. The first menu is Stompbox effects where you can select one of five stompbox type effects. The menus following (4) the Stompbox menu are submenus of settings for the selected stompbox effect. Submenus will change depending on the effect you select, to provide the appropri-ate settings for that effect.
♫ If no stompbox effect is selected, the next menu (4) will take you directly to the next category of effects (modu-lation).
Effects Selection
To select effects and adjust effect settings:
1. Press the FX soft-key.
2. The first menu is Stompbox. Here you can select one of five stompbox type effects or NO STOMPBOX by turning the big knob.
3. Press the end soft-keys (3–or–4) to access other catego-ries of effects and to adjust settings for the effects you have selected.
Effects Menus
Stompbox—Use the Stompbox menu to select one of the following 5 effects:
No Stompbox effect
Overdrive
Fixed Wah
Touch Wah
Fuzz
Fuzz Touch Wah
Modulation—Use the Modulation menu to select one of the following 13 effects:
No Modulation effect
Sine Chorus
Tri Chorus
Sine Flanger
Tri Flanger
Vibratone
Vintage Tremolo
Sine Tremolo
Alienator
Resolver
Ring Modulation
Step Filter
Phaser
Pitch Shift
Delay—Use the Delay menu to select one of the following 9 effects:
No Delay effect
Mono
Echo Filter
Stereo Echo Filter
Multitap
Ping Pong
Ducking
Reverse
Tape
Stereo Tape
Reverb—Use the Reverb menu to select one of the following 10 effects:
No Reverb effect
Small Hall
Large Hall
Small Room
Large Room
Small Plate
Plate
Ambient
Icons for each active effect category
5fender.com

Arena
'63 Fender Spring
'65 Fender Spring
Import—Use the Import menu to copy the effects, including all effect settings, from another preset to the current preset.
Save ButtonUse the SAVE button when you want to save any changes that you have made to the current preset. You can save over the current preset or you can save
over any other preset you choose.
����������
�����������
�����������
�� ��
���
������������
����
���
When you make any change to the current preset, such as selecting a different band track or a new effect, the SAVE but-ton will turn red to indicate that you have altered the current preset. Your changes up to this point are still temporary. To cancel your temporary changes, simply turn the big knob to select a different preset and then back again.
Save ProcedureTo save a preset requires two presses of the SAVE button, one press to initiate the save process and then another press to confirm the save. If you decide that you want to cancel the save process after the first press of the SAVE button but before the second press, simply press the EXIT button to cancel the save. Your temporary changes to the current preset will still be active and the preset will only be reset when you select a different preset.
To save your changes to the current preset:
1. Press the SAVE button once.
2. Turn the big knob to select a target preset to save over. If you do not turn the knob, the default selection is the cur-rent preset.
♫ Before you save over a preset, make a list of your least favorite presets to target as your new preset locations.
3. Use the CURSOR soft-keys to highlight each character in the preset name, then use the big knob to change the character.
4. Use the two center soft-keys to change character case, select numbers and insert blank spaces.
5. After you have the target preset selected and the title of the new preset finished, press the SAVE button to confirm the save process.
♫ You can use the Save Procedure even if you have NOT made any changes to the current preset (and the SAVE button is not red) if you want to simply change the name of the current preset or copy the current preset to another location.
Tap / TunerThe TAP / TUNER button has two functions. First, it can be used to quickly set the delay interval of delay effects and the tempo of MIDI tracks. Secondly, it is used to activate the onboard instrument tuner.
����������
�����������
�����������
�� ��
���
������������
����
���
Tap ButtonIf the current preset has a delay effect assigned to it, you can use the TAP button to set the delay interval of the delay effect simply by pressing the TAP button rhythmically in time with the desired delay interval.
Select target preset
Change preset name
Tap / Tuner button
Save button
Select characters
Change case / add space
6 fender.com

To set the delay interval of delay effects using TAP:
1. Select a preset with a delay effect –or– select a delay effect for the current preset using the FX menus. (See FX Menus on page 5.)
2. Press the TAP button repeatedly (twice minimum) in sync with the desired delay interval.
♫ If you press the TAP button only one time, the delay interval will be set to the maximum length.
To set the tempo of MIDI tracks using TAP:
1. Select a preset with a MIDI band track –or– select a MIDI band track for the current preset using the Band menus. (See Band Menus on page 7.)
2. Activate the Band Tempo menu. (See Band Menus on page 7.)
3. Press the TAP button repeatedly (twice minimum) in sync with the desired tempo for the band track.
♫ If you press the TAP button only one time, the tempo set-ting of the MIDI band track will not be affected.
Tuner ButtonThe G-DEC 3 has a built-in instrument tuner that you can use to tune your guitar.
To use the tuner:
1. Press and hold the TAP button for 2 seconds.
2. Strike any single string on your guitar and watch the tuner screen on the G-DEC 3. In the lower left corner you will see the note of the string being tuned.
3. Turn the tuning peg on your guitar until the tuning needle on screen indicates the string is in tune, as shown above.
♫ You can also activate the Tuner from a Fender ULT-4 footswitch. See Footswitch on page 12.
4. Standard guitar tuning is as follows:
5. Press any button on the G-DEC 3 to exit from the Tuner.
Band menusUse the Band menus to select a new band track for the current preset and adjust all band track settings, or to import the band track (will all settings) from another
preset.
Band Track Selection
To select a new band track:
1. Press the BAND soft-key.
2. The first menu is Band Type. Here you can select either MP3/WAV –or– MIDI as the band track file type.
♫ Select MP3/WAV as the Band Type for the best results in most instances. MIDI is more useful for specialized pur-poses such as generating metronome clicks.
3. Press the FILE soft-key to access the band track File selec-tion menu.
4. Turn the big knob to select a new band track.
♫ Turning the big knob will scroll through all the band tracks on the G-DEC 3 hard drive (HD) in alphanumeri-cal order and then continue with all the band tracks on the SD card (SD).
5. Press EXIT.
♫ The SAVE button will turn red to indicate a change to the current preset. To reset the band track, simply turn the big knob to a different preset and then back again.
Advanced Band Menus
Repeat—Use the Repeat menu to choose REPEAT for endless loop playback of the band track or ONCE for once through playback.
Note of string played
Tuning needle
7fender.com

♫ When REPEAT is selected, WAV and MIDI files provide smoother "gap free" loop playback than MP3 files.
Speed (Tempo)—Use the Speed menu to adjust the play-back speed of the band track. You can use this feature to learn fast licks by reducing the Band Speed so that you can hear each note more slowly.
♫ This menu will become TEMPO if a MIDI file is selected as the band track.
Pitch (Transpose)—Use the Pitch menu to adjust the play-back pitch of the band track. You can use this feature to change the key signature of a song.
♫ This menu will become TRANSPOSE if a MIDI file is selected as the band track.
Mix (Drum Solo/Count In)—Use the Band Mix menu to choose STEREO, LEFT/RIGHT MIX, or CENTER CANCEL. STEREO is the normal setting. When LEFT/RIGHT MIX is selected, an additional menu will appear after Band Mix that allows you to adjust the left/right channel mix. CENTER CANCEL is useful for removing the lead guitar and vocal tracks from some songs.
♫ This menu will become DRUM SOLO/COUNT IN if a MIDI file is selected as the band track.
Import—Use the Import menu to import the band track with all of its settings from another preset.
Phrase SamplerThe most basic function of the Phrase Sampler is to record and play back phrases of G-DEC 3 audio. A recorded phrase can be used as a short backing track or as a tool to practice tricky riffs by playing the phrase in an endless loop. A more powerful function of the Phrase Sampler allows you to "over-dub" (record in layers, over a previous phrase) so that you can hear yourself playing the rhythm AND lead guitars together in one phrase!
The following step-by-step instructions start with the basic record and playback functions of the Phrase Sampler, then progress to overdubbing and the many other amazing fea-tures of the Phrase Sampler found in the Phrase Menus.
����������
�����������
�����������
�� ��
���
������������
����
���
Phrase Recording and Playback
To record your guitar:
1. Press the (record) button.
2. Play guitar.
3. Press the (record) button to stop recording –or– you can keep playing until the progress bar reaches the maxi-mum phrase length.
♫ Maximum phrase length depends on the Phrase Quality setting. See Phrase Menus on page 9.
To play back your phrase:
1. Press the (playback) button. Your recorded phrase plays back.
2. Press the (playback) button again to stop playback.
♫ You can set Phrase Playback to REPEAT to play phrases in an endless loop, or to ONCE to play phrases through just one time when playback is pressed. See Phrase Menus on page 9.
To record the band track and your guitar:
1. Press the START-STOP button to start the band track play-ing.
2. Press the (record) button immediately –or– wait for the section of the song that you want to record and then press record.
3. Play your guitar if you want to record it also.
4. Press the (record) button to stop recording –or– you can keep playing until the progress bar reaches the maxi-mum phrase length.
♫ You can set the Phrase Sampler to record GUITAR, BAND or ALL in the Phrase Source menu. See Phrase Menus on page 9.
Phrase OverdubbingThe (dub) button gives the Phrase Sampler an overdub function which allows you to create multi-track phrases that feature you playing two or more guitars simultaneously!
Every overdub must start with an original phrase, so first record something with the Phrase Sampler, such a simple chord progression (see "To record your guitar" above). This will be your "rhythm track." Now you can dub a "lead track" over the rhythm track.
Phrase Sampler keys
PLAY / RECORD / DUB
8 fender.com

To dub over an existing phrase:
1. Press the (dub) button. You will hear the original phrase start to play back.
2. Play guitar along with the original phrase.
3. Press the (dub) button to stop recording – or – you can keep going until the progress bar reaches the end of the phrase.
To play back your overdubbed phrase:
1. Press the (playback) button. You will hear the original phrase and your overdub play back together.
♫ If you press the (record) button accidentally, it will erase your overdub and start recording a new phrase.
Overdubbing multiple layers
You don't have to stop with one layer of overdubbing. You can add as many layers to your phrase as you want. Every time you press (dub) you can play a different section or instru-ment until you are playing every part in the band!
♫ You can adjust the Dub Feedback setting so that every time you overdub another layer onto a phrase, the previous overdub layers will become quieter or fade out completely, making the newest overdub layers more audible. See Phrase Menus below.
Phrase MenusUse the phrase menus to save, load or delete phrase samples and adjust all phrase sampler settings, or to work with the dub track options.
Dub Commit—Use the Dub Commit menu when you want to make the overdub track "permanent" by mixing it together with the original phrase. The advantage of Dub Commit is that you can erase new overdub layers without erasing the previously "committed" overdub layer (See Dub Undo below).
Dub Undo—Use the Dub Undo menu when you want to erase an overdub track and start over. Any overdub tracks that have been "committed" will not be affected (see Dub Commit above).
Save Phrase—Use the Save Phrase menu to save the cur-rently active phrase (all overdubbed layers are automatically committed). Turn the big knob to select the G-DEC 3 hard drive (HD) or a flash card (SD) as the save destination, then press either SAVE PHRASE soft-key.
♫ Phrases are saved as .wav files with consecutively num-bered filenames in the format: GDEC0000.wav
Load Phrase—Use the Load Phrase menu to load any phrase file on the G-DEC 3 hard drive (HD) or SD card (SD). Turn the big knob to select a file, then press either LOAD PHRASE soft-key.
Phrase Level—Use the Phrase Level menu to adjust the vol-ume level of phrase playback.
Dub Feedback—Use the Dub Feedback to make previous overdub layers fade out as new overdub layers are recorded. When Dub Feedback is set to "10" the previous overdub lay-ers will remain at their original volume levels. Lower Dub Feedback settings will decrease the volume level of previous overdub layers and a setting of "1" will cause previous over-dubs to fade out completely.
Phrase Mode—Phrase Mode only applies if you are using a MIDI file as a phrase. Select SYNCHRONOUS to have the phrase neatly trimmed to the nearest measure during play-back. Select FREEFORM to disable this feature.
Phrase Source—Use Phrase Source to select exactly what the Phrase Sampler records. You can choose to record just your GUITAR or just the BAND track or you can select ALL (nor-mal setting) to record everything.
♫ Try setting Phrase Source to GUITAR then record along with a band track. When you play the phrase back you can hear how good you sound without the band!
Phrase Speed—Use the Phrase Speed menu to adjust the playback speed of the Phrase Sampler from 50% to 150%. You can use this feature to learn fast licks by recording a section of a song, then reducing the Phrase Speed so that you can hear each of the notes more slowly.
♫ The Phrase DUB function is disabled if Phrase Speed is set to anything other than 100%.
Phrase Pitch—Use the Phrase Pitch menu to adjust the play-back pitch of the Phrase Sampler ±5 half steps. You can use this feature to change the key signature of a song.
♫ The Phrase DUB function is disabled if Phrase Pitch is set to anything other than NO SHIFT.
Phrase Playback—Use the Playback menu to choose REPEAT for endless loop phrase playback or ONCE for once through phrase playback.
Phrase Quality—Select HI RES for maximum quality phrase recording with a total phrase length of 35 seconds or select LOW RES for normal quality phrase recording with a total phrase length of 2 min, 20 sec.
9fender.com

Phrase Delete—Use the Delete menu to erase any phrase file. Select a file by turning the big knob, then press either of the DELETE soft-keys.
♫ Memory Lock must be disabled in the Utility Menus to delete phrase files. See Utility Menus on page 10.
Utility MenusUse the Utility menus for a variety of amplifier soft-ware and hardware settings. Press and hold the EXIT button for 2 seconds to activate the Utility menus.
QA1 / QA2 / QA3—Use the first four Utility menus to assign Quick Access presets. See Quick Access on page 3.
Memory Lock—Use the Memory Lock menu to prevent accidental preset modifications. You will still be able to make temporary changes to presets with Memory Lock ON, but you won't be able to save those changes until Memory Lock is switched OFF.
Line Level—(G-DEC 3 THIRTY, ONLY) Use the Line Level menu to adjust the output level of the rear panel LINE OUT jacks to accommodate the input sensitivity of external audio equipment.
Line Out— (G-DEC 3 THIRTY, ONLY) Use the Line Out menu to select the audio content sent out through the rear panel LINE OUT jacks. Choose ALL to send all G-DEC 3 audio to the LINE OUT jacks (normal setting) or choose BAND to send only the band track to the LINE OUT jacks.
♫ For the most intense one-man band experience possible with the G-DEC 3 Thirty and a PA system: Connect the LINE OUT jacks to a PA sound system. Set the Line Out menu to BAND and the Speaker menu to GUITAR. Now the band track audio will play in stereo through the PA speakers and your guitar will play through the G-DEC 3 speaker, creating a realistic band simulation!
Speaker— (G-DEC 3 THIRTY, ONLY) Use the Speaker menu to select the audio content sent to the G-DEC 3 internal speaker. Choose ALL to send all G-DEC 3 audio to the speaker (normal setting) or choose GUITAR to send only your guitar audio to the G-DEC 3 speaker. See the Line Out ♫ note above.
Import One Preset—Use the Import menu to import any one preset from an SD card inserted into the G-DEC 3.
To import one preset from the SD card to the G-DEC 3:
1. Press and hold the EXIT button to activate the Utility menus.
2. Use the soft-keys (3–or–4) to access the Import menu.
3. Turn the big knob and select the preset you want to import.
4. Press SAVE.
5. Turn the big knob to select the preset you want to over-write.
6. Press SAVE again to confirm and finalize the preset import.
♫ Any band track associated with the imported preset will only play if an SD card with the band track file (media) is plugged into the G-DEC 3. See ! note on page 11.
Export One Preset—Use the Export One menu to export a single preset to an SD card inserted into the G-DEC 3.
To export one preset from the G-DEC 3 to the SD card:
1. Press and hold the EXIT button to activate the Utility menus.
2. Use the soft-keys (3–or–4) to access the Export One menu.
3. Turn the big knob and select the preset you want to export.
4. Press either one of the EXPORT ONE soft-keys to export the selected preset.
5. Turn the big knob to select the preset you want to save over.
6. Press SAVE again to confirm and finalize the preset export.
♫ Exporting a preset will overwrite any preset on the SD card with the same name! See ! note on page 11.
Export All Presets—Use the Export All menu to export ALL presets to an SD card inserted into the G-DEC 3.
To export all presets from the G-DEC 3 to the SD card:
1. Press and hold the EXIT button to activate the Utility menus.
2. Use the soft-keys (3–or–4) to access the Export All menu.
3. Press either one of the EXPORT ALL soft-keys to export all presets.
♫ Exporting presets will overwrite any presets on the SD card with the same names! See ! note on page 11.
Restore All Presets—Use the Preset Restore menu to restore all presets on the G-DEC 3 to their original factory settings. Preset Restore will NOT restore any media (band tracks) if they have been deleted from the G-DEC 3 hard drive (HD), which can only be done using the Fender FUSE software interface or through the USB Drive menu.
10 fender.com
! The IMPORT, EXPORT and RESTORE menus above do NOT transfer the band track files (media) associated with the presets. However, you CAN move appropriately licensed media files to and from the G-DEC 3 using the Fender FUSE software included on the G-DEC 3 DVD, or through the USB Drive menu (below).
♫ The Fender FUSE software included with your G-DEC 3 has backup and restore functions that DO transfer the media files (band tracks) along with the preset files.
Format SD Card—Use the Format SD menu to format your SD card as “FAT32” if the pre-existing format is not recognized by the G-DEC 3. Warning: All files on your SD card will be erased by the formatting process.
USB Drive—Use the USB Drive menu to connect the G-DEC 3 to your computer to enable direct access to all media files on the G-DEC 3 hard drive (HD). You will find three folders on the G-DEC 3 HD:
FOLDER NAME USED FOR FILE TYPES
Audio Band Tracks .wav / .mp3
Midi Band Tracks (MIDI) .mid
Phrase Phrase Sampler files .wav
♫ There is no menu function on the G-DEC 3 that allows you to copy media files (band tracks) directly between an SD card and the G-DEC 3 hard drive. However, you can accomplish this from your computer when the G-DEC 3 is connected as a USB drive.
Memory Free Space—Use the Memory menu to see how much free space is available on the G-DEC 3 hard drive (HD) and on the SD card, if one is present.
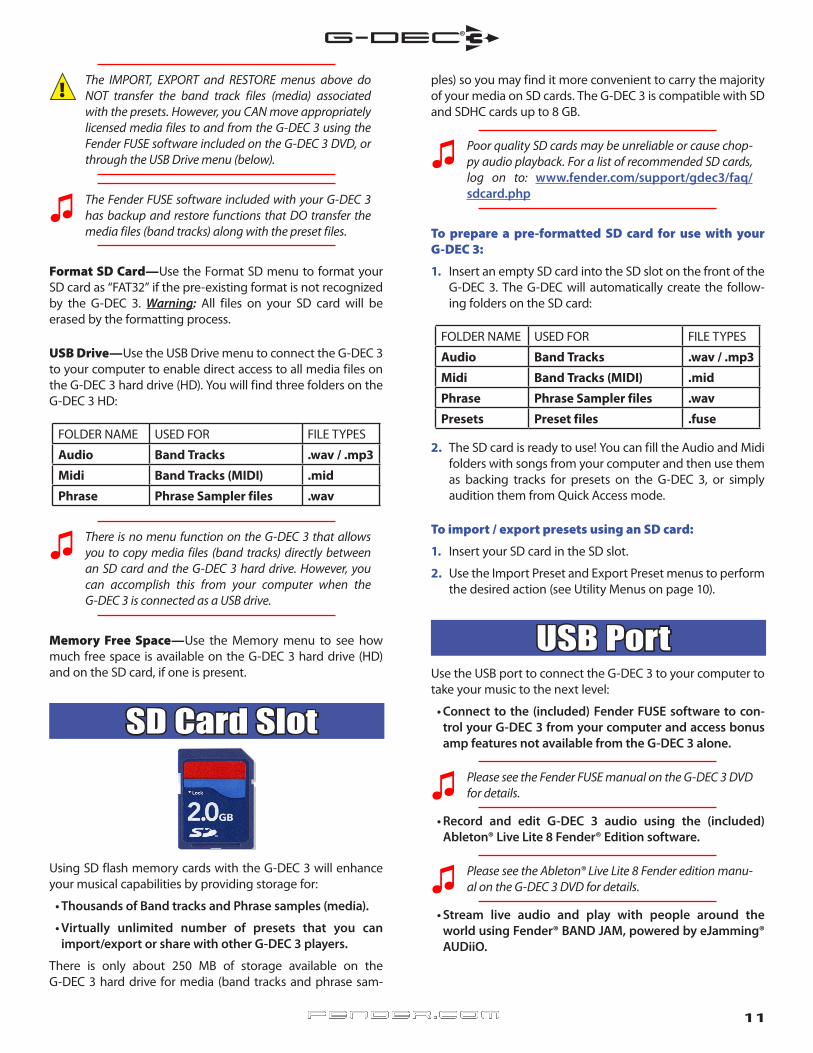
SD Card Slot
Using SD flash memory cards with the G-DEC 3 will enhance your musical capabilities by providing storage for:
•ThousandsofBandtracksandPhrasesamples(media).
•Virtually unlimited number of presets that you canimport/exportorsharewithotherG-DEC 3players.
There is only about 250 MB of storage available on the G-DEC 3 hard drive for media (band tracks and phrase sam-
ples) so you may find it more convenient to carry the majority of your media on SD cards. The G-DEC 3 is compatible with SD and SDHC cards up to 8 GB.
♫ Poor quality SD cards may be unreliable or cause chop-py audio playback. For a list of recommended SD cards, log on to: www.fender.com/support/gdec3/faq/sdcard.php
To prepare a pre-formatted SD card for use with your G-DEC 3:
1. Insert an empty SD card into the SD slot on the front of the G-DEC 3. The G-DEC will automatically create the follow-ing folders on the SD card:
FOLDER NAME USED FOR FILE TYPES
Audio Band Tracks .wav / .mp3
Midi Band Tracks (MIDI) .mid
Phrase Phrase Sampler files .wav
Presets Preset files .fuse
2. The SD card is ready to use! You can fill the Audio and Midi folders with songs from your computer and then use them as backing tracks for presets on the G-DEC 3, or simply audition them from Quick Access mode.
To import / export presets using an SD card:
1. Insert your SD card in the SD slot.
2. Use the Import Preset and Export Preset menus to perform the desired action (see Utility Menus on page 10).
USB PortUse the USB port to connect the G-DEC 3 to your computer to take your music to the next level:
•Connect tothe (included)FenderFUSEsoftwaretocon-trolyourG-DEC3fromyourcomputerandaccessbonusampfeaturesnotavailablefromtheG-DEC3alone.
♫ Please see the Fender FUSE manual on the G-DEC 3 DVD for details.
•Record and edit G-DEC 3 audio using the (included)Ableton®LiveLite8Fender®Editionsoftware.
♫ Please see the Ableton® Live Lite 8 Fender edition manu-al on the G-DEC 3 DVD for details.
•Stream live audio and play with people around theworldusingFender®BANDJAM,poweredbyeJamming®AUDiiO.
11fender.com

♫ For a 30-day trial subscription, log on to: www.fender.com/ejamming
•Connect G-DEC 3 to your computer as a USB drive toenable direct media file management (see USB DriveunderUtilitymenus,onpage11).
FootswitchConnect an (optional) Fender ULT-4 footswitch (P/N 0994070000) to your G-DEC 3 to enable remote control of essential G-DEC 3 functions. The footswitch screen and LEDs show you some of the same information as the amplifier display, so you can, for example, tune your guitar and select presets by watching the footswitch without ever looking at the G-DEC 3 display!
•SelectQuickAccesspresets
•UsetheTuner
•Selectpresets(up/down)
•Start/stopBandtracks
•UsethePhraseSampler(play/record/overdub)
����������������
������
������
���
����
���
��� ���
�� ������
������ �����
��� ����������������
The footswitch has three modes that are indicated by the three LEDs labeled MODE 1, MODE 2 and MODE 3. The footswitch also has a Tuner mode which is indicated when all of the mode LEDs are off.
To switch between modes, press the MODE button. To acti-vate Tuner mode, press and hold the MODE button for 2 seconds.
Mode 1—In Mode 1 the footswitch is used to select Quick Access presets as indicated by the labels (QA1 / QA2 / QA3) under each button, in line with the MODE 1 LED. When you select a Quick Access preset, the number of the preset will appear in the display of the footswitch.
Mode 2—In Mode 2 the footswitch is used to select pre-sets and start/stop the band track as indicated by the labels (DOWN / UP / SELECT) under each button, in line with the MODE 2 LED. When you select a preset, the number of the preset will appear in the display of the footswitch.
Mode 3—In Mode 3 the footswitch is used to operate the Phrase Sampler as indicated by the labels (PLAY / RECORD / OVERDUB) under each button, in line with the MODE 3 LED. The footswitch button LEDs indicate your Phrase sampler
actions, but the phrase progress bar is only displayed on the G-DEC 3 screen.
Tuner Mode—Press and hold the MODE button for 2 sec-onds to activate the Tuner. The screen and the footswitch both will display the same tuner information so that you can look in either place to tune your guitar. The footswitch will display the nearest note. The button LEDs will indicate sharp and flat. "In tune" is indicated when the green LED below the footswitch display lights up.
Press any footswitch button to exit Tuner mode.
FAQThere are several great places you can go to learn more about the G-DEC 3 and music in general:
•www.fender.com/support
•JoinaFenderCommunityforumwhereyoucanaskques-tionsandreadthreads.There'sevenaforumjustfortheG-DEC3:www.fender.com/community/forums
•Log on to the Fender Knowledge Base to download"G-DEC 3 Performance Notes" and read "FrequentlyAsked Questions" (FAQ): www.fender.com/support/faqs.php
•FindmusictheorylearningmaterialsandsheetmusicatHalLeonardPublications:www.halleonard.com
12 fender.com
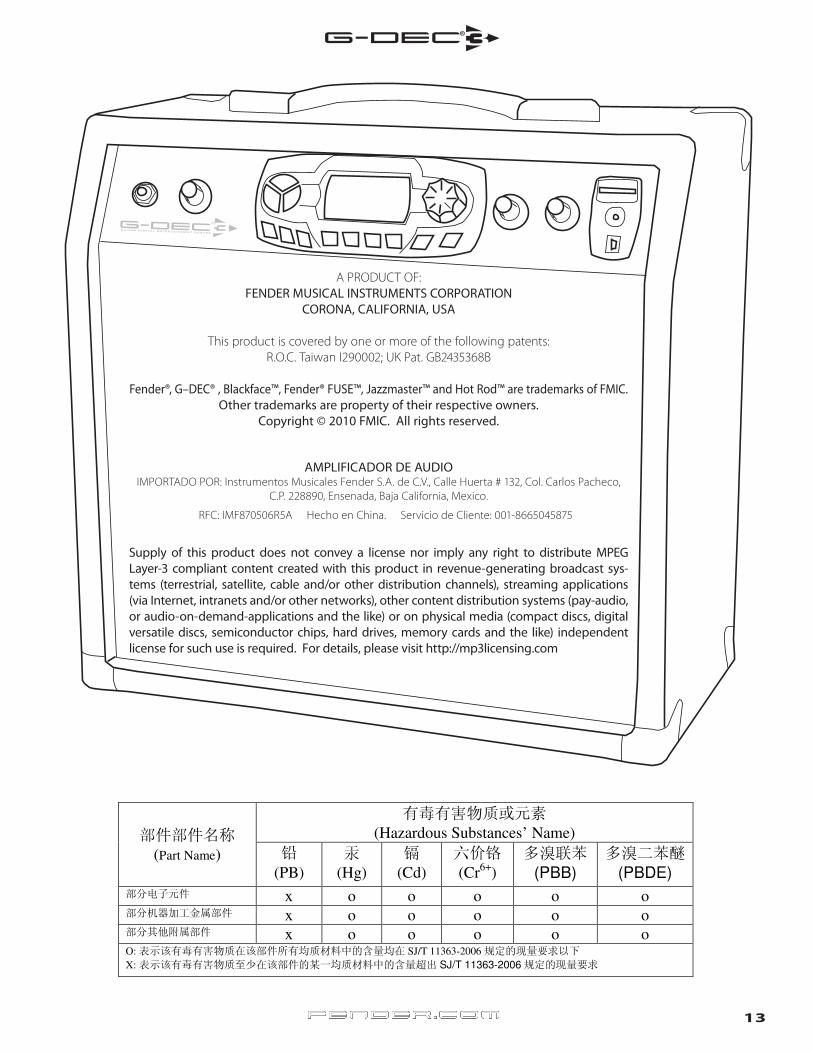
A PRODUCT OF:FENDER MUSICAL INSTRUMENTS CORPORATION
CORONA, CALIFORNIA, USA
This product is covered by one or more of the following patents: R.O.C. Taiwan I290002; UK Pat. GB2435368B
Fender®, G–DEC® , Blackface™, Fender® FUSE™, Jazzmaster™ and Hot Rod™ are trademarks of FMIC. Other trademarks are property of their respective owners.
Copyright © 2010 FMIC. All rights reserved.
AMPLIFICADOR DE AUDIOIMPORTADO POR: Instrumentos Musicales Fender S.A. de C.V., Calle Huerta # 132, Col. Carlos Pacheco,
C.P. 228890, Ensenada, Baja California, Mexico.
RFC: IMF870506R5A Hecho en China. Servicio de Cliente: 001-8665045875
Supply of this product does not convey a license nor imply any right to distribute MPEG Layer-3 compliant content created with this product in revenue-generating broadcast sys-tems (terrestrial, satellite, cable and/or other distribution channels), streaming applications (via Internet, intranets and/or other networks), other content distribution systems (pay-audio, or audio-on-demand-applications and the like) or on physical media (compact discs, digital versatile discs, semiconductor chips, hard drives, memory cards and the like) independent license for such use is required. For details, please visit http://mp3licensing.com
有毒有害物质或元素
(Hazardous Substances’ Name) 部件部件名称
(Part Name) 铅
(PB)
汞
(Hg)
镉
(Cd)
六价铬
(Cr6+
)
多溴联苯
(PBB)
多溴二苯醚
(PBDE)
部分电子元件 x o o o o o 部分机器加工金属部件 x o o o o o 部分其他附属部件 x o o o o o O: 表示该有毒有害物质在该部件所有均质材料中的含量均在 SJ/T 11363-2006 规定的现量要求以下
X: 表示该有毒有害物质至少在该部件的某一均质材料中的含量超出 SJ/T 11363-2006规定的现量要求
13fender.com

P/N 0081367000 (ENGLISH) REV A
Related Documents