ADVIA Centaur® XP / XPT Systems Advanced Operator Training Local Area Training Workbook

Welcome message from author
This document is posted to help you gain knowledge. Please leave a comment to let me know what you think about it! Share it to your friends and learn new things together.
Transcript

ADVIA Centaur® XP / XPT Systems
Advanced Operator TrainingLocal Area Training Workbook


ADVIA Centaur XP / XPT Systems T03013.008 Effective Date: 03/11/22
Siemens Healthineers
ADVIA Centaur XP /XPT Systems
Advanced Operator Local Area Training Workbook
ii ADVIA Centaur XP / Centaur XPT Systems
© 2022 Siemens Healthineers Inc. All rights reserved.
This manual, and the software described in this manual, are copyrighted. No part of this may be copied, reproduced, translated or reduced to any electronic medium or machine-readable form without the prior written consent of Siemens Healthineers.
ADVIA Centaur is a registered trademark of Siemens Healthineers.
All other products mentioned are trademarks of their respective companies.
Siemens HealthineersCertificate No: UQA0113493
Siemens quality products are manufactured under a qualitysystem that is registered to ISO 13485:2003.

ADVIA Centaur XP / Centaur XPT Systems iii
Table of Contents
1: Welcome
2: System Overview / Cuvette Journey
3: Assay Troubleshooting
4: Event Log
5: Troubleshooting Cuvette Handling Issues
6: Troubleshooting Sample Handling Issues
7: Troubleshooting Reagent Handling Issues
8: Troubleshooting System Fluidics Issues

iv ADVIA Centaur XP / Centaur XPT Systems
Welcome
ADVIA Centaur XP / Centaur XPT Systems 1-1
1 Welcome
Welcome to TrainingSiemens Healthineers would like to welcome you to the advanced training course onthe ADVIA Centaur XP / Centaur XPT Systems.
This course is designed to enhance your skills needed to troubleshoot and maintainthe ADVIA Centaur XP / Centaur XPT Systems.
Our staff welcomes the opportunity to present this training program to you.
Training MaterialThis training workbook includes an agenda, learning goals, and practical exerciseswhich will help facilitate the learning objectives for this course.
Welcome
1-2 ADVIA Centaur XP / Centaur XPT Systems
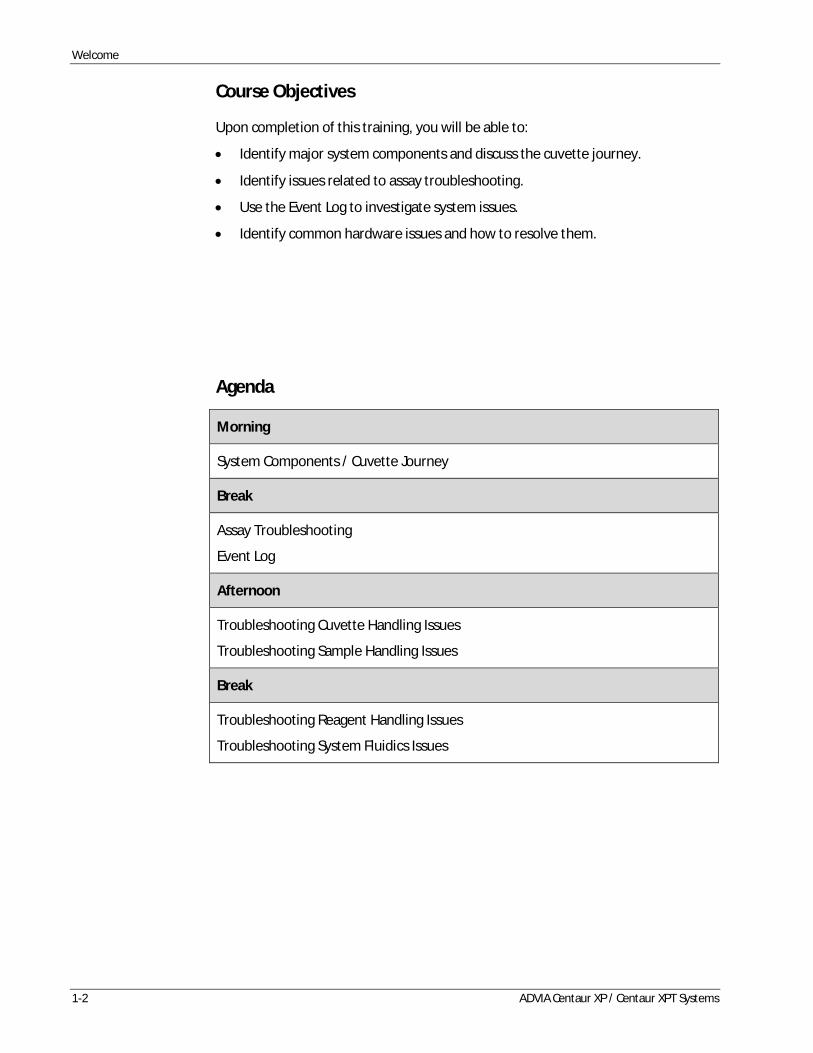
Course Objectives
Upon completion of this training, you will be able to:
· Identify major system components and discuss the cuvette journey.
· Identify issues related to assay troubleshooting.
· Use the Event Log to investigate system issues.
· Identify common hardware issues and how to resolve them.
Agenda
Morning
System Components / Cuvette Journey
Break
Assay Troubleshooting
Event Log
Afternoon
Troubleshooting Cuvette Handling Issues
Troubleshooting Sample Handling Issues
Break
Troubleshooting Reagent Handling Issues
Troubleshooting System Fluidics Issues
Welcome
ADVIA Centaur XP / Centaur XPT Systems 1-3
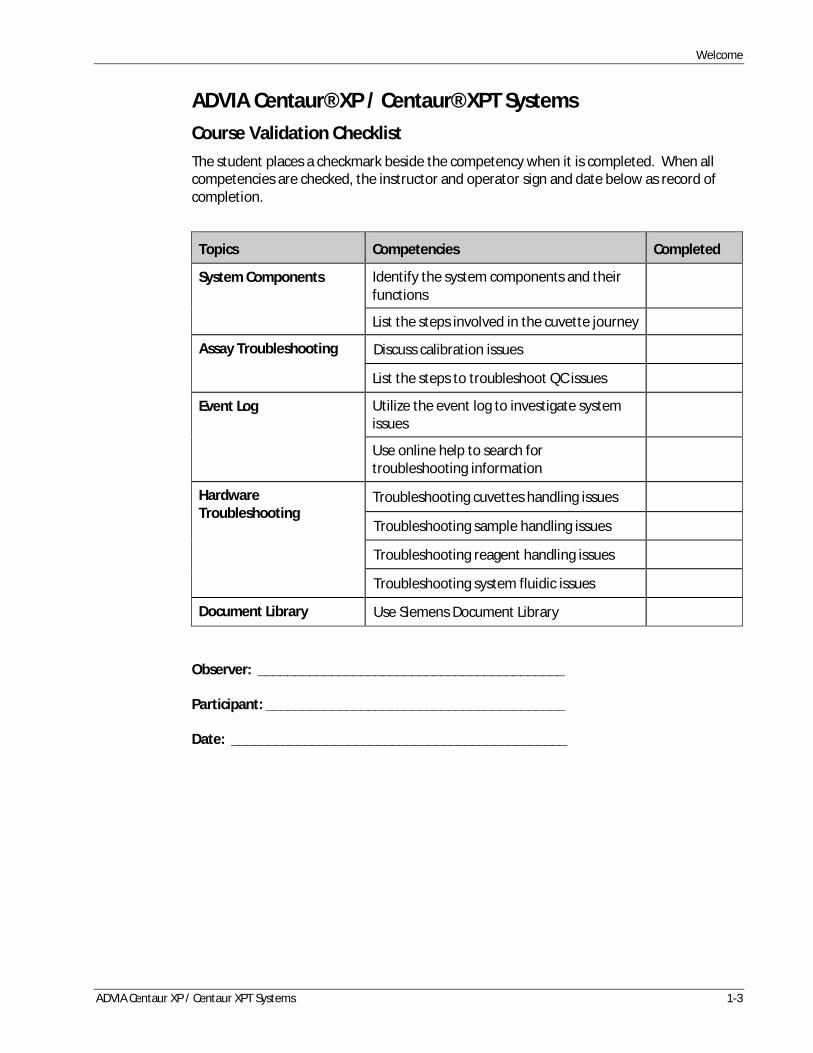
ADVIA Centaur® XP / Centaur® XPT SystemsCourse Validation ChecklistThe student places a checkmark beside the competency when it is completed. When allcompetencies are checked, the instructor and operator sign and date below as record ofcompletion.
Topics Competencies Completed
System Components Identify the system components and theirfunctions
List the steps involved in the cuvette journey
Assay Troubleshooting Discuss calibration issues
List the steps to troubleshoot QC issues
Event Log Utilize the event log to investigate systemissues
Use online help to search fortroubleshooting information
HardwareTroubleshooting
Troubleshooting cuvettes handling issues
Troubleshooting sample handling issues
Troubleshooting reagent handling issues
Troubleshooting system fluidic issues
Document Library Use Siemens Document Library
Observer: __________________________________________
Participant: _________________________________________
Date: ______________________________________________

Welcome
1-4 ADVIA Centaur XP / Centaur XPT Systems
What was most helpful to you during this program?
How can we improve this program to make it more meaningful to you?
System Overview / Cuvette Journey
ADVIA Centaur XP / Centaur XPT Systems 2-1
2 System Overview/Cuvette Journey
Resources
· ADVIA Centaur XP / Centaur XPT System Operator’s Guide
· Online Help
· System Components PEP Online Training Course
ObjectivesAfter completing this section, you will be able to:
· Identify the system components
· List the steps involved in the cuvette journey

System Overview / Cuvette Journey
2-2 ADVIA Centaur XP / Centaur XPT Systems
System Overview / Cuvette Journey
ADVIA Centaur XP / Centaur XPT Systems 2-3
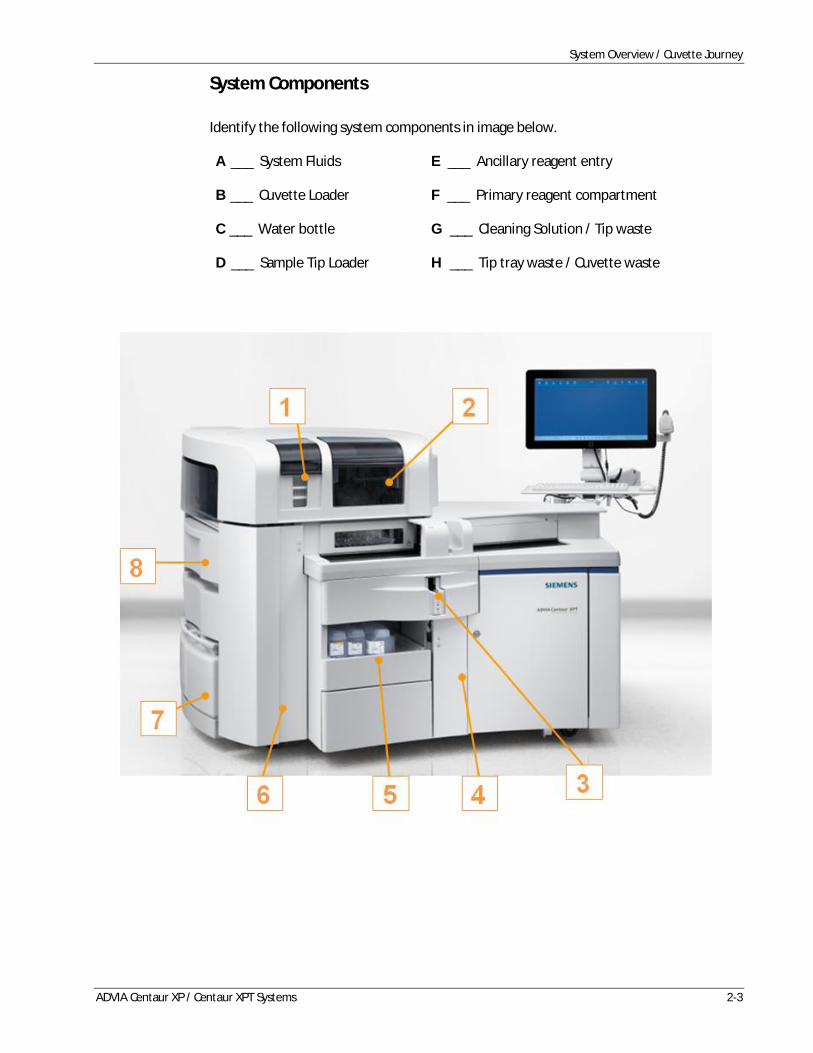
System Components
Identify the following system components in image below.
A ___ System Fluids E ___ Ancillary reagent entry
B ___ Cuvette Loader F ___ Primary reagent compartment
C ___ Water bottle G ___ Cleaning Solution / Tip waste
D ___ Sample Tip Loader H ___ Tip tray waste / Cuvette waste
System Overview / Cuvette Journey
2-4 ADVIA Centaur XP / Centaur XPT Systems
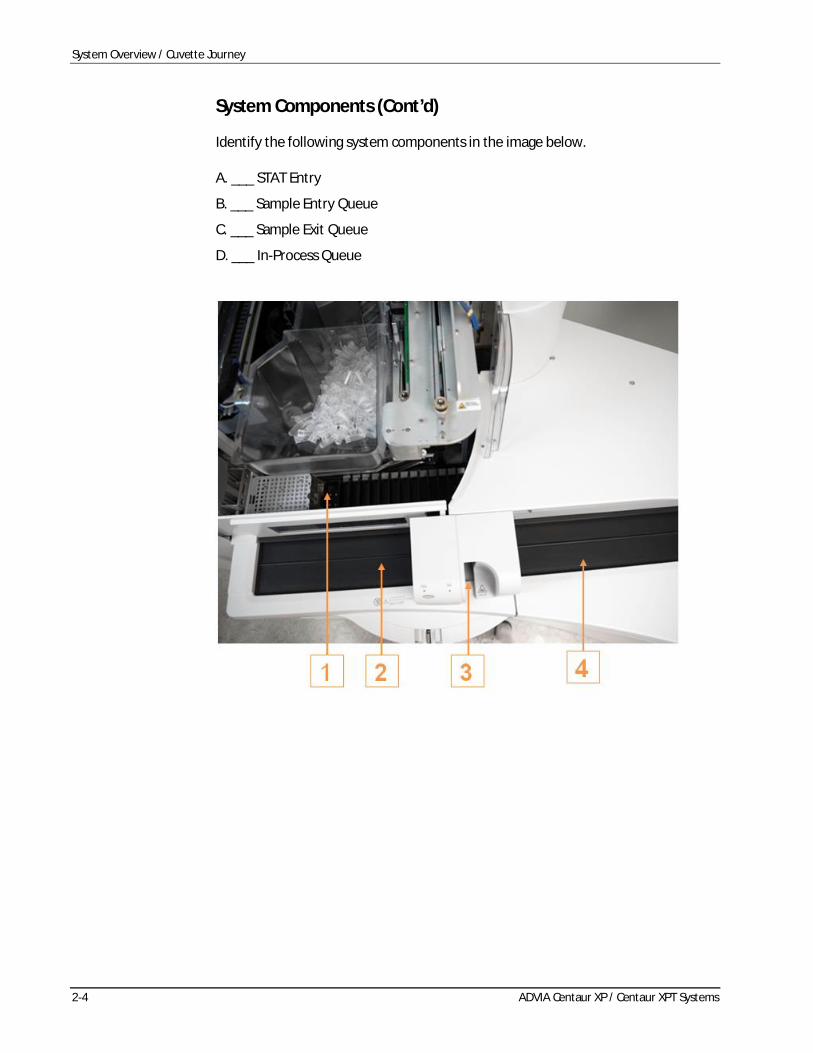
System Components (Cont’d)
Identify the following system components in the image below.
A. ___ STAT Entry
B. ___ Sample Entry Queue
C. ___ Sample Exit Queue
D. ___ In-Process Queue
System Overview / Cuvette Journey
ADVIA Centaur XP / Centaur XPT Systems 2-5
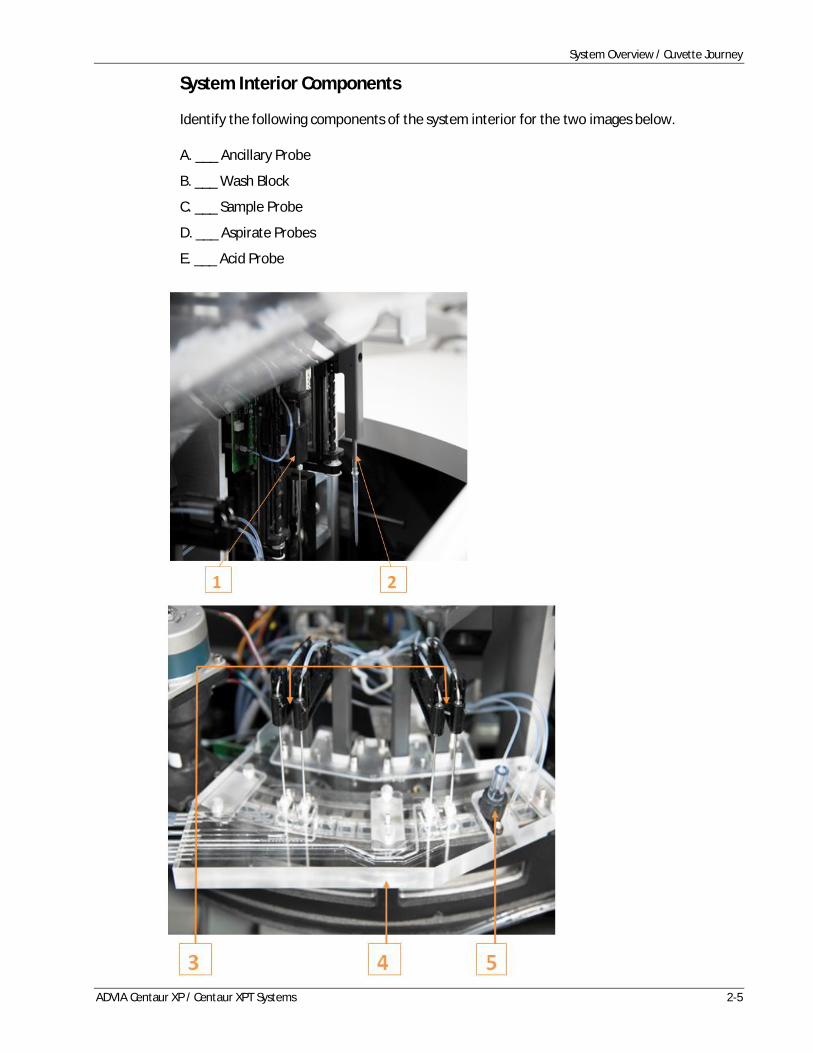
System Interior Components
Identify the following components of the system interior for the two images below.
A. ___ Ancillary Probe
B. ___ Wash Block
C. ___ Sample Probe
D. ___ Aspirate Probes
E. ___ Acid Probe

System Overview / Cuvette Journey
2-6 ADVIA Centaur XP / Centaur XPT Systems
System Interior Components (Cont’d)
Identify the following system interior components for the image below.
A. ___ Luminometer
B. ___ Incubation Ring
C. ___ Preheater
D. ___ Ejector Rod
E. ___ Waste Probe
(Please stop here)
System Overview / Cuvette Journey
ADVIA Centaur XP / Centaur XPT Systems 2-7
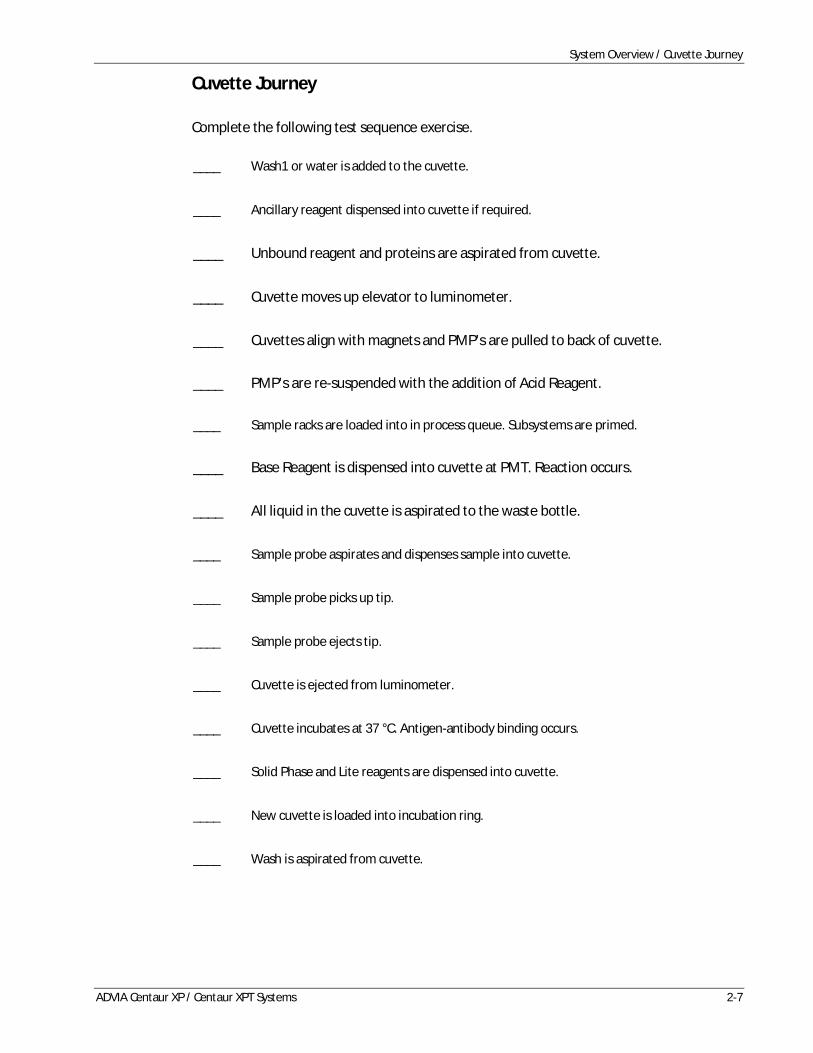
Cuvette Journey
Complete the following test sequence exercise.
____A. Wash1 or water is added to the cuvette.
____B. Ancillary reagent dispensed into cuvette if required.
____C. Unbound reagent and proteins are aspirated from cuvette.
____D. Cuvette moves up elevator to luminometer.
____E. Cuvettes align with magnets and PMP’s are pulled to back of cuvette.
____F. PMP’s are re-suspended with the addition of Acid Reagent.
____G. Sample racks are loaded into in process queue. Subsystems are primed.
____H. Base Reagent is dispensed into cuvette at PMT. Reaction occurs.
____I. All liquid in the cuvette is aspirated to the waste bottle.
____J. Sample probe aspirates and dispenses sample into cuvette.
____K. Sample probe picks up tip.
____L. Sample probe ejects tip.
____M. Cuvette is ejected from luminometer.
____N. Cuvette incubates at 37 °C. Antigen-antibody binding occurs.
____O. Solid Phase and Lite reagents are dispensed into cuvette.
____P. New cuvette is loaded into incubation ring.
____Q. Wash is aspirated from cuvette.

System Overview / Cuvette Journey
2-8 ADVIA Centaur XP / Centaur XPT Systems
Notes:

Assay Troubleshooting
ADVIA Centaur XP / Centaur XPT Systems 3-1
3 Assay Troubleshooting
Resources· ADVIA Centaur XP / Centaur XPT System Operator’s Guide
· ADVIA Centaur XP / XPT Assay Chart
ObjectivesAfter completing this section, you will be able to:
· Discuss how to address calibration issues
· List the steps to troubleshoot QC issues

Assay Troubleshooting
3-2 ADVIA Centaur XP / Centaur XPT Systems
Assay Troubleshooting
ADVIA Centaur XP / Centaur XPT Systems 3-3
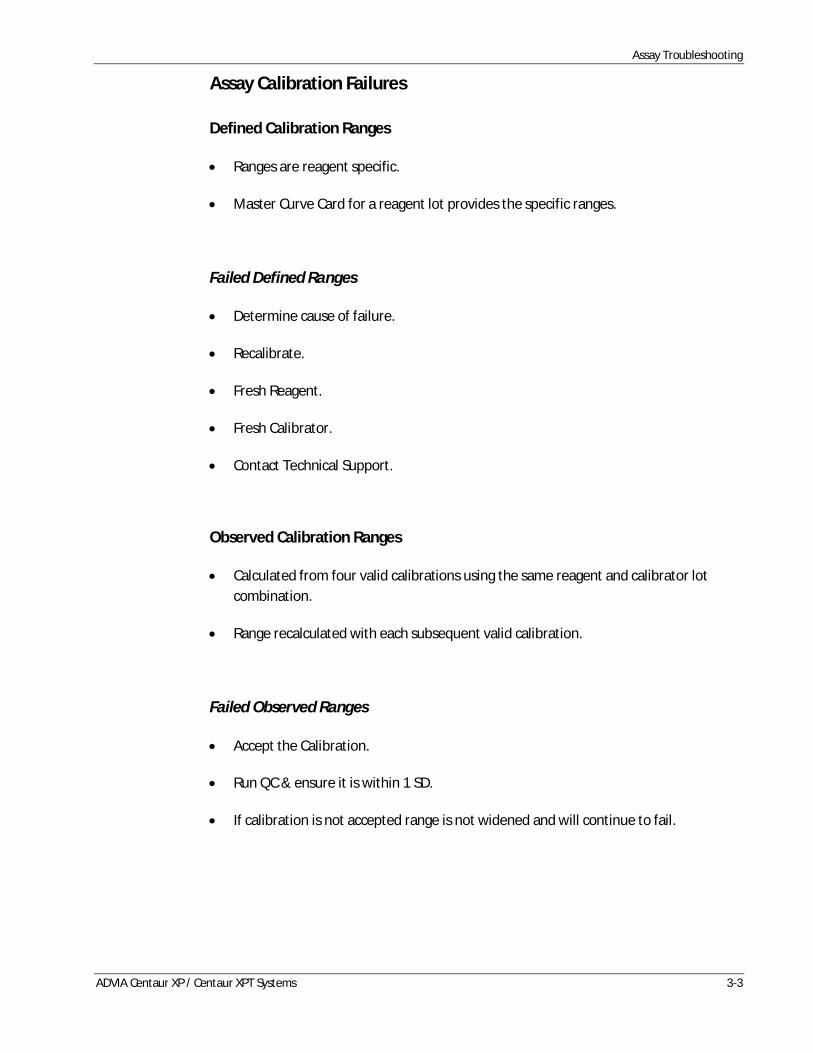
Assay Calibration Failures
Defined Calibration Ranges
· Ranges are reagent specific.
· Master Curve Card for a reagent lot provides the specific ranges.
Failed Defined Ranges
· Determine cause of failure.
· Recalibrate.
· Fresh Reagent.
· Fresh Calibrator.
· Contact Technical Support.
Observed Calibration Ranges
· Calculated from four valid calibrations using the same reagent and calibrator lotcombination.
· Range recalculated with each subsequent valid calibration.
Failed Observed Ranges
· Accept the Calibration.
· Run QC & ensure it is within 1 SD.
· If calibration is not accepted range is not widened and will continue to fail.
Assay Troubleshooting
3-4 ADVIA Centaur XP / Centaur XPT Systems
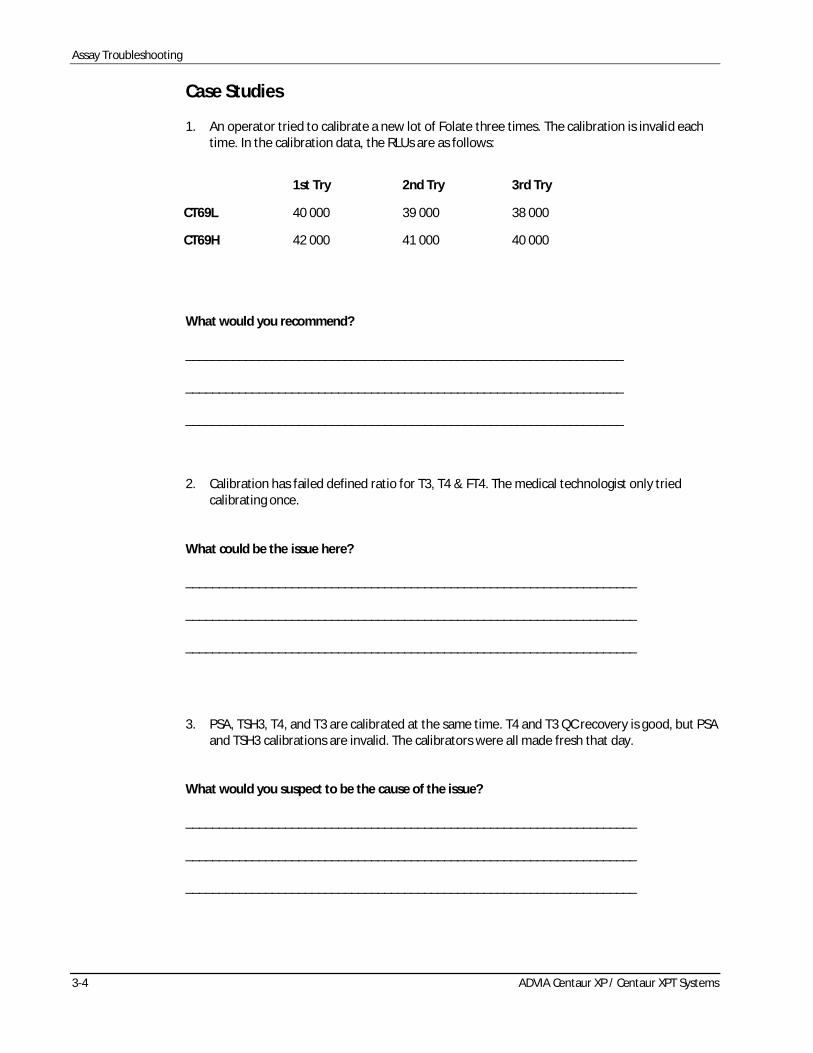
Case Studies
1. An operator tried to calibrate a new lot of Folate three times. The calibration is invalid eachtime. In the calibration data, the RLUs are as follows:
What would you recommend?
__________________________________________________________________
__________________________________________________________________
__________________________________________________________________
2. Calibration has failed defined ratio for T3, T4 & FT4. The medical technologist only triedcalibrating once.
What could be the issue here?
____________________________________________________________________
____________________________________________________________________
____________________________________________________________________
3. PSA, TSH3, T4, and T3 are calibrated at the same time. T4 and T3 QC recovery is good, but PSAand TSH3 calibrations are invalid. The calibrators were all made fresh that day.
What would you suspect to be the cause of the issue?
____________________________________________________________________
____________________________________________________________________
____________________________________________________________________
1st Try 2nd Try 3rd Try
CT69L 40 000 39 000 38 000
CT69H 42 000 41 000 40 000
Assay Troubleshooting
ADVIA Centaur XP / Centaur XPT Systems 3-5
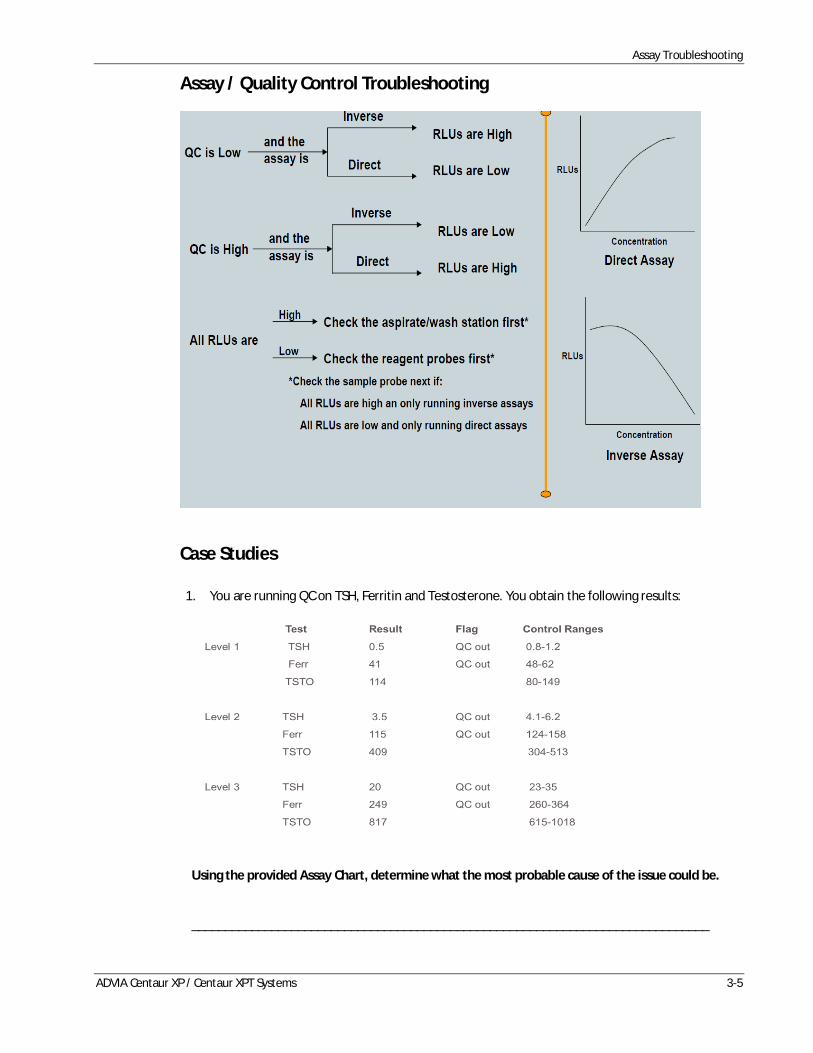
Assay / Quality Control Troubleshooting
Case Studies
1. You are running QC on TSH, Ferritin and Testosterone. You obtain the following results:
Using the provided Assay Chart, determine what the most probable cause of the issue could be.
______________________________________________________________________________
Assay Troubleshooting
3-6 ADVIA Centaur XP / Centaur XPT Systems
2. The operator is running tHCG, TSH, TSTO, PRGE, VB12, COR, on his Centaur XPT system. At theend of the day, the operator is having discrepant patient results and decides to run QC on allthe assays on board. They observed the following QC performance:
· QC high for tHCG
· QC low for PRGE, COR
· QC good for TSH, VB12, TSTO
What could be the cause of the issue?
____________________________________________________________________
____________________________________________________________________
3. The operator is running QC on his Centaur XPT system. They observed the following QCperformance:
· QC was high for Vit D
· QC was low for anti-HBs2
· QC was good for eHIV, HBcT, Fer
What could be the cause of the issue?
____________________________________________________________________
____________________________________________________________________
Event Log
ADVIA Centaur XP / Centaur XPT Systems 4-1
4 Event Log
Resources· ADVIA Centaur XP / Centaur XPT System Operator’s Guide
· Online Help
ObjectivesAfter completing this section, you will be able to:
· Utilize the event log to investigate system issues
· Use online help to search for troubleshooting information

Event Log
4-2 ADVIA Centaur XP / Centaur XPT Systems
Event Log
ADVIA Centaur XP / Centaur XPT Systems 4-3
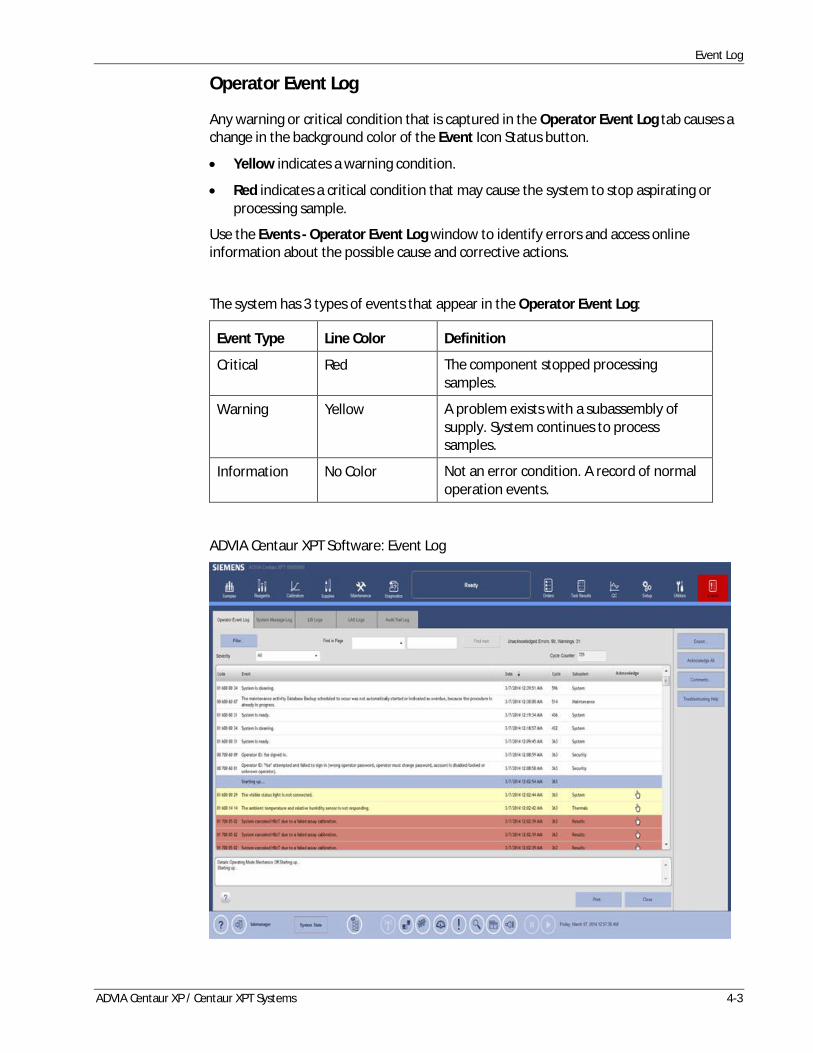
Operator Event Log
Any warning or critical condition that is captured in the Operator Event Log tab causes achange in the background color of the Event Icon Status button.
· Yellow indicates a warning condition.
· Red indicates a critical condition that may cause the system to stop aspirating orprocessing sample.
Use the Events - Operator Event Log window to identify errors and access onlineinformation about the possible cause and corrective actions.
The system has 3 types of events that appear in the Operator Event Log:
Event Type Line Color Definition
Critical Red The component stopped processingsamples.
Warning Yellow A problem exists with a subassembly ofsupply. System continues to processsamples.
Information No Color Not an error condition. A record of normaloperation events.
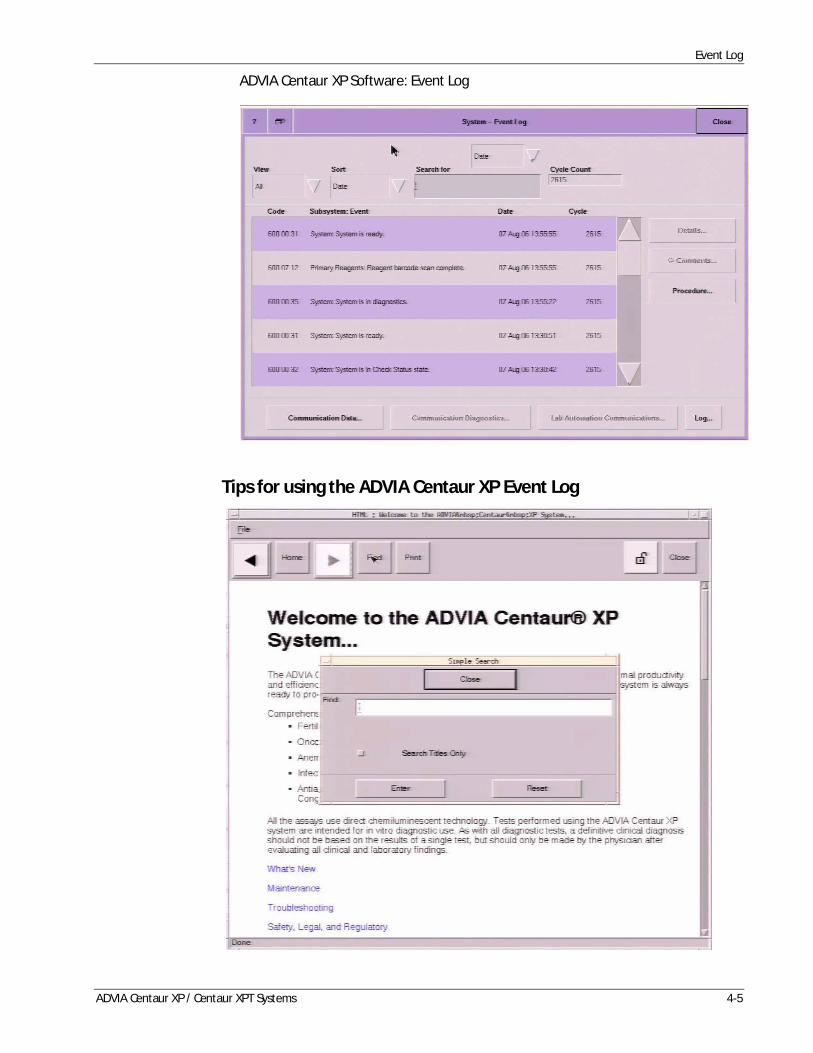
ADVIA Centaur XPT Software: Event Log
Event Log
4-4 ADVIA Centaur XP / Centaur XPT Systems
Tips for using the XPT event log· Searching for Warning events that occurred before a critical event will provide
you with more information than just searching for Critical events.
· To look into the event, select the line and click on Troubleshooting Help, onthe right side options.
· Remember to always look for a cause first (i.e. yellow errors that mightprecede a red error). This should help you decide which corrective action isappropriate.
· If you have to call Technical Support, provide any details on the error, if theyexist.
Event Log
ADVIA Centaur XP / Centaur XPT Systems 4-5
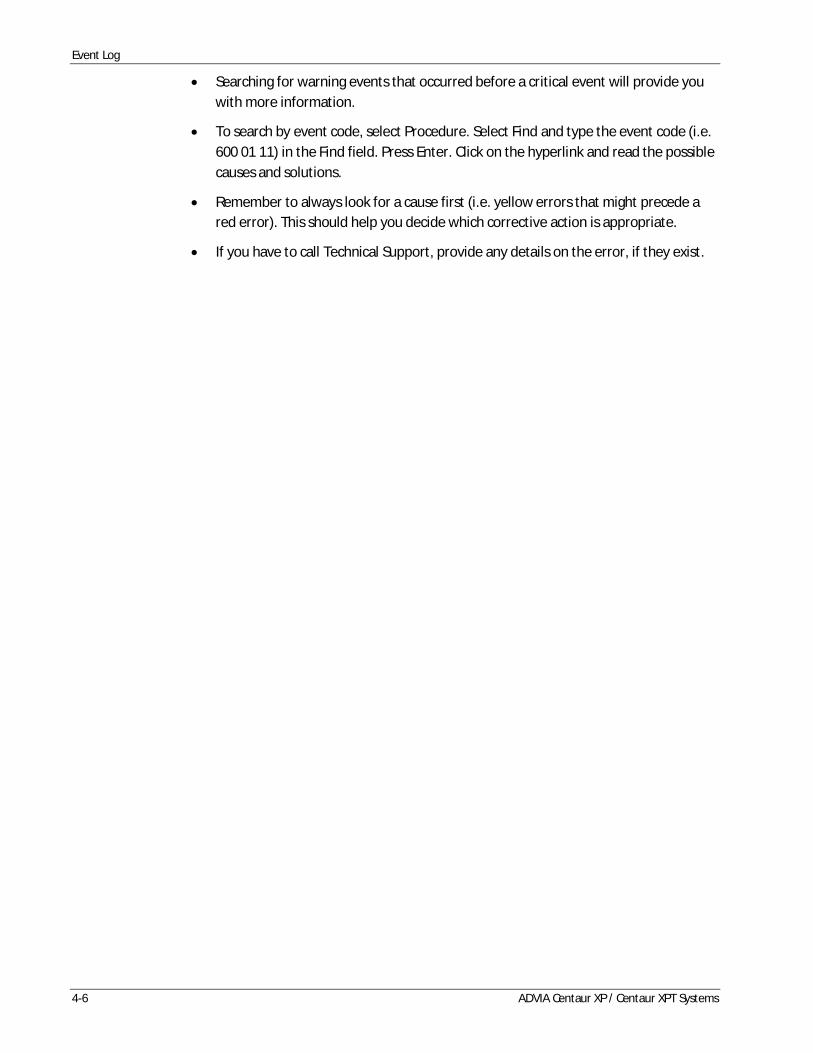
ADVIA Centaur XP Software: Event Log
Tips for using the ADVIA Centaur XP Event Log
Event Log
4-6 ADVIA Centaur XP / Centaur XPT Systems
· Searching for warning events that occurred before a critical event will provide youwith more information.
· To search by event code, select Procedure. Select Find and type the event code (i.e.600 01 11) in the Find field. Press Enter. Click on the hyperlink and read the possiblecauses and solutions.
· Remember to always look for a cause first (i.e. yellow errors that might precede ared error). This should help you decide which corrective action is appropriate.
· If you have to call Technical Support, provide any details on the error, if they exist.

Troubleshooting Cuvette Handling Issues
ADVIA Centaur XP / Centaur XPT Systems 5-1
5 Troubleshooting Cuvette Handling issues
Resources· ADVIA Centaur XPT System Operator’s Guide
· Online Help
· Troubleshooting Online PEP Training Course
ObjectivesUpon completion of this section, you will be able to identify and list the steps toresolve common hardware issues related to Cuvette Handling.

Troubleshooting Cuvette Handling Issues
5-2 ADVIA Centaur XP / Centaur XPT Systems
Troubleshooting Cuvette Handling Issues
ADVIA Centaur XP / Centaur XPT Systems 5-3
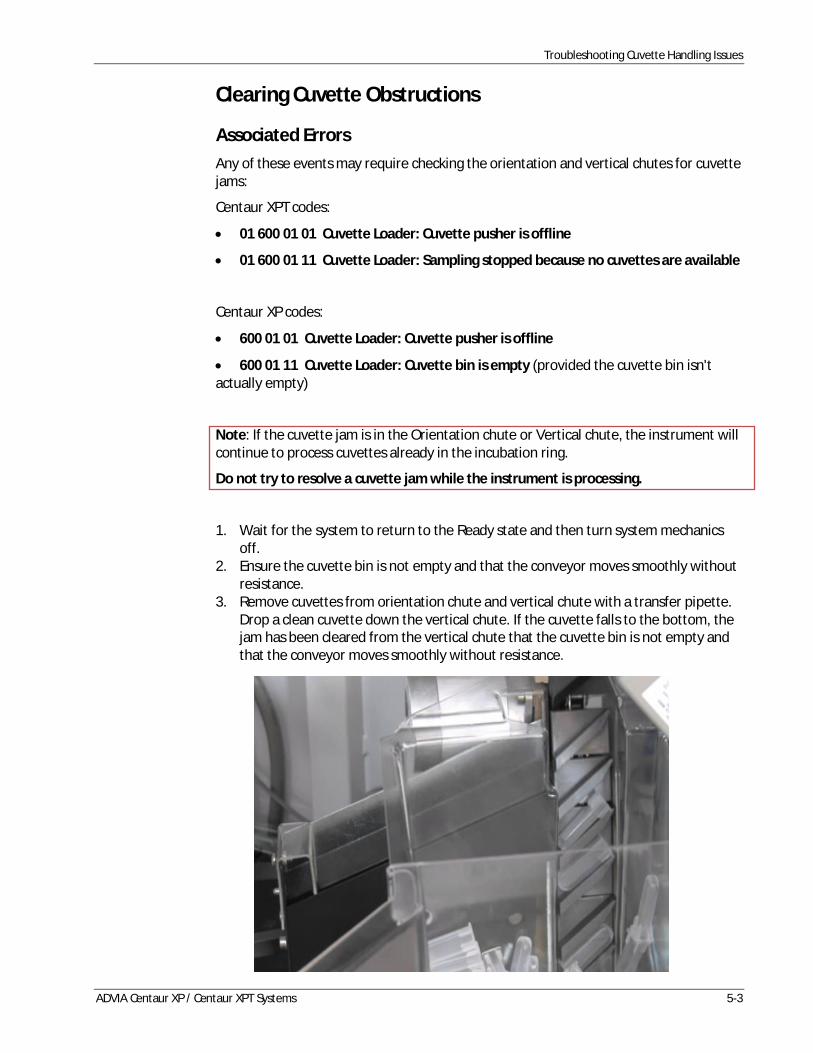
Clearing Cuvette Obstructions
Associated ErrorsAny of these events may require checking the orientation and vertical chutes for cuvettejams:
Centaur XPT codes:
· 01 600 01 01 Cuvette Loader: Cuvette pusher is offline
· 01 600 01 11 Cuvette Loader: Sampling stopped because no cuvettes are available
Centaur XP codes:
· 600 01 01 Cuvette Loader: Cuvette pusher is offline
· 600 01 11 Cuvette Loader: Cuvette bin is empty (provided the cuvette bin isn'tactually empty)
Note: If the cuvette jam is in the Orientation chute or Vertical chute, the instrument willcontinue to process cuvettes already in the incubation ring.
Do not try to resolve a cuvette jam while the instrument is processing.
1. Wait for the system to return to the Ready state and then turn system mechanicsoff.
2. Ensure the cuvette bin is not empty and that the conveyor moves smoothly withoutresistance.
3. Remove cuvettes from orientation chute and vertical chute with a transfer pipette.Drop a clean cuvette down the vertical chute. If the cuvette falls to the bottom, thejam has been cleared from the vertical chute that the cuvette bin is not empty andthat the conveyor moves smoothly without resistance.

Troubleshooting Cuvette Handling Issues
5-4 ADVIA Centaur XP / Centaur XPT Systems
Preheater Jams
Any of these events may require checking the preheater for cuvette jams:
Centaur XPT System associated error codes
· 01 600 01 01 Cuvette Loader: Cuvette pusher is offline
· 01 600 01 13 Cuvette Loader: Ring loader is offline
Centaur XP System associated error codes
· 600 01 01 Cuvette Loader: Cuvette pusher is offline
· 600 01 13 Cuvette Loader: Ring loader is offline
If a cuvette jam occurs in the Preheater, the instrument will continue to processcuvettes already in the incubation ring.
Note: Cuvette pusher arm errors can usually be cleared by Homing the System, if primecuvette does not work.
1. Remove the preheater (J channel) cover and discard cuvettes.
2. Clean the bottom of the preheater cover before replacing. Do not overtight. Makesure that there are never more than 14 cuvettes in the preheater and that they donot overlap.
Troubleshooting Cuvette Handling Issues
ADVIA Centaur XP / Centaur XPT Systems 5-5
3. In Diagnostic tools or in the Supply Status window, perform “Prime Cuvette”.
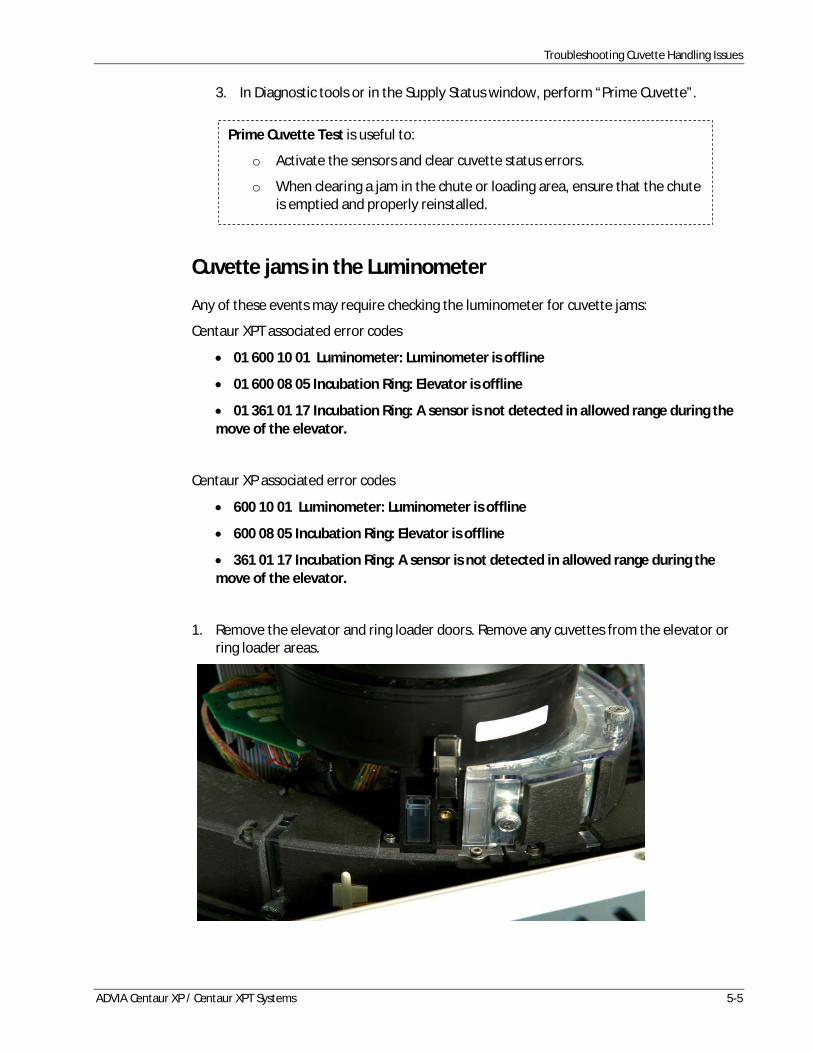
Cuvette jams in the Luminometer
Any of these events may require checking the luminometer for cuvette jams:
Centaur XPT associated error codes
· 01 600 10 01 Luminometer: Luminometer is offline
· 01 600 08 05 Incubation Ring: Elevator is offline
· 01 361 01 17 Incubation Ring: A sensor is not detected in allowed range during themove of the elevator.
Centaur XP associated error codes
· 600 10 01 Luminometer: Luminometer is offline
· 600 08 05 Incubation Ring: Elevator is offline
· 361 01 17 Incubation Ring: A sensor is not detected in allowed range during themove of the elevator.
1. Remove the elevator and ring loader doors. Remove any cuvettes from the elevator orring loader areas.
Prime Cuvette Test is useful to:
o Activate the sensors and clear cuvette status errors.
o When clearing a jam in the chute or loading area, ensure that the chuteis emptied and properly reinstalled.
Troubleshooting Cuvette Handling Issues
5-6 ADVIA Centaur XP / Centaur XPT Systems
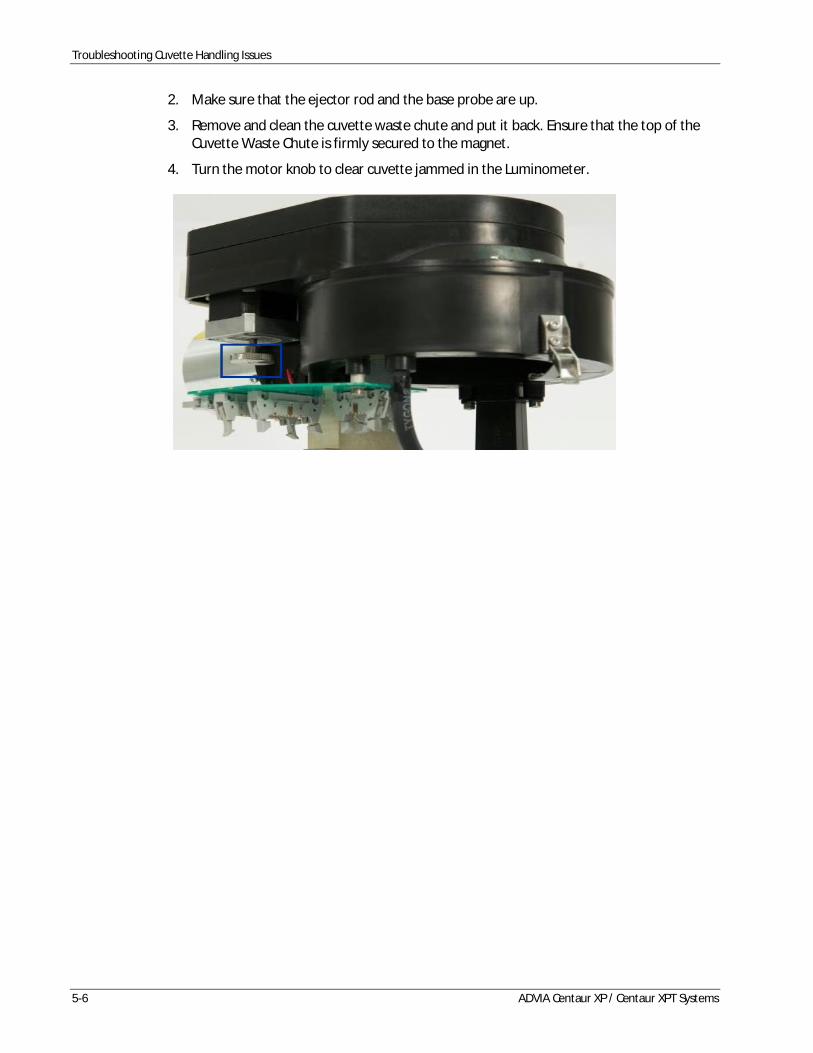
2. Make sure that the ejector rod and the base probe are up.
3. Remove and clean the cuvette waste chute and put it back. Ensure that the top of theCuvette Waste Chute is firmly secured to the magnet.
4. Turn the motor knob to clear cuvette jammed in the Luminometer.
Troubleshooting Sample Handling Issues
ADVIA Centaur XP / Centaur XPT System 6-1
6 Troubleshooting Sample Handling issues
Resources· ADVIA Centaur XPT System Operator’s Guide
· Online Help
· Troubleshooting Online PEP Training Course
ObjectivesAfter completing this section, you will be able to identify and list the steps to resolvecommon hardware issues related to Sample Handling.

Troubleshooting Sample Handling Issues
6-2 ADVIA Centaur XP / Centaur XPT System
Troubleshooting Sample Handling Issues
ADVIA Centaur XP / Centaur XPT System 6-3
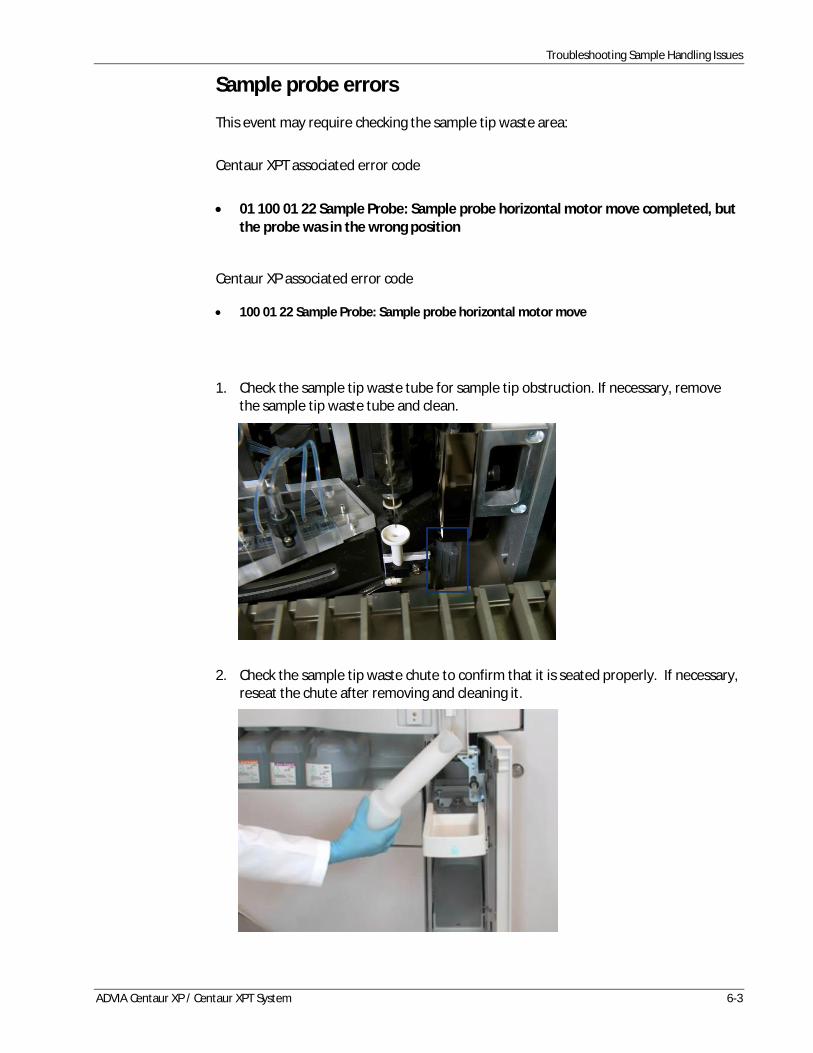
Sample probe errors
This event may require checking the sample tip waste area:
Centaur XPT associated error code
· 01 100 01 22 Sample Probe: Sample probe horizontal motor move completed, butthe probe was in the wrong position
Centaur XP associated error code
· 100 01 22 Sample Probe: Sample probe horizontal motor move
1. Check the sample tip waste tube for sample tip obstruction. If necessary, removethe sample tip waste tube and clean.
2. Check the sample tip waste chute to confirm that it is seated properly. If necessary,reseat the chute after removing and cleaning it.
Troubleshooting Sample Handling Issues
6-4 ADVIA Centaur XP / Centaur XPT System
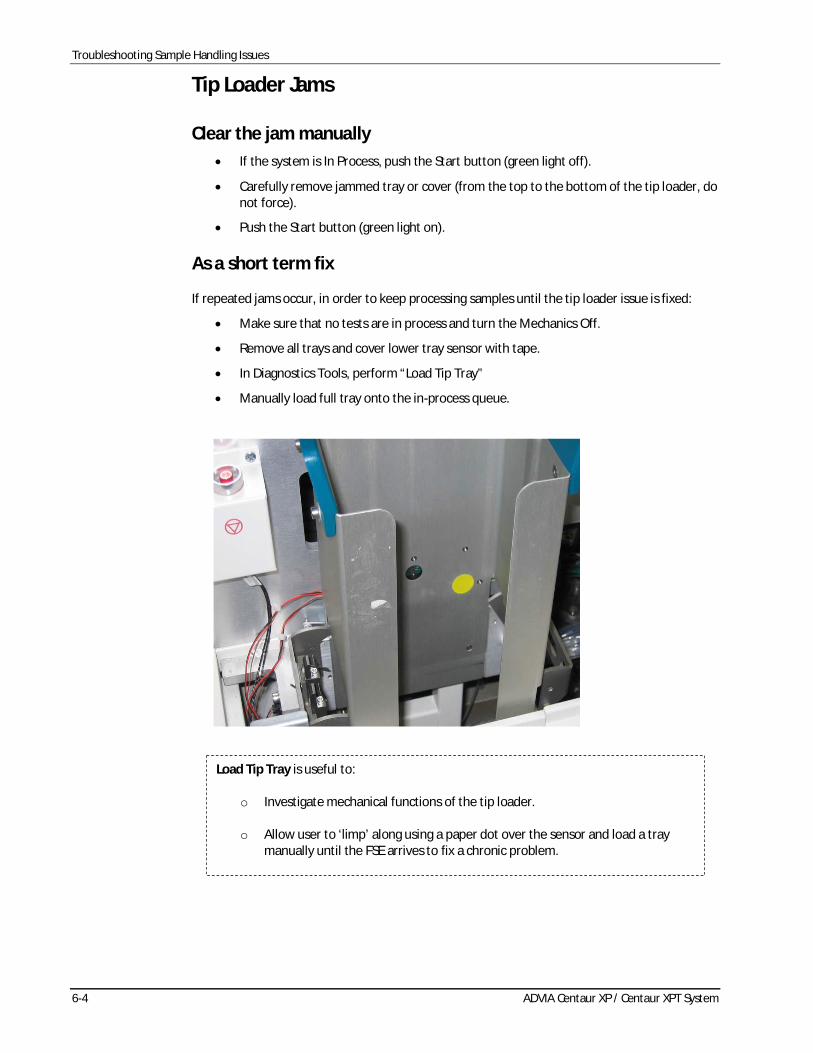
Tip Loader Jams
Clear the jam manually· If the system is In Process, push the Start button (green light off).
· Carefully remove jammed tray or cover (from the top to the bottom of the tip loader, donot force).
· Push the Start button (green light on).
As a short term fix
If repeated jams occur, in order to keep processing samples until the tip loader issue is fixed:
· Make sure that no tests are in process and turn the Mechanics Off.
· Remove all trays and cover lower tray sensor with tape.
· In Diagnostics Tools, perform “Load Tip Tray”
· Manually load full tray onto the in-process queue.
Load Tip Tray is useful to:
o Investigate mechanical functions of the tip loader.
o Allow user to ‘limp’ along using a paper dot over the sensor and load a traymanually until the FSE arrives to fix a chronic problem.
Troubleshooting Reagent Handling Issues
ADVIA Centaur XP / Centaur XPT System 7-1
7 Troubleshooting Reagent Handling Issues
Resources· ADVIA Centaur XPT System Operator’s Guide
· Online Help
· Troubleshooting Online PEP Training Course
ObjectivesAfter completing this section, you will be able to identify and list the steps to resolvecommon hardware issues related to Reagent Handling.

Troubleshooting Reagent Handling Issues
7-2 ADVIA Centaur XP / Centaur XPT Systems
Troubleshooting Reagent Handling Issues
ADVIA Centaur XP / Centaur XPT System 7-3
Reagent Probe Errors
One of these events may require investigating a reagent pack or a reagent probe issue:
Centaur XPT associated error codes
· 01 600 06 33 Reagent Probes: Reagent probe 1 volume check failure.The optical sensor detects a problem when aspirating from a pack. The cause of thiserror could be the pack itself or air bubbles in the reagent probe tubing.Several volume check errors can lead to a reagent probe going offline.
· 01 202 01 21 Reagent Probes: Reagent probe 1 vertical move did not completewithin specifications.
Centaur XP associated error codes
· 600 06 33 Reagent Probes: Reagent probe 1 volume check failure.The optical sensor detects a problem when aspirating from a pack. The cause of this error couldbe the pack itself or air bubbles in the reagent probe tubing.Several volume check errors can lead to a reagent probe going offline.
600 xx xx Reagent Probes: Reagent probe 1 vertical move error.
A reagent probe vertical move error indicates that the probe's movement could havebeen obstructed when moving vertically.
1. In the Operator Event Log, check the pack position.
· Check for proper pack placement and volume (“Volume Check Error at Pack X”).
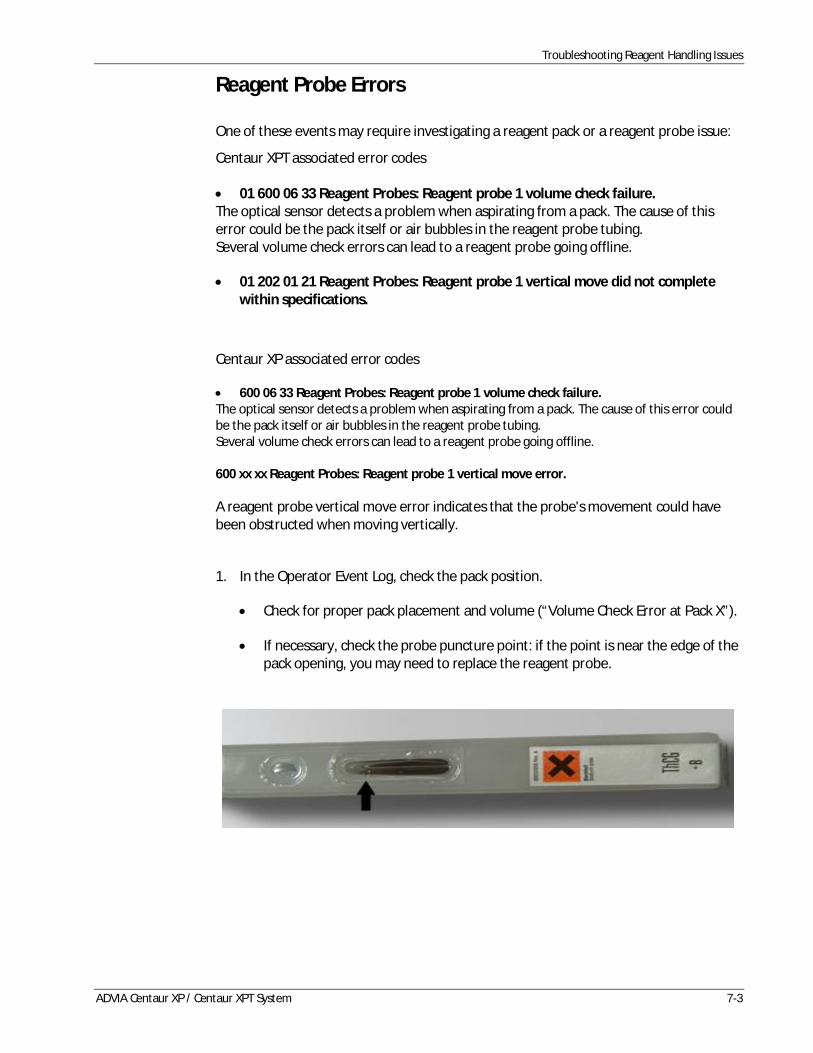
· If necessary, check the probe puncture point: if the point is near the edge of thepack opening, you may need to replace the reagent probe.
Troubleshooting Reagent Handling Issues
7-4 ADVIA Centaur XP / Centaur XPT Systems
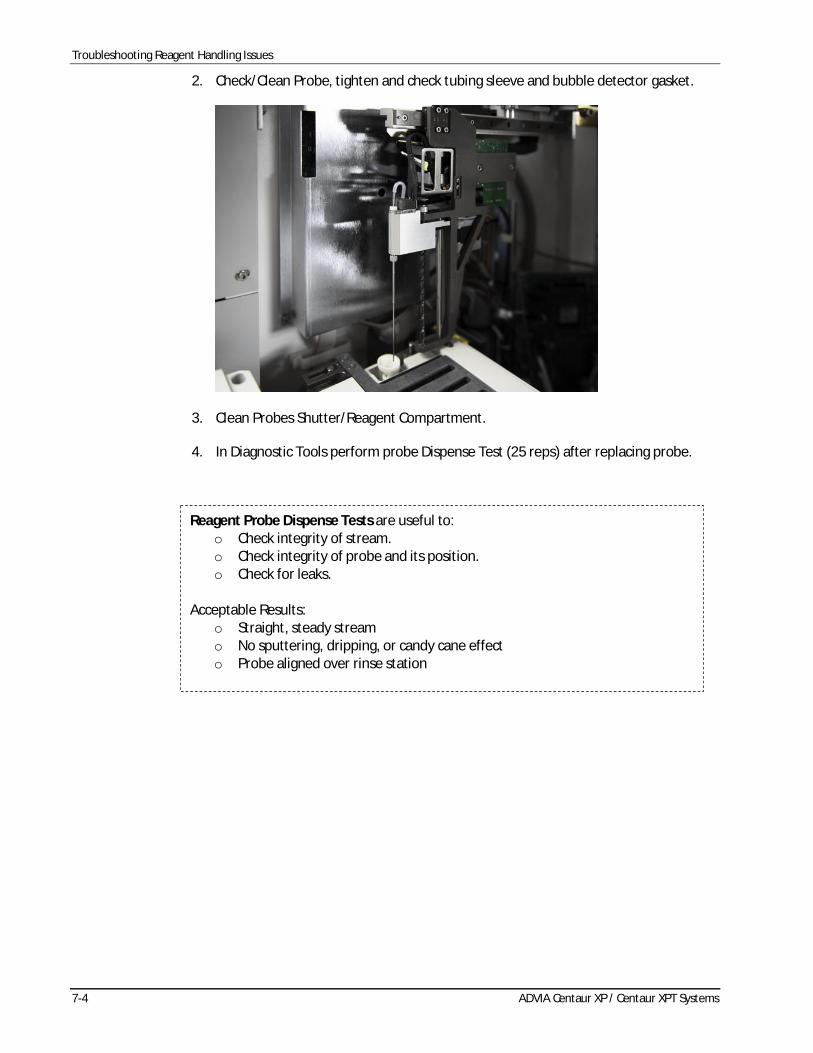
2. Check/Clean Probe, tighten and check tubing sleeve and bubble detector gasket.
3. Clean Probes Shutter/Reagent Compartment.
4. In Diagnostic Tools perform probe Dispense Test (25 reps) after replacing probe.
Reagent Probe Dispense Tests are useful to:o Check integrity of stream.o Check integrity of probe and its position.o Check for leaks.
Acceptable Results:o Straight, steady streamo No sputtering, dripping, or candy cane effecto Probe aligned over rinse station
Troubleshooting System Fluidics Issues
ADVIA Centaur XP / Centaur XPT Systems 8-1
8 Troubleshooting System Fluidics Issues
Resources
· ADVIA Centaur XPT Immunoassay System Operator’s Guide
· Online Help
ObjectivesAfter completing this section, you will be able to identify and list the steps to resolvecommon hardware issues related to system fluidics.

Troubleshooting System Fluidics Issues
8-2 ADVIA Centaur XP / Centaur XPT Systems
Troubleshooting System Fluidics Issues
ADVIA Centaur XP / Centaur XPT Systems 8-3
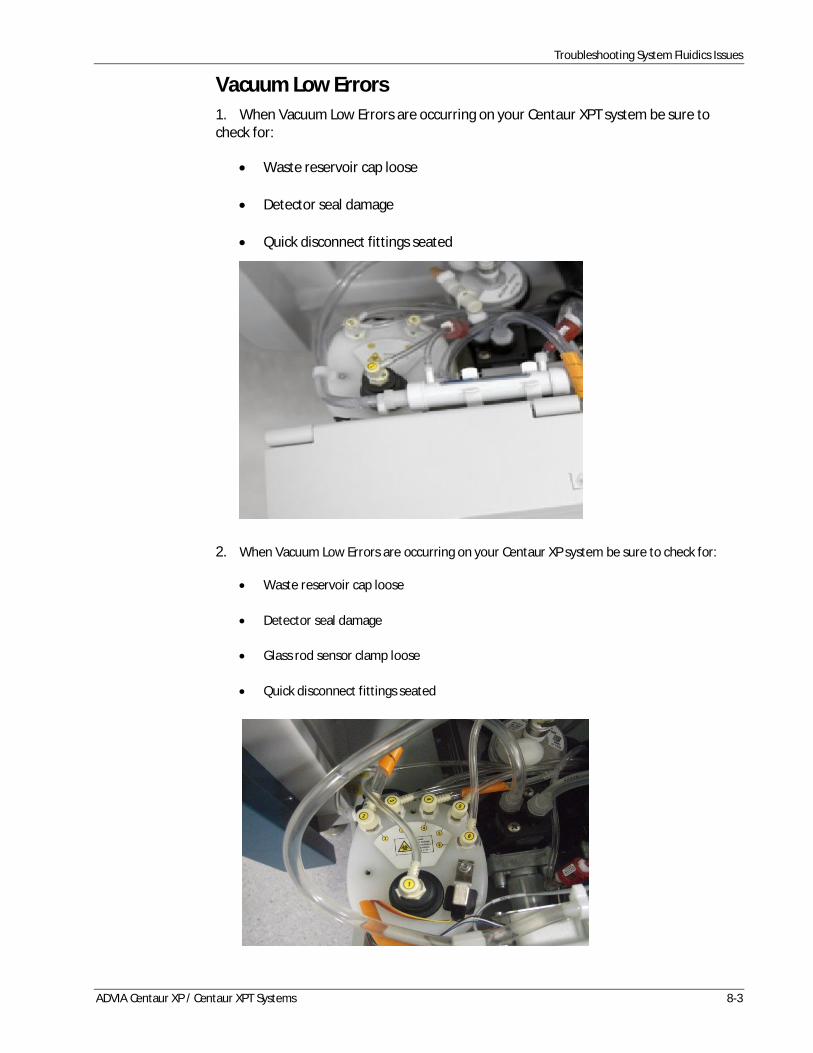
Vacuum Low Errors1. When Vacuum Low Errors are occurring on your Centaur XPT system be sure tocheck for:
· Waste reservoir cap loose
· Detector seal damage
· Quick disconnect fittings seated
2. When Vacuum Low Errors are occurring on your Centaur XP system be sure to check for:
· Waste reservoir cap loose
· Detector seal damage
· Glass rod sensor clamp loose
· Quick disconnect fittings seated
Troubleshooting System Fluidics Issues
8-4 ADVIA Centaur XP / Centaur XPT Systems
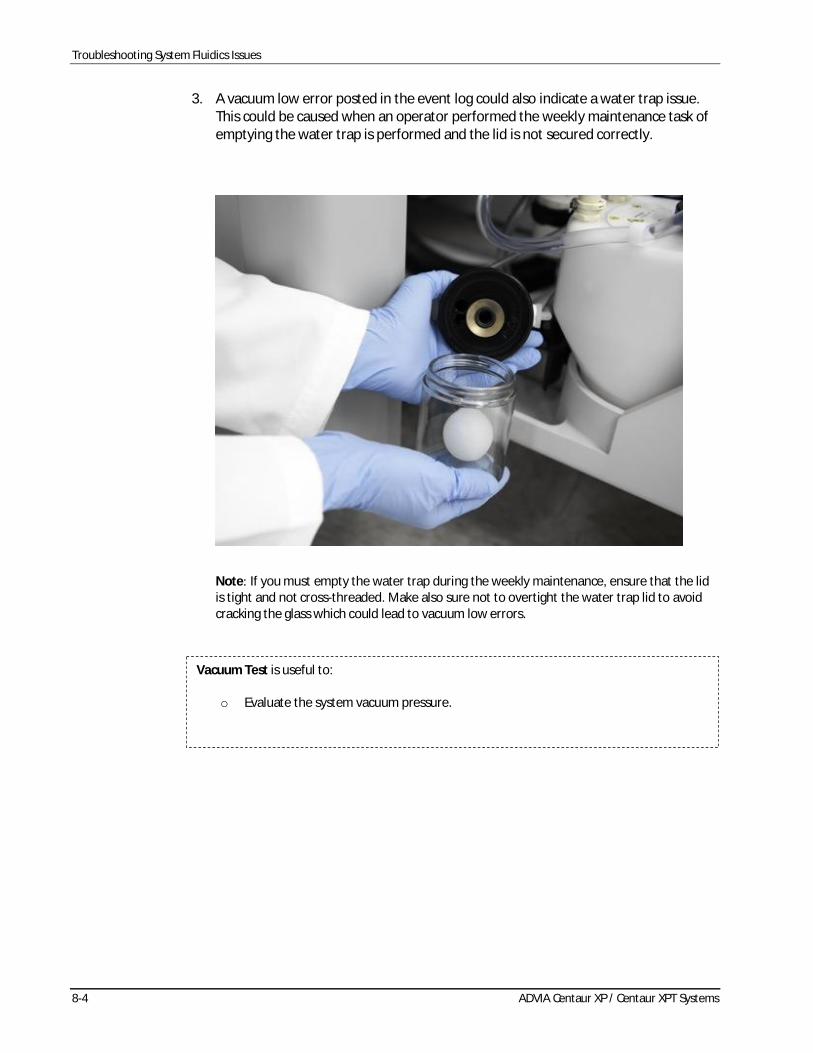
3. A vacuum low error posted in the event log could also indicate a water trap issue.This could be caused when an operator performed the weekly maintenance task ofemptying the water trap is performed and the lid is not secured correctly.
Note: If you must empty the water trap during the weekly maintenance, ensure that the lidis tight and not cross-threaded. Make also sure not to overtight the water trap lid to avoidcracking the glass which could lead to vacuum low errors.
Vacuum Test is useful to:
o Evaluate the system vacuum pressure.
Troubleshooting System Fluidics Issues
ADVIA Centaur XP / Centaur XPT Systems 8-5
Water Pressure Low Errors
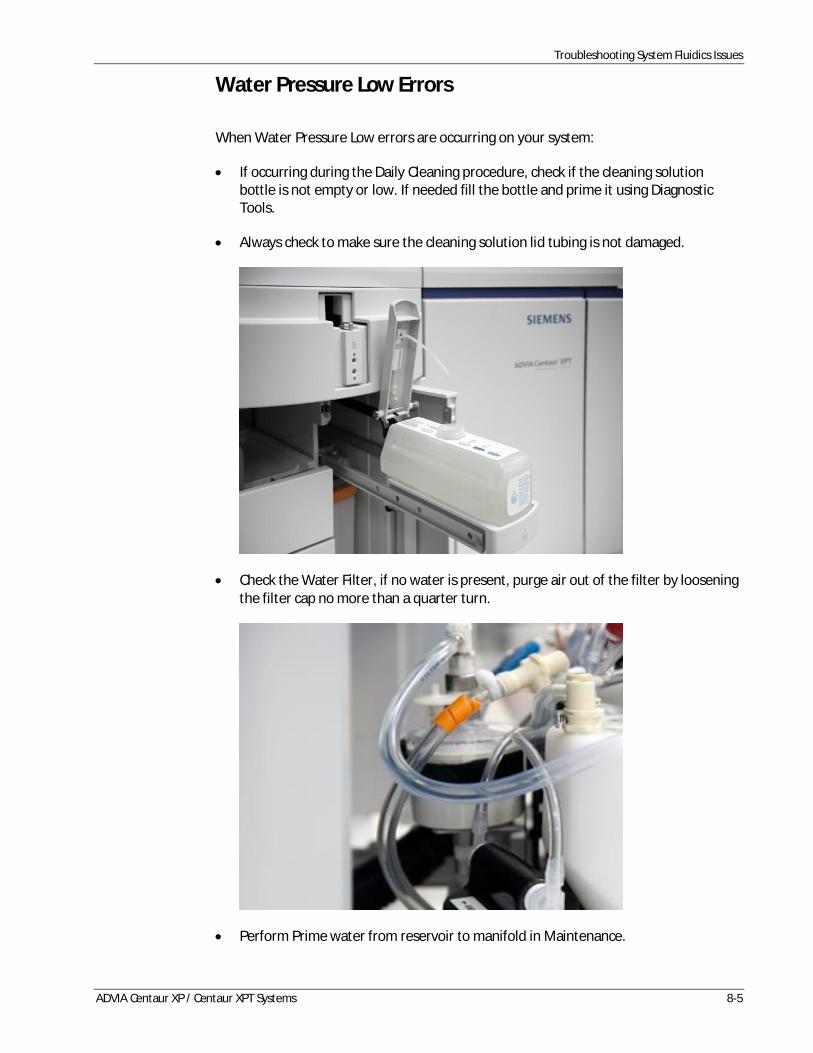
When Water Pressure Low errors are occurring on your system:
· If occurring during the Daily Cleaning procedure, check if the cleaning solutionbottle is not empty or low. If needed fill the bottle and prime it using DiagnosticTools.
· Always check to make sure the cleaning solution lid tubing is not damaged.
· Check the Water Filter, if no water is present, purge air out of the filter by looseningthe filter cap no more than a quarter turn.
· Perform Prime water from reservoir to manifold in Maintenance.
Troubleshooting System Fluidics Issues
8-6 ADVIA Centaur XP / Centaur XPT Systems
Monthly Cleaning Procedure
If you fail the MCP on your Centaur XP System:
1. Before restarting the procedure, rinse water bottle and reservoir thoroughly of cleaningsolution, fill water bottle about half way with water, install both on system and allowreservoir to fill.
2. Start the procedure from the beginning, making sure you follow the prompts carefully.
3. If procedure will not restart, check to see if the water reservoir has water. If not, manuallyfill reservoir to about ¾ full. Restart procedure.
Troubleshooting System Fluidics Issues
ADVIA Centaur XP / Centaur XPT Systems 8-7
Signal Errors
A Signal Error is an abnormal light flash during the chemiluminescent reaction in theLuminometer, usually caused by light leaks, acid/base issues, electrical noise, or staticdischarge.
· More frequent during low RLU reactions (like BNP, ID assays).
· No result is generated for that sample.
· System schedules automatic rerun.
1. Check/Replace Acid and Base (the onboard stability is 28 days).
2. Inspect Acid and Base Pumps for leaks.
3. In Diagnostic Tools, Prime Fluid Line, select Acid then Base.
4. In Diagnostic Tools, Perform Dark Count Tests with and without cuvettes.
Dark Count is useful to:
o Investigate PMT/Luminometer errors due to light leaks or static.

Troubleshooting System Fluidics Issues
8-8 ADVIA Centaur XP / Centaur XPT Systems
Related Documents