Advanced Multi Uploader Manual DMXzone.com Advanced Multi Uploader Manual About Advanced Multi Uploader ......................................................................................... 2 Features in Detail ................................................................................................................... 3 Before you begin ................................................................................................................... 8 Installing the extension ......................................................................................................... 8 Uploading Multi Files With Pure PHP Upload ........................................................................ 9 Publishing The Upload Component On Your Page............................................................. 9 Uploading Multi Files With Pure ASP Upload 3 ................................................................... 25 Publishing The Upload Component On Your Page........................................................... 25 Editing the Advanced Multi Uploader with the Property Inspector ................................. 45 FAQ.. ..................................................................................................................................... 49 Copyright © 2007-2008 DMXzone.com All Rights Reserved To get more go to DMXzone.com Page 1 of 49

Welcome message from author
This document is posted to help you gain knowledge. Please leave a comment to let me know what you think about it! Share it to your friends and learn new things together.
Transcript
Advanced Multi Uploader Manual DMXzone.com
Advanced Multi Uploader Manual About Advanced Multi Uploader.........................................................................................2 Features in Detail ...................................................................................................................3 Before you begin ...................................................................................................................8 Installing the extension .........................................................................................................8 Uploading Multi Files With Pure PHP Upload........................................................................9 Publishing The Upload Component On Your Page.............................................................9 Uploading Multi Files With Pure ASP Upload 3...................................................................25 Publishing The Upload Component On Your Page...........................................................25 Editing the Advanced Multi Uploader with the Property Inspector.................................45 FAQ.. .....................................................................................................................................49
Copyright © 2007-2008 DMXzone.com All Rights Reserved To get more go to DMXzone.com
Page 1 of 49

Advanced Multi Uploader Manual DMXzone.com
About Advanced Multi Uploader Use Advanced Multi Uploader to allow full file management and multiple secure uploads in just a few clicks! Use the easy browsing feature for the selection of files to upload, automatically generate a clear overview and advanced status report with progress bars and the condition of the selected files. Optionally remove files from your overview or upload queue and customize it to any site design. The Advanced Multi Upload component is fully integrated with the latest PHP & ASP Upload extensions, is Flash 9 compatible and weighs less then 60kb.
Copyright © 2007-2008 DMXzone.com All Rights Reserved To get more go to DMXzone.com
Page 2 of 49

Advanced Multi Uploader Manual DMXzone.com
Features in Detail
Advanced Multi Uploader
• Advanced Multiple Uploader o Easy browsing for the selection of files
Copyright © 2007-2008 DMXzone.com All Rights Reserved To get more go to DMXzone.com
Page 3 of 49
Advanced Multi Uploader Manual DMXzone.com
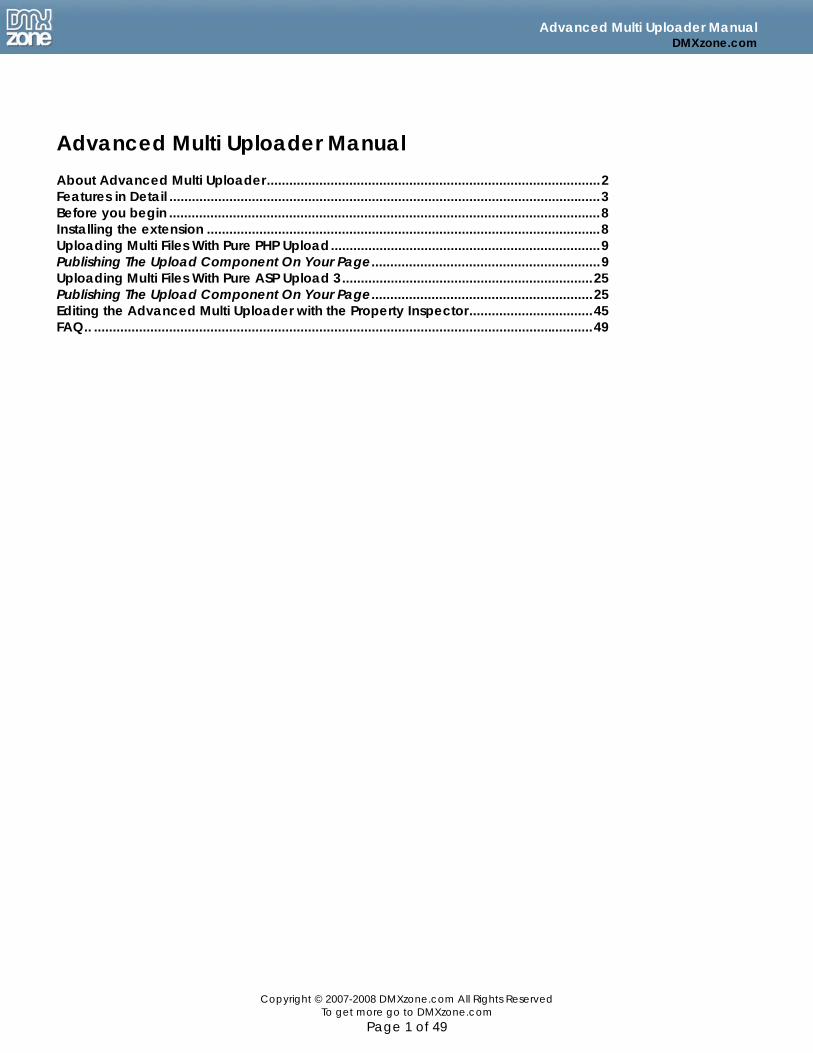
o Automatically generates a clear overview and advanced status report with progress bars and the condition of the selected files
o Full color indication in the list of files about the success and failure o Optionally remove files from your overview or upload queue
Copyright © 2007-2008 DMXzone.com All Rights Reserved To get more go to DMXzone.com
Page 4 of 49
Advanced Multi Uploader Manual DMXzone.com
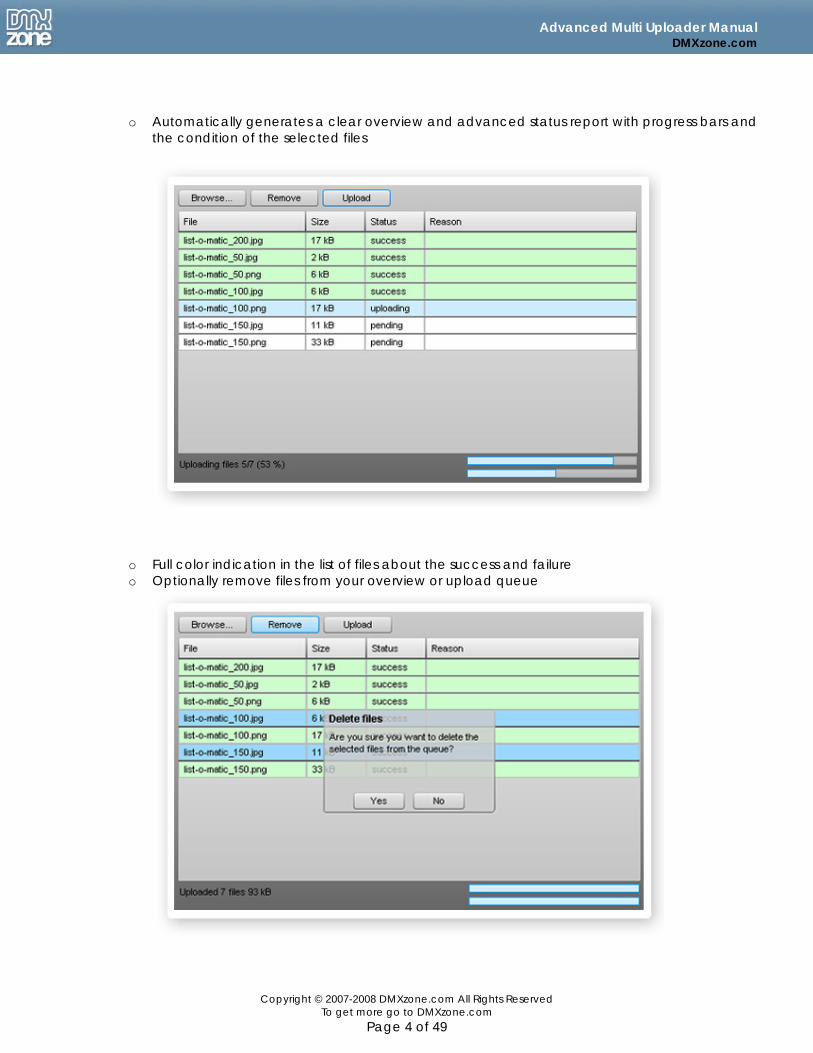
• Fully Customizable o Fits any site design
Copyright © 2007-2008 DMXzone.com All Rights Reserved To get more go to DMXzone.com
Page 5 of 49

Advanced Multi Uploader Manual DMXzone.com
• Fully integrated with the latest PHP and ASP Upload extensions o Create a multiple file upload field in one click, use the settings from your favourite upload
extensions – and their companions like Smart Image Processor
• Robust error checking
The component makes sure that all the files are securely uploaded, gives nice progress indication and if one the upload fails – displays the exact reason of the failure – all within the same interface
• Flash 9 compatible with light weight Flash component o Fully flash 9 compatible - gaining all the power and reliability of the Flash 9 player! o The complete Multi Uploader component is less then 60 kb.
• New generation property inspector
The property inspector enables you to change several options directly.
Copyright © 2007-2008 DMXzone.com All Rights Reserved To get more go to DMXzone.com
Page 6 of 49

Advanced Multi Uploader Manual DMXzone.com
• Fully Integrated in Dreamweaver o No coding required, define all your options using the Upload extensions o Generate a visual Preview in Dreamweaver with the press of a button
Copyright © 2007-2008 DMXzone.com All Rights Reserved To get more go to DMXzone.com
Page 7 of 49

Advanced Multi Uploader Manual DMXzone.com
Before you begin Make sure to setup your site in Dreamweaver first before creating a page, if you don’t know how to do this please read this.
Installing the extension Read the tutorial at http://www.dmxzone.com/ShowDetail.asp?NewsId=4671 Login, download the product, and lookup your serial at http://www.dmxzone.com/myZone.asp?Section=purchases Get the latest extension manager from Adobe at http://www.adobe.com/exchange/em_download/ Open the .mxp file (the extension manager should start-up) and install the extension. If you experience problems please read the FAQ at http://www.dmxzone.com/index.asp?TypeId=7&CatId=687 before contacting support.
Copyright © 2007-2008 DMXzone.com All Rights Reserved To get more go to DMXzone.com
Page 8 of 49

Advanced Multi Uploader Manual DMXzone.com
Uploading Multi Files With Pure PHP Upload
Introduction In this tutorial we’re going to show you how easy it is to upload multiple files with Pure PHP Upload and the Multi Uploader.
Publishing The Upload Component On Your Page 1. Create a new PHP page
Create a new or open an existing PHP page and save the page in the site you have defined.
2. Applying the extension Choose the icon from the DMXzone object bar to apply the extension, the following popup appears:
As you can see the Multi Uploader automatically starts Pure PHP Upload.
Copyright © 2007-2008 DMXzone.com All Rights Reserved To get more go to DMXzone.com
Page 9 of 49

Advanced Multi Uploader Manual DMXzone.com
3. Defining the basic Upload Options Specify the Upload Folder on your server by pressing the Browse… button, make sure you have the proper access rights. For setting the appropriate security read setting the folder security on your server tutorial.
§ Define the allowed file extensions, you can choose from All, Images or add your own Custom File Extensions. We’ll leave it to All.
Copyright © 2007-2008 DMXzone.com All Rights Reserved To get more go to DMXzone.com
Page 10 of 49
Advanced Multi Uploader Manual DMXzone.com
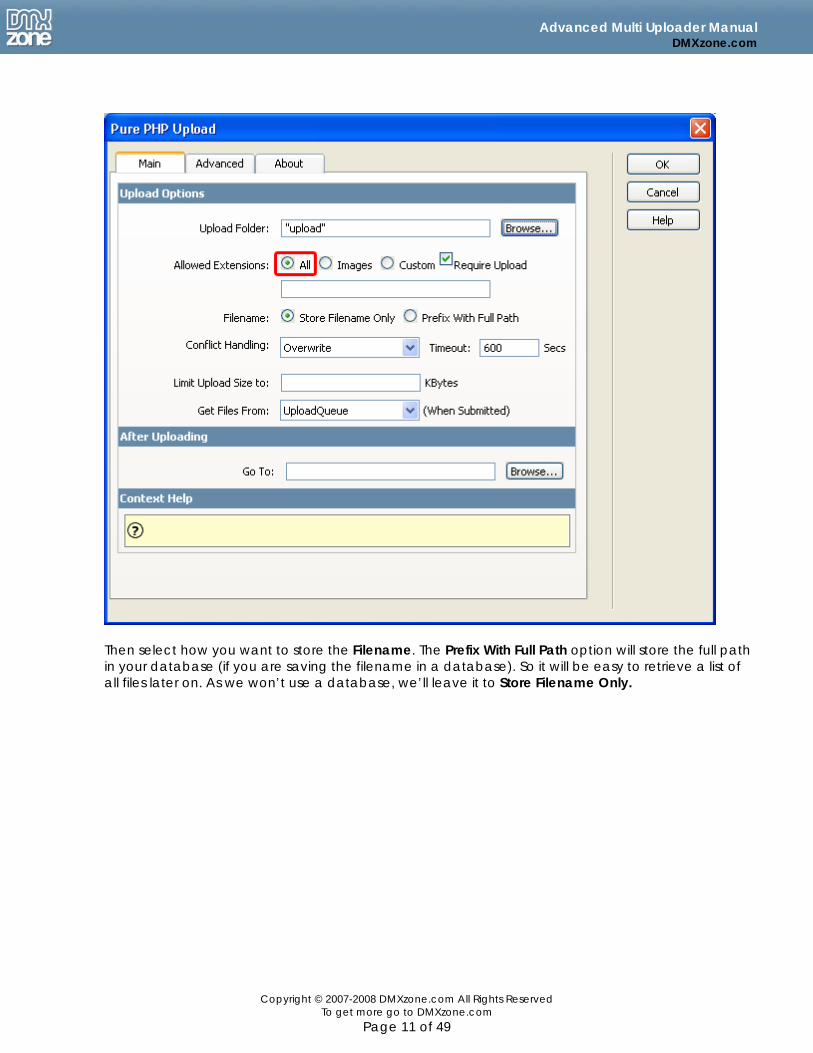
Then select how you want to store the Filename. The Prefix With Full Path option will store the full path in your database (if you are saving the filename in a database). So it will be easy to retrieve a list of all files later on. As we won’t use a database, we’ll leave it to Store Filename Only.
Copyright © 2007-2008 DMXzone.com All Rights Reserved To get more go to DMXzone.com
Page 11 of 49
Advanced Multi Uploader Manual DMXzone.com
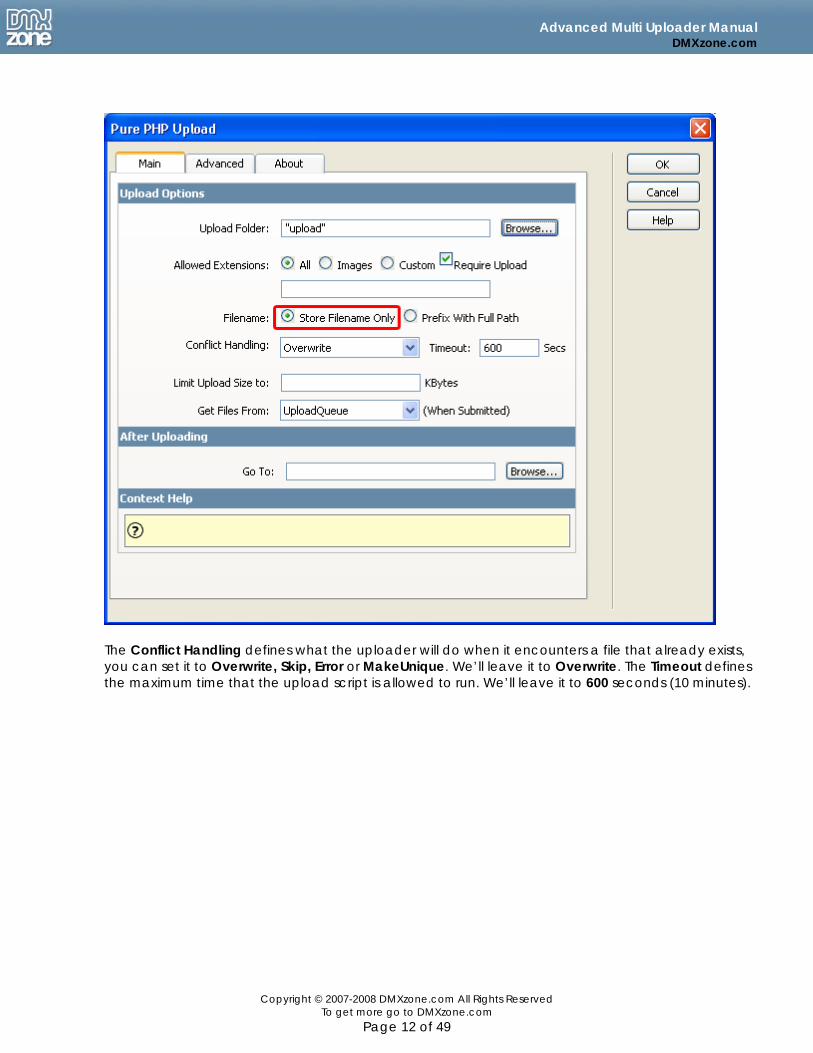
The Conflict Handling defines what the uploader will do when it encounters a file that already exists, you can set it to Overwrite, Skip, Error or MakeUnique. We’ll leave it to Overwrite. The Timeout defines the maximum time that the upload script is allowed to run. We’ll leave it to 600 seconds (10 minutes).
Copyright © 2007-2008 DMXzone.com All Rights Reserved To get more go to DMXzone.com
Page 12 of 49

Advanced Multi Uploader Manual DMXzone.com
We leave the Limit Upload Size to empty as we don’t want to restrict the maximum file size.
Copyright © 2007-2008 DMXzone.com All Rights Reserved To get more go to DMXzone.com
Page 13 of 49

Advanced Multi Uploader Manual DMXzone.com
We don’t have to set the Get Files From property as the multi uploader sets this by default (to UploadQueue).
Copyright © 2007-2008 DMXzone.com All Rights Reserved To get more go to DMXzone.com
Page 14 of 49
Advanced Multi Uploader Manual DMXzone.com
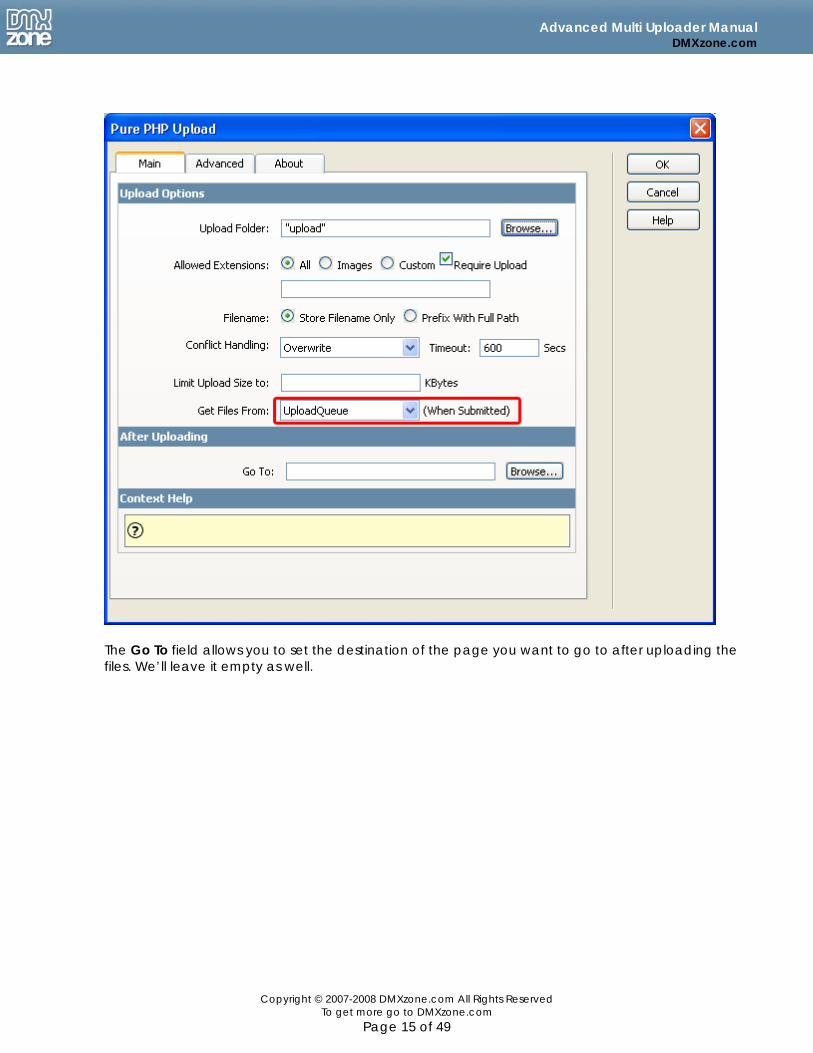
The Go To field allows you to set the destination of the page you want to go to after uploading the files. We’ll leave it empty as well.
Copyright © 2007-2008 DMXzone.com All Rights Reserved To get more go to DMXzone.com
Page 15 of 49

Advanced Multi Uploader Manual DMXzone.com
Press the OK button to apply the settings, save your page and upload the files to your server.
4. Setting the Advanced Options Click on the Advanced tab. You can set the minimum and the maximum dimensions of your image using the Min Width, Max Width, Min Height and Max Height options. We’ll leave them empty for now.
Copyright © 2007-2008 DMXzone.com All Rights Reserved To get more go to DMXzone.com
Page 16 of 49
Advanced Multi Uploader Manual DMXzone.com
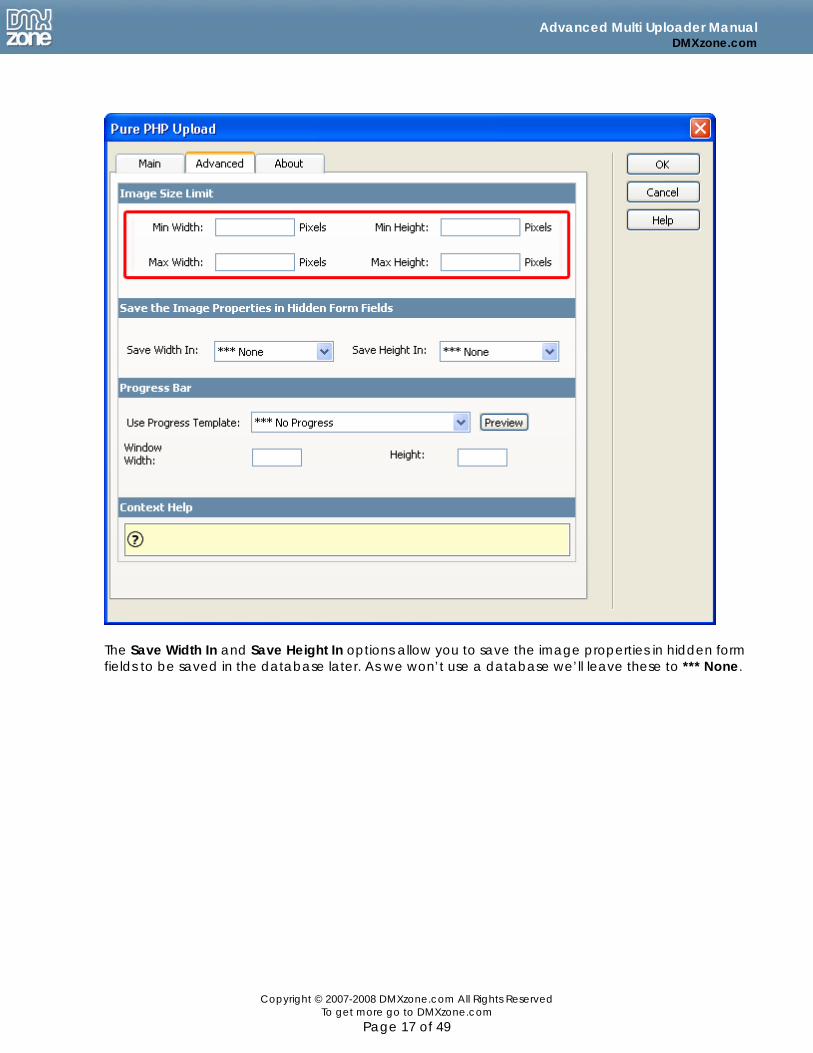
The Save Width In and Save Height In options allow you to save the image properties in hidden form fields to be saved in the database later. As we won’t use a database we’ll leave these to *** None.
Copyright © 2007-2008 DMXzone.com All Rights Reserved To get more go to DMXzone.com
Page 17 of 49

Advanced Multi Uploader Manual DMXzone.com
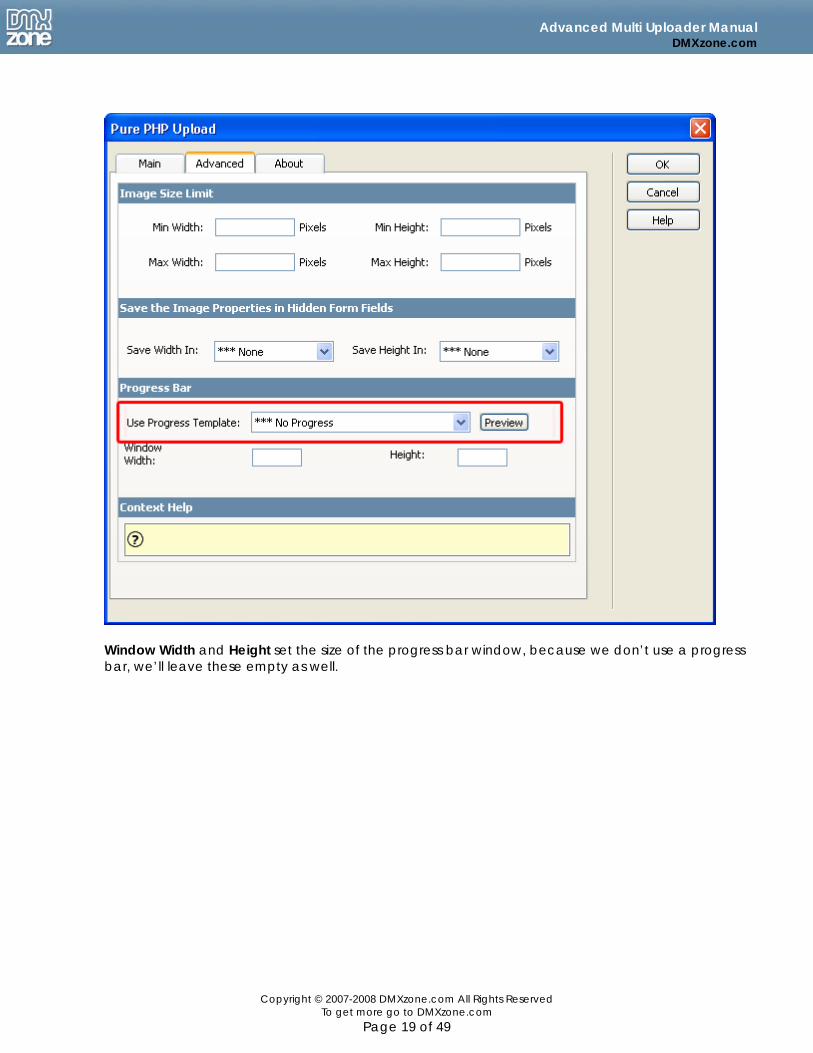
The Progess Bar options won’t work as they don’t work with the Multi Uploader so we’ll leave it to ***No Progress.
Copyright © 2007-2008 DMXzone.com All Rights Reserved To get more go to DMXzone.com
Page 18 of 49
Advanced Multi Uploader Manual DMXzone.com
Window Width and Height set the size of the progress bar window, because we don’t use a progress bar, we’ll leave these empty as well.
Copyright © 2007-2008 DMXzone.com All Rights Reserved To get more go to DMXzone.com
Page 19 of 49

Advanced Multi Uploader Manual DMXzone.com
5. Using the Multi Uploader Preview your page in your browser. You should see the uploader:
Copyright © 2007-2008 DMXzone.com All Rights Reserved To get more go to DMXzone.com
Page 20 of 49
Advanced Multi Uploader Manual DMXzone.com
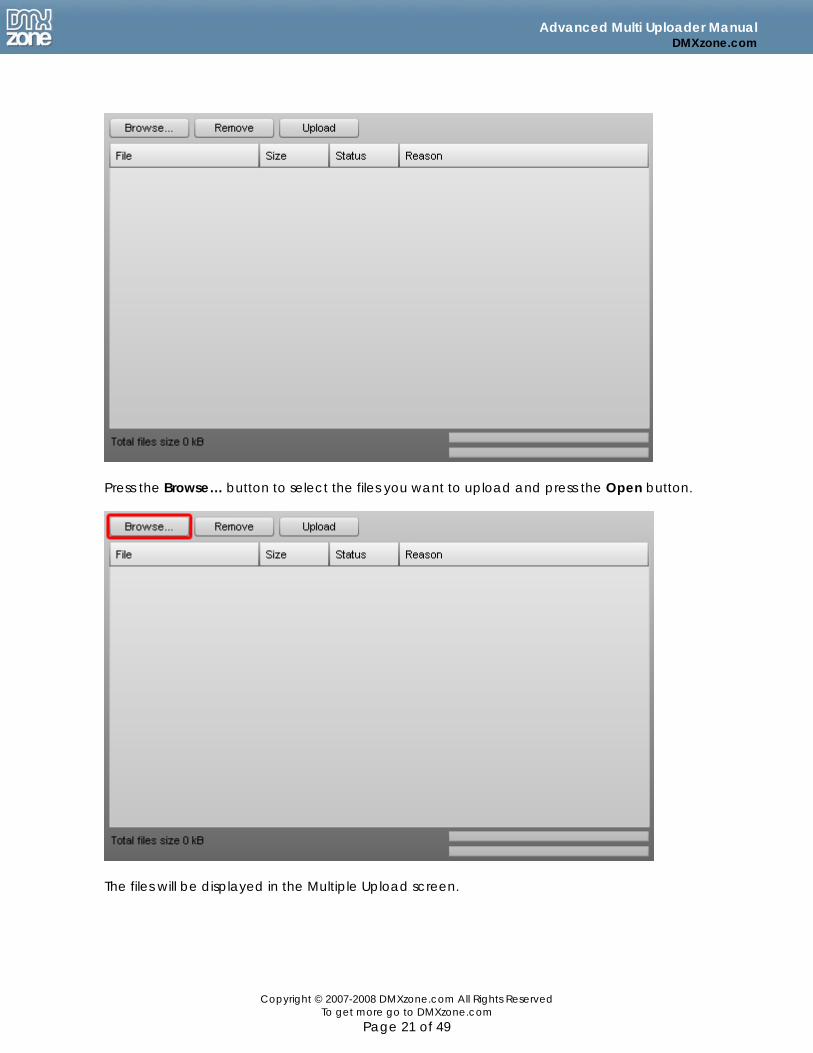
Press the Browse… button to select the files you want to upload and press the Open button.
The files will be displayed in the Multiple Upload screen.
Copyright © 2007-2008 DMXzone.com All Rights Reserved To get more go to DMXzone.com
Page 21 of 49

Advanced Multi Uploader Manual DMXzone.com
You can select individual files and optionally delete them with the Remove button, we won’t do this now as we want to upload all files that we selected earlier with the Browse… button. Press the Upload button to upload your files. The upload progress is indicated by the two status bar on the bottom right. The top one displays the progress of the current file upload.
Copyright © 2007-2008 DMXzone.com All Rights Reserved To get more go to DMXzone.com
Page 22 of 49

Advanced Multi Uploader Manual DMXzone.com
Copyright © 2007-2008 DMXzone.com All Rights Reserved
The bottom bar shows the total progress of all file uploads.
To get more go to DMXzone.com Page 23 of 49

Advanced Multi Uploader Manual DMXzone.com
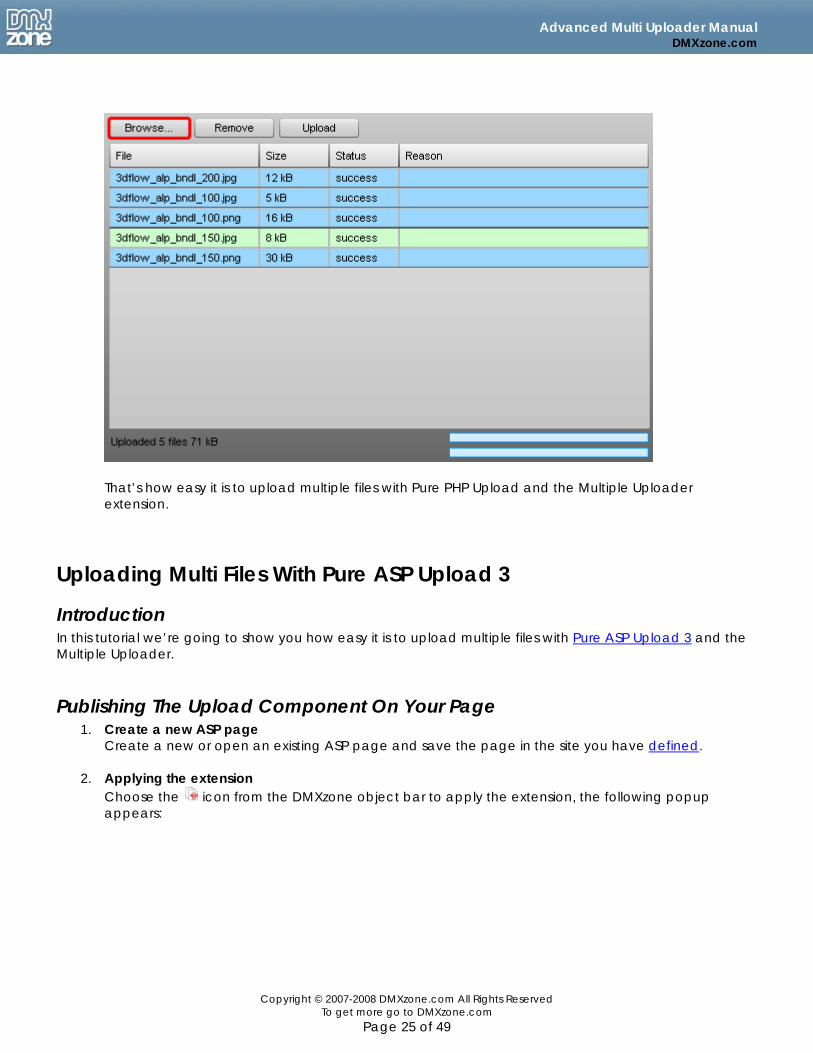
After the files are uploaded they are marked green and the Status is set to success.
If you wish you can remove the uploaded files, we won’t do this now.
You can select a new set of files to upload by pressing the Browse… button, we won’t do this now.
Copyright © 2007-2008 DMXzone.com All Rights Reserved To get more go to DMXzone.com
Page 24 of 49
Advanced Multi Uploader Manual DMXzone.com
That’s how easy it is to upload multiple files with Pure PHP Upload and the Multiple Uploader extension.
Uploading Multi Files With Pure ASP Upload 3
Introduction In this tutorial we’re going to show you how easy it is to upload multiple files with Pure ASP Upload 3 and the Multiple Uploader.
Publishing The Upload Component On Your Page 1. Create a new ASP page
Create a new or open an existing ASP page and save the page in the site you have defined.
2. Applying the extension Choose the icon from the DMXzone object bar to apply the extension, the following popup appears:
Copyright © 2007-2008 DMXzone.com All Rights Reserved To get more go to DMXzone.com
Page 25 of 49

Advanced Multi Uploader Manual DMXzone.com
As you can see the multi uploader automatically starts Pure ASP Upload 3.
3. Defining the Upload Options We leave the Use Form field to its default value as the multiple uploader sets this by default (to UploadQueue). Make sure you have set the correct permissions on your server.
Copyright © 2007-2008 DMXzone.com All Rights Reserved To get more go to DMXzone.com
Page 26 of 49

Advanced Multi Uploader Manual DMXzone.com
The Timeout defines the maximum time that the upload script is allowed to run. We’ll set it to 600 seconds (10 minutes).
Copyright © 2007-2008 DMXzone.com All Rights Reserved To get more go to DMXzone.com
Page 27 of 49

Advanced Multi Uploader Manual DMXzone.com
We’ll leave the Max Form Size empty as we don’t want to restrict the maximum file size of the total upload.
Copyright © 2007-2008 DMXzone.com All Rights Reserved To get more go to DMXzone.com
Page 28 of 49

Advanced Multi Uploader Manual DMXzone.com
Path Type can be set to Related or Absolute. The Related setting uses a path relative to the current document. The Absolute uses a full path from the root of the site, use this setting only if the parent paths of your server are disabled (as is the case when you have a Windows 2003 server). We’ll leave it at Related.
Copyright © 2007-2008 DMXzone.com All Rights Reserved To get more go to DMXzone.com
Page 29 of 49

Advanced Multi Uploader Manual DMXzone.com
The Conflict Handling defines what the upload extension will do when it encounters a file that already exists, you can set it to Overwrite, Skip, Error or MakeUnique, and we’ll set it to Overwrite.
Copyright © 2007-2008 DMXzone.com All Rights Reserved To get more go to DMXzone.com
Page 30 of 49
Advanced Multi Uploader Manual DMXzone.com
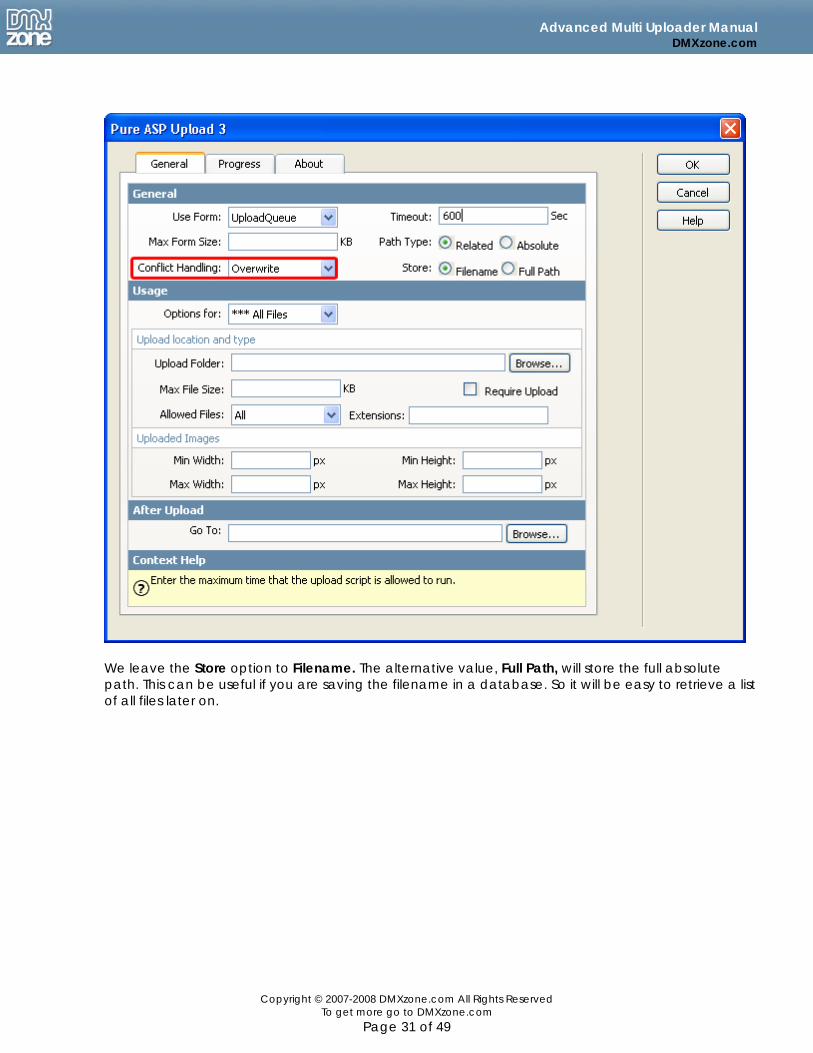
We leave the Store option to Filename. The alternative value, Full Path, will store the full absolute path. This can be useful if you are saving the filename in a database. So it will be easy to retrieve a list of all files later on.
Copyright © 2007-2008 DMXzone.com All Rights Reserved To get more go to DMXzone.com
Page 31 of 49
Advanced Multi Uploader Manual DMXzone.com
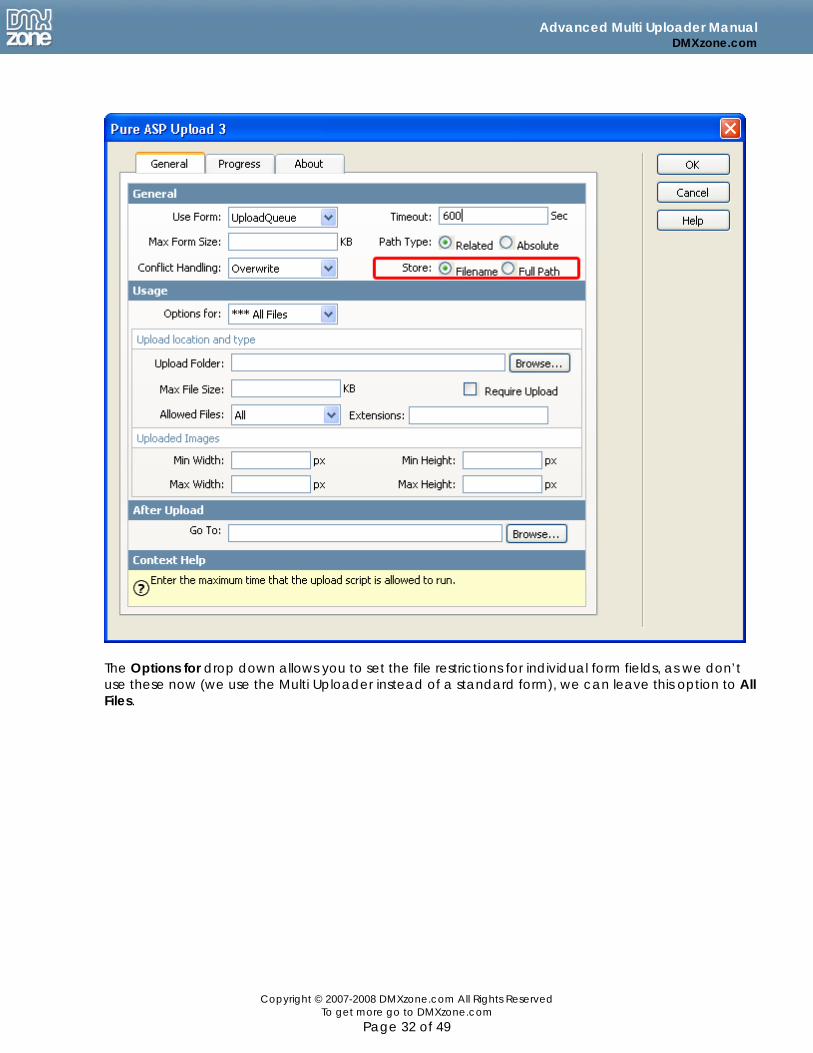
The Options for drop down allows you to set the file restrictions for individual form fields, as we don’t use these now (we use the Multi Uploader instead of a standard form), we can leave this option to All Files.
Copyright © 2007-2008 DMXzone.com All Rights Reserved To get more go to DMXzone.com
Page 32 of 49

Advanced Multi Uploader Manual DMXzone.com
Specify the Upload Folder on your server by pressing the Browse… button; make sure you have the proper access rights. For setting the appropriate security read setting the folder security on your server tutorial.
Copyright © 2007-2008 DMXzone.com All Rights Reserved To get more go to DMXzone.com
Page 33 of 49

Advanced Multi Uploader Manual DMXzone.com
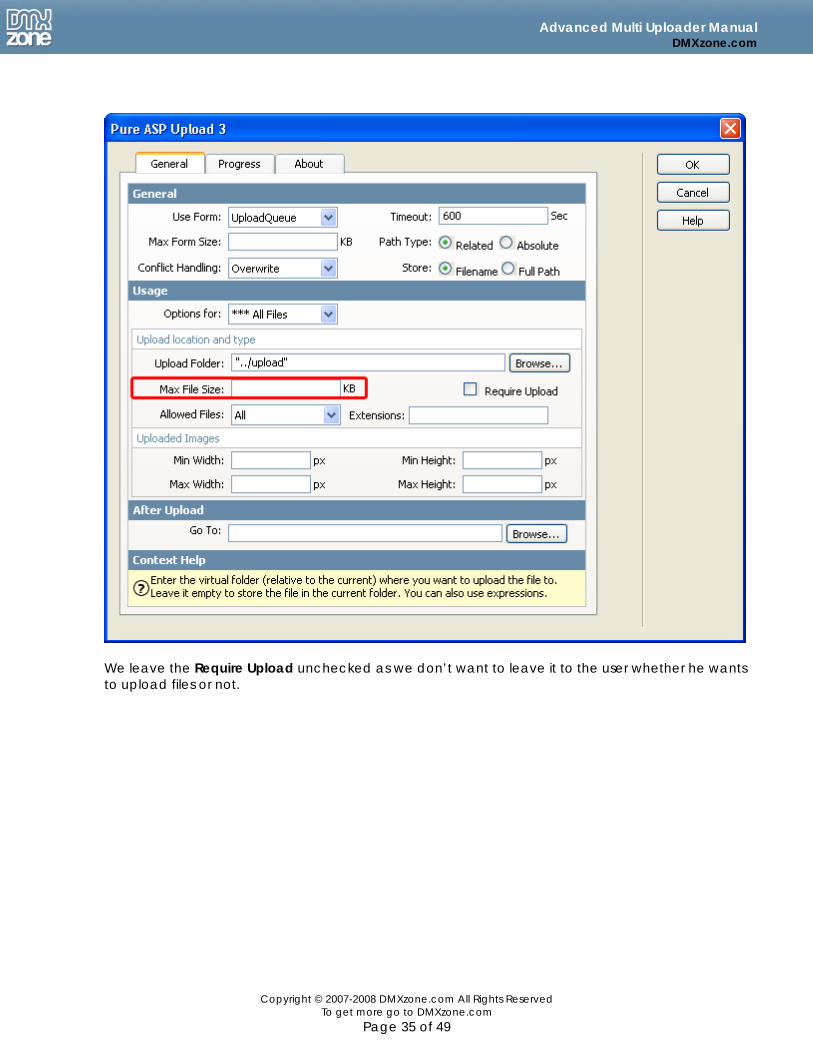
We’ll leave the Max File Size empty as we don’t want to restrict the maximum file size of the individual uploads.
Copyright © 2007-2008 DMXzone.com All Rights Reserved To get more go to DMXzone.com
Page 34 of 49
Advanced Multi Uploader Manual DMXzone.com
We leave the Require Upload unchecked as we don’t want to leave it to the user whether he wants to upload files or not.
Copyright © 2007-2008 DMXzone.com All Rights Reserved To get more go to DMXzone.com
Page 35 of 49

Advanced Multi Uploader Manual DMXzone.com
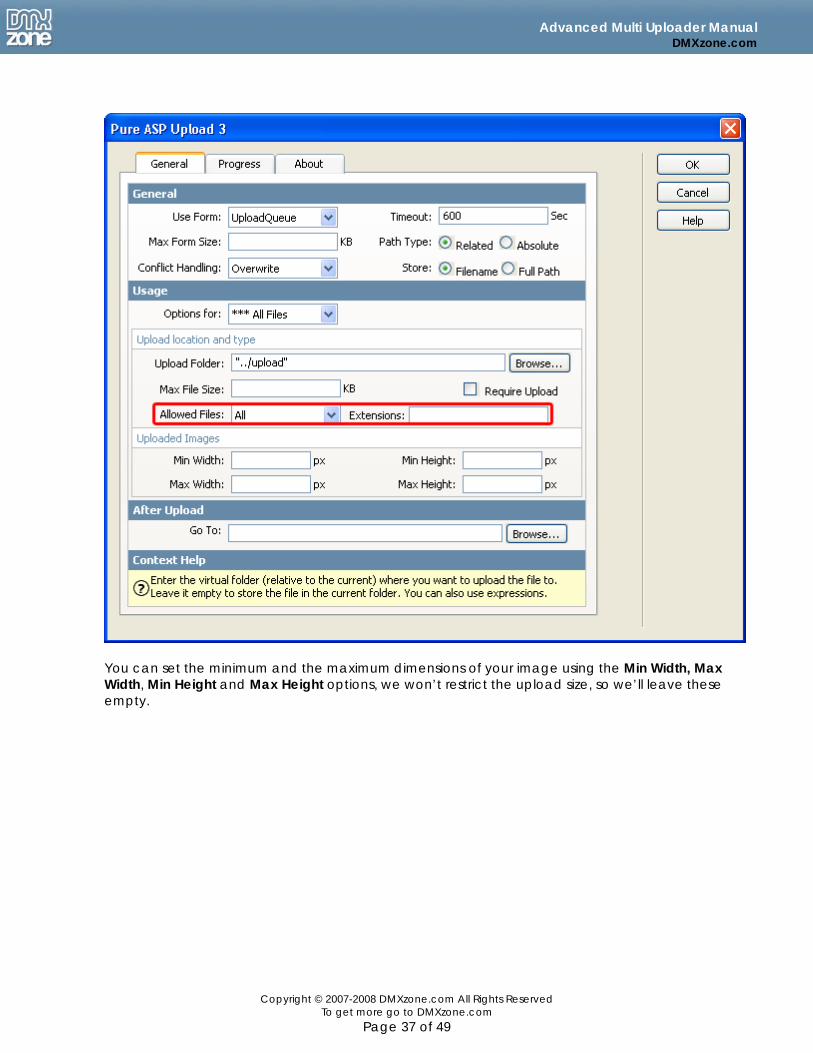
Define the allowed file extensions, you can choose from All, Images or add your own Custom File Extensions, we’ll leave it to All and leave the Extensions field (file extensions) empty
Copyright © 2007-2008 DMXzone.com All Rights Reserved To get more go to DMXzone.com
Page 36 of 49
Advanced Multi Uploader Manual DMXzone.com
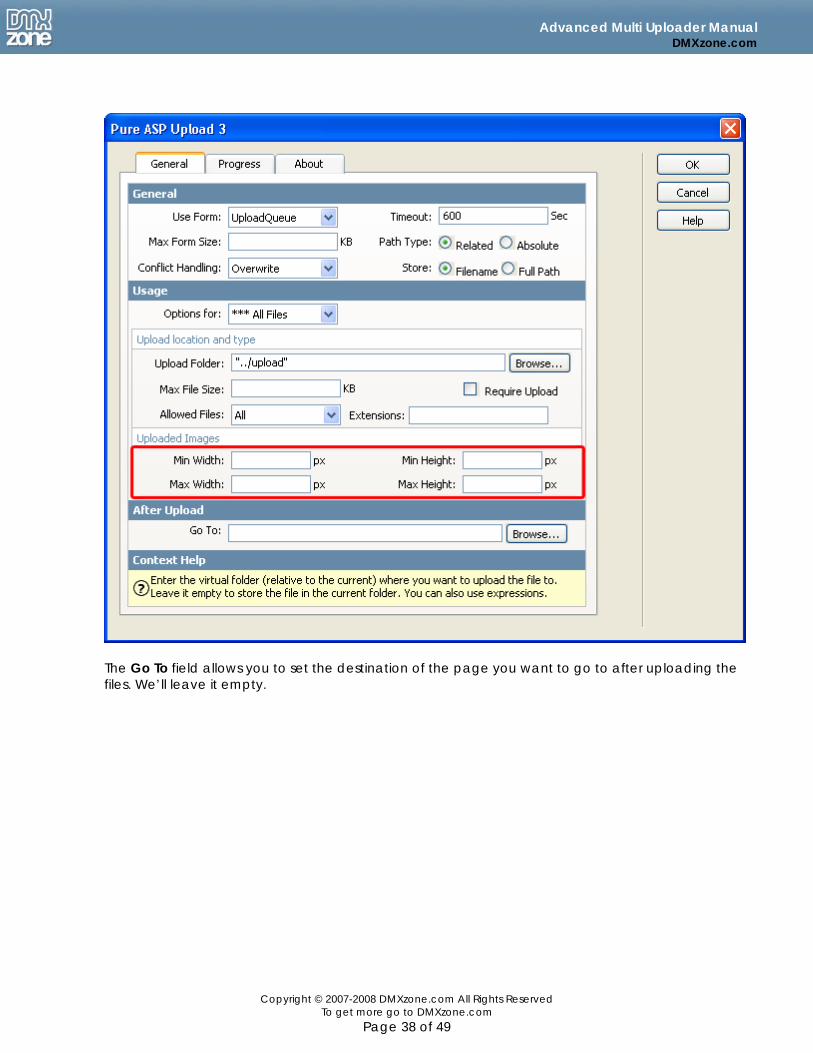
You can set the minimum and the maximum dimensions of your image using the Min Width, Max Width, Min Height and Max Height options, we won’t restrict the upload size, so we’ll leave these empty.
Copyright © 2007-2008 DMXzone.com All Rights Reserved To get more go to DMXzone.com
Page 37 of 49
Advanced Multi Uploader Manual DMXzone.com
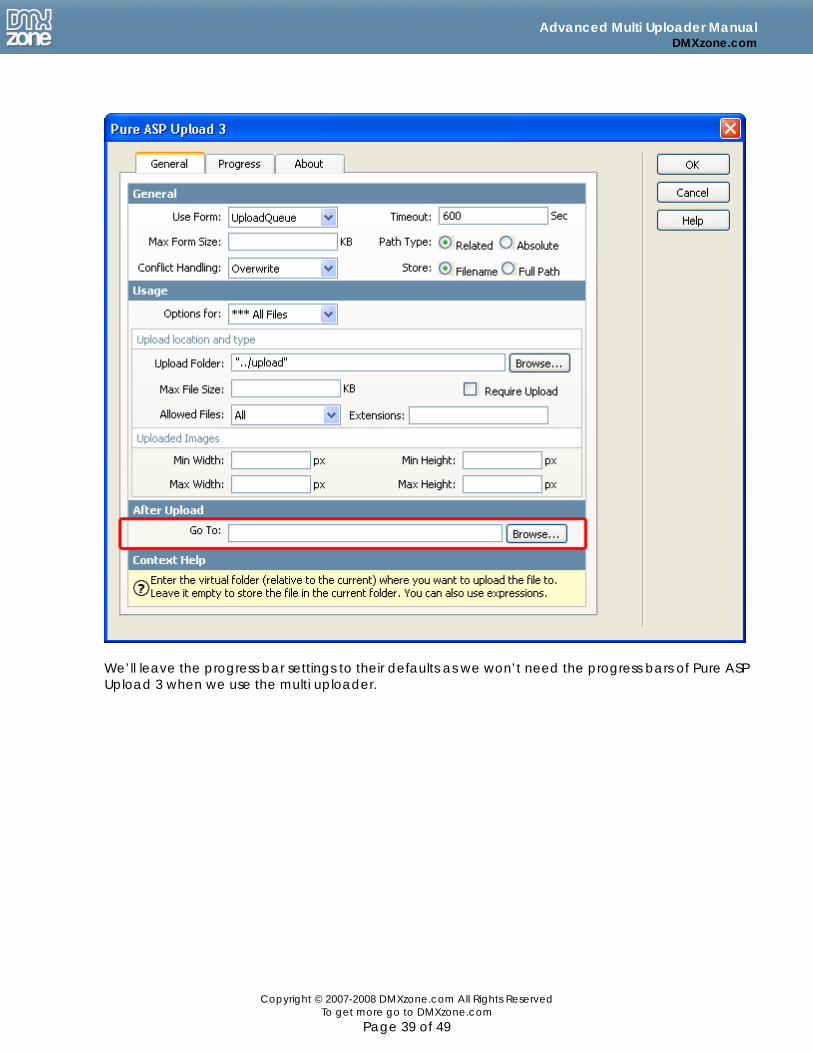
The Go To field allows you to set the destination of the page you want to go to after uploading the files. We’ll leave it empty.
Copyright © 2007-2008 DMXzone.com All Rights Reserved To get more go to DMXzone.com
Page 38 of 49
Advanced Multi Uploader Manual DMXzone.com
We’ll leave the progress bar settings to their defaults as we won’t need the progress bars of Pure ASP Upload 3 when we use the multi uploader.
Copyright © 2007-2008 DMXzone.com All Rights Reserved To get more go to DMXzone.com
Page 39 of 49

Advanced Multi Uploader Manual DMXzone.com
4. Using the Multi Uploader Preview your page in your browser. You should see the uploader:
Copyright © 2007-2008 DMXzone.com All Rights Reserved To get more go to DMXzone.com
Page 40 of 49

Advanced Multi Uploader Manual DMXzone.com
Press the Browse… button to select the files you want to upload and press the Open button.
The files will be displayed in the Multiple Upload screen.
Copyright © 2007-2008 DMXzone.com All Rights Reserved To get more go to DMXzone.com
Page 41 of 49

Advanced Multi Uploader Manual DMXzone.com
You can select individual files and optionally delete them with the Remove button, we won’t do this now as we want to upload all files that we selected earlier with the Browse… button. Press the Upload button to upload your files. The upload progress is indicated by the two status bar on the bottom right. The top one displays the progress of the current file upload.
Copyright © 2007-2008 DMXzone.com All Rights Reserved To get more go to DMXzone.com
Page 42 of 49

Advanced Multi Uploader Manual DMXzone.com
Copyright © 2007-2008 DMXzone.com All Rights Reserved
The bottom bar shows the total progress of all file uploads.
To get more go to DMXzone.com Page 43 of 49
Advanced Multi Uploader Manual DMXzone.com
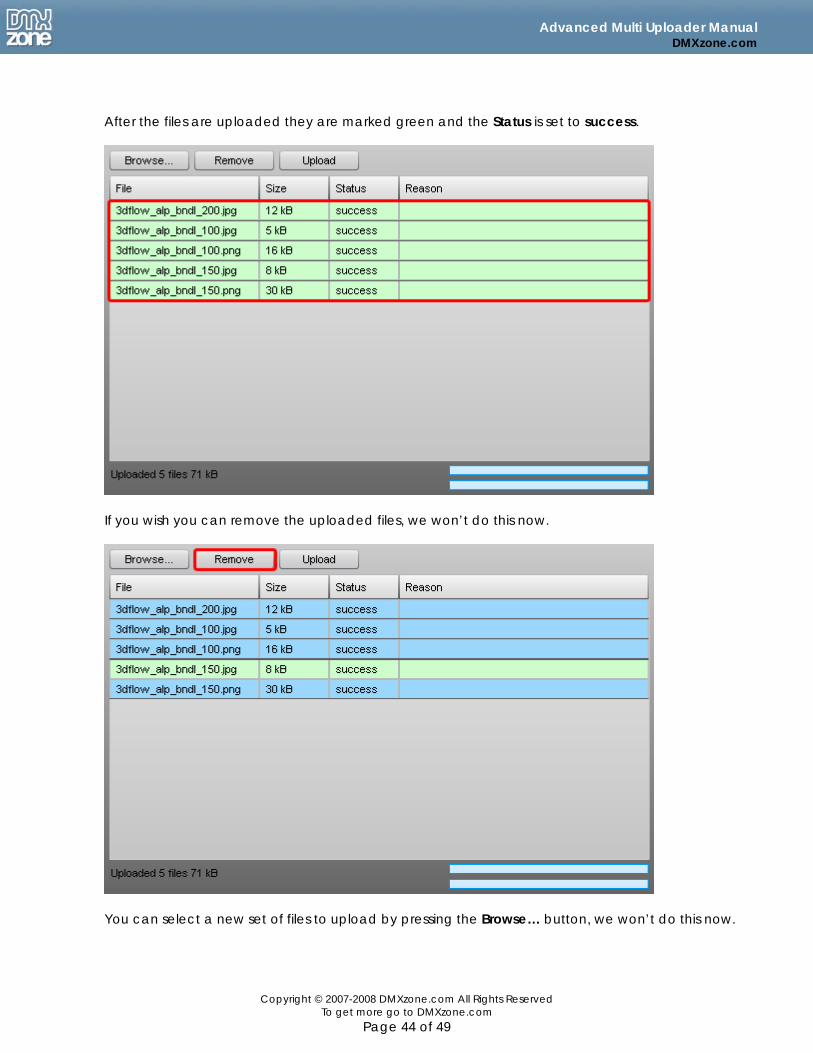
After the files are uploaded they are marked green and the Status is set to success.
If you wish you can remove the uploaded files, we won’t do this now.
You can select a new set of files to upload by pressing the Browse… button, we won’t do this now.
Copyright © 2007-2008 DMXzone.com All Rights Reserved To get more go to DMXzone.com
Page 44 of 49
Advanced Multi Uploader Manual DMXzone.com
Editing the Advanced Multi Uploader with the Property Inspector
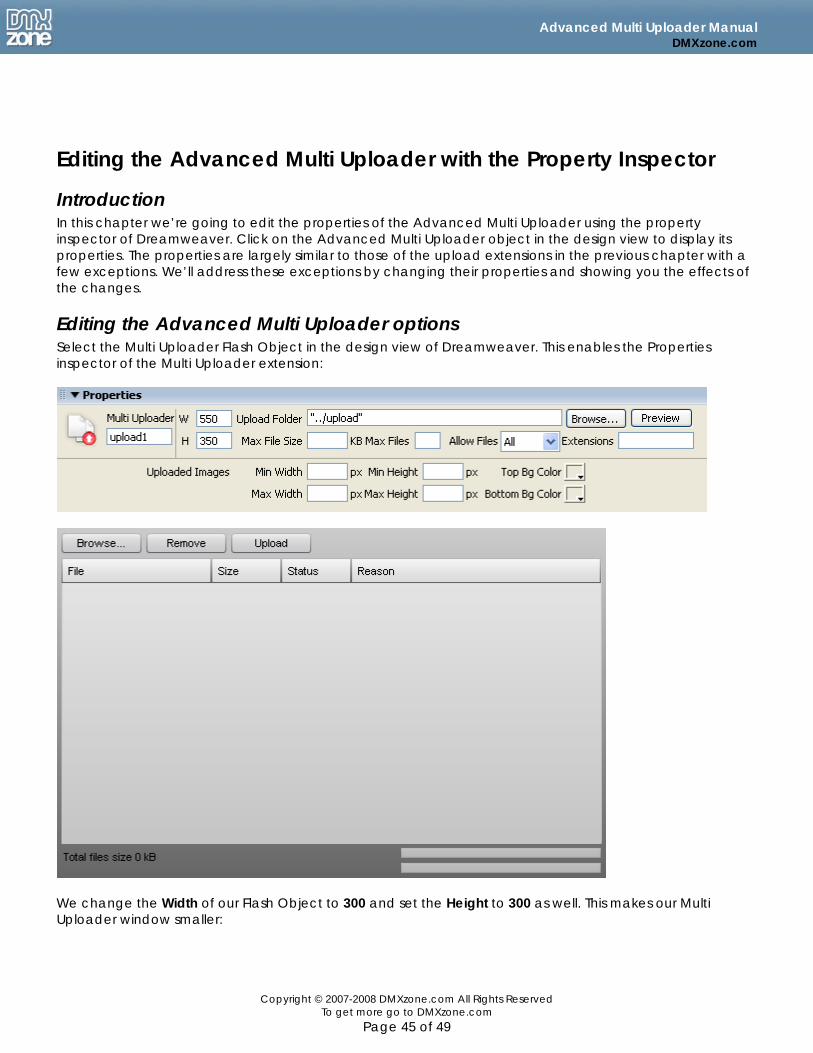
Introduction In this chapter we’re going to edit the properties of the Advanced Multi Uploader using the property inspector of Dreamweaver. Click on the Advanced Multi Uploader object in the design view to display its properties. The properties are largely similar to those of the upload extensions in the previous chapter with a few exceptions. We’ll address these exceptions by changing their properties and showing you the effects of the changes.
Editing the Advanced Multi Uploader options Select the Multi Uploader Flash Object in the design view of Dreamweaver. This enables the Properties inspector of the Multi Uploader extension:
We change the Width of our Flash Object to 300 and set the Height to 300 as well. This makes our Multi Uploader window smaller:
Copyright © 2007-2008 DMXzone.com All Rights Reserved To get more go to DMXzone.com
Page 45 of 49

Advanced Multi Uploader Manual DMXzone.com
Press the Preview button in the property inspector.
You’ll see that the screen has decreased in size:
Let’s change the colors of our Uploader window. Set the Top BG Color to your favourite colour (we choose dark blue).
Copyright © 2007-2008 DMXzone.com All Rights Reserved To get more go to DMXzone.com
Page 46 of 49

Advanced Multi Uploader Manual DMXzone.com
Press the Preview button in the property inspector to see the difference:
Let’s set the Bottom BG Color to light blue.
And we press the Preview button in the property inspector once more to see the difference:
Copyright © 2007-2008 DMXzone.com All Rights Reserved To get more go to DMXzone.com
Page 47 of 49

Advanced Multi Uploader Manual DMXzone.com
That’s how easy you can edit your uploader with the property inspector. For a reference to the other settings, read (one of) the previous chapters.
Copyright © 2007-2008 DMXzone.com All Rights Reserved To get more go to DMXzone.com
Page 48 of 49
Advanced Multi Uploader Manual DMXzone.com
FAQ Q: Advanced Multi Uploader does not work, what should I do? A: Make sure that you have uploaded all the files required by the extension. Q: The Advanced Multi Uploader says it doesn’t have enough permissions to upload a file A: Make sure that you have set the correct permissions on your server, read the PHP or ASP tutorial to see how it is done.
Copyright © 2007-2008 DMXzone.com All Rights Reserved To get more go to DMXzone.com
Page 49 of 49
Related Documents