PictureTel ® 900 Series Collaboration System Administrator’s Guide

Welcome message from author
This document is posted to help you gain knowledge. Please leave a comment to let me know what you think about it! Share it to your friends and learn new things together.
Transcript

PictureTel®900 Series
CollaborationSystem
Administrator’s Guide

Copyright © 2002: Polycom, Inc.–Printed in U.S.A.Polycom, Inc., 100 Minuteman Road, Andover, MA 01810www.polycom.com
Polycom and the Polycom logo are registered trademarks of Polycom, Inc.
PictureTel and the PictureTel logo are registered trademarks of PictureTel Corporation. IDEC, ImageShare,LAMB, Look-At-Me-Button, PictureTel LiveGateway, PowerMic, PT716, PT724, and Siren are trademarks ofPictureTel Corporation.
Bose is a registered trademark of Bose Corporation.
Intel is a registered trademark of Intel Corporation.
Microsoft, NetMeeting, PowerPoint, Windows, and Windows NT are registered trademarks of MicrosoftCorporation.
HP is a registered trademark of Hewlett-Packard Company.
Netscape and Netscape Directory Server are registered trademarks of Netscape CommunicationsCorporation.
Lucent Technologies is a trademark of Lucent Technologies, Inc.
All other product and company names are the trademarks or registered trademarks of their respectiveowners.
The information contained in this document is subject to change without notice. Polycom assumes noresponsibility for technical or editorial errors or omissions that may appear in this document or for the use ofthis material. Nor does Polycom make any commitment to update the information contained in thisdocument. This document contains proprietary information which is protected by copyright. All rightsreserved. No part of this document may be photocopied or reproduced in any form without the prior writtenconsent of Polycom, Inc.
CautionFor service personnel only:Danger of explosion if battery is incorrectly replaced. Replace only with the same or equivalent typerecommended by the manufacturer. Dispose of used batteries according to the manufacturer’sinstructions.
Edition: 800-1164-01/C
Do you have any suggestions or comments on the documentation for thisproduct? If so, please send them by e-mail to [email protected].

About This Guide
This guide explains how to configure, maintain, and troubleshootthe PictureTel® 900 Series collaboration system.
To install your system, see the Installing the PictureTel 900 SeriesCollaboration System document, which is included in the shipping kitwith the system. For regulatory information, see the PictureTelProduct Regulatory Information document, which is available on thePictureTel support web site, http://www.polycom.com. (For the titlesand descriptions of each piece of the PictureTel 900 Series systemdocumentation suite, see Appendix B, “System Documentation.”)
For support or service, please contact your PictureTel serviceprovider or call PictureTel Technical Support. You can find phonenumbers for Technical Support in your area, as well as the latestproduct information, at the PictureTel support web site.
PictureTel recommends that you record the serial number of thePictureTel 900 Series system here for use by your service providerand for future reference. The serial number for the system is printedon the back of the computer box.
System Serial Number:
iii

Contents
About This Guide.............................................................................................................................. iii
Chapter 1Introducing the PictureTel 900 Series System
About the PictureTel 900 Series System .......................................................................................1-1
System Components ........................................................................................................................1-2
Computer Box .........................................................................................................................1-2
PictureTel Cameras ................................................................................................................1-3
Remote Control Devices ........................................................................................................1-4
PowerMic.................................................................................................................................1-5
ImageShare ..............................................................................................................................1-5
Software Components ...........................................................................................................1-6
Optional Components .....................................................................................................................1-8
Monitor ....................................................................................................................................1-8
Cart ...........................................................................................................................................1-9
Look-At-Me-Button..............................................................................................................1-10
Other Optional Components ..............................................................................................1-10
Administrative Applications........................................................................................................1-11
Setup Wizard.........................................................................................................................1-11
AdminTools...........................................................................................................................1-11
Operating Statistics ..............................................................................................................1-11
Hardware Diagnostics .........................................................................................................1-12
iv
Chapter 2Customizing System Behavior
Managing User Access ....................................................................................................................2-1
Choosing Logon Options ......................................................................................................2-1
Disabling Auto Logon ...........................................................................................................2-3
Setting Up User Accounts for Standard Windows Logon ...............................................2-4
Choosing Logoff Options ......................................................................................................2-5
Configuring Standby Mode............................................................................................................2-6
Setting Call Preferences...................................................................................................................2-8
Allowing Use of a Custom Control Panel ....................................................................................2-9
Chapter 3Configuring Network Use
Configuring ISDN Support ............................................................................................................3-1
Setting the Basic Configuration............................................................................................3-1
Controlling ISDN Bandwidth...............................................................................................3-3
Choosing Advanced Options ...............................................................................................3-5
Configuring the System to Use an IMUX ....................................................................................3-7
Configuring LAN Support ...........................................................................................................3-11
Setting the Basic Configuration..........................................................................................3-12
Controlling LAN Bandwidth..............................................................................................3-13
Configuring the System to Use a Gateway ................................................................................3-14
Configuring the System to Use a Gatekeeper............................................................................3-16
v

Chapter 4Configuring Audio
Setting Audio Algorithms ..............................................................................................................4-1
Choosing the G.711 Encoding Law for Your Location...............................................................4-4
Configuring the Microphones........................................................................................................4-5
Adding Optional Audio Components ..........................................................................................4-7
Adding Laptop Output .........................................................................................................4-7
Adding PowerMic Microphones..........................................................................................4-7
Chapter 5Configuring Video
Setting Video Preferences ...............................................................................................................5-1
Configuring Video Sources ............................................................................................................5-6
Configuring Camera Behavior.......................................................................................................5-8
Adding Optional Video Components...........................................................................................5-9
Adding a Second Monitor...................................................................................................5-10
Adding VCRs ........................................................................................................................5-15
Chapter 6Setting Up Directory Services
Setting Up a Local Directory ..........................................................................................................6-1
Setting Up Directories on a Server ................................................................................................6-3
Loading Server Software .......................................................................................................6-4
Setting Up a Central Directory .............................................................................................6-4
Managing One or More Servers ...........................................................................................6-6
vi

Chapter 7Allowing Data Sharing
Managing Data Sharing Options ...................................................................................................7-1
Allowing File Transfer ....................................................................................................................7-1
Installing User Applications...........................................................................................................7-2
Allowing Document Server Use ....................................................................................................7-3
Setting Up a Document Server .............................................................................................7-3
Configuring the PictureTel 900 Series System to Use a Document Server ....................7-4
Observing Data Sharing Tips and Guidelines .............................................................................7-6
If You Allow File Transfer.....................................................................................................7-6
If You Allow Document Server Use... .................................................................................7-6
Chapter 8Maintaining the System
Monitoring System Statistics..........................................................................................................8-1
Viewing Detailed System Statistics......................................................................................8-1
Viewing the Configuration Summary.................................................................................8-3
Viewing Statistics for the Current Call................................................................................8-5
Accessing and Viewing Logs................................................................................................8-6
Optimizing System Performance...................................................................................................8-7
Setting Up Virus Protection ..................................................................................................8-9
Conserving Disk Space ..........................................................................................................8-9
Restoring the System .......................................................................................................................8-9
Chapter 9Using Remote Management Tools
Setting Up WebRemote Management...........................................................................................9-2
Setting Up RAS Access Over ISDN .....................................................................................9-2
Using WebRemote to Manage the PictureTel 900 Series System..............................................9-4
vii

Setting Up SNMP Management.....................................................................................................9-5
Setting Up an SNMP Environment......................................................................................9-5
Installing the PictureTel MIBs ..............................................................................................9-5
Configuring the System for SNMP Management..............................................................9-6
Adding the PictureTel Network Manager..........................................................................9-7
Using SNMP to Manage the PictureTel 900 Series System........................................................9-7
Chapter 10Configuring Internal Multipoint
Allowing Internal Multipoint.......................................................................................................10-1
Setting the Default Video Display...............................................................................................10-2
Setting Audio and Video Preferences .........................................................................................10-3
Chapter 11Troubleshooting
Solving Installation Problems ......................................................................................................11-1
Solving Startup Problems .............................................................................................................11-2
Solving General System Problems...............................................................................................11-3
Solving Network Problems ..........................................................................................................11-5
Solving Video Problems..............................................................................................................11-15
Solving Audio Problems.............................................................................................................11-20
Solving ImageShare or ImageShare II Problems.....................................................................11-24
Appendix ASystem Default Settings .................................................................................................... A-1
viii

Appendix BSystem Documentation...................................................................................................... B-1
Documentation CD......................................................................................................................... B-1
Hardcopy Documentation............................................................................................................. B-2
Online Documentation .................................................................................................................. B-2
Online Help...................................................................................................................................... B-3
Web Documentation....................................................................................................................... B-4
Appendix CAssisting Users .................................................................................................................... C-1
Customizing the Getting Started Guide ......................................................................................C-1
Maintaining System Information..................................................................................................C-2
Adding Applications to the System .............................................................................................C-3
Index ............................................................................................................................................. Index-1
ix

1
Introducing thePictureTel 900Series System
About thePictureTel 900Series System
The PictureTel 900 Series system is a state-of-the-art visualcollaboration tool. It allows users to exchange ideas and sharedocuments with people anywhere in the world, as if they were all inthe same room.
PIP
ZOOM
VOLUME
MUTE AUTO
CONTENT
PEOPLE
SETCANCEL PRESET
7 PQRS 8 TUV 9 WXYZ
4 GHI 5 JKL 6 MNO
2 ABC 3 DEF
* 0#
CALL/ANSWERHANG UP
HELP ON/STANDBY OPTIONS
1
PIP
ZOOM
VOLUME
MUTE AUTO
CONTENT
PEOPLE
SETCANCEL PRESET
7 PQRS 8 TUV 9 WXYZ
4 GHI 5 JKL 6 MNO
2 ABC 3 DEF
* 0#
CALL/ANSWERHANG UP
HELP ON/STANDBY OPTIONS
1
1-1

System Components
SystemComponents
Computer BoxThe computer box is a self-contained unit that contains the systemsoftware, internal hardware, and power supply. The powerbutton , CD-ROM drive, and diskette drive are at the front of thebox, while the connection panel is at the rear.
a
a
1-2
System Components
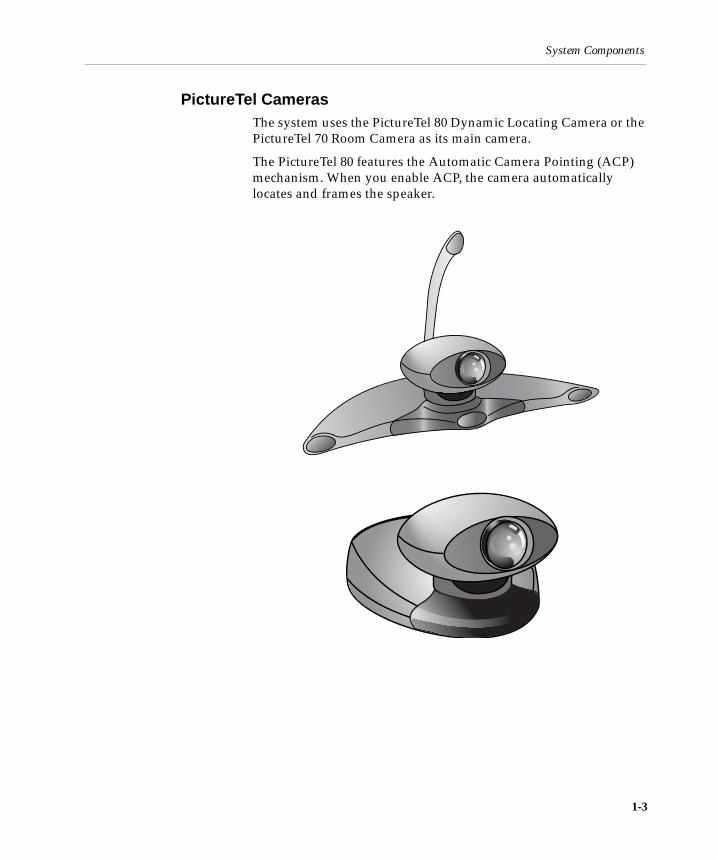
PictureTel CamerasThe system uses the PictureTel 80 Dynamic Locating Camera or thePictureTel 70 Room Camera as its main camera.
The PictureTel 80 features the Automatic Camera Pointing (ACP)mechanism. When you enable ACP, the camera automaticallylocates and frames the speaker.
1-3

System Components
Remote Control Devices
Keyboard
The keyboard is designed for both administrative and user tasks. Itincludes the standard keyboard character buttons, as well as anintegrated trackball, left-click button, and right-click button.
Remote Control
The remote control is designed to make visual collaboration easierfor your users — a clearly marked button corresponds to eachcommon user task. See the PictureTel iPower Collaboration SystemGetting Started Guide and the PictureTel iPower Collaboration SystemQuick Tips Sheet for detailed information on how to use the remotecontrol.
1-4

System Components
PowerMicThe system uses the PowerMic™ as the main microphone. You canuse up to a total of four PowerMic microphones with your system.
ImageShareThe ImageShare™ device makes it easy for your users to add audioand video input and output devices to the system for a particularcall.
The ImageShare is included with the PictureTel 970 system and isavailable as an option for the PictureTel 960 system.
1-5

System Components
Software ComponentsThe following table describes the software applications included onthe PictureTel 900 Series System Software CD.
This application... Allows you to...
Setup Wizard Set up the system.
Collaboration application Participate in videoconferences orin-room presentations.
AdminTools Configure and maintain thePictureTel 900 Series collaborationsystem.
Operating Statistics Verify system performance andrun loopback tests.
Hardware Diagnostics Run hardware tests.
File Transfer Send and receive files duringmeetings.
NetMeeting® Chat Use text chatting while you are in acall.
Acrobat Reader Read user documents provided in.pdf format.
1-6

System Components
The following table describes the optional PictureTel DocumentServer application included on the PictureTel Document Server CD.
The following table describes the optional PictureTel DirectoryServices Setup application included on the PictureTel DirectoryService Tools CD.
The following table describes the optional PictureTel NetworkManager application included on the PictureTel Network ManagerCD.
This application... Allows you to...
PictureTel Document Server Store files on a server so they can beretrieved during meetings.
This application... Allows you to...
PictureTel Directory ServicesSetup
Set up and access Central andPersonal Directories, or “phonebooks,” of collaboration sites.
This application... Allows you to...
PictureTel Network Manager Manage networked collaborationsystems.
1-7

Optional Components
OptionalComponents
MonitorThe monitor displays video from the cameras and other videosources, application windows, online help, and so on.
The monitor’s picture-in-picture (PIP) window is an area on thescreen that is usually used to display the image you are sending tothe other call participants.
With a dual-monitor system, you typically view People on onemonitor; on the second monitor, you view Content, such as reportsand presentations.
F Y IF.Y.I. If you have a dual-monitor system, one monitor will be anSVGA/XGA monitor. The second monitor will be an NTSCmonitor (if you have an NTSC main camera) or a PALmonitor (if you have a PAL main camera).
1-8
Optional Components
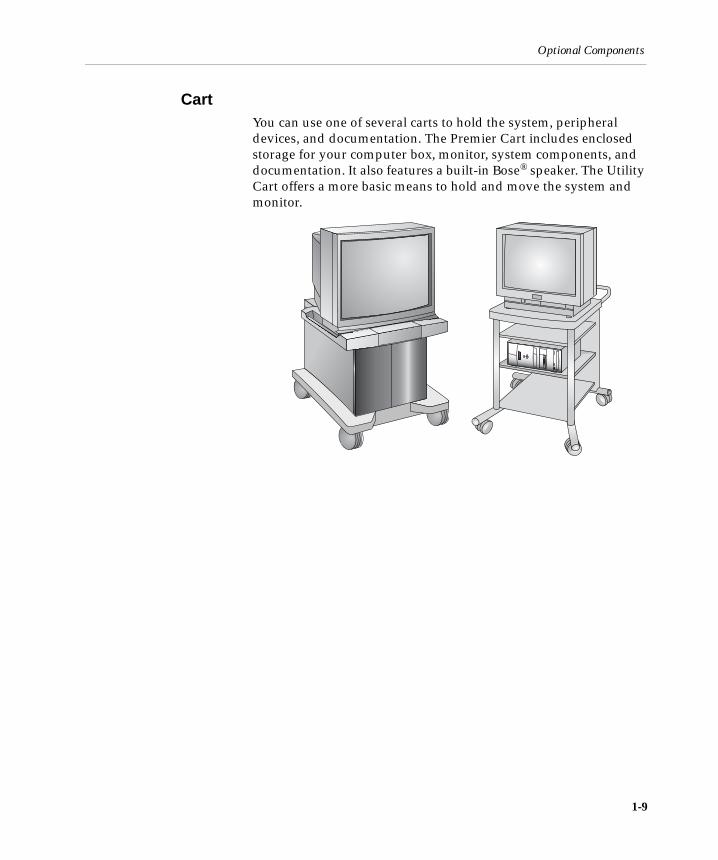
CartYou can use one of several carts to hold the system, peripheraldevices, and documentation. The Premier Cart includes enclosedstorage for your computer box, monitor, system components, anddocumentation. It also features a built-in Bose® speaker. The UtilityCart offers a more basic means to hold and move the system andmonitor.
1-9
Optional Components
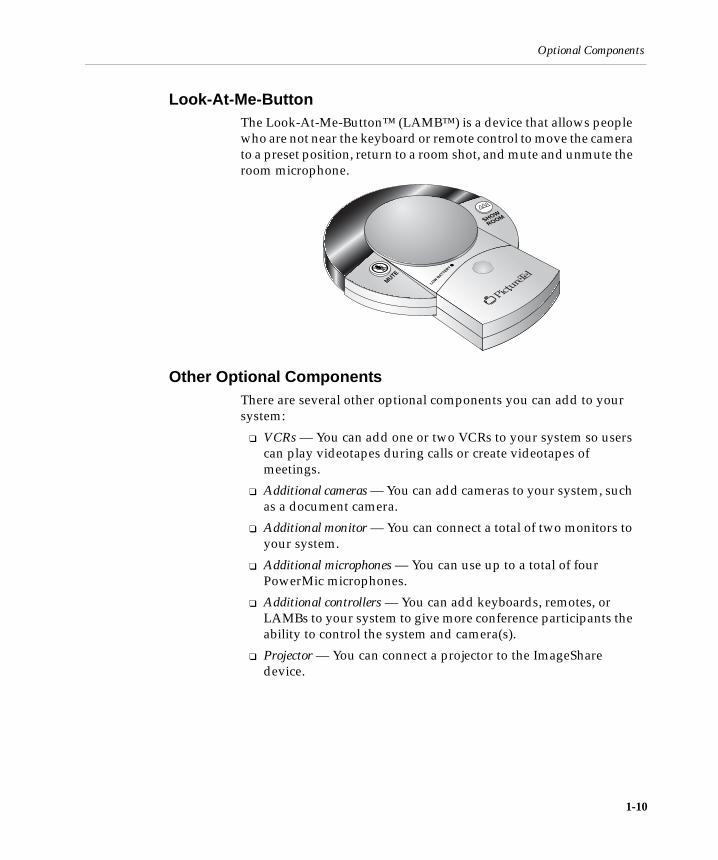
Look-At-Me-ButtonThe Look-At-Me-Button™ (LAMB™) is a device that allows peoplewho are not near the keyboard or remote control to move the camerato a preset position, return to a room shot, and mute and unmute theroom microphone.
Other Optional ComponentsThere are several other optional components you can add to yoursystem:
❑ VCRs — You can add one or two VCRs to your system so userscan play videotapes during calls or create videotapes ofmeetings.
❑ Additional cameras — You can add cameras to your system, suchas a document camera.
❑ Additional monitor — You can connect a total of two monitors toyour system.
❑ Additional microphones — You can use up to a total of fourPowerMic microphones.
❑ Additional controllers — You can add keyboards, remotes, orLAMBs to your system to give more conference participants theability to control the system and camera(s).
❑ Projector — You can connect a projector to the ImageSharedevice.
LOW BATTERY
MUTE
SHOW
ROOM
1-10

Administrative Applications
AdministrativeApplications
Setup WizardThe Setup Wizard application allows you to easily install theCollaboration software onto your system.
Note: Before starting the Setup Wizard, shut down any otherapplications that may be running.
To start the Setup Wizard
Choose Start > Programs > PictureTel iPower > AdministratorInformation > Setup Wizard.
AdminToolsThe AdminTools application is your main system management tool.It allows you to configure and maintain the PictureTel 900 Seriessystem.
To start AdminTools
Choose Start > Programs > PictureTel iPower > AdministratorInformation > AdminTools.
Operating StatisticsThe Operating Statistics application allows you to verify systemperformance, view a log of call-related statistics and events, logsystem events, and run loopback tests.
Note: Before starting Operating Statistics, shut down any otherapplications, other than the Collaboration application,that may be running.
1-11

Administrative Applications
To start Operating Statistics
Choose Start > Programs > PictureTel iPower > AdministratorInformation > Operating Statistics.
Hardware DiagnosticsThe Hardware Diagnostics application allows you to test theperformance of the system’s internal boards and cables. Theapplication can also monitor input and output from audio and videodevices that are connected to the system.
Note: Before starting Hardware Diagnostics, shut down anyother applications that may be running.
To start Hardware Diagnostics
Choose Start > Programs > PictureTel iPower> AdministratorInformation > Hardware Diagnostics.
1-12
2
CustomizingSystemBehavior
Managing User Access
To control how users access and exit the PictureTel 900 Seriessystem, you must decide which logon and logoff options to employ.
Choosing Logon OptionsThe PictureTel 900 Series system offers two logon options:
❑ Standard Windows® logon lets users log on by entering a validuser or administrator name and password for either a localWindows user account or a Windows domain account. Afterthey log on, users have the privileges you define for the localWindows user account or Windows domain account.
❑ Auto Logon lets users log on without entering a user name andpassword for the default user account. This means that anyonecan use the system. After they log on, users have the privilegesdefined for the default user account.
2-1

Managing User Access
2-2
To choose the logon method
1. Open the AdminTools Logon and Security page:
a. Start AdminTools and click General.
b. Click the Logon and Security tab.
2. Choose one of the following:
Option Description
Standard Windows Logon Requires users to enter a valid user oradministrator name and password toaccess both Windows and theCollaboration application.
Auto Logon Automatically logs users on to bothWindows and the Collaborationapplication. A user name andpassword are not required.
Managing User Access
3. If you chose Standard Windows Logon...
You must also choose the type of user account to employ. Skip to“Setting Up User Accounts for Standard Windows Logon” onpage 2-4.
4. If you chose Auto Logon...
Set the default user name and password using the Default User Account section of the page. If the user account does not exist onthe system, it will be created. The default user name andpassword appear automatically in the Logon dialog box.
Disabling Auto LogonIf you want to change any configuration settings and Auto Logon isenabled, you must log on as the administrator, disable Auto Logon,and restart the system.
To disable Auto Logon
1. Shut down the Collaboration application.
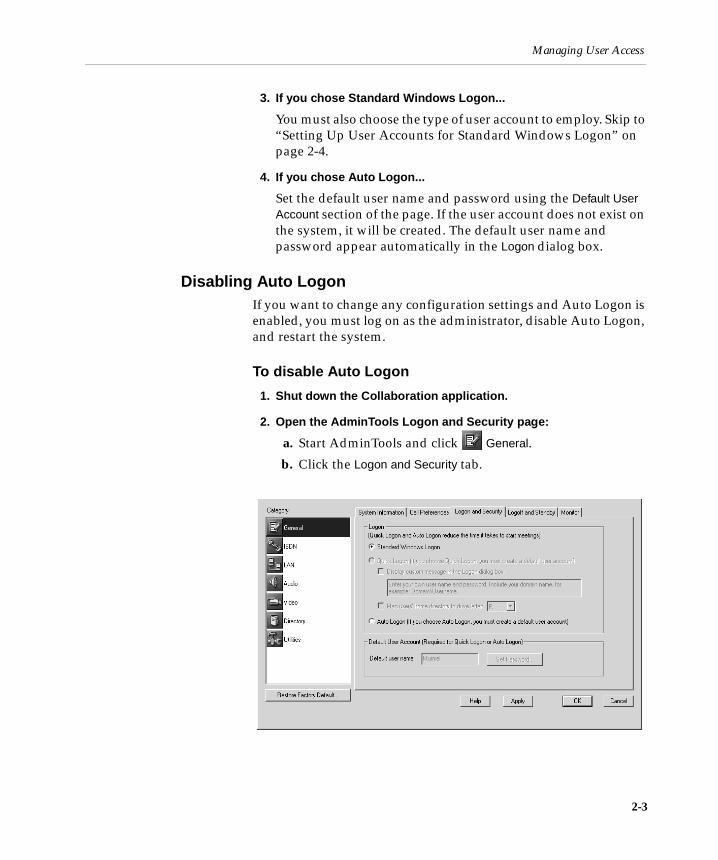
2. Open the AdminTools Logon and Security page:
a. Start AdminTools and click General.
b. Click the Logon and Security tab.
2-3

Managing User Access
3. Deselect the Auto Logon option.
4. Restart the system.
Setting Up User Accounts for Standard Windows LogonThe available user accounts are as follows:
Type of Account
Description How to Create It
Local useraccount
Requires a uniqueaccount for each user,which allows the user toaccess the system.
You create local user accountsusing the Windows UserManager. For specificinstructions, see yourWindows documentation.
Domainaccount
Requires a uniqueaccount for each user,which allows the user toaccess each system in thedomain.
You create domain accountsusing the Windows UserManager for Domains. Forspecific instructions, see yourWindows documentation.
PictureTel 900Series systemdefault useraccount
Allows all users to accessthe system. The defaultuser name and passwordappear in the Logondialog box.
You set up the PictureTel 900Series system default useraccount from the AdminToolsLogon and Security page. Set thedefault user name andpassword using the Default User Account section of thepage.
2-4

Managing User Access
Choosing Logoff OptionsThe logoff option you choose determines how the system behaveswhen a call ends or the system is idle for the period of time youspecify.
To set the logoff options
1. Open the AdminTools Logoff and Standby page:
a. Start AdminTools and click General.
b. Click the Logoff and Standby tab.
2. Configure the logoff options as follows:
Option Description
Show logoff reminder after call Determines whether thesystem displays a dialog boxafter users end a callinstructing them to log offwhen they are finished usingthe system.
Log off automatically Determines whether thesystem automatically logs offusers.
2-5

Configuring Standby Mode
Configuring Standby Mode
If you enable Standby mode, the PictureTel 900 Series system goesinto Standby when it hasn’t been used in a specified period of time.The system does not enter Standby mode if in a call. The systemexits Standby mode when a user presses a key or button on thekeyboard, remote control, mouse, LAMB, or ImageShare, or whenan incoming call arrives.
After x minutes Sets how long the systemmust be inactive beforeautomatically logging off thelast user.
Countdown for x seconds Determines how long thesystem displays the timeremaining before logoff.
Option Description
F Y IF.Y.I. If you enable both automatic logoff and Standby mode, thetime set for automatic logoff must exceed the Standby timeror the system will always log off before going into Standbymode.
2-6

Configuring Standby Mode
To configure Standby mode
1. Open the AdminTools Logoff and Standby page:
a. Start AdminTools and click General.
b. Click the Logoff and Standby tab.
2. To enable Standby mode, choose the Put the system in Standby mode option.
3. If desired, change the Standby timer using the minutes of inactivity drop-down list.
2-7

Setting Call Preferences
Setting Call Preferences
To set call preferences
1. Open the AdminTools Call Preferences page:
a. Start AdminTools and click General.
b. Click the Call Preferences tab.
2. Configure the call preference options as follows:
Option Description
Answer incoming video calls automatically
Determines if the system answersincoming video calls automatically orif users have to answer themmanually. This option only works forthe initial video call to a site.Incoming voice calls and incomingvideo calls during a voice call arenever auto-answered.
Mute audio for automatically answered calls
Keeps the system microphones fromsending sound to calling systemswhen the PictureTel 900 Series systemautomatically answer calls.
2-8

Allowing Use of a Custom Control Panel
Allowing Use of a Custom Control Panel
You can use a custom control panel with your iPower system, aslong as that control panel uses the PictureTel iPower ControlProtocol. You can continue to use the iPower keyboard and remotecontrol along with your custom control panel.
To allow use of a custom control panel
1. Open the AdminTools Custom Control page:
a. Start AdminTools and click Utilities.
b. Click the Custom Control tab.
2. Check the This system can be controlled by a custom control panel that uses the PictureTel iPower Control Protocol check box.
Display Number Last Dialed
Determines whether the system savesthe last number dialed and presentsan option to redial it in the Make a Calldialog box as follows: Never, Only if call fails, or Always.
Record numbers in the Call Log file
Directs the system to record thenumbers of called systems in theOperating Statistics application’s CallLog.
Option Description
F Y IF.Y.I. The automatic answer and redial options make callingeasier for your users, but they also present securityconcerns:
❑ With automatic answer, an unexpected caller couldinterrupt a meeting in progress or look at equipmentand notes left in an empty room.
❑ With redial, a user could access a sensitive site called bya previous user.
2-9

3
ConfiguringNetwork Use
Configuring ISDN Support
Before attempting to configure ISDN support, make sure that bothyour network administrator and your ISDN service provider havecompleted the appropriate sections of the Preparing Your Network forCollaboration document, available at http://www.polycom.com.
Setting the Basic Configuration
To set the basic ISDN configuration
1. Open the AdminTools ISDN Configuration page:
a. Start AdminTools and click ISDN.
b. Click the ISDN Configuration tab.
2. Click Set Up ISDN.
3-1

Configuring ISDN Support
3-2
3. If you’re in North America, click Run Auto ISDN Configuration to start the automatic configuration of the system.
Auto ISDN attempts to automatically set the basic ISDNconfiguration. If the configuration cannot be set automatically,you will need to enter the information manually.
4. If you’re not in North America, or Run Auto ISDN Configuration failed, refer to Preparing Your Network for Collaboration, and enter or confirm the values in the ISDN Line Configuration section.
a. Choose the appropriate ISDN protocol or switch type fromthe ISDN Protocol or switch type drop-down list.
b. Click Line 1, Line 2, Line 3, or Line 4.
c. Enter the local numbers and SPIDs for the selected line.
d. Repeat steps b and c for each line.

Configuring ISDN Support
Controlling ISDN Bandwidth
To set the bandwidth options
1. Open the AdminTools ISDN Bandwidth page:
a. Start AdminTools and click ISDN.
b. Click the ISDN Bandwidth tab.
2. Configure the bandwidth options as follows:
Option Description
Standard Selects the rate for theStandard setting available tousers from the Advanced Call Options dialog box.
Premium Selects the rate for thePremium setting available tousers from the Advanced Call Options dialog box.
3-3
Configuring ISDN Support
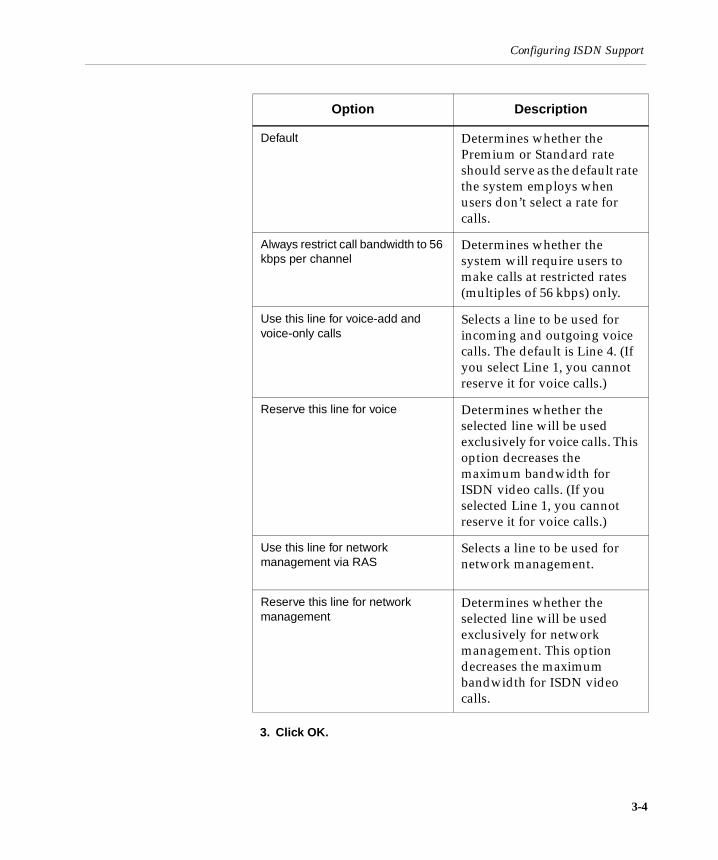
3. Click OK.
Default Determines whether thePremium or Standard rateshould serve as the default ratethe system employs whenusers don’t select a rate forcalls.
Always restrict call bandwidth to 56 kbps per channel
Determines whether thesystem will require users tomake calls at restricted rates(multiples of 56 kbps) only.
Use this line for voice-add and voice-only calls
Selects a line to be used forincoming and outgoing voicecalls. The default is Line 4. (Ifyou select Line 1, you cannotreserve it for voice calls.)
Reserve this line for voice Determines whether theselected line will be usedexclusively for voice calls. Thisoption decreases themaximum bandwidth forISDN video calls. (If youselected Line 1, you cannotreserve it for voice calls.)
Use this line for network management via RAS
Selects a line to be used fornetwork management.
Reserve this line for network management
Determines whether theselected line will be usedexclusively for networkmanagement. This optiondecreases the maximumbandwidth for ISDN videocalls.
Option Description
3-4
Configuring ISDN Support
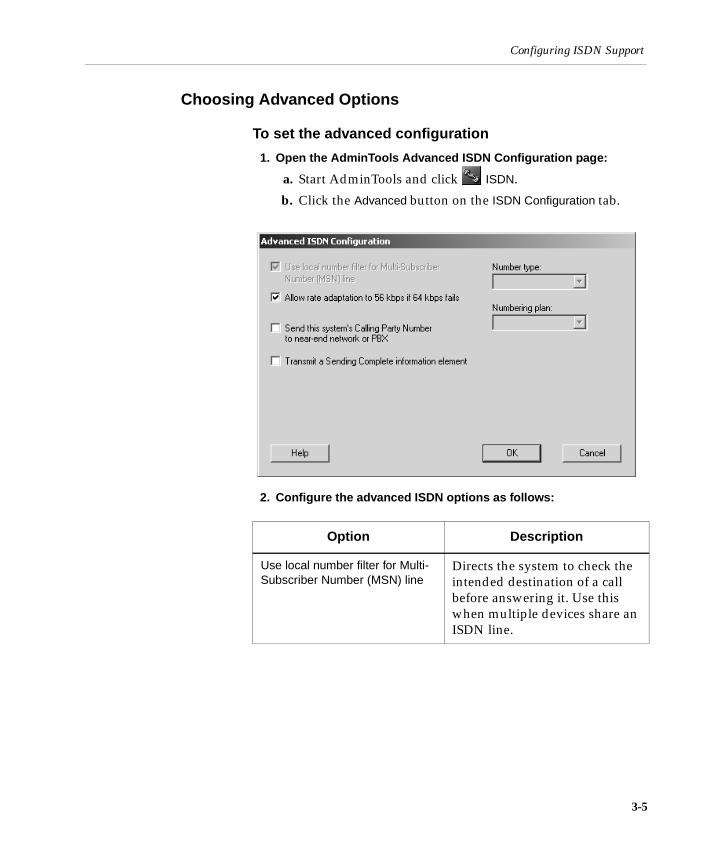
Choosing Advanced Options
To set the advanced configuration
1. Open the AdminTools Advanced ISDN Configuration page:
a. Start AdminTools and click ISDN.
b. Click the Advanced button on the ISDN Configuration tab.
2. Configure the advanced ISDN options as follows:
Option Description
Use local number filter for Multi-Subscriber Number (MSN) line
Directs the system to check theintended destination of a callbefore answering it. Use thiswhen multiple devices share anISDN line.
3-5

Configuring ISDN Support
3. Click OK.
Allow rate adaptation to 56 kbps if 64 kbps fails
Determines whether the systemshould redial rejectedunrestricted calls (multiples of64 kbps) at the correspondingrestricted rate (multiples of 56kbps). This option allows thesystem to adjust to the ratesused by different far-endnetworks.
Send this system’s Calling Party Number to near-end network or PBX
Allows local numbers to bedisplayed at the far end whenfar-end systems support CallerID.
Transmit a Sending Complete information element
Directs the system to sendinformation indicating that thetransmission of the dialednumber is complete (requiredby some network equipment).
Number type Selects the appropriate numbertype for your location, if itdiffers from the default.
Numbering plan Selects the appropriatenumbering plan for yourlocation, if it differs from thedefault.
Option Description
3-6

Configuring the System to Use an IMUX
Configuring the System to Use an IMUX
To configure your system to use a DICA OASIS IMUX
Typically, a caller must specify the rate of an outgoing call to anIMUX by including a call profile (a sequence of characters suchas #20) with the dialed number. Completing the following stepsallows the user to place a call without entering a call profile.
1. Open the AdminTools IMUX Setup page:
a. Start AdminTools and click ISDN.
b. Click the IMUX Setup tab.
2. Choose DICA OASIS from the IMUX type drop-down list.
3. Choose the appropriate IMUX call mode from the IMUX call mode drop-down list.
Predefined Code Call Type
#10* 64 kbps Clear call
#11* 56 kbps Clear call
#20* 128 kbps IMUX call
#21* 112 kbps IMUX call
#30* 192 kbps IMUX call
3-7
Configuring the System to Use an IMUX
4. Click OK.
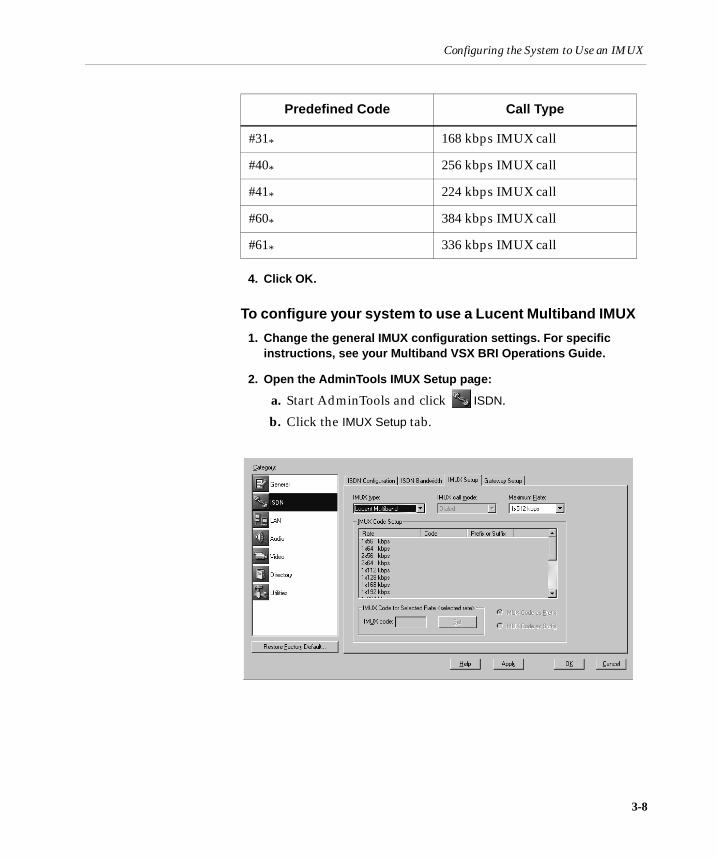
To configure your system to use a Lucent Multiband IMUX
1. Change the general IMUX configuration settings. For specific instructions, see your Multiband VSX BRI Operations Guide.
2. Open the AdminTools IMUX Setup page:
a. Start AdminTools and click ISDN.
b. Click the IMUX Setup tab.
#31* 168 kbps IMUX call
#40* 256 kbps IMUX call
#41* 224 kbps IMUX call
#60* 384 kbps IMUX call
#61* 336 kbps IMUX call
Predefined Code Call Type
3-8

Configuring the System to Use an IMUX
3. Choose Lucent Multiband from the IMUX type drop-down list.
4. Choose the appropriate IMUX call mode from the IMUX call mode drop-down list.
5. Redefine the call profiles in the internal call profile directory, as listed in the following table. For specific instructions, see your Multiband VSX BRI Operations Guide.
Call Profile Name Data Rate
#001 1x56 kbps non-bonded, restricted
#002 1x64 kbps non-bonded
#003 2x56 kbps non-bonded, restricted
#004 2x64 kbps non-bonded
#005 1x112 kbps bonded, restricted
#006 1x128 kbps bonded
#007 1x224 kbps bonded, restricted
#008 1x256 kbps bonded
#009 1x336 kbps bonded, restricted
#010 1x384 kbps bonded
#011 1x448 kbps bonded, restricted
#012 1x512 kbps bonded
#013 1x672 kbps bonded, restricted
#014 1x768 kbps bonded
F Y IF.Y.I. You change the settings on a Multiband VSX BRI bycommunicating through its COM port connector (RJ-12),using a terminal emulation program such as MicrosoftHyperTerminal.
3-9

Configuring the System to Use an IMUX
6. Click OK.
To configure your system to use another IMUX
1. Open the AdminTools IMUX Setup page:
a. Start AdminTools and click ISDN.
b. Click the IMUX Setup tab.
2. Choose Other from the IMUX type drop-down list.
3. Choose Dialed from the IMUX call mode drop-down list.
4. Configure the remaining options on this page, as follows:
Option Description
Maximum Rate Provides a list of rates to choosefrom.
IMUX Code for Selected Rate Displays the code associatedwith the rate selected in theMaximum Rate drop-down list.
Set Saves the settings in the IMUX code box.
3-10

Configuring LAN Support
3-11
5. Click OK.
Configuring LAN Support
Before configuring the system to allow LAN calls, you must do thefollowing:
❑ Make sure the system is connected to the network correctly, asdescribed in the Preparing Your Network for Collaborationdocument, available at http://www.polycom.com.
❑ Set up TCP/IP support through the Windows Control Panel.For specific instructions, see your Windows documentation oronline help.
IMUX Code as Prefix Indicates if the system shoulddial the IMUX code before thevideo number.
IMUX Code as Suffix Indicates if the system shoulddial the IMUX code after thevideo number.
External Encryption Device Specifies which externalencryption device, if any, to useto encrypt and decrypt data.
Option Description

Configuring LAN Support
Setting the Basic Configuration
To set the basic configuration
1. Open the AdminTools LAN Configuration page:
a. Start AdminTools and click LAN.
2. Configure your system for LAN use as follows:
Option Description
Allow LAN (H.323) calls on this system
Enables LAN support. In orderto make LAN calls, the systemmust also have been configuredfor TCP/IP through theWindows Control Panel.
Allow E.164 numbers to be used for LAN calls
Allows users to make LAN callsby dialing E.164 numbers. If youdo not check this box, usersmust use IP addresses, such asaliases or DNS numbers, to dialLAN calls. In order to use E.164numbers, you must alsoconfigure a gatekeeper.
3-12

Configuring LAN Support
3. Click OK.
Controlling LAN Bandwidth
To set the bandwidth options
1. Open the AdminTools LAN Bandwidth page:
a. Start AdminTools and click LAN.
b. Click the LAN Bandwidth tab.
2. Configure the bandwidth options as follows:
Option Description
Standard Selects the rate for theStandard setting available tousers from the Advanced Call Options dialog box.
Premium Selects the rate for thePremium setting available tousers from the Advanced Call Options dialog box.
3-13

Configuring the System to Use a Gateway
3. Click OK.
Configuring the System to Use a Gateway
If you enable the system to use a gateway, you must specify thedialing codes to be used to dial out through the gateway(s), install agatekeeper, and configure the system to use the gatekeeper.
To set up a gateway
1. Open the AdminTools Gateway Setup page:
a. Start AdminTools and click ISDN.
b. Click the Gateway Setup tab.
Default Determines whether thePremium rate or the Standardrate should serve as the defaultrate the system employs whenusers don’t select a rate forcalls.
Incoming Call Bandwidth Specifies a maximum rate forincoming calls.
Option Description
3-14

Configuring the System to Use a Gateway
2. Enable gateway use by clicking the Use gateway for outgoing ISDN calls (requires a gatekeeper) option.
3. Configure the system to use a gateway as follows:
If you chose Add or Edit, the following page appears, with eitherAdd Gateway or Edit Gateway in the title bar.
Option Description
Add Opens the Add Gateway page soyou can set up a new gateway.
Edit Opens the Edit Gateway page soyou can modify the selectedgateway.
Remove Removes the selected gateway.
Set as Default Specifies the selected gatewayas the default gateway to usefor video calls.
3-15

Configuring the System to Use a Gatekeeper
4. Create or modify the gateway information as follows:
5. Click Set to save the displayed settings.
6. Click OK to close the page.
Configuring the System to Use a Gatekeeper
If your network includes one or more gateways or if you want tomake LAN calls using E.164 addresses, you must install agatekeeper and configure the PictureTel 900 Series system to use it.
Option Description
Gateway name Indicates the name that will identifythe gateway to users.
Prefix or Suffix for <selected bandwidth>
Indicates the selected bandwidth.Click a bandwidth in the list boxabove to make it appear in this field.
Prefix Specifies that the prefix associatedwith a bandwidth should be dialedbefore the number.
Suffix Specifies that the suffix associatedwith a bandwidth should be dialedafter the number.
Default Bandwidth Specifies this bandwidth as thedefault bandwidth for the selectedgateway.
Set Saves the selected settings.
3-16

Configuring the System to Use a Gatekeeper
To set up a gatekeeper
1. Open the AdminTools Gatekeeper Setup page:
a. Start AdminTools and click LAN.
b. Click the Gatekeeper Setup tab.
2. Configure the system to use the gatekeeper as follows:
Option Description
Use a gatekeeper Enables the collaborationsystem to use a gatekeeper.
Alias for this system Indicates the alias for thiscollaboration system to beused by the gatekeeper.
E.164 number for this system Indicates the extension of thecollaboration system.
Gatekeeper DNS name or IP address
Indicates the DNS name or IPaddress of the collaborationsystem on which thegatekeeper is installed.
3-17

Configuring the System to Use a Gatekeeper
3. Click OK.
LAN Call Dialing Sets whether users can callother systems on the LAN bydialing the system’s extension.The system must be registeredto a gatekeeper for this optionto be effective.
Option Description
3-18

4
ConfiguringAudio
Setting Audio Algorithms
The audio algorithm determines the method of compression usedon the audio transmitted during a call.
PictureTel recommends that you use the default Automatic setting.This setting allows the sites in the call to negotiate to the highestcommon algorithm, which results in the best audio quality possible.
You set the audio algorithms for ISDN and LAN calls separately.
F Y IF.Y.I. If you force the system to use a specific audio algorithm, andthe other systems in the call don’t support it, the call willconnect using the lowest available algorithm.
4-1

Setting Audio Algorithms
To set the audio algorithm for ISDN calls
1. Open the AdminTools Audio Preferences page:
a. Start AdminTools and click Audio.
b. Click the Audio Preferences tab.
2. Set Audio algorithm for ISDN (H.320) calls as follows:
Option Description
Automatic Allows the system to negotiate to the highestalgorithm supported by all of the callparticipants. PictureTel recommends that youuse this setting.
G.711 Specifies 3.4 kHz audio at 64 kbps.
G.722 Specifies 7 kHz audio at 64 kbps.
G.722.1 Specifies 7 kHz audio at 16, 24, or 32 kbps.
PT724™ Specifies 7 kHz audio at 24 kbps.
PT716plus™ Specifies 7 kHz audio at 16, 24, or 32 kbps.
Siren™ 14 Specifies 14 kHz audio at 24, 32, or 48 kbps.
4-2

Setting Audio Algorithms
To set the audio algorithm for LAN calls
1. Open the AdminTools Audio Preferences page:
a. Start AdminTools and click Audio.
b. Click the Audio Preferences tab.
2. Set Audio algorithm for LAN (H.323) calls as follows:
Option Description
Automatic Allows the system to negotiate to the highestalgorithm supported by all of the callparticipants. PictureTel recommends that youuse this setting.
G.711 Specifies 3.4 kHz audio at 64 kbps.
G.722 Specifies 7 kHz audio at 64 kbps.
4-3

Choosing the G.711 Encoding Law for Your Location
Choosing the G.711 Encoding Law for Your Location
The proper G.711 setting for your location should appear in theAudio Preferences page by default. If you’re uncertain about theappropriate setting, check the information supplied by yournetwork provider in the Preparing Your Network for Collaborationdocument.
To set the G.711 encoding law
1. Open the AdminTools Audio Preferences page:
a. Start AdminTools and click Audio.
b. Click the Audio Preferences tab.
G.722.1 Specifies 7 kHz audio at 16, 24, or 32 kbps.
G.723.1 Specifies 3.4 kHz audio at 6 kbps.
G.728 Specifies 3.4 kHz audio at 16 kbps.
G.729 Specifies 3.4 kHz audio at 8 kbps.
Siren 14 Specifies 14 kHz audio at 24, 32, or 48 kbps.
Option Description
4-4

Configuring the Microphones
2. Choose the appropriate Encoding Law for G.711 for your location as follows:
Configuring the Microphones
To configure the microphones
1. Open the AdminTools Audio Inputs page:
a. Start AdminTools and click Audio.
b. Click the Audio Inputs tab.
Option Description
Automatic Allows the system to automatically determinethe encoding law according to the systemlocation.
µ-law Required for North America, Japan, andKorea.
a-law Required in most other parts of the world.
4-5
Configuring the Microphones
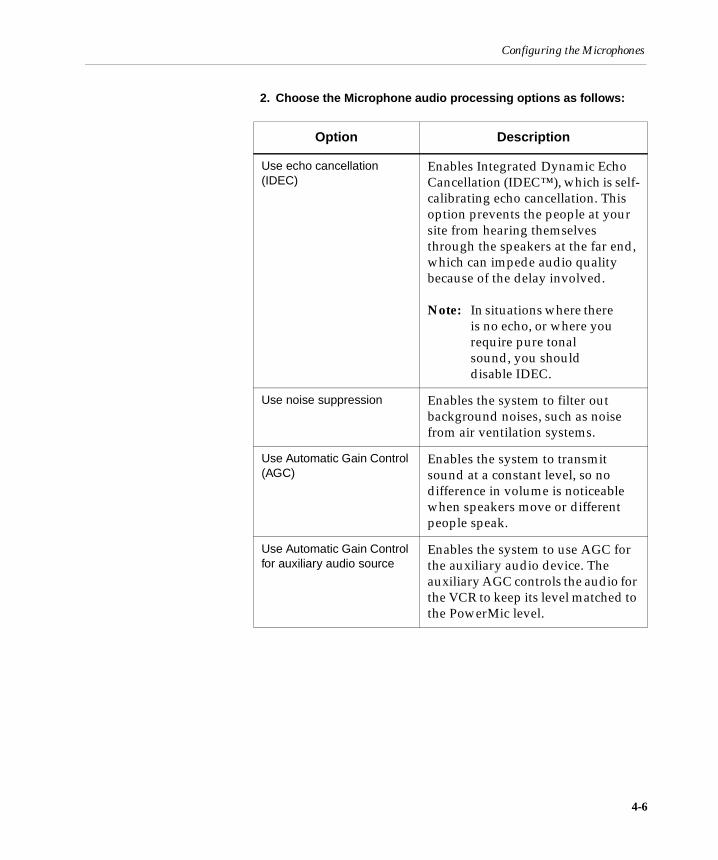
2. Choose the Microphone audio processing options as follows:
Option Description
Use echo cancellation (IDEC)
Enables Integrated Dynamic EchoCancellation (IDEC™), which is self-calibrating echo cancellation. Thisoption prevents the people at yoursite from hearing themselvesthrough the speakers at the far end,which can impede audio qualitybecause of the delay involved.
Note: In situations where thereis no echo, or where yourequire pure tonalsound, you shoulddisable IDEC.
Use noise suppression Enables the system to filter outbackground noises, such as noisefrom air ventilation systems.
Use Automatic Gain Control (AGC)
Enables the system to transmitsound at a constant level, so nodifference in volume is noticeablewhen speakers move or differentpeople speak.
Use Automatic Gain Control for auxiliary audio source
Enables the system to use AGC forthe auxiliary audio device. Theauxiliary AGC controls the audio forthe VCR to keep its level matched tothe PowerMic level.
4-6
Adding Optional Audio Components
Adding Optional Audio Components
Adding Laptop Output
You can add laptop (or PC) audio output to your system byconnecting a laptop to the ImageShare or ImageShare II device, andthen connecting the ImageShare or ImageShare II to your system’scomputer box. For instructions, see the Installing and Using theImageShare Devices document.
Adding PowerMic MicrophonesYou can use up to a total of four PowerMic microphones with yoursystem. For instructions on connecting additional microphones, seethe Installing the PowerMic document.
4-7

5
ConfiguringVideo
Setting Video Preferences
The video algorithm determines the method of compression used onthe video transmitted during a call.
PictureTel recommends that you use the default Automatic setting.This setting allows the sites in the call to negotiate to the highestcommon algorithm, which results in the best video quality possible.
You set the video algorithms for ISDN and LAN calls separately.
To set the video algorithm for ISDN calls
1. Open the AdminTools Video Preferences page:
a. Start AdminTools and click Video.
b. Click the Video Preferences tab.
F Y I F.Y.I. If you force the system to use a specific video algorithm, andthe other systems in the call don’t support it, the call willconnect using the H.261 algorithm.
5-1

Setting Video Preferences
2. Set Video algorithm for ISDN (H.320) calls as follows:
Setting Description
Automatic Allows the system to negotiate to thehighest algorithm supported by all of thecall participants.
H.263+ Provides an enhanced version of H.263,with improved coding efficiency, videomotion handling, and network errorresiliency.
H.263 Compared to H.261, provides bettercoding efficiency at video transmissionrates of 384 or above and better videomotion handling.
H.261 Provides good video resolution. H.261 issupported by all H.320 and H.323 enabledvideoconferencing terminals.
5-2

Setting Video Preferences
To set the video algorithm for LAN calls
1. Open the AdminTools Video Preferences page:
a. Start AdminTools and click Video.
b. Click the Video Preferences tab.
2. Set Video algorithm for LAN (H.323) calls as follows:
Setting Description
Automatic Allows the system to negotiate to thehighest algorithm supported by all of thecall participants.
H.263+ Provides an enhanced version of H.263,with improved coding efficiency, videomotion handling, and network errorresiliency.
H.263 Compared to H.261, provides bettercoding efficiency at video transmissionrates of 384 or above and better videomotion handling.
5-3

Setting Video Preferences
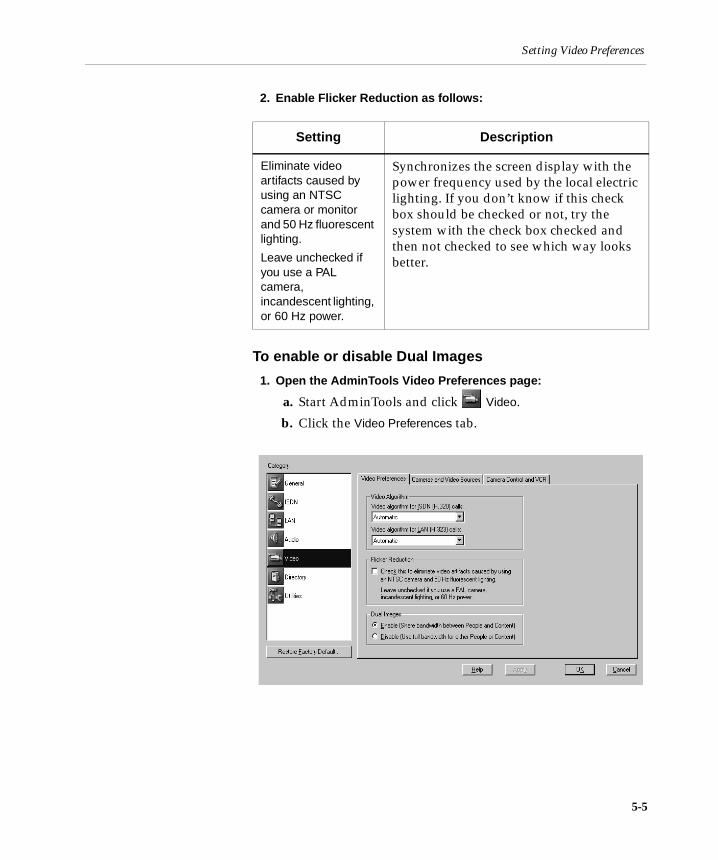
To enable Flicker Reduction
1. Open the AdminTools Video Preferences page:
a. Start AdminTools and click Video.
b. Click the Video Preferences tab.
H.261 Provides good video resolution. H.261 issupported by all H.320 and H.323 enabledvideoconferencing terminals.
Setting Description
5-4
Setting Video Preferences
2. Enable Flicker Reduction as follows:
To enable or disable Dual Images
1. Open the AdminTools Video Preferences page:
a. Start AdminTools and click Video.
b. Click the Video Preferences tab.
Setting Description
Eliminate video artifacts caused by using an NTSC camera or monitor and 50 Hz fluorescent lighting.
Leave unchecked if you use a PAL camera, incandescent lighting, or 60 Hz power.
Synchronizes the screen display with thepower frequency used by the local electriclighting. If you don’t know if this checkbox should be checked or not, try thesystem with the check box checked andthen not checked to see which way looksbetter.
5-5

Configuring Video Sources
2. Enable or disable Dual Images as follows:
Configuring Video Sources
To set up cameras and video sources
1. Open the AdminTools Cameras and Video Sources page:
a. Start AdminTools and click Video.
b. Click the Cameras and Video Sources tab.
Setting Description
Enable (Share bandwidth between People and Content)
Allows People and Content sources toshare the same bandwidth; thus,conference participants can view bothsimultaneously.
Allow system to dynamically adjust People and Content bandwidth allocation
Allows the system to allocate bandwidthto the video source (either People orContent) that needs it the most at anygiven time. For example, if a participant ispresenting a slide show, the system willprovide more bandwidth to Content whenthe participant changes a slide; when theparticipant is speaking, the system willallocate more bandwidth to People.
Disable (Use full bandwidth for either People or Content)
Allows only one video source (eitherPeople or Content) to be sent. Because thefull bandwidth is allocated to that videosource, it appears on the screen morequickly. Far-end participants can see thenear-end participants or Content, but notboth at the same time.
5-6

Configuring Video Sources
2. Click the camera or video source you want to configure in the Camera or Video Source list.
All the available video sources appear on this list, such as thevarious cameras, the VCR, the Laptop, and the Windows Desktop.
3. Configure the selected video source as follows:
Option Description
Always appears in the People and Content list
Adds the video source to theCollaboration application’s People andContent list even when the video source isdisconnected.
Camera or video source label (optional)
Allows you to name the camera or videosource. The name you choose identifies thesource in the Collaboration application’sPeople and Content list.
Preferred capture resolution
Sets one of these resolutions:
QCIF (176x120)
CIF (or FCIF) (352x240)
4CIF (704x480)
XGA (1024x768)
5-7

Configuring Camera Behavior
Configuring Camera Behavior
The PictureTel 900 Series system provides several camera controloptions which determine the behavior of the system camera(s).
To configure the camera behavior
1. Open the AdminTools Camera Control and VCR page:
a. Start AdminTools and click Video.
b. Click the Camera Control and VCR tab.
Video Source Type Allows you to define the video source typeas either People or Content for theauxiliary camera.
Option Description
5-8

Adding Optional Video Components
2. Configure the camera control options as follows:
Adding Optional Video Components
To add video components, you must install the hardware and thenuse AdminTools to configure the system to use it.
Setting Description
Allow far-end sites to control the camera on this system (Far-End Camera Control)
Allows callers at the far-end sitesto control the camera at the near-end site when that camera is beingshown to the far end. The far-endsite can pan, tilt, and zoom thecamera, as well as use presets andturn Automatic Camera Pointingon and off.
Allow near-end Automatic Camera Pointing (ACP)
Automatically points the cameraat the speaker. If you enable ACP,users can turn this feature on andoff during a call using the remotecontrol or on-screen cameracontrols.
Start near-end Automatic Camera Pointing when call connects
Starts ACP at the beginning ofeach call.
Pan Direction of Near-End Cameras
Normal causes the camera tobehave in the same manner as ascroll bar. For example, press theright arrow to look further to theright on the monitor; press the leftarrow to look further to the left.This is the recommended setting.Mirrored causes the camera tomove to the right when you pressthe right arrow.
5-9

Adding Optional Video Components
Adding a Second MonitorIf you ordered one monitor with your system, you received anSVGA/XGA monitor. If you ordered two monitors, the secondmonitor is an NTSC/PAL monitor. With a dual-monitor system, youcan view People on the NTSC/PAL monitor and view Content, suchas presentations and reports, on the SVGA/XGA monitor.
Note: When adding a second monitor, be sure to install thePTZ camera onto the NTSC or PAL monitor and not ontothe SVGA/XGA monitor.
To add a second monitor
1. Power off your system.
2. If you are installing the second monitor on a cart, place the computer box on the same cart, and see the cart documentation for installation instructions. If you are not installing the second monitor on a cart, place the monitor near the computer box.
3. Plug one end of the VGA cable into the connector on the back of the SVGA/XGA monitor.
4. Plug the other end of the VGA cable into the connector on the VGA board of the computer box.
a
a
A/V
8
8
4
7
WANISDN
LANVCRVGA
1
1
4
2
A
o
4
7
2
A/V
INPUT OUTPUT
AV1 AV2 MONITOR
VIDEO
R
AUDIO
L
¥
¥MONO
S2TERMINAL
MONO
1
ab
5-10

Adding Optional Video Components
5. Plug one end of the video cable into the 4–pin connector on the A/V board of the computer box.
If you are using the composite video cable (shippedseparately), rather than the video cable , the video cablingtypically looks like this:
Note: In European countries, you may need to use a Scartadapter.
6. If necessary, plug the optional composite video cable (shipped separately) into the Scart adapter (shipped separately), and connect the Scart adapter to the back of the monitor. Then plug the composite video cable into the 4–pin connector on the A/V board of the computer box. Make sure that the Scart adapter switch is switched to the IN position.
7. Plug the video cable into the 4–pin connector on the back of the NTSC/PAL monitor.
b
c
b
A/V
8
8
4
7
WANISDN
LANVCRVGA
1
1
4
2
A
o
4
7
2
A/V
INPUT OUTPUT
AV1 AV2 MONITOR
VIDEO
R
AUDIO
L
¥
¥MONO
INPUT OUTPUT
AV1 AV2 MONITOR
VIDEO
R
AUDIO
L
¥
¥MONO
1
c a
c
OUTIN
R AUDIO L S-VHS VIDEO
b
5-11

Adding Optional Video Components
8. If the NTSC/PAL monitor is not on a Premier Cart, plug the power cable into a wall outlet. If the NTSC/PAL monitor is on a Premier Cart:
a. Run the power cable from the monitor down through thecenter channel on the rear of the cart.
b. Plug the power cable into the power adapter shipped withthe cart.
c. Plug the power adapter into the power strip on the rear ofthe cart.
9. Plug the SVGA/XGA monitor power cable into a wall outlet.
10. If a PictureTel 70 camera is being installed onto the NTSC/PAL monitor, see the Installing the PictureTel 70 Room Camera document for camera mounting instructions.
If the NTSC/PAL monitor is installed on a cart with Bosespeakers, the PictureTel 70 camera and audio cabling typicallylooks like this (note that this illustration shows a Premier Cart):
A/V
8
8
4
7
WANISDN
LANVCRVGA
1
1
4
2
A
o
A/V
8
8
4
7
WANISDN
1
4
2
A
o
INPUT OUTPUT
AV1 AV2 MONITOR
VIDEO
R
AUDIO
L
¥
¥MONO
8
8
5-12

Adding Optional Video Components
If the NTSC/PAL monitor is installed on a tabletop or on a cartwithout Bose speakers, the PictureTel 70 camera and audiocabling typically looks like this:
11. If a PictureTel 80 camera is being installed onto the NTSC/PAL monitor, see the Installing the PictureTel 80 Dynamic Locating Camera document for camera mounting instructions.
If the NTSC/PAL monitor is installed on a cart with Bosespeakers, the PictureTel 80 camera and audio cabling typicallylooks like this (note that this illustration shows a Premier Cart):
A/V
8
8
4
7
WANISDN
LANVCRVGA
1
1
4
2
A
o
A/V
8
8
4
7
WANISDN
1
4
2
A
o
INPUT OUTPUT
AV1 AV2 MONITOR
VIDEO
R
AUDIO
L
¥
¥MONO
INPUT OUTPUT
AV1 AV2 MONITOR
VIDEO
R
AUDIO
L
¥
¥MONO
8
8
A/V
8
8
4
7
WANISDN
LANVCRVGA
1
1
4
2
A
o
A/V
8
8
4
7
WANISDN
1
4
2
A
o
8
8
INPUT OUTPUT
AV1 AV2 MONITOR
VIDEO
R
AUDIO
L
¥
¥MONO
5-13

Adding Optional Video Components
If the NTSC/PAL monitor is installed on a tabletop or on a cartwithout Bose speakers, the PictureTel 80 camera and audiocabling typically looks like this:
12. Power on your system.
13. Open the AdminTools Monitor page:
a. Start AdminTools and click General.
b. Click the Monitor tab.
A/V
8
8
4
7
WANISDN
LANVCRVGA
1
1
4
2
A
o
A/V
8
8
4
7
WANISDN
1
4
2
A
o
8
INPUT OUTPUT
AV1 AV2 MONITOR
VIDEO
R
AUDIO
L
¥
¥MONO
INPUT OUTPUT
AV1 AV2 MONITOR
VIDEO
R
AUDIO
L
¥
¥MONO
8
5-14
Adding Optional Video Components
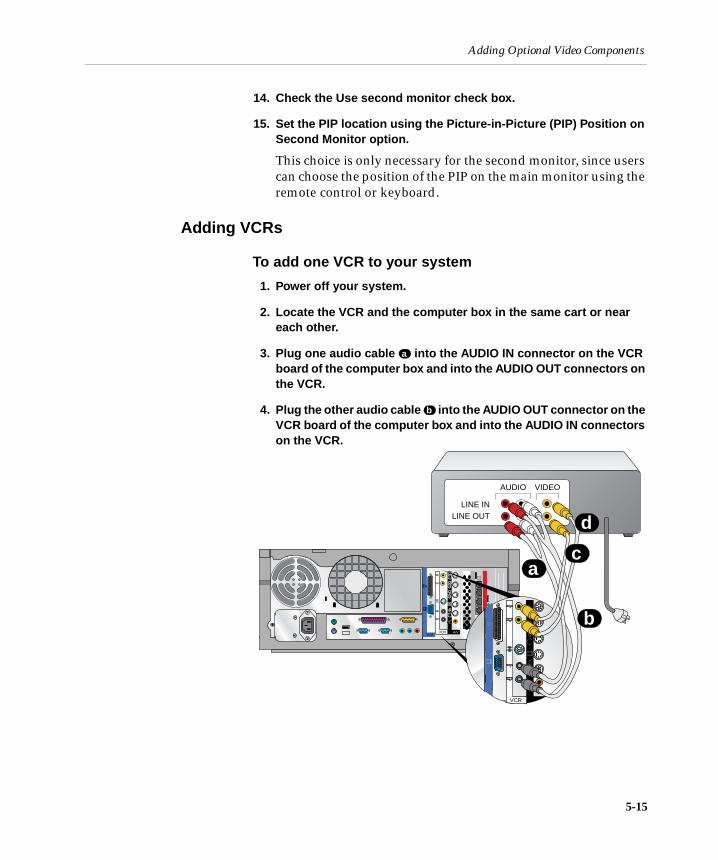
14. Check the Use second monitor check box.
15. Set the PIP location using the Picture-in-Picture (PIP) Position on Second Monitor option.
This choice is only necessary for the second monitor, since userscan choose the position of the PIP on the main monitor using theremote control or keyboard.
Adding VCRs
To add one VCR to your system
1. Power off your system.
2. Locate the VCR and the computer box in the same cart or near each other.
3. Plug one audio cable into the AUDIO IN connector on the VCR board of the computer box and into the AUDIO OUT connectors on the VCR.
4. Plug the other audio cable into the AUDIO OUT connector on the VCR board of the computer box and into the AUDIO IN connectors on the VCR.
a
b
A/V
8
8
4
7
WANISDN
LANVCRVGA
1
1
4
2
A
o
8
8
4
7
VCR
1
2
A
o
VCR
VIDEOAUDIO
LINE INLINE OUT
ac
d
b
5-15

Adding Optional Video Components
5. Plug one video cable into the VIDEO IN connector on the VCR board of the computer box and into the VIDEO OUT connector on the VCR.
6. Plug the other video cable into the VIDEO OUT connector on the VCR board of the computer box and into the VIDEO IN connector on the VCR.
7. If the VCR is not located in a Premier Cart, plug the VCR power cable into a wall outlet. If the VCR is located in a Premier Cart, plug the VCR power cable into the power strip in the Premier Cart.
8. Power on your system.
9. Open the AdminTools Camera Control and VCR page:
a. Start AdminTools and click Video.
b. Click the Camera Control and VCR tab.
10. In the VCR Setup section, click One VCR (for both recording and playback).
c
d
5-16

Adding Optional Video Components
To add two VCRs to your system
Note: When you add two VCRs to your system, one VCR isreferred to as the Record VCR, while the other is referredto as the Play VCR.
1. Power off the system.
2. Locate at least one of the VCRs and the computer box near each other.
3. Plug one audio cable into the AUDIO OUT connector on the VCR board of the computer box and into the AUDIO IN connectors on the Record VCR.
4. Plug one video cable into the VIDEO OUT connector on the VCR board of the computer box and into the VIDEO IN connector on the Record VCR.
a
b
A/V
8
8
4
7
WANISDN
LANVCRVGA
1
1
4
2
A
o
8
8
4
7
VCR
1
2
A
o
VCR
VIDEOAUDIO
LINE INLINE OUT
VIDEOAUDIO
LINE INLINE OUT
ab
c d
5-17
Adding Optional Video Components
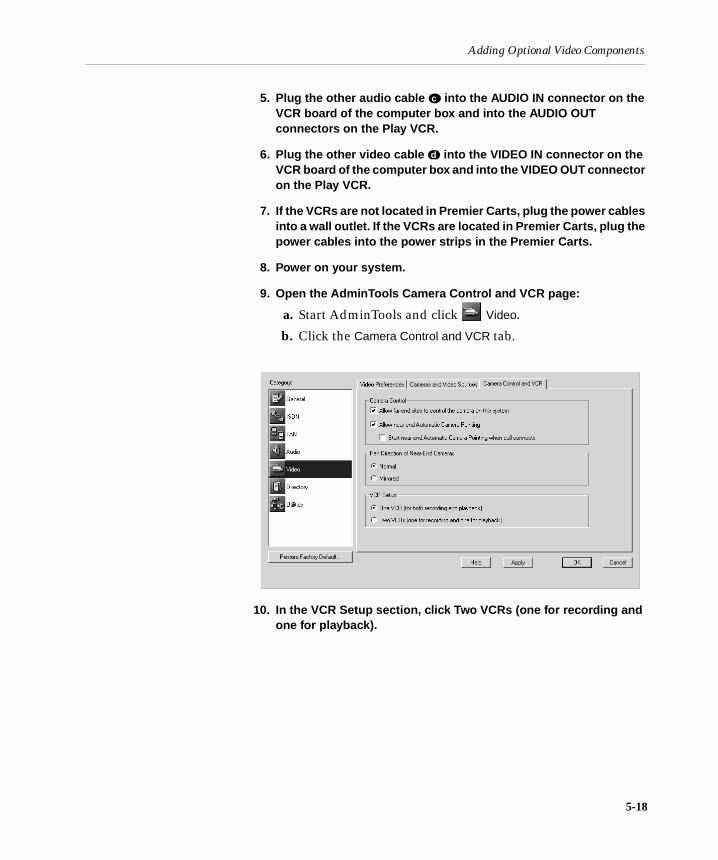
5. Plug the other audio cable into the AUDIO IN connector on the VCR board of the computer box and into the AUDIO OUT connectors on the Play VCR.
6. Plug the other video cable into the VIDEO IN connector on the VCR board of the computer box and into the VIDEO OUT connector on the Play VCR.
7. If the VCRs are not located in Premier Carts, plug the power cables into a wall outlet. If the VCRs are located in Premier Carts, plug the power cables into the power strips in the Premier Carts.
8. Power on your system.
9. Open the AdminTools Camera Control and VCR page:
a. Start AdminTools and click Video.
b. Click the Camera Control and VCR tab.
10. In the VCR Setup section, click Two VCRs (one for recording and one for playback).
c
d
5-18
6
Setting UpDirectory Services
There are two types of Directories:
❑ Local Directories, which are hosted on the PictureTel 900 Seriessystem and are accessible to anyone who can open theCollaboration application.
❑ Central Directories, which are hosted on a server and can beaccessed by users from the PictureTel 900 Series system onceyou configure the system to use them.
Setting Up a Local Directory
Once you set up a Local Directory, no further configuration isnecessary.
6-1
Setting Up a Local Directory
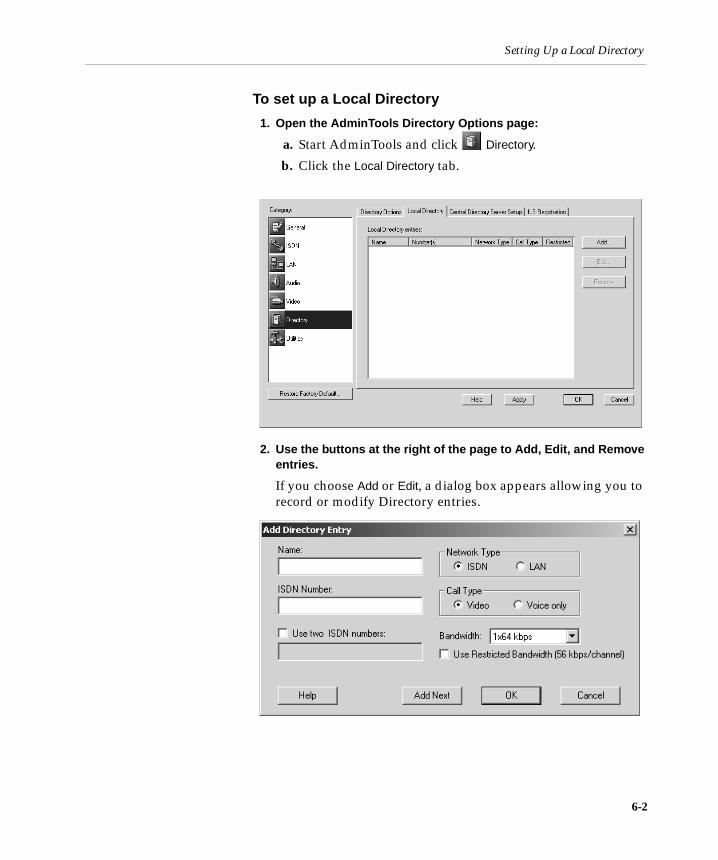
To set up a Local Directory
1. Open the AdminTools Directory Options page:
a. Start AdminTools and click Directory.
b. Click the Local Directory tab.
2. Use the buttons at the right of the page to Add, Edit, and Remove entries.
If you choose Add or Edit, a dialog box appears allowing you torecord or modify Directory entries.
6-2

Setting Up Directories on a Server
3. Record or modify the entry as follows:
4. Click OK.
Setting Up Directories on a Server
To set up a Central Directory, you must install the PictureTelDirectory Service Tools application onto a Microsoft Windowsserver platform and then configure the PictureTel 900 Series systemto access the server over the LAN.
Option Description
Name Identifies the entry in theDirectory. You can use the nameof a person, conference room, orcompany.
Network Type Specifies whether the systemshould call the site via ISDN orLAN.
ISDN Number Indicates the video number ofthe system as dialed (includingany extra digits, such as 9).
Use two ISDN numbers Provides a second number forISDN calls when applicable.
Call Type Specifies whether the call isvideo or voice-only.
Bandwidth Sets the bandwidth for videocalls to the site. This option isnot available for voice-onlycalls.
Use Restricted Bandwidth (56 kbps/channel)
Determines whether the systemwill require users to make callsto the site at restricted rates(multiples of 56 kbps) only.
6-3

Setting Up Directories on a Server
Loading Server Software
To install the Directory Services Setup Utility
1. Load the Directory server application that you have chosen to use.
2. Insert the PictureTel Directory Service Tools CD into the CD-ROM drive of the intended Directory server.
3. Navigate to the CD drive.
4. Double-click the Directory Service Setup icon.
5. Follow the onscreen instructions to complete the installation.
Setting Up a Central DirectoryOnce you set up a networked Directory, your users can access it tolook up conference sites in the Central Directory.
To set up a Central Directory
1. Open the Central Directory Server Setup page:
a. Start AdminTools and click Directory.
b. Click the Central Directory Server Setup tab.
6-4

Setting Up Directories on a Server
2. Configure the Central Directory server as follows (you may need to obtain some of this information from your LDAP server administrator, if your organization has one):
Option Description
Server DNS name Specifies the DNS of theDirectory server (the systemon which the Directory ServiceTools application is installed).This is not required if theServer IP address is provided.
Server IP address Specifies the IP address of theDirectory server, if applicable.This is not required if theServer DNS name is provided.
Port number Indicates the port number ofthe server assigned to theDirectory server.
Directory service root Indicates the root of the datatree that contains allcollaboration system entries.You can obtain the root fromyour LDAP serveradministrator.
Server type Specifies whether the servertype is Netscape DirectoryServer® or MicrosoftExchange.
Server Access Account name Specifies the name of theDirectory server accessaccount. See your serveradministrator for the accountname.
6-5
Setting Up Directories on a Server
3. Click OK.
Managing One or More ServersThe PictureTel 900 Series system can access one Directory server ata time. If you need to use a different server than the one you arecurrently set up to use, change the options on the Central Directory Server Setup page.
Account password Specifies the password of theDirectory server account forthe automatically registeredinformation of this system. Seeyour server administrator forthe account password.
Automatically register this system’s information with the server
Allows the system toautomatically create or updateits own entry in the Directoryserver at startup.
Auto Publish folder name (optional)
Specifies the name of theDirectory server folder thatcontains the automaticallyregistered information of thissystem. See your serveradministrator for the foldername.
Option Description
6-6

7
AllowingData Sharing
Managing Data Sharing Options
You can extend your users’ data sharing options as follows:
❑ To allow users to exchange files during conferences, enablethe File Transfer application.
❑ To allow users to edit files during conferences, install thedesired applications on the PictureTel 900 Series system.
❑ To allow users to store and retrieve files from a server, set up aDocument Server.
Allowing File Transfer
The File Transfer application allows users to exchange data filesduring calls.
7-1
Installing User Applications
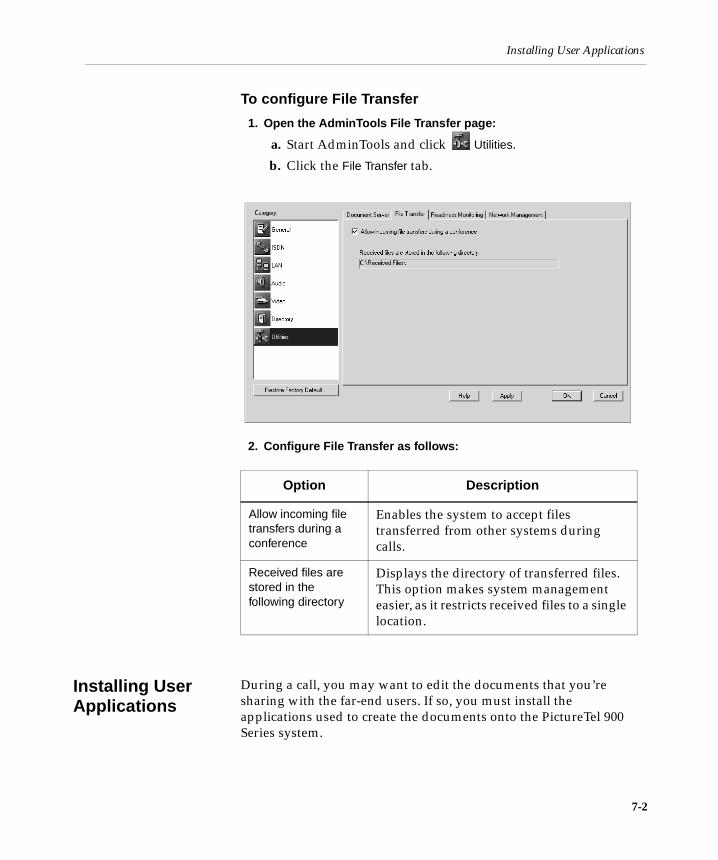
To configure File Transfer
1. Open the AdminTools File Transfer page:
a. Start AdminTools and click Utilities.
b. Click the File Transfer tab.
2. Configure File Transfer as follows:
Installing User Applications
During a call, you may want to edit the documents that you’resharing with the far-end users. If so, you must install theapplications used to create the documents onto the PictureTel 900Series system.
Option Description
Allow incoming file transfers during a conference
Enables the system to accept filestransferred from other systems duringcalls.
Received files are stored in the following directory
Displays the directory of transferred files.This option makes system managementeasier, as it restricts received files to a singlelocation.
7-2

Allowing Document Server Use
To install software, follow the same procedure as you would toinstall an application on a typical PC running Microsoft Windows.For specific instructions, see the Windows documentation.
Allowing Document Server Use
Users can access data during meetings in one of these ways:
❑ Using the optional Document Server.
❑ Using diskettes.
❑ Using CDs.
❑ Browsing the network.
A Document Server provides several advantages, such as:
❑ Flexibility. Users aren’t hindered by the space limitationsimposed by diskettes.
❑ Frees hard drive space. Users store the files they intend toshare on the server, not on the PictureTel 900 Series system.
❑ Security. User data is secure. Each user’s access to the server islimited to an individual folder created at logon.
Setting Up a Document ServerTo set up a Document Server, you must install the server software ona Windows NT server and then configure the PictureTel 900 Seriessystem to use it.
System Requirements
❑ Microsoft Internet Information Server (IIS) version 4.0 or higher
❑ Microsoft Windows NT Server 4.0 or higher with Service Pack 3or higher
❑ An NTFS partition
❑ 90 MHz or faster Intel® Pentium processor
❑ 64 MB of RAM
❑ 10 MB of hard drive disk space per user
7-3

Allowing Document Server Use
To install Document Server software
1. Log on to the system you intend to use as the server.
2. Insert the PictureTel Document Server CD into the CD-ROM drive.
3. Double-click the CD-ROM drive icon and double-click the Install Document Server icon.
4. Follow the onscreen instructions to complete the installation.
Configuring the PictureTel 900 Series System to Use a Document Server
After installing the Document Server software on the server, youmust configure how your users use the server from the PictureTel900 Series system.
To configure the system to use a server
1. Open the AdminTools Document Server page:
a. Start AdminTools and click Utilities.
b. Click the Document Server tab.
7-4

Allowing Document Server Use
2. Configure the system’s Document Server use as follows:
Option Description
Use a Document Server Enables the system to access a DocumentServer that was previously installed.
Document Server IP address or DNS name
Identifies the server’s IP address or DNSname.
Add Adds the server specified in theDocument Server IP address or DNS namefield to the server list box. The listedservers are available to users.
Set as Default Specifies the selected server as thedefault server for this system. Thisserver appears first in the server list boxpresented to users.
Remove Removes the selected server from theserver list box. (If the removed serverwas the default server, the first serverlisted in the list box becomes the defaultserver.)
Default Document Server URL
Displays the full URL of the defaultDocument Server. (If no default isselected, this field displays the URL ofthe first server listed in the list box.)
Automatically delete Document Server documents from this system at user logoff
Directs the system to delete any datafiles added by users to the PictureTel 900Series system. The system deletes thefiles when users log off.
Add Document Server addresses accessed by users in the Add Documents dialog box
Directs the system to add a DocumentServer to the list box in the PictureTel 900Series system’s Add Documents dialogbox the first time a user browses to it.You should check this box if you checkedUse a Document Server.
7-5

Observing Data Sharing Tips and Guidelines
Observing Data Sharing Tips and Guidelines
If You Allow File Transfer...❑ Install a virus protection package and keep it updated with the
latest definitions.
❑ If you haven’t checked the Automatically delete Document Server documents from this system at user logoff check box, remind usersto delete the data files they place on the system after sending orreceiving files.
If You Allow Document Server Use...❑ Check that users have one of the following browsers installed
on their desktop computers:
• Microsoft Internet Explorer version 4.0 or higher
• Netscape® Navigator version 4.0 or higher
❑ Publish the Document Server URL(s) throughout yourorganization.
❑ Customize the Document Server logon message to suit yourcollaboration environment. To customize the message, edit theWelcome.txt file at C:\inetpub\wwwroot\documentserver\ on theDocument Server.
❑ Maintain the permissions for the Document Server so thatunauthorized individuals can’t access other people’s accounts.
❑ If you haven’t checked the Automatically delete Document Server documents from this system at user logoff check box, remind usersthat you will periodically delete shared files from theDocument Server.
7-6

8
Maintainingthe System
8-1
Monitoring System Statistics
The Conference Statistics screen and the Operating Statisticsapplication allow you to view a wide variety of statistics on thesystem’s performance during calls.
Viewing Detailed System Statistics
To start Operating Statistics
1. Make sure the Collaboration application is running.
2. Choose Start > Programs > PictureTel iPower> Administrator Information > Operating Statistics.
F Y IF.Y.I. The Operating Statistics and Collaboration applicationsmay be run simultaneously, whereas the AdminTools andCollaboration applications cannot be run simultaneously.

Monitoring System Statistics
3. Choose the category of statistics that you want to view.
Category Description
System Statistics Displays the total number ofcalls, total time of calls, andtotal number of remote controland camera commands issued.
H.323 Statistics Displays information aboutH.323 calls on seven pages(State, Video, Audio, Video Channel, Audio Channel, Control Data, and Channel).
H.320 Statistics Displays information aboutH.320 calls on six pages (State, Video, Video Errors, Audio, Channel, and Data).
Voice Statistics Displays information aboutvoice calls.
8-2

Monitoring System Statistics
Viewing the Configuration Summary
To view the system configuration
1. Choose Start > Programs > PictureTel iPower>Administrator Information > Operating Statistics.
2. Click Configuration Summary.
Configuration Summary Displays summaryinformation about theconfiguration on seven pages(General, ISDN, LAN, Video, Audio, Directory, and Utilities).
Running Loopback Tests Displays a list of loopbacktests available to run.
Logging Displays information aboutthe call log and the systemlogs.
Preferences Displays preferences that canbe set by the systemadministrator.
Category Description
8-3

Monitoring System Statistics
3. Choose a tab to view detailed information.
Page Description
General Provides details related toSystem Information, CallPreferences, Logon andSecurity, Logoff and Standby,and Monitor.
ISDN Provides details related toISDN, Advanced ISDNConfiguration, ISDNBandwidth, ISDN Setup,IMUX Setup, and GatewaySetup.
LAN Provides details related toLAN Configuration,Gatekeeper Setup, and LANBandwidth.
8-4
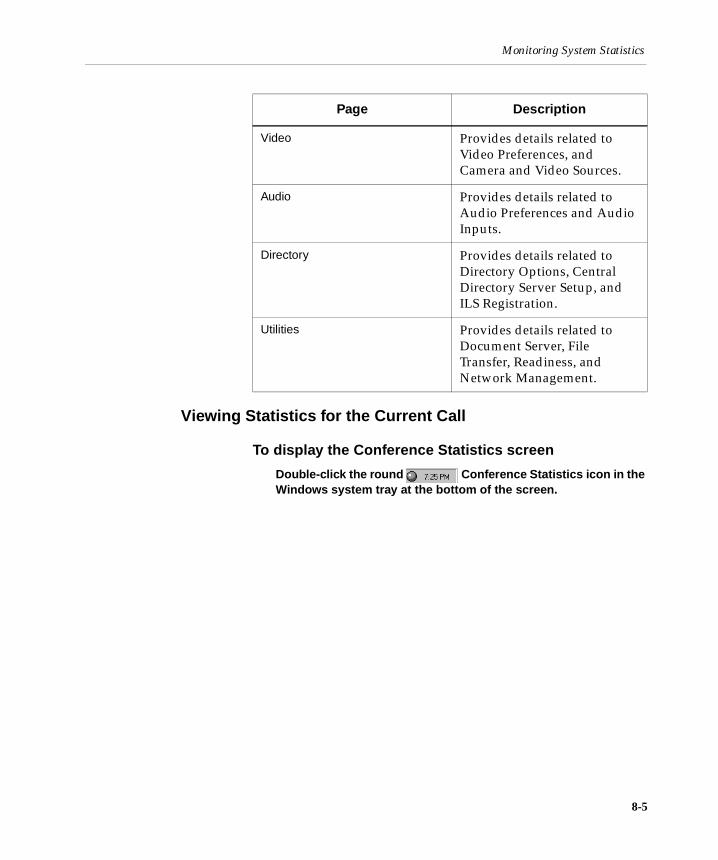
Monitoring System Statistics
Viewing Statistics for the Current Call
To display the Conference Statistics screen
Double-click the round Conference Statistics icon in the Windows system tray at the bottom of the screen.
Video Provides details related toVideo Preferences, andCamera and Video Sources.
Audio Provides details related toAudio Preferences and AudioInputs.
Directory Provides details related toDirectory Options, CentralDirectory Server Setup, andILS Registration.
Utilities Provides details related toDocument Server, FileTransfer, Readiness, andNetwork Management.
Page Description
8-5

Monitoring System Statistics
Accessing and Viewing Logs❑ From Operating Statistics:
• Call Log — tracks general information on all of the callsmade and answered by the system.
• System Logs (four logs) — records a variety of technicalinformation that can help you verify system performanceand troubleshoot problems. The System Detailed Log, ISDNLog, and BAS Codes Log files are located atC:\DiagLogFile.ptl, C:\ISDNLog.log, and C:\BASCodesLog.log. Alog containing a subset of the information in the SystemDetailed Log is located at C:\SysLogFile.ptl and is designed tobe copied onto a diskette.
• Configuration Summary — lists the specific system settingsconfigured through the AdminTools application. FromOperating Statistics, you can view the settings and save thesettings as a text file to the location you specify and with afile name you specify. The default file name isPT900SeriesSysConfig.txt.
❑ From Hardware Diagnostics:
• Hardware Diagnostics Error Log — tracks informationgenerated by the Hardware Diagnostics application. The logfile is designed to be copied onto a diskette and then sent toPictureTel for analysis, should you encounter problems you
8-6

Optimizing System Performance
can’t resolve. This log is intended for use by PictureTel, notend users. The log file is located atC:\Program Files\PictureTel\VCS\Diagnostics\ErrorLog.txt.
❑ From Windows:
• System, Security, and Application logs — track system,security, and application events. Use Microsoft EventViewer to view and manage these event logs.
Optimizing System Performance
The Readiness Monitor feature searches the system components fordefects or a deterioration in performance. When you enableReadiness Monitoring, it runs in the background whenever thePictureTel 900 Series system is in use.
When Readiness Monitoring detects a problem, the system displaysan exclamation mark icon in the system tray. Double-click the iconto see a message that specifies the problem and suggests one or moreremedies.
To set up Readiness Monitoring
1. Open the AdminTools Readiness Monitoring page:
a. Start AdminTools and click Utilities.
b. Click the Readiness Monitoring tab.
8-7

Optimizing System Performance
2. Check the system components you want to monitor.
Option Description
Remote devices (remote control and LAMB)
Enables monitoring of thestate of the batteries in theremote devices.
Color depth and resolution Enables monitoring for 16 bitcolor depth and 800x600 or1024x768 resolution.
Camera Enables monitoring of themain camera.
Microphone(s) Enables monitoring of themicrophone(s).
ISDN Enables monitoring of theISDN lines.
LAN Enables monitoring of theLAN network.
Gatekeeper Enables monitoring of thegatekeeper.
Document Server(s) Enables monitoring of thedocument server(s).
Central Directory Server Enables monitoring of theCentral Directory Server.
F Y IF.Y.I. ISDN Readiness Monitoring determines when a linebecomes inactive. In North America, this indicates an errorcondition. In many other parts of the world, the networkdeactivates lines between calls. If your network deactivateslines between calls, you should not activate ISDN ReadinessMonitoring, since you will get a problem report every timea user hangs up a call.
8-8

Restoring the System
Setting Up Virus ProtectionAlthough infection from a computer virus is rare, you should beaware that the PictureTel 900 Series system uses a standard PCmicroprocessor and is therefore susceptible to virus infection.
PictureTel recommends that you obtain and install a virusprotection application and keep it updated.
To start the virus protection application
For complete information about the virus protection application’scapabilities, see the application’s hardcopy documentation or onlinehelp.
Conserving Disk SpaceYou should conserve space on the hard drive by periodicallychecking for and eliminating unwanted files.
Check for unwanted files in the following places:
❑ Received files
❑ Document Server documents
❑ Documents placed on the hard drive
Restoring the System
When you reinstall your software, your system is returned to itsoriginal factory state. Any Directory entries and any customizedsettings you have entered are lost, and any additional software iserased, including system upgrades that you may have applied.
F Y IF.Y.I. Periodically, you should update your system with a currentlist of virus definitions.
8-9

Restoring the System
When you install upgrades to the system, Directory entries areretained and any additional software you may have installed is noterased.
To save your Directory data before reinstalling the system software,copy C:\Program Files\PictureTel\Vcs\tsdir.ini to diskettes or otherexternal media.
To restore the system:
1. Power off the system.
2. Insert the PictureTel 900 Series System Software CD into the CD-ROM drive.
3. Insert the boot diskette into the diskette drive.
4. Power on the system.
5. Follow the onscreen instructions to complete the reinstallation.
F Y IF.Y.I. PictureTel 900 Series system software does not provide anuninstall program to remove the system software. However,reinstalling the system software will overwrite all of the filescreated and installed during the original installation.
8-10

9
Using RemoteManagement Tools
The PictureTel 900 Series system supports two remote managementtools:
❑ WebRemote
❑ SNMP (Simple Network Management Protocol)
F Y IF.Y.I. Your choice of management tool depends on your networkenvironment. WebRemote requires only a web browser tocontrol the PictureTel 900 Series system. SNMP requiresnetwork management software on your networkmanagement station.
9-1

Setting Up WebRemote Management
Setting Up WebRemote Management
To configure the PictureTel 900 Series system for WebRemote management
1. Open the AdminTools Network Management page:
a. Start AdminTools and click Utilities.
b. Click the Network Management tab.
2. Check the Allow WebRemote management check box.
3. Click OK.
Setting Up RAS Access Over ISDNSet up RAS over ISDN if you need to perform network managementof a PictureTel 900 Series system but your network managementstation (NMS) is not connected to the system via a LAN.
F Y IF.Y.I. To help maintain system security, a PictureTel 900 Seriessystem requires that you configure a RAS dial-up accountuser with administrative privileges and a password beforeusing RAS dial-up to connect to a remote PictureTel 900Series system.
9-2

Setting Up WebRemote Management
1. Open the AdminTools ISDN Bandwidth page:
a. Start AdminTools and click ISDN.
b. Click the ISDN Bandwidth tab.
2. Choose a line for remote access using the Use this line for network management via RAS drop-down list.
When choosing a line, please note the following:
❑ Do not choose Line 1, which is reserved for calls.
❑ Do not choose a line that has been reserved for voice calls.
3. If you want to use the selected line exclusively for remote access, check the Reserve this line for network management check box.
9-3
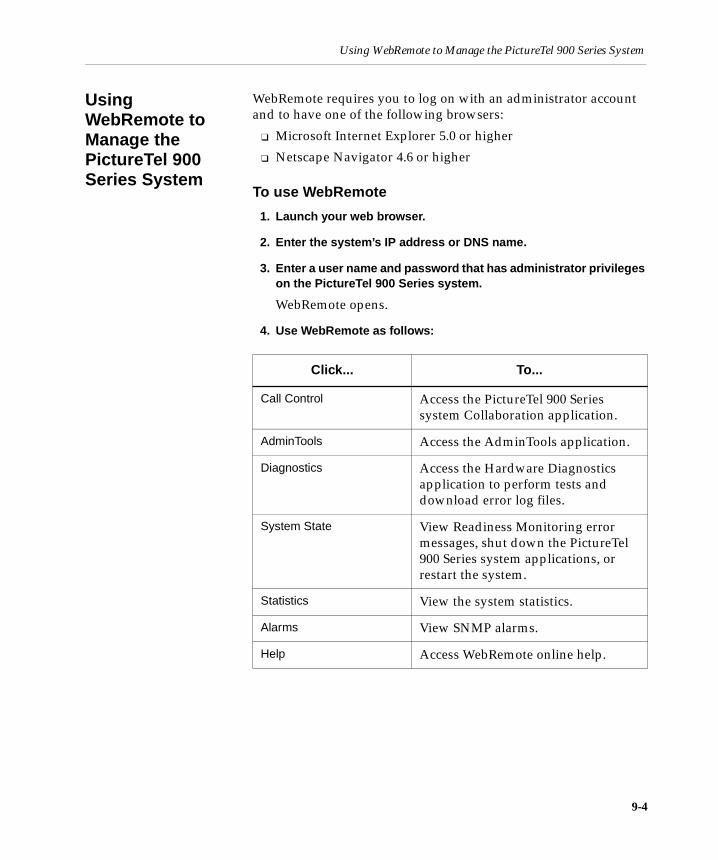
Using WebRemote to Manage the PictureTel 900 Series System
Using WebRemote to Manage the PictureTel 900 Series System
WebRemote requires you to log on with an administrator accountand to have one of the following browsers:
❑ Microsoft Internet Explorer 5.0 or higher
❑ Netscape Navigator 4.6 or higher
To use WebRemote
1. Launch your web browser.
2. Enter the system’s IP address or DNS name.
3. Enter a user name and password that has administrator privileges on the PictureTel 900 Series system.
WebRemote opens.
4. Use WebRemote as follows:
Click... To...
Call Control Access the PictureTel 900 Seriessystem Collaboration application.
AdminTools Access the AdminTools application.
Diagnostics Access the Hardware Diagnosticsapplication to perform tests anddownload error log files.
System State View Readiness Monitoring errormessages, shut down the PictureTel900 Series system applications, orrestart the system.
Statistics View the system statistics.
Alarms View SNMP alarms.
Help Access WebRemote online help.
9-4

Setting Up SNMP Management
Setting Up SNMP Management
Setting Up an SNMP EnvironmentTo set up an SNMP environment, you must install networkmanagement software (such as HP OpenView) on the computer youintend to use as your network management station (NMS). Youcannot use the PictureTel 900 Series system as the NMS.
Installing the PictureTel MIBsOnce an SNMP environment is in place, you must install thePictureTel MIBs on the management station.
The PictureTel MIBs are available from the PictureTel web site at thefollowing location: http://www.polycom.com.
To install the PictureTel MIBs
1. From the network management station, launch your web browser.
2. Enter the following URL:
http://www.polycom.com
3. Download the appropriate PictureTel 900 Series collaboration system MIB file.
4. Install the MIBs on the network management station as required by your management software.
For details, see the management application’s documentation.
9-5

Setting Up SNMP Management
Configuring the System for SNMP Management
To configure the PictureTel 900 Series system for SNMP management.
1. Open the AdminTools Network Management page:
a. Start AdminTools and click Utilities.
b. Click the Network Management tab.
2. Configure the system as follows:
Option Description
Allow management via SNMP Allows remote managementthrough SNMP.
Community string Specifies the communitystring for the system assignedby your networkadministrator. The communitystring is used as a type ofpassword.
9-6

Using SNMP to Manage the PictureTel 900 Series System
3. Click Apply.
Adding the PictureTel Network ManagerOnce you’ve configured the PictureTel 900 Series system to allowremote management via SNMP, you may choose to use thePictureTel Network Manager application, which is available on thePictureTel Network Manager CD. This optional application enhancesHP OpenView or other network management software.
Using SNMP to Manage the PictureTel 900 Series System
For specific instructions on how to use your SNMP networkmanagement application to control a remote system, see thedocumentation that came with the application.
For specific instructions on how to use the PictureTel NetworkManager application, see the online help that is part of theapplication.
Management station IP address Specifies the IP address of thecomputer with the SNMPmanagement softwareinstalled.
Add Adds the managementstation’s IP address to the list.
Remove Removes the managementstation’s IP address from thelist.
Option Description
9-7
10
ConfiguringInternal Multipoint
The Internal Multipoint option lets users add up to three additionalsites to their LAN videoconference (for a total of four sites).
To use Internal Multipoint:
❑ You must have purchased the Internal Multipoint option.
❑ All sites must be connected as LAN calls.
❑ You must initiate the videoconference.
Users can also add voice-only calls to their multipoint conferences.
Allowing Internal Multipoint
To allow internal multipoint conferences
1. Open the AdminTools Internal Multipoint page:
Start AdminTools and click Multipoint.
2. Check the Allow internal multipoint conferences on this system check box.
10-1
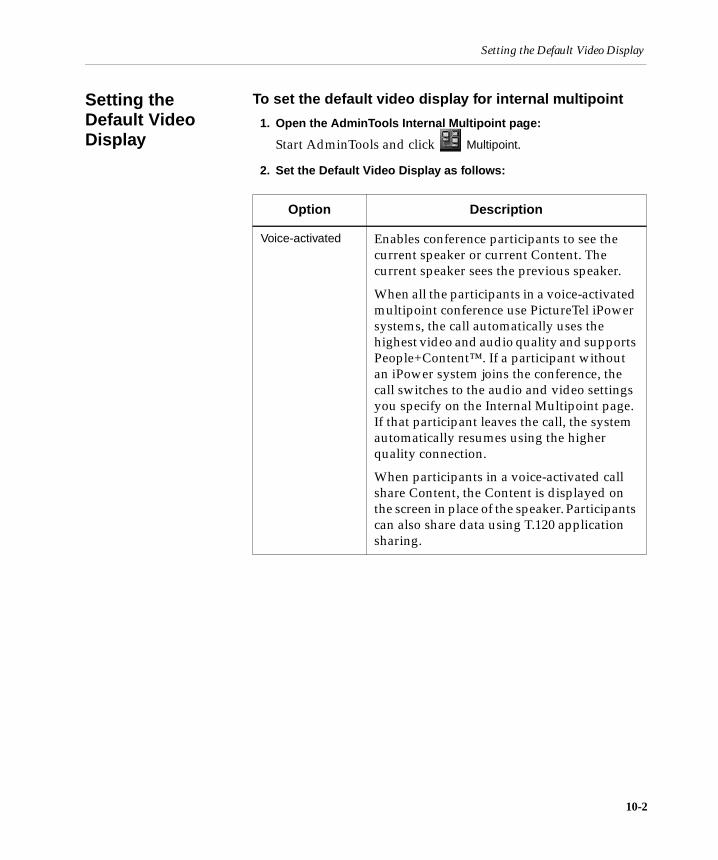
Setting the Default Video Display
Setting the Default Video Display
To set the default video display for internal multipoint
1. Open the AdminTools Internal Multipoint page:
Start AdminTools and click Multipoint.
2. Set the Default Video Display as follows:
Option Description
Voice-activated Enables conference participants to see thecurrent speaker or current Content. Thecurrent speaker sees the previous speaker.
When all the participants in a voice-activatedmultipoint conference use PictureTel iPowersystems, the call automatically uses thehighest video and audio quality and supportsPeople+Content™. If a participant withoutan iPower system joins the conference, thecall switches to the audio and video settingsyou specify on the Internal Multipoint page.If that participant leaves the call, the systemautomatically resumes using the higherquality connection.
When participants in a voice-activated callshare Content, the Content is displayed onthe screen in place of the speaker. Participantscan also share data using T.120 applicationsharing.
10-2

Setting Audio and Video Preferences
Setting Audio and Video Preferences
To set the audio and video preferences for internal multipoint
1. Open the AdminTools Internal Multipoint page:
Start AdminTools and click Internal Multipoint.
2. Set the Audio algorithm as follows:
Continuous presence
Divides the screen into quadrants so that upto four conference participants can see eachother (People or Content) simultaneously.
The video bandwidth is split evenly amongthe four images that are displayed. Forexample, in a 384 kbps conference, thebandwidth for each quadrant is 96 kbps.
In Continuous Presence conferences, theH.261 video algorithm is used. Participantswhose systems cannot support CIF video orContinuous Presence view the call as if itwere a voice-activated call.
Option Description
F Y IF.Y.I. If all conference participants are using PictureTel iPowercollaboration systems, the system software automaticallyselects the best audio and video algorithm and the highestvideo frame rate.
Option Description
G.711 Specifies 3.4 kHz audio at 64 kbps.
G.722 Specifies 7 kHz audio at 64 kbps.
G.723 Specifies 3.4 kHz audio at 6 kbps.
10-3

Setting Audio and Video Preferences
3. Set the Video algorithm for voice-activated as follows:
Setting Description
H.261 QCIF H.261 is supported by all H.320 and H.323enabled videoconferencing terminals.QCIF provides less fine video resolutionthan CIF, but handles video motionupdates more quickly.
H.261 CIF H.261 is supported by all H.320 and H.323enabled videoconferencing terminals. CIFprovides the finest video resolution, buthandles video motion updates the mostslowly.
H.263 SQCIF Compared to H.261, provides bettercoding efficiency at video transmissionrates of 384 or above. SQCIF provides theleast fine video resolution, but handlesvideo motion updates the most quickly.
H.263 QCIF Compared to H.261, provides bettercoding efficiency at video transmissionrates of 384 or above. QCIF provides lessfine video resolution than CIF, but handlesvideo motion updates more quickly.
H.263 CIF Compared to H.261, provides bettercoding efficiency at video transmissionrates of 384 or above. CIF provides thefinest video resolution, but handles videomotion updates the most slowly.
10-4

Setting Audio and Video Preferences
4. Set the Maximum video frame rate as follows:
Select a frame rate that is compatible with the other systems inyour multipoint conference. If you call a system that cannotsupport a frame rate as high as the frame rate you have selected,that system will not see video.
Setting Description
30 Displays the transmitted video at 30frames per second. This rate provides thesmoothest on-screen movement,particularly during image changes.
15 Displays the transmitted video at 15frames per second
10 Displays the transmitted video at 10frames per second
7.5 Displays the transmitted video at 7.5frames per second
10-5

11
TroubleshootingFor support or service, please contact your PictureTel serviceprovider or call PictureTel Technical Support. You can find phonenumbers for Technical Support in your area at the PictureTel website, http://www.polycom.com.
Solving Installation Problems Problem Corrective Action
First-timeinstallation hasfailed
❑ Make sure that all monitor,ImageShare, infrared receiver, andpower cables are correctly installedand secure. (If necessary, consult themanual that came with your monitor.)
❑ Retry the installation.
Windows Wizardhas failed
❑ Perform standard PC debuggingprocedures.
PictureTel 900Series SetupWizard has failed
❑ View any error messages.
❑ From the Hardware Diagnosticsapplication, start Automated Testing. Ifthe test fails, call for service.
11-1
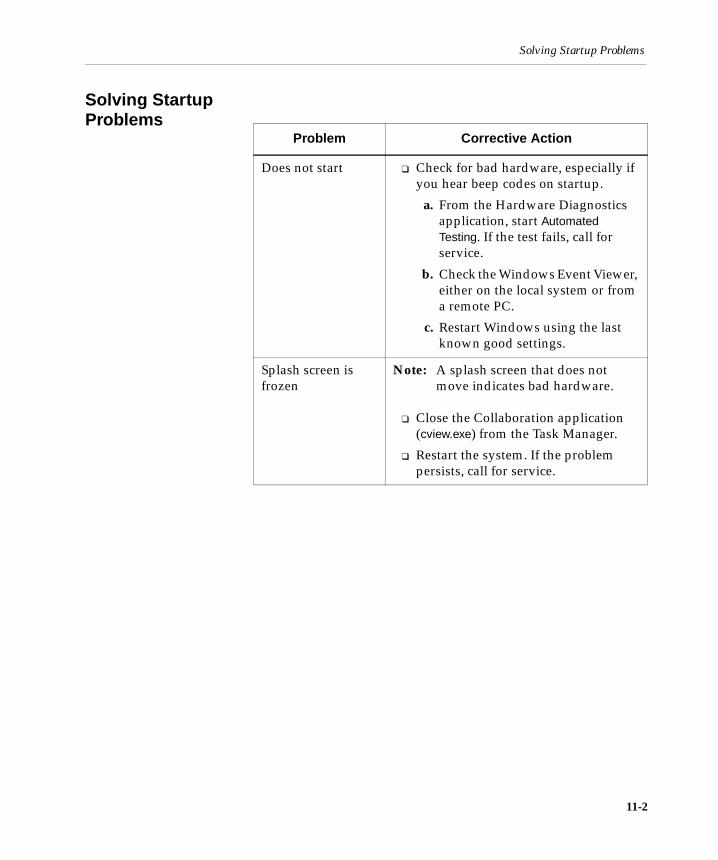
Solving Startup Problems
Solving Startup Problems
Problem Corrective Action
Does not start ❑ Check for bad hardware, especially ifyou hear beep codes on startup.
a. From the Hardware Diagnosticsapplication, start Automated Testing. If the test fails, call forservice.
b. Check the Windows Event Viewer,either on the local system or froma remote PC.
c. Restart Windows using the lastknown good settings.
Splash screen isfrozen
Note: A splash screen that does notmove indicates bad hardware.
❑ Close the Collaboration application(cview.exe) from the Task Manager.
❑ Restart the system. If the problempersists, call for service.
11-2

Solving General System Problems
Solving General System Problems
Problem Corrective Action
Parts of the systemare not working
❑ Make sure that all cabling is correctlyinstalled and secure.
❑ Make sure that all power cables areplugged into a power source (cartpower strip, wall outlet, oruninterruptible power supply).
❑ Make sure that the cart power strip oruninterruptible power supply isturned on.
❑ Enable Readiness Monitoring inAdminTools. Address any warningsgenerated by the system.
Keyboard is notworking
❑ Make sure that the keyboard andremote control are not being used atthe same time. You can’t use bothinfrared devices simultaneously.
❑ Make sure that keys on the keyboardare not being accidentally held down.
❑ Make sure that the infrared path fromthe keyboard to the keyboard’sinfrared receiver is not blocked.
❑ Make sure that the keyboard’sinfrared receiver is plugged incorrectly. Make sure that the LEDindicator on the front of the receiver ison when the system is on.
❑ Make sure that the keyboard containsfresh batteries. Check the keyboardbatteries at least every two months.
11-3

Solving General System Problems
Remote control isnot working
❑ Make sure that the keyboard andremote control are not being used atthe same time. You can’t use bothinfrared devices simultaneously.
❑ Make sure that the infrared path fromthe remote control to the infraredreceiver at the base of the maincamera is not blocked.
❑ Make sure that the remote controlcontains fresh batteries.
• Check the remote control batteriesat least every two months with theHardware Diagnosticsapplication.
• Enable Readiness Monitoring inAdminTools. The PictureTel 900Series system will receive amessage when the batteries arelow.
❑ If the remote control still doesn’twork, restart the system.
ISDN or voicenumber isdisplayedincorrectly in the“To call this system”field
❑ Make sure that your locationinformation is correct. To correct thelocal area code or city code:
a. Choose Start > Settings > ControlPanel > Telephony.
b. On the My Location page, type thecorrect code.
c. On the My Location page, in the I am in field, choose the country.
d. Click OK to close the Dialing Properties dialog box.
❑ Enter your local numbers without thearea code or city code, in AdminTools.
Problem Corrective Action
11-4

Solving Network Problems
Solving Network Problems
Problem Corrective Action
Readiness icon isdisplayed in thecorner of thetaskbar
❑ Double-click the exclamation markicon in the system tray to view theReadiness message.
Readiness message:TCP/IP Connection Error:Network cable unplugged or network configured improperly
❑ Check the network cables to be surethat they are properly connected andsecure.
❑ Use the Windows Control Panel tocheck the TCP/IP settings.
❑ Contact your network administrator.
Readiness message:ISDN cable is unplugged or the ISDN line is not active(continued onnext page)
Note: Use ISDN Readiness only inNorth America. Elsewhere, thenetwork deactivates ISDNlines between calls, which willcause false Readinessmessages.
❑ Verify that the ISDN lines areconnected and active.
a. From the Hardware Diagnosticsapplication, click Test ISDN Lines. Ifa line does not reach the activestate, make sure that it isconnected properly. See theInstalling the PictureTel 900 SeriesCollaboration System document forinformation about how to connectISDN lines.
11-5

Solving Network Problems
Readiness message:ISDN cable is unplugged or the ISDN line is not active
b. If you have NT-1 boxes, checkeach box to see if that line is readyto place calls (usually indicated bygreen lights). If a light is red, checkthe ISDN cable connectionsbetween the wall outlet and theNT-1 box and between the NT-1box and the computer system.
c. If you make any changes to thesystem, open the HardwareDiagnostics application, and clickTest ISDN Lines.
d. If the ISDN lines activate, close theHardware Diagnostics applicationand start the Collaborationapplication.
e. If you still see an ISDN Readinesscondition and your switch type isDMS100, NI1, 5ESS G3, or 5ESSMultipoint, you may have aproblem registering your SPIDswith the network. From theOperating Statistics application,check your ISDN configuration orcontact your network provider.
❑ If the problem persists, check theprovisioning of the line or contact thenetwork administrator.
Readiness message:Gatekeeper registration failed
❑ From the Operating Statisticsapplication, check the gatekeeperconfiguration.
❑ Notify the network administrator.
❑ Place LAN calls using IP addresseswhich do not require a gatekeeper.
Problem Corrective Action
11-6
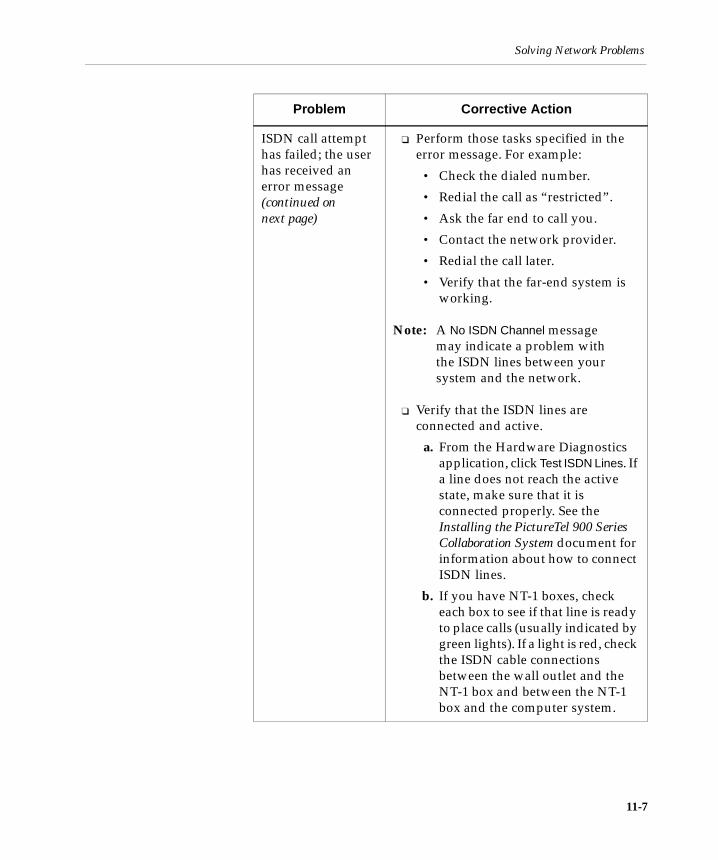
Solving Network Problems
ISDN call attempthas failed; the userhas received anerror message(continued onnext page)
❑ Perform those tasks specified in theerror message. For example:
• Check the dialed number.
• Redial the call as “restricted”.
• Ask the far end to call you.
• Contact the network provider.
• Redial the call later.
• Verify that the far-end system isworking.
Note: A No ISDN Channel messagemay indicate a problem withthe ISDN lines between yoursystem and the network.
❑ Verify that the ISDN lines areconnected and active.
a. From the Hardware Diagnosticsapplication, click Test ISDN Lines. Ifa line does not reach the activestate, make sure that it isconnected properly. See theInstalling the PictureTel 900 SeriesCollaboration System document forinformation about how to connectISDN lines.
b. If you have NT-1 boxes, checkeach box to see if that line is readyto place calls (usually indicated bygreen lights). If a light is red, checkthe ISDN cable connectionsbetween the wall outlet and theNT-1 box and between the NT-1box and the computer system.
Problem Corrective Action
11-7

Solving Network Problems
11-8
ISDN call attempthas failed; the userhas received anerror message(continued onnext page)
c. If you make any changes to thesystem, open the HardwareDiagnostics application, and clickTest ISDN Lines.
d. If the ISDN lines activate, close theHardware Diagnostics applicationand start the Collaborationapplication.
e. If you still have call problems andyour switch type is DMS100, NI1,5ESS G3, or 5ESS Multipoint, youmay have a problem registeringyour SPIDs with the network.From the Operating Statisticsapplication, check your ISDNconfiguration or contact yournetwork provider.
❑ Make sure that the number beingdialed is correct and properlyformatted and try the call again.Callers may need to dial 9 or include along distance access code or countrycode.
❑ Verify that the far-end system is inworking order.
Telephone the far-end site and find outif the system is turned on and isfunctioning properly.
❑ Have the far-end system call yoursystem.
To find out if the problem exists in onedirection only, ask the person at thefar-end site to call your system.
Problem Corrective Action

Solving Network Problems
ISDN call attempthas failed; the userhas received anerror message
❑ Check the ISDN configuration.
Contact your ISDN service providerand verify that the ISDN lines areprovisioned according to the PreparingYour Network for Collaborationdocument, which is available athttp://www.polycom.com.
Check the configuration in the ISDN Setup page in AdminTools. (Obtain thecorrect numbers from your ISDNservice provider.)
❑ From the Operating Statisticsapplication, start the Local Channelloopback test.
Difficulty makingLAN calls(continued on nextpage)
❑ Check the number, system name, orLAN address of the far-end systemthat you are calling.
Make sure that the number beingdialed is correct and properlyformatted and try the call again.
❑ Make sure that the network cable isconnected and secure.
The LAN cable must be connectedproperly, as shown in the Installing thePictureTel 900 Series CollaborationSystem document.
❑ Have the far-end system call yoursystem.
To find out if the problem exists in onedirection only, ask the person at thefar-end site to call your system.
Problem Corrective Action
11-9

Solving Network Problems
Difficulty makingLAN calls
❑ Verify that the far-end system is inworking order.
Telephone the far-end site and find outif the system is turned on and isfunctioning properly. Ask whether thefar-end system is behind an IPnetwork firewall. If it is, the far endmust provide a way for LAN traffic togo through, which will allow asuccessful connection.
❑ If you are using an extension or analias to place the call to the far-endsite, use the IP address instead. If youcan place the call using the IP address,your H.323 gatekeeper or your accessto the gatekeeper is faulty. Notifyyour network administrator.
❑ Check the LAN configuration.
Check the configuration in the LAN Setup page in AdminTools. (Obtaincorrect numbers from your networkprovider.)
The system canmake calls but notreceive them
❑ From the Configuration Summarycategory of the Operating Statisticsapplication, check the local phonenumbers.
A call stays in the“Connecting” state
❑ Check the phone number, systemname, or TCP/IP address to makesure that you are dialing avideoconferencing system.
❑ Redial the call as “restricted”.
Problem Corrective Action
11-10

Solving Network Problems
The call brieflyenters the“Connecting” stateand thendisconnects(continued onnext page)
❑ Check the phone number, systemname, or TCP/IP address to makesure that you are dialing avideoconferencing system.
❑ Redial the call using a lower rate(1x512 to 1x384, 1x384 to 2x64, 2x64 to2x56) because the far end or networkmay not support the call rate yourequested.
❑ Operationally test the lines formaking outgoing calls:
a. Make a 1x512 call to anotherPictureTel 900 Series system usinga number that is known to becorrect.
b. After the call connects, check thecall rate from the Conference Statistics screen.
i. If the call connected at 1x512,all lines work.
ii. If some lines do not come up,the lines may not be connectedto the network properly.
❑ Verify that the ISDN lines areconnected and active.
a. From the Hardware Diagnosticsapplication, click Test ISDN Lines. Ifa line does not reach the activestate, make sure that it isconnected properly. See theInstalling the PictureTel 900 SeriesCollaboration System document forinformation about how to connectISDN lines.
Problem Corrective Action
11-11

Solving Network Problems
The call brieflyenters the“Connecting” stateand thendisconnects
b. If you have NT-1 boxes, checkeach box to see if that line is readyto place calls (usually indicated bygreen lights). If a light is red, checkthe ISDN cable connectionsbetween the wall outlet and theNT-1 box and between the NT-1box and the computer system.
c. If you make any changes to thesystem, open the HardwareDiagnostics application, and clickTest ISDN Lines.
d. If all ISDN lines activate, close theHardware Diagnostics applicationand start the Collaborationapplication.
e. If you still have call problems andyour switch type is DMS100, NI1,5ESS G3, or 5ESS Multipoint, youmay have a problem registeringyour SPIDs with the network.From the Operating Statisticsapplication, check your ISDNconfiguration or contact yournetwork provider.
The call connects atless than therequested rate; thesystem displays“Call connected at maximum available rate”
Note: Remain in the call at thereduced rate. The call isoperating at the maximumrate supported by the farend.
Problem Corrective Action
11-12

Solving Network Problems
The call connects atless than therequested rate; thesystem displays“Call connected at <rate>”(continued onnext page)
❑ Operationally test the lines formaking outgoing calls:
a. Make a 1x512 call to anotherPictureTel 900 Series system usinga number that is known to becorrect, or start the Local Channelloopback test from the OperatingStatistics application. If the callconnects, all lines work.
b. After the call connects, check thecall rate from the Conference Statistics screen.
i. If the call connected at 512, alllines work.
ii. If some lines do not come up,the lines may not be connectedto the network properly.
❑ Verify that the ISDN lines areconnected and active.
a. From the Hardware Diagnosticsapplication, click Test ISDN Lines. Ifa line does not reach the activestate, make sure that it isconnected properly. See theInstalling the PictureTel 900 SeriesCollaboration System document forinformation about how to connectISDN lines.
b. If you have NT-1 boxes, checkeach box to see if that line is readyto place calls (usually indicated bygreen lights). If a light is red, checkthe ISDN cable connectionsbetween the wall outlet and theNT-1 box and between the NT-1box and the computer system.
Problem Corrective Action
11-13

Solving Network Problems
The call connects atless than therequested rate; thesystem displays“Call connected at <rate>”
c. If you make any changes to thesystem, open the HardwareDiagnostics application, and clickTest ISDN Lines.
d. If all ISDN lines activate, close theHardware Diagnostics applicationand start the Collaborationapplication.
e. If you still have call problems andyour switch type is DMS100, NI1,5ESS G3, or 5ESS Multipoint, youmay have a problem registeringyour SPIDs with the network.From the Operating Statisticsapplication, check your ISDNconfiguration or contact yournetwork provider.
Problem Corrective Action
11-14

Solving Video Problems
Solving Video Problems
Problem Corrective Action
Poor video isreported from thefar end or seen onthe near-endsystem
❑ Double-click the Conference Statistics icon (a small circle) on thetaskbar in the lower right-hand cornerof the screen. Check the videostatistics.
❑ Make sure that all video, camera, andmonitor cables are correctly installedand secure. (If necessary, consult themanual that came with your monitor.)
❑ From the Hardware Diagnosticsapplication, start Automated Testing.
a. If the test passes, the video boardis good; from the HardwareDiagnostics application, click Test Video and select the appropriatevideo source. If no source isdetected:
i. Unplug the camera videocable and then plug it in again.
ii. Replace the video cable.
iii. Change the cable connections.
b. If the test fails, the video board isfaulty. Call for service.
❑ If the problem persists, call forservice.
11-15
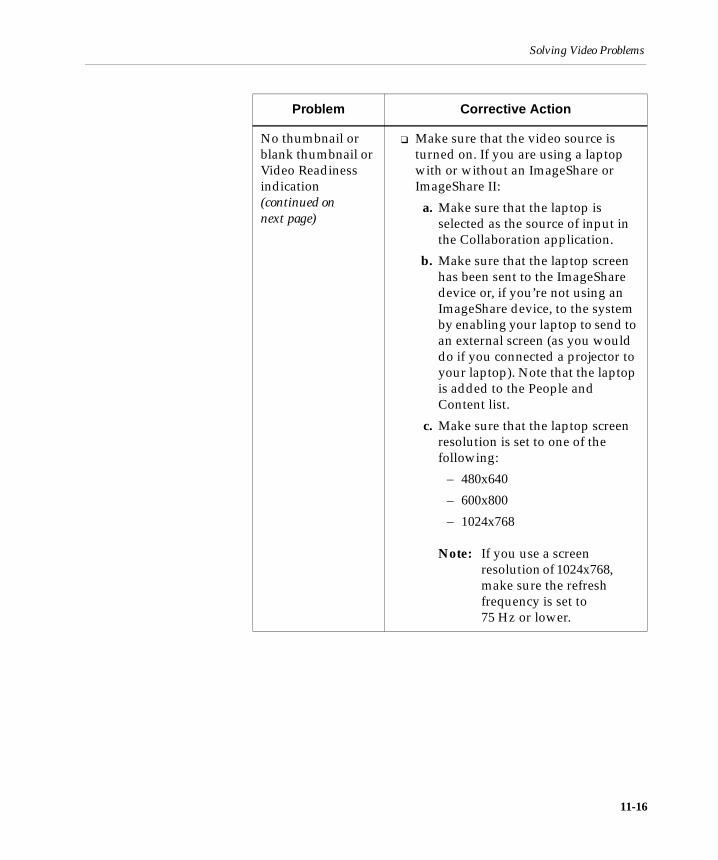
Solving Video Problems
No thumbnail orblank thumbnail orVideo Readinessindication(continued onnext page)
❑ Make sure that the video source isturned on. If you are using a laptopwith or without an ImageShare orImageShare II:
a. Make sure that the laptop isselected as the source of input inthe Collaboration application.
b. Make sure that the laptop screenhas been sent to the ImageSharedevice or, if you’re not using anImageShare device, to the systemby enabling your laptop to send toan external screen (as you woulddo if you connected a projector toyour laptop). Note that the laptopis added to the People andContent list.
c. Make sure that the laptop screenresolution is set to one of thefollowing:
– 480x640
– 600x800
– 1024x768
Note: If you use a screenresolution of 1024x768,make sure the refreshfrequency is set to75 Hz or lower.
Problem Corrective Action
11-16
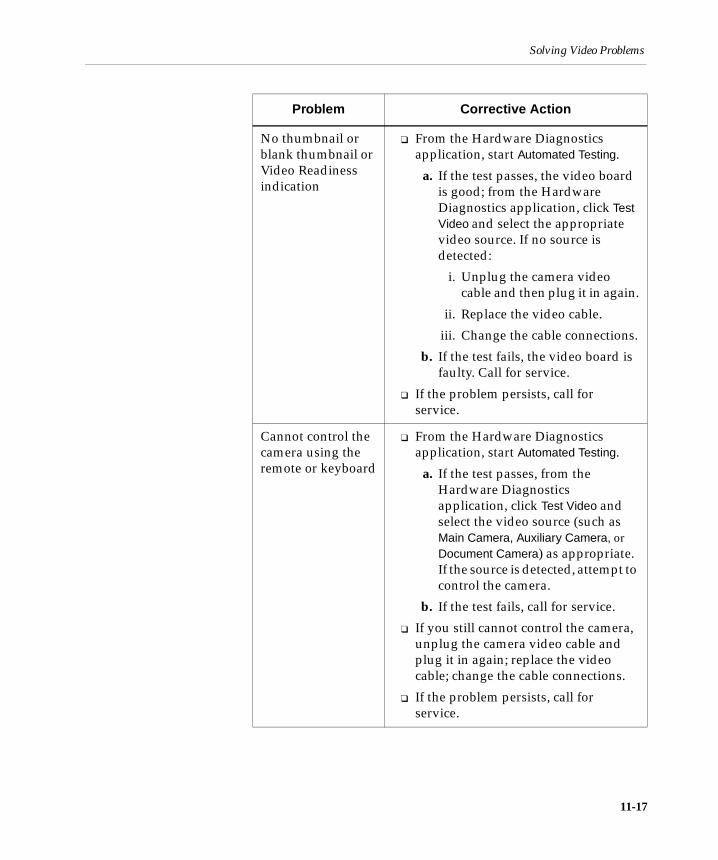
Solving Video Problems
No thumbnail orblank thumbnail orVideo Readinessindication
❑ From the Hardware Diagnosticsapplication, start Automated Testing.
a. If the test passes, the video boardis good; from the HardwareDiagnostics application, click Test Video and select the appropriatevideo source. If no source isdetected:
i. Unplug the camera videocable and then plug it in again.
ii. Replace the video cable.
iii. Change the cable connections.
b. If the test fails, the video board isfaulty. Call for service.
❑ If the problem persists, call forservice.
Cannot control thecamera using theremote or keyboard
❑ From the Hardware Diagnosticsapplication, start Automated Testing.
a. If the test passes, from theHardware Diagnosticsapplication, click Test Video andselect the video source (such asMain Camera, Auxiliary Camera, orDocument Camera) as appropriate.If the source is detected, attempt tocontrol the camera.
b. If the test fails, call for service.
❑ If you still cannot control the camera,unplug the camera video cable andplug it in again; replace the videocable; change the cable connections.
❑ If the problem persists, call forservice.
Problem Corrective Action
11-17

Solving Video Problems
No video (VGA)output (blank VGAmonitor)
❑ Check all video and power cableconnections to and from the VGAmonitor.
❑ Check the brightness setting on themonitor to be sure that it is not set toone extreme or the other.
No video (NTSC orPAL) output
Note: The NTSC/PAL monitor isused only if in a call. If thesystem is not in a call, thismonitor will not display video.
❑ Make sure that all cables to and fromthe NTSC or PAL monitor arecorrectly installed and secure, andthat the monitor power is on.
❑ From the Operating Statistics orAdminTools application, check thesystem configuration for the NTSC orPAL settings. If appropriate, enabledual-monitor use and restart thecollaboration system.
❑ From the Hardware Diagnosticsapplication, start Automated Testing.
a. If the test passes, click Test Videoand select the Internal NTSC Color Bar video source. If the color bardoes not appear on the NTSC/PAL monitor, call for service.
b. If the test fails, call for service.
Problem Corrective Action
11-18
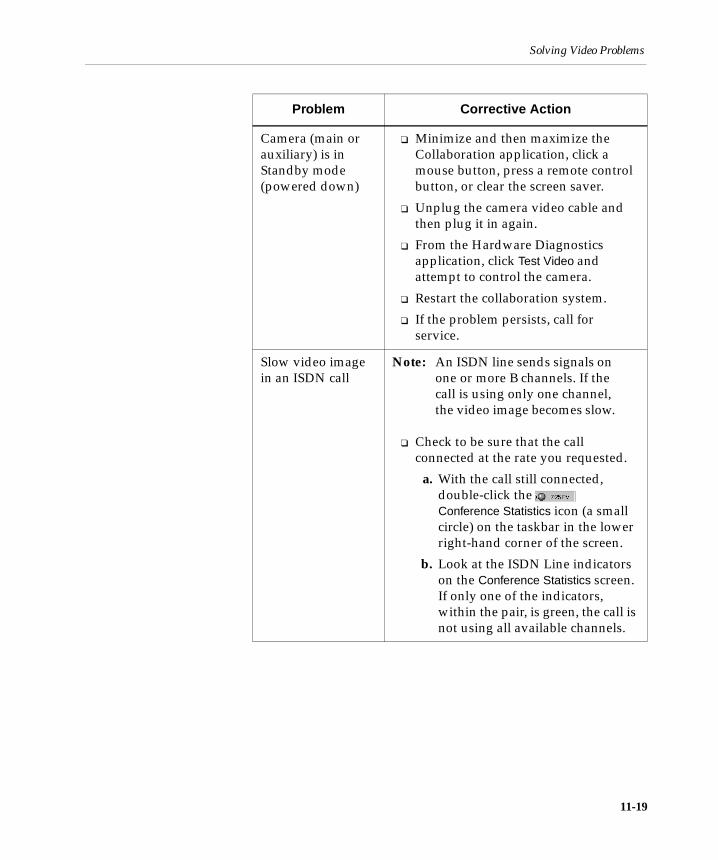
Solving Video Problems
Camera (main orauxiliary) is inStandby mode(powered down)
❑ Minimize and then maximize theCollaboration application, click amouse button, press a remote controlbutton, or clear the screen saver.
❑ Unplug the camera video cable andthen plug it in again.
❑ From the Hardware Diagnosticsapplication, click Test Video andattempt to control the camera.
❑ Restart the collaboration system.
❑ If the problem persists, call forservice.
Slow video imagein an ISDN call
Note: An ISDN line sends signals onone or more B channels. If thecall is using only one channel,the video image becomes slow.
❑ Check to be sure that the callconnected at the rate you requested.
a. With the call still connected,double-click theConference Statistics icon (a smallcircle) on the taskbar in the lowerright-hand corner of the screen.
b. Look at the ISDN Line indicatorson the Conference Statistics screen.If only one of the indicators,within the pair, is green, the call isnot using all available channels.
Problem Corrective Action
11-19

Solving Audio Problems
Solving Audio Problems
No VCR output ❑ Make sure that all power, audio, andvideo cables to and from the system,display, and VCR are correctlyinstalled and secure.
❑ Play a known good VCR tape. If thetape will not play:
a. Restart the collaboration system.
b. From the Hardware Diagnosticsapplication, click Test Video andselect the VCR Video Source option.
c. Play a known good VCR tapeagain. If the tape still will not play,call for service.
Problem Corrective Action
Problem Corrective Action
Far-end participantscannot hear you
❑ Make sure that the near end hasnot muted the call. A mute icon
appears in the status barwhen the call is muted.
❑ Make sure that all power andaudio cables to and from thesystem, display, and peripheralsare correctly installed and secure.
11-20

Solving Audio Problems
Cannot hear the far-endparticipants
❑ Make sure that the far-end site hasnot muted the call. A mute icon
appears in the status barwhen the call is muted.
Note: If you are in a call and inFull-Screen mode, enablethe status bar in order tosee the icon.
❑ Make sure that all speaker cablesto the system are correctlyinstalled and secure.
❑ From the Operating Statisticsapplication, start the Local Channelloopback test.
❑ From the Hardware Diagnosticsapplication, start Automated Testing.
a. If the test passes, click Test Audio and select one of theInternal options as the Audio Source. If you do not hear theaudio tones or noise, call forservice.
b. If the test fails, call for service.
Problem Corrective Action
11-21

Solving Audio Problems
Poor audio from thefar-end system
❑ Double-click theConference Statistics icon (a smallcircle) on the taskbar in the lowerright-hand corner of the screen.Check the audio statistics.
❑ From the Hardware Diagnosticsapplication, start Automated Testing.
❑ From the Hardware Diagnosticsapplication, click Test Audio. Selectone of the Internal options as theAudio Source. If the audio tones ornoise have poor quality, call forservice.
Cannot hear any audioor the volume is toolow or too high
❑ If you are in a call, adjust thevolume by using the controlbuttons on the remote or bymanipulating on-screen controlswith the keyboard.
❑ If your audio speakers have theirown volume control, check thatthe control is set appropriately.
❑ Listen for the dial-up tonesduring the dial-up process.
❑ From the Hardware Diagnosticsapplication, start Automated Testing. If the test fails, call forservice.
❑ From the Hardware Diagnosticsapplication, click Test Audio. Selectone of the Internal options as theAudio Source. If the audio tones ornoise have poor quality, call forservice.
Problem Corrective Action
11-22

Solving Audio Problems
Poor Automatic GainControl (AGC). Far enddetects variations inaudio from near-endsources that aredifferent distances fromthe microphone
❑ From the Operating Statisticsapplication, check the audiosettings.
Poor Automatic NoiseSuppression (ANS). Farend hears near-endbackground noise
❑ From the Operating Statisticsapplication, check the audiosettings.
Poor IntegratedDynamic EchoCancellation (IDEC).Far-end participantshear echoes ofthemselves
❑ From the Operating Statisticsapplication, check the audiosettings.
Problem Corrective Action
11-23

Solving ImageShare or ImageShare II Problems
Solving ImageShare or ImageShare II Problems
Problem Corrective Action
Data or images will notpass through the Monitoror VGA In connector ofthe ImageShare device
❑ Make sure that all cables to andfrom the ImageShare device arecorrectly installed and secure.
❑ If you are using a laptop with theImageShare:
a. Make sure that the laptopscreen has been sent to theImageShare device byenabling your laptop to sendto an external screen (as youwould do if you connected aprojector to your laptop). Notethat the laptop is added to thePeople and Content list.
b. Make sure that the laptopscreen resolution, captureresolution, and frequencysettings are correct. See thelaptop documentation if youneed information on settingup the laptop to send videofrom its VGA port.
c. From the HardwareDiagnostics application, startAutomated Testing.
i. If the test passes, from theHardware Diagnosticsapplication, start Test Video and select theImageShare Video Sourceoption; if the PC or laptopvideo image does notappear, call for service.
ii. If the test fails, call forservice.
11-24

Solving ImageShare or ImageShare II Problems
Projector connected tothe ImageShare is notdisplaying output
❑ Make sure that all cables to andfrom the ImageShare device arecorrectly installed and secure.
❑ Consult the documentation thatcame with the projector.
ImageShare capturefeature is not working(no thumbnail)
❑ Make sure that all cables to andfrom the ImageShare device arecorrectly installed and secure.
❑ Make sure that the laptop screenhas been sent to the ImageSharedevice by enabling your laptop tosend to an external screen (as youwould do if you connected aprojector to your laptop). Notethat an icon for the laptop isadded to the People and Contentlist.
❑ Restart the collaboration system.
❑ From the Hardware Diagnosticsapplication, start Automated Testing.
a. If the test passes, from theHardware Diagnosticsapplication, start Test Video;select the appropriate Video Source option; if the videoimage does not appear, call forservice.
b. If the test fails, call for service.
Problem Corrective Action
11-25

Solving ImageShare or ImageShare II Problems
Pushing the blueSelection button doesnot display the laptopcontent
❑ Choose the ImageShare device onthe People and Content list.
❑ If the ImageShare device becomesthe Content source:
a. Make sure that all cables toand from the ImageSharedevice are correctly installedand secure.
b. Make sure that the laptopsettings are correct.
c. Make sure that the laptop isrecognized as the source ofinput.
❑ If the ImageShare device does notbecome the Content source,restart the collaboration system.
Problem Corrective Action
11-26

A
System DefaultSettings
Options not listed below do not have default settings.
Option Default Setting
Allow far-end sites to control the camera on this system
Enabled
Allow ISDN calls on this system Enabled
Allow near-end Automatic Camera Pointing
Enabled
Allow rate adaptation to 56 kbps if 64 kbps fails
Disabled in Italy.Enabled in all othercountries.
Answer incoming video calls automatically
Disabled
Audio algorithm for ISDN (H.320) calls Automatic
Audio algorithm for LAN (H.323) calls Automatic
Components to monitor Remote devices (remotecontrol and LAMB)
Color depth andresolution
Camera(s)
Microphone(s)
Countdown for 30 seconds
A-1

Display number last dialed Always
Dual Images Enabled
Encoding law for G.711 µ-law (in North America,Japan, and Korea)
a-law (in most otherparts of the world)
ISDN bandwidth: Default Standard
ISDN bandwidth: Premium 1x512 kbps (normalconfigurations)
ISDN bandwidth: Standard 1x384 kbps (normalconfigurations)
[LAN] Incoming call transmission bandwidth
1x768 kbps
[LAN] Outgoing call bandwidth: Default Premium
[LAN] Outgoing call bandwidth: Premium 1x768 kbps
[LAN] Outgoing call bandwidth: Standard 1x384 kbps
Local Directory (stored on system) Enabled
Log file security Disabled
Log off automatically after 30 minutes
Logon Standard Windowslogon
Mute audio for automatically answered calls
Enabled
Number type Unknown
Numbering plan Unknown
Pan direction of near-end camera Normal
Option Default Setting
A-2
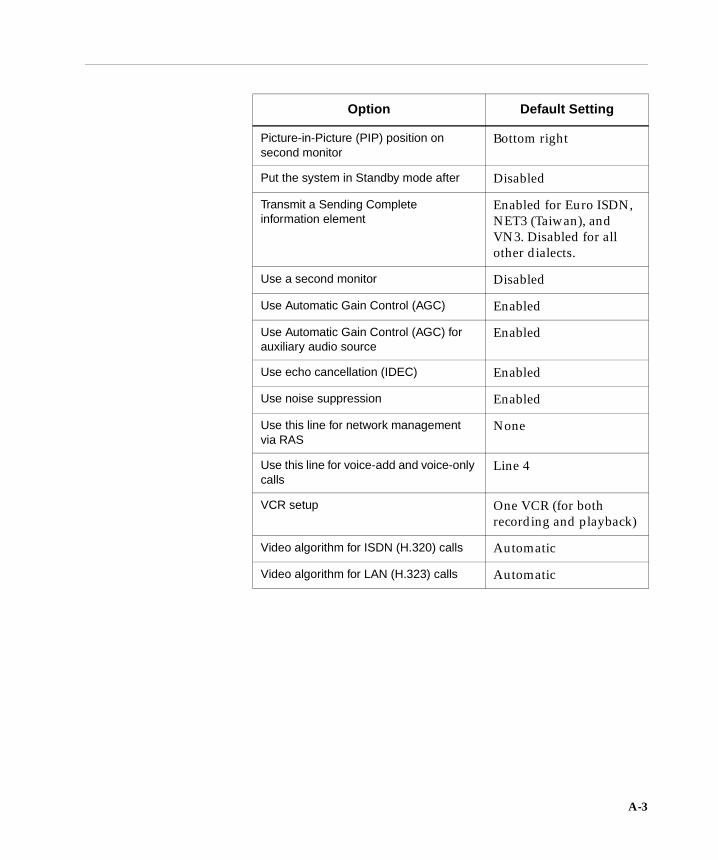
Picture-in-Picture (PIP) position on second monitor
Bottom right
Put the system in Standby mode after Disabled
Transmit a Sending Complete information element
Enabled for Euro ISDN,NET3 (Taiwan), andVN3. Disabled for allother dialects.
Use a second monitor Disabled
Use Automatic Gain Control (AGC) Enabled
Use Automatic Gain Control (AGC) for auxiliary audio source
Enabled
Use echo cancellation (IDEC) Enabled
Use noise suppression Enabled
Use this line for network management via RAS
None
Use this line for voice-add and voice-only calls
Line 4
VCR setup One VCR (for bothrecording and playback)
Video algorithm for ISDN (H.320) calls Automatic
Video algorithm for LAN (H.323) calls Automatic
Option Default Setting
A-3

B
SystemDocumentation
Documentation CD
You can find the following documents on the iPower DocumentationCD that came with your system.
This document... Describes how to...
Installing the PictureTel 900Series Collaboration System
Install the system hardware andsoftware.
PictureTel iPowerCollaboration SystemGetting Started Guide
Make a call, use the remote control,use the Directories, set up the roomfor audio and video. Both .pdf and.doc versions of this guide areavailable.
PictureTel iPowerCollaboration System QuickTips Sheet
Participate in a successful call.
PictureTel 900 SeriesCollaboration SystemAdministrator’s Guide
Configure, maintain, andtroubleshoot the system.
B-1

Hardcopy Documentation
Hardcopy Documentation
Online Documentation
This document... Describes how to...
Installing the PictureTel 900Series Collaboration System
Install the system hardware.
Microsoft Windows 2000Licensing Agreement
License Microsoft 2000 for use.
This document... Describes how to...
PictureTel iPowerCollaboration SystemGetting Started Guide
Make a call, use the remote control,use the Directories, set up the roomfor audio and video.
Note: The .doc version of thisguide is available on thesystem. You cancustomize this version,thereby making it moreuseful for your users (see“Customizing theGetting Started Guide”in Appendix C).
B-2

Online Help
Online Help You can open each help system within the correspondingapplication by pressing the HELP button on the remote controlor by clicking Help or pressing F1 on the keyboard.
This help system... Describes how to...
AdminTools Help Use AdminTools to configure andmaintain the system.
Operating Statistics Help Use Operating Statistics to verifysystem performance.
Hardware DiagnosticsHelp
Test the system hardware.
WebRemote Help Manage the PictureTel 900 Seriessystem remotely.
Collaboration Help Use the collaboration system tomake and answer calls, share data,and so on.
PictureTel DocumentServer Help (optional)
Use a Document Server to store datafiles and then access them duringmeetings.
PictureTel PersonalDirectory Editor Help(optional)
Create and maintain PersonalDirectories on a server.
PictureTel NetworkManager Help (optional)
Use Network Manager to enhanceremote SNMP management.
B-3

Web Documentation
Web Documentation
You can find web documents at the PictureTel support web site,http://www.polycom.com.
This web document... Describes how to...
Preparing Your Network forCollaboration
Prepare for system installation byordering ISDN, verifyingrequirements, and getting thenetwork ready.
PictureTel ProductRegulatory Information
Observe regulatory information,notices, and approvals.
PictureTel 900 SeriesSystem Software ReleaseBulletin
Observe usage notes and otherrelease information.
Installing the PictureTel 900Series Collaboration System
Install the system hardware.
PictureTel iPowerCollaboration SystemGetting Started Guide
Make a call, use the remote control,use the Directories, set up the roomfor audio and video. Both .pdf and.doc versions of this guide areavailable.
PictureTel iPowerCollaboration System QuickTips Sheet
Participate in a successful call.
PictureTel 900 SeriesCollaboration SystemAdministrator’s Guide
Configure, maintain, andtroubleshoot the system.
Installing the PictureTel 70Room Camera
Install the PictureTel 70 camera withthe system.
Installing the PictureTel 80Dynamic Locating Camera
Install the PictureTel 80 camera withthe system.
Installing and Using theImageShare Devices
Install and use the ImageShare orImageShare II with the system.
B-4
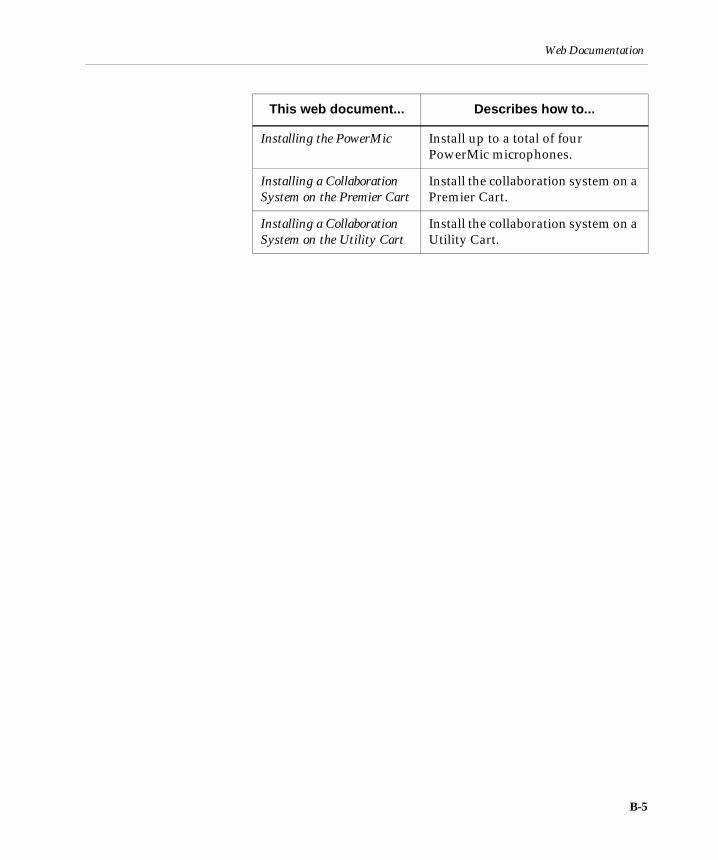
Web Documentation
Installing the PowerMic Install up to a total of fourPowerMic microphones.
Installing a CollaborationSystem on the Premier Cart
Install the collaboration system on aPremier Cart.
Installing a CollaborationSystem on the Utility Cart
Install the collaboration system on aUtility Cart.
This web document... Describes how to...
B-5

C
AssistingUsers
C-1
Customizing the Getting Started Guide
The PictureTel 900 Series system includes an online user’s guide, thePictureTel iPower Collaboration System Getting Started Guide, availableas a .doc file. Since the options available to your users depend onyour system configuration, the Getting Started Guide is somewhatgeneric. To maximize its usefulness for your particular users youshould customize the original Microsoft Word version of thedocument according to your collaboration environment.
At a minimum, it is recommended that you add information in the“Site Info” section that is specific to your site, such as a name andphone number for users to call if they have trouble using the system.
After you customize the document using Word, you may want tomake a .pdf version available to your users by putting it on yourorganization’s intranet, for example. This way, users can view orprint the document away from the system in preparation for systemuse.
To edit the Getting Started Guide
1. Locate and open the Microsoft Word version of the Getting Started Guide document.
The file is located atC:\Programs Files\PictureTel\VCS\Help\GetStart.doc.

Maintaining System Information
2. Use Microsoft Word to customize the document according to your environment.
3. Save the document as GetStart.pdf and distribute it to your users.
Maintaining System Information
Another way to help your users is to make sure you keep thePictureTel 900 Series system information up-to-date.
To update the system information
1. Open the AdminTools System Information page:
a. Start AdminTools and click General.
b. Click the System Information tab.
C-2

Adding Applications to the System
2. Update your system information as follows:
Adding Applications to the System
To extend your users’ collaboration effectiveness, install thesoftware applications you think users will use most often to createor edit documents.
To install software applications, follow the same procedure as youwould to install a software application on a typical PC runningMicrosoft Windows. For specific instructions, see the Windowsdocumentation.
Option Description
Computer name Identifies the PictureTel 900Series system on the network.(You set this option through theWindows Control Panel.)
Site name Identifies the PictureTel 900Series system to callers.
Administrator name Specifies the name of thePictureTel 900 Series systemadministrator. This nameappears in the System Informationand System Readiness dialogboxes.
Contact number Specifies the phone number ofthe PictureTel 900 Series systemadministrator. This numberappears in the System Informationand System Readiness dialogboxes.
C-3
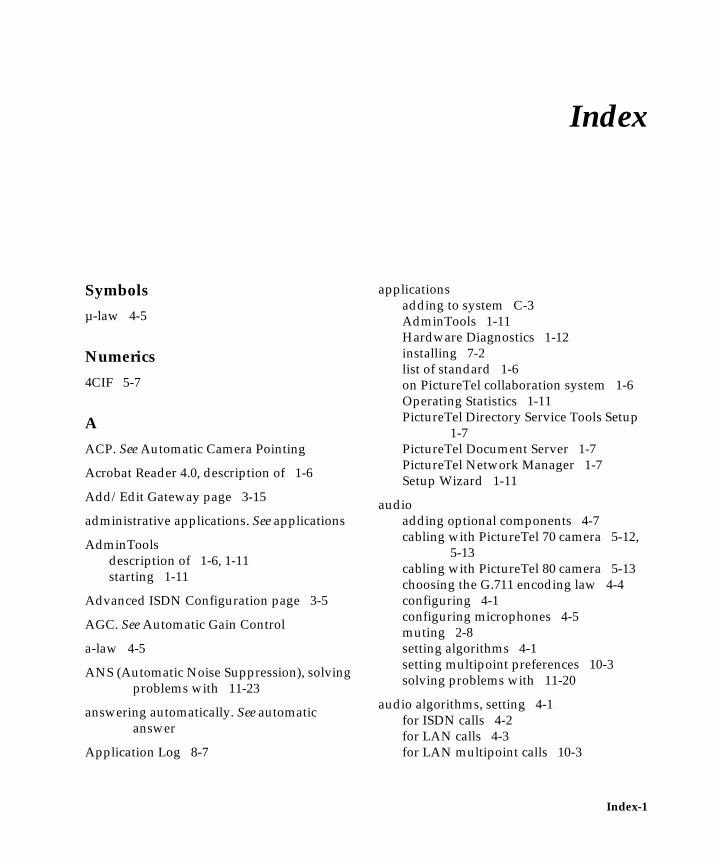
Index
Symbols
µ-law 4-5
Numerics
4CIF 5-7
A
ACP. See Automatic Camera Pointing
Acrobat Reader 4.0, description of 1-6
Add/Edit Gateway page 3-15
administrative applications. See applications
AdminToolsdescription of 1-6, 1-11starting 1-11
Advanced ISDN Configuration page 3-5
AGC. See Automatic Gain Control
a-law 4-5
ANS (Automatic Noise Suppression), solvingproblems with 11-23
answering automatically. See automaticanswer
Application Log 8-7
applicationsadding to system C-3AdminTools 1-11Hardware Diagnostics 1-12installing 7-2list of standard 1-6on PictureTel collaboration system 1-6Operating Statistics 1-11PictureTel Directory Service Tools Setup
1-7PictureTel Document Server 1-7PictureTel Network Manager 1-7Setup Wizard 1-11
audioadding optional components 4-7cabling with PictureTel 70 camera 5-12,
5-13cabling with PictureTel 80 camera 5-13choosing the G.711 encoding law 4-4configuring 4-1configuring microphones 4-5muting 2-8setting algorithms 4-1setting multipoint preferences 10-3solving problems with 11-20
audio algorithms, setting 4-1for ISDN calls 4-2for LAN calls 4-3for LAN multipoint calls 10-3
Index-1

Audio Inputs page 4-5
Audio Preferences page 4-2, 4-3, 4-4
Auto Logondescription of 2-1, 2-2
automatic answermuting audio for 2-8security concerns 2-9setting 2-8
Automatic Camera Pointing (ACP)description of 1-3setting 5-9
Automatic Gain Control (AGC)description of 4-6solving problems with 11-23
automatic logoffdescription of 2-5using with Standby mode 2-6
Automatic Noise Suppression (ANS), solvingproblems with 11-23
B
bandwidth, controllingfor ISDN 3-3for LAN 3-13with Dual Images 5-6
C
cablingfor dual-monitor systems 5-10for one VCR 5-15for PictureTel 70 camera 5-12, 5-13for PictureTel 80 camera 5-13for two VCRs 5-17
Call Logdescription of 8-6recording numbers in 2-9
call preferencesanswer calls automatically 2-8display last number dialed 2-9mute audio for automatically answered
calls 2-8record numbers in Call Log file 2-9setting 2-8
Call Preferences page 2-8, 2-9
Calling Party Number 3-6
cameracabling for PictureTel 70 camera 5-12,
5-13cabling for PictureTel 80 camera 5-13configuring behavior of 5-8description of 1-3monitoring 8-8placing in a dual-monitor system 5-10setting up 5-6solving problems with 11-17, 11-19
Camera Control and VCR page 5-8, 5-16, 5-18
Cameras and Video Sources page 5-6
capture resolution 5-7
carts, description of 1-9
Central Directorydefinition of 6-1setting up 6-4
Central Directory Server, monitoring 8-8
CIF 5-7, 10-4
Collaboration application, description of 1-6
color depth, monitoring 8-8
Index-2

components, optional 1-8cart 1-9ImageShare 1-5Look-At-Me-Button 1-10monitor 1-8projector 1-10VCR 1-10
components, standard 1-2cameras 1-3computer box 1-2PowerMic 1-5remote control devices 1-4software 1-6
computer box, description of 1-2
Conference Statistics screen 8-5
conference statistics, viewing 8-5
Configuration Summarylisting settings 8-6viewing 8-3
Configuration Summary page 8-3
configuringadvanced ISDN 3-5audio 4-1ISDN support 3-1LAN support 3-11system settings 8-3system to use gatekeeper 3-16system to use gateway 3-14system to use IMUX 3-7video 5-1
continuous presence, for multipointconferences 10-3
control panel, allowing use of 2-9
custom control panel, allowing use of 2-9
D
data sharingallowing 7-1allowing Document Server use 7-3allowing file transfer 7-1installing user applications 7-2managing options 7-1tips and guidelines for 7-6
default user account 2-4
DICA OASIS IMUX, configuring system touse 3-7
Directory Servicesdescription of 1-7installing setup utility 6-4setting up 6-1setting up Central Directories 6-4setting up Directories on a server 6-3setting up Local Directory 6-1
disk space, conserving 8-9
Document Serverallowing use of 7-3configuring system to use 7-4description of 1-7installing software 7-4monitoring 8-8setting up 7-3system requirements 7-3tips and guidelines for 7-6
Document Server page 7-4
documentation B-1, B-2on CD B-1online documentation B-2online help B-3standard hardcopy B-2
domain account 2-4
Dual Images 5-5
Index-3

dual-monitor. See second monitor
E
echo cancellation 4-6
encoding law 4-4, 4-5
encryption device 3-11
external encryption device 3-11
F
Far-End Camera Control (FECC) 5-9
FCIF 5-7
FECC (Far-End Camera Control) 5-9
File Transferallowing 7-1configuring 7-2description of 1-6tips and guidelines for 7-6
File Transfer page 7-2
files, sharing. See data sharing
files, transferring. See File Transfer
flicker reduction, enabling 5-4
frame ratesetting for multipoint conferences 10-5
G
G.711choosing the G.711 encoding law 4-4for ISDN 4-2for LAN 4-3for LAN multipoint conferences 10-3
G.722for ISDN 4-2for LAN 4-3for LAN multipoint 10-3for LAN multipoint conferences 10-3
G.722.1for ISDN 4-2for LAN 4-4
G.723.1for LAN multipoint conferences 10-3
G.723.1, for LAN 4-4
G.728, for LAN 4-4
G.729, for LAN 4-4
gatekeeperconfiguring system to use 3-16monitoring 8-8setting up 3-17
Gatekeeper Setup page 3-17
gatewayconfiguring system to use 3-14setting up 3-14
Gateway Setup page 3-14
Getting Started Guidecustomizing C-1location of C-1
H
H.261for ISDN 5-2for LAN 5-4for LAN multipoint 10-4
H.263for ISDN 5-2for LAN 5-3for LAN multipoint 10-4
Index-4

H.263+for ISDN 5-2for LAN 5-3
H.320. See ISDN
H.323. See LAN
hardcopy documentationlist of standard B-1, B-2
Hardware Diagnosticsdescription of 1-6, 1-12starting 1-12
Hardware Diagnostics Error Log 8-6
I
IDEC. See Integrated Dynamic EchoCancellation
ImageSharedescription of 1-5solving problems with 11-24
IMUXconfiguring another IMUX 3-10configuring DICA OASIS IMUX 3-7configuring Lucent Multiband IMUX 3-8configuring system to use 3-7
IMUX Setup page 3-8, 3-10
installation, solving problems during 11-1
Integrated Dynamic Echo Cancellation (IDEC)description of 4-6solving problems with 11-23
internal multipointallowing 10-1configuring 10-1continuous presence conferences 10-3setting audio and video preferences 10-3setting the default video display 10-2voice-activated conferences 10-2
inverse multiplexer. See IMUX
ISDNchoosing advanced options 3-5configuring support for 3-1controlling bandwidth 3-3monitoring 8-8setting bandwidth options 3-3setting basic configuration 3-1setting up RAS access over 9-2setting video algorithm 5-1
ISDN Bandwidth page 3-3, 9-3
ISDN Configuration page 3-1
K
keyboarddescription of 1-4solving problems with 11-3
L
LAMB. See Look-At-Me-Button
LANconfiguring support for 3-11controlling bandwidth 3-13monitoring 8-8setting audio algorithm 4-3setting bandwidth options 3-13setting basic configuration 3-12setting video algorithm 5-3
LAN Bandwidth page 3-13
laptop, adding output from 4-7
Local Area Network. See LAN
Local Directorydefinition of 6-1setting up 6-1
Local Directory page 6-2
Index-5

local user account 2-4
logging offautomatically 2-5logoff options 2-5
logging onchoosing the logon method 2-2logon options 2-1
Logoff and Standby page 2-5, 2-7
logoff. See logging off
Logon and Security page 2-2
logon. See logging on
logs, accessing and viewing 8-6
Look-At-Me-Button, description of 1-10
Lucent Multiband IMUX, configuring systemto use 3-8
M
maintenance, of system 8-1monitoring system statistics 8-1optimizing system performance 8-7restoring the system 8-9
Management Information Bases. See MIBs
MIBsdescription of 9-5installing 9-5
microphonesadding PowerMic microphones 4-7configuring 4-5description of 1-5monitoring 8-8
monitoradding second 5-10description of 1-8solving problems with 11-18
Monitor page 5-14
monitoring, readiness 8-7
MSN (Multi-Subscriber Number) 3-5
multipoint conferencingsetting video preferences 10-3
Multipoint Conferencing page 10-2
multipoint. See internal multipoint
Multi-Subscriber Number (MSN) 3-5
mutingaudio for automatically answered calls
2-8solving problems with 11-20
N
NetMeeting Chat, description of 1-6
networkconfiguring ISDN support 3-1configuring LAN support 3-11configuring system to use gatekeeper
3-16configuring system to use gateway 3-14configuring system to use IMUX 3-7installing network management software
9-5network management station (NMS) 9-5solving problems with 11-5
Network Management page 9-2, 9-6
Network Manager. See PictureTel NetworkManager
noise suppression 4-6
NTSC/PAL monitor 1-8, 5-10
numberdisplaying last number dialed 2-9recording in Call Log file 2-9
Index-6

O
online documentationaccessing B-2list of B-2
online helpaccessing B-3list of B-3
Operating Statisticsdescription of 1-6, 1-11starting 1-12, 8-1
options. See components, optional
P
PC. See laptop
picture-in-picture (PIP). See PIP
PictureTelphone numbers iiiTechnical Support iii, 11-1web site iii, 11-1
PictureTel 80 Dynamic Locating Camera,description of 1-3
PictureTel 900 Series System Software CD,applications on 1-6
PictureTel collaboration systemadministrative applications 1-11allowing data sharing 7-1components 1-2configuring audio 4-1configuring network use 3-1configuring video 5-1customizing behavior 2-1default settings A-1documentation B-1, B-2introduction to 1-1maintaining 8-1setting up Directory Services 6-1
troubleshooting 11-1using remote management tools 9-1
PictureTel Directory Service Tools CD,applications on 1-7
PictureTel Directory Services. See DirectoryServices
PictureTel Document Server CD, applicationson 1-7
PictureTel Document Server. See DocumentServer
PictureTel Network Manageradding to SNMP management 9-7description of 1-7
PictureTel Network Manager CD, applicationson 1-7
PIPdescription of 1-8setting location for second monitor 5-15
PowerMicadding 4-7description of 1-5
Premier Cart, description of 1-9
problems, solving. See troubleshooting
PT716plus, for ISDN 4-2
PT724, for ISDN 4-2
Q
QCIF 5-7, 10-4
R
RAS, setting up access over ISDN 9-2
rate adaption 3-6
Index-7
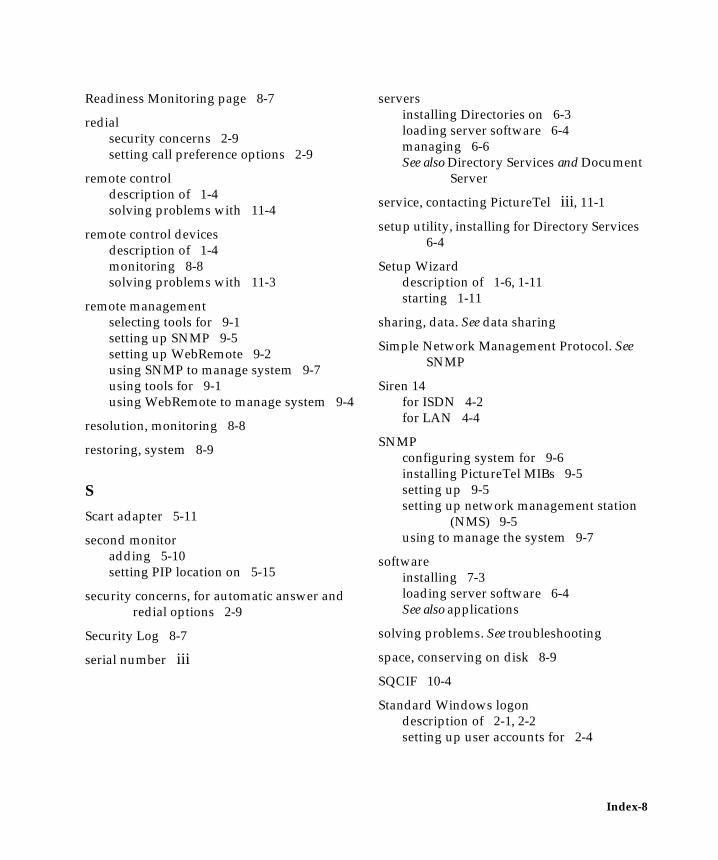
Readiness Monitoring page 8-7
redialsecurity concerns 2-9setting call preference options 2-9
remote controldescription of 1-4solving problems with 11-4
remote control devicesdescription of 1-4monitoring 8-8solving problems with 11-3
remote managementselecting tools for 9-1setting up SNMP 9-5setting up WebRemote 9-2using SNMP to manage system 9-7using tools for 9-1using WebRemote to manage system 9-4
resolution, monitoring 8-8
restoring, system 8-9
S
Scart adapter 5-11
second monitoradding 5-10setting PIP location on 5-15
security concerns, for automatic answer andredial options 2-9
Security Log 8-7
serial number iii
serversinstalling Directories on 6-3loading server software 6-4managing 6-6See also Directory Services and Document
Server
service, contacting PictureTel iii, 11-1
setup utility, installing for Directory Services6-4
Setup Wizarddescription of 1-6, 1-11starting 1-11
sharing, data. See data sharing
Simple Network Management Protocol. SeeSNMP
Siren 14for ISDN 4-2for LAN 4-4
SNMPconfiguring system for 9-6installing PictureTel MIBs 9-5setting up 9-5setting up network management station
(NMS) 9-5using to manage the system 9-7
softwareinstalling 7-3loading server software 6-4See also applications
solving problems. See troubleshooting
space, conserving on disk 8-9
SQCIF 10-4
Standard Windows logondescription of 2-1, 2-2setting up user accounts for 2-4
Index-8

Standby mode, configuring 2-6
startup, solving problems during 11-2
statisticsmonitoring for system 8-1starting Operating Statistics 8-1viewing detailed system statistics 8-1viewing general call statistics 8-5
support, contacting PictureTel iii, 11-1
SVGA/XGA monitor 1-8
system configuration, viewing 8-3
System Information page C-2
system information, maintaining C-2
System Log 8-6, 8-7
system management. See AdminTools
system serial number iii
system statisticsmonitoring 8-1viewing 8-1, 8-2
system. See PictureTel collaboration system
T
Technical Support, PictureTel iii
telephone numbers, PictureTel iii
troubleshooting 11-1audio problems 11-20general system problems 11-3ImageShare problems 11-24installation problems 11-1network problems 11-5startup problems 11-2video problems 11-15
U
user access, managing 2-1
user accountsdomain account 2-4local user account 2-4PictureTel collaboration system default
user account 2-4
User Guide. See Getting Started Guide
Utility Cart, description of 1-9
V
VCRadding one 5-15adding two 5-17cabling for one 5-15cabling for two 5-17solving problems with 11-20
videoadding optional components 5-9adding second monitor 5-10adding VCR 5-15cabling with PictureTel 70 camera 5-12,
5-13cabling with PictureTel 80 camera 5-13configuring 5-1configuring camera behavior 5-8configuring video sources 5-6setting frame rate for multipoint
conferences 10-5setting multipoint preferences 10-3setting video preferences 5-1solving problems with 11-15
video algorithmssetting for ISDN calls 5-1setting for LAN calls 5-3setting for LAN multipoint calls 10-4
Index-9

video frame ratesetting for multipoint conferences 10-5
Video Preferences page 5-1, 5-3, 5-4, 5-5
video sources, configuring 5-6
virus protectionsetting up 8-9starting 8-9
voice-activated, for multipoint conferences10-2
W
web documentation B-4
web site, PictureTel iii, 11-1
WebRemoteconfiguring system for 9-2requirements for 9-4setting up 9-2setting up RAS access over ISDN 9-2using to manage system 9-4
Windows logondescription of 2-1, 2-2setting up user accounts for 2-4
X
XGA 5-7
Index-10
Related Documents