ThinKiosk Administrator’s Guide 1 Administrator’s Guide. Revision 1.4

Welcome message from author
This document is posted to help you gain knowledge. Please leave a comment to let me know what you think about it! Share it to your friends and learn new things together.
Transcript

ThinKiosk Administrator’s Guide
1
Administrator’s Guide.
Revision 1.4
ThinKiosk Administrator’s Guide
2
Contents
Contents .......................................................................................................................... 2
Quick Start Guide:............................................................................................................ 5
Deploying the ThinKiosk Client: ................................................................................... 5
Quick Requirements: ................................................................................................. 5
Decision checklist: .................................................................................................... 5
Profile Delivery Type:................................................................................................... 5
Device login options: .................................................................................................... 7
Preparing the profile: ................................................................................................... 9
Deploying the client: .................................................................................................... 9
ThinKiosk Client Overview: ........................................................................................... 10
ThinKiosk Product Benefits: ........................................................................................ 10
Requirements: ............................................................................................................ 12
Licensing: ................................................................................................................... 13
Community edition:................................................................................................. 13
Trial: ....................................................................................................................... 13
Enterprise: .............................................................................................................. 13
Profile Sources: .......................................................................................................... 13
Installation: ................................................................................................................. 14
Silent installation options: ........................................................................................ 14
Manual Install: ......................................................................................................... 16
ThinKiosk Client Interface: ......................................................................................... 16
Splash Screen: ......................................................................................................... 16
ThinKiosk Ribbon Interface: .................................................................................... 18
ThinKiosk Browser Interface: ................................................................................... 24
ThinKiosk Applications Interface: ............................................................................ 25
VDI / SBC Integration: ................................................................................................ 27
Citrix VDI technology Integration: .......................................................................... 27
Microsoft Remote Desktop Services integration: ..................................................... 35
VMware View Integration: ...................................................................................... 38
ThinKiosk Management Console: ................................................................................... 40
Requirements: ............................................................................................................ 40
Installation: ................................................................................................................. 40
ThinKiosk Administrator’s Guide
3
Things to know before you start: ................................................................................. 41
Login Screen: ............................................................................................................. 41
Default Layout: ............................................................................................................ 42
Icons: ...................................................................................................................... 43
Devices Area: .......................................................................................................... 43
Folder View: ........................................................................................................... 44
Device View: ........................................................................................................... 46
Remote Control: ......................................................................................................... 47
Quick notes: ............................................................................................................ 47
Requesting access: .................................................................................................. 47
Profile Area: ............................................................................................................... 48
Folder View: ........................................................................................................... 48
Profile View: ........................................................................................................... 51
Menu Buttons: ............................................................................................................. 51
Finding a ThinKiosk Device: .................................................................................... 52
Licensing Interface: ................................................................................................. 53
Audit Trail: .............................................................................................................. 55
Troubleshooting: ........................................................................................................ 55
ThinKiosk Profile Editor: ................................................................................................ 56
Appearance: ............................................................................................................... 56
When used from the ThinKiosk management Console: ............................................ 56
When used as a standalone application when installed with ThinKiosk: ................... 57
Profile details tab:....................................................................................................... 58
Appearance Tab: ........................................................................................................ 59
Browser Tab: ........................................................................................................... 60
Applications Tab: .................................................................................................... 63
App Window Appearance: ...................................................................................... 67
Computer Settings: ................................................................................................. 68
Local Session Options:............................................................................................. 69
Local Admin Access: ............................................................................................... 70
Auto-Login Options: ................................................................................................ 71
Power Management: ............................................................................................... 72
Start-up Script: ........................................................................................................ 73
VDI integration Options: ......................................................................................... 74
Advanced: ............................................................................................................... 76

ThinKiosk Administrator’s Guide
4
SMTP Settings: ......................................................................................................... 76
Licensing: ............................................................................................................... 78
ThinKiosk Broker service: .............................................................................................. 79
Requirements: ............................................................................................................ 80
Installation: ................................................................................................................. 80
Database location: ...................................................................................................... 80
Log file: ...................................................................................................................... 81
Licensing: ................................................................................................................... 81
Settings: ..................................................................................................................... 81
Advanced Settings: ..................................................................................................... 82
High Availability: ........................................................................................................ 83
ThinKiosk Administrator’s Guide
5
Quick Start Guide:
Below you will find some notes on getting you up and running as quickly as possible.
Deploying the ThinKiosk Client:
Quick Requirements:
Windows XP or better.
100mb of disk space.
Internet explorer 7 or later.
.net Framework 4.0 Client Profile.
Decision checklist:
Decide how you will deliver the profile.
Decide how the users will log in each day to the Device.
Decide how you will install the client.
For the sake of A POC, our recommendation is:
ThinKiosk Broker Service hosting profiles
ThinKiosk Auto login account.
Manually install the software for the first client, and then script the install for the
rest.
Below you will find a breakdown for each of these decisions and the pros and cons
associated.
Profile Delivery Type:
When Deploying ThinKiosk you have three deployment types for saving a profile, each
with their own benefits.
The ThinKiosk Broker service is the easiest and most feature rich deployment type and is
highly recommended.
Locally stored profile:
ThinKiosk will use a locally stored profile if required (called localprofile.xml in the
installation directory). This profile will need to be maintained using Group Policy
preferences, scripted copies or an image type deployment method.
ThinKiosk Administrator’s Guide
6
Pros:
No requirements on the network to retrieve the profile each day.
Available in community edition licensing.
Cons:
Difficult to maintain in off domain scenarios.
Systems cannot be viewed / managed from a central location.
My recommendation would be to only use the local profile file if you are running on a
domain or can control the local file system via a Thin Client management service.
FTP Stored Profile:
ThinKiosk can use an FTP server to download its configuration. During start-up ThinKiosk
will attempt five times to connect to the specified FTP server to download a profile
specified.
If the profile is downloaded, it will be stored on the local file system in the local profile in
case FTP access is down on next start.
If the profile cannot be reached, ThinKiosk will attempt to read the last backup and boot
using it.
Pros:
No Domain requirement for deploying the configuration file.
Modifying the profile is centrally controlled and stored.
Cons:
Multiple profiles become difficult to manage.
Systems cannot be viewed / managed from a central location.
Use the FTP Configuration option if you wish to manage profiles for devices off domain or
do not wish to push a Thin Client image update each time you change the profile.
ThinKiosk Broker Service:
ThinKiosk can use the ThinKiosk broker service to download its individual configuration.
During start-up ThinKiosk will attempt to connect to the broker 5 times to check in and
download its profile.
If the profile is downloaded, it will be stored on the local file system in the local profile in
case Broker access is down on next start.
If the profile cannot be reached, ThinKiosk will attempt to read the last backup and load
it.
ThinKiosk Administrator’s Guide
7
If the ThinKiosk broker service comes back online, ThinKiosk will silently connect and
become manageable.
Pros:
Central management of profiles.
Central management of devices.
Fastest setup time.
No Domain requirement.
Cons:
Requires a server / workstation to host the role
Requires ThinKiosk Enterprise licensing.
The ThinKiosk broker service delivers the best management and access to your
ThinKiosk estate and is highly recommended for any installation type.
Device login options:
When deploying ThinKiosk you need to decide how the users will log into the
workstation. Below you will find the three options available to you and the pros and cons
associated with each choice.
Auto Login with ThinKiosk user account:
When you install ThinKiosk on a client device, it will create a secure local user account
you can use to log into the PC each day. This users account is matched to the ThinKiosk
machines unlock password delivered by a policy.
When you use this login method, your users will login as themselves via the Citrix web
interface / Storefront / VDI in a box login screen or via the Microsoft RDS / VMware View
connection files. When their desktop ends, the Kiosk is immediately useable by the next
user.
Pros:
Fast boot and login times.
Secure and off your corporate domain.
Fastest login for end user to his desktop.
No Local profiles bloating the pc.
Cons:
If you wish to publish any resources which require user authentication, this login
method may not work.
Auto login with the ThinKiosk user account is recommended as your first option. Only
exclude it if it does not suit your deployment method.
ThinKiosk Administrator’s Guide
8
Auto Login with a domain account:
You can instruct ThinKiosk via policy or the installation to auto login to the domain as a
domain account.
When you use this login method, your users will login as themselves via the Citrix web
interface / Storefront / VDI in a box login screen or via the Microsoft RDS / VMware View
connection files. When their desktop ends, the Kiosk is immediately useable by the next
user.
By using a domain account, you have the added benefit Active Directory brings to
Device and user management.
Pros:
Fast boot / login times
Fastest login for end user to his desktop.
No Local profiles bloating the pc.
Cons:
You are required to keep the ThinKiosk machine on the domain, and as such you
must adhere to domain policies.
No Auto login (the user logs in as themselves each day):
You can instruct ThinKiosk via policy or the installation to not auto login at all. This means
that the users must log in as themselves each day.
When you use this login method, your users will login as themselves and then either use
single sign on via Citrix web interface or VMware View connection files, or they must
authenticate again to connect to their desktop.
When their desktop ends, you must use ThinKiosk policies to log them off to make the pc
ready for the next user.
Pros:
Allow you to use domain based user policies on a per user basis.
Allows you to use Single sign on to Citrix / VMware desktops.
Cons:
You are required to keep the ThinKiosk machine on the domain, and as such you
must adhere to domain policies.
The login time is much slower due to group policy processing and user profile
loading.

ThinKiosk Administrator’s Guide
9
User profiles will slowly bloat as more users log into the pc each day.
Preparing the profile:
Prepare the management server or ftp server in advance of installing the client.
If using the management server, change the login password as soon as you can.
Configure your profile in advance if using the management server.
If using the Local profile delivery method, modify the local profile with the profile
editor and configure it until you are happy with it before starting ThinKiosk or
restarting.
Change the unlock password as soon as you can.
If you intend to use FTP, start by using the local profile and get it right. Then
backup your profile, move it to FTP then reinstall the client choosing the FTP
options.
Deploying the client:
It is recommended you choose a spare PC or Workstation for the first installation
of the client.
Deploy the client manually the first time to become familiar with the options.
Don’t restart the PC while configuring the profile until you are happy it’s ready.
Scripted install:
ThinKiosk has a rich MSI command line to configure all the options you need. You could
script the installation using the MSI parameters covered in the ThinKiosk Documentation.
This script could be run manually, or via a group policy start-up script.
ThinKiosk Administrator’s Guide
10
ThinKiosk Client Overview:
The ThinKiosk Client is the first, windows based, software only, enterprise ready Pc to
Thin Client converter. The client agent is installed on your current windows deployment
to convert the pc into a secured Thin Client interface.
You don’t need a degree in Linux.
You don’t need to reinstall your pc.
You don’t need to deploy USB keys to be later stolen by your users.
You won’t spend hours fighting with Client devices and drivers.
It, Just, Works.
ThinKiosk Product Benefits:
Security and Optimisation:
ThinKiosk 4.0 has been designed to do all the hard work of configuring
Group policies.
Best practices.
Internet explorer policies.
Citrix/Microsoft/VMware tweaks.
ThinKiosk 4.0 is the ONLY Thin Client technology for windows capable of
disabling Windows protected keystrokes ([ctrl] [alt] [del] etc.) and passing these
to the remote desktop with our MagicFilter technology.
All out of box.
Simple Login method:
The ThinKiosk client creates a local user account tuned for security and Thin Client
access. This account is off domain and coupled with ThinKiosk’s policies and start-up
script integration you can safely and easily take the machines off the domain reducing
your attack platform.
Extremely fast:
ThinKiosk leverages your local hardware, which is nearly always better than the out of
box hardware you will receive from a Thin Client vendor… at no cost!
This allows for all the benefits of technologies like Citrix HDX, Microsoft RemoteFX and
VMware’s PCOIP with zero limitations that you will experience with Linux devices.
ThinKiosk Administrator’s Guide
11
Thinking Green:
ThinKiosk has power management policies configurable to bring the power consumption
of your pc down to the draw from a vendors Thin Client device.
Fully integrated Browser:
ThinKiosk 4.0 ships with a web browser engine you can use to allow your users to browse
corporate pages or display pertinent information to the users without them logging into
their desktop.
Citrix ICA File, VMware View and Microsoft Remote Desktop Services integration:
You can now deploy ICA files to your users directly without the need for a web interface
or storefront infrastructure.
ThinKiosk 4.0 has oodles of additional functionality for both VMware view and Microsoft
Remote Desktop services. You can quickly and easily deploy connection files to your
users and ThinKiosk will do all the hard work for you.
ThinKiosk handles the login information for you; it’s just a case of click and login.
Simple Deployment:
The ThinKiosk client installation takes roughly 30 seconds on a pc and can be deployed
from central extremely quickly. When coupled with the ThinKiosk broker service you
have security, ease of use and central management in a matter of minutes.
The end result has turned a typical deployment of 8-24 hours of creating a working
profile into 4-8 hours and the roll out to the pc’s from a few days to a matter of minutes.
No More Complicated Group Policy Object’s.
No need for a degree in VDI technologies.
No need for prior experience with Windows Thin Client devices.
You can deploy ThinKiosk to your pc via Group Policy or start-up script on next restart,
safe in the knowledge that a rollback is very simple.
Central Management:
With ThinKiosk 4.0 we are proud to release the ThinKiosk Broker service. This product
will allow you to centrally manage and report on your deployed devices without any
desk-to-desk visits.
Easy Rollback:
ThinKiosk Administrator’s Guide
12
ThinKiosk 4.0 can also be instantly rolled back to the user’s desktop by simply
instructing the user to hold [Shift] on log off, allowing the users to log back in as
themselves
You can also roll back to the previous state via the profile editor allowing you to revert
the machine to PC status on next restart.
Easy troubleshooting:
With a keystroke and a password, your administrators can take control back of the PC
and get straight to work on fixing your problems. Simply restarting or relocking the
device will revert it back to its secure state.
Easy upgrade road map.
The ThinKiosk client is also perfectly capable (and happy) to run on Windows based Thin
Clients. This gives you a roadmap to Thin Client devices while still maintaining the fresh
and easy to use interface ThinKiosk offers that your users have become accustomed to.
No vendor lock in.
ThinKiosk isn’t trying to sell you hardware and it’s not trying to sell you a management
stack. We’re experts in this market so let us do what we do best!
Stylish look and feel:
Out with the old and in with the new! ThinKiosk 4.0 has a sleek and stylish interface
provided by DevExpress. This new style really breathes new life into your older
hardware.
ThinKiosk’s new look and feel is completely configurable, from 8 themes, to 6
backgrounds to any colour interface you wish, ThinKiosk has lots of choice.
Custom Branding.
ThinKiosk can be completely de-branded, allowing you to display a portal to your users
that you are proud of, without it feeling like a vendor’s sales pitch!
Requirements:
There are a few requirements you should be aware of, nothing scary.
.Net Framework 4.0 Client Profile.
Windows XP or higher (note Windows Home edition may suffer some limitations).
ThinKiosk Administrator’s Guide
13
Firewall rule allowing ThinKiosk to take inbound connections (created by the
installer).
Internet Explorer 7 or better.
Licensing:
ThinKiosk 4.0 ships with 3 licensing options:
Community edition:
The VDI community is a wonderful bunch! For this reason all the current functionality that
the previous versions of ThinKiosk offers, will be still available in 4.0… With the
improved look and feel and the improved application handling. This will allow all current
ThinKiosk customers to upgrade for free to the latest and greatest incarnation without the
need to spend a penny.
Note: A community edition license requires you to register the license and amount of
seats you require… Nothing too scary.
Trial:
By default when ThinKiosk 4.0 is installed, it will install a 30-day license trial for you to
test the entire product. A trial license can be used with the ThinKiosk Broker service to
evaluate the functionality.
When the trial expires, you must request an enterprise or community license and publish
this license to the client to continue to work undisturbed. You can request licensing
information from [email protected]
Enterprise:
An enterprise license entitles you to all functionality, you rock. You can request licensing
information from [email protected]
Profile Sources:
ThinKiosk requires a profile to connect to your Virtual desktops and internal settings.
This profile is XML based and very easy to modify with the new ThinKiosk Profile Editor.
By Default ThinKiosk can be installed to use 3 methods to collect a profile:
1. ThinKiosk Broker Server
2. Pull Profile from FTP
3. Use a local file (localprofile.xml in the installation directory)
ThinKiosk Administrator’s Guide
14
Note: in event 1 or 2, ThinKiosk will copy its profile from an external source to the
localprofile.xml on each boot just in case it loses access to the profile source. This allows
ThinKiosk to work offline for extended periods without interruption.
Installation:
By default the ThinKiosk Client will install in the directories below:
C:\Program Files (x86)\ThinKiosk(64 bit Machine)
C:\Program Files\ThinKiosk (32bit Machine)
Silent installation options:
ThinKiosk can be installed silently with the values below:
Note: ThinKiosk only locks itself down on first launch, so a restart after the installation is
advisable.
FTPSERVER=FTPSERVER
FTPUSER=FTPUSER
FTPPASSWORD=FTPPASSWORD
FTPPATH = /TEST/PROFILE.XML
SERVERNAME= SERVERNAME
SERVERPORT = SERVERPORT
CONNECTIONTYPE=x
0=TK SERVER
1=FTP
2=LOCAL FILE
FIREWALLRULE=1 – Auto create the firewall rule
LEAVEDOMAIN=1 – Leave the domain the current pc is a member of after the
installation.
RESTART=1 – Restart the computer after the installation.
TARGETFOLDER=”FOLDERNAME” - Add the computer to the following folder during
install.
TARGETFOLDERGUID=”Guid” Add the device to following folder by Guid During install.
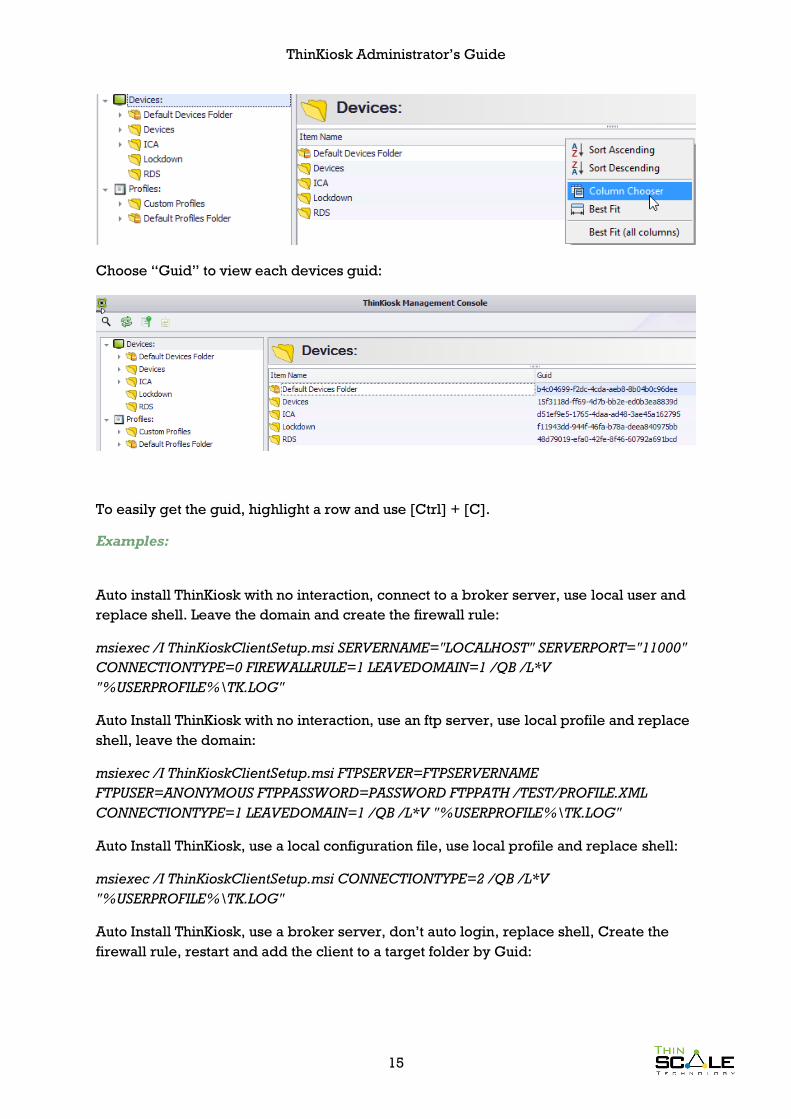
To get a folders Guid:
Open a folder view, right click the menu bar and choose “column chooser”:
ThinKiosk Administrator’s Guide
15
Choose “Guid” to view each devices guid:
To easily get the guid, highlight a row and use [Ctrl] + [C].
Examples:
Auto install ThinKiosk with no interaction, connect to a broker server, use local user and
replace shell. Leave the domain and create the firewall rule:
msiexec /I ThinKioskClientSetup.msi SERVERNAME="LOCALHOST" SERVERPORT="11000"
CONNECTIONTYPE=0 FIREWALLRULE=1 LEAVEDOMAIN=1 /QB /L*V
"%USERPROFILE%\TK.LOG"
Auto Install ThinKiosk with no interaction, use an ftp server, use local profile and replace
shell, leave the domain:
msiexec /I ThinKioskClientSetup.msi FTPSERVER=FTPSERVERNAME
FTPUSER=ANONYMOUS FTPPASSWORD=PASSWORD FTPPATH /TEST/PROFILE.XML
CONNECTIONTYPE=1 LEAVEDOMAIN=1 /QB /L*V "%USERPROFILE%\TK.LOG"
Auto Install ThinKiosk, use a local configuration file, use local profile and replace shell:
msiexec /I ThinKioskClientSetup.msi CONNECTIONTYPE=2 /QB /L*V
"%USERPROFILE%\TK.LOG"
Auto Install ThinKiosk, use a broker server, don’t auto login, replace shell, Create the
firewall rule, restart and add the client to a target folder by Guid:
ThinKiosk Administrator’s Guide
16
msiexec /I ThinKioskClientSetup.msi SERVERNAME="LOCALHOST" SERVERPORT="11000"
CONNECTIONTYPE=0 FIREWALLRULE=1 RESTART=1 TARGETFOLDERGUID=f11943dd-
944f-46fa-b78a-deea840975bb /QB /L*V "%USERPROFILE%\TK.LOG"
Auto Install ThinKiosk with no interaction, connect to a broker server, auto login as a
domain user and replace the shell,
msiexec /I ThinKioskClientSetup.msi SERVERNAME="LOCALHOST" SERVERPORT="11000"
CONNECTIONTYPE=0 ALUSERNAME=USERNAME ALPASSWORD=MYPASSWORD
ALDOMAIN=DOMAIN /QB /L*V "%USERPROFILE%\TK.LOG"
Manual Install:
A manual installation is just as easy, just fire up the MSI installer and only pick the options
you wish.
Note: You can ignore any settings not pertinent to your installation and ThinKiosk will
figure out what you want and do it.
ThinKiosk Client Interface:
The new ThinKiosk client interface is sleek, stylish and extremely configurable. Every
button, box and colour can be modified or hidden.
Splash Screen:
When ThinKiosk launches, it will fire up it’s own splash screen, which will give you,
detailed information on its current activities and progress.
This splash screen can be customised or supressed completely with an Enterprise
license.

ThinKiosk Administrator’s Guide
17
The registry values needed for this are as follows:
64 bit key (HKEY_LOCAL_MACHINE\SOFTWARE\Wow6432Node\ThinKiosk)
32 bit Key (HKEY_LOCAL_MACHINE\SOFTWARE \ThinKiosk)
CustomSplash - (reg_Dword) 1 Use a custom Splash Screen.
CustomSplashPath (reg_sz) Path to your custom splash screen (e.g.
c:\splash.png)
HideSplash – (reg_Dword) 1 Hide the splash screen completely.
Note: the splash screen image must be a PNG file and the dimensions should be
w=394,h=158 for best appearance.
ThinKiosk Administrator’s Guide
18
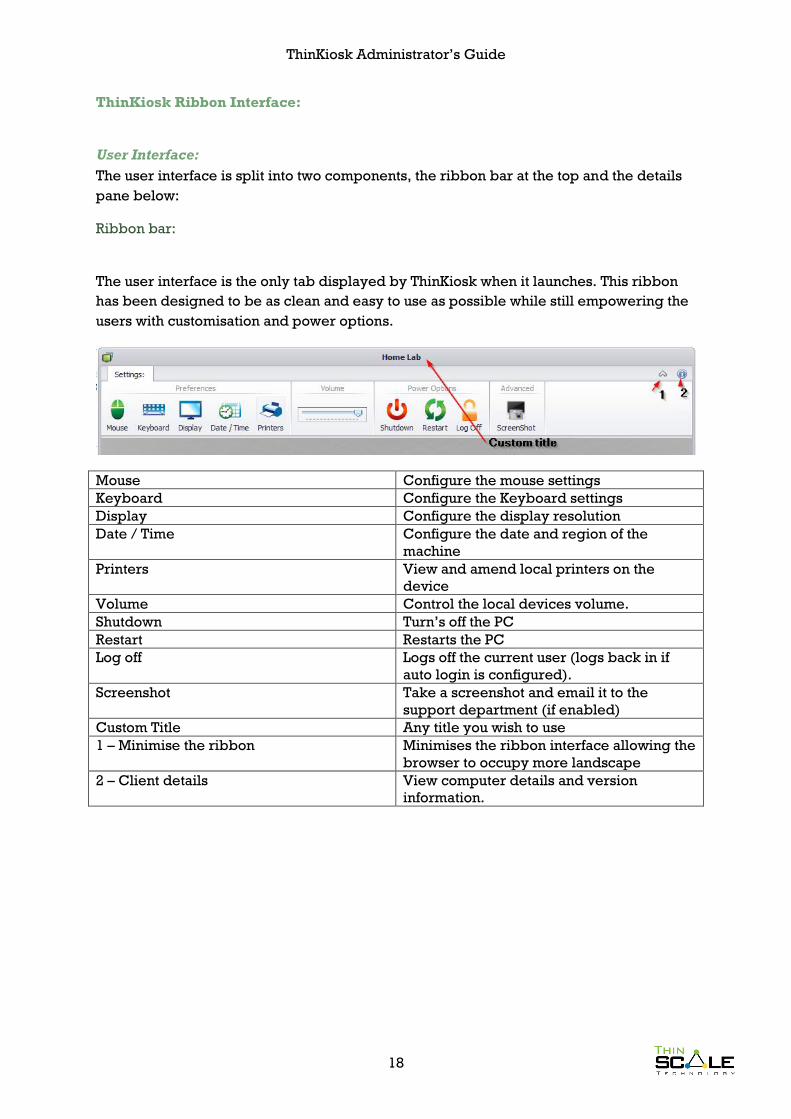
ThinKiosk Ribbon Interface:
User Interface:
The user interface is split into two components, the ribbon bar at the top and the details
pane below:
Ribbon bar:
The user interface is the only tab displayed by ThinKiosk when it launches. This ribbon
has been designed to be as clean and easy to use as possible while still empowering the
users with customisation and power options.
Mouse Configure the mouse settings
Keyboard Configure the Keyboard settings
Display Configure the display resolution
Date / Time Configure the date and region of the
machine
Printers View and amend local printers on the
device
Volume Control the local devices volume.
Shutdown Turn’s off the PC
Restart Restarts the PC
Log off Logs off the current user (logs back in if
auto login is configured).
Screenshot Take a screenshot and email it to the
support department (if enabled)
Custom Title Any title you wish to use
1 – Minimise the ribbon Minimises the ribbon interface allowing the
browser to occupy more landscape
2 – Client details View computer details and version
information.
ThinKiosk Administrator’s Guide
19
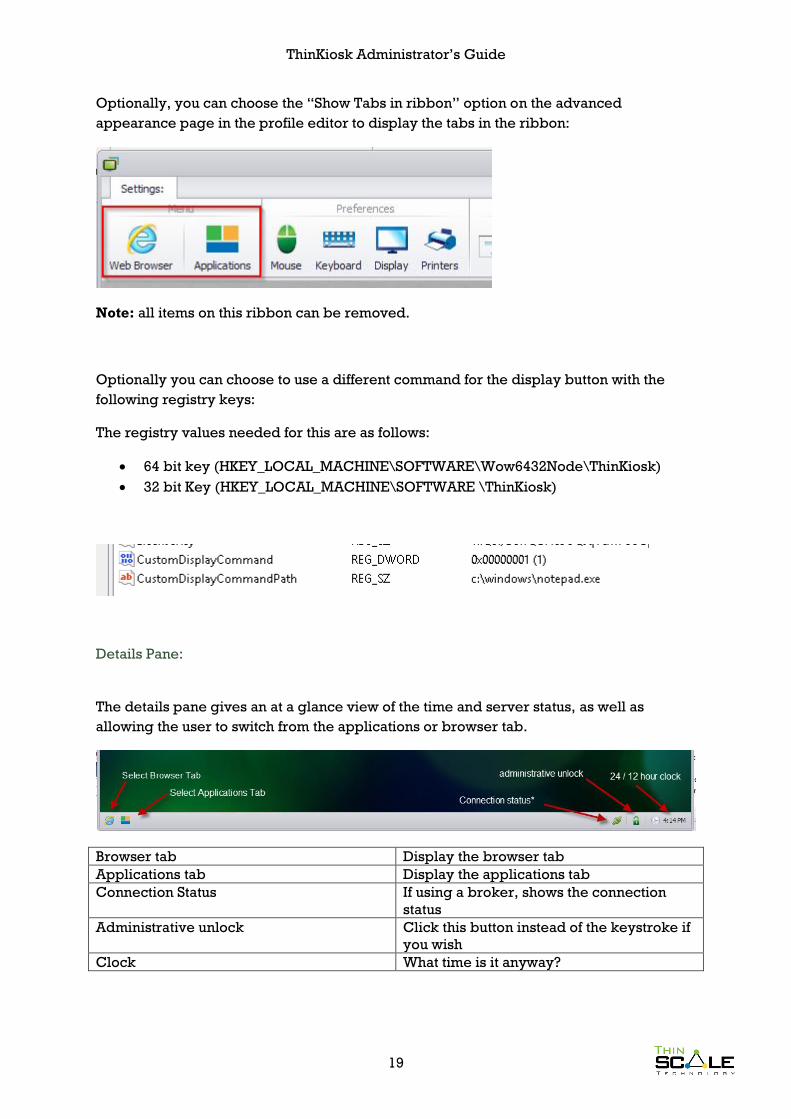
Optionally, you can choose the “Show Tabs in ribbon” option on the advanced
appearance page in the profile editor to display the tabs in the ribbon:
Note: all items on this ribbon can be removed.
Optionally you can choose to use a different command for the display button with the
following registry keys:
The registry values needed for this are as follows:
64 bit key (HKEY_LOCAL_MACHINE\SOFTWARE\Wow6432Node\ThinKiosk)
32 bit Key (HKEY_LOCAL_MACHINE\SOFTWARE \ThinKiosk)
Details Pane:
The details pane gives an at a glance view of the time and server status, as well as
allowing the user to switch from the applications or browser tab.
Browser tab Display the browser tab
Applications tab Display the applications tab
Connection Status If using a broker, shows the connection
status
Administrative unlock Click this button instead of the keystroke if
you wish
Clock What time is it anyway?
ThinKiosk Administrator’s Guide
20
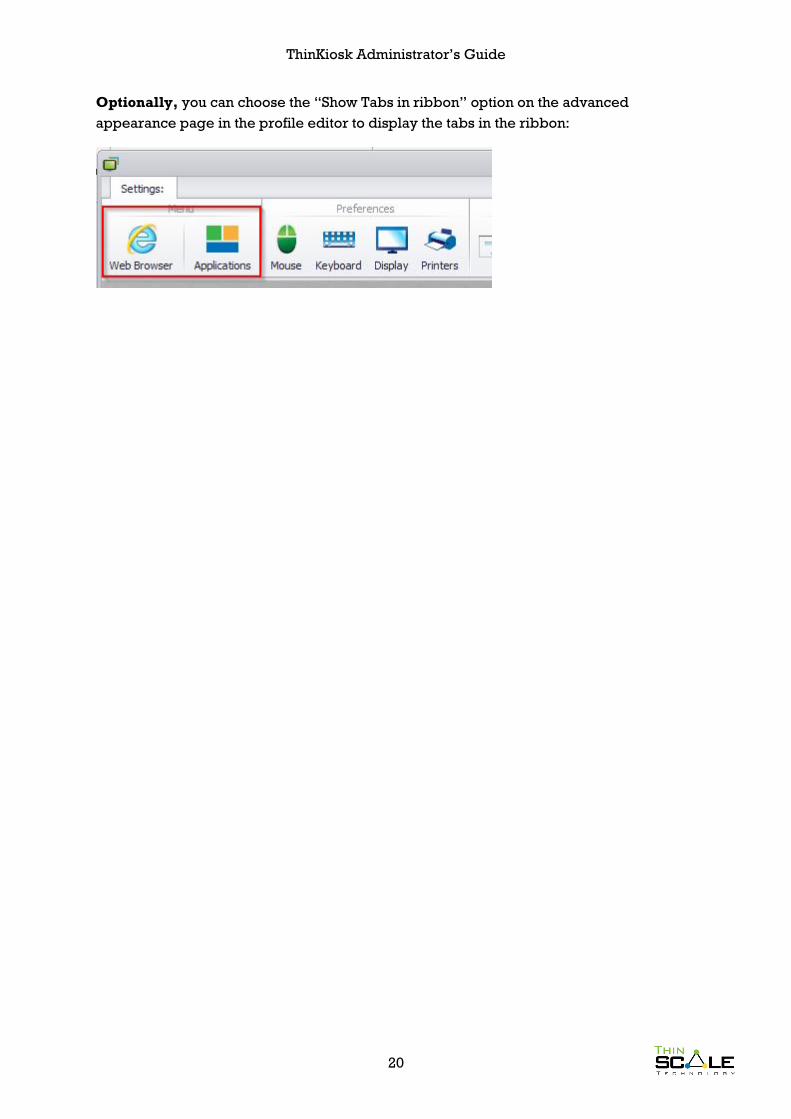
Optionally, you can choose the “Show Tabs in ribbon” option on the advanced
appearance page in the profile editor to display the tabs in the ribbon:
ThinKiosk Administrator’s Guide
21
Optionally, you can add captions to the tab icons via the “Advanced Appearance”
settings in the profile editor:
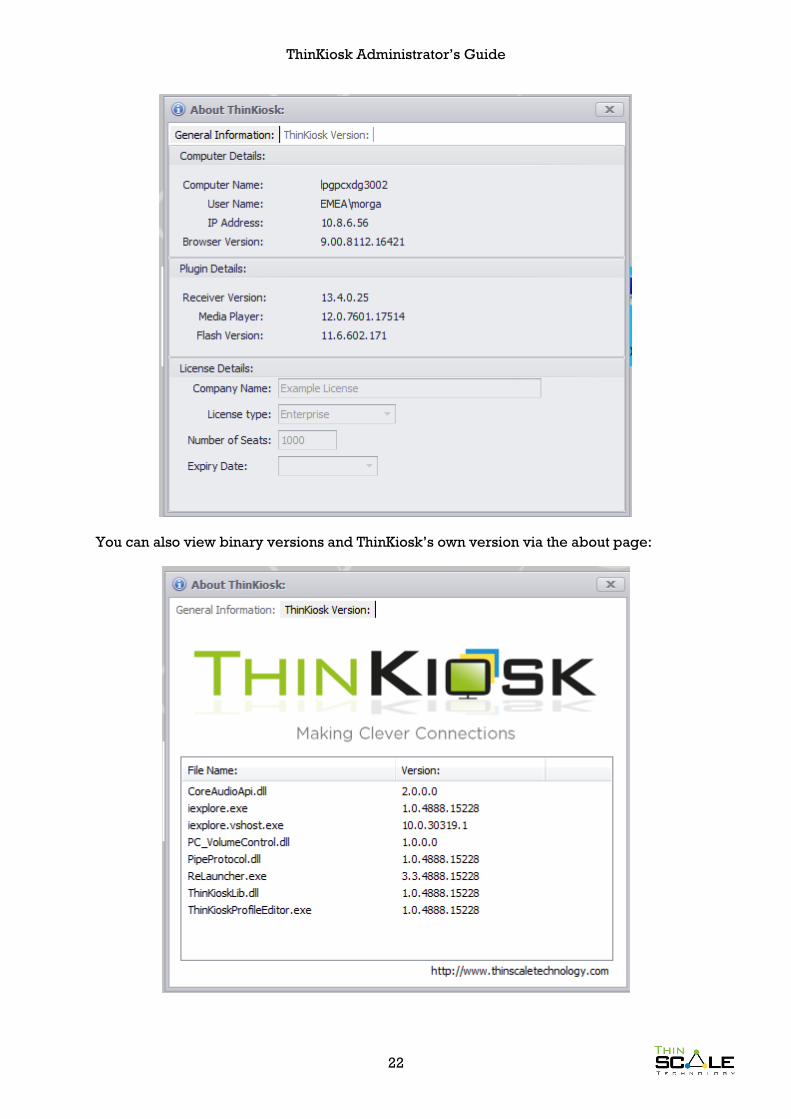
Printers Window:
The printers window available from the ribbon, gives the user access to the local printers
installed on the device.
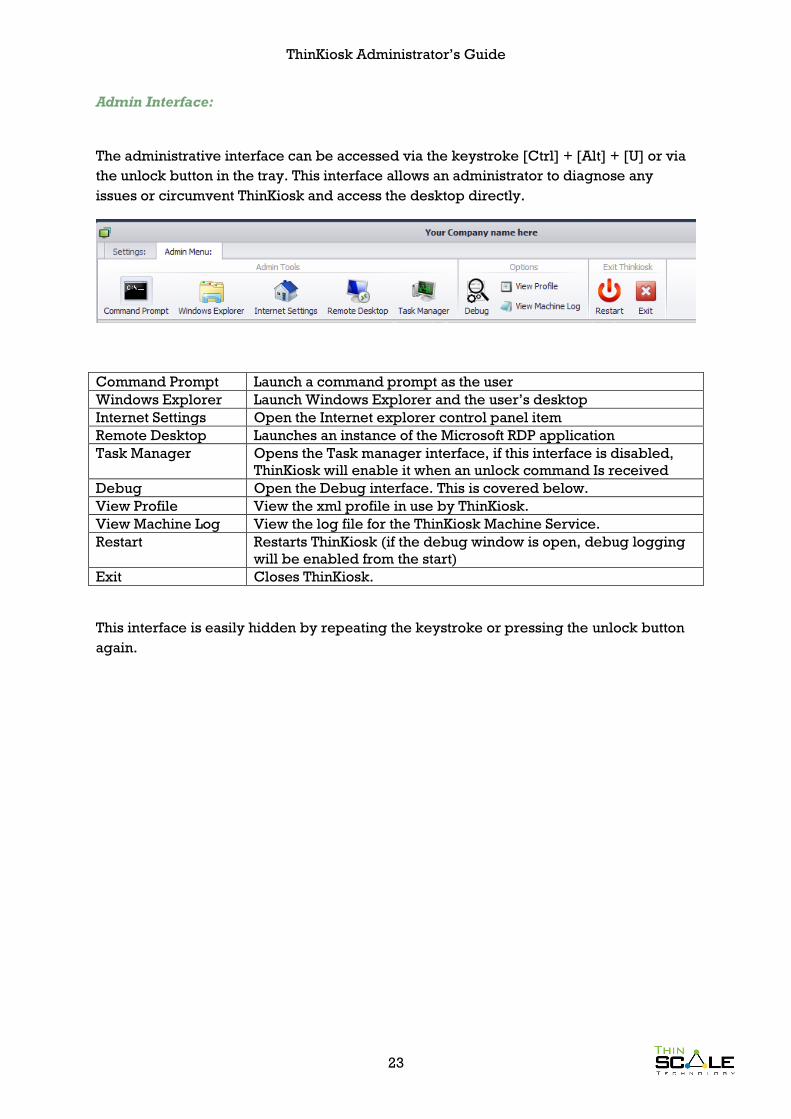
About Window:
The about window gives the administrator or user an “at a glance” view of the machine
specific personality:
ThinKiosk Administrator’s Guide
22
You can also view binary versions and ThinKiosk’s own version via the about page:
ThinKiosk Administrator’s Guide
23
Admin Interface:
The administrative interface can be accessed via the keystroke [Ctrl] + [Alt] + [U] or via
the unlock button in the tray. This interface allows an administrator to diagnose any
issues or circumvent ThinKiosk and access the desktop directly.
Command Prompt Launch a command prompt as the user
Windows Explorer Launch Windows Explorer and the user’s desktop
Internet Settings Open the Internet explorer control panel item
Remote Desktop Launches an instance of the Microsoft RDP application
Task Manager Opens the Task manager interface, if this interface is disabled,
ThinKiosk will enable it when an unlock command Is received
Debug Open the Debug interface. This is covered below.
View Profile View the xml profile in use by ThinKiosk.
View Machine Log View the log file for the ThinKiosk Machine Service.
Restart Restarts ThinKiosk (if the debug window is open, debug logging
will be enabled from the start)
Exit Closes ThinKiosk.
This interface is easily hidden by repeating the keystroke or pressing the unlock button
again.
ThinKiosk Administrator’s Guide
24
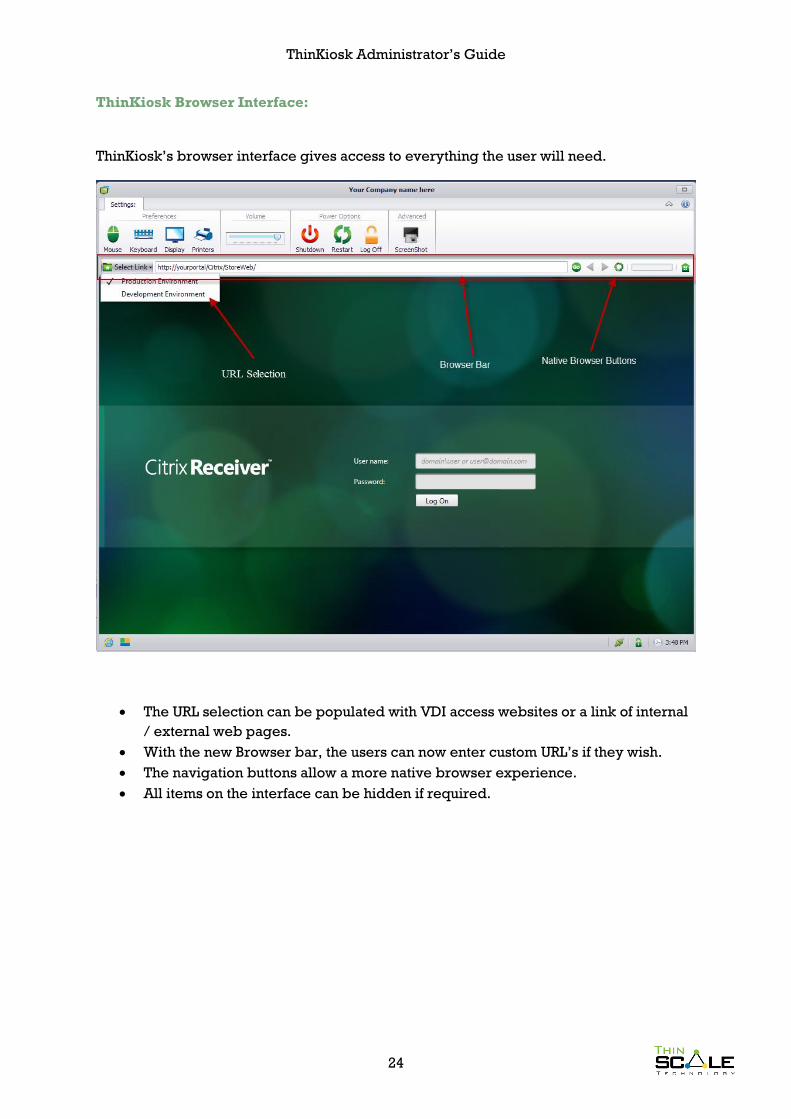
ThinKiosk Browser Interface:
ThinKiosk’s browser interface gives access to everything the user will need.
The URL selection can be populated with VDI access websites or a link of internal
/ external web pages.
With the new Browser bar, the users can now enter custom URL’s if they wish.
The navigation buttons allow a more native browser experience.
All items on the interface can be hidden if required.
ThinKiosk Administrator’s Guide
25
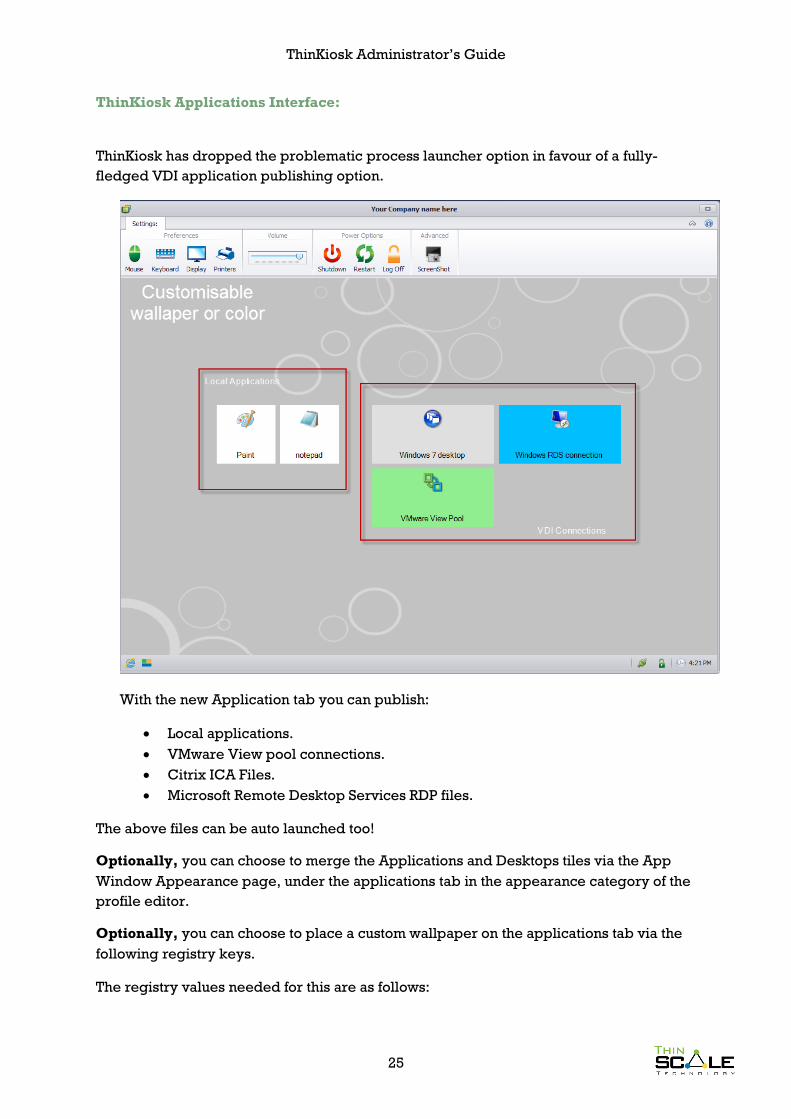
ThinKiosk Applications Interface:
ThinKiosk has dropped the problematic process launcher option in favour of a fully-
fledged VDI application publishing option.
With the new Application tab you can publish:
Local applications.
VMware View pool connections.
Citrix ICA Files.
Microsoft Remote Desktop Services RDP files.
The above files can be auto launched too!
Optionally, you can choose to merge the Applications and Desktops tiles via the App
Window Appearance page, under the applications tab in the appearance category of the
profile editor.
Optionally, you can choose to place a custom wallpaper on the applications tab via the
following registry keys.
The registry values needed for this are as follows:
ThinKiosk Administrator’s Guide
26
64 bit key (HKEY_LOCAL_MACHINE\SOFTWARE\Wow6432Node\ThinKiosk)
32 bit Key (HKEY_LOCAL_MACHINE\SOFTWARE \ThinKiosk)
CustomAppsWallpaper - (reg_Dword) 1 Use a custom Splash Screen.
CustomAppsWallPaperPath (reg_sz) Path to your custom splash screen (e.g.
c:\background.png)
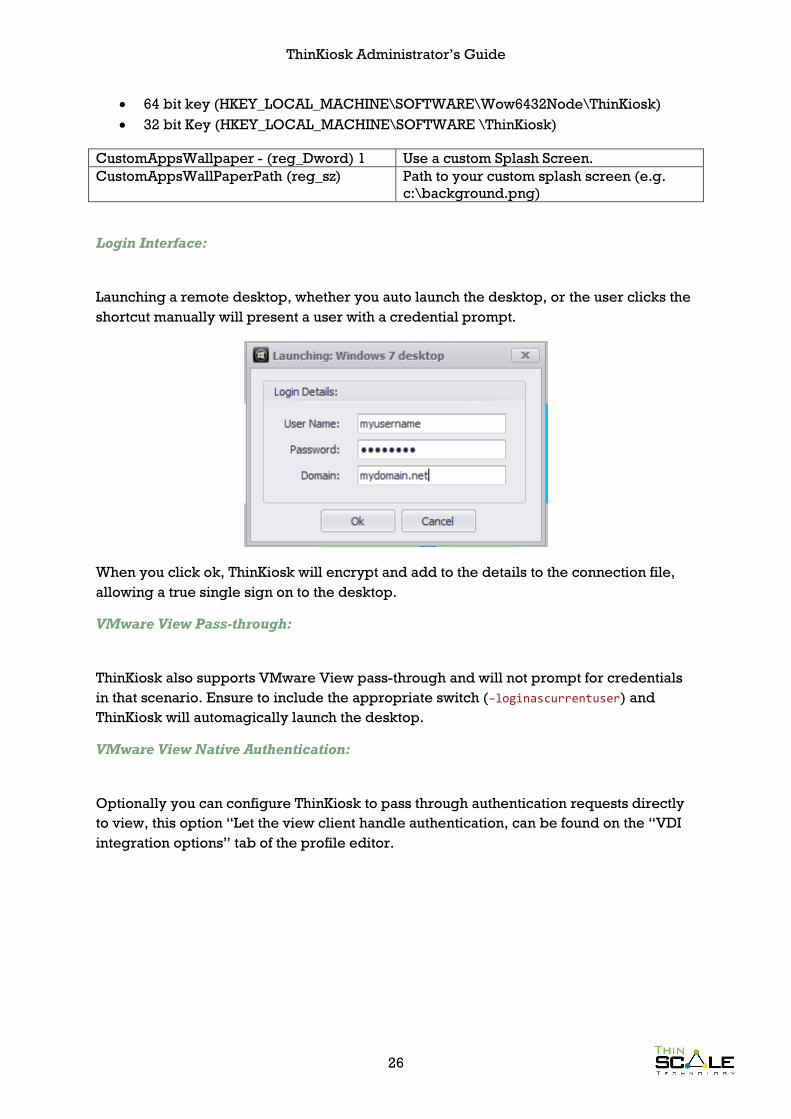
Login Interface:
Launching a remote desktop, whether you auto launch the desktop, or the user clicks the
shortcut manually will present a user with a credential prompt.
When you click ok, ThinKiosk will encrypt and add to the details to the connection file,
allowing a true single sign on to the desktop.
VMware View Pass-through:
ThinKiosk also supports VMware View pass-through and will not prompt for credentials
in that scenario. Ensure to include the appropriate switch (–loginascurrentuser) and
ThinKiosk will automagically launch the desktop.
VMware View Native Authentication:
Optionally you can configure ThinKiosk to pass through authentication requests directly
to view, this option “Let the view client handle authentication, can be found on the “VDI
integration options” tab of the profile editor.
ThinKiosk Administrator’s Guide
27
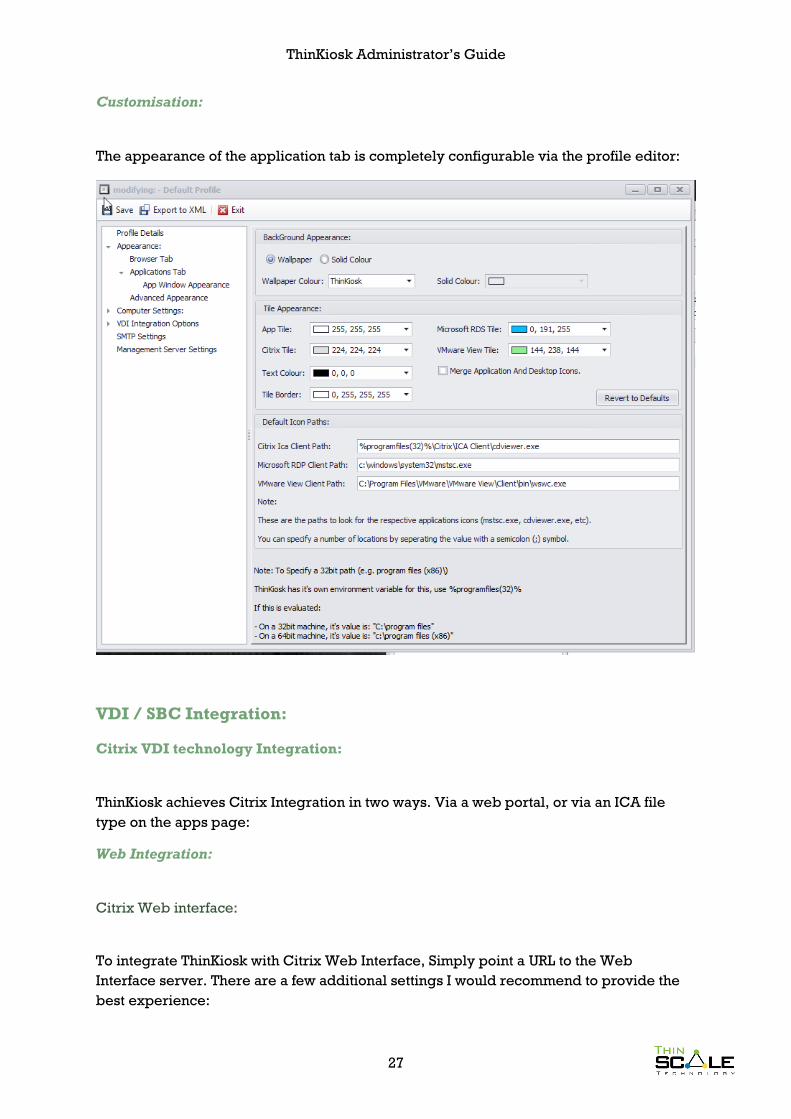
Customisation:
The appearance of the application tab is completely configurable via the profile editor:
VDI / SBC Integration:
Citrix VDI technology Integration:
ThinKiosk achieves Citrix Integration in two ways. Via a web portal, or via an ICA file
type on the apps page:
Web Integration:
Citrix Web interface:
To integrate ThinKiosk with Citrix Web Interface, Simply point a URL to the Web
Interface server. There are a few additional settings I would recommend to provide the
best experience:

ThinKiosk Administrator’s Guide
28
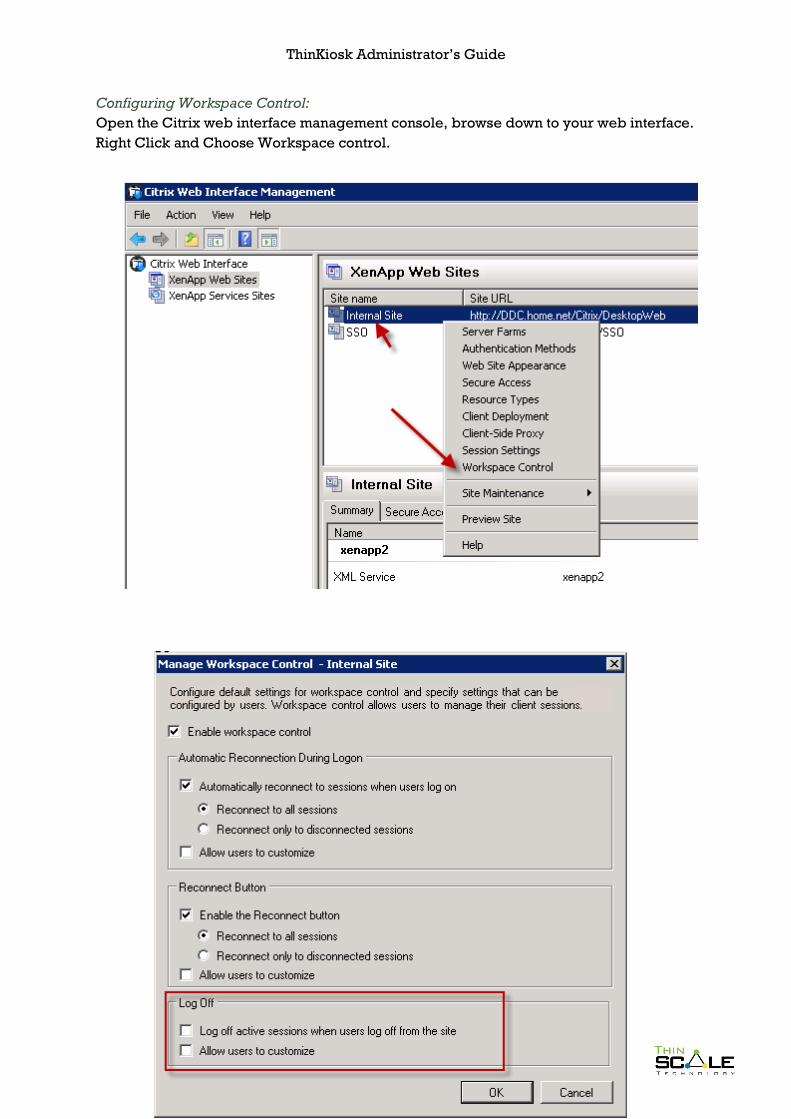
Configure workspace control to not log the user off when they log off the web
interface.
Disable the Citrix Desktop Viewer.
Enable / Disable Auto Launch. *
*Enabling auto launch in Web interface is a double-sided sword, as it also disables
workspace control and does not work if the user has access to multiple desktops. I’ll
show you how to do it, but don’t would be my advice.
ThinKiosk Administrator’s Guide
29
Configuring Workspace Control:
Open the Citrix web interface management console, browse down to your web interface.
Right Click and Choose Workspace control.
ThinKiosk Administrator’s Guide
30
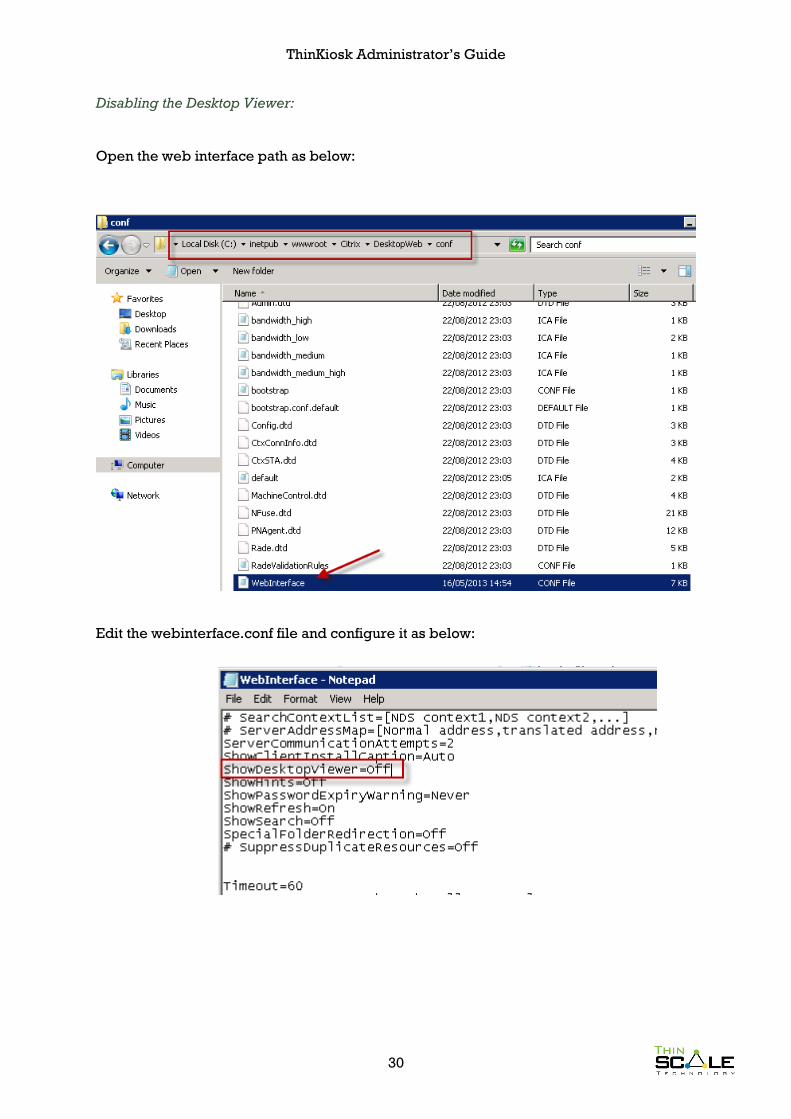
Disabling the Desktop Viewer:
Open the web interface path as below:
Edit the webinterface.conf file and configure it as below:
ThinKiosk Administrator’s Guide
31
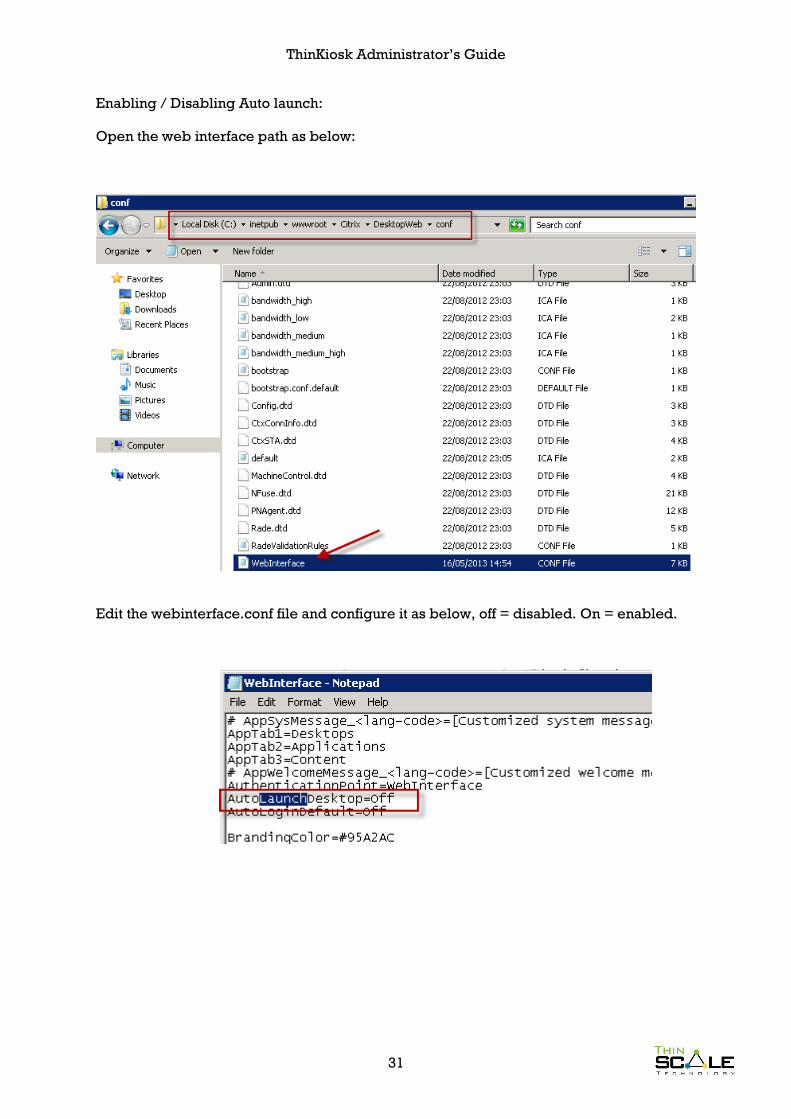
Enabling / Disabling Auto launch:
Open the web interface path as below:
Edit the webinterface.conf file and configure it as below, off = disabled. On = enabled.
ThinKiosk Administrator’s Guide
32
Citrix Storefront:
Citrix Storefront requires a little bit of tweaking to best support ThinKiosk. Below you will
find the three recommended settings:
Enabling workspace control (reconnect desktops on login)
Disable the desktop viewer.
Enable Auto Launch Desktop. *
*If your users only have one desktop available, use this value, if they see more than one
desktop this setting is of no use to you.
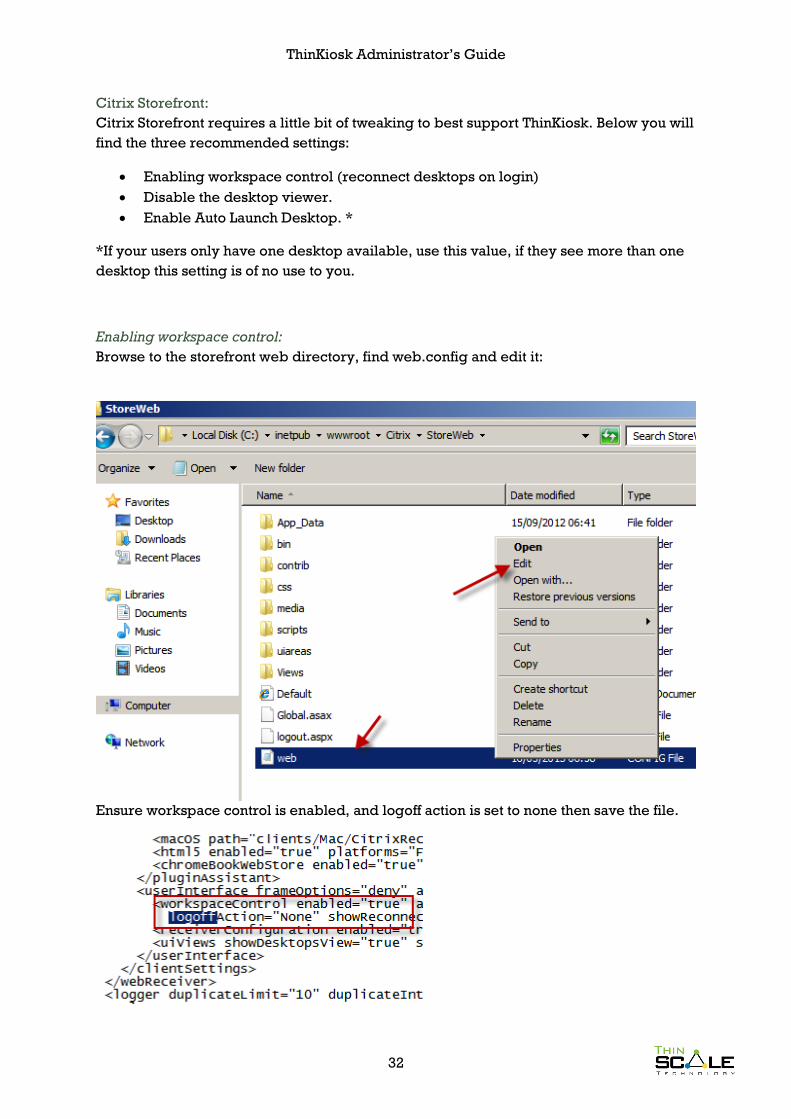
Enabling workspace control:
Browse to the storefront web directory, find web.config and edit it:
Ensure workspace control is enabled, and logoff action is set to none then save the file.
ThinKiosk Administrator’s Guide
33
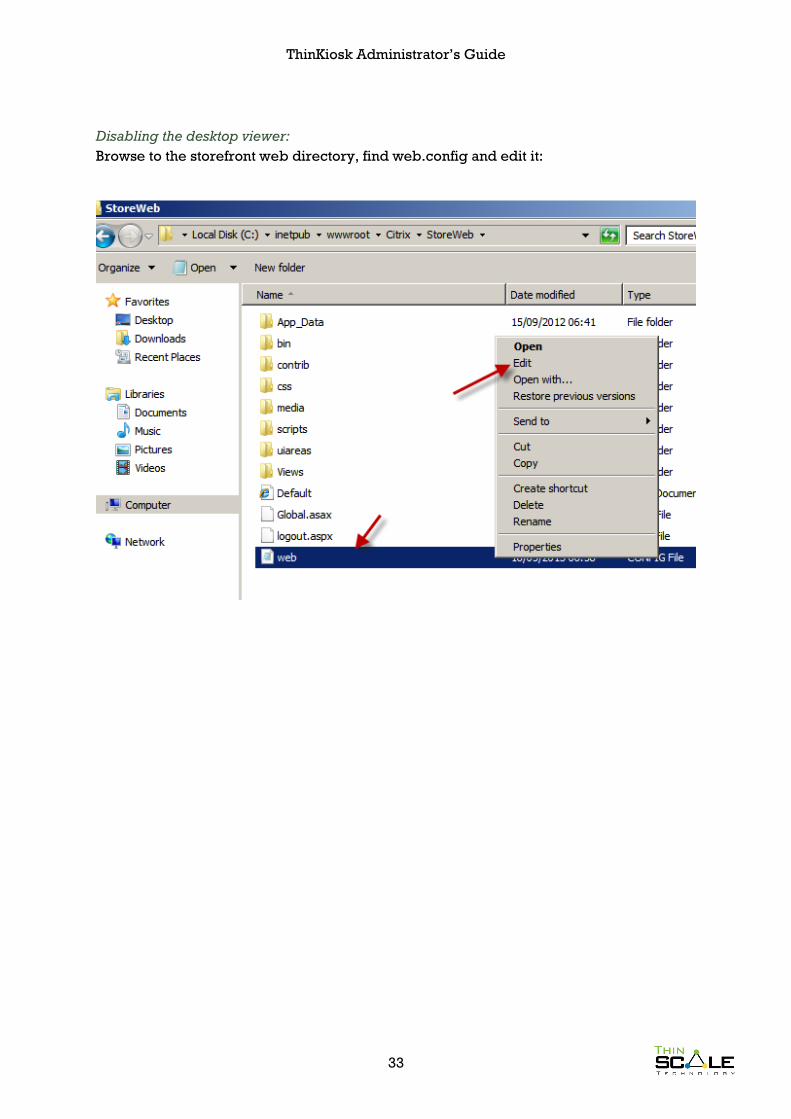
Disabling the desktop viewer:
Browse to the storefront web directory, find web.config and edit it:
ThinKiosk Administrator’s Guide
34
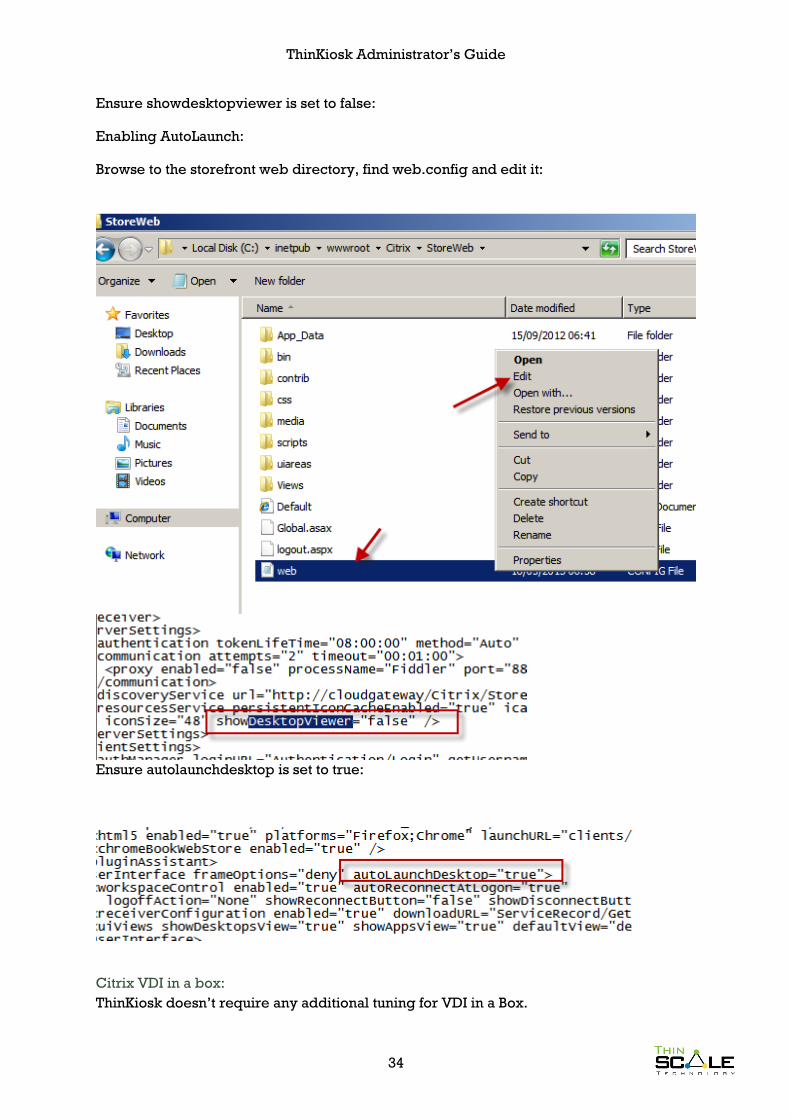
Ensure showdesktopviewer is set to false:
Enabling AutoLaunch:
Browse to the storefront web directory, find web.config and edit it:
Ensure autolaunchdesktop is set to true:
Citrix VDI in a box:
ThinKiosk doesn’t require any additional tuning for VDI in a Box.
ThinKiosk Administrator’s Guide
35
ICA File:
Publishing a Citrix connection file via the applications tab will only work with XenApp.
For help creating this file, see the following guide:
http://support.citrix.com/article/ctx122536
Microsoft Remote Desktop Services integration:
Microsoft RDS integration can be achieved in two ways:
A connection to a Microsoft Remote Desktop Services Web Broker
Via the Application tab with a connection file.
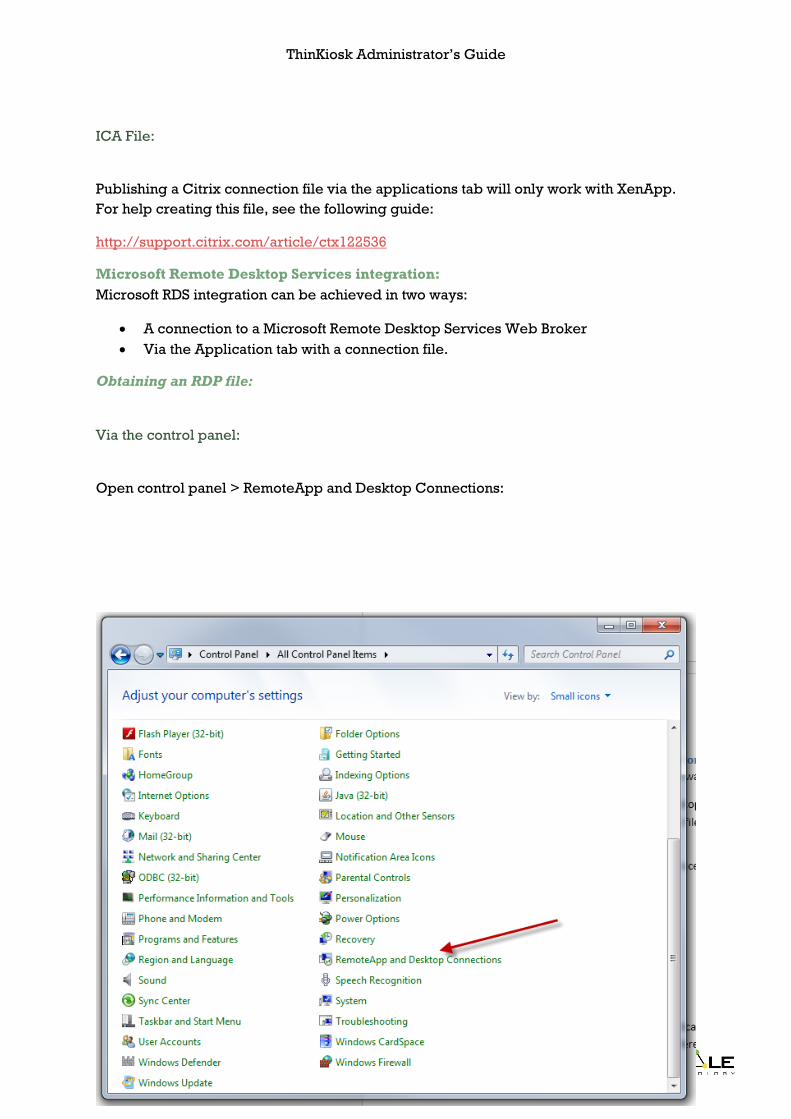
Obtaining an RDP file:
Via the control panel:
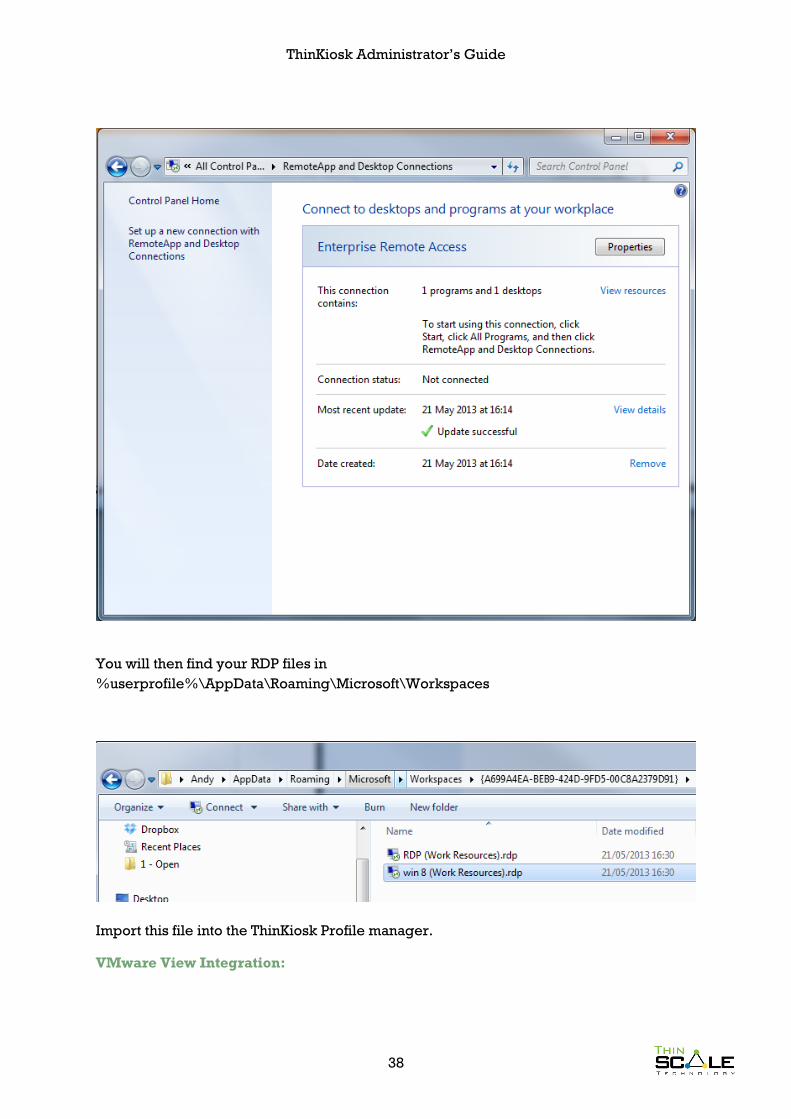
Open control panel > RemoteApp and Desktop Connections:
ThinKiosk Administrator’s Guide
36
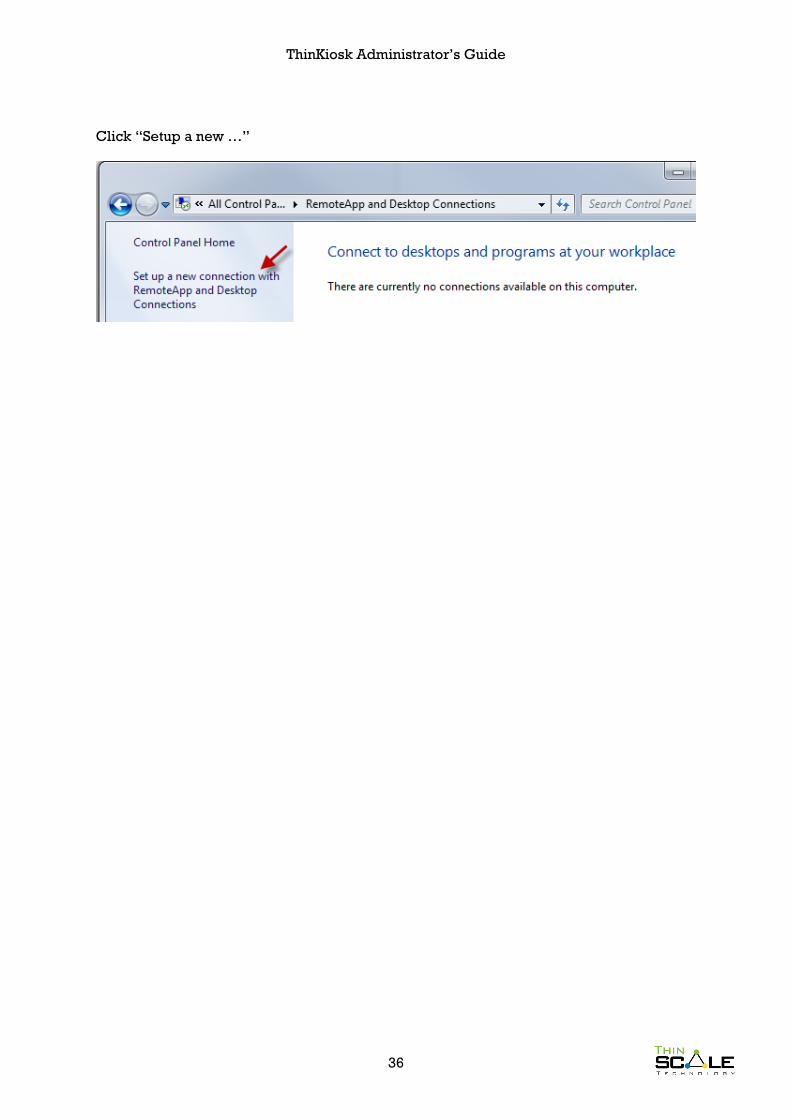
Click “Setup a new …”
ThinKiosk Administrator’s Guide
37
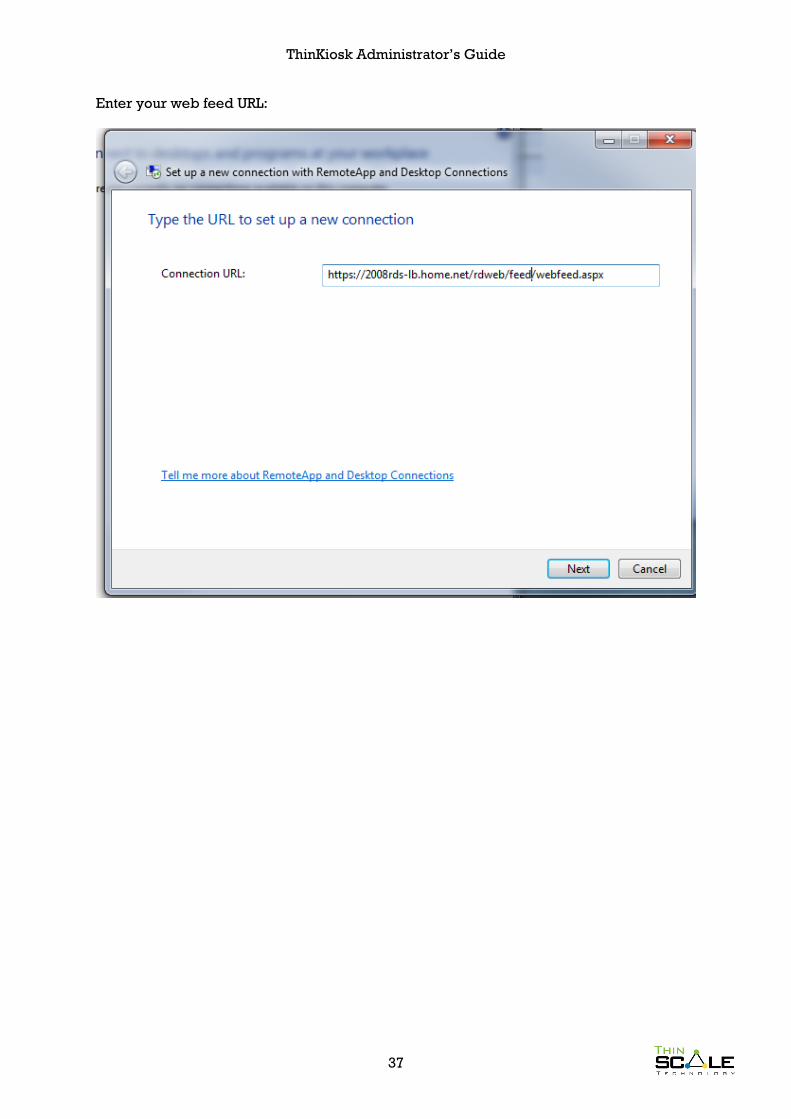
Enter your web feed URL:
ThinKiosk Administrator’s Guide
38
You will then find your RDP files in
%userprofile%\AppData\Roaming\Microsoft\Workspaces
Import this file into the ThinKiosk Profile manager.
VMware View Integration:
ThinKiosk Administrator’s Guide
39
VMware View integration is achieved via the application tab. Add VMware View Desktop
or pool connections via a connection file (see here for reference or examples below).
Authentication:
VMware view connections can have two authentication types:
Local, ThinKiosk adds the credentials to the connection.
Pass-through. Let’s VMware view do the authentication.
By Default Local authentication is used, if the –loginascurrentuser true command line is in
the connection file, ThinKiosk will allow the View client do the authentication.
Example connection files:
Connect to a view pool called “view.home.net”, launching a desktop called “windows 7
(x64)” with the PCOIP protocol:
-serverurl "view.home.net"
-desktopName "windows 7 (x64)"
-desktopProtocol PCOIP
Connect to a view pool called “view.home.net”, launching a desktop called “windows 7
(x64)” with the PCOIP protocol and use the local credentials:
-serverurl "view.home.net"
-desktopName "windows 7 (x64)"
-desktopProtocol PCOIP
-logInAsCurrentUser true
Connect to a view pool called “view.home.net”, launch the desktop unattended and use
the local credentials:
-serverurl "view.home.net"
-unattended
-logInAsCurrentUser true
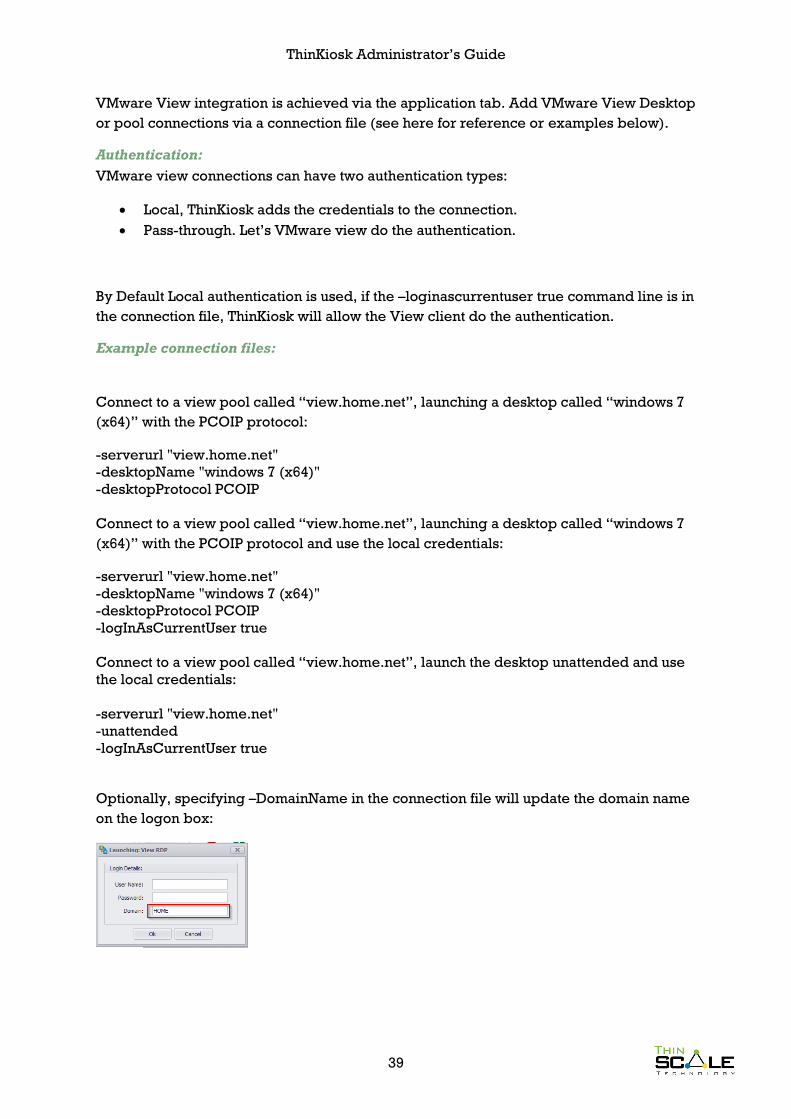
Optionally, specifying –DomainName in the connection file will update the domain name
on the logon box:
ThinKiosk Administrator’s Guide
40
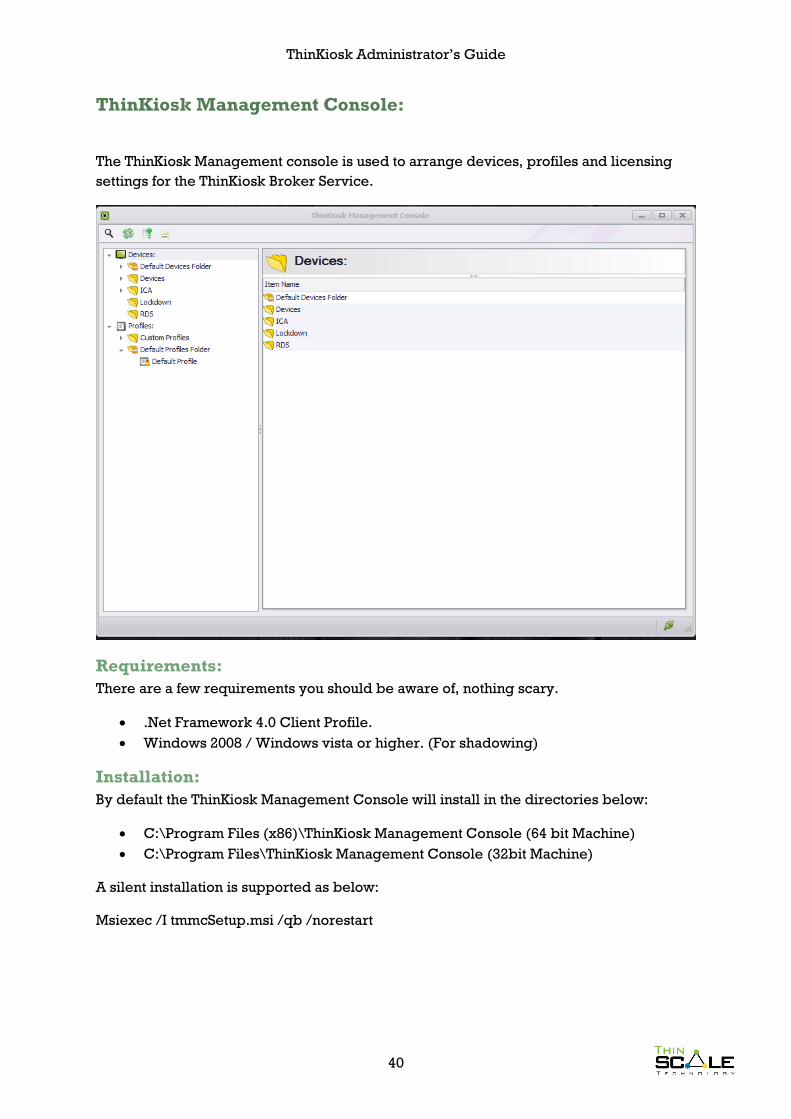
ThinKiosk Management Console:
The ThinKiosk Management console is used to arrange devices, profiles and licensing
settings for the ThinKiosk Broker Service.
Requirements:
There are a few requirements you should be aware of, nothing scary.
.Net Framework 4.0 Client Profile.
Windows 2008 / Windows vista or higher. (For shadowing)
Installation:
By default the ThinKiosk Management Console will install in the directories below:
C:\Program Files (x86)\ThinKiosk Management Console (64 bit Machine)
C:\Program Files\ThinKiosk Management Console (32bit Machine)
A silent installation is supported as below:
Msiexec /I tmmcSetup.msi /qb /norestart
ThinKiosk Administrator’s Guide
41
Things to know before you start:
The ThinKiosk Broker will disconnect idle management server connections after 30
minutes, this value is configurable (see Broker service documentation) but I advise you
don’t.
By default all traffic, client or server related, is relayed by the broker service, at no point
are you talking to a client pc. The exception to this rule is when Remote Controlling a
ThinKiosk Device, you are communicating directly with the device when the shadow
window opens.
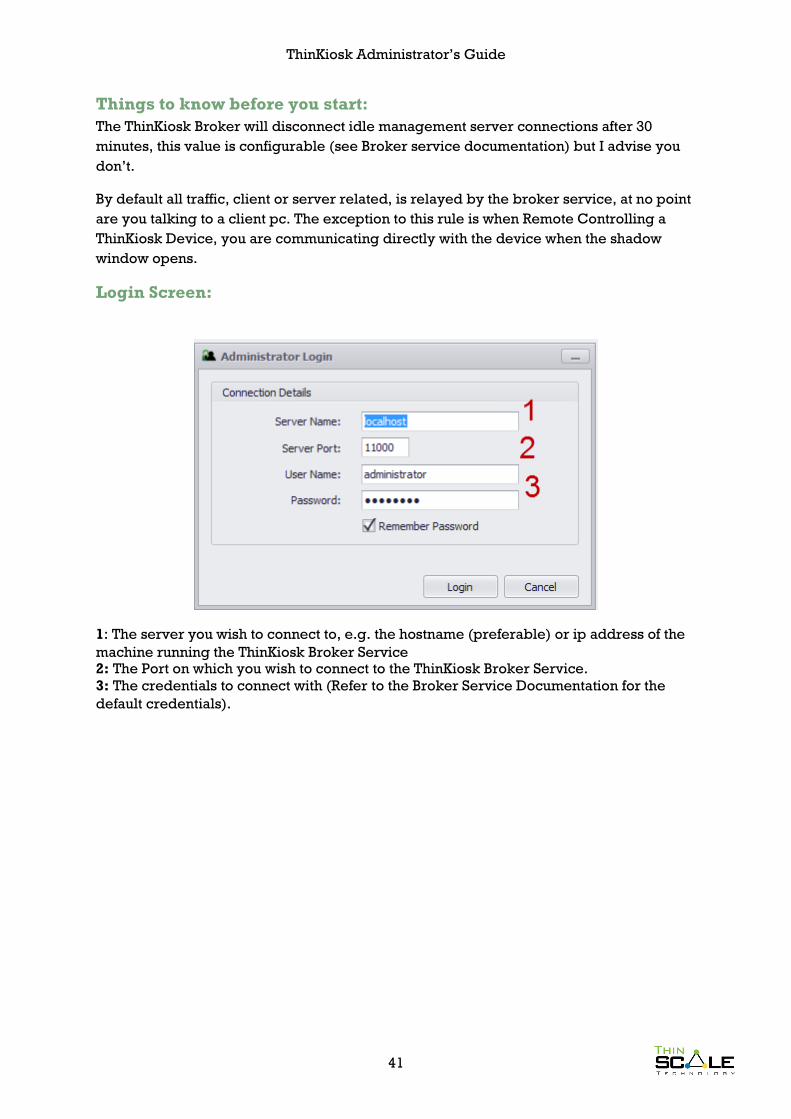
Login Screen:
1: The server you wish to connect to, e.g. the hostname (preferable) or ip address of the
machine running the ThinKiosk Broker Service 2: The Port on which you wish to connect to the ThinKiosk Broker Service.
3: The credentials to connect with (Refer to the Broker Service Documentation for the
default credentials).
ThinKiosk Administrator’s Guide
42
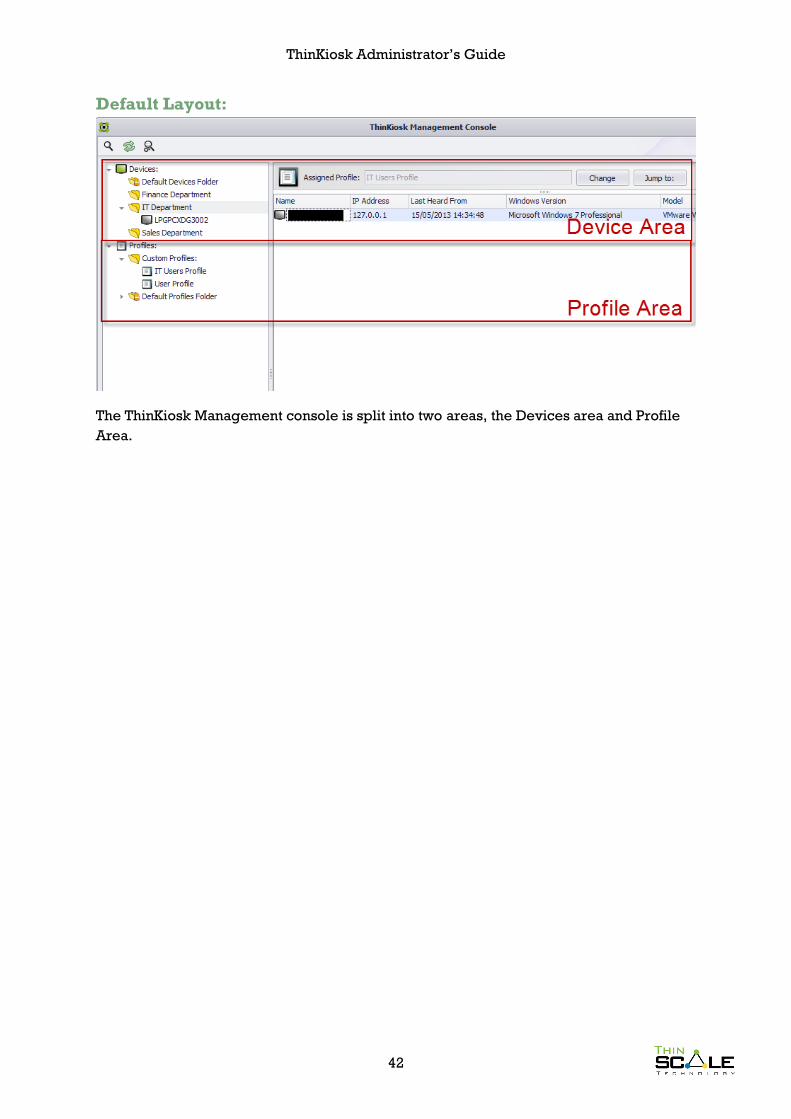
Default Layout:
The ThinKiosk Management console is split into two areas, the Devices area and Profile
Area.
ThinKiosk Administrator’s Guide
43
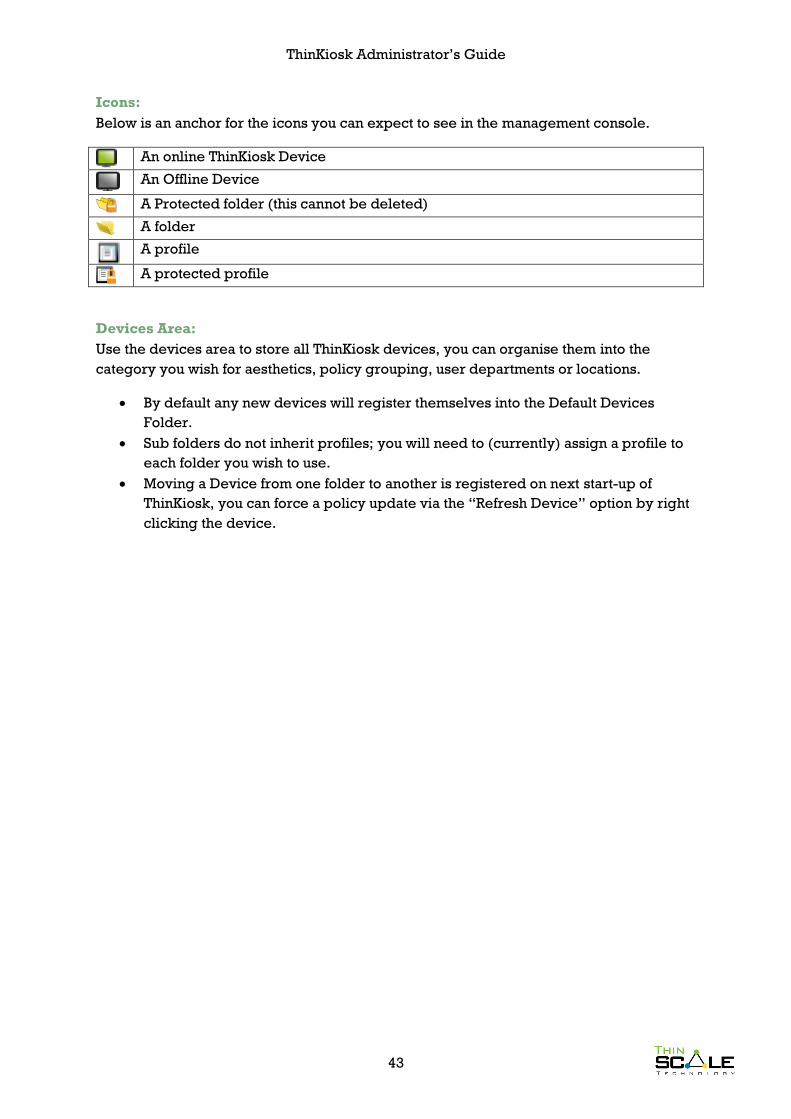
Icons:
Below is an anchor for the icons you can expect to see in the management console.
An online ThinKiosk Device
An Offline Device
A Protected folder (this cannot be deleted)
A folder
A profile
A protected profile
Devices Area:
Use the devices area to store all ThinKiosk devices, you can organise them into the
category you wish for aesthetics, policy grouping, user departments or locations.
By default any new devices will register themselves into the Default Devices
Folder.
Sub folders do not inherit profiles; you will need to (currently) assign a profile to
each folder you wish to use.
Moving a Device from one folder to another is registered on next start-up of
ThinKiosk, you can force a policy update via the “Refresh Device” option by right
clicking the device.
ThinKiosk Administrator’s Guide
44
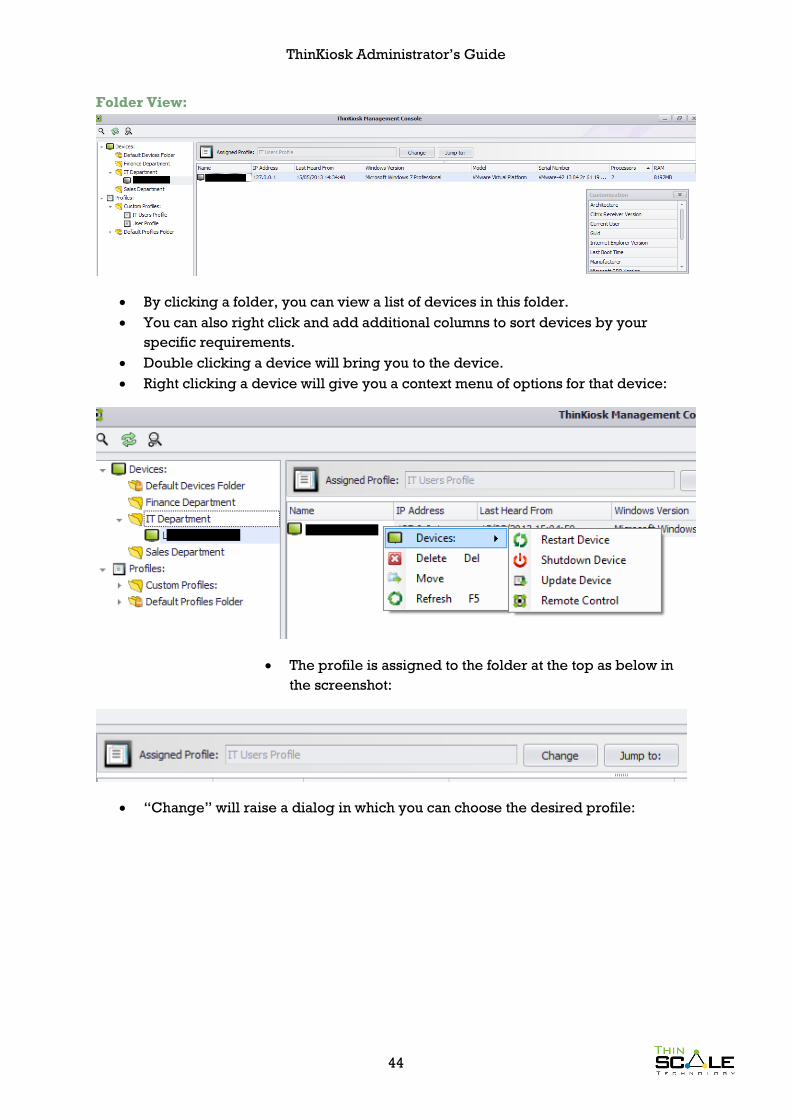
Folder View:
By clicking a folder, you can view a list of devices in this folder.
You can also right click and add additional columns to sort devices by your
specific requirements.
Double clicking a device will bring you to the device.
Right clicking a device will give you a context menu of options for that device:
The profile is assigned to the folder at the top as below in
the screenshot:
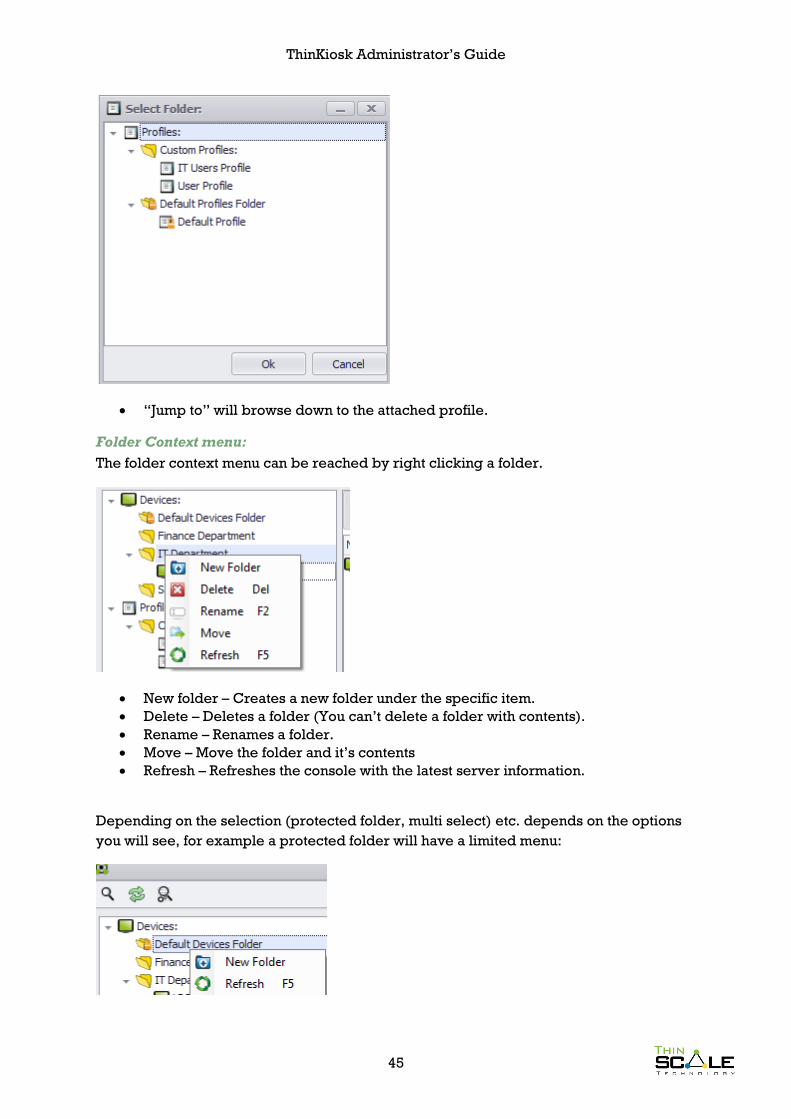
“Change” will raise a dialog in which you can choose the desired profile:
ThinKiosk Administrator’s Guide
45
“Jump to” will browse down to the attached profile.
Folder Context menu:
The folder context menu can be reached by right clicking a folder.
New folder – Creates a new folder under the specific item.
Delete – Deletes a folder (You can’t delete a folder with contents).
Rename – Renames a folder.
Move – Move the folder and it’s contents
Refresh – Refreshes the console with the latest server information.
Depending on the selection (protected folder, multi select) etc. depends on the options
you will see, for example a protected folder will have a limited menu:
ThinKiosk Administrator’s Guide
46
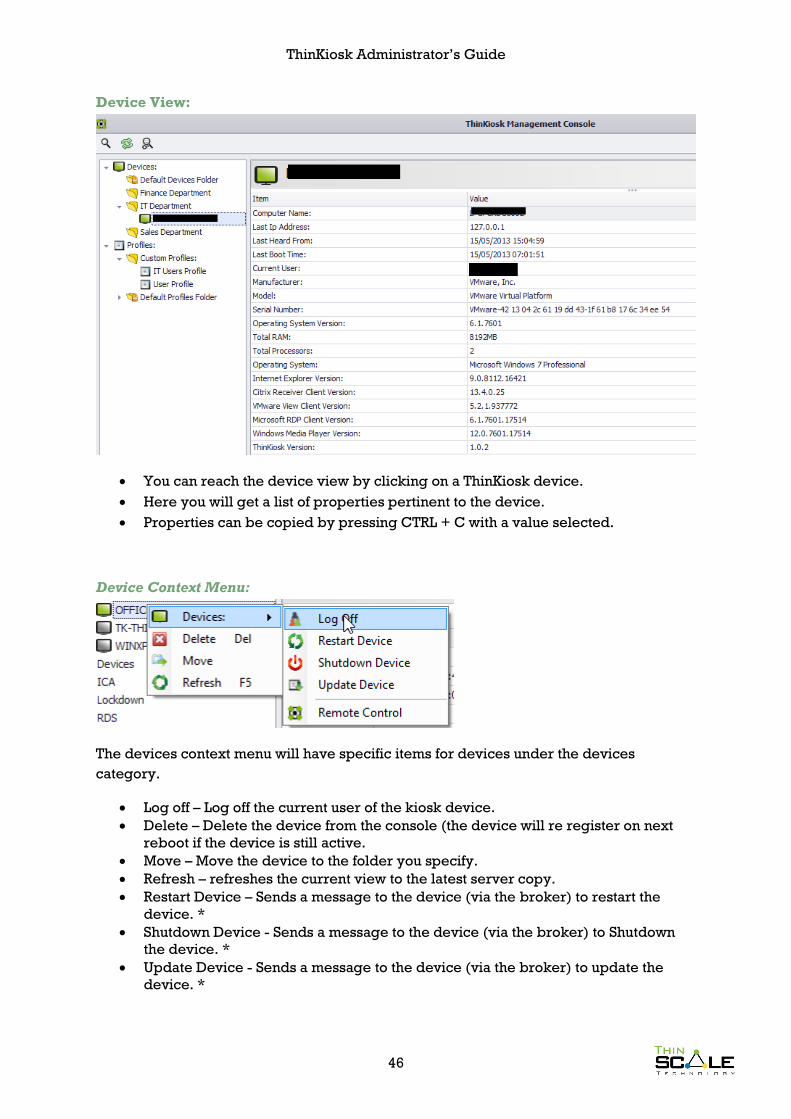
Device View:
You can reach the device view by clicking on a ThinKiosk device.
Here you will get a list of properties pertinent to the device.
Properties can be copied by pressing CTRL + C with a value selected.
Device Context Menu:
The devices context menu will have specific items for devices under the devices
category.
Log off – Log off the current user of the kiosk device.
Delete – Delete the device from the console (the device will re register on next
reboot if the device is still active.
Move – Move the device to the folder you specify.
Refresh – refreshes the current view to the latest server copy.
Restart Device – Sends a message to the device (via the broker) to restart the
device. *
Shutdown Device - Sends a message to the device (via the broker) to Shutdown
the device. *
Update Device - Sends a message to the device (via the broker) to update the
device. *
ThinKiosk Administrator’s Guide
47
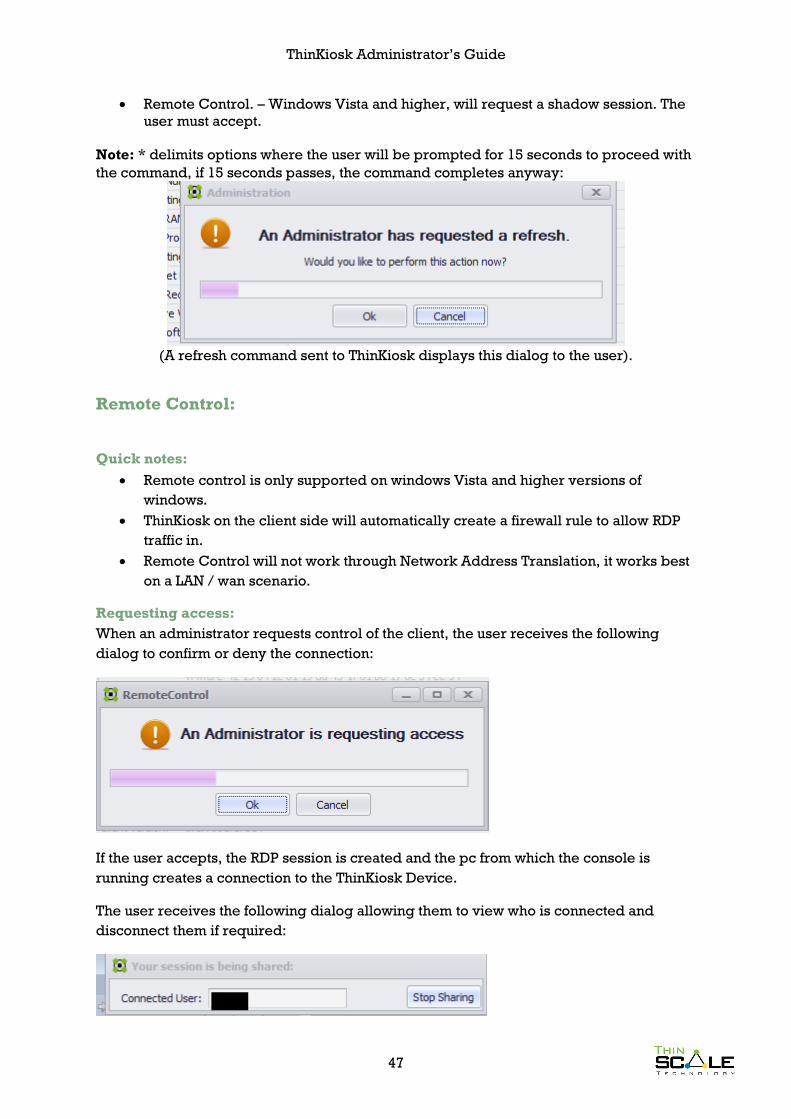
Remote Control. – Windows Vista and higher, will request a shadow session. The
user must accept.
Note: * delimits options where the user will be prompted for 15 seconds to proceed with
the command, if 15 seconds passes, the command completes anyway:
(A refresh command sent to ThinKiosk displays this dialog to the user).
Remote Control:
Quick notes:
Remote control is only supported on windows Vista and higher versions of
windows.
ThinKiosk on the client side will automatically create a firewall rule to allow RDP
traffic in.
Remote Control will not work through Network Address Translation, it works best
on a LAN / wan scenario.
Requesting access:
When an administrator requests control of the client, the user receives the following
dialog to confirm or deny the connection:
If the user accepts, the RDP session is created and the pc from which the console is
running creates a connection to the ThinKiosk Device.
The user receives the following dialog allowing them to view who is connected and
disconnect them if required:
ThinKiosk Administrator’s Guide
48
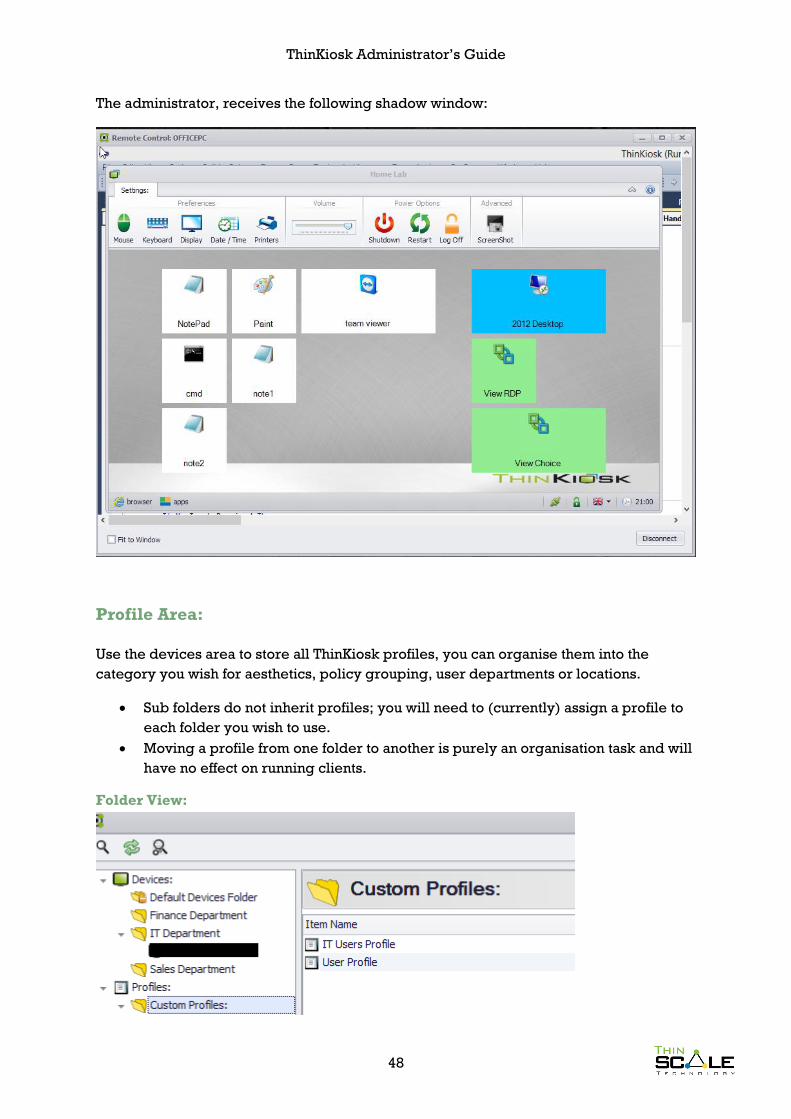
The administrator, receives the following shadow window:
Profile Area:
Use the devices area to store all ThinKiosk profiles, you can organise them into the
category you wish for aesthetics, policy grouping, user departments or locations.
Sub folders do not inherit profiles; you will need to (currently) assign a profile to
each folder you wish to use.
Moving a profile from one folder to another is purely an organisation task and will
have no effect on running clients.
Folder View:
ThinKiosk Administrator’s Guide
49
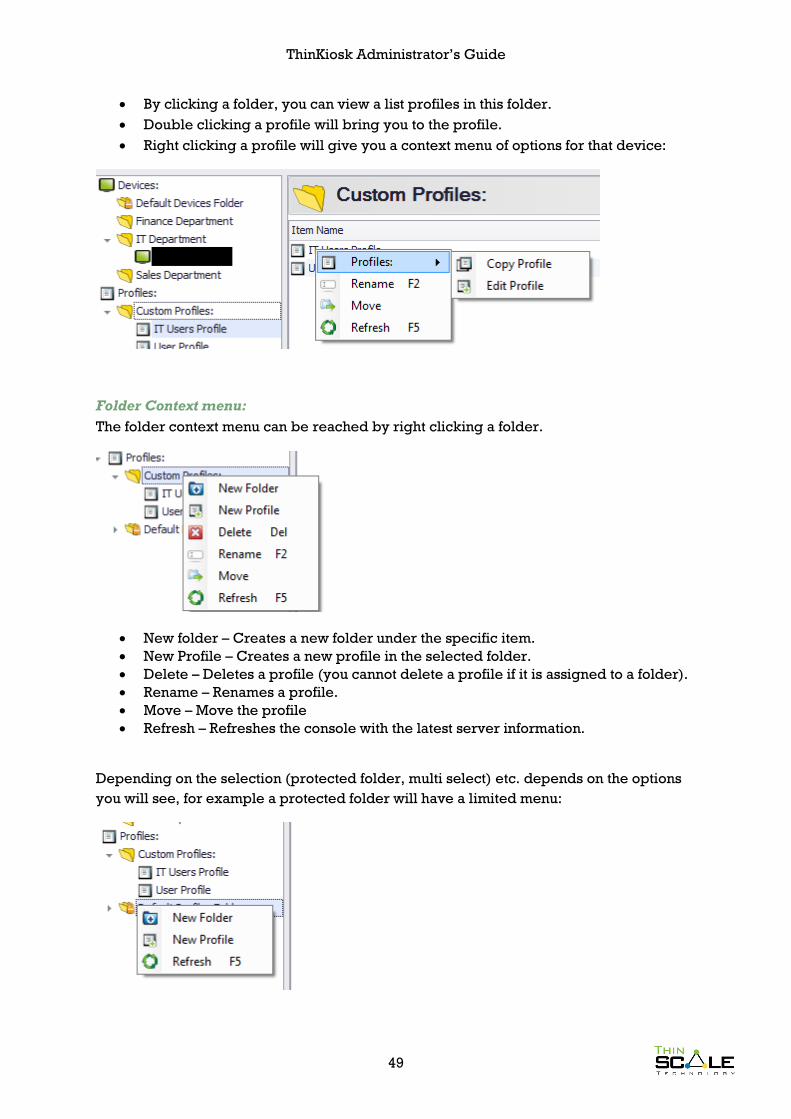
By clicking a folder, you can view a list profiles in this folder.
Double clicking a profile will bring you to the profile.
Right clicking a profile will give you a context menu of options for that device:
Folder Context menu:
The folder context menu can be reached by right clicking a folder.
New folder – Creates a new folder under the specific item.
New Profile – Creates a new profile in the selected folder.
Delete – Deletes a profile (you cannot delete a profile if it is assigned to a folder).
Rename – Renames a profile.
Move – Move the profile
Refresh – Refreshes the console with the latest server information.
Depending on the selection (protected folder, multi select) etc. depends on the options
you will see, for example a protected folder will have a limited menu:
ThinKiosk Administrator’s Guide
50
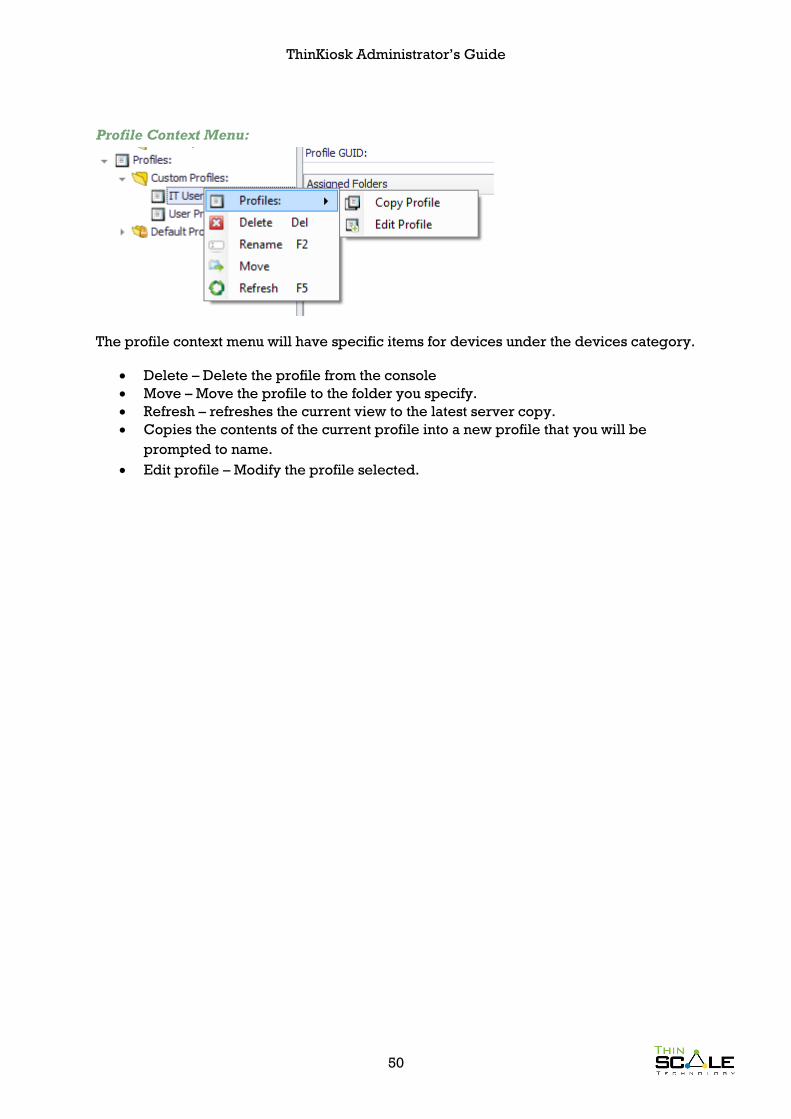
Profile Context Menu:
The profile context menu will have specific items for devices under the devices category.
Delete – Delete the profile from the console
Move – Move the profile to the folder you specify.
Refresh – refreshes the current view to the latest server copy.
Copies the contents of the current profile into a new profile that you will be
prompted to name.
Edit profile – Modify the profile selected.
ThinKiosk Administrator’s Guide
51
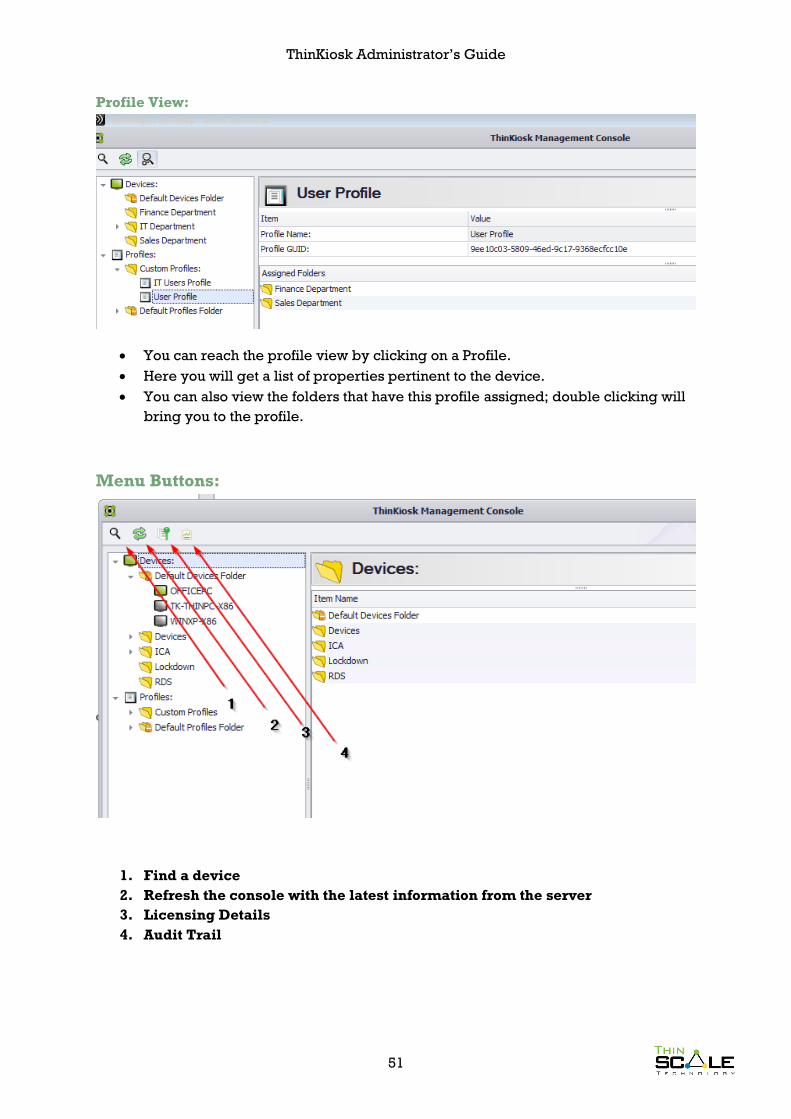
Profile View:
You can reach the profile view by clicking on a Profile.
Here you will get a list of properties pertinent to the device.
You can also view the folders that have this profile assigned; double clicking will
bring you to the profile.
Menu Buttons:
1. Find a device
2. Refresh the console with the latest information from the server
3. Licensing Details
4. Audit Trail
ThinKiosk Administrator’s Guide
52
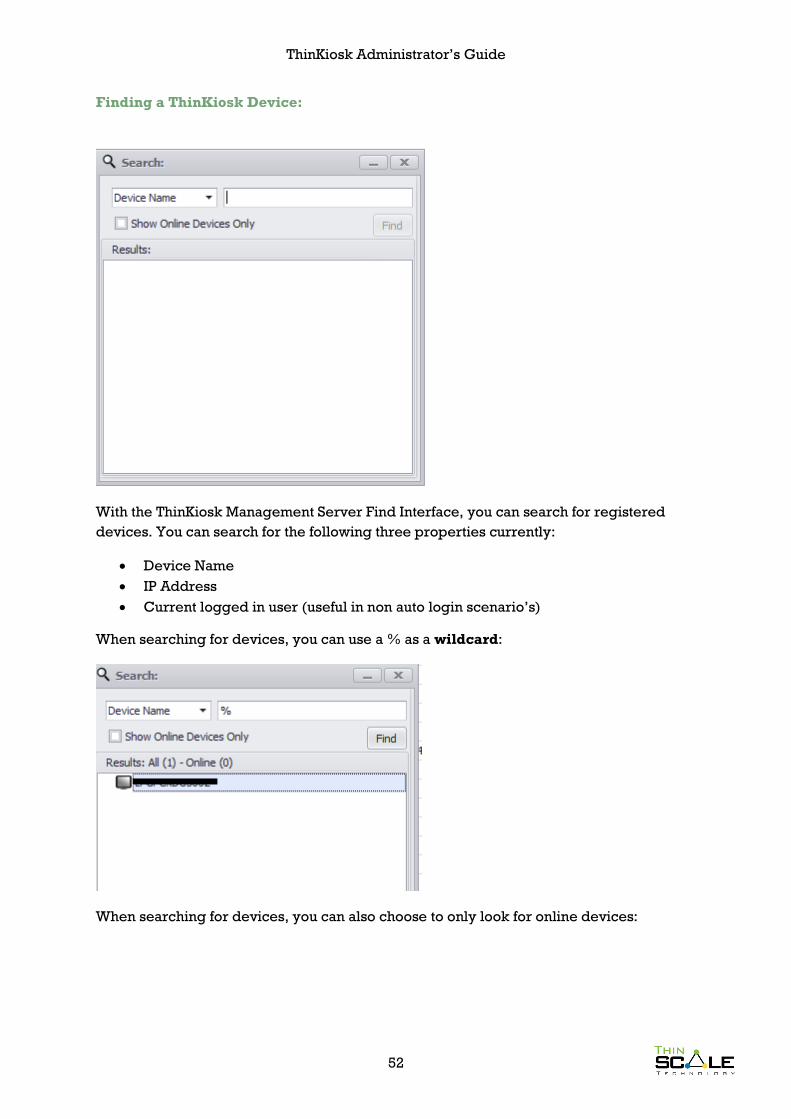
Finding a ThinKiosk Device:
With the ThinKiosk Management Server Find Interface, you can search for registered
devices. You can search for the following three properties currently:
Device Name
IP Address
Current logged in user (useful in non auto login scenario’s)
When searching for devices, you can use a % as a wildcard:
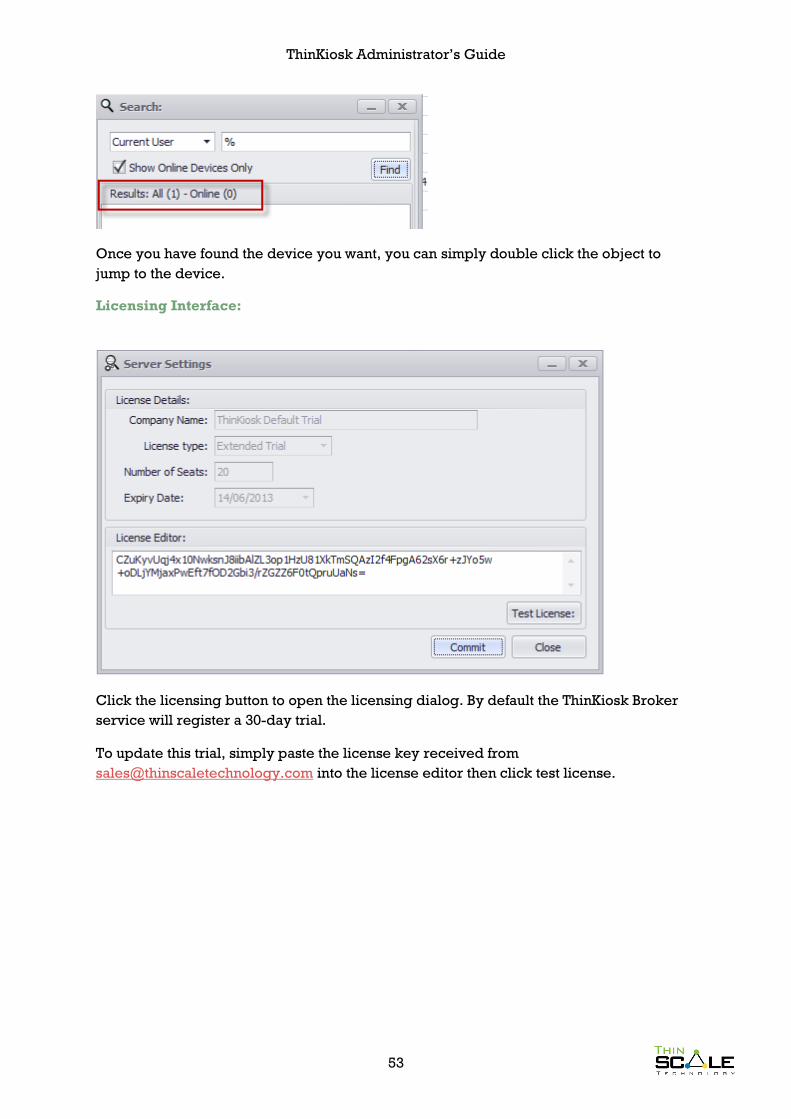
When searching for devices, you can also choose to only look for online devices:
ThinKiosk Administrator’s Guide
53
Once you have found the device you want, you can simply double click the object to
jump to the device.
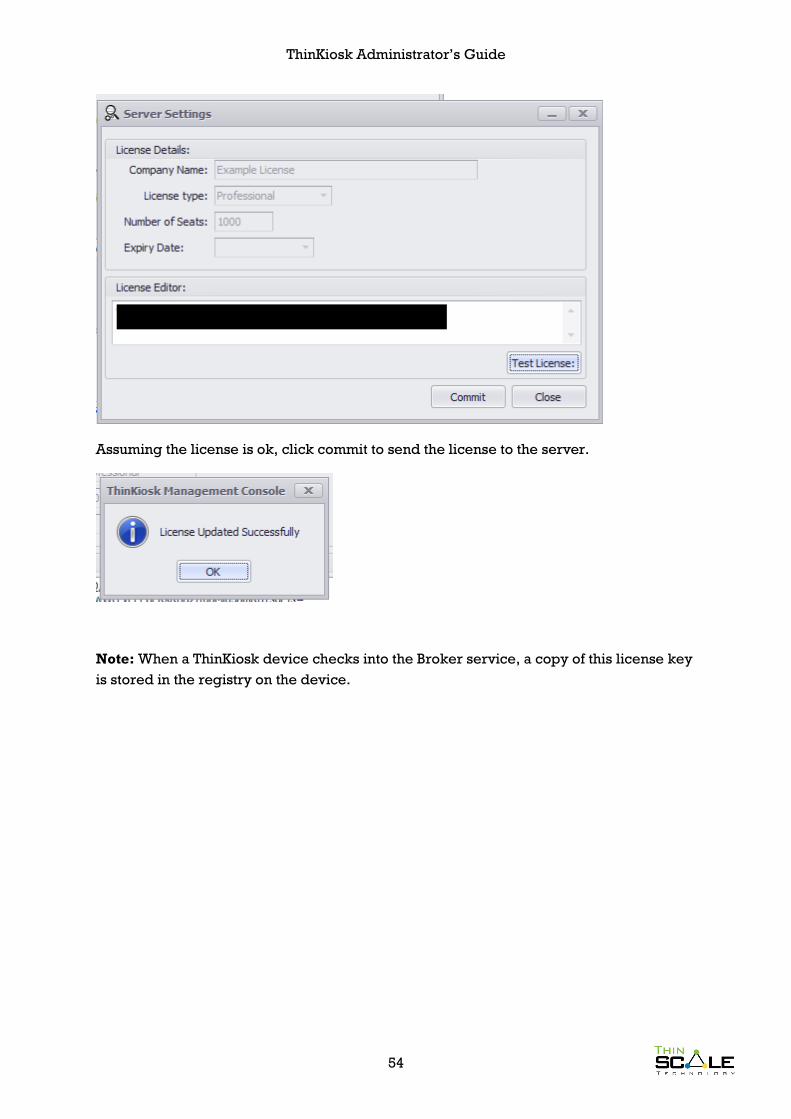
Licensing Interface:
Click the licensing button to open the licensing dialog. By default the ThinKiosk Broker
service will register a 30-day trial.
To update this trial, simply paste the license key received from
[email protected] into the license editor then click test license.
ThinKiosk Administrator’s Guide
54
Assuming the license is ok, click commit to send the license to the server.
Note: When a ThinKiosk device checks into the Broker service, a copy of this license key
is stored in the registry on the device.
ThinKiosk Administrator’s Guide
55
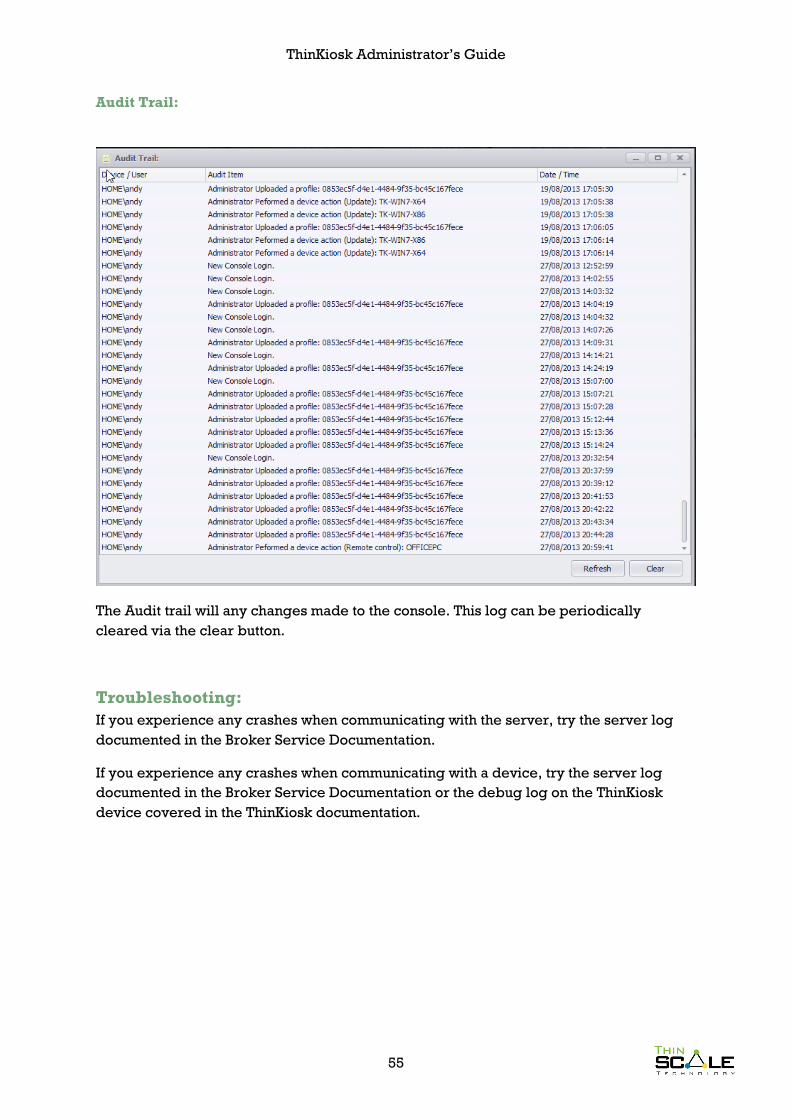
Audit Trail:
The Audit trail will any changes made to the console. This log can be periodically
cleared via the clear button.
Troubleshooting:
If you experience any crashes when communicating with the server, try the server log
documented in the Broker Service Documentation.
If you experience any crashes when communicating with a device, try the server log
documented in the Broker Service Documentation or the debug log on the ThinKiosk
device covered in the ThinKiosk documentation.

ThinKiosk Administrator’s Guide
56
ThinKiosk Profile Editor:
The ThinKiosk Profile editor has been completely overhauled to store all ThinKiosk
related information in xml format for ease of deployment and modification.
NOTE: No changes are committed until you press save!
Appearance:
The ThinKiosk Profile editor will appear differently in two scenarios:
When used from the ThinKiosk management Console:
A “Profile Details” heading will appear, this is for ease of labelling your profiles.
ThinKiosk Administrator’s Guide
57
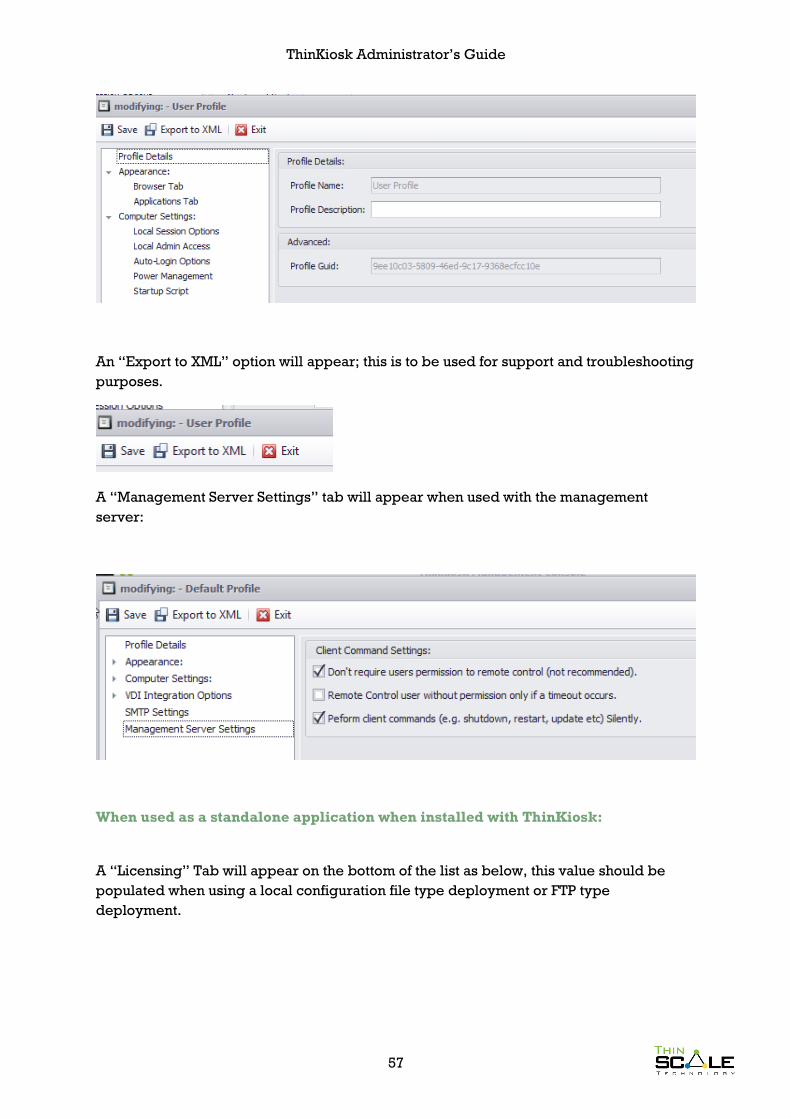
An “Export to XML” option will appear; this is to be used for support and troubleshooting
purposes.
A “Management Server Settings” tab will appear when used with the management
server:
When used as a standalone application when installed with ThinKiosk:
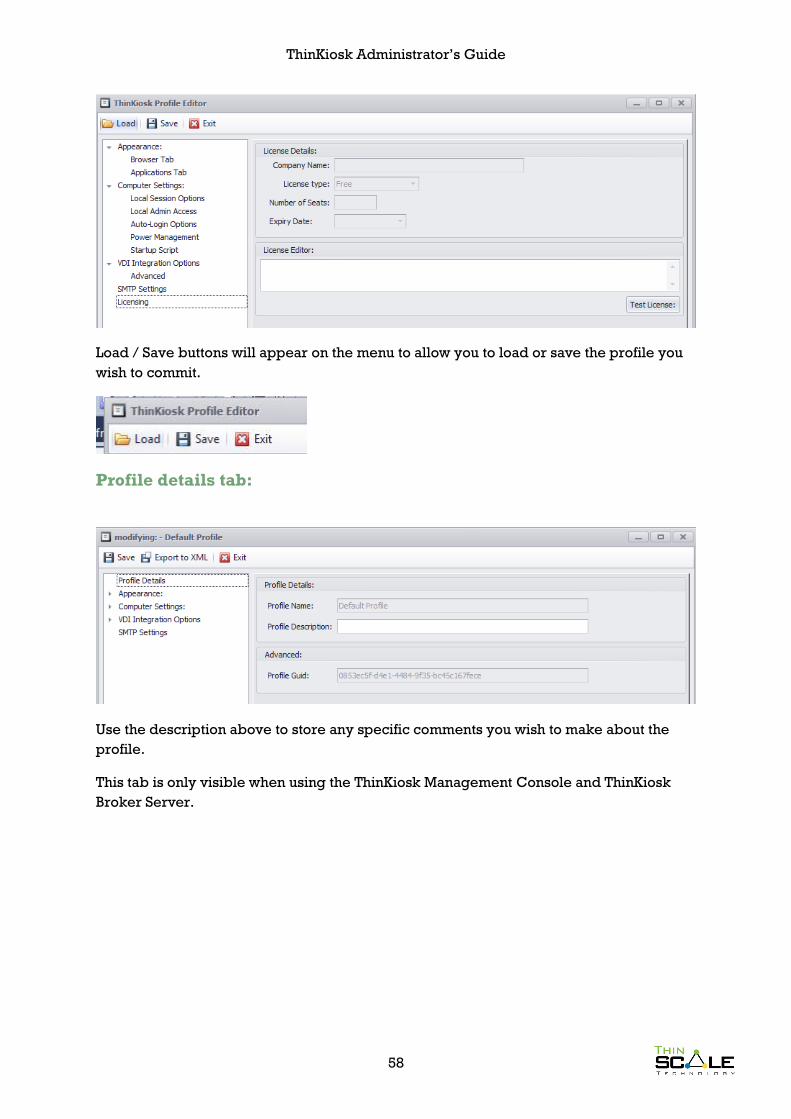
A “Licensing” Tab will appear on the bottom of the list as below, this value should be
populated when using a local configuration file type deployment or FTP type
deployment.
ThinKiosk Administrator’s Guide
58
Load / Save buttons will appear on the menu to allow you to load or save the profile you
wish to commit.
Profile details tab:
Use the description above to store any specific comments you wish to make about the
profile.
This tab is only visible when using the ThinKiosk Management Console and ThinKiosk
Broker Server.
ThinKiosk Administrator’s Guide
59
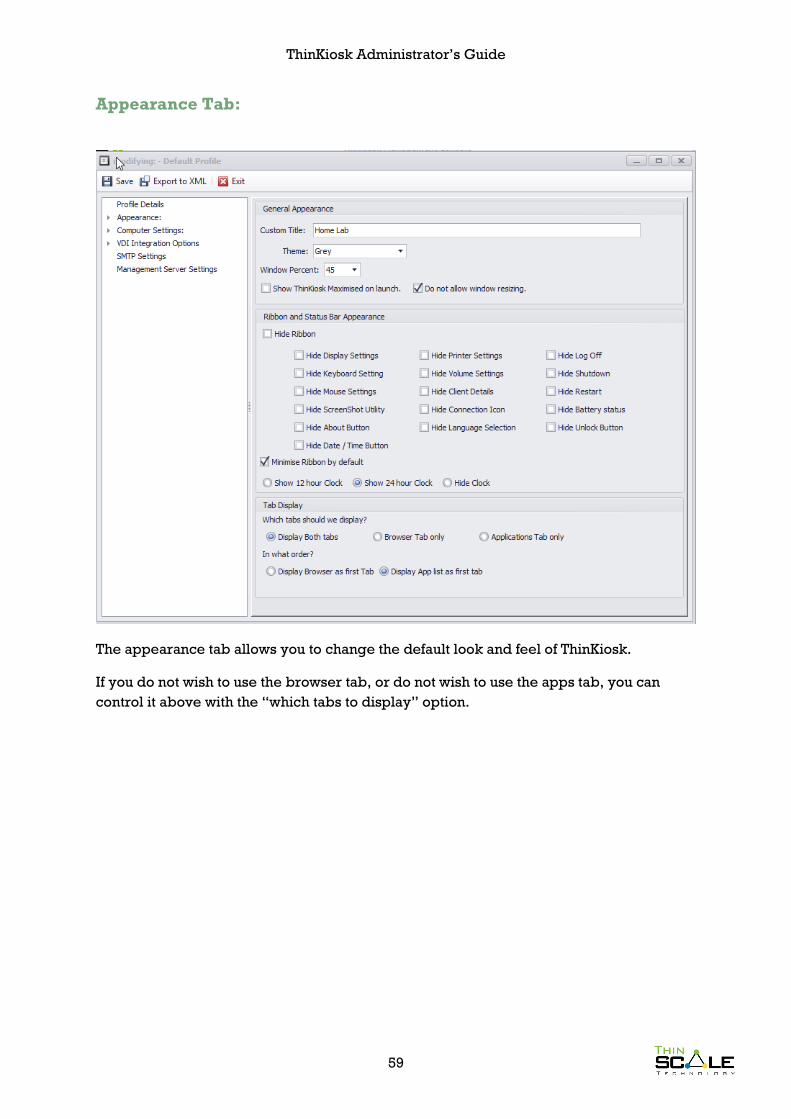
Appearance Tab:
The appearance tab allows you to change the default look and feel of ThinKiosk.
If you do not wish to use the browser tab, or do not wish to use the apps tab, you can
control it above with the “which tabs to display” option.
ThinKiosk Administrator’s Guide
60
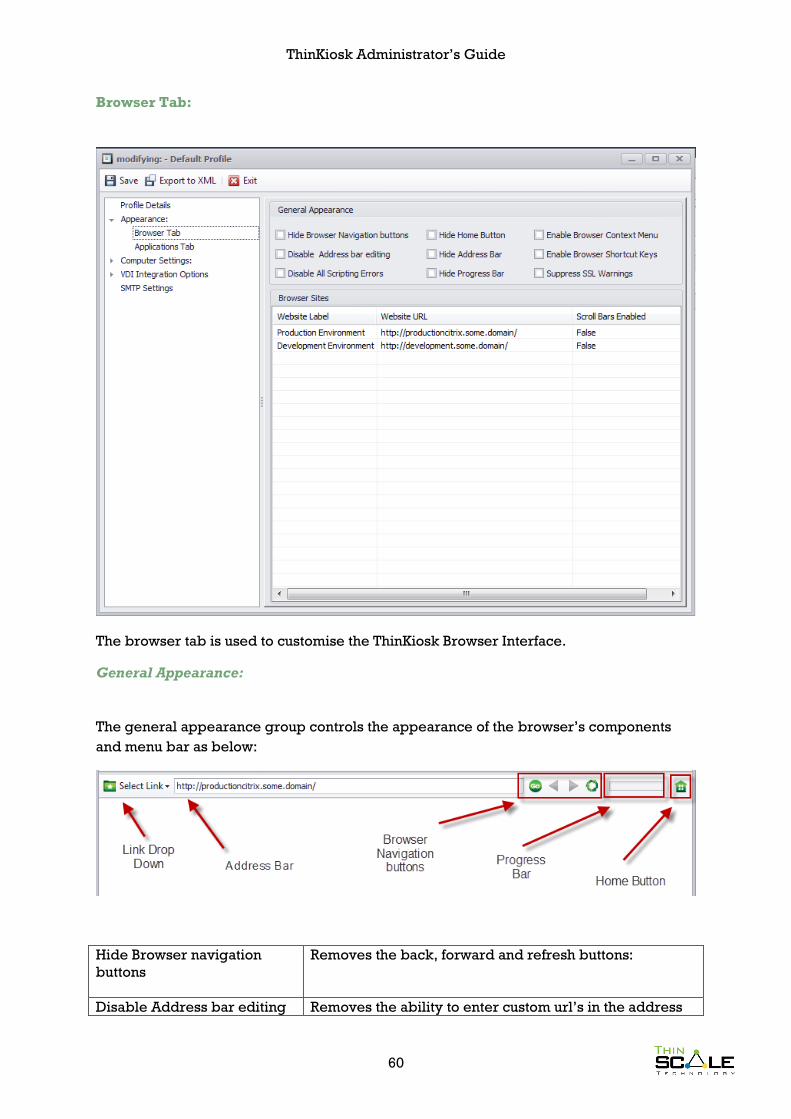
Browser Tab:
The browser tab is used to customise the ThinKiosk Browser Interface.
General Appearance:
The general appearance group controls the appearance of the browser’s components
and menu bar as below:
Hide Browser navigation
buttons
Removes the back, forward and refresh buttons:
Disable Address bar editing Removes the ability to enter custom url’s in the address
ThinKiosk Administrator’s Guide
61
bar.
Disable all scripting errors By default ThinKiosk will circumvent a lot of script errors,
in the unlikely situation where a website is throwing a
scripting error, you can disable it here.
Hide Home Button Hides the Home Button
Hide Address Bar Hides the address bar (not recommended)
Hide Progress Bar Hides the Progress bar (not recommended)
Enable Browser context
menu
Enables the right click context menu on the browser
Enable Browser Shortcut
keys
Enables the browser shortcut keys (back, forward, print,
etc.)
Suppress SSL warnings This option will auto redirect away
from an SSL error thrown by the
browser if the SSL certificate is
untrusted, mismatched, expired etc.
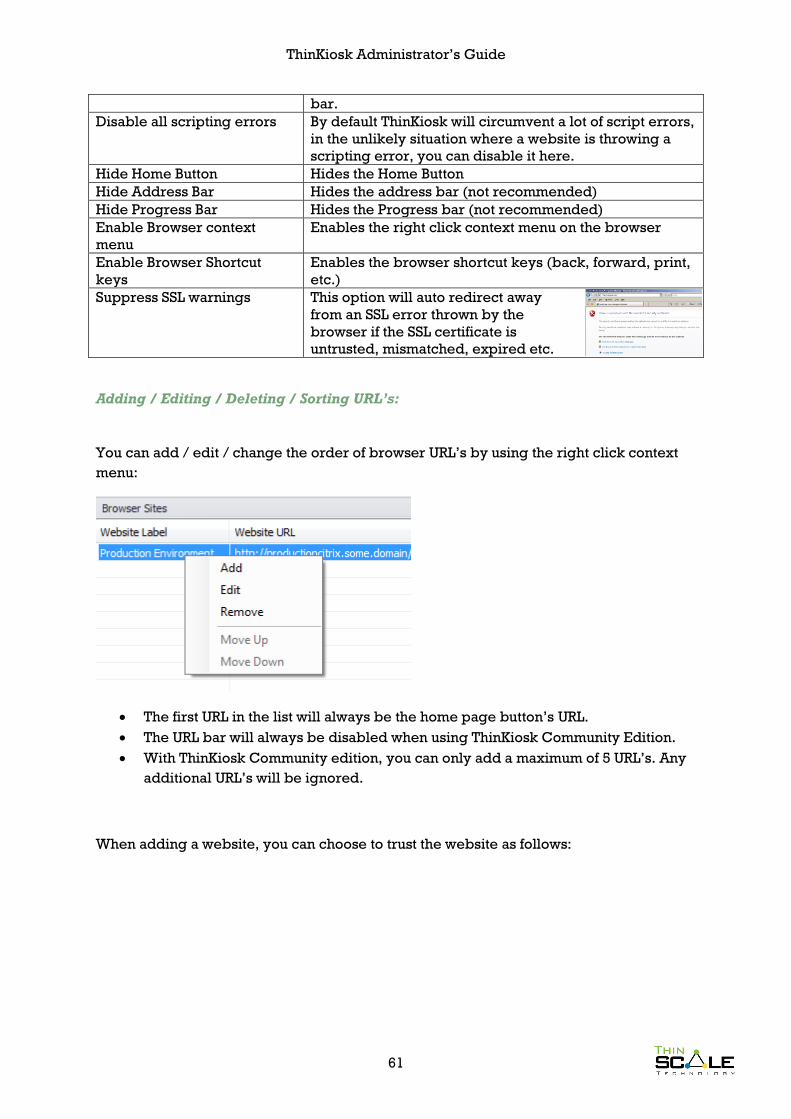
Adding / Editing / Deleting / Sorting URL’s:
You can add / edit / change the order of browser URL’s by using the right click context
menu:
The first URL in the list will always be the home page button’s URL.
The URL bar will always be disabled when using ThinKiosk Community Edition.
With ThinKiosk Community edition, you can only add a maximum of 5 URL’s. Any
additional URL’s will be ignored.
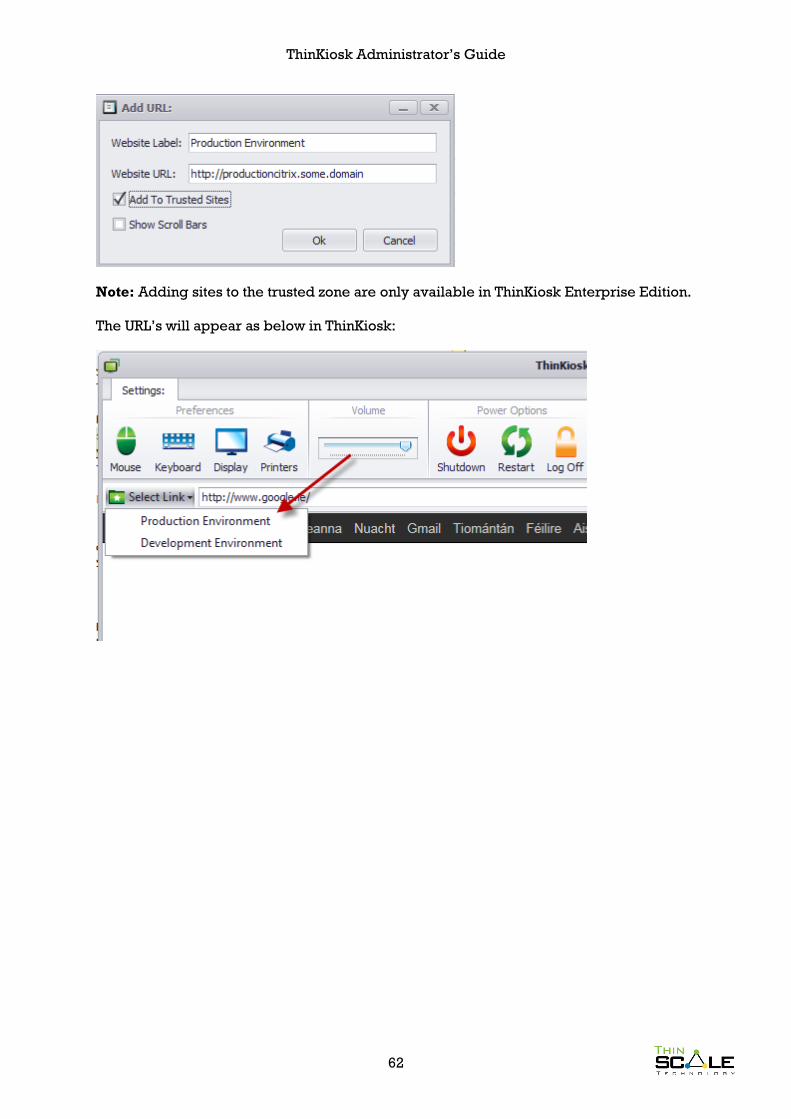
When adding a website, you can choose to trust the website as follows:
ThinKiosk Administrator’s Guide
62
Note: Adding sites to the trusted zone are only available in ThinKiosk Enterprise Edition.
The URL’s will appear as below in ThinKiosk:
ThinKiosk Administrator’s Guide
63
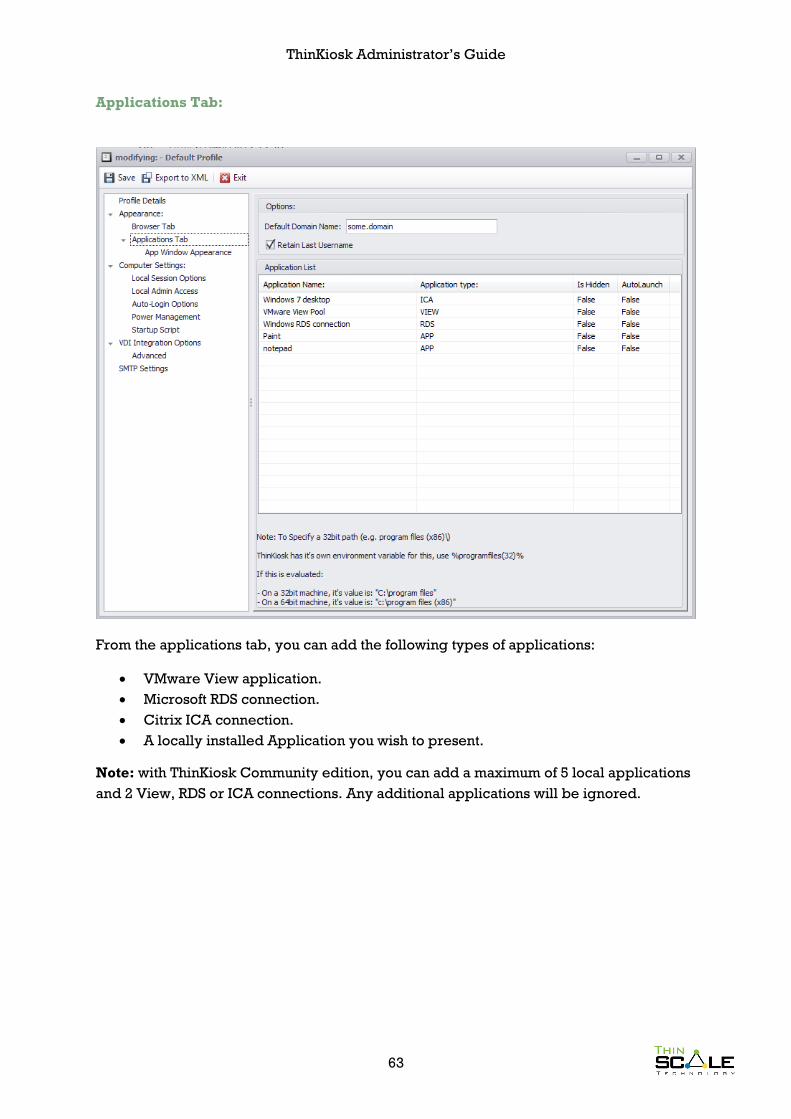
Applications Tab:
From the applications tab, you can add the following types of applications:
VMware View application.
Microsoft RDS connection.
Citrix ICA connection.
A locally installed Application you wish to present.
Note: with ThinKiosk Community edition, you can add a maximum of 5 local applications
and 2 View, RDS or ICA connections. Any additional applications will be ignored.
ThinKiosk Administrator’s Guide
64
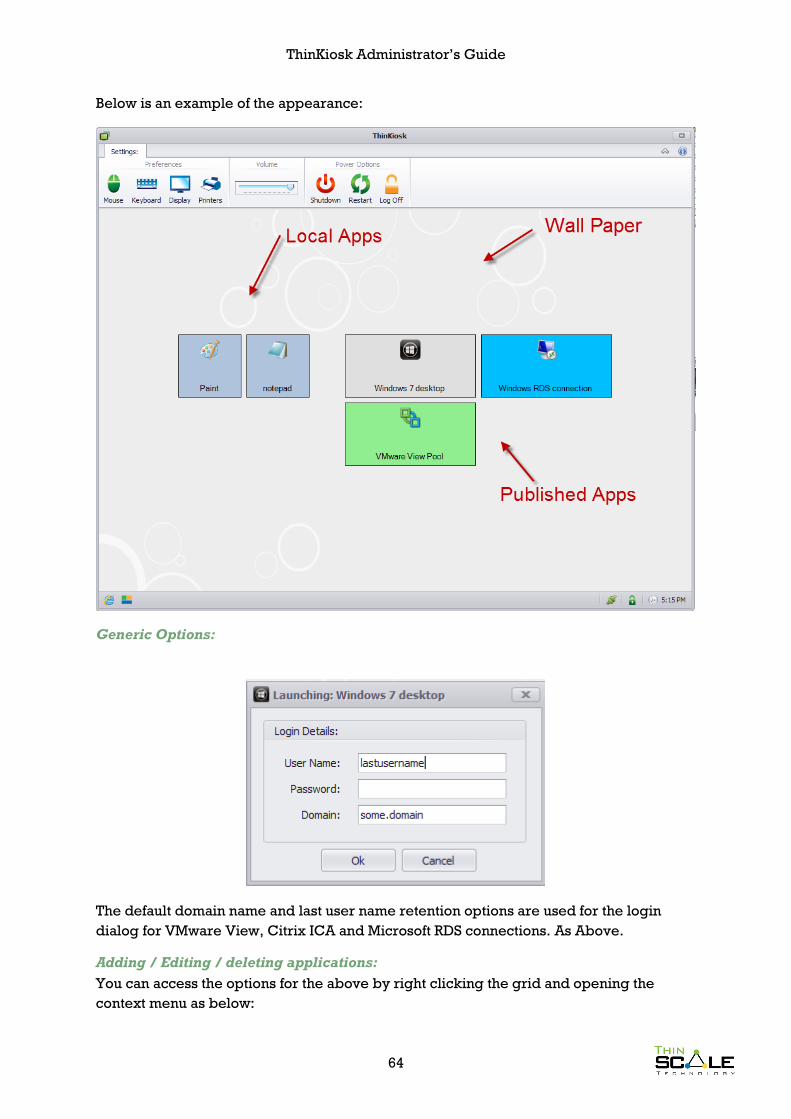
Below is an example of the appearance:
Generic Options:
The default domain name and last user name retention options are used for the login
dialog for VMware View, Citrix ICA and Microsoft RDS connections. As Above.
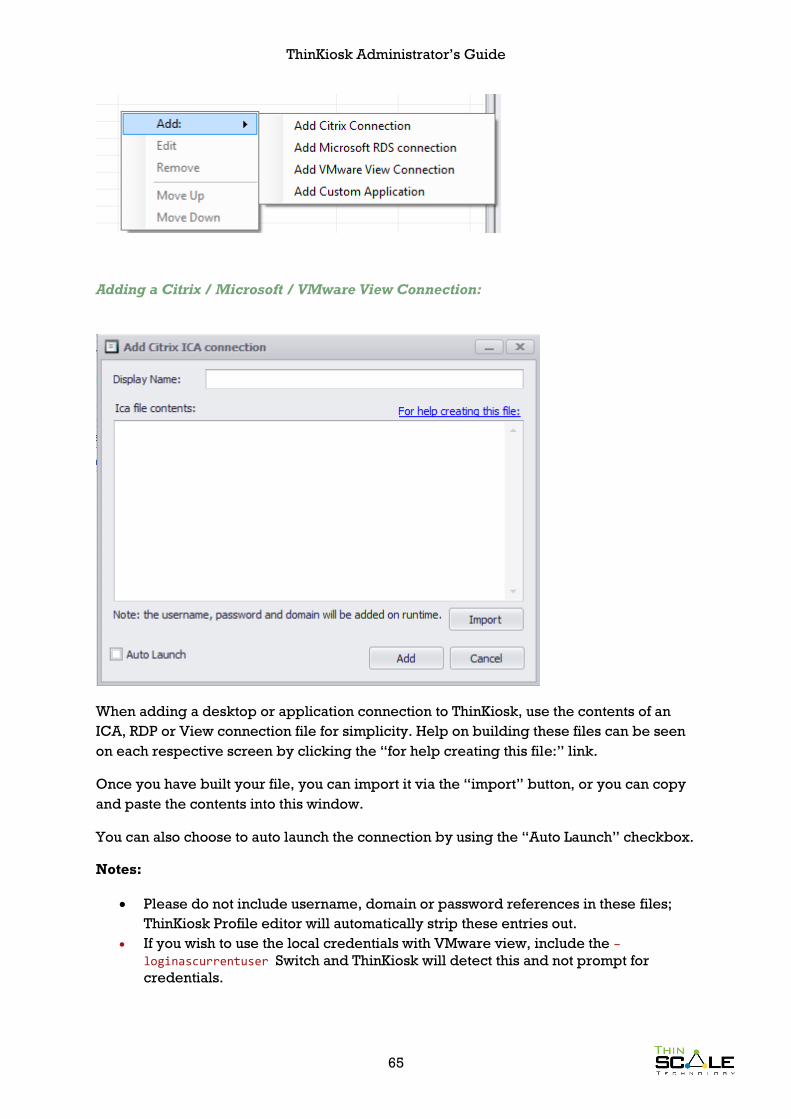
Adding / Editing / deleting applications:
You can access the options for the above by right clicking the grid and opening the
context menu as below:
ThinKiosk Administrator’s Guide
65
Adding a Citrix / Microsoft / VMware View Connection:
When adding a desktop or application connection to ThinKiosk, use the contents of an
ICA, RDP or View connection file for simplicity. Help on building these files can be seen
on each respective screen by clicking the “for help creating this file:” link.
Once you have built your file, you can import it via the “import” button, or you can copy
and paste the contents into this window.
You can also choose to auto launch the connection by using the “Auto Launch” checkbox.
Notes:
Please do not include username, domain or password references in these files;
ThinKiosk Profile editor will automatically strip these entries out.
If you wish to use the local credentials with VMware view, include the –
loginascurrentuser Switch and ThinKiosk will detect this and not prompt for
credentials.
ThinKiosk Administrator’s Guide
66
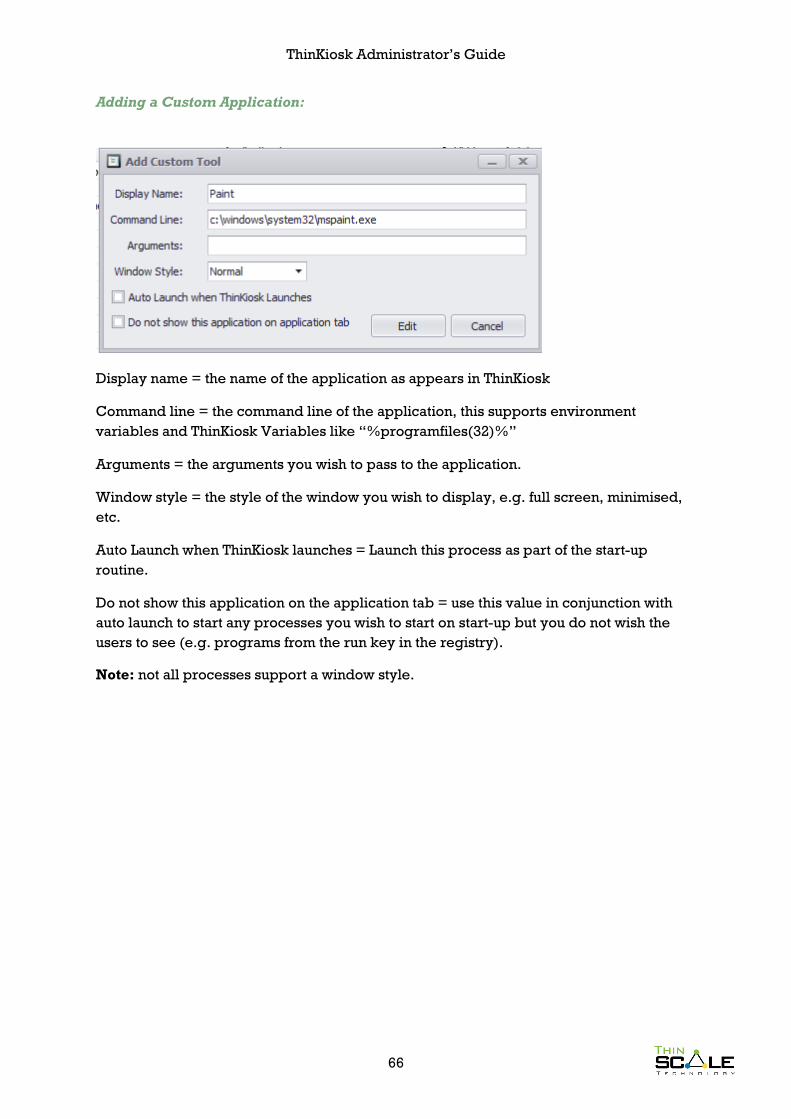
Adding a Custom Application:
Display name = the name of the application as appears in ThinKiosk
Command line = the command line of the application, this supports environment
variables and ThinKiosk Variables like “%programfiles(32)%”
Arguments = the arguments you wish to pass to the application.
Window style = the style of the window you wish to display, e.g. full screen, minimised,
etc.
Auto Launch when ThinKiosk launches = Launch this process as part of the start-up
routine.
Do not show this application on the application tab = use this value in conjunction with
auto launch to start any processes you wish to start on start-up but you do not wish the
users to see (e.g. programs from the run key in the registry).
Note: not all processes support a window style.
ThinKiosk Administrator’s Guide
67
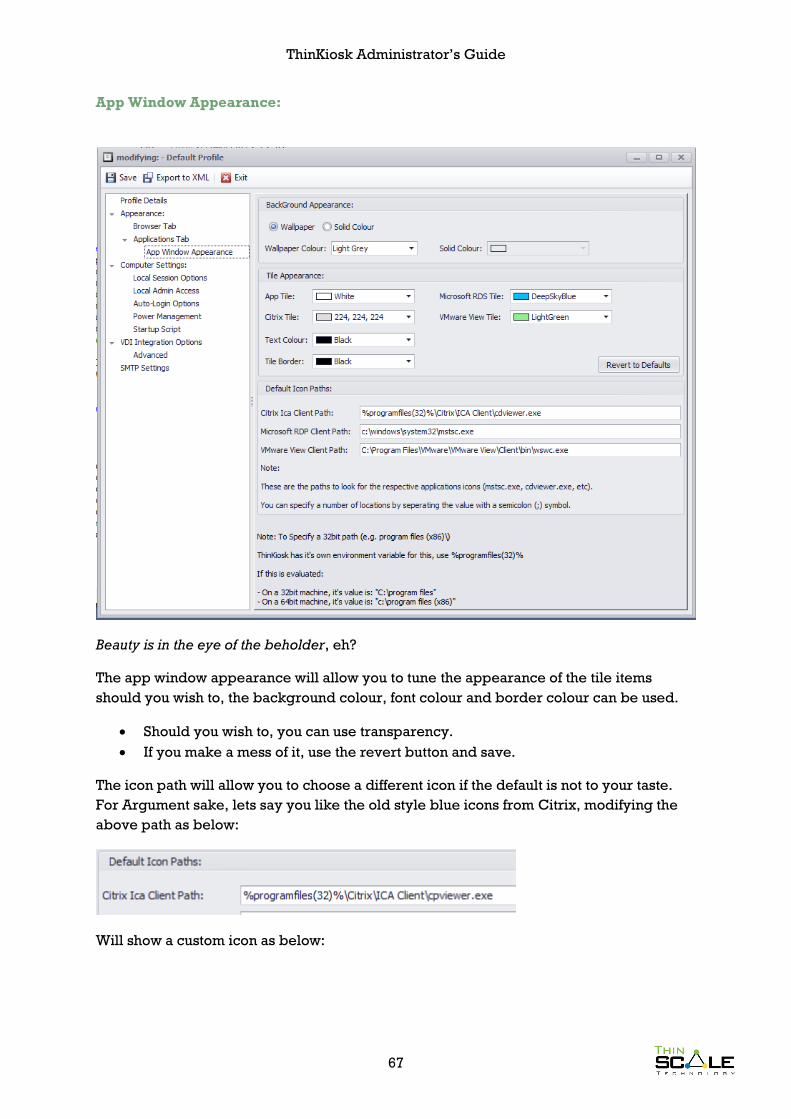
App Window Appearance:
Beauty is in the eye of the beholder, eh?
The app window appearance will allow you to tune the appearance of the tile items
should you wish to, the background colour, font colour and border colour can be used.
Should you wish to, you can use transparency.
If you make a mess of it, use the revert button and save.
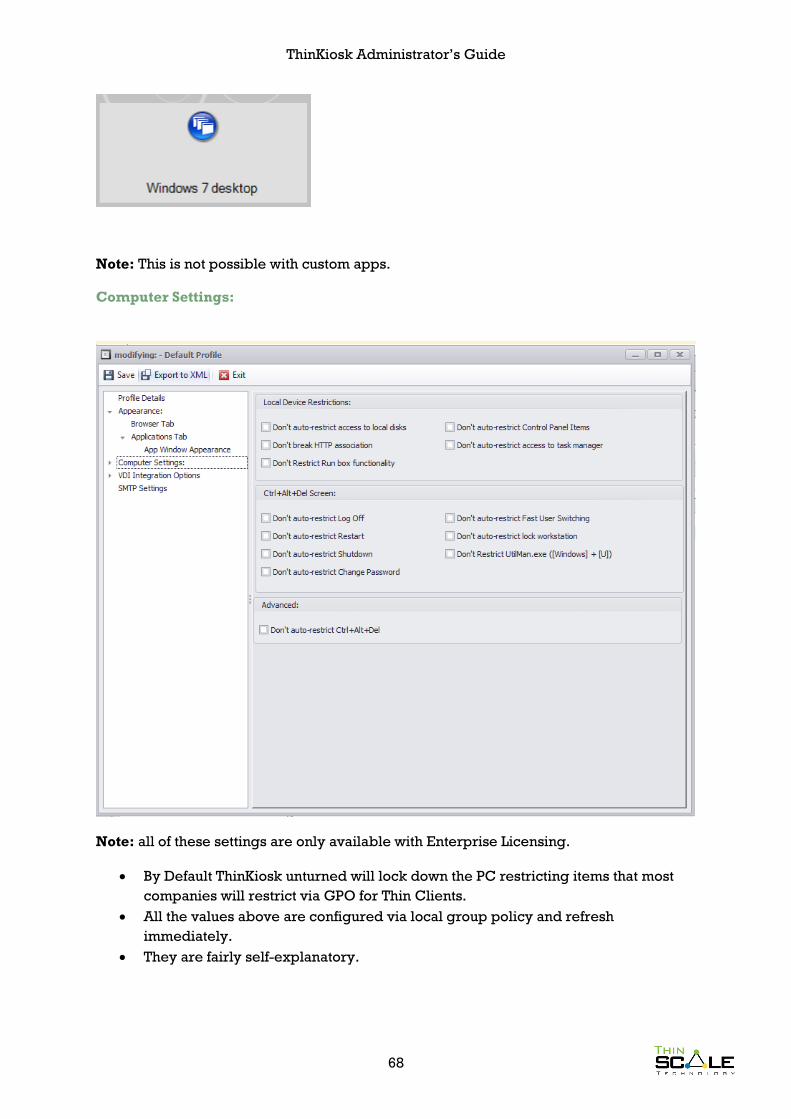
The icon path will allow you to choose a different icon if the default is not to your taste.
For Argument sake, lets say you like the old style blue icons from Citrix, modifying the
above path as below:
Will show a custom icon as below:
ThinKiosk Administrator’s Guide
68
Note: This is not possible with custom apps.
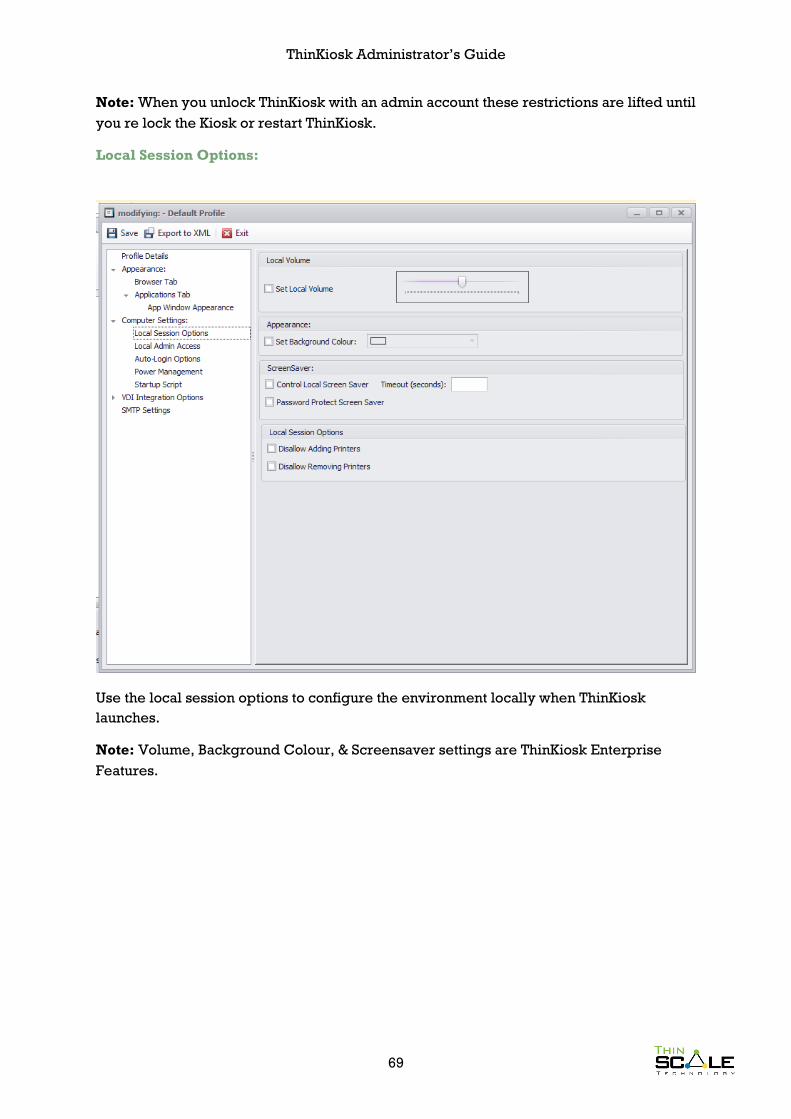
Computer Settings:
Note: all of these settings are only available with Enterprise Licensing.
By Default ThinKiosk unturned will lock down the PC restricting items that most
companies will restrict via GPO for Thin Clients.
All the values above are configured via local group policy and refresh
immediately.
They are fairly self-explanatory.
ThinKiosk Administrator’s Guide
69
Note: When you unlock ThinKiosk with an admin account these restrictions are lifted until
you re lock the Kiosk or restart ThinKiosk.
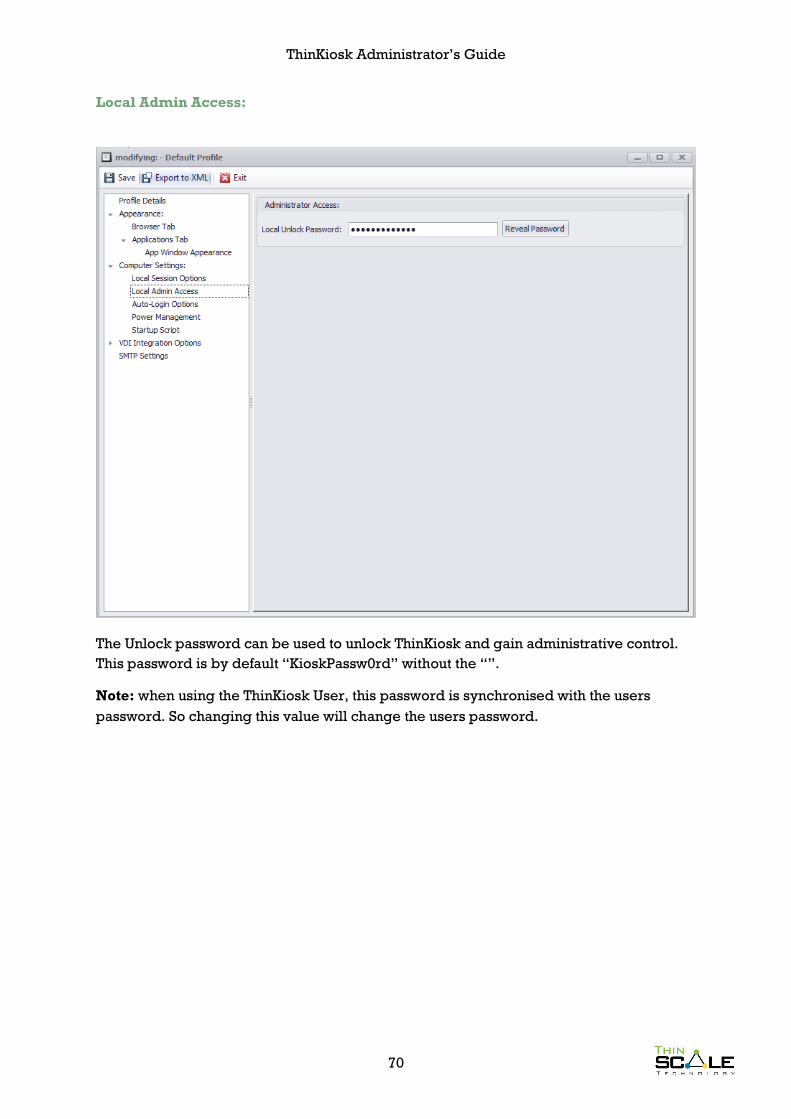
Local Session Options:
Use the local session options to configure the environment locally when ThinKiosk
launches.
Note: Volume, Background Colour, & Screensaver settings are ThinKiosk Enterprise
Features.
ThinKiosk Administrator’s Guide
70
Local Admin Access:
The Unlock password can be used to unlock ThinKiosk and gain administrative control.
This password is by default “KioskPassw0rd” without the “”.
Note: when using the ThinKiosk User, this password is synchronised with the users
password. So changing this value will change the users password.
ThinKiosk Administrator’s Guide
71
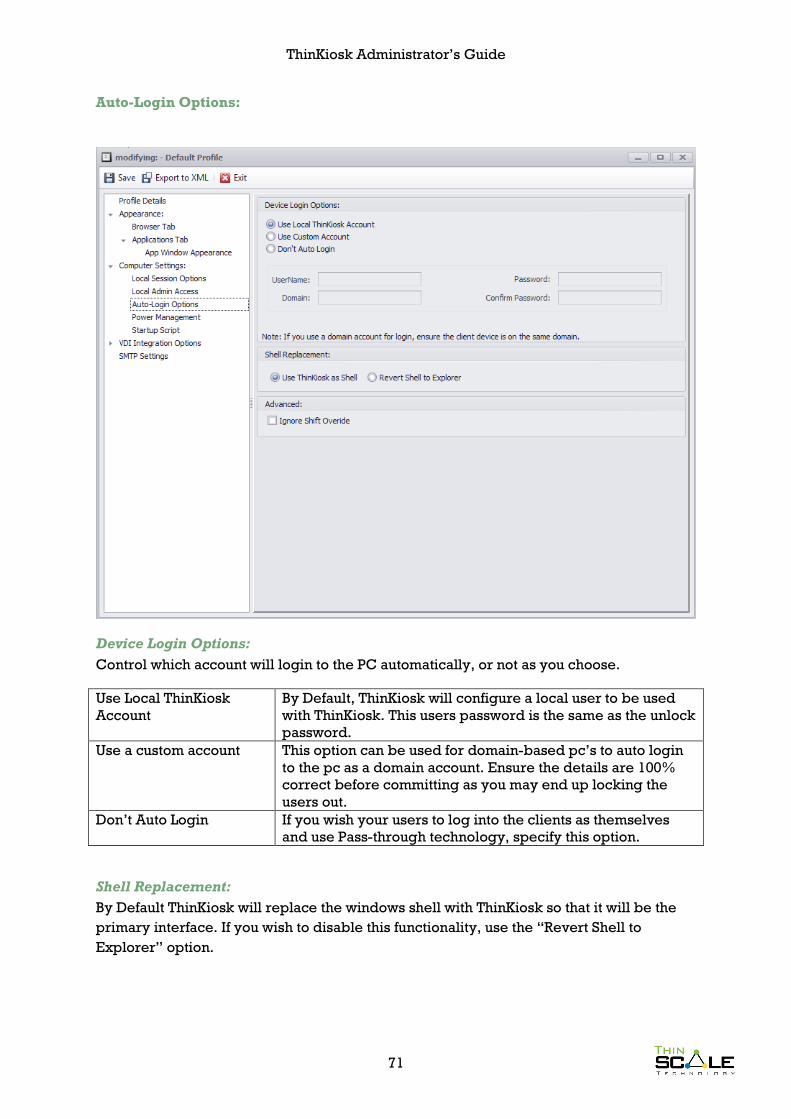
Auto-Login Options:
Device Login Options:
Control which account will login to the PC automatically, or not as you choose.
Use Local ThinKiosk
Account
By Default, ThinKiosk will configure a local user to be used
with ThinKiosk. This users password is the same as the unlock
password.
Use a custom account This option can be used for domain-based pc’s to auto login
to the pc as a domain account. Ensure the details are 100%
correct before committing as you may end up locking the
users out.
Don’t Auto Login If you wish your users to log into the clients as themselves
and use Pass-through technology, specify this option.
Shell Replacement:
By Default ThinKiosk will replace the windows shell with ThinKiosk so that it will be the
primary interface. If you wish to disable this functionality, use the “Revert Shell to
Explorer” option.
ThinKiosk Administrator’s Guide
72
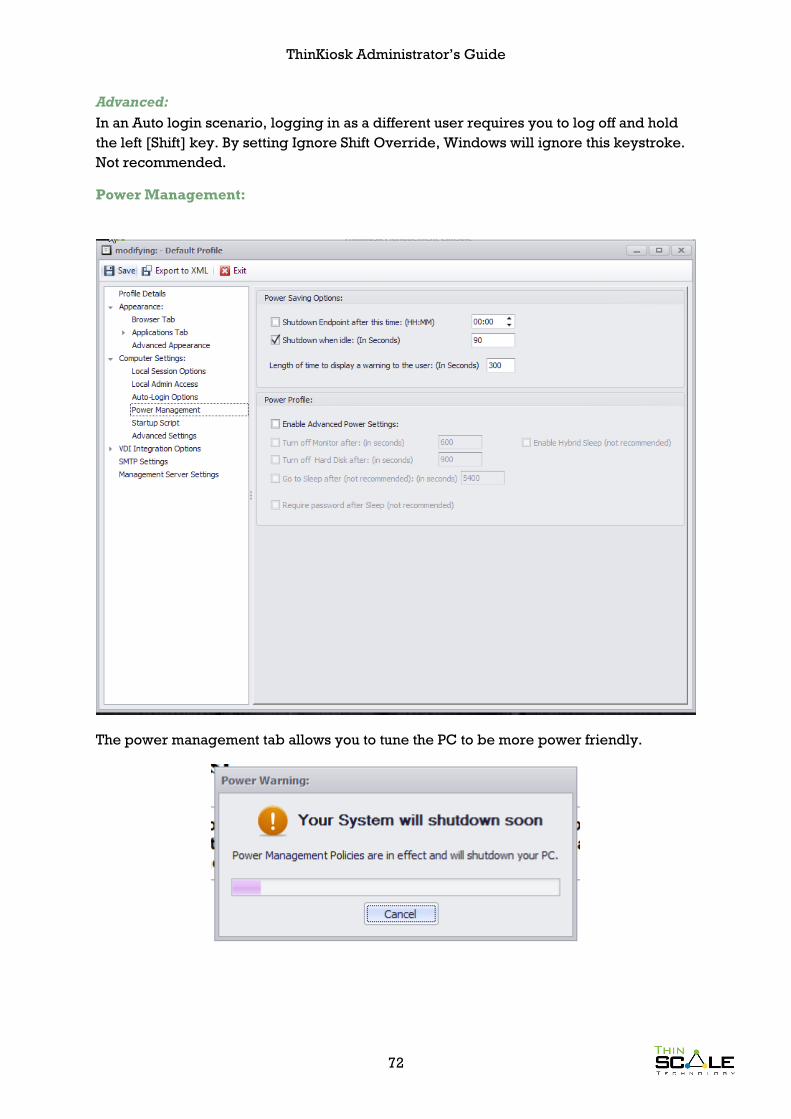
Advanced:
In an Auto login scenario, logging in as a different user requires you to log off and hold
the left [Shift] key. By setting Ignore Shift Override, Windows will ignore this keystroke.
Not recommended.
Power Management:
The power management tab allows you to tune the PC to be more power friendly.
ThinKiosk Administrator’s Guide
73
Shutdown the endpoint after this time:
By specifying this value, ThinKiosk will attempt to turn the PC off at the time specified.
The user will receive a warning as specified in the “Length of time to display a warning to
the user” setting.
Note: If the pc boots after this time of day, the power action is suppressed until the
following day.
Shutdown when Idle:
If the pc goes idle (no input) for the length of time specified, ThinKiosk will attempt to
turn the PC off. A warning will be specified to the user for the length of time specified in
the Length of time to display a warning to the user” setting.
Length of Time to Display a warning to the user:
When a power action is deemed appropriate, a warning message will be displayed to
the user as above. Configure this value to specify the timeout before a power action is
taken without the users consent.
Power Profile:
If the kiosk PC is running windows Vista or higher, you can configure a windows power
profile for the device.
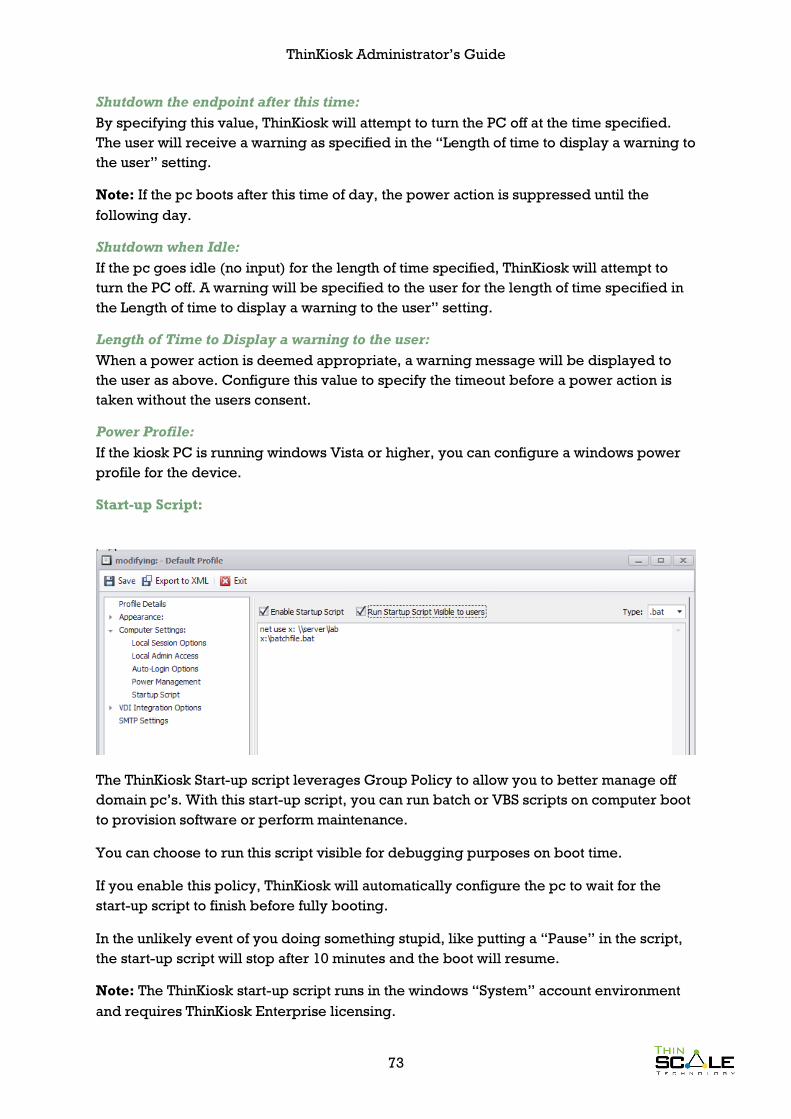
Start-up Script:
The ThinKiosk Start-up script leverages Group Policy to allow you to better manage off
domain pc’s. With this start-up script, you can run batch or VBS scripts on computer boot
to provision software or perform maintenance.
You can choose to run this script visible for debugging purposes on boot time.
If you enable this policy, ThinKiosk will automatically configure the pc to wait for the
start-up script to finish before fully booting.
In the unlikely event of you doing something stupid, like putting a “Pause” in the script,
the start-up script will stop after 10 minutes and the boot will resume.
Note: The ThinKiosk start-up script runs in the windows “System” account environment
and requires ThinKiosk Enterprise licensing.
ThinKiosk Administrator’s Guide
74
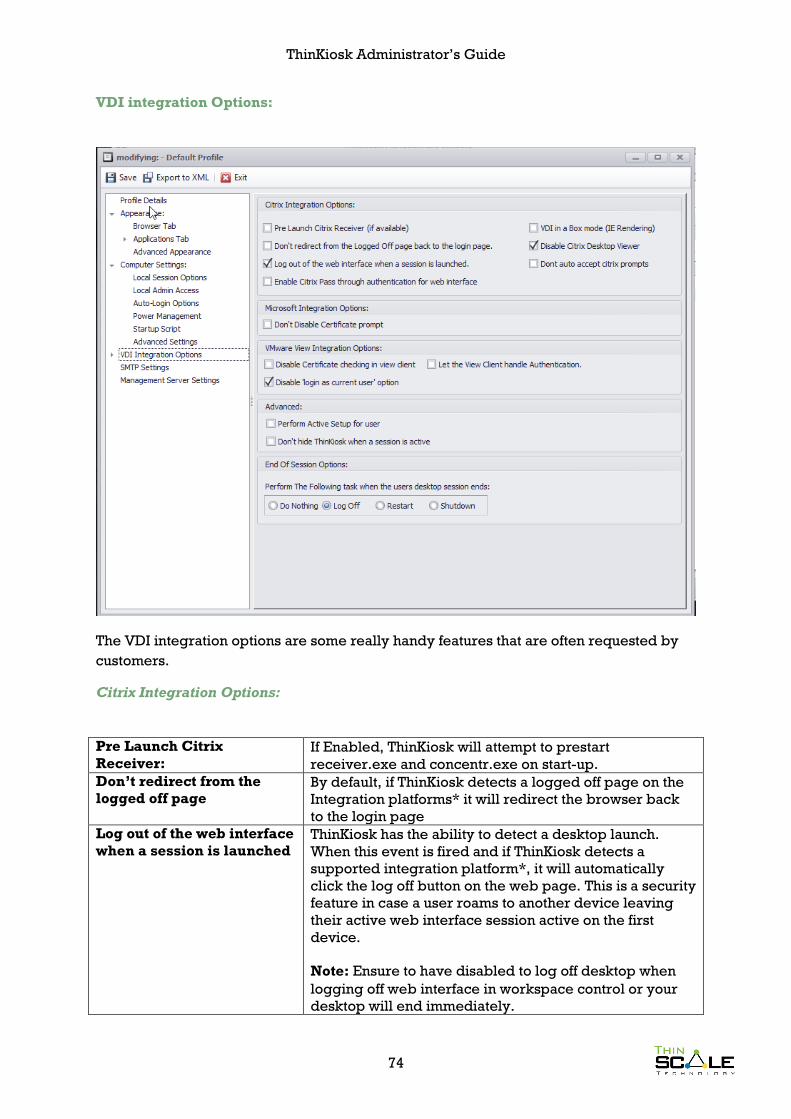
VDI integration Options:
The VDI integration options are some really handy features that are often requested by
customers.
Citrix Integration Options:
Pre Launch Citrix
Receiver: If Enabled, ThinKiosk will attempt to prestart
receiver.exe and concentr.exe on start-up.
Don’t redirect from the
logged off page By default, if ThinKiosk detects a logged off page on the
Integration platforms* it will redirect the browser back
to the login page
Log out of the web interface
when a session is launched ThinKiosk has the ability to detect a desktop launch.
When this event is fired and if ThinKiosk detects a
supported integration platform*, it will automatically
click the log off button on the web page. This is a security
feature in case a user roams to another device leaving
their active web interface session active on the first
device.
Note: Ensure to have disabled to log off desktop when
logging off web interface in workspace control or your
desktop will end immediately.
ThinKiosk Administrator’s Guide
75
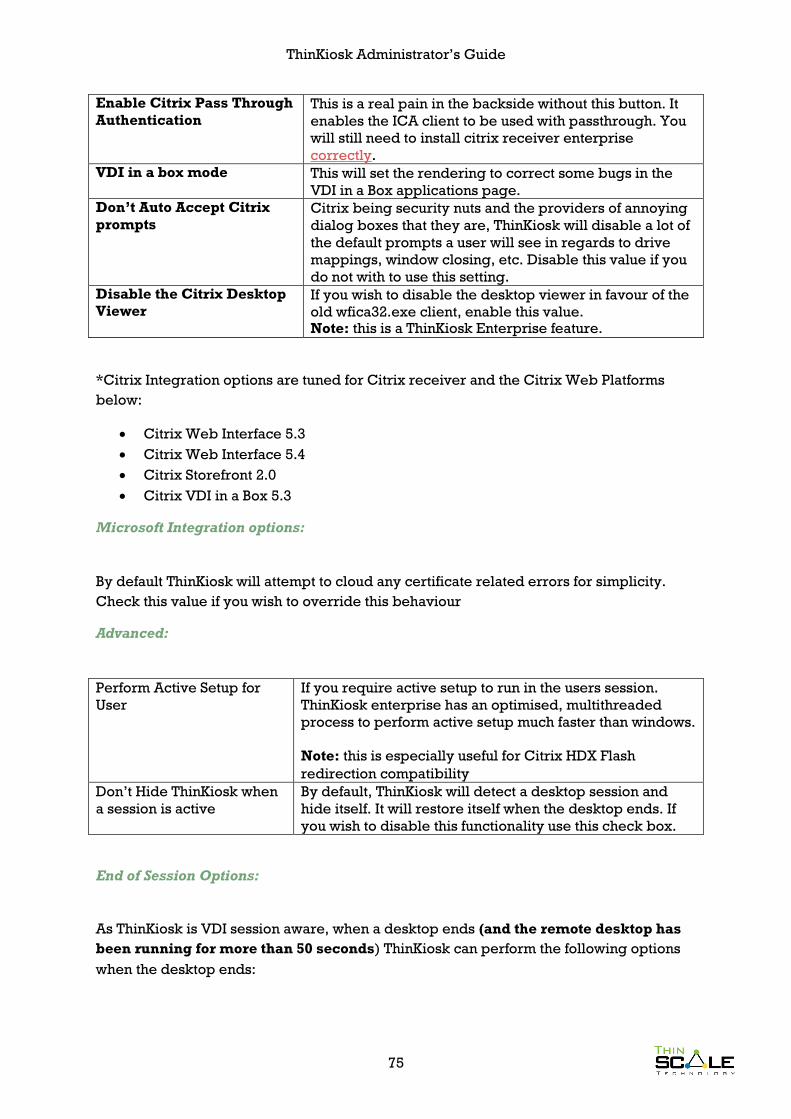
Enable Citrix Pass Through
Authentication This is a real pain in the backside without this button. It
enables the ICA client to be used with passthrough. You
will still need to install citrix receiver enterprise
correctly.
VDI in a box mode This will set the rendering to correct some bugs in the
VDI in a Box applications page.
Don’t Auto Accept Citrix
prompts Citrix being security nuts and the providers of annoying
dialog boxes that they are, ThinKiosk will disable a lot of
the default prompts a user will see in regards to drive
mappings, window closing, etc. Disable this value if you
do not with to use this setting.
Disable the Citrix Desktop
Viewer If you wish to disable the desktop viewer in favour of the
old wfica32.exe client, enable this value. Note: this is a ThinKiosk Enterprise feature.
*Citrix Integration options are tuned for Citrix receiver and the Citrix Web Platforms
below:
Citrix Web Interface 5.3
Citrix Web Interface 5.4
Citrix Storefront 2.0
Citrix VDI in a Box 5.3
Microsoft Integration options:
By default ThinKiosk will attempt to cloud any certificate related errors for simplicity.
Check this value if you wish to override this behaviour
Advanced:
Perform Active Setup for
User
If you require active setup to run in the users session.
ThinKiosk enterprise has an optimised, multithreaded
process to perform active setup much faster than windows.
Note: this is especially useful for Citrix HDX Flash
redirection compatibility
Don’t Hide ThinKiosk when
a session is active
By default, ThinKiosk will detect a desktop session and
hide itself. It will restore itself when the desktop ends. If
you wish to disable this functionality use this check box.
End of Session Options:
As ThinKiosk is VDI session aware, when a desktop ends (and the remote desktop has
been running for more than 50 seconds) ThinKiosk can perform the following options
when the desktop ends:
ThinKiosk Administrator’s Guide
76
Do Nothing (ThinKiosk will appear again and the next user is ready immediately
to jump in).
Log off (log off the current user, logs back in if you are using Auto Login)
Restart (restart the pc, useful for RAM caching machines)
Shutdown (save the planet!)
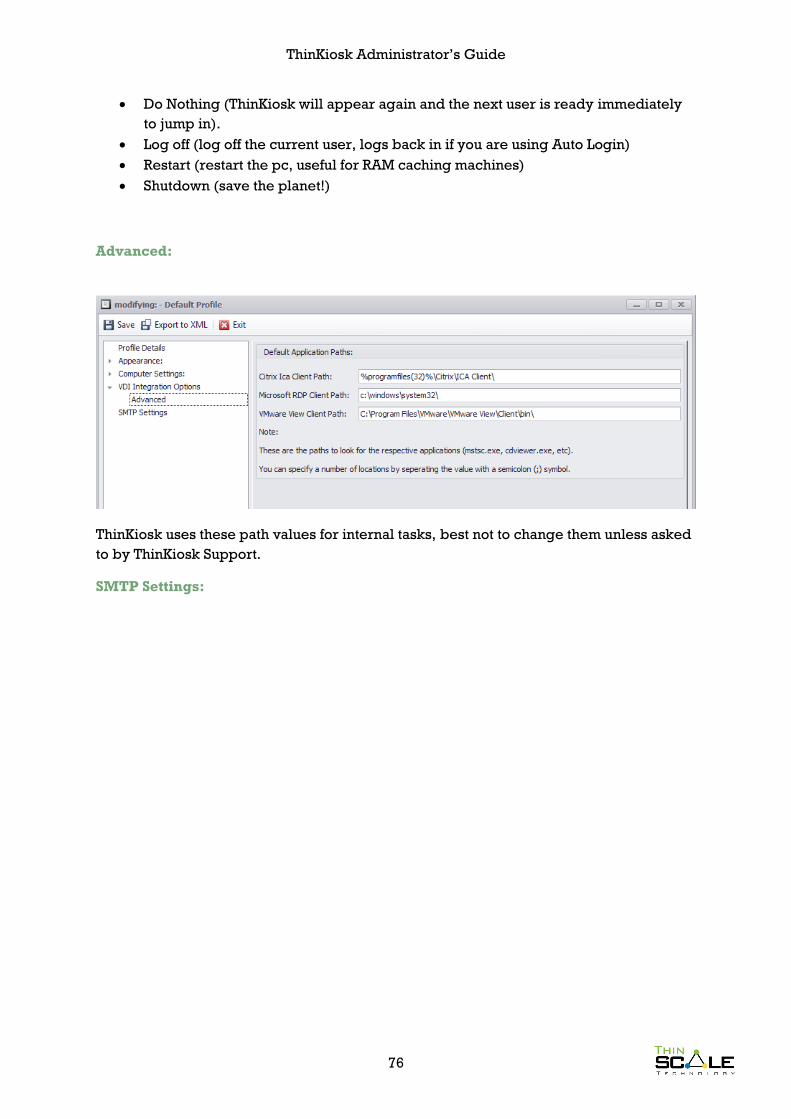
Advanced:
ThinKiosk uses these path values for internal tasks, best not to change them unless asked
to by ThinKiosk Support.
SMTP Settings:

ThinKiosk Administrator’s Guide
77
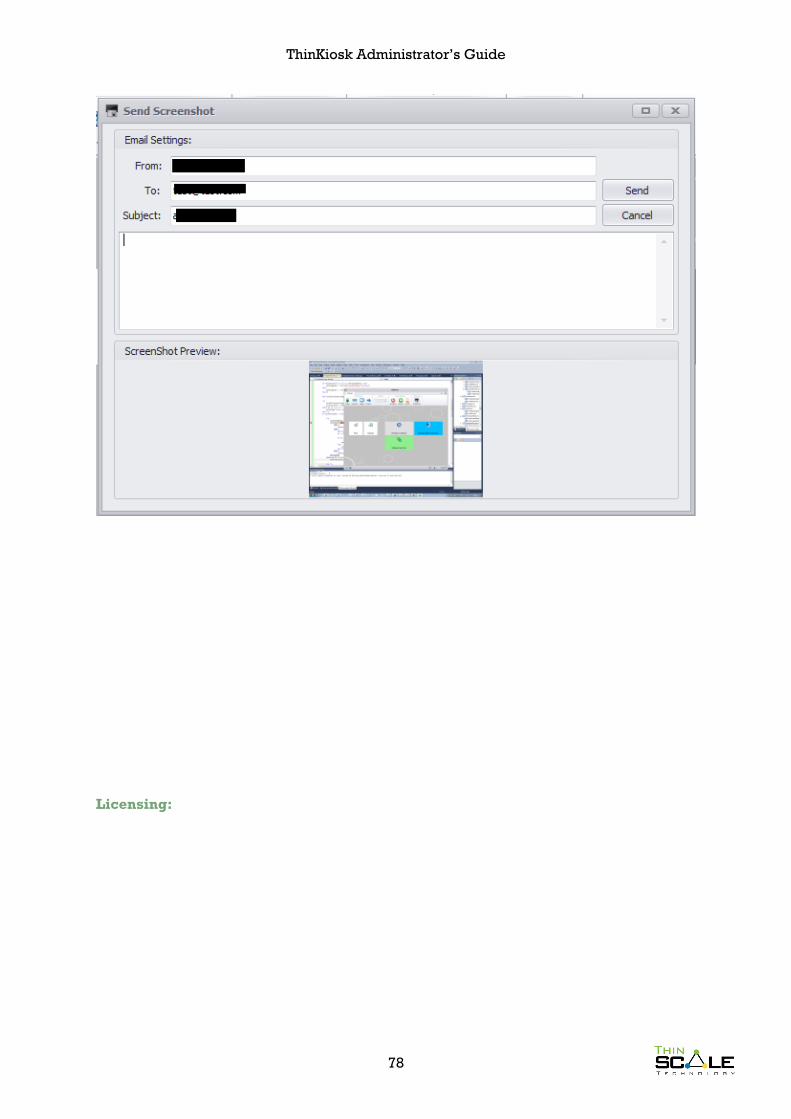
If you wish to enable the ability to send screenshots for support purposes via email, you
can enable these settings.
When configured correctly, the screenshot button will appear in ThinKiosk as below:
When the user clicks this button, it will take a screenshot and allow you to send it to the
support department:
ThinKiosk Administrator’s Guide
78
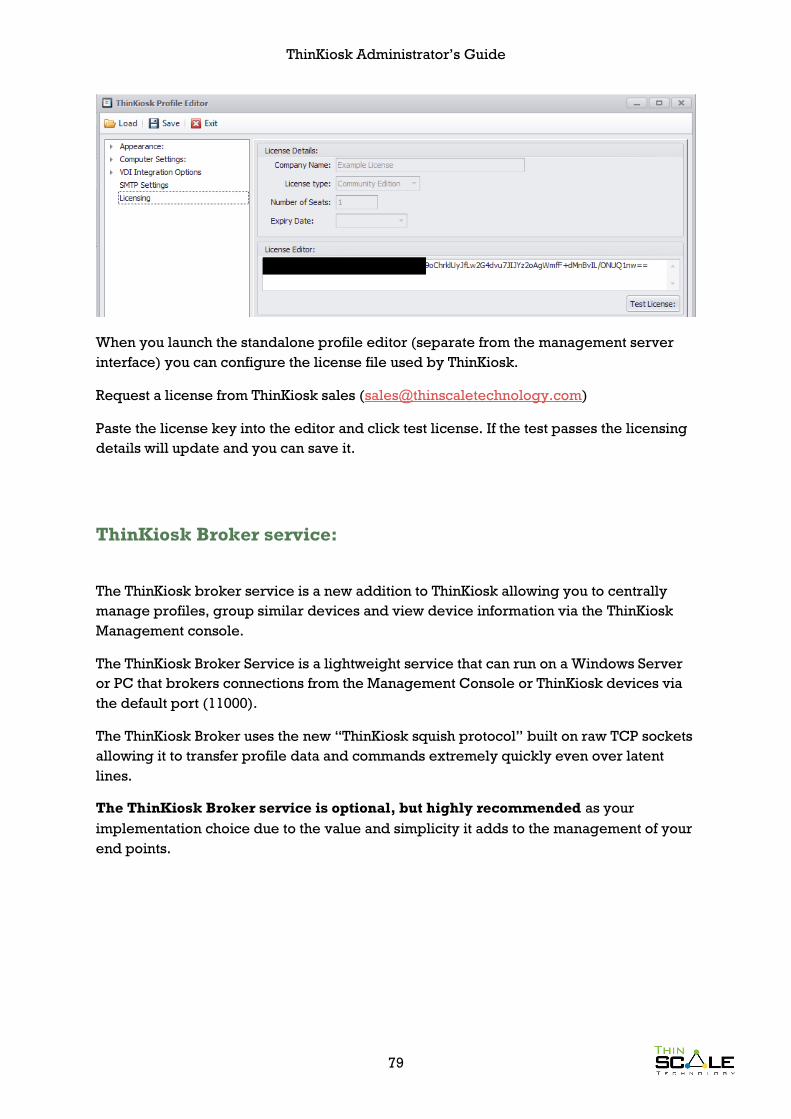
Licensing:
ThinKiosk Administrator’s Guide
79
When you launch the standalone profile editor (separate from the management server
interface) you can configure the license file used by ThinKiosk.
Request a license from ThinKiosk sales ([email protected])
Paste the license key into the editor and click test license. If the test passes the licensing
details will update and you can save it.
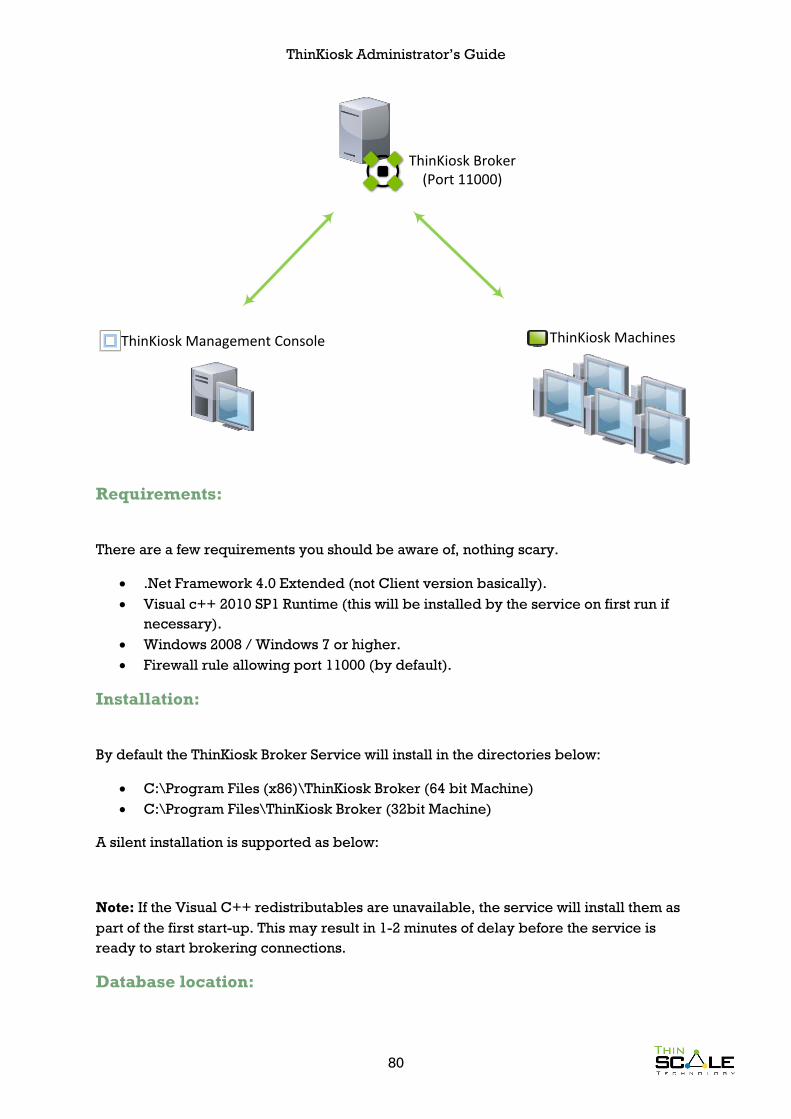
ThinKiosk Broker service:
The ThinKiosk broker service is a new addition to ThinKiosk allowing you to centrally
manage profiles, group similar devices and view device information via the ThinKiosk
Management console.
The ThinKiosk Broker Service is a lightweight service that can run on a Windows Server
or PC that brokers connections from the Management Console or ThinKiosk devices via
the default port (11000).
The ThinKiosk Broker uses the new “ThinKiosk squish protocol” built on raw TCP sockets
allowing it to transfer profile data and commands extremely quickly even over latent
lines.
The ThinKiosk Broker service is optional, but highly recommended as your
implementation choice due to the value and simplicity it adds to the management of your
end points.
ThinKiosk Administrator’s Guide
80
ThinKiosk Broker (Port 11000)
ThinKiosk MachinesThinKiosk Management Console
Requirements:
There are a few requirements you should be aware of, nothing scary.
.Net Framework 4.0 Extended (not Client version basically).
Visual c++ 2010 SP1 Runtime (this will be installed by the service on first run if
necessary).
Windows 2008 / Windows 7 or higher.
Firewall rule allowing port 11000 (by default).
Installation:
By default the ThinKiosk Broker Service will install in the directories below:
C:\Program Files (x86)\ThinKiosk Broker (64 bit Machine)
C:\Program Files\ThinKiosk Broker (32bit Machine)
A silent installation is supported as below:
Note: If the Visual C++ redistributables are unavailable, the service will install them as
part of the first start-up. This may result in 1-2 minutes of delay before the service is
ready to start brokering connections.
Database location:
ThinKiosk Administrator’s Guide
81
By default ThinKiosk Broker will install an SQLite database in the installation
directory called mc.s3db.
The database will back itself up during an install or upgrade to mc.s3db_bak.
Note: A Microsoft SQL compatible database connection will be added in the future if
needed.
This database should not be modified by any other tool than the management server under
any circumstances.
Log file:
The ThinKiosk Broker Service will by default log any changes / actions to the log file in
the installation directory. The log file’s name is log.log and is largely only used by
ThinScale support.
If the ThinKiosk Broker Service is restarted it will by default backup this log file to
log.log_old.
Licensing:
The ThinKiosk Broker Service can only be used with Enterprise Licensing. The
community edition cannot be used with the Broker Service.
By default the ThinKiosk Broker Service will install a trial license for 30 Days. Contact
[email protected] for a quote on licensing or an extension of your
license.
Configuring the login password:
Logging in to the console for the first time:
If you have not yet configured the username or password as below, the default values are
as follows:
Username: administrator
Password: Passw0rd
Note: username and password are case sensitive.
Settings:
Although limited, the ThinKiosk Broker Service does have some settings that can be
configured. The Settings are stored in tkservice.exe.config as found below:

ThinKiosk Administrator’s Guide
82
The following login details should be changed to suit your deployment:
Note: Only change these values when the service is stopped or changes cannot be
guaranteed.
AdministratorName The name of the administrative user for accessing the service
via the management console.
AdministratorPassword The Password for the above account for accessing the service
via the management console.
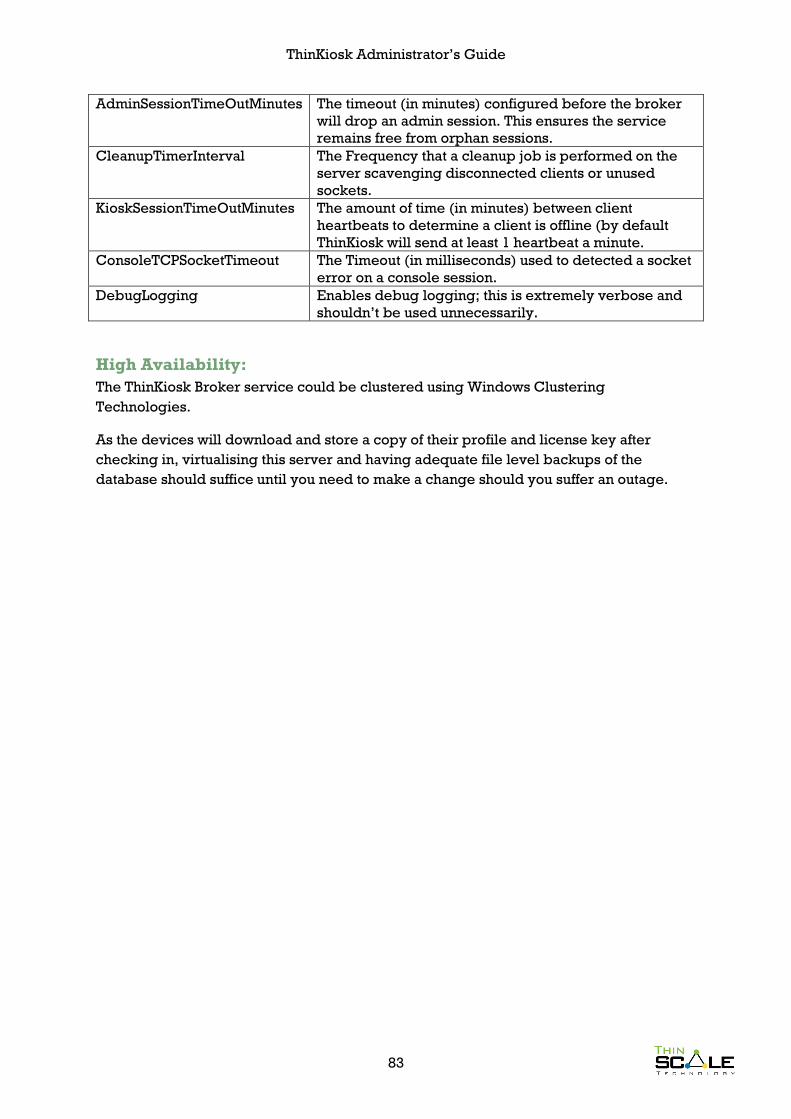
Advanced Settings:
(Don’t tune these values unless instructed to do so by ThinScale Technology support)
TCPSocketPort The Port on Which The broker Listens
KioskTCPSocketTimeOut The Timeout (in milliseconds) used to detected a socket
error on a kiosk
ThinKiosk Administrator’s Guide
83
AdminSessionTimeOutMinutes The timeout (in minutes) configured before the broker
will drop an admin session. This ensures the service
remains free from orphan sessions.
CleanupTimerInterval The Frequency that a cleanup job is performed on the
server scavenging disconnected clients or unused
sockets.
KioskSessionTimeOutMinutes The amount of time (in minutes) between client
heartbeats to determine a client is offline (by default
ThinKiosk will send at least 1 heartbeat a minute.
ConsoleTCPSocketTimeout The Timeout (in milliseconds) used to detected a socket
error on a console session.
DebugLogging Enables debug logging; this is extremely verbose and
shouldn’t be used unnecessarily.
High Availability:
The ThinKiosk Broker service could be clustered using Windows Clustering
Technologies.
As the devices will download and store a copy of their profile and license key after
checking in, virtualising this server and having adequate file level backups of the
database should suffice until you need to make a change should you suffer an outage.
Related Documents