Social Connected 1.2 for Sitecore CMS 6.5 Administrator's and Developer's Guide Rev: 23 May 2016 Sitecore® is a registered trademark. All other brand and product names are the property of their respective holders. The contents of this document are the property of Sitecore. Copyright © 2001-2016 Sitecore. All rights reserved. Social Connected 1.2 for Sitecore CMS 6.5 Administrator's and Developer's Guide A Quick Start Guide and Configuration Reference for Administrators and Developers

Welcome message from author
This document is posted to help you gain knowledge. Please leave a comment to let me know what you think about it! Share it to your friends and learn new things together.
Transcript
Social Connected 1.2 for Sitecore CMS 6.5 Administrator's and Developer's Guide Rev: 23 May 2016
Sitecore® is a registered trademark. All other brand and product names are the property of their respective holders. The contents of this document are the property of Sitecore. Copyright © 2001-2016 Sitecore. All rights reserved.
Social Connected 1.2 for Sitecore CMS 6.5
Administrator's and Developer's Guide A Quick Start Guide and Configuration Reference for Administrators and Developers
Social Connected 1.2 for Sitecore CMS 6.5
Sitecore® is a registered trademark. All other brand and product names are the property of their respective holders. The contents of this document are the property of Sitecore. Copyright © 2001-2016 Sitecore. All rights reserved.
Page 2 of 53
Table of Contents
Chapter 1 Introduction .......................................................................................................................... 3 1.1 Features .................................................................................................................................. 4 1.2 Architectural Requirements and Limitations ........................................................................... 5
Chapter 2 Social Connector ................................................................................................................. 6 2.1 Configuration ........................................................................................................................... 7
2.1.1 Use Case ............................................................................................................................. 7 2.1.2 Configuration Actions .......................................................................................................... 7
2.2 Configuring Access to Social Networks .................................................................................. 9 2.2.1 Creating and Configuring a Facebook Web Application ..................................................... 9 2.2.2 Creating and Configuring a Twitter Web Application ........................................................ 11 2.2.3 Creating and Configuring a LinkedIn Web Application ..................................................... 14 2.2.4 Creating and Configuring a Google+ Web Application ..................................................... 16
2.3 Configuring Access to the Visitor’s Profile Information ......................................................... 20 2.3.1 Web Application Access Request for Facebook, LinkedIn and Google+ ......................... 20 2.3.2 Twitter Web Application Access Request ......................................................................... 21
2.4 Placing Social Connector Controls on a Web Page.............................................................. 22 2.5 Mapping the Fields in the Visitor Profile ................................................................................ 23 2.6 Synchronizing User Information ............................................................................................ 24 2.7 Disabling the Attachment of a Visitor’s Social Network Accounts to their User Profile ........ 25
Chapter 3 Posting Messages to Social Networks when a Goal is Triggered .................................... 26 3.1 Configuration ......................................................................................................................... 27
3.1.1 Use Case ........................................................................................................................... 27 3.1.2 Configuration Actions ........................................................................................................ 27
3.2 Creating a Message .............................................................................................................. 28 3.3 Asking the Visitor if they Want Messages Posted Automatically .......................................... 29 3.4 Placing Goal Context Information in the Message Body ...................................................... 30
Chapter 4 Posting Content Messages to Social Networks ................................................................ 31 4.1 Configuration ......................................................................................................................... 32
4.1.1 Use Case ........................................................................................................................... 32 4.1.2 Configuration Actions ........................................................................................................ 32
URL Generating ......................................................................................................................... 32 4.2 Configuring Access to Social Networks ................................................................................ 33
4.2.1 Facebook ........................................................................................................................... 33 4.2.2 Twitter ................................................................................................................................ 33
4.3 Creating an Account Item ...................................................................................................... 34 4.4 Creating a Message .............................................................................................................. 38 4.5 Tracking Statistics on a Content Message ............................................................................ 40
Chapter 5 Analytics Features ............................................................................................................. 41 5.1 Tracking Campaign Statistics on a Content Message .......................................................... 42 5.2 Putting Like and Tweet Buttons on the Web Page ............................................................... 44 5.3 Tracking Like and Tweet Buttons Usage .............................................................................. 45 5.4 Personalization Rules for the Social Connected Module ...................................................... 46
Chapter 6 Developer’s Notes ............................................................................................................. 48 6.1 The Social Connected Module Pipelines .............................................................................. 49
6.1.1 CreateSocialMessage Pipeline ......................................................................................... 49 6.1.2 ReadSocialMessage Pipeline ........................................................................................... 49 6.1.3 PublishMessage Pipeline .................................................................................................. 49 6.1.4 BuildMessage Pipeline ...................................................................................................... 49 6.1.5 MatchUser Pipeline ........................................................................................................... 50
Chapter 7 Tips and Tricks .................................................................................................................. 51 7.1 What Roles Social Connected Authors Require? ................................................................. 52 7.2 How to Use the Error Handling Mechanism .......................................................................... 53
7.2.1 Error Handling on the Website .......................................................................................... 53

Administrator's and Developer's Guide
Sitecore® is a registered trademark. All other brand and product names are the property of their respective holders. The contents of this document are the property of Sitecore. Copyright © 2001-2016 Sitecore. All rights reserved.
Page 3 of 53
Chapter 1
Introduction
This document is designed for Sitecore administrators and developers. It contains information about how to set up, configure, and tune the module.
The document contains the following chapters:
Chapter 1 — Introduction An introduction to the Sitecore Social Connected module.
Chapter 2 – Social Connector Instructions for administrators about configuring and using the Social Connector.
Chapter 3 – Posting Messages to Social Networks when a Goal is Triggered Instructions for administrators how to configure Goal Messaging.
Chapter 4 – Posting Content Messages to Social Networks Instructions for administrators how to configure Content Messaging.
Chapter 5 – Analytics Features A description of the analytics features in the module.
Chapter 6 – Developer’s Notes Information about module pipelines and processors.
Chapter 7 – Tips and Tricks Tips and tricks for administrators.

Social Connected 1.2 for Sitecore CMS 6.5
Sitecore® is a registered trademark. All other brand and product names are the property of their respective holders. The contents of this document are the property of Sitecore. Copyright © 2001-2016 Sitecore. All rights reserved.
Page 4 of 53
1.1 Features
The Sitecore Social Connected module provides the following features:
Social Connector
The Social Connector lets website visitors log in to the website using the credentials from their social network accounts. The website then receives information about the visitor from their social network profile. You can also use the Social Connector to personalize the website.
Posting Messages to Social Networks when a Goal is Triggered
This feature works with the Social Connector and posts messages to the visitor’s wall in the social network every time they trigger a goal on the website.
Posting Content Messages to Social Networks
This feature posts messages about Sitecore content automatically to the walls of the selected social network accounts when you publish Sitecore items. You can also post messages manually without publishing Sitecore items.
Analytics
You can place Like and Tweet buttons on a web page as Sitecore controls and then use Sitecore analytics to track the activity of website visitors.
Note In this document the phrase “post message” means to send a message to a social network and put it on the Facebook wall or the Twitter timeline.

Administrator's and Developer's Guide
Sitecore® is a registered trademark. All other brand and product names are the property of their respective holders. The contents of this document are the property of Sitecore. Copyright © 2001-2016 Sitecore. All rights reserved.
Page 5 of 53
1.2 Architectural Requirements and Limitations
The Sitecore Social Connected module cooperates with third party products and services. You should therefore pay special attention to the requirements and limitations related to your Sitecore solution.
Internet Access to Social Services
In a distributed Sitecore solution that is built on one or more environments, such as a Content Management server and one or more Content Delivery servers, make sure the servers have access to the social network services over the Internet.
Configuring Security
The Social Connector creates a new Sitecore user the first time a website visitor uses their social network credentials to log in to the website. If the Sitecore solution is built on one or more environments, such as a Content Management server and one or more Content Delivery servers, make sure you configure security according to the Sitecore recommendations. Security is an inseparable part of the Core database that must be shared between all the Content Management and Content Delivery servers if you want to keep security accounts synchronized. If the Core database cannot be shared between the servers, use database replication instead.
For more information about configuring security in multi-environment solutions, see the Sitecore Scaling Guide, the section Isolating Instances within the CM and CD Environments and the section How to: Address Security Caching Clearing.

Social Connected 1.2 for Sitecore CMS 6.5
Sitecore® is a registered trademark. All other brand and product names are the property of their respective holders. The contents of this document are the property of Sitecore. Copyright © 2001-2016 Sitecore. All rights reserved.
Page 6 of 53
Chapter 2
Social Connector
Social Connector is a feature of the Sitecore Social Connected module that lets website visitors log in to the website with their social network credentials. Sitecore does not get access to the visitor’s credentials; it uses the API to communicate with the social network.
When a website visitor logs in with their social network credentials, the Sitecore Social Connected module receives all the information from the visitor’s profile that the visitor has allowed the social network to share. This information is saved in the user profile, which Sitecore creates automatically in the extranet domain.
On the one hand, Social Connector lets website visitors log in to the website with their social network credentials and thereby avoid the registration process. On the other hand, Social Connector lets the website collect more information about a website visitor from their social network profile.
This chapter contains the following sections:
Configuration
Configuring Access to Social Networks
Configuring Access to the Visitor’s Profile Information
Placing Social Connector Controls on a Web Page
Mapping the Fields in the Visitor Profile
Synchronizing User Information
Disabling the Attachment of a Visitor’s Social Network Accounts to their User Profile

Administrator's and Developer's Guide
Sitecore® is a registered trademark. All other brand and product names are the property of their respective holders. The contents of this document are the property of Sitecore. Copyright © 2001-2016 Sitecore. All rights reserved.
Page 7 of 53
2.1 Configuration
Before we explain how to configure Social Connector, we will describe a use case in which a website visitor logs in to the website with social network credentials.
2.1.1 Use Case
In this example, a website visitor uses their Facebook credentials to log in to the website.
To connect with Facebook credentials:
1. A website visitor navigates to the website:
2. To log in to the website with their social network credentials, the visitor clicks the social network icon. The module redirects them to the social network login page.
3. On the login page, the visitor enters their credentials. The social network asks the visitor to grant the web application of the website access to the visitor’s profile information.
If the visitor does not grant access to their profile information, the system redirects them back to the website. The visitor still has to log in to the website.
If the visitor grants access to their profile information, the system redirects them back to the website where they are already logged in. Sitecore creates a new user profile or updates the information in the existing user profile.
4. The visitor can attach one more social network account to their profile on the website. To attach one more social network account, the visitor clicks the appropriate social network icon and grants access to the web application.
2.1.2 Configuration Actions
To configure Social Connector:
5. Create a web application for each social network and a corresponding Sitecore item. This web application will concatenate the module with the social network. For more information about configuring a web application, see the section Configuring Access to Social Networks.

Social Connected 1.2 for Sitecore CMS 6.5
Sitecore® is a registered trademark. All other brand and product names are the property of their respective holders. The contents of this document are the property of Sitecore. Copyright © 2001-2016 Sitecore. All rights reserved.
Page 8 of 53
6. Configure an access request for the information that the web application will receive from the website visitor’s profile on the social network. For more information about configuring an access request, see the section Configuring Access to the Visitor’s Profile Information.
7. Configure and place log in controls for the social networks on the web page. For more information about how to place log in controls, see the section, Placing Social Connector Controls on a Web Page.
8. Reduce the time that the Social Connector spends to find an existing user when the visitor
logs in to the website. Add the following string to the web.config file, to the
configuration/system.web/profile/properties section:
<add type="System.String" name="SC_SocialNetworkId" />
After you have performed the obligatory configuration actions, you can:
Arrange a Sitecore scheduled task to periodically update the user profile with information from the social network.
For more information about how to schedule a Sitecore task, see the section Synchronizing User Information.
Disable attaching the visitor’s social network accounts to their user profile.
For more information about how to disable attaching visitor’s social network accounts, see the section Disabling the Attachment of a Visitor’s Social Network Accounts to their User Profile.

Administrator's and Developer's Guide
Sitecore® is a registered trademark. All other brand and product names are the property of their respective holders. The contents of this document are the property of Sitecore. Copyright © 2001-2016 Sitecore. All rights reserved.
Page 9 of 53
2.2 Configuring Access to Social Networks
When interacting with social networks, Sitecore Social Connector uses the API of the social networks or the OAuth protocol for Google+. You must create a web application for every social network that you want the module to communicate with. You must also create a Sitecore item for each web application.
In a multisite scenario, you should create a web application for each website.
2.2.1 Creating and Configuring a Facebook Web Application
To create and configure a web application for Facebook:
1. Go to https://developers.facebook.com/apps and create a new web application.
For more information about how to create a new web application, go to https://developers.facebook.com/docs/guides/canvas/
2. In the web application, on the Basic settings page, fill in all the required fields.

Social Connected 1.2 for Sitecore CMS 6.5
Sitecore® is a registered trademark. All other brand and product names are the property of their respective holders. The contents of this document are the property of Sitecore. Copyright © 2001-2016 Sitecore. All rights reserved.
Page 10 of 53
3. In the Select how your app integrates with Facebook section, select Website and in the Site URL field, enter the URL of the web page where you want to place the login controls.
4. In Sitecore, in the Content Editor, navigate to the
sitecore/system/social/applications/default folder.
5. In this folder create an item based on the
sitecore/templates/system/social/application template.
Important
The Default folder must contain only one item for the corresponding social network. If you are going
to use several web applications for one social network, create the new items in the
sitecore/system/social/applications folder.
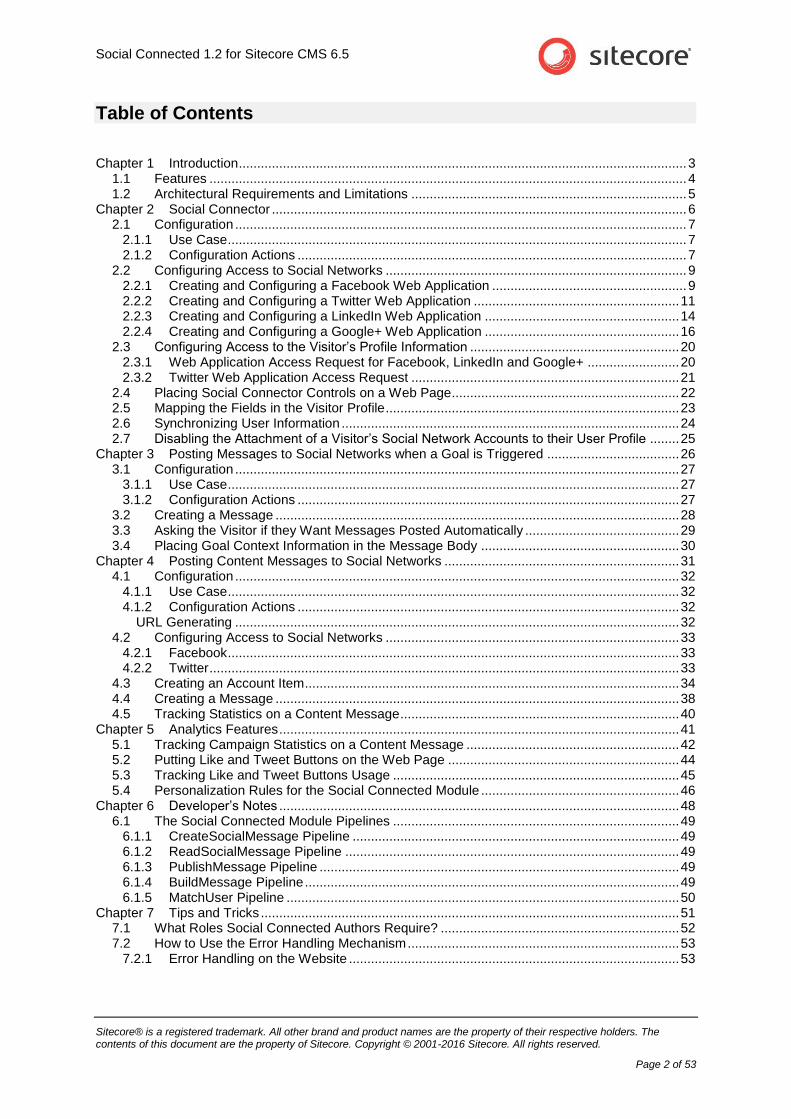
6. In the new item, enter the appropriate information:
Field Value
ApplicationId The App ID value of the web application
ApplicationSecret The App Secret value of the web application
Network Facebook
Administrator's and Developer's Guide
Sitecore® is a registered trademark. All other brand and product names are the property of their respective holders. The contents of this document are the property of Sitecore. Copyright © 2001-2016 Sitecore. All rights reserved.
Page 11 of 53
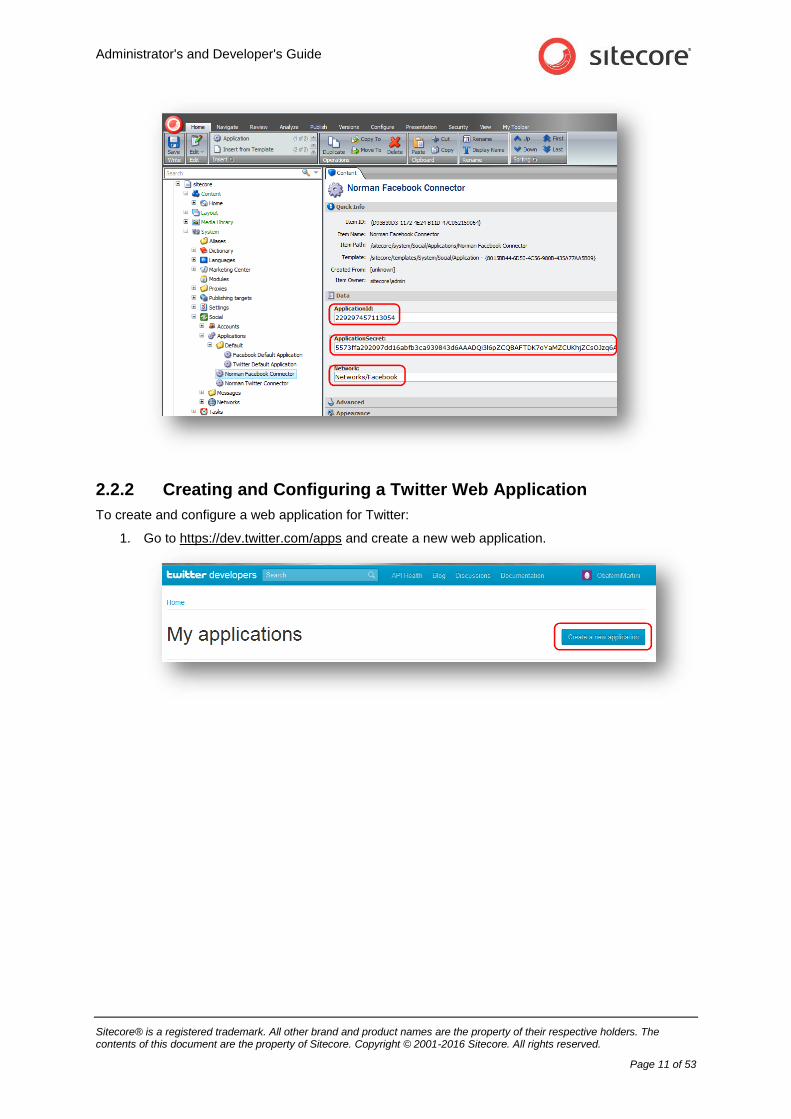
2.2.2 Creating and Configuring a Twitter Web Application
To create and configure a web application for Twitter:
1. Go to https://dev.twitter.com/apps and create a new web application.

Social Connected 1.2 for Sitecore CMS 6.5
Sitecore® is a registered trademark. All other brand and product names are the property of their respective holders. The contents of this document are the property of Sitecore. Copyright © 2001-2016 Sitecore. All rights reserved.
Page 12 of 53
2. In the web application, in the Application details section, fill in all the required fields.

Administrator's and Developer's Guide
Sitecore® is a registered trademark. All other brand and product names are the property of their respective holders. The contents of this document are the property of Sitecore. Copyright © 2001-2016 Sitecore. All rights reserved.
Page 13 of 53
3. In the Callback URL field, enter the URL of the webpage where you want to place the login controls.
4. In Sitecore, in the Content Editor, navigate to the
sitecore/system/social/applications/default folder.
5. In this folder create an item based on the
sitecore/templates/system/social/application template.
Important
The Default folder must contain only one item for the corresponding social network. If you are going
to use several web applications for one social network, create the new items in the
sitecore/system/social/applications folder.
6. In the new item, enter the appropriate information:
Field Value
ApplicationId The Consumer Key value of the web application
ApplicationSecret The Consumer Secret value of the web application
Network Twitter

Social Connected 1.2 for Sitecore CMS 6.5
Sitecore® is a registered trademark. All other brand and product names are the property of their respective holders. The contents of this document are the property of Sitecore. Copyright © 2001-2016 Sitecore. All rights reserved.
Page 14 of 53
2.2.3 Creating and Configuring a LinkedIn Web Application
To create and configure a web application for LinkedIn:
1. Go to https://www.linkedin.com/secure/developer and create a new web application.
2. In the web application, fill in all the required fields.
Administrator's and Developer's Guide
Sitecore® is a registered trademark. All other brand and product names are the property of their respective holders. The contents of this document are the property of Sitecore. Copyright © 2001-2016 Sitecore. All rights reserved.
Page 15 of 53
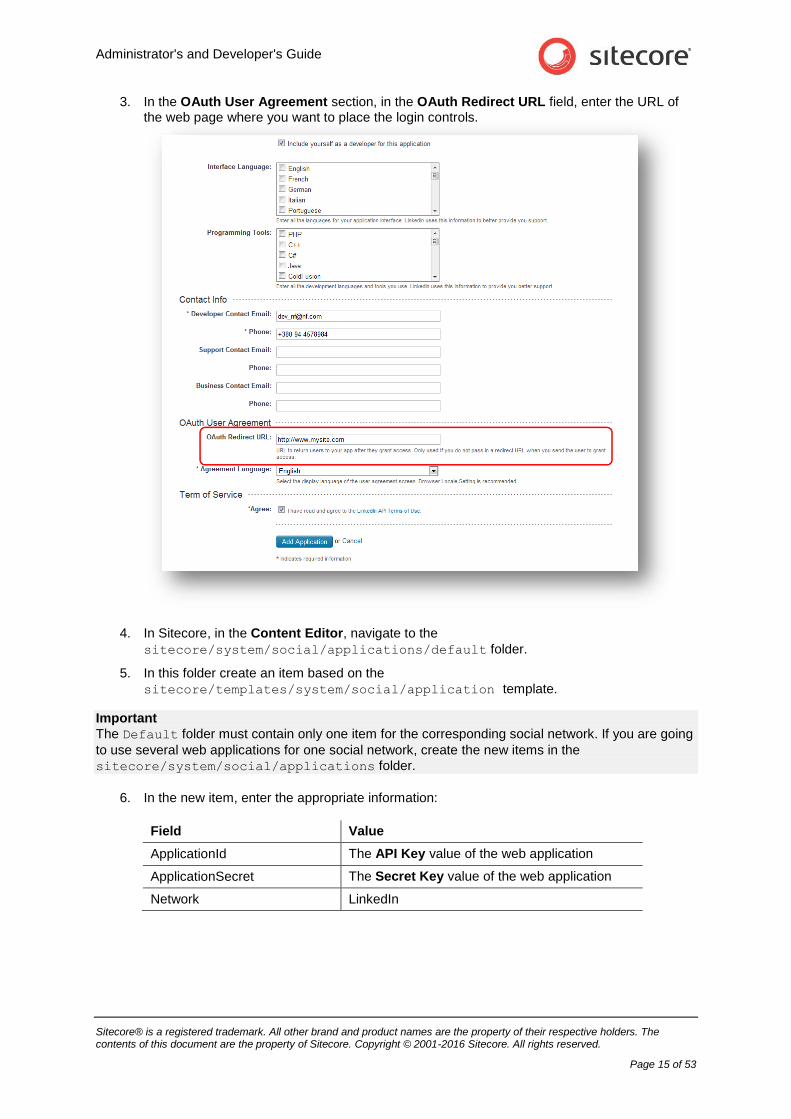
3. In the OAuth User Agreement section, in the OAuth Redirect URL field, enter the URL of the web page where you want to place the login controls.
4. In Sitecore, in the Content Editor, navigate to the
sitecore/system/social/applications/default folder.
5. In this folder create an item based on the
sitecore/templates/system/social/application template.
Important
The Default folder must contain only one item for the corresponding social network. If you are going
to use several web applications for one social network, create the new items in the
sitecore/system/social/applications folder.
6. In the new item, enter the appropriate information:
Field Value
ApplicationId The API Key value of the web application
ApplicationSecret The Secret Key value of the web application
Network LinkedIn
Social Connected 1.2 for Sitecore CMS 6.5
Sitecore® is a registered trademark. All other brand and product names are the property of their respective holders. The contents of this document are the property of Sitecore. Copyright © 2001-2016 Sitecore. All rights reserved.
Page 16 of 53
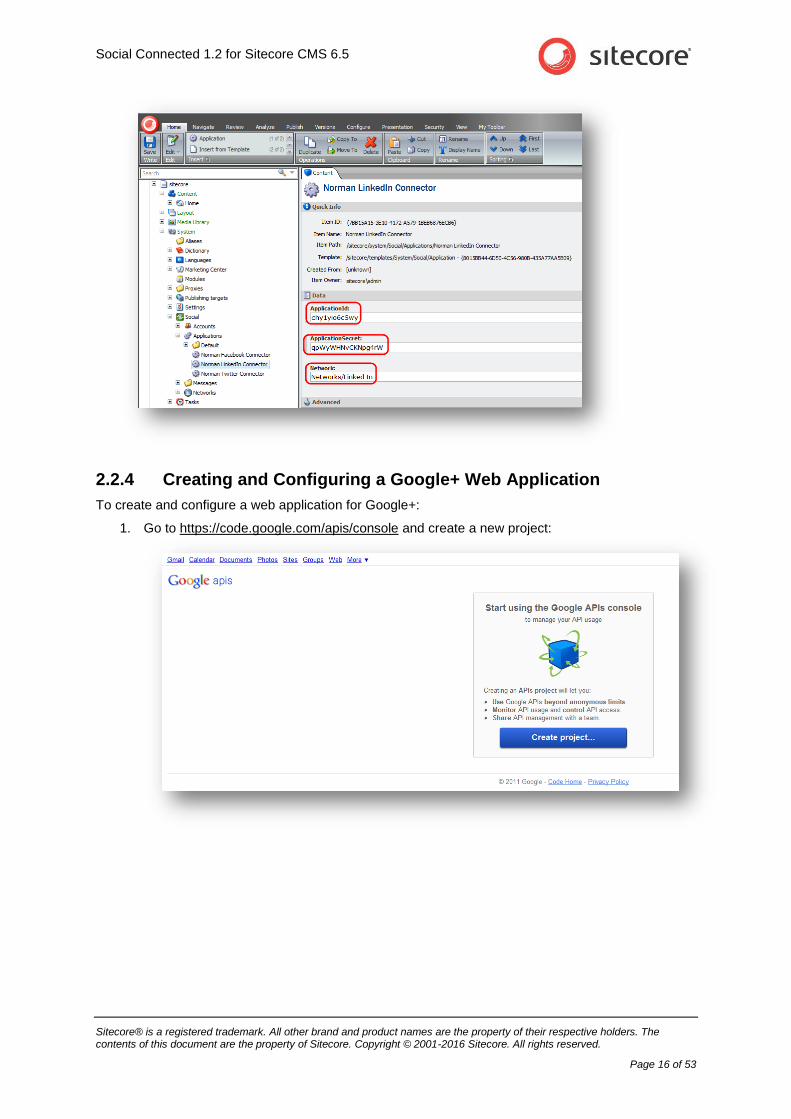
2.2.4 Creating and Configuring a Google+ Web Application
To create and configure a web application for Google+:
1. Go to https://code.google.com/apis/console and create a new project:

Administrator's and Developer's Guide
Sitecore® is a registered trademark. All other brand and product names are the property of their respective holders. The contents of this document are the property of Sitecore. Copyright © 2001-2016 Sitecore. All rights reserved.
Page 17 of 53
2. On the All Services page, expand API Project menu and click Create.
3. In the Create Project dialog box, enter the name of the project and then click Create Project.
4. On the All Services page, set Google+ API to On.
5. In the left-hand menu, click API Access.
6. On the API Access page, click Create an OAuth 2.0 client ID.

Social Connected 1.2 for Sitecore CMS 6.5
Sitecore® is a registered trademark. All other brand and product names are the property of their respective holders. The contents of this document are the property of Sitecore. Copyright © 2001-2016 Sitecore. All rights reserved.
Page 18 of 53
7. In the Create Client ID dialog box, on the Branding Information page, enter the name in the Product Name field and click Next.
8. In the Create Client ID dialog box, on the Client ID Settings page, select Web Application type. Skip the website field.
9. In the Create Client ID dialog box, on the Client ID Settings page, click Create Client ID.
10. On the API Access page, in the Client ID for web application section, click Edit Settings.
11. In the Edit Client Settings dialog box, enter the following URIs in the Authorized Redirect URIs field:
http://hostname/layouts/system/Social/SocialLogin.ashx?type=google_access
http://hostname/layouts/system/Social/SocialLogin.ashx?type=google_add
http://hostname/layouts/system/Social/SocialLogin.ashx?type=access
where hostname is the name of the host that is running the website.
12. In the Edit Client Settings dialog box, click Update.
13. On the API Access page, save the values of the Client ID and Client secret fields.
14. In Sitecore, in the Content Editor, navigate to the
sitecore/system/social/applications/default folder.
15. In this folder, create an item based on the
sitecore/templates/system/social/application template.
Important
The Default folder must contain only one item for the corresponding social network. If you are going
to use several web applications for one social network, create the new items in the
sitecore/system/social/applications folder.

Administrator's and Developer's Guide
Sitecore® is a registered trademark. All other brand and product names are the property of their respective holders. The contents of this document are the property of Sitecore. Copyright © 2001-2016 Sitecore. All rights reserved.
Page 19 of 53
16. In the new item, enter the appropriate information:
Item Field Value
ApplicationId The Client ID value of the web application
ApplicationSecret The Client secret value of the web application
Network Google+

Social Connected 1.2 for Sitecore CMS 6.5
Sitecore® is a registered trademark. All other brand and product names are the property of their respective holders. The contents of this document are the property of Sitecore. Copyright © 2001-2016 Sitecore. All rights reserved.
Page 20 of 53
2.3 Configuring Access to the Visitor’s Profile Information
When a website visitor logs in to the website with their social network credentials, the module redirects them to the login page of the social network. On that page, the visitor enters their credentials and the web application asks the visitor to grant it access to their profile information.
You can configure the exact information that the web application will ask for.
2.3.1 Web Application Access Request for Facebook, LinkedIn and Google+
For Facebook, LinkedIn, and Google+, you configure the access request in the
Sitecore.social.profilemapping.config file.
To configure the fields that the web application can access:
1. Open the [website_root]\app_config\include\sitecore.social.profilemapping.conf
ig file.
2. In the configuration section for the social network, in the configuration section for the field that
you want the web application to use, set the field enabled parameter to true.
3. If the field is private, you must set its permission parameter according to the official social
network documentation.
For example, to get access to the Groups’ field on Facebook, the field section in the
Sitecore.social.profilemapping.config file should look like this:
<!-- 'Groups' field. -->
<!-- The Groups that the user belongs to. -->
<field enabled="true" originalKey="" sitecoreKey="fb_groups"
permission="user_groups" access="/me/groups" />
Note At the moment, the Google+ API doesn’t allow you to access some user profile fields such as Formatted name, Family name, Given name, and so on. This is why those fields are disabled in the
Sitecore.Social.ProfileMapping.config file by default.
For more information about user profile fields, see the official documentation of the social network:
For Facebook documentation, go to http://developers.facebook.com/docs/reference/api/user/.
Administrator's and Developer's Guide
Sitecore® is a registered trademark. All other brand and product names are the property of their respective holders. The contents of this document are the property of Sitecore. Copyright © 2001-2016 Sitecore. All rights reserved.
Page 21 of 53
For LinkedIn documentation, go to https://developer.linkedin.com/documents/profile-fields.
For new Google+ API, go to https://developers.google.com/+/api/latest/people.
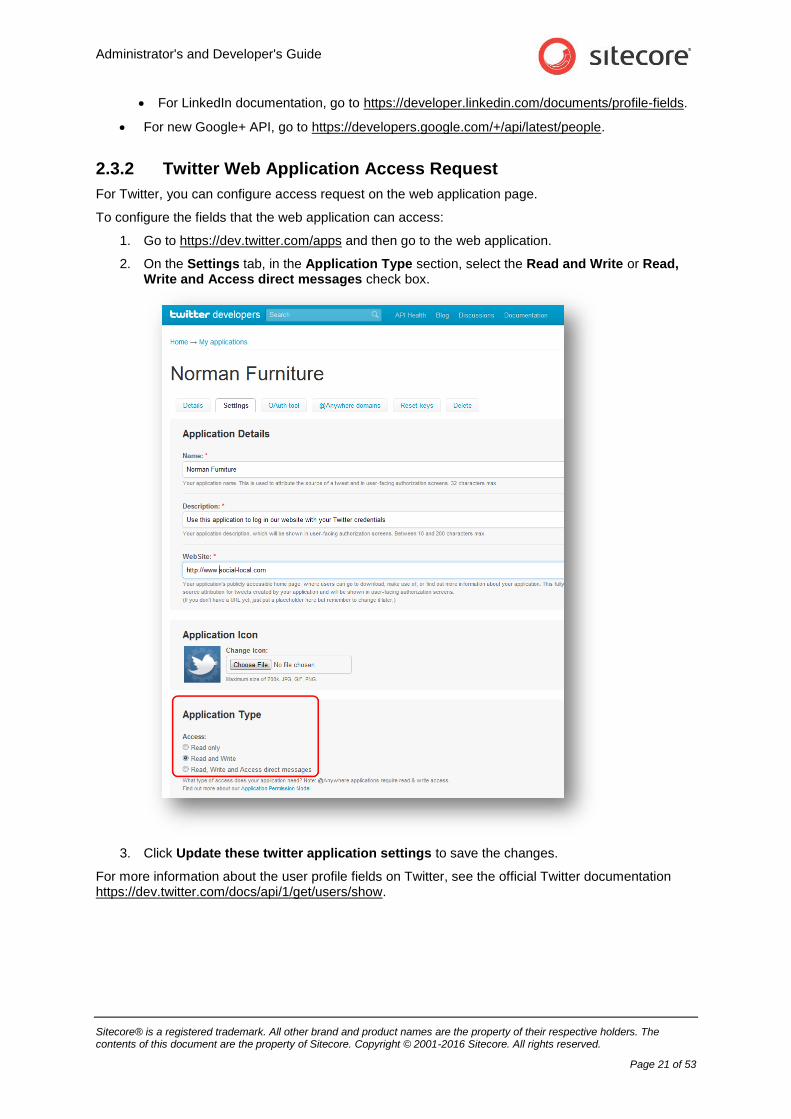
2.3.2 Twitter Web Application Access Request
For Twitter, you can configure access request on the web application page.
To configure the fields that the web application can access:
1. Go to https://dev.twitter.com/apps and then go to the web application.
2. On the Settings tab, in the Application Type section, select the Read and Write or Read, Write and Access direct messages check box.
3. Click Update these twitter application settings to save the changes.
For more information about the user profile fields on Twitter, see the official Twitter documentation https://dev.twitter.com/docs/api/1/get/users/show.

Social Connected 1.2 for Sitecore CMS 6.5
Sitecore® is a registered trademark. All other brand and product names are the property of their respective holders. The contents of this document are the property of Sitecore. Copyright © 2001-2016 Sitecore. All rights reserved.
Page 22 of 53
2.4 Placing Social Connector Controls on a Web Page
You can configure and place log in controls for the social networks on the website. You can find the
controls in the sitecore/layout/sublayouts/social/connector folder. You can fully
customize these controls (change images, texts, and so on).
Note By default, the Social Connector controls use social web applications that are stored in the
sitecore/system/social/applications/default folder
In API, you can specify the social web application to be used by Social Connector. In the
ApplicationItemId parameter, specify the ID of the Sitecore item containing social web
application settings. For a sample code, see the section Disabling the Attachment of a Visitor’s Social Network Accounts to their User Profile.

Administrator's and Developer's Guide
Sitecore® is a registered trademark. All other brand and product names are the property of their respective holders. The contents of this document are the property of Sitecore. Copyright © 2001-2016 Sitecore. All rights reserved.
Page 23 of 53
2.5 Mapping the Fields in the Visitor Profile
When a website visitor logs in to the website with their social network credentials, the module receives their visitor profile information from the social network. This information is saved in the corresponding
user profile on the website. The information is stored in the Core database, in the aspnet_profile
table. By default, the module saves the information from the social network in the fields with the
corresponding prefixes. For example, fb is a prefix for Facebook fields. You can change the field
mappings in the sitecore.social.profilemapping.config file.
To change the field mappings between a social network visitor profile and the user profile on the website:
1. Open the [website_root]\app_config\include\sitecore.social.profilemapping.conf
ig file.
2. In the configuration section for the social network, set the following fields according to the official social network API documentation:
Field Description
originalKey All social networks use this field.
Permission Facebook uses this field.
Access Facebook uses this field.
xmlPath LinkedIn uses this field.
3. In the configuration section for the social network, set the sitecoreKey field to the name of the Sitecore database field.
Important We recommend that you do not change the sitecoreKey field values.
For more information about the user profile fields, see the official documentation of the social network:
For Facebook documentation, go to http://developers.facebook.com/docs/reference/api/user/.
For LinkedIn documentation, go to https://developer.linkedin.com/documents/profile-fields.
For new Google+ API, go to https://developers.google.com/+/api/latest/people.
For Twitter documentation, go to https://dev.twitter.com/docs/api/1/get/users/show.
For more information about the originalKey field for Twitter, see the properties of the TwitterUser class in the Twitterizer 2 library.
For more information about the originalKey field for Google+, see the WellKnownAttribute class in the DotNetOpenAuth library.
Social Connected 1.2 for Sitecore CMS 6.5
Sitecore® is a registered trademark. All other brand and product names are the property of their respective holders. The contents of this document are the property of Sitecore. Copyright © 2001-2016 Sitecore. All rights reserved.
Page 24 of 53
2.6 Synchronizing User Information
When a website visitor logs in to the website, Sitecore Connector receives and saves all the user profile information from the social network that the visitor has allowed the network to share.
The module receives user profile information in two stages:
When the website visitor enters their social network credentials, the module receives basic data from the social network: ID, email, application key, application secret, access token, and access token secret. The module uses this information to identify the visitor.
When the visitor is identified, the module receives all the information from the user profile that the visitor has allowed to be shared. As a result this information comes later than basic data. But you can configure the module so that it receives all user information at the same time. For this, use the new parameter in the LoginUser and AttachUser methods. For a sample code, see the section Disabling the Attachment of a Visitor’s Social Network Accounts to their User Profile.
To regularly update user information with the user profile data from the social network, you can use a Sitecore scheduled task. This allows you to synchronize the user information with the social network regardless of the user’s activity on your website.
By default the scheduled task for synchronizing data between the users’ profiles on the social networks and their profile information on your website is created but not run.
To run the scheduled task:
1. In Sitecore, in the Content Editor, select the
Sitecore/system/tasks/schedules/social data synchronization item.
2. In the Schedule field, set the schedule.
For more information about using the Schedule field, see the Scheduled Tasks article on the SDN.
Alternatively, you can set and run the scheduled task in the sitecore.social.config file:
1. In the [website_root]\app_config\include\sitecore.social.config file, in the
scheduling section, uncomment the following string:
<agent type="Sitecore.Social.Connector.ScheduledTaskPerformer"
method="SynchronizeData" interval="23:59:59">
</agent>
2. In the interval parameter, specify how regularly the task should be run.
When the module synchronizes information, it follows these rules:
If the field in the social network user profile has been updated, Sitecore updates this field in the user profile.
If the field in the social network user profile has become blank, Sitecore clears this field in the user profile.
Administrator's and Developer's Guide
Sitecore® is a registered trademark. All other brand and product names are the property of their respective holders. The contents of this document are the property of Sitecore. Copyright © 2001-2016 Sitecore. All rights reserved.
Page 25 of 53
2.7 Disabling the Attachment of a Visitor’s Social Network Accounts to their User Profile
By default, the Sitecore Social Connected module lets the visitor who logged in to the website with their social network account add one more social network account to their user profile. In this case, the module does not create a new account but adds the information to an existing user profile.
You can disable this functionality by editing the following API:
protected void FacebookLoginButtonOneClick(object sender, ImageClickEventArgs e)
{
var connectUserManager = new ConnectUserManager();
const bool IsAsyncProfileUpdate = true;
const string ApplicationItemId = "<YourAppItemId>";
if (!Sitecore.Context.User.IsAuthenticated)
{
connectUserManager.LoginUser("Facebook", IsAsyncProfileUpdate,
ApplicationItemId);
}
else
{
connectUserManager.AttachUser("Facebook", IsAsyncProfileUpdate,
ApplicationItemId);
}
}
Social Connected 1.2 for Sitecore CMS 6.5
Sitecore® is a registered trademark. All other brand and product names are the property of their respective holders. The contents of this document are the property of Sitecore. Copyright © 2001-2016 Sitecore. All rights reserved.
Page 26 of 53
Chapter 3
Posting Messages to Social Networks when a
Goal is Triggered
The Sitecore Social Connected module can automatically post messages to Facebook and Twitter when a website visitor triggers a goal on the website.
This feature requires that you have the Digital Marketing Suite 2.0 or later is installed and that Social Connector is configured on the website.
For Facebook, you can post messages both to the visitor's wall and Facebook pages. For Twitter you can post tweets to the visitor timeline.
This chapter contains the following sections:
Configuration
Creating a Message
Asking the Visitor if they Want Messages Posted Automatically
Placing Goal Context Information in the Message Body
Administrator's and Developer's Guide
Sitecore® is a registered trademark. All other brand and product names are the property of their respective holders. The contents of this document are the property of Sitecore. Copyright © 2001-2016 Sitecore. All rights reserved.
Page 27 of 53
3.1 Configuration
The Social Connected module can post messages to social networks when a website visitor triggers a goal on the website. To enable this feature, you must configure the Social Connector because the module requires that the website visitor logs in to the website with their social network credentials.
You can use this feature to post messages to Facebook and Twitter.
Before we explain how to configure posting messages on goal triggering, we will describe a use case in which the module automatically posts messages to social networks when a website visitor uploads a new image to the website.
3.1.1 Use Case
A visitor logs in to the website with their social network credentials. When the visitor triggers a goal the module posts a message to the corresponding social network. You can configure the goal and the text used in the message.
Example:
A website visitor logs in to the website with their Facebook credentials. The visitor uploads an image Friday Party to the website. The uploading an image goal is triggered and the Social Connected module posts a message to the visitor’s wall on Facebook saying that the visitor uploaded the image called Friday Party.
3.1.2 Configuration Actions
To configure the posting of messages when a goal is achieved:
1. Configure Social Connector.
For more information about Social Connector configuration, see the section Configuration
2. Create a goal.
For more information about configuring goals and page events, see the document Marketing Operations Cookbook, chapter Goals, Campaigns, and Events.
3. Create a goal message that is sent to the social network.
For more information about editing messages, see the section Creating a Message.
After you have configured this, you can:
Create a UI control that asks website visitors for permission to post messages to their social networks when they trigger goals.
For more information about creating UI control, see the section Asking the Visitor if they Want Messages Posted Automatically.
Create personalized messages using goal context parameters.
For more information about the usage of goal context parameters, see the section Placing Goal Context Information in the Message Body.
Note The analytics features used by the Sitecore Social Connected module, such as goals, page events, and so on require Sitecore DMS 2.0.0 or later.
Social Connected 1.2 for Sitecore CMS 6.5
Sitecore® is a registered trademark. All other brand and product names are the property of their respective holders. The contents of this document are the property of Sitecore. Copyright © 2001-2016 Sitecore. All rights reserved.
Page 28 of 53
3.2 Creating a Message
When you have configured Social Connector and assigned a goal to an item, you can edit the message.
Note Twitter does not allow you to post messages with the same text more than once.
To edit the message text:
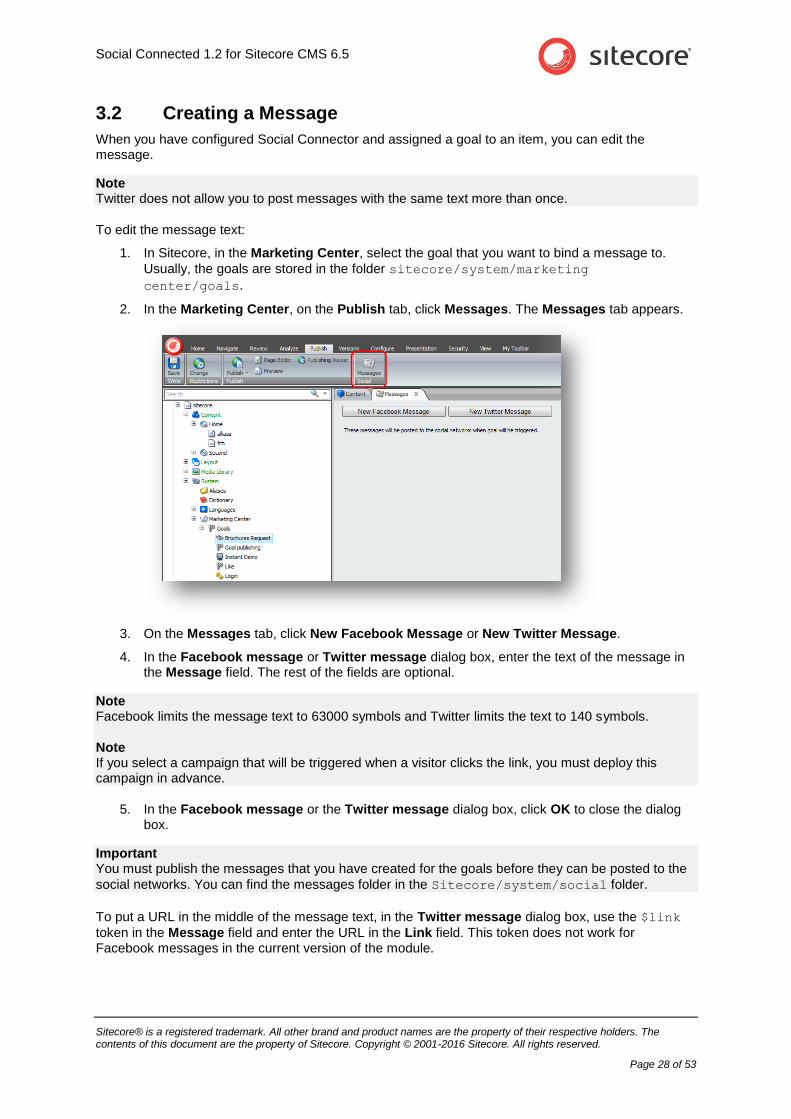
1. In Sitecore, in the Marketing Center, select the goal that you want to bind a message to.
Usually, the goals are stored in the folder sitecore/system/marketing
center/goals.
2. In the Marketing Center, on the Publish tab, click Messages. The Messages tab appears.
3. On the Messages tab, click New Facebook Message or New Twitter Message.
4. In the Facebook message or Twitter message dialog box, enter the text of the message in the Message field. The rest of the fields are optional.
Note Facebook limits the message text to 63000 symbols and Twitter limits the text to 140 symbols.
Note If you select a campaign that will be triggered when a visitor clicks the link, you must deploy this campaign in advance.
5. In the Facebook message or the Twitter message dialog box, click OK to close the dialog box.
Important You must publish the messages that you have created for the goals before they can be posted to the
social networks. You can find the messages folder in the Sitecore/system/social folder.
To put a URL in the middle of the message text, in the Twitter message dialog box, use the $link
token in the Message field and enter the URL in the Link field. This token does not work for Facebook messages in the current version of the module.

Administrator's and Developer's Guide
Sitecore® is a registered trademark. All other brand and product names are the property of their respective holders. The contents of this document are the property of Sitecore. Copyright © 2001-2016 Sitecore. All rights reserved.
Page 29 of 53
3.3 Asking the Visitor if they Want Messages Posted Automatically
When you have configured Sitecore to post messages to the social network when a visitor achieves a goal on the website, this functionality applies to every visitor.
If you want to ask website visitors whether or not they want messages to be posted on their social network walls, you must disable sending of messages by default and create a UI control to ask the visitor what they prefer:
1. In the [website_root]\app_config\include\sitecore.social.config file, set the
value of the Social.AllowPublishByDefault setting to false.
2. Use the Sitecore API to create a UI control that asks the visitor whether or not they want to allow Sitecore Social Connected to send messages to their social network walls.
Use the following methods of the
Sitecore.Social.Security.Managers.PublishPreferenceManager class:
o GetPreference
o SetPreference.
For example, the following code snippet asks the current visitor to decide whether or not to post a specific message. The message is specified in the message id:
var manager = new Sitecore.Social.Security.Managers.PublishPreferenceManager();
var status = manager.GetPreference(id, Sitecore.Context.User);
var newstatus = status == PublishPreference.Allowed ? PublishPreference.Denied :
PublishPreference.Allowed;
manager.SetPreference(id, Sitecore.Context.User, newstatus);
Social Connected 1.2 for Sitecore CMS 6.5
Sitecore® is a registered trademark. All other brand and product names are the property of their respective holders. The contents of this document are the property of Sitecore. Copyright © 2001-2016 Sitecore. All rights reserved.
Page 30 of 53
3.4 Placing Goal Context Information in the Message Body
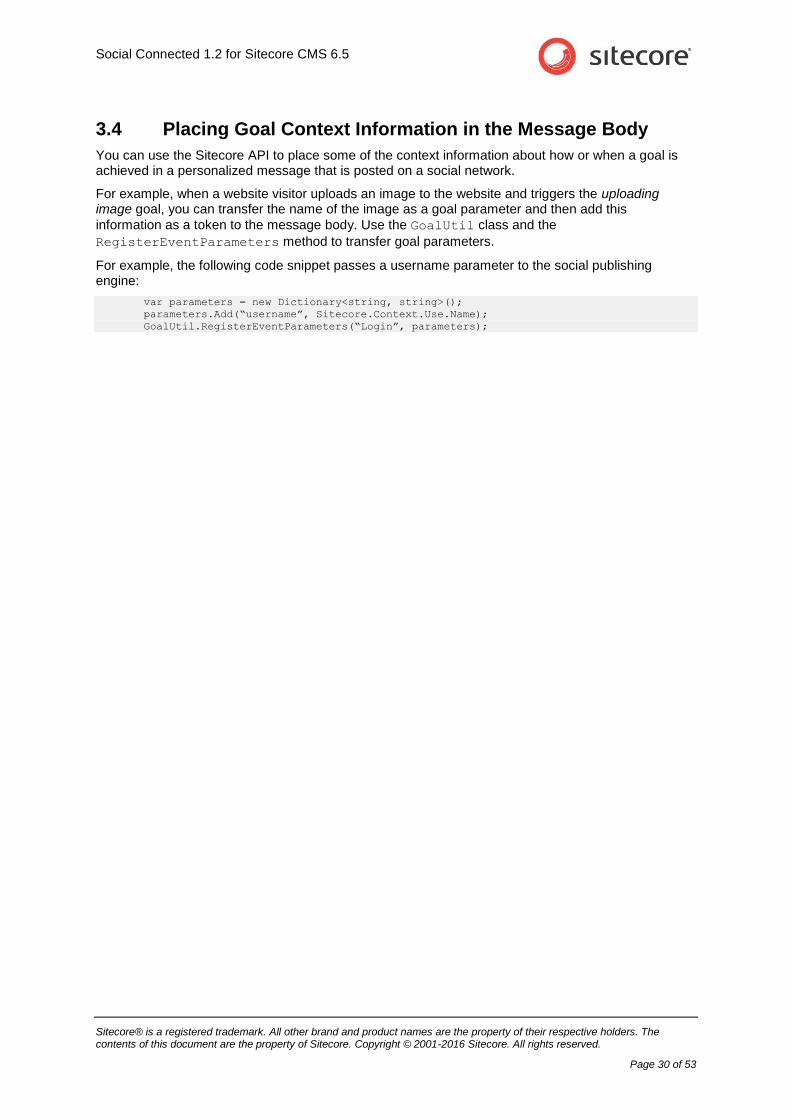
You can use the Sitecore API to place some of the context information about how or when a goal is achieved in a personalized message that is posted on a social network.
For example, when a website visitor uploads an image to the website and triggers the uploading image goal, you can transfer the name of the image as a goal parameter and then add this
information as a token to the message body. Use the GoalUtil class and the
RegisterEventParameters method to transfer goal parameters.
For example, the following code snippet passes a username parameter to the social publishing engine:
var parameters = new Dictionary<string, string>();
parameters.Add(“username”, Sitecore.Context.Use.Name);
GoalUtil.RegisterEventParameters(“Login”, parameters);

Administrator's and Developer's Guide
Sitecore® is a registered trademark. All other brand and product names are the property of their respective holders. The contents of this document are the property of Sitecore. Copyright © 2001-2016 Sitecore. All rights reserved.
Page 31 of 53
Chapter 4
Posting Content Messages to Social Networks
When you publish Sitecore items on the website, the Sitecore Social Connected module can post associated messages to one or more accounts in Facebook and Twitter. You can also post a message to the social network without publishing items.
This chapter contains the following sections:
Configuration
Configuring Access to Social Networks
Creating an Account Item
Creating a Message
Tracking Statistics on a Content Message
Social Connected 1.2 for Sitecore CMS 6.5
Sitecore® is a registered trademark. All other brand and product names are the property of their respective holders. The contents of this document are the property of Sitecore. Copyright © 2001-2016 Sitecore. All rights reserved.
Page 32 of 53
4.1 Configuration
The Sitecore Social Connected module can post messages to social networks when you publish Sitecore items. You bind the message to the content item and the module posts this message automatically when you publish the content item. You can also post these messages manually without publishing the content items.
This feature works with Facebook and Twitter. You can post messages to a visitor’s wall in Facebook and to a Facebook page. You can post messages (tweets) to the timeline of a Twitter user who used the web application to create a Twitter account.
Before we explain how to configure posting content messages, we will describe a use case in which the module automatically posts messages to social network when a new web page is published on the website.
4.1.1 Use Case
Your company produces and sells smartphones. Every time the company produces a new smartphone, a new web page is created on the website describing its features. To attract more attention to the new model you can automatically post messages to the website’s wall on Facebook or to the corresponding timeline on Twitter publicizing the fact that you have unveiled a new product. This message can contain the link to the new webpage.
4.1.2 Configuration Actions
To configure posting of the content messages:
1. Create and configure a web application in the social network and create a Sitecore item for the web application. The web application will concatenate the module with the social network.
For more information about how to create and configure a web application, see the section Configuring Access to Social Networks.
2. Create a Sitecore item for the social network account.
For more information about how to create an account item, see the section Creating an Account Item.
3. Create a message and post it immediately to the social network or post it later when you publish the Sitecore item.
For more information about creating and publishing messages, see the section Creating a Message.
URL Generating
In a single site solution, where the Content Management and Content Delivery servers are on
different domains, in the social.config file, in the Social.LinkDomain attribute, specify the
host name.
In a multisite solution, on the Content Management server, in the web.config file, the module uses
the path of the content item that the message is associated with, to look for a matching website in the
<sites> section and its startItem attribute. The module then uses the hostName attribute of that
website to generate the URLs.

Administrator's and Developer's Guide
Sitecore® is a registered trademark. All other brand and product names are the property of their respective holders. The contents of this document are the property of Sitecore. Copyright © 2001-2016 Sitecore. All rights reserved.
Page 33 of 53
4.2 Configuring Access to Social Networks
When interacting with social networks, the module uses the API of the social networks. You must create a web application for every social network that you want the module to communicate with and create a Sitecore item for the social network account.
4.2.1 Facebook
To configure posting of content messages to Facebook:
1. Create a new web application or use an existing one and then create a Sitecore item for the web application.
For more information about creating a web application, see the section Creating and Configuring a Facebook Web Application.
2. In Sitecore, in the Content Editor, in the /sitecore/system/Social/Accounts/ folder,
create a new account item using the wizard. For more information about how to use the wizard, see the section Creating an Account Item.
4.2.2 Twitter
To configure posting of content messages to Twitter:
1. Create a new web application or use the existing one and create a Sitecore item for the web application. For more information about how to create a web application, see the section Creating and Configuring a Twitter Web Application.
2. Set the required permissions on the web application.
For more information about the required permissions, see the section Twitter Web Application .
3. In Sitecore, in the Content Editor, in the /sitecore/system/Social/Accounts/ folder,
use the wizard to create a new account item.
For more information about the wizard, see the section Creating an Account Item.

Social Connected 1.2 for Sitecore CMS 6.5
Sitecore® is a registered trademark. All other brand and product names are the property of their respective holders. The contents of this document are the property of Sitecore. Copyright © 2001-2016 Sitecore. All rights reserved.
Page 34 of 53
4.3 Creating an Account Item
To create an account item:
1. In the Content Editor, select the folder sitecore/system/social/accounts.
2. To start the Add Network Account wizard, use the Account insert option.
The Add a Social Network Account wizard guides you through the process of creating a network account.
Social Network
In the Select Network window, select the social network that you want to create an account for.
If you have created more than one web application for this social network, in the Network Application field, select the web application that the account should use to cooperate with the social network.

Administrator's and Developer's Guide
Sitecore® is a registered trademark. All other brand and product names are the property of their respective holders. The contents of this document are the property of Sitecore. Copyright © 2001-2016 Sitecore. All rights reserved.
Page 35 of 53
Authentication
As part of this step, the wizard opens a new browser window, in which you must enter the credentials of the social network user account. The module will post messages to the wall of this user or its pages.
To set the user groups which can see activity from the web application on Facebook, click Public and select one of the user groups.
Click Go to App.
Review the permissions that the web application asks for and click Allow.

Social Connected 1.2 for Sitecore CMS 6.5
Sitecore® is a registered trademark. All other brand and product names are the property of their respective holders. The contents of this document are the property of Sitecore. Copyright © 2001-2016 Sitecore. All rights reserved.
Page 36 of 53
Note To create an account, you must allow all the required permissions.
Select a Profile or Page
In the Select a Profile or Page window, you specify which profile or page the module should update.
The module can post messages to the user’s wall or to any assigned Facebook pages. Select where you want to post messages to in the drop-down list.

Administrator's and Developer's Guide
Sitecore® is a registered trademark. All other brand and product names are the property of their respective holders. The contents of this document are the property of Sitecore. Copyright © 2001-2016 Sitecore. All rights reserved.
Page 37 of 53
Account Name
In the Account Name window, enter the name for this new network account.
Final Page
In the last window of the wizard, click Finish to close it.
A new item for the social network account is added to the Content Tree.

Social Connected 1.2 for Sitecore CMS 6.5
Sitecore® is a registered trademark. All other brand and product names are the property of their respective holders. The contents of this document are the property of Sitecore. Copyright © 2001-2016 Sitecore. All rights reserved.
Page 38 of 53
4.4 Creating a Message
When you have configured the web application and created a Sitecore item for the social network account, you can create a message.
To create and post a message:
1. In the Sitecore Desktop, in the Content Editor, select the item that you want to bind a message to.
2. In the Content Editor, on the Publish tab, click Messages. The Messages tab appears.
3. On the Messages tab, click New Facebook Message or New Twitter Message.
4. In the Facebook message or Twitter message dialog box, in the Message field, enter the text of the message.
5. In the Link field, enter the link to the webpage that you want the website visitor to go to. By default, the link refers to the current page.
6. In the Campaign field, select the campaign that is triggered when a visitor clicks the link.
If you assign a campaign to the message, you will be able to review DMS message statistics including value, visits, and value per visits for all the visitors who click on a link in this message. Note that the campaign must be deployed before you can use it in the message.
7. Click Create Campaign to create a new campaign. The new campaign is stored in the appropriate folders under Marketing Center/Campaigns/Social.
Administrator's and Developer's Guide
Sitecore® is a registered trademark. All other brand and product names are the property of their respective holders. The contents of this document are the property of Sitecore. Copyright © 2001-2016 Sitecore. All rights reserved.
Page 39 of 53
8. To stylize the link, use the Link Image, Link Title and Link Description fields. This is available for a Facebook message only.
9. To post the message automatically when you publish the current Sitecore item, select the Post when the item is published check box.
10. In the Accounts field, select the social network accounts that you want to post the message to.
11. Click OK to close the dialog box.
12. Click Post to all accounts to post the message immediately.
In a Twitter message, the link is inserted at the end of the message by default. To put the URL in the
middle of the message text, in the Twitter message dialog box, use the $link token in the Text field
and enter the URL in the Link field. This token does not work for Facebook messages because Facebook structures the links according to Facebook’s design.
Note You can only post a message to a social network once.

Social Connected 1.2 for Sitecore CMS 6.5
Sitecore® is a registered trademark. All other brand and product names are the property of their respective holders. The contents of this document are the property of Sitecore. Copyright © 2001-2016 Sitecore. All rights reserved.
Page 40 of 53
4.5 Tracking Statistics on a Content Message
You can track the social media statistics on a content message: how many times the message is liked, commented, or retweeted.
If you are using the Sitecore Social Connected module with DMS, you can also see information about any campaigns that are associated with messages. For more information about campaign statistics, see the section Tracking Campaign Statistics on a Content Message.
You can update the social media statistics manually and automatically.
Manually Updating the Statistics
To update the message statistics manually, click Refresh Statistics.
The module will use APIs of respective social networks to retrieve the updated data.
Automatically Updating the Statistics
The Sitecore Social Connected module uses the scheduled task called Process Messages Statistics to update statistics. This task is stored in the Sitecore/system/tasks/ Schedules/social/process messages statistics folder. It is ready to use. The task updates statistics at increasing time intervals depending on the age of the message, to balance the freshness of the data with the number of web requests to the social network APIs.
The module stops updating the statistics when the message is 107 days old. You can change this
parameter in the social.config file, in the
Social.FibonacciRefreshStrategy.StopRefreshAge setting.
Administrator's and Developer's Guide
Sitecore® is a registered trademark. All other brand and product names are the property of their respective holders. The contents of this document are the property of Sitecore. Copyright © 2001-2016 Sitecore. All rights reserved.
Page 41 of 53
Chapter 5
Analytics Features
You can use the Sitecore Social Connected module and the Sitecore Digital Marketing Suite to personalize your website. The Social Connected module provides the Like and Tweet buttons as standard Sitecore controls that track visitors’ activity.
This chapter contains the following sections:
Tracking Campaign Statistics on a Content Message
Putting Like and Tweet Buttons on the Web Page
Tracking Like and Tweet Buttons Usage
Personalization Rules for the Social Connected Module

Social Connected 1.2 for Sitecore CMS 6.5
Sitecore® is a registered trademark. All other brand and product names are the property of their respective holders. The contents of this document are the property of Sitecore. Copyright © 2001-2016 Sitecore. All rights reserved.
Page 42 of 53
5.1 Tracking Campaign Statistics on a Content Message
If you use the Sitecore Social Connected module with DMS, you can track the campaign statistics on a content message.
These statistics are available for the messages that are assigned campaigns.
To see the campaign statistics, click Show campaign reports.
By default, a content message uses the generic Twitter Content Messages or Facebook Content Messages campaigns. The reports for these campaigns give you an overview of the effectiveness of all your Twitter or Facebook messages.
To only see the numbers for a particular message, when you set up the message, click Create campaign to create a new campaign for that message. For more information about creating a message, see the section Creating a Message.
To get detailed information about a session report or a campaign dashboard, click the respective link.
Note The Sitecore Social Connected module gathers campaign statistics from DMS aggregate tables. As a result, the campaign statistics are updated as often as DMS aggregation task runs.

Administrator's and Developer's Guide
Sitecore® is a registered trademark. All other brand and product names are the property of their respective holders. The contents of this document are the property of Sitecore. Copyright © 2001-2016 Sitecore. All rights reserved.
Page 43 of 53
Campaign Dashboard report
Campaign Dashboard report presents a campaign statistics overview, data over time, using graphs.
Session report
Session report presents detailed campaign information, along with review of individual sessions and visits to understand more about the experience of the visitors after they click the twitter/facebook link. This report shows what visitors are doing on the website, what are potential problems in their experience.
For more information about DMS reports, see the documentation on SDN.

Social Connected 1.2 for Sitecore CMS 6.5
Sitecore® is a registered trademark. All other brand and product names are the property of their respective holders. The contents of this document are the property of Sitecore. Copyright © 2001-2016 Sitecore. All rights reserved.
Page 44 of 53
5.2 Putting Like and Tweet Buttons on the Web Page
You can put the Like (for Facebook) and Tweet (for Twitter) buttons on the website.
Sitecore provides them as standard controls. You can find the controls in the
sitecore/layout/sublayouts/social/sharing folder.
To make these controls available for users to put on a webpage, you must enable the controls on the appropriate placeholder:
1. In the Content Editor, navigate to sitecore/layout/placeholder settings folder and
select the placeholder item where the controls will be located
2. In the Allowed Controls field add the Like Button and the Tweet Button controls to the
list of the selected controls.
For more information about the Tweet button, see the official Twitter documentation:
https://dev.twitter.com/docs/tweet-button
For more information about the Like button, see the official Facebook documentation:
http://developers.facebook.com/docs/reference/plugins/like/
Administrator's and Developer's Guide
Sitecore® is a registered trademark. All other brand and product names are the property of their respective holders. The contents of this document are the property of Sitecore. Copyright © 2001-2016 Sitecore. All rights reserved.
Page 45 of 53
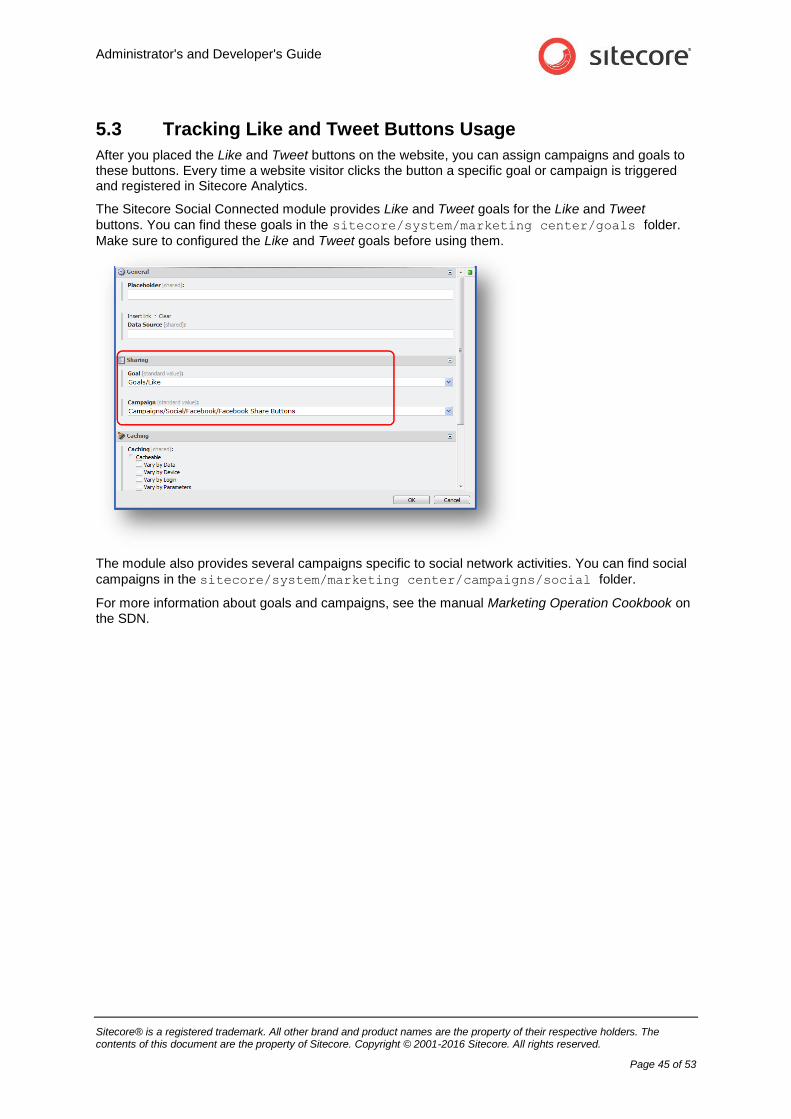
5.3 Tracking Like and Tweet Buttons Usage
After you placed the Like and Tweet buttons on the website, you can assign campaigns and goals to these buttons. Every time a website visitor clicks the button a specific goal or campaign is triggered and registered in Sitecore Analytics.
The Sitecore Social Connected module provides Like and Tweet goals for the Like and Tweet
buttons. You can find these goals in the sitecore/system/marketing center/goals folder.
Make sure to configured the Like and Tweet goals before using them.
The module also provides several campaigns specific to social network activities. You can find social
campaigns in the sitecore/system/marketing center/campaigns/social folder.
For more information about goals and campaigns, see the manual Marketing Operation Cookbook on the SDN.

Social Connected 1.2 for Sitecore CMS 6.5
Sitecore® is a registered trademark. All other brand and product names are the property of their respective holders. The contents of this document are the property of Sitecore. Copyright © 2001-2016 Sitecore. All rights reserved.
Page 46 of 53
5.4 Personalization Rules for the Social Connected Module
The Social Connected module adds four personalization conditions and an action to the Sitecore Rule Set Editor.
You can use these personalization conditions and the action with the Social Connected module to personalize the website.
The Sitecore Social Connected module provides the following conditions:
where the gender of the current user is value
where the current user is interested in value on any connected social network
where the current user is connected to the specific social network
where the network profile specific field compares to value
The Sitecore Social Connected module provides the following action:
send associated messages.
For more information about personalization rules, see the manual Marketing Operation Cookbook on the SDN.
Where the gender of the current user is value
This condition defines visitor’s gender.
Where the current user is interested in value on any connected social network
This condition checks for the existence of the value in multiple profile fields in each connected network.
Editors can use this rule to define visitors interested, for example, in sports, instead of creating multiple rules to check individual profile attributes, such as interests, hobbies, books, and so on.
The set of attributes that this condition checks is configured in the social.config file, in the
<interestedInRule> section.

Administrator's and Developer's Guide
Sitecore® is a registered trademark. All other brand and product names are the property of their respective holders. The contents of this document are the property of Sitecore. Copyright © 2001-2016 Sitecore. All rights reserved.
Page 47 of 53
Note The where the current user is interested in value on any connected social network condition only supports one keyword for the value. Consider creating several conditions to use several values.
Where the current user is connected to the specific social network
This condition checks whether the visitor is connected to the specific social network.
Where the network profile specific field compares to value
This condition checks whether a specific profile field contains a specific value.
Use this condition when you need more specific requirements that are not covered by other rules.

Social Connected 1.2 for Sitecore CMS 6.5
Sitecore® is a registered trademark. All other brand and product names are the property of their respective holders. The contents of this document are the property of Sitecore. Copyright © 2001-2016 Sitecore. All rights reserved.
Page 48 of 53
Chapter 6
Developer’s Notes
The Sitecore Social Connected module uses 5 pipelines. This chapter describes the goals of the pipelines and their processors.
The chapter contains the following sections:
The Social Connected Module Pipelines

Administrator's and Developer's Guide
Sitecore® is a registered trademark. All other brand and product names are the property of their respective holders. The contents of this document are the property of Sitecore. Copyright © 2001-2016 Sitecore. All rights reserved.
Page 49 of 53
6.1 The Social Connected Module Pipelines
The Sitecore Social Connected module uses 5 pipelines.
6.1.1 CreateSocialMessage Pipeline
The CreateSocialMessage pipeline is used when the module creates a message for a social
network.
GetRoot Processor
The GetRoot processor creates a path in the content tree for the message item.
CreateItem Processor
The CreateItem processor creates two items under the message item: message and source items.
SaveData Processor
The SaveData processor saves message data from its fields.
6.1.2 ReadSocialMessage Pipeline
The ReadSocialMessage pipeline reads all the messages for the current item from the content tree
and returns the messages collection.
GetMessagesRoot Processor
The GetMessageRoot processor reads the message item path for the current Sitecore item.
ReadMessages Processor
The ReadMessages processor reads all the messages for the current Sitecore item.
6.1.3 PublishMessage Pipeline
The PublishMessage pipeline posts the message to the social network.
ResolvePublishProvider Processor
The ResolvePublishProvider processor selects a publishing provider to post the message.
PublishMessage Processor
The PublishMessage processor posts the message to the social network.
6.1.4 BuildMessage Pipeline
The BuildMessage pipeline builds the message before it is posted to the social network. It returns
the message object that is ready to be posted.
ResolveRenderer Processor
The ResolveRenderer processor returns the message builder for the source (goal or content).
BuildMessage Processor
The BuildMessage processor builds the message.

Social Connected 1.2 for Sitecore CMS 6.5
Sitecore® is a registered trademark. All other brand and product names are the property of their respective holders. The contents of this document are the property of Sitecore. Copyright © 2001-2016 Sitecore. All rights reserved.
Page 50 of 53
ReplaceTokens Processor
The ReplaceTokens processor replaces tokens with their values.
6.1.5 MatchUser Pipeline
The MatchUser pipeline uses the data provided by the user to search for an existing user or creates
a new user if no existing user is found.
PrepareUserData Processor
The PrepareUserData processor creates data for the user: username and email. This is based on
the user basic data.
FindByEmail Processor
The FindByEmail processor uses the email information provided by the user to search for an
existing user.
FindByDomain Processor
The FindByDomain processor searches for an existing user by domain.
FindByNetworkCredentials Processor
The FindByNetworkCredentials processor uses the network credentials (ID) to search for an
existing user.
CreateUser Processor
The CreateUser processor creates a new user.

Administrator's and Developer's Guide
Sitecore® is a registered trademark. All other brand and product names are the property of their respective holders. The contents of this document are the property of Sitecore. Copyright © 2001-2016 Sitecore. All rights reserved.
Page 51 of 53
Chapter 7
Tips and Tricks
This chapter contains some tips and tricks for developers and administrators.
This chapter contains the following sections:
What Roles Social Connected Authors Require?
How to Use the Error Handling Mechanism

Social Connected 1.2 for Sitecore CMS 6.5
Sitecore® is a registered trademark. All other brand and product names are the property of their respective holders. The contents of this document are the property of Sitecore. Copyright © 2001-2016 Sitecore. All rights reserved.
Page 52 of 53
7.1 What Roles Social Connected Authors Require?
The Sitecore Social Connected module provides the following security role for content authors and editors:
Sitecore\Sitecore Client Social Authoring
This role gives a user permissions to work with content messaging. This role is assigned to a user together with the Sitecore\Author role.
You must assign the Sitecore\Analytics Maintaining role to a user if you want to enable creating goal/page event messages, and creating campaigns for messages. You must assign the Sitecore\Analytics Reporting role to a user if you want to enable viewing DMS reports for a message.
Administrator's and Developer's Guide
Sitecore® is a registered trademark. All other brand and product names are the property of their respective holders. The contents of this document are the property of Sitecore. Copyright © 2001-2016 Sitecore. All rights reserved.
Page 53 of 53
7.2 How to Use the Error Handling Mechanism
The Sitecore Social Connected module contains an error handling mechanism that you can use to display error messages both on the website and in the Sitecore Desktop. This mechanism lets you personalize the look and style of the errors that are displayed in your solution.
The error handling mechanism deals with the module features that directly cooperate with social networks. An error is typically comprised of a simple message and a detailed message. You can find
the detailed message in the module log files under the folder [installation_root]\data\logs.
The simple message is displayed in the UI.
You can use the language packages provided with the module to localize the simple error messages.
7.2.1 Error Handling on the Website
Any errors that are caused by visitors on the website when they use the Social Connector log in buttons are also registered. The module registers detailed error messages in the log files.
To display the error messages to website visitors in the style used by your website, a developer should follow this procedure:
1. Create a control that looks for authentication errors in the query string and gets the GUID of the error.
2. Get the simple and detailed error message using exception manager and method Sitecore.Social.Exceptions.ExceptionManager.Get(errorKey)
3. Display this information to the website visitors in the same style as the website design.
Related Documents