Administration Guide for Dynamics 365 Version: 8.2 View the latest version of this document online.

Welcome message from author
This document is posted to help you gain knowledge. Please leave a comment to let me know what you think about it! Share it to your friends and learn new things together.
Transcript
Administration Guide for Dynamics 365
Version: 8.2
View the latest version of this document online.
2
Contents
Administration Guide for Dynamics 365 .................................................................................................... 1
Administering Dynamics 365 ................................................................................................................... 38
In This Section ...................................................................................................................................... 38
Related Sections .................................................................................................................................. 38
What's new for administrators and customizers in Microsoft Dynamics 365 ........................................... 38
What's new in the December 2016 update for Dynamics 365 (online and on-premises) .................... 39
What's new in CRM Online 2016 Update 1 and CRM 2016 Service Pack 1 ....................................... 50
What’s new in CRM Online 2016 and CRM 2016 (on-premises)......................................................... 63
CRM Online 2015 Update 1 features now apply to CRM 2016 on-premises ...................................... 72
See Also ............................................................................................................................................... 76
Important changes coming in future releases of Microsoft Dynamics 365 .............................................. 76
Removal of support for older mobile operating systems ..................................................................... 76
Some knowledge management entities are deprecated ...................................................................... 76
Removal of legacy form rendering option ............................................................................................ 77
Microsoft Dynamics CRM List Component is deprecated .................................................................... 77
Removal of support for Microsoft Office 2010 ...................................................................................... 77
Microsoft Dynamics Email Router is deprecated ................................................................................. 77
See Also ............................................................................................................................................... 78
Getting started ......................................................................................................................................... 78
In This Section ...................................................................................................................................... 78
See Also ............................................................................................................................................... 78
Microsoft Dynamics 365 (online) requirements ....................................................................................... 78
Web browser requirements .................................................................................................................. 79
Microsoft Dynamics 365 for Outlook requirements .............................................................................. 79
Mobile device requirements ................................................................................................................. 79
Microsoft Office requirements .............................................................................................................. 79
See Also ............................................................................................................................................... 79
Plan for Microsoft Dynamics 365 (online) deployment and administration ............................................. 80
See Also ............................................................................................................................................... 83
64-bit supported configurations for Microsoft Dynamics 365 .................................................................. 84
Dynamics 365 for Outlook .................................................................................................................... 84
Email Router ......................................................................................................................................... 84
SQL Server (on-premises only) ............................................................................................................ 84
See Also ............................................................................................................................................... 84
3
Supported web browsers and mobile devices ......................................................................................... 85
Known issues when you run Microsoft Dynamics 365 with certain web browsers .............................. 85
See Also ............................................................................................................................................... 86
Web application requirements for Microsoft Dynamics 365 .................................................................... 86
In This Topic ......................................................................................................................................... 86
Microsoft Dynamics 365 web application hardware requirements ....................................................... 86
Supported versions of Internet Explorer and Microsoft Edge .............................................................. 87
Supported non-Internet Explorer web browsers................................................................................... 88
Supported versions of Microsoft Office ................................................................................................ 88
Printing reports ..................................................................................................................................... 89
See Also ............................................................................................................................................... 89
Performance tuning and optimization ...................................................................................................... 89
In This Section ...................................................................................................................................... 89
Related Sections .................................................................................................................................. 89
Verify network capacity and throughput for Dynamics 365 clients .......................................................... 89
See Also ............................................................................................................................................... 91
Key preparation and configuration tasks ................................................................................................. 91
In This Topic ......................................................................................................................................... 91
Common configuration settings for Internet Explorer ........................................................................... 91
Configuration settings for Microsoft Dynamics 365 for Outlook ........................................................... 94
Network connections settings............................................................................................................... 95
Antivirus or malware application settings ............................................................................................. 95
Important email messages from Microsoft Dynamics 365 ................................................................... 96
Available resources for Microsoft Dynamics 365 users ....................................................................... 96
Technical support for Microsoft Dynamics 365 .................................................................................... 96
See Also ............................................................................................................................................... 97
Set up a Dynamics 365 organization ....................................................................................................... 97
In This Section ...................................................................................................................................... 97
Related Sections .................................................................................................................................. 98
Create or edit business units ................................................................................................................... 98
In This Topic ......................................................................................................................................... 99
Create a new business unit .................................................................................................................. 99
Change the settings for a business unit ............................................................................................. 101
Change the business unit for a record ............................................................................................... 101
See Also ............................................................................................................................................. 102
Delete a business unit ........................................................................................................................... 102
See Also ............................................................................................................................................. 103
4
Assign a business unit a different parent business ............................................................................... 103
See Also ............................................................................................................................................. 104
Create or edit a site ............................................................................................................................... 104
See Also ............................................................................................................................................. 105
Add resources to a site .......................................................................................................................... 105
See Also ............................................................................................................................................. 105
Add or remove a currency ..................................................................................................................... 106
In This Topic ....................................................................................................................................... 106
Add a currency ................................................................................................................................... 106
Delete or deactivate a currency.......................................................................................................... 106
See Also ............................................................................................................................................. 107
Change regional and language options for your organization ............................................................... 107
See Also ............................................................................................................................................. 108
Enhanced service level agreements ...................................................................................................... 108
Case-on-hold support ......................................................................................................................... 109
Considerations when you choose a SLA type.................................................................................... 109
See Also ............................................................................................................................................. 109
Enable languages .................................................................................................................................. 110
In This Topic ....................................................................................................................................... 110
Enable the language .......................................................................................................................... 110
Select the language to display the user interface and Help ............................................................... 111
Known issues with Language settings ............................................................................................... 111
See Also ............................................................................................................................................. 112
Configure Quick Find options for the organization ................................................................................ 112
In this topic ......................................................................................................................................... 112
Choose the method used for Quick Find indexing ............................................................................. 112
What system administrators should consider before enabling or disabling full-text indexing ............ 113
Enable or disable full-text indexing for Quick Find ............................................................................. 114
See Also ............................................................................................................................................. 114
Configure Relevance Search for the organization ................................................................................. 114
In This Topic ....................................................................................................................................... 114
Compare Dynamics 365 searches ..................................................................................................... 115
How Relevance Search works ........................................................................................................... 116
Relevance Search architecture .......................................................................................................... 117
Enable Relevance Search .................................................................................................................. 117
Select entities for Relevance Search ................................................................................................. 119
Configure searchable fields for Relevance Search ............................................................................ 120
5
Set managed property for Relevance Search .................................................................................... 123
Privacy notice ..................................................................................................................................... 125
See Also ............................................................................................................................................. 126
Import data into Microsoft Dynamics 365 (online) ................................................................................. 126
In This Topic ....................................................................................................................................... 127
Delete sample data ............................................................................................................................ 127
Import Outlook contacts into Microsoft Dynamics 365 (online) .......................................................... 127
Import other types of data into Microsoft Dynamics 365 (online) ....................................................... 127
See Also ............................................................................................................................................. 128
Turn off the welcome screen (navigation tour) in CRM 2015 or earlier ................................................. 128
See Also ............................................................................................................................................. 131
Manage security, users, and teams ....................................................................................................... 131
In This Section .................................................................................................................................... 131
See Also ............................................................................................................................................. 131
Security concepts for Microsoft Dynamics 365...................................................................................... 131
In this topic ......................................................................................................................................... 132
Business units .................................................................................................................................... 132
Role-based security ............................................................................................................................ 132
User-based access and licensing ...................................................................................................... 133
Teams ................................................................................................................................................. 133
Record-based security ....................................................................................................................... 133
Hierarchy security ............................................................................................................................... 134
Field-based security ........................................................................................................................... 134
Deployment-wide administrative-level security (on-premises only) ................................................... 134
Security Modeling with Microsoft Dynamics 365 ................................................................................ 134
See Also ............................................................................................................................................. 135
Security roles and privileges .................................................................................................................. 135
Security roles ...................................................................................................................................... 135
Overriding security roles ..................................................................................................................... 138
In This Section .................................................................................................................................... 138
See Also ............................................................................................................................................. 138
Create or edit a security role .................................................................................................................. 138
Create a security role ......................................................................................................................... 139
Edit a security role .............................................................................................................................. 139
Minimum privileges for common tasks ............................................................................................... 140
Privacy notices ................................................................................................................................... 141
See Also ............................................................................................................................................. 142
6
Copy a security role ............................................................................................................................... 142
See Also ............................................................................................................................................. 143
View your user profile ............................................................................................................................ 143
Field level security ................................................................................................................................. 144
In This Topic ....................................................................................................................................... 144
Overview of field level security ........................................................................................................... 145
Example for restricting the mobile phone field for the Contact entity ................................................. 145
Which fields can be secured? ............................................................................................................ 146
Best practices when you use field security ........................................................................................ 147
See Also ............................................................................................................................................. 147
Hierarchy security .................................................................................................................................. 147
In This Topic ....................................................................................................................................... 147
Manager hierarchy and Position hierarchy security models .............................................................. 148
Set up hierarchy security .................................................................................................................... 151
Set up Manager and Position hierarchies .......................................................................................... 154
Performance considerations............................................................................................................... 157
See Also ............................................................................................................................................. 158
Manage users ........................................................................................................................................ 158
In This Topic ....................................................................................................................................... 158
Manage users in Dynamics 365 (online) ............................................................................................ 158
Manage users in Microsoft Dynamics 365 (on-premises) .................................................................. 158
See Also ............................................................................................................................................. 162
Manage teams ....................................................................................................................................... 162
In This Topic ....................................................................................................................................... 162
Owner team or access team? ............................................................................................................ 162
About owner teams ............................................................................................................................ 163
About access teams and team templates .......................................................................................... 163
Maximum settings for system-managed access teams ..................................................................... 164
See Also ............................................................................................................................................. 164
Add teams or users to a field security profile ......................................................................................... 165
See Also ............................................................................................................................................. 165
Synchronize user information between Microsoft Dynamics 365 and Active Directory ........................ 165
See Also ............................................................................................................................................. 167
Add or remove territory members .......................................................................................................... 167
See Also ............................................................................................................................................. 168
Troubleshooting: User needs read-write access to the Dynamics 365 organization ............................ 168

7
See Also ............................................................................................................................................. 169
Audit data and user activity.................................................................................................................... 169
In This Topic ....................................................................................................................................... 170
Start or stop auditing for an organization ........................................................................................... 170
View audit logging details ................................................................................................................... 171
Enable or disable entities and fields for auditing ................................................................................ 171
See Also ............................................................................................................................................. 172
Customize your Dynamics 365 system ................................................................................................. 172
In This Section .................................................................................................................................... 173
See Also ............................................................................................................................................. 173
Getting started with customization ......................................................................................................... 173
In This Section .................................................................................................................................... 174
See Also ............................................................................................................................................. 174
Privileges required for customization ..................................................................................................... 175
In This Topic ....................................................................................................................................... 175
System Administrator and System Customizer security roles ........................................................... 175
Delegate customization tasks............................................................................................................. 176
Test customizations without customization privileges ........................................................................ 176
See Also ............................................................................................................................................. 176
Customization concepts ......................................................................................................................... 176
In This Topic ....................................................................................................................................... 177
What is metadata and why should you care? .................................................................................... 177
What kinds of customizations are supported? ................................................................................... 178
What kinds of customizations aren’t supported?................................................................................ 178
What you need to know about solutions ............................................................................................ 180
Publishing customizations .................................................................................................................. 184
Prepare client customizations to improve performance for mobile and interactive service hub ........ 185
Changes that affect Dynamics 365 organization performance .......................................................... 185
Combine customization capabilities ................................................................................................... 186
Additional capabilities not included in this guide ................................................................................ 186
See Also ............................................................................................................................................. 187
Use solutions for your customizations ................................................................................................... 188
In This Topic ....................................................................................................................................... 188
The default solution ............................................................................................................................ 188
Navigate to a specific solution ............................................................................................................ 188
Use the solution explorer .................................................................................................................... 189
Create your own solution .................................................................................................................... 191
Import, update, and export solutions .................................................................................................. 192
8
Settings options for solution export .................................................................................................... 195
Privacy notices ................................................................................................................................... 201
See Also ............................................................................................................................................. 201
Use segmented solutions and patches to simplify solution updates ..................................................... 201
Understanding version numbers for cloned solutions and patches ................................................... 203
Create a segmented solution with the entity assets you want ........................................................... 203
Create a solution patch ...................................................................................................................... 209
Clone a solution .................................................................................................................................. 212
See Also ............................................................................................................................................. 213
Change the color scheme or add a logo to match your organization’s brand ....................................... 214
In This Topic ....................................................................................................................................... 214
Use themes to enhance the user interface and create your product branding .................................. 214
Solution awareness ............................................................................................................................ 215
Copy and alter the existing theme ...................................................................................................... 215
Preview and publish a theme ............................................................................................................. 218
Best practices ..................................................................................................................................... 218
Custom theme considerations ............................................................................................................ 219
See Also ............................................................................................................................................. 219
Changes to forms and views in Dynamics 2015.................................................................................... 219
In This Topic ....................................................................................................................................... 220
Hierarchies ......................................................................................................................................... 220
Product Catalog .................................................................................................................................. 224
Enhanced SLAs .................................................................................................................................. 227
See Also ............................................................................................................................................. 230
Create and edit metadata ...................................................................................................................... 231
In This Topic ....................................................................................................................................... 231
Metadata used with customization ..................................................................................................... 231
Use the metadata browser ................................................................................................................. 231
Create new metadata or use existing metadata................................................................................. 232
Limitations on creating metadata items .............................................................................................. 233
See Also ............................................................................................................................................. 233
Create and edit entities .......................................................................................................................... 234
In this topic ......................................................................................................................................... 234
Types of entities ................................................................................................................................. 234
Security considerations: Accessing activities and entities ................................................................. 237
Create entities .................................................................................................................................... 237
Edit entities ......................................................................................................................................... 238
Edit system entity messages .............................................................................................................. 241
Delete custom entities ........................................................................................................................ 242

9
Set managed properties ..................................................................................................................... 242
See Also ............................................................................................................................................. 243
Create and edit fields ............................................................................................................................. 243
In This Topic ....................................................................................................................................... 243
Create and edit fields ......................................................................................................................... 244
Types of fields .................................................................................................................................... 247
Image fields ........................................................................................................................................ 254
Delete fields ........................................................................................................................................ 255
Set managed properties for fields ...................................................................................................... 255
See Also ............................................................................................................................................. 255
Default status and status reason values ................................................................................................ 256
In This Topic ....................................................................................................................................... 256
Activity entity....................................................................................................................................... 257
Appointment entity .............................................................................................................................. 258
Article entity ........................................................................................................................................ 258
Authorization Server entity ................................................................................................................. 258
Bulk Delete Operation entity............................................................................................................... 258
Campaign entity ................................................................................................................................. 259
Campaign Activity entity ..................................................................................................................... 259
Campaign Response entity ................................................................................................................ 260
Case entity.......................................................................................................................................... 260
Case Resolution entity ....................................................................................................................... 260
Column Mapping entity ....................................................................................................................... 260
Contract entity .................................................................................................................................... 261
Contract Line entity ............................................................................................................................ 261
Data Import entity ............................................................................................................................... 261
Discount List entity ............................................................................................................................. 261
Duplicate Detection Rule entity .......................................................................................................... 262
Email entity ......................................................................................................................................... 262
Fax entity ............................................................................................................................................ 262
Goal entity .......................................................................................................................................... 262
Goal Metric entity ............................................................................................................................... 263
Import Data entity ............................................................................................................................... 263
Import Entity Mapping entity ............................................................................................................... 263
Import Log entity ................................................................................................................................. 263
Import Source File entity .................................................................................................................... 263
Invoice entity....................................................................................................................................... 264
Lead entity .......................................................................................................................................... 264
Letter entity ......................................................................................................................................... 264
List Value Mapping entity ................................................................................................................... 265
10
Lookup Mapping entity ....................................................................................................................... 265
Marketing List entity ........................................................................................................................... 265
Opportunity entity ............................................................................................................................... 265
Opportunity Close entity ..................................................................................................................... 265
Order entity ......................................................................................................................................... 266
Order Close entity .............................................................................................................................. 266
Owner Mapping entity ........................................................................................................................ 266
Partner Application entity ................................................................................................................... 266
Phone Call entity ................................................................................................................................ 267
Price List entity ................................................................................................................................... 267
Process entity ..................................................................................................................................... 267
Process Session entity ....................................................................................................................... 267
Queue entity ....................................................................................................................................... 268
Queue Item entity ............................................................................................................................... 268
Quick Campaign entity ....................................................................................................................... 268
Quote entity ........................................................................................................................................ 268
Quote Close entity .............................................................................................................................. 269
Recurring Appointment entity ............................................................................................................. 269
Rollup Query entity ............................................................................................................................. 269
Saved View entity ............................................................................................................................... 269
Sdk Message Processing Step entity ................................................................................................. 270
Service Activity entity ......................................................................................................................... 270
System Job entity ............................................................................................................................... 270
Task entity .......................................................................................................................................... 271
Transformation Mapping entity ........................................................................................................... 271
See Also ............................................................................................................................................. 271
Define status reason transitions ............................................................................................................ 271
What is the connection between Status and Status Reason fields? .................................................. 271
Edit status reason transitions ............................................................................................................. 272
See Also ............................................................................................................................................. 273
Set custom icon for custom case origin ................................................................................................. 274
Case origin field icons ........................................................................................................................ 274
See Also ............................................................................................................................................. 275
Behavior and format of the date and time field ...................................................................................... 275
In This Topic ....................................................................................................................................... 275
Date and time field behavior and format ............................................................................................ 276
Set managed property to change date and time behavior ................................................................. 277
Date Only example: birthdays and anniversaries............................................................................... 278
Time-Zone Independent example: hotel check-in .............................................................................. 279
Special considerations for date and time fields .................................................................................. 279
11
See Also ............................................................................................................................................. 281
Define rollup fields ................................................................................................................................. 281
In This Topic ....................................................................................................................................... 281
Rollup fields benefits and capabilities ................................................................................................ 281
Rollup calculations ............................................................................................................................. 282
Rollup field business scenarios .......................................................................................................... 284
Rollup field considerations ................................................................................................................. 291
See Also ............................................................................................................................................. 293
Define calculated fields .......................................................................................................................... 293
In This Topic ....................................................................................................................................... 294
Calculated fields examples ................................................................................................................. 294
Calculated field functions syntax ........................................................................................................ 303
Calculated fields considerations ......................................................................................................... 305
See Also ............................................................................................................................................. 306
Create and edit entity relationships ....................................................................................................... 307
In This Topic ....................................................................................................................................... 307
Decide whether to use entity relationships or connections ................................................................ 307
Types of entity relationships ............................................................................................................... 308
Create and edit 1:N relationships ....................................................................................................... 308
Map entity fields ................................................................................................................................. 315
Create and edit N:N (many-to-many) relationships ............................................................................ 317
Set managed properties for relationships .......................................................................................... 319
See Also ............................................................................................................................................. 319
Customizable parental entity relationships ............................................................................................ 320
Customizable one-to-many entity relationships with parental relationship behavior ......................... 320
See Also ............................................................................................................................................. 321
Default entity and attribute mappings .................................................................................................... 321
Default entity and field mappings ....................................................................................................... 322
See Also ............................................................................................................................................. 355
Create and edit global option sets ......................................................................................................... 355
In This Topic ....................................................................................................................................... 356
Configure global option sets ............................................................................................................... 356
Use a global option set ....................................................................................................................... 357
See Also ............................................................................................................................................. 358
Create and design forms ....................................................................................................................... 358
In This Topic ....................................................................................................................................... 359
Form differences by entity .................................................................................................................. 359
12
Types of forms .................................................................................................................................... 360
Assign form order ............................................................................................................................... 361
Control access to forms ...................................................................................................................... 361
See Also ............................................................................................................................................. 363
Use the form editor ................................................................................................................................ 363
In This Topic ....................................................................................................................................... 363
Open the form editor .......................................................................................................................... 364
Form editor user interface .................................................................................................................. 365
Form properties .................................................................................................................................. 372
Visibility options .................................................................................................................................. 374
Tab properties .................................................................................................................................... 375
Section properties .............................................................................................................................. 376
Common field properties .................................................................................................................... 377
Special field properties ....................................................................................................................... 379
Sub-grid properties ............................................................................................................................. 382
Quick view control properties ............................................................................................................. 385
Web resource properties .................................................................................................................... 386
IFRAME properties ............................................................................................................................. 388
Notes control ...................................................................................................................................... 390
Configure Bing maps .......................................................................................................................... 391
Edit Navigation ................................................................................................................................... 392
Timer control....................................................................................................................................... 393
Additional controls for Dynamics 365 for phones and tablets ............................................................ 394
Configure event handlers ................................................................................................................... 402
Privacy notices ................................................................................................................................... 404
See Also ............................................................................................................................................. 404
Design considerations for main forms ................................................................................................... 405
In This Topic ....................................................................................................................................... 405
Custom forms for different groups ...................................................................................................... 405
Presentation differences ..................................................................................................................... 406
Form performance .............................................................................................................................. 406
Managing auto-save ........................................................................................................................... 406
See Also ............................................................................................................................................. 406
Main form presentations ........................................................................................................................ 407
In This Topic ....................................................................................................................................... 407
Main forms .......................................................................................................................................... 407
Updated forms .................................................................................................................................... 408
Dynamics 365 for phones and tablets forms ...................................................................................... 411
Classic forms ...................................................................................................................................... 416
Dynamics 365 for Outlook reading pane ............................................................................................ 417
13
See Also ............................................................................................................................................. 419
Optimize form performance ................................................................................................................... 419
In This Topic ....................................................................................................................................... 419
Form design........................................................................................................................................ 419
Form scripts ........................................................................................................................................ 419
Command bar or ribbon ..................................................................................................................... 420
See Also ............................................................................................................................................. 420
Manage auto-save ................................................................................................................................. 420
In This Topic ....................................................................................................................................... 421
How auto-save works ......................................................................................................................... 421
Should you disable auto-save? .......................................................................................................... 421
Disable auto-save for the organization ............................................................................................... 421
Disable auto-save for a form .............................................................................................................. 422
See Also ............................................................................................................................................. 424
Update your forms ................................................................................................................................. 425
Merging main forms to use the new layout ........................................................................................ 425
See Also ............................................................................................................................................. 426
Create and edit mobile forms for Dynamics CRM for phones express ................................................. 426
In this topic ......................................................................................................................................... 426
View the mobile express form ............................................................................................................ 426
Create a mobile express form ............................................................................................................ 428
Edit a mobile express form ................................................................................................................. 428
See Also ............................................................................................................................................. 430
Create and edit quick create forms ........................................................................................................ 430
In This Topic ....................................................................................................................................... 430
Entities with quick create forms .......................................................................................................... 430
Create a quick create form ................................................................................................................. 431
Edit a quick create form ...................................................................................................................... 431
See Also ............................................................................................................................................. 432
Create and edit quick view forms .......................................................................................................... 432
In This Topic ....................................................................................................................................... 432
Create a quick view form .................................................................................................................... 433
Edit a quick view form ........................................................................................................................ 433
Add a quick view control to a main form ............................................................................................ 433
See Also ............................................................................................................................................. 434
Create and design interactive forms for the interactive service hub...................................................... 434
In This Topic ....................................................................................................................................... 434
14
Supported entities .............................................................................................................................. 435
Enable entities for interactive experience .......................................................................................... 435
Types of forms .................................................................................................................................... 436
Assign form order ............................................................................................................................... 437
See Also ............................................................................................................................................. 437
Use the Main - Interactive experience form and its components .......................................................... 437
In This Topic ....................................................................................................................................... 438
Open the form editor .......................................................................................................................... 438
Publish the changes for use in the interactive service hub ................................................................ 439
Form editor user interface .................................................................................................................. 439
Form properties .................................................................................................................................. 445
Visibility options .................................................................................................................................. 446
Tab properties .................................................................................................................................... 447
Section properties .............................................................................................................................. 448
Interaction Wall ................................................................................................................................... 449
Common field properties .................................................................................................................... 449
Special field properties ....................................................................................................................... 451
Sub-grid properties ............................................................................................................................. 456
Quick view control properties ............................................................................................................. 459
Web resource properties .................................................................................................................... 460
IFRAME properties ............................................................................................................................. 462
Edit Navigation ................................................................................................................................... 465
Configure event handlers ................................................................................................................... 465
See Also ............................................................................................................................................. 467
Create and edit a card form ................................................................................................................... 467
In this topic ......................................................................................................................................... 468
Create a card form ............................................................................................................................. 468
Edit a card form .................................................................................................................................. 469
See Also ............................................................................................................................................. 469
Create and edit views ............................................................................................................................ 469
In This Topic ....................................................................................................................................... 470
Types of views .................................................................................................................................... 470
Accessing view definitions .................................................................................................................. 472
Specify default views .......................................................................................................................... 472
Create and edit views ......................................................................................................................... 473
Choose and configure columns .......................................................................................................... 474
Display custom icons instead of values in list views .......................................................................... 476
Edit filter criteria .................................................................................................................................. 480
Configure sorting ................................................................................................................................ 480
Remove views .................................................................................................................................... 480
15
Dependencies .................................................................................................................................... 481
Managed properties ........................................................................................................................... 481
See Also ............................................................................................................................................. 482
Create and edit dashboards .................................................................................................................. 482
In This Topic ....................................................................................................................................... 482
Create a new dashboard .................................................................................................................... 482
Edit an existing dashboard ................................................................................................................. 483
See Also ............................................................................................................................................. 483
Configure interactive experience dashboards ....................................................................................... 484
In This Topic ....................................................................................................................................... 484
Interactive experience dashboards overview ..................................................................................... 484
Configure entities, fields, and security roles for the interactive dashboards ...................................... 489
Configure interactive experience dashboards .................................................................................... 494
Configure dashboard colors ............................................................................................................... 500
See Also ............................................................................................................................................. 502
Create and edit processes ..................................................................................................................... 502
Workflow processes ............................................................................................................................... 503
In This Topic ....................................................................................................................................... 503
Where do you customize workflow processes? ................................................................................. 503
Workflow properties ............................................................................................................................ 504
Security context of workflow processes ............................................................................................. 508
Activate a workflow ............................................................................................................................. 508
See Also ............................................................................................................................................. 508
Configure workflow steps ....................................................................................................................... 509
In This Topic ....................................................................................................................................... 509
Workflow stages and steps ................................................................................................................ 509
Actions that workflow processes can perform .................................................................................... 509
Setting conditions for workflow actions .............................................................................................. 511
Using real-time workflows .................................................................................................................. 513
See Also ............................................................................................................................................. 514
Best practices for workflow processes .................................................................................................. 514
In This Topic ....................................................................................................................................... 514
Avoid infinite loops ............................................................................................................................. 515
Use workflow templates ..................................................................................................................... 515
Use child workflows ............................................................................................................................ 515
Keep fewer logs .................................................................................................................................. 515
Use Notes to keep track of changes .................................................................................................. 515
See Also ............................................................................................................................................. 515
16
Dialogs ................................................................................................................................................... 516
Where do I customize dialog processes? .......................................................................................... 516
Dialog properties ................................................................................................................................ 516
Activating dialogs ............................................................................................................................... 517
See Also ............................................................................................................................................. 517
Configure dialog processes ................................................................................................................... 517
In This Topic ....................................................................................................................................... 517
Dialog components ............................................................................................................................. 517
Steps available for dialogs ................................................................................................................. 520
Link child dialog .................................................................................................................................. 524
See Also ............................................................................................................................................. 525
Actions ................................................................................................................................................... 525
In This Topic ....................................................................................................................................... 525
Why use actions? ............................................................................................................................... 525
Configurable messages ...................................................................................................................... 526
Global messages ................................................................................................................................ 526
See Also ............................................................................................................................................. 526
Configure actions ................................................................................................................................... 526
In This Topic ....................................................................................................................................... 527
Create an action ................................................................................................................................. 527
Edit an action ...................................................................................................................................... 528
See Also ............................................................................................................................................. 530
Invoke custom actions from a workflow or dialog .................................................................................. 531
In This Topic ....................................................................................................................................... 531
Create a custom action ...................................................................................................................... 531
Invoke a custom action from a workflow ............................................................................................ 534
Invoke a custom action from a dialog ................................................................................................. 536
See Also ............................................................................................................................................. 538
Business process flows ......................................................................................................................... 538
In This Topic ....................................................................................................................................... 539
Why use business process flows? ..................................................................................................... 539
What can business process flows do? ............................................................................................... 539
Multiple entities in business process flows ......................................................................................... 540
Multiple business process flows are available per entity ................................................................... 540
Business process flow considerations ............................................................................................... 541
See Also ............................................................................................................................................. 542
Configure business process flows ......................................................................................................... 543
In This Topic ....................................................................................................................................... 543
17
Create business process flows........................................................................................................... 543
Edit business process flows ............................................................................................................... 544
See Also ............................................................................................................................................. 546
Enhance business process flows with branching .................................................................................. 546
In This Topic ....................................................................................................................................... 547
What you need to know when designing business process flows with branches .............................. 547
Car selling process flow with two branches example ......................................................................... 548
Prevent information disclosure ........................................................................................................... 551
See Also ............................................................................................................................................. 553
Monitor and manage processes ............................................................................................................ 553
In This Topic ....................................................................................................................................... 553
Monitoring background workflows ...................................................................................................... 553
Monitoring real-time workflows and actions ....................................................................................... 554
Monitoring dialogs .............................................................................................................................. 554
Status of workflow processes ............................................................................................................. 554
See Also ............................................................................................................................................. 555
Create and edit business rules .............................................................................................................. 555
In This Topic ....................................................................................................................................... 555
Why business rules? .......................................................................................................................... 555
What can business rules do? ............................................................................................................. 556
How do I configure business rules? ................................................................................................... 558
Limitations for business rules ............................................................................................................. 563
Localize error messages used in business rules ............................................................................... 564
See Also ............................................................................................................................................. 565
Create business rules based on business process flows ...................................................................... 565
Example scenarios for business rules based on business process flows ......................................... 566
See Also ............................................................................................................................................. 572
Create and edit web resources .............................................................................................................. 572
In this topic ......................................................................................................................................... 573
What are web resources? .................................................................................................................. 573
Create and edit web resources .......................................................................................................... 574
See Also ............................................................................................................................................. 576
Define alternate keys to reference Dynamics 365 records .................................................................... 576
Define the alternate keys .................................................................................................................... 577
See Also ............................................................................................................................................. 577
Query and visualize hierarchical data .................................................................................................... 578
In This Topic ....................................................................................................................................... 578
18
Query hierarchical data ...................................................................................................................... 578
Visualize hierarchical data .................................................................................................................. 580
See Also ............................................................................................................................................. 586
Customize the Help experience ............................................................................................................. 586
Where to find help when you design your custom Help ..................................................................... 587
Set up customizable Help ................................................................................................................... 587
See Also ............................................................................................................................................. 588
Customize Dynamics 365 for phones and tablets ................................................................................. 589
In this topic ......................................................................................................................................... 589
Home page for Dynamics 365 for phones and tablets ....................................................................... 589
Form customizations for Dynamics 365 for phones and tablets ........................................................ 590
Entities displayed in Dynamics 365 for phones and tablets ............................................................... 592
Change navigation options for Dynamics 365 for phones and tablets ............................................... 593
Change commands for Dynamics 365 for phones and tablets .......................................................... 594
Form script differences for Dynamics 365 for phones and tablets ..................................................... 595
Publishing customizations for Dynamics 365 for phones and tablets ................................................ 596
Business rules in Dynamics 365 for phones and tablets ................................................................... 596
Visual controls in Dynamics 365 for phones and tablets ................................................................... 596
See Also ............................................................................................................................................. 600
Manage configuration data .................................................................................................................... 600
In This Topic ....................................................................................................................................... 601
How does the Configuration Migration tool work?.............................................................................. 601
Troubleshoot configuration data migration issues using log files....................................................... 602
Best practices for migrating your configuration data by using the tool .............................................. 603
See Also ............................................................................................................................................. 603
Create a schema to export configuration data....................................................................................... 603
In This Topic ....................................................................................................................................... 604
Before you begin ................................................................................................................................ 604
Create a schema and export configuration data ................................................................................ 604
Reuse an existing schema to export configuration data .................................................................... 610
See Also ............................................................................................................................................. 610
Modify a configuration data schema ...................................................................................................... 610
Before you begin ................................................................................................................................ 611
Modify a schema file ........................................................................................................................... 611
See Also ............................................................................................................................................. 611
Import configuration data ....................................................................................................................... 612
Before you begin ................................................................................................................................ 612
Import configuration data .................................................................................................................... 612
19
See Also ............................................................................................................................................. 613
Manage product catalog configuration .................................................................................................. 614
Configure product catalog .................................................................................................................. 614
Migrate product catalog configuration data ........................................................................................ 615
See Also ............................................................................................................................................. 617
Manage your data .................................................................................................................................. 617
In This Section .................................................................................................................................... 617
See Also ............................................................................................................................................. 617
Import data (all record types) ................................................................................................................. 618
See Also ............................................................................................................................................. 619
Detect duplicate data ............................................................................................................................. 619
See Also ............................................................................................................................................. 620
Delete bulk records ................................................................................................................................ 620
Delete bulk data ................................................................................................................................. 621
See Also ............................................................................................................................................. 621
Data encryption ...................................................................................................................................... 621
Change an organization encryption key ............................................................................................. 622
Copy your organization data encryption key ...................................................................................... 622
See Also ............................................................................................................................................. 623
Free storage space in Microsoft Dynamics 365 .................................................................................... 623
In This Topic ....................................................................................................................................... 624
Method 1: Delete bulk email and workflow instances using a bulk deletion job ................................ 624
Method 2: Evaluate and delete suspended workflows ....................................................................... 625
Method 3: Remove email attachments using Advanced Find ............................................................ 626
Method 4: Remove email messages with attachments using a bulk deletion job .............................. 626
Method 5: Remove notes with attachments using Advanced Find .................................................... 627
Method 6: Remove notes with attachments using a bulk deletion job ............................................... 628
Method 7: Remove bulk duplicate detection jobs and associated copies of duplicate records ......... 628
Method 8: Delete bulk import instances using a bulk deletion job ..................................................... 629
Method 9: Delete bulk deletion job instances using a bulk deletion job ............................................. 630
Method 10: Delete audit logs.............................................................................................................. 631
See Also ............................................................................................................................................. 631
Enable change tracking to control data synchronization ....................................................................... 632
See Also ............................................................................................................................................. 632
Replicate Microsoft Dynamics 365 (online) data to Microsoft Azure SQL Database ............................ 633
In this topic ......................................................................................................................................... 633
20
Export Profile ...................................................................................................................................... 633
Permissions required .......................................................................................................................... 634
Prerequisites for using Data Export Service ...................................................................................... 634
Create an Export Profile ..................................................................................................................... 636
Table details for the destination Azure SQL database ....................................................................... 641
Error handling and monitoring ............................................................................................................ 641
How to set up Azure Key Vault........................................................................................................... 642
How to delete Data Export Profile tables and stored procedures ...................................................... 644
Privacy notice ..................................................................................................................................... 645
See Also ............................................................................................................................................. 646
Set up and manage phones and tablets ................................................................................................ 646
In This Section .................................................................................................................................... 646
See Also ............................................................................................................................................. 647
Set up Dynamics 365 for phones and Dynamics 365 for tablets........................................................... 647
In this topic ......................................................................................................................................... 647
Get started with Dynamics 365 for phones and Dynamics 365 for tablets ........................................ 648
What users need to do ....................................................................................................................... 649
What admins need to do .................................................................................................................... 650
Configure Dynamics 365 for phones and Dynamics 365 for tablets .................................................. 655
Things to know about Dynamics 365 for phones .............................................................................. 663
Supported languages for Dynamics 365 for phones and Dynamics 365 for tablets .......................... 665
Entities and Dynamics 365 for phones and Dynamics 365 for tablets ............................................... 666
Authentication and Dynamics 365 for phones and Dynamics 365 for tablets .................................... 668
Considerations and best practices for securing Dynamics 365 data on Dynamics 365 for phones and
Dynamics 365 for tablets ................................................................................................................ 668
Other features .................................................................................................................................... 669
Privacy notice ..................................................................................................................................... 669
See Also ............................................................................................................................................. 669
Support for Dynamics 365 for phones and Dynamics 365 for tablets ................................................... 670
In this topic ......................................................................................................................................... 670
Support for Dynamics 365 for phones ................................................................................................ 670
Support for Dynamics 365 for tablets ................................................................................................. 671
Web browser support for tablets ........................................................................................................ 672
See Also ............................................................................................................................................. 673
Secure and manage Dynamics 365 for phones and tablets .................................................................. 673
Manage Dynamics 365 on mobile devices with Microsoft Intune ...................................................... 674
Set up conditional access to Dynamics 365 (online) ........................................................................ 674
Secure Dynamics 365 on mobile devices with Microsoft Dynamics 365 for Good ............................ 675
Troubleshooting and things to know about Dynamics 365 for phones and tablets ............................... 677
21
Important considerations .................................................................................................................... 677
Potential issues and resolutions ......................................................................................................... 678
Issue still not resolved? ...................................................................................................................... 691
See Also ............................................................................................................................................. 692
Integrate (synchronize) your email system with Microsoft Dynamics 365 ............................................. 692
In this topic: ........................................................................................................................................ 693
When to use server-side synchronization .......................................................................................... 693
When to use Dynamics 365 for Outlook ............................................................................................. 694
See Also ............................................................................................................................................. 694
Server-side synchronization .................................................................................................................. 694
Features available with server-side synchronization in Microsoft Dynamics 365 (online) ................. 696
Features available with server-side synchronization in both Microsoft Dynamics 365 (online) and
Microsoft Dynamics 365 (on-premises) .......................................................................................... 696
Features available with server-side synchronization in Microsoft Dynamics 365 (on-premises) ....... 697
See Also ............................................................................................................................................. 697
Supported email service configurations for server-side synchronization .............................................. 697
Using Exchange Online with Dynamics 365 (online) ......................................................................... 698
Unsupported email service configurations ......................................................................................... 699
See Also ............................................................................................................................................. 699
Email Router .......................................................................................................................................... 700
See Also ............................................................................................................................................. 701
Supported email systems and network topology ................................................................................... 701
Supported email systems ................................................................................................................... 702
Network topology and email traffic ..................................................................................................... 702
See Also ............................................................................................................................................. 703
Email Router tasks and components ..................................................................................................... 703
See Also ............................................................................................................................................. 704
Microsoft Dynamics CRM Email Router hardware requirements .......................................................... 704
See Also ............................................................................................................................................. 705
Microsoft Dynamics CRM Email Router software requirements ........................................................... 705
In This Topic ....................................................................................................................................... 706
Exchange Server ................................................................................................................................ 707
Messaging and transport protocols .................................................................................................... 707
Exchange Online ................................................................................................................................ 707
Additional Email Router software requirements ................................................................................. 708
See Also ............................................................................................................................................. 708
22
Dynamics 365 for Outlook ..................................................................................................................... 708
See Also ............................................................................................................................................. 710
Microsoft Dynamics 365 for Outlook hardware requirements ............................................................... 710
See Also ............................................................................................................................................. 711
Microsoft Dynamics 365 for Outlook software requirements ................................................................. 711
In this topic ......................................................................................................................................... 712
Microsoft Dynamics 365 for Outlook software feature prerequisites ................................................. 712
See Also ............................................................................................................................................. 714
Dynamics 365 for Outlook support ........................................................................................................ 714
Microsoft Office .................................................................................................................................. 714
Microsoft Windows ............................................................................................................................. 714
See Also ............................................................................................................................................. 715
Set up server-side synchronization of email, appointments, contacts, and tasks ................................. 715
Connect Dynamics 365 (online) to Exchange Online ............................................................................ 716
In This Topic ....................................................................................................................................... 716
Get Exchange ready ........................................................................................................................... 716
Verify you have the profile: Microsoft Exchange Online .................................................................... 717
Configure default email processing and synchronization ................................................................... 717
Configure mailboxes ........................................................................................................................... 718
Approve email .................................................................................................................................... 719
Test configuration of mailboxes.......................................................................................................... 720
Test email configuration for all mailboxes associated with an email server profile ............................ 720
See Also ............................................................................................................................................. 721
Connect Dynamics 365 (online) to Exchange Server (on-premises) .................................................... 721
In This Topic ....................................................................................................................................... 721
Prerequisites....................................................................................................................................... 722
Create an email server profile ............................................................................................................ 722
Configure default email processing and synchronization ................................................................... 725
Configure mailboxes ........................................................................................................................... 726
Approve email .................................................................................................................................... 727
Test configuration of mailboxes.......................................................................................................... 727
Test email configuration for all mailboxes associated with an email server profile ............................ 728
See Also ............................................................................................................................................. 728
Connect Dynamics 365 (on-premises) to Exchange Server (on-premises) .......................................... 728
In This Topic ....................................................................................................................................... 728
Create an email server profile ............................................................................................................ 729
Configure default email processing and synchronization ................................................................... 734
23
Configure mailboxes ........................................................................................................................... 735
Approve email .................................................................................................................................... 736
Test configuration of mailboxes.......................................................................................................... 737
Test email configuration for all mailboxes associated with an email server profile ............................ 737
See Also ............................................................................................................................................. 738
Connect Dynamics 365 (on-premises) to Exchange Online .................................................................. 738
In This Topic ....................................................................................................................................... 739
Permissions required .......................................................................................................................... 740
Set up server-based authentication with Microsoft Dynamics 365 and Exchange Online ................. 740
Run the ConfigureCRMServerSideSync command ........................................................................... 741
Troubleshoot enable server-based authentication wizard validation issues ...................................... 742
Create an email server profile ............................................................................................................ 742
Configure default email processing and synchronization ................................................................... 744
Configure mailboxes ........................................................................................................................... 745
Approve email .................................................................................................................................... 746
Test configuration of mailboxes.......................................................................................................... 747
Test email configuration for all mailboxes associated with an email server profile ............................ 747
See Also ............................................................................................................................................. 748
Connect Dynamics 365 to POP3/SMTP servers ................................................................................... 748
In This Topic ....................................................................................................................................... 748
Create an email server profile ............................................................................................................ 748
Configure default email processing and synchronization ................................................................... 753
Configure mailboxes ........................................................................................................................... 753
Approve email .................................................................................................................................... 755
Test configuration of mailboxes.......................................................................................................... 755
Test email configuration for all mailboxes associated with an email server profile ............................ 756
Network ports for Dynamics 365 (online) Government ...................................................................... 756
See Also ............................................................................................................................................. 756
Troubleshooting and monitoring server-side synchronization ............................................................... 757
The Server-Side Synchronization Performance dashboard ............................................................... 757
Common alerts and recommended resolutions ................................................................................. 758
Potential issues and resolutions ......................................................................................................... 762
See Also ............................................................................................................................................. 765
Error logging for server-side synchronization ........................................................................................ 765
See Also ............................................................................................................................................. 766
Best practices for server-side synchronization ...................................................................................... 766
Best practices for configuring server-side synchronization ................................................................ 766
See Also ............................................................................................................................................. 769
24
Create forward mailboxes or edit mailboxes ......................................................................................... 769
See Also ............................................................................................................................................. 774
Configure Outlook or Exchange folder-level tracking ............................................................................ 774
Enable folder-level tracking ................................................................................................................ 774
Some important points about folder-level tracking ............................................................................. 774
See Also ............................................................................................................................................. 775
Migrate settings from the Email Router to server-side synchronization ................................................ 775
See Also ............................................................................................................................................. 776
Set up Email Router ............................................................................................................................... 777
Privacy notice ..................................................................................................................................... 777
In This Section .................................................................................................................................... 777
Install Email Router for Microsoft Dynamics CRM and Dynamics CRM Online .................................... 778
See Also ............................................................................................................................................. 778
Install Email Router and Rule Deployment Wizard................................................................................ 779
To set up the Email Router ................................................................................................................. 779
In This Topic ....................................................................................................................................... 779
Install the Email Router ...................................................................................................................... 780
Minimum permissions required to run the Email Router and the Rule Deployment Wizard .............. 781
See Also ............................................................................................................................................. 782
Configure the Email Router ................................................................................................................... 782
In This Topic ....................................................................................................................................... 782
Email Router Configuration Manager ................................................................................................. 783
Keep user credentials secure ............................................................................................................. 788
Set email access type ........................................................................................................................ 789
Deploy inbox rules .............................................................................................................................. 790
Set up a forward mailbox .................................................................................................................... 792
See Also ............................................................................................................................................. 793
Upgrade Dynamics 2015 Email Router to Dynamics CRM 2016 Email Router .................................... 793
In This Topic ....................................................................................................................................... 794
Upgrade both the Email Router and Microsoft Dynamics CRM ......................................................... 794
Back up and use Email Router state files and Smart Matching settings ........................................... 795
Upgrade the Email Router .................................................................................................................. 796
See Also ............................................................................................................................................. 797
Merge email server profiles for migration .............................................................................................. 797
In This Topic ....................................................................................................................................... 797
Email server profile migration ............................................................................................................. 797
Field mapping when two profiles are merged .................................................................................... 798
25
Incoming connection field mapping .................................................................................................... 800
Outgoing connection field mapping .................................................................................................... 803
See Also ............................................................................................................................................. 806
Troubleshooting Email Router issues .................................................................................................... 806
In This Section .................................................................................................................................... 806
See Also ............................................................................................................................................. 806
Email Router installation issues ............................................................................................................. 806
See Also ............................................................................................................................................. 807
Incoming email configuration issues ...................................................................................................... 807
To troubleshoot an Email Router incoming profile configuration ....................................................... 807
In This Topic ....................................................................................................................................... 807
Login timeout error ............................................................................................................................. 808
Unauthorized access to the mailbox .................................................................................................. 808
Mailbox not found (access test fails) .................................................................................................. 809
Mailbox not found (access test succeeds) ......................................................................................... 810
The Email Router service configuration parameter "EmailUser" is missing....................................... 810
TLS/SSL error from Email Router Configuration Manager test access ............................................. 811
POP3 issues ....................................................................................................................................... 811
See Also ............................................................................................................................................. 811
Outgoing email configuration issues ...................................................................................................... 812
To troubleshoot an Email Router outgoing configuration profile ........................................................ 812
Test Access error ............................................................................................................................... 812
Load Data error .................................................................................................................................. 812
See Also ............................................................................................................................................. 813
Users do not receive Microsoft Dynamics CRM e-mail messages ........................................................ 813
Add the service account to the PrivUserGroup security group .......................................................... 814
See Also ............................................................................................................................................. 814
Test the access for the Email Router .................................................................................................... 814
Test access error ................................................................................................................................ 814
Error message when you send an email message by using the Dynamics CRM web application ... 815
See Also ............................................................................................................................................. 815
Install Microsoft Dynamics CRM Email Router using a command prompt ............................................ 815
In This Topic ....................................................................................................................................... 816
Email Router XML configuration file ................................................................................................... 816
Sample Microsoft Dynamics CRM Email Router XML configuration file ............................................ 817
See Also ............................................................................................................................................. 818
Uninstall, change, or repair Email Router .............................................................................................. 818
26
See Also ............................................................................................................................................. 819
Use Email Router Configuration Manager ............................................................................................. 819
To start the Email Router Configuration Manager ............................................................................. 820
The Email Router Configuration Manager user interface ................................................................... 820
See Also ............................................................................................................................................. 820
Managing Configuration Profiles ........................................................................................................... 821
See Also ............................................................................................................................................. 821
Create or Modify an Incoming Configuration Profile (On Premises) ..................................................... 821
To create or modify an incoming configuration profile ....................................................................... 822
See Also ............................................................................................................................................. 824
Create or Modify an Incoming Configuration Profile (Online) ................................................................ 824
To create or modify an incoming configuration profile ....................................................................... 825
See Also ............................................................................................................................................. 826
Create or Modify an Outgoing Configuration Profile (On Premises) ..................................................... 827
To create or modify an outgoing configuration profile ........................................................................ 827
See Also ............................................................................................................................................. 830
Create or Modify an Outgoing Configuration Profile (Online) ................................................................ 830
To create or modify an outgoing configuration profile ........................................................................ 831
See Also ............................................................................................................................................. 833
Set Advanced Configuration Profile Options ......................................................................................... 833
To set advanced configuration profile options .................................................................................... 834
See Also ............................................................................................................................................. 834
Remove a Configuration Profile ............................................................................................................. 834
To remove a configuration profile ....................................................................................................... 835
See Also ............................................................................................................................................. 835
Managing Deployments ......................................................................................................................... 835
See Also ............................................................................................................................................. 835
Create or modify a Deployment (On-premises) ..................................................................................... 836
To create or modify deployment information ...................................................................................... 836
See Also ............................................................................................................................................. 837
Create or modify a Deployment (Online) ............................................................................................... 837
To create or modify deployment information ...................................................................................... 838
See Also ............................................................................................................................................. 839
Disable or Enable a Deployment ........................................................................................................... 839
27
To disable or enable a deployment .................................................................................................... 839
See Also ............................................................................................................................................. 839
Remove a Deployment .......................................................................................................................... 839
To remove a deployment .................................................................................................................... 840
See Also ............................................................................................................................................. 840
Manage Users, Queues, and Forward Mailboxes ................................................................................. 840
See Also ............................................................................................................................................. 840
Load User, Queue, and Forward Mailbox Data (On Premises) ............................................................. 841
Load users, queues, and forward-mailbox information ...................................................................... 841
Load Data Troubleshooting ................................................................................................................ 842
See Also ............................................................................................................................................. 842
Load User, Queue, and Forward Mailbox Data (Online) ....................................................................... 843
Load Email Router users, queues, and forward-mailbox information ................................................ 843
Unable to load Microsoft Dynamics CRM users, queues, and forward-mailbox information ............. 844
See Also ............................................................................................................................................. 844
Specify a Forward Mailbox .................................................................................................................... 844
Specify or modify a forward mailbox .................................................................................................. 845
See Also ............................................................................................................................................. 846
Test Access for Users, Queues, and Forward Mailboxes ..................................................................... 846
Test access for users and queues ..................................................................................................... 846
See Also ............................................................................................................................................. 847
Modify a User, Queue, or Forward Mailbox ........................................................................................... 847
To modify the incoming or outgoing profile for a user or queue......................................................... 847
To modify the name, email address, or incoming configuration profile for a forward mailbox ........... 848
See Also ............................................................................................................................................. 848
Disable or Enable a User, Queue, or Forward Mailbox ......................................................................... 849
To disable or enable a user or a queue ............................................................................................. 849
To disable or enable a forward mailbox ............................................................................................. 849
See Also ............................................................................................................................................. 850
Set up Dynamics 365 for Outlook .......................................................................................................... 850
In This Section .................................................................................................................................... 850
Privacy notices ................................................................................................................................... 851
Permissions required for Dynamics 365 for Outlook tasks .................................................................... 852
See Also ............................................................................................................................................. 852
28
Planning and installing Dynamics 365 for Outlook for Microsoft Dynamics 365 and Dynamics 365
Online ................................................................................................................................................. 853
See Also ............................................................................................................................................. 854
Upgrade to Microsoft Dynamics 365 for Outlook ................................................................................... 854
In this topic ......................................................................................................................................... 855
Microsoft Dynamics 365 for Outlook upgrade requirements .............................................................. 855
Task 1: Upgrade CRM 2015 for Outlook to CRM 2016 for Outlook ................................................... 855
Task 2: Configure Dynamics 365 for Outlook .................................................................................... 856
Silent installation and configuration .................................................................................................... 857
Cross-architecture upgrade of Microsoft Dynamics 365 for Outlook ................................................. 857
See Also ............................................................................................................................................. 858
Install Dynamics 365 for Outlook ........................................................................................................... 858
In This Topic ....................................................................................................................................... 858
Install Dynamics Dynamics 365 for Outlook ....................................................................................... 858
Configure Dynamics Dynamics 365 for Outlook ................................................................................ 860
Enable multi-factor authentication through OAuth ............................................................................. 861
See Also ............................................................................................................................................. 861
Advanced deployment options for Microsoft Dynamics 365 for Outlook ............................................... 862
In This Section .................................................................................................................................... 862
See Also ............................................................................................................................................. 862
Deploy Microsoft Dynamics 365 for Outlook by using Group Policy ..................................................... 862
Preparing Dynamics 365 for Outlook for a Group Policy deployment ............................................... 863
Publish versus Assign ........................................................................................................................ 865
See Also ............................................................................................................................................. 865
Install Microsoft Dynamics 365 for Outlook for desktop virtualization ................................................... 865
In This Topic ....................................................................................................................................... 866
Roaming user profiles ........................................................................................................................ 866
Windows Server Remote Desktop Services ...................................................................................... 866
Support for Citrix XenApp 6.5 and 7.0-7.6 session virtualization for Microsoft Dynamics 365 for
Outlook on a single XenApp instance ............................................................................................. 868
See Also ............................................................................................................................................. 868
Install Dynamics 365 for Outlook without an Internet connection .......................................................... 868
In This Topic ....................................................................................................................................... 869
Step 1: Extract the Dynamics 365 for Outlook installation files .......................................................... 869
Step 2: Create the dependent and optional software subfolders ....................................................... 869
Step 3: Download the prerequisite files .............................................................................................. 871
Step 4: Run Dynamics 365 for Outlook Setup ................................................................................... 872
See Also ............................................................................................................................................. 872

29
Uninstall or repair Microsoft Dynamics 365 for Outlook ........................................................................ 873
Files not removed during a Microsoft Dynamics 365 for Outlook uninstall ........................................ 873
See Also ............................................................................................................................................. 874
Configure synchronization for appointments, contacts, and tasks ........................................................ 874
Enable appointment attachment synchronization with Outlook or Exchange .................................... 875
Address synchronization for Contacts ................................................................................................ 875
Enable synchronization for tasks that are assigned in Outlook ......................................................... 876
See Also ............................................................................................................................................. 876
Install Microsoft Dynamics 365 for Outlook using a command prompt ................................................. 877
In This Topic ....................................................................................................................................... 877
Step 1: Install files .............................................................................................................................. 877
Step 2: Configure Dynamics 365 for Outlook by using an XML configuration file ............................. 879
Command examples for the Dynamics 365 for Outlook configuration ............................................... 880
Dynamics 365 for Outlook XML configuration file elements .............................................................. 881
User credentials are required when you run the Configuration Wizard ............................................. 882
Sample Dynamics 365 for Outlook XML configuration file for configuration ...................................... 883
See Also ............................................................................................................................................. 884
Microsoft Dynamics 365 for Outlook failure recovery ............................................................................ 885
Backup and recovery tools ................................................................................................................. 885
Restoring from backup ....................................................................................................................... 886
See Also ............................................................................................................................................. 886
Control field synchronization between Dynamics 365 and Dynamics 365 for Outlook ......................... 886
Set field synchronization between Dynamics 365 and Dynamics 365 for Outlook ............................ 886
Performance and synchronization ...................................................................................................... 887
Permissions and synchronization ....................................................................................................... 887
See Also ............................................................................................................................................. 888
What fields can be synchronized between Dynamics 365 and Dynamics 365 for Outlook? ................ 888
Entity: Appointment ............................................................................................................................ 889
Entity: Contact .................................................................................................................................... 890
Entity: Fax........................................................................................................................................... 892
Entity: Letter ....................................................................................................................................... 893
Entity: Phone Call ............................................................................................................................... 894
Entity: Recurring Appointment............................................................................................................ 895
Entity: Service Activity ........................................................................................................................ 896
Entity: Task ......................................................................................................................................... 897
See Also ............................................................................................................................................. 898
How field security affects synchronization between Dynamics 365 and Dynamics 365 for Outlook .... 898
Scenario: Restrict users from changing Job Title............................................................................... 899
30
See Also ............................................................................................................................................. 904
Troubleshooting and things to know about Microsoft Dynamics 365 for Outlook ................................. 904
In This Topic ....................................................................................................................................... 905
Potential issues and resolutions ......................................................................................................... 905
Microsoft Dynamics 365 (online) with Office 365 ............................................................................... 907
Log files .............................................................................................................................................. 907
Event Viewer ...................................................................................................................................... 908
Disable the Dynamics 365 for Outlook notification bar on the Web application ................................ 908
See Also ............................................................................................................................................. 909
Set incoming and outgoing email synchronization ................................................................................ 909
Set the synchronization method ......................................................................................................... 909
Incoming email messaging options .................................................................................................... 909
Outgoing email messaging options .................................................................................................... 910
See Also ............................................................................................................................................. 910
Monitor email processing errors ............................................................................................................ 910
View alerts .......................................................................................................................................... 911
See Also ............................................................................................................................................. 912
Email message filtering and correlation ................................................................................................. 913
How Microsoft Dynamics 365 uses tracking tokens ........................................................................... 913
What is smart matching? .................................................................................................................... 915
See Also ............................................................................................................................................. 915
Forward mailbox vs. individual mailboxes ............................................................................................. 916
Monitor a forward mailbox .................................................................................................................. 916
See Also ............................................................................................................................................. 917
Recover from Exchange Server failure .................................................................................................. 917
Restore Exchange Server in a Microsoft Dynamics 365 environment ............................................... 917
See Also ............................................................................................................................................. 917
Extend Dynamics 365 with integration and solutions ............................................................................ 918
In This Section .................................................................................................................................... 918
See Also ............................................................................................................................................. 918
Manage your documents using SharePoint ........................................................................................... 918
In This Section .................................................................................................................................... 918
See Also ............................................................................................................................................. 919
SharePoint Document Management software requirements for Microsoft Dynamics 365 .................... 919
In This Topic ....................................................................................................................................... 919
Use document management in Microsoft Dynamics 365 (online) ...................................................... 919
31
Use document management in Microsoft Dynamics 365 (on-premises) ........................................... 920
Server-based SharePoint integration ................................................................................................. 921
Microsoft Dynamics CRM List Component for Microsoft SharePoint ................................................. 921
See Also ............................................................................................................................................. 922
Important considerations for server-based SharePoint integration ....................................................... 922
Known issues with server-based SharePoint integration ................................................................... 927
See Also ............................................................................................................................................. 928
Set up SharePoint integration with Microsoft Dynamics 365 ................................................................. 928
In This Section .................................................................................................................................... 929
See Also ............................................................................................................................................. 929
Switching from the list component or changing the deployment ........................................................... 930
In This Topic ....................................................................................................................................... 930
Switch from list component to server-based authentication ............................................................... 930
Changing the SharePoint deployment type ........................................................................................ 930
See Also ............................................................................................................................................. 931
Configure server-based authentication with Dynamics 365 Online and SharePoint Online ................. 931
Configure server-based authentication with Dynamics 365 Online and SharePoint on-premises ........ 933
In This Topic ....................................................................................................................................... 934
Permissions required .......................................................................................................................... 934
Set up server-to-server authentication with Dynamics 365 (online) and SharePoint on-premises .... 935
Add OneDrive for Business integration .............................................................................................. 941
Selecting a claims-based authentication mapping type ..................................................................... 942
See Also ............................................................................................................................................. 943
Configure server-based authentication with Microsoft Dynamics 365 (on-premises) and SharePoint
Online ................................................................................................................................................. 943
In This Topic ....................................................................................................................................... 944
Permissions required .......................................................................................................................... 944
Set up server-based authentication with Microsoft Dynamics 365 and SharePoint Online ............... 945
Get the SharePoint online tenant ID .................................................................................................. 948
Troubleshoot enable server-based authentication wizard validation issues ...................................... 949
See Also ............................................................................................................................................. 949
Configure server-based authentication with Microsoft Dynamics 365 (on-premises) and SharePoint on-
premises ............................................................................................................................................. 949
In This Topic ....................................................................................................................................... 949
Set up server-based integration with Dynamics 365 and SharePoint ................................................ 949
Add OneDrive for Business integration .............................................................................................. 955
32
Troubleshooting Dynamics 365 Server on-premises to SharePoint Server on-premises server-based
integration ....................................................................................................................................... 956
About claims-based authentication mapping ..................................................................................... 956
Working with digital certificates .......................................................................................................... 957
Get the SharePoint realm ID .............................................................................................................. 957
Troubleshooting server-based authentication ....................................................................................... 958
In This Topic ....................................................................................................................................... 958
Troubleshooting SharePoint ............................................................................................................... 959
Known issues with server-based authentication ................................................................................ 959
See Also ............................................................................................................................................. 961
Configure SharePoint integration using the list component .................................................................. 961
See Also ............................................................................................................................................. 963
Permissions required for document management tasks ....................................................................... 964
See Also ............................................................................................................................................. 965
Validate and fix SharePoint site URLs ................................................................................................... 965
See Also ............................................................................................................................................. 966
Connect to OneDrive for Business ........................................................................................................ 967
Requirements ..................................................................................................................................... 967
Enable OneDrive for Business ........................................................................................................... 967
Controlling access to OneDrive for Business in Dynamics 365 ......................................................... 968
See Also ............................................................................................................................................. 969
Skype for Business and Skype integration with Microsoft Dynamics 365 ............................................. 969
In This Topic ....................................................................................................................................... 969
Using Skype for Business with Microsoft Dynamics 365 ................................................................... 969
Using Skype with Microsoft Dynamics 365 ........................................................................................ 970
See Also ............................................................................................................................................. 971
Set up knowledge management in Microsoft Dynamics 365 ................................................................. 971
In This Topic ....................................................................................................................................... 972
Prerequisites....................................................................................................................................... 972
Set up knowledge management ......................................................................................................... 973
See Also ............................................................................................................................................. 975
Add the Knowledge Base Search control to Microsoft Dynamics 365 forms ........................................ 975
In This Topic ....................................................................................................................................... 976
Prerequisites....................................................................................................................................... 976
Add the Knowledge Base Search control to the Main forms for use in the Dynamics 365 web
application ....................................................................................................................................... 976
Add the search control to the activity wall of the Main form in the Dynamics 365 web application ... 980
33
Add the search control to a reference panel in an interactive form.................................................... 983
See Also ............................................................................................................................................. 987
Assign Parature licenses to Microsoft Dynamics 365 users .................................................................. 988
See Also ............................................................................................................................................. 990
Connect to Microsoft Social Engagement ............................................................................................. 991
In This Topic ....................................................................................................................................... 991
Connect Dynamics 365 (online) to Microsoft Social Engagement for Social Insights ....................... 992
Connect Dynamics 365 on-premises to Microsoft Social Engagement for Social Insights................ 993
Assign Microsoft Social Engagement licenses to Dynamics 365 users ............................................. 995
Reset Social Insights .......................................................................................................................... 996
Add the Social Insights control to a Dynamics 365 entity form .......................................................... 996
Add and set up Social Insights controls on the system dashboards .................................................. 998
Privacy notice ................................................................................................................................... 1002
See Also ........................................................................................................................................... 1002
Connect Microsoft Dynamics 365 to Yammer ..................................................................................... 1002
Connect your organization to Yammer ............................................................................................. 1002
Enable Dynamics 365 entities for Yammer ...................................................................................... 1004
What triggers automatic posts to the Yammer newsfeed? .............................................................. 1005
Additional considerations ................................................................................................................. 1006
Privacy notice ................................................................................................................................... 1006
See Also ........................................................................................................................................... 1007
Control social data ............................................................................................................................... 1007
Enable or disable social engagement .............................................................................................. 1007
See Also ........................................................................................................................................... 1007
Manage Bing Maps for your organization ............................................................................................ 1008
Enter a Bing Maps license key (on-premises only) .......................................................................... 1008
Turn Bing Maps on or off for your organization ................................................................................ 1008
Languages supported in Microsoft Dynamics 365 for viewing Bing Maps ....................................... 1008
Privacy notice ................................................................................................................................... 1009
See Also ........................................................................................................................................... 1010
Deploy packages using Dynamics 365 Package Deployer and Windows PowerShell ....................... 1010
In This Topic ..................................................................................................................................... 1011
Use Windows PowerShell to deploy packages ................................................................................ 1013
Troubleshoot package deployment issues by using log files ........................................................... 1017
Best practices for deploying packages ............................................................................................. 1017
See Also ........................................................................................................................................... 1018
Use Power BI with Microsoft Dynamics 365 ........................................................................................ 1018
34
In this topic ....................................................................................................................................... 1018
Get started using Microsoft Power BI with Microsoft Dynamics 365 (online) .................................. 1018
Embed Power BI visualizations on personal dashboards ................................................................ 1019
Use Power BI Desktop to connect directly to your Microsoft Dynamics 365 (online) instance ........ 1020
Use Power BI with Microsoft Dynamics 365 (on-premises) ............................................................. 1021
See Also ........................................................................................................................................... 1022
Install or remove a preferred solution .................................................................................................. 1022
Install a preferred solution ................................................................................................................ 1023
Delete a preferred solution ............................................................................................................... 1023
See Also ........................................................................................................................................... 1024
Azure Cognitive Services integration with Dynamics 365 ................................................................... 1024
In this topic ....................................................................................................................................... 1024
About Azure Cognitive Services ....................................................................................................... 1024
Set the text analytics connection ...................................................................................................... 1025
Set the recommendations connection .............................................................................................. 1025
Create similar record suggestion rules ............................................................................................. 1026
Privacy notice ................................................................................................................................... 1029
See Also ........................................................................................................................................... 1031
Preview feature: Create and manage models to make product recommendations ............................ 1032
In this topic ....................................................................................................................................... 1033
Requirements ................................................................................................................................... 1033
Enable Dynamics 365 Cross-sell Product Recommendations ......................................................... 1033
Connect Dynamics 365 (online) to the Azure Machine Learning recommendation service ............ 1034
The Product Recommendation Model page ..................................................................................... 1034
Test your model ................................................................................................................................ 1040
Activate your model .......................................................................................................................... 1040
See the recommendations in action ................................................................................................. 1041
See product recommendations in Dynamics 365 for phones and tablets ........................................ 1041
See Also ........................................................................................................................................... 1042
Preview feature: Automatically suggest knowledge articles ................................................................ 1042
In this topic ....................................................................................................................................... 1042
Enable Dynamics 365 Text Analytics ............................................................................................... 1043
Connect Dynamics 365 (online) to the Azure Text Analytics service............................................... 1043
Set up Knowledge Search field settings ........................................................................................... 1043
Modify the Case form to include knowledge base suggestions ....................................................... 1045
View automatic suggestions in a case ............................................................................................. 1045
Search for related knowledge articles and cases in the interactive service hub .............................. 1045
See Also ........................................................................................................................................... 1045
Preview feature: Topic analysis ........................................................................................................... 1046

35
In This Topic ..................................................................................................................................... 1046
Enable Dynamics 365 Text Analytics ............................................................................................... 1046
Connect Dynamics 365 (online) to the Azure Text Analytics service............................................... 1047
Create a topic model ........................................................................................................................ 1047
View recent case topics .................................................................................................................... 1050
See Also ........................................................................................................................................... 1050
Preview feature: Suggest similar cases for a case .............................................................................. 1051
In this topic ....................................................................................................................................... 1051
Enable Dynamics 365 Text Analytics ............................................................................................... 1051
Connect Dynamics 365 (online) to the Azure Machine Learning Text Analytics service ................. 1052
Define and activate similarity rules ................................................................................................... 1052
See related cases ............................................................................................................................. 1052
See related cases in the interactive service hub .............................................................................. 1053
See Also ........................................................................................................................................... 1054
Preview feature: Enable document suggestions ................................................................................. 1054
Requirements ................................................................................................................................... 1056
How it works ..................................................................................................................................... 1056
Step 1: Enable Dynamics 365 Text Analytics .................................................................................. 1058
Step 2: Set up the Azure text analytics connection .......................................................................... 1058
Step 3: Define and activate similarity rules ...................................................................................... 1058
Step 4: Enable Document Suggestions ........................................................................................... 1058
See Also ........................................................................................................................................... 1059
Add interoperation features to Microsoft Dynamics 365 (online) ......................................................... 1059
In This Section .................................................................................................................................. 1059
Install Microsoft Dynamics 365 for Outlook ......................................................................................... 1059
Dynamics 365 for Outlook Requirements ........................................................................................ 1060
Install Dynamics 365 for Outlook on a user’s computer ................................................................... 1060
See Also ........................................................................................................................................... 1060
Deploy Office 365 Groups ................................................................................................................... 1060
In This Topic ..................................................................................................................................... 1061
Requirements ................................................................................................................................... 1062
Provision Office 365 Groups ............................................................................................................ 1062
Check required privileges ................................................................................................................. 1063
Configure Office 365 Groups............................................................................................................ 1063
Use the Office 365 Connectors for Groups ...................................................................................... 1064
Known issues ................................................................................................................................... 1067
Privacy notice ................................................................................................................................... 1068
See Also ........................................................................................................................................... 1068
36
Enable OneNote integration ................................................................................................................ 1068
See Also ........................................................................................................................................... 1068
Deploy Dynamics 365 App for Outlook ................................................................................................ 1068
In This Topic ..................................................................................................................................... 1069
Requirements ................................................................................................................................... 1069
Deploy Dynamics 365 App for Outlook ............................................................................................ 1072
To deploy to Dynamics 365 on-premises users ............................................................................... 1073
Explore the User’s Guide ................................................................................................................. 1073
See Also ........................................................................................................................................... 1073
Enable OneDrive for Business ............................................................................................................ 1073
Requirements ................................................................................................................................... 1073
Enable OneDrive for Business ......................................................................................................... 1074
Controlling access to OneDrive for Business in Dynamics 365 ....................................................... 1074
See Also ........................................................................................................................................... 1074
Enable Office Delve ............................................................................................................................. 1075
Requirements ................................................................................................................................... 1075
Enable Delve .................................................................................................................................... 1075
See Also ........................................................................................................................................... 1075
Add Office 365 Online services ........................................................................................................... 1076
In This Section .................................................................................................................................. 1077
Set up Dynamics 365 (online) to use Exchange Online ...................................................................... 1077
See Also ........................................................................................................................................... 1078
Set up Dynamics 365 (online) to use SharePoint Online .................................................................... 1078
Assign user permissions to the Team SharePoint site .................................................................... 1079
Configure Dynamics 365 (online) for SharePoint document management ...................................... 1082
Using Document Management ......................................................................................................... 1085
See Also ........................................................................................................................................... 1088
Set up Dynamics 365 (online) to use Skype or Skype for Business ................................................... 1088
Set up Skype in Microsoft Dynamics 365 (online)............................................................................ 1089
Tracking Skype ................................................................................................................................. 1091
See Also ........................................................................................................................................... 1092
Set up Dynamics 365 (online) to use Social Engagement .................................................................. 1092
Set up Dynamics 365 (online) to use Yammer .................................................................................... 1093
See Also ........................................................................................................................................... 1093
Help and additional resources for Microsoft Dynamics 365 (online) ................................................... 1093
37
In This Topic ..................................................................................................................................... 1094
Service description ........................................................................................................................... 1094
Security and service continuity ......................................................................................................... 1094
Microsoft Dynamics 365 (online) Trust Center ................................................................................. 1094
Microsoft Dynamics 365 (online) Security and Compliance Planning Guide ................................... 1094
Integration Guide: Microsoft Dynamics 365 (online) and Office 365................................................ 1094
Support and service status ............................................................................................................... 1095
Help for administrators ..................................................................................................................... 1095
More self-service help resources ..................................................................................................... 1095
See Also ........................................................................................................................................... 1095
Troubleshooting: Unblock URLs required for Dynamics 365 (online) ................................................. 1095
Unblock Dynamics 365 URLs in Internet Explorer ........................................................................... 1096
Copyright.............................................................................................................................................. 1096
38
Administering Dynamics 365
Applies To: Dynamics 365 (online), Dynamics 365 (on-premises), Dynamics CRM 2016, Dynamics CRM Online
[This topic is pre-release documentation and is subject to change.]
IT Pros and Dynamics 365 administrators can use the resources and topics provided in this section to help them manage and configure Microsoft Dynamics 365 and Microsoft Dynamics CRM Online 2016 Update.
In This Section What's new for administrators and customizers in Microsoft Dynamics 365
After you update: next steps to success with Microsoft Dynamics CRM
Getting started
Manage security, users, and teams
Audit data and user activity
Customize your Dynamics 365 system
Manage configuration data
Manage product catalog configuration
Manage your data
Set up and manage phones and tablets
Integrate (synchronize) your email system with Microsoft Dynamics 365
Extend Dynamics 365 with integration and solutions
Azure Cognitive Services integration with Dynamics 365
Add interoperation features to Microsoft Dynamics 365 (online)
Add Office 365 Online services
Related Sections Referenced topic 'fdcb7532-2a86-462e-aaa1-c59cbbc85d33' is only available online.
Microsoft Dynamics CRM Help & Training
© 2016 Microsoft. All rights reserved. Copyright
What's new for administrators and customizers in Microsoft Dynamics 365
Applies To: Dynamics 365 (online), Dynamics 365 (on-premises), Dynamics CRM 2016, Dynamics CRM Online
[This topic is pre-release documentation and is subject to change.]
We’re excited to introduce these new features for the Microsoft Dynamics 365 (online & on-premises)!
39
Note
As of the December 2016 update for Dynamics 365 (online and on-premises), Dynamics CRM functionality is now included as a part of Dynamics 365, a suite of intelligent business applications. This help content covers the new Dynamics apps for Sales, Customer Service, Field Service, and Project Service Automation. In addition, these pages cover all supported versions of Dynamics CRM. Where relevant, see the Applies to section on each page to determine which versions are covered.
For end user features in this release, see: Dynamics 365 Help & Training: What's new. If you’re a developer, see: Referenced topic 'c0f1a55e-9262-404c-bfb0-78b250e577aa' is only available online..
What's new in the December 2016 update for Dynamics 365 (online and on-premises)
Introducing modular business apps, app designer, and site map designer
Processes unification and enhancements
Microsoft Dynamics 365 for Field Service enhancements
Enhancements to Portal capabilities for Microsoft Dynamics 365
Mobile app enhancements
Relevance Search enhancements
Display the associated activities of the related entities
Editable Grid custom control
Power BI integration enhancements
Preview feature: Azure Cognitive Service integration
Replicate Microsoft Dynamics 365 (online) data to Microsoft Azure SQL Database using Data
Export
Customer-initiated backup and restore
Access restriction with trusted IP rules
View metrics about your instance with Organization Insights solution
Preview feature: Customer Insights service
Assign a Dynamics 365 (online) administrator at the tenant level
Preview feature: Relationship Insights
Introducing modular business apps, app designer, and site map designer You can now create custom task-based apps for your users. Apps are solution-aware components that store references to the existing Dynamics 365 schema.
40
Use the new app designer to quickly create simple (single entity) or complex (multi-entity) business apps. The app designer, which is a tile-based information structure, makes the process of designing apps very simple. Just pick the required set of components such as forms, views, dashboards, charts, and process flows, and create simple or complex apps like case management or lead management in no time. Once you’ve pulled together all the components you want, you can also validate your app for any missing or required components.
The new site map designer, which is integrated with the app designer, greatly simplifies the process of creating a navigation and site map for your apps. Use the WYSIWYG designer that lets you quickly drag and drop areas and sub areas within the site map.
Note
App designer, site map designer, and creation of custom apps are preview features in December 2016 update for Microsoft Dynamics 365 (online). These features aren’t available in December 2016 Service Pack for Microsoft Dynamics 365 (on-premises). A preview feature is a feature that is not complete, but is made available before it’s officially released so customers can get early access and provide feedback. Preview features aren’t meant for production use and may have limited or restricted functionality. Preview features must be enabled by an administrator.
After you design an app, you can control access and visibility to it by restricting it to specific roles.
More information:
Preview feature: Design custom business apps by using the App Designer
Accessing and switching apps
Processes unification and enhancements Defining and enforcing consistent processes is very important for any successful business. Dynamics 365 provides a number processes, such as business process flows, task flows, and workflows, to help organizations improve their productivity and customer satisfaction. Up until now, these processes were created and customized by using different design interfaces. In this release, we are making a first step in simplifying the design experience by unifying the customization user interface for business process flows, task flows, and business rules. The new design environment is based on a visual drag-and-drop interface.
We are also adding a number of new powerful features and capabilities, such as concurrently running business processes and security role support for business processes and task flows. The following table lists some of the new features and their benefits.
Feature Benefit
Switching between concurrently running business process flows
Concurrent business process flows let customizers configure multiple business processes and associate them with the same starting record. Users can switch between multiple business processes running concurrently, and resume their work at the stage in the process that they were on.
Process security With concurrent business process flows, it's crucial to be able to separate business process definitions according to user roles. For example, a customizer
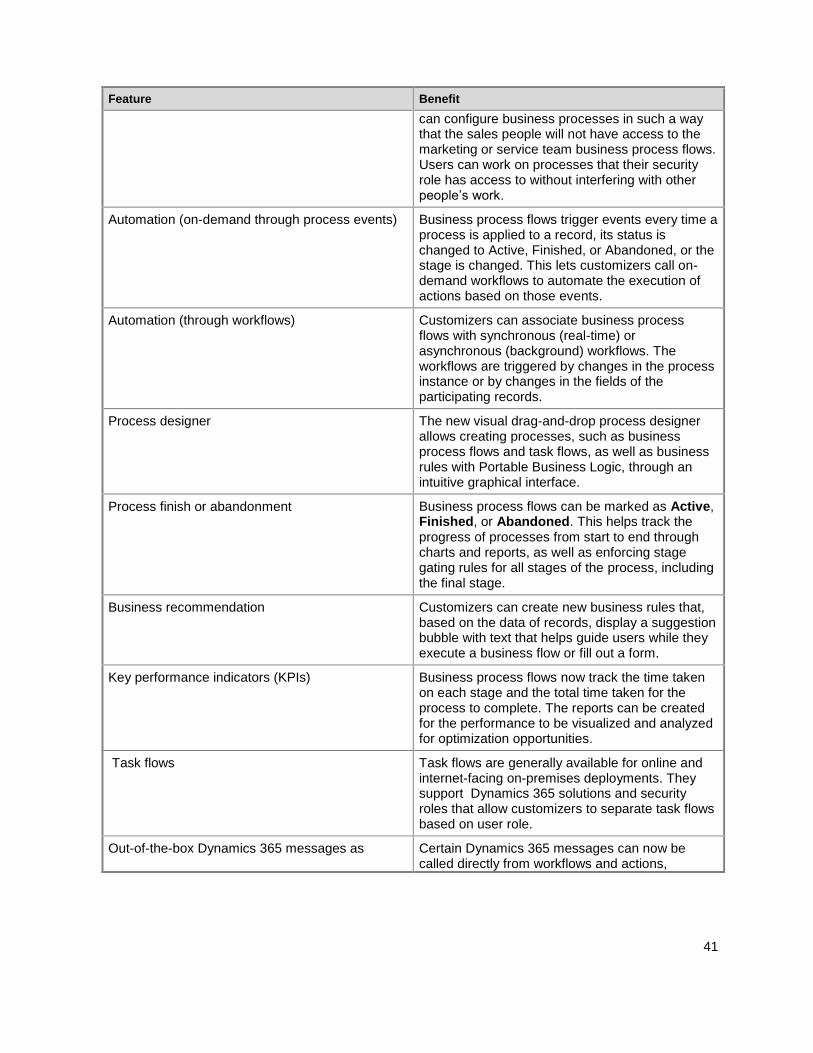
41
Feature Benefit
can configure business processes in such a way that the sales people will not have access to the marketing or service team business process flows. Users can work on processes that their security role has access to without interfering with other people’s work.
Automation (on-demand through process events) Business process flows trigger events every time a process is applied to a record, its status is changed to Active, Finished, or Abandoned, or the stage is changed. This lets customizers call on-demand workflows to automate the execution of actions based on those events.
Automation (through workflows) Customizers can associate business process flows with synchronous (real-time) or asynchronous (background) workflows. The workflows are triggered by changes in the process instance or by changes in the fields of the participating records.
Process designer The new visual drag-and-drop process designer allows creating processes, such as business process flows and task flows, as well as business rules with Portable Business Logic, through an intuitive graphical interface.
Process finish or abandonment Business process flows can be marked as Active, Finished, or Abandoned. This helps track the progress of processes from start to end through charts and reports, as well as enforcing stage gating rules for all stages of the process, including the final stage.
Business recommendation Customizers can create new business rules that, based on the data of records, display a suggestion bubble with text that helps guide users while they execute a business flow or fill out a form.
Key performance indicators (KPIs) Business process flows now track the time taken on each stage and the total time taken for the process to complete. The reports can be created for the performance to be visualized and analyzed for optimization opportunities.
Task flows Task flows are generally available for online and internet-facing on-premises deployments. They support Dynamics 365 solutions and security roles that allow customizers to separate task flows based on user role.
Out-of-the-box Dynamics 365 messages as Certain Dynamics 365 messages can now be called directly from workflows and actions,
42
Feature Benefit
actions simplifying the automation of tasks.
More information: Create a business process
Microsoft Dynamics 365 for Field Service enhancements We made the following enhancements:
Connected field service: Connected field service, new in this release, helps service organizations
move from a costly break-fix model to a proactive and predictive service model by combining
monitoring and predictive maintenance with Internet of Things (IoT) and machine learning.
Key benefits include:
Reduce downtime with proactive alerts from connected devices.
Address issues faster by remotely monitoring devices and keeping customers in the loop.
Reduce maintenance costs by dispatching a technician with the right expertise, availability, and
location to do the job.
As a platform, IoT also enables ISVs and partners to enable new IoT scenarios on any Dynamics 365 entity.
Resource scheduling optimization: With resource scheduling optimization, you can set up the
system to automatically schedule multiple items on a recurring basis to minimize overall travel time
and make efficient use of all schedulable resources. Resource scheduling optimization takes into
account a number of constraints and objectives when optimizing schedules, such as resource
availability, skills required, priority and duration, and time windows.
Unified scheduling experience:With the new unified scheduling experience, you can schedule
anything. You can enable it for any entity, including custom entities. For example, you can turn it
on to schedule marketing visits for an opportunity or book time to work on a case, work orders,
bookings, and more.
For organizations that use Field Service capabilities, you’ll see a new integrated scheduling experience.
For organizations that use Microsoft Dynamics 365 Project Service Automation capabilities, you’ll have a new improved scheduling experience.
Enhancements to Portal capabilities for Microsoft Dynamics 365 We made many enhancements to Portal capabilities for Microsoft Dynamics 365:
Multi-language portal support:By surfacing the multi-language content you create in Portal
capabilities for Microsoft Dynamics 365, you can support your customers, partners, and employees
in multiple regions. Multi-language portals also support languages with multi-byte characters, such
as Japanese, Chinese, and Korean.
Faceted search for knowledge articles:Search portal content by using different characteristics of
knowledge articles as filters to improve how quickly customers can find the content they are looking
43
for. Faceted portal searches can increase the visibility and effectiveness of content that may not
have been surfaced through a traditional search.
Content access levels for knowledge articles:Develop a well-structured knowledge base and
provide content to the right audience using content access levels. You can create structured
learning paths for your users and prevent content that is not relevant from surfacing.
Project Service Automation integration:Vendor companies can use Project Service Automation
integration to provide access and visibility for active and closed projects across all stages of a
project lifecycle to their partner channel and customer. Partner project service team members,
reviewers, and customers can view project status and view quotes, order forms, and bookable
resources directly from the partner portal.
Field Service integration:Vendor companies can use the Field Service integration to expose
information about active agreements, assets, work orders, invoices, and support cases to their
partner channel and customers. Partner field service team members, reviewers, and customers can
access this information directly from the partner portal.
Multi-partner collaboration:Distribute opportunities to multiple partners to maximize a sales
opportunity and provide the best solutions for your customers’ needs. Partner sellers can work
collaboratively to cover the needs of customers they normally couldn’t with the assistance of other
partners and provide information to one another, such as product and pricing updates, notes or
comments, and partner contacts to enhance the health of the opportunity.
Partner onboarding and recruitment:Use the partner recruitment and onboarding capabilities to
identify, recruit, and onboard the best partners in your partner channel for better customer sales
and service experiences. Use built-in dashboards to get better visibility of your current partner
channel and focus efforts into enhancing your channel coverage based on identified gaps.
Partner locator: Enable your customers to find the right partners in your partner ecosystem based
on geographic location, product expertise, supported industries, partner categories, and more.
Partner portal dashboard:Partners can gain insight into their opportunity pipeline and their
performance using portal dashboards. With this information, partners can make more informed
decisions about opportunities they bid on, as well as currently active opportunities to more
intelligently devote resources and improve the health of their relationships with customers and the
parent organization.
Deal registration and protection:Enable your partner channel to register more deals by providing
deal registration capabilities. Partners can register opportunities through the portal to get deal
protection and other benefits. Using these capabilities, encourage your partner channel to partner
with you to sell more.
Mobile app enhancements We made the following enhancements:
New layouts: The new layouts in the mobile app have one important implication for admins and
customizers. Items are now displayed in stacks to expose more info at once. Items in each section
44
are stacked together by default, but you can use the form editor to change the way these sections
are displayed to better reflect how your organization works.
Multimedia content: Users can now record multimedia content directly in the mobile app. Please
note that if you’re concerned about large files, you should recommend that users change the
settings of their device to take lower resolution photos.
Enhanced sync filter: Users can now make more finely tuned choices about what info they want
to sync to their devices. That means they don’t have to clog their device’s memory with large sets
of records—they can take just what they need.
JavaScript Support: Offline mode now supports the ability to run ClientAPI (JavaScript), so you
can run your client-side business logic while users are offline.
Web Resources Support: Offline mode now also supports web resources.
More information:
Dynamics 365 Help & Training: What's new
Dynamics 365 for Phones and Tablets User's Guide
Relevance Search enhancements With new facet and filter support, users have the ability to drill into and explore search results without having to repeatedly refine the search terms. The global Relevance Search facets are used for the fields common to most entities in Dynamics 365. Four facets are displayed by default on the left side of the Relevance Search results page, as shown below. They represent Record type, Owner, Modified On, and Created On fields.
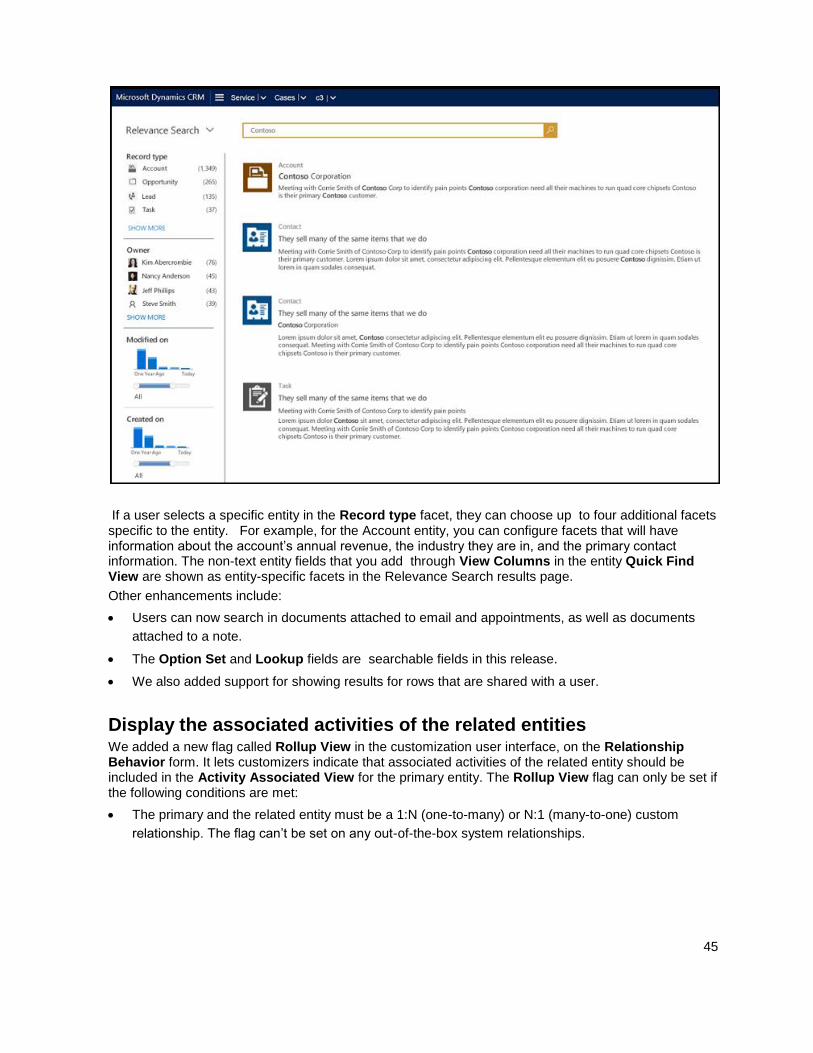
45
If a user selects a specific entity in the Record type facet, they can choose up to four additional facets specific to the entity. For example, for the Account entity, you can configure facets that will have information about the account’s annual revenue, the industry they are in, and the primary contact information. The non-text entity fields that you add through View Columns in the entity Quick Find View are shown as entity-specific facets in the Relevance Search results page.
Other enhancements include:
Users can now search in documents attached to email and appointments, as well as documents
attached to a note.
The Option Set and Lookup fields are searchable fields in this release.
We also added support for showing results for rows that are shared with a user.
Display the associated activities of the related entities We added a new flag called Rollup View in the customization user interface, on the Relationship Behavior form. It lets customizers indicate that associated activities of the related entity should be included in the Activity Associated View for the primary entity. The Rollup View flag can only be set if the following conditions are met:
The primary and the related entity must be a 1:N (one-to-many) or N:1 (many-to-one) custom
relationship. The flag can’t be set on any out-of-the-box system relationships.
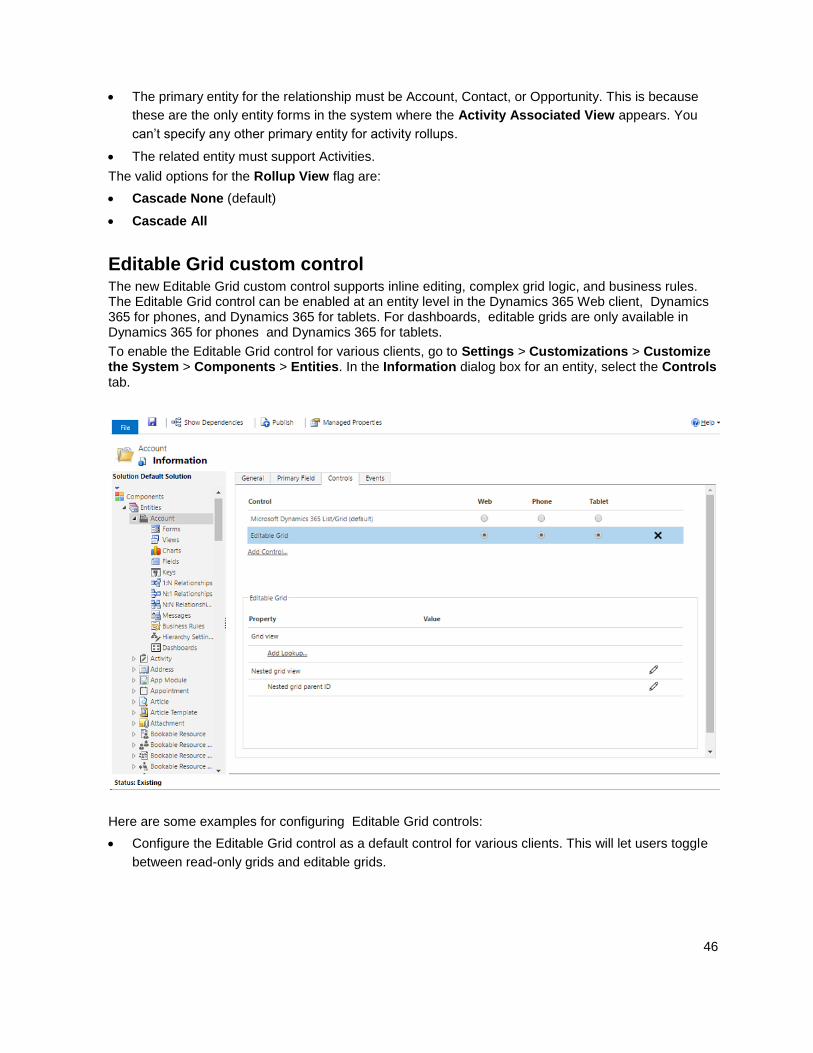
46
The primary entity for the relationship must be Account, Contact, or Opportunity. This is because
these are the only entity forms in the system where the Activity Associated View appears. You
can’t specify any other primary entity for activity rollups.
The related entity must support Activities.
The valid options for the Rollup View flag are:
Cascade None (default)
Cascade All
Editable Grid custom control The new Editable Grid custom control supports inline editing, complex grid logic, and business rules. The Editable Grid control can be enabled at an entity level in the Dynamics 365 Web client, Dynamics 365 for phones, and Dynamics 365 for tablets. For dashboards, editable grids are only available in Dynamics 365 for phones and Dynamics 365 for tablets.
To enable the Editable Grid control for various clients, go to Settings > Customizations > Customize the System > Components > Entities. In the Information dialog box for an entity, select the Controls tab.
Here are some examples for configuring Editable Grid controls:
Configure the Editable Grid control as a default control for various clients. This will let users toggle
between read-only grids and editable grids.
47
Configure Editable Grid control properties, such as Group By filter, Lookup, or related grid
properties. This will provide inline editing capabilities in the main grid and the nested grid in one
view, without having to switch records or views.
Configure event handlers to support complex grid logic. For example, you can upload JavaScript
libraries for the following events: OnRecordSelect, OnSave,and OnChange.
Create business rules at an entity level to support business logic in editable grids.
Power BI integration enhancements Building on the Microsoft Power BI enhancements from the previous release, Power BI dashboards can now be added to Microsoft Dynamics 365 personal dashboards. This release also brings support for Dynamics 365 for tablets and Dynamics 365 for phones mobile clients.
More information: Use Power BI with Microsoft Dynamics 365
Preview feature: Azure Cognitive Service integration Azure Cognitive Services includes several APIs that leverage the power of machine learning. Some Microsoft Dynamics 365 features can use the text analytics APIs to detect sentiment, key phrases, topics, and language from the text found in your Microsoft Dynamics 365 data. Similarly, using the recommendation API, Microsoft Dynamics 365 can automatically make product recommendations to your users. Several features are available that tap into the capabilities of Azure Text Analytics and Recommendations services.
Preview feature: Create and manage models to make product recommendations
Preview feature: Automatically suggest knowledge articles
Preview feature: Topic analysis
Preview feature: Suggest similar cases for a case
Preview feature: Enable document suggestions
Replicate Microsoft Dynamics 365 (online) data to Microsoft Azure SQL Database using Data Export Data Export Service is an add-on service made available as a Microsoft Dynamics 365 solution that adds the ability to replicate Microsoft Dynamics 365 (online) data to a Microsoft Azure SQL Database store in a customer-owned Microsoft Azure subscription. The supported target destinations are Microsoft Azure SQL Database and Microsoft Azure SQL Server on Microsoft Azure virtual machines. Data Export Service intelligently synchronizes the entire Dynamics 365 data initially and thereafter synchronizes on a continuous basis as changes occur (delta changes) in the Microsoft Dynamics 365 (online) system. This helps enable several analytics and reporting scenarios on top of Dynamics 365 data with Azure data and analytics services and opens up new possibilities for customers and partners to build custom solutions. More information: Replicate Microsoft Dynamics 365 (online) data to Microsoft Azure SQL Database
More information: Replicate Microsoft Dynamics 365 (online) data to Microsoft Azure SQL Database
48
Customer-initiated backup and restore Protecting your Dynamics 365 data and providing continuous availability of service is important for you and for us. You have multiple options for backing up and restoring your Dynamics 365 (online) instances. In CRM Online 2016 Update 1, we introduced on-demand backups that you can perform on Production and Sandbox instances. There are two types of Dynamics 365 (online) backups: system and on-demand.
About system backups:
All your instances are backed up.
System backups occur daily.
System backups are retained for up to three days. Check your expiration date.
System backups do not count against your storage limits.
About on-demand backups:
You can back up Production and Sandbox instances.
You can only restore to a Sandbox instance. To restore to a Production instance, first switch to a
Sandbox instance. See Switch an instance.
Only CRM Online 2016 Update 1 or later versions are supported for backup.
On-demand backups are retained for up to three days. Check your expiration date.
For more information, see Backup and restore instances.
Access restriction with trusted IP rules You can limit access to Dynamics 365 (online) to users with trusted IP addresses to reduce unauthorized access. When trusted IP address restrictions are set in a user’s profile and the user tries to log in from an untrusted IP address, access to Dynamics 365 (online) is blocked. For more information, see Restrict access to Dynamics 365 (online) with trusted IP rules.
View metrics about your instance with Organization Insights solution The Organization Insights dashboard surfaces key data points around activity, usage, performance, and quality of service on the Dynamics 365 (online) instance. The new Organization Insights solution adds more insights and metrics such as who are your most active users, which entities are being used, which are the top failing workflows and plugins, and the storage used by your organization's tables.
More information: View metrics about your instance with the Organization Insights solution
Preview feature: Customer Insights service Customer Insights is a cloud-based SaaS service that enables organizations of all sizes to bring together data from multiple sources and generate knowledge and insights to build a holistic 360° view of their customers. Customer Insights delivers the ability to connect to transactional data sources and model profiles of customers and their interactions. It enables organizations to generate insights through key performance indicators (KPIs) about their business. The Customer Insights application transforms the profile, interaction, and KPI’s into rich visuals that you can customize and organize to focus on what matters to you.
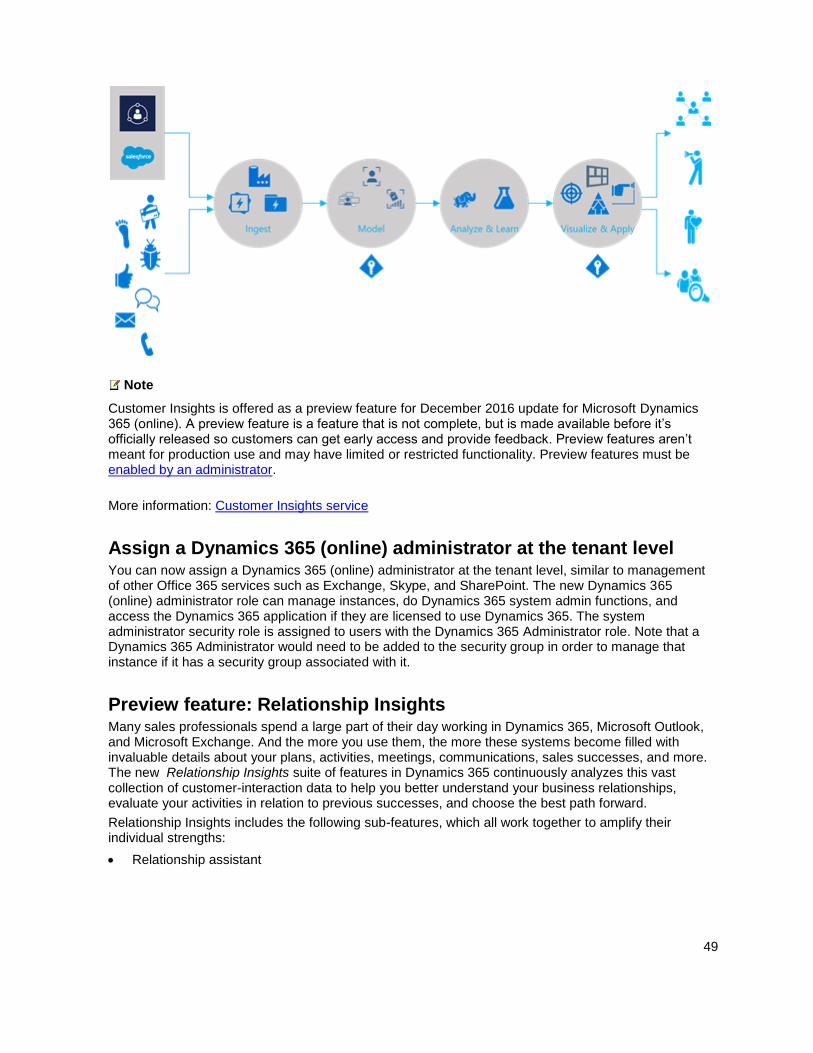
49
Note
Customer Insights is offered as a preview feature for December 2016 update for Microsoft Dynamics 365 (online). A preview feature is a feature that is not complete, but is made available before it’s officially released so customers can get early access and provide feedback. Preview features aren’t meant for production use and may have limited or restricted functionality. Preview features must be enabled by an administrator.
More information: Customer Insights service
Assign a Dynamics 365 (online) administrator at the tenant level You can now assign a Dynamics 365 (online) administrator at the tenant level, similar to management of other Office 365 services such as Exchange, Skype, and SharePoint. The new Dynamics 365 (online) administrator role can manage instances, do Dynamics 365 system admin functions, and access the Dynamics 365 application if they are licensed to use Dynamics 365. The system administrator security role is assigned to users with the Dynamics 365 Administrator role. Note that a Dynamics 365 Administrator would need to be added to the security group in order to manage that instance if it has a security group associated with it.
Preview feature: Relationship Insights Many sales professionals spend a large part of their day working in Dynamics 365, Microsoft Outlook, and Microsoft Exchange. And the more you use them, the more these systems become filled with invaluable details about your plans, activities, meetings, communications, sales successes, and more. The new Relationship Insights suite of features in Dynamics 365 continuously analyzes this vast collection of customer-interaction data to help you better understand your business relationships, evaluate your activities in relation to previous successes, and choose the best path forward.
Relationship Insights includes the following sub-features, which all work together to amplify their individual strengths:
Relationship assistant
50
Email engagement
Auto capture
For more information on each of these features, see Dynamics 365 Help & Training: What's new
Note
All Relationship Insights features are offered as preview features for December 2016 update for Microsoft Dynamics 365 (online). A preview feature is a feature that is not complete, but is made available before it’s officially released so customers can get early access and provide feedback. Preview features aren’t meant for production use and may have limited or restricted functionality. Preview features must be enabled by an administrator. You can enable or disable each Relationship Insights feature individually on the Previews tab in the System Settings dialog box.
Configuration settings for the Relationship Insights features are provided on a new tabbed settings page. To find it, go to Settings > System > Relationship Insights. From here you can enable, disable, and configure the various sub-features. The settings you make here apply to all users.
For requirements, prerequisites, and complete details about how to set up and configure Relationship Insights, see Configure Relationship Insights features
What's new in CRM Online 2016 Update 1 and CRM 2016 Service Pack 1
In-app guidance increases user adoption and productivity (CRM Online)
Self-service portals for external audiences (CRM Online)
Feedback and ratings on entities
Project-based sales (CRM Online)
Field service management (CRM Online)
Enhanced Power BI integration
Preview feature: Product recommendations using Azure Machine Learning
Preview feature: Knowledge base article suggestions using Azure Machine Learning
SLAs for any custom entity and other system entities
Interactive service hub enhancements
Unified Service Desk enhancements
Rich mobile offline experience (CRM Online)
Mobile management enhancements
Mobile devices conditional access (CRM Online)
Mobile app preparation is faster after customization
Keep track of company news from a mobile device (CRM Online)
Preview feature: Organization Insights Dashboard shows system usage stats

51
Hybrid server-side sync (CRM on-premises to Exchange Online)
CRM App for Outlook available for CRM on-premises
Customer field for any entity
New datacenter in India (CRM Online)
Package Deployer tool now runs from a command prompt
Preview feature: Display multi-entity search results in a single list by using Relevance Search
In-app guidance increases user adoption and productivity (CRM Online) In this release, we’re introducing Learning Path, a new guided user experience that provides context-sensitive, interactive, and scenario-based guided tasks and sidebars personalized to the user, their lifecycle stage, and role. Whether the user is participating in a trial, has just purchased, or has recently updated their service, Learning Path helps them onboard quickly, facilitates adoption, and improves productivity.
In this release, we’re providing Learning Path guidance for onboarding, what’s new, and frequent tasks such as lead management in the web and mobile apps.
More information: Watch a short video (1:49) on Learning Path, On/off switch for Learning Path (guided help)
52
Self-service portals for external audiences (CRM Online) This release introduces the first Microsoft-published version of portal capabilities for Dynamics CRM 2016. Portal capabilities for CRM empower the 84% majority who prefer to find answers on their own through self-service and community options.
Note
Portal capabilities are provided as an add-on for customers who upgrade to the latest version (CRM Online 2016 Update 1).
We’re extending CRM to the web to include:
Profile management capabilities
Configurable business components
Rich web content configuration capabilities
Responsive design for desktop, tablet, and mobile
Customers can purchase portal instances as an add-on in the CRM Online Administration Center. These portal instances can then be configured to work with their CRM Online instances. The provisioning system automatically deploys the portal solution to Azure.
Out-of-the-box portal solutions include:
Custom portal.The custom portal is a basic portal that contains flows and pages common to all
portals. It includes basic support content as well as custom applications to meet the specific
support needs of different organizations, including login/authentication features and contact pages.
Customer Self-Service portal. Lets customers access self-service knowledge and support
resources, increasing customer satisfaction, reducing call center volumes, and ultimately allowing
service agents to focus their efforts on issues of greatest impact.
Employee Self-Service portal.Creates an efficient and well-informed workforce by streamlining
common tasks and empowering every employee with a definitive source of knowledge. Employee
self-service is now available worldwide using CRM Online and portal capabilities, and is available in
all CRM Onlinemarkets.
Community portal.Enables peer-to-peer interactions between experts in the community, subject
matter experts within an organization, and internal and external users. Communities organically
grow the catalog of available knowledge from knowledge base articles, forums, and blogs.
Participants can provide feedback through rating and comments features. Contributors can also
receive alerts on content revisions and workflow updates.
Partner portal.Create an environment for interacting with your partners and collaborating on sales
opportunities to provide products and services based on your customers' needs.
Partner relationship management portal capabilities include:
Account and contact management
Channel opportunity management
Partner profiling
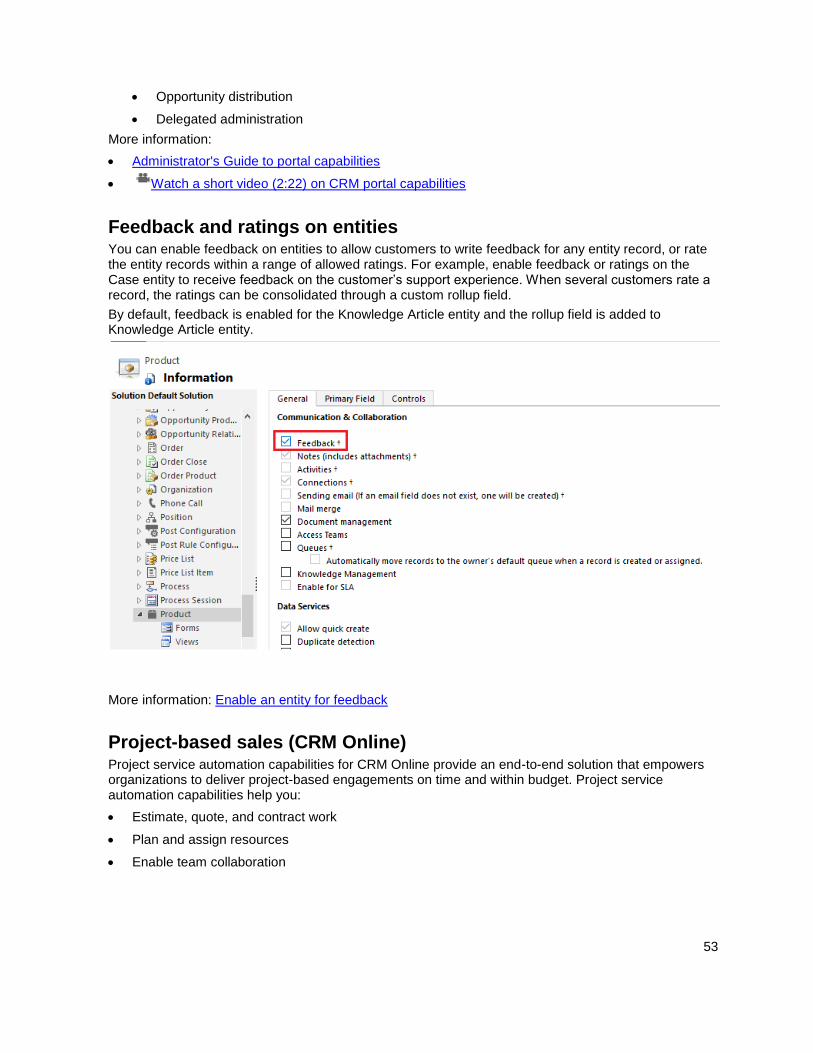
53
Opportunity distribution
Delegated administration
More information:
Administrator's Guide to portal capabilities
Watch a short video (2:22) on CRM portal capabilities
Feedback and ratings on entities You can enable feedback on entities to allow customers to write feedback for any entity record, or rate the entity records within a range of allowed ratings. For example, enable feedback or ratings on the Case entity to receive feedback on the customer’s support experience. When several customers rate a record, the ratings can be consolidated through a custom rollup field.
By default, feedback is enabled for the Knowledge Article entity and the rollup field is added to Knowledge Article entity.
More information: Enable an entity for feedback
Project-based sales (CRM Online) Project service automation capabilities for CRM Online provide an end-to-end solution that empowers organizations to deliver project-based engagements on time and within budget. Project service automation capabilities help you:
Estimate, quote, and contract work
Plan and assign resources
Enable team collaboration
54
Capture time, expense, and progress data for real-time insights and accurate invoicing
Note
Project service automation capabilities are provided as an add-on for customers who upgrade to the latest version (CRM Online 2016 Update 1).
Project service automation capabilities include:
Project-based contracts.Project contracts relate quotes and orders to project plans, financial
estimates, labor pricing, and billing arrangements, like time and materials or fixed price. The
contract highlights key metrics, including profitability and feasibility.
Project planning.Visual project planning and estimation includes predecessors, automatic task
scheduling, and views of sales and cost information for time and expenses. You can use the
resulting plan in quotes and project contracts.
Resource management. Resource information includes the skills and proficiencies of your
workforce. You can view and filter resources based on skills and availability, so you can assign the
right people to the right projects. You can also track resource utilization and forecasting metrics.
Time and expenses.Team members can use the web or mobile apps to record time and expenses
for multiple projects. Managers can easily approve new entries while understanding the financial
implications of the newly-approved items.
Project billing. Project invoices reflect the terms of the contract and the approved work and
expenses. The financial impact of project work, including costs, unbilled revenue, and invoices, is
recorded for use in analytics and integration into financial systems.
Both project service automation capabilities and field service capabilities (see below) share a resource pool, with resource schedules appearing in both.
More information:
Manage project-based sales with CRM project serivce
Watch a short video (2:41) on project service capabilities
Field service management (CRM Online) Field service is an end-to-end solution that delivers advanced scheduling, inventory tracking, and asset management for service depots and highly mobile, in-field specialists who need to fulfill work orders and provide preventive maintenance across multiple sites under complex service agreements.
Note
Field service capabilities are provided as an add-on for customers who upgrade to the latest version (CRM Online 2016 Update 1).
Field service capabilities include:
55
Characteristics and proficiency ratings.You can define proficiency and competency levels and
set them as requirements for a work order. Proficiency and competency levels are also part of the
worker profile, so you can make an appropriate match when scheduling resources.
Detached schedule support.Field service capabilities support time allocation outside of a work
order. For example, a field tech can schedule time for lunch or supply provisioning without having to
associate that time with an empty work order.
Out-of-the-box business processes. The CRM Online incident management business process is
closely aligned with the work order process. If a field service work order originates from a case, the
originating case is visually part of that workflow, which spans from case creation through work order
completion.
Mobile enhancements.Drip scheduling enhances and de-clutters the user experience by
displaying fewer upcoming work orders. It also improves dispatch control by limiting the number of
declined work orders or change requests by field techs.
Both field service capabilities and project service capabilities (see above) share a resource pool, with resource schedules appearing in both.
More information:
Install the Field Service solution
Watch a short video (2:21) on field service capabilities
Enhanced Power BI integration Enhanced Microsoft Power BI integration lets you discover, analyze, and share data-sourced visualizations with colleagues. Power BI provides information workers and everyday business users with data analysis and visualization capabilities to get better business insights.
Features available in this release include:
New Service Content Pack includes several key service indicators such as cases created, cases
resolved, satisfaction percentage, top agent leaders, and most used and viewed KB articles.
Improved Sales Manager Content Pack includes OData (Open Data Protocol) version 4.0 support.
The ability to embed Power BI tiles directly from a CRM user dashboard without having to switch to
the Power BI service.
More information: Embed Power BI tiles in your personal dashboard
Preview feature: Product recommendations using Azure Machine Learning Imagine being able to make product recommendations to your customers when they select an item for purchase. When you connect CRM Online to the Azure Recommendations API using Azure Machine Learning, this becomes available to you. You can use the Recommendations API to build an advanced machine learning model for automatic cross-sell product recommendations based on historical transaction data.Once you add the product recommendations capability in CRM Online by using the
56
Recommendations API, a native capability is added to the product catalog to generate automatic recommendations by configuring connectivity to the service. In addition, you set up the product catalog and synchronization to build a machine-learning-based recommendation model. You will then use this model to make recommendations in CRM Onlinetransactions, such as opportunity, quote, or order level, to suggest additional cross-sell products and help improve the total value of the deal.
Note
Product recommendations is offered as a preview feature for CRM Online customers only. A preview feature is a feature that is not complete, but is made available before it’s officially released so customers can get early access and provide feedback. Preview features aren’t meant for production use and may have limited or restricted functionality. Preview features must be enabled by a CRM administrator.
More information: Preview feature: Create and manage models to make product recommendations
Preview feature: Knowledge base article suggestions using Azure Machine Learning You want your customer service reps to quickly resolve cases with high customer satisfaction. Using the Azure Machine Learning Text Analytics service with CRM Online, you can set up service case analysis to automatically provide your support staff with more relevant solutions from the knowledge base. They spend less time searching for answers and more time providing the right response.
Note
Knowledge base suggestions is offered as a preview feature for CRM Online customers only. A preview feature is a feature that is not complete, but is made available before it’s officially released so customers can get early access and provide feedback. Preview features aren’t meant for production use and may have limited or restricted functionality. Preview features must be enabled by a CRM administrator.
More information: Preview feature: Automatically suggest knowledge articles
SLAs for any custom entity and other system entities In previous releases of CRM, SLAs were enabled by default just for the Case entity. Now users can enable SLAs for any custom entity, and for any of the following system entities:
All activity entities (such as Email, Task, and Appointment) except recurring appointments
(RecurringAppointmentMaster)
Account
Contact
Invoice
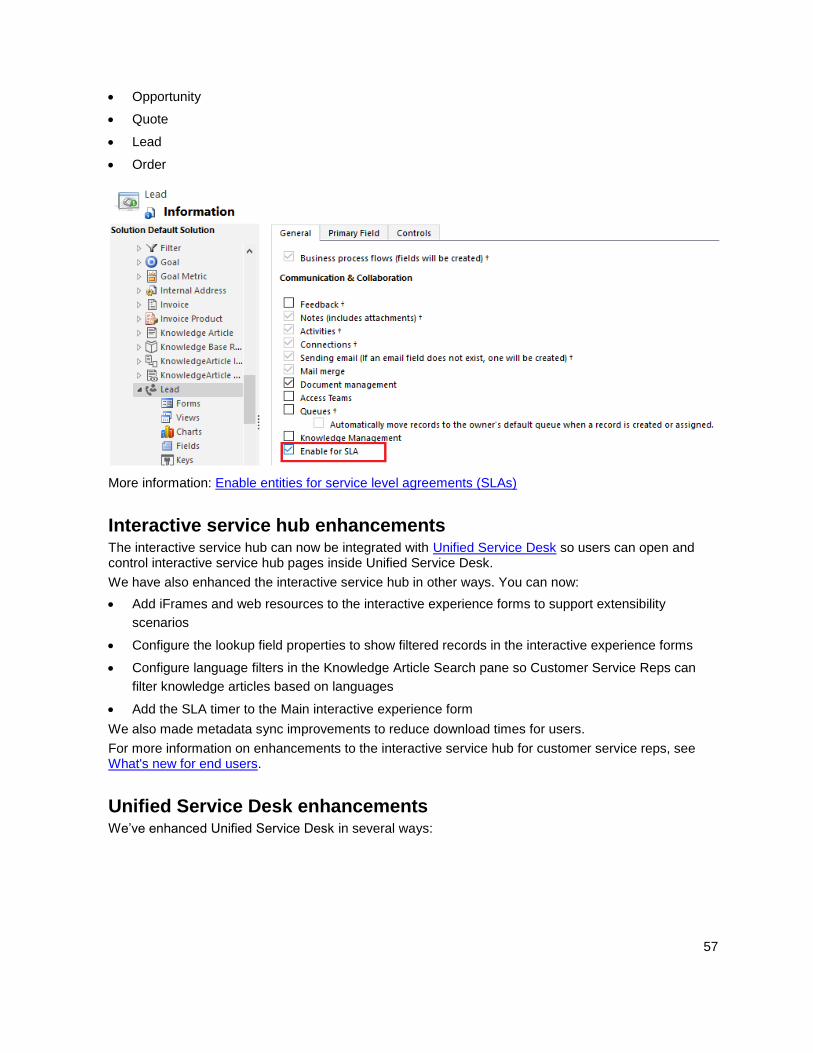
57
Opportunity
Quote
Lead
Order
More information: Enable entities for service level agreements (SLAs)
Interactive service hub enhancements The interactive service hub can now be integrated with Unified Service Desk so users can open and control interactive service hub pages inside Unified Service Desk.
We have also enhanced the interactive service hub in other ways. You can now:
Add iFrames and web resources to the interactive experience forms to support extensibility
scenarios
Configure the lookup field properties to show filtered records in the interactive experience forms
Configure language filters in the Knowledge Article Search pane so Customer Service Reps can
filter knowledge articles based on languages
Add the SLA timer to the Main interactive experience form
We also made metadata sync improvements to reduce download times for users.
For more information on enhancements to the interactive service hub for customer service reps, see What's new for end users.
Unified Service Desk enhancements We’ve enhanced Unified Service Desk in several ways:
58
Interactive service hub integration.The interactive service hub can now be integrated with
Unified Service Desk so users can open and control interactive service hub pages inside Unified
Service Desk.
Windows Update.Unified Service Desk also supports Windows Update now. Windows Update is
an easy and free way to help keep Microsoft applications (like the Unified Service Desk client) safer
and running smoothly. Just turn it on, and you'll get the latest security and other important updates
from Microsoft automatically, or you can choose to apply updates manually.
Demo packages. New demo packages include samples for new Unified Service Desk
environments, upgrading existing Unified Service Desk environments, interactive service hub
integration, and CRM 2013 or later web client.
Telemetry.You can now help improve Unified Service Desk by sending usage data to Microsoft
anonymously.
More information: What's new in Unified Service Desk update 2.1
Rich mobile offline experience (CRM Online) Mobile offline synchronization, an enhanced offline experience that goes further than the offline drafts experience, is now available for CRM Online customers. The new mobile offline capabilities provide a richer offline experience for end users, allowing them to view, update, and add records while using the mobile apps offline—without having to save changes or additions as drafts first. The new mobile offline experience also supports conflict detection.
More information: Configure mobile offline synchronization for CRM for phones and tablets
Working offline with Dynamics CRM mobile apps (3:16)
Mobile management enhancements CRM mobile applications for iOS and Android can now be managed by Intune Mobile Application Management (MAM) without enrolling the device. This protects company data in Dynamics CRM without requiring IT to enroll and deeply manage the user's entire device. This is particularly useful for bring-your-own-device (BYOD) scenarios where end users don’t want to or can’t enroll their devices for IT management. This capability is also useful if a device is already enrolled in another MDM solution.
Mobile devices conditional access (CRM Online) Use Azure with CRM Online to set up conditional access from mobile devices. You configure conditions for CRM access at the AzureActive Directory group level. For example, you might want to set up conditions that require multi-factor authentication for mobile users accessing CRM when they’re not at work—or maybe you want to require it at all times. You can also set up conditions that require the user’s mobile device to be compliant with your policies before the user can access CRM.
If you configure conditional access, before a user can connect to CRM, the device they use must be:
Enrolled with Intune or a domain-joined PC
Registered in AzureActive Directory (this happens automatically when the device is enrolled with
Intune)
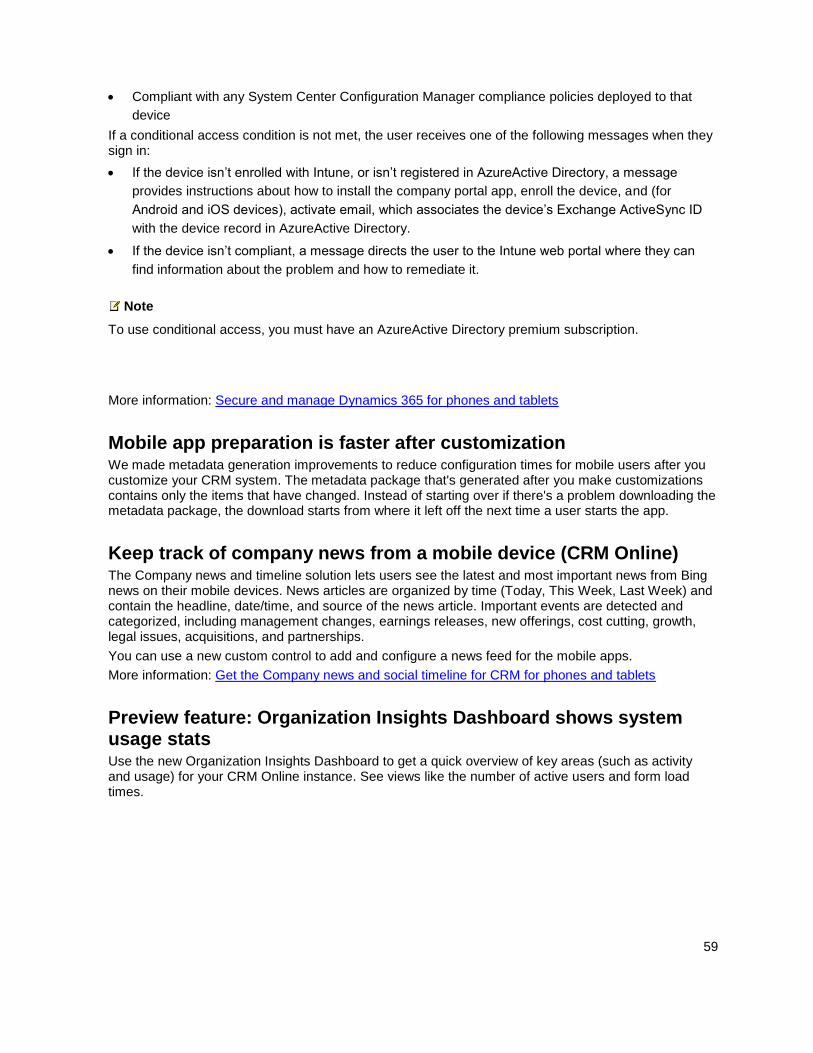
59
Compliant with any System Center Configuration Manager compliance policies deployed to that
device
If a conditional access condition is not met, the user receives one of the following messages when they sign in:
If the device isn’t enrolled with Intune, or isn’t registered in AzureActive Directory, a message
provides instructions about how to install the company portal app, enroll the device, and (for
Android and iOS devices), activate email, which associates the device’s Exchange ActiveSync ID
with the device record in AzureActive Directory.
If the device isn’t compliant, a message directs the user to the Intune web portal where they can
find information about the problem and how to remediate it.
Note
To use conditional access, you must have an AzureActive Directory premium subscription.
More information: Secure and manage Dynamics 365 for phones and tablets
Mobile app preparation is faster after customization We made metadata generation improvements to reduce configuration times for mobile users after you customize your CRM system. The metadata package that's generated after you make customizations contains only the items that have changed. Instead of starting over if there's a problem downloading the metadata package, the download starts from where it left off the next time a user starts the app.
Keep track of company news from a mobile device (CRM Online) The Company news and timeline solution lets users see the latest and most important news from Bing news on their mobile devices. News articles are organized by time (Today, This Week, Last Week) and contain the headline, date/time, and source of the news article. Important events are detected and categorized, including management changes, earnings releases, new offerings, cost cutting, growth, legal issues, acquisitions, and partnerships.
You can use a new custom control to add and configure a news feed for the mobile apps.
More information: Get the Company news and social timeline for CRM for phones and tablets
Preview feature: Organization Insights Dashboard shows system usage stats Use the new Organization Insights Dashboard to get a quick overview of key areas (such as activity and usage) for your CRM Online instance. See views like the number of active users and form load times.
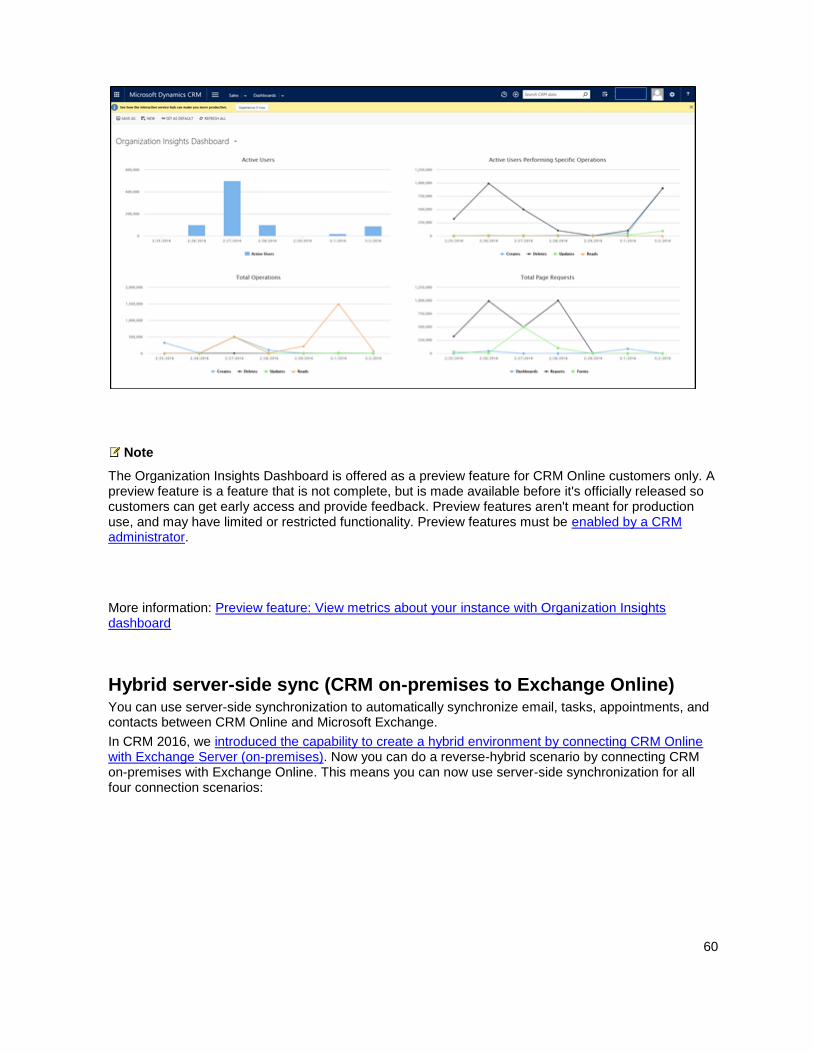
60
Note
The Organization Insights Dashboard is offered as a preview feature for CRM Online customers only. A preview feature is a feature that is not complete, but is made available before it's officially released so customers can get early access and provide feedback. Preview features aren't meant for production use, and may have limited or restricted functionality. Preview features must be enabled by a CRM administrator.
More information: Preview feature: View metrics about your instance with Organization Insights dashboard
Hybrid server-side sync (CRM on-premises to Exchange Online) You can use server-side synchronization to automatically synchronize email, tasks, appointments, and contacts between CRM Online and Microsoft Exchange.
In CRM 2016, we introduced the capability to create a hybrid environment by connecting CRM Online with Exchange Server (on-premises). Now you can do a reverse-hybrid scenario by connecting CRM on-premises with Exchange Online. This means you can now use server-side synchronization for all four connection scenarios:
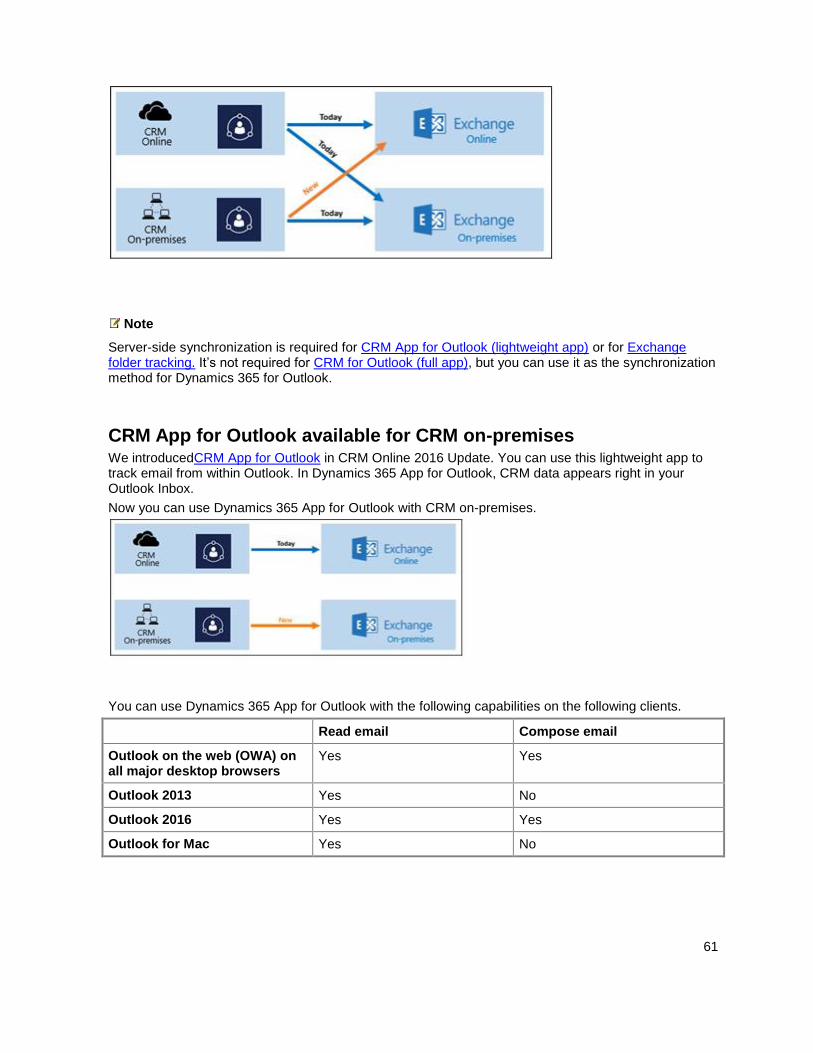
61
Note
Server-side synchronization is required for CRM App for Outlook (lightweight app) or for Exchange folder tracking. It’s not required for CRM for Outlook (full app), but you can use it as the synchronization method for Dynamics 365 for Outlook.
CRM App for Outlook available for CRM on-premises We introducedCRM App for Outlook in CRM Online 2016 Update. You can use this lightweight app to track email from within Outlook. In Dynamics 365 App for Outlook, CRM data appears right in your Outlook Inbox.
Now you can use Dynamics 365 App for Outlook with CRM on-premises.
You can use Dynamics 365 App for Outlook with the following capabilities on the following clients.
Read email Compose email
Outlook on the web (OWA) on all major desktop browsers
Yes Yes
Outlook 2013 Yes No
Outlook 2016 Yes Yes
Outlook for Mac Yes No

62
Note
Dynamics 365 App for Outlook requires Exchange Server 2013, 2013 SP1, or 2016. Previous versions of ExchangeServer don’t support the add-in platform that Dynamics 365 App for Outlook requires.
More information: Deploy CRM App for Outlook (lightweight app)
Customer field for any entity Previously, several out-of-the-box entities in Dynamics CRM, such as the Case, Lead, and Opportunity, entities contained a field that represented a customer (account or contact). With this release, you'll be able to add the Customer field to any system or custom entity to track the customer information you need.
More information: Create and edit fields
New datacenter in India (CRM Online) We're opening a new datacenter in India. Once available, you can open new tenants or migrate existing tenants to this datacenter.
Package Deployer tool now runs from a command prompt The Package Deployer tool has been expanded to run from a command prompt and it accepts a parameter that allows for more control over solution package deployment, including language selection and the option to preserve data. The WindowsPowerShell cmdlets for the Package Deployer include the same enhanced functionality.
More information: Use Package Deployer tool at the command line
Preview feature: Display multi-entity search results in a single list by using Relevance Search Relevance Search delivers fast and comprehensive search results in a single list, sorted by relevance. To boost performance, Relevance Search uses a dedicated search service external to Dynamics CRM, powered by Microsoft Azure. As an administrator or customizer, you can enable and configure Relevance Search in the user interface without writing code. Many of the configuration steps will look familiar to you, since the user interface is similar to the Quick Find configuration.
Note
Relevance Search is offered as a preview feature for CRM Online customers only. A preview feature is a feature that is not complete, but is made available before it's officially released so customers can get
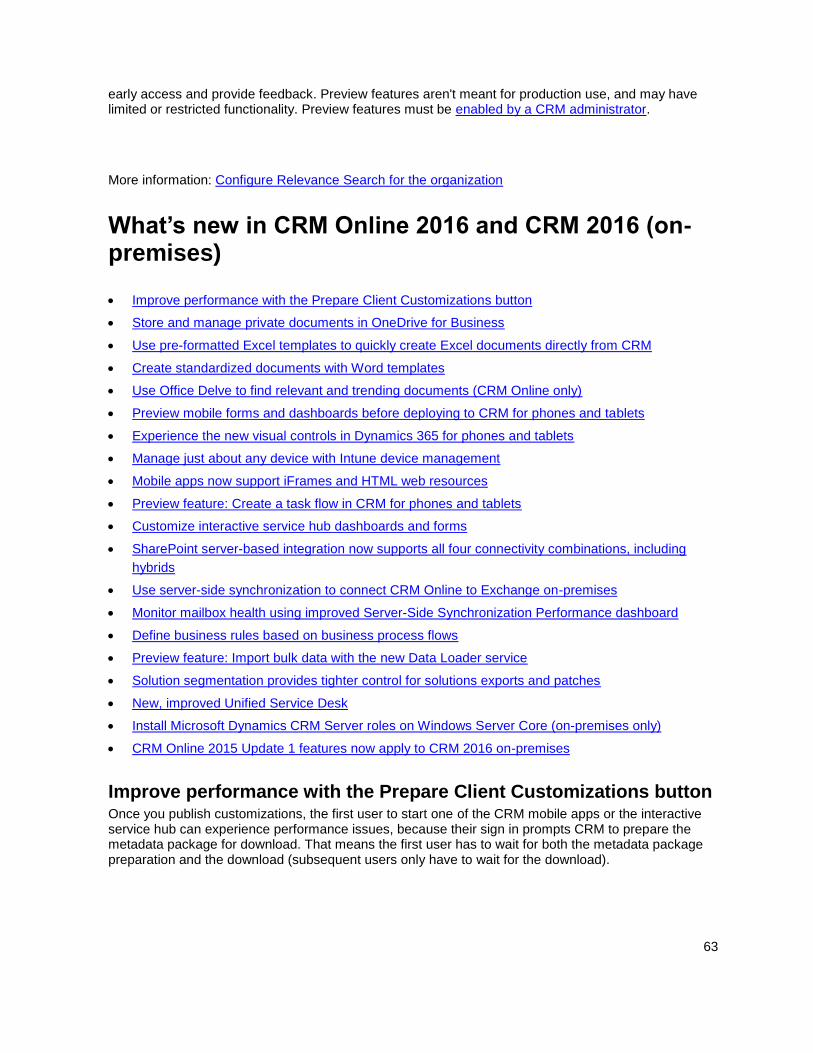
63
early access and provide feedback. Preview features aren't meant for production use, and may have limited or restricted functionality. Preview features must be enabled by a CRM administrator.
More information: Configure Relevance Search for the organization
What’s new in CRM Online 2016 and CRM 2016 (on-premises)
Improve performance with the Prepare Client Customizations button
Store and manage private documents in OneDrive for Business
Use pre-formatted Excel templates to quickly create Excel documents directly from CRM
Create standardized documents with Word templates
Use Office Delve to find relevant and trending documents (CRM Online only)
Preview mobile forms and dashboards before deploying to CRM for phones and tablets
Experience the new visual controls in Dynamics 365 for phones and tablets
Manage just about any device with Intune device management
Mobile apps now support iFrames and HTML web resources
Preview feature: Create a task flow in CRM for phones and tablets
Customize interactive service hub dashboards and forms
SharePoint server-based integration now supports all four connectivity combinations, including
hybrids
Use server-side synchronization to connect CRM Online to Exchange on-premises
Monitor mailbox health using improved Server-Side Synchronization Performance dashboard
Define business rules based on business process flows
Preview feature: Import bulk data with the new Data Loader service
Solution segmentation provides tighter control for solutions exports and patches
New, improved Unified Service Desk
Install Microsoft Dynamics CRM Server roles on Windows Server Core (on-premises only)
CRM Online 2015 Update 1 features now apply to CRM 2016 on-premises
Improve performance with the Prepare Client Customizations button Once you publish customizations, the first user to start one of the CRM mobile apps or the interactive service hub can experience performance issues, because their sign in prompts CRM to prepare the metadata package for download. That means the first user has to wait for both the metadata package preparation and the download (subsequent users only have to wait for the download).
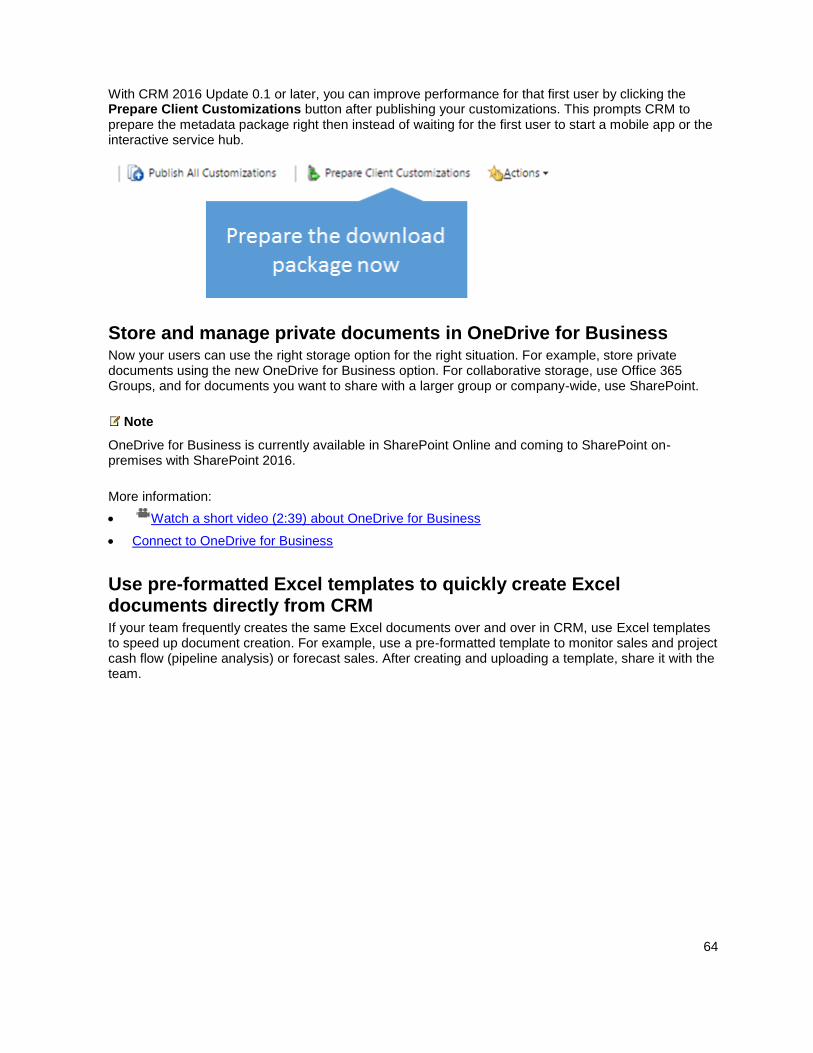
64
With CRM 2016 Update 0.1 or later, you can improve performance for that first user by clicking the Prepare Client Customizations button after publishing your customizations. This prompts CRM to prepare the metadata package right then instead of waiting for the first user to start a mobile app or the interactive service hub.
Store and manage private documents in OneDrive for Business Now your users can use the right storage option for the right situation. For example, store private documents using the new OneDrive for Business option. For collaborative storage, use Office 365 Groups, and for documents you want to share with a larger group or company-wide, use SharePoint.
Note
OneDrive for Business is currently available in SharePoint Online and coming to SharePoint on-premises with SharePoint 2016.
More information:
Watch a short video (2:39) about OneDrive for Business
Connect to OneDrive for Business
Use pre-formatted Excel templates to quickly create Excel documents directly from CRM If your team frequently creates the same Excel documents over and over in CRM, use Excel templates to speed up document creation. For example, use a pre-formatted template to monitor sales and project cash flow (pipeline analysis) or forecast sales. After creating and uploading a template, share it with the team.

65
More information:
Watch a short video (2:38) about Excel templates
Analyze your data with Excel templates
Create standardized documents with Word templates Standard documents are a cornerstone of business dealings – from quotes and contracts to work orders and invoices. With this release, your users can create documents from standardized templates, and pull in CRM data at the same time. Use templates to enhance productivity, reduce human error, and ensure consistent communication across the company.
More information:
Watch a short video (2:38) about Word templates
Using Word templates in CRM
Use Office Delve to find relevant and trending documents (CRM Online only) Office Delve proactively surfaces trending documents relevant to you and your work. Discover new content and make new connections right from a dashboard.
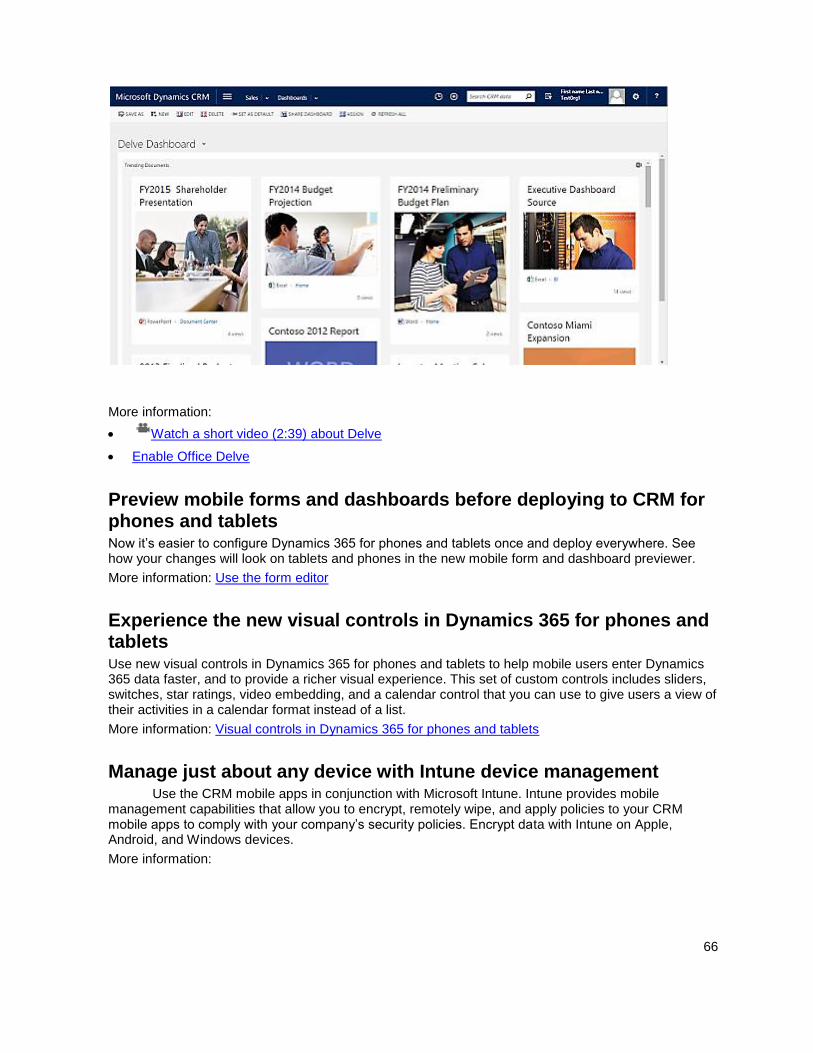
66
More information:
Watch a short video (2:39) about Delve
Enable Office Delve
Preview mobile forms and dashboards before deploying to CRM for phones and tablets Now it’s easier to configure Dynamics 365 for phones and tablets once and deploy everywhere. See how your changes will look on tablets and phones in the new mobile form and dashboard previewer.
More information: Use the form editor
Experience the new visual controls in Dynamics 365 for phones and tablets Use new visual controls in Dynamics 365 for phones and tablets to help mobile users enter Dynamics 365 data faster, and to provide a richer visual experience. This set of custom controls includes sliders, switches, star ratings, video embedding, and a calendar control that you can use to give users a view of their activities in a calendar format instead of a list.
More information: Visual controls in Dynamics 365 for phones and tablets
Manage just about any device with Intune device management Use the CRM mobile apps in conjunction with Microsoft Intune. Intune provides mobile management capabilities that allow you to encrypt, remotely wipe, and apply policies to your CRM mobile apps to comply with your company’s security policies. Encrypt data with Intune on Apple, Android, and Windows devices.
More information:
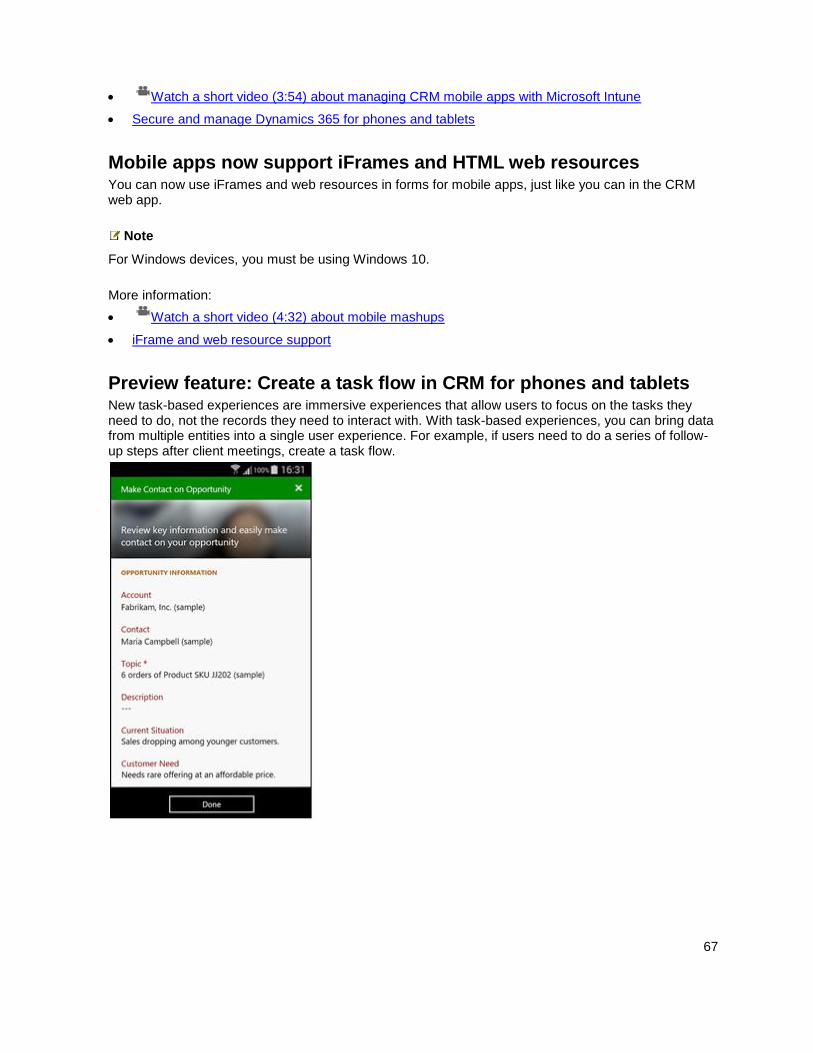
67
Watch a short video (3:54) about managing CRM mobile apps with Microsoft Intune
Secure and manage Dynamics 365 for phones and tablets
Mobile apps now support iFrames and HTML web resources You can now use iFrames and web resources in forms for mobile apps, just like you can in the CRM web app.
Note
For Windows devices, you must be using Windows 10.
More information:
Watch a short video (4:32) about mobile mashups
iFrame and web resource support
Preview feature: Create a task flow in CRM for phones and tablets New task-based experiences are immersive experiences that allow users to focus on the tasks they need to do, not the records they need to interact with. With task-based experiences, you can bring data from multiple entities into a single user experience. For example, if users need to do a series of follow-up steps after client meetings, create a task flow.
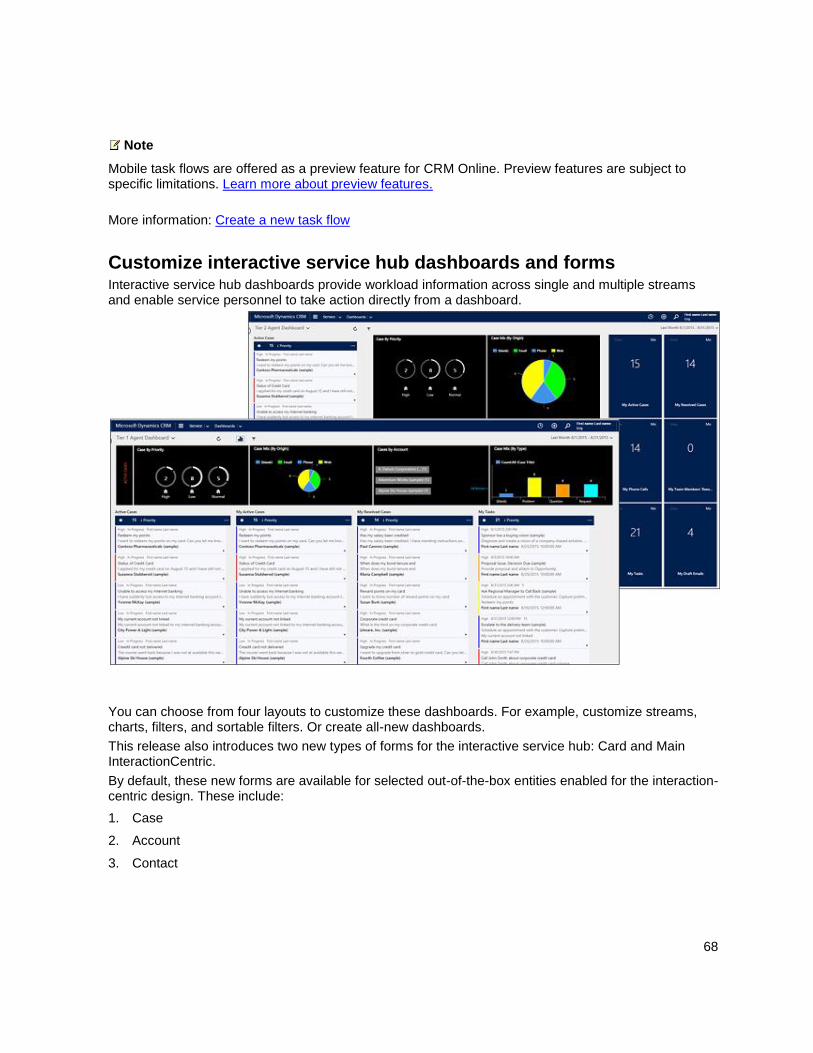
68
Note
Mobile task flows are offered as a preview feature for CRM Online. Preview features are subject to specific limitations. Learn more about preview features.
More information: Create a new task flow
Customize interactive service hub dashboards and forms Interactive service hub dashboards provide workload information across single and multiple streams and enable service personnel to take action directly from a dashboard.
You can choose from four layouts to customize these dashboards. For example, customize streams, charts, filters, and sortable filters. Or create all-new dashboards.
This release also introduces two new types of forms for the interactive service hub: Card and Main InteractionCentric.
By default, these new forms are available for selected out-of-the-box entities enabled for the interaction-centric design. These include:
1. Case
2. Account
3. Contact
69
4. Social Profile
5. Custom entity
6. Activities:
a. Email
b. Phone call
c. Task
d. Appointment
e. Social Activity
f. Custom Activity
You can customize these forms or create new interactive-centric forms for any new custom entity that’s enabled for the interactive design. Quick create and quick view forms are shared between the web client and the interactive service hub.
You can also customize the Reference Panel (related items) on interactive service hub forms by adding vertical tabs.
Note
Upgrades aren’t supported for version 1 of the interactive service hub. When you upgrade to Dynamics CRM 2016, your service hub forms (for valid service hub entities) won’t automatically be upgraded to include all customizations that you make to web client forms for the same entity. For example, if you have customized the main case form in the web client, the service hub case main form will be the system-defined form—it will not include any customizations. You’ll need to make those customizations manually (provided those customizations are supported in version 1).
More information:
Watch a short video (3:34) about the interactive service hub
Configure interactive experience dashboards
Help & Training: Interactive service hub dashboards and forms help you prioritize workloads
SharePoint server-based integration now supports all four connectivity combinations, including hybrids You can now integrate CRM and SharePoint in all four possible combinations:
CRM Online to SharePoint Online
CRM Online to SharePoint on-premises
CRM on-premises to SharePoint Online
CRM on-premises to SharePoint on-premises
More information: Set up SharePoint integration with Microsoft Dynamics 365
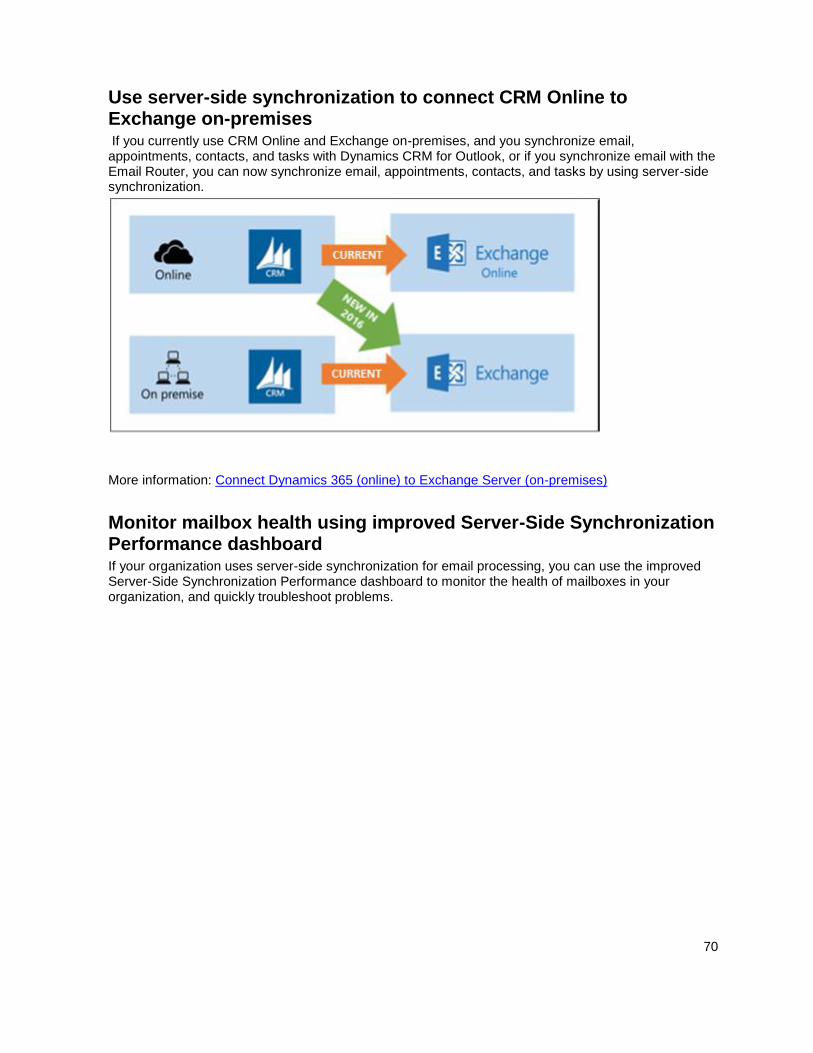
70
Use server-side synchronization to connect CRM Online to Exchange on-premises If you currently use CRM Online and Exchange on-premises, and you synchronize email, appointments, contacts, and tasks with Dynamics CRM for Outlook, or if you synchronize email with the Email Router, you can now synchronize email, appointments, contacts, and tasks by using server-side synchronization.
More information: Connect Dynamics 365 (online) to Exchange Server (on-premises)
Monitor mailbox health using improved Server-Side Synchronization Performance dashboard If your organization uses server-side synchronization for email processing, you can use the improved Server-Side Synchronization Performance dashboard to monitor the health of mailboxes in your organization, and quickly troubleshoot problems.
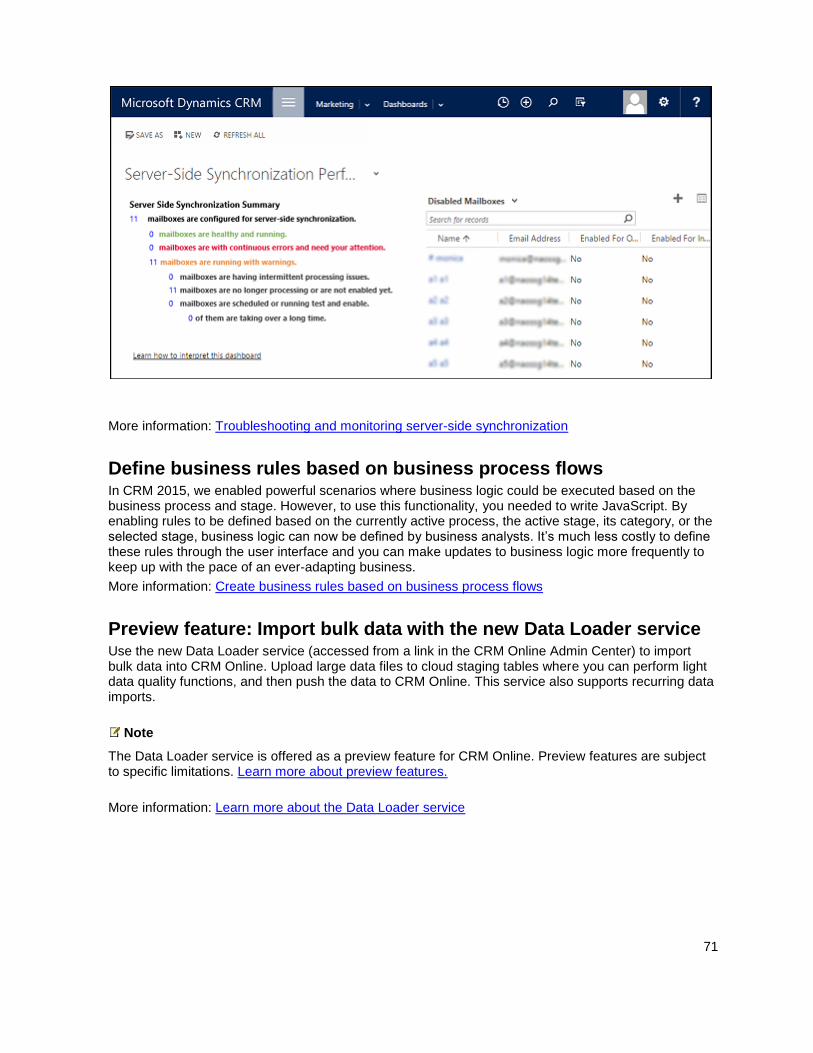
71
More information: Troubleshooting and monitoring server-side synchronization
Define business rules based on business process flows In CRM 2015, we enabled powerful scenarios where business logic could be executed based on the business process and stage. However, to use this functionality, you needed to write JavaScript. By enabling rules to be defined based on the currently active process, the active stage, its category, or the selected stage, business logic can now be defined by business analysts. It’s much less costly to define these rules through the user interface and you can make updates to business logic more frequently to keep up with the pace of an ever-adapting business.
More information: Create business rules based on business process flows
Preview feature: Import bulk data with the new Data Loader service Use the new Data Loader service (accessed from a link in the CRM Online Admin Center) to import bulk data into CRM Online. Upload large data files to cloud staging tables where you can perform light data quality functions, and then push the data to CRM Online. This service also supports recurring data imports.
Note
The Data Loader service is offered as a preview feature for CRM Online. Preview features are subject to specific limitations. Learn more about preview features.
More information: Learn more about the Data Loader service
72
Solution segmentation provides tighter control for solutions exports and patches With solution segmentation, you can export solutions with selected entity components, such as attributes, forms, or views, rather than entire entities with all the components. This will provide a tighter control over what you distribute in solutions and solution patches. You don’t have to write any code to create segmented solutions.
More information: Use segmented solutions and patches to simplify solution updates
New, improved Unified Service Desk Unified Service Desk provides an agent desktop with information from CRM and third-party applications in a combined user interface. Improvements in Unified Service Desk 2.0 include:
An improved installation and deployment experience
Support for OAuth
Ability to integrate with third-party telemetry systems and analytics systems such as Azure
HDInsight
Improved administration and agent experience
Performance and stability improvements
More information:
What's new in Unified Service Desk
Install Microsoft Dynamics CRM Server roles on Windows Server Core (on-premises only) You can install most Microsoft Dynamics CRM 2016 Server server roles on a Server Core installation of Microsoft Windows Server. More information: Referenced topic '1f5d3be8-bec4-44b2-86c7-e4dbd18a8eae' is only available online.
CRM Online 2015 Update 1 features now apply to CRM 2016 on-premises The following Microsoft Dynamics CRM Online 2015 Update 1 features now apply to Dynamics CRM 2016 on-premises:
Easy navigation with the remodeled navigation bar With the new navigation bar design, you can find information easier and faster, even if you have to navigate through a large number of entities. We also provided access to most recently viewed records (up to 30 records) and quick navigation in large forms with many fields.
More information: Video: New navigation tour Help & Training: Get around in Microsoft Dynamics CRM, CRM for Outlook, and mobile devices
73
Form rendering enhancements Microsoft Dynamics CRM Online 2015 Update 1 made enhancements to Dynamics CRM forms so that they load faster. However, if you have forms that include unsupported customizations, these enhancements can cause compatibility problems. To avoid these compatibility problems, you can temporarily turn off the form enhancements in System Settings by setting Use legacy form rendering to Yes. More information: How to check an organization for unsupported customizations
Important
The Use legacy form rendering setting is expected to be removed in an upcoming release of Dynamics CRM. Therefore, we recommend that you update your customizations as soon as possible and set Use legacy rendering to No to take advantage of the form rendering enhancements.
When a form is used that has unsupported customizations, such as unsupported JavaScript, the user will receive an error message. To see information about the error, choose View the data that will be sent to Microsoft and see the details within the CrmScriptErrorReport tags.
Use Exchange folder-level tracking to automatically track email You can enable folder-level tracking for Microsoft Exchange folders to map an Exchange folder to a CRM record. Any email moved to that folder will automatically be linked to the mapped record in CRM. For example, let’s say you have an account called “Adventure Works” in Dynamics 365. You can create a folder in Microsoft Outlook called “Adventure Works” in your Inbox folder, and then create Exchange rules to automatically route email messages to that folder based on the subject or body of an email message. Next, in CRM map the Adventure Works folder to the account record (Adventure Works).
More information: Configure Outlook or Exchange folder-level tracking
“Older Than X” clause improvements Earlier versions of Microsoft Dynamics CRM were limited to the Older Than X Months clause for filtering, by using Older Than. You can now filter on additional units of time including minutes, hours, days, weeks, and years. The Older Than X clauses can be used with Advanced Find, the saved view editor, and queries that are based on FetchXML.
Change the color scheme or add a logo to match your organization’s brand You can create a custom look and feel (theme) for your application by changing the default colors and visual elements provided in the uncustomized CRM system. For example, without writing any code, you can create your personal product branding, add a company logo, and provide entity-specific coloring. The theme colors are applied globally throughout the application, with the exception of some legacy areas, such as gradient buttons. You can define multiple themes, but only one can be set and published as the default theme. Custom themes are also supported by Microsoft Dynamics CRM for Outlook.
Note
Changes made to an organization's theme aren’t included in solutions exported from the organization. To learn how to export\import a custom theme, see: Manage configuration data.
74
More information: Change the color scheme or add a logo to match your organization’s brand Help & Training: Change the color scheme or add a logo to match your organization’s brand
New behavior and format of the Date and Time field Previously, the behavior of the Date and Time field was limited to the current user's local time zone. With this “time zone aware” behavior, we couldn’t properly address cases where the date and time needed to be presented independently of the user’s local time zone, such as for birthdays or hotel check-in times. In this release, we introduced two new time zone independent behaviors for the Date and Time data type to address such cases:
Date Only
Time Zone Independent
More information: Behavior and format of the date and time field
Calculated field enhancements You can now compute the difference between two dates by using new built-in functions available for calculated fields: DIFFINDAYS, DIFFINHOURS, DIFFINMINUTES, DIFFINMONTHS, DIFFINWEEKS, DIFFINYEARS.
More information: Define calculated fields
Rollup field enhancements Rollup fields help you obtain insights into data by monitoring key business metrics. In this release, we’re further enriching your experience with rollup fields by adding new capabilities that include:
Calculations using the AVG operator.
Aggregating data across all activities related to a record, such as phone calls, emails, or
appointments.
Aggregating data across all activities related to a record and activities indirectly related to a record
via the Activity Party entity. For example, by using the Activity Party participation types, you can
include emails where the account is listed only on the To: and Cc: lines for aggregation.
More information: Define rollup fields
Clear field values with business rules Enhancements to business rules let you clear field values on both the client and server to ensure accuracy of your CRM records. No code required.
More information: Create and edit business rules
Call custom actions from workflows or dialogs Workflows and dialogs support many business scenarios. In previous releases, you could call basic SDK actions, such as create, update, and delete a record, from a workflow or a dialog. In this release, we coupled workflow and dialog capabilities with the power of custom actions, so now you can invoke a custom action directly from a workflow or a dialog without writing any code.
75
More information: Invoke custom actions from a workflow or dialog
Create alternate keys for referencing records in Microsoft Dynamics CRM To improve performance of certain operations in CRM systems and help correctly identify data imported into CRM from external systems, we provided a new way of uniquely referencing records in CRM through alternate keys. Until now, the records in CRM were only referenced by unique identifiers, known as GUIDs. However, some external systems can’t be extended to store CRM record GUIDs. For these cases, you can now reference records by using alternate keys that aren’t GUIDs. An alternate key has a unique name and you use one or more entity fields to define the key, for example, account name and account number. While you can define an alternate key in the Customization area in the web application (Components >Entities > Entity <X> > Keys), the key can only be used programmatically, in code.
More information: Define alternate keys to reference Dynamics 365 records
Full-featured phone and mobile app and phone-specific customizations The new phone app features the “design once, deploy everywhere” paradigm. It allows administrators to deliver the same feature-rich experience available on Dynamics 365 for tablets to users of the phone app. The app includes full support for charts, processes, multiple dashboards, customization, and business logic (business rules or JavaScript). The administrator can also selectively hide tabs, sections, or fields.
More information: Set up and manage phones and tablets and Customize Dynamics 365 for phones and tablets
Microsoft Dynamics 365 for Good Microsoft Dynamics 365 for Good is a special version of Dynamics 365 for tablets that works with Good Technology’s mobile security platform. Microsoft Dynamics 365 for Good is currently supported for Apple iPad running iOS 7 or later. To use Microsoft Dynamics 365 for Good, you must have Good Dynamics server software and services from Good Technology. The app is listed in the Good Dynamics Marketplace and can be downloaded from the Apple App store.
More information: Secure your mobile data with CRM for Good
Enable track changes to control data synchronization Large CRM organizations that synchronize their data with external data sources can now enable entities for change tracking, which will enable a new change tracking API to be executed against the given entity. Using the new API, you can reduce the load on your server resources and save processing time when extracting CRM data and syncing it to an external store.
More information: Enable change tracking to control data synchronization
76
See Also Administering Dynamics 365 Referenced topic '89f41190-e266-450d-b3c9-95b09eef5f63' is only available online.
© 2016 Microsoft. All rights reserved. Copyright
Important changes coming in future releases of Microsoft Dynamics 365
Applies To: Dynamics 365 (online), Dynamics 365 (on-premises), Dynamics CRM 2016, Dynamics CRM Online
[This topic is pre-release documentation and is subject to change.]
Administrators and IT professionals can use this information to prepare for future releases of Microsoft Dynamics 365. With the Microsoft Dynamics CRM Online 2016 Update 1 and Microsoft Dynamics CRM 2016 Service Pack 1 (on-premises) releases, some knowledge management entities are deprecated and older Android and iOS versions will no longer be supported. There are also details about removal of the legacy form rendering option and a reminder about the Microsoft Dynamics CRM List Component. For information about changes that developers should consider to prepare for future versions of Dynamics 365, see MSDN: Important changes coming in future releases of Microsoft Dynamics 365.
Removal of support for older mobile operating systems In support of the latest technologies, these mobile device operating systems will no longer be supported in the Microsoft Dynamics 365 mobile app.
Android versions 4.2 and 4.3.
Apple iOS 7 and iOS 8.
More information: Support for Dynamics 365 for phones and Dynamics 365 for tablets
Some knowledge management entities are deprecated With Microsoft Dynamics CRM Online 2016 Update 1 and Microsoft Dynamics CRM 2016 Service Pack 1 (on-premises) release, the following entities used for knowledge management are deprecated: KbArticle, KbArticleComment, and KbArticleTemplate. These entities won't be supported in a future major release of Dynamics 365. You must use the newer KnowledgeArticle entity (introduced in CRM Online 2016 Update and Dynamics 365) for knowledge management in Dynamics 365. More information: MSDN: Knowledge management entities
77
Removal of legacy form rendering option With Microsoft Dynamics CRM Online 2015 Update 1 we introduced a new form rendering engine (sometimes called "turbo forms" ) that provides improved performance. This new rendering engine became available for customers with on-premises deployments with Microsoft Dynamics 365.
Because such a change can introduce different behaviors in form scripts, we currently provide a Use legacy form rendering option in System Settings so that an organization can opt out if they detect problems. This is intended to be a temporary solution. As documented in What's new for administrators and customizers in Microsoft Dynamics CRM 2015 and CRM Online and MSDN: Write code for Microsoft Dynamics CRM forms, we recommend addressing issues as soon as possible.
The Use legacy form rendering option will be removed in the next major release. Legacy form rendering (sometimes called "refresh forms") is deprecated and will no longer be available. Only the rendering option will be removed; the form definition is still supported. Organizations who have not yet resolved issues with their customizations by using the new form rendering engine should take action immediately so that they will be able to upgrade to the next major version.
If you have turned on legacy form rendering, please turn it off and test your scripts. During testing, if you see breaking changes in forms that use:
The supported client API objects and methods documented in MSDN: Client-side programming
reference, report this to Dynamics 365 technical support.
Unsupported form objects or methods, remove these customizations or find a different way to
achieve the results you want.
Microsoft Dynamics CRM List Component is deprecated Although we first announced the deprecation with the release of Microsoft Dynamics CRM Online 2015 Update 1, as a reminder, customers currently using the Microsoft Dynamics CRM List Component for SharePoint Server are advised to upgrade to use server-based Microsoft SharePoint integration. For more information about how to configure server-based SharePoint integration, see Set up SharePoint integration with Microsoft Dynamics 365.
Removal of support for Microsoft Office 2010 Future releases of Microsoft Dynamics 365 applications and features, such as Dynamics 365 for Outlook, export to Excel, and mail merge, will no longer be supported for use when you run them using Microsoft Office 2010, which includes Microsoft Office Outlook 2010. To prepare for this change, we strongly recommend that you upgrade to a later version of Microsoft Office. More information: Microsoft Office
Microsoft Dynamics Email Router is deprecated The Microsoft Dynamics CRM Email Router will become deprecated in the next major release of Microsoft Dynamics 365. To prepare for this change, we strongly recommend that you migrate all email routing functionality to use the server-side synchronization feature. More information: Migrate settings from the Email Router to server-side synchronization
78
See Also What's new for administrators and customizers in Microsoft Dynamics 365 Referenced topic 'd0d49a86-6297-4431-8b30-1f477bca2bad' is only available online.
© 2016 Microsoft. All rights reserved. Copyright
Getting started
Applies To: Dynamics 365 (online), Dynamics 365 (on-premises), Dynamics CRM 2016, Dynamics CRM Online
[This topic is pre-release documentation and is subject to change.]
As a Dynamics 365 administrator, you’ll find the information that you need here to get your organization started with Microsoft Dynamics 365.
In This Section 64-bit supported configurations for Microsoft Dynamics 365
Supported web browsers and mobile devices
Performance tuning and optimization
Set up a Dynamics 365 organization
Turn off the welcome screen (navigation tour) in CRM 2015 or earlier
See Also Training and Adoption Kit for Microsoft Dynamics 365 Administering Dynamics 365 Manage security, users, and teams
© 2016 Microsoft. All rights reserved. Copyright
Microsoft Dynamics 365 (online) requirements
Applies To: Dynamics 365 (online), Dynamics CRM Online
[This topic is pre-release documentation and is subject to change.]
Microsoft Dynamics 365 (online) gives you the following options to access Dynamics 365 data:
Web browser. No need to install anything to run Dynamics 365 (online) from a computer running a
supported web browser.
Microsoft Dynamics 365 for Outlook. An Outlook add-in that provides you with a complete set of
Dynamics 365 capabilities right within Microsoft Office Outlook.
79
Microsoft Dynamics 365 for phones and Dynamics 365 for tablets. Lightweight applications that let
you access Dynamics 365 data on almost any web browser running on a tablet, smartphone, or
non-Windows computer.
Web browser requirements You use a common web browser, such as Internet Explorer, Mozilla Firefox, Google Chrome or Apple Safari to view, add, or edit information stored in your organization’s Dynamics 365 (online) database. For more information about the supported web browsers and hardware requirements, see Web application requirements for Microsoft Dynamics 365.
Microsoft Dynamics 365 for Outlook requirements Dynamics 365 for Outlook is a free add-in that give you access to Dynamics 365 (online) in the Outlook user interface. You can download the Dynamics 365 for Outlook add-in from within Dynamics 365 (online) by clicking Get Dynamics 365 for Outlook on the message bar.
For information about using Dynamics 365 for Outlook, see Microsoft Dynamics 365 for Outlook hardware requirements and Microsoft Dynamics 365 for Outlook software requirements.
For complete installation and configuration instructions, see Set up Dynamics 365 for Outlook [admin guide].
Mobile device requirements Users can work in Dynamics 365 (online) by using a supported browser on a mobile device, or by using Microsoft Dynamics 365 for phones. For more information about the mobile experience in Dynamics 365 (online), see Referenced topic '4eadd04d-98cd-443e-94fc-9ca0c1d62728' is only available online. and Set up Dynamics 365 for phones and Dynamics 365 for tablets [Admin Guide].
Microsoft Office requirements Microsoft Dynamics 365 leverages the capabilities of on-premises versions of Microsoft Office or Microsoft Office 365 and integrates with Microsoft Office Word and Microsoft Office Excel. For more information about the supported versions of Microsoft Office, see Supported versions of Microsoft Office.
For full Office 365 feature integration with Microsoft Dynamics 365 (online) and Dynamics 365 (on-premises), you'll need Office 365 Enterprise E3 or later. Skype for Business PSTN calling and conferencing requires Office 365 Enterprise E5. Other Office 365 plans are not supported. For more information on licensing and pricing, see: Licensing and Pricing Guide.
See Also Get started administering Microsoft Dynamics 365 (online) Plan for Microsoft Dynamics 365 (online) deployment and administration Licensing plans for Microsoft Dynamics 365 (online)
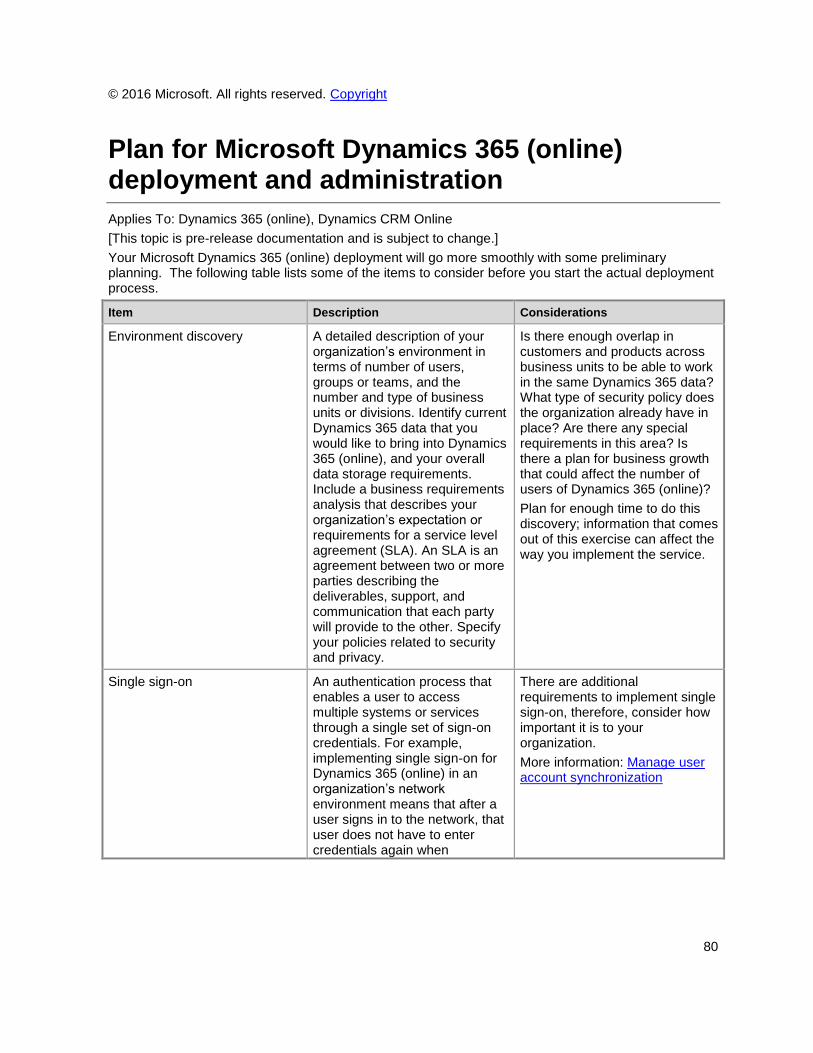
80
© 2016 Microsoft. All rights reserved. Copyright
Plan for Microsoft Dynamics 365 (online) deployment and administration
Applies To: Dynamics 365 (online), Dynamics CRM Online
[This topic is pre-release documentation and is subject to change.]
Your Microsoft Dynamics 365 (online) deployment will go more smoothly with some preliminary planning. The following table lists some of the items to consider before you start the actual deployment process.
Item Description Considerations
Environment discovery A detailed description of your organization’s environment in terms of number of users, groups or teams, and the number and type of business units or divisions. Identify current Dynamics 365 data that you would like to bring into Dynamics 365 (online), and your overall data storage requirements. Include a business requirements analysis that describes your organization’s expectation or requirements for a service level agreement (SLA). An SLA is an agreement between two or more parties describing the deliverables, support, and communication that each party will provide to the other. Specify your policies related to security and privacy.
Is there enough overlap in customers and products across business units to be able to work in the same Dynamics 365 data? What type of security policy does the organization already have in place? Are there any special requirements in this area? Is there a plan for business growth that could affect the number of users of Dynamics 365 (online)?
Plan for enough time to do this discovery; information that comes out of this exercise can affect the way you implement the service.
Single sign-on An authentication process that enables a user to access multiple systems or services through a single set of sign-on credentials. For example, implementing single sign-on for Dynamics 365 (online) in an organization’s network environment means that after a user signs in to the network, that user does not have to enter credentials again when
There are additional requirements to implement single sign-on, therefore, consider how important it is to your organization.
More information: Manage user account synchronization
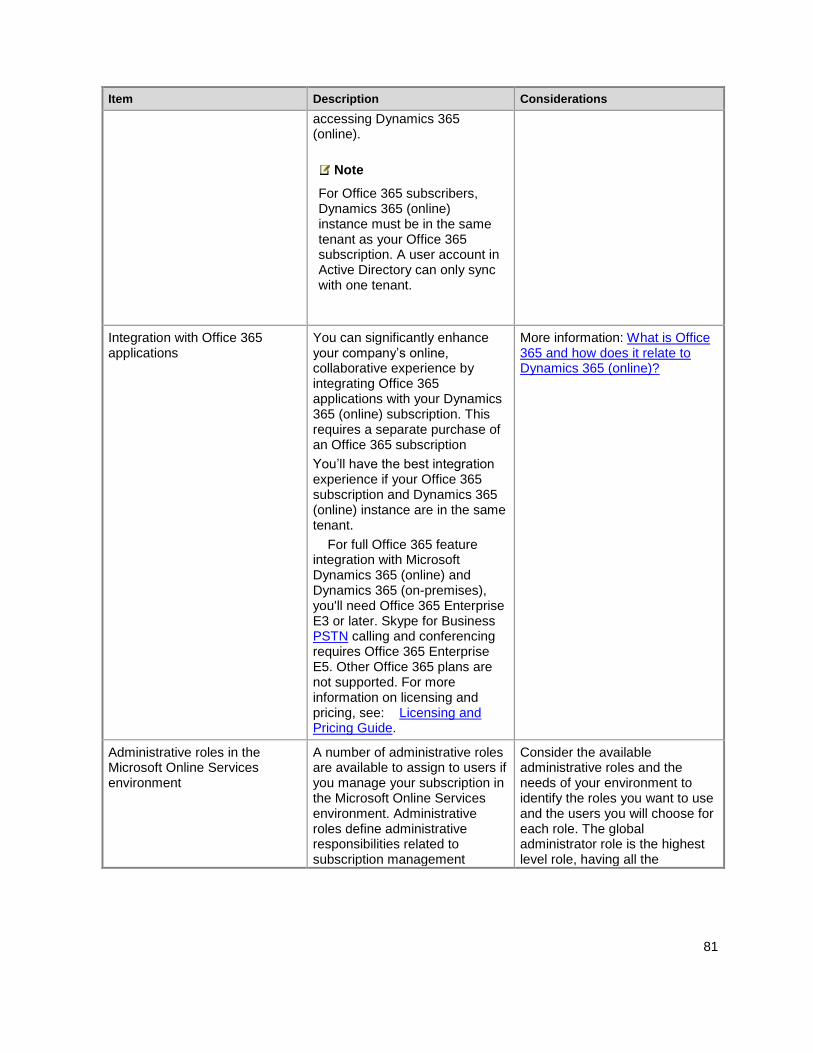
81
Item Description Considerations
accessing Dynamics 365 (online).
Note
For Office 365 subscribers, Dynamics 365 (online) instance must be in the same tenant as your Office 365 subscription. A user account in Active Directory can only sync with one tenant.
Integration with Office 365 applications
You can significantly enhance your company’s online, collaborative experience by integrating Office 365 applications with your Dynamics 365 (online) subscription. This requires a separate purchase of an Office 365 subscription
You’ll have the best integration experience if your Office 365 subscription and Dynamics 365 (online) instance are in the same tenant.
For full Office 365 feature integration with Microsoft Dynamics 365 (online) and Dynamics 365 (on-premises), you'll need Office 365 Enterprise E3 or later. Skype for Business PSTN calling and conferencing requires Office 365 Enterprise E5. Other Office 365 plans are not supported. For more information on licensing and pricing, see: Licensing and Pricing Guide.
More information: What is Office 365 and how does it relate to Dynamics 365 (online)?
Administrative roles in the Microsoft Online Services environment
A number of administrative roles are available to assign to users if you manage your subscription in the Microsoft Online Services environment. Administrative roles define administrative responsibilities related to subscription management
Consider the available administrative roles and the needs of your environment to identify the roles you want to use and the users you will choose for each role. The global administrator role is the highest level role, having all the
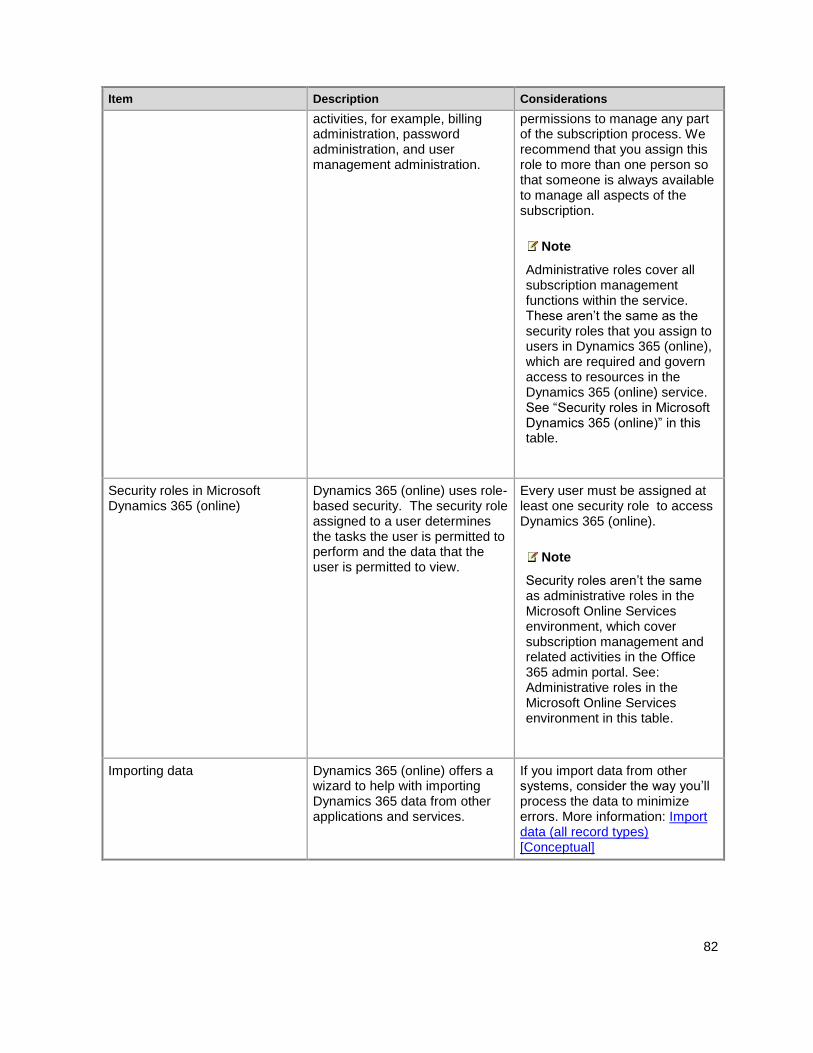
82
Item Description Considerations
activities, for example, billing administration, password administration, and user management administration.
permissions to manage any part of the subscription process. We recommend that you assign this role to more than one person so that someone is always available to manage all aspects of the subscription.
Note
Administrative roles cover all subscription management functions within the service. These aren’t the same as the security roles that you assign to users in Dynamics 365 (online), which are required and govern access to resources in the Dynamics 365 (online) service. See “Security roles in Microsoft Dynamics 365 (online)” in this table.
Security roles in Microsoft Dynamics 365 (online)
Dynamics 365 (online) uses role-based security. The security role assigned to a user determines the tasks the user is permitted to perform and the data that the user is permitted to view.
Every user must be assigned at least one security role to access Dynamics 365 (online).
Note
Security roles aren’t the same as administrative roles in the Microsoft Online Services environment, which cover subscription management and related activities in the Office 365 admin portal. See: Administrative roles in the Microsoft Online Services environment in this table.
Importing data Dynamics 365 (online) offers a wizard to help with importing Dynamics 365 data from other applications and services.
If you import data from other systems, consider the way you’ll process the data to minimize errors. More information: Import data (all record types) [Conceptual]
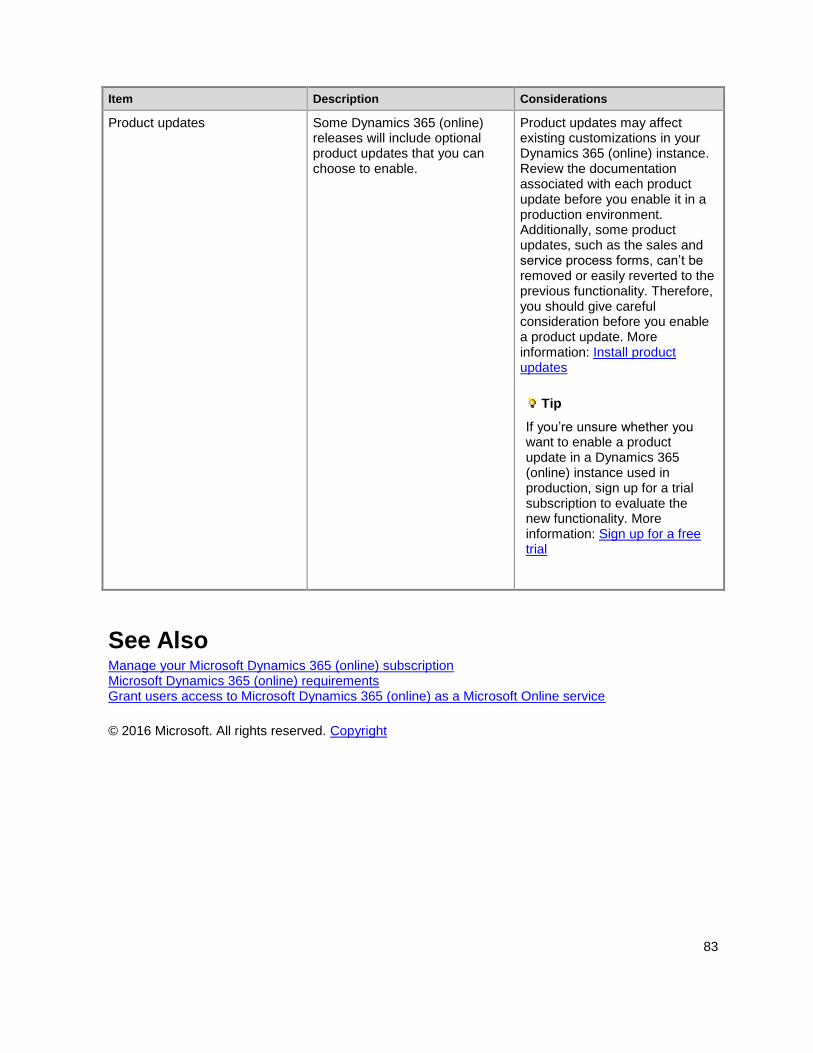
83
Item Description Considerations
Product updates Some Dynamics 365 (online) releases will include optional product updates that you can choose to enable.
Product updates may affect existing customizations in your Dynamics 365 (online) instance. Review the documentation associated with each product update before you enable it in a production environment. Additionally, some product updates, such as the sales and service process forms, can’t be removed or easily reverted to the previous functionality. Therefore, you should give careful consideration before you enable a product update. More information: Install product updates
Tip
If you’re unsure whether you want to enable a product update in a Dynamics 365 (online) instance used in production, sign up for a trial subscription to evaluate the new functionality. More information: Sign up for a free trial
See Also Manage your Microsoft Dynamics 365 (online) subscription Microsoft Dynamics 365 (online) requirements Grant users access to Microsoft Dynamics 365 (online) as a Microsoft Online service
© 2016 Microsoft. All rights reserved. Copyright
84
64-bit supported configurations for Microsoft Dynamics 365
Applies To: Dynamics 365 (online), Dynamics 365 (on-premises), Dynamics CRM 2016, Dynamics CRM Online
[This topic is pre-release documentation and is subject to change.]
Installing and running Microsoft Dynamics 365 applications that connect to database, reporting services, and email features running on other 32-bit computers is generally supported.
Dynamics 365 for Outlook Dynamics 365 for Outlook includes a 64-bit version that can be installed on any of the supported
64-bit Windows operating systems. More information: Microsoft Dynamics 365 for Outlook software
requirements
The 32-bit version of Dynamics 365 for Outlook can be installed and run on a 64-bit Windows
operating system but the version of Microsoft Outlook must be 32-bit.
Email Router Microsoft Exchange Server 2010 or Microsoft Exchange Server 2013 editions, which are available only for 64-bit systems, are supported, and can run 64-bit, or 32-bit, editions of the Microsoft Dynamics CRM Email Router.
SQL Server (on-premises only) 32-bit versions of Microsoft SQL Server database engine or Microsoft SQL Server reporting services aren’t supported with Microsoft Dynamics 365. You can’t use a computer that is running a Microsoft SQL Server 32-bit edition as the database server or reporting services server for Microsoft Dynamics 365 Server. For more information about the supported versions of Microsoft SQL Server, see Referenced topic '1f5d3be8-bec4-44b2-86c7-e4dbd18a8eae' is only available online. and Referenced topic '6d0d42e2-0ad0-4dfa-aa42-72ab4e92b001' is only available online..
See Also Getting started Supported web browsers and mobile devices Web application requirements for Microsoft Dynamics 365
© 2016 Microsoft. All rights reserved. Copyright

85
Supported web browsers and mobile devices
Applies To: Dynamics 365 (online), Dynamics 365 (on-premises), Dynamics CRM 2016, Dynamics CRM Online
[This topic is pre-release documentation and is subject to change.]
Users can access the Microsoft Dynamics 365 Web application on the most recent versions of the following browsers:
Internet Explorer on Windows
Firefox on Windows
Safari on Mac OS X
Chrome on Windows or Google Nexus 10
For more detailed information about supported browsers, see Web application requirements for Microsoft Dynamics 365.
For a mobile device, such as an iPad or smartphone, the following apps are available:
Microsoft Dynamics 365 for iPad
Microsoft Dynamics 365 for Windows 8
For more detailed information about supported phones and tablets, see Support for Dynamics 365 for phones and Dynamics 365 for tablets.
Note
Users who try to view Microsoft Dynamics 365 on an unsupported browser may be redirected to
Microsoft Dynamics 365 for phones. This is a basic service that has limited functionality, and isn’t
intended to serve as a substitute for the full feature set of Microsoft Dynamics 365. We recommend
that users choose a supported browser or a Microsoft Dynamics 365 app specific to the device.
If you have added content to forms or dashboards in an iFrame, you might have implemented
security restrictions around certain actions in that content, such as external links. Keep in mind that
in Firefox, this security restriction code will likely be unsupported.
Known issues when you run Microsoft Dynamics 365 with certain web browsers This section describes the known issues when you run Microsoft Dynamics 365 in a web browser.
Limited copy and paste support in Firefox and Chrome Copy and paste functionality by using the clipboard is not yet fully supported on the Firefox and Chrome web browsers; the Copy a Link button at the top of the page may not function as expected.
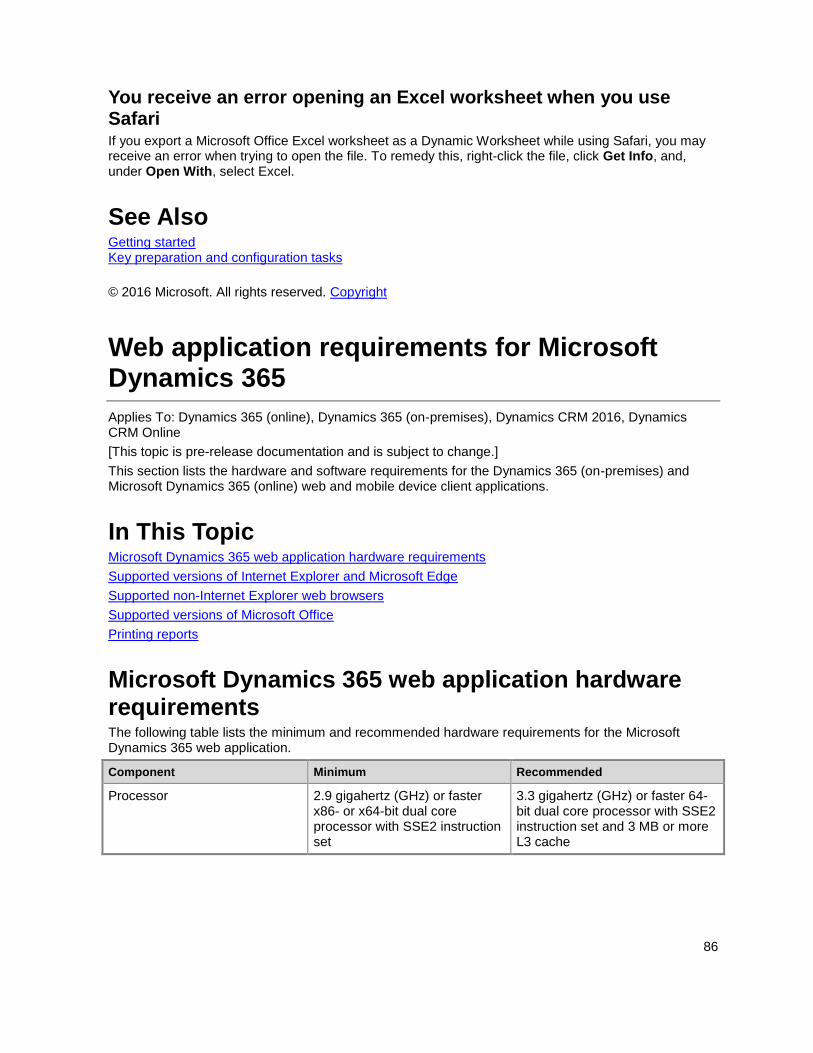
86
You receive an error opening an Excel worksheet when you use Safari If you export a Microsoft Office Excel worksheet as a Dynamic Worksheet while using Safari, you may receive an error when trying to open the file. To remedy this, right-click the file, click Get Info, and, under Open With, select Excel.
See Also Getting started Key preparation and configuration tasks
© 2016 Microsoft. All rights reserved. Copyright
Web application requirements for Microsoft Dynamics 365
Applies To: Dynamics 365 (online), Dynamics 365 (on-premises), Dynamics CRM 2016, Dynamics CRM Online
[This topic is pre-release documentation and is subject to change.]
This section lists the hardware and software requirements for the Dynamics 365 (on-premises) and Microsoft Dynamics 365 (online) web and mobile device client applications.
In This Topic Microsoft Dynamics 365 web application hardware requirements
Supported versions of Internet Explorer and Microsoft Edge
Supported non-Internet Explorer web browsers
Supported versions of Microsoft Office
Printing reports
Microsoft Dynamics 365 web application hardware requirements The following table lists the minimum and recommended hardware requirements for the Microsoft Dynamics 365 web application.
Component Minimum Recommended
Processor 2.9 gigahertz (GHz) or faster x86- or x64-bit dual core processor with SSE2 instruction set
3.3 gigahertz (GHz) or faster 64-bit dual core processor with SSE2 instruction set and 3 MB or more L3 cache
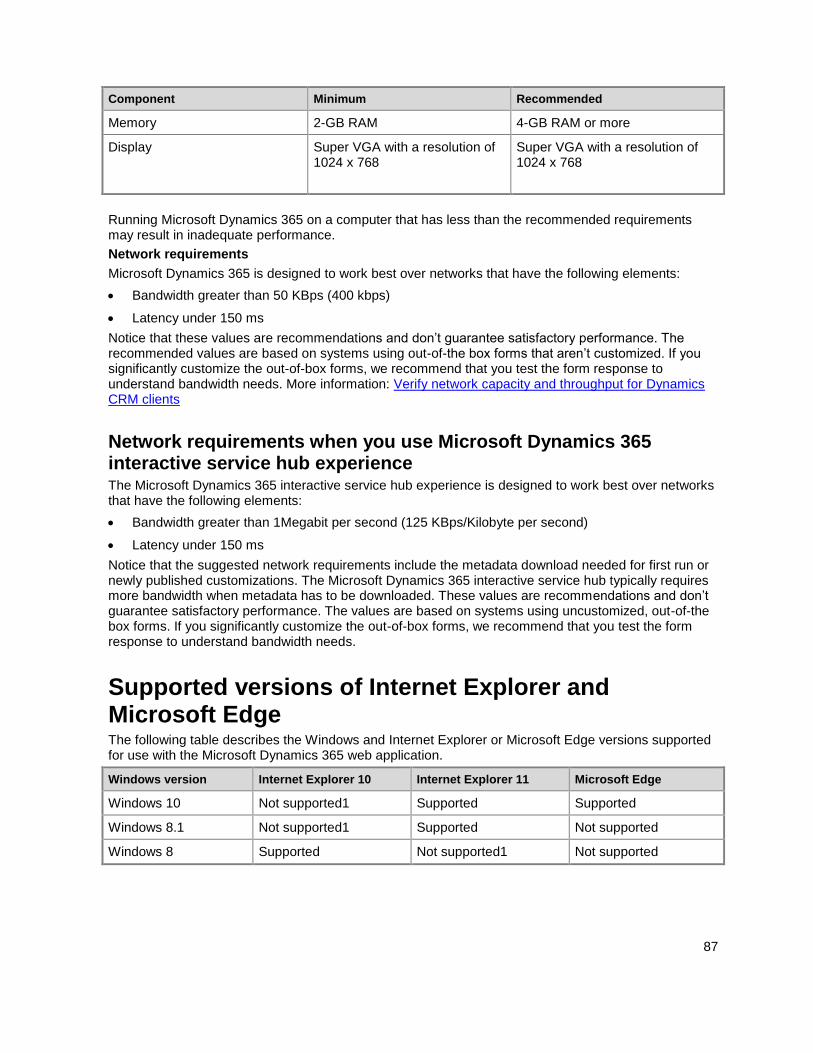
87
Component Minimum Recommended
Memory 2-GB RAM 4-GB RAM or more
Display Super VGA with a resolution of 1024 x 768
Super VGA with a resolution of 1024 x 768
Running Microsoft Dynamics 365 on a computer that has less than the recommended requirements may result in inadequate performance.
Network requirements
Microsoft Dynamics 365 is designed to work best over networks that have the following elements:
Bandwidth greater than 50 KBps (400 kbps)
Latency under 150 ms
Notice that these values are recommendations and don’t guarantee satisfactory performance. The recommended values are based on systems using out-of-the box forms that aren’t customized. If you significantly customize the out-of-box forms, we recommend that you test the form response to understand bandwidth needs. More information: Verify network capacity and throughput for Dynamics CRM clients
Network requirements when you use Microsoft Dynamics 365 interactive service hub experience The Microsoft Dynamics 365 interactive service hub experience is designed to work best over networks that have the following elements:
Bandwidth greater than 1Megabit per second (125 KBps/Kilobyte per second)
Latency under 150 ms
Notice that the suggested network requirements include the metadata download needed for first run or newly published customizations. The Microsoft Dynamics 365 interactive service hub typically requires more bandwidth when metadata has to be downloaded. These values are recommendations and don’t guarantee satisfactory performance. The values are based on systems using uncustomized, out-of-the box forms. If you significantly customize the out-of-box forms, we recommend that you test the form response to understand bandwidth needs.
Supported versions of Internet Explorer and Microsoft Edge The following table describes the Windows and Internet Explorer or Microsoft Edge versions supported for use with the Microsoft Dynamics 365 web application.
Windows version Internet Explorer 10 Internet Explorer 11 Microsoft Edge
Windows 10 Not supported1 Supported Supported
Windows 8.1 Not supported1 Supported Not supported
Windows 8 Supported Not supported1 Not supported
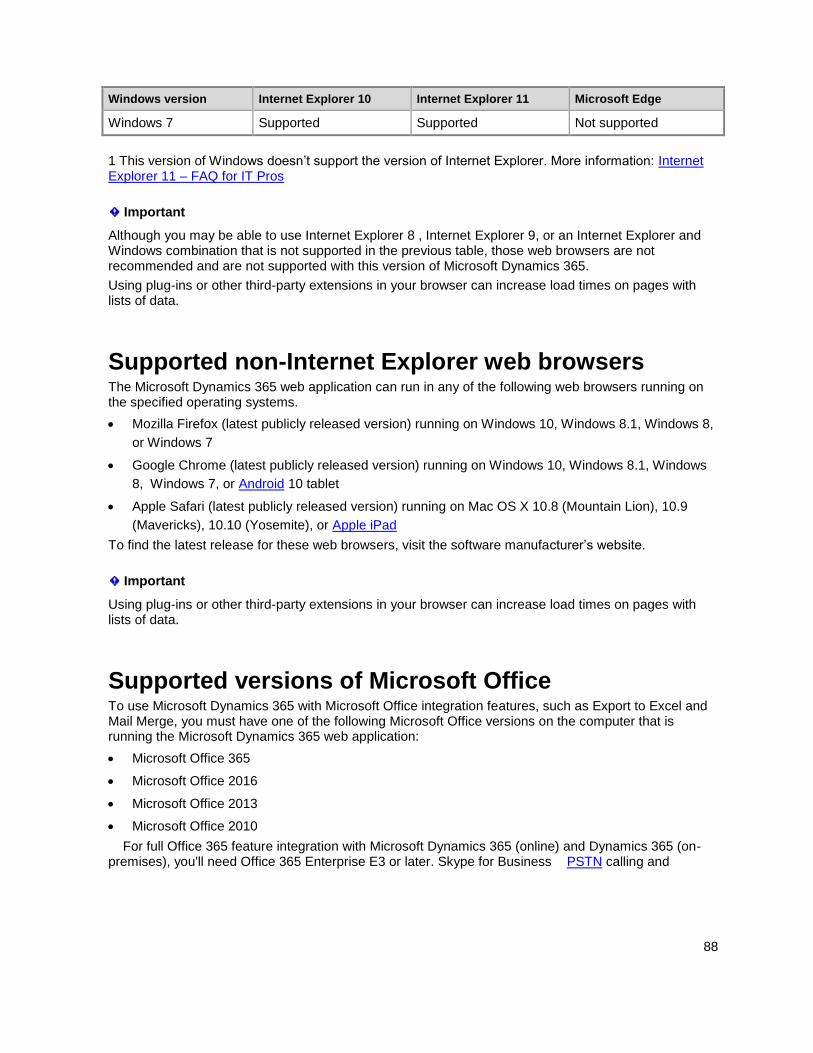
88
Windows version Internet Explorer 10 Internet Explorer 11 Microsoft Edge
Windows 7 Supported Supported Not supported
1 This version of Windows doesn’t support the version of Internet Explorer. More information: Internet Explorer 11 – FAQ for IT Pros
Important
Although you may be able to use Internet Explorer 8 , Internet Explorer 9, or an Internet Explorer and Windows combination that is not supported in the previous table, those web browsers are not recommended and are not supported with this version of Microsoft Dynamics 365.
Using plug-ins or other third-party extensions in your browser can increase load times on pages with lists of data.
Supported non-Internet Explorer web browsers The Microsoft Dynamics 365 web application can run in any of the following web browsers running on the specified operating systems.
Mozilla Firefox (latest publicly released version) running on Windows 10, Windows 8.1, Windows 8,
or Windows 7
Google Chrome (latest publicly released version) running on Windows 10, Windows 8.1, Windows
8, Windows 7, or Android 10 tablet
Apple Safari (latest publicly released version) running on Mac OS X 10.8 (Mountain Lion), 10.9
(Mavericks), 10.10 (Yosemite), or Apple iPad
To find the latest release for these web browsers, visit the software manufacturer’s website.
Important
Using plug-ins or other third-party extensions in your browser can increase load times on pages with lists of data.
Supported versions of Microsoft Office To use Microsoft Dynamics 365 with Microsoft Office integration features, such as Export to Excel and Mail Merge, you must have one of the following Microsoft Office versions on the computer that is running the Microsoft Dynamics 365 web application:
Microsoft Office 365
Microsoft Office 2016
Microsoft Office 2013
Microsoft Office 2010
For full Office 365 feature integration with Microsoft Dynamics 365 (online) and Dynamics 365 (on-premises), you'll need Office 365 Enterprise E3 or later. Skype for Business PSTN calling and
89
conferencing requires Office 365 Enterprise E5. Other Office 365 plans are not supported. For more information on licensing and pricing, see: Licensing and Pricing Guide.
Printing reports The Reporting ServicesMicrosoft ActiveX control is required to print reports. If you try to print a report, but the control isn’t installed, you’ll be prompted to install it. The installer package is named RSClientPrint.cab and can found on the Microsoft SQL Server Reporting Services server at <drive>:\Program files\Microsoft SQL Server\<MSSQL>\Reporting Services\ReportServer\bin.
See Also Supported web browsers and mobile devices 64-bit supported configurations for Microsoft Dynamics 365 Referenced topic 'e2c85d76-2b14-4d80-b6a7-5ea53fafcc8d' is only available online.
© 2016 Microsoft. All rights reserved. Copyright
Performance tuning and optimization
Applies To: Dynamics 365 (online), Dynamics 365 (on-premises), Dynamics CRM 2016, Dynamics CRM Online
[This topic is pre-release documentation and is subject to change.]
Use this information to help you plan and optimize application performance with Microsoft Dynamics 365.
In This Section Verify network capacity and throughput for Dynamics 365 clients
Key preparation and configuration tasks
Related Sections Getting started
Set up a Dynamics 365 organization
© 2016 Microsoft. All rights reserved. Copyright
Verify network capacity and throughput for Dynamics 365 clients
Applies To: Dynamics 365 (online), Dynamics 365 (on-premises), Dynamics CRM 2016, Dynamics CRM Online
90
[This topic is pre-release documentation and is subject to change.]
The primary characteristics of a network that affect the performance of Microsoft Dynamics 365 clients, such as the web application or Dynamics 365 for Outlook, are bandwidth and latency.
Bandwidth is the width or capacity of a specific communications channel.
Latency is the time required for a signal to travel from one point on a network to another, and is a
fixed cost between two points.
One of the main causes of poor performance of Microsoft Dynamics 365 clients is the latency of the network over which the clients connect to the Microsoft Dynamics 365 organization. Lower latencies (measured in milliseconds) generally provide better levels of performance.
Notice that, even if the latency of a network connection is low, bandwidth can become a performance degradation factor if there are many resources sharing the network connection, for example, to download large files or send and receive email.
Networks with high bandwidth don’t guarantee low latency. For example, a network path traversing a satellite link often has high latency, even though throughput is very high. It’s common for a network round trip traversing a satellite link to have five or more seconds of latency. An application designed to send a request, wait for a reply, send another request, wait for another reply, and so on, will wait at least five seconds for each packet exchange, regardless of the speed of the server.
How to check latency Microsoft Dynamics 365 includes a basic diagnostic tool that analyzes the client-to-organization connectivity and produces a report. To run the Dynamics 365 Diagnostics tool, follow these steps.
1. On the user’s computer or device, start a web browser, and sign in to a Microsoft Dynamics 365
organization.
2. Enter the following URL, https://myorg.crm.dynamics.com/tools/diagnostics/diag.aspx, where
myorg.crm.dynamics.com is the URL of your Microsoft Dynamics 365 (online) organization.
Similarly, you can enter the path to your Microsoft Dynamics 365 Server for on-premises
deployments.
3. Click Run.
The report displays a table with test and benchmark information. Of particular importance is the Latency Test row value. This value is an average of twenty individual test runs. Generally, the lower the number, the better the performance of the client. Although users may receive a satisfactory experience by using connections with more latency, for best application performance we recommend that the value be 150 ms (milliseconds) or less.
Best practices for improving application performance
Maximize how quickly your forms load. More information: Optimize form performance
Make sure you aren’t using legacy form rendering, which can make forms take significantly longer
to load. More information: System Settings dialog box - General tab
91
See Also Performance tuning and optimization Key preparation and configuration tasks
© 2016 Microsoft. All rights reserved. Copyright
Key preparation and configuration tasks
Applies To: Dynamics 365 (online), Dynamics 365 (on-premises), Dynamics CRM 2016, Dynamics CRM Online
[This topic is pre-release documentation and is subject to change.]
This topic, which is intended for administrators and business users of Microsoft Dynamics 365, describes common configuration settings and tasks that can help you keep your organization optimized so that you can focus on what’s important. It’s designed to improve your overall experience with Microsoft Dynamics 365, even before your business begins to use it.
In This Topic Common configuration settings for Internet Explorer
Configuration settings for Microsoft Dynamics 365 for Outlook
Network connections settings
Antivirus or malware application settings
Important email messages from Microsoft Dynamics 365
Available resources for Microsoft Dynamics 365 users
Technical support for Microsoft Dynamics 365
Common configuration settings for Internet Explorer Microsoft Dynamics 365 is a web-based application and uses web browsers, such as Internet Explorer, as the user interface to view, add, or edit information that you’ve stored in the Dynamics 365 database. Make the following common Internet Explorer configuration settings to optimize your Dynamics 365 experience.
Increase disk space for temporary Internet files
To make sure that Internet files for Microsoft Dynamics 365 are not being deleted, increase the disk space for temporary Internet files.
1. Open Internet Explorer, and on the Tools menu, click or tap Internet Options.
2. On the General tab, in the Browsing history section, click or tap Settings.
3. Set the Disk space to use field to 350.
4. Click or tap OK, and then click or tap OK again.
Retain browsing history
92
To optimize your Dynamics 365 experience, we recommend that you do not select the option to delete the browsing history when you exit from your browser. If you select this option, it deletes everything marked in your Browsing history settings, such as temporary Internet files, cookies, and history (by default, the check boxes for these options are selected). Deleting your temporary Internet files causes Internet Explorer to cache the files again, and deleting cookies signs you out of Dynamics 365.
1. Open Internet Explorer, and on the Tools menu, click or tap Internet Options.
2. Click or tap the General tab, and in the Browsing history section, make sure that the Delete
browsing history on exit check box is cleared.
Microsoft Dynamics 365 occasionally uses pop-up windows. Your browser may be blocking these windows because of the pop-up blocker settings. You must configure the pop-up blocker settings to allow pop-up windows for the Dynamics 365 websites.
Microsoft Dynamics 365 occasionally uses pop-up windows. Your browser may be blocking these windows because of the pop-up blocker settings. You must configure the pop-up blocker settings to allow pop-up windows for the Dynamics 365 websites.
If you experience slower performance in Internet Explorer
If your Dynamics 365 performance is slower in Internet Explorer than in other browsers, set JavaScript Timer Frequency to Maximum Performance.
1. Go to Control Panel > System and Security > Power Options.
2. For your active power plan, click Change plan settings > Change advanced power settings.
3. Expand Internet Explorer > JavaScript Timer Frequency, for On battery and Plugged in,
choose Maximum Performance.
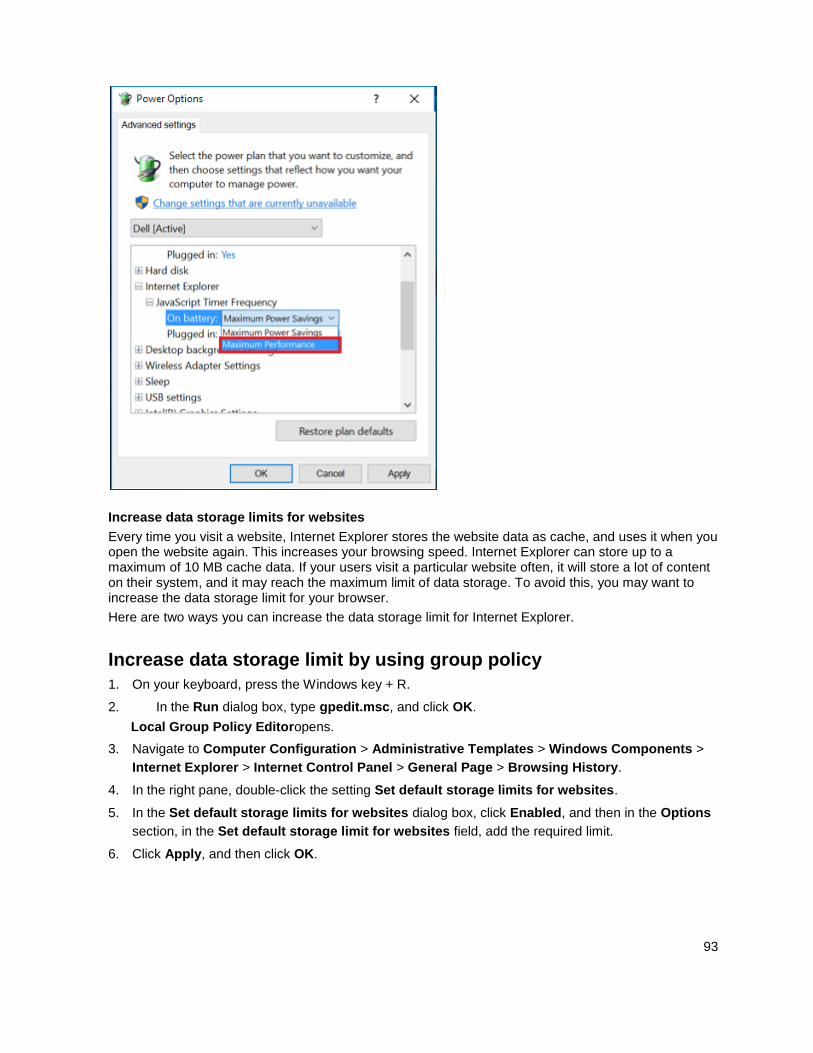
93
Increase data storage limits for websites
Every time you visit a website, Internet Explorer stores the website data as cache, and uses it when you open the website again. This increases your browsing speed. Internet Explorer can store up to a maximum of 10 MB cache data. If your users visit a particular website often, it will store a lot of content on their system, and it may reach the maximum limit of data storage. To avoid this, you may want to increase the data storage limit for your browser.
Here are two ways you can increase the data storage limit for Internet Explorer.
Increase data storage limit by using group policy
1. On your keyboard, press the Windows key + R.
2. In the Run dialog box, type gpedit.msc, and click OK.
Local Group Policy Editoropens.
3. Navigate to Computer Configuration > Administrative Templates > Windows Components >
Internet Explorer > Internet Control Panel > General Page > Browsing History.
4. In the right pane, double-click the setting Set default storage limits for websites.
5. In the Set default storage limits for websites dialog box, click Enabled, and then in the Options
section, in the Set default storage limit for websites field, add the required limit.
6. Click Apply, and then click OK.
94
7. Close Local Group Policy Editor, and restart the computer.
Increase data storage limit by using Registry Editor
1. On your keyboard, press the Windows key + R.
2. In the Run dialog box, type regedit, and click OK.
Registry Editoropens.
3. Navigate to the key: HKEY_LOCAL_MACHINE\SOFTWARE\Policies\Microsoft.
4. Create a subkey Internet Explorer inside Microsoft.
a. Right-click Microsoft, and then click New > Key.
b. Type Internet Explorer as the name of the subkey.
5. Similarly, create a subkey BrowserStorage in the newly created subkey Internet Explorer.
6. Click the BrowserStorage subkey, and in the right pane, right-click, and then click New > DWORD
Value.
7. Type DeafultDomainCacheLimitInMB as the name.
8. Double-click the DWORD item you just created.
9. In the Edit DWORD Value dialog box, select Decimal as Base, and then enter the required
storage limit in MB, and click OK.
10. Close Registry Editor, and restart the computer.
Configuration settings for Microsoft Dynamics 365 for Outlook You can configure the following settings to optimize the performance of Dynamics 365 for Outlook.
Install recent updates for Dynamics 365 for Outlook
Use Windows Update to check for updates to Dynamics 365 for Outlook. Typically, these updates help improve performance or ensure greater stability.
Automatic synchronization for Outlook Online and Offline modes
Enabling automatic synchronization allows Dynamics 365 for Outlook to systematically synchronize the data from the Microsoft Dynamics 365 data center. This ensures that your local data is regularly updated. Therefore, when you go offline, the data required to synchronize locally is a manageable size.
1. Open Outlook that has Dynamics 365 for Outlook installed.
2. On the File tab, click or tap Dynamics 365, and then click or tap Options.
3. On the Synchronization tab, in the Schedule automatic synchronization with Outlook section,
make sure that the Synchronize the Dynamics 365 items in my Outlook folders every __
minutes check box is selected.
- OR -
For offline synchronization, on the Local Data tab, in the Select how often to update local data section, make sure that the Update local data every __ minutes check box is selected.
95
Synchronize only essential data for Outlook Online and Offline modes
By limiting the data that you synchronize with Dynamics 365 for Outlook, you can reduce the network bandwidth consumed by Dynamics 365 users, and therefore improve your overall application performance. To control which records synchronize with Outlook, edit the Outlook filters. More information: Help & Training: Choose the records to synchronize between CRM and Outlook or Exchange
Track Microsoft Dynamics 365 calendar appointments in Dynamics 365 for Outlook
To make sure that your calendar appointments don’t disappear from Dynamics 365 after you begin to track these in Dynamics 365 for Outlook, make sure that your user email address on the respective user record matches your email address being used for Outlook.
Note
The email address may differ from your Microsoft account. It depends on the email addresses you’re using in Outlook and on your Dynamics 365 user record.
Network connections settings Network connections are established based on the order that the device is listed in the Adapters and Bindings tab of the Network Connections window. For example, if you have enabled a Local Area Network (LAN) and a wireless connection, the order of how a device is connected to the Internet is based on its order in the Adapter and Bindings list. If the LAN connection is higher in the list, most network connections will be established by using the LAN adapter instead of the wireless adapter. To make sure that your network connections are optimized, organize the connections according to your network administrator's recommendation.
To change the network connection order
1. Right-click Start and then click or tap Run.
2. Type: control netconnections and then click or tap OK.
3. Click or tap Organize > Layout > and verify Menu bar is checked.
4. Click or tap Advanced > Advanced Settings.
5. Click or tap the Adapters and Bindings tab, and then, under Connections, click or tap the
connection that you want to move in the list, click or tap the up or down arrow button, and then click
or tap OK.
Antivirus or malware application settings Depending on your antivirus or malware application settings, virus scanning can block certain files, making them inaccessible to other applications and causing an adverse effect on Microsoft Dynamics 365 performance.
Each environment requires a thoughtful decision on what to include and exclude, and there is always a possibility that excluding files from scans could lead to unwanted consequences. Use the following list alongside your well-planned internal IT management policies:
Check for any interference from desktop security software. Some antivirus programs include a
feature known as ScriptScan that can affect the performance of Dynamics 365. Most programs
96
have functionality to disable scanning on certain websites. Make sure that the Dynamics 365 URL
is added to this list. For McAfee specifically, see the following KB articles for this setting:
McAfee Knowledge Base Article: KB65382
Microsoft Support Knowledge Base Article: KB924341
If you use other antivirus software, make sure that the URL of the Dynamics 365 website is
included in the trusted zone for the virus scanning, and disable on-access scanning for the
Dynamics 365 website. For more information, see the specific antivirus application documentation.
Important email messages from Microsoft Dynamics 365 Microsoft occasionally sends out email messages to Microsoft Dynamics 365 users or administrators. These messages provide information about how to use Dynamics 365 and also contain important billing or upgrade details.
Make sure that the following email addresses are added to the allowed list for your email application:
[email protected]. This email alias sends information about updates to the service.
[email protected]. This email alias sends information about Dynamics 365 billing.
[email protected]. This email alias sends informational email
messages when you sign up for Dynamics 365.
Available resources for Microsoft Dynamics 365 users We want you and your organization to take full advantage of the extensive content and materials available that can help your business be more successful while you are using Microsoft Dynamics 365. For a list of available resources, including training materials and information about how to support your online organization, see the CRM Help Center.
Technical support for Microsoft Dynamics 365 If you cannot find the answers you need in the resources discussed earlier, you can submit a technical support request to Microsoft Customer Support Services. Technical support incidents provide reactive support that focuses on a specific problem, error message, or functionality that is not working as intended. For assistance information, see Support.
Maximize your technical support experience When you request help for technical issues or questions, it is important that you have as much information available as possible. Here are common questions that you may be asked when you request technical support:
What part of the application are you having issues with?
For example, installation issues with Dynamics 365 for Outlook.
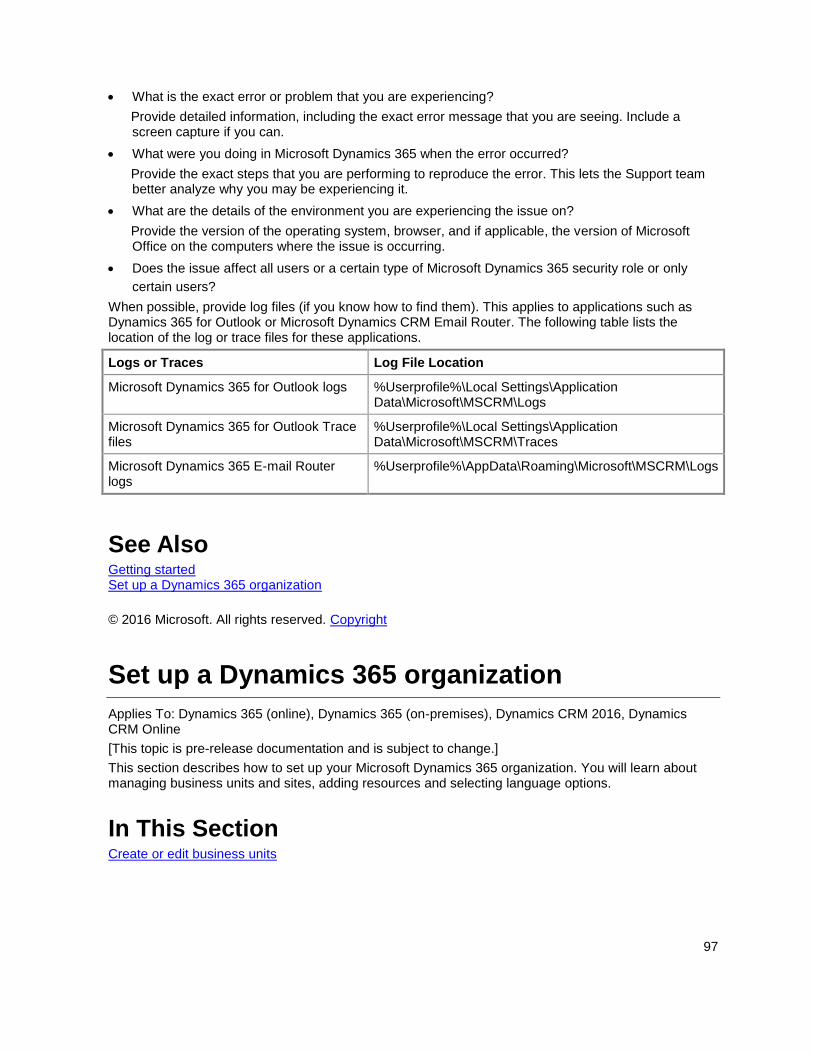
97
What is the exact error or problem that you are experiencing?
Provide detailed information, including the exact error message that you are seeing. Include a screen capture if you can.
What were you doing in Microsoft Dynamics 365 when the error occurred?
Provide the exact steps that you are performing to reproduce the error. This lets the Support team better analyze why you may be experiencing it.
What are the details of the environment you are experiencing the issue on?
Provide the version of the operating system, browser, and if applicable, the version of Microsoft Office on the computers where the issue is occurring.
Does the issue affect all users or a certain type of Microsoft Dynamics 365 security role or only
certain users?
When possible, provide log files (if you know how to find them). This applies to applications such as Dynamics 365 for Outlook or Microsoft Dynamics CRM Email Router. The following table lists the location of the log or trace files for these applications.
Logs or Traces Log File Location
Microsoft Dynamics 365 for Outlook logs %Userprofile%\Local Settings\Application Data\Microsoft\MSCRM\Logs
Microsoft Dynamics 365 for Outlook Trace files
%Userprofile%\Local Settings\Application Data\Microsoft\MSCRM\Traces
Microsoft Dynamics 365 E-mail Router logs
%Userprofile%\AppData\Roaming\Microsoft\MSCRM\Logs
See Also Getting started Set up a Dynamics 365 organization
© 2016 Microsoft. All rights reserved. Copyright
Set up a Dynamics 365 organization
Applies To: Dynamics 365 (online), Dynamics 365 (on-premises), Dynamics CRM 2016, Dynamics CRM Online
[This topic is pre-release documentation and is subject to change.]
This section describes how to set up your Microsoft Dynamics 365 organization. You will learn about managing business units and sites, adding resources and selecting language options.
In This Section Create or edit business units
98
Delete a business unit
Assign a business unit a different parent business
Create or edit a site
Add resources to a site
Add or remove a currency
Change regional and language options for your organization
Enhanced service level agreements
Enable languages
Configure Quick Find options for the organization
Configure Relevance Search for the organization
Related Sections Getting started
Install Dynamics 365 for Outlook
© 2016 Microsoft. All rights reserved. Copyright
Create or edit business units
Applies To: Dynamics 365 (online), Dynamics 365 (on-premises), Dynamics CRM 2016, Dynamics CRM Online
[This topic is pre-release documentation and is subject to change.]
In Microsoft Dynamics 365, a business unit is a logical grouping of related business activities.
If your Dynamics 365 organization is structured around departments or divisions that have separate products, customers, and marketing lists, you might want to create business units. Business units are mapped to an organization’s departments or divisions. Users can securely access data in their own business unit, but they can’t access data in other business units.
Business units, security roles, and users are linked together in a way that conforms to the Microsoft Dynamics 365 role-based security model. Use business units together with security roles to control data access so people see just the information they need to do their jobs. More information: Security concepts for Microsoft Dynamics 365
Keep the following in mind when creating business units:
The organization (also known as the root business unit) is the top level of a Microsoft Dynamics
365 business unit hierarchy. Dynamics 365 automatically creates the organization when you install
or provision Dynamics 365. You can’t change or delete the organization name.
Each business unit can have just one parent business unit.
Each business unit can have multiple child business units.
Dynamics 365 security roles and users are associated with a business unit. You must assign every
user to one (and only one) business unit.
99
You can assign a team to just one business unit, but a team can consist of users from one or many
business units. Consider using a team if you have a situation where users from different business
units need to work together on a shared set of records.
In This Topic Create a new business unit
Change the settings for a business unit
Change the business unit for a record
Create a new business unit
1. Go to Settings > Security.
2. Choose Business Units.
3. On the Actions bar, select New.
4. In the Business Unit dialog box, type a name for the new business unit. Dynamics 365
automatically fills in the Parent Business field with the name of the root business unit.

100
5. If you want to change the parent business unit, select the Lookup button , Look Up More
Records, and then do one of the following:
Select an existing business unit from the list.
Create a new parent business unit:
i. Choose New, and then add the information for the new parent business unit in the
Business Unit dialog box.
ii. When you’re done adding information, select Save and Close.
iii. In the Look Up Record dialog box, select Add.
6. In the Business Unit dialog box, fill in any of the other optional fields, such as the Division,
Website, contact information, or addresses.
7. When you’re done making entries, select Save and Close.
101
Change the settings for a business unit
1. Go to Settings > Security.
2. Choose Business Units and then select a business unit name.
3. In the Business Unit dialog box, do one or more of the following:
Modify the data in one or more fields.
Note
You can’t change the name of a business unit or delete a business unit after it has been created. You can disable a business unit or change the parent, however. When you disable a business unit, all users and teams associated with the business unit are also disabled.
Make a selection on the Actions menu. For example, to change the parent business unit,
select Actions, and then Change Parent Business.
Note
Changing the parent business removes security roles for users and teams associated with the business unit. You must reassign them.
Select a record type under Organization to see a list of related records. For example, select
Users to view a list of users in the selected business unit or to add a New User to the business
unit.
4. When you’re done making changes select Save and Close.
Change the business unit for a record You can change the business unit for an individual facility, equipment, or user. By changing the business unit for a user, you remove all security role assignments for the user. At least one security role must be assigned to the user in the new business unit. More information: Security roles and privileges
Change the business unit for facilities or equipment
1. Go to Settings > Business Management.
2. Choose Facilities/Equipment.
3. Select the Name of a piece of equipment or a facility.
4. In the Facility/Equipment dialog box, on the Actions menu, choose Change Business Unit.
102
5. In the Change Business Unit dialog box, use the Lookup button to select a new business
unit, and then select OK.
6. Select Save and Close.
Change the business unit for a user
1. Go to Settings > Security.
2. Choose Users.
3. Select a user name.
4. On the More Commands (…) menu, select Change Business Unit.
5. In the Change Business Unit dialog box, use the Lookup button to select a new business
unit, and then select OK.
See Also Set up a Dynamics 365 organization Delete a business unit Assign a business unit a different parent business
© 2016 Microsoft. All rights reserved. Copyright
Delete a business unit
Applies To: Dynamics 365 (online), Dynamics 365 (on-premises), Dynamics CRM 2016, Dynamics CRM Online
[This topic is pre-release documentation and is subject to change.]
You can delete a business unit to completely remove it from Microsoft Dynamics 365.
Important
Before deleting a business unit, be sure to consider the following:
Deleting a business unit is irreversible.
The records owned by the business unit are deleted at the same time you delete the business unit.
You can’t delete a business unit until you delete any associated users, teams, and child business
units.
103
1. Go to Settings > Security.
2. Choose Business Units.
3. Click to select the business unit that you want to delete.
4. On the Actions toolbar, choose More Actions > Disable.
5. In the Confirm Deactivation dialog box, choose Deactivate.
6. With the entry for the business unit you’re deleting still selected, on the Actions toolbar, choose the
Delete icon .
7. In the Confirm Deletion dialog box, choose Delete.
See Also Set up a Dynamics 365 organization Assign a business unit a different parent business
© 2016 Microsoft. All rights reserved. Copyright
Assign a business unit a different parent business
Applies To: Dynamics 365 (online), Dynamics 365 (on-premises), Dynamics CRM 2016, Dynamics CRM Online
[This topic is pre-release documentation and is subject to change.]
You can assign a different parent business to a business unit to accommodate changes in your business requirements. When you reassign a business unit, any child business units are also reassigned with it.
1. Go to Settings > Security.
2. Choose Business Units.
3. Choose to select the business unit you want to change the settings for.
4. On the Actions toolbar, choose More Actions > Change Parent Business.
104
5. In the Change Parent Business dialog box, in the New parent business text box, type part or all of
the name of the parent business you want to assign the business unit to, and then choose the Click
to select a value for New parent business icon .
6. Select the record for the parent business you want to assign the business unit to, and then click
OK.
See Also Security roles and privileges Set up a Dynamics 365 organization Create or edit a site
© 2016 Microsoft. All rights reserved. Copyright
Create or edit a site
Applies To: Dynamics 365 (online), Dynamics 365 (on-premises), Dynamics CRM 2016, Dynamics CRM Online
[This topic is pre-release documentation and is subject to change.]
You can create a new site to add an office location or other facility where service operations take place. You can also edit the details, such as the street address or phone number, for an existing site.
1. Go to Settings > Business Management.
2. Choose Sites.
3. To create a new site, on the Actions toolbar, choose New.
- OR -
To edit an existing site, in the list of sites, under Name, double-click or tap the entry for the site you want to edit details for.
4. Under General, in the Name text box, specify or edit the name for the site.
You can also enter or update contact information for the site.
5. Under Primary Address, enter or update address details.
6. In the Time Zone box, ensure that the default time zone is appropriate for the site.
7. Choose Save and Close.
105
See Also Set up a Dynamics 365 organization Create or edit business units Add resources to a site
© 2016 Microsoft. All rights reserved. Copyright
Add resources to a site
Applies To: Dynamics 365 (online), Dynamics 365 (on-premises), Dynamics CRM 2016, Dynamics CRM Online
[This topic is pre-release documentation and is subject to change.]
After you create a site, you can add resources such as users, equipment, or facilities to it.
1. Go to Settings > Business Management.
2. Choose Sites.
3. In the list of sites, under Name, double-click or tap the site that you want to add resources to.
4. In the Navigation Pane, expand Common if necessary, and then click or tap Resources.
5. On the Actions toolbar, click or tap Add Resources.
6. In the Look Up Records dialog box, in the Search text box, type in a part of the name of the
resource you want to add to the site, and then click or tap the Start search icon .
7. In the list of records, under Full Name, click or tap the entry for the resource you want to add to the
site, and then click or tap Add.
8. Close the site record.
See Also Set up a Dynamics 365 organization Change regional and language options for your organization
© 2016 Microsoft. All rights reserved. Copyright
106
Add or remove a currency
Applies To: Dynamics 365 (online), Dynamics 365 (on-premises), Dynamics CRM 2016, Dynamics CRM Online
[This topic is pre-release documentation and is subject to change.]
Microsoft Dynamics 365 is a multicurrency system, in which each record can be associated with its own currency. You can perform financial transactions like opportunities, quotes, orders, and invoices in multiple currencies.
In This Topic Add a currency
Delete or deactivate a currency
Add a currency
1. Go to Settings > Business Management.
2. Choose Currencies.
On the Actions toolbar, choose New.
Add a custom currency
a. After you select New, next to Currency Type choose Custom.
b. Enter the currency code, name, precision, and symbol for the custom currency, and then
proceed to Step 5.
3. Use the Lookup button next to the Currency Code box, to select the currency that you want
to add.
You can change the Currency Name, Currency Precision, or Currency Symbol.
4. Under Currency Conversion, in the Exchange Rate box, type the rate of exchange between your
base currency and the new currency you are adding.
5. After you have completed your entries, select Save and Close.
Delete or deactivate a currency Currencies that are in use by other records cannot be deleted, but you can deactivate them. Deactivating currency records does not remove the currency information stored in existing records, such as opportunities or orders. The original currency information stays in those records, but the currency cannot be selected for new transactions.
Important
107
The base currency cannot be deleted.
1. Go to Settings > Business Management.
2. Choose Currencies.
3. Select the currency you want to delete or deactivate.
4. On the Actions menu, select Delete Currency or Deactivate Currency.
5. Confirm the deletion or deactivation and choose Close.
See Also Set up a Dynamics 365 organization Change regional and language options for your organization
© 2016 Microsoft. All rights reserved. Copyright
Change regional and language options for your organization
Applies To: Dynamics 365 (online), Dynamics 365 (on-premises), Dynamics CRM 2016, Dynamics CRM Online
[This topic is pre-release documentation and is subject to change.]
You can change how Microsoft Dynamics 365 displays dates, times, numbers, and currencies. You can also select the language in which Dynamics 365 displays the user interface and Help.
Important
If you’re running Dynamics 365 for Outlook, you must download one or more Language Packs before you can enable additional languages.
The following table shows tasks that are associated with changing regional and language options for your organization.
Task Description
Set the base language The base language determines default settings for regional and language options in Dynamics 365. After the base language is set, you can’t change it.
Enable or disable languages You can enable or disable available languages in the Settings area. More information: Enable or disable languages
108
Task Description
Add and remove currencies Similar to setting the base language, you select your organization's base currency during the purchasing process for a subscription to Dynamics 365. After the base currency is set, you can’t change it.
However, if your organization uses more than one currency to track financial transactions, you can add currencies.
Deactivate or activate currency records You can’t delete currency records that are being used by other records, such as opportunities or invoices. However, you can deactivate currency records so they won’t be available for future transactions.
See Also Set up a Dynamics 365 organization Add resources to a site
© 2016 Microsoft. All rights reserved. Copyright
Enhanced service level agreements
Applies To: Dynamics 365 (online), Dynamics 365 (on-premises), Dynamics CRM 2016, Dynamics CRM Online
[This topic is pre-release documentation and is subject to change.]
Service level agreements (SLAs) are a formalized method to help organizations meet service levels when they provide customer service and support. For example, an organization can have an SLA to complete the first customer response within 48 business hours after a case is created. Another example is to escalate an unresolved case after a specified duration, such as five business days. SLAs are used to define these different aspects of service.
Microsoft Dynamics 365 includes two kinds of SLAs, standard and enhanced. Enhanced SLAs include the following features not available in standard SLAs:
Case-on-hold support
Auto-pause and resume of time calculation
Support for success actions
Creation of dashboards or reports based on the SLA KPI Instance entity
109
Case-on-hold support One feature of SLA tracking is the ability to control the case-on-hold status. For example, this functionality lets you pause a case for a time when the case is on hold waiting for a response from the customer. Once the response is received, the case is resumed.
System administrators turn on SLAs and select case hold functionality in Settings > Service Management > Service Configuration Settings. Afterwards, CSR Managers can create SLAs using the enhanced SLA type that allows pause and resume functionality. SLAs are created in Settings > Service Management.
More information: Help & Training: Define service level agreements (SLAs)
Considerations when you choose a SLA type Because there are two types of SLAs that have different functionality, consider the following features before you choose an SLA type. We recommend that you use only one type of SLA for an organization.
After you select an SLA type, either standard or enhanced, you cannot change the SLA type for any
record associated with the SLA.
Because standard and enhanced SLAs exist as separate entities with separate forms, views, and
fields, the following behaviors exist.
Case views cannot be sorted by enhanced SLA fields. To display enhanced SLA fields in Case
views, you can modify any of the Case views to display the fields from the enhanced SLA
(which has the entity name SLA KPI Instance). Although you can sort on the fields that are part
of the Case entity, because the enhanced SLA fields are on a related entity, you cannot sort on
columns that are associated with the enhanced SLA fields.
Queue Item views do not display enhanced SLA fields. Although, Queue Item views display the
standard fields SLA (First Response By and Resolve By), because the enhanced SLA (SLA
KPI Instance entity) is not directly related to the Queue Item entity, the columns associated with
enhanced SLAs cannot be displayed.
Tip
To monitor enhanced SLA details, consider creating custom dashboards based on the SLA KPI Instance entity or custom views using the Regarding (Case) relationship.
See Also Video: SLA Enhancements in Microsoft Dynamics CRM 2015 Set up a Dynamics 365 organization Enable languages
© 2016 Microsoft. All rights reserved. Copyright
110
Enable languages
Applies To: Dynamics 365 (online), Dynamics 365 (on-premises), Dynamics CRM 2016, Dynamics CRM Online
[This topic is pre-release documentation and is subject to change.]
Enable languages in your organization to display the user interface and Help in a language that’s different from the base language.
In This Topic Enable the language
Select the language to display the user interface and Help
Known issues with Language settings
Enable the language Before users can start using a Language Pack to display a language, the Language Pack must be enabled in your Microsoft Dynamics 365 organization.
1. Start the Microsoft Dynamics 365 web application. You’ll need a System Administrator security role
or equivalent privileges for the Microsoft Dynamics 365 organization that you want to provision a
Language Pack for.
2. Go to Settings > Administration.
3. Click Languages to open the Language Settings dialog box. Here you’ll see each Language Pack
installed in your Microsoft Dynamics 365 deployment, with a check box to the left of each listed
Language Pack
4. For each Language Pack that you want to provision (enable), select the check box next to it. For
each Language Pack that you want to unprovision (disable), clear the check box.
5. Click Apply.
6. Click OK on any confirmation dialog boxes that open.
Note
It may take several minutes for Microsoft Dynamics 365 to provision or unprovision the languages.
7. To close the Language Settings dialog box, click Close.
Repeat the previous steps for each organization in your Microsoft Dynamics 365 deployment.
111
Select the language to display the user interface and Help Each user selects the language to display in both the Microsoft Dynamics 365 web client and Dynamics 365 for Outlook applications.
Important
For Microsoft Dynamics 365 for Outlook, you must download and install the Language Packs before you can select them. More information: Referenced topic '3ffb8f29-2bc2-4074-8c44-f7e3cb4a14be' is only available online.
1. Sign in to Microsoft Dynamics 365 and open the Set Personal Options page, as follows:
If you’re using the Microsoft Dynamics 365 web client, click the Settings button , and then
click Options.
If you are using Dynamics 365 for Outlook, on the top menu bar, choose Dynamics 365, and
then click Options.
2. Choose the Languages tab.
3. In the User Interface Language list, select the language in which you want to display Microsoft
Dynamics 365.
4. In the Help Language list, select the language in which you want to display Microsoft Dynamics
365 Help.
5. To save your changes and close the dialog box, click OK.
Note
In Dynamics 365 for Outlook, the user language settings only apply to Dynamics 365 for Outlook features, such as the user interface display of the Dynamics 365 menu, and don’t affect other areas of Microsoft Office Outlook. To display all of the Dynamics 365 for Outlook user interface or Help in multiple languages, you need to install one or more Microsoft OfficeLanguage Packs. More information: Office 2013 Language Options.
Known issues with Language settings
112
Distorted characters are displayed in some languages when you run Dynamics 365 for Outlook on Windows 10 By default, Windows 10 includes a limited number of available languages. If your language is not already available on Windows 10, you’ll need to download and install it before you install Dynamics 365 for Outlook. More information: Language packs.
See Also Help & Training: Enable or disable languages
© 2016 Microsoft. All rights reserved. Copyright
Configure Quick Find options for the organization
Applies To: Dynamics 365 (on-premises), Dynamics CRM 2016
[This topic is pre-release documentation and is subject to change.]
The Quick Find search feature provides quick results to users who enter simple queries to commonly-searched entities. You can tailor the Quick Find functionality by selecting record return limits, an indexing method, and which entities are included.
In this topic Choose the method used for Quick Find indexing
What system administrators should consider before enabling or disabling full-text indexing
Enable or disable full-text indexing for Quick Find
Choose the method used for Quick Find indexing By default, Microsoft Dynamics 365 uses the same search functionality as in previous releases, which is based mostly on string matches.
System administrators have the option to use full-text indexing for Quick Find. We recommend you enable full-text indexing for Quick Find because it can provide a better search experience by improving query performance. Full-text search also uses more sophisticated indexing methods that include support for linguistic-based searches and superior relevance ranking.
While the previous search method (standard indexing) returns results based on literal matches, full-text indexing returns linguistic-based matches. For example the term service can return similar words like servicing and serviced. More information: Full-Text Search (SQL Server)
To find information, standard indexing often requires users to add wildcards to search strings. This results in poor performance for large data sets, due to the required full table scans instead of using an index. Full-text indexing doesn’t use wildcards, which leads to improved query and system performance. Notice that, although users can include wildcards in search strings, wildcards are ignored.
113
Important
Quick Find full-text search is not available with Microsoft Dynamics 365 (online).
What system administrators should consider before enabling or disabling full-text indexing Changes made to how and when Microsoft Dynamics 365 data is indexed are not initiated until a certain time of day, typically during the late evening. Before you enable or disable full-text indexing, consider the following:
Because indexing is a maintenance job that runs one time every day, it can take up to 24 hours for
the system to enable or disable full-text search, or add and remove find columns.
When customizers add an item for Quick Find, such as a find column, the column data won’t
appear in Quick Find search results until the next maintenance job completes. These items can still
be discoverable through Quick Find searches, but will use the previous search method. Any
columns that have not finished indexing for full-text will continue to use the standard indexing
method for Quick Find searches. When indexing for a column completes, Quick Find will use full-
text search. When full-text search for Quick Find is enabled, columns newly added to a Quick Find
view will not have any indexing until the next maintenance job completes. This may cause poor
Quick Find performance.
Advanced Find search is not affected when you enable full-text indexing for Quick Find. Advanced
Find will continue to use the same standard indexing that was available in previous releases of
Microsoft Dynamics 365.
Because full-text indexing for Quick Find uses SQL Server full-text indexing, certain queries made
up of mostly or entirely common words (stopwords such as on, or, for, and, like) may not return
expected results. SQL Server database administrators can create a custom stoplist or choose not
to use a stoplist by dropping the system stoplist (not recommended). More information: TechNet:
Configure and Manage Stopwords and Stoplists for Full-Text Search
For Microsoft Dynamics 365 (on-premises) administrators When you enable full-text indexing for a database with a large number of columns, the size of the transaction log of the organization database may increase. We recommend you monitor and consider shrinking the transaction log. More information: MSDN: Manage the Size of the Transaction Log File
The aspects of resource consumption for full-text indexing are different from standard indexing, which may lead to SQL Server performance issues. Performance can especially be affected during the initial full-text indexing for all Quick Find text fields. More information: MSDN: Improve the Performance of Full-Text Indexes > Common Causes of Performance Issues
Index creation is a background process, so for large amounts of data serviced by busy SQL Servers, it can take several hours to multiple days for the full-text indexes to fully complete.
114
Enable or disable full-text indexing for Quick Find Before you enable or disable full-text indexing for Quick Find, review the preceding What system administrators should consider before enabling or disabling full-text indexing section.
1. Go to Settings > Administration > System Settings >General tab.
2. Select Yes or No next to Enable full-text search for Quick Find.
See Also Enable languages Manage security, users, and teams
© 2016 Microsoft. All rights reserved. Copyright
Configure Relevance Search for the organization
Applies To: Dynamics 365 (online), Dynamics CRM Online
[This topic is pre-release documentation and is subject to change.]
Relevance Search delivers fast and comprehensive search results in a single list, sorted by relevance. It uses a dedicated search service external to Microsoft Dynamics 365 powered by Microsoft Azure to boost Dynamics 365 search performance. As an administrator or customizer, you'll be able to enable and configure Relevance Search in the Dynamics 365 user interface without writing code. Many of the configuration steps will look familiar to you, as they use a similar user interface to the Quick Find configuration.
Relevance Search is available in addition to other Dynamics 365 searches you’re already familiar with. You can still use single-entity Quick Find on the entity grid. You can also use multi-entity Quick Find (now called Categorized Search) from the Search Dynamics 365 data search box on the navigation bar.
Relevance Search brings the following enhancements and benefits:
Improves performance with external indexing and Azure Search technology.
Finds matches to any word in the search term in any field in the entity. Matches may include
inflectional words, like “stream,” “streaming,” or “streamed.”
Returns results from all searchable entities in a single list sorted by relevance, based on factors,
such as number of words matched or their proximity to each other in the text.
Matches in the result list are highlighted.
In This Topic Compare Dynamics 365 searches
How Relevance Search works
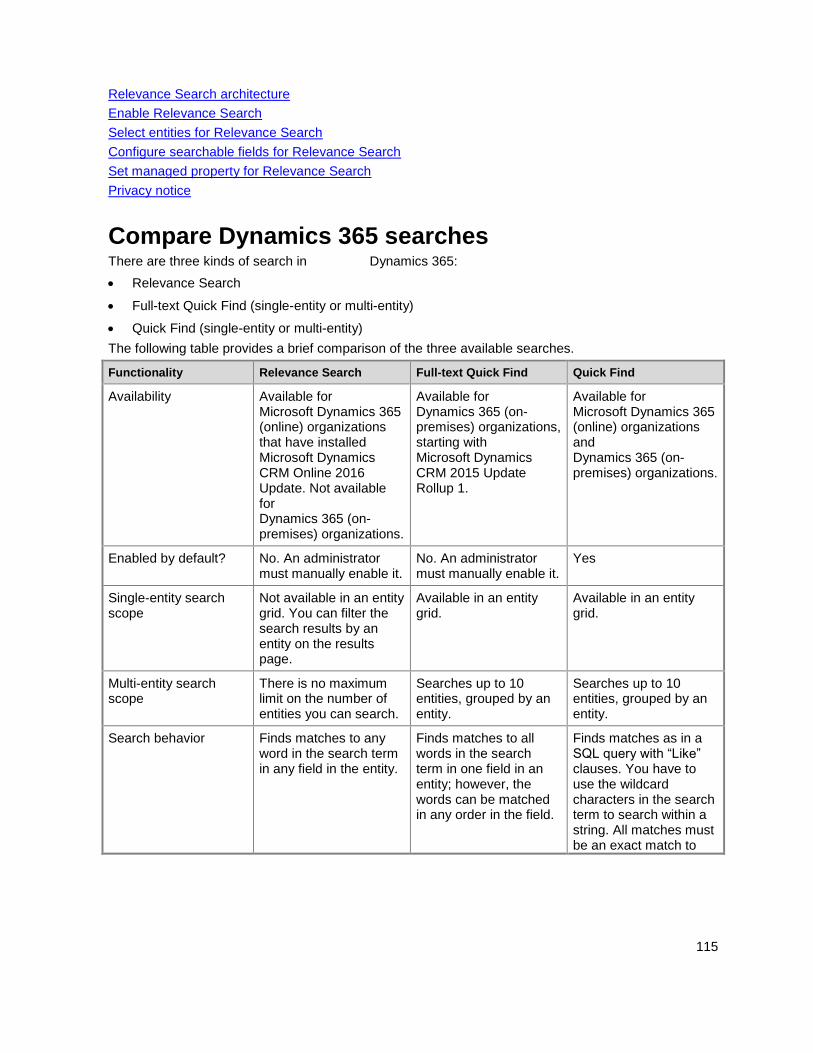
115
Relevance Search architecture
Enable Relevance Search
Select entities for Relevance Search
Configure searchable fields for Relevance Search
Set managed property for Relevance Search
Privacy notice
Compare Dynamics 365 searches There are three kinds of search in Dynamics 365:
Relevance Search
Full-text Quick Find (single-entity or multi-entity)
Quick Find (single-entity or multi-entity)
The following table provides a brief comparison of the three available searches.
Functionality Relevance Search Full-text Quick Find Quick Find
Availability Available for Microsoft Dynamics 365 (online) organizations that have installed Microsoft Dynamics CRM Online 2016 Update. Not available for Dynamics 365 (on-premises) organizations.
Available for Dynamics 365 (on-premises) organizations, starting with Microsoft Dynamics CRM 2015 Update Rollup 1.
Available for Microsoft Dynamics 365 (online) organizations and Dynamics 365 (on-premises) organizations.
Enabled by default? No. An administrator must manually enable it.
No. An administrator must manually enable it.
Yes
Single-entity search scope
Not available in an entity grid. You can filter the search results by an entity on the results page.
Available in an entity grid.
Available in an entity grid.
Multi-entity search scope
There is no maximum limit on the number of entities you can search.
Searches up to 10 entities, grouped by an entity.
Searches up to 10 entities, grouped by an entity.
Search behavior Finds matches to any word in the search term in any field in the entity.
Finds matches to all words in the search term in one field in an entity; however, the words can be matched in any order in the field.
Finds matches as in a SQL query with “Like” clauses. You have to use the wildcard characters in the search term to search within a string. All matches must be an exact match to
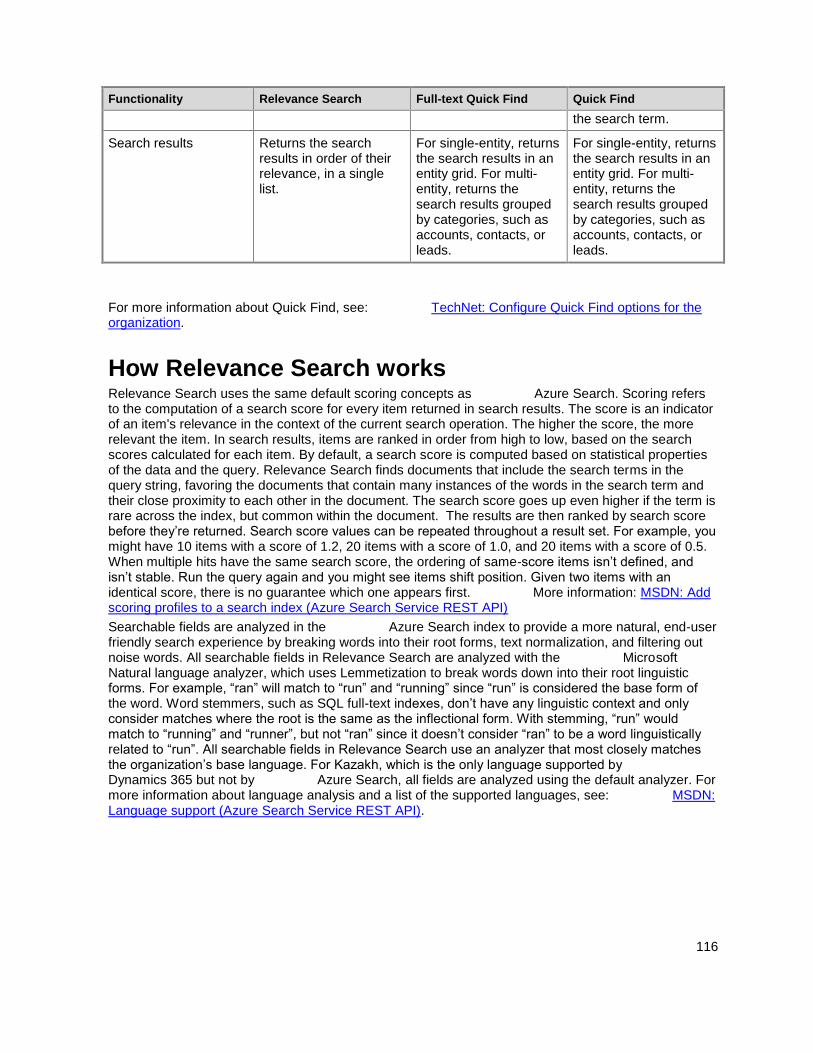
116
Functionality Relevance Search Full-text Quick Find Quick Find
the search term.
Search results Returns the search results in order of their relevance, in a single list.
For single-entity, returns the search results in an entity grid. For multi-entity, returns the search results grouped by categories, such as accounts, contacts, or leads.
For single-entity, returns the search results in an entity grid. For multi-entity, returns the search results grouped by categories, such as accounts, contacts, or leads.
For more information about Quick Find, see: TechNet: Configure Quick Find options for the organization.
How Relevance Search works Relevance Search uses the same default scoring concepts as Azure Search. Scoring refers to the computation of a search score for every item returned in search results. The score is an indicator of an item's relevance in the context of the current search operation. The higher the score, the more relevant the item. In search results, items are ranked in order from high to low, based on the search scores calculated for each item. By default, a search score is computed based on statistical properties of the data and the query. Relevance Search finds documents that include the search terms in the query string, favoring the documents that contain many instances of the words in the search term and their close proximity to each other in the document. The search score goes up even higher if the term is rare across the index, but common within the document. The results are then ranked by search score before they’re returned. Search score values can be repeated throughout a result set. For example, you might have 10 items with a score of 1.2, 20 items with a score of 1.0, and 20 items with a score of 0.5. When multiple hits have the same search score, the ordering of same-score items isn’t defined, and isn’t stable. Run the query again and you might see items shift position. Given two items with an identical score, there is no guarantee which one appears first. More information: MSDN: Add scoring profiles to a search index (Azure Search Service REST API)
Searchable fields are analyzed in the Azure Search index to provide a more natural, end-user friendly search experience by breaking words into their root forms, text normalization, and filtering out noise words. All searchable fields in Relevance Search are analyzed with the Microsoft Natural language analyzer, which uses Lemmetization to break words down into their root linguistic forms. For example, “ran” will match to “run” and “running” since “run” is considered the base form of the word. Word stemmers, such as SQL full-text indexes, don’t have any linguistic context and only consider matches where the root is the same as the inflectional form. With stemming, “run” would match to “running” and “runner”, but not “ran” since it doesn’t consider “ran” to be a word linguistically related to “run”. All searchable fields in Relevance Search use an analyzer that most closely matches the organization’s base language. For Kazakh, which is the only language supported by Dynamics 365 but not by Azure Search, all fields are analyzed using the default analyzer. For more information about language analysis and a list of the supported languages, see: MSDN: Language support (Azure Search Service REST API).
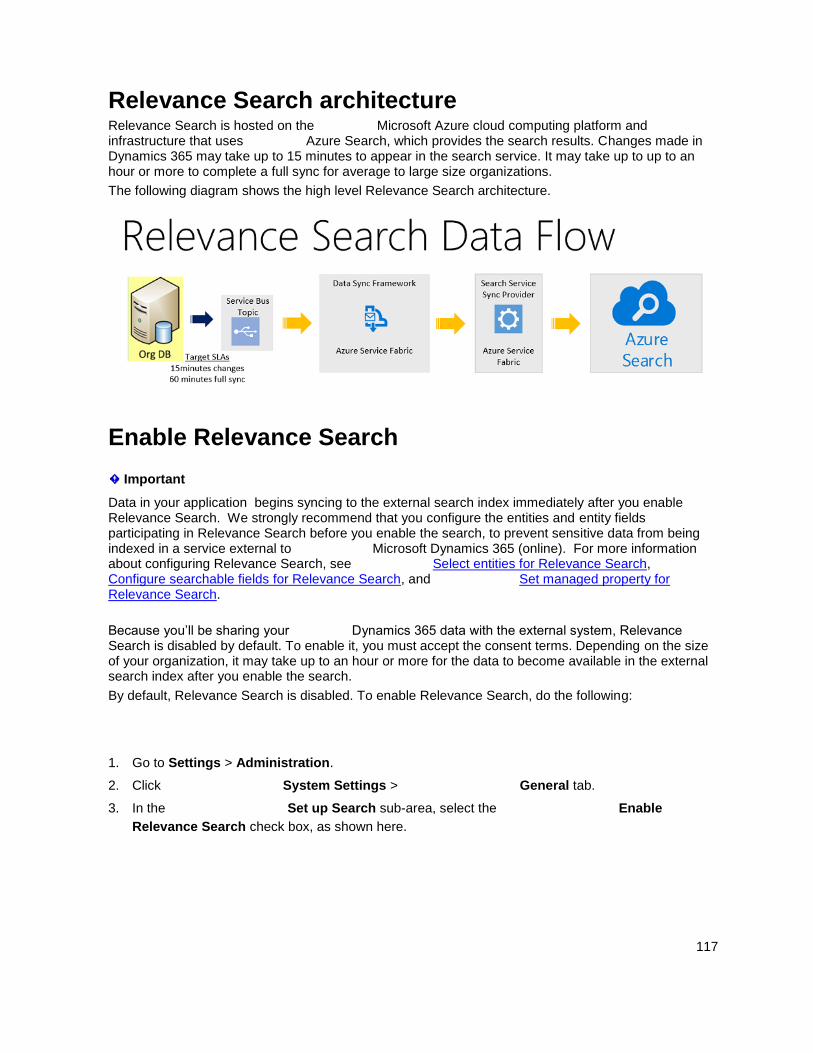
117
Relevance Search architecture Relevance Search is hosted on the Microsoft Azure cloud computing platform and infrastructure that uses Azure Search, which provides the search results. Changes made in Dynamics 365 may take up to 15 minutes to appear in the search service. It may take up to up to an hour or more to complete a full sync for average to large size organizations.
The following diagram shows the high level Relevance Search architecture.
Enable Relevance Search
Important
Data in your application begins syncing to the external search index immediately after you enable Relevance Search. We strongly recommend that you configure the entities and entity fields participating in Relevance Search before you enable the search, to prevent sensitive data from being indexed in a service external to Microsoft Dynamics 365 (online). For more information about configuring Relevance Search, see Select entities for Relevance Search, Configure searchable fields for Relevance Search, and Set managed property for Relevance Search.
Because you’ll be sharing your Dynamics 365 data with the external system, Relevance Search is disabled by default. To enable it, you must accept the consent terms. Depending on the size of your organization, it may take up to an hour or more for the data to become available in the external search index after you enable the search.
By default, Relevance Search is disabled. To enable Relevance Search, do the following:
1. Go to Settings > Administration.
2. Click System Settings > General tab.
3. In the Set up Search sub-area, select the Enable
Relevance Search check box, as shown here.
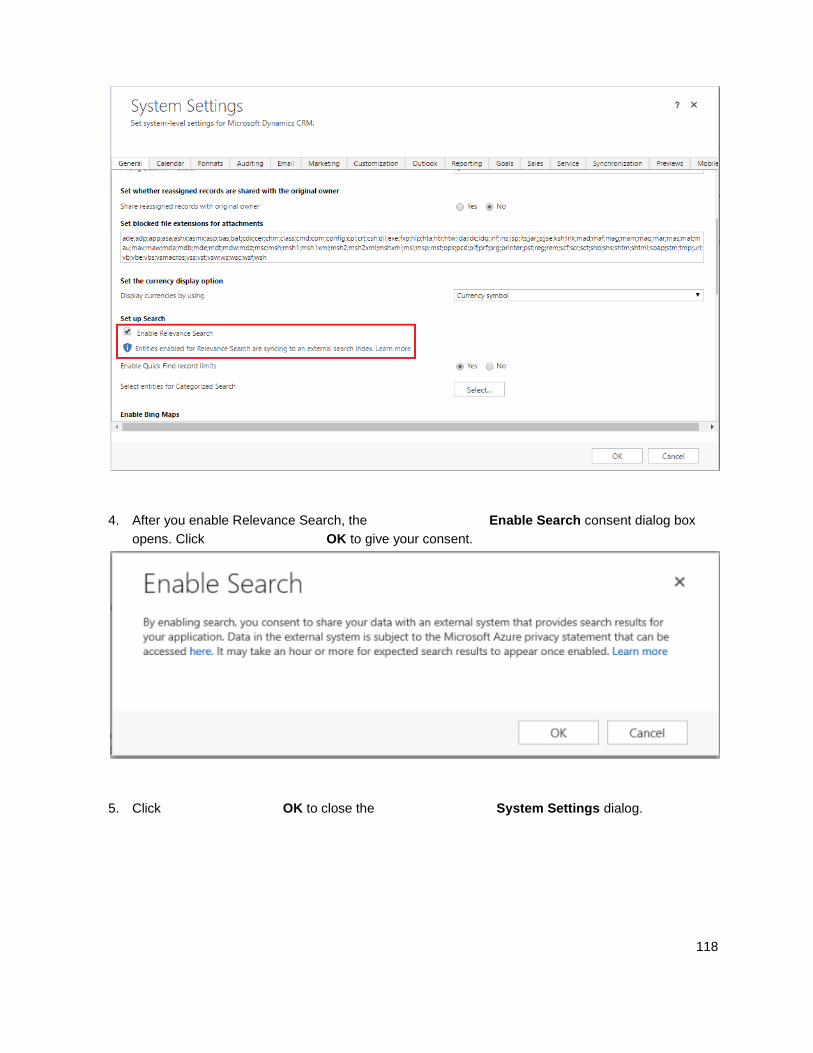
118
4. After you enable Relevance Search, the Enable Search consent dialog box
opens. Click OK to give your consent.
5. Click OK to close the System Settings dialog.
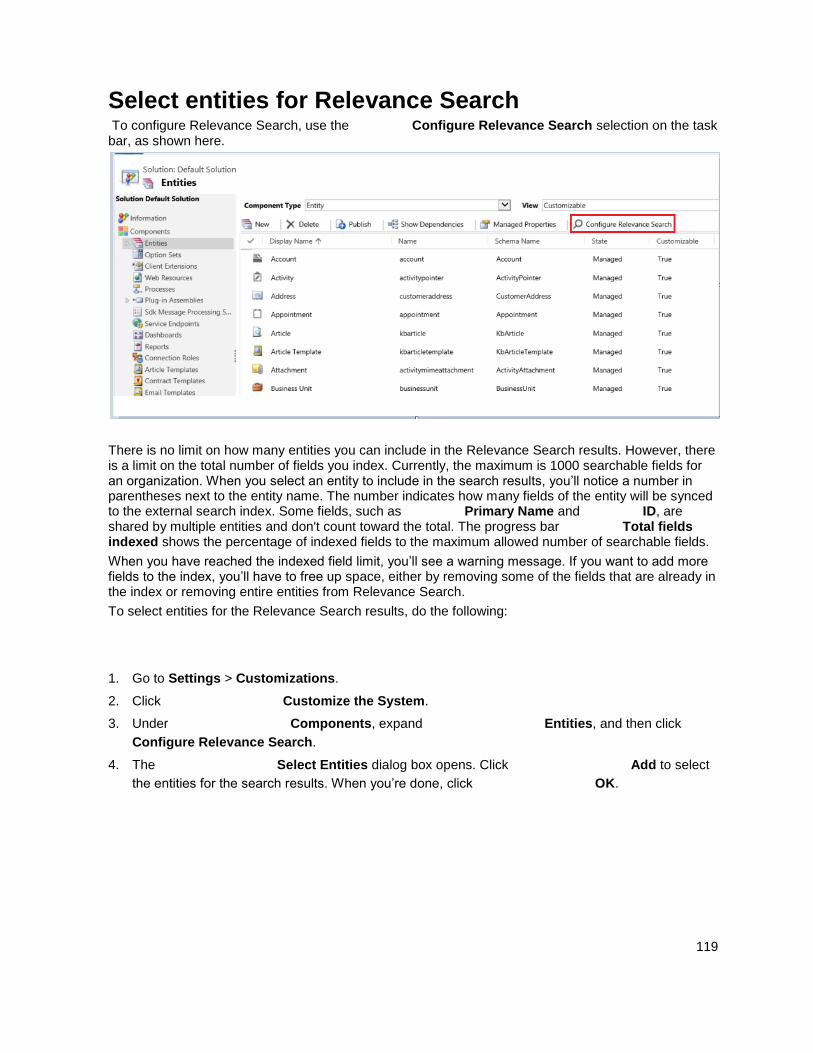
119
Select entities for Relevance Search To configure Relevance Search, use the Configure Relevance Search selection on the task bar, as shown here.
There is no limit on how many entities you can include in the Relevance Search results. However, there is a limit on the total number of fields you index. Currently, the maximum is 1000 searchable fields for an organization. When you select an entity to include in the search results, you’ll notice a number in parentheses next to the entity name. The number indicates how many fields of the entity will be synced to the external search index. Some fields, such as Primary Name and ID, are shared by multiple entities and don't count toward the total. The progress bar Total fields indexed shows the percentage of indexed fields to the maximum allowed number of searchable fields.
When you have reached the indexed field limit, you’ll see a warning message. If you want to add more fields to the index, you’ll have to free up space, either by removing some of the fields that are already in the index or removing entire entities from Relevance Search.
To select entities for the Relevance Search results, do the following:
1. Go to Settings > Customizations.
2. Click Customize the System.
3. Under Components, expand Entities, and then click
Configure Relevance Search.
4. The Select Entities dialog box opens. Click Add to select
the entities for the search results. When you’re done, click OK.
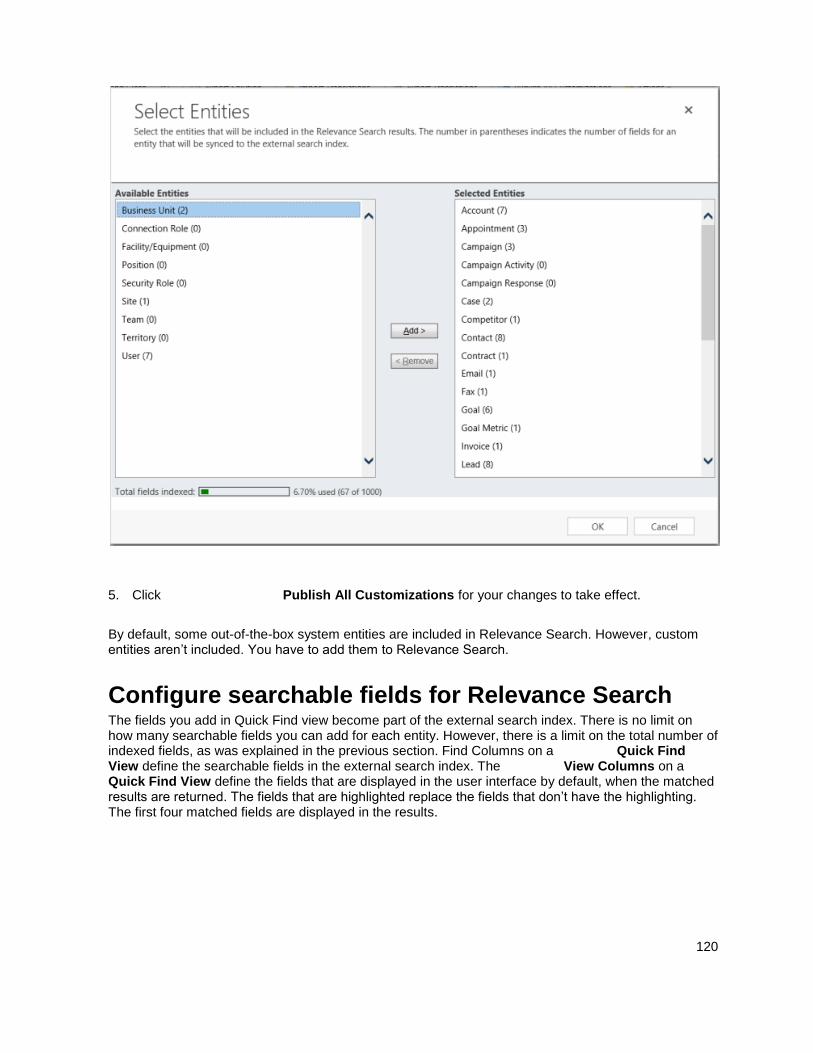
120
5. Click Publish All Customizations for your changes to take effect.
By default, some out-of-the-box system entities are included in Relevance Search. However, custom entities aren’t included. You have to add them to Relevance Search.
Configure searchable fields for Relevance Search The fields you add in Quick Find view become part of the external search index. There is no limit on how many searchable fields you can add for each entity. However, there is a limit on the total number of indexed fields, as was explained in the previous section. Find Columns on a Quick Find View define the searchable fields in the external search index. The View Columns on a Quick Find View define the fields that are displayed in the user interface by default, when the matched results are returned. The fields that are highlighted replace the fields that don’t have the highlighting. The first four matched fields are displayed in the results.
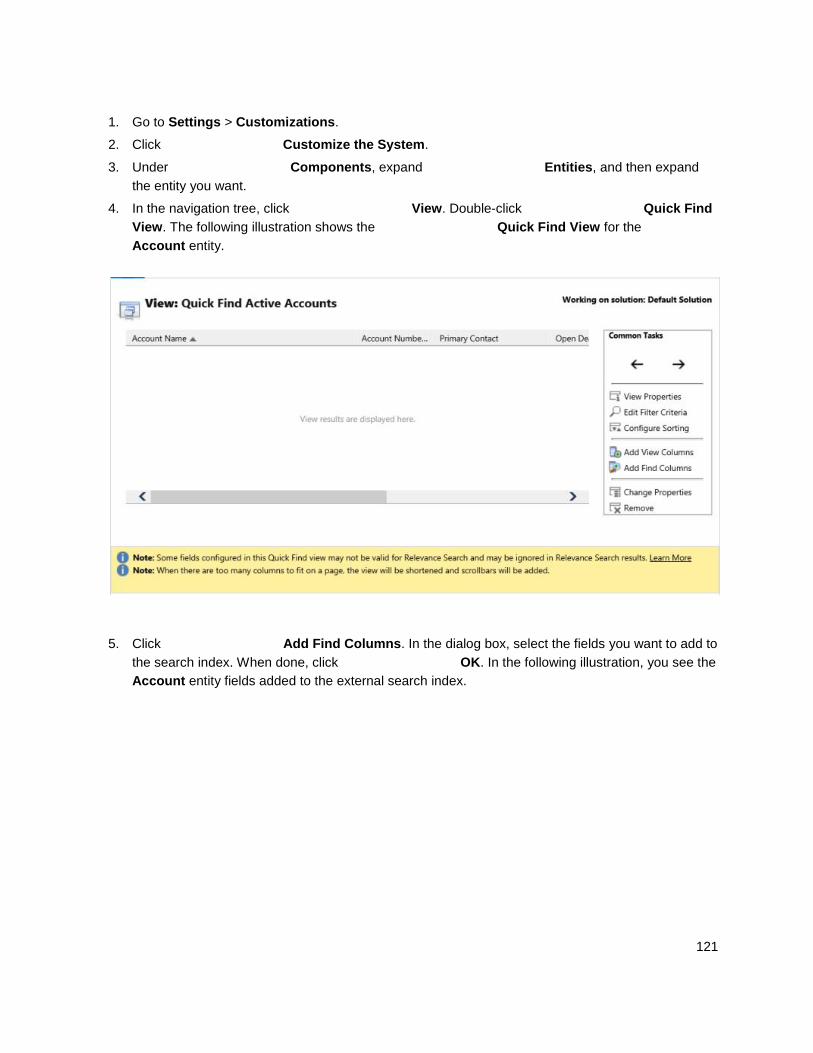
121
1. Go to Settings > Customizations.
2. Click Customize the System.
3. Under Components, expand Entities, and then expand
the entity you want.
4. In the navigation tree, click View. Double-click Quick Find
View. The following illustration shows the Quick Find View for the
Account entity.
5. Click Add Find Columns. In the dialog box, select the fields you want to add to
the search index. When done, click OK. In the following illustration, you see the
Account entity fields added to the external search index.
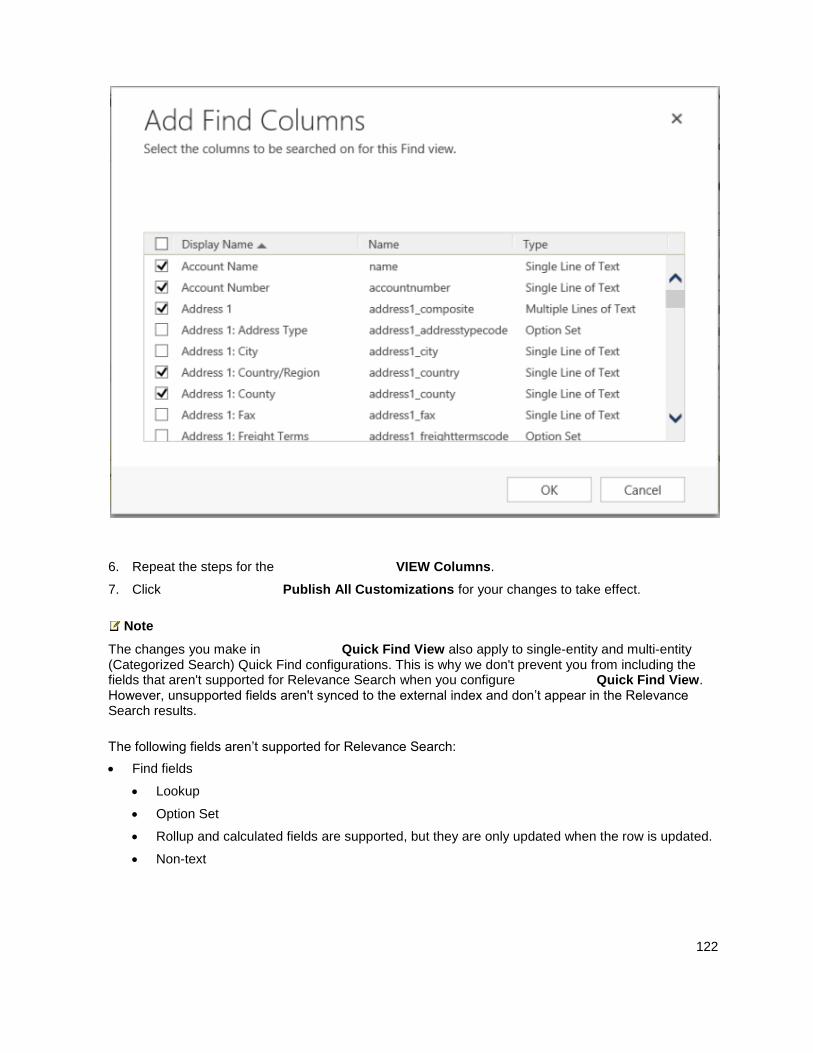
122
6. Repeat the steps for the VIEW Columns.
7. Click Publish All Customizations for your changes to take effect.
Note
The changes you make in Quick Find View also apply to single-entity and multi-entity (Categorized Search) Quick Find configurations. This is why we don't prevent you from including the fields that aren't supported for Relevance Search when you configure Quick Find View. However, unsupported fields aren't synced to the external index and don’t appear in the Relevance Search results.
The following fields aren’t supported for Relevance Search:
Find fields
Lookup
Option Set
Rollup and calculated fields are supported, but they are only updated when the row is updated.
Non-text
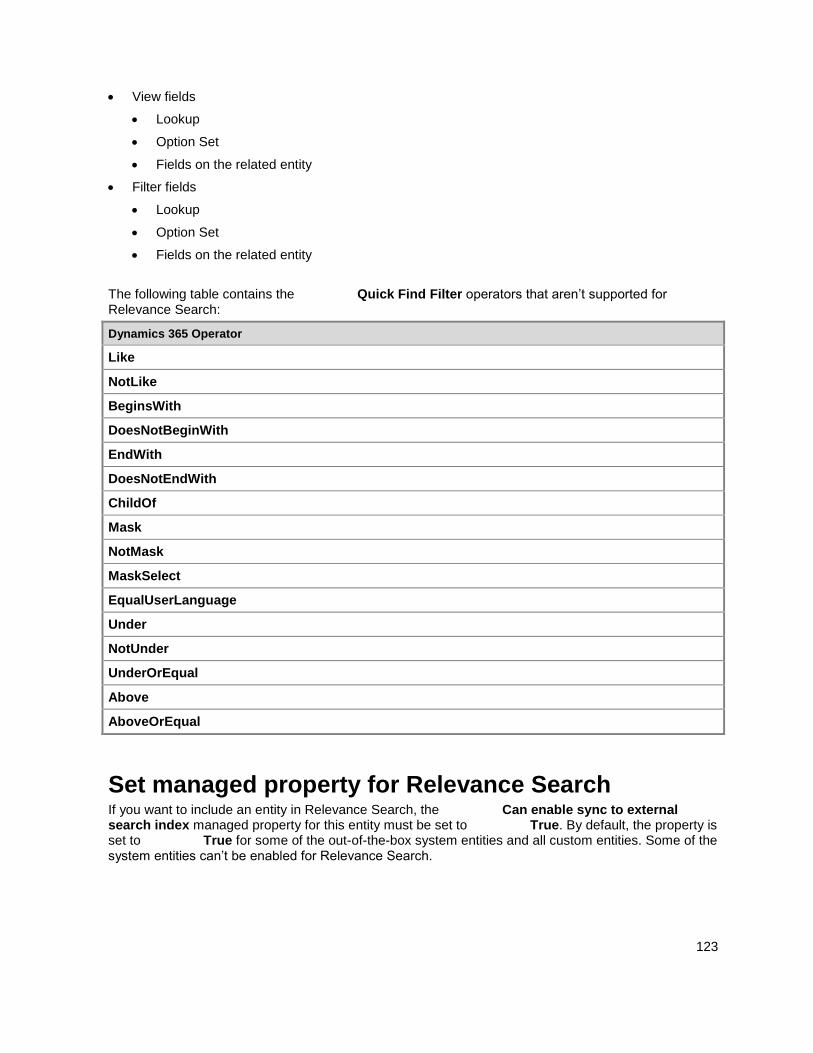
123
View fields
Lookup
Option Set
Fields on the related entity
Filter fields
Lookup
Option Set
Fields on the related entity
The following table contains the Quick Find Filter operators that aren’t supported for Relevance Search:
Dynamics 365 Operator
Like
NotLike
BeginsWith
DoesNotBeginWith
EndWith
DoesNotEndWith
ChildOf
Mask
NotMask
MaskSelect
EqualUserLanguage
Under
NotUnder
UnderOrEqual
Above
AboveOrEqual
Set managed property for Relevance Search If you want to include an entity in Relevance Search, the Can enable sync to external search index managed property for this entity must be set to True. By default, the property is set to True for some of the out-of-the-box system entities and all custom entities. Some of the system entities can’t be enabled for Relevance Search.
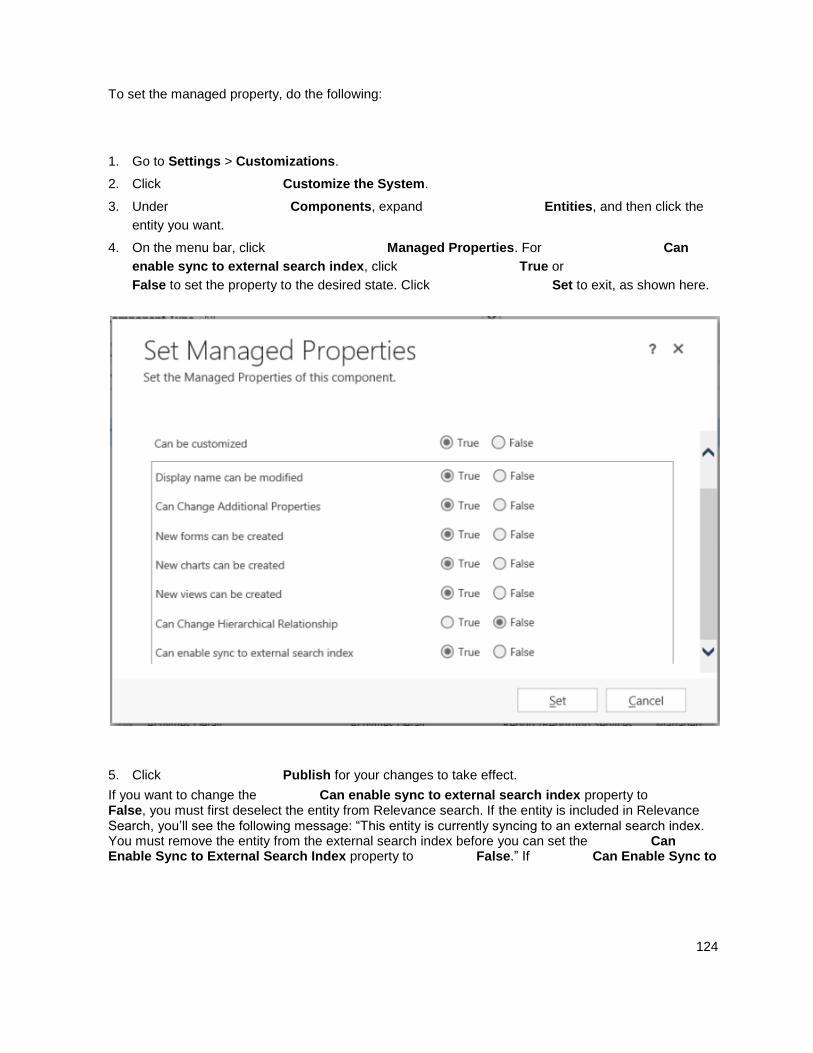
124
To set the managed property, do the following:
1. Go to Settings > Customizations.
2. Click Customize the System.
3. Under Components, expand Entities, and then click the
entity you want.
4. On the menu bar, click Managed Properties. For Can
enable sync to external search index, click True or
False to set the property to the desired state. Click Set to exit, as shown here.
5. Click Publish for your changes to take effect.
If you want to change the Can enable sync to external search index property to False, you must first deselect the entity from Relevance search. If the entity is included in Relevance Search, you’ll see the following message: “This entity is currently syncing to an external search index. You must remove the entity from the external search index before you can set the Can Enable Sync to External Search Index property to False.” If Can Enable Sync to
125
External Search Index is set to False, you’ll see the following message when you try to include an entity in Relevance Search: “Entity can’t be enabled for relevance search because of the configuration of its managed properties.” For custom entities with particularly sensitive data, you may consider setting the Can enable sync to external search index property to False. Keep in mind, after you install the managed solution on the target system, you won’t be able to change the value of the property because it’s a managed property.
Privacy notice By enabling Relevance Search, data in participating entities and attributes in your Dynamics 365 (online) instance will begin syncing to and be stored in an Azure Search index.
Relevance Search is not enabled by default. The system administrator must enable the functionality within a Dynamics 365 (online) instance. After Relevance Search is enabled, system administrators and customizers have full control over the data that will be synchronized to the Azure Search index.
System customizers can use the Configure Relevance Search dialog box in Customization Tools to enable specific entities for search and then configure Quick Find views on enabled entities to select the searchable attributes. Data changes are synchronized continuously between Dynamics 365 (online) and Azure Search through a secure connection. Configuration data is encrypted and the required secrets are stored in Azure Key Vault.
Azure components and services that are involved with Relevance Search functionality are detailed in the following sections.
Note:For more information about additional Azure service offerings, see the Microsoft Azure Trust Center.
Azure Search Services
An Azure Search index is used to provide high-quality search results with quick response times. Azure Search adds powerful and sophisticated next-generation search capabilities to Dynamics 365 (online). This is a dedicated search service external to Dynamics 365 (online) provided by Microsoft Azure.Data in the Azure Search index is not encrypted at rest, but is only accessible by the Relevance Search infrastructure.
Azure SQL Database
Relevance Search uses the Azure SQL Database to store:
Configuration data related to the organization and the corresponding index
Metadata relating to the search service and indexes
Pointers to system metadata and data when synchronizing changes
Authorization data to enable enhanced row- level security
Azure Event Hubs
The Azure Event Hubs component is used for message exchange between Dynamics 365 (online) and Azure and to maintain work items that are managed by the synchronization process. Each message stores information, such as the organization ID and entity name, used to sync the data.
Azure Service Fabric Cluster
The processing and indexing of data is handled in micro-services deployed on virtual machines managed through the Service Fabric runtime. The search APIs and the data synchronization process are also hosted on the Service Fabric cluster.
Service Fabric was born from years of experience at Microsoft delivering mission-critical cloud services and is now production-proven for over five years. It’s the foundational technology on which we run our
126
Azure core infrastructure, powering services including Skype for Business, Intune, Azure Event Hubs, Azure Data Factory, Azure DocumentDB, Azure SQL Database, and Cortana—which can scale to process more than 500 million evaluations per second.
Azure Virtual Machine Scale Sets
Azure Virtual Machine Scale Sets are elastic and designed to support hyper scale-out workloads. The Azure Service Fabric cluster runs on virtual machine scale sets. The micro-services for processing and indexing data are hosted on the scale sets and managed by the Service Fabric runtime.
Azure Key Vault
Azure Key Vault is used for secure management of certificates, keys, and other secrets used in the search process.
Azure Storage (Blob Storage)
Changes to customer data are stored for up to 2 days in Azure Blob Storage. These blobs are encrypted by leveraging the latest feature in the Azure Storage SDK, which provides symmetric and asymmetric encryption support and integration with Azure Key Vault. With December 2016 update for Dynamics 365 (online), the attachments associated with Notes and Activities will are also be synced to the blob storage.
Azure Active Directory Service
Azure Active Directory is used to authenticate between the Dynamics 365 (online) and Microsoft Azure services.
Azure Load Balancer
The Azure Load Balancer is used to distribute incoming traffic among healthy service instances in cloud services or virtual machines defined in a load balancer set. Relevance Search uses it to load balance the end points in a deployment.
Azure Virtual Networks
The Virtual Machines on the Service Fabric cluster running in one or more subnets are connected by Azure Virtual Network. The security policies, DNS settings, route tables, and IP addresses are fully controlled within this virtual network. Network Security Groups are leveraged to apply security rules on this virtual network. These rules allow or deny network traffic to the VMs in the virtual network.
See Also Configure Quick Find options for the organization Help & Training: Use Relevance Search for faster comprehensive results
Import data into Microsoft Dynamics 365 (online)
Applies To: Dynamics 365 (online), Dynamics CRM Online
[This topic is pre-release documentation and is subject to change.]
If you’ve completed a Microsoft Dynamics 365 (online) free trial and are converting to a Dynamics 365 (online) paid subscription, you can easily remove the sample data and then import or enter your own data.
127
If your business data is currently located in other systems, you should import it into Dynamics 365 (online). Depending on the amount and complexity of the data in other systems, there are several options for importing it.
Note
You can also import bulk data using the Data Loader cloud service (preview feature). More information: Preview feature: Import bulk data with the Data Loader.
In This Topic Delete sample data
Import Outlook contacts into Microsoft Dynamics 365 (online)
Import other types of data into Microsoft Dynamics 365 (online)
Delete sample data If you’ve been using the sample data in a free trial of Dynamics 365 (online), you can easily delete it before adding your business data.
1. Go to Settings > Data Management.
2. In the Data Management area, click or tap Sample Data.
3. In the Sample Data dialog box, click or tap Remove Sample Data.
Import Outlook contacts into Microsoft Dynamics 365 (online) In Dynamics 365 (online), contacts are people you do business with and accounts are the companies they work for. If your current Outlook contacts are the names of people that you do business with, importing the Outlook contacts is a streamlined process because the field names are the same in both systems.
After you install Dynamics 365 for Outlook, you can use the Add Contacts Wizard to add contacts directly from Outlook into Dynamics 365 (online). More information: Help & Training: Import contacts.
Import other types of data into Microsoft Dynamics 365 (online) Using the Dynamics 365 (online) Import Data Wizard, you can import many types of customer data stored in comma-separated value (.csv) format. Many spreadsheet programs that you use to store data, such as Microsoft Office Excel, provide an option to convert the data into .csv format when you save it. Many browser-based email programs enable you to save your contacts information to a file in (.csv) format.
128
After the data is in a supported format, you can use the Import Data Wizard to import contact information that is stored in .csv, .txt, .xml, or .zip files.
More information: Help & Training: Import data.
Note
When you have verified that your imported data is correct, consider running a duplicate detection job on the imported data to identify and delete duplicated data. More information: Detect duplicate data [admin guide].
See Also Import data (all record types) [Conceptual] Referenced topic '4e4cff91-4fd8-4fe5-ac0b-35457905fc18' is only available online. Get started administering Microsoft Dynamics 365 (online)
© 2016 Microsoft. All rights reserved. Copyright
Turn off the welcome screen (navigation tour) in CRM 2015 or earlier
Applies To: Dynamics 365 (online), Dynamics 365 (on-premises), Dynamics CRM 2016, Dynamics CRM Online
[This topic is pre-release documentation and is subject to change.]
When people first start Dynamics CRM 2015 or earlier, they are offered a quick overview. They can start the navigation tour by choosing Let’s go.
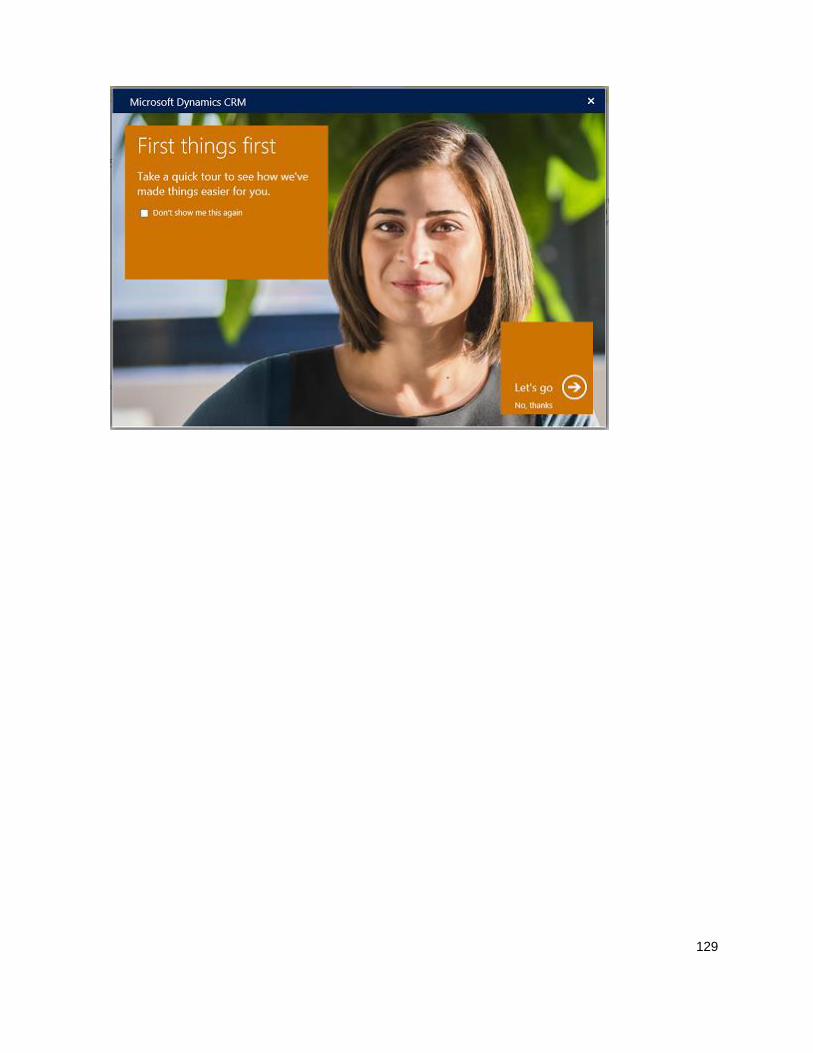
129
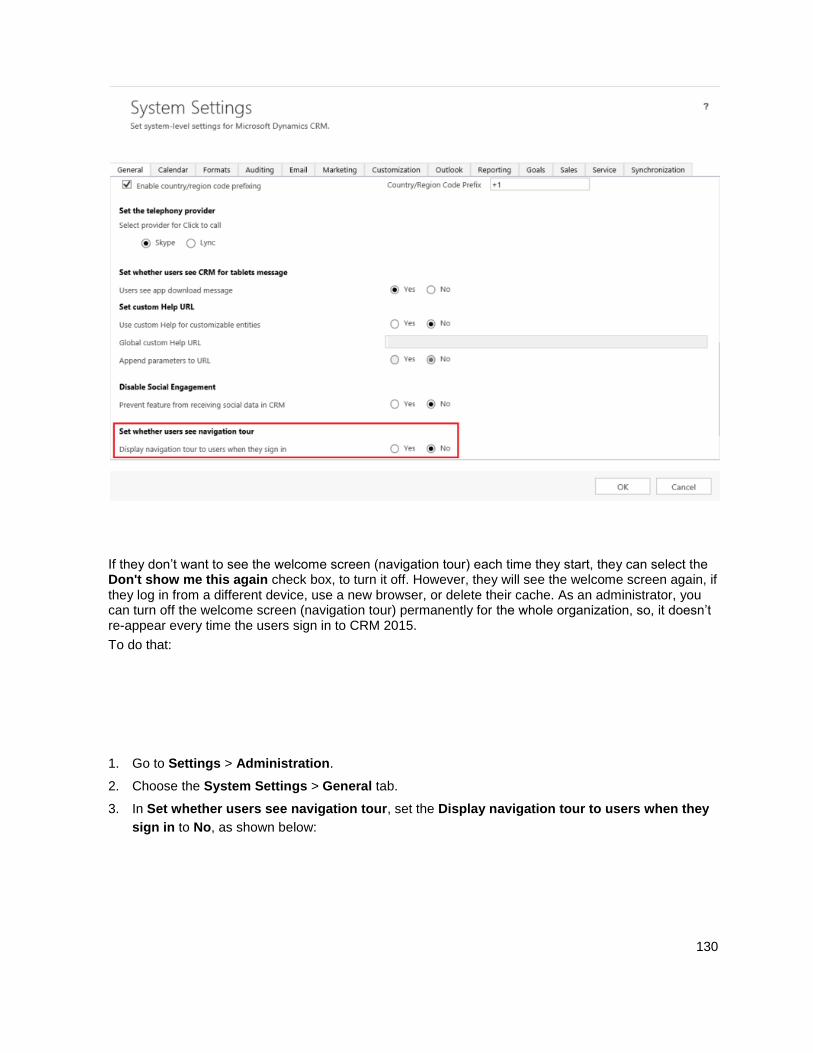
130
If they don’t want to see the welcome screen (navigation tour) each time they start, they can select the Don't show me this again check box, to turn it off. However, they will see the welcome screen again, if they log in from a different device, use a new browser, or delete their cache. As an administrator, you can turn off the welcome screen (navigation tour) permanently for the whole organization, so, it doesn’t re-appear every time the users sign in to CRM 2015.
To do that:
1. Go to Settings > Administration.
2. Choose the System Settings > General tab.
3. In Set whether users see navigation tour, set the Display navigation tour to users when they
sign in to No, as shown below:
131
See Also Getting started Set up a Dynamics 365 organization
© 2016 Microsoft. All rights reserved. Copyright
Manage security, users, and teams
Applies To: Dynamics 365 (online), Dynamics 365 (on-premises), Dynamics CRM 2016, Dynamics CRM Online
[This topic is pre-release documentation and is subject to change.]
The following section contains information about users, teams, and security in Microsoft Dynamics 365.
In This Section Security concepts for Microsoft Dynamics 365
Manage users
Manage teams
Add teams or users to a field security profile
Synchronize user information between Microsoft Dynamics 365 and Active Directory
Add or remove territory members
Troubleshooting: User needs read-write access to the Dynamics 365 organization
See Also Administering Dynamics 365 Getting started
© 2016 Microsoft. All rights reserved. Copyright
Security concepts for Microsoft Dynamics 365
Applies To: Dynamics 365 (online), Dynamics 365 (on-premises), Dynamics CRM 2016, Dynamics CRM Online
[This topic is pre-release documentation and is subject to change.]
You use the security model in Microsoft Dynamics 365 to protect the data integrity and privacy in a Microsoft Dynamics 365 organization. The security model also promotes efficient data access and collaboration. The goals of the model are as follows:
Provide a multi-tiered licensing model for users.
132
Grant users access that allows only the levels of information required to do their jobs.
Categorize users and teams by security role and restrict access based on those roles.
Support data sharing so that users can be granted access to objects they do not own for a one-time
collaborative effort.
Prevent access to objects a user does not own or share.
You combine business units, role-based security, record-based security, and field-based security to define the overall access to information that users have in your Microsoft Dynamics 365 organization.
In this topic Business units
Role-based security
User-based access and licensing
Teams
Record-based security
Hierarchy security
Field-based security
Deployment-wide administrative-level security (on-premises only)
Security Modeling with Microsoft Dynamics 365
Business units A business unit basically is a group of users. Large organizations with multiple customer bases often use multiple business units to control data access and define security roles so that users can access records only in their own business unit. More information: Create or edit business units
Role-based security You can use role-based security to group sets of privileges together into roles that describe the tasks that can be performed by a user or team. Microsoft Dynamics 365 includes a set of predefined security roles, each of which is a set of privileges aggregated to make security management easier. The bulk of the privileges define the ability to create, read, write, delete and share records of a specific entity type. Each privilege also defines how broadly the privilege applies: at the user level, business unit level, the entire business unit hierarchy or across the entire organization.
For example, if you sign in as a user that is assigned the Salesperson role, you have the privileges to read, write and share accounts for the entire organization, but you can only delete account records that you own. Also, you have no privileges to perform system administration tasks such as install product updates, or to add users to the system.
A user that has been assigned the Vice President of Sales role can perform a wider set of tasks (and has a greater number of privileges) associated with viewing and modifying data and resources than can a user who has been assigned to the Salesperson role. A user assigned the Vice President of Sales role can, for instance, read and assign any account to anyone in the system, while a user assigned the Salesperson role cannot.
133
There are two roles that have very broad privileges: System Administrator and Customizer. To minimize misconfiguration, the use of these two roles should be limited to a few people in your organization responsible for administering and customizing Microsoft Dynamics 365. Organizations can also customize existing roles and create its own roles to meet their needs. More information: Security roles and privileges
User-based access and licensing By default, when you create a user the user has read and write access to any data for which they have permission. Also, by default, the user client access license (CAL) is set to Professional. You can change either of these settings to further restrict data and feature access.
Access mode. This setting determines the level of access for each user.
Read-Write access. By default, users have Read-Write access that allows them access to data for
which they have appropriate permission set by security roles.
Administrative access. Allows access to areas that the user has appropriate permission set by
security roles but doesn’t allow the user to view or access business data typically found in the
Sales, Service, and Marketing areas, such as accounts, contacts, leads, opportunities, campaigns,
and cases. For example, Administrative access can be used to create Dynamics 365 administrators
who can have access to perform a complete variety of administrative tasks, such as create
business units, create users, set duplicate detection, but cannot view or access any business data.
Notice that users who are assigned this access mode do not consume a CAL.
Read access. Allows access to areas for which the user has appropriate access set by security role
but the user with Read access can only view data and can’t create or change existing data. For
example, a user with the system administrator security role who has read access can view
business units, users, and teams but can’t create or modify those records.
License type. This sets the user CAL and determines what features and areas are available to the user. This feature and area control is separate from the user’s security role setting. By default, users are created with Professional CAL for the most feature and area access that they have permission granted.
Teams Teams provide an easy way to share business objects and let you collaborate with other people across business units. While a team belongs to one business unit, it can include users from other business units. You can associate a user with more than one team. More information: Manage teams
Record-based security You can use record-based security to control user and team rights to perform actions on individual records. This applies to instances of entities (records) and is provided by access rights. The owner of a record can share, or grant access to a record to another user or team. When this is done, they must choose which rights they are granting. For example, the owner of an account record can grant read access to that account information, but not grant write access.
134
Access rights apply only after privileges have taken effect. For example, if a user does not have the privileges to view (read) account records, they will be unable to view any account, regardless of the access rights another user might grant them to a specific account through sharing.
Hierarchy security You can use the hierarchy security model for accessing hierarchical data. With this additional security, you gain a more granular access to records, allowing managers to access the records of their reports for approval or do work on reports’ behalf. More information: Hierarchy security
Field-based security You can use field-level security to restrict access to specific high business impact fields in an entity only to specified users or teams. Like record-based security, this applies after privileges have taken affect. For example, a user may have privileges to read an account, but can be restricted from seeing specific fields in all accounts. More information: Field level security
Deployment-wide administrative-level security (on-premises only) During installation, Microsoft Dynamics 365 Server Setup creates a special deployment-wide administrator role and attaches it to the user account that is used to run Microsoft Dynamics 365 Server Setup. Deployment Administrators have complete and unrestricted access to all organizations in Deployment Manager in the Dynamics 365 (on-premises) deployment. The Deployment Administrator role is not a security role and does not appear in the Microsoft Dynamics 365 web application as such.
Deployment Administrators can create new organizations or disable any existing organization in the deployment. Conversely, members of the System Administrator Role only have permissions within the organization where the user and security role are located.
Important
When a deployment administrator creates an organization, that administrator must give db_owner privileges for the org’s databases to the other deployment administrators so that they also have full access to those organizations.
For more information about the Deployment Administrator role, see Referenced topic '96c87bbc-9735-4cb9-8549-10a144461c25' is only available online..
Security Modeling with Microsoft Dynamics 365 For detailed information about and best practices with designing the security model in Microsoft Dynamics 365, read the Scalable Security Modeling with Microsoft Dynamics CRM white paper available from the Microsoft Download Center.
135
See Also Referenced topic '507567f3-2354-4ef3-a093-0f209ebf2b29' is only available online. Field level security Hierarchy security Security roles and privileges Create or edit a security role Copy a security role Manage users Manage teams Add teams or users to a field security profile Manage security, users, and teams
© 2016 Microsoft. All rights reserved. Copyright
Security roles and privileges
Applies To: Dynamics 365 (online), Dynamics 365 (on-premises), Dynamics CRM 2016, Dynamics CRM Online
[This topic is pre-release documentation and is subject to change.]
To control data access, you must set up an organizational structure that both protects sensitive data and enables collaboration. You do this by setting up business units, security roles, and field security profiles.
Security roles A security role defines how different users, such as salespeople, access different types of records. To control access to data, you can modify existing security roles, create new security roles, or change which security roles are assigned to each user. Each user can have multiple security roles.
Security role privileges are cumulative: having more than one security role gives a user every privilege available in every role.
Each security role consists of record-level privileges and task-based privileges.
Record-level privileges define which tasks a user with access to the record can do, such as Read, Create, Delete, Write, Assign, Share, Append, and Append To. Append means to attach another record, such as an activity or note, to a record. Append to means to be attached to a record. More information: Record-level privileges
Task-based privileges, at the bottom of the form, give a user privileges to perform specific tasks, such as publish articles or perform a mail merge.
The colored circles on the security role settings page define the access level for that privilege. Access levels determine how deep or high in the organizational business unit hierarchy the user can perform the specified privilege. The following table lists the levels of access in Microsoft Dynamics 365, starting with the level that gives users the most access.
Global. This access level gives a user access to all records in the organization, regardless of the
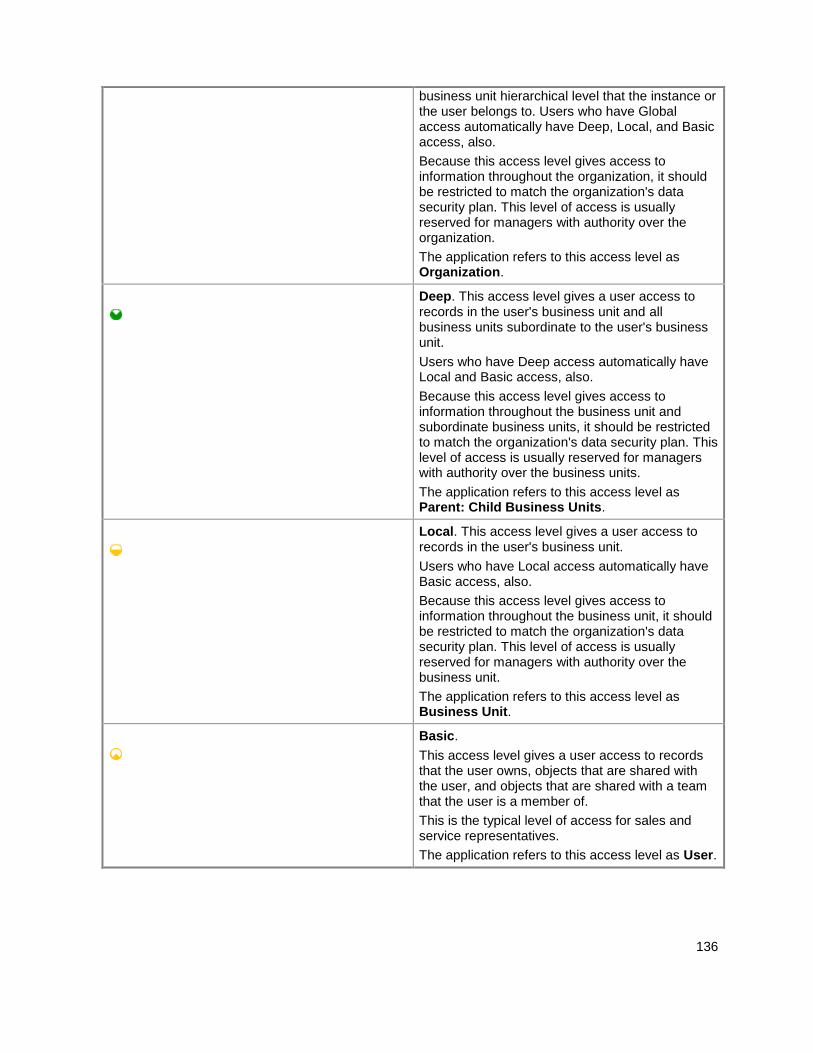
136
business unit hierarchical level that the instance or the user belongs to. Users who have Global access automatically have Deep, Local, and Basic access, also.
Because this access level gives access to information throughout the organization, it should be restricted to match the organization's data security plan. This level of access is usually reserved for managers with authority over the organization.
The application refers to this access level as Organization.
Deep. This access level gives a user access to records in the user's business unit and all business units subordinate to the user's business unit.
Users who have Deep access automatically have Local and Basic access, also.
Because this access level gives access to information throughout the business unit and subordinate business units, it should be restricted to match the organization's data security plan. This level of access is usually reserved for managers with authority over the business units.
The application refers to this access level as Parent: Child Business Units.
Local. This access level gives a user access to records in the user's business unit.
Users who have Local access automatically have Basic access, also.
Because this access level gives access to information throughout the business unit, it should be restricted to match the organization's data security plan. This level of access is usually reserved for managers with authority over the business unit.
The application refers to this access level as Business Unit.
Basic.
This access level gives a user access to records that the user owns, objects that are shared with the user, and objects that are shared with a team that the user is a member of.
This is the typical level of access for sales and service representatives.
The application refers to this access level as User.
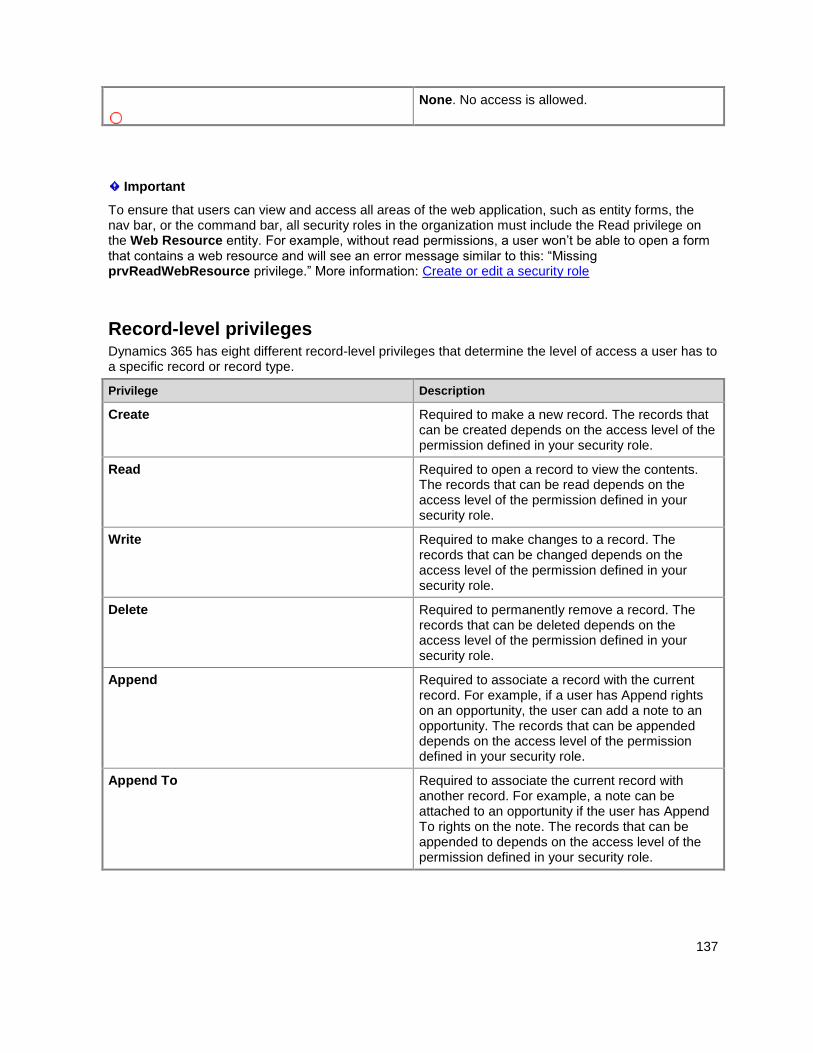
137
None. No access is allowed.
Important
To ensure that users can view and access all areas of the web application, such as entity forms, the nav bar, or the command bar, all security roles in the organization must include the Read privilege on the Web Resource entity. For example, without read permissions, a user won’t be able to open a form that contains a web resource and will see an error message similar to this: “Missing prvReadWebResource privilege.” More information: Create or edit a security role
Record-level privileges Dynamics 365 has eight different record-level privileges that determine the level of access a user has to a specific record or record type.
Privilege Description
Create Required to make a new record. The records that can be created depends on the access level of the permission defined in your security role.
Read Required to open a record to view the contents. The records that can be read depends on the access level of the permission defined in your security role.
Write Required to make changes to a record. The records that can be changed depends on the access level of the permission defined in your security role.
Delete Required to permanently remove a record. The records that can be deleted depends on the access level of the permission defined in your security role.
Append Required to associate a record with the current record. For example, if a user has Append rights on an opportunity, the user can add a note to an opportunity. The records that can be appended depends on the access level of the permission defined in your security role.
Append To Required to associate the current record with another record. For example, a note can be attached to an opportunity if the user has Append To rights on the note. The records that can be appended to depends on the access level of the permission defined in your security role.
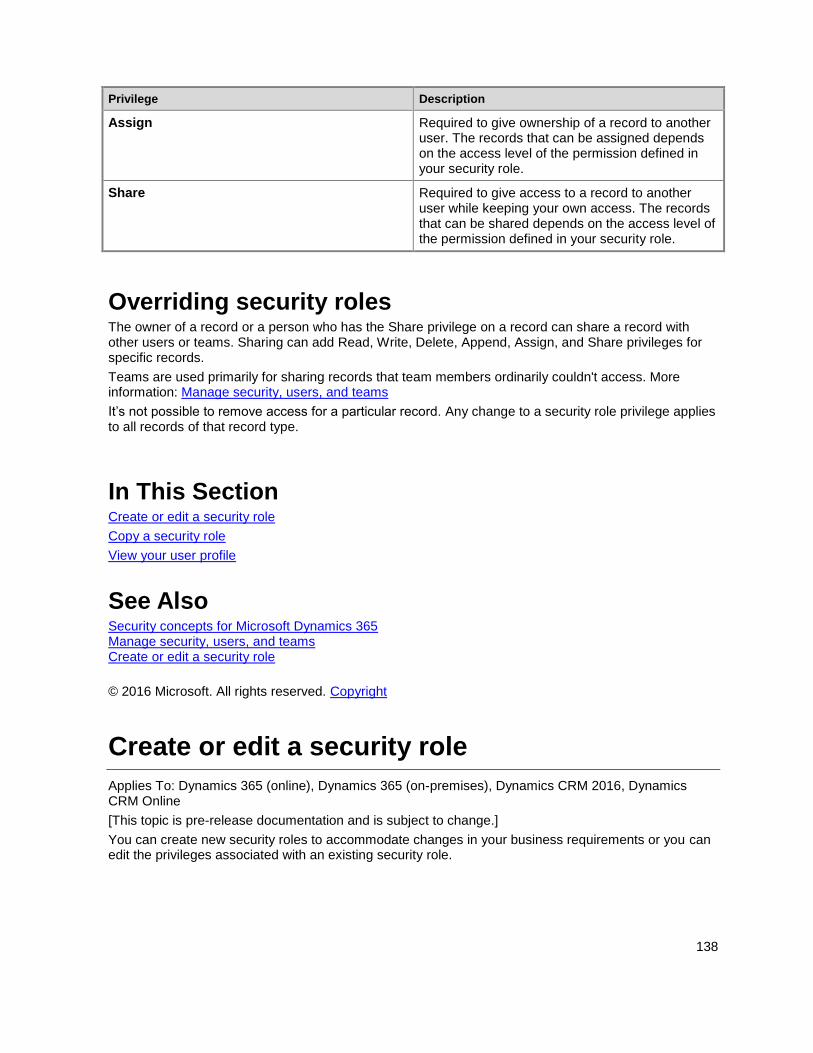
138
Privilege Description
Assign Required to give ownership of a record to another user. The records that can be assigned depends on the access level of the permission defined in your security role.
Share Required to give access to a record to another user while keeping your own access. The records that can be shared depends on the access level of the permission defined in your security role.
Overriding security roles The owner of a record or a person who has the Share privilege on a record can share a record with other users or teams. Sharing can add Read, Write, Delete, Append, Assign, and Share privileges for specific records.
Teams are used primarily for sharing records that team members ordinarily couldn't access. More information: Manage security, users, and teams
It’s not possible to remove access for a particular record. Any change to a security role privilege applies to all records of that record type.
In This Section Create or edit a security role
Copy a security role
View your user profile
See Also Security concepts for Microsoft Dynamics 365 Manage security, users, and teams Create or edit a security role
© 2016 Microsoft. All rights reserved. Copyright
Create or edit a security role
Applies To: Dynamics 365 (online), Dynamics 365 (on-premises), Dynamics CRM 2016, Dynamics CRM Online
[This topic is pre-release documentation and is subject to change.]
You can create new security roles to accommodate changes in your business requirements or you can edit the privileges associated with an existing security role.
139
If you need to back up your security role changes, or export security roles for use in a different implementation of Microsoft Dynamics 365, you can export them as part of exporting customizations. More information: Help & Training: Export your customizations as a solution
Create a security role
Make sure that you have the System Administrator or System Customizer security role or equivalent permissions.
Check your security role
Follow the steps in View your user profile.
Don’t have the correct permissions? Contact your system administrator.
1. Go to Settings > Security.
2. Click Security Roles.
3. On the Actions toolbar, click New.
4. Set the privileges on each tab.
To change the access level for a privilege, click the symbol until you see the symbol you want. The possible access levels depend on whether the record type is organization-owned or user-owned.
Tip
To cycle through the access levels, you can also click the privilege column heading, or click the record type multiple times.
5. When you have finished configuring the security role, on the toolbar, click or tap Save and Close.
Edit a security role Before you edit an existing security role, make sure that you understand the principles of data access. More information: Security roles and privileges
Note
You can’t edit the System Administrator security role. To create a security role similar to the System Administrator security role, copy the System Administrator security role, and make changes to the new role.
140
Make sure that you have the System Administrator or System Customizer security role or equivalent permissions.
Check your security role
Follow the steps in View your user profile.
Don’t have the correct permissions? Contact your system administrator.
1. Go to Settings > Security.
2. Click Security Roles.
3. In the list of security roles, double-click or tap a name to open the page associated with that
security role.
4. Set the privileges on each tab.
To change the access level for a privilege, click the symbol until you see the symbol you want. The possible access levels depend on whether the record type is organization-owned or user-owned.
Tip
To cycle through the access levels, you can also click the privilege column heading, or click the record type multiple times.
5. When you have finished configuring the security role, on the toolbar, click or tap Save and Close.
Minimum privileges for common tasks It's helpful to keep in mind the minimum privileges that are needed for some common tasks. These include:
When logging in to Microsoft Dynamics 365:
To render the home page, assign the following privileges on the Customization tab: Read Web
Resource, Read Customizations
To render an entity grid (that is, to view lists of records and other data): Read privilege on the
entity, Read User Settings on the Business Management tab, and Read View on the
Customization tab
To view single entities in detail: Read privilege on the entity, Read System Form on the
Customization tab, Create and Read User Entity UI Settings on the Core Records tab
When logging in to Dynamics 365 for Outlook:
To render navigation for Microsoft Dynamics 365 and all Microsoft Dynamics 365 buttons: Read
Entity and Read View on the Customizations tab
To render an entity grid: Read privilege on the entity, Read Customizations and Read Web
Resource on the Customization tab, and Read Saved View on the Core Records tab
141
To render entities: Read privilege on the entity, Read System Form on the Customization tab,
and Create, Read, and Write User Entity UI Settings on the Core Records tab
Privacy notices Licensed Dynamics 365 Online users with specific Security Roles (CEO – Business Manager, Sales Manager, Salesperson, System Administrator, System Customizer, and Vice President of Sales) are automatically authorized to access the service by using Dynamics 365 for phones, as well as other clients. An administrator has full control (at the user security role or entity level) over the ability to access and the level of authorized access associated with the phone client. Users can then access Dynamics 365 (online) by using Dynamics 365 for phones, and Customer Data will be cached on the device running the specific client. Based on the specific settings at the user security and entity levels, the types of Customer Data that can be exported from Dynamics 365 (online) and cached on an end user’s device include record data, record metadata, entity data, entity metadata, and business logic.
Licensed Dynamics 365 Online users with specific Security Roles (CEO – Business Manager, Sales Manager, Salesperson, System Administrator, System Customizer, and Vice President of Sales) are automatically authorized to access the service by using Dynamics 365 for tablets, as well as other clients. An administrator has full control (at the user security role or entity level) over the ability to access and the level of authorized access associated with the tablet client. Users can then access Dynamics 365 (online) by using Dynamics 365 for tablets, and Customer Data will be cached on the device running the specific client. Based on the specific settings at the user security and entity levels, the types of Customer Data that can be exported from Dynamics 365 (online) and cached on an end user’s device include record data, record metadata, entity data, entity metadata, and business logic.
If you use Microsoft Dynamics 365 for Outlook, when you go offline, a copy of the data you are working on is created and stored on your local computer. The data is transferred from Dynamics 365 (online) to your computer by using a secure connection, and a link is maintained between the local copy and Dynamics 365 Online. The next time you sign in to Dynamics 365 (online), the local data will be synchronized with Dynamics 365 (online). An administrator determines whether or not an organization’s users are permitted to go offline with Microsoft Dynamics 365 for Outlook by using security roles. Users and administrators can configure which entities are downloaded via Offline Sync by using the Sync Filters setting in the Options dialog box. Alternatively, users and Administrators can configure which fields are downloaded (and uploaded) by using Advanced Options in the Sync Filters dialog box.
If you use Microsoft Dynamics 365 (online), when you use the Sync to Outlook feature, the Dynamics 365 data you are syncing is “exported” to Outlook. A link is maintained between the information in
142
Outlook and the information in Dynamics 365 (online) to ensure that the information remains current between the two. Outlook Sync downloads only the relevant Dynamics 365 record IDs to use when a user attempts to track and set regarding an Outlook item. The company data is not stored on the device. An administrator determines whether your organization’s users are permitted to sync Dynamics 365 data to Outlook by using security roles.
If you use Microsoft Dynamics 365 (online), exporting data to a static worksheet creates a local copy of the exported data and stores it on your computer. The data is transferred from Dynamics 365 (online) to your computer by using a secure connection, and no connection is maintained between this local copy and Dynamics 365 (online). When you export to a dynamic worksheet or PivotTable, a link is maintained between the Excel worksheet and Dynamics 365 (online). Every time a dynamic worksheet or PivotTable is refreshed, you’ll be authenticated with Dynamics 365 (online) using your credentials. You’ll be able to see the data that you have permissions to view. An administrator determines whether or not an organization’s users are permitted to export data to Excel by using security roles.
When Microsoft Dynamics 365 (online) users print Dynamics 365 data, they are effectively “exporting” that data from the security boundary provided by Dynamics 365 (online) to a less secure environment, in this case, to a piece of paper. An administrator has full control (at the user security role or entity level) over the data that can be extracted. However, after the data has been extracted it is no longer protected by the security boundary provided by Dynamics 365 (online) and is instead controlled directly by the customer.
See Also Security concepts for Microsoft Dynamics 365 Security roles and privileges Manage security, users, and teams Copy a security role
© 2016 Microsoft. All rights reserved. Copyright
Copy a security role
Applies To: Dynamics 365 (online), Dynamics 365 (on-premises), Dynamics CRM 2016, Dynamics CRM Online
[This topic is pre-release documentation and is subject to change.]
If you want to create a security role that is similar to another security role, you can copy an existing security role and save it with a new name. You can then modify the privileges and access levels to accommodate the new security role.
143
Note
You can’t copy a security role to a different business unit.
Make sure that you have the System Administrator or System Customizer security role or equivalent permissions.
Check your security role
Follow the steps in View your user profile.
Don’t have the correct permissions? Contact your system administrator.
1. Go to Settings > Security.
2. Click Security Roles.
3. In the list of security roles, under Name, click or tap to select the security role you want to copy,
and then on the Actions toolbar, click or tap More Actions > Copy Role.
4. In the Copy Security Role dialog box, in the New Role Name text box, type in the name for the
new security role.
5. To modify the new security role after creating a copy, verify that the Open the new security role
when copying is complete check box is selected; otherwise, clear the check box.
6. Click OK.
See Also Security concepts for Microsoft Dynamics 365 Security roles and privileges Field level security
© 2016 Microsoft. All rights reserved. Copyright
View your user profile
Applies To: Dynamics 365 (online), Dynamics 365 (on-premises), Dynamics CRM 2016, Dynamics CRM Online
[This topic is pre-release documentation and is subject to change.]
144
Your user profile shows useful information about you to your entire organization; for example, your contact information, your organization, and your security role. Depending on your security role, you may be able to make changes to your user profile.
1. Click or tap the Settings gear in the upper right side of the screen, then click or tap Options.
2. Scroll down and click or tap View your user information.
3. To check your security role, on the nav bar, click or tap the down arrow next to your name,
and then click or tap Security Roles.
4. To view other profile information, such as Work Hours, Connections, and Services, on the nav bar,
click or tap the down arrow next to your name.
© 2016 Microsoft. All rights reserved. Copyright
Field level security
Applies To: Dynamics 365 (online), Dynamics 365 (on-premises), Dynamics CRM 2016, Dynamics CRM Online
[This topic is pre-release documentation and is subject to change.]
Record-level permissions are granted at the entity level, but you may have certain fields associated with an entity that contain data that is more sensitive than the other fields. For these situations, you use field level security to control access to specific fields.
The scope of field level security is organization-wide and applies to all data access requests including the following:
Data access requests from within a client application, such as web browser, mobile client, or
Microsoft Dynamics 365 for Outlook.
Web service calls using the Microsoft Dynamics 365 SDK (for use in plug-ins, custom workflow
activities, and custom code)
Reporting (using Filtered Views)
In This Topic Overview of field level security
Example for restricting the mobile phone field for the Contact entity
Which fields can be secured?
Best practices when you use field security

145
Overview of field level security Field level security is available for the default fields on most out-of-box entities, custom fields, and custom fields on custom entities. Field level security is managed by the security profiles. To implement field level security, a system administrator performs the following tasks.
1. Enable field security on one or more fields for a given entity.
2. Associate one more existing security profiles, or create one or more new security profiles to grant
the appropriate access to specific users or teams.
A security profile determines the following:
Permissions to the secure fields
Users and Teams
A security profile can be configured to grant user or team members the following permissions at the field level:
Read. Read-only access to the field’s data.
Create. Users or teams in this profile can add data to this field when creating a record.
Update. Users or teams in this profile can update the field’s data after it has been created.
A combination of these three permissions can be configured to determine the user privileges for a specific data field.
Important
Unless one or more security profiles are assigned to a security enabled field, only Microsoft Dynamics 365 users with the system administrator security role will have access to the field.
Example for restricting the mobile phone field for the Contact entity Imagine you company’s policy is that sales members should have different levels of access to contact mobile phone numbers as described here.
User or Team Access
Vice presidents Full. Can create, update, and view mobile phone numbers for contacts.
Sales Managers Read-only. Can only view mobile phone numbers for contacts.
Salespersons and all other Dynamics 365 users None. Cannot create, update or view mobile phone numbers for contacts.
To restrict this field, you would perform the following tasks.
Secure the field.
1. Go to Settings > Customizations.
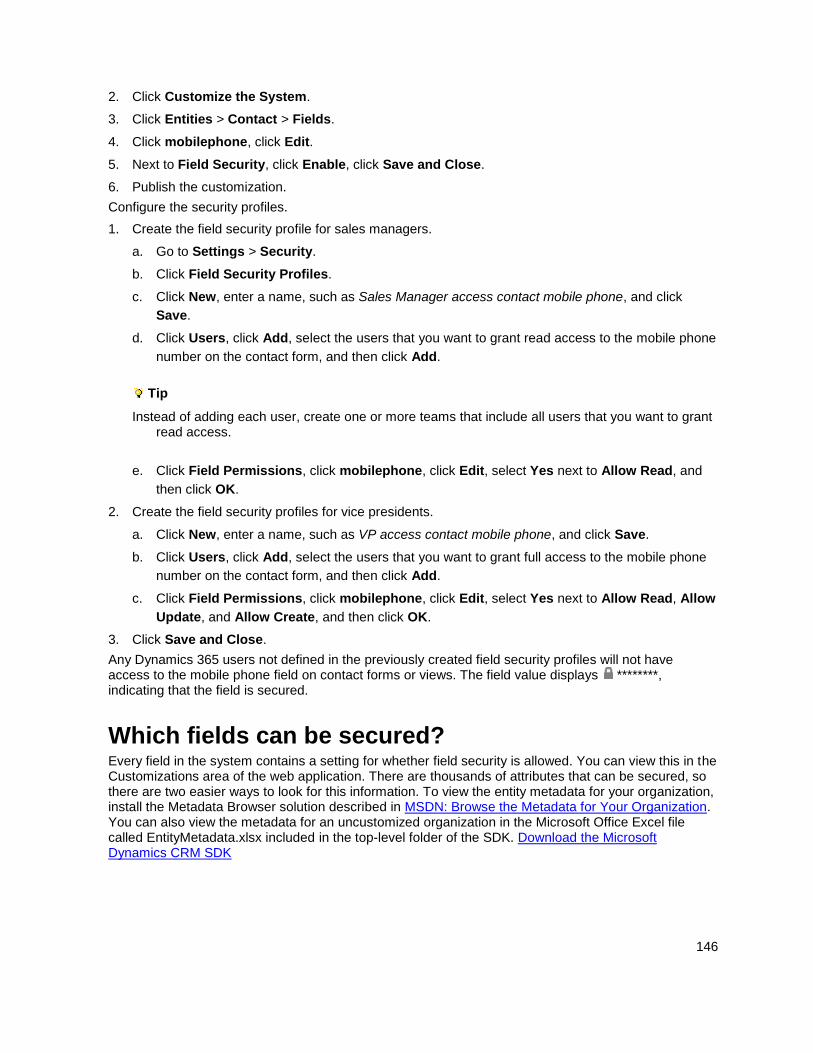
146
2. Click Customize the System.
3. Click Entities > Contact > Fields.
4. Click mobilephone, click Edit.
5. Next to Field Security, click Enable, click Save and Close.
6. Publish the customization.
Configure the security profiles.
1. Create the field security profile for sales managers.
a. Go to Settings > Security.
b. Click Field Security Profiles.
c. Click New, enter a name, such as Sales Manager access contact mobile phone, and click
Save.
d. Click Users, click Add, select the users that you want to grant read access to the mobile phone
number on the contact form, and then click Add.
Tip
Instead of adding each user, create one or more teams that include all users that you want to grant read access.
e. Click Field Permissions, click mobilephone, click Edit, select Yes next to Allow Read, and
then click OK.
2. Create the field security profiles for vice presidents.
a. Click New, enter a name, such as VP access contact mobile phone, and click Save.
b. Click Users, click Add, select the users that you want to grant full access to the mobile phone
number on the contact form, and then click Add.
c. Click Field Permissions, click mobilephone, click Edit, select Yes next to Allow Read, Allow
Update, and Allow Create, and then click OK.
3. Click Save and Close.
Any Dynamics 365 users not defined in the previously created field security profiles will not have access to the mobile phone field on contact forms or views. The field value displays ********, indicating that the field is secured.
Which fields can be secured? Every field in the system contains a setting for whether field security is allowed. You can view this in the Customizations area of the web application. There are thousands of attributes that can be secured, so there are two easier ways to look for this information. To view the entity metadata for your organization, install the Metadata Browser solution described in MSDN: Browse the Metadata for Your Organization. You can also view the metadata for an uncustomized organization in the Microsoft Office Excel file called EntityMetadata.xlsx included in the top-level folder of the SDK. Download the Microsoft Dynamics CRM SDK
147
Best practices when you use field security When you use calculated fields that include a field that is secured, data may be displayed in the calculated field to users that don’t have permission to the secured field. In this situation, both the original field and the calculated field should be secured.
Some data, such as addresses, are actually made up of multiple fields. Therefore, to completely secure data that includes multiple fields, such as addresses, you must secure and configure the appropriate field security profiles on multiple fields for the entity. For example, to completely secure addresses for an entity, secure all relevant address fields, such as address_line1, address_line2, address_line3, address1_city, address1_composite, and so on.
When a system administrator implements security for particular fields or records, it can affect the data that’s synchronized between Microsoft Dynamics 365 and Outlook, including the inability to push data to the user running Dynamics 365 for Outlook. Before you secure a field, consider how it may affect your users that are running Dynamics 365 for Outlook. More information: How field security affects synchronization between Dynamics 365 and Dynamics 365 for Outlook
See Also Video: Field Level Security in Microsoft Dynamics CRM 2015 Help & Training: Create a field security profile Help & Training: Add or remove security from a field Hierarchy security
© 2016 Microsoft. All rights reserved. Copyright
Hierarchy security
Applies To: Dynamics 365 (online), Dynamics 365 (on-premises), Dynamics CRM 2016, Dynamics CRM Online
[This topic is pre-release documentation and is subject to change.]
The hierarchy security model is an extension to the existing Microsoft Dynamics 365 security models that use business units, security roles, sharing, and teams. It can be used in conjunction with all other existing security models. The hierarchy security offers a more granular access to records for an organization and helps to bring the maintenance costs down. For example, in complex scenarios, you can start with creating several business units and then add the hierarchy security. This will achieve a more granular access to data with far less maintenance costs that a large number of business units may require.
In This Topic Manager hierarchy and Position hierarchy security models
Set up hierarchy security
Set up Manager and Position hierarchies
Performance considerations
148
Manager hierarchy and Position hierarchy security models Two security models can be used for hierarchies, the Manager hierarchy and the Position hierarchy. With the Manager hierarchy, a manager must be within the same business unit as the report, or in the parent business unit of the report’s business unit, to have access to the report’s data. The Position hierarchy allows data access across business units. If you are a financial organization, you may prefer the Manager hierarchy model, to prevent managers’ accessing data outside of their business units. However, if you are a part of a customer service organization and want the managers to access service cases handled in different business units, the Position hierarchy may work better for you.
Note
While the hierarchy security model provides a certain level of access to data, additional access can be obtained by using other forms of security, such as security roles.
Manager hierarchy The Manager hierarchy security model is based on the management chain or direct reporting structure, where the manager’s and the report’s relationship is established by using the Manager field on the system user entity. With this security model, the managers are able to access the data that their reports have access to. They are able to perform work on behalf of their direct reports or access information that needs approval.
Note
With the Manager hierarchy security model, a manager has access to the records owned by the user or by the team that a user is a member of, and to the records that are directly shared with the user or the team that a user is a member of.
In addition to the Manager hierarchy security model, a manager must have at least the user level Read privilege on an entity, to see the reports’ data. For example, if a manager doesn’t have the Read access to the Case entity, the manager won’t be able to see the cases that their reports have access to.
For a non-direct report, a manager has the Read-only access to the report’s data. For a direct report, the manager has the Read, Write, Update, Append, AppendTo access to the report’s data. To illustrate the Manager hierarchy security model, let’s take a look at the diagram below. The CEO can read or update the VP of Sales data and the VP of Service data. However, the CEO can only read the Sales Manager data and the Service Manager data, as well as the Sales and Support data. You can further limit the amount of data accessible by a manager with “Depth”. Depth is used to limit how many levels deep a manager has Read-only access to the data of their reports. For example, if the depth is set to 2, the CEO can see the data of the VP of Sales, VP of Service and Sales and Service Managers. However, the CEO doesn’t see the Sales data or the Support data.
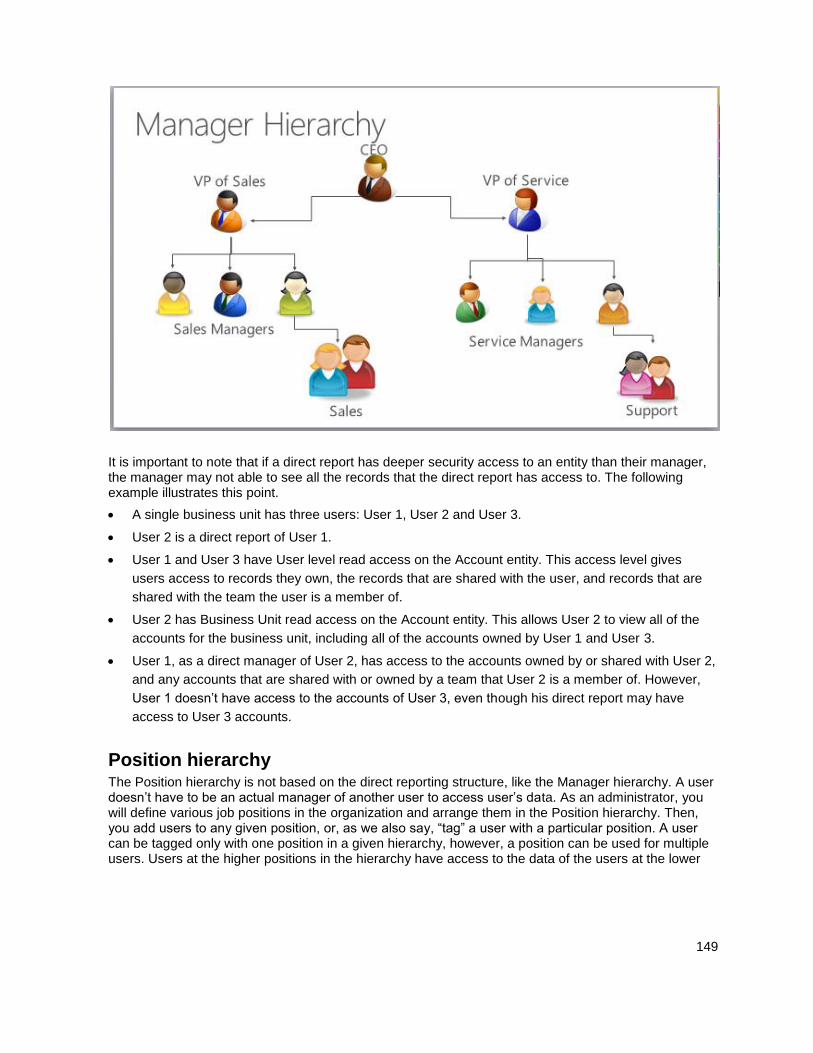
149
It is important to note that if a direct report has deeper security access to an entity than their manager, the manager may not able to see all the records that the direct report has access to. The following example illustrates this point.
A single business unit has three users: User 1, User 2 and User 3.
User 2 is a direct report of User 1.
User 1 and User 3 have User level read access on the Account entity. This access level gives
users access to records they own, the records that are shared with the user, and records that are
shared with the team the user is a member of.
User 2 has Business Unit read access on the Account entity. This allows User 2 to view all of the
accounts for the business unit, including all of the accounts owned by User 1 and User 3.
User 1, as a direct manager of User 2, has access to the accounts owned by or shared with User 2,
and any accounts that are shared with or owned by a team that User 2 is a member of. However,
User 1 doesn’t have access to the accounts of User 3, even though his direct report may have
access to User 3 accounts.
Position hierarchy The Position hierarchy is not based on the direct reporting structure, like the Manager hierarchy. A user doesn’t have to be an actual manager of another user to access user’s data. As an administrator, you will define various job positions in the organization and arrange them in the Position hierarchy. Then, you add users to any given position, or, as we also say, “tag” a user with a particular position. A user can be tagged only with one position in a given hierarchy, however, a position can be used for multiple users. Users at the higher positions in the hierarchy have access to the data of the users at the lower

150
positions, in the direct ancestor path. The direct higher positions have Read, Write, Update, Append, AppendTo access to the lower positions’ data in the direct ancestor path. The non-direct higher positions, have Read-only access to the lower positions’ data in the direct ancestor path.
To illustrate the concept of the direct ancestor path, let’s look at the diagram below. The Sales Manager position has access to the Sales data, however, it doesn’t have access to the Support data, which is in the different ancestor path. The same is true for the Service Manager position. It doesn’t have access to the Sales data, which is in the Sales path. Like in the Manager hierarchy, you can limit the amount of data accessible by higher positions with “Depth”. The depth will limit how many levels deep a higher position has a Read-only access, to the data of the lower positions in the direct ancestor path. For example, if the depth is set to 3, the CEO position can see the data all the way down from the VP of Sales and VP of Service positions, to the Sales and Support positions.
Note
With the Position hierarchy security, a user at a higher position has access to the records owned by a lower position user or by the team that a user is a member of, and to the records that are directly shared to the user or the team that a user is a member of.
In addition to the Position hierarchy security model, the users at a higher level must have at least the user level Read privilege on an entity to see the records that the users at the lower positions have access to. For example, if a user at a higher level doesn’t have the Read access to the Case entity, that user won’t be able to see the cases that the users at a lower positions have access to.
151
Set up hierarchy security To set up the security hierarchy, you must have an Administrator security role.
The hierarchy security is disabled by default. To enable:
1. Go to Settings > Security.
2. Choose Hierarchy security and select Enable Hierarchy Modeling.
Important
To make any changes in Hierarchy security, you must have the Change Hierarchy Security Settings privilege.
After you have enabled the hierarchy modeling, choose the specific model by selecting the Manager Hierarchy or Custom Position Hierarchy. All system entities are enabled for hierarchy security out-of-the-box, but, you can exclude selective entities from the hierarchy. The Hierarchy Security window shown below:
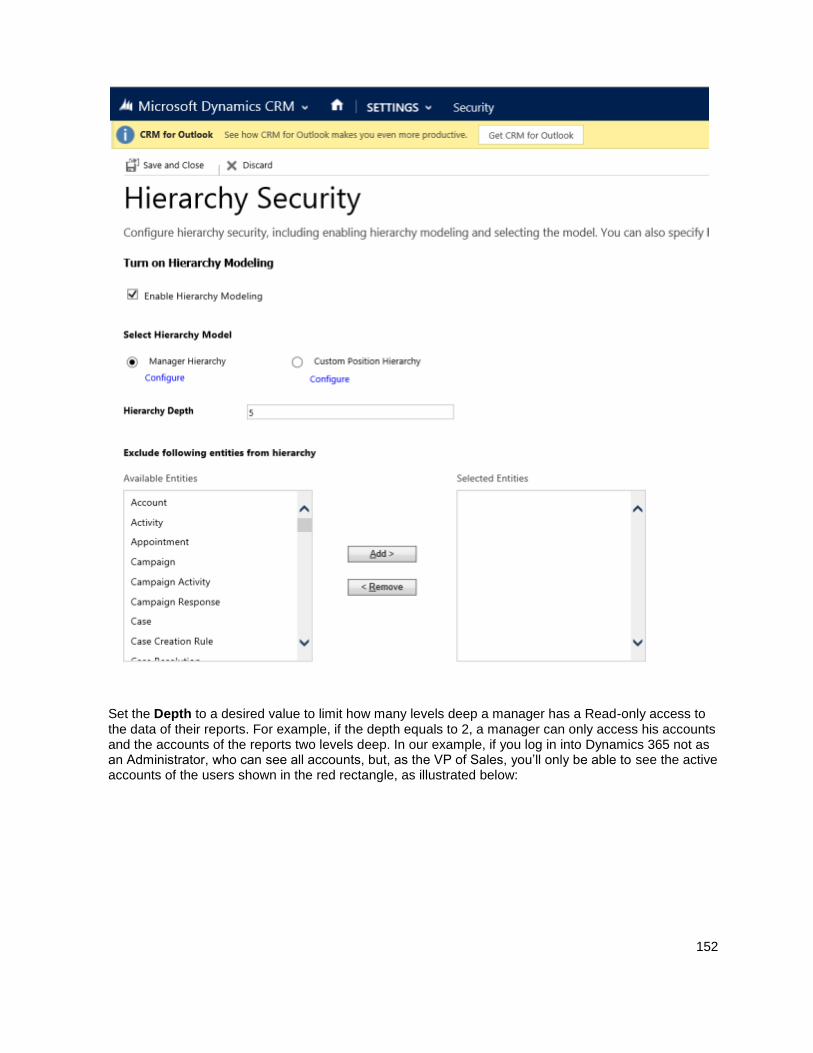
152
Set the Depth to a desired value to limit how many levels deep a manager has a Read-only access to the data of their reports. For example, if the depth equals to 2, a manager can only access his accounts and the accounts of the reports two levels deep. In our example, if you log in into Dynamics 365 not as an Administrator, who can see all accounts, but, as the VP of Sales, you’ll only be able to see the active accounts of the users shown in the red rectangle, as illustrated below:
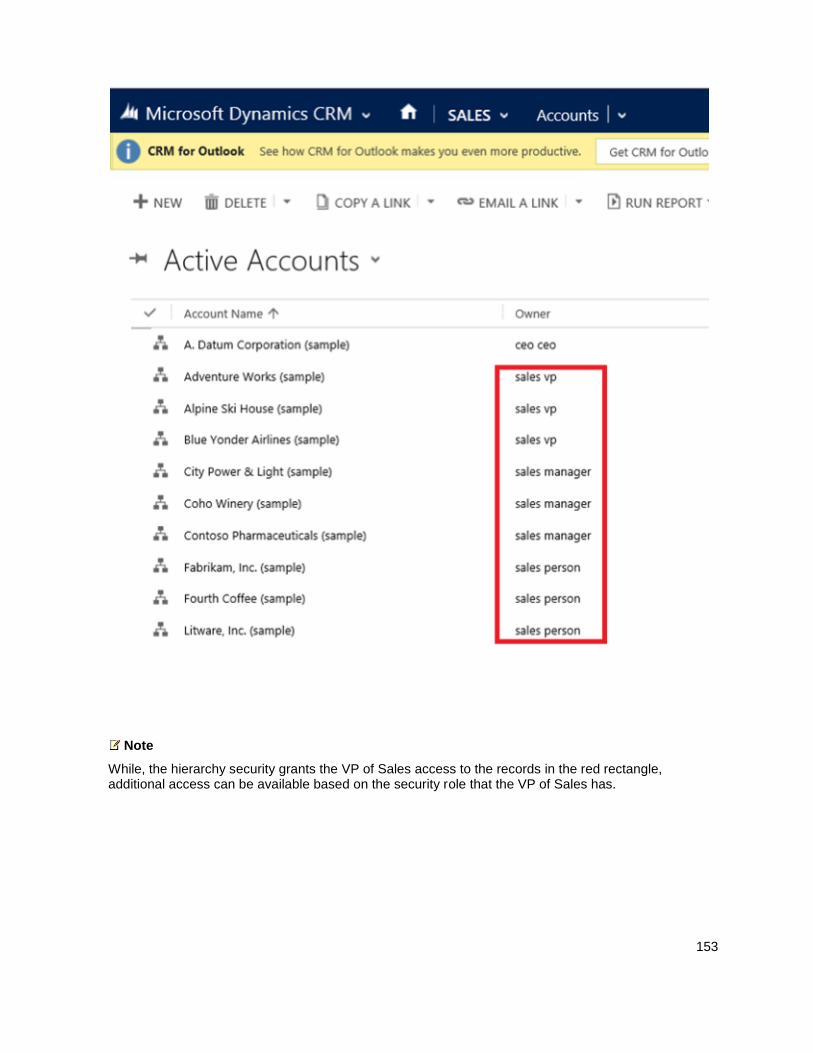
153
Note
While, the hierarchy security grants the VP of Sales access to the records in the red rectangle, additional access can be available based on the security role that the VP of Sales has.
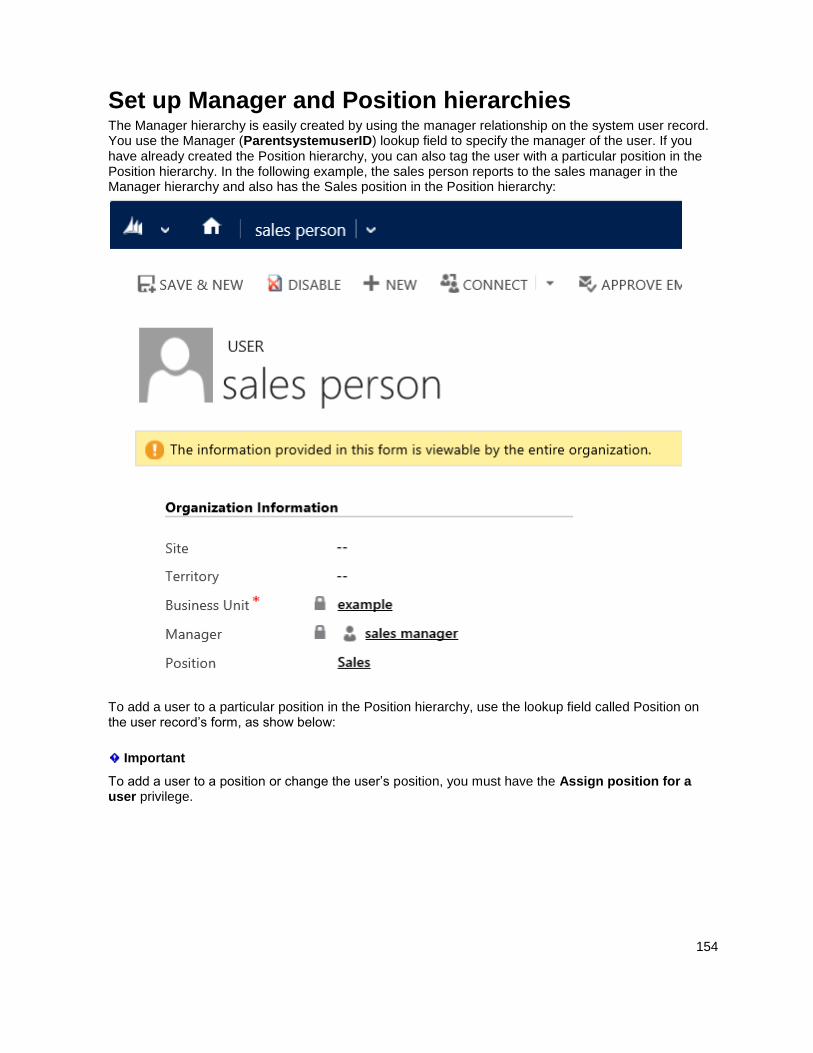
154
Set up Manager and Position hierarchies The Manager hierarchy is easily created by using the manager relationship on the system user record. You use the Manager (ParentsystemuserID) lookup field to specify the manager of the user. If you have already created the Position hierarchy, you can also tag the user with a particular position in the Position hierarchy. In the following example, the sales person reports to the sales manager in the Manager hierarchy and also has the Sales position in the Position hierarchy:
To add a user to a particular position in the Position hierarchy, use the lookup field called Position on the user record’s form, as show below:
Important
To add a user to a position or change the user’s position, you must have the Assign position for a user privilege.
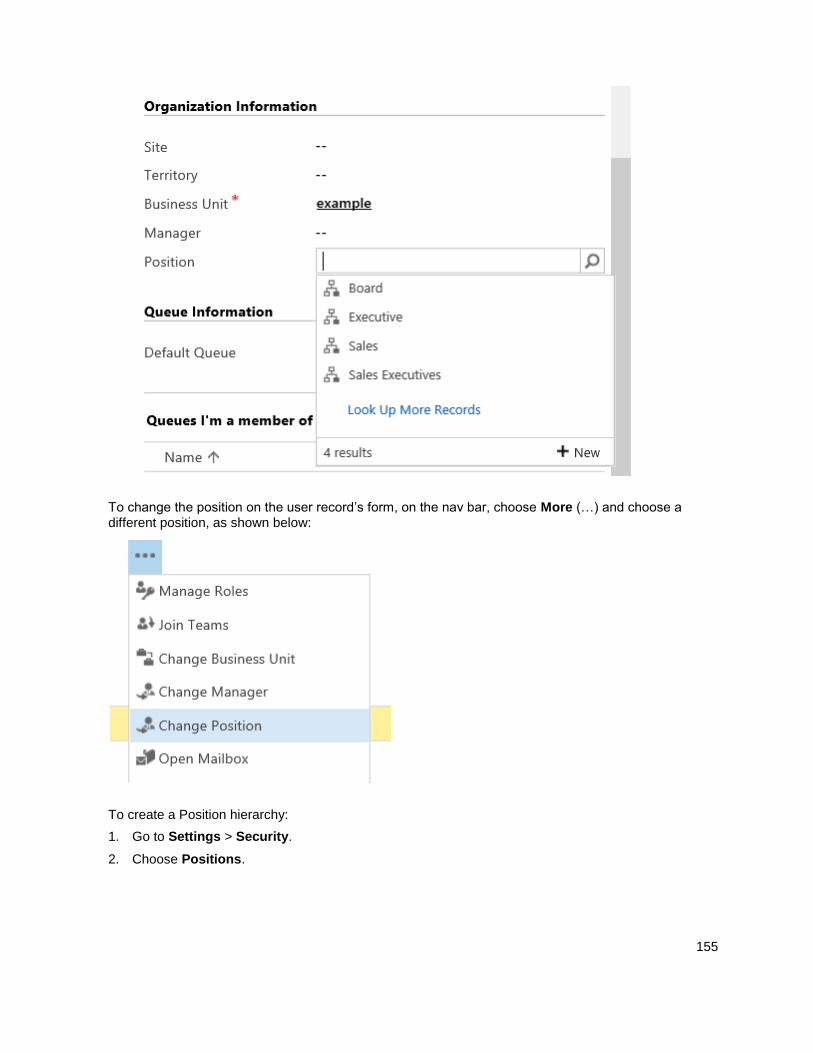
155
To change the position on the user record’s form, on the nav bar, choose More (…) and choose a different position, as shown below:
To create a Position hierarchy:
1. Go to Settings > Security.
2. Choose Positions.
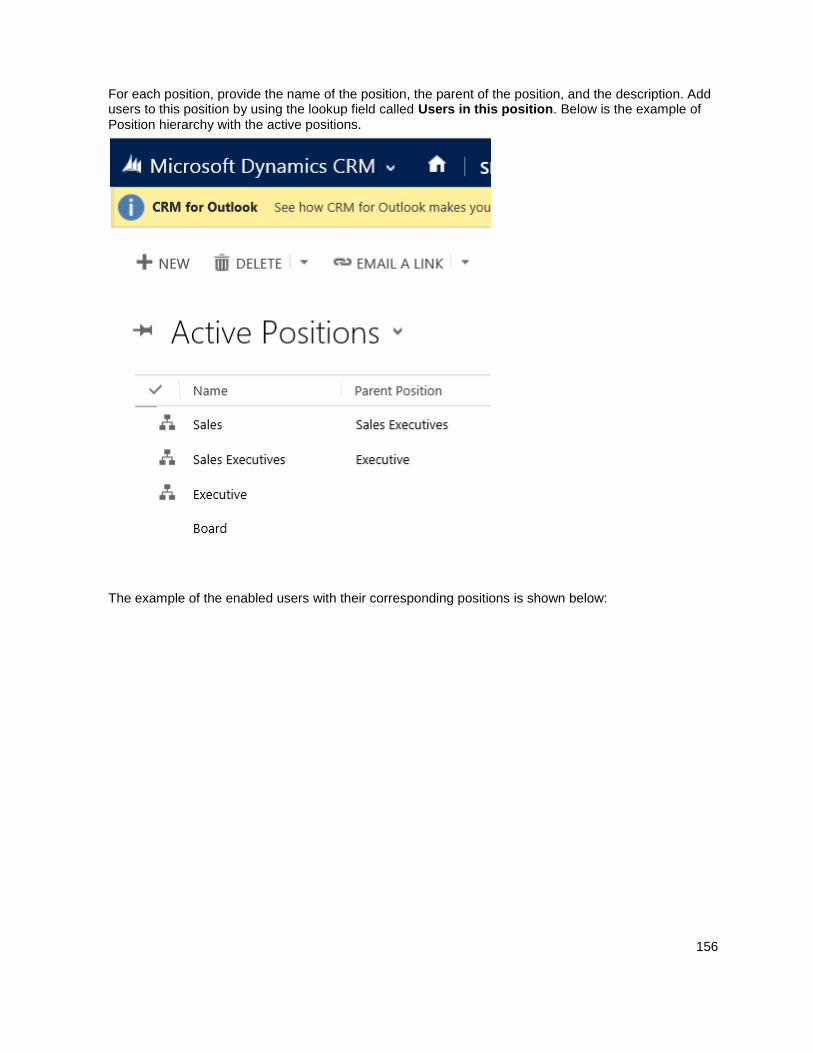
156
For each position, provide the name of the position, the parent of the position, and the description. Add users to this position by using the lookup field called Users in this position. Below is the example of Position hierarchy with the active positions.
The example of the enabled users with their corresponding positions is shown below:
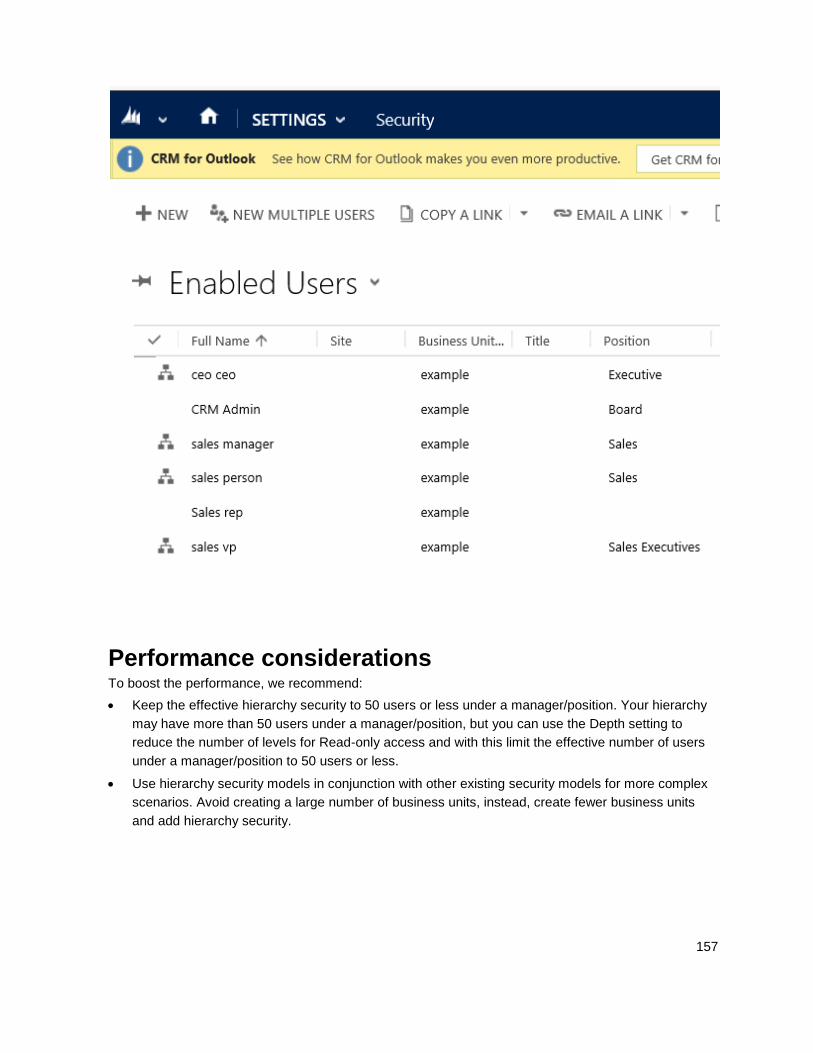
157
Performance considerations To boost the performance, we recommend:
Keep the effective hierarchy security to 50 users or less under a manager/position. Your hierarchy
may have more than 50 users under a manager/position, but you can use the Depth setting to
reduce the number of levels for Read-only access and with this limit the effective number of users
under a manager/position to 50 users or less.
Use hierarchy security models in conjunction with other existing security models for more complex
scenarios. Avoid creating a large number of business units, instead, create fewer business units
and add hierarchy security.
158
See Also Security concepts for Microsoft Dynamics 365 Query and visualize hierarchical data Video: Hierarchical Security Modelling in Microsoft Dynamics CRM 2015 Video: Hierarchy Visualization in Microsoft Dynamics CRM 2015
© 2016 Microsoft. All rights reserved. Copyright
Manage users
Applies To: Dynamics 365 (online), Dynamics 365 (on-premises), Dynamics CRM 2016, Dynamics CRM Online
[This topic is pre-release documentation and is subject to change.]
How you manage users, including creating new users and assigning security roles, depends on the version of Microsoft Dynamics 365 that you have.
In This Topic Manage users in Dynamics 365 (online)
Manage users in Microsoft Dynamics 365 (on-premises)
Manage users in Dynamics 365 (online) To manage users with subscriptions through the Microsoft Dynamics 365 (online) environment, see Referenced topic 'd4ab2d51-15e7-4ad6-9792-35148984a68b' is only available online..
Manage users in Microsoft Dynamics 365 (on-premises) With Microsoft Dynamics 365 (on-premises), you can add users to your organization one at a time, or add multiple users at the same time by using the Add Users wizard.
Add a user
1. Go to Settings > Security.
2. Choose Users.
3. On the toolbar, choose New.
4. On the New User page, in the Account Information section, specify the User Name for the user.
5. In the User Information section, specify the Full Name for the user.
159
6. In the Organization Information section, verify the Business Unit for the user.
7. Follow the step for the task you’re doing:
To save the information for the new user, choose Save.
To save the information for the user and add another user, choose Save & New.
To add another user without saving the information you entered for the user, choose New, and
then in the Message from webpage dialog box, choose OK.
Next, you’ll need to assign a security role to the newly added user. See “Assign a security role to a user” later in this topic.
Add multiple users You can add multiple user records for the same set of security roles by using the Add Users wizard. Any users you add must be in the Active Directory directory service.
1. Go to Settings > Security.
2. Choose Users.
3. On the toolbar, choose New Multiple Users.
The Add Users wizard opens.
4. On the Select Security Roles page, select one or more security roles, and then choose Next.
5. On the Select Access and License Type page, under Access Type, select the appropriate
access type for this set of users.
6. Under License Type, specify the license type for this set of users.
7. Under Email Access Configuration, specify how this set of users will access incoming and
outgoing email messages, and then choose Next.
8. On the Select Domain or Group page, specify to select users from all trusted domains and groups
or users from a particular domain or group, and then choose Next.
9. On the Select Users page, type a part of the name of user you want to add to Microsoft Dynamics
365. Use semi-colons between names.
Note
You can also use Look Up to select users. More information: How Inline Lookup Works
10. Choose Create New Users.
11. On the Summary page, review the information about the user additions, and then follow the step
for the task you are performing:
To close the Add Users wizard, choose Close.
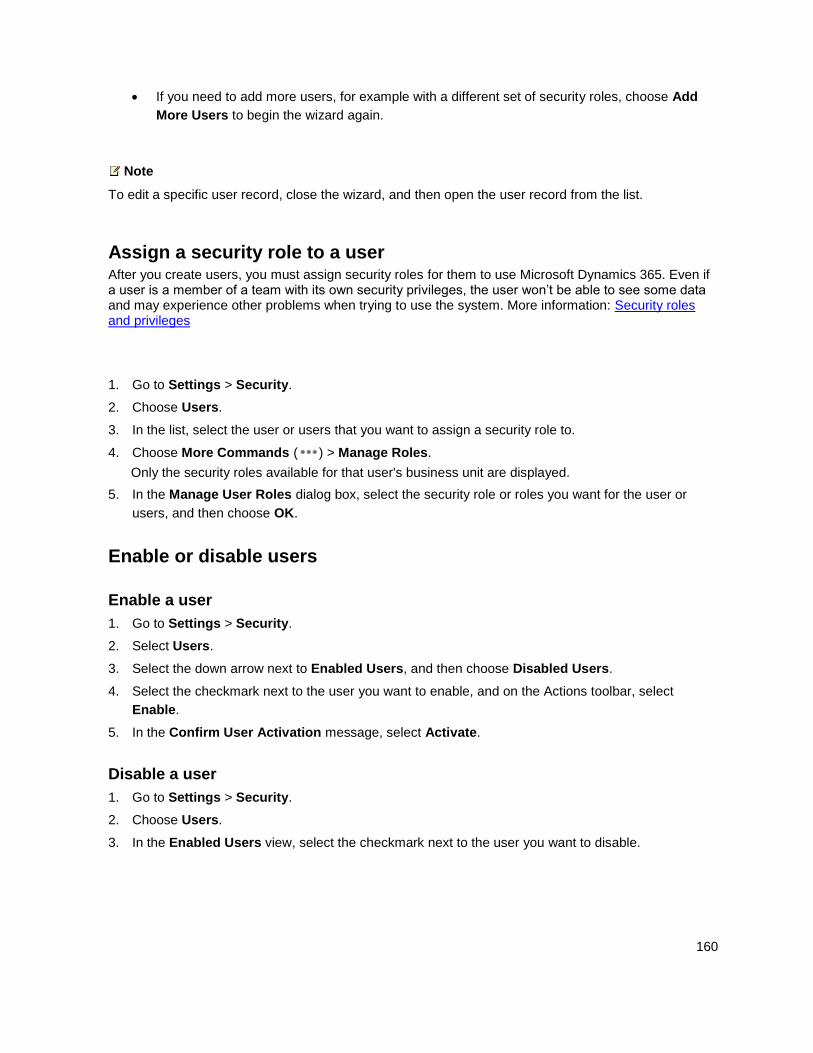
160
If you need to add more users, for example with a different set of security roles, choose Add
More Users to begin the wizard again.
Note
To edit a specific user record, close the wizard, and then open the user record from the list.
Assign a security role to a user After you create users, you must assign security roles for them to use Microsoft Dynamics 365. Even if a user is a member of a team with its own security privileges, the user won’t be able to see some data and may experience other problems when trying to use the system. More information: Security roles and privileges
1. Go to Settings > Security.
2. Choose Users.
3. In the list, select the user or users that you want to assign a security role to.
4. Choose More Commands ( ) > Manage Roles.
Only the security roles available for that user's business unit are displayed.
5. In the Manage User Roles dialog box, select the security role or roles you want for the user or
users, and then choose OK.
Enable or disable users
Enable a user
1. Go to Settings > Security.
2. Select Users.
3. Select the down arrow next to Enabled Users, and then choose Disabled Users.
4. Select the checkmark next to the user you want to enable, and on the Actions toolbar, select
Enable.
5. In the Confirm User Activation message, select Activate.
Disable a user
1. Go to Settings > Security.
2. Choose Users.
3. In the Enabled Users view, select the checkmark next to the user you want to disable.
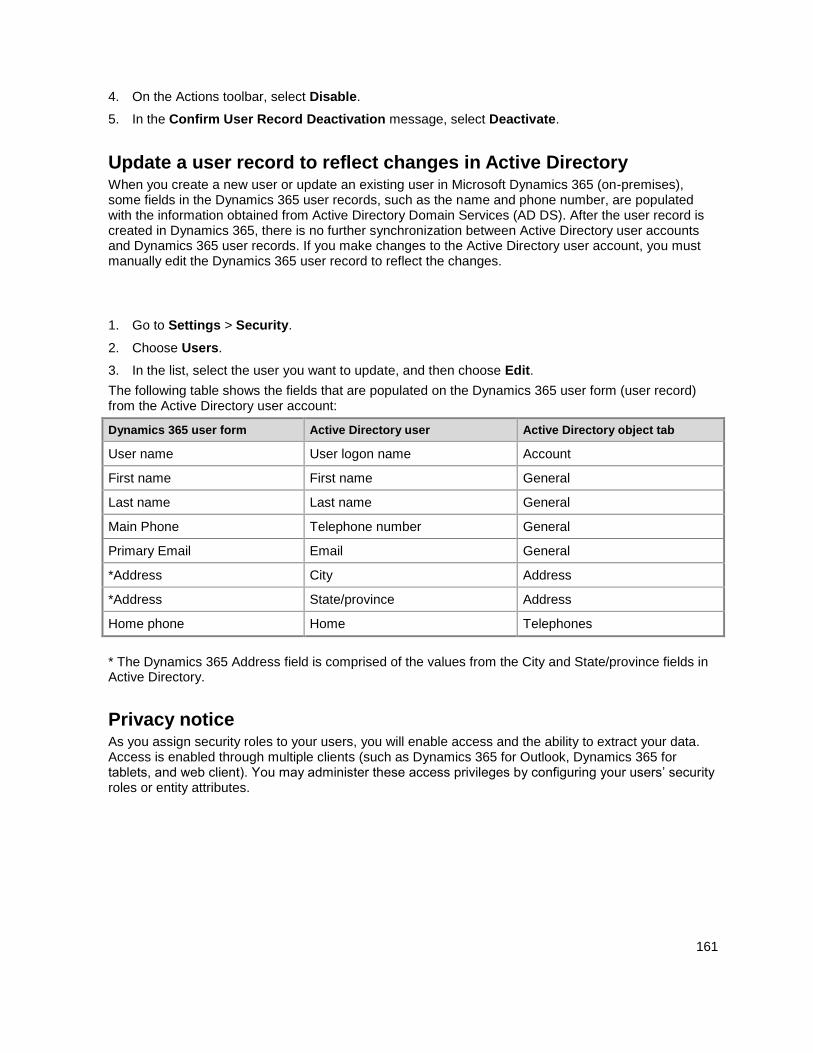
161
4. On the Actions toolbar, select Disable.
5. In the Confirm User Record Deactivation message, select Deactivate.
Update a user record to reflect changes in Active Directory When you create a new user or update an existing user in Microsoft Dynamics 365 (on-premises), some fields in the Dynamics 365 user records, such as the name and phone number, are populated with the information obtained from Active Directory Domain Services (AD DS). After the user record is created in Dynamics 365, there is no further synchronization between Active Directory user accounts and Dynamics 365 user records. If you make changes to the Active Directory user account, you must manually edit the Dynamics 365 user record to reflect the changes.
1. Go to Settings > Security.
2. Choose Users.
3. In the list, select the user you want to update, and then choose Edit.
The following table shows the fields that are populated on the Dynamics 365 user form (user record) from the Active Directory user account:
Dynamics 365 user form Active Directory user Active Directory object tab
User name User logon name Account
First name First name General
Last name Last name General
Main Phone Telephone number General
Primary Email Email General
*Address City Address
*Address State/province Address
Home phone Home Telephones
* The Dynamics 365 Address field is comprised of the values from the City and State/province fields in Active Directory.
Privacy notice As you assign security roles to your users, you will enable access and the ability to extract your data. Access is enabled through multiple clients (such as Dynamics 365 for Outlook, Dynamics 365 for tablets, and web client). You may administer these access privileges by configuring your users’ security roles or entity attributes.
162
See Also Security roles and privileges Manage security, users, and teams Manage teams Manage passwords
© 2016 Microsoft. All rights reserved. Copyright
Manage teams
Applies To: Dynamics 365 (online), Dynamics 365 (on-premises), Dynamics CRM 2016, Dynamics CRM Online
[This topic is pre-release documentation and is subject to change.]
Using teams in Microsoft Dynamics 365 is optional. However, teams provide an easy way to share business objects and let you collaborate with other people across business units. While a team belongs to one business unit, it can include users from other business units. You can associate a user with more than one team.
You can use two types of teams:
An owner team owns records and has security roles assigned to the team. The team’s privileges
are defined by these security roles. In addition to privileges provided by the team, team members
have the privileges defined by their individual security roles and by the roles from other teams in
which they are members. A team has full access rights on the records that the team owns.
An access team doesn’t own records and doesn’t have security roles assigned to the team. The
team members have privileges defined by their individual security roles and by roles from the teams
in which they are members. The records are shared with an access team and the team is granted
access rights on the records, such as Read, Write, or Append.
In This Topic Owner team or access team?
About owner teams
About access teams and team templates
Maximum settings for system-managed access teams
Owner team or access team? Choosing the type of the team may depend on the goals, nature of the project, and even the size of your organization. There are a few guidelines that you can use when choosing the team type.
163
When to use owner teams
Your organization’s policies require the ability for records to be owned by entities other than users,
such as the team entity.
The number of teams is known at the design time of your Microsoft Dynamics 365 system.
Daily reporting on progress by owning teams is required.
When to use access teams
The teams are dynamically formed and dissolved. This typically happens if the clear criteria for
defining the teams, such as established territory, product, or volume are not provided.
The number of teams is not known at the design time of your Microsoft Dynamics 365 system.
The team members require different access rights on the records. You can share a record with
several access teams, each team providing different access rights on the record. For example, one
team is granted the Read access right on the account and another team, the Read, Write, and
Share access rights on the same account.
A unique set of users requires access to a single record without having an ownership of the record.
About owner teams An owner team can own one or more records. To make a team an owner of the record, you must assign a record to the team.
While teams provide access to a group of users, you must still associate individual users with security roles that grant the privileges they need to create, update, or delete user-owned records. These privileges can't be applied by assigning security roles to a team and then adding the user to that team.
If an owner team doesn’t own records and doesn’t have security roles assigned to the team, it can be converted to an access team. It is a one-way conversion. You can’t convert the access team back to the owner team. During conversion, all queues and mailboxes associated with the team are deleted. When you create a team in the Web application, you have to choose the team type Owner.
More information: Help & Training: Create or edit a team, Help & Training: Assign a record to a user or team
About access teams and team templates You can create an access team manually by choosing the team type Access, or let the system create and manage an access team for you. When you create an access team, you can share multiple records with the team.
A system-managed access team is created for a specific record, other records can’t be shared with this team. You have to provide a team template that the system uses to create a team. In this template, you define the entity type and the access rights on the record that are granted to the team members when the team is created.
A team template is displayed on all record forms for the specified entity as a list. When you add the first user to the list, the actual access team for this record is created. You can add and remove members in the team by using this list. The team template applies to the records of the specified entity type and the related entities, according to the cascading rules. To give team members different access on the
164
record, you can provide several team templates, each template specifying different access rights. For example, you can create a team template for the Account entity with the Read access right, which allows the team members to view the specified account. For another team that requires more access to the same account, you can create a team template with Read, Write, Share and other access rights. To be added to the team, a minimum access level a user must have on the entity specified in the template is Basic (User) Read.
Because of the parental relationship between the team template and system-managed access teams, when you delete a template, all teams associated with the template are deleted according to the cascading rules. If you change access rights for the team template, the changes are applied only to the new auto-created (system-managed) access teams. The existing teams are not affected.
Note
A user must have sufficient privileges to join an access team. For example, if the access team has the Delete access right on an account, the user must have the Delete privilege on the Account entity to join the team. If you’re trying to add a user with insufficient privileges, you’ll see this error message: “You can’t add the user to the access team because the user doesn’t have sufficient privileges on the entity.”
For the step-by-step instructions on how to create a team template and add it the entity form, see the article in the Help & Training: Create a team template and add to an entity form
Maximum settings for system-managed access teams The maximum number of team templates that you can create for an entity is specified in the MaxAutoCreatedAccessTeamsPerEntity deployment setting. The default value is 2. The maximum number of entities that you can enable for auto-created access teams is specified in the MaxEntitiesEnabledForAutoCreatedAccessTeams deployment setting. The default value is 5. You can use the Set-CrmSetting Windows PowerShell command to update this value. More information: Referenced topic 'f715ab04-f78f-4bcb-b260-4807091cf7d6' is only available online. or MSDN: Deployment Entities and Deployment Configuration Settings.
See Also Manage security, users, and teams Add teams or users to a field security profile Referenced topic 'f715ab04-f78f-4bcb-b260-4807091cf7d6' is only available online. Help & Training: About team templates Download: Access Teams in Microsoft Dynamics CRM Download: Scalable security modeling with Microsoft Dynamics CRM MSDN: Entity relationship behavior
© 2016 Microsoft. All rights reserved. Copyright
165
Add teams or users to a field security profile
Applies To: Dynamics 365 (online), Dynamics 365 (on-premises), Dynamics CRM 2016, Dynamics CRM Online
[This topic is pre-release documentation and is subject to change.]
Role-based security controls access to a specific entity type, record-based security controls access to individual records, and field-level security controls access to specific fields. You can use a field security profile to manage the permission of users and teams to read, create, or write in secured fields. For example, the System Administrator field security profile gives full access to all secured fields in Microsoft Dynamics 365.
1. Go to Settings > Security.
2. Choose Field Security Profiles.
3. Choose the profile name that you want to add teams or users to.
4. Under Related, choose Teams or Users.
5. On the Actions toolbar, choose Add.
6. Select a team or user from the list. You can search for a team or user first.
7. Choose Add.
8. Close the field security profile record.
See Also Security roles and privileges Security concepts for Microsoft Dynamics 365 Manage security, users, and teams Synchronize user information between Microsoft Dynamics 365 and Active Directory
© 2016 Microsoft. All rights reserved. Copyright
Synchronize user information between Microsoft Dynamics 365 and Active Directory
Applies To: Dynamics 365 (online), Dynamics 365 (on-premises), Dynamics CRM 2016, Dynamics CRM Online
[This topic is pre-release documentation and is subject to change.]
166
Microsoft Dynamics 365 supports two methods for authenticating users:
Integrated Windows Authentication
Claims-based authentication
By default, customers who purchase Microsoft Dynamics 365 and deploy it on-premises use Windows Authentication. These customers also can set up claims-based authentication for Internet-facing deployments (IFDs) of the product.
With integrated Windows Authentication, each user record in Dynamics 365 must be associated with a user account in Active Directory to enable log on to Dynamics 365. When the user records are associated, Dynamics 365 automatically reads and stores other information about the user record (including the first and last name, the email address, and the globally unique identifier, or GUID) from the Active Directory directory service.
However, changes to the Active Directory information associated with a specific user can create discrepancies with the information maintained in Dynamics 365, thereby preventing the user from accessing Dynamics 365. Specifically, if value of the User SamAccountName logon attribute in Active Directory changes for a user, the corresponding user information in Dynamics 365 won’t match and the user won’t be able log on..
To ensure that the user can successfully log on to Dynamics 365, you must update the information in the Dynamics 365 user record so that it matches the detail in Active Directory.
Before you start, be sure to record the value of the User SamAccountName logon attribute for the affected user before updating the corresponding user record in Dynamics 365.
Note
For information about synchronizing Microsoft Dynamics 365 (online) with Active Directory, see the blog post How to Synchronize CRM Online with your Active Directory.
1. Go to Settings > Security.
2. Choose Users.
3. In the list of users, choose to select the user record you want to update, and then choose Edit.
4. In the User Name text box, type an Active Directory user name that isn’t used by any Dynamics
365 user record.
Important
If you specify a user name that already exists in Active Directory, Dynamics 365 will try to map the user to the updated user in Active Directory, and when it locates an existing record with the same GUID, the mapping will fail.
If all the user accounts in Active Directory are used by Dynamics 365 user records, create a temporary Active Directory user account.
167
5. Save the user record, and then in the User Name text box, type in the User SamAccountName
logon value that appears for the user Active Directory, which you recorded prior to starting this
procedure.
6. Choose Save and Close.
See Also Manage security, users, and teams Add or remove territory members
© 2016 Microsoft. All rights reserved. Copyright
Add or remove territory members
Applies To: Dynamics 365 (online), Dynamics 365 (on-premises), Dynamics CRM 2016, Dynamics CRM Online
[This topic is pre-release documentation and is subject to change.]
To accommodate changes in sales territories or the representatives that are assigned to each territory, you can add or remove territory members in Microsoft Dynamics 365.
1. Go to Settings > Business Management.
2. Choose Sales Territories.
3. In the list of territories, under Territory Name, double-click or tap the entry for the territory you want
to add people to or remove people from.
4. In the Navigation Pane, expand Common if necessary, and then choose Members.
Follow the steps for the task you’re performing:
Add people to a sales territory
a. On the ribbon, choose Add Members, view the text in the Message from webpage dialog box,
and then choose OK to close the dialog box.
b. In the Look Up Records dialog box, in the Search text box, type in the name or a part of the
name of the user you want to add to the sales territory, and then choose the Start search icon
.
168
c. In the list of records, select the people you want to add to the sales territory, and then tap or
click Add.
Remove people from a sales territory
a. In the list of members, select the people you want to remove from the sales territory, and then
on the ribbon, choose Remove Members.
b. In the Remove Members dialog box, choose Remove.
Note
When you remove someone from a sales territory, the updated list of members isn’t displayed until you refresh the page.
See Also Manage users Manage security, users, and teams
© 2016 Microsoft. All rights reserved. Copyright
Troubleshooting: User needs read-write access to the Dynamics 365 organization
Applies To: Dynamics 365 (online), Dynamics 365 (on-premises), Dynamics CRM 2016, Dynamics CRM Online
[This topic is pre-release documentation and is subject to change.]
You don’t have sufficient permissions to access Microsoft Dynamics 365. A Dynamics 365 system administrator will need to do the following in the Dynamics 365 application:
1. Go to Settings > Security.
2. Choose Users.
3. Open the user record.
4. Choose More Commands ( ) > Manage Roles.
5. Make note of the role assigned to the user. If appropriate, select a different security role. Close the
Manage User Roles dialog box.
6. Choose Security > Security Roles.
7. Choose the security role from step 4.
8. Choose Core Records.
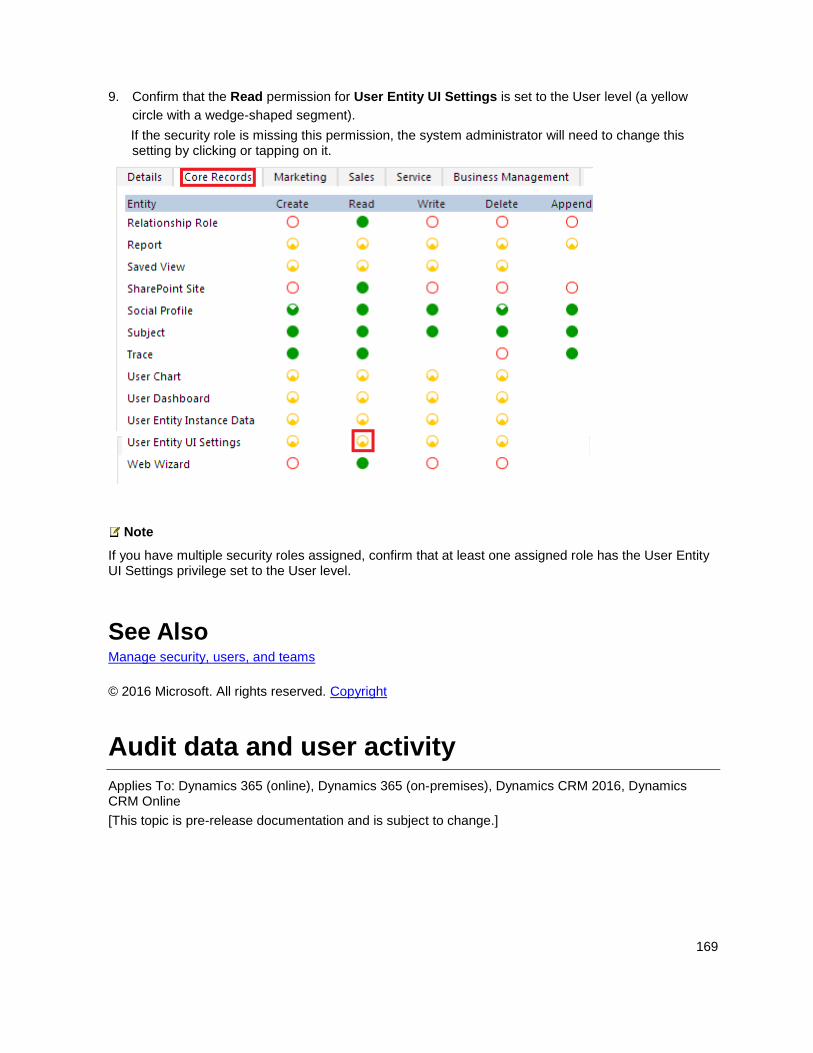
169
9. Confirm that the Read permission for User Entity UI Settings is set to the User level (a yellow
circle with a wedge-shaped segment).
If the security role is missing this permission, the system administrator will need to change this setting by clicking or tapping on it.
Note
If you have multiple security roles assigned, confirm that at least one assigned role has the User Entity UI Settings privilege set to the User level.
See Also Manage security, users, and teams
© 2016 Microsoft. All rights reserved. Copyright
Audit data and user activity
Applies To: Dynamics 365 (online), Dynamics 365 (on-premises), Dynamics CRM 2016, Dynamics CRM Online
[This topic is pre-release documentation and is subject to change.]
170
The Microsoft Dynamics 365 auditing feature logs changes that are made to customer records and user access so you can review the activity later. The auditing feature is designed to meet the auditing, compliance, security, and governance policies of many regulated enterprises.
The audit logs help the Microsoft Dynamics 365 Administrator answer questions such as:
Which user was accessing the system and when?
Who updated this field value on this record and when?
What was the previous field value before it was updated?
What actions has this user taken recently?
Who deleted this record?
What locale was used to make the update?
The following operations can be audited:
Create, update, deactivate, and delete operations on records.
Changes to the sharing privileges of a record.
The N:N association or disassociation of records.
Changes to security roles.
Audit changes at the entity, attribute, and organization level. For example, enabling audit on an
entity.
Deletion of audit logs.
For changes made to entity fields that can be localized, such as the Product entity name or
description fields, the locale ID (LCID) appears in the audit record.
System administrators and customizers can start or stop auditing for an organization.
Important
For Dynamics 365 (on-premises), you may notice that auditing can significantly increase the size of the organization database over time. You can delete audit logs by going to Settings > Auditing > Audit Log Management. Additionally, you may want to stop auditing for maintenance purposes. Stopping auditing stops tracking for the organization during the period until auditing is started again. When you start auditing again, the same auditing selection is maintained that was previously used.
In This Topic Start or stop auditing for an organization
View audit logging details
Enable or disable entities and fields for auditing
Start or stop auditing for an organization This task requires the system administrator or customizer security role or equivalent permissions.
171
1. Go to Settings > Administration.
2. Choose System Settings.
3. On the Auditing tab, select the Start Auditing check box to start auditing. Clear the Start
Auditing check box to stop all auditing.
4. Select the entities you want to track. To start or stop auditing on specific entities, select or clear the
following check boxes:
Audit user access. Tracks when a user accesses Microsoft Dynamics 365 including the user
name and time.
Common Entities. Tracks common entities like Account, Contact, Goal, Product, and User.
Sales Entities. Tracks sales-related entities lilke Competitor, Opportunity, Invoice, Order, and
Quote.
Marketing Entities. Tracks Campaign entity activity.
Customer Service Entities. Tracks Case, Contract, Queue, and Service entity activity.
5. Click OK.
View audit logging details System administrators can see activity for the entities that are enabled for audit logging.
1. Go to Settings > Auditing.
2. Choose Audit Summary View.
3. In the Audit Summary View, you can do the following:
Click Enable/Disable Filters to turn on filtering. Then, you can filter on a specific event, such
as Delete actions.
Choose an Event to view specific details about the activity, such as field changes that were
made during an update to a record and who performed the update.
Click the Refresh button to view the most recent activity.
Enable or disable entities and fields for auditing System administrators or customizers can change the default audit settings for entities and for specific fields for an entity.
To enable or disable auditing for an entity
1. Go to Settings > System.
172
2. Click Auditing.
3. In the Audit area, choose Entity and Field Audit Settings.
4. Under Components, expand Entities.
5. Open the entity for which you want to enable or disable auditing.
6. To start auditing, on the General tab, in the Data Services section, select the Auditing check box
to enable auditing, or clear the Auditing check box to disable it.
By default, when you start or stop auditing for an entity, you also start or stop auditing for all the fields of this entity.
7. Click Save.
8. Publish the customization. To publish for a single entity, choose the entity, such as Account, and
then click Publish on the toolbar.
To enable or disable auditing for specific fields on an entity
1. Under the entity for which you want to enable or disable auditing with specific fields, click Fields.
2. To enable or disable a single field, open the field and in the Auditing section, select Enable or
Disable.
To enable or disable more than one field, select the fields you want, and then on the toolbar click Edit. In the Edit Multiple Fields dialog box, in the Auditing area, click Enabled or Disabled.
3. Click Save.
4. Publish the customization. To publish for a single entity, choose the entity, such as Account, and
then click Publish on the Actions toolbar.
See Also Manage security, users, and teams Customize your Dynamics 365 system TechNet: Audit data and user activity
© 2016 Microsoft. All rights reserved. Copyright
Customize your Dynamics 365 system
Applies To: Dynamics 365 (online), Dynamics 365 (on-premises), Dynamics CRM 2016, Dynamics CRM Online
[This topic is pre-release documentation and is subject to change.]
IT Pros and Dynamics 365 administrators can use the resources and topics provided in this section to help them customize the Microsoft Dynamics 365 (online & on-premises).
173
In This Section Getting started with customization
Change the color scheme or add a logo to match your organization’s brand
Changes to forms and views in Dynamics 2015
Create and edit metadata
Create and design forms
Create and design interactive forms for the interactive service hub
Create and edit views
Create and edit dashboards
Configure interactive experience dashboards
Create and edit processes
Create and edit business rules
Create and edit web resources
Define alternate keys to reference Dynamics 365 records
Query and visualize hierarchical data
Customize the Help experience
Customize Dynamics 365 for phones and tablets
See Also Administering Dynamics 365 Manage security, users, and teams Video: 6 ways to customize CRM (without writing any code) White paper: UX Design Guidelines for Microsoft Dynamics CRM
© 2016 Microsoft. All rights reserved. Copyright
Getting started with customization
Applies To: Dynamics 365 (online), Dynamics 365 (on-premises), Dynamics CRM 2016, Dynamics CRM Online
[This topic is pre-release documentation and is subject to change.]
You can tailor Microsoft Dynamics 365 (online) to more closely fit your organization’s industry, nomenclature, and unique business processes by customizing the service. You can implement many customizations without developer support by using tools that are part of the service. More information: Customize your Dynamics 365 system
The following table shows some examples of customizations.
Customization Definition Reason for the customization
Entity An item with properties that you track, such as a contact or account. For an entity you might
You can create or modify the name or properties of an entity that your organization wants to
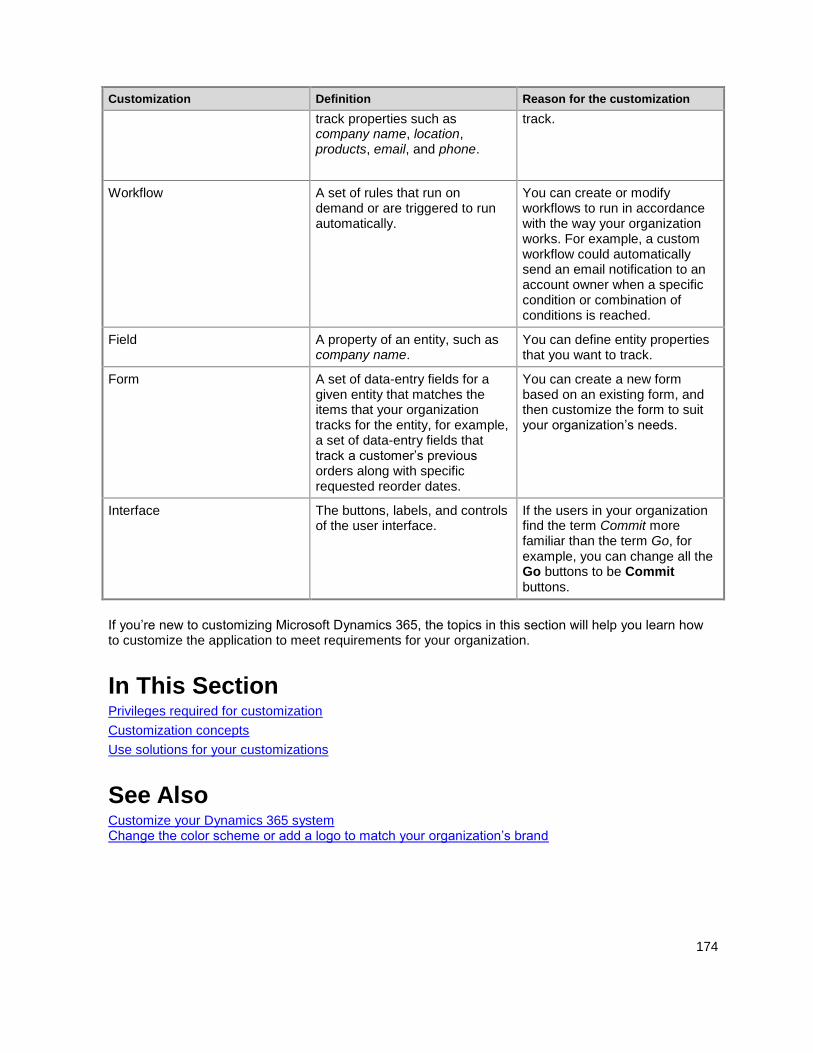
174
Customization Definition Reason for the customization
track properties such as company name, location, products, email, and phone.
track.
Workflow A set of rules that run on demand or are triggered to run automatically.
You can create or modify workflows to run in accordance with the way your organization works. For example, a custom workflow could automatically send an email notification to an account owner when a specific condition or combination of conditions is reached.
Field A property of an entity, such as company name.
You can define entity properties that you want to track.
Form A set of data-entry fields for a given entity that matches the items that your organization tracks for the entity, for example, a set of data-entry fields that track a customer’s previous orders along with specific requested reorder dates.
You can create a new form based on an existing form, and then customize the form to suit your organization’s needs.
Interface The buttons, labels, and controls of the user interface.
If the users in your organization find the term Commit more familiar than the term Go, for example, you can change all the Go buttons to be Commit buttons.
If you’re new to customizing Microsoft Dynamics 365, the topics in this section will help you learn how to customize the application to meet requirements for your organization.
In This Section Privileges required for customization
Customization concepts
Use solutions for your customizations
See Also Customize your Dynamics 365 system Change the color scheme or add a logo to match your organization’s brand
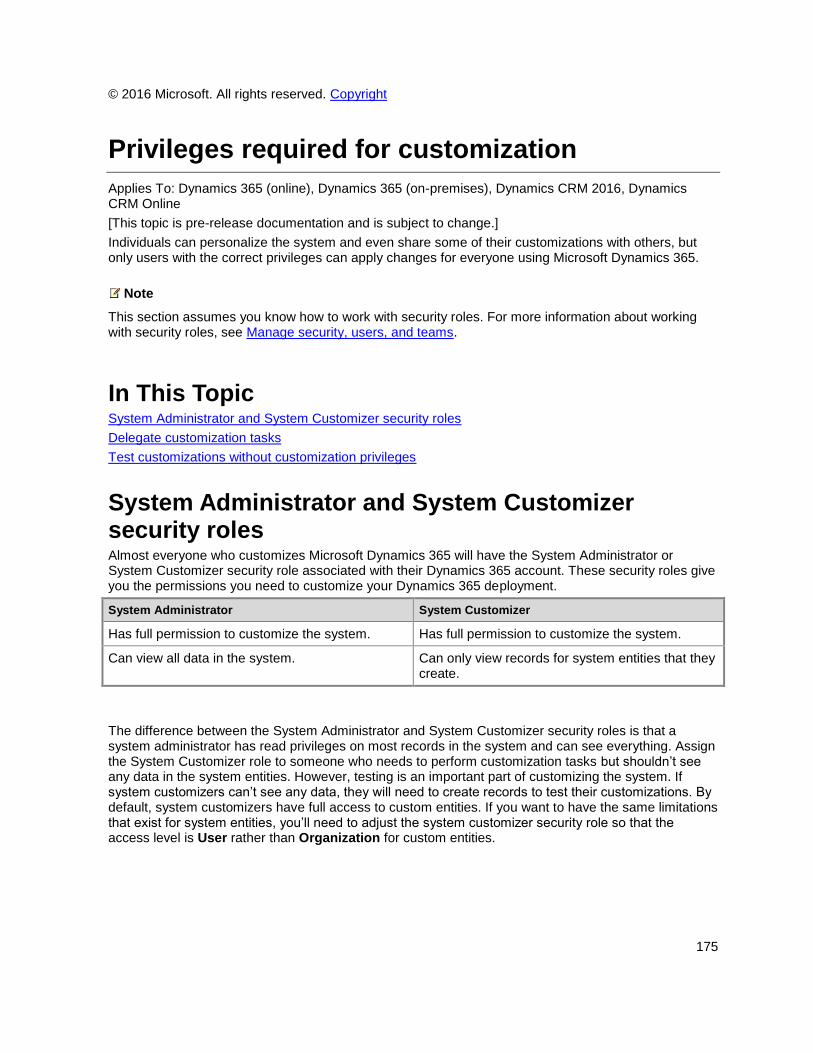
175
© 2016 Microsoft. All rights reserved. Copyright
Privileges required for customization
Applies To: Dynamics 365 (online), Dynamics 365 (on-premises), Dynamics CRM 2016, Dynamics CRM Online
[This topic is pre-release documentation and is subject to change.]
Individuals can personalize the system and even share some of their customizations with others, but only users with the correct privileges can apply changes for everyone using Microsoft Dynamics 365.
Note
This section assumes you know how to work with security roles. For more information about working with security roles, see Manage security, users, and teams.
In This Topic System Administrator and System Customizer security roles
Delegate customization tasks
Test customizations without customization privileges
System Administrator and System Customizer security roles Almost everyone who customizes Microsoft Dynamics 365 will have the System Administrator or System Customizer security role associated with their Dynamics 365 account. These security roles give you the permissions you need to customize your Dynamics 365 deployment.
System Administrator System Customizer
Has full permission to customize the system. Has full permission to customize the system.
Can view all data in the system. Can only view records for system entities that they create.
The difference between the System Administrator and System Customizer security roles is that a system administrator has read privileges on most records in the system and can see everything. Assign the System Customizer role to someone who needs to perform customization tasks but shouldn’t see any data in the system entities. However, testing is an important part of customizing the system. If system customizers can’t see any data, they will need to create records to test their customizations. By default, system customizers have full access to custom entities. If you want to have the same limitations that exist for system entities, you’ll need to adjust the system customizer security role so that the access level is User rather than Organization for custom entities.
176
Delegate customization tasks You might want to delegate some tasks to trusted people so that they can apply changes they need. Keep in mind that anyone can have multiple security roles associated with their user account and that privileges and access rights granted by security roles is based on the least restrictive level of permissions.
This means that you can give the System Customizer security role to someone who already has another security role, perhaps a sales manager., This lets them customize the system in addition to other privileges they already have. You don’t need to edit the security role they already have, and you can remove the System Customizer security role from the person’s user account when you want.
Test customizations without customization privileges You should always test any customizations you make with a user account that doesn’t have customization privileges. This way you can make sure that people without the System Administrator or System Customizer security roles will be able to use your customizations. To do this effectively, you need access to two user accounts: One account with the System Administrator security role and another that has the security roles that represent the people who will be using the customizations.
Important
Don’t attempt to remove your System Administrator security role if you have only one user account. The system will warn you if you try, but if you proceed you could find that you won’t be able to get it back. Most security roles don’t allow editing of a user’s security roles.
See Also Getting started with customization Customization concepts Use solutions for your customizations
© 2016 Microsoft. All rights reserved. Copyright
Customization concepts
Applies To: Dynamics 365 (online), Dynamics 365 (on-premises), Dynamics CRM 2016, Dynamics CRM Online
[This topic is pre-release documentation and is subject to change.]
The way your organization works is unique. Some organizations have well-defined business processes that they apply using Microsoft Dynamics 365. Others aren’t happy with their current business processes and use Dynamics 365 to apply new data and processes to their business. Whatever situation you find yourself in, you’ll find a lot of customization capabilities in Dynamics 365 so that it can work for your organization.
177
Of course you’re eager to get started, but please take a few minutes to read the content in this section. This will introduce you to important terms, give you some background about why things are done a certain way, and help you avoid potential problems in the future.
In This Topic What is metadata and why should you care?
What kinds of customizations are supported?
What kinds of customizations aren’t supported?
What you need to know about solutions
Publishing customizations
Prepare client customizations to improve performance for mobile and interactive service hub
Changes that affect Dynamics 365 organization performance
Combine customization capabilities
Additional capabilities not included in this guide
What is metadata and why should you care? In the past, you customized business applications by editing the source code. This created complications because each organization had unique changes and it was very difficult, or extremely expensive, to upgrade. Then, application developers started exposing application programming interfaces (APIs) so that other developers could interact with the application and add their own logic without touching the source code. This was moderately better because it means developers can extend the application without changing it. But it still requires a developer to write code.
Today, modern business applications use a metadata-driven architecture so that people can customize the application without writing code. Metadata means “data about data” and it defines the structure of the data stored in the system. With this metadata, an application knows about any changes to the data structure and this enables the application to adapt as the data structure changes. Since the metadata is known, additional capabilities can be included that are tied to the metadata.
When you customize Microsoft Dynamics 365 using the customization tools in the application, you’re adding or updating the metadata or data used by features that depend on the metadata. Because we know the kinds of data used to customize the system, we can take this data into account and add new features to Dynamics 365 without breaking your system. This way you should always be able to apply an update rollup or upgrade to the latest version and enjoy the best new features.
Customize or Configure? Most people say that they want to customize the application, so we use the word “customize” to describe changing the system to make it work the way you want. Some people prefer to use the word “configure” because it suggests that no code was required to make changes. Call it whatever you like, we just want to make it clear that you don’t need to be a developer to customize Microsoft Dynamics 365.
Microsoft Dynamics 365 provides a set of web services and APIs that allow developers to write code. When code is written using supported methods you can expect that it will continue to work when you upgrade your organization.
178
What kinds of customizations are supported? We expect that you can do most of your customization with the tools in the application. Everything you do by using those tools is supported by Microsoft because they apply changes to the metadata or data that depends on the metadata.
But, if the customization tools don’t meet your needs, you can install a solution provided by a third party or hire a developer to code your customizations. Either way, it’s good for you to understand supported customizations. If you need to invest in a solution that requires code, you should make sure that the code is written using only supported APIs. This helps you protect your investment in both Dynamics 365 and any solutions you get.
Developers who extend Microsoft Dynamics 365 have a responsibility to follow rules and best practices documented in the SDK: MSDN: Best practices for developing with Microsoft Dynamics 365. The SDK documents the APIs available to developers and provides guidance about how to best use them. Microsoft supports only the APIs and practices that are documented in the SDK. You may find something on the Internet that describes how you can solve a problem, but if it doesn’t leverage APIs documented in the SDK, it isn’t supported by Microsoft. Before you have a developer apply a change you should verify whether it uses supported methods.
If developers use the APIs and best practices described in the SDK we can be sure to test whether any of the changes we make to Dynamics 365 has the potential to break existing customizations. Our goal is that code customizations written using supported methods will continue to work when new versions or updates of Dynamics 365 are released. You benefit because you can upgrade to new versions with improved features without having developers change their code each time.
If we detect that a change in a new version of Dynamics 365 will cause a supported customization to break, we will document what is affected and how people can change their code to fix it.
What kinds of customizations aren’t supported? Just because certain APIs and programming practices aren’t supported by Microsoft doesn’t mean that they don’t work. “Unsupported by Microsoft” means exactly what it says: you can’t get support about these APIs or programming practices from Microsoft. We don’t test them and we don’t know if something we change will break them. We can’t predict what will happen if someone changes code in our application.
The developer who uses unsupported APIs and programming practices assumes the responsibility to support their code. They will need to test their code to make sure it works.
If you choose to use unsupported customizations in your Dynamics 365 deployment you should be sure to document what was done and have a strategy to remove those customizations before you contact Microsoft Dynamics 365 Technical Support. If you need help with unsupported customizations, contact the developer or organization who prepared the customizations.
Common unsupported customization practices The following is a list of common customization practices that aren’t supported. This is not a complete list. More information: MSDN: Supported extensions for Microsoft Dynamics 365: Unsupported customizations
Interacting with the web application Document Object Model (DOM) elements using JavaScript
Any JavaScript libraries used anywhere in the application must only interact with the documented APIs. When JavaScript developers work with applications they frequently access DOM elements using specific names. Because Microsoft Dynamics 365 is a web
179
application these techniques work, but they are likely to break during an update because the names of the elements they reference are subject to change at any time. We reserve the right to make any changes necessary in the application and this frequently means changing how the page is constructed. Adding any changes that depend on the current structure of the page means that you’ll need to invest in testing and perhaps changing the custom code in these scripts each time you apply an update to your application.
jQuery is a very common library used by JavaScript developers. Most of the benefit of using jQuery is that it simplifies a developer’s ability to access and create DOM elements, which is exactly what we do not support in the Dynamics 365 application pages. jQuery is recommended when developers are creating custom user interfaces with HTML web resources, but within the Dynamics 365application pages, the supported APIs do not require jQuery to be used.
Using any undocumented internal objects or methods using JavaScript
Microsoft Dynamics 365 uses many JavaScript objects within pages. A JavaScript developer can discover these objects by debugging a page and then access and reuse these objects. We reserve the right to make any changes necessary to these objects, including removing them or changing the names of the methods. If a script references these objects, the script will break if they are not found.
Directly changing files in the application
If you have Microsoft Dynamics 365 on-premises you have access to the web application installed on your server. The web application contains many text files that a developer could edit or replace to change the behavior or appearance of the application. Changing these files isn't supported because any update that you install could remove your changes and the files will be overwritten when you update to the next release.
Retrieving data directly from database tables
If you have Microsoft Dynamics 365 on-premises you have access to the database so that you could retrieve data directly from the tables. However, by doing this you‘re bypassing the security infrastructure. The recommended practice is to use special filtered views to retrieve the data. This will apply the calling user’s security so that they can only see data that they should see.
Updating data directly in the database tables
If you have Microsoft Dynamics 365 on-premises you can perform updates on the Dynamics 365 data directly in the database tables. The risk with this approach is that you can set invalid data that can break the application. Developers should always use the APIs provided with the application platform web services to update data.
Changing the database tables, stored procedures, or views
If you have Microsoft Dynamics 365 on-premises you can use database tools to change the database. The only direct database changes that are supported are adding or updating indexes. You should use the customization tools to add any new entities or entity attributes. This is the only supported way to apply changes to these parts of the database. Any direct changes you make risk breaking the application or your ability to apply update rollups. Any changes you apply may be destroyed when you apply an update or during an upgrade and any data that you may have included in custom database table columns will be lost.
How to check an organization for unsupported customizations If you aren’t certain your organization has unsupported customizations, you can run the Custom Code Validation Tool. This tool is a solution that scans the organization and can detect certain kinds of unsupported customizations, such as deprecated APIs, that may exist and then returns information

180
about the customization. Notice that the Custom Code Validation Tool may not detect other unsupported customizations as described earlier in Common unsupported customization practices or in some cases may detect customizations that are supported as unsupported. For more information, see the documentation that is included with the tool.
Download and run the Custom Code Validation Tool
1. First, verify that the organization has one or more solutions imported. Outdated solutions are the
most common cause of unsupported customizations. Go to Settings > Solutions. . Installed
solutions will appear in the All Solutions view.
2. Download the Custom Code Validation Tool.
3. Import the Custom Code Validation Tool. More information: Import solutions
4. Run the Custom Code Validation Tool. For more information, see the Readme file that is included
with the download.
What you need to know about solutions Solutions exist so that a set of customizations can be purchased, shared or otherwise transported from one organization to another. You can get solutions in the Microsoft Dynamics Marketplace or from an independent software vendor (ISV). A Dynamics 365 solution is a file that you can import to apply a set of customizations.
More information: Whitepaper: Patterns and Principles for Solution Builders
Note
If you’re an ISV creating a customization that you will distribute, you’ll need to use solutions. For more information about using solutions, see MSDN: Package and Distribute Extensions.
If you are just interested in customizing your organization, here is what you need to know about solutions:
Creating solutions is optional. You can customize your Dynamics 365 system directly without ever
creating a solution.
When you customize the Dynamics 365 system directly, you work with a special solution called the
Default Solution. This solution contains all the components in your system.
You can export your Default Solution to create a backup of the customizations you have defined in
your organization. This is good to have in a worst case scenario.
Solution components A solution component represents something that you can potentially customize. Anything that can be included in a solution is a solution component. The following is a list of solution components that you can view in a solution:
Application Ribbon
Article Template
181
Business Rule
Chart
Connection Role
Contract Template
Dashboard
Email Template
Entity
Entity Relationship
Field
Field Security Profile
Form
Mail Merge Template
Message
Option Set
Plug-in Assembly
Process
Sdk Message Processing Step
Security Role
Service Endpoint
Site Map
Web Resource
Most solution components are nested within other solution components. For example, an entity contains forms, views, charts, fields, entity relationships, messages, and business rules. Each of those solution components requires an entity to exist. A field can’t exist outside of an entity. We say that the field is dependent on the entity. There are actually twice as many types of solution components as shown in the preceding list, but most of them are not visible in the application.
The purpose of having solution components is to keep track of any limitations on what can be customized using Managed properties and all the Solution dependencies so that it can be exported, imported, and (in managed solutions) deleted without leaving anything behind.
Managed and unmanaged solutions A managed solution can be uninstalled after it is imported. All the components of that solution are removed by uninstalling the solution.
When you import an unmanaged solution, you add all the components of that solution into your default solution. You can’t remove the components by uninstalling the solution.
When you import an unmanaged solution that contains solution components that you have already customized, your customizations will be overwritten by the customizations in the unmanaged solution. You can’t undo this.
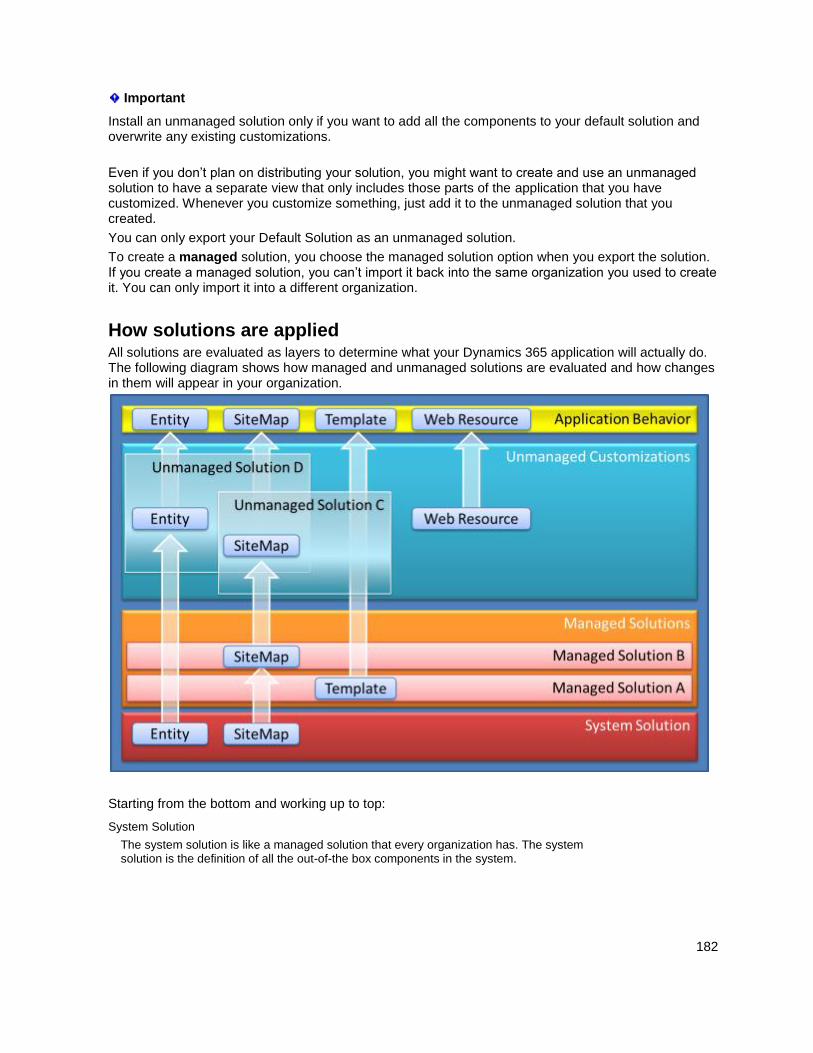
182
Important
Install an unmanaged solution only if you want to add all the components to your default solution and overwrite any existing customizations.
Even if you don’t plan on distributing your solution, you might want to create and use an unmanaged solution to have a separate view that only includes those parts of the application that you have customized. Whenever you customize something, just add it to the unmanaged solution that you created.
You can only export your Default Solution as an unmanaged solution.
To create a managed solution, you choose the managed solution option when you export the solution. If you create a managed solution, you can’t import it back into the same organization you used to create it. You can only import it into a different organization.
How solutions are applied All solutions are evaluated as layers to determine what your Dynamics 365 application will actually do. The following diagram shows how managed and unmanaged solutions are evaluated and how changes in them will appear in your organization.
Starting from the bottom and working up to top:
System Solution
The system solution is like a managed solution that every organization has. The system solution is the definition of all the out-of-the box components in the system.
183
Managed Solutions
Managed solutions can modify the system solution components and add new components. If multiple managed solutions are installed, the first one installed is below the managed solution installed later. This means that the second solution installed can customize the one installed before it. When two managed solutions have conflicting definitions, the general rule is “Last one wins”. If you uninstall a managed solution, the managed solution below it takes effect. If you uninstall all managed solution, the default behavior defined within the system solution is applied.
Unmanaged Customizations
Unmanaged customizations are any change you have made to your organization through an unmanaged solution. The system solution defines what you can or cannot customize by
using Managed properties. Publishers of managed solutions have the same ability to limit
your ability to customize solution components that they add in their solution. You can customize any of the solution components that do not have managed properties that prevent you from customization them.
Application Behavior
This is what you actually see in your organization. The default system solution plus any managed solutions, plus any unmanaged customizations you have applied.
Managed properties Some parts of Microsoft Dynamics 365 can’t be customized. These items in the system solution have metadata that prevents you from customizing them. These are called managed properties. The publisher of a managed solution can also set the managed properties to prevent you from customizing their solution in ways they don’t want you to.
Solution dependencies Because of the way that managed solutions are layered some managed solutions can be dependent on solution components in other managed solutions. Some solution publishers will take advantage of this to build solutions that modular. You may need to install a “base” managed solution first and then you can install a second managed that will further customize the components in the base managed solution. The second managed solution depends on solution components that are part of the first solution.
Dynamics 365 tracks these dependencies between solutions. If you try to install a solution that requires a base solution that isn’t installed, you won’t be able to install the solution. You will get a message saying that the solution requires another solution to be installed first. Similarly, because of the dependencies, you can’t uninstall the base solution while a solution that depends on it is still installed. You have to uninstall the dependent solution before you can uninstall the base solution.
Solution publisher Every solution has a publisher. The default solution has a publisher named “Default Publisher for <your organization name>”.
The publisher record contains a Prefix value. The default value of this prefix is “new”. When you create new solution components, this prefix will be appended to the name. This is a quick way that allows people to understand what solution the components are part of.
Before you start customizing the system we recommend that you change the prefix value for the default publisher to something that identifies your company.
184
To change the Solution Publisher Prefix for the default publisher
1. Go to Settings > Customizations.
2. Select Publishers.
3. If there is more than one publisher, open the one with the Display Name that starts with Default
Publisher for<your organization name>.
4. At the bottom of the form, update the Prefix field to change the default value of “new” to something
that identifies your organization.
5. When you change the value, make sure to tab to the next field. The Option Value Prefix will
automatically generate a number based on the customization prefix. This number is used when you
add options to option sets and provides an indicator of which solution was used to add the option.
Publishing customizations Certain customizations that make changes to the user interface require that they be published before people can use them in the application. Publishing provides a way for you to save your work before you have finished and then come back and finish at a later time. Publishing is only required when you change a solution component. When you create or delete a solution component, publishing occurs automatically. Before you export a solution, you’ll be prompted to publish customizations. This is because any unpublished customizations won’t be included in the solution.
When you perform customizations that will appear in Microsoft Dynamics 365 for tablets you should always explicitly publish your customizations to make sure that every item is synchronized with the Dynamics 365 for tablets application.
Note
Publishing customizations can interfere with normal system operation. In a production environment we recommend that you schedule publishing customizations when it’s least disruptive to users.
The following solution components require publishing when they are updated:
Application Ribbon
Entity
Entity Relationship
Field
Form
Message
Option Set
Site Map
Web Resource
Note
When using Dynamics 365 App for Outlook it can take at least an hour for customization changes to
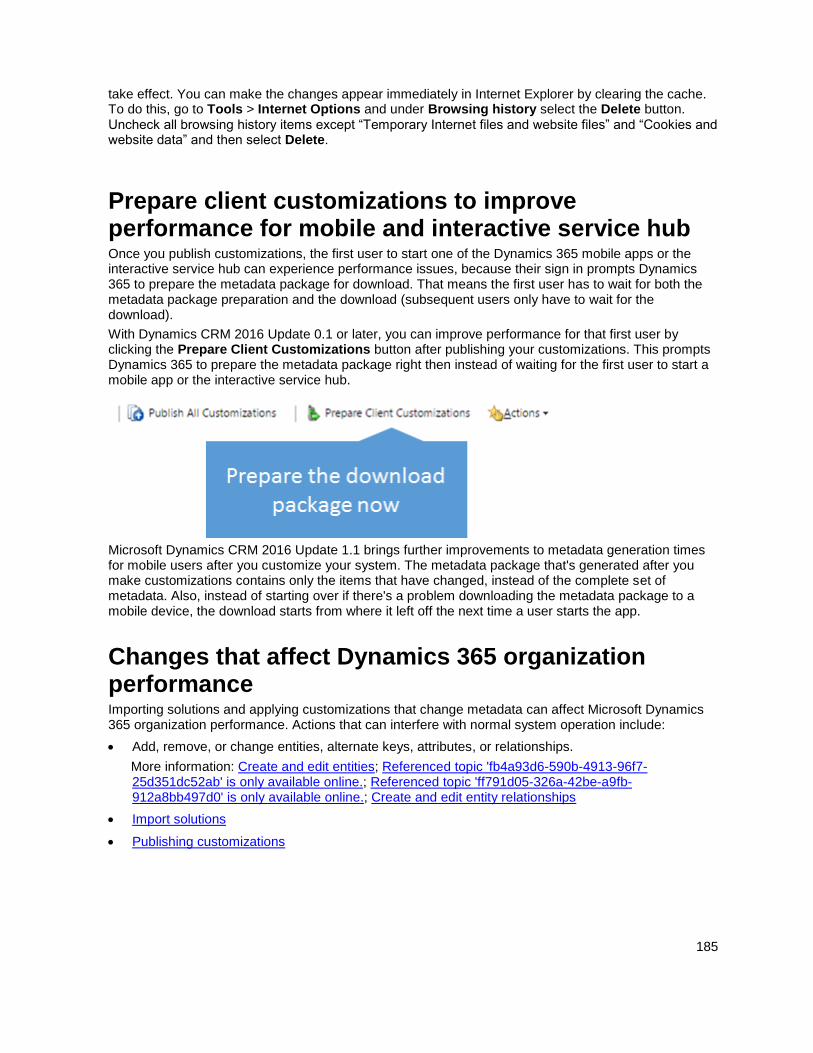
185
take effect. You can make the changes appear immediately in Internet Explorer by clearing the cache. To do this, go to Tools > Internet Options and under Browsing history select the Delete button. Uncheck all browsing history items except “Temporary Internet files and website files” and “Cookies and website data” and then select Delete.
Prepare client customizations to improve performance for mobile and interactive service hub Once you publish customizations, the first user to start one of the Dynamics 365 mobile apps or the interactive service hub can experience performance issues, because their sign in prompts Dynamics 365 to prepare the metadata package for download. That means the first user has to wait for both the metadata package preparation and the download (subsequent users only have to wait for the download).
With Dynamics CRM 2016 Update 0.1 or later, you can improve performance for that first user by clicking the Prepare Client Customizations button after publishing your customizations. This prompts Dynamics 365 to prepare the metadata package right then instead of waiting for the first user to start a mobile app or the interactive service hub.
Microsoft Dynamics CRM 2016 Update 1.1 brings further improvements to metadata generation times for mobile users after you customize your system. The metadata package that's generated after you make customizations contains only the items that have changed, instead of the complete set of metadata. Also, instead of starting over if there's a problem downloading the metadata package to a mobile device, the download starts from where it left off the next time a user starts the app.
Changes that affect Dynamics 365 organization performance Importing solutions and applying customizations that change metadata can affect Microsoft Dynamics 365 organization performance. Actions that can interfere with normal system operation include:
Add, remove, or change entities, alternate keys, attributes, or relationships.
More information: Create and edit entities; Referenced topic 'fb4a93d6-590b-4913-96f7-25d351dc52ab' is only available online.; Referenced topic 'ff791d05-326a-42be-a9fb-912a8bb497d0' is only available online.; Create and edit entity relationships
Import solutions
Publishing customizations
186
If you’re applying these changes to a production system, we recommend that you schedule these operations when it is least disruptive to users.
Combine customization capabilities Each of the topics in the “Customize your Dynamics 365 system” section describe individual customization capabilities in considerable depth. But it’s important to keep in mind that the solutions to meeting your business requirements will frequently use one of the capabilities together with one or more other capabilities.
Choose the right customization capability for the job The law of instrument states “If all you have is a hammer, everything looks like a nail.” With all the different customization capabilities available in Microsoft Dynamics 365 it’s easy to become familiar with one of them and seek to use it to solve every problem. As you evaluate the business problems you want to solve, think about the end result you want to achieve and then work backwards to how you can get there.
Additional capabilities not included in this guide In addition to the capabilities described in “Customize your Dynamics 365 system,” you should be familiar with additional capabilities not described in detail here. This section introduces some of the capabilities and include links to other resources where you can find more information.
Document management Document management allows for integration between Microsoft Dynamics 365 and SharePoint. For information about how to enable and configure document management, see Manage your documents using SharePoint or Help & Training: Manage SharePoint documents from within Microsoft Dynamics 365. Developers should look at the Microsoft Dynamics 365 SDK topic: MSDN: Integrate SharePoint with Microsoft Dynamics 365. For information about installation requirements for Dynamics 365 on-premises deployments, see SharePoint Document Management software requirements for Microsoft Dynamics 365.
Field security profiles You can set an extra level of security for a custom field you have added to a form by using field security profiles. To enable field-level security, you must set the Field Security property for the custom field and then specify the permissions you will allow for this field to any field security profiles you have created. More information: Help & Training: Create a field security profile and Add teams or users to a field security profile
Localization If your organization has people who use a language other than the base language you chose when you deployed Dynamics 365, you can add more languages.
For Dynamics 365 (online), you’ll find all the languages are already installed; you just need to enable them.
187
For Dynamics 365 (on-premises), you can install additional language packs to add more languages. After you install the language pack you must enable the language to make it available for people to choose in their personal preferences. More information: Referenced topic '25af20e4-2eac-4bed-888e-be35015b59fb' is only available online.
Note
Enabling a language can take several minutes. During this time, people might not be able to use Microsoft Dynamics 365.
Enable additional languages
1. Go to Settings > Administration.
2. Choose Languages.
3. In the Language Settings dialog box, choose any available languages and choose Apply to
enable them.
While you can enable additional languages, the localized text is only available for text that’s included in Dynamics 365 before it is customized. You can only customize Dynamics 365 using the base language. Users of other languages will see the text in the base language unless you export translations and add localized text for any user interface items that you have added or changed. More information: Help & Training: Export customized entity and field text for translation
Note
Because customization is supported only in the base language, as the System Customizer you may be working with the base language set as your language preference. To verify that the translated text is appearing, you must change your language preference for the Microsoft Dynamics 365 user interface. To perform additional customization work, you must change back to the base language.
Security roles A discussion of implementing security for your organization is beyond the scope of this guide. More information: Security roles and privileges
See Also Getting started with customization Privileges required for customization Use solutions for your customizations
© 2016 Microsoft. All rights reserved. Copyright
188
Use solutions for your customizations
Applies To: Dynamics 365 (online), Dynamics 365 (on-premises), Dynamics CRM 2016, Dynamics CRM Online
[This topic is pre-release documentation and is subject to change.]
All customizations performed in Microsoft Dynamics 365 are done in the context of a solution. If you aren’t sure about what a solution is, please see What you need to know about solutions.
In This Topic The default solution
Navigate to a specific solution
Use the solution explorer
Create your own solution
Import, update, and export solutions
Settings options for solution export
Privacy notices
The default solution When you customize Microsoft Dynamics 365, you’ll typically work with the default solution. To open the default solution, navigate to Settings > Customizations and select Customize the System.
Tip
After you have the default solution open, use Ctrl+D to create a favorite or bookmark in your browser. This will help you open it faster even if you don’t already have the web application open.
Every organization has a default solution and it has some unique properties. The default solution contains all the solution components available in your organization. Other solutions may include a subset of the solution components visible in the default solution, but the default solution contains all of them.
Tip
Before you start creating new customizations, remember to change the solution publisher customization prefix. More information: Solution publisher
Navigate to a specific solution If your organization already has a specific solution you should work in, this is how you can find it. To create a new solution, see Create your own solution.

189
Open an unmanaged solution
1. Go to Settings > Customizations.
2. Choose Solutions.
3. Double-click the unmanaged solution that you want to work in to open it.
When you’re in the solution, you’ll see solution components. More information: Add solution components
Use the solution explorer Within the solution explorer you can navigate through a hierarchy of nodes using the navigation pane on the left side as shown in the following screenshot:
Note
Use your mouse and keyboard when working with customization tools in the solution explorer. This part of the application isn’t optimized for touch.
As you select each node, you can see a list of the solution components. The actions available in the command bar will change depending on the context of the node you have selected and if the solution is the default solution or a managed solution. With unmanaged solutions that are not the default solution,
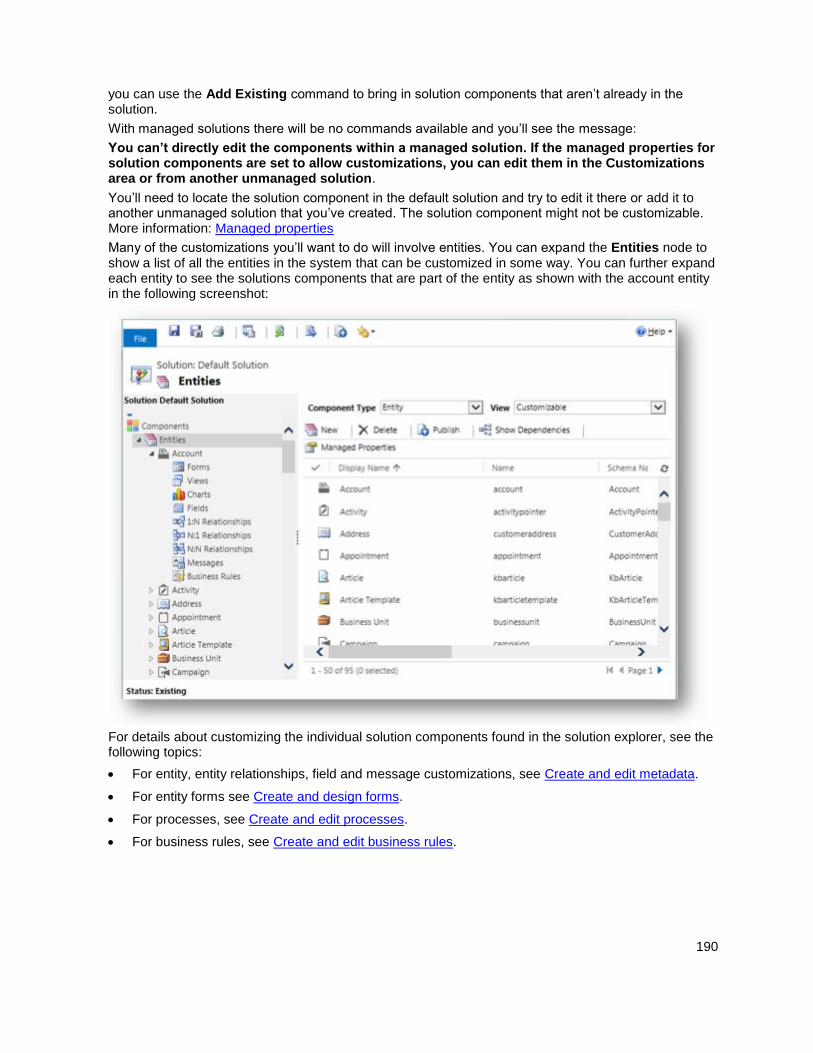
190
you can use the Add Existing command to bring in solution components that aren’t already in the solution.
With managed solutions there will be no commands available and you’ll see the message:
You can’t directly edit the components within a managed solution. If the managed properties for solution components are set to allow customizations, you can edit them in the Customizations area or from another unmanaged solution.
You’ll need to locate the solution component in the default solution and try to edit it there or add it to another unmanaged solution that you’ve created. The solution component might not be customizable. More information: Managed properties
Many of the customizations you’ll want to do will involve entities. You can expand the Entities node to show a list of all the entities in the system that can be customized in some way. You can further expand each entity to see the solutions components that are part of the entity as shown with the account entity in the following screenshot:
For details about customizing the individual solution components found in the solution explorer, see the following topics:
For entity, entity relationships, field and message customizations, see Create and edit metadata.
For entity forms see Create and design forms.
For processes, see Create and edit processes.
For business rules, see Create and edit business rules.
191
Create your own solution Because the default solution contains all the solutions components, it may be easier for you to locate just the solution components that you’ve customized if you create a separate solution and do all your customization there. This also makes it easy to export a backup of your solution as a smaller file. If you choose to do this, you must always remember to add any of the solution components you edit to this solution. When you create new solution components, you should always create them in the context of this solution. This way the solution publisher customization prefix will be applied consistently. After you have created solution components in your solution, or added existing solution components to that solution, you can also edit them in the default solution if you wish.
1. Navigate to Settings > Solutions.
2. Choose New and complete the required fields for the solution
Field Description
Display Name The name shown in the list of solutions. You can change this later.
Name The unique name of the solution. This is generated using the value you enter in the Display Name field. You can edit this before you save the solution, but after you save the solution, you can’t change it.
Publisher You can select the default publisher or create a new publisher. Unless you plan to distribute your solution, you should just use the default publisher for your organization.
Version Enter a number for the version of your solution. This is only important if you export your solution. The version number will be included in the file name when you export the solution.
3. Choose Save.
Add solution components After you’ve created your solution, it won’t contain any solution components. You can create new solution components or use the Add Existing button in the list menu to add any solution components from the default solution.
When you do this you may see a Missing Required Components dialog.
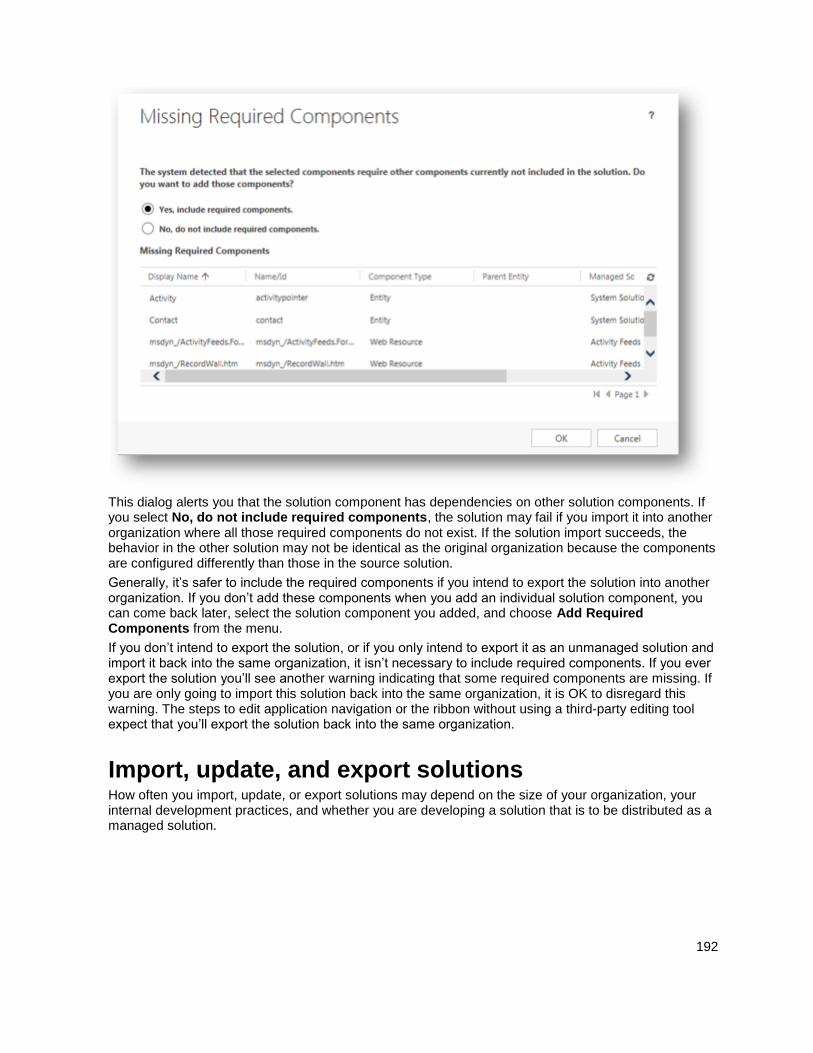
192
This dialog alerts you that the solution component has dependencies on other solution components. If you select No, do not include required components, the solution may fail if you import it into another organization where all those required components do not exist. If the solution import succeeds, the behavior in the other solution may not be identical as the original organization because the components are configured differently than those in the source solution.
Generally, it’s safer to include the required components if you intend to export the solution into another organization. If you don’t add these components when you add an individual solution component, you can come back later, select the solution component you added, and choose Add Required Components from the menu.
If you don’t intend to export the solution, or if you only intend to export it as an unmanaged solution and import it back into the same organization, it isn’t necessary to include required components. If you ever export the solution you’ll see another warning indicating that some required components are missing. If you are only going to import this solution back into the same organization, it is OK to disregard this warning. The steps to edit application navigation or the ribbon without using a third-party editing tool expect that you’ll export the solution back into the same organization.
Import, update, and export solutions How often you import, update, or export solutions may depend on the size of your organization, your internal development practices, and whether you are developing a solution that is to be distributed as a managed solution.

193
If you have a small organization with few customizations, and you’re the only customizer, you may
never export or import solutions except to periodically export the default solution to create a backup
or if you choose to use or buy a managed solution provided by someone else.
Some organizations will have an outside company create customizations for them. In this case,
they’ll export any customizations that they currently have and send them to the outside company.
That company will develop and test customizations and send them back to the organization to be
imported.
Large organizations may have several teams of people customizing the system. They may have a
separate organization just for development and customizations. These organizations frequently
also have a separate test organizations and a UAT (User Acceptance Testing) organizations in
addition to a production organization which everyone in the organization actually uses. These
organizations depend on exporting and importing customizations from one organization to the next
in the process of creating, testing, and verifying the solutions.
The strategy you choose should depend on your needs. Some important things to keep in mind:
You can’t export your default solution as a managed solution.
We don’t support importing a default solution taken from an on-premise deployment into a
Dynamics 365 (online) organization or a default solution taken from a Dynamics 365 (online)
organization into an on-premises deployment. We do support importing custom solutions between
these deployment types, but not default solutions.
When you export a managed solution, you can’t import it back into the organization it was imported
from.
Only export a solution as a managed solution when you intend to distribute it.
Never import an unmanaged solution unless you are sure you want to accept all the customizations
in it and allow any of those customizations to overwrite any customizations you previously created.
Solutions can’t delete anything. Importing an unmanaged solution might overwrite existing
customizations, but it can’t entirely remove them. For example, if you create a custom field for an
entity, and then import a solution containing the definition of that entity that doesn’t have the custom
field, the custom field you created will still be there. Also, any changes defined within the solution
you imported will be there.
You can’t import a custom entity with the same name as an existing entity. Microsoft Dynamics 365
allows duplicate display names, though.
You can import only items that you have organization-level access to create, read, and update.
You must have the System Administrator security role to import security roles, organization
settings, sdk message processing steps, and plug-in assemblies.
If you import customizations that include a language that is not installed on your system, any labels
defined in the customizations will default to the base language of the Microsoft Dynamics 365
system the customizations were imported from.
All imported security roles will be attached to the root business unit.
194
If an imported security role originated from the same Dynamics 365 system, any changes applied to
the security role will be merged. All privileges on system entities for the security role will be
replaced by privileges defined by the security role that is being imported.
Import solutions You can import solutions manually using the steps below. Only import solutions that you've obtained from a trusted source. Customizations might include code that can send data to external sources.
1. Go to Settings > Solutions.
2. In the solutions list menu choose Import.
3. In the Import Solution dialog, Select Solution Package step browse to the compressed (.zip or
.cab) file that contains the solution you want to import.
4. Choose Next
5. You can view information about the solution before you choose Import.
6. You may need to wait a few moments while the solution import completes. If it is successful, you
can view the results and choose Close.
Update solutions There are times when you may wish to install an update to an existing managed solution. The procedure is similar to installing a new managed solution, except you will get some different options. If you are updating a solution you got from someone else, you should get guidance from the solution publisher about which options you should choose.
1. Go to Settings > Solutions.
2. In the solutions list menu choose Import.
3. In the Import Solution dialog, Select Solution Package step browse to the compressed (.zip or
.cab) file that contains the solution you want to update.
4. Choose Next
5. You can view information about the solution before you choose Next. This page will display a
yellow bar saying This solution package contains an update for a solution that is already
installed.
6. You will have the following options:
Maintain customizations (recommended)
Selecting this option will maintain any unmanaged customizations performed on components but also implies that some of the updates included in this solution will not take effect.
195
Overwrite Customizations
Selecting this option overwrites any unmanaged customizations previously performed on components included in this solution. All updates included in this solution will take effect.
Choose the appropriate option and then choose Next.
7. You may need to wait a few moments while the solution import completes. If it is successful, you
can view the results and choose Close.
Export solutions We recommend that you export your unmanaged customizations periodically so that you have a backup in case anything happens. You cannot export managed solutions.
1. Go to Settings > Solutions.
2. In the list select the solution you want to export and choose Export.
3. In the Publish Customizations step you will be reminded that only published customizations are
exported and you will have the option to Publish All Customizations before you choose Next.
4. If your solution contains any missing required components you will see the Missing Required
Components step. You can disregard this warning only if you intend to import this as an
unmanaged solution back into the original organization. Otherwise, follow the instructions in the
dialog to cancel the export and add the required components.
5. In the Export System Settings (Advanced) step you can choose certain system settings to
include in your solution. If your solution depends on any of the groups of system settings, select
them and choose Next.
See Settings options for solution export for details about the settings that will be included with each option.
6. In the Package Type step, you must choose whether to export the solution as an Unmanaged or
Managed solution.
7. The next step allows you to choose a target solution for a specific Dynamics 365 version. This
option is typically used by ISVs who may want to export a solution that is compliant with a previous
version. Unless you intend to import this solution into an organization that is not upgraded to the
same version as the organization version you are using, accept the default.
For more information see the SDK topic MSDN: Export a solution for a specific Dynamics 365 version.
8. Choose Export to download the solution file.
Settings options for solution export The following table shows the options available when you export a solution:
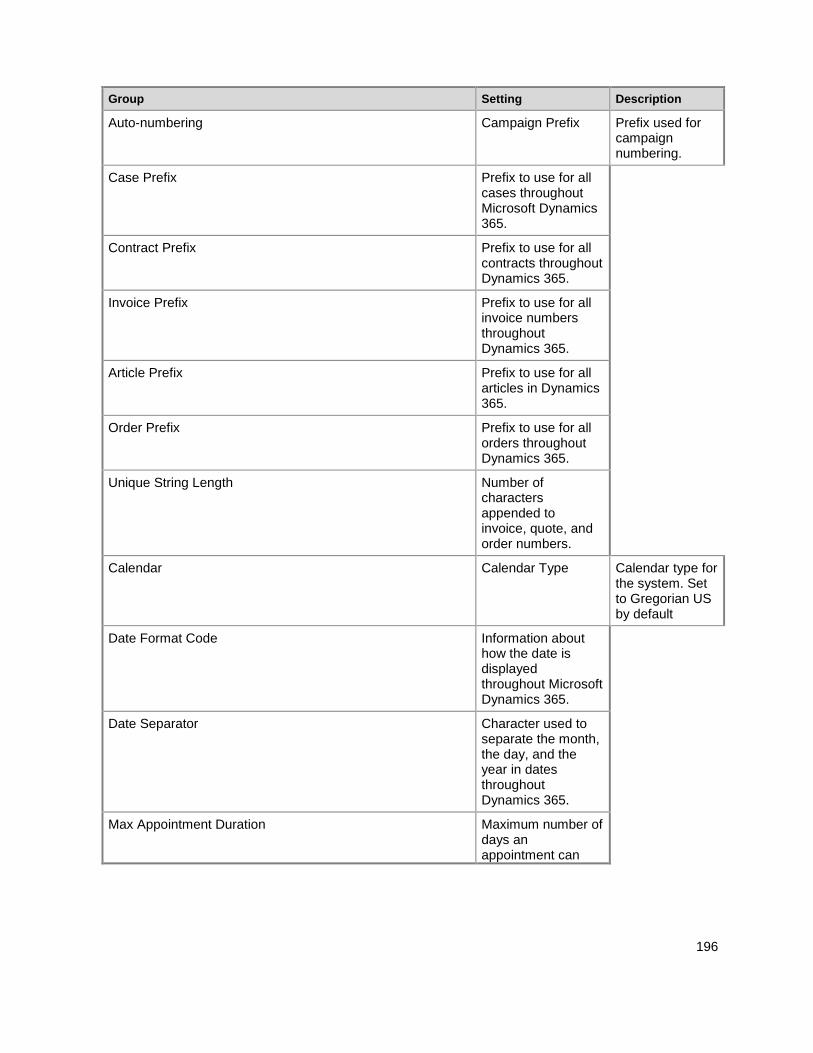
196
Group Setting Description
Auto-numbering Campaign Prefix Prefix used for campaign numbering.
Case Prefix Prefix to use for all cases throughout Microsoft Dynamics 365.
Contract Prefix Prefix to use for all contracts throughout Dynamics 365.
Invoice Prefix Prefix to use for all invoice numbers throughout Dynamics 365.
Article Prefix Prefix to use for all articles in Dynamics 365.
Order Prefix Prefix to use for all orders throughout Dynamics 365.
Unique String Length Number of characters appended to invoice, quote, and order numbers.
Calendar Calendar Type Calendar type for the system. Set to Gregorian US by default
Date Format Code Information about how the date is displayed throughout Microsoft Dynamics 365.
Date Separator Character used to separate the month, the day, and the year in dates throughout Dynamics 365.
Max Appointment Duration Maximum number of days an appointment can
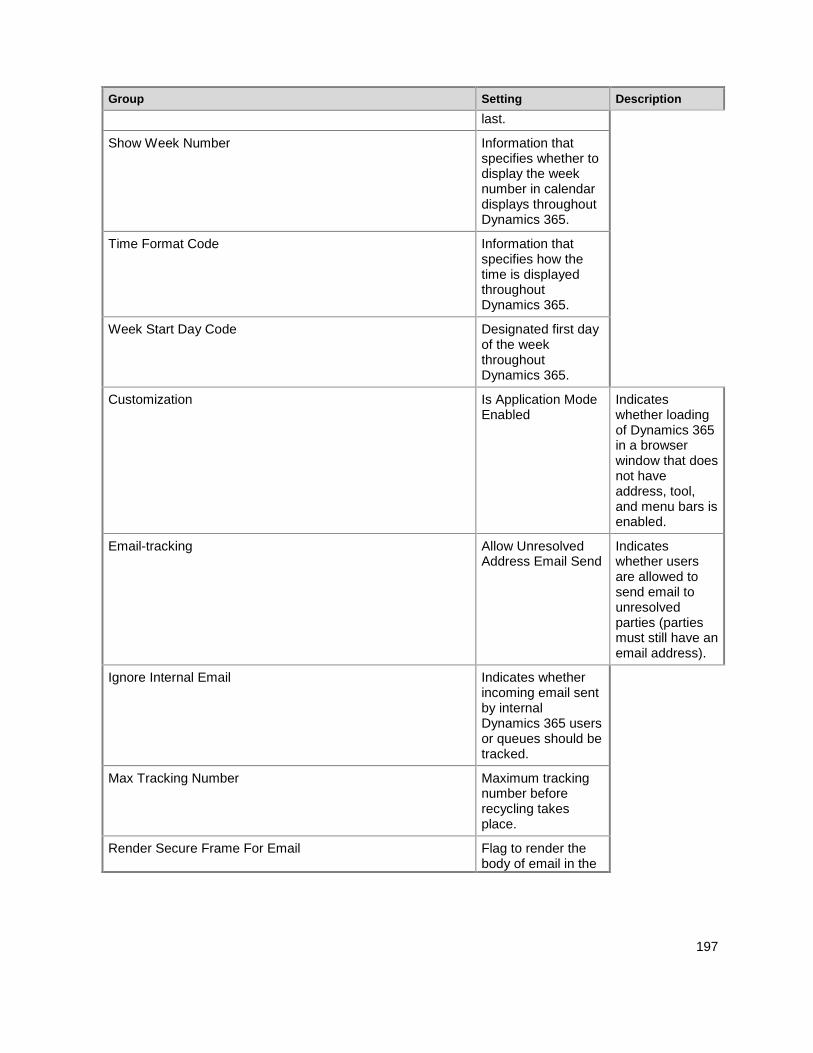
197
Group Setting Description
last.
Show Week Number Information that specifies whether to display the week number in calendar displays throughout Dynamics 365.
Time Format Code Information that specifies how the time is displayed throughout Dynamics 365.
Week Start Day Code Designated first day of the week throughout Dynamics 365.
Customization Is Application Mode Enabled
Indicates whether loading of Dynamics 365 in a browser window that does not have address, tool, and menu bars is enabled.
Email-tracking Allow Unresolved Address Email Send
Indicates whether users are allowed to send email to unresolved parties (parties must still have an email address).
Ignore Internal Email Indicates whether incoming email sent by internal Dynamics 365 users or queues should be tracked.
Max Tracking Number Maximum tracking number before recycling takes place.
Render Secure Frame For Email Flag to render the body of email in the
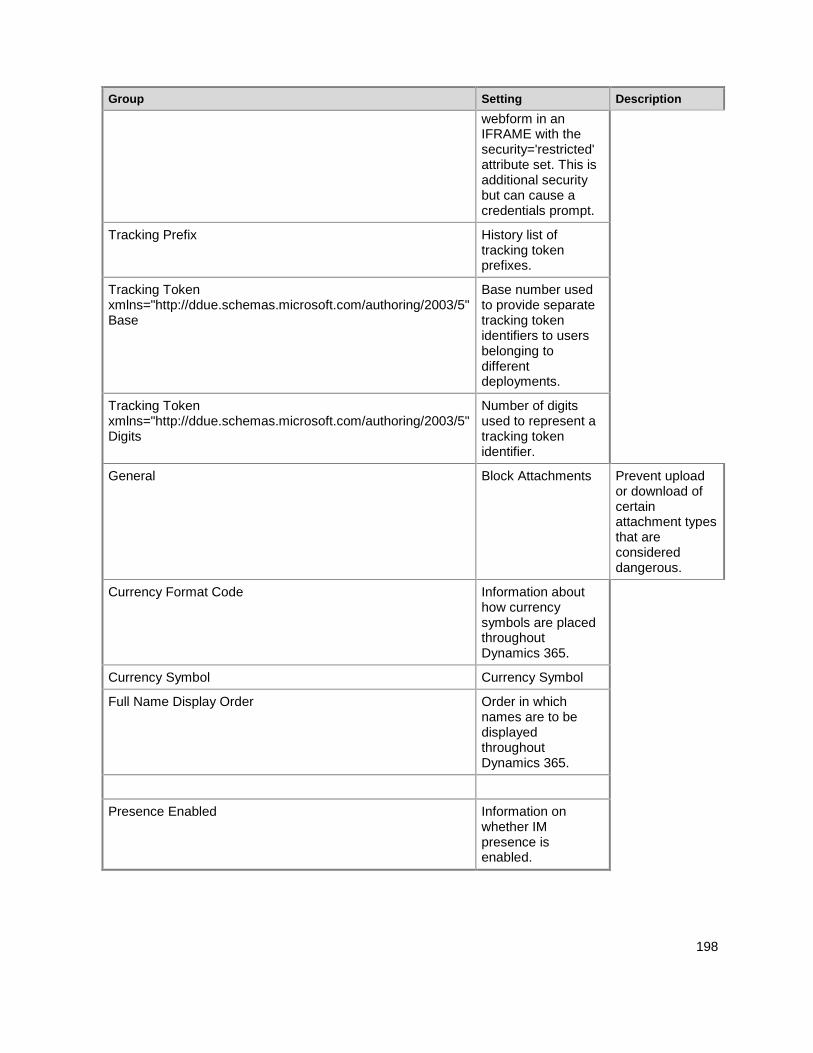
198
Group Setting Description
webform in an IFRAME with the security='restricted' attribute set. This is additional security but can cause a credentials prompt.
Tracking Prefix History list of tracking token prefixes.
Tracking Token xmlns="http://ddue.schemas.microsoft.com/authoring/2003/5" Base
Base number used to provide separate tracking token identifiers to users belonging to different deployments.
Tracking Token xmlns="http://ddue.schemas.microsoft.com/authoring/2003/5" Digits
Number of digits used to represent a tracking token identifier.
General Block Attachments Prevent upload or download of certain attachment types that are considered dangerous.
Currency Format Code Information about how currency symbols are placed throughout Dynamics 365.
Currency Symbol Currency Symbol
Full Name Display Order Order in which names are to be displayed throughout Dynamics 365.
Presence Enabled Information on whether IM presence is enabled.
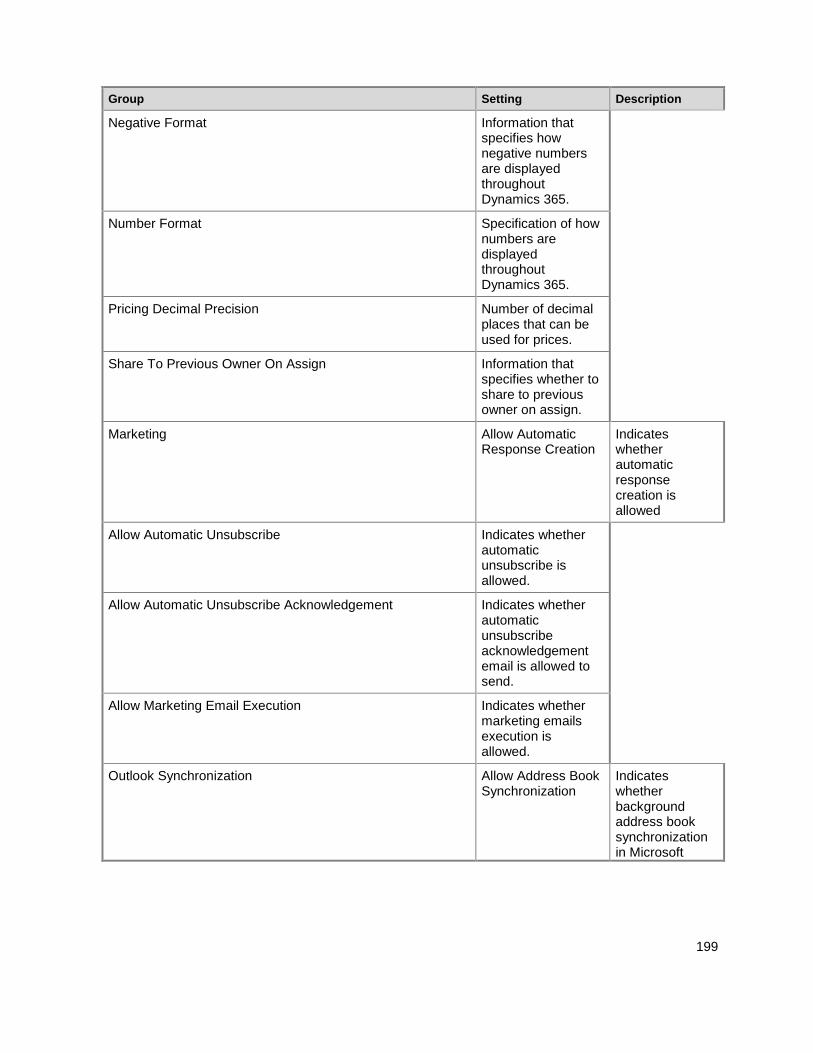
199
Group Setting Description
Negative Format Information that specifies how negative numbers are displayed throughout Dynamics 365.
Number Format Specification of how numbers are displayed throughout Dynamics 365.
Pricing Decimal Precision Number of decimal places that can be used for prices.
Share To Previous Owner On Assign Information that specifies whether to share to previous owner on assign.
Marketing Allow Automatic Response Creation
Indicates whether automatic response creation is allowed
Allow Automatic Unsubscribe Indicates whether automatic unsubscribe is allowed.
Allow Automatic Unsubscribe Acknowledgement Indicates whether automatic unsubscribe acknowledgement email is allowed to send.
Allow Marketing Email Execution Indicates whether marketing emails execution is allowed.
Outlook Synchronization Allow Address Book Synchronization
Indicates whether background address book synchronization in Microsoft
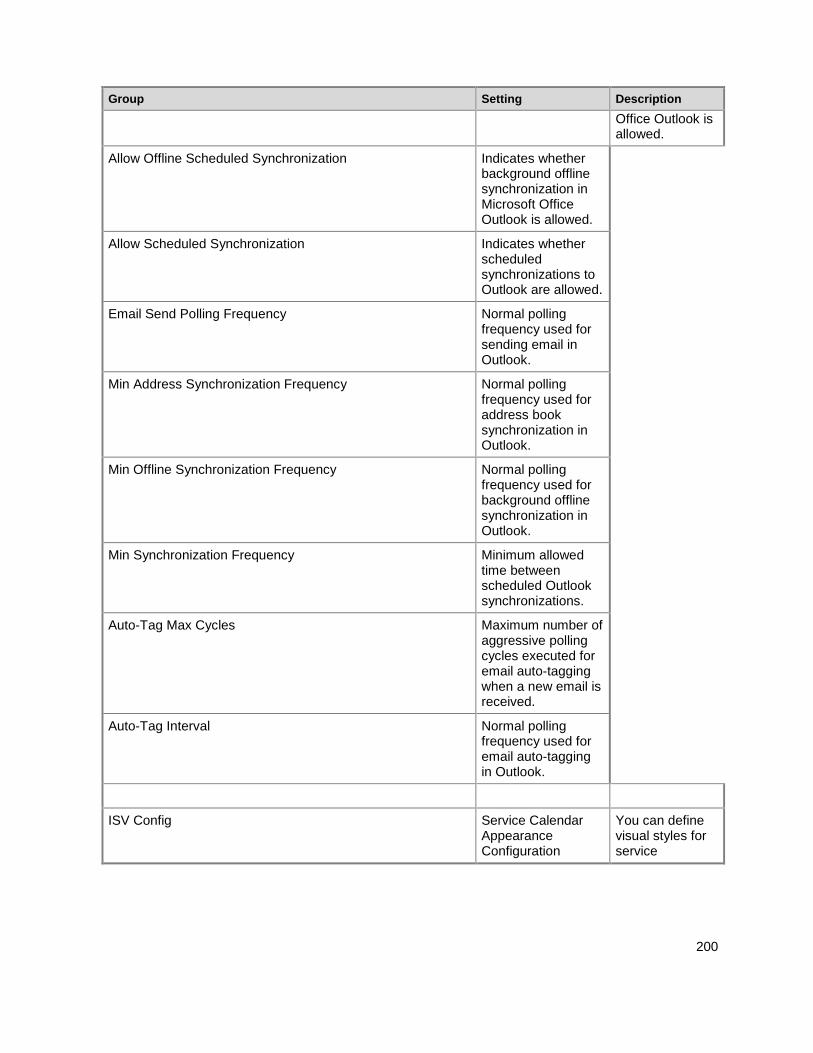
200
Group Setting Description
Office Outlook is allowed.
Allow Offline Scheduled Synchronization Indicates whether background offline synchronization in Microsoft Office Outlook is allowed.
Allow Scheduled Synchronization Indicates whether scheduled synchronizations to Outlook are allowed.
Email Send Polling Frequency Normal polling frequency used for sending email in Outlook.
Min Address Synchronization Frequency Normal polling frequency used for address book synchronization in Outlook.
Min Offline Synchronization Frequency Normal polling frequency used for background offline synchronization in Outlook.
Min Synchronization Frequency Minimum allowed time between scheduled Outlook synchronizations.
Auto-Tag Max Cycles Maximum number of aggressive polling cycles executed for email auto-tagging when a new email is received.
Auto-Tag Interval Normal polling frequency used for email auto-tagging in Outlook.
ISV Config Service Calendar Appearance Configuration
You can define visual styles for service
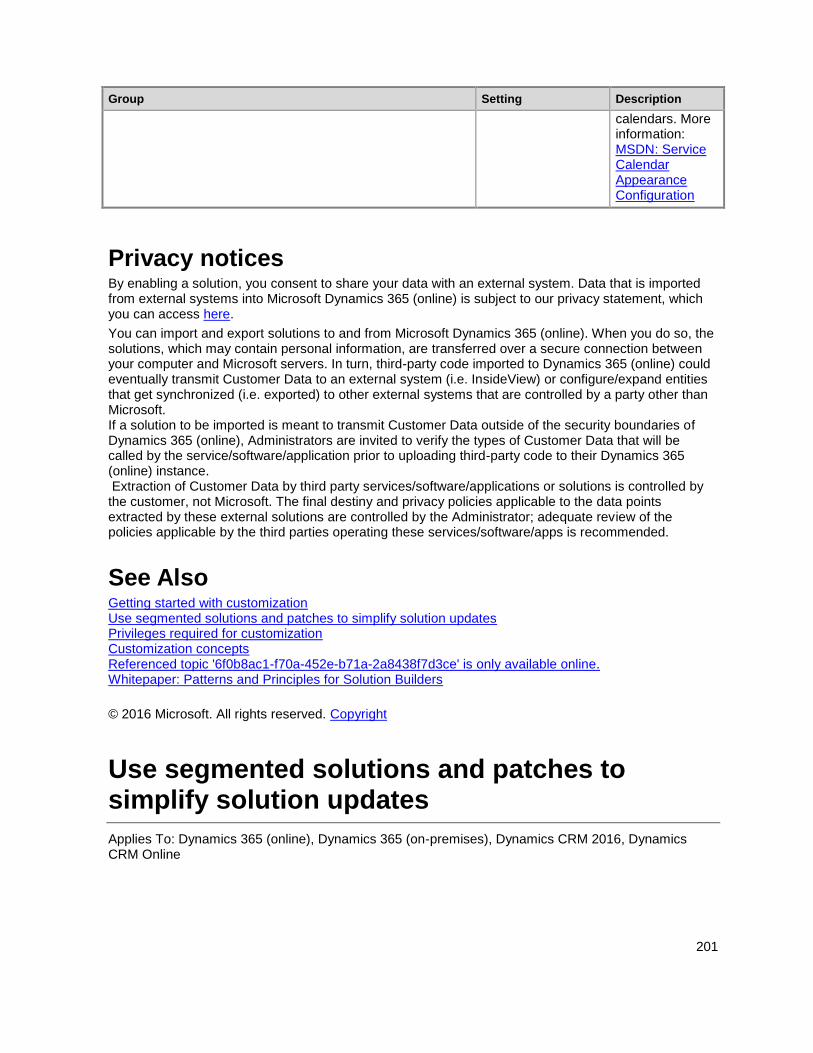
201
Group Setting Description
calendars. More information: MSDN: Service Calendar Appearance Configuration
Privacy notices By enabling a solution, you consent to share your data with an external system. Data that is imported from external systems into Microsoft Dynamics 365 (online) is subject to our privacy statement, which you can access here.
You can import and export solutions to and from Microsoft Dynamics 365 (online). When you do so, the solutions, which may contain personal information, are transferred over a secure connection between your computer and Microsoft servers. In turn, third-party code imported to Dynamics 365 (online) could eventually transmit Customer Data to an external system (i.e. InsideView) or configure/expand entities that get synchronized (i.e. exported) to other external systems that are controlled by a party other than Microsoft. If a solution to be imported is meant to transmit Customer Data outside of the security boundaries of Dynamics 365 (online), Administrators are invited to verify the types of Customer Data that will be called by the service/software/application prior to uploading third-party code to their Dynamics 365 (online) instance. Extraction of Customer Data by third party services/software/applications or solutions is controlled by the customer, not Microsoft. The final destiny and privacy policies applicable to the data points extracted by these external solutions are controlled by the Administrator; adequate review of the policies applicable by the third parties operating these services/software/apps is recommended.
See Also Getting started with customization Use segmented solutions and patches to simplify solution updates Privileges required for customization Customization concepts Referenced topic '6f0b8ac1-f70a-452e-b71a-2a8438f7d3ce' is only available online. Whitepaper: Patterns and Principles for Solution Builders
© 2016 Microsoft. All rights reserved. Copyright
Use segmented solutions and patches to simplify solution updates
Applies To: Dynamics 365 (online), Dynamics 365 (on-premises), Dynamics CRM 2016, Dynamics CRM Online
202
[This topic is pre-release documentation and is subject to change.]
To gain tighter control over what you distribute in solutions and solution patches, use solution segmentation. With Microsoft Dynamics 365 solution segmentation, you can export solutions with selected entity assets, such as entity fields, forms, and views, rather than entire entities with all the assets. To create the segmented solutions and patches, you can use the Dynamics 365 user interface, without writing code.
Important
This feature was introduced in CRM Online 2016 Update and CRM 2016 (on-premises). Interested in getting this feature? Find your CRM administrator or support person.
In addition to having more control over what’s in a solution, you’ll be able to control what goes into a patch. You can create a patch for a parent solution and export it as a minor update to the base solution. When you clone a solution, the system rolls up all related patches into the base solution and creates a new version.
When you’re working with patches and cloned solutions, keep the following information in mind:
A patch represents an incremental minor update to the parent solution. A patch can add or update
components and assets in the parent solution when installed on the target system, but it can’t
delete any components or assets from the parent solution.
A patch can have only one parent solution, but a parent solution can have one or more patches.
A patch is created for unmanaged solution. You can’t create a patch for a managed solution.
When you export a patch to a target system, you should export it as a managed patch. Don’t use
unmanaged patches in production environments.
The parent solution must be present in the target system to install a patch.
You can delete or update a patch.
If you delete a parent solution, all child patches are also deleted. The system gives you a warning
message that you can’t undo the delete operation. The deletion is performed in a single transaction.
If one of the patches or the parent solution fails to delete, the entire transaction is rolled back.
After you have created the first patch for a parent solution, the solution becomes locked, and you
can’t make any changes in this solution or export it. However, if you delete all of its child patches,
the parent solution becomes unlocked.
When you clone a base solution, all child patches are rolled up into the base solution and it
becomes a new version. You can add, edit, or delete components and assets in the cloned
solution.
A cloned solution represents a replacement of the base solution when it’s installed on the target
system as a managed solution. Typically, you use a cloned solution to ship a major update to the
preceding solution.

203
Understanding version numbers for cloned solutions and patches A solution’s version has the following format: major.minor.build.revision. A patch must have a higher build or revision number than the parent solution. It can’t have a higher major or minor version. For example, for a base solution version 3.1.5.7, a patch could be a version 3.1.5.8 or version 3.1.7.0, but not version 3.2.0.0. A cloned solution must have the version number greater than or equal to the version number of the base solution. For example, for a base solution version 3.1.5.7, a cloned solution could be a version 3.2.0.0, or version 3.1.5.7. In the UI, you can only set the major and minor version values for a cloned solution, and the build or revision values for a patch.
Create a segmented solution with the entity assets you want To create a segmented solution, start with creating an unmanaged solution and adding the existing resources. You can add multiple system or custom entities, and for each entity, choose the assets you want to include in the solution. The wizard-like setup takes you step-by-step through the process of adding entity assets.
1. Go to Settings > Solutions.
2. Click New and create a solution. Enter information in the required fields. Click Save & Close.
3. Open the solution you just created. In the Add Existing drop-down list, select Entity.
4. In the Select solution components dialog box, select one or more entities you want to add to the
solution. Click OK.
5. The wizard opens. Follow the wizard to add assets for each selected entity to the solution.
6. Click Publish for changes to take effect.
The following illustrations provide an example of creating a segmented solution by choosing entity assets from the Account, Case, and Contact entities.
Start by choosing the Entity component.
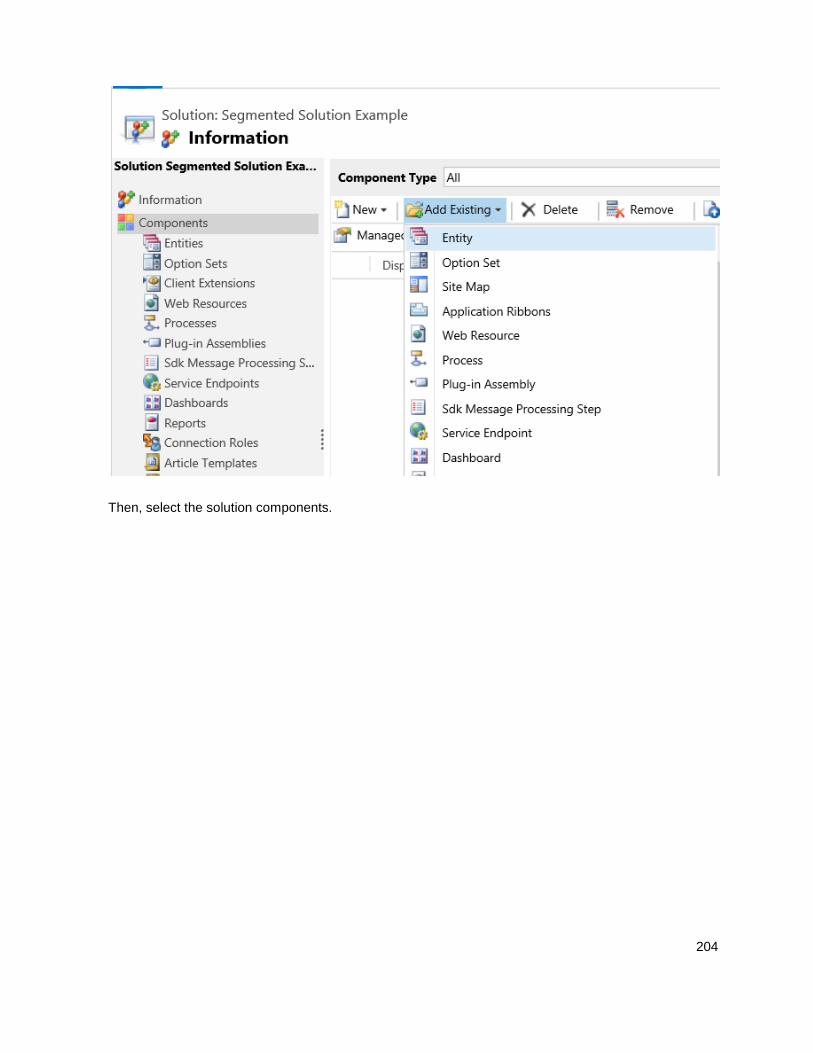
204
Then, select the solution components.
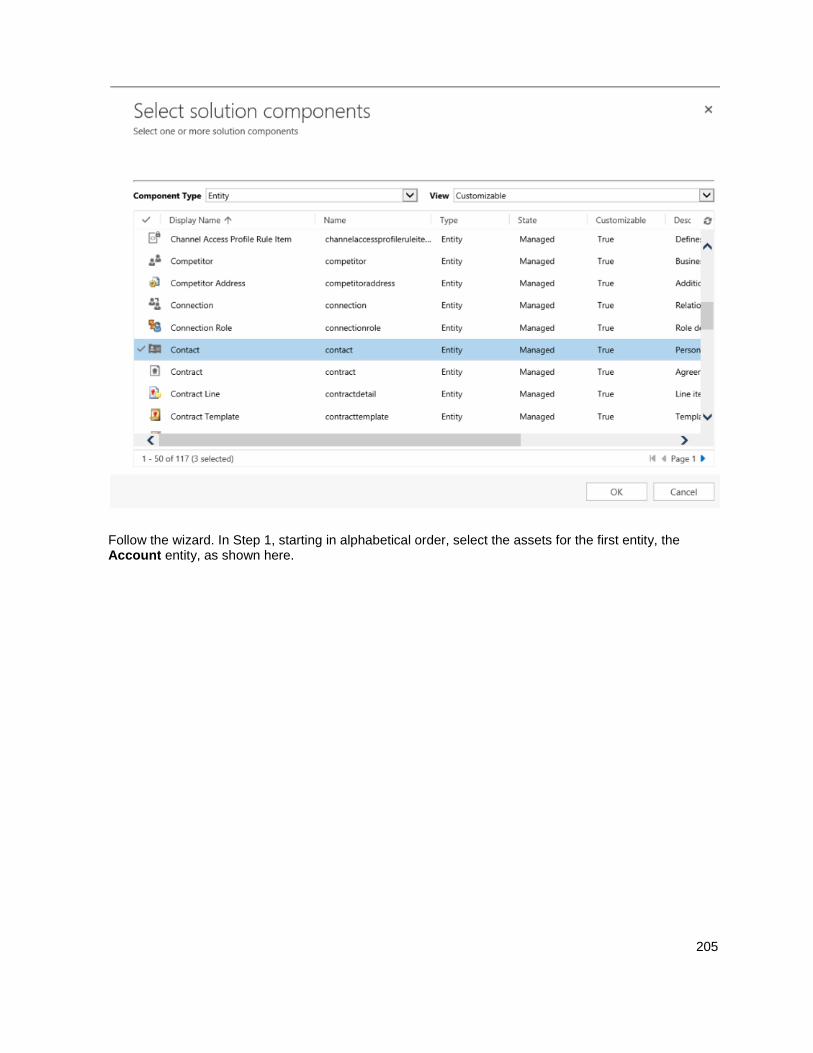
205
Follow the wizard. In Step 1, starting in alphabetical order, select the assets for the first entity, the Account entity, as shown here.
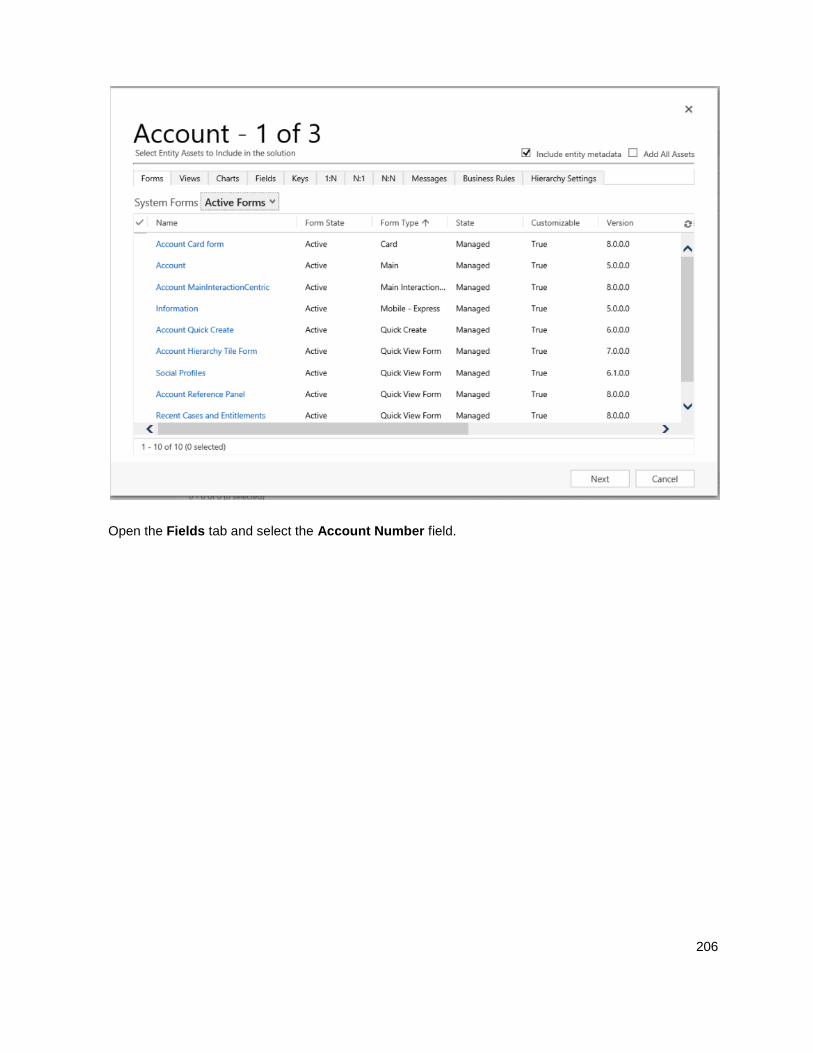
206
Open the Fields tab and select the Account Number field.
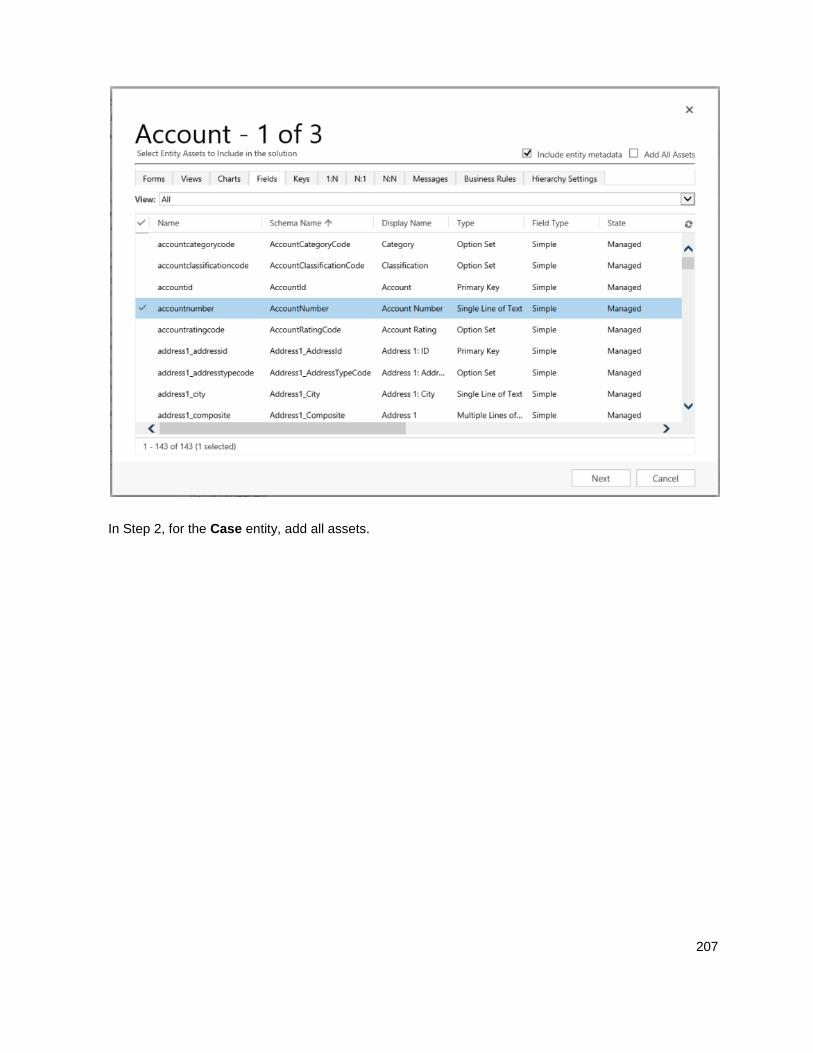
207
In Step 2, for the Case entity, add all assets.
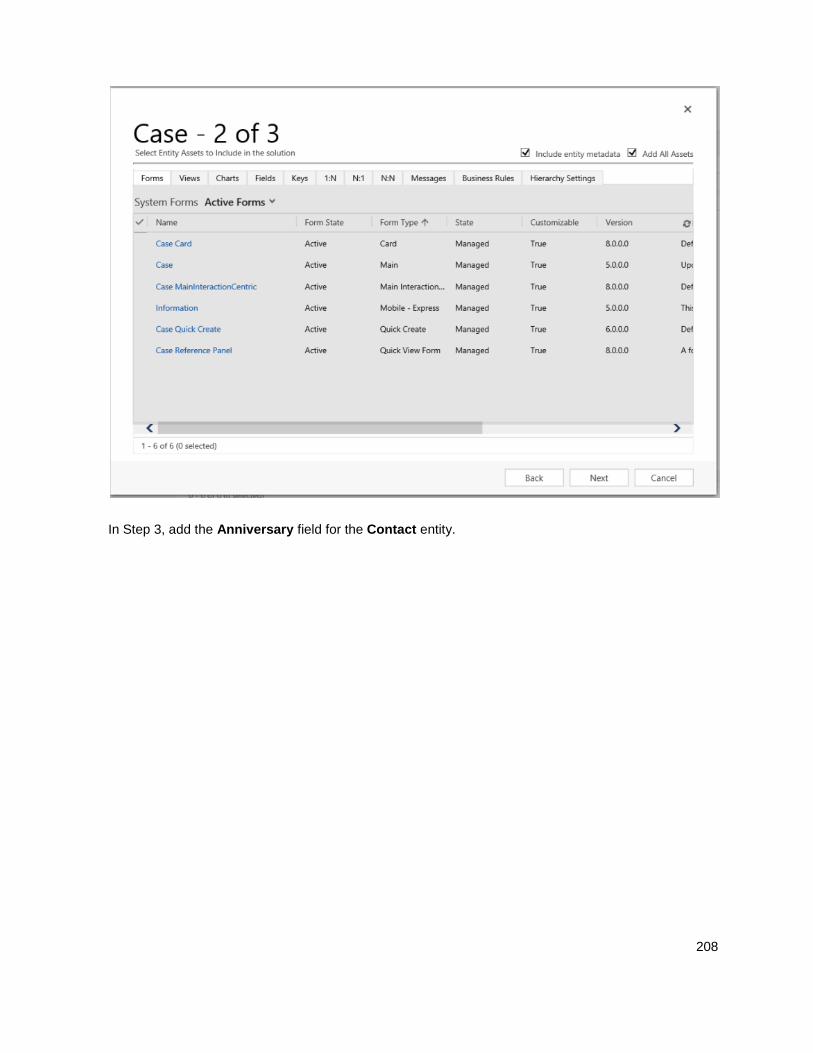
208
In Step 3, add the Anniversary field for the Contact entity.
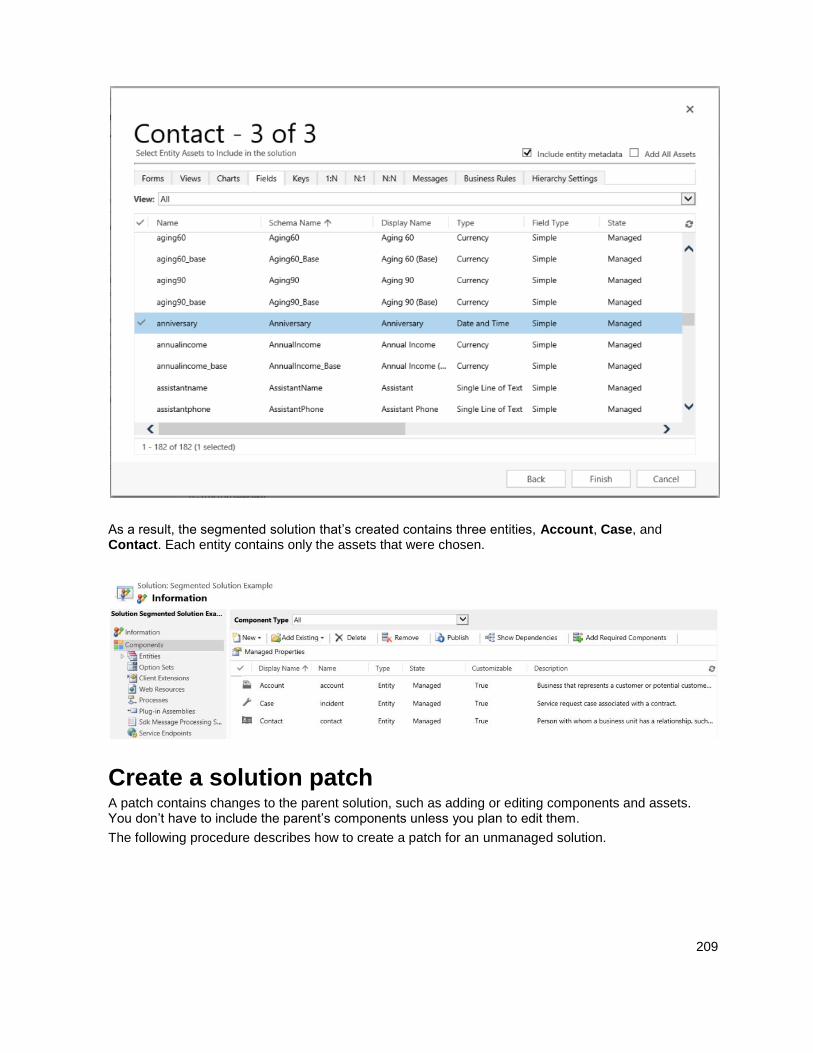
209
As a result, the segmented solution that’s created contains three entities, Account, Case, and Contact. Each entity contains only the assets that were chosen.
Create a solution patch A patch contains changes to the parent solution, such as adding or editing components and assets. You don’t have to include the parent’s components unless you plan to edit them.
The following procedure describes how to create a patch for an unmanaged solution.
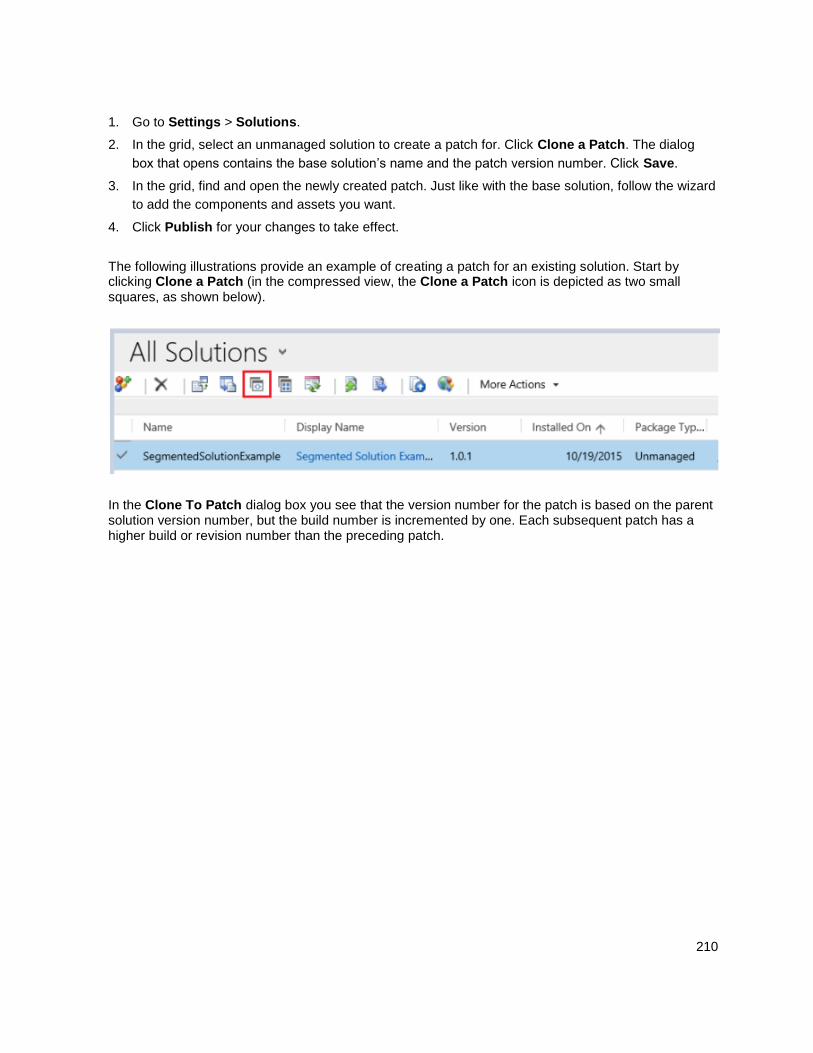
210
1. Go to Settings > Solutions.
2. In the grid, select an unmanaged solution to create a patch for. Click Clone a Patch. The dialog
box that opens contains the base solution’s name and the patch version number. Click Save.
3. In the grid, find and open the newly created patch. Just like with the base solution, follow the wizard
to add the components and assets you want.
4. Click Publish for your changes to take effect.
The following illustrations provide an example of creating a patch for an existing solution. Start by clicking Clone a Patch (in the compressed view, the Clone a Patch icon is depicted as two small squares, as shown below).
In the Clone To Patch dialog box you see that the version number for the patch is based on the parent solution version number, but the build number is incremented by one. Each subsequent patch has a higher build or revision number than the preceding patch.
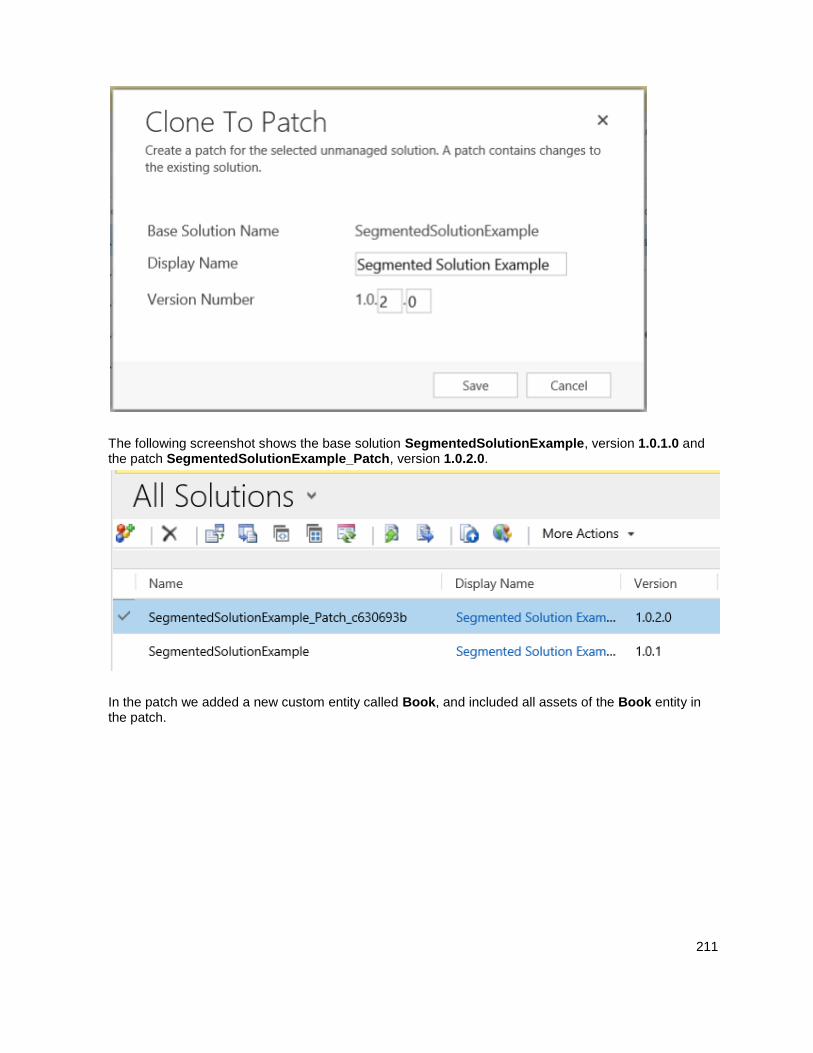
211
The following screenshot shows the base solution SegmentedSolutionExample, version 1.0.1.0 and the patch SegmentedSolutionExample_Patch, version 1.0.2.0.
In the patch we added a new custom entity called Book, and included all assets of the Book entity in the patch.
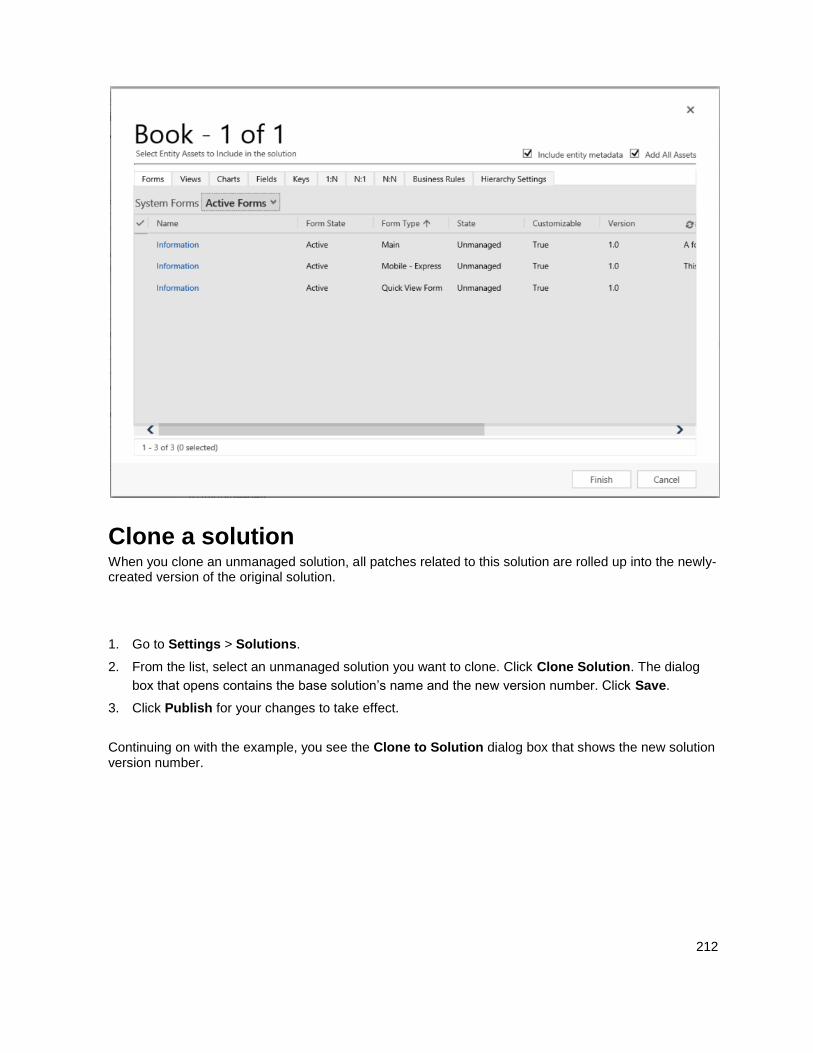
212
Clone a solution When you clone an unmanaged solution, all patches related to this solution are rolled up into the newly-created version of the original solution.
1. Go to Settings > Solutions.
2. From the list, select an unmanaged solution you want to clone. Click Clone Solution. The dialog
box that opens contains the base solution’s name and the new version number. Click Save.
3. Click Publish for your changes to take effect.
Continuing on with the example, you see the Clone to Solution dialog box that shows the new solution version number.
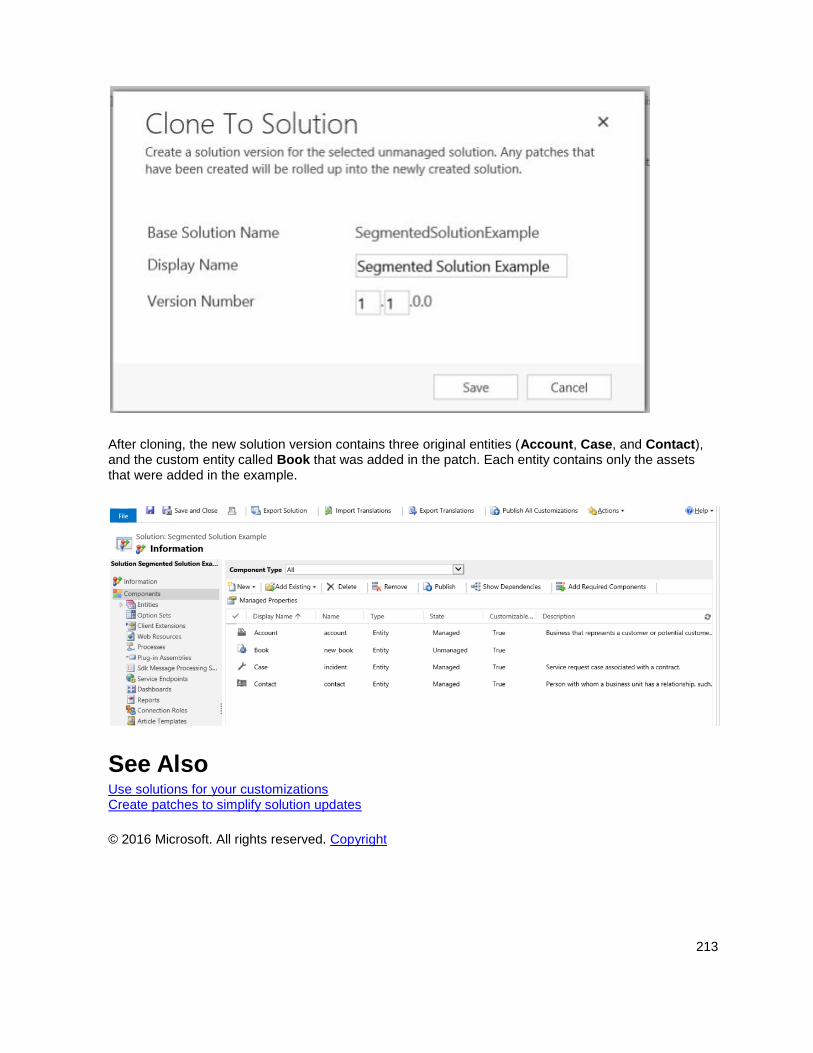
213
After cloning, the new solution version contains three original entities (Account, Case, and Contact), and the custom entity called Book that was added in the patch. Each entity contains only the assets that were added in the example.
See Also Use solutions for your customizations Create patches to simplify solution updates
© 2016 Microsoft. All rights reserved. Copyright
214
Change the color scheme or add a logo to match your organization’s brand
Applies To: Dynamics 365 (online), Dynamics 365 (on-premises), Dynamics CRM 2016, Dynamics CRM Online
[This topic is pre-release documentation and is subject to change.]
You can create a custom look and feel (a theme), for your Microsoft Dynamics 365 web application by making changes to the default colors and visual elements provided in the uncustomized Dynamics 365 system. For example, you can create your personal product branding by adding a company logo and providing entity-specific coloring. A theme is created by using the customization tools in the user interface, without requiring a developer to write code. You can create, change or delete themes that are used in your organization. The theme customization is supported in the Web forms inDynamics 365 for Outlook. You can define multiple themes, but only one can be set and published as the default theme.
In This Topic Use themes to enhance the user interface and create your product branding
Solution awareness
Copy and alter the existing theme
Preview and publish a theme
Best practices
Custom theme considerations
Use themes to enhance the user interface and create your product branding Theming is used to enhance the Dynamics 365 User Interface, not drastically alter it. The theme colors are applied globally throughout the application. For example, you can enhance the following visual elements in the UI:
Change product logos and navigation colors to create product branding
Adjust accent colors, such as hover or selection colors
Provide entity-specific coloring
What can you change or adjust?
Logo
Logo tooltip
Navigation bar color
Navigation bar shelf color
Header color
Global link color
Selected link effect
215
Hover link effect
Process control color
Default entity color
Default custom entity color
Control shade
Control border
Solution awareness The theme is not solution aware. The changes made for an organization's theme aren’t included in solutions exported from the organization. The data is stored in the theme entity that can be exported and re-imported in other environment. The imported theme must be published to take an effect.
Copy and alter the existing theme The easiest and quickest way to create a new them is to clone and alter an existing theme, then save it, preview and publish. Go to Go to Settings > Customizations. Choose Themes and then choose Dynamics 365 Default Theme. The following screenshot shows the default theme setup.
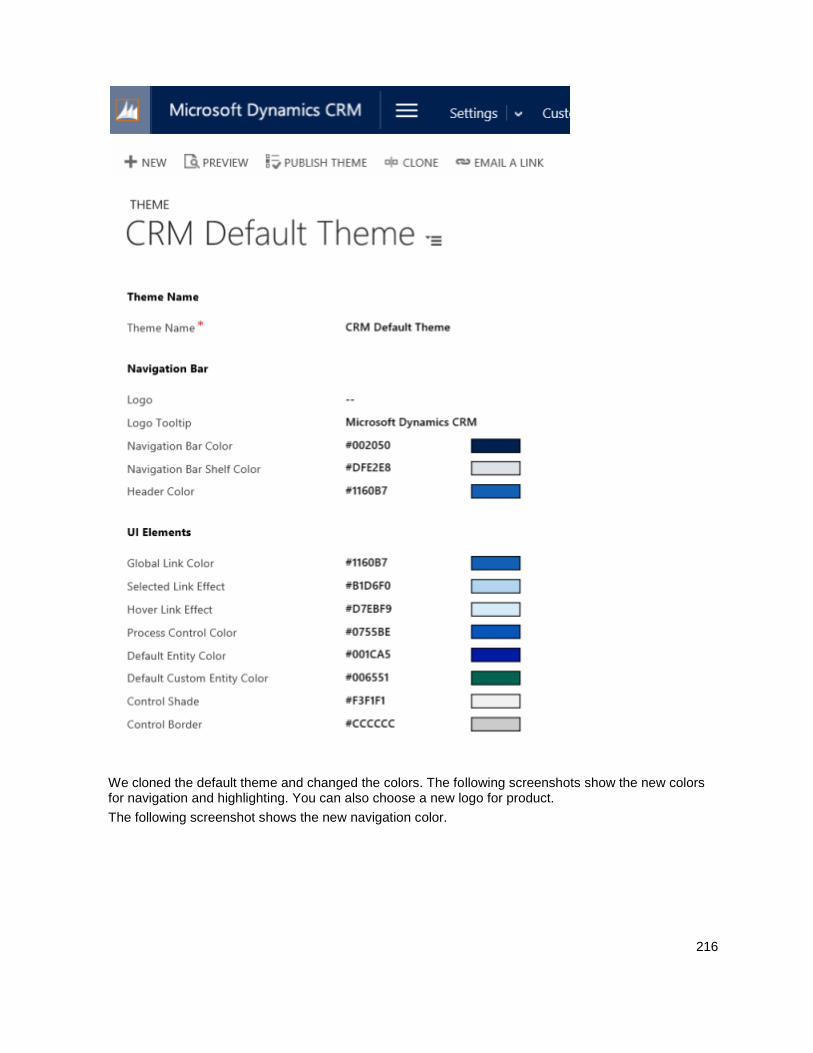
216
We cloned the default theme and changed the colors. The following screenshots show the new colors for navigation and highlighting. You can also choose a new logo for product.
The following screenshot shows the new navigation color.
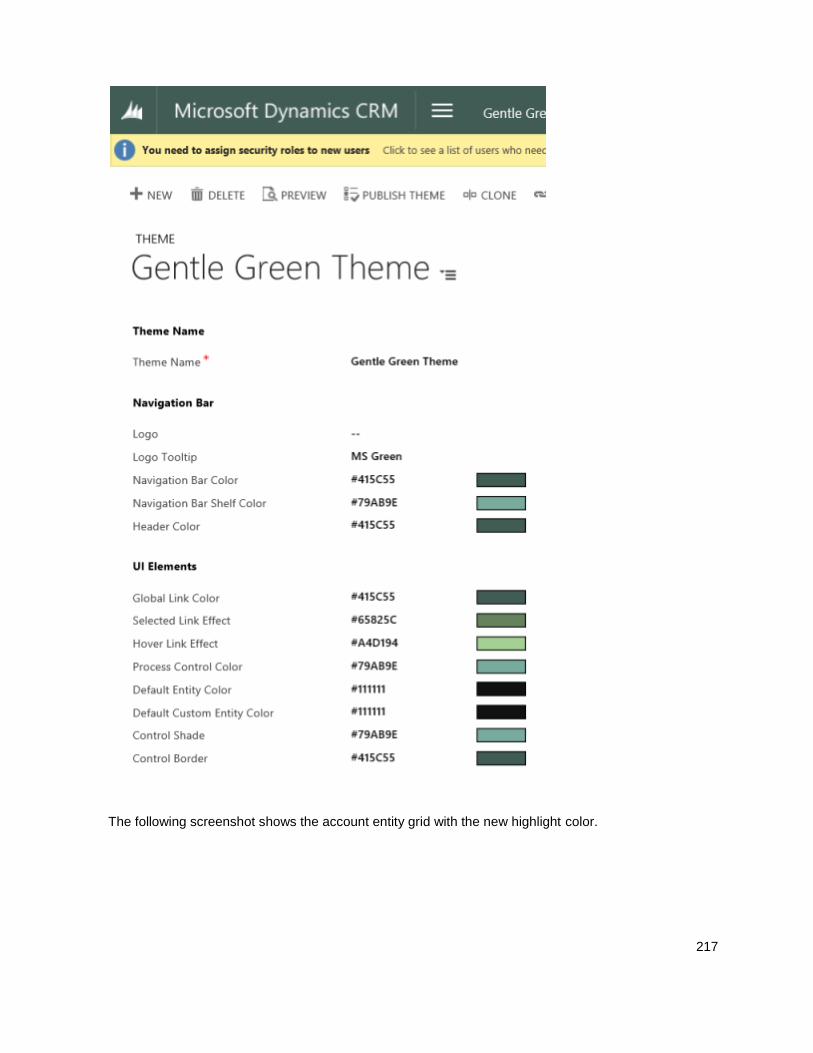
217
The following screenshot shows the account entity grid with the new highlight color.
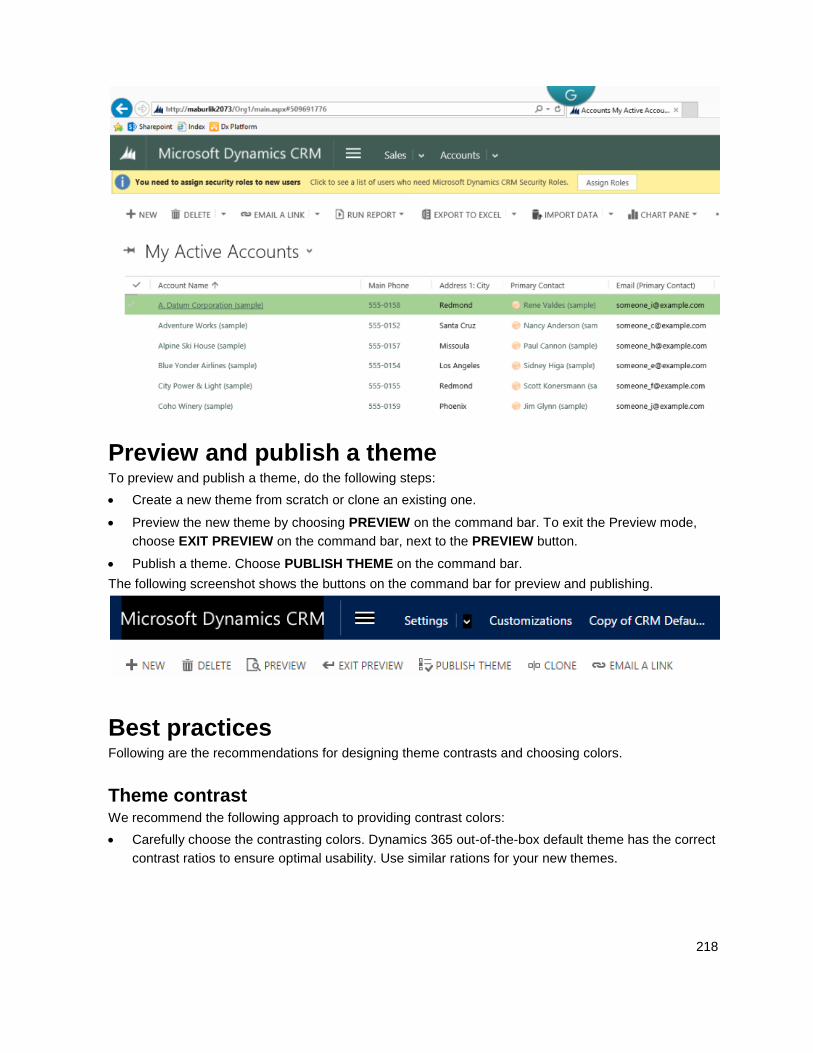
218
Preview and publish a theme To preview and publish a theme, do the following steps:
Create a new theme from scratch or clone an existing one.
Preview the new theme by choosing PREVIEW on the command bar. To exit the Preview mode,
choose EXIT PREVIEW on the command bar, next to the PREVIEW button.
Publish a theme. Choose PUBLISH THEME on the command bar.
The following screenshot shows the buttons on the command bar for preview and publishing.
Best practices Following are the recommendations for designing theme contrasts and choosing colors.
Theme contrast We recommend the following approach to providing contrast colors:
Carefully choose the contrasting colors. Dynamics 365 out-of-the-box default theme has the correct
contrast ratios to ensure optimal usability. Use similar rations for your new themes.

219
For high contrast mode, use the default color settings.
Theme colors We recommend that you don’t use a large number of different colors. Although you can set a different color for every entity, we recommend one of two patterns:
Make all entities in neutral colors and highlight the key entities.
Use the same color for similar entities or related entities, such as queue and queue item, or product
catalog entities. Keep the total number of groups low.
Custom theme considerations You should consider the following when planning on using custom themes:
Most updated user interface (UI) areas will be displayed in the custom theme colors.
Even though the theme colors are applied globally throughout the application, some legacy UI
areas, such as gradient buttons, will retain the default colors.
Certain areas must use dark or light colors to contrast with the default icon colors. The icon color
isn’t customizable.
An entity can’t be displayed in different colors under different Sitemap nodes.
The Sitemap nodes colors aren’t customizable.
See Also Customize your Dynamics 365 system Help & Training: Change the color scheme or add a log to match your organization’s brand Changes to forms and views in Dynamics 2015 Video: Theming In Microsoft Dynamics CRM MSDN: Query and edit an organization theme
© 2016 Microsoft. All rights reserved. Copyright
Changes to forms and views in Dynamics 2015
Applies To: Dynamics 365 (online), Dynamics 365 (on-premises), Dynamics CRM 2016, Dynamics CRM Online
[This topic is pre-release documentation and is subject to change.]
Changes to forms and views for Accounts, the Product Catalog, and User management make it easier to find related information with product and account families and hierarchical charts. These changes, introduced with CRM 2015, apply to forms for system entities such as Account, Case, and User, but do not appear in custom forms.
In service management, changes to service configuration settings improve Service Level Agreement (SLA) tracking.
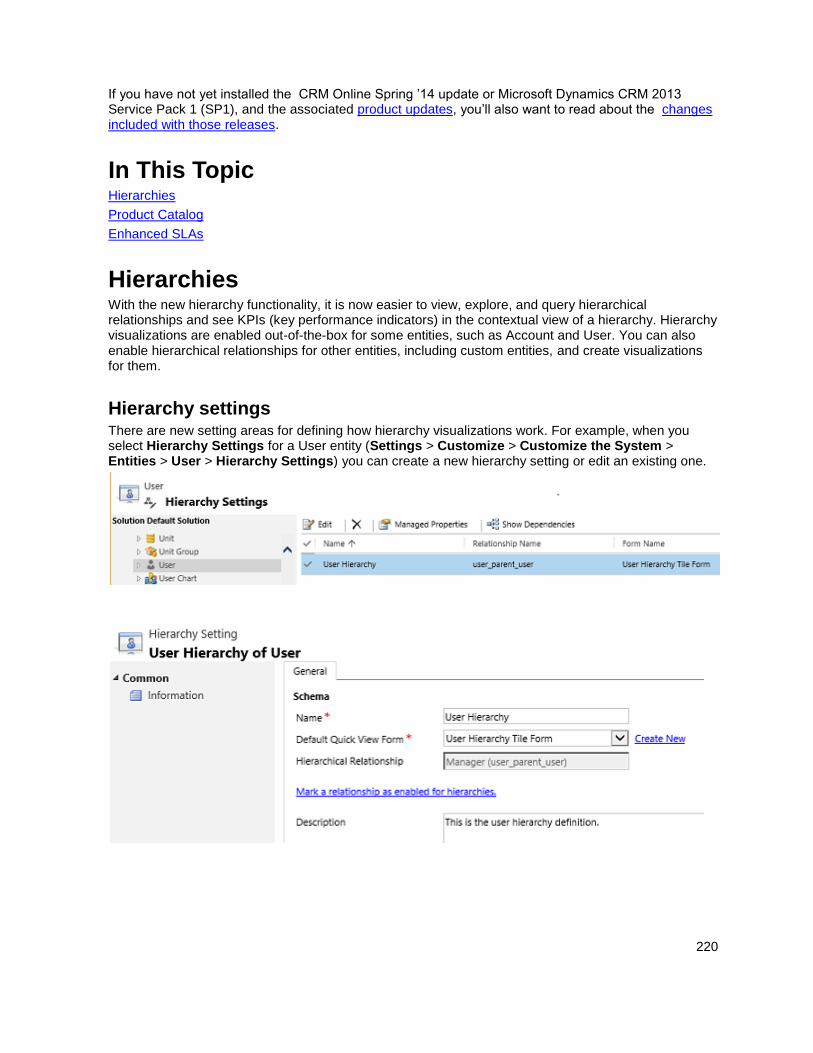
220
If you have not yet installed the CRM Online Spring ’14 update or Microsoft Dynamics CRM 2013 Service Pack 1 (SP1), and the associated product updates, you’ll also want to read about the changes included with those releases.
In This Topic Hierarchies
Product Catalog
Enhanced SLAs
Hierarchies With the new hierarchy functionality, it is now easier to view, explore, and query hierarchical relationships and see KPIs (key performance indicators) in the contextual view of a hierarchy. Hierarchy visualizations are enabled out-of-the-box for some entities, such as Account and User. You can also enable hierarchical relationships for other entities, including custom entities, and create visualizations for them.
Hierarchy settings There are new setting areas for defining how hierarchy visualizations work. For example, when you select Hierarchy Settings for a User entity (Settings > Customize > Customize the System > Entities > User > Hierarchy Settings) you can create a new hierarchy setting or edit an existing one.
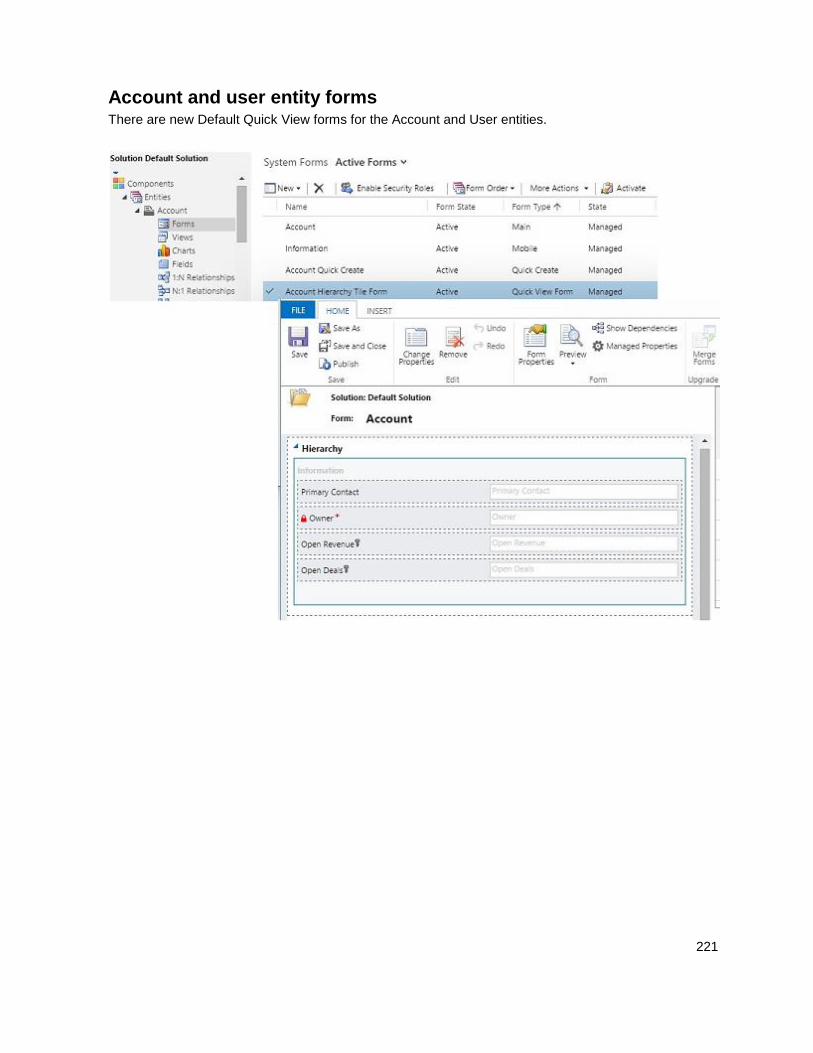
221
Account and user entity forms There are new Default Quick View forms for the Account and User entities.
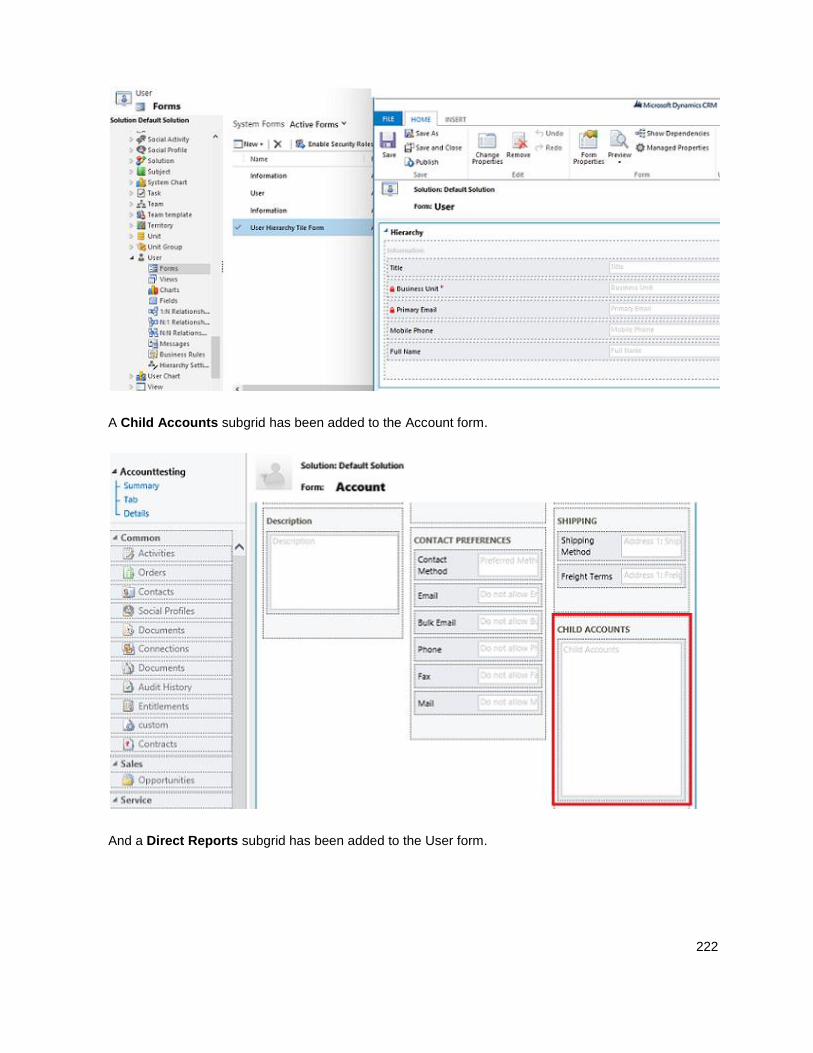
222
A Child Accounts subgrid has been added to the Account form.
And a Direct Reports subgrid has been added to the User form.
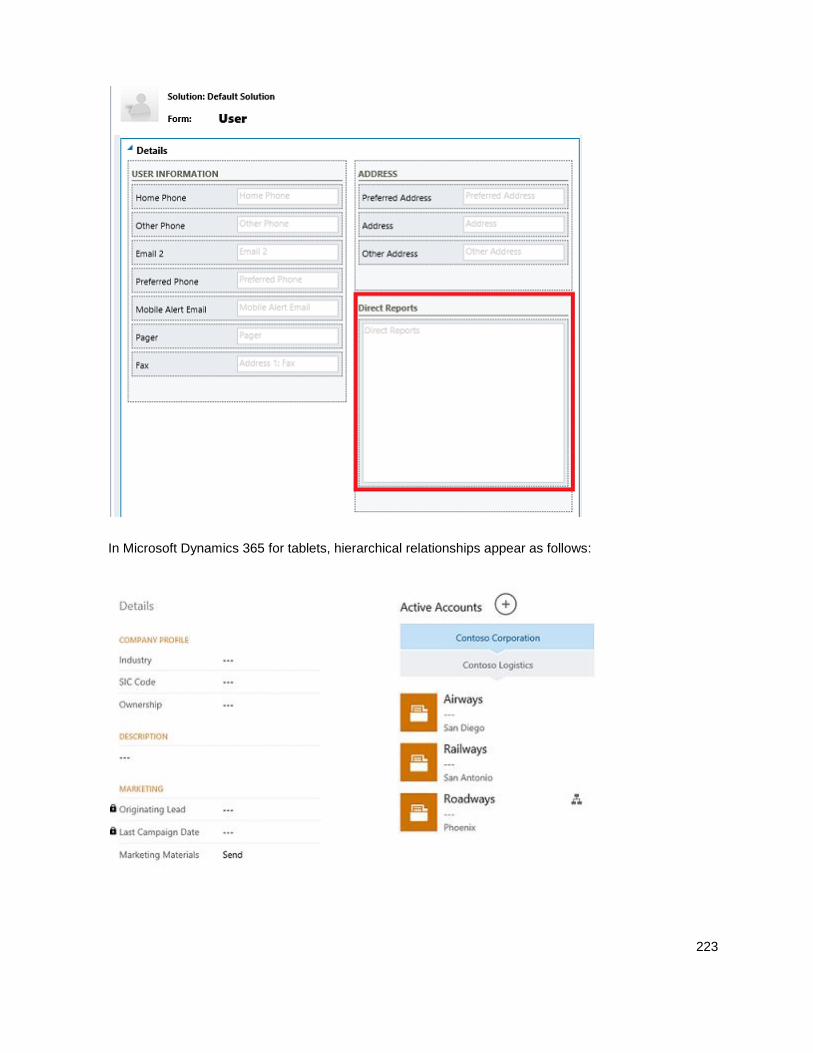
223
In Microsoft Dynamics 365 for tablets, hierarchical relationships appear as follows:
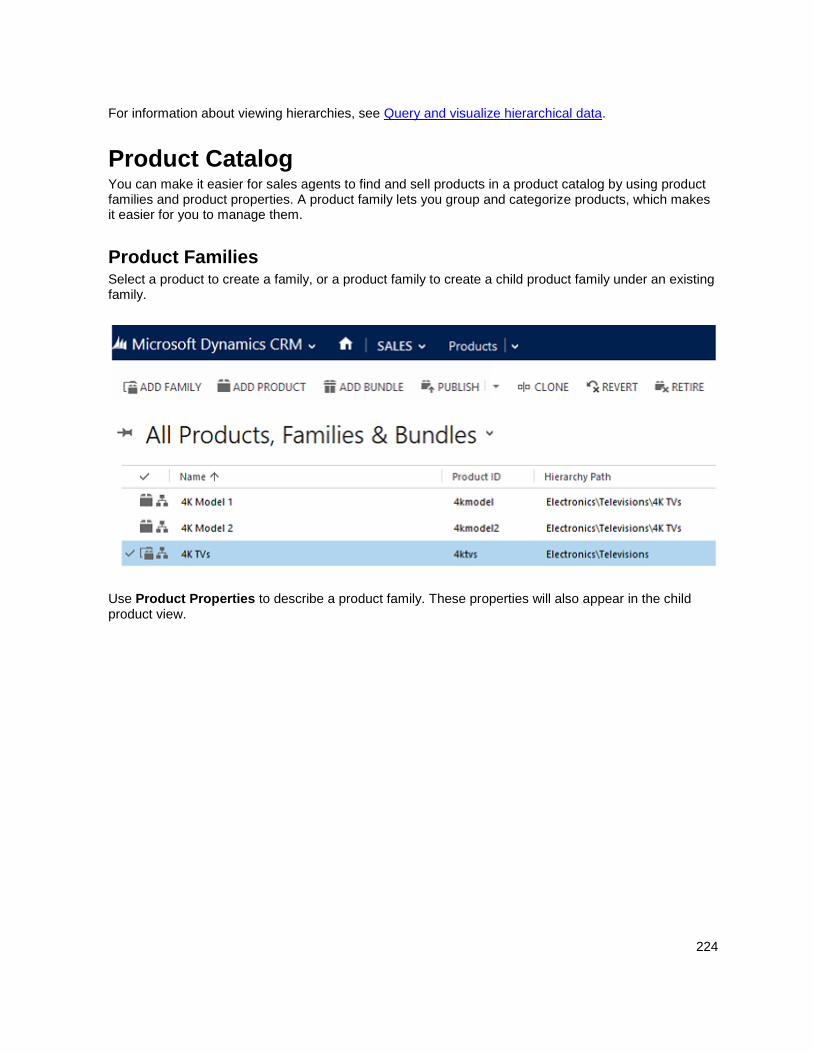
224
For information about viewing hierarchies, see Query and visualize hierarchical data.
Product Catalog You can make it easier for sales agents to find and sell products in a product catalog by using product families and product properties. A product family lets you group and categorize products, which makes it easier for you to manage them.
Product Families Select a product to create a family, or a product family to create a child product family under an existing family.
Use Product Properties to describe a product family. These properties will also appear in the child product view.
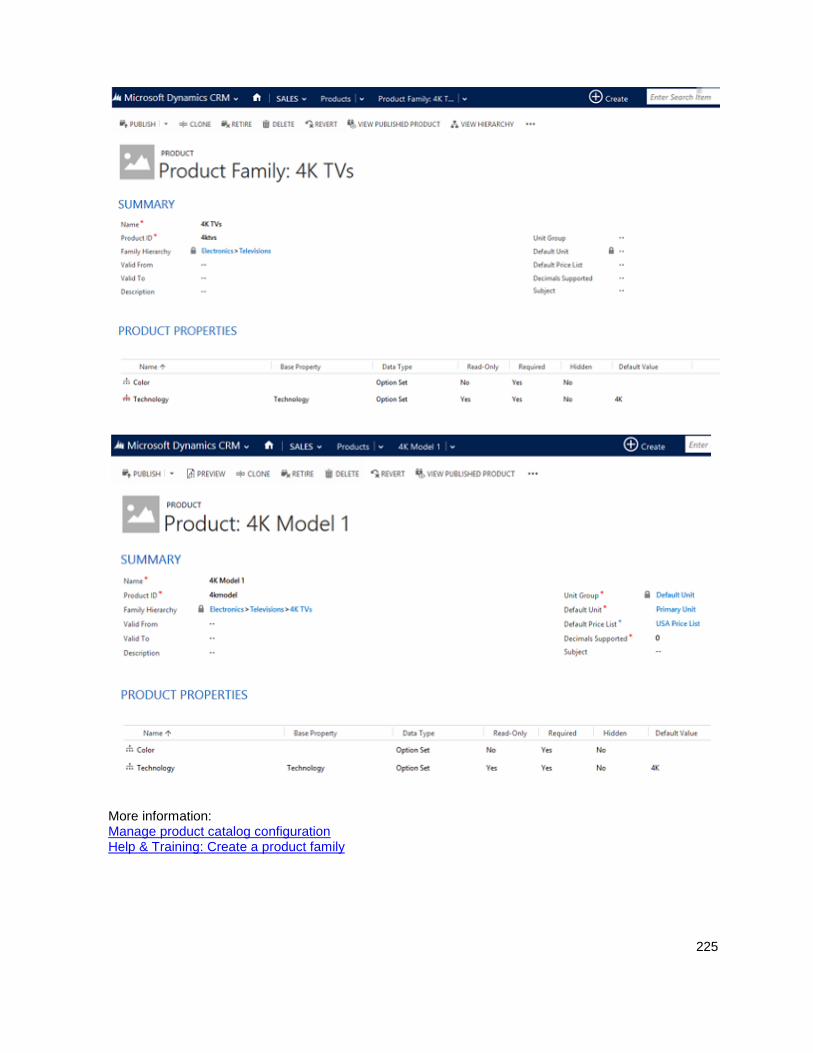
225
More information: Manage product catalog configuration Help & Training: Create a product family
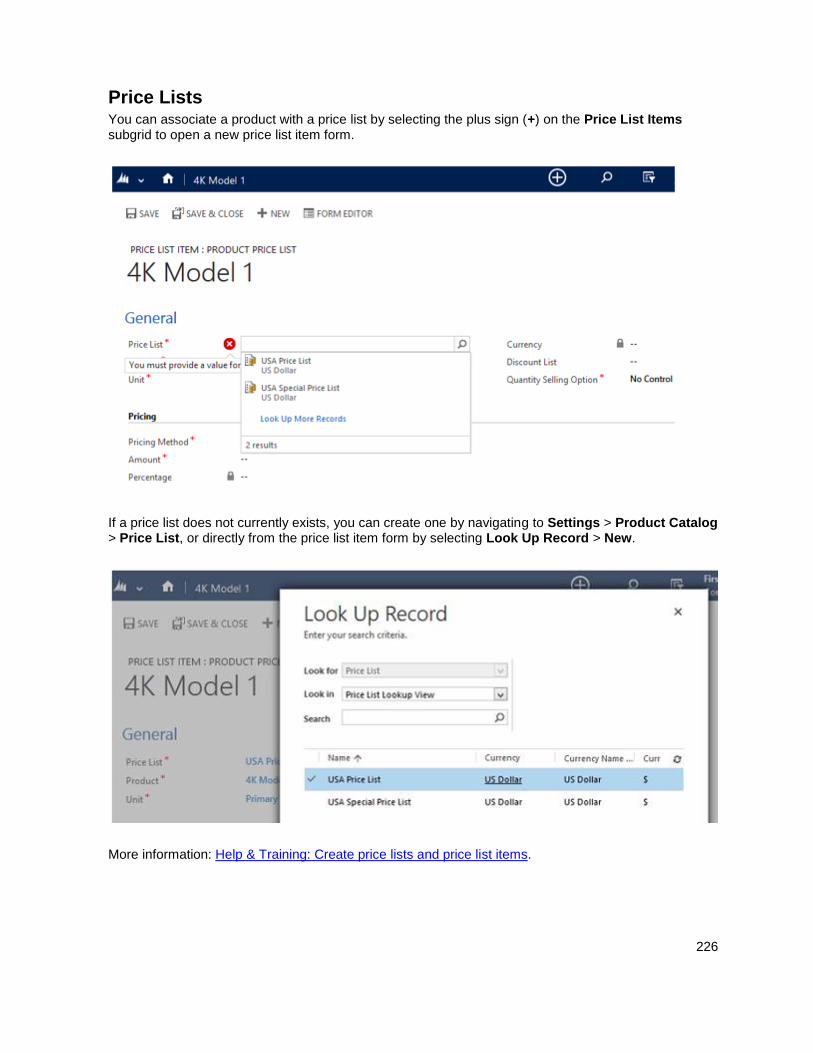
226
Price Lists You can associate a product with a price list by selecting the plus sign (+) on the Price List Items subgrid to open a new price list item form.
If a price list does not currently exists, you can create one by navigating to Settings > Product Catalog > Price List, or directly from the price list item form by selecting Look Up Record > New.
More information: Help & Training: Create price lists and price list items.
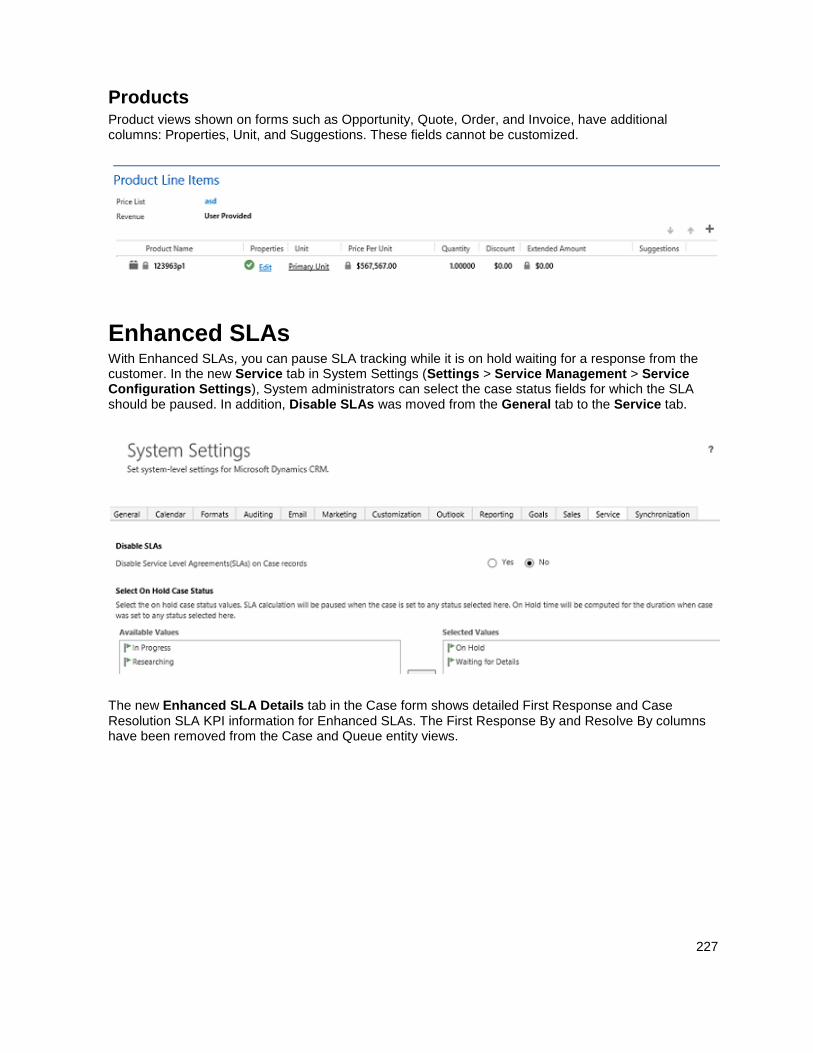
227
Products Product views shown on forms such as Opportunity, Quote, Order, and Invoice, have additional columns: Properties, Unit, and Suggestions. These fields cannot be customized.
Enhanced SLAs With Enhanced SLAs, you can pause SLA tracking while it is on hold waiting for a response from the customer. In the new Service tab in System Settings (Settings > Service Management > Service Configuration Settings), System administrators can select the case status fields for which the SLA should be paused. In addition, Disable SLAs was moved from the General tab to the Service tab.
The new Enhanced SLA Details tab in the Case form shows detailed First Response and Case Resolution SLA KPI information for Enhanced SLAs. The First Response By and Resolve By columns have been removed from the Case and Queue entity views.
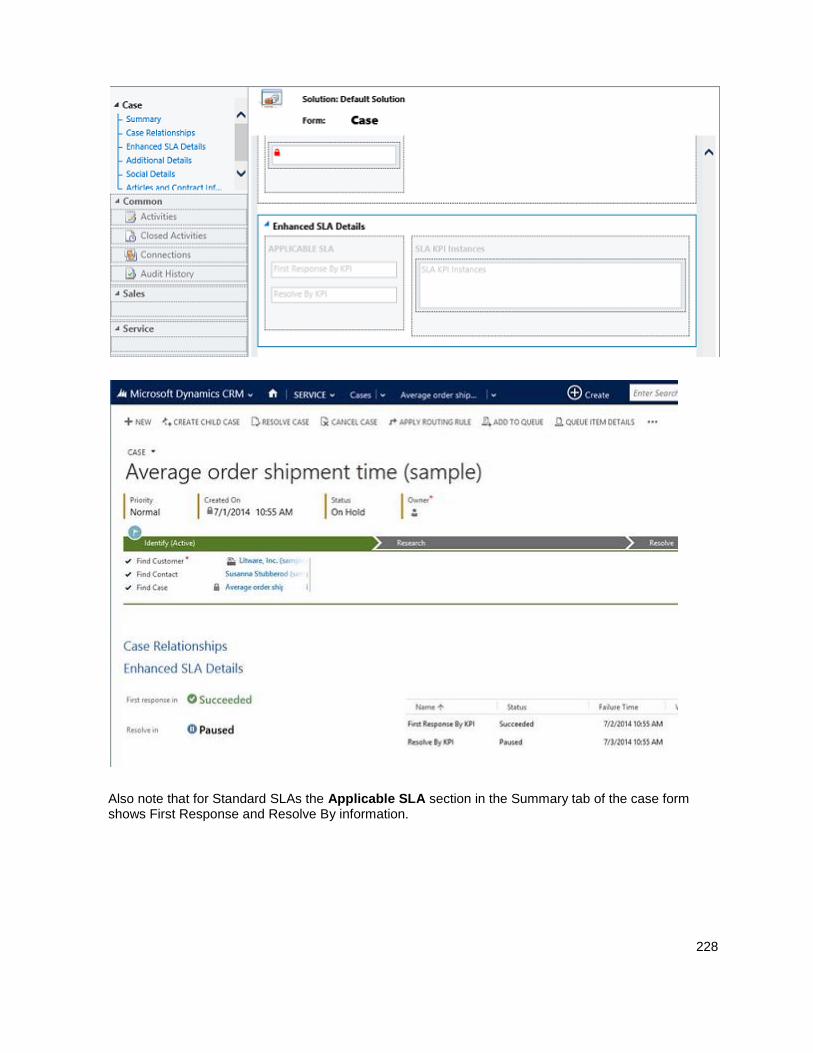
228
Also note that for Standard SLAs the Applicable SLA section in the Summary tab of the case form shows First Response and Resolve By information.
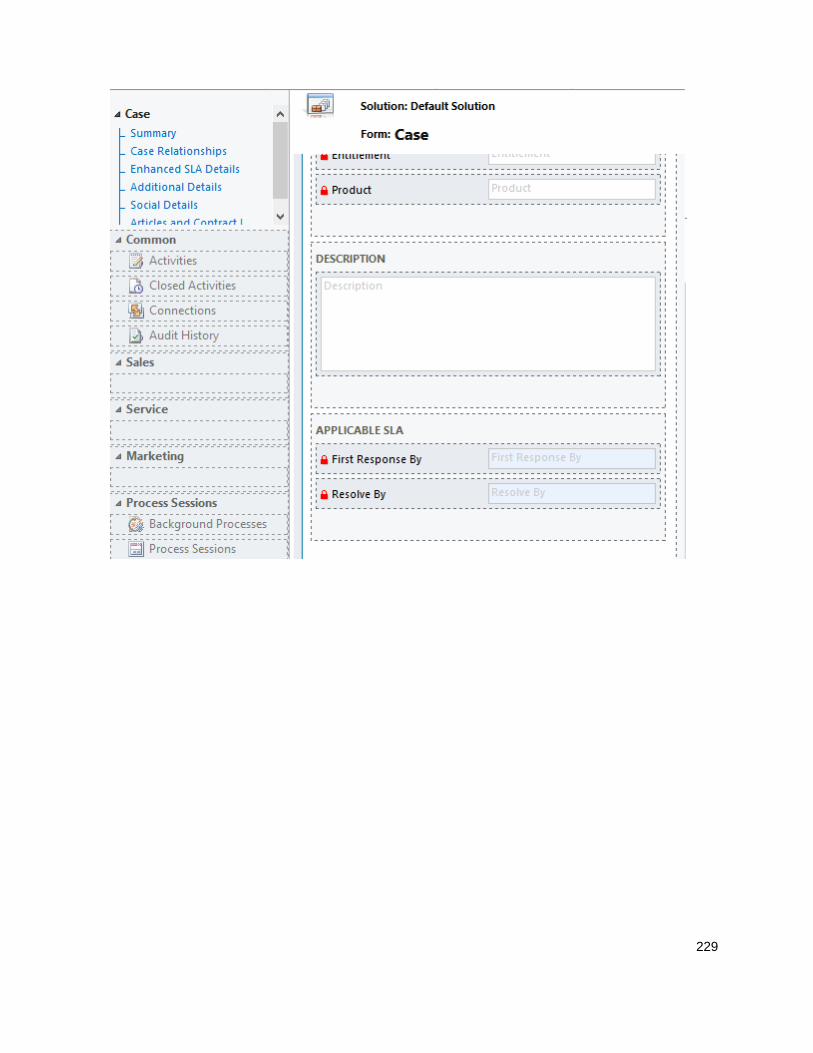
229
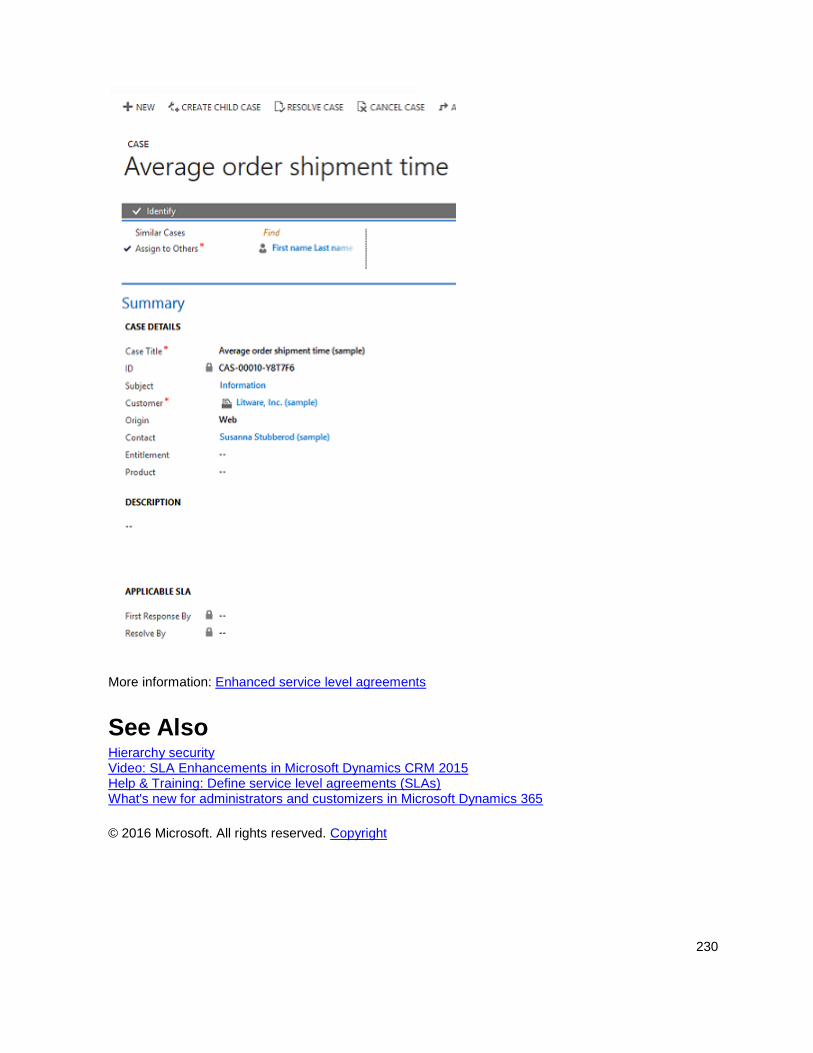
230
More information: Enhanced service level agreements
See Also Hierarchy security Video: SLA Enhancements in Microsoft Dynamics CRM 2015 Help & Training: Define service level agreements (SLAs) What's new for administrators and customizers in Microsoft Dynamics 365
© 2016 Microsoft. All rights reserved. Copyright
231
Create and edit metadata
Applies To: Dynamics 365 (online), Dynamics 365 (on-premises), Dynamics CRM 2016, Dynamics CRM Online
[This topic is pre-release documentation and is subject to change.]
This topic looks at metadata and how you can use it to customize your Microsoft Dynamics 365 deployment.
In This Topic Metadata used with customization
Create new metadata or use existing metadata
Limitations on creating metadata items
Metadata used with customization Metadata means data about data. Microsoft Dynamics 365 provides a flexible platform for your Dynamics 365 deployment because it is relatively easy to edit the definitions of the data that the deployment will use. In Microsoft Dynamics 365 the metadata is a collection of entities. Entities describe the kinds of data which is stored in the database. Each entity corresponds to a database table and each field (also known as attribute) within an entity represents a column in that table. Entity metadata is what controls the kinds of records you can create and what kind of actions can be performed on them. Using only the entity metadata and the Microsoft Dynamics 365 web services a developer can write code to perform actions with data on your Dynamics 365 organization. You have the ability to edit this metadata with the customization tools to create or edit entities, fields, and entity relationships.
The web application or different clients people use to interact with the data in your Dynamics 365 organization depend on the entity metadata and adapt as the entity metadata changes. But these clients also depend on other data to control what visual elements to display, any custom logic to apply, and how to apply security. This system data is also stored within entities but the entities themselves are not available for customization.
Use the metadata browser The solution explorer provides access to all the entities that you can customize, but this is just a fraction of all the entities that define the metadata used for Microsoft Dynamics 365. For most basic customization tasks the information presented within the solution explorer is going to be all you need. Developers frequently need more information and an easy way to see the metadata. If you need to have in-depth discussions with developers about metadata or if you just want to have a deeper understanding of the metadata, try installing the Metadata Browser solution that is included in the Microsoft Dynamics 365 SDK. The Metadata browser is a managed solution containing only HTML web resources that you can install that will let you view all the metadata and filter entities and fields to gain a better understanding of what the metadata contains.
232
Download and install the metadata browser
1. Download the Microsoft Dynamics CRM SDK package.
2. Run the MicrosoftDynamicsCRM2016SDK.exe to extract the contents to a folder of your choice on
your computer.
3. In the folder containing the extracted SDK files, navigate to the sdk\tools\metadatabrowser folder.
4. In that folder you will find a managed solution file (MetadataBrowser_2_0_0_3_managed.zip) and a
readme.docx file containing information about the solution.
5. Install the managed solution. See Import solutions for more information.
6. After you install the solution you will see it in the list of solutions. Click the solution to open it.
7. On the Configuration tab you will find instructions about how to use the metadata browser and
buttons to open the pages it contains.
Create new metadata or use existing metadata Microsoft Dynamics 365 comes with a number of system entities that support core Dynamics 365 capabilities. For example, data about your customers or potential customers is intended to be stored using the account or contact entities. The lead entity is where information about prospects or potential sales opportunities should be kept. The opportunity entity is intended to be used to track potential revenue generating events.
Each of these entities also contain a number of fields that represent common data that Dynamics 365 systems may need to store for the respective entity.
For most organizations it is to your advantage to use the system entities and attributes for the purposes they were provided. Even though you can create new custom entities, system entities may have special capabilities that you will not be able to easily replicate without writing code.
For example,
Lead entity records can be qualified. This qualification action will deactivate the lead and create a
new opportunity and account or contact record to allow moving forward in your business process.
Case entity records have a special connection with contract entities to help define entitlements for
customer services.
If you want to install a solution you can expect that the solution developer has leveraged the system entities and attributes. Creating a new custom entity that replaces a system entity or attribute will mean that any solutions available may not work for your organization.
For these reasons, we recommend that you use the provided system entities and fields when they make sense for your organization. If they don’t make sense and can’t be edited to match your need, you should evaluate if creating a new entity is required. Remember that you can change the display name of an entity so that it matches the nomenclature your organization uses. For example, it is very common for people to change the display name of the account entity to “Company” or the name of the contact entity to “Individual”. This can be done to entities or attributes without changing the behavior of the entity. For more information about renaming entities, see Change the name of an entity.
You can’t delete system entities or fields. They are considered part of the system solution and every organization is expected to have them. If you want to hide a system entity, change the security role privileges for your organization to remove the read privilege for that entity. This will remove the entity from most parts of the application. If there is a system field that you don’t need, remove it from the form
233
and any views that use it. Change the Searchable value in the field definition so that it does not appear in advanced find. More information: Create and edit fields
Limitations on creating metadata items With Microsoft Dynamics 365 (online) there is a limit to the number of entities you can create. You can find information about the maximum number in the Resources In Use page for your deployment. If you need more custom entities, contact Microsoft Dynamics 365 technical support. This upper limit can be adjusted. With Microsoft Dynamics 365 on-premises, there is practically no limit to the number of custom entities you can create other than the maximum capacity for your version of Microsoft SQL Server. See Maximum Capacity Specifications for SQL Server.
Within each entity there is an upper limit on the number of fields you can create. This limit is based on the technical limitations on the amount of data that can be stored in a row of a database table. It is difficult to provide a specific number because each type of field can use a different amount of space. The upper limit depends on the total space used by all the fields for the entity.
Most people do not create enough custom fields to reach the limit, but if you find yourself planning to add hundreds of custom fields to an entity, you should consider if this is the best design. Do all the fields you plan to add describe properties for a record for that entity? Do you really expect that people using your organization will be able to manage in a form that includes such a high number of fields? The number of fields you add to a form increase the amount of data that has to be transferred each time a record is edited and will affect the performance of the system. Take these factors into consideration when you are adding custom fields to an entity.
Option set fields provide a set of options that will be displayed in a drop-down control on a form or in picklist control when using advanced find. Dynamics 365 can support thousands of options within an Option set, but you shouldn’t consider this as the upper limit. Usability studies have shown that people have trouble using a system where a drop-down control provides large numbers of options. Use option set field to define categories for data. Don’t use option set fields to select categories that actually represent separate items of data. For example, rather than maintain an option set field that stores each of hundreds of possible manufacturers of a type of equipment, consider creating an entity that stores references to each manufacturer and use a lookup field instead of an option set.
See Also Create and edit entities Create and edit fields Create and edit entity relationships Create and edit global option sets Customize your Dynamics 365 system Referenced topic '6f0b8ac1-f70a-452e-b71a-2a8438f7d3ce' is only available online. Create and design forms
© 2016 Microsoft. All rights reserved. Copyright

234
Create and edit entities
Applies To: Dynamics 365 (online), Dynamics 365 (on-premises), Dynamics CRM 2016, Dynamics CRM Online
[This topic is pre-release documentation and is subject to change.]
Entities define the types of records people can use in a Microsoft Dynamics 365 organization. In the Dynamics 365 application, you can edit customizable system entities and create, edit, and delete custom entities.
In this topic Types of entities
Security considerations: Accessing activities and entities
Create entities
Edit entities
Edit system entity messages
Delete custom entities
Set managed properties
Types of entities Before creating or editing entities you should understand that there are different types of entities. Once a custom entity is created, these types cannot be changed. The two major divisions are based on entity ownership and whether the entities are activity entities.
Entity ownership There are four different types of entity ownership. When you create a custom entity the only options are user or team owned or organization-owned, but you should be aware that other entities have different ownership types.
Ownership Description
Business-owned There are 12 business-owned system entities. These include Business Unit, Calendar, Team, Security Role, and User.
None There are 127 system entities that don’t have an owner, but most of these aren’t visible in the solution explorer. These mostly consist of intersect entities created to support Many-to-Many relationships or where access to the record is controlled by a parent record. For example, Opportunity Product records must be accessed through a user or team owned Opportunity record.
Organization-owned There are 68 organization-owned system entities. These include Article, Article Template,
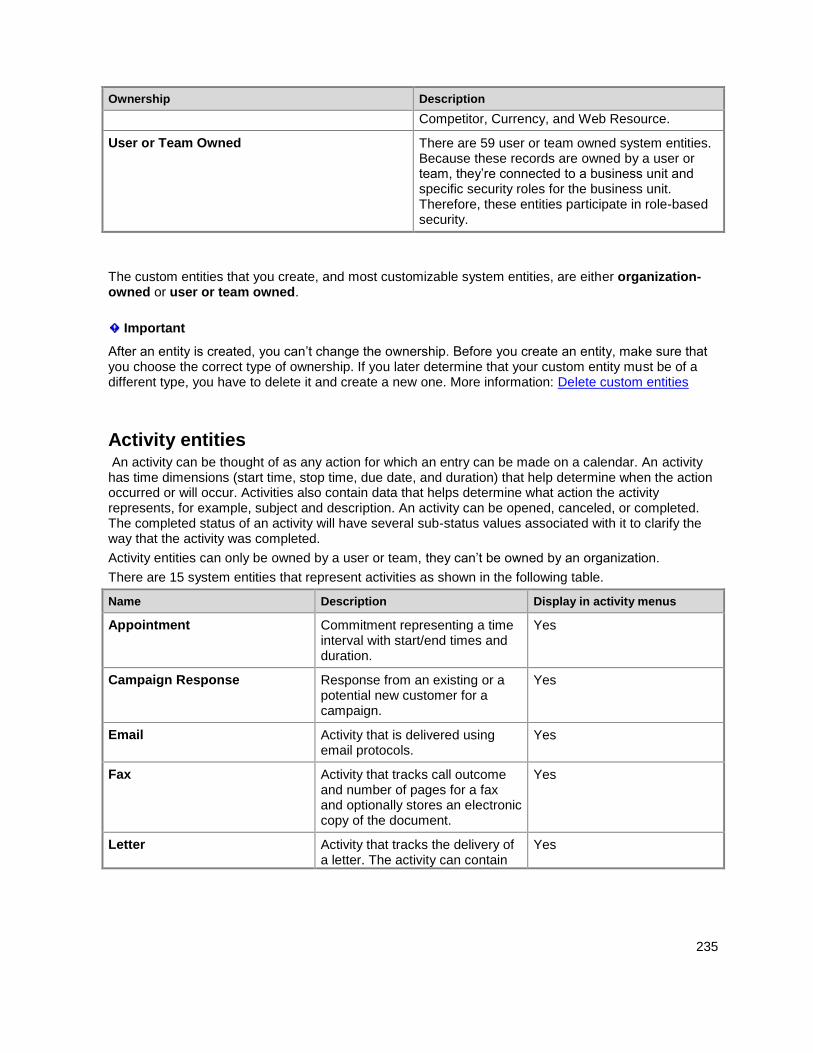
235
Ownership Description
Competitor, Currency, and Web Resource.
User or Team Owned There are 59 user or team owned system entities. Because these records are owned by a user or team, they’re connected to a business unit and specific security roles for the business unit. Therefore, these entities participate in role-based security.
The custom entities that you create, and most customizable system entities, are either organization-owned or user or team owned.
Important
After an entity is created, you can’t change the ownership. Before you create an entity, make sure that you choose the correct type of ownership. If you later determine that your custom entity must be of a different type, you have to delete it and create a new one. More information: Delete custom entities
Activity entities An activity can be thought of as any action for which an entry can be made on a calendar. An activity has time dimensions (start time, stop time, due date, and duration) that help determine when the action occurred or will occur. Activities also contain data that helps determine what action the activity represents, for example, subject and description. An activity can be opened, canceled, or completed. The completed status of an activity will have several sub-status values associated with it to clarify the way that the activity was completed.
Activity entities can only be owned by a user or team, they can’t be owned by an organization.
There are 15 system entities that represent activities as shown in the following table.
Name Description Display in activity menus
Appointment Commitment representing a time interval with start/end times and duration.
Yes
Campaign Response Response from an existing or a potential new customer for a campaign.
Yes
Email Activity that is delivered using email protocols.
Yes
Fax Activity that tracks call outcome and number of pages for a fax and optionally stores an electronic copy of the document.
Yes
Letter Activity that tracks the delivery of a letter. The activity can contain
Yes
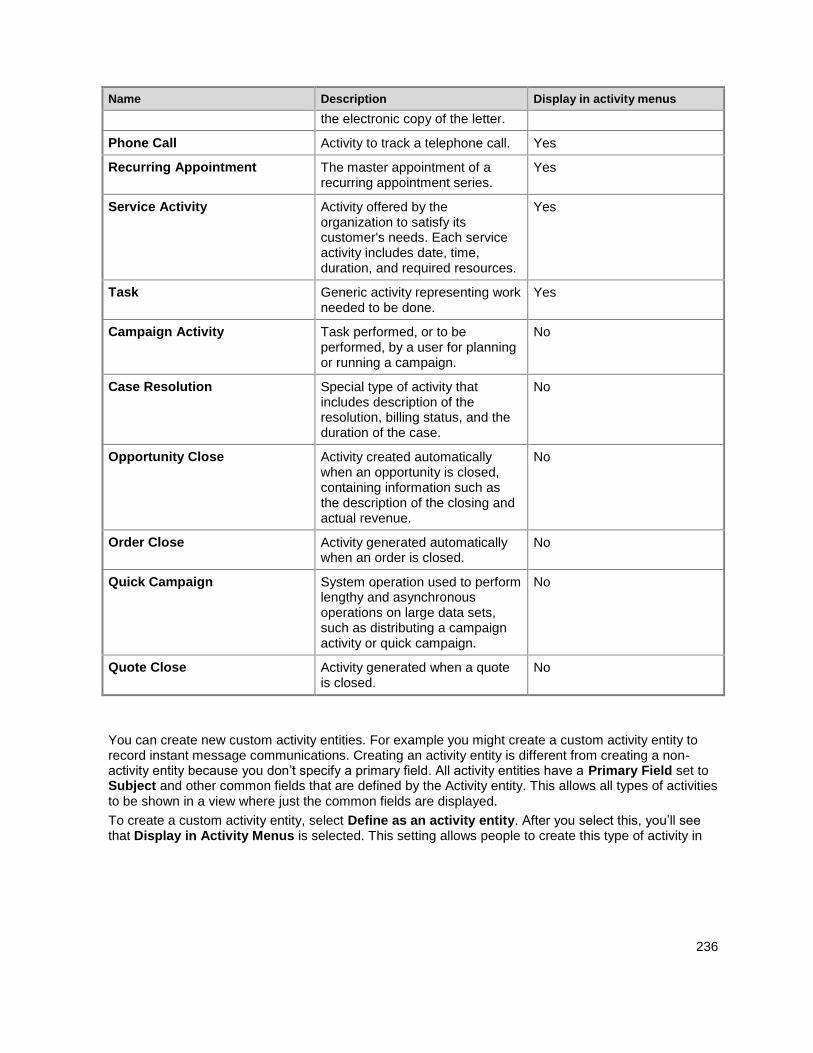
236
Name Description Display in activity menus
the electronic copy of the letter.
Phone Call Activity to track a telephone call. Yes
Recurring Appointment The master appointment of a recurring appointment series.
Yes
Service Activity Activity offered by the organization to satisfy its customer's needs. Each service activity includes date, time, duration, and required resources.
Yes
Task Generic activity representing work needed to be done.
Yes
Campaign Activity Task performed, or to be performed, by a user for planning or running a campaign.
No
Case Resolution Special type of activity that includes description of the resolution, billing status, and the duration of the case.
No
Opportunity Close Activity created automatically when an opportunity is closed, containing information such as the description of the closing and actual revenue.
No
Order Close Activity generated automatically when an order is closed.
No
Quick Campaign System operation used to perform lengthy and asynchronous operations on large data sets, such as distributing a campaign activity or quick campaign.
No
Quote Close Activity generated when a quote is closed.
No
You can create new custom activity entities. For example you might create a custom activity entity to record instant message communications. Creating an activity entity is different from creating a non-activity entity because you don’t specify a primary field. All activity entities have a Primary Field set to Subject and other common fields that are defined by the Activity entity. This allows all types of activities to be shown in a view where just the common fields are displayed.
To create a custom activity entity, select Define as an activity entity. After you select this, you’ll see that Display in Activity Menus is selected. This setting allows people to create this type of activity in
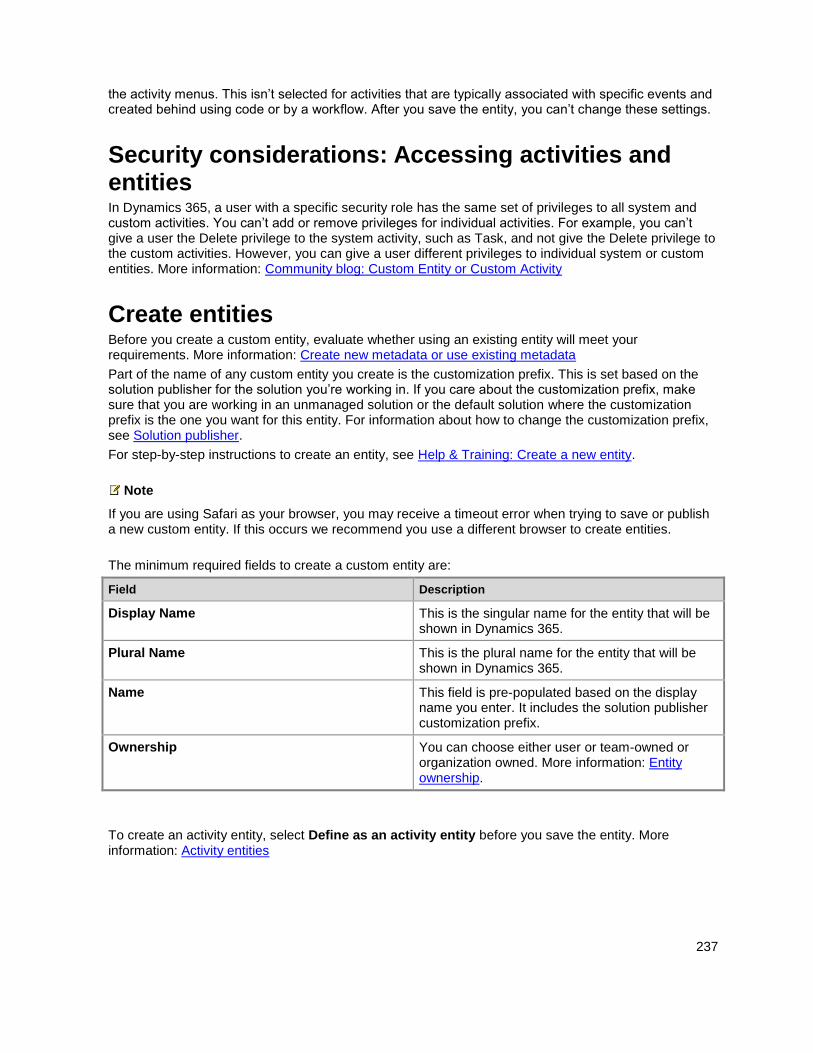
237
the activity menus. This isn’t selected for activities that are typically associated with specific events and created behind using code or by a workflow. After you save the entity, you can’t change these settings.
Security considerations: Accessing activities and entities In Dynamics 365, a user with a specific security role has the same set of privileges to all system and custom activities. You can’t add or remove privileges for individual activities. For example, you can’t give a user the Delete privilege to the system activity, such as Task, and not give the Delete privilege to the custom activities. However, you can give a user different privileges to individual system or custom entities. More information: Community blog: Custom Entity or Custom Activity
Create entities Before you create a custom entity, evaluate whether using an existing entity will meet your requirements. More information: Create new metadata or use existing metadata
Part of the name of any custom entity you create is the customization prefix. This is set based on the solution publisher for the solution you’re working in. If you care about the customization prefix, make sure that you are working in an unmanaged solution or the default solution where the customization prefix is the one you want for this entity. For information about how to change the customization prefix, see Solution publisher.
For step-by-step instructions to create an entity, see Help & Training: Create a new entity.
Note
If you are using Safari as your browser, you may receive a timeout error when trying to save or publish a new custom entity. If this occurs we recommend you use a different browser to create entities.
The minimum required fields to create a custom entity are:
Field Description
Display Name This is the singular name for the entity that will be shown in Dynamics 365.
Plural Name This is the plural name for the entity that will be shown in Dynamics 365.
Name This field is pre-populated based on the display name you enter. It includes the solution publisher customization prefix.
Ownership You can choose either user or team-owned or organization owned. More information: Entity ownership.
To create an activity entity, select Define as an activity entity before you save the entity. More information: Activity entities
238
Under Areas that display this entity, select which of the areas available in the navigation bar you want this entity to be available from. This isn’t required, but if you need people to be able to discover the entity easily, choose one of these. Making changes here updates the data that defines the navigation pane. You can’t change the settings for system entities. However, you can edit this data to modify where each entity is displayed and how it is displayed by editing the sitemap.
There are a number of options that are set by default. If you’re not sure you want these for your custom entity, disable them before you save. You can always choose to enable them later, but certain options can’t be disabled after they are enabled. Notes, Activities, and Connections are enabled by default and can’t be disabled later. For more information about available options, see Edit entities.
Each custom entity has a primary field. This is defined in the Primary Field tab. This field is used when records for the entity are displayed in a list. The primary field is typically a link that opens the record. This field must be a Single Line of Text field with the format of Text. When creating the entity the only value that can’t be changed later is the Name. By default the Display Name is “Name” and the Name is your solution publisher customizations prefix, an underscore, and “name”. If this isn’t what you want, change this before you create the entity. After you save the entity, you can’t edit the primary field values from the Primary Field tab for the entity. You must locate this field in the entity fields. You’ll be able to edit it there like any other single line of text field.
People with the system administrator or system customizer security roles can see all new custom entities. This allows you to test your custom entities before showing them to people who will use the system. Before people with other security roles can see these entities, you need to edit the security roles and grant access to other users so that they can see them. When the custom entity is created it will be included on the Custom Entities tab for each security role. You must provide at least user-level read access to the custom entity before people will be able to see it in the application.
When a new entity is created, a number of metadata and supporting system records are created for it. You continue editing the entity by working with these.
Edit entities You can edit any custom entities that you create. System entities or managed custom entities may have limitations about changes you can make.
System entities are any entities that are included with Microsoft Dynamics 365. Managed custom entities are entities that have been added to the system by importing a managed solution. The degree to which you can edit these entities is determined by the managed properties set for each entity. Any properties that can’t be edited will be disabled. To view the Managed properties for an entity selected in the solution explorer, click the Managed Properties button in the menu bar.
Note
You must publish customizations after you save changes to an existing entity. More information: Publishing customizations
When you edit entities you can make the following metadata changes:
Edit the entity fields More information: Create and edit fields
Edit the entity relationships More information: Create and edit entity relationships
You can also make changes to records that support the entity:
Forms More information: Create and design forms
Business Rules More information: Create and edit business rules
239
For your custom entities you can change the Areas that display this entity, but for system entities or managed custom entities you will find that the options are disabled.
Change the name of an entity Use the Display Name and Plural Name properties to change the name of the entity in the application. However, the name of many system entities may also be used in other text in the application. To locate and change text where this name was used, see Edit system entity messages.
Change the icons used for custom entities By default, all custom entities in the web application have the same icons. You can create image web resources for the icons you want for your custom entities and set them using the Update Icons button on the toolbar. There are two sizes of icons:
Icon in Web Application This icon should be 16x16 pixels.
Icon for Entity Forms This icon should be 32x32 pixels.
Both icons should be no larger than 10 KB. PNG format files with transparent backgrounds are recommended. More information: Help & Training: Change entity icons
Note
Microsoft Dynamics 365 for tablets and Microsoft Dynamics 365 for phones don’t display custom icons for custom entities.
Entity options that can only be enabled The following table lists the options that you can enable for an entity, but after these items are enabled, they can’t be disabled:
Option Description
Business process flows Create business process flows for this entity. More information: Business process flows
Notes Append notes to records for this entity. Notes include the ability to add attachments.
Activities Associate activities to records for this entity.
Connections Use the connections feature to show how records for this entity have connections to records of other entities that also have connections enabled.
Sending e-mail (if an e-mail field does not exist, one will be created)
Send emails using an email address stored in one of the fields for this entity. If a Single Line of Text field with format set to email doesn’t already exist for this entity, a new one will be created when you enable sending email.
Queues Use the entity with queues. Queues improve routing and sharing of work by making records for
240
Option Description
this entity available in a central place that everyone can access.
Enable or disable entity options The following table lists the entity options that you can enable or disable at any time.
Option Description
Primary Image System entities that support images will already have an Image field. You can choose whether to display data in this field as the image for the record by setting this field to [None] or Default Image.
For custom entities you must first create an image field. Each entity can have only one image field. After you create one, you can change this setting to set the primary image. More information: Image fields
Mail Merge People can use this entity with mail merge.
Document Management After other tasks have been performed to enable document management for your organization, enabling this feature allows for this entity to participate in integration with Microsoft SharePoint. More information: Help & Training: Manage SharePoint documents from within Microsoft Dynamics 365
Duplicate Detection If duplicate detection is enabled for your organization, enabling this allows you to create duplicate detection rules for this entity. For information about enabling duplicate detection, see Help & Training: Turn duplicate detection on or off.
Allow Quick Create After you have created and published a Quick Create Form for this entity, people will have the option to create a new record using the Create button in the navigation pane. More information: Create and design forms
When this is enabled for a custom activity entity, the custom activity will be visible in the group of activity entities when people use the Create button in the navigation pane. However, because activities don’t support quick create forms, the main form will be used when the custom entity icon is clicked.
241
Option Description
Auditing When auditing is enabled for your organization, this allows for changes to entity records to be captured over time. When you enable auditing for an entity, auditing is also enabled on all its fields. You can select or clear fields that you want to enable auditing on.
Access Teams Create team templates for this entity. More information: Help & Training: About team templates
Enable for phone express Make this entity available to the Microsoft Dynamics 365 for phones express app.
Enable for mobile Make this entity available to the Dynamics 365 for phones and tablets apps. You also have the option to make this entity Read-only in mobile.
If the forms for an entity require an extension not supported in Dynamics 365 for phones and tablets, such as iFrame or web resource controls, use this setting to ensure that mobile app users can’t edit the data for these entities.
Offline capability for Dynamics 365 for Outlook People using Microsoft Dynamics 365 for Outlook can choose to include data from this entity with the data they take offline.
Warning
Each entity that you enable for offline capability directly affects the time required for people to synchronize data when they come back online. This is especially true for people with less powerful computers. Carefully consider if an entity must be available for people while working offline.
Reading pane in Dynamics 365 for Outlook Records for this entity can display in a read-only view in Dynamics 365 for Outlook. More information: Dynamics 365 for Outlook reading pane
Edit system entity messages The default display name of some system entities are used in user interface text and error messages in Dynamics 365. If you change the display name, you should also update any messages that use the
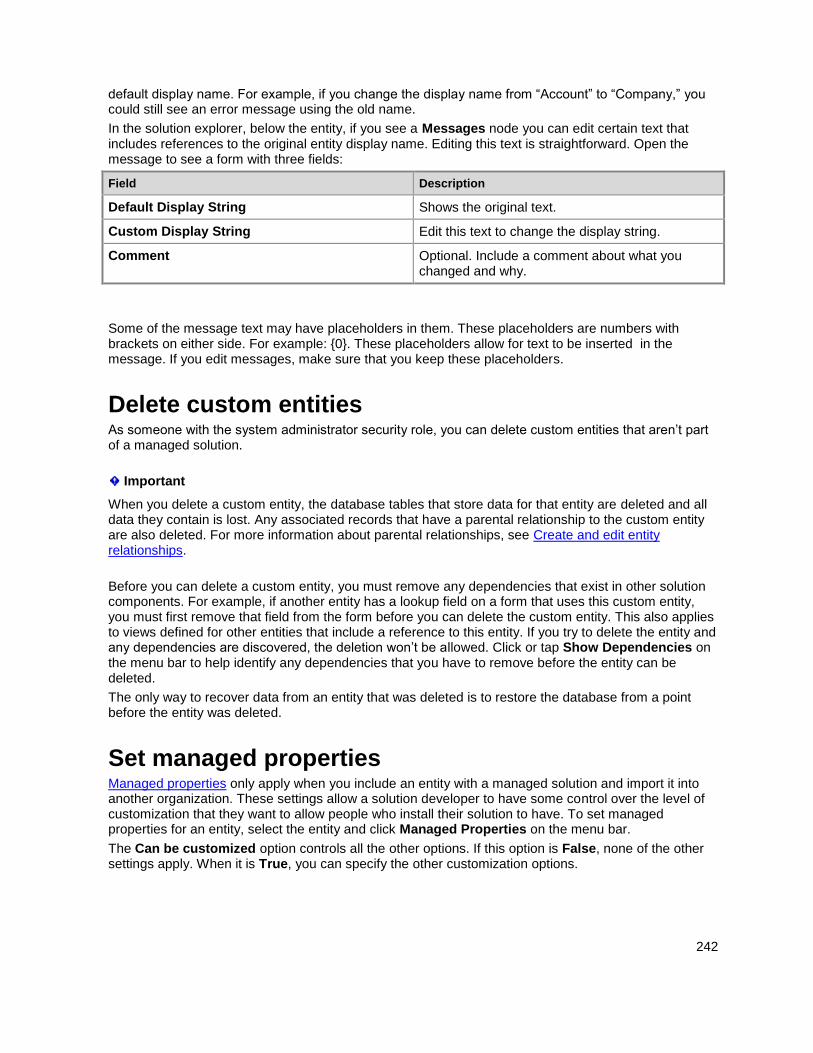
242
default display name. For example, if you change the display name from “Account” to “Company,” you could still see an error message using the old name.
In the solution explorer, below the entity, if you see a Messages node you can edit certain text that includes references to the original entity display name. Editing this text is straightforward. Open the message to see a form with three fields:
Field Description
Default Display String Shows the original text.
Custom Display String Edit this text to change the display string.
Comment Optional. Include a comment about what you changed and why.
Some of the message text may have placeholders in them. These placeholders are numbers with brackets on either side. For example: {0}. These placeholders allow for text to be inserted in the message. If you edit messages, make sure that you keep these placeholders.
Delete custom entities As someone with the system administrator security role, you can delete custom entities that aren’t part of a managed solution.
Important
When you delete a custom entity, the database tables that store data for that entity are deleted and all data they contain is lost. Any associated records that have a parental relationship to the custom entity are also deleted. For more information about parental relationships, see Create and edit entity relationships.
Before you can delete a custom entity, you must remove any dependencies that exist in other solution components. For example, if another entity has a lookup field on a form that uses this custom entity, you must first remove that field from the form before you can delete the custom entity. This also applies to views defined for other entities that include a reference to this entity. If you try to delete the entity and any dependencies are discovered, the deletion won’t be allowed. Click or tap Show Dependencies on the menu bar to help identify any dependencies that you have to remove before the entity can be deleted.
The only way to recover data from an entity that was deleted is to restore the database from a point before the entity was deleted.
Set managed properties Managed properties only apply when you include an entity with a managed solution and import it into another organization. These settings allow a solution developer to have some control over the level of customization that they want to allow people who install their solution to have. To set managed properties for an entity, select the entity and click Managed Properties on the menu bar.
The Can be customized option controls all the other options. If this option is False, none of the other settings apply. When it is True, you can specify the other customization options.

243
Entities have more managed properties than any other type of solution component. If the entity is customizable, you can set the following options:
Display name can be modified
Can Change Additional Properties
New forms can be created
New charts can be created
New views can be created
Except for Can Change Additional Properties, these options should be self-explanatory. The Can Change Additional Properties property simply means anything not covered by the other options. If you set all the individual options to False, you might as well set Can be customized to False.
See Also Create and edit metadata Create and edit fields Create and edit entity relationships Create and edit global option sets Community blog: Custom Entity or Custom Activity
© 2016 Microsoft. All rights reserved. Copyright
Create and edit fields
Applies To: Dynamics 365 (online), Dynamics 365 (on-premises), Dynamics CRM 2016, Dynamics CRM Online
[This topic is pre-release documentation and is subject to change.]
In Microsoft Dynamics 365, fields define the individual data items that can be used to store data in an entity. Fields are sometimes called attributes by developers. You can use the customization tools in the solution explorer to edit system fields that allow customization, or to create, edit, or delete custom entities.
In This Topic Create and edit fields
Types of fields
Image fields
Delete fields
Set managed properties for fields

244
Create and edit fields Before you create a custom field, evaluate whether using an existing field meets your requirements. More information: Create new metadata or use existing metadata
Part of the name of any custom field you create is the customization prefix. This is set based on the solution publisher for the solution you’re working in. If you care about the customization prefix, make sure that you are working in an unmanaged solution or the default solution where the customization prefix is the one you want for this entity. For information about how to change the customization prefix, see Solution publisher.
You can access fields in the application in several ways:
From the solution explorer you can expand the entity and choose the Fields node. From the list of
fields, click New to create a new field or double-click any of the fields on the list to edit them.
Expand the entity and choose the Forms node. Open a form in the form editor and below the Field
Explorer click New Field to create a new field. For any field already added to the form you can
double-click the field to display the Field Properties. On the Details tab, click Edit.
Another way to go to the form editor is to use the Form command on the command bar for any
entity record.
If you use the metadata browser tool, use the Entity Metadata Browser page to view details about
a specific entity, and then click the Attributes button. If a field is editable, you can click the Edit
Attribute button to edit the field. More information: Use the metadata browser
All fields have the following properties:
Property Description
Display Name The name that appears as a label in the header for lists where this attribute is included. It is also the default label when this field is shown in a form, but the label text in each form can be edited separately.
Name This field is pre-populated based on this Display Name you enter. It includes the solution publisher customization prefix. You can change the Display Name later, but the Name can’t be changed after the field is saved.
Field Requirement There are three options:
Optional
This field doesn’t require data to save the record.
Business Recommended
This field doesn’t require data to save the record. However a blue asterisk appears near the field to indicate it is important.
Business Required
The record can’t be saved without data in this
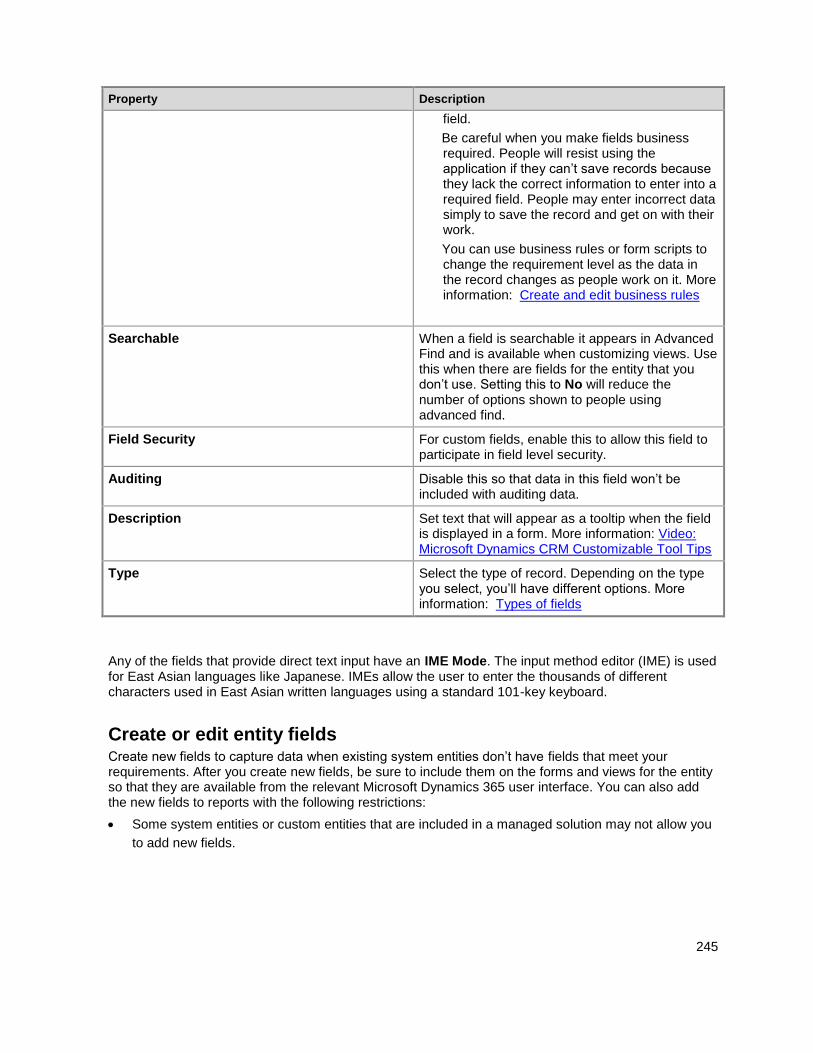
245
Property Description
field.
Be careful when you make fields business required. People will resist using the application if they can’t save records because they lack the correct information to enter into a required field. People may enter incorrect data simply to save the record and get on with their work.
You can use business rules or form scripts to change the requirement level as the data in the record changes as people work on it. More information: Create and edit business rules
Searchable When a field is searchable it appears in Advanced Find and is available when customizing views. Use this when there are fields for the entity that you don’t use. Setting this to No will reduce the number of options shown to people using advanced find.
Field Security For custom fields, enable this to allow this field to participate in field level security.
Auditing Disable this so that data in this field won’t be included with auditing data.
Description Set text that will appear as a tooltip when the field is displayed in a form. More information: Video: Microsoft Dynamics CRM Customizable Tool Tips
Type Select the type of record. Depending on the type you select, you’ll have different options. More information: Types of fields
Any of the fields that provide direct text input have an IME Mode. The input method editor (IME) is used for East Asian languages like Japanese. IMEs allow the user to enter the thousands of different characters used in East Asian written languages using a standard 101-key keyboard.
Create or edit entity fields Create new fields to capture data when existing system entities don’t have fields that meet your requirements. After you create new fields, be sure to include them on the forms and views for the entity so that they are available from the relevant Microsoft Dynamics 365 user interface. You can also add the new fields to reports with the following restrictions:
Some system entities or custom entities that are included in a managed solution may not allow you
to add new fields.
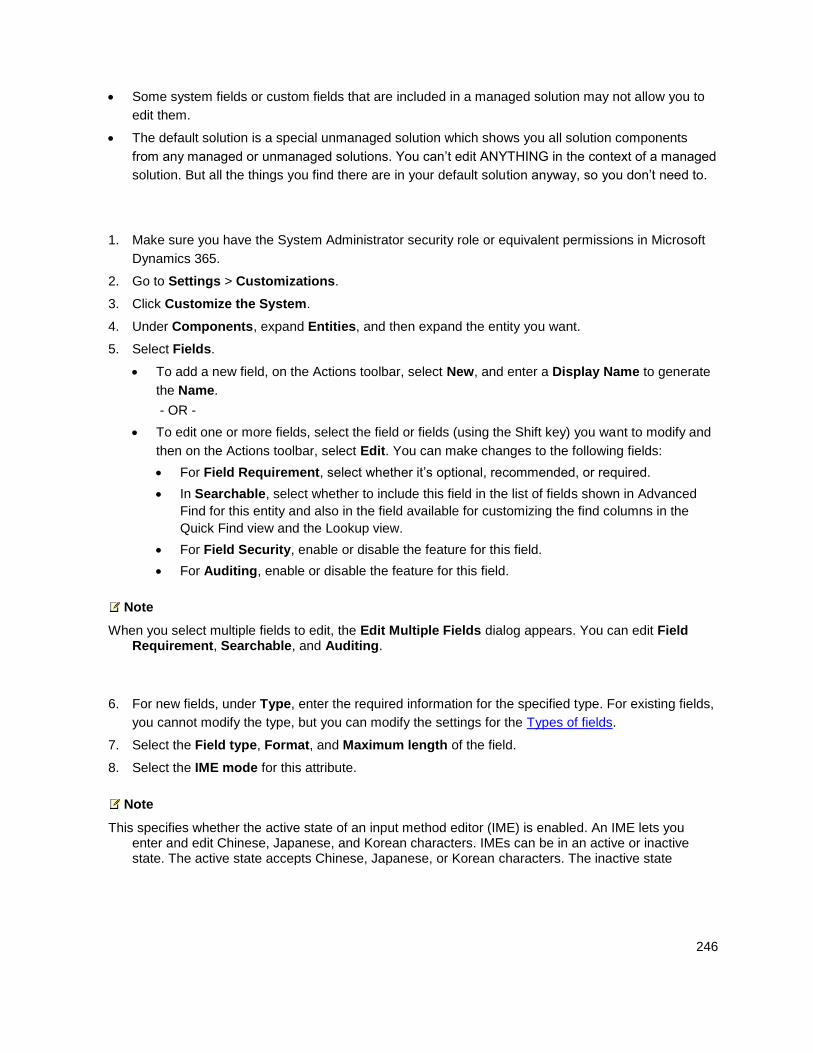
246
Some system fields or custom fields that are included in a managed solution may not allow you to
edit them.
The default solution is a special unmanaged solution which shows you all solution components
from any managed or unmanaged solutions. You can’t edit ANYTHING in the context of a managed
solution. But all the things you find there are in your default solution anyway, so you don’t need to.
1. Make sure you have the System Administrator security role or equivalent permissions in Microsoft
Dynamics 365.
2. Go to Settings > Customizations.
3. Click Customize the System.
4. Under Components, expand Entities, and then expand the entity you want.
5. Select Fields.
To add a new field, on the Actions toolbar, select New, and enter a Display Name to generate
the Name.
- OR -
To edit one or more fields, select the field or fields (using the Shift key) you want to modify and
then on the Actions toolbar, select Edit. You can make changes to the following fields:
For Field Requirement, select whether it’s optional, recommended, or required.
In Searchable, select whether to include this field in the list of fields shown in Advanced
Find for this entity and also in the field available for customizing the find columns in the
Quick Find view and the Lookup view.
For Field Security, enable or disable the feature for this field.
For Auditing, enable or disable the feature for this field.
Note
When you select multiple fields to edit, the Edit Multiple Fields dialog appears. You can edit Field Requirement, Searchable, and Auditing.
6. For new fields, under Type, enter the required information for the specified type. For existing fields,
you cannot modify the type, but you can modify the settings for the Types of fields.
7. Select the Field type, Format, and Maximum length of the field.
8. Select the IME mode for this attribute.
Note
This specifies whether the active state of an input method editor (IME) is enabled. An IME lets you enter and edit Chinese, Japanese, and Korean characters. IMEs can be in an active or inactive state. The active state accepts Chinese, Japanese, or Korean characters. The inactive state
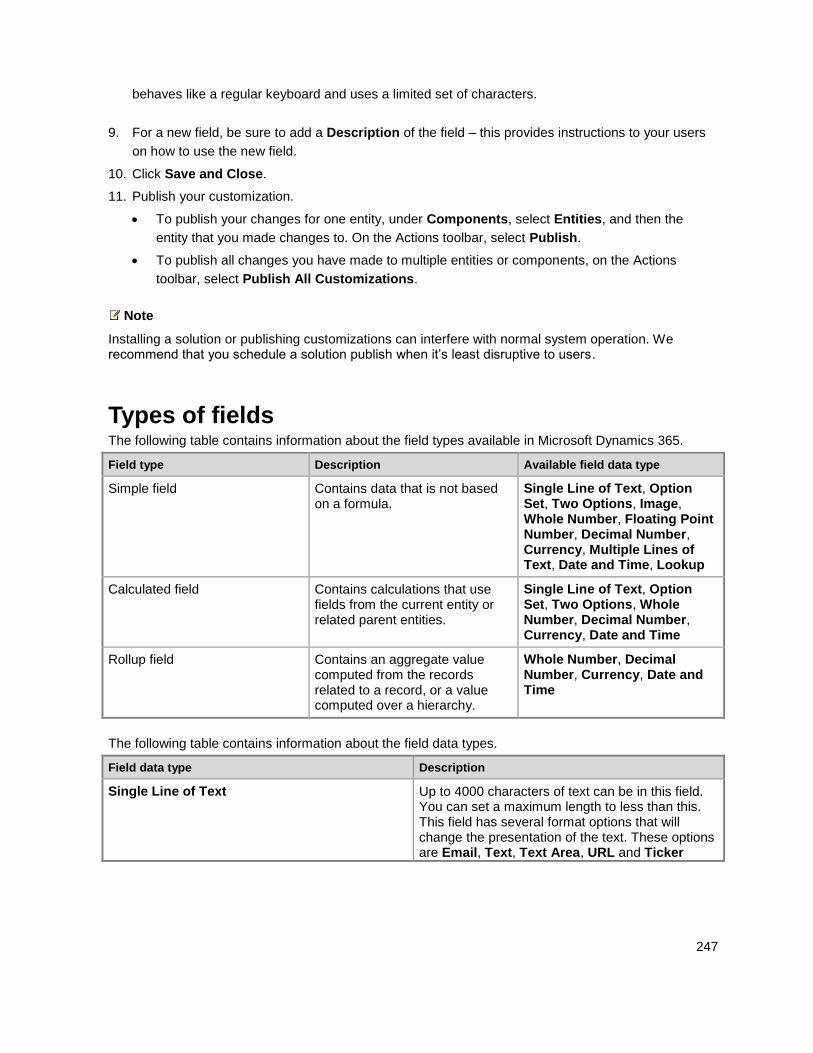
247
behaves like a regular keyboard and uses a limited set of characters.
9. For a new field, be sure to add a Description of the field – this provides instructions to your users
on how to use the new field.
10. Click Save and Close.
11. Publish your customization.
To publish your changes for one entity, under Components, select Entities, and then the
entity that you made changes to. On the Actions toolbar, select Publish.
To publish all changes you have made to multiple entities or components, on the Actions
toolbar, select Publish All Customizations.
Note
Installing a solution or publishing customizations can interfere with normal system operation. We recommend that you schedule a solution publish when it’s least disruptive to users.
Types of fields The following table contains information about the field types available in Microsoft Dynamics 365.
Field type Description Available field data type
Simple field Contains data that is not based on a formula.
Single Line of Text, Option Set, Two Options, Image, Whole Number, Floating Point Number, Decimal Number, Currency, Multiple Lines of Text, Date and Time, Lookup
Calculated field Contains calculations that use fields from the current entity or related parent entities.
Single Line of Text, Option Set, Two Options, Whole Number, Decimal Number, Currency, Date and Time
Rollup field Contains an aggregate value computed from the records related to a record, or a value computed over a hierarchy.
Whole Number, Decimal Number, Currency, Date and Time
The following table contains information about the field data types.
Field data type Description
Single Line of Text Up to 4000 characters of text can be in this field. You can set a maximum length to less than this. This field has several format options that will change the presentation of the text. These options are Email, Text, Text Area, URL and Ticker
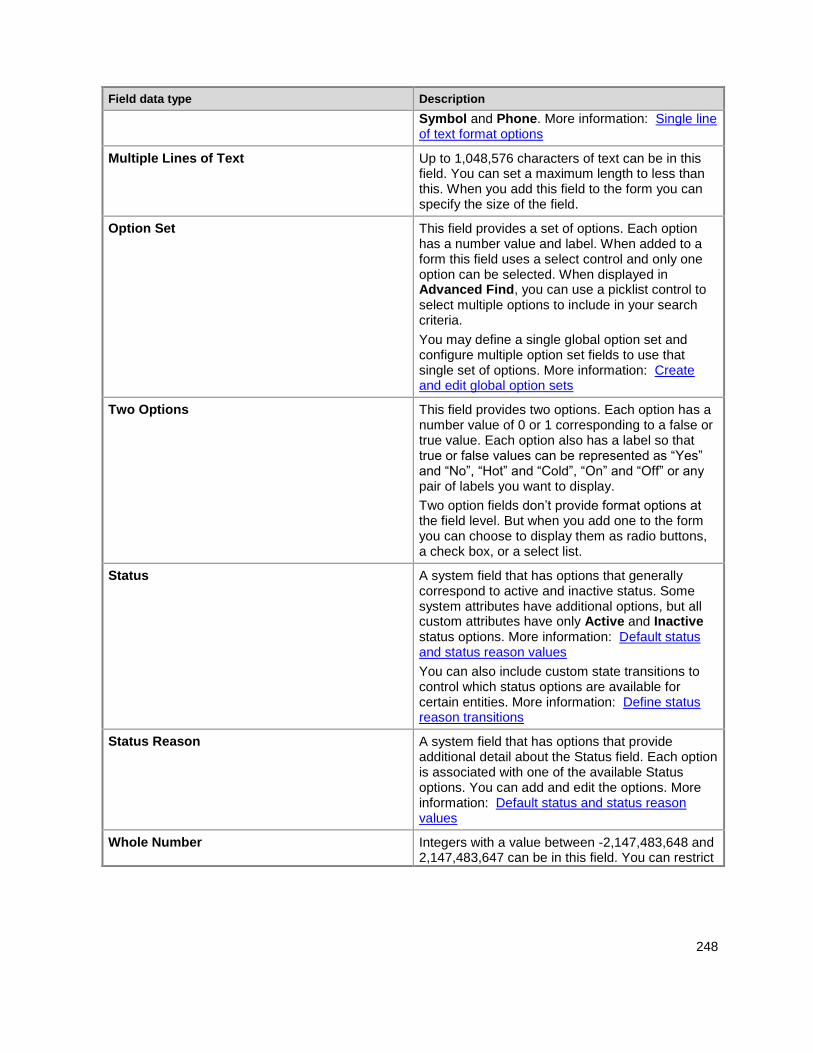
248
Field data type Description
Symbol and Phone. More information: Single line of text format options
Multiple Lines of Text Up to 1,048,576 characters of text can be in this field. You can set a maximum length to less than this. When you add this field to the form you can specify the size of the field.
Option Set This field provides a set of options. Each option has a number value and label. When added to a form this field uses a select control and only one option can be selected. When displayed in Advanced Find, you can use a picklist control to select multiple options to include in your search criteria.
You may define a single global option set and configure multiple option set fields to use that single set of options. More information: Create and edit global option sets
Two Options This field provides two options. Each option has a number value of 0 or 1 corresponding to a false or true value. Each option also has a label so that true or false values can be represented as “Yes” and “No”, “Hot” and “Cold”, “On” and “Off” or any pair of labels you want to display.
Two option fields don’t provide format options at the field level. But when you add one to the form you can choose to display them as radio buttons, a check box, or a select list.
Status A system field that has options that generally correspond to active and inactive status. Some system attributes have additional options, but all custom attributes have only Active and Inactive status options. More information: Default status and status reason values
You can also include custom state transitions to control which status options are available for certain entities. More information: Define status reason transitions
Status Reason A system field that has options that provide additional detail about the Status field. Each option is associated with one of the available Status options. You can add and edit the options. More information: Default status and status reason values
Whole Number Integers with a value between -2,147,483,648 and 2,147,483,647 can be in this field. You can restrict
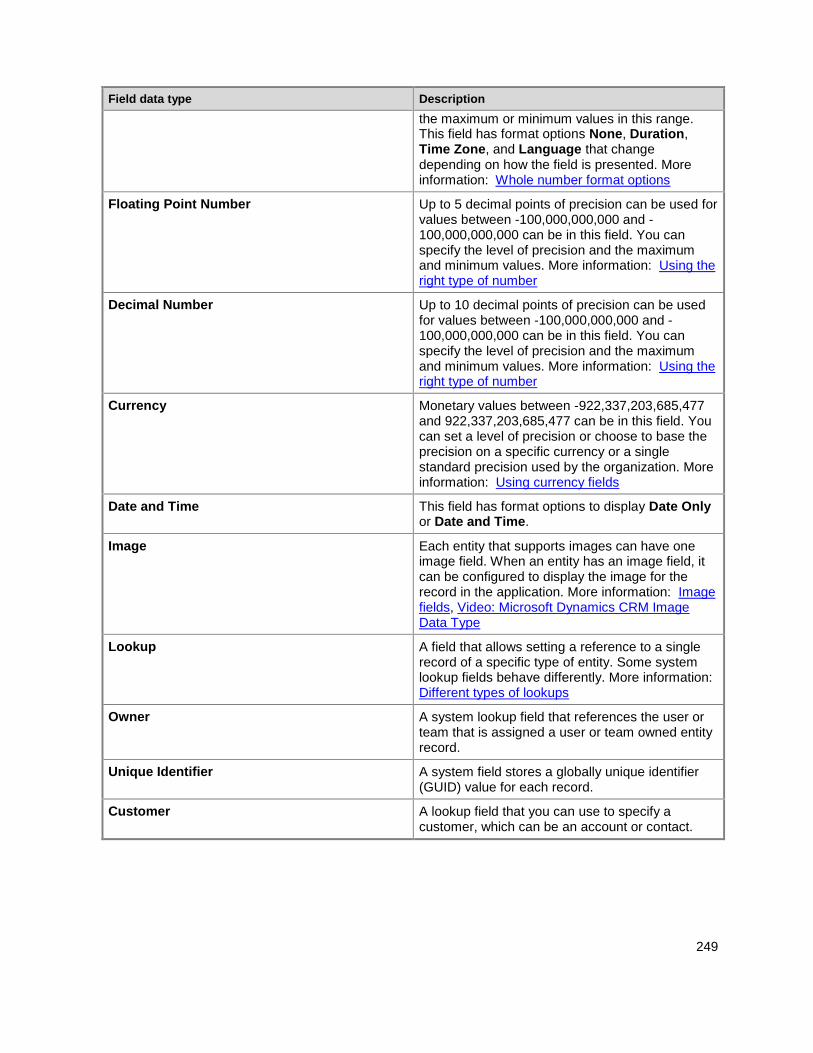
249
Field data type Description
the maximum or minimum values in this range. This field has format options None, Duration, Time Zone, and Language that change depending on how the field is presented. More information: Whole number format options
Floating Point Number Up to 5 decimal points of precision can be used for values between -100,000,000,000 and -100,000,000,000 can be in this field. You can specify the level of precision and the maximum and minimum values. More information: Using the right type of number
Decimal Number Up to 10 decimal points of precision can be used for values between -100,000,000,000 and -100,000,000,000 can be in this field. You can specify the level of precision and the maximum and minimum values. More information: Using the right type of number
Currency Monetary values between -922,337,203,685,477 and 922,337,203,685,477 can be in this field. You can set a level of precision or choose to base the precision on a specific currency or a single standard precision used by the organization. More information: Using currency fields
Date and Time This field has format options to display Date Only or Date and Time.
Image Each entity that supports images can have one image field. When an entity has an image field, it can be configured to display the image for the record in the application. More information: Image fields, Video: Microsoft Dynamics CRM Image Data Type
Lookup A field that allows setting a reference to a single record of a specific type of entity. Some system lookup fields behave differently. More information: Different types of lookups
Owner A system lookup field that references the user or team that is assigned a user or team owned entity record.
Unique Identifier A system field stores a globally unique identifier (GUID) value for each record.
Customer A lookup field that you can use to specify a customer, which can be an account or contact.
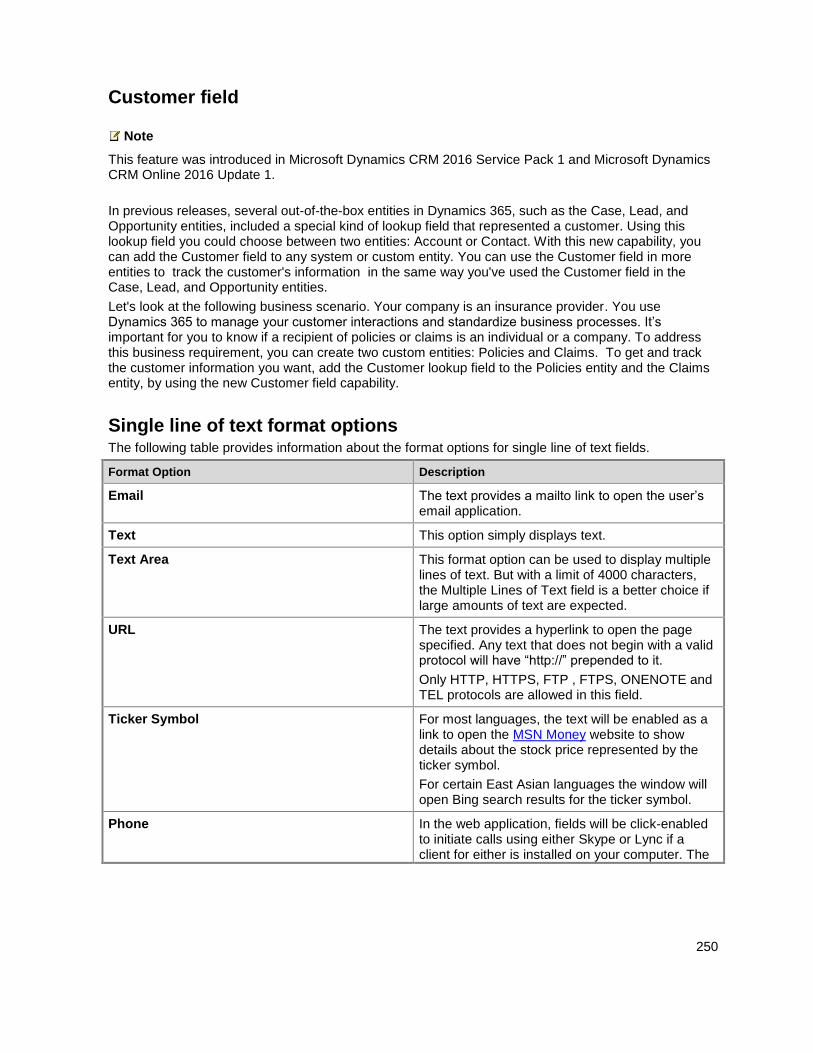
250
Customer field
Note
This feature was introduced in Microsoft Dynamics CRM 2016 Service Pack 1 and Microsoft Dynamics CRM Online 2016 Update 1.
In previous releases, several out-of-the-box entities in Dynamics 365, such as the Case, Lead, and Opportunity entities, included a special kind of lookup field that represented a customer. Using this lookup field you could choose between two entities: Account or Contact. With this new capability, you can add the Customer field to any system or custom entity. You can use the Customer field in more entities to track the customer's information in the same way you've used the Customer field in the Case, Lead, and Opportunity entities.
Let's look at the following business scenario. Your company is an insurance provider. You use Dynamics 365 to manage your customer interactions and standardize business processes. It’s important for you to know if a recipient of policies or claims is an individual or a company. To address this business requirement, you can create two custom entities: Policies and Claims. To get and track the customer information you want, add the Customer lookup field to the Policies entity and the Claims entity, by using the new Customer field capability.
Single line of text format options The following table provides information about the format options for single line of text fields.
Format Option Description
Email The text provides a mailto link to open the user’s email application.
Text This option simply displays text.
Text Area This format option can be used to display multiple lines of text. But with a limit of 4000 characters, the Multiple Lines of Text field is a better choice if large amounts of text are expected.
URL The text provides a hyperlink to open the page specified. Any text that does not begin with a valid protocol will have “http://” prepended to it.
Only HTTP, HTTPS, FTP , FTPS, ONENOTE and TEL protocols are allowed in this field.
Ticker Symbol For most languages, the text will be enabled as a link to open the MSN Money website to show details about the stock price represented by the ticker symbol.
For certain East Asian languages the window will open Bing search results for the ticker symbol.
Phone In the web application, fields will be click-enabled to initiate calls using either Skype or Lync if a client for either is installed on your computer. The
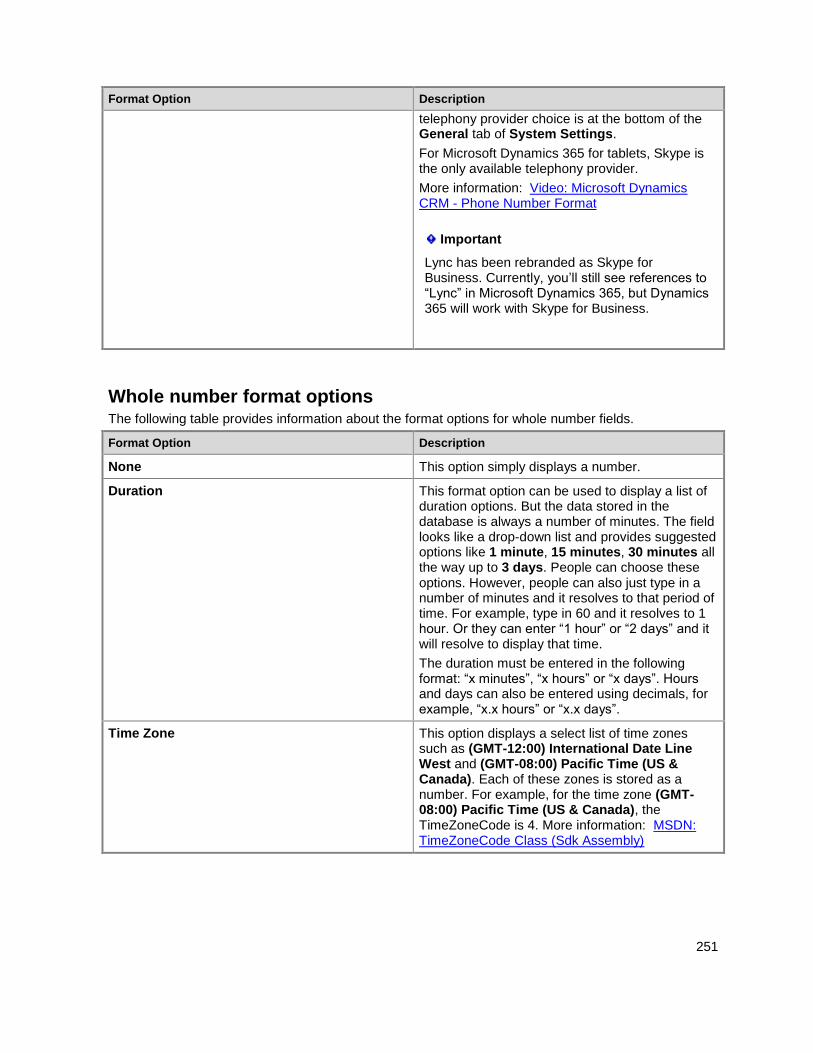
251
Format Option Description
telephony provider choice is at the bottom of the General tab of System Settings.
For Microsoft Dynamics 365 for tablets, Skype is the only available telephony provider.
More information: Video: Microsoft Dynamics CRM - Phone Number Format
Important
Lync has been rebranded as Skype for Business. Currently, you’ll still see references to “Lync” in Microsoft Dynamics 365, but Dynamics 365 will work with Skype for Business.
Whole number format options The following table provides information about the format options for whole number fields.
Format Option Description
None This option simply displays a number.
Duration This format option can be used to display a list of duration options. But the data stored in the database is always a number of minutes. The field looks like a drop-down list and provides suggested options like 1 minute, 15 minutes, 30 minutes all the way up to 3 days. People can choose these options. However, people can also just type in a number of minutes and it resolves to that period of time. For example, type in 60 and it resolves to 1 hour. Or they can enter “1 hour” or “2 days” and it will resolve to display that time.
The duration must be entered in the following format: “x minutes”, “x hours” or “x days”. Hours and days can also be entered using decimals, for example, “x.x hours” or “x.x days”.
Time Zone This option displays a select list of time zones such as (GMT-12:00) International Date Line West and (GMT-08:00) Pacific Time (US & Canada). Each of these zones is stored as a number. For example, for the time zone (GMT-08:00) Pacific Time (US & Canada), the TimeZoneCode is 4. More information: MSDN: TimeZoneCode Class (Sdk Assembly)
252
Format Option Description
Language This option displays a list of the languages provisioned for your organization. The values are displayed as a drop-down list of language names, but the data is stored as a number using LCID codes. Language codes are four-digit or five-digit locale IDs. Valid locale ID values can be found at Locale ID (LCID) Chart).
Using the right type of number When choosing the correct type of number field to use, the choice to use a Whole Number or Currency type should be pretty straightforward. The choice between using Floating Point or Decimal numbers requires more thought.
Decimal numbers are stored in the database exactly as specified. Floating point numbers store an extremely close approximation of the value. Why choose extremely close approximation when you can have the exact value? The answer is that you get different system performance.
Use decimals when you need to provide reports that require very accurate calculations, or if you typically use queries that look for values that are equal or not equal to another value.
Use floating point numbers when you store data that represents fractions or values that you will typically query comparing to another value using greater than or less than operators. In most cases, the difference between decimal and float isn’t noticeable. Unless you require the most accurate possible calculations, floating point numbers should work for you.
Using currency fields Currency fields allow for an organization to configure multiple currencies that can be used for records in the organization. When organizations have multiple currencies, they typically want to be able to perform calculations to provide values using their base currency. When you add a currency field to an entity that has no other currency fields, two additional fields are added:
A lookup field called Currency that you can set to any active currency configured for your
organization. You can configure multiple active currencies for your organization in Settings >
Business Management > Currencies. There you can specify the currency and an exchange rate
with the base currency set for your organization. If you have multiple active currencies, you can add
the currency field to the form and allow people to specify which currency should be applied to
money values for this record. This will change the currency symbol that is shown for the currency
fields in the form.
Individuals can also change their personal options to select a default currency for the records they create.
A decimal field called Exchange Rate that provides the exchange rate for a selected currency
associated with the entity with respect to the base currency. If this field is added to the form, people
can see the value, but they can’t edit it. The exchange rate is stored with the currency.
253
For each currency field you add, another currency field is added with the prefix “_Base” on the name. This field stores the calculation of the value of the currency field you added and the base currency. Again, if this field is added to the form, it can’t be edited.
When you configure a currency field you can choose the precision value. There are essentially three options as shown in the following table.
Option Description
Pricing Decimal Precision This is a single organization precision to be used for prices found in Settings > Administration > System Settings > General Tab.
Currency Precision This option applies the precision defined for the currency in the record.
Specific precision values 0 – 4 These settings allow for defining a specific set precision.
Different types of lookups When you create a new lookup field you are creating a new Many-to-One (N:1) entity relationship between the entity you’re working with and the Target Record Type defined for the lookup. There are additional configuration options for this relationship that are described in Create and edit entity relationships. But all custom lookups can only allow for a reference to a single record for a single target record type.
However, you should be aware that not every lookup behaves this way. There are several different types of system lookups as shown here.
Lookup type Description
Simple Allows for a single reference to a specific entity. All custom lookups are this type.
Customer Allows for a single reference to either an account or a contact record. These lookups are available for the Opportunity, Case, Quote, Order, and Invoice entities. These entities also have separate Account and Contact lookups that you can use if your customers are always one type. Or you can include both instead of using the Customer lookup.
Owner Allows for a single reference to either a team or a user record. All team or user-owned entities have one of these.
PartyList Allows for multiple references to multiple entities. These lookups are found on the Email entity To and Cc fields. They’re also used in the Phone and Appointment entities.
Regarding Allows for a single reference to multiple entities. These lookups are found in the regarding field used in activities.
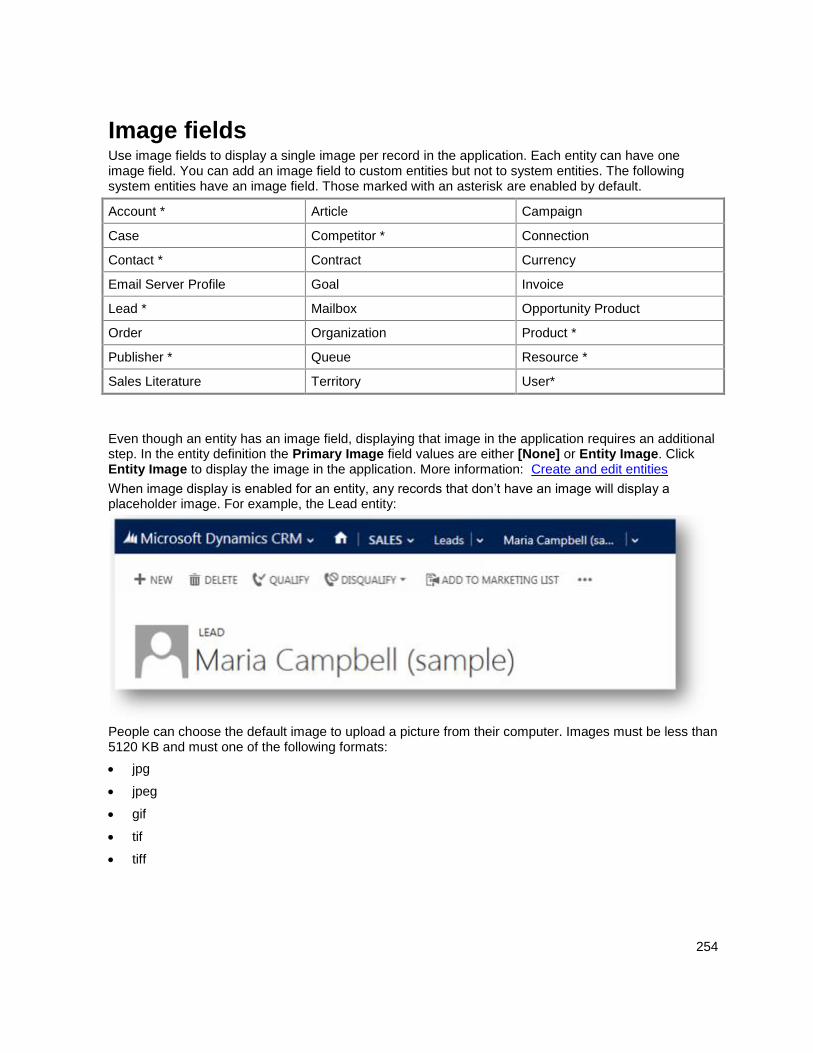
254
Image fields Use image fields to display a single image per record in the application. Each entity can have one image field. You can add an image field to custom entities but not to system entities. The following system entities have an image field. Those marked with an asterisk are enabled by default.
Account * Article Campaign
Case Competitor * Connection
Contact * Contract Currency
Email Server Profile Goal Invoice
Lead * Mailbox Opportunity Product
Order Organization Product *
Publisher * Queue Resource *
Sales Literature Territory User*
Even though an entity has an image field, displaying that image in the application requires an additional step. In the entity definition the Primary Image field values are either [None] or Entity Image. Click Entity Image to display the image in the application. More information: Create and edit entities
When image display is enabled for an entity, any records that don’t have an image will display a placeholder image. For example, the Lead entity:
People can choose the default image to upload a picture from their computer. Images must be less than 5120 KB and must one of the following formats:
jpg
jpeg
gif
tif
tiff
255
bmp
png
When the image is uploaded, it will be converted to a .jpg format and all downloaded images will also use this format. If an animated .gif is uploaded, only the first frame is saved.
When an image is uploaded, it will be resized to a maximum size of 144 pixels by 144 pixels. People should resize or crop the images before they upload them so that they will display well using this size. All images are cropped to be square. If both sides of an image are smaller than 144 pixels, the image will be cropped to be a square with the dimensions of the smaller side.
Delete fields As someone with the system administrator security role, you can delete any custom fields that aren’t part of a managed solution. When you delete fields, any data stored in the fields is lost. The only way to recover data from a field that was deleted is to restore the database from a point before the field was deleted.
Before you can delete a custom entity, you must remove any dependencies that may exist in other solution components. Open the field and use the Show Dependencies button in the menu bar to view any Dependent Components. For example, if the field is used in a form or view, you must first, remove references to the field in those solution components.
If you delete a lookup field, the 1:N entity relationship for it will automatically be deleted.
Set managed properties for fields Managed properties only apply when you include fields in a managed solution and import the solution into another organization. These settings allow a solution developer to have some control over the level of customization that people who install their managed solution can have when they customize this field. To set managed properties for a field, click Managed Properties on the menu bar.
The Can be customized option controls all the other options. If this option is False, none of the other settings apply. When it is True, you can specify the other customization options.
If the field is customizable, you set the following options to True or False.
Display name can be modified
Can change requirement level
Can change Additional Properties
These options are self-explanatory. If you set all the individual options to False, you might as well set Can be customized to False.
See Also Create and edit metadata Create and edit entities Create and edit entity relationships Create and edit global option sets Default status and status reason values Edit status reason transitions Set custom icon for custom case origin
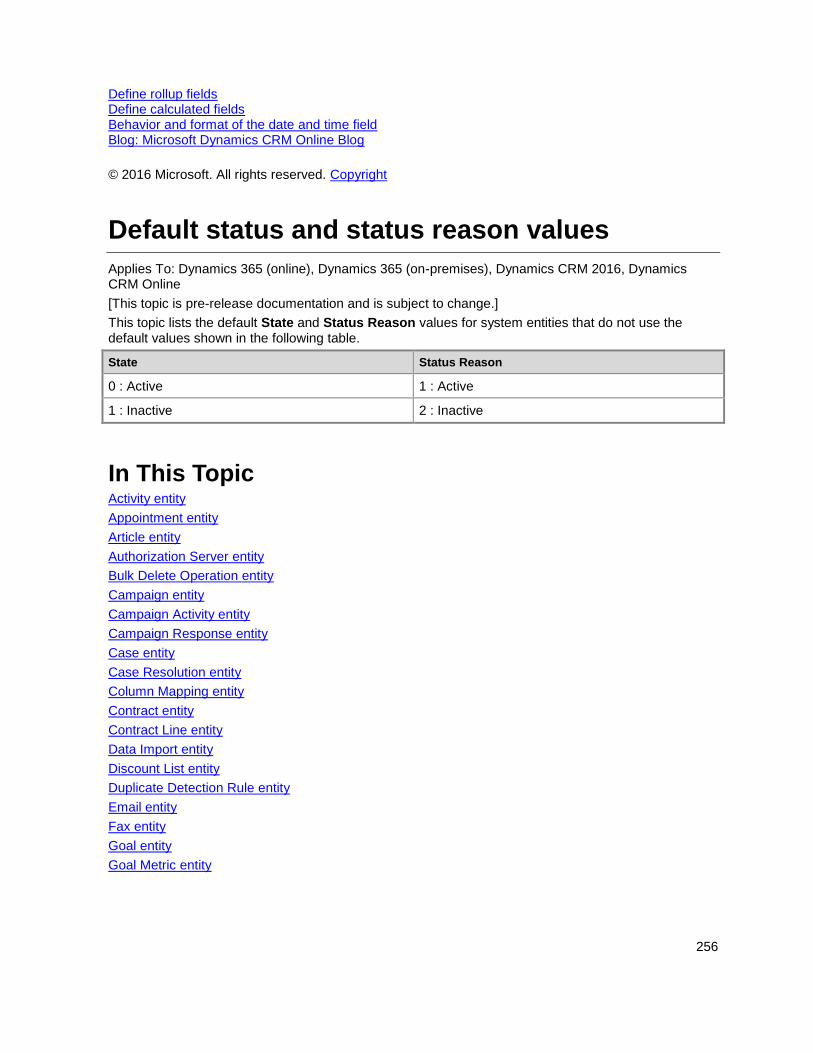
256
Define rollup fields Define calculated fields Behavior and format of the date and time field Blog: Microsoft Dynamics CRM Online Blog
© 2016 Microsoft. All rights reserved. Copyright
Default status and status reason values
Applies To: Dynamics 365 (online), Dynamics 365 (on-premises), Dynamics CRM 2016, Dynamics CRM Online
[This topic is pre-release documentation and is subject to change.]
This topic lists the default State and Status Reason values for system entities that do not use the default values shown in the following table.
State Status Reason
0 : Active 1 : Active
1 : Inactive 2 : Inactive
In This Topic Activity entity
Appointment entity
Article entity
Authorization Server entity
Bulk Delete Operation entity
Campaign entity
Campaign Activity entity
Campaign Response entity
Case entity
Case Resolution entity
Column Mapping entity
Contract entity
Contract Line entity
Data Import entity
Discount List entity
Duplicate Detection Rule entity
Email entity
Fax entity
Goal entity
Goal Metric entity
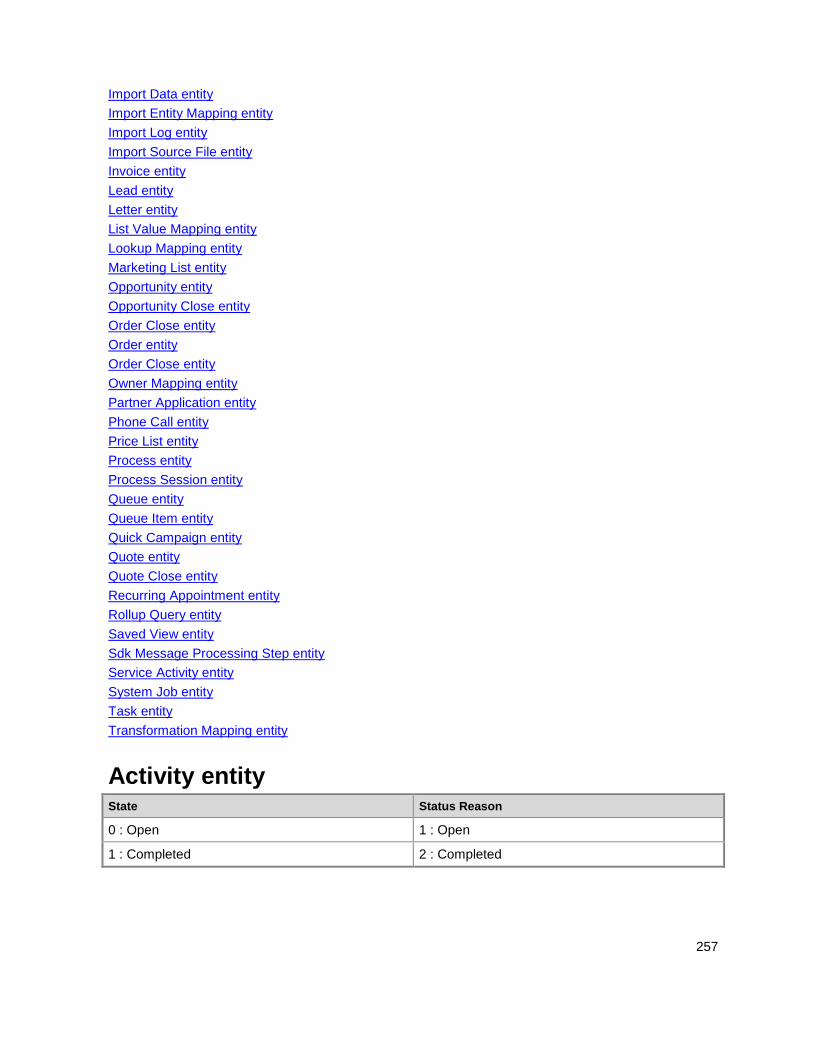
257
Import Data entity
Import Entity Mapping entity
Import Log entity
Import Source File entity
Invoice entity
Lead entity
Letter entity
List Value Mapping entity
Lookup Mapping entity
Marketing List entity
Opportunity entity
Opportunity Close entity
Order Close entity
Order entity
Order Close entity
Owner Mapping entity
Partner Application entity
Phone Call entity
Price List entity
Process entity
Process Session entity
Queue entity
Queue Item entity
Quick Campaign entity
Quote entity
Quote Close entity
Recurring Appointment entity
Rollup Query entity
Saved View entity
Sdk Message Processing Step entity
Service Activity entity
System Job entity
Task entity
Transformation Mapping entity
Activity entity State Status Reason
0 : Open 1 : Open
1 : Completed 2 : Completed
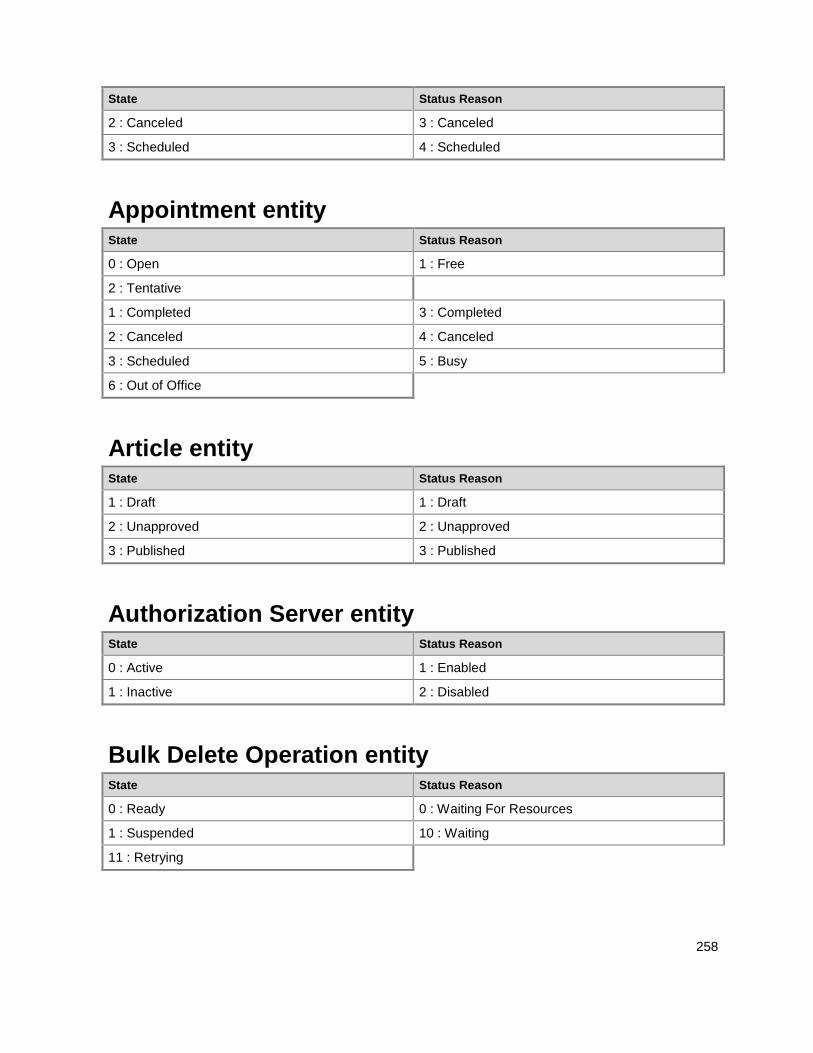
258
State Status Reason
2 : Canceled 3 : Canceled
3 : Scheduled 4 : Scheduled
Appointment entity State Status Reason
0 : Open 1 : Free
2 : Tentative
1 : Completed 3 : Completed
2 : Canceled 4 : Canceled
3 : Scheduled 5 : Busy
6 : Out of Office
Article entity State Status Reason
1 : Draft 1 : Draft
2 : Unapproved 2 : Unapproved
3 : Published 3 : Published
Authorization Server entity State Status Reason
0 : Active 1 : Enabled
1 : Inactive 2 : Disabled
Bulk Delete Operation entity State Status Reason
0 : Ready 0 : Waiting For Resources
1 : Suspended 10 : Waiting
11 : Retrying
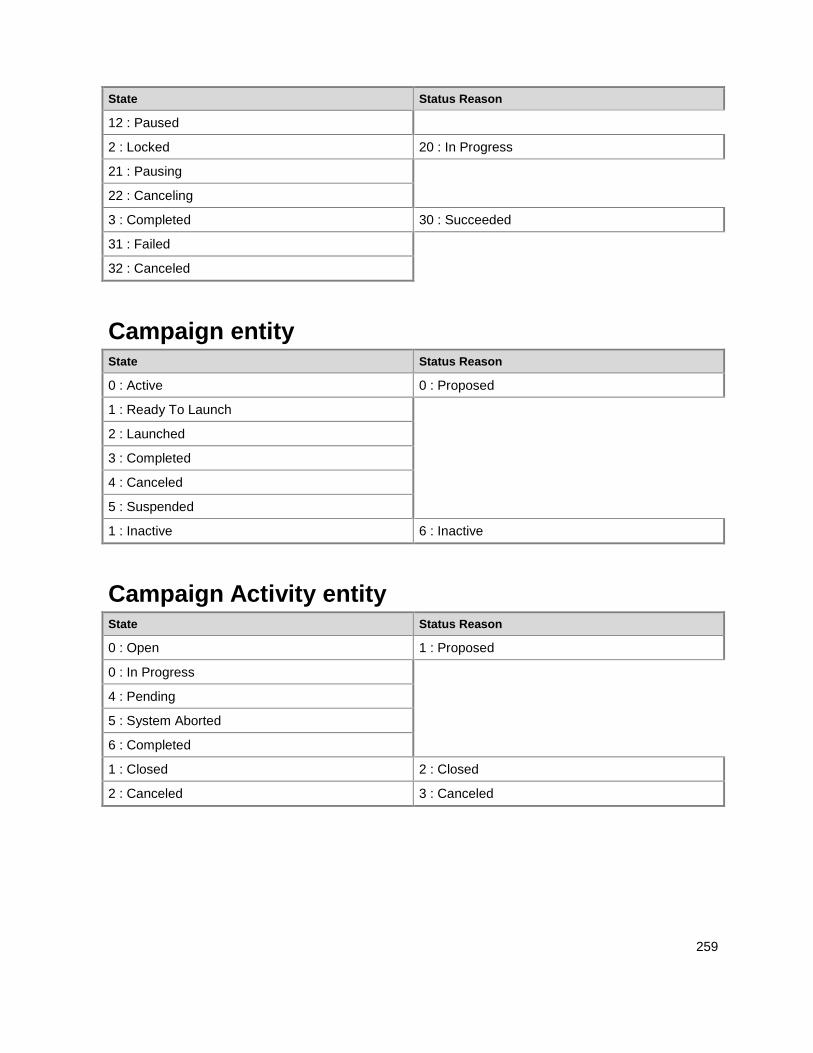
259
State Status Reason
12 : Paused
2 : Locked 20 : In Progress
21 : Pausing
22 : Canceling
3 : Completed 30 : Succeeded
31 : Failed
32 : Canceled
Campaign entity State Status Reason
0 : Active 0 : Proposed
1 : Ready To Launch
2 : Launched
3 : Completed
4 : Canceled
5 : Suspended
1 : Inactive 6 : Inactive
Campaign Activity entity State Status Reason
0 : Open 1 : Proposed
0 : In Progress
4 : Pending
5 : System Aborted
6 : Completed
1 : Closed 2 : Closed
2 : Canceled 3 : Canceled
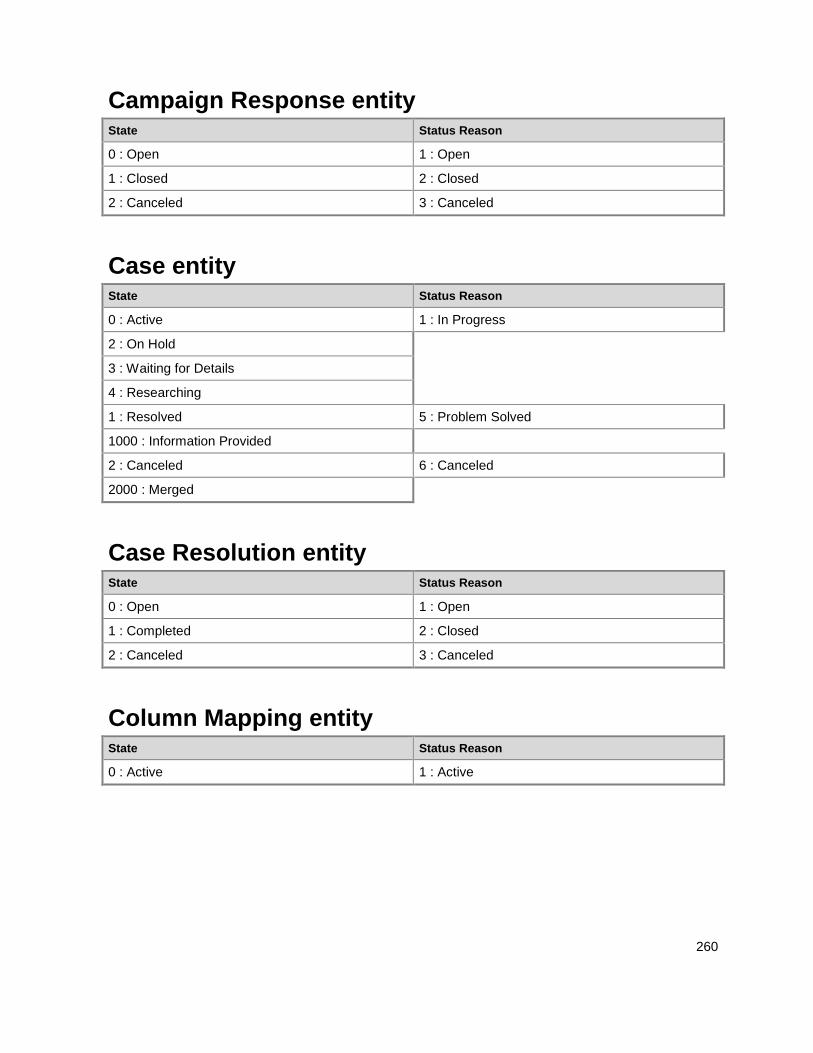
260
Campaign Response entity State Status Reason
0 : Open 1 : Open
1 : Closed 2 : Closed
2 : Canceled 3 : Canceled
Case entity State Status Reason
0 : Active 1 : In Progress
2 : On Hold
3 : Waiting for Details
4 : Researching
1 : Resolved 5 : Problem Solved
1000 : Information Provided
2 : Canceled 6 : Canceled
2000 : Merged
Case Resolution entity State Status Reason
0 : Open 1 : Open
1 : Completed 2 : Closed
2 : Canceled 3 : Canceled
Column Mapping entity State Status Reason
0 : Active 1 : Active
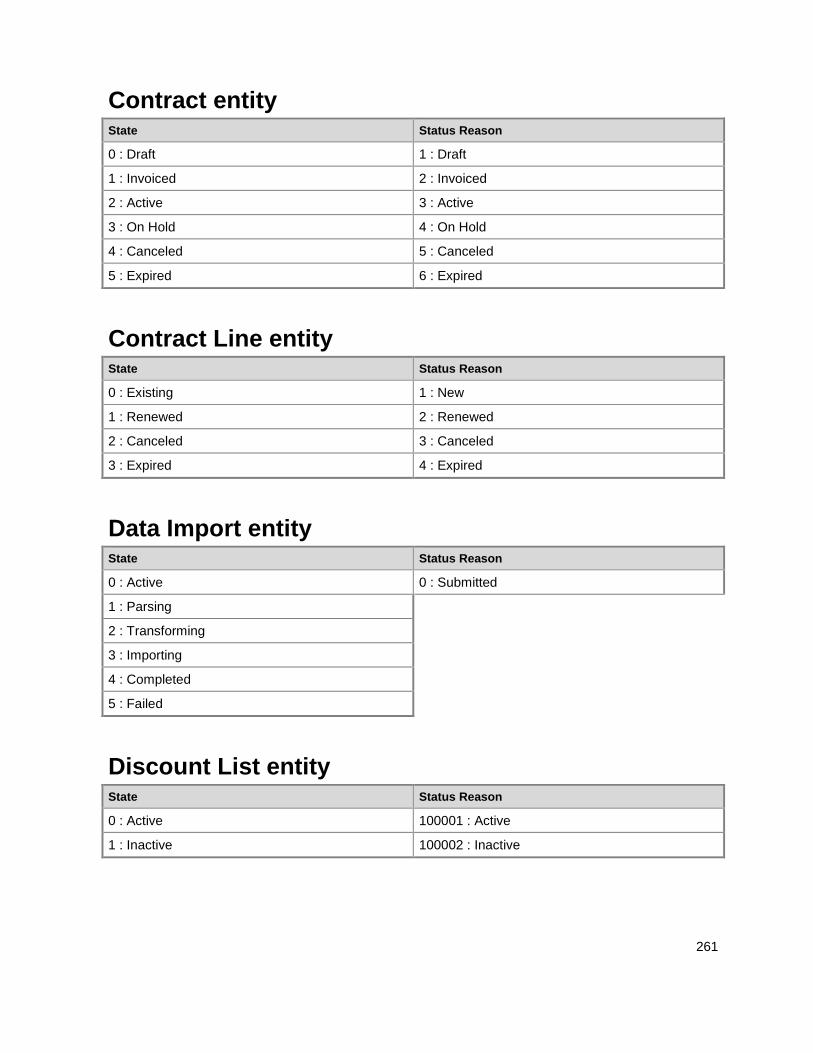
261
Contract entity State Status Reason
0 : Draft 1 : Draft
1 : Invoiced 2 : Invoiced
2 : Active 3 : Active
3 : On Hold 4 : On Hold
4 : Canceled 5 : Canceled
5 : Expired 6 : Expired
Contract Line entity State Status Reason
0 : Existing 1 : New
1 : Renewed 2 : Renewed
2 : Canceled 3 : Canceled
3 : Expired 4 : Expired
Data Import entity State Status Reason
0 : Active 0 : Submitted
1 : Parsing
2 : Transforming
3 : Importing
4 : Completed
5 : Failed
Discount List entity State Status Reason
0 : Active 100001 : Active
1 : Inactive 100002 : Inactive
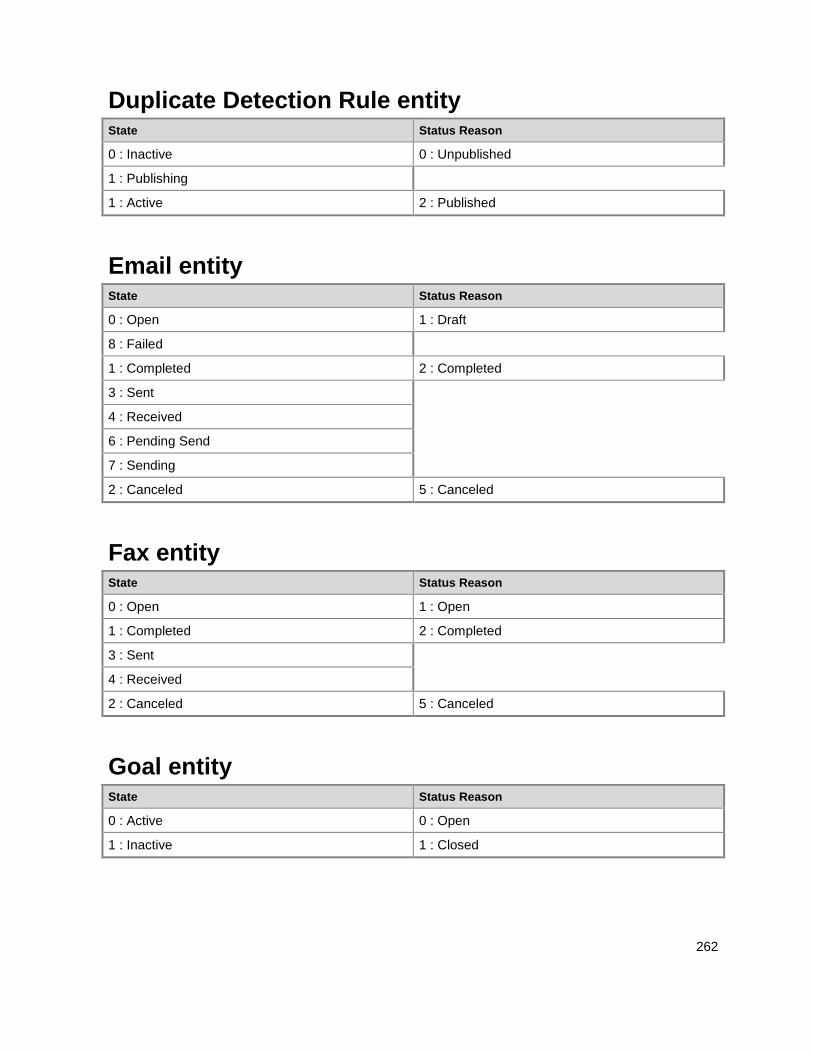
262
Duplicate Detection Rule entity State Status Reason
0 : Inactive 0 : Unpublished
1 : Publishing
1 : Active 2 : Published
Email entity State Status Reason
0 : Open 1 : Draft
8 : Failed
1 : Completed 2 : Completed
3 : Sent
4 : Received
6 : Pending Send
7 : Sending
2 : Canceled 5 : Canceled
Fax entity State Status Reason
0 : Open 1 : Open
1 : Completed 2 : Completed
3 : Sent
4 : Received
2 : Canceled 5 : Canceled
Goal entity State Status Reason
0 : Active 0 : Open
1 : Inactive 1 : Closed
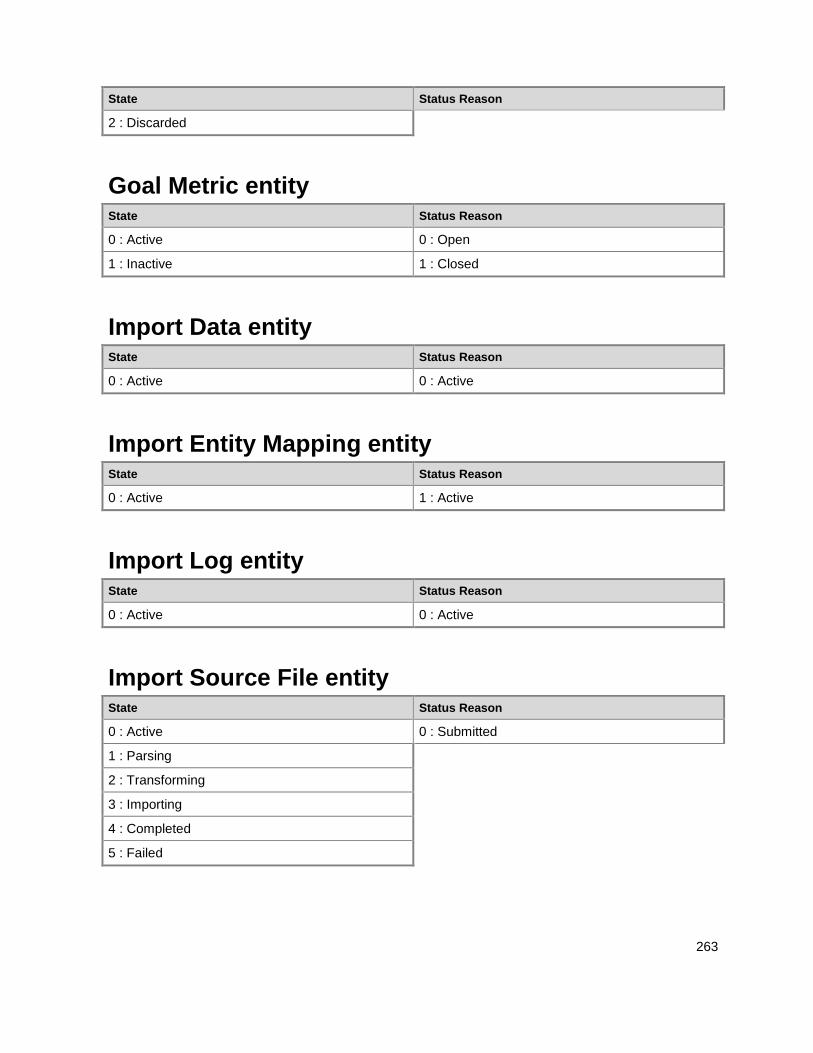
263
State Status Reason
2 : Discarded
Goal Metric entity State Status Reason
0 : Active 0 : Open
1 : Inactive 1 : Closed
Import Data entity State Status Reason
0 : Active 0 : Active
Import Entity Mapping entity State Status Reason
0 : Active 1 : Active
Import Log entity State Status Reason
0 : Active 0 : Active
Import Source File entity State Status Reason
0 : Active 0 : Submitted
1 : Parsing
2 : Transforming
3 : Importing
4 : Completed
5 : Failed
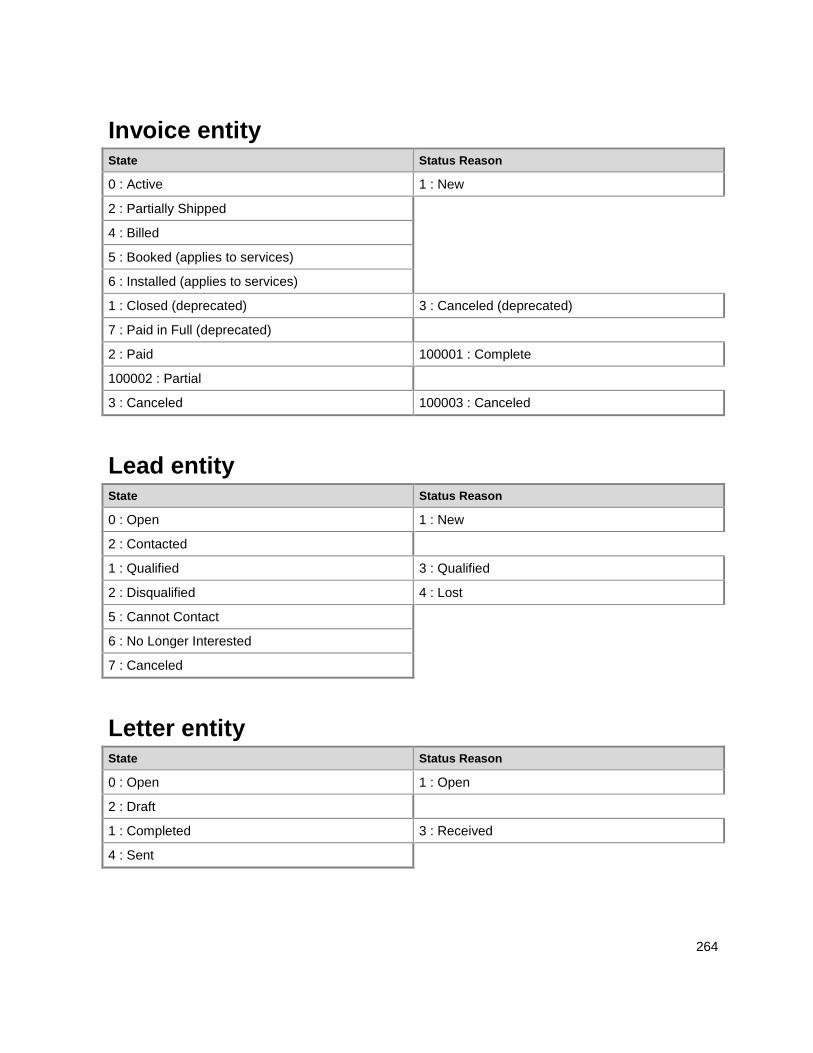
264
Invoice entity State Status Reason
0 : Active 1 : New
2 : Partially Shipped
4 : Billed
5 : Booked (applies to services)
6 : Installed (applies to services)
1 : Closed (deprecated) 3 : Canceled (deprecated)
7 : Paid in Full (deprecated)
2 : Paid 100001 : Complete
100002 : Partial
3 : Canceled 100003 : Canceled
Lead entity State Status Reason
0 : Open 1 : New
2 : Contacted
1 : Qualified 3 : Qualified
2 : Disqualified 4 : Lost
5 : Cannot Contact
6 : No Longer Interested
7 : Canceled
Letter entity State Status Reason
0 : Open 1 : Open
2 : Draft
1 : Completed 3 : Received
4 : Sent
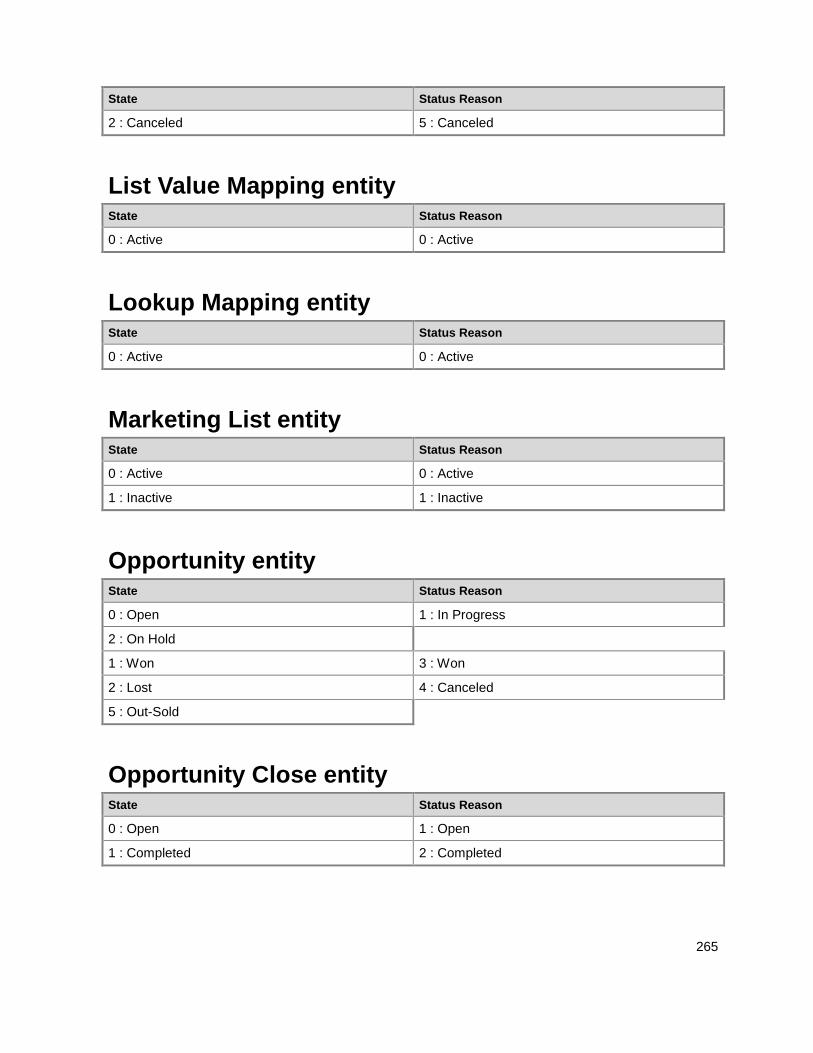
265
State Status Reason
2 : Canceled 5 : Canceled
List Value Mapping entity State Status Reason
0 : Active 0 : Active
Lookup Mapping entity State Status Reason
0 : Active 0 : Active
Marketing List entity State Status Reason
0 : Active 0 : Active
1 : Inactive 1 : Inactive
Opportunity entity State Status Reason
0 : Open 1 : In Progress
2 : On Hold
1 : Won 3 : Won
2 : Lost 4 : Canceled
5 : Out-Sold
Opportunity Close entity State Status Reason
0 : Open 1 : Open
1 : Completed 2 : Completed
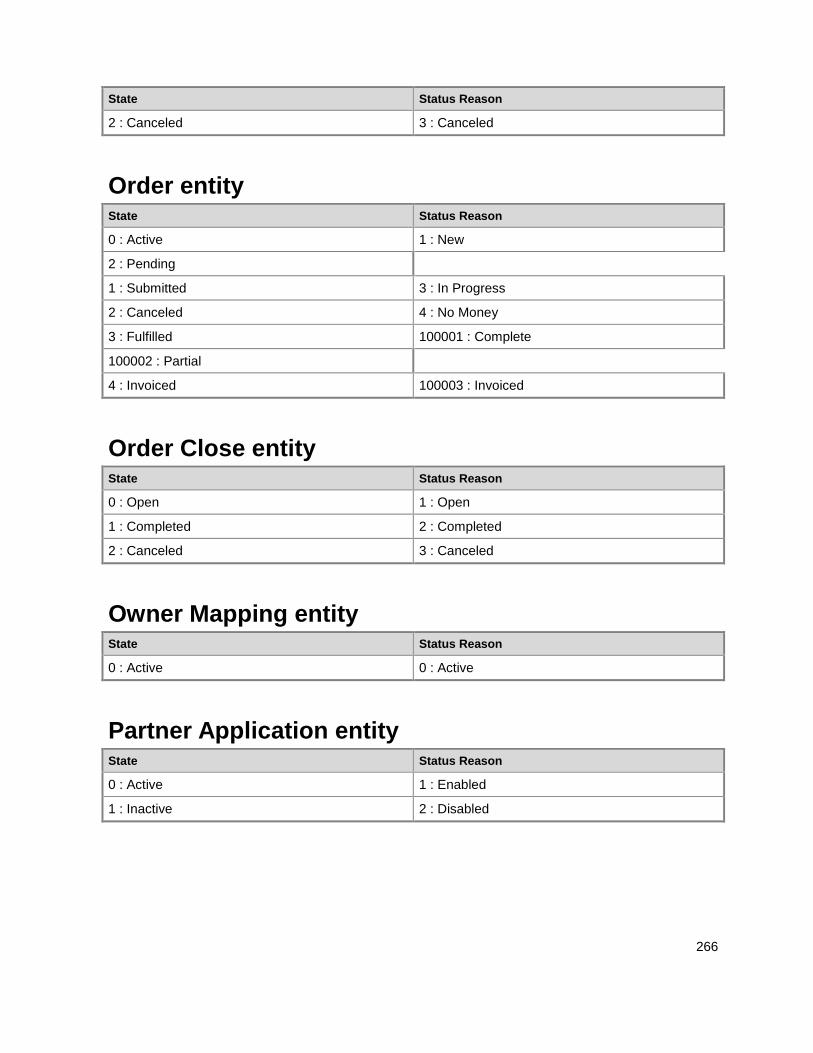
266
State Status Reason
2 : Canceled 3 : Canceled
Order entity State Status Reason
0 : Active 1 : New
2 : Pending
1 : Submitted 3 : In Progress
2 : Canceled 4 : No Money
3 : Fulfilled 100001 : Complete
100002 : Partial
4 : Invoiced 100003 : Invoiced
Order Close entity State Status Reason
0 : Open 1 : Open
1 : Completed 2 : Completed
2 : Canceled 3 : Canceled
Owner Mapping entity State Status Reason
0 : Active 0 : Active
Partner Application entity State Status Reason
0 : Active 1 : Enabled
1 : Inactive 2 : Disabled
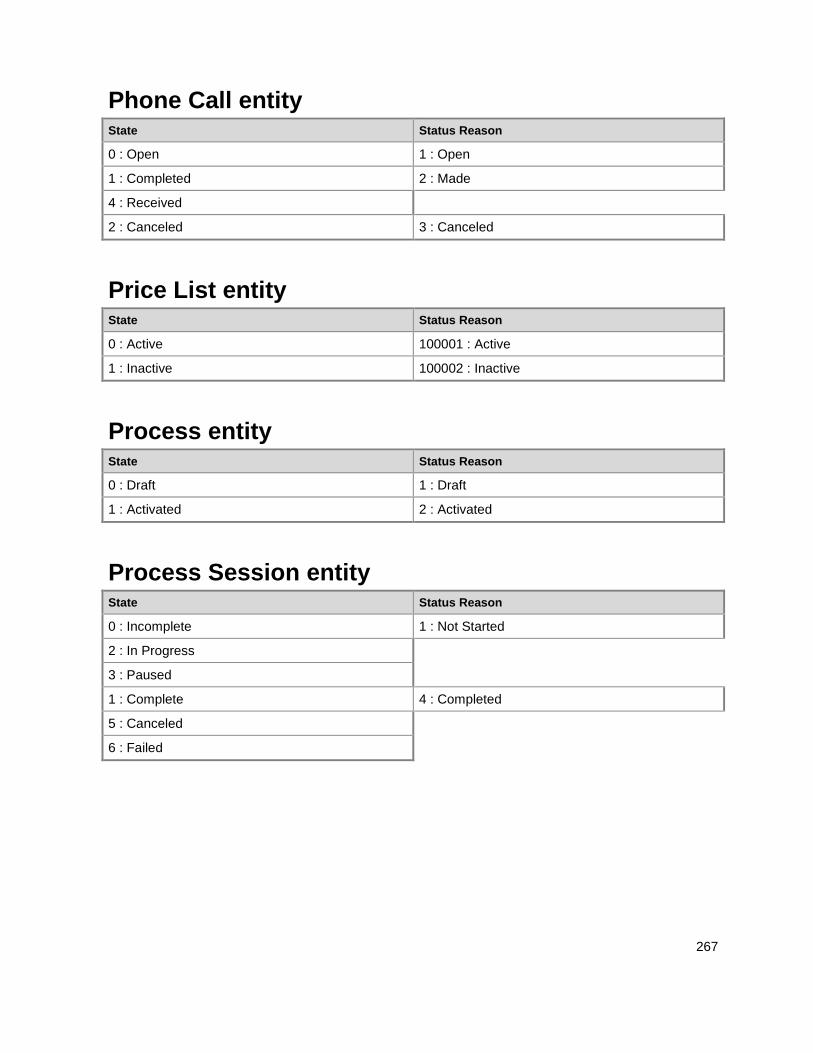
267
Phone Call entity State Status Reason
0 : Open 1 : Open
1 : Completed 2 : Made
4 : Received
2 : Canceled 3 : Canceled
Price List entity State Status Reason
0 : Active 100001 : Active
1 : Inactive 100002 : Inactive
Process entity State Status Reason
0 : Draft 1 : Draft
1 : Activated 2 : Activated
Process Session entity State Status Reason
0 : Incomplete 1 : Not Started
2 : In Progress
3 : Paused
1 : Complete 4 : Completed
5 : Canceled
6 : Failed

268
Queue entity State Status Reason
0 : Active 1 : Active
1 : Inactive 2 : Inactive
Queue Item entity State Status Reason
0 : Active 1 : Active
1 : Inactive 2 : Inactive
Quick Campaign entity State Status Reason
0 : Open 1 : Pending
2 : In Progress
1 : Closed 3 : Aborted
4 : Completed
2 : Canceled 5 : Canceled
Quote entity State Status Reason
0 : Draft 1 : In Progress
1 : Active 2 : In Progress
3 : Open
2 : Won 4 : Won
3 : Closed 5 : Lost
6 : Canceled
7 : Revised
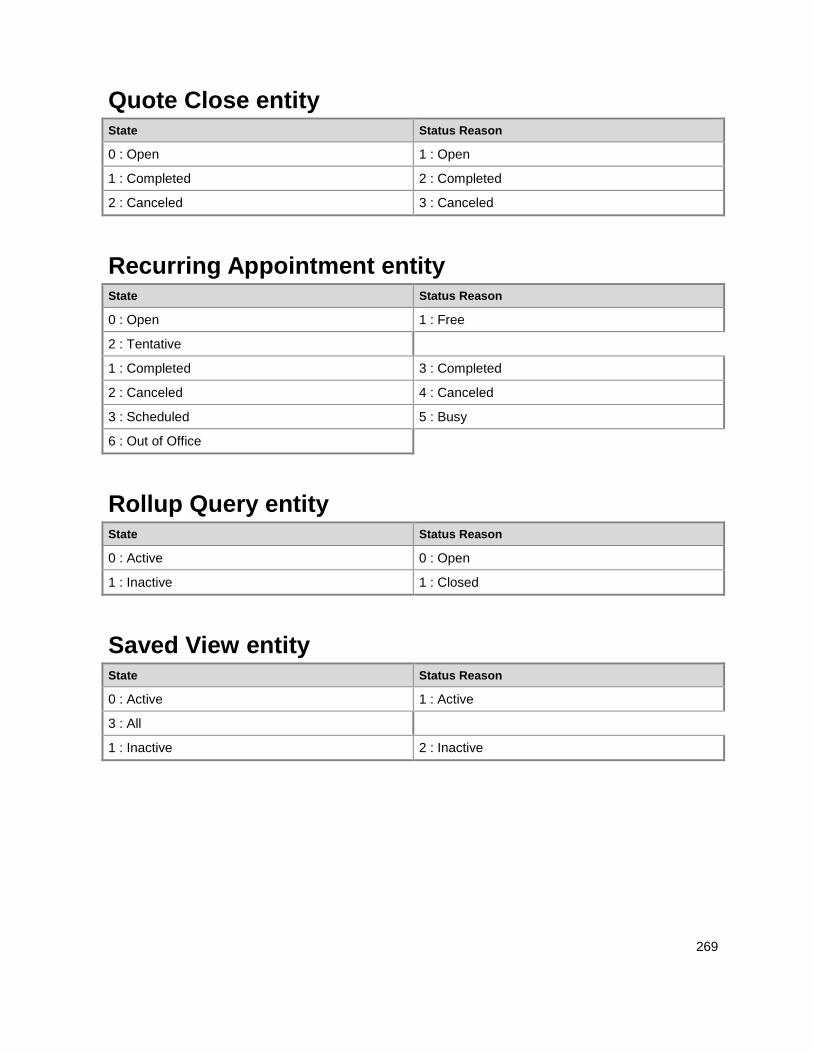
269
Quote Close entity State Status Reason
0 : Open 1 : Open
1 : Completed 2 : Completed
2 : Canceled 3 : Canceled
Recurring Appointment entity State Status Reason
0 : Open 1 : Free
2 : Tentative
1 : Completed 3 : Completed
2 : Canceled 4 : Canceled
3 : Scheduled 5 : Busy
6 : Out of Office
Rollup Query entity State Status Reason
0 : Active 0 : Open
1 : Inactive 1 : Closed
Saved View entity State Status Reason
0 : Active 1 : Active
3 : All
1 : Inactive 2 : Inactive
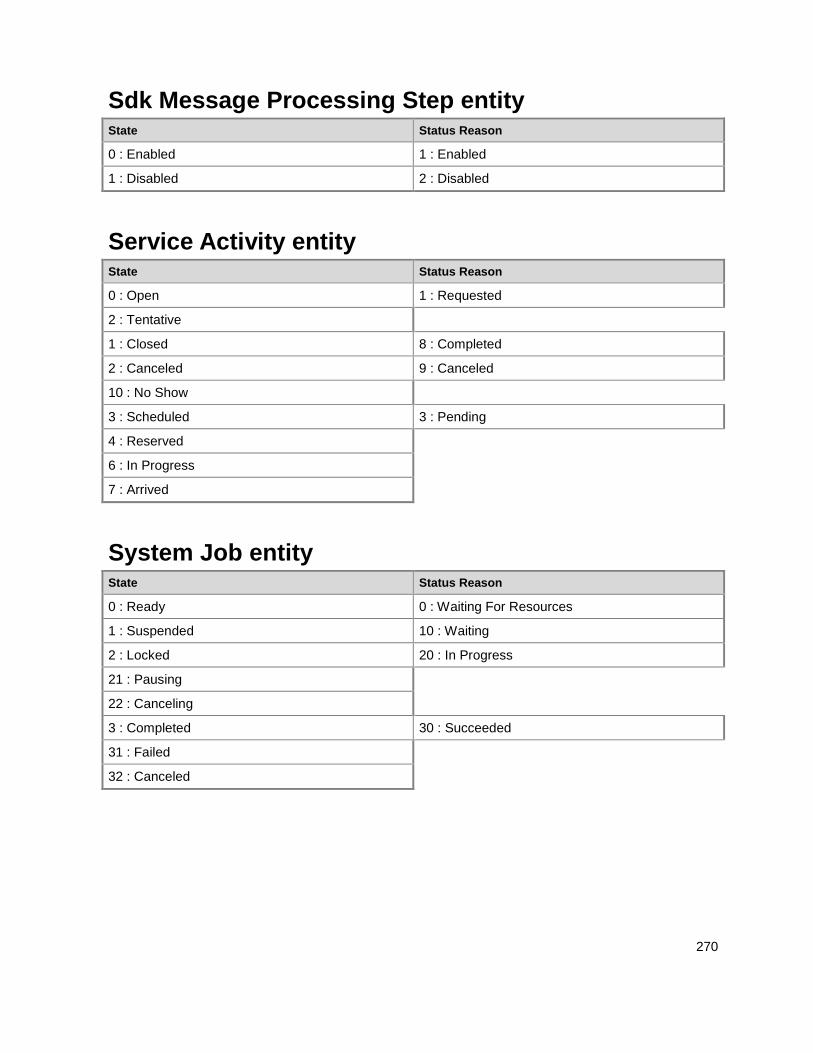
270
Sdk Message Processing Step entity State Status Reason
0 : Enabled 1 : Enabled
1 : Disabled 2 : Disabled
Service Activity entity State Status Reason
0 : Open 1 : Requested
2 : Tentative
1 : Closed 8 : Completed
2 : Canceled 9 : Canceled
10 : No Show
3 : Scheduled 3 : Pending
4 : Reserved
6 : In Progress
7 : Arrived
System Job entity State Status Reason
0 : Ready 0 : Waiting For Resources
1 : Suspended 10 : Waiting
2 : Locked 20 : In Progress
21 : Pausing
22 : Canceling
3 : Completed 30 : Succeeded
31 : Failed
32 : Canceled
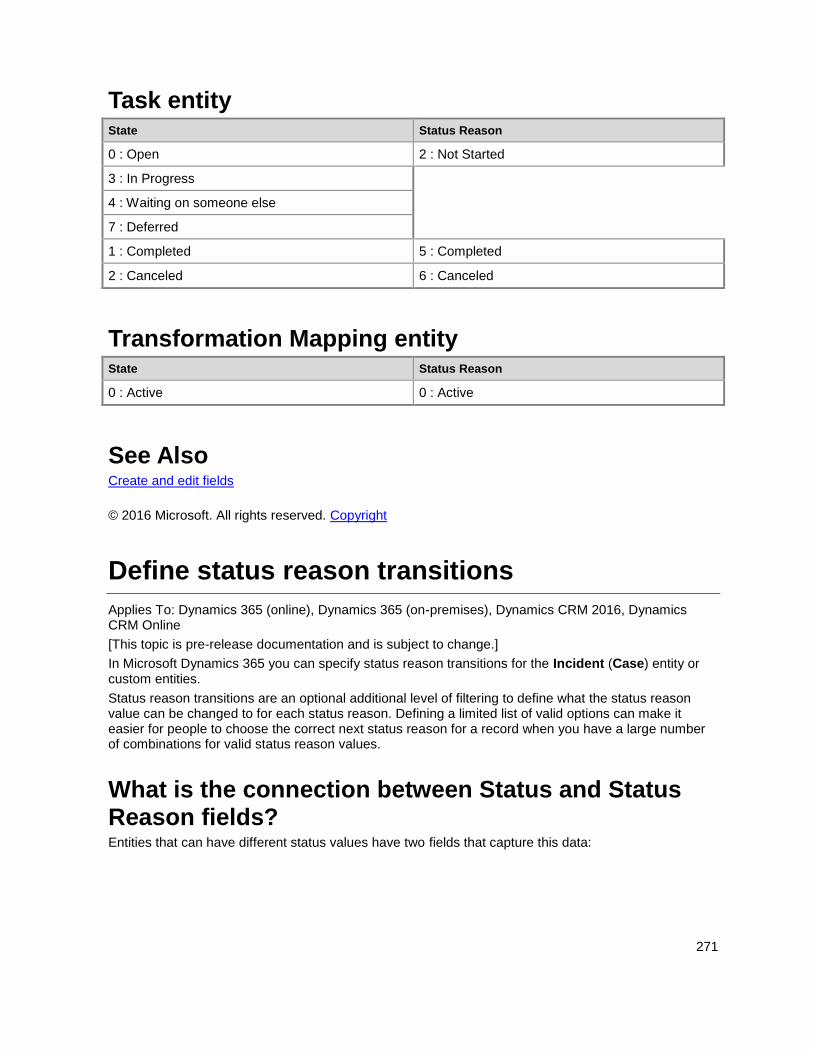
271
Task entity State Status Reason
0 : Open 2 : Not Started
3 : In Progress
4 : Waiting on someone else
7 : Deferred
1 : Completed 5 : Completed
2 : Canceled 6 : Canceled
Transformation Mapping entity State Status Reason
0 : Active 0 : Active
See Also Create and edit fields
© 2016 Microsoft. All rights reserved. Copyright
Define status reason transitions
Applies To: Dynamics 365 (online), Dynamics 365 (on-premises), Dynamics CRM 2016, Dynamics CRM Online
[This topic is pre-release documentation and is subject to change.]
In Microsoft Dynamics 365 you can specify status reason transitions for the Incident (Case) entity or custom entities.
Status reason transitions are an optional additional level of filtering to define what the status reason value can be changed to for each status reason. Defining a limited list of valid options can make it easier for people to choose the correct next status reason for a record when you have a large number of combinations for valid status reason values.
What is the connection between Status and Status Reason fields? Entities that can have different status values have two fields that capture this data:
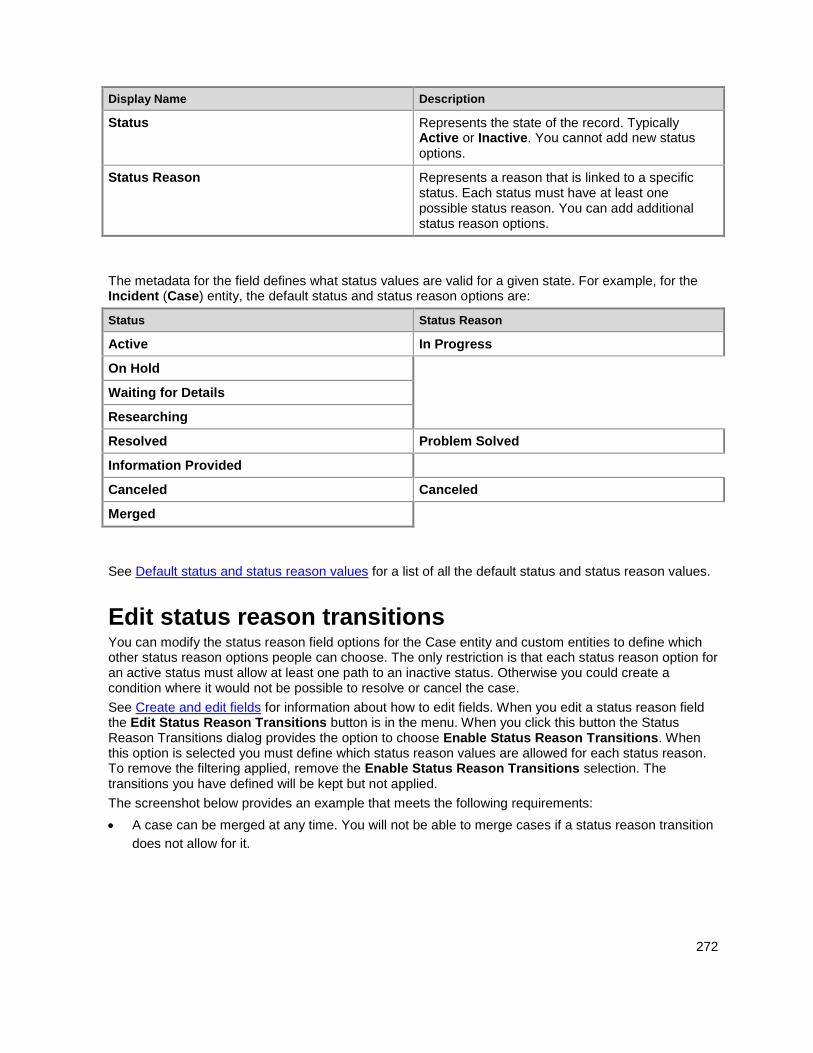
272
Display Name Description
Status Represents the state of the record. Typically Active or Inactive. You cannot add new status options.
Status Reason Represents a reason that is linked to a specific status. Each status must have at least one possible status reason. You can add additional status reason options.
The metadata for the field defines what status values are valid for a given state. For example, for the Incident (Case) entity, the default status and status reason options are:
Status Status Reason
Active In Progress
On Hold
Waiting for Details
Researching
Resolved Problem Solved
Information Provided
Canceled Canceled
Merged
See Default status and status reason values for a list of all the default status and status reason values.
Edit status reason transitions You can modify the status reason field options for the Case entity and custom entities to define which other status reason options people can choose. The only restriction is that each status reason option for an active status must allow at least one path to an inactive status. Otherwise you could create a condition where it would not be possible to resolve or cancel the case.
See Create and edit fields for information about how to edit fields. When you edit a status reason field the Edit Status Reason Transitions button is in the menu. When you click this button the Status Reason Transitions dialog provides the option to choose Enable Status Reason Transitions. When this option is selected you must define which status reason values are allowed for each status reason. To remove the filtering applied, remove the Enable Status Reason Transitions selection. The transitions you have defined will be kept but not applied.
The screenshot below provides an example that meets the following requirements:
A case can be merged at any time. You will not be able to merge cases if a status reason transition
does not allow for it.
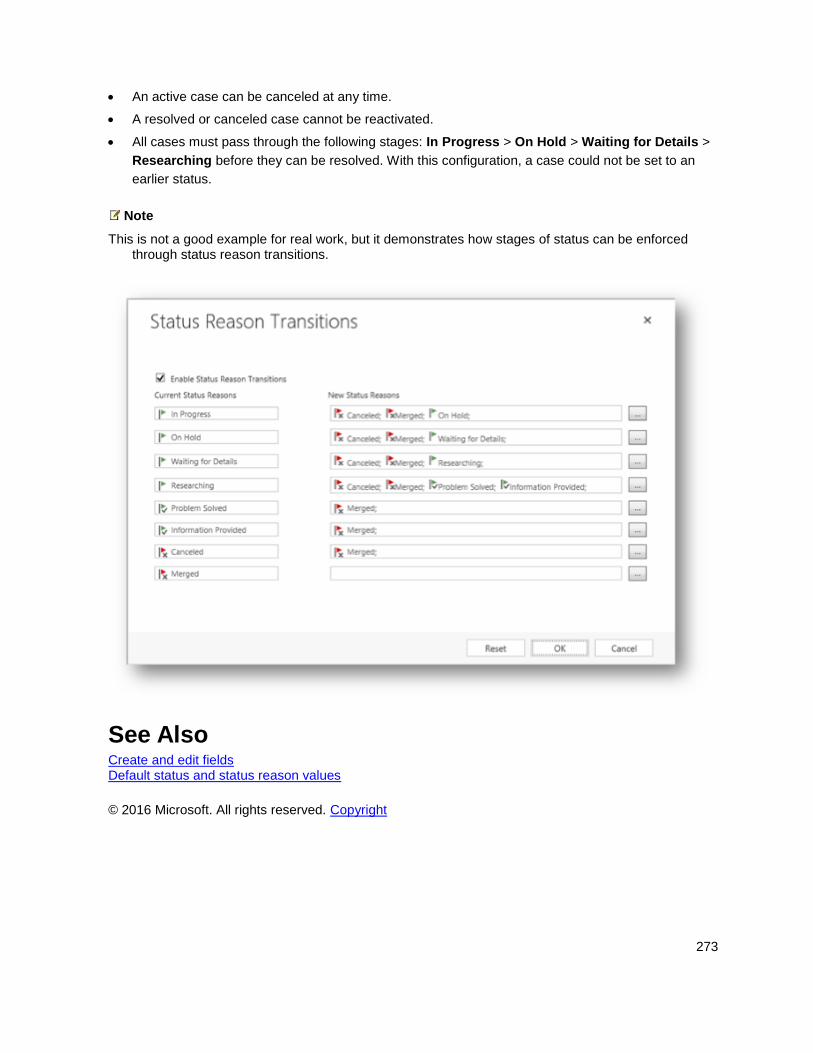
273
An active case can be canceled at any time.
A resolved or canceled case cannot be reactivated.
All cases must pass through the following stages: In Progress > On Hold > Waiting for Details >
Researching before they can be resolved. With this configuration, a case could not be set to an
earlier status.
Note
This is not a good example for real work, but it demonstrates how stages of status can be enforced through status reason transitions.
See Also Create and edit fields Default status and status reason values
© 2016 Microsoft. All rights reserved. Copyright
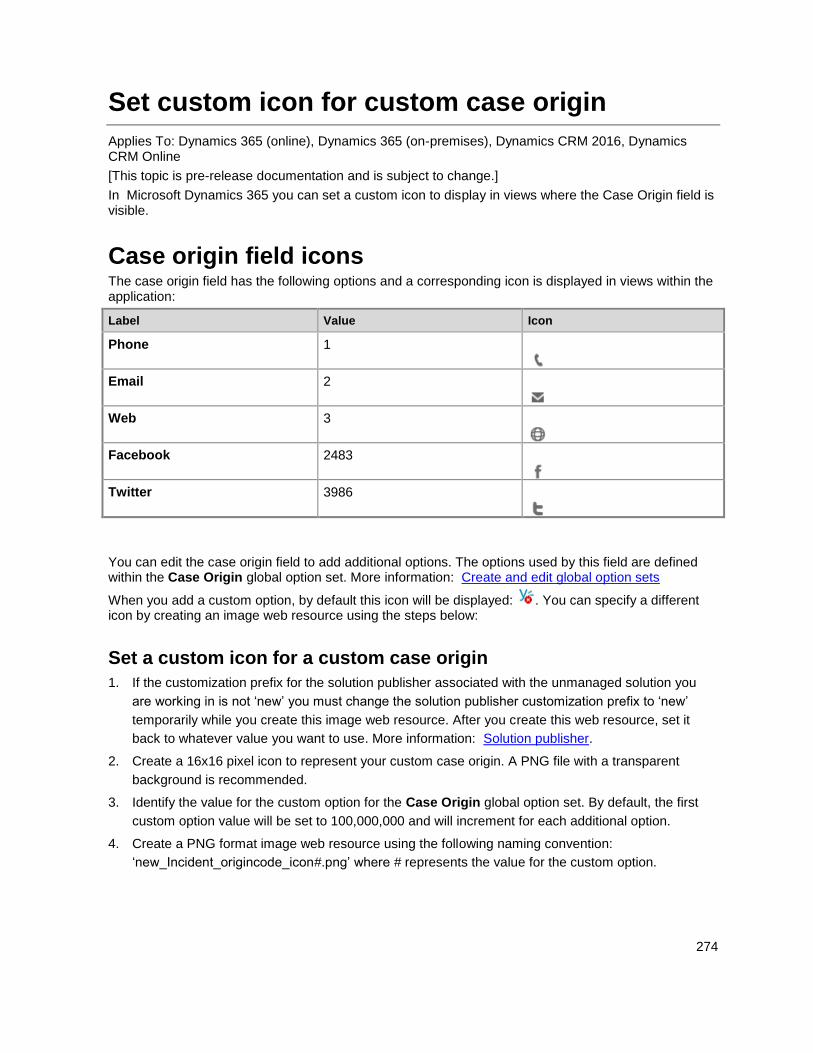
274
Set custom icon for custom case origin
Applies To: Dynamics 365 (online), Dynamics 365 (on-premises), Dynamics CRM 2016, Dynamics CRM Online
[This topic is pre-release documentation and is subject to change.]
In Microsoft Dynamics 365 you can set a custom icon to display in views where the Case Origin field is visible.
Case origin field icons The case origin field has the following options and a corresponding icon is displayed in views within the application:
Label Value Icon
Phone 1
Email 2
Web 3
Facebook 2483
Twitter 3986
You can edit the case origin field to add additional options. The options used by this field are defined within the Case Origin global option set. More information: Create and edit global option sets
When you add a custom option, by default this icon will be displayed: . You can specify a different icon by creating an image web resource using the steps below:
Set a custom icon for a custom case origin
1. If the customization prefix for the solution publisher associated with the unmanaged solution you
are working in is not ‘new’ you must change the solution publisher customization prefix to ‘new’
temporarily while you create this image web resource. After you create this web resource, set it
back to whatever value you want to use. More information: Solution publisher.
2. Create a 16x16 pixel icon to represent your custom case origin. A PNG file with a transparent
background is recommended.
3. Identify the value for the custom option for the Case Origin global option set. By default, the first
custom option value will be set to 100,000,000 and will increment for each additional option.
4. Create a PNG format image web resource using the following naming convention:
‘new_Incident_origincode_icon#.png’ where # represents the value for the custom option.
275
More information: Create and edit web resources
For example, for a custom option with a value of 100,000,000 create a web resource with the name new_Incident_origincode_icon100000000.png.
Important
Do not include commas in the name of the web resource. The solution publisher customization prefix is prepended to the name of the web resource and this value must be ‘new’.
Use the Upload File button in the web resource form to upload the icon file you created.
5. Save and publish your web resource.
6. To verify, create a case record using the custom case origin and verify that a view that displays the
case origin icon shows your custom icon.
There may be a several minutes delay after you publish your custom web resource. You may need to press F5 to refresh the page in your browser.
See Also Create and edit global option sets Create and edit web resources
© 2016 Microsoft. All rights reserved. Copyright
Behavior and format of the date and time field
Applies To: Dynamics 365 (online), Dynamics 365 (on-premises), Dynamics CRM 2016, Dynamics CRM Online
[This topic is pre-release documentation and is subject to change.]
In Microsoft Dynamics 365, the Date and Time data type is used in many system entity fields. For example, you can show when an account was last used in a marketing campaign or the date and time when a case was escalated. You can also create custom entities that include the date and time fields. Depending on what the field represents, you can choose several different field behaviors: User Local, Date Only or Time-Zone Independent.
In This Topic Date and time field behavior and format
Set managed property to change date and time behavior
Date Only example: birthdays and anniversaries
Time-Zone Independent example: hotel check-in
Special considerations for date and time fields
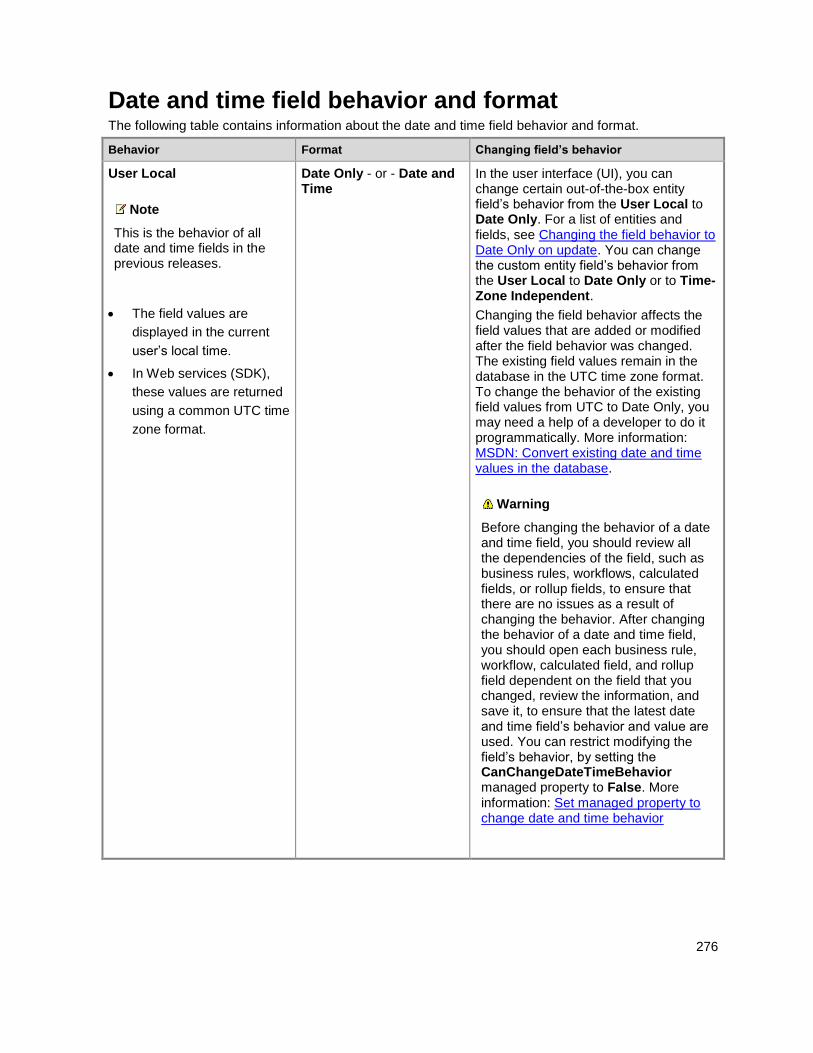
276
Date and time field behavior and format The following table contains information about the date and time field behavior and format.
Behavior Format Changing field’s behavior
User Local
Note
This is the behavior of all date and time fields in the previous releases.
The field values are
displayed in the current
user’s local time.
In Web services (SDK),
these values are returned
using a common UTC time
zone format.
Date Only - or - Date and Time
In the user interface (UI), you can change certain out-of-the-box entity field’s behavior from the User Local to Date Only. For a list of entities and fields, see Changing the field behavior to Date Only on update. You can change the custom entity field’s behavior from the User Local to Date Only or to Time-Zone Independent.
Changing the field behavior affects the field values that are added or modified after the field behavior was changed. The existing field values remain in the database in the UTC time zone format. To change the behavior of the existing field values from UTC to Date Only, you may need a help of a developer to do it programmatically. More information: MSDN: Convert existing date and time values in the database.
Warning
Before changing the behavior of a date and time field, you should review all the dependencies of the field, such as business rules, workflows, calculated fields, or rollup fields, to ensure that there are no issues as a result of changing the behavior. After changing the behavior of a date and time field, you should open each business rule, workflow, calculated field, and rollup field dependent on the field that you changed, review the information, and save it, to ensure that the latest date and time field’s behavior and value are used. You can restrict modifying the field’s behavior, by setting the CanChangeDateTimeBehavior managed property to False. More information: Set managed property to change date and time behavior
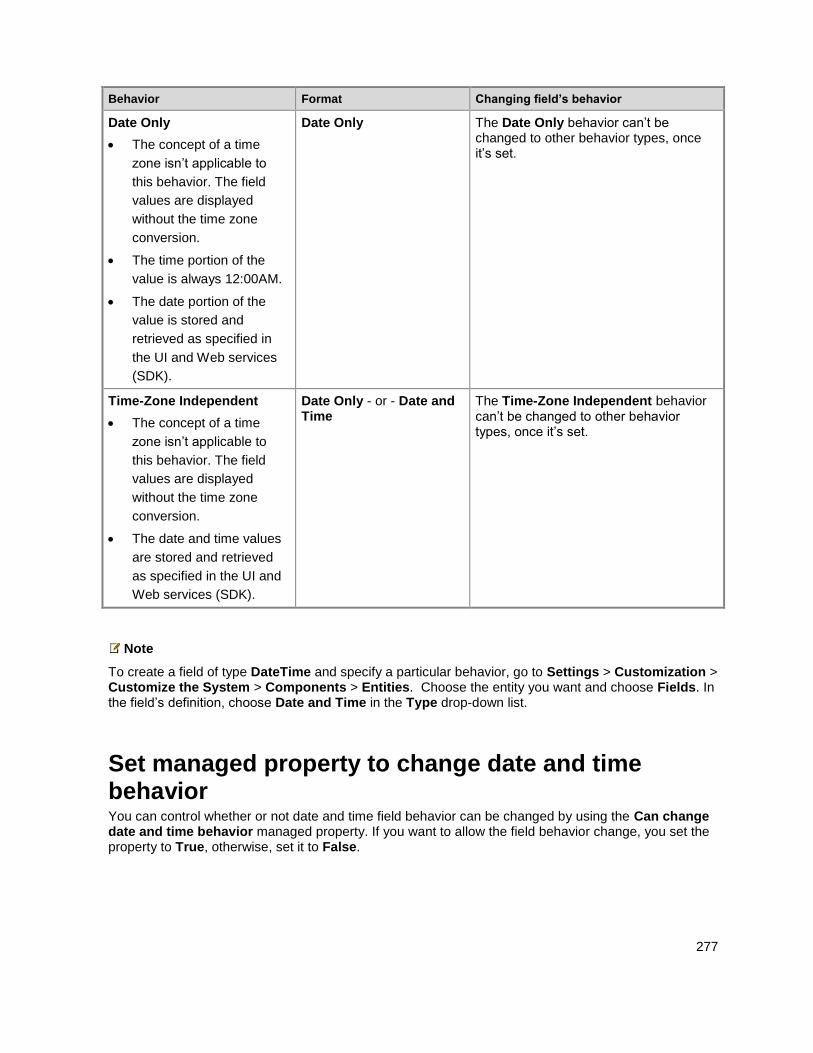
277
Behavior Format Changing field’s behavior
Date Only
The concept of a time
zone isn’t applicable to
this behavior. The field
values are displayed
without the time zone
conversion.
The time portion of the
value is always 12:00AM.
The date portion of the
value is stored and
retrieved as specified in
the UI and Web services
(SDK).
Date Only The Date Only behavior can’t be changed to other behavior types, once it’s set.
Time-Zone Independent
The concept of a time
zone isn’t applicable to
this behavior. The field
values are displayed
without the time zone
conversion.
The date and time values
are stored and retrieved
as specified in the UI and
Web services (SDK).
Date Only - or - Date and Time
The Time-Zone Independent behavior can’t be changed to other behavior types, once it’s set.
Note
To create a field of type DateTime and specify a particular behavior, go to Settings > Customization > Customize the System > Components > Entities. Choose the entity you want and choose Fields. In the field’s definition, choose Date and Time in the Type drop-down list.
Set managed property to change date and time behavior You can control whether or not date and time field behavior can be changed by using the Can change date and time behavior managed property. If you want to allow the field behavior change, you set the property to True, otherwise, set it to False.
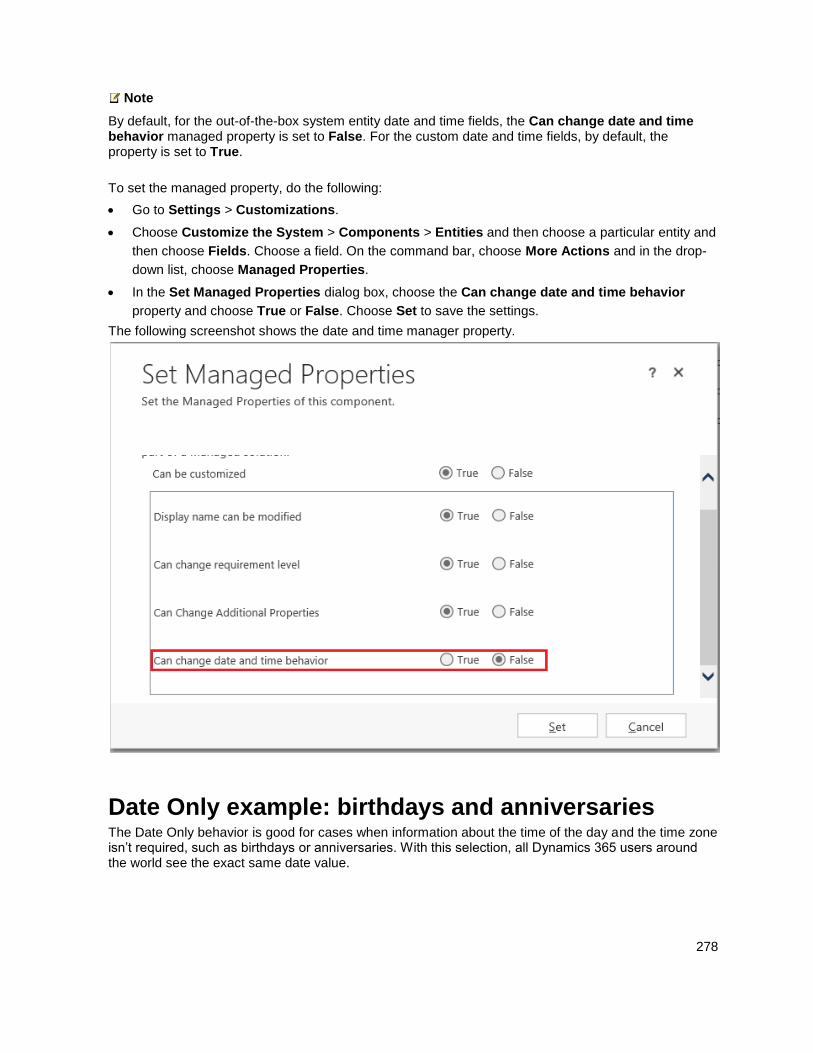
278
Note
By default, for the out-of-the-box system entity date and time fields, the Can change date and time behavior managed property is set to False. For the custom date and time fields, by default, the property is set to True.
To set the managed property, do the following:
Go to Settings > Customizations.
Choose Customize the System > Components > Entities and then choose a particular entity and
then choose Fields. Choose a field. On the command bar, choose More Actions and in the drop-
down list, choose Managed Properties.
In the Set Managed Properties dialog box, choose the Can change date and time behavior
property and choose True or False. Choose Set to save the settings.
The following screenshot shows the date and time manager property.
Date Only example: birthdays and anniversaries The Date Only behavior is good for cases when information about the time of the day and the time zone isn’t required, such as birthdays or anniversaries. With this selection, all Dynamics 365 users around the world see the exact same date value.
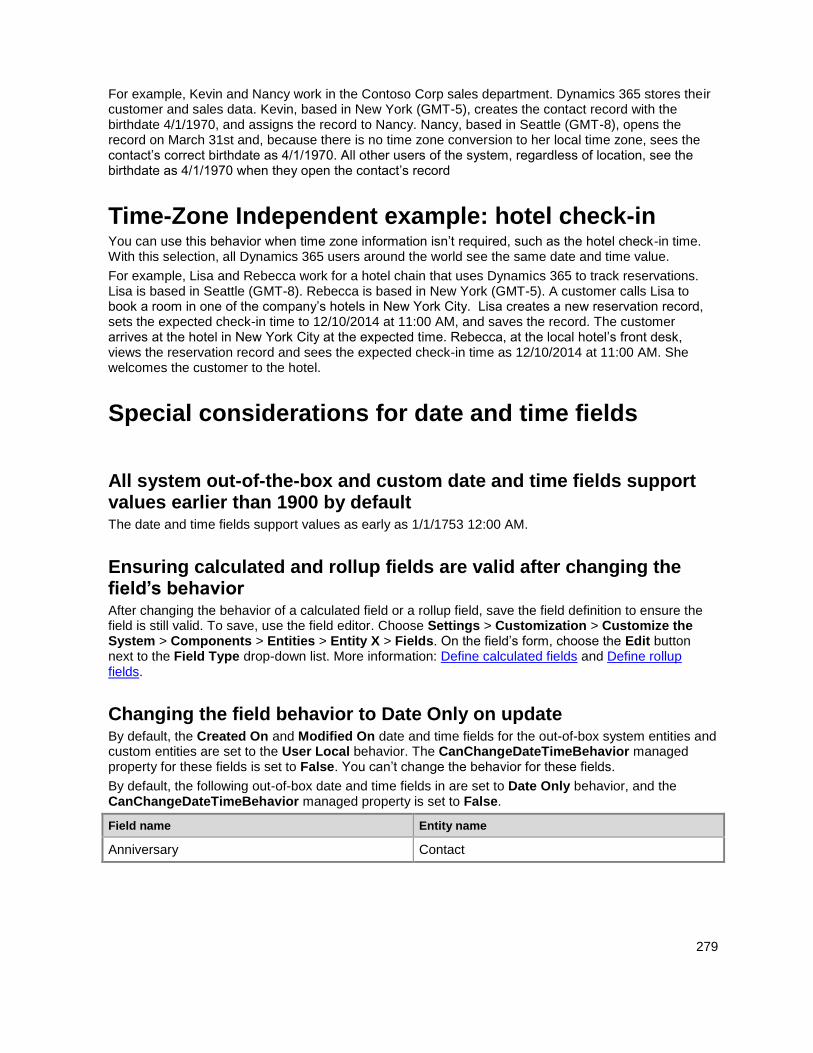
279
For example, Kevin and Nancy work in the Contoso Corp sales department. Dynamics 365 stores their customer and sales data. Kevin, based in New York (GMT-5), creates the contact record with the birthdate 4/1/1970, and assigns the record to Nancy. Nancy, based in Seattle (GMT-8), opens the record on March 31st and, because there is no time zone conversion to her local time zone, sees the contact’s correct birthdate as 4/1/1970. All other users of the system, regardless of location, see the birthdate as 4/1/1970 when they open the contact’s record
Time-Zone Independent example: hotel check-in You can use this behavior when time zone information isn’t required, such as the hotel check-in time. With this selection, all Dynamics 365 users around the world see the same date and time value.
For example, Lisa and Rebecca work for a hotel chain that uses Dynamics 365 to track reservations. Lisa is based in Seattle (GMT-8). Rebecca is based in New York (GMT-5). A customer calls Lisa to book a room in one of the company’s hotels in New York City. Lisa creates a new reservation record, sets the expected check-in time to 12/10/2014 at 11:00 AM, and saves the record. The customer arrives at the hotel in New York City at the expected time. Rebecca, at the local hotel’s front desk, views the reservation record and sees the expected check-in time as 12/10/2014 at 11:00 AM. She welcomes the customer to the hotel.
Special considerations for date and time fields
All system out-of-the-box and custom date and time fields support values earlier than 1900 by default The date and time fields support values as early as 1/1/1753 12:00 AM.
Ensuring calculated and rollup fields are valid after changing the field’s behavior After changing the behavior of a calculated field or a rollup field, save the field definition to ensure the field is still valid. To save, use the field editor. Choose Settings > Customization > Customize the System > Components > Entities > Entity X > Fields. On the field’s form, choose the Edit button next to the Field Type drop-down list. More information: Define calculated fields and Define rollup fields.
Changing the field behavior to Date Only on update By default, the Created On and Modified On date and time fields for the out-of-box system entities and custom entities are set to the User Local behavior. The CanChangeDateTimeBehavior managed property for these fields is set to False. You can’t change the behavior for these fields.
By default, the following out-of-box date and time fields in are set to Date Only behavior, and the CanChangeDateTimeBehavior managed property is set to False.
Field name Entity name
Anniversary Contact
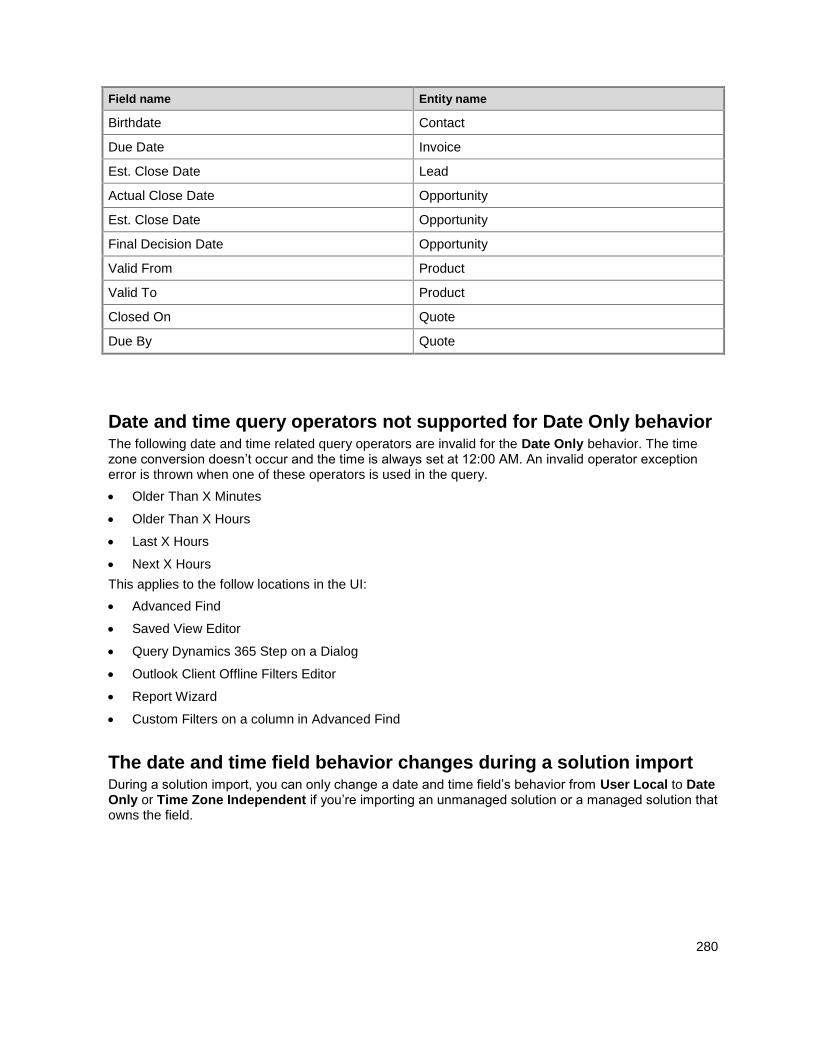
280
Field name Entity name
Birthdate Contact
Due Date Invoice
Est. Close Date Lead
Actual Close Date Opportunity
Est. Close Date Opportunity
Final Decision Date Opportunity
Valid From Product
Valid To Product
Closed On Quote
Due By Quote
Date and time query operators not supported for Date Only behavior The following date and time related query operators are invalid for the Date Only behavior. The time zone conversion doesn’t occur and the time is always set at 12:00 AM. An invalid operator exception error is thrown when one of these operators is used in the query.
Older Than X Minutes
Older Than X Hours
Last X Hours
Next X Hours
This applies to the follow locations in the UI:
Advanced Find
Saved View Editor
Query Dynamics 365 Step on a Dialog
Outlook Client Offline Filters Editor
Report Wizard
Custom Filters on a column in Advanced Find
The date and time field behavior changes during a solution import During a solution import, you can only change a date and time field’s behavior from User Local to Date Only or Time Zone Independent if you’re importing an unmanaged solution or a managed solution that owns the field.
281
See Also Create and edit fields Define calculated fields MSDN: Behavior and format of the date and time attribute
© 2016 Microsoft. All rights reserved. Copyright
Define rollup fields
Applies To: Dynamics 365 (online), Dynamics 365 (on-premises), Dynamics CRM 2016, Dynamics CRM Online
[This topic is pre-release documentation and is subject to change.]
In Microsoft Dynamics 365, rollup fields are designed to help users obtain insights into data by monitoring key business metrics. A rollup field contains an aggregate value computed over the records related to a specified record, such as open opportunities of an account. Also, you’ll be able to aggregate data from the activities directly related to a record, such as emails and appointments, and activities indirectly related to a record via the Activity Party entity. In more complex scenarios, you can aggregate data over the hierarchy of records. As an administrator or customizer, you can define rollup fields by using the customization tools in the Dynamics 365 Web application, without needing a developer to write code.
In This Topic Rollup fields benefits and capabilities
Rollup calculations
Rollup field business scenarios
Rollup field considerations
Rollup fields benefits and capabilities The benefits and capabilities of rollup fields include the following:
Visual editing is easy. You can create rollup fields by using the Field Editor, just like you do when
you create a regular field.
Wide selection of aggregate functions. You can aggregate data by using the following functions:
SUM, COUNT, MIN, MAX and AVG.
Full filter support for aggregation. You can set various filters for the source entity or related entity
while setting multiple conditions.
Seamless integration with the user interface. You can include the rollup fields in forms, views,
charts and reports.
Rollup fields are solution components. You can easily transport the rollup fields as components
between organizations and distribute them in solutions.

282
Rollup fields and the calculated fields are complementary to each other. You can use a rollup field
as a part of the calculated field, and vice versa.
If you updated your Online organization to December 2016 update for Microsoft Dynamics 365
(online), you can configure rollup fields to use custom controls.
More information: Visual controls in Dynamics 365 for phones and tablets
Some examples of rollup fields include:
Total estimated revenue of open opportunities of an account
Total estimated revenue of open opportunities across all accounts in a hierarchy
Total estimated revenue of an opportunity including child opportunities
Total estimated value of qualified leads generated by a campaign
Number of high priority open cases across all accounts in a hierarchy
Earliest created time of all high priority open cases for an account
Each Rollup field creates two accessory fields with <fieldname>_date and <fieldname>_state suffix pattern. The _date field is of the Datetime data type and _state field is of the integer data type. The _state field has the following values:
0 => NotCalculated The field value is yet to be calculated.
1 => Calculated The field value has been calculated per the last update time in _date field.
2 => OverflowError The field value calculation resulted in overflow error.
3 => OtherError The field value calculation failed due to an internal error. The following run of the calculation job will likely fix it.
4 => RetryLimitExceeded The field value calculation failed because the maximum number of retry attempts to calculate the value was exceeded due to high number of concurrency and locking conflicts.
5 => HierarchicalRecursionLimitReached The field value calculation failed because the maximum hierarchy depth limit for the calculation was reached.
6 => LoopDetected The field value calculation failed because a recursive loop was detected in the hierarchy of the record.
Rollup calculations The rollups are calculated by scheduled system jobs that run asynchronously in the background. You have to be an administrator to view and manage the rollup jobs. To view the rollup jobs go to Settings
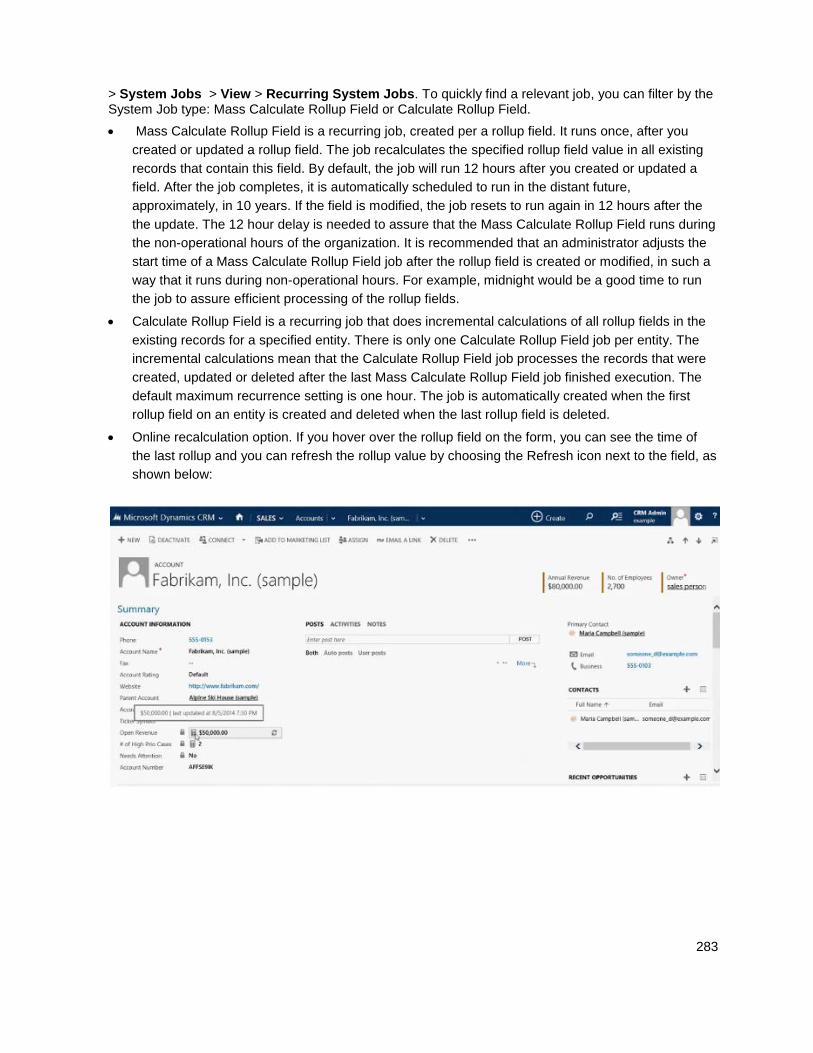
283
> System Jobs > View > Recurring System Jobs. To quickly find a relevant job, you can filter by the System Job type: Mass Calculate Rollup Field or Calculate Rollup Field.
Mass Calculate Rollup Field is a recurring job, created per a rollup field. It runs once, after you
created or updated a rollup field. The job recalculates the specified rollup field value in all existing
records that contain this field. By default, the job will run 12 hours after you created or updated a
field. After the job completes, it is automatically scheduled to run in the distant future,
approximately, in 10 years. If the field is modified, the job resets to run again in 12 hours after the
the update. The 12 hour delay is needed to assure that the Mass Calculate Rollup Field runs during
the non-operational hours of the organization. It is recommended that an administrator adjusts the
start time of a Mass Calculate Rollup Field job after the rollup field is created or modified, in such a
way that it runs during non-operational hours. For example, midnight would be a good time to run
the job to assure efficient processing of the rollup fields.
Calculate Rollup Field is a recurring job that does incremental calculations of all rollup fields in the
existing records for a specified entity. There is only one Calculate Rollup Field job per entity. The
incremental calculations mean that the Calculate Rollup Field job processes the records that were
created, updated or deleted after the last Mass Calculate Rollup Field job finished execution. The
default maximum recurrence setting is one hour. The job is automatically created when the first
rollup field on an entity is created and deleted when the last rollup field is deleted.
Online recalculation option. If you hover over the rollup field on the form, you can see the time of
the last rollup and you can refresh the rollup value by choosing the Refresh icon next to the field, as
shown below:
284
There are a few considerations you should keep in mind when using the online recalculation option (manual refresh on the form):
You have to have Write privileges on the entity and Write access rights on the source record on
which you are requesting the Refresh. For example, if you are calculating the estimated
revenue from the open opportunities of an account, you don’t have to have Write privileges on
the opportunity entity, only on the account entity.
This option is only available in the online mode. You can’t use it while working offline.
The maximum number of records during the rollup refresh is limited to 50,000 records. In case
of the hierarchical rollup, this applies to the related records across the hierarchy. If the limit is
exceeded, you see an error message: “Calculations can’t be performed online because the
calculation limit of 50,000 related records has been reached.” This limit does not apply when
the rollup is automatically recalculated by the system jobs.
The maximum hierarchy depth is limited to 10 for the source record. If the limit is exceeded,
you see an error message: “Calculations can’t be performed online because the hierarchy
depth limit of 10 for the source record has been reached.” This limit does not apply when the
rollup is automatically recalculated by the system jobs.
As a system administrator, you can modify the rollup job recurrence pattern, postpone, pause or resume the rollup job. However, you can’t cancel or delete a rollup job. To pause, postpone, resume or modify the recurrence pattern, go to Settings > System Jobs. In View, select Recurring System Jobs. On the nav bar, choose Actions and select the action you want. For the Mass Calculate Rollup Field job, the available selections are: Resume, Postpone, and Pause. For the Calculate Rollup Field job, the available selections are: Modify Recurrence, Resume, Postpone, and Pause.
Rollup field business scenarios Let’s take a look at several rollup field scenarios. We’ll aggregate data for a record from the related records with and without using a hierarchy. We’ll also aggregate data for a record from related activities and activities indirectly related to a record via the Activitiy Party entity. In each example, we define the rollup field by using the Field Editor. To open the Field Editor, go to Settings > Customizations > Customize the System > Components > Entities. Select the entity you want and choose Fields. Choose New. In the editor, provide the required information for the field, including the Field Type and Data Type. In the Field Type, select Rollup, after you have selected the data type. The data types include decimal or whole numbers, currency, and date/time. Choose the Edit button next to the Field Type. This takes you to the rollup field definition editor. The rollup field definition consists of three sections: Source entity, Related entity and Aggregation.
In the Source entity section, you specify the entity for which the rollup field is defined and whether
or not you aggregate over a hierarchy. You can add filters with multiple conditions to specify the
records in the hierarchy you want to use for rollup.
In the Related entity section, you specify the entity over which you aggregate. This section is
optional when you choose to rollup over the hierarchy on the source entity. You can add filters with
multiple conditions to specify which related records to use in the calculation. For example, you
include the revenue from the open opportunities with an annual revenue greater than $1000.
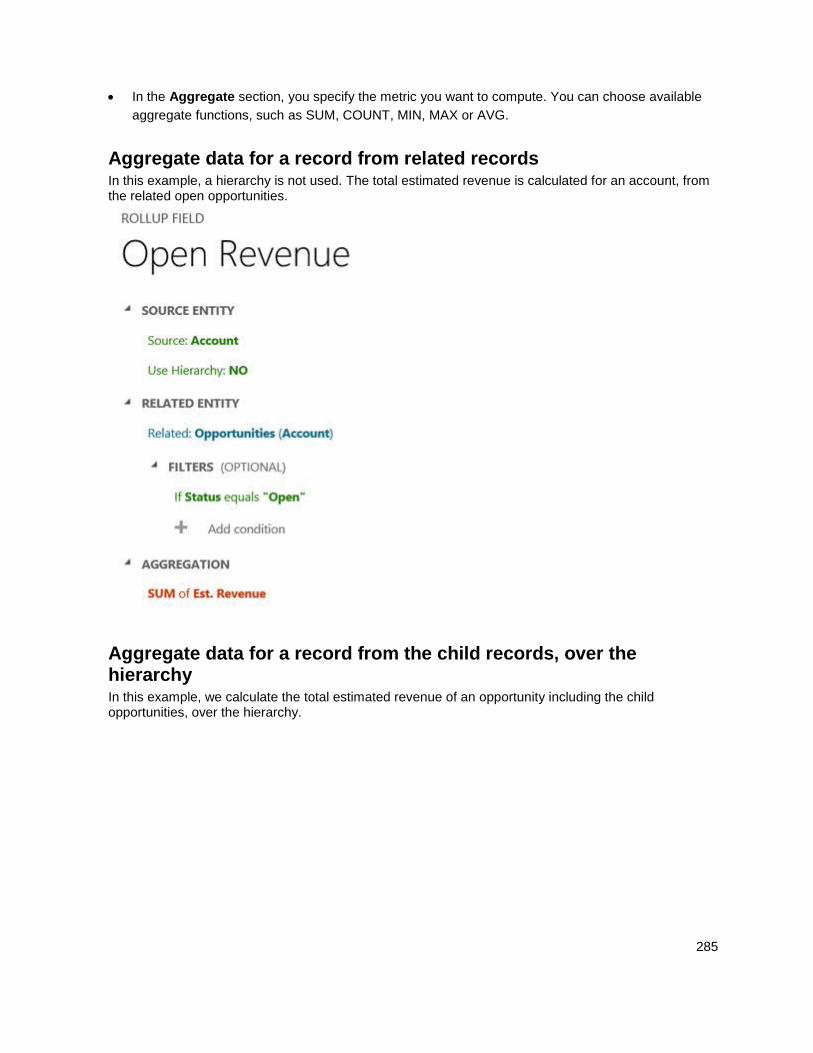
285
In the Aggregate section, you specify the metric you want to compute. You can choose available
aggregate functions, such as SUM, COUNT, MIN, MAX or AVG.
Aggregate data for a record from related records In this example, a hierarchy is not used. The total estimated revenue is calculated for an account, from the related open opportunities.
Aggregate data for a record from the child records, over the hierarchy In this example, we calculate the total estimated revenue of an opportunity including the child opportunities, over the hierarchy.
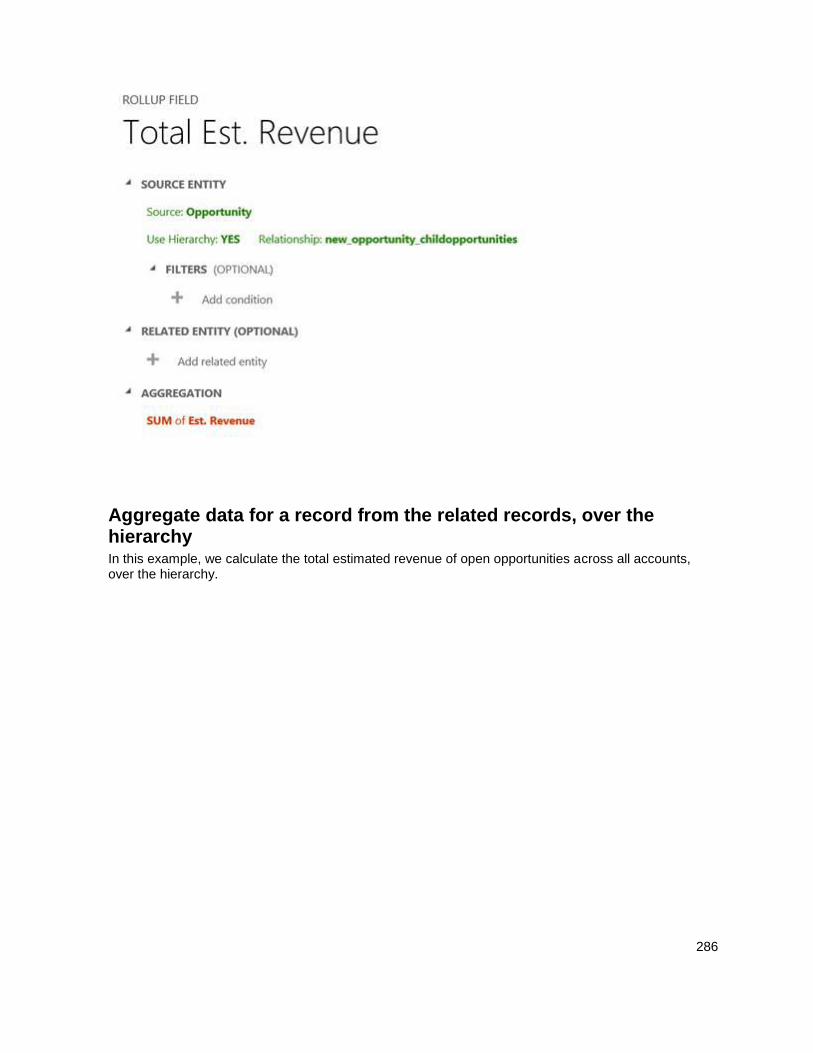
286
Aggregate data for a record from the related records, over the hierarchy In this example, we calculate the total estimated revenue of open opportunities across all accounts, over the hierarchy.
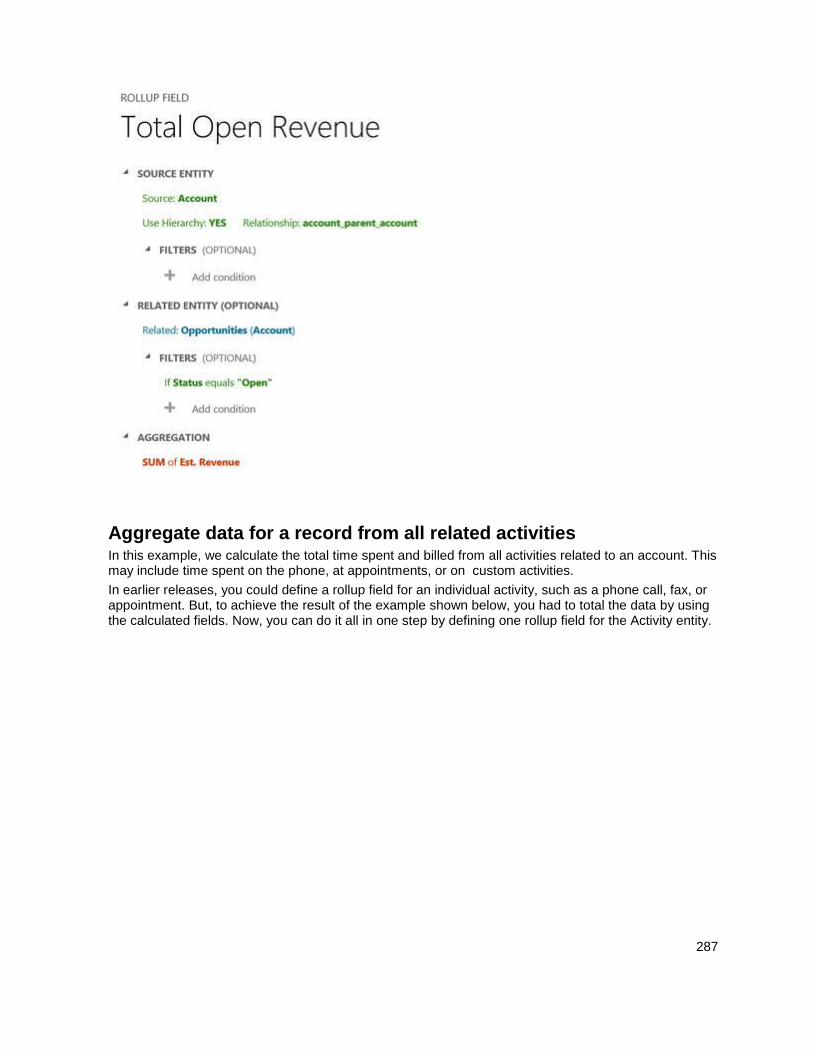
287
Aggregate data for a record from all related activities In this example, we calculate the total time spent and billed from all activities related to an account. This may include time spent on the phone, at appointments, or on custom activities.
In earlier releases, you could define a rollup field for an individual activity, such as a phone call, fax, or appointment. But, to achieve the result of the example shown below, you had to total the data by using the calculated fields. Now, you can do it all in one step by defining one rollup field for the Activity entity.
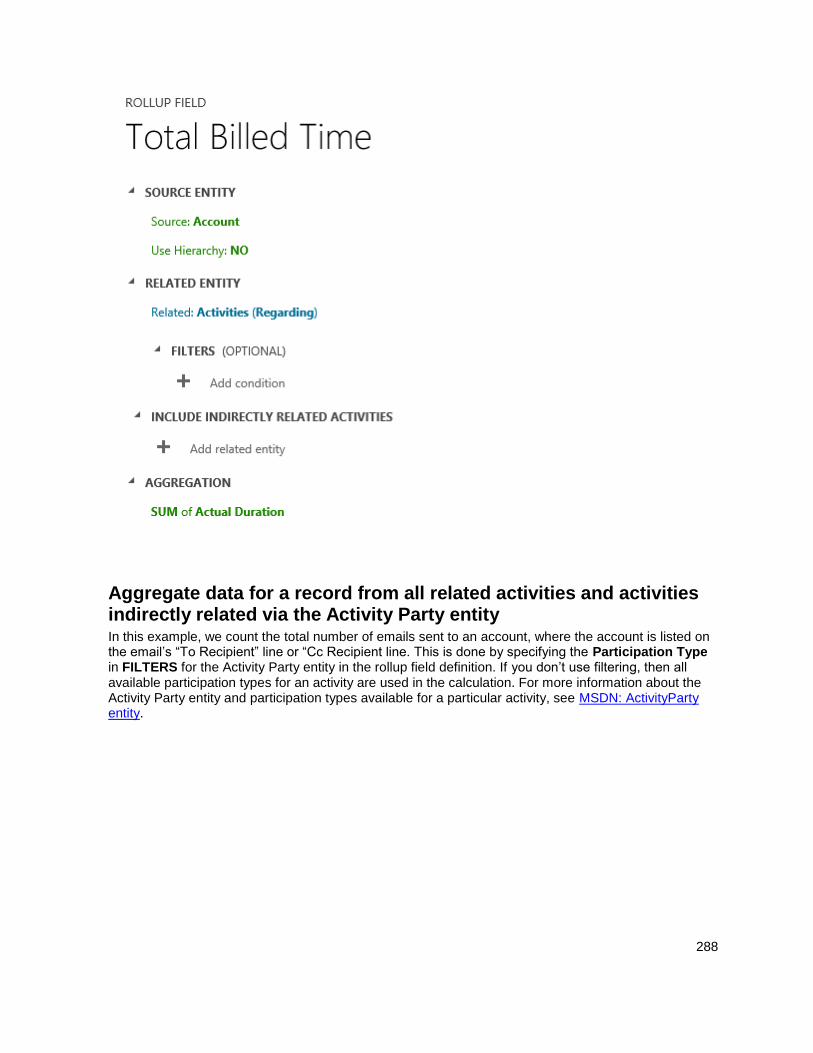
288
Aggregate data for a record from all related activities and activities indirectly related via the Activity Party entity In this example, we count the total number of emails sent to an account, where the account is listed on the email’s “To Recipient” line or “Cc Recipient line. This is done by specifying the Participation Type in FILTERS for the Activity Party entity in the rollup field definition. If you don’t use filtering, then all available participation types for an activity are used in the calculation. For more information about the Activity Party entity and participation types available for a particular activity, see MSDN: ActivityParty entity.
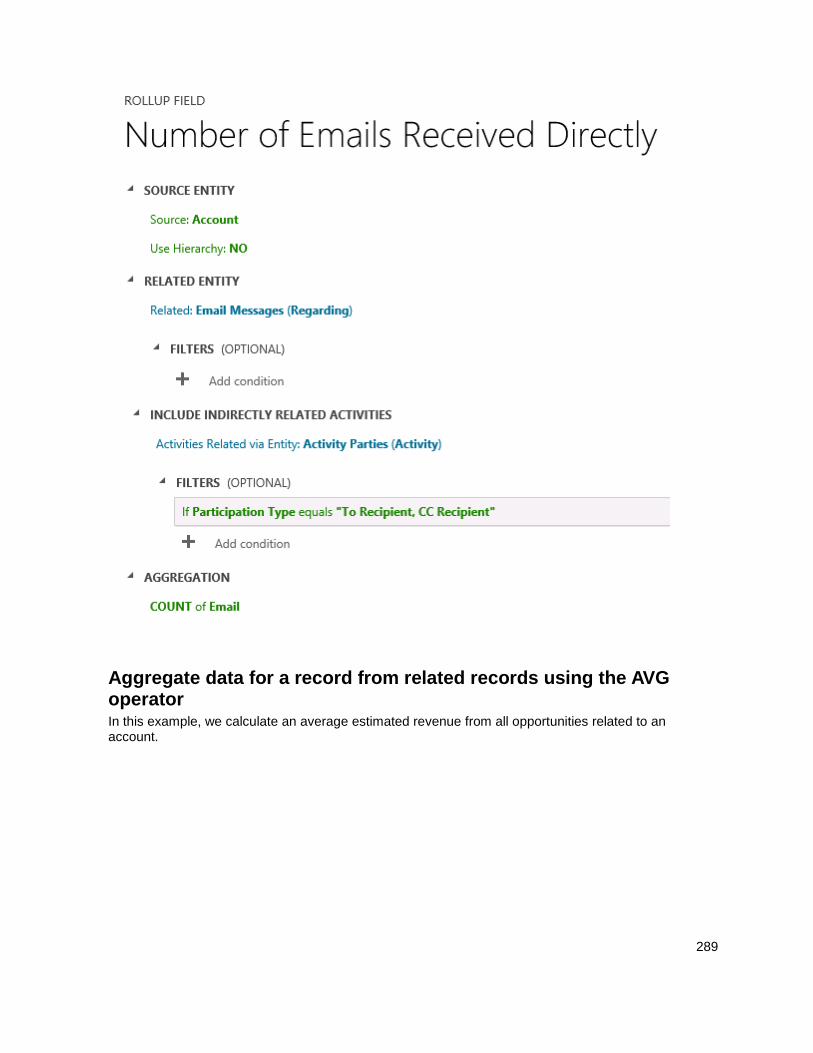
289
Aggregate data for a record from related records using the AVG operator In this example, we calculate an average estimated revenue from all opportunities related to an account.
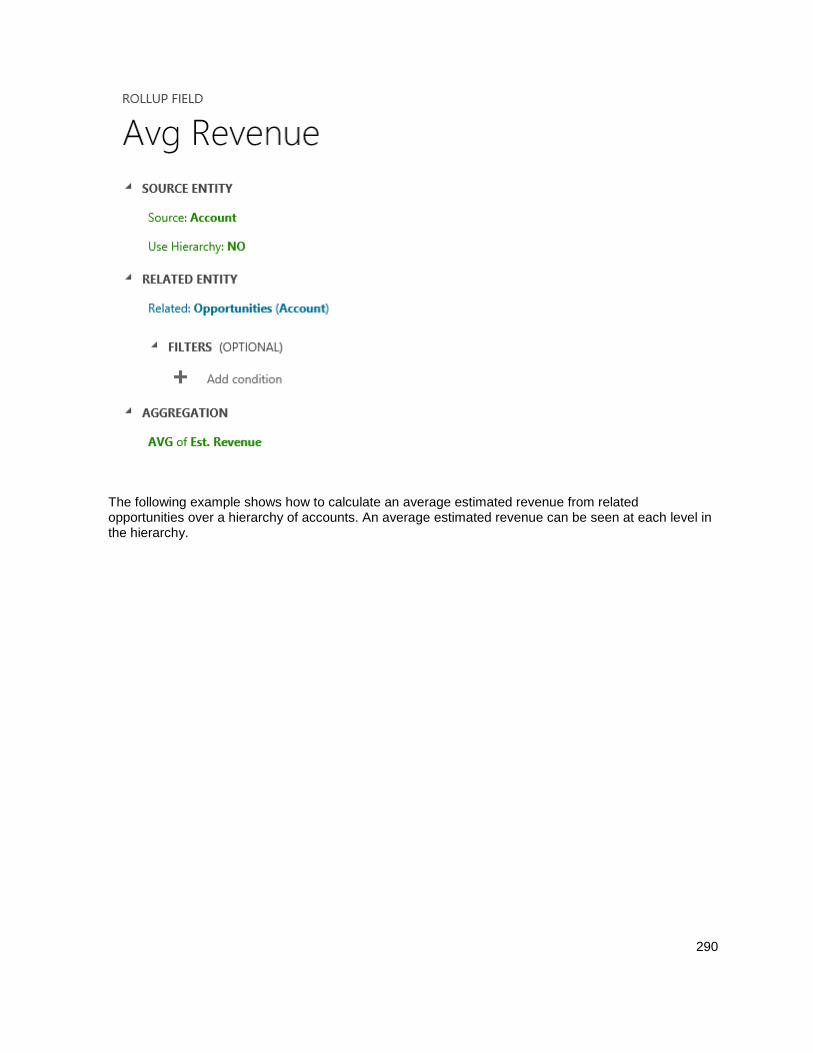
290
The following example shows how to calculate an average estimated revenue from related opportunities over a hierarchy of accounts. An average estimated revenue can be seen at each level in the hierarchy.
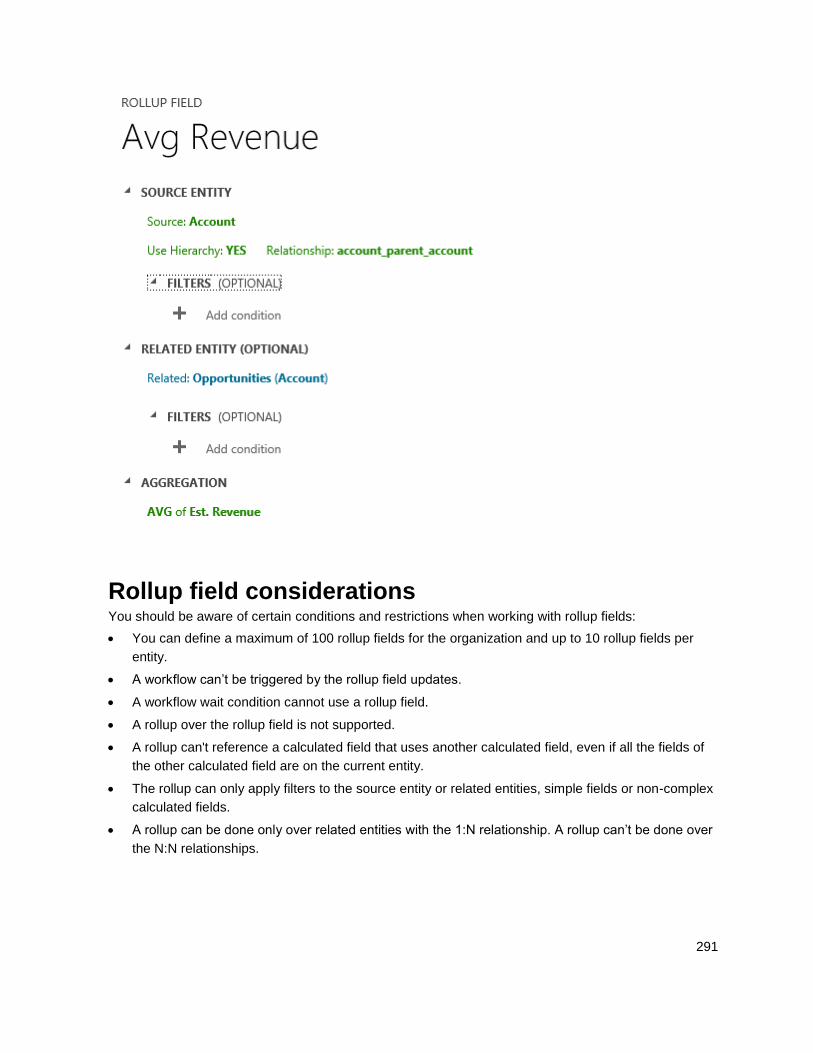
291
Rollup field considerations You should be aware of certain conditions and restrictions when working with rollup fields:
You can define a maximum of 100 rollup fields for the organization and up to 10 rollup fields per
entity.
A workflow can’t be triggered by the rollup field updates.
A workflow wait condition cannot use a rollup field.
A rollup over the rollup field is not supported.
A rollup can't reference a calculated field that uses another calculated field, even if all the fields of
the other calculated field are on the current entity.
The rollup can only apply filters to the source entity or related entities, simple fields or non-complex
calculated fields.
A rollup can be done only over related entities with the 1:N relationship. A rollup can’t be done over
the N:N relationships.
292
A rollup can’t be done over the 1:N relationship for the Activity entity or the Activity Party entity.
The business rules, workflows or calculated fields always use the last calculated value of the rollup
field.
A rollup field is aggregated under the system user context. All users are able to see the same rollup
field value. You can control the rollup field visibility with the field level security (FLS), by restricting
who can access the rollup field. More information: Field level security.
If the precision of the aggregated field is greater than the precision of the rollup field, the
aggregated field precision is rounded down to the precision of the rollup field, before the
aggregation is performed. To illustrate this behavior, let’s look at a specific example. Let’s say that
the rollup field on the account entity, for calculating the total estimated revenue of the related
opportunities, has a precision of two decimal points. The Est. Revenue field on the opportunity
entity is the aggregated field with the precision of four decimal points. In our example, the account
has two related opportunities. The aggregated sum of the estimated revenue is calculated as
follows:
a. Est. Revenue for the first opportunity: $1000.0041
b. Est. Revenue for the second opportunity: $2000.0044
c. Aggregated sum of Est. Revenue: $1000.00 + $2000.00 = $3000.00
As you can see, the precision rounding to two decimal points on the aggregated field is done
before the aggregation is performed.
Certain entity forms, such as Account or Contact, out-of-the-box, contain the associated grids. For
example, an Account form includes Contacts, Cases, Opportunities and other grids. Some of the
records shown in the Account form grids are directly related to the account record; others,
indirectly, through the relationships with other records. In comparison, the rollup field aggregation
uses only direct relationships explicitly defined in the rollup field definition. No other relationships
are considered. To illustrate the difference in behavior, let’s look at the following example.
a. The account A1 has a primary contact, P1. The case C1 is associated with the account A1
(C1.Customer field = A1) and the case C2 is associated with the contact P1 (C2.Customer
field = P1).
b. The Cases grid on the Account form for the A1 record, shows two cases, C1 and C2.
c. The rollup field on the account entity, called Total Number of Cases, is used to count the cases
associated with the account.
d. In the account rollup field definition, we specify the cases that have the Customer relationship
with the account. After aggregation, the Total Number of Cases is equal to 1 (case C1). The
case C2 is not included in the total, as it is directly related to the contact, not to the account,
and can’t be explicitly defined in the account rollup field definition. As a result, the total number
of cases returned by rollup operation doesn’t match the number of cases shown in the Cases
grid.
293
See Also Create and edit fields Define calculated fields Behavior and format of the date and time field Query and visualize hierarchical data Video: Rollup and Calculated Fields in Microsoft Dynamics CRM 2015 Video: Using Power Business Intelligence with Microsoft Dynamic CRM 2015
© 2016 Microsoft. All rights reserved. Copyright
Define calculated fields
Applies To: Dynamics 365 (online), Dynamics 365 (on-premises), Dynamics CRM 2016, Dynamics CRM Online
[This topic is pre-release documentation and is subject to change.]
In Microsoft Dynamics 365, calculated fields let you automate manual calculations used in your business processes. For example, a salesperson may want to know the weighted revenue for an opportunity which is based on the estimated revenue from an opportunity multiplied by the probability. Or, they want to automatically apply a discount, if an order is greater than $500. A calculated field can contain values resulting from simple math operations, or conditional operations, such as greater than or if-else, and many others. You can accomplish all this by using the Dynamics 365 user interface, no need to write code.
The calculated field capabilities:
The calculated fields comprise of calculations that use the fields from the current entity or related
parent entities.
The expression support is available on the current entity and the related parent entity fields in the
Condition sections and the Action sections. The built-in functions include:
ADDHOURS, ADDDAYS, ADDWEEKS, ADDMONTHS, ADDYEARS, SUBTRACTHOURS, SUBTRACTDAYS, SUBTRACTWEEKS, SUBTRACTMONTHS, SUBTRACTYEARS, DIFFINDAYS, DIFFINHOURS, DIFFINMINUTES, DIFFINMONTHS, DIFFINWEEKS, DIFFINYEARS, CONCAT, TRIMLEFT, and TRIMRIGHT.
A rich conditional support provides branching and multiple conditions. The logical operations
include AND and OR operators.
The visual editing capabilities include modern user interface and intellisense in the ACTION
section.
A seamless integration of the calculated fields with the forms, views, charts, and reports is available
in real time.
If you updated your Online organization to December 2016 update for Microsoft Dynamics 365
(online), you can configure calculated fields to use custom controls.
294
More information: Visual controls in Dynamics 365 for phones and tablets
A few examples of the calculated fields
Weighted Revenue: Estimated revenue multiplied by probability
Net Worth: Assets subtracted by the liabilities for a given account
Cost of Labor: Base rate up to 40 hours, plus additional overtime
Contact Number: Phone number for an opportunity based on account or contact
Lead Score: Single field that provides insights to the quality of a given lead
Follow Up By: Follow up on an activity by a specified number of days based on priority
Important
To create a calculated field you must have the Write privilege on the Field Security Profile entity. If the calculated field uses the secured fields in a calculation, you should consider securing the calculated field as well, to prevent users from accessing data for which they don’t have sufficient permissions. The calculated field editor gives you a warning if you are creating a calculated field that uses secured fields in a calculation, suggesting you secure the calculated field. More information: Field level security.
In This Topic Calculated fields examples
Calculated field functions syntax
Calculated fields considerations
Calculated fields examples Let’s take a look at calculated field examples in more detail. We’ll define the calculated fields with the Field Editor. To open the Field Editor:
1. Go to Settings > Customizations.
2. Choose Customize the System > Components > Entities.
3. Select the entity you want and choose Fields. Choose New.
In the editor, provide the required information for the field, including the Field Type and Data Type. The Field Type is Calculated. The available data types for the calculated field:
Single line of text
Option Set
Two Options
Whole Number
Decimal Number
Currency
Date and Time
295
The Edit button next to the Field Type takes you to the calculated field definition editor, where the new calculated field has been created, but no formula has been set. The calculated field definition consists of two sections: CONDITION and ACTION.
In the Condition section, you can specify an entity, field, operator, type, and value. In the
dropdown box for the Entity, you can choose a current entity or a related entity. In the Field
dropdown box, you have a selection of all available fields for the entity. Depending on the operator
you choose, you may need to provide type and value. You can specify multiple conditions using the
AND or OR operators.
In the Action section, you provide the formula for the calculated field.
Note
You can use data from Lookup records within your Action. You first have to select the Lookup field and then type a period. After that, you can select one of the fields available on the related entity. For example, in the case of <LookupFieldName>.<RelatedFieldName>, you can select: ParentAccountId.AccountNumber.
Note that field level security will be ignored on the related entity, so if there is sensitive data in the accessed field we suggest securing your calculated field as well.
Weighted revenue of opportunity In this example, we are using the fields of the opportunity entity to calculate the weighted revenue based on the opportunity’s probability. In the field editor for an opportunity entity, we create a field called “Weighted Revenue” and specify the field type as Calculated and the data type is Currency. In the calculated field definition editor, in the Condition section, we specify the opportunity with the Status = Open. In the ACTION, the formula calculates the weighted revenue based on the opportunity estimated revenue multiplied by the probability of the opportunity. The following screenshots show step-by-step how to define the Weighted Revenue calculated field.
Create the calculated field called “Weighted Revenue”:
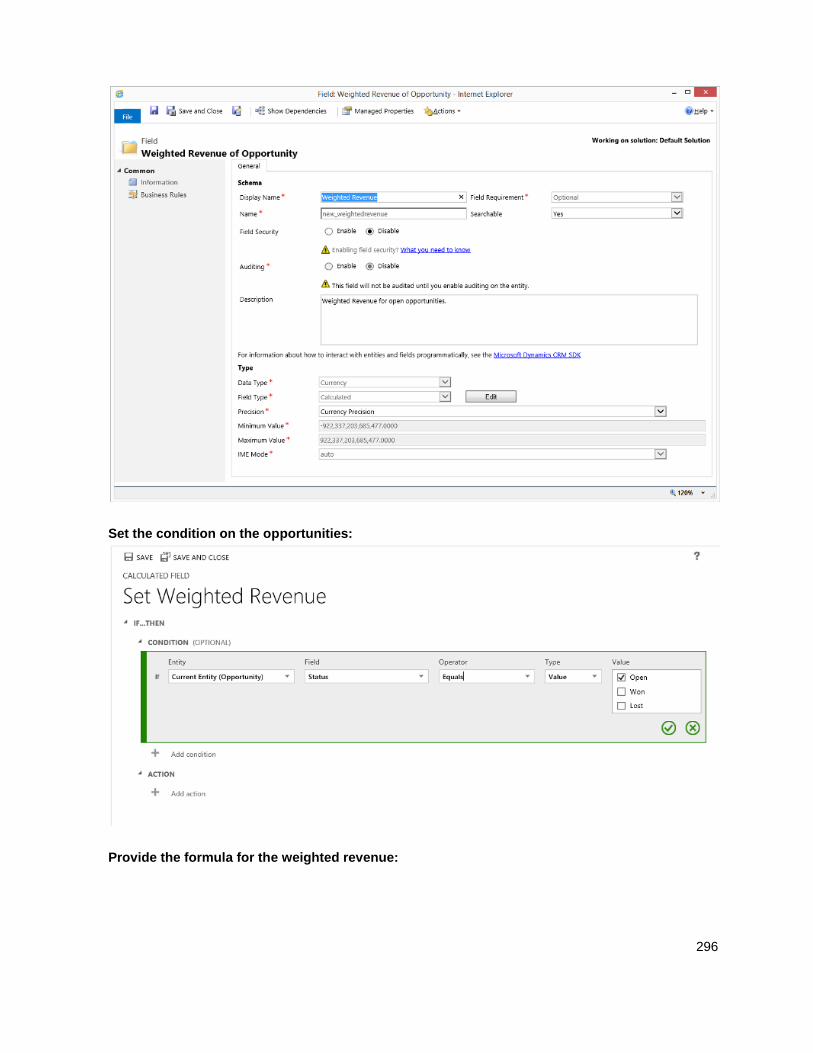
296
Set the condition on the opportunities:
Provide the formula for the weighted revenue:
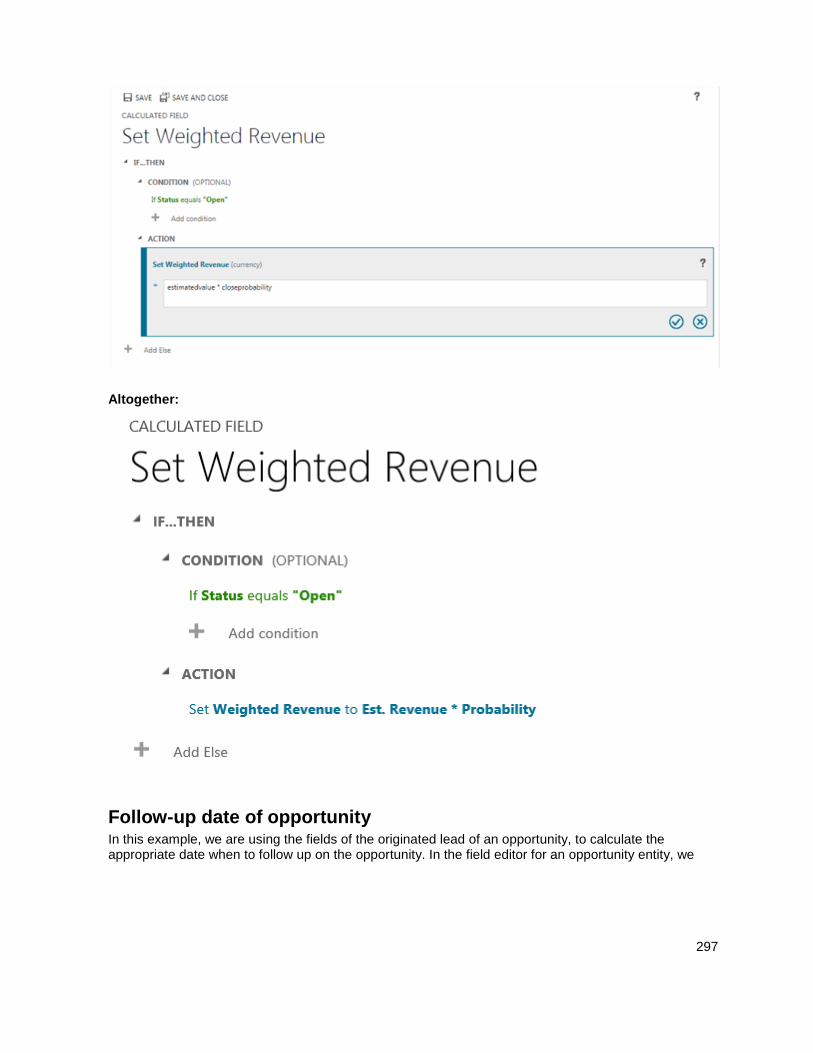
297
Altogether:
Follow-up date of opportunity In this example, we are using the fields of the originated lead of an opportunity, to calculate the appropriate date when to follow up on the opportunity. In the field editor for an opportunity entity, we
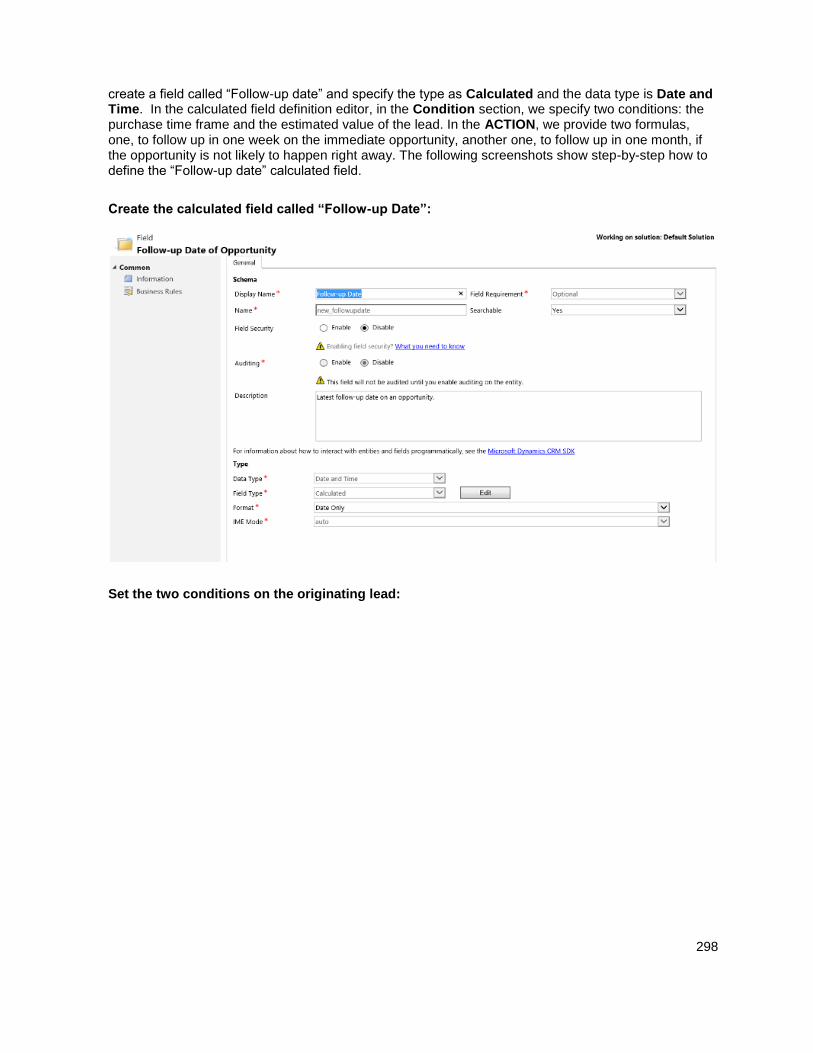
298
create a field called “Follow-up date” and specify the type as Calculated and the data type is Date and Time. In the calculated field definition editor, in the Condition section, we specify two conditions: the purchase time frame and the estimated value of the lead. In the ACTION, we provide two formulas, one, to follow up in one week on the immediate opportunity, another one, to follow up in one month, if the opportunity is not likely to happen right away. The following screenshots show step-by-step how to define the “Follow-up date” calculated field.
Create the calculated field called “Follow-up Date”:
Set the two conditions on the originating lead:
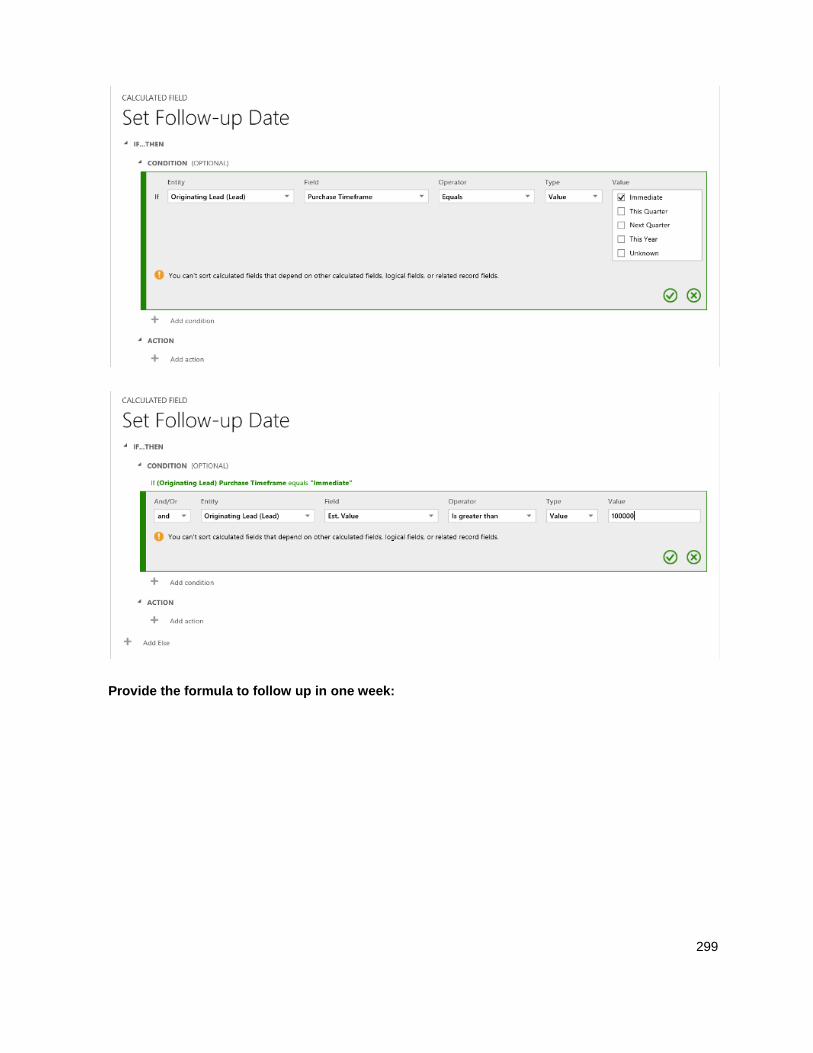
299
Provide the formula to follow up in one week:
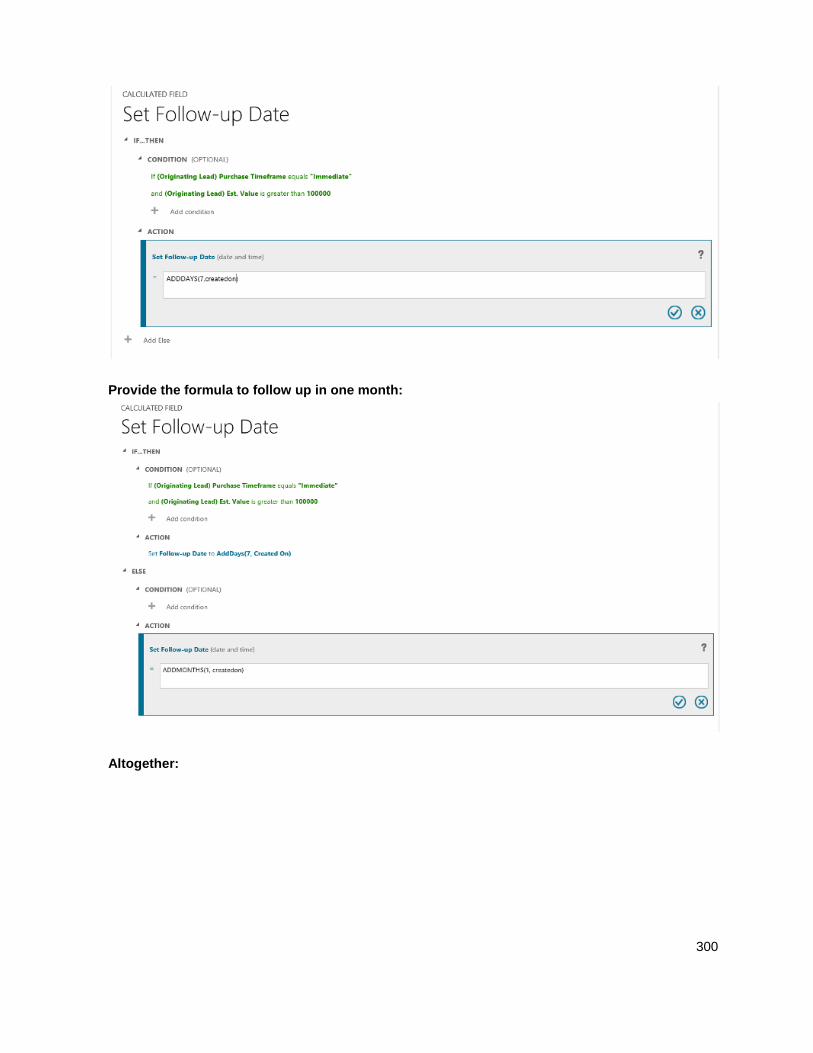
300
Provide the formula to follow up in one month:
Altogether:
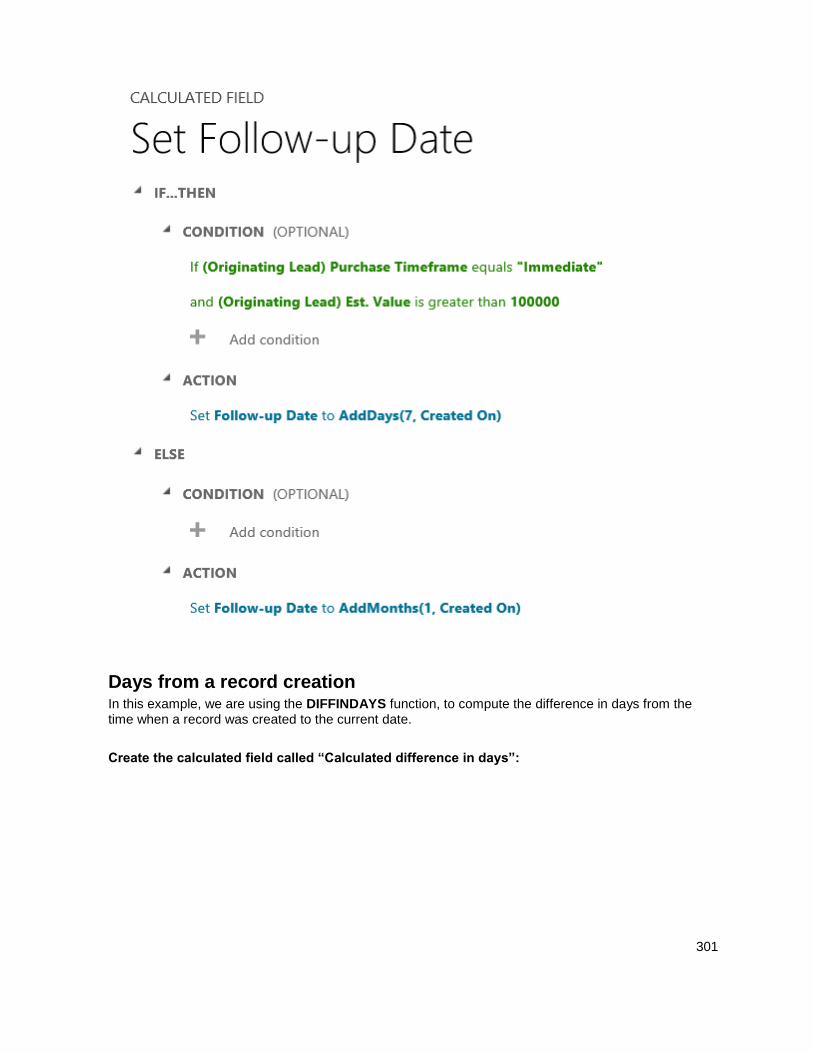
301
Days from a record creation In this example, we are using the DIFFINDAYS function, to compute the difference in days from the time when a record was created to the current date.
Create the calculated field called “Calculated difference in days”:
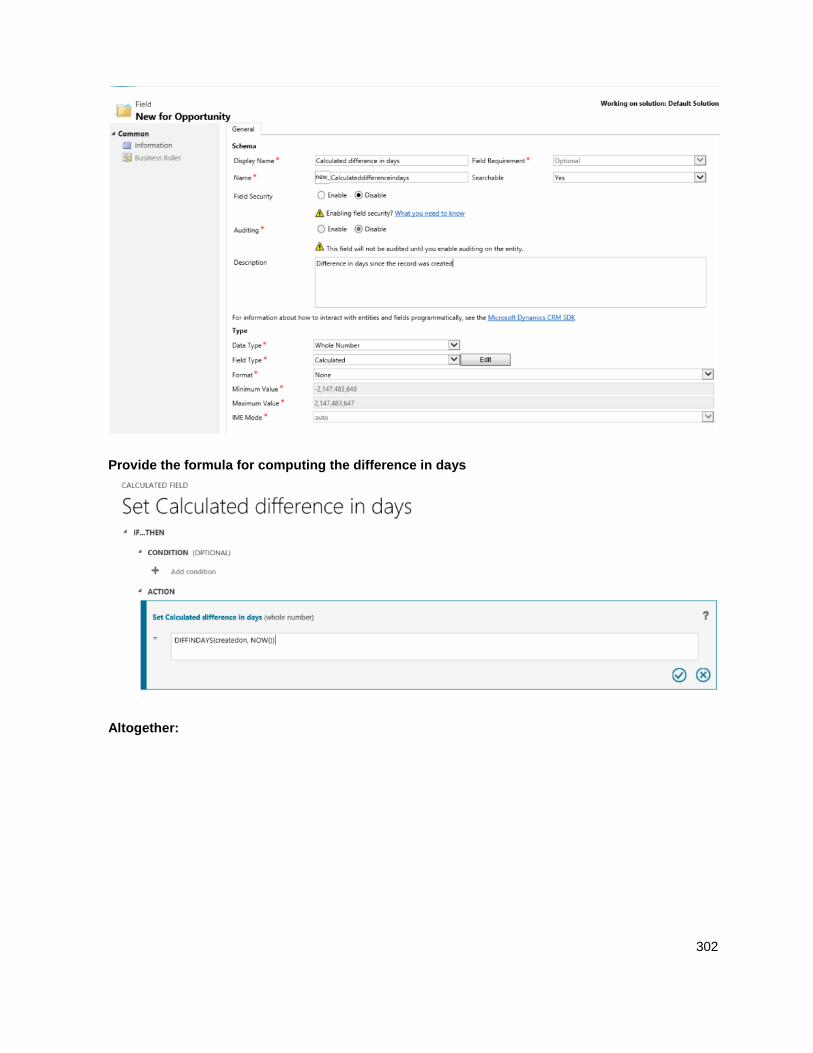
302
Provide the formula for computing the difference in days
Altogether:
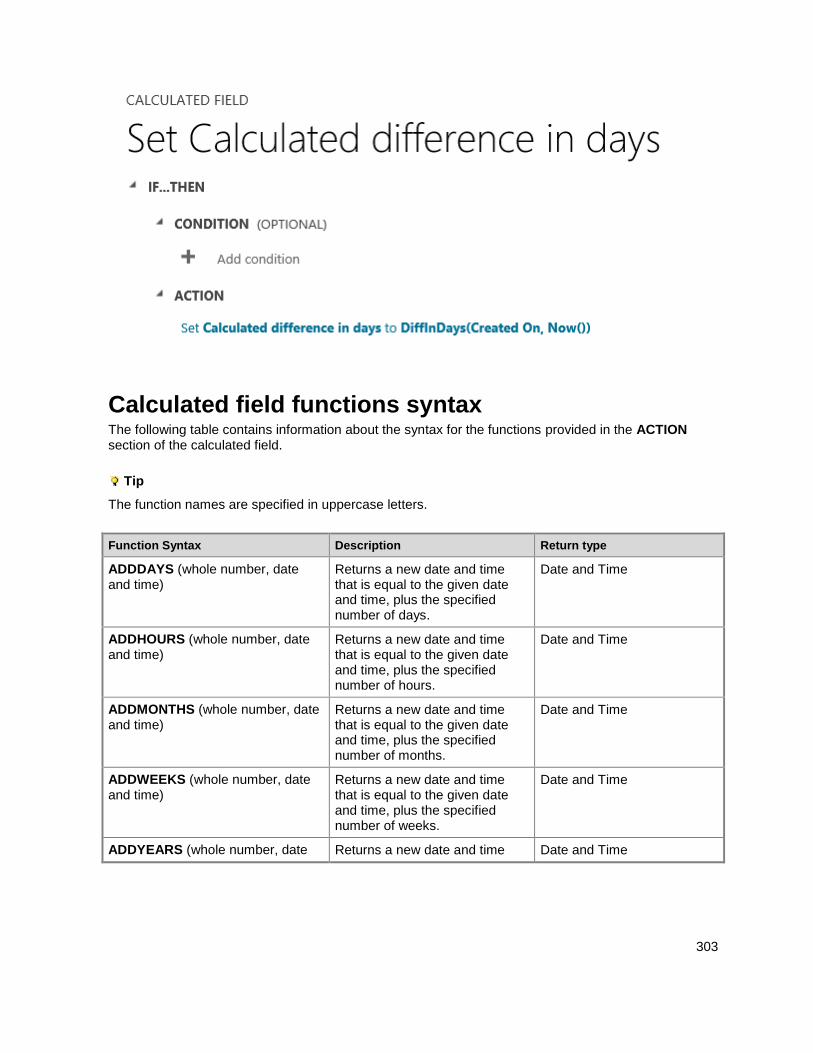
303
Calculated field functions syntax The following table contains information about the syntax for the functions provided in the ACTION section of the calculated field.
Tip
The function names are specified in uppercase letters.
Function Syntax Description Return type
ADDDAYS (whole number, date and time)
Returns a new date and time that is equal to the given date and time, plus the specified number of days.
Date and Time
ADDHOURS (whole number, date and time)
Returns a new date and time that is equal to the given date and time, plus the specified number of hours.
Date and Time
ADDMONTHS (whole number, date and time)
Returns a new date and time that is equal to the given date and time, plus the specified number of months.
Date and Time
ADDWEEKS (whole number, date and time)
Returns a new date and time that is equal to the given date and time, plus the specified number of weeks.
Date and Time
ADDYEARS (whole number, date Returns a new date and time Date and Time
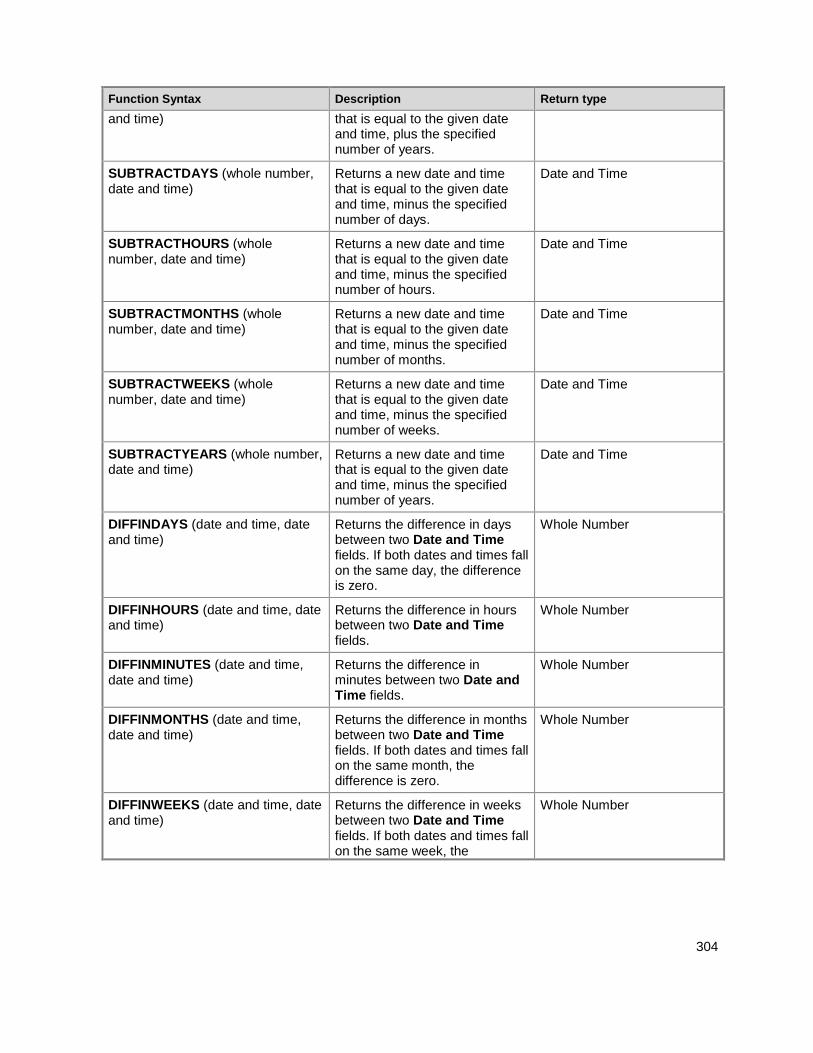
304
Function Syntax Description Return type
and time) that is equal to the given date and time, plus the specified number of years.
SUBTRACTDAYS (whole number, date and time)
Returns a new date and time that is equal to the given date and time, minus the specified number of days.
Date and Time
SUBTRACTHOURS (whole number, date and time)
Returns a new date and time that is equal to the given date and time, minus the specified number of hours.
Date and Time
SUBTRACTMONTHS (whole number, date and time)
Returns a new date and time that is equal to the given date and time, minus the specified number of months.
Date and Time
SUBTRACTWEEKS (whole number, date and time)
Returns a new date and time that is equal to the given date and time, minus the specified number of weeks.
Date and Time
SUBTRACTYEARS (whole number, date and time)
Returns a new date and time that is equal to the given date and time, minus the specified number of years.
Date and Time
DIFFINDAYS (date and time, date and time)
Returns the difference in days between two Date and Time fields. If both dates and times fall on the same day, the difference is zero.
Whole Number
DIFFINHOURS (date and time, date and time)
Returns the difference in hours between two Date and Time fields.
Whole Number
DIFFINMINUTES (date and time, date and time)
Returns the difference in minutes between two Date and Time fields.
Whole Number
DIFFINMONTHS (date and time, date and time)
Returns the difference in months between two Date and Time fields. If both dates and times fall on the same month, the difference is zero.
Whole Number
DIFFINWEEKS (date and time, date and time)
Returns the difference in weeks between two Date and Time fields. If both dates and times fall on the same week, the
Whole Number
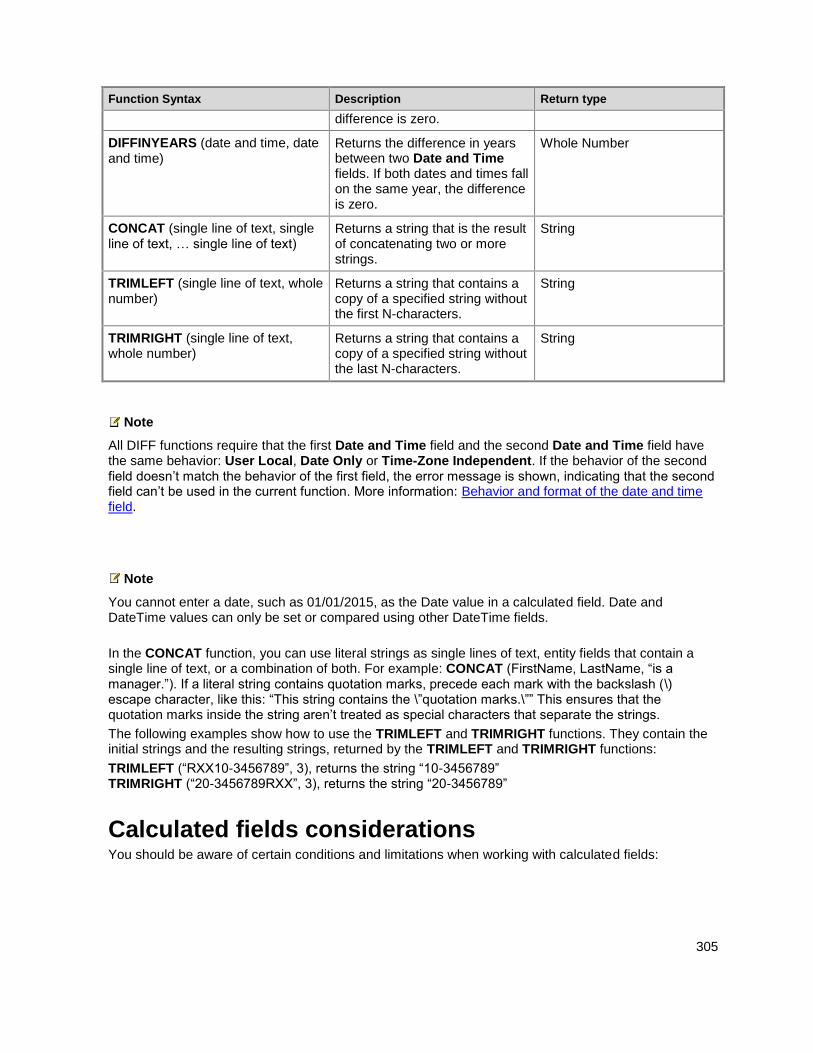
305
Function Syntax Description Return type
difference is zero.
DIFFINYEARS (date and time, date and time)
Returns the difference in years between two Date and Time fields. If both dates and times fall on the same year, the difference is zero.
Whole Number
CONCAT (single line of text, single line of text, … single line of text)
Returns a string that is the result of concatenating two or more strings.
String
TRIMLEFT (single line of text, whole number)
Returns a string that contains a copy of a specified string without the first N-characters.
String
TRIMRIGHT (single line of text, whole number)
Returns a string that contains a copy of a specified string without the last N-characters.
String
Note
All DIFF functions require that the first Date and Time field and the second Date and Time field have the same behavior: User Local, Date Only or Time-Zone Independent. If the behavior of the second field doesn’t match the behavior of the first field, the error message is shown, indicating that the second field can’t be used in the current function. More information: Behavior and format of the date and time field.
Note
You cannot enter a date, such as 01/01/2015, as the Date value in a calculated field. Date and DateTime values can only be set or compared using other DateTime fields.
In the CONCAT function, you can use literal strings as single lines of text, entity fields that contain a single line of text, or a combination of both. For example: CONCAT (FirstName, LastName, “is a manager.”). If a literal string contains quotation marks, precede each mark with the backslash (\) escape character, like this: “This string contains the \”quotation marks.\”” This ensures that the quotation marks inside the string aren’t treated as special characters that separate the strings.
The following examples show how to use the TRIMLEFT and TRIMRIGHT functions. They contain the initial strings and the resulting strings, returned by the TRIMLEFT and TRIMRIGHT functions:
TRIMLEFT (“RXX10-3456789”, 3), returns the string “10-3456789” TRIMRIGHT (“20-3456789RXX”, 3), returns the string “20-3456789”
Calculated fields considerations You should be aware of certain conditions and limitations when working with calculated fields:
306
Saved queries, charts, and visualizations can have a maximum of 10 unique calculated fields.
The calculated field values are not displayed in the Dynamics 365 Outlook Offline mode in the tile
views or on entity main forms.
A maximum number of chained calculated fields is 5.
A calculated field can’t refer to itself or have cyclic chains.
If you change one of the condition operators in a multiple condition clause, all of the condition
operators will update to that condition. For example, in the clause IF (x > 50) OR (y ==10) OR (z <
5), if you change the OR operator to the AND operator, then all OR operators in the clause will
become AND operators.
You can access parental fields via the Lookup field to the parent entity, such as
<LookupFieldName>.<FieldName>. This is not possible with multi-entity Lookup fields like
Customer which can be Account or Contact. However, some entities have individual Lookup
fields for a specific entity, such as ParentAccountid.<FieldName> or
ParentContactid.<FieldName>.
Sorting is disabled on:
A calculated field that contains a field of a parent record.
A calculated field that contains a logical field (for example, address field).
A calculated field that contains another calculated field.
Calculated fields can span two entities only.
A calculated field can contain a field from another entity (spanning two entities – current entity
and parent record).
A calculated field can’t contain a calculated field from another entity that also contains another
field from a different entity (spanning three entities):
(Current Entity)Calculated Field <- (Parent Record) Calculated Field 1 <- (Parent Record)
Calculated Field 2.
You can’t trigger workflows or plug-ins on calculated fields.
You can’t change an existing simple field to a calculated field. If your current application is using
JavaScript or plug-ins to calculate a field, you would not be able to use the calculated fields feature
without creating a new field.
Duplicate detection rules are not triggered on calculated fields.
A rollup can't reference a calculated field that uses another calculated field, even if all the fields of
the other calculated field are on the current entity.
See Also Create and edit fields Define rollup fields Video: Rollup and Calculated Fields in Microsoft Dynamics CRM 2015
307
© 2016 Microsoft. All rights reserved. Copyright
Create and edit entity relationships
Applies To: Dynamics 365 (online), Dynamics 365 (on-premises), Dynamics CRM 2016, Dynamics CRM Online
[This topic is pre-release documentation and is subject to change.]
Entity relationships define how records can be related to each other in the database. At the simplest level, adding a lookup field to an entity creates a new 1:N (one-to-many) relationship between the two entities and lets you put that lookup field in a form. With the lookup field, users can associate multiple “child” records of that entity to a single “parent” entity record.
Beyond simply defining how records can be related to other records, 1:N entity relationships also provide data to address the following questions:
When I delete a record should any records related to that record also be deleted?
When I assign a record, do I also need to assign all records related to that record to the new
owner?
How can I streamline the data entry process when I create a new related record in the context of an
existing record?
How should people viewing a record be able to view the associated records?
Entities can also participate in a N:N (many-to-many) relationship where any number of records for two entities can be associated with each other.
In This Topic Decide whether to use entity relationships or connections
Types of entity relationships
Create and edit 1:N relationships
Map entity fields
Create and edit N:N (many-to-many) relationships
Set managed properties for relationships
Decide whether to use entity relationships or connections Entity relationships are metadata that make changes to the database. These relationships allow for queries to retrieve related data very efficiently. Use entity relationships to define formal relationships that define the entity or that most records can use. For example, an opportunity without a potential customer wouldn’t be very useful. The Opportunity entity also has a N:N relationship with the Competitor entity. This allows for multiple competitors to be added to the opportunity. You may want to capture this data and create a report that shows the competitors.
There are other less formal kinds of relationships between records that are called connections. For example, it may be useful to know if two contacts are married, or perhaps they are friends outside of

308
work, or perhaps a contact used to work for another account. Most businesses won’t generate reports using this kind of information or require that it is entered, so it’s probably not worthwhile to create entity relationships.
Types of entity relationships When you look at the solution explorer you might think that there are three types of entity relationships. Actually there are only two, as shown in the following table.
Relationship Type Description
1:N (One-to-Many) An entity relationship where one entity record for the Primary Entity can be associated to many other Related Entity records because of a lookup field on the related entity.
When viewing a primary entity record you can see a list of the related entity records that are associated with it.
N:N (Many-to-Many) An entity relationship that depends on a special Relationship Entity, sometimes called an Intersect entity, so that many records of one entity can be related to many records of another entity.
When viewing records of either entity in a N:N relationship you can see a list of any records of the other entity that are related to it.
The N:1 (many-to-one) relationship type exists in the solution explorer user interface because the solution explorer shows you a view grouped by entities. 1:N relationships actually exist between entities and refer to each entity as either a Primary Entity or Related Entity. The related entity, sometimes called the child entity, has a lookup field that allows storing a reference to a record from the primary entity, sometimes called the parent entity. A N:1 relationship is just a 1:N relationship viewed from the related entity.
Create and edit 1:N relationships The easiest way to create a 1:N relationship is to create a new lookup field for an entity. This allows you to set the common field values for the lookup field as well as two additional options when you set the Type to Lookup. Those additional fields are Target Record Type and Relationship Name.
Target Record Type selects the Primary Entity in the 1:N relationship. Relationship Name is auto-generated for you based on the two entities that participate in the relationship. You typically don’t need to edit this, but you can if you want. The name of the entity relationship contains the customization prefix of the solution publisher for the solution you are currently working in.
Note
If you care about the customization prefix, be sure you are working within the context of a solution that is linked to the solution publisher with the prefix you want.
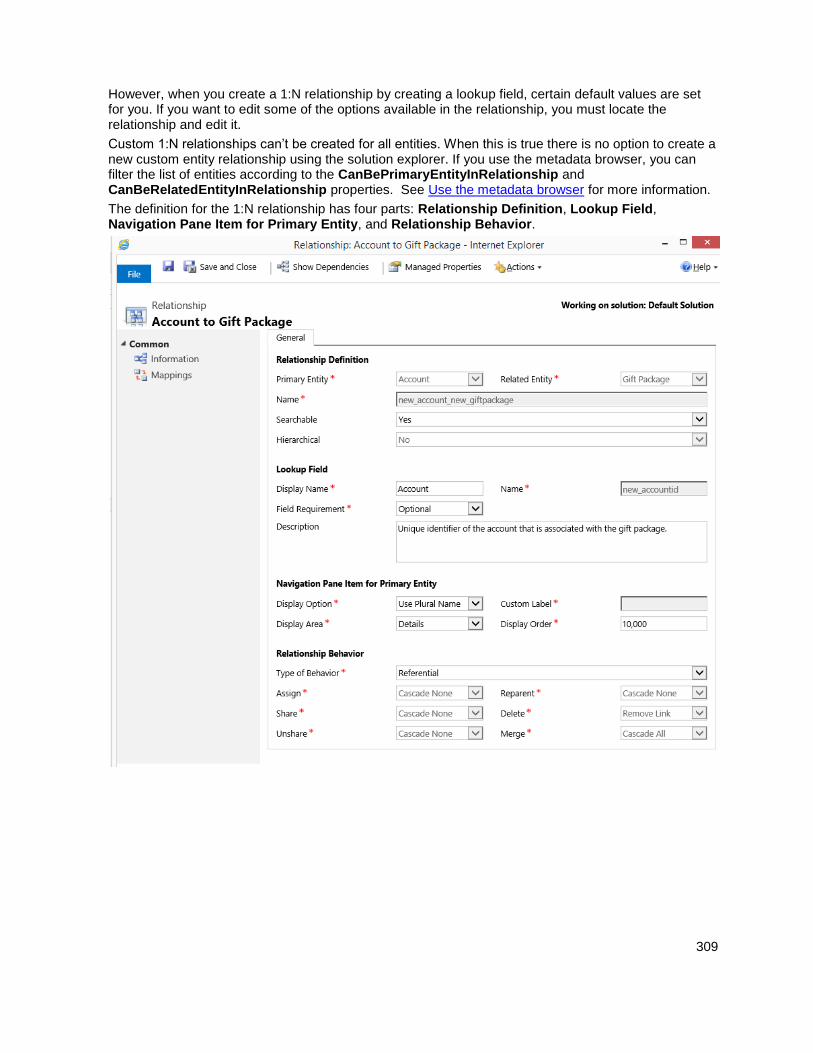
309
However, when you create a 1:N relationship by creating a lookup field, certain default values are set for you. If you want to edit some of the options available in the relationship, you must locate the relationship and edit it.
Custom 1:N relationships can’t be created for all entities. When this is true there is no option to create a new custom entity relationship using the solution explorer. If you use the metadata browser, you can filter the list of entities according to the CanBePrimaryEntityInRelationship and CanBeRelatedEntityInRelationship properties. See Use the metadata browser for more information.
The definition for the 1:N relationship has four parts: Relationship Definition, Lookup Field, Navigation Pane Item for Primary Entity, and Relationship Behavior.
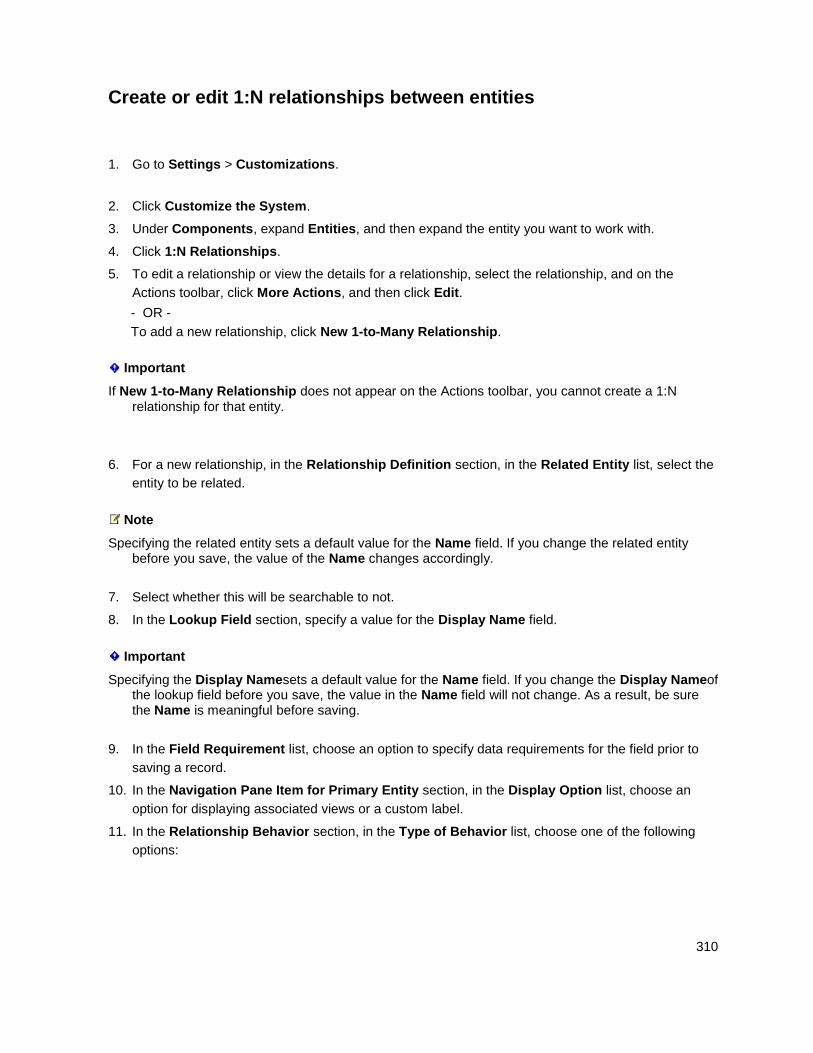
310
Create or edit 1:N relationships between entities
1. Go to Settings > Customizations.
2. Click Customize the System.
3. Under Components, expand Entities, and then expand the entity you want to work with.
4. Click 1:N Relationships.
5. To edit a relationship or view the details for a relationship, select the relationship, and on the
Actions toolbar, click More Actions, and then click Edit.
- OR -
To add a new relationship, click New 1-to-Many Relationship.
Important
If New 1-to-Many Relationship does not appear on the Actions toolbar, you cannot create a 1:N relationship for that entity.
6. For a new relationship, in the Relationship Definition section, in the Related Entity list, select the
entity to be related.
Note
Specifying the related entity sets a default value for the Name field. If you change the related entity before you save, the value of the Name changes accordingly.
7. Select whether this will be searchable to not.
8. In the Lookup Field section, specify a value for the Display Name field.
Important
Specifying the Display Namesets a default value for the Name field. If you change the Display Nameof the lookup field before you save, the value in the Name field will not change. As a result, be sure the Name is meaningful before saving.
9. In the Field Requirement list, choose an option to specify data requirements for the field prior to
saving a record.
10. In the Navigation Pane Item for Primary Entity section, in the Display Option list, choose an
option for displaying associated views or a custom label.
11. In the Relationship Behavior section, in the Type of Behavior list, choose one of the following
options:
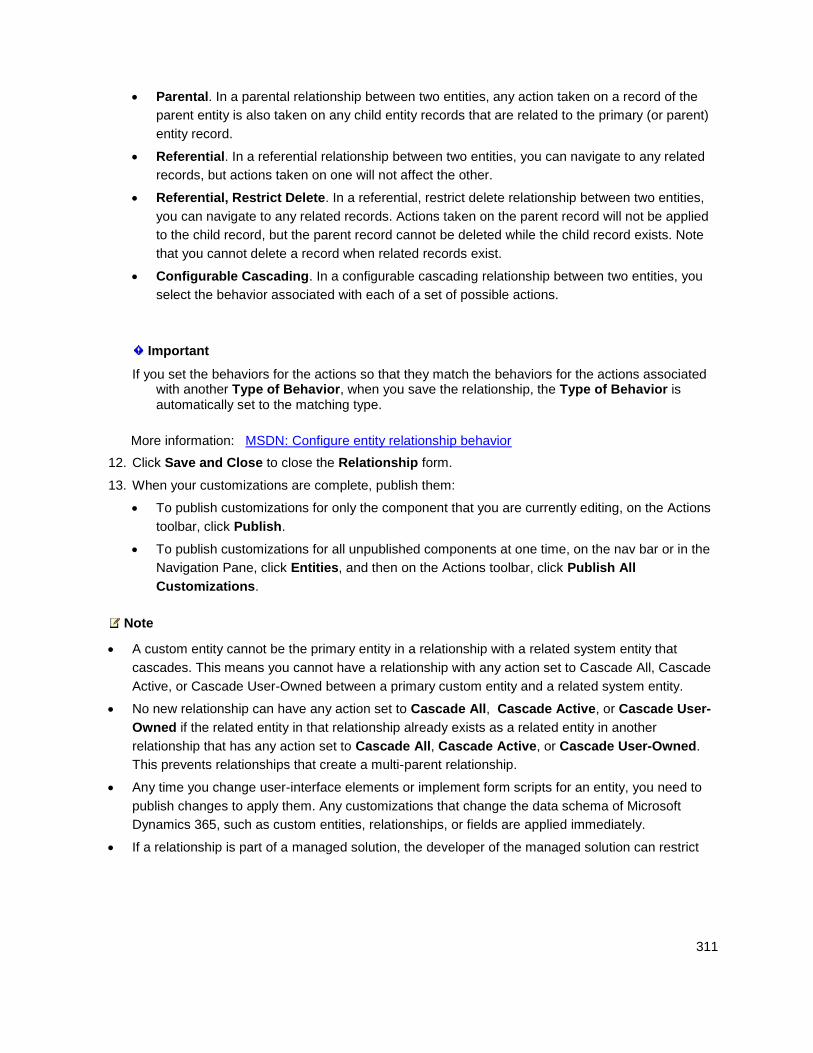
311
Parental. In a parental relationship between two entities, any action taken on a record of the
parent entity is also taken on any child entity records that are related to the primary (or parent)
entity record.
Referential. In a referential relationship between two entities, you can navigate to any related
records, but actions taken on one will not affect the other.
Referential, Restrict Delete. In a referential, restrict delete relationship between two entities,
you can navigate to any related records. Actions taken on the parent record will not be applied
to the child record, but the parent record cannot be deleted while the child record exists. Note
that you cannot delete a record when related records exist.
Configurable Cascading. In a configurable cascading relationship between two entities, you
select the behavior associated with each of a set of possible actions.
Important
If you set the behaviors for the actions so that they match the behaviors for the actions associated with another Type of Behavior, when you save the relationship, the Type of Behavior is automatically set to the matching type.
More information: MSDN: Configure entity relationship behavior
12. Click Save and Close to close the Relationship form.
13. When your customizations are complete, publish them:
To publish customizations for only the component that you are currently editing, on the Actions
toolbar, click Publish.
To publish customizations for all unpublished components at one time, on the nav bar or in the
Navigation Pane, click Entities, and then on the Actions toolbar, click Publish All
Customizations.
Note
A custom entity cannot be the primary entity in a relationship with a related system entity that
cascades. This means you cannot have a relationship with any action set to Cascade All, Cascade
Active, or Cascade User-Owned between a primary custom entity and a related system entity.
No new relationship can have any action set to Cascade All, Cascade Active, or Cascade User-
Owned if the related entity in that relationship already exists as a related entity in another
relationship that has any action set to Cascade All, Cascade Active, or Cascade User-Owned.
This prevents relationships that create a multi-parent relationship.
Any time you change user-interface elements or implement form scripts for an entity, you need to
publish changes to apply them. Any customizations that change the data schema of Microsoft
Dynamics 365, such as custom entities, relationships, or fields are applied immediately.
If a relationship is part of a managed solution, the developer of the managed solution can restrict

312
you from customizing the relationship.
Installing a solution or publishing customizations can interfere with normal system operation. We
recommend that you schedule a solution import when it’s least disruptive to users.
Relationship definition Depending on whether you chose to create a New 1-to-Many Relationship or a New Many-to-1 Relationship from the solution explorer, either the Primary Entity or Related Entity fields will be pre-populated. You only need to choose the other one. A default value for the Name field is pre-populated based on the solution publisher’s customization prefix and the names of the entities you choose to participate in the relationship. You can edit this if you want. If you create more than one custom relationship between two entities and use the same customization prefix for both, the auto-generated name value will not be unique and you will not be able to save the new relationship. You must edit the name to differentiate it from any existing name before you can save it. Once saved, you cannot change it.
If you don’t want to have this entity relationship visible in Advanced Find, set the Searchable value to No.
Lookup fields These fields are the common properties all fields have except Searchable, Field Security, and Auditing. To edit these values for the lookup field that is created with the entity relationship, you must locate and edit the lookup field separately after you create the entity relationship. More information: Create and edit fields
As a general rule, the Display Name should correspond to the primary entity display name.
Navigation pane item for primary entity The primary entity can reveal lists of related entities if you expand the navigation pane. The options in this group control how or whether to display this list. These navigation items can also be edited using the form editor and, by using JavaScript, a developer can apply changes to these items when the form is displayed.
Field Description
Display Option Do Not Display: Choose this if you do not
want to allow people to be able to navigate to
a list of related entity records.
Use Custom Label: Choose this if you want
to specify a custom label to use.
Use Plural Name: Choose this if you want to
use the plural name of the related entity as the
label.
Custom Label When you select Use Custom Label as the display option, enter the custom label you want to
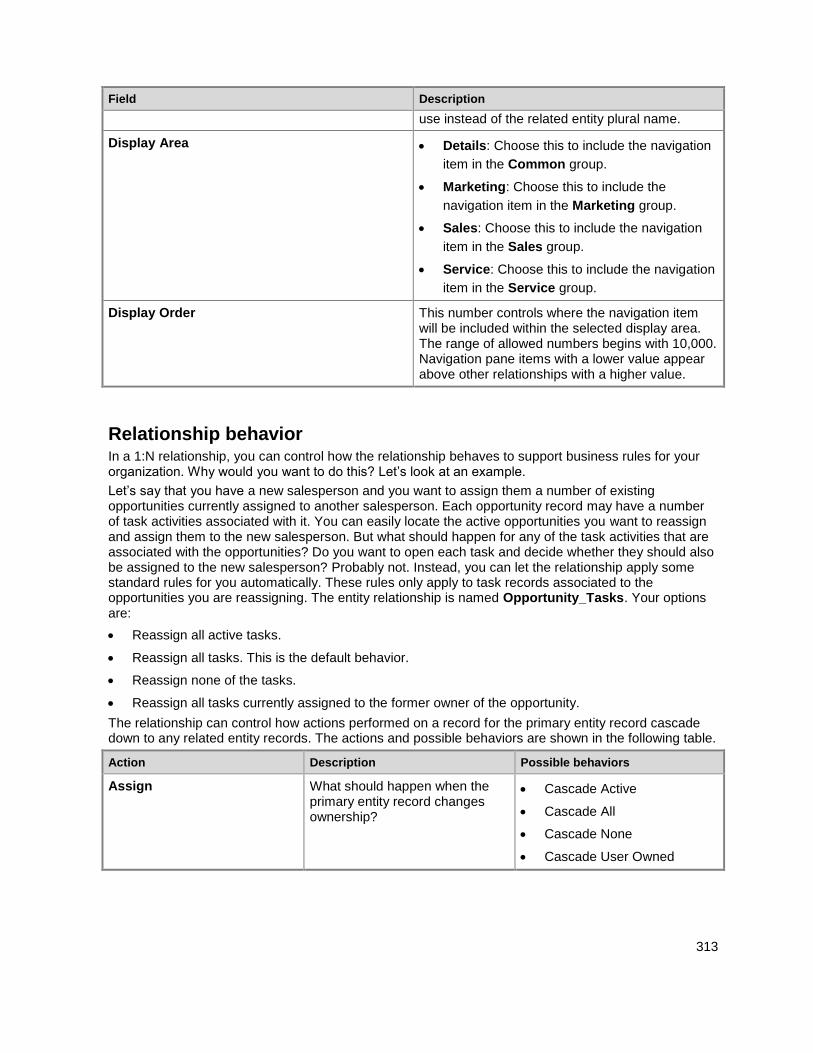
313
Field Description
use instead of the related entity plural name.
Display Area Details: Choose this to include the navigation
item in the Common group.
Marketing: Choose this to include the
navigation item in the Marketing group.
Sales: Choose this to include the navigation
item in the Sales group.
Service: Choose this to include the navigation
item in the Service group.
Display Order This number controls where the navigation item will be included within the selected display area. The range of allowed numbers begins with 10,000. Navigation pane items with a lower value appear above other relationships with a higher value.
Relationship behavior In a 1:N relationship, you can control how the relationship behaves to support business rules for your organization. Why would you want to do this? Let’s look at an example.
Let’s say that you have a new salesperson and you want to assign them a number of existing opportunities currently assigned to another salesperson. Each opportunity record may have a number of task activities associated with it. You can easily locate the active opportunities you want to reassign and assign them to the new salesperson. But what should happen for any of the task activities that are associated with the opportunities? Do you want to open each task and decide whether they should also be assigned to the new salesperson? Probably not. Instead, you can let the relationship apply some standard rules for you automatically. These rules only apply to task records associated to the opportunities you are reassigning. The entity relationship is named Opportunity_Tasks. Your options are:
Reassign all active tasks.
Reassign all tasks. This is the default behavior.
Reassign none of the tasks.
Reassign all tasks currently assigned to the former owner of the opportunity.
The relationship can control how actions performed on a record for the primary entity record cascade down to any related entity records. The actions and possible behaviors are shown in the following table.
Action Description Possible behaviors
Assign What should happen when the primary entity record changes ownership?
Cascade Active
Cascade All
Cascade None
Cascade User Owned
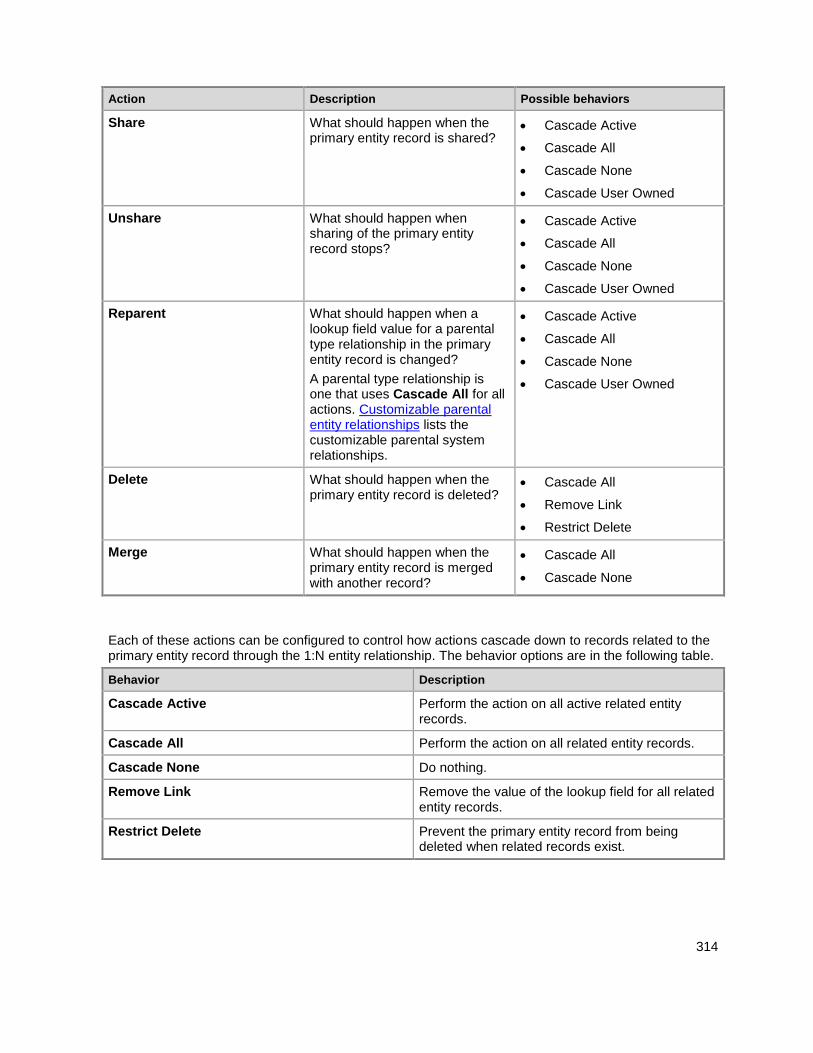
314
Action Description Possible behaviors
Share What should happen when the primary entity record is shared?
Cascade Active
Cascade All
Cascade None
Cascade User Owned
Unshare What should happen when sharing of the primary entity record stops?
Cascade Active
Cascade All
Cascade None
Cascade User Owned
Reparent What should happen when a lookup field value for a parental type relationship in the primary entity record is changed?
A parental type relationship is one that uses Cascade All for all actions. Customizable parental entity relationships lists the customizable parental system relationships.
Cascade Active
Cascade All
Cascade None
Cascade User Owned
Delete What should happen when the primary entity record is deleted?
Cascade All
Remove Link
Restrict Delete
Merge What should happen when the primary entity record is merged with another record?
Cascade All
Cascade None
Each of these actions can be configured to control how actions cascade down to records related to the primary entity record through the 1:N entity relationship. The behavior options are in the following table.
Behavior Description
Cascade Active Perform the action on all active related entity records.
Cascade All Perform the action on all related entity records.
Cascade None Do nothing.
Remove Link Remove the value of the lookup field for all related entity records.
Restrict Delete Prevent the primary entity record from being deleted when related records exist.
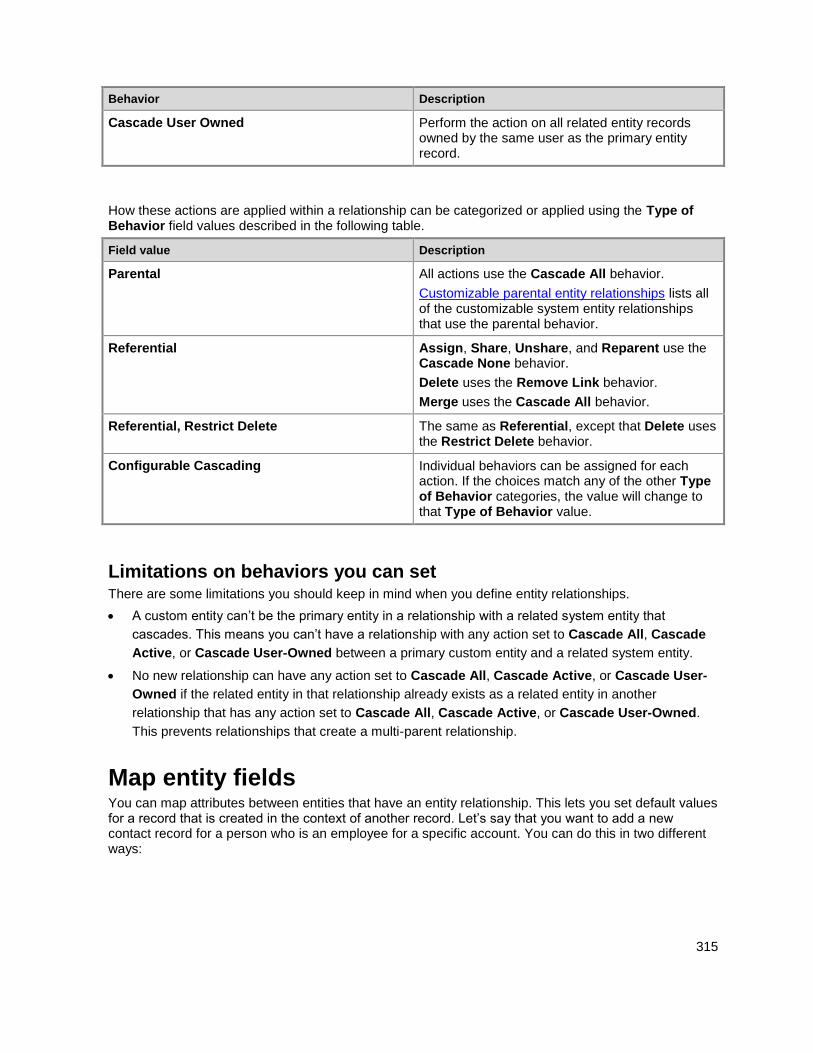
315
Behavior Description
Cascade User Owned Perform the action on all related entity records owned by the same user as the primary entity record.
How these actions are applied within a relationship can be categorized or applied using the Type of Behavior field values described in the following table.
Field value Description
Parental All actions use the Cascade All behavior.
Customizable parental entity relationships lists all of the customizable system entity relationships that use the parental behavior.
Referential Assign, Share, Unshare, and Reparent use the Cascade None behavior.
Delete uses the Remove Link behavior.
Merge uses the Cascade All behavior.
Referential, Restrict Delete The same as Referential, except that Delete uses the Restrict Delete behavior.
Configurable Cascading Individual behaviors can be assigned for each action. If the choices match any of the other Type of Behavior categories, the value will change to that Type of Behavior value.
Limitations on behaviors you can set There are some limitations you should keep in mind when you define entity relationships.
A custom entity can’t be the primary entity in a relationship with a related system entity that
cascades. This means you can’t have a relationship with any action set to Cascade All, Cascade
Active, or Cascade User-Owned between a primary custom entity and a related system entity.
No new relationship can have any action set to Cascade All, Cascade Active, or Cascade User-
Owned if the related entity in that relationship already exists as a related entity in another
relationship that has any action set to Cascade All, Cascade Active, or Cascade User-Owned.
This prevents relationships that create a multi-parent relationship.
Map entity fields You can map attributes between entities that have an entity relationship. This lets you set default values for a record that is created in the context of another record. Let’s say that you want to add a new contact record for a person who is an employee for a specific account. You can do this in two different ways:
316
You could just navigate to Sales > Contacts and create a new contact record from scratch. But then you need to set the parent account and enter several items of information (such as address and phone information) which are probably the same as the parent account. This can be time consuming and introduces opportunities for errors.
The easier way is to start with the account entity and, using the Contacts subgrid on the form, click + to add a contact. It will first guide you to look up any existing related contacts so you don’t accidentally create a duplicate record. If you don’t find an existing record, you can click New and create a new contact record. The difference is that certain items of data from the account record will be copied into the new contact form to set certain default values that you can edit before saving. This can save a lot of time when you are entering data, and help reduce errors.
Default entity and attribute mappings shows all the default mappings set for Microsoft Dynamics 365.
Note
These mappings aren’t applied to related records created using a workflow or dialog process. They aren’t automatically applied to new records created using code, although developers can use a special message called MSDN: InitializeFromRequest to create a new record using available mappings.
These mappings only set default values to a record before it is saved. People can edit the values before saving. The data that is transferred is the data at that point in time. It isn’t synchronized. If the information in the primary entity record changes, the related entity record data that was transferred when it was created won’t change.
The default values set when you create a new record from a list aren’t actually defined within the entity relationships, but they are exposed in the relationship user interface. Not every 1:N entity relationship has them. When you view a list of 1:N (or N:1) entity relationships for an entity, you can filter the relationships shown by type. You can select either All, Custom, Customizable, or Mappable. Mappable entity relationships provide access to allow mapping entity fields.
The following rules show what kinds of data can be mapped.
Both fields must be of the same type and the same format.
The length of the target field must be equal to or greater than the length of the source field.
The target field can’t be mapped to another field already.
The source field must be visible on the form.
The target field must be a field that a user can enter data into.
If the fields are option sets, the integer values for each option should be identical.
Address ID values can’t be mapped.
Note
If you need to map option set fields, we recommend you configure both fields to use the same global option set. Otherwise, it can be difficult to keep two separate sets of options synchronized manually. If the integer values for each option aren’t mapped correctly you can introduce problems in your data. More information: Create and edit global option sets
317
Create or edit mapping between fields
1. Go to Settings > Customizations.
2. Click Customize the System.
3. Under Components, expand Entities, and then expand the entity you want.
4. Click either 1:N Relationships or N:1 Relationships.
5. In the main pane, in the Type list, select Mappable.
6. Select a mappable relationship. Then, on the Actions toolbar, click Actions, and then click Edit.
7. Under Related, click Mappings.
8. For each new mapping, on the Actions toolbar, click New.
9. In the Create Field Mapping dialog box, select the source field from Source Entity Fields. Select
the target field from Target Entity Fields.
10. Click OK.
11. Click Save and Close to close the Relationship form.
12. When your customizations are complete, publish them
Automatically generate field mappings You can also generate mappings automatically but you should use care when doing this with system entities. Use this when you create custom entities and want to leverage mapping. When viewing the list of mappings, in the More Actions menu select Generate Mappings. This removes any existing mappings and replaces them with suggested mappings that are based only on the fields that have similar names and data types. If you use this on a system entity, you could lose some expected mappings. For custom entities, it helps save time because you can more easily delete any mappings you don’t want and add any others that the generate mappings action didn’t create.
Create and edit N:N (many-to-many) relationships 1:N entity relationships establish a hierarchy between records. With N:N (many-to-many) relationships there is no explicit hierarchy. There are no lookup fields or behaviors to configure. Records created using N:N relationships can be considered peers and the relationship is reciprocal.
With N:N relationships a special entity is created called a Relationship (or Intersect) entity. This entity has a relationship with each of the related entities and only stores the necessary values to define the relationship. You can’t add custom fields to a relationship entity.
The procedure to create a N:N relationship is essentially choosing the two entities that you want to participate in the relationship, and then for each entity defining how you want the respective lists to be available within the navigation pane of the form for each entity. These are the same options used for the primary entity in 1:N entity relationships. More information: Navigation pane item for primary entity
Not all entities can be used with N:N relationships. If the New Many-to-Many Relationship button isn’t present, you can’t create a new N:N relationship with this entity. If you use the metadata browser, you can filter on entities that have the CanBeInManyToMany value set to true. More information: Use the metadata browser
318
Create or edit N-N relationships between entities
1. Go to Settings > Customizations.
2. Click Customize the System.
3. Under Components, expand Entities, and then expand the entity you want to work with.
4. Click N:N Relationships.
5. To edit or view the details for an existing relationship, select the relationship, on the Actions toolbar,
click Actions, and then click Edit.
- OR -
To add a new relationship, click New Many-to-Many Relationship.
Important
If New Many-to-Many Relationship does not appear on the Actions toolbar, you cannot create a N:N relationship for that entity.
6. For a new relationship, in the Current Entity section, in the Display Option list, choose one of the
following options:
Do Not Display: The other entity will not display an associated view for the current entity.
Use Custom Label: This label will be used for the associated view created for the other entity.
Be sure to enter a corresponding value in the Custom Label field.
Use Plural Name: This will use the plural name of the current entity for the associated view.
Note
When the Use Plural Name or Use Custom Label options are selected, you can choose from the Display Area option list to specify the display area (for example Marketing or Sales) on the form where the relationship label will be displayed. You can also specify the Display Order to control where the label will be included within the selected display area.
Important
The navigation paradigm for the forms associated with updated entities is significantly different than that for entities that have not been updated. While the mechanics for defining the Display Area and Display Order are common, be sure you understand the various navigation paradigms as you establish entity relationships.
7. In the Other Entity section, select the other entity from the Entity Name list.
319
Note
When you specify the entity name, default values are set for the Name and Relationship Entity Name fields in the Relationship Definition section. If you change the Entity Name value before you save, these names will not change, so be sure these names are meaningful before saving.
8. In the Relationship Definition section, confirm the Name and the Relationship Entity Name.
These values must be unique among N:N relationships.
9. Click Save and Close to close the N:N Relationship form.
10. When your customizations are complete, publish them:
To publish customizations for only the component that you’re currently editing, on the Home
tab, in the Save group, click Publish.
To publish customizations for all unpublished components at one time, click Publish All
Customizations.
Note
Any time you change user-interface elements or implement form scripts for an entity, you must publish changes to apply them. Any customizations that change the data schema of Microsoft Dynamics 365 such as custom entities, relationships, or fields, are applied immediately.
Installing a solution or publishing customizations can interfere with normal system operation. We recommend that you schedule a solution import when it’s least disruptive to users.
Set managed properties for relationships Managed properties only apply when you include a field with a managed solution and import it into another organization. These settings allow a solution developer to have some control over the level of customization that they want to allow people who install their managed solution to have when they customize an entity relationship. To set managed properties for a relationship, click the Managed Properties button on the menu bar.
With relationships, the only managed property is Can Be Customized. This single setting controls all changes that can be made to the entity relationship.
See Also Create and edit metadata Create and edit entities Create and edit fields Create and edit global option sets Customizable parental entity relationships Default entity and attribute mappings
© 2016 Microsoft. All rights reserved. Copyright
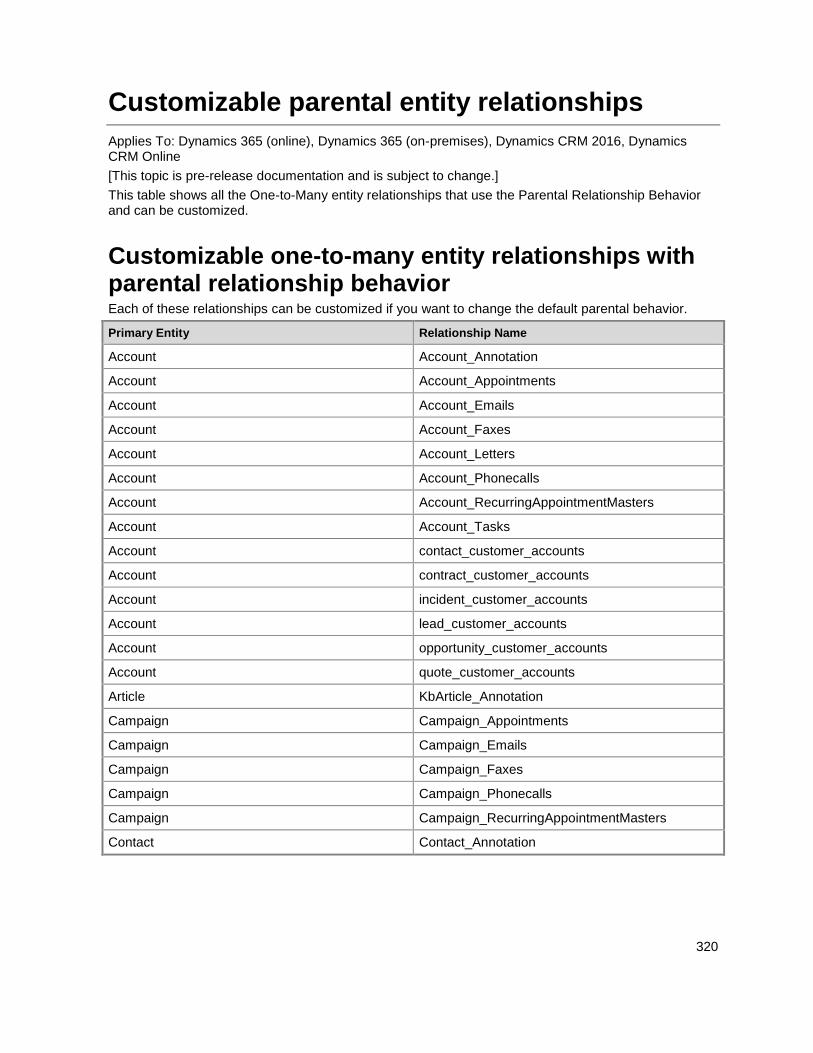
320
Customizable parental entity relationships
Applies To: Dynamics 365 (online), Dynamics 365 (on-premises), Dynamics CRM 2016, Dynamics CRM Online
[This topic is pre-release documentation and is subject to change.]
This table shows all the One-to-Many entity relationships that use the Parental Relationship Behavior and can be customized.
Customizable one-to-many entity relationships with parental relationship behavior Each of these relationships can be customized if you want to change the default parental behavior.
Primary Entity Relationship Name
Account Account_Annotation
Account Account_Appointments
Account Account_Emails
Account Account_Faxes
Account Account_Letters
Account Account_Phonecalls
Account Account_RecurringAppointmentMasters
Account Account_Tasks
Account contact_customer_accounts
Account contract_customer_accounts
Account incident_customer_accounts
Account lead_customer_accounts
Account opportunity_customer_accounts
Account quote_customer_accounts
Article KbArticle_Annotation
Campaign Campaign_Appointments
Campaign Campaign_Emails
Campaign Campaign_Faxes
Campaign Campaign_Phonecalls
Campaign Campaign_RecurringAppointmentMasters
Contact Contact_Annotation
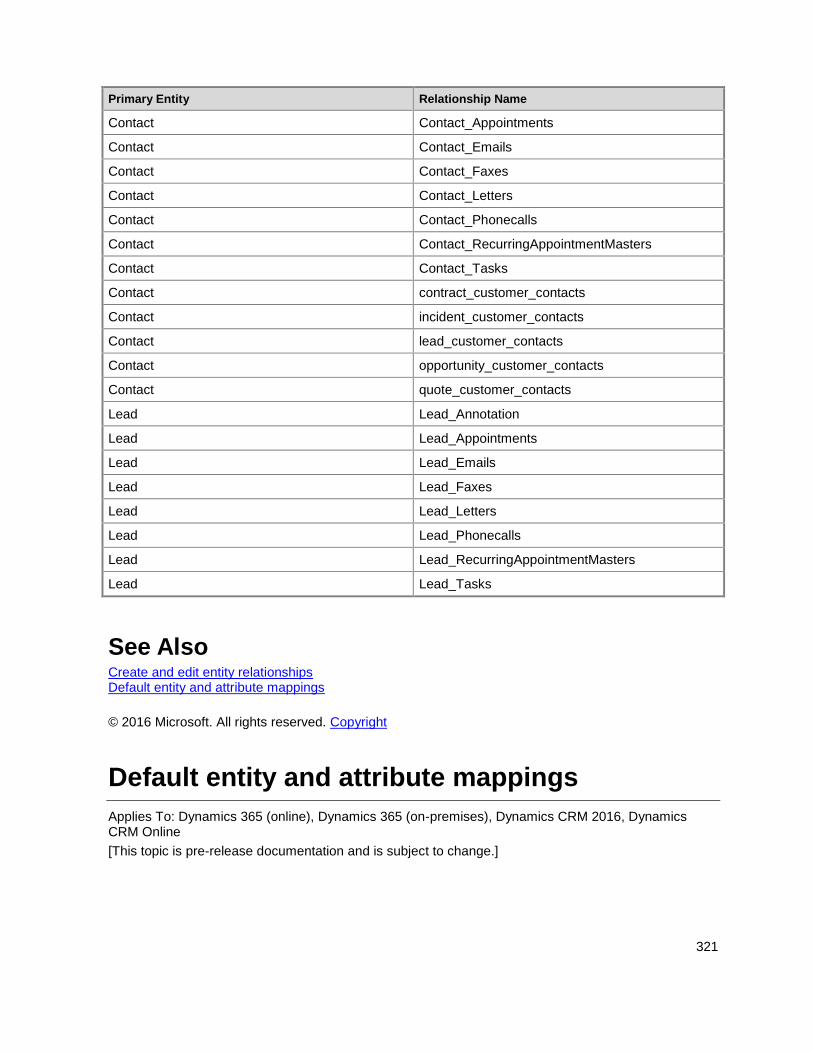
321
Primary Entity Relationship Name
Contact Contact_Appointments
Contact Contact_Emails
Contact Contact_Faxes
Contact Contact_Letters
Contact Contact_Phonecalls
Contact Contact_RecurringAppointmentMasters
Contact Contact_Tasks
Contact contract_customer_contacts
Contact incident_customer_contacts
Contact lead_customer_contacts
Contact opportunity_customer_contacts
Contact quote_customer_contacts
Lead Lead_Annotation
Lead Lead_Appointments
Lead Lead_Emails
Lead Lead_Faxes
Lead Lead_Letters
Lead Lead_Phonecalls
Lead Lead_RecurringAppointmentMasters
Lead Lead_Tasks
See Also Create and edit entity relationships Default entity and attribute mappings
© 2016 Microsoft. All rights reserved. Copyright
Default entity and attribute mappings
Applies To: Dynamics 365 (online), Dynamics 365 (on-premises), Dynamics CRM 2016, Dynamics CRM Online
[This topic is pre-release documentation and is subject to change.]
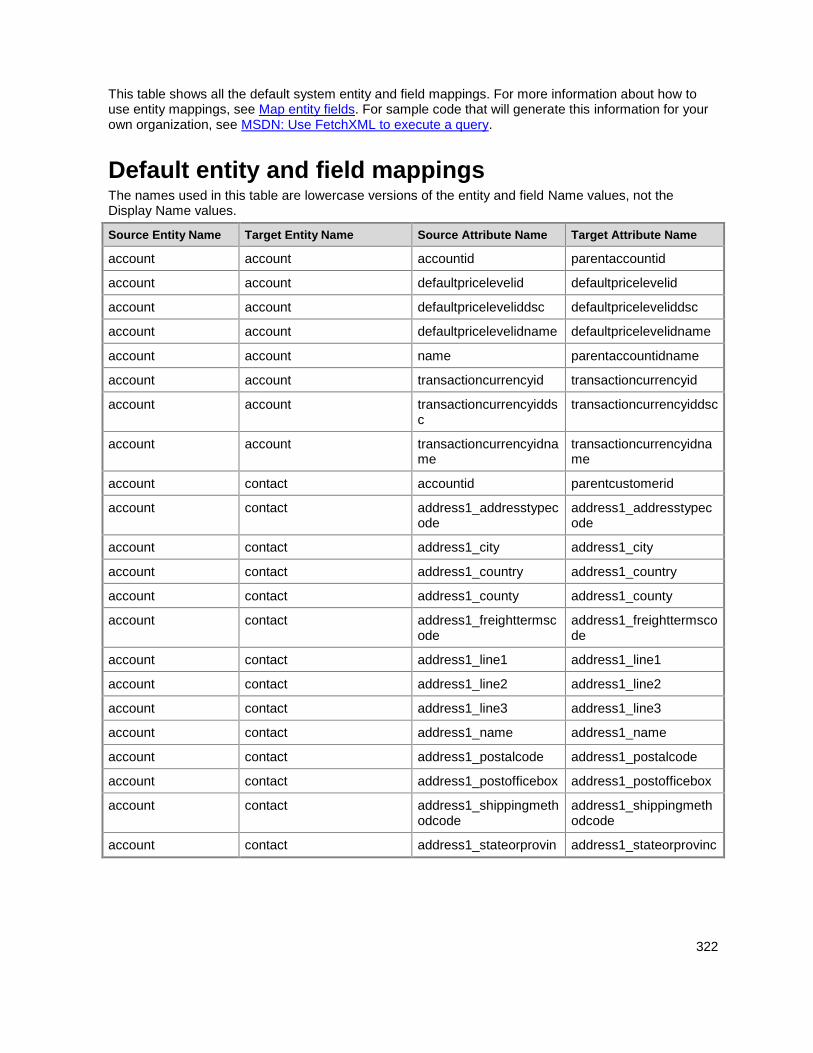
322
This table shows all the default system entity and field mappings. For more information about how to use entity mappings, see Map entity fields. For sample code that will generate this information for your own organization, see MSDN: Use FetchXML to execute a query.
Default entity and field mappings The names used in this table are lowercase versions of the entity and field Name values, not the Display Name values.
Source Entity Name Target Entity Name Source Attribute Name Target Attribute Name
account account accountid parentaccountid
account account defaultpricelevelid defaultpricelevelid
account account defaultpriceleveliddsc defaultpriceleveliddsc
account account defaultpricelevelidname defaultpricelevelidname
account account name parentaccountidname
account account transactioncurrencyid transactioncurrencyid
account account transactioncurrencyiddsc
transactioncurrencyiddsc
account account transactioncurrencyidname
transactioncurrencyidname
account contact accountid parentcustomerid
account contact address1_addresstypecode
address1_addresstypecode
account contact address1_city address1_city
account contact address1_country address1_country
account contact address1_county address1_county
account contact address1_freighttermscode
address1_freighttermscode
account contact address1_line1 address1_line1
account contact address1_line2 address1_line2
account contact address1_line3 address1_line3
account contact address1_name address1_name
account contact address1_postalcode address1_postalcode
account contact address1_postofficebox address1_postofficebox
account contact address1_shippingmethodcode
address1_shippingmethodcode
account contact address1_stateorprovin address1_stateorprovinc

323
Source Entity Name Target Entity Name Source Attribute Name Target Attribute Name
ce e
account contact address1_telephone1 address1_telephone1
account contact defaultpricelevelid defaultpricelevelid
account contact defaultpriceleveliddsc defaultpriceleveliddsc
account contact defaultpricelevelidname defaultpricelevelidname
account contact name parentcustomeridname
account contact paymenttermscode paymenttermscode
account contact telephone1 telephone1
account contact transactioncurrencyid transactioncurrencyid
account contact transactioncurrencyiddsc
transactioncurrencyiddsc
account contact transactioncurrencyidname
transactioncurrencyidname
account contract accountid customerid
account contract name customeridname
account contract transactioncurrencyid transactioncurrencyid
account contract transactioncurrencyiddsc
transactioncurrencyiddsc
account contract transactioncurrencyidname
transactioncurrencyidname
account customeropportunityrole accountid customerid
account customeropportunityrole name customeridname
account customerrelationship accountid customerid
account customerrelationship name customeridname
account entitlement accountid customerid
account entitlement name customeridname
account incident accountid customerid
account incident name customeridname
account invoice accountid customerid
account invoice address1_shippingmethodcode
shippingmethodcode
account invoice defaultpricelevelid pricelevelid
account invoice defaultpriceleveliddsc priceleveliddsc
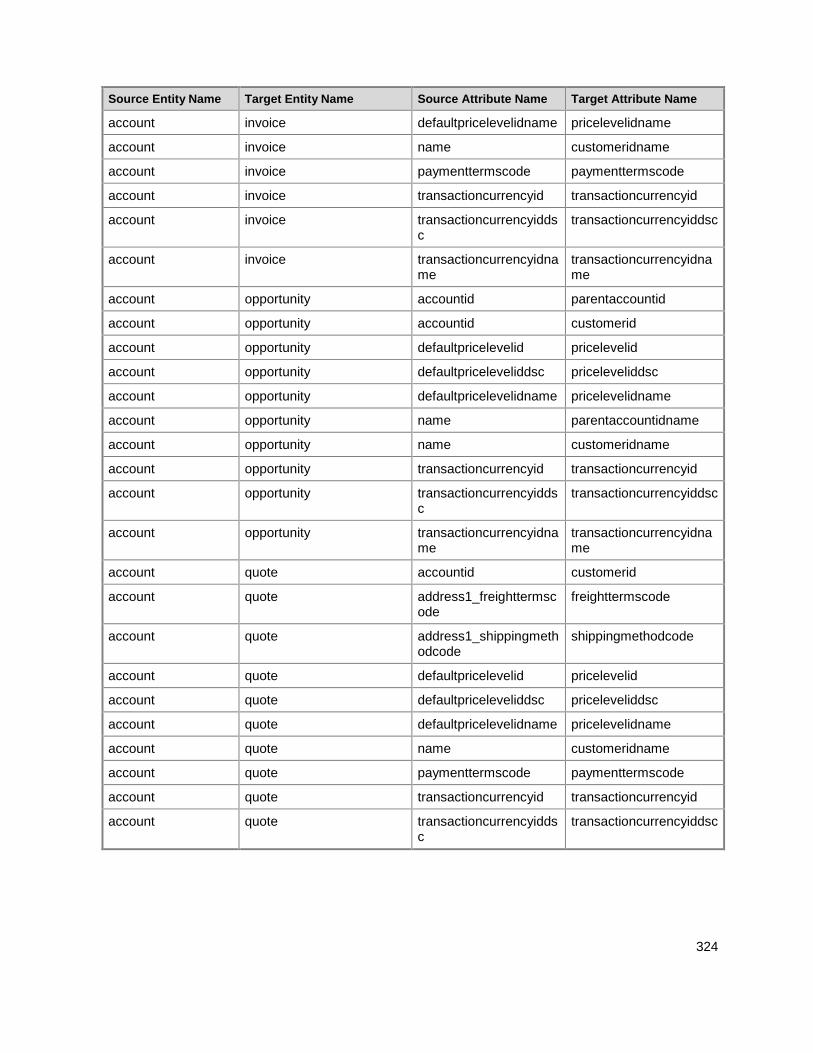
324
Source Entity Name Target Entity Name Source Attribute Name Target Attribute Name
account invoice defaultpricelevelidname pricelevelidname
account invoice name customeridname
account invoice paymenttermscode paymenttermscode
account invoice transactioncurrencyid transactioncurrencyid
account invoice transactioncurrencyiddsc
transactioncurrencyiddsc
account invoice transactioncurrencyidname
transactioncurrencyidname
account opportunity accountid parentaccountid
account opportunity accountid customerid
account opportunity defaultpricelevelid pricelevelid
account opportunity defaultpriceleveliddsc priceleveliddsc
account opportunity defaultpricelevelidname pricelevelidname
account opportunity name parentaccountidname
account opportunity name customeridname
account opportunity transactioncurrencyid transactioncurrencyid
account opportunity transactioncurrencyiddsc
transactioncurrencyiddsc
account opportunity transactioncurrencyidname
transactioncurrencyidname
account quote accountid customerid
account quote address1_freighttermscode
freighttermscode
account quote address1_shippingmethodcode
shippingmethodcode
account quote defaultpricelevelid pricelevelid
account quote defaultpriceleveliddsc priceleveliddsc
account quote defaultpricelevelidname pricelevelidname
account quote name customeridname
account quote paymenttermscode paymenttermscode
account quote transactioncurrencyid transactioncurrencyid
account quote transactioncurrencyiddsc
transactioncurrencyiddsc
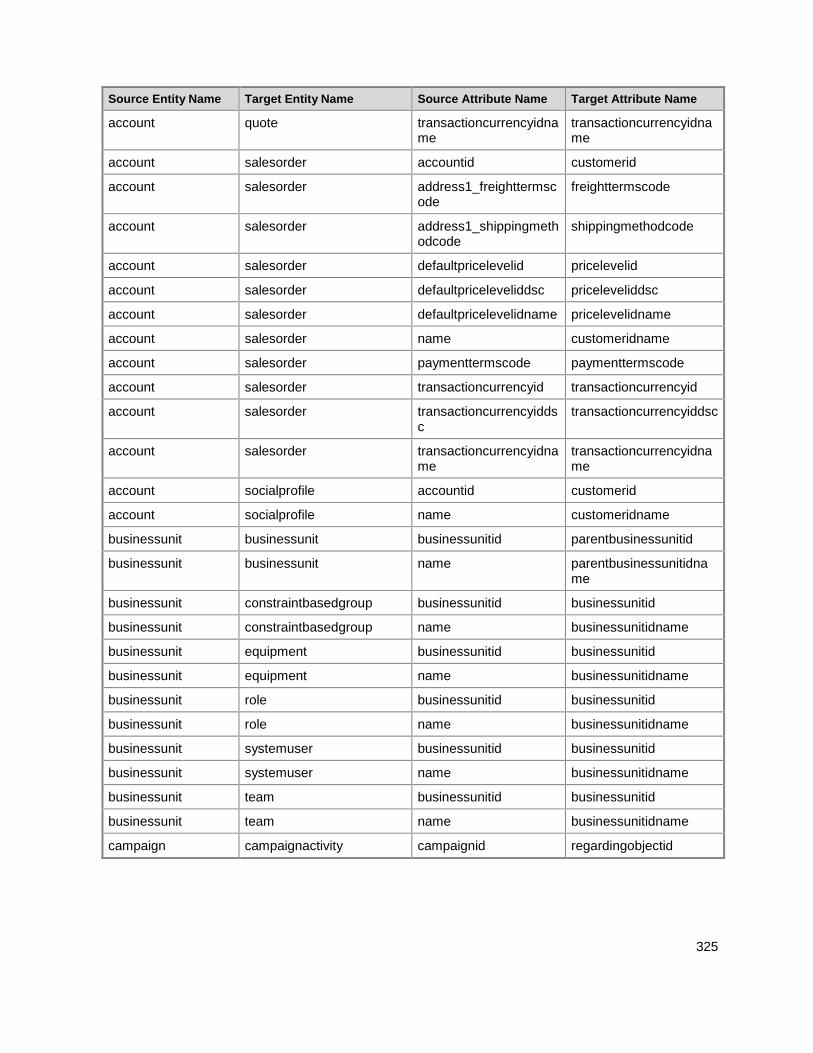
325
Source Entity Name Target Entity Name Source Attribute Name Target Attribute Name
account quote transactioncurrencyidname
transactioncurrencyidname
account salesorder accountid customerid
account salesorder address1_freighttermscode
freighttermscode
account salesorder address1_shippingmethodcode
shippingmethodcode
account salesorder defaultpricelevelid pricelevelid
account salesorder defaultpriceleveliddsc priceleveliddsc
account salesorder defaultpricelevelidname pricelevelidname
account salesorder name customeridname
account salesorder paymenttermscode paymenttermscode
account salesorder transactioncurrencyid transactioncurrencyid
account salesorder transactioncurrencyiddsc
transactioncurrencyiddsc
account salesorder transactioncurrencyidname
transactioncurrencyidname
account socialprofile accountid customerid
account socialprofile name customeridname
businessunit businessunit businessunitid parentbusinessunitid
businessunit businessunit name parentbusinessunitidname
businessunit constraintbasedgroup businessunitid businessunitid
businessunit constraintbasedgroup name businessunitidname
businessunit equipment businessunitid businessunitid
businessunit equipment name businessunitidname
businessunit role businessunitid businessunitid
businessunit role name businessunitidname
businessunit systemuser businessunitid businessunitid
businessunit systemuser name businessunitidname
businessunit team businessunitid businessunitid
businessunit team name businessunitidname
campaign campaignactivity campaignid regardingobjectid
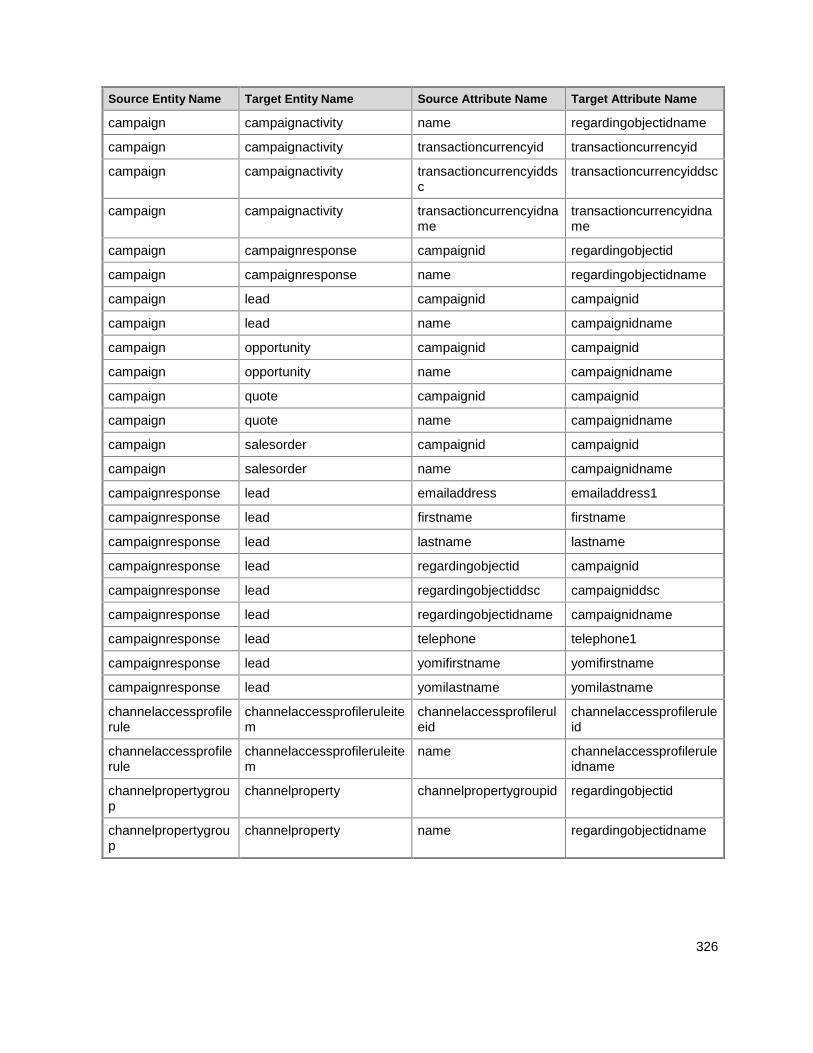
326
Source Entity Name Target Entity Name Source Attribute Name Target Attribute Name
campaign campaignactivity name regardingobjectidname
campaign campaignactivity transactioncurrencyid transactioncurrencyid
campaign campaignactivity transactioncurrencyiddsc
transactioncurrencyiddsc
campaign campaignactivity transactioncurrencyidname
transactioncurrencyidname
campaign campaignresponse campaignid regardingobjectid
campaign campaignresponse name regardingobjectidname
campaign lead campaignid campaignid
campaign lead name campaignidname
campaign opportunity campaignid campaignid
campaign opportunity name campaignidname
campaign quote campaignid campaignid
campaign quote name campaignidname
campaign salesorder campaignid campaignid
campaign salesorder name campaignidname
campaignresponse lead emailaddress emailaddress1
campaignresponse lead firstname firstname
campaignresponse lead lastname lastname
campaignresponse lead regardingobjectid campaignid
campaignresponse lead regardingobjectiddsc campaigniddsc
campaignresponse lead regardingobjectidname campaignidname
campaignresponse lead telephone telephone1
campaignresponse lead yomifirstname yomifirstname
campaignresponse lead yomilastname yomilastname
channelaccessprofilerule
channelaccessprofileruleitem
channelaccessprofileruleid
channelaccessprofileruleid
channelaccessprofilerule
channelaccessprofileruleitem
name channelaccessprofileruleidname
channelpropertygroup
channelproperty channelpropertygroupid regardingobjectid
channelpropertygroup
channelproperty name regardingobjectidname
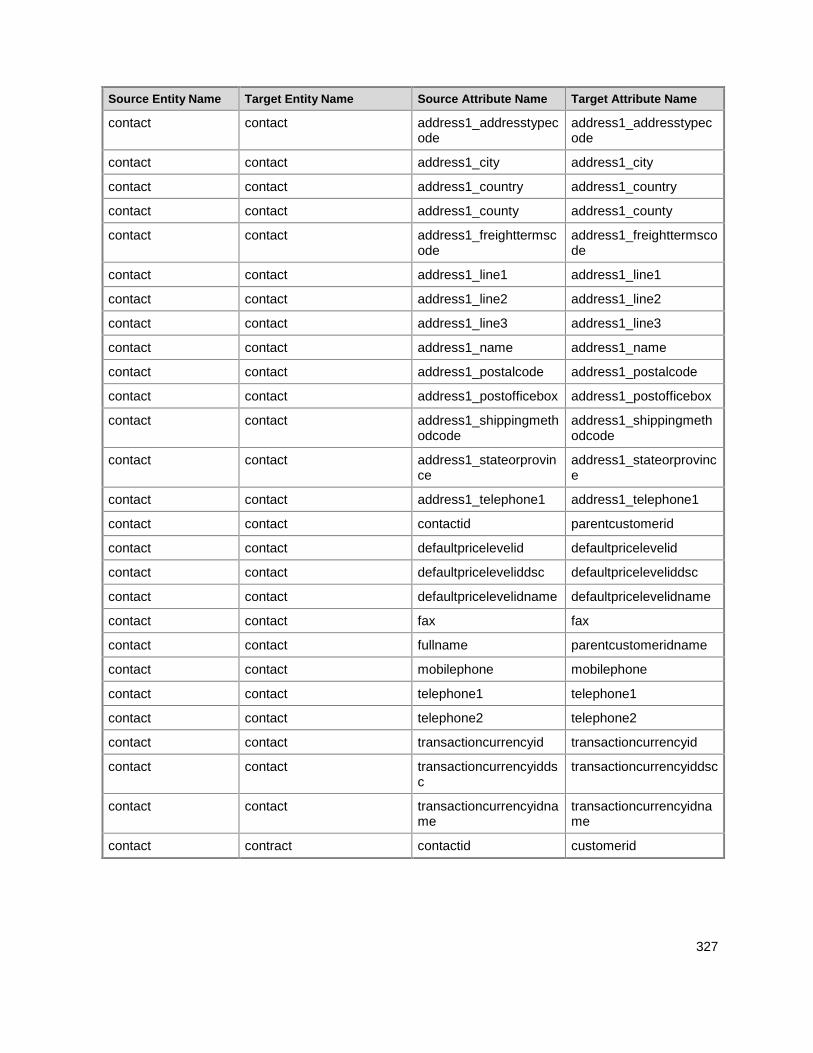
327
Source Entity Name Target Entity Name Source Attribute Name Target Attribute Name
contact contact address1_addresstypecode
address1_addresstypecode
contact contact address1_city address1_city
contact contact address1_country address1_country
contact contact address1_county address1_county
contact contact address1_freighttermscode
address1_freighttermscode
contact contact address1_line1 address1_line1
contact contact address1_line2 address1_line2
contact contact address1_line3 address1_line3
contact contact address1_name address1_name
contact contact address1_postalcode address1_postalcode
contact contact address1_postofficebox address1_postofficebox
contact contact address1_shippingmethodcode
address1_shippingmethodcode
contact contact address1_stateorprovince
address1_stateorprovince
contact contact address1_telephone1 address1_telephone1
contact contact contactid parentcustomerid
contact contact defaultpricelevelid defaultpricelevelid
contact contact defaultpriceleveliddsc defaultpriceleveliddsc
contact contact defaultpricelevelidname defaultpricelevelidname
contact contact fax fax
contact contact fullname parentcustomeridname
contact contact mobilephone mobilephone
contact contact telephone1 telephone1
contact contact telephone2 telephone2
contact contact transactioncurrencyid transactioncurrencyid
contact contact transactioncurrencyiddsc
transactioncurrencyiddsc
contact contact transactioncurrencyidname
transactioncurrencyidname
contact contract contactid customerid
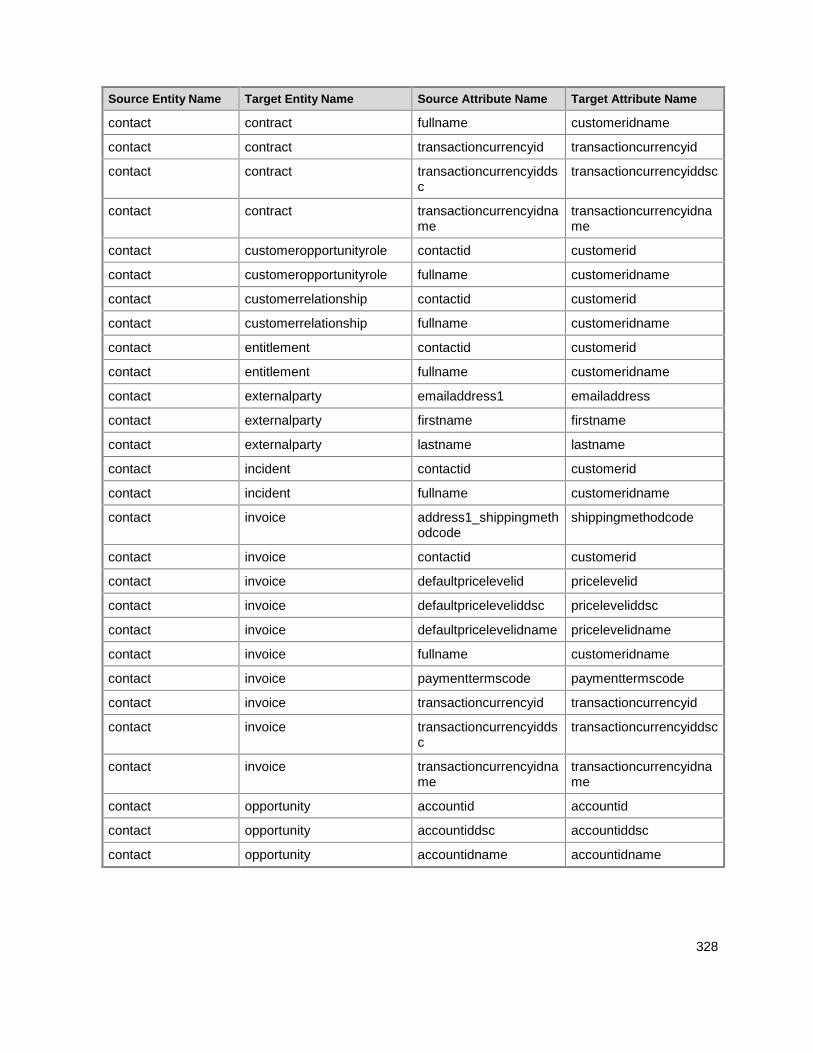
328
Source Entity Name Target Entity Name Source Attribute Name Target Attribute Name
contact contract fullname customeridname
contact contract transactioncurrencyid transactioncurrencyid
contact contract transactioncurrencyiddsc
transactioncurrencyiddsc
contact contract transactioncurrencyidname
transactioncurrencyidname
contact customeropportunityrole contactid customerid
contact customeropportunityrole fullname customeridname
contact customerrelationship contactid customerid
contact customerrelationship fullname customeridname
contact entitlement contactid customerid
contact entitlement fullname customeridname
contact externalparty emailaddress1 emailaddress
contact externalparty firstname firstname
contact externalparty lastname lastname
contact incident contactid customerid
contact incident fullname customeridname
contact invoice address1_shippingmethodcode
shippingmethodcode
contact invoice contactid customerid
contact invoice defaultpricelevelid pricelevelid
contact invoice defaultpriceleveliddsc priceleveliddsc
contact invoice defaultpricelevelidname pricelevelidname
contact invoice fullname customeridname
contact invoice paymenttermscode paymenttermscode
contact invoice transactioncurrencyid transactioncurrencyid
contact invoice transactioncurrencyiddsc
transactioncurrencyiddsc
contact invoice transactioncurrencyidname
transactioncurrencyidname
contact opportunity accountid accountid
contact opportunity accountiddsc accountiddsc
contact opportunity accountidname accountidname
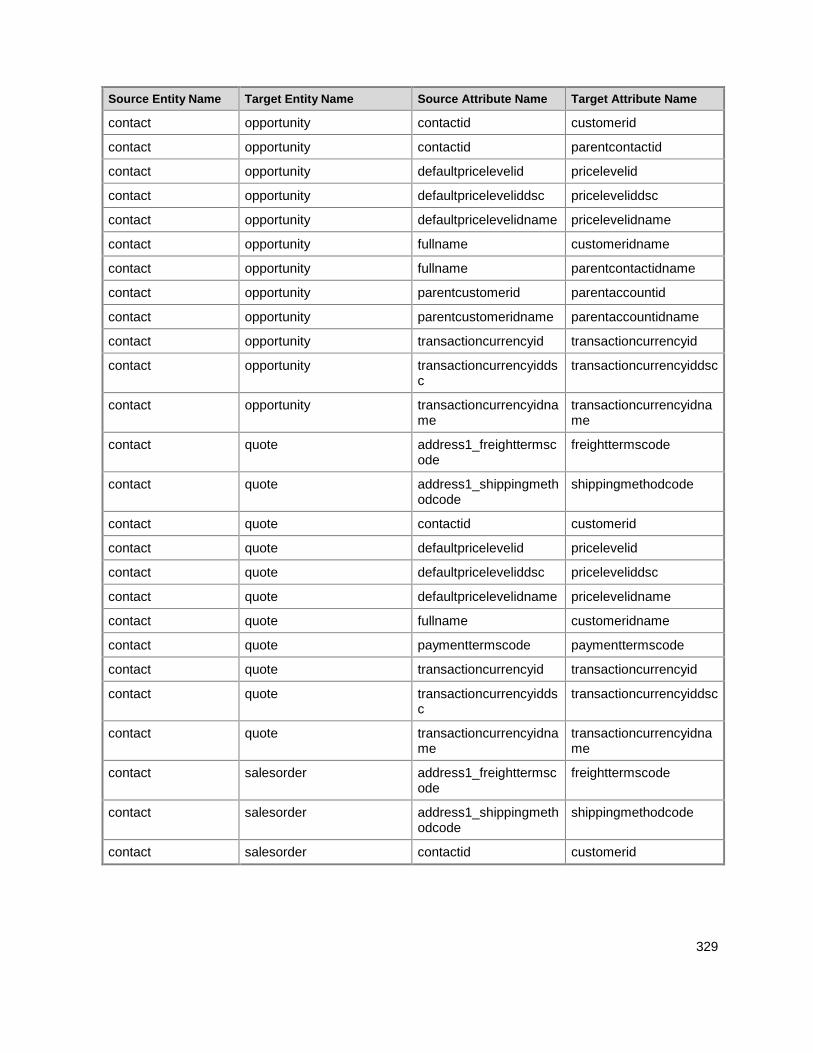
329
Source Entity Name Target Entity Name Source Attribute Name Target Attribute Name
contact opportunity contactid customerid
contact opportunity contactid parentcontactid
contact opportunity defaultpricelevelid pricelevelid
contact opportunity defaultpriceleveliddsc priceleveliddsc
contact opportunity defaultpricelevelidname pricelevelidname
contact opportunity fullname customeridname
contact opportunity fullname parentcontactidname
contact opportunity parentcustomerid parentaccountid
contact opportunity parentcustomeridname parentaccountidname
contact opportunity transactioncurrencyid transactioncurrencyid
contact opportunity transactioncurrencyiddsc
transactioncurrencyiddsc
contact opportunity transactioncurrencyidname
transactioncurrencyidname
contact quote address1_freighttermscode
freighttermscode
contact quote address1_shippingmethodcode
shippingmethodcode
contact quote contactid customerid
contact quote defaultpricelevelid pricelevelid
contact quote defaultpriceleveliddsc priceleveliddsc
contact quote defaultpricelevelidname pricelevelidname
contact quote fullname customeridname
contact quote paymenttermscode paymenttermscode
contact quote transactioncurrencyid transactioncurrencyid
contact quote transactioncurrencyiddsc
transactioncurrencyiddsc
contact quote transactioncurrencyidname
transactioncurrencyidname
contact salesorder address1_freighttermscode
freighttermscode
contact salesorder address1_shippingmethodcode
shippingmethodcode
contact salesorder contactid customerid

330
Source Entity Name Target Entity Name Source Attribute Name Target Attribute Name
contact salesorder defaultpricelevelid pricelevelid
contact salesorder defaultpriceleveliddsc priceleveliddsc
contact salesorder defaultpricelevelidname pricelevelidname
contact salesorder fullname customeridname
contact salesorder paymenttermscode paymenttermscode
contact salesorder transactioncurrencyid transactioncurrencyid
contact salesorder transactioncurrencyiddsc
transactioncurrencyiddsc
contact salesorder transactioncurrencyidname
transactioncurrencyidname
contact socialprofile contactid customerid
contact socialprofile fullname customeridname
contract contractdetail accountid accountid
contract contractdetail activeon activeon
contract contractdetail contactid contactid
contract contractdetail contractid contractid
contract contractdetail customerid customerid
contract contractdetail customeriddsc customeriddsc
contract contractdetail customeridname customeridname
contract contractdetail customeridtype customeridtype
contract contractdetail effectivitycalendar effectivitycalendar
contract contractdetail expireson expireson
contract contractdetail serviceaddress serviceaddress
contract contractdetail serviceaddressdsc serviceaddressdsc
contract contractdetail serviceaddressname serviceaddressname
contract contractdetail title contractidname
contract contractdetail transactioncurrencyid transactioncurrencyid
contract contractdetail transactioncurrencyiddsc
transactioncurrencyiddsc
contract contractdetail transactioncurrencyidname
transactioncurrencyidname
contract incident accountid accountid
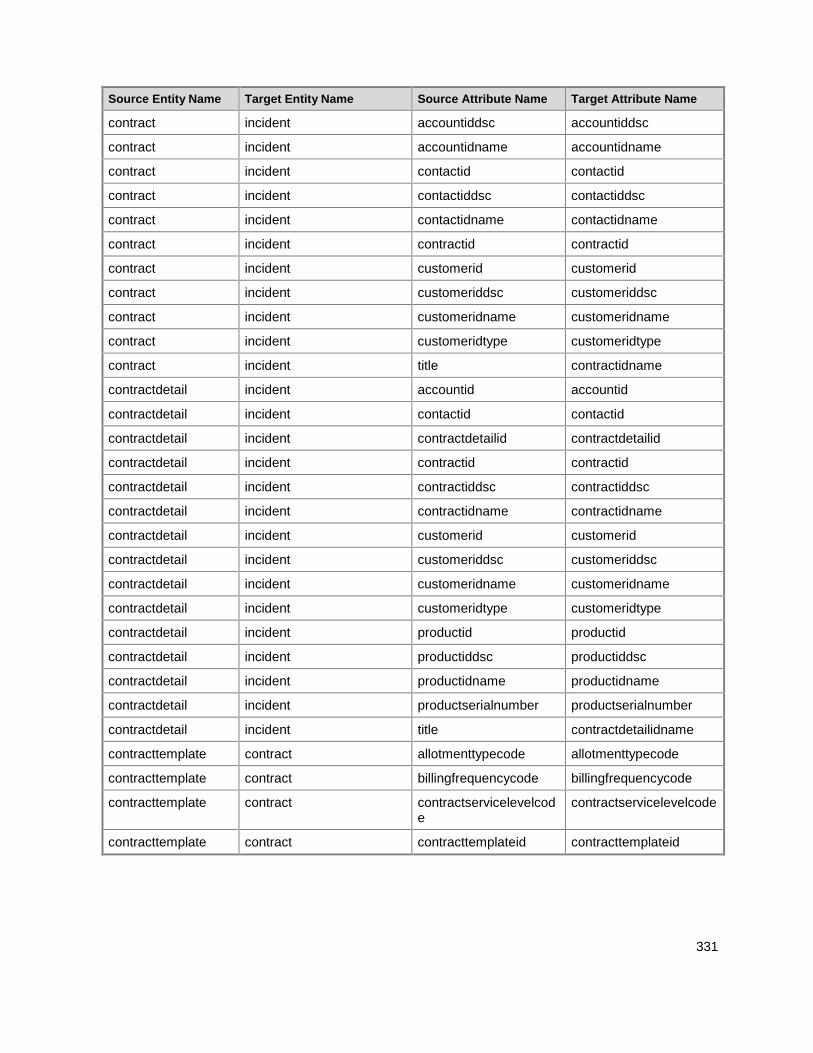
331
Source Entity Name Target Entity Name Source Attribute Name Target Attribute Name
contract incident accountiddsc accountiddsc
contract incident accountidname accountidname
contract incident contactid contactid
contract incident contactiddsc contactiddsc
contract incident contactidname contactidname
contract incident contractid contractid
contract incident customerid customerid
contract incident customeriddsc customeriddsc
contract incident customeridname customeridname
contract incident customeridtype customeridtype
contract incident title contractidname
contractdetail incident accountid accountid
contractdetail incident contactid contactid
contractdetail incident contractdetailid contractdetailid
contractdetail incident contractid contractid
contractdetail incident contractiddsc contractiddsc
contractdetail incident contractidname contractidname
contractdetail incident customerid customerid
contractdetail incident customeriddsc customeriddsc
contractdetail incident customeridname customeridname
contractdetail incident customeridtype customeridtype
contractdetail incident productid productid
contractdetail incident productiddsc productiddsc
contractdetail incident productidname productidname
contractdetail incident productserialnumber productserialnumber
contractdetail incident title contractdetailidname
contracttemplate contract allotmenttypecode allotmenttypecode
contracttemplate contract billingfrequencycode billingfrequencycode
contracttemplate contract contractservicelevelcode
contractservicelevelcode
contracttemplate contract contracttemplateid contracttemplateid
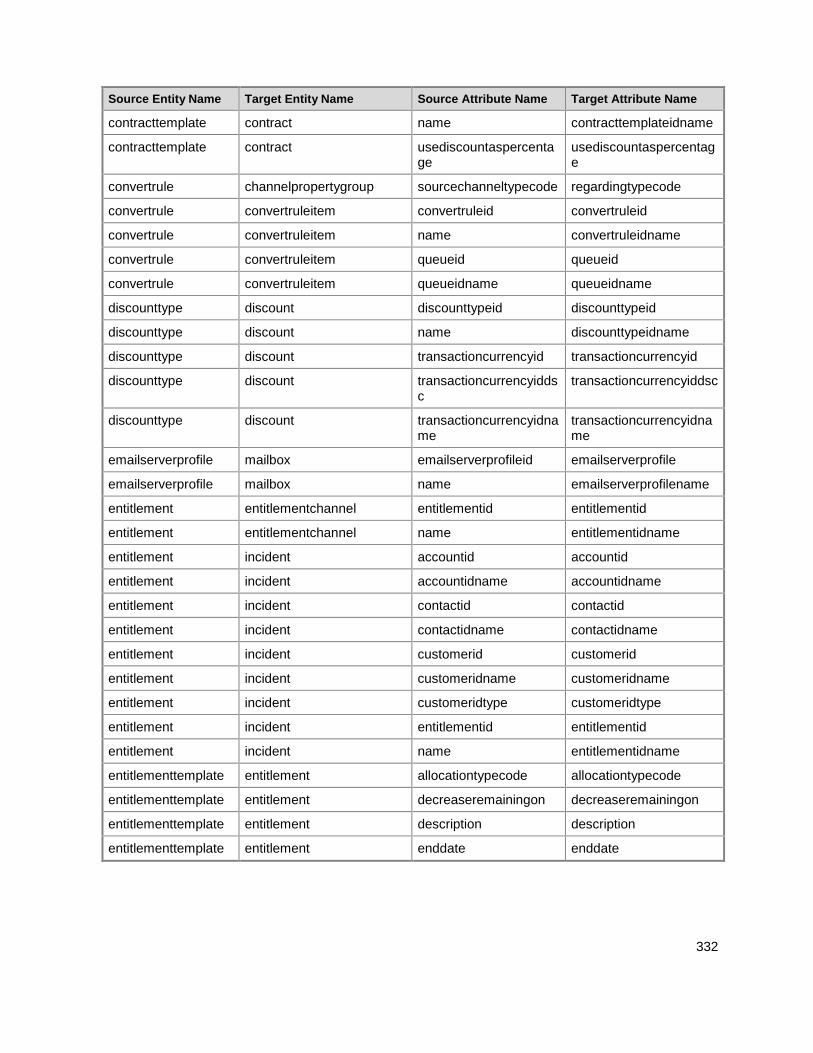
332
Source Entity Name Target Entity Name Source Attribute Name Target Attribute Name
contracttemplate contract name contracttemplateidname
contracttemplate contract usediscountaspercentage
usediscountaspercentage
convertrule channelpropertygroup sourcechanneltypecode regardingtypecode
convertrule convertruleitem convertruleid convertruleid
convertrule convertruleitem name convertruleidname
convertrule convertruleitem queueid queueid
convertrule convertruleitem queueidname queueidname
discounttype discount discounttypeid discounttypeid
discounttype discount name discounttypeidname
discounttype discount transactioncurrencyid transactioncurrencyid
discounttype discount transactioncurrencyiddsc
transactioncurrencyiddsc
discounttype discount transactioncurrencyidname
transactioncurrencyidname
emailserverprofile mailbox emailserverprofileid emailserverprofile
emailserverprofile mailbox name emailserverprofilename
entitlement entitlementchannel entitlementid entitlementid
entitlement entitlementchannel name entitlementidname
entitlement incident accountid accountid
entitlement incident accountidname accountidname
entitlement incident contactid contactid
entitlement incident contactidname contactidname
entitlement incident customerid customerid
entitlement incident customeridname customeridname
entitlement incident customeridtype customeridtype
entitlement incident entitlementid entitlementid
entitlement incident name entitlementidname
entitlementtemplate entitlement allocationtypecode allocationtypecode
entitlementtemplate entitlement decreaseremainingon decreaseremainingon
entitlementtemplate entitlement description description
entitlementtemplate entitlement enddate enddate
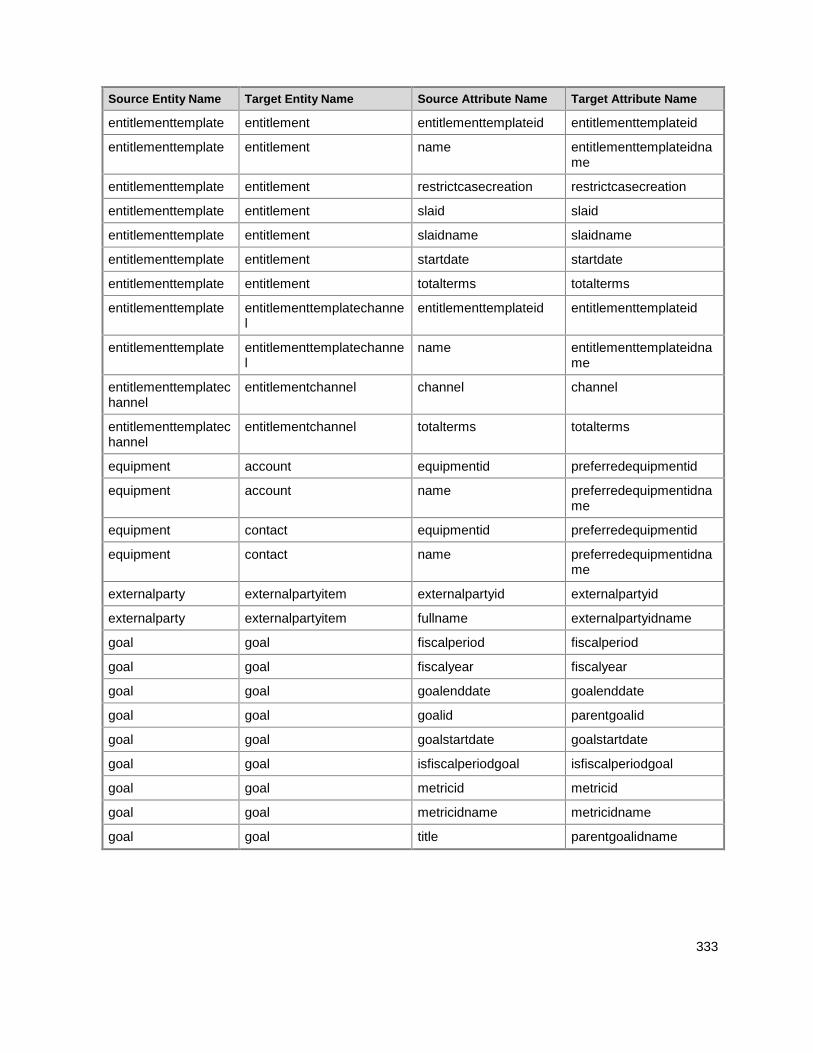
333
Source Entity Name Target Entity Name Source Attribute Name Target Attribute Name
entitlementtemplate entitlement entitlementtemplateid entitlementtemplateid
entitlementtemplate entitlement name entitlementtemplateidname
entitlementtemplate entitlement restrictcasecreation restrictcasecreation
entitlementtemplate entitlement slaid slaid
entitlementtemplate entitlement slaidname slaidname
entitlementtemplate entitlement startdate startdate
entitlementtemplate entitlement totalterms totalterms
entitlementtemplate entitlementtemplatechannel
entitlementtemplateid entitlementtemplateid
entitlementtemplate entitlementtemplatechannel
name entitlementtemplateidname
entitlementtemplatechannel
entitlementchannel channel channel
entitlementtemplatechannel
entitlementchannel totalterms totalterms
equipment account equipmentid preferredequipmentid
equipment account name preferredequipmentidname
equipment contact equipmentid preferredequipmentid
equipment contact name preferredequipmentidname
externalparty externalpartyitem externalpartyid externalpartyid
externalparty externalpartyitem fullname externalpartyidname
goal goal fiscalperiod fiscalperiod
goal goal fiscalyear fiscalyear
goal goal goalenddate goalenddate
goal goal goalid parentgoalid
goal goal goalstartdate goalstartdate
goal goal isfiscalperiodgoal isfiscalperiodgoal
goal goal metricid metricid
goal goal metricidname metricidname
goal goal title parentgoalidname
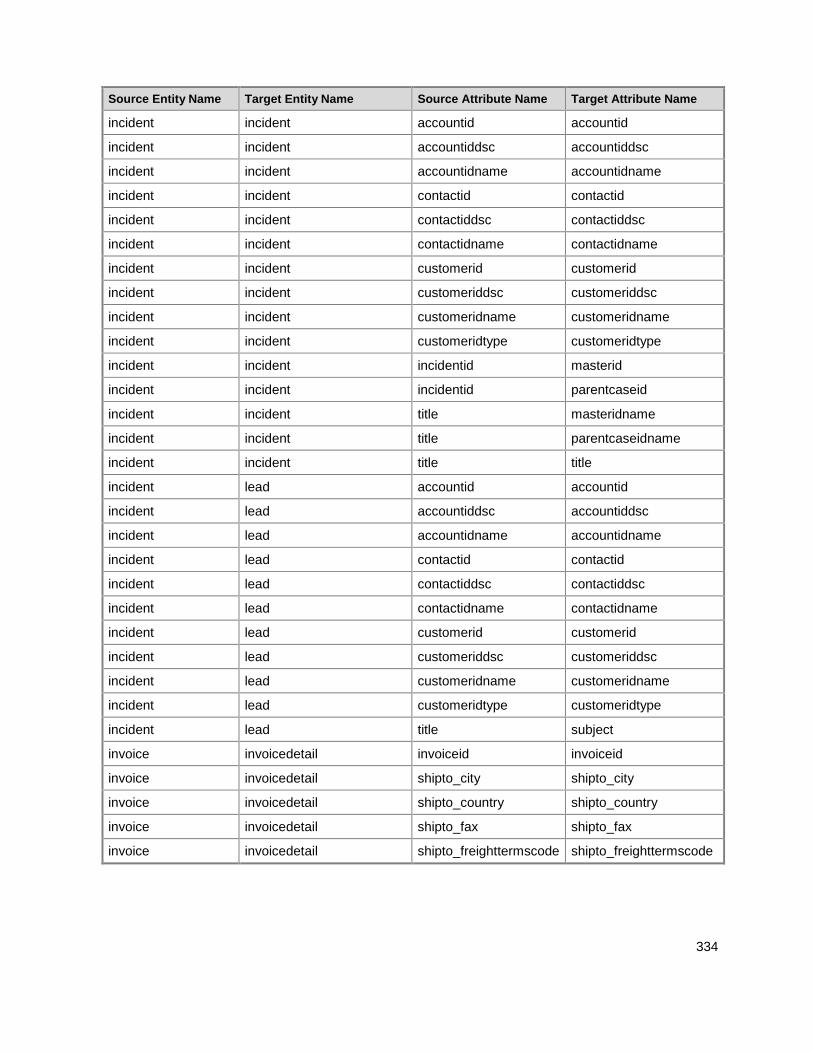
334
Source Entity Name Target Entity Name Source Attribute Name Target Attribute Name
incident incident accountid accountid
incident incident accountiddsc accountiddsc
incident incident accountidname accountidname
incident incident contactid contactid
incident incident contactiddsc contactiddsc
incident incident contactidname contactidname
incident incident customerid customerid
incident incident customeriddsc customeriddsc
incident incident customeridname customeridname
incident incident customeridtype customeridtype
incident incident incidentid masterid
incident incident incidentid parentcaseid
incident incident title masteridname
incident incident title parentcaseidname
incident incident title title
incident lead accountid accountid
incident lead accountiddsc accountiddsc
incident lead accountidname accountidname
incident lead contactid contactid
incident lead contactiddsc contactiddsc
incident lead contactidname contactidname
incident lead customerid customerid
incident lead customeriddsc customeriddsc
incident lead customeridname customeridname
incident lead customeridtype customeridtype
incident lead title subject
invoice invoicedetail invoiceid invoiceid
invoice invoicedetail shipto_city shipto_city
invoice invoicedetail shipto_country shipto_country
invoice invoicedetail shipto_fax shipto_fax
invoice invoicedetail shipto_freighttermscode shipto_freighttermscode
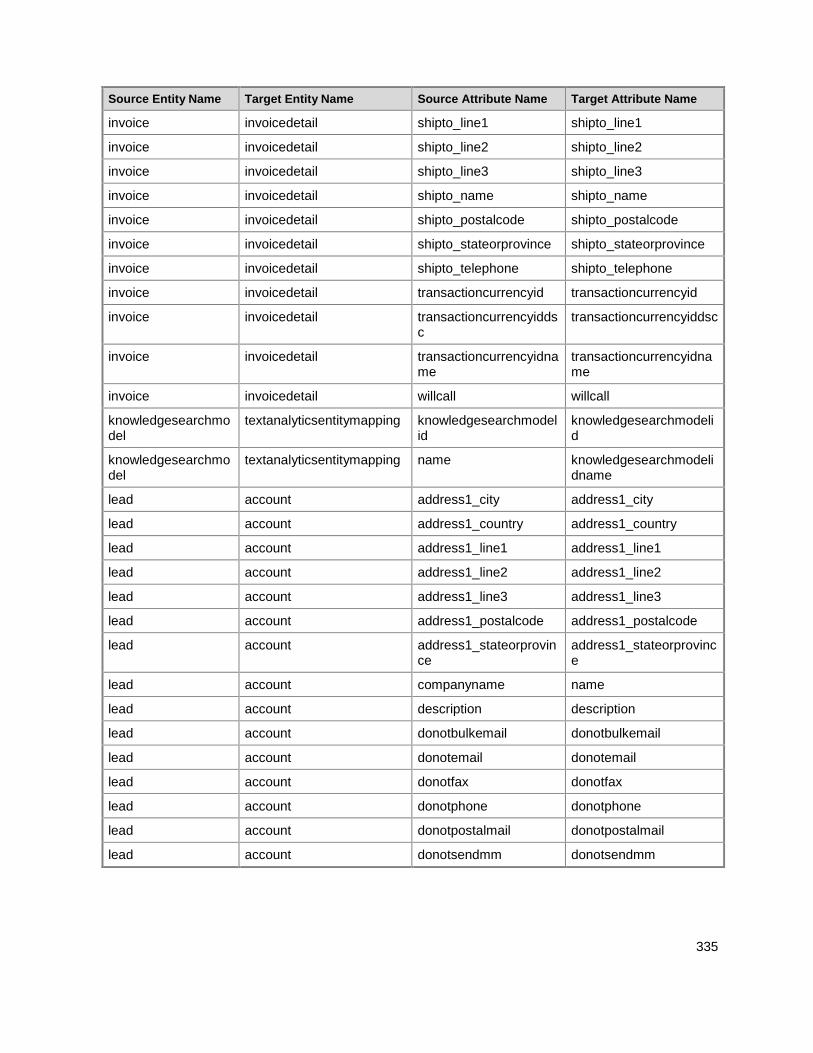
335
Source Entity Name Target Entity Name Source Attribute Name Target Attribute Name
invoice invoicedetail shipto_line1 shipto_line1
invoice invoicedetail shipto_line2 shipto_line2
invoice invoicedetail shipto_line3 shipto_line3
invoice invoicedetail shipto_name shipto_name
invoice invoicedetail shipto_postalcode shipto_postalcode
invoice invoicedetail shipto_stateorprovince shipto_stateorprovince
invoice invoicedetail shipto_telephone shipto_telephone
invoice invoicedetail transactioncurrencyid transactioncurrencyid
invoice invoicedetail transactioncurrencyiddsc
transactioncurrencyiddsc
invoice invoicedetail transactioncurrencyidname
transactioncurrencyidname
invoice invoicedetail willcall willcall
knowledgesearchmodel
textanalyticsentitymapping knowledgesearchmodelid
knowledgesearchmodelid
knowledgesearchmodel
textanalyticsentitymapping name knowledgesearchmodelidname
lead account address1_city address1_city
lead account address1_country address1_country
lead account address1_line1 address1_line1
lead account address1_line2 address1_line2
lead account address1_line3 address1_line3
lead account address1_postalcode address1_postalcode
lead account address1_stateorprovince
address1_stateorprovince
lead account companyname name
lead account description description
lead account donotbulkemail donotbulkemail
lead account donotemail donotemail
lead account donotfax donotfax
lead account donotphone donotphone
lead account donotpostalmail donotpostalmail
lead account donotsendmm donotsendmm
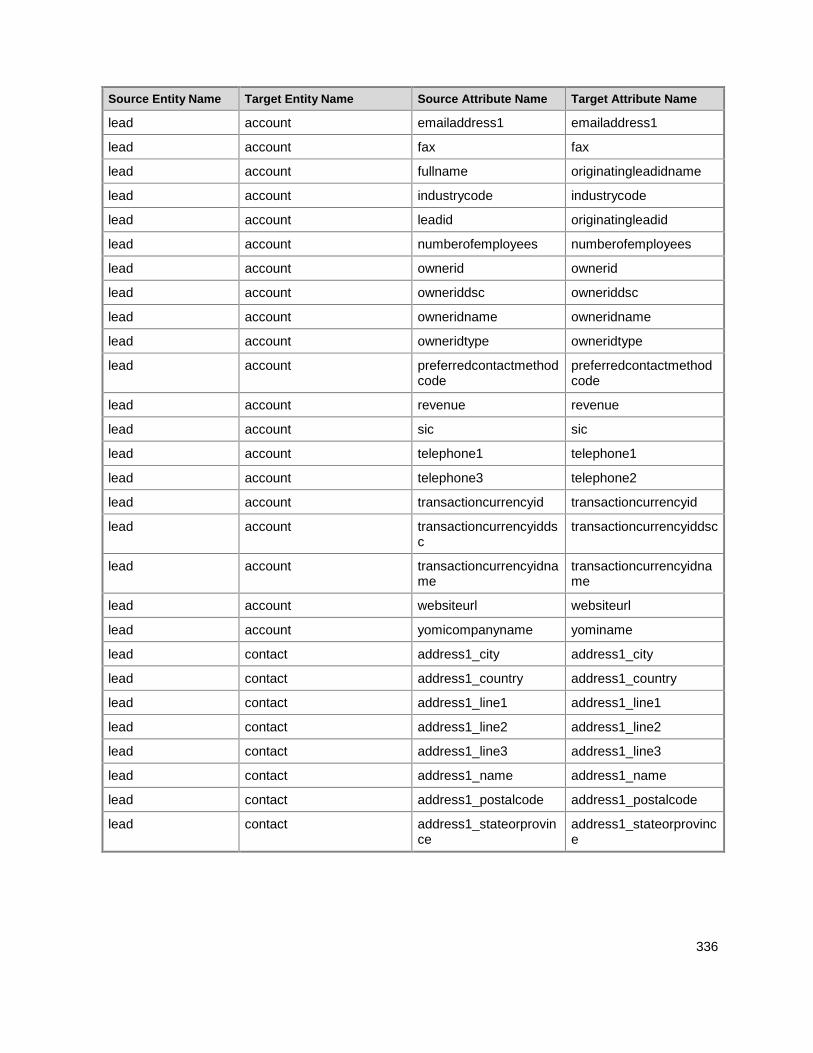
336
Source Entity Name Target Entity Name Source Attribute Name Target Attribute Name
lead account emailaddress1 emailaddress1
lead account fax fax
lead account fullname originatingleadidname
lead account industrycode industrycode
lead account leadid originatingleadid
lead account numberofemployees numberofemployees
lead account ownerid ownerid
lead account owneriddsc owneriddsc
lead account owneridname owneridname
lead account owneridtype owneridtype
lead account preferredcontactmethodcode
preferredcontactmethodcode
lead account revenue revenue
lead account sic sic
lead account telephone1 telephone1
lead account telephone3 telephone2
lead account transactioncurrencyid transactioncurrencyid
lead account transactioncurrencyiddsc
transactioncurrencyiddsc
lead account transactioncurrencyidname
transactioncurrencyidname
lead account websiteurl websiteurl
lead account yomicompanyname yominame
lead contact address1_city address1_city
lead contact address1_country address1_country
lead contact address1_line1 address1_line1
lead contact address1_line2 address1_line2
lead contact address1_line3 address1_line3
lead contact address1_name address1_name
lead contact address1_postalcode address1_postalcode
lead contact address1_stateorprovince
address1_stateorprovince
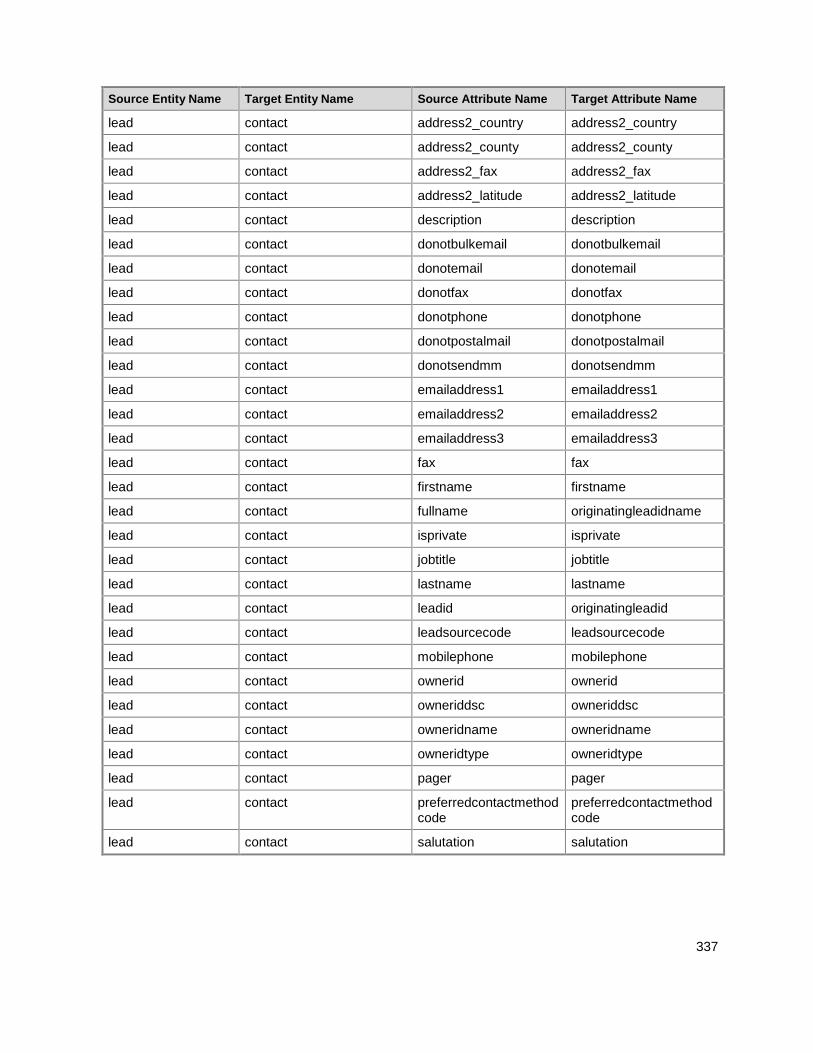
337
Source Entity Name Target Entity Name Source Attribute Name Target Attribute Name
lead contact address2_country address2_country
lead contact address2_county address2_county
lead contact address2_fax address2_fax
lead contact address2_latitude address2_latitude
lead contact description description
lead contact donotbulkemail donotbulkemail
lead contact donotemail donotemail
lead contact donotfax donotfax
lead contact donotphone donotphone
lead contact donotpostalmail donotpostalmail
lead contact donotsendmm donotsendmm
lead contact emailaddress1 emailaddress1
lead contact emailaddress2 emailaddress2
lead contact emailaddress3 emailaddress3
lead contact fax fax
lead contact firstname firstname
lead contact fullname originatingleadidname
lead contact isprivate isprivate
lead contact jobtitle jobtitle
lead contact lastname lastname
lead contact leadid originatingleadid
lead contact leadsourcecode leadsourcecode
lead contact mobilephone mobilephone
lead contact ownerid ownerid
lead contact owneriddsc owneriddsc
lead contact owneridname owneridname
lead contact owneridtype owneridtype
lead contact pager pager
lead contact preferredcontactmethodcode
preferredcontactmethodcode
lead contact salutation salutation
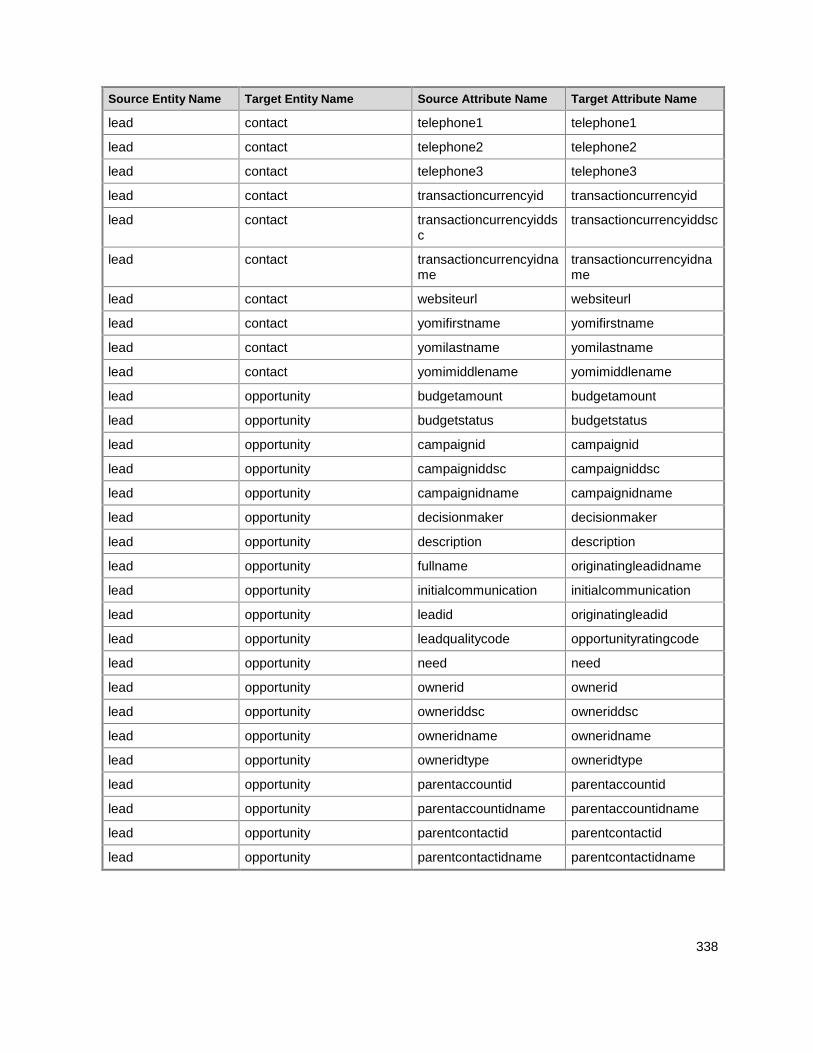
338
Source Entity Name Target Entity Name Source Attribute Name Target Attribute Name
lead contact telephone1 telephone1
lead contact telephone2 telephone2
lead contact telephone3 telephone3
lead contact transactioncurrencyid transactioncurrencyid
lead contact transactioncurrencyiddsc
transactioncurrencyiddsc
lead contact transactioncurrencyidname
transactioncurrencyidname
lead contact websiteurl websiteurl
lead contact yomifirstname yomifirstname
lead contact yomilastname yomilastname
lead contact yomimiddlename yomimiddlename
lead opportunity budgetamount budgetamount
lead opportunity budgetstatus budgetstatus
lead opportunity campaignid campaignid
lead opportunity campaigniddsc campaigniddsc
lead opportunity campaignidname campaignidname
lead opportunity decisionmaker decisionmaker
lead opportunity description description
lead opportunity fullname originatingleadidname
lead opportunity initialcommunication initialcommunication
lead opportunity leadid originatingleadid
lead opportunity leadqualitycode opportunityratingcode
lead opportunity need need
lead opportunity ownerid ownerid
lead opportunity owneriddsc owneriddsc
lead opportunity owneridname owneridname
lead opportunity owneridtype owneridtype
lead opportunity parentaccountid parentaccountid
lead opportunity parentaccountidname parentaccountidname
lead opportunity parentcontactid parentcontactid
lead opportunity parentcontactidname parentcontactidname
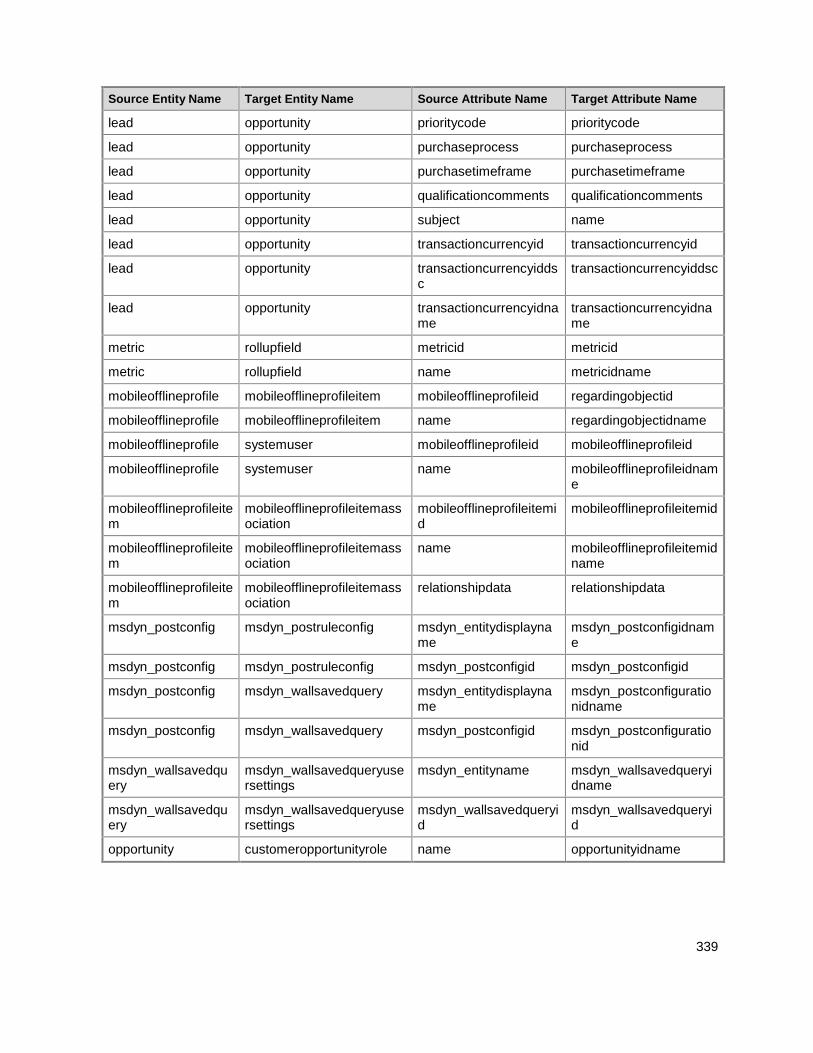
339
Source Entity Name Target Entity Name Source Attribute Name Target Attribute Name
lead opportunity prioritycode prioritycode
lead opportunity purchaseprocess purchaseprocess
lead opportunity purchasetimeframe purchasetimeframe
lead opportunity qualificationcomments qualificationcomments
lead opportunity subject name
lead opportunity transactioncurrencyid transactioncurrencyid
lead opportunity transactioncurrencyiddsc
transactioncurrencyiddsc
lead opportunity transactioncurrencyidname
transactioncurrencyidname
metric rollupfield metricid metricid
metric rollupfield name metricidname
mobileofflineprofile mobileofflineprofileitem mobileofflineprofileid regardingobjectid
mobileofflineprofile mobileofflineprofileitem name regardingobjectidname
mobileofflineprofile systemuser mobileofflineprofileid mobileofflineprofileid
mobileofflineprofile systemuser name mobileofflineprofileidname
mobileofflineprofileitem
mobileofflineprofileitemassociation
mobileofflineprofileitemid
mobileofflineprofileitemid
mobileofflineprofileitem
mobileofflineprofileitemassociation
name mobileofflineprofileitemidname
mobileofflineprofileitem
mobileofflineprofileitemassociation
relationshipdata relationshipdata
msdyn_postconfig msdyn_postruleconfig msdyn_entitydisplayname
msdyn_postconfigidname
msdyn_postconfig msdyn_postruleconfig msdyn_postconfigid msdyn_postconfigid
msdyn_postconfig msdyn_wallsavedquery msdyn_entitydisplayname
msdyn_postconfigurationidname
msdyn_postconfig msdyn_wallsavedquery msdyn_postconfigid msdyn_postconfigurationid
msdyn_wallsavedquery
msdyn_wallsavedqueryusersettings
msdyn_entityname msdyn_wallsavedqueryidname
msdyn_wallsavedquery
msdyn_wallsavedqueryusersettings
msdyn_wallsavedqueryid
msdyn_wallsavedqueryid
opportunity customeropportunityrole name opportunityidname
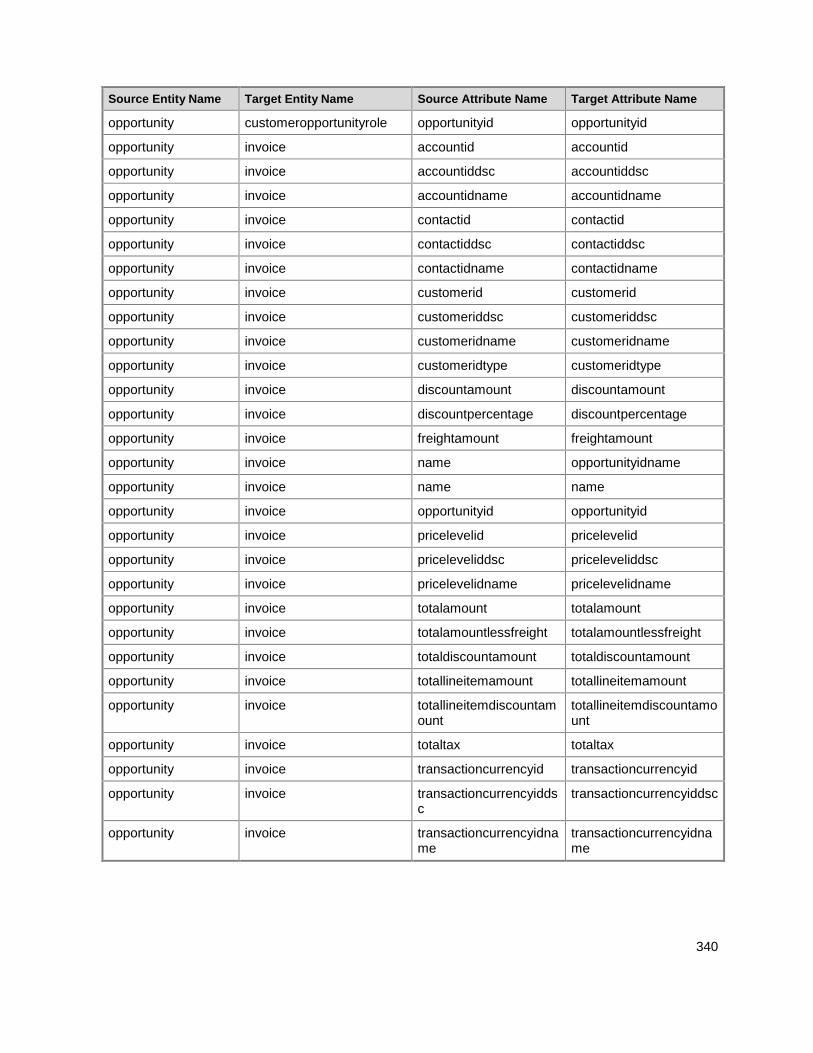
340
Source Entity Name Target Entity Name Source Attribute Name Target Attribute Name
opportunity customeropportunityrole opportunityid opportunityid
opportunity invoice accountid accountid
opportunity invoice accountiddsc accountiddsc
opportunity invoice accountidname accountidname
opportunity invoice contactid contactid
opportunity invoice contactiddsc contactiddsc
opportunity invoice contactidname contactidname
opportunity invoice customerid customerid
opportunity invoice customeriddsc customeriddsc
opportunity invoice customeridname customeridname
opportunity invoice customeridtype customeridtype
opportunity invoice discountamount discountamount
opportunity invoice discountpercentage discountpercentage
opportunity invoice freightamount freightamount
opportunity invoice name opportunityidname
opportunity invoice name name
opportunity invoice opportunityid opportunityid
opportunity invoice pricelevelid pricelevelid
opportunity invoice priceleveliddsc priceleveliddsc
opportunity invoice pricelevelidname pricelevelidname
opportunity invoice totalamount totalamount
opportunity invoice totalamountlessfreight totalamountlessfreight
opportunity invoice totaldiscountamount totaldiscountamount
opportunity invoice totallineitemamount totallineitemamount
opportunity invoice totallineitemdiscountamount
totallineitemdiscountamount
opportunity invoice totaltax totaltax
opportunity invoice transactioncurrencyid transactioncurrencyid
opportunity invoice transactioncurrencyiddsc
transactioncurrencyiddsc
opportunity invoice transactioncurrencyidname
transactioncurrencyidname
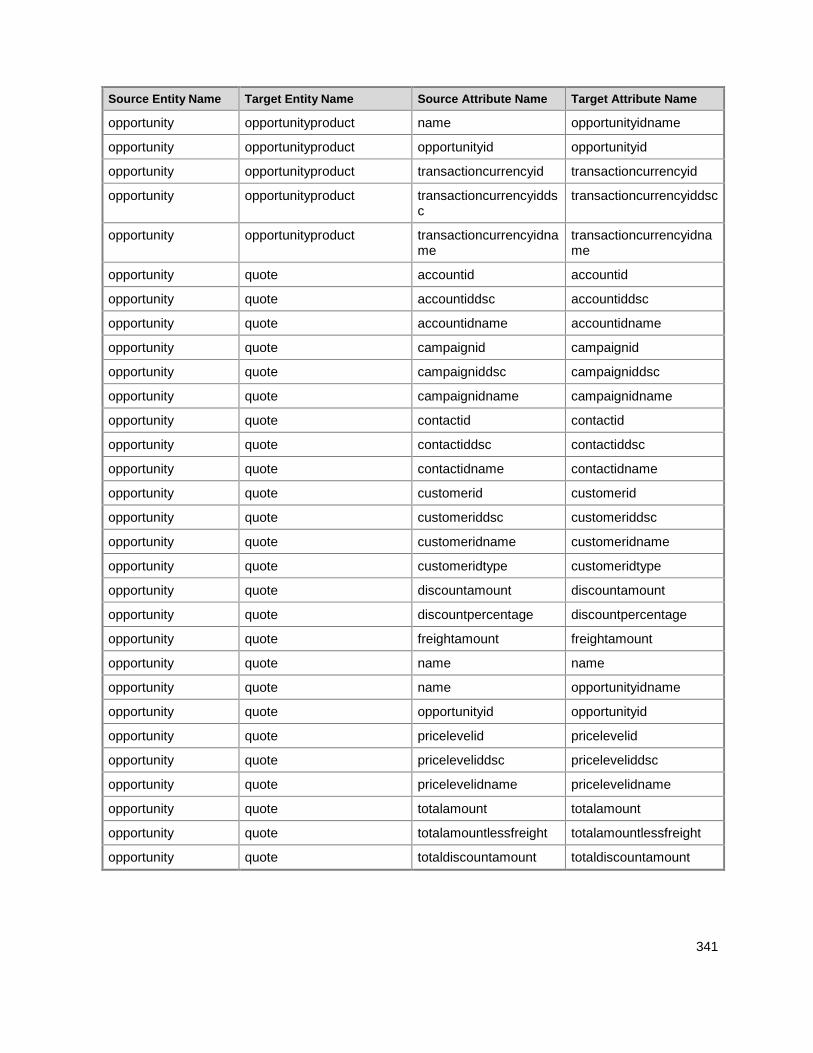
341
Source Entity Name Target Entity Name Source Attribute Name Target Attribute Name
opportunity opportunityproduct name opportunityidname
opportunity opportunityproduct opportunityid opportunityid
opportunity opportunityproduct transactioncurrencyid transactioncurrencyid
opportunity opportunityproduct transactioncurrencyiddsc
transactioncurrencyiddsc
opportunity opportunityproduct transactioncurrencyidname
transactioncurrencyidname
opportunity quote accountid accountid
opportunity quote accountiddsc accountiddsc
opportunity quote accountidname accountidname
opportunity quote campaignid campaignid
opportunity quote campaigniddsc campaigniddsc
opportunity quote campaignidname campaignidname
opportunity quote contactid contactid
opportunity quote contactiddsc contactiddsc
opportunity quote contactidname contactidname
opportunity quote customerid customerid
opportunity quote customeriddsc customeriddsc
opportunity quote customeridname customeridname
opportunity quote customeridtype customeridtype
opportunity quote discountamount discountamount
opportunity quote discountpercentage discountpercentage
opportunity quote freightamount freightamount
opportunity quote name name
opportunity quote name opportunityidname
opportunity quote opportunityid opportunityid
opportunity quote pricelevelid pricelevelid
opportunity quote priceleveliddsc priceleveliddsc
opportunity quote pricelevelidname pricelevelidname
opportunity quote totalamount totalamount
opportunity quote totalamountlessfreight totalamountlessfreight
opportunity quote totaldiscountamount totaldiscountamount
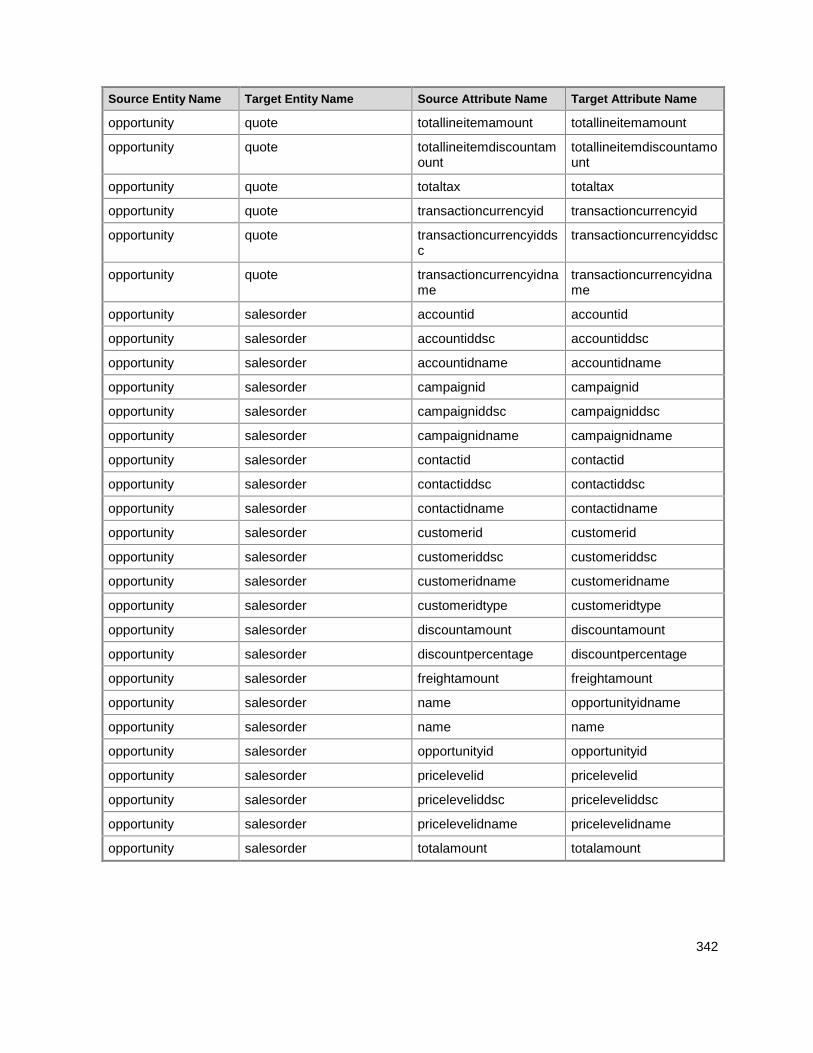
342
Source Entity Name Target Entity Name Source Attribute Name Target Attribute Name
opportunity quote totallineitemamount totallineitemamount
opportunity quote totallineitemdiscountamount
totallineitemdiscountamount
opportunity quote totaltax totaltax
opportunity quote transactioncurrencyid transactioncurrencyid
opportunity quote transactioncurrencyiddsc
transactioncurrencyiddsc
opportunity quote transactioncurrencyidname
transactioncurrencyidname
opportunity salesorder accountid accountid
opportunity salesorder accountiddsc accountiddsc
opportunity salesorder accountidname accountidname
opportunity salesorder campaignid campaignid
opportunity salesorder campaigniddsc campaigniddsc
opportunity salesorder campaignidname campaignidname
opportunity salesorder contactid contactid
opportunity salesorder contactiddsc contactiddsc
opportunity salesorder contactidname contactidname
opportunity salesorder customerid customerid
opportunity salesorder customeriddsc customeriddsc
opportunity salesorder customeridname customeridname
opportunity salesorder customeridtype customeridtype
opportunity salesorder discountamount discountamount
opportunity salesorder discountpercentage discountpercentage
opportunity salesorder freightamount freightamount
opportunity salesorder name opportunityidname
opportunity salesorder name name
opportunity salesorder opportunityid opportunityid
opportunity salesorder pricelevelid pricelevelid
opportunity salesorder priceleveliddsc priceleveliddsc
opportunity salesorder pricelevelidname pricelevelidname
opportunity salesorder totalamount totalamount
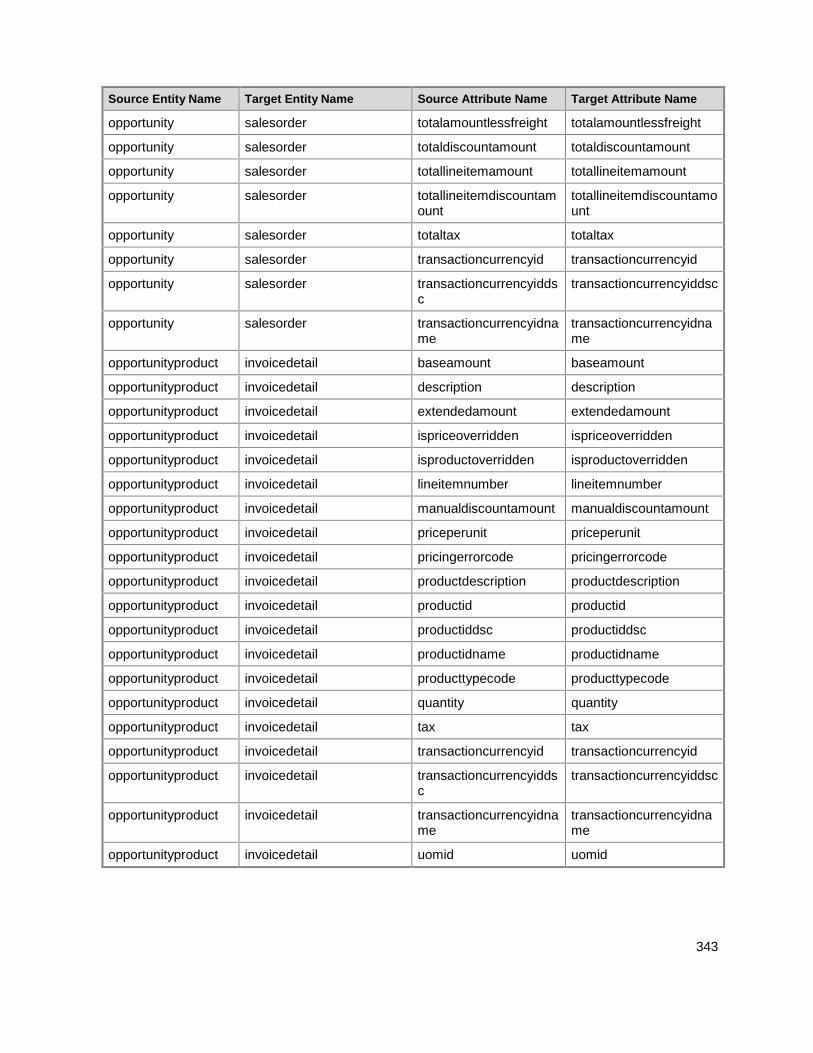
343
Source Entity Name Target Entity Name Source Attribute Name Target Attribute Name
opportunity salesorder totalamountlessfreight totalamountlessfreight
opportunity salesorder totaldiscountamount totaldiscountamount
opportunity salesorder totallineitemamount totallineitemamount
opportunity salesorder totallineitemdiscountamount
totallineitemdiscountamount
opportunity salesorder totaltax totaltax
opportunity salesorder transactioncurrencyid transactioncurrencyid
opportunity salesorder transactioncurrencyiddsc
transactioncurrencyiddsc
opportunity salesorder transactioncurrencyidname
transactioncurrencyidname
opportunityproduct invoicedetail baseamount baseamount
opportunityproduct invoicedetail description description
opportunityproduct invoicedetail extendedamount extendedamount
opportunityproduct invoicedetail ispriceoverridden ispriceoverridden
opportunityproduct invoicedetail isproductoverridden isproductoverridden
opportunityproduct invoicedetail lineitemnumber lineitemnumber
opportunityproduct invoicedetail manualdiscountamount manualdiscountamount
opportunityproduct invoicedetail priceperunit priceperunit
opportunityproduct invoicedetail pricingerrorcode pricingerrorcode
opportunityproduct invoicedetail productdescription productdescription
opportunityproduct invoicedetail productid productid
opportunityproduct invoicedetail productiddsc productiddsc
opportunityproduct invoicedetail productidname productidname
opportunityproduct invoicedetail producttypecode producttypecode
opportunityproduct invoicedetail quantity quantity
opportunityproduct invoicedetail tax tax
opportunityproduct invoicedetail transactioncurrencyid transactioncurrencyid
opportunityproduct invoicedetail transactioncurrencyiddsc
transactioncurrencyiddsc
opportunityproduct invoicedetail transactioncurrencyidname
transactioncurrencyidname
opportunityproduct invoicedetail uomid uomid
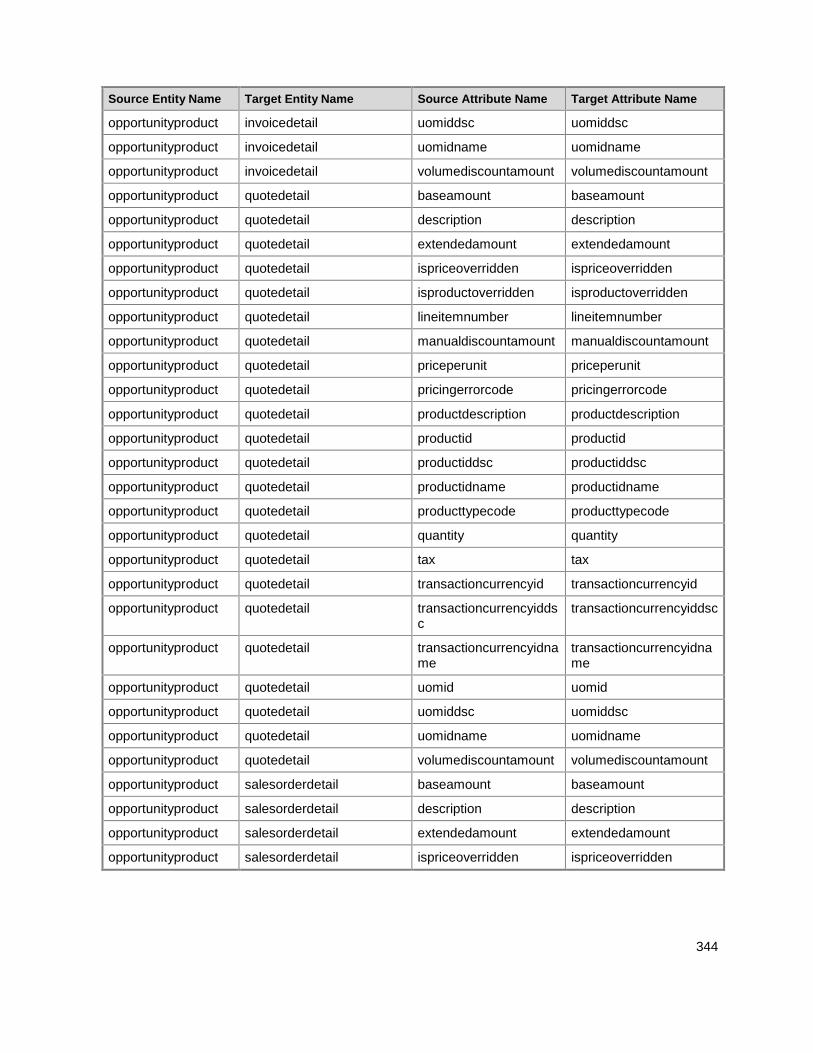
344
Source Entity Name Target Entity Name Source Attribute Name Target Attribute Name
opportunityproduct invoicedetail uomiddsc uomiddsc
opportunityproduct invoicedetail uomidname uomidname
opportunityproduct invoicedetail volumediscountamount volumediscountamount
opportunityproduct quotedetail baseamount baseamount
opportunityproduct quotedetail description description
opportunityproduct quotedetail extendedamount extendedamount
opportunityproduct quotedetail ispriceoverridden ispriceoverridden
opportunityproduct quotedetail isproductoverridden isproductoverridden
opportunityproduct quotedetail lineitemnumber lineitemnumber
opportunityproduct quotedetail manualdiscountamount manualdiscountamount
opportunityproduct quotedetail priceperunit priceperunit
opportunityproduct quotedetail pricingerrorcode pricingerrorcode
opportunityproduct quotedetail productdescription productdescription
opportunityproduct quotedetail productid productid
opportunityproduct quotedetail productiddsc productiddsc
opportunityproduct quotedetail productidname productidname
opportunityproduct quotedetail producttypecode producttypecode
opportunityproduct quotedetail quantity quantity
opportunityproduct quotedetail tax tax
opportunityproduct quotedetail transactioncurrencyid transactioncurrencyid
opportunityproduct quotedetail transactioncurrencyiddsc
transactioncurrencyiddsc
opportunityproduct quotedetail transactioncurrencyidname
transactioncurrencyidname
opportunityproduct quotedetail uomid uomid
opportunityproduct quotedetail uomiddsc uomiddsc
opportunityproduct quotedetail uomidname uomidname
opportunityproduct quotedetail volumediscountamount volumediscountamount
opportunityproduct salesorderdetail baseamount baseamount
opportunityproduct salesorderdetail description description
opportunityproduct salesorderdetail extendedamount extendedamount
opportunityproduct salesorderdetail ispriceoverridden ispriceoverridden

345
Source Entity Name Target Entity Name Source Attribute Name Target Attribute Name
opportunityproduct salesorderdetail isproductoverridden isproductoverridden
opportunityproduct salesorderdetail lineitemnumber lineitemnumber
opportunityproduct salesorderdetail manualdiscountamount manualdiscountamount
opportunityproduct salesorderdetail priceperunit priceperunit
opportunityproduct salesorderdetail pricingerrorcode pricingerrorcode
opportunityproduct salesorderdetail productdescription productdescription
opportunityproduct salesorderdetail productid productid
opportunityproduct salesorderdetail productiddsc productiddsc
opportunityproduct salesorderdetail productidname productidname
opportunityproduct salesorderdetail producttypecode producttypecode
opportunityproduct salesorderdetail quantity quantity
opportunityproduct salesorderdetail tax tax
opportunityproduct salesorderdetail transactioncurrencyid transactioncurrencyid
opportunityproduct salesorderdetail transactioncurrencyiddsc
transactioncurrencyiddsc
opportunityproduct salesorderdetail transactioncurrencyidname
transactioncurrencyidname
opportunityproduct salesorderdetail uomid uomid
opportunityproduct salesorderdetail uomiddsc uomiddsc
opportunityproduct salesorderdetail uomidname uomidname
opportunityproduct salesorderdetail volumediscountamount volumediscountamount
pricelevel productpricelevel name pricelevelidname
pricelevel productpricelevel pricelevelid pricelevelid
pricelevel productpricelevel transactioncurrencyid transactioncurrencyid
pricelevel productpricelevel transactioncurrencyiddsc
transactioncurrencyiddsc
pricelevel productpricelevel transactioncurrencyidname
transactioncurrencyidname
product dynamicproperty name regardingobjectidname
product dynamicproperty productid regardingobjectid
product product defaultuomid defaultuomid
product product defaultuomiddsc defaultuomiddsc
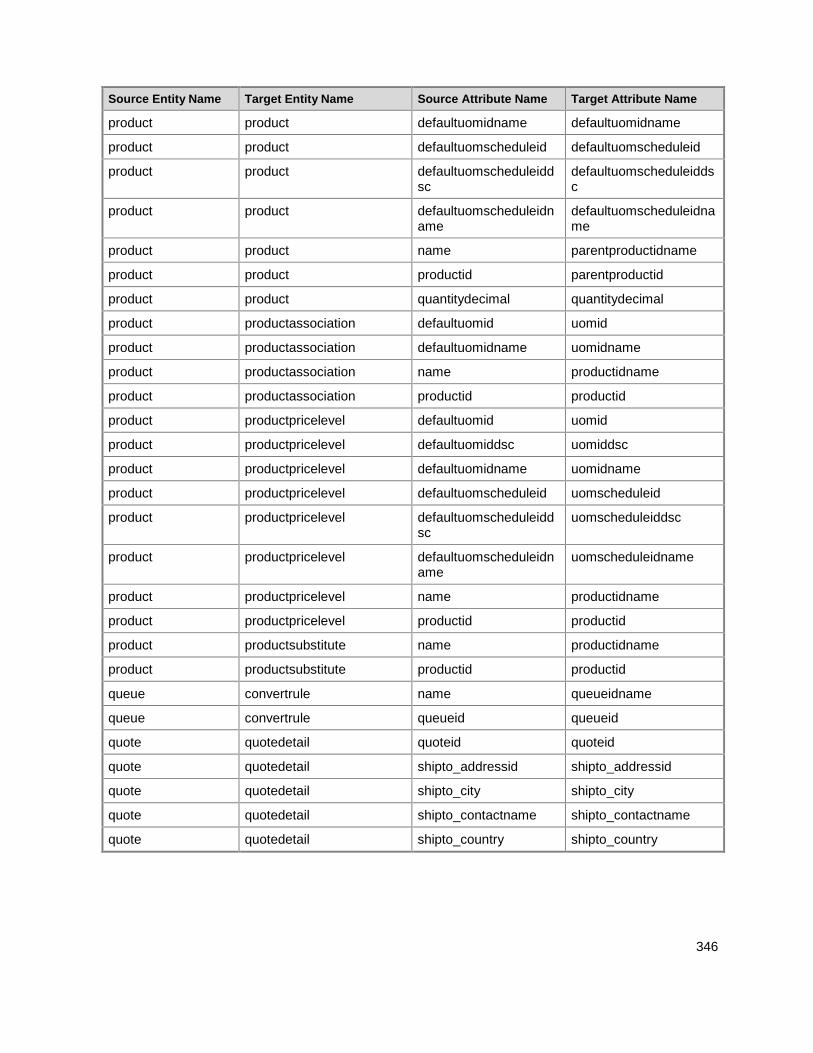
346
Source Entity Name Target Entity Name Source Attribute Name Target Attribute Name
product product defaultuomidname defaultuomidname
product product defaultuomscheduleid defaultuomscheduleid
product product defaultuomscheduleiddsc
defaultuomscheduleiddsc
product product defaultuomscheduleidname
defaultuomscheduleidname
product product name parentproductidname
product product productid parentproductid
product product quantitydecimal quantitydecimal
product productassociation defaultuomid uomid
product productassociation defaultuomidname uomidname
product productassociation name productidname
product productassociation productid productid
product productpricelevel defaultuomid uomid
product productpricelevel defaultuomiddsc uomiddsc
product productpricelevel defaultuomidname uomidname
product productpricelevel defaultuomscheduleid uomscheduleid
product productpricelevel defaultuomscheduleiddsc
uomscheduleiddsc
product productpricelevel defaultuomscheduleidname
uomscheduleidname
product productpricelevel name productidname
product productpricelevel productid productid
product productsubstitute name productidname
product productsubstitute productid productid
queue convertrule name queueidname
queue convertrule queueid queueid
quote quotedetail quoteid quoteid
quote quotedetail shipto_addressid shipto_addressid
quote quotedetail shipto_city shipto_city
quote quotedetail shipto_contactname shipto_contactname
quote quotedetail shipto_country shipto_country
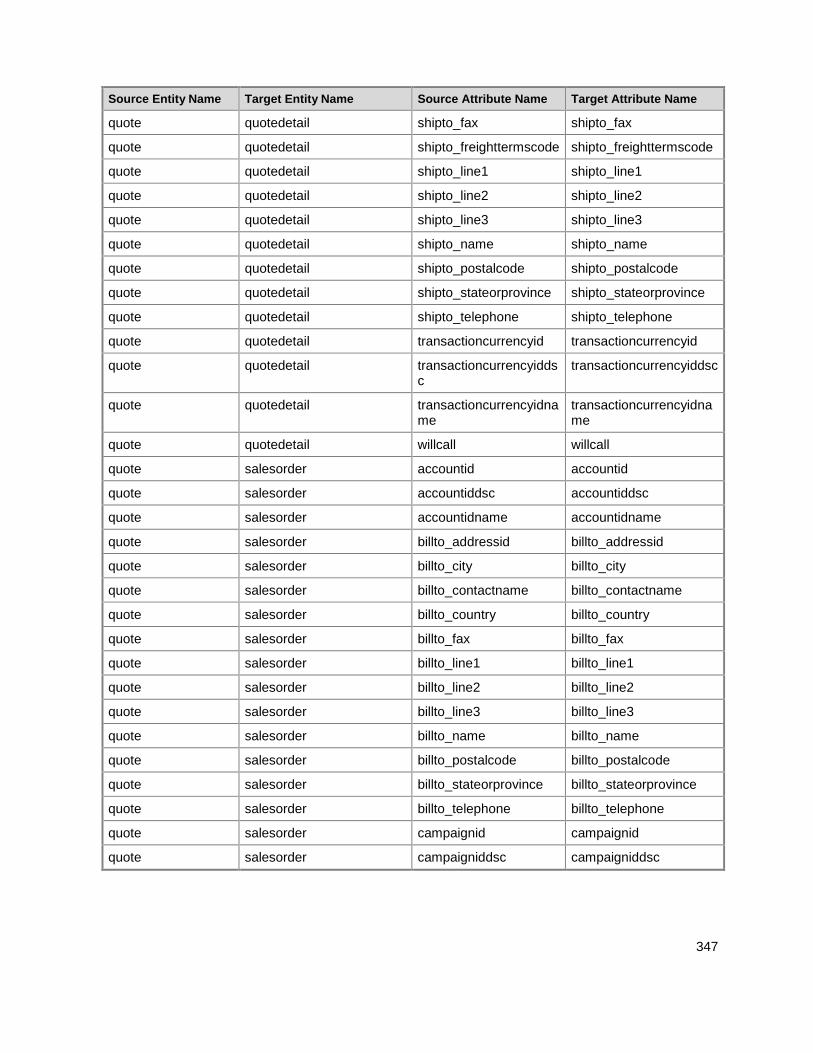
347
Source Entity Name Target Entity Name Source Attribute Name Target Attribute Name
quote quotedetail shipto_fax shipto_fax
quote quotedetail shipto_freighttermscode shipto_freighttermscode
quote quotedetail shipto_line1 shipto_line1
quote quotedetail shipto_line2 shipto_line2
quote quotedetail shipto_line3 shipto_line3
quote quotedetail shipto_name shipto_name
quote quotedetail shipto_postalcode shipto_postalcode
quote quotedetail shipto_stateorprovince shipto_stateorprovince
quote quotedetail shipto_telephone shipto_telephone
quote quotedetail transactioncurrencyid transactioncurrencyid
quote quotedetail transactioncurrencyiddsc
transactioncurrencyiddsc
quote quotedetail transactioncurrencyidname
transactioncurrencyidname
quote quotedetail willcall willcall
quote salesorder accountid accountid
quote salesorder accountiddsc accountiddsc
quote salesorder accountidname accountidname
quote salesorder billto_addressid billto_addressid
quote salesorder billto_city billto_city
quote salesorder billto_contactname billto_contactname
quote salesorder billto_country billto_country
quote salesorder billto_fax billto_fax
quote salesorder billto_line1 billto_line1
quote salesorder billto_line2 billto_line2
quote salesorder billto_line3 billto_line3
quote salesorder billto_name billto_name
quote salesorder billto_postalcode billto_postalcode
quote salesorder billto_stateorprovince billto_stateorprovince
quote salesorder billto_telephone billto_telephone
quote salesorder campaignid campaignid
quote salesorder campaigniddsc campaigniddsc
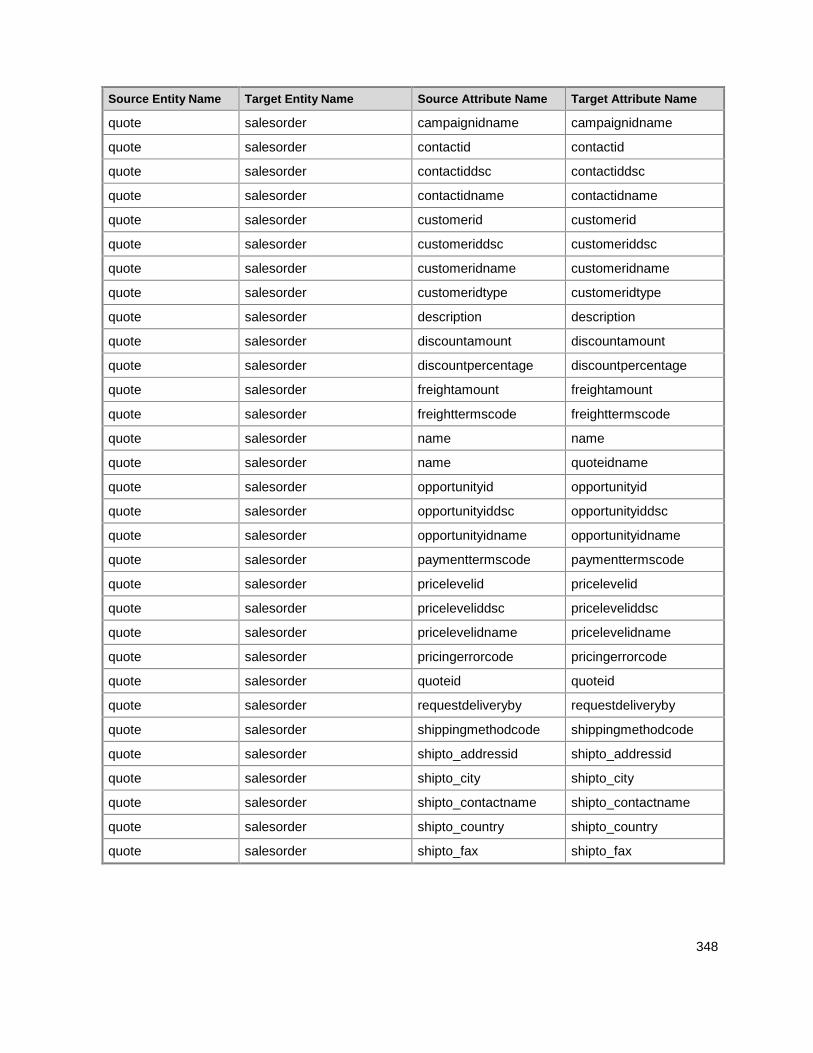
348
Source Entity Name Target Entity Name Source Attribute Name Target Attribute Name
quote salesorder campaignidname campaignidname
quote salesorder contactid contactid
quote salesorder contactiddsc contactiddsc
quote salesorder contactidname contactidname
quote salesorder customerid customerid
quote salesorder customeriddsc customeriddsc
quote salesorder customeridname customeridname
quote salesorder customeridtype customeridtype
quote salesorder description description
quote salesorder discountamount discountamount
quote salesorder discountpercentage discountpercentage
quote salesorder freightamount freightamount
quote salesorder freighttermscode freighttermscode
quote salesorder name name
quote salesorder name quoteidname
quote salesorder opportunityid opportunityid
quote salesorder opportunityiddsc opportunityiddsc
quote salesorder opportunityidname opportunityidname
quote salesorder paymenttermscode paymenttermscode
quote salesorder pricelevelid pricelevelid
quote salesorder priceleveliddsc priceleveliddsc
quote salesorder pricelevelidname pricelevelidname
quote salesorder pricingerrorcode pricingerrorcode
quote salesorder quoteid quoteid
quote salesorder requestdeliveryby requestdeliveryby
quote salesorder shippingmethodcode shippingmethodcode
quote salesorder shipto_addressid shipto_addressid
quote salesorder shipto_city shipto_city
quote salesorder shipto_contactname shipto_contactname
quote salesorder shipto_country shipto_country
quote salesorder shipto_fax shipto_fax
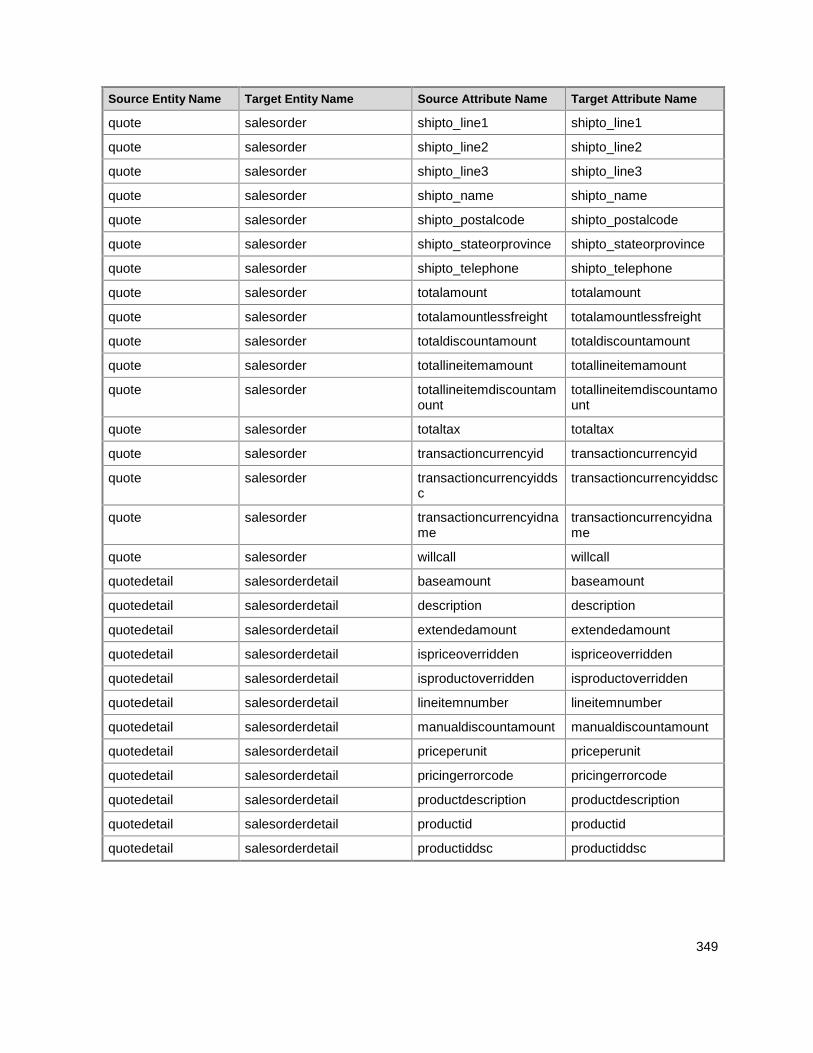
349
Source Entity Name Target Entity Name Source Attribute Name Target Attribute Name
quote salesorder shipto_line1 shipto_line1
quote salesorder shipto_line2 shipto_line2
quote salesorder shipto_line3 shipto_line3
quote salesorder shipto_name shipto_name
quote salesorder shipto_postalcode shipto_postalcode
quote salesorder shipto_stateorprovince shipto_stateorprovince
quote salesorder shipto_telephone shipto_telephone
quote salesorder totalamount totalamount
quote salesorder totalamountlessfreight totalamountlessfreight
quote salesorder totaldiscountamount totaldiscountamount
quote salesorder totallineitemamount totallineitemamount
quote salesorder totallineitemdiscountamount
totallineitemdiscountamount
quote salesorder totaltax totaltax
quote salesorder transactioncurrencyid transactioncurrencyid
quote salesorder transactioncurrencyiddsc
transactioncurrencyiddsc
quote salesorder transactioncurrencyidname
transactioncurrencyidname
quote salesorder willcall willcall
quotedetail salesorderdetail baseamount baseamount
quotedetail salesorderdetail description description
quotedetail salesorderdetail extendedamount extendedamount
quotedetail salesorderdetail ispriceoverridden ispriceoverridden
quotedetail salesorderdetail isproductoverridden isproductoverridden
quotedetail salesorderdetail lineitemnumber lineitemnumber
quotedetail salesorderdetail manualdiscountamount manualdiscountamount
quotedetail salesorderdetail priceperunit priceperunit
quotedetail salesorderdetail pricingerrorcode pricingerrorcode
quotedetail salesorderdetail productdescription productdescription
quotedetail salesorderdetail productid productid
quotedetail salesorderdetail productiddsc productiddsc

350
Source Entity Name Target Entity Name Source Attribute Name Target Attribute Name
quotedetail salesorderdetail productidname productidname
quotedetail salesorderdetail producttypecode producttypecode
quotedetail salesorderdetail quantity quantity
quotedetail salesorderdetail requestdeliveryby requestdeliveryby
quotedetail salesorderdetail salesrepid salesrepid
quotedetail salesorderdetail salesrepiddsc salesrepiddsc
quotedetail salesorderdetail salesrepidname salesrepidname
quotedetail salesorderdetail shipto_addressid shipto_addressid
quotedetail salesorderdetail shipto_city shipto_city
quotedetail salesorderdetail shipto_contactname shipto_contactname
quotedetail salesorderdetail shipto_country shipto_country
quotedetail salesorderdetail shipto_fax shipto_fax
quotedetail salesorderdetail shipto_freighttermscode shipto_freighttermscode
quotedetail salesorderdetail shipto_line1 shipto_line1
quotedetail salesorderdetail shipto_line2 shipto_line2
quotedetail salesorderdetail shipto_line3 shipto_line3
quotedetail salesorderdetail shipto_name shipto_name
quotedetail salesorderdetail shipto_postalcode shipto_postalcode
quotedetail salesorderdetail shipto_stateorprovince shipto_stateorprovince
quotedetail salesorderdetail shipto_telephone shipto_telephone
quotedetail salesorderdetail tax tax
quotedetail salesorderdetail transactioncurrencyid transactioncurrencyid
quotedetail salesorderdetail transactioncurrencyiddsc
transactioncurrencyiddsc
quotedetail salesorderdetail transactioncurrencyidname
transactioncurrencyidname
quotedetail salesorderdetail uomid uomid
quotedetail salesorderdetail uomiddsc uomiddsc
quotedetail salesorderdetail uomidname uomidname
quotedetail salesorderdetail volumediscountamount volumediscountamount
quotedetail salesorderdetail willcall willcall
recommendationmod recommendationmodelmap name recommendationmodelid
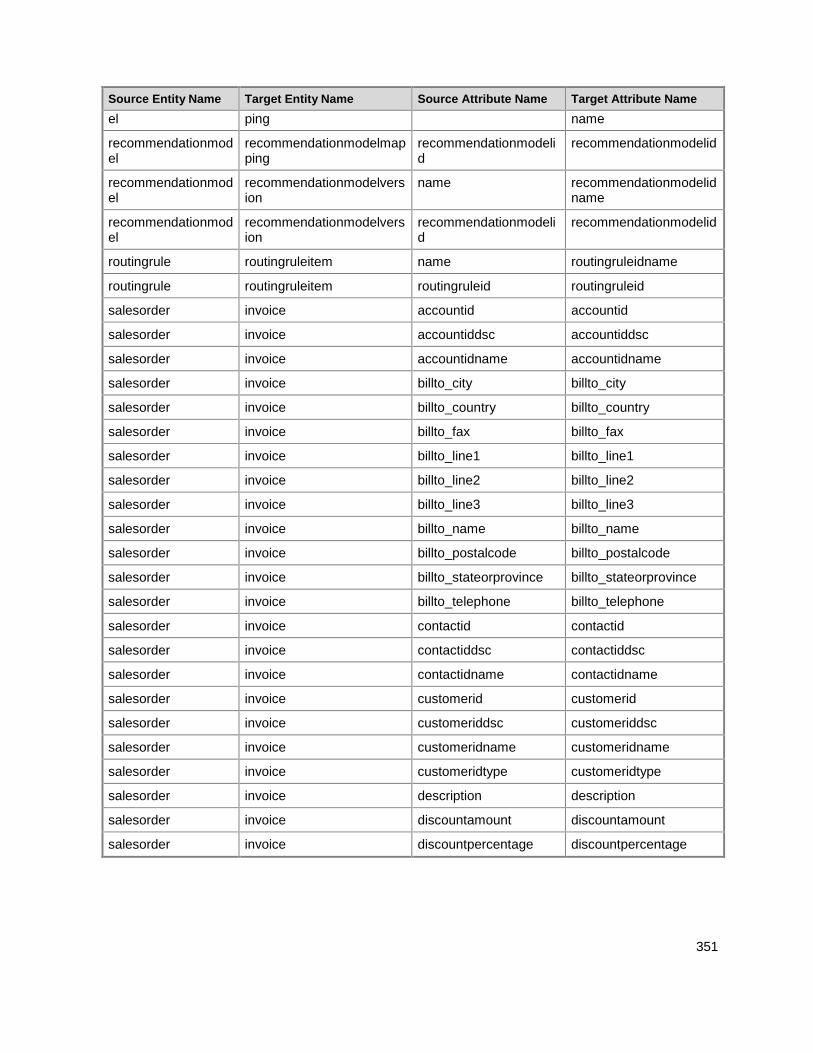
351
Source Entity Name Target Entity Name Source Attribute Name Target Attribute Name
el ping name
recommendationmodel
recommendationmodelmapping
recommendationmodelid
recommendationmodelid
recommendationmodel
recommendationmodelversion
name recommendationmodelidname
recommendationmodel
recommendationmodelversion
recommendationmodelid
recommendationmodelid
routingrule routingruleitem name routingruleidname
routingrule routingruleitem routingruleid routingruleid
salesorder invoice accountid accountid
salesorder invoice accountiddsc accountiddsc
salesorder invoice accountidname accountidname
salesorder invoice billto_city billto_city
salesorder invoice billto_country billto_country
salesorder invoice billto_fax billto_fax
salesorder invoice billto_line1 billto_line1
salesorder invoice billto_line2 billto_line2
salesorder invoice billto_line3 billto_line3
salesorder invoice billto_name billto_name
salesorder invoice billto_postalcode billto_postalcode
salesorder invoice billto_stateorprovince billto_stateorprovince
salesorder invoice billto_telephone billto_telephone
salesorder invoice contactid contactid
salesorder invoice contactiddsc contactiddsc
salesorder invoice contactidname contactidname
salesorder invoice customerid customerid
salesorder invoice customeriddsc customeriddsc
salesorder invoice customeridname customeridname
salesorder invoice customeridtype customeridtype
salesorder invoice description description
salesorder invoice discountamount discountamount
salesorder invoice discountpercentage discountpercentage
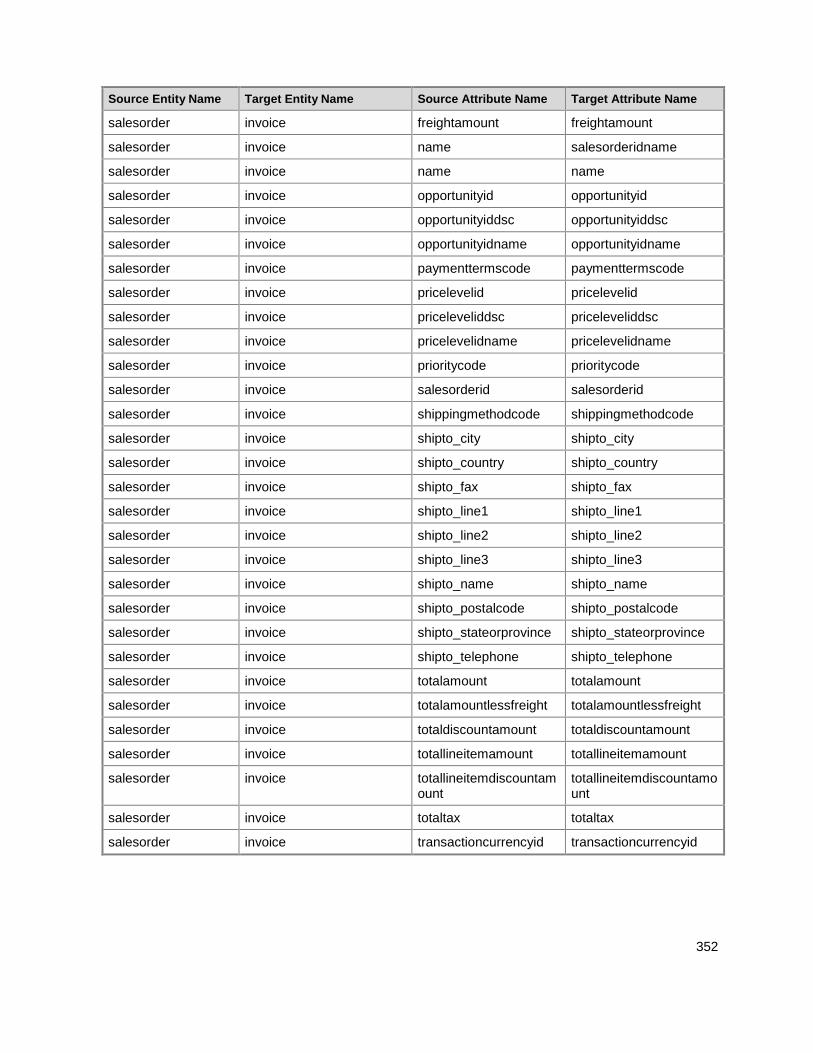
352
Source Entity Name Target Entity Name Source Attribute Name Target Attribute Name
salesorder invoice freightamount freightamount
salesorder invoice name salesorderidname
salesorder invoice name name
salesorder invoice opportunityid opportunityid
salesorder invoice opportunityiddsc opportunityiddsc
salesorder invoice opportunityidname opportunityidname
salesorder invoice paymenttermscode paymenttermscode
salesorder invoice pricelevelid pricelevelid
salesorder invoice priceleveliddsc priceleveliddsc
salesorder invoice pricelevelidname pricelevelidname
salesorder invoice prioritycode prioritycode
salesorder invoice salesorderid salesorderid
salesorder invoice shippingmethodcode shippingmethodcode
salesorder invoice shipto_city shipto_city
salesorder invoice shipto_country shipto_country
salesorder invoice shipto_fax shipto_fax
salesorder invoice shipto_line1 shipto_line1
salesorder invoice shipto_line2 shipto_line2
salesorder invoice shipto_line3 shipto_line3
salesorder invoice shipto_name shipto_name
salesorder invoice shipto_postalcode shipto_postalcode
salesorder invoice shipto_stateorprovince shipto_stateorprovince
salesorder invoice shipto_telephone shipto_telephone
salesorder invoice totalamount totalamount
salesorder invoice totalamountlessfreight totalamountlessfreight
salesorder invoice totaldiscountamount totaldiscountamount
salesorder invoice totallineitemamount totallineitemamount
salesorder invoice totallineitemdiscountamount
totallineitemdiscountamount
salesorder invoice totaltax totaltax
salesorder invoice transactioncurrencyid transactioncurrencyid
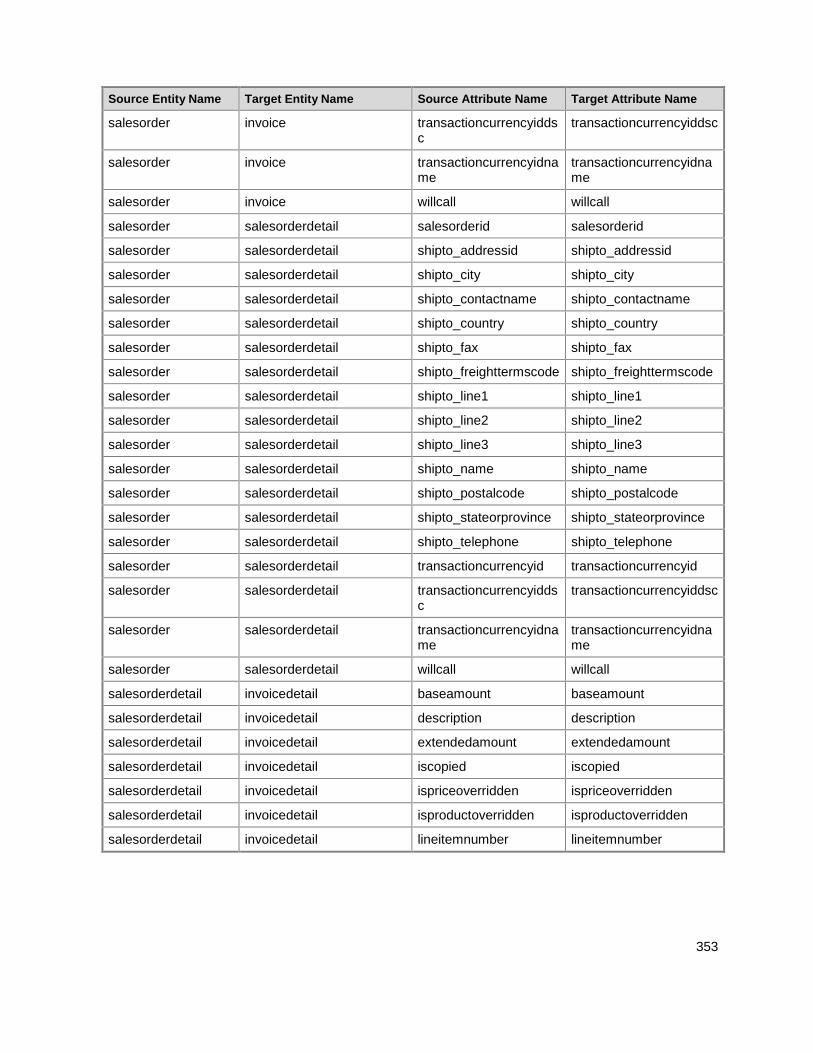
353
Source Entity Name Target Entity Name Source Attribute Name Target Attribute Name
salesorder invoice transactioncurrencyiddsc
transactioncurrencyiddsc
salesorder invoice transactioncurrencyidname
transactioncurrencyidname
salesorder invoice willcall willcall
salesorder salesorderdetail salesorderid salesorderid
salesorder salesorderdetail shipto_addressid shipto_addressid
salesorder salesorderdetail shipto_city shipto_city
salesorder salesorderdetail shipto_contactname shipto_contactname
salesorder salesorderdetail shipto_country shipto_country
salesorder salesorderdetail shipto_fax shipto_fax
salesorder salesorderdetail shipto_freighttermscode shipto_freighttermscode
salesorder salesorderdetail shipto_line1 shipto_line1
salesorder salesorderdetail shipto_line2 shipto_line2
salesorder salesorderdetail shipto_line3 shipto_line3
salesorder salesorderdetail shipto_name shipto_name
salesorder salesorderdetail shipto_postalcode shipto_postalcode
salesorder salesorderdetail shipto_stateorprovince shipto_stateorprovince
salesorder salesorderdetail shipto_telephone shipto_telephone
salesorder salesorderdetail transactioncurrencyid transactioncurrencyid
salesorder salesorderdetail transactioncurrencyiddsc
transactioncurrencyiddsc
salesorder salesorderdetail transactioncurrencyidname
transactioncurrencyidname
salesorder salesorderdetail willcall willcall
salesorderdetail invoicedetail baseamount baseamount
salesorderdetail invoicedetail description description
salesorderdetail invoicedetail extendedamount extendedamount
salesorderdetail invoicedetail iscopied iscopied
salesorderdetail invoicedetail ispriceoverridden ispriceoverridden
salesorderdetail invoicedetail isproductoverridden isproductoverridden
salesorderdetail invoicedetail lineitemnumber lineitemnumber
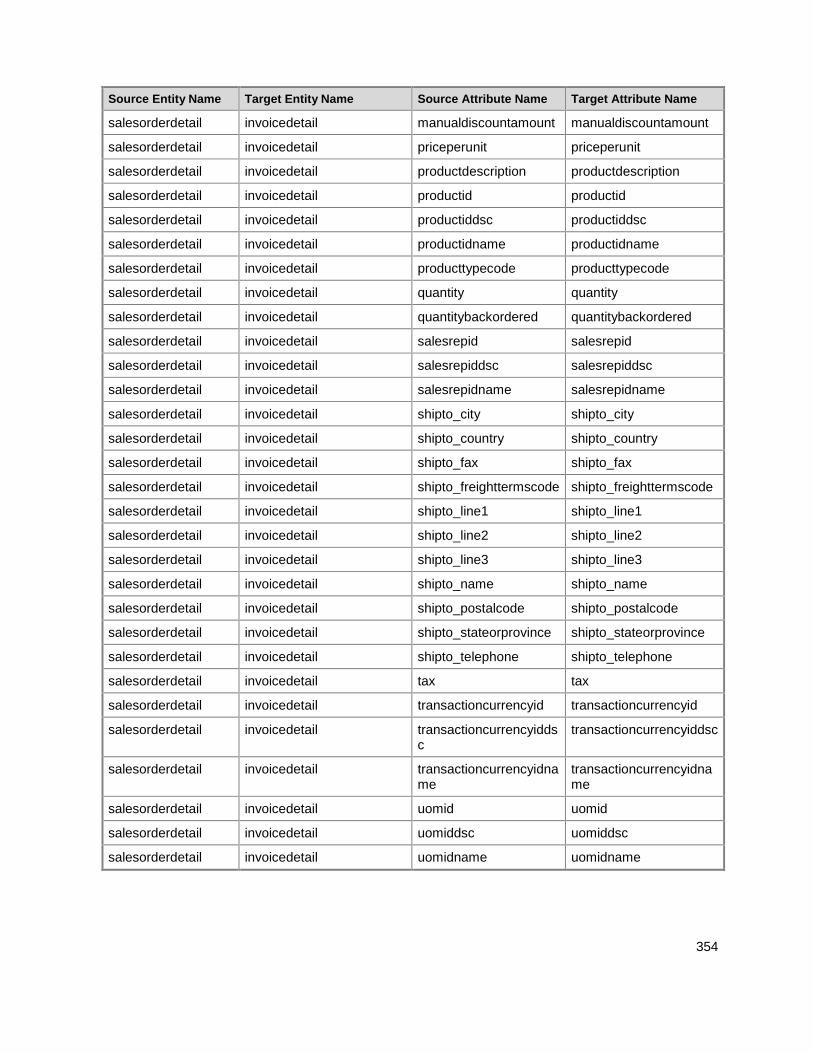
354
Source Entity Name Target Entity Name Source Attribute Name Target Attribute Name
salesorderdetail invoicedetail manualdiscountamount manualdiscountamount
salesorderdetail invoicedetail priceperunit priceperunit
salesorderdetail invoicedetail productdescription productdescription
salesorderdetail invoicedetail productid productid
salesorderdetail invoicedetail productiddsc productiddsc
salesorderdetail invoicedetail productidname productidname
salesorderdetail invoicedetail producttypecode producttypecode
salesorderdetail invoicedetail quantity quantity
salesorderdetail invoicedetail quantitybackordered quantitybackordered
salesorderdetail invoicedetail salesrepid salesrepid
salesorderdetail invoicedetail salesrepiddsc salesrepiddsc
salesorderdetail invoicedetail salesrepidname salesrepidname
salesorderdetail invoicedetail shipto_city shipto_city
salesorderdetail invoicedetail shipto_country shipto_country
salesorderdetail invoicedetail shipto_fax shipto_fax
salesorderdetail invoicedetail shipto_freighttermscode shipto_freighttermscode
salesorderdetail invoicedetail shipto_line1 shipto_line1
salesorderdetail invoicedetail shipto_line2 shipto_line2
salesorderdetail invoicedetail shipto_line3 shipto_line3
salesorderdetail invoicedetail shipto_name shipto_name
salesorderdetail invoicedetail shipto_postalcode shipto_postalcode
salesorderdetail invoicedetail shipto_stateorprovince shipto_stateorprovince
salesorderdetail invoicedetail shipto_telephone shipto_telephone
salesorderdetail invoicedetail tax tax
salesorderdetail invoicedetail transactioncurrencyid transactioncurrencyid
salesorderdetail invoicedetail transactioncurrencyiddsc
transactioncurrencyiddsc
salesorderdetail invoicedetail transactioncurrencyidname
transactioncurrencyidname
salesorderdetail invoicedetail uomid uomid
salesorderdetail invoicedetail uomiddsc uomiddsc
salesorderdetail invoicedetail uomidname uomidname
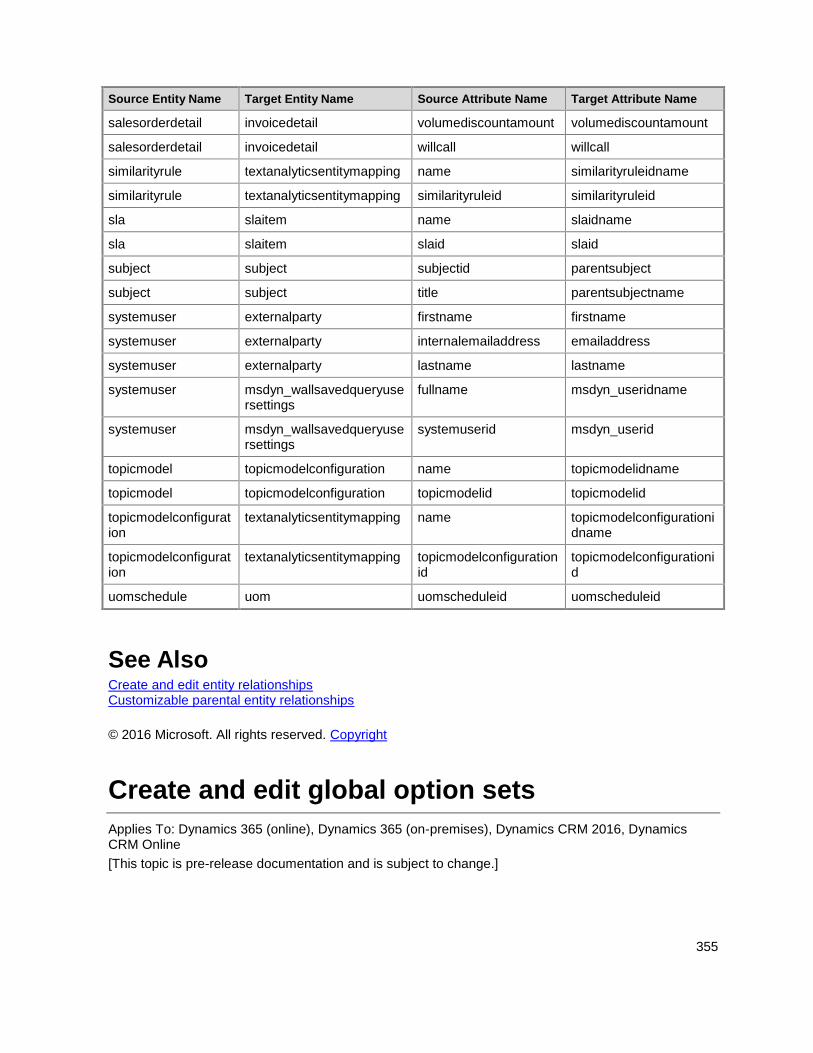
355
Source Entity Name Target Entity Name Source Attribute Name Target Attribute Name
salesorderdetail invoicedetail volumediscountamount volumediscountamount
salesorderdetail invoicedetail willcall willcall
similarityrule textanalyticsentitymapping name similarityruleidname
similarityrule textanalyticsentitymapping similarityruleid similarityruleid
sla slaitem name slaidname
sla slaitem slaid slaid
subject subject subjectid parentsubject
subject subject title parentsubjectname
systemuser externalparty firstname firstname
systemuser externalparty internalemailaddress emailaddress
systemuser externalparty lastname lastname
systemuser msdyn_wallsavedqueryusersettings
fullname msdyn_useridname
systemuser msdyn_wallsavedqueryusersettings
systemuserid msdyn_userid
topicmodel topicmodelconfiguration name topicmodelidname
topicmodel topicmodelconfiguration topicmodelid topicmodelid
topicmodelconfiguration
textanalyticsentitymapping name topicmodelconfigurationidname
topicmodelconfiguration
textanalyticsentitymapping topicmodelconfigurationid
topicmodelconfigurationid
uomschedule uom uomscheduleid uomscheduleid
See Also Create and edit entity relationships Customizable parental entity relationships
© 2016 Microsoft. All rights reserved. Copyright
Create and edit global option sets
Applies To: Dynamics 365 (online), Dynamics 365 (on-premises), Dynamics CRM 2016, Dynamics CRM Online
[This topic is pre-release documentation and is subject to change.]
356
An option set is a type of field that can be included in an entity. It defines a set of options. When an option set is displayed in a form it uses a drop-down list control. When displayed in Advanced Find it uses a picklist control. Sometimes option sets are called picklists by developers.
You can define an option set to use a set of options defined within itself (locally) or it can use a set of options defined elsewhere (globally) which can be used by other option set fields. Global option sets are useful when you have a standard set of categories that can apply to more than one entity. Maintaining two separate option sets with the same values is difficult and if they are not synchronized you can see errors, especially if you are mapping entity fields in a one-to-many entity relationship. More information: Map entity fields
In This Topic Configure global option sets
Use a global option set
Configure global option sets
Create a global option set
1. Go to Settings > Customizations.
2. Choose Customize the System.
3. In the solution explorer, choose Option Sets.
4. On the actions toolbar choose New.
5. Enter a Display Name and (optionally) a Description.
The Name field value will be generated based on the value of the Display Name you enter.
The Name field value will include the customization prefix for the solution publisher for the solution you are working in. If the customization prefix is important to you, make sure you are working in the context of a solution that has the customization prefix you want for this global option set. See Solution publisher for information about how to change the customization prefix.
The Name field value must be unique. If the generated value is the same as an existing global option set, you will need to change it before you can save.
6. Unlike the Description for fields, the Description value for a global option set is not displayed as a
tooltip when the field is used in a form. This description is only visible in the list of global options.
You can use the description to provide information about why you have created this global option
set and what it should be used for.
7. In the toolbar choose Save to save the global option set. You can then edit the options in the option
set using the instructions below.
Edit a global option set
1. Go to Settings > Customizations.
357
2. Choose Customize the System.
3. In the solution explorer, choose Option Sets.
4. Double-click one of the existing option sets to open it.
5. You can edit the Display Name or Description fields, but editing the options is the most common
reason to edit a global option set.
6.
a. In the Options section you can create, edit, delete and change the order in which options are
presented.
b.
i. Choose the green + icon to create an option.
ii. Each option you create will have a Label value of Item and a Value that starts with 10,000
and increments for each option you add.
Edit the Label to be the text you want to display.
You can edit the Value, but we recommend that you accept the auto-generated value. The value must be unique within the options.
The Description for each option is not visible to people using the application. Use it to provide some definition of the category it represents so that others editing this option set in the future can understand your intention in adding it.
c.
i. To edit an option that already exists you may change the Label, Value and Description
values just as you would when creating a new option.
d.
i. To delete an option you select one and choose the delete icon.
Important
If you delete an option that has already been used in entity records, the data value in those records will be invalid. If you are not sure, use Advanced Find to see if there are any records set to the value you are about to delete. If they are set to the option you plan to delete, you should change the data before you delete the option. After you delete the option you will no longer be able to use Advanced Find to query records that have that option set.
e.
i. Use the green arrows in options toolbar to move selected options up or down.
Use the ascending or descending sort buttons to sort all options in the respective direction according to their label values.
Use a global option set To use a global option set, you create or edit a field in the field editor.
358
1. Go to Settings > Customizations.
2. Choose Customize the System.
3. In the solution explorer, select an entity and then choose Fields.
4. Select the field you want to edit or select New to create a new field.
5. In the field editor, select Yes for Use Existing Option Set.
If you are creating a new field you need to first select Option Set for the Data Type.
6. Make a selection in the Option Set drop-down menu.
7. When you have completed your entries, select Save and Close.
Note
You can also get to the field editor through Forms. Select an entity and then choose Forms. Select a field and then choose Change Properties. In the dialog box select the Details tab and then choose Edit.
In addition to the option sets you see in the solution explorer, there are also a number of system global option sets. You can use these if they happen to meet your need but they aren’t customizable.
Note
The system global option set options may change with updates or new versions so we recommend you don’t use them unless you are certain that your requirements align with the way that the application uses these values.
In addition to selecting the global option set, you can also choose which of the options (if any) should be the Default Value for that field.
See Also Create and edit metadata Create and edit entities Create and edit fields Create and edit entity relationships
© 2016 Microsoft. All rights reserved. Copyright
Create and design forms
Applies To: Dynamics 365 (online), Dynamics 365 (on-premises), Dynamics CRM 2016, Dynamics CRM Online
[This topic is pre-release documentation and is subject to change.]
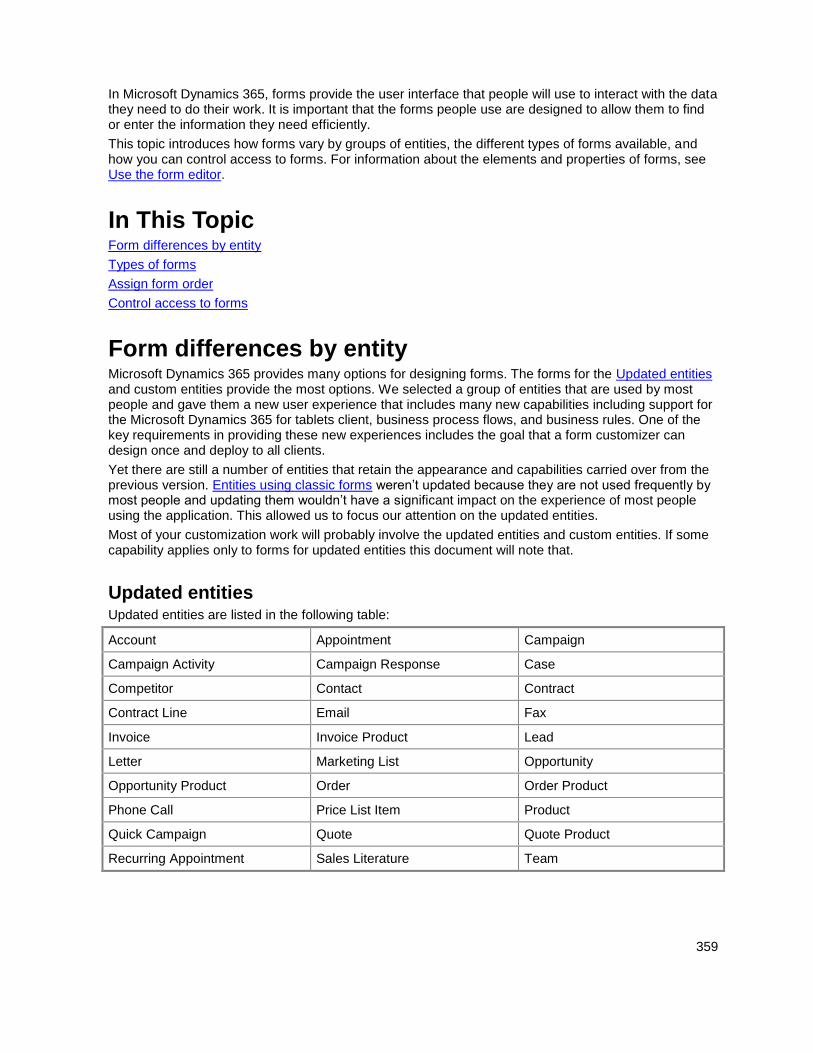
359
In Microsoft Dynamics 365, forms provide the user interface that people will use to interact with the data they need to do their work. It is important that the forms people use are designed to allow them to find or enter the information they need efficiently.
This topic introduces how forms vary by groups of entities, the different types of forms available, and how you can control access to forms. For information about the elements and properties of forms, see Use the form editor.
In This Topic Form differences by entity
Types of forms
Assign form order
Control access to forms
Form differences by entity Microsoft Dynamics 365 provides many options for designing forms. The forms for the Updated entities and custom entities provide the most options. We selected a group of entities that are used by most people and gave them a new user experience that includes many new capabilities including support for the Microsoft Dynamics 365 for tablets client, business process flows, and business rules. One of the key requirements in providing these new experiences includes the goal that a form customizer can design once and deploy to all clients.
Yet there are still a number of entities that retain the appearance and capabilities carried over from the previous version. Entities using classic forms weren’t updated because they are not used frequently by most people and updating them wouldn’t have a significant impact on the experience of most people using the application. This allowed us to focus our attention on the updated entities.
Most of your customization work will probably involve the updated entities and custom entities. If some capability applies only to forms for updated entities this document will note that.
Updated entities Updated entities are listed in the following table:
Account Appointment Campaign
Campaign Activity Campaign Response Case
Competitor Contact Contract
Contract Line Email Fax
Invoice Invoice Product Lead
Letter Marketing List Opportunity
Opportunity Product Order Order Product
Phone Call Price List Item Product
Quick Campaign Quote Quote Product
Recurring Appointment Sales Literature Team
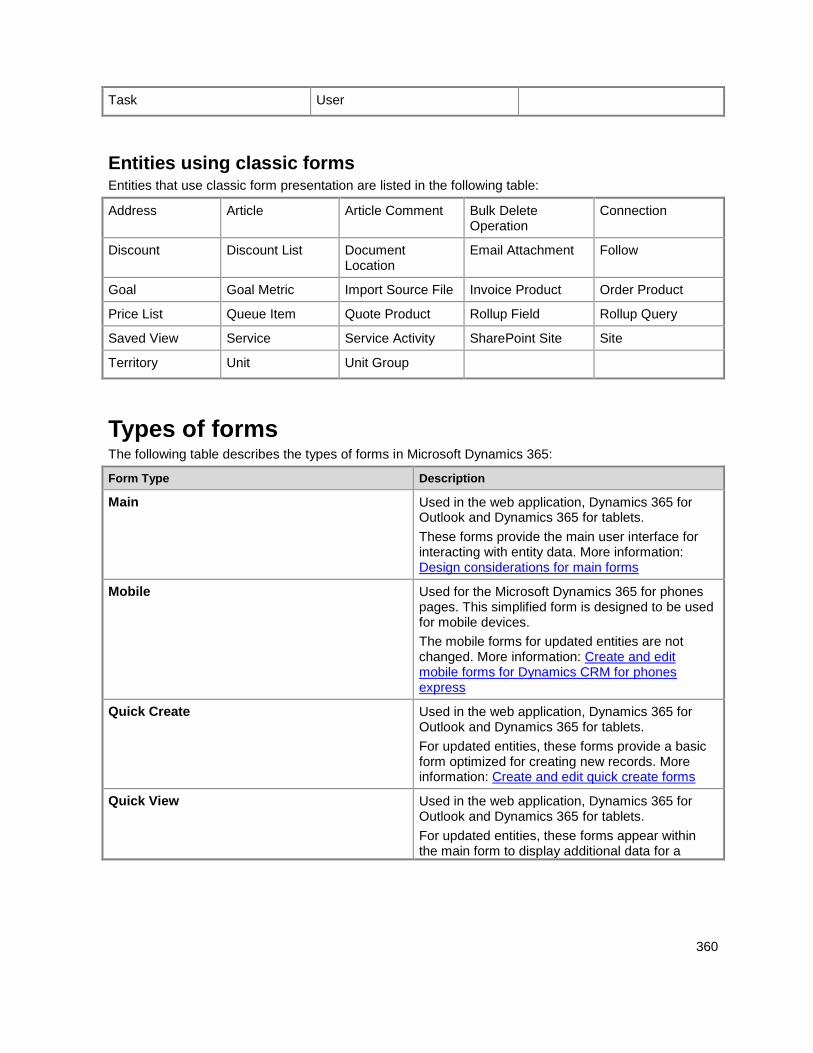
360
Task User
Entities using classic forms Entities that use classic form presentation are listed in the following table:
Address Article Article Comment Bulk Delete Operation
Connection
Discount Discount List Document Location
Email Attachment Follow
Goal Goal Metric Import Source File Invoice Product Order Product
Price List Queue Item Quote Product Rollup Field Rollup Query
Saved View Service Service Activity SharePoint Site Site
Territory Unit Unit Group
Types of forms The following table describes the types of forms in Microsoft Dynamics 365:
Form Type Description
Main Used in the web application, Dynamics 365 for Outlook and Dynamics 365 for tablets.
These forms provide the main user interface for interacting with entity data. More information: Design considerations for main forms
Mobile Used for the Microsoft Dynamics 365 for phones pages. This simplified form is designed to be used for mobile devices.
The mobile forms for updated entities are not changed. More information: Create and edit mobile forms for Dynamics CRM for phones express
Quick Create Used in the web application, Dynamics 365 for Outlook and Dynamics 365 for tablets.
For updated entities, these forms provide a basic form optimized for creating new records. More information: Create and edit quick create forms
Quick View Used in the web application, Dynamics 365 for Outlook and Dynamics 365 for tablets.
For updated entities, these forms appear within the main form to display additional data for a
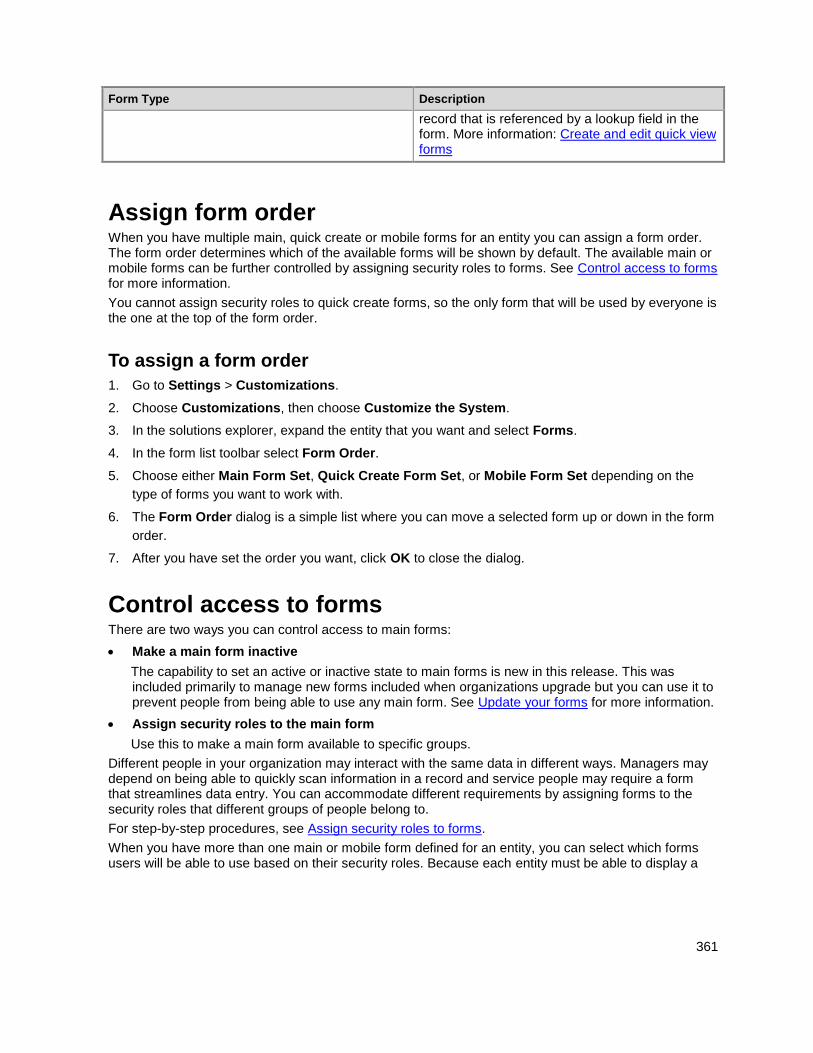
361
Form Type Description
record that is referenced by a lookup field in the form. More information: Create and edit quick view forms
Assign form order When you have multiple main, quick create or mobile forms for an entity you can assign a form order. The form order determines which of the available forms will be shown by default. The available main or mobile forms can be further controlled by assigning security roles to forms. See Control access to forms for more information.
You cannot assign security roles to quick create forms, so the only form that will be used by everyone is the one at the top of the form order.
To assign a form order
1. Go to Settings > Customizations.
2. Choose Customizations, then choose Customize the System.
3. In the solutions explorer, expand the entity that you want and select Forms.
4. In the form list toolbar select Form Order.
5. Choose either Main Form Set, Quick Create Form Set, or Mobile Form Set depending on the
type of forms you want to work with.
6. The Form Order dialog is a simple list where you can move a selected form up or down in the form
order.
7. After you have set the order you want, click OK to close the dialog.
Control access to forms There are two ways you can control access to main forms:
Make a main form inactive
The capability to set an active or inactive state to main forms is new in this release. This was included primarily to manage new forms included when organizations upgrade but you can use it to prevent people from being able to use any main form. See Update your forms for more information.
Assign security roles to the main form
Use this to make a main form available to specific groups.
Different people in your organization may interact with the same data in different ways. Managers may depend on being able to quickly scan information in a record and service people may require a form that streamlines data entry. You can accommodate different requirements by assigning forms to the security roles that different groups of people belong to.
For step-by-step procedures, see Assign security roles to forms.
When you have more than one main or mobile form defined for an entity, you can select which forms users will be able to use based on their security roles. Because each entity must be able to display a
362
form for any user, at least one form must be designated as a ”fallback” form – a form visible to users whose security roles do not have any forms explicitly assigned to them.
Note
Quick Create and Quick View forms cannot be assigned to security roles.
Within the Form editor or from the Forms grid you can assign security roles to a form. However, if there is only one form for the entity, you will not be able to clear the Enabled for fallback option in the Assign Security Roles dialog box. In this case, even though you have assigned security roles to the form, anyone associated with a security role you did not include will still be able to view the form because it is enabled for fallback.
After you create a second main or mobile form for the entity, you will be able to clear the Enabled for fallback option for one of them. The system will always make sure that at least one form is enabled for fallback.
When you have more than one main form, you can specify a form order that will control which of the forms a person is allowed to see will be the one they see by default. If there is more than one form they can use, they can change forms and the form they choose will be their default form until they choose a different one. This preference is stored in their browser. If they use a different computer or browser they will see the original default form.
Strategies to manage the fallback form Strategies to manage the fallback form include the following:
All users view the same form
If you do not require multiple forms for an entity you do not need a fallback form.
Create a contingency form
If you are using role-based forms because you want to restrict the information people might view or edit, consider creating a form that has a minimum of information displayed. Then, in the Assign Security Roles dialog box, select Display only to these selected security roles, but do not select any roles except System Administrator, and select Enabled for fallback. The result is that this form will never be seen by anyone except the System Administrator and anyone whose security roles have not been associated with a specific form. You could include a HTML web resource in the form with information about why little information is visible in the form and a link to information about how to request being added to a security role that is associated with a from or to include a new security role for a form.
Note
You can’t include a web resource in a form header or footer.
Create a generic form If you use role-based forms to provide a customized user experience based on a person’s role in the organization, you can set your least specialized form as the fallback form and configure it to display for
363
everyone. Then, create customized forms for specific security roles and configure those forms to only display for security roles that require them. Do not enable these forms for fallback. Finally, in the Forms list use the Form Order dialog to specify which forms to display ranking them from most exclusive to least exclusive. Your fallback form will be at the bottom of the list. This strategy will cause people seeing the form that has been customized for their role as the default form, yet they can still use the form selector to select the most common form if they want. Whatever form they select will remain their default form until they select a different form.
Use form scripting Finally, in the web application it is possible, but not recommended, for a developer to use scripts in the form Onload event to use the Xrm.Page.ui.formSelector.items collection to query available forms and use the navigate method to direct users to a specific form. Remember that the navigate method will cause the form to load again (and the Onload event to occur again). Your logic in the event handler should always check some condition before you use the navigate method to avoid an endless loop or unnecessarily restrict users options to navigate between forms.
This approach will not work for Microsoft Dynamics 365 for tablets because multiple forms are not available for selection.
See Also Customize your Dynamics 365 system Create and edit metadata Create and edit views
© 2016 Microsoft. All rights reserved. Copyright
Use the form editor
Applies To: Dynamics 365 (online), Dynamics 365 (on-premises), Dynamics CRM 2016, Dynamics CRM Online
[This topic is pre-release documentation and is subject to change.]
This topic explains how to access the form editor, the features it contains, the form elements you can edit, and the properties of those elements.
In This Topic Open the form editor
Form editor user interface
Form properties
Visibility options
Tab properties
Section properties
Common field properties
364
Special field properties
Sub-grid properties
Quick view control properties
Web resource properties
IFRAME properties
Notes control
Configure Bing maps
Edit Navigation
Timer control
Additional controls for Dynamics 365 for phones and tablets
Configure event handlers
Privacy notices
Open the form editor You can access the form editor through the command bar or the ribbon, depending on the entity. Both of these methods will open the form in the context of the default solution. If you create any new solution components in the process of editing the form, for example web resources, the names of the components will use the solution publisher customization prefix for the default solution and these components will only be included in the default solution. If you want any new solution components to be included in a specific unmanaged solution, you should open the form editor through that unmanaged solution.
To access the form editor through the command bar
1. Open a record.
2. If there are multiple main forms for the entity, verify that the form is the one you want to edit. If it
isn’t, use the form selector to choose the form you want to edit.
3. Click the More Commands button .
4. Click Form Editor.
To access the form editor through the default solution
1. Go to Settings > Customizations.
2. Click Customize the System to open the default solution.
3. Under Components, expand Entities, and then the entity you want, and click Forms.
4. In the list of forms, click the form you want to edit.
To access the form editor for an unmanaged solution
1. Go to Settings > Customizations.
2. Click Solutions.
365
3. Double-click the unmanaged solution you want to work with.
Locate the entity with the form you want to edit. If the entity isn’t there, you’ll need to add it.
Add an entity to an unmanaged solution
a. Select the Entities node and, in the toolbar above the list, click Add Existing.
b. In the Select Solution Components dialog box, with the Component Type selector set to
Entity, select the entity you want to add and click OK.
c. If the Missing Required Components dialog box appears, you can click No, do not include
required components if you don’t intend to export this unmanaged solution to another
organization. If you choose not to include missing required components at this time, you can
add them later. You’ll receive notification again if you export this solution in the future.
4. In the solution explorer expand the entity with the form you want to edit and select Forms.
5. In the list of forms, double-click the form you want to edit.
Form editor user interface The form editor displays commands in two ribbon tabs: Home and Insert. For details about the commands available there, see Home tab and Insert tab.

366
The body of the form editor is divided into three areas: Navigation, Body, and Explorer.
Navigation area
Located on the left side, use the navigation area to control access to related entities or to add links to web resources or URLs to be displayed in the main pane of the form. To edit navigation you must first select the Navigation command in the Select group of the Home
tab.
Forms for Entities using classic forms provide a navigation experience that is visually
similar to what you see in the navigation area. Forms for Updated entities provide
navigation options through the navigation bar, but use the same data to control what
navigation options are available. More information: Edit Navigation
Body area
Located in the center, use the body area to control the layout of the form. You can select and drag form elements to position them. Double-clicking on an element will open the properties for the element.
To add a field, select it from the Field Explorer and drag it into a section.
To add an element that is not a field, select where you want to place it and use the
appropriate command from the Insert tab add it.
To remove an element, select it and use the Remove command in the Edit group of the
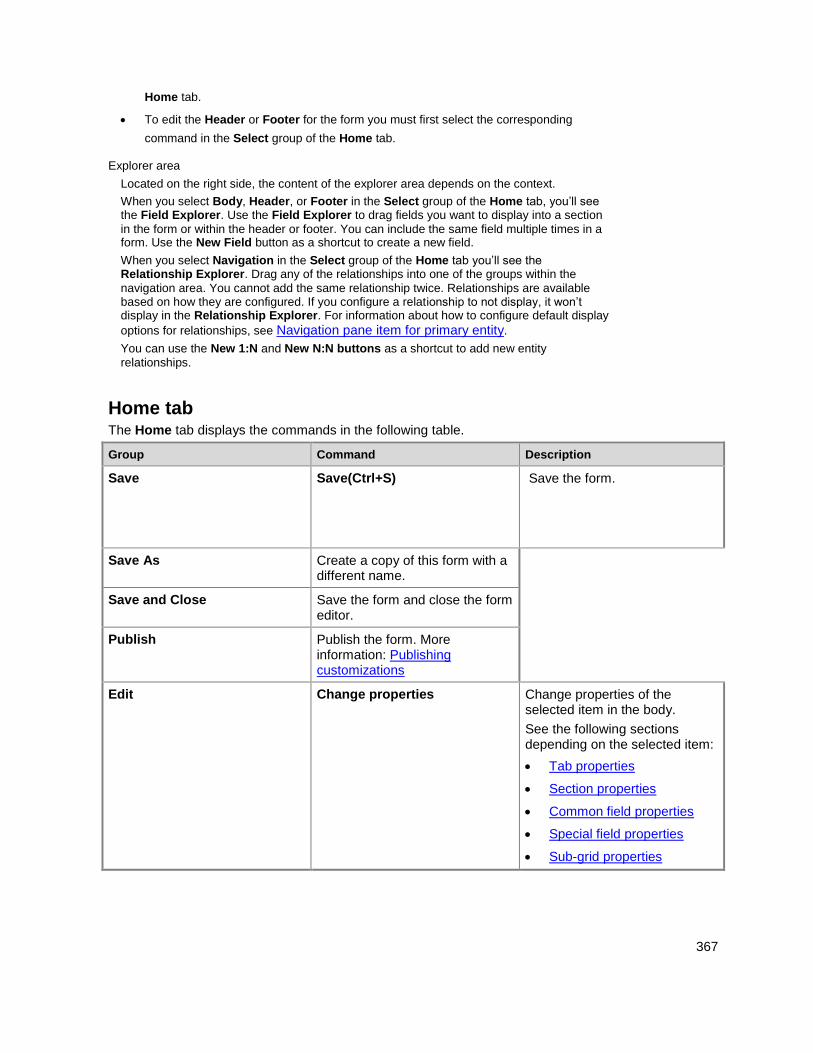
367
Home tab.
To edit the Header or Footer for the form you must first select the corresponding
command in the Select group of the Home tab.
Explorer area
Located on the right side, the content of the explorer area depends on the context.
When you select Body, Header, or Footer in the Select group of the Home tab, you’ll see the Field Explorer. Use the Field Explorer to drag fields you want to display into a section
in the form or within the header or footer. You can include the same field multiple times in a form. Use the New Field button as a shortcut to create a new field.
When you select Navigation in the Select group of the Home tab you’ll see the Relationship Explorer. Drag any of the relationships into one of the groups within the
navigation area. You cannot add the same relationship twice. Relationships are available based on how they are configured. If you configure a relationship to not display, it won’t display in the Relationship Explorer. For information about how to configure default display
options for relationships, see Navigation pane item for primary entity.
You can use the New 1:N and New N:N buttons as a shortcut to add new entity
relationships.
Home tab The Home tab displays the commands in the following table.
Group Command Description
Save
Save(Ctrl+S) Save the form.
Save As Create a copy of this form with a different name.
Save and Close Save the form and close the form editor.
Publish Publish the form. More information: Publishing customizations
Edit
Change properties Change properties of the selected item in the body.
See the following sections depending on the selected item:
Tab properties
Section properties
Common field properties
Special field properties
Sub-grid properties
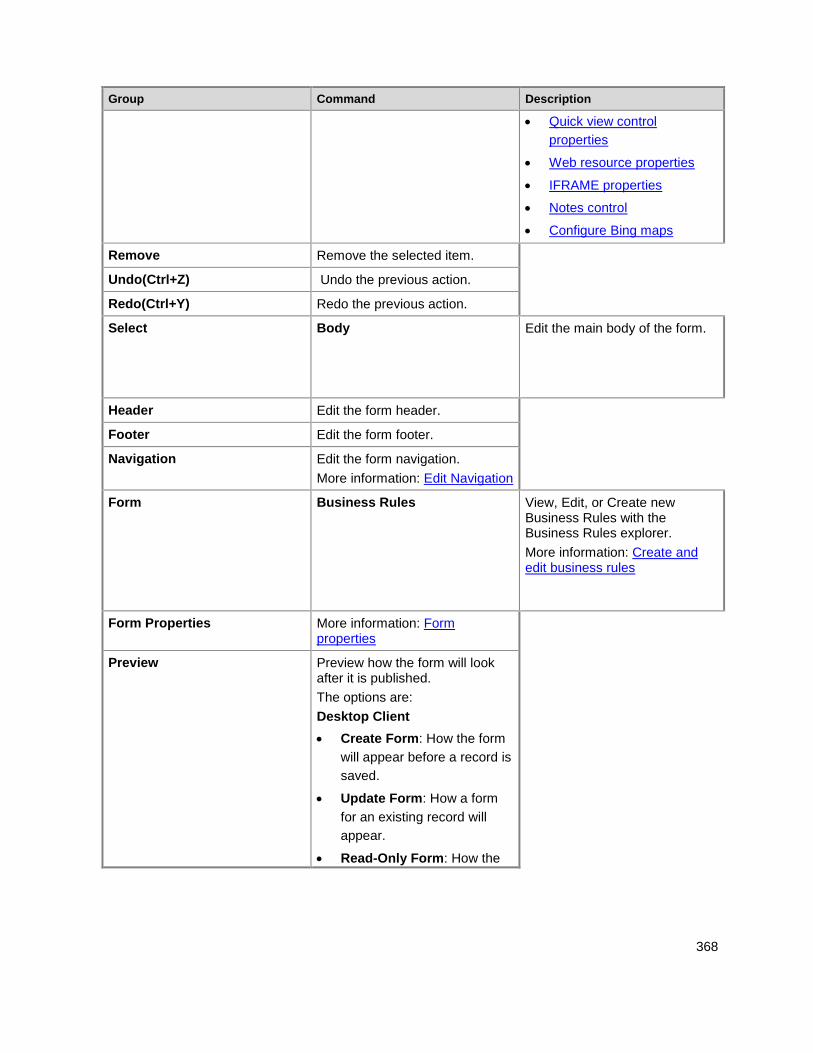
368
Group Command Description
Quick view control
properties
Web resource properties
IFRAME properties
Notes control
Configure Bing maps
Remove Remove the selected item.
Undo(Ctrl+Z) Undo the previous action.
Redo(Ctrl+Y) Redo the previous action.
Select
Body Edit the main body of the form.
Header Edit the form header.
Footer Edit the form footer.
Navigation Edit the form navigation.
More information: Edit Navigation
Form
Business Rules View, Edit, or Create new Business Rules with the Business Rules explorer.
More information: Create and edit business rules
Form Properties More information: Form properties
Preview Preview how the form will look after it is published.
The options are:
Desktop Client
Create Form: How the form
will appear before a record is
saved.
Update Form: How a form
for an existing record will
appear.
Read-Only Form: How the
369
Group Command Description
form will appear for people
who have only read access
to a record.
Scripts in the form can be tested but certain scenarios, like checking data values in the OnLoad event, can’t be tested because the preview form doesn’t contain data.
Mobile Client
These options appear if the form is available on mobile.
Note
If you see unexpected results while previewing the mobile form, try clearing the browser cache.
Mobile form preview doesn’t work in a browser’s In Private mode.
Tablet (1024 x 768 4:3):
How the form will appear on
tablets.
Phone (360 x 640 9:16):
How the form will appear on
phones.
Mobile preview forms contain data, but the form is blocked for editing. It will always display the first record (oldest) that the current user has access to. If no record is available, it’s possible to create a new one through a command in the preview window.
Enable Security Roles Use this to set which security roles will have access to the forms. More information: Control access to forms
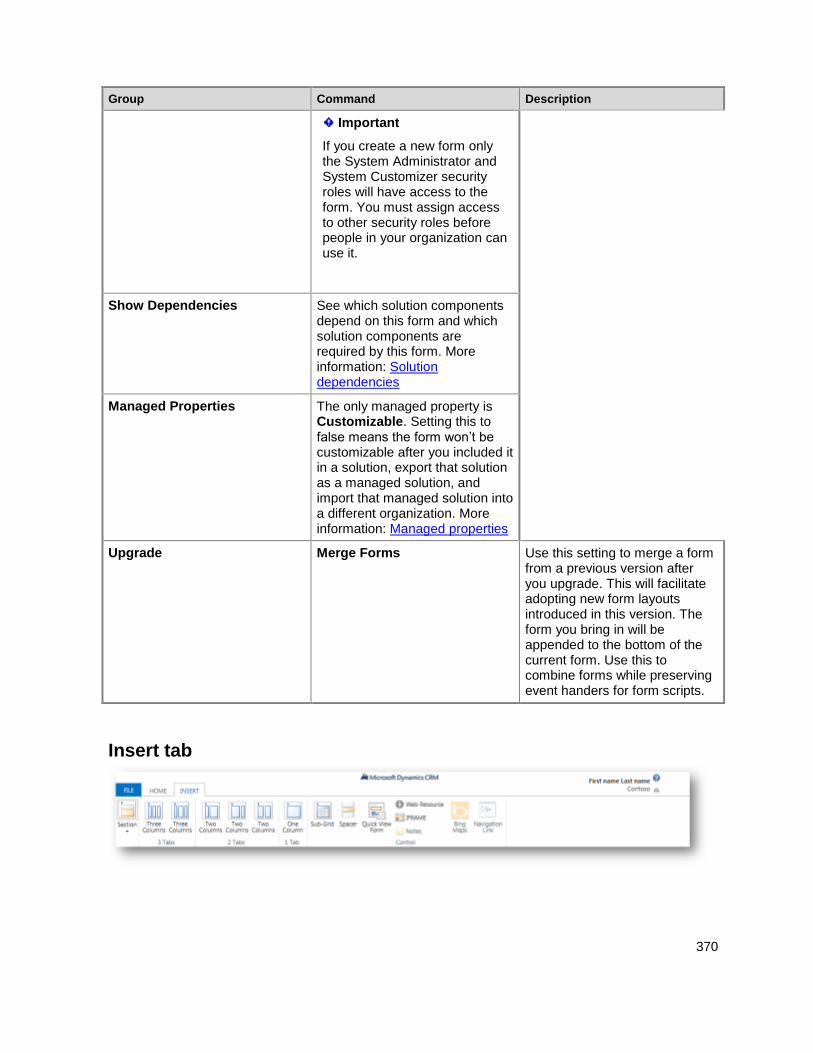
370
Group Command Description
Important
If you create a new form only the System Administrator and System Customizer security roles will have access to the form. You must assign access to other security roles before people in your organization can use it.
Show Dependencies See which solution components depend on this form and which solution components are required by this form. More information: Solution dependencies
Managed Properties The only managed property is Customizable. Setting this to false means the form won’t be customizable after you included it in a solution, export that solution as a managed solution, and import that managed solution into a different organization. More information: Managed properties
Upgrade Merge Forms Use this setting to merge a form from a previous version after you upgrade. This will facilitate adopting new form layouts introduced in this version. The form you bring in will be appended to the bottom of the current form. Use this to combine forms while preserving event handers for form scripts.
Insert tab
371
The Insert tab displays the commands in the following table:
Group Command Description
Section Add a section to a selected tab. You can choose to include a section with one to four columns.
More information: Section properties
3 Tabs
Three Columns Insert a three-column tab with equal widths.
More information: Tab properties
Three Columns Insert a three-column tab with a wider middle column.
2 Tabs
Two Columns Insert a two-column tab with a wider right column.
Two Columns Insert a two-column tab with a wider left column.
Two Columns Insert a two-column tab with equal width columns.
1 Tab One Column Insert a one-column tab.
Control Sub-Grid Format a sub-grid and insert it into the form.
More information: Sub-grid properties
Spacer Insert an empty space.
Quick View Form Insert a Quick View Form.
More information: Quick view control properties
Web Resource Insert a web resource.
More information: Web resource properties
IFRAME Insert an IFRAME.
More information: IFRAME properties
Notes Insert a control to view activities, posts, and notes. More information: Notes control
Bing Maps Insert a control to show maps in the form. More information: Configure Bing maps
372
Group Command Description
Navigation Link Insert a navigation link into the navigation area. This command is disabled unless you select the Navigation command in the Select group of the Home tab. More information: Navigation link properties
Timer Insert a timer control. More information: Timer control
Form properties The properties of the form are in the following table:
Tab Property Description
Events Form Libraries Manage which JavaScript web resources are available in the form and the order in which they will be loaded.
Event Handers Configure which JavaScript functions from the Form Libraries will run for the OnLoad and OnSave form events and the order in which they’ll be run.
Display Form Name Enter a name that will be meaningful to people. This name will be shown to people when they use the form. If they can use multiple forms configured for the entity they will use this name to differentiate between available forms.
Description Enter a description that explains how this form is different from other main forms. This description is only shown in the list of forms for an entity in the solution explorer.
Page Navigation You can choose not to show navigation items.
In forms for updated entities this means the primary name value for the record currently being viewed will not appear in the navigation
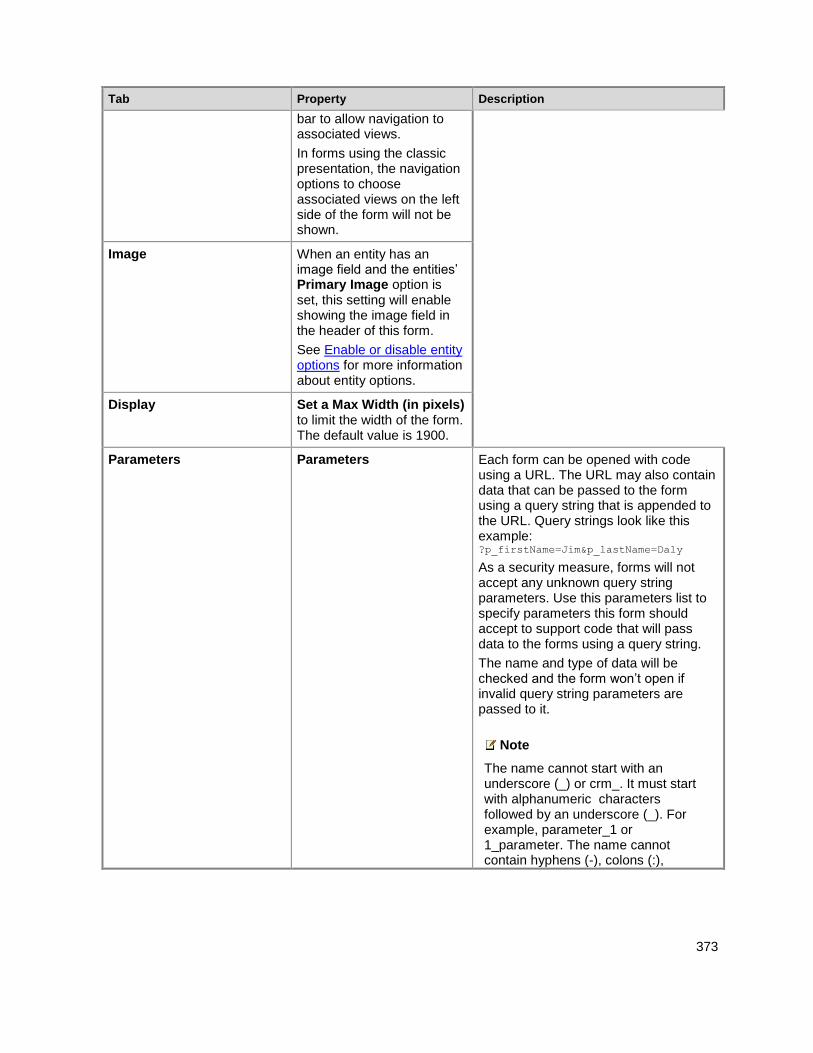
373
Tab Property Description
bar to allow navigation to associated views.
In forms using the classic presentation, the navigation options to choose associated views on the left side of the form will not be shown.
Image When an entity has an image field and the entities’ Primary Image option is set, this setting will enable showing the image field in the header of this form.
See Enable or disable entity options for more information about entity options.
Display Set a Max Width (in pixels) to limit the width of the form. The default value is 1900.
Parameters Parameters Each form can be opened with code using a URL. The URL may also contain data that can be passed to the form using a query string that is appended to the URL. Query strings look like this example: ?p_firstName=Jim&p_lastName=Daly
As a security measure, forms will not accept any unknown query string parameters. Use this parameters list to specify parameters this form should accept to support code that will pass data to the forms using a query string.
The name and type of data will be checked and the form won’t open if invalid query string parameters are passed to it.
Note
The name cannot start with an underscore (_) or crm_. It must start with alphanumeric characters followed by an underscore (_). For example, parameter_1 or 1_parameter. The name cannot contain hyphens (-), colons (:),
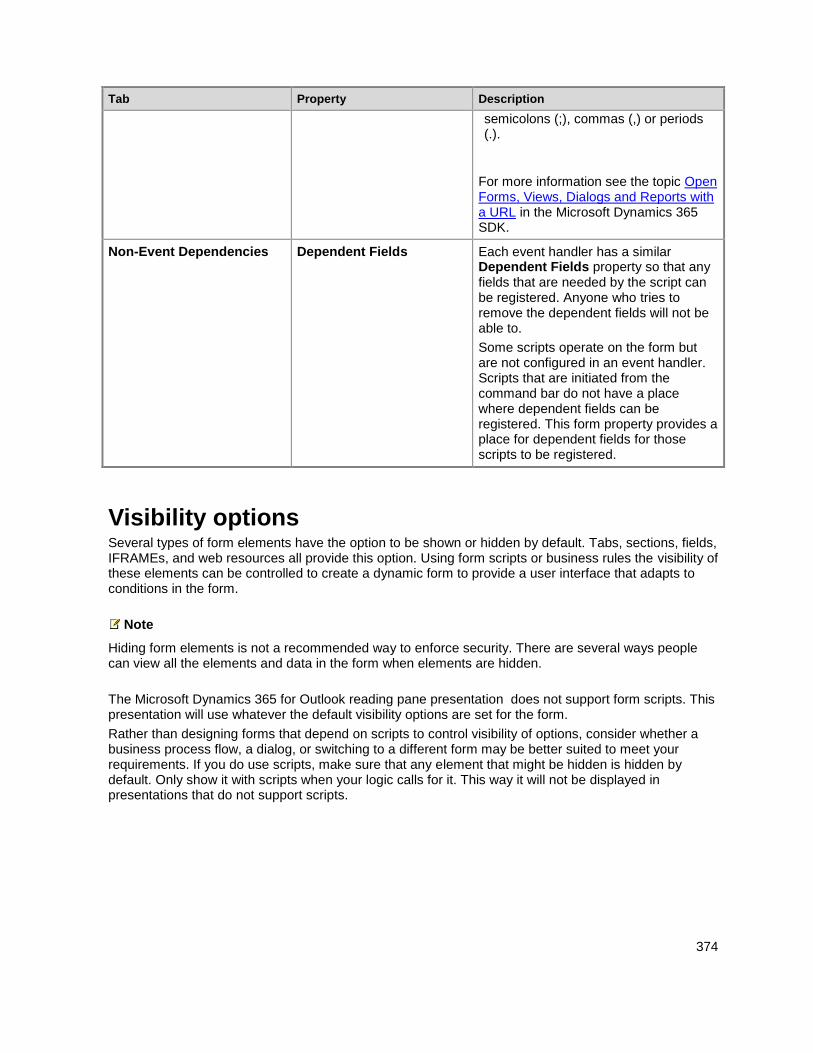
374
Tab Property Description
semicolons (;), commas (,) or periods (.).
For more information see the topic Open Forms, Views, Dialogs and Reports with a URL in the Microsoft Dynamics 365 SDK.
Non-Event Dependencies Dependent Fields Each event handler has a similar Dependent Fields property so that any fields that are needed by the script can be registered. Anyone who tries to remove the dependent fields will not be able to.
Some scripts operate on the form but are not configured in an event handler. Scripts that are initiated from the command bar do not have a place where dependent fields can be registered. This form property provides a place for dependent fields for those scripts to be registered.
Visibility options Several types of form elements have the option to be shown or hidden by default. Tabs, sections, fields, IFRAMEs, and web resources all provide this option. Using form scripts or business rules the visibility of these elements can be controlled to create a dynamic form to provide a user interface that adapts to conditions in the form.
Note
Hiding form elements is not a recommended way to enforce security. There are several ways people can view all the elements and data in the form when elements are hidden.
The Microsoft Dynamics 365 for Outlook reading pane presentation does not support form scripts. This presentation will use whatever the default visibility options are set for the form.
Rather than designing forms that depend on scripts to control visibility of options, consider whether a business process flow, a dialog, or switching to a different form may be better suited to meet your requirements. If you do use scripts, make sure that any element that might be hidden is hidden by default. Only show it with scripts when your logic calls for it. This way it will not be displayed in presentations that do not support scripts.
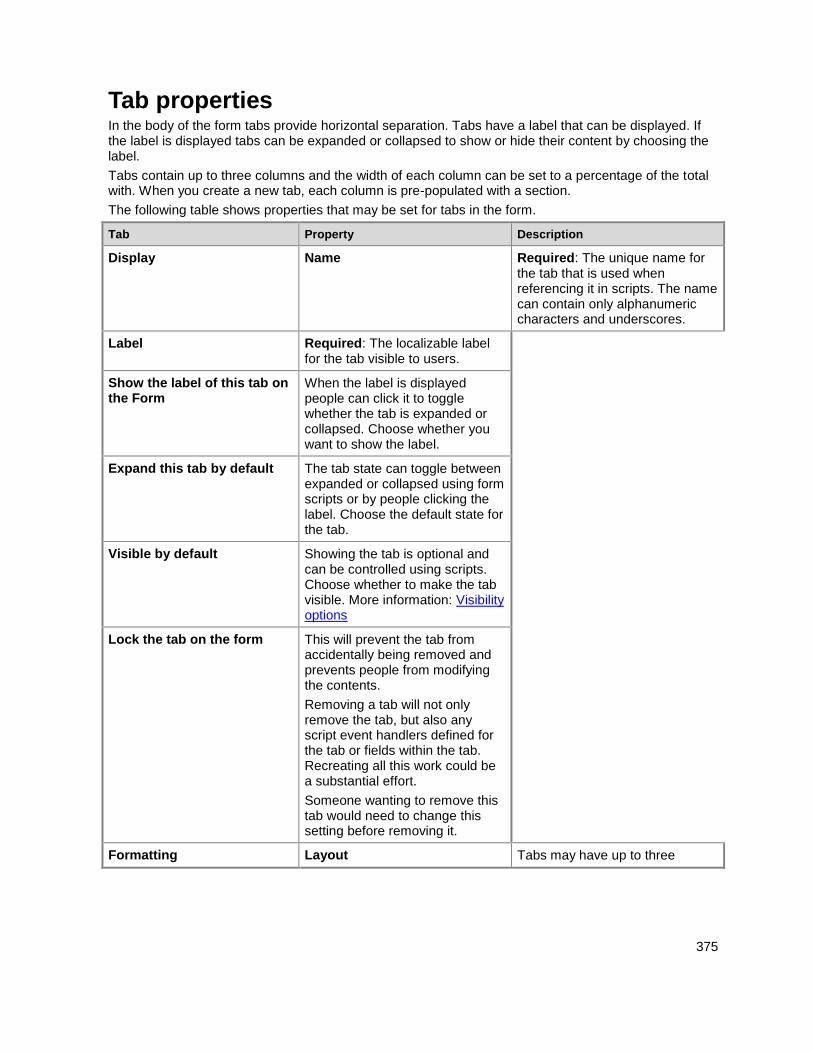
375
Tab properties In the body of the form tabs provide horizontal separation. Tabs have a label that can be displayed. If the label is displayed tabs can be expanded or collapsed to show or hide their content by choosing the label.
Tabs contain up to three columns and the width of each column can be set to a percentage of the total with. When you create a new tab, each column is pre-populated with a section.
The following table shows properties that may be set for tabs in the form.
Tab Property Description
Display Name Required: The unique name for the tab that is used when referencing it in scripts. The name can contain only alphanumeric characters and underscores.
Label Required: The localizable label for the tab visible to users.
Show the label of this tab on the Form
When the label is displayed people can click it to toggle whether the tab is expanded or collapsed. Choose whether you want to show the label.
Expand this tab by default The tab state can toggle between expanded or collapsed using form scripts or by people clicking the label. Choose the default state for the tab.
Visible by default Showing the tab is optional and can be controlled using scripts. Choose whether to make the tab visible. More information: Visibility options
Lock the tab on the form This will prevent the tab from accidentally being removed and prevents people from modifying the contents.
Removing a tab will not only remove the tab, but also any script event handlers defined for the tab or fields within the tab. Recreating all this work could be a substantial effort.
Someone wanting to remove this tab would need to change this setting before removing it.
Formatting Layout Tabs may have up to three
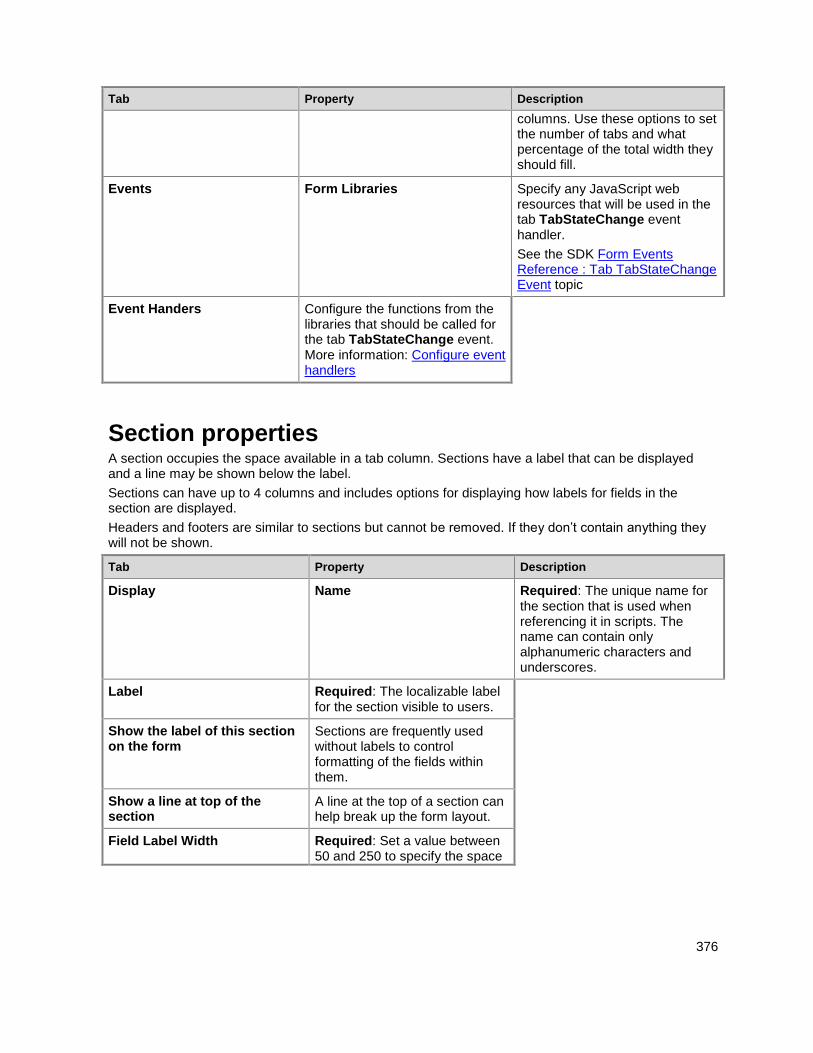
376
Tab Property Description
columns. Use these options to set the number of tabs and what percentage of the total width they should fill.
Events Form Libraries Specify any JavaScript web resources that will be used in the tab TabStateChange event handler.
See the SDK Form Events Reference : Tab TabStateChange Event topic
Event Handers Configure the functions from the libraries that should be called for the tab TabStateChange event. More information: Configure event handlers
Section properties A section occupies the space available in a tab column. Sections have a label that can be displayed and a line may be shown below the label.
Sections can have up to 4 columns and includes options for displaying how labels for fields in the section are displayed.
Headers and footers are similar to sections but cannot be removed. If they don’t contain anything they will not be shown.
Tab Property Description
Display Name Required: The unique name for the section that is used when referencing it in scripts. The name can contain only alphanumeric characters and underscores.
Label Required: The localizable label for the section visible to users.
Show the label of this section on the form
Sections are frequently used without labels to control formatting of the fields within them.
Show a line at top of the section
A line at the top of a section can help break up the form layout.
Field Label Width Required: Set a value between 50 and 250 to specify the space
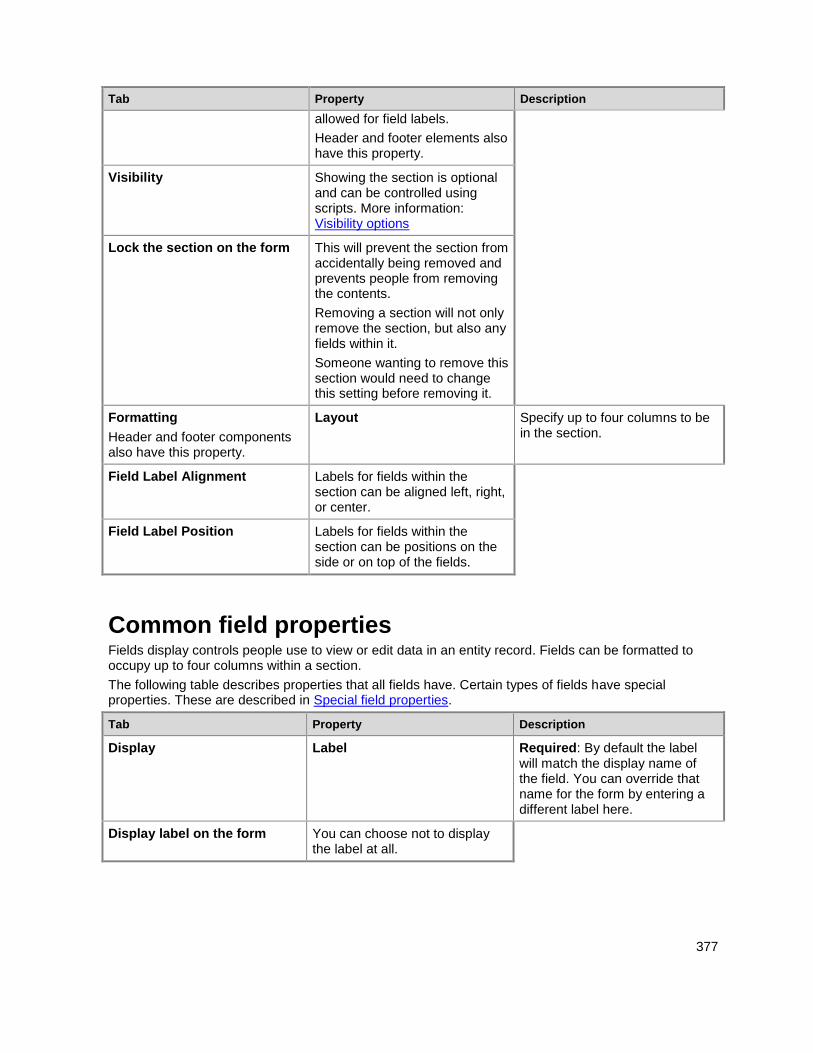
377
Tab Property Description
allowed for field labels.
Header and footer elements also have this property.
Visibility Showing the section is optional and can be controlled using scripts. More information: Visibility options
Lock the section on the form This will prevent the section from accidentally being removed and prevents people from removing the contents.
Removing a section will not only remove the section, but also any fields within it.
Someone wanting to remove this section would need to change this setting before removing it.
Formatting
Header and footer components also have this property.
Layout Specify up to four columns to be in the section.
Field Label Alignment Labels for fields within the section can be aligned left, right, or center.
Field Label Position Labels for fields within the section can be positions on the side or on top of the fields.
Common field properties Fields display controls people use to view or edit data in an entity record. Fields can be formatted to occupy up to four columns within a section.
The following table describes properties that all fields have. Certain types of fields have special properties. These are described in Special field properties.
Tab Property Description
Display Label Required: By default the label will match the display name of the field. You can override that name for the form by entering a different label here.
Display label on the form You can choose not to display the label at all.

378
Tab Property Description
Field is read-only You can specify that the field is not editable. Using form scripts you can change this to enable or disable editing based on criteria evaluated in the script.
Lock the field on the form This will prevent the field from being removed from the form accidentally. This will prevent any configuration you have applied to the field, such as event handlers, from being cleared if the field were removed. To remove this field a customizer would need to clear this setting first.
Visible by default Showing the field is optional and can be controlled using scripts. More information: Visibility options
Formatting Select the number of columns the control occupies
When the section containing the fields has more than one column you can set the field to occupy up to the number of columns that the section has.
Details Display Name, Name, and Description
These read-only fields are for reference. Click the Edit button for convenient access to the field definition if you want to edit it.
Each instance of a field in the form has a name property so that they can be referenced in form scripts, but this name is managed by the application. The first instance of the field is the name of the field specified when it was created. More information: Create and edit fields
For each additional time that a field is included in a form, the name appends a number starting with 1 to the end. So if the field name is ‘new_cost’, the first instance is ‘new_cost’, the second is ‘new_cost1’, and so on for each instance of the field in the form.
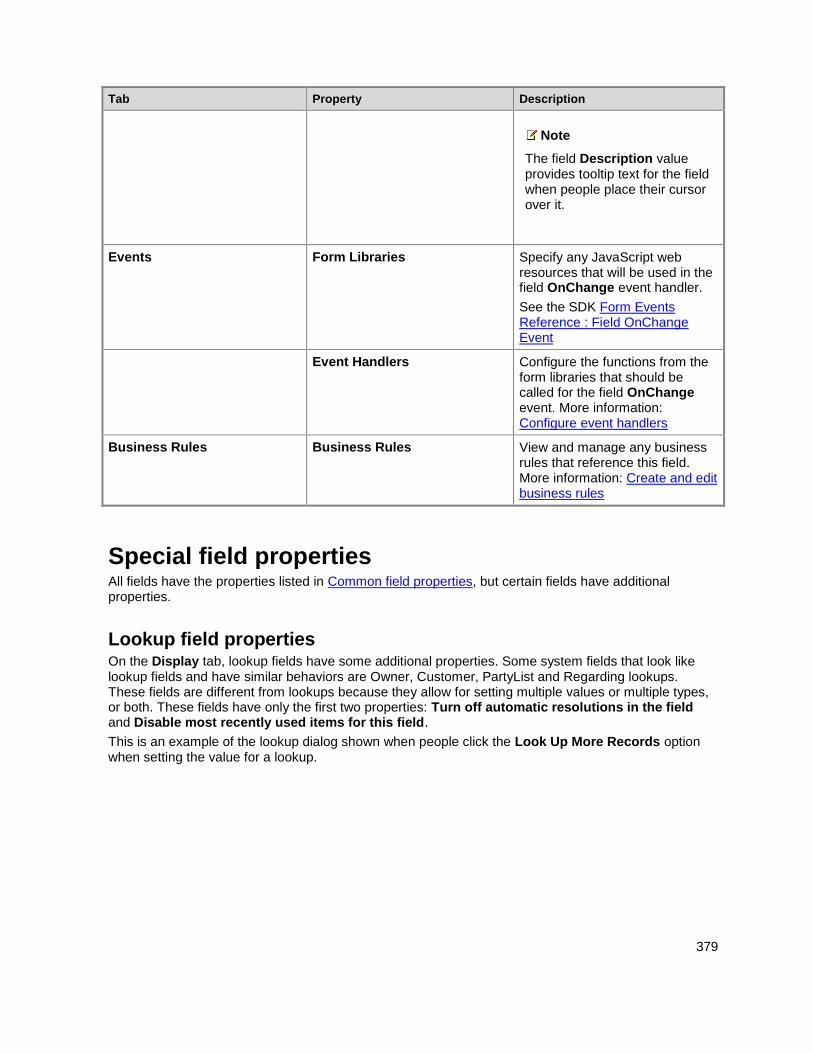
379
Tab Property Description
Note
The field Description value provides tooltip text for the field when people place their cursor over it.
Events Form Libraries Specify any JavaScript web resources that will be used in the field OnChange event handler.
See the SDK Form Events Reference : Field OnChange Event
Event Handlers Configure the functions from the form libraries that should be called for the field OnChange event. More information: Configure event handlers
Business Rules Business Rules View and manage any business rules that reference this field. More information: Create and edit business rules
Special field properties All fields have the properties listed in Common field properties, but certain fields have additional properties.
Lookup field properties On the Display tab, lookup fields have some additional properties. Some system fields that look like lookup fields and have similar behaviors are Owner, Customer, PartyList and Regarding lookups. These fields are different from lookups because they allow for setting multiple values or multiple types, or both. These fields have only the first two properties: Turn off automatic resolutions in the field and Disable most recently used items for this field.
This is an example of the lookup dialog shown when people click the Look Up More Records option when setting the value for a lookup.
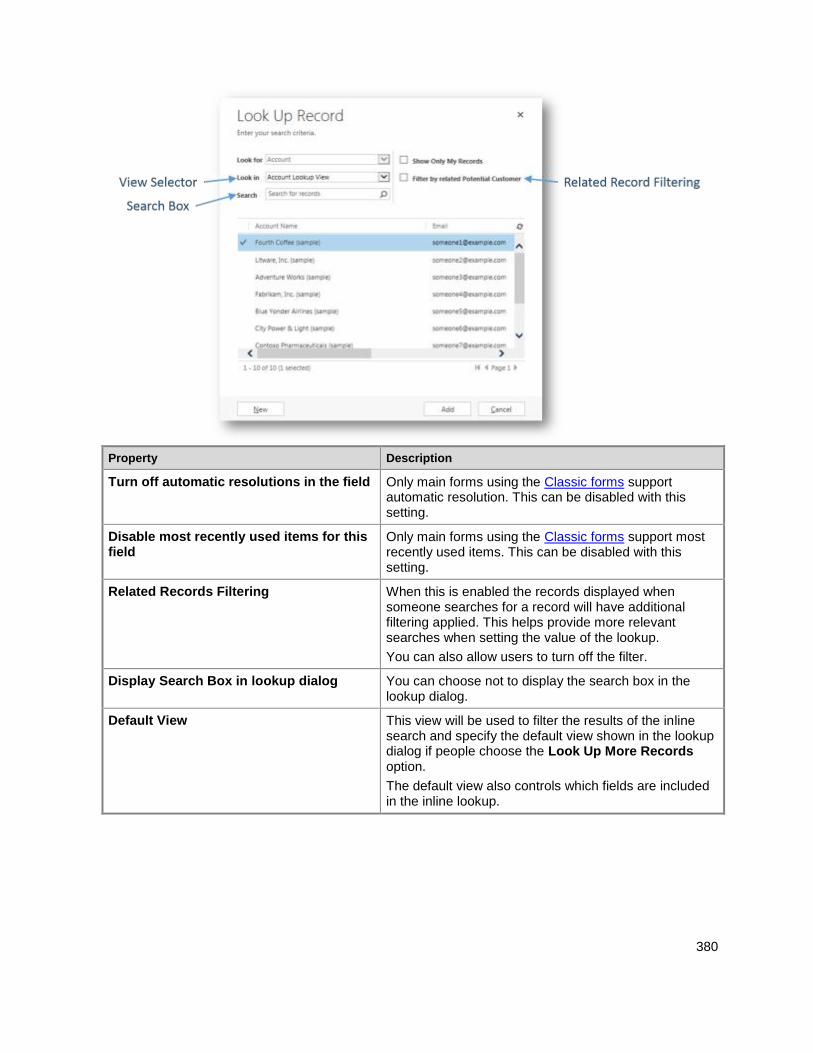
380
Property Description
Turn off automatic resolutions in the field Only main forms using the Classic forms support automatic resolution. This can be disabled with this setting.
Disable most recently used items for this field
Only main forms using the Classic forms support most recently used items. This can be disabled with this setting.
Related Records Filtering When this is enabled the records displayed when someone searches for a record will have additional filtering applied. This helps provide more relevant searches when setting the value of the lookup.
You can also allow users to turn off the filter.
Display Search Box in lookup dialog You can choose not to display the search box in the lookup dialog.
Default View This view will be used to filter the results of the inline search and specify the default view shown in the lookup dialog if people choose the Look Up More Records option.
The default view also controls which fields are included in the inline lookup.
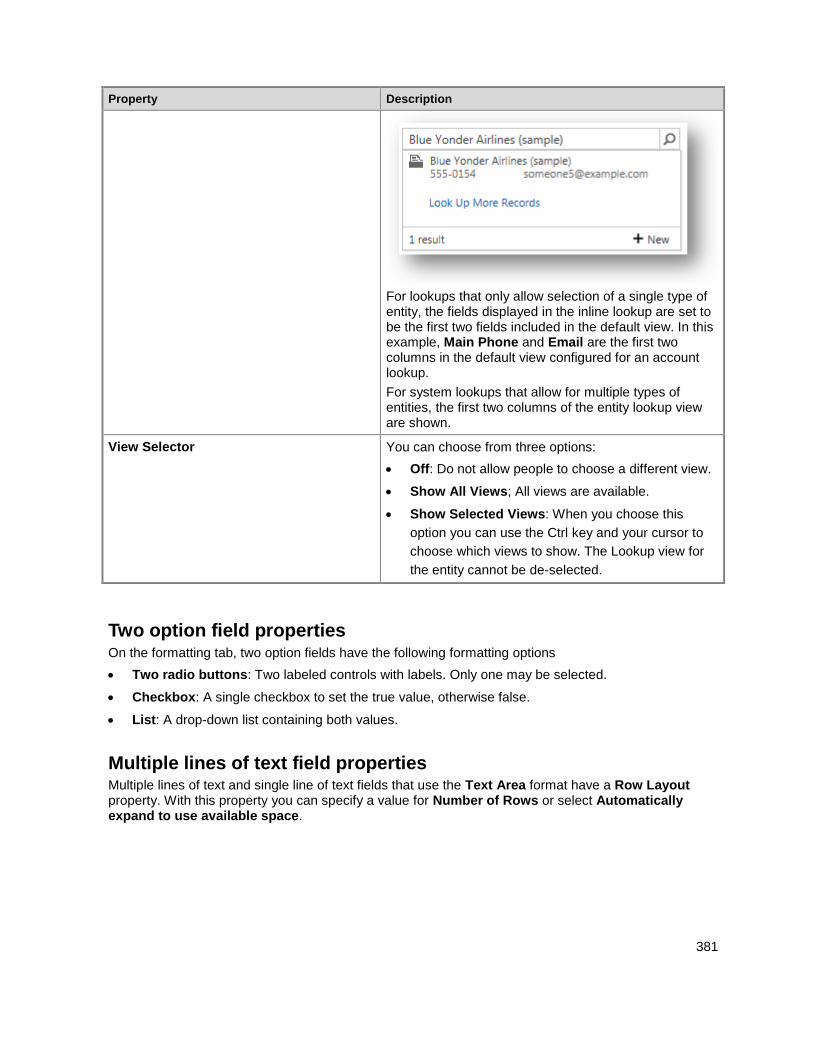
381
Property Description
For lookups that only allow selection of a single type of entity, the fields displayed in the inline lookup are set to be the first two fields included in the default view. In this example, Main Phone and Email are the first two columns in the default view configured for an account lookup.
For system lookups that allow for multiple types of entities, the first two columns of the entity lookup view are shown.
View Selector You can choose from three options:
Off: Do not allow people to choose a different view.
Show All Views; All views are available.
Show Selected Views: When you choose this
option you can use the Ctrl key and your cursor to
choose which views to show. The Lookup view for
the entity cannot be de-selected.
Two option field properties On the formatting tab, two option fields have the following formatting options
Two radio buttons: Two labeled controls with labels. Only one may be selected.
Checkbox: A single checkbox to set the true value, otherwise false.
List: A drop-down list containing both values.
Multiple lines of text field properties Multiple lines of text and single line of text fields that use the Text Area format have a Row Layout property. With this property you can specify a value for Number of Rows or select Automatically expand to use available space.
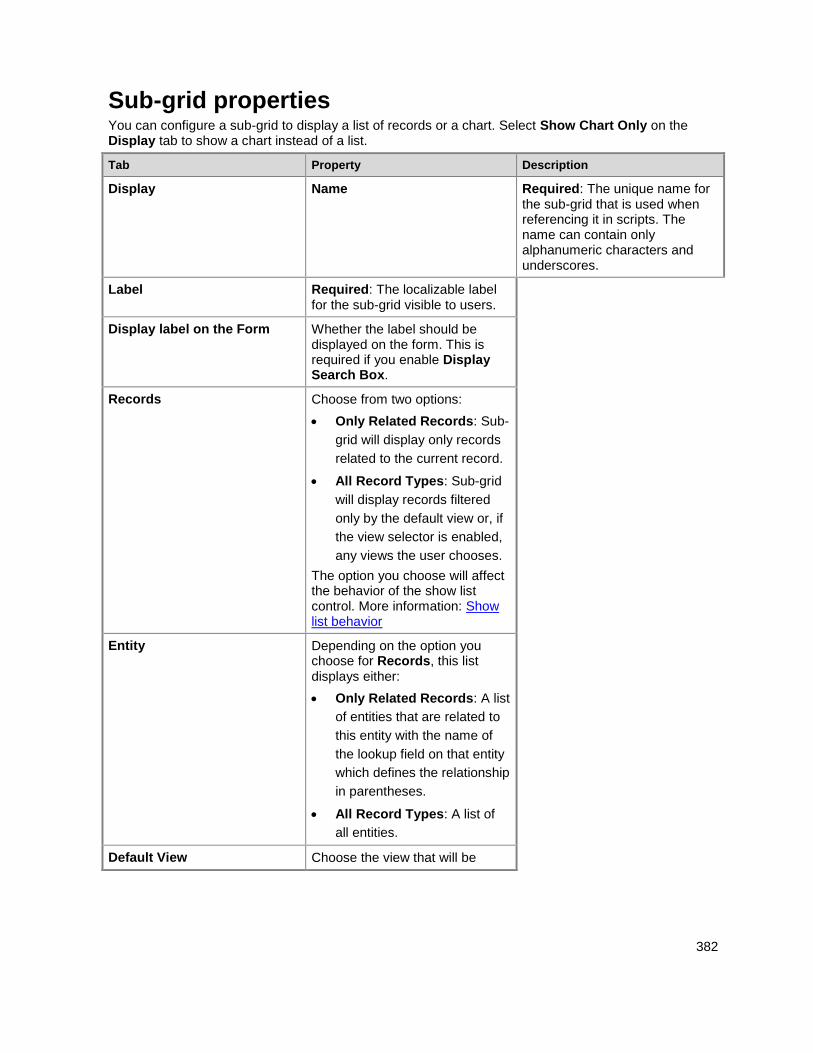
382
Sub-grid properties You can configure a sub-grid to display a list of records or a chart. Select Show Chart Only on the Display tab to show a chart instead of a list.
Tab Property Description
Display Name Required: The unique name for the sub-grid that is used when referencing it in scripts. The name can contain only alphanumeric characters and underscores.
Label Required: The localizable label for the sub-grid visible to users.
Display label on the Form Whether the label should be displayed on the form. This is required if you enable Display Search Box.
Records Choose from two options:
Only Related Records: Sub-
grid will display only records
related to the current record.
All Record Types: Sub-grid
will display records filtered
only by the default view or, if
the view selector is enabled,
any views the user chooses.
The option you choose will affect the behavior of the show list control. More information: Show list behavior
Entity Depending on the option you choose for Records, this list displays either:
Only Related Records: A list
of entities that are related to
this entity with the name of
the lookup field on that entity
which defines the relationship
in parentheses.
All Record Types: A list of
all entities.
Default View Choose the view that will be

383
Tab Property Description
applied by default. If you do not enable any other views using the View Selector property. This will be the only view.
Use the Edit button to open the default view for editing. Use the New button to create a new view to use for this sub-grid.
Display Search Box Display the search box. When this option is chosen the Display Label on the Form option is required.
Display Index Only forms using the Classic forms support display index.
Select this check box if you want the alphabetical index to be available with the list. This lets you jump to records starting with a particular letter or number.
View Selector You have three options:
Off: Only the default view can
be used.
Show All Views: Allow
people to choose any view.
Show Selected Views: Use
the Ctrl key with your cursor
to select which of the
available views to show.
Default Chart Select which chart to show if Show Chart Only is selected.
Show Chart Only Rather than a list of records a chart will be displayed.
Display Chart Selection If Show Chart Only is selected, allow people to choose different charts.
Formatting Layout Select the number of columns the control occupies.
When the section containing the sub-grid has more than one column you can set the field to occupy up to the number of
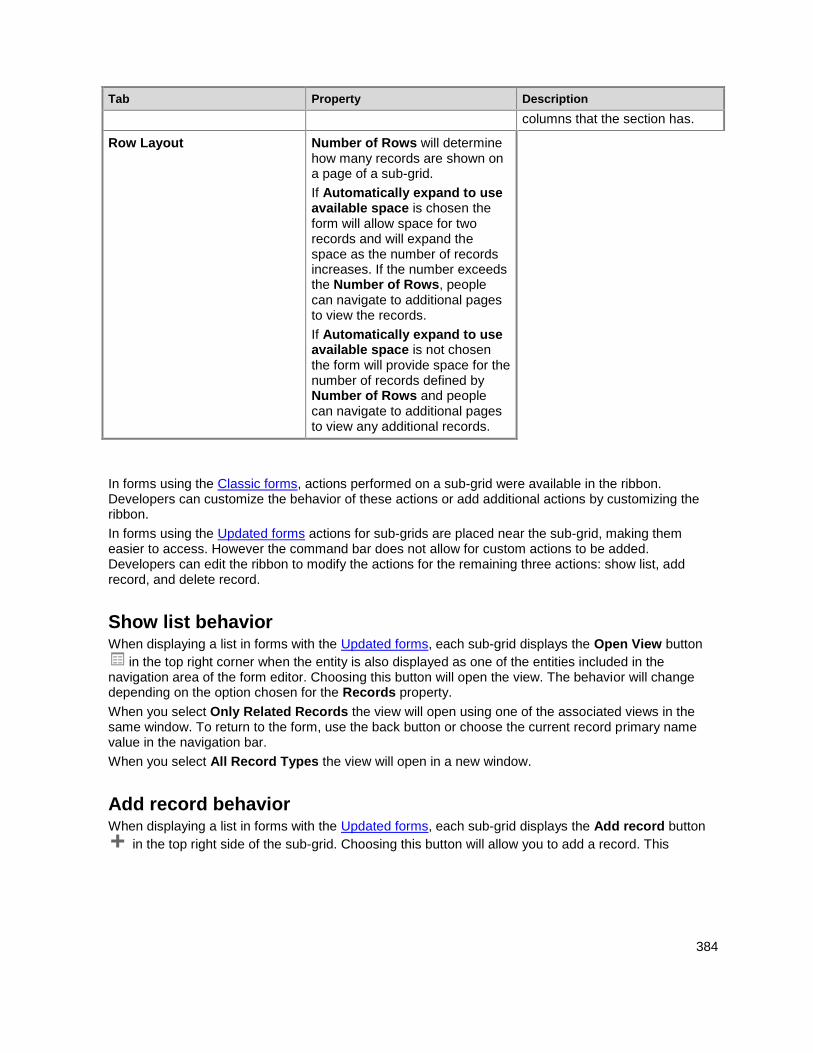
384
Tab Property Description
columns that the section has.
Row Layout Number of Rows will determine how many records are shown on a page of a sub-grid.
If Automatically expand to use available space is chosen the form will allow space for two records and will expand the space as the number of records increases. If the number exceeds the Number of Rows, people can navigate to additional pages to view the records.
If Automatically expand to use available space is not chosen the form will provide space for the number of records defined by Number of Rows and people can navigate to additional pages to view any additional records.
In forms using the Classic forms, actions performed on a sub-grid were available in the ribbon. Developers can customize the behavior of these actions or add additional actions by customizing the ribbon.
In forms using the Updated forms actions for sub-grids are placed near the sub-grid, making them easier to access. However the command bar does not allow for custom actions to be added. Developers can edit the ribbon to modify the actions for the remaining three actions: show list, add record, and delete record.
Show list behavior When displaying a list in forms with the Updated forms, each sub-grid displays the Open View button
in the top right corner when the entity is also displayed as one of the entities included in the navigation area of the form editor. Choosing this button will open the view. The behavior will change depending on the option chosen for the Records property.
When you select Only Related Records the view will open using one of the associated views in the same window. To return to the form, use the back button or choose the current record primary name value in the navigation bar.
When you select All Record Types the view will open in a new window.
Add record behavior When displaying a list in forms with the Updated forms, each sub-grid displays the Add record button
in the top right side of the sub-grid. Choosing this button will allow you to add a record. This
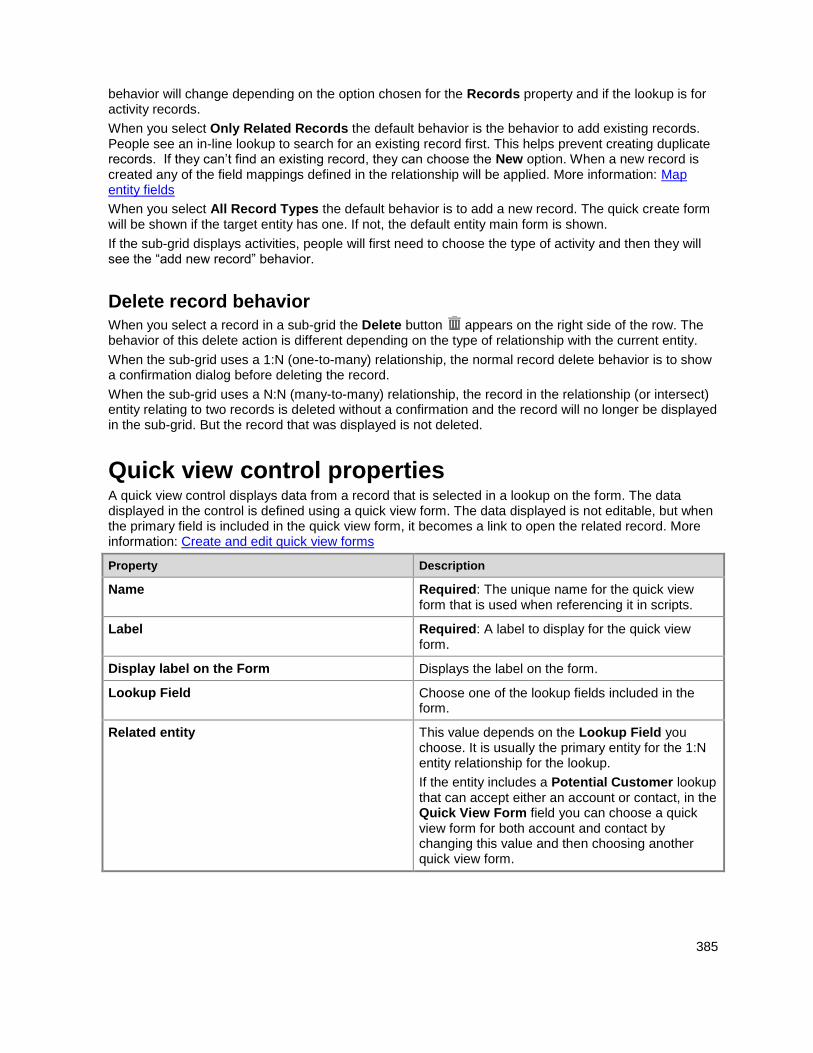
385
behavior will change depending on the option chosen for the Records property and if the lookup is for activity records.
When you select Only Related Records the default behavior is the behavior to add existing records. People see an in-line lookup to search for an existing record first. This helps prevent creating duplicate records. If they can’t find an existing record, they can choose the New option. When a new record is created any of the field mappings defined in the relationship will be applied. More information: Map entity fields
When you select All Record Types the default behavior is to add a new record. The quick create form will be shown if the target entity has one. If not, the default entity main form is shown.
If the sub-grid displays activities, people will first need to choose the type of activity and then they will see the “add new record” behavior.
Delete record behavior When you select a record in a sub-grid the Delete button appears on the right side of the row. The behavior of this delete action is different depending on the type of relationship with the current entity.
When the sub-grid uses a 1:N (one-to-many) relationship, the normal record delete behavior is to show a confirmation dialog before deleting the record.
When the sub-grid uses a N:N (many-to-many) relationship, the record in the relationship (or intersect) entity relating to two records is deleted without a confirmation and the record will no longer be displayed in the sub-grid. But the record that was displayed is not deleted.
Quick view control properties A quick view control displays data from a record that is selected in a lookup on the form. The data displayed in the control is defined using a quick view form. The data displayed is not editable, but when the primary field is included in the quick view form, it becomes a link to open the related record. More information: Create and edit quick view forms
Property Description
Name Required: The unique name for the quick view form that is used when referencing it in scripts.
Label Required: A label to display for the quick view form.
Display label on the Form Displays the label on the form.
Lookup Field Choose one of the lookup fields included in the form.
Related entity This value depends on the Lookup Field you choose. It is usually the primary entity for the 1:N entity relationship for the lookup.
If the entity includes a Potential Customer lookup that can accept either an account or contact, in the Quick View Form field you can choose a quick view form for both account and contact by changing this value and then choosing another quick view form.
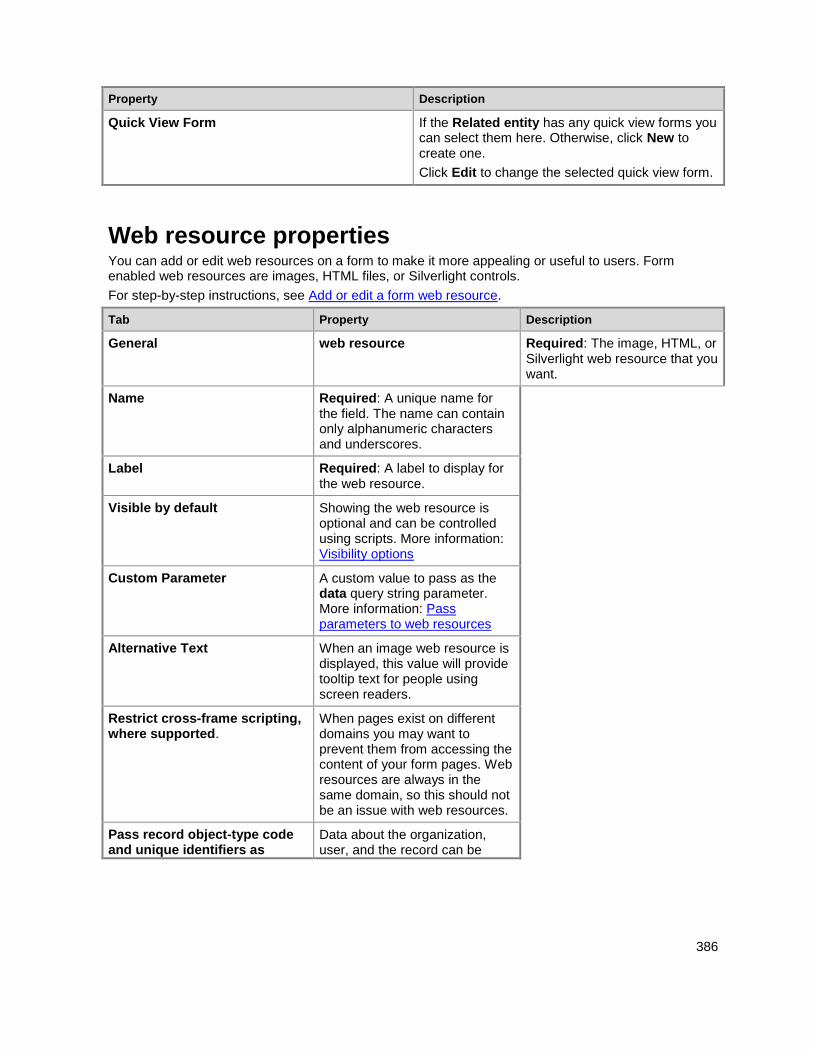
386
Property Description
Quick View Form If the Related entity has any quick view forms you can select them here. Otherwise, click New to create one.
Click Edit to change the selected quick view form.
Web resource properties You can add or edit web resources on a form to make it more appealing or useful to users. Form enabled web resources are images, HTML files, or Silverlight controls.
For step-by-step instructions, see Add or edit a form web resource.
Tab Property Description
General web resource Required: The image, HTML, or Silverlight web resource that you want.
Name Required: A unique name for the field. The name can contain only alphanumeric characters and underscores.
Label Required: A label to display for the web resource.
Visible by default Showing the web resource is optional and can be controlled using scripts. More information: Visibility options
Custom Parameter A custom value to pass as the data query string parameter. More information: Pass parameters to web resources
Alternative Text When an image web resource is displayed, this value will provide tooltip text for people using screen readers.
Restrict cross-frame scripting, where supported.
When pages exist on different domains you may want to prevent them from accessing the content of your form pages. Web resources are always in the same domain, so this should not be an issue with web resources.
Pass record object-type code and unique identifiers as
Data about the organization, user, and the record can be
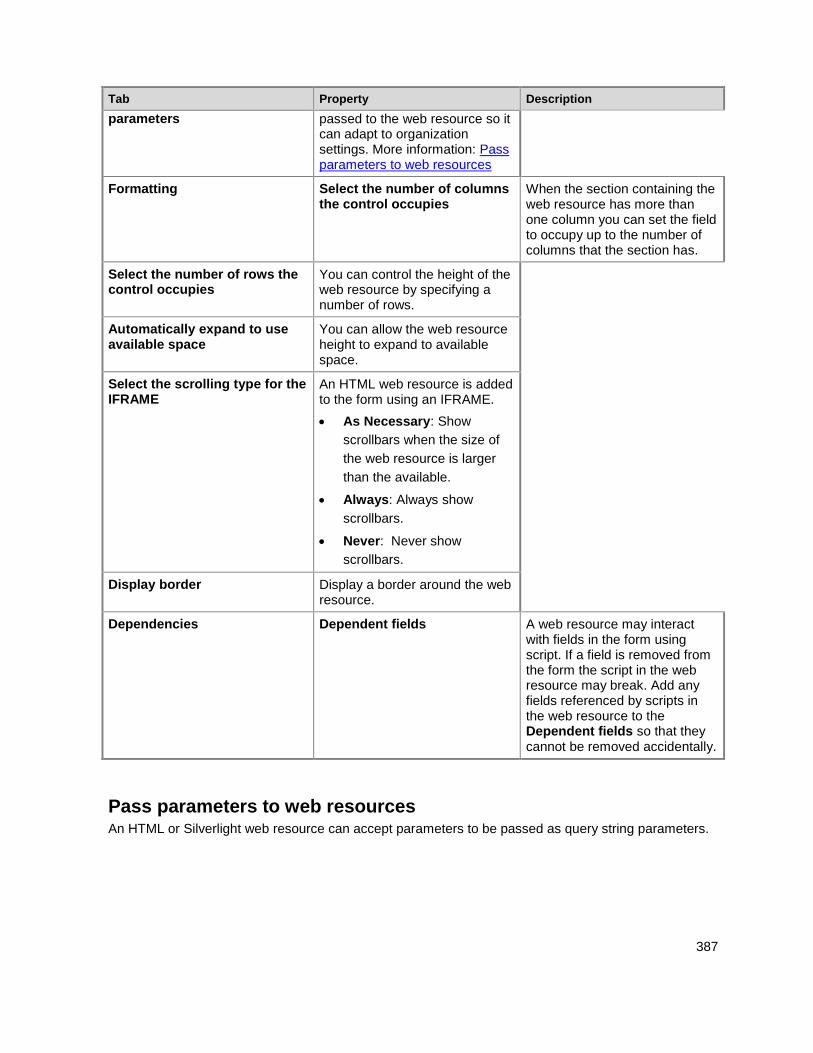
387
Tab Property Description
parameters passed to the web resource so it can adapt to organization settings. More information: Pass parameters to web resources
Formatting Select the number of columns the control occupies
When the section containing the web resource has more than one column you can set the field to occupy up to the number of columns that the section has.
Select the number of rows the control occupies
You can control the height of the web resource by specifying a number of rows.
Automatically expand to use available space
You can allow the web resource height to expand to available space.
Select the scrolling type for the IFRAME
An HTML web resource is added to the form using an IFRAME.
As Necessary: Show
scrollbars when the size of
the web resource is larger
than the available.
Always: Always show
scrollbars.
Never: Never show
scrollbars.
Display border Display a border around the web resource.
Dependencies Dependent fields A web resource may interact with fields in the form using script. If a field is removed from the form the script in the web resource may break. Add any fields referenced by scripts in the web resource to the Dependent fields so that they cannot be removed accidentally.
Pass parameters to web resources An HTML or Silverlight web resource can accept parameters to be passed as query string parameters.
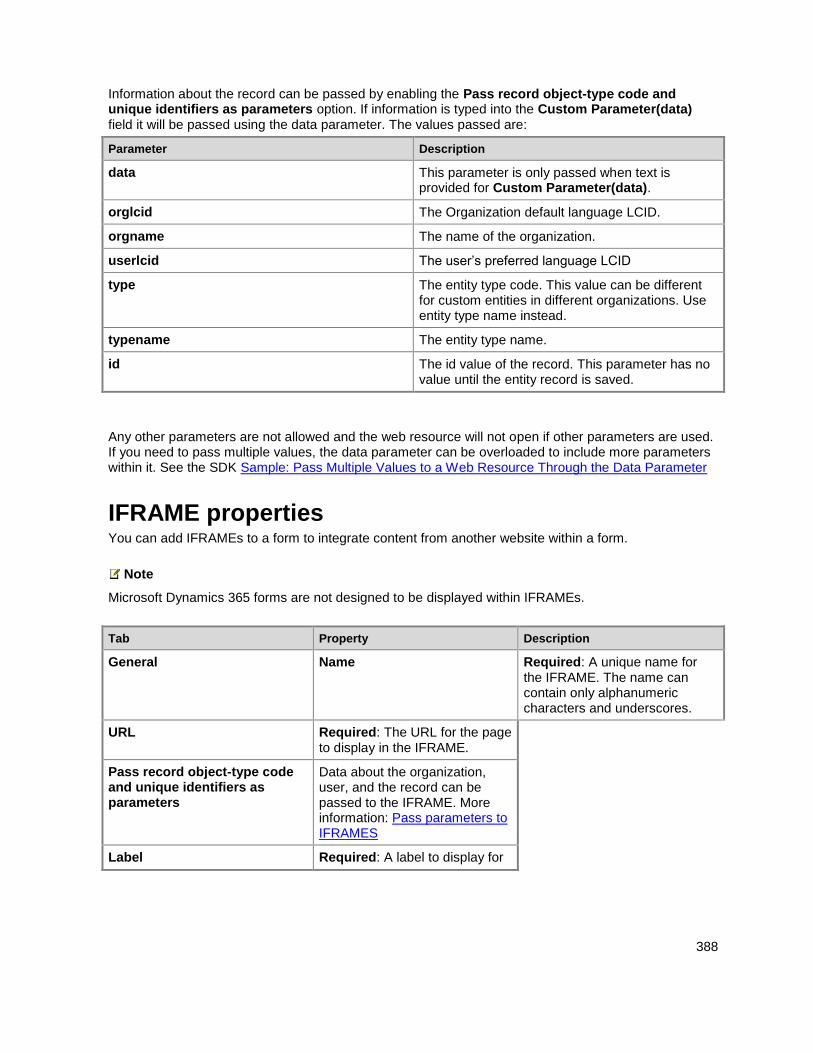
388
Information about the record can be passed by enabling the Pass record object-type code and unique identifiers as parameters option. If information is typed into the Custom Parameter(data) field it will be passed using the data parameter. The values passed are:
Parameter Description
data This parameter is only passed when text is provided for Custom Parameter(data).
orglcid The Organization default language LCID.
orgname The name of the organization.
userlcid The user’s preferred language LCID
type The entity type code. This value can be different for custom entities in different organizations. Use entity type name instead.
typename The entity type name.
id The id value of the record. This parameter has no value until the entity record is saved.
Any other parameters are not allowed and the web resource will not open if other parameters are used. If you need to pass multiple values, the data parameter can be overloaded to include more parameters within it. See the SDK Sample: Pass Multiple Values to a Web Resource Through the Data Parameter
IFRAME properties You can add IFRAMEs to a form to integrate content from another website within a form.
Note
Microsoft Dynamics 365 forms are not designed to be displayed within IFRAMEs.
Tab Property Description
General Name Required: A unique name for the IFRAME. The name can contain only alphanumeric characters and underscores.
URL Required: The URL for the page to display in the IFRAME.
Pass record object-type code and unique identifiers as parameters
Data about the organization, user, and the record can be passed to the IFRAME. More information: Pass parameters to IFRAMES
Label Required: A label to display for
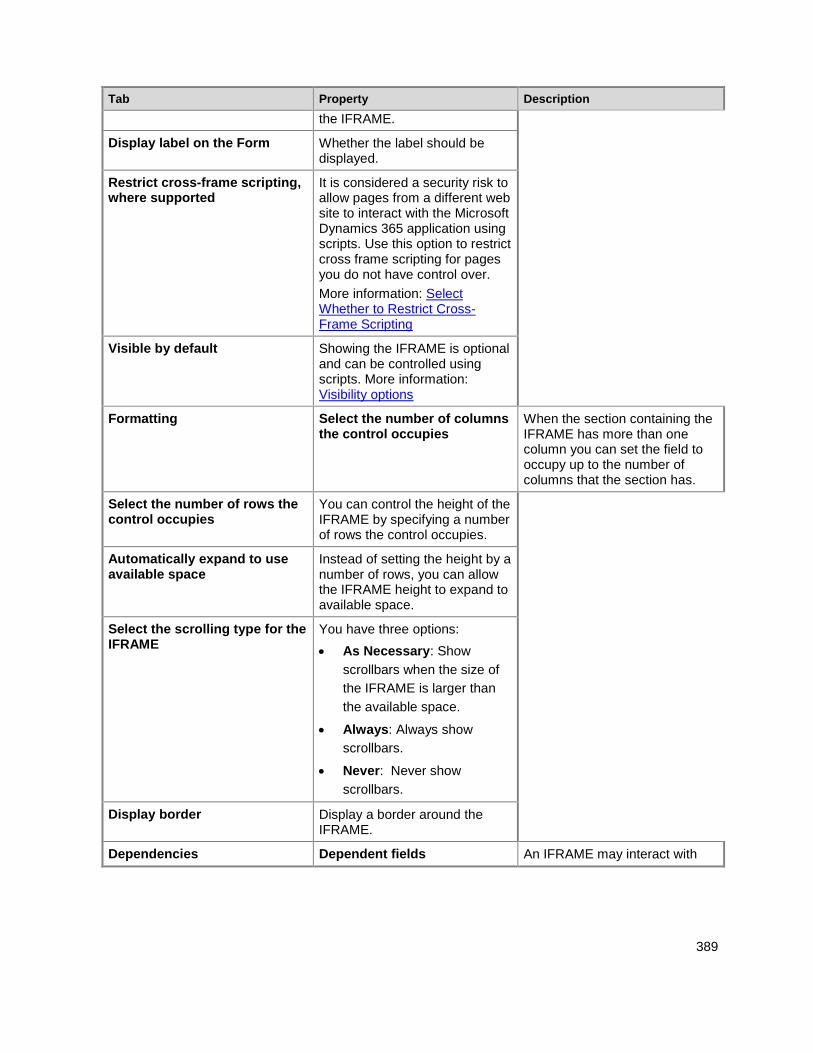
389
Tab Property Description
the IFRAME.
Display label on the Form Whether the label should be displayed.
Restrict cross-frame scripting, where supported
It is considered a security risk to allow pages from a different web site to interact with the Microsoft Dynamics 365 application using scripts. Use this option to restrict cross frame scripting for pages you do not have control over.
More information: Select Whether to Restrict Cross-Frame Scripting
Visible by default Showing the IFRAME is optional and can be controlled using scripts. More information: Visibility options
Formatting Select the number of columns the control occupies
When the section containing the IFRAME has more than one column you can set the field to occupy up to the number of columns that the section has.
Select the number of rows the control occupies
You can control the height of the IFRAME by specifying a number of rows the control occupies.
Automatically expand to use available space
Instead of setting the height by a number of rows, you can allow the IFRAME height to expand to available space.
Select the scrolling type for the IFRAME
You have three options:
As Necessary: Show
scrollbars when the size of
the IFRAME is larger than
the available space.
Always: Always show
scrollbars.
Never: Never show
scrollbars.
Display border Display a border around the IFRAME.
Dependencies Dependent fields An IFRAME may interact with
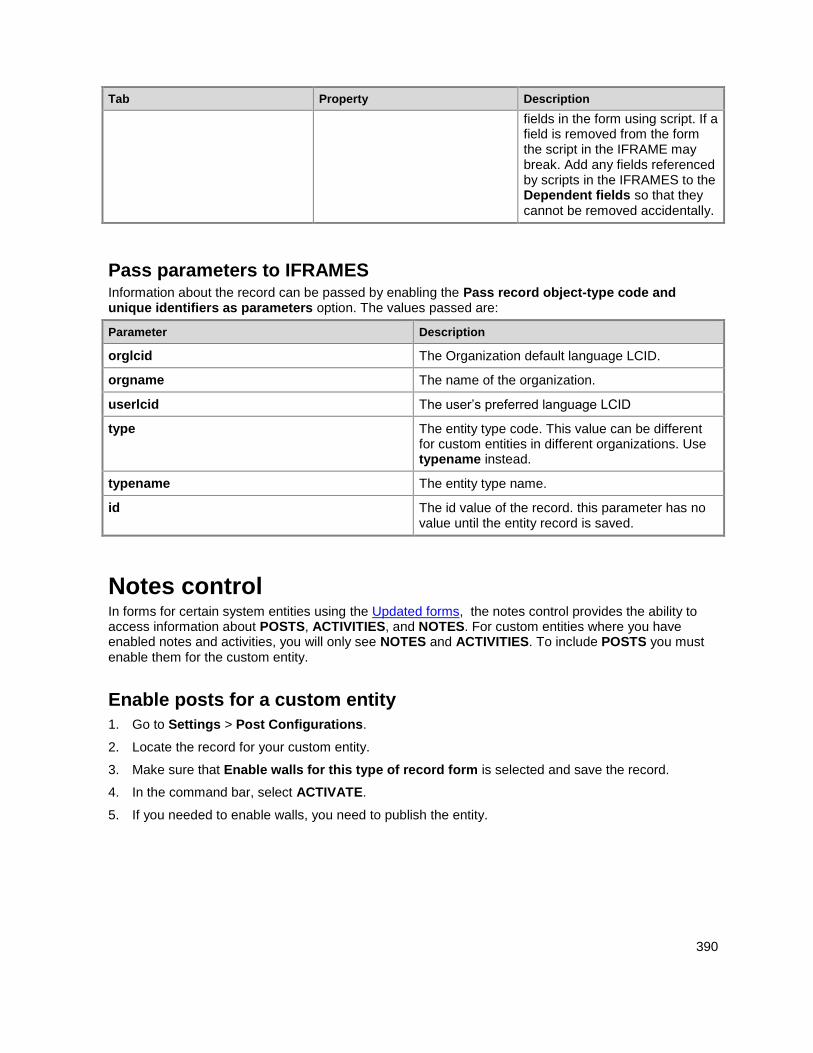
390
Tab Property Description
fields in the form using script. If a field is removed from the form the script in the IFRAME may break. Add any fields referenced by scripts in the IFRAMES to the Dependent fields so that they cannot be removed accidentally.
Pass parameters to IFRAMES Information about the record can be passed by enabling the Pass record object-type code and unique identifiers as parameters option. The values passed are:
Parameter Description
orglcid The Organization default language LCID.
orgname The name of the organization.
userlcid The user’s preferred language LCID
type The entity type code. This value can be different for custom entities in different organizations. Use typename instead.
typename The entity type name.
id The id value of the record. this parameter has no value until the entity record is saved.
Notes control In forms for certain system entities using the Updated forms, the notes control provides the ability to access information about POSTS, ACTIVITIES, and NOTES. For custom entities where you have enabled notes and activities, you will only see NOTES and ACTIVITIES. To include POSTS you must enable them for the custom entity.
Enable posts for a custom entity
1. Go to Settings > Post Configurations.
2. Locate the record for your custom entity.
3. Make sure that Enable walls for this type of record form is selected and save the record.
4. In the command bar, select ACTIVATE.
5. If you needed to enable walls, you need to publish the entity.
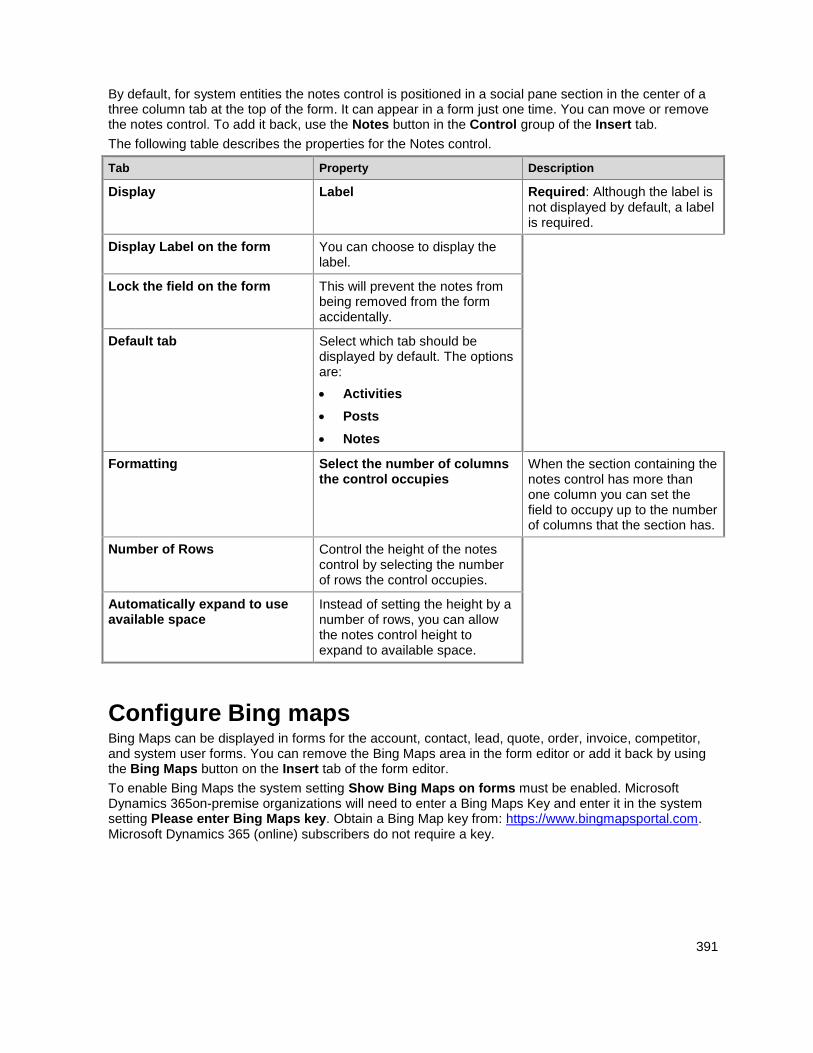
391
By default, for system entities the notes control is positioned in a social pane section in the center of a three column tab at the top of the form. It can appear in a form just one time. You can move or remove the notes control. To add it back, use the Notes button in the Control group of the Insert tab.
The following table describes the properties for the Notes control.
Tab Property Description
Display Label Required: Although the label is not displayed by default, a label is required.
Display Label on the form You can choose to display the label.
Lock the field on the form This will prevent the notes from being removed from the form accidentally.
Default tab Select which tab should be displayed by default. The options are:
Activities
Posts
Notes
Formatting Select the number of columns the control occupies
When the section containing the notes control has more than one column you can set the field to occupy up to the number of columns that the section has.
Number of Rows Control the height of the notes control by selecting the number of rows the control occupies.
Automatically expand to use available space
Instead of setting the height by a number of rows, you can allow the notes control height to expand to available space.
Configure Bing maps Bing Maps can be displayed in forms for the account, contact, lead, quote, order, invoice, competitor, and system user forms. You can remove the Bing Maps area in the form editor or add it back by using the Bing Maps button on the Insert tab of the form editor.
To enable Bing Maps the system setting Show Bing Maps on forms must be enabled. Microsoft Dynamics 365on-premise organizations will need to enter a Bing Maps Key and enter it in the system setting Please enter Bing Maps key. Obtain a Bing Map key from: https://www.bingmapsportal.com. Microsoft Dynamics 365 (online) subscribers do not require a key.
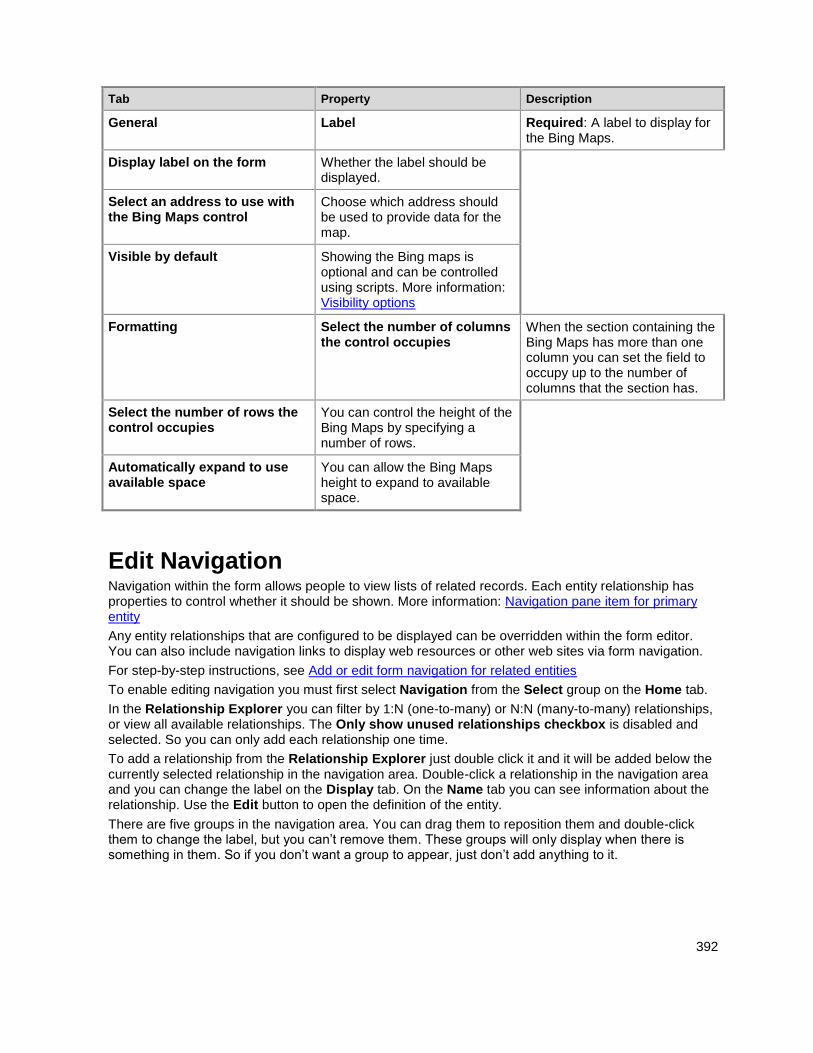
392
Tab Property Description
General Label Required: A label to display for the Bing Maps.
Display label on the form Whether the label should be displayed.
Select an address to use with the Bing Maps control
Choose which address should be used to provide data for the map.
Visible by default Showing the Bing maps is optional and can be controlled using scripts. More information: Visibility options
Formatting Select the number of columns the control occupies
When the section containing the Bing Maps has more than one column you can set the field to occupy up to the number of columns that the section has.
Select the number of rows the control occupies
You can control the height of the Bing Maps by specifying a number of rows.
Automatically expand to use available space
You can allow the Bing Maps height to expand to available space.
Edit Navigation Navigation within the form allows people to view lists of related records. Each entity relationship has properties to control whether it should be shown. More information: Navigation pane item for primary entity
Any entity relationships that are configured to be displayed can be overridden within the form editor. You can also include navigation links to display web resources or other web sites via form navigation.
For step-by-step instructions, see Add or edit form navigation for related entities
To enable editing navigation you must first select Navigation from the Select group on the Home tab.
In the Relationship Explorer you can filter by 1:N (one-to-many) or N:N (many-to-many) relationships, or view all available relationships. The Only show unused relationships checkbox is disabled and selected. So you can only add each relationship one time.
To add a relationship from the Relationship Explorer just double click it and it will be added below the currently selected relationship in the navigation area. Double-click a relationship in the navigation area and you can change the label on the Display tab. On the Name tab you can see information about the relationship. Use the Edit button to open the definition of the entity.
There are five groups in the navigation area. You can drag them to reposition them and double-click them to change the label, but you can’t remove them. These groups will only display when there is something in them. So if you don’t want a group to appear, just don’t add anything to it.

393
Use the Navigation Link button in the Control group of the Insert tab to add a link to a web resource or external URL.
Navigation link properties Navigation links have the following properties:
Property Description
Name Required: Text to display as a label.
Icon Use a 32x32 pixel web resource. Use a PNG image with a transparent background is recommended.
Web Resource Specify a web resource to display in the main pane of the form.
External URL Specify the URL of a page to display in the main pane of the form.
Timer control Use a timer control in forms where records need to meet a specific time-based milestone. A timer control shows people how much time is available to complete an action in the resolution of an active record or how much time has passed since the time to complete the action has passed. At a minimum, timer controls must be configured to show success or failure in completing the action. In addition, they can be configured to display warnings when the conditions are approaching failure.
A timer control can be added to a form for any entity, but they are most frequently used for the case entity, especially when linked to fields that track service level agreements. You can add multiple timer controls in the body of a form. You can’t add them to the header or footer.
Timer control Data Source properties use fields for the entity.
The Failure Time Field uses a date-time field to set the time.
The three condition fields use one of the Option Set, Two Options, Status, or Status Reason
fields for the entity.
Timer control properties The following table describes the properties of a timer control.
Group Name Description
Name
Name Required. A unique name for the control.
Label Required. The label to display for the timer control.
Data Source
Failure Time Field Required. Choose one of the date-time fields for the entity to
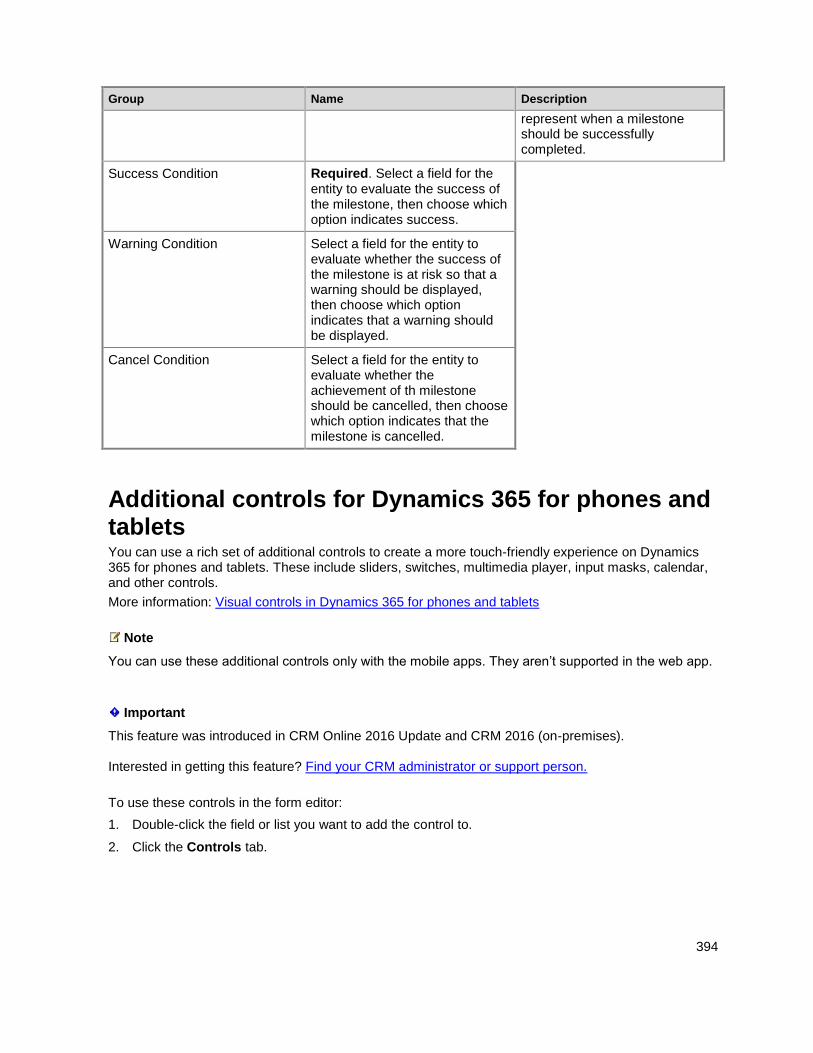
394
Group Name Description
represent when a milestone should be successfully completed.
Success Condition Required. Select a field for the entity to evaluate the success of the milestone, then choose which option indicates success.
Warning Condition Select a field for the entity to evaluate whether the success of the milestone is at risk so that a warning should be displayed, then choose which option indicates that a warning should be displayed.
Cancel Condition Select a field for the entity to evaluate whether the achievement of th milestone should be cancelled, then choose which option indicates that the milestone is cancelled.
Additional controls for Dynamics 365 for phones and tablets You can use a rich set of additional controls to create a more touch-friendly experience on Dynamics 365 for phones and tablets. These include sliders, switches, multimedia player, input masks, calendar, and other controls.
More information: Visual controls in Dynamics 365 for phones and tablets
Note
You can use these additional controls only with the mobile apps. They aren’t supported in the web app.
Important
This feature was introduced in CRM Online 2016 Update and CRM 2016 (on-premises). Interested in getting this feature? Find your CRM administrator or support person.
To use these controls in the form editor:
1. Double-click the field or list you want to add the control to.
2. Click the Controls tab.
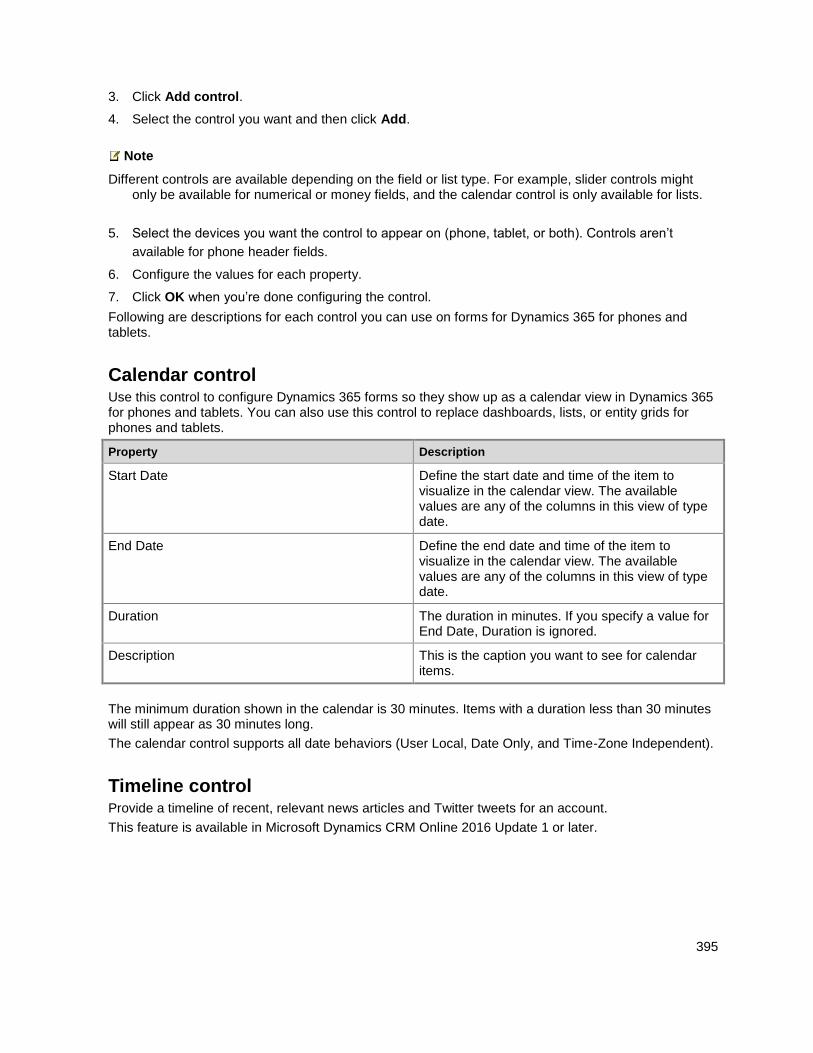
395
3. Click Add control.
4. Select the control you want and then click Add.
Note
Different controls are available depending on the field or list type. For example, slider controls might only be available for numerical or money fields, and the calendar control is only available for lists.
5. Select the devices you want the control to appear on (phone, tablet, or both). Controls aren’t
available for phone header fields.
6. Configure the values for each property.
7. Click OK when you’re done configuring the control.
Following are descriptions for each control you can use on forms for Dynamics 365 for phones and tablets.
Calendar control Use this control to configure Dynamics 365 forms so they show up as a calendar view in Dynamics 365 for phones and tablets. You can also use this control to replace dashboards, lists, or entity grids for phones and tablets.
Property Description
Start Date Define the start date and time of the item to visualize in the calendar view. The available values are any of the columns in this view of type date.
End Date Define the end date and time of the item to visualize in the calendar view. The available values are any of the columns in this view of type date.
Duration The duration in minutes. If you specify a value for End Date, Duration is ignored.
Description This is the caption you want to see for calendar items.
The minimum duration shown in the calendar is 30 minutes. Items with a duration less than 30 minutes will still appear as 30 minutes long.
The calendar control supports all date behaviors (User Local, Date Only, and Time-Zone Independent).
Timeline control Provide a timeline of recent, relevant news articles and Twitter tweets for an account.
This feature is available in Microsoft Dynamics CRM Online 2016 Update 1 or later.
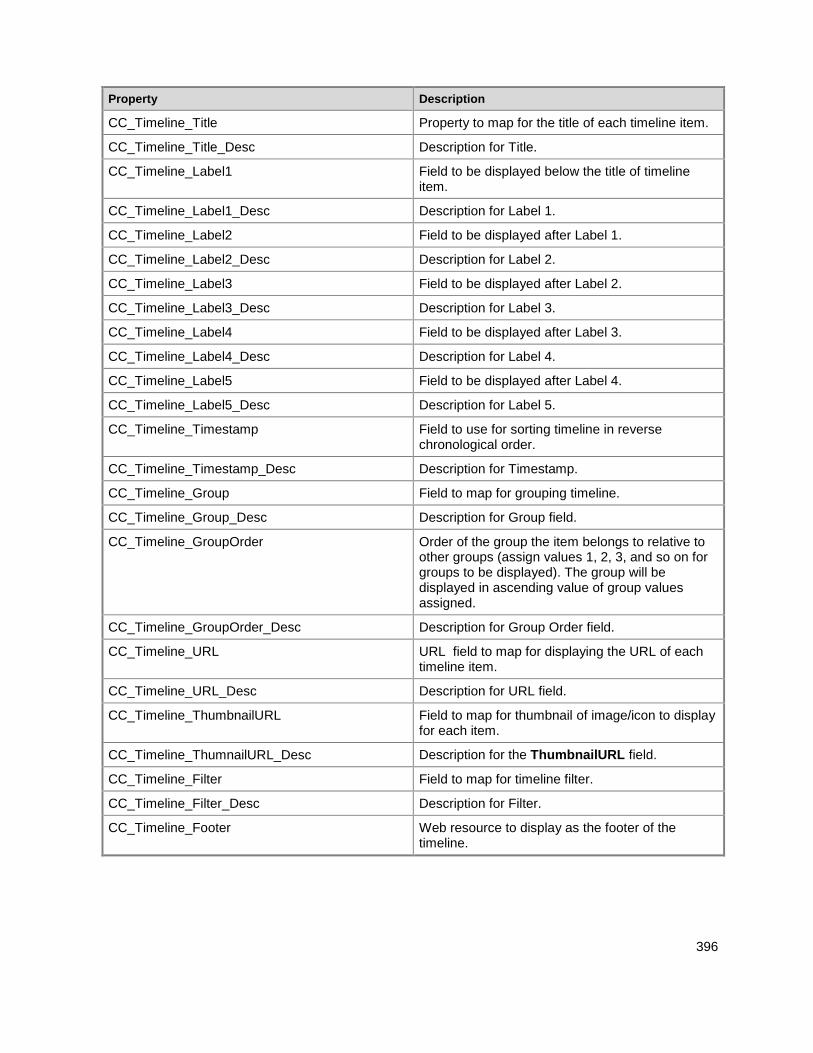
396
Property Description
CC_Timeline_Title Property to map for the title of each timeline item.
CC_Timeline_Title_Desc Description for Title.
CC_Timeline_Label1 Field to be displayed below the title of timeline item.
CC_Timeline_Label1_Desc Description for Label 1.
CC_Timeline_Label2 Field to be displayed after Label 1.
CC_Timeline_Label2_Desc Description for Label 2.
CC_Timeline_Label3 Field to be displayed after Label 2.
CC_Timeline_Label3_Desc Description for Label 3.
CC_Timeline_Label4 Field to be displayed after Label 3.
CC_Timeline_Label4_Desc Description for Label 4.
CC_Timeline_Label5 Field to be displayed after Label 4.
CC_Timeline_Label5_Desc Description for Label 5.
CC_Timeline_Timestamp Field to use for sorting timeline in reverse chronological order.
CC_Timeline_Timestamp_Desc Description for Timestamp.
CC_Timeline_Group Field to map for grouping timeline.
CC_Timeline_Group_Desc Description for Group field.
CC_Timeline_GroupOrder Order of the group the item belongs to relative to other groups (assign values 1, 2, 3, and so on for groups to be displayed). The group will be displayed in ascending value of group values assigned.
CC_Timeline_GroupOrder_Desc Description for Group Order field.
CC_Timeline_URL URL field to map for displaying the URL of each timeline item.
CC_Timeline_URL_Desc Description for URL field.
CC_Timeline_ThumbnailURL Field to map for thumbnail of image/icon to display for each item.
CC_Timeline_ThumnailURL_Desc Description for the ThumbnailURL field.
CC_Timeline_Filter Field to map for timeline filter.
CC_Timeline_Filter_Desc Description for Filter.
CC_Timeline_Footer Web resource to display as the footer of the timeline.
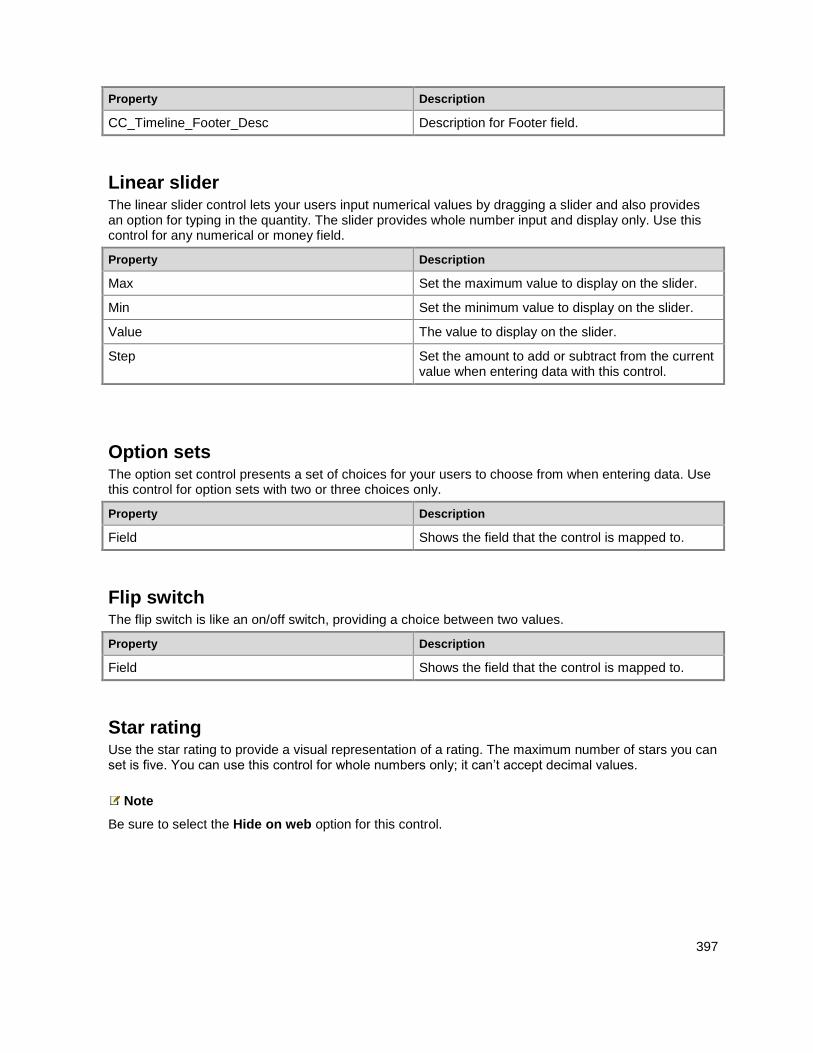
397
Property Description
CC_Timeline_Footer_Desc Description for Footer field.
Linear slider The linear slider control lets your users input numerical values by dragging a slider and also provides an option for typing in the quantity. The slider provides whole number input and display only. Use this control for any numerical or money field.
Property Description
Max Set the maximum value to display on the slider.
Min Set the minimum value to display on the slider.
Value The value to display on the slider.
Step Set the amount to add or subtract from the current value when entering data with this control.
Option sets The option set control presents a set of choices for your users to choose from when entering data. Use this control for option sets with two or three choices only.
Property Description
Field Shows the field that the control is mapped to.
Flip switch The flip switch is like an on/off switch, providing a choice between two values.
Property Description
Field Shows the field that the control is mapped to.
Star rating Use the star rating to provide a visual representation of a rating. The maximum number of stars you can set is five. You can use this control for whole numbers only; it can’t accept decimal values.
Note
Be sure to select the Hide on web option for this control.
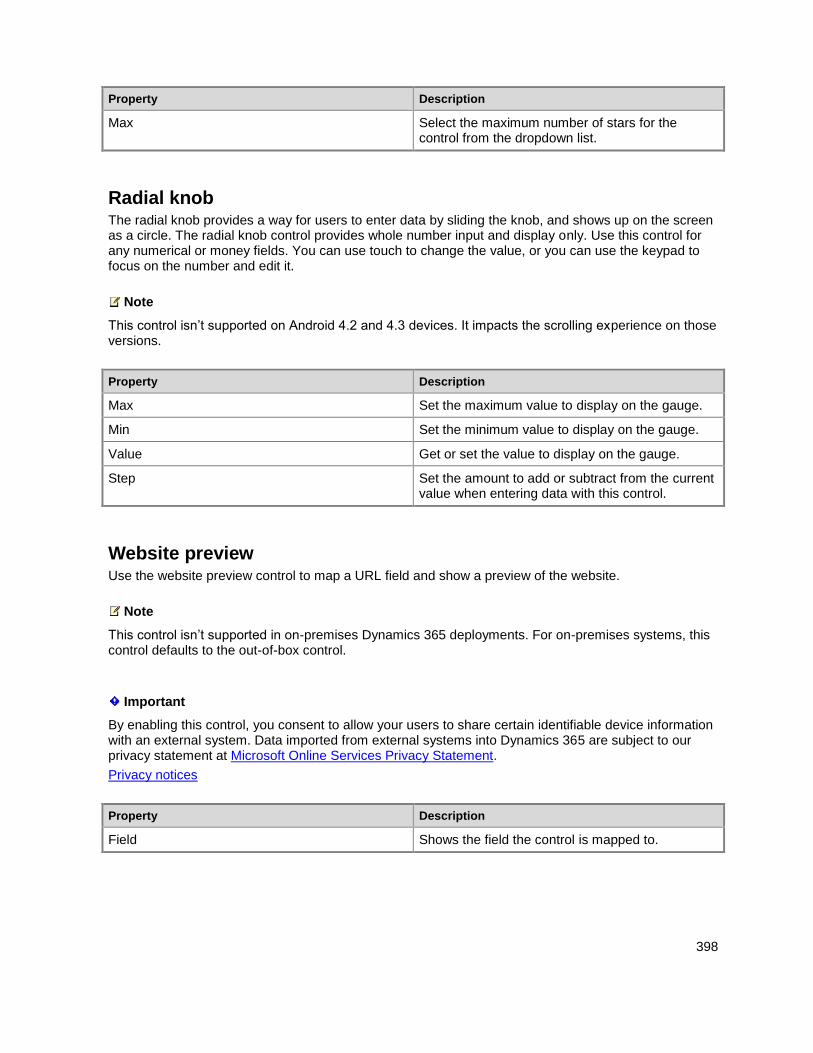
398
Property Description
Max Select the maximum number of stars for the control from the dropdown list.
Radial knob The radial knob provides a way for users to enter data by sliding the knob, and shows up on the screen as a circle. The radial knob control provides whole number input and display only. Use this control for any numerical or money fields. You can use touch to change the value, or you can use the keypad to focus on the number and edit it.
Note
This control isn’t supported on Android 4.2 and 4.3 devices. It impacts the scrolling experience on those versions.
Property Description
Max Set the maximum value to display on the gauge.
Min Set the minimum value to display on the gauge.
Value Get or set the value to display on the gauge.
Step Set the amount to add or subtract from the current value when entering data with this control.
Website preview Use the website preview control to map a URL field and show a preview of the website.
Note
This control isn’t supported in on-premises Dynamics 365 deployments. For on-premises systems, this control defaults to the out-of-box control.
Important
By enabling this control, you consent to allow your users to share certain identifiable device information with an external system. Data imported from external systems into Dynamics 365 are subject to our privacy statement at Microsoft Online Services Privacy Statement.
Privacy notices
Property Description
Field Shows the field the control is mapped to.
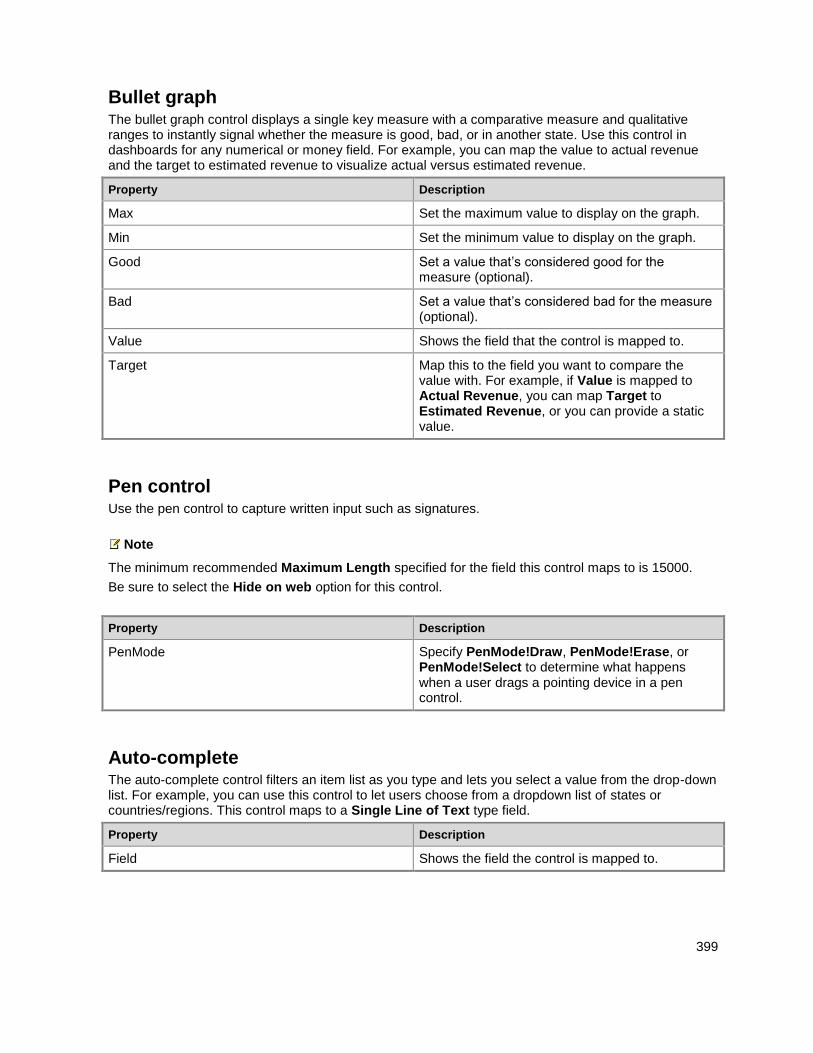
399
Bullet graph The bullet graph control displays a single key measure with a comparative measure and qualitative ranges to instantly signal whether the measure is good, bad, or in another state. Use this control in dashboards for any numerical or money field. For example, you can map the value to actual revenue and the target to estimated revenue to visualize actual versus estimated revenue.
Property Description
Max Set the maximum value to display on the graph.
Min Set the minimum value to display on the graph.
Good Set a value that’s considered good for the measure (optional).
Bad Set a value that’s considered bad for the measure (optional).
Value Shows the field that the control is mapped to.
Target Map this to the field you want to compare the value with. For example, if Value is mapped to Actual Revenue, you can map Target to Estimated Revenue, or you can provide a static value.
Pen control Use the pen control to capture written input such as signatures.
Note
The minimum recommended Maximum Length specified for the field this control maps to is 15000.
Be sure to select the Hide on web option for this control.
Property Description
PenMode Specify PenMode!Draw, PenMode!Erase, or PenMode!Select to determine what happens when a user drags a pointing device in a pen control.
Auto-complete The auto-complete control filters an item list as you type and lets you select a value from the drop-down list. For example, you can use this control to let users choose from a dropdown list of states or countries/regions. This control maps to a Single Line of Text type field.
Property Description
Field Shows the field the control is mapped to.
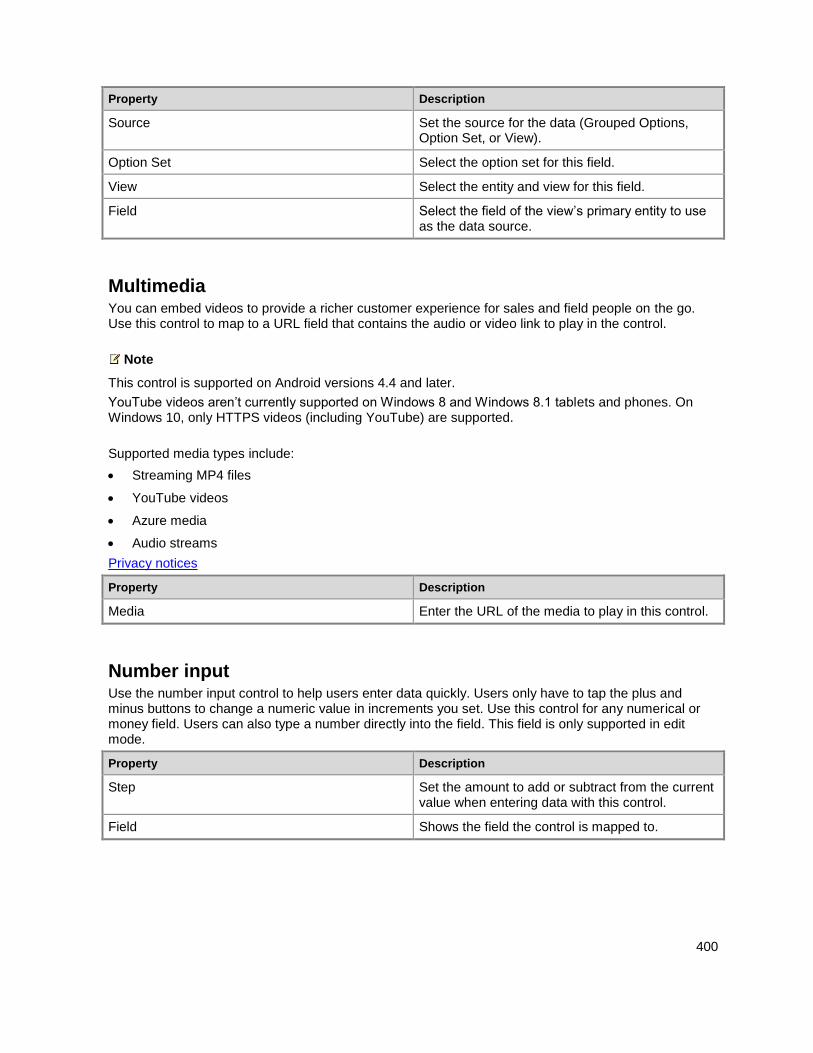
400
Property Description
Source Set the source for the data (Grouped Options, Option Set, or View).
Option Set Select the option set for this field.
View Select the entity and view for this field.
Field Select the field of the view’s primary entity to use as the data source.
Multimedia You can embed videos to provide a richer customer experience for sales and field people on the go. Use this control to map to a URL field that contains the audio or video link to play in the control.
Note
This control is supported on Android versions 4.4 and later.
YouTube videos aren’t currently supported on Windows 8 and Windows 8.1 tablets and phones. On Windows 10, only HTTPS videos (including YouTube) are supported.
Supported media types include:
Streaming MP4 files
YouTube videos
Azure media
Audio streams
Privacy notices
Property Description
Media Enter the URL of the media to play in this control.
Number input Use the number input control to help users enter data quickly. Users only have to tap the plus and minus buttons to change a numeric value in increments you set. Use this control for any numerical or money field. Users can also type a number directly into the field. This field is only supported in edit mode.
Property Description
Step Set the amount to add or subtract from the current value when entering data with this control.
Field Shows the field the control is mapped to.
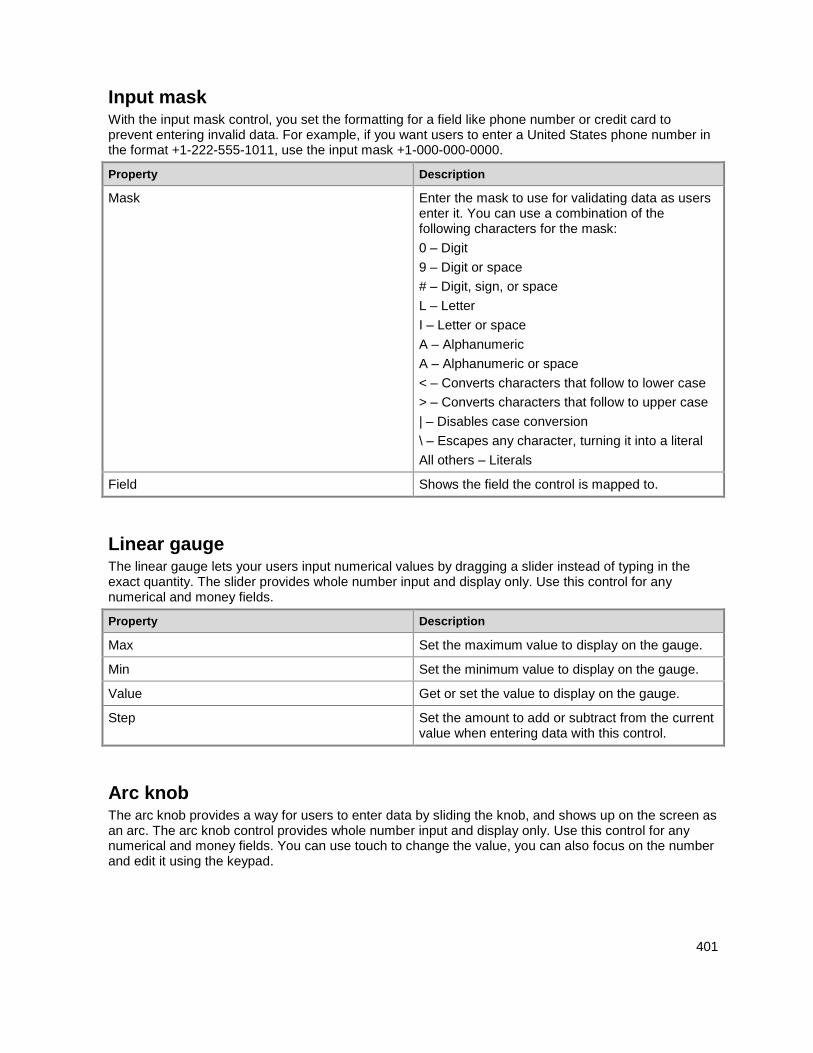
401
Input mask With the input mask control, you set the formatting for a field like phone number or credit card to prevent entering invalid data. For example, if you want users to enter a United States phone number in the format +1-222-555-1011, use the input mask +1-000-000-0000.
Property Description
Mask Enter the mask to use for validating data as users enter it. You can use a combination of the following characters for the mask:
0 – Digit
9 – Digit or space
# – Digit, sign, or space
L – Letter
I – Letter or space
A – Alphanumeric
A – Alphanumeric or space
< – Converts characters that follow to lower case
> – Converts characters that follow to upper case
| – Disables case conversion
\ – Escapes any character, turning it into a literal
All others – Literals
Field Shows the field the control is mapped to.
Linear gauge The linear gauge lets your users input numerical values by dragging a slider instead of typing in the exact quantity. The slider provides whole number input and display only. Use this control for any numerical and money fields.
Property Description
Max Set the maximum value to display on the gauge.
Min Set the minimum value to display on the gauge.
Value Get or set the value to display on the gauge.
Step Set the amount to add or subtract from the current value when entering data with this control.
Arc knob The arc knob provides a way for users to enter data by sliding the knob, and shows up on the screen as an arc. The arc knob control provides whole number input and display only. Use this control for any numerical and money fields. You can use touch to change the value, you can also focus on the number and edit it using the keypad.
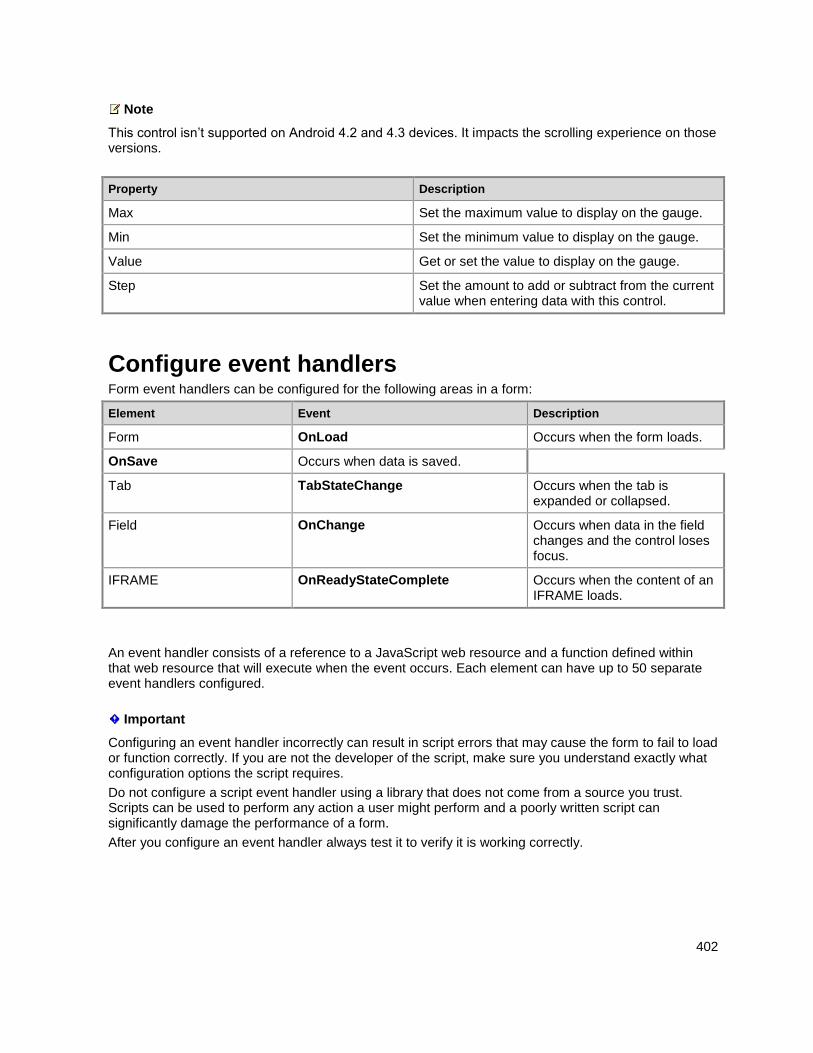
402
Note
This control isn’t supported on Android 4.2 and 4.3 devices. It impacts the scrolling experience on those versions.
Property Description
Max Set the maximum value to display on the gauge.
Min Set the minimum value to display on the gauge.
Value Get or set the value to display on the gauge.
Step Set the amount to add or subtract from the current value when entering data with this control.
Configure event handlers Form event handlers can be configured for the following areas in a form:
Element Event Description
Form OnLoad Occurs when the form loads.
OnSave Occurs when data is saved.
Tab TabStateChange Occurs when the tab is expanded or collapsed.
Field OnChange Occurs when data in the field changes and the control loses focus.
IFRAME OnReadyStateComplete Occurs when the content of an IFRAME loads.
An event handler consists of a reference to a JavaScript web resource and a function defined within that web resource that will execute when the event occurs. Each element can have up to 50 separate event handlers configured.
Important
Configuring an event handler incorrectly can result in script errors that may cause the form to fail to load or function correctly. If you are not the developer of the script, make sure you understand exactly what configuration options the script requires.
Do not configure a script event handler using a library that does not come from a source you trust. Scripts can be used to perform any action a user might perform and a poorly written script can significantly damage the performance of a form.
After you configure an event handler always test it to verify it is working correctly.
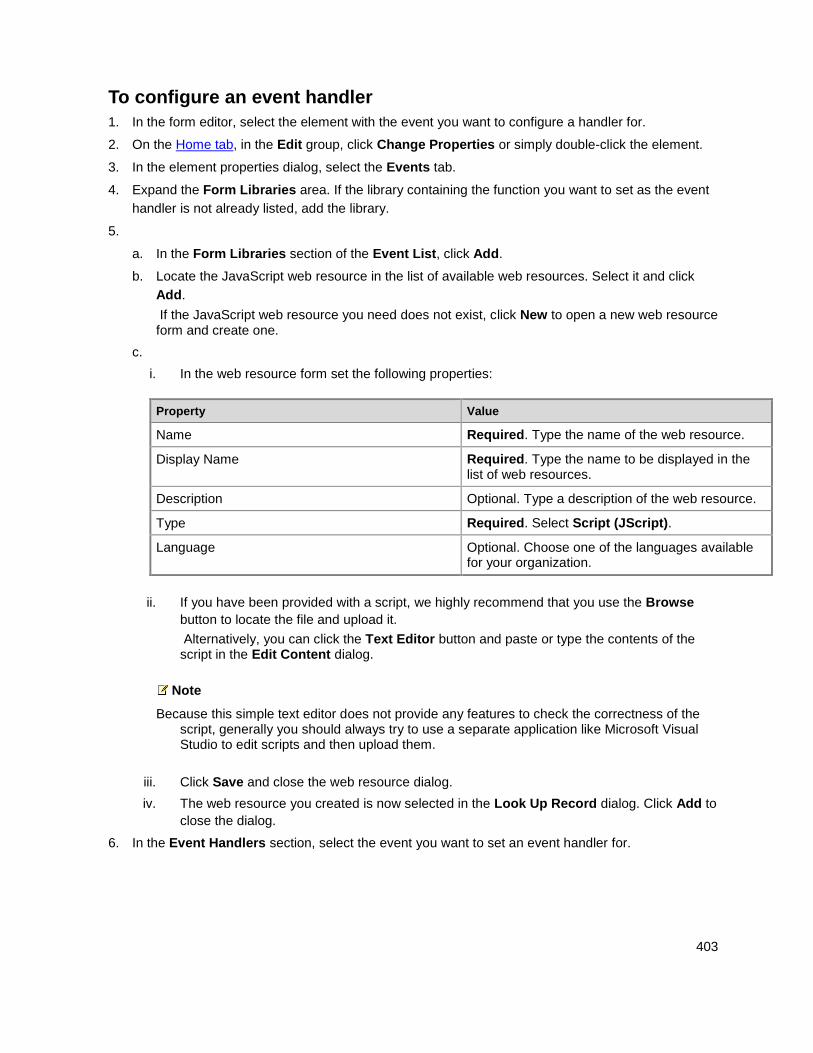
403
To configure an event handler
1. In the form editor, select the element with the event you want to configure a handler for.
2. On the Home tab, in the Edit group, click Change Properties or simply double-click the element.
3. In the element properties dialog, select the Events tab.
4. Expand the Form Libraries area. If the library containing the function you want to set as the event
handler is not already listed, add the library.
5.
a. In the Form Libraries section of the Event List, click Add.
b. Locate the JavaScript web resource in the list of available web resources. Select it and click
Add.
If the JavaScript web resource you need does not exist, click New to open a new web resource form and create one.
c.
i. In the web resource form set the following properties:
Property Value
Name Required. Type the name of the web resource.
Display Name Required. Type the name to be displayed in the list of web resources.
Description Optional. Type a description of the web resource.
Type Required. Select Script (JScript).
Language Optional. Choose one of the languages available for your organization.
ii. If you have been provided with a script, we highly recommend that you use the Browse
button to locate the file and upload it.
Alternatively, you can click the Text Editor button and paste or type the contents of the script in the Edit Content dialog.
Note
Because this simple text editor does not provide any features to check the correctness of the script, generally you should always try to use a separate application like Microsoft Visual Studio to edit scripts and then upload them.
iii. Click Save and close the web resource dialog.
iv. The web resource you created is now selected in the Look Up Record dialog. Click Add to
close the dialog.
6. In the Event Handlers section, select the event you want to set an event handler for.
404
7. Click Add to open the Handler Properties dialog.
8. On the Details tab choose the appropriate library and type the name of the function that should be
executed for the event.
9. By default the event handler is enabled. Clear the Enabled checkbox if you do not want to enable
this event.
Some functions require an execution context to be passed to the function. Select Pass execution context as the first parameter if it is required.
Some functions can accept a set of parameters to control the behavior of a function. If these are required, enter them in the Comma separated list of parameters that will be passed to the function.
10. On the Dependencies tab, add any fields that the script depends on into the Dependent Fields
area.
11. Click OK to close the Handler Properties dialog.
12. When the event handler is entered you may adjust the order in which the function will be executed
relative to any other functions by using the green arrows to move it up or down.
13. Click OK to close the element properties dialog.
14. Click Save to save your changes. Click Publish to publish the form.
Note
While the user interface (UI) lets you adjust the order in which the scripts are loaded by using the up and down green arrows, the scripts are actually not loaded sequentially. More information: MSDN: Manage library dependencies
Privacy notices When you add the Website Preview Control to a form, on load, certain identifiable device information (the device name – such as iPhone, the OS and the OS version, the browser and the browser version) will be sent to Bing (a consumer service). Therefore, Consumer Data sent to Bing will be subject to the Microsoft Online Services Privacy Statement. By adding this control, you agree for this limited set of data to be sent to the Bing service. Note that you may remove the control at any time to discontinue use of this functionality.
When you add the Multimedia Control to a form, certain identifiable device information (the device name – such as iPhone, the OS and the OS version, the browser and the browser version) will be sent to the service that you are calling (such as YouTube or Azure Media Services) and will be subject to the terms of that service’s privacy statement. By adding this control, you agree for this limited set of data to be sent to the external service you are calling. Note that you may remove the control at any time to discontinue use of this functionality.
See Also Create and design forms Design considerations for main forms Create and edit mobile forms for Dynamics CRM for phones express
405
Create and edit quick create forms Create and edit quick view forms Customize Dynamics 365 for phones and tablets
© 2016 Microsoft. All rights reserved. Copyright
Design considerations for main forms
Applies To: Dynamics 365 (online), Dynamics 365 (on-premises), Dynamics CRM 2016, Dynamics CRM Online
[This topic is pre-release documentation and is subject to change.]
Main forms are the primary user interface where people view and interact with their data in Microsoft Dynamics 365. Main forms provide the widest range of options and are available for most clients, the exception being Microsoft Dynamics 365 for phones.
One of the main design objectives for main forms is that you design them once and deploy them everywhere. The same main form you design for the web application is also used in Dynamics 365 for Outlook and Dynamics 365 for tablets. The advantage to this approach is that you don’t have to integrate changes into three different forms. However there are several important factors to consider in designing these forms.
In This Topic Custom forms for different groups
Presentation differences
Form performance
Managing auto-save
Custom forms for different groups Because you can create multiple main forms and assign different security roles to each form you can present different groups in your organization with a form that is optimized for how they use the application. You can even provide each group with different options so that they have different forms to choose from. More information: Control access to forms
You can expect that managers and decisions makers will want forms that are optimized to provide quick reference to key data points. They will like to see charts more than lists and they may not perform a lot of data entry.
People who interact directly with customers may need forms tailored to tasks they perform most frequently. They may want forms that allow for the most efficient data entry.
You’ll need to find out what people in your organization want and need. This is frequently an iterative process where you gather input, try different things and build forms that people can use. Keep in mind that you have a variety of tools available to you and that not everything has to be done within the form. Use business rules, workflow processes, dialogs and business process flows together with your forms to provide a solution that works for your organization.
You’ll have to balance this with the amount of time you want to spend managing forms. Creating and editing forms is relatively easy, but as you create more forms, you have to manage more forms.
406
Presentation differences Although you don’t have to manage multiple forms for each presentation, you must consider how differences in the presentation can be accounted for in the main form. Main form presentations describes the different ways that the main form may be presented. The primary things to take into consideration are:
Dynamics 365 for tablets doesn’t support image, HTML, or Silverlight web resources to be added to
forms.
The layout of Dynamics 365 for tablets forms is auto-generated based on the main form. There is
no special form editor for Dynamics 365 for tablets forms. You need to verify that the form
presentation works well for both clients.
If you have unsupported scripts that interact with DOM elements found in the web application,
those scripts won’t work in the Dynamics 365 for tablets forms because the same DOM elements
aren’t available.
Dynamics 365 for Outlook Reading Pane forms don’t allow for scripting. The visibility of form
elements depend on the default settings and can’t be changed at runtime using scripts.
Form performance Forms that load slowly or don’t respond quickly are sure to affect productivity and user adoption of the system. Optimize form performance provides a number of recommendations you should consider when designing forms so that customizations don’t adversely affect form performance.
Managing auto-save Most people will welcome the simplified interaction they have with auto-save enabled. However this is a significant change from the save model in place for earlier versions of Microsoft Dynamics 365 where the record needed to be explicitly saved each time data was updated. Some organizations created customizations that assumed that saving a record meant that the person was finished editing it. Best practices for customizations are to treat each save as an update and to design automated tasks so that they fire only when specific data conditions occur. This change will require some time for organizations to adapt to, so there are options to control how auto-save works for your organization. More information: Manage auto-save
See Also Create and design forms Use the form editor Create and edit mobile forms for Dynamics CRM for phones express Create and edit quick create forms Create and edit quick view forms Main form presentations Optimize form performance Manage auto-save Update your forms
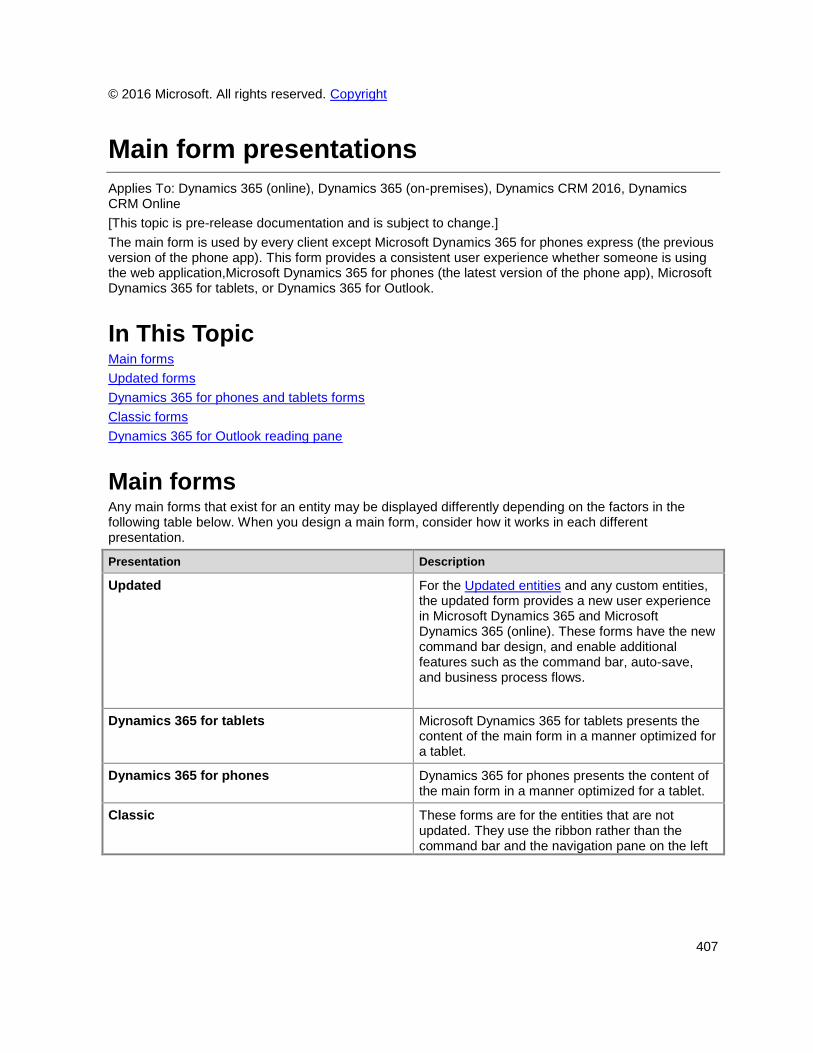
407
© 2016 Microsoft. All rights reserved. Copyright
Main form presentations
Applies To: Dynamics 365 (online), Dynamics 365 (on-premises), Dynamics CRM 2016, Dynamics CRM Online
[This topic is pre-release documentation and is subject to change.]
The main form is used by every client except Microsoft Dynamics 365 for phones express (the previous version of the phone app). This form provides a consistent user experience whether someone is using the web application,Microsoft Dynamics 365 for phones (the latest version of the phone app), Microsoft Dynamics 365 for tablets, or Dynamics 365 for Outlook.
In This Topic Main forms
Updated forms
Dynamics 365 for phones and tablets forms
Classic forms
Dynamics 365 for Outlook reading pane
Main forms Any main forms that exist for an entity may be displayed differently depending on the factors in the following table below. When you design a main form, consider how it works in each different presentation.
Presentation Description
Updated For the Updated entities and any custom entities, the updated form provides a new user experience in Microsoft Dynamics 365 and Microsoft Dynamics 365 (online). These forms have the new command bar design, and enable additional features such as the command bar, auto-save, and business process flows.
Dynamics 365 for tablets Microsoft Dynamics 365 for tablets presents the content of the main form in a manner optimized for a tablet.
Dynamics 365 for phones Dynamics 365 for phones presents the content of the main form in a manner optimized for a tablet.
Classic These forms are for the entities that are not updated. They use the ribbon rather than the command bar and the navigation pane on the left
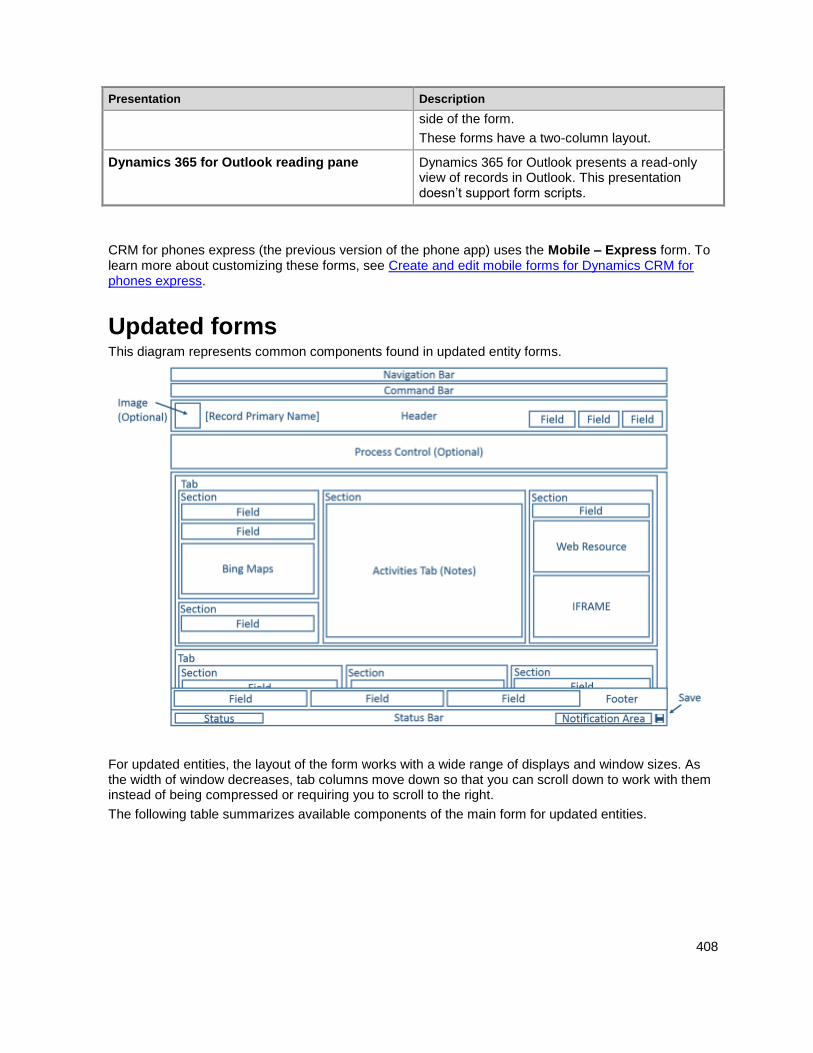
408
Presentation Description
side of the form.
These forms have a two-column layout.
Dynamics 365 for Outlook reading pane Dynamics 365 for Outlook presents a read-only view of records in Outlook. This presentation doesn’t support form scripts.
CRM for phones express (the previous version of the phone app) uses the Mobile – Express form. To learn more about customizing these forms, see Create and edit mobile forms for Dynamics CRM for phones express.
Updated forms This diagram represents common components found in updated entity forms.
For updated entities, the layout of the form works with a wide range of displays and window sizes. As the width of window decreases, tab columns move down so that you can scroll down to work with them instead of being compressed or requiring you to scroll to the right.
The following table summarizes available components of the main form for updated entities.
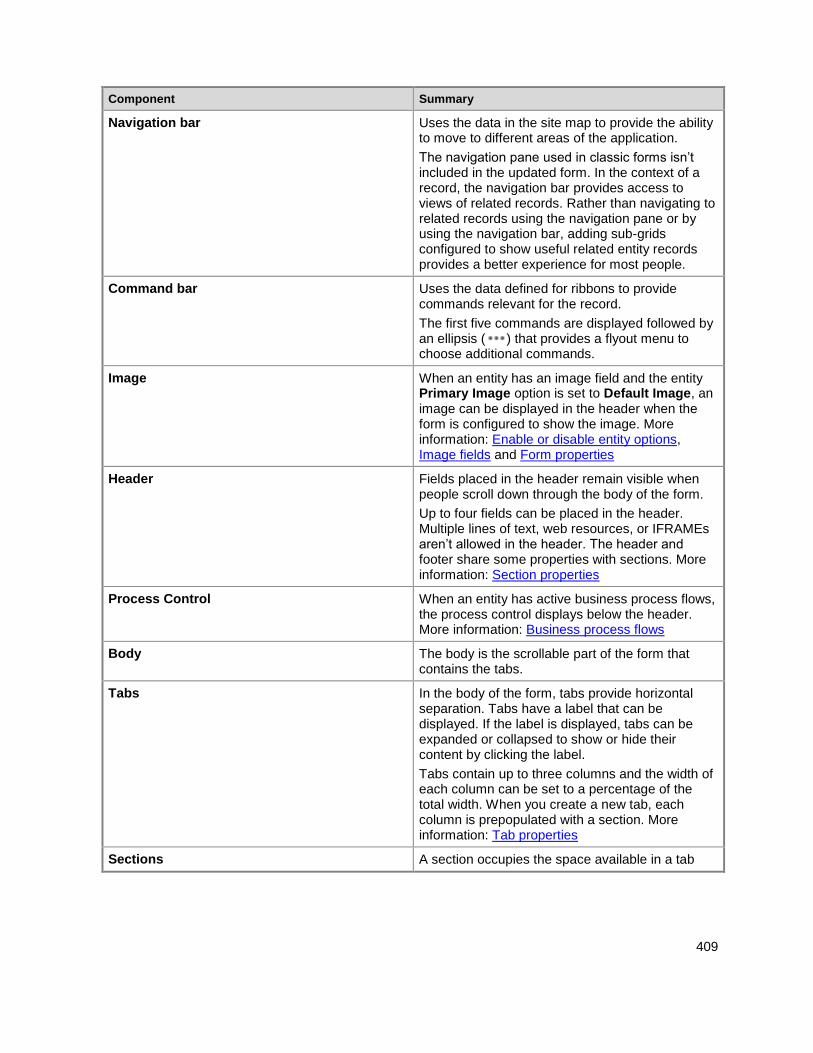
409
Component Summary
Navigation bar Uses the data in the site map to provide the ability to move to different areas of the application.
The navigation pane used in classic forms isn’t included in the updated form. In the context of a record, the navigation bar provides access to views of related records. Rather than navigating to related records using the navigation pane or by using the navigation bar, adding sub-grids configured to show useful related entity records provides a better experience for most people.
Command bar Uses the data defined for ribbons to provide commands relevant for the record.
The first five commands are displayed followed by an ellipsis ( ) that provides a flyout menu to choose additional commands.
Image When an entity has an image field and the entity Primary Image option is set to Default Image, an image can be displayed in the header when the form is configured to show the image. More information: Enable or disable entity options, Image fields and Form properties
Header Fields placed in the header remain visible when people scroll down through the body of the form.
Up to four fields can be placed in the header. Multiple lines of text, web resources, or IFRAMEs aren’t allowed in the header. The header and footer share some properties with sections. More information: Section properties
Process Control When an entity has active business process flows, the process control displays below the header. More information: Business process flows
Body The body is the scrollable part of the form that contains the tabs.
Tabs In the body of the form, tabs provide horizontal separation. Tabs have a label that can be displayed. If the label is displayed, tabs can be expanded or collapsed to show or hide their content by clicking the label.
Tabs contain up to three columns and the width of each column can be set to a percentage of the total width. When you create a new tab, each column is prepopulated with a section. More information: Tab properties
Sections A section occupies the space available in a tab
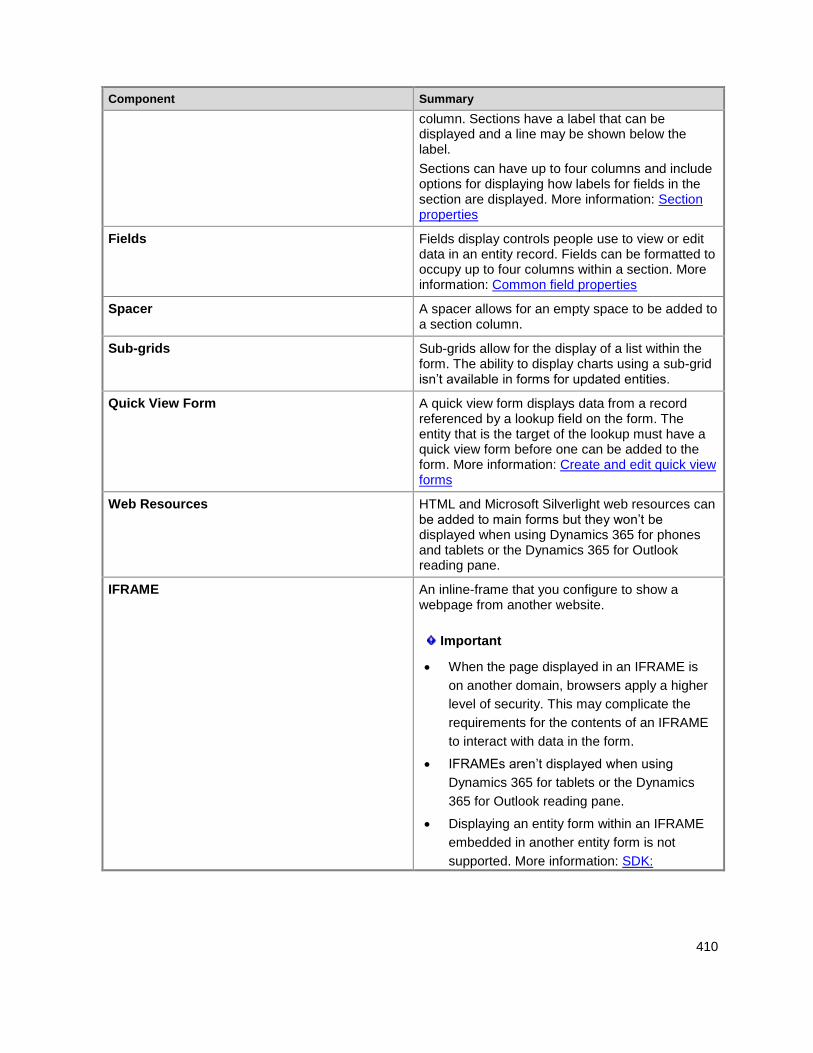
410
Component Summary
column. Sections have a label that can be displayed and a line may be shown below the label.
Sections can have up to four columns and include options for displaying how labels for fields in the section are displayed. More information: Section properties
Fields Fields display controls people use to view or edit data in an entity record. Fields can be formatted to occupy up to four columns within a section. More information: Common field properties
Spacer A spacer allows for an empty space to be added to a section column.
Sub-grids Sub-grids allow for the display of a list within the form. The ability to display charts using a sub-grid isn’t available in forms for updated entities.
Quick View Form A quick view form displays data from a record referenced by a lookup field on the form. The entity that is the target of the lookup must have a quick view form before one can be added to the form. More information: Create and edit quick view forms
Web Resources HTML and Microsoft Silverlight web resources can be added to main forms but they won’t be displayed when using Dynamics 365 for phones and tablets or the Dynamics 365 for Outlook reading pane.
IFRAME An inline-frame that you configure to show a webpage from another website.
Important
When the page displayed in an IFRAME is
on another domain, browsers apply a higher
level of security. This may complicate the
requirements for the contents of an IFRAME
to interact with data in the form.
IFRAMEs aren’t displayed when using
Dynamics 365 for tablets or the Dynamics
365 for Outlook reading pane.
Displaying an entity form within an IFRAME
embedded in another entity form is not
supported. More information: SDK:
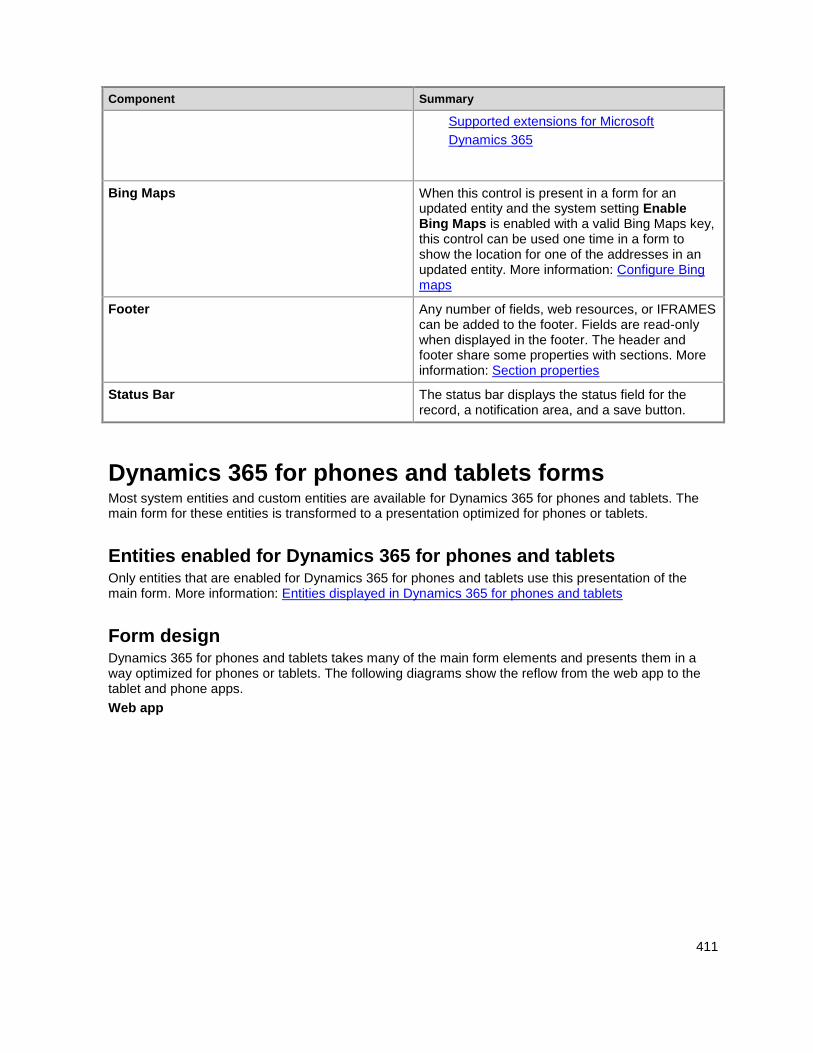
411
Component Summary
Supported extensions for Microsoft
Dynamics 365
Bing Maps When this control is present in a form for an updated entity and the system setting Enable Bing Maps is enabled with a valid Bing Maps key, this control can be used one time in a form to show the location for one of the addresses in an updated entity. More information: Configure Bing maps
Footer Any number of fields, web resources, or IFRAMES can be added to the footer. Fields are read-only when displayed in the footer. The header and footer share some properties with sections. More information: Section properties
Status Bar The status bar displays the status field for the record, a notification area, and a save button.
Dynamics 365 for phones and tablets forms Most system entities and custom entities are available for Dynamics 365 for phones and tablets. The main form for these entities is transformed to a presentation optimized for phones or tablets.
Entities enabled for Dynamics 365 for phones and tablets Only entities that are enabled for Dynamics 365 for phones and tablets use this presentation of the main form. More information: Entities displayed in Dynamics 365 for phones and tablets
Form design Dynamics 365 for phones and tablets takes many of the main form elements and presents them in a way optimized for phones or tablets. The following diagrams show the reflow from the web app to the tablet and phone apps.
Web app
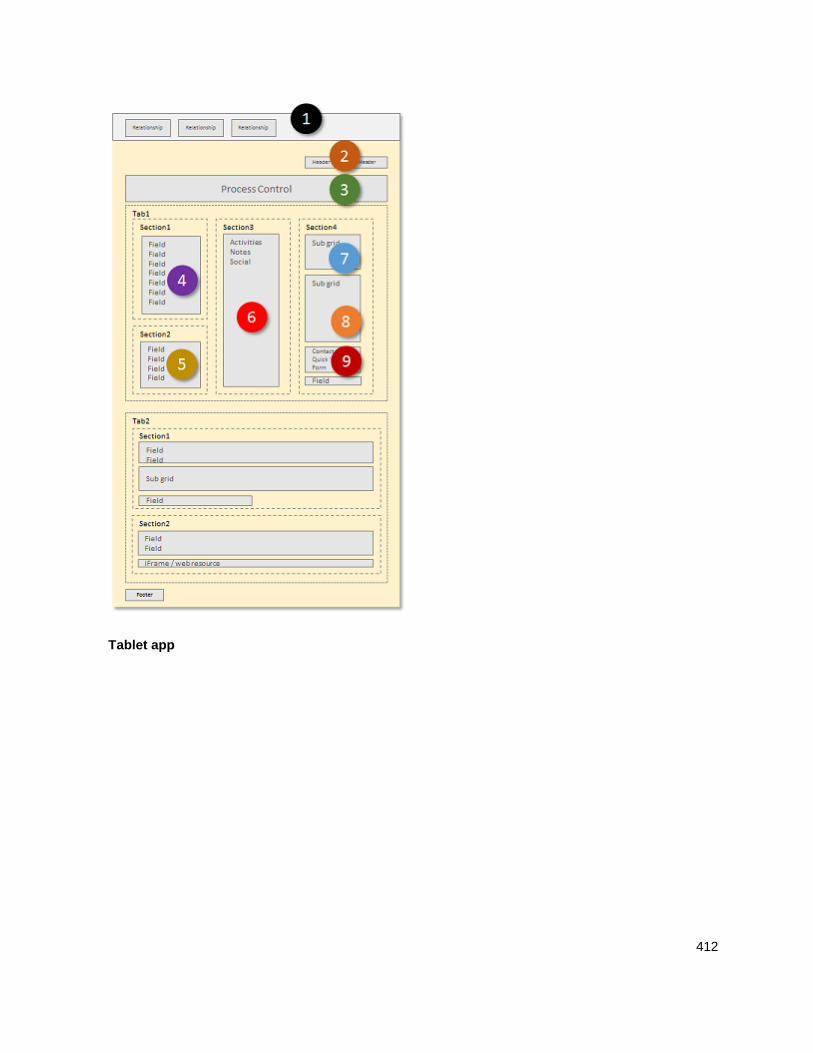
412
Tablet app
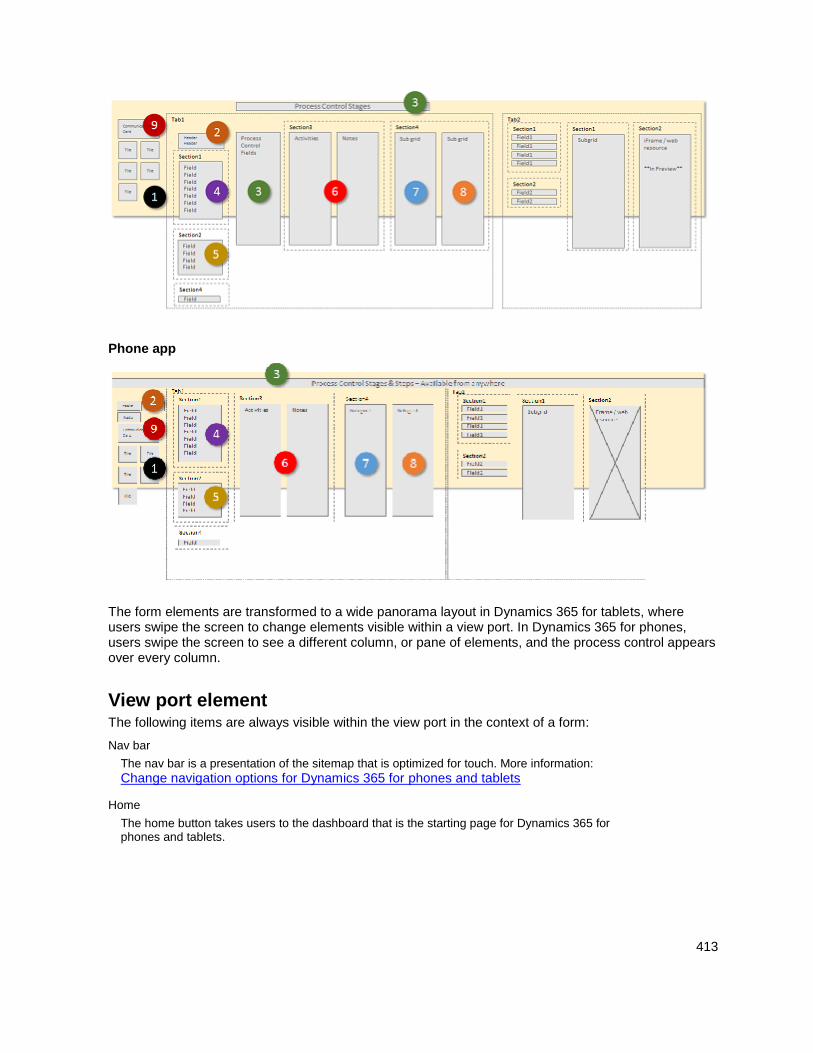
413
Phone app
The form elements are transformed to a wide panorama layout in Dynamics 365 for tablets, where users swipe the screen to change elements visible within a view port. In Dynamics 365 for phones, users swipe the screen to see a different column, or pane of elements, and the process control appears over every column.
View port element The following items are always visible within the view port in the context of a form:
Nav bar
The nav bar is a presentation of the sitemap that is optimized for touch. More information:
Change navigation options for Dynamics 365 for phones and tablets
Home
The home button takes users to the dashboard that is the starting page for Dynamics 365 for phones and tablets.
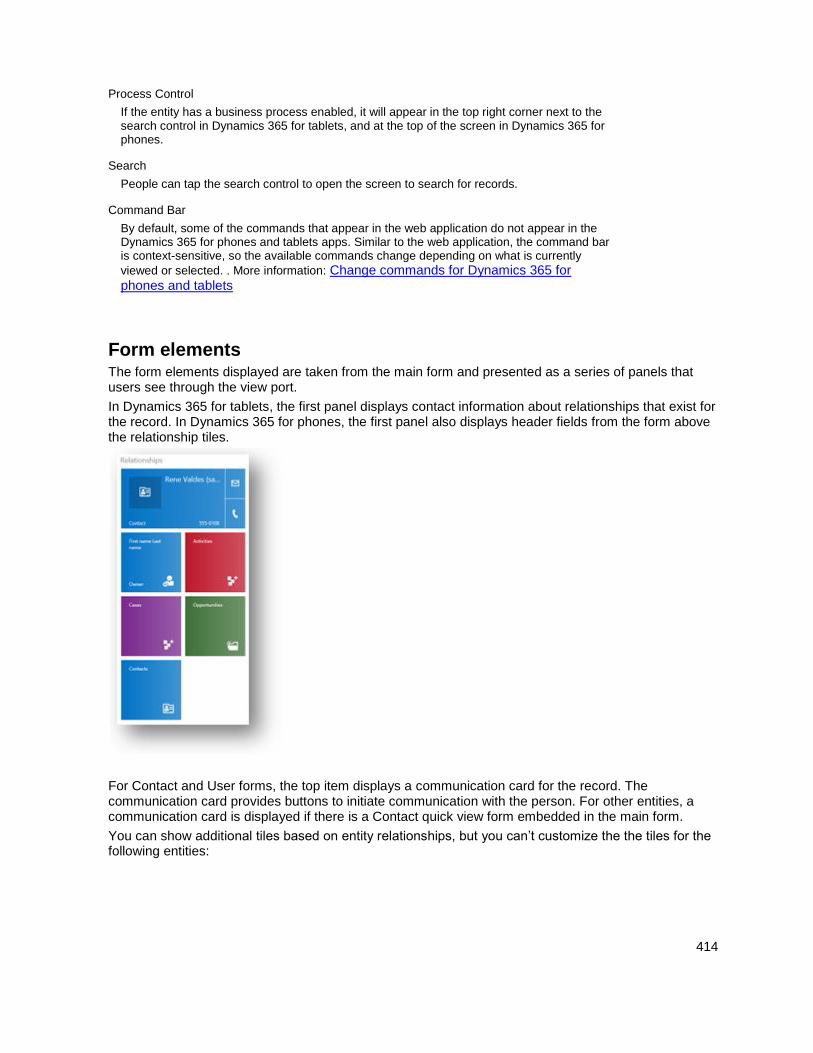
414
Process Control
If the entity has a business process enabled, it will appear in the top right corner next to the search control in Dynamics 365 for tablets, and at the top of the screen in Dynamics 365 for phones.
Search
People can tap the search control to open the screen to search for records.
Command Bar
By default, some of the commands that appear in the web application do not appear in the Dynamics 365 for phones and tablets apps. Similar to the web application, the command bar is context-sensitive, so the available commands change depending on what is currently
viewed or selected. . More information: Change commands for Dynamics 365 for phones and tablets
Form elements The form elements displayed are taken from the main form and presented as a series of panels that users see through the view port.
In Dynamics 365 for tablets, the first panel displays contact information about relationships that exist for the record. In Dynamics 365 for phones, the first panel also displays header fields from the form above the relationship tiles.
For Contact and User forms, the top item displays a communication card for the record. The communication card provides buttons to initiate communication with the person. For other entities, a communication card is displayed if there is a Contact quick view form embedded in the main form.
You can show additional tiles based on entity relationships, but you can’t customize the the tiles for the following entities:
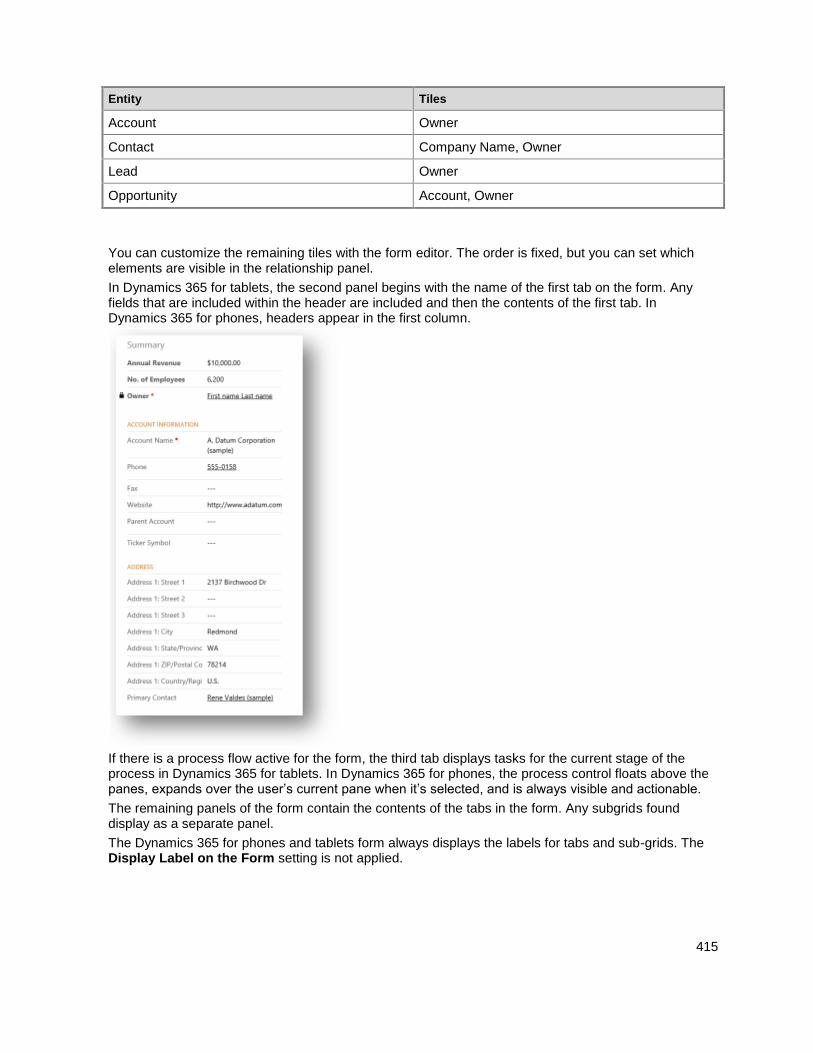
415
Entity Tiles
Account Owner
Contact Company Name, Owner
Lead Owner
Opportunity Account, Owner
You can customize the remaining tiles with the form editor. The order is fixed, but you can set which elements are visible in the relationship panel.
In Dynamics 365 for tablets, the second panel begins with the name of the first tab on the form. Any fields that are included within the header are included and then the contents of the first tab. In Dynamics 365 for phones, headers appear in the first column.
If there is a process flow active for the form, the third tab displays tasks for the current stage of the process in Dynamics 365 for tablets. In Dynamics 365 for phones, the process control floats above the panes, expands over the user’s current pane when it’s selected, and is always visible and actionable.
The remaining panels of the form contain the contents of the tabs in the form. Any subgrids found display as a separate panel.
The Dynamics 365 for phones and tablets form always displays the labels for tabs and sub-grids. The Display Label on the Form setting is not applied.
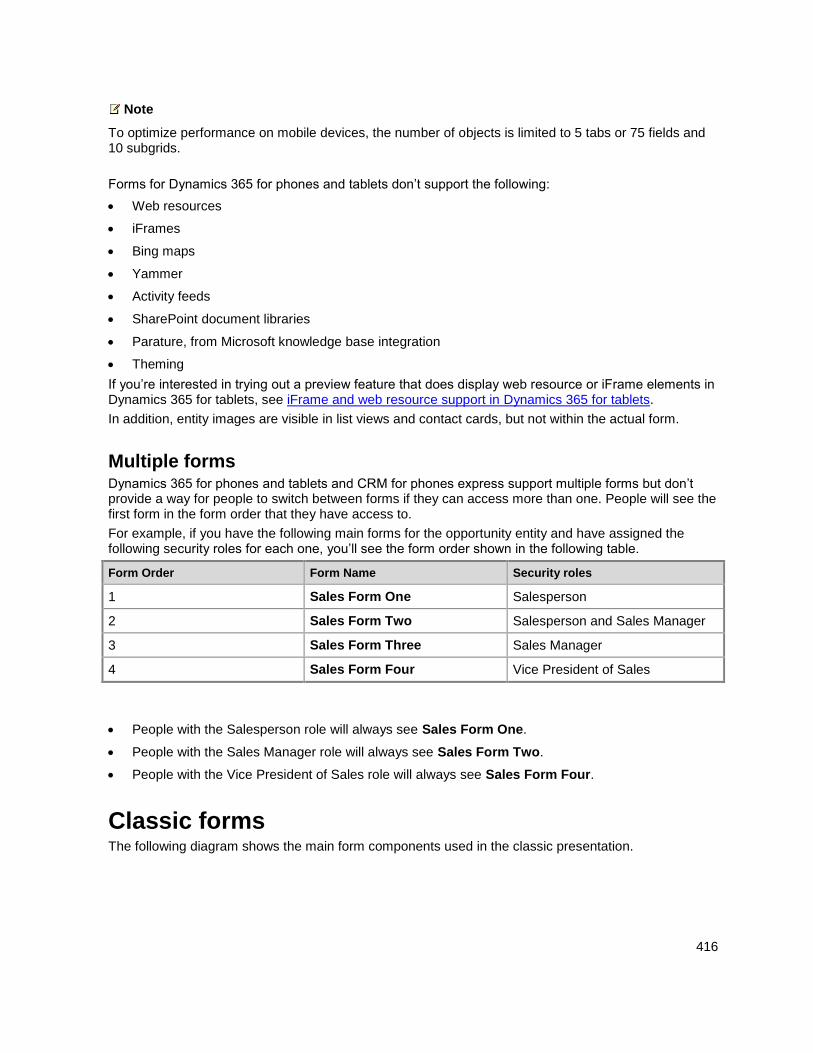
416
Note
To optimize performance on mobile devices, the number of objects is limited to 5 tabs or 75 fields and 10 subgrids.
Forms for Dynamics 365 for phones and tablets don’t support the following:
Web resources
iFrames
Bing maps
Yammer
Activity feeds
SharePoint document libraries
Parature, from Microsoft knowledge base integration
Theming
If you’re interested in trying out a preview feature that does display web resource or iFrame elements in Dynamics 365 for tablets, see iFrame and web resource support in Dynamics 365 for tablets.
In addition, entity images are visible in list views and contact cards, but not within the actual form.
Multiple forms Dynamics 365 for phones and tablets and CRM for phones express support multiple forms but don’t provide a way for people to switch between forms if they can access more than one. People will see the first form in the form order that they have access to.
For example, if you have the following main forms for the opportunity entity and have assigned the following security roles for each one, you’ll see the form order shown in the following table.
Form Order Form Name Security roles
1 Sales Form One Salesperson
2 Sales Form Two Salesperson and Sales Manager
3 Sales Form Three Sales Manager
4 Sales Form Four Vice President of Sales
People with the Salesperson role will always see Sales Form One.
People with the Sales Manager role will always see Sales Form Two.
People with the Vice President of Sales role will always see Sales Form Four.
Classic forms The following diagram shows the main form components used in the classic presentation.
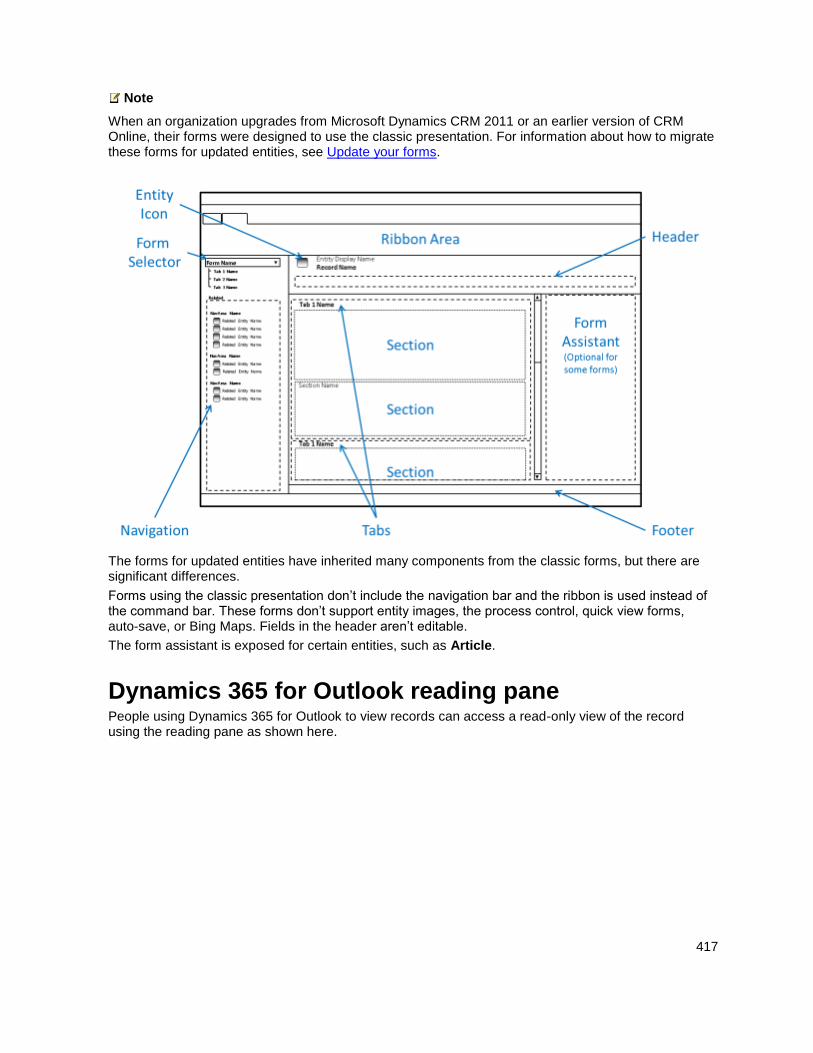
417
Note
When an organization upgrades from Microsoft Dynamics CRM 2011 or an earlier version of CRM Online, their forms were designed to use the classic presentation. For information about how to migrate these forms for updated entities, see Update your forms.
The forms for updated entities have inherited many components from the classic forms, but there are significant differences.
Forms using the classic presentation don’t include the navigation bar and the ribbon is used instead of the command bar. These forms don’t support entity images, the process control, quick view forms, auto-save, or Bing Maps. Fields in the header aren’t editable.
The form assistant is exposed for certain entities, such as Article.
Dynamics 365 for Outlook reading pane People using Dynamics 365 for Outlook to view records can access a read-only view of the record using the reading pane as shown here.
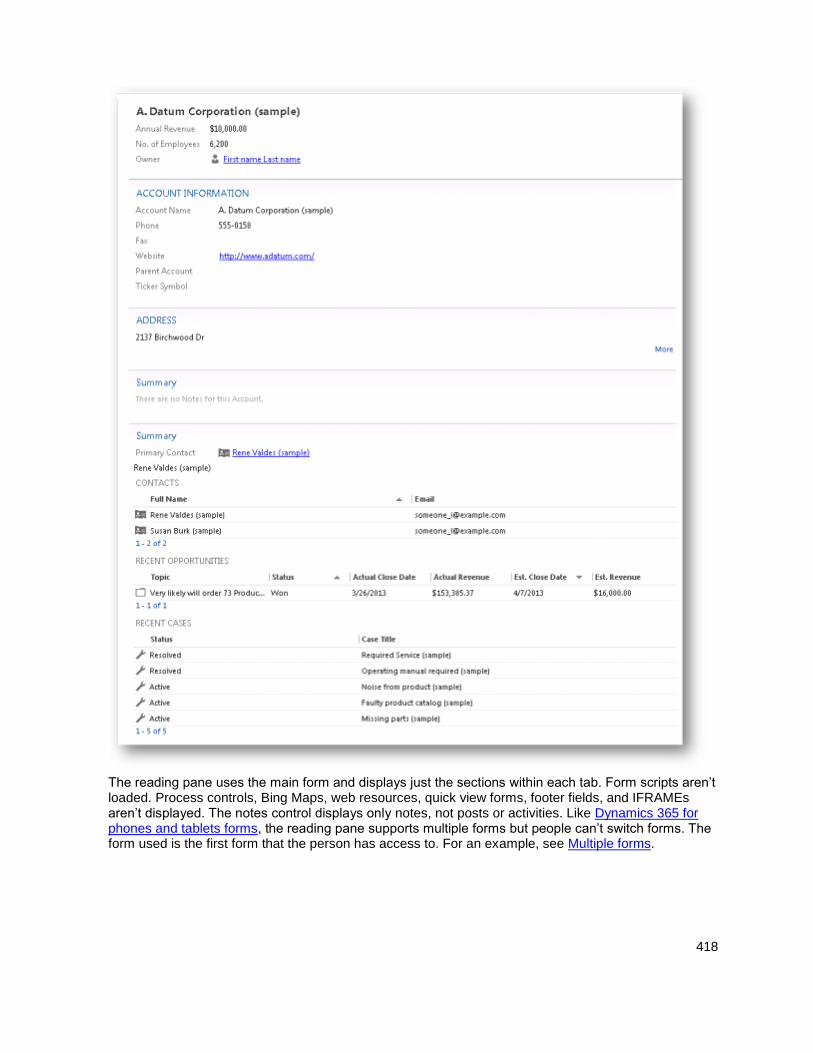
418
The reading pane uses the main form and displays just the sections within each tab. Form scripts aren’t loaded. Process controls, Bing Maps, web resources, quick view forms, footer fields, and IFRAMEs aren’t displayed. The notes control displays only notes, not posts or activities. Like Dynamics 365 for phones and tablets forms, the reading pane supports multiple forms but people can’t switch forms. The form used is the first form that the person has access to. For an example, see Multiple forms.
419
When viewing the reading pane, people can rearrange the sections as they like. Their changes will be preserved as they navigate between records.
See Also Create and design forms Use the form editor Design considerations for main forms Optimize form performance Manage auto-save Update your forms
© 2016 Microsoft. All rights reserved. Copyright
Optimize form performance
Applies To: Dynamics 365 (online), Dynamics 365 (on-premises), Dynamics CRM 2016, Dynamics CRM Online
[This topic is pre-release documentation and is subject to change.]
Forms that load slowly can reduce productivity and user adoption. Follow these recommendations to maximize how quickly your forms will load. Many of these recommendations are about how a developer may implement form scripts for your organization. Be sure to discuss these recommendations with developers who create form scripts for your forms.
In This Topic Form design
Form scripts
Command bar or ribbon
Form design Think about the interaction the user will have with the form and the amount of data that must be displayed within it.
Keep the number of fields to a minimum
The more fields you have in a form, the more data that needs to be transferred over the Internet or intranet to view each record.
Form scripts When you have customizations using form scripts make sure that the developer understands these strategies to improve performance.
Avoid including unnecessary JavaScript web resource libraries
The more scripts you add to the form, the more time it will take to download them. Usually
420
scripts are cached in your browser after they are loaded the first time, but the performance the first time a form is viewed often creates a significant impression.
Avoid loading all scripts in the Onload event
If you have code that only supports OnChange events for fields or the OnSave event, make sure to set the script library with the event handler for those events instead of the OnLoad
event. This way loading those libraries can be deferred and increase performance when the form loads.
Use collapsed tabs to defer loading web resources
When web resources or IFRAMES are included in sections inside a collapsed tab they will not be loaded if the tab is collapsed. They will be loaded when the tab is expanded. When the tab state changes the TabStateChange event occurs. Any code that is required to
support web resources or IFRAMEs within collapsed tabs can use event handlers for the TabStateChange event and reduce code that might otherwise have to occur in the OnLoad
event.
Set default visibility options
Avoid using form scripts in the OnLoad event that hide form elements. Instead set the
default visibility options for form elements that might be hidden to not be visible by default when the form loads. Then, use scripts in the OnLoad event to show those form elements
you want to display.
Command bar or ribbon Keep these recommendations in mind as you edit the command bar or ribbon.
Keep the number of controls to a minimum
Within the command bar or the ribbon for the form, evaluate what controls are necessary and hide any that you don’t need. Every control that is displayed increases resources that need to be downloaded to the browser.
See Also Create and design forms Use the form editor Design considerations for main forms Main form presentations Manage auto-save Update your forms
© 2016 Microsoft. All rights reserved. Copyright
Manage auto-save
Applies To: Dynamics 365 (online), Dynamics 365 (on-premises), Dynamics CRM 2016, Dynamics CRM Online
[This topic is pre-release documentation and is subject to change.]

421
Auto-save helps people focus on their work without having to manage saving data in the form. Most people will appreciate not having to explicitly save data each time they update a record, but some organizations may have customizations that were designed expecting an explicit save. For these organizations there are options to manage how auto-save is applied.
In This Topic How auto-save works
Should you disable auto-save?
Disable auto-save for the organization
Disable auto-save for a form
How auto-save works By default all main forms for Updated entities will have auto-save enabled. After a record is created (initially saved), any changes made to a form will automatically be saved thirty seconds after the change is made. If no changes are made in the form, the automatic save won’t occur while the form is open. After a change is made the 30-second period before an auto-save begins again. The field that someone is currently editing isn’t included in an auto-save. If someone else has updated the same record while you’re editing it, those changes will be retrieved and displayed in the form when auto-save occurs.
With auto-save enabled, the save button only appears for the initial save of the record. After the record is created, the save button in the command bar isn’t shown, but you can see a button in the lower right corner that will show if there are any unsaved changes. This control is also displayed if auto-save is disabled.
You can click this button to save the record and refresh data in the form immediately. When auto-save is enabled the record will be saved whenever you navigate away from a record or close a separate window displaying a record. There is no need for the Save & Close button that appears in forms for entities that aren’t updated.
Should you disable auto-save? If you have plug-ins, workflows, or form scripts that execute when a record is saved, they’ll run each time auto-save occurs. This might lead to undesirable behaviors if these extensions weren’t designed to work with auto-save. Whether auto-save is enabled or not, plug-ins, workflows, and form scripts should be designed to look for specific changes, and shouldn’t execute indiscriminately for each save event.
If you have auditing configured for an entity, each save is treated like a separate update. If someone lingers on a form with unsaved changes for more than thirty seconds, you’ll see an additional entry only if they add more data after the auto-save is performed. If you have reports that depend on auditing data and treat each save as an individual “touch” of a record, you might see an increase in the frequency of touches. If you are using this approach, you should consider that individual user behaviors make it an unreliable metric with or without auto-save enabled.
Disable auto-save for the organization If you determine that auto-save will cause problems with any extensions you are using, you can disable it for your organization. There is no setting to disable auto-save for individual entities or forms.
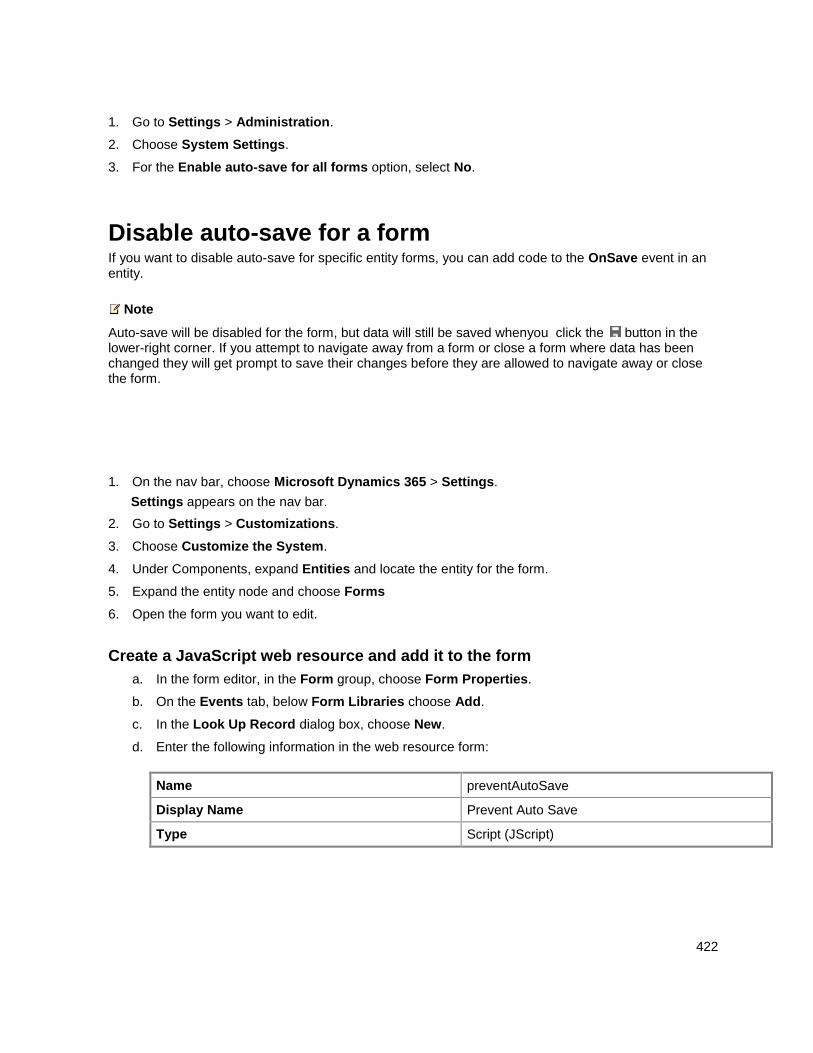
422
1. Go to Settings > Administration.
2. Choose System Settings.
3. For the Enable auto-save for all forms option, select No.
Disable auto-save for a form If you want to disable auto-save for specific entity forms, you can add code to the OnSave event in an entity.
Note
Auto-save will be disabled for the form, but data will still be saved whenyou click the button in the lower-right corner. If you attempt to navigate away from a form or close a form where data has been changed they will get prompt to save their changes before they are allowed to navigate away or close the form.
1. On the nav bar, choose Microsoft Dynamics 365 > Settings.
Settings appears on the nav bar.
2. Go to Settings > Customizations.
3. Choose Customize the System.
4. Under Components, expand Entities and locate the entity for the form.
5. Expand the entity node and choose Forms
6. Open the form you want to edit.
Create a JavaScript web resource and add it to the form
a. In the form editor, in the Form group, choose Form Properties.
b. On the Events tab, below Form Libraries choose Add.
c. In the Look Up Record dialog box, choose New.
d. Enter the following information in the web resource form:
Name preventAutoSave
Display Name Prevent Auto Save
Type Script (JScript)
423
e. Next to the Type field, choose Text Editor.
f. In the Source field, paste the following code:
function preventAutoSave(econtext) {
var eventArgs = econtext.getEventArgs();
if (eventArgs.getSaveMode() == 70 || eventArgs.getSaveMode() == 2) {
eventArgs.preventDefault();
}
}
g. Choose OK to close the text editor.
h. Choose Save to save the web resource and then close the web resource window.
i. In the Look Up Record dialog the new web resource you created will be selected. Choose
Add to close the dialog.
Configure the OnSave event
a. In the Form Properties window, in the Event Handlers section, set Event to OnSave.
b. Click Add.
c. In the Handler Properties window, set Library to the web resource you added in the previous
step.
d. Type ‘preventAutoSave’ in the Function field. This is case sensitive. Do not include quotation
marks.
e. Make sure that Enabled is checked.
f. Check Pass execution context as first parameter.
Important
If you do not do this the script will not work.
The Handler Properties dialog should look like this. The customization prefix: “new_” may vary based on the customization prefix set for the default publisher for your organization.
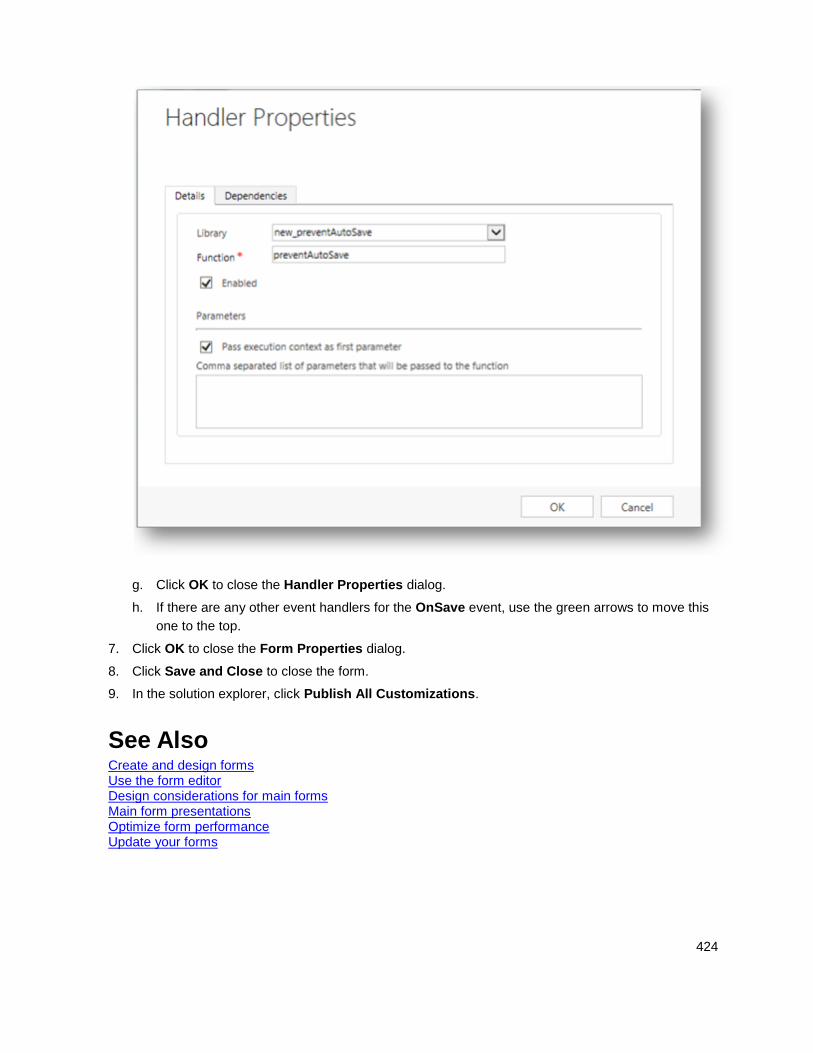
424
g. Click OK to close the Handler Properties dialog.
h. If there are any other event handlers for the OnSave event, use the green arrows to move this
one to the top.
7. Click OK to close the Form Properties dialog.
8. Click Save and Close to close the form.
9. In the solution explorer, click Publish All Customizations.
See Also Create and design forms Use the form editor Design considerations for main forms Main form presentations Optimize form performance Update your forms

425
© 2016 Microsoft. All rights reserved. Copyright
Update your forms
Applies To: Dynamics 365 (online), Dynamics 365 (on-premises), Dynamics CRM 2016, Dynamics CRM Online
[This topic is pre-release documentation and is subject to change.]
The ability to merge main forms facilitates the upgrade process. This topic explains how you can merge existing forms to use the new layout optimized for this release.
Merging main forms to use the new layout You only need to merge forms for Updated entities that you have customized. You do not need to do this right away, but you will need to do it sometime before the next major release of Microsoft Dynamics 365.
When you view one of the updated forms using the form editor, you will see a Merge Forms button in the Upgrade group in the Home tab. Use this button and select one of your existing forms and choose Add.
At the bottom of the form, you will find the visual elements of the form you selected have been appended to the bottom of the current form. The only difference is that the header and footer elements from the old form will be added as separate tabs containing a section with the contents of each element.
What you can’t see so easily is that all the form script event handlers are also brought in and merged with the new form. There is a limit to the number of event handlers that can be merged. The merge process supports up to 50 event handlers. If the total number of event handlers exceeds 50, the action will be canceled. You will need to remove some event handlers from the form you want to merge before you can merge it.
Once the new forms are merged, you need to move any of the form elements from the old form into the new form until all the added elements are gone. Remove any form elements you don’t need.
If your original form has any security roles assigned to it, be sure to apply the same security roles to the new form.
When you are finished, activate the new main form and deactivate the old one.
Activate or deactivate a main form
1. In the solution explorer, expand the entities node and select the entity with the main form you want
to activate or deactivate.
2. Select Forms to view the forms list.
If you do not see the form you are looking for, check that the All Forms view is selected.
3. Select the view and, in the toolbar, choose either Activate or Deactivate.
Note
You must have at least one active main form for each entity. If you try to deactivate the only active main
426
form, you will see an error message.
4. You must publish customizations before these settings take effect.
See Also Create and design forms Create and edit mobile forms for Dynamics CRM for phones express Use the form editor Design considerations for main forms Main form presentations Optimize form performance Manage auto-save
© 2016 Microsoft. All rights reserved. Copyright
Create and edit mobile forms for Dynamics CRM for phones express
Applies To: Dynamics 365 (online), Dynamics 365 (on-premises), Dynamics CRM 2016, Dynamics CRM Online
[This topic is pre-release documentation and is subject to change.]
Microsoft Dynamics 365 for phones express uses a form that is optimized for use with a phone. While editing the form, you select which fields you want to display the order in which you want them to appear. You can make certain fields read-only, but can’t use form scripting in the CRM for phones express forms.
CRM for phones express is the previous version of the phone app for Microsoft Dynamics 365. The latest version of the phone app, Microsoft Dynamics 365 for phones, provides the same full-featured experience as the Microsoft Dynamics 365 for tablets app. For information about customizing Dynamics 365 for phones and tablets, see Customize Dynamics 365 for phones and tablets.
When you have multiple forms, you need to adjust the form order and assign appropriate security roles to ensure your users see the forms tailored for their needs.
In this topic View the mobile express form
Create a mobile express form
Edit a mobile express form
View the mobile express form The first step in customizing the mobile form is to understand what it looks like. Start the CRM for phones express app on your phone and sign in to your organization.
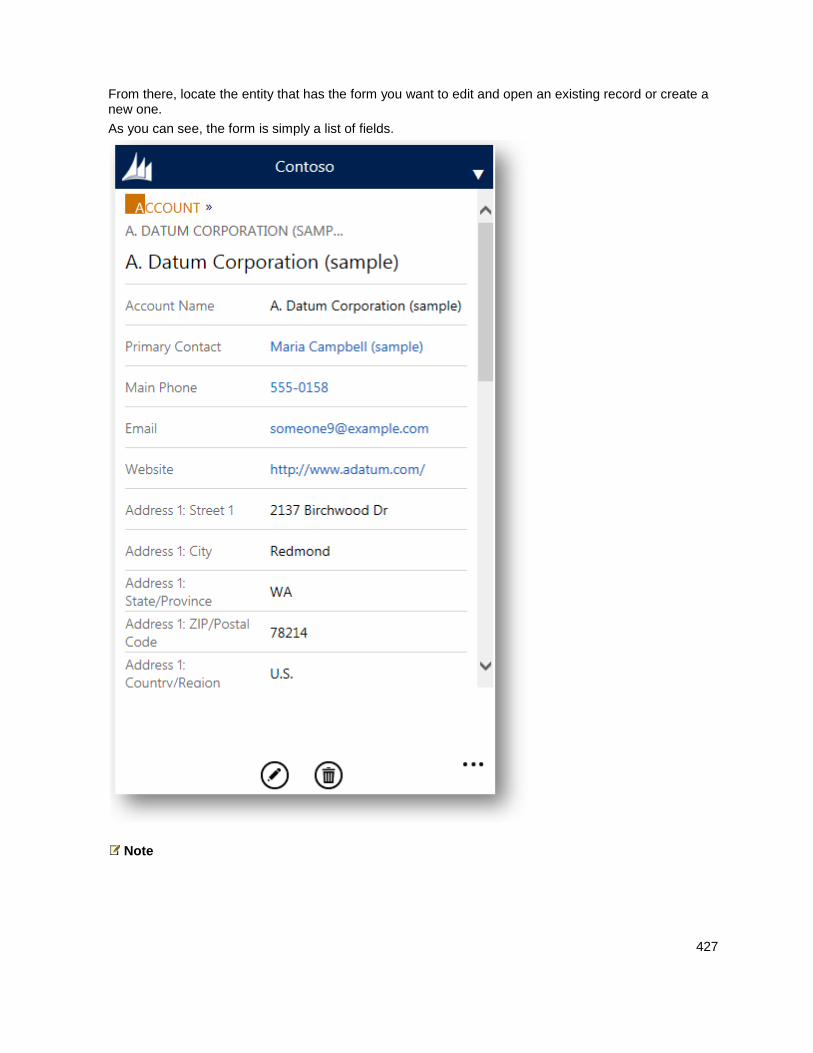
427
From there, locate the entity that has the form you want to edit and open an existing record or create a new one.
As you can see, the form is simply a list of fields.
Note
428
Only the fields that contain data display.
To edit the data, click the Edit icon at the bottom of the form. The position of the field labels shifts to provide more space for editing. All fields are now displayed. If you scroll down, you can see a list of all the related entities as defined by their entity relationship definitions.
Create a mobile express form If you need more than one mobile form, create a new one in the same manner you would create any other type of form. If you create more than one form, you need to set the form order and security roles for the form. Users can’t switch forms in the CRM for phones express app; they’ll see the first form in the form order that their security roles allow them to see. For an example, see Multiple forms.
1. Go to Settings > Customizations. Choose Customize the System.
2. Expand the Entities node and select the entity you want to create a new mobile form for.
3. Expand the entity and select the Forms node.
4. Choose New and select Mobile – Express.
If you don’t see this option, the entity is not enabled for CRM for phones express. You can change this for some entities. See Enable or disable entity options for more information.
5. Choose File > Save As, type in a Name and Description, and then choose OK.
You don’t have to give your mobile express form a unique name, but you should give it a meaningful name so you can differentiate it from other mobile express forms in the list. This is important when you set the form order.
6. You can now edit the form or choose Save and Close to close it. More information: Edit a mobile
express form
7.
a. In the list of forms for an entity, choose Form Order and select Mobile - Express.
b. In the Form Order dialog box, select a form and use the green arrows to move the form up or
down in the form order.
This is where you will be glad you gave your new mobile form a unique name.
c. Choose OK to close the Form Order dialog box.
Edit a mobile express form Unlike other entity forms, you can’t create new attributes or entity relationships in the mobile express form editor. However, you can always edit the mobile express form within the default solution.
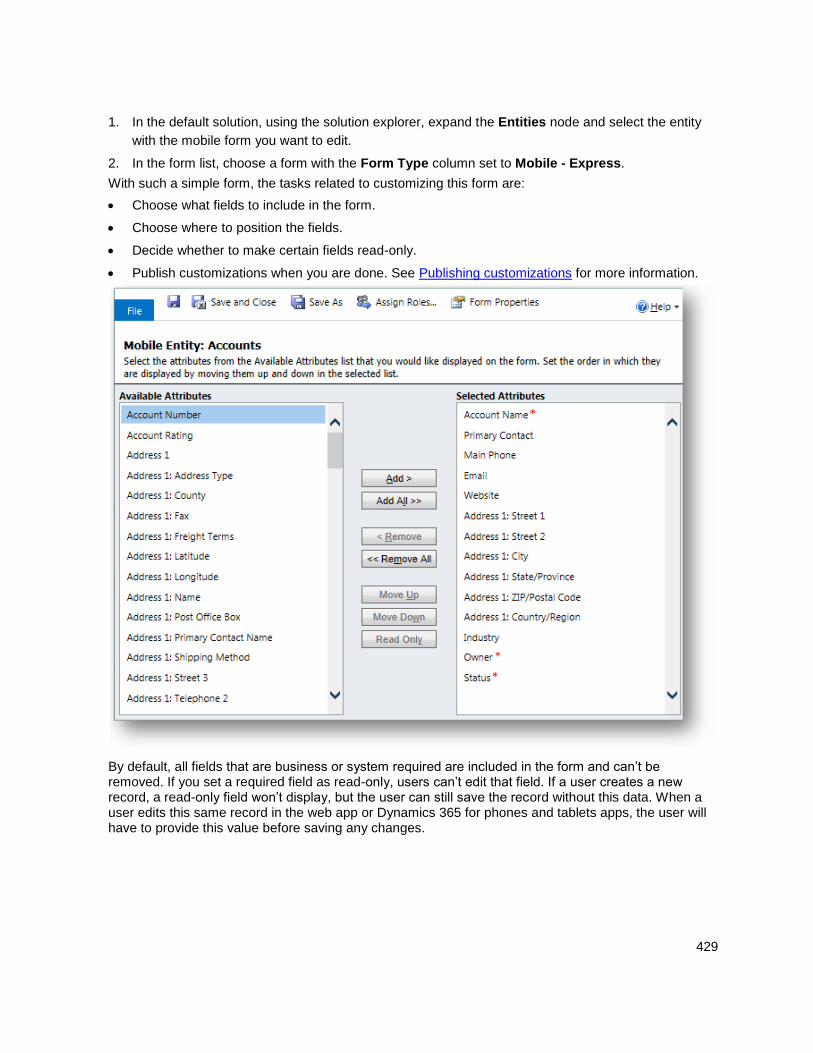
429
1. In the default solution, using the solution explorer, expand the Entities node and select the entity
with the mobile form you want to edit.
2. In the form list, choose a form with the Form Type column set to Mobile - Express.
With such a simple form, the tasks related to customizing this form are:
Choose what fields to include in the form.
Choose where to position the fields.
Decide whether to make certain fields read-only.
Publish customizations when you are done. See Publishing customizations for more information.
By default, all fields that are business or system required are included in the form and can’t be removed. If you set a required field as read-only, users can’t edit that field. If a user creates a new record, a read-only field won’t display, but the user can still save the record without this data. When a user edits this same record in the web app or Dynamics 365 for phones and tablets apps, the user will have to provide this value before saving any changes.

430
See Also Create and design forms Use the form editor Create and edit quick create forms Create and edit quick view forms
© 2016 Microsoft. All rights reserved. Copyright
Create and edit quick create forms
Applies To: Dynamics 365 (online), Dynamics 365 (on-premises), Dynamics CRM 2016, Dynamics CRM Online
[This topic is pre-release documentation and is subject to change.]
In Microsoft Dynamics 365, quick create forms appear when you click the Create button in the navigation bar or when you choose + New when creating a new record from a lookup or sub-grid. With quick create forms, you can have a streamlined data entry experience with full support for logic defined by form scripts and business rules.
The mobile apps use quick create forms for creating new records. If an entity already has a quick create form configured for it, the mobile apps use that form. If an entity doesn't have a configured quick create form, Dynamics 365 generates a quick create form for creating records in the mobile apps based on the main form definition.
In This Topic Entities with quick create forms
Create a quick create form
Edit a quick create form
Entities with quick create forms By default only the following system entities have quick create forms.
Account Campaign Response Case Competitor
Contact Lead Opportunity
Although you can create quick create forms for System Activity entities, they do not support quick create forms. Any of the other Updated entities and any custom entities can be enabled to support these forms by selecting Allow Quick Create in the entity definition and creating a quick create form for them. More information: Enable or disable entity options
You can enable custom activity entities to support quick create forms, and you can create quick create forms for those entities. However, the quick create form for custom activity entities will not be used

431
when people click the Create button on the nav bar. These quick create forms can be used only when people add a new record for a subgrid that displays that specific custom activity entity.
Create a quick create form Although you can define multiple quick create forms, only one quick create form can be used by everyone. The form everyone will use is set using the form order. Quick create forms cannot be assigned to security roles and they do not provide the capability for the user to switch forms.
Note
The entity must have the Allow Quick Create option enabled for the quick create form to be displayed. More information: Enable or disable entity options
To create a quick create form
1. Go to Settings > Customizations.
2. Choose Customizations, then choose Customize the System.
3. In the solutions explorer, expand the entity that you want and select Forms.
4. Select New > Quick Create Form from the tool bar.
5. Drag any fields from the Field Explorer into the sections in the form.
6. When you are finished, click or tap Save and Close.
7. Publish customizations to see the new form in the application.
Edit a quick create form While quick create forms support form scripts and business rules, their purpose is different from main forms and they don’t support all the capabilities of main forms. Quick create forms always have one section with three columns. You can’t add additional sections or columns.
The following controls cannot be added to quick create forms:
Sub-grids
Quick View Forms
Web resources
IFRAMEs
Notes
Bing Maps
If you add a composite field to a quick create form, it will be displayed as separate fields.
To edit a quick create form
1. Go to Settings > Customizations.
432
2. Choose Customizations, then choose Customize the System.
3. In the solutions explorer, expand the entity that you want and select Forms.
4. In the form list, double-click or tap a form where the Form Type is Quick Create.
5. Drag any fields from the Field Explorer into the sections in the form.
See Configure event handlers for information about editing event handlers for form scripts.
6. When you are finished, click or tap Save and Close.
7. Publish customizations to see the modified form in the application.
See Also Video: Microsoft Dynamics CRM Customization New Features - Quick Create Forms Video: Microsoft Dynamics CRM Customization New Features - Quick Forms Create and design forms Use the form editor Create and edit mobile forms for Dynamics CRM for phones express Create and edit quick view forms
© 2016 Microsoft. All rights reserved. Copyright
Create and edit quick view forms
Applies To: Dynamics 365 (online), Dynamics 365 (on-premises), Dynamics CRM 2016, Dynamics CRM Online
[This topic is pre-release documentation and is subject to change.]
In Microsoft Dynamics 365, a quick view form can be added to another form as a quick view control. It provides a template to view information about a related entity record within a form for another entity record. This means you do not need to navigate to a different record to see the information you need to do your work.
Quick view controls are associated with a lookup field that is included in a form. If the lookup field value is not set, the quick view control will not be visible. Data in quick view controls cannot be edited and quick view forms do not support form scripts.
Because quick view forms are viewed using a quick view control in a form, they do not include header, footer, or navigation areas. Security roles cannot be assigned to quick view forms and they cannot be activated or deactivated.
In This Topic Create a quick view form
Edit a quick view form
Add a quick view control to a main form
433
Create a quick view form You create quick view forms using the form editor in a manner similar to the way you create other forms. Quick view forms are read-only. Use them to create forms that are for reading purposes only.
1. In the default solution, using the solution explorer, expand the Entities node and select the entity
you want to create a new quick view form for.
2. Expand the entity and select the Forms node.
3. Choose New and select Quick View Form. This will open the form editor.
4. In the form editor, choose Form Properties in the Form group of the Home tab.
5. In the Form Properties dialog box, enter a Form Name and Description to differentiate this quick
view form from any others and close the Form Properties dialog box.
6. Edit the form to add the fields you want. More information: Edit a quick view form
Important
If you add a field and choose Field Requirement > Business Required and then save it, you will not be able to delete the field.
7. To save the form and close the form editor, on the Home tab, Save group, choose Save and
Close.
Edit a quick view form Quick view forms have a simplified layout because they are designed to be viewed within a form section. Only one single column tab is available. You can add only additional single column sections, fields, subgrids, and spacers. More information: Use the form editor
Note
You cannot delete a field that is Business Required. You will receive this message if you try to delete the field: “The field you are trying to remove is required by the system or business.” If you do not want the field in the form you have to delete the entire form and then recreate it.
When you edit a quick view form, you must publish your changes before they will be visible in the application.
Add a quick view control to a main form Quick view forms can only be added to a main form where a lookup field exists that targets the entity of the quick view form.
434
1. In an entity main form, choose Quick View Form in the Control group of the Insert tab.
2. In the Quick View Control Properties dialog box, set the properties described in Quick view
control properties.
3. Choose OK to close the Quick View Control Properties dialog box.
See Also Video: Microsoft Dynamics CRM Customization New Features - Quick Forms Create and design forms Use the form editor Create and edit mobile forms for Dynamics CRM for phones express Create and edit quick create forms
© 2016 Microsoft. All rights reserved. Copyright
Create and design interactive forms for the interactive service hub
Applies To: Dynamics 365 (online), Dynamics 365 (on-premises), Dynamics CRM 2016, Dynamics CRM Online
[This topic is pre-release documentation and is subject to change.]
Improve your users' productivity with the new interactive forms. The interactive forms have a new user experience that saves users some clicks and helps them maintain context while working on related records.
These forms are specially introduced for use in the interactive service hub, which is designed and optimized for customer service scenarios.
Important
For Microsoft Dynamics 365 (online) organizations, the interactive forms feature is only available if you've installed the CRM Online 2016 Update. For on-premises Dynamics 365 organizations, this feature is only available if you've updated to CRM 2016. Interested in getting this feature? Find your Dynamics 365 administrator or support person.
In This Topic Supported entities
Enable entities for interactive experience
Types of forms
435
Assign form order
Supported entities Interactive forms are supported only for entities that are enabled for the interactive experience.
By default, the following entities are enabled for the interactive experience, and have the interactive forms created out-of-the box:
Account
Contact
Case
Out-of-the-box activities (Phone, task, email, appointment, and social activity)
Social Profile
Queue Item
Knowledge Article
Note
Apart from these entities, you can also create or customize interactive dashboards. More information: Configure interactive experience dashboards
You can see the interactive forms for each entity in their list of forms in the solution explorer in the Customization area. The form type of interactive forms is Main InteractionCentric.
As a customizer, you can customize these forms in a way that it is easier for the users in your organization to find or enter information efficiently. You can create more interactive forms for these entities.
You can enable any new custom entity or custom activity for the interactive experience, and then create interactive forms for it.
Important
All customization tasks for the interactive service hub must be done in the Microsoft Dynamics 365
web application.
You can’t enable out-of-the-box entities other than the ones listed about for the interactive
experience.
Enable entities for interactive experience You can enable interactive experience only for custom entities or activities. You can’t enable existing default (out-of-the-box) entities for interactive experience.
1. Go to Settings > Customizations.
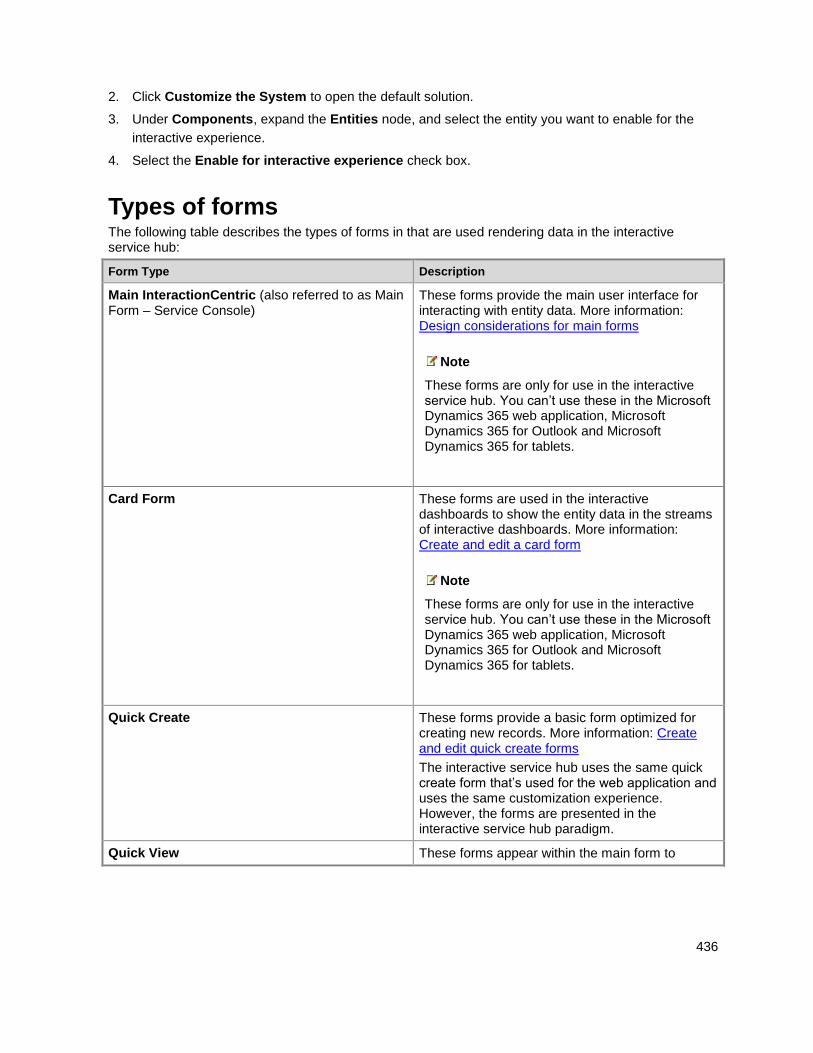
436
2. Click Customize the System to open the default solution.
3. Under Components, expand the Entities node, and select the entity you want to enable for the
interactive experience.
4. Select the Enable for interactive experience check box.
Types of forms The following table describes the types of forms in that are used rendering data in the interactive service hub:
Form Type Description
Main InteractionCentric (also referred to as Main Form – Service Console)
These forms provide the main user interface for interacting with entity data. More information: Design considerations for main forms
Note
These forms are only for use in the interactive service hub. You can’t use these in the Microsoft Dynamics 365 web application, Microsoft Dynamics 365 for Outlook and Microsoft Dynamics 365 for tablets.
Card Form These forms are used in the interactive dashboards to show the entity data in the streams of interactive dashboards. More information: Create and edit a card form
Note
These forms are only for use in the interactive service hub. You can’t use these in the Microsoft Dynamics 365 web application, Microsoft Dynamics 365 for Outlook and Microsoft Dynamics 365 for tablets.
Quick Create These forms provide a basic form optimized for creating new records. More information: Create and edit quick create forms
The interactive service hub uses the same quick create form that’s used for the web application and uses the same customization experience. However, the forms are presented in the interactive service hub paradigm.
Quick View These forms appear within the main form to
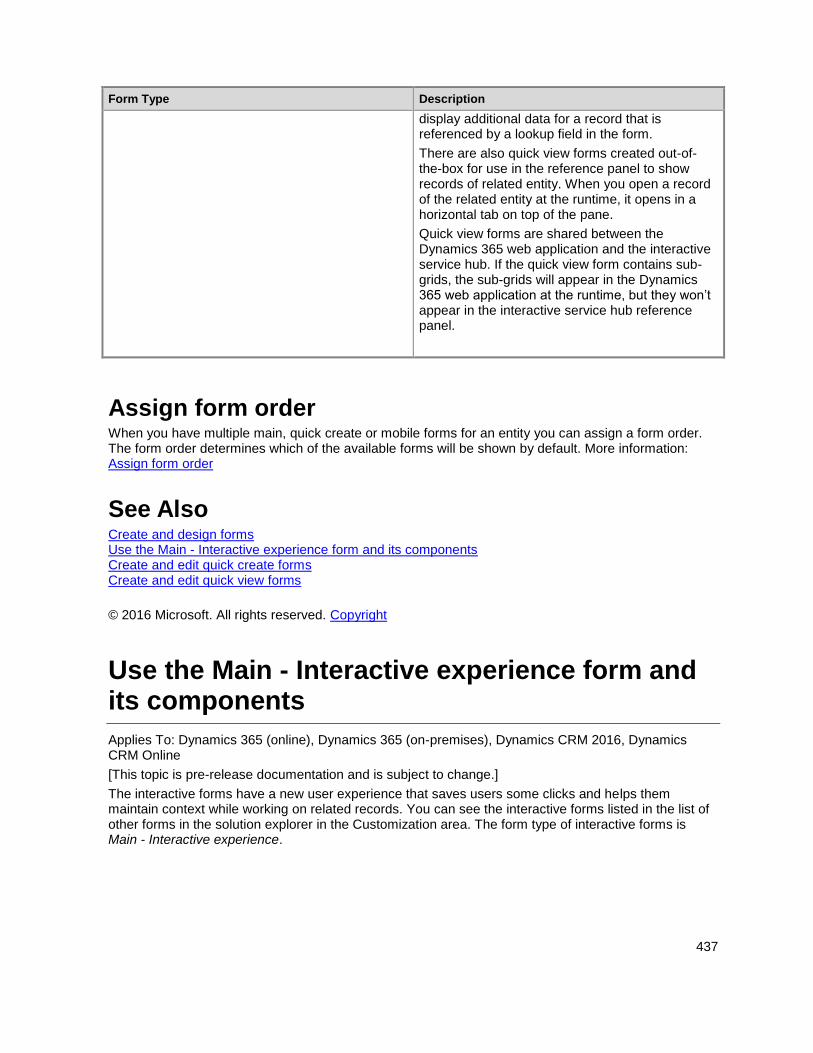
437
Form Type Description
display additional data for a record that is referenced by a lookup field in the form.
There are also quick view forms created out-of-the-box for use in the reference panel to show records of related entity. When you open a record of the related entity at the runtime, it opens in a horizontal tab on top of the pane.
Quick view forms are shared between the Dynamics 365 web application and the interactive service hub. If the quick view form contains sub-grids, the sub-grids will appear in the Dynamics 365 web application at the runtime, but they won’t appear in the interactive service hub reference panel.
Assign form order When you have multiple main, quick create or mobile forms for an entity you can assign a form order. The form order determines which of the available forms will be shown by default. More information: Assign form order
See Also Create and design forms Use the Main - Interactive experience form and its components Create and edit quick create forms Create and edit quick view forms
© 2016 Microsoft. All rights reserved. Copyright
Use the Main - Interactive experience form and its components
Applies To: Dynamics 365 (online), Dynamics 365 (on-premises), Dynamics CRM 2016, Dynamics CRM Online
[This topic is pre-release documentation and is subject to change.]
The interactive forms have a new user experience that saves users some clicks and helps them maintain context while working on related records. You can see the interactive forms listed in the list of other forms in the solution explorer in the Customization area. The form type of interactive forms is Main - Interactive experience.
438
This topic explains how to edit a Main - Interactive experience form, and add or change various elements of the form.
In This Topic Open the form editor
Publish the changes for use in the interactive service hub
Form editor user interface
Form properties
Visibility options
Tab properties
Section properties
Common field properties
Special field properties
Sub-grid properties
Quick view control properties
Web resource properties
IFRAME properties
Edit Navigation
Configure event handlers
Open the form editor To edit a form or to add or change elements, use the form editor.
If you create any new solution components in the process of editing the form, the names of the components will use the solution publisher customization prefix for the default solution and these components will only be included in the default solution. If you want any new solution components to be included in a specific unmanaged solution, open the form editor through that unmanaged solution.
Access the form editor through the default solution
1. Go to Settings > Customizations.
2. Click Customize the System to open the default solution.
3. Under Components, expand Entities, expand the entity you want, and then select Forms.
4. In the list of forms, open the form of type Main - Interactive experience.
Access the form editor for an unmanaged solution
1. Go to Settings > Customizations.
2. Click Solutions.
3. Double-click the unmanaged solution you want to work with.
Locate the entity with the form you want to edit. If the entity isn’t there, you’ll need to add it.

439
Add an entity to an unmanaged solution
a. Select the Entities node and, in the toolbar above the list, click Add Existing.
b. In the Select Solution Components dialog box, with the Component Type selector set to
Entity, select the entity you want to add and click OK.
c. If the Missing Required Components dialog box appears, you can click No, do not include
required components if you don’t intend to export this unmanaged solution to another
organization. If you don’t want to include missing required components at this time, you can
add them later. You’ll receive notification again if you export this solution in the future.
4. In the solution explorer expand the entity with the form you want to edit and select Forms.
5. In the list of forms, open the form of type Main - Interactive experience.
Publish the changes for use in the interactive service hub Certain customizations that make changes to the user interface require that they be published before people can use them in the application. To publish your customization, in the solution explorer, click Publish All Customizations.
With Microsoft Dynamics CRM 2016 Update 0.1 or later, you can improve performance for that first user by clicking the Prepare Client Customizations button after publishing your customizations. This prompts Dynamics 365 to prepare the metadata package right then instead of waiting for the first user to start the interactive service hub. More information: Customization concepts
Important
Preparing client customizations may take some time. If you see a message that the browser page has become unresponsive, wait for the page to become responsive, and don't kill it.
Form editor user interface The form editor displays commands in two tabs: Home and Insert. More information: Home tab, Insert tab
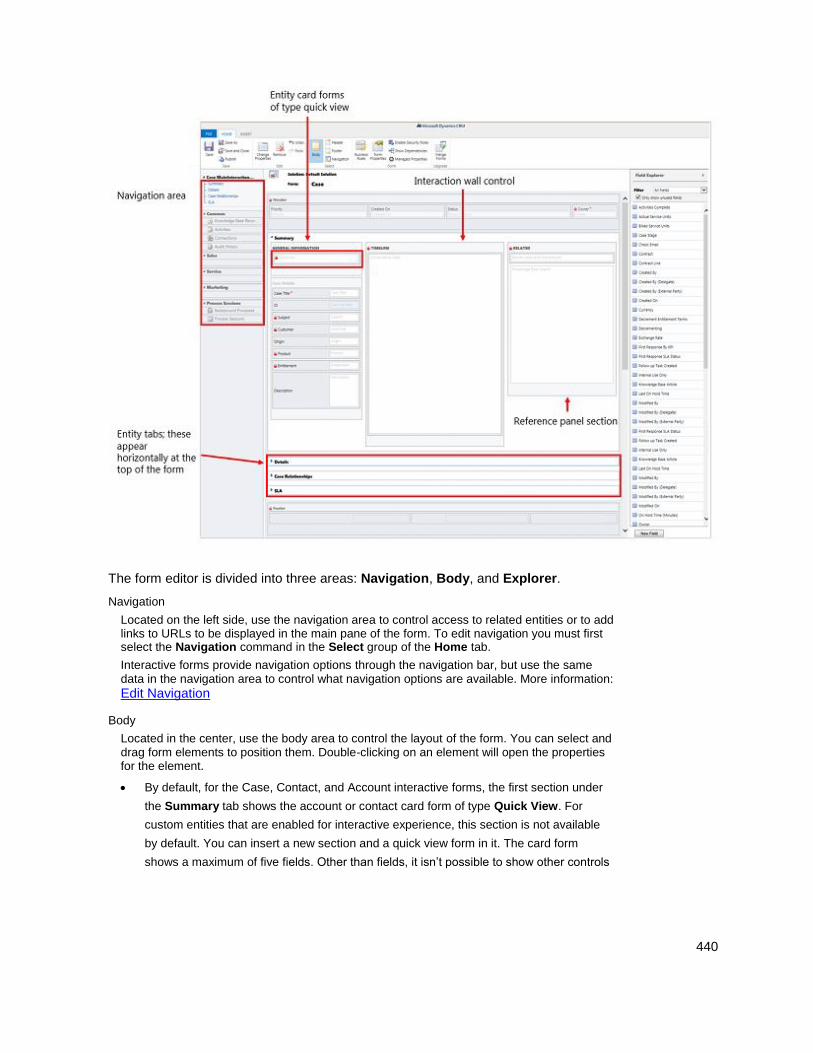
440
The form editor is divided into three areas: Navigation, Body, and Explorer.
Navigation
Located on the left side, use the navigation area to control access to related entities or to add links to URLs to be displayed in the main pane of the form. To edit navigation you must first select the Navigation command in the Select group of the Home tab.
Interactive forms provide navigation options through the navigation bar, but use the same data in the navigation area to control what navigation options are available. More information:
Edit Navigation
Body
Located in the center, use the body area to control the layout of the form. You can select and drag form elements to position them. Double-clicking on an element will open the properties for the element.
By default, for the Case, Contact, and Account interactive forms, the first section under
the Summary tab shows the account or contact card form of type Quick View. For
custom entities that are enabled for interactive experience, this section is not available
by default. You can insert a new section and a quick view form in it. The card form
shows a maximum of five fields. Other than fields, it isn’t possible to show other controls
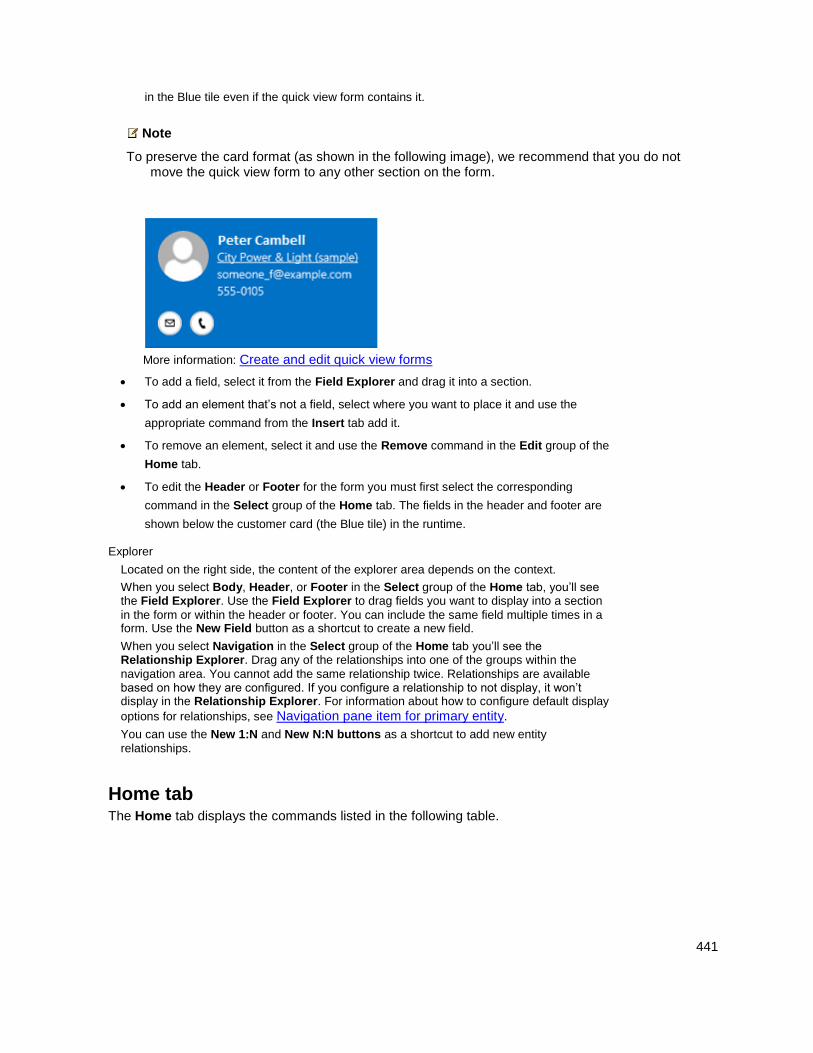
441
in the Blue tile even if the quick view form contains it.
Note
To preserve the card format (as shown in the following image), we recommend that you do not move the quick view form to any other section on the form.
More information: Create and edit quick view forms
To add a field, select it from the Field Explorer and drag it into a section.
To add an element that’s not a field, select where you want to place it and use the
appropriate command from the Insert tab add it.
To remove an element, select it and use the Remove command in the Edit group of the
Home tab.
To edit the Header or Footer for the form you must first select the corresponding
command in the Select group of the Home tab. The fields in the header and footer are
shown below the customer card (the Blue tile) in the runtime.
Explorer
Located on the right side, the content of the explorer area depends on the context.
When you select Body, Header, or Footer in the Select group of the Home tab, you’ll see the Field Explorer. Use the Field Explorer to drag fields you want to display into a section
in the form or within the header or footer. You can include the same field multiple times in a form. Use the New Field button as a shortcut to create a new field.
When you select Navigation in the Select group of the Home tab you’ll see the Relationship Explorer. Drag any of the relationships into one of the groups within the
navigation area. You cannot add the same relationship twice. Relationships are available based on how they are configured. If you configure a relationship to not display, it won’t display in the Relationship Explorer. For information about how to configure default display
options for relationships, see Navigation pane item for primary entity.
You can use the New 1:N and New N:N buttons as a shortcut to add new entity
relationships.
Home tab The Home tab displays the commands listed in the following table.
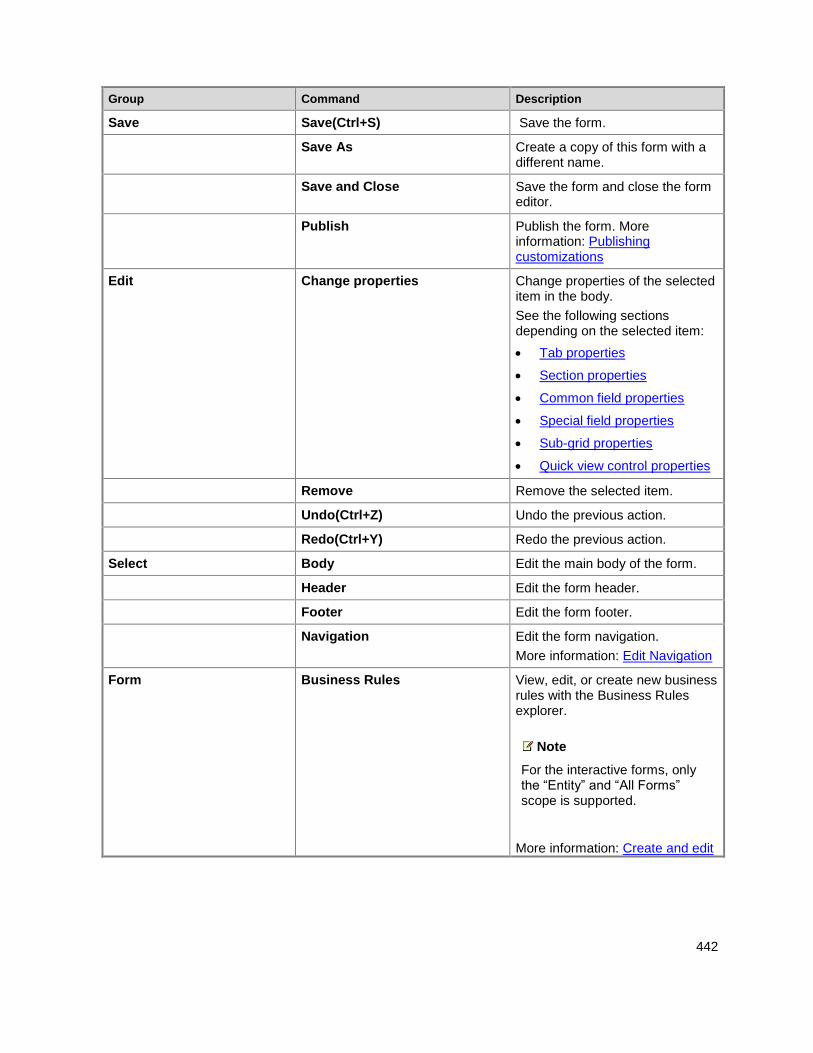
442
Group Command Description
Save Save(Ctrl+S) Save the form.
Save As Create a copy of this form with a different name.
Save and Close Save the form and close the form editor.
Publish Publish the form. More information: Publishing customizations
Edit Change properties Change properties of the selected item in the body.
See the following sections depending on the selected item:
Tab properties
Section properties
Common field properties
Special field properties
Sub-grid properties
Quick view control properties
Remove Remove the selected item.
Undo(Ctrl+Z) Undo the previous action.
Redo(Ctrl+Y) Redo the previous action.
Select Body Edit the main body of the form.
Header Edit the form header.
Footer Edit the form footer.
Navigation Edit the form navigation.
More information: Edit Navigation
Form Business Rules View, edit, or create new business rules with the Business Rules explorer.
Note
For the interactive forms, only the “Entity” and “All Forms” scope is supported.
More information: Create and edit
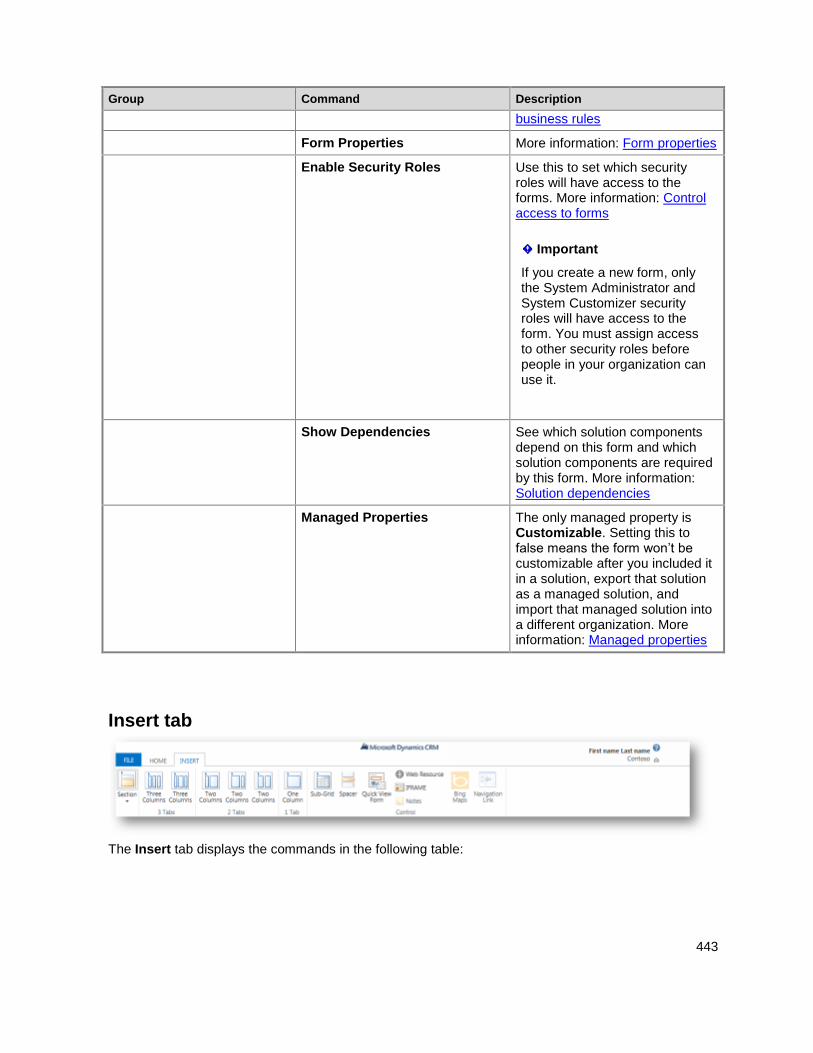
443
Group Command Description
business rules
Form Properties More information: Form properties
Enable Security Roles Use this to set which security roles will have access to the forms. More information: Control access to forms
Important
If you create a new form, only the System Administrator and System Customizer security roles will have access to the form. You must assign access to other security roles before people in your organization can use it.
Show Dependencies See which solution components depend on this form and which solution components are required by this form. More information: Solution dependencies
Managed Properties The only managed property is Customizable. Setting this to false means the form won’t be customizable after you included it in a solution, export that solution as a managed solution, and import that managed solution into a different organization. More information: Managed properties
Insert tab
The Insert tab displays the commands in the following table:
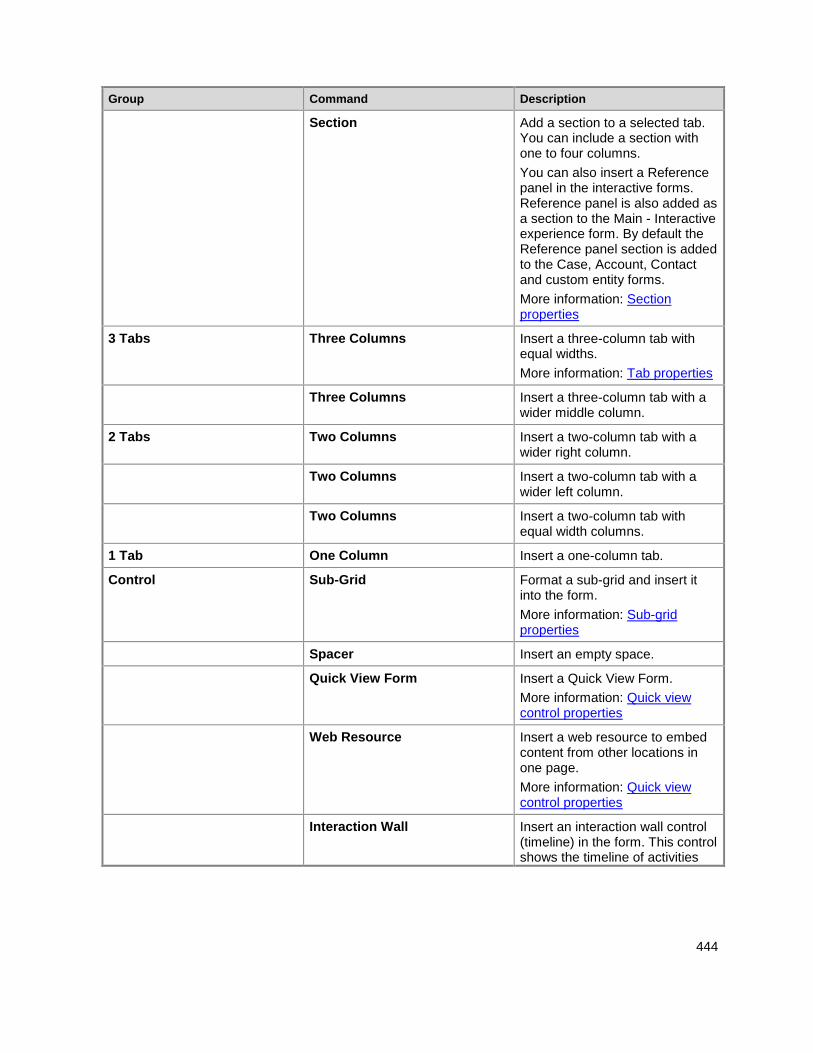
444
Group Command Description
Section Add a section to a selected tab. You can include a section with one to four columns.
You can also insert a Reference panel in the interactive forms. Reference panel is also added as a section to the Main - Interactive experience form. By default the Reference panel section is added to the Case, Account, Contact and custom entity forms.
More information: Section properties
3 Tabs Three Columns Insert a three-column tab with equal widths.
More information: Tab properties
Three Columns Insert a three-column tab with a wider middle column.
2 Tabs Two Columns Insert a two-column tab with a wider right column.
Two Columns Insert a two-column tab with a wider left column.
Two Columns Insert a two-column tab with equal width columns.
1 Tab One Column Insert a one-column tab.
Control Sub-Grid Format a sub-grid and insert it into the form.
More information: Sub-grid properties
Spacer Insert an empty space.
Quick View Form Insert a Quick View Form.
More information: Quick view control properties
Web Resource Insert a web resource to embed content from other locations in one page.
More information: Quick view control properties
Interaction Wall Insert an interaction wall control (timeline) in the form. This control shows the timeline of activities
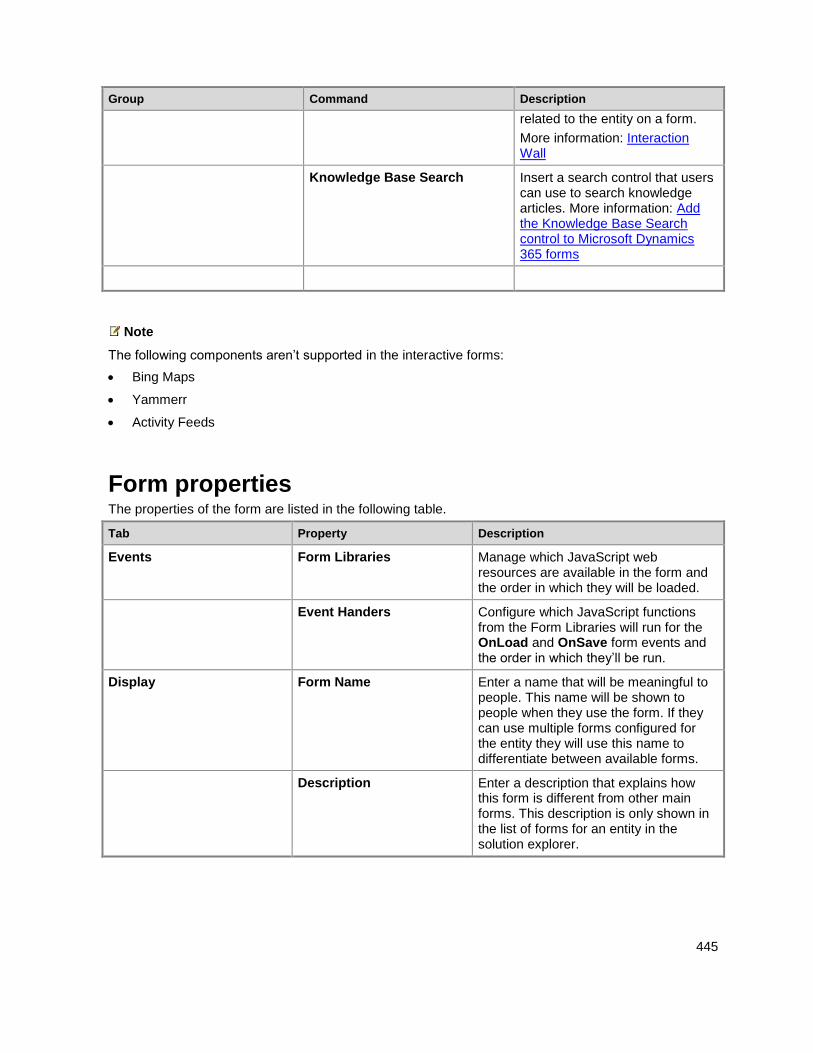
445
Group Command Description
related to the entity on a form.
More information: Interaction Wall
Knowledge Base Search Insert a search control that users can use to search knowledge articles. More information: Add the Knowledge Base Search control to Microsoft Dynamics 365 forms
Note
The following components aren’t supported in the interactive forms:
Bing Maps
Yammerr
Activity Feeds
Form properties The properties of the form are listed in the following table.
Tab Property Description
Events Form Libraries Manage which JavaScript web resources are available in the form and the order in which they will be loaded.
Event Handers Configure which JavaScript functions from the Form Libraries will run for the OnLoad and OnSave form events and the order in which they’ll be run.
Display Form Name Enter a name that will be meaningful to people. This name will be shown to people when they use the form. If they can use multiple forms configured for the entity they will use this name to differentiate between available forms.
Description Enter a description that explains how this form is different from other main forms. This description is only shown in the list of forms for an entity in the solution explorer.
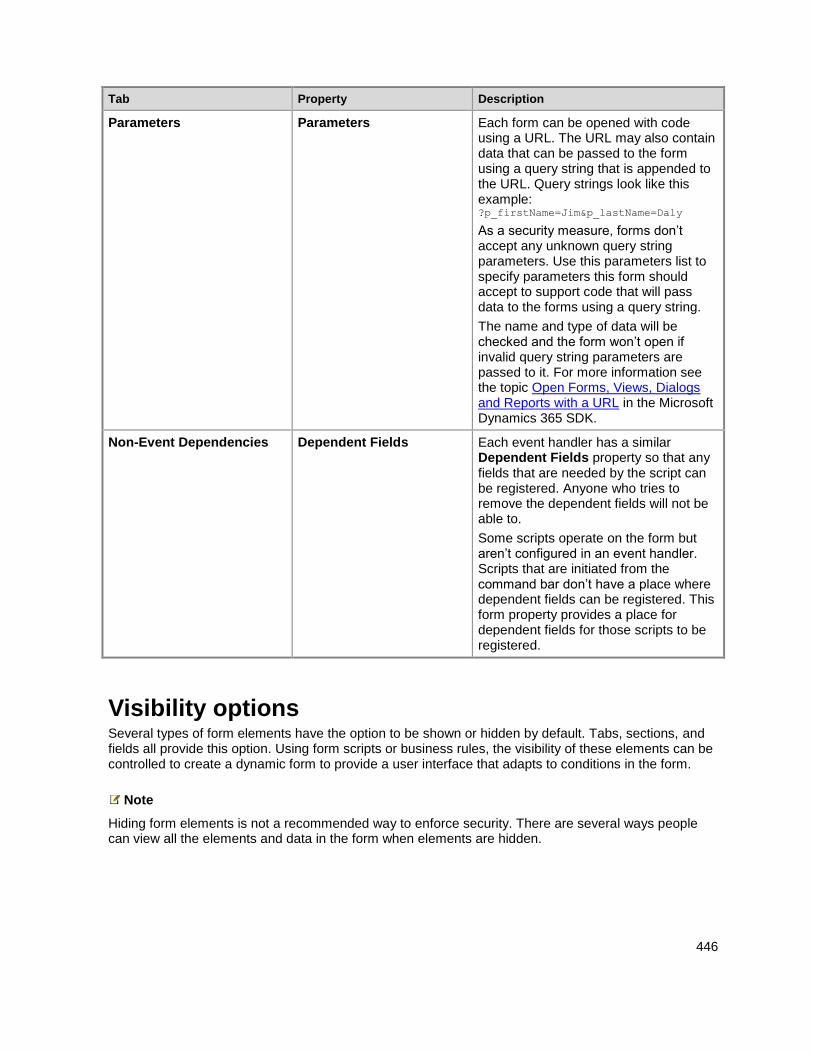
446
Tab Property Description
Parameters Parameters Each form can be opened with code using a URL. The URL may also contain data that can be passed to the form using a query string that is appended to the URL. Query strings look like this example: ?p_firstName=Jim&p_lastName=Daly
As a security measure, forms don’t accept any unknown query string parameters. Use this parameters list to specify parameters this form should accept to support code that will pass data to the forms using a query string.
The name and type of data will be checked and the form won’t open if invalid query string parameters are passed to it. For more information see the topic Open Forms, Views, Dialogs and Reports with a URL in the Microsoft Dynamics 365 SDK.
Non-Event Dependencies Dependent Fields Each event handler has a similar Dependent Fields property so that any fields that are needed by the script can be registered. Anyone who tries to remove the dependent fields will not be able to.
Some scripts operate on the form but aren’t configured in an event handler. Scripts that are initiated from the command bar don’t have a place where dependent fields can be registered. This form property provides a place for dependent fields for those scripts to be registered.
Visibility options Several types of form elements have the option to be shown or hidden by default. Tabs, sections, and fields all provide this option. Using form scripts or business rules, the visibility of these elements can be controlled to create a dynamic form to provide a user interface that adapts to conditions in the form.
Note
Hiding form elements is not a recommended way to enforce security. There are several ways people can view all the elements and data in the form when elements are hidden.
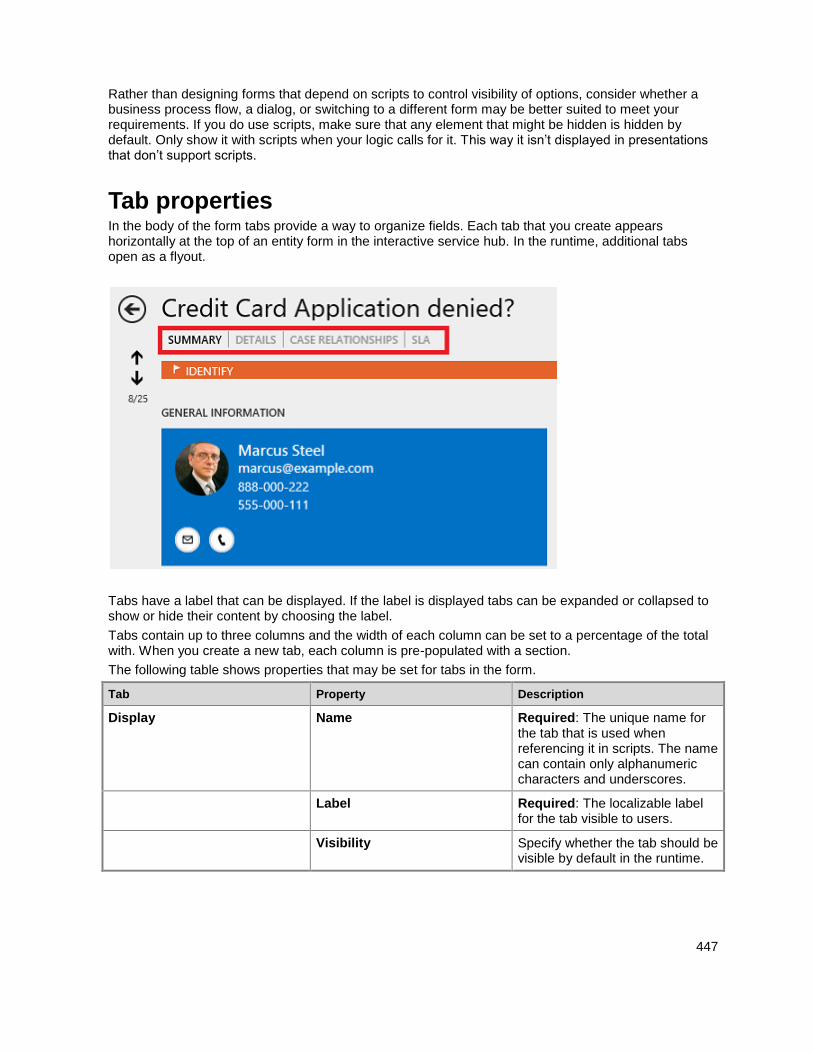
447
Rather than designing forms that depend on scripts to control visibility of options, consider whether a business process flow, a dialog, or switching to a different form may be better suited to meet your requirements. If you do use scripts, make sure that any element that might be hidden is hidden by default. Only show it with scripts when your logic calls for it. This way it isn’t displayed in presentations that don’t support scripts.
Tab properties In the body of the form tabs provide a way to organize fields. Each tab that you create appears horizontally at the top of an entity form in the interactive service hub. In the runtime, additional tabs open as a flyout.
Tabs have a label that can be displayed. If the label is displayed tabs can be expanded or collapsed to show or hide their content by choosing the label.
Tabs contain up to three columns and the width of each column can be set to a percentage of the total with. When you create a new tab, each column is pre-populated with a section.
The following table shows properties that may be set for tabs in the form.
Tab Property Description
Display Name Required: The unique name for the tab that is used when referencing it in scripts. The name can contain only alphanumeric characters and underscores.
Label Required: The localizable label for the tab visible to users.
Visibility Specify whether the tab should be visible by default in the runtime.
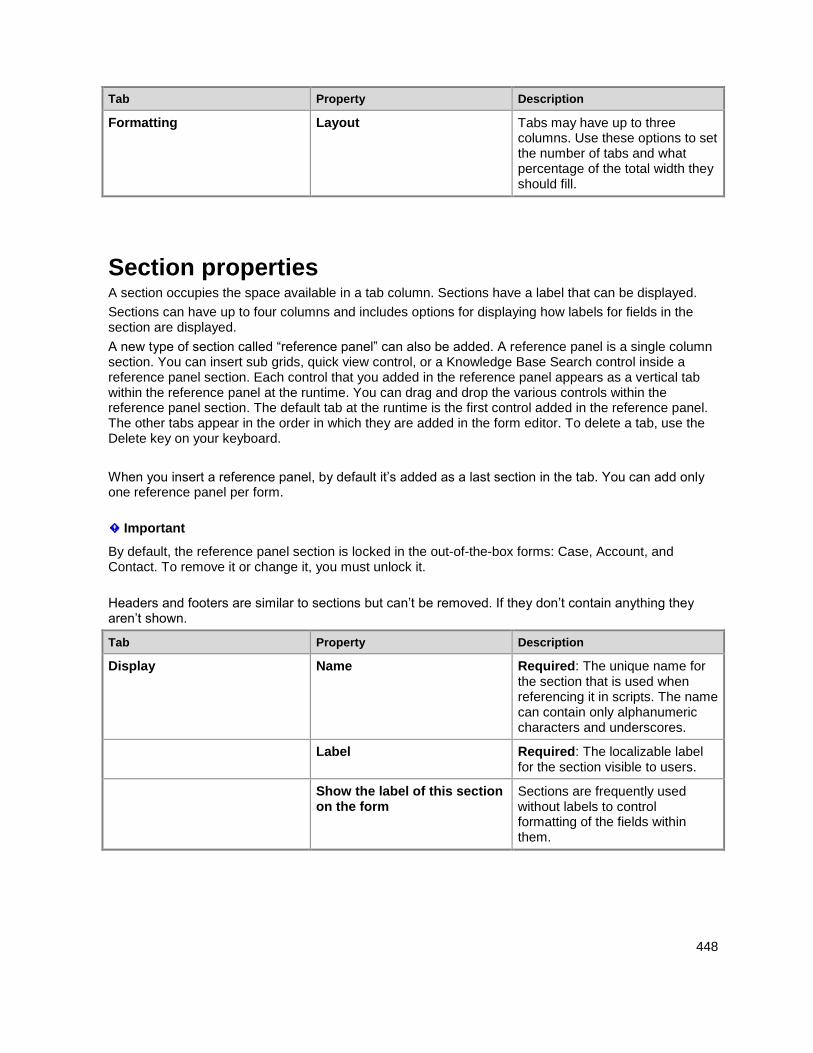
448
Tab Property Description
Formatting Layout Tabs may have up to three columns. Use these options to set the number of tabs and what percentage of the total width they should fill.
Section properties A section occupies the space available in a tab column. Sections have a label that can be displayed.
Sections can have up to four columns and includes options for displaying how labels for fields in the section are displayed.
A new type of section called “reference panel” can also be added. A reference panel is a single column section. You can insert sub grids, quick view control, or a Knowledge Base Search control inside a reference panel section. Each control that you added in the reference panel appears as a vertical tab within the reference panel at the runtime. You can drag and drop the various controls within the reference panel section. The default tab at the runtime is the first control added in the reference panel. The other tabs appear in the order in which they are added in the form editor. To delete a tab, use the Delete key on your keyboard.
When you insert a reference panel, by default it’s added as a last section in the tab. You can add only one reference panel per form.
Important
By default, the reference panel section is locked in the out-of-the-box forms: Case, Account, and Contact. To remove it or change it, you must unlock it.
Headers and footers are similar to sections but can’t be removed. If they don’t contain anything they aren’t shown.
Tab Property Description
Display Name Required: The unique name for the section that is used when referencing it in scripts. The name can contain only alphanumeric characters and underscores.
Label Required: The localizable label for the section visible to users.
Show the label of this section on the form
Sections are frequently used without labels to control formatting of the fields within them.
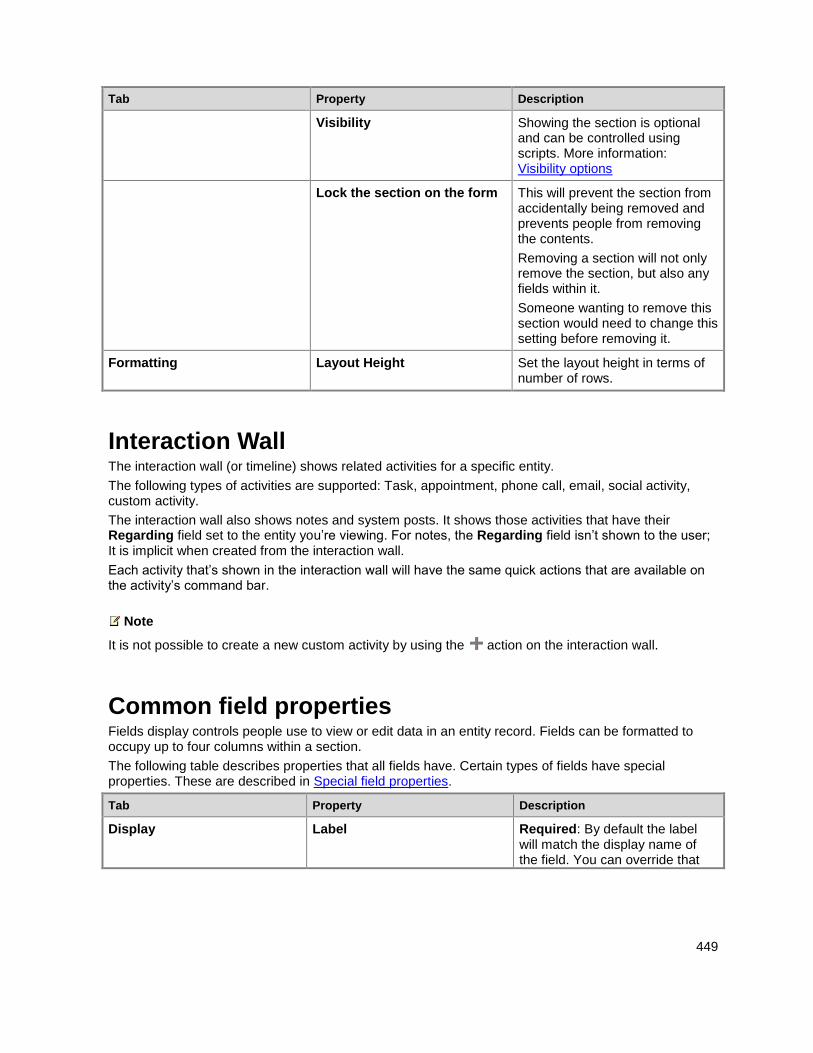
449
Tab Property Description
Visibility Showing the section is optional and can be controlled using scripts. More information: Visibility options
Lock the section on the form This will prevent the section from accidentally being removed and prevents people from removing the contents.
Removing a section will not only remove the section, but also any fields within it.
Someone wanting to remove this section would need to change this setting before removing it.
Formatting Layout Height Set the layout height in terms of number of rows.
Interaction Wall The interaction wall (or timeline) shows related activities for a specific entity.
The following types of activities are supported: Task, appointment, phone call, email, social activity, custom activity.
The interaction wall also shows notes and system posts. It shows those activities that have their Regarding field set to the entity you’re viewing. For notes, the Regarding field isn’t shown to the user; It is implicit when created from the interaction wall.
Each activity that’s shown in the interaction wall will have the same quick actions that are available on the activity’s command bar.
Note
It is not possible to create a new custom activity by using the action on the interaction wall.
Common field properties Fields display controls people use to view or edit data in an entity record. Fields can be formatted to occupy up to four columns within a section.
The following table describes properties that all fields have. Certain types of fields have special properties. These are described in Special field properties.
Tab Property Description
Display Label Required: By default the label will match the display name of the field. You can override that
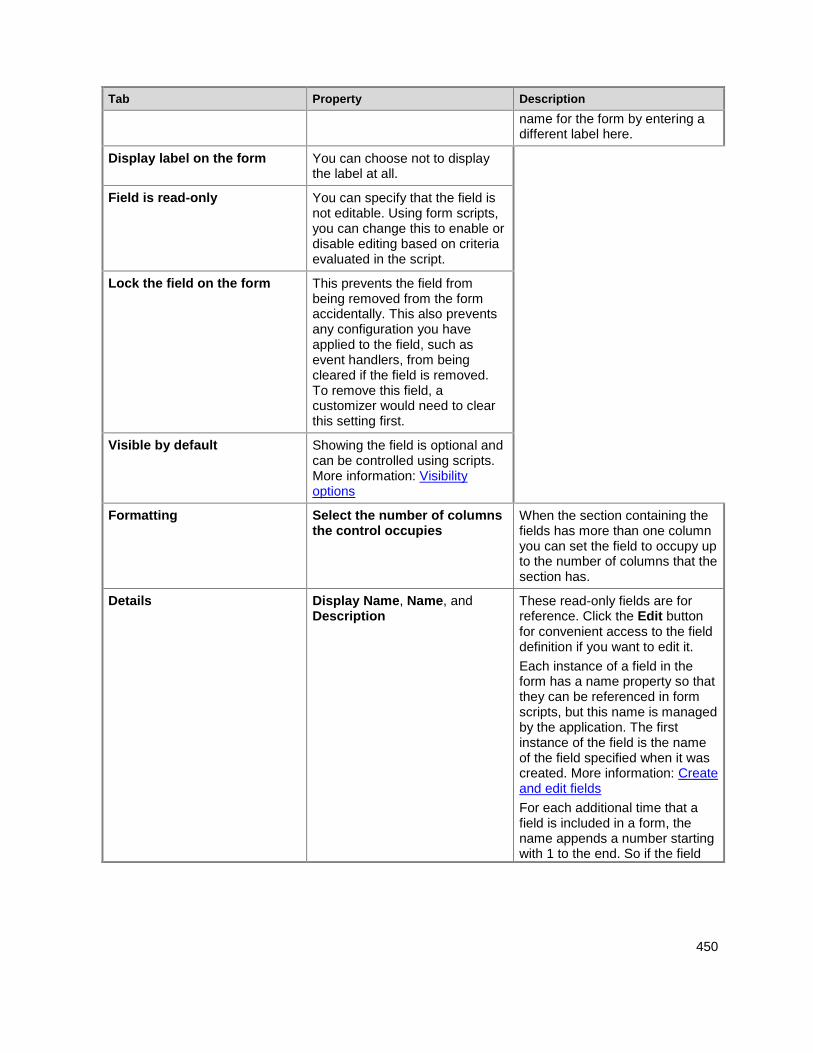
450
Tab Property Description
name for the form by entering a different label here.
Display label on the form You can choose not to display the label at all.
Field is read-only You can specify that the field is not editable. Using form scripts, you can change this to enable or disable editing based on criteria evaluated in the script.
Lock the field on the form This prevents the field from being removed from the form accidentally. This also prevents any configuration you have applied to the field, such as event handlers, from being cleared if the field is removed. To remove this field, a customizer would need to clear this setting first.
Visible by default Showing the field is optional and can be controlled using scripts. More information: Visibility options
Formatting Select the number of columns the control occupies
When the section containing the fields has more than one column you can set the field to occupy up to the number of columns that the section has.
Details Display Name, Name, and Description
These read-only fields are for reference. Click the Edit button for convenient access to the field definition if you want to edit it.
Each instance of a field in the form has a name property so that they can be referenced in form scripts, but this name is managed by the application. The first instance of the field is the name of the field specified when it was created. More information: Create and edit fields
For each additional time that a field is included in a form, the name appends a number starting with 1 to the end. So if the field
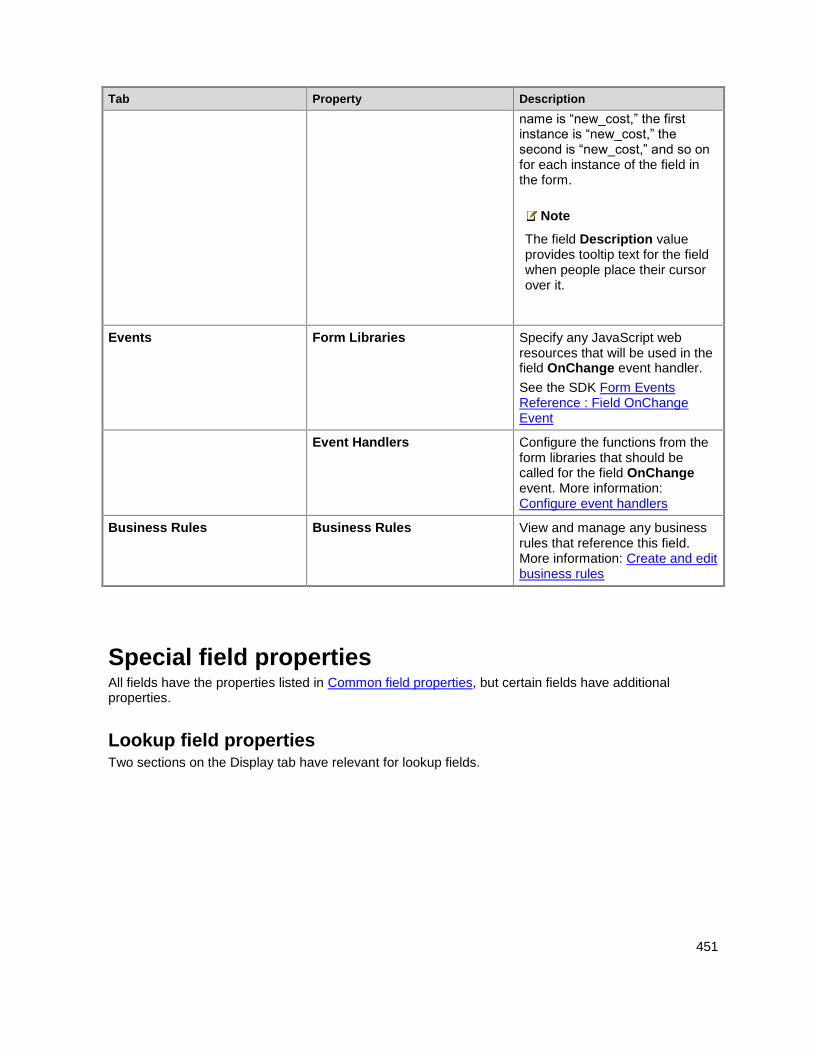
451
Tab Property Description
name is “new_cost,” the first instance is “new_cost,” the second is “new_cost,” and so on for each instance of the field in the form.
Note
The field Description value provides tooltip text for the field when people place their cursor over it.
Events Form Libraries Specify any JavaScript web resources that will be used in the field OnChange event handler.
See the SDK Form Events Reference : Field OnChange Event
Event Handlers Configure the functions from the form libraries that should be called for the field OnChange event. More information: Configure event handlers
Business Rules Business Rules View and manage any business rules that reference this field. More information: Create and edit business rules
Special field properties All fields have the properties listed in Common field properties, but certain fields have additional properties.
Lookup field properties Two sections on the Display tab have relevant for lookup fields.
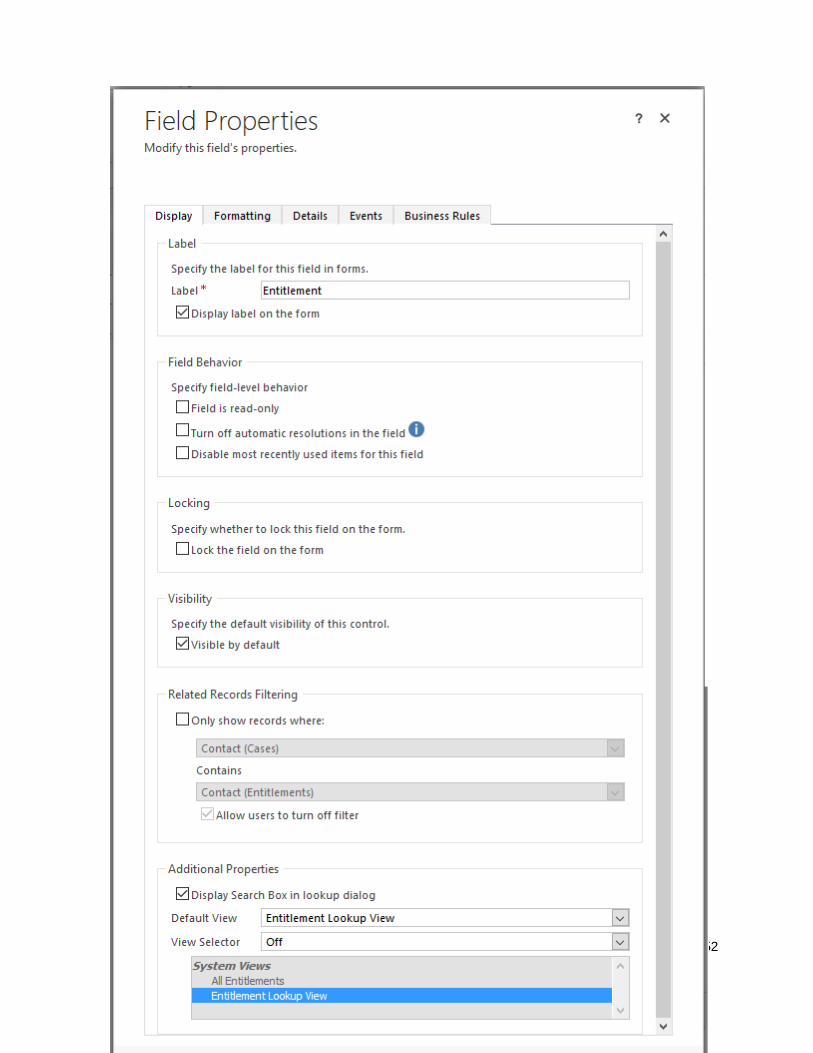
452
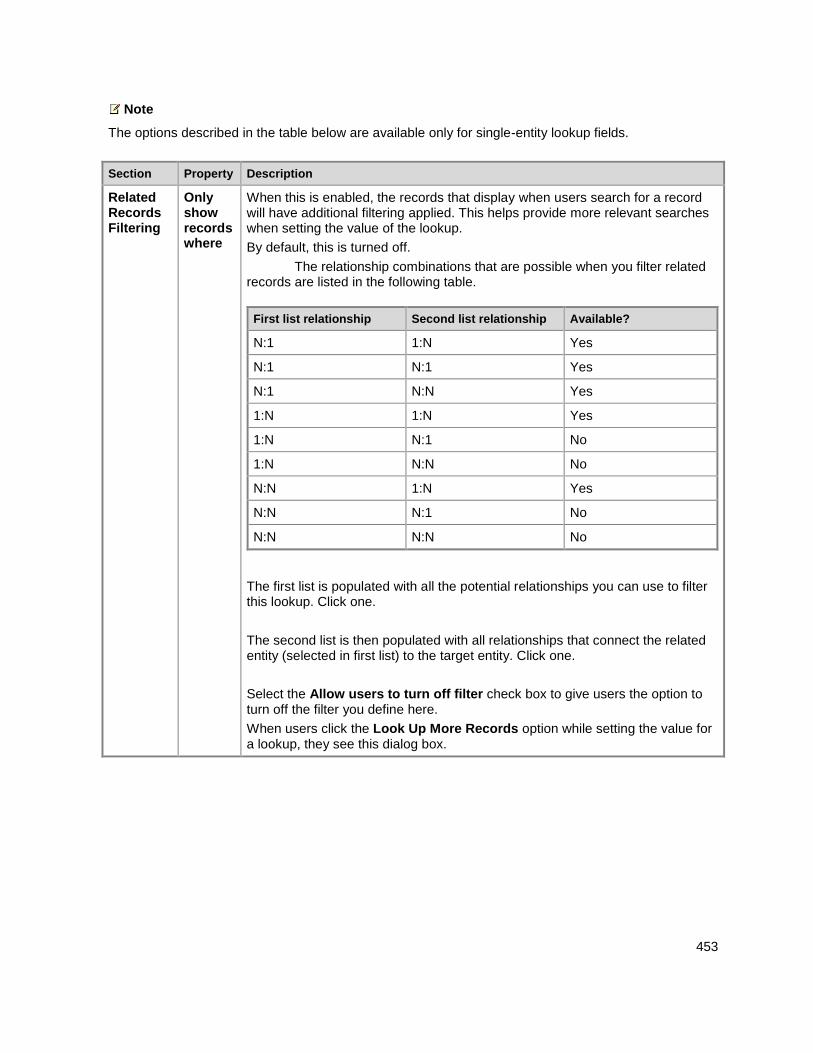
453
Note
The options described in the table below are available only for single-entity lookup fields.
Section Property Description
Related Records Filtering
Only show records where
When this is enabled, the records that display when users search for a record will have additional filtering applied. This helps provide more relevant searches when setting the value of the lookup.
By default, this is turned off.
The relationship combinations that are possible when you filter related records are listed in the following table.
First list relationship Second list relationship Available?
N:1 1:N Yes
N:1 N:1 Yes
N:1 N:N Yes
1:N 1:N Yes
1:N N:1 No
1:N N:N No
N:N 1:N Yes
N:N N:1 No
N:N N:N No
The first list is populated with all the potential relationships you can use to filter this lookup. Click one.
The second list is then populated with all relationships that connect the related entity (selected in first list) to the target entity. Click one.
Select the Allow users to turn off filter check box to give users the option to turn off the filter you define here.
When users click the Look Up More Records option while setting the value for a lookup, they see this dialog box.
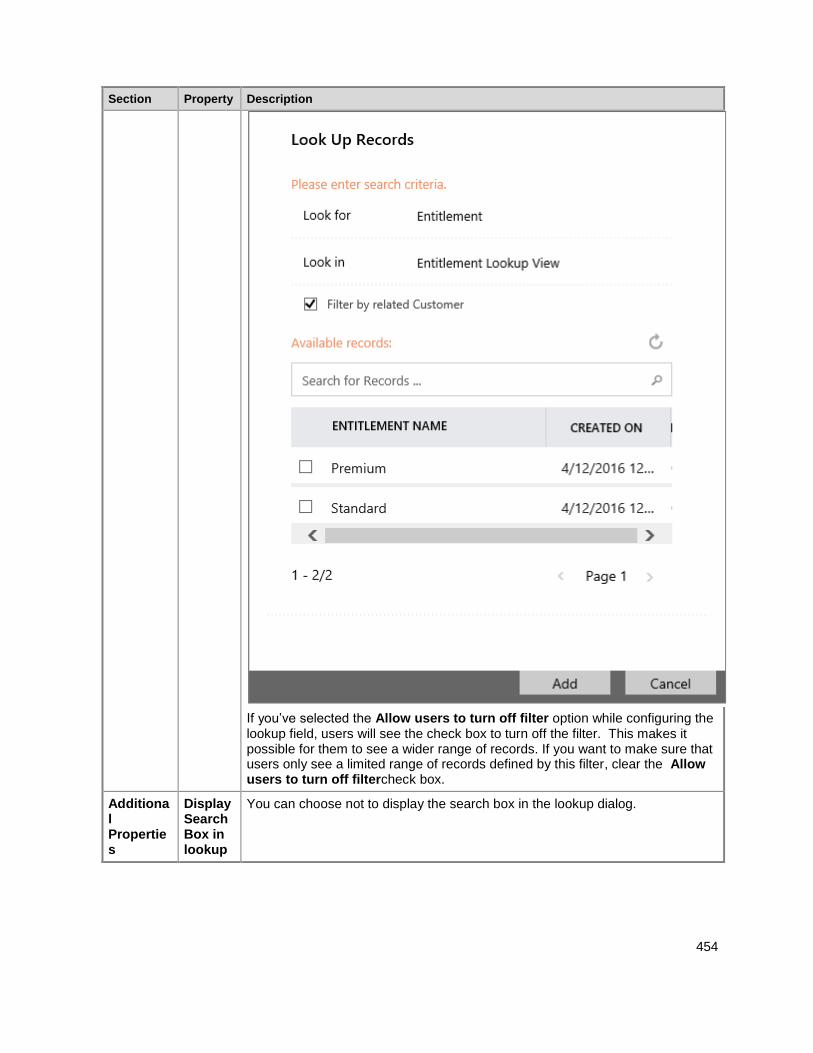
454
Section Property Description
If you’ve selected the Allow users to turn off filter option while configuring the lookup field, users will see the check box to turn off the filter. This makes it possible for them to see a wider range of records. If you want to make sure that users only see a limited range of records defined by this filter, clear the Allow users to turn off filtercheck box.
Additional Properties
Display Search Box in lookup
You can choose not to display the search box in the lookup dialog.
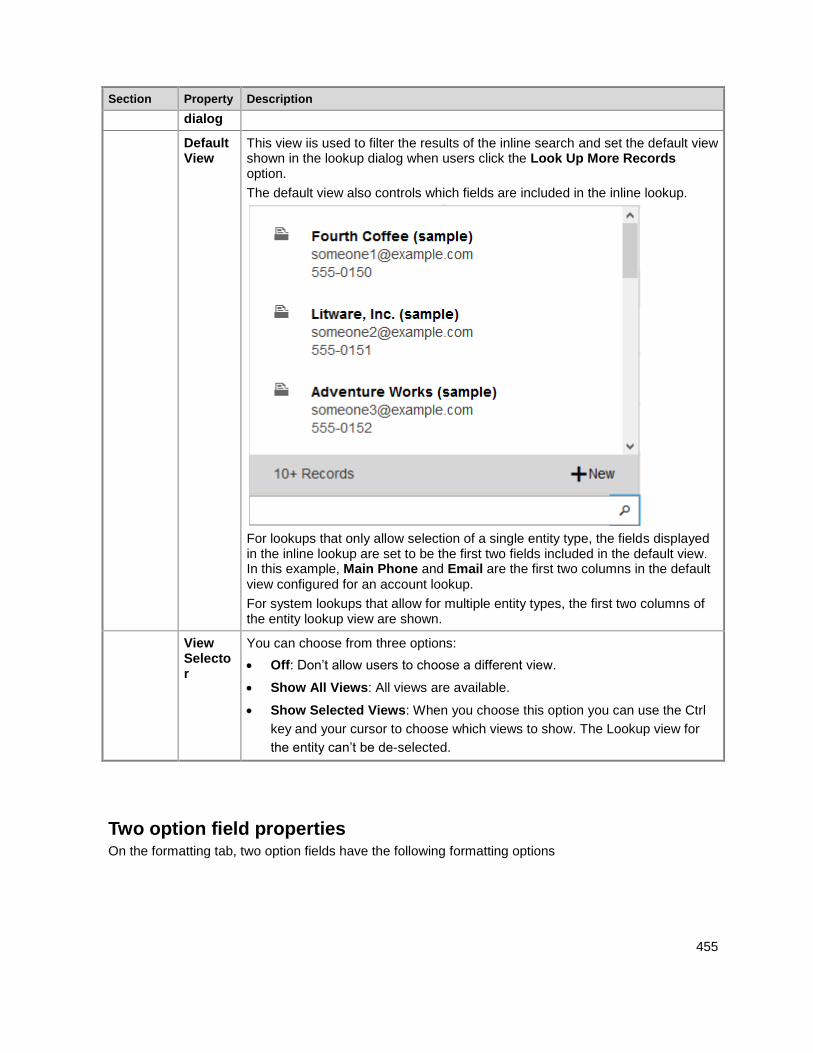
455
Section Property Description
dialog
Default View
This view iis used to filter the results of the inline search and set the default view shown in the lookup dialog when users click the Look Up More Records option.
The default view also controls which fields are included in the inline lookup.
For lookups that only allow selection of a single entity type, the fields displayed in the inline lookup are set to be the first two fields included in the default view. In this example, Main Phone and Email are the first two columns in the default view configured for an account lookup.
For system lookups that allow for multiple entity types, the first two columns of the entity lookup view are shown.
View Selector
You can choose from three options:
Off: Don’t allow users to choose a different view.
Show All Views: All views are available.
Show Selected Views: When you choose this option you can use the Ctrl
key and your cursor to choose which views to show. The Lookup view for
the entity can’t be de-selected.
Two option field properties On the formatting tab, two option fields have the following formatting options
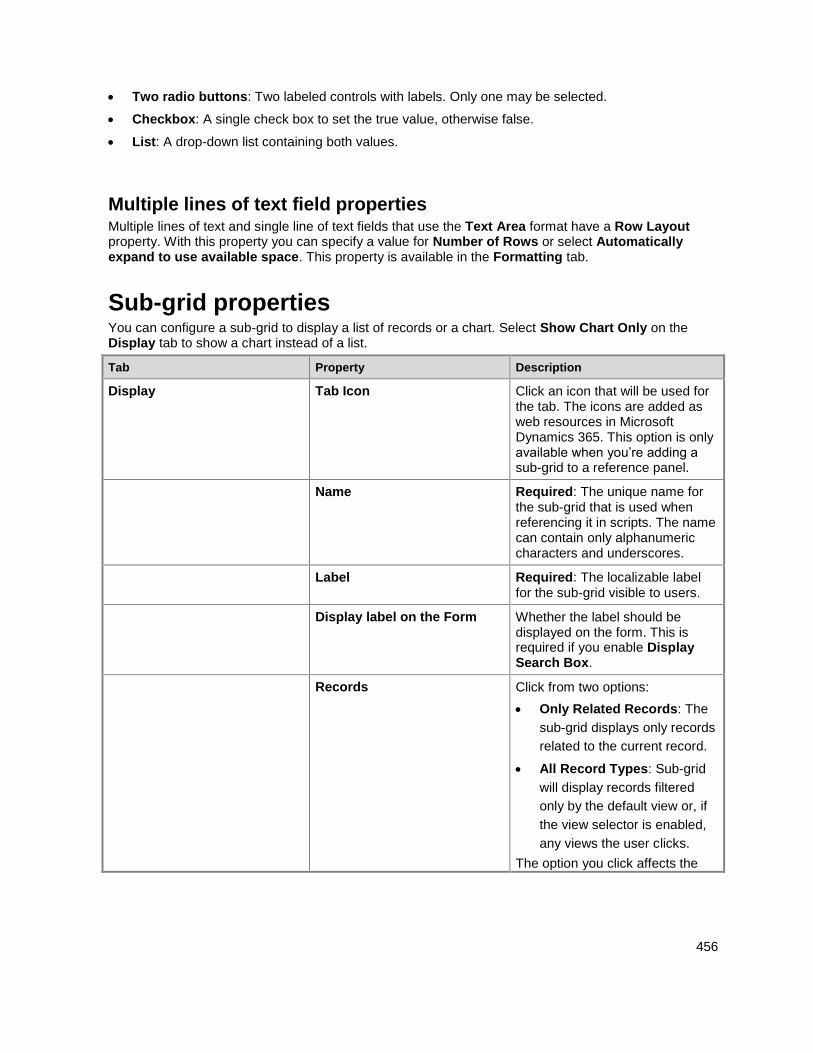
456
Two radio buttons: Two labeled controls with labels. Only one may be selected.
Checkbox: A single check box to set the true value, otherwise false.
List: A drop-down list containing both values.
Multiple lines of text field properties Multiple lines of text and single line of text fields that use the Text Area format have a Row Layout property. With this property you can specify a value for Number of Rows or select Automatically expand to use available space. This property is available in the Formatting tab.
Sub-grid properties You can configure a sub-grid to display a list of records or a chart. Select Show Chart Only on the Display tab to show a chart instead of a list.
Tab Property Description
Display Tab Icon Click an icon that will be used for the tab. The icons are added as web resources in Microsoft Dynamics 365. This option is only available when you’re adding a sub-grid to a reference panel.
Name Required: The unique name for the sub-grid that is used when referencing it in scripts. The name can contain only alphanumeric characters and underscores.
Label Required: The localizable label for the sub-grid visible to users.
Display label on the Form Whether the label should be displayed on the form. This is required if you enable Display Search Box.
Records Click from two options:
Only Related Records: The
sub-grid displays only records
related to the current record.
All Record Types: Sub-grid
will display records filtered
only by the default view or, if
the view selector is enabled,
any views the user clicks.
The option you click affects the
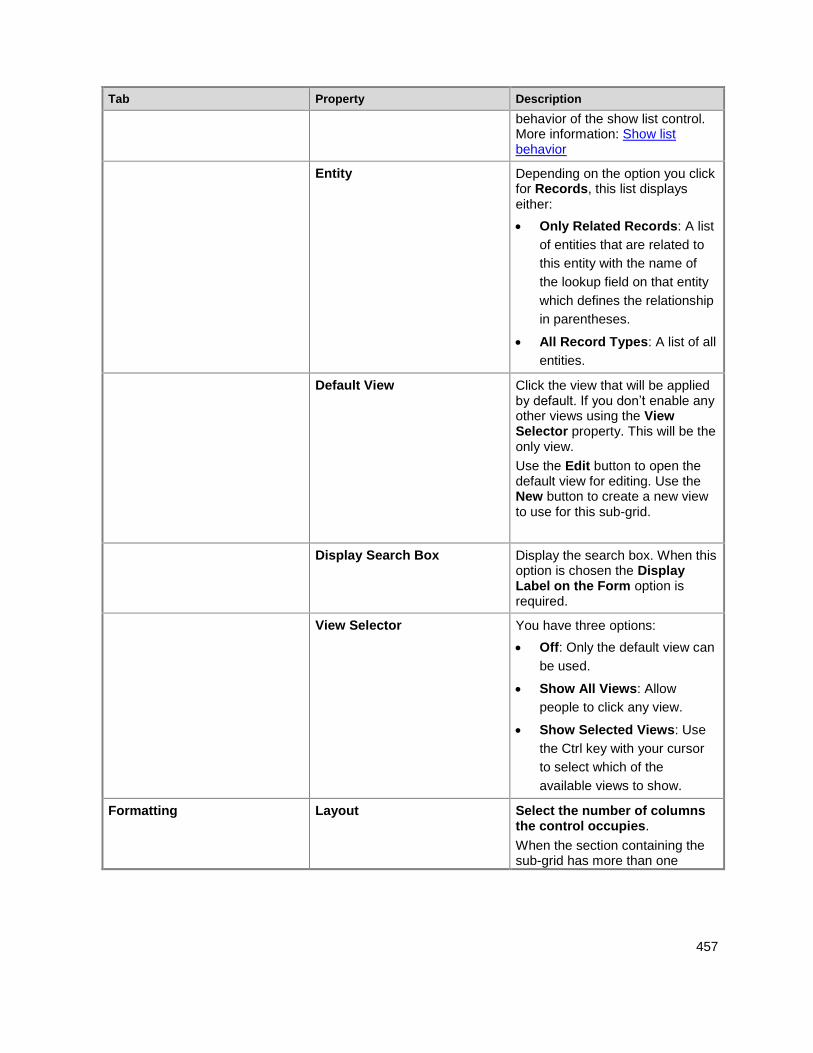
457
Tab Property Description
behavior of the show list control. More information: Show list behavior
Entity Depending on the option you click for Records, this list displays either:
Only Related Records: A list
of entities that are related to
this entity with the name of
the lookup field on that entity
which defines the relationship
in parentheses.
All Record Types: A list of all
entities.
Default View Click the view that will be applied by default. If you don’t enable any other views using the View Selector property. This will be the only view.
Use the Edit button to open the default view for editing. Use the New button to create a new view to use for this sub-grid.
Display Search Box Display the search box. When this option is chosen the Display Label on the Form option is required.
View Selector You have three options:
Off: Only the default view can
be used.
Show All Views: Allow
people to click any view.
Show Selected Views: Use
the Ctrl key with your cursor
to select which of the
available views to show.
Formatting Layout Select the number of columns the control occupies.
When the section containing the sub-grid has more than one

458
Tab Property Description
column you can set the field to occupy up to the number of columns that the section has.
Row Layout Number of Rows will determine how many records are shown on a page of a sub-grid.
If Automatically expand to use available space is chosen the form will allow space for two records and will expand the space as the number of records increases. If the number exceeds the Number of Rows, people can navigate to additional pages to view the records.
If Automatically expand to use available space is not chosen, the form will provide space for the number of records defined by Number of Rows and people can navigate to additional pages to view any additional records.
Show list behavior
When displaying a list in forms, each sub-grid displays the Open View button in the top right corner when the entity is also displayed as one of the entities included in the navigation area of the form editor. Click this button to open the view. The behavior changes depending on the option chosen for the Records property.
When you select Only Related Records, the view opens using one of the associated views in the same window. To return to the form, use the back button or click the current record primary name value in the navigation bar.
When you select All Record Types, the view opens in a new window.
Add record behavior
When displaying a list in forms, each sub-grid displays the Add record button in the top right side of the sub-grid. Click this button to add a record. This behavior changes depending on the option chosen for the Records property and if the lookup is for activity records.
When you select Only Related Records, the default behavior is the behavior to add existing records. People see an in-line lookup to search for an existing record first. This helps prevent creating duplicate records. If they can’t find an existing record, they can click the New option. When a new record is created, any of the field mappings defined in the relationship are applied. More information: Map entity fields
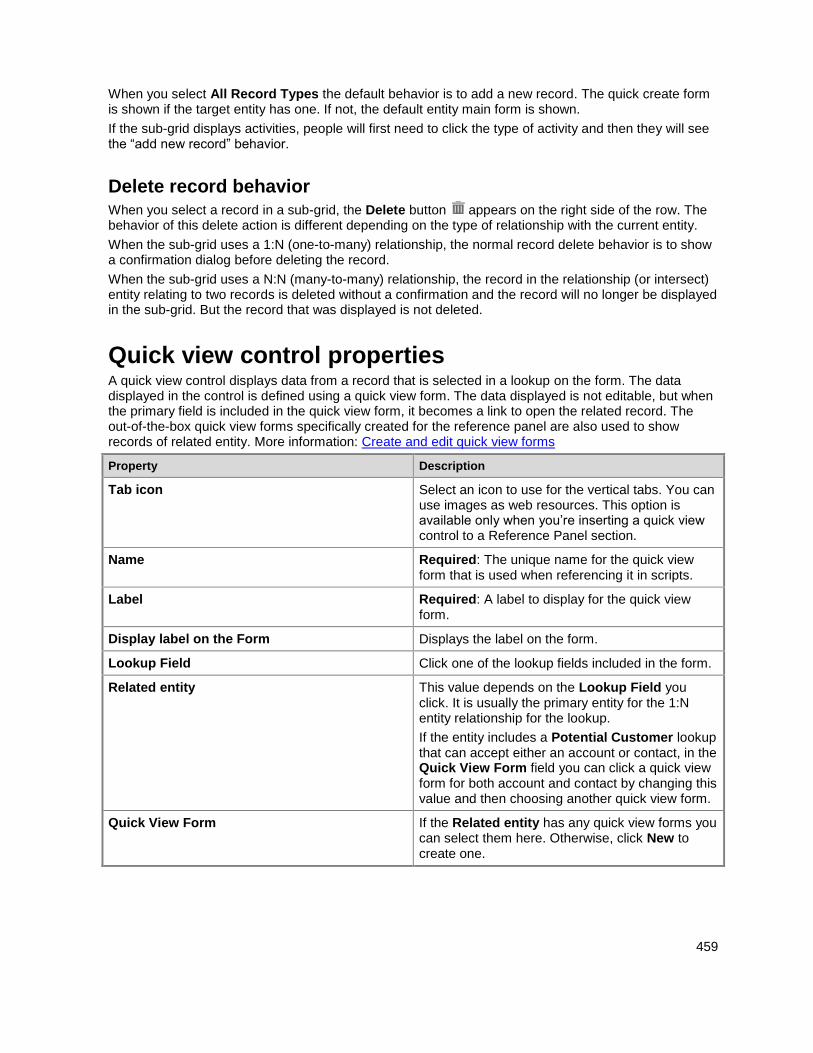
459
When you select All Record Types the default behavior is to add a new record. The quick create form is shown if the target entity has one. If not, the default entity main form is shown.
If the sub-grid displays activities, people will first need to click the type of activity and then they will see the “add new record” behavior.
Delete record behavior When you select a record in a sub-grid, the Delete button appears on the right side of the row. The behavior of this delete action is different depending on the type of relationship with the current entity.
When the sub-grid uses a 1:N (one-to-many) relationship, the normal record delete behavior is to show a confirmation dialog before deleting the record.
When the sub-grid uses a N:N (many-to-many) relationship, the record in the relationship (or intersect) entity relating to two records is deleted without a confirmation and the record will no longer be displayed in the sub-grid. But the record that was displayed is not deleted.
Quick view control properties A quick view control displays data from a record that is selected in a lookup on the form. The data displayed in the control is defined using a quick view form. The data displayed is not editable, but when the primary field is included in the quick view form, it becomes a link to open the related record. The out-of-the-box quick view forms specifically created for the reference panel are also used to show records of related entity. More information: Create and edit quick view forms
Property Description
Tab icon Select an icon to use for the vertical tabs. You can use images as web resources. This option is available only when you’re inserting a quick view control to a Reference Panel section.
Name Required: The unique name for the quick view form that is used when referencing it in scripts.
Label Required: A label to display for the quick view form.
Display label on the Form Displays the label on the form.
Lookup Field Click one of the lookup fields included in the form.
Related entity This value depends on the Lookup Field you click. It is usually the primary entity for the 1:N entity relationship for the lookup.
If the entity includes a Potential Customer lookup that can accept either an account or contact, in the Quick View Form field you can click a quick view form for both account and contact by changing this value and then choosing another quick view form.
Quick View Form If the Related entity has any quick view forms you can select them here. Otherwise, click New to create one.
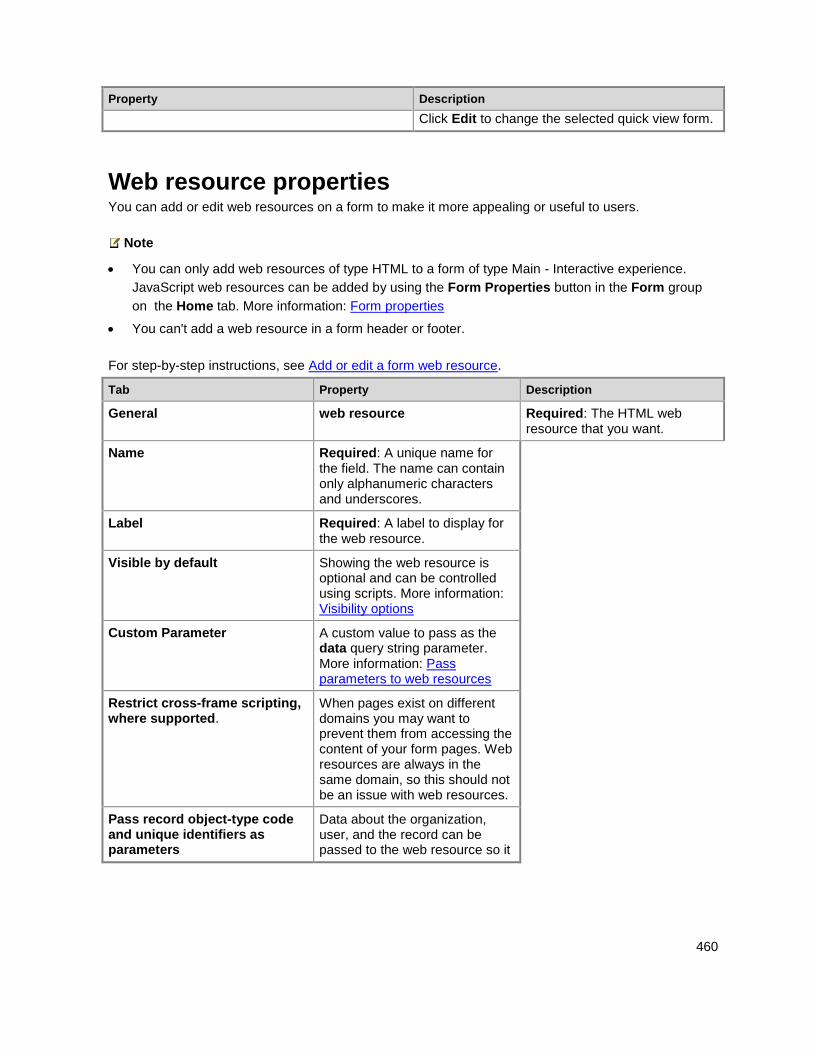
460
Property Description
Click Edit to change the selected quick view form.
Web resource properties You can add or edit web resources on a form to make it more appealing or useful to users.
Note
You can only add web resources of type HTML to a form of type Main - Interactive experience.
JavaScript web resources can be added by using the Form Properties button in the Form group
on the Home tab. More information: Form properties
You can't add a web resource in a form header or footer.
For step-by-step instructions, see Add or edit a form web resource.
Tab Property Description
General web resource Required: The HTML web resource that you want.
Name Required: A unique name for the field. The name can contain only alphanumeric characters and underscores.
Label Required: A label to display for the web resource.
Visible by default Showing the web resource is optional and can be controlled using scripts. More information: Visibility options
Custom Parameter A custom value to pass as the data query string parameter. More information: Pass parameters to web resources
Restrict cross-frame scripting, where supported.
When pages exist on different domains you may want to prevent them from accessing the content of your form pages. Web resources are always in the same domain, so this should not be an issue with web resources.
Pass record object-type code and unique identifiers as parameters
Data about the organization, user, and the record can be passed to the web resource so it

461
Tab Property Description
can adapt to organization settings. More information: Pass parameters to web resources
Formatting Select the number of columns the control occupies
When the section containing the web resource has more than one column you can set the field to occupy up to the number of columns that the section has.
Select the number of rows the control occupies
You can control the height of the web resource by specifying a number of rows.
Automatically expand to use available space
You can allow the web resource height to expand to available space.
Select the scrolling type for the IFRAME
An HTML web resource is added to the form using an IFRAME.
As Necessary: Show
scrollbars when the size of
the web resource is larger
than the available.
Always: Always show
scrollbars.
Never: Never show
scrollbars.
Display border Display a border around the web resource.
Dependencies Dependent fields A web resource may interact with fields in the form using script. If a field is removed from the form the script in the web resource may break. Add any fields referenced by scripts in the web resource to the Dependent fields so that they cannot be removed accidentally.
Pass parameters to web resources An HTML web resource can accept parameters to be passed as query string parameters.
Information about the record can be passed by enabling the Pass record object-type code and unique identifiers as parameters option. If information is typed into the Custom Parameter(data) field it will be passed using the data parameter. The values passed are:
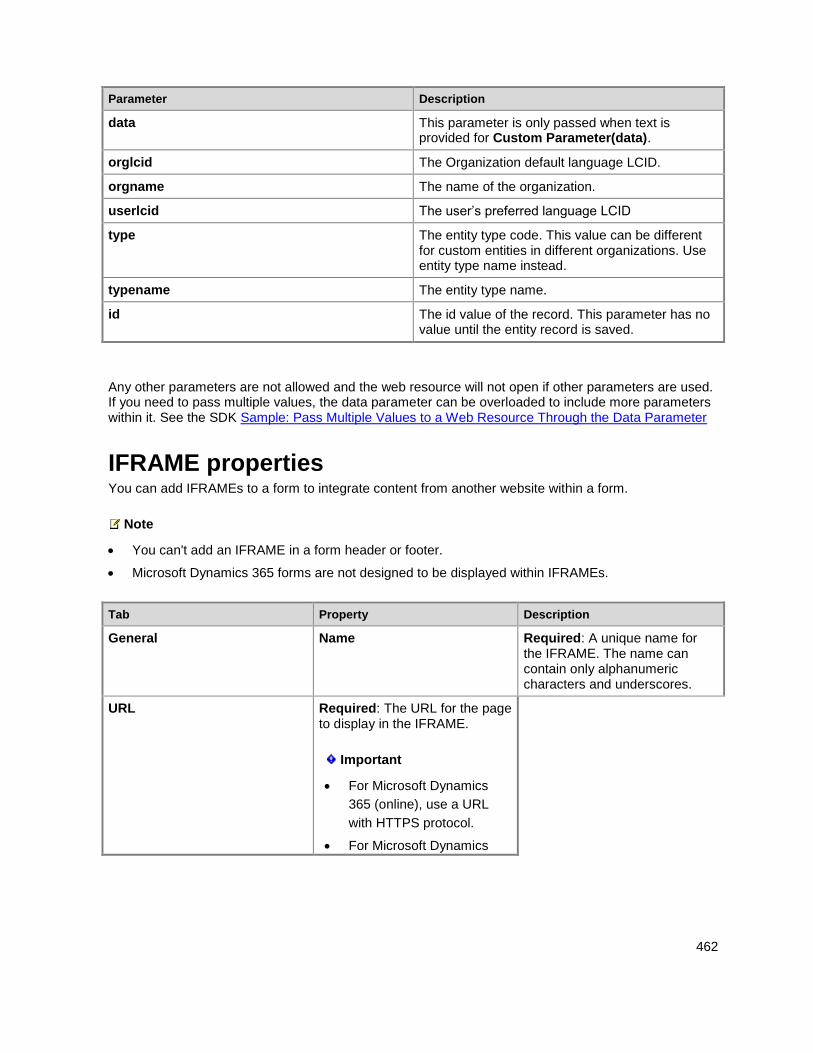
462
Parameter Description
data This parameter is only passed when text is provided for Custom Parameter(data).
orglcid The Organization default language LCID.
orgname The name of the organization.
userlcid The user’s preferred language LCID
type The entity type code. This value can be different for custom entities in different organizations. Use entity type name instead.
typename The entity type name.
id The id value of the record. This parameter has no value until the entity record is saved.
Any other parameters are not allowed and the web resource will not open if other parameters are used. If you need to pass multiple values, the data parameter can be overloaded to include more parameters within it. See the SDK Sample: Pass Multiple Values to a Web Resource Through the Data Parameter
IFRAME properties You can add IFRAMEs to a form to integrate content from another website within a form.
Note
You can't add an IFRAME in a form header or footer.
Microsoft Dynamics 365 forms are not designed to be displayed within IFRAMEs.
Tab Property Description
General Name Required: A unique name for the IFRAME. The name can contain only alphanumeric characters and underscores.
URL Required: The URL for the page to display in the IFRAME.
Important
For Microsoft Dynamics
365 (online), use a URL
with HTTPS protocol.
For Microsoft Dynamics
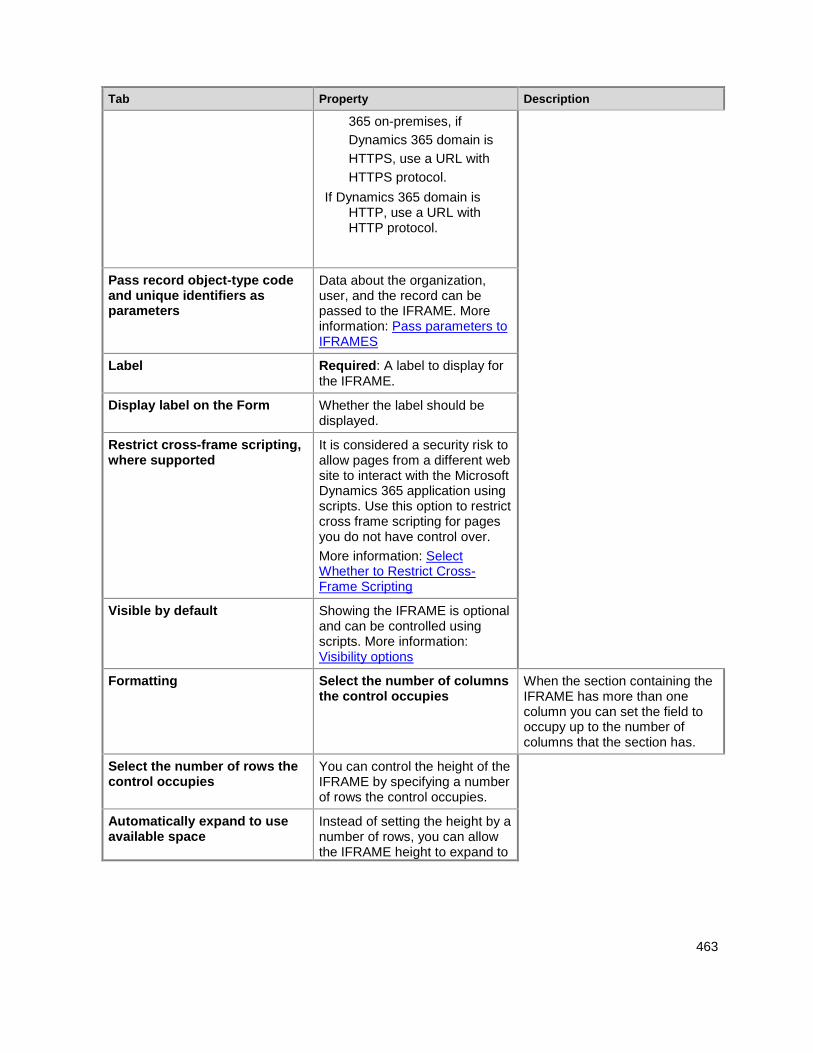
463
Tab Property Description
365 on-premises, if
Dynamics 365 domain is
HTTPS, use a URL with
HTTPS protocol.
If Dynamics 365 domain is HTTP, use a URL with HTTP protocol.
Pass record object-type code and unique identifiers as parameters
Data about the organization, user, and the record can be passed to the IFRAME. More information: Pass parameters to IFRAMES
Label Required: A label to display for the IFRAME.
Display label on the Form Whether the label should be displayed.
Restrict cross-frame scripting, where supported
It is considered a security risk to allow pages from a different web site to interact with the Microsoft Dynamics 365 application using scripts. Use this option to restrict cross frame scripting for pages you do not have control over.
More information: Select Whether to Restrict Cross-Frame Scripting
Visible by default Showing the IFRAME is optional and can be controlled using scripts. More information: Visibility options
Formatting Select the number of columns the control occupies
When the section containing the IFRAME has more than one column you can set the field to occupy up to the number of columns that the section has.
Select the number of rows the control occupies
You can control the height of the IFRAME by specifying a number of rows the control occupies.
Automatically expand to use available space
Instead of setting the height by a number of rows, you can allow the IFRAME height to expand to
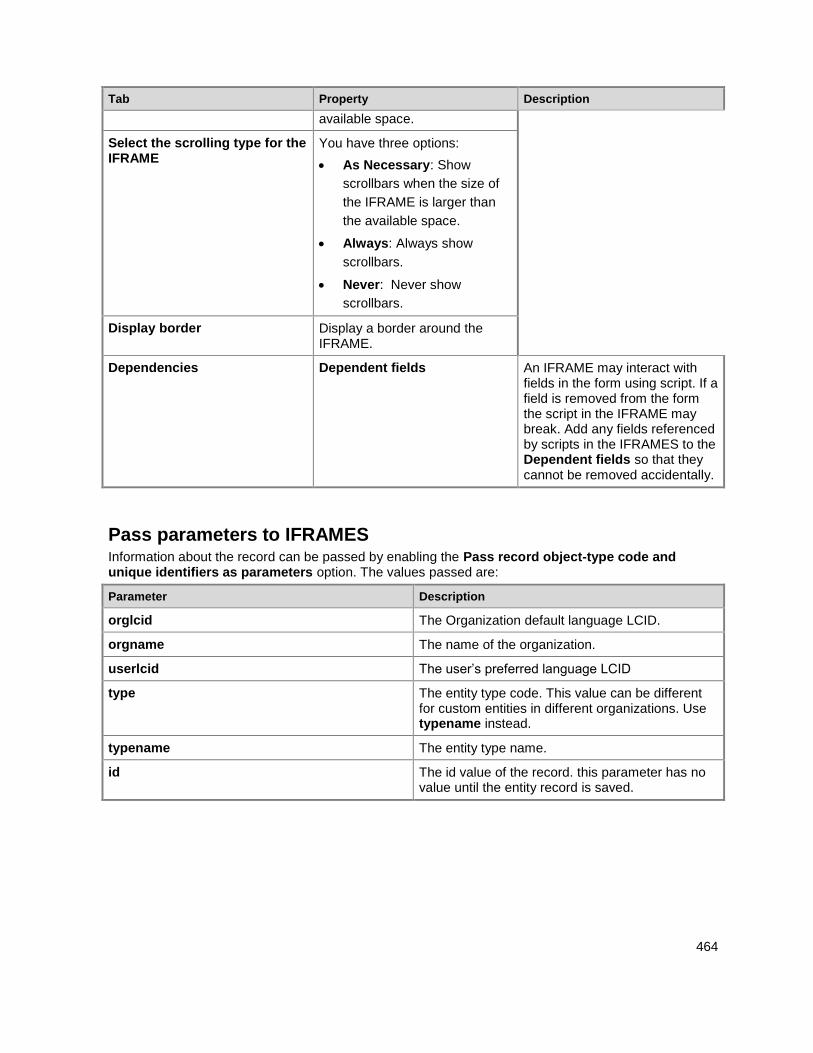
464
Tab Property Description
available space.
Select the scrolling type for the IFRAME
You have three options:
As Necessary: Show
scrollbars when the size of
the IFRAME is larger than
the available space.
Always: Always show
scrollbars.
Never: Never show
scrollbars.
Display border Display a border around the IFRAME.
Dependencies Dependent fields An IFRAME may interact with fields in the form using script. If a field is removed from the form the script in the IFRAME may break. Add any fields referenced by scripts in the IFRAMES to the Dependent fields so that they cannot be removed accidentally.
Pass parameters to IFRAMES Information about the record can be passed by enabling the Pass record object-type code and unique identifiers as parameters option. The values passed are:
Parameter Description
orglcid The Organization default language LCID.
orgname The name of the organization.
userlcid The user’s preferred language LCID
type The entity type code. This value can be different for custom entities in different organizations. Use typename instead.
typename The entity type name.
id The id value of the record. this parameter has no value until the entity record is saved.

465
Edit Navigation Navigation within the form allows people to view lists of related records. Each entity relationship has properties to control whether it should be shown. More information: Navigation pane item for primary entity
Any entity relationships that are configured to be displayed can be overridden within the form editor.
For step-by-step instructions, see Add or edit form navigation for related entities
To enable editing navigation you must first select Navigation from the Select group on the Home tab.
In the Relationship Explorer you can filter by 1:N (one-to-many) or N:N (many-to-many) relationships, or view all available relationships. The Only show unused relationships checkbox is disabled and selected. So you can only add each relationship one time.
To add a relationship from the Relationship Explorer just double-click it and it will be added below the currently selected relationship in the navigation area. Double-click a relationship in the navigation area and you can change the label on the Display tab. On the Name tab, you can see information about the relationship. Use the Edit button to open the definition of the entity.
There are five groups in the navigation area. You can drag them to reposition them and double-click them to change the label, but you can’t remove them. These groups are displayed only when there is something in them. If you don’t want a group to appear, just don’t add anything to it.
Configure event handlers Form event handlers can be configured for the following areas in a form.
Element Event Description
Form OnLoad Occurs when the form loads.
OnSave Occurs when data is saved.
Tab TabStateChange Occurs when the tab is expanded or collapsed.
Field OnChange Occurs when data in the field changes and the control loses focus.
An event handler consists of a reference to a JavaScript web resource and a function defined within that web resource that will execute when the event occurs. Each element can have up to 50 separate event handlers configured.
Important
Configuring an event handler incorrectly can result in script errors that may cause the form to fail to load or function correctly. If you are not the developer of the script, make sure you understand exactly what configuration options the script requires.
Be sure to only configure a script event handler using a library that comes from a source you trust. Scripts can be used to perform any action a user might perform and a poorly written script can significantly damage the performance of a form.
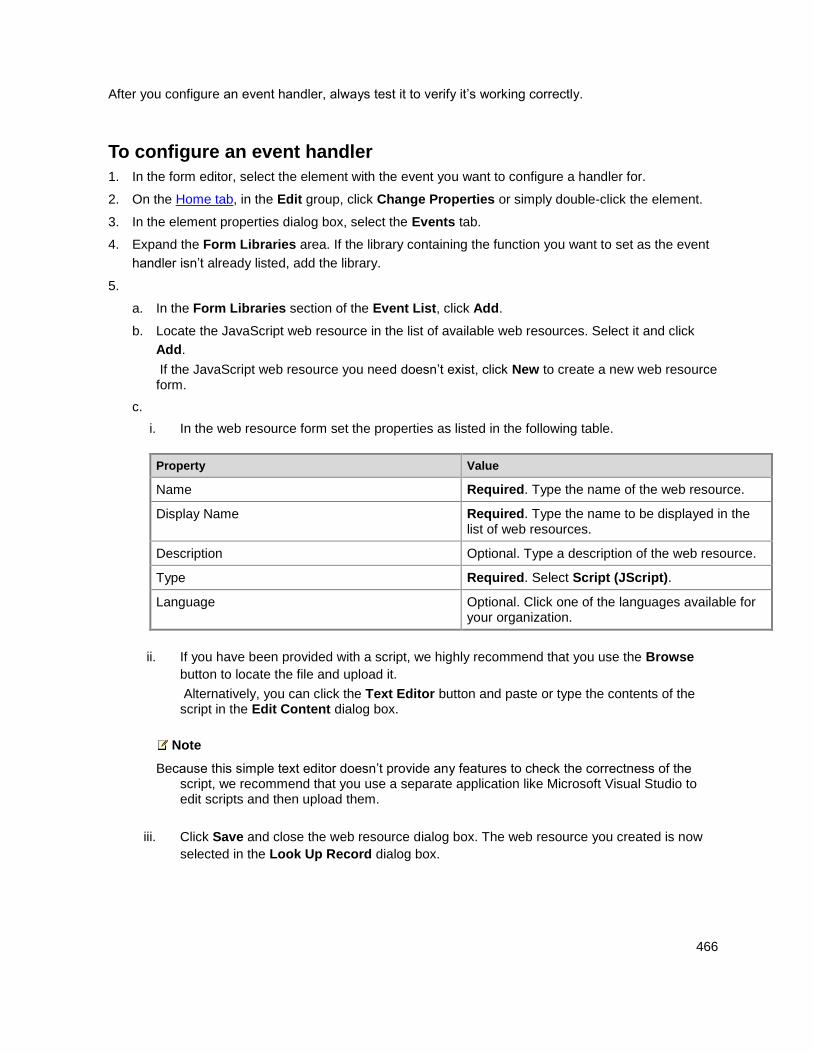
466
After you configure an event handler, always test it to verify it’s working correctly.
To configure an event handler
1. In the form editor, select the element with the event you want to configure a handler for.
2. On the Home tab, in the Edit group, click Change Properties or simply double-click the element.
3. In the element properties dialog box, select the Events tab.
4. Expand the Form Libraries area. If the library containing the function you want to set as the event
handler isn’t already listed, add the library.
5.
a. In the Form Libraries section of the Event List, click Add.
b. Locate the JavaScript web resource in the list of available web resources. Select it and click
Add.
If the JavaScript web resource you need doesn’t exist, click New to create a new web resource form.
c.
i. In the web resource form set the properties as listed in the following table.
Property Value
Name Required. Type the name of the web resource.
Display Name Required. Type the name to be displayed in the list of web resources.
Description Optional. Type a description of the web resource.
Type Required. Select Script (JScript).
Language Optional. Click one of the languages available for your organization.
ii. If you have been provided with a script, we highly recommend that you use the Browse
button to locate the file and upload it.
Alternatively, you can click the Text Editor button and paste or type the contents of the script in the Edit Content dialog box.
Note
Because this simple text editor doesn’t provide any features to check the correctness of the script, we recommend that you use a separate application like Microsoft Visual Studio to edit scripts and then upload them.
iii. Click Save and close the web resource dialog box. The web resource you created is now
selected in the Look Up Record dialog box.
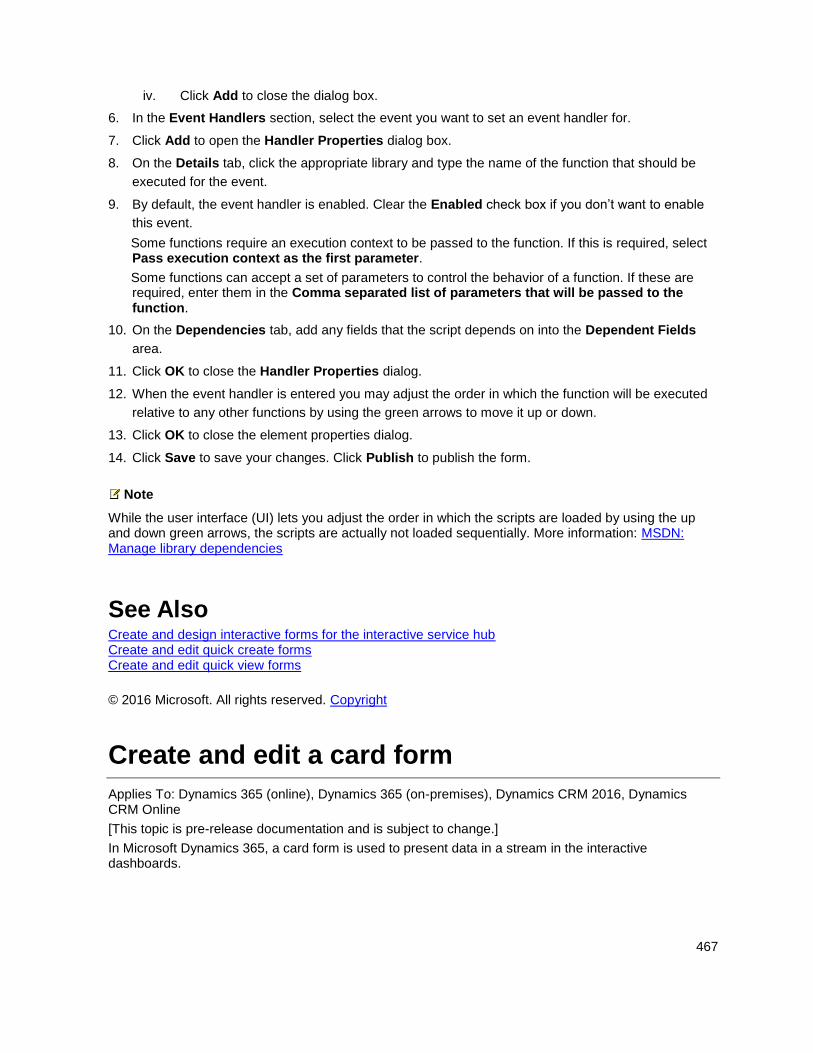
467
iv. Click Add to close the dialog box.
6. In the Event Handlers section, select the event you want to set an event handler for.
7. Click Add to open the Handler Properties dialog box.
8. On the Details tab, click the appropriate library and type the name of the function that should be
executed for the event.
9. By default, the event handler is enabled. Clear the Enabled check box if you don’t want to enable
this event.
Some functions require an execution context to be passed to the function. If this is required, select Pass execution context as the first parameter.
Some functions can accept a set of parameters to control the behavior of a function. If these are required, enter them in the Comma separated list of parameters that will be passed to the function.
10. On the Dependencies tab, add any fields that the script depends on into the Dependent Fields
area.
11. Click OK to close the Handler Properties dialog.
12. When the event handler is entered you may adjust the order in which the function will be executed
relative to any other functions by using the green arrows to move it up or down.
13. Click OK to close the element properties dialog.
14. Click Save to save your changes. Click Publish to publish the form.
Note
While the user interface (UI) lets you adjust the order in which the scripts are loaded by using the up and down green arrows, the scripts are actually not loaded sequentially. More information: MSDN: Manage library dependencies
See Also Create and design interactive forms for the interactive service hub Create and edit quick create forms Create and edit quick view forms
© 2016 Microsoft. All rights reserved. Copyright
Create and edit a card form
Applies To: Dynamics 365 (online), Dynamics 365 (on-premises), Dynamics CRM 2016, Dynamics CRM Online
[This topic is pre-release documentation and is subject to change.]
In Microsoft Dynamics 365, a card form is used to present data in a stream in the interactive dashboards.
468
For each entity that needs to be shown in the views or queues in the interactive dashboard streams, a card form must be created.
This card provides a template to show how the entity data will be presented in the stream.
In this topic Create a card form
Edit a card form
Create a card form You create forms using the form editor much like you create or edit other forms. Card forms are read only in runtime. Use them to create forms that are for reading purposes only.
Note
All out-of-the-box entities that are enabled for the interactive experience already have an out-of-the-box card form created. You can change this default form, or you can create a new form if needed.
1. In the default solution, using the solution explorer, expand the Entities node, and then select the
entity you want to create a new quick view form for.
2. Expand the entity, and then select the Forms node.
3. Click New, and then select Card Form to open the form editor.
The form has sections added to it by default. You can’t add sections to, or remove or move existing sections from the form.
The first section of the form is a color strip. A color strip can include any field that has a color definition associated with it, and is of the type Option Set. You can add only one field to this section.
Note
You can only add four fields to the header, footer, and details through customization. However, you can add more fields through solution import. Regardless of the number of fields added to the header, footer, and details sections of the form, only the first four fields in each of the sections are displayed at runtime.
4. In the form editor, click Form Properties in the Form group of the Home tab.
5. In the Form Properties dialog box, enter a Form Name and Description to differentiate this card
form from any others, and then close the Form Properties dialog box.
6. Edit the form to add the fields you want. More information: Edit a card form
Important
469
If you add a field and click Field Requirement > Business Required and then save it, you will not be able to delete the field.
7. To save the form and close the form editor, on the Home tab, Save group, click Save and Close.
Edit a card form Card forms have a simplified layout because they are designed to be viewed within a stream on a dashboard. One single-column tab is available. You can add fields or remove fields from the form.
When you edit a card form, you need to publish your changes before they will be visible in the application.
Important
After publishing the changes in the web application, the configuration changes must be downloaded in the interactive service hub before they are visible in the application.
See Also Create and design interactive forms for the interactive service hub Use the Main - Interactive experience form and its components
© 2016 Microsoft. All rights reserved. Copyright
Create and edit views
Applies To: Dynamics 365 (online), Dynamics 365 (on-premises), Dynamics CRM 2016, Dynamics CRM Online
[This topic is pre-release documentation and is subject to change.]
In Microsoft Dynamics 365, use views to define how a list of records for a specific entity is displayed in the application. A view defines:
The columns to display
How wide each column should be
How the list of records should be sorted by default
What default filters should be applied to restrict which records will appear in the list
A drop-down list of views is frequently displayed in the application so that people have options for different views of entity data.
The records that are visible in individual views are displayed in a list, sometimes called a grid, which frequently provides options so that people can change the default sorting, column widths, and filters to more easily see the data that’s important to them. Views also define the data source for charts that are used in the application.
470
In This Topic Types of views
Accessing view definitions
Specify default views
Create and edit views
Choose and configure columns
Display custom icons instead of values in list views
Edit filter criteria
Configure sorting
Remove views
Dependencies
Managed properties
Types of views There are three types of views, personal, system, and public views.
Personal views You and anyone else who has at least User level access to actions for the Saved View entity can also create personal views. As system administrator, you can modify the access level for each action in the security role to control the depth to which people can create, read, write, delete, assign, or share personal views.
Personal views are owned by individuals and, because of their default User level access, they are visible only to that person or anyone else they choose to share their personal views with. You can create personal views by saving a query that you define by using Advanced Find or by using the Save Filters as New Views and Save Filters to Current View options in the list of views. These views are typically included at the bottom in lists of system or public views that are available in the application. While you can create a new personal view based on a system or public view, you cannot create a system or public view based on a personal view.
This topic is about how system administrators and system customizers work with system and public views. For more information about personal views, see Help & Training: Create, edit, or save an Advanced Find search.
System views As a system administrator or system customizer, you can edit system views. System views are special views the application depends on, which exist for system entities or are automatically created when you create custom entities. These views have specific purposes and some additional capabilities.
System Views Description
Quick Find The default view used when searches are performed using Quick Find. This view also defines which fields are searched when using search capabilities of Quick Find and Lookup
471
System Views Description
views.
Advanced Find The default view used to display results when using Advanced Find. This view also defines the columns used by default when new custom public views or personal views are created without defining a view to use as a template.
Associated The default view that lists the related entities for a record.
Lookup The view you see when you select a record to set for a lookup field.
These views are not shown in the view selector and you can’t use them in sublists in a form or as a list in a dashboard. You cannot delete or deactivate these views. More information: Remove views
System views are owned by the organization so that everyone can see them. For example, everyone has organization-level access to read records for the View (savedquery) entity. These views are associated with specific entities and are visible within the solution explorer. You can include these views in solutions because they are associated with the entity.
Public views Public views are general purpose views that you can customize as you see fit. These views are available in the view selector and you can use them in sub-grids in a form or as a list in a dashboard. Some public views exist by default for system entities and for any custom entity. For example, when you create a new custom entity, it will have the following combination of public and system views.
Name Type
Active<entity plural name> Public
Inactive<entity plural name> Public
Quick Find Active<entity plural name> Quick Find
<entity name>Advanced Find View Advanced Find
<entity name>Associated View Associated
<entity name>Lookup View Lookup
You can create custom public views. You can delete any custom public views you create in an unmanaged solution. You cannot delete any system-defined public views. Custom public views added by importing a managed solution may have managed properties set that can prevent them from being deleted, except by uninstalling the managed solution.
472
Accessing view definitions There are several ways you can access view definitions if you are a system administrator or customizer. On any list view for an entity, in the command bar you will find the following commands after you click or tap the ellipsis ( ) button:
View: Opens the definition of the current view in the default solution.
New System View: Opens a new window to create a new view for the current entity in the default
solution.
Customize Entity: Takes you to the definition of the current entity in the default solution where you
can then select Views.
System Views: Opens the same window as Customize Entity, except with Views selected.
Alternatively, you can navigate to the view definitions in the default solution by using the following steps:
Open a view
1. Go to Settings > Customizations.
2. Click Customize the System.
3. Under Components, expand Entities, and then expand the entity you want.
4. Click Views.
5. Double-click the view you want to open.
This list of views has four filters you can use to find the views you want more easily:
All Active Views
Active Public Views
Inactive Public Views
Active System-Defined Views
If the entity that the view is associated with is part of an unmanaged solution, you can still create or edit views for that entity in the default solution. System views are associated with an entity and are not available as separate solution components. Unlike fields, views do not use a customization prefix in a unique name that should be consistent in a solution, so you do not need to create views in the context of a solution.
Specify default views Unless someone has ‘pinned’ a different view as their personal default, they will see the default view that you specify. You can set any of the public views as the default view for an entity.
Set the default view for an entity
1. Navigate to Views as described in Accessing view definitions.
2. Select a Public view.
473
3. On the menu bar, click More Actions > Set Default.
4. Click Publish All Customizations.
Create and edit views You can create custom public views by editing existing views and saving them with a different name or by creating a new view.
Also see Help & Training: Create or edit a public view for an entity.
Create a new view
1. As described in Accessing view definitions, from a list view for the entity, on the command bar,
select New System View.
2. In the View Properties dialog box, provide a Name and optionally a Description for the view.
3. After you close the properties dialog you can do the following:
Choose and configure columns.
Edit filter criteria.
Configure sorting.
4. When you are finished, click Save and Close.
5. Click Publish All Customizations.
Edit a view
1. Go to Settings > Customizations.
2. Click Customize the System.
3. Under Components, expand Entities, and then expand the entity you want.
4. Click Views.
5. Double-click the view you want to edit.
6. To change the Name or the Description for the view, click View Properties.
7. Do the following:
Choose and configure columns.
Edit filter criteria.
Configure sorting.
8. When you are finished, click Save and Close.
9. Click Publish All Customizations.

474
Create a new view from an existing view Follow the procedure to edit a view, except instead of choosing Save and Close, clickSave As and enter a new Name and Description for the view.
Choose and configure columns Along with the filter criteria, the columns visible in a view are very important to the value provided by the view. When you Create and edit views you can perform the following tasks with columns:
Add columns
Remove columns
Change column width
Move a column
Enable or disable presence for a column
Add find columns
Add columns You can include columns from the current entity or any of the related entities that have a 1:N entity relationship with the current entity.
For example, perhaps you want to display the owner of a user-owned entity in a column. You can choose the Owner field of the current entity to display the name of the owner. This will appear as a link to open the User record for the person who is the owner. In this case, you also have the option to Enable or disable presence for a column.
If you want to display the phone number for the owner of the record, you must select Owning User (User) from the Record type drop-down and then select the Main Phone field.
Add columns to views
1. While Create and edit views click Add Columns and the Add Columns dialog box appears.
2. Select the Record type if you want to include fields from related entities.
3. You can select multiple fields, even from related entities.
4. When you have selected the fields you want, click OK to close the Add Columns dialog box.
As you add columns, you will increase the width of the view. If the width of the view exceeds the space available to show it in the page, horizontal scrollbars will allow people to scroll and see the hidden columns.
Tip
If your view filters on data for a certain field so that only records with a certain value are shown, don’t include that column in the view. For example, if you are only showing active records, don’t include the status column in the view. Instead, name the view to indicate that all the records shown in the view are active.
475
Note
When you add columns to Lookup views for updated entities, only the first three columns will be displayed.
Remove columns
1. While Create and edit views, choose the column you want to remove.
2. In the Common Tasks area, click Remove.
3. In the confirmation message, click OK.
Change column width
1. While Create and edit views, choose the column you want to change.
2. In the Common Tasks area, click Change Properties.
3. In the Change Column Properties dialog box, choose an option to set the column width, and then
click OK.
Move a column
1. While Create and edit views, choose the column you want to move.
2. In the Common Tasks area, use the arrows to move the column left or right.
Enable or disable presence for a column When the following conditions are true, people can a see a Microsoft Lync online presence control in lists that shows if the person is available and allows people to interact with them by IM:
People use Internet Explorer.
People have the Lync application installed.
People have Microsoft ActiveX enabled in Internet Explorer.
Your organization has enabled presence for the system in the system settings.
Important
Lync has been rebranded as Skype for Business. Currently, you’ll still see references to “Lync” in
476
Microsoft Dynamics 365, but Dynamics 365 will work with Skype for Business.
The presence control and the setting to enable it are available only for columns that display primary fields for email-enabled entities (users, contacts, opportunities, leads, or custom entities).
Enable or disable Lync presence for a column
1. While Create and edit views, choose the column you want to change.
2. In the Common Tasks area, click Change Properties.
3. In the Change Column Properties dialog box, select or deselect Enable presence for this
column, and then click OK.
Add find columns Find columns are the columns searched by the application when people use the search for records text box displayed for lists or whenever there is the ability to search for records for an entity in the application, such as when people are searching for a record for a lookup field.
1. Open a Quick Find view as described in Create and edit views.
2. Click Add Find Columns to open the dialog box.
3. Select the fields that contain the data that you want to search for.
4. Click OK to close the Add Find Columns dialog box.
Display custom icons instead of values in list views Some Relationship Insights features display list views that show icons rather than text or numerical values in some columns. Though this capability was created to support specific Relationship Insights features, administrators and customizers can also add new graphics and establish the logic used to select them based on a column values using JavaScript.
Note
Grid icons are only shown in the Web interface. They are not shown in Outlook or the mobile app.
Add custom graphics and JavaScript as web resources in Dynamics 365
1. Create the new graphic files needed for your customization. We recommend an icon size of 16x16
pixels (larger images will be scaled down).
2. Write one or more JavaScript functions that establish which icons to show for which values (you'll
typically need one function for each column you want to customize). Each function must accept a
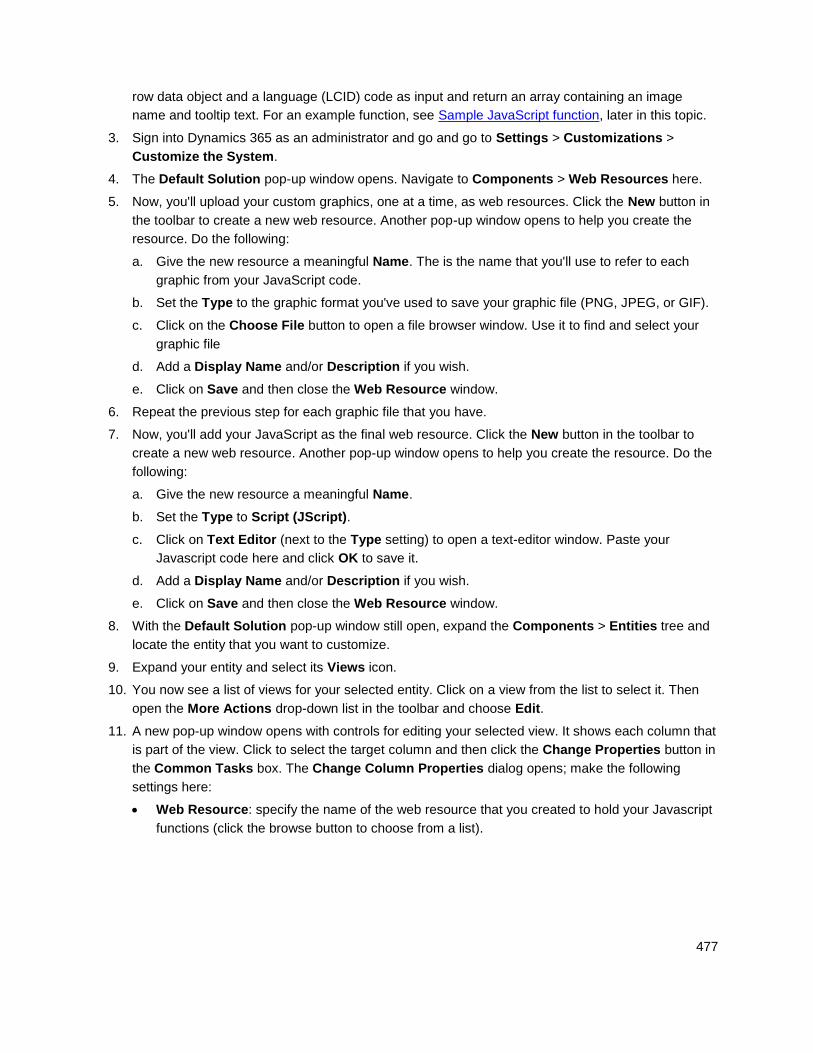
477
row data object and a language (LCID) code as input and return an array containing an image
name and tooltip text. For an example function, see Sample JavaScript function, later in this topic.
3. Sign into Dynamics 365 as an administrator and go and go to Settings > Customizations >
Customize the System.
4. The Default Solution pop-up window opens. Navigate to Components > Web Resources here.
5. Now, you'll upload your custom graphics, one at a time, as web resources. Click the New button in
the toolbar to create a new web resource. Another pop-up window opens to help you create the
resource. Do the following:
a. Give the new resource a meaningful Name. The is the name that you'll use to refer to each
graphic from your JavaScript code.
b. Set the Type to the graphic format you've used to save your graphic file (PNG, JPEG, or GIF).
c. Click on the Choose File button to open a file browser window. Use it to find and select your
graphic file
d. Add a Display Name and/or Description if you wish.
e. Click on Save and then close the Web Resource window.
6. Repeat the previous step for each graphic file that you have.
7. Now, you'll add your JavaScript as the final web resource. Click the New button in the toolbar to
create a new web resource. Another pop-up window opens to help you create the resource. Do the
following:
a. Give the new resource a meaningful Name.
b. Set the Type to Script (JScript).
c. Click on Text Editor (next to the Type setting) to open a text-editor window. Paste your
Javascript code here and click OK to save it.
d. Add a Display Name and/or Description if you wish.
e. Click on Save and then close the Web Resource window.
8. With the Default Solution pop-up window still open, expand the Components > Entities tree and
locate the entity that you want to customize.
9. Expand your entity and select its Views icon.
10. You now see a list of views for your selected entity. Click on a view from the list to select it. Then
open the More Actions drop-down list in the toolbar and choose Edit.
11. A new pop-up window opens with controls for editing your selected view. It shows each column that
is part of the view. Click to select the target column and then click the Change Properties button in
the Common Tasks box. The Change Column Properties dialog opens; make the following
settings here:
Web Resource: specify the name of the web resource that you created to hold your Javascript
functions (click the browse button to choose from a list).
478
Function Name: type the name of the function that you wrote to modify the selected column
and view.
12. Click OK to close the Change Column Properties dialog.
13. Click Save and Close to save your view.
14. Repeat these steps for each entity, view, and column as needed.
15. When you are ready, click Publish All Customizations to publish your changes. Then you can
close the Default Solution pop-up window.
Sample JavaScript function The JavaScript function for displaying custom icons and tooltips expects the following two arguments: the entire row object specified in layoutxml and the calling user’s Locale ID (LCID). The LCID parameter enables you to specify tooltip text in multiple languages. For more information about the languages supported by CRM, see Enable languages and Install or upgrade Language Packs for Microsoft Dynamics 365. For a list of locale ID (LCID) values that you can use in your code, see Locale IDs Assigned by Microsoft .
Assuming you will be adding custom icons for an option-set type of attribute, which has a limited set of predefined options, make sure you use the integer value of the options instead of label to avoid localization issues.
The following sample code displays icons and tooltips based on one of three values (1: Hot, 2: Warm, 3: Cold) in the opportunityratingcode (Rating) attribute. The sample code also shows how to display localized tooltip text. For this sample to work, you must create three image web resources with 16x16 images in your Dynamics 365 instance with the following names: new_Hot, new_Warm, and new_Cold.
function displayIconTooltip(rowData, userLCID) {
var str = JSON.parse(rowData);
var coldata = str.opportunityratingcode_Value;
var imgName = "";
var tooltip = "";
switch (coldata) {
case 1:
imgName = "new_Hot";
switch (userLCID) {
case 1036:
tooltip = "French: Opportunity is Hot";
break;
default:
tooltip = "Opportunity is Hot";
break;
}
479
break;
case 2:
imgName = "new_Warm";
switch (userLCID) {
case 1036:
tooltip = "French: Opportunity is Warm";
break;
default:
tooltip = "Opportunity is Warm";
break;
}
break;
case 3:
imgName = "new_Cold";
switch (userLCID) {
case 1036:
tooltip = "French: Opportunity is Cold";
break;
default:
tooltip = "Opportunity is Cold";
break;
}
break;
default:
imgName = "";
tooltip = "";
break;
}
var resultarray = [imgName, tooltip];
return resultarray;
}
This results in displaying icons with tooltips in the Rating column that depend on the value in each row. The result could look like this:
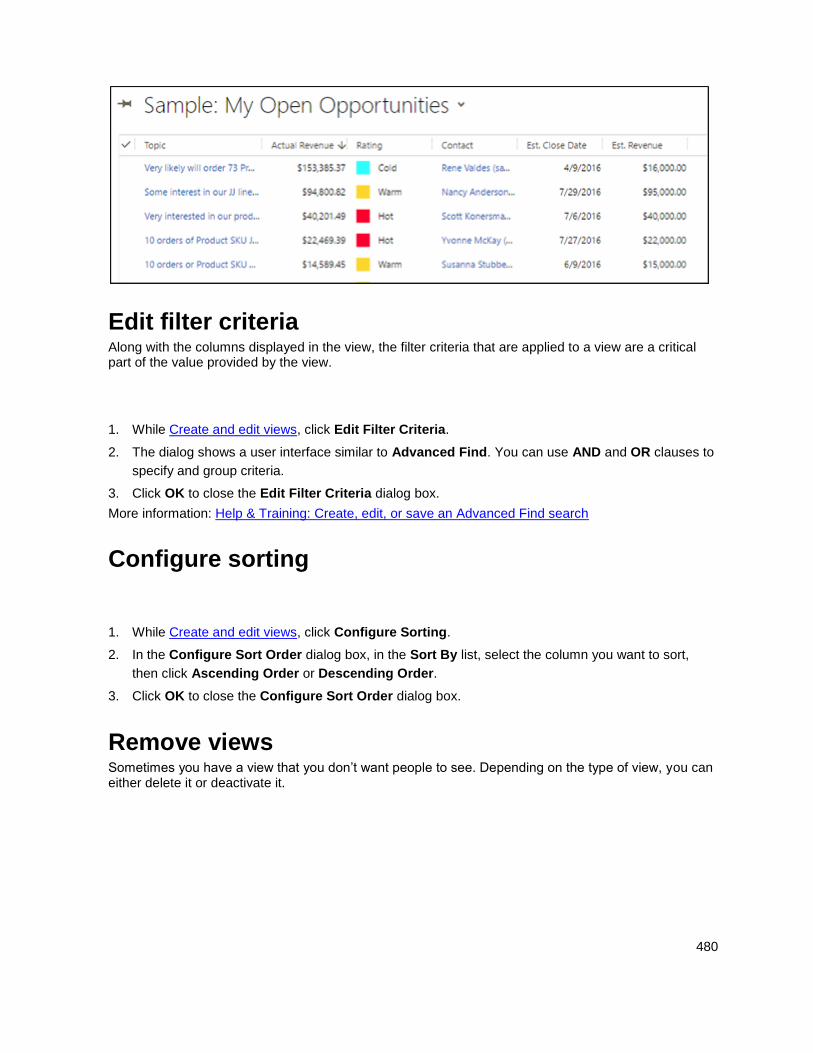
480
Edit filter criteria Along with the columns displayed in the view, the filter criteria that are applied to a view are a critical part of the value provided by the view.
1. While Create and edit views, click Edit Filter Criteria.
2. The dialog shows a user interface similar to Advanced Find. You can use AND and OR clauses to
specify and group criteria.
3. Click OK to close the Edit Filter Criteria dialog box.
More information: Help & Training: Create, edit, or save an Advanced Find search
Configure sorting
1. While Create and edit views, click Configure Sorting.
2. In the Configure Sort Order dialog box, in the Sort By list, select the column you want to sort,
then click Ascending Order or Descending Order.
3. Click OK to close the Configure Sort Order dialog box.
Remove views Sometimes you have a view that you don’t want people to see. Depending on the type of view, you can either delete it or deactivate it.
481
Delete a view You can delete any custom public view. Use the steps in Accessing view definitions to find the view you
want to delete and use the Delete command. Once you verify that you really want to delete it, the view will be permanently deleted.
If you don’t want to delete the view permanently, you can deactivate it instead.
Deactivate or activate views You cannot delete or deactivate any System views, including public views the system created. You can deactivate any public view, including public views the system created
Deactivate or activate a public view
1. Navigate to System Views as described in Accessing view definitions.
2. Select a public view. To see inactive views, use the Inactive Public Views view.
3. On the menu bar, click More Actions, and then click either Deactivate or Activate.
4. Click Publish All Customizations.
Dependencies Views are dependent on the fields that they display. The fields are required components for a view. If you have a custom field that is included in a view, you will not be able to delete that field while it is included in the definition of a view. Because views are usually presented as a list, other solution components are usually not dependent on a specific view. A chart may use a view as a data source, but it can use any of the views for an entity.
View the solution components with dependencies on views
1. Navigate to System Views as described in Accessing view definitions.
2. Select a view.
3. On the menu bar, click More Actions > Show Dependencies.
Managed properties If you create a custom public view that you want to include in a managed solution that you will distribute, you have the option to limit the ability of anyone who is installing your solution from customizing the view.
By default, most views have their Customizable managed property set to true so that people can customize them. Unless you have a very good reason to change this, we recommend you allow people to customize views you create.
Set managed properties for a view
1. Navigate to System Views as described in Accessing view definitions.
482
2. Select a custom public view.
3. On the menu bar, click More Actions > Managed properties.
4. Set the Customizable option to True or False.
See Also Customize your Dynamics 365 system What's new for administrators and customizers in Microsoft Dynamics 365 Getting started with customization Referenced topic '6f0b8ac1-f70a-452e-b71a-2a8438f7d3ce' is only available online. Create and edit metadata Create and design forms Customize Dynamics 365 for phones and tablets Create and edit processes Create and edit business rules Help & Training: Create or edit a public view for an entity Help & Training: Create, edit, or save an Advanced Find search
© 2016 Microsoft. All rights reserved. Copyright
Create and edit dashboards
Applies To: Dynamics 365 (online), Dynamics 365 (on-premises), Dynamics CRM 2016, Dynamics CRM Online
[This topic is pre-release documentation and is subject to change.]
There are two types of dashboards, user dashboards and system dashboards. Any user can create a dashboard visible only to them in their work area such as Sales, Service, or Marketing. An admin or customizer creates or customizes system dashboards that, when published, are visible to everyone in the organization. A user can choose to set their user dashboard as their default dashboard and override the system dashboard. This topic focuses on system dashboards.
For additional information on creating system or user dashboards, see Help & Training: Work with, create, or customize dashboards.
In This Topic Create a new dashboard
Edit an existing dashboard
Create a new dashboard
1. Go to Settings > Customizations.
483
2. Click Customize the System > Components > Dashboards.
3. Click New, choose a layout, and then click Create.
4. In the Dashboard: New dialog box enter a name for the dashboard.
5. Select one of the component areas and then select the icon for a chart or a list.
You can have up to six components in the dashboard.
6. For example, to add a chart, in the Add Component dialog box, select values for Record Type,
View, and Chart, and then select Add to add the chart to the dashboard.
7. When you are finished adding components to your dashboard, select Save and then Publish.
Edit an existing dashboard
1. Go to Settings > Customizations..
2. Click Customize the System > Components > Dashboards.
3. Open (double-click) a dashboard, select one of the component areas, and then click Edit
Component.
4. In the Set Properties dialog box, make your changes. When you’re done, click Set.
For details on setting properties, see Set properties for a chart or list included in a dashboard.
5. When you’ve completed your changes be sure to save them, and then publish them.
Additional system dashboards tasks you can perform include:
Remove a list or chart from a dashboard
Add a list or chart to a dashboard
Set the default dashboard
Use security roles to make a dashboard visible to just certain roles
To learn how to do these and other system dashboard tasks see: Help & Training: Work with, create, or customize dashboards.
See Also Customize your Dynamics 365 system
© 2016 Microsoft. All rights reserved. Copyright
484
Configure interactive experience dashboards
Applies To: Dynamics 365 (online), Dynamics 365 (on-premises), Dynamics CRM 2016, Dynamics CRM Online
[This topic is pre-release documentation and is subject to change.]
The Microsoft Dynamics 365 interactive service hub brings you a modern, intuitive, and interactive experience for managing your customer service operations. It’s loaded with capabilities, interactive dashboards, and redesigned forms that pull together key information, so customer service representatives can focus on what’s important to them and get things done faster. For service reps, the interactive experience dashboards will become a one-stop workplace to see their workload information and take actions. The dashboards are fully configurable, security-role based and deliver workload information across multiple streams in real time. The customer service reps will no longer need to page through the application looking for particular cases; they’ll be able to act on a case right from the dashboard. While end users will access these dashboards using the interactive service hub URL, as an administrator or customizer, you’ll do all of your configuration work in the Dynamics 365 web application user interface. You won’t have to write code.
Important
This feature was introduced in CRM Online 2016 Update and CRM 2016 (on-premises). Interested in getting this feature? Find your CRM administrator or support person.
In This Topic Interactive experience dashboards overview
Configure entities, fields, and security roles for the interactive dashboards
Configure interactive experience dashboards
Configure dashboard colors
Interactive experience dashboards overview The interactive experience dashboards come in two forms: multi-stream and single-stream. In addition, multi-stream dashboards can be home page or entity-specific dashboards. The entity-specific dashboards are configured in a different part of the user interface and partially preloaded with the entity-specific configuration information.
The multi-stream dashboards display data in real time over multiple data streams. There’s no limit on how many streams you can configure on the dashboard. The data in a stream can be based only on one entity, but, each stream can be based on a different entity. In the entity-specific dashboards, all streams are based on the same entity. The data flows from various views or queues, such as My Activities, My Cases, or Cases in the Banking Queue. The multi-stream home page dashboards typically target Tier 1 customer support, where service representatives handle many support cases at the same time. However, entity-specific dashboards can be also suitable for Tier 2 support that focuses on more complex cases. In the multi-stream dashboard, you can easily switch from a standard view to the tile view. The interactive tiles are an aggregated view of the data across the views or queues. For example, you can configure a tile based on the My Active Cases view that currently contains ten active
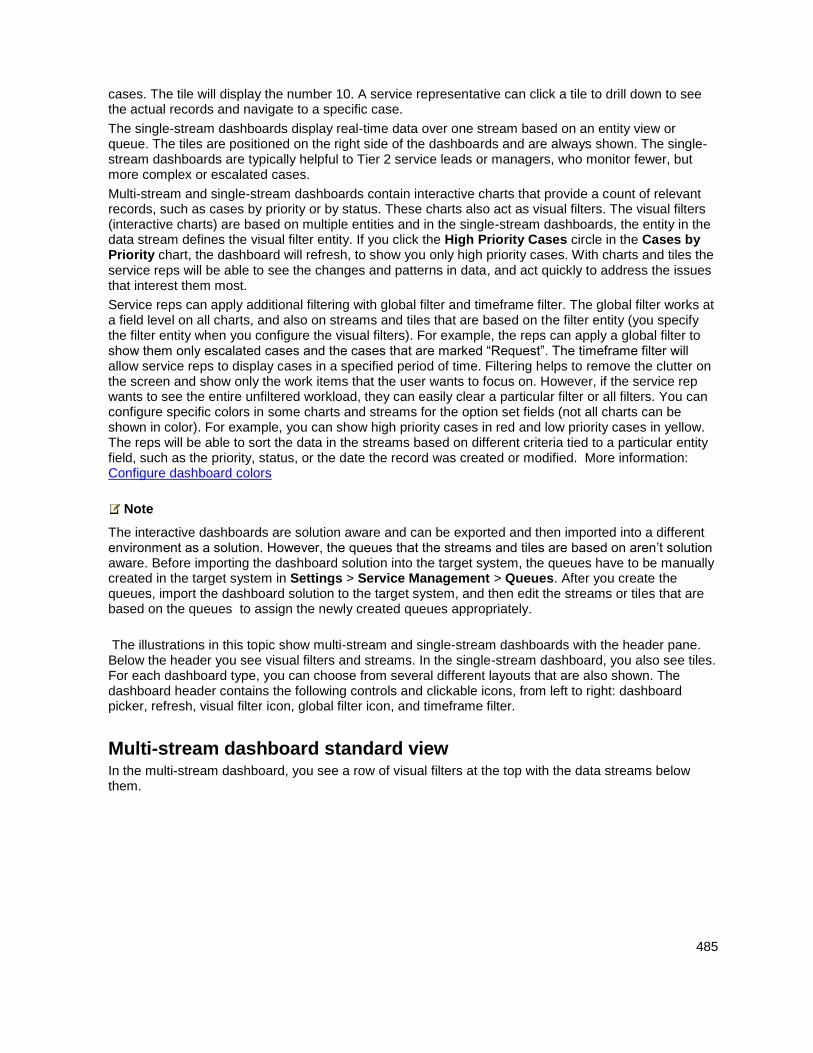
485
cases. The tile will display the number 10. A service representative can click a tile to drill down to see the actual records and navigate to a specific case.
The single-stream dashboards display real-time data over one stream based on an entity view or queue. The tiles are positioned on the right side of the dashboards and are always shown. The single-stream dashboards are typically helpful to Tier 2 service leads or managers, who monitor fewer, but more complex or escalated cases.
Multi-stream and single-stream dashboards contain interactive charts that provide a count of relevant records, such as cases by priority or by status. These charts also act as visual filters. The visual filters (interactive charts) are based on multiple entities and in the single-stream dashboards, the entity in the data stream defines the visual filter entity. If you click the High Priority Cases circle in the Cases by Priority chart, the dashboard will refresh, to show you only high priority cases. With charts and tiles the service reps will be able to see the changes and patterns in data, and act quickly to address the issues that interest them most.
Service reps can apply additional filtering with global filter and timeframe filter. The global filter works at a field level on all charts, and also on streams and tiles that are based on the filter entity (you specify the filter entity when you configure the visual filters). For example, the reps can apply a global filter to show them only escalated cases and the cases that are marked “Request”. The timeframe filter will allow service reps to display cases in a specified period of time. Filtering helps to remove the clutter on the screen and show only the work items that the user wants to focus on. However, if the service rep wants to see the entire unfiltered workload, they can easily clear a particular filter or all filters. You can configure specific colors in some charts and streams for the option set fields (not all charts can be shown in color). For example, you can show high priority cases in red and low priority cases in yellow. The reps will be able to sort the data in the streams based on different criteria tied to a particular entity field, such as the priority, status, or the date the record was created or modified. More information: Configure dashboard colors
Note
The interactive dashboards are solution aware and can be exported and then imported into a different environment as a solution. However, the queues that the streams and tiles are based on aren’t solution aware. Before importing the dashboard solution into the target system, the queues have to be manually created in the target system in Settings > Service Management > Queues. After you create the queues, import the dashboard solution to the target system, and then edit the streams or tiles that are based on the queues to assign the newly created queues appropriately.
The illustrations in this topic show multi-stream and single-stream dashboards with the header pane. Below the header you see visual filters and streams. In the single-stream dashboard, you also see tiles. For each dashboard type, you can choose from several different layouts that are also shown. The dashboard header contains the following controls and clickable icons, from left to right: dashboard picker, refresh, visual filter icon, global filter icon, and timeframe filter.
Multi-stream dashboard standard view In the multi-stream dashboard, you see a row of visual filters at the top with the data streams below them.
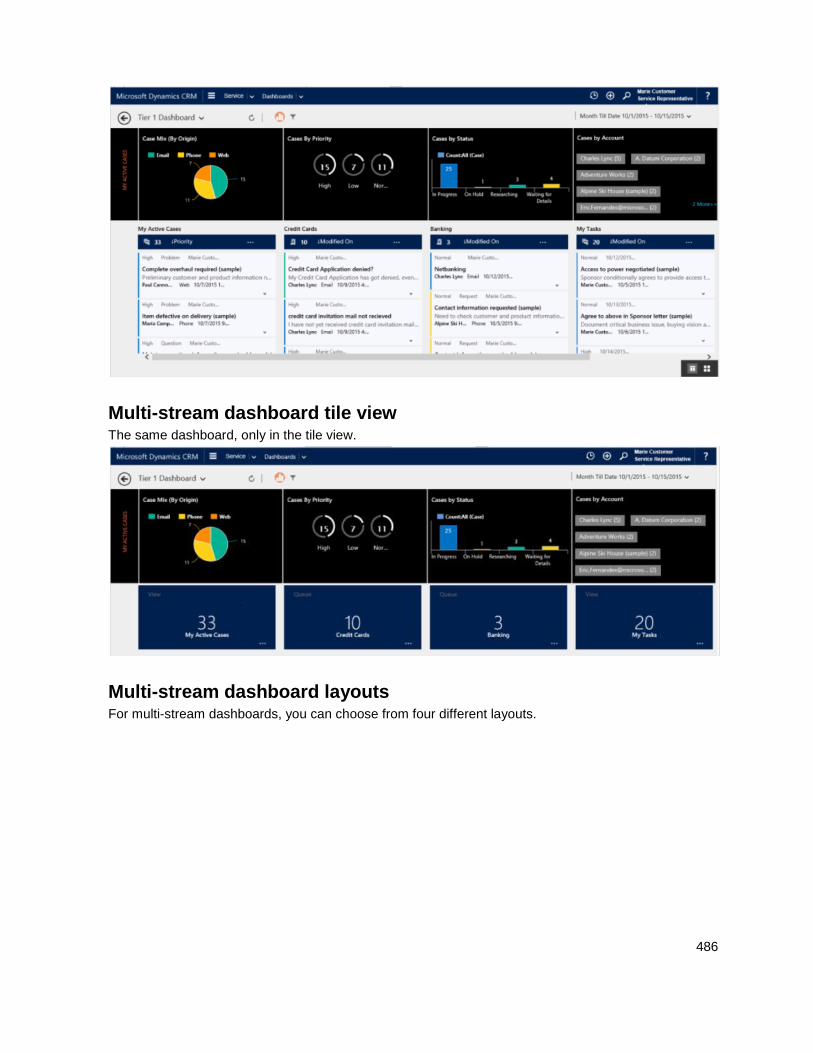
486
Multi-stream dashboard tile view The same dashboard, only in the tile view.
Multi-stream dashboard layouts For multi-stream dashboards, you can choose from four different layouts.
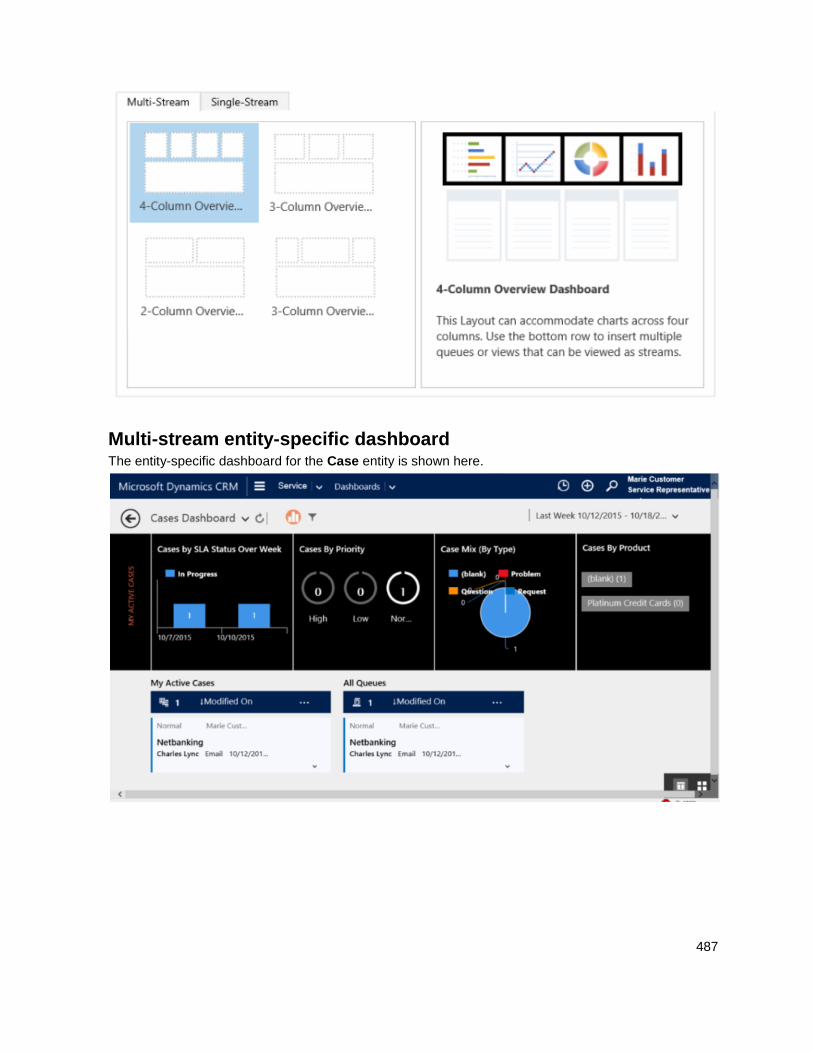
487
Multi-stream entity-specific dashboard The entity-specific dashboard for the Case entity is shown here.

488
Single-stream dashboard The single-stream dashboard contains the data stream on the left and visual filters and tiles on the right.
Single-stream dashboard layouts For single-stream dashboards, you can choose from four different layouts.

489
Configure entities, fields, and security roles for the interactive dashboards When you configure interactive dashboards, your first task is to enable entities, fields, and security roles for the interactive experience.
Enable entities You can create interactive dashboards for entities that are enabled for the interactive experience. You can also enable custom entities and custom activities for the interactive dashboards.
Out of the box, the following system entities are enabled for interactive dashboards:
Case
Contact
Account
Social Profile
Queue Item
Knowledge Article
Activities: Email, Phone Call, Task, Appointment, Social Activity
The following procedure describes how to enable a custom entity for the interactive experience:
1. Go to Settings > Customizations.
2. Click Customize the System.
3. Under Components, expand Entities, and then expand the entity you want to enable.
4. On the General tab, select the Enable for interactive experience check box. Click Save and
Close.
5. Click Publish for your changes to take effect.
6. Click Prepare Client Customizations.
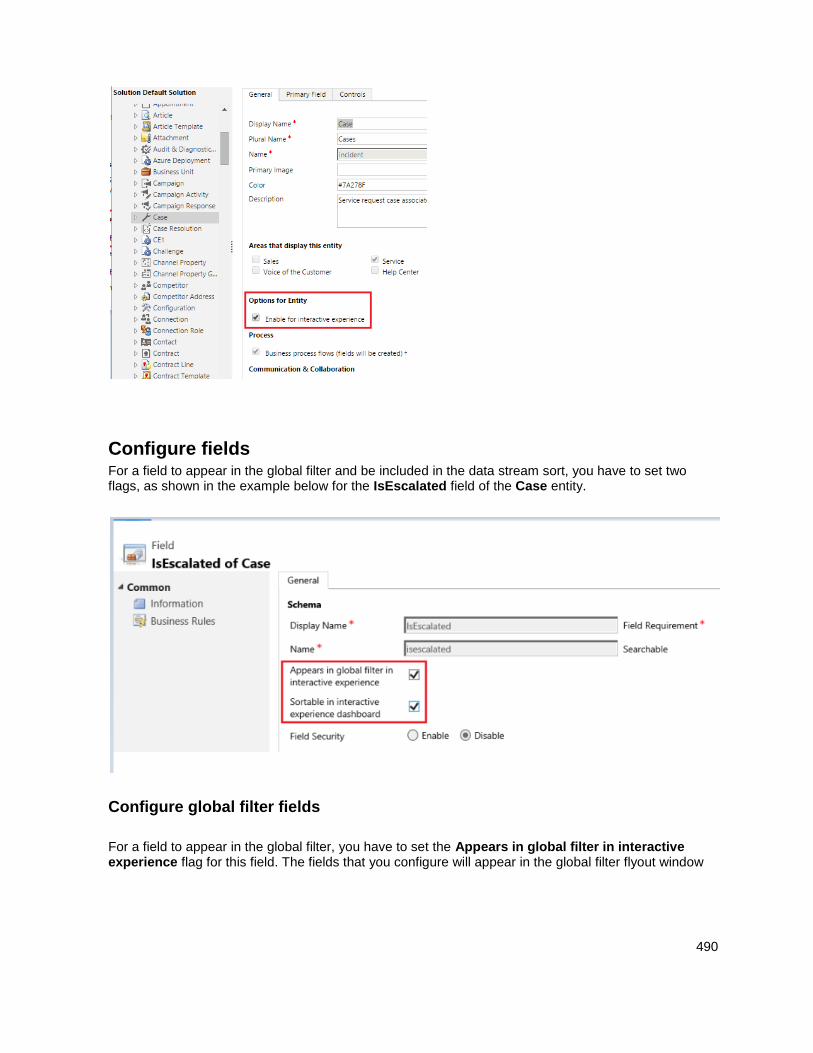
490
Configure fields For a field to appear in the global filter and be included in the data stream sort, you have to set two flags, as shown in the example below for the IsEscalated field of the Case entity.
Configure global filter fields
For a field to appear in the global filter, you have to set the Appears in global filter in interactive experience flag for this field. The fields that you configure will appear in the global filter flyout window
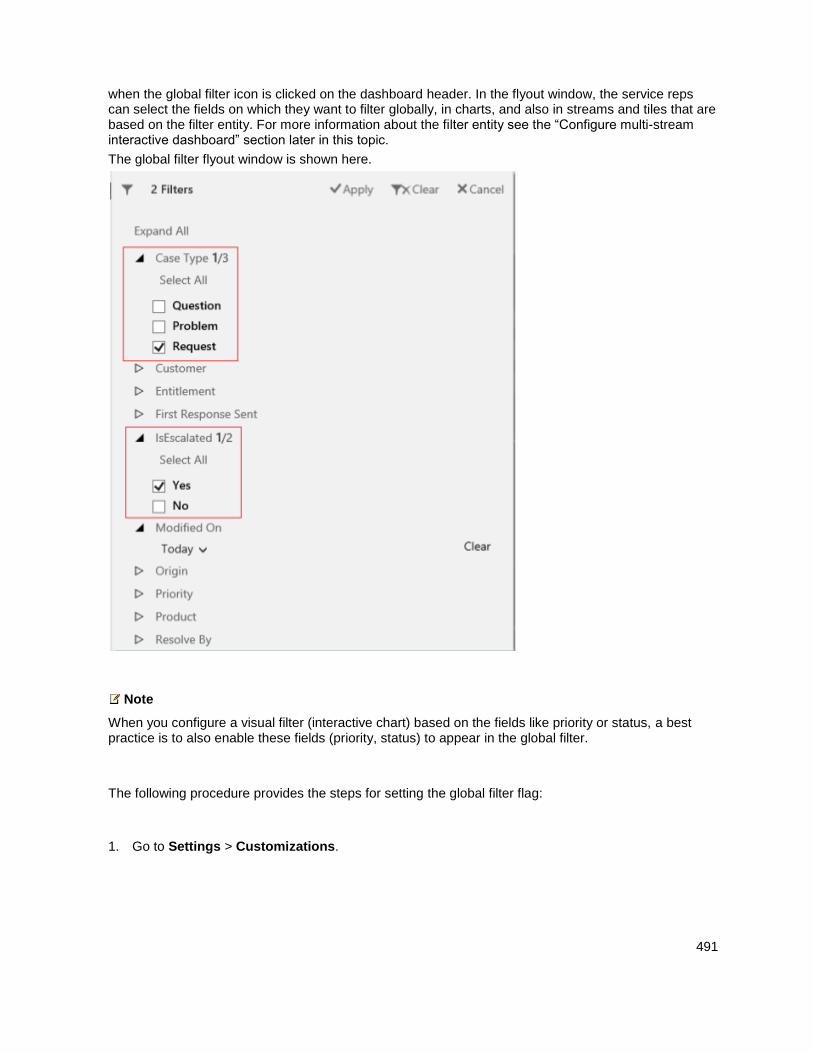
491
when the global filter icon is clicked on the dashboard header. In the flyout window, the service reps can select the fields on which they want to filter globally, in charts, and also in streams and tiles that are based on the filter entity. For more information about the filter entity see the “Configure multi-stream interactive dashboard” section later in this topic.
The global filter flyout window is shown here.
Note
When you configure a visual filter (interactive chart) based on the fields like priority or status, a best practice is to also enable these fields (priority, status) to appear in the global filter.
The following procedure provides the steps for setting the global filter flag:
1. Go to Settings > Customizations.
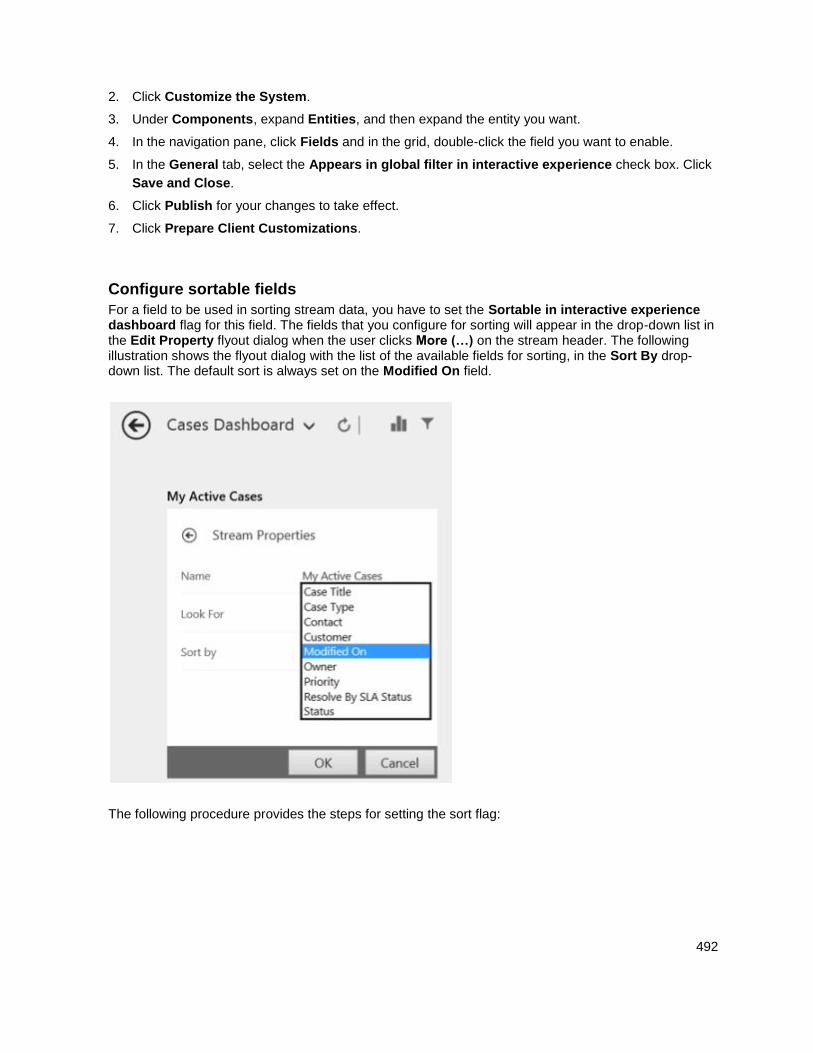
492
2. Click Customize the System.
3. Under Components, expand Entities, and then expand the entity you want.
4. In the navigation pane, click Fields and in the grid, double-click the field you want to enable.
5. In the General tab, select the Appears in global filter in interactive experience check box. Click
Save and Close.
6. Click Publish for your changes to take effect.
7. Click Prepare Client Customizations.
Configure sortable fields
For a field to be used in sorting stream data, you have to set the Sortable in interactive experience dashboard flag for this field. The fields that you configure for sorting will appear in the drop-down list in the Edit Property flyout dialog when the user clicks More (…) on the stream header. The following illustration shows the flyout dialog with the list of the available fields for sorting, in the Sort By drop-down list. The default sort is always set on the Modified On field.
The following procedure provides the steps for setting the sort flag:
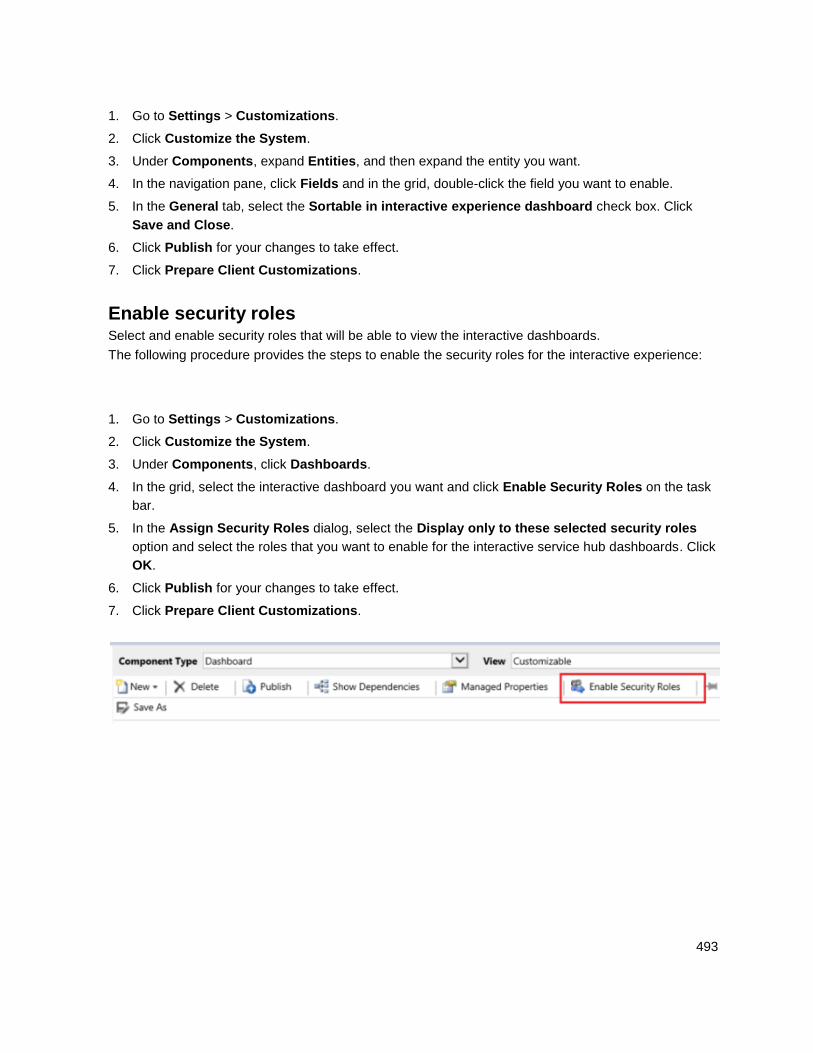
493
1. Go to Settings > Customizations.
2. Click Customize the System.
3. Under Components, expand Entities, and then expand the entity you want.
4. In the navigation pane, click Fields and in the grid, double-click the field you want to enable.
5. In the General tab, select the Sortable in interactive experience dashboard check box. Click
Save and Close.
6. Click Publish for your changes to take effect.
7. Click Prepare Client Customizations.
Enable security roles Select and enable security roles that will be able to view the interactive dashboards.
The following procedure provides the steps to enable the security roles for the interactive experience:
1. Go to Settings > Customizations.
2. Click Customize the System.
3. Under Components, click Dashboards.
4. In the grid, select the interactive dashboard you want and click Enable Security Roles on the task
bar.
5. In the Assign Security Roles dialog, select the Display only to these selected security roles
option and select the roles that you want to enable for the interactive service hub dashboards. Click
OK.
6. Click Publish for your changes to take effect.
7. Click Prepare Client Customizations.
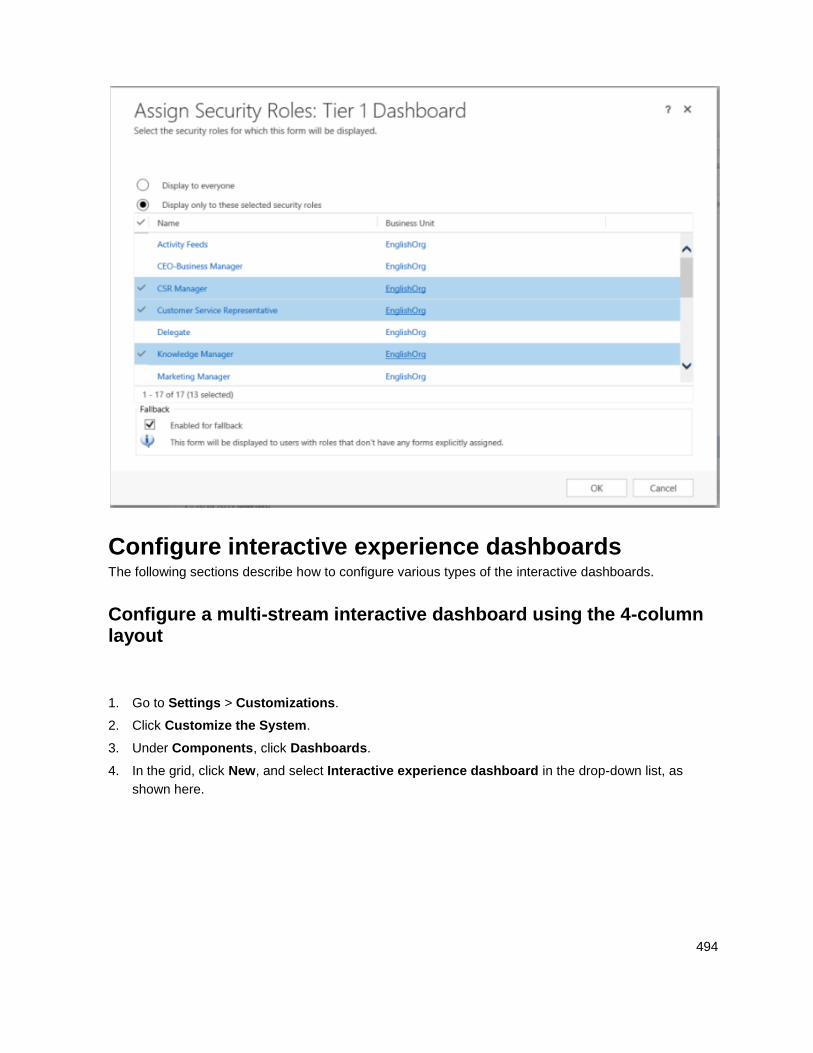
494
Configure interactive experience dashboards The following sections describe how to configure various types of the interactive dashboards.
Configure a multi-stream interactive dashboard using the 4-column layout
1. Go to Settings > Customizations.
2. Click Customize the System.
3. Under Components, click Dashboards.
4. In the grid, click New, and select Interactive experience dashboard in the drop-down list, as
shown here.
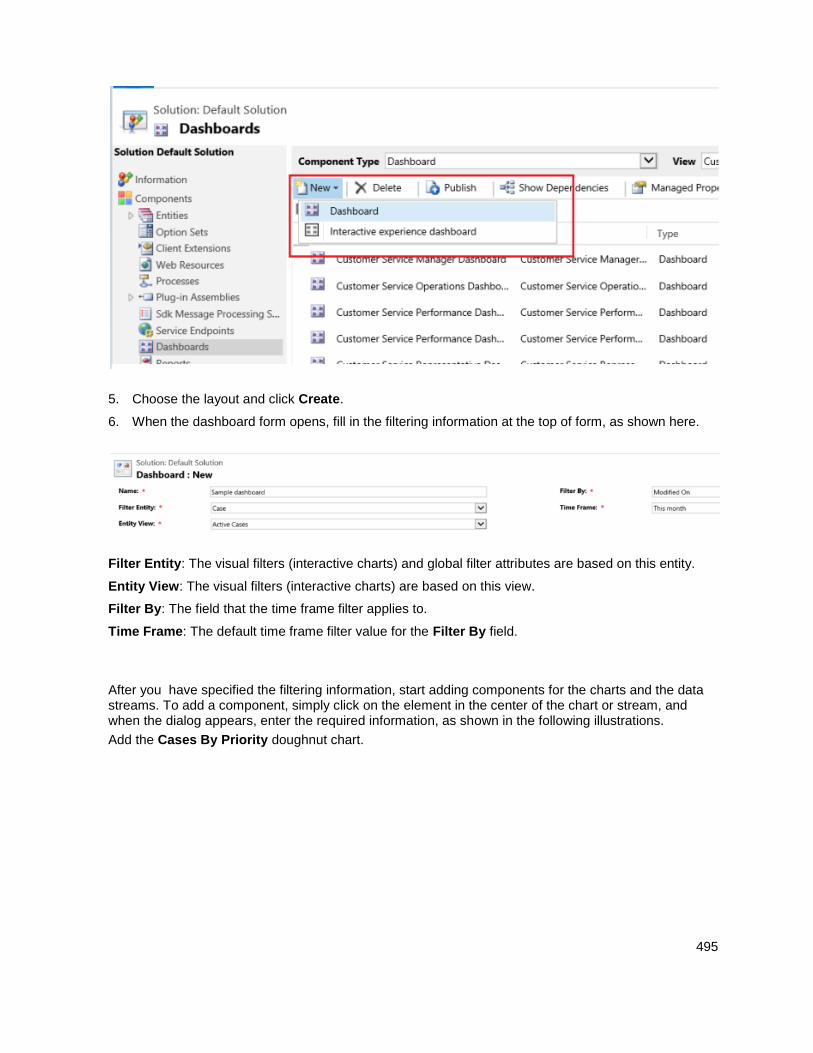
495
5. Choose the layout and click Create.
6. When the dashboard form opens, fill in the filtering information at the top of form, as shown here.
Filter Entity: The visual filters (interactive charts) and global filter attributes are based on this entity.
Entity View: The visual filters (interactive charts) are based on this view.
Filter By: The field that the time frame filter applies to.
Time Frame: The default time frame filter value for the Filter By field.
After you have specified the filtering information, start adding components for the charts and the data streams. To add a component, simply click on the element in the center of the chart or stream, and when the dialog appears, enter the required information, as shown in the following illustrations.
Add the Cases By Priority doughnut chart.
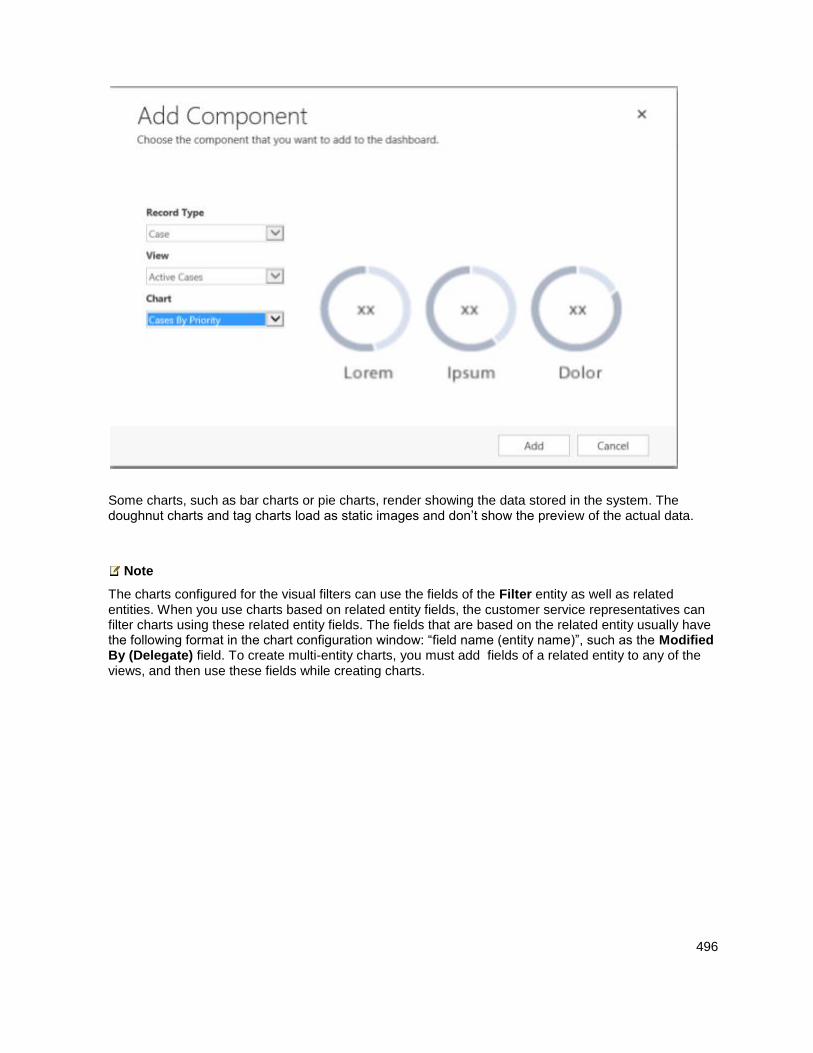
496
Some charts, such as bar charts or pie charts, render showing the data stored in the system. The doughnut charts and tag charts load as static images and don’t show the preview of the actual data.
Note
The charts configured for the visual filters can use the fields of the Filter entity as well as related entities. When you use charts based on related entity fields, the customer service representatives can filter charts using these related entity fields. The fields that are based on the related entity usually have the following format in the chart configuration window: “field name (entity name)”, such as the Modified By (Delegate) field. To create multi-entity charts, you must add fields of a related entity to any of the views, and then use these fields while creating charts.
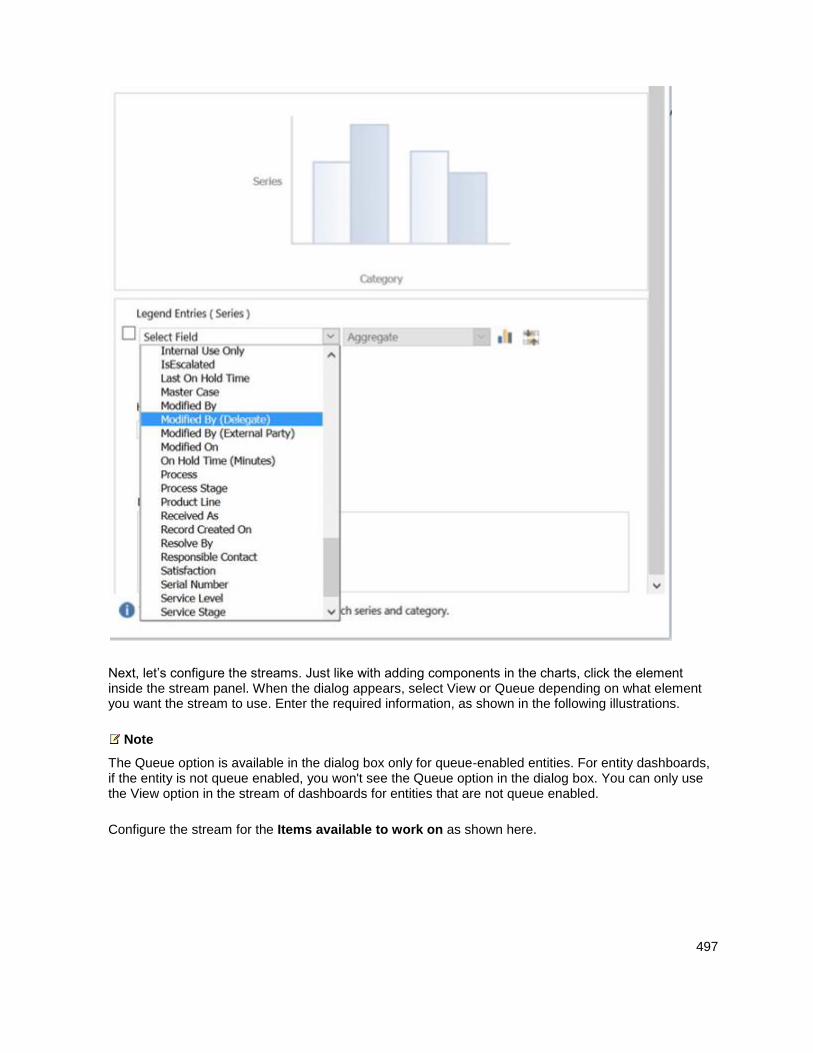
497
Next, let’s configure the streams. Just like with adding components in the charts, click the element inside the stream panel. When the dialog appears, select View or Queue depending on what element you want the stream to use. Enter the required information, as shown in the following illustrations.
Note
The Queue option is available in the dialog box only for queue-enabled entities. For entity dashboards, if the entity is not queue enabled, you won't see the Queue option in the dialog box. You can only use the View option in the stream of dashboards for entities that are not queue enabled.
Configure the stream for the Items available to work on as shown here.

498
The following illustration is an example of the chart panel, left to right: doughnut chart, tag chart, and bar chart.
This illustration is an example of the stream panel with several streams:
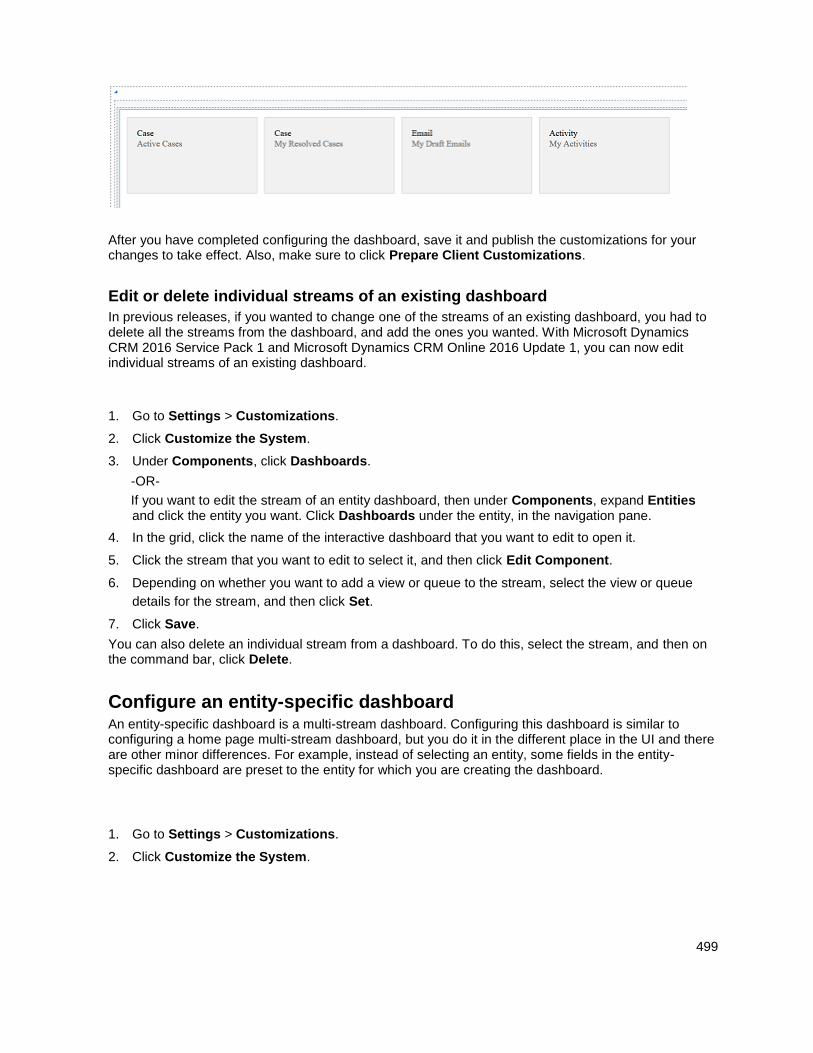
499
After you have completed configuring the dashboard, save it and publish the customizations for your changes to take effect. Also, make sure to click Prepare Client Customizations.
Edit or delete individual streams of an existing dashboard
In previous releases, if you wanted to change one of the streams of an existing dashboard, you had to delete all the streams from the dashboard, and add the ones you wanted. With Microsoft Dynamics CRM 2016 Service Pack 1 and Microsoft Dynamics CRM Online 2016 Update 1, you can now edit individual streams of an existing dashboard.
1. Go to Settings > Customizations.
2. Click Customize the System.
3. Under Components, click Dashboards.
-OR-
If you want to edit the stream of an entity dashboard, then under Components, expand Entities and click the entity you want. Click Dashboards under the entity, in the navigation pane.
4. In the grid, click the name of the interactive dashboard that you want to edit to open it.
5. Click the stream that you want to edit to select it, and then click Edit Component.
6. Depending on whether you want to add a view or queue to the stream, select the view or queue
details for the stream, and then click Set.
7. Click Save.
You can also delete an individual stream from a dashboard. To do this, select the stream, and then on the command bar, click Delete.
Configure an entity-specific dashboard An entity-specific dashboard is a multi-stream dashboard. Configuring this dashboard is similar to configuring a home page multi-stream dashboard, but you do it in the different place in the UI and there are other minor differences. For example, instead of selecting an entity, some fields in the entity-specific dashboard are preset to the entity for which you are creating the dashboard.
1. Go to Settings > Customizations.
2. Click Customize the System.
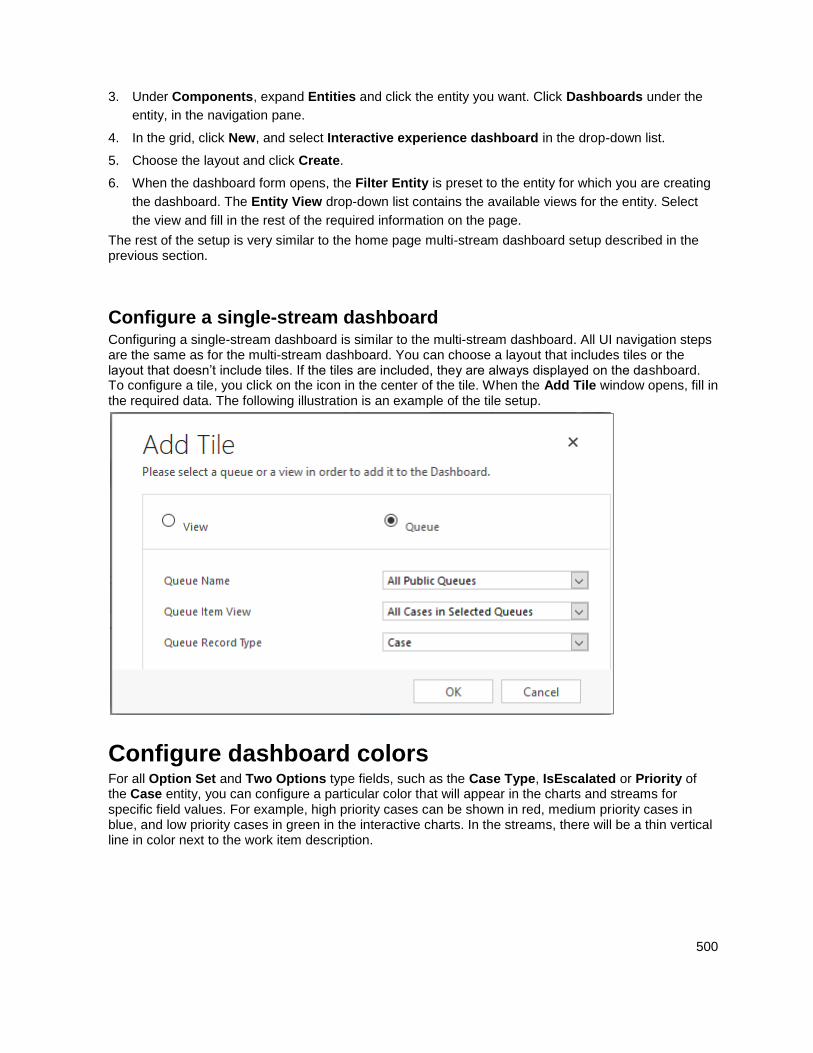
500
3. Under Components, expand Entities and click the entity you want. Click Dashboards under the
entity, in the navigation pane.
4. In the grid, click New, and select Interactive experience dashboard in the drop-down list.
5. Choose the layout and click Create.
6. When the dashboard form opens, the Filter Entity is preset to the entity for which you are creating
the dashboard. The Entity View drop-down list contains the available views for the entity. Select
the view and fill in the rest of the required information on the page.
The rest of the setup is very similar to the home page multi-stream dashboard setup described in the previous section.
Configure a single-stream dashboard Configuring a single-stream dashboard is similar to the multi-stream dashboard. All UI navigation steps are the same as for the multi-stream dashboard. You can choose a layout that includes tiles or the layout that doesn’t include tiles. If the tiles are included, they are always displayed on the dashboard. To configure a tile, you click on the icon in the center of the tile. When the Add Tile window opens, fill in the required data. The following illustration is an example of the tile setup.
Configure dashboard colors For all Option Set and Two Options type fields, such as the Case Type, IsEscalated or Priority of the Case entity, you can configure a particular color that will appear in the charts and streams for specific field values. For example, high priority cases can be shown in red, medium priority cases in blue, and low priority cases in green in the interactive charts. In the streams, there will be a thin vertical line in color next to the work item description.
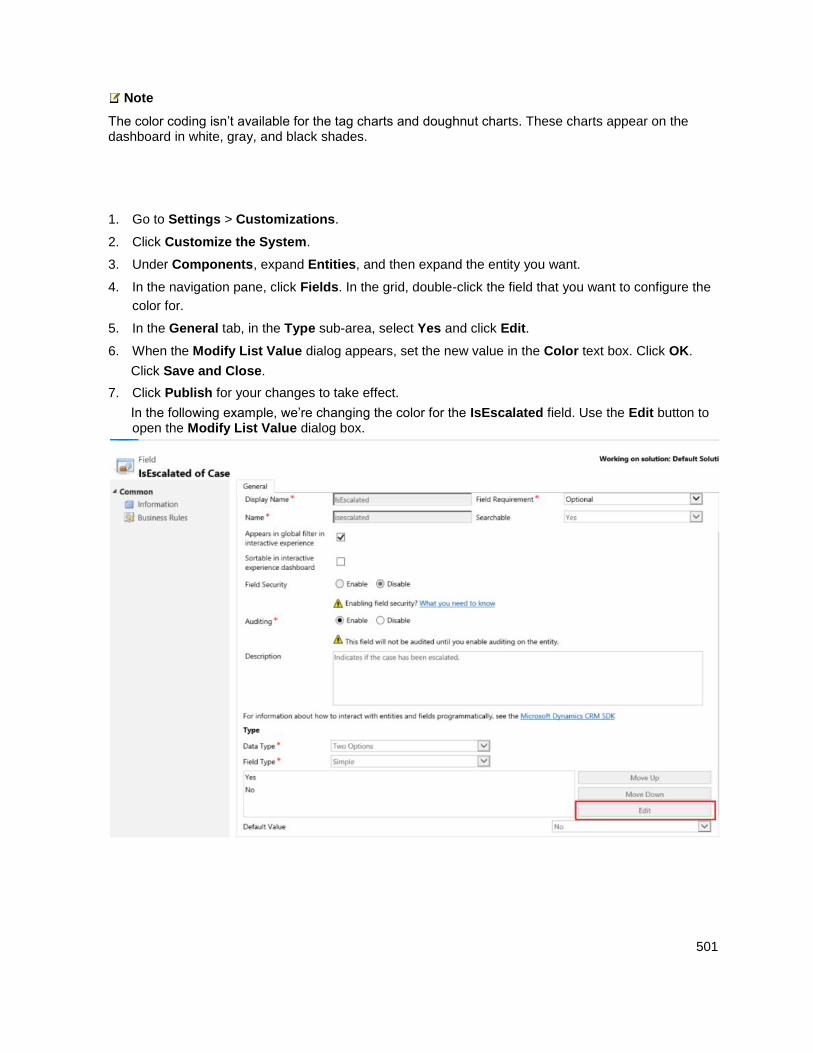
501
Note
The color coding isn’t available for the tag charts and doughnut charts. These charts appear on the dashboard in white, gray, and black shades.
1. Go to Settings > Customizations.
2. Click Customize the System.
3. Under Components, expand Entities, and then expand the entity you want.
4. In the navigation pane, click Fields. In the grid, double-click the field that you want to configure the
color for.
5. In the General tab, in the Type sub-area, select Yes and click Edit.
6. When the Modify List Value dialog appears, set the new value in the Color text box. Click OK.
Click Save and Close.
7. Click Publish for your changes to take effect.
In the following example, we’re changing the color for the IsEscalated field. Use the Edit button to open the Modify List Value dialog box.
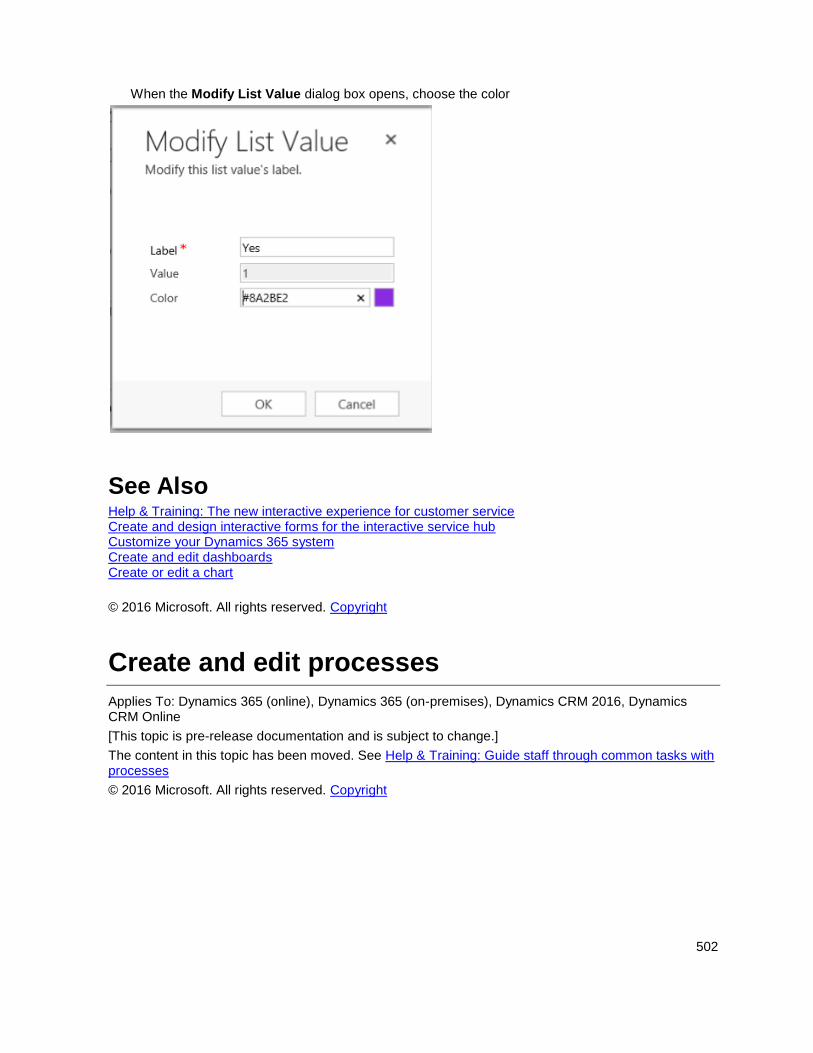
502
When the Modify List Value dialog box opens, choose the color
See Also Help & Training: The new interactive experience for customer service Create and design interactive forms for the interactive service hub Customize your Dynamics 365 system Create and edit dashboards Create or edit a chart
© 2016 Microsoft. All rights reserved. Copyright
Create and edit processes
Applies To: Dynamics 365 (online), Dynamics 365 (on-premises), Dynamics CRM 2016, Dynamics CRM Online
[This topic is pre-release documentation and is subject to change.]
The content in this topic has been moved. See Help & Training: Guide staff through common tasks with processes
© 2016 Microsoft. All rights reserved. Copyright
503
Workflow processes
Applies To: Dynamics 365 (online), Dynamics 365 (on-premises), Dynamics CRM 2016, Dynamics CRM Online
[This topic is pre-release documentation and is subject to change.]
Workflows automate business processes without a user interface. People usually use workflow processes to initiate automation that doesn’t require any user interaction.
Each workflow process is associated with a single entity. When configuring workflows you have four major areas to consider:
When to start them?
Should they run as a real-time workflow or a background workflow?
What actions should they perform?
Under what conditions should actions be performed?
This topic introduces how to find workflow processes and will describe when to start them and if they should run as real time or background. For information about the actions they should perform, and the conditions, see Configure workflow steps.
In This Topic Where do you customize workflow processes?
Workflow properties
Security context of workflow processes
Activate a workflow
Where do you customize workflow processes? You can see the workflows in your organization by viewing the Processes node in the Default Solution and filtering on processes that have the Category Workflow.
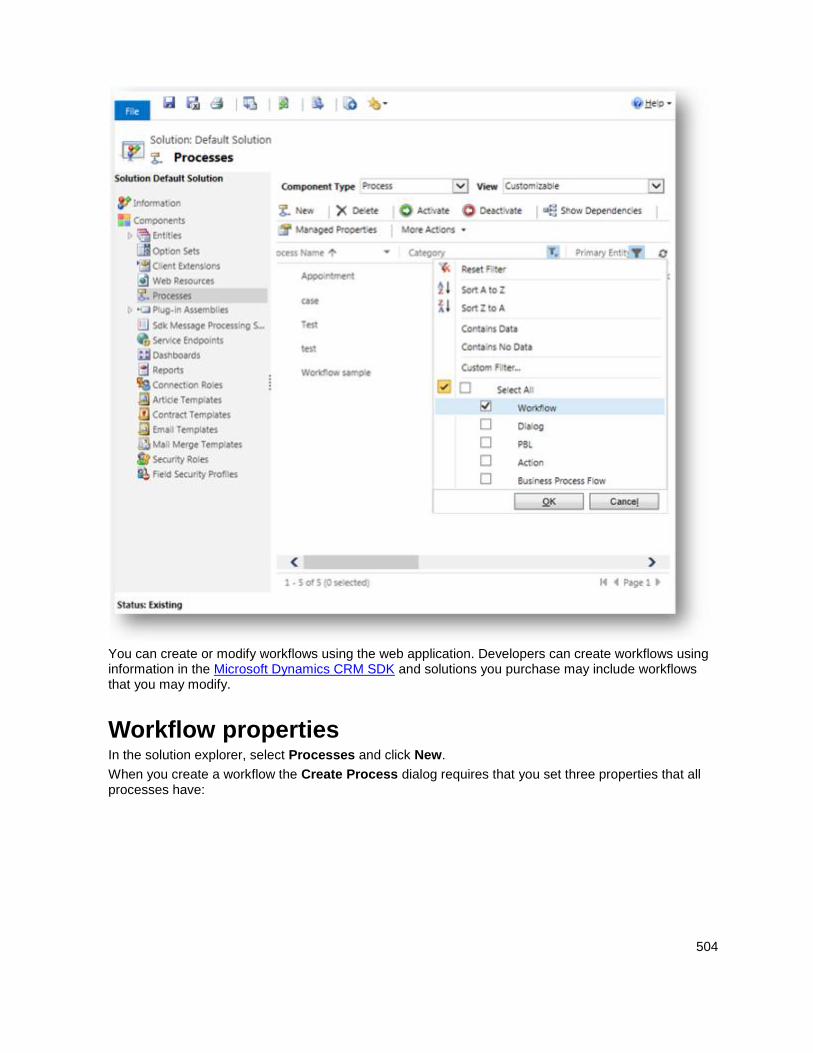
504
You can create or modify workflows using the web application. Developers can create workflows using information in the Microsoft Dynamics CRM SDK and solutions you purchase may include workflows that you may modify.
Workflow properties In the solution explorer, select Processes and click New.
When you create a workflow the Create Process dialog requires that you set three properties that all processes have:
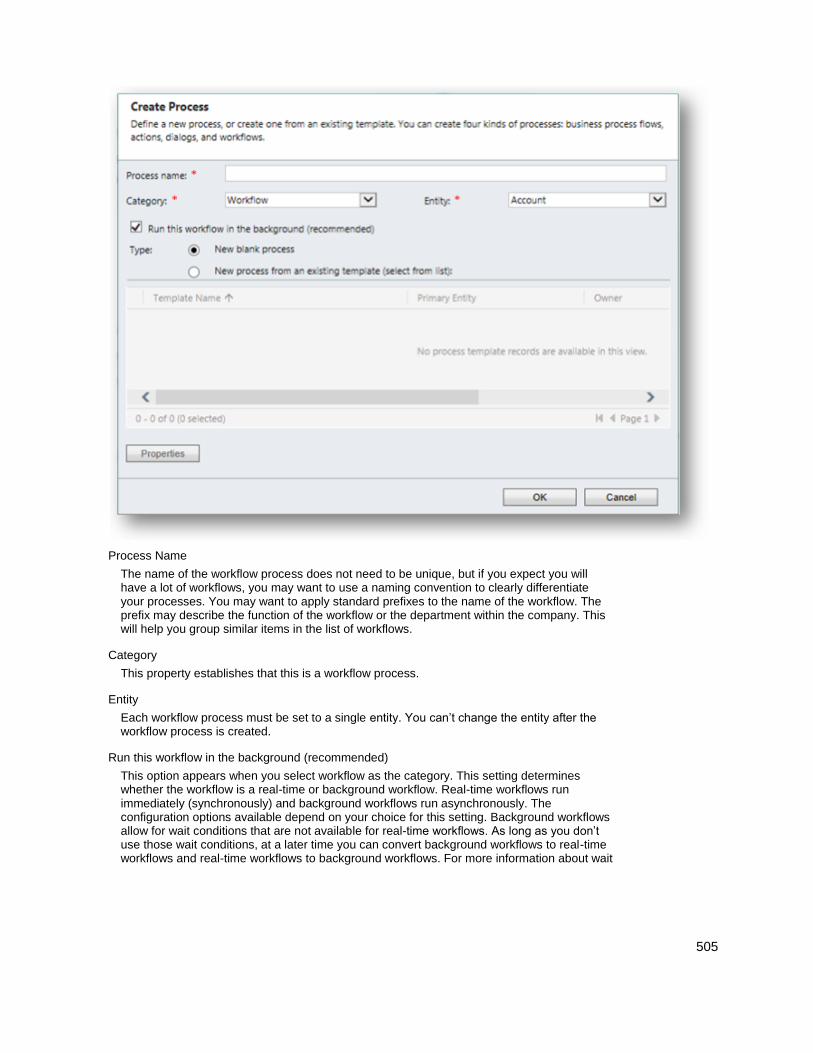
505
Process Name
The name of the workflow process does not need to be unique, but if you expect you will have a lot of workflows, you may want to use a naming convention to clearly differentiate your processes. You may want to apply standard prefixes to the name of the workflow. The prefix may describe the function of the workflow or the department within the company. This will help you group similar items in the list of workflows.
Category
This property establishes that this is a workflow process.
Entity
Each workflow process must be set to a single entity. You can’t change the entity after the workflow process is created.
Run this workflow in the background (recommended)
This option appears when you select workflow as the category. This setting determines whether the workflow is a real-time or background workflow. Real-time workflows run immediately (synchronously) and background workflows run asynchronously. The configuration options available depend on your choice for this setting. Background workflows allow for wait conditions that are not available for real-time workflows. As long as you don’t use those wait conditions, at a later time you can convert background workflows to real-time workflows and real-time workflows to background workflows. For more information about wait
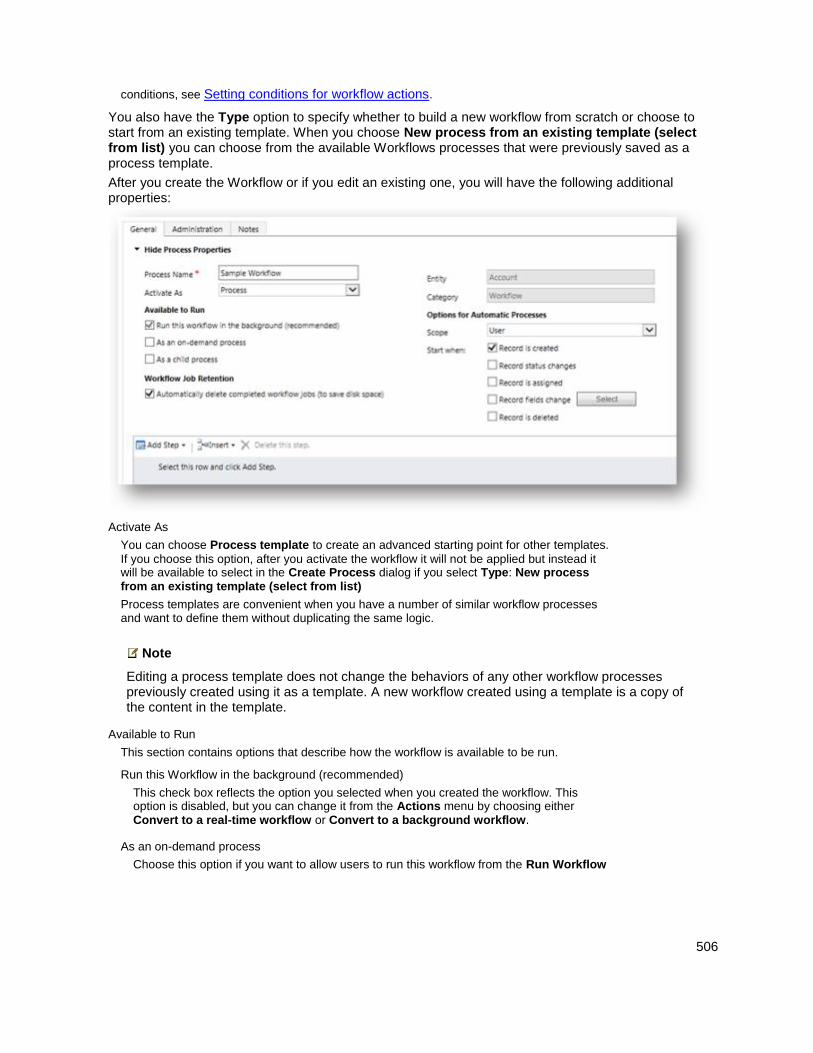
506
conditions, see Setting conditions for workflow actions.
You also have the Type option to specify whether to build a new workflow from scratch or choose to start from an existing template. When you choose New process from an existing template (select from list) you can choose from the available Workflows processes that were previously saved as a process template.
After you create the Workflow or if you edit an existing one, you will have the following additional properties:
Activate As
You can choose Process template to create an advanced starting point for other templates.
If you choose this option, after you activate the workflow it will not be applied but instead it will be available to select in the Create Process dialog if you select Type: New process from an existing template (select from list)
Process templates are convenient when you have a number of similar workflow processes and want to define them without duplicating the same logic.
Note
Editing a process template does not change the behaviors of any other workflow processes previously created using it as a template. A new workflow created using a template is a copy of the content in the template.
Available to Run
This section contains options that describe how the workflow is available to be run.
Run this Workflow in the background (recommended)
This check box reflects the option you selected when you created the workflow. This option is disabled, but you can change it from the Actions menu by choosing either Convert to a real-time workflow or Convert to a background workflow.
As an on-demand process
Choose this option if you want to allow users to run this workflow from the Run Workflow
507
command.
As a child process
Choose this option if you want to allow the workflow to be available to be started from another workflow.
Workflow Job Retention
This section contains an option to delete a workflow after the workflow execution has completed .
Automatically delete completed workflow jobs (to save disk space)
Choose this option, if you want a completed workflow job to be automatically deleted.
Note
The workflow jobs are not deleted immediately upon completion, but soon after, through a batch process.
Scope
For user-owned entities, options are Organization, Parent: Child Business Units, Business Unit, or User. For Organization-owned entities the only option is Organization.
If scope is Organization, then the workflow logic can be applied to any record in the
organization. Otherwise, the workflow can only be applied to a subset of records that fall within the scope.
Note
The default scope value is User. Make sure you verify that the scope value is appropriate before you activate the workflow.
Start When
Use the options in this section to specify when a workflow should start automatically. You can configure a real-time workflow to be run before certain events. This is a very powerful capability because the workflow can stop the action before it occurs. More information:
Using real-time workflows. The options are:
Record is created
Record status changes
Record is assigned
Record fields change
Record is deleted
Note
Keep in mind that the actions and conditions you define for the workflow are not aware of when the workflow is run. For example, if you define a workflow to update the record, this action can’t be performed by a real-time workflow before the record is created. A record that doesn’t exist cannot be updated. Similarly, a background workflow can’t update a record that has been deleted, even though you could define this action for the workflow. If you configure a workflow to perform an action that can’t be performed, it will fail and the entire workflow will fail.
508
Execute As
This option is only available if you unselected the Run this workflow in the background (recommended) option when you created the workflow or if you later converted a
background workflow to be a real-time workflow.
Security context of workflow processes When a background workflow is configured as an on-demand process and is started by a user using the Run Workflow command, the actions that the workflow can perform are limited to those the user could perform based on the privileges and access levels defined by the security role(s) set for their user account.
When a background workflow starts based on an event the workflow operates in the context of the person who owns it, usually the person who created the workflow.
For real-time workflows you have the Execute As option and you can choose whether the workflow should apply the security context of the owner of the workflow or the user who made changes to the record. If your workflow includes actions which all users would not be able to perform based on security constraints, you should choose to have the workflow run as the owner of the workflow.
Activate a workflow Workflows can only be edited while they are deactivated. Before a workflow can be used manually or be applied due to events it has to be activated. Before a workflow can be activated it must contain at least one step. For information on configuring steps, see Configure workflow steps
A workflow can only be activated or deactivated by the workflow owner or by someone with the Act on Behalf of Another User privilege such as the system administrator. The reason for this is that a malicious user could modify someone’s workflow without them being aware of the change. You can reassign a workflow you own by changing the owner. This field is on the Administration tab. If you are not the system administrator and you need to edit a workflow that is owned by another user, you need them to deactivate it and assign it to you. After you finish editing the workflow, you can to assign it back to them so they can activate it.
Real-time workflows require that the user have the Activate Real-time Processes privilege. Because real-time workflows have a greater risk of affecting system performance, only people who can evaluate the potential risk should be given this privilege.
Workflows are saved when they are activated, so it is not necessary to save them before activating them.
See Also Create and edit processes Configure workflow steps Monitor and manage processes Best practices for workflow processes
© 2016 Microsoft. All rights reserved. Copyright
509
Configure workflow steps
Applies To: Dynamics 365 (online), Dynamics 365 (on-premises), Dynamics CRM 2016, Dynamics CRM Online
[This topic is pre-release documentation and is subject to change.]
When configuring workflows you have four major areas to consider:
When to start them?
Should they run as a real-time workflow or a background workflow?
What actions should they perform?
Under what conditions actions should be performed?
The topic Workflow processes introduced how to find workflow processes, when to start them, and if they should run as real time or background. This topic focuses on specifying what actions workflows can perform and specifying conditions to perform those actions.
In This Topic Workflow stages and steps
Actions that workflow processes can perform
Setting conditions for workflow actions
Using real-time workflows
Workflow stages and steps When you design workflows you have the option to contain the logic you want to perform in stages and steps.
Stages
Stages make the workflow logic easier to read, and explain the workflow logic. However, stages do not affect the logic or behavior of workflows. If a process has stages, all the steps within the process must be contained with a stage.
Steps
Steps are a unit of business logic within a workflow. Steps can include conditions, actions, other steps, or a combination of these elements.
Actions that workflow processes can perform Workflow processes can perform the actions listed in the following table.
Action Description
Create Record Creates a new record for an entity and assigns values you choose to attributes.
Update Record You can update the record that the workflow is running on, any of the records linked to that record
510
Action Description
in an N:1 relationships, or any records created by earlier steps.
Assign Record You can assign the record that the workflow is running on, any of the records linked to that record with an N:1 relationship, or any records created by earlier steps.
Send Email Sends an email. You can choose to create a new email message or use an email template configured for the entity of the record that the workflow is running on or any entities that have an N:1 relationship with the entity, or the entity for any records created by earlier steps.
Start Child Workflow Starts a workflow process that has been configured as a child workflow.
Change Status Changes the status of the record that the process is running on, any of the records linked to that record with an N:1 relationship, or any records created by earlier steps.
Stop Workflow Stops the current workflow. You can set a status of either Succeeded or Cancelled and specify a status message.
When real-time workflows are configured for an event, stopping a workflow with a status of cancelled will prevent the event action from completing. See Using real-time workflows for more information.
Custom Step Developers can create custom workflow steps that define actions. There are no custom steps available in Microsoft Dynamics 365 by default.
Setting record values When you create a record you can set values for the record. When you update a record you can set, append, increment, decrement, multiply, or clear values.
When you click Set Properties, a dialog opens showing you the default form for the entity.
At the bottom of the dialog you can see a list of additional fields not present in the form.
For any field, you can set a static value and that will be set by the workflow.
On the right side of the dialog the Form Assistant gives you the ability to set or append dynamic values from the context of the current record. This includes values from related records that can be accessed from the N:1 (many-to-one) relationships for the entity.
The options available in the Form Assistant depend on the field you have selected in the form. When you set a dynamic value, you will see a yellow placeholder known as a ‘slug’ that shows where the
511
dynamic data will be included. If you want to remove the value, just select the slug and delete it. For text fields, you can use a combination of static and dynamic data.
With dynamic values you don’t know for certain that a field or related entity has the value you want to set. You can actually set a number of fields to try and set the value and sort them in order using the green arrows. If the first field doesn’t have data, the second field will be tried and so on. If none of the fields have data, you can specify a default value to be used.
Setting conditions for workflow actions The actions that you will apply often depend on conditions. Workflow processes provide several ways to set conditions and create branching logic to get the results you want. You can check values of the record that the workflow process is running against, any of the records linked to that record with an N:1 relationship, or values within the process itself
Condition Type Description
Check Condition A logical "if-<condition> then" statement.
You can check values for the record that the workflow is running on, any of the records linked to that record in an N:1 relationships, or any records created by earlier steps. Based on these values you can define additional steps when the condition is true.
In the "if-<condition> then" statement, you can use the following operators: Equals, Does Not Equal, Contains Data, Does Not Contain Data, Under and Not Under.
Note
The Under and Not Under are hierarchical operators. They can only be used on the entities that have a hierarchical relationship defined. If you’re trying to use these operators on the entities that don’t have the hierarchical relationship defined, you’ll see the error message: “You’re using a hierarchical operator on an entity that doesn’t have a hierarchical relationship defined. Either make the entity hierarchical (by marking a relationship as hierarchical) or use a different operator.” For more information about hierarchical relationships, see Query and visualize hierarchical data.
A screenshot that follows the table is an example of the definition of the workflow process that uses the Under and Not Under hierarchical operators.
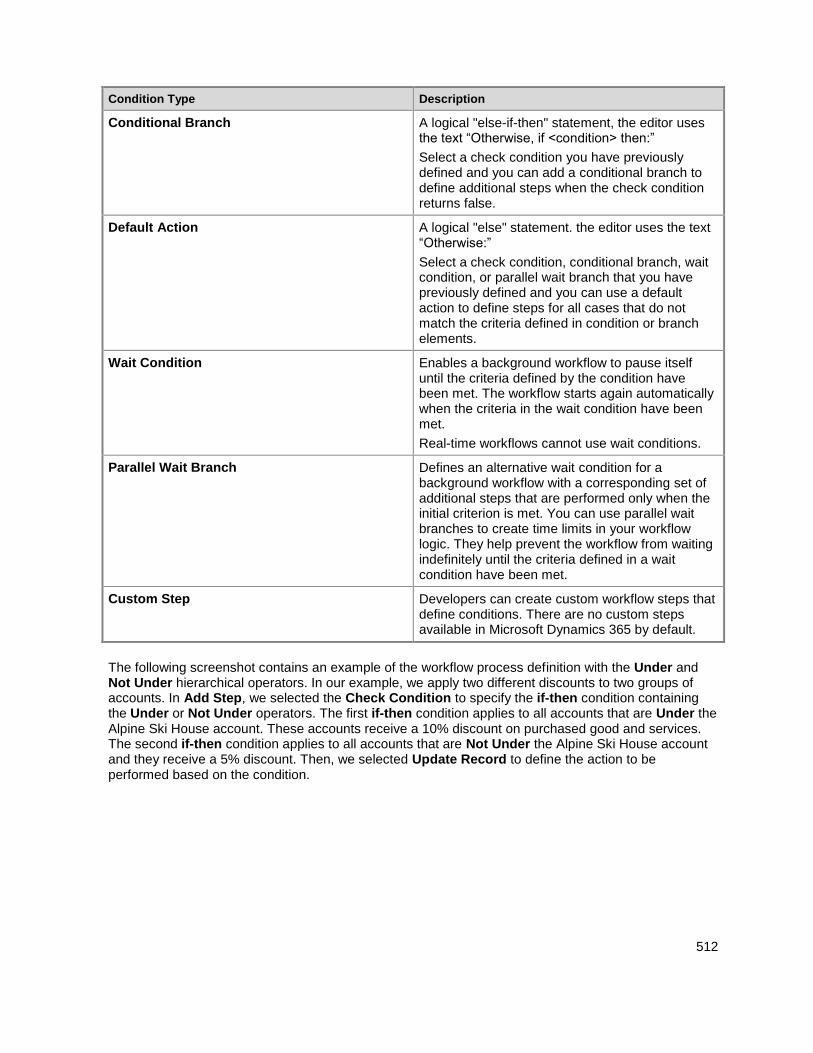
512
Condition Type Description
Conditional Branch A logical "else-if-then" statement, the editor uses the text “Otherwise, if <condition> then:”
Select a check condition you have previously defined and you can add a conditional branch to define additional steps when the check condition returns false.
Default Action A logical "else" statement. the editor uses the text “Otherwise:”
Select a check condition, conditional branch, wait condition, or parallel wait branch that you have previously defined and you can use a default action to define steps for all cases that do not match the criteria defined in condition or branch elements.
Wait Condition Enables a background workflow to pause itself until the criteria defined by the condition have been met. The workflow starts again automatically when the criteria in the wait condition have been met.
Real-time workflows cannot use wait conditions.
Parallel Wait Branch Defines an alternative wait condition for a background workflow with a corresponding set of additional steps that are performed only when the initial criterion is met. You can use parallel wait branches to create time limits in your workflow logic. They help prevent the workflow from waiting indefinitely until the criteria defined in a wait condition have been met.
Custom Step Developers can create custom workflow steps that define conditions. There are no custom steps available in Microsoft Dynamics 365 by default.
The following screenshot contains an example of the workflow process definition with the Under and Not Under hierarchical operators. In our example, we apply two different discounts to two groups of accounts. In Add Step, we selected the Check Condition to specify the if-then condition containing the Under or Not Under operators. The first if-then condition applies to all accounts that are Under the Alpine Ski House account. These accounts receive a 10% discount on purchased good and services. The second if-then condition applies to all accounts that are Not Under the Alpine Ski House account and they receive a 5% discount. Then, we selected Update Record to define the action to be performed based on the condition.
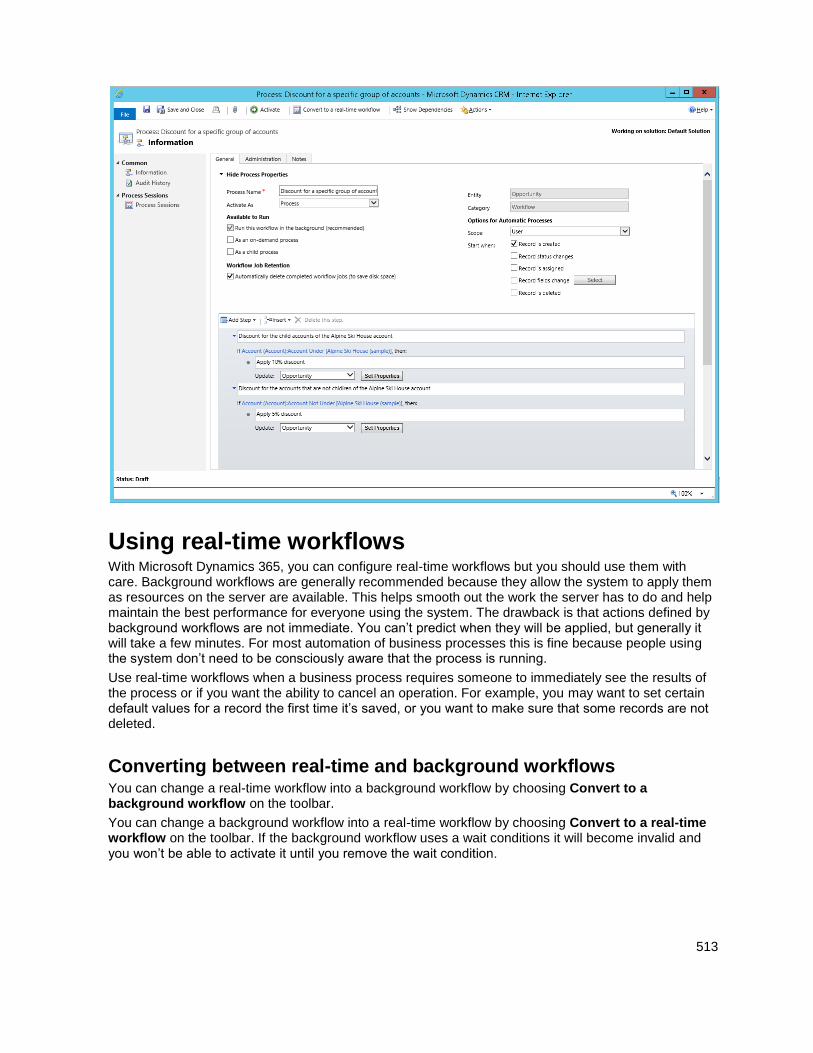
513
Using real-time workflows With Microsoft Dynamics 365, you can configure real-time workflows but you should use them with care. Background workflows are generally recommended because they allow the system to apply them as resources on the server are available. This helps smooth out the work the server has to do and help maintain the best performance for everyone using the system. The drawback is that actions defined by background workflows are not immediate. You can’t predict when they will be applied, but generally it will take a few minutes. For most automation of business processes this is fine because people using the system don’t need to be consciously aware that the process is running.
Use real-time workflows when a business process requires someone to immediately see the results of the process or if you want the ability to cancel an operation. For example, you may want to set certain default values for a record the first time it’s saved, or you want to make sure that some records are not deleted.
Converting between real-time and background workflows You can change a real-time workflow into a background workflow by choosing Convert to a background workflow on the toolbar.
You can change a background workflow into a real-time workflow by choosing Convert to a real-time workflow on the toolbar. If the background workflow uses a wait conditions it will become invalid and you won’t be able to activate it until you remove the wait condition.
514
Initiating real-time workflows before or after status changes When you configure Options for Automatic Processes for real-time workflows, the Start When options for the status changes event let you select After or Before for when status changes. The default option is After.
When you select Before you are saying that you want the logic in the workflow to be applied before data changing the status is saved. This provides you with the ability to check the values before other logic has been applied after the operation and prevent further logic from being performed. For example, you may have additional logic in a plug-in or custom workflow action which could initiate actions on another system. By stopping further processing you can avoid cases where external systems are affected. Applying real-time workflows before this event also means that other workflow or plug-in actions in Microsoft Dynamics 365 that may have saved data don’t need to be “rolled back” when the operation is canceled.
Using the Stop Workflow action with real-time workflows When you apply a Stop Workflow action in a workflow you have the option to specify a status condition that can be either Succeeded or Canceled. When you set the status to canceled, you prevent the operation. An error message containing the text from the stop action status message will be displayed to the user with the heading Business Process Error.
See Also Create and edit processes Workflow processes Monitor and manage processes Best practices for workflow processes
© 2016 Microsoft. All rights reserved. Copyright
Best practices for workflow processes
Applies To: Dynamics 365 (online), Dynamics 365 (on-premises), Dynamics CRM 2016, Dynamics CRM Online
[This topic is pre-release documentation and is subject to change.]
This topic contains best practices for creating and managing workflow processes.
In This Topic Avoid infinite loops
Use workflow templates
Use child workflows
Keep fewer logs
Use Notes to keep track of changes
515
Avoid infinite loops It’s possible to create logic in a workflow that initiates an infinite loop, which consumes server resources and affects performance. The typical situation where an infinite loop might occur is if you have a workflow configured to start when an attribute is updated and then updates that attribute in the logic of the workflow. The update action triggers the same workflow that updates the record and triggers the workflow again and again.
Microsoft Dynamics 365 includes logic to detect and stop infinite loops. If a workflow process is run more than a certain number of times on a specific record in a short period of time, the process fails with the following error: This workflow job was canceled because the workflow that started it included an infinite loop. Correct the workflow logic and try again. For Microsoft Dynamics 365 (online) the limit of times is 16. For on-premises deployments of Dynamics 365, the limit is 8.
Use workflow templates If you have workflows that are similar and you anticipate creating more workflows that follow the same pattern, save your workflow as a workflow template. This way, the next time you need to create a similar workflow, create the workflow using the template and avoid entering all the conditions and actions from scratch.
In the Create Process dialog, choose New process from an existing template (select from list).
Use child workflows If you apply the same logic in different workflows or in conditional branches, define that logic as a child workflow so you don’t have to replicate that logic manually in each workflow or conditional branch. This helps make your workflows easier to maintain. Instead of examining many workflows that may apply the same logic, you can just update one workflow.
Keep fewer logs To save disk space, clear the Keep logs for workflow jobs that encounter errors check box if you don’t need to keep this data.
Use Notes to keep track of changes When you edit workflows you should use the Notes tab and type what you did and why you did it. This allows someone else to understand the changes you made.
See Also Create and edit processes Workflow processes Configure workflow steps Monitor and manage processes
© 2016 Microsoft. All rights reserved. Copyright
516
Dialogs
Applies To: Dynamics 365 (online), Dynamics 365 (on-premises), Dynamics CRM 2016, Dynamics CRM Online
[This topic is pre-release documentation and is subject to change.]
Dialogs are a type of process in Microsoft Dynamics 365 that displays the input forms and the data that a user needs at each step while interacting with a customer or following a complex procedure. A dialog can have branching logic that is based on input from the person stepping through a case, phone call, or other customer interaction.
Dialogs are frequently used in call centers to provide scripts that allow customer facing staff to apply consistent interactions with customers. You can also use dialogs to provide a kind of “wizard” user interface to allow people to perform complex procedures consistently.
Dialogs provide:
Consistent customer interactions and interactive user tasks.
Consistent information entry into your organization's database.
A way for people in your organization to focus on growing your business, instead of performing
repetitive tasks.
Dialogs display a series of screens based on the responses you enter to the prompts on each screen. The dialog can provide a different set of screens based on the responses you enter. After the dialog is complete, the data is saved and can be reviewed later.
Unlike workflow processes, a dialog can only be applied to one record at a time.
Where do I customize dialog processes? You can see the dialogs in your organization by navigating to Settings > Processes and filtering on processes in the Dialog category.
You can also see the dialogs in your organization by viewing the Processes node in the default solution and filtering on processes in the Dialog category.
Dialog properties Every dialog must have the following properties set:
Name
The name of the dialog process doesn’t need to be unique, but if you expect you’ll have a lot of dialogs, you may want to use a naming convention to clearly differentiate your processes. You may want to apply standard prefixes to the name of the dialog. The prefix may describe the function of the workflow or the department within the company. This will help you group similar items in the list of dialogs.
Entity
Each dialog process must be set to a single entity. You can’t change the entity after the dialog is created.
Category
This property establishes that this is a Dialog process.
517
Unlike workflow processes, dialogs do not have scope. They are available to the entire organization. If a user runs a dialog that creates or updates record, the user must have privileges to perform those actions outside the dialog. Each dialog will create a Dialog session record and the user must have privileges to create and update those records.
Activating dialogs Before you can use a dialog, you have to activate it. A dialog can only be activated or deactivated by the dialog owner. You can reassign a dialog by changing the owner. You can do this on the Administration tab.
Dialogs can only be edited while they are deactivated. If you need to edit a dialog that is owned by another user, have them deactivate it and assign it to you.
See Also Configure dialog processes Actions Business process flows Workflow processes
© 2016 Microsoft. All rights reserved. Copyright
Configure dialog processes
Applies To: Dynamics 365 (online), Dynamics 365 (on-premises), Dynamics CRM 2016, Dynamics CRM Online
[This topic is pre-release documentation and is subject to change.]
Dialogs provide a user interface to people who use them. You need to be familiar with what is possible within this user interface as you configure dialogs to meet your business requirements.
In This Topic Dialog components
Steps available for dialogs
Link child dialog
Dialog components It is helpful to see what a dialog looks like to people using them before you start configuring your first one. When you open a dialog process to use it you will see a window like the one shown in the following screenshot:
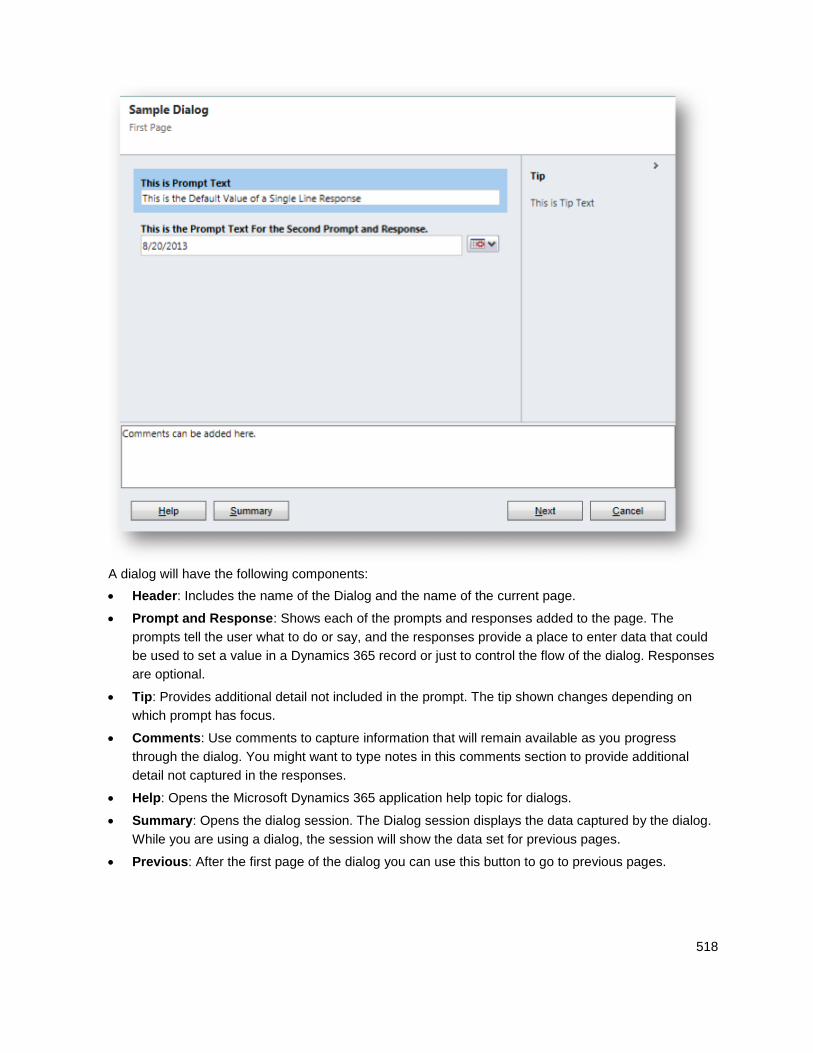
518
A dialog will have the following components:
Header: Includes the name of the Dialog and the name of the current page.
Prompt and Response: Shows each of the prompts and responses added to the page. The
prompts tell the user what to do or say, and the responses provide a place to enter data that could
be used to set a value in a Dynamics 365 record or just to control the flow of the dialog. Responses
are optional.
Tip: Provides additional detail not included in the prompt. The tip shown changes depending on
which prompt has focus.
Comments: Use comments to capture information that will remain available as you progress
through the dialog. You might want to type notes in this comments section to provide additional
detail not captured in the responses.
Help: Opens the Microsoft Dynamics 365 application help topic for dialogs.
Summary: Opens the dialog session. The Dialog session displays the data captured by the dialog.
While you are using a dialog, the session will show the data set for previous pages.
Previous: After the first page of the dialog you can use this button to go to previous pages.
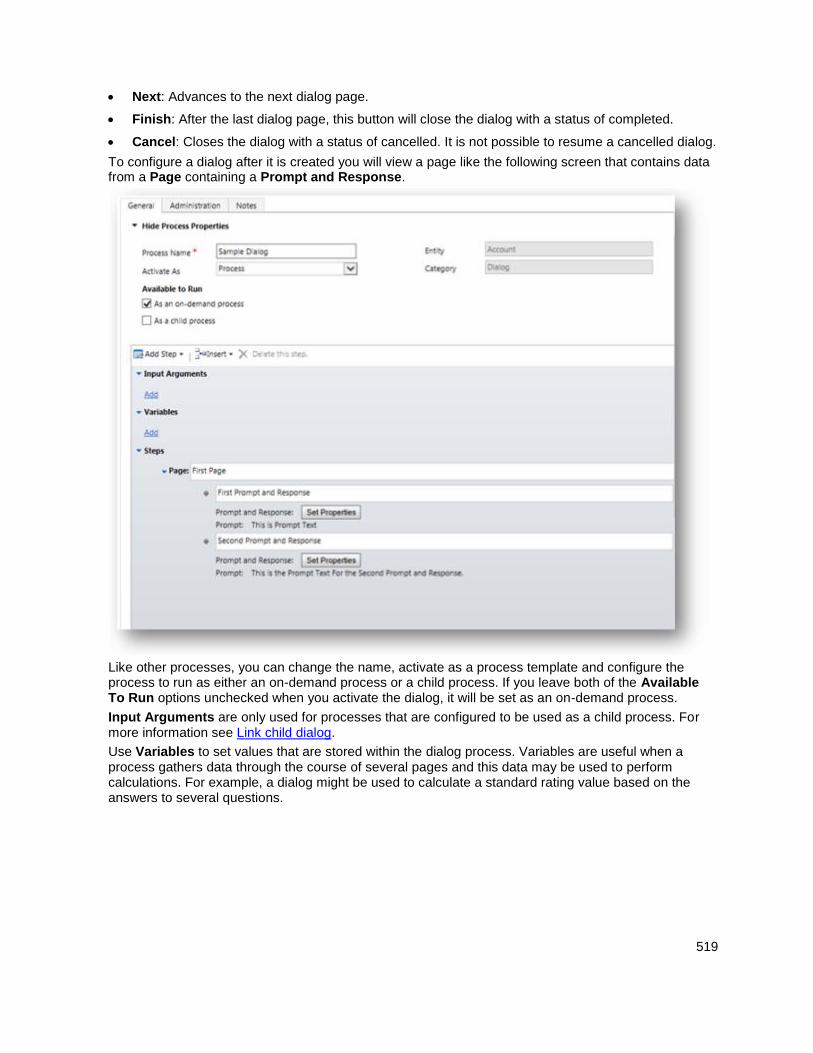
519
Next: Advances to the next dialog page.
Finish: After the last dialog page, this button will close the dialog with a status of completed.
Cancel: Closes the dialog with a status of cancelled. It is not possible to resume a cancelled dialog.
To configure a dialog after it is created you will view a page like the following screen that contains data from a Page containing a Prompt and Response.
Like other processes, you can change the name, activate as a process template and configure the process to run as either an on-demand process or a child process. If you leave both of the Available To Run options unchecked when you activate the dialog, it will be set as an on-demand process.
Input Arguments are only used for processes that are configured to be used as a child process. For more information see Link child dialog.
Use Variables to set values that are stored within the dialog process. Variables are useful when a process gathers data through the course of several pages and this data may be used to perform calculations. For example, a dialog might be used to calculate a standard rating value based on the answers to several questions.
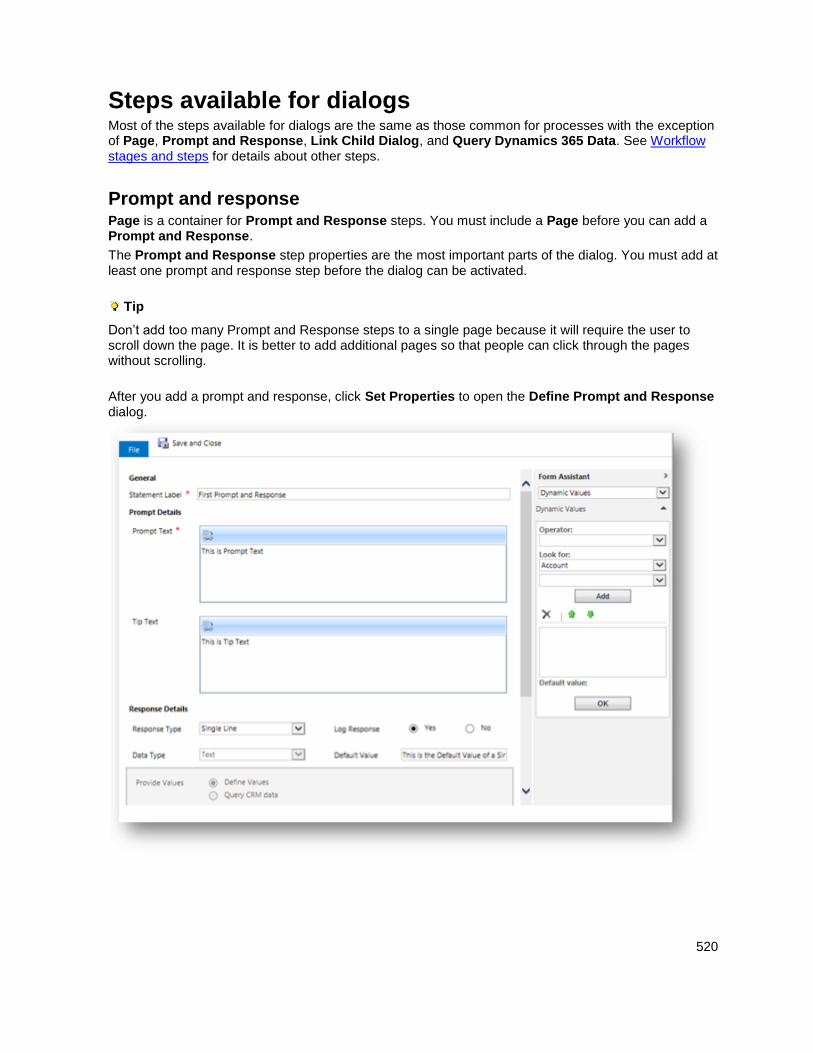
520
Steps available for dialogs Most of the steps available for dialogs are the same as those common for processes with the exception of Page, Prompt and Response, Link Child Dialog, and Query Dynamics 365 Data. See Workflow stages and steps for details about other steps.
Prompt and response Page is a container for Prompt and Response steps. You must include a Page before you can add a Prompt and Response.
The Prompt and Response step properties are the most important parts of the dialog. You must add at least one prompt and response step before the dialog can be activated.
Tip
Don’t add too many Prompt and Response steps to a single page because it will require the user to scroll down the page. It is better to add additional pages so that people can click through the pages without scrolling.
After you add a prompt and response, click Set Properties to open the Define Prompt and Response dialog.
521
A Prompt and Response step has the following properties:
Statement Label
The statement label should provide an appropriate heading for the Prompt Text. The Statement Label is visible in the dialog session when viewing the summary during or after
the dialog is completed.
Prompt Text
Prompt Text may represent something the person using the dialog should say to the customer or it could include instructions about how to complete a step of a complex procedure.
Tip Text
Tip text provides additional information to support the Prompt Text.
Response Type
Choose one of the following Response Types:
None
You can add a prompt without a response.
Single Line
A single line can represent a text, integer or float data by setting the Data Type.
Option Set (Radio Buttons)
The results are presented as a set of Radio buttons. Use this option when there are
just a small number of options to choose from.
The data selected can be set to either text, integer or float data by setting the Data
Type.
You can choose to define static values or query Dynamics 365 Data to provide a list of
options. See Query Dynamics 365 Data for more information.
Options Set (Picklist)
This is exactly like Option Set (Radio Buttons), except that the options are displayed as
a list. Use this option when there are very many options to choose from.
Multiple Lines (Text Only)
Provides an area to type text with multiple lines.
Date and Time
Provides a control to set a date and a time.
Date Only
Provides a control to set a date.
Lookup
This option will present one of the lookup fields used in the application. When you select this option the following fields appear and you must provide values for them:
Reference Entity : An entity that contains the lookup you want to use
522
Reference Field: The specific lookup in the reference entity that you want to use.
Tip
If you want to have a list for an entity that has no many-to-one entity relationships, you can create a custom entity and then create a one-to-many relationship between it and the entity that you want to appear in the list. Since this custom entity has no other purpose than to allow this lookup, make sure to configure it so that it is not visible in the application and set the entity description to indicate the purpose of the entity.
Data Type
When you select a Response Type of Single Line, Option Set (radio buttons), or Option Set (picklist), you can choose to have the data set in the control be expressed using one of
the following data types:
Text
Integer
Float
When you select a Response Type of Lookup, the Data Type field is replaced by the Reference Entity field.
Log Response
When you choose to not log responses you will still be able to access the responses as variables within your dialog, but the data in the response will not be saved with the dialog session. This is a security feature. Consider if you have a dialog that requires some personal information to be entered and processed. If the response is not logged it will not be saved with the dialog session record that contains the data in the dialog summary.
Default Value
Use default value to set a value to indicate that the data in the response was not provided or represents a very common response which would only need to be edited if it was different.
Query Dynamics 365 Data If your dialog depends on the ability to display some data that is retrieved from Dynamics 365 you should add a Query Dynamics 365 Data step before you need to view this data as either of the Option Set response types.
When you define a query you are shown a screen based on the Advanced Find page. You can define a new query or use one of the existing views. When any of the queries requires setting a specific value, that value is considered a variable. For example, you can create a query that shows all the Case records where a specific Account is the Customer. For the query to work, you must specify an Account Record to be the placeholder. Then, when you select the Modify Query Variables tab you will see the FetchXML representation of the query with a variable generated where you had specified a specific Account in your query.
You need to use the Form Assistant to set a slug to represent the Account record that is the context of a Dialog defined for the account entity.
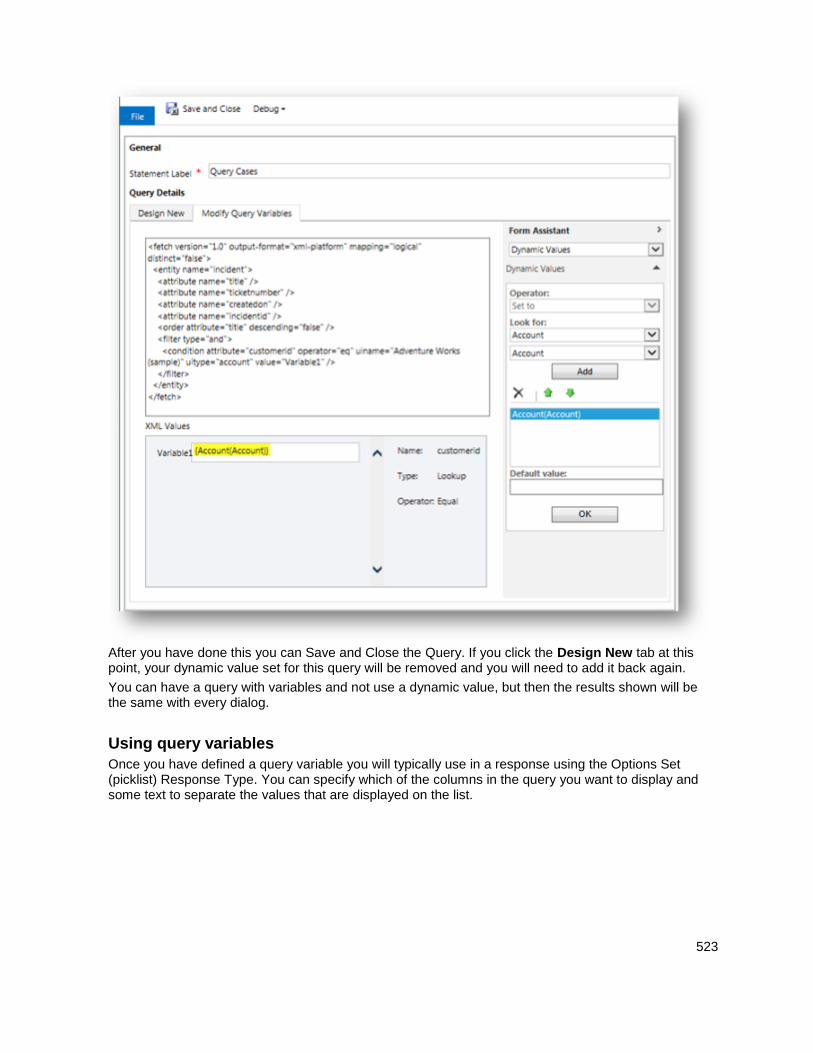
523
After you have done this you can Save and Close the Query. If you click the Design New tab at this point, your dynamic value set for this query will be removed and you will need to add it back again.
You can have a query with variables and not use a dynamic value, but then the results shown will be the same with every dialog.
Using query variables
Once you have defined a query variable you will typically use in a response using the Options Set (picklist) Response Type. You can specify which of the columns in the query you want to display and some text to separate the values that are displayed on the list.
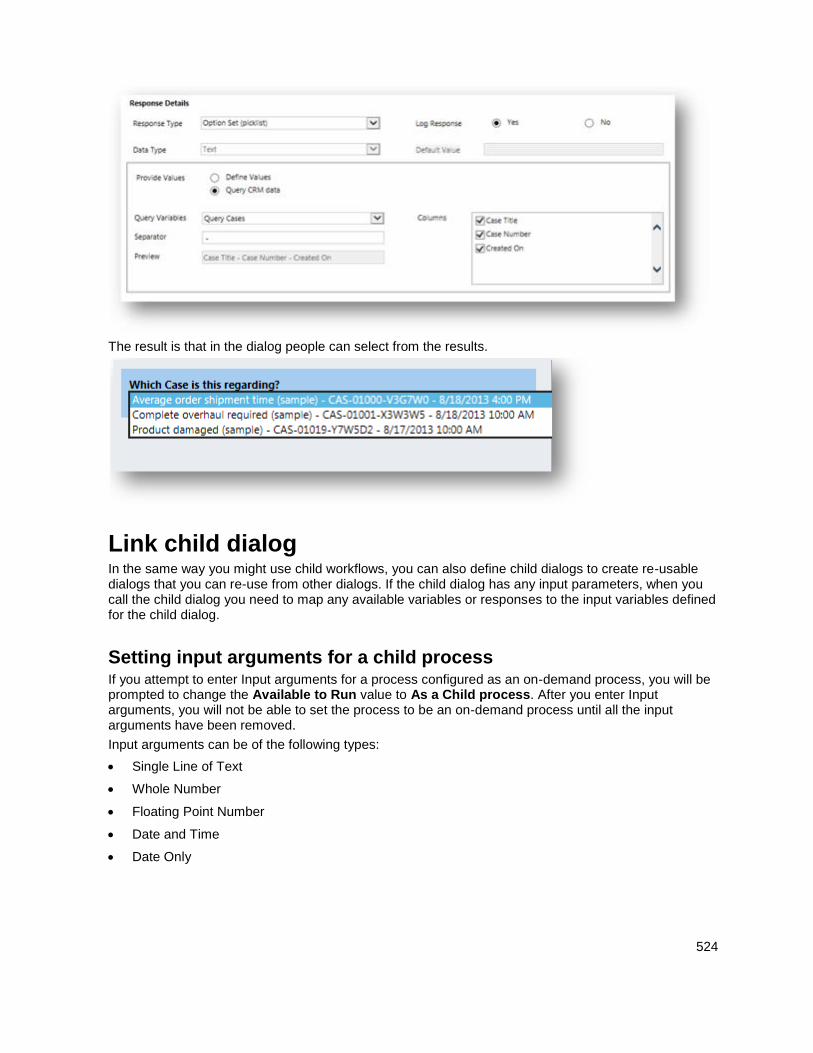
524
The result is that in the dialog people can select from the results.
Link child dialog In the same way you might use child workflows, you can also define child dialogs to create re-usable dialogs that you can re-use from other dialogs. If the child dialog has any input parameters, when you call the child dialog you need to map any available variables or responses to the input variables defined for the child dialog.
Setting input arguments for a child process If you attempt to enter Input arguments for a process configured as an on-demand process, you will be prompted to change the Available to Run value to As a Child process. After you enter Input arguments, you will not be able to set the process to be an on-demand process until all the input arguments have been removed.
Input arguments can be of the following types:
Single Line of Text
Whole Number
Floating Point Number
Date and Time
Date Only
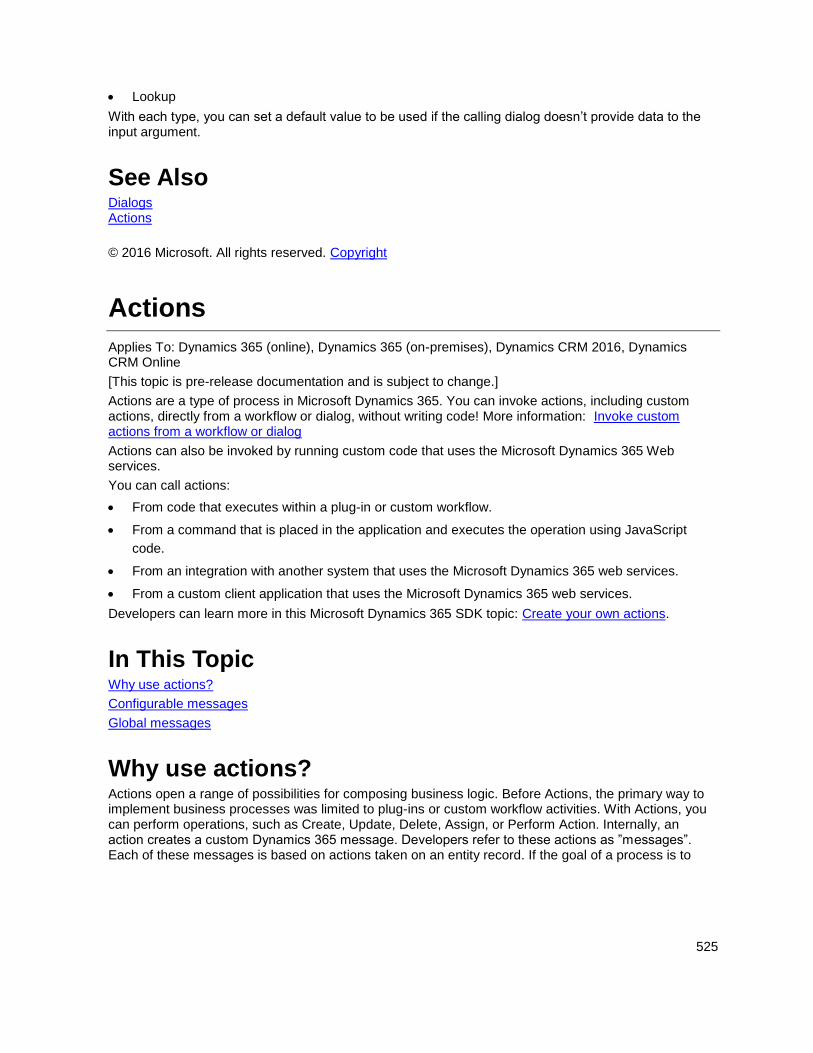
525
Lookup
With each type, you can set a default value to be used if the calling dialog doesn’t provide data to the input argument.
See Also Dialogs Actions
© 2016 Microsoft. All rights reserved. Copyright
Actions
Applies To: Dynamics 365 (online), Dynamics 365 (on-premises), Dynamics CRM 2016, Dynamics CRM Online
[This topic is pre-release documentation and is subject to change.]
Actions are a type of process in Microsoft Dynamics 365. You can invoke actions, including custom actions, directly from a workflow or dialog, without writing code! More information: Invoke custom actions from a workflow or dialog
Actions can also be invoked by running custom code that uses the Microsoft Dynamics 365 Web services.
You can call actions:
From code that executes within a plug-in or custom workflow.
From a command that is placed in the application and executes the operation using JavaScript
code.
From an integration with another system that uses the Microsoft Dynamics 365 web services.
From a custom client application that uses the Microsoft Dynamics 365 web services.
Developers can learn more in this Microsoft Dynamics 365 SDK topic: Create your own actions.
In This Topic Why use actions?
Configurable messages
Global messages
Why use actions? Actions open a range of possibilities for composing business logic. Before Actions, the primary way to implement business processes was limited to plug-ins or custom workflow activities. With Actions, you can perform operations, such as Create, Update, Delete, Assign, or Perform Action. Internally, an action creates a custom Dynamics 365 message. Developers refer to these actions as ”messages”. Each of these messages is based on actions taken on an entity record. If the goal of a process is to
526
create a record, then update it, and then assign it, there are three separate steps. Each step is defined by the capabilities of the entity – not necessarily your business process.
Actions provide the ability to define a single verb (or message) that matches an operation you need to perform for your business. These new messages are driven by a process or behavior rather than what can be done with an entity. These messages can correspond to verbs like Escalate, Convert, Schedule, Route, or Approve – whatever you need. The addition of these verbs helps provide a richer vocabulary for you to fluently define your business processes. You can apply this richer vocabulary from clients or integrations rather than having to write the action within clients. This also makes it easier because you can manage and log the success or failure of the entire action as a single unit.
Configurable messages Once an action is defined and activated, a developer can use that message like any of the other messages provided by the Microsoft Dynamics 365 platform. However, a significant difference is that now someone who is not a developer can apply changes to what should be done when that message is used. You can configure the action to modify steps as your business processes change. Any custom code that uses that message does not need to be changed as long as the process arguments do not change.
Workflow processes and plug-ins continue to provide similar capabilities for defining automation. Workflow processes still provide the capability for a non-developer to apply changes. But the difference is in how the business processes are composed and how a developer can write their code. An action is a message that operates on the same level as any of the messages provided by the Microsoft Dynamics 365 Platform. Developers can register plug-ins for Actions.
Global messages Unlike workflow processes or plug-ins, an action doesn’t have to be associated with a specific entity. You can define ”global” Actions that can be called on their own.
See Also Create your own actions Configure actions Invoke custom actions from a workflow or dialog Business process flows Workflow processes Dialogs
© 2016 Microsoft. All rights reserved. Copyright
Configure actions
Applies To: Dynamics 365 (online), Dynamics 365 (on-premises), Dynamics CRM 2016, Dynamics CRM Online
[This topic is pre-release documentation and is subject to change.]
527
You can enable a custom action from a workflow or dialog, without writing code. More information: Invoke custom actions from a workflow or dialog.
You may also create an action so that a developer can use it in code or you may need to edit an action that was previously defined. Like workflow processes, consider the following:
What should the action do?
Under what conditions should the action be performed?
Unlike workflow processes, you don’t need to set the following options:
Start When: Actions start when code calls the message generated for them.
Scope: Actions always run in the context of the calling user.
Run in the background: Actions are always real-time workflows.
Actions also have something that workflow processes don’t – input and output arguments. More information: Define process arguments
In This Topic Create an action
Edit an action
Create an action
Important
If you’re creating an action to include as part of a solution that will be distributed, create it in the context of the solution. Go to Settings > Solutions and locate the unmanaged solution that this action will be part of. Then, in the menu bar, select New > Process. This ensures that the customization prefix associated with the name of the action will be consistent with other components in the solution. After you create the action, you can’t change the prefix.
Like workflow processes, actions have the following properties in the Create Process dialog box.
Process name
After you enter a name for the process, a unique name will be created for it by removing any spaces or special characters from the process name.
Category
This property establishes that this is an action process. You can’t change this after you save the process.
Entity
With actions processes, you can select an entity to provide context for the workflow just like other types of processes, but you also have the option to choose None (global). Use this if
your action doesn’t require the context of a specific entity. You can’t change this after you save the process.
Type
Use this property to choose whether to build a new action from scratch or to start from an
528
existing template.
Edit an action You must deactivate processes before you can edit them.
You can edit an action that was created as part of an unmanaged solution or included in a solution installed in your organization. If the solution is a managed solution, you might not be able to edit it. The solution publisher has the option to edit the managed properties so that the action installed with a managed solution can’t be edited.
When an action is saved, a unique name is generated based on the process name. This unique name has the customization prefix added from the solution publisher. This is the name of the message that a developer will use in their code.
When editing an action you have the following options:
Process Name
After the process is created and the unique name is generated from the process name, you can edit the process name. You might want to apply a naming convention to make it easier to locate specific processes.
Unique Name
When an action is saved, a unique name is generated based on the process name. This unique name has the customization prefix from the solution publisher added. This is the name of the message that a developer will use in their code. Don’t change this unique name if the process has been activated and code is in place expecting to call the action using this name.
Important
After the action is activated and code is written to use a unique name, the unique name must not be changed without also changing the code that references it.
Enable rollback
Generally, processes that support transactions will “undo” (or roll back) the entire operation if any part of them fails. There are some exceptions to this. Some actions developers might do in code initiated by the action might not support transactions. For example, if the code perform actions in other systems that are beyond the scope of the transaction. Those can’t be rolled back by the action running in Microsoft Dynamics 365. Some messages in the Dynamics 365 platform don’t support transactions. But everything you can do just with the user interface of the action will support transactions. All the actions that are part of a real-time workflow are considered in transaction, but with actions you have the option to opt out of this.
You should consult with the developer who will use this message to determine whether it must be in transaction or not. Generally, an action should be in transaction if the actions performed by the business process don’t make sense unless all of them are completed successfully. The classic example is transferring funds between two bank accounts. If you withdraw funds from one account you must deposit them in the other. If either fails, both must fail.
Note
You can’t enable rollback if a custom action is invoked directly from within a workflow or dialog. You can enable rollback if an action is triggered by a Dynamics 365 web services message.
529
Activate As
Like all processes, you can activate the process as a template and use it as an advanced starting point for processes that follow a similar pattern.
Define Process Arguments
In this area, you’ll specify any data that the action expects to start and what data will be
passed out of the action. More information: Define process arguments
Add Stages, Conditions and Actions
Like other processes, you specify what actions to perform and when to perform them. More
information: Add stages and steps
Define process arguments When a developer uses a message, they may begin with some data that they can pass into the message. For example, to create a new case record, there might be the case title value that is passed in as a the input argument.
When the message is finished, the developer may need to pass some data that was changed or generated by the message to another operation in their code. This data is the output argument.
Both input and output arguments must have a name, a type, and some information about whether the argument is always required. You can also provide a description.
The name of the message and the information about all the process arguments represent the “signature” for the message. After an action is activated and is being used in code, the signature must not change. If this signature changes, any code that uses the message will fail. The only exception to this may be changing one of the parameters so that it is not always required.
You can change the order of the arguments by sorting them or moving them up or down because the arguments are identified by name, not by the order. Also, changing the description won’t break code using the message.
Action process argument types
The following table describes the action process argument types.
Type Description
Boolean A true or false value.
DateTime A value that stores date and time information.
Decimal A number value with decimal precision. Used when precision is extremely important.
Entity A Dynamics 365 record for the specified entity. When you select Entity, the drop-down is enabled and allows you to select the entity type.
EntityCollection A collection of entity records.
EntityReference An object that contains the name, ID, and type of an entity record that uniquely identifies it. When you select EntityReference, the drop-down is enabled and allows you to select the entity type.
530
Type Description
Float A number value with decimal precision. Used when data comes from a measurement that isn’t absolutely precise.
Integer A whole number.
Money A value that stores data about an amount of money.
Picklist A value that represents an option for an OptionSet attribute.
String A text value.
Note
EntityCollection argument values can’t be set in the user interface for conditions or actions. These are provided for use by developers in custom code. More information: Create your own actions
Add stages and steps Actions are a type of process very similar to real-time workflows. All the steps that can be used in real-time workflows can be used in actions. For information about the steps that can be used for both real-time workflows and actions, see Workflow stages and steps.
In addition to the steps that can be used for real-time workflows, actions also have the Assign Value step that is similar to the one used to set variables or input arguments in dialogs. In actions, these can be used only to set output arguments. You can use the form assistant to set output arguments to specific values or, more likely, to values from the record that the action is running against, records related to that record with a many-to-one relationship, records created in an earlier step, or values that are part of the process itself.
See Also Actions Invoke custom actions from a workflow or dialog Monitoring real-time workflows and actions Create and edit processes Workflow processes Dialogs Business process flows Monitor and manage processes Create your own actions
© 2016 Microsoft. All rights reserved. Copyright
531
Invoke custom actions from a workflow or dialog
Applies To: Dynamics 365 (online), Dynamics 365 (on-premises), Dynamics CRM 2016, Dynamics CRM Online
[This topic is pre-release documentation and is subject to change.]
In Microsoft Dynamics 365, workflows and dialogs have numerous capabilities supporting business scenarios. Calling basic SDK actions for a record, such as create, update, and delete, from within a workflow or a dialog solves quite a few business scenarios. However, if you couple the capabilities of the workflows and dialogs with the power of the custom actions invoked directly from within a workflow or a dialog, you add a whole new range of business scenarios to your application without needing to write code.
Let’s look at the scenario in which a custom action is invoked from a workflow and a dialog. We’ll invoke a custom action to request the manager’s approval when a discount for a particular opportunity exceeds 20%.
In This Topic Create a custom action
Invoke a custom action from a workflow
Invoke a custom action from a dialog
Create a custom action 1. Go to Settings > Processes.
2. On the Nav bar, choose New. Give the process a name and choose the Action category.
To request an approval for the discount, we’re using a custom action called Approval Process. We added an input parameter, SpecialNotes, and a Send email step to create a new message and send a request for the manager’s approval, as shown here.
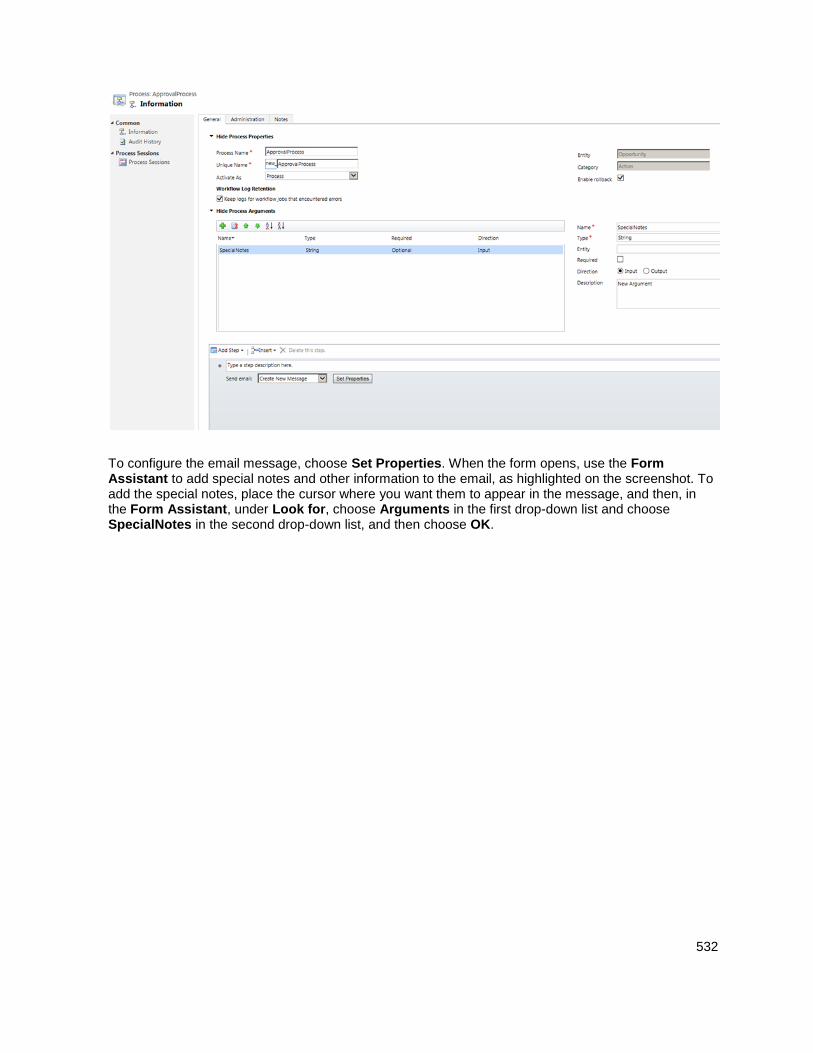
532
To configure the email message, choose Set Properties. When the form opens, use the Form Assistant to add special notes and other information to the email, as highlighted on the screenshot. To add the special notes, place the cursor where you want them to appear in the message, and then, in the Form Assistant, under Look for, choose Arguments in the first drop-down list and choose SpecialNotes in the second drop-down list, and then choose OK.
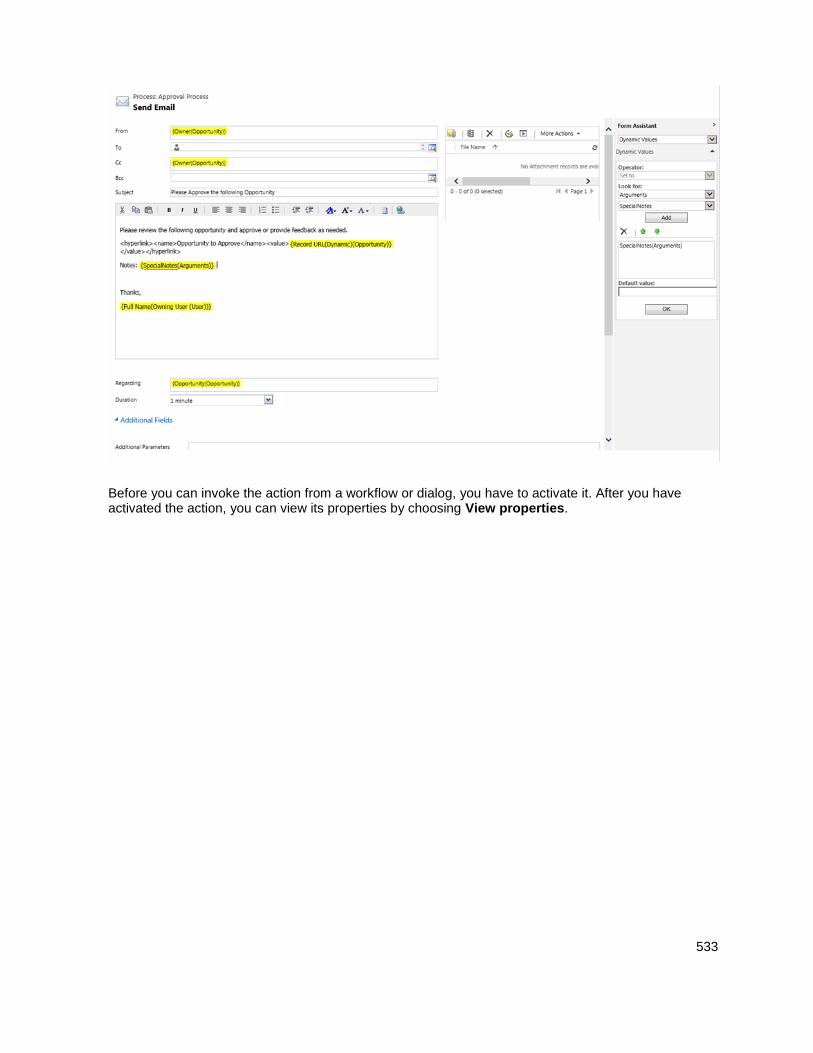
533
Before you can invoke the action from a workflow or dialog, you have to activate it. After you have activated the action, you can view its properties by choosing View properties.
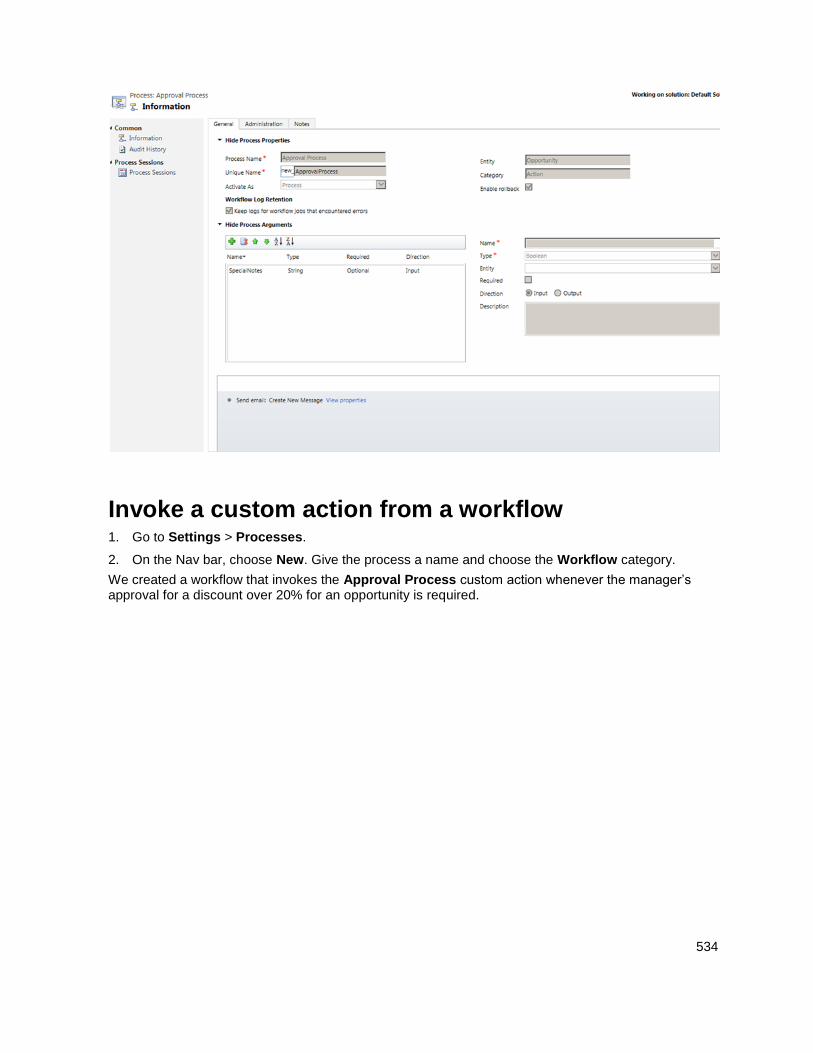
534
Invoke a custom action from a workflow 1. Go to Settings > Processes.
2. On the Nav bar, choose New. Give the process a name and choose the Workflow category.
We created a workflow that invokes the Approval Process custom action whenever the manager’s approval for a discount over 20% for an opportunity is required.
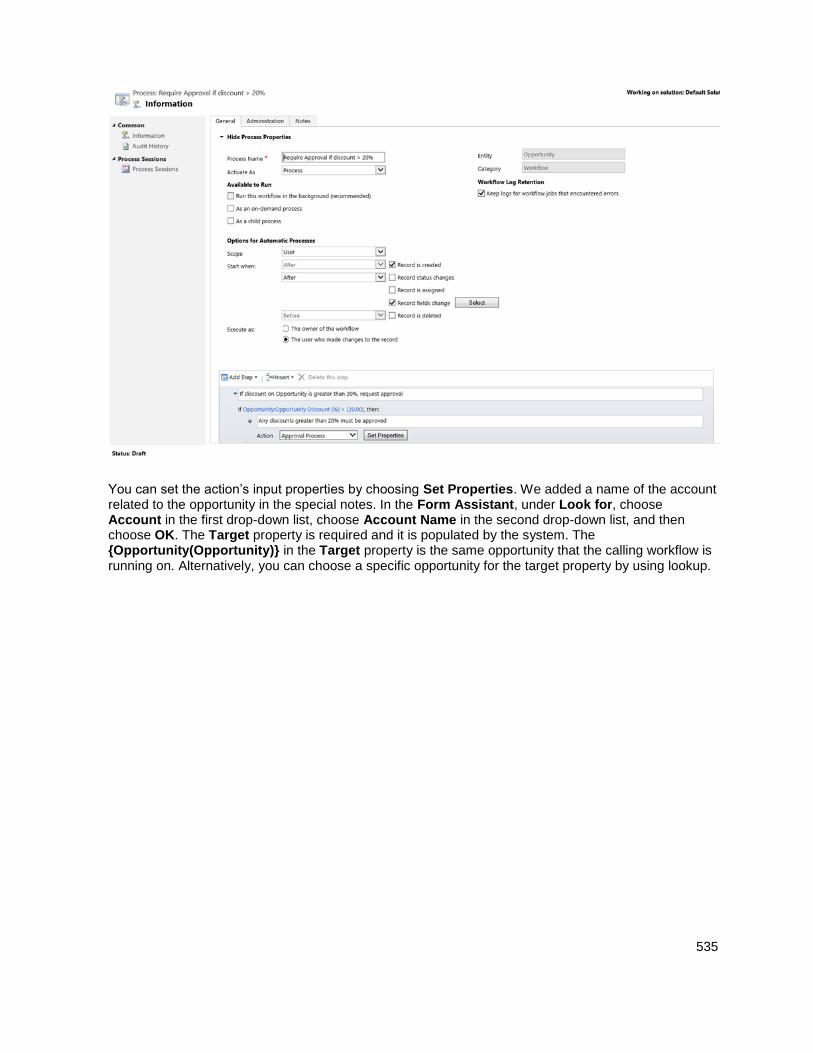
535
You can set the action’s input properties by choosing Set Properties. We added a name of the account related to the opportunity in the special notes. In the Form Assistant, under Look for, choose Account in the first drop-down list, choose Account Name in the second drop-down list, and then choose OK. The Target property is required and it is populated by the system. The {Opportunity(Opportunity)} in the Target property is the same opportunity that the calling workflow is running on. Alternatively, you can choose a specific opportunity for the target property by using lookup.
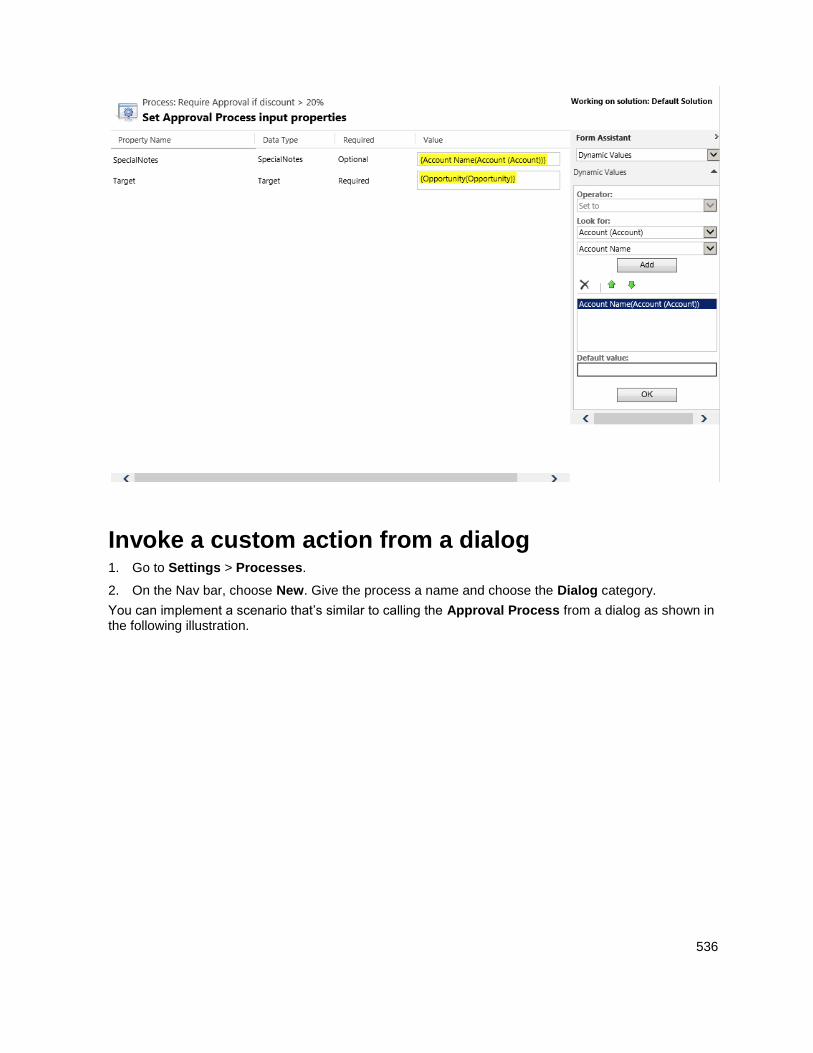
536
Invoke a custom action from a dialog 1. Go to Settings > Processes.
2. On the Nav bar, choose New. Give the process a name and choose the Dialog category.
You can implement a scenario that’s similar to calling the Approval Process from a dialog as shown in the following illustration.
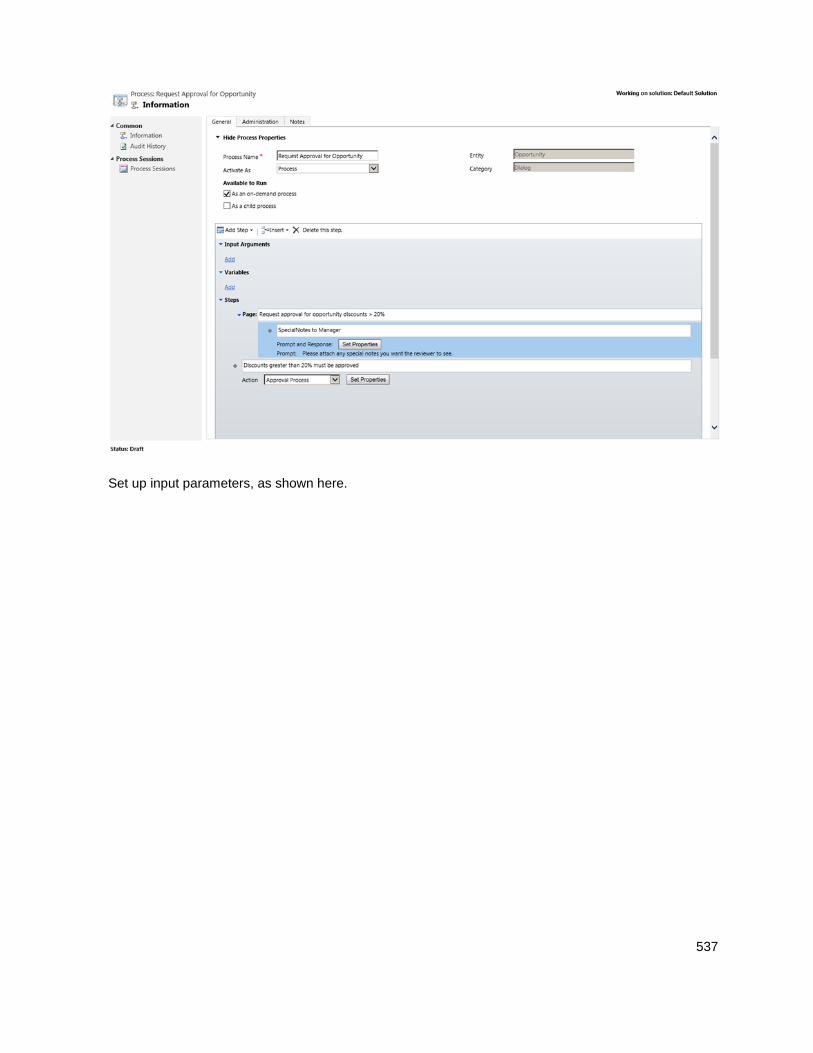
537
Set up input parameters, as shown here.
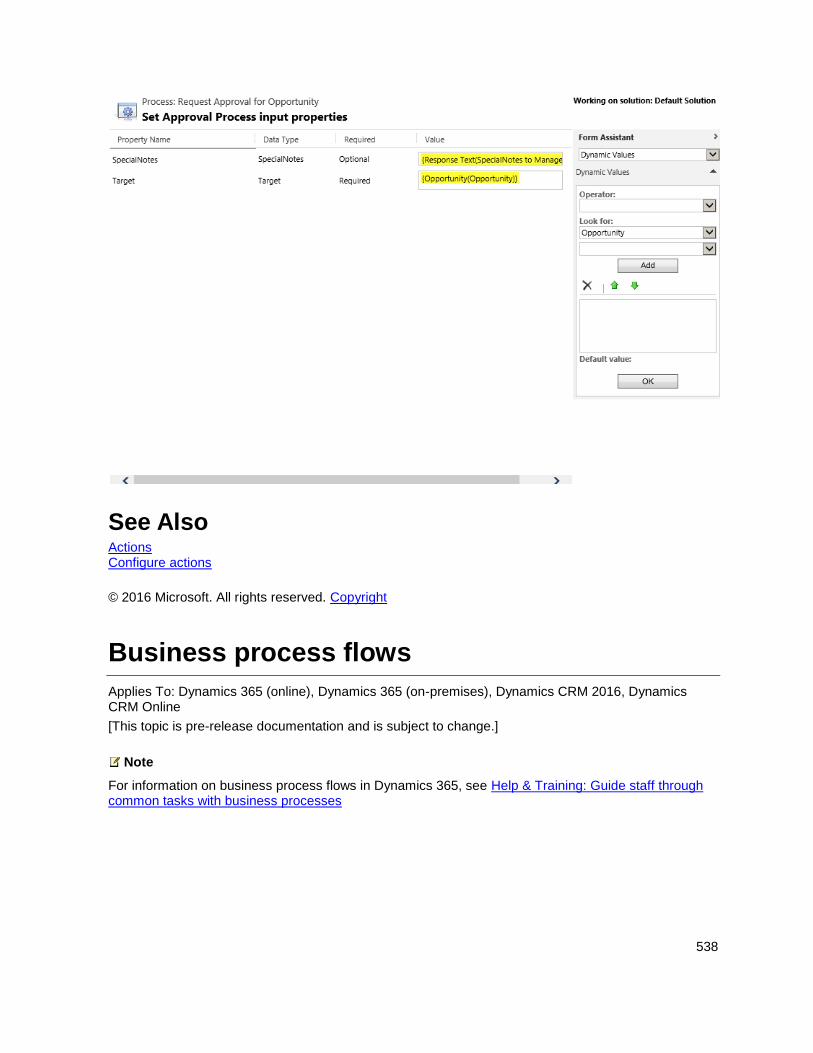
538
See Also Actions Configure actions
© 2016 Microsoft. All rights reserved. Copyright
Business process flows
Applies To: Dynamics 365 (online), Dynamics 365 (on-premises), Dynamics CRM 2016, Dynamics CRM Online
[This topic is pre-release documentation and is subject to change.]
Note
For information on business process flows in Dynamics 365, see Help & Training: Guide staff through common tasks with business processes
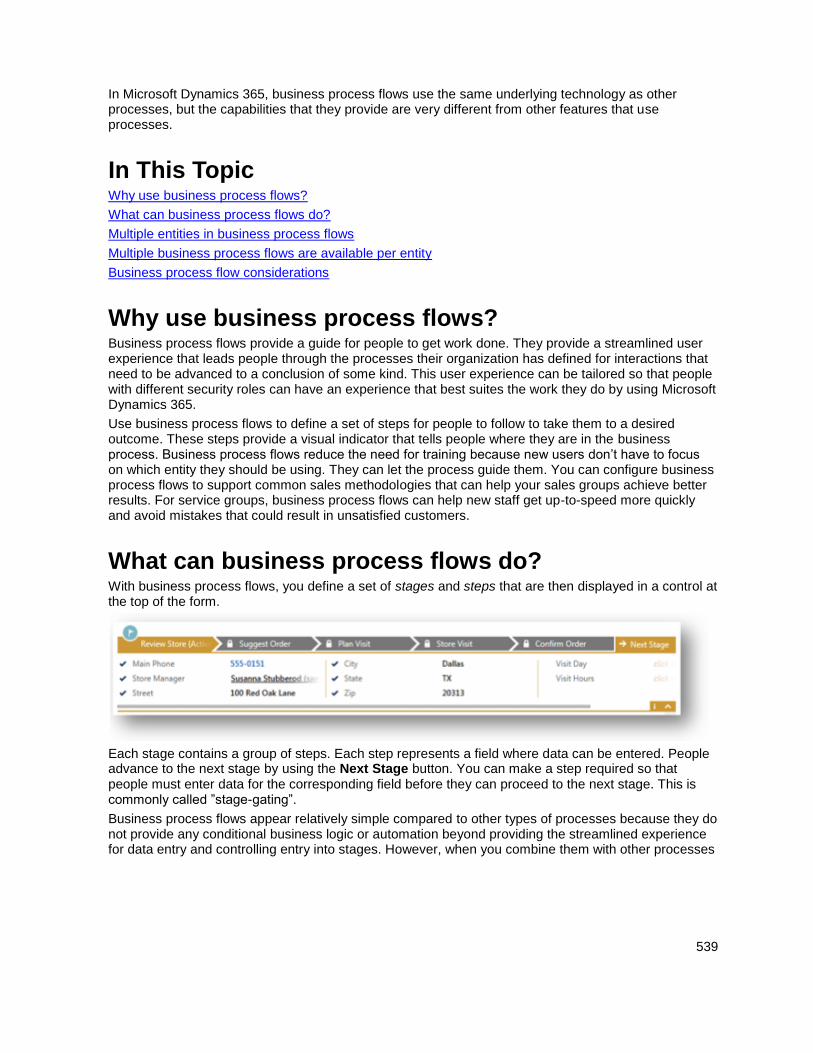
539
In Microsoft Dynamics 365, business process flows use the same underlying technology as other processes, but the capabilities that they provide are very different from other features that use processes.
In This Topic Why use business process flows?
What can business process flows do?
Multiple entities in business process flows
Multiple business process flows are available per entity
Business process flow considerations
Why use business process flows? Business process flows provide a guide for people to get work done. They provide a streamlined user experience that leads people through the processes their organization has defined for interactions that need to be advanced to a conclusion of some kind. This user experience can be tailored so that people with different security roles can have an experience that best suites the work they do by using Microsoft Dynamics 365.
Use business process flows to define a set of steps for people to follow to take them to a desired outcome. These steps provide a visual indicator that tells people where they are in the business process. Business process flows reduce the need for training because new users don’t have to focus on which entity they should be using. They can let the process guide them. You can configure business process flows to support common sales methodologies that can help your sales groups achieve better results. For service groups, business process flows can help new staff get up-to-speed more quickly and avoid mistakes that could result in unsatisfied customers.
What can business process flows do? With business process flows, you define a set of stages and steps that are then displayed in a control at the top of the form.
Each stage contains a group of steps. Each step represents a field where data can be entered. People advance to the next stage by using the Next Stage button. You can make a step required so that people must enter data for the corresponding field before they can proceed to the next stage. This is commonly called ”stage-gating”.
Business process flows appear relatively simple compared to other types of processes because they do not provide any conditional business logic or automation beyond providing the streamlined experience for data entry and controlling entry into stages. However, when you combine them with other processes
540
and customizations, they can play an important role in saving people time, reducing training costs, and increasing user adoption.
Business process flows integrated with other customizations When you or your user enters data using business process flows, the data changes are also applied to form fields so that any automation provided by business rules or form scripts can be applied immediately. Steps can be added that set values for fields that are not present in the form and these fields will be added to the Xrm.Page object model used for form scripts. Any workflows that are initiated by changes to fields included in a business process flow will be applied when the data in the form is saved. If the automation is applied by a real-time workflow, the changes will be immediately visible to the user when the data in the form is refreshed after the record is saved.
Although the business process flow control in the form does not provide any direct client-side programmability, changes applied by business rules or form scripts are automatically applied to business process flow controls. If you hide a field in a form, that field will also be hidden in the business process flow control. If you set a value by using business rules or form scripts, that value will be set within the business process flow.
System business process flows Microsoft Dynamics 365 includes the following business process flows. To understand how business process flows work, review these system business process flows:
Lead to Opportunity Sales Process
Opportunity Sales Process
Phone to Case Process
Multiple entities in business process flows You can use a business process flow for a single entity or span multiple entities. For example, you may have a process that begins with an opportunity, then continues to a quote, an order, and then an invoice, before finally returning to close the opportunity.
You can design business process flows that tie together the records for up to five different entities into a single process so that people using Microsoft Dynamics 365 can focus on the flow of their process rather than on which entity they are working in. They can more easily navigate between related entity records.
Multiple business process flows are available per entity Not every user in an organization may follow the same process and different conditions may require that a different process be applied. You can have up to 10 active business process flows per entity to provide appropriate processes for different situations.
541
Control which business process flow will be applied You can associate business process flows with security roles so that only people with those security roles can see or use them. You can also set the order of the business process flows so that you can control which business process flow will be set by default. This works in the same way that multiple forms for an entity are defined.
When someone creates a new entity record, the list of available activated business process flows is compared to the business processes flows that the person’s security role will show them. The first activated business process flow in that list is the one that will be applied by default. If more than one active business process flow is available, people can chose Switch Process from the command bar to apply a different process. Whenever someone switches processes, the current process stage will be set to the first stage of the newly applied business process flow.
Each record can have only one business process flow at a time. When any user applies a different process, that process is the one that the next user to view the record will see. If someone’s security roles do not allow them to use a specific business process flow, the current business process flow will be visible, but disabled.
Business process flow considerations You can define business process flows only for those entities that support them. You also need to be aware of the limits for the number of processes, stages, and steps that can be added.
Entities that can use business process flows Only entities that use the updated forms can use business process flows. This includes custom entities and the following system entities:
Account
Appointment
Campaign
Campaign Activity
Campaign Response
Competitor
Contact
Entitlement
Fax
Case
Invoice
Lead
Letter
Marketing List
Opportunity
542
Phone Call
Product
Price List Item
Quote
Recurring Appointment
Sales Literature
Social Activity
Order
User
Task
Team
To enable a custom entity for business process flows, select the Business process flows (fields will be created) check box in the entity definition. Note that you can’t undo this action.
Note
If you navigate to the business process flow stage that contains the Social Activity entity and choose the Next Stage button, you’ll see the Create option. When you choose Create, the Social Activity form loads. However, because Social Activity isn’t valid for Create from the Dynamics 365 application user interface, you won’t be able to save the form and you’ll see the error message: “Unexpected error.”
Maximum number of processes, stages, and steps To ensure acceptable performance and the usability of the user interface, there are some limitations you need to be aware of when you plan to use business process flows:
There can be no more than 10 activated business process flow processes per entity.
Each process can contain no more than 30 stages.
Multi-entity processes can contain no more than five entities.
See Also Configure business process flows Enhance business process flows with branching Video: Microsoft Dynamics CRM Business Process Overview Process Enablement with Microsoft Dynamics CRM Workflow processes Dialogs Actions
© 2016 Microsoft. All rights reserved. Copyright

543
Configure business process flows
Applies To: Dynamics 365 (online), Dynamics 365 (on-premises), Dynamics CRM 2016, Dynamics CRM Online
[This topic is pre-release documentation and is subject to change.]
Note
For information on business process flows in Dynamics 365, see Help & Training: Guide staff through common tasks with business processes
Business process flows are guides for helping people get work done. Use business process flows to help ensure common tasks are performed consistently by all team members. You can enable business process flows for various entities, such as leads, opportunities, or cases.The procedure to create business process flows is similar to creating other types of processes, but configuring them is very different.
To learn more about why you use business process flows, see Business process flows.
In This Topic Create business process flows
Edit business process flows
Create business process flows When you create business process flows, you define a set of stages that contain steps. You choose various types of information to include for each step.
To create a business process flow go to Settings > Processes and choose New. For the complete procedure to create a business process, see Create a new business process.
As with other processes, enter the following information in the Create Process dialog box:
Process name
The name of the process doesn’t need to be unique, but it should be meaningful for people who need to choose a process. You can change this later.
Category
This property establishes that this is a business process flow process. You can’t change this after you save the process.
Entity
Select an entity to base the first stage of the business process flow on. The entity you select affects the fields available for steps that can be added to the first stage of the process flow. If you don’t find the entity you want, make sure the entity has the Business process flows (fields will be created) option set in the entity definition. You can’t change this after you
save the process.
Note
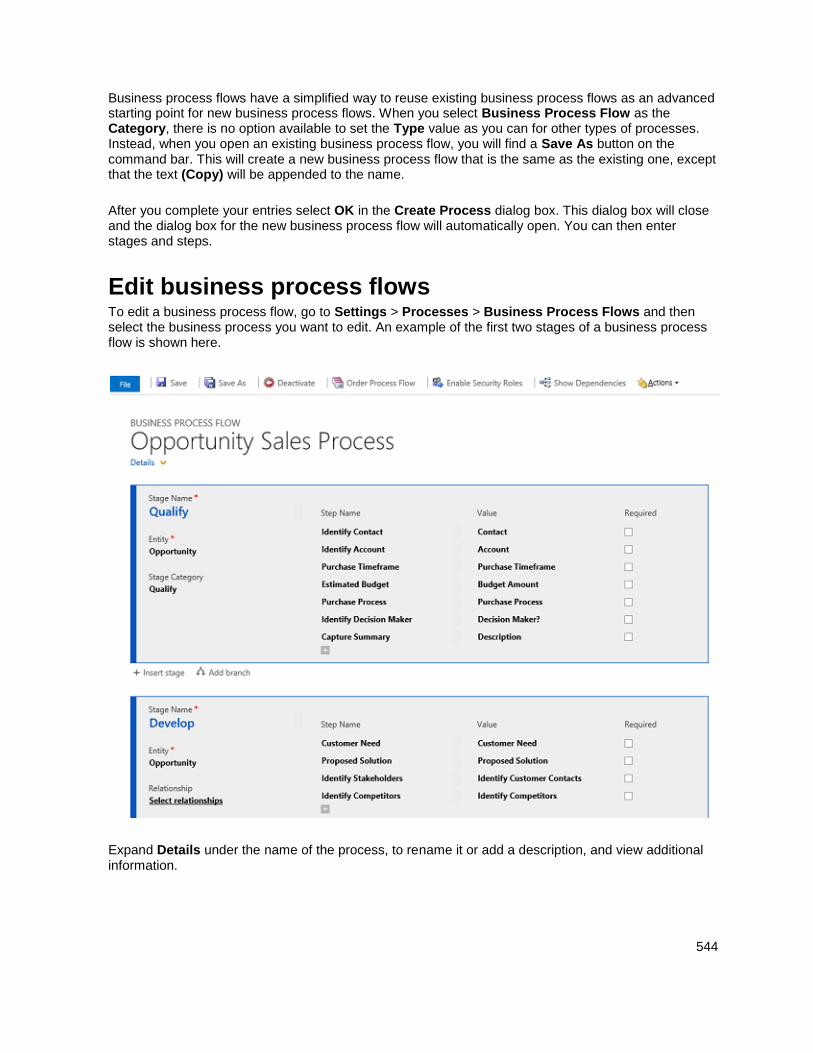
544
Business process flows have a simplified way to reuse existing business process flows as an advanced starting point for new business process flows. When you select Business Process Flow as the Category, there is no option available to set the Type value as you can for other types of processes. Instead, when you open an existing business process flow, you will find a Save As button on the command bar. This will create a new business process flow that is the same as the existing one, except that the text (Copy) will be appended to the name.
After you complete your entries select OK in the Create Process dialog box. This dialog box will close and the dialog box for the new business process flow will automatically open. You can then enter stages and steps.
Edit business process flows To edit a business process flow, go to Settings > Processes > Business Process Flows and then select the business process you want to edit. An example of the first two stages of a business process flow is shown here.
Expand Details under the name of the process, to rename it or add a description, and view additional information.
545
When you configure a business process flow, you can edit it and add stages and steps. For the complete procedure to edit a business process flow, see the eBook: Customize a business process in Dynamics CRM.
Edit Stages
Business process flows can have up to 30 stages.
To add a stage, select Insert stage beneath a stage and enter a Stage Name.
To remove a stage, select it and then choose the X in the upper right corner.
You can add or change the following properties of a stage:
Stage Name
Entity. You can change the entity for any stage except the first one.
Stage Category. A category lets you group stages by a type of action. It is useful for
reports that will group records by the stage they are in. The options for the stage
category come from the Stage Category global option set. You can add additional
options to this global option set and change the labels of existing options if you want.
You can also delete these options if you wish, but we recommend that you keep the
existing options. You won’t be able to add the exact same option back if you delete it. If
you don’t want them to be used, change the label to ”Do not use”.
Relationship. Enter a relationship when the preceding stage in the process is based on
a different entity. For the stage currently being defined, choose Select relationships to
identify a relationship to use when moving between the two stages. It is recommended
you select a relationship for the following benefits:
Relationships often have attribute maps defined that automatically carry over data
between records, minimizing data entry.
When you select Next Stage on the process bar for a record, any records that use
the relationship will be listed in the process flow, thereby promoting reuse of records
in the process. In addition, you can use workflows to automate creation of records
so that the user simply selects it instead of creating one to further streamline the
process.
Edit Steps
Each stage can have up to 30 steps.
To create a new step, select a stage, and then select the plus sign (+) under Step
Name. Enter a name.
In the Value column, select a field to use for data entry.
Optionally, you can select the Required check box for any required field.
To remove a step, select it and then choose the X to the right of the step.
Add branch
To learn about adding a branch to a stage, see Enhance business process flows with branching.
546
To make a business process flow available for people to use, you must order the process flow, enable security roles, and activate it.
Set Process Flow Order
When you have more than one business process flow for an entity (record type), you’ll need to set which process is automatically assigned to new records.. In the command bar, select Order Process Flow. For new records or records that do not already have a process flow
associated with them, the first business process flow that a user has access to is the one that will be used.
Enable Security Roles
People will only be able to use business process flows that are associated with security roles assigned to their user account. By default, only the System Administrator and System Customizer security roles can view a new business process flow.
To set these roles, in the command bar, select Enable Security Roles. You can choose
either the Enable for Everyone or Enable only for the selected security roles
options.
If you choose Enable only for the selected security roles, you can select which
security roles will allow access to the business process flow.
Activate
Before anyone can use the business process flow, you must activate it. In the command bar, select Activate. After you confirm the activation, the business process flow is ready to use. If
a business process flow has errors, you will not be able to activate it until the errors are corrected.
See Also Business process flows Monitor and manage processes
© 2016 Microsoft. All rights reserved. Copyright
Enhance business process flows with branching
Applies To: Dynamics 365 (online), Dynamics 365 (on-premises), Dynamics CRM 2016, Dynamics CRM Online
[This topic is pre-release documentation and is subject to change.]
Business process flows guide you through various stages of sales, marketing, or service processes toward completion. In simple cases, a linear business process flow is a good option. However, in more complex scenarios, you can enhance a business process flow with branching. If you have the create permissions on business process flows, you’ll be able create business process flow with multiple branches by using the If-Else logic. The branching condition can be formed of multiple logical expressions that use a combination of AND or OR operators. The branch selection is done automatically, in real time, based on rules defined during the process definition. For example, in selling
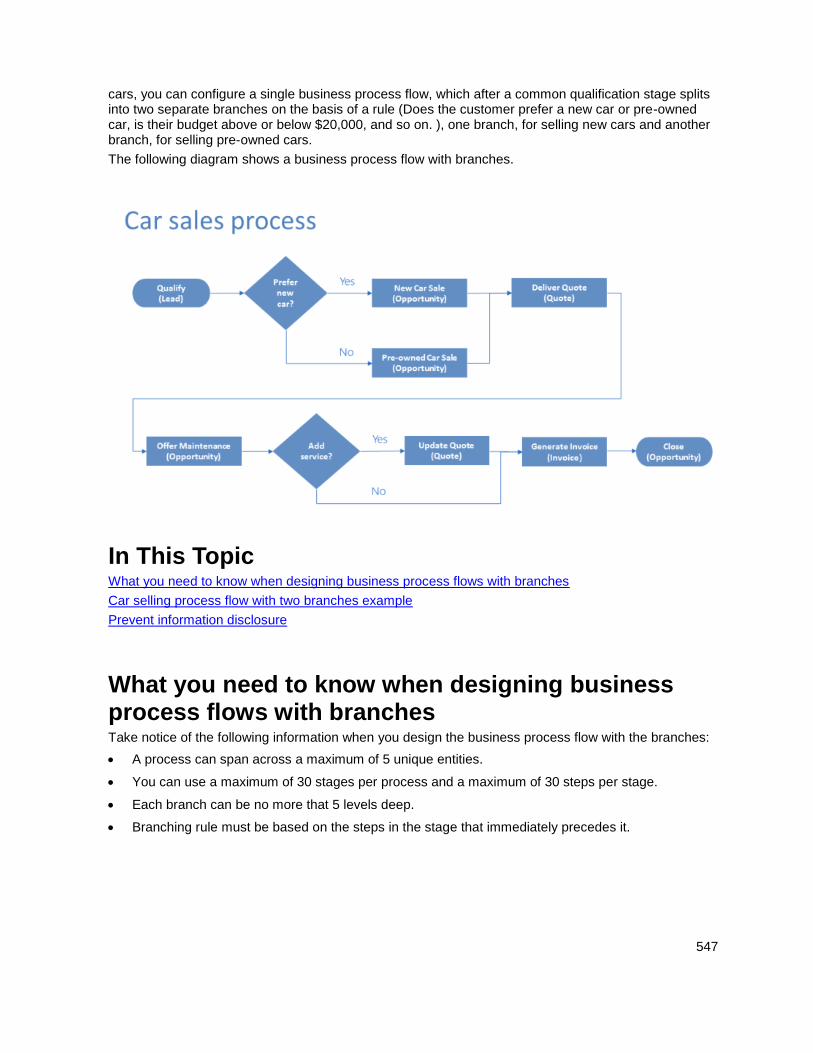
547
cars, you can configure a single business process flow, which after a common qualification stage splits into two separate branches on the basis of a rule (Does the customer prefer a new car or pre-owned car, is their budget above or below $20,000, and so on. ), one branch, for selling new cars and another branch, for selling pre-owned cars.
The following diagram shows a business process flow with branches.
In This Topic What you need to know when designing business process flows with branches
Car selling process flow with two branches example
Prevent information disclosure
What you need to know when designing business process flows with branches Take notice of the following information when you design the business process flow with the branches:
A process can span across a maximum of 5 unique entities.
You can use a maximum of 30 stages per process and a maximum of 30 steps per stage.
Each branch can be no more that 5 levels deep.
Branching rule must be based on the steps in the stage that immediately precedes it.
548
You can combine multiple conditions in a rule by using the AND operator or the OR operator, but
not both operators.
An entity used in the process can be revisited multiple times (multiple closed entity loops).
You can go back to the previous stage regardless of an entity type. For example, if the active stage
is Deliver Quote on a quote record, you can move the active stage back to the Propose stage on
an opportunity record. In another example, suppose you’re currently in the Present Proposal stage
in your process flow: Qualify Lead > Identify Needs > Create Proposal > Present Proposal >
Close. If the proposal presented to the customer requires more research to identify customer
needs, you can simply select the Identify Needs stage of your process and choose Set Active.
When you define a process flow, you can optionally select an entity relationship. This relationship
must a 1:N (One-to-Many) entity relationship.
Only one active process per a record is possible.
A process name is not exposed to workflow conditions.
The stages can be reordered using the MOVE UP or MOVE DOWN arrows within the branch. The
stages can’t be moved from one branch to other branches.
When merging branches, all peer branches must merge to a single stage.
The peer branches must all either merge to a single stage, or each peer branch must end the
process. A peer branch can’t merge with other branches and at the same time end the process.
Car selling process flow with two branches example Let’s look at the example of the business process flow with two branches, for selling new and pre-owned cars.
First, we’ll create a new process named Car Sales Process.
1. Go to Settings > Processes.
2. Specify the Category as Business Process Flow and for the primary Entity choose Lead.
3. Add the first stage to the process called Qualify and add steps Purchase Time frame and Car
Preference.
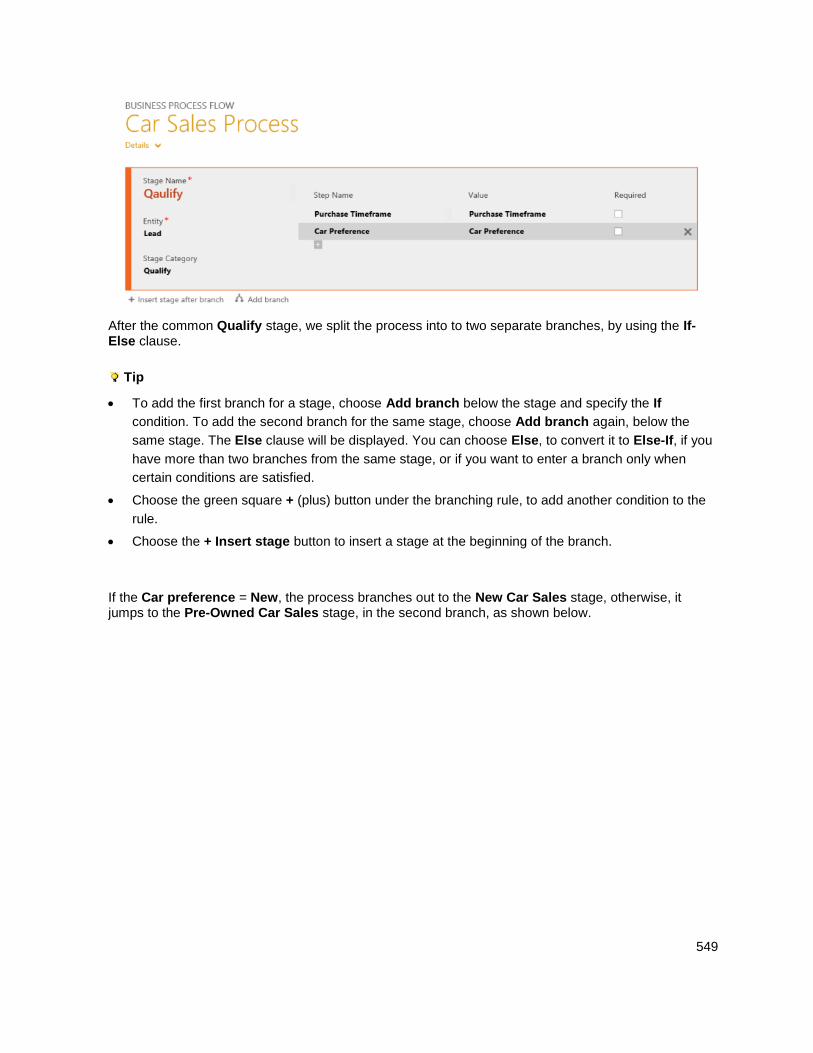
549
After the common Qualify stage, we split the process into to two separate branches, by using the If-Else clause.
Tip
To add the first branch for a stage, choose Add branch below the stage and specify the If
condition. To add the second branch for the same stage, choose Add branch again, below the
same stage. The Else clause will be displayed. You can choose Else, to convert it to Else-If, if you
have more than two branches from the same stage, or if you want to enter a branch only when
certain conditions are satisfied.
Choose the green square + (plus) button under the branching rule, to add another condition to the
rule.
Choose the + Insert stage button to insert a stage at the beginning of the branch.
If the Car preference = New, the process branches out to the New Car Sales stage, otherwise, it jumps to the Pre-Owned Car Sales stage, in the second branch, as shown below.
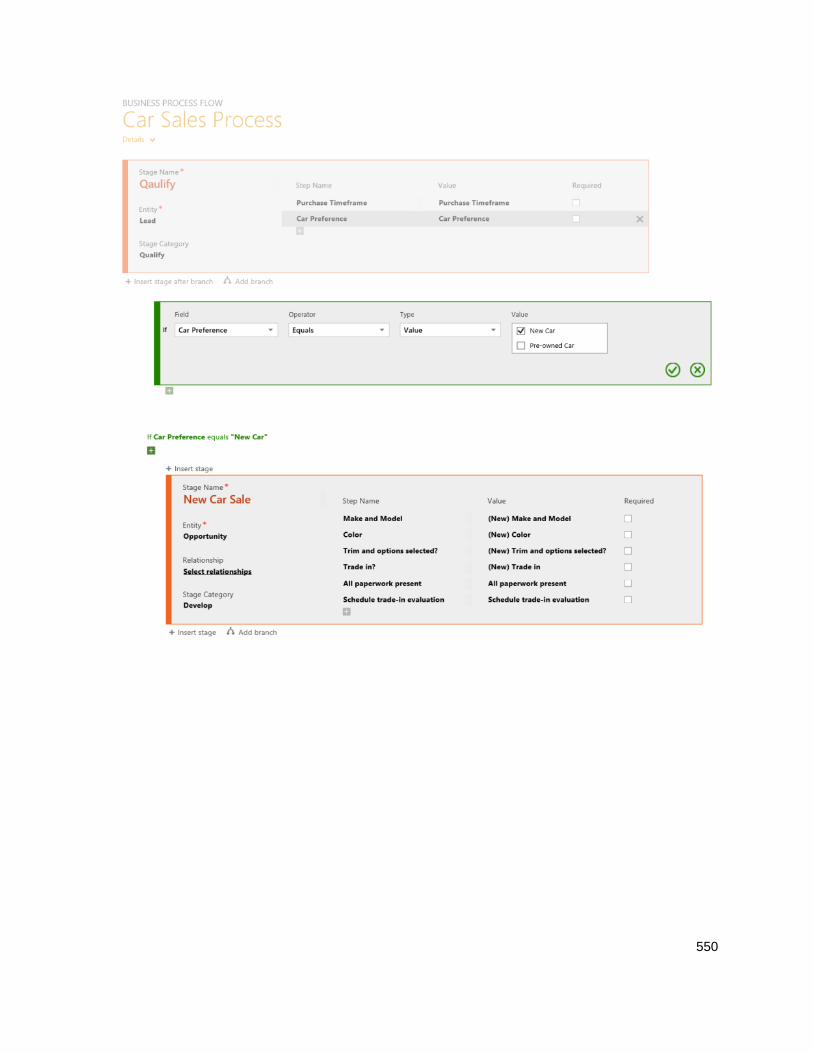
550
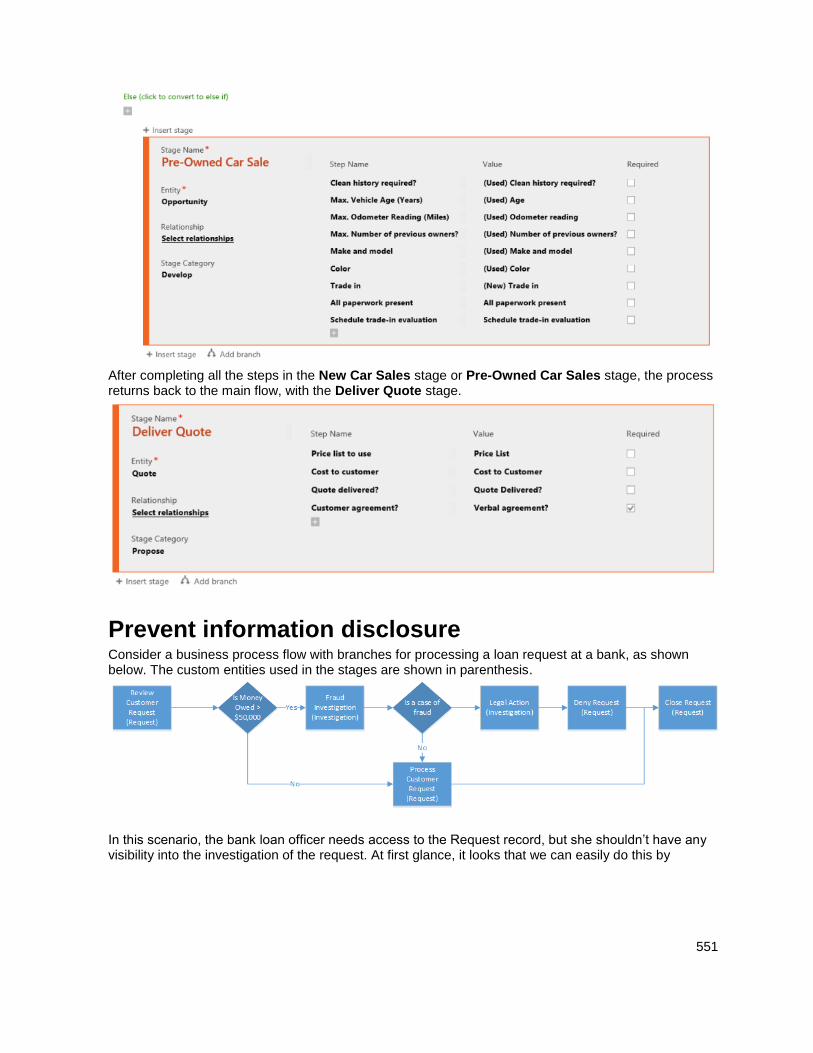
551
After completing all the steps in the New Car Sales stage or Pre-Owned Car Sales stage, the process returns back to the main flow, with the Deliver Quote stage.
Prevent information disclosure Consider a business process flow with branches for processing a loan request at a bank, as shown below. The custom entities used in the stages are shown in parenthesis.
In this scenario, the bank loan officer needs access to the Request record, but she shouldn’t have any visibility into the investigation of the request. At first glance, it looks that we can easily do this by

552
assigning the loan officer a security role that specifies no access to the Investigation entity. But, let’s look at the example in more detail and see if this is really true. Let’s say that a customer puts in the loan request for over $60,000 to the bank. The loan officer reviews the request in the first stage. If the branching rule that checks if the amount owed to the bank will exceed $50,000 is satisfied, the next stage in the process is to investigate if the request is fraudulent. If it’s determined that this is indeed a case of fraud, the process moves on to taking a legal action against the requestor. The loan officer shouldn’t have visibility into the two investigative stages as she doesn’t have access to the Investigation entity. However, if the loan officer opens the Request record, she would be able to see the entire end-to-end process. Not only will she be able to see the fraud investigation stage, but she’ll also be able to identify the outcome of the investigation by having been able to see the Legal Action stage in the process. Also, she’ll be able to preview the steps in the investigative stages by choosing the stage. While she won’t be able to see the data or the step completion status, she’ll be able to identify the potential actions that were taken against the submitter of the request during the investigation and legal action stages. In this process flow, the loan officer will be able to see the Fraud Investigation and Legal Action stages, which constitutes an improper information disclosure. We recommend paying special attention to the information that may become disclosed due to branching. In our example, split the process into two separate processes, one for the request processing and another one for the fraud investigation, to prevent the information disclosure. The process for the loan officer will look like this:
The process for the investigation will be self-contained and include the following stages:
You will need to provide a workflow to synchronize the Approve/Deny decision from the Investigation record to the Request record.
553
See Also Business process flows Configure business process flows Create and edit processes Security roles and privileges Video: Business Process in Microsoft Dynamics CRM 2015
© 2016 Microsoft. All rights reserved. Copyright
Monitor and manage processes
Applies To: Dynamics 365 (online), Dynamics 365 (on-premises), Dynamics CRM 2016, Dynamics CRM Online
[This topic is pre-release documentation and is subject to change.]
To monitor and manage processes, you must locate the process, evaluate the status, and perform any actions necessary to address problems.
In This Topic Monitoring background workflows
Monitoring real-time workflows and actions
Monitoring dialogs
Status of workflow processes
Monitoring background workflows Background workflows generate System Job records to track their status. You can access information about these system jobs in several places within the application:
Settings > System Jobs
This will include all types of system jobs. You will need to filter records to those where System Job Type is Workflow.
From the Workflow Process
Open the background workflow definition and go to the Process Session tab. This will show
only the system jobs for this background workflow.
From the record
You can edit the entity form so that the navigation will include the Background Processes
relationship. This will show all the system jobs that have been started in the context of the record.
Note
If an asynchronous system job (workflow) fails several times consecutively, Dynamics 365 starts to postpone execution of that job for longer and longer time intervals to allow the Dynamics 365
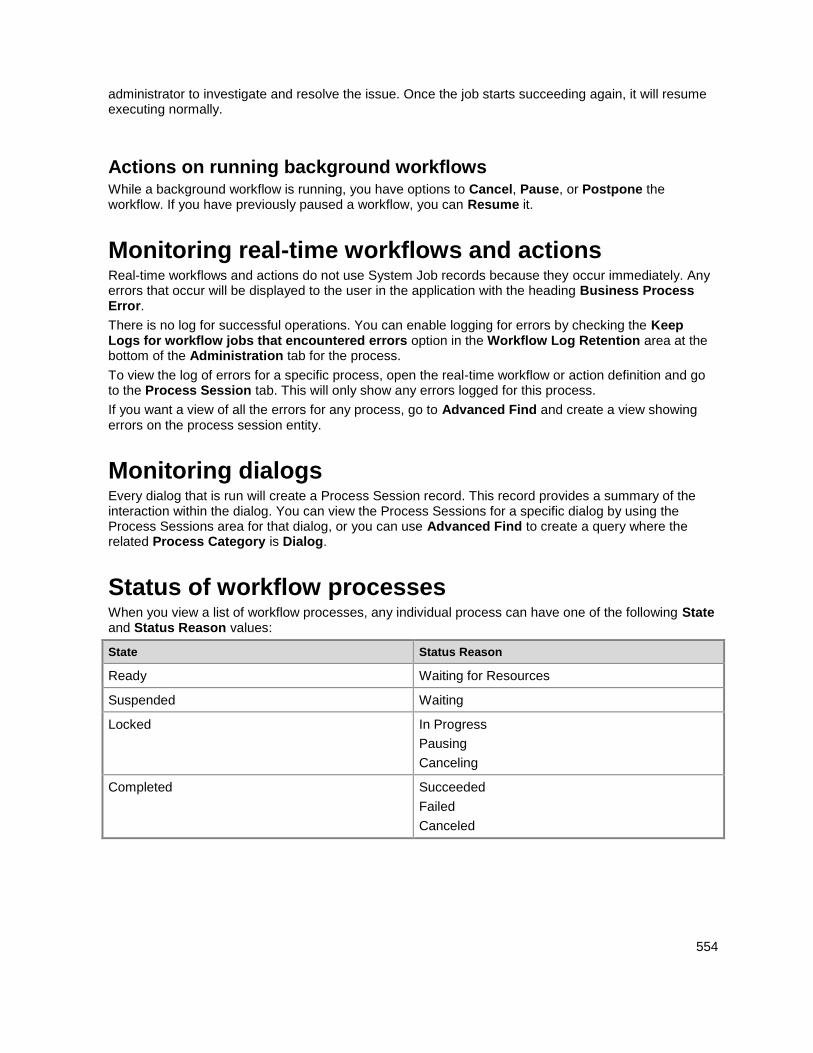
554
administrator to investigate and resolve the issue. Once the job starts succeeding again, it will resume executing normally.
Actions on running background workflows While a background workflow is running, you have options to Cancel, Pause, or Postpone the workflow. If you have previously paused a workflow, you can Resume it.
Monitoring real-time workflows and actions Real-time workflows and actions do not use System Job records because they occur immediately. Any errors that occur will be displayed to the user in the application with the heading Business Process Error.
There is no log for successful operations. You can enable logging for errors by checking the Keep Logs for workflow jobs that encountered errors option in the Workflow Log Retention area at the bottom of the Administration tab for the process.
To view the log of errors for a specific process, open the real-time workflow or action definition and go to the Process Session tab. This will only show any errors logged for this process.
If you want a view of all the errors for any process, go to Advanced Find and create a view showing errors on the process session entity.
Monitoring dialogs Every dialog that is run will create a Process Session record. This record provides a summary of the interaction within the dialog. You can view the Process Sessions for a specific dialog by using the Process Sessions area for that dialog, or you can use Advanced Find to create a query where the related Process Category is Dialog.
Status of workflow processes When you view a list of workflow processes, any individual process can have one of the following State and Status Reason values:
State Status Reason
Ready Waiting for Resources
Suspended Waiting
Locked In Progress
Pausing
Canceling
Completed Succeeded
Failed
Canceled

555
See Also Create and edit processes Workflow processes Configure workflow steps Best practices for workflow processes MSDN: Asynchronous service architecture
© 2016 Microsoft. All rights reserved. Copyright
Create and edit business rules
Applies To: Dynamics 365 (online), Dynamics 365 (on-premises), Dynamics CRM 2016, Dynamics CRM Online
[This topic is pre-release documentation and is subject to change.]
In Microsoft Dynamics 365, you can apply form logic without writing JavaScript code or developing plug-ins. Business rules provide a simple declarative interface to implement and maintain fast changing, commonly used business rules that will be applied to Main and Quick Create forms, and to an entity, in the Web application and Microsoft Dynamics 365 for tablets. It is applied to the Main and Quick forms in the Outlook client in online and offline modes.
In This Topic Why business rules?
What can business rules do?
How do I configure business rules?
Server side business rules and support for IF-Else and AND/OR logic
Limitations for business rules
Localize error messages used in business rules
Why business rules? Business rules provide an easy declarative way to consistently evaluate the business logic on both client and server, without the need to write code. The client-side logic evaluation is more immediate because it is performed when you open and update the record form, while the server-side provides consistent logic evaluation on the server.
The business rule is executed only on the client, if the rule’s scope is set at a form level (all forms
or a specific form). The rules are executed when a record form is loaded and updated.
The business rule is executed both on the server and client, if the rule’s scope is set at an entity
level. The rules on the server-side are executed when a record is created or saved.

556
What can business rules do? Business rules allow for a subset of the capabilities provided by form scripts. You can define conditions and apply the following actions:
Set field values
Clear field values
Set field requirement levels
Show or hide fields
Enable or disable fields
Validate data and show error messages
Business rules can be set to apply to all Main or Quick Create entity forms or specific Main forms that you choose. You can also set the rule to apply to an entity.
You can transport business rules from one organization to another by including them in a solution and you can install solutions that contain business rules.
Examples of how to set or clear field values Let’s consider a couple of examples. With the first rule, for any immediate purchase, you apply a 5% discount. With the second rule, you clear all discounts if the purchase timeframe is unknown,
The following rule definition shows how to set a field value to a 5% discount for immediate purchases.
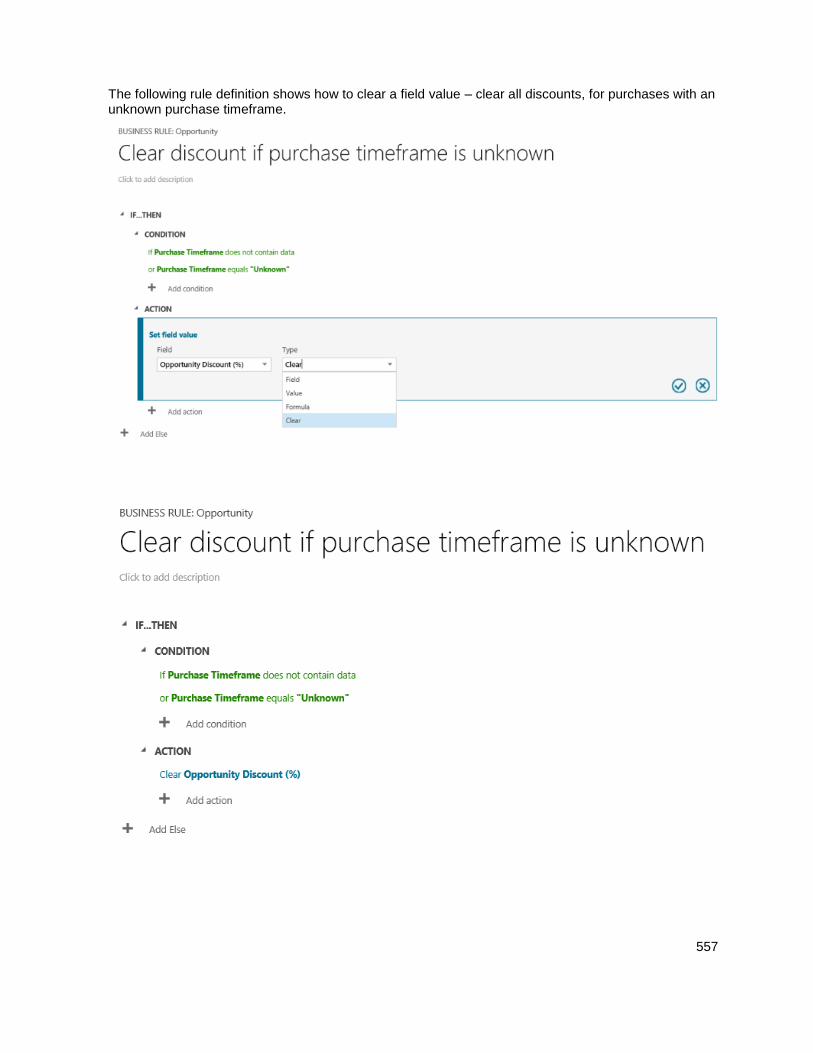
557
The following rule definition shows how to clear a field value – clear all discounts, for purchases with an unknown purchase timeframe.
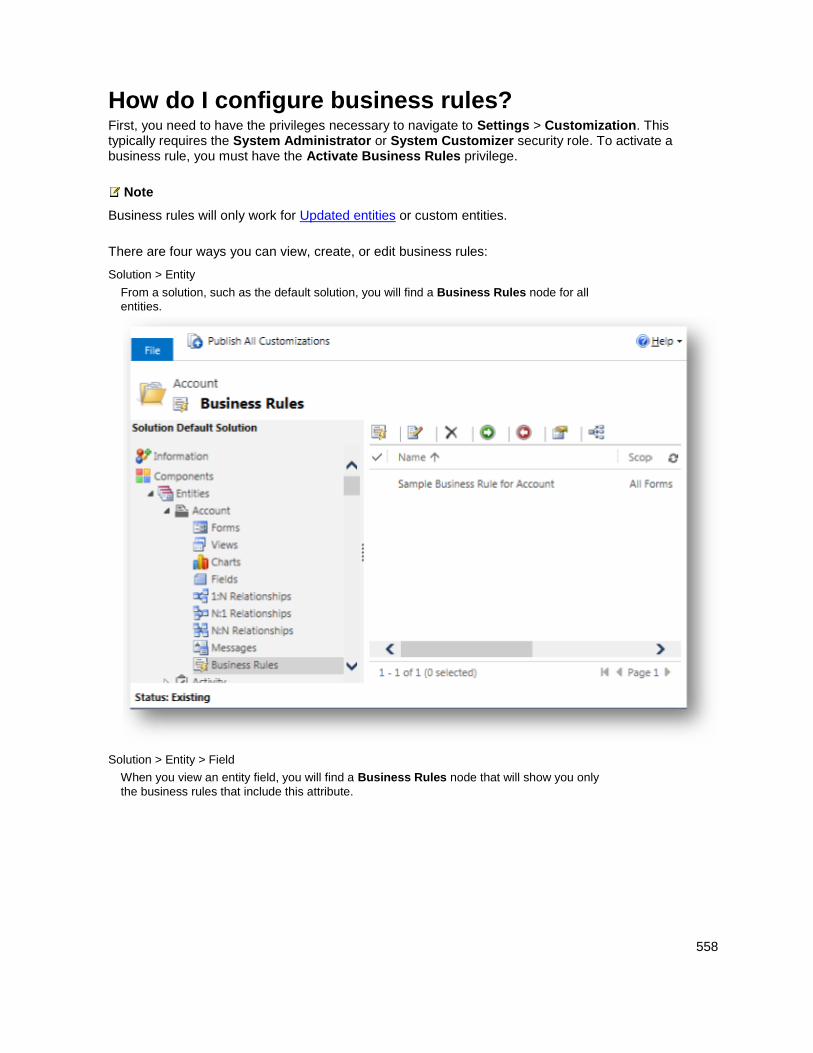
558
How do I configure business rules? First, you need to have the privileges necessary to navigate to Settings > Customization. This typically requires the System Administrator or System Customizer security role. To activate a business rule, you must have the Activate Business Rules privilege.
Note
Business rules will only work for Updated entities or custom entities.
There are four ways you can view, create, or edit business rules:
Solution > Entity
From a solution, such as the default solution, you will find a Business Rules node for all
entities.
Solution > Entity > Field
When you view an entity field, you will find a Business Rules node that will show you only
the business rules that include this attribute.
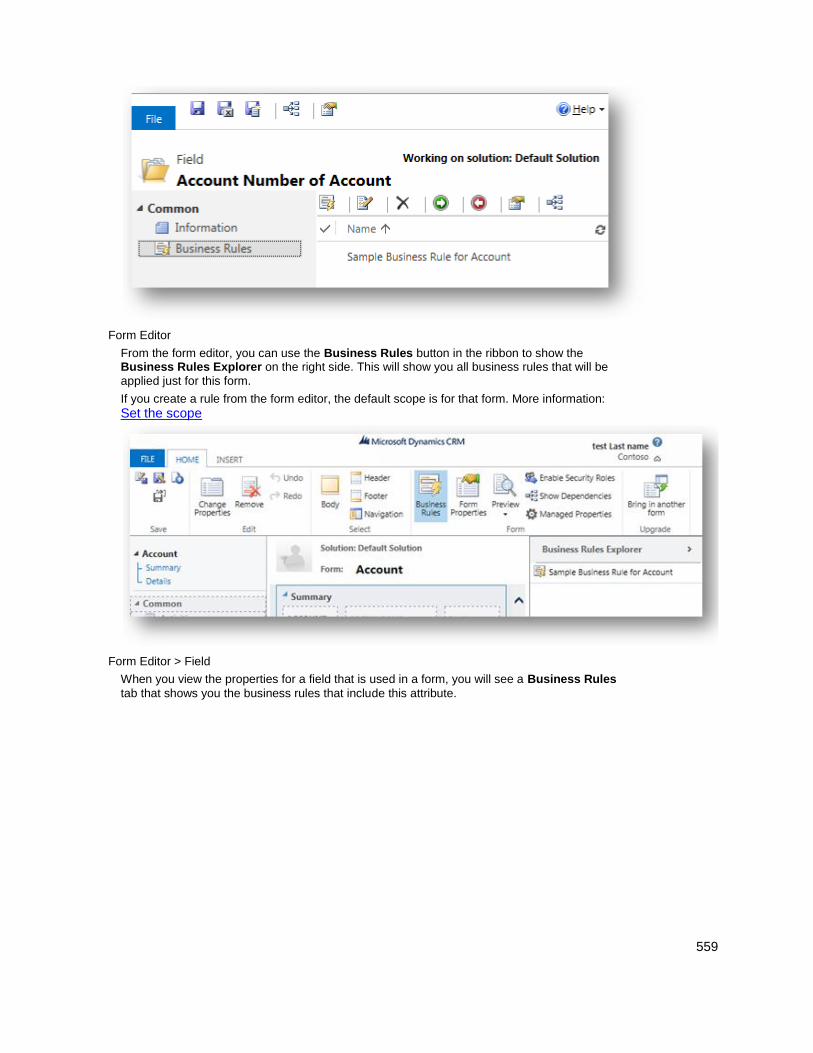
559
Form Editor
From the form editor, you can use the Business Rules button in the ribbon to show the Business Rules Explorer on the right side. This will show you all business rules that will be
applied just for this form.
If you create a rule from the form editor, the default scope is for that form. More information:
Set the scope
Form Editor > Field
When you view the properties for a field that is used in a form, you will see a Business Rules
tab that shows you the business rules that include this attribute.
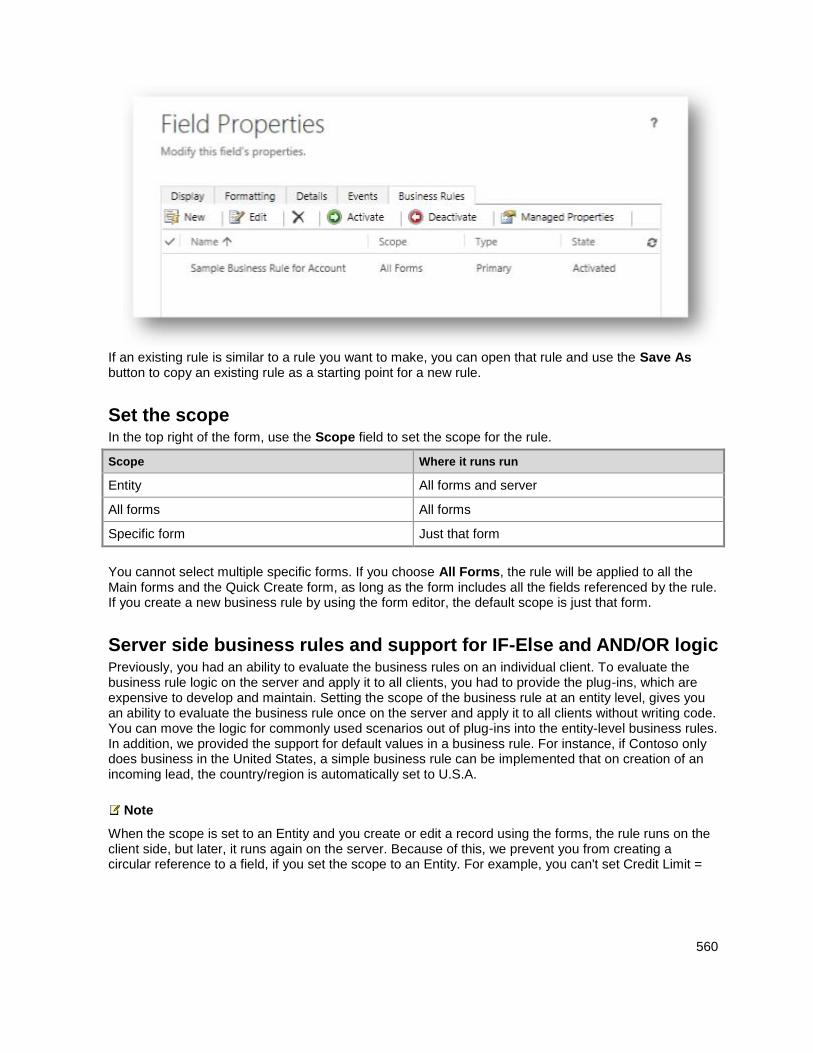
560
If an existing rule is similar to a rule you want to make, you can open that rule and use the Save As button to copy an existing rule as a starting point for a new rule.
Set the scope In the top right of the form, use the Scope field to set the scope for the rule.
Scope Where it runs run
Entity All forms and server
All forms All forms
Specific form Just that form
You cannot select multiple specific forms. If you choose All Forms, the rule will be applied to all the Main forms and the Quick Create form, as long as the form includes all the fields referenced by the rule. If you create a new business rule by using the form editor, the default scope is just that form.
Server side business rules and support for IF-Else and AND/OR logic Previously, you had an ability to evaluate the business rules on an individual client. To evaluate the business rule logic on the server and apply it to all clients, you had to provide the plug-ins, which are expensive to develop and maintain. Setting the scope of the business rule at an entity level, gives you an ability to evaluate the business rule once on the server and apply it to all clients without writing code. You can move the logic for commonly used scenarios out of plug-ins into the entity-level business rules. In addition, we provided the support for default values in a business rule. For instance, if Contoso only does business in the United States, a simple business rule can be implemented that on creation of an incoming lead, the country/region is automatically set to U.S.A.
Note
When the scope is set to an Entity and you create or edit a record using the forms, the rule runs on the client side, but later, it runs again on the server. Because of this, we prevent you from creating a circular reference to a field, if you set the scope to an Entity. For example, you can't set Credit Limit =
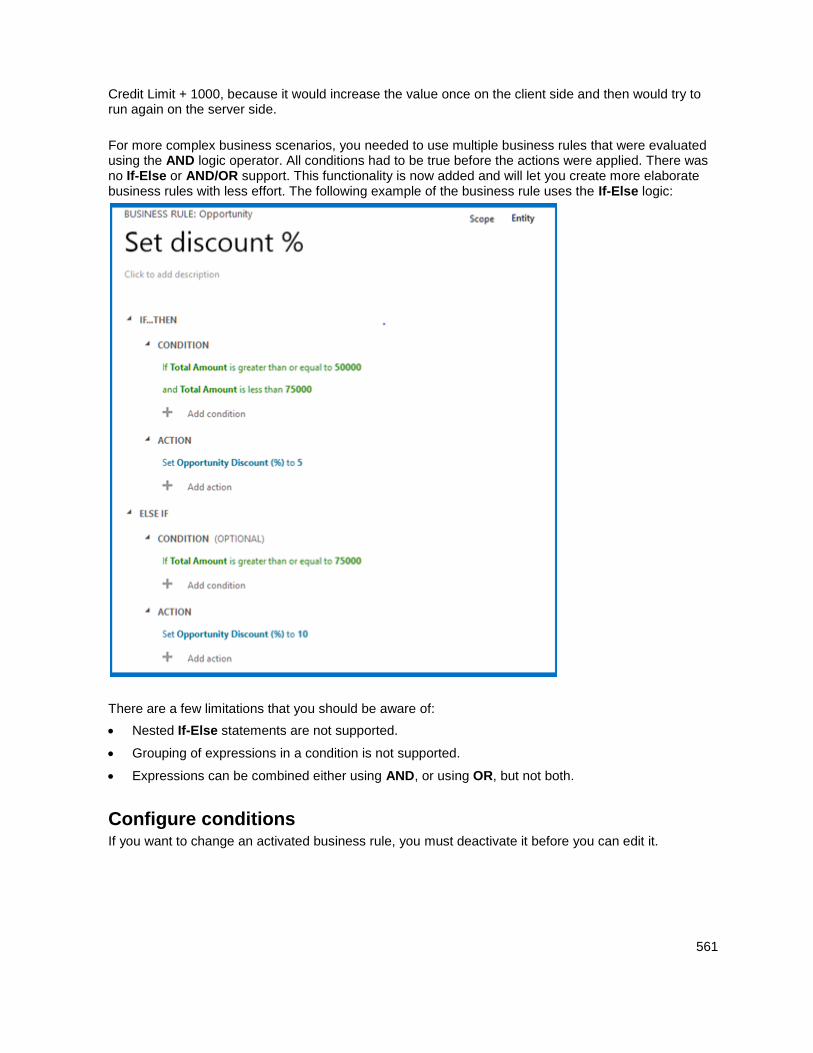
561
Credit Limit + 1000, because it would increase the value once on the client side and then would try to run again on the server side.
For more complex business scenarios, you needed to use multiple business rules that were evaluated using the AND logic operator. All conditions had to be true before the actions were applied. There was no If-Else or AND/OR support. This functionality is now added and will let you create more elaborate business rules with less effort. The following example of the business rule uses the If-Else logic:
There are a few limitations that you should be aware of:
Nested If-Else statements are not supported.
Grouping of expressions in a condition is not supported.
Expressions can be combined either using AND, or using OR, but not both.
Configure conditions If you want to change an activated business rule, you must deactivate it before you can edit it.
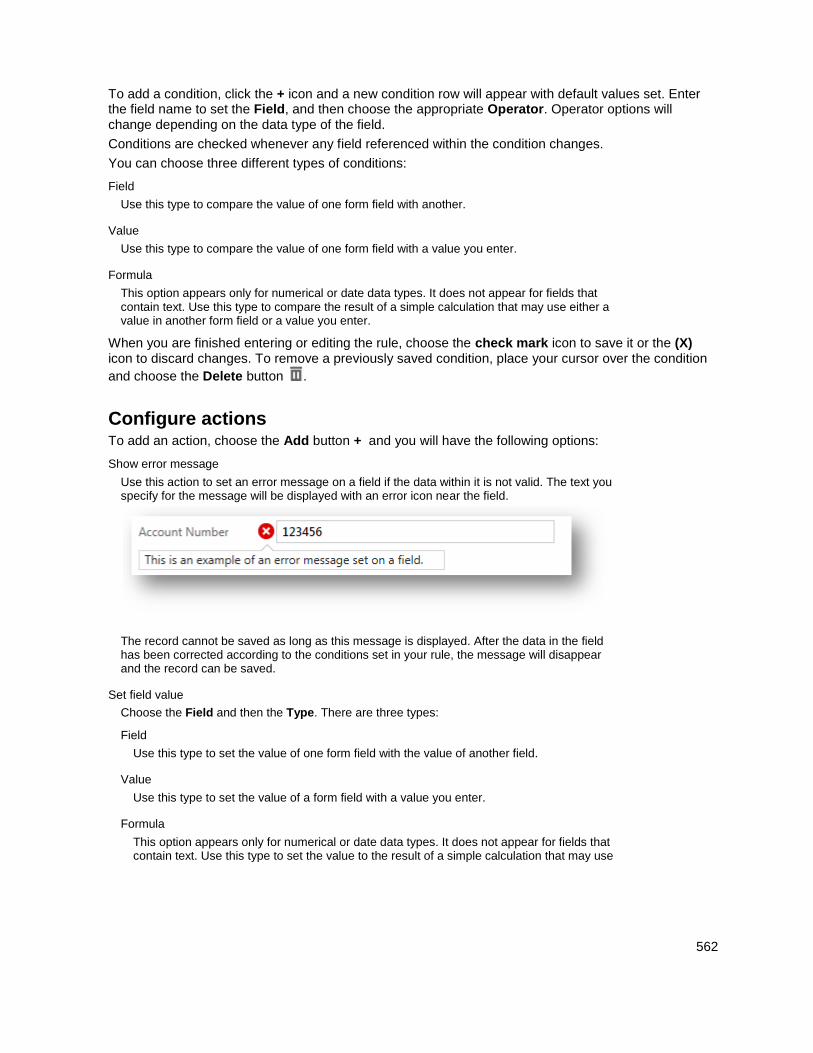
562
To add a condition, click the + icon and a new condition row will appear with default values set. Enter the field name to set the Field, and then choose the appropriate Operator. Operator options will change depending on the data type of the field.
Conditions are checked whenever any field referenced within the condition changes.
You can choose three different types of conditions:
Field
Use this type to compare the value of one form field with another.
Value
Use this type to compare the value of one form field with a value you enter.
Formula
This option appears only for numerical or date data types. It does not appear for fields that contain text. Use this type to compare the result of a simple calculation that may use either a value in another form field or a value you enter.
When you are finished entering or editing the rule, choose the check mark icon to save it or the (X) icon to discard changes. To remove a previously saved condition, place your cursor over the condition
and choose the Delete button .
Configure actions To add an action, choose the Add button + and you will have the following options:
Show error message
Use this action to set an error message on a field if the data within it is not valid. The text you specify for the message will be displayed with an error icon near the field.
The record cannot be saved as long as this message is displayed. After the data in the field has been corrected according to the conditions set in your rule, the message will disappear and the record can be saved.
Set field value
Choose the Field and then the Type. There are three types:
Field
Use this type to set the value of one form field with the value of another field.
Value
Use this type to set the value of a form field with a value you enter.
Formula
This option appears only for numerical or date data types. It does not appear for fields that contain text. Use this type to set the value to the result of a simple calculation that may use
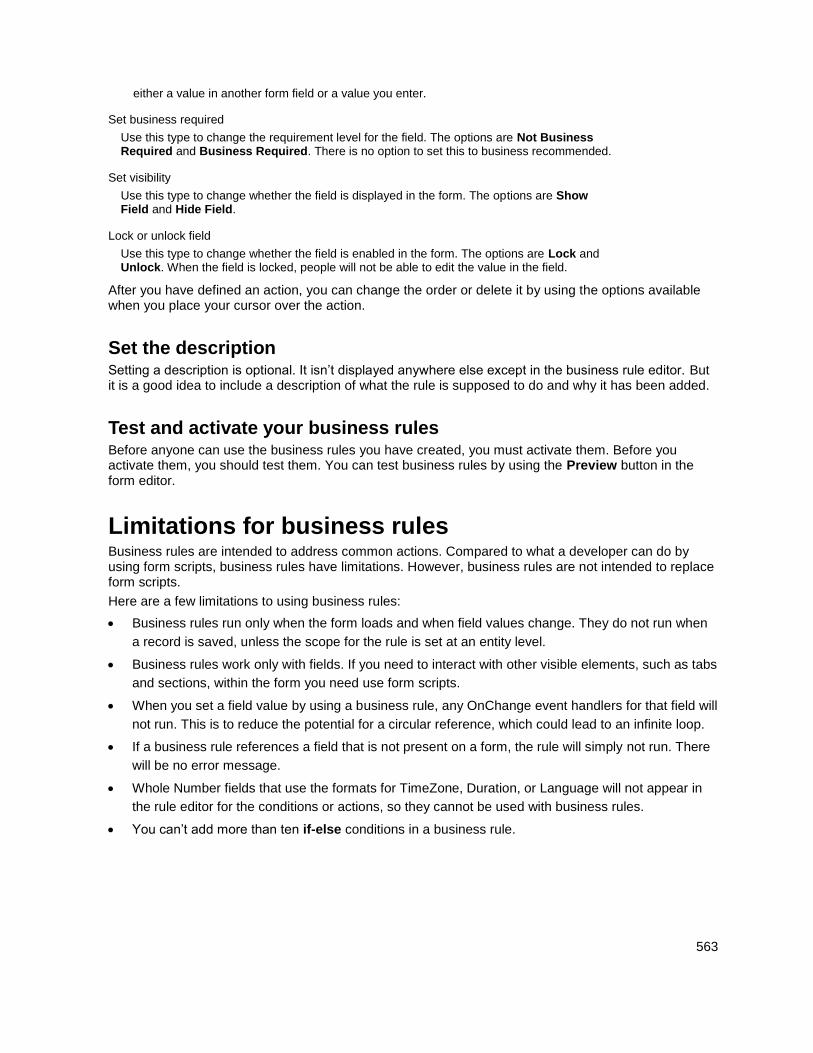
563
either a value in another form field or a value you enter.
Set business required
Use this type to change the requirement level for the field. The options are Not Business Required and Business Required. There is no option to set this to business recommended.
Set visibility
Use this type to change whether the field is displayed in the form. The options are Show Field and Hide Field.
Lock or unlock field
Use this type to change whether the field is enabled in the form. The options are Lock and Unlock. When the field is locked, people will not be able to edit the value in the field.
After you have defined an action, you can change the order or delete it by using the options available when you place your cursor over the action.
Set the description Setting a description is optional. It isn’t displayed anywhere else except in the business rule editor. But it is a good idea to include a description of what the rule is supposed to do and why it has been added.
Test and activate your business rules Before anyone can use the business rules you have created, you must activate them. Before you activate them, you should test them. You can test business rules by using the Preview button in the form editor.
Limitations for business rules Business rules are intended to address common actions. Compared to what a developer can do by using form scripts, business rules have limitations. However, business rules are not intended to replace form scripts.
Here are a few limitations to using business rules:
Business rules run only when the form loads and when field values change. They do not run when
a record is saved, unless the scope for the rule is set at an entity level.
Business rules work only with fields. If you need to interact with other visible elements, such as tabs
and sections, within the form you need use form scripts.
When you set a field value by using a business rule, any OnChange event handlers for that field will
not run. This is to reduce the potential for a circular reference, which could lead to an infinite loop.
If a business rule references a field that is not present on a form, the rule will simply not run. There
will be no error message.
Whole Number fields that use the formats for TimeZone, Duration, or Language will not appear in
the rule editor for the conditions or actions, so they cannot be used with business rules.
You can’t add more than ten if-else conditions in a business rule.
564
For Microsoft Dynamics 365 for tablets, the definition of the business rules are downloaded and
cached when Dynamics 365 for tablets opens. Changes made to business rules are not applied
until Dynamics 365 for tablets is closed and re-opened.
When you set the value of a lookup field, the text of the primary field value that is set in the form will
always match the text that is visible in the rule definition. If the text representing the primary field
value of the record you are setting in the lookup changes, the value set by your rule will continue to
use the text portion of the primary field value defined by the rule. To fix this, update the rule
definition to use the current primary name field value.
It is useful to understand that the value set for a lookup has three parts:
Name: The text of the primary field value you see in the form.
Id: The unique identifier for the record. This is the data that is saved. This is not visible in the
form.
LogicalName: The name of the entity, such as contact, account, or opportunity.
The rule will set all three parts of this value. The Id value for a specific record never changes, but the Name value might change.
For example, if you define a rule to set a lookup to a contact that has the Full Name of ‘Old Name’, this text is the Name you will see in the lookup when it is set by your business rule even if someone later changes the Full Name of the contact to ‘New Name’. The lookup Id value will be correctly set to the expected record, but the Name (which is not saved) will reflect the rule definition value rather than the current Full Name value of the record it references.
Clear the actions from your rules Except for showing error messages, you must be sure to include a separate business rule to clear any actions you may have applied. For example, let’s say you have a rule on an Account entity that says:
If Preferred Method of Contact equals “Phone” Set Business Phone as Business Required
This will work whenever the Preferred Method of Contact field is set to Phone. But if the Preferred Method of Contact field is later changed to something else, the Phone field will remain Business Required. In order to clear this action, you need to include a separate rule to apply the following logic:
If Preferred Method of Contact does not equal “Phone” Set Business Phone as Not Business Required
The Show error message action is different because it automatically evaluates any conditions used to set the error message and will remove it if the conditions are no longer true.
Localize error messages used in business rules If you have more than one language provisioned for your organization, you will want to localize any error messages that you have set. Each time you set a message, a label is generated by the system. If you export the translations in your organization, you can add localized versions of your messages and then import those labels back into Microsoft Dynamics 365, so that people using languages other than your base language can view the translated messages.
565
See Also Video: Microsoft Dynamics CRM Customization New Features - Business Rules Create and edit processes Create and design forms Create and edit views SDK: Create or edit how business rules are initiated
© 2016 Microsoft. All rights reserved. Copyright
Create business rules based on business process flows
Applies To: Dynamics 365 (online), Dynamics 365 (on-premises), Dynamics CRM 2016, Dynamics CRM Online
[This topic is pre-release documentation and is subject to change.]
In previous versions of Microsoft Dynamics 365, we provided a programmatic way for defining and executing the business rules based upon business process flows. This implementation required writing code in JavaScript.
With Microsoft Dynamics 365 (online & on-premises), you can define business rules based on business processes without writing code, directly in the Dynamics 365 user interface (UI).
You’ll be able to define business rules in the user interface based on:
Currently active business process that is rendered on a form in the UI.
Active stage of the business process. An active stage is the stage that you're currently on.
Selected stage of the business process. A stage that you select in the process flow. This stage may
or may not be the active stage.
Stage category of the business process. A category lets you group stages by a type of action. The
options for the stage category come from the Stage Category global option set. You can add
options to this global option set and change the labels of existing options if you want.
To learn more about business process flows, see: Business process flows and Help & Training: Create a new business process.
A business rule is triggered by the business process events, such as when a process changes to a new active stage or a stage is selected. The execution of the business logic will cause the business process flow UI page to update. You’ll be able to customize the UI to show or hide particular fields at different stages of the process flow or mark certain fields as business required.
When you create business rules based upon business process flows, consider the following information about a business rule execution.
566
Conditions based on the business process flow in business rules with the entity scope are
evaluated on the server for the following cases:
If the condition is based only on the process flow and not on stages.
If the condition is based on the process flow and the active stage.
If the condition is based on the stage category of the active stage.
Conditions based on the business process flow with the entity scope aren't valid for the
following cases:
If the condition is based on the process flow and the selected stage.
If the condition is based on the stage category of the selected stage.
A business rule based on a business process flow is executed:
On change of the business process if the rule is based only on the process flow and
not on stages.
On change of the business process or on change of the active stage if the selection for the
Field column for stages is Active Stage.
On change of the process or on change of the selected stage if the selection for the
Field column for stages is Selected Stage.
A business rule defined on the stage category for the active stage is executed on change of the
process or on change of the active stage in the process.
A business rule defined on the stage category for the selected stage is executed on change of the
process or on change of the selected stage in the process.
To define the business rules, you have to navigate to Microsoft Dynamics 365 > Settings > Customization > Customize the System. Under Components, expand the entity that you want to define the business rule for and click Business Rules in the navigation pane. To define a new rule, click New.
Example scenarios for business rules based on business process flows The following examples depict business rules defined for the Opportunity entity. They represent several common scenarios based on the Opportunity Sales Process business process, process stages, and stage categories.
Business Process Rule In this example, the rule is based on the Opportunity Sales Process and not tied to any particular stage. The ACTION specifies that the Account field must be shown on a form as a required field.
In the IF…THEN CONDITION, select Business Process, and then in the Type drop-down list, select Value. In the Valuelist, the Opportunity Sales Processis shown, which is the default value for the Business Process selection.
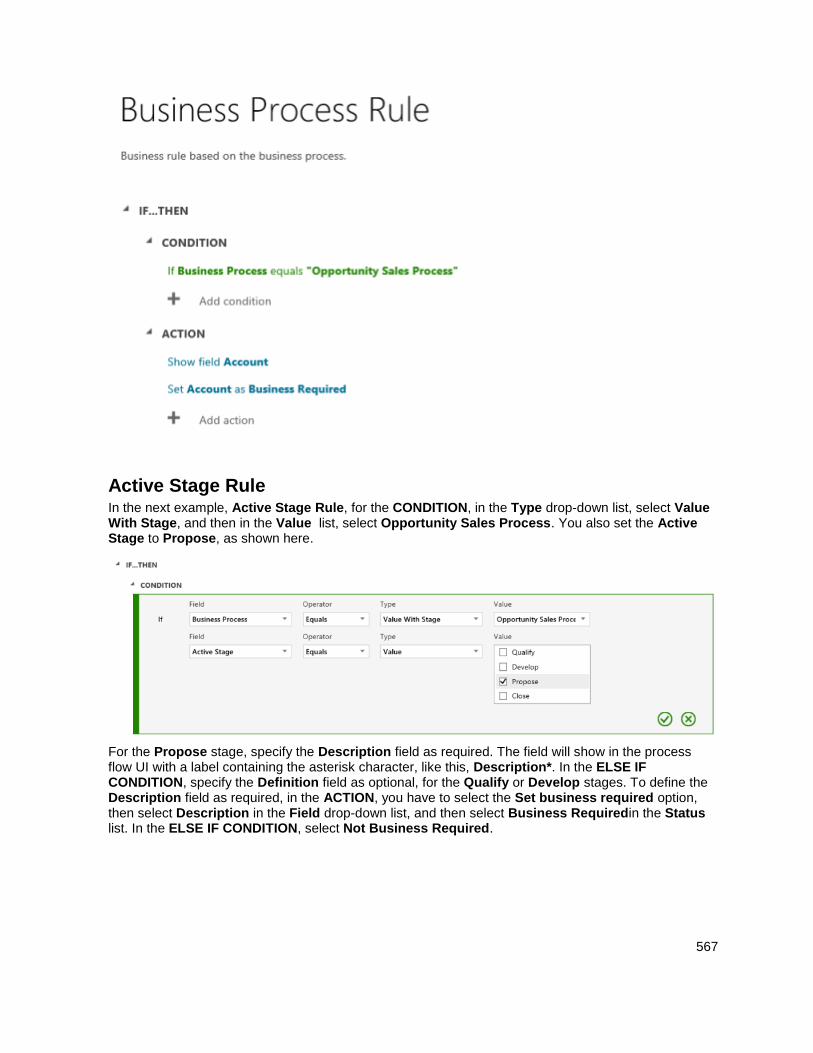
567
Active Stage Rule In the next example, Active Stage Rule, for the CONDITION, in the Type drop-down list, select Value With Stage, and then in the Value list, select Opportunity Sales Process. You also set the Active Stage to Propose, as shown here.
For the Propose stage, specify the Description field as required. The field will show in the process flow UI with a label containing the asterisk character, like this, Description*. In the ELSE IF CONDITION, specify the Definition field as optional, for the Qualify or Develop stages. To define the Description field as required, in the ACTION, you have to select the Set business required option, then select Description in the Field drop-down list, and then select Business Requiredin the Status list. In the ELSE IF CONDITION, select Not Business Required.

568
A complete example:
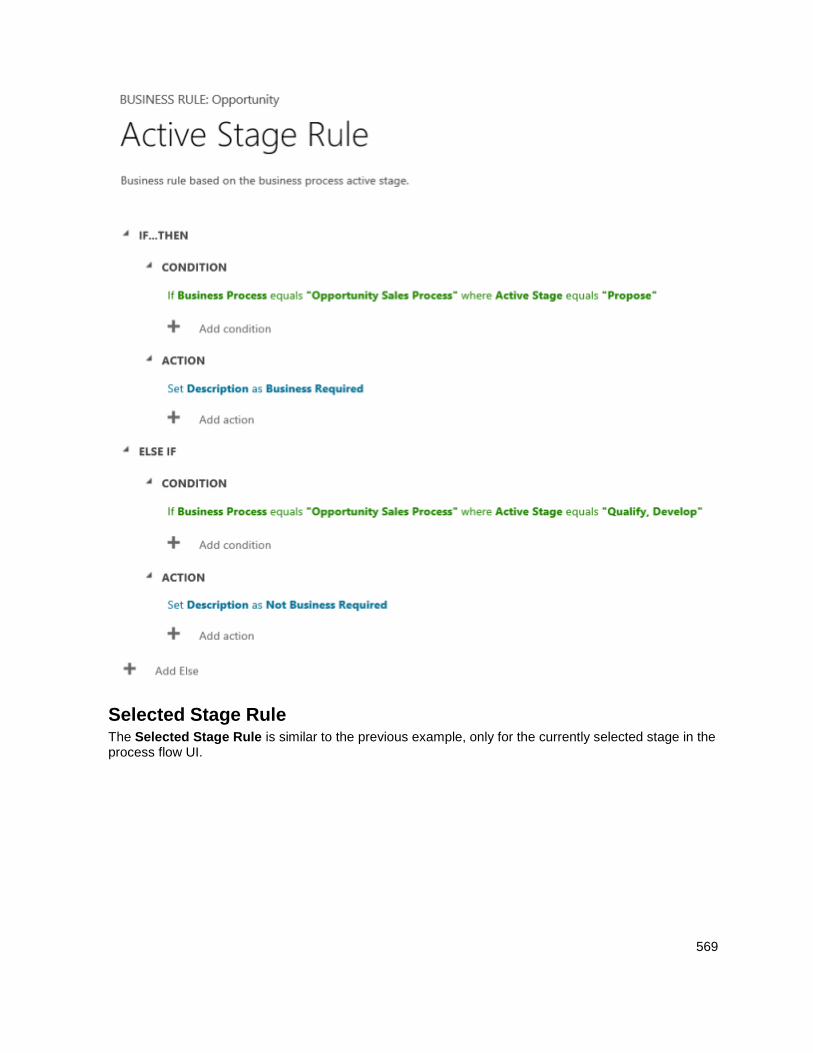
569
Selected Stage Rule The Selected Stage Rule is similar to the previous example, only for the currently selected stage in the process flow UI.
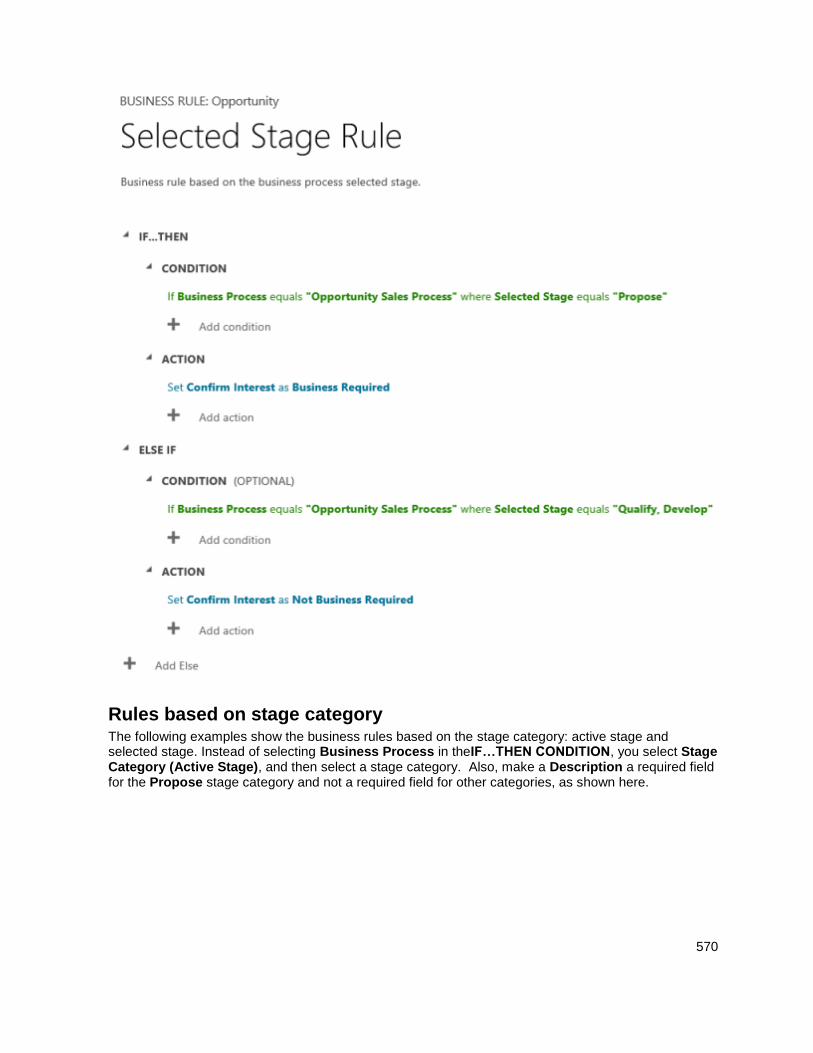
570
Rules based on stage category The following examples show the business rules based on the stage category: active stage and selected stage. Instead of selecting Business Process in theIF…THEN CONDITION, you select Stage Category (Active Stage), and then select a stage category. Also, make a Description a required field for the Propose stage category and not a required field for other categories, as shown here.

571
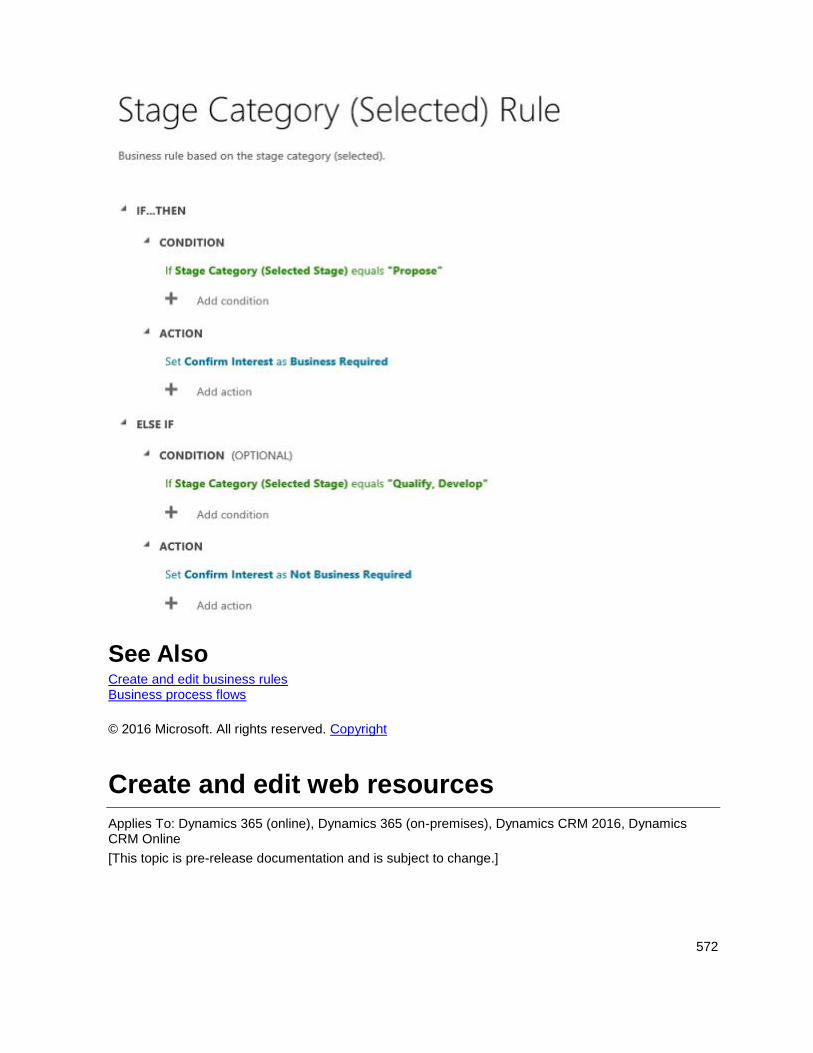
572
See Also Create and edit business rules Business process flows
© 2016 Microsoft. All rights reserved. Copyright
Create and edit web resources
Applies To: Dynamics 365 (online), Dynamics 365 (on-premises), Dynamics CRM 2016, Dynamics CRM Online
[This topic is pre-release documentation and is subject to change.]
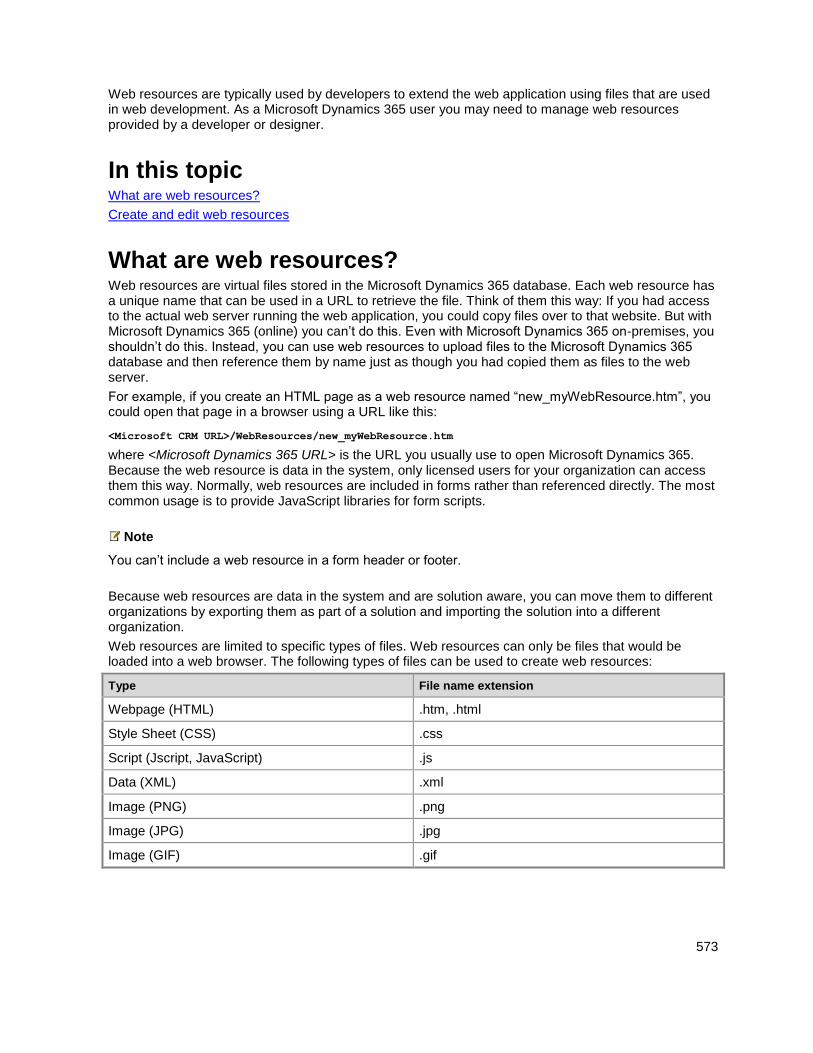
573
Web resources are typically used by developers to extend the web application using files that are used in web development. As a Microsoft Dynamics 365 user you may need to manage web resources provided by a developer or designer.
In this topic What are web resources?
Create and edit web resources
What are web resources? Web resources are virtual files stored in the Microsoft Dynamics 365 database. Each web resource has a unique name that can be used in a URL to retrieve the file. Think of them this way: If you had access to the actual web server running the web application, you could copy files over to that website. But with Microsoft Dynamics 365 (online) you can’t do this. Even with Microsoft Dynamics 365 on-premises, you shouldn’t do this. Instead, you can use web resources to upload files to the Microsoft Dynamics 365 database and then reference them by name just as though you had copied them as files to the web server.
For example, if you create an HTML page as a web resource named “new_myWebResource.htm”, you could open that page in a browser using a URL like this:
<Microsoft CRM URL>/WebResources/new_myWebResource.htm
where <Microsoft Dynamics 365 URL> is the URL you usually use to open Microsoft Dynamics 365. Because the web resource is data in the system, only licensed users for your organization can access them this way. Normally, web resources are included in forms rather than referenced directly. The most common usage is to provide JavaScript libraries for form scripts.
Note
You can’t include a web resource in a form header or footer.
Because web resources are data in the system and are solution aware, you can move them to different organizations by exporting them as part of a solution and importing the solution into a different organization.
Web resources are limited to specific types of files. Web resources can only be files that would be loaded into a web browser. The following types of files can be used to create web resources:
Type File name extension
Webpage (HTML) .htm, .html
Style Sheet (CSS) .css
Script (Jscript, JavaScript) .js
Data (XML) .xml
Image (PNG) .png
Image (JPG) .jpg
Image (GIF) .gif
574
Type File name extension
Silverlight (XAP) .xap
StyleSheet (XSL) .xsl, .xslt
Image (ICO) .ico
Silverlight web resources are supported, but to support multiple browsers, HTML web resources are the recommended type of web resources to use if you are designing a user interface.
Create and edit web resources
1. Go to Settings > Customizations.
2. Choose Customize the System.
3. Under Components, choose Web Resources.
4. To create a web resource: Choose New.
To edit a web resource: Double click the web resource you want to edit.
5. The web resource form has the following fields and capabilities:
575
Label Description
Name Required. This is the unique name for this web resource. You can’t change this after you save the web resource.
This name can only include letters, numbers, periods, and nonconsecutive forward slash (“/”) characters.
The solution publisher customization prefix will be prepended to the name of the web resource.
Display Name The name displayed if you view a list of web resources.
Description A description of the web resource.
Type Required. This is the type of web resource. You can’t change this after you save the web resource.
Text Editor When the type of web resource represents a kind of text file, click this button to open a page to edit the content using the text editor.
Language Allows for a selection of a language. This option just tags the record that stores the web resource data. It doesn’t change the behavior of the web resource.
Upload File Press the Browse… button to choose a file to upload as a web resource.
You can upload a file when creating a new web resource or to overwrite an existing web resource.
The file name extension of the file must match allowed extensions.
By default the maximum size file that can be uploaded as a web resource is 5MB. This value can be modified using the System Settings > Email tab > Set file size limit for attachments setting. More information: Help & Training: System Settings dialog box - Email tab
URL After you save the web resource, the URL to the web resource will be displayed here. Click this link to view the web resource in your browser.
6. After you have added your changes, choose Save and then Publish.
Use the text editor appropriately The text editor provided in the application for web resources should only be used for simple edits of text files. You can use it to create and edit HTML web resources, but you should only edit HTML web resources that were created using the text editor. The text editor is designed for very simple HTML
576
content. If the content of an HTML web resource wasn’t created using the text editor, don’t use the text editor to edit it.
The text editor uses a control that modifies the HTML source in a way that allows it to be edited. These changes can make the page behave differently in the browser and cause more sophisticated code to stop working. Opening an HTML web resource with the text editor and saving it without making any changes can break some HTML web resources.
We recommend that you use an external editor to edit text files and then save them locally before uploading them with the Upload File button. This way you can preserve a copy of the web resource if you need to return to an earlier version. You can use a simple editor like Notepad, but a text editor with more advanced capabilities is highly recommended. Visual Studio Express editions are free and provide powerful capabilities for editing the files used by text-based web resources.
See Also Customize your Dynamics 365 system MSDN: Web resources for Microsoft Dynamics 365
© 2016 Microsoft. All rights reserved. Copyright
Define alternate keys to reference Dynamics 365 records
Applies To: Dynamics 365 (online), Dynamics 365 (on-premises), Dynamics CRM 2016, Dynamics CRM Online
[This topic is pre-release documentation and is subject to change.]
With alternate keys, you can assure an efficient and accurate way of integrating data into Microsoft Dynamics 365 from external systems. It’s especially important in cases when an external system doesn’t store the Dynamics 365 record IDs (GUIDs) that uniquely identify records. The alternate keys are not GUIDs and you can use them to uniquely identify the Dynamics 365 records. You must give an alternate key a unique name. You can use one or more entity fields to define the key. For example, to identify an account record with an alternate key, you can use the account name and the account number. You can define alternate keys in the Dynamics 365 web application without writing code, or you can define them programmatically. Note that while you can define the alternate keys in the user interface (UI), they can only be used programmatically, in code.
Some of the benefits of the alternate keys feature include:
Faster lookup of the records.
More robust bulk data operations, especially in Dynamics 365 (online).
Simplified programming with data imported from external systems without Dynamics 365 record
IDs.
To learn more about alternate keys programmability, see: MSDN: Define alternate keys for an entity MSDN: Use an alternate key to create a record
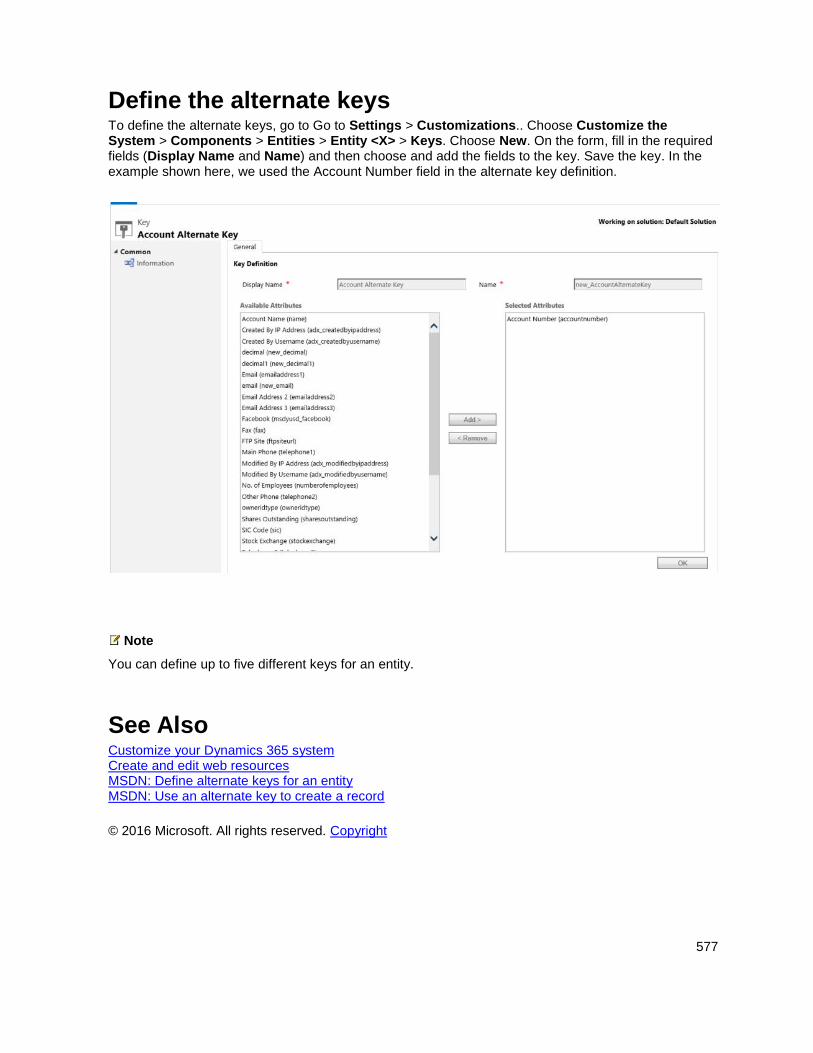
577
Define the alternate keys To define the alternate keys, go to Go to Settings > Customizations.. Choose Customize the System > Components > Entities > Entity <X> > Keys. Choose New. On the form, fill in the required fields (Display Name and Name) and then choose and add the fields to the key. Save the key. In the example shown here, we used the Account Number field in the alternate key definition.
Note
You can define up to five different keys for an entity.
See Also Customize your Dynamics 365 system Create and edit web resources MSDN: Define alternate keys for an entity MSDN: Use an alternate key to create a record
© 2016 Microsoft. All rights reserved. Copyright
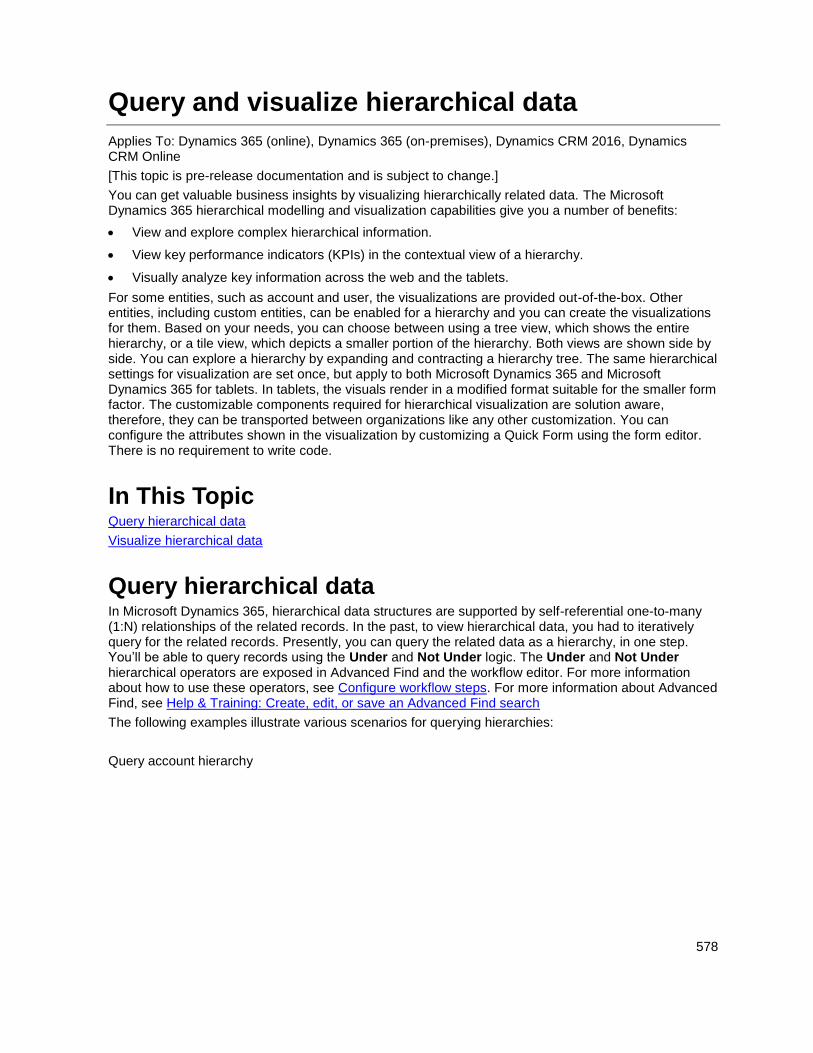
578
Query and visualize hierarchical data
Applies To: Dynamics 365 (online), Dynamics 365 (on-premises), Dynamics CRM 2016, Dynamics CRM Online
[This topic is pre-release documentation and is subject to change.]
You can get valuable business insights by visualizing hierarchically related data. The Microsoft Dynamics 365 hierarchical modelling and visualization capabilities give you a number of benefits:
View and explore complex hierarchical information.
View key performance indicators (KPIs) in the contextual view of a hierarchy.
Visually analyze key information across the web and the tablets.
For some entities, such as account and user, the visualizations are provided out-of-the-box. Other entities, including custom entities, can be enabled for a hierarchy and you can create the visualizations for them. Based on your needs, you can choose between using a tree view, which shows the entire hierarchy, or a tile view, which depicts a smaller portion of the hierarchy. Both views are shown side by side. You can explore a hierarchy by expanding and contracting a hierarchy tree. The same hierarchical settings for visualization are set once, but apply to both Microsoft Dynamics 365 and Microsoft Dynamics 365 for tablets. In tablets, the visuals render in a modified format suitable for the smaller form factor. The customizable components required for hierarchical visualization are solution aware, therefore, they can be transported between organizations like any other customization. You can configure the attributes shown in the visualization by customizing a Quick Form using the form editor. There is no requirement to write code.
In This Topic Query hierarchical data
Visualize hierarchical data
Query hierarchical data In Microsoft Dynamics 365, hierarchical data structures are supported by self-referential one-to-many (1:N) relationships of the related records. In the past, to view hierarchical data, you had to iteratively query for the related records. Presently, you can query the related data as a hierarchy, in one step. You’ll be able to query records using the Under and Not Under logic. The Under and Not Under hierarchical operators are exposed in Advanced Find and the workflow editor. For more information about how to use these operators, see Configure workflow steps. For more information about Advanced Find, see Help & Training: Create, edit, or save an Advanced Find search
The following examples illustrate various scenarios for querying hierarchies:
Query account hierarchy
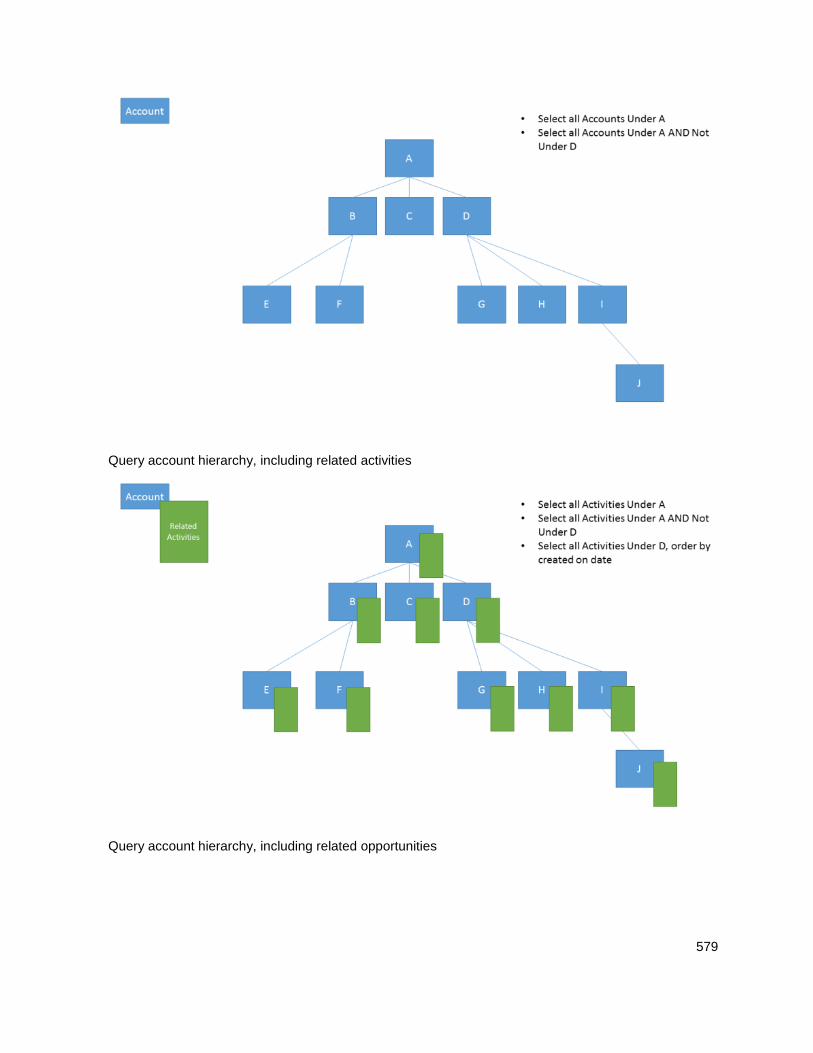
579
Query account hierarchy, including related activities
Query account hierarchy, including related opportunities
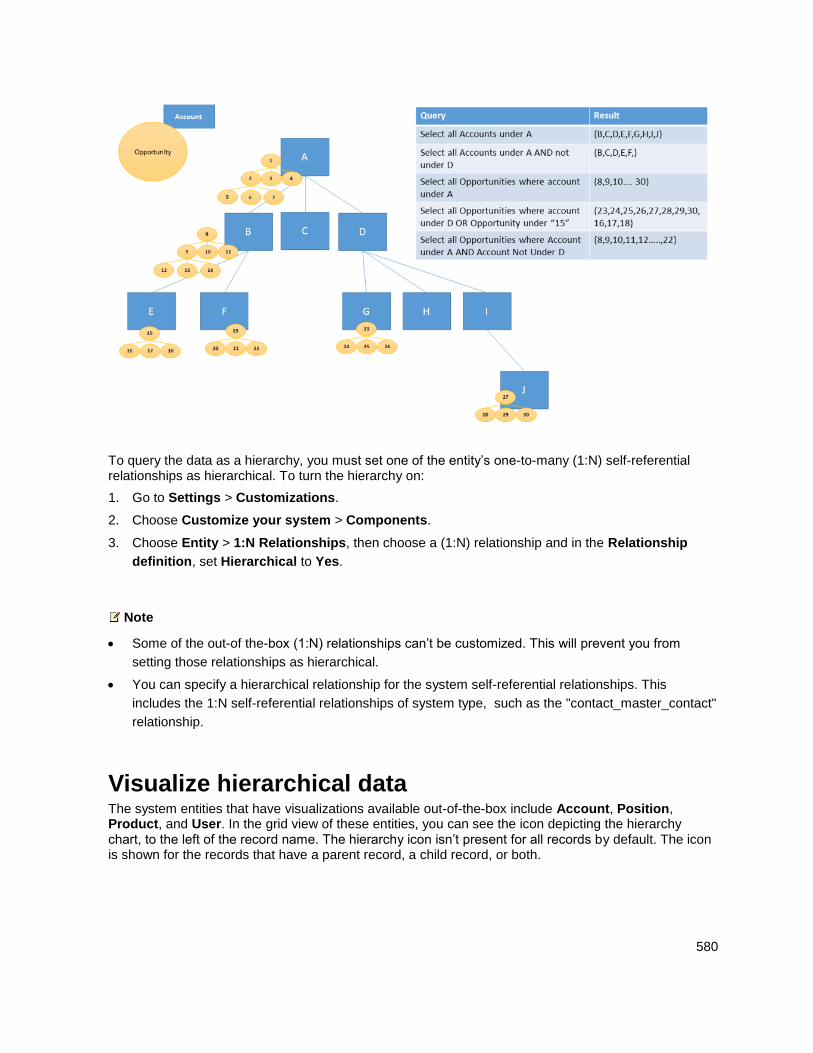
580
To query the data as a hierarchy, you must set one of the entity’s one-to-many (1:N) self-referential relationships as hierarchical. To turn the hierarchy on:
1. Go to Settings > Customizations.
2. Choose Customize your system > Components.
3. Choose Entity > 1:N Relationships, then choose a (1:N) relationship and in the Relationship
definition, set Hierarchical to Yes.
Note
Some of the out-of the-box (1:N) relationships can’t be customized. This will prevent you from
setting those relationships as hierarchical.
You can specify a hierarchical relationship for the system self-referential relationships. This
includes the 1:N self-referential relationships of system type, such as the "contact_master_contact"
relationship.
Visualize hierarchical data The system entities that have visualizations available out-of-the-box include Account, Position, Product, and User. In the grid view of these entities, you can see the icon depicting the hierarchy chart, to the left of the record name. The hierarchy icon isn’t present for all records by default. The icon is shown for the records that have a parent record, a child record, or both.
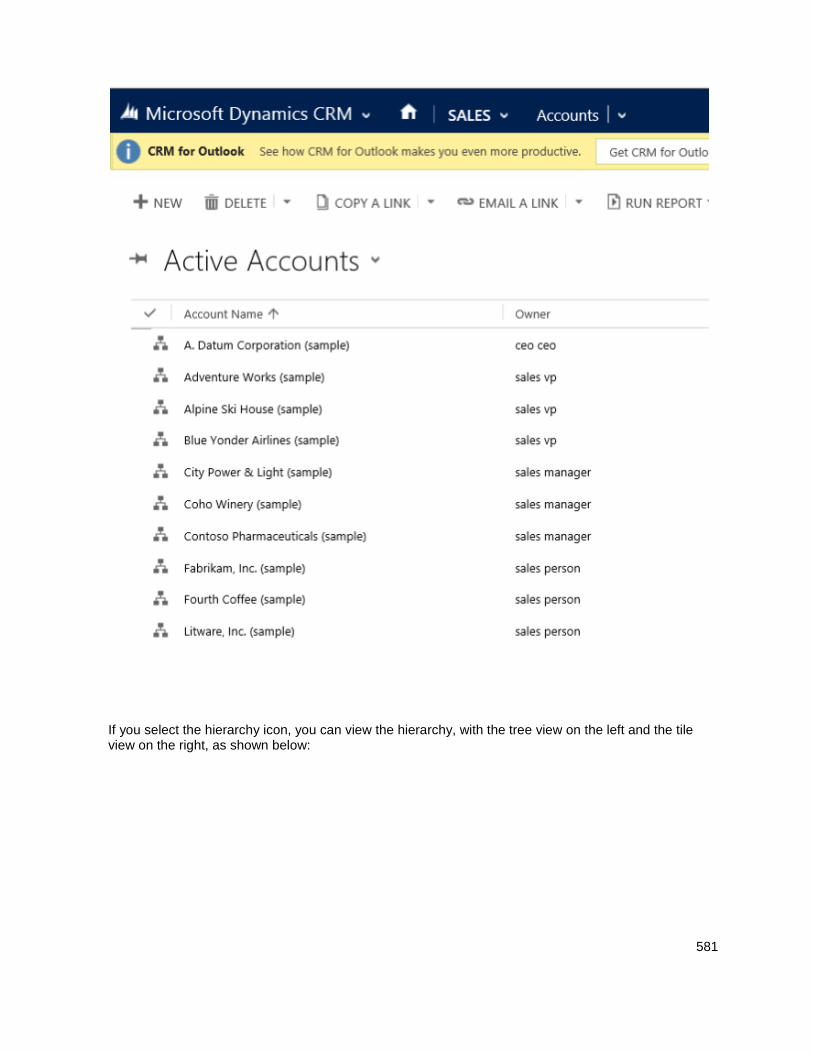
581
If you select the hierarchy icon, you can view the hierarchy, with the tree view on the left and the tile view on the right, as shown below:
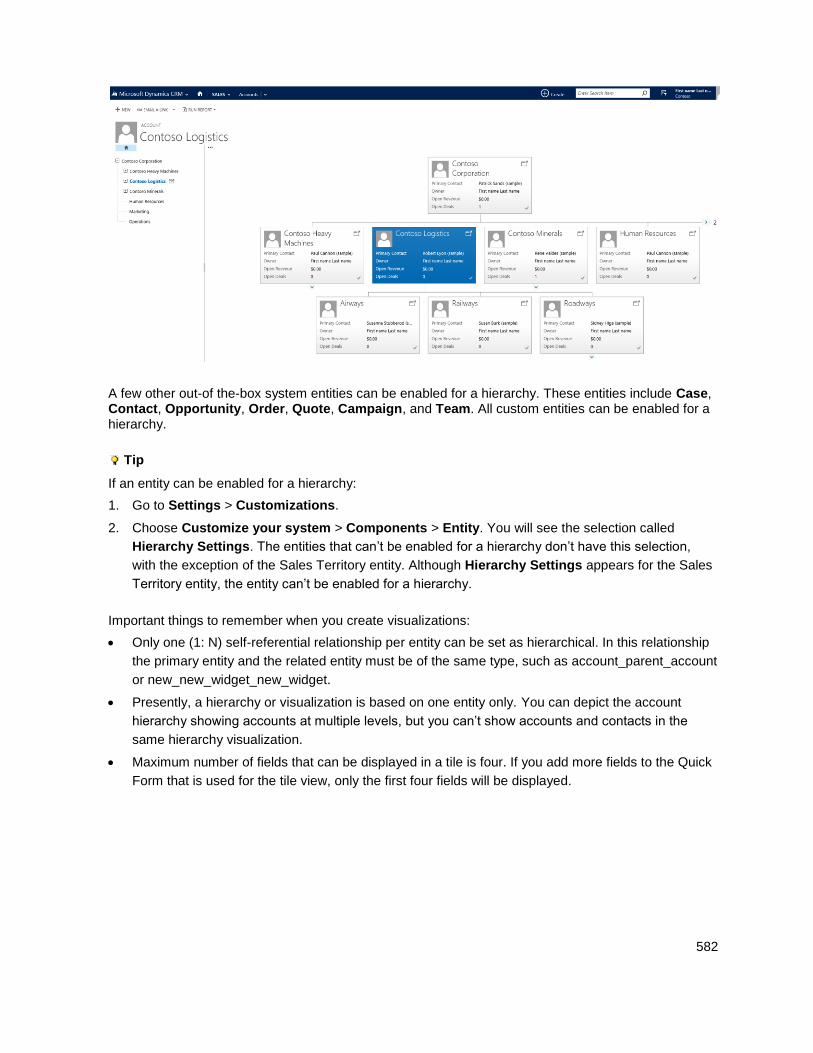
582
A few other out-of the-box system entities can be enabled for a hierarchy. These entities include Case, Contact, Opportunity, Order, Quote, Campaign, and Team. All custom entities can be enabled for a hierarchy.
Tip
If an entity can be enabled for a hierarchy:
1. Go to Settings > Customizations.
2. Choose Customize your system > Components > Entity. You will see the selection called
Hierarchy Settings. The entities that can’t be enabled for a hierarchy don’t have this selection,
with the exception of the Sales Territory entity. Although Hierarchy Settings appears for the Sales
Territory entity, the entity can’t be enabled for a hierarchy.
Important things to remember when you create visualizations:
Only one (1: N) self-referential relationship per entity can be set as hierarchical. In this relationship
the primary entity and the related entity must be of the same type, such as account_parent_account
or new_new_widget_new_widget.
Presently, a hierarchy or visualization is based on one entity only. You can depict the account
hierarchy showing accounts at multiple levels, but you can’t show accounts and contacts in the
same hierarchy visualization.
Maximum number of fields that can be displayed in a tile is four. If you add more fields to the Quick
Form that is used for the tile view, only the first four fields will be displayed.
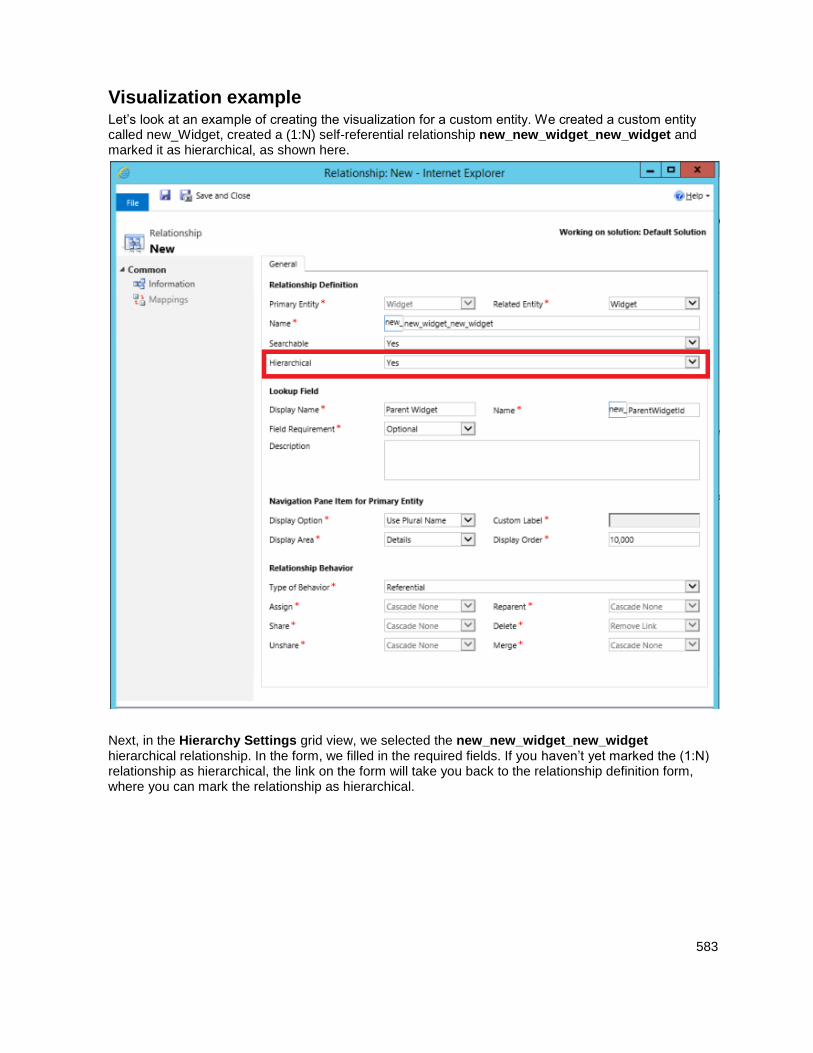
583
Visualization example Let’s look at an example of creating the visualization for a custom entity. We created a custom entity called new_Widget, created a (1:N) self-referential relationship new_new_widget_new_widget and marked it as hierarchical, as shown here.
Next, in the Hierarchy Settings grid view, we selected the new_new_widget_new_widget hierarchical relationship. In the form, we filled in the required fields. If you haven’t yet marked the (1:N) relationship as hierarchical, the link on the form will take you back to the relationship definition form, where you can mark the relationship as hierarchical.
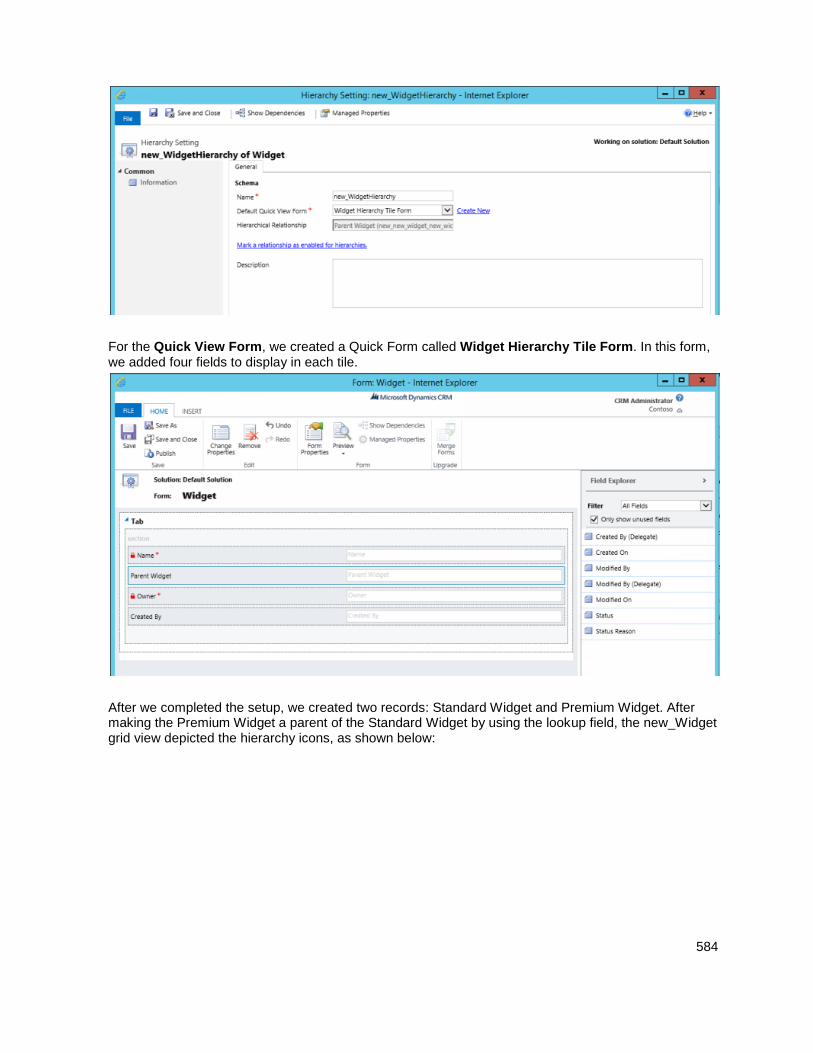
584
For the Quick View Form, we created a Quick Form called Widget Hierarchy Tile Form. In this form, we added four fields to display in each tile.
After we completed the setup, we created two records: Standard Widget and Premium Widget. After making the Premium Widget a parent of the Standard Widget by using the lookup field, the new_Widget grid view depicted the hierarchy icons, as shown below:

585
Tip
The hierarchy icons don’t appear in the record grid view until the records are paired in the parent – child relationship.
Choosing the hierarchy icon displays the new_Widget hierarchy with the tree view on the left and the tile view on the right, showing two records. Each tile contains four fields that we provided in the Widget Hierarchy Tile Form.
586
See Also Customize your Dynamics 365 system Customize the Help experience Video: Hierarchical Security Modelling in Microsoft Dynamics CRM Video: Hierarchy Visualization in Microsoft Dynamics CRM
© 2016 Microsoft. All rights reserved. Copyright
Customize the Help experience
Applies To: Dynamics 365 (online), Dynamics 365 (on-premises), Dynamics CRM 2016, Dynamics CRM Online
[This topic is pre-release documentation and is subject to change.]
Microsoft Dynamics 365 has a knowledge base application built in for online help. This help is hosted on the Dynamics 365 Help & Training site, a central location where users can find articles, videos, eBooks, best practices, and tips regarding topical issues.
In addition to the built-in help, Microsoft Dynamics 365 offers customizable help and tooltips to provide contextual information to users filling in forms. You can replace default Help with the custom Help of your choice, at the global (organization) level or entity level. Custom Help makes the content exposed through the Help links more relevant to the user’s day-to-day activities. With a single, global URL you can override the out-of-the-box Help links for all customizable entities. Per entity URLs override the out-of-the-box Help links on grids and forms for a specific customizable entity. You can include additional parameters in the URL, such as language code and entity name. These parameters allow a developer to add functionality to redirect the user to a page that’s relevant to their language or the entity context within the application. The entity level custom Help settings are solution aware, therefore you can package them as a part of the solution and transport them between organizations or distribute them in solutions. Custom tooltips provide the ability to set the text that appears as a tooltip when the field is displayed in a form. Tooltips are also solution aware. For more information about tooltips, view: Video: Microsoft Dynamics CRM Customizable Tool Tips
Note
Customizable Help is not available in Microsoft Dynamics 365 for tablets.
Example of a custom URL at a global level
You have a dynamic Help server to serve the Help content for the custom entities. Your solution almost entirely consists of the custom entities. You can specify the . aspx page that points to the Help server and pass the parameters in the URL. You can program the Help server to display the correct Help page based on the parameters passed.
Example of a custom URL at an entity level
You have a static set of Help webpages for the custom entities and customized out-of-the box (OOB) system entities. For example, you have added only two or three custom entities and heavily customized the opportunity entity. The rest of the OOB system entities remained unchanged. In this case, you can override the Help content for the custom entities and the Opportunity entity and use the default Help for the rest of the entities in your system.
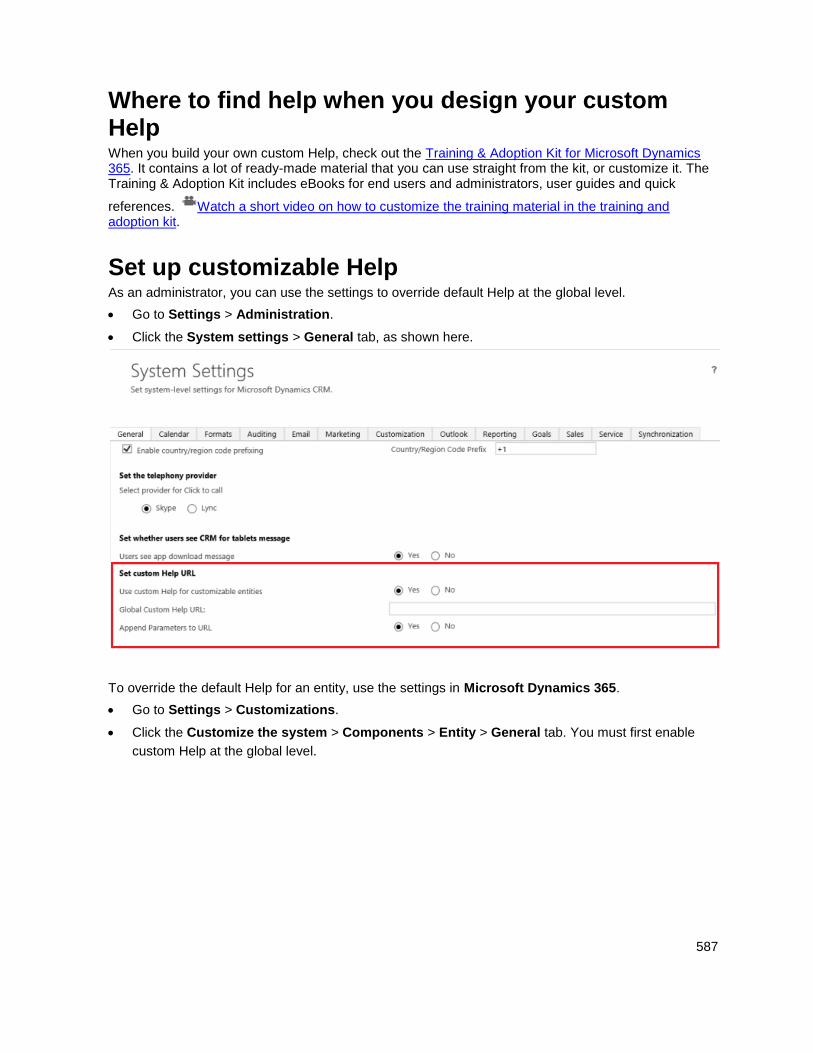
587
Where to find help when you design your custom Help When you build your own custom Help, check out the Training & Adoption Kit for Microsoft Dynamics 365. It contains a lot of ready-made material that you can use straight from the kit, or customize it. The Training & Adoption Kit includes eBooks for end users and administrators, user guides and quick
references. Watch a short video on how to customize the training material in the training and adoption kit.
Set up customizable Help As an administrator, you can use the settings to override default Help at the global level.
Go to Settings > Administration.
Click the System settings > General tab, as shown here.
To override the default Help for an entity, use the settings in Microsoft Dynamics 365.
Go to Settings > Customizations.
Click the Customize the system > Components > Entity > General tab. You must first enable
custom Help at the global level.
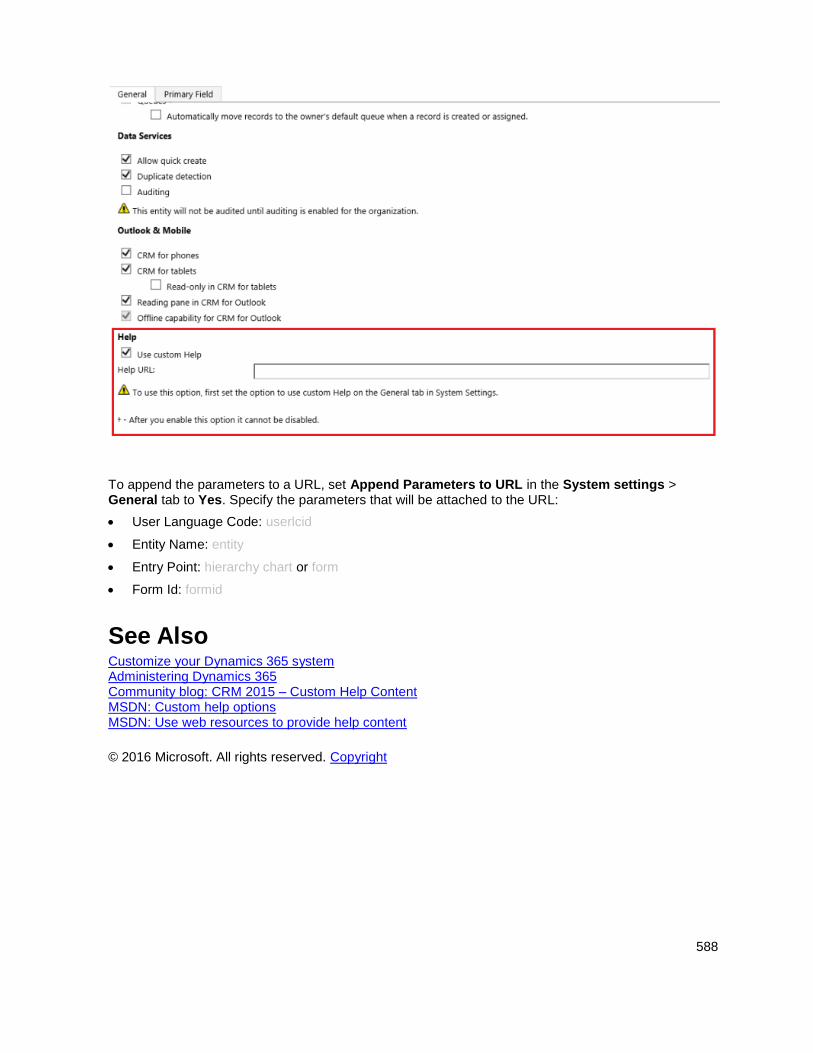
588
To append the parameters to a URL, set Append Parameters to URL in the System settings > General tab to Yes. Specify the parameters that will be attached to the URL:
User Language Code: userlcid
Entity Name: entity
Entry Point: hierarchy chart or form
Form Id: formid
See Also Customize your Dynamics 365 system Administering Dynamics 365 Community blog: CRM 2015 – Custom Help Content MSDN: Custom help options MSDN: Use web resources to provide help content
© 2016 Microsoft. All rights reserved. Copyright

589
Customize Dynamics 365 for phones and tablets
Applies To: Dynamics 365 (online), Dynamics 365 (on-premises), Dynamics CRM 2016, Dynamics CRM Online
[This topic is pre-release documentation and is subject to change.]
With Microsoft Dynamics 365, you can design once and deploy everywhere. Customizations you make to your Dynamics 365 system appear in the Dynamics 365 for phones and tablets apps as well as in the web app. Your changes are optimized in the mobile apps so they display properly. Choose one of the following or scroll down to see the types of changes you can make, and how they might display differently in the mobile apps than the web app.
The latest version of the phone app, Microsoft Dynamics 365 for phones, provides the same full-featured experience as the Dynamics 365 for tablets app. It has the same intuitive user interface (adapted for phones), as well as offline capabilities.
The previous version of the phone app has a new name: Microsoft Dynamics 365 for phones express. For information about customizing the previous version of the app, see Create and edit mobile forms for Dynamics CRM for phones express.
After you’ve made customizations to a form, users will see a prompt to download updates the next time they open their mobile app.
In this topic Home page for Dynamics 365 for phones and tablets
Form customizations for Dynamics 365 for phones and tablets
Entities displayed in Dynamics 365 for phones and tablets
Change navigation options for Dynamics 365 for phones and tablets
Change commands for Dynamics 365 for phones and tablets
Form script differences for Dynamics 365 for phones and tablets
Publishing customizations for Dynamics 365 for phones and tablets
Business rules in Dynamics 365 for phones and tablets
Visual controls in Dynamics 365 for phones and tablets
Home page for Dynamics 365 for phones and tablets When users first open Dynamics 365 for phones and tablets, they’ll see the home page, which defaults to the Sales Dashboard. You can create new dashboards or edit existing ones in the web app and enable them for mobile, and users can choose a different Home dashboard. For more information about creating or changing dashboards, see Create a dashboard or Manage dashboard components on the Dynamics 365 Help & Training site.
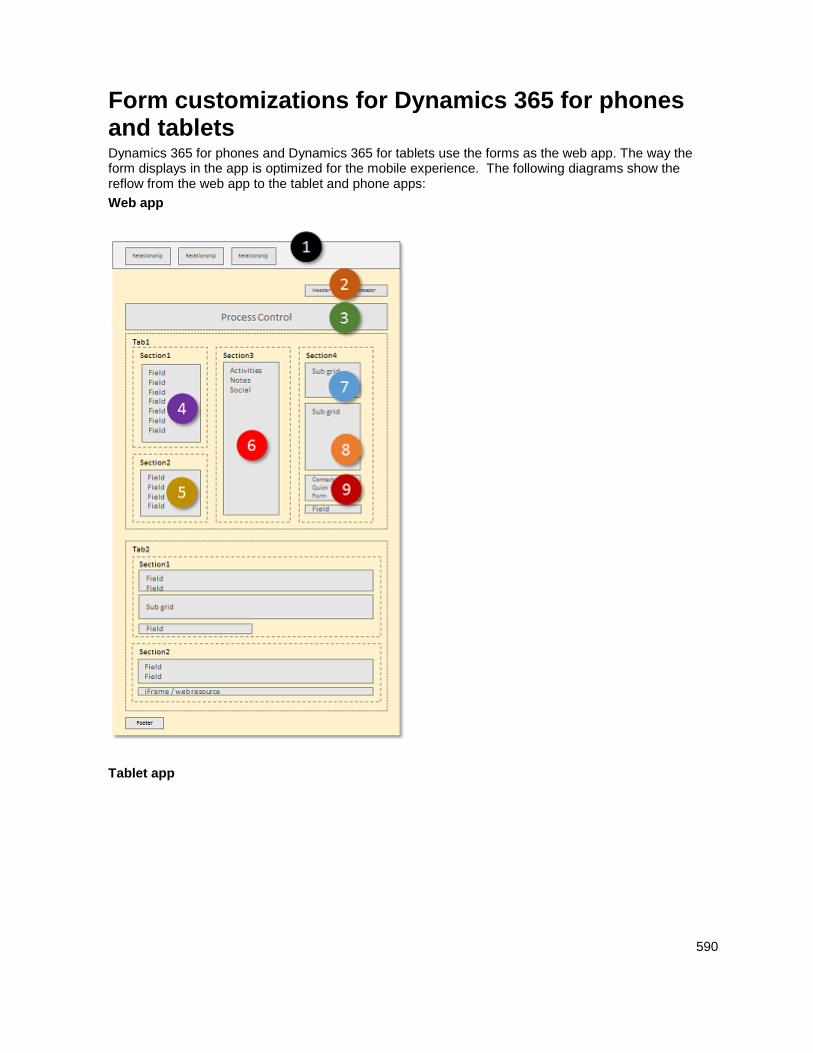
590
Form customizations for Dynamics 365 for phones and tablets Dynamics 365 for phones and Dynamics 365 for tablets use the forms as the web app. The way the form displays in the app is optimized for the mobile experience. The following diagrams show the reflow from the web app to the tablet and phone apps:
Web app
Tablet app

591
Phone app
Dynamics 365 for phones and tablets does not provide the capability to switch between forms. If you have more than one main form for an entity, the one displayed depends on the form order set and which security roles are assigned to the form. More information: Multiple forms
While customizing a form, you can hide the following from the Dynamics 365 for phones experience:
1. Fields
2. Sections
3. Entire tabs
That way, if you think phone users need to focus only on the primary information for a contact, for example, you can hide the contact details from the phone app while you’re customizing the form.
Hide details from the Dynamics 365 for phones display
1. While customizing a form in the form editor, select the field, section, or tab you want to hide. For
tips on using the form editor, see Use the form editor.
2. Click Change Properties.
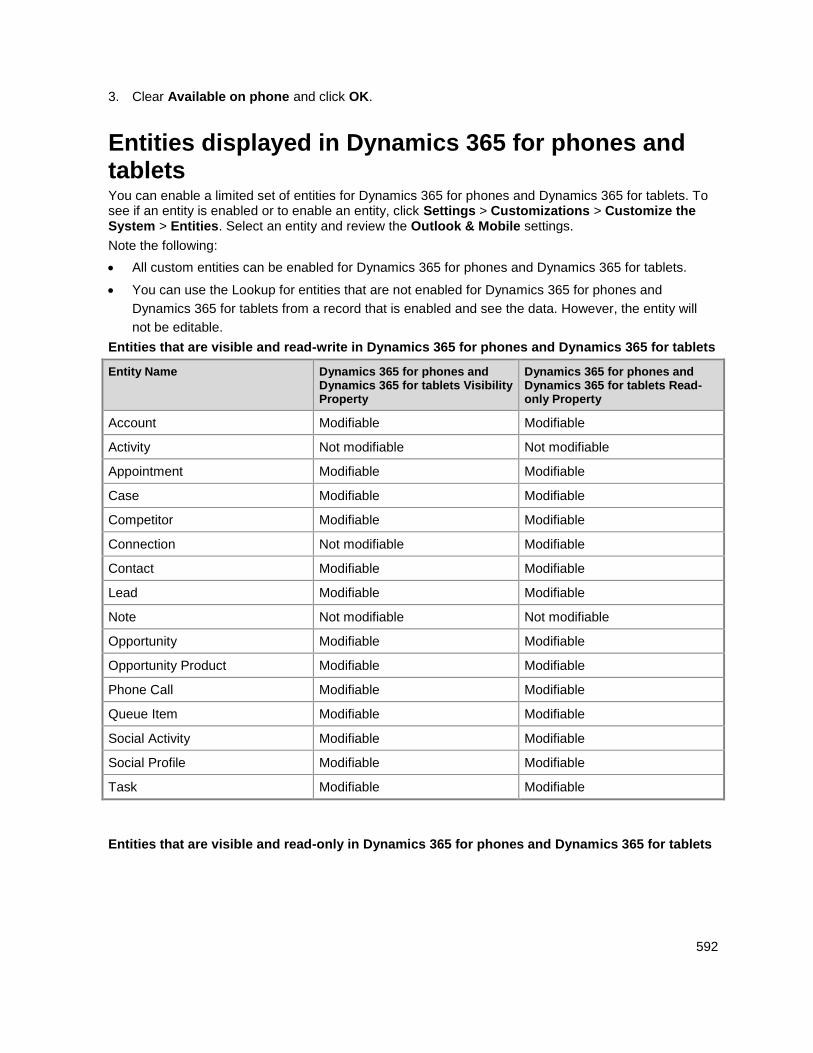
592
3. Clear Available on phone and click OK.
Entities displayed in Dynamics 365 for phones and tablets You can enable a limited set of entities for Dynamics 365 for phones and Dynamics 365 for tablets. To see if an entity is enabled or to enable an entity, click Settings > Customizations > Customize the System > Entities. Select an entity and review the Outlook & Mobile settings.
Note the following:
All custom entities can be enabled for Dynamics 365 for phones and Dynamics 365 for tablets.
You can use the Lookup for entities that are not enabled for Dynamics 365 for phones and
Dynamics 365 for tablets from a record that is enabled and see the data. However, the entity will
not be editable.
Entities that are visible and read-write in Dynamics 365 for phones and Dynamics 365 for tablets
Entity Name Dynamics 365 for phones and Dynamics 365 for tablets Visibility Property
Dynamics 365 for phones and Dynamics 365 for tablets Read-only Property
Account Modifiable Modifiable
Activity Not modifiable Not modifiable
Appointment Modifiable Modifiable
Case Modifiable Modifiable
Competitor Modifiable Modifiable
Connection Not modifiable Modifiable
Contact Modifiable Modifiable
Lead Modifiable Modifiable
Note Not modifiable Not modifiable
Opportunity Modifiable Modifiable
Opportunity Product Modifiable Modifiable
Phone Call Modifiable Modifiable
Queue Item Modifiable Modifiable
Social Activity Modifiable Modifiable
Social Profile Modifiable Modifiable
Task Modifiable Modifiable
Entities that are visible and read-only in Dynamics 365 for phones and Dynamics 365 for tablets
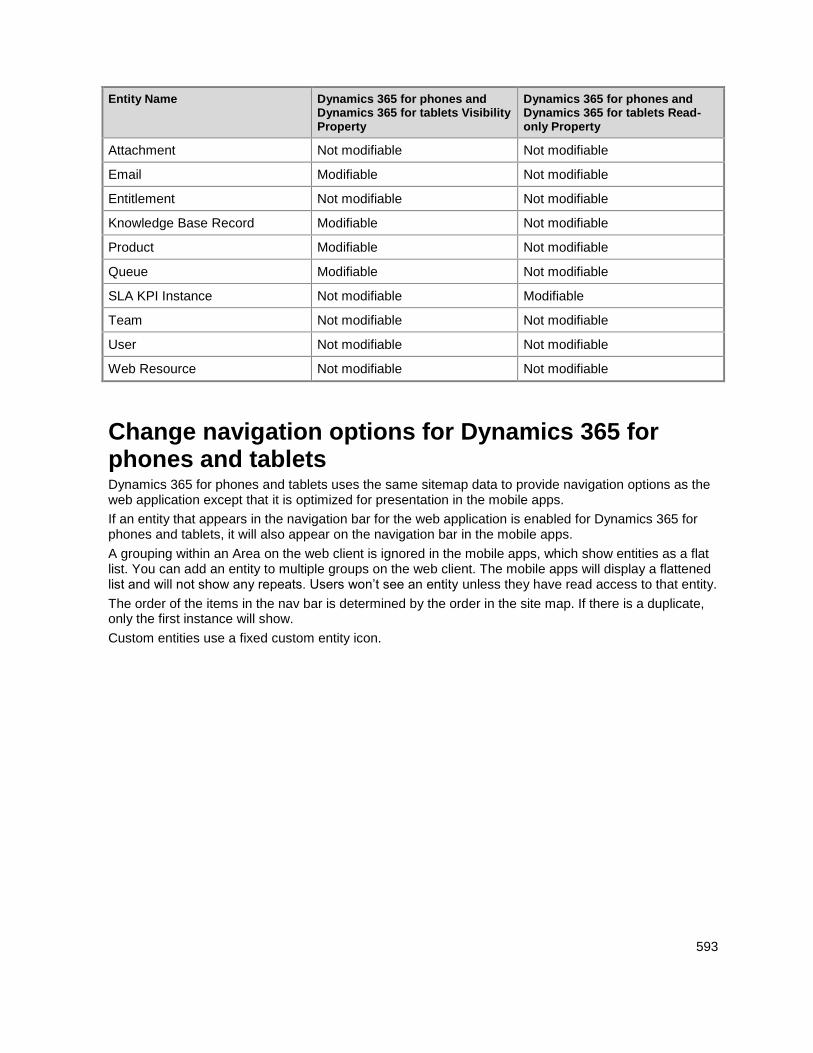
593
Entity Name Dynamics 365 for phones and Dynamics 365 for tablets Visibility Property
Dynamics 365 for phones and Dynamics 365 for tablets Read-only Property
Attachment Not modifiable Not modifiable
Email Modifiable Not modifiable
Entitlement Not modifiable Not modifiable
Knowledge Base Record Modifiable Not modifiable
Product Modifiable Not modifiable
Queue Modifiable Not modifiable
SLA KPI Instance Not modifiable Modifiable
Team Not modifiable Not modifiable
User Not modifiable Not modifiable
Web Resource Not modifiable Not modifiable
Change navigation options for Dynamics 365 for phones and tablets Dynamics 365 for phones and tablets uses the same sitemap data to provide navigation options as the web application except that it is optimized for presentation in the mobile apps.
If an entity that appears in the navigation bar for the web application is enabled for Dynamics 365 for phones and tablets, it will also appear on the navigation bar in the mobile apps.
A grouping within an Area on the web client is ignored in the mobile apps, which show entities as a flat list. You can add an entity to multiple groups on the web client. The mobile apps will display a flattened list and will not show any repeats. Users won’t see an entity unless they have read access to that entity.
The order of the items in the nav bar is determined by the order in the site map. If there is a duplicate, only the first instance will show.
Custom entities use a fixed custom entity icon.
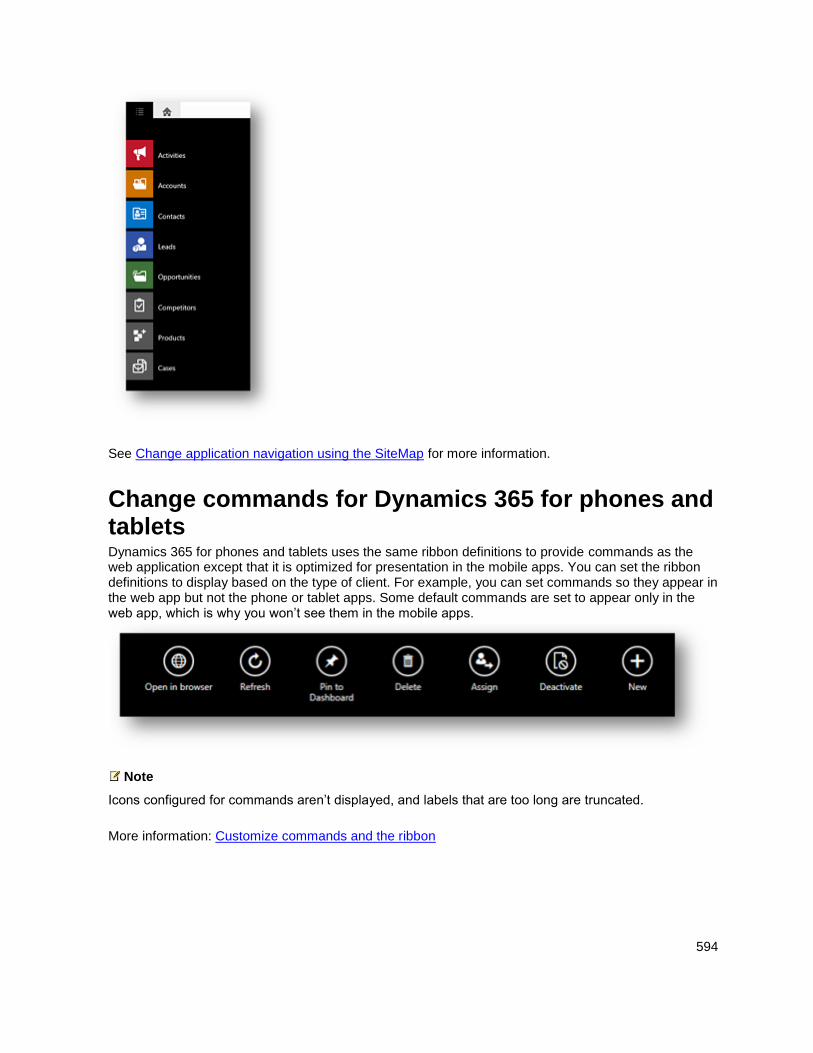
594
See Change application navigation using the SiteMap for more information.
Change commands for Dynamics 365 for phones and tablets Dynamics 365 for phones and tablets uses the same ribbon definitions to provide commands as the web application except that it is optimized for presentation in the mobile apps. You can set the ribbon definitions to display based on the type of client. For example, you can set commands so they appear in the web app but not the phone or tablet apps. Some default commands are set to appear only in the web app, which is why you won’t see them in the mobile apps.
Note
Icons configured for commands aren’t displayed, and labels that are too long are truncated.
More information: Customize commands and the ribbon
595
Form script differences for Dynamics 365 for phones and tablets Scripts written for forms used in the web application should also work with Dynamics 365 for phones and tablets, but there are some differences. As a rule, methods that aren’t valid within for the mobile apps don’t return errors, but they also don’t return any values. Developers can use the following conditional statement to separate code that won’t work correctly in the mobile apps:
if (Xrm.Page.context.client.getClient() != "Mobile")
{
// Add code that should not run in CRM for phones and tablets here
}
You can also use the getFormFactor API to set whether code will work on just phones or just tablets, with a statement like this:
if (Xrm.Page.context.client.getClient() == "Mobile" && Xrm.Page.context.client.getFormFactor()
== 3)
{
// Add code that should only run in CRM for phones here
}
The following list shows what to expect with scripts in the mobile apps. For specific details, see the developer documentation in the MSDN: Client-side programming reference.
Using window.alert, window.confirm, window.prompt or any other code that blocks code execution
while waiting for a user’s response won’t work as expected or will display an error. You shouldn’t
use these methods in scripts for the mobile apps.
Because tabs displayed in Dynamics 365 for phones and tablets can’t expand or collapse, code
that tries to expand or collapse them won’t work, and code configured for event handlers using
these events won’t execute.
Web resource or iFrame elements in your dashboards won’t display in the mobile apps. Methods
that interact with them won’t work, and code configured for event handlers using these for the
events called when these items load won’t run. If you’re interested in trying out a preview feature
that does display web resource or iFrame elements in Dynamics 365 for tablets, see Preview
feature: iFrame and web resource support in CRM for tablets.
Because Dynamics 365 for phones and tablets doesn’t provide the ability for a user to switch to
different forms, methods that enable this in the web application won’t work.
Any methods for showing or navigating to related entities in the web application won’t work.
Methods that would refresh the command bar, get dimensions of the view port, or close a form
window won’t work.
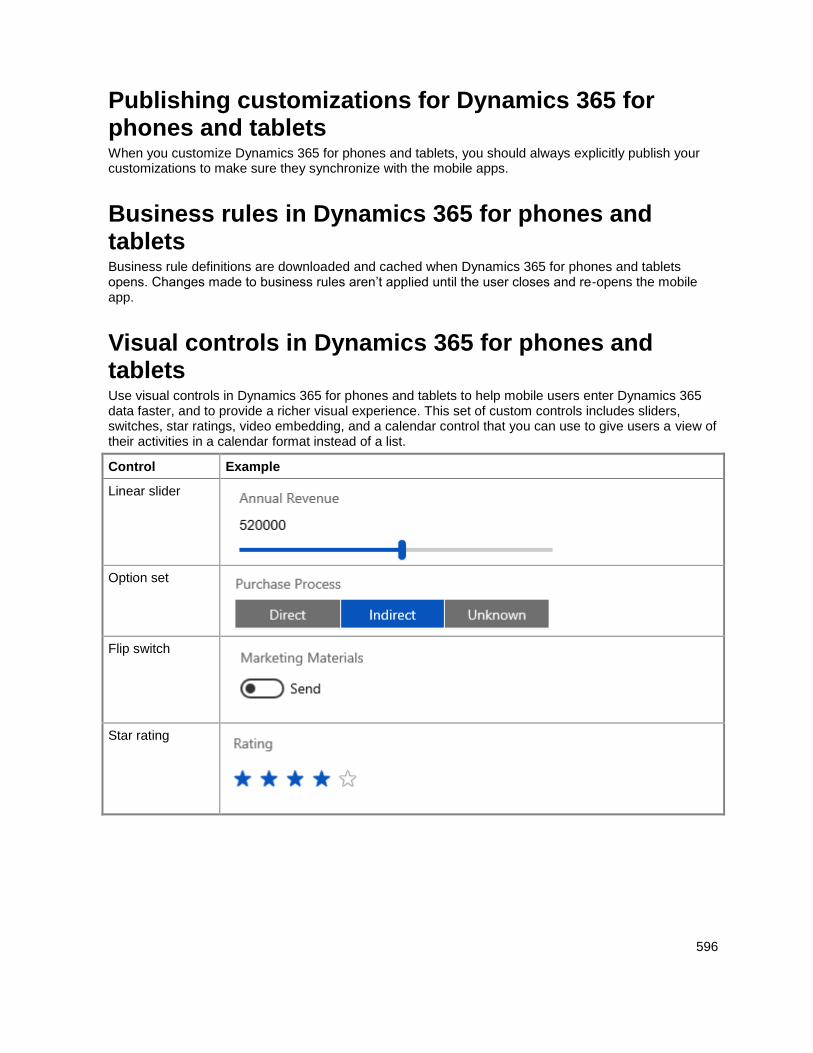
596
Publishing customizations for Dynamics 365 for phones and tablets When you customize Dynamics 365 for phones and tablets, you should always explicitly publish your customizations to make sure they synchronize with the mobile apps.
Business rules in Dynamics 365 for phones and tablets Business rule definitions are downloaded and cached when Dynamics 365 for phones and tablets opens. Changes made to business rules aren’t applied until the user closes and re-opens the mobile app.
Visual controls in Dynamics 365 for phones and tablets Use visual controls in Dynamics 365 for phones and tablets to help mobile users enter Dynamics 365 data faster, and to provide a richer visual experience. This set of custom controls includes sliders, switches, star ratings, video embedding, and a calendar control that you can use to give users a view of their activities in a calendar format instead of a list.
Control Example
Linear slider
Option set
Flip switch
Star rating
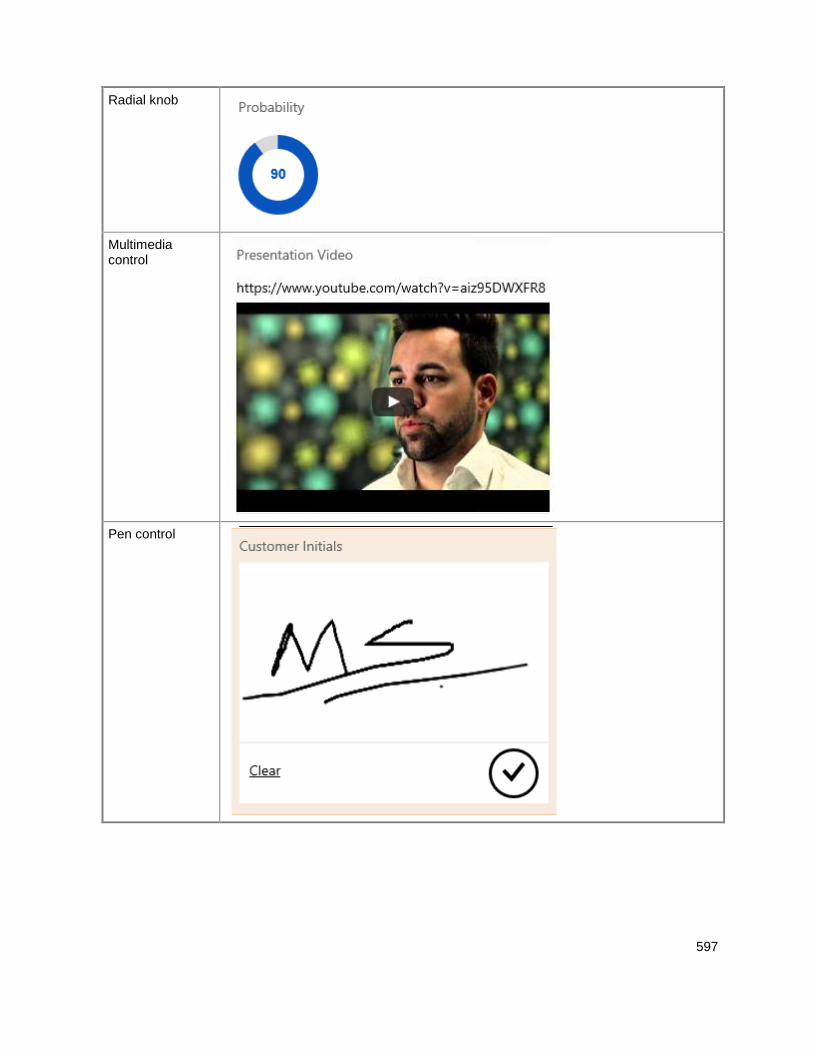
597
Radial knob
Multimedia control
Pen control
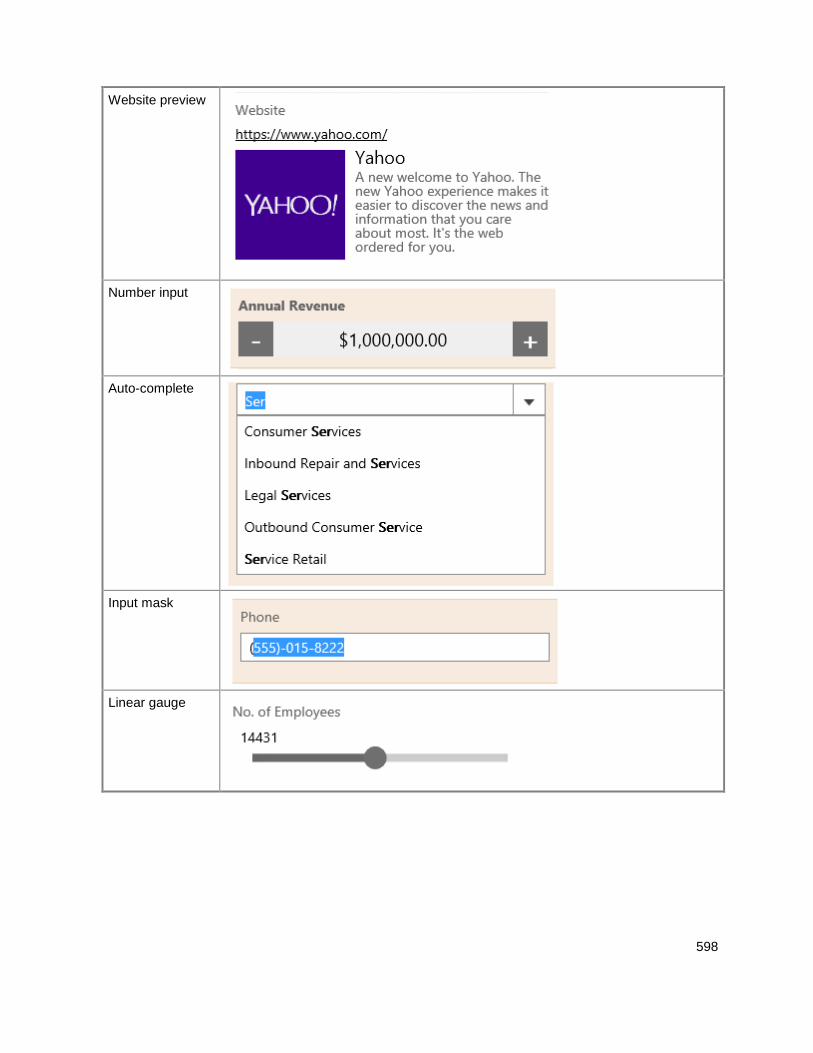
598
Website preview
Number input
Auto-complete
Input mask
Linear gauge
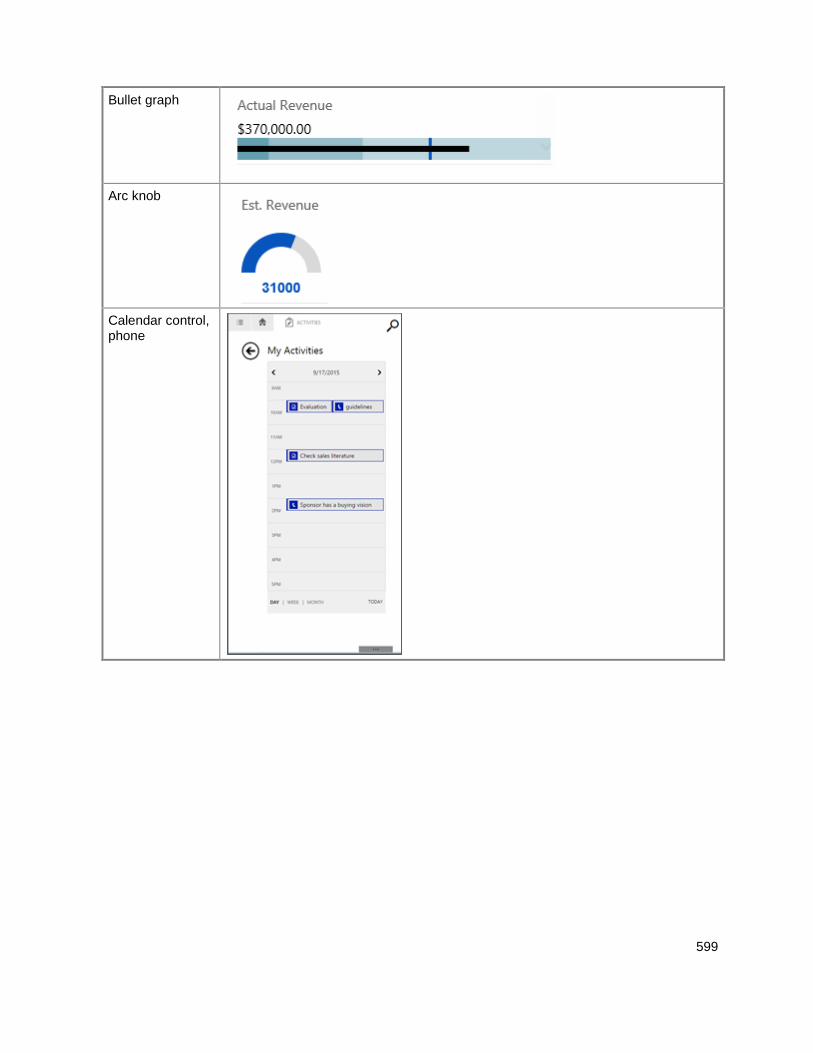
599
Bullet graph
Arc knob
Calendar control, phone
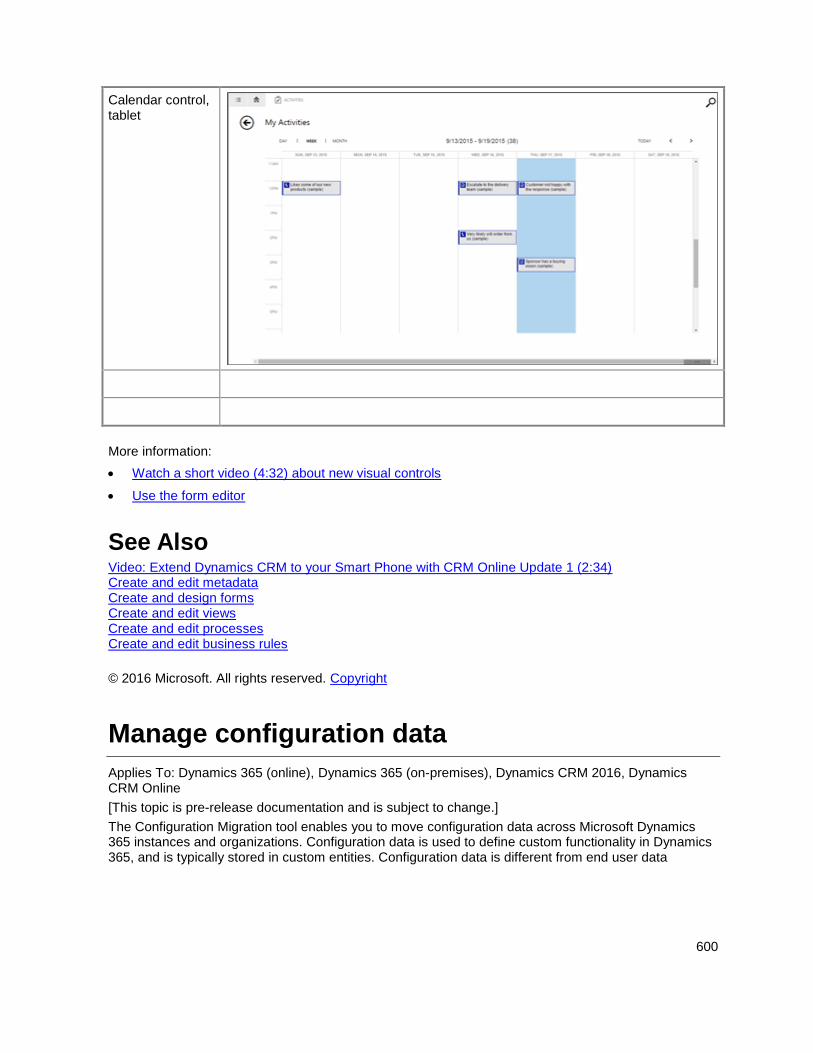
600
Calendar control, tablet
More information:
Watch a short video (4:32) about new visual controls
Use the form editor
See Also Video: Extend Dynamics CRM to your Smart Phone with CRM Online Update 1 (2:34) Create and edit metadata Create and design forms Create and edit views Create and edit processes Create and edit business rules
© 2016 Microsoft. All rights reserved. Copyright
Manage configuration data
Applies To: Dynamics 365 (online), Dynamics 365 (on-premises), Dynamics CRM 2016, Dynamics CRM Online
[This topic is pre-release documentation and is subject to change.]
The Configuration Migration tool enables you to move configuration data across Microsoft Dynamics 365 instances and organizations. Configuration data is used to define custom functionality in Dynamics 365, and is typically stored in custom entities. Configuration data is different from end user data
601
(account, contacts, and so on). A typical example of configuration data is what you define in Unified Service Desk for Microsoft Dynamics 365 to configure a customized call center agent application. The Unified Service Desk entities, along with the configuration data that is stored in the entities, define an agent application. For more information about Unified Service Desk, see Administration Guide for Unified Service Desk for Microsoft Dynamics 365.
The Configuration Migration tool enables you to:
Select the entities and fields from where you want to export the configuration data.
Avoid duplicate records on the target system by defining a uniqueness condition for each entity
based on a combination of fields in the entity, which is used to compare against the values on the
target system. If there are no matching values, a unique record is created on the target system. If a
matching record is found, the record is updated on the target system.
Note
If no duplicate detection (uniqueness) condition is specified for an entity that is being exported, the tool uses the primary field name of the entity to compare against the existing data on the target system.
Disable plug-ins before exporting data and then re-enable them on the target system after the
import is complete for all the entities or selected entities.
Validate the schema for the selected entities to be exported to ensure that all the required
data/information is present.
Reuse an existing schema to export data from a source system.
Embed the exported modules created from this tool (schema and data files) in other programs. For
example, you can use the exported data in Microsoft Dynamics CRM Package Deployer along with
other solutions files and data to create and deploy packages on a Dynamics 365 instance. More
information: Deploy packages using Dynamics 365 Package Deployer and Windows PowerShell
Important
The Configuration Migration tool does not support filtering of records in an entity. By default, all the records in the selected entity will be exported.
In This Topic How does the Configuration Migration tool work?
Troubleshoot configuration data migration issues using log files
Best practices for migrating your configuration data by using the tool
How does the Configuration Migration tool work? The following diagram illustrates how the Configuration Migration tool is used for migrating configuration data.
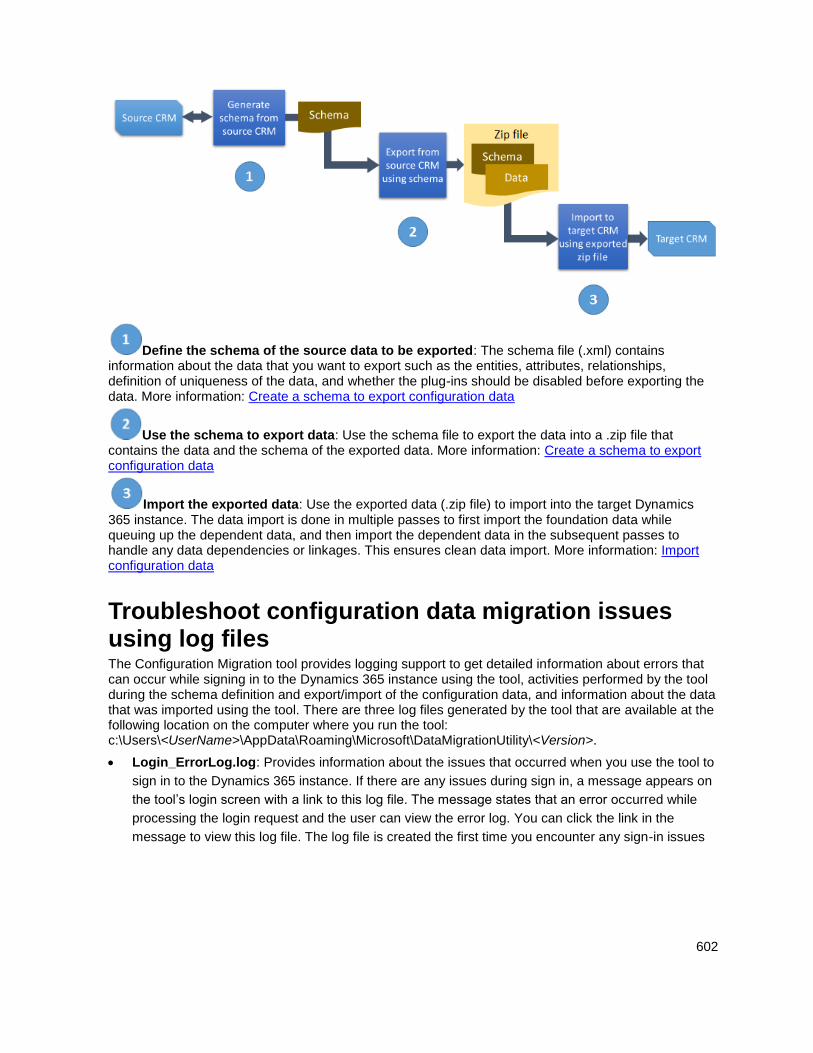
602
Define the schema of the source data to be exported: The schema file (.xml) contains information about the data that you want to export such as the entities, attributes, relationships, definition of uniqueness of the data, and whether the plug-ins should be disabled before exporting the data. More information: Create a schema to export configuration data
Use the schema to export data: Use the schema file to export the data into a .zip file that contains the data and the schema of the exported data. More information: Create a schema to export configuration data
Import the exported data: Use the exported data (.zip file) to import into the target Dynamics 365 instance. The data import is done in multiple passes to first import the foundation data while queuing up the dependent data, and then import the dependent data in the subsequent passes to handle any data dependencies or linkages. This ensures clean data import. More information: Import configuration data
Troubleshoot configuration data migration issues using log files The Configuration Migration tool provides logging support to get detailed information about errors that can occur while signing in to the Dynamics 365 instance using the tool, activities performed by the tool during the schema definition and export/import of the configuration data, and information about the data that was imported using the tool. There are three log files generated by the tool that are available at the following location on the computer where you run the tool: c:\Users\<UserName>\AppData\Roaming\Microsoft\DataMigrationUtility\<Version>.
Login_ErrorLog.log: Provides information about the issues that occurred when you use the tool to
sign in to the Dynamics 365 instance. If there are any issues during sign in, a message appears on
the tool’s login screen with a link to this log file. The message states that an error occurred while
processing the login request and the user can view the error log. You can click the link in the
message to view this log file. The log file is created the first time you encounter any sign-in issues

603
in the tool. Thereafter, the log file is used to log information about a sign-in issue, whenever it
occurs.
DataMigrationUtility.log: Provides detailed information about each task performed in the tool
during last run. You can view the log file from the tool by clicking the Logs menu on the main
screen, and clicking Running Log.
ImportDataDetail.log: Provides detailed information about the data imported in the last import job
by using the tool. Each time you run an import job using this tool, the existing details from the log
file are moved to a file called ImportDataDetail._old.log in the same directory, and the
ImportDataDetail.log file displays information about the latest import job run using the tool. You can
view this log file from the tool by clicking the Logs menu on the main screen, and then clicking Last
Import Log.
Best practices for migrating your configuration data by using the tool The following are things you should consider while using this tool to migrate your configuration data:
While creating the export data schema, you must define uniqueness rules appropriately for each
entity to avoid any unintentional data updates on the target system.
Import the exported data in a pre-production environment (preferably a mirror image of the
production environment) to ensure that the data import results are as you intended.
Back up your production environment before importing the data.
See Also Create a schema to export configuration data Modify a configuration data schema Import configuration data Migrate your Unified Service Desk configuration to another Dynamics 365 server Administering Dynamics 365 Manage product catalog configuration
© 2016 Microsoft. All rights reserved. Copyright
Create a schema to export configuration data
Applies To: Dynamics 365 (online), Dynamics 365 (on-premises), Dynamics CRM 2016, Dynamics CRM Online
[This topic is pre-release documentation and is subject to change.]
The Configuration Migration tool lets you build a schema to describe your export data. It also enables you to check for any missing dependencies and relationships in the entities or fields to be exported to avoid an inconsistent data set.
604
In This Topic Before you begin
Create a schema and export configuration data
Reuse an existing schema to export configuration data
Before you begin Download the Microsoft Dynamics CRM SDK package. Extract the contents of the package on your computer. The Configuration Migration tool is available under the SDK\Tools\ConfgurationMigration folder in the extracted Dynamics 365 SDK package. You do not need to install the Configuration Migration tool. Run the tool by double-clicking the DataMigrationUtility.exe file in the SDK\Tools\ConfgurationMigration folder.
Create a schema and export configuration data
1. Start the Configuration Migration tool.
2. On the main screen, click Create schema, and click Continue.
3. On the Login screen, provide authentication details to connect to your Dynamics 365 instance from
where you want to export data. If you have multiple organizations on the Dynamics 365 server, and
want to select the organization from where to export the data, select the Always display list of
available orgs check box. Click Login.
4. If you have multiple organizations, and you selected the Always display list of available orgs
check box, the next screen lets you choose the organization that you want to connect to. Select a
Dynamics 365 organization to connect to.
5. From the Select the solution list, select a solution from where you want to export the data:
6. In the selected solution, you can select the entities and fields to be exported or export all the
entities within the solution.
a. To select the entities and fields to be exported, from the Select Entity list, select the entity for
which you want to export the data. The Fields for the entity list displays all the fields of the
selected entity.
i. To add selected fields of the entity, click Add Fields.
ii. To add the entity itself and all the fields, click Add Entity.
b. To export all the entities, click Add All next to the Select Entity list.
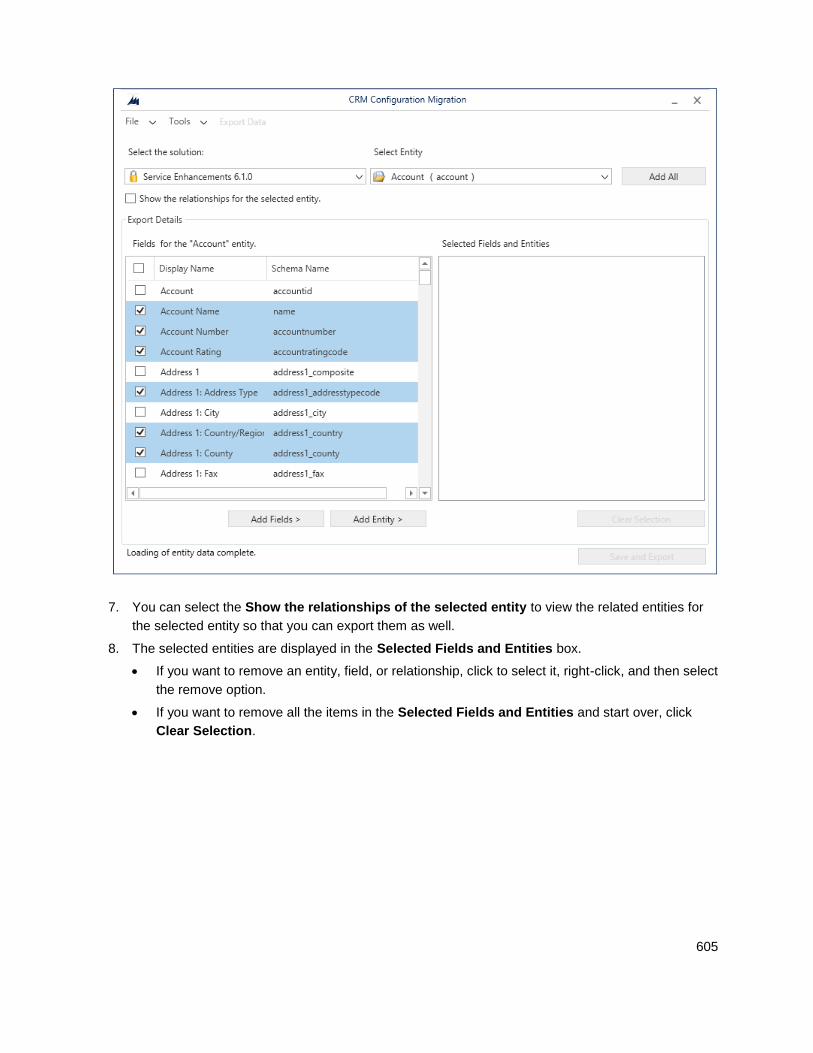
605
7. You can select the Show the relationships of the selected entity to view the related entities for
the selected entity so that you can export them as well.
8. The selected entities are displayed in the Selected Fields and Entities box.
If you want to remove an entity, field, or relationship, click to select it, right-click, and then select
the remove option.
If you want to remove all the items in the Selected Fields and Entities and start over, click
Clear Selection.
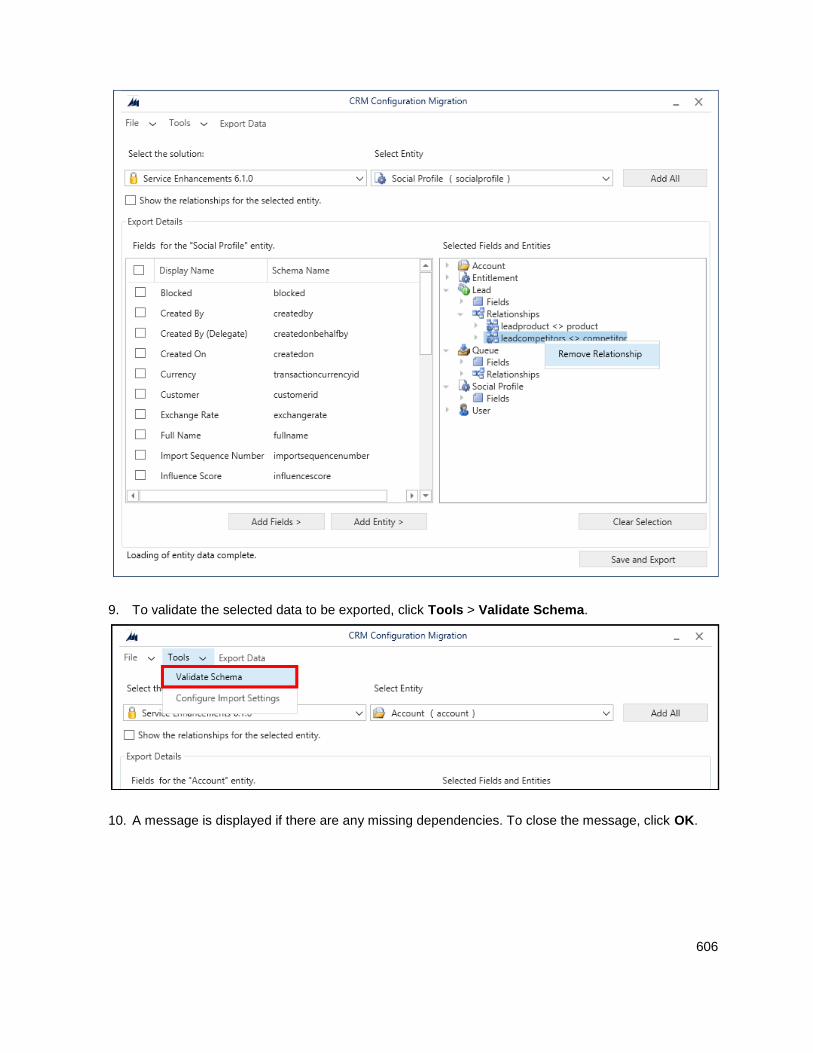
606
9. To validate the selected data to be exported, click Tools > Validate Schema.
10. A message is displayed if there are any missing dependencies. To close the message, click OK.
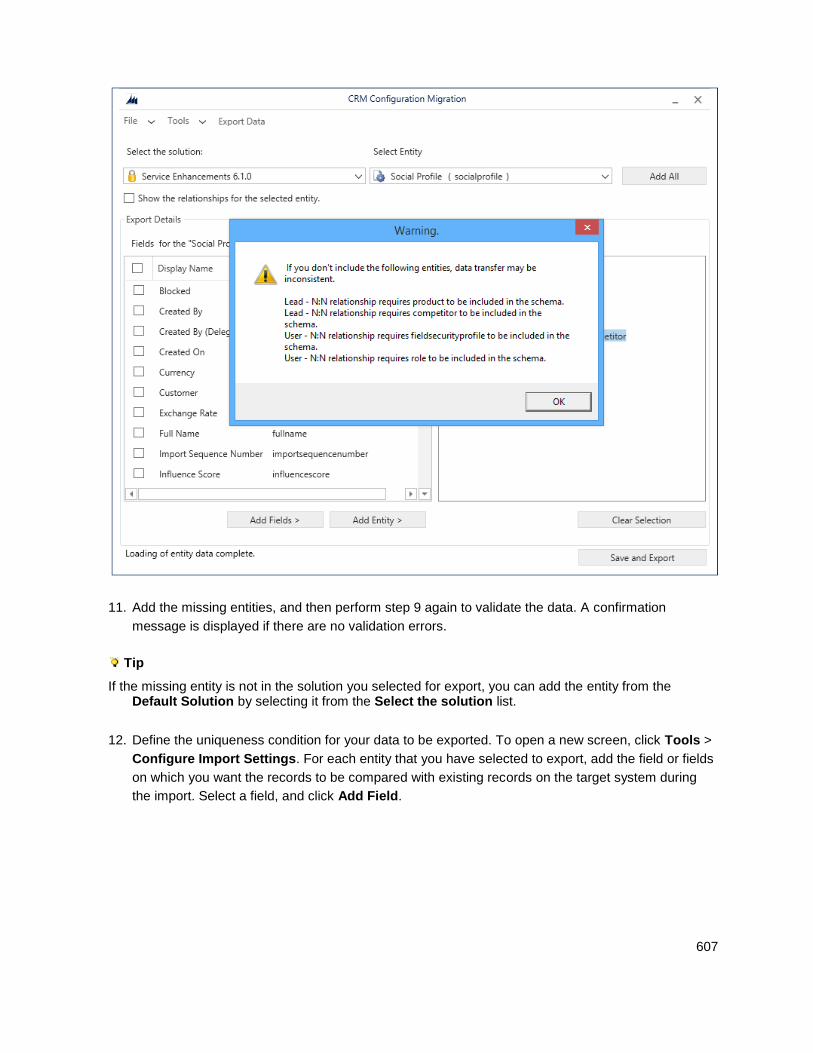
607
11. Add the missing entities, and then perform step 9 again to validate the data. A confirmation
message is displayed if there are no validation errors.
Tip
If the missing entity is not in the solution you selected for export, you can add the entity from the Default Solution by selecting it from the Select the solution list.
12. Define the uniqueness condition for your data to be exported. To open a new screen, click Tools >
Configure Import Settings. For each entity that you have selected to export, add the field or fields
on which you want the records to be compared with existing records on the target system during
the import. Select a field, and click Add Field.
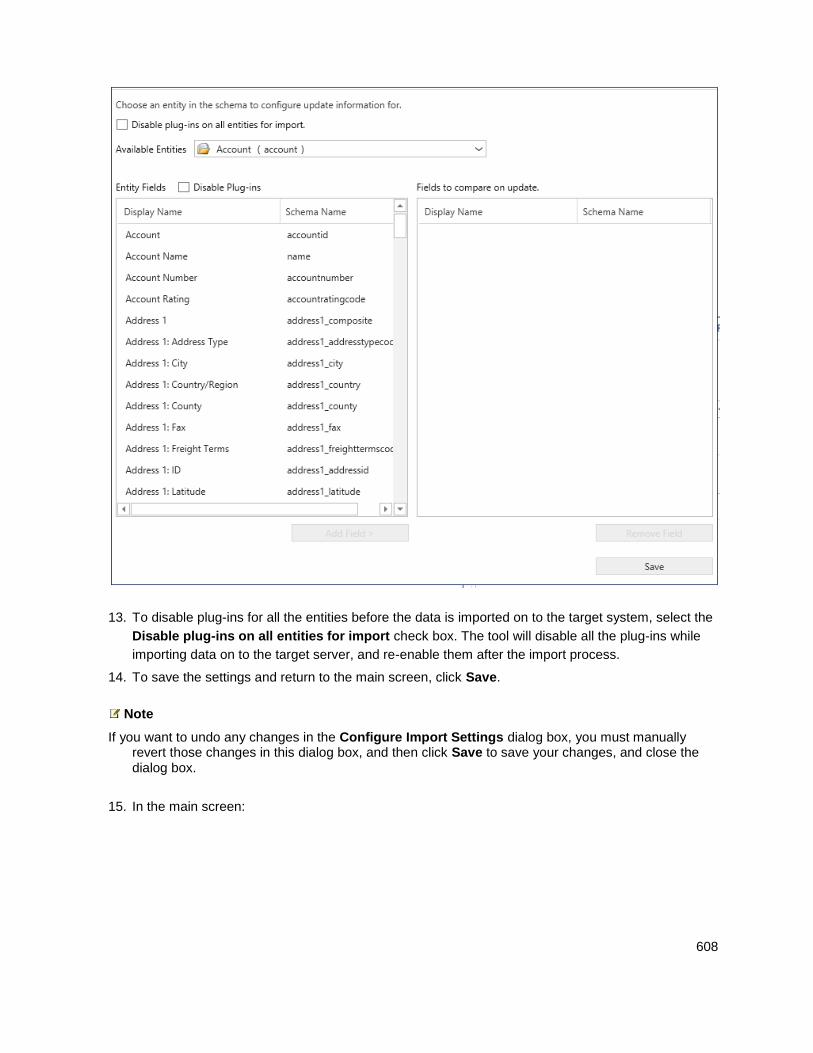
608
13. To disable plug-ins for all the entities before the data is imported on to the target system, select the
Disable plug-ins on all entities for import check box. The tool will disable all the plug-ins while
importing data on to the target server, and re-enable them after the import process.
14. To save the settings and return to the main screen, click Save.
Note
If you want to undo any changes in the Configure Import Settings dialog box, you must manually revert those changes in this dialog box, and then click Save to save your changes, and close the dialog box.
15. In the main screen:
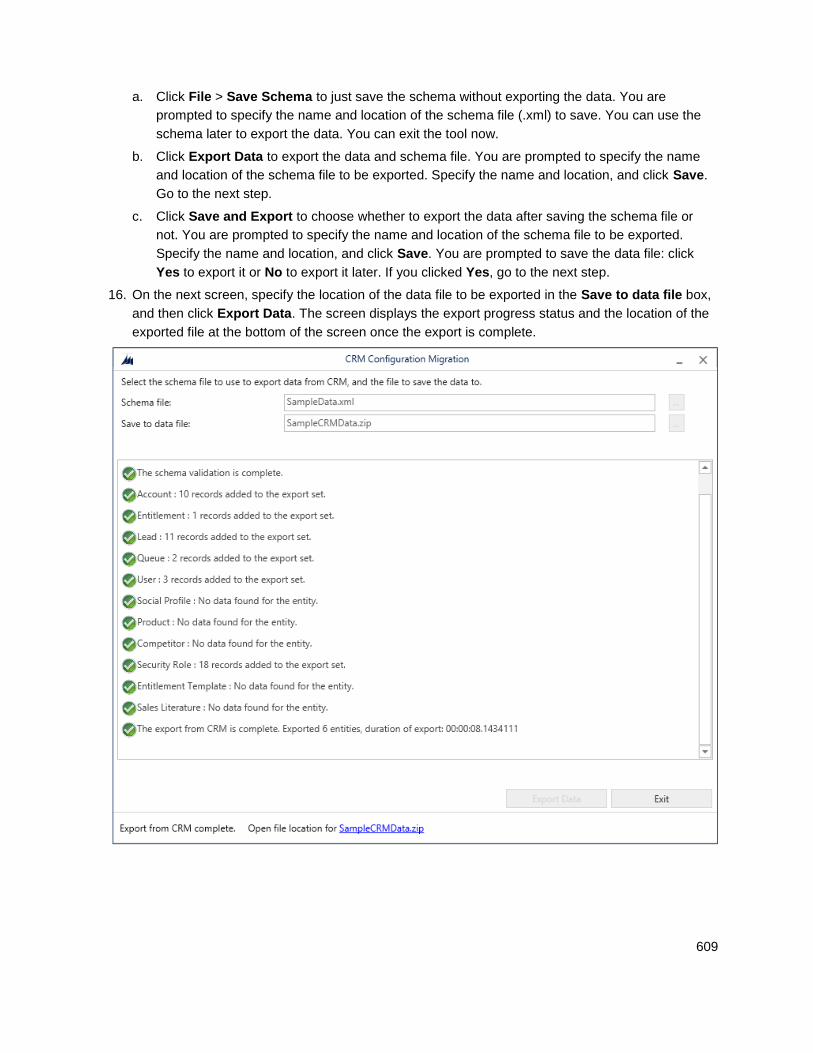
609
a. Click File > Save Schema to just save the schema without exporting the data. You are
prompted to specify the name and location of the schema file (.xml) to save. You can use the
schema later to export the data. You can exit the tool now.
b. Click Export Data to export the data and schema file. You are prompted to specify the name
and location of the schema file to be exported. Specify the name and location, and click Save.
Go to the next step.
c. Click Save and Export to choose whether to export the data after saving the schema file or
not. You are prompted to specify the name and location of the schema file to be exported.
Specify the name and location, and click Save. You are prompted to save the data file: click
Yes to export it or No to export it later. If you clicked Yes, go to the next step.
16. On the next screen, specify the location of the data file to be exported in the Save to data file box,
and then click Export Data. The screen displays the export progress status and the location of the
exported file at the bottom of the screen once the export is complete.
610
17. Click Exit to close the tool.
Reuse an existing schema to export configuration data You can reuse a schema file that was generated using the Configuration Migration tool to quickly export data across Dynamics 365 instances without having to create the schema all over again.
1. Start the Configuration Migration tool.
2. On the main screen, click Export data, and click Continue.
3. On the Login screen, provide authentication details to connect to your Dynamics 365 instance from
where you want to export data. If you have multiple organizations on the Dynamics 365 server, and
want to select the organization from where to export the data, select the Always display list of
available orgs check box. Click Login.
4. If you have multiple organizations, and you selected the Always display list of available orgs
check box, the next screen lets you choose the organization that you want to connect to. Select a
Dynamics 365 organization to connect to.
5. On the next screen, select the schema file to be used for the data export.
6. Specify the name and location of the data file to be exported.
7. Click Export Data. The screen displays the export progress status and the location of the exported
file at the bottom of the screen once the export is complete.
8. Click Exit to close the tool.
See Also Modify a configuration data schema Manage configuration data Import configuration data
© 2016 Microsoft. All rights reserved. Copyright
Modify a configuration data schema
Applies To: Dynamics 365 (online), Dynamics 365 (on-premises), Dynamics CRM 2016, Dynamics CRM Online
[This topic is pre-release documentation and is subject to change.]
You can modify an existing schema file to include information about new configuration data or to update the existing configuration data definition to enhance the configuration data export process.
611
Before you begin Download the Microsoft Dynamics CRM SDK package. Then extract the contents of the package
on your computer. The Configuration Migration tool is available under the
SDK\Tools\ConfgurationMigration folder in the extracted Dynamics 365 SDK package. You do not
need to install the Configuration Migration tool. Run the tool by double-clicking the
DataMigrationUtility.exe file in the SDK\Tools\ConfgurationMigration folder.
You must have a schema file that was created using the Configuration Migration tool. More
information: Create a schema to export configuration data
Modify a schema file 1. Start the Configuration Migration tool.
2. On the main screen, click Create schema, and click Continue.
3. On the Login screen, provide authentication details to connect to your Dynamics 365 instance for
which you originally created the export data schema file. If you have multiple organizations on the
Dynamics 365 server, and want to select an organization, select the Always display list of
available orgs check box. Click Login.
4. If you have multiple organizations, and you selected the Always display list of available orgs
check box, the next screen lets you choose the organization that you want to connect to. Select a
Dynamics 365 organization to connect to.
5. On the main screen, click File > Load Schema.
6. Navigate to the schema file that you want to edit, select it, and click Open.
7. The schema file definition appears in the Configuration Migration tool. Make the required changes
to the schema definition file. For information about defining a schema file, see steps 5-14 in Create
a schema to export configuration data.
8. Save the updated schema file.
9. Click Exit to close the tool.
See Also Import configuration data Create a schema to export configuration data Manage configuration data
© 2016 Microsoft. All rights reserved. Copyright
612
Import configuration data
Applies To: Dynamics 365 (online), Dynamics 365 (on-premises), Dynamics CRM 2016, Dynamics CRM Online
[This topic is pre-release documentation and is subject to change.]
After exporting your configuration data from the source Dynamics 365 instance, you are now ready to import it to the target Dynamics 365 instance.
Before you begin Download the Microsoft Dynamics CRM SDK package. Then extract the contents of the package on your computer. The Configuration Migration tool is available under the SDK\Tools\ConfgurationMigration folder in the extracted Dynamics 365 SDK package. You do not need to install the Configuration Migration tool. Run the tool by double-clicking the DataMigrationUtility.exe file in the SDK\Tools\ConfgurationMigration folder.
Import configuration data 1. Start the Configuration Migration tool.
2. On the main screen, click Import data, and click Continue.
3. On the Login screen, provide authentication details to connect to your Dynamics 365 instance from
where you want to import data. If you have multiple organizations on the Dynamics 365 server, and
want to select the organization where to import the configuration data, select the Always display
list of available orgs check box. Click Login.
4. If you have multiple organizations, and you selected the Always display list of available orgs
check box, the next screen lets you choose the organization that you want to connect to. Select a
Dynamics 365 organization to connect to.
5. Provide the data file. (.zip) to be imported. Browse to the data file, and select it. Click Import Data.
6. This step is applicable only if the data that you are importing contains the user information
of the source system. Enter mapping user information on the target system. You can either map
all of them to the user who is running the import process or map to individual users by using a user
map file (.xml). If you choose the latter, you will have to either specify an existing user map file or
the tool can generate it for you. If you generate a new file, fill in the mapping user name in the New
parameter for every user on the source server. Select the user map file in the tool when you are
done, and click OK.
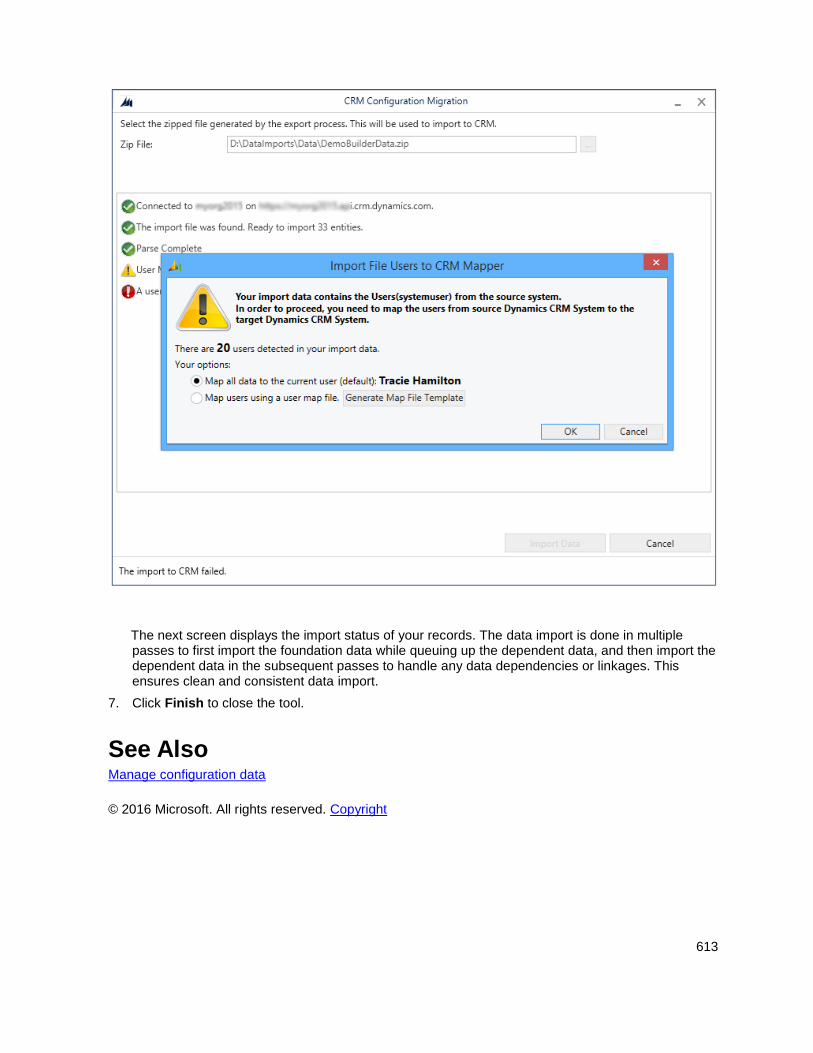
613
The next screen displays the import status of your records. The data import is done in multiple passes to first import the foundation data while queuing up the dependent data, and then import the dependent data in the subsequent passes to handle any data dependencies or linkages. This ensures clean and consistent data import.
7. Click Finish to close the tool.
See Also Manage configuration data
© 2016 Microsoft. All rights reserved. Copyright
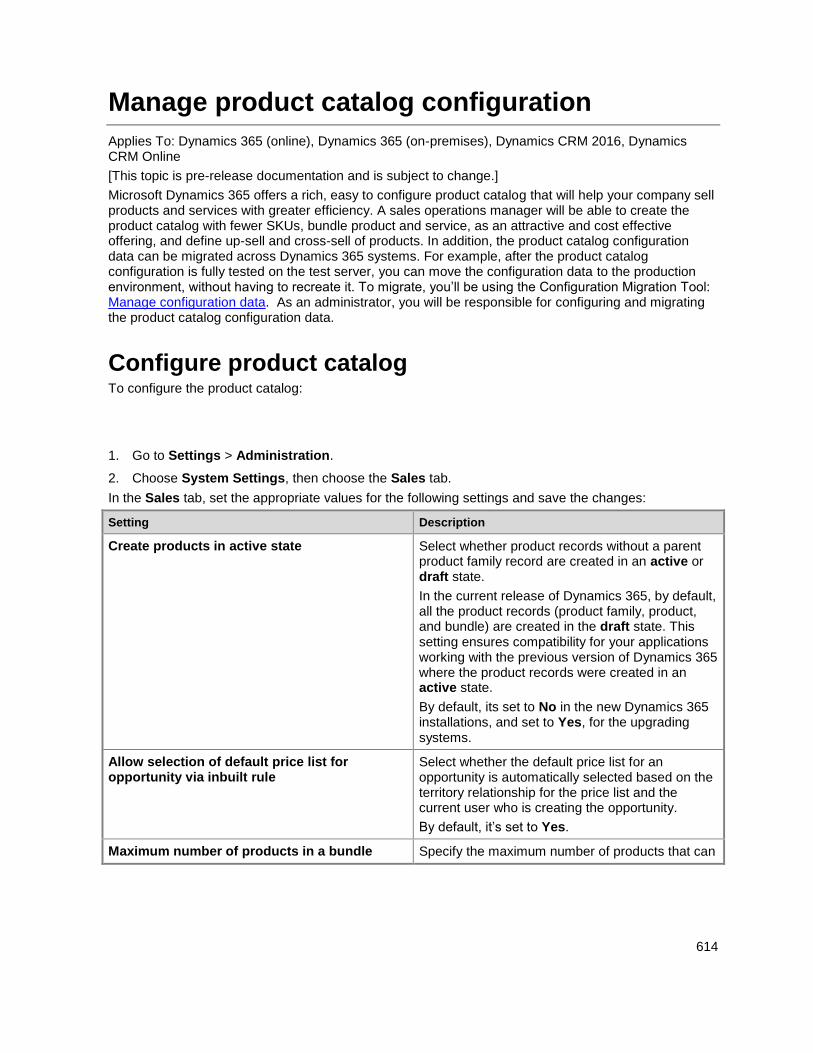
614
Manage product catalog configuration
Applies To: Dynamics 365 (online), Dynamics 365 (on-premises), Dynamics CRM 2016, Dynamics CRM Online
[This topic is pre-release documentation and is subject to change.]
Microsoft Dynamics 365 offers a rich, easy to configure product catalog that will help your company sell products and services with greater efficiency. A sales operations manager will be able to create the product catalog with fewer SKUs, bundle product and service, as an attractive and cost effective offering, and define up-sell and cross-sell of products. In addition, the product catalog configuration data can be migrated across Dynamics 365 systems. For example, after the product catalog configuration is fully tested on the test server, you can move the configuration data to the production environment, without having to recreate it. To migrate, you’ll be using the Configuration Migration Tool: Manage configuration data. As an administrator, you will be responsible for configuring and migrating the product catalog configuration data.
Configure product catalog To configure the product catalog:
1. Go to Settings > Administration.
2. Choose System Settings, then choose the Sales tab.
In the Sales tab, set the appropriate values for the following settings and save the changes:
Setting Description
Create products in active state Select whether product records without a parent product family record are created in an active or draft state.
In the current release of Dynamics 365, by default, all the product records (product family, product, and bundle) are created in the draft state. This setting ensures compatibility for your applications working with the previous version of Dynamics 365 where the product records were created in an active state.
By default, its set to No in the new Dynamics 365 installations, and set to Yes, for the upgrading systems.
Allow selection of default price list for opportunity via inbuilt rule
Select whether the default price list for an opportunity is automatically selected based on the territory relationship for the price list and the current user who is creating the opportunity.
By default, it’s set to Yes.
Maximum number of products in a bundle Specify the maximum number of products that can
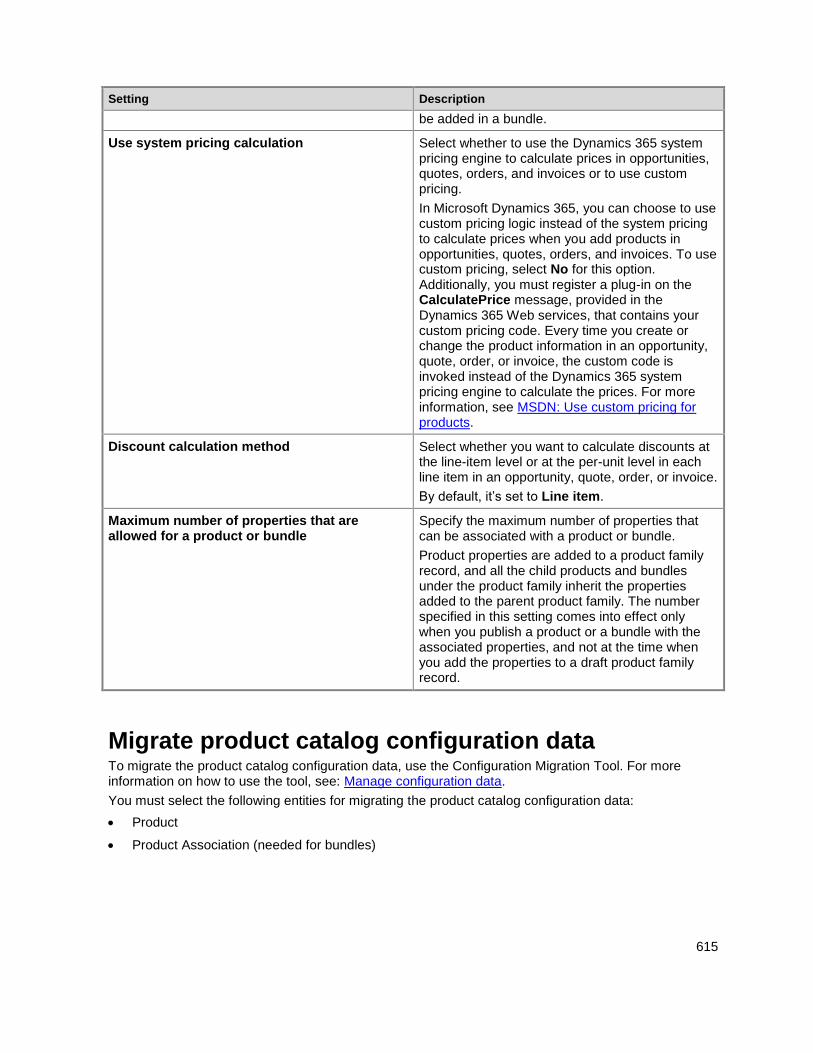
615
Setting Description
be added in a bundle.
Use system pricing calculation Select whether to use the Dynamics 365 system pricing engine to calculate prices in opportunities, quotes, orders, and invoices or to use custom pricing.
In Microsoft Dynamics 365, you can choose to use custom pricing logic instead of the system pricing to calculate prices when you add products in opportunities, quotes, orders, and invoices. To use custom pricing, select No for this option. Additionally, you must register a plug-in on the CalculatePrice message, provided in the Dynamics 365 Web services, that contains your custom pricing code. Every time you create or change the product information in an opportunity, quote, order, or invoice, the custom code is invoked instead of the Dynamics 365 system pricing engine to calculate the prices. For more information, see MSDN: Use custom pricing for products.
Discount calculation method Select whether you want to calculate discounts at the line-item level or at the per-unit level in each line item in an opportunity, quote, order, or invoice.
By default, it’s set to Line item.
Maximum number of properties that are allowed for a product or bundle
Specify the maximum number of properties that can be associated with a product or bundle.
Product properties are added to a product family record, and all the child products and bundles under the product family inherit the properties added to the parent product family. The number specified in this setting comes into effect only when you publish a product or a bundle with the associated properties, and not at the time when you add the properties to a draft product family record.
Migrate product catalog configuration data To migrate the product catalog configuration data, use the Configuration Migration Tool. For more information on how to use the tool, see: Manage configuration data.
You must select the following entities for migrating the product catalog configuration data:
Product
Product Association (needed for bundles)
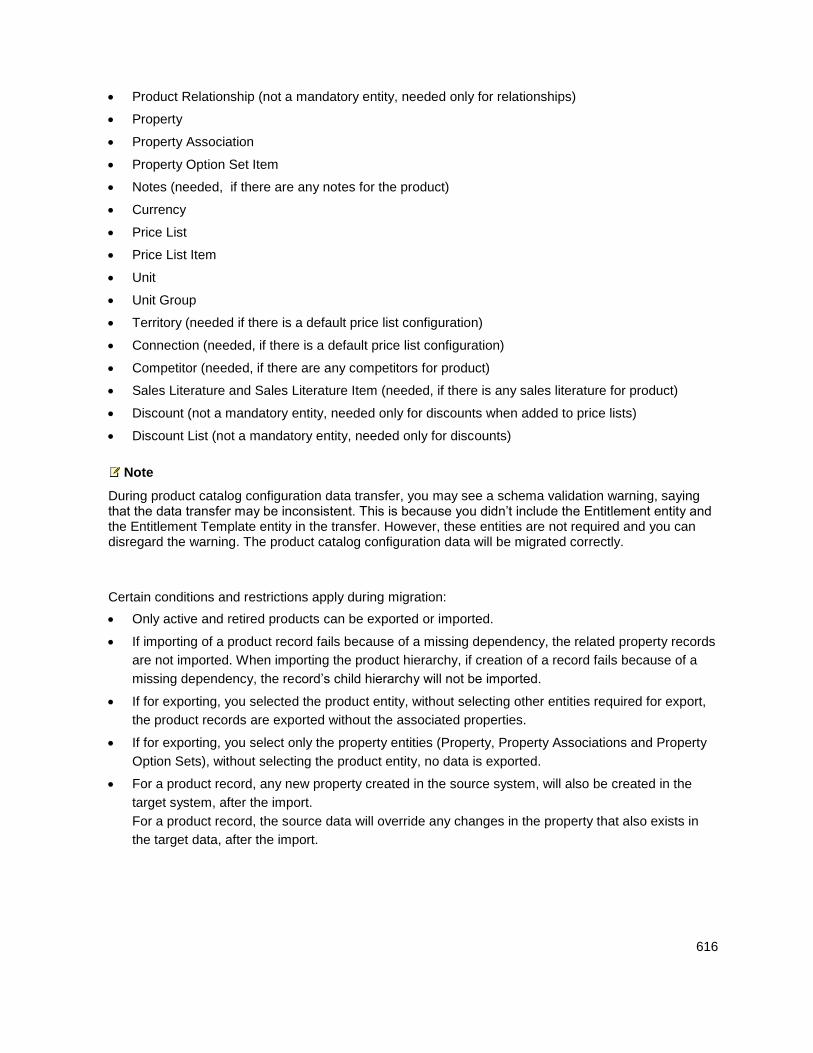
616
Product Relationship (not a mandatory entity, needed only for relationships)
Property
Property Association
Property Option Set Item
Notes (needed, if there are any notes for the product)
Currency
Price List
Price List Item
Unit
Unit Group
Territory (needed if there is a default price list configuration)
Connection (needed, if there is a default price list configuration)
Competitor (needed, if there are any competitors for product)
Sales Literature and Sales Literature Item (needed, if there is any sales literature for product)
Discount (not a mandatory entity, needed only for discounts when added to price lists)
Discount List (not a mandatory entity, needed only for discounts)
Note
During product catalog configuration data transfer, you may see a schema validation warning, saying that the data transfer may be inconsistent. This is because you didn’t include the Entitlement entity and the Entitlement Template entity in the transfer. However, these entities are not required and you can disregard the warning. The product catalog configuration data will be migrated correctly.
Certain conditions and restrictions apply during migration:
Only active and retired products can be exported or imported.
If importing of a product record fails because of a missing dependency, the related property records
are not imported. When importing the product hierarchy, if creation of a record fails because of a
missing dependency, the record’s child hierarchy will not be imported.
If for exporting, you selected the product entity, without selecting other entities required for export,
the product records are exported without the associated properties.
If for exporting, you select only the property entities (Property, Property Associations and Property
Option Sets), without selecting the product entity, no data is exported.
For a product record, any new property created in the source system, will also be created in the
target system, after the import.
For a product record, the source data will override any changes in the property that also exists in
the target data, after the import.
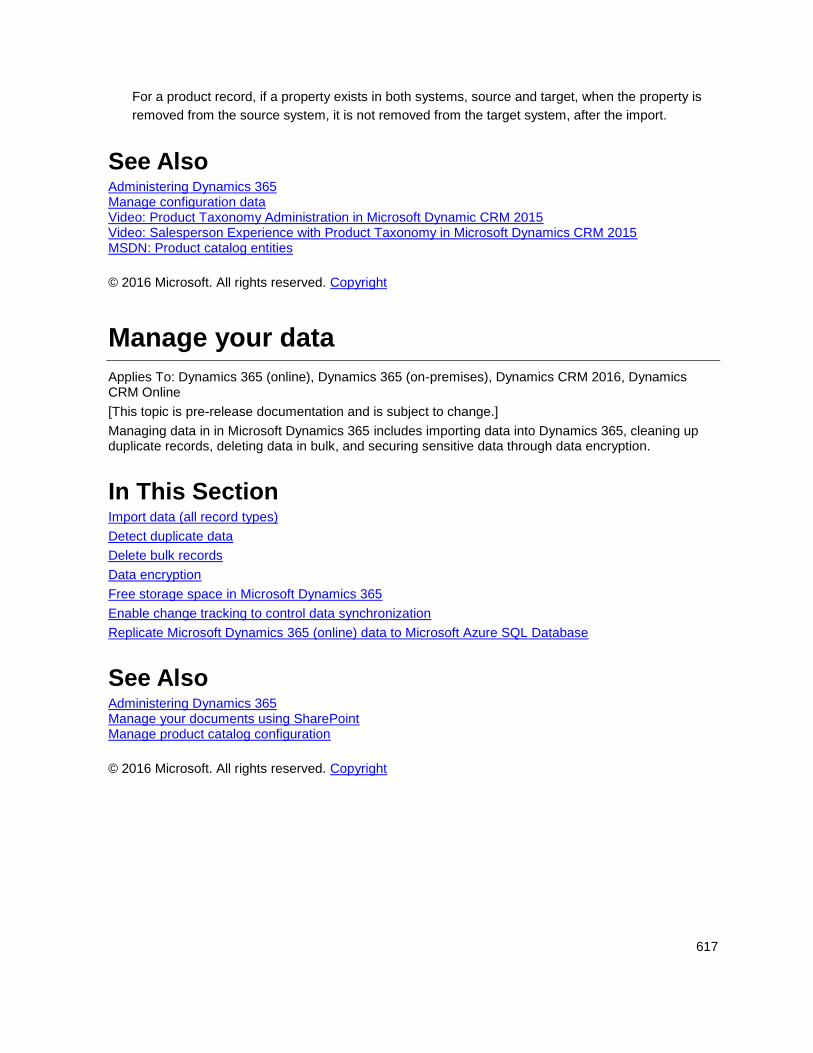
617
For a product record, if a property exists in both systems, source and target, when the property is
removed from the source system, it is not removed from the target system, after the import.
See Also Administering Dynamics 365 Manage configuration data Video: Product Taxonomy Administration in Microsoft Dynamic CRM 2015 Video: Salesperson Experience with Product Taxonomy in Microsoft Dynamics CRM 2015 MSDN: Product catalog entities
© 2016 Microsoft. All rights reserved. Copyright
Manage your data
Applies To: Dynamics 365 (online), Dynamics 365 (on-premises), Dynamics CRM 2016, Dynamics CRM Online
[This topic is pre-release documentation and is subject to change.]
Managing data in in Microsoft Dynamics 365 includes importing data into Dynamics 365, cleaning up duplicate records, deleting data in bulk, and securing sensitive data through data encryption.
In This Section Import data (all record types)
Detect duplicate data
Delete bulk records
Data encryption
Free storage space in Microsoft Dynamics 365
Enable change tracking to control data synchronization
Replicate Microsoft Dynamics 365 (online) data to Microsoft Azure SQL Database
See Also Administering Dynamics 365 Manage your documents using SharePoint Manage product catalog configuration
© 2016 Microsoft. All rights reserved. Copyright
618
Import data (all record types)
Applies To: Dynamics 365 (online), Dynamics 365 (on-premises), Dynamics CRM 2016, Dynamics CRM Online
[This topic is pre-release documentation and is subject to change.]
Importing data is often the first important task that you need to perform after you have installed Microsoft Dynamics 365. You can import data from various Dynamics 365 systems and data sources into standard and customized fields of most business and custom entities in Microsoft Dynamics 365. You can include related data, such as notes and attachments. To assure data integrity, you can enable duplicate detection that prevents importing duplicate records. More information: Detect duplicate data
Preliminary steps before you import the data into Dynamics 365 include:
1. Preparing source data files in one of the following formats: comma-separated values (.csv), XML
Spreadsheet 2003 (.xml), Compressed (.zip) or text files. You can import data from one source file
or several source files. A source file can contain data for one entity type or multiple entity types.
2. Preparing data maps for mapping data contained in the source file to the Dynamics 365 record
fields. You must map every column in the source file to an appropriate field. Unmapped data isn’t
imported. More information: Select a data map
There are several ways to import data into Dynamics 365:
1. To import large volumes of data, we recommend a programmatic way, as most efficient. When you
import data programmatically, you gain additional capabilities that are not available when you use
other methods of importing data. These advanced capabilities include viewing stored source data,
accessing error logs and creating data maps that include complex transformation mapping, such as
concatenation, split, and replace. More information: Import data.
2. For smaller import jobs, you can use the Import Data Wizard tool included in the Dynamics 365 web
application. For information about the Import Data Wizard or how to import specific record types,
see Import accounts, leads, or other data.
Note
For the Import Data Wizard, the maximum file size for .zip files is 32 MB; for the other file formats, it’s 8 MB.
With the Import Data Wizard, you can specify the “Map Automatically” option. The wizard automatically maps all the files and the column headings with Microsoft Dynamics 365 record types and fields if:
The file names exactly match the display name of the record type.
The column headings of the file you are importing exactly match the display names of the fields
in the record.
3. To add data for an individual record, the quickest way is to use Quick Create from the nav bar or
New from the entity form.
More information: Data import.
619
See Also Microsoft Dynamics CRM Help & Training Manage your data Detect duplicate data
© 2016 Microsoft. All rights reserved. Copyright
Detect duplicate data
Applies To: Dynamics 365 (online), Dynamics 365 (on-premises), Dynamics CRM 2016, Dynamics CRM Online
[This topic is pre-release documentation and is subject to change.]
To determine whether a record is a potential duplicate, Microsoft Dynamics 365 uses duplicate detection rules. When publishing a duplicate detection rule, a matchcode is created for each existing record. A matchcode is also created when a record is created or updated. When a record is in the process of being created or updated, its matchcode can be checked automatically against the matchcodes of existing records. By default, Microsoft Dynamics 365 has simple duplicate detection rules for accounts, contacts, and leads. For example, you detect duplicates by matching the record fields, such as email address, first name, and last name.
Note
Duplicate detection works with Microsoft Dynamics 365 for tablets, but isn't available for Dynamics 365 for phones.
Important
You have to be a system administrator or a system customizer to create, enable, and publish duplicate detection rules for your organization.
After publishing a duplicate detection rule, increasing the length of fields that are included in the duplicate detection criteria goes undetected. The field length could exceed the matchcode length limit and not be verified. This may result in duplicates not being detected.
You can create multiple detection rules for the same entity type. However, you can publish a maximum of five duplicate detection rules per entity type at one time.
You can detect duplicates:
When you create or update records for entities that enabled for duplicate detection. This includes
records created with Dynamics 365 for Outlook and tracked in Microsoft Dynamics 365 web
application. The duplicate detection dialog is only displayed for the records created or updated in
the Dynamics 365 user interface (UI). For example, for records created by a workflow, the duplicate
detection dialog is not displayed.
Note
620
Microsoft Dynamics 365 has the ability to detect duplicates for the updated UI entities when you create or update records using entity forms or grid views in the Dynamics 365 web application.
When Dynamics 365 for Outlook goes from offline to online.
During data import. You can specify whether or not to check for duplicates during the import.
Note
Duplicates can’t be detected when a user merges two records, converts a lead, or saves an activity as completed. Duplicates also aren’t detected when a user changes the status of a record, such as activating or reactivating it.
To check for duplicates in the web application, you can use Detect Duplicates capability provided in More Commands ( ) on the nav bar in the grid. The duplicate records are also detected when you import data programmatically or through Import Data Wizard. In addition, you can check for duplicates by running scheduled duplicate detection jobs. For step-by-step instructions on how to set up the duplicate detection job, see Run system jobs to detect duplicates.
A duplicate detection job runs in the background while you do other things in Microsoft Dynamics 365. You can request email notification from Dynamics 365 upon the completion of a duplicate detection job.
See Also Manage your data Import data (all record types) Check for duplicates Set up duplicate detection rules Run system jobs to detect duplicates Delete bulk records
© 2016 Microsoft. All rights reserved. Copyright
Delete bulk records
Applies To: Dynamics 365 (online), Dynamics 365 (on-premises), Dynamics CRM 2016, Dynamics CRM Online
[This topic is pre-release documentation and is subject to change.]
The bulk deletion feature helps you to maintain data quality and manage the consumption of system storage in Microsoft Dynamics 365 by deleting data that you no longer need.
For example, you can delete the following data in bulk:
Stale data.
Data that is irrelevant to the business.
Unneeded test or sample data.
Data that is incorrectly imported from other systems.
621
With bulk deletion you can perform the following operations:
Delete data across multiple entities.
Delete records for a specified entity.
Receive email notifications when a bulk deletion finishes.
Delete data periodically.
Schedule the start time of a recurring bulk delete.
Retrieve the information about the failures that occurred during a bulk deletion.
Delete bulk data
1. Go to Settings > Data Management.
2. Choose Bulk Record Deletion.
3. Choose New to run the Bulk Deletion Wizard to create a bulk deletion job with the records you
want to delete.
For information about how to implement bulk delete in code, see MSDN: Delete data in bulk.
See Also Manage your data Data encryption
© 2016 Microsoft. All rights reserved. Copyright
Data encryption
Applies To: Dynamics 365 (online), Dynamics 365 (on-premises), Dynamics CRM 2016, Dynamics CRM Online
[This topic is pre-release documentation and is subject to change.]
Microsoft Dynamics 365 uses standard Microsoft SQL Server cell level encryption for a set of default entity attributes that contain sensitive information, such as user names and email passwords. This feature can help organizations meet FIPS 140-2 compliance.
For Microsoft Dynamics 365 (online) and Dynamics 365 (on-premises), all new and upgraded organizations use data encryption by default. Data encryption can’t be turned off.
Microsoft Dynamics 365 users who have the system administrator security role can change the encryption key at any time. More information: Change an organization encryption key
622
Important
For on-premises versions of Microsoft Dynamics 365:
Changing the encryption key requires TLS/SSL configured on the Microsoft Dynamics 365 website.
It is a best practice is to change the encryption key once every year.
The encryption key is required to activate data encryption when you import an organization
database into a new deployment or a deployment that has had the configuration database
(MSCRM_CONFIG) re-created after the organization was encrypted. You can copy the original
encryption key to Notepad and paste it into the Settings > Data Management > Data Encryption
dialog box after the organization import is completed.
When you re-enter the data encryption key, we recommend that you run the Microsoft Dynamics
365 web application using Internet Explorer to paste the encryption key into the Data Encryption
dialog box.
Change an organization encryption key
1. Go to Settings > Data Management.
2. Click Data Encryption.
3. In the Change Encryption Key box type the new encryption key and then select Change.
4. Select OK in the confirmation message and then click Close to exit the Data Encryption page.
5. We recommend that you copy the key to a safe place. Copy your organization data encryption key
Copy your organization data encryption key We strongly recommend that you make a copy of your data encryption key. This is particularly important for on-premises deployments that may need to reactivate data encryption after a redeployment or failure recovery.
1. Sign in to Microsoft Dynamics 365 as a user with the system administrator security role.
2. Go to Settings > Data Management.
3. Click Data Encryption.
4. In the Data Encryption dialog box, select Show Encryption Key, in the Current encryption key
box select the encryption key, and copy it to the clipboard.
623
Caution
When the Dynamics 365 (on-premises) website is not configured for HTTPS, the Data Encryption dialog box will not be displayed. For a more secure deployment, we recommend that you configure the website for HTTPS. However, if the website is not configured for HTTPS, use a tool that can be used to modify Dynamics 365 database tables, such as Microsoft SQL Server Management Studio or the Deployment Web Service, open the configuration database (MSCRM_CONFIG), and in the DeploymentProperties table, set DisableSSLCheckForEncryption to 1.
5. Paste the encryption key in to a text editor, such as Notepad.
Warning
By default, Microsoft Dynamics 365 generates a passphrase that is a random collection of Unicode characters. Therefore, you must save the system-generated passphrase by using an application and file that supports Unicode characters. Some text editors, such as Notepad use ANSI coding by default. Before you save the passphrase using Notepad, select Save As, and then in the Encoding list, select Unicode.
6. As a best practice, save the text file that contains the encryption key on a computer in a secure
location on an encrypted hard drive.
See Also SQL Server Encryption FIPS 140 Evaluation Manage your data Manage configuration data
© 2016 Microsoft. All rights reserved. Copyright
Free storage space in Microsoft Dynamics 365
Applies To: Dynamics 365 (online), Dynamics 365 (on-premises), Dynamics CRM 2016, Dynamics CRM Online
[This topic is pre-release documentation and is subject to change.]
These are ways to reduce the amount of storage space used by removing or deleting different types of information from Microsoft Dynamics 365. Use one or more of these methods to control your total data storage usage with Microsoft Dynamics 365. You can delete certain categories of data as the need arises, or you can set up bulk deletion jobs to reoccur at set intervals.
Warning
The suggestions in this topic include deleting notes, attachments, import history, and other data. Before you delete data, be sure that the data is no longer needed because you cannot retrieve deleted data. There is no “undo” to restore your data once it has been deleted. This means it may make more sense
624
for you to increase the amount of storage space you have with your Microsoft Dynamics 365 subscription instead of reducing the amount of storage space used.
Note
Except for methods 3 and 5, all these methods require that you have an administrator Microsoft Dynamics 365 security role, such as System Administrator. This gives you permission to delete records in bulk and to delete system jobs.
In This Topic Method 1: Delete bulk email and workflow instances using a bulk deletion job
Method 2: Evaluate and delete suspended workflows
Method 3: Remove email attachments using Advanced Find
Method 4: Remove email messages with attachments using a bulk deletion job
Method 5: Remove notes with attachments using Advanced Find
Method 6: Remove notes with attachments using a bulk deletion job
Method 7: Remove bulk duplicate detection jobs and associated copies of duplicate records
Method 8: Delete bulk import instances using a bulk deletion job
Method 9: Delete bulk deletion job instances using a bulk deletion job
Method 10: Delete audit logs
Method 1: Delete bulk email and workflow instances using a bulk deletion job
Warning
If you delete this data, you will no longer be able to tell if an email was sent through bulk email or if a workflow rule ran against a record. The emails that were sent and the actions that ran against the record in the workflow will remain.
1. Go to Settings > Data Management.
2. Choose Bulk Record Deletion. In the menu bar, choose New. This opens the Bulk Deletion
Wizard.
3. Choose Next.
4. In the Look for list, select System Jobs.
5. In the search criteria area, add criteria similar to the following:
System Job Type – Equals – Bulk E-mail; Workflow;
625
Status Reason – Equals – Succeeded
Completed On – Older Than X Months – 1
6. Group the three criteria rows:
a. Choose the arrow next to each criteria row, and then choose Select Row.
b. With all three rows selected, choose Group AND.
7. Choose Next.
8. In the Name text box, type a name for the bulk deletion job.
9. Select a date and time for the job start time; preferably a time when users are not in Microsoft
Dynamics 365.
10. Select the Run this job after every check box, and then in the days list, select the frequency you
want the job to run.
11. If you want a notification e-mail sent, select the Send an e-mail to me ([email protected])
when this job is finished check box.
12. Choose Next, review the bulk deletion job, and then choose Submit to create the recurring job.
Method 2: Evaluate and delete suspended workflows Sometimes workflows will enter a suspended state because there is a condition that will never be met or some other reason that will not allow the workflow to continue.
Warning
Some workflows will be in a suspended state because they are waiting for a condition that has not yet been met, which is expected. For example, a workflow may be waiting for a task to be completed.
1. Choose Advanced Find.
2. In the Look for list, select System Jobs.
3. In the search criteria area, add criteria similar to the following:
System Job Type – Equals – Workflow
Status Reason – Equals – Waiting
4. Group the two criteria rows:
a. Choose the arrow next to each criteria row, and then choose Select Row.
b. With all three rows selected, choose Group AND.
5. Choose Find.
6. In the results window, you can open each item to determine whether the workflow can be deleted.
626
Method 3: Remove email attachments using Advanced Find
Warning
If you delete this data, the attachments will no longer be available in Microsoft Dynamics 365. However, if you have them saved in Microsoft Office Outlook, they will still be there.
1. Choose Advanced Find.
2. In the Look for list, select Email Messages.
3. In the search criteria area, add criteria similar to the following:
Email Attachments (Item)
File Size (Bytes) – Is Greater Than - In the text box, type a byte value, such as 25000.
4. Choose Results.
5. Under Activities, you will now have a list of email messages that have attachments that are larger
than ‘X’ bytes. Review the emails and delete the attachments as needed.
Method 4: Remove email messages with attachments using a bulk deletion job
Warning
If you delete this data, the email messages and their associated attachments will no longer be available in Microsoft Dynamics 365. However, if you have them saved in Microsoft Office Outlook, they will still be there.
1. Go to Settings > Data Management.
2. Choose Bulk Record Deletion, and then in the menu bar, choose New. This opens the Bulk
Deletion Wizard.
3. Choose Next.
4. In the Look for list, select Email Messages.
5. In the search criteria area, add criteria similar to the following:
Status Reason – Equals – Completed
Actual End – Older Than X Months – 1
627
Email Attachments (Item)
File Size (Bytes) – Is Greater Than – In the text box, type a byte value, such as 25000.
6. Group the first two criteria rows:
a. Choose the arrow next to each criteria row, and then choose Select Row.
b. With both rows selected, choose Group AND.
7. Choose Next.
8. In the Name text box, type a name for the bulk deletion job.
9. Select a date and time for the job start time; preferably a time when users are not in Microsoft
Dynamics 365.
10. Select the Run this job after every check box, and then in the days list, select the frequency you
want the job to run.
11. If you want a notification e-mail sent, select the Send an email to me ([email protected]) when
this job is finished check box.
12. Choose Next, review the bulk deletion job, and then choose Submit to create the recurring job.
Method 5: Remove notes with attachments using Advanced Find
Warning
If you delete this data, notes and their associated attachments will no longer be available in Microsoft Dynamics 365.
1. Choose Advanced Find.
2. In the Look for list, select Notes.
3. In the search criteria area, add criteria similar to the following:
File Size (Bytes) – Is Greater Than – In the text box, type a byte value, such as 1048576.
4. Choose Results.
5. You will now have a list of attachments that are larger than the size you specified.
6. Select individual or a multiple attachments, and then choose Delete (X).
628
Method 6: Remove notes with attachments using a bulk deletion job
Warning
If you delete this data, notes and their associated attachments will no longer be available in Microsoft Dynamics 365.
1. Go to Settings > Data Management.
2. Choose Bulk Record Deletion, and then in the menu bar, choose New. This opens the Bulk
Deletion Wizard.
3. Choose Next.
4. In the Look for list, select Notes.
5. In the search criteria area, add criteria similar to the following:
File Size (Bytes) – Is Greater Than – In the text box, type a byte value, such as 1048576.
Created On – Older Than X Months – 1
6. Group the two criteria rows:
a. Choose the arrow next to each criteria row, and then choose Select Row.
b. With all three rows selected, choose Group AND.
7. Choose Next.
8. In the Name text box, type a name for the bulk deletion job.
9. Select a date and time for the job start time; preferably a time when users are not in Microsoft
Dynamics 365.
10. Select the Run this job after every check box, and then in the days list, select the frequency you
want the job to run.
11. If you want a notification e-mail sent, select the Send an email to me ([email protected]) when
this job is finished check box.
12. Choose Next, review the bulk deletion job, and then choose Submit to create the recurring job.
Method 7: Remove bulk duplicate detection jobs and associated copies of duplicate records Every time that a duplicate detection job runs, a copy of each duplicate record is stored in the database as part of the duplicate detection job. For example, if you have 100 duplicate records, every time that you run a duplicate detection job that finds these duplicates, whether it is manual or reoccurring, those
629
100 duplicate records will be stored in the database under that instance of that duplicate job until the duplicates are merged or deleted, or until the instance of that duplicate detection job is deleted.
1. Go to Settings > Data Management.
2. Choose Duplicate Detection Jobs.
3. Select the duplicate detection job instances you want to delete and then choose Delete (X).
To avoid wasting storage space, make sure duplicates are resolved promptly so that they are not reported in multiple duplicate detection jobs.
Method 8: Delete bulk import instances using a bulk deletion job Every time you perform a bulk import, there is a system job associated with that import. The system job details show which records imported successfully and which records failed.
Warning
After you delete these bulk import jobs, you will not be able to see what data was imported and you cannot roll back the import.
1. Go to Settings > Data Management.
2. Choose Bulk Record Deletion, and then in the menu bar, choose New. This opens the Bulk
Deletion Wizard.
3. Choose Next.
4. In the Look for list, select System Jobs.
5. In the search criteria area, add criteria similar to the following:
System Job Type – Equals – Import
Status Reason – Equals – Succeeded
Completed On – Older Than X Months – 1
6. Group the three criteria rows:
a. Choose the arrow next to each criteria row, and then choose Select Row.
b. With all three rows selected, choose Group AND.
7. Choose Next.
8. In the Name text box, type a name for the bulk deletion job.

630
9. Select a date and time for the job start time; preferably a time when users are not in Microsoft
Dynamics 365.
10. Select the Run this job after every check box, and then in the days list, select the frequency you
want the job to run.
11. If you want a notification e-mail sent, select the Send an email to me ([email protected]) when
this job is finished check box.
12. Choose Next, review the bulk deletion job, and then choose Submit to create the recurring job.
Method 9: Delete bulk deletion job instances using a bulk deletion job When you are bulk deleting data, such as in many of the methods described in this article, a bulk deletion system job is created and can be deleted.
Warning
After you delete these jobs, you will lose the history of the prior bulk deletion jobs that you’ve run.
1. Go to Settings > Data Management.
2. Choose Bulk Record Deletion, and then in the menu bar, choose New. This opens the Bulk
Deletion Wizard.
3. Choose Next.
4. In the Look for list, select System Jobs.
5. In the search criteria area, add criteria similar to the following:
System Job Type – Equals – Bulk Delete
Status Reason – Equals – Succeeded
Completed On – Older Than X Months – 1
Note
You could also delete jobs that have failed or been canceled.
6. Group the three criteria rows:
a. Choose the arrow next to each criteria row, and then choose Select Row.
b. With all three rows selected, choose Group AND.
7. Choose Next.
8. In the Name text box, type a name for the bulk deletion job.
631
9. Select a date and time for the job start time; preferably a time when users are not in Microsoft
Dynamics 365.
10. Select the Run this job after every check box, and then in the days list, select the frequency you
want the job to run.
11. If you want a notification e-mail sent, select the Send an email to me ([email protected]) when
this job is finished check box.
12. Choose Next, review the bulk deletion job, and then choose Submit to create the recurring job.
Method 10: Delete audit logs When you enable auditing, Microsoft Dynamics 365 creates audit logs to store the audit history of the records. You can delete these audit logs to free space when they are no longer needed.
Warning
When you delete an audit log, you can no longer view the audit history for the period covered by that audit log.
1. Go to Settings > Auditing.
2. In the Audit area choose Audit Log Management.
3. Select the oldest audit log, then choose Delete Logs.
4. In the confirmation message choose OK.
Note
You can only delete the oldest audit log in the system. To delete more than one audit log repeat deleting the oldest available audit log until you have deleted enough logs.
See Also Manage your data Data encryption Manage Microsoft Dynamics 365 (online) instances
© 2016 Microsoft. All rights reserved. Copyright
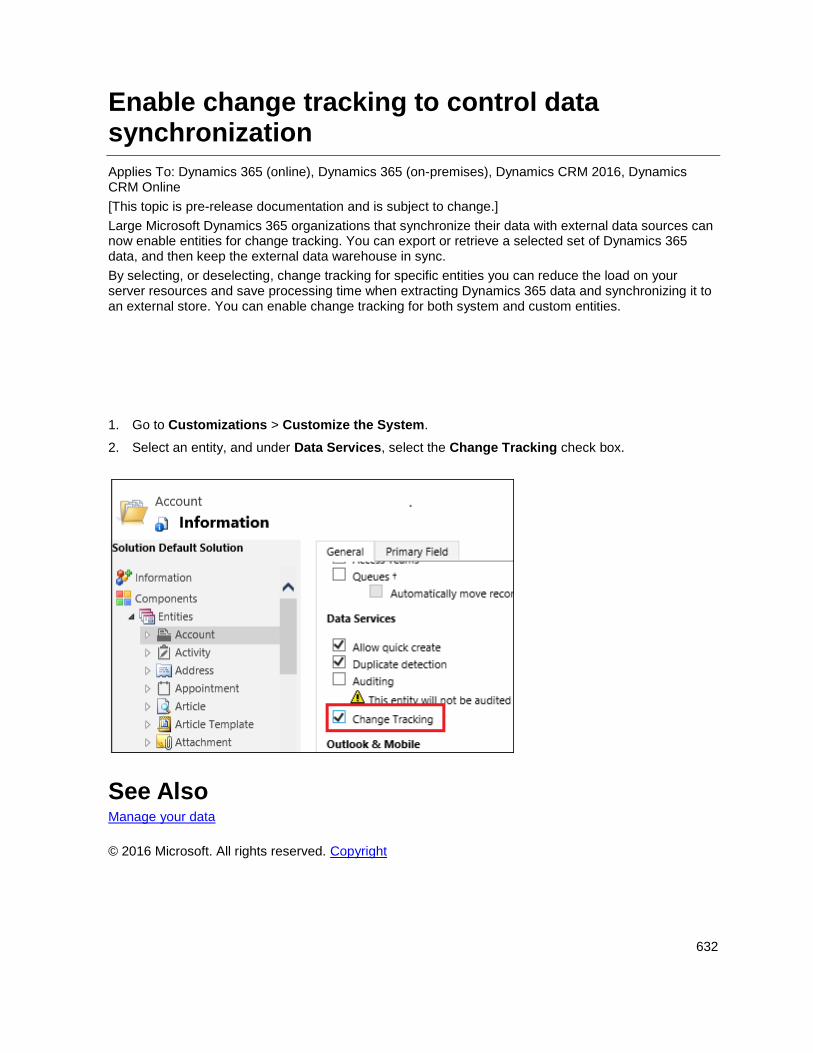
632
Enable change tracking to control data synchronization
Applies To: Dynamics 365 (online), Dynamics 365 (on-premises), Dynamics CRM 2016, Dynamics CRM Online
[This topic is pre-release documentation and is subject to change.]
Large Microsoft Dynamics 365 organizations that synchronize their data with external data sources can now enable entities for change tracking. You can export or retrieve a selected set of Dynamics 365 data, and then keep the external data warehouse in sync.
By selecting, or deselecting, change tracking for specific entities you can reduce the load on your server resources and save processing time when extracting Dynamics 365 data and synchronizing it to an external store. You can enable change tracking for both system and custom entities.
1. Go to Customizations > Customize the System.
2. Select an entity, and under Data Services, select the Change Tracking check box.
See Also Manage your data
© 2016 Microsoft. All rights reserved. Copyright
633
Replicate Microsoft Dynamics 365 (online) data to Microsoft Azure SQL Database
Applies To: Dynamics 365 (online), Dynamics CRM Online
[This topic is pre-release documentation and is subject to change.]
The Microsoft Dynamics 365-Data Export Service is an add-on service made available as a Microsoft Dynamics 365 solution that adds the ability to replicate Microsoft Dynamics 365 (online) data to a Microsoft Azure SQL Database store in a customer-owned Microsoft Azure subscription. The supported target destinations are Microsoft Azure SQL Database and Microsoft Azure SQL Server on Microsoft Azure virtual machines. The Data Export Service intelligently synchronizes the entire Dynamics 365 data initially and thereafter synchronizes on a continuous basis as changes occur (delta changes) in the Microsoft Dynamics 365 (online) system. This helps enable several analytics and reporting scenarios on top of Dynamics 365 data with Azure data and analytics services and opens up new possibilities for customers and partners to build custom solutions.
In this topic Export Profile
Permissions required
Prerequisites for using Data Export Service
Create an Export Profile
Table details for the destination Azure SQL database
Error handling and monitoring
How to set up Azure Key Vault
Export Profile To export data from Microsoft Dynamics 365 (online), the Microsoft Dynamics 365 (online) administrator creates an Export Profile. Multiple profiles can be created and activated to synchronize data to different destination databases simultaneously.
The Export Profile is the core concept of the Data Export Service. The Export Profile gathers set up and configuration information to synchronize data with the destination database. As part of the Export Profile, the administrator provides a list of entities to be exported to the destination database. Once activated, the Export Profile starts the automatic synchronization of data. Initially, all data that corresponds to each selected entity is exported. Thereafter, only the changes to data as they occur to the entity records or metadata in the Microsoft Dynamics 365 (online) are synchronized continuously in near real time. Therefore, you don’t need to set up a schedule to retrieve data from Microsoft Dynamics 365 (online).
Only entities that have change tracking enabled can be added to the Export Profile. Notice that, most of the standard Microsoft Dynamics 365 entities which capture data are change tracking enabled. Custom entities must be explicitly enabled for change tracking before you can add them to an Export Profile.
The Data Export Service does both metadata and data synchronization. Each entity translates into one or more tables, and each field translates into a column in the destination database table. Table and column names use the schema name of the Microsoft Dynamics 365 metadata.
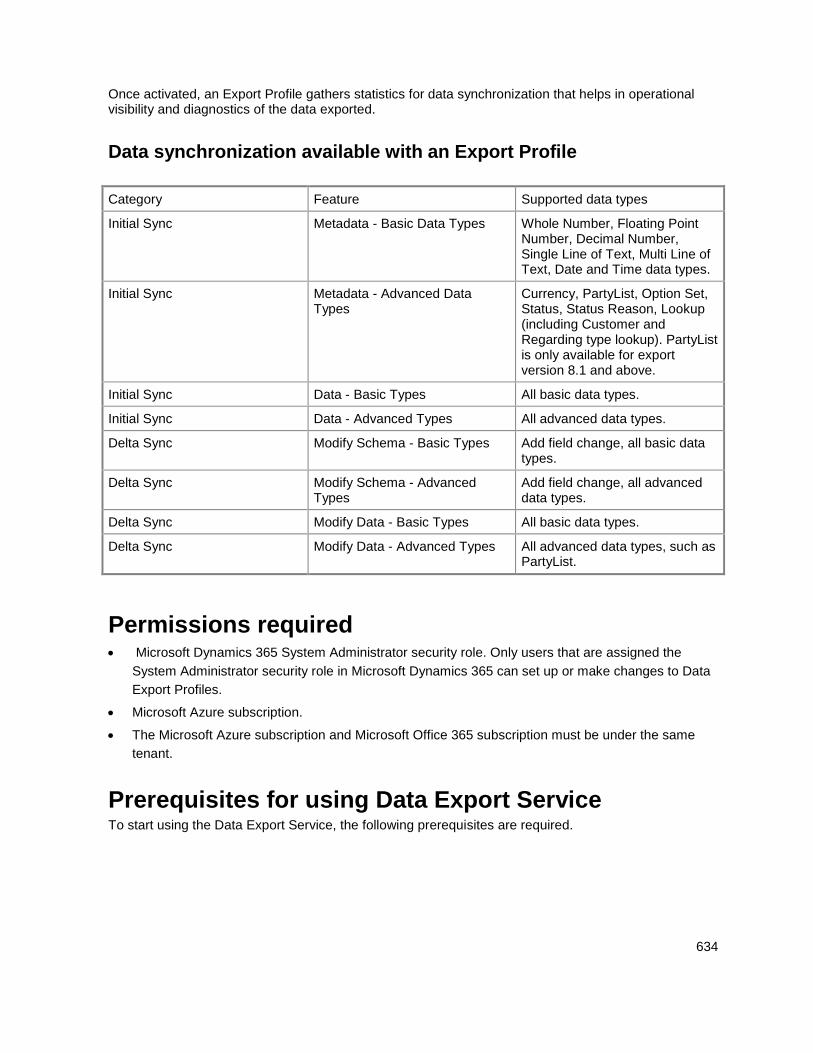
634
Once activated, an Export Profile gathers statistics for data synchronization that helps in operational visibility and diagnostics of the data exported.
Data synchronization available with an Export Profile
Category Feature Supported data types
Initial Sync Metadata - Basic Data Types Whole Number, Floating Point Number, Decimal Number, Single Line of Text, Multi Line of Text, Date and Time data types.
Initial Sync Metadata - Advanced Data Types
Currency, PartyList, Option Set, Status, Status Reason, Lookup (including Customer and Regarding type lookup). PartyList is only available for export version 8.1 and above.
Initial Sync Data - Basic Types All basic data types.
Initial Sync Data - Advanced Types All advanced data types.
Delta Sync Modify Schema - Basic Types Add field change, all basic data types.
Delta Sync Modify Schema - Advanced Types
Add field change, all advanced data types.
Delta Sync Modify Data - Basic Types All basic data types.
Delta Sync Modify Data - Advanced Types All advanced data types, such as PartyList.
Permissions required Microsoft Dynamics 365 System Administrator security role. Only users that are assigned the
System Administrator security role in Microsoft Dynamics 365 can set up or make changes to Data
Export Profiles.
Microsoft Azure subscription.
The Microsoft Azure subscription and Microsoft Office 365 subscription must be under the same
tenant.
Prerequisites for using Data Export Service To start using the Data Export Service, the following prerequisites are required.
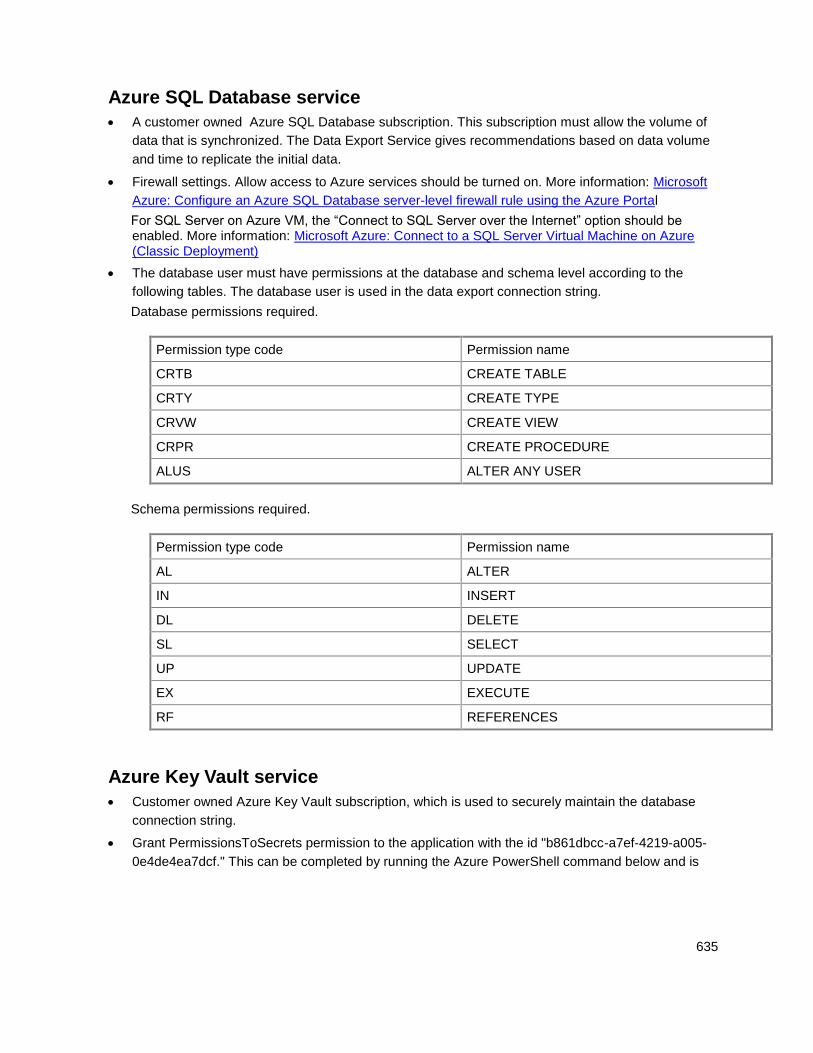
635
Azure SQL Database service
A customer owned Azure SQL Database subscription. This subscription must allow the volume of
data that is synchronized. The Data Export Service gives recommendations based on data volume
and time to replicate the initial data.
Firewall settings. Allow access to Azure services should be turned on. More information: Microsoft
Azure: Configure an Azure SQL Database server-level firewall rule using the Azure Portal
For SQL Server on Azure VM, the “Connect to SQL Server over the Internet” option should be enabled. More information: Microsoft Azure: Connect to a SQL Server Virtual Machine on Azure (Classic Deployment)
The database user must have permissions at the database and schema level according to the
following tables. The database user is used in the data export connection string.
Database permissions required.
Permission type code Permission name
CRTB CREATE TABLE
CRTY CREATE TYPE
CRVW CREATE VIEW
CRPR CREATE PROCEDURE
ALUS ALTER ANY USER
Schema permissions required.
Permission type code Permission name
AL ALTER
IN INSERT
DL DELETE
SL SELECT
UP UPDATE
EX EXECUTE
RF REFERENCES
Azure Key Vault service
Customer owned Azure Key Vault subscription, which is used to securely maintain the database
connection string.
Grant PermissionsToSecrets permission to the application with the id "b861dbcc-a7ef-4219-a005-
0e4de4ea7dcf." This can be completed by running the Azure PowerShell command below and is
636
used to access the Key Vault that contains the connection string secret. More information: How to
set up Azure Key Vault
The Key Vault should be tagged with the Microsoft Dynamics 365 organization (OrgId) and tenant
ids (TenantId). This can be completed by running the Azure PowerShell command below. More
information: How to set up Azure Key Vault
Microsoft Dynamics 365 (online)
The Data Export Service solution must be installed in the Microsoft Dynamics 365 (online)
organization.
The entities that will be added to the Export Profile are enabled with change tracking in Microsoft
Dynamics 365. To ensure a standard or custom entity can be synchronized, verify change tracking.
To do this, go to Customization > Customize the System, and then click the entity. On the
General tab make sure the Change Tracking option under the Data Services section is enabled.
A Microsoft Dynamics CRM Online 2016 Update or later instance with a full data copy.
You must have the System Administrator security role in the instance of Microsoft Dynamics 365
(online).
Web browser Enable pop-ups for the domain https://discovery.crmreplication.azure.net/ in your web browser. This is required for auto-sign in when you navigate to Settings > Data Export.
Create an Export Profile Ensure that following requirements are met before creating an Export Profile.
The Data Export Service solution is installed in your Microsoft Dynamics 365 (online) instance.
Maintain the SQL Database connection string in the Key Vault and copy the Key Vault URL to
provide in the Export Profile. More information: Microsoft Azure: Get started with Azure Key Vault
The entities to be added to the Export Profile are enabled for change tracking. More information:
Enable change tracking to control data synchronization
Your SQL Database service has enough storage space to store the Microsoft Dynamics 365 data.
You are a System Administrator in the Microsoft Dynamics 365 (online) instance.
1. In Microsoft Dynamics 365 (online), go to Settings > Data Export.
2. Review the notice, and click Continue or Cancel if you don't want to export data.
3. Click New to create a new Export Profile.
637
4. In the Properties step, enter the following information, and then click Next to continue without
connecting to the Key Vault. Clicking Validate uses the Key Vault URL you provided to connect to
the Key Vault.
Name. Unique name of the profile. This field is mandatory.
Key Vault Connection URL. Key Vault URL pointing to the connection string stored with
credentials used to connect to the destination database. This field is mandatory. More
information: How to set up Azure Key Vault
Schema. Name for an alternative database schema. Only alphanumeric characters are valid.
This field is optional. By default, dbo is the schema that is used for the destination SQL
Database.
Prefix. Prefix to be used for the table names created in the destination database. This helps
you easily identify the tables created for the Export Profile in the destination database. When
specified, make sure that the prefix is less than 15 characters. This field is optional and only
alphanumeric characters are allowed.
Retry count. The number of times a record is retried in case of a failure to insert or update in
the destination table. This field is mandatory. The default is 3 and the maximum allowed retry
value is 10.
Retry interval (in sec.). The number of seconds to wait before a retry in case of a failure. This
field is mandatory.
Write Delete Log. Optional setting for logging deleted records.
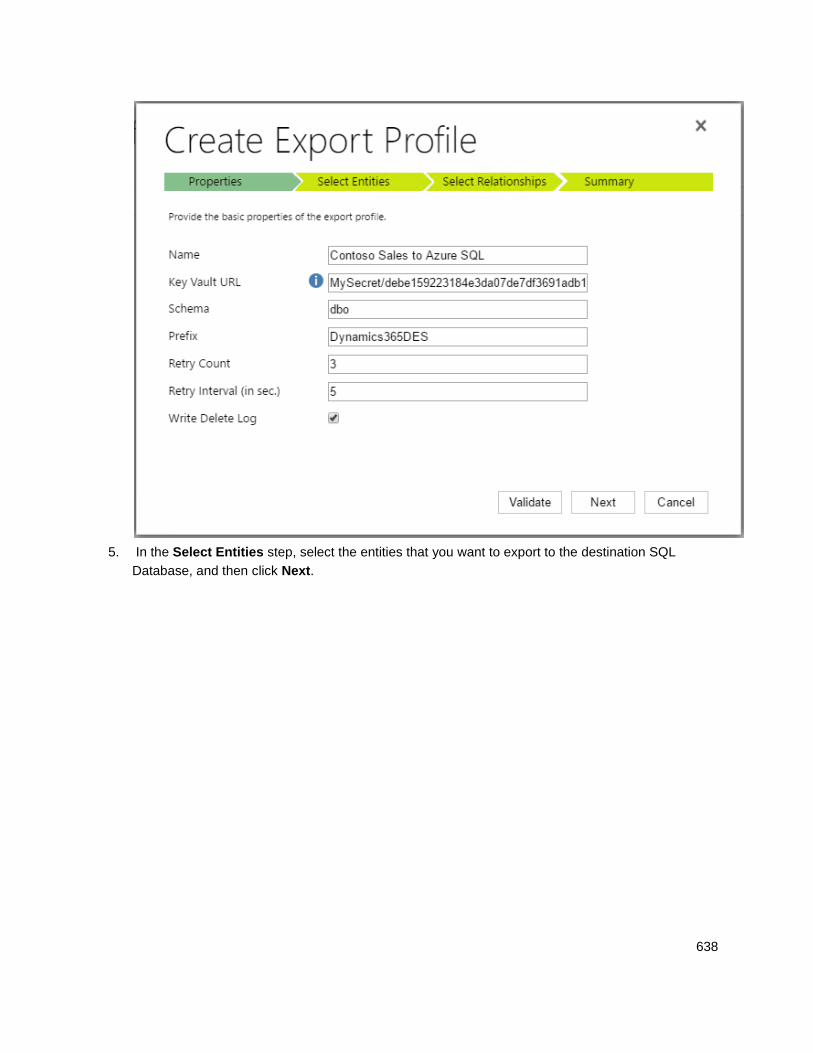
638
5. In the Select Entities step, select the entities that you want to export to the destination SQL
Database, and then click Next.
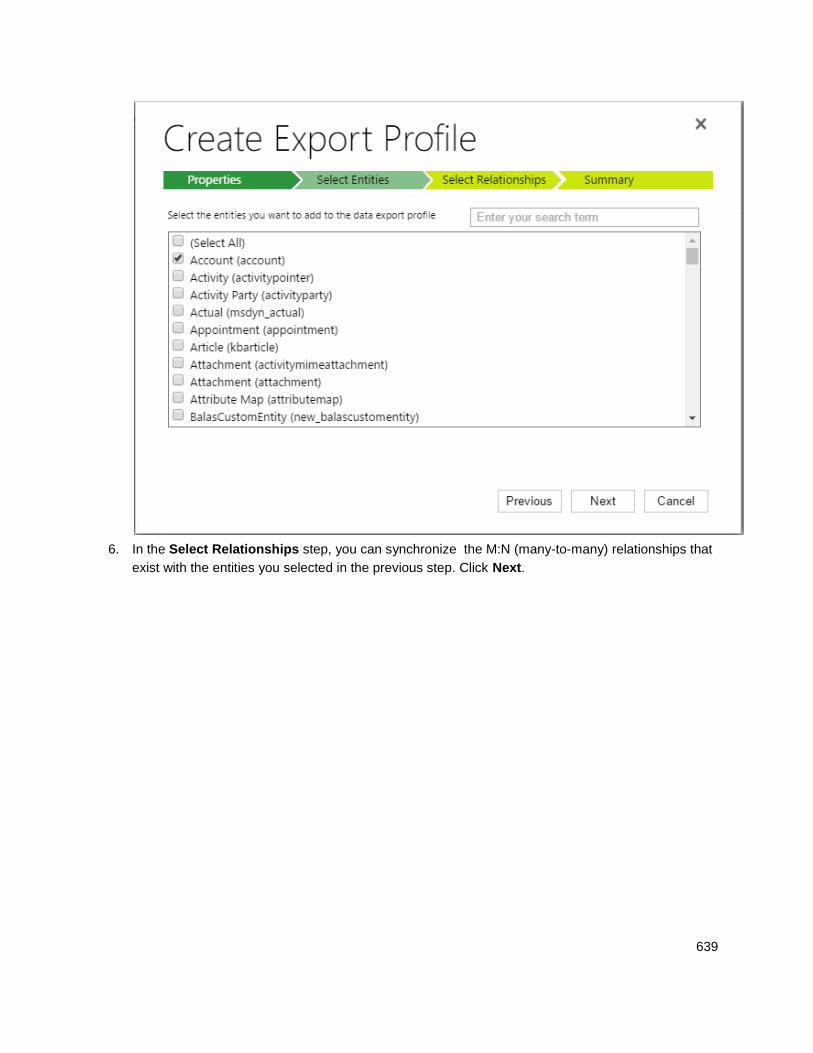
639
6. In the Select Relationships step, you can synchronize the M:N (many-to-many) relationships that
exist with the entities you selected in the previous step. Click Next.
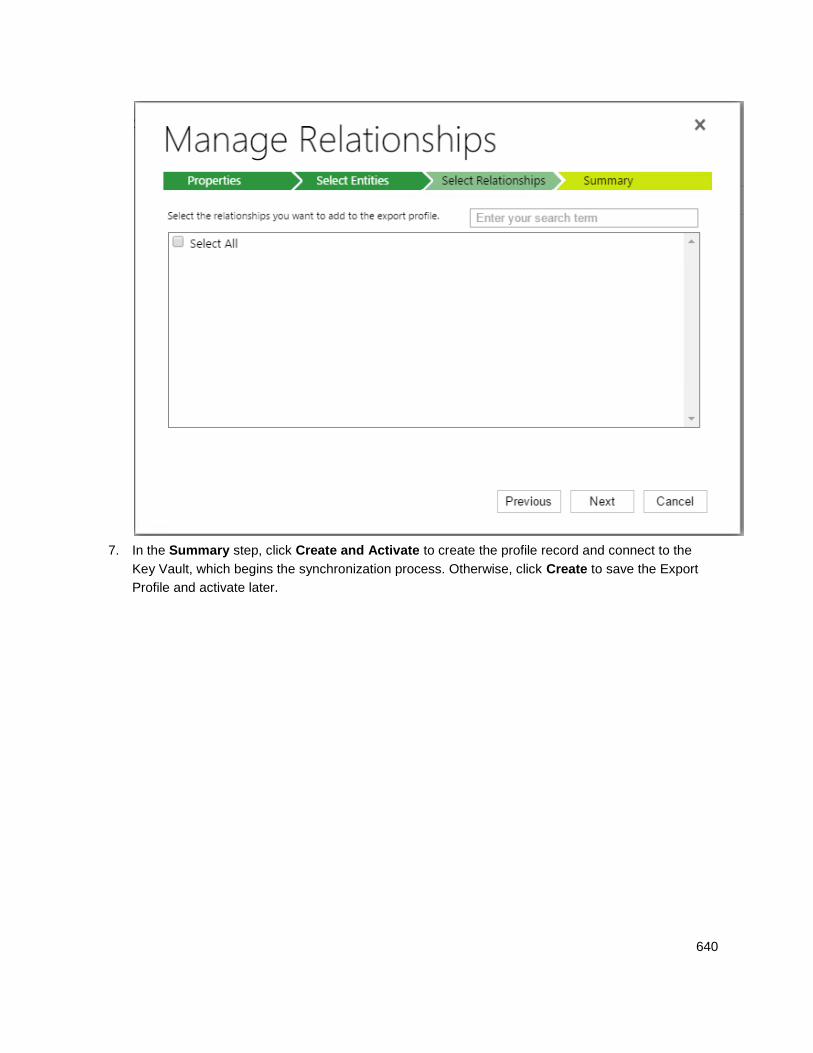
640
7. In the Summary step, click Create and Activate to create the profile record and connect to the
Key Vault, which begins the synchronization process. Otherwise, click Create to save the Export
Profile and activate later.
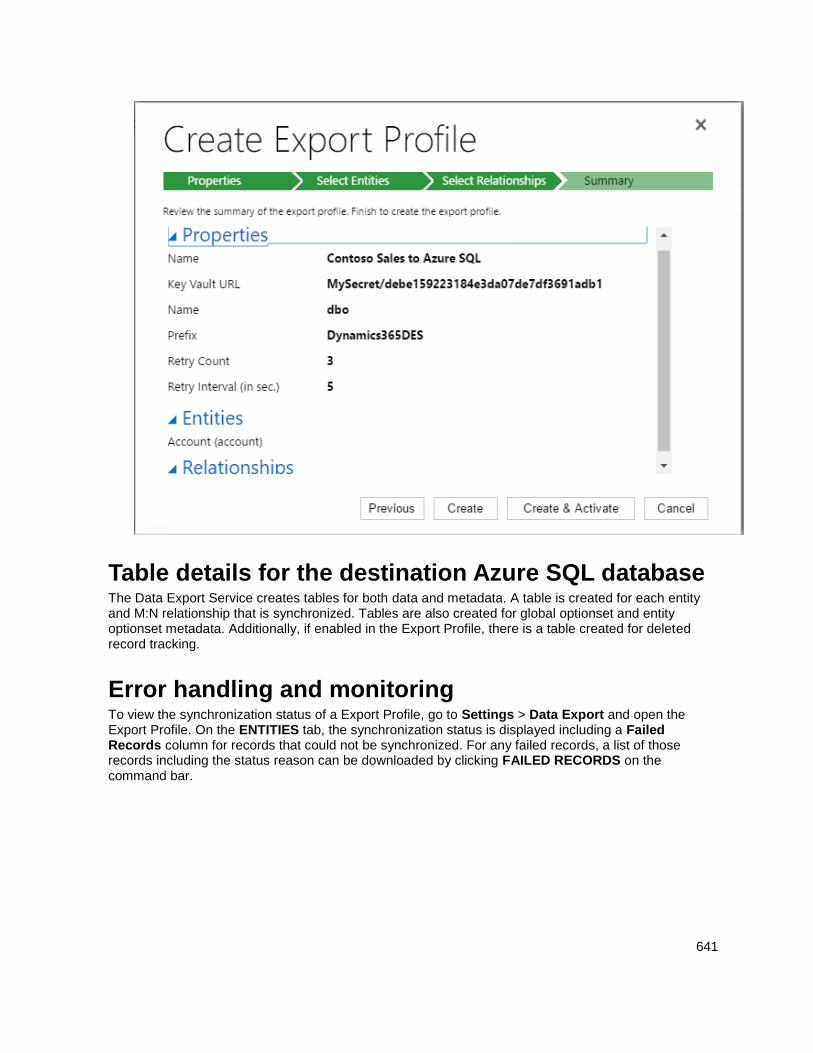
641
Table details for the destination Azure SQL database The Data Export Service creates tables for both data and metadata. A table is created for each entity and M:N relationship that is synchronized. Tables are also created for global optionset and entity optionset metadata. Additionally, if enabled in the Export Profile, there is a table created for deleted record tracking.
Error handling and monitoring To view the synchronization status of a Export Profile, go to Settings > Data Export and open the Export Profile. On the ENTITIES tab, the synchronization status is displayed including a Failed Records column for records that could not be synchronized. For any failed records, a list of those records including the status reason can be downloaded by clicking FAILED RECORDS on the command bar.
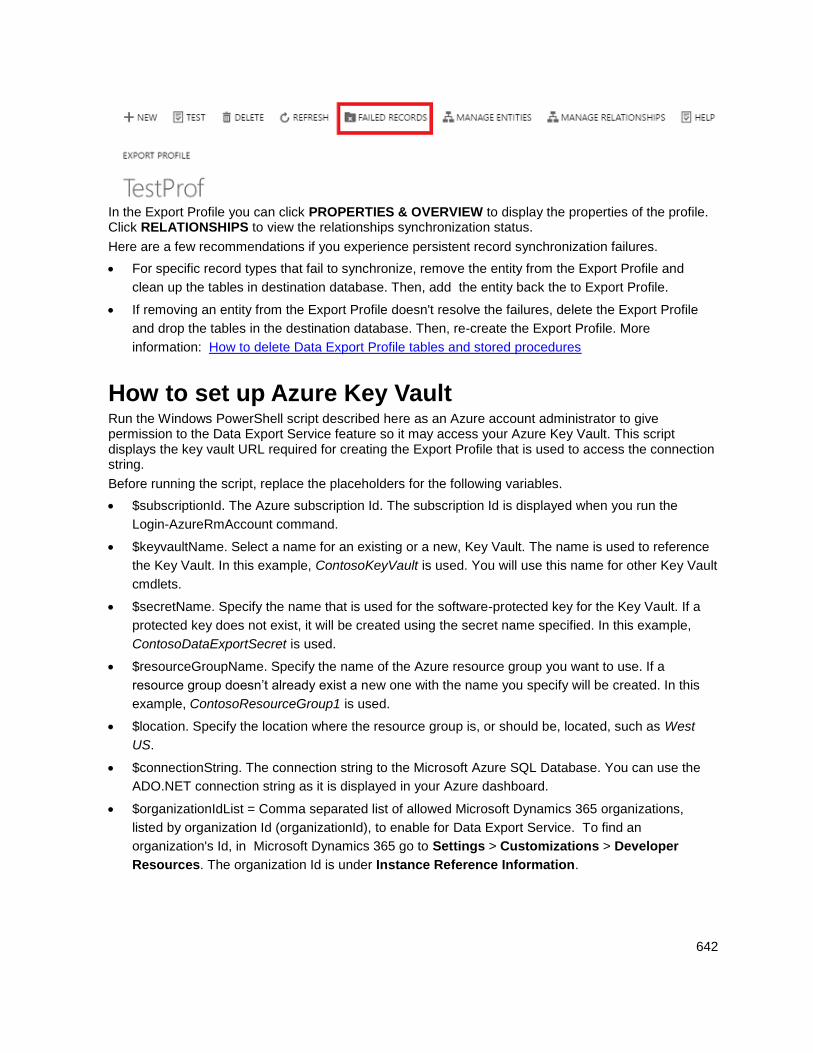
642
In the Export Profile you can click PROPERTIES & OVERVIEW to display the properties of the profile. Click RELATIONSHIPS to view the relationships synchronization status.
Here are a few recommendations if you experience persistent record synchronization failures.
For specific record types that fail to synchronize, remove the entity from the Export Profile and
clean up the tables in destination database. Then, add the entity back the to Export Profile.
If removing an entity from the Export Profile doesn't resolve the failures, delete the Export Profile
and drop the tables in the destination database. Then, re-create the Export Profile. More
information: How to delete Data Export Profile tables and stored procedures
How to set up Azure Key Vault Run the Windows PowerShell script described here as an Azure account administrator to give permission to the Data Export Service feature so it may access your Azure Key Vault. This script displays the key vault URL required for creating the Export Profile that is used to access the connection string.
Before running the script, replace the placeholders for the following variables.
$subscriptionId. The Azure subscription Id. The subscription Id is displayed when you run the
Login-AzureRmAccount command.
$keyvaultName. Select a name for an existing or a new, Key Vault. The name is used to reference
the Key Vault. In this example, ContosoKeyVault is used. You will use this name for other Key Vault
cmdlets.
$secretName. Specify the name that is used for the software-protected key for the Key Vault. If a
protected key does not exist, it will be created using the secret name specified. In this example,
ContosoDataExportSecret is used.
$resourceGroupName. Specify the name of the Azure resource group you want to use. If a
resource group doesn’t already exist a new one with the name you specify will be created. In this
example, ContosoResourceGroup1 is used.
$location. Specify the location where the resource group is, or should be, located, such as West
US.
$connectionString. The connection string to the Microsoft Azure SQL Database. You can use the
ADO.NET connection string as it is displayed in your Azure dashboard.
$organizationIdList = Comma separated list of allowed Microsoft Dynamics 365 organizations,
listed by organization Id (organizationId), to enable for Data Export Service. To find an
organization's Id, in Microsoft Dynamics 365 go to Settings > Customizations > Developer
Resources. The organization Id is under Instance Reference Information.
643
$tenantId. The tenant Id (TenantId) of your Azure subscription. The tenant Id is displayed when
you run the Login-AzureRmAccount command.
# -------------------------------------------------------------------------------- #
# Provide the value for the following parameters before executing the script
$subscriptionId = 'ContosoSubscriptionId'
$keyvaultName = 'ContosoKeyVault'
$secretName = 'ContosoDataExportSecret'
$resourceGroupName = 'ContosoResourceGroup1'
$location = 'West US'
$connectionString = 'AzureSQLconnectionString'
$organizationIdList = 'ContosoSalesOrg1_id, ContosoSalesOrg2_id'
$tenantId = 'tenantId'
# -------------------------------------------------------------------------------- #
# Login to Azure account and select Subscription
Login-AzureRmAccount
Select-AzureRmSubscription -SubscriptionId $subscriptionId
# Create new resource group if not exists.
$rgAvail = Get-AzureRmResourceGroup -Name $resourceGroupName -Location $location -ErrorAction
SilentlyContinue
if(!$rgAvail){
New-AzureRmResourceGroup -Name $resourceGroupName -Location $location
}
# Create new key vault if not exists.
$kvAvail = Get-AzureRmKeyVault -VaultName $keyvaultName -ResourceGroupName $resourceGroupName -
ErrorAction SilentlyContinue
if(!$kvAvail){
New-AzureRmKeyVault -VaultName $keyvaultName -ResourceGroupName $resourceGroupName -
Location $location
# Wait few seconds for DNS entry to propagate
Start-Sleep -Seconds 15
644
}
# Create tags to store allowed set of Organizations.
$secretTags = @{}
foreach ($orgId in $organizationIdList.Split(',')) {
$secretTags.Add($orgId.Trim(), $tenantId)
}
# Add or update a secret to key vault.
$secretVaule = ConvertTo-SecureString $connectionString -AsPlainText -Force
$secret = Set-AzureKeyVaultSecret -VaultName $keyvaultName -Name $secretName -SecretValue
$secretVaule -Tags $secretTags
# Authorize application to access key vault.
$servicePrincipal = 'b861dbcc-a7ef-4219-a005-0e4de4ea7dcf'
Set-AzureRmKeyVaultAccessPolicy -VaultName $keyvaultName -ServicePrincipalName
$servicePrincipal -PermissionsToSecrets get
# Display secret url.
Write-Host "Connection key vault URL is "$secret.id""
How to delete Data Export Profile tables and stored procedures
Important
Before you run this SQL statement make sure that you have correctly defined the @prefix value in the statement that corresponds to the prefix value defined in the Export Profile.
-----------------------------------------------------------------
-- Provide the value for the following parameters
DECLARE @prefix nvarchar(32) ='';
-----------------------------------------------------------------
645
DECLARE @sql nvarchar(max) = '';
SELECT @sql += 'DROP TABLE ' + QUOTENAME([TABLE_SCHEMA]) + '.' + QUOTENAME([TABLE_NAME]) + ';'
FROM [INFORMATION_SCHEMA].[TABLES]
WHERE [TABLE_TYPE] = 'BASE TABLE' AND [TABLE_NAME] like @prefix + '_%';
PRINT @sql
EXEC SP_EXECUTESQL @sql;
PRINT 'Finished dropping all tables. Starting to drop all stored procedures now.'
SELECT @sql='';
SELECT @sql += 'DROP PROCEDURE ' + QUOTENAME([ROUTINE_SCHEMA]) + '.' +
QUOTENAME([ROUTINE_NAME]) + ';'
FROM [INFORMATION_SCHEMA].[ROUTINES]
WHERE [ROUTINE_TYPE] = 'PROCEDURE' AND [ROUTINE_NAME] like @prefix + '_%';
PRINT @sql
EXEC SP_EXECUTESQL @sql;
Privacy notice By using the Data Export Service, when you activate a data export profile from within Microsoft Dynamics 365, the data of the entities added to the profile is sent to Azure. The initial synchronization includes all the data associated with the entities added to the export profile, but thereafter synchronization includes only new changes, which are continuously sent to the Data Export Service. Data sent to the Data Export Service is stored temporarily in Azure Service Bus and Azure Storage, processed in Azure Service Fabric, and finally synchronized (inserted, updated, or deleted) to the destination database specified in your Azure subscription. After the data has been synchronized, it is deleted from Azure Service Bus and Azure Storage. If there is a failure during data synchronization, minimal data corresponding to entity type, record ID, and sync timestamp is stored in Azure Storage to allow for downloading a list of records that were not updated.
An administrator can deactivate the data export profile at any time to stop data synchronization. In addition, an administrator can delete the export profile to remove any failed record logs and can uninstall the Data Export Service solution to stop using the Data Export Service.
Data synchronization happens continuously between Dynamics 365 and the Data Export Service in a secure manner. Data is encrypted as it is continuously exchanged between Dynamics 365 and the Data Export Service.
646
Azure components and services that are involved with the Data Export Service are detailed in the following sections.
Note:For more information about additional Azure service offerings, see the Microsoft Azure Trust Center.
Azure Service Fabric
This provides the API and compute Azure VMs to process record synchronize notifications received from Dynamics 365 and then process them to insert, update, or delete record data in the destination database. Micro-services that are deployed on virtual machines managed by the Azure Service Fabric runtime handle all the compute services related to data synchronization.
Azure Service Bus
This provides the message bus into which Dynamics 365 inserts the synchronization notification messages that are processed by compute nodes in Azure Service Fabric. Each message stores information, such as the org id and record, for which for which to sync data.
Azure Blob Storage
Data is temporarily stored in Azure Blob Storage in case the record sync notification’s data is too large to store in a message or a transient failure is encountered to process the synchronization notification. These blobs are encrypted by leveraging the latest feature in the Azure Storage SDK, which provides symmetric and asymmetric encryption support and integration with Azure Key Vault.
Azure SQL
The Azure SQL Database stores data export profile configuration and data synchronization metrics.
See Also Manage your data
© 2016 Microsoft. All rights reserved. Copyright
Set up and manage phones and tablets
Applies To: Dynamics 365 (online), Dynamics 365 (on-premises), Dynamics CRM 2016, Dynamics CRM Online
[This topic is pre-release documentation and is subject to change.]
The following section contains information about setting up and supporting Microsoft Dynamics 365 when using mobile devices.
In This Section Set up Dynamics 365 for phones and Dynamics 365 for tablets
Support for Dynamics 365 for phones and Dynamics 365 for tablets
Secure and manage Dynamics 365 for phones and tablets
Troubleshooting and things to know about Dynamics 365 for phones and tablets
647
See Also Administering Dynamics 365
© 2016 Microsoft. All rights reserved. Copyright
Set up Dynamics 365 for phones and Dynamics 365 for tablets
Applies To: Dynamics 365 (online), Dynamics 365 (on-premises), Dynamics CRM 2016, Dynamics CRM Online
[This topic is pre-release documentation and is subject to change.]
Your users want their Dynamics 365 data while on-the-go. We’ve got two mobile Dynamics 365 apps for you to deploy:
Dynamics 365 for phones: If you’re running Microsoft Dynamics CRM Online 2015 Update 1 or
later or Microsoft Dynamics 365 on-premises, we’ve got a new phone app for you that’s been
reworked to be “Configure once, deploy everywhere”. Design your information architecture once
and the customizations will automatically flow to all form factors. Much is shared with Dynamics 365
for tablets.
Video: Extend Dynamics CRM to your Smart Phone
Dynamics 365 for tablets: With the same basic features as Dynamics 365 for phones, tablet users
will appreciate the Dynamics 365 experience optimized for a larger screen.
In this topic Get started with Dynamics 365 for phones and Dynamics 365 for tablets
What users need to do
What admins need to do
Configure Dynamics 365 for phones and Dynamics 365 for tablets
Things to know about Dynamics 365 for phones
Supported languages for Dynamics 365 for phones and Dynamics 365 for tablets
Entities and Dynamics 365 for phones and Dynamics 365 for tablets
Authentication and Dynamics 365 for phones and Dynamics 365 for tablets
Considerations and best practices for securing Dynamics 365 data on Dynamics 365 for phones and Dynamics 365 for tablets
Other features
Privacy notice
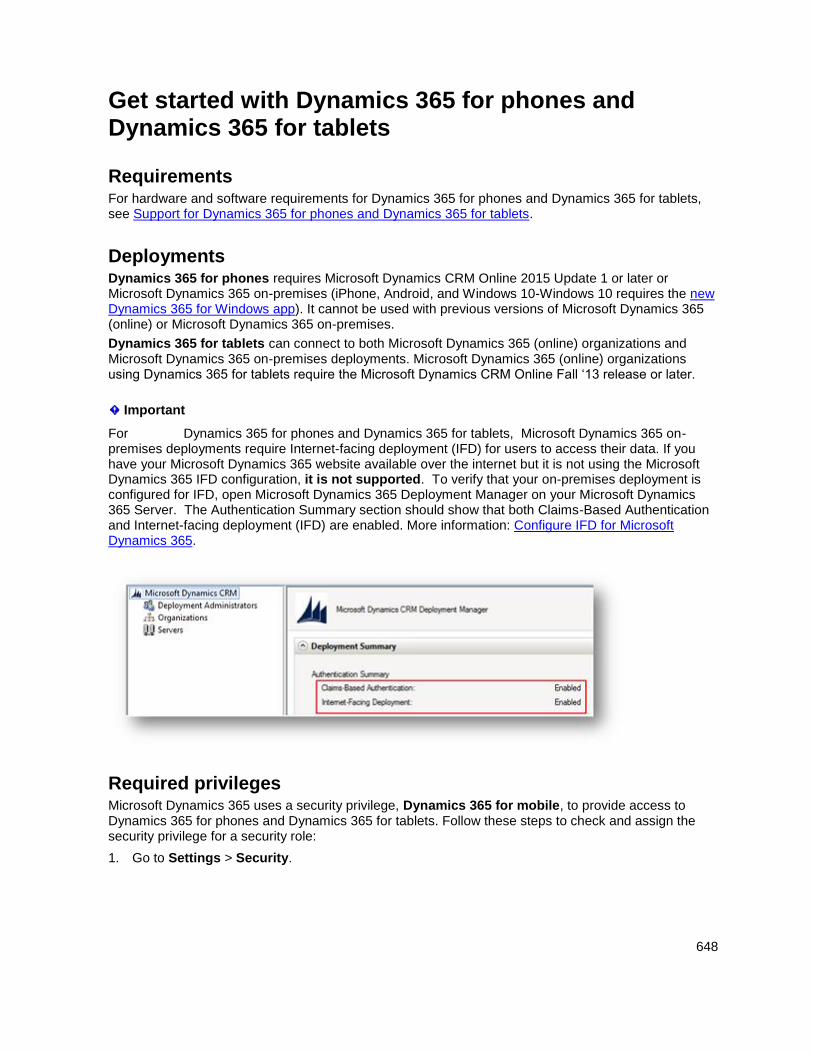
648
Get started with Dynamics 365 for phones and Dynamics 365 for tablets
Requirements For hardware and software requirements for Dynamics 365 for phones and Dynamics 365 for tablets, see Support for Dynamics 365 for phones and Dynamics 365 for tablets.
Deployments Dynamics 365 for phones requires Microsoft Dynamics CRM Online 2015 Update 1 or later or Microsoft Dynamics 365 on-premises (iPhone, Android, and Windows 10-Windows 10 requires the new Dynamics 365 for Windows app). It cannot be used with previous versions of Microsoft Dynamics 365 (online) or Microsoft Dynamics 365 on-premises.
Dynamics 365 for tablets can connect to both Microsoft Dynamics 365 (online) organizations and Microsoft Dynamics 365 on-premises deployments. Microsoft Dynamics 365 (online) organizations using Dynamics 365 for tablets require the Microsoft Dynamics CRM Online Fall ‘13 release or later.
Important
For Dynamics 365 for phones and Dynamics 365 for tablets, Microsoft Dynamics 365 on-premises deployments require Internet-facing deployment (IFD) for users to access their data. If you have your Microsoft Dynamics 365 website available over the internet but it is not using the Microsoft Dynamics 365 IFD configuration, it is not supported. To verify that your on-premises deployment is configured for IFD, open Microsoft Dynamics 365 Deployment Manager on your Microsoft Dynamics 365 Server. The Authentication Summary section should show that both Claims-Based Authentication and Internet-facing deployment (IFD) are enabled. More information: Configure IFD for Microsoft Dynamics 365.
Required privileges Microsoft Dynamics 365 uses a security privilege, Dynamics 365 for mobile, to provide access to Dynamics 365 for phones and Dynamics 365 for tablets. Follow these steps to check and assign the security privilege for a security role:
1. Go to Settings > Security.
649
2. Click Security Roles.
3. Choose a security role > Business Management tab.
4. In the Privacy Related Privileges section, verify that Dynamics 365 for mobile is set to
Organization. If not, click Dynamics 365 for mobile.
5. Click Save and Close to save the changes to the security role.
6. Send an email to tablet-enabled users to let them know they can download the mobile app from the
app store. Include the organization URL and sign-in information in the email.
This applies to new installations of Microsoft Dynamics 365 (online), Microsoft Dynamics CRM 2013 or later, and customers that upgrade from Microsoft Dynamics CRM 2011. You can add or remove this privilege from custom or default security roles to meet your business needs. Users who do not have this privilege will see the following error:
You haven't been authorized to use this app. Check with your system administrator to update your settings.
Note
Microsoft Dynamics 365 includes the ability to audit user access. Audit events are logged if a user accesses your Dynamics 365 organization through Dynamics 365 for tablets. However, there is not a new event type that indicates the access was through Dynamics 365 for tablets. The audit login events would appear as User Access via Web Services.
In addition, particularly if you have created a custom security role, validate that three entities have Read permission.
1. Go to Settings > Security.
2. Click Security Roles.
3. Choose a security role > Customization tab.
4. Verify that the Read permission is set for the following entities:
Custom Control
Custom Control Default Config
Custom Control Resource
System Application Metadata
User Application Metadata
5. Click Save and Close to save the changes to the security role.
What users need to do See the topic: Help & Training: CRM for Phones and Tablets User's Guide
Install Dynamics 365 for phones and Dynamics 365 for tablets Help & Training: Install Dynamics 365 for tablets and phones
650
Tip
Be sure to provide users the URL and credentials they need to sign in.
What admins need to do
Enable dashboards for Dynamics 365 for phone and Dynamics 365 for tablet users Multiple dashboards are available for Dynamics 365 for phones and Dynamics 365 for tablets users. After you set up standard or custom dashboards for mobile access, users can easily modify which dashboards appear and how they appear on their phones or tablets.
1. Go to Settings > Customizations.
2. Click Customize the System.
3. Under Components, click Dashboards.
4. Double-click or press and hold the dashboard you want to enable for phone or tablet access.
5. Click Properties > Enable for mobile > OK.
6. Click Save.
Show your users how to set and view the enabled dashboards on their phones or tablets. More information: Help & Training: Get around in Dynamics 365 for phones and tablets
You can assign security roles to a dashboard so the dashboard appears only to users with certain security roles. For example, to set who has access to the Sales Dashboard, click Settings > Customizations > Customize the System > Components > Dashboards, and then select the Sales Dashboard. Then, click Enable Security Roles.
Get your on-premises deployment ready for Dynamics 365 for Windows 8.1 tablets
Important
The following content covering registry changes applies to Dynamics 365 for tablets and notDynamics 365 for phones.
The new Dynamics 365 for tablets Windows 10 app does not require registry changes.
To deploy the Dynamics 365 for Windows 8.1 app, review the following scenarios.
Admin action
You’re using Microsoft Dynamics CRM Online Spring ‘14 or later.
None. You can skip the steps in this section. They apply only to on-premises Microsoft Dynamics 365.

651
Admin action
You’re using an on-premises version of Dynamics 365 that is earlier than Microsoft Dynamics CRM 2013 Service Pack 1 (SP1).
Update to Microsoft Dynamics CRM 2013 Service Pack 1 (SP1) or later, and then follow the steps in this section.
You organization is running Microsoft Dynamics CRM 2013 Service Pack 1 (SP1) or later.
Follow the steps in this section.
Note
If you need to delay updating to Microsoft Dynamics CRM 2013 Service Pack 1 (SP1) or later, your users can use the Windows 8 app.
Before your users install the Windows 8.1 app, complete these steps:
1. Make sure your Dynamics 365 server is updated to Microsoft Dynamics CRM 2013 Service Pack 1
(SP1) or later.
2. Update a registry setting on your mobile devices.
Note
If users have installed the Dynamics 365 for Windows 8.1 app prior to you making these registry changes, they will need to restart the tablet app after the changes are complete.
Update the registry on managed mobile devices If your mobile devices are managed under the control of group policy, the following steps describe what you need to do.
Caution
This task contains steps that tell you how to modify the registry. However, because serious problems may occur if you modify the registry incorrectly, it’s important that you follow these steps carefully. For added protection, back up the registry before you modify it. Then, you can restore the registry if a problem occurs. For more information about how to back up and restore the registry, open the following link to view the article in the Microsoft Knowledge Base: How to back up and restore the registry in Windows.
1. If you plan on using group policy to do a domain wide deployment of the registry change and your
server is not running Windows Server 2012 R2 or later, download and install the Windows Server
Administrative Templates.
2. Open the Group Policy Management Editor.
652
3. Select an existing policy or create a new policy.
4. Go to Computer Configuration > Policies > Administrative Templates > Windows
Components > App runtime and set Turn on dynamic Content URI Rules for Windows store
apps to Enabled.
5. Click Show, and then add the URL for your organization. For example,
https://orgname.contoso.com.
6. Close the group policy editor and save your changes.
More information: How to update links to external web pages for an enterprise environment and Group Policy
Update the registry on unmanaged mobile devices using a script If your mobile devices are unmanaged, see the following sample PowerShell script that shows how to change the registry on each Windows 8.1 or later device.
# *********************************************************
#
# Copyright (c) Microsoft. All rights reserved.
# This code is licensed under the Microsoft Limited Public License.
# THIS CODE IS PROVIDED *AS IS* WITHOUT WARRANTY OF
# ANY KIND, EITHER EXPRESS OR IMPLIED, INCLUDING ANY
# IMPLIED WARRANTIES OF FITNESS FOR A PARTICULAR
# PURPOSE, MERCHANTABILITY, OR NON-INFRINGEMENT.
#
# *********************************************************
param([string]$admin)
#Force PowerShell to relaunch in Admin mode
if($admin -ne 'LaunchingAsAdminNow')
{
$Args = '-ExecutionPolicy Unrestricted -file "' + ((Get-Variable
MyInvocation).Value.MyCommand.Path) + '" LaunchingAsAdminNow'
$AdminProcess = Start-Process "$PsHome\PowerShell.exe" -Verb RunAs -ArgumentList $Args -
PassThru
}
else
653
{
# Create Packages key if it does not exist
$packages=Get-Item -Path HKLM:\SOFTWARE\Microsoft\Windows\CurrentVersion\Policies\Packages
-ErrorAction SilentlyContinue
if($packages -eq $null)
{ New-Item -Path HKLM:\SOFTWARE\Microsoft\Windows\CurrentVersion\Policies -Name Packages}
# Create Applications key if it does not exist
$apps=Get-Item -Path
HKLM:\SOFTWARE\Microsoft\Windows\CurrentVersion\Policies\Packages\Applications -ErrorAction
SilentlyContinue
if($apps -eq $null)
{ New-Item -Path HKLM:\SOFTWARE\Microsoft\Windows\CurrentVersion\Policies\Packages -Name
Applications}
# Add or overwrite EnableDynamicContentUriRules value to 1
New-ItemProperty -Path
HKLM:\SOFTWARE\Microsoft\Windows\CurrentVersion\Policies\Packages\Applications -Name
EnableDynamicContentUriRules -PropertyType DWord -Value 1 -force
# Create ContentUriRules key if it does not exist
$rules=Get-Item -Path
HKLM:\SOFTWARE\Microsoft\Windows\CurrentVersion\Policies\Packages\Applications\ContentUriRules
-ErrorAction SilentlyContinue
if($rules -eq $null)
{New-Item -Path
HKLM:\SOFTWARE\Microsoft\Windows\CurrentVersion\Policies\Packages\Applications -Name
ContentUriRules}
# Prompt user for the domain uri
$domainname = Read-Host 'Please provide the domain uri that you want to add to the allow
list(such as https://*.contoso.com:444)'
# Add uri to the allow list under ContentUriRules
654
$urls=Get-Item -Path
HKLM:\SOFTWARE\Microsoft\Windows\CurrentVersion\Policies\Packages\Applications\ContentUriRules
-ErrorAction SilentlyContinue
New-ItemProperty -Path
HKLM:\SOFTWARE\Microsoft\Windows\CurrentVersion\Policies\Packages\Applications\ContentUriRules
-Name ($urls.ValueCount+1) -PropertyType String -Value $domainname -force
}
Update the registry on unmanaged mobile devices using the Registry Editor If your mobile devices are unmanaged, you can also change the registry on each Windows 8.1 or later device like this:
1. Start Registry Editor.
2. Before making changes to your registry, make a backup. Click File > Export, and then enter your
settings.
3. Locate the following registry subkey:
HKEY_LOCAL_MACHINE\Software\Microsoft\Windows\CurrentVersion\policies
4. Right-click or tap policies, point to New, and then click Key.
5. Type Packages, and then press ENTER.
6. Right-click or tap Packages, point to New, and then click Key.
7. Type Applications, and then save the text.
8. Right-click or tap Applications, point to New, and then click DWORD (32-bit) Value.
9. Type EnableDynamicContentUriRules and then save the text.
10. Right-click or tap EnableDynamicContentUriRules, and then click Modify.
11. Type 1 in the Value Data box, and then click OK.
12. Right-click or tap Applications, point to New, and then click Key.
13. Type ContentUriRules, and then save the text.
14. Right-click or tap ContentUriRules, point to New, and then click String Value.
15. Type 1, and then save the text.
16. Right-click or tap 1, and then click Modify.
17. Type your Dynamics 365 organization’s URL in the Value Data box (for example,
https://contoso.com), and then click OK.
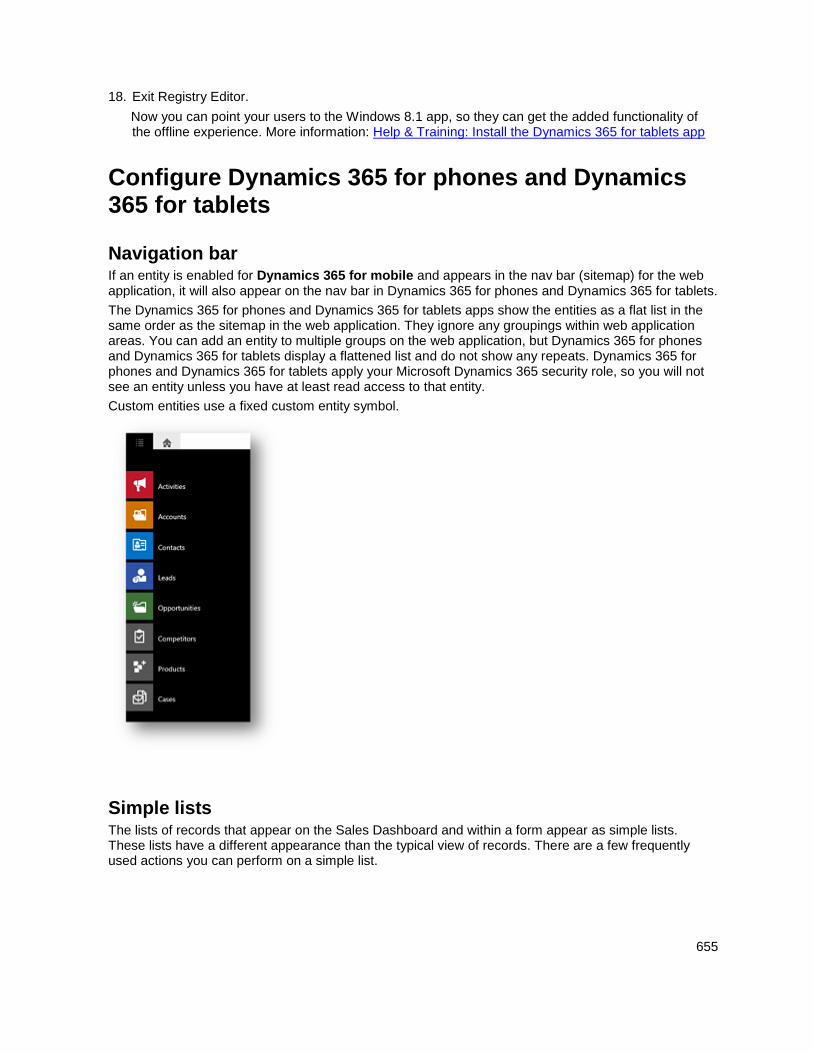
655
18. Exit Registry Editor.
Now you can point your users to the Windows 8.1 app, so they can get the added functionality of the offline experience. More information: Help & Training: Install the Dynamics 365 for tablets app
Configure Dynamics 365 for phones and Dynamics 365 for tablets
Navigation bar If an entity is enabled for Dynamics 365 for mobile and appears in the nav bar (sitemap) for the web application, it will also appear on the nav bar in Dynamics 365 for phones and Dynamics 365 for tablets.
The Dynamics 365 for phones and Dynamics 365 for tablets apps show the entities as a flat list in the same order as the sitemap in the web application. They ignore any groupings within web application areas. You can add an entity to multiple groups on the web application, but Dynamics 365 for phones and Dynamics 365 for tablets display a flattened list and do not show any repeats. Dynamics 365 for phones and Dynamics 365 for tablets apply your Microsoft Dynamics 365 security role, so you will not see an entity unless you have at least read access to that entity.
Custom entities use a fixed custom entity symbol.
Simple lists The lists of records that appear on the Sales Dashboard and within a form appear as simple lists. These lists have a different appearance than the typical view of records. There are a few frequently used actions you can perform on a simple list.
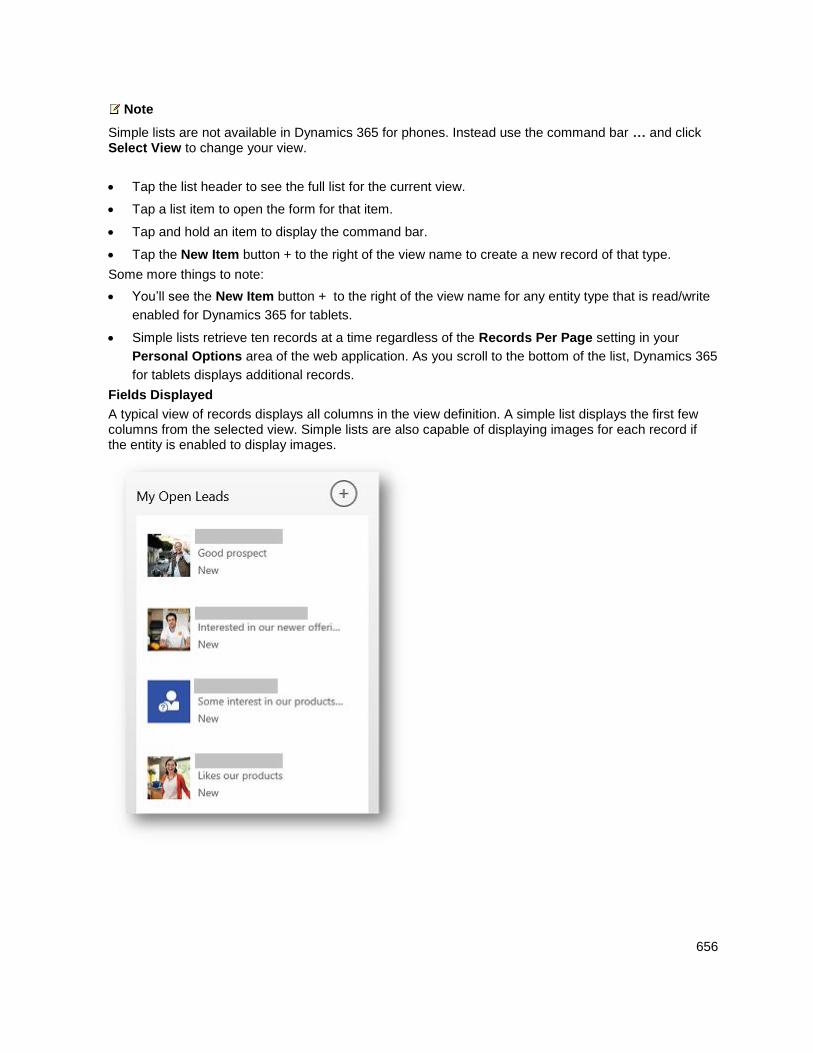
656
Note
Simple lists are not available in Dynamics 365 for phones. Instead use the command bar … and click Select View to change your view.
Tap the list header to see the full list for the current view.
Tap a list item to open the form for that item.
Tap and hold an item to display the command bar.
Tap the New Item button + to the right of the view name to create a new record of that type.
Some more things to note:
You’ll see the New Item button + to the right of the view name for any entity type that is read/write
enabled for Dynamics 365 for tablets.
Simple lists retrieve ten records at a time regardless of the Records Per Page setting in your
Personal Options area of the web application. As you scroll to the bottom of the list, Dynamics 365
for tablets displays additional records.
Fields Displayed
A typical view of records displays all columns in the view definition. A simple list displays the first few columns from the selected view. Simple lists are also capable of displaying images for each record if the entity is enabled to display images.
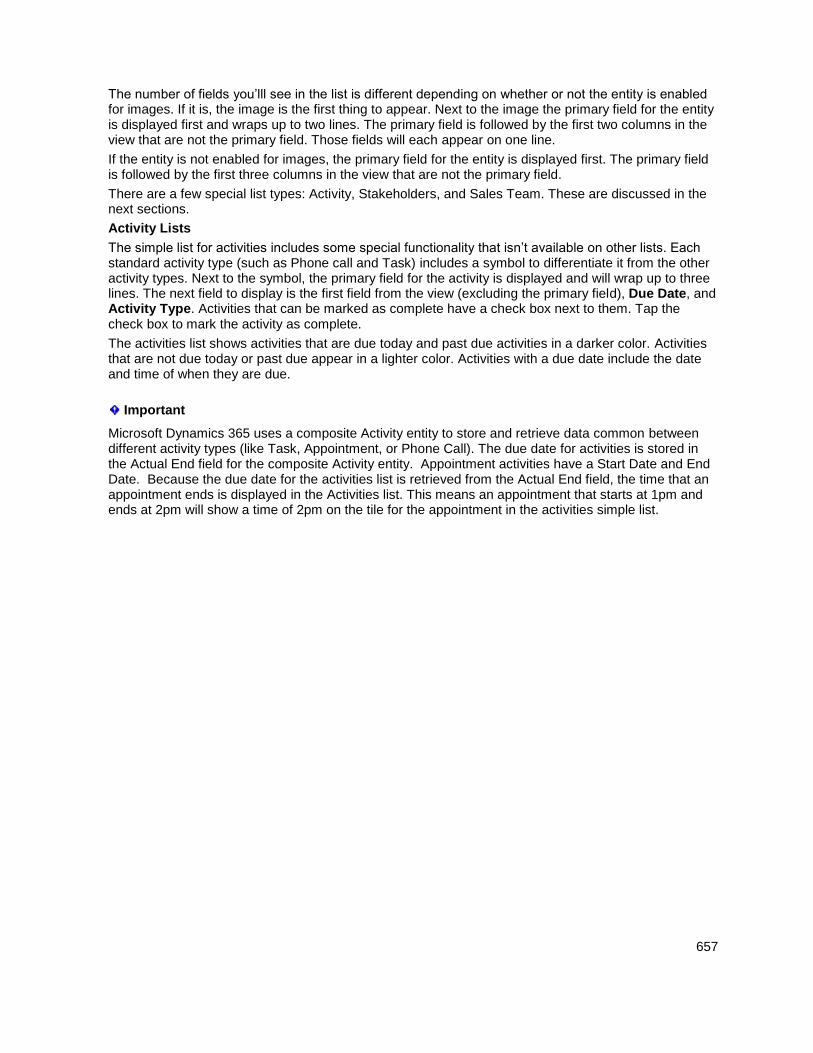
657
The number of fields you’lll see in the list is different depending on whether or not the entity is enabled for images. If it is, the image is the first thing to appear. Next to the image the primary field for the entity is displayed first and wraps up to two lines. The primary field is followed by the first two columns in the view that are not the primary field. Those fields will each appear on one line.
If the entity is not enabled for images, the primary field for the entity is displayed first. The primary field is followed by the first three columns in the view that are not the primary field.
There are a few special list types: Activity, Stakeholders, and Sales Team. These are discussed in the next sections.
Activity Lists
The simple list for activities includes some special functionality that isn’t available on other lists. Each standard activity type (such as Phone call and Task) includes a symbol to differentiate it from the other activity types. Next to the symbol, the primary field for the activity is displayed and will wrap up to three lines. The next field to display is the first field from the view (excluding the primary field), Due Date, and Activity Type. Activities that can be marked as complete have a check box next to them. Tap the check box to mark the activity as complete.
The activities list shows activities that are due today and past due activities in a darker color. Activities that are not due today or past due appear in a lighter color. Activities with a due date include the date and time of when they are due.
Important
Microsoft Dynamics 365 uses a composite Activity entity to store and retrieve data common between different activity types (like Task, Appointment, or Phone Call). The due date for activities is stored in the Actual End field for the composite Activity entity. Appointment activities have a Start Date and End Date. Because the due date for the activities list is retrieved from the Actual End field, the time that an appointment ends is displayed in the Activities list. This means an appointment that starts at 1pm and ends at 2pm will show a time of 2pm on the tile for the appointment in the activities simple list.
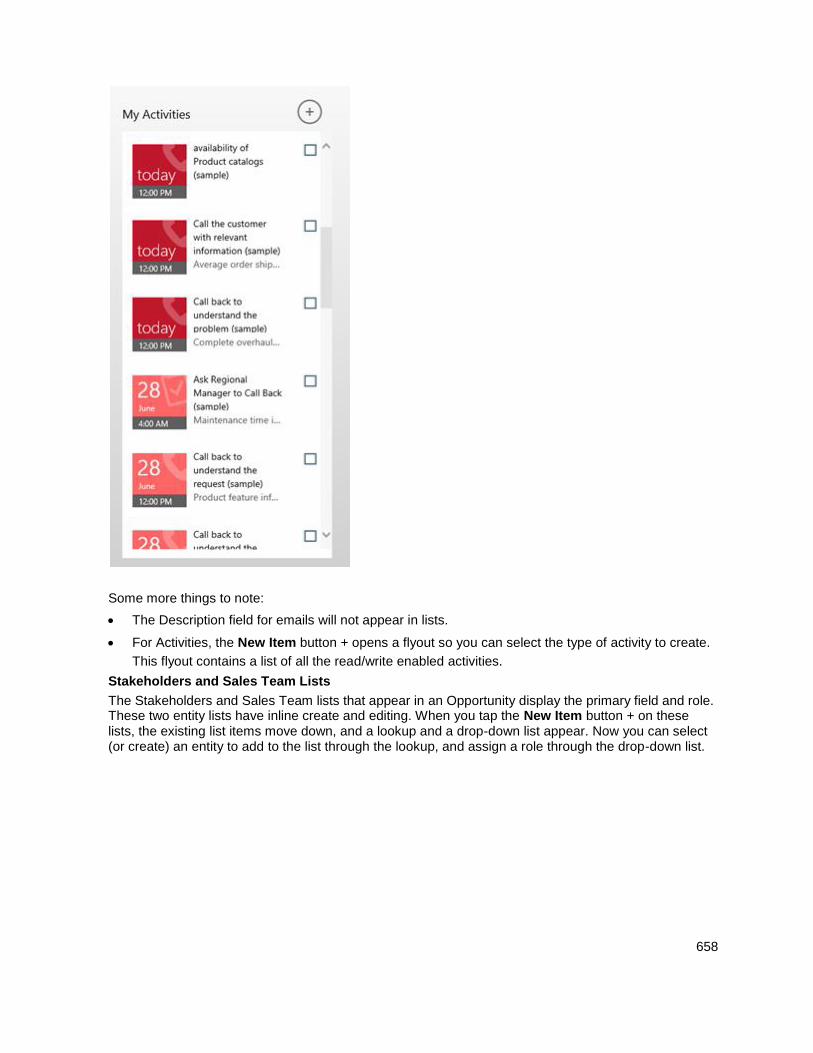
658
Some more things to note:
The Description field for emails will not appear in lists.
For Activities, the New Item button + opens a flyout so you can select the type of activity to create.
This flyout contains a list of all the read/write enabled activities.
Stakeholders and Sales Team Lists
The Stakeholders and Sales Team lists that appear in an Opportunity display the primary field and role. These two entity lists have inline create and editing. When you tap the New Item button + on these lists, the existing list items move down, and a lookup and a drop-down list appear. Now you can select (or create) an entity to add to the list through the lookup, and assign a role through the drop-down list.
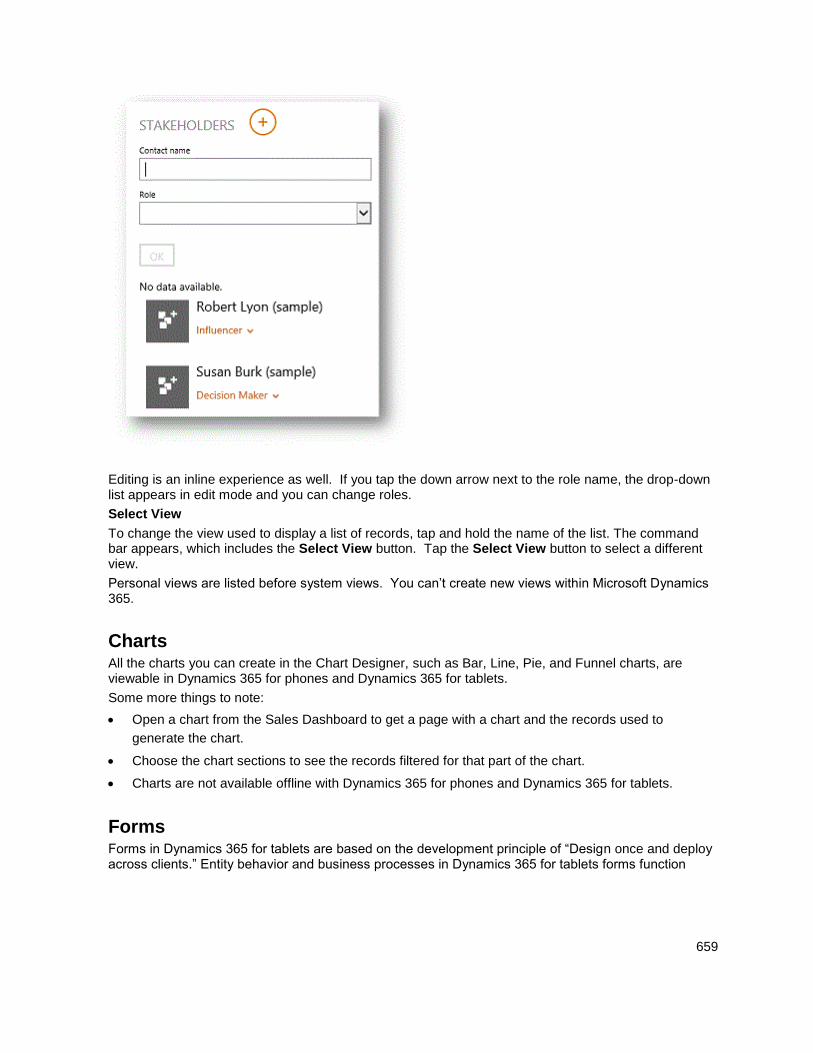
659
Editing is an inline experience as well. If you tap the down arrow next to the role name, the drop-down list appears in edit mode and you can change roles.
Select View
To change the view used to display a list of records, tap and hold the name of the list. The command bar appears, which includes the Select View button. Tap the Select View button to select a different view.
Personal views are listed before system views. You can’t create new views within Microsoft Dynamics 365.
Charts All the charts you can create in the Chart Designer, such as Bar, Line, Pie, and Funnel charts, are viewable in Dynamics 365 for phones and Dynamics 365 for tablets.
Some more things to note:
Open a chart from the Sales Dashboard to get a page with a chart and the records used to
generate the chart.
Choose the chart sections to see the records filtered for that part of the chart.
Charts are not available offline with Dynamics 365 for phones and Dynamics 365 for tablets.
Forms Forms in Dynamics 365 for tablets are based on the development principle of “Design once and deploy across clients.” Entity behavior and business processes in Dynamics 365 for tablets forms function
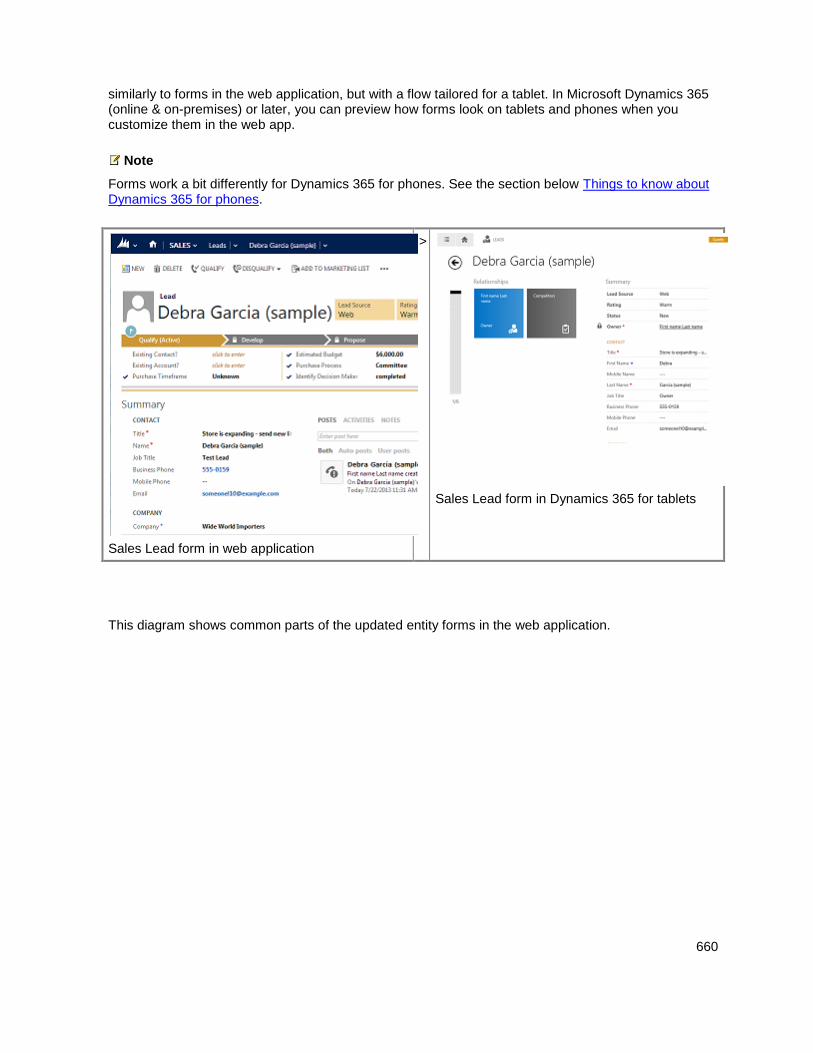
660
similarly to forms in the web application, but with a flow tailored for a tablet. In Microsoft Dynamics 365 (online & on-premises) or later, you can preview how forms look on tablets and phones when you customize them in the web app.
Note
Forms work a bit differently for Dynamics 365 for phones. See the section below Things to know about Dynamics 365 for phones.
Sales Lead form in web application
>
Sales Lead form in Dynamics 365 for tablets
This diagram shows common parts of the updated entity forms in the web application.
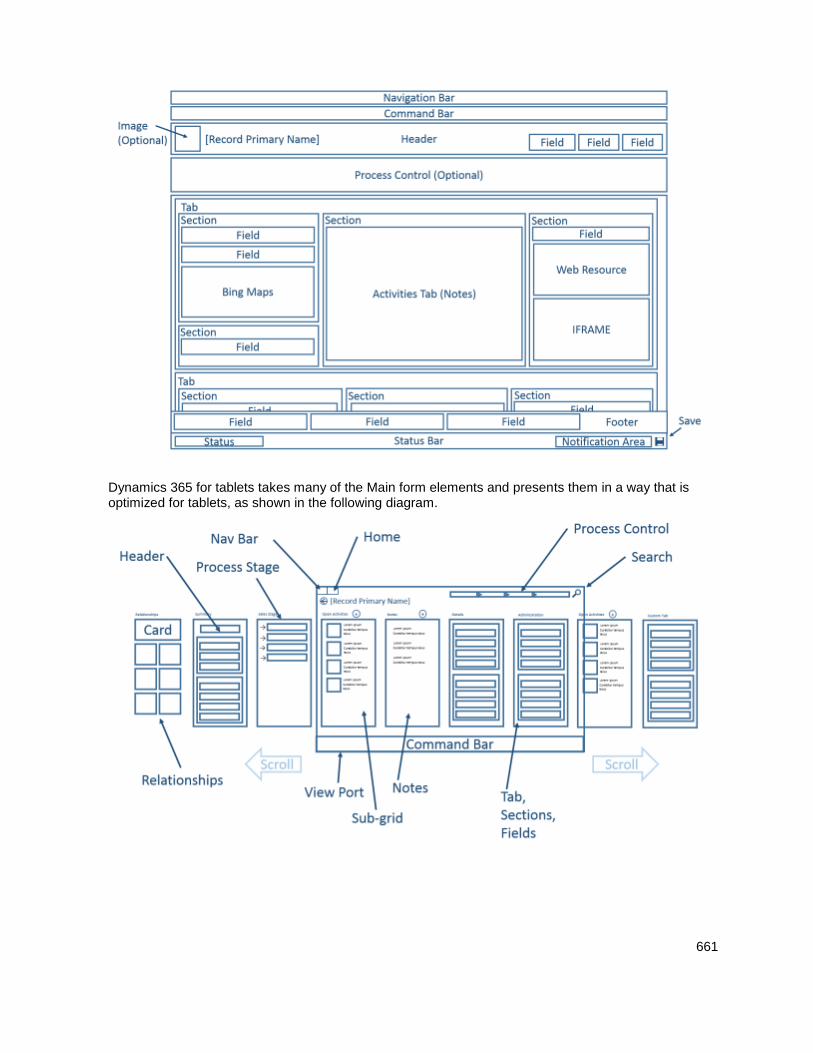
661
Dynamics 365 for tablets takes many of the Main form elements and presents them in a way that is optimized for tablets, as shown in the following diagram.
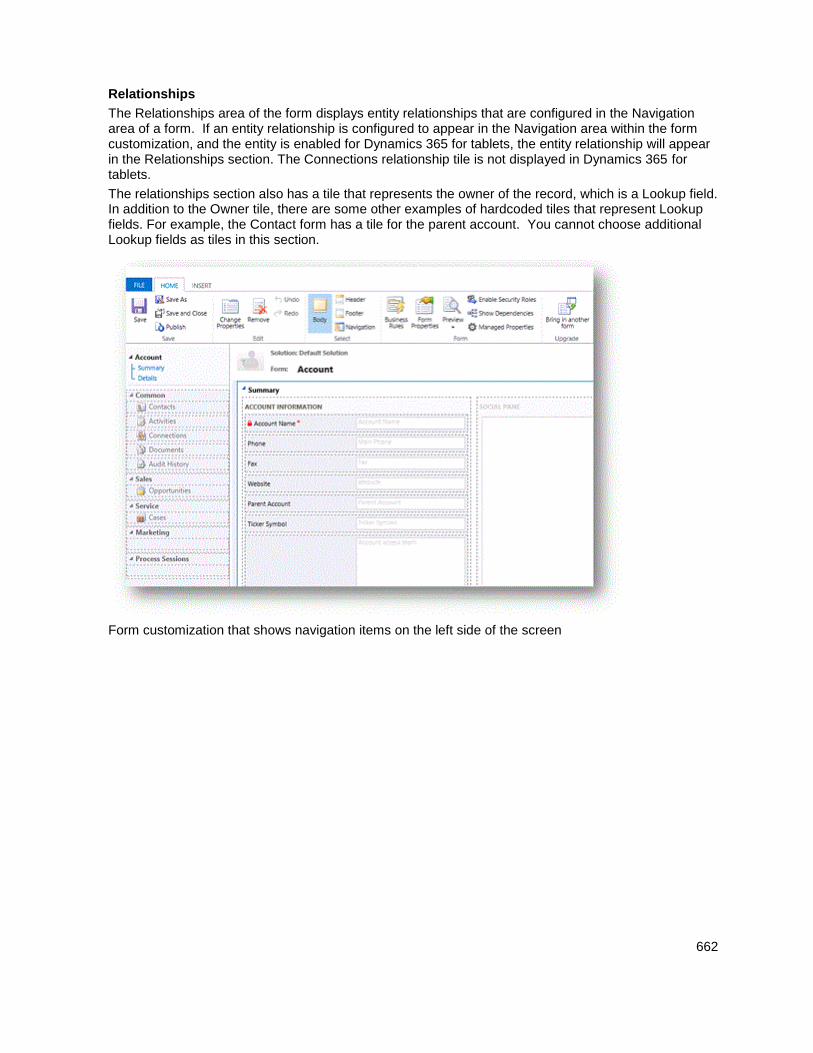
662
Relationships
The Relationships area of the form displays entity relationships that are configured in the Navigation area of a form. If an entity relationship is configured to appear in the Navigation area within the form customization, and the entity is enabled for Dynamics 365 for tablets, the entity relationship will appear in the Relationships section. The Connections relationship tile is not displayed in Dynamics 365 for tablets.
The relationships section also has a tile that represents the owner of the record, which is a Lookup field. In addition to the Owner tile, there are some other examples of hardcoded tiles that represent Lookup fields. For example, the Contact form has a tile for the parent account. You cannot choose additional Lookup fields as tiles in this section.
Form customization that shows navigation items on the left side of the screen
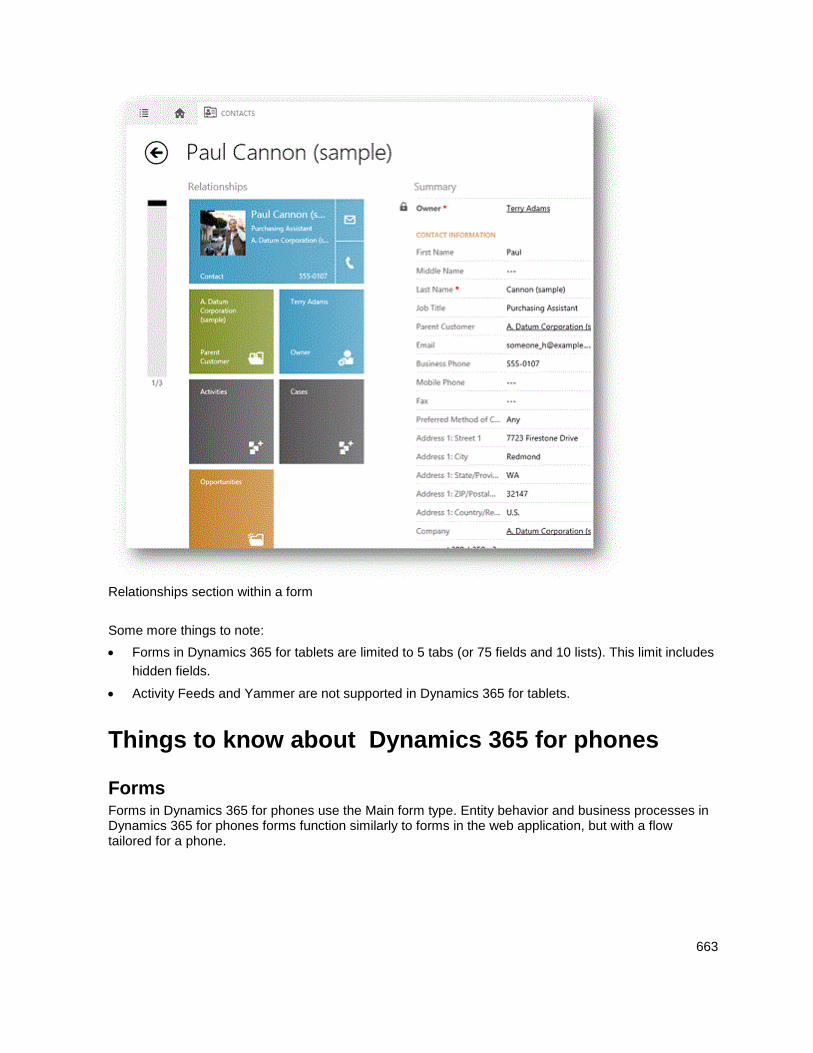
663
Relationships section within a form
Some more things to note:
Forms in Dynamics 365 for tablets are limited to 5 tabs (or 75 fields and 10 lists). This limit includes
hidden fields.
Activity Feeds and Yammer are not supported in Dynamics 365 for tablets.
Things to know about Dynamics 365 for phones
Forms Forms in Dynamics 365 for phones use the Main form type. Entity behavior and business processes in Dynamics 365 for phones forms function similarly to forms in the web application, but with a flow tailored for a phone.
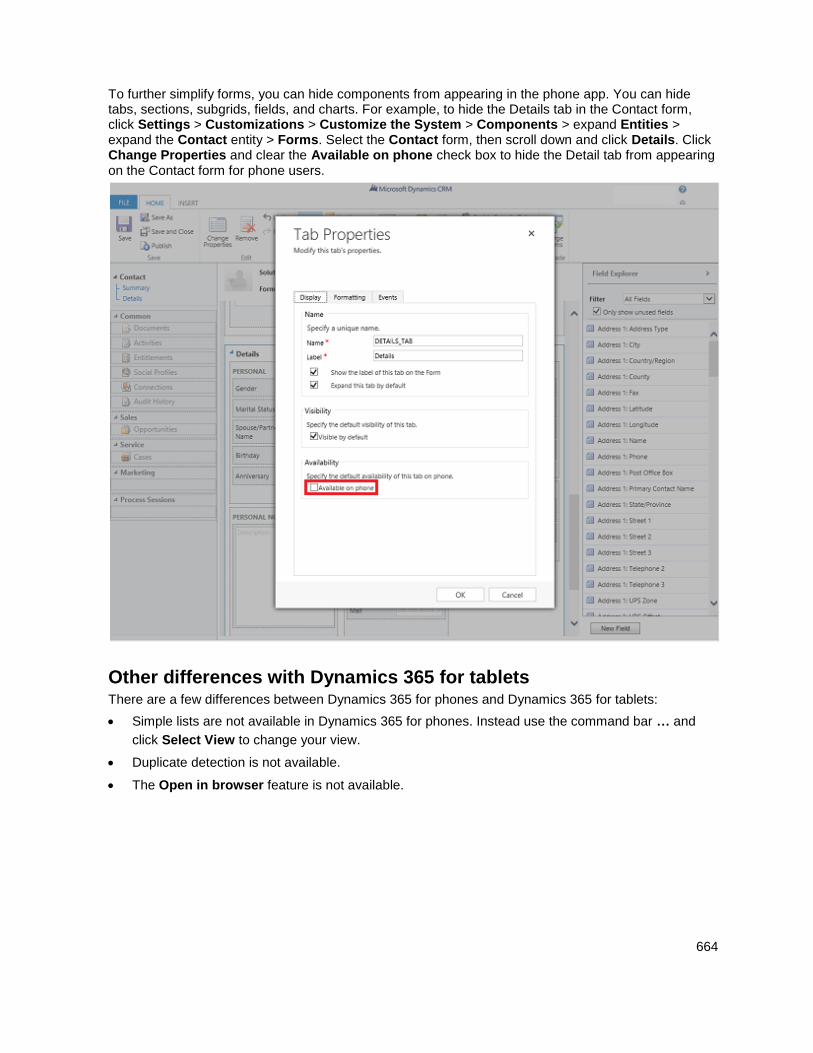
664
To further simplify forms, you can hide components from appearing in the phone app. You can hide tabs, sections, subgrids, fields, and charts. For example, to hide the Details tab in the Contact form, click Settings > Customizations > Customize the System > Components > expand Entities > expand the Contact entity > Forms. Select the Contact form, then scroll down and click Details. Click Change Properties and clear the Available on phone check box to hide the Detail tab from appearing on the Contact form for phone users.
Other differences with Dynamics 365 for tablets There are a few differences between Dynamics 365 for phones and Dynamics 365 for tablets:
Simple lists are not available in Dynamics 365 for phones. Instead use the command bar … and
click Select View to change your view.
Duplicate detection is not available.
The Open in browser feature is not available.
665
Supported languages for Dynamics 365 for phones and Dynamics 365 for tablets Dynamics 365 for phones and Dynamics 365 for tablets support the following languages:
Basque (Basque) - 1069
Bulgarian (Bulgaria) - 1026
Catalan (Catalan) - 1027
Chinese (Hong Kong S.A.R.) - 3076
Chinese (People's Republic of China) - 2052
Chinese (Simplified) - 2052
Chinese (Taiwan) - 1028
Chinese (Traditional) - 1028
Croatian (Croatia) - 1050
Czech (Czech Republic) - 1029
Danish - 1030
Dutch - 1043
English - 1033
Estonian - 1061
Finnish - 1035
French - 1036
Galician
German - 1031
Greek - 30
Hindi (India) - 91
Hungarian - 36
Indonesian - 62
Italian - 1040
Japanese - 1041
Kazakh - 705
Korean - 82
Latvian - 371
Lithuanian - 370
Norwegian - 47
Polish - 48
Portuguese (Brazil) - 55
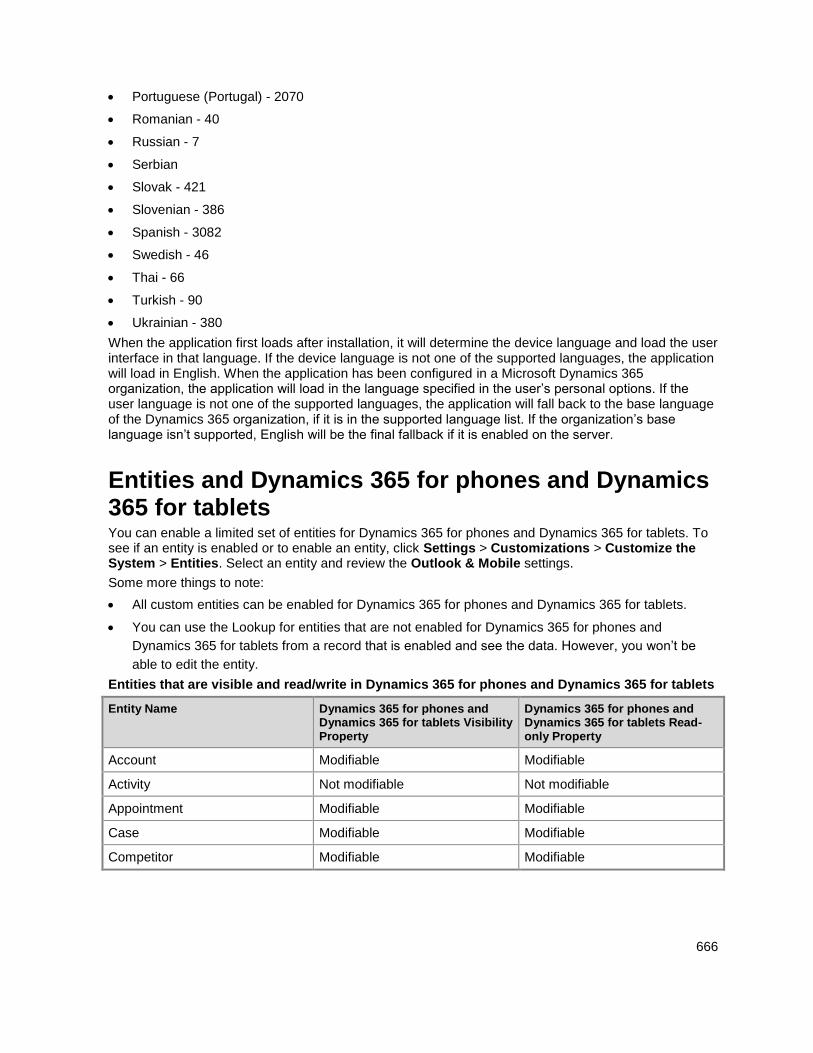
666
Portuguese (Portugal) - 2070
Romanian - 40
Russian - 7
Serbian
Slovak - 421
Slovenian - 386
Spanish - 3082
Swedish - 46
Thai - 66
Turkish - 90
Ukrainian - 380
When the application first loads after installation, it will determine the device language and load the user interface in that language. If the device language is not one of the supported languages, the application will load in English. When the application has been configured in a Microsoft Dynamics 365 organization, the application will load in the language specified in the user’s personal options. If the user language is not one of the supported languages, the application will fall back to the base language of the Dynamics 365 organization, if it is in the supported language list. If the organization’s base language isn’t supported, English will be the final fallback if it is enabled on the server.
Entities and Dynamics 365 for phones and Dynamics 365 for tablets You can enable a limited set of entities for Dynamics 365 for phones and Dynamics 365 for tablets. To see if an entity is enabled or to enable an entity, click Settings > Customizations > Customize the System > Entities. Select an entity and review the Outlook & Mobile settings.
Some more things to note:
All custom entities can be enabled for Dynamics 365 for phones and Dynamics 365 for tablets.
You can use the Lookup for entities that are not enabled for Dynamics 365 for phones and
Dynamics 365 for tablets from a record that is enabled and see the data. However, you won’t be
able to edit the entity.
Entities that are visible and read/write in Dynamics 365 for phones and Dynamics 365 for tablets
Entity Name Dynamics 365 for phones and Dynamics 365 for tablets Visibility Property
Dynamics 365 for phones and Dynamics 365 for tablets Read-only Property
Account Modifiable Modifiable
Activity Not modifiable Not modifiable
Appointment Modifiable Modifiable
Case Modifiable Modifiable
Competitor Modifiable Modifiable
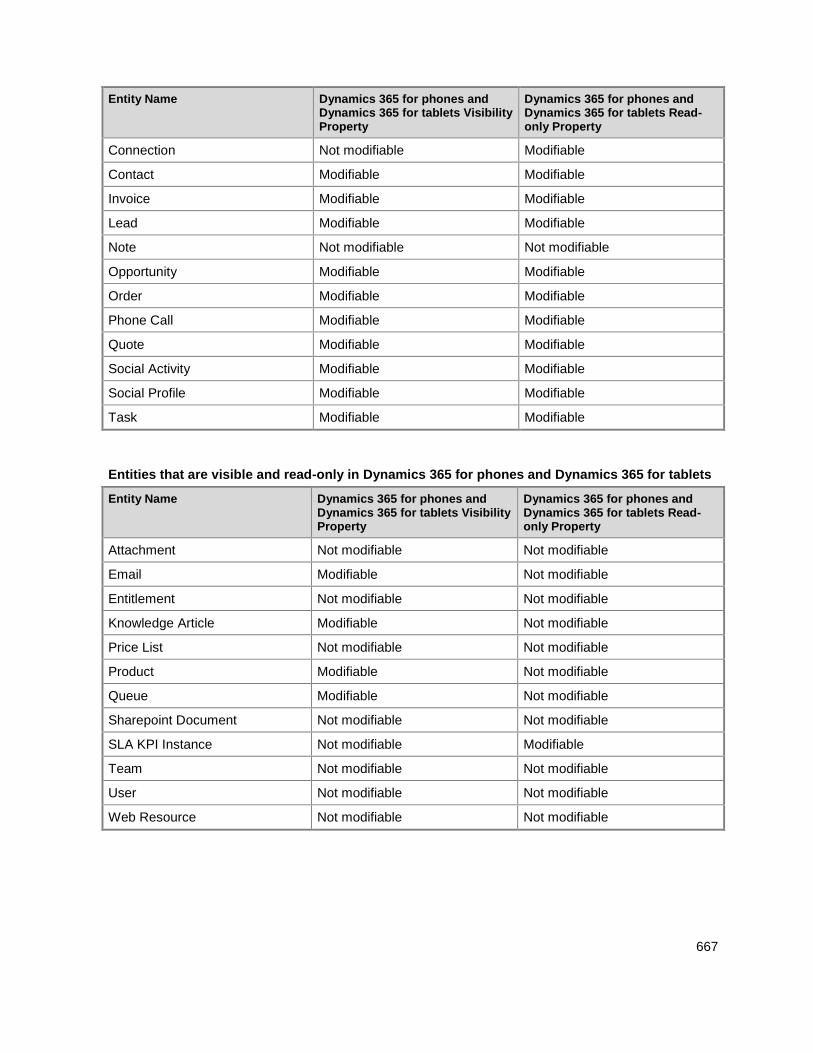
667
Entity Name Dynamics 365 for phones and Dynamics 365 for tablets Visibility Property
Dynamics 365 for phones and Dynamics 365 for tablets Read-only Property
Connection Not modifiable Modifiable
Contact Modifiable Modifiable
Invoice Modifiable Modifiable
Lead Modifiable Modifiable
Note Not modifiable Not modifiable
Opportunity Modifiable Modifiable
Order Modifiable Modifiable
Phone Call Modifiable Modifiable
Quote Modifiable Modifiable
Social Activity Modifiable Modifiable
Social Profile Modifiable Modifiable
Task Modifiable Modifiable
Entities that are visible and read-only in Dynamics 365 for phones and Dynamics 365 for tablets
Entity Name Dynamics 365 for phones and Dynamics 365 for tablets Visibility Property
Dynamics 365 for phones and Dynamics 365 for tablets Read-only Property
Attachment Not modifiable Not modifiable
Email Modifiable Not modifiable
Entitlement Not modifiable Not modifiable
Knowledge Article Modifiable Not modifiable
Price List Not modifiable Not modifiable
Product Modifiable Not modifiable
Queue Modifiable Not modifiable
Sharepoint Document Not modifiable Not modifiable
SLA KPI Instance Not modifiable Modifiable
Team Not modifiable Not modifiable
User Not modifiable Not modifiable
Web Resource Not modifiable Not modifiable
668
Authentication and Dynamics 365 for phones and Dynamics 365 for tablets Dynamics 365 for phones and Dynamics 365 for tablets authenticate users with browser-based authentication, which means no credentials are stored on the phone.
Microsoft Dynamics 365 (online)
Dynamics 365 for phones and Dynamics 365 for tablets users transitioned to Microsoft Dynamics 365 (online) on Microsoft Online Services environment will automatically renew their sign-in for up to 30 days.
Microsoft Dynamics CRM 2015 or later (on-premises versions)
Dynamics 365 for tablets connections to Microsoft Dynamics CRM 2015 or later require an Internet-facing deployment.
Note
Microsoft Dynamics CRM 2013 or later is required for Dynamics 365 for tablets users to connect to their Microsoft Dynamics 365 organization. Organizations that are using earlier versions of on-premises editions of Microsoft Dynamics 365 will need to upgrade.
Considerations and best practices for securing Dynamics 365 data on Dynamics 365 for phones and Dynamics 365 for tablets Consider the following when planning security for Dynamics 365 for tablets:
Data transmission. Dynamics 365 for tablets requires an Internet-facing deployment (IFD), so
when your organization’s mobile devices synchronize Dynamics 365 data with your online or on-
premises Dynamics 365, the data is encrypted with Transport Layer Security (TLS) or Secure
Sockets Layer (SSL).
Cached data. Dynamics 365 for phones and Dynamics 365 for tablets only cached records and
lists that you’ve recently accessed in the app. To clear cached data, users can either sign out or
reconfigure. More information: see “What’s the difference between sign out and reconfigure?” in
Help & Training: Sign out or reconfigure Dynamics 365 for tablets
Encrypting cached data. Cached data is not encrypted. You can use BitLocker to encrypt the
entire hard drive on a Windows 8 or later device. For Apple and Android devices, consider
Windows Intune or a product from another company to encrypt the hard drive on the mobile device.
669
Other features
Save Records are saved in Dynamics 365 for tablets based on how you configured autosave in your organization settings. To view your save settings, click Settings > Administration > System Settings > General tab. View the settings under Select the default save option for forms.
If autosave is:
Enabled for the organization, changes to forms are saved when users leave forms.
Disabled for the organization, users must use the command bar and click Save to save form
changes.
Images Images, such as contact photos, are not stored in the browser cache. Images may not be displayed when users work offline with Dynamics 365 for tablets.
Privacy notice Licensed Dynamics 365 Online users with specific Security Roles (CEO – Business Manager, Sales Manager, Salesperson, System Administrator, System Customizer, and Vice President of Sales) are automatically authorized to access the service by using Dynamics 365 for tablets, as well as other clients. An administrator has full control (at the user security role or entity level) over the ability to access and the level of authorized access associated with the tablet client. Users can then access Dynamics 365 (online) by using Dynamics 365 for tablets, and Customer Data will be cached on the device running the specific client. Based on the specific settings at the user security and entity levels, the types of Customer Data that can be exported from Dynamics 365 (online) and cached on an end user’s device include record data, record metadata, entity data, entity metadata, and business logic.
See Also Secure and manage Dynamics 365 for phones and tablets Troubleshooting and things to know about Dynamics 365 for phones and tablets Help & Training: Install Dynamics 365 for tablets and phones Help & Training: CRM for Phones and Tablets User's Guide Watch Microsoft Dynamics CRM videos on YouTube
© 2016 Microsoft. All rights reserved. Copyright
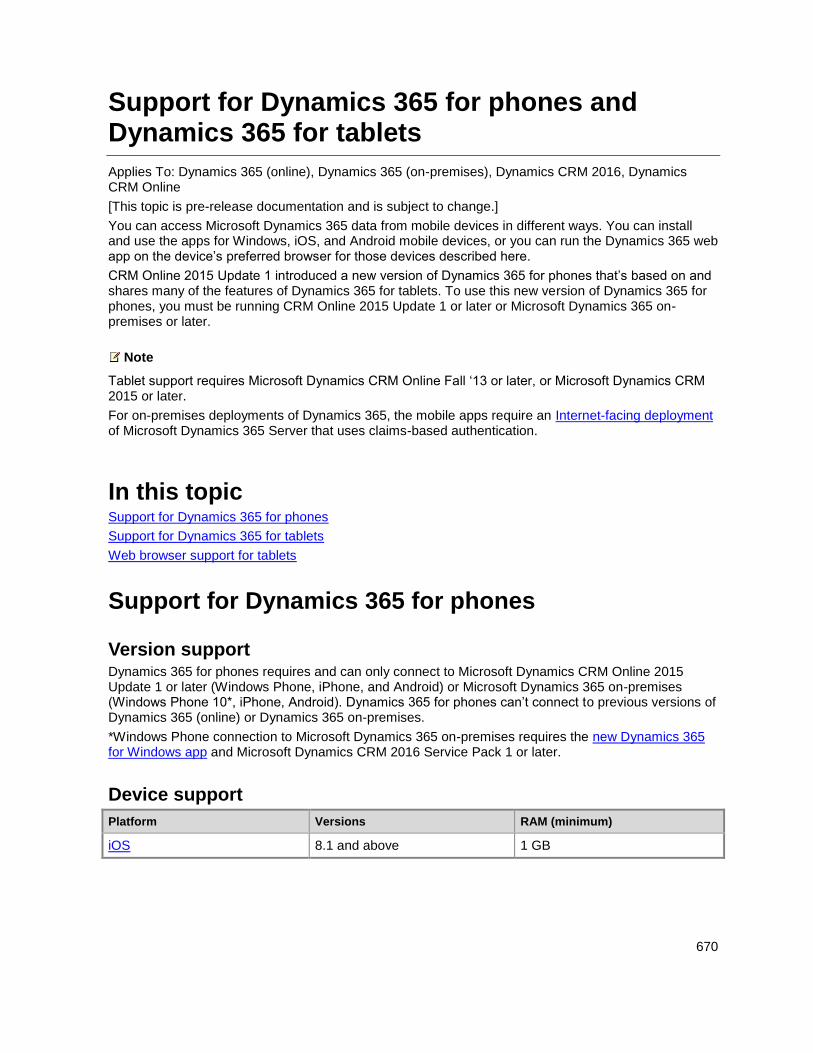
670
Support for Dynamics 365 for phones and Dynamics 365 for tablets
Applies To: Dynamics 365 (online), Dynamics 365 (on-premises), Dynamics CRM 2016, Dynamics CRM Online
[This topic is pre-release documentation and is subject to change.]
You can access Microsoft Dynamics 365 data from mobile devices in different ways. You can install and use the apps for Windows, iOS, and Android mobile devices, or you can run the Dynamics 365 web app on the device’s preferred browser for those devices described here.
CRM Online 2015 Update 1 introduced a new version of Dynamics 365 for phones that’s based on and shares many of the features of Dynamics 365 for tablets. To use this new version of Dynamics 365 for phones, you must be running CRM Online 2015 Update 1 or later or Microsoft Dynamics 365 on-premises or later.
Note
Tablet support requires Microsoft Dynamics CRM Online Fall ‘13 or later, or Microsoft Dynamics CRM 2015 or later.
For on-premises deployments of Dynamics 365, the mobile apps require an Internet-facing deployment of Microsoft Dynamics 365 Server that uses claims-based authentication.
In this topic Support for Dynamics 365 for phones
Support for Dynamics 365 for tablets
Web browser support for tablets
Support for Dynamics 365 for phones
Version support Dynamics 365 for phones requires and can only connect to Microsoft Dynamics CRM Online 2015 Update 1 or later (Windows Phone, iPhone, and Android) or Microsoft Dynamics 365 on-premises (Windows Phone 10*, iPhone, Android). Dynamics 365 for phones can’t connect to previous versions of Dynamics 365 (online) or Dynamics 365 on-premises.
*Windows Phone connection to Microsoft Dynamics 365 on-premises requires the new Dynamics 365 for Windows app and Microsoft Dynamics CRM 2016 Service Pack 1 or later.
Device support
Platform Versions RAM (minimum)
iOS 8.1 and above 1 GB
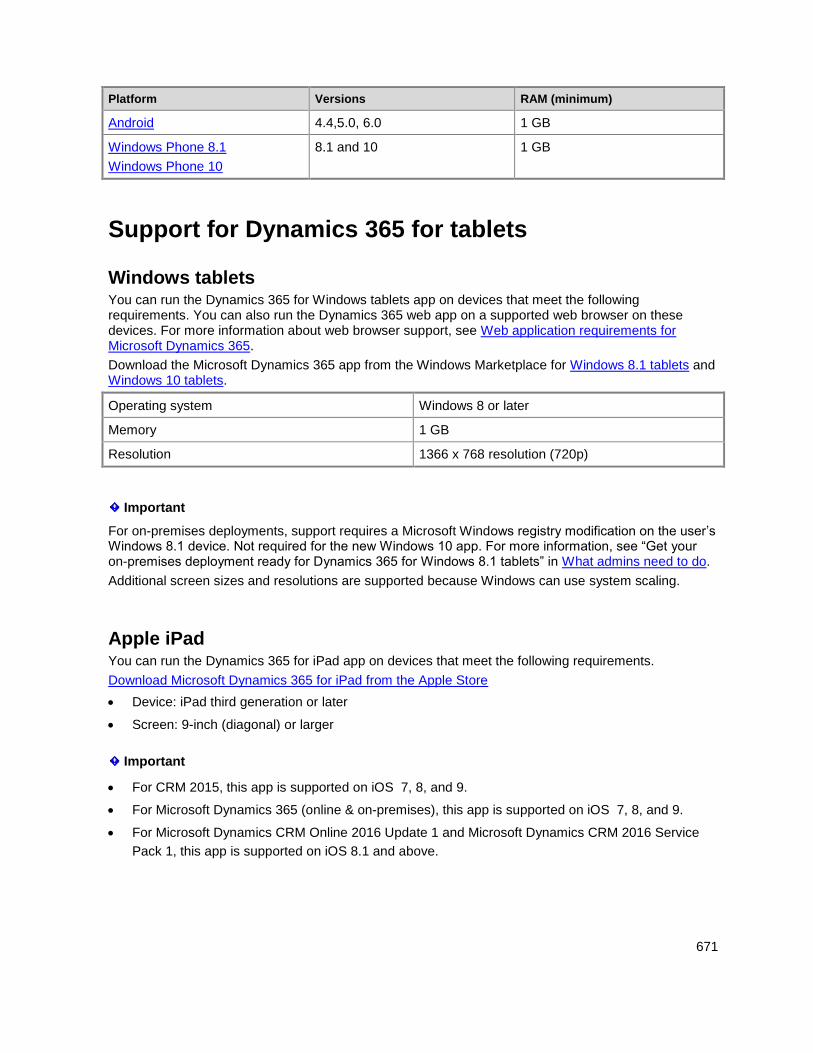
671
Platform Versions RAM (minimum)
Android 4.4,5.0, 6.0 1 GB
Windows Phone 8.1
Windows Phone 10
8.1 and 10 1 GB
Support for Dynamics 365 for tablets
Windows tablets You can run the Dynamics 365 for Windows tablets app on devices that meet the following requirements. You can also run the Dynamics 365 web app on a supported web browser on these devices. For more information about web browser support, see Web application requirements for Microsoft Dynamics 365.
Download the Microsoft Dynamics 365 app from the Windows Marketplace for Windows 8.1 tablets and Windows 10 tablets.
Operating system Windows 8 or later
Memory 1 GB
Resolution 1366 x 768 resolution (720p)
Important
For on-premises deployments, support requires a Microsoft Windows registry modification on the user’s Windows 8.1 device. Not required for the new Windows 10 app. For more information, see “Get your on-premises deployment ready for Dynamics 365 for Windows 8.1 tablets” in What admins need to do.
Additional screen sizes and resolutions are supported because Windows can use system scaling.
Apple iPad You can run the Dynamics 365 for iPad app on devices that meet the following requirements.
Download Microsoft Dynamics 365 for iPad from the Apple Store
Device: iPad third generation or later
Screen: 9-inch (diagonal) or larger
Important
For CRM 2015, this app is supported on iOS 7, 8, and 9.
For Microsoft Dynamics 365 (online & on-premises), this app is supported on iOS 7, 8, and 9.
For Microsoft Dynamics CRM Online 2016 Update 1 and Microsoft Dynamics CRM 2016 Service
Pack 1, this app is supported on iOS 8.1 and above.

672
How to find the version of your Microsoft Dynamics 365 for iPad app
1. In the Dynamics 365 for tablets app, go to the home screen, and then open the command bar. Tap
Settings, and then tap About.
Android You can run the Dynamics 365 for Androidapp on devices that meet the following requirements.
Download Microsoft Dynamics 365 for Android from Google play
Android versions 4.2, 4.3, 4.4*, 5.0**, and 6.0*** are supported for tablets with screens larger than 7 inches (optimized for 9 to 10 inches) using Microsoft Dynamics 365 for Android.
The following tablet model, screen, and Android versions have been tested for installing and running Dynamics 365 for Android or running Microsoft Dynamics 365 in the tablet’s web browser.
Model Dynamics 365 for Android supported operating system
Samsung Galaxy Tab 4 4.4*
Samsung Galaxy Tab S 4.4*
Google Nexus 10 Android 4.2, 4.4*, and 5.0**
Samsung Galaxy Tab 3 Android 4.2.2
Asus Transformer Pad Infinity TF700 Android 4.2
Samsung Galaxy Note 10 Android 4.3
Note
*This feature is available only if your organization has updated to Microsoft Dynamics CRM 2015 Update 0.1 or later.
**This feature is available only if your organization has updated to Microsoft Dynamics CRM 2015 Update 1.1 or later.
***This feature is available only if your organization has updated to Microsoft Dynamics CRM 2015 Update 1.1 or later.
Web browser support for tablets You can run Microsoft Dynamics 365 in the default web browser on any of the supported Windows tablets tablets listed earlier. For Apple iPad tablets, iOS 7, iOS 8, and iOS 9 are supported. For Android, versions 4.2.2, 4.3, 4.4, 5.0, and 6.0 are supported for the tablets listed earlier.
Using Microsoft Dynamics 365 on a web browser on an Apple or Android mobile device provides a similar experience to using it with a web browser on a desktop or laptop computer. However, some features are not available, including:
Pinch and zoom
673
Yammer
Reports
Customization/Editors
System Settings
Advanced Find
Process dialogs
Skype for Business presence
Adding attachments to Notes—for Apple iPad users with Dynamics 365 (on-premises)
Entities that use classic forms such as Goal and Order Product (see Entities using classic forms)
See Also Set up and manage phones and tablets Web application requirements for Microsoft Dynamics 365 Referenced topic 'c82f9957-51b7-4767-8ff8-eda3d9122583' is only available online. Update Rollup 1 for Microsoft Dynamics CRM 2013 (KB 2891271)
© 2016 Microsoft. All rights reserved. Copyright
Secure and manage Dynamics 365 for phones and tablets
Applies To: Dynamics 365 (online), Dynamics 365 (on-premises), Dynamics CRM 2016, Dynamics CRM Online
[This topic is pre-release documentation and is subject to change.]
You can secure and manage Microsoft Dynamics 365 for phones and Microsoft Dynamics 365 for tablets with the following technologies:
1. Microsoft Intune. You can use Microsoft Intune to manage Dynamics 365 for phones and
Dynamics 365 for tablets on Apple and Android tablets and phones. Intune provides mobile device
management, mobile application management, and PC management capabilities from the cloud.
Using Intune, you can provide your users with access to corporate applications, data, and
resources from virtually anywhere on almost any device, while helping to keep corporate
information secure.
Important
This feature was introduced in CRM Online 2016 Update.
2. Microsoft Dynamics 365 for Good. Microsoft Dynamics 365 for Good, integrated with Good
Dynamics, protects your Dynamics 365 data even if your users lose or leave their mobile devices
674
somewhere. For example, if someone leaves their device in a taxi cab and can’t get it back right
away, Dynamics 365 data is protected by Good encryption. If someone loses their device entirely,
all they have to do is notify you so you can remotely wipe Microsoft Dynamics 365 for Good data
from their device.
Important
This feature was introduced in CRM Online 2015 Update and CRM 2015 (on-premises). Interested in getting this feature? Find your CRM administrator or support person.
Manage Dynamics 365 on mobile devices with Microsoft Intune If your organization is set up with Intune, you can use it to manage the Dynamics 365 for phones and tablets apps on Apple, Android, and Windows 10 tablets and phones. Intune manages encryption at the device level, as well as app-to-app communications. With Intune, you can selectively wipe managed apps and related data on devices that are unenrolled, no longer compliant, lost, stolen, or retired from use.
With CRM Online 2016 Update 1, you can use Intune mobile application management (MAM) to manage Dynamics 365 mobile applications for Apple and Android without enrolling the device. This protects company data in Dynamics 365 without requiring you to enroll and deeply manage the end user's entire device. This is particularly useful for bring-your-own-device (BYOD) scenarios where end users don’t want to or can’t enroll their devices for IT management. This capability is also useful if a device is already enrolled in another mobile application management solution.
More information For more information about getting and using Intune, see:
Microsoft Intune
Documentation for Microsoft Intune
Set up conditional access to Dynamics 365 (online) You can use System Center Configuration Manager conditional access to manage access to Dynamics 365 from mobile devices based on conditions you specify. For more information about setting up conditional access, see Conditional Access in Configuration Manager.
Note
To use conditional access, you must have an Azure Active Directory premium subscription.
Important
This feature was introduced in CRM Online 2016 Update 1 and CRM 2016 Service Pack 1 (on-premises).
675
Secure Dynamics 365 on mobile devices with Microsoft Dynamics 365 for Good Microsoft Dynamics 365 for Good is a special version of Dynamics 365 for tablets that works with the Good Technology mobile security platform. Microsoft Dynamics 365 for Good is currently supported for Apple iPad and Apple iPhone running iOS 7 or later. To use Microsoft Dynamics 365 for Good, you must have Good Dynamics server software and services from Good Technology.
Prepare to use Dynamics 365 for Good Your organization should have services set up with Good Technology. Then follow the common directions for configuring Dynamics 365 for tablets in Set up Dynamics 365 for phones and Dynamics 365 for tablets.
In addition, the Good Dynamics admin should do the following:
1. Within the Good Control server, authorize the Microsoft Dynamics 365 for Good app for mobile
users.
2. Within the Good Control server, add connection URLs to the allowed list. Any domain that the app
needs to access for connection or content must be in the Allowed Domains list.
If you are using an on-premises deployment, see Configure a Microsoft Dynamics 365 Internet-facing deployment.
3. Send users the email address and access key they will need to set up the app, or set up another
secured application to act as an authentication delegate.
What users need to do Users should update to the latest version of the Dynamics 365 for Good application. On the Apple App store, the latest version is 1.1. On the Good Dynamics Marketplace or Good Control Console, the latest version is listed as 1.1.0.
Direct your users to Secure your mobile data with Microsoft Dynamics 365 for Good
Install Dynamics 365 for Good The app is listed in the Good Dynamics Marketplace and can be downloaded from the Apple App Store.
Supported languages for Dynamics 365 for Good Dynamics 365 for Good supports the same languages as Dynamics 365 for tablets. However, when users are viewing Good Dynamics pages, only the following languages are supported:
Dutch - 1043
English - 1033
French - 1036
German - 1031
676
Italian - 1040
Spanish - 3082
While viewing Good Dynamics pages, if you’re not using one of the languages listed, the screens will be in English.
Things to know about Dynamics 365 for Good
Requires Microsoft Dynamics CRM 2015 or later. Connecting to earlier versions is not a supported
secure configuration.
The Dynamics 365 for Good Apple app requires Microsoft Dynamics CRM Online 2015 Update 1 or
later or Microsoft Dynamics 365 on-premises when running on an iPhone.
Microsoft Dynamics 365 on-premises version requires an Internet-facing deployment to use this
application.
There are multiple policies Good Dynamics administrators set to control data sharing between apps
on the mobile device.
a. Prevent click-to-call: Prevents users from initiating a phone call from within the Dynamics 365
for Good app.
b. Prevent click for mapping: Prevents users from opening an address in the mobile device's
native maps application.
c. Prevent opening OneNote: Prevents users from opening Microsoft OneNote notebooks from
external sources from within the Dynamics 365 for Good app.
d. Prevent opening Word: Prevents users from opening Word files from external sources within
the Dynamics 365 for Good app.
e. Prevent opening Excel: Prevents users from opening Microsoft Excel files from external
sources from within the Dynamics 365 for Good app.
f. Prevent opening PowerPoint: Prevents users from opening Microsoft PowerPoint files from
external sources from within the Dynamics 365 for Good app.
g. Require a secure browser for opening URLs: Enable to ensure browser windows launched
from the Dynamics 365 for Good app use a secure browser application.
Security Note
The policies for preventing opening Microsoft OneNote, Word, Microsoft Excel, and Microsoft PowerPoint files block opening these files on external sources such as Microsoft SharePoint, OneDrive for Business, and Office 365 Groups. These policies don’t apply to items attached to notes in Dynamics 365 or when exporting to Microsoft Excel, Microsoft Excel templates, and Word templates. These files download to Good-compliant encrypted file stores and require a Good-compliant application for viewing.
Enable the Prevent Data Leakage setting in the Security Policies tab to cover other situations
including using a secure app for email, and handling of copy/paste scenarios.
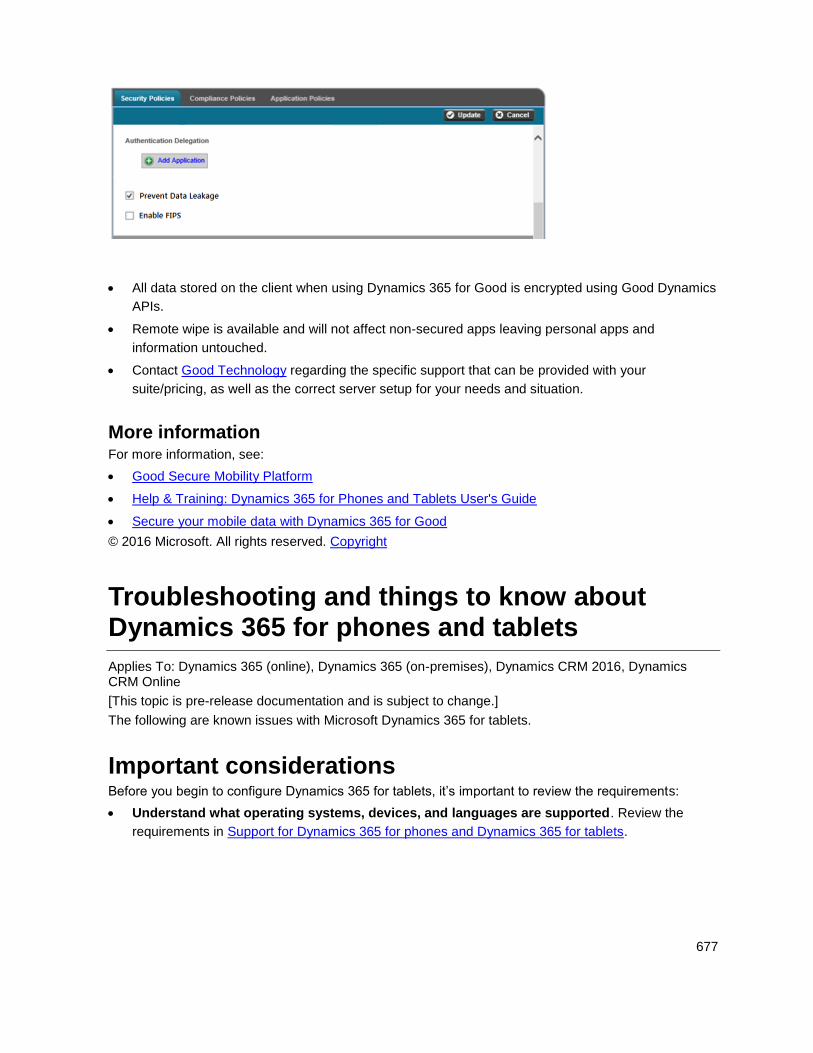
677
All data stored on the client when using Dynamics 365 for Good is encrypted using Good Dynamics
APIs.
Remote wipe is available and will not affect non-secured apps leaving personal apps and
information untouched.
Contact Good Technology regarding the specific support that can be provided with your
suite/pricing, as well as the correct server setup for your needs and situation.
More information For more information, see:
Good Secure Mobility Platform
Help & Training: Dynamics 365 for Phones and Tablets User's Guide
Secure your mobile data with Dynamics 365 for Good
© 2016 Microsoft. All rights reserved. Copyright
Troubleshooting and things to know about Dynamics 365 for phones and tablets
Applies To: Dynamics 365 (online), Dynamics 365 (on-premises), Dynamics CRM 2016, Dynamics CRM Online
[This topic is pre-release documentation and is subject to change.]
The following are known issues with Microsoft Dynamics 365 for tablets.
Important considerations Before you begin to configure Dynamics 365 for tablets, it’s important to review the requirements:
Understand what operating systems, devices, and languages are supported. Review the
requirements in Support for Dynamics 365 for phones and Dynamics 365 for tablets.
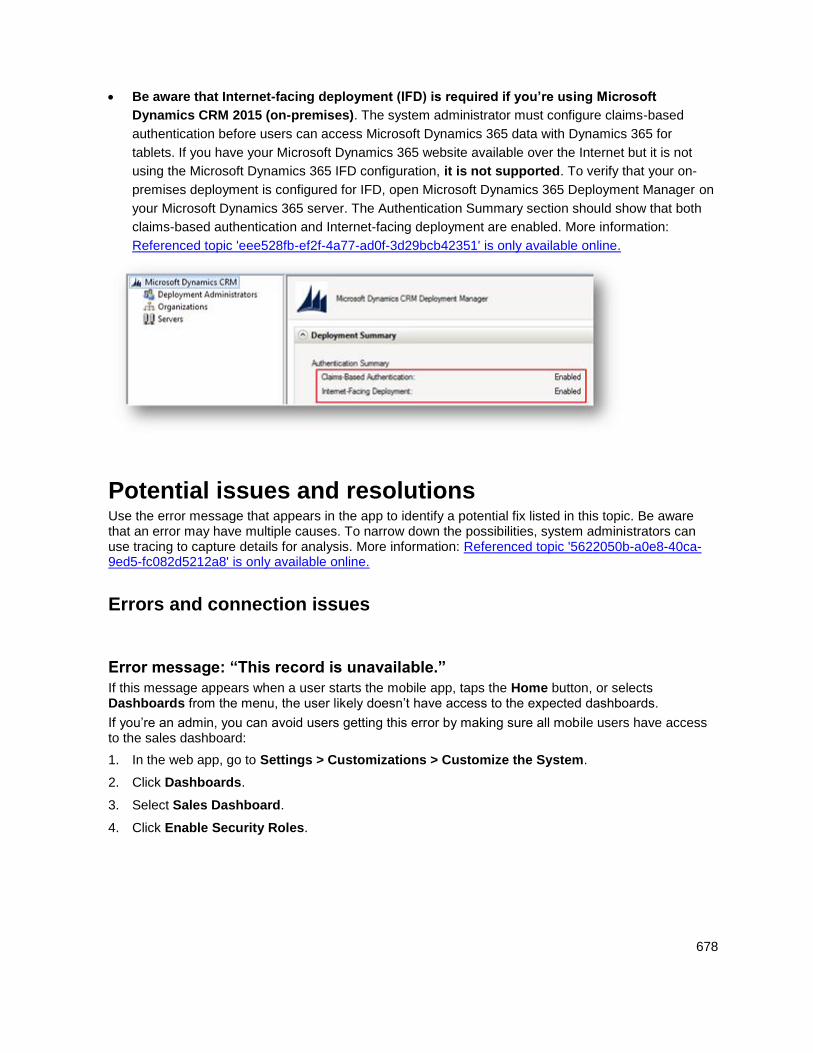
678
Be aware that Internet-facing deployment (IFD) is required if you’re using Microsoft
Dynamics CRM 2015 (on-premises). The system administrator must configure claims-based
authentication before users can access Microsoft Dynamics 365 data with Dynamics 365 for
tablets. If you have your Microsoft Dynamics 365 website available over the Internet but it is not
using the Microsoft Dynamics 365 IFD configuration, it is not supported. To verify that your on-
premises deployment is configured for IFD, open Microsoft Dynamics 365 Deployment Manager on
your Microsoft Dynamics 365 server. The Authentication Summary section should show that both
claims-based authentication and Internet-facing deployment are enabled. More information:
Referenced topic 'eee528fb-ef2f-4a77-ad0f-3d29bcb42351' is only available online.
Potential issues and resolutions Use the error message that appears in the app to identify a potential fix listed in this topic. Be aware that an error may have multiple causes. To narrow down the possibilities, system administrators can use tracing to capture details for analysis. More information: Referenced topic '5622050b-a0e8-40ca-9ed5-fc082d5212a8' is only available online.
Errors and connection issues
Error message: “This record is unavailable.”
If this message appears when a user starts the mobile app, taps the Home button, or selects Dashboards from the menu, the user likely doesn’t have access to the expected dashboards.
If you’re an admin, you can avoid users getting this error by making sure all mobile users have access to the sales dashboard:
1. In the web app, go to Settings > Customizations > Customize the System.
2. Click Dashboards.
3. Select Sales Dashboard.
4. Click Enable Security Roles.
679
5. Select Display to everyone and then click OK. If you prefer to display only to select security roles,
be sure to select your user’s security role.
6. Click Publish.
7. Have your user close and open the mobile app so your dashboard changes will download.
If you’re an end user and you’re seeing this message on your home page, you can choose a different dashboard and set it as your home page:
1. From the mobile app, tap the menu and then tap Dashboards.
2. On the command bar, tap Select Dashboard and then select the dashboard you would like to use
as your home page.
3. On the command bar, tap Set as Home.
If you’re an end user and you’re seeing this message on the dashboards page, you can create a personal dashboard through the web app and enable it for mobile:
1. In the web app, go to Sales > Dashboards.
2. Click New.
3. Click Properties.
4. Enter a name for your dashboard and select Enable for mobile.
5. Add the components you want on your dashboard and click Save.
6. In the mobile app, follow the previous procedure to select your new dashboard and set it as your
home page.
Error message: “Your server is not available or does not support this application.”
Cause 1: The Dynamics 365 server is down. Verify that the server is on and connected to your network.
Sample Trace Message for Cause 1:
“Dynamics CRM [Error] | Connection error: 404”
Cause 2: Your Dynamics 365 version is not supported. See Support for Dynamics 365 for phones and Dynamics 365 for tablets for version support information.
Cause 4: This error can also occur if you enter an invalid URL. Make sure the same URL you have provided works to access Microsoft Dynamics 365 in your browser on your device.
Sample Trace Messages for Cause 4:
“XMLHttpRequest: Network Error 0x2ee7, Could not complete the operation due to error 00002ee7.” “Dynamics CRM [Error] | Connection error: 0”
Cause 5: If you connect to a Microsoft Dynamics 365 on-premises organization, this error can occur if the certificate from the Microsoft Dynamics 365 website is not trusted by the device. To avoid this scenario make sure to use a publicly trusted certificate. For more information, see Your server is not available or does not support this application.
Sample Trace Messages for Cause 5:
Windows 8: “XMLHttpRequest: Network Error 0x800c0019, Security certificate required to access this resource is invalid”
iPad: “[ERROR] Loading app failed due to SSL error”
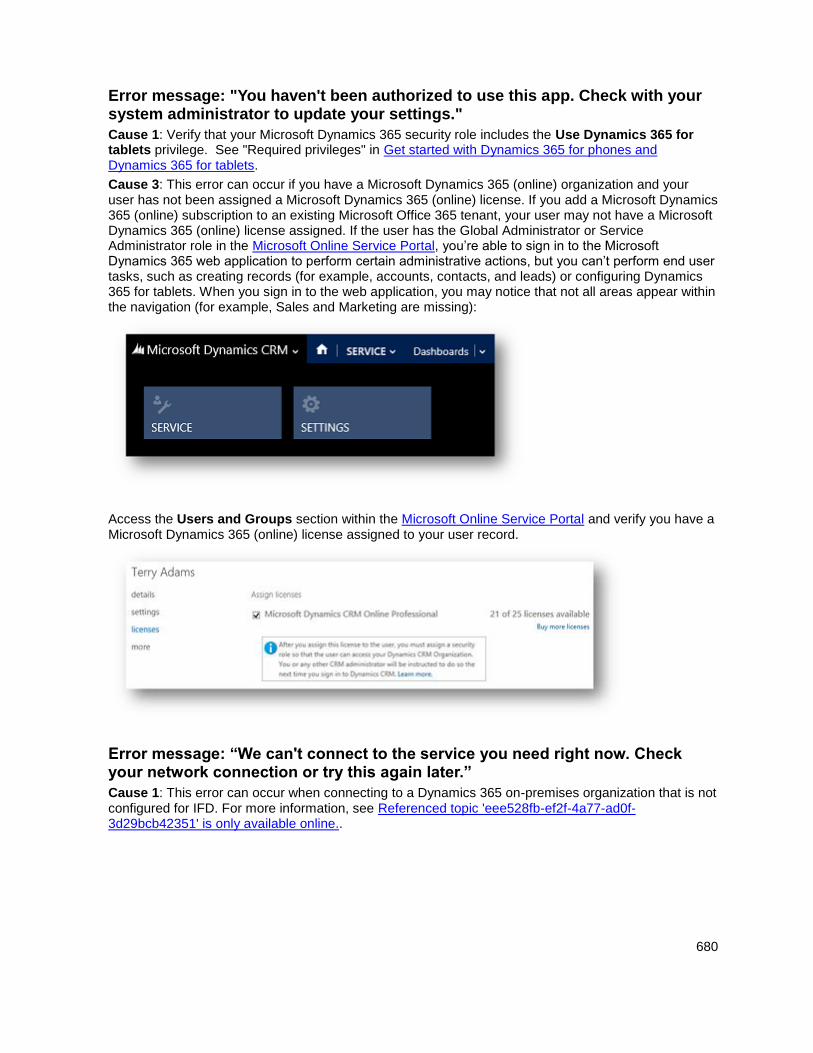
680
Error message: "You haven't been authorized to use this app. Check with your system administrator to update your settings."
Cause 1: Verify that your Microsoft Dynamics 365 security role includes the Use Dynamics 365 for tablets privilege. See "Required privileges" in Get started with Dynamics 365 for phones and Dynamics 365 for tablets.
Cause 3: This error can occur if you have a Microsoft Dynamics 365 (online) organization and your user has not been assigned a Microsoft Dynamics 365 (online) license. If you add a Microsoft Dynamics 365 (online) subscription to an existing Microsoft Office 365 tenant, your user may not have a Microsoft Dynamics 365 (online) license assigned. If the user has the Global Administrator or Service Administrator role in the Microsoft Online Service Portal, you’re able to sign in to the Microsoft Dynamics 365 web application to perform certain administrative actions, but you can’t perform end user tasks, such as creating records (for example, accounts, contacts, and leads) or configuring Dynamics 365 for tablets. When you sign in to the web application, you may notice that not all areas appear within the navigation (for example, Sales and Marketing are missing):
Access the Users and Groups section within the Microsoft Online Service Portal and verify you have a Microsoft Dynamics 365 (online) license assigned to your user record.
Error message: “We can't connect to the service you need right now. Check your network connection or try this again later.”
Cause 1: This error can occur when connecting to a Dynamics 365 on-premises organization that is not configured for IFD. For more information, see Referenced topic 'eee528fb-ef2f-4a77-ad0f-3d29bcb42351' is only available online..
681
Error message: “Server certificate can’t be verified”
You can’t connect to the server because it doesn’t have a trusted TLS/SSL certificate. This error can occur when connecting to a Dynamics 365 on-premises organization that does not have a certificate configured correctly. For more information, see “Certificate selection and requirements” in the white paper Configuring Claims-based Authentication for Microsoft Dynamics CRM Server.
Error message: "You need an internet connection to use this app. Reconnect and try again."
Cause 1: This error can occur if you do not have an internet connection. Verify you are connected to the internet and can access the same URL in your web browser.
Cause 2: Check if you are using a preview build of Windows 8.1. So far this issue has only been reported with the preview version of Windows 8.1.
Error message: "Sorry, something went wrong while initializing the app. Please try again, or restart the app."
Cause 1: Permissions might not be set properly. See "Required privileges" in Get started with Dynamics 365 for phones and Dynamics 365 for tablets.
Cause 2: See the following KB article:
An error occurs in the Microsoft Dynamics 365 app for users in child business units. For more information, see Sorry, something went wrong while initializing the app.
Sample Trace Message for Cause 2:
Error Message:System.NullReferenceException: Object reference not set to an instance of an
object. Microsoft.Crm.Application.WebServices.ApplicationMetadataService.<>c__DisplayClass30.<UserRoles
Changed>b__2d(Entity role) at System.Linq.Enumerable.Any[TSource](IEnumerable`1 source, Func`2 predicate) at Microsoft.Crm.Application.WebServices.ApplicationMetadataService.UserRolesChanged(Guid[]
clientUserRoles, DateTime syncTime, ExecutionContext context) at
Microsoft.Crm.Application.WebServices.ApplicationMetadataService.RetrieveUserContext(UserContex
tRetrieveRequest userContextRetrieveRequest)
Cause 3: This can occur if the download of the metadata failed. The next attempt to connect will fully regenerate the metadata and successfully connect. Microsoft is aware of an issue where metadata may fail to download due to a timeout and plans to address this issue in a future update.
Sample Trace Messages for Cause 3:
“Error occurred during complete refresh of Application/Entity/Attribute metadata” “XMLHttpRequest: Network Error 0x2ef3, Could not complete the operation due to error 00002ef3.”
Error message: “The language installed on your company’s system isn’t available on the app. Please contact your system administrator to set up a supported language.”
Cause: This error will occur if one of the supported languages is not enabled in Microsoft Dynamics 365. For more information on the supported languages, see Help & Training: Dynamics 365 for tablets: Set up and use and expand What you need to use Dynamics 365 for tablets and Supported Languages.
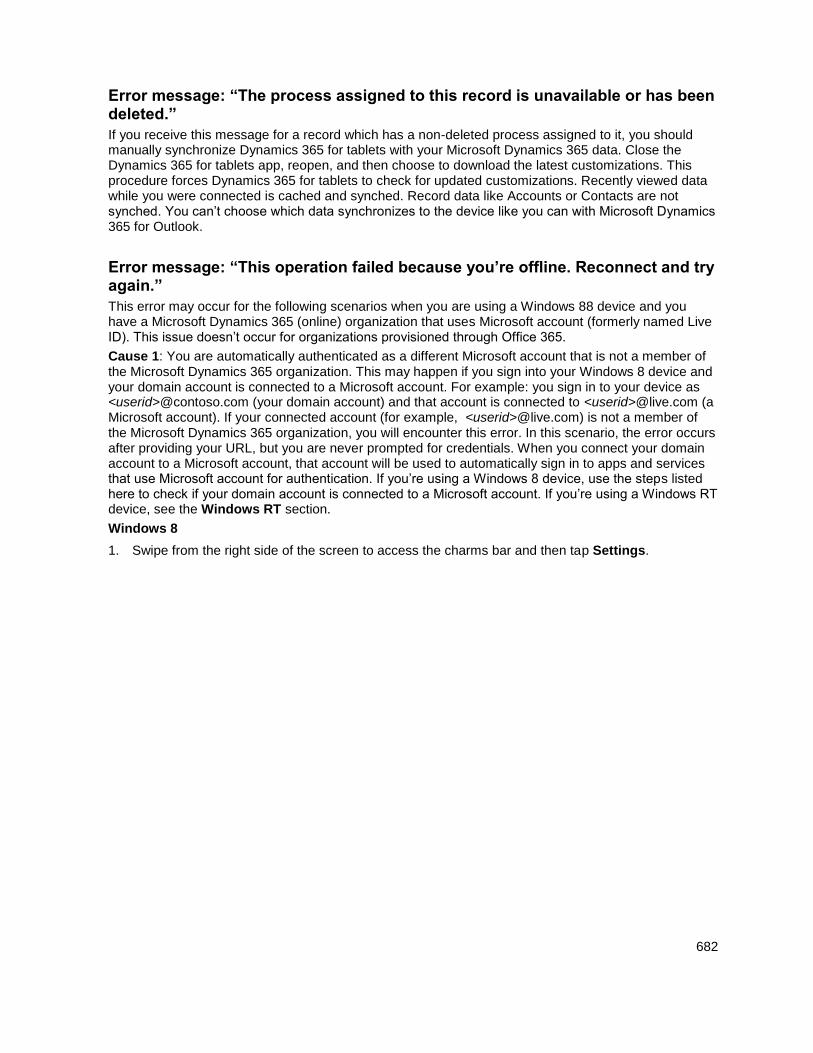
682
Error message: “The process assigned to this record is unavailable or has been deleted.”
If you receive this message for a record which has a non-deleted process assigned to it, you should manually synchronize Dynamics 365 for tablets with your Microsoft Dynamics 365 data. Close the Dynamics 365 for tablets app, reopen, and then choose to download the latest customizations. This procedure forces Dynamics 365 for tablets to check for updated customizations. Recently viewed data while you were connected is cached and synched. Record data like Accounts or Contacts are not synched. You can’t choose which data synchronizes to the device like you can with Microsoft Dynamics 365 for Outlook.
Error message: “This operation failed because you’re offline. Reconnect and try again.”
This error may occur for the following scenarios when you are using a Windows 88 device and you have a Microsoft Dynamics 365 (online) organization that uses Microsoft account (formerly named Live ID). This issue doesn’t occur for organizations provisioned through Office 365.
Cause 1: You are automatically authenticated as a different Microsoft account that is not a member of the Microsoft Dynamics 365 organization. This may happen if you sign into your Windows 8 device and your domain account is connected to a Microsoft account. For example: you sign in to your device as <userid>@contoso.com (your domain account) and that account is connected to <userid>@live.com (a Microsoft account). If your connected account (for example, <userid>@live.com) is not a member of the Microsoft Dynamics 365 organization, you will encounter this error. In this scenario, the error occurs after providing your URL, but you are never prompted for credentials. When you connect your domain account to a Microsoft account, that account will be used to automatically sign in to apps and services that use Microsoft account for authentication. If you’re using a Windows 8 device, use the steps listed here to check if your domain account is connected to a Microsoft account. If you’re using a Windows RT device, see the Windows RT section.
Windows 8
1. Swipe from the right side of the screen to access the charms bar and then tap Settings.
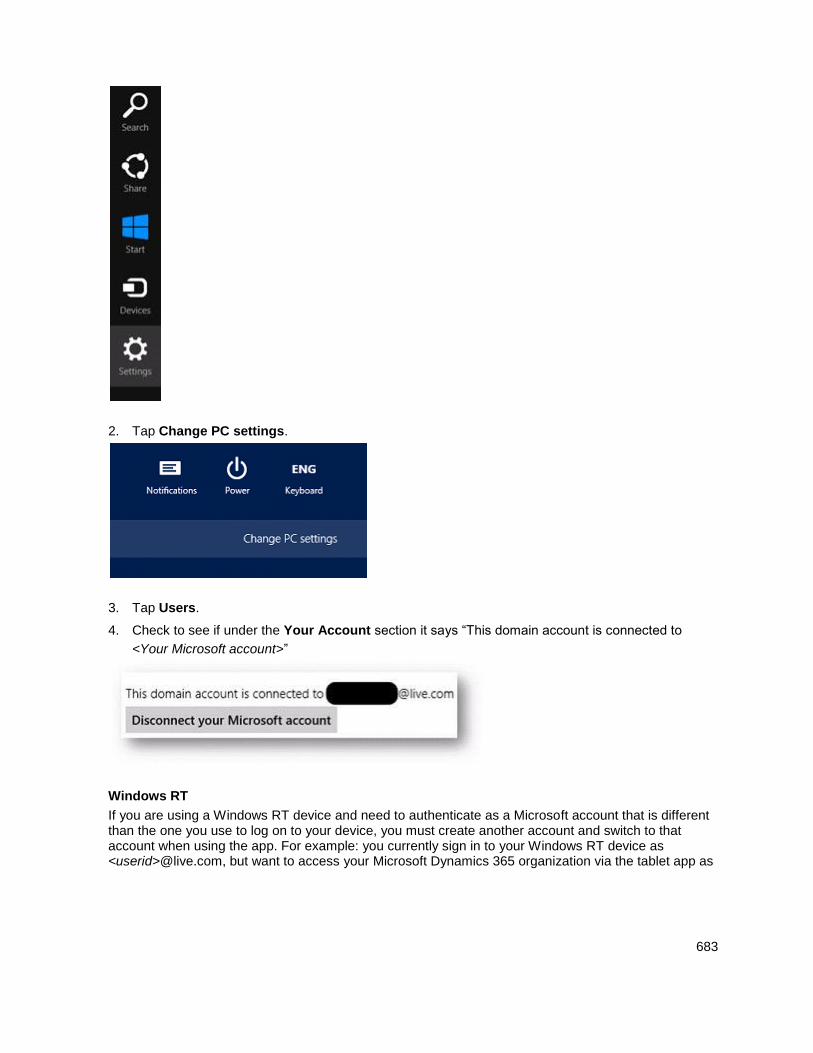
683
2. Tap Change PC settings.
3. Tap Users.
4. Check to see if under the Your Account section it says “This domain account is connected to
<Your Microsoft account>”
Windows RT
If you are using a Windows RT device and need to authenticate as a Microsoft account that is different than the one you use to log on to your device, you must create another account and switch to that account when using the app. For example: you currently sign in to your Windows RT device as <userid>@live.com, but want to access your Microsoft Dynamics 365 organization via the tablet app as
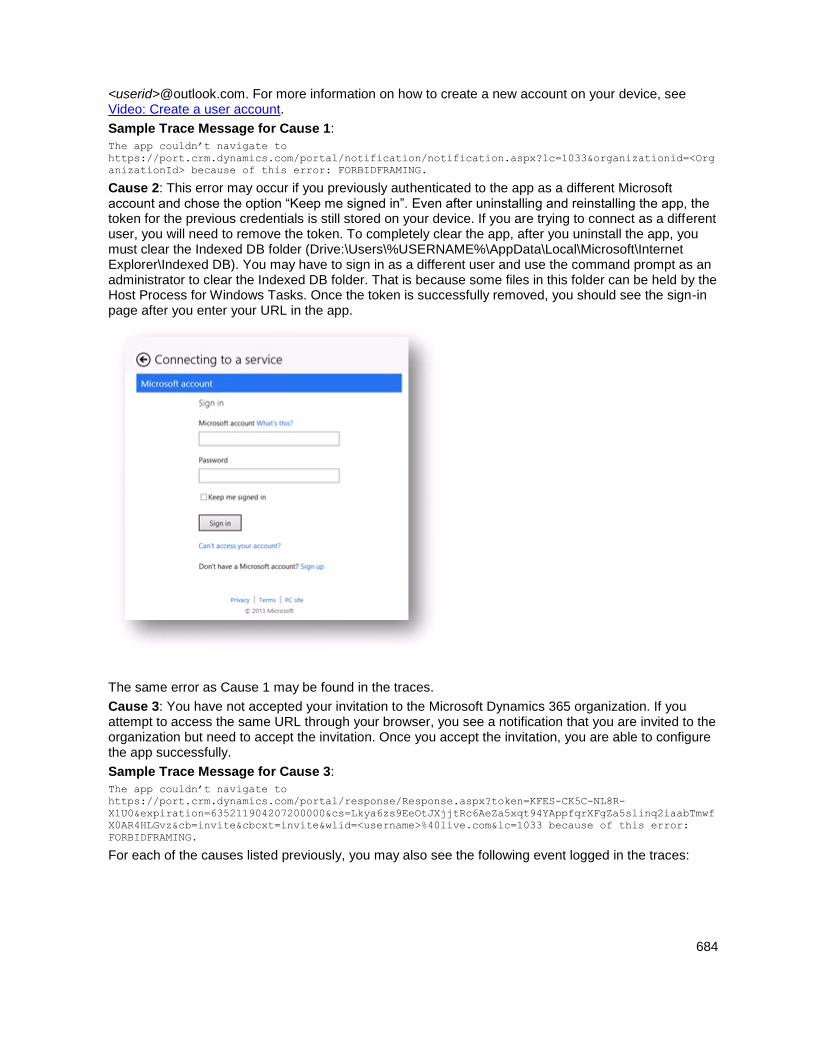
684
<userid>@outlook.com. For more information on how to create a new account on your device, see Video: Create a user account.
Sample Trace Message for Cause 1:
The app couldn’t navigate to
https://port.crm.dynamics.com/portal/notification/notification.aspx?lc=1033&organizationid=<Org
anizationId> because of this error: FORBIDFRAMING.
Cause 2: This error may occur if you previously authenticated to the app as a different Microsoft account and chose the option “Keep me signed in”. Even after uninstalling and reinstalling the app, the token for the previous credentials is still stored on your device. If you are trying to connect as a different user, you will need to remove the token. To completely clear the app, after you uninstall the app, you must clear the Indexed DB folder (Drive:\Users\%USERNAME%\AppData\Local\Microsoft\Internet Explorer\Indexed DB). You may have to sign in as a different user and use the command prompt as an administrator to clear the Indexed DB folder. That is because some files in this folder can be held by the Host Process for Windows Tasks. Once the token is successfully removed, you should see the sign-in page after you enter your URL in the app.
The same error as Cause 1 may be found in the traces.
Cause 3: You have not accepted your invitation to the Microsoft Dynamics 365 organization. If you attempt to access the same URL through your browser, you see a notification that you are invited to the organization but need to accept the invitation. Once you accept the invitation, you are able to configure the app successfully.
Sample Trace Message for Cause 3:
The app couldn’t navigate to
https://port.crm.dynamics.com/portal/response/Response.aspx?token=KFES-CK5C-NL8R-
X1U0&expiration=635211904207200000&cs=Lkya6zs9EeOtJXjjtRc6AeZa5xqt94YAppfqrXFgZa5slinq2iaabTmwf
X0AR4HLGvz&cb=invite&cbcxt=invite&wlid=<username>%40live.com&lc=1033 because of this error:
FORBIDFRAMING.
For each of the causes listed previously, you may also see the following event logged in the traces:
685
“Authentication: Failed - cookie setup”
Cause 4: If you connect to a Microsoft Dynamics 365 organization on an Android device, this error can occur if the certificate from the Microsoft Dynamics 365 website or the federated server, such as AD FS, is not trusted by the device. To avoid this scenario, make sure to use a publicly trusted certificate or add the Certificate Authority certificate to the device. For more information, see KB article: While configuring Dynamics CRM for phones and tablets, you receive an error message.
Error message, Dynamics 365 for Good: “We’re sorry. Your server is not available or does not support this application”
Users must update to the latest version of the Microsoft Dynamics 365 for Good application prior to updating to Microsoft Dynamics CRM Online 2015 Update 1. On the Apple App store, the version the users need is 1.1. On the Good Dynamics Marketplace or (Good Control Console), the version needed is listed as 1.1.0.
Users who have not updated their app prior to connecting to Microsoft Dynamics CRM Online 2015 Update 1, will likely see the following error approximately 2 minutes after connecting to Microsoft Dynamics CRM Online 2015 Update 1.
Error: We’re sorry. Your server is not available or does not support this application.
To fix this error, the user must uninstall and reinstall the Microsoft Dynamics 365 for Good app using the version listed above.
Error message: “Additional steps may be needed to configure Microsoft Dynamics 365 for this organization”
If you’re using a computer or tablet, you need to make some configuration changes to enable the Microsoft Dynamics 365 for Windows 8.1 app for on-premises Dynamics 365 deployments. More information: Set up Dynamics 365 for phones and tablets
Important
If you’re using a Windows Phone, you received this error because your version of Windows Phones isn't supported for on-premises Dynamics 365 deployments. Windows Phone connection to Microsoft Dynamics 365 on-premises requires the Dynamics 365 for Windows app built for Windows 10. More information: Support for Dynamics 365 for phones and tablets
Event 10001 messages appear in the Event Log when you run Microsoft Dynamics 365 for Windows 8
The following event may be recorded multiple times to the Event Log, when Show Analytic and Debug Logs is enabled, on the device where Microsoft Dynamics 365 for Windows 8 is running. Notice that, by default, Show Analytic and Debug Logs is disabled in Event Viewer and these messages won’t be recorded. More information: Enable Analytic and Debug Logs
Event Id: 10001
Message: SEC7131 : Security of a sandboxed iframe is potentially compromised by allowing
script and same origin access.
Verify the source of the messages. If the source is Microsoft Dynamics 365 Server, these events don’t pose a security threat and can be ignored.
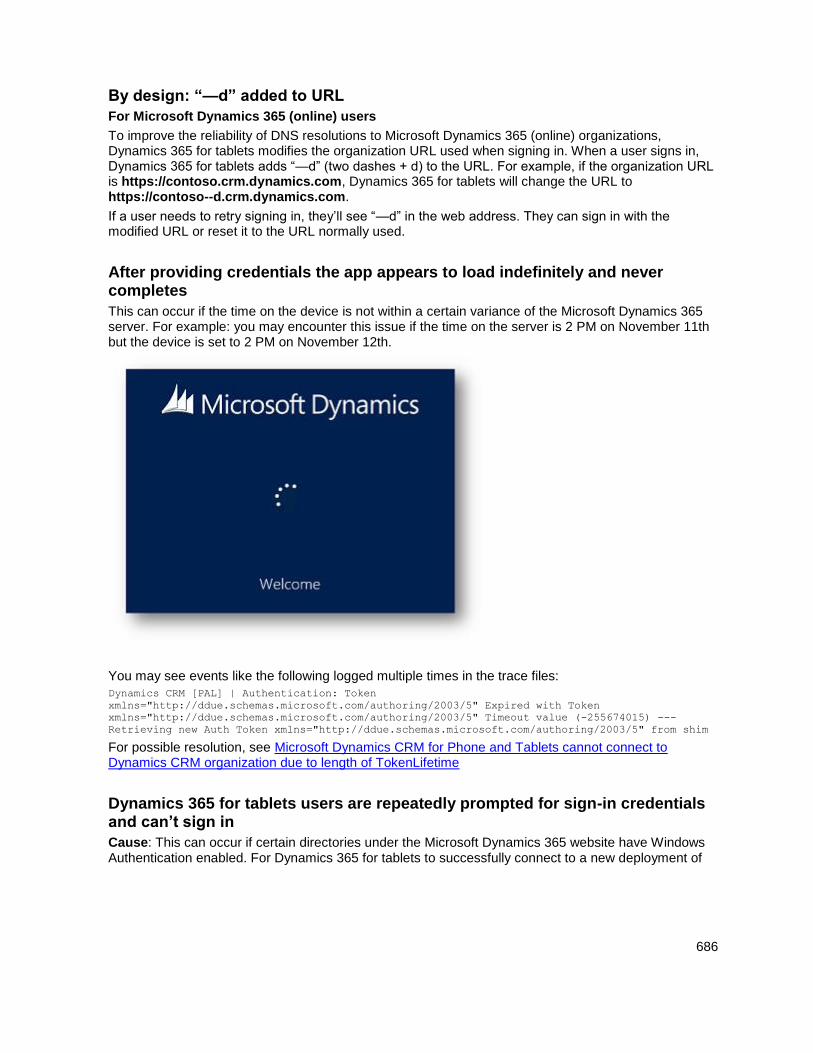
686
By design: “—d” added to URL
For Microsoft Dynamics 365 (online) users
To improve the reliability of DNS resolutions to Microsoft Dynamics 365 (online) organizations, Dynamics 365 for tablets modifies the organization URL used when signing in. When a user signs in, Dynamics 365 for tablets adds “—d” (two dashes + d) to the URL. For example, if the organization URL is https://contoso.crm.dynamics.com, Dynamics 365 for tablets will change the URL to https://contoso--d.crm.dynamics.com.
If a user needs to retry signing in, they’ll see “—d” in the web address. They can sign in with the modified URL or reset it to the URL normally used.
After providing credentials the app appears to load indefinitely and never completes
This can occur if the time on the device is not within a certain variance of the Microsoft Dynamics 365 server. For example: you may encounter this issue if the time on the server is 2 PM on November 11th but the device is set to 2 PM on November 12th.
You may see events like the following logged multiple times in the trace files:
Dynamics CRM [PAL] | Authentication: Token
xmlns="http://ddue.schemas.microsoft.com/authoring/2003/5" Expired with Token
xmlns="http://ddue.schemas.microsoft.com/authoring/2003/5" Timeout value (-255674015) ---
Retrieving new Auth Token xmlns="http://ddue.schemas.microsoft.com/authoring/2003/5" from shim
For possible resolution, see Microsoft Dynamics CRM for Phone and Tablets cannot connect to Dynamics CRM organization due to length of TokenLifetime
Dynamics 365 for tablets users are repeatedly prompted for sign-in credentials and can’t sign in
Cause: This can occur if certain directories under the Microsoft Dynamics 365 website have Windows Authentication enabled. For Dynamics 365 for tablets to successfully connect to a new deployment of
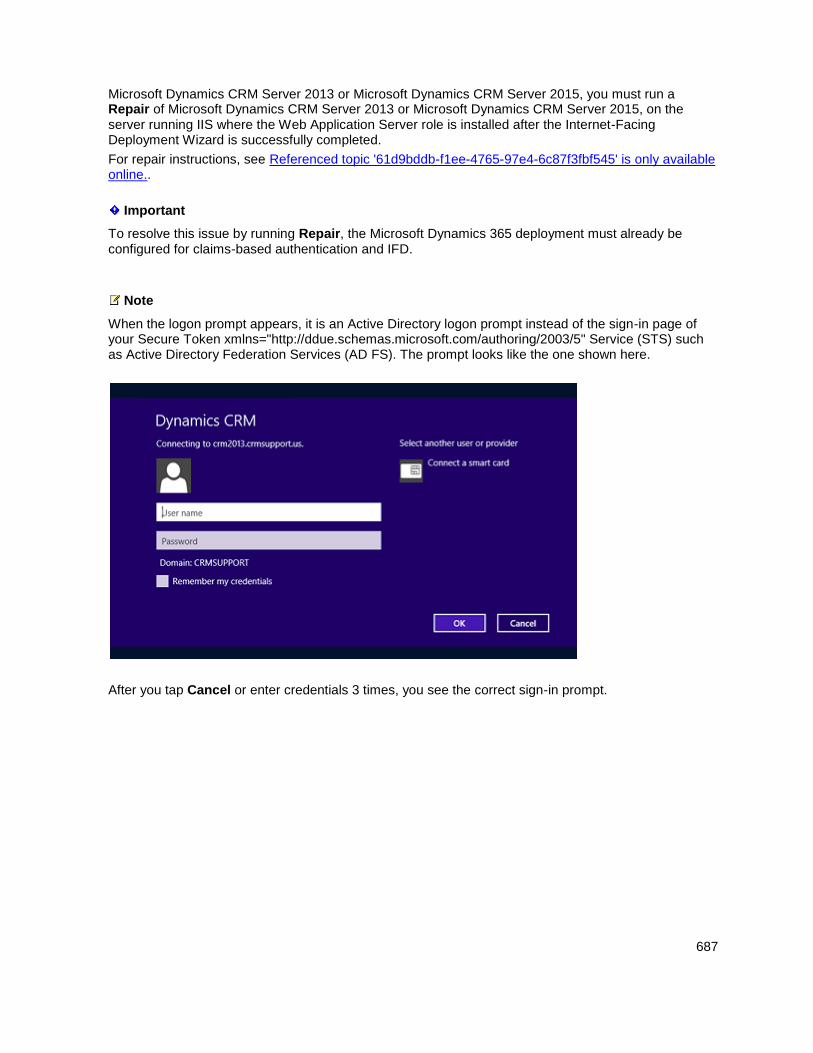
687
Microsoft Dynamics CRM Server 2013 or Microsoft Dynamics CRM Server 2015, you must run a Repair of Microsoft Dynamics CRM Server 2013 or Microsoft Dynamics CRM Server 2015, on the server running IIS where the Web Application Server role is installed after the Internet-Facing Deployment Wizard is successfully completed.
For repair instructions, see Referenced topic '61d9bddb-f1ee-4765-97e4-6c87f3fbf545' is only available online..
Important
To resolve this issue by running Repair, the Microsoft Dynamics 365 deployment must already be configured for claims-based authentication and IFD.
Note
When the logon prompt appears, it is an Active Directory logon prompt instead of the sign-in page of your Secure Token xmlns="http://ddue.schemas.microsoft.com/authoring/2003/5" Service (STS) such as Active Directory Federation Services (AD FS). The prompt looks like the one shown here.
After you tap Cancel or enter credentials 3 times, you see the correct sign-in prompt.
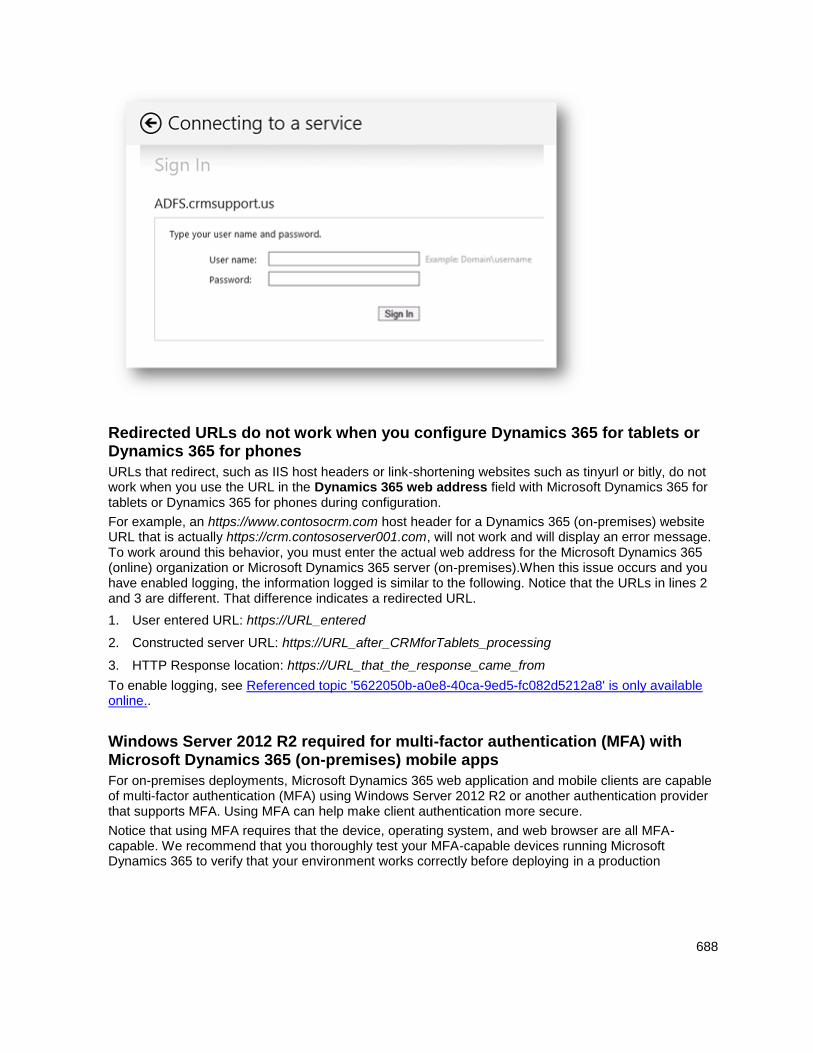
688
Redirected URLs do not work when you configure Dynamics 365 for tablets or Dynamics 365 for phones
URLs that redirect, such as IIS host headers or link-shortening websites such as tinyurl or bitly, do not work when you use the URL in the Dynamics 365 web address field with Microsoft Dynamics 365 for tablets or Dynamics 365 for phones during configuration.
For example, an https://www.contosocrm.com host header for a Dynamics 365 (on-premises) website URL that is actually https://crm.contososerver001.com, will not work and will display an error message. To work around this behavior, you must enter the actual web address for the Microsoft Dynamics 365 (online) organization or Microsoft Dynamics 365 server (on-premises).When this issue occurs and you have enabled logging, the information logged is similar to the following. Notice that the URLs in lines 2 and 3 are different. That difference indicates a redirected URL.
1. User entered URL: https://URL_entered
2. Constructed server URL: https://URL_after_CRMforTablets_processing
3. HTTP Response location: https://URL_that_the_response_came_from
To enable logging, see Referenced topic '5622050b-a0e8-40ca-9ed5-fc082d5212a8' is only available online..
Windows Server 2012 R2 required for multi-factor authentication (MFA) with Microsoft Dynamics 365 (on-premises) mobile apps
For on-premises deployments, Microsoft Dynamics 365 web application and mobile clients are capable of multi-factor authentication (MFA) using Windows Server 2012 R2 or another authentication provider that supports MFA. Using MFA can help make client authentication more secure.
Notice that using MFA requires that the device, operating system, and web browser are all MFA-capable. We recommend that you thoroughly test your MFA-capable devices running Microsoft Dynamics 365 to verify that your environment works correctly before deploying in a production
689
environment. More information: Overview: Manage Risk with Additional Multi-Factor Authentication for Sensitive Applications.
Regarding customization
Users not getting customizations
Users will not get customizations made to Dynamics 365 if there are draft records present. Users should be encouraged to save records as soon as they go online.
Data cached for offline viewing remains after the entity is no longer enabled for Dynamics 365 for tablets
In Dynamics 365 for tablets, record data is cached as the user visits the record so the user can access the data when going offline.
This cached data persists after the entity is no longer enabled for Dynamics 365 for tablets (Settings > Customizations > Customize the System > [select an entity] > under Outlook & Mobile, deselect Dynamics 365 for tablets).
To remove the cached data, the user must sign out of Dynamics 365 for tablets, or Dynamics 365 for tablets must be reconfigured or uninstalled.
Customization changes do not appear in Dynamics 365 for tablets
Cause 1: The customizations (metadata) from your Microsoft Dynamics 365 organization are cached on your device. The app checks for updated metadata after 24 hours or any time you reopen the app. For customization changes to become available immediately, you must completely close and then reopen the app. If new metadata is found, you will be prompted to download it. For more information on how to completely close an app, refer to the help for your operating system or reference one of the articles provided:
Windows 8: How do I close an app?
iPad: Force an app to close
Android: How to force close Android apps
Cause 2: You may be seeing a different form than the one you customized. If you have multiple forms for an entity, you will see the first form in the form order that you have access to. This is different than the web application where you see the last form you used and have the ability to change between forms.
Regarding mobile browser
Private Browsing not supported in Safari
If you enable Private Browsing on your iPad in your Safari browser, you will see the following error message when you attempt to connect to your Dynamics 365 organization: “Microsoft Dynamics 365

690
has encountered an error.” You will need to disable Private Browsing. Tap the address bar, and then tap Private.
Dynamics 365 (on-premises) URL doesn’t resolve on Nexus tablets
When you try to access Microsoft Dynamics 365 (on-premises) using an internal URL on a Nexus 10 tablet in the Chrome web browser, the URL doesn’t resolve and you can’t access the site. For example, a URL in the form of https:// servername:5555 doesn’t resolve.
This is a known issue with Android devices accessing IIS intranet sites. To work around this issue, select one of the following solutions.
Use the fully qualified domain name to resolve the address, such as
https://servername.contoso.com:5555.
Use the server IP address, such as https://10.0.0.1:5555.
Web app differences in mobile browsers
For differences you can expect to find in the web app when you’re accessing it from a mobile device, see Support for Dynamics 365 for phones and Dynamics 365 for tablets.
Other
Clipboard data – available to admins and customizers
Microsoft Dynamics 365 System Administrators or System Customizers can access other users’ Clipboard data for users of Windows 8 and 8.1 devices.
Users can view queue items in another person’s queue
A user viewing records in Dynamics 365 for tablets can view records in another user’s queue.
Update the Dynamics 365 for Good app before updating to Microsoft Dynamics CRM Online 2015 Update 1
Users must update to the latest version of the Microsoft Dynamics 365 for Good application prior to updating to Microsoft Dynamics CRM Online 2015 Update 1. On the Apple App store, the version the users need is 1.1. On the Good Dynamics Marketplace or Good Control Console, the version needed is listed as 1.1.0.
Users who haven’t updated their app prior to connecting to Microsoft Dynamics CRM Online 2015 Update 1, will likely see the following error approximately 2 minutes after connecting to Microsoft Dynamics CRM Online 2015 Update 1.
Error: We’re sorry. Your server is not available or does not support this application.
To fix this error, the user must uninstall and reinstall the Microsoft Dynamics 365 for Good app using the version listed previously.
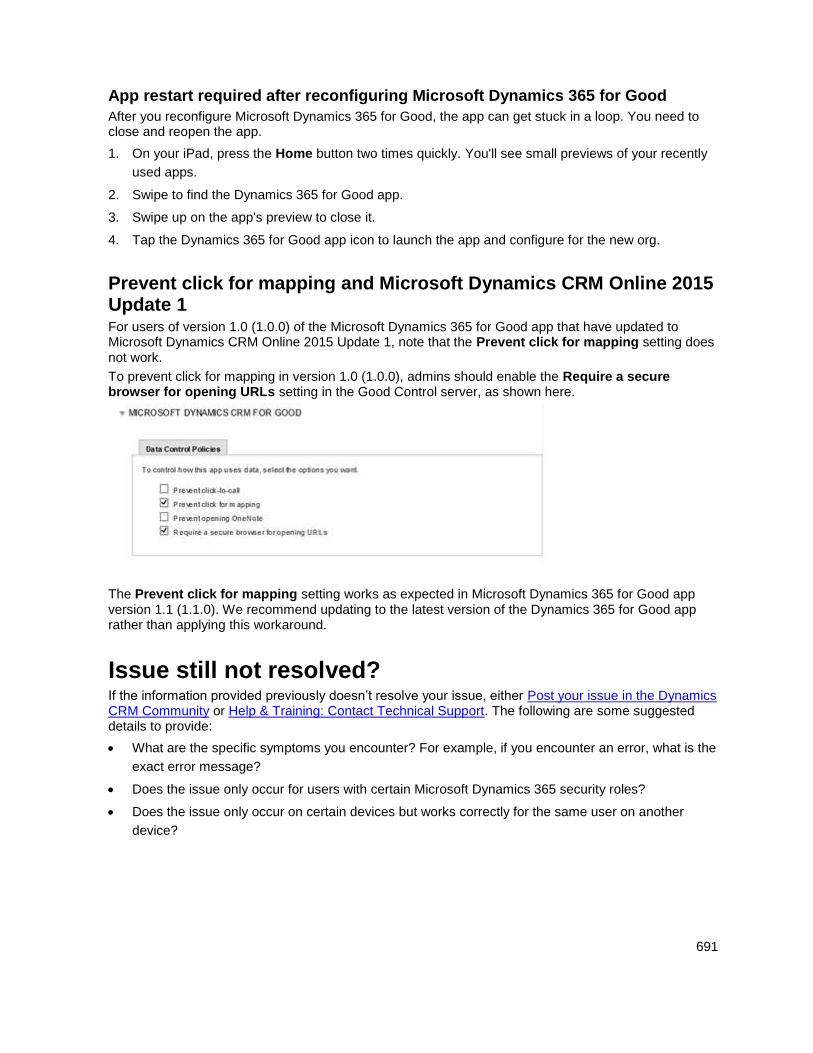
691
App restart required after reconfiguring Microsoft Dynamics 365 for Good
After you reconfigure Microsoft Dynamics 365 for Good, the app can get stuck in a loop. You need to close and reopen the app.
1. On your iPad, press the Home button two times quickly. You'll see small previews of your recently
used apps.
2. Swipe to find the Dynamics 365 for Good app.
3. Swipe up on the app's preview to close it.
4. Tap the Dynamics 365 for Good app icon to launch the app and configure for the new org.
Prevent click for mapping and Microsoft Dynamics CRM Online 2015 Update 1 For users of version 1.0 (1.0.0) of the Microsoft Dynamics 365 for Good app that have updated to Microsoft Dynamics CRM Online 2015 Update 1, note that the Prevent click for mapping setting does not work.
To prevent click for mapping in version 1.0 (1.0.0), admins should enable the Require a secure browser for opening URLs setting in the Good Control server, as shown here.
The Prevent click for mapping setting works as expected in Microsoft Dynamics 365 for Good app version 1.1 (1.1.0). We recommend updating to the latest version of the Dynamics 365 for Good app rather than applying this workaround.
Issue still not resolved? If the information provided previously doesn’t resolve your issue, either Post your issue in the Dynamics CRM Community or Help & Training: Contact Technical Support. The following are some suggested details to provide:
What are the specific symptoms you encounter? For example, if you encounter an error, what is the
exact error message?
Does the issue only occur for users with certain Microsoft Dynamics 365 security roles?
Does the issue only occur on certain devices but works correctly for the same user on another
device?
692
If you attempt to connect to a different Microsoft Dynamics 365 organization that does not include
your customizations, does the same issue occur? If the issue only occurs with your customizations,
provide a copy of the customizations if possible.
Does the issue still occur after uninstalling the app and reinstalling it?
Please provide traces. See Referenced topic '5622050b-a0e8-40ca-9ed5-fc082d5212a8' is only
available online..
What type of device (ex. iPad 4th Generation, Microsoft Surface, etc…) are you using and what is
the version of the operating system (ex. iOS 6.0, Windows 8, etc…)?
See Also Set up Dynamics 365 for phones and Dynamics 365 for tablets Referenced topic '4eadd04d-98cd-443e-94fc-9ca0c1d62728' is only available online. Help & Training: Get started with Dynamics 365 for tablets Set up and manage phones and tablets
© 2016 Microsoft. All rights reserved. Copyright
Integrate (synchronize) your email system with Microsoft Dynamics 365
Applies To: Dynamics 365 (online), Dynamics 365 (on-premises), Dynamics CRM 2016, Dynamics CRM Online
[This topic is pre-release documentation and is subject to change.]
One of the main reasons people use Microsoft Dynamics 365 is to store all customer communications in one place, so anyone with the appropriate permissions can see all relevant customer records. For example, view all email associated with a particular contact, account, opportunity, or case.
To store email and other messaging records in Dynamics 365, you need to synchronize your email system with Dynamics 365. There are two ways to do this:
Server-side synchronization
Microsoft Dynamics 365 for Outlook (includes a synchronization agent)
Important
In previous versions of Microsoft Dynamics CRM, you could also use the Email Router to
synchronize records. The Email Router has been deprecated as of the December 2016 update for
Dynamics 365 (online and on-premises). We strongly recommend that you migrate all email
routing functionality to use server-side synchronization. More information: Migrate settings from the
Email Router to server-side synchronization
Internet Message Access Protocol (IMAP) email servers are not currently supported by server-side
synchronization or the Email Router.
693
In this topic: When to use server-side synchronization
When to use Dynamics 365 for Outlook
When to use server-side synchronization Server-side synchronization is the preferred synchronization method for the following reasons:
Enables Microsoft Dynamics 365 App for Outlook. With Dynamics 365 App for Outlook (not the
same thing as Dynamics 365 for Outlook), Dynamics 365 information appears next to a user’s
Outlook email messages or appointments. They can view information about contacts and leads
stored in Dynamics 365 and add Dynamics 365 contacts directly from an email message. They can
also link email, appointment, and contact records to new or existing Dynamics 365 records, such
as opportunity, account, or case records. Dynamics 365 App for Outlook is very simple to deploy
and it works with Outlook on the web (included in Microsoft Office 365) the Outlook desktop client,
and Outlook mobile. Help & Training: Learn more about Dynamics 365 App for Outlook.
Enables Exchange folder tracking. With folder tracking, users can simply drag email to an
Exchange folder to track it automatically in Dynamics 365. Folder tracking works on any mobile
device that supports Microsoft Exchange, which means users can track email from just about any
device. Help & Training: Learn more about folder tracking.
Automatic synchronization. When you synchronize records with server-side synchronization, the
synchronization happens automatically at the server level. This isn’t true if you synchronize records
with Dynamics 365 for Outlook. In this case, the user has to have Dynamics 365 for Outlook open
to synchronize records.
Enables multiple scenarios, including hybrid scenarios. You can use server-side
synchronization to connect:
Dynamics 365 (online) to Exchange Online
Dynamics 365 (online) to Exchange Server (on-premises)
Dynamics 365 Server (on-premises) to Exchange Server (on-premises)
Dynamics 365 Server (on-premises) to Exchange Online
Synchronize appointments, contacts, and tasks. In addition to email, you can synchronize
Outlook appointments, contacts, and tasks.
Synchronize with POP3 email servers. You can use server-side synchronization to synchronize
Dynamics 365 with Gmail, Outlook.com, Yahoo, and other POP3 email servers. Note, however,
that you can’t synchronize appointments, contacts, and tasks with POP3 email servers.
Integrated mailbox management and resource utilization. You can use the server-side
synchronization performance dashboard to quickly monitor mailbox performance across the
organization. You can also troubleshoot errors through error logging and reporting.
694
More information: Set up server-side synchronization of email, appointments, contacts, and tasks
When to use Dynamics 365 for Outlook Dynamics 365 for Outlook, the legacy add-in for Outlook, is a full Dynamics 365 client that includes offline capabilities. However, as of the December 2016 update for Dynamics 365 (online and on-premises), the preferred way to use Dynamics 365 and Outlook together is to use Microsoft Dynamics 365 App for Outlook paired with server-side synchronization.
If you do use Dynamics 365 for Outlook, server-side synchronization isn't required since Dynamics 365 for Outlook has its own synchronization agent that runs on the user’s computer, but it’s best to do the synchronization through server-side synchronization for the reasons mentioned in the previous section. Help and Training: Learn more about Dynamics 365 for Outlook
See Also Set up server-side synchronization of email, appointments, contacts, and tasks Troubleshooting and monitoring server-side synchronization Deploy Dynamics 365 App for Outlook Install Dynamics 365 for Outlook Migrate settings from the Email Router to server-side synchronization
© 2016 Microsoft. All rights reserved. Copyright
Server-side synchronization
Applies To: Dynamics 365 (online), Dynamics 365 (on-premises), Dynamics CRM 2016, Dynamics CRM Online
[This topic is pre-release documentation and is subject to change.]
Server-side synchronization is the preferred option for organizations with users who run Microsoft Dynamics 365 in a web browser or on a mobile device, such as a tablet or smartphone. Server-side synchronization provides direct Microsoft Dynamics 365-to-email server synchronization. When you use Exchange, this includes bi-directional synchronization of email, contacts, tasks, and appointments. The data synchronized for each user can be controlled by using synchronization filters that are available from the Synchronization tab in the Microsoft Dynamics 365 user options dialog.
If you use a POP3 email server, the data that is synchronized includes email only.
Using server-side synchronization makes messaging data available to a web browser, tablet, or smartphone that is running Microsoft Dynamics 365.

695
For more information about server-side synchronization, see Set up server-side synchronization of email, appointments, contacts, and tasks.
Note
A Microsoft Dynamics 365 user can only map to a single Exchange or POP3 mailbox. Similarly, an Exchange or POP3 mailbox can only be mapped to a single Microsoft Dynamics 365 user. When Microsoft Dynamics 365 detects that an Exchange or POP3 mailbox has already been mapped to a Microsoft Dynamics 365 user, a dialog box is displayed to present a choice to the user whether to map the Microsoft Dynamics 365 user to the Exchange mailbox. When the user selects yes, it breaks the previous Microsoft Dynamics 365 user to Exchange mailbox mapping and subsequently the synchronization that would occur between the Microsoft Dynamics 365 user and the Exchange mailbox.
Server-side synchronization frequency When synchronization by using server-side synchronization occurs, the process is dynamic and unique for each user’s mailbox. The synchronization algorithm ensures that mailboxes are synced according to dynamic parameters such as the number of email messages and the activity within the mailbox. Normally, email synchronization occurs every 5 minutes. When a mailbox has many email messages, the interval can be reduced dynamically to 2 minutes. If the mailbox is less active, the interval can be increased up to 12 minutes. Generally speaking, you can assume that a mailbox will be synced at least once every 12 minutes. Note that you can’t manually synchronize records through server-side synchronization and when you track email (Track button), this occurs immediately.
696
Features available with server-side synchronization in Microsoft Dynamics 365 (online) Some features offered by server-side synchronization include the following:
1. Email folder tracking. You can simply drag email to a folder to track it. Folder tracking works on
any mobile device that supports Microsoft Exchange, which means you can track email from just
about any device.
2. Doesn’t require Outlook. You don’t have to have the Dynamics 365 for Outlook add-in open to
synchronize records. You can still use Dynamics 365 for Outlook to track records manually even if
you do the synchronization through server-side sync. This also helps to boost the performance of
the Outlook add-in.
3. Support for Dynamics 365 App for Outlook. You can track incoming email with the new
Dynamics 365 App for Outlook. Dynamics 365 App for Outlook works with Outlook on the web. So
all you need is a browser to track incoming email.
Features available with server-side synchronization in both Microsoft Dynamics 365 (online) and Microsoft Dynamics 365 (on-premises) Some features offered by server-side synchronization include the following:
Efficient resource utilization.Server-side synchronization provides integrated mailbox
management. You can disable inactive mailboxes that have permanent errors. It prevents resource
hogging by applying an upper limit on the allocated capacity and time-out requests.
Connection throttling.Server-side synchronization provides a way to control the number of
parallel connections opened against an email server to prevent overloading the mail server.
Data migration.Server-side synchronization supports migrating configuration data from Email
Router to server-side synchronization by using the migration wizard. More information: Migrate
settings from the Email Router to server-side synchronization, Merge email server profiles for
migration.
Service isolation.Server-side synchronization has separate queue-management and configuration
settings for asynchronous operations, outgoing activities, and mailboxes. It is based off
asynchronous service architecture and may share the same process. In all cases, it manages
server resources while maintaining isolation with the asynchronous service.
Error reporting for users and administrators.Server-side synchronization supports logging and
reporting of errors specific to an email or one or more mailboxes. More information: Error logging
for server-side synchronization.
Note
In Microsoft Dynamics 365, you can synchronize emails using Dynamics 365 for Outlook or server-
697
side synchronization. If server-side synchronization is selected, the synchronization does not
require running Dynamics 365 for Outlook. You will, however, still need Dynamics 365 for Outlook
to promote an item from Outlook.
Features available with server-side synchronization in Microsoft Dynamics 365 (on-premises) Some features offered by server-side synchronization with Microsoft Dynamics 365 (on-premises) include the following:
Performance counters. Performance counters are added to Activity and mailbox queue for
Asynchronous service and server-side synchronization.
Server role deployment.Server-side synchronization leverages the Asynchronous Service server
role on the Microsoft Dynamics 365 server.
See Also Integrate (synchronize) your email system with Microsoft Dynamics 365 Set up server-side synchronization of email, appointments, contacts, and tasks Help & Training: Synchronizing data with Outlook or Exchange FAQ
© 2016 Microsoft. All rights reserved. Copyright
Supported email service configurations for server-side synchronization
Applies To: Dynamics 365 (online), Dynamics 365 (on-premises), Dynamics CRM 2016, Dynamics CRM Online
[This topic is pre-release documentation and is subject to change.]
Depending on your Microsoft Dynamics 365 installation, you may be deciding whether to use server-side synchronization or the Email Router/Outlook synchronization. This following table lists what is supported by server-side synchronization for each type of installation. Later in this topic, you can read about the scenarios that aren’t supported by server-side synchronization.
Important
The information here includes the POP3/SMTP systems supported by Microsoft. Although other
POP3/SMTP systems may work with Microsoft Dynamics 365, those systems were not tested by
Microsoft and are not supported.
Outlook on the web is not supported in a hybrid deployment: Dynamics 365 (on-premises) with
Exchange Online.
698
You can create two different email server profiles: one for online mailboxes, and another for on-
premises mailboxes. Associate the mailboxes with the correct email server profile.
Manual tracking in Dynamics 365 for Outlook is not supported when a user’s mailbox is configured
to use server-side synchronization with the POP/SMTP protocol.
Dynamics 365 deployment
Email system Email synchronization
Appointments, contacts, and tasks synchronization
Protocol
Dynamics 365 (on-premises)
Exchange Online
Exchange Server
2010
Exchange Server
2013
Exchange Server
2016
Yes Yes Exchange Web Services
Dynamics 365 (on-premises)
Gmail
Yahoo! Mail
MSN1
Outlook.com1
Windows Live
Mail1
Yes No POP3/SMTP
Microsoft Dynamics 365 (online)
1. Exchange Online
2. Exchange Server
2010 SP3
3. Exchange Server
2013 SP1
4. Exchange Server
2016
Yes Yes Exchange Web Services
Microsoft Dynamics 365 (online)
Gmail
Yahoo! Mail
Yes No POP3/SMTP
1 May be unsupported for FIPS-compliancy. See the following section for more information.
Using Exchange Online with Dynamics 365 (online) If your company is using Exchange Online with Dynamics 365 (online), note the following:
699
Dynamics 365 (online) supports server-side synchronization with Exchange Online in the same tenant in Office 365 with Server to Server Authentication. Other authentication methods or settings are not recommended or supported, including:
Using credentials specified by a user or queue
Using credentials specified in an email server profile
Using Impersonation
Setting Auto Discover Server Location to No
Using an email server profile other than Microsoft Exchange Online
Using non-default network ports
Connecting Dynamics 365 (online) with Exchange Online in different tenant is not supported.
Unsupported email service configurations Server-side synchronization doesn’t support the following scenarios:
Mix of Exchange/SMTP and POP3/Exchange
Creation of mass email marketing campaigns
Extensibility scenarios like extending EWS/POP3/SMTP protocols and creating custom email
providers
Exchange Server 2003 and Exchange Server 2007
Server-side synchronization in Dynamics 365 (online), or in a Microsoft Dynamics 365 (on
premises) deployment that is configured for FIPS 140-2 compliancy, requires a POP3/SMTP email
server that is also FIPS 140-2 compliant. Some email servers are not FIPS 140-2 compliant, such
as MSN, Outlook.com, or Windows Live Mail.
For most situations not supported by server-side synchronization, you can use the Microsoft Dynamics CRM Email Router. More information: Integrate (synchronize) your email system with Microsoft Dynamics 365
Note
We recommend that you don’t use a mixed configuration of Outlook synchronization and server-side synchronization for appointments, contacts, and tasks in the same organization, because it may result in updated Dynamics 365 data not synchronizing to all attendees.
See Also Server-side synchronization Set up server-side synchronization of email, appointments, contacts, and tasks
© 2016 Microsoft. All rights reserved. Copyright
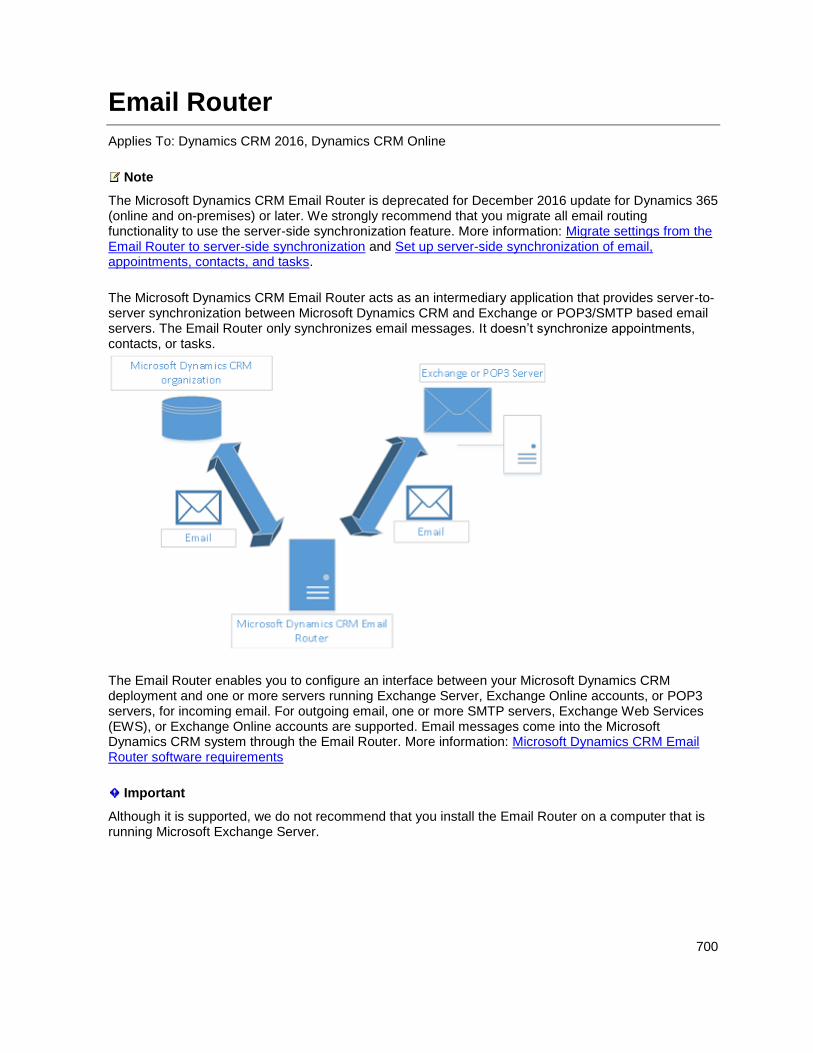
700
Email Router
Applies To: Dynamics CRM 2016, Dynamics CRM Online
Note
The Microsoft Dynamics CRM Email Router is deprecated for December 2016 update for Dynamics 365 (online and on-premises) or later. We strongly recommend that you migrate all email routing functionality to use the server-side synchronization feature. More information: Migrate settings from the Email Router to server-side synchronization and Set up server-side synchronization of email, appointments, contacts, and tasks.
The Microsoft Dynamics CRM Email Router acts as an intermediary application that provides server-to-server synchronization between Microsoft Dynamics CRM and Exchange or POP3/SMTP based email servers. The Email Router only synchronizes email messages. It doesn’t synchronize appointments, contacts, or tasks.
The Email Router enables you to configure an interface between your Microsoft Dynamics CRM deployment and one or more servers running Exchange Server, Exchange Online accounts, or POP3 servers, for incoming email. For outgoing email, one or more SMTP servers, Exchange Web Services (EWS), or Exchange Online accounts are supported. Email messages come into the Microsoft Dynamics CRM system through the Email Router. More information: Microsoft Dynamics CRM Email Router software requirements
Important
Although it is supported, we do not recommend that you install the Email Router on a computer that is running Microsoft Exchange Server.
701
After you install the Email Router, you must run the Email Router Configuration Manager, an application that is installed during Microsoft Dynamics CRM Email Router Setup. You can use the Email Router Configuration Manager to configure the following:
One or more incoming profiles. An incoming profile contains the information about the email
systems that will be used to process incoming email messages.
One or more outgoing profiles. An outgoing profile contains the information about the email
systems that will be used to process outgoing email messages.
One or more deployments. The Deployments area contains information about the Microsoft
Dynamics CRM deployment and maps to an incoming and outgoing profile.
Users, queues, and forward mailboxes. This area contains information about each user that will
use the Email Router for email tracking. You can also configure email routing for queues and define
a forward mailbox.
For more information about the Email Router Configuration Manager, see the following resources:
Install Email Router for Microsoft Dynamics CRM and Dynamics CRM Online
Use Email Router Configuration Manager
See Also Integrate (synchronize) your email system with Microsoft Dynamics 365 Set up Email Router
© 2016 Microsoft. All rights reserved. Copyright
Supported email systems and network topology
Applies To: Dynamics CRM 2016, Dynamics CRM Online
Note
The Microsoft Dynamics CRM Email Router is deprecated for December 2016 update for Dynamics 365 (online and on-premises) or later. We strongly recommend that you migrate all email routing functionality to use the server-side synchronization feature. More information: Migrate settings from the Email Router to server-side synchronization and Set up server-side synchronization of email, appointments, contacts, and tasks.
The Email Router is an optional interface component that integrates your email system with Microsoft Dynamics CRM Microsoft Dynamics CRM, and routes qualified email messages to and from your Microsoft Dynamics CRM organization. This section provides guidelines for analyzing your organization’s requirements for integrating email with Microsoft Dynamics CRM, and outlines the things to consider when you plan, install, and configure an Email Router deployment.
702
Supported email systems The Email Router can connect to one or more email servers running Microsoft Exchange Server or Exchange Online. The Email Router can also connect to POP3-compliant servers to provide incoming email routing. For outgoing email, you can use SMTP and EWS (Exchange Online only). For more information about the email server versions and protocols that Microsoft Dynamics CRM supports, see Microsoft Dynamics CRM Email Router software requirements in this guide.
Exchange Server is an enterprise messaging system with the versatility to support various organizations. As with Active Directory and Microsoft Dynamics CRM, Exchange Server requires planning before it is deployed. Many documents are available from Microsoft that explain how to plan, deploy, and operate Exchange Server. More information: Exchange.
Network topology and email traffic The overall requirements to deploy and configure an effective Microsoft Dynamics CRM email solution for a small business are similar to those of a large enterprise. However, a small business might not have an IT department. As you plan your email solution, consider the details of your particular IT environment, such as who is responsible for network administration, what is allowed for Email Router placement, use of forward mailbox, and forwarding rules.
To optimize performance, carefully consider the size, complexity, and geographical distribution of your network. The location of your email servers, the number of users who will route email to and from Microsoft Dynamics CRM, expected traffic levels, and the frequency and size of attachments should help guide your decisions.
For example, an international enterprise-level Microsoft Dynamics CRM deployment might have user and queue mailboxes in multiple sites, regions, or countries. Such a deployment may accommodate multiple Microsoft Dynamics CRM organizations and multiple email server configurations. The email servers might be located inside or outside the corporate domain, separated by firewalls.
A small business deployment, on the other hand, will typically have a relatively small number of users and significantly less email traffic. Frequently, there will be no full-time IT department to configure and maintain an Email Router deployment.
Avoid mailbox storage problems Every organization has its own unique requirements for email message routing and storage. To avoid problems that can result from overtaxing your system's storage capacity, consider the following when you plan an Email Router deployment:
All email messages
Email messages in response to Microsoft Dynamics CRM email
Email messages from Microsoft Dynamics CRM Leads, Contacts, and Accounts
Email messages from Microsoft Dynamics CRM records that are email enabled
For more information, see Email message filtering and correlation in this guide.
What storage quotas should be applied to each mailbox? For more information about how to
apply mailbox storage quotas and managing automated messages that are sent to mailbox owners
when their size limit is exceeded, see the documentation for your email system.
703
How long should email messages be stored? For more information about automatically
archiving or deleting email messages, see the documentation for your email system.
Like server-side synchronization and Microsoft Dynamics 365 for Outlook, the Microsoft Dynamics CRM Email Router lets you track Dynamics CRM-related information automatically. The email tracking functionality in the Email Router operates in the manner described in the Email message filtering and correlation topic. The Email Router also lets you send and receive emails through Microsoft Dynamics CRM (online).
See Also Email Router Integrate (synchronize) your email system with Microsoft Dynamics 365 Set up Email Router
© 2016 Microsoft. All rights reserved. Copyright
Email Router tasks and components
Applies To: Dynamics CRM 2016, Dynamics CRM Online
Note
The Microsoft Dynamics CRM Email Router is deprecated for December 2016 update for Dynamics 365 (online and on-premises) or later. We strongly recommend that you migrate all email routing functionality to use the server-side synchronization feature. More information: Migrate settings from the Email Router to server-side synchronization and Set up server-side synchronization of email, appointments, contacts, and tasks.
The Email Router performs the following tasks:
Routes incoming email messages to Microsoft Dynamics CRM.
Sends email messages generated from Microsoft Dynamics CRM.
The Email Router is required to route email messages for organizations that don’t use server-side synchronization or Microsoft Dynamics 365 for Outlook. The Email Router can be installed on various versions of the Microsoft Windows operating system. For a list of supported Windows versions, see Microsoft Dynamics CRM Email Router software requirements. The computer on which you install the Email Router must have a connection to a Microsoft Exchange Server or to a POP3/SMTP email server.
The Email Router contains the following components:
The Email Router service ("Microsoft Dynamics CRM Email Router") and the Email Router
configuration files.
The Email Router Configuration Manager. You use this wizard to configure the Email Router
service.
704
The Rule Deployment Wizard. This wizard lets you deploy rules that are used to route email
messages to a forward mailbox from the mailbox of a user or queue. The Rule Deployment Wizard
doesn’t work with POP3/SMTP email servers. More information: Deploy inbox rules
Note
Only message class types IPM.Note and IPM.NOTE.Rules.OofTemplate.Microsoft are tracked and saved in Microsoft Dynamics CRM. For a list of known message class types, see Office Dev Center: Item Types and Message Classes.
See Also Email Router Set up Email Router
© 2016 Microsoft. All rights reserved. Copyright
Microsoft Dynamics CRM Email Router hardware requirements
Applies To: Dynamics CRM 2016, Dynamics CRM Online
Note
The Microsoft Dynamics CRM Email Router is deprecated for December 2016 update for Dynamics 365 (online and on-premises) or later. We strongly recommend that you migrate all email routing functionality to use the server-side synchronization feature. More information: Migrate settings from the Email Router to server-side synchronization and Set up server-side synchronization of email, appointments, contacts, and tasks.
The following table lists the minimum and recommended hardware requirements for Microsoft Dynamics CRM Email Router.
Component *Minimum *Recommended
Processor (32-bit) 750-MHz CPU or comparable Multi-core 1.8-GHz CPU or higher
Processor (64-bit) x64 architecture or compatible 1.5 GHz processor
Multi-core x64 architecture 2GHz CPU or higher
Memory 1-GB RAM 2-GB RAM or more
Hard disk 100 MB of available hard disk space
100 MB of available hard disk space
*Actual requirements and product functionality may vary based on your system configuration and operating system.
705
Running Microsoft Dynamics CRM Email Router on a computer that has less than the recommended requirements may result in inadequate performance.
See Also Email Router Referenced topic 'fdeb81bd-ee6a-4a8c-9e33-311297c585ed' is only available online.
© 2016 Microsoft. All rights reserved. Copyright
Microsoft Dynamics CRM Email Router software requirements
Applies To: Dynamics CRM 2016, Dynamics CRM Online
Note
The Microsoft Dynamics CRM Email Router is deprecated for December 2016 update for Dynamics 365 (online and on-premises) or later. We strongly recommend that you migrate all email routing functionality to use the server-side synchronization feature. More information: Migrate settings from the Email Router to server-side synchronization and Set up server-side synchronization of email, appointments, contacts, and tasks.
This topic lists the software and application software requirements for Microsoft Dynamics CRM Email Router.
Microsoft Dynamics CRM Email Router Setup consists of two main components: the Email Router and the Rule Deployment Wizard. The Email Router component installs the Email Router service and Email Router Configuration Manager. You use the Email Router Configuration Manager to configure the Email Router. The Rule Deployment Wizard component deploys the rules that enables received email messages to be tracked.
Microsoft Dynamics CRM version support
Be aware of the following requirements for Email Router:
Microsoft Dynamics CRM 2013 Email Router requires CRM 2013
Microsoft Dynamics CRM 2015 Email Router requires CRM 2015
Microsoft Dynamics CRM 2016 Email Router requires Microsoft Dynamics CRM 2016.
Important
For Microsoft Dynamics CRM applications, we recommend using the latest version and service pack (SP) for all required components, such as Windows Server, Microsoft SQL Server, Microsoft Office, Internet Explorer, and Microsoft Exchange Server. In some cases, there might be a delay between the availability of a component update and support for the update in Microsoft Dynamics CRM applications. However, you should always apply the latest Microsoft Dynamics CRM update for Microsoft Dynamics CRM to fully support the latest version of a required component.
706
Supported Windows operating systems
You can install the Email Router and Rule Deployment Wizard on any computer that is running one of the following operating systems, and that has network access to both Microsoft Dynamics CRM and the email server:
Windows 8.1 or Windows 8 (64-bit and 32-bit versions)
Windows 7 (64-bit and 32-bit versions)
Windows Server 2012
Important
After Microsoft Dynamics CRM Server Setup is finished, apply the latest update rollup, if any.
Running Microsoft Dynamics CRM Email Router and Email Router Configuration Manager (32-bit)
is not supported on a Windows Server 64-bit operating system, in Windows-On-Windows (WOW)
mode. Install and run the 64-bit version of the Microsoft Dynamics CRM Email Router.
The Microsoft Dynamics CRM Email Router is not supported for use with Windows 10.
Rule Deployment Wizard Requires MAPI The Rule Deployment Wizard requires the Microsoft Exchange Server Messaging API (MAPI) client runtime libraries. To install the MAPI client runtime libraries, see Microsoft Exchange Server MAPI Client and Collaboration Data Objects 1.2.1.
Important
Installing and running the Rule Deployment Wizard on a computer that has Microsoft Office Outlook installed is not supported. Both applications use a different version of MAPI that are incompatible.
Note
MAPI versions 6.5.8147 (or later) are supported by Microsoft Exchange Server 2010.
If you already have a version of the MAPI download installed, you must uninstall it before installing the new version.
If you are installing the Rule Deployment Wizard on a system that uses Microsoft Exchange Server 2010 as its email server, you must also have installed Update Rollup 2 (or later) of Microsoft Exchange Server 2010. For more information, see Update Rollup 2 for Exchange Server 2010 (KB979611).
In This Topic Exchange Server
Messaging and transport protocols
Exchange Online
Additional Email Router software requirements
707
Exchange Server Microsoft Exchange Server is only required if you want to use the Email Router to connect to an Exchange Server email messaging system. To do this, you can install the Email Router on any of the supported Windows or Windows Server operating systems that have a connection to the Exchange Server. The Email Router supports the following versions of Exchange Server:
Microsoft Exchange Server 2010 Standard and Enterprise editions
Exchange Server 2013 Standard and Enterprise editions
Microsoft Exchange Online
Important
If missing, Microsoft Dynamics CRM Email Router Setup installs the Microsoft .NET Framework 4 on the computer where you install the Email Router.
The Rule Deployment Wizard component must be installed on a computer that is running any of the supported Windows or Windows Server operating systems and that has the MAPI client runtime libraries installed.
Download the MAPI client runtime libraries from the Microsoft Download Center.
Messaging and transport protocols Microsoft Dynamics CRM Email Router supports a variety of email messaging and transport options.
POP3 POP3-compliant email systems are supported for incoming email message routing.
Important
When you use the Forward Mailbox option on the User form, the POP3 email server must provide support where an email message can be sent as an attachment to another email message.
If you configure the Microsoft Dynamics CRM Email Router to connect to a POP3-compliant email server, the server must support RFC 1939.
Transport protocols Both SMTP and Exchange Online with Exchange Web Services (EWS) are messaging transport protocols that are supported for outgoing email message routing.
If you configure the Microsoft Dynamics CRM Email Router to use an SMTP-compliant transport service, the server must support RFC 2821 and RFC 2822.
Exchange Online Microsoft Exchange Online is a hosted enterprise messaging service from Microsoft. It provides the robust capabilities of Microsoft Exchange Server as a cloud-based service. To learn more, see Exchange Online.
708
Additional Email Router software requirements If the following components are missing, they will be installed by Microsoft Dynamics CRM Email Router Setup:
Microsoft .NET Framework 4
Microsoft Visual C++ Redistributable
Microsoft Application Error Reporting
Windows Identity Foundation (WIF)
Windows Live ID Sign-in Assistant 6.5
Microsoft Online Services Sign-in Assistant (Required for Microsoft Dynamics CRM (online) when
you subscribe through Microsoft Office 365.)
See Also Email Router Referenced topic '1f5d3be8-bec4-44b2-86c7-e4dbd18a8eae' is only available online.
© 2016 Microsoft. All rights reserved. Copyright
Dynamics 365 for Outlook
Applies To: Dynamics 365 (online), Dynamics 365 (on-premises), Dynamics CRM 2016, Dynamics CRM Online
[This topic is pre-release documentation and is subject to change.]
Microsoft Dynamics 365 for Outlook can synchronize email messages, contacts, tasks, and appointments between Microsoft Office Outlook and Microsoft Dynamics 365 (client-to-server synchronization). Similar to server-side synchronization, synchronization filters are used to synchronize messaging data from Microsoft Dynamics 365 to Outlook or Exchange. Manually tracked or Inbox-rule based tracking is used to synchronize messaging data from Exchange or Outlook to Microsoft Dynamics 365.

709
When you use Dynamics 365 for Outlook, there are a few synchronization concepts that are helpful to understand. Notice that, to have any of this Dynamics 365 for Outlook functionality, each Microsoft Dynamics 365 user must run the Dynamics 365 for Outlook add-in and the Microsoft Dynamics 365 user mailbox record must be configured appropriately.
When you select Dynamics 365 for Outlook as the messaging data synchronization method in the user mailbox record, email, contacts, appointments, and tasks created in Outlook are synchronized with Microsoft Dynamics 365 (online) or Dynamics 365 (on-premises).
Dynamics 365 for Outlook synchronization concepts Note the following concepts when you use Dynamics 365 for Outlook as the synchronizing agent:
1. Synchronizing organization. Only one organization can be designated as the synchronizing
organization. If you have more than one Microsoft Dynamics 365 organization configured, you can
view the synchronizing organization in the Microsoft Dynamics 365 Configuration Wizard. The
Configuration Wizard is an application included with Dynamics 365 for Outlook. Notice that you can
still connect to additional organizations by using Dynamics 365 for Outlook. However, when an
organization is not defined as the synchronizing organization in Dynamics 365 for Outlook,
messaging data in Outlook does not synchronize with that organization.
2. Synchronizing mailbox. Only one Exchange or POP3 mailbox can be designated for a single
Microsoft Dynamics 365 user. You cannot designate multiple mailboxes and you cannot map more
than one Microsoft Dynamics 365 user to a single Exchange or POP3 email mailbox. This mailbox
is referred to as the primary mailbox.
3. Synchronizing Dynamics 365 for Outlook instance. Only one Dynamics 365 for Outlook
instance can be designated as the Synchronizing Dynamics 365 for Outlook instance. When you
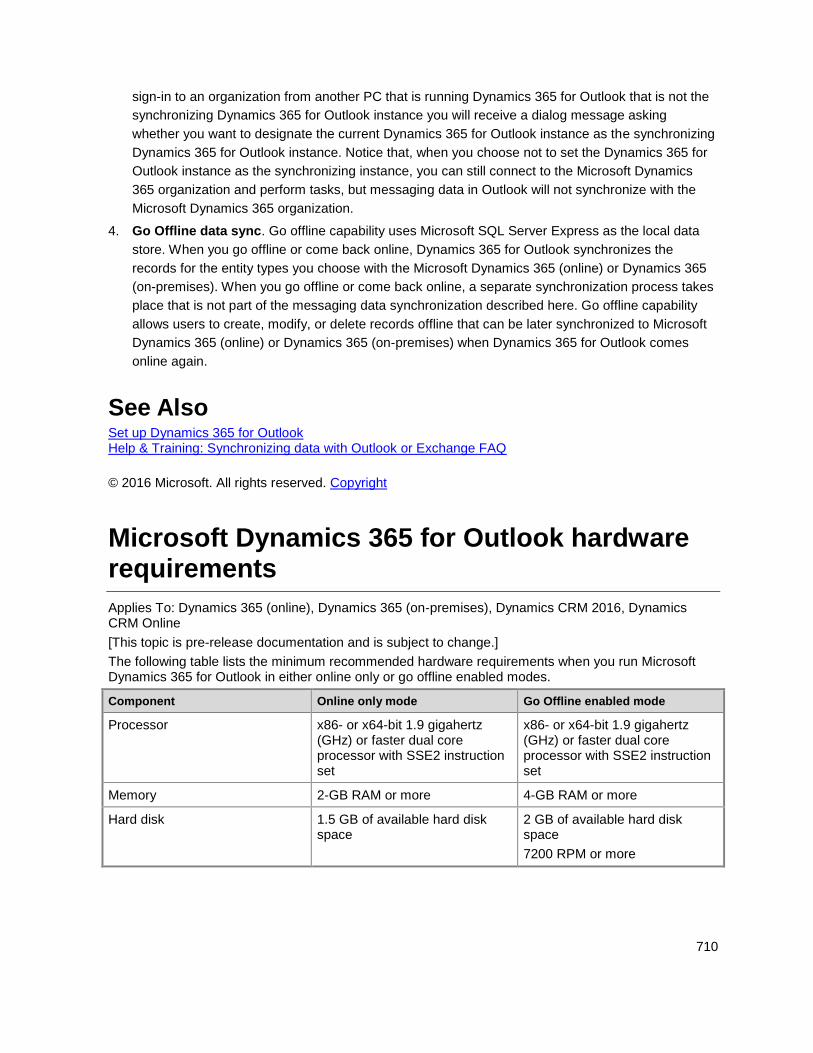
710
sign-in to an organization from another PC that is running Dynamics 365 for Outlook that is not the
synchronizing Dynamics 365 for Outlook instance you will receive a dialog message asking
whether you want to designate the current Dynamics 365 for Outlook instance as the synchronizing
Dynamics 365 for Outlook instance. Notice that, when you choose not to set the Dynamics 365 for
Outlook instance as the synchronizing instance, you can still connect to the Microsoft Dynamics
365 organization and perform tasks, but messaging data in Outlook will not synchronize with the
Microsoft Dynamics 365 organization.
4. Go Offline data sync. Go offline capability uses Microsoft SQL Server Express as the local data
store. When you go offline or come back online, Dynamics 365 for Outlook synchronizes the
records for the entity types you choose with the Microsoft Dynamics 365 (online) or Dynamics 365
(on-premises). When you go offline or come back online, a separate synchronization process takes
place that is not part of the messaging data synchronization described here. Go offline capability
allows users to create, modify, or delete records offline that can be later synchronized to Microsoft
Dynamics 365 (online) or Dynamics 365 (on-premises) when Dynamics 365 for Outlook comes
online again.
See Also Set up Dynamics 365 for Outlook Help & Training: Synchronizing data with Outlook or Exchange FAQ
© 2016 Microsoft. All rights reserved. Copyright
Microsoft Dynamics 365 for Outlook hardware requirements
Applies To: Dynamics 365 (online), Dynamics 365 (on-premises), Dynamics CRM 2016, Dynamics CRM Online
[This topic is pre-release documentation and is subject to change.]
The following table lists the minimum recommended hardware requirements when you run Microsoft Dynamics 365 for Outlook in either online only or go offline enabled modes.
Component Online only mode Go Offline enabled mode
Processor x86- or x64-bit 1.9 gigahertz (GHz) or faster dual core processor with SSE2 instruction set
x86- or x64-bit 1.9 gigahertz (GHz) or faster dual core processor with SSE2 instruction set
Memory 2-GB RAM or more 4-GB RAM or more
Hard disk 1.5 GB of available hard disk space
2 GB of available hard disk space
7200 RPM or more
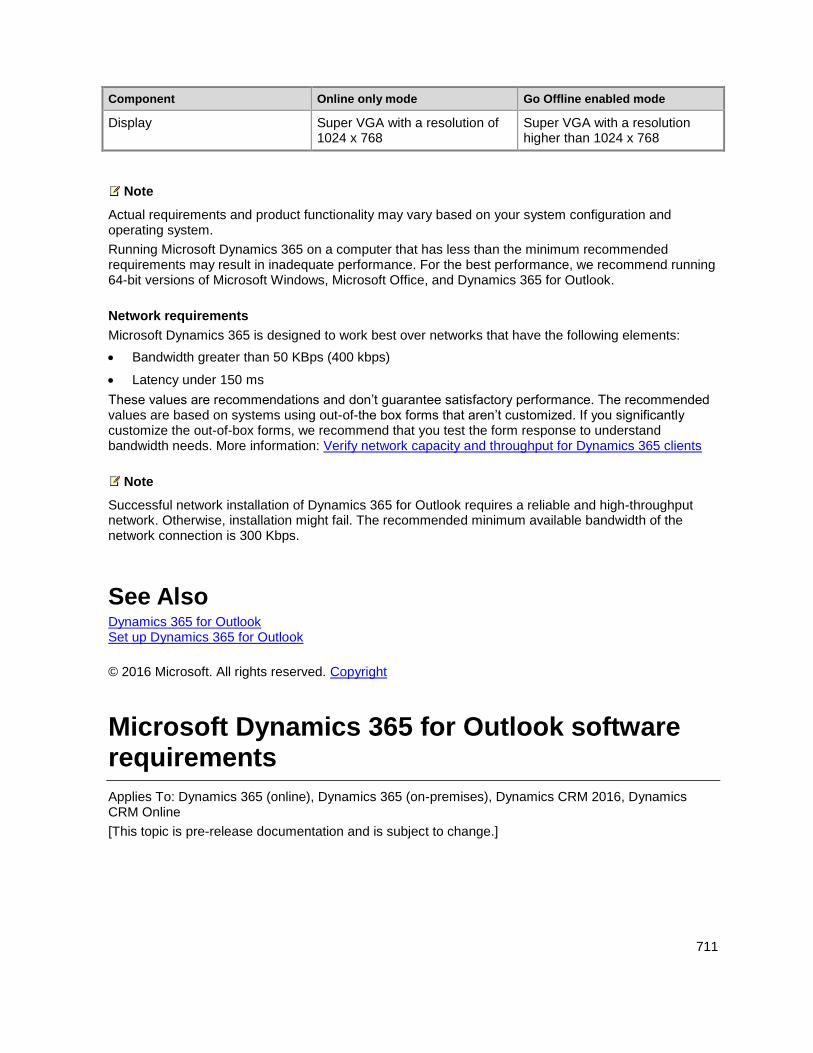
711
Component Online only mode Go Offline enabled mode
Display Super VGA with a resolution of 1024 x 768
Super VGA with a resolution higher than 1024 x 768
Note
Actual requirements and product functionality may vary based on your system configuration and operating system.
Running Microsoft Dynamics 365 on a computer that has less than the minimum recommended requirements may result in inadequate performance. For the best performance, we recommend running 64-bit versions of Microsoft Windows, Microsoft Office, and Dynamics 365 for Outlook.
Network requirements
Microsoft Dynamics 365 is designed to work best over networks that have the following elements:
Bandwidth greater than 50 KBps (400 kbps)
Latency under 150 ms
These values are recommendations and don’t guarantee satisfactory performance. The recommended values are based on systems using out-of-the box forms that aren’t customized. If you significantly customize the out-of-box forms, we recommend that you test the form response to understand bandwidth needs. More information: Verify network capacity and throughput for Dynamics 365 clients
Note
Successful network installation of Dynamics 365 for Outlook requires a reliable and high-throughput network. Otherwise, installation might fail. The recommended minimum available bandwidth of the network connection is 300 Kbps.
See Also Dynamics 365 for Outlook Set up Dynamics 365 for Outlook
© 2016 Microsoft. All rights reserved. Copyright
Microsoft Dynamics 365 for Outlook software requirements
Applies To: Dynamics 365 (online), Dynamics 365 (on-premises), Dynamics CRM 2016, Dynamics CRM Online
[This topic is pre-release documentation and is subject to change.]
712
Dynamics 365 for Outlook works the way that you do by providing a seamless combination of Microsoft Dynamics 365 features in the familiar Microsoft Outlook environment. This section lists software requirements for Dynamics 365 for Outlook and Microsoft Dynamics 365 for Microsoft Office Outlook with Offline Access.
One of the following operating systems is required:
Windows 10 (64-bit and 32-bit versions)*
Windows 8.1 or Windows 8 (64-bit and 32-bit versions)
Windows 7 Service Pack 1 (64-bit and 32-bit versions)
Windows Server 2012 and Windows Server 2012 R2 when running as a Remote Desktop Services
application
*This feature is available only if your organization has updated to Microsoft Dynamics CRM Online 2015 Update 1.1, Microsoft Dynamics CRM 2015 Update 0.2 or Microsoft Dynamics 365.
In this topic Microsoft Dynamics 365 for Outlook software feature prerequisites
Additional Microsoft Dynamics 365 for Outlook software requirements
Microsoft Dynamics 365 for Outlook software feature prerequisites The following software must be installed and running on the computer before you run Microsoft Dynamics 365 for Outlook Setup:
Web Browser. One of the following:
Internet Explorer 11
Internet Explorer 10
Important
Internet Explorer 9 or earlier versions are not supported for use with Dynamics 365 for Outlook.
Microsoft Office. One of the following:
Microsoft Office 2016*
Microsoft Office 2013
Microsoft Office 2010
*This feature is available only if your organization has updated to Microsoft Dynamics CRM Online 2015 Update 1.1, Microsoft Dynamics CRM 2015 Update 0.2 or Microsoft Dynamics 365.
Important
Dynamics 365 for Outlook isn’t supported with Office for Mac versions of Microsoft Office Outlook.
To install and run the 64-bit version of Dynamics 365 for Outlook, a 64-bit version of Microsoft Office is
713
required.
Before you run the Configuration Wizard to configure Dynamics 365 for Outlook, a Microsoft Office Outlook profile must exist for the user. Therefore, Microsoft Outlook must be run at least once to create the user's Microsoft Outlook profile.
Both the web application and Dynamics 365 for Outlook require JavaScript enabled for certain features, such as Activity Feeds, dashboard areas, and the display of certain panes or menus. Although the web application displays error messages when JavaScript is disabled, Dynamics 365 for Outlook doesn’t. To verify if JavaScript is enabled in Internet Explorer, start Internet Explorer, on the Tools menu click or tap Internet options. On the Security tab, click or tap Internet, and then click or tap Custom level. In the Security Settings dialog box under Scripting, Active scripting must be set to Enable.
The Indexing Service (now known as the Windows Search Service, or WSS) is required by users who will set up and use Dynamics 365 for Outlook and its Help file in offline mode.
Microsoft Dynamics 365. One of the following editions of Microsoft Dynamics 365 must be available so that Dynamics 365 for Outlook can connect to it:
On-premises editions of Microsoft Dynamics 365 Server
Microsoft Dynamics 365 (online)
Additional Microsoft Dynamics 365 for Outlook software requirements If needed, the following software will be installed by Microsoft Dynamics 365 for Outlook Setup:
Microsoft SQL Server 2012 Express
Note
Installed from Microsoft Dynamics 365 for Microsoft Office Outlook with Offline Access only.
Microsoft .NET Framework 4.5.2.
Microsoft Windows Installer 4.5.
Microsoft Visual C++ Redistributable.
Microsoft Report Viewer 2010.
Microsoft Application Error Reporting.
Windows Identity Foundation (WIF).
Microsoft Azure AppFabric SDK V1.0.
Microsoft SQL Server Native Client.
Microsoft SQL Server Compact 4.0.
Reporting Services Microsoft ActiveX control. If not installed on the computer, the user will be
prompted to install the software at first attempt to print a report. This installer package is named
RSClientPrint.cab and can found on the Microsoft SQL Server Reporting Services server at
<drive>:\Program files\Microsoft SQL Server\<MSSQL>\Reporting Services\ReportServer\bin.
714
See Also Dynamics 365 for Outlook Dynamics 365 for Outlook support
© 2016 Microsoft. All rights reserved. Copyright
Dynamics 365 for Outlook support
Applies To: Dynamics 365 (online), Dynamics 365 (on-premises), Dynamics CRM 2016, Dynamics CRM Online
[This topic is pre-release documentation and is subject to change.]
This topic contains links to information about the supported software requirements for Microsoft Dynamics 365 for Outlook.
Important
For Microsoft Dynamics 365 applications, we recommend using the latest version and service pack (SP) for all required components, such as Windows Server, Microsoft SQL Server, Microsoft Office, Internet Explorer, and Microsoft Exchange Server. In some cases, there might be a delay between the availability of a component update and support for the update in Dynamics 365 applications. However, you should always apply the latest update for Microsoft Dynamics 365 to fully support the latest version of a required component.
For up-to-date compatibility information about Dynamics 365, see Compatibility with Microsoft Dynamics CRM 2016.
For up-to-date compatibility information about CRM 2015, see Compatibility with Microsoft Dynamics CRM 2015.
For up-to-date compatibility information about CRM 2013, see Compatibility with Microsoft Dynamics CRM 2013.
Microsoft Office For versions of Microsoft Office that are supported for Dynamics 365 for Outlook, see Microsoft Dynamics 365 for Outlook software requirements.
Microsoft Windows For versions of Microsoft Windowsthat are supported for Dynamics 365 for Outlook, see Microsoft Dynamics 365 for Outlook software requirements.
715
See Also Microsoft Dynamics 365 for Outlook hardware requirements Dynamics 365 for Outlook
© 2016 Microsoft. All rights reserved. Copyright
Set up server-side synchronization of email, appointments, contacts, and tasks
Applies To: Dynamics 365 (online), Dynamics 365 (on-premises), Dynamics CRM 2016, Dynamics CRM Online
[This topic is pre-release documentation and is subject to change.]
You can use server-side synchronization to synchronize your email system with Microsoft Dynamics 365 at the server level. For example, you can synchronize Microsoft Dynamics 365 (online) with Microsoft Exchange Online (hosted email server) or Microsoft Exchange Server (on-premises). If you synchronize Microsoft Dynamics 365 with Exchange Online or Exchange Server, in addition to Outlook email, you can synchronize Outlook appointments, contacts, and tasks.
You can also use server-side synchronization to synchronize Microsoft Dynamics 365 with a POP3 email server for web-hosted email like Gmail or Outlook.com. If you synchronize email with a POP3 email server, you can’t synchronize appointments, contacts, and tasks, however.
Important
Using encryption software (such as Vaultive) together with server-side synchronization is not supported.
Synchronization scenarios
Choose one of the following scenarios to configure server-side synchronization for your organization:
Connect Dynamics 365 (online) to Exchange Online
Connect Dynamics 365 (online) to Exchange Server (on-premises)
Connect Dynamics 365 (on-premises) to Exchange Server (on-premises)
Connect Dynamics 365 (on-premises) to Exchange Online
Connect Dynamics 365 to POP3/SMTP servers
© 2016 Microsoft. All rights reserved. Copyright
716
Connect Dynamics 365 (online) to Exchange Online
Applies To: Dynamics 365 (online), Dynamics CRM Online
[This topic is pre-release documentation and is subject to change.]
With both Microsoft Dynamics 365 (online) and Microsoft Exchange Online hosted as online services, connecting the two is a simpler, more straightforward configuration.
Tip
Check out the following video: Connect Dynamics 365 (online) to Exchange Online using server-side sync
Important
This feature requires that you have an Office 365 subscription or a subscription to an online service such as SharePoint Online or Exchange Online. For more information, see What is Office 365 and how does it relate to Dynamics 365 (online)?
In This Topic Get Exchange ready
Verify you have the profile: Microsoft Exchange Online
Configure default email processing and synchronization
Configure mailboxes
Approve email
Test configuration of mailboxes
Test email configuration for all mailboxes associated with an email server profile
Get Exchange ready To use Exchange Online with Dynamics 365 (online), you must have an Exchange Online subscription that comes as part of an Office 365 subscription or that can be subscribed to separately. For information on Exchange Online, see:
Exchange Online
Exchange Online Service Description
Office 365 service comparison
Tip
To make sure you’ve got a good connection to Exchange Online, run the Microsoft Remote
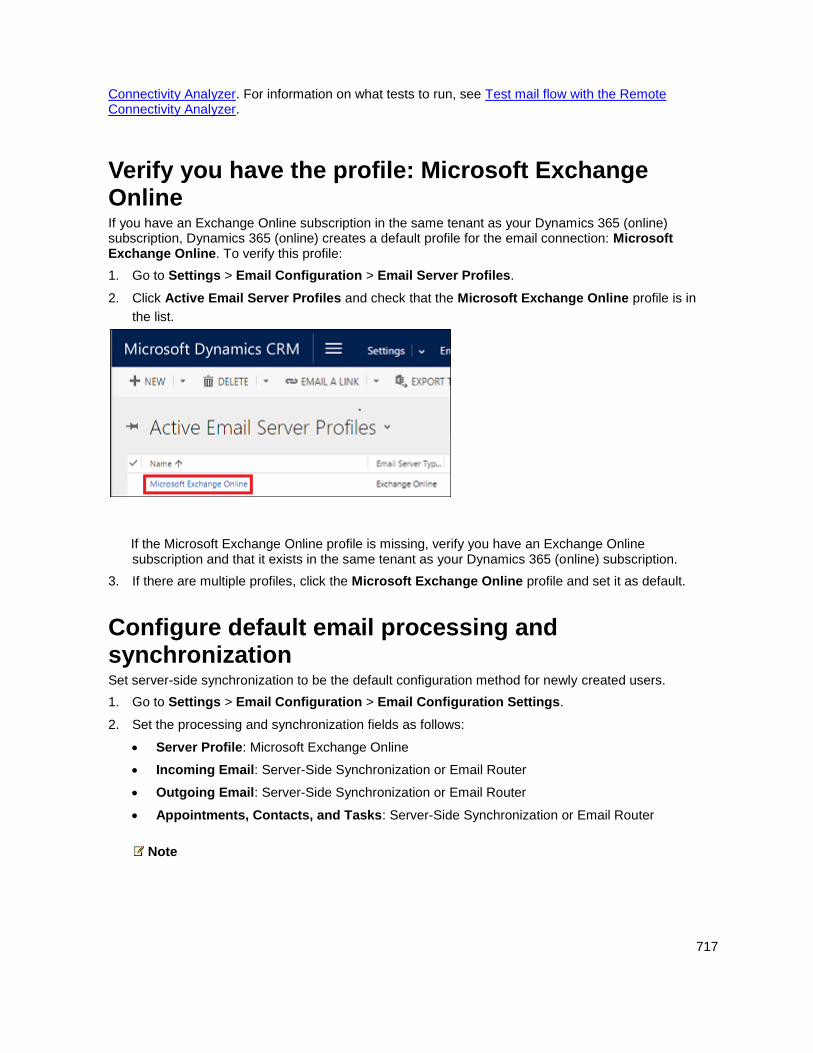
717
Connectivity Analyzer. For information on what tests to run, see Test mail flow with the Remote Connectivity Analyzer.
Verify you have the profile: Microsoft Exchange Online If you have an Exchange Online subscription in the same tenant as your Dynamics 365 (online) subscription, Dynamics 365 (online) creates a default profile for the email connection: Microsoft Exchange Online. To verify this profile:
1. Go to Settings > Email Configuration > Email Server Profiles.
2. Click Active Email Server Profiles and check that the Microsoft Exchange Online profile is in
the list.
If the Microsoft Exchange Online profile is missing, verify you have an Exchange Online subscription and that it exists in the same tenant as your Dynamics 365 (online) subscription.
3. If there are multiple profiles, click the Microsoft Exchange Online profile and set it as default.
Configure default email processing and synchronization Set server-side synchronization to be the default configuration method for newly created users.
1. Go to Settings > Email Configuration > Email Configuration Settings.
2. Set the processing and synchronization fields as follows:
Server Profile: Microsoft Exchange Online
Incoming Email: Server-Side Synchronization or Email Router
Outgoing Email: Server-Side Synchronization or Email Router
Appointments, Contacts, and Tasks: Server-Side Synchronization or Email Router
Note
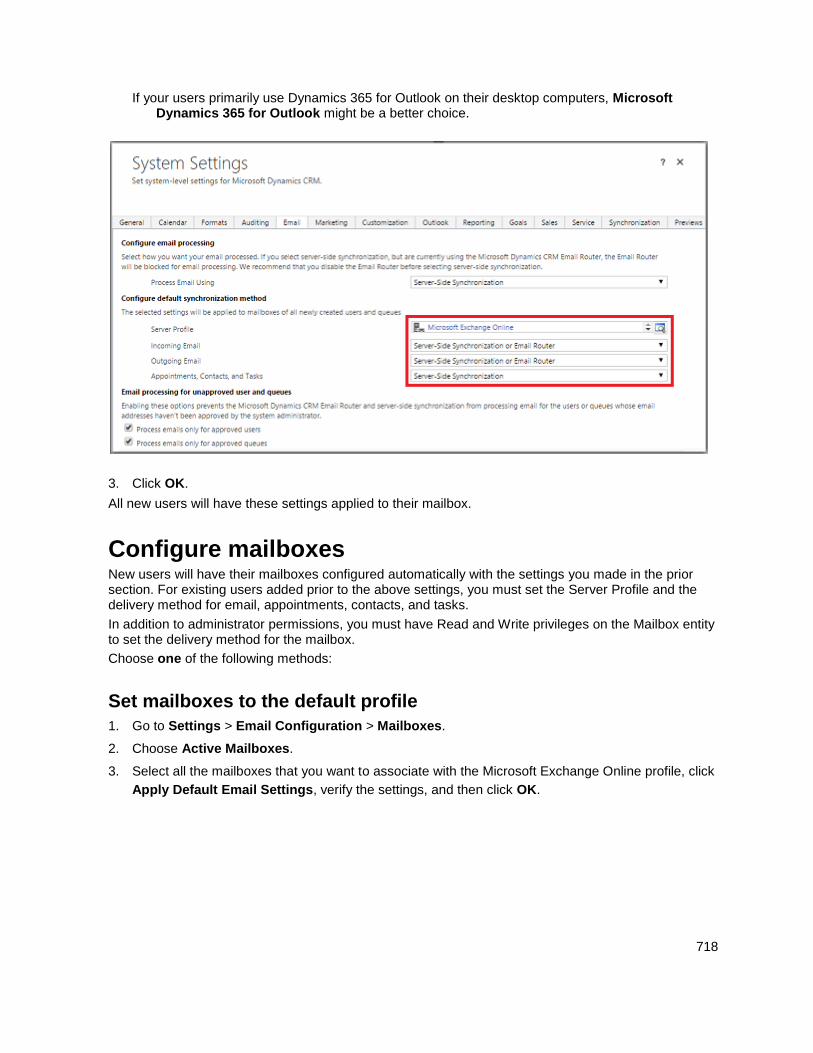
718
If your users primarily use Dynamics 365 for Outlook on their desktop computers, Microsoft Dynamics 365 for Outlook might be a better choice.
3. Click OK.
All new users will have these settings applied to their mailbox.
Configure mailboxes New users will have their mailboxes configured automatically with the settings you made in the prior section. For existing users added prior to the above settings, you must set the Server Profile and the delivery method for email, appointments, contacts, and tasks.
In addition to administrator permissions, you must have Read and Write privileges on the Mailbox entity to set the delivery method for the mailbox.
Choose one of the following methods:
Set mailboxes to the default profile
1. Go to Settings > Email Configuration > Mailboxes.
2. Choose Active Mailboxes.
3. Select all the mailboxes that you want to associate with the Microsoft Exchange Online profile, click
Apply Default Email Settings, verify the settings, and then click OK.
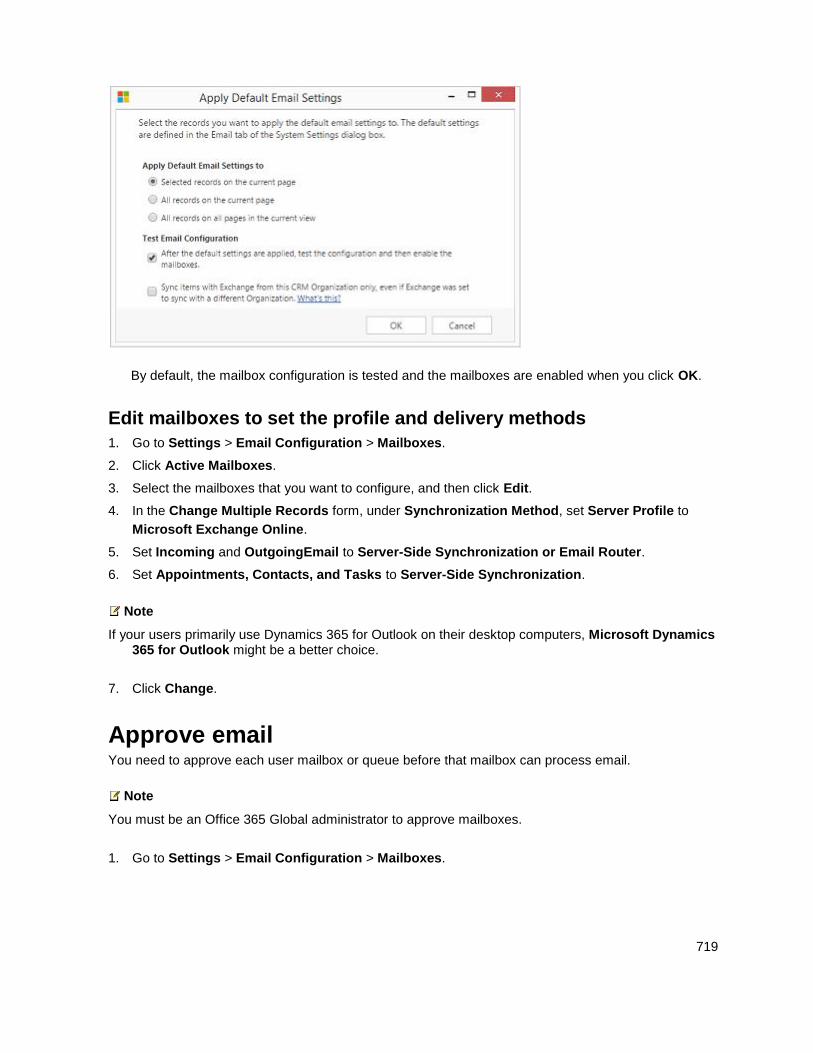
719
By default, the mailbox configuration is tested and the mailboxes are enabled when you click OK.
Edit mailboxes to set the profile and delivery methods
1. Go to Settings > Email Configuration > Mailboxes.
2. Click Active Mailboxes.
3. Select the mailboxes that you want to configure, and then click Edit.
4. In the Change Multiple Records form, under Synchronization Method, set Server Profile to
Microsoft Exchange Online.
5. Set Incoming and OutgoingEmail to Server-Side Synchronization or Email Router.
6. Set Appointments, Contacts, and Tasks to Server-Side Synchronization.
Note
If your users primarily use Dynamics 365 for Outlook on their desktop computers, Microsoft Dynamics 365 for Outlook might be a better choice.
7. Click Change.
Approve email You need to approve each user mailbox or queue before that mailbox can process email.
Note
You must be an Office 365 Global administrator to approve mailboxes.
1. Go to Settings > Email Configuration > Mailboxes.
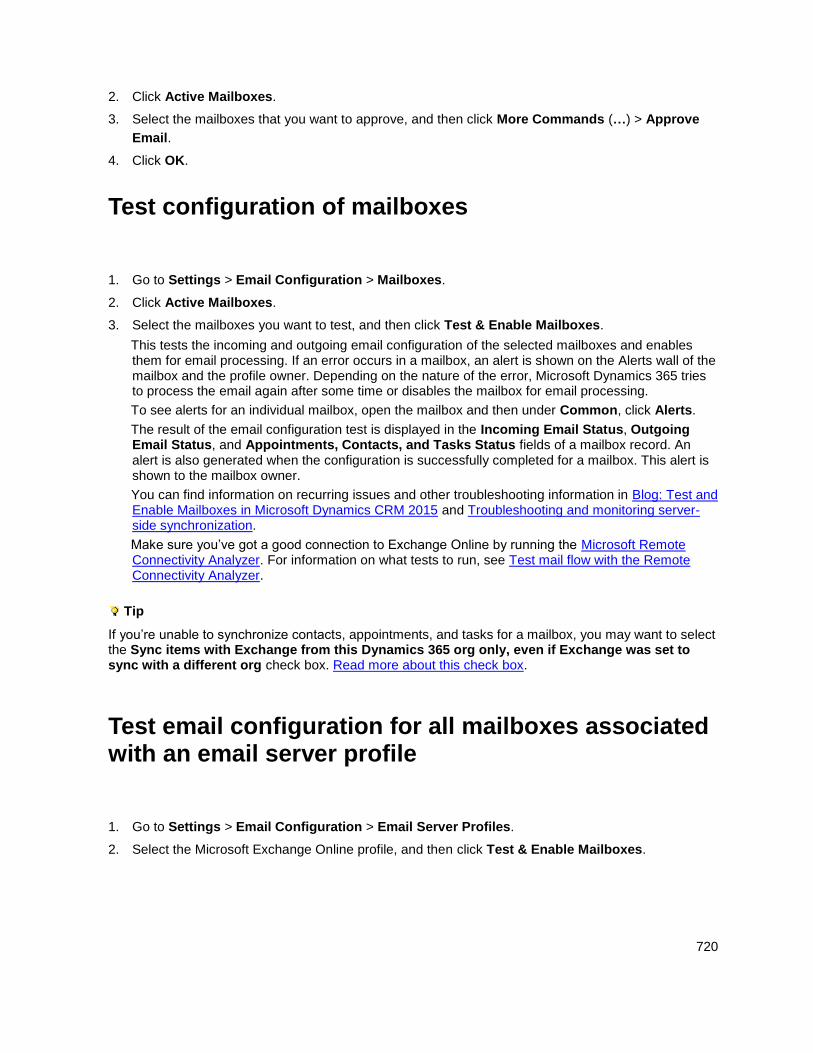
720
2. Click Active Mailboxes.
3. Select the mailboxes that you want to approve, and then click More Commands (…) > Approve
Email.
4. Click OK.
Test configuration of mailboxes
1. Go to Settings > Email Configuration > Mailboxes.
2. Click Active Mailboxes.
3. Select the mailboxes you want to test, and then click Test & Enable Mailboxes.
This tests the incoming and outgoing email configuration of the selected mailboxes and enables them for email processing. If an error occurs in a mailbox, an alert is shown on the Alerts wall of the mailbox and the profile owner. Depending on the nature of the error, Microsoft Dynamics 365 tries to process the email again after some time or disables the mailbox for email processing.
To see alerts for an individual mailbox, open the mailbox and then under Common, click Alerts.
The result of the email configuration test is displayed in the Incoming Email Status, Outgoing Email Status, and Appointments, Contacts, and Tasks Status fields of a mailbox record. An alert is also generated when the configuration is successfully completed for a mailbox. This alert is shown to the mailbox owner.
You can find information on recurring issues and other troubleshooting information in Blog: Test and Enable Mailboxes in Microsoft Dynamics CRM 2015 and Troubleshooting and monitoring server-side synchronization.
Make sure you’ve got a good connection to Exchange Online by running the Microsoft Remote Connectivity Analyzer. For information on what tests to run, see Test mail flow with the Remote Connectivity Analyzer.
Tip
If you’re unable to synchronize contacts, appointments, and tasks for a mailbox, you may want to select the Sync items with Exchange from this Dynamics 365 org only, even if Exchange was set to sync with a different org check box. Read more about this check box.
Test email configuration for all mailboxes associated with an email server profile
1. Go to Settings > Email Configuration > Email Server Profiles.
2. Select the Microsoft Exchange Online profile, and then click Test & Enable Mailboxes.
721
When you test the email configuration, an asynchronous job runs in the background. It may take a few minutes for the test to be completed. Microsoft Dynamics 365 tests the email configuration of all the mailboxes associated with the Microsoft Exchange Online profile. For the mailboxes configured with server-side synchronization for synchronizing appointments, tasks, and contacts, it also checks to make sure they’re configured properly.
Tip
If you’re unable to synchronize contacts, appointments, and tasks for a mailbox, you may want to select the Sync items with Exchange from this Dynamics 365 org only, even if Exchange was set to sync with a different org check box. Read more about this check box.
See Also Troubleshooting and monitoring server-side synchronization Test mail flow with the Remote Connectivity Analyzer Integrate (synchronize) your email system with Microsoft Dynamics 365 Set up server-side synchronization of email, appointments, contacts, and tasks
© 2016 Microsoft. All rights reserved. Copyright
Connect Dynamics 365 (online) to Exchange Server (on-premises)
Applies To: Dynamics 365 (online), Dynamics CRM Online
[This topic is pre-release documentation and is subject to change.]
With Microsoft Dynamics CRM Online 2016 Update, you can connect your Dynamics 365 (online) with Microsoft Exchange Server (on-premises).
Check out the following white paper: Setup Guide: Server-side synchronization for CRM Online and Exchange Server
In This Topic Prerequisites
Create an email server profile
Configure default email processing and synchronization
Configure mailboxes
Approve email
Test configuration of mailboxes
Test email configuration for all mailboxes associated with an email server profile

722
Prerequisites 1. Microsoft Exchange Server. The following versions are supported: Exchange Server 2010 SP3,
Exchange Server 2013 SP1, or Exchange Server 2016.
2. Basic authentication. During installation, Exchange configures Internet Information Services (IIS).
To connect Dynamics 365 (online)with Exchange Server, Basic authentication must be enabled in
Exchange Server.
For more information on Basic authentication, see:
Exchange Server 2010: Configure Basic Authentication
Exchange Server 2010: Default Authentication Settings for Exchange-related Virtual Directories
Exchange Server 2013: Authentication and EWS in Exchange
Exchange Server 2013: Default settings for Exchange virtual directories
3. ApplicationImpersonation role. You need to create and configure a service account with the
ApplicationImpersonation role in Microsoft Exchange. More information: MSDN: Impersonation
and EWS in Exchange.
4. Secured connection. The connection between Dynamics 365 (online) and Exchange must be
encrypted via TLS/SSL (HTTPS).
5. Exchange Web Services (EWS). Connections to EWS must be allowed through the firewall. Often
a reverse proxy is used for the exterior facing connection.
Tip
To make sure you’ve got a good connection to Exchange on-premises run the Microsoft Remote Connectivity Analyzer. For information on what tests to run, see Test mail flow with the Remote Connectivity Analyzer.
Create an email server profile
1. Go to Settings > Email Configuration > Email Server Profiles.
2. Click New > Exchange Server.
3. For an Exchange email server profile, specify the following details:
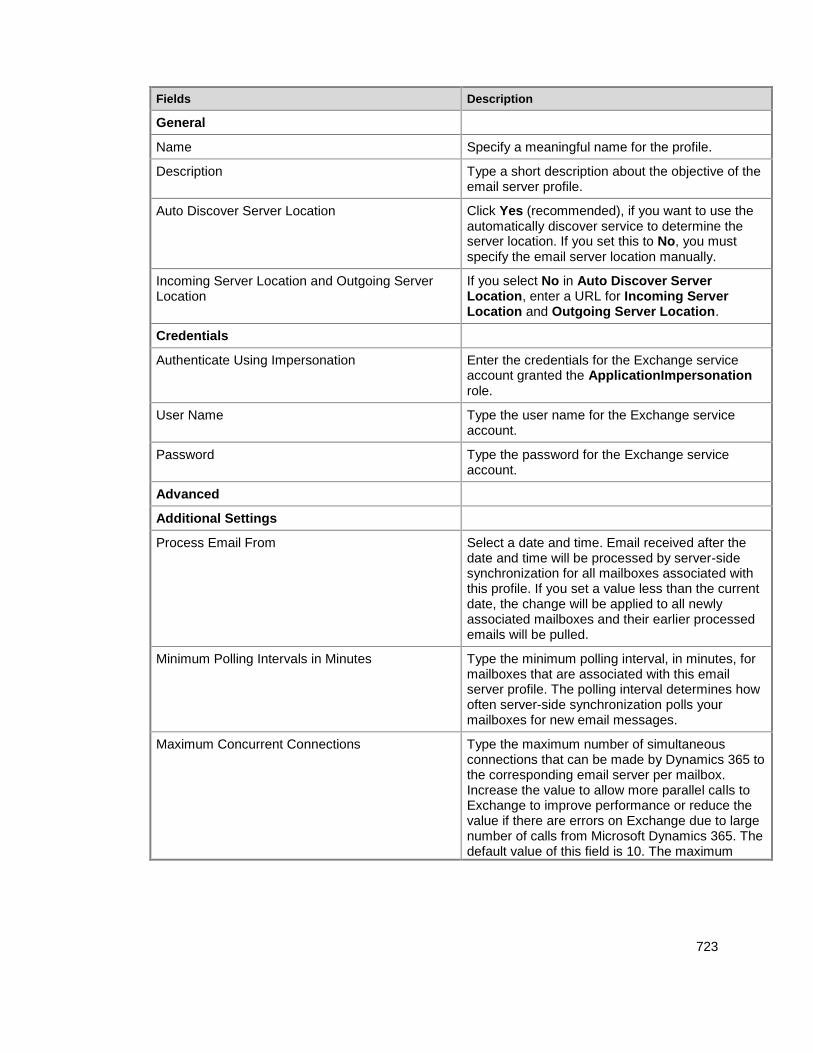
723
Fields Description
General
Name Specify a meaningful name for the profile.
Description Type a short description about the objective of the email server profile.
Auto Discover Server Location Click Yes (recommended), if you want to use the automatically discover service to determine the server location. If you set this to No, you must specify the email server location manually.
Incoming Server Location and Outgoing Server Location
If you select No in Auto Discover Server Location, enter a URL for Incoming Server Location and Outgoing Server Location.
Credentials
Authenticate Using Impersonation Enter the credentials for the Exchange service account granted the ApplicationImpersonation role.
User Name Type the user name for the Exchange service account.
Password Type the password for the Exchange service account.
Advanced
Additional Settings
Process Email From Select a date and time. Email received after the date and time will be processed by server-side synchronization for all mailboxes associated with this profile. If you set a value less than the current date, the change will be applied to all newly associated mailboxes and their earlier processed emails will be pulled.
Minimum Polling Intervals in Minutes Type the minimum polling interval, in minutes, for mailboxes that are associated with this email server profile. The polling interval determines how often server-side synchronization polls your mailboxes for new email messages.
Maximum Concurrent Connections Type the maximum number of simultaneous connections that can be made by Dynamics 365 to the corresponding email server per mailbox. Increase the value to allow more parallel calls to Exchange to improve performance or reduce the value if there are errors on Exchange due to large number of calls from Microsoft Dynamics 365. The default value of this field is 10. The maximum
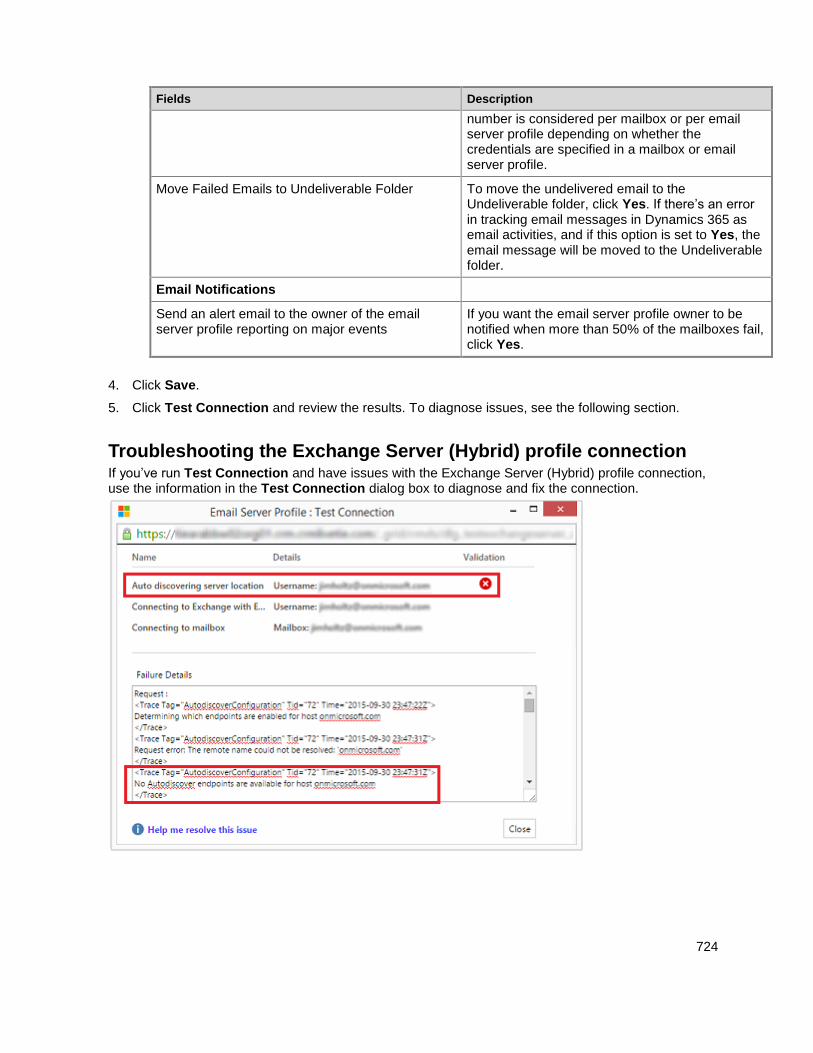
724
Fields Description
number is considered per mailbox or per email server profile depending on whether the credentials are specified in a mailbox or email server profile.
Move Failed Emails to Undeliverable Folder To move the undelivered email to the Undeliverable folder, click Yes. If there’s an error in tracking email messages in Dynamics 365 as email activities, and if this option is set to Yes, the email message will be moved to the Undeliverable folder.
Email Notifications
Send an alert email to the owner of the email server profile reporting on major events
If you want the email server profile owner to be notified when more than 50% of the mailboxes fail, click Yes.
4. Click Save.
5. Click Test Connection and review the results. To diagnose issues, see the following section.
Troubleshooting the Exchange Server (Hybrid) profile connection If you’ve run Test Connection and have issues with the Exchange Server (Hybrid) profile connection, use the information in the Test Connection dialog box to diagnose and fix the connection.
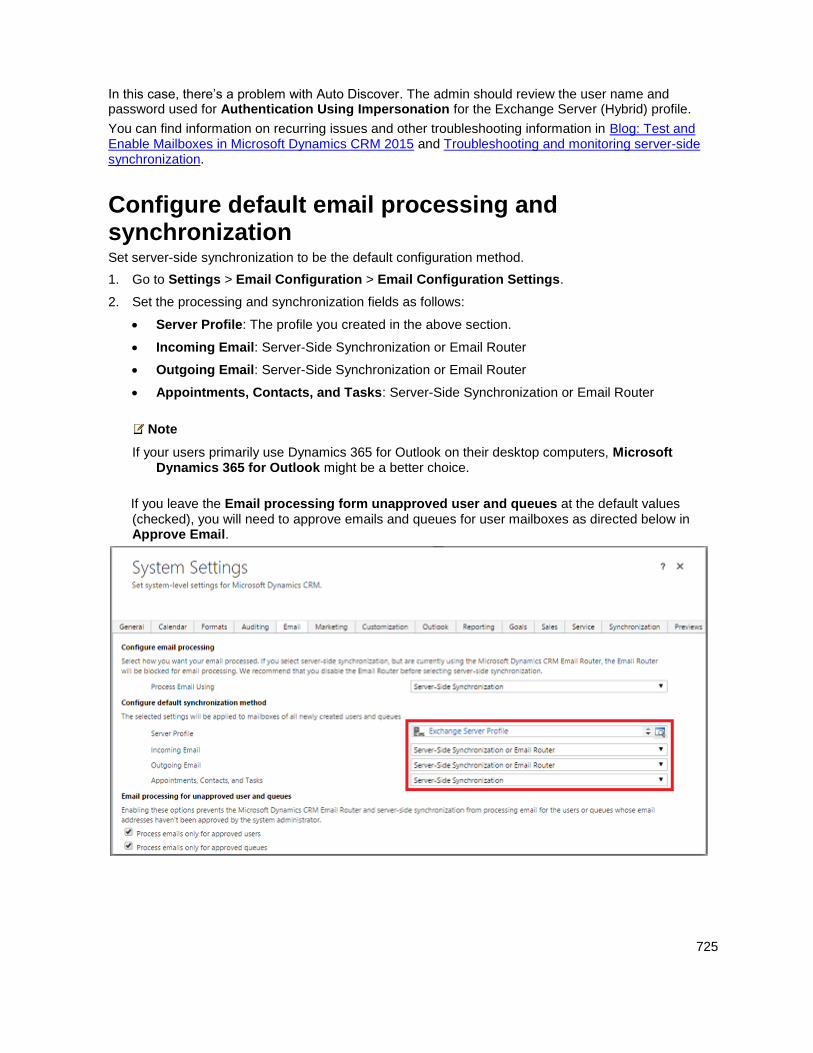
725
In this case, there’s a problem with Auto Discover. The admin should review the user name and password used for Authentication Using Impersonation for the Exchange Server (Hybrid) profile.
You can find information on recurring issues and other troubleshooting information in Blog: Test and Enable Mailboxes in Microsoft Dynamics CRM 2015 and Troubleshooting and monitoring server-side synchronization.
Configure default email processing and synchronization Set server-side synchronization to be the default configuration method.
1. Go to Settings > Email Configuration > Email Configuration Settings.
2. Set the processing and synchronization fields as follows:
Server Profile: The profile you created in the above section.
Incoming Email: Server-Side Synchronization or Email Router
Outgoing Email: Server-Side Synchronization or Email Router
Appointments, Contacts, and Tasks: Server-Side Synchronization or Email Router
Note
If your users primarily use Dynamics 365 for Outlook on their desktop computers, Microsoft Dynamics 365 for Outlook might be a better choice.
If you leave the Email processing form unapproved user and queues at the default values (checked), you will need to approve emails and queues for user mailboxes as directed below in Approve Email.
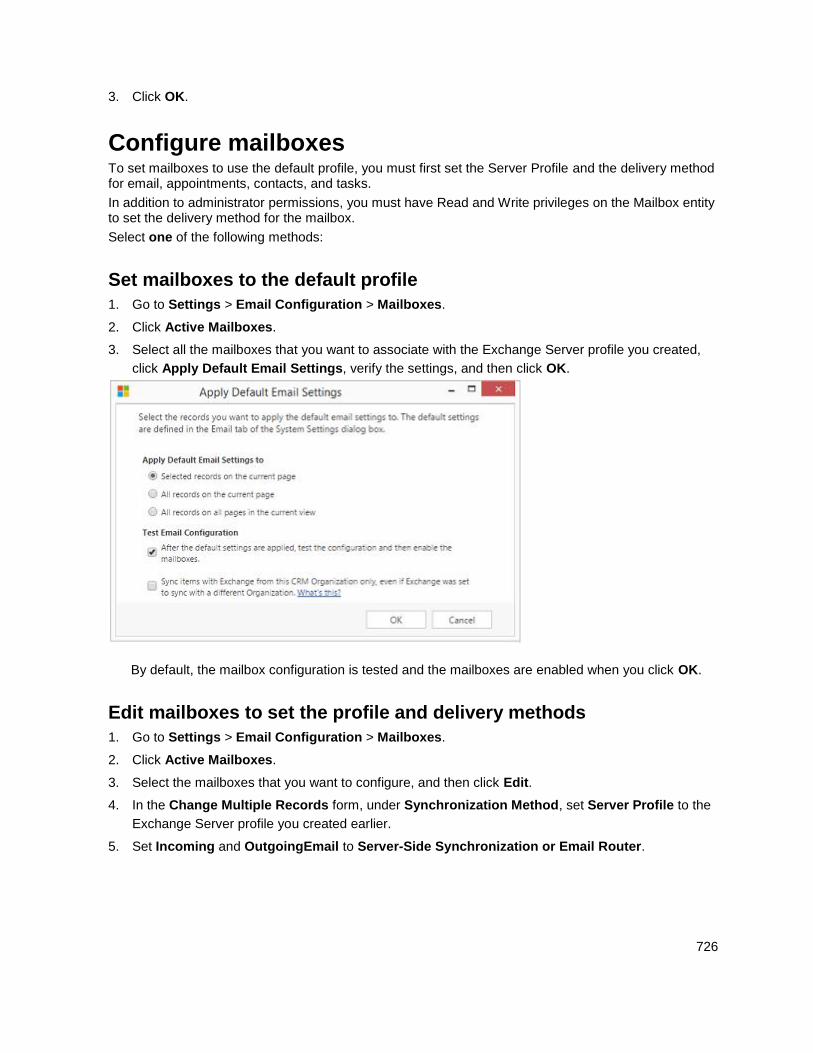
726
3. Click OK.
Configure mailboxes To set mailboxes to use the default profile, you must first set the Server Profile and the delivery method for email, appointments, contacts, and tasks.
In addition to administrator permissions, you must have Read and Write privileges on the Mailbox entity to set the delivery method for the mailbox.
Select one of the following methods:
Set mailboxes to the default profile
1. Go to Settings > Email Configuration > Mailboxes.
2. Click Active Mailboxes.
3. Select all the mailboxes that you want to associate with the Exchange Server profile you created,
click Apply Default Email Settings, verify the settings, and then click OK.
By default, the mailbox configuration is tested and the mailboxes are enabled when you click OK.
Edit mailboxes to set the profile and delivery methods
1. Go to Settings > Email Configuration > Mailboxes.
2. Click Active Mailboxes.
3. Select the mailboxes that you want to configure, and then click Edit.
4. In the Change Multiple Records form, under Synchronization Method, set Server Profile to the
Exchange Server profile you created earlier.
5. Set Incoming and OutgoingEmail to Server-Side Synchronization or Email Router.
727
6. Set Appointments, Contacts, and Tasks to Server-Side Synchronization.
Note
If your users primarily use Dynamics 365 for Outlook on their desktop computers, Microsoft Dynamics 365 for Outlook might be a better choice.
7. Click Change.
Approve email You need to approve each user mailbox or queue before that mailbox can process email.
1. Go to Settings > Email Configuration > Mailboxes.
2. Click Active Mailboxes.
3. Select the mailboxes that you want to approve, and then click More Commands (…) > Approve
Email.
4. Click OK.
Test configuration of mailboxes
1. Go to Settings > Email Configuration > Mailboxes.
2. Click Active Mailboxes.
3. Select the mailboxes you want to test, and then click Test & Enable Mailboxes.
This tests the incoming and outgoing email configuration of the selected mailboxes and enables them for email processing. If an error occurs in a mailbox, an alert is shown on the Alerts wall of the mailbox and the profile owner. Depending on the nature of the error, Microsoft Dynamics 365 tries to process the email again after some time or disables the mailbox for email processing.
The result of the email configuration test is displayed in the Incoming Email Status, Outgoing Email Status, and Appointments, Contacts, and Tasks Status fields of a mailbox record. An alert is also generated when the configuration is successfully completed for a mailbox. This alert is shown to the mailbox owner.
Tip
If you’re unable to synchronize contacts, appointments, and tasks for a mailbox, you may want to select the Sync items with Exchange from this Dynamics 365 org only, even if Exchange was set to sync with a different org check box. Read more about this check box.
728
Test email configuration for all mailboxes associated with an email server profile
1. Go to Settings > Email Configuration > Email Server Profiles.
2. Select the profile you created, and then click Test & Enable Mailboxes.
When you test the email configuration, an asynchronous job runs in the background. It may take a few minutes for the test to be completed. Microsoft Dynamics 365 tests the email configuration of all the mailboxes associated with the Exchange Server profile. For the mailboxes configured with server-side synchronization for synchronizing appointments, tasks, and contacts, it also checks to make sure they’re configured properly.
Tip
If you’re unable to synchronize contacts, appointments, and tasks for a mailbox, you may want to select the Sync items with Exchange from this Dynamics 365 org only, even if Exchange was set to sync with a different org check box. Read more about this check box.
See Also Troubleshooting and monitoring server-side synchronization Test mail flow with the Remote Connectivity Analyzer Integrate (synchronize) your email system with Microsoft Dynamics 365 Set up server-side synchronization of email, appointments, contacts, and tasks Server-side synchronization Autodiscover service Managing the Autodiscover Service
© 2016 Microsoft. All rights reserved. Copyright
Connect Dynamics 365 (on-premises) to Exchange Server (on-premises)
Applies To: Dynamics 365 (on-premises), Dynamics CRM 2016
[This topic is pre-release documentation and is subject to change.]
Follow these steps to connect Dynamics 365 (on-premises) with Microsoft Exchange Server (on-premises).
In This Topic Create an email server profile
729
Configure default email processing and synchronization
Configure mailboxes
Approve email
Test configuration of mailboxes
Test email configuration for all mailboxes associated with an email server profile
Create an email server profile
1. Go to Settings > Email Configuration > Email Server Profiles.
2. Click New > Exchange Server.
3. For an Exchange email server profile, specify the following details:

730
Fields Description
General
Name Specify a meaningful name for the profile.
Description Type a short description about the objective of the email server profile.
Auto Discover Server Location Click Yes if you want to use the automatically discover service to determine the server location. If you set this to No, you must specify the email server location manually.
Note
If the server location doesn’t change for mailboxes, we recommend that you don’t use auto discover because it may affect performance.
Incoming Server Location and Outgoing Server Location
If you select No in Auto Discover Server Location, enter a URL for Incoming Server Location and Outgoing Server Location.
Credentials
Authenticate Using Select a method to authenticate while connecting to the specified email server. What’s available depends on whether you are using an online or on-premises version of Dynamics 365.
Credentials Specified by a User or
Queue. If you select this option, the
credentials specified in the mailbox record
of a user or queue are used for sending or
receiving email for the respective user or
queue.
Note
To ensure the credentials are secured in Microsoft Dynamics 365, SQL encryption is used to encrypt the credentials stored in the mailbox.
Credentials Specified in Email Server
Profile. If you select this option, the
credentials specified in the email server
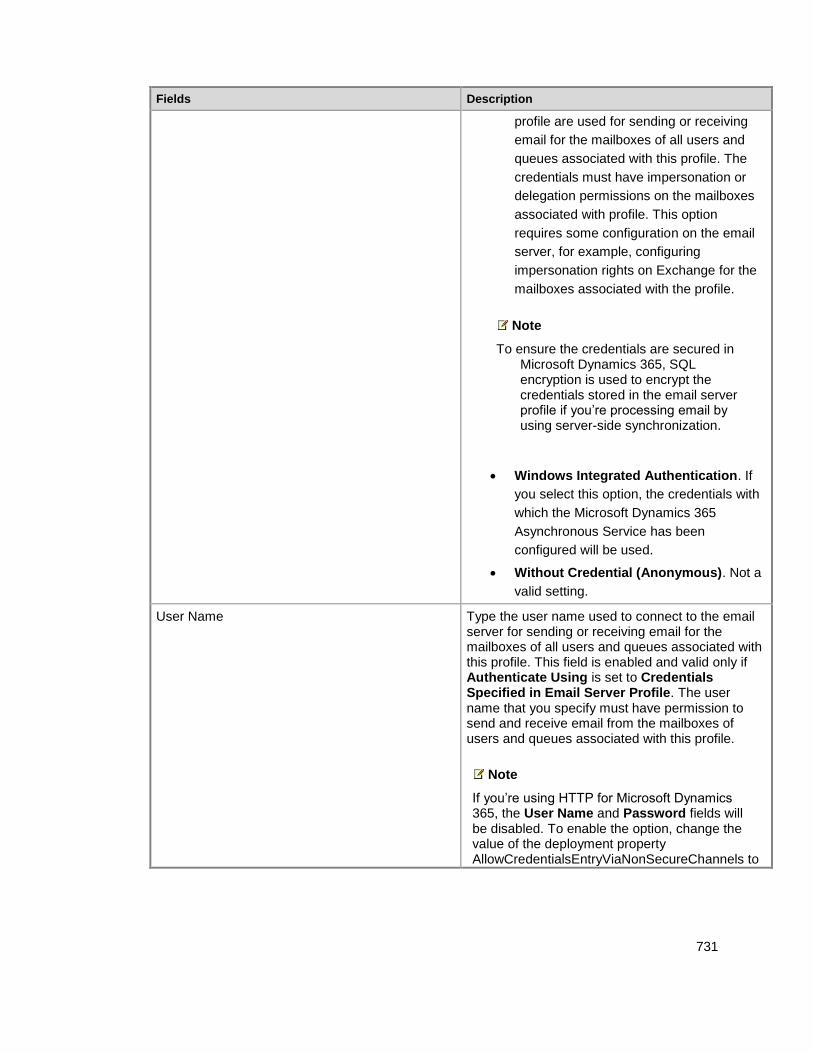
731
Fields Description
profile are used for sending or receiving
email for the mailboxes of all users and
queues associated with this profile. The
credentials must have impersonation or
delegation permissions on the mailboxes
associated with profile. This option
requires some configuration on the email
server, for example, configuring
impersonation rights on Exchange for the
mailboxes associated with the profile.
Note
To ensure the credentials are secured in Microsoft Dynamics 365, SQL encryption is used to encrypt the credentials stored in the email server profile if you’re processing email by using server-side synchronization.
Windows Integrated Authentication. If
you select this option, the credentials with
which the Microsoft Dynamics 365
Asynchronous Service has been
configured will be used.
Without Credential (Anonymous). Not a
valid setting.
User Name Type the user name used to connect to the email server for sending or receiving email for the mailboxes of all users and queues associated with this profile. This field is enabled and valid only if Authenticate Using is set to Credentials Specified in Email Server Profile. The user name that you specify must have permission to send and receive email from the mailboxes of users and queues associated with this profile.
Note
If you’re using HTTP for Microsoft Dynamics 365, the User Name and Password fields will be disabled. To enable the option, change the value of the deployment property AllowCredentialsEntryViaNonSecureChannels to
732
Fields Description
1.
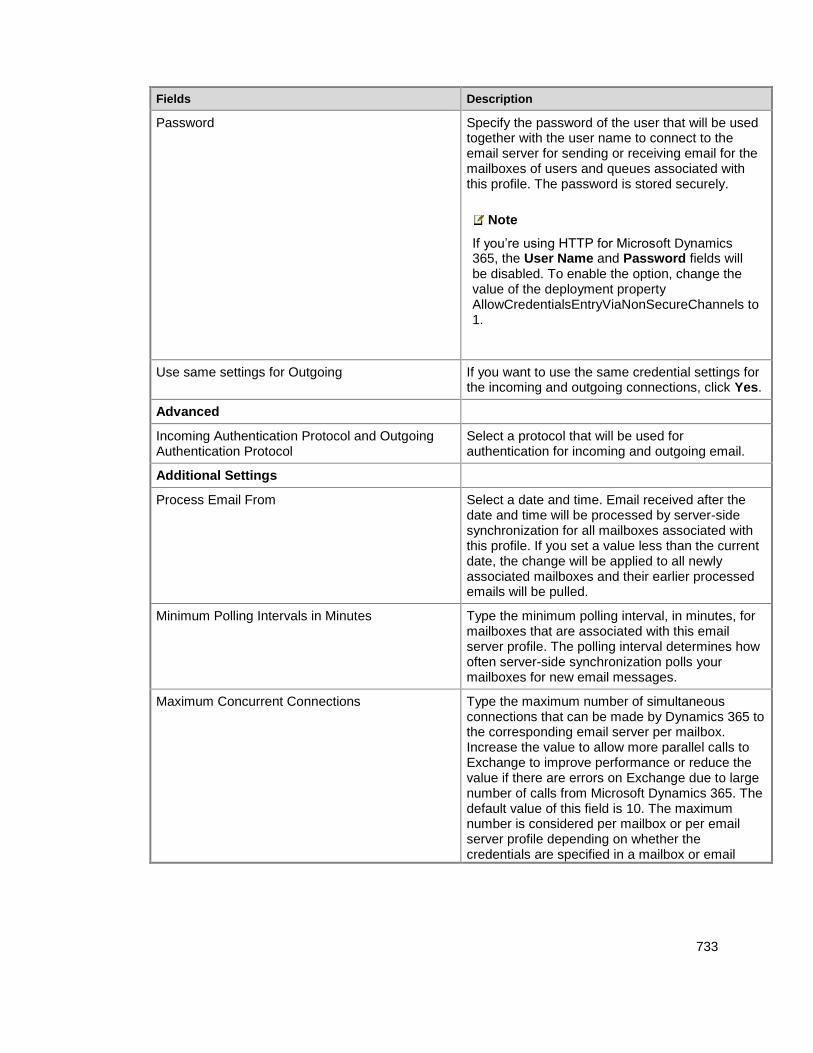
733
Fields Description
Password Specify the password of the user that will be used together with the user name to connect to the email server for sending or receiving email for the mailboxes of users and queues associated with this profile. The password is stored securely.
Note
If you’re using HTTP for Microsoft Dynamics 365, the User Name and Password fields will be disabled. To enable the option, change the value of the deployment property AllowCredentialsEntryViaNonSecureChannels to 1.
Use same settings for Outgoing If you want to use the same credential settings for the incoming and outgoing connections, click Yes.
Advanced
Incoming Authentication Protocol and Outgoing Authentication Protocol
Select a protocol that will be used for authentication for incoming and outgoing email.
Additional Settings
Process Email From Select a date and time. Email received after the date and time will be processed by server-side synchronization for all mailboxes associated with this profile. If you set a value less than the current date, the change will be applied to all newly associated mailboxes and their earlier processed emails will be pulled.
Minimum Polling Intervals in Minutes Type the minimum polling interval, in minutes, for mailboxes that are associated with this email server profile. The polling interval determines how often server-side synchronization polls your mailboxes for new email messages.
Maximum Concurrent Connections Type the maximum number of simultaneous connections that can be made by Dynamics 365 to the corresponding email server per mailbox. Increase the value to allow more parallel calls to Exchange to improve performance or reduce the value if there are errors on Exchange due to large number of calls from Microsoft Dynamics 365. The default value of this field is 10. The maximum number is considered per mailbox or per email server profile depending on whether the credentials are specified in a mailbox or email
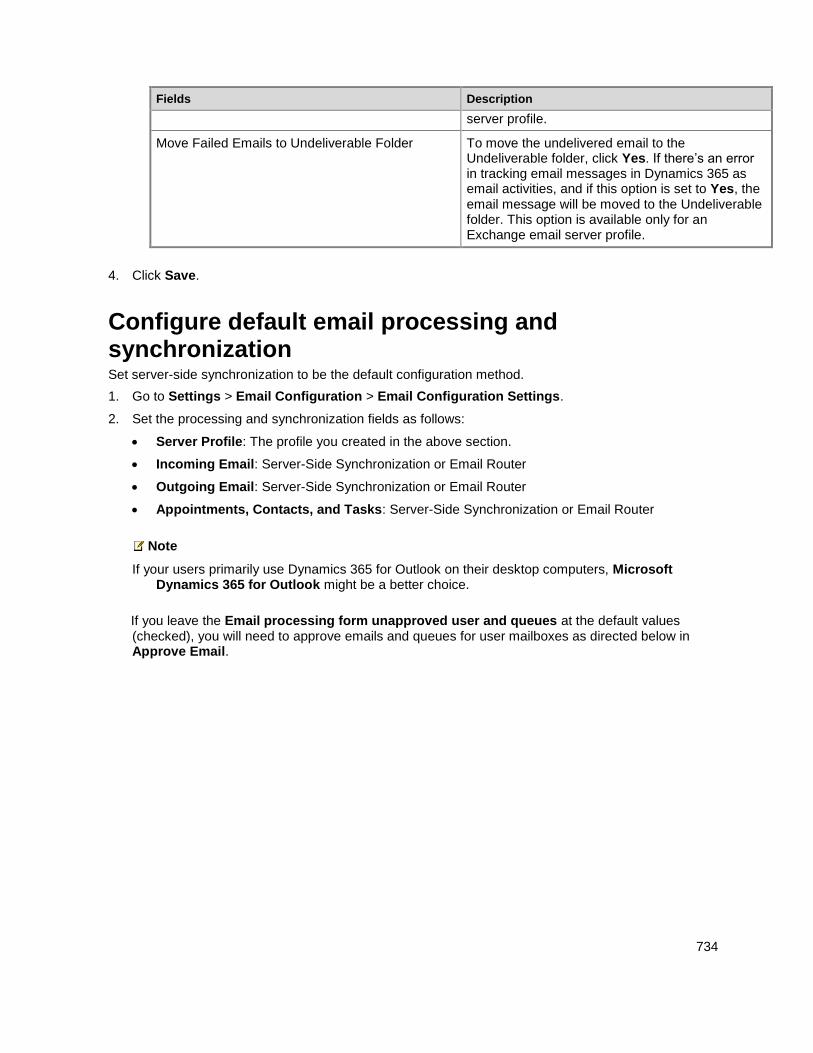
734
Fields Description
server profile.
Move Failed Emails to Undeliverable Folder To move the undelivered email to the Undeliverable folder, click Yes. If there’s an error in tracking email messages in Dynamics 365 as email activities, and if this option is set to Yes, the email message will be moved to the Undeliverable folder. This option is available only for an Exchange email server profile.
4. Click Save.
Configure default email processing and synchronization Set server-side synchronization to be the default configuration method.
1. Go to Settings > Email Configuration > Email Configuration Settings.
2. Set the processing and synchronization fields as follows:
Server Profile: The profile you created in the above section.
Incoming Email: Server-Side Synchronization or Email Router
Outgoing Email: Server-Side Synchronization or Email Router
Appointments, Contacts, and Tasks: Server-Side Synchronization or Email Router
Note
If your users primarily use Dynamics 365 for Outlook on their desktop computers, Microsoft Dynamics 365 for Outlook might be a better choice.
If you leave the Email processing form unapproved user and queues at the default values (checked), you will need to approve emails and queues for user mailboxes as directed below in Approve Email.
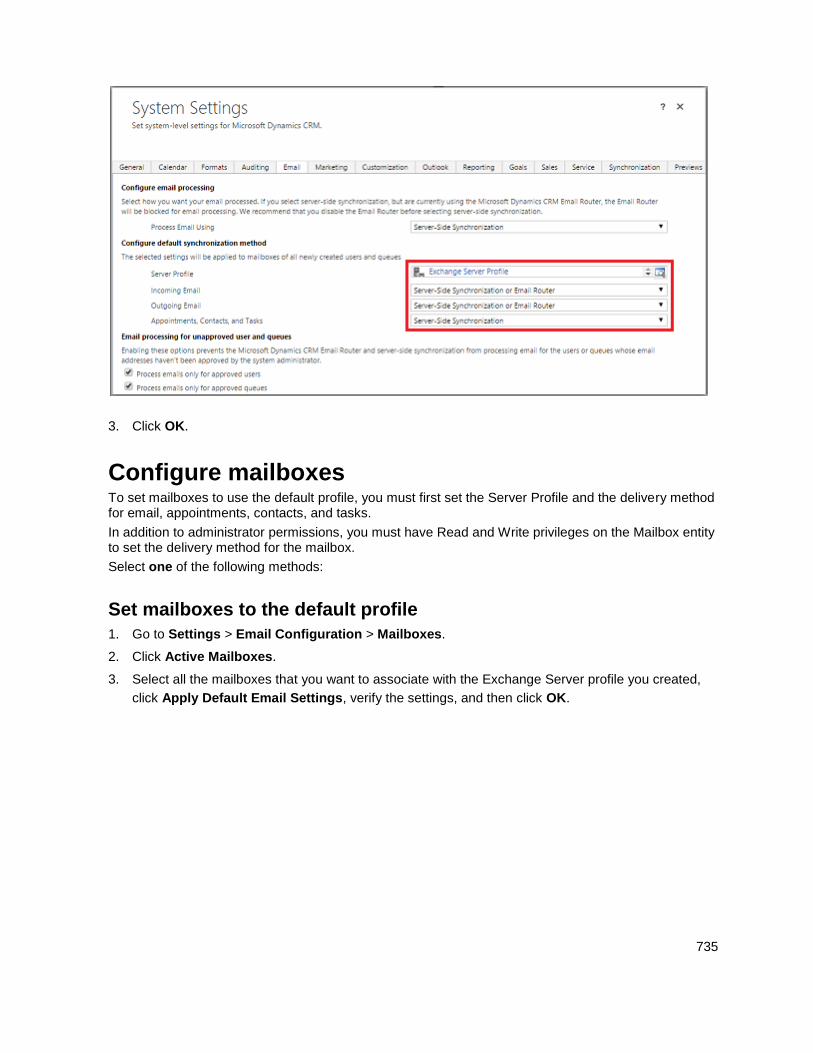
735
3. Click OK.
Configure mailboxes To set mailboxes to use the default profile, you must first set the Server Profile and the delivery method for email, appointments, contacts, and tasks.
In addition to administrator permissions, you must have Read and Write privileges on the Mailbox entity to set the delivery method for the mailbox.
Select one of the following methods:
Set mailboxes to the default profile
1. Go to Settings > Email Configuration > Mailboxes.
2. Click Active Mailboxes.
3. Select all the mailboxes that you want to associate with the Exchange Server profile you created,
click Apply Default Email Settings, verify the settings, and then click OK.

736
By default, the mailbox configuration is tested and the mailboxes are enabled when you click OK.
Edit mailboxes to set the profile and delivery methods
1. Go to Settings > Email Configuration > Mailboxes.
2. Click Active Mailboxes.
3. Select the mailboxes that you want to configure, and then click Edit.
4. In the Change Multiple Records form, under Synchronization Method, set Server Profile to the
Exchange Server profile you created earlier.
5. Set Incoming and OutgoingEmail to Server-Side Synchronization or Email Router.
6. Set Appointments, Contacts, and Tasks to Server-Side Synchronization.
Note
If your users primarily use Dynamics 365 for Outlook on their desktop computers, Microsoft Dynamics 365 for Outlook might be a better choice.
7. Click Change.
Approve email You need to approve each user mailbox or queue before that mailbox can process email.
1. Go to Settings > Email Configuration > Mailboxes.
2. Click Active Mailboxes.
3. Select the mailboxes that you want to approve, and then click More Commands (…) > Approve
Email.
737
4. Click OK.
Test configuration of mailboxes
1. Go to Settings > Email Configuration > Mailboxes.
2. Click Active Mailboxes.
3. Select the mailboxes you want to test, and then click Test & Enable Mailboxes.
This tests the incoming and outgoing email configuration of the selected mailboxes and enables them for email processing. If an error occurs in a mailbox, an alert is shown on the Alerts wall of the mailbox and the profile owner. Depending on the nature of the error, Microsoft Dynamics 365 tries to process the email again after some time or disables the mailbox for email processing.
The result of the email configuration test is displayed in the Incoming Email Status, Outgoing Email Status, and Appointments, Contacts, and Tasks Status fields of a mailbox record. An alert is also generated when the configuration is successfully completed for a mailbox. This alert is shown to the mailbox owner.
You can find information on recurring issues and other troubleshooting information in MSDN: Test and Enable Mailboxes in Microsoft Dynamics CRM 2015 and Troubleshooting and monitoring server-side synchronization.
Tip
If you’re unable to synchronize contacts, appointments, and tasks for a mailbox, you may want to select the Sync items with Exchange from this Dynamics 365 org only, even if Exchange was set to sync with a different org check box. Read more about this check box.
Test email configuration for all mailboxes associated with an email server profile
1. Go to Settings > Email Configuration > Email Server Profiles.
2. Select the profile you created, and then click Test & Enable Mailboxes.
When you test the email configuration, an asynchronous job runs in the background. It may take a few minutes for the test to be completed. Microsoft Dynamics 365 tests the email configuration of all the mailboxes associated with the Exchange Server profile. For the mailboxes configured with server-side synchronization for synchronizing appointments, tasks, and contacts, it also checks to make sure they’re configured properly.
Tip
If you’re unable to synchronize contacts, appointments, and tasks for a mailbox, you may want to select
738
the Sync items with Exchange from this Dynamics 365 org only, even if Exchange was set to sync with a different org check box. Read more about this check box.
See Also Troubleshooting and monitoring server-side synchronization Test mail flow with the Remote Connectivity Analyzer Integrate (synchronize) your email system with Microsoft Dynamics 365 Set up server-side synchronization of email, appointments, contacts, and tasks Server-side synchronization Autodiscover service Managing the Autodiscover Service
© 2016 Microsoft. All rights reserved. Copyright
Connect Dynamics 365 (on-premises) to Exchange Online
Applies To: Dynamics 365 (on-premises), Dynamics CRM 2016
[This topic is pre-release documentation and is subject to change.]
This topic describes how to configure server-based authentication between Dynamics 365 (on-premises) and Exchange Online. The diagram below illustrates the communication between Dynamics 365 (on-premises), Azure Active Directory, and Exchange Online.
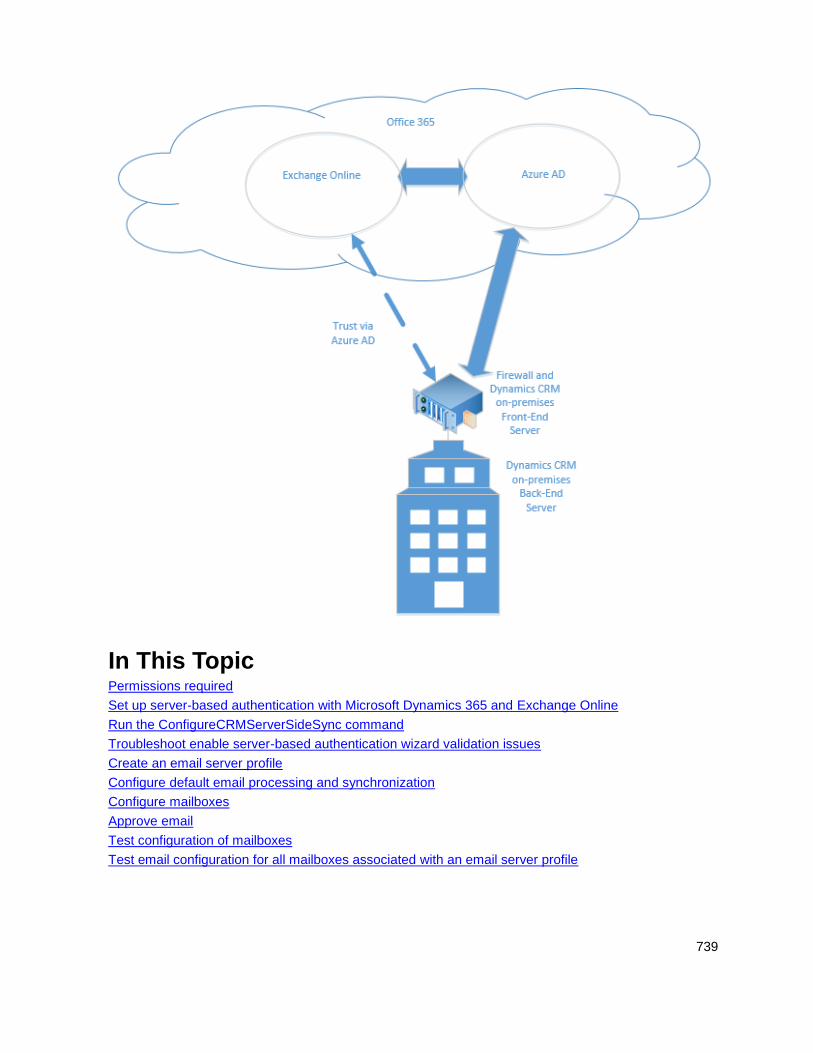
739
In This Topic Permissions required
Set up server-based authentication with Microsoft Dynamics 365 and Exchange Online
Run the ConfigureCRMServerSideSync command
Troubleshoot enable server-based authentication wizard validation issues
Create an email server profile
Configure default email processing and synchronization
Configure mailboxes
Approve email
Test configuration of mailboxes
Test email configuration for all mailboxes associated with an email server profile
740
Permissions required Microsoft Dynamics 365
System Administrator security role.
If you are using a self-signed certificate for evaluation purposes, you must have local
Administrators group membership on the computer where Microsoft Dynamics 365 Server is
running.
Exchange Online
Office 365 Global Administrators membership. This is required for administrative-level access to the
Office 365 subscription and to run the Microsoft AzurePowerShell cmdlets.
Important
In this deployment, the Dynamics 365 administrator can approve mailboxes.
Set up server-based authentication with Microsoft Dynamics 365 and Exchange Online Follow the steps in the order provided to set up Dynamics 365 (on-premises) with Exchange Online.
Important
The steps described here must be completed in the order provided. If a task is not completed, such
as a Windows PowerShell command that returns an error message, the issue must be resolved
before you continue to the next command, task, or step.
Verify prerequisites Before you configure Dynamics 365 (on-premises) and Exchange Online for server-based authentication, the following prerequisites must be met:
The Dynamics 365 (on-premises) deployment must already be configured and available through
the Internet. More information: Referenced topic 'eee528fb-ef2f-4a77-ad0f-3d29bcb42351' is only
available online.
Microsoft Dynamics 365 Hybrid Connector. The Microsoft Dynamics 365 Hybrid Connector is a free
connector that lets you use server-based authentication with Microsoft Dynamics 365 (on-premises)
and Exchange Online. More information: Microsoft Dynamics 365 Hybrid Connector
An x509 digital certificate issued by a trusted certificate authority that will be used to authenticate
between Dynamics 365 (on-premises) and Exchange Online. If you are evaluating server-based
authentication, you can use a self-signed certificate.
The following software features are required to run the Windows PowerShell cmdlets described in this topic:

741
Microsoft Online Services Sign-In Assistant for IT Professionals Beta
Azure Active Directory Module for Windows PowerShell (64-bit version)
Important
At the time of this writing, there is an issue with the RTW version of Microsoft Online Services Sign-In Assistant for IT Professionals. Until the issue is resolved, we recommend that you use the Beta version. More information: Microsoft Azure Forums: Cannot install Azure Active Directory Module for Windows PowerShell. MOSSIA is not installed
Set up server-based authentication
1. On the Microsoft Dynamics 365 Server where the deployment tools server role is running, start the
Azure Active Directory Module for Windows PowerShell.
Important
The computer where you run the following PowerShell commands must have the prerequisite software features described earlier in Verify prerequisites.
2. Prepare the certificate. Replace contoso\adminstratorwith your domain\account.
$CertificateScriptWithCommand = “.\CertificateReconfiguration.ps1 -certificateFile
c:\Personalcertfile.pfx -password personal_certfile_password -updateCrm -
certificateType S2STokenIssuer -serviceAccount contoso\administrator -storeFindType
FindBySubjectDistinguishedName”
Invoke-Expression -command $CertificateScriptWithCommand
Run the ConfigureCRMServerSideSync command Run ConfigureCRMServerSideSync command to do the following:
1. Set up the Dynamics 365 Principal Name in Azure Active Directory Access Control Services (ACS).
2. Configure Dynamics 365 for server-based authentication with Exchange Online.
3. Set the Exchange Online tenant ID.
To run the ConfigureCRMServerSideSync command
1. In Windows PowerShell, change your directory to the folder that contains
ConfigureCRMServerSideSync.ps1, as shown in this example.
cd C:\Program Files\Microsoft Dynamics CRM\Tools
2. Run the ConfigureCrmServerSideSync.ps1 script. Type the following command, and press
ENTER.
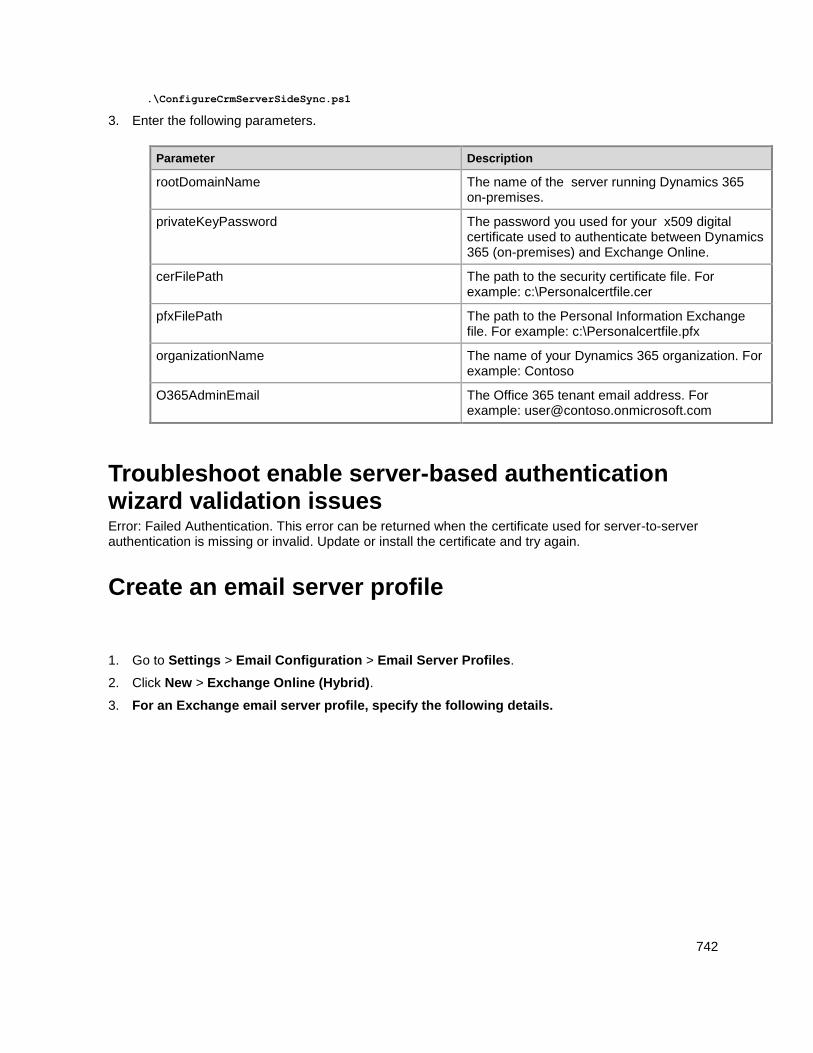
742
.\ConfigureCrmServerSideSync.ps1
3. Enter the following parameters.
Parameter Description
rootDomainName The name of the server running Dynamics 365 on-premises.
privateKeyPassword The password you used for your x509 digital certificate used to authenticate between Dynamics 365 (on-premises) and Exchange Online.
cerFilePath The path to the security certificate file. For example: c:\Personalcertfile.cer
pfxFilePath The path to the Personal Information Exchange file. For example: c:\Personalcertfile.pfx
organizationName The name of your Dynamics 365 organization. For example: Contoso
O365AdminEmail The Office 365 tenant email address. For example: [email protected]
Troubleshoot enable server-based authentication wizard validation issues Error: Failed Authentication. This error can be returned when the certificate used for server-to-server authentication is missing or invalid. Update or install the certificate and try again.
Create an email server profile
1. Go to Settings > Email Configuration > Email Server Profiles.
2. Click New > Exchange Online (Hybrid).
3. For an Exchange email server profile, specify the following details.
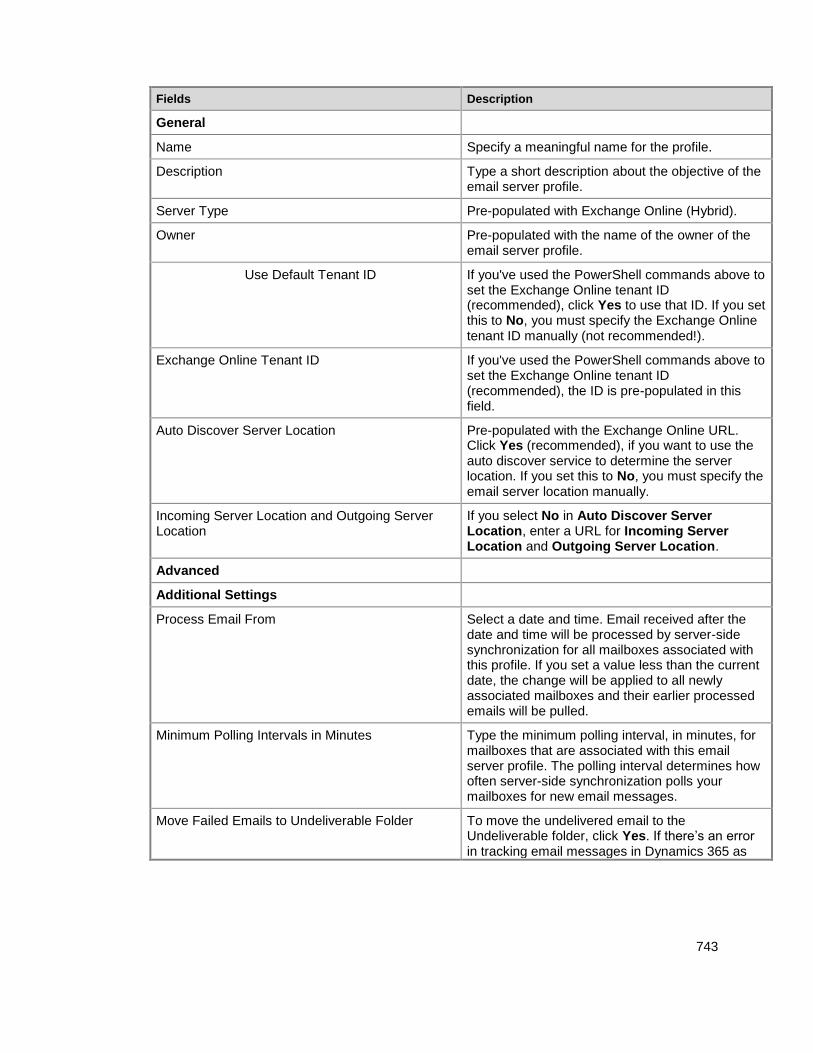
743
Fields Description
General
Name Specify a meaningful name for the profile.
Description Type a short description about the objective of the email server profile.
Server Type Pre-populated with Exchange Online (Hybrid).
Owner Pre-populated with the name of the owner of the email server profile.
Use Default Tenant ID If you've used the PowerShell commands above to set the Exchange Online tenant ID (recommended), click Yes to use that ID. If you set this to No, you must specify the Exchange Online tenant ID manually (not recommended!).
Exchange Online Tenant ID If you've used the PowerShell commands above to set the Exchange Online tenant ID (recommended), the ID is pre-populated in this field.
Auto Discover Server Location Pre-populated with the Exchange Online URL. Click Yes (recommended), if you want to use the auto discover service to determine the server location. If you set this to No, you must specify the email server location manually.
Incoming Server Location and Outgoing Server Location
If you select No in Auto Discover Server Location, enter a URL for Incoming Server Location and Outgoing Server Location.
Advanced
Additional Settings
Process Email From Select a date and time. Email received after the date and time will be processed by server-side synchronization for all mailboxes associated with this profile. If you set a value less than the current date, the change will be applied to all newly associated mailboxes and their earlier processed emails will be pulled.
Minimum Polling Intervals in Minutes Type the minimum polling interval, in minutes, for mailboxes that are associated with this email server profile. The polling interval determines how often server-side synchronization polls your mailboxes for new email messages.
Move Failed Emails to Undeliverable Folder To move the undelivered email to the Undeliverable folder, click Yes. If there’s an error in tracking email messages in Dynamics 365 as
744
Fields Description
email activities, and if this option is set to Yes, the email message will be moved to the Undeliverable folder.
4. Click Save.
5. Click Test Connection and review the results. To diagnose issues, see the following section.
Troubleshoot the Exchange Online (Hybrid) profile connection If you’ve run Test Connection and have issues with the Exchange Online (Hybrid) profile connection, use the information in the Test Connection dialog box to diagnose and fix the connection.
You can find information on recurring issues and other troubleshooting information in Blog: Test and Enable Mailboxes in Microsoft Dynamics CRM 2015 and Troubleshooting and monitoring server-side synchronization.
Configure default email processing and synchronization Set server-side synchronization to be the default configuration method.
1. Go to Settings > Email Configuration > Email Configuration Settings.
2. Set the processing and synchronization fields as follows:
Server Profile: The profile you created in the above section.
Incoming Email: Server-Side Synchronization or Email Router
Outgoing Email: Server-Side Synchronization or Email Router
Appointments, Contacts, and Tasks: Server-Side Synchronization or Email Router
Note
If your users primarily use Dynamics 365 for Outlook on their desktop computers, Microsoft Dynamics 365 for Outlook might be a better choice.
If you leave the Email processing form unapproved user and queues at the default values (selected), you will need to approve emails and queues for user mailboxes as directed below in Approve Email.

745
3. Click OK.
Configure mailboxes To set mailboxes to use the default profile, you must first set the Server Profile and the delivery method for email, appointments, contacts, and tasks.
In addition to administrator permissions, you must have Read and Write privileges on the Mailbox entity to set the delivery method for the mailbox.
Select one of the following methods:
Set mailboxes to the default profile
1. Go to Settings > Email Configuration > Mailboxes.
2. Click Active Mailboxes.
3. Select all the mailboxes that you want to associate with the Exchange Server profile you created,
click Apply Default Email Settings, verify the settings, and then click OK.
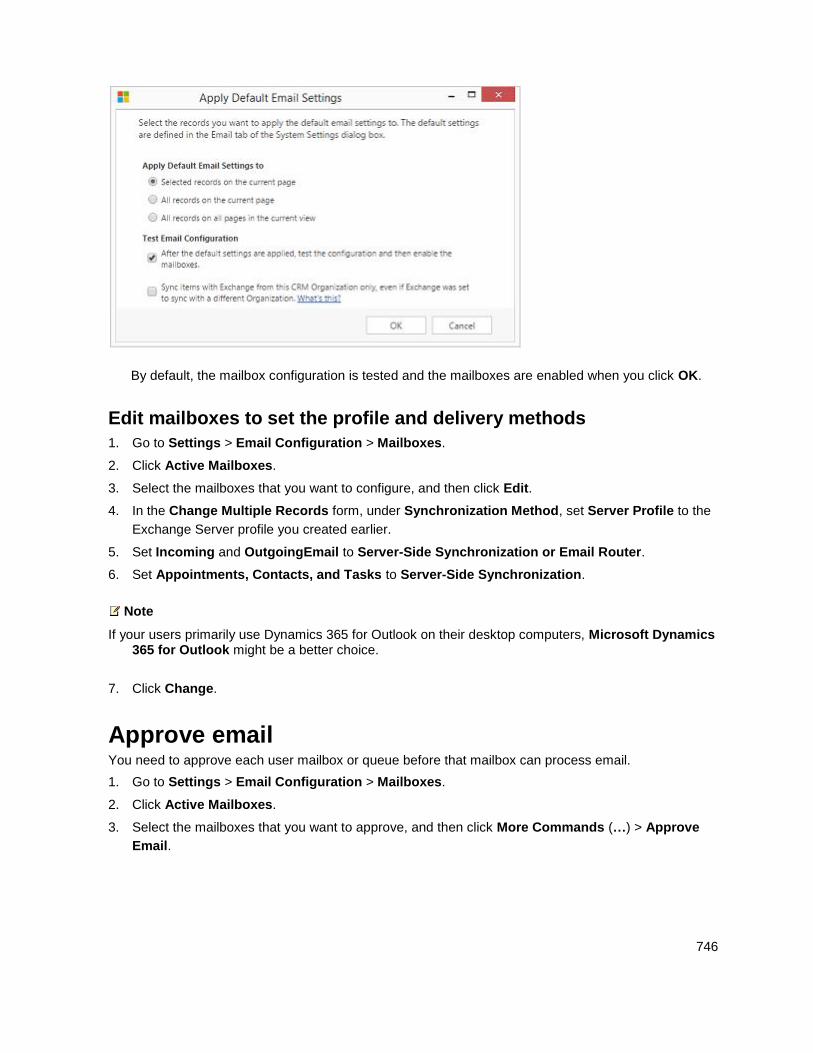
746
By default, the mailbox configuration is tested and the mailboxes are enabled when you click OK.
Edit mailboxes to set the profile and delivery methods
1. Go to Settings > Email Configuration > Mailboxes.
2. Click Active Mailboxes.
3. Select the mailboxes that you want to configure, and then click Edit.
4. In the Change Multiple Records form, under Synchronization Method, set Server Profile to the
Exchange Server profile you created earlier.
5. Set Incoming and OutgoingEmail to Server-Side Synchronization or Email Router.
6. Set Appointments, Contacts, and Tasks to Server-Side Synchronization.
Note
If your users primarily use Dynamics 365 for Outlook on their desktop computers, Microsoft Dynamics 365 for Outlook might be a better choice.
7. Click Change.
Approve email You need to approve each user mailbox or queue before that mailbox can process email.
1. Go to Settings > Email Configuration > Mailboxes.
2. Click Active Mailboxes.
3. Select the mailboxes that you want to approve, and then click More Commands (…) > Approve
Email.
747
4. Click OK.
Test configuration of mailboxes
1. Go to Settings > Email Configuration > Mailboxes.
2. Click Active Mailboxes.
3. Select the mailboxes you want to test, and then click Test & Enable Mailboxes.
This tests the incoming and outgoing email configuration of the selected mailboxes and enables them for email processing. If an error occurs in a mailbox, an alert is shown on the Alerts wall of the mailbox and the profile owner. Depending on the nature of the error, Microsoft Dynamics 365 tries to process the email again after some time or disables the mailbox for email processing.
The result of the email configuration test is displayed in the Incoming Email Status, Outgoing Email Status, and Appointments, Contacts, and Tasks Status fields of a mailbox record. An alert is also generated when the configuration is successfully completed for a mailbox. This alert is shown to the mailbox owner.
Tip
If you’re unable to synchronize contacts, appointments, and tasks for a mailbox, you may want to select the Sync items with Exchange from this Dynamics 365 org only, even if Exchange was set to sync with a different org check box. Read more about this check box.
Test email configuration for all mailboxes associated with an email server profile
1. Go to Settings > Email Configuration > Email Server Profiles.
2. Select the profile you created, and then click Test & Enable Mailboxes.
When you test the email configuration, an asynchronous job runs in the background. It may take a few minutes for the test to be completed. Microsoft Dynamics 365 tests the email configuration of all the mailboxes associated with the Exchange Server profile. For the mailboxes configured with server-side synchronization for synchronizing appointments, tasks, and contacts, it also checks to make sure they’re configured properly.
Tip
If you’re unable to synchronize contacts, appointments, and tasks for a mailbox, you may want to select the Sync items with Exchange from this Dynamics 365 org only, even if Exchange was set to sync with a different org check box. Read more about this check box.
748
See Also Troubleshooting and monitoring server-side synchronization Test mail flow with the Remote Connectivity Analyzer Integrate (synchronize) your email system with Microsoft Dynamics 365 Set up server-side synchronization of email, appointments, contacts, and tasks Server-side synchronization
© 2016 Microsoft. All rights reserved. Copyright
Connect Dynamics 365 to POP3/SMTP servers
Applies To: Dynamics 365 (online), Dynamics 365 (on-premises), Dynamics CRM 2016, Dynamics CRM Online
[This topic is pre-release documentation and is subject to change.]
Follow these steps to connect Dynamics 365 (on-premises) with POP3/IMAP and SMTP email servers such as used for Gmail and Outlook.com.
In This Topic Create an email server profile
Configure default email processing and synchronization
Configure mailboxes
Approve email
Test configuration of mailboxes
Test email configuration for all mailboxes associated with an email server profile
Network ports for Dynamics 365 (online) Government
Create an email server profile
1. Go to Settings > Email Configuration > Email Server Profiles.
2. Choose New > POP3-SMTP Profile.
3. For an Exchange email server profile, specify the following details:
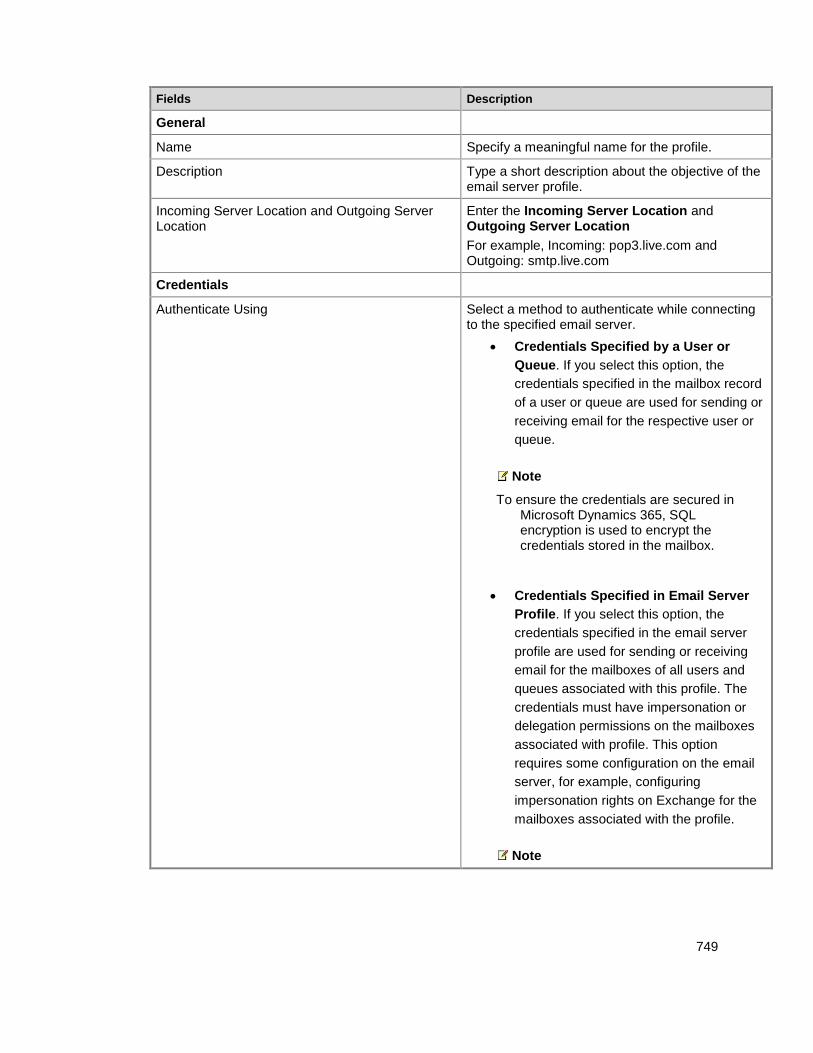
749
Fields Description
General
Name Specify a meaningful name for the profile.
Description Type a short description about the objective of the email server profile.
Incoming Server Location and Outgoing Server Location
Enter the Incoming Server Location and Outgoing Server Location
For example, Incoming: pop3.live.com and Outgoing: smtp.live.com
Credentials
Authenticate Using Select a method to authenticate while connecting to the specified email server.
Credentials Specified by a User or
Queue. If you select this option, the
credentials specified in the mailbox record
of a user or queue are used for sending or
receiving email for the respective user or
queue.
Note
To ensure the credentials are secured in Microsoft Dynamics 365, SQL encryption is used to encrypt the credentials stored in the mailbox.
Credentials Specified in Email Server
Profile. If you select this option, the
credentials specified in the email server
profile are used for sending or receiving
email for the mailboxes of all users and
queues associated with this profile. The
credentials must have impersonation or
delegation permissions on the mailboxes
associated with profile. This option
requires some configuration on the email
server, for example, configuring
impersonation rights on Exchange for the
mailboxes associated with the profile.
Note
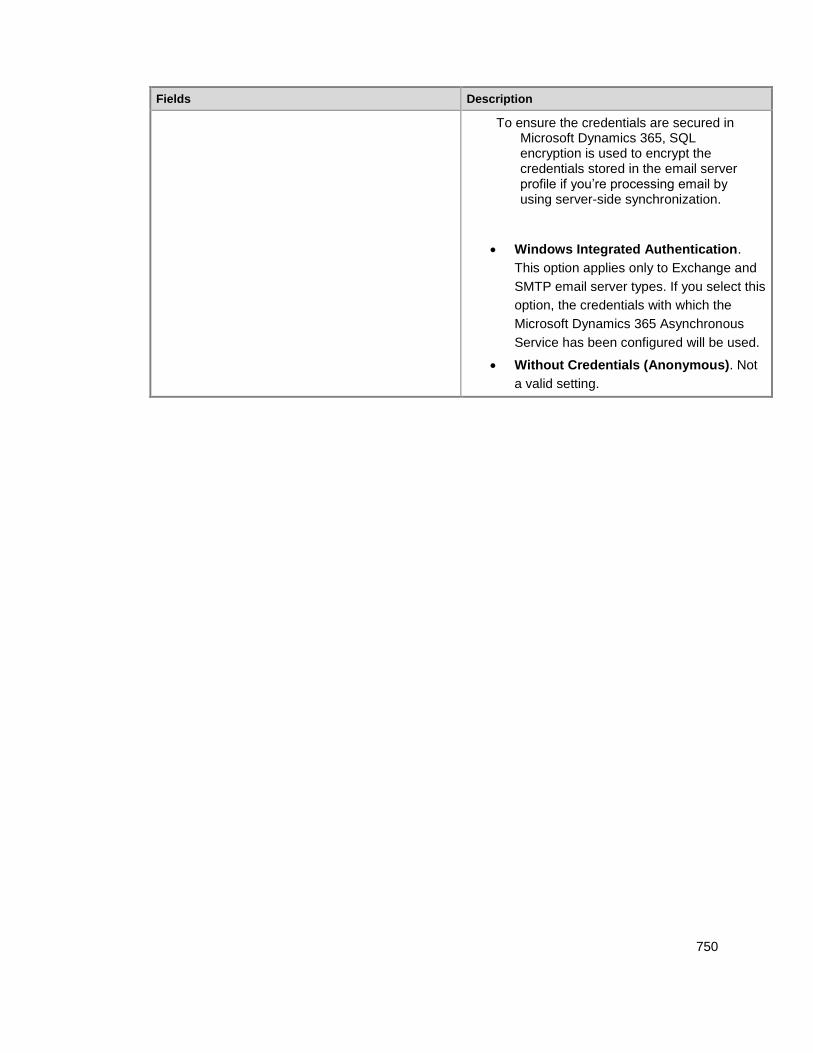
750
Fields Description
To ensure the credentials are secured in Microsoft Dynamics 365, SQL encryption is used to encrypt the credentials stored in the email server profile if you’re processing email by using server-side synchronization.
Windows Integrated Authentication.
This option applies only to Exchange and
SMTP email server types. If you select this
option, the credentials with which the
Microsoft Dynamics 365 Asynchronous
Service has been configured will be used.
Without Credentials (Anonymous). Not
a valid setting.
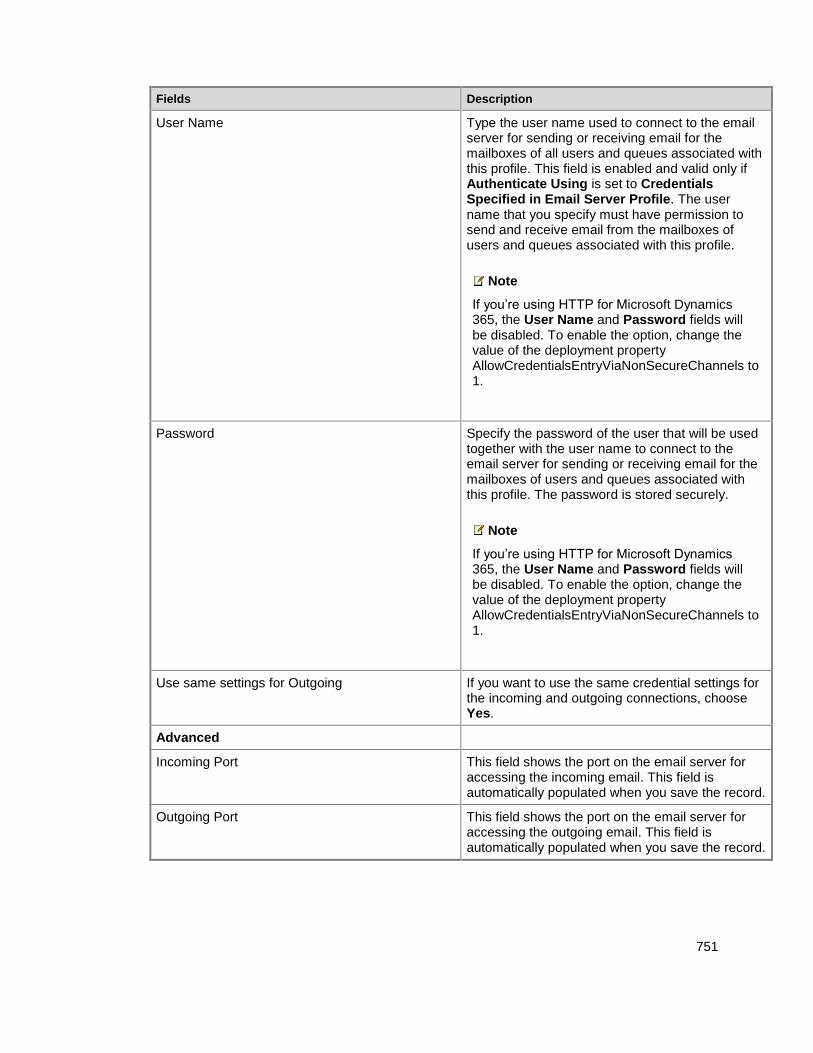
751
Fields Description
User Name Type the user name used to connect to the email server for sending or receiving email for the mailboxes of all users and queues associated with this profile. This field is enabled and valid only if Authenticate Using is set to Credentials Specified in Email Server Profile. The user name that you specify must have permission to send and receive email from the mailboxes of users and queues associated with this profile.
Note
If you’re using HTTP for Microsoft Dynamics 365, the User Name and Password fields will be disabled. To enable the option, change the value of the deployment property AllowCredentialsEntryViaNonSecureChannels to 1.
Password Specify the password of the user that will be used together with the user name to connect to the email server for sending or receiving email for the mailboxes of users and queues associated with this profile. The password is stored securely.
Note
If you’re using HTTP for Microsoft Dynamics 365, the User Name and Password fields will be disabled. To enable the option, change the value of the deployment property AllowCredentialsEntryViaNonSecureChannels to 1.
Use same settings for Outgoing If you want to use the same credential settings for the incoming and outgoing connections, choose Yes.
Advanced
Incoming Port This field shows the port on the email server for accessing the incoming email. This field is automatically populated when you save the record.
Outgoing Port This field shows the port on the email server for accessing the outgoing email. This field is automatically populated when you save the record.
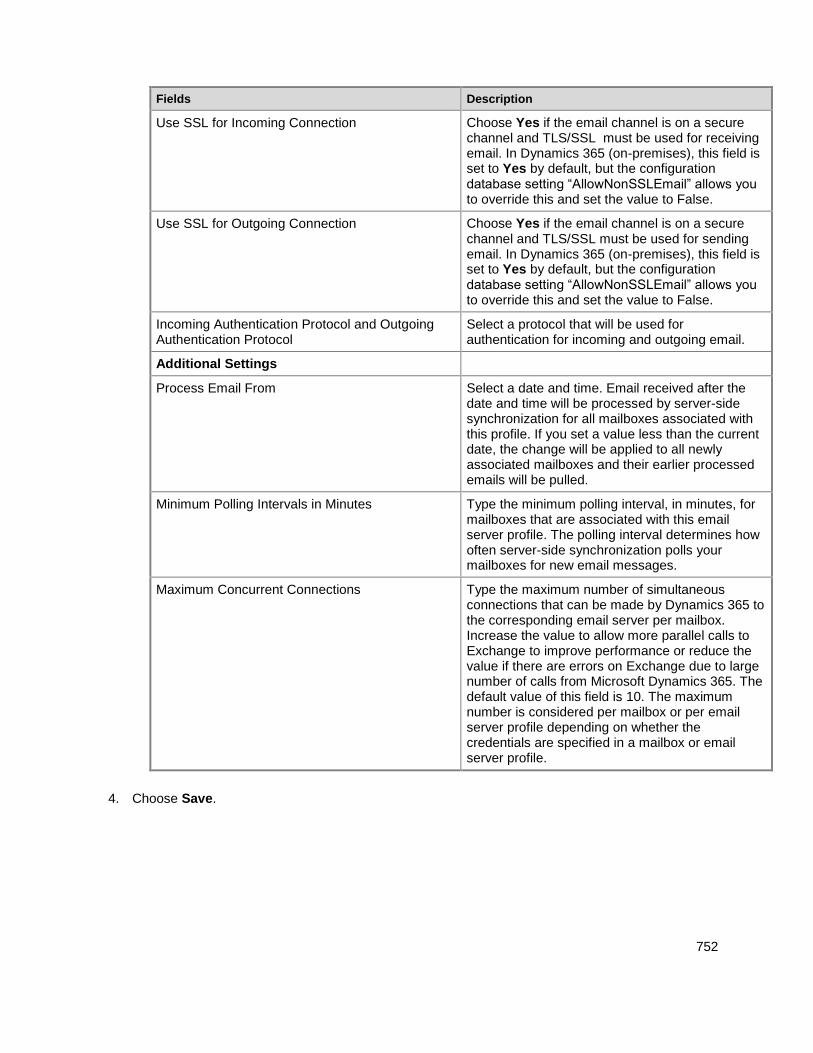
752
Fields Description
Use SSL for Incoming Connection Choose Yes if the email channel is on a secure channel and TLS/SSL must be used for receiving email. In Dynamics 365 (on-premises), this field is set to Yes by default, but the configuration database setting “AllowNonSSLEmail” allows you to override this and set the value to False.
Use SSL for Outgoing Connection Choose Yes if the email channel is on a secure channel and TLS/SSL must be used for sending email. In Dynamics 365 (on-premises), this field is set to Yes by default, but the configuration database setting “AllowNonSSLEmail” allows you to override this and set the value to False.
Incoming Authentication Protocol and Outgoing Authentication Protocol
Select a protocol that will be used for authentication for incoming and outgoing email.
Additional Settings
Process Email From Select a date and time. Email received after the date and time will be processed by server-side synchronization for all mailboxes associated with this profile. If you set a value less than the current date, the change will be applied to all newly associated mailboxes and their earlier processed emails will be pulled.
Minimum Polling Intervals in Minutes Type the minimum polling interval, in minutes, for mailboxes that are associated with this email server profile. The polling interval determines how often server-side synchronization polls your mailboxes for new email messages.
Maximum Concurrent Connections Type the maximum number of simultaneous connections that can be made by Dynamics 365 to the corresponding email server per mailbox. Increase the value to allow more parallel calls to Exchange to improve performance or reduce the value if there are errors on Exchange due to large number of calls from Microsoft Dynamics 365. The default value of this field is 10. The maximum number is considered per mailbox or per email server profile depending on whether the credentials are specified in a mailbox or email server profile.
4. Choose Save.

753
Configure default email processing and synchronization Set server-side synchronization to be the default configuration method.
1. Go to Settings > Email Configuration > Email Configuration Settings.
2. Set the processing and synchronization fields as follows:
Server Profile: The profile you created in the above section.
Incoming Email: Server-Side Synchronization or Email Router
Outgoing Email: Server-Side Synchronization or Email Router
Appointments, Contacts, and Tasks: Microsoft Dynamics 365 for Outlook
Note
Server-Side Synchronization or Email Router is not supported for the POP3-SMTP profile.
If you leave the Email processing form unapproved user and queues at the default values (checked), you will need to approve emails and queues for user mailboxes as directed below in Approve Email.
3. Click OK.
Configure mailboxes To set mailboxes to use the default profile, you must first set the Server Profile and the delivery method for email, appointments, contacts, and tasks.
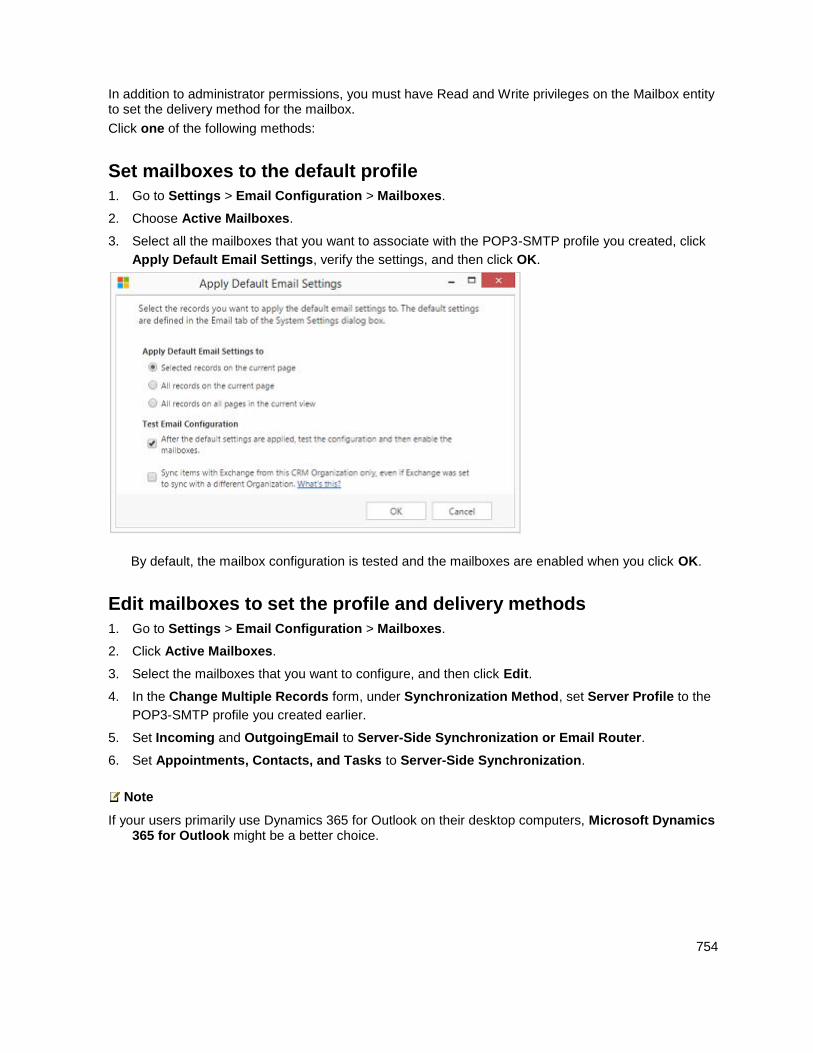
754
In addition to administrator permissions, you must have Read and Write privileges on the Mailbox entity to set the delivery method for the mailbox.
Click one of the following methods:
Set mailboxes to the default profile
1. Go to Settings > Email Configuration > Mailboxes.
2. Choose Active Mailboxes.
3. Select all the mailboxes that you want to associate with the POP3-SMTP profile you created, click
Apply Default Email Settings, verify the settings, and then click OK.
By default, the mailbox configuration is tested and the mailboxes are enabled when you click OK.
Edit mailboxes to set the profile and delivery methods
1. Go to Settings > Email Configuration > Mailboxes.
2. Click Active Mailboxes.
3. Select the mailboxes that you want to configure, and then click Edit.
4. In the Change Multiple Records form, under Synchronization Method, set Server Profile to the
POP3-SMTP profile you created earlier.
5. Set Incoming and OutgoingEmail to Server-Side Synchronization or Email Router.
6. Set Appointments, Contacts, and Tasks to Server-Side Synchronization.
Note
If your users primarily use Dynamics 365 for Outlook on their desktop computers, Microsoft Dynamics 365 for Outlook might be a better choice.
755
7. Click Change.
Approve email You need to approve each user mailbox or queue before that mailbox can process email.
1. Go to Settings > Email Configuration > Mailboxes.
2. Click Active Mailboxes.
3. Select the mailboxes that you want to approve, and then click More Commands (…) > Approve
Email.
4. Click OK.
Test configuration of mailboxes
1. Go to Settings > Email Configuration > Mailboxes.
2. Click Active Mailboxes.
3. Select the mailboxes you want to test, and then click Test & Enable Mailboxes.
This tests the incoming and outgoing email configuration of the selected mailboxes and enables them for email processing. If an error occurs in a mailbox, an alert is shown on the Alerts wall of the mailbox and the profile owner. Depending on the nature of the error, Microsoft Dynamics 365 tries to process the email again after some time or disables the mailbox for email processing.
The result of the email configuration test is displayed in the Incoming Email Status, Outgoing Email Status, and Appointments, Contacts, and Tasks Status fields of a mailbox record. An alert is also generated when the configuration is successfully completed for a mailbox. This alert is shown to the mailbox owner.
You can find information on recurring issues and other troubleshooting information in Test and Enable Mailboxes in Microsoft Dynamics CRM 2015 and Troubleshooting and monitoring server-side synchronization.
Tip
If you’re unable to synchronize contacts, appointments, and tasks for a mailbox, you may want to select the Sync items with Exchange from this Dynamics 365 org only, even if Exchange was set to sync with a different org check box. Read more about this check box.
756
Test email configuration for all mailboxes associated with an email server profile
1. Go to Settings > Email Configuration > Email Server Profiles.
2. Select the profile you created, and then click Test & Enable Mailboxes.
When you test the email configuration, an asynchronous job runs in the background. It may take a few minutes for the test to be completed. Microsoft Dynamics 365 tests the email configuration of all the mailboxes associated with the POP3-SMTP profile. For the mailboxes configured with server-side synchronization for synchronizing appointments, tasks, and contacts, it also checks to make sure they’re configured properly.
Tip
If you’re unable to synchronize contacts, appointments, and tasks for a mailbox, you may want to select the Sync items with Exchange from this Dynamics 365 org only, even if Exchange was set to sync with a different org check box. Read more about this check box.
Network ports for Dynamics 365 (online) Government The following ports are open for outbound connections between Dynamics 365 (online) Government and internet services.
80 HTTP
443 HTTPS
465 Secure SMTP
995 Secure POP3
Customizations or email configurations in Dynamics 365 (online) Government can only use these ports.
See Also Troubleshooting and monitoring server-side synchronization Test mail flow with the Remote Connectivity Analyzer Integrate (synchronize) your email system with Microsoft Dynamics 365 Set up server-side synchronization of email, appointments, contacts, and tasks Server-side synchronization Microsoft Dynamics 365 (online) Government
© 2016 Microsoft. All rights reserved. Copyright
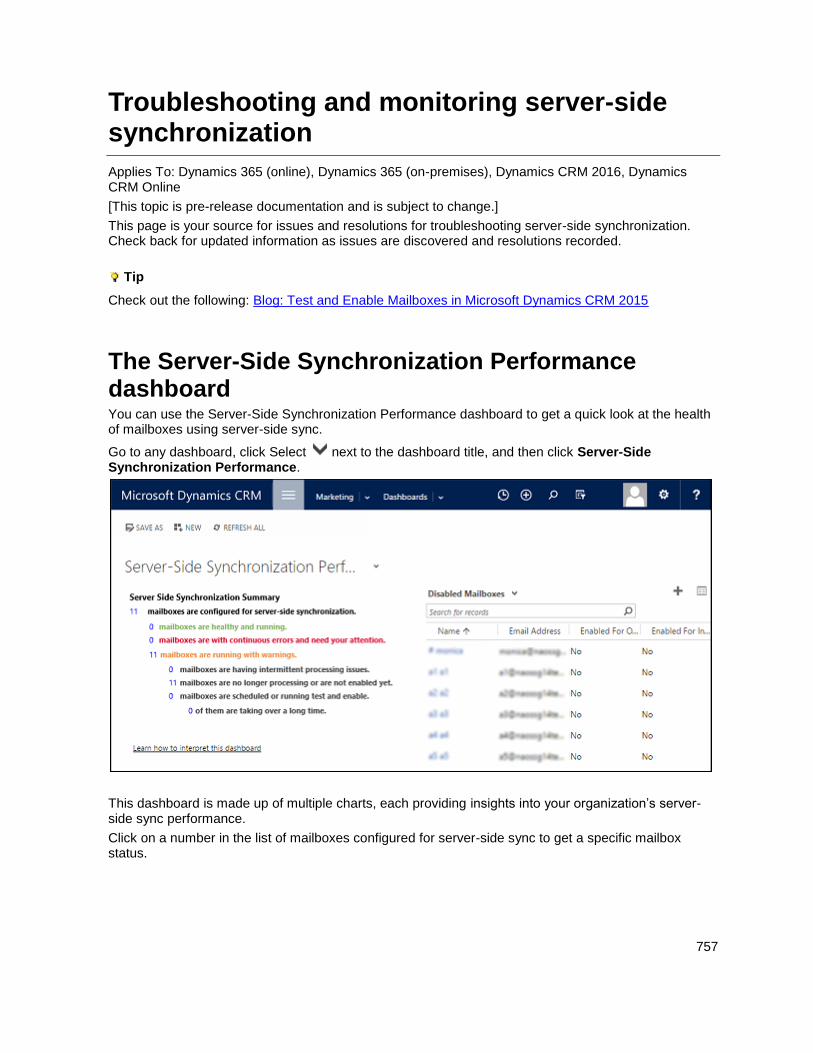
757
Troubleshooting and monitoring server-side synchronization
Applies To: Dynamics 365 (online), Dynamics 365 (on-premises), Dynamics CRM 2016, Dynamics CRM Online
[This topic is pre-release documentation and is subject to change.]
This page is your source for issues and resolutions for troubleshooting server-side synchronization. Check back for updated information as issues are discovered and resolutions recorded.
Tip
Check out the following: Blog: Test and Enable Mailboxes in Microsoft Dynamics CRM 2015
The Server-Side Synchronization Performance dashboard You can use the Server-Side Synchronization Performance dashboard to get a quick look at the health of mailboxes using server-side sync.
Go to any dashboard, click Select next to the dashboard title, and then click Server-Side Synchronization Performance.
This dashboard is made up of multiple charts, each providing insights into your organization’s server-side sync performance.
Click on a number in the list of mailboxes configured for server-side sync to get a specific mailbox status.
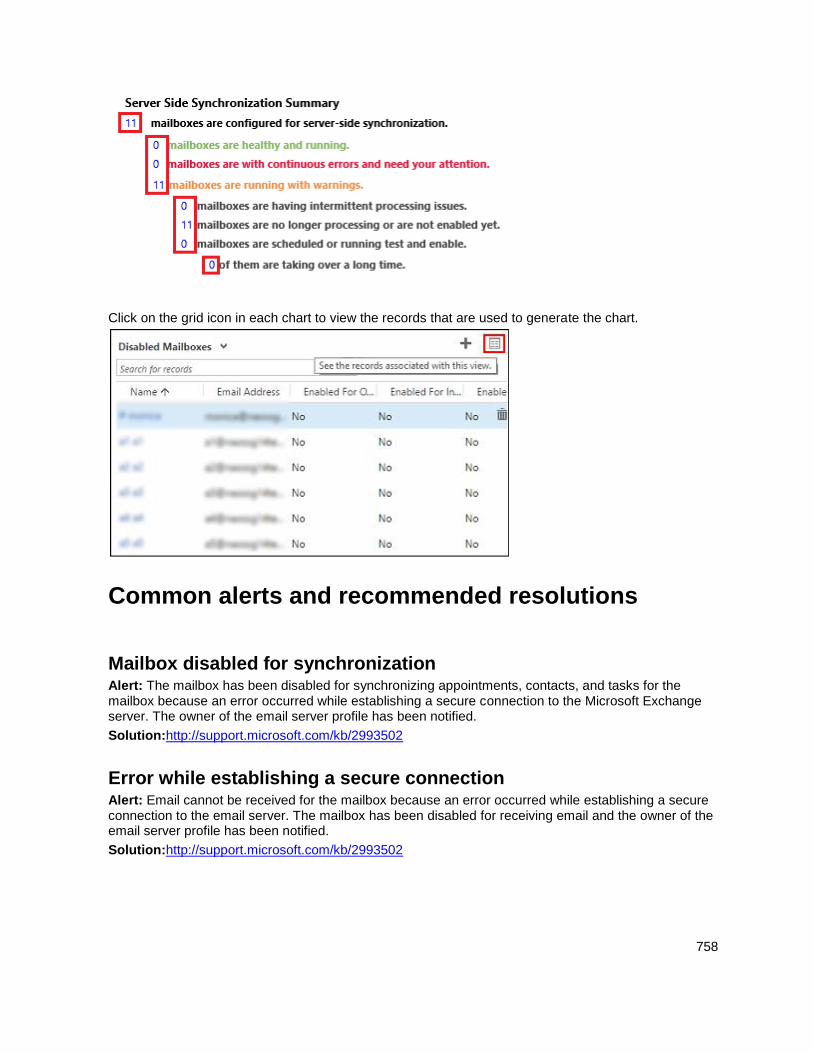
758
Click on the grid icon in each chart to view the records that are used to generate the chart.
Common alerts and recommended resolutions
Mailbox disabled for synchronization Alert: The mailbox has been disabled for synchronizing appointments, contacts, and tasks for the mailbox because an error occurred while establishing a secure connection to the Microsoft Exchange server. The owner of the email server profile has been notified.
Solution:http://support.microsoft.com/kb/2993502
Error while establishing a secure connection Alert: Email cannot be received for the mailbox because an error occurred while establishing a secure connection to the email server. The mailbox has been disabled for receiving email and the owner of the email server profile has been notified.
Solution:http://support.microsoft.com/kb/2993502
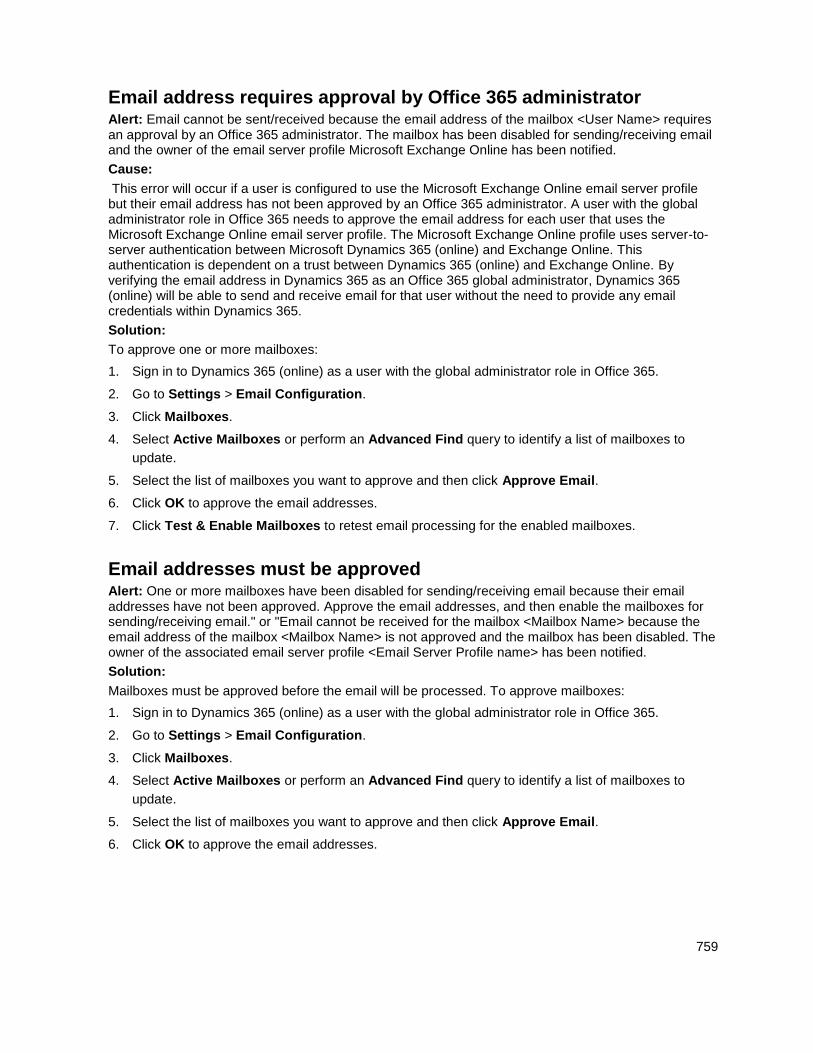
759
Email address requires approval by Office 365 administrator Alert: Email cannot be sent/received because the email address of the mailbox <User Name> requires an approval by an Office 365 administrator. The mailbox has been disabled for sending/receiving email and the owner of the email server profile Microsoft Exchange Online has been notified.
Cause:
This error will occur if a user is configured to use the Microsoft Exchange Online email server profile but their email address has not been approved by an Office 365 administrator. A user with the global administrator role in Office 365 needs to approve the email address for each user that uses the Microsoft Exchange Online email server profile. The Microsoft Exchange Online profile uses server-to-server authentication between Microsoft Dynamics 365 (online) and Exchange Online. This authentication is dependent on a trust between Dynamics 365 (online) and Exchange Online. By verifying the email address in Dynamics 365 as an Office 365 global administrator, Dynamics 365 (online) will be able to send and receive email for that user without the need to provide any email credentials within Dynamics 365.
Solution:
To approve one or more mailboxes:
1. Sign in to Dynamics 365 (online) as a user with the global administrator role in Office 365.
2. Go to Settings > Email Configuration.
3. Click Mailboxes.
4. Select Active Mailboxes or perform an Advanced Find query to identify a list of mailboxes to
update.
5. Select the list of mailboxes you want to approve and then click Approve Email.
6. Click OK to approve the email addresses.
7. Click Test & Enable Mailboxes to retest email processing for the enabled mailboxes.
Email addresses must be approved Alert: One or more mailboxes have been disabled for sending/receiving email because their email addresses have not been approved. Approve the email addresses, and then enable the mailboxes for sending/receiving email." or "Email cannot be received for the mailbox <Mailbox Name> because the email address of the mailbox <Mailbox Name> is not approved and the mailbox has been disabled. The owner of the associated email server profile <Email Server Profile name> has been notified.
Solution:
Mailboxes must be approved before the email will be processed. To approve mailboxes:
1. Sign in to Dynamics 365 (online) as a user with the global administrator role in Office 365.
2. Go to Settings > Email Configuration.
3. Click Mailboxes.
4. Select Active Mailboxes or perform an Advanced Find query to identify a list of mailboxes to
update.
5. Select the list of mailboxes you want to approve and then click Approve Email.
6. Click OK to approve the email addresses.
760
7. Click Test & Enable Mailboxes to retest email processing for the enabled mailboxes.
Note
You can remove the requirement for approving mailboxes using: Settings > Administration > System Settings > Email tab. Uncheck Process emails only for approved users and Process emails only for approved queues, then click OK. If you are using the Microsoft Exchange Online profile, email addresses must still be approved by an Office 365 global administrator.
Mailbox location could not be determined Alert: The mailbox location could not be determined while sending/receiving the email message <Message Subject>. The mailbox <Mailbox Name> has been disabled for sending/receiving email and the owner of the associated email server profile <Email Server Profile name> has been notified.
Solution: You will see this alert if your email server profile (Settings > Email Configuration > Email Server Profiles) is configured to use the Auto Discover Server Location option but auto discover cannot detect the location of your mailbox. If this issue occurs, check with your Exchange administrator to verify your network is configured for auto discover. You can update the email server profile and click No for Auto Discover Server Location. Then provide the Exchange web services URL for your Exchange deployment. For example: https://ExchangeServerName/EWS/Exchange.asmx.
Credentials are incorrect or have insufficient permissions Alert: Email cannot be sent/received because the credentials specified in the associated email server profile are incorrect or have insufficient permissions for sending/receiving email. The mailbox <Mailbox Name> has been disabled for sending/receiving email and the owner of the email server profile <Email Server Profile name> has been notified.
Solution:
This error can appear if incorrect credentials are provided or if the user account specified to access the mailbox does not have sufficient permissions to the mailbox. Check credentials and permissions for the mailbox. If you are providing credentials within an email server profile, make sure the user has impersonation permissions and mailbox access to each associated mailbox.
For more information on configuring Exchange impersonation and granting mailbox access, see:
Configuring Exchange Impersonation
Allow Mailbox Access
Appointments can’t be synchronized Alert: Appointments can’t be synchronized because the Organizer field is not present.
Cause: The Organizer field is required for appointment records to synchronize. By default, this field isn’t included on the appointment form.
Solution:
To add the Organizer field to the appointment form:
1. Go to Settings > Customizations > Customize the System
2. Under Components, expand Entities > Appointment, and then click Forms.
761
3. Click Appointment, and then drag the Organizer field onto the form.
4. Click Save > Publish.
Appointments, contacts, and tasks can't be synchronized Alert: Appointments, contacts, and tasks can't be synchronized because the email address of the mailbox <Mailbox Name> is configured with another Microsoft Dynamics 365 organization. The best practice is to overwrite the configuration when you test and enable the mailbox in your primary organization. Also, change the synchronization method for your mailbox in non-primary organizations to None.
Solution:
To change the primary synchronization organization and overwrite the setting stored in Exchange, click: Settings > Email Configuration > Mailbox > open a mailbox > Test & Enable Mailbox > select Sync items with Exchange from this Dynamics 365 Organization only, even if Exchanges was set to sync with a different Organization. This will allow server-side synchronization to work for this Dynamics 365 instance but the other instance would no longer work for synching that mailbox through server-side synchronization. To change the synchronization method for Appointments, Contacts, and Tasks, click: Settings > Email Configuration > Mailbox > open a mailbox > select None for Appointments, Contacts, and Tasks.
For more information, see: When would I want to use this check box?
Can't set user name and password Alert: You can't set the user name and password in this email server profile and its associated mailboxes because the Microsoft Dynamics 365 server requires using a secure mode (TLS/SSL) to specify credentials. Use another mode of authentication, or contact the Microsoft Dynamics 365 server admin to allow setting credentials on a nonsecure channel.
Cause:
For security reasons, Microsoft Dynamics 365 will not allow you to save your email credentials in Dynamics 365 if the URL is not configured for TLS/SSL (HTTPS). Microsoft Dynamics 365 also does not allow for the connection to a mail server that does not use TLS/SSL.
Important
You can only disable this requirement in a Dynamics 365 on-premises installation.
Solution:
The following Windows PowerShell commands can be used to allow for the entry of credentials via HTTP and to connect to a non TLS/SSL email server:
Allow for credentials via HTTP
1. Open a PowerShell command window.
2. Add the Microsoft Dynamics 365PowerShell snap-in:
Add-PSSnapin Microsoft.Crm.PowerShell
3. Enter the following:
762
$itemSetting = new-object
'System.Collections.Generic.KeyValuePair[String,Object]'("AllowCredentialsEntryViaIns
ecureChannels",1)$setting = get-crmsetting customcodesettings
$configEntity = New-Object "Microsoft.Xrm.Sdk.Deployment.ConfigurationEntity"
$configEntity.LogicalName="Deployment"
$configEntity.Attributes = New-Object
"Microsoft.Xrm.Sdk.Deployment.AttributeCollection"
Set-CrmAdvancedSetting -Entity $configEntity
$itemSetting = new-object
'System.Collections.Generic.KeyValuePair[String,Object]'("ECAllowNonSSLEmail",1)
$configEntity = New-Object "Microsoft.Xrm.Sdk.Deployment.ConfigurationEntity"
$configEntity.LogicalName="Deployment"
$configEntity.Attributes = New-Object
"Microsoft.Xrm.Sdk.Deployment.AttributeCollection"
$configEntity.Attributes.Add($itemSetting)
Set-CrmAdvancedSetting -Entity $configEntity
Note
Before you can save a URL that uses HTTP, you will need to update the Use SSL settings for incoming and outgoing connections (Go to Settings > Email Configuration > Email Server Profiles. Then select a profile, expand Advanced, and set Use SSL for Incoming/Outgoing Connection to No).
Potential issues and resolutions
Email fails to be sent or received when server-side synchronization is configured with Gmail If Microsoft Dynamics 365 is configured to use Server-Side Synchronization with Gmail, you may encounter one of the following errors:
Email cannot be received for the mailbox <Mailbox Name>. Make sure that the credentials
specified in the mailbox are correct and have sufficient permissions for receiving email. Then,
enable the mailbox for email processing.
An unknown error occurred while sending the email message "Test Message". Mailbox <Mailbox
Name> didn't synchronize. The owner of the associated email server profile <Email Server Profile
Name> has been notified.
763
For more information, see this kb article.
Using Dynamics 365 (online) with Exchange Online If your company is using Exchange Online with Dynamics 365 (online), note the following:
Dynamics 365 (online) supports server-side synchronization with Exchange Online in the same tenant with Server to Server Authentication. Other authentication methods or settings are not recommended or supported, including:
Using Credentials Specified by a User or Queue
Using Credentials Specified in Email Server Profile
Using Impersonation
Setting Auto Discover Server Location to No
Using an email server profile other than Exchange Online
Using non-default network ports
Connecting Dynamics 365 (online) with Exchange Online in different tenant is not supported.
Mailbox deliveries regularly disabled Mailbox delivery errors are classified as follows:
1. A permanent error (for example, 401 Unauthorized) or a transient error (for example, a network
issue).
2. A server error (for example, invalid profile credentials) or a mailbox error (for example, invalid
mailbox credentials).
Dynamics 365 responds to the error as follows:
For server or mailbox permanent errors, the mailbox is disabled as soon as the error is detected.
For server or mailbox transient errors, delivery is retried up to 10 times with a 5 minute gap
between attempts. If delivery fails after 10 attempts, the error is considered permanent and the
mailbox is disabled.
Review the troubleshooting steps in this topic and if the issue is successfully resolved, enable the mailbox.
Unsupported email service configurations Server-side synchronization doesn’t support the following scenarios:
Mix of Exchange/SMTP and POP3/Exchange.
Creation of mass email marketing campaigns.
Extensibility scenarios like extending EWS/POP3/SMTP protocols and creating custom email
providers.
Exchange Server 2003 and Exchange Server 2007.
Server-side synchronization in Dynamics 365 (online), or in a Microsoft Dynamics 365 (on
premises) deployment that is configured for FIPS 140-2 compliancy, requires a POP3/SMTP email
764
server that is also FIPS 140-2 compliant. Some email servers are not FIPS 140-2 compliant, such
as MSN, Outlook.com, or Windows Live Mail.
For most situations not supported by server-side synchronization, you can use the Microsoft Dynamics CRM Email Router. More information: Integrate (synchronize) your email system with Microsoft Dynamics 365
Note
We recommend that you don’t use a mixed configuration of Outlook synchronization and server-side synchronization for appointments, contacts, and tasks in the same organization, because it may result in updated Dynamics 365 data not synchronizing to all attendees.
Appointment record is not created in Dynamics 365 when tracked by invitee Consider the following scenario regarding tracking an event in Dynamics 365:
1. An event organizer uses Outlook for the synchronization method.
2. An event invitee uses server-side synchronization for the synchronization method.
3. In Dynamics 365 for Outlook, the organizer creates an appointment and sends an invite to the
invitee.
4. In Dynamics 365 for Outlook, the invitee tracks the appointment.
5. The invitee logs in to Dynamics 365 and navigates to Marketing > Activities > Appointment > My
Appointments
Result: the appointment is not created in Dynamics 365 for the invitee.
This is a known issue and is not supported. If the organizer is someone outside of the Dynamics 365 organization, a Dynamics 365 user who is an invitee can still track the appointment and have the record created in Dynamics 365.
Status fields not listed in Dynamics 365 for Outlook Consider the following scenario:
1. In Dynamics 365 for Outlook, click File > Dynamics 365 > Synchronize > Review
Synchronization Settings.
2. Choose the Synchronization Fields tab and the Contact entity.
Result: there is no Category: [Dynamics 365] Inactive Outlook/Exchange field and no Status Reason: Inactive Dynamics 365 field.
This is a known issue and is not supported.
Service Appointments and Activities don’t synchronize from Outlook to Dynamics 365 Changes made to Service Appointments and Activities in Dynamics 365 will update in Dynamics 365 for Outlook when you synchronize but the reverse is not true. When you make changes to Service
765
Appointments or Activities in Dynamics 365 for Outlook, the changes are not synchronized to Dynamics 365. Service appointments are scheduled by an agent and need free/busy information for resources available only in Dynamics 365.
See Also Best practices for server-side synchronization {Hidden Gem}Understanding Server Side sync Performance Dashboard Troubleshooting and things to know about Microsoft Dynamics 365 for Outlook Set up server-side synchronization of email, appointments, contacts, and tasks
© 2016 Microsoft. All rights reserved. Copyright
Error logging for server-side synchronization
Applies To: Dynamics 365 (online), Dynamics 365 (on-premises), Dynamics CRM 2016, Dynamics CRM Online
[This topic is pre-release documentation and is subject to change.]
In this topic, you will learn about the error logging tasks performed by server-side synchronization. Server-side synchronization generates alerts if an error occurs while processing email. An error is classified based on the nature of the error and on the object the error was encountered for.
The following table shows classification of errors based on the nature of the errors.
Transient Errors Permanent Errors
Errors are temporary in nature and may get
fixed automatically after certain attempts. If the
error persists after reaching the configured
retry count, a new error (without changing the
error code) is logged as a permanent error.
These errors do not require a direct corrective
action by a Dynamics 365 user, but an
administrator should look for any reliability or
throttling issues.
All errors appear in the Warning section of the
administrator’s and user’s alert wall.
These are permanent in nature and mostly
occur when the transient errors remain
unresolved even after certain attempts.
Permanent errors can also be triggered
directly without any transient errors (for
example: password expired).
Email processing for the affected mailboxes is
stopped as a result of these errors. These
require a corrective action by the mailbox
owner or a Dynamics 365 administrator.
All permanent errors appear in Error section of
the administrator’s and user’s alert wall.
The errors are also classified based on the object on which the error is encountered:
Email-level errors. Errors that are specific to an email and prevent processing of an individual
email without impacting processing of other emails. Error alerts are displayed in the Alerts section
of the email form.
766
Mailbox-level errors. Errors that are specific to a mailbox and prevent processing of all emails in a
mailbox and require corrective action from the respective mailbox owner. Error alerts are displayed
in the alerts section of the email form, mailbox owner’s alert wall, and on the Mailbox form.
Profile-level errors. Errors which prevent processing of all emails in one or more mailboxes and
require corrective action from the associated email server profile owner. Error alerts are displayed
on the alerts section of the email server profile form, alerts wall of the owner of the email server
profile, and on the alert walls of the impacted mailbox owners - but no action is required from them.
To know how to view the alerts and the actions you can take on these alerts, see Monitor email processing errors.
See Also Troubleshooting and monitoring server-side synchronization Set up server-side synchronization of email, appointments, contacts, and tasks Supported email service configurations for server-side synchronization
© 2016 Microsoft. All rights reserved. Copyright
Best practices for server-side synchronization
Applies To: Dynamics 365 (online), Dynamics 365 (on-premises), Dynamics CRM 2016, Dynamics CRM Online
[This topic is pre-release documentation and is subject to change.]
Consider the following when planning and deploying server-side synchronization.
Best practices for configuring server-side synchronization
If you use Microsoft Dynamics 365 (online) and Microsoft Exchange Online By default, the Microsoft Exchange Online email server profile is created for Dynamics 365 (online) organizations and should be your first choice. If you want to use your own profile, you use Dynamics 365 (online), and Exchange Online, and both services are on the same tenant, use the following settings in your email server profile (Settings > Email Configuration > Email Server Profiles).
Settings Recommendation
Auto Discover Server Location Yes
Incoming Connection
Authenticate Using Server to Server Authentication
767
Settings Recommendation
Use Impersonation No
Use same settings for Outgoing Yes
If you want to use one set of credentials to process emails with Outlook or Exchange Using one account to process email to all mailboxes is easier to maintain but requires using an account that has access to all mailboxes in Outlook or Exchange. The account must have impersonation rights on Exchange. If that single account is compromised, all mailboxes using that account are compromised. Use the following settings in your email server profile (Settings > Email Configuration > Email Server Profiles to use a single account for email processing.
Settings Recommendation
Incoming Connection
Authenticate Using Credentials Specified in Email Server Profile
User Name The administrator’s user name
Password The administrator’s password
Use Impersonation Yes
Use same settings for Outgoing Yes
Delegation (Use Impersonation = No) is not supported for syncing Appointments, Contacts, and Tasks.
If you want to use individual credentials to process emails with Outlook or Exchange An alternative to a single account to process emails is using individual accounts. This method requires more maintenance effort but does not focus security on a single account. If you want each user account to synchronize with Outlook or Exchange and you’re not using the Microsoft Exchange Online email server profile, use the following settings (Settings > Email Configuration > Email Server Profiles).
Settings Recommendation
Incoming Connection
Authenticate Using Credentials Specified by a User or Queue
Use Impersonation No
Use same settings for Outgoing Yes
Set the following in each user mailbox.
Settings Recommendation
Credentials
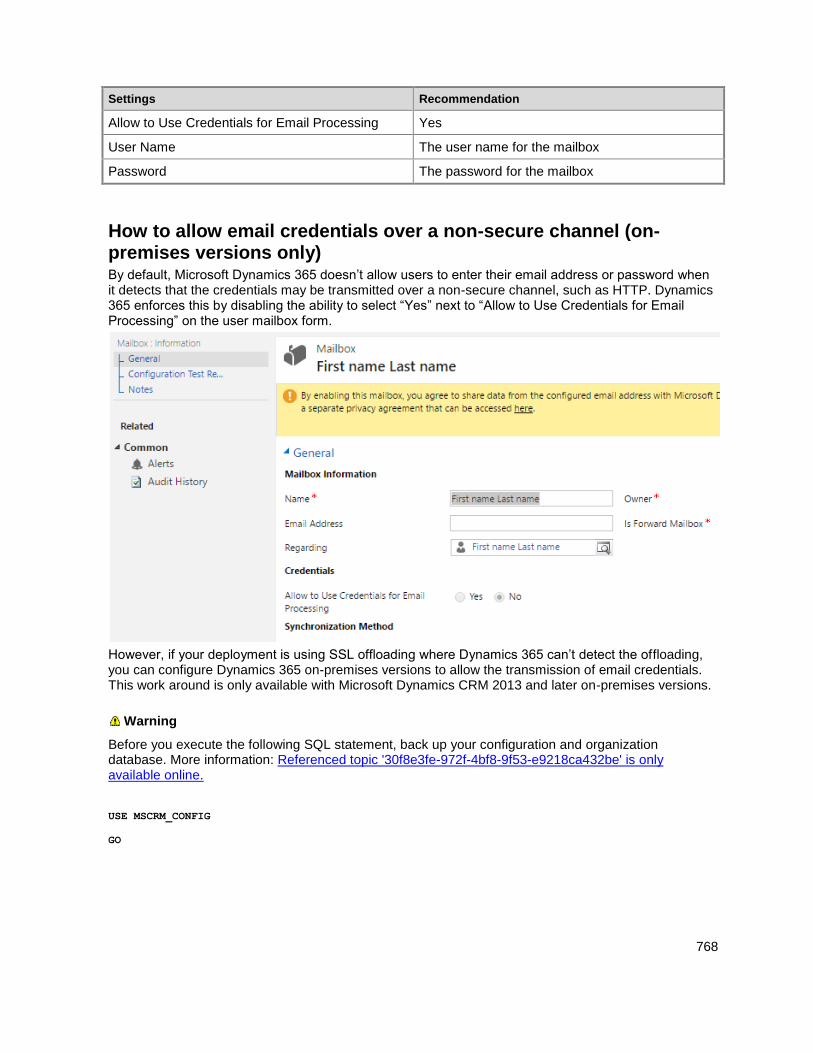
768
Settings Recommendation
Allow to Use Credentials for Email Processing Yes
User Name The user name for the mailbox
Password The password for the mailbox
How to allow email credentials over a non-secure channel (on-premises versions only) By default, Microsoft Dynamics 365 doesn’t allow users to enter their email address or password when it detects that the credentials may be transmitted over a non-secure channel, such as HTTP. Dynamics 365 enforces this by disabling the ability to select “Yes” next to “Allow to Use Credentials for Email Processing” on the user mailbox form.
However, if your deployment is using SSL offloading where Dynamics 365 can’t detect the offloading, you can configure Dynamics 365 on-premises versions to allow the transmission of email credentials. This work around is only available with Microsoft Dynamics CRM 2013 and later on-premises versions.
Warning
Before you execute the following SQL statement, back up your configuration and organization database. More information: Referenced topic '30f8e3fe-972f-4bf8-9f53-e9218ca432be' is only available online.
USE MSCRM_CONFIG
GO
769
IF EXISTS (SELECT ColumnName, BitColumn FROM DeploymentProperties WHERE ColumnName =
‘AllowCredentialsEntryViaInsecureChannels’ AND BitColumn=0)
BEGIN
Update DeploymentProperties set BitColumn=1 where
ColumnName=’AllowCredentialsEntryViaInsecureChannels’
END
See Also Set up server-side synchronization of email, appointments, contacts, and tasks Troubleshooting and monitoring server-side synchronization Troubleshooting and things to know about Microsoft Dynamics 365 for Outlook
© 2016 Microsoft. All rights reserved. Copyright
Create forward mailboxes or edit mailboxes
Applies To: Dynamics 365 (online), Dynamics 365 (on-premises), Dynamics CRM 2016, Dynamics CRM Online
[This topic is pre-release documentation and is subject to change.]
By default, when users and queues are created in Microsoft Dynamics 365, their respective mailbox records are also created. These mailbox records contain information that is specific to an individual mailbox on the email server, like email address, mailbox credentials, and email synchronization method. To process email messages using server-side synchronization for users and queues, their respective mailbox records should be associated to an email server profile record in Microsoft Dynamics 365.
If your organization wants to configure server-side synchronization using a forward mailbox, you can create a new forward mailbox record. A forward mailbox is used as a collection box for email messages that are transferred from each user’s mailbox on the email system by a server-side rule. The forward mailbox must be dedicated to server-side synchronization, and must not be used as a working mailbox by an individual user. This can be used to process email messages for users and queues whose mailboxes have Incoming Email Synchronization Method set to Forward Mailbox. You must associate the forward mailbox record to an email server profile record to process email using server-side synchronization. Forward mailbox vs. individual mailboxes.
Tip
You can use an Office 365 shared mailbox when you create a queue in Dynamics 365 and not consume an Office 365 license for a forwarding email account.
See Blog: CRM Queue with an Office 365 Shared Mailbox
770
1. Go to Settings > Email Configuration.
2. Click or tap Mailboxes.
3. Click or tap New Forward Mailbox, or to edit an existing mailbox record, open the mailbox record.
4. In the mailbox record, specify the following details.
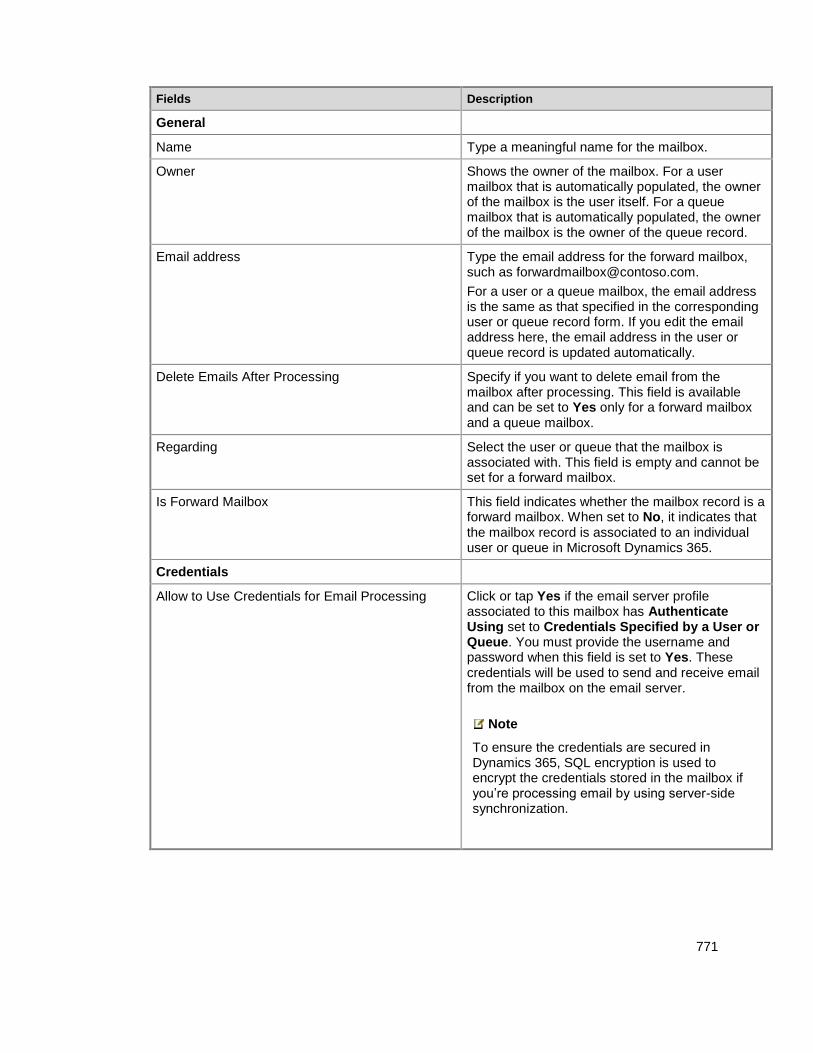
771
Fields Description
General
Name Type a meaningful name for the mailbox.
Owner Shows the owner of the mailbox. For a user mailbox that is automatically populated, the owner of the mailbox is the user itself. For a queue mailbox that is automatically populated, the owner of the mailbox is the owner of the queue record.
Email address Type the email address for the forward mailbox, such as [email protected].
For a user or a queue mailbox, the email address is the same as that specified in the corresponding user or queue record form. If you edit the email address here, the email address in the user or queue record is updated automatically.
Delete Emails After Processing Specify if you want to delete email from the mailbox after processing. This field is available and can be set to Yes only for a forward mailbox and a queue mailbox.
Regarding Select the user or queue that the mailbox is associated with. This field is empty and cannot be set for a forward mailbox.
Is Forward Mailbox This field indicates whether the mailbox record is a forward mailbox. When set to No, it indicates that the mailbox record is associated to an individual user or queue in Microsoft Dynamics 365.
Credentials
Allow to Use Credentials for Email Processing Click or tap Yes if the email server profile associated to this mailbox has Authenticate Using set to Credentials Specified by a User or Queue. You must provide the username and password when this field is set to Yes. These credentials will be used to send and receive email from the mailbox on the email server.
Note
To ensure the credentials are secured in Dynamics 365, SQL encryption is used to encrypt the credentials stored in the mailbox if you’re processing email by using server-side synchronization.
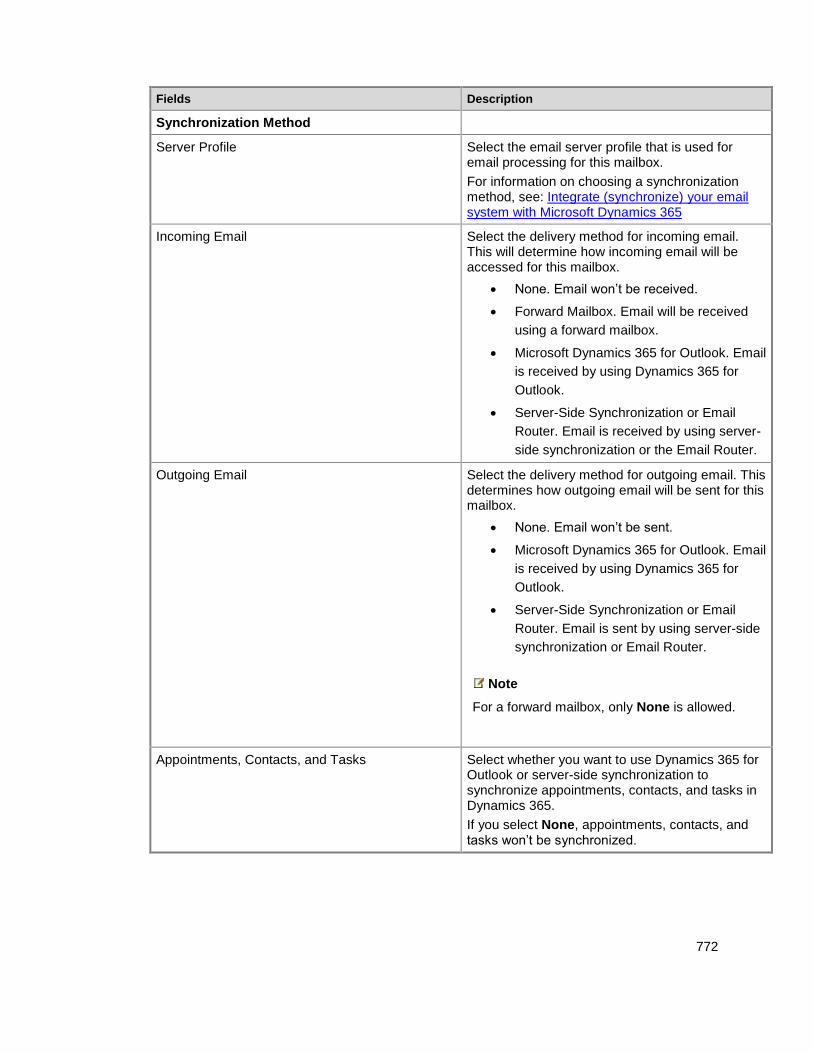
772
Fields Description
Synchronization Method
Server Profile Select the email server profile that is used for email processing for this mailbox.
For information on choosing a synchronization method, see: Integrate (synchronize) your email system with Microsoft Dynamics 365
Incoming Email Select the delivery method for incoming email. This will determine how incoming email will be accessed for this mailbox.
None. Email won’t be received.
Forward Mailbox. Email will be received
using a forward mailbox.
Microsoft Dynamics 365 for Outlook. Email
is received by using Dynamics 365 for
Outlook.
Server-Side Synchronization or Email
Router. Email is received by using server-
side synchronization or the Email Router.
Outgoing Email Select the delivery method for outgoing email. This determines how outgoing email will be sent for this mailbox.
None. Email won’t be sent.
Microsoft Dynamics 365 for Outlook. Email
is received by using Dynamics 365 for
Outlook.
Server-Side Synchronization or Email
Router. Email is sent by using server-side
synchronization or Email Router.
Note
For a forward mailbox, only None is allowed.
Appointments, Contacts, and Tasks Select whether you want to use Dynamics 365 for Outlook or server-side synchronization to synchronize appointments, contacts, and tasks in Dynamics 365.
If you select None, appointments, contacts, and tasks won’t be synchronized.
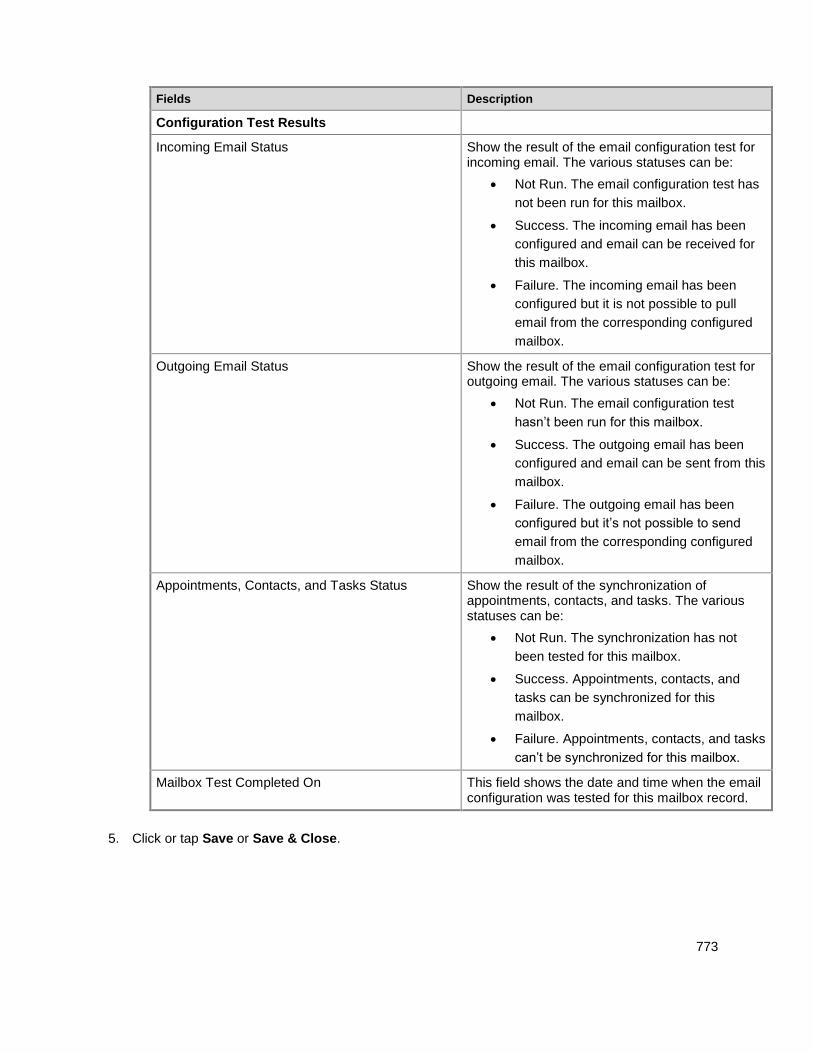
773
Fields Description
Configuration Test Results
Incoming Email Status Show the result of the email configuration test for incoming email. The various statuses can be:
Not Run. The email configuration test has
not been run for this mailbox.
Success. The incoming email has been
configured and email can be received for
this mailbox.
Failure. The incoming email has been
configured but it is not possible to pull
email from the corresponding configured
mailbox.
Outgoing Email Status Show the result of the email configuration test for outgoing email. The various statuses can be:
Not Run. The email configuration test
hasn’t been run for this mailbox.
Success. The outgoing email has been
configured and email can be sent from this
mailbox.
Failure. The outgoing email has been
configured but it’s not possible to send
email from the corresponding configured
mailbox.
Appointments, Contacts, and Tasks Status Show the result of the synchronization of appointments, contacts, and tasks. The various statuses can be:
Not Run. The synchronization has not
been tested for this mailbox.
Success. Appointments, contacts, and
tasks can be synchronized for this
mailbox.
Failure. Appointments, contacts, and tasks
can’t be synchronized for this mailbox.
Mailbox Test Completed On This field shows the date and time when the email configuration was tested for this mailbox record.
5. Click or tap Save or Save & Close.
774
See Also Set up server-side synchronization of email, appointments, contacts, and tasks
© 2016 Microsoft. All rights reserved. Copyright
Configure Outlook or Exchange folder-level tracking
Applies To: Dynamics 365 (online), Dynamics 365 (on-premises), Dynamics CRM 2016, Dynamics CRM Online
[This topic is pre-release documentation and is subject to change.]
You can enable folder-level tracking for Microsoft Exchange folders to map an Exchange inbox folder to a Microsoft Dynamics 365 record so that all the emails in the Exchange folder get automatically tracked against the mapped record in Dynamics 365. Consider an example where you have an account called Adventure Works in Dynamics 365. You can create a folder in your Microsoft Outlook called Adventure Works under your Inbox folder, and create some Exchange rules to automatically route the emails to the Adventure Works folder based on the subject or the body of an email. Next, in Dynamics 365 you can map your Exchange folder (Adventure Works) with the account record (Adventure Works) to automatically track all the emails in Dynamics 365 that land in the Adventure Works Exchange folder, and set the regarding object as the Adventure Works account record in Dynamics 365.
Tip
Check out the following video: Folder Level Tracking in CRM Online 2015 Update 1
Enable folder-level tracking 1. In Dynamics 365, click Settings > Email Configuration.
2. Click Email Configuration Settings.
3. Confirm that Process Email Using is set to Server-Side Synchronization.
4. Enable Use folder-level tracking from Exchange folders (server-side synchronization must
be enabled).
5. Configure other tracking options on this page, and then click OK.
Once you’ve enabled folder-level tracking, users will need to configure folder-tracking rules in Dynamics
365 with Settings ( ) > Options > Email > Configure Folder Tracking Rules.
Some important points about folder-level tracking Folder-level tracking of emails will work only if your organization is configured to use server-side
synchronization for emails. Server-side synchronization must be configured for Exchange (and not
775
POP3) mailboxes. For more information, see Set up server-side synchronization of email,
appointments, contacts, and tasks.
You can track emails only in folders under your Inbox folder in Exchange. Other folder emails
cannot be tracked.
You can track up to a maximum of 25 folders per user account.
Any manual changes done to the regarding object in the tracked activity records in Dynamics 365
will be overridden the next time server-side synchronization kicks in. For example, if you have set
up a mapping between the Adventure Works folder and the Adventure Works account, all the
emails in the Adventure Works Exchange folder will be tracked as activities in Dynamics 365 with
the regarding set to the Adventure Works account record. If you change the regarding to some
other record, it will automatically be overridden the next time server-side synchronization occurs. To
change the regarding for any email, move the email to a different folder such as the Inbox.
See Also Track Outlook email by moving it to a tracked Exchange folder Set up server-side synchronization of email, appointments, contacts, and tasks System Settings dialog box - Email tab Overview of tracking records in Dynamics 365 for Outlook
© 2016 Microsoft. All rights reserved. Copyright
Migrate settings from the Email Router to server-side synchronization
Applies To: Dynamics 365 (online), Dynamics 365 (on-premises), Dynamics CRM 2016, Dynamics CRM Online
[This topic is pre-release documentation and is subject to change.]
Server-side synchronization is a method in Microsoft Dynamics 365 that you can use to set up email and synchronize your appointments, contacts, and tasks. With server-side synchronization, you can centrally manage mailboxes and profiles, and also track errors about email processing. If your organization is currently using the Email Router, but wants to start using server-side synchronization instead, you can easily migrate the configuration settings from the Email Router to server-side synchronization to set up email.
Note
An organization can only use either the Email Router or server-side synchronization to process email. You can define what to use in the Email tab of System Settings in Microsoft Dynamics 365. If you select server-side synchronization, the Email Router stops functioning for the organization.
To switch from Microsoft Outlook synchronization to server-side synchronization, simply change the synchronization method in mailbox records to server-side synchronization. That’s all you have to do to make the change from Outlook synchronization to server-side synchronization.
776
During migration, the old incoming and outgoing profiles for the user and queue mailboxes are merged to create a new email server profile that will be used by server-side synchronization.
1. Go to Settings > Email Configuration.
2. Choose Migrate Email Router Data.
3. In the Email Router Data Migration wizard, in the three text boxes, choose Browse, and select the
three files specified at the top of the page in the same order. If you must migrate data from multiple
email routers, choose More Email Routers and again select the three files. You can migrate data
from up to four email routers at once.
Note
The maximum combined size of all the files from all the email routers that you can upload at a time is 32 MB.
4. Choose Next.
5. On the Select Email Server Profiles to Migrate page, the incoming and outgoing email server
profiles of the Email Router are listed and the details about the new email server profile for server-
side synchronization is also listed. If you want to migrate the profile, in Migrate Server Profile,
choose Yes.
In the Email Router, incoming and outgoing email server profiles are different and each user or queue is associated with both incoming and outgoing profiles. However, with server-side synchronization, the incoming and outgoing settings are defined in a single profile and a user or queue is associated with this profile. Thus, when you migrate the data, the data from two server profiles is combined into one. The Select Email Server Profiles to Migrate page shows details about the new email server profile that will be created.
6. Choose Next.
7. The Migration Review Summary page shows what data will be migrated. Choose Start.
After the migration is complete, you’ll see the summary of the migrated data. You must test the email configuration for the mailboxes after the migration is complete. To be able to start email processing through server-side synchronization, in the Process Email From field in the System Settings dialog box, select Server-Side Synchronization.
See Also Set up server-side synchronization of email, appointments, contacts, and tasks Monitor email processing errors
777
© 2016 Microsoft. All rights reserved. Copyright
Set up Email Router
Applies To: Dynamics CRM 2016, Dynamics CRM Online
Note
The Microsoft Dynamics CRM Email Router is deprecated for December 2016 update for Dynamics 365 (online and on-premises) or later. We strongly recommend that you migrate all email routing functionality to use the server-side synchronization feature. More information: Migrate settings from the Email Router to server-side synchronization and Set up server-side synchronization of email, appointments, contacts, and tasks.
The Microsoft Dynamics CRM Email Router provides centrally managed Exchange Server and POP3/SMTP-based email server routing for users, queues, and forward mailboxes. The Email Router runs continuously as a service and only synchronizes email messages. You can’t use it to synchronize appointments, contacts, or tasks.
This section covers installing and configuring the Microsoft Dynamics CRM Email Router.
Privacy notice If you use Microsoft Dynamics CRM, when you use the Email Router, Dynamics CRM emails are synchronized to your specified email system, and your emails in specified mailboxes may be synced back to Dynamics CRM. The Email Router is available as a separate component for download and installation. An administrator can configure the Email Router to specify which users have the ability to send emails from Dynamics CRM or synchronize emails to Dynamics CRM, as well as which mailboxes to synchronize.
In This Section Install Email Router for Microsoft Dynamics CRM and Dynamics CRM Online
Install Microsoft Dynamics CRM Email Router using a command prompt
Uninstall, change, or repair Email Router
Use Email Router Configuration Manager
© 2016 Microsoft. All rights reserved. Copyright
778
Install Email Router for Microsoft Dynamics CRM and Dynamics CRM Online
Applies To: Dynamics CRM 2016, Dynamics CRM Online
Note
The Microsoft Dynamics CRM Email Router is deprecated for December 2016 update for Dynamics 365 (online and on-premises) or later. We strongly recommend that you migrate all email routing functionality to use the server-side synchronization feature. More information: Migrate settings from the Email Router to server-side synchronization and Set up server-side synchronization of email, appointments, contacts, and tasks.
The Microsoft Dynamics CRM Email Router is a software application that creates an interface between Microsoft Dynamics CRM 2016 or Microsoft Dynamics CRM Online and a supported Microsoft Exchange Server, SMTP, or a POP3-compliant email server. After the Email Router is installed and configured, it transfers email messages to the Microsoft Dynamics CRM system, and sends outgoing email messages that are created by users, workflows, or custom applications in the Microsoft Dynamics CRM system.
Important
Instead of using the Email Router, consider using server-side synchronization, which offers similar functionality and is easier to manage. More information: Set up server-side synchronization of email, appointments, contacts, and tasks
Only one instance of the Email Router should be installed in an organization.
Microsoft Dynamics CRM stores email messages as activity records. These email activity records include both the contents of the email message, such as the text of the message and its subject line, and relevant associations with other Microsoft Dynamics CRM records.
For example, when a salesperson replies to a customer about a case, the salesperson creates an email activity record that includes the text of the message, plus information associating the email activity record with the correct case record.
Note
For a list of prerequisites, see Microsoft Dynamics CRM Email Router software requirements.
To download Microsoft Dynamics CRM 2016 Email Router.
See Also Set up Email Router Email Router
© 2016 Microsoft. All rights reserved. Copyright

779
Install Email Router and Rule Deployment Wizard
Applies To: Dynamics CRM 2016, Dynamics CRM Online
Note
The Microsoft Dynamics CRM Email Router is deprecated for December 2016 update for Dynamics 365 (online and on-premises) or later. We strongly recommend that you migrate all email routing functionality to use the server-side synchronization feature. More information: Migrate settings from the Email Router to server-side synchronization and Set up server-side synchronization of email, appointments, contacts, and tasks.
To install the Email Router and the Rule Deployment Wizard, run the Microsoft Dynamics CRM Email Router Setup. To install the Email Router and the Rule Deployment Wizard, follow the instructions in this section.
Keep your Microsoft Dynamics CRM deployment current by installing the latest updates and hotfixes automatically from Microsoft Update. You can also search for updates on the Microsoft Download Center. Choosing Microsoft Update lets you install recommended updates automatically and without administrator permissions.
If you have a previous version of the Email Router installed, do not use the procedures in this section. Instead, see Upgrade Dynamics 2015 Email Router to Dynamics CRM 2016 Email Router.
To set up the Email Router 1. Installation Task 1: Install the Email Router and, optionally, the Rule Deployment Wizard. For more
information, see Install the Email Router below.
2. Installation Task 2: Configure the Email Router. For more information, see Configure the Email
Router.
3. Installation Task 3: (Optional) Deploy Inbox Rules. For more information, see Deploy inbox rules.
Important
If you did not specify an incoming email server during Microsoft Dynamics CRM Server Setup, you must manually add the service account running the Email Router service to the PrivUserGroup security group. The PrivUserGroup security group is created during Microsoft Dynamics CRM Server Setup.
In This Topic Install the Email Router
Minimum permissions required to run the Email Router and the Rule Deployment Wizard
780
Install the Email Router
1. Meet the Email Router requirements specified in Microsoft Dynamics CRM Email Router hardware
requirements and in Microsoft Dynamics CRM Email Router software requirements.
2. Log on to the computer that will serve as the Email Router as a Domain User with Local
Administrator privileges. We recommend that you dedicate a Windows desktop PC that will not be
shut down on a regular basis so that the Email Router will consistently route email messages.
3. Access and run the installation files.
To install from the Web, open the download page (Microsoft Dynamics CRM 2016 Email
Router) and then download and run the executable file.
Note
The download site may present you with a choice of executable files. If you are installing on a 64-bit computer, choose a file with a name such as DynamicsCRMEmail_1033_amd64.exe. For a 32-bit computer, the file name is similar to DynamicsCRMEmail_1033_i386.exe.
To install from a network or from a DVD: Open the appropriate installation folder
(..\EmailRouter\amd64 for 64-bit or ..\EmailRouter\i386 for 32-bit) and then run the
SetupEmailRouter.exe file.
4. If a Security Warning dialog box appears, click Run.
5. On the Welcome to Microsoft Dynamics CRM Email Router setup page, select whether you
want to update Email Router setup. We recommend that you click Get updates for Microsoft
Dynamics CRM. Then, click Next.
6. On the License Agreement page, review the information and if you accept the license agreement,
click I accept this license agreement, and then click I Accept.
7. If required components are missing, the Install Required Components page appears. If this page
does not appear, all required components are installed, and you can skip to the next step in the
installation procedure.
If required components are listed, you can install them now. Click Install. After the components are installed, the status column changes from Not Installed to Installed. Click Next to continue.
Note
These components are required before the Email Router can be installed. You can exit Setup and install the components manually, or select Install. The Next button on this page is disabled until Setup detects that these components are installed.
Setup might require connection to the internet if the required component setup binary files are not found on your computer.
Although installation of certain components requires a computer restart, the computer is not restarted automatically. Setup installs the required components and then waits for your input. At this point,
781
quit the setup process, restart the computer, and continue the Email Router installation by running SetupEmailRouter.exe again.
8. On the Select Router Components page, select either or both options, and then click Next.
Microsoft Dynamics CRM Email Router Service. This option installs the Email Router
service and Email Router Configuration Manager.
Rule Deployment Wizard. This option installs the Rule Deployment Wizard. Optionally, you
can install this wizard on any computer in the Active Directory Domain of the Exchange Server.
Caution
On the Select Router Components page, if you clear the option of a component that has already been installed, that component will be uninstalled.
9. On the Select Microsoft Update Preference page, you must select either of the following options,
and then click Next. For more information about the legal terms and privacy with Microsoft Update
licensing, see Windows Update FAQ.
Use Microsoft Update when I check for updates (recommended). By selecting this option,
Email Router will use the Microsoft Update settings on the computer.
I don’t want to use Microsoft update. You should only select this option if the computer uses
another method to install updates such as by using Windows Server Update Services (WSUS).
10. On the Select Install Location page, either accept the Default file installation directory or Browse
to indicate a different location, and then click Next.
11. The System Checks page appears. This page is a summary of all system requirements for a
successful Email Router installation. Verification errors must be corrected before the installation
can continue. If there is a problem that will take time to correct, cancel Setup at this point, fix the
problem, and restart Setup. When no verification errors remain, click Next.
12. The Ready to Install page appears. Review the installation selections that you have made. Click
Back to change your selections, or Install to install now.
13. After Email Router Setup is finished installing files, click Finish.
Minimum permissions required to run the Email Router and the Rule Deployment Wizard For Email Router, the following conditions must be met:
The account that is running the Email Router service (Microsoft Dynamics CRM Email Router)
must be the Local System account.
For Microsoft Dynamics CRM (on-premises), the computer where the Email Router service is
running must be added to the PrivUserGroup Active Directory security group. This membership
can be added during Microsoft Dynamics CRM Server Setup.
782
For the Rule Deployment Wizard, the following conditions must be met:
The user must have logged on as a Microsoft Dynamics CRM user with a security role.
The user must be a member of the Local Administrators group on the computer where the
wizard is running.
For Microsoft Dynamics CRM (on-premises), the user must have administrative permissions on
the Exchange Server.
See Also Install Email Router for Microsoft Dynamics CRM and Dynamics CRM Online Email Router
© 2016 Microsoft. All rights reserved. Copyright
Configure the Email Router
Applies To: Dynamics CRM 2016, Dynamics CRM Online
You can configure Email Router after it is installed. Some of these configuration tasks are mandatory. Others are optional in that you use them to enable the following functionality:
Configuration Task 1: Set up profiles and (optionally) set up deployments, by using the Email
Router Configuration Manager. For more information, see "Email Router Configuration Manager"
later in this topic.
Configuration Task 2: Microsoft Dynamics CRM users must have their incoming email access
type set to Email Router. For more information, see "Set email access type" later in this topic.
Configuration Task 3: (Optional) As part of configuration, you can deploy rules. For more
information, see "Deploy Inbox Rules" later in this topic.
Configuration Task 4: (Optional) As part of configuration, you can set up a forward mailbox. For
more information, see "Set up a Forward Mailbox" later in this topic.
In This Topic Email Router Configuration Manager
Keep user credentials secure
Set email access type
Deploy inbox rules
Set up a forward mailbox
783
Email Router Configuration Manager The Email Router Configuration Manager is a tool that you use to configure the Email Router. The Email Router Configuration Manager is installed with the Email Router and can be run after the Email Router Setup is completed.
The Email Router settings configured by using the Email Router Configuration Manager are saved in the Microsoft.Crm.tools.EmailAgent.xml file that is located in the folder where the Email Router is installed.
The Email Router has several options. Before you run the Email Router Configuration Manager, you should determine how you want to configure these options:
Incoming Configuration. The Microsoft Dynamics CRM Email Router supports popular versions of
Exchange or POP3 email systems for incoming email messages. More information: Microsoft
Dynamics CRM Email Router software requirements
Outgoing Configuration. Microsoft Dynamics CRM supports only Exchange Online or SMTP
email systems for outgoing email messages.
Mailbox Monitoring Type. You can configure the following two mailbox types:
Forward Mailbox. If you select Forward Mailbox when you run the Email Router Configuration
Manager, the Email Router uses a single mailbox to process email messages. Then, for each
Microsoft Dynamics CRM user or queue that will receive email messages, you must create a
rule for the user or queue by running the Rule Deployment Wizard.
Email Router. If email messages can be forwarded as attachments, but your email system
does not allow rules, you must configure each user to use the Email Router setting. If you are
using Exchange Server, we recommend that you use Forward Mailbox Monitoring.
For more information about Email Router options, see Email Router. Also, see Use Email Router Configuration Manager.
To start the Email Router Configuration Manager, click Start, point to All Programs, point to Microsoft Dynamics CRM Email Router, and then click Microsoft Dynamics CRMEmail Router Configuration Manager.
Configuration profiles You must configure at least one incoming email profile and one outgoing email profile to enable the Email Router to route email to and from your Microsoft Dynamics CRM organization. Depending on the complexity of your organization’s email system, you may have to create multiple incoming and outgoing configuration profiles. For example, if your organization requires incoming Email Router services for multiple email servers, you must create one incoming configuration profile for each email server.
Important
Due to performance throttling when accessing Exchange Online, the Email Router should not be configured to use the on-premises deployments of Microsoft Exchange Server or POP3 accounts when a profile is also configured for Exchange Online. If you must communicate with both Exchange Online and an Exchange Server On-Premises or POP3 email server, you can do so by using multiple instances of the Email Router (you can install only one instance of the Email Router on a computer). Connecting to Exchange Server On-Premises and POP3 email servers by using multiple profiles from
784
the same Email Router instance is supported.
Authentication types You must specify the type of authentication the Email Router will use for each incoming and outgoing email profile. Depending on the type of email server that you use to process incoming email, select one of the following authentication types:
Windows Authentication. This is the only authentication type available if you use Microsoft
Exchange Server for incoming email.
NTLM. This option is available only if you use a POP3-compliant server for incoming email.
Clear Text. This option is available if you use either a POP3-compliant server or Microsoft
Exchange Online for incoming email. For Microsoft Exchange Online, this is the only authentication
type available.
For Exchange Server, incoming profiles support Windows authentication only. For POP3-compliant servers, incoming profiles support NTLM and clear text authentication.
Tip
You can configure the Email Router to use POP3 protocol with Exchange Server. However, the Exchange Server POP3 service is disabled by default. For information about how to enable POP3, see the Exchange Server documentation.
Important
Clear text authentication transmits unencrypted user names and passwords. If you use clear text authentication, we recommend that you do this only with Transport Layer Security (TLS) or Secure Sockets Layer (SSL). Select the Use SSL and set the Network Port field (on the Advanced tab) to a value that is appropriate for your environment. (If you specify Exchange Online, the Use SSL option is not available because you can connect to Exchange Online only over an https connection.) Verify your POP3 server requirements with your email administrator.
Note
Anonymous SMTP is only valid for internal, non-Internet-facing SMTP servers. Many SMTP servers do not support Anonymous authentication. To ensure uninterrupted email flow from the Email Router, verify your SMTP server requirements with your email administrator.
Access credentials Depending on how you set the other configuration profile options, the following options are available for specifying the user name and password that the Email Router will use to access each mailbox that the profile serves.
Important
785
If you use access credentials that are valid for the email server but not for a particular mailbox, a "401 access denied" error is generated when you test access.
Incoming profiles support the following access credentials:
Local System Account. This option requires a machine trust between the computer where the
Email Router is running and the computer where Microsoft Exchange Server is running. For
incoming profiles, this option is available only for Exchange Server (not for Exchange Online or
other POP3 compliant email servers).
User specified. This option is available only in the on-premises version of the product. This option
is available for all email server types, protocols, and authentication types.
This option requires that each user enter a user name and password in the Set Personal Options dialog box (available in the Workplace section of the Microsoft Dynamics CRM web client). This enables the Email Router to monitor mailboxes by using each user's access credentials. When a user changes a domain password -- for example, when it expires -- the user must update the password in Microsoft Dynamics CRM so that the Email Router can continue to monitor the mailbox. This option is available for Exchange Server, Exchange Online and other POP3 compliant email servers.
Other specified. Select this option if you want the Email Router to authenticate by using the
credentials of a specified user. This option is available for all email server types, protocols, and
authentication types. The specified user must have full access to all the mailboxes that the
incoming profile will serve. To specify multiple sets of access credentials, you must create a
separate configuration profile for each specified user.
Outgoing profiles support the following access credentials. For more information, see the Email Router Configuration Manager Help.
Local System Account. Select this option if you select SMTP as the email server type and you
want to authenticate by using the local system account of the computer where the Email Router is
running. This option requires a machine trust between the computer where the Email Router is
running and the computer where the Exchange Server is running. For more information, see
“Securing Exchange Server and Outlook” in Referenced topic '833034aa-73b6-475a-8fde-
0060ebeb7726' is only available online.. If you select this option, either the Email Router must be
installed on the same server as the Microsoft Dynamics CRM server, or the Email Router computer
name must have been entered during Microsoft Dynamics CRM Server Setup. This option is
available only when you select SMTP as the email server type, and Windows Authentication or
Anonymous as the authentication type.
User Specified.
This option is available in the on-premises and Service Provider editions of Microsoft Dynamics CRM, and when you are using Exchange Online as the Exchange Server Type.
Select this option if you want the Email Router to authenticate by using an individual user account or a mailbox.
Other Specified. This option enables the administrator to configure the Email Router to send email
messages on each user's behalf by using the access credentials of a specified user account. The
specified user must have full access to all the mailboxes that the incoming profile will serve. To
786
specify multiple sets of access credentials, you must create a separate configuration profile for
each specified user. This option is not available if you select SMTP as the email server type and
Anonymous as the authentication type.
User Type. If you select Exchange Online as the email server type and Other Specified as the
access credentials, you must select either Administrator or User as the user type. Select
Administrator if you want to use a single set of credentials to process multiple mailboxes, or if you
want to provide a different set of email credentials to process individual mailboxes.
Access Type. If you select Exchange Online as the email server type, Other Specified as the
access credentials, and Administrator as the user type, you must select either Delegate Access
or Send as as the access type.
Delegate Access causes email to be sent as "Send on behalf of" messages.
Send as causes email to be sent as "Send As" messages.
Deployments You can link a configuration profile of the Email Router to Microsoft Dynamics CRM Online. It is not mandatory, but doing so provides the benefit of assigning the configuration profile to users for whom no other profile is assigned.
You must select the type of Microsoft Dynamics CRM system that the Email Router will connect to. The following options are available:
My company. Select this option if Microsoft Dynamics CRM is deployed at your company.
An online service provider. Select this option if the deployment that the Email Router will connect
to is an online service provider deployment of Microsoft Dynamics CRM.
Microsoft Dynamics CRM Online. Select this option to connect the Email Router to a Microsoft
Dynamics CRM Online organization.
Microsoft Dynamics CRM server
Type the URL of Microsoft Dynamics CRM server.
If you are connecting to an on-premises version at your company, the format is similar to
http://myCRMServer:5555/OrganizationUniqueName.
If you are connecting to a service provider deployment, contact your service provider to obtain the
correct URL. For more information, see the documentation for service providers that is available
from the Microsoft Download Center.
If you are connecting to Microsoft Dynamics CRM Online and your organization uses Microsoft
account, enter:
https://dev.crm.dynamics.com/<OrganizationName> where OrganizationName is a placeholder
for the actual ID of your organization.
If you are connecting to Microsoft Dynamics CRM Online and your organization uses Microsoft
Office 365, enter:
787
https://disco.crm.dynamics.com/<OrganizationName> where OrganizationName is a
placeholder for the actual ID of your organization.
Important
Make sure that the URL of the Microsoft Dynamics CRM deployment is spelled correctly. The OrganizationUniqueName part of the URL must be spelled exactly as it appears in the Microsoft Dynamics CRM server. To determine the OrganizationUniqueName, start the Microsoft Dynamics CRM web application as a user who has the System Customizer role. Click Settings, and then click Customizations. On the Customization page, click Developer Resources. The OrganizationUniqueName is displayed below the Organization Unique Name label.
One deployment type at a time
There are two types of deployments. One type includes deployments to Microsoft Dynamics CRM Online only. The other type includes deployments to either My company or An online service provider. If you define multiple deployments for the Email Router, they must all be of the same type. That is, after you have created a deployment that uses one deployment type, any other deployments that you create must be of the same type. (To create a deployment of the other type, you must first delete all of the deployments that currently exist.)
Obtaining user email credentials from Microsoft Dynamics CRM
In certain circumstances, the Email Router must obtain user credentials from Microsoft Dynamics CRM. However, Microsoft Dynamics CRM stores user names and passwords only when HTTPS has been selected as the protocol that the Email Router will use to access Microsoft Dynamics CRM. You can change this behavior so that Microsoft Dynamics CRM can store and distribute user names and passwords to the Email Router over HTTP. For more information, see “HTTP Option” in “Keep user credentials secure” later in this topic.
Access credentials
You must specify the access credentials that the Email Router will use to log on to Microsoft Dynamics CRM Server.
To use the Local System Account (available only if you select My company as the deployment type), either the Email Router must be installed on the same computer as Microsoft Dynamics CRM Server, or the computer where the Email Router is installed must be a member of the Active Directory PrivUserGroup security group.
Tip
For an on-premises deployment of Microsoft Dynamics CRM, the computer will already be added to the PrivUserGroup security group if you specified the Email Router computer during Microsoft Dynamics CRM Server Setup.
788
Configuring email routing for multiple configurations and deployments You can add or edit an Email Router configuration, which contains a single incoming and outgoing method that routes email to the email server. In the configuration, you must specify the following:
A name of the configuration profile, for display and reference.
The direction of the configuration profile: incoming or outgoing.
The email transport type, such as Exchange or POP3 for incoming, and SMTP for outgoing.
You can also add or edit Email Router deployments. An Email Router deployment contains a URL to a Microsoft Dynamics CRM server computer, one incoming configuration, and one outgoing configuration. In an Email Router deployment object, you specify the following components:
A URL to the Microsoft Dynamics CRM server computer (required).
A default incoming configuration (optional).
A default outgoing configuration (optional).
To specify additional operational settings for a new or existing configuration profile, click Advanced on the Email Router Configuration Manager dialog box.
For more information, see the Email Router Configuration Manager Help.
Keep user credentials secure If your organization uses the Email Router to send and receive messages on behalf of users or queues, you should increase security. You can do this either by using the HTTPS protocol or by enabling IPsec.
Note
This issue applies only to users of the on-premises deployment of Microsoft Dynamics CRM.
HTTPS option In processing email for a user or queue, the Email Router requires credentials for the user or queue. Those credentials can be entered in the Microsoft Dynamics CRM web application in the Set Personal Options dialog box (for users) and in the Queues form (for queues). Microsoft Dynamics CRM stores these credentials in encrypted form in the Microsoft Dynamics CRM database. The Email Router uses a key stored in the Microsoft Dynamics CRM database to decrypt these credentials. The call that the Email Router makes to obtain this key enforces HTTPS. In Microsoft Dynamics CRM Server, the Email Router functions this way by default, which means that you need not take any action to retain this behavior. However, if you do not want to use HTTPS, you must set a particular Windows registry key, as described in the following section.
HTTP option If you do not want to use HTTPS, you must set a Windows registry key, as follows:
789
1. On the Microsoft Dynamics CRM server, check the value of the registry key
DisableSecureDecryptionKey at the path HKLM\Software\Microsoft\MSCRM. If this registry key is
present, set its value to 1. (If the key is not present or set to 0, calls from the Email Router to the
Microsoft Dynamics CRM server are made using HTTPS.) Setting the value of this key to 1 allows
the Email Router to obtain information from the Microsoft Dynamics CRM database over the HTTP
protocol.
2. If you changed the value of DisableSecureDecryptionKey, do the following on the Microsoft
Dynamics CRM server: Restart Internet Information Services (IIS). To do this, click Start, click Run,
type IISRESET, and then click OK.
3. (Recommended) Enable secure networking, such as Windows Firewall, for all communications
between the Microsoft Dynamics CRM server and the Email Router computer. More information:
Windows Firewall with Advanced Security Overview
Managing certificates to use the email router with HTTPS If you are running Microsoft Dynamics CRM on HTTPS and one or more certificates is not signed by a certification authority, do the following on the computer on which the Email Router is installed:
For the Microsoft Dynamics CRM certificate
1. If the Email Router Service is configured to use the "LocalSystem" account, import the Microsoft
Dynamics CRM certificate into the trusted store of the local machine account of the computer on
which the Email Router is installed.
2. If the Email Router Service is configured to use any other specific user account, import the
Microsoft Dynamics CRM certificate into the trusted store of that user's account on the computer on
which the Email Router is installed.
For any Exchange Server certificates:
1. If the Email Router Service is configured to use the "LocalSystem" account, import the Exchange
Server certificate into the trusted store of the local machine account of the computer on which the
Email Router is installed.
2. If the Email Router Service is configured to use any other specific user account, import the
Exchange Server certificate into the trusted store of that user's account on the computer on which
the Email Router is installed.
Set email access type Before a user can send and receive email messages that will be tracked in Microsoft Dynamics CRM, you must change the email access type that is set for that user, as described in the following procedure.
To set the email access type
1. Go to Settings > Security.
2. Choose Users. Find the user whose settings you want to edit. You may need to navigate to a
different page.
790
3. Click the name of the user, or select the user and then click Edit. The User form opens. You can
edit the messaging options in the Email Access Configuration section.
Warning
By default, Microsoft Dynamics CRM sets both the incoming email access type and the outgoing email access type to "Dynamics 365 for Outlook."
4. For each user of the Microsoft Dynamics CRM web application whose mail will be routed by the
Email Router, you must change the incoming type to Email Router or to Forward Mailbox, and the
outgoing type to Email Router.
Set the email router to work with Microsoft Dynamics CRM (online)
1. Start the Email Router Configuration Manager.
2. Click the Deployments tab.
3. Click New to create a new deployment.
4. Make sure that the Deployment option is set to Microsoft Dynamics CRM Online. If the
Microsoft Dynamics CRM Online option is not available, delete the existing deployments as
explained in the following note:
Note
There are two types of deployments. One type includes deployments to Microsoft Dynamics CRM Online only. The other type includes deployments to either My company or An online service provider. If you define multiple deployments for the Email Router, they must all be of the same type. That is, after you have created a deployment that uses one deployment type, any other deployments that you create must be of the same type. (To create a deployment of the other type, you must first delete all of the deployments that currently exist.)
5. Enter the rest of the information required to define the deployment and then click OK to finish.
Deploy inbox rules An important part of routing email messages to your Microsoft Dynamics CRM system is the placement of an Microsoft Exchange Server inbox rule in the inbox of each Microsoft Dynamics CRM user or queue. This rule sends a copy of each message that is received by a Microsoft Dynamics CRM user to the Microsoft Dynamics CRM system mailbox. From the Microsoft Dynamics CRM system mailbox, the Email Router retrieves the messages and creates an email activity in Microsoft Dynamics CRM.
To deploy these Microsoft Dynamics CRM user inbox rules, use the Rule Deployment Wizard, which can be run at any time to add or change the inbox rules for your Microsoft Dynamics CRM users.
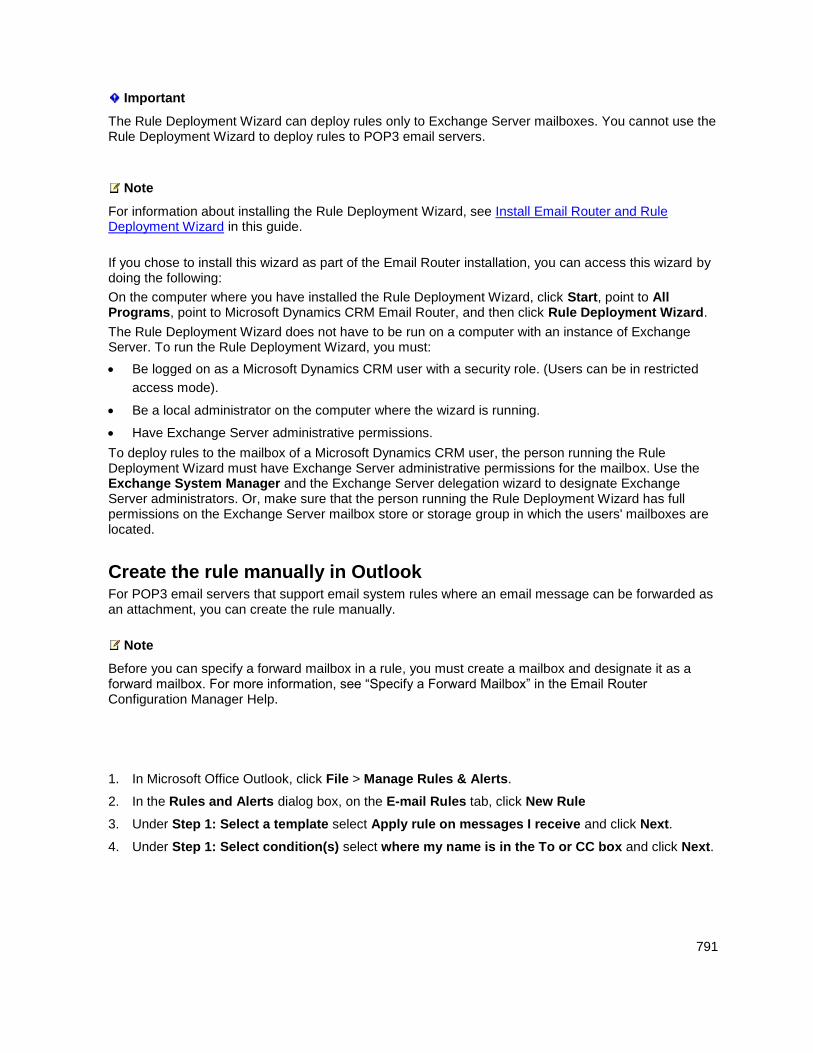
791
Important
The Rule Deployment Wizard can deploy rules only to Exchange Server mailboxes. You cannot use the Rule Deployment Wizard to deploy rules to POP3 email servers.
Note
For information about installing the Rule Deployment Wizard, see Install Email Router and Rule Deployment Wizard in this guide.
If you chose to install this wizard as part of the Email Router installation, you can access this wizard by doing the following:
On the computer where you have installed the Rule Deployment Wizard, click Start, point to All Programs, point to Microsoft Dynamics CRM Email Router, and then click Rule Deployment Wizard.
The Rule Deployment Wizard does not have to be run on a computer with an instance of Exchange Server. To run the Rule Deployment Wizard, you must:
Be logged on as a Microsoft Dynamics CRM user with a security role. (Users can be in restricted
access mode).
Be a local administrator on the computer where the wizard is running.
Have Exchange Server administrative permissions.
To deploy rules to the mailbox of a Microsoft Dynamics CRM user, the person running the Rule Deployment Wizard must have Exchange Server administrative permissions for the mailbox. Use the Exchange System Manager and the Exchange Server delegation wizard to designate Exchange Server administrators. Or, make sure that the person running the Rule Deployment Wizard has full permissions on the Exchange Server mailbox store or storage group in which the users' mailboxes are located.
Create the rule manually in Outlook For POP3 email servers that support email system rules where an email message can be forwarded as an attachment, you can create the rule manually.
Note
Before you can specify a forward mailbox in a rule, you must create a mailbox and designate it as a forward mailbox. For more information, see “Specify a Forward Mailbox” in the Email Router Configuration Manager Help.
1. In Microsoft Office Outlook, click File > Manage Rules & Alerts.
2. In the Rules and Alerts dialog box, on the E-mail Rules tab, click New Rule
3. Under Step 1: Select a template select Apply rule on messages I receive and click Next.
4. Under Step 1: Select condition(s) select where my name is in the To or CC box and click Next.
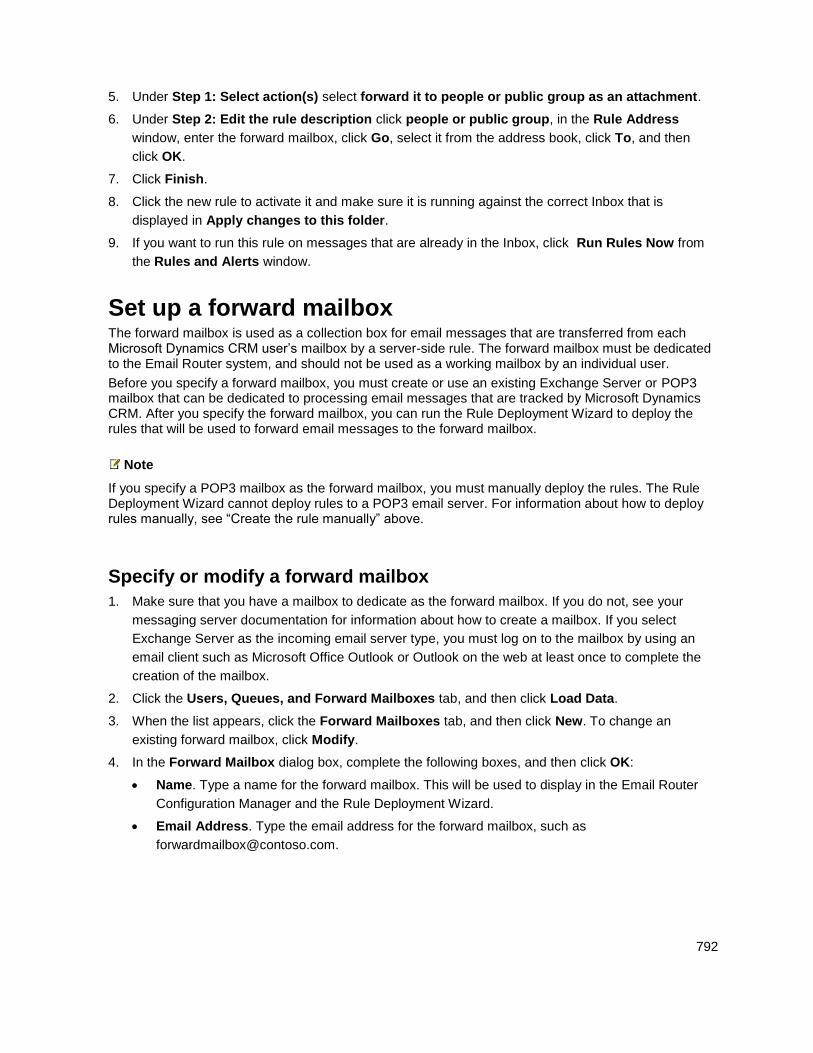
792
5. Under Step 1: Select action(s) select forward it to people or public group as an attachment.
6. Under Step 2: Edit the rule description click people or public group, in the Rule Address
window, enter the forward mailbox, click Go, select it from the address book, click To, and then
click OK.
7. Click Finish.
8. Click the new rule to activate it and make sure it is running against the correct Inbox that is
displayed in Apply changes to this folder.
9. If you want to run this rule on messages that are already in the Inbox, click Run Rules Now from
the Rules and Alerts window.
Set up a forward mailbox The forward mailbox is used as a collection box for email messages that are transferred from each Microsoft Dynamics CRM user’s mailbox by a server-side rule. The forward mailbox must be dedicated to the Email Router system, and should not be used as a working mailbox by an individual user.
Before you specify a forward mailbox, you must create or use an existing Exchange Server or POP3 mailbox that can be dedicated to processing email messages that are tracked by Microsoft Dynamics CRM. After you specify the forward mailbox, you can run the Rule Deployment Wizard to deploy the rules that will be used to forward email messages to the forward mailbox.
Note
If you specify a POP3 mailbox as the forward mailbox, you must manually deploy the rules. The Rule Deployment Wizard cannot deploy rules to a POP3 email server. For information about how to deploy rules manually, see “Create the rule manually” above.
Specify or modify a forward mailbox
1. Make sure that you have a mailbox to dedicate as the forward mailbox. If you do not, see your
messaging server documentation for information about how to create a mailbox. If you select
Exchange Server as the incoming email server type, you must log on to the mailbox by using an
email client such as Microsoft Office Outlook or Outlook on the web at least once to complete the
creation of the mailbox.
2. Click the Users, Queues, and Forward Mailboxes tab, and then click Load Data.
3. When the list appears, click the Forward Mailboxes tab, and then click New. To change an
existing forward mailbox, click Modify.
4. In the Forward Mailbox dialog box, complete the following boxes, and then click OK:
Name. Type a name for the forward mailbox. This will be used to display in the Email Router
Configuration Manager and the Rule Deployment Wizard.
Email Address. Type the email address for the forward mailbox, such as
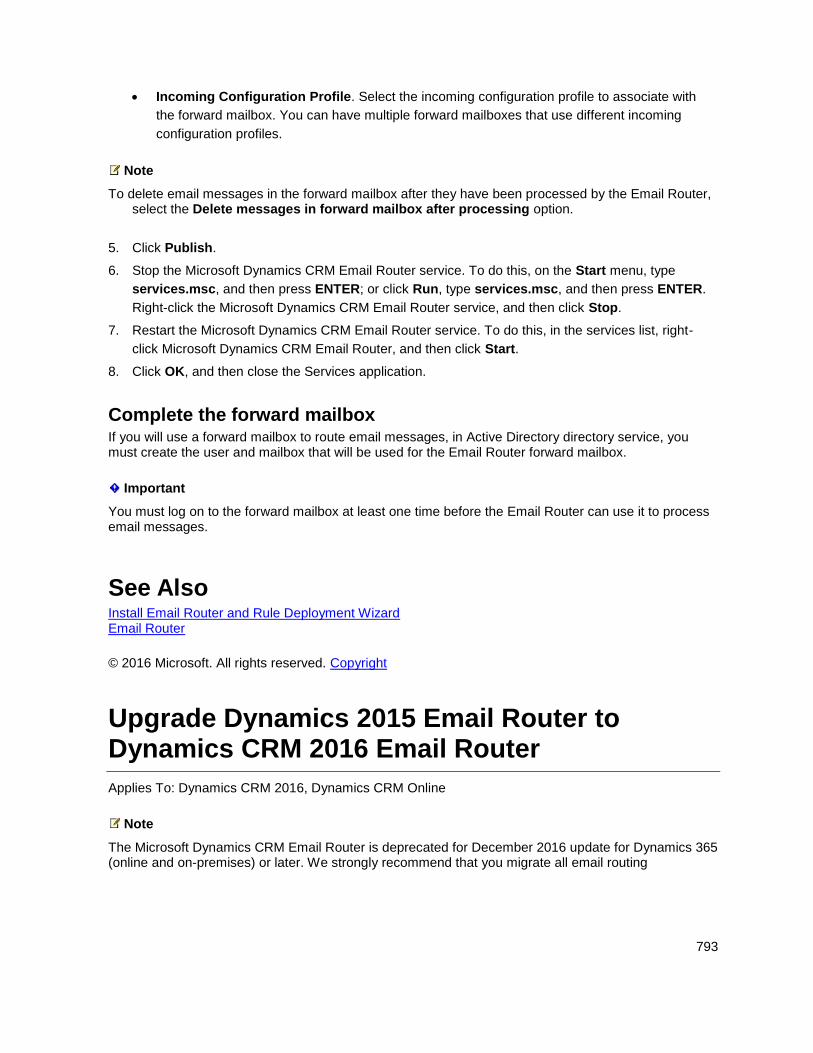
793
Incoming Configuration Profile. Select the incoming configuration profile to associate with
the forward mailbox. You can have multiple forward mailboxes that use different incoming
configuration profiles.
Note
To delete email messages in the forward mailbox after they have been processed by the Email Router, select the Delete messages in forward mailbox after processing option.
5. Click Publish.
6. Stop the Microsoft Dynamics CRM Email Router service. To do this, on the Start menu, type
services.msc, and then press ENTER; or click Run, type services.msc, and then press ENTER.
Right-click the Microsoft Dynamics CRM Email Router service, and then click Stop.
7. Restart the Microsoft Dynamics CRM Email Router service. To do this, in the services list, right-
click Microsoft Dynamics CRM Email Router, and then click Start.
8. Click OK, and then close the Services application.
Complete the forward mailbox If you will use a forward mailbox to route email messages, in Active Directory directory service, you must create the user and mailbox that will be used for the Email Router forward mailbox.
Important
You must log on to the forward mailbox at least one time before the Email Router can use it to process email messages.
See Also Install Email Router and Rule Deployment Wizard Email Router
© 2016 Microsoft. All rights reserved. Copyright
Upgrade Dynamics 2015 Email Router to Dynamics CRM 2016 Email Router
Applies To: Dynamics CRM 2016, Dynamics CRM Online
Note
The Microsoft Dynamics CRM Email Router is deprecated for December 2016 update for Dynamics 365 (online and on-premises) or later. We strongly recommend that you migrate all email routing
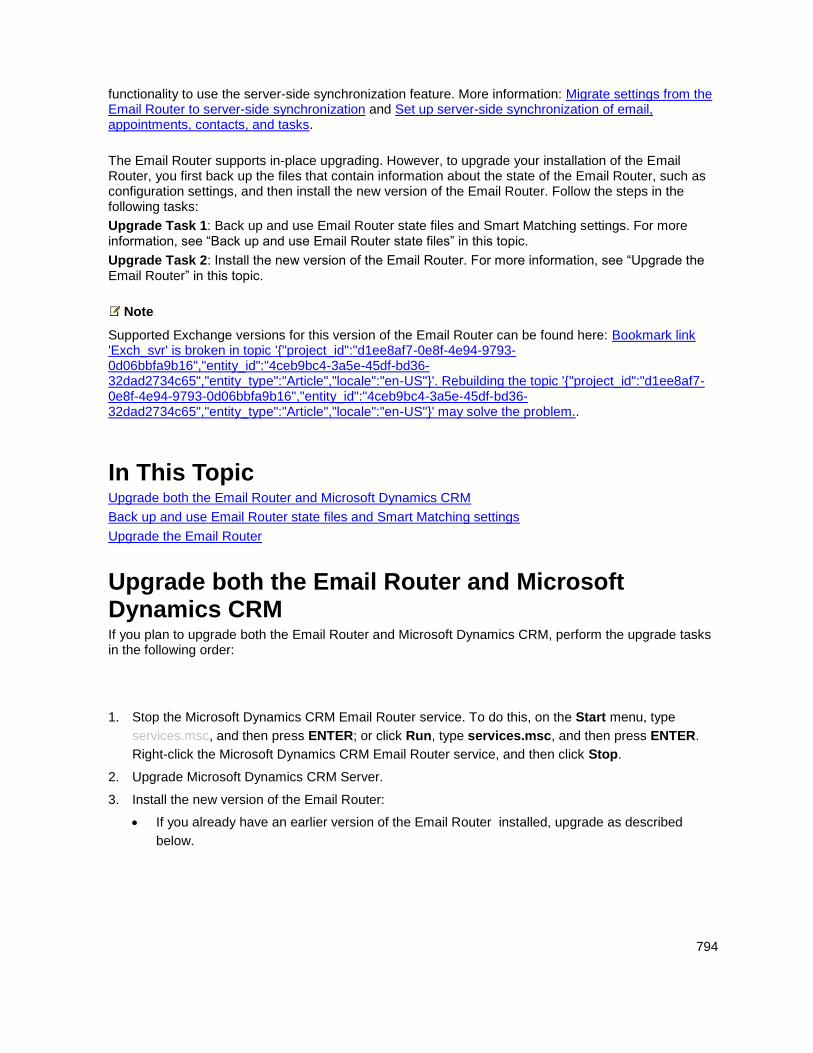
794
functionality to use the server-side synchronization feature. More information: Migrate settings from the Email Router to server-side synchronization and Set up server-side synchronization of email, appointments, contacts, and tasks.
The Email Router supports in-place upgrading. However, to upgrade your installation of the Email Router, you first back up the files that contain information about the state of the Email Router, such as configuration settings, and then install the new version of the Email Router. Follow the steps in the following tasks:
Upgrade Task 1: Back up and use Email Router state files and Smart Matching settings. For more information, see “Back up and use Email Router state files” in this topic.
Upgrade Task 2: Install the new version of the Email Router. For more information, see “Upgrade the Email Router” in this topic.
Note
Supported Exchange versions for this version of the Email Router can be found here: Bookmark link 'Exch_svr' is broken in topic '{"project_id":"d1ee8af7-0e8f-4e94-9793-0d06bbfa9b16","entity_id":"4ceb9bc4-3a5e-45df-bd36-32dad2734c65","entity_type":"Article","locale":"en-US"}'. Rebuilding the topic '{"project_id":"d1ee8af7-0e8f-4e94-9793-0d06bbfa9b16","entity_id":"4ceb9bc4-3a5e-45df-bd36-32dad2734c65","entity_type":"Article","locale":"en-US"}' may solve the problem..
In This Topic Upgrade both the Email Router and Microsoft Dynamics CRM
Back up and use Email Router state files and Smart Matching settings
Upgrade the Email Router
Upgrade both the Email Router and Microsoft Dynamics CRM If you plan to upgrade both the Email Router and Microsoft Dynamics CRM, perform the upgrade tasks in the following order:
1. Stop the Microsoft Dynamics CRM Email Router service. To do this, on the Start menu, type
services.msc, and then press ENTER; or click Run, type services.msc, and then press ENTER.
Right-click the Microsoft Dynamics CRM Email Router service, and then click Stop.
2. Upgrade Microsoft Dynamics CRM Server.
3. Install the new version of the Email Router:
If you already have an earlier version of the Email Router installed, upgrade as described
below.
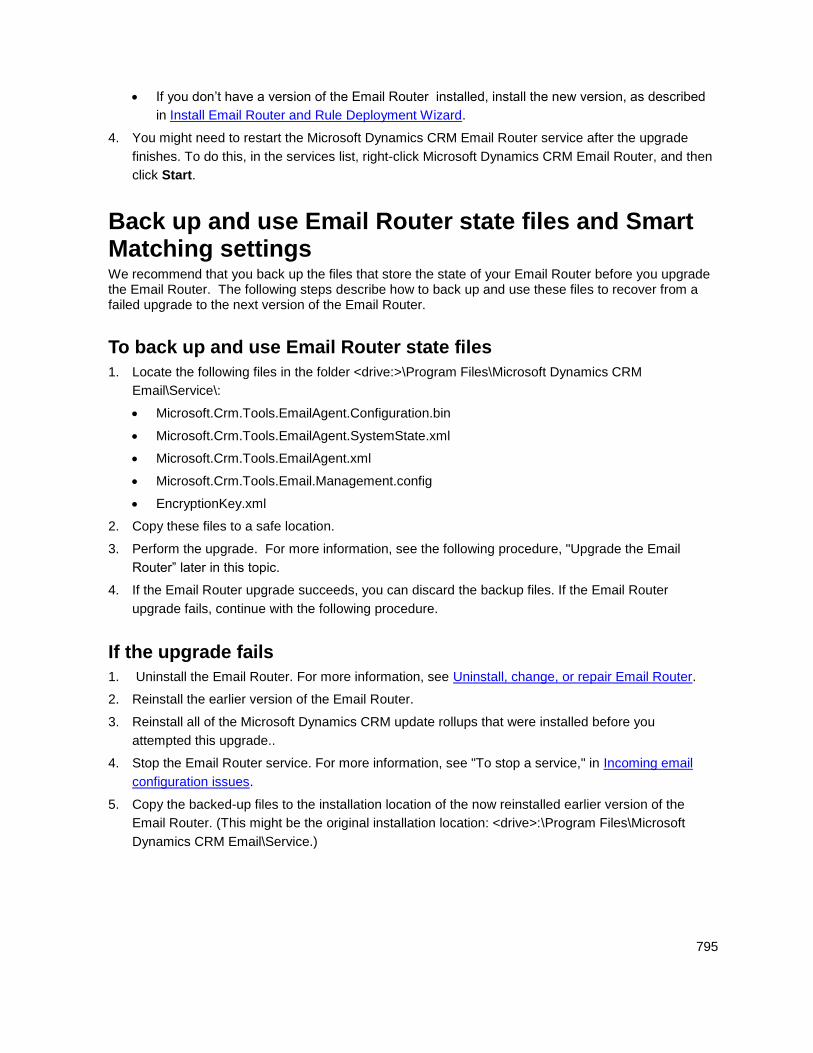
795
If you don’t have a version of the Email Router installed, install the new version, as described
in Install Email Router and Rule Deployment Wizard.
4. You might need to restart the Microsoft Dynamics CRM Email Router service after the upgrade
finishes. To do this, in the services list, right-click Microsoft Dynamics CRM Email Router, and then
click Start.
Back up and use Email Router state files and Smart Matching settings We recommend that you back up the files that store the state of your Email Router before you upgrade the Email Router. The following steps describe how to back up and use these files to recover from a failed upgrade to the next version of the Email Router.
To back up and use Email Router state files
1. Locate the following files in the folder <drive:>\Program Files\Microsoft Dynamics CRM
Email\Service\:
Microsoft.Crm.Tools.EmailAgent.Configuration.bin
Microsoft.Crm.Tools.EmailAgent.SystemState.xml
Microsoft.Crm.Tools.EmailAgent.xml
Microsoft.Crm.Tools.Email.Management.config
EncryptionKey.xml
2. Copy these files to a safe location.
3. Perform the upgrade. For more information, see the following procedure, "Upgrade the Email
Router” later in this topic.
4. If the Email Router upgrade succeeds, you can discard the backup files. If the Email Router
upgrade fails, continue with the following procedure.
If the upgrade fails
1. Uninstall the Email Router. For more information, see Uninstall, change, or repair Email Router.
2. Reinstall the earlier version of the Email Router.
3. Reinstall all of the Microsoft Dynamics CRM update rollups that were installed before you
attempted this upgrade..
4. Stop the Email Router service. For more information, see "To stop a service," in Incoming email
configuration issues.
5. Copy the backed-up files to the installation location of the now reinstalled earlier version of the
Email Router. (This might be the original installation location: <drive>:\Program Files\Microsoft
Dynamics CRM Email\Service.)
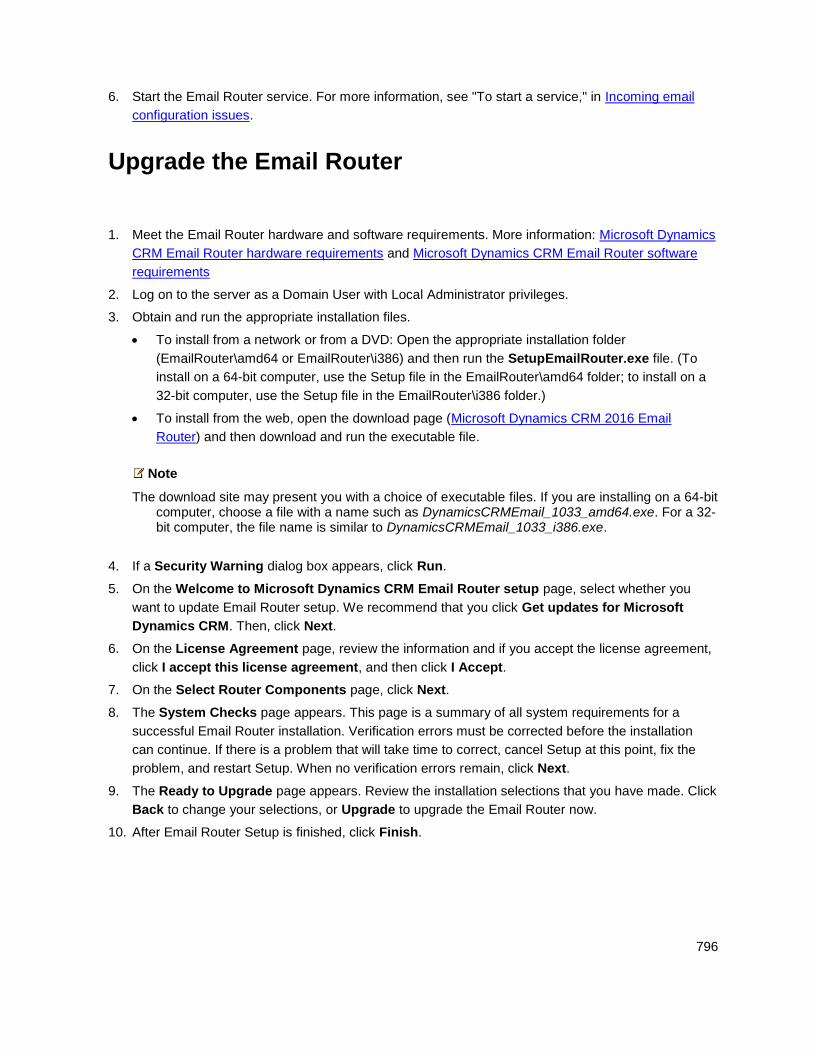
796
6. Start the Email Router service. For more information, see "To start a service," in Incoming email
configuration issues.
Upgrade the Email Router
1. Meet the Email Router hardware and software requirements. More information: Microsoft Dynamics
CRM Email Router hardware requirements and Microsoft Dynamics CRM Email Router software
requirements
2. Log on to the server as a Domain User with Local Administrator privileges.
3. Obtain and run the appropriate installation files.
To install from a network or from a DVD: Open the appropriate installation folder
(EmailRouter\amd64 or EmailRouter\i386) and then run the SetupEmailRouter.exe file. (To
install on a 64-bit computer, use the Setup file in the EmailRouter\amd64 folder; to install on a
32-bit computer, use the Setup file in the EmailRouter\i386 folder.)
To install from the web, open the download page (Microsoft Dynamics CRM 2016 Email
Router) and then download and run the executable file.
Note
The download site may present you with a choice of executable files. If you are installing on a 64-bit computer, choose a file with a name such as DynamicsCRMEmail_1033_amd64.exe. For a 32-bit computer, the file name is similar to DynamicsCRMEmail_1033_i386.exe.
4. If a Security Warning dialog box appears, click Run.
5. On the Welcome to Microsoft Dynamics CRM Email Router setup page, select whether you
want to update Email Router setup. We recommend that you click Get updates for Microsoft
Dynamics CRM. Then, click Next.
6. On the License Agreement page, review the information and if you accept the license agreement,
click I accept this license agreement, and then click I Accept.
7. On the Select Router Components page, click Next.
8. The System Checks page appears. This page is a summary of all system requirements for a
successful Email Router installation. Verification errors must be corrected before the installation
can continue. If there is a problem that will take time to correct, cancel Setup at this point, fix the
problem, and restart Setup. When no verification errors remain, click Next.
9. The Ready to Upgrade page appears. Review the installation selections that you have made. Click
Back to change your selections, or Upgrade to upgrade the Email Router now.
10. After Email Router Setup is finished, click Finish.
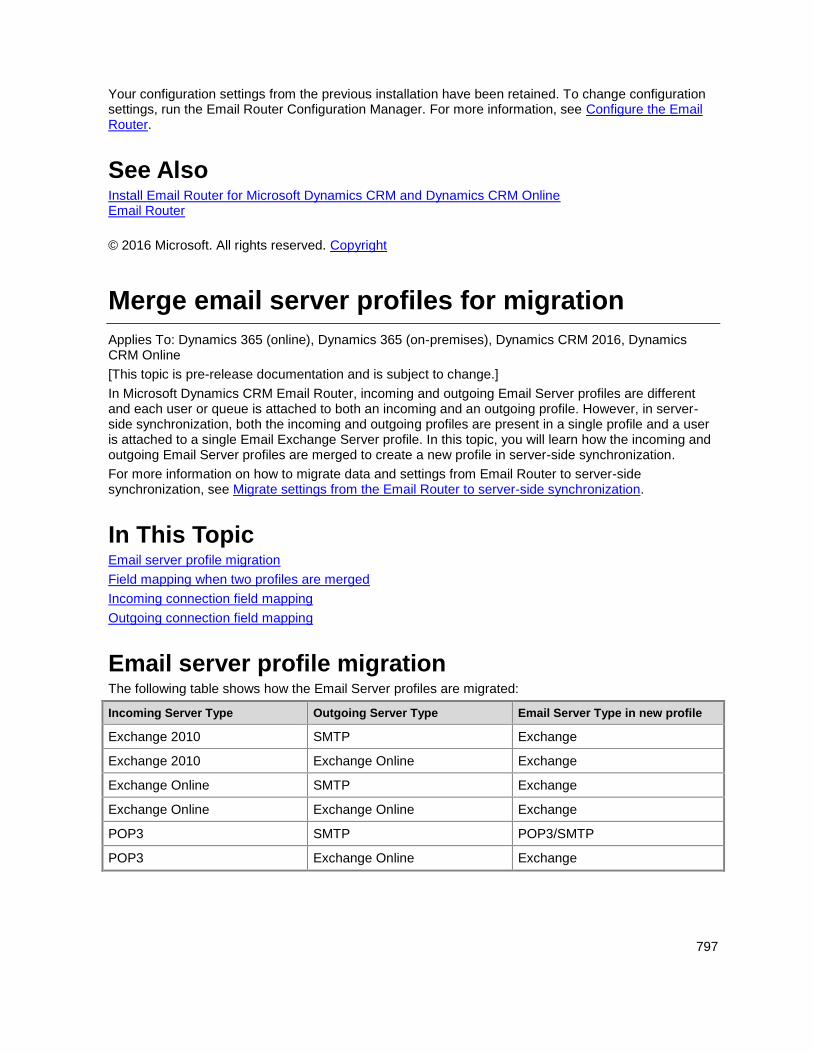
797
Your configuration settings from the previous installation have been retained. To change configuration settings, run the Email Router Configuration Manager. For more information, see Configure the Email Router.
See Also Install Email Router for Microsoft Dynamics CRM and Dynamics CRM Online Email Router
© 2016 Microsoft. All rights reserved. Copyright
Merge email server profiles for migration
Applies To: Dynamics 365 (online), Dynamics 365 (on-premises), Dynamics CRM 2016, Dynamics CRM Online
[This topic is pre-release documentation and is subject to change.]
In Microsoft Dynamics CRM Email Router, incoming and outgoing Email Server profiles are different and each user or queue is attached to both an incoming and an outgoing profile. However, in server-side synchronization, both the incoming and outgoing profiles are present in a single profile and a user is attached to a single Email Exchange Server profile. In this topic, you will learn how the incoming and outgoing Email Server profiles are merged to create a new profile in server-side synchronization.
For more information on how to migrate data and settings from Email Router to server-side synchronization, see Migrate settings from the Email Router to server-side synchronization.
In This Topic Email server profile migration
Field mapping when two profiles are merged
Incoming connection field mapping
Outgoing connection field mapping
Email server profile migration The following table shows how the Email Server profiles are migrated:
Incoming Server Type Outgoing Server Type Email Server Type in new profile
Exchange 2010 SMTP Exchange
Exchange 2010 Exchange Online Exchange
Exchange Online SMTP Exchange
Exchange Online Exchange Online Exchange
POP3 SMTP POP3/SMTP
POP3 Exchange Online Exchange
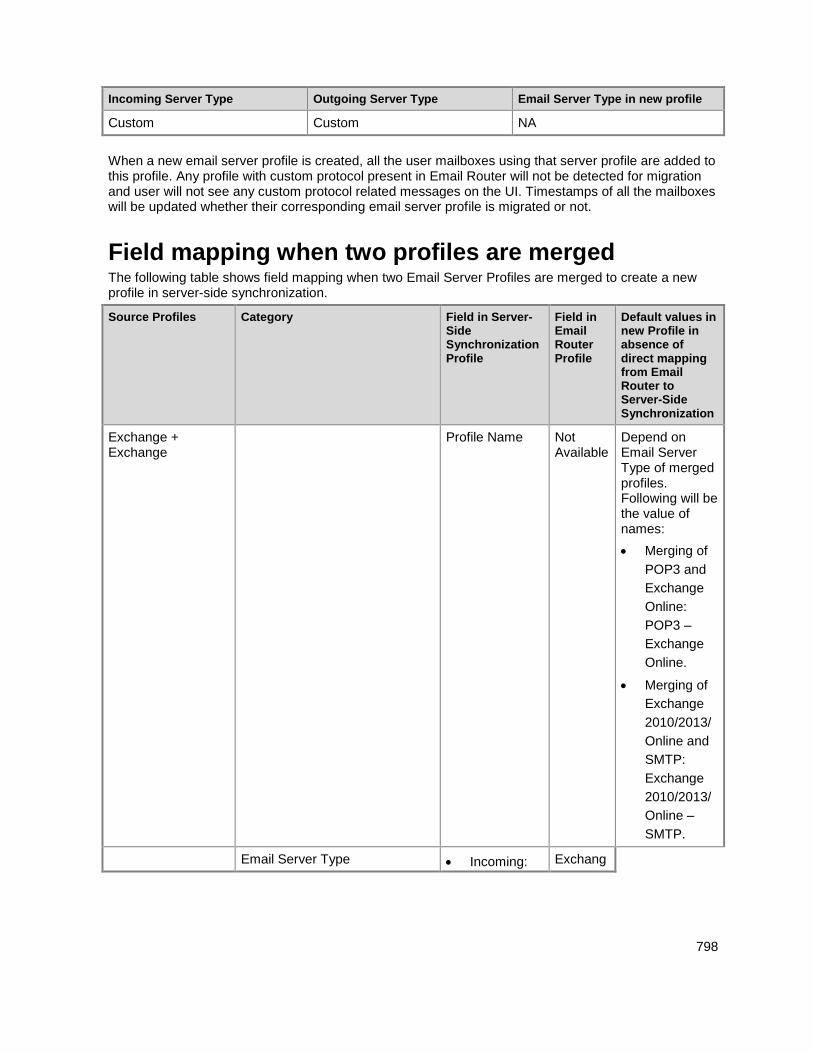
798
Incoming Server Type Outgoing Server Type Email Server Type in new profile
Custom Custom NA
When a new email server profile is created, all the user mailboxes using that server profile are added to this profile. Any profile with custom protocol present in Email Router will not be detected for migration and user will not see any custom protocol related messages on the UI. Timestamps of all the mailboxes will be updated whether their corresponding email server profile is migrated or not.
Field mapping when two profiles are merged The following table shows field mapping when two Email Server Profiles are merged to create a new profile in server-side synchronization.
Source Profiles Category Field in Server-Side Synchronization Profile
Field in Email Router Profile
Default values in new Profile in absence of direct mapping from Email Router to Server-Side Synchronization
Exchange + Exchange
Profile Name Not Available
Depend on Email Server Type of merged profiles. Following will be the value of names:
Merging of
POP3 and
Exchange
Online:
POP3 –
Exchange
Online.
Merging of
Exchange
2010/2013/
Online and
SMTP:
Exchange
2010/2013/
Online –
SMTP.
Email Server Type Incoming: Exchang
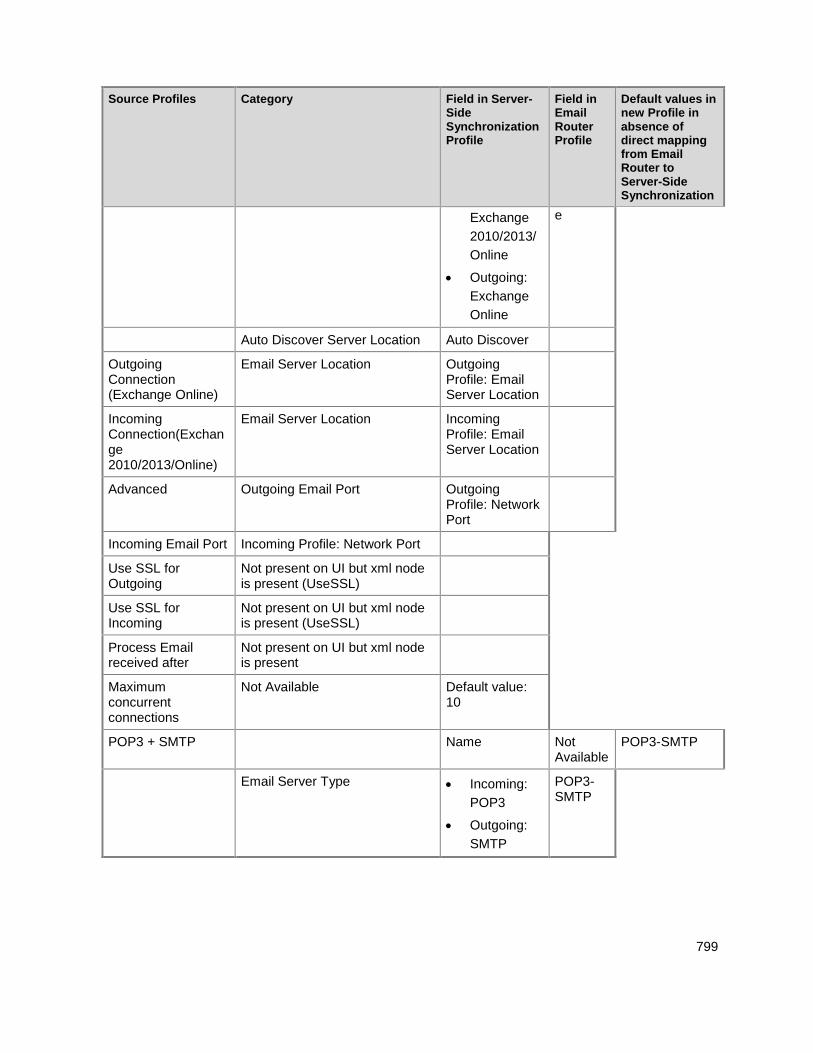
799
Source Profiles Category Field in Server-Side Synchronization Profile
Field in Email Router Profile
Default values in new Profile in absence of direct mapping from Email Router to Server-Side Synchronization
Exchange
2010/2013/
Online
Outgoing:
Exchange
Online
e
Auto Discover Server Location Auto Discover
Outgoing Connection (Exchange Online)
Email Server Location Outgoing Profile: Email Server Location
Incoming Connection(Exchange 2010/2013/Online)
Email Server Location Incoming Profile: Email Server Location
Advanced Outgoing Email Port Outgoing Profile: Network Port
Incoming Email Port Incoming Profile: Network Port
Use SSL for Outgoing
Not present on UI but xml node is present (UseSSL)
Use SSL for Incoming
Not present on UI but xml node is present (UseSSL)
Process Email received after
Not present on UI but xml node is present
Maximum concurrent connections
Not Available Default value: 10
POP3 + SMTP Name Not Available
POP3-SMTP
Email Server Type Incoming:
POP3
Outgoing:
SMTP
POP3-SMTP
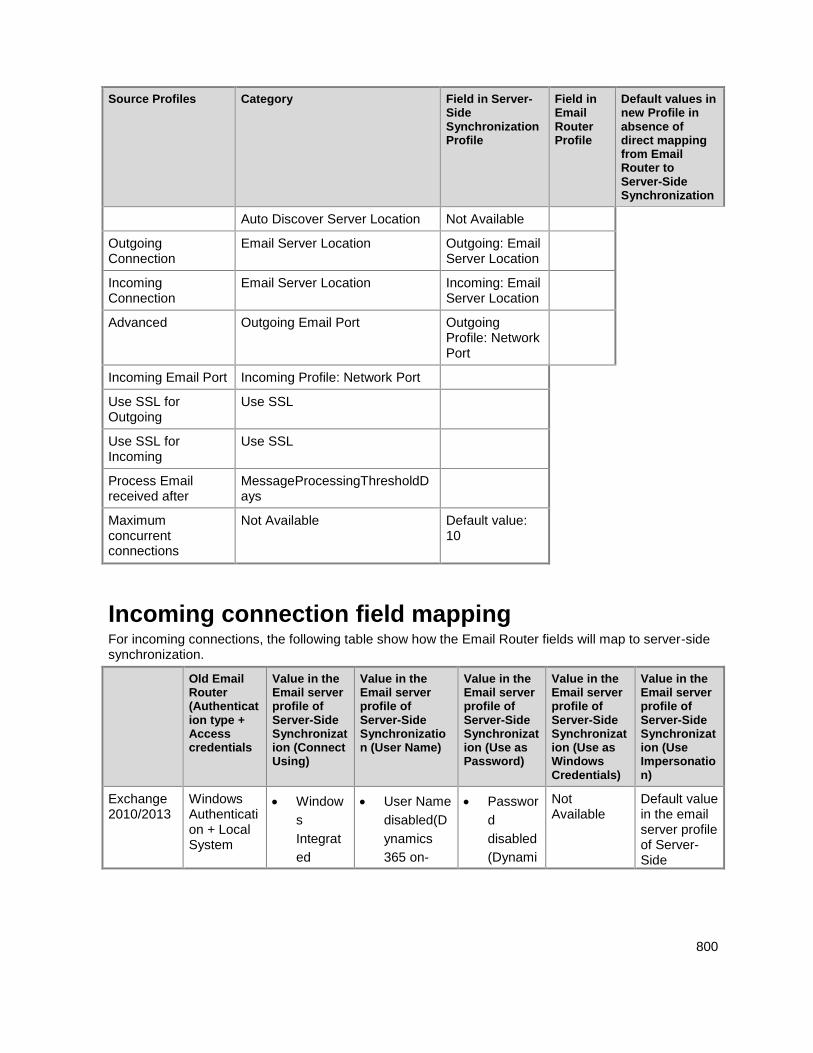
800
Source Profiles Category Field in Server-Side Synchronization Profile
Field in Email Router Profile
Default values in new Profile in absence of direct mapping from Email Router to Server-Side Synchronization
Auto Discover Server Location Not Available
Outgoing Connection
Email Server Location Outgoing: Email Server Location
Incoming Connection
Email Server Location Incoming: Email Server Location
Advanced Outgoing Email Port Outgoing Profile: Network Port
Incoming Email Port Incoming Profile: Network Port
Use SSL for Outgoing
Use SSL
Use SSL for Incoming
Use SSL
Process Email received after
MessageProcessingThresholdDays
Maximum concurrent connections
Not Available Default value: 10
Incoming connection field mapping For incoming connections, the following table show how the Email Router fields will map to server-side synchronization.
Old Email Router (Authentication type + Access credentials
Value in the Email server profile of Server-Side Synchronization (Connect Using)
Value in the Email server profile of Server-Side Synchronization (User Name)
Value in the Email server profile of Server-Side Synchronization (Use as Password)
Value in the Email server profile of Server-Side Synchronization (Use as Windows Credentials)
Value in the Email server profile of Server-Side Synchronization (Use Impersonation)
Exchange 2010/2013
Windows Authentication + Local System
Window
s
Integrat
ed
User Name
disabled(D
ynamics
365 on-
Passwor
d
disabled
(Dynami
Not Available
Default value in the email server profile of Server-Side
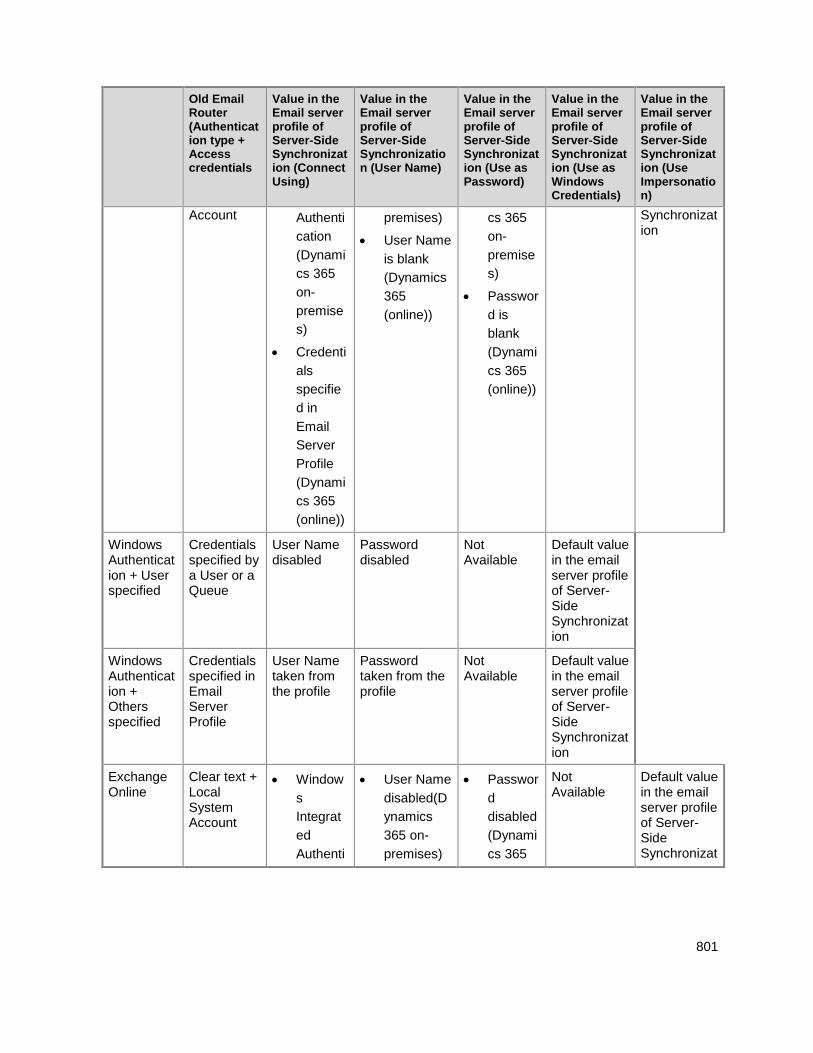
801
Old Email Router (Authentication type + Access credentials
Value in the Email server profile of Server-Side Synchronization (Connect Using)
Value in the Email server profile of Server-Side Synchronization (User Name)
Value in the Email server profile of Server-Side Synchronization (Use as Password)
Value in the Email server profile of Server-Side Synchronization (Use as Windows Credentials)
Value in the Email server profile of Server-Side Synchronization (Use Impersonation)
Account Authenti
cation
(Dynami
cs 365
on-
premise
s)
Credenti
als
specifie
d in
Server
Profile
(Dynami
cs 365
(online))
premises)
User Name
is blank
(Dynamics
365
(online))
cs 365
on-
premise
s)
Passwor
d is
blank
(Dynami
cs 365
(online))
Synchronization
Windows Authentication + User specified
Credentials specified by a User or a Queue
User Name disabled
Password disabled
Not Available
Default value in the email server profile of Server-Side Synchronization
Windows Authentication + Others specified
Credentials specified in Email Server Profile
User Name taken from the profile
Password taken from the profile
Not Available
Default value in the email server profile of Server-Side Synchronization
Exchange Online
Clear text + Local System Account
Window
s
Integrat
ed
Authenti
User Name
disabled(D
ynamics
365 on-
premises)
Passwor
d
disabled
(Dynami
cs 365
Not Available
Default value in the email server profile of Server-Side Synchronizat
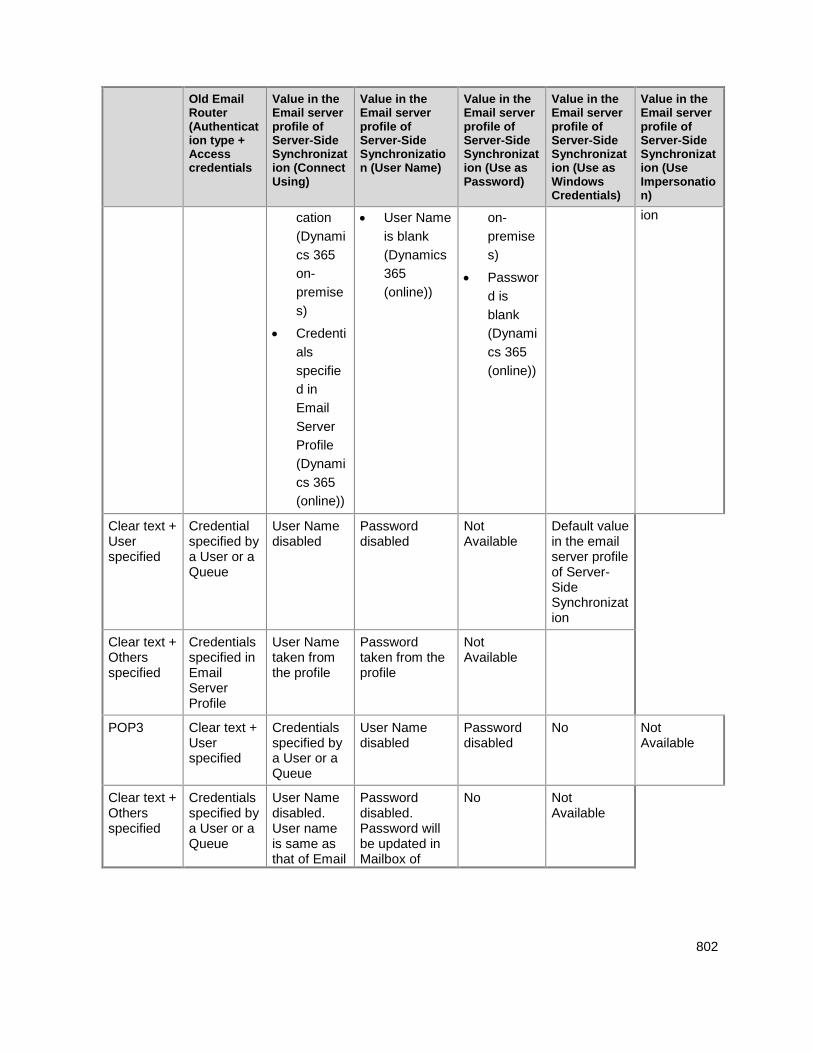
802
Old Email Router (Authentication type + Access credentials
Value in the Email server profile of Server-Side Synchronization (Connect Using)
Value in the Email server profile of Server-Side Synchronization (User Name)
Value in the Email server profile of Server-Side Synchronization (Use as Password)
Value in the Email server profile of Server-Side Synchronization (Use as Windows Credentials)
Value in the Email server profile of Server-Side Synchronization (Use Impersonation)
cation
(Dynami
cs 365
on-
premise
s)
Credenti
als
specifie
d in
Server
Profile
(Dynami
cs 365
(online))
User Name
is blank
(Dynamics
365
(online))
on-
premise
s)
Passwor
d is
blank
(Dynami
cs 365
(online))
ion
Clear text + User specified
Credential specified by a User or a Queue
User Name disabled
Password disabled
Not Available
Default value in the email server profile of Server-Side Synchronization
Clear text + Others specified
Credentials specified in Email Server Profile
User Name taken from the profile
Password taken from the profile
Not Available
POP3 Clear text + User specified
Credentials specified by a User or a Queue
User Name disabled
Password disabled
No Not Available
Clear text + Others specified
Credentials specified by a User or a Queue
User Name disabled. User name is same as that of Email
Password disabled. Password will be updated in Mailbox of
No Not Available
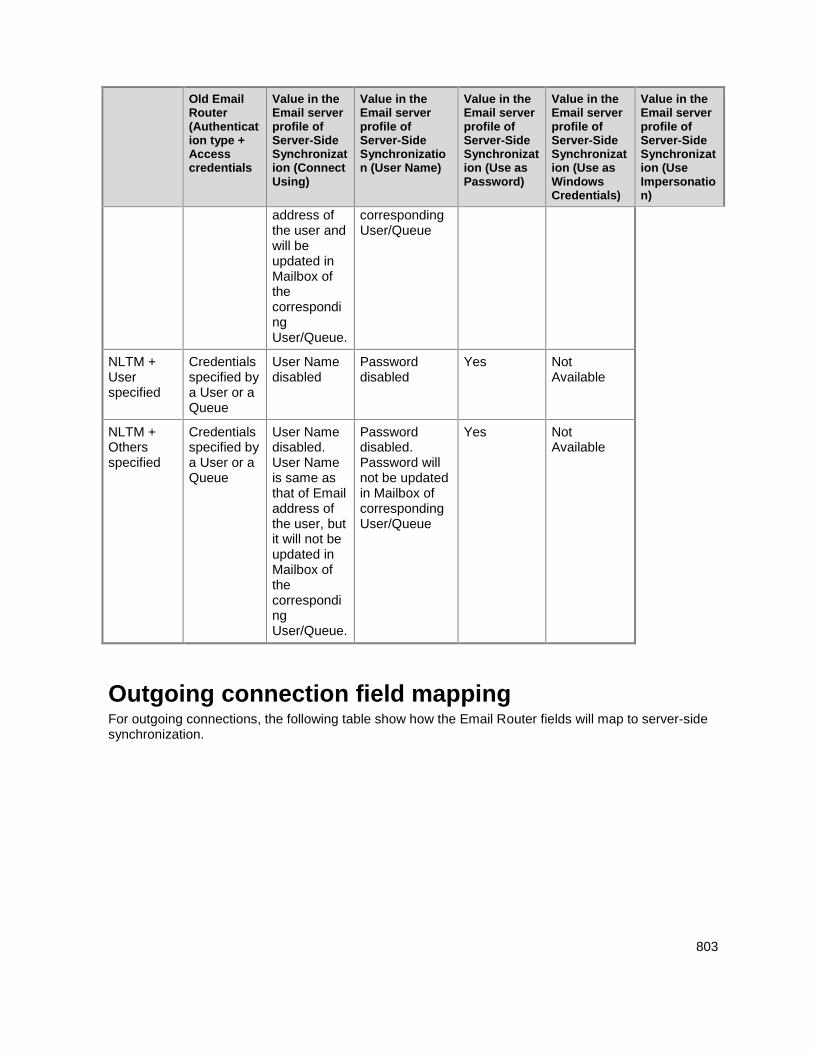
803
Old Email Router (Authentication type + Access credentials
Value in the Email server profile of Server-Side Synchronization (Connect Using)
Value in the Email server profile of Server-Side Synchronization (User Name)
Value in the Email server profile of Server-Side Synchronization (Use as Password)
Value in the Email server profile of Server-Side Synchronization (Use as Windows Credentials)
Value in the Email server profile of Server-Side Synchronization (Use Impersonation)
address of the user and will be updated in Mailbox of the corresponding User/Queue.
corresponding User/Queue
NLTM + User specified
Credentials specified by a User or a Queue
User Name disabled
Password disabled
Yes Not Available
NLTM + Others specified
Credentials specified by a User or a Queue
User Name disabled. User Name is same as that of Email address of the user, but it will not be updated in Mailbox of the corresponding User/Queue.
Password disabled. Password will not be updated in Mailbox of corresponding User/Queue
Yes Not Available
Outgoing connection field mapping For outgoing connections, the following table show how the Email Router fields will map to server-side synchronization.
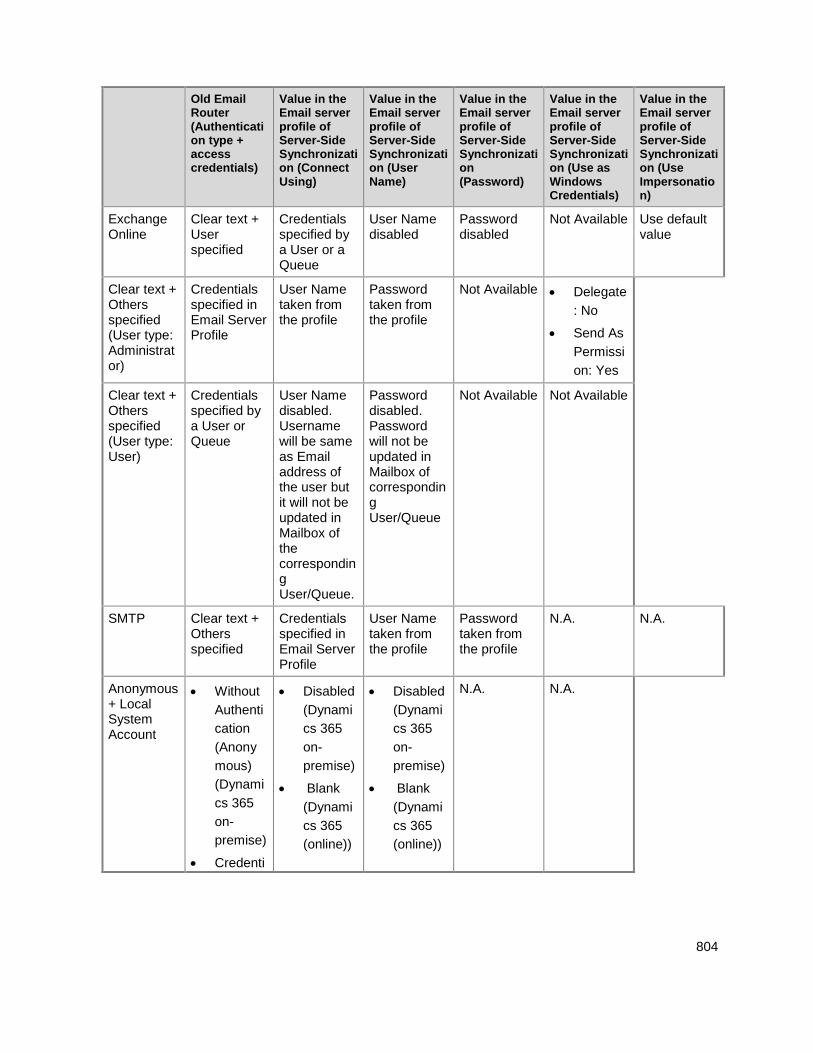
804
Old Email Router (Authentication type + access credentials)
Value in the Email server profile of Server-Side Synchronization (Connect Using)
Value in the Email server profile of Server-Side Synchronization (User Name)
Value in the Email server profile of Server-Side Synchronization (Password)
Value in the Email server profile of Server-Side Synchronization (Use as Windows Credentials)
Value in the Email server profile of Server-Side Synchronization (Use Impersonation)
Exchange Online
Clear text + User specified
Credentials specified by a User or a Queue
User Name disabled
Password disabled
Not Available Use default value
Clear text + Others specified (User type: Administrator)
Credentials specified in Email Server Profile
User Name taken from the profile
Password taken from the profile
Not Available Delegate
: No
Send As
Permissi
on: Yes
Clear text + Others specified (User type: User)
Credentials specified by a User or Queue
User Name disabled. Username will be same as Email address of the user but it will not be updated in Mailbox of the corresponding User/Queue.
Password disabled. Password will not be updated in Mailbox of corresponding User/Queue
Not Available Not Available
SMTP Clear text + Others specified
Credentials specified in Email Server Profile
User Name taken from the profile
Password taken from the profile
N.A. N.A.
Anonymous + Local System Account
Without
Authenti
cation
(Anony
mous)
(Dynami
cs 365
on-
premise)
Credenti
Disabled
(Dynami
cs 365
on-
premise)
Blank
(Dynami
cs 365
(online))
Disabled
(Dynami
cs 365
on-
premise)
Blank
(Dynami
cs 365
(online))
N.A. N.A.
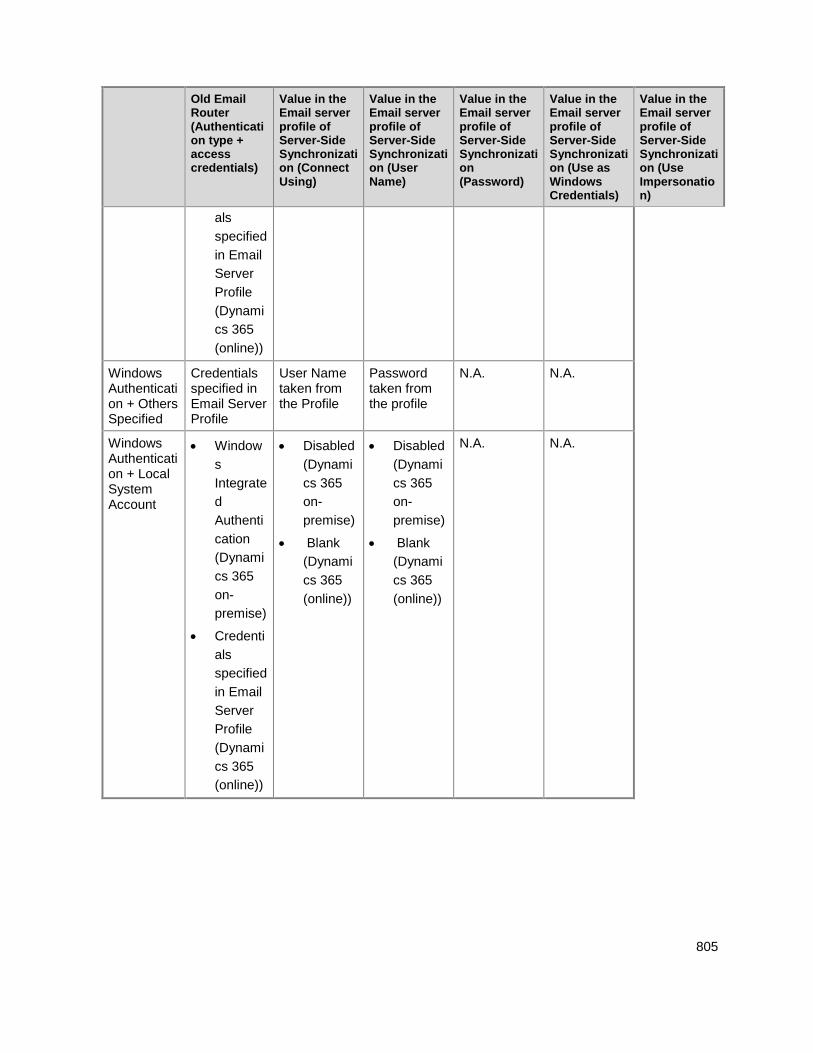
805
Old Email Router (Authentication type + access credentials)
Value in the Email server profile of Server-Side Synchronization (Connect Using)
Value in the Email server profile of Server-Side Synchronization (User Name)
Value in the Email server profile of Server-Side Synchronization (Password)
Value in the Email server profile of Server-Side Synchronization (Use as Windows Credentials)
Value in the Email server profile of Server-Side Synchronization (Use Impersonation)
als
specified
in Email
Server
Profile
(Dynami
cs 365
(online))
Windows Authentication + Others Specified
Credentials specified in Email Server Profile
User Name taken from the Profile
Password taken from the profile
N.A. N.A.
Windows Authentication + Local System Account
Window
s
Integrate
d
Authenti
cation
(Dynami
cs 365
on-
premise)
Credenti
als
specified
in Email
Server
Profile
(Dynami
cs 365
(online))
Disabled
(Dynami
cs 365
on-
premise)
Blank
(Dynami
cs 365
(online))
Disabled
(Dynami
cs 365
on-
premise)
Blank
(Dynami
cs 365
(online))
N.A. N.A.
806
See Also Install Email Router for Microsoft Dynamics CRM and Dynamics CRM Online Troubleshooting Email Router issues Migrate settings from the Email Router to server-side synchronization
© 2016 Microsoft. All rights reserved. Copyright
Troubleshooting Email Router issues
Applies To: Dynamics CRM 2016, Dynamics CRM Online
This section provides guidelines for troubleshooting issues that you might encounter as you deploy and configure the Email Router.
In This Section Email Router installation issues
Incoming email configuration issues
Outgoing email configuration issues
Users do not receive Microsoft Dynamics CRM e-mail messages
Test the access for the Email Router
See Also Install Email Router and Rule Deployment Wizard
© 2016 Microsoft. All rights reserved. Copyright
Email Router installation issues
Applies To: Dynamics CRM 2016, Dynamics CRM Online
This section provides troubleshooting guidelines and reference information about how to resolve issues that can occur during Microsoft Dynamics CRM Email Router installation.
Note
You can upgrade the Email Router without first needing to uninstall the previous version.
Keep your Microsoft Dynamics CRM deployment current by installing the latest updates and hotfixes automatically from Microsoft Update. You can also search for updates on the Microsoft Download Center. Choosing Microsoft Update lets you install recommended updates automatically and without administrator permissions.
807
Troubleshoot an Email Router installation
1. Verify that your operating environment meets all hardware and software requirements. For detailed
requirements, see Microsoft Dynamics CRM Email Router hardware requirements and Microsoft
Dynamics CRM Email Router software requirements.
2. Make sure that you follow the Email Router installation instructions in the Install Email Router for
Microsoft Dynamics CRM and Dynamics CRM Online.
If a problem occurs during Email Router Setup, review the log file for information. By default, the Email Router Setup log is named crmEmailRouterSetup.log and is located in the C:\Users\<user>\AppData\Roaming\Microsoft\MSCRM\Logs folder on the computer where the Email Router is installed.
See Also Troubleshooting Email Router issues Incoming email configuration issues
© 2016 Microsoft. All rights reserved. Copyright
Incoming email configuration issues
Applies To: Dynamics CRM 2016, Dynamics CRM Online
This section provides troubleshooting guidelines and reference information about how to resolve some commonly encountered issues that can occur during Email Router incoming profile configuration.
To troubleshoot an Email Router incoming profile configuration 1. Make sure that you follow the incoming profile configuration procedures in the Managing
Configuration Profiles topics.
2. For more information about how to configure an incoming profile, see Configure the Email Router.
3. See the following sections for information about how to resolve some commonly encountered
issues with incoming configuration profiles.
In This Topic Login timeout error
Unauthorized access to the mailbox
Mailbox not found (access test fails)
808
Mailbox not found (access test succeeds)
The Email Router service configuration parameter "EmailUser" is missing
TLS/SSL error from Email Router Configuration Manager test access
POP3 issues
Login timeout error Symptom: When you click Test Access in the Email Router Configuration Manager, you receive the following HTTP error message:
Incoming Status: Failure - The remote server returned an error: (440) Login Timeout
This is typically caused by trying to use forms-based authentication instead of Windows authentication (the only supported authentication method).
Resolution: Change the authentication mode to Windows authentication on the mailbox server. For more information, see the Microsoft Knowledge Base (KB) article 954047.
Note
Make sure that you point the incoming profile to the Exchange Server that has the mailbox server where the Exadmin and Exchange virtual directories are located.
Unauthorized access to the mailbox Symptom: When you click Test Access in the Email Router Configuration Manager, you receive the following HTTP error message:
Incoming Status: Failure - The remote Microsoft Exchange email server returned the error "(401) Unauthorized". Verify that you have permission to connect to the mailbox.
Resolution: Verify the following:
1. Before you click Test Access, make sure that the user has logged on to the mailbox so that the
mailbox is activated.
2. Make sure that you can receive email messages in the mailbox.
3. In the Location section of the Email Router Configuration Profile dialog box, verify that the
correct URL of the Exchange Server is entered. For example:
https://myexchangeserver
https://www.myexchangeserver.local
https://myexchangeserver/EWS/Exchange.asmx
Important
Do not enter any additional characters at the end of the URL string, such as /OWA or /Exchange or even a / character. If you are using Transport Layer Security (TLS) or Secure Sockets Layer (SSL), be sure to use https in the URL instead of http.
809
4. Verify the settings in the Access Credentials section of the Email Router Configuration Manager
incoming profile dialog box:
Make sure that the specified user has full access rights to the mailboxes that this incoming
profile will serve. To test this, log on to the computer that is running the Email Router by using
the specified access credentials, or in Windows Internet Explorer, try to access the Outlook on
the web URL of the user that you are testing (for example,
http://exchangeserver/Exchange/crmuser).
For instructions about granting this access in Exchange Server 2013, see the Microsoft TechNet article Change the Assignment Policy on a Mailbox.
For instructions about how to grant this access in Exchange Server 2010, see the Microsoft TechNet article Allow Mailbox Access.
If you selected the User specified option in the Access Credentials drop-down list, make sure
that the users whose mailboxes this profile will serve have set their user name and password in
the Set Personal Options dialog box (available in the Workplace section of the Microsoft
Dynamics 365 web application). This enables the Email Router to access mailboxes by using
each user's access credentials.
Note
The User specified option is intended for use in scenarios where the Email Router is configured to monitor user mailboxes, instead of a forward mailbox. This option is available only in the on-premises version of the product.
Mailbox not found (access test fails) Symptom: When you click Test Access in the Email Router Configuration Manager, you receive the following HTTP error message:
Incoming Status: Failure - The remote Microsoft Exchange email server returned an error "(404) Not Found". The user or queue does not have a mailbox. Create a mailbox and try again.
Resolution: Depending on which version of Exchange Server you are using, perform one of the following procedures.
Note
Another possible cause of this error is in the Microsoft Dynamics 365 user email address information. In the Web application, verify that the user's email address is set correctly.
For Exchange Server 2010
1. Connect to the Exchange Server where the mailbox is located.
2. Open Internet Information Services (IIS) Manager: Click Start, type inetmgr, and then press
ENTER.
810
3. Verify the presence of the virtual directory (Exadmin or Exchange) that you are using to connect to
the mailbox:
a. Expand the default Web site.
b. Verify that the Exadmin folder is present. If it is not, you will have to create it. For detailed
information, see the Microsoft KB article 947802.
To start a service
1. On the Start menu, type services.msc, or click Run, type services.msc, and then press ENTER.
2. Right-click the service that you want to start, and then click Start.
3. Click OK and then close the Services application.
To stop a service
1. On the Start menu, type services.msc, or click Run, type services.msc, and then press ENTER.
2. Right-click the service that you want to stop, and then click Stop.
3. Click OK and then close the Services application.
Mailbox not found (access test succeeds) Symptom: When you click Test Access in the Email Router Configuration Manager, the test succeeds. However, you receive HTTP 404 errors in the application event log when the Email Router processes email messages. Check the IIS logs for the following error:
Request Filtering: Denied because URL doubled escaping 404.11
Resolution: Run the following command on the Exchange Web site to allow double escaping:
%windir%\system32\inetsrv\appcmd set config "Default Web Site" -
section:system.webServer/security/requestfiltering -allowDoubleEscaping:true
The Email Router service configuration parameter "EmailUser" is missing Symptom: When you use the Email Router, you may experience one or more of the following issues:
An error event is logged in the application log (Event Source: MSCRMEmail) with a description that
states “EmailUser" is missing.
When you use the Test Access functionality in the Email Router Configuration Manager, you
receive an error message that states “Emailuser” is missing.
This issue occurs because Microsoft Dynamics 365 is not configured to use your credentials to send and receive email messages.
Resolution: For information about how to resolve this issue, see the KB article 947094.
811
TLS/SSL error from Email Router Configuration Manager test access Symptom: You run the Email Router to configure access to a mailbox. When you try to test access to the mailbox, you receive the following error message:
“Incoming Status: Failure - The underlying connection was closed: Could not establish trust relationship for the TLS/SSL secure channel. The remote certificate is invalid according to the validation procedure.”
This issue occurs if you use self-signed certificates. The Email Router does not support self-signed certificates.
Resolution: For information about how to resolve this issue, see the KB article 954584.
POP3 issues
Error connecting the Email Router with a POP3 mailbox Symptom: When you click Test Access in the Email Router Configuration Manager to test a profile that uses a POP3 mailbox, you receive the following error:
Incoming Status: Failure – An error occurred while executing POP3 command ”Command removed for security reasons”. The server response was: “-ERR authorization first”.
This error occurs because POP3 does not use NTLM authentication. Instead, POP3 uses Basic authentication (clear text).
Resolution: For information about how to resolve this issue, see the KB article 954046.
Issues with using a POP3 email account Symptom: After you configure the Email Router to use a POP3 email account, you may experience one or more of the following symptoms:
After you read email messages from the POP3 mailbox, the Email Router does not process these
messages.
When you try to open the POP3 mailbox by using an email reader, or when the Email Router
connects to the POP3 mailbox, you receive one of the following error messages:
The application cannot connect or open the mailbox.
The mailbox is in use.
Resolution: For information about how to resolve this issue, see the KB article 947059.
See Also Troubleshooting Email Router issues Email Router installation issues Outgoing email configuration issues Test the access for the Email Router Users do not receive Microsoft Dynamics CRM e-mail messages
812
© 2016 Microsoft. All rights reserved. Copyright
Outgoing email configuration issues
Applies To: Dynamics CRM 2016, Dynamics CRM Online
This section provides troubleshooting guidelines and information about resolving issues that can occur during Email Router outgoing profile configuration.
To troubleshoot an Email Router outgoing configuration profile 1. Make sure that you follow the outgoing configuration profile procedures in the Managing
Configuration Profiles topics.
2. For more information about how to configure an outgoing profile, see Configure the Email Router in
this guide.
3. See the following sections for information about how to resolve commonly encountered issues with
outgoing configuration profiles.
Test Access error If there is a problem with your outgoing e-mail configuration, you may receive the following error message when you click Test Access on the Email Router Configuration Manager:
"Outgoing status: Failure - An error occurred while checking the connection to e-mail server EXSERVERNAME. The requested address is not valid in its context"
To troubleshoot test access
1. Run a telnet command to verify that connectivity is functioning between the computer that is
running the Email Router and the Microsoft Exchange Server. For example, start the Telnet tool
and type the following command:
TELNET EXSERVERNAME PORT
2. Make sure that you have no antivirus services running on the Exchange Server computer that
prevent connection through port 25.
Load Data error When you click Load Data in the Email Router Configuration Manager, you receive the following error:
The Email Router Configuration Manager was unable to retrieve user and queue information from the Microsoft Dynamics CRM server. This may indicate that the Microsoft Dynamics CRM server is busy. Verify that URL 'http://OrganizationName' is correct. Additionally, this problem can occur if the specified access credentials are insufficient. To try again, click Load Data. (The request failed with HTTP status 404: Not Found.)
813
To resolve this issue
1. Make sure the user account that is running the Email Router service is a member of the Active
Directory directory service PrivUserGroup security group.
2. Make sure the account that is specified in the Access Credentials field on the General tab of the
Email Router Configuration Profile dialog box is a Microsoft Dynamics CRM administrative user. If
the access credentials are set to Local System Account, the computer account must be a
member of the Active DirectoryPrivUserGroup security group.
3. Make sure that the URL of the Microsoft Dynamics CRM deployment is spelled correctly. The
OrganizationUniqueName part of the URL must be spelled exactly as it appears in the Microsoft
Dynamics CRM server. To determine the OrganizationUniqueName, start the Microsoft Dynamics
CRM web application as a user who has the System Customizer role.
4. Go to Settings > Customizations.
5. On the Customization page, click Developer Resources. The OrganizationUniqueName is
displayed below the Organization Unique Name label. For more information, see Configure the
Email Router.
See Also Troubleshooting Email Router issues Email Router installation issues Incoming email configuration issues Test the access for the Email Router Users do not receive Microsoft Dynamics CRM e-mail messages
© 2016 Microsoft. All rights reserved. Copyright
Users do not receive Microsoft Dynamics CRM e-mail messages
Applies To: Dynamics CRM 2016, Dynamics CRM Online
This issue can occur because the service account that the Email Router is running under hasn’t been added to the PrivUserGroup security group.
Note
Perform the following steps on a computer that is a domain controller in the domain where you installed Microsoft Dynamics CRM Server.
814
Add the service account to the PrivUserGroup security group 1. Click Start, point to Administrative Tools, and then click Active Directory Users and
Computers.
2. Expand the organizational unit (OU) that you selected during Microsoft Dynamics 365 Server
Setup. By default, this is the Domain Controllers OU.
3. Right-click PrivUserGroup, and then click Properties.
4. On the Members tab, click Add, and then select the computer where the Email Router service is
installed and running.
5. Click OK two times.
See Also Troubleshooting Email Router issues Outgoing email configuration issues Test the access for the Email Router
© 2016 Microsoft. All rights reserved. Copyright
Test the access for the Email Router
Applies To: Dynamics CRM 2016, Dynamics CRM Online
The Email Router Configuration Manager can test access for Microsoft Dynamics CRM users, queues, and forward mailboxes. By using the test-access feature, you can troubleshoot issues that can prevent the Email Router from functioning correctly.
Test access error If there’s a problem with your outgoing email configuration, you may receive the following error message when you click Test Access on the Email Router Configuration Manager:
"Outgoing status: Failure - An error occurred while checking the connection to e-mail server EXSERVERNAME. The requested address is not valid in its context."
Troubleshoot test access
1. To verify that connectivity is functioning between the computer that is running the Email Router
and the Microsoft Exchange Server, start the Telnet tool and type the following command:
TELNET EXSERVERNAME PORT
2. Make sure that there are no antivirus services or firewall services running on the server that is
running Exchange Server that prevent connection through port 25.
815
Error message when you send an email message by using the Dynamics CRM web application In addition, when you send an email message by using the Microsoft Dynamics CRM web application, you may receive an error message that resembles one of the following:
This message has not yet been submitted for delivery. 1 attempts have been made so far.
The message delivery failed. It must be resubmitted for any further processing.
For more information about the test access feature, see Test Access for Users, Queues, and Forward Mailboxes, as well as the following topics in this guide:
“Access credentials” in Configure the Email Router
Incoming email configuration issues
Outgoing email configuration issues
See Also Troubleshooting Email Router issues Planning and installing Dynamics 365 for Outlook for Microsoft Dynamics 365 and Dynamics 365 Online
© 2016 Microsoft. All rights reserved. Copyright
Install Microsoft Dynamics CRM Email Router using a command prompt
Applies To: Dynamics CRM 2016, Dynamics CRM Online
Note
The Microsoft Dynamics CRM Email Router is deprecated for December 2016 update for Dynamics 365 (online and on-premises) or later. We strongly recommend that you migrate all email routing functionality to use the server-side synchronization feature. More information: Migrate settings from the Email Router to server-side synchronization and Set up server-side synchronization of email, appointments, contacts, and tasks.
The Email Router accepts the same command prompt parameters as Microsoft Dynamics 365 Server. To install the Email Router in quiet mode, run the SetupEmailRouter.exe command in the EmailRouter folder on the installation media, or download location of the Microsoft Dynamics CRM installation files as follows:
SetupEmailRouter /Q /CONFIG folderpath\install-config.xml /L c:\temp\log.txt
This installation uses an XML configuration file named install-config.xml and creates a log file named log.txt.
816
In This Topic Email Router XML configuration file
Sample Microsoft Dynamics CRM Email Router XML configuration file
Email Router XML configuration file The /config[drive:] [[path] configfilename.xml]] command-line parameter provides Microsoft Dynamics CRM Email Router Setup with required information. It is the same information that each Microsoft Dynamics CRM Email Router Setup Wizard screen requires.
Important
To use the Email Router after it is installed, you must run the Email Router Configuration Manager to configure it. You cannot configure the Email Router by using an XML configuration file.
The XML elements must be in English (US). An XML configuration file that has localized XML elements will not work correctly.
An explanation of each XML element and a sample XML file follows:
<CRMSetup> </CRMSetup>
The configuration file must be a valid XML file that uses <CRMSetup> as the root element.
<EmailRouter> </ EmailRouter>
Specifies a Microsoft Dynamics CRM Email Router installation. The <EmailRouter> tag must be within the <CRMSetup> open and end tags. All the Email Router entries that follow must be within the <EmailRouter> tags.
<InstallType>Uninstall/Repair</InstallType>
Specifies the type of installation that Setup will perform. The following options are available:
Uninstall
Uninstalls Microsoft Dynamics CRM Email Router.
Repair
Starts Setup in repair mode.
<Patch update="true"/"false">\\ServerName\ShareName\Patch_Location</Patch>
If you do not specify a location, by default Setup will go online to a location that is managed by Microsoft to search for available updates. Or, you can point Setup to install a Microsoft Dynamics CRM Email Router Setup update .msp file from a different location, such as an internal share.
update
Specifies whether Setup will look for, download, and apply updates for Microsoft Dynamics CRM Email Router Setup. We recommend that you let Setup download the latest version by selecting true. By default, this value is set to false. If the value is set to false, Setup will
ignore this step and continue with the installation.
<muoptin optin="true”/“false" />
Specifies whether to use Microsoft Update to download and install updates for the Microsoft Dynamics CRM Email Router. After the installation is completed, this feature helps keep your computer up-to-date on an ongoing basis.
817
True. When you specify this option, Setup will opt in to Microsoft Update as the update
service and use the Windows automatic updating settings on the computer. Windows
automatic update settings can be viewed in Windows Update in Control Panel. Microsoft
Update helps make sure that your computer has the latest technology, which can help
reduce the risk of vulnerabilities and security issues.
False. When you specify this option, Setup won’t change the existing Windows
automatic update settings. If the computer isn’t already configured to use Microsoft
Update as the update service, we recommend that you have another method to install
updates on the computer, such as by using Windows Update Services. If left blank, a
value of false will be selected.
<InstallDir>c:\Program Files\Microsoft CRM Email</InstallDir>
Specifies the folder where the Email Router will be installed. By default, the Email Router is installed to C:\Program Files\Microsoft CRM Email.
<Features></Features>
If a value is not specified, Setup installs the Email Router service and the Email Router Configuration Manager, but does not install the Rule Deployment Wizard.
The following features are available:
<SinkService />
Add this entry if you want to install the E-mail Router service and Email Router Configuration Manager.
<RulesWizard />
Add this entry if you want to install the Rule Deployment Wizard.
Sample Microsoft Dynamics CRM Email Router XML configuration file The following configuration-file sample instructs Setup to check a Microsoft Web site for available updates to Email Router Setup and if found, apply them. It opts-in to Microsoft Update and then installs the Email Router service and Rule Deployment Wizard in the C:\Program Files\Microsoft Dynamics CRM Email Router folder:
<
CRMSetup
>
<EmailRouter>
<Features>
<SinkService />
<RulesWizard />
</Features>
818
<Patch update="true"></Patch>
<muoptin optin=”true” />
<InstallDir>c:\Program Files\Microsoft Dynamics CRM Email Router</InstallDir>
</EmailRouter>
</CRMSetup>
See Also Set up Email Router Email Router
© 2016 Microsoft. All rights reserved. Copyright
Uninstall, change, or repair Email Router
Applies To: Dynamics CRM 2016, Dynamics CRM Online
To uninstall, change, or repair Microsoft Dynamics CRM Email Router components, select from the following options. Before selecting an option, you must start Programs and Features in Control Panel.
Uninstall. To remove the Email Router follow these steps.
1. On the Uninstall or change a program page, click Microsoft Dynamics CRM E-mail Router and
then click Uninstall/Change. The Microsoft Dynamics CRM E-mail Router Maintenance wizard
starts.
2. Select Uninstall, and then click Uninstall.
3. After the Email Router components have been uninstalled, click Finish on the Microsoft
Dynamics CRM E-mail Router setup completed page.
Change. To add or remove Email Router or Rule Deployment Wizard, follow these steps.
1. On the Uninstall or change a program page, right-click Microsoft Dynamics CRM E-mail
Router and then click Uninstall/Change. The Microsoft Dynamics CRM E-mail Router
Maintenance wizard starts.
2. Select Add/Remove Features and click Next.
3. On the Select Router Components page, select Microsoft Dynamics CRM E-mail Router
Service or Rule Deployment Wizard, or you can select both items.
Note
Clearing the Microsoft Dynamics CRM E-mail Router Service or Rule Deployment Wizard check box does not cause the application to be uninstalled.
4. Click Next. Follow the instructions on the screen.
Repair. To reinstall Email Router program files and reconstruct settings, follow these steps.
819
1. On the Uninstall or change a program page, click Microsoft Dynamics CRM E-mail Router,
and then click Uninstall/Change. The Microsoft Dynamics CRM E-mail Router Maintenance wizard
starts.
2. Select Repair and click Next. Follow the instructions on the screen.
Caution
For on-premises deployment of Microsoft Dynamics CRM, during Microsoft Dynamics CRM Server Setup, the computer where the Email Router is installed is added to the Active Directory PrivUserGroup security group. However, if the Email Router is uninstalled, the computer is not removed from the security group, and therefore has an unnecessary permission. If you uninstall the Email Router and decide not to reinstall it on the same computer, we recommend that you manually remove the computer from the PrivUserGroup security group.
See Also Set up Email Router Email Router
© 2016 Microsoft. All rights reserved. Copyright
Use Email Router Configuration Manager
Applies To: Dynamics CRM 2016, Dynamics CRM Online
Note
The Microsoft Dynamics CRM Email Router is deprecated for December 2016 update for Dynamics 365 (online and on-premises) or later. We strongly recommend that you migrate all email routing functionality to use the server-side synchronization feature. More information: Migrate settings from the Email Router to server-side synchronization and Set up server-side synchronization of email, appointments, contacts, and tasks.
The Microsoft Dynamics CRM Email Router Configuration Manager is an application that system administrators and value-added resellers can use to configure Email Router deployments. For more information about installing Email Router and using Rule Deployment wizard, see Install Email Router and Rule Deployment Wizard.
Important
To use the Email Router Configuration Manager, you must be a Microsoft Dynamics CRM user who has the Dynamics CRM System Administrator security role. Additionally, Email Router will only work with Microsoft Dynamics CRM users when Server-Side Synchronization or Email Router has been selected as the option in the Synchronization Method setting in the Microsoft Dynamics CRM user’s Mailbox dialog box.
820
To start the Email Router Configuration Manager On the computer where the Email Router is installed, click Start, point to All Programs, click
Microsoft Dynamics CRM Email Router, and then click Microsoft Dynamics CRMEmail Router
Configuration Manager.
To save a configuration so that it is available the next time you run Email Router Configuration Manager, you must click Publish. The configuration information is saved to the Microsoft.Crm.Tools.EmailAgent.Configuration.bin and Microsoft.Crm.Tools.EmailAgent.xml files in the Drive:\Program Files\Microsoft CRM Email\Service\ folder.
Note
To create and manage rule deployments, use the Rule Deployment Wizard. This wizard is installed by Email Router Setup and can be installed on the same computer as the Email Router.
The Email Router Configuration Manager user interface To configure the Email Router, you must enter information on the following tabs of the Email Router Configuration Manager.
Configuration Profiles. To configure the Email Router, you first create one or more incoming and
one or more outgoing configuration profiles. These configuration profiles contain information about
the email server and the authentication methods that the Email Router will use to connect to the
email server and transfer email messages to and from the Microsoft Dynamics CRM organization.
You can create configuration profiles in the Configuration Profiles tab in the Email Router
Configuration Manager.
Deployments. After you create the configuration profiles that you want, you must define at least
one deployment. The information that you enter into the Deployment area will be used by the
Email Router to connect to your Microsoft Dynamics CRM deployment.
Users, Queues, and Forward Mailboxes. After you have the configuration profiles and
deployment established, then you manage the users, queues, and forward mailboxes that will be
used by the Email Router to route Microsoft Dynamics CRM email messages. You manage these
items on the Users, Queues, and Forward Mailboxes tab in the Email Router Configuration
Manager.
See Also Managing Configuration Profiles Managing Deployments Manage Users, Queues, and Forward Mailboxes
© 2016 Microsoft. All rights reserved. Copyright
821
Managing Configuration Profiles
Applies To: Dynamics CRM 2016, Dynamics CRM Online
Configuration profiles contain information about the email server and authentication methods that the Microsoft Dynamics CRM Email Router will use to connect to the server and transfer email messages to and from your Microsoft Dynamics CRM deployment.
You can create and modify configuration profiles on the Configuration Profiles tab in the Email Router Configuration Manager.
There are two types of configuration profiles:
Incoming. An incoming configuration profile defines how the Email Router receives email
messages that are to be routed to your Microsoft Dynamics CRM organization.
Outgoing. An outgoing configuration profile defines how the Email Router sends email messages
that are being routed from your Microsoft Dynamics CRM organization.
You can create multiple incoming and outgoing configuration profiles. For example, you can use multiple incoming configuration profiles to specify different email servers that process incoming email.
Important
A single instance of Email Router with a variety of email profiles is not a certified configuration. For example, do not configure the same instance of Email Router to retrieve emails from an on-premises Exchange Server and Exchange Online. To avoid performance problems, use separate instances of Email Router.
After you create the configuration profiles, you can use them as the default incoming and outgoing method for each user. Alternatively, you can specify different incoming and outgoing information for each user on the Users, Queues, and Forward Mailboxes tab.
See Also Use Email Router Configuration Manager Create or Modify an Incoming Configuration Profile (On Premises) Create or Modify an Outgoing Configuration Profile (On Premises) Set Advanced Configuration Profile Options Remove a Configuration Profile Managing Deployments Manage Users, Queues, and Forward Mailboxes
© 2016 Microsoft. All rights reserved. Copyright
Create or Modify an Incoming Configuration Profile (On Premises)
Applies To: Dynamics CRM 2016, Dynamics CRM Online
822
Note
This Help topic applies only to users of the on-premises deployment of Microsoft Dynamics CRM. To find comparable information that applies to Microsoft Dynamics CRM Online, see Create or Modify an Incoming Configuration Profile (Online).
You can create or modify Email Router configuration profiles for incoming email messages.
To create or modify an incoming configuration profile 1. In the Email Router Configuration Manager, click the Configuration Profiles tab. To create a new
configuration profile, click New. To modify an existing configuration profile, select one from the list,
and then click Modify.
2. On the General tab, enter or update the information and observe any noted restrictions or
requirements as appropriate in the following locations, and then click OK.
Profile Name. You must enter a name for the configuration profile. It is useful to enter a name
that describes the email server type and direction. For example, you might name the profile
Exchange Server Incoming.
Direction. Select Incoming to create a new configuration profile for email messages that will
be routed to your Microsoft Dynamics CRM organization. After you save the configuration
profile, the direction cannot be changed.
Email Server Type. For an email server that processes incoming email, select one of the
following server types:
Exchange 2007. Select this option if you use Microsoft Exchange Server 2007 for
incoming email.
Exchange 2010 or 2013. Select this option if you use Microsoft Exchange Server 2010 or
Microsoft Exchange Server 2013 for incoming email.
Exchange Online. Select this option if you use Microsoft Exchange Online for incoming
email.
POP3. Select this option if you use a POP3-compliant email server for incoming email.
Authentication Type. Depending on the type of email server that you use to process incoming
email, select one of the following authentication types:
Windows Authentication. This is the only authentication type available if you use
Microsoft Exchange Server for incoming email.
NTLM. This option is available only if you use a POP3-compliant server for incoming email.
Clear Text. This option is available if you use either a POP3-compliant server or Microsoft
Exchange Online for incoming email. For Microsoft Exchange Online, this is the only
authentication type available.
Important
823
Clear text authentication transmits unencrypted user names and passwords. If you use clear text authentication, we recommend that you do this only with Transport Layer Security (TLS) or Secure Sockets Layer (SSL). Select Use SSL and set the Network Port field (on the Advanced tab) to a value that is appropriate for your environment. (If you specify Exchange Online, the Use SSL option is not available because you can connect to Exchange Online only over an https connection.) Verify your POP3 server requirements with your email administrator.
Location. In the Email Server field, enter the complete URL for the incoming email server.
For incoming configuration profiles that use Exchange Server, use the
http://server.domain.com format.
For incoming configuration profiles that use a POP3-compliant server, use the
server.domain.com format.
For incoming configuration profiles that use Exchange Online, use the Exchange Web
Services (EWS) URL format (EWS/exchange.asmx), as illustrated in the following
examples:
https://autodiscover-red001.mail.microsoftonline.com/ews/exchange.asmx - US Data
Center
https://autodiscover-red002.mail.emea.microsoftonline.com/ews/exchange.asmx -
EMEA Data Center
https://autodiscover-red003.mail.apac.microsoftonline.com/ews/exchange.asmx -
APAC Data Center
Use Autodiscover. Select this option to use the Autodiscover service as the way to obtain
the Exchange Web Services URL. The Autodiscover option is available only in profiles that
use Exchange Web Services (EWS).
Access Credentials. Complete the following fields to configure the authentication method that
the Email Router will use to connect to the incoming email server:
Local System Account. Select this option if you use Exchange Server as the incoming
email server and you want to authenticate by using the local system account of the
computer where the Email Router is running. This option requires a trust relationship
between the computer where the Email Router is running and the computer where the
Exchange Server is running.
User Specified. Select this option if you want the Email Router to authenticate by using an
individual user account or a mailbox. This option is available in the on-premises and
Service Provider editions of Microsoft Dynamics CRM.
Note
If you select User Specified for Access Credentials, each user that this profile serves must specify their access credentials on the Email tab in the Dynamics 365 for Outlook or Web application Set Personal Options page.
If you select User Specified for Access Credentials, for each queue that this profile serves, the queue's access credentials must be added in the corresponding mailbox form.
If you select User Specified for Access Credentials, the account specified in the Deployments
824
tab to connect to Microsoft Dynamics CRM must be a member of the PrivUserGroup security group.
Other Specified. Select this option if you want the Email Router to authenticate by using
the credentials of a specified user. The specified user must have full access to all the
mailboxes that the incoming profile will serve. To specify multiple sets of access
credentials, you must create a separate configuration profile for each specified user.
Note
If you select Other Specified and you select POP3 as the incoming email server type, you cannot enter a value in the User Name box because the POP3 protocol authenticates by using an email address and not a user name. You must provide the email address password in the Password box.
If you select Other Specified, you must enter in the User Name and Password fields the credentials that the Email Router will use to retrieve email messages from the Exchange Online mailbox to which this profile is mapped. The credentials can be either those of the Exchange Online mailbox, or those of the Exchange Online tenant administrator. Enter the user name in the username@fulldomain format.
3. To save the configuration profile, click Publish.
See Also Configure the Email Router Managing Configuration Profiles Create or Modify an Incoming Configuration Profile (Online) Create or Modify an Outgoing Configuration Profile (On Premises) Set Advanced Configuration Profile Options
© 2016 Microsoft. All rights reserved. Copyright
Create or Modify an Incoming Configuration Profile (Online)
Applies To: Dynamics CRM 2016, Dynamics CRM Online
Note
This Help topic applies only to users of Microsoft Dynamics CRM Online. To find comparable information that applies to the on-premises deployment of Microsoft Dynamics CRM, see Create or Modify an Incoming Configuration Profile (On Premises).
You can create or modify Email Router configuration profiles for incoming email messages.
825
To create or modify an incoming configuration profile 1. In the Email Router Configuration Manager, click the Configuration Profiles tab. To create a new
configuration profile, click New. To modify an existing configuration profile, select one from the list,
and then click Modify.
2. On the General tab, enter or update the information and observe any noted restrictions or
requirements as appropriate in the following locations, and then click OK.
Profile Name. You must enter a name for the configuration profile. It is useful to enter a name
that describes the email server type and direction. For example, you might name the profile
Exchange Server Incoming.
Direction. Select Incoming to create a new configuration profile for email messages that will
be routed to your Microsoft Dynamics CRM organization. After you save the configuration
profile, the direction cannot be changed.
Email Server Type. For an email server that processes incoming email, select one of the
following server types:
Exchange 2007. Select this option if you use Microsoft Exchange Server 2007 for
incoming email.
Exchange 2010 or 2013. Select this option if you use Microsoft Exchange Server 2010 or
Microsoft Exchange Server 2013 for incoming email.
Exchange Online. Select this option if you use Microsoft Exchange Online for incoming
email.
POP3. Select this option if you use a POP3-compliant email server for incoming email.
Authentication Type. Depending on the type of email server that you use to process incoming
email, select one of the following authentication types:
Windows Authentication. This is the only authentication type available if you use
Microsoft Exchange Server for incoming email.
NTLM. This option is available only if you use a POP3-compliant server for incoming email.
Clear Text. This option is available if you use either a POP3-compliant server or Microsoft
Exchange Online for incoming email. For Microsoft Exchange Online, this is the only
authentication type available.
Important
Because clear text authentication transmits user names and passwords without encryption, it is not recommended for use over an unsecured network. We recommend that you contact your email administrator to verify the appropriate authentication type for your environment.
Location. In the Email Server or Exchange Web Services URL field, enter the complete URL
for the incoming email server.
For incoming configuration profiles that use Exchange Server, use the
http://server.domain.com format.
826
For incoming configuration profiles that use a POP3-compliant server, use the
server.domain.com format.
For incoming configuration profiles that use Exchange Online, use the Exchange Web
Services (EWS) URL format (EWS/exchange.asmx), as illustrated in the following
examples:
https://autodiscover-red001.mail.microsoftonline.com/ews/exchange.asmx - US Data
Center
https://autodiscover-red002.mail.emea.microsoftonline.com/ews/exchange.asmx -
EMEA Data Center
https://autodiscover-red003.mail.apac.microsoftonline.com/ews/exchange.asmx -
APAC Data Center
Use Autodiscover. Select this option to use the Autodiscover service as the way to obtain
the Exchange Web Services URL. The Autodiscover option is available only in profiles that
use Exchange Web Services (EWS).
Access Credentials. Complete the following fields to configure the authentication method that
the Email Router will use to connect to the incoming email server:
Local System Account. Select this option if you use Exchange Server as the incoming
email server and you want to authenticate by using the local system account of the
computer where the Email Router is running. This option requires a trust relationship
between the computer where the Email Router is running and the computer where the
Exchange Server is running.
Other Specified. Select this option if you want the Email Router to authenticate by using
the credentials of a specified user. The specified user must have full access to all the
mailboxes that the incoming profile will serve. To specify multiple sets of access
credentials, you must create a separate configuration profile for each specified user.
Note
If you select Other Specified and you select POP3 as the incoming email server type, you cannot enter a value in the User Name box because the POP3 protocol authenticates by using an email address and not a user name. You must provide the email address password in the Password box.
If you select Other Specified, you must enter in the User Name and Password fields the credentials that the Email Router will use to retrieve email messages from the Exchange Online mailbox to which this profile is mapped. The credentials can be either those of the Exchange Online mailbox, or those of the Exchange Online tenant administrator. Enter the user name in the username@fulldomain format.
3. To save the configuration profile, click Publish.
See Also Managing Configuration Profiles Create or Modify an Incoming Configuration Profile (On Premises)
827
Create or Modify an Outgoing Configuration Profile (On Premises) Create or Modify an Outgoing Configuration Profile (Online) Set Advanced Configuration Profile Options Managing Deployments
© 2016 Microsoft. All rights reserved. Copyright
Create or Modify an Outgoing Configuration Profile (On Premises)
Applies To: Dynamics CRM 2016, Dynamics CRM Online
Note
This Help topic applies only to users of the on-premises deployment of Microsoft Dynamics CRM Server. To find comparable information that applies to Microsoft Dynamics CRM Online, see Create or Modify an Outgoing Configuration Profile (Online).
You can create or modify Email Router configuration profiles for outgoing email messages.
To create or modify an outgoing configuration profile 1. In the Email Router Configuration Manager, click the Configuration Profiles tab. To create a new
configuration profile, click New. To modify an existing configuration profile, select one in the list and
then click Modify.
2. On the General tab, enter or update the information and observe any noted restrictions or
requirements as appropriate in the following locations, and then click OK.
Profile Name. You must enter a name for the configuration profile. It is useful to enter a name
that describes the email server type and direction. For example, you might name the profile
Exchange Server Outgoing.
Direction. Select Outgoing to create a new configuration profile for email messages that will
be routed from your Microsoft Dynamics CRM organization to an external recipient. After you
save the configuration profile, the direction cannot be changed.
Email Server Type. For an email server that processes outgoing email, select one of the
following server types:
SMTP. Select this option if you use Exchange Server or another SMTP-compliant email
server.
Exchange Online. Select this option if you use Exchange Online.
Protocol. For an Exchange Online email server that processes outgoing email, Exchange Web
Services is the only available protocol. For an SMTP email server that processes outgoing
email, SMTP is the only available protocol.
828
Authentication Type. Depending on the type of email server that you use to process outgoing
email, select one of the following authentication types:
Windows Authentication. This option is available only if you select SMTP as the outgoing
email server type.
Clear Text. This option is available if you select either SMTP or Microsoft Exchange
Online as your outgoing email server type. For Microsoft Exchange Online, this is the only
authentication type available.
Important
Clear text authentication transmits unencrypted user names and passwords. If you use clear text authentication, we recommend that you do this only with Transport Layer Security (TLS) or Secure Sockets Layer (SSL). Select Use SSL and set the Network Port field (on the Advanced tab) to a value that is appropriate for your environment. (If you specify Exchange Online, the Use SSL option is not available because you can connect to Exchange Online only over an https connection.) Verify your POP3 server requirements with your email administrator.
Anonymous. This option is available only if you select SMTP as your outgoing email
server type.
Important
Anonymous SMTP authentication is valid only for internal, non-Internet-facing SMTP servers. Many SMTP servers do not support anonymous authentication. To ensure uninterrupted email flow from the Email Router, verify your SMTP server requirements with your email administrator.
Location. In the Server field, enter the complete URL for the outgoing email server:
For outgoing configuration profiles that use SMTP, use the http://server.domain.com
format.
For outgoing configuration profiles that use Exchange Online, use the Exchange Web
Services (EWS) URL format (EWS/exchange.asmx), as illustrated in the following
examples:
https://autodiscover-red001.mail.microsoftonline.com/ews/exchange.asmx - US Data
Center
https://autodiscover-red002.mail.emea.microsoftonline.com/ews/exchange.asmx -
EMEA Data Center
https://autodiscover-red003.mail.apac.microsoftonline.com/ews/exchange.asmx -
APAC Data Center
Use SSL. Select this check box if you want to require Transport Layer Security (TLS) or
Secure Sockets Layer (SSL) for the connection to the outgoing email server.
Access Credentials. Complete the following fields to configure the authentication method that
the Email Router will use to connect to the outgoing email server:
829
Local System Account. Select this option if you select SMTP as the email server type and
you want to authenticate by using the local system account of the computer where the
Email Router is running. This option requires a trust relationship between the computer
where the Email Router is running and the computer where the Exchange Server is
running.
Note
The Local System Account is the only option available if you select Anonymous as the authentication type.
User Specified. Select this option if you want the Email Router to authenticate by using an
individual user account or a mailbox. This option is available in the on-premises and
Service Provider editions of Microsoft Dynamics CRM.
Note
If you select User Specified for Access Credentials, each user that this profile serves must specify their access credentials on the Email tab in the Dynamics 365 for Outlook or Web application Set Personal Options page.
If you select User Specified for Access Credentials, for each queue that this profile serves, the queue's access credentials must be added in the Configure Credentials for Email Router section on the Queue form.
If you select User Specified for Access Credentials, the account specified in the Deployments tab to connect to Microsoft Dynamics CRM must be a member of the PrivUserGroup security group.
Other Specified. Select this option if you want the Email Router to authenticate by using
the credentials of a specified user. The specified user must have full access to all the
mailboxes that the incoming profile will serve. To specify multiple sets of access
credentials, you must create a separate configuration profile for each specified user.
Note
If you select Other Specified, you must enter in the User Name and Password fields the credentials that the Email Router will use to retrieve email messages from the Exchange Online mailbox to which this profile is mapped. The credentials can be either those of the Exchange Online mailbox, or those of the Exchange Online tenant administrator. Enter the user name in the username@fulldomain format.
For processing outgoing email messages for Exchange Online, the credentials specified in the outgoing profile must have "PublishingEditor" permissions (Delegate Access) on the Exchange Online mailboxes that need to be accessed. The Exchange Online administrator has this permission by default.
User Type. If you select Exchange Online as the email server type and Other Specified
as the access credentials, you must select either Administrator or User as the user type.
Select Administrator if you want to use a single set of credentials to process multiple
830
mailboxes, or if you want to provide a different set of email credentials to process individual
mailboxes.
Note
If you select User as the user type, the Email Router will connect to the mailbox whose credentials consist of the user's email address (used as the User Name) and a password taken from the Password box.
If you select Administrator as the user type, the Email Router can use the specified credentials to connect to any mailbox within the Exchange Online tenant to send email messages. The send method can be either Delegate Access or Send as permission, depending on which access type that you select.
Access Type. If you select Exchange Online as the email server type, Other Specified
as the access credentials, and Administrator as the user type, you must select either
Delegate Access or Send as as the access type.
Note
Delegate Access causes email to be sent as "Send on behalf of" messages.
Send as causes email to be sent as "Send As" messages.
3. To save the configuration profile, click Publish.
See Also Managing Configuration Profiles Create or Modify an Outgoing Configuration Profile (Online) Create or Modify an Incoming Configuration Profile (On Premises) Create or Modify an Incoming Configuration Profile (Online) Set Advanced Configuration Profile Options Managing Deployments
© 2016 Microsoft. All rights reserved. Copyright
Create or Modify an Outgoing Configuration Profile (Online)
Applies To: Dynamics CRM 2016, Dynamics CRM Online
Note
This Help topic applies only to users of Microsoft Dynamics CRM Online. To find comparable information that applies to the on-premises deployment of Microsoft Dynamics CRM Server, see Create or Modify an Outgoing Configuration Profile (On Premises).
831
You can create or modify Email Router configuration profiles for outgoing email messages.
To create or modify an outgoing configuration profile 1. In the Email Router Configuration Manager, click the Configuration Profiles tab. To create a new
configuration profile, click New. To modify an existing deployment, select a configuration profile,
select one in the list, and then click Modify.
2. On the General tab, enter or update the information and observe any noted restrictions or
requirements as appropriate in the following locations, and then click OK.
Profile Name. You must enter a name for the configuration profile. It is useful to enter a name
that describes the email server type and direction. For example, you might name the profile
Exchange Server Outgoing.
Direction. Select Outgoing to create a new configuration profile for email messages that will
be routed from your organization to an external recipient. After you save the configuration
profile, the direction cannot be changed.
Email Server Type. For an email server that processes outgoing email, select one of the
following server types:
SMTP. Select this option if you use Microsoft Exchange or another SMTP-compliant email
server.
Exchange Online. Select this option if you use Microsoft Exchange Online for outgoing
email.
Protocol. For an Exchange Online email server that processes outgoing email, Exchange Web
Services is the only available protocol. For an SMTP email server that processes outgoing
email, SMTP is the only available protocol.
Authentication Type. Depending on the type of email server that you use to process outgoing
email, select one of the following authentication types:
Windows Authentication. This option is available only if you select SMTP as the outgoing
email server type.
Clear Text. This option is available if you select either SMTP or Microsoft Exchange
Online as your outgoing email server type. For Microsoft Exchange Online, this is the only
authentication type available.
Important
Because clear text authentication transmits user names and passwords without encryption, it is not recommended for use over an unsecured network. We recommend that you contact your email administrator to verify the appropriate authentication type for your environment.
Anonymous. This option is available only if you select SMTP as your outgoing email
server type.
832
Important
Anonymous SMTP authentication is valid only for internal, non-Internet-facing SMTP servers. Many SMTP servers do not support anonymous authentication. To ensure uninterrupted email flow from the Email Router, verify your SMTP server requirements with your email administrator.
Location. In the Email Server or Exchange Web Services URL field, enter the complete URL
for the outgoing email server:
For outgoing configuration profiles that use SMTP, use the http://server.domain.com
format.
For outgoing configuration profiles that use Exchange Online, use the Exchange Web
Services (EWS) URL format (EWS/exchange.asmx), as illustrated in the following
examples:
https://autodiscover-red001.mail.microsoftonline.com/ews/exchange.asmx - US Data
Center
https://autodiscover-red002.mail.emea.microsoftonline.com/ews/exchange.asmx -
EMEA Data Center
https://autodiscover-red003.mail.apac.microsoftonline.com/ews/exchange.asmx -
APAC Data Center
Use Autodiscover. Select this option to use the Autodiscover service as the way to obtain
the Exchange Web Services URL. The Autodiscover option is available only in profiles that
use Exchange Web Services (EWS).
Use SSL. Select this check box if you want to require Transport Layer Security (TLS) or
Secure Sockets Layer (SSL) for the connection to the outgoing email server.
Access Credentials. Complete the following fields to configure the authentication method that
the Email Router will use to connect to the outgoing email server:
Local System Account. Select this option if you select SMTP as the email server type and
you want to authenticate by using the local system account of the computer where the
Email Router is running. This option requires a trust relationship between the computer
where the Email Router is running and the computer where the Exchange Server is
running. This is the only option available if you select Anonymous as the authentication
type.
Other Specified. Select this option if you want the Email Router to authenticate by using
the credentials of a specified user. The specified user must have full access to all the
mailboxes that the incoming profile will serve. To specify multiple sets of access
credentials, you must create a separate configuration profile for each specified user. If you
select Other Specified, you must enter in the User Name and Password fields the
credentials that the Email Router will use to retrieve email messages from the Exchange
Online mailbox to which this profile is mapped. The credentials can be either those of the
Exchange Online mailbox, or those of the Exchange Online tenant administrator. Enter the
user name in the username@fulldomain format.
833
User Type. If you select Exchange Online as the email server type and Other Specified
as the access credentials, you must select either Administrator or User as the user type.
Select Administrator if you want to use a single set of credentials to process multiple
mailboxes, or if you want to provide a different set of email credentials to process individual
mailboxes. If you select User as the user type, the Email Router will connect to the mailbox
whose credentials consist of the user's email address (used as the User Name) and a
password taken from the Password box.If you select Administrator as the user type, the
Email Router can use the specified credentials to connect to any mailbox within the
Exchange Online tenant to send email messages. The send method can be either
Delegate Access or Send as permission, depending on which access type that you
select.
Access Type. If you select Exchange Online as the email server type, Other Specified
as the access credentials, and Administrator as the user type, you must select either
Delegate Access or Send As as the access type. Delegate Access causes email to be
sent as "Send on behalf of" messages. This requires the administrator to have delegate
access permissions over the Exchange Online mailbox to which the Email Router is
connecting. If the administrator does not have those permissions, the Email Router will try
to grant the delegate access permissions to the administrator before processing email
messages. The Send As access type causes email to be sent as "Send As" messages.
This requires the administrator to have "Send As" permissions over the Exchange Online
mailbox to which the Email Router is connecting.
3. To save the configuration profile, click Publish.
See Also Managing Configuration Profiles Create or Modify an Incoming Configuration Profile (On Premises) Create or Modify an Incoming Configuration Profile (Online) Create or Modify an Outgoing Configuration Profile (On Premises) Set Advanced Configuration Profile Options Managing Deployments
© 2016 Microsoft. All rights reserved. Copyright
Set Advanced Configuration Profile Options
Applies To: Dynamics CRM 2016, Dynamics CRM Online
When you create or modify a configuration profile, you can set advanced options on the Advanced tab of the Email Router Configuration Profile dialog box.

834
To set advanced configuration profile options 1. In the Email Router Configuration Manager, click the Configuration Profiles tab, and then either
click New to create a new configuration profile, or click Modify to edit an existing configuration
profile in the list.
2. If this is a new configuration file, on the General tab, type the information for each field.
3. Click the Advanced tab, and then type information or observe any noted restrictions or
requirements as needed in the following locations. When you are finished entering information, click
OK.
a. Network Port. Enter the TCP port number that will be used by the Email Router to connect to
the email server. By default, the Email Router uses port 80 for Exchange Server incoming
configuration profiles, port 110 for POP3 incoming configuration profiles, and port 25 for
outgoing configuration profiles.
b. Connection Timeout. Enter the number of seconds that will transpire before the Email Router
stops trying to connect to the email server. The default value is 300 seconds.
c. Maximum Messages Per Cycle. Enter the maximum number of messages the Email Router
will try to process for each connection cycle. The default value for processing outgoing
messages is 100 messages per cycle. The default value for processing incoming messages is
1000 messages per cycle.
d. Polling Period. Enter the number of seconds that the Email Router will wait before checking
for new email messages. The default value is 60 seconds.
e. Message Expiration. Enter the number of seconds that will transpire before the Email Router
marks the message as expired. Expired email messages will not be processed. This setting is
available for incoming configuration profiles only. The default value is 86400 seconds or 24
hours.
4. To save the profile, click OK.
See Also Managing Configuration Profiles Remove a Configuration Profile Create or modify a Deployment (On-premises) Create or modify a Deployment (Online)
© 2016 Microsoft. All rights reserved. Copyright
Remove a Configuration Profile
Applies To: Dynamics CRM 2016, Dynamics CRM Online
835
When you remove a configuration profile, the Email Router will no longer process email messages for the incoming or outgoing profile that is removed.
Note
You cannot remove an incoming or outgoing profile that is referenced by a deployment. Before you can remove the configuration profile, you must go to the Deployments tab, select the deployment that is referenced by a configuration profile, and then either modify the deployment so that it no longer uses the configuration profile, or remove the deployment.
To remove a configuration profile 1. On the Configuration Profiles tab, select the configuration profile that you want to remove, and
then click Remove.
2. To confirm that you want to remove the configuration profile, click Yes.
See Also Managing Configuration Profiles Create or Modify an Incoming Configuration Profile (On Premises) Create or modify a Deployment (On-premises) Remove a Deployment
© 2016 Microsoft. All rights reserved. Copyright
Managing Deployments
Applies To: Dynamics CRM 2016, Dynamics CRM Online
On the Deployments tab, you specify information about one or more instances of Microsoft Dynamics CRM Online or Microsoft Dynamics CRM Server (on-premises) deployments. This information includes the type and location of Microsoft Dynamics CRM that the Microsoft Dynamics CRM Email Router will connect to. Additionally, you can specify the default incoming and outgoing configuration profiles for the Email Router. If you have more than one instance of Microsoft Dynamics CRM Online, Microsoft Dynamics CRM Server (on-premises) or email server, you can create multiple deployments.
See Also Use Email Router Configuration Manager Create or modify a Deployment (On-premises) Create or modify a Deployment (Online) Disable or Enable a Deployment Remove a Deployment Managing Configuration Profiles
836
© 2016 Microsoft. All rights reserved. Copyright
Create or modify a Deployment (On-premises)
Applies To: Dynamics CRM 2016, Dynamics CRM Online
Note
This Help topic applies only to users of the on-premises deployment of Microsoft Dynamics CRM. To find comparable information that applies to Microsoft Dynamics CRM Online, see Create or modify a Deployment (Online).
You can create or modify the deployment configuration information that the Email Router will use to connect to a Microsoft Dynamics CRM Server deployment.
To create or modify deployment information 1. Click the Deployments tab, and then click New to create a new deployment configuration. To
modify an existing deployment configuration, select a deployment in the list, and then click Modify.
2. On the Deployments tab, enter information or observe any noted restrictions or requirements as
needed in the following locations, and then click OK.
Deployment. You must select the type of Microsoft Dynamics CRM system that the Email
Router will connect to. The following options are available.
My company. Select this option if the deployment of Microsoft Dynamics CRM is deployed
at your company.
An online service provider. Select this option if the deployment that the Email Router will
connect to is an online service provider deployment of Microsoft Dynamics CRM.
Microsoft Dynamics CRM Server. Type the URL of the Microsoft Dynamics CRM Server.
If you are connecting to an on-premises version at your company, the format is similar to
http://myCRMServer:5555/OrganizationUniqueName.
If you are connecting to a service provider deployment, contact your service provider to
obtain the correct URL. For more information, see the documentation that is available from
the Microsoft Download Center.
Important
Make sure that the URL of the Microsoft Dynamics CRM deployment is spelled correctly. The OrganizationUniqueName part of the URL must be spelled exactly as it appears in the Microsoft Dynamics CRM server. To determine the OrganizationUniqueName, start the Microsoft Dynamics CRM web application as a user who has the System Customizer role. Click Settings, and then click Customizations. On the Customization page, click Developer Resources. The OrganizationUniqueName is displayed below the Organization Unique Name label.
837
If you have installed Microsoft Dynamics CRM Server roles on separate computers, you must enter the URL of the computer that is running the Discovery Web Service server role.
Access Credentials. If you select My company in Deployment options, you can choose either
Local System Account or Other Specified.
Note
If you select Local System Account, either the Email Router must be installed on the same server as the Microsoft Dynamics CRM Server, or the Email Router computer must be added to the Active DirectoryPrivUserGroup security group. This computer will already be a member of the PrivUserGroup security group if you specified the Email Router computer during Microsoft Dynamics CRM Server Setup.
If you select Other Specified in Access Credentials, the Email Router will use the credentials that you enter in the User Name and Password boxes.
If you select An online service provider in Deployment options, the Other Specified option is required.
Default configuration profiles. In this area you can select the default incoming and outgoing
configuration profiles.
These configuration profiles will automatically be applied to users and queues. Incoming and outgoing configuration profiles are created on the Configuration Profiles tab.
If you do not select an incoming or outgoing default configuration profile, you must select an incoming and outgoing profile for each user. You can set individual configuration profiles on the Users, Queues, and Forward Mailboxes tab.
3. To save the deployment configuration information, click Publish.
See Also Managing Deployments Create or modify a Deployment (Online) Disable or Enable a Deployment Remove a Deployment Manage Users, Queues, and Forward Mailboxes
© 2016 Microsoft. All rights reserved. Copyright
Create or modify a Deployment (Online)
Applies To: Dynamics CRM 2016, Dynamics CRM Online
Note
This Help topic applies only to users of Microsoft Dynamics CRM Online. To find comparable information that applies to the on-premises deployment of Microsoft Dynamics CRM, see Create or
838
modify a Deployment (On-premises).
You can create or modify the deployment configuration information that the Email Router will use to Microsoft Dynamics CRM Online.
To create or modify deployment information 1. Click the Deployments tab, and then click New to create a new deployment configuration. To
modify an existing deployment configuration, select a deployment in the list, and then click Modify.
2. On the Deployments tab, enter information or observe any noted restrictions or requirements as
needed in the following locations, and then click OK.
Deployment. Select the type of Microsoft Dynamics CRM system that the Email Router will
connect to. The following option is available.
Microsoft Dynamics CRM (online). Select this option to connect the Email Router to an
instance of Microsoft Dynamics CRM Online.
If your organization uses Microsoft account, enter:
https://dev.crm.dynamics.com/<OrganizationName> where OrganizationName is a
placeholder for the actual ID of your organization.
If your organization uses Microsoft Office 365, enter:
https://disco.crm.dynamics.com/<OrganizationName> where OrganizationName is a
placeholder for the actual ID of your organization.
If your organization uses Microsoft Office 365, make sure that the computer on which
the Email Router is installed also has the Microsoft Online Services Sign-In Assistant
(MSOSIA) installed on it. Organizations in the Online Service Delivery Platform have
dependency on MSOSIA.
If Microsoft Online Services Sign-In Assistant is already installed, check the registry key SOFTWARE\Microsoft\MSOIdentityCRL and make sure that the TargetDir registry key in MSOIdentityCRL contains msoidcli.dll.
Important
Make sure that the URL of the Microsoft Dynamics CRM deployment is spelled correctly. The OrganizationUniqueName part of the URL must be spelled exactly as it appears in the Microsoft Dynamics CRM server. To determine the OrganizationUniqueName, start the Microsoft Dynamics CRM web application as a user who has the System Customizer role. Go to Settings > Customizations. Click Developer Resources. The OrganizationUniqueName is displayed below the Organization Unique Name label.
Access Credentials. Select the credentials that will be used by the Email Router to connect to
Microsoft Dynamics CRM. You must select Other Specified. The Email Router will use the
credentials that you enter in the User Name and Password boxes.
839
Default configuration profiles. In this area you can select the default incoming and outgoing
configuration profiles.
These configuration profiles will automatically be applied to users and queues. Incoming and outgoing configuration profiles are created on the Configuration Profiles tab.
If you do not select an incoming or outgoing default configuration profile, you must select an incoming and outgoing profile for each user. You can set individual configuration profiles on the Users, Queues, and Forward Mailboxes tab.
3. To save the deployment configuration information, click Publish.
See Also Managing Deployments Create or modify a Deployment (On-premises) Disable or Enable a Deployment Remove a Deployment Manage Users, Queues, and Forward Mailboxes
© 2016 Microsoft. All rights reserved. Copyright
Disable or Enable a Deployment
Applies To: Dynamics CRM 2016, Dynamics CRM Online
When you disable a deployment, the Email Router will no longer route Microsoft Dynamics CRM email messages for the selected deployment.
To disable or enable a deployment 1. On the Deployments tab, select the deployment that you want to disable or enable.
2. Click Disable to disable the deployment, or click Enable to enable the deployment.
See Also Managing Deployments Create or modify a Deployment (On-premises) Remove a Deployment
© 2016 Microsoft. All rights reserved. Copyright
Remove a Deployment
Applies To: Dynamics CRM 2016, Dynamics CRM Online
840
When you remove a deployment, the settings for the deployment will be lost and the Email Router will no longer route Microsoft Dynamics CRM email messages for the deployment that is removed.
To remove a deployment 1. On the Deployments tab, select the deployment that you want to remove, and then click Remove.
2. To confirm that you want to remove the deployment, click OK.
See Also Disable or Enable a Deployment Managing Deployments Create or modify a Deployment (On-premises)
© 2016 Microsoft. All rights reserved. Copyright
Manage Users, Queues, and Forward Mailboxes
Applies To: Dynamics CRM 2016, Dynamics CRM Online
On the Users, Queues, and Forward Mailboxes tab, you can view, test access, enable, and disable Microsoft Dynamics CRM users, queues, and forward mailboxes. Additionally, you can modify incoming and outgoing configuration profiles for users and queues, and specify or modify settings for a forward mailbox.
To manage users, queues, and forward mailboxes, you must have a connection to Microsoft Dynamics CRM Online or Microsoft Dynamics CRM Server (on-premises). Although you can use Email Router for email processing, consider using Server-Side Synchronization instead. In addition to email synchronization, Server-Side Synchronization also synchronizes accounts, contacts, and tasks. More information: Server-side synchronization
See Also Use Email Router Configuration Manager Load User, Queue, and Forward Mailbox Data (On Premises) Load User, Queue, and Forward Mailbox Data (Online) Specify a Forward Mailbox Test Access for Users, Queues, and Forward Mailboxes Modify a User, Queue, or Forward Mailbox Disable or Enable a User, Queue, or Forward Mailbox Create or modify a Deployment (On-premises)
© 2016 Microsoft. All rights reserved. Copyright
841
Load User, Queue, and Forward Mailbox Data (On Premises)
Applies To: Dynamics CRM 2016, Dynamics CRM Online
Note
This Help topic applies only to users of the on-premises deployment of Microsoft Dynamics CRM. To find comparable information that applies to Microsoft Dynamics CRM Online, see Load User, Queue, and Forward Mailbox Data (Online).
The procedure in this section describes how to display data about Microsoft Dynamics CRM users, queues, and forward mailboxes for the purposes of testing and configuring aspects of Email Router functionality. After you load this data by clicking Load Data, the Email Router Configuration Manager connects to Microsoft Dynamics CRM and displays a list of users and queues.
To appear in the list, each user or queue must have the following configuration settings on the Mailbox or Queue form in the Microsoft Dynamics CRM application:
Server-Side Synchronization or Email Router selected as either incoming or outgoing email
delivery, or both incoming and outgoing email delivery. By default, Microsoft Dynamics CRM users
do not have the this option configured for the user settings.
A valid email address.
Email approval.
Important
The primary email address of the user record must be approved by a system administrator. Users with the system administrator security role can approve an email address by clicking Approve Email on the user’s Mailbox form in the Microsoft Dynamics CRM application.
After you have set the configuration profiles and deployments that you want, you can load users, queues, and forward-mailbox information from the Microsoft Dynamics CRM Server.
Load users, queues, and forward-mailbox information 1. On the Users, Queues, and Forward Mailboxes tab, select the deployment that you want, and
then click Load Data. The Microsoft Dynamics CRM user and queue information appears in the list.
2. From the list, you can select an individual user that you want to modify or disable, or you can test
access for all items.
To view forward mailbox information, click the Forward Mailboxes tab.
842
Load Data Troubleshooting If the Email Router Configuration Manager cannot load data, verify the following:
The URL for the selected deployment is in the form
http://myCRMServer:5555/OrganizationUniqueName, where CRMServer:5555 is the name of the
computer where Microsoft Dynamics CRM Server is running and port number, and
OrganizationUniqueName is the name of the organization that the deployment is connecting to. For
more information about determining the OrganizationUniqueName, see Create or modify a
Deployment (On-premises).
When you specify the access credentials for an on-premises deployment of Microsoft Dynamics
CRM, the credentials must be in the form Domain\UserName, where Domain is the name of the
domain, and UserName is the name of the user account that has the appropriate permissions.
If at least one user or queue is configured to use a user-specified configuration profile, the
computer on which the Email Router runs must be a member of the PrivUserGroup security group
in Active Directory. (This computer will already be in the PrivUserGroup security group if you
specified the Email Router computer during Microsoft Dynamics CRM Server Setup.)
Note
After you add the Email Router computer to the PrivUserGroup security group, you might have to wait for a period of time before the Email Router Configuration Manager can load data. If data loading still fails, you might need to reset the IIS services on the Web server on which the Microsoft Dynamics CRM web application is installed. To do this, as an administrator on the Web server, click Start, click Run, type iisreset in the Open box, and then click OK.
Warning
When you restart the IIS services, all sessions connected to your Web server (including Internet, FTP, SMTP, and NNTP) are dropped. Any data held in Web applications is lost. All Internet sites are unavailable until Internet services are restarted. For this reason, you should avoid restarting or stopping your server if possible.
See Also Manage Users, Queues, and Forward Mailboxes Load User, Queue, and Forward Mailbox Data (Online) Disable or Enable a User, Queue, or Forward Mailbox Specify a Forward Mailbox Test Access for Users, Queues, and Forward Mailboxes Modify a User, Queue, or Forward Mailbox
© 2016 Microsoft. All rights reserved. Copyright
843
Load User, Queue, and Forward Mailbox Data (Online)
Applies To: Dynamics CRM 2016, Dynamics CRM Online
Note
This Help topic applies to users of Microsoft Dynamics CRM Online. To find comparable information that applies to the on-premises deployment of Microsoft Dynamics CRM, see Load User, Queue, and Forward Mailbox Data (On Premises).
The procedure in this section describes how to display data about Microsoft Dynamics CRM users, queues, and forward mailboxes for the purposes of testing and configuring aspects of Email Router functionality. After you load this data by clicking Load Data, the Email Router Configuration Manager connects to Microsoft Dynamics CRM and displays a list of users and queues.
To appear in the list, each user or queue must have the following configuration settings on the Mailbox or Queue form in the Microsoft Dynamics CRM application:
Server-Side Synchronization or Email Router selected as either incoming or outgoing email
delivery, or both incoming and outgoing email delivery. By default, Microsoft Dynamics CRM users
do not have the this option configured for the user settings.
A valid email address.
Email approval.
Important
The primary email address of the user record must be approved by a system administrator. Users with the system administrator security role can approve an email address by clicking Approve Email on the user’s Mailbox form in the Microsoft Dynamics CRM application.
After you have set the configuration profiles and deployments that you want, you can load users, queues, and forward-mailbox information from the instance of Microsoft Dynamics CRM Online.
Load Email Router users, queues, and forward-mailbox information 1. On the Users, Queues, and Forward Mailboxes tab, select the deployment that you want, and
then click Load Data. The Microsoft Dynamics CRM user and queue information appears in the list.
2. From the list, you can select an individual user that you want to modify or disable, or you can test
access for all items.
To view forward mailbox information, click the Forward Mailboxes tab.
844
Unable to load Microsoft Dynamics CRM users, queues, and forward-mailbox information If the Email Router Configuration Manager cannot load data, verify that the URL for the selected deployment is in the form https://dev.crm.dynamics.com/OrganizationUniqueName, where OrganizationUniqueName is the name of the organization that the deployment is connecting to.
Additionally, by default, the Email Router service is configured to run under the Local System account. The Email Router service may be unable to connect to Microsoft Dynamics CRM Online when the following conditions are true:
The Email Router service is configured to run under the Local System account.
The Email Router service must pass through and authenticate with an Internet proxy server to
connect to Microsoft Dynamics CRM.
To work around this issue, we recommend that you configure the Email Router service to use an Active Directory domain user account. Note that, the user account that you specify must be able to access the Internet through the proxy server.
To configure the Email Router service to use a domain user account
1. On the computer where the Email Router is installed, click Start, point to Administrative Tools,
and then click Services.
2. In the services list, right-click Microsoft Dynamics CRM Email Router, and then click Properties.
3. On the properties page, click the Log On tab, click This account, enter or select a user account
and password, and then click OK.
4. You must restart the Email Router service. To do this, in the services list, right-click Microsoft
Dynamics CRM Email Router, and then click Restart.
5. Close the Services MMC snap-in.
See Also Manage Users, Queues, and Forward Mailboxes Load User, Queue, and Forward Mailbox Data (On Premises) Disable or Enable a User, Queue, or Forward Mailbox Specify a Forward Mailbox Test Access for Users, Queues, and Forward Mailboxes Modify a User, Queue, or Forward Mailbox
© 2016 Microsoft. All rights reserved. Copyright
Specify a Forward Mailbox
Applies To: Dynamics CRM 2016, Dynamics CRM Online

845
The forward mailbox is used as a collection box for email messages that are transferred from each Microsoft Dynamics CRM user’s mailbox by a server-side rule. The forward mailbox must be dedicated to the Email Router system, and should not be used as a working mailbox by an individual user.
Before you specify a forward mailbox, you must create or use an existing Exchange Server or POP3 mailbox that can be dedicated to processing email messages that are tracked by Microsoft Dynamics CRM. After you specify the forward mailbox, you can run the Rule Deployment Wizard to deploy the rules that will be used to forward email messages to the forward mailbox.
Note
If you specify a POP3 mailbox as the forward mailbox, you must manually deploy the rules. The Rule Deployment Wizard cannot deploy rules to a POP3 email server. For information about how to deploy rules manually, see Bookmark link 'BKMK_CreateRuleManually' is broken in topic '{"project_id":"d1ee8af7-0e8f-4e94-9793-0d06bbfa9b16","entity_id":"c578a81c-1b30-4ff3-b392-6ff1b78ce6e0","entity_type":"Article","locale":"en-US"}'. Rebuilding the topic '{"project_id":"d1ee8af7-0e8f-4e94-9793-0d06bbfa9b16","entity_id":"c578a81c-1b30-4ff3-b392-6ff1b78ce6e0","entity_type":"Article","locale":"en-US"}' may solve the problem..
Specify or modify a forward mailbox 1. Make sure that you have a mailbox to dedicate as the forward mailbox. If you do not, see your
messaging server documentation for information about how to create a mailbox. If you select
Exchange Server as the incoming email server type, you must log on to the mailbox by using an
email client such as Microsoft Office Outlook orOutlook on the web at least once to complete the
creation of the mailbox.
2. Click the Users, Queues, and Forward Mailboxes tab, and then click Load Data.
3. When the list appears, click the Forward Mailboxes tab, and then click New. To change an
existing forward mailbox, click Modify.
4. In the Forward Mailbox dialog box, complete the following boxes, and then click OK:
Name. Type a name for the forward mailbox. This will be used to display in the Email Router
Configuration Manager and the Rule Deployment Wizard.
Email Address. Type the email address for the forward mailbox, such as
Incoming Configuration Profile. Select the incoming configuration profile to associate with
the forward mailbox. You can have multiple forward mailboxes that use different incoming
configuration profiles.
Note
To delete email messages in the forward mailbox after they have been processed by the Email Router, select the Delete messages in forward mailbox after processing option.
5. Click Publish.
846
6. Stop the Microsoft Dynamics CRM Email Router service. To do this, on the Start menu, type
services.msc, and then press ENTER; or click Run, type services.msc, and then press ENTER.
Right-click the Microsoft Dynamics CRM Email Router service, and then click Stop.
7. Restart the Microsoft Dynamics CRM Email Router service. To do this, in the services list, right-
click Microsoft Dynamics CRM Email Router, and then click Start.
8. Click OK, and then close the Services application.
See Also Manage Users, Queues, and Forward Mailboxes Test Access for Users, Queues, and Forward Mailboxes Load User, Queue, and Forward Mailbox Data (On Premises) Load User, Queue, and Forward Mailbox Data (Online) Test Access for Users, Queues, and Forward Mailboxes
© 2016 Microsoft. All rights reserved. Copyright
Test Access for Users, Queues, and Forward Mailboxes
Applies To: Dynamics CRM 2016, Dynamics CRM Online
To help troubleshoot issues that may occur with accessing mailboxes, queues, and user information, the test access feature performs several tests on all users, queues, and forward mailboxes that are displayed in the Users and Queues and Forward Mailboxes lists. If all tests complete successfully, it is a good indication that the Email Router will be able to function correctly. During the test, the Email Router Configuration Manager displays name, incoming, and outgoing SMTP connection information for all potential users, queues, and forward mailboxes that appear in both lists on the Users and Queues and Forward Mailboxes tabs.
Note
Users and queues are not created in the Email Router Configuration Manager. For information about how to create these items, see Manage users and Help & Training: Create or edit a queue.
Users, queues, or forward mailboxes that are disabled in Email Router Configuration Manager are ignored during the test. Test access performs the test on Microsoft Dynamics CRM users and queues that have the following criteria:
The user has a valid email address configured on the User form.
The user has Email Router configured in the Email access type - Incoming list on the User form.
Test access for users and queues 1. On the Users, Queues, and Forward Mailboxes tab, click Load Data.
847
2. On the Users and Queues tab, click Test Access. Alternatively, you can click the Forward
Mailbox tab, and then click Test Access.
The Test Access dialog box appears.
3. View the results of the access test that are displayed in the Test Access dialog box. To close the
Test Access dialog box, click Close.
Note
If a large number of items, such as hundreds of users, are tested, the test access process can take several minutes to complete.
4. To cancel the test, click Close.
See Also Manage Users, Queues, and Forward Mailboxes Modify a User, Queue, or Forward Mailbox Load User, Queue, and Forward Mailbox Data (On Premises) Load User, Queue, and Forward Mailbox Data (Online) Specify a Forward Mailbox Managing Deployments
© 2016 Microsoft. All rights reserved. Copyright
Modify a User, Queue, or Forward Mailbox
Applies To: Dynamics CRM 2016, Dynamics CRM Online
You can modify incoming or outgoing profiles for users or queues, and configuration information for forward mailboxes.
To modify the incoming or outgoing profile for a user or queue 1. Click the Users, Queues, and Forward Mailboxes tab, select the deployment that you want in the
Select a Dynamics CRM Deployment to view users and mailboxes list, and then click Load
Data.
2. On the Users and Queues tab, select the user that you want to modify, and then click Modify.
3. In the Microsoft Dynamics CRM User / Queue dialog box, change one or both of the following
settings:
Incoming Configuration Profile. Select the incoming configuration profile in the list. For items
to appear in the list, you must have at least one incoming configuration profile specified. You
specify incoming configuration profiles on the Configuration Profiles tab.
848
Outgoing Configuration Profile. Select the outgoing configuration profile in the list. For items
to appear in the list, you must have at least one outgoing configuration profile specified. You
specify outgoing configuration profiles on the Configuration Profiles tab.
4. Click OK.
5. Save the changes, click Publish.
To modify the Name or Email address values for a user or queue, you must start the Microsoft Dynamics CRM web application, and make the change on the User or Queue form.
To modify the name, email address, or incoming configuration profile for a forward mailbox 1. Click the Users, Queues, and Forward Mailboxes tab, select the deployment that you want in the
Select a Dynamics CRM Deployment to view users, queues, and mailboxes, and then click
Load Data.
2. On the Forward Mailboxes tab, select the forward mailbox that you want to modify, and then click
Modify.
3. In the dialog box, you can make changes to the following fields:
Name. Type the name that you want to give the forward mailbox.
Email Address. Type the email address for the mailbox.
Incoming Configuration Profile. Select the incoming configuration profile in the list.
Delete messages in forward mailbox after processing. You can select to delete email
messages in the forward mailbox after they have been processed by the Email Router.
Note
If you do not select this option, email messages must be removed manually when the number of email messages becomes very large and exceeds storage limitations.
4. Click OK.
5. Save the changes, click Publish.
See Also Manage Users, Queues, and Forward Mailboxes Load User, Queue, and Forward Mailbox Data (On Premises) Load User, Queue, and Forward Mailbox Data (Online) Disable or Enable a User, Queue, or Forward Mailbox Specify a Forward Mailbox Test Access for Users, Queues, and Forward Mailboxes
© 2016 Microsoft. All rights reserved. Copyright
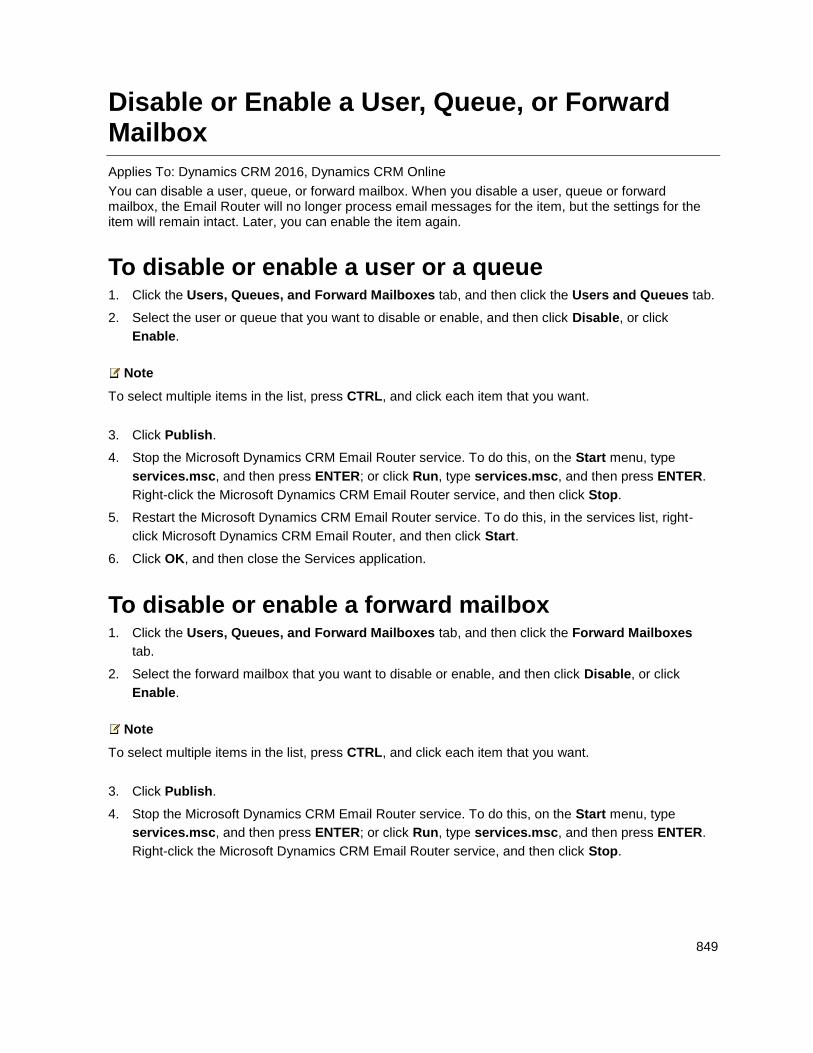
849
Disable or Enable a User, Queue, or Forward Mailbox
Applies To: Dynamics CRM 2016, Dynamics CRM Online
You can disable a user, queue, or forward mailbox. When you disable a user, queue or forward mailbox, the Email Router will no longer process email messages for the item, but the settings for the item will remain intact. Later, you can enable the item again.
To disable or enable a user or a queue 1. Click the Users, Queues, and Forward Mailboxes tab, and then click the Users and Queues tab.
2. Select the user or queue that you want to disable or enable, and then click Disable, or click
Enable.
Note
To select multiple items in the list, press CTRL, and click each item that you want.
3. Click Publish.
4. Stop the Microsoft Dynamics CRM Email Router service. To do this, on the Start menu, type
services.msc, and then press ENTER; or click Run, type services.msc, and then press ENTER.
Right-click the Microsoft Dynamics CRM Email Router service, and then click Stop.
5. Restart the Microsoft Dynamics CRM Email Router service. To do this, in the services list, right-
click Microsoft Dynamics CRM Email Router, and then click Start.
6. Click OK, and then close the Services application.
To disable or enable a forward mailbox 1. Click the Users, Queues, and Forward Mailboxes tab, and then click the Forward Mailboxes
tab.
2. Select the forward mailbox that you want to disable or enable, and then click Disable, or click
Enable.
Note
To select multiple items in the list, press CTRL, and click each item that you want.
3. Click Publish.
4. Stop the Microsoft Dynamics CRM Email Router service. To do this, on the Start menu, type
services.msc, and then press ENTER; or click Run, type services.msc, and then press ENTER.
Right-click the Microsoft Dynamics CRM Email Router service, and then click Stop.

850
5. Restart the Microsoft Dynamics CRM Email Router service. To do this, in the services list, right-
click Microsoft Dynamics CRM Email Router, and then click Start.
6. Click OK, and then close the Services application.
See Also Manage Users, Queues, and Forward Mailboxes Load User, Queue, and Forward Mailbox Data (On Premises) Load User, Queue, and Forward Mailbox Data (Online) Specify a Forward Mailbox Test Access for Users, Queues, and Forward Mailboxes Modify a User, Queue, or Forward Mailbox Managing Deployments
© 2016 Microsoft. All rights reserved. Copyright
Set up Dynamics 365 for Outlook
Applies To: Dynamics 365 (online), Dynamics 365 (on-premises), Dynamics CRM 2016, Dynamics CRM Online
[This topic is pre-release documentation and is subject to change.]
If your users run a recent version of Microsoft Outlook, they can use Microsoft Dynamics 365 for Outlook. Dynamics 365 for Outlook makes it easier for your team to work with Dynamics 365 data in the familiar Outlook environment.
This section covers installing and deploying Dynamics 365 for Outlook.
In This Section Permissions required for Dynamics 365 for Outlook tasks
Planning and installing Dynamics 365 for Outlook for Microsoft Dynamics 365 and Dynamics 365 Online
Uninstall or repair Microsoft Dynamics 365 for Outlook
Configure synchronization for appointments, contacts, and tasks
Install Microsoft Dynamics 365 for Outlook using a command prompt
Microsoft Dynamics 365 for Outlook failure recovery
Control field synchronization between Dynamics 365 and Dynamics 365 for Outlook
What fields can be synchronized between Dynamics 365 and Dynamics 365 for Outlook?
How field security affects synchronization between Dynamics 365 and Dynamics 365 for Outlook
Troubleshooting and things to know about Microsoft Dynamics 365 for Outlook
851
Privacy notices To use Microsoft Dynamics 365 for Outlook, you are required to sign in by using your credentials (an email address and password). You may choose to save this information locally so that you are not prompted for your credentials each time you open Outlook. If you do choose to save this information locally, Dynamics 365 for Outlook will automatically connect to Microsoft Dynamics 365 (online) every time you open Outlook. After the first time you sign in and use Dynamics 365 for Outlook, the connection between your computer and Dynamics 365 (online) will always be open when you have access to the Internet. You may choose to turn off the connection between your computer and Dynamics 365 only by using a configuration setting, but if you do turn off the connection, Dynamics 365 for Outlook may exhibit decreased performance. If you use Dynamics 365 for Outlook to track email, the email thread will be visible to users in your organization who have permission to view it. For every email you receive, Dynamics 365 for Outlook will send Dynamics 365 (online) the sender’s email address, the recipient’s email address, and the subject line of the message. This allows Dynamics 365 (online) to validate whether or not a particular mail should be stored by the Dynamics 365 (online) service. When you track an item, a copy of that item will be maintained by the Dynamics 365 service and will be visible to other users in your organization who have the appropriate permissions. When you untrack an item, that copy is automatically deleted from Dynamics 365 (online) only if you own the item.
If you use Microsoft Dynamics 365 for Outlook, when you go offline, a copy of the data you are working on is created and stored on your local computer. The data is transferred from Dynamics 365 (online) to your computer by using a secure connection, and a link is maintained between the local copy and Dynamics 365 Online. The next time you sign in to Dynamics 365 (online), the local data will be synchronized with Dynamics 365 (online). An administrator determines whether or not an organization’s users are permitted to go offline with Microsoft Dynamics 365 for Outlook by using security roles. Users and administrators can configure which entities are downloaded via Offline Sync by using the Sync Filters setting in the Options dialog box. Alternatively, users and Administrators can configure which fields are downloaded (and uploaded) by using Advanced Options in the Sync Filters dialog box.
If you use Microsoft Dynamics 365 (online), when you use the Sync to Outlook feature, the Dynamics 365 data you are syncing is “exported” to Outlook. A link is maintained between the information in Outlook and the information in Dynamics 365 (online) to ensure that the information remains current between the two. Outlook Sync downloads only the relevant Dynamics 365 record IDs to use when a user attempts to track and set regarding an Outlook item. The company data is not stored on the device. An administrator determines whether your organization’s users are permitted to sync Dynamics 365 data to Outlook by using security roles.
© 2016 Microsoft. All rights reserved. Copyright
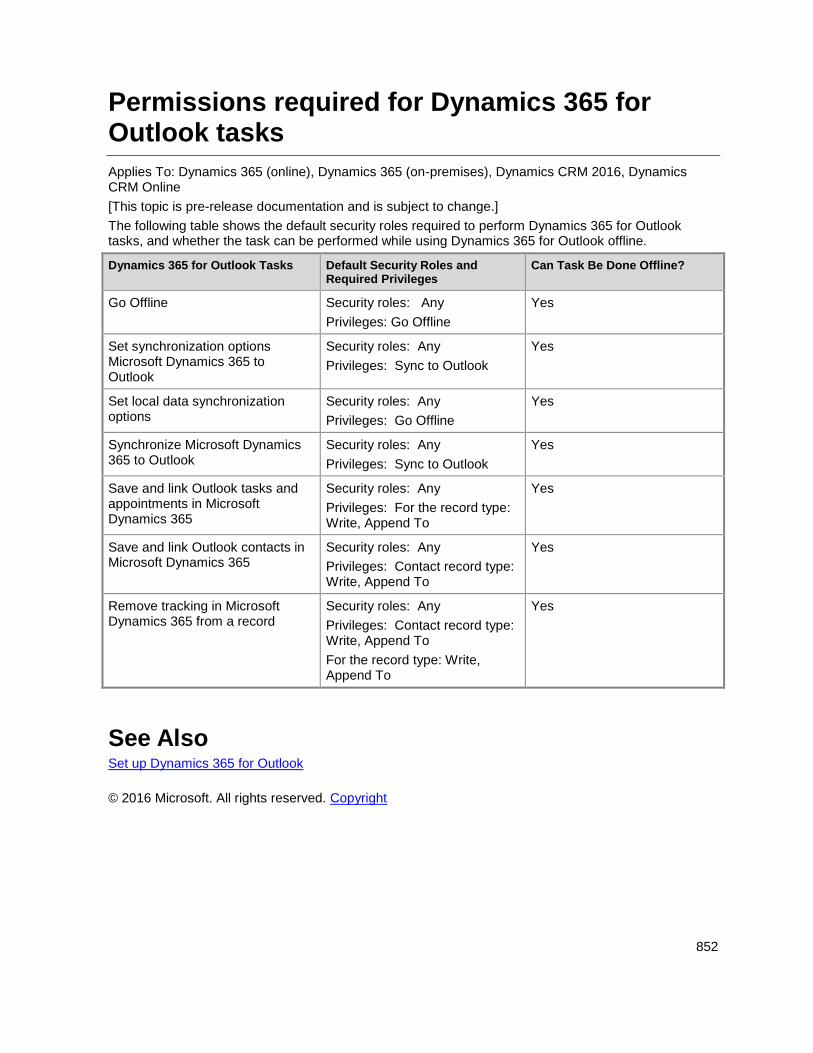
852
Permissions required for Dynamics 365 for Outlook tasks
Applies To: Dynamics 365 (online), Dynamics 365 (on-premises), Dynamics CRM 2016, Dynamics CRM Online
[This topic is pre-release documentation and is subject to change.]
The following table shows the default security roles required to perform Dynamics 365 for Outlook tasks, and whether the task can be performed while using Dynamics 365 for Outlook offline.
Dynamics 365 for Outlook Tasks Default Security Roles and Required Privileges
Can Task Be Done Offline?
Go Offline Security roles: Any
Privileges: Go Offline
Yes
Set synchronization options Microsoft Dynamics 365 to Outlook
Security roles: Any
Privileges: Sync to Outlook
Yes
Set local data synchronization options
Security roles: Any
Privileges: Go Offline
Yes
Synchronize Microsoft Dynamics 365 to Outlook
Security roles: Any
Privileges: Sync to Outlook
Yes
Save and link Outlook tasks and appointments in Microsoft Dynamics 365
Security roles: Any
Privileges: For the record type: Write, Append To
Yes
Save and link Outlook contacts in Microsoft Dynamics 365
Security roles: Any
Privileges: Contact record type: Write, Append To
Yes
Remove tracking in Microsoft Dynamics 365 from a record
Security roles: Any
Privileges: Contact record type: Write, Append To
For the record type: Write, Append To
Yes
See Also Set up Dynamics 365 for Outlook
© 2016 Microsoft. All rights reserved. Copyright
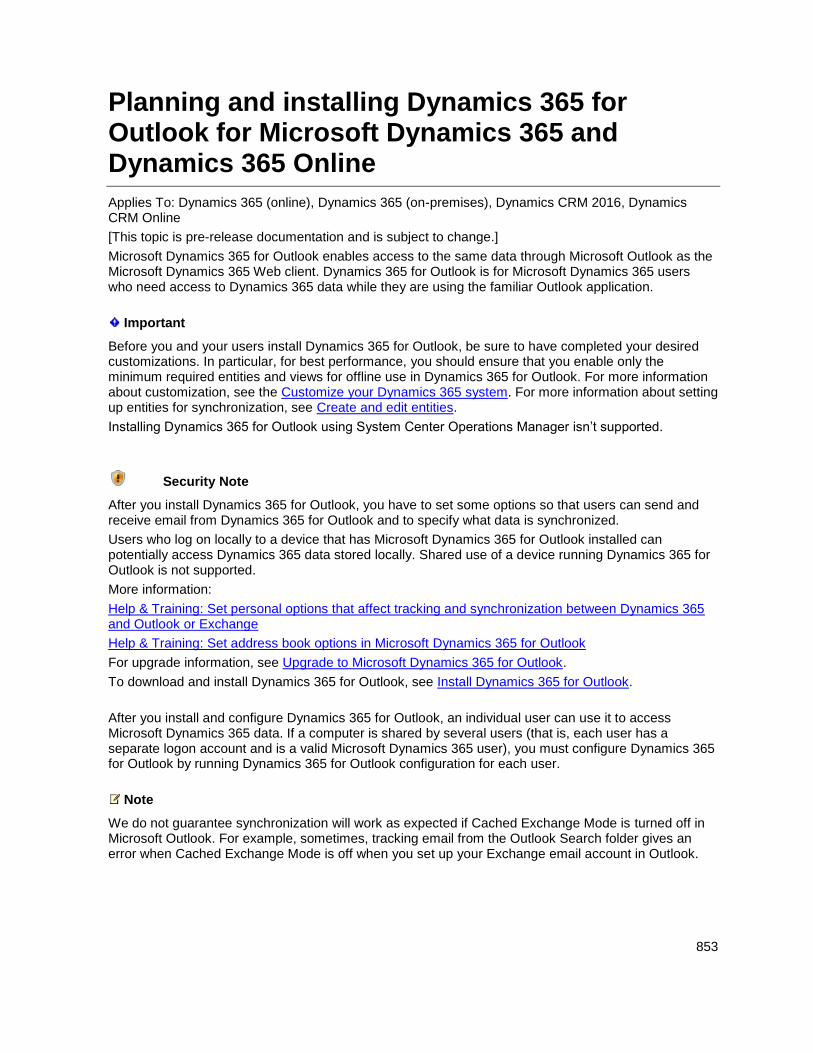
853
Planning and installing Dynamics 365 for Outlook for Microsoft Dynamics 365 and Dynamics 365 Online
Applies To: Dynamics 365 (online), Dynamics 365 (on-premises), Dynamics CRM 2016, Dynamics CRM Online
[This topic is pre-release documentation and is subject to change.]
Microsoft Dynamics 365 for Outlook enables access to the same data through Microsoft Outlook as the Microsoft Dynamics 365 Web client. Dynamics 365 for Outlook is for Microsoft Dynamics 365 users who need access to Dynamics 365 data while they are using the familiar Outlook application.
Important
Before you and your users install Dynamics 365 for Outlook, be sure to have completed your desired customizations. In particular, for best performance, you should ensure that you enable only the minimum required entities and views for offline use in Dynamics 365 for Outlook. For more information about customization, see the Customize your Dynamics 365 system. For more information about setting up entities for synchronization, see Create and edit entities.
Installing Dynamics 365 for Outlook using System Center Operations Manager isn’t supported.
Security Note
After you install Dynamics 365 for Outlook, you have to set some options so that users can send and receive email from Dynamics 365 for Outlook and to specify what data is synchronized.
Users who log on locally to a device that has Microsoft Dynamics 365 for Outlook installed can potentially access Dynamics 365 data stored locally. Shared use of a device running Dynamics 365 for Outlook is not supported.
More information:
Help & Training: Set personal options that affect tracking and synchronization between Dynamics 365 and Outlook or Exchange
Help & Training: Set address book options in Microsoft Dynamics 365 for Outlook
For upgrade information, see Upgrade to Microsoft Dynamics 365 for Outlook.
To download and install Dynamics 365 for Outlook, see Install Dynamics 365 for Outlook.
After you install and configure Dynamics 365 for Outlook, an individual user can use it to access Microsoft Dynamics 365 data. If a computer is shared by several users (that is, each user has a separate logon account and is a valid Microsoft Dynamics 365 user), you must configure Dynamics 365 for Outlook by running Dynamics 365 for Outlook configuration for each user.
Note
We do not guarantee synchronization will work as expected if Cached Exchange Mode is turned off in Microsoft Outlook. For example, sometimes, tracking email from the Outlook Search folder gives an error when Cached Exchange Mode is off when you set up your Exchange email account in Outlook.
854
The best practice is to turn on Cached Exchange Mode when you set up your Exchange email account in Outlook. More information: Turn on Cached Exchange Mode
To install or upgrade Dynamics 365 for Outlook, you must have administrator permissions on the computer where you perform the installation or upgrade steps. The exception to this is when you install an update from Microsoft Update, in which case administrator privileges are not required. You can install Dynamics 365 for Outlook with offline capability. A user who has this capability installed can access Microsoft Dynamics 365 data when they are not connected to the LAN. You can add offline capability at either of the following times:
During installation of Dynamics 365 for Outlook.
After installation has completed. In this case, a user can add offline capability by clicking Go
Offline in Microsoft Outlook. This starts the installation of additional required components and
stores a copy of the user’s Microsoft Dynamics 365 data locally. Subsequent offline sessions
require no additional installations, but may require updating the local copy of the user’s data.
Note
Although multiple users can share a computer that uses Dynamics 365 for Outlook, go offline capability is not supported in a shared computer environment, such as when you use remote desktop services (formerly Terminal Services).
Using Folder Redirection with offline files is not supported for Dynamics 365 for Outlook. If the Dynamics 365 data is stored with redirected offline files, users may be unable to use Dynamics 365 for Outlook.
See Also Set up Dynamics 365 for Outlook
© 2016 Microsoft. All rights reserved. Copyright
Upgrade to Microsoft Dynamics 365 for Outlook
Applies To: Dynamics 365 (online), Dynamics 365 (on-premises), Dynamics CRM 2016, Dynamics CRM Online
[This topic is pre-release documentation and is subject to change.]
There are three steps to follow for a smooth upgrade to Microsoft Dynamics 365 for Outlook.
1. Upgrade all Dynamics 365 for Outlook to Microsoft Dynamics CRM 2015 for Outlook.
2. Upgrade your Dynamics 365 server to Microsoft Dynamics 365 – for on-premises editions. See
Referenced topic '17c454d2-27be-47e6-a894-db1afc8e4d8f' is only available online..
3. Upgrade Dynamics CRM 2015 for Outlook to Dynamics 365 for Outlook.
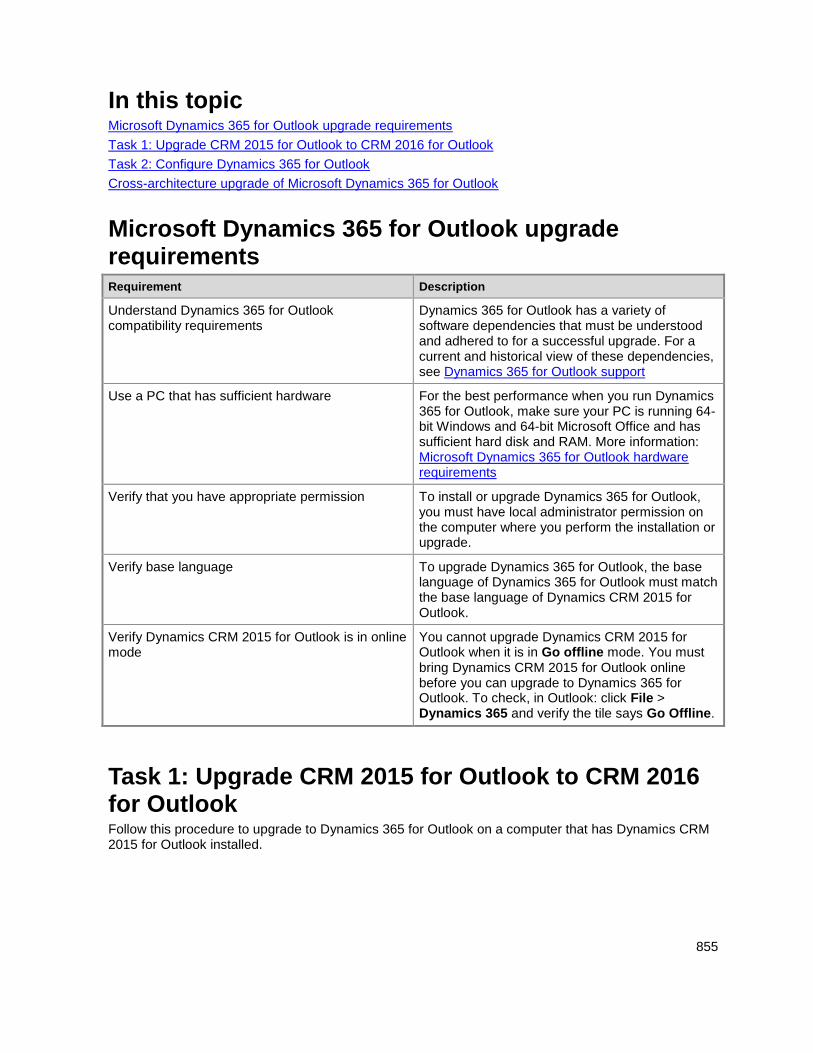
855
In this topic Microsoft Dynamics 365 for Outlook upgrade requirements
Task 1: Upgrade CRM 2015 for Outlook to CRM 2016 for Outlook
Task 2: Configure Dynamics 365 for Outlook
Cross-architecture upgrade of Microsoft Dynamics 365 for Outlook
Microsoft Dynamics 365 for Outlook upgrade requirements Requirement Description
Understand Dynamics 365 for Outlook compatibility requirements
Dynamics 365 for Outlook has a variety of software dependencies that must be understood and adhered to for a successful upgrade. For a current and historical view of these dependencies, see Dynamics 365 for Outlook support
Use a PC that has sufficient hardware For the best performance when you run Dynamics 365 for Outlook, make sure your PC is running 64-bit Windows and 64-bit Microsoft Office and has sufficient hard disk and RAM. More information: Microsoft Dynamics 365 for Outlook hardware requirements
Verify that you have appropriate permission To install or upgrade Dynamics 365 for Outlook, you must have local administrator permission on the computer where you perform the installation or upgrade.
Verify base language To upgrade Dynamics 365 for Outlook, the base language of Dynamics 365 for Outlook must match the base language of Dynamics CRM 2015 for Outlook.
Verify Dynamics CRM 2015 for Outlook is in online mode
You cannot upgrade Dynamics CRM 2015 for Outlook when it is in Go offline mode. You must bring Dynamics CRM 2015 for Outlook online before you can upgrade to Dynamics 365 for Outlook. To check, in Outlook: click File > Dynamics 365 and verify the tile says Go Offline.
Task 1: Upgrade CRM 2015 for Outlook to CRM 2016 for Outlook Follow this procedure to upgrade to Dynamics 365 for Outlook on a computer that has Dynamics CRM 2015 for Outlook installed.
856
1. Log on to the computer as a user who has local Administrators group permissions.
2. Best practice: Make sure that all Microsoft Office security updates are installed. To verify, visit
Microsoft Update.
3. Locate and run the appropriate installation file:
To install from a DVD, double-click SetupClient.exe in the installation folder for the architecture
(32-bit or 64-bit) of Microsoft Office that you’ve installed:
... \Client\amd64 for 64-bit
... \Client\i386 for 32-bit
To install from the web, open the Microsoft Dynamics CRM 2015 for Outlook (Outlook Client)
download page and then download and run the installation package.
To install from the Microsoft Dynamics 365 user interface, click Get Dynamics 365 for
Outlook on the message bar. If you see any dialog boxes titled Security Warning, click Run in
each.
The Microsoft Dynamics 365 for Outlook Setup wizard starts.
4. On the License Agreement page, review the information. If you accept the license agreement,
select I accept the license agreement, and then click Next.
5. On the Upgrade page, click Upgrade Now.
6. Setup stores your configuration information, installs the program features, and displays a progress
indicator. Your configuration information is reapplied in the new installation.
7. On the completion page of the Microsoft Dynamics 365 for Outlook Setup wizard, click Close.
Task 2: Configure Dynamics 365 for Outlook After the upgrade from Dynamics CRM 2015 for Outlook, Dynamics 365 for Outlook attempts to use the configuration information that was used by Dynamics CRM 2015 for Outlook.
When your restart Outlook after the upgrade of Dynamics 365 for Outlook, you will know that reconfiguration is necessary if the Configuration Wizard automatically starts.
If you don’t want to configure Dynamics 365 for Outlook immediately after you install it, click Cancel on the Configure Organization page of the wizard. A Configure Microsoft Dynamics 365 for Outlook button then appears on the Outlook toolbar and remains there until you configure Dynamics 365 for Outlook.
If the Configuration Wizard doesn’t start automatically, you can start it as described in the following procedure.
To configure Microsoft Dynamics 365 for Outlook
1. Start the Configuration Wizard: On the Start screen, click Configuration Wizard or on earlier
versions of Windows click Start > All Programs > Microsoft Dynamics 365 > Configuration
Wizard. Alternatively, click Configure Dynamics 365 for Outlook on the Dynamics 365 tab in
Outlook.

857
2. Click Delete or Add to remove or add a Dynamics 365 organization.
3. To add an organization, choose the option appropriate for you.
To connect to a Microsoft Dynamics 365 (online) organization, choose Dynamics 365 (online)
from the drop-down menu.
To connect to an on-premises deployment of Dynamics 365, type the discovery-service URL for
Microsoft Dynamics 365 in the format https://orgname.contoso.com for Internet-facing
deployments (IFD) or http://crmserver:5555 for internal deployments. Contact your system
administrator for the correct URL.
4. Click Connect.
If you are prompted for credentials, select from the following options.
For a Microsoft Dynamics 365 (online) organization, enter your Microsoft Online Services user
name and password, and then click OK. This information should have been sent to you in email
when your account was added.
For an on-premises deployment of Dynamics 365, you may not be prompted because Microsoft
Dynamics 365 will use your Active Directory domain credentials.
5. Click Close.
6. If you are a member of more than one organization, restart the Configuration Wizard to designate a
different organization as your current organization.
Silent installation and configuration You use the command prompt to install and configure Dynamics 365 for Outlook. More information: Install Microsoft Dynamics 365 for Outlook using a command prompt
Cross-architecture upgrade of Microsoft Dynamics 365 for Outlook If you intend to change to a different architecture (move from 32-bit to 64-bit) while upgrading, note the following:
In-place cross-architecture upgrade is not supported. If you are running Dynamics CRM 2015 for
Outlook 32-bit, you can perform an in-place upgrade only to 32-bit Dynamics 365 for Outlook. This
also applies to Microsoft Office: If you are running and intend to retain a 32-bit version of Microsoft
Office, you can upgrade only to 32-bit Dynamics 365 for Outlook.
Cross-architecture upgrade requires uninstalling and reinstalling. If you have a 64-bit PC
running a 64-bit version of Microsoft Windows, you can change from 32-bit to 64-bit Dynamics 365
for Outlook by performing the following steps in the order listed.
a. Make sure that your PC has a 64-bit version of Windows. How to determine whether a
computer is running a 32-bit version or 64-bit version of the Windows operating system.
b. Uninstall Dynamics CRM 2015 for Outlook.
858
c. Uninstall Microsoft Office.
d. Install a 64-bit edition of Microsoft Office.
e. Install the 64-bit edition of Dynamics 365 for Outlook.
For more information about installing Dynamics 365 for Outlook, see Install Dynamics 365 for Outlook.
See Also Planning and installing Dynamics 365 for Outlook for Microsoft Dynamics 365 and Dynamics 365 Online Referenced topic '17c454d2-27be-47e6-a894-db1afc8e4d8f' is only available online.
© 2016 Microsoft. All rights reserved. Copyright
Install Dynamics 365 for Outlook
Applies To: Dynamics 365 (online), Dynamics 365 (on-premises), Dynamics CRM 2016, Dynamics CRM Online
[This topic is pre-release documentation and is subject to change.]
To set up Microsoft Dynamics 365 for Outlook on a user’s computer, you need to install the software, and then configure it. This topic describes how to set up and configure Dynamics 365 for Outlook, and also how to enable multi-factor authentication (MFA) through OAuth. Using MFA can help make client authentication more secure, especially for mobile users.
For information about installing Dynamics 365 for Outlook at a command prompt (silent installation), see Install Microsoft Dynamics 365 for Outlook using a command prompt.
Important
You can’t install Dynamics 365 for Outlook on a computer running Microsoft Exchange Server.
We don't support installing Dynamics 365 for Outlook by using System Center Configuration
Manager.
In This Topic Install Dynamics Dynamics 365 for Outlook
Configure Dynamics Dynamics 365 for Outlook
Enable multi-factor authentication through OAuth
Install Dynamics Dynamics 365 for Outlook You can add offline capability for the user either during this installation or at a later time.
859
Tip
If you encounter an issue installing, connecting, or enabling Dynamics 365 for Outlook with your Dynamics 365 (online) organization, use the Microsoft Support and Recovery Assistant to diagnose and fix the issue. You’ll need to sign in to the diagnostics tool with your Dynamics 365 (online) credentials.
1. Meet the Dynamics 365 for Outlook requirements specified in Microsoft Dynamics 365 for Outlook
hardware requirements and Dynamics 365 for Outlook support.
2. Log on to the computer as a local administrator.
3. Make sure that the latest Microsoft Office updates are installed, including all security updates. To
verify, visit Microsoft Update.
4. Locate and run the appropriate installation file by choosing one of the following methods:
To install from the web, go to Microsoft Dynamics CRM 2016 for Microsoft Office Outlook
(Outlook Client), and then download and run the executable file that matches the installed
Microsoft Office architecture.
To install from a DVD, double-click SetupClient.exe in the installation folder for the architecture
(32-bit or 64-bit) of Microsoft Office that you’ve installed:
... \Client\amd64 for 64-bit
... \Client\i386 for 32-bit
To install from the Microsoft Dynamics 365 web application:
i. Click the Settings button , and then click Apps for Dynamics 365.
ii. On the Apps for Dynamics 365 page, click Download from Microsoft Download Center.
iii. If you see any dialog boxes titled Security Warning, click Run in each.
The Microsoft Dynamics 365 for Microsoft Office Outlook Setup wizard starts.
5. On the License Agreement page, review the information. If you accept the license agreement,
select I accept the license agreement, and then click Next.
6. If the Get Recommended Updates page appears, indicate whether you want to obtain updates
through the Microsoft Update program, and then click Next.
Note
Microsoft releases improvements to Dynamics 365 for Outlook as software updates. If you click Get Recommended Updates, those updates will be installed automatically. The exact level of automation, for example, whether any user interaction is required during the installation, is determined by the group policy of your organization.
860
7. Click Install Now or Options.
To install Dynamics 365 for Outlook with offline capability, click Options, select Offline
Capability on the Customize Installation page, and then click Install Now. Although offline
capability lets you run Microsoft Dynamics 365 without a network or Internet connection, it does
require the installation of additional technologies and places more demand on your computer’s
processor and memory. For more information about the minimum recommended requirements,
see Microsoft Dynamics 365 for Outlook hardware requirements.
To install Dynamics 365 for Outlook without offline capability, click Install Now.
Important
If you don’t install offline capability at this point, the user will initially have no offline capability. If you click Install Now, the Outlook user can add offline capability later by clicking Go Offline in Outlook.
The program features are installed and a progress indicator is displayed. You may be asked to restart your computer to complete the installation.
8. On the completion page of the Microsoft Dynamics 365 for Microsoft Office Outlook Setup
wizard, click Close.
Configure Dynamics Dynamics 365 for Outlook After Dynamics 365 for Outlook is installed, it must be configured. When you restart Outlook after you’ve installed Dynamics 365 for Outlook, the configuration wizard starts automatically.
Note
If you don’t want to configure Dynamics 365 for Outlook immediately after you install it, click Cancel. A Configure Microsoft Dynamics 365 for Outlook button then appears on the Outlook toolbar and will remain there until you configure Dynamics 365 for Outlook.
If the wizard doesn’t start automatically, you can start it as follows: On the Start screen, click Configuration Wizard or on earlier versions of Windows click Start > All Programs > Microsoft Dynamics 365, and then click Configuration Wizard. Alternatively, click Configure Microsoft Dynamics 365 for Outlook on the Dynamics 365 tab in Outlook.
If you encounter an issue configuring Dynamics 365 for Outlook with your Dynamics 365 (online) organization, use the Microsoft Dynamics CRM for Outlook Configuration Diagnostic to fix the issue. You’ll need to sign in to the diagnostics tool with your Dynamics 365 (online) credentials.
1. To add an organization, choose one of the following:
To connect to a Microsoft Dynamics 365 (online) organization, choose Dynamics 365 (online)
from the drop-down list.
861
To connect to an on-premises deployment of Microsoft Dynamics 365, type the discovery-
service URL for Microsoft Dynamics 365 in the format https://orgname.contoso.com for
Internet-facing deployment (IFD) or http://crmserver:5555 for internal deployments.
2. Click Connect.
If you are prompted for credentials, select from the following options.
For a Microsoft Dynamics 365 (online) organization, enter your Microsoft Online Services user
name and password, and then click OK. This information should have been sent to you in email
when your account was added.
For an on-premises deployment of Microsoft Dynamics 365, you may not be prompted because
Microsoft Dynamics 365 will use your Active Directory domain credentials.
3. Click Close.
4. If you’re a member of more than one organization, restart the Configuration Wizard to designate a
different organization as your current organization.
Enable multi-factor authentication through OAuth In the Microsoft Dynamics 365 for Outlook Configuration Wizard, System Administrators can enable multi-factor authentication through the OAuth 2.0 Framework. OAuth 2.0 is an open framework for authorization that lets users provide access tokens, instead of credentials, to access data hosted by a given service provider (such as Dynamics 365). Using MFA can help make client authentication more secure, especially for mobile users. Dynamics 365 (online and on-premises) versions of Microsoft Dynamics 365 can take advantage of MFA; Microsoft Dynamics 365 on-premises requires at least Windows Server 2012 R2. Dynamics 365 (online) automatically uses OAuth.
If you have upgraded your authentication server to use OAuth prior to installing Dynamics Dynamics 365 for Outlook, Dynamics Dynamics 365 for Outlook will automatically check for and use OAuth for MFA. Users will see the OAuth sign-in form the first time they use Dynamics Dynamics 365 for Outlook.
If you upgrade your authentication server to use OAuth after rolling out Dynamics Dynamics 365 for Outlook, you have two options to set Dynamics Dynamics 365 for Outlook to use OAuth.
1. Reconfigure Dynamics 365 for Outlook on all computers. Run the Microsoft Dynamics 365 for
Outlook Configuration Wizard and remove and re-add your organization.
-- OR --
2. Use Group Policy to update the following registration key:
HKEY_CURRENT_USER\Software\Microsoft\MSCRMClient\{orgid}.
Set AuthenticationProvider to 0
After the registry change, Dynamics Dynamics 365 for Outlook will automatically check for and use OAuth for MFA.
See Also Planning and installing Dynamics 365 for Outlook for Microsoft Dynamics 365 and Dynamics 365 Online Blog: Microsoft Dynamics CRM for Outlook Configuration Diagnostic
862
Deploy Microsoft Dynamics 365 for Outlook by using Group Policy
© 2016 Microsoft. All rights reserved. Copyright
Advanced deployment options for Microsoft Dynamics 365 for Outlook
Applies To: Dynamics 365 (online), Dynamics 365 (on-premises), Dynamics CRM 2016, Dynamics CRM Online
[This topic is pre-release documentation and is subject to change.]
This section describes advanced deployment options that can be used for a large scale deployment of Microsoft Dynamics 365 for Outlook.
In This Section Deploy Microsoft Dynamics 365 for Outlook by using Group Policy
Install Microsoft Dynamics 365 for Outlook for desktop virtualization
Install Dynamics 365 for Outlook without an Internet connection
See Also Planning and installing Dynamics 365 for Outlook for Microsoft Dynamics 365 and Dynamics 365 Online Dynamics 365 for Outlook
© 2016 Microsoft. All rights reserved. Copyright
Deploy Microsoft Dynamics 365 for Outlook by using Group Policy
Applies To: Dynamics 365 (online), Dynamics 365 (on-premises), Dynamics CRM 2016, Dynamics CRM Online
[This topic is pre-release documentation and is subject to change.]
Group Policy provides an infrastructure for centralized configuration management of the operating system and applications, such as Microsoft Dynamics 365 for Outlook, that run on the operating system. The Group Policy settings you create are contained in a Group Policy Object (GPO). To create and edit a GPO, use the Group Policy Management Console (GPMC). By using the GPMC to link a GPO to selected Active Directory sites, domains, and organizational units (OUs), you apply the policy settings in the GPO to the users and computers in those Active Directory objects. More information: TechNet: Group Policy Overview
863
Using Group Policy, you can deploy Dynamics 365 for Outlook. This topic shows you how to perform a Group Policy-based software deployment that publishes Dynamics 365 for Outlook making it available for users to install from Control Panel. When you publish software for users, you give them the opportunity to decide if and when they want to install it.
Important
You must run the Microsoft Dynamics 365 for Outlook Setup program (SetupClient.exe) by using the administrative installation option (/A) to create a Windows Installer package (CRMClient_bitversion.msi) for Group Policy deployment. You cannot use the Windows Installer package (Client.msi) that is included with the Dynamics 365 for Outlook installation files to deploy by using Group Policy. For more information about how to perform an administrative installation, see Install Microsoft Dynamics 365 for Outlook using a command prompt.
To complete this procedure, you must be a member of the Domain Administrators security group, the Enterprise Administrators security group, or the Group Policy Creator Owners security group.
Preparing Dynamics 365 for Outlook for a Group Policy deployment Use this procedure to create the CRMClient_bitversion.msi file that is required for a Dynamics 365 for Outlook Group Policy deployment.
Create the CRMClient_bitversion.msi file
1. Before you build the CRMClient_bitversion.msi file, you can edit the Default-Client_Config.xml file
that is included with the installation files. This file is used by the Microsoft Dynamics 365 for Outlook
Configuration Wizard to establish settings, such as the organization URL, after Dynamics 365 for
Outlook is installed on the user’s computer. Although this step is optional, it can simplify Dynamics
365 for Outlook configuration for Microsoft Dynamics 365 users. More information: Step 2:
Configure Dynamics 365 for Outlook by using an XML configuration file
2. Determine the distribution share, and then run Microsoft Dynamics 365 for Outlook Setup to build
the administrative installation files.
Important
The CRMClient_bitversion.msi file is used as the package for Group Policy software installation. After you follow this procedure, users can select Dynamics 365 for Outlook in Control Panel for on-demand installation. You can’t use the CRMClient_bitversion.msi file directly to install Dynamics 365 for Outlook.
a. Create a network share that all Dynamics 365 for Outlook users will have access to. This share
will be the distribution location for the GPO.
b. Run SetupClient.exe at the command prompt by using the /A and /targetdir parameters. The /A
parameter specifies an administrative installation, and /targetdir parameter specifies the
864
distribution share that you created in the previous step. For more information about Microsoft
Dynamics 365 for Outlook Setup command prompt parameters, see Step 1: Install files.
Example:
setupclient.exe /a /q /targetdir \\FileShare\CRMforOutlook
c. Consider using Microsoft Distributed File System (DFS) to help improve the security and
availability of your distribution points. For more information about DFS, see DFS Namespaces
and DFS Replication Overview. We recommend that you understand the DFS features before
you configure your distribution point servers.
3. Create the Group Policy Object (GPO) and target the application to Microsoft Dynamics 365 users.
To do this, follow these steps:
a. On a domain controller in the domain where Microsoft Dynamics 365 is installed, start Group
Policy Management.
b. In Group Policy Management, expand Forest, Domains right-click the domain, and then click
Create a GPO in this domain, and Link it here.
c. In the New GPO dialog, type a name for the GPO, such as Microsoft Dynamics 365 Users, and
then click OK.
Creating a GPO at the domain level configures the GPO with domain-wide scope.
d. In the group policy pane, right-click the GPO that you created in the previous step, and then
click Edit.
The Group Policy Management Editor opens.
e. In Group Policy Management Editor, under User Configuration, expand Policies, and then
expand Software Settings.
f. Right-click Software Installation, point to New, and then click Package.
g. Type the full path or locate the Dynamics 365 for Outlook Windows Installer package
(CRMClient_64.msi or CRMClient_32.msi) that was created by the administrative installation,
and then click Open. For more information about how to create an administrative install
package for Dynamics 365 for Outlook, see the /A parameter in Install Microsoft Dynamics 365
for Outlook using a command prompt.
Important
The Dynamics 365 for Outlook administrative installation folders must be on a network share that can be read-accessed by Microsoft Dynamics 365 users in the domain.
Tip
865
By default, the package name is Microsoft Dynamics 365 <version> for Outlook for both 32-bit and 64-bit packages. Consider renaming the package to Dynamics 365 for Outlook <version> 64-(bit) or Dynamics 365 for Outlook <version> (32-bit). This name appears in Control Panel in the list of programs to install from the network.
h. In the Deploy Software dialog, select Publish to publish the Dynamics 365 for Outlook
application, and then click OK.
i. By default, Dynamics 365 for Outlook is available in Control Panel for all authenticated users
the next time that they log on to the domain. To limit the scope to a specific organizational unit
(OU), group, or individual user, in Group Policy Management, expand Group Policy Objects,
and click the GPO named Microsoft Dynamics 365 Users, and then add or remove the security
objects that you want, such as a group, in the Security Filtering area of the publication on the
Scope tab.
Publish versus Assign When you publish an application by using GPO deployment, it is made available for users to install by using Program and Features (or in previous versions of Windows, Add or Remove Programs) in Control Panel. Assigned applications are installed when a user logs on to the domain.
Note
Dynamics 365 for Outlook doesn’t support application assignment through GPO installation. For more information about publishing versus assigning software, see the Group Policy deployment documentation for your operating system.
See Also Advanced deployment options for Microsoft Dynamics 365 for Outlook Install Microsoft Dynamics 365 for Outlook for desktop virtualization Referenced topic '25af20e4-2eac-4bed-888e-be35015b59fb' is only available online.
© 2016 Microsoft. All rights reserved. Copyright
Install Microsoft Dynamics 365 for Outlook for desktop virtualization
Applies To: Dynamics 365 (online), Dynamics 365 (on-premises), Dynamics CRM 2016, Dynamics CRM Online
[This topic is pre-release documentation and is subject to change.]
This topic describes how to install Dynamics 365 for Outlook with roaming user profiles by using Windows ServerRemote Desktop Services. Remote Desktop Services, formerly Terminal Services, is a server role in Windows Server that provides technologies that enable users to access session-based

866
desktops, virtual machine-based desktops, or applications in the data center from both within a corporate network and from the Internet.
In This Topic Roaming user profiles
Windows Server Remote Desktop Services
Support for Citrix XenApp 6.5 and 7.0-7.6 session virtualization for Microsoft Dynamics 365 for Outlook on a single XenApp instance
Roaming user profiles A roaming user profile is a copy of the local user profile that is copied to, and stored on, a server share. The advantage of roaming user profiles is that users do not have to create a profile on each computer that they use on a network. Their profile is downloaded to each computer that they log on to on a network. Changes made to a roaming user profile are synchronized with the server copy of the profile when the user logs off.
While the roaming user profile moves with the user, software applications such as Dynamics 365 for Outlook do not. Identical applications have to be installed on each computer that the user logs on to.
Windows Server Remote Desktop Services Dynamics 365 for Outlook is supported for running on Windows Server 2012Remote Desktop Services. When users run an application on Remote Desktop Services, the application execution occurs on the server. Only keyboard, mouse, and display information are transmitted over the network. Users see only their own individual sessions, which are managed transparently by the server operating system and remain independent of any other client session.
More information: Remote Desktop Services
Deploy Dynamics 365 for Outlook to use as a Remote Desktop Services application The following is the basic procedure required to deploy Dynamics 365 for Outlook to use as a Remote Desktop Services application.
1. Provide at least one Microsoft Windows Server that is running the Remote Desktop Services server
role. More information: Remote Desktop Services
2. Install Dynamics 365 for Outlook using the /disableofflinecapability parameter on the Remote
Desktop Services server. Go offline mode is not supported when Dynamics 365 for Outlook is
installed for Remote Desktop Services use. More information: Install Microsoft Dynamics 365 for
Outlook using a command prompt
Important
The Dynamics 365 for Outlook offline database is not supported for roaming profile use.
867
3. Run the Microsoft Dynamics 365 Configuration Wizard on the Remote Desktop Services server.
For instructions, see Install Dynamics 365 for Outlook.
4. Disable the Microsoft Dynamics 365 Configuration Wizard on all desktops that will be used to
connect to Remote Desktop Services and run Dynamics 365 for Outlook. For details, see the
section below.
Disable the Dynamics 365 for Outlook Configuration Wizard
Note
The information in this topic applies to Dynamics 365 for Outlook deployments that use Remote Desktop Services. To remove only the Get Dynamics 365 for Outlook button for Dynamics 365 for Outlook deployments that don’t use Remote Desktop Services, see the “Set whether users see Dynamics 365 for Outlook message” setting in Help & Training: System Settings dialog box – Outlook tab.
The Dynamics 365 for OutlookConfiguration Wizard starts every time a roaming user connects to a Windows Server that is running Remote Desktop Services. In addition, users will see the option to configure Dynamics 365 for Outlook when they run Microsoft Office Outlook.
Tip
Instead of manually creating the registry key as described here, you can use Group Policy or a logon script to create the registry key for the Remote Desktop Services users who do not use Dynamics 365 for Outlook.
Warning
Serious problems might occur if you modify the registry incorrectly by using Registry Editor or by using another method. These problems might require you to reinstall the operating system and Microsoft Dynamics 365. We can’t guarantee that these problems can be resolved. Modify the registry at your own risk.
To disable the Dynamics 365 for OutlookConfiguration Wizard and the option to configure Dynamics 365 for Outlook, follow these steps on the client computer.
Disable the Configuration Wizard
1. On the computer where Microsoft Office is installed, start Registry Editor (regedit.exe).
2. Locate the following registry subkey:
HKEY_CURRENT_USER\Software\Microsoft\Office\Outlook\Addins
3. Right-click Addins, point to New, and then click Key.
4. Type crmaddin.Addin, and then press ENTER.
5. Right-click crmaddin.Addin, point to New, and then click DWORD Value or DWORD (32-bit)
Value.
868
6. Type LoadBehavior and then press ENTER.
7. Right-click LoadBehavior, and then click Modify.
8. Type 8 in the Value Data box, click Decimal, and then click OK.
9. Exit Registry Editor.
Support for Citrix XenApp 6.5 and 7.0-7.6 session virtualization for Microsoft Dynamics 365 for Outlook on a single XenApp instance Microsoft will support Citrix XenApp 6.5 and 7.0 -7.6 with session virtualization for Microsoft Dynamics 365 for Outlook on a single XenApp instance.
Please note that Citrix deployment may include a complex configuration topology based on other configurations, and these are not supported. For example, these configurations are not supported:
Citrix products like XenApp (except for versions 6.5 and 7.0-7.6), XenDesktop, and XenServer and
versions of these products
Application streaming modes
Modes of application deployment
Application virtualization layered on top of other virtualization technologies (such as Network and
storage virtualization technologies)
Cached Exchange Mode turned off in Outlook is supported if Dynamics 365 for Outlook syncs with
Dynamics 365 using server-side synchronization but not supported if Dynamics 365 for Outlook
syncs with Dynamics 365 for Outlook synchronization. See: Turn on Cached Exchange Mode.
See Also Advanced deployment options for Microsoft Dynamics 365 for Outlook Referenced topic '25af20e4-2eac-4bed-888e-be35015b59fb' is only available online. Planning and installing Dynamics 365 for Outlook for Microsoft Dynamics 365 and Dynamics 365 Online
© 2016 Microsoft. All rights reserved. Copyright
Install Dynamics 365 for Outlook without an Internet connection
Applies To: Dynamics 365 (online), Dynamics 365 (on-premises), Dynamics CRM 2016, Dynamics CRM Online
[This topic is pre-release documentation and is subject to change.]
869
This section applies to Microsoft Dynamics 365 for Outlook when you use either Microsoft Dynamics 365 (on-premises) or Microsoft Dynamics 365 (online).
There may be occasions when you have to install Dynamics 365 for Outlook where there is no Internet connection available. Common occasions are when you are creating virtual demonstration environments, such as when you use Hyper-V, and environments that use firewalls or other security requirements that block Internet access.
To install Dynamics 365 for Outlook without an Internet connection, you must first download all prerequisite software. To do this, you will need a computer that has an Internet connection to download all the prerequisites beforehand.
Notice that, when you download the Dynamics 365 ISO from MSDN, or have a physical DVD that you are installing from, you will already have all of the prerequisites downloaded. However, if you download the Dynamics 365 for Outlook installation media from the Microsoft Download Center, you must manually build the prerequisite folder structure.
In This Topic Step 1: Extract the Dynamics 365 for Outlook installation files
Step 2: Create the dependent and optional software subfolders
Step 3: Download the prerequisite files
Step 4: Run Dynamics 365 for Outlook Setup
Step 1: Extract the Dynamics 365 for Outlook installation files First, create a folder on your local computer and then download the Dynamics 365 for Outlook installation package. It doesn't matter what name you give the folder where you extract the Dynamics 365 for Outlook files. For example, you can name the folder CRMforOutlookwithoutInternet.
After you complete this step there should be several files and folders under the CRMforOutlookwithoutInternet folder you created, including SetupClient.exe.
Step 2: Create the dependent and optional software subfolders Create the following subfolders under the CRMforOutlookwithoutInternet folder that you created in the previous step.
1. dotNETFX
2. ReportViewer
3. SQLCE
4. SQLExpr – Required if you use the Go offline capability with Dynamics 365 for Outlook
5. SQLExprRequiredSp - Required in order to upgrade SQL Express 2008 to 2012. Not required for a
new install of SQL Express 2012.
6. VCRedist
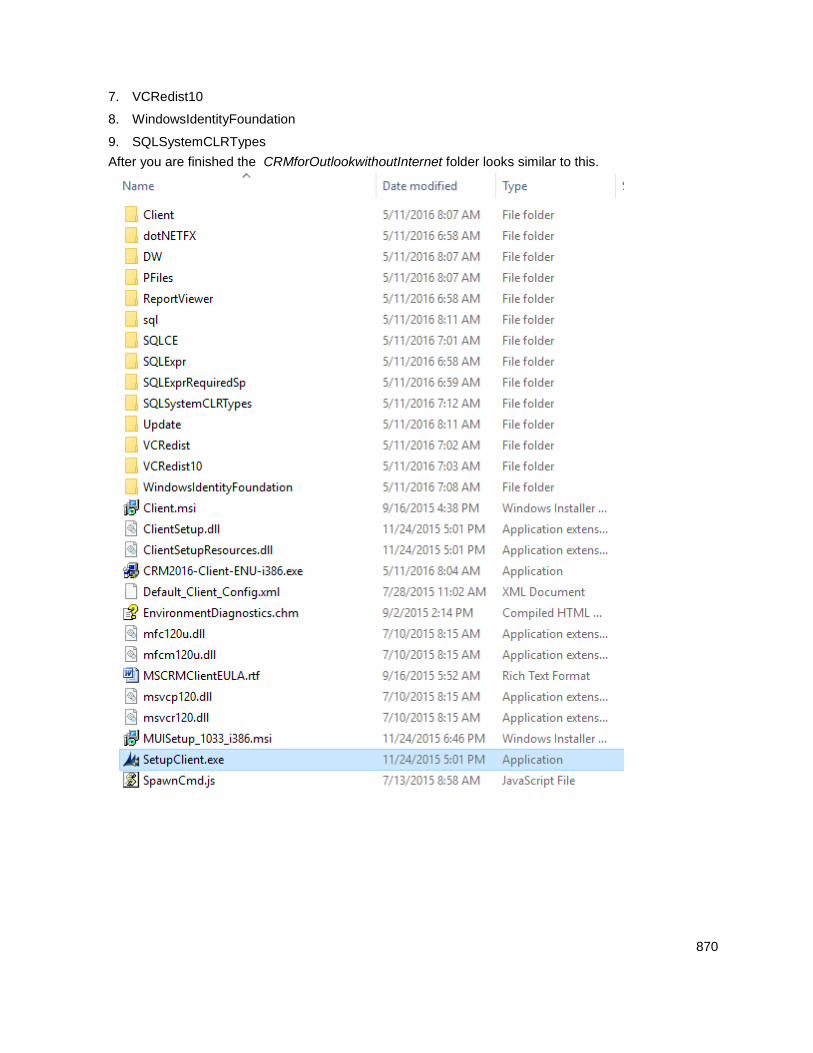
870
7. VCRedist10
8. WindowsIdentityFoundation
9. SQLSystemCLRTypes
After you are finished the CRMforOutlookwithoutInternet folder looks similar to this.
871
Step 3: Download the prerequisite files Download the prerequisite components and copy them into the appropriate subfolders as indicated in the following list.
1. dotNETFX
Description File name and direct download link
Microsoft .NET Framework 4 (Offline Installer (64 and 32-bit))
NDP452-KB2901907-x86-x64-AllOS-ENU.exe
2. ReportViewer
Description File name and direct download link
Microsoft Report Viewer 2012 Runtime ReportViewer.msi
3. SQLCE
Description File name and direct download link
Microsoft SQL Server Compact 4.0 SP1 (64-bit) SSCERuntime_x64-ENU.exe
Microsoft SQL Server Compact 4.0 SP1 (32-bit) SSCERuntime_x86-ENU.exe
4. SQLExpr
Description File name and direct download link
SQL Express 2012 Express SP2 x86 (32-bit, used by both 64 and 32-bit versions of Dynamics 365 for Outlook)
SQLEXPR_x86_ENU.exe
5. SQLExprRequiredSp
Description File name and direct download link
SQL Express 2008 R2 SP3 SQLEXPR_x86_ENU.exe
6. VCRedist
Description File name and direct download link
Microsoft Visual C++ 2013 Redistributable (64-bit) vcredist_x64.exe
Microsoft Visual C++ 2013 Redistributable (32-bit) vcredist_x86.exe
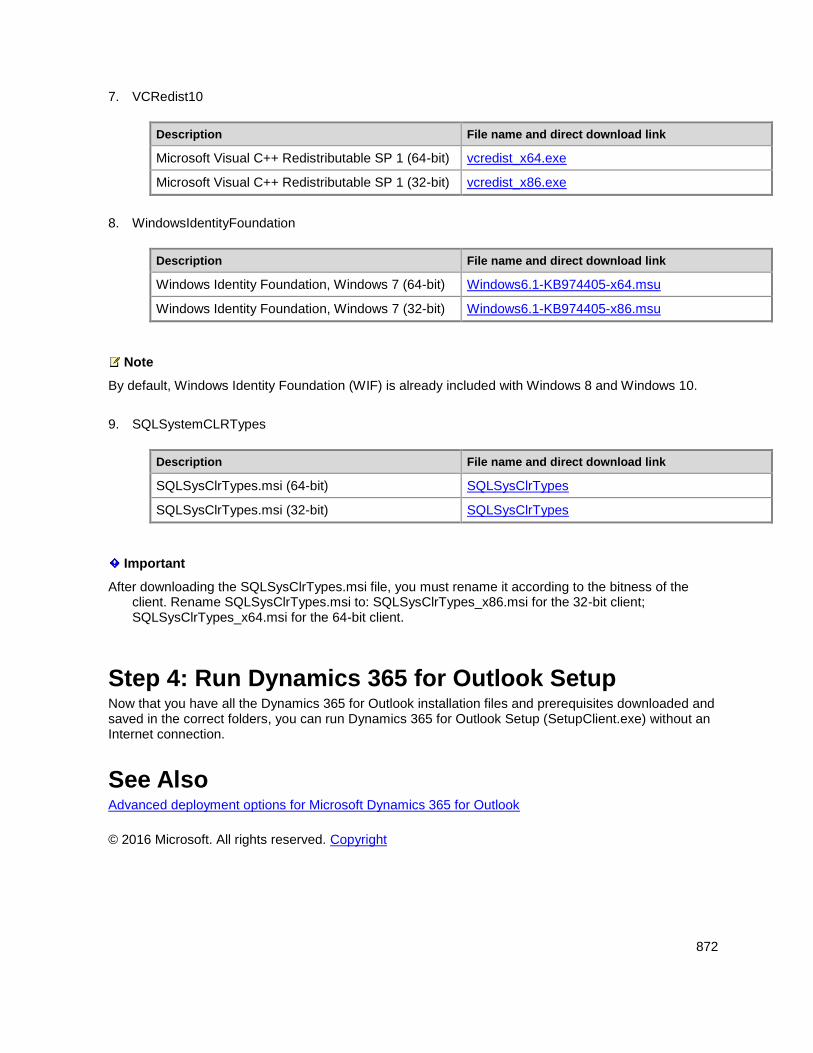
872
7. VCRedist10
Description File name and direct download link
Microsoft Visual C++ Redistributable SP 1 (64-bit) vcredist_x64.exe
Microsoft Visual C++ Redistributable SP 1 (32-bit) vcredist_x86.exe
8. WindowsIdentityFoundation
Description File name and direct download link
Windows Identity Foundation, Windows 7 (64-bit) Windows6.1-KB974405-x64.msu
Windows Identity Foundation, Windows 7 (32-bit) Windows6.1-KB974405-x86.msu
Note
By default, Windows Identity Foundation (WIF) is already included with Windows 8 and Windows 10.
9. SQLSystemCLRTypes
Description File name and direct download link
SQLSysClrTypes.msi (64-bit) SQLSysClrTypes
SQLSysClrTypes.msi (32-bit) SQLSysClrTypes
Important
After downloading the SQLSysClrTypes.msi file, you must rename it according to the bitness of the client. Rename SQLSysClrTypes.msi to: SQLSysClrTypes_x86.msi for the 32-bit client; SQLSysClrTypes_x64.msi for the 64-bit client.
Step 4: Run Dynamics 365 for Outlook Setup Now that you have all the Dynamics 365 for Outlook installation files and prerequisites downloaded and saved in the correct folders, you can run Dynamics 365 for Outlook Setup (SetupClient.exe) without an Internet connection.
See Also Advanced deployment options for Microsoft Dynamics 365 for Outlook
© 2016 Microsoft. All rights reserved. Copyright
873
Uninstall or repair Microsoft Dynamics 365 for Outlook
Applies To: Dynamics 365 (online), Dynamics 365 (on-premises), Dynamics CRM 2016, Dynamics CRM Online
[This topic is pre-release documentation and is subject to change.]
If other users run Dynamics 365 for Outlook on the same device, those users should sign out of Microsoft Windows before uninstalling Dynamics 365 for Outlook. This is especially true for Citrix or Remote Desktop environments where additional sessions are common and should be closed before uninstalling Dynamics 365 for Outlook.
Tip
You might want to disable Dynamics 365 for Outlook instead of uninstalling it. To disable Dynamics 365 for Outlook, go to File > Options. Click Add-Ins, click the Go button next to Manage: COM Add-ins, clear both Microsoft Dynamics 365 add-ins, and then click OK.
1. Start Programs and Features in the Control Panel.
2. On the Uninstall or change a program page, select the version of Dynamics 365 for Outlook you
want to uninstall, and then click Uninstall/Change.
3. In the Setup wizard, on the Choose the installation you want page, click Uninstall or Repair.
4. When the wizard finishes, click Close.
5. If prompted, restart your computer.
Note
If an uninstallation is not completed while you are logged on to the client computer as the user who originally installed the application, the offline database will remain attached to the instance of Microsoft SQL Server Express. After the uninstall is complete, you can manually detach the offline database.
Files not removed during a Microsoft Dynamics 365 for Outlook uninstall The following files aren’t removed when you uninstall Dynamics 365 for Outlook.
*Program Files\Microsoft Dynamics CRM\Client\ConfigWizard\CrmForOutlookInstaller.exe
Windows\CrmClient.mif
*The default folder name is Program Files or Program Files (x86).
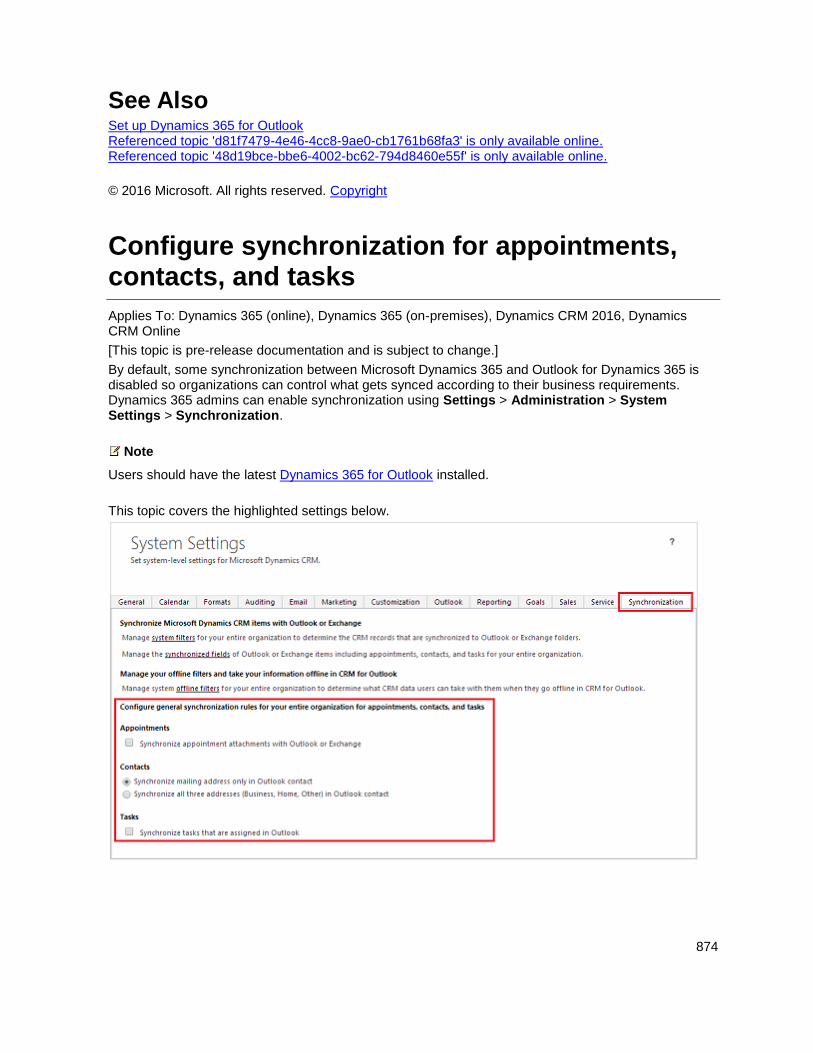
874
See Also Set up Dynamics 365 for Outlook Referenced topic 'd81f7479-4e46-4cc8-9ae0-cb1761b68fa3' is only available online. Referenced topic '48d19bce-bbe6-4002-bc62-794d8460e55f' is only available online.
© 2016 Microsoft. All rights reserved. Copyright
Configure synchronization for appointments, contacts, and tasks
Applies To: Dynamics 365 (online), Dynamics 365 (on-premises), Dynamics CRM 2016, Dynamics CRM Online
[This topic is pre-release documentation and is subject to change.]
By default, some synchronization between Microsoft Dynamics 365 and Outlook for Dynamics 365 is disabled so organizations can control what gets synced according to their business requirements. Dynamics 365 admins can enable synchronization using Settings > Administration > System Settings > Synchronization.
Note
Users should have the latest Dynamics 365 for Outlook installed.
This topic covers the highlighted settings below.
875
Enable appointment attachment synchronization with Outlook or Exchange
Note
This section applies to message synchronization done through Microsoft Dynamics 365 for Outlook or server-side synchronization. More information: Integrate (synchronize) your email system with Microsoft Dynamics 365
Users can attach documents, pictures, recordings, etc. to the appointments they create in the Dynamics 365 web application or Dynamics 365 for Outlook. By default, appointment attachment synchronization is disabled. To enable:
1. Go to Settings > Administration.
2. Choose System Settings, then choose Synchronization.
3. Choose Synchronize appointment attachments with Outlook or Exchange
Considerations
When you disable attachment synchronization, the attachments will not appear in appointments in
Dynamics 365 but will remain in Dynamics 365 for Outlook appointments.
Recurring appointment attachment synchronization is not supported. When users synchronize
recurring appointments with attachments, the attachments do not synch.
Attachments could affect synchronization times so you may want to use attachments sparingly if
attached to a low bandwidth network.
Service activity attachment synchronization is not supported.
Address synchronization for Contacts
Note
This section applies to message synchronization done through Dynamics 365 for Outlook or server-side synchronization. More information: Integrate (synchronize) your email system with Microsoft Dynamics 365
Admins have two options they can specify for how contact synchronization occurs.
Synchronize mailing address only in Outlook contact
By default, just one Outlook mailing address field is synchronized between Dynamics 365 and Outlook. This is sufficient for most organizations.
Synchronize all three addresses (Business, Home, Other) in Outlook contact
876
Choose this option to synchronize all three Outlook mailing address fields (Business, Home, and Other fields) between Dynamics 365 and Outlook.
Warning
Enabling this option can cause data loss if you have existing data. This is due to the remapping of the attributes for existing tracked contacts. We recommend you test this option prior to deployment to understand how the re-mapping affects your environment and your data. In most cases, you should have the full data in one side (normally in Dynamics 365) and have them sync to the other side (normally Outlook or Exchange).
More information: What fields can be synchronized between Dynamics 365 and Dynamics 365 for Outlook?
Enable synchronization for tasks that are assigned in Outlook
Note
This section applies to message synchronization done through Dynamics 365 for Outlook only. More information: Integrate (synchronize) your email system with Microsoft Dynamics 365
By default, task synchronization is disabled. User created tasks in Dynamics 365 for Outlook are not synchronized with the Dynamics 365 web application. To enable:
1. Go to Settings > Administration.
2. Choose System Settings, then choose Synchronization.
3. Choose Synchronize tasks that are assigned in Outlook
Considerations
Recurring task synchronization is not supported. When users synchronize recurring tasks, the tasks
do not synch.
The person assigning the task and the person the task is assigned to must be in the same
organization.
Tasks cannot be synchronized to multiple email addresses.
See Also Set up Dynamics 365 for Outlook
© 2016 Microsoft. All rights reserved. Copyright
877
Install Microsoft Dynamics 365 for Outlook using a command prompt
Applies To: Dynamics 365 (online), Dynamics 365 (on-premises), Dynamics CRM 2016, Dynamics CRM Online
[This topic is pre-release documentation and is subject to change.]
Installing Microsoft Dynamics 365 for Outlook is a two-step procedure. First, you must run Setup to install the files on the computer. Next, run the Microsoft Dynamics 365Configuration Wizard to configure the application and complete the installation.
Important
If there’s a conflict between a value in the configuration file and a value in the command-line parameters, the command-line parameter takes precedence.
In This Topic Step 1: Install files
Step 2: Configure Dynamics 365 for Outlook by using an XML configuration file
Command examples for the Dynamics 365 for Outlook configuration
Dynamics 365 for Outlook XML configuration file elements
User credentials are required when you run the Configuration Wizard
Sample Dynamics 365 for Outlook XML configuration file for configuration
Step 1: Install files The following command displays the available options to run Microsoft Dynamics 365 for Outlook Setup at the command prompt:
Setupclient.exe [/A] [/Q] [/X] [/L or /LV "[drive:][[ path] logfilename.log]"] [/targetdir "[drive:][ path]"] [/installofflinecapability] [/disableofflinecapability] [/ignoreofflinequeue]
Command examples for Dynamics 365 for Outlook installation For users who travel or who are not always connected to the Microsoft Dynamics 365 Server, Microsoft Dynamics 365 for Microsoft Office Outlook with Offline Access provides access to their customer data. To install Microsoft Dynamics 365 for Microsoft Office Outlook with Offline Access in quiet mode:
Setupclient /Q /l c:\clientinstalllog.txt /installofflinecapability /targetdir "c:\Program
Files\Microsoft Dynamics CRM Client"
To uninstall Microsoft Dynamics 365 for Microsoft Office Outlook with Offline Access in quiet mode:
SetupClient /x /q
878
Parameters for Dynamics 365 for Outlook installation
Parameter Description
None Used without parameters, Setupclient.exe will run with all display screens.
installofflinecapability Determines whether offline capability will be installed. When you include this parameter, offline capability and components are installed. If you don’t specify this parameter, the online-only client is installed.
/targetdir <"drive:\path"> Specifies the folder in which Dynamics 365 for Outlook files will be installed.
/A Creates an administrative installation of Dynamics 365 for Outlook by creating a Windows Installer package. This package lets users run Setup from a network share or lets non-administrative users run Setup that is driven from a group policy. This parameter must be used with the /targetdir parameter described earlier. When using this parameter, the /targetdir value doesn’t have to be located on the local computer. A mapped drive or network share, such as \\share\mscrm_client_admin, can be used.
Important
If you don’t specify a target folder by using the /targetdir parameter, Setup installs the administrative installation to the default folder <drive:> Program Files\Microsoft Dynamics CRM.
For example, the command:
Setupclient /Q /A /targetdir
"\\share\mscrm_client_admin"
/Q Quiet mode installation. This parameter requires a configuration file in XML format. The /i parameter contains the name of the XML configuration file. No dialog boxes or error messages will appear on the display screen. To capture error message information, include the log file parameter (/L or /LV).
/L [drive:][[path] logfilename.log] Creates a log file of installation activity. You must specify the file name of the log file and where to put it, but the path can’t be a relative path, such as
879
Parameter Description
%appdata%\CRMLogs.
/LV [drive:][[path] logfilename.log] Creates a verbose log file of installation activity. You must specify the file name of the log file and where to put it, but the path can’t be a relative path, such as %appdata%\CRMLogs.
disableofflinecapability When you specify this parameter, Dynamics 365 for Outlook is configured to hide the “go offline” button in the application. This button lets users switch to Dynamics 365 for Outlook with offline capability.
ignoreofflinequeue When you specify this parameter, Setup will not attempt to synchronize items that may remain in the offline queue during upgrade.
/X Uninstalls Dynamics 365 for Outlook. This is a maintenance mode option that is only available when the application is already installed.
Sample Dynamics 365 for Outlook XML configuration file for installation The following configuration-file example installs Dynamics 365 for Outlook without offline access capability into the Program Files folder.
Note
You can use the same file that includes both the installation and configuration elements. Setup and the Configuration Wizard ignore the elements that aren’t relevant to the operation.
<Deployments>
<TargetDir>c:\program files\Microsoft Dynamics CRM\Client</TargetDir>
<InstallOfflineCapability>false</InstallOfflineCapability>
</Deployments>
Step 2: Configure Dynamics 365 for Outlook by using an XML configuration file After you install Dynamics 365 for Outlook, you must configure it. You can do this by running the Dynamics 365 for OutlookConfiguration Wizard at the command prompt. The Configuration Wizard file is named Microsoft.Crm.Application.Outlook.ConfigWizard.exe and is located in the Client\ConfigWizard folder where Dynamics 365 for Outlook is installed. By default, the folder is C:\Program Files\Microsoft Dynamics CRM.
880
Note
The credentials of the user who will run Dynamics 365 for Outlook are used to authenticate to Microsoft Dynamics 365. Therefore, to perform a silent configuration of Dynamics 365 for Outlook, you must run the Configuration Wizard under the user's context, such as by running a user-invoked batch file or as a one-time entry in a logon script. For more information, see User credentials are required when you run the Configuration Wizard. To deploy Dynamics 365 for Outlook by using Microsoft Group Policy, see Deploy Microsoft Dynamics 365 for Outlook by using Group Policy.
If a path to the configuration file isn’t specified, the Configuration Wizard looks for the default configuration file (default_client_config.xml) in the non-roaming profile folder (%localappdata%\Microsoft\MSCRM\). If the file isn’t located in the non-roaming profile folder, the Configuration Wizard looks for the folder where Dynamics 365 for Outlook is installed. By default, Dynamics 365 for Outlook is installed in the C:\Program Files\Microsoft Dynamics CRM folder.
If the configuration file is located in the roaming location used by other applications (AppData\Roaming\Microsoft\MSCRM\), it won’t be honored.
Command examples for the Dynamics 365 for Outlook configuration The following command configures Microsoft Dynamics 365 for Outlook with Offline Access by using a file named config_client.xml in quiet mode, and outputs a log file named clientinstall.log:
Microsoft.Crm.Application.Outlook.ConfigWizard.exe /Q /i c:\config_client.xml /xa /l
c:\clientinstall.log
The /Q quiet mode configuration parameter requires a configuration file in XML format. No dialog boxes or error messages will appear on the display screen. To capture error message information, include the log file parameter (/L) or verbose logging (/LV).
Important
Valid user credentials stored in the Windows Vault are required to run the Configuration Wizard in quiet mode. More information: User credentials are required when you run the Configuration Wizard
The /i [drive:] [[path] configfilename.xml]] command-line parameter provides Microsoft Dynamics 365 for Outlook Setup with required information. It is the same information that each installation screen requires. The XML elements must be in English (US); special or extended characters can’t be used. An XML configuration file that has localized XML elements will not work correctly. An explanation of each XML element and a sample XML file follows:
The /xa parameter, when used with the /q parameter, removes all organizations that are configured for Dynamics 365 for Outlook.
The /R parameter may be used to suppress the Configuration Wizard user interface and only display the progress dialog box. This parameter requires a valid XMLSetup file that is named Default_Client_Config.xml and must be located in either the local user AppData or Client installation folder.
881
Dynamics 365 for Outlook XML configuration file elements Element Description
<Deployments> </Deployments> The configuration file must be a valid XML file that uses <Deployment> as the root element.
<InstallOfflineCapability>true/false</InstallOfflineCapability> Specifies the type of Dynamics 365 for Outlook installation. Specifying true will install Microsoft Dynamics 365 for Outlook with Offline Access capability.
<TargetDir>drive:\path</TargetDirectory> Specifies the folder in which Dynamics 365 for Outlook files will be installed.
<Deployment> </Deployment> Parent element for all of the following elements.
<DiscoveryUrl>https://website:portnumber</DiscoveryUrl> Specifies the URL for the Microsoft Dynamics 365Discovery Web Service.
For an on-premises deployment of Microsoft Dynamics 365 Server, the supported binding can be HTTPS or HTTP. If the Discovery Web Service is using a port other than the default ports 80 (HTTP) or 443 (HTTPS), you must specify the port number. If this is a Full Server deployment of Microsoft Dynamics 365 Server, the Discovery Web Service URL is the same as the one for the web application, such as http://crmserver.
For Microsoft Dynamics 365 (online), use the full organization URL, such as https://orgname.crm.dynamics.com, or depending on your online environment and location, use the discovery service URL, in the form https://disco.crm.dynamics.com. For a list of URLs, see MSDN: Discovery service.
<FederatedAuthentication>true/false</FederatedAuthentication> Specifies if federated (Azure Active Directory) credentials are used for authentication in the Configuration Wizard. If you specify false, you can
882
Element Description
use credentials such as [email protected].
<Organizations> </Organizations> This is the parent element for the following <Organization> element.
<Organization FriendlyName="My Friendly Organization Name" IsPrimary="true"/"false">OrganizationName</Organization>
Specifies the name of the organization that the client will connect to.
FriendlyName. Specifies a different display name other than the organization name in Outlook.
IsPrimary. Specifies the organization that will be configured as the synchronizing organization in Dynamics 365 for Outlook.
Note
OrganizationName is case-sensitive.
<CEIPNotification>true/false</CEIPNotification> Specifies whether Dynamics 365 for Outlook will display the “I want to join the Customer Experience Improvement Program” notification banner. The default setting is true and the notification banner is displayed. If you specify false, the notification banner doesn’t appear in Dynamics 365 for Outlook. More information: Microsoft Customer Experience Improvement Program
User credentials are required when you run the Configuration Wizard The Configuration Wizard requires user credentials. During a silent configuration, by using /Q with the Microsoft.Crm.Application.Outlook.ConfigWizard.exe file, the Configuration Wizard will look for the user’s credentials in the Windows Vault. If the Configuration Wizard can’t find the credentials, or the credentials aren’t in the required format, the configuration will not finish and an error will be recorded to the configuration log file. Notice that the Configuration Wizard doesn’t support adding the user UPN or password in the XML configuration file. For information about how to add user credentials from a command script to the Windows Vault, see the blog post Silent configuration of CRM for Outlook client in CRM 2011 claims enabled environment. For more information about the Windows Vault and Credential Manager, see What is Credential Manager
883
Sample Dynamics 365 for Outlook XML configuration file for configuration The following configuration file example configures Dynamics 365 for Outlook to connect to a primary organization named Contoso and another organization named AdventureWorksCycle on the Microsoft Dynamics 365 Server that is named crmserver.
Note
You can use the same file that includes both the installation and configuration elements. Setup and the Configuration Wizard will ignore the elements that aren’t relevant to the operation.
Example Default_Client_Config.xml file
<Deployments>
<Deployment>
<DiscoveryUrl>http://crmserver</DiscoveryUrl>
<Organizations>
<Organization IsPrimary='true'>Constoso</Organization>
<Organization>AdventureWorksCycle</Organization>
</Organizations>
<CEIPNotification>false</CEIPNotification>
</Deployment>
</Deployments>
Note
The preceding example specifies two different organizations that the user has access to and configures Dynamics 365 for Outlook to not display the “I want to join the Customer Experience Improvement Program” notification banner. The value in the Organization element can’t contain special characters or spaces. For Dynamics 365 (on-premises), you can find the organization unique name by running the Get-CrmOrganization Windows PowerShell cmdlet or in the Name column in the Organizations area of Deployment Manager.
Configure Dynamics 365 for Outlook by using a script
1. Write a script that automatically updates the configuration settings for users of Dynamics 365 for
Outlook. You could use lines such as the following to perform the basic configuration actions,
based on a new configuration file that is stored on the computer indicated as <servername>.
In the following script, the default client configuration file is overwritten, previously configured organizations are removed, user credentials are added to the Windows Vault, and the new organization is installed.
884
copy /y \\<servername>\share\Default_Client_Config.xml "c:\Program Files\Microsoft
Dynamics CRM\Default_Client_Config.xml"
"C:\Program Files\Microsoft Dynamics
CRM\Client\ConfigWizard\Microsoft.Crm.Application.Outlook.ConfigWizard.exe" /q /xa
cmdkey /generic:Microsoft_CRM_https://contoso.crm.dynamics.com/
/user:[email protected] /password{password_goes_here}
"C:\Program Files\Microsoft Dynamics
CRM\Client\ConfigWizard\Microsoft.Crm.Application.Outlook.ConfigWizard.exe" /q /i
"C:\Program Files\Microsoft Dynamics CRM\Default_Client_Config.xml"
Tip
Consider running your script as a logon script, or forcing the script to run at a specific time, such as by using Microsoft System Center 2012 Configuration Manager.
In the script, you might also want to include detection logic that determines whether the client computer has already been configured. If it has, you can have the script exit without taking action.
Example Default_Client_Config.xml file
<Deployment>
<DiscoveryUrl>http://CrmDiscoveryUrl</DiscoveryUrl>
<Organizations>
<Organization IsPrimary='true'>Organization1</Organization>
</Organizations>
</Deployment>
2. Run the script on each client computer in the organization whose server has changed. You can run
the script in various ways, including through the Profile tab of the user properties dialog box in
Active Directory Users and Computers (ADUC), or through Group Policy Objects (GPO).
See Also Install Dynamics 365 for Outlook Set up Dynamics 365 for Outlook Referenced topic '0497afad-c0d9-4f6a-8b10-b08fe6b4e559' is only available online. Dynamics 365 for Outlook
© 2016 Microsoft. All rights reserved. Copyright

885
Microsoft Dynamics 365 for Outlook failure recovery
Applies To: Dynamics 365 (online), Dynamics 365 (on-premises), Dynamics CRM 2016, Dynamics CRM Online
[This topic is pre-release documentation and is subject to change.]
Microsoft Dynamics 365 for Outlook with “Go offline” capability uses Microsoft SQL Server Express for local data storage on the user’s computer. This enables Microsoft Dynamics 365 users to work offline and later synchronize local data with SQL Server (on-premises) or Microsoft Dynamics 365 (online) when Dynamics 365 for Outlook is brought online again.
In some cases, Microsoft Dynamics 365 users may want to back up the local Microsoft SQL Server Express database. This is especially useful when Microsoft Dynamics 365 users are offline for prolonged periods. The following table indicates different methods that can be used for backing up the SQL database used with Dynamics 365 for Outlook.
Backup method What to back up Comments
Offline backup Contents of Microsoft Dynamics 365 data directory.
The default location of 64-bit Microsoft Office on 32-bit Windows: %programfiles%\Microsoft Dynamics 365\LocaleCode\sql\7
The default location of 32-bit Microsoft Office on 64-bit Windows: %programfiles(x86)%\Microsoft Dynamics 365\LocaleCode\sql\7
Before you start the backup, make sure that the SQL Server (CRM) service is stopped. Restart the service after the backup is complete.
LocaleCode is the 4-digit number representing the language locale.
Online backup using Microsoft tools
MSDE_MSCRM7.mdf
MSDE_MSCRM7_log.LDF
Use Microsoft SQL Server Management Studio Express (SSMSE) or sqlcmd.exe (a command-line tool).
Online backup using non-Microsoft tools
MSDE_MSCRM7.mdf
MSDE_MSCRM7_log.LDF
Look for tools that are compatible with Microsoft SQL Server Express.
Backup and recovery tools Microsoft SQL Server 2012 Express provides a graphical management tool (SQL Server Management Studio Express (SQLManagementStudio)) that includes backup and recovery features. You can download SQL Server Management Studio Express at Microsoft SQL Server® 2012 Service Pack 2 (SP2) Express.
886
Restoring from backup If there is a problem with Dynamics 365 for Outlook offline synchronization, the backup can be used to restore Microsoft Dynamics 365 functionality. Dynamics 365 for Outlook should be in offline mode before you restore the backup. When restored, you can then connect to Microsoft Dynamics 365 (online mode). The data that isn’t already on the server will be transferred to the server from the client. Be careful when reconnecting to the server. If you restore from an outdated backup, the existing data on the server may have subsequently changed and you run the risk of overwriting current data on the server with older data from the offline client backup.
See Also Set up Dynamics 365 for Outlook Referenced topic '09348882-9013-4a0c-a616-222a768bce5e' is only available online.
© 2016 Microsoft. All rights reserved. Copyright
Control field synchronization between Dynamics 365 and Dynamics 365 for Outlook
Applies To: Dynamics 365 (online), Dynamics 365 (on-premises), Dynamics CRM 2016, Dynamics CRM Online
[This topic is pre-release documentation and is subject to change.]
With field synchronization, admins can set the sync direction between Microsoft Dynamics 365 and Microsoft Dynamics 365 for Outlook fields. You can control synchronization when using either Outlook synchronization or server-side synchronization (Exchange).
For example, a salesperson may want to take personal notes about a contact and not want the notes to synchronize with Dynamics 365 data available to all users. You can set the Personal Notes field for contacts in Outlook to not Dynamics 365 for Outlook with Dynamics 365 so the salesperson’s notes will remain private.
Tip
Check out the following video: Configurability in Synchronizing Data with Outlook or Exchange in Microsoft Dynamics CRM 2015
Set field synchronization between Dynamics 365 and Dynamics 365 for Outlook 1. In Dynamics 365, Go to Settings > Email Configuration.
2. Choose Email Configuration Settings.
3. Choose the Synchronization tab > synchronized fields

887
4. For the fields you want to change synchronization, choose the arrows in the Sync Direction column.
Each choice will change the direction.
Tip
Hover over a field name to see the fields mapped to it.
5. Choose OK > OK to close the open dialog boxes.
Let your users know they can view (not change) the synchronization settings. More information: What fields can be synchronized between Dynamics 365 and Dynamics 365 for Outlook?
Performance and synchronization Configuring synchronization might have an impact on the time it takes to sync between Dynamics 365 for Outlook and Dynamics 365. You should test your configuration before deploying to ensure satisfactory sync times.
Permissions and synchronization Role-based security controls access to a specific entity type, record-based security controls access to individual records, and field-level security controls access to specific fields. All these can impact what is synchronized between Dynamics 365 and Dynamics 365 for Outlook or Exchange.
Best practice is to review the security settings for these security methods to ensure field synchronization is processes as desired. For more information see:
Securing roles: Create or edit a security role
Securing fields: Help & Training: Add or remove security from a field
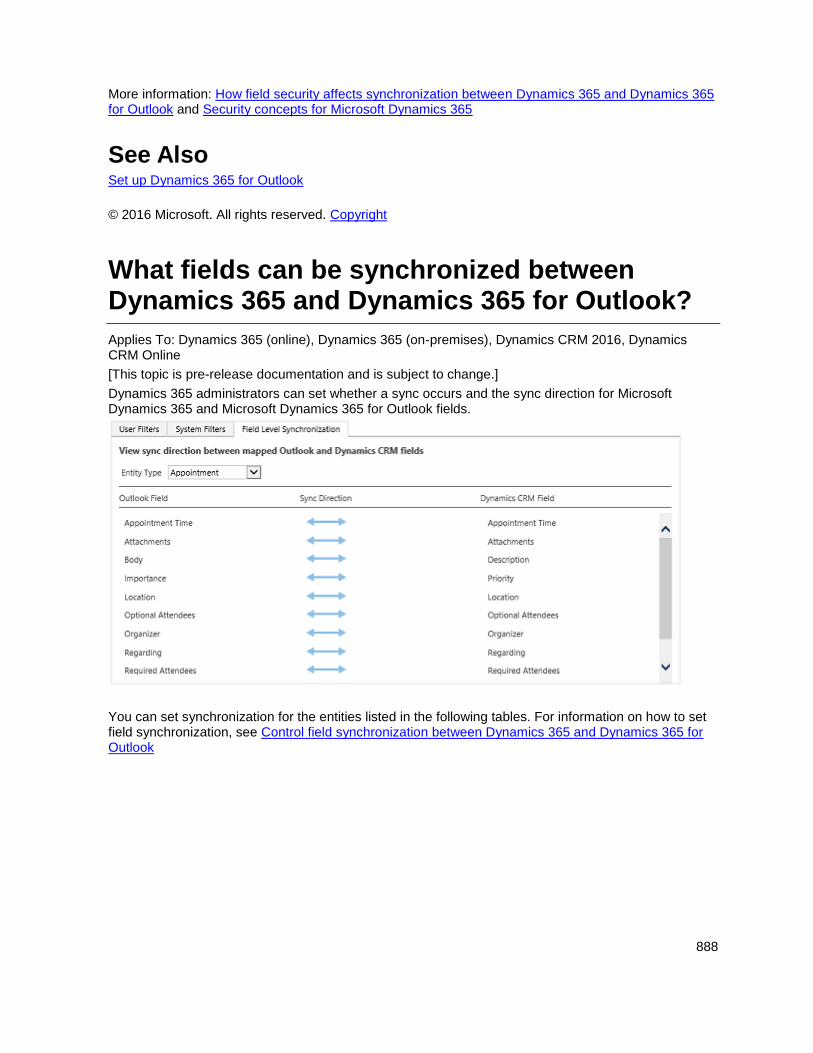
888
More information: How field security affects synchronization between Dynamics 365 and Dynamics 365 for Outlook and Security concepts for Microsoft Dynamics 365
See Also Set up Dynamics 365 for Outlook
© 2016 Microsoft. All rights reserved. Copyright
What fields can be synchronized between Dynamics 365 and Dynamics 365 for Outlook?
Applies To: Dynamics 365 (online), Dynamics 365 (on-premises), Dynamics CRM 2016, Dynamics CRM Online
[This topic is pre-release documentation and is subject to change.]
Dynamics 365 administrators can set whether a sync occurs and the sync direction for Microsoft Dynamics 365 and Microsoft Dynamics 365 for Outlook fields.
You can set synchronization for the entities listed in the following tables. For information on how to set field synchronization, see Control field synchronization between Dynamics 365 and Dynamics 365 for Outlook

889
Entity: Appointment Dynamics 365 for Outlook field
Default sync Settable sync Dynamics 365 field Notes
Appointment Time Appointment Time Aggregation of Start Time, End Time, Duration, All Day Event, etc.
Attachments Computed Attachments Changes to based on System Settings.
Body , , ,
Description Outlook and Exchange can contain things like images and links. Dynamics 365 can only contain multiple lines of text.
Importance Priority Outlook has High Importance, Low Importance.
Location , , ,
Location
Optional Attendees Optional Attendees
Organizer Organizer See below.
Regarding Regarding See below.
Required Attendees Required Attendees
Show Time As Appointment Status
Subject , , ,
Subject
Notes
1. Organizer: In Outlook sync, an appointment created in Dynamics 365 will not result in filling in the
Outlook Organizer field until it is further modified in Outlook. This applies to Appointment, Recurring
Appointment, and Service Activity. In server-side sync, a service activity created in Dynamics 365
will result in filling in the Exchange Organizer field with the person who synchronizes this
appointment.
2. Regarding: When you do a Set Regarding, the Regarding field in Outlook is replaced by the name
of the regarding object from Dynamics 365. Until you sync, the Set Regarding action in Dynamics
365 for Outlook and in Dynamics 365 should not change the Regarding field in Outlook.

890
Entity: Contact Dynamics 365 for Outlook field
Default sync Settable sync Dynamics 365 field Notes
Anniversary , , ,
Anniversary
Assistant’s Name , , ,
Assistant
Assistant’s Phone , , ,
Assistant Phone
Birthday , , ,
Birthday
Business Fax , , ,
Fax
Business Phone , , ,
Business Phone
Business Phone 2 , , ,
Business Phone 2
Callback , , ,
Callback Number
Children , , ,
Children’s Names
Company Main Phone , , ,
Company Phone
Department , , ,
Department
E-mail , , ,
E-mail 2 , , ,
Email Address 2
E-mail 3 , , ,
Email Address 3
FTP Site , , ,
FTP Site
Full Name Full Name
Government ID Number , , ,
Government
Home Address , , ,
Address 2 Changes to based on System Settings.
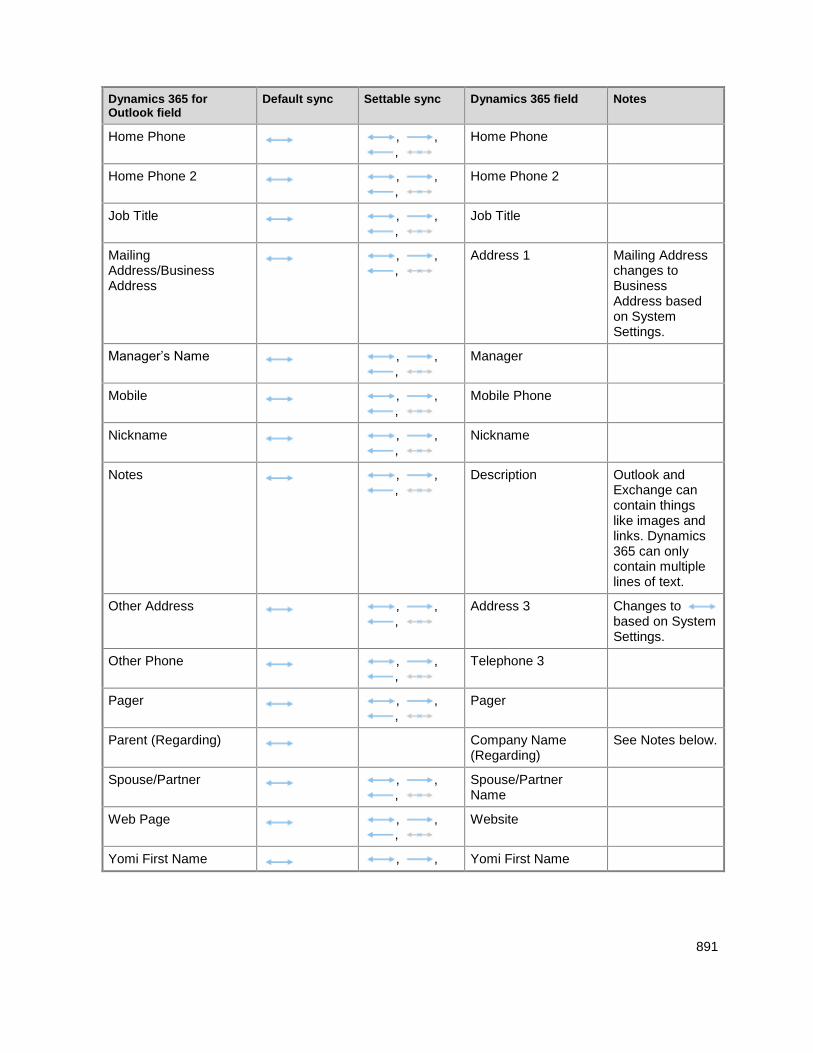
891
Dynamics 365 for Outlook field
Default sync Settable sync Dynamics 365 field Notes
Home Phone , , ,
Home Phone
Home Phone 2 , , ,
Home Phone 2
Job Title , , ,
Job Title
Mailing Address/Business Address
, , ,
Address 1 Mailing Address changes to Business Address based on System Settings.
Manager’s Name , , ,
Manager
Mobile , , ,
Mobile Phone
Nickname , , ,
Nickname
Notes , , ,
Description Outlook and Exchange can contain things like images and links. Dynamics 365 can only contain multiple lines of text.
Other Address , , ,
Address 3 Changes to based on System Settings.
Other Phone , , ,
Telephone 3
Pager , , ,
Pager
Parent (Regarding) Company Name (Regarding)
See Notes below.
Spouse/Partner , , ,
Spouse/Partner Name
Web Page , , ,
Website
Yomi First Name , , Yomi First Name
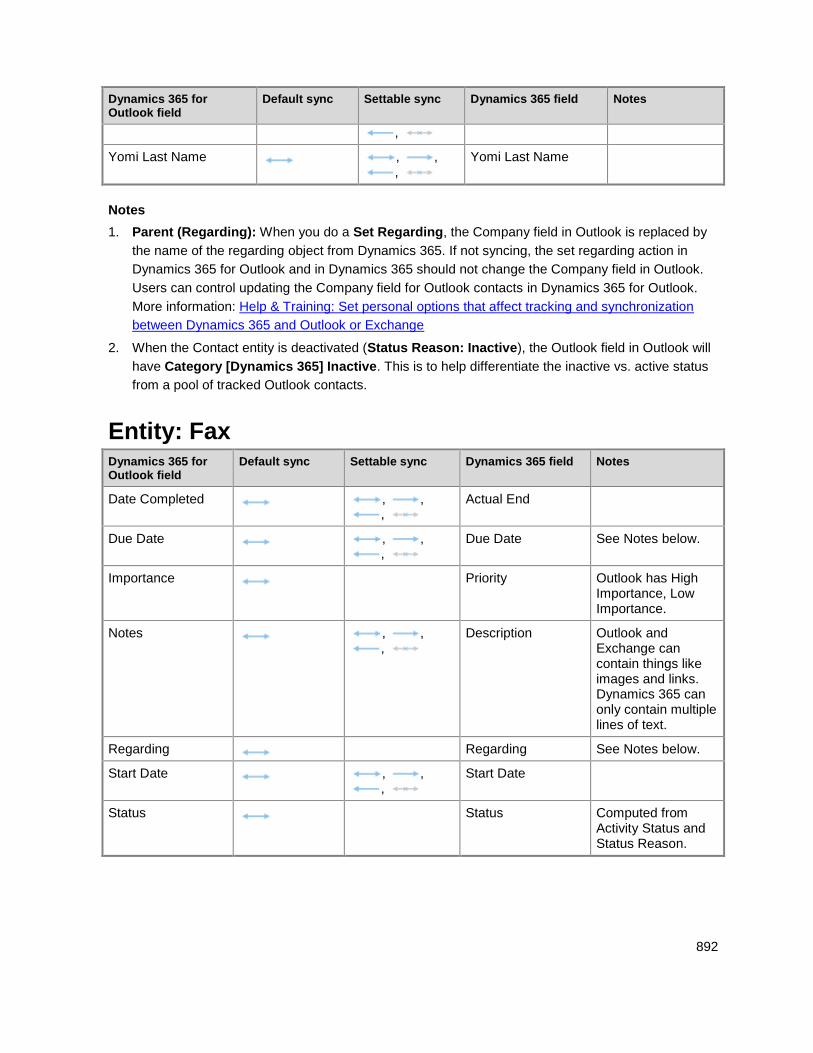
892
Dynamics 365 for Outlook field
Default sync Settable sync Dynamics 365 field Notes
,
Yomi Last Name , , ,
Yomi Last Name
Notes
1. Parent (Regarding): When you do a Set Regarding, the Company field in Outlook is replaced by
the name of the regarding object from Dynamics 365. If not syncing, the set regarding action in
Dynamics 365 for Outlook and in Dynamics 365 should not change the Company field in Outlook.
Users can control updating the Company field for Outlook contacts in Dynamics 365 for Outlook.
More information: Help & Training: Set personal options that affect tracking and synchronization
between Dynamics 365 and Outlook or Exchange
2. When the Contact entity is deactivated (Status Reason: Inactive), the Outlook field in Outlook will
have Category [Dynamics 365] Inactive. This is to help differentiate the inactive vs. active status
from a pool of tracked Outlook contacts.
Entity: Fax Dynamics 365 for Outlook field
Default sync Settable sync Dynamics 365 field Notes
Date Completed , , ,
Actual End
Due Date , , ,
Due Date See Notes below.
Importance Priority Outlook has High Importance, Low Importance.
Notes , , ,
Description Outlook and Exchange can contain things like images and links. Dynamics 365 can only contain multiple lines of text.
Regarding Regarding See Notes below.
Start Date , , ,
Start Date
Status Status Computed from Activity Status and Status Reason.
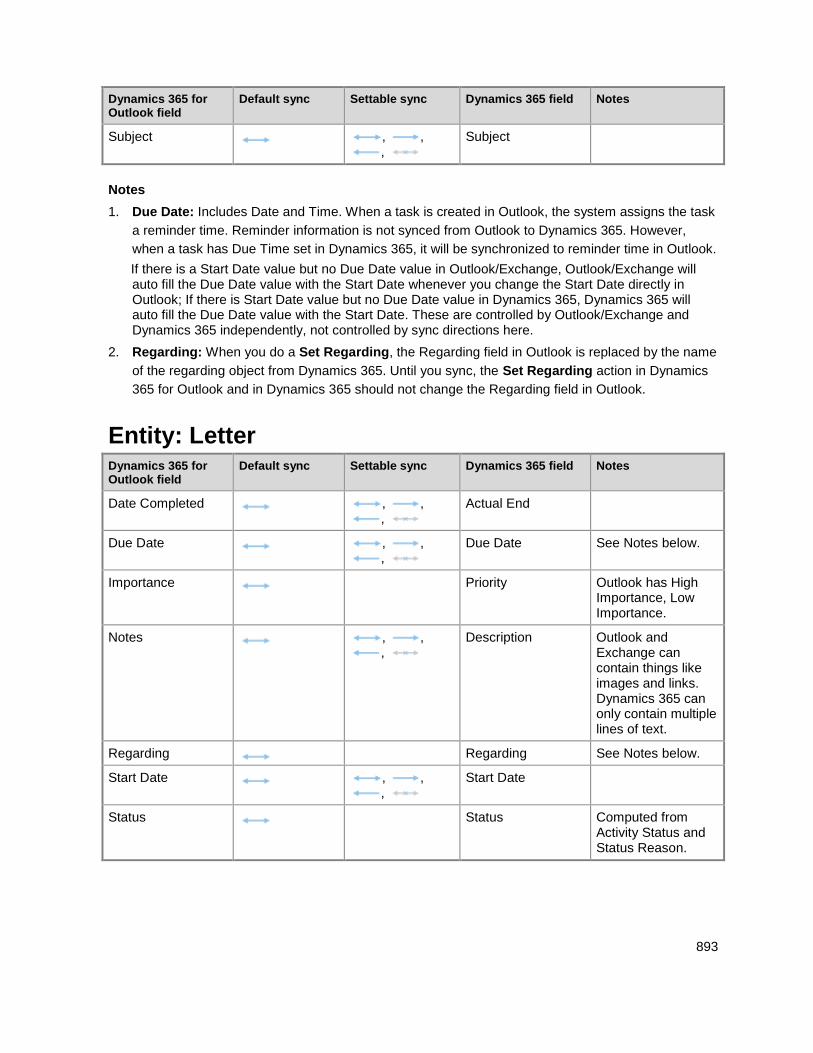
893
Dynamics 365 for Outlook field
Default sync Settable sync Dynamics 365 field Notes
Subject , , ,
Subject
Notes
1. Due Date: Includes Date and Time. When a task is created in Outlook, the system assigns the task
a reminder time. Reminder information is not synced from Outlook to Dynamics 365. However,
when a task has Due Time set in Dynamics 365, it will be synchronized to reminder time in Outlook.
If there is a Start Date value but no Due Date value in Outlook/Exchange, Outlook/Exchange will auto fill the Due Date value with the Start Date whenever you change the Start Date directly in Outlook; If there is Start Date value but no Due Date value in Dynamics 365, Dynamics 365 will auto fill the Due Date value with the Start Date. These are controlled by Outlook/Exchange and Dynamics 365 independently, not controlled by sync directions here.
2. Regarding: When you do a Set Regarding, the Regarding field in Outlook is replaced by the name
of the regarding object from Dynamics 365. Until you sync, the Set Regarding action in Dynamics
365 for Outlook and in Dynamics 365 should not change the Regarding field in Outlook.
Entity: Letter Dynamics 365 for Outlook field
Default sync Settable sync Dynamics 365 field Notes
Date Completed , , ,
Actual End
Due Date , , ,
Due Date See Notes below.
Importance Priority Outlook has High Importance, Low Importance.
Notes , , ,
Description Outlook and Exchange can contain things like images and links. Dynamics 365 can only contain multiple lines of text.
Regarding Regarding See Notes below.
Start Date , , ,
Start Date
Status Status Computed from Activity Status and Status Reason.

894
Dynamics 365 for Outlook field
Default sync Settable sync Dynamics 365 field Notes
Subject , , ,
Subject
Notes
1. Due Date: Includes Date and Time. When a task is created in Outlook, the system assigns the task
a reminder time. Reminder information is not synced from Outlook to Dynamics 365. However,
when a task has Due Time set in Dynamics 365, it will be synchronized to reminder time in Outlook.
If there is a Start Date value but no Due Date value in Outlook/Exchange, Outlook/Exchange will auto fill the Due Date value with the Start Date whenever you change the Start Date directly in Outlook; if there is Start Date value but no Due Date value in Dynamics 365, Dynamics 365 will auto fill the Due Date value with the Start Date. These are controlled by Outlook/Exchange and Dynamics 365 independently, not controlled by sync directions here.
2. Regarding: When you do a Set Regarding, the Regarding field in Outlook is replaced by the name
of the regarding object from Dynamics 365. Until you sync, the Set Regarding action in Dynamics
365 for Outlook and in Dynamics 365 should not change the Regarding field in Outlook.
Entity: Phone Call Dynamics 365 for Outlook field
Default sync Settable sync Dynamics 365 field Notes
Date Completed , , ,
Actual End
Due Date , , ,
Due Date See below.
Importance Priority Outlook has High Importance, Low Importance.
Notes , , ,
Description Outlook and Exchange can contain things like images and links. Dynamics 365 can only contain multiple lines of text.
Regarding Regarding See Notes below.
Start Date , , ,
Start Date
Status Status Computed from Activity Status and Status Reason.
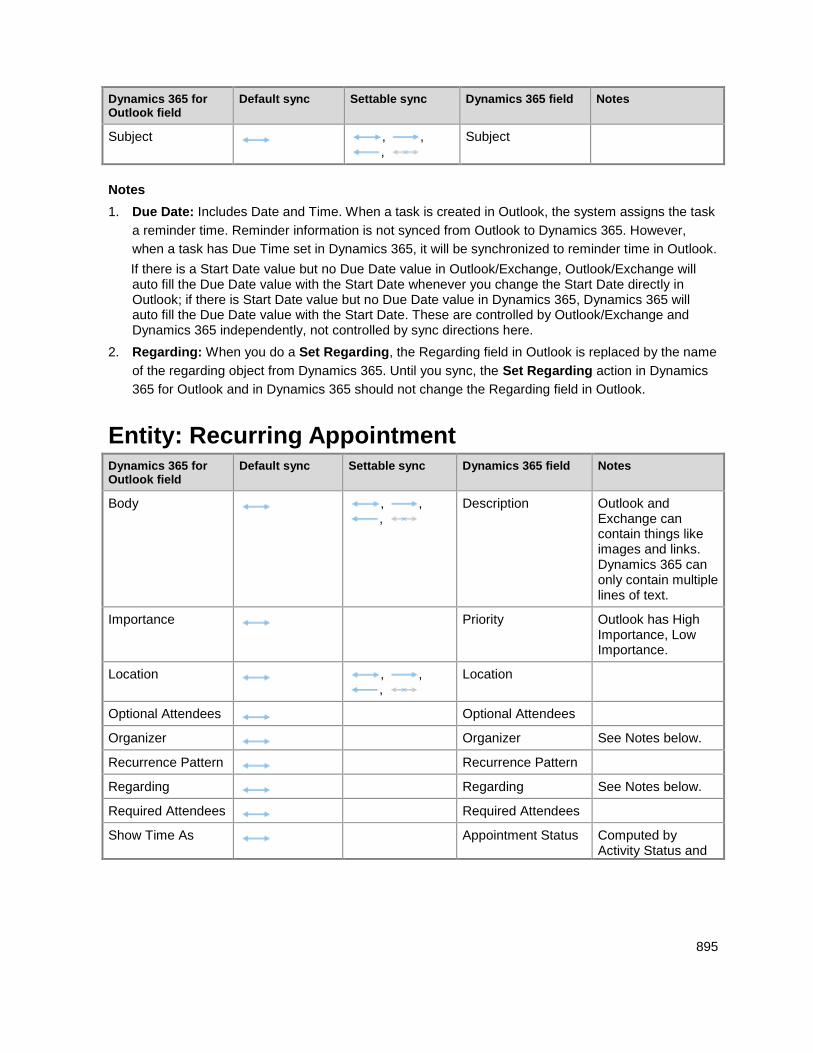
895
Dynamics 365 for Outlook field
Default sync Settable sync Dynamics 365 field Notes
Subject , , ,
Subject
Notes
1. Due Date: Includes Date and Time. When a task is created in Outlook, the system assigns the task
a reminder time. Reminder information is not synced from Outlook to Dynamics 365. However,
when a task has Due Time set in Dynamics 365, it will be synchronized to reminder time in Outlook.
If there is a Start Date value but no Due Date value in Outlook/Exchange, Outlook/Exchange will auto fill the Due Date value with the Start Date whenever you change the Start Date directly in Outlook; if there is Start Date value but no Due Date value in Dynamics 365, Dynamics 365 will auto fill the Due Date value with the Start Date. These are controlled by Outlook/Exchange and Dynamics 365 independently, not controlled by sync directions here.
2. Regarding: When you do a Set Regarding, the Regarding field in Outlook is replaced by the name
of the regarding object from Dynamics 365. Until you sync, the Set Regarding action in Dynamics
365 for Outlook and in Dynamics 365 should not change the Regarding field in Outlook.
Entity: Recurring Appointment Dynamics 365 for Outlook field
Default sync Settable sync Dynamics 365 field Notes
Body , , ,
Description Outlook and Exchange can contain things like images and links. Dynamics 365 can only contain multiple lines of text.
Importance Priority Outlook has High Importance, Low Importance.
Location , , ,
Location
Optional Attendees Optional Attendees
Organizer Organizer See Notes below.
Recurrence Pattern Recurrence Pattern
Regarding Regarding See Notes below.
Required Attendees Required Attendees
Show Time As Appointment Status Computed by Activity Status and
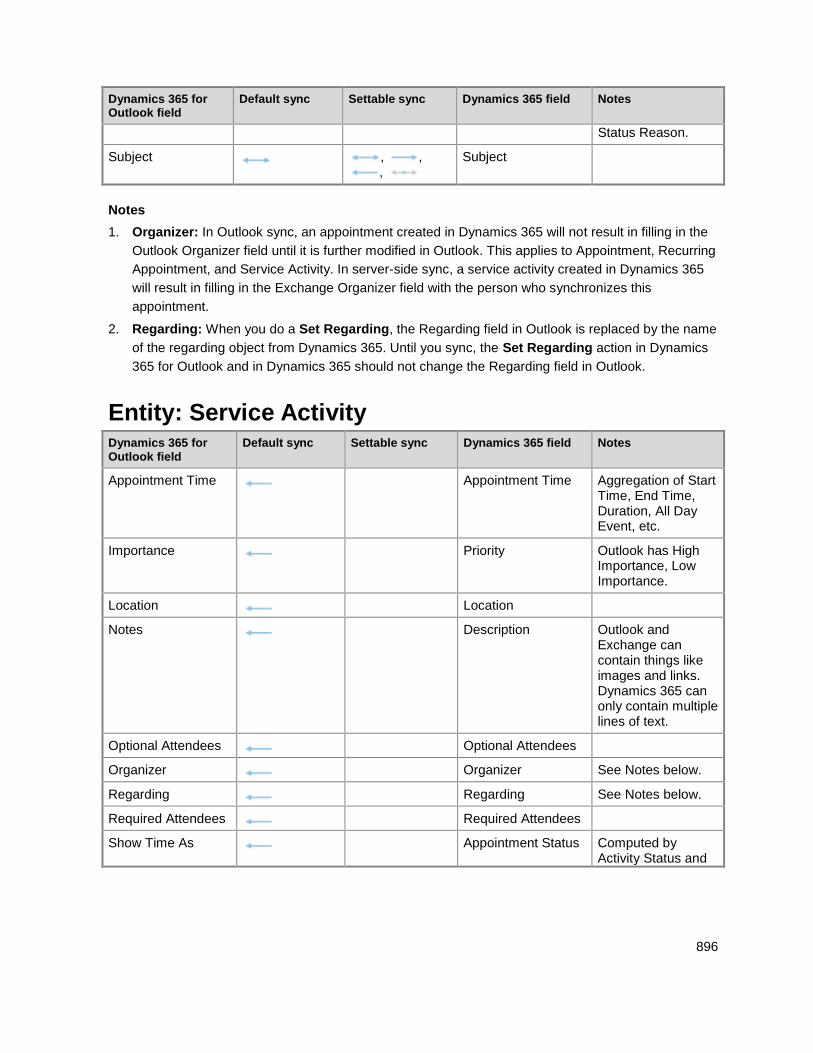
896
Dynamics 365 for Outlook field
Default sync Settable sync Dynamics 365 field Notes
Status Reason.
Subject , , ,
Subject
Notes
1. Organizer: In Outlook sync, an appointment created in Dynamics 365 will not result in filling in the
Outlook Organizer field until it is further modified in Outlook. This applies to Appointment, Recurring
Appointment, and Service Activity. In server-side sync, a service activity created in Dynamics 365
will result in filling in the Exchange Organizer field with the person who synchronizes this
appointment.
2. Regarding: When you do a Set Regarding, the Regarding field in Outlook is replaced by the name
of the regarding object from Dynamics 365. Until you sync, the Set Regarding action in Dynamics
365 for Outlook and in Dynamics 365 should not change the Regarding field in Outlook.
Entity: Service Activity Dynamics 365 for Outlook field
Default sync Settable sync Dynamics 365 field Notes
Appointment Time Appointment Time Aggregation of Start Time, End Time, Duration, All Day Event, etc.
Importance Priority Outlook has High Importance, Low Importance.
Location Location
Notes Description Outlook and Exchange can contain things like images and links. Dynamics 365 can only contain multiple lines of text.
Optional Attendees Optional Attendees
Organizer Organizer See Notes below.
Regarding Regarding See Notes below.
Required Attendees Required Attendees
Show Time As Appointment Status Computed by Activity Status and
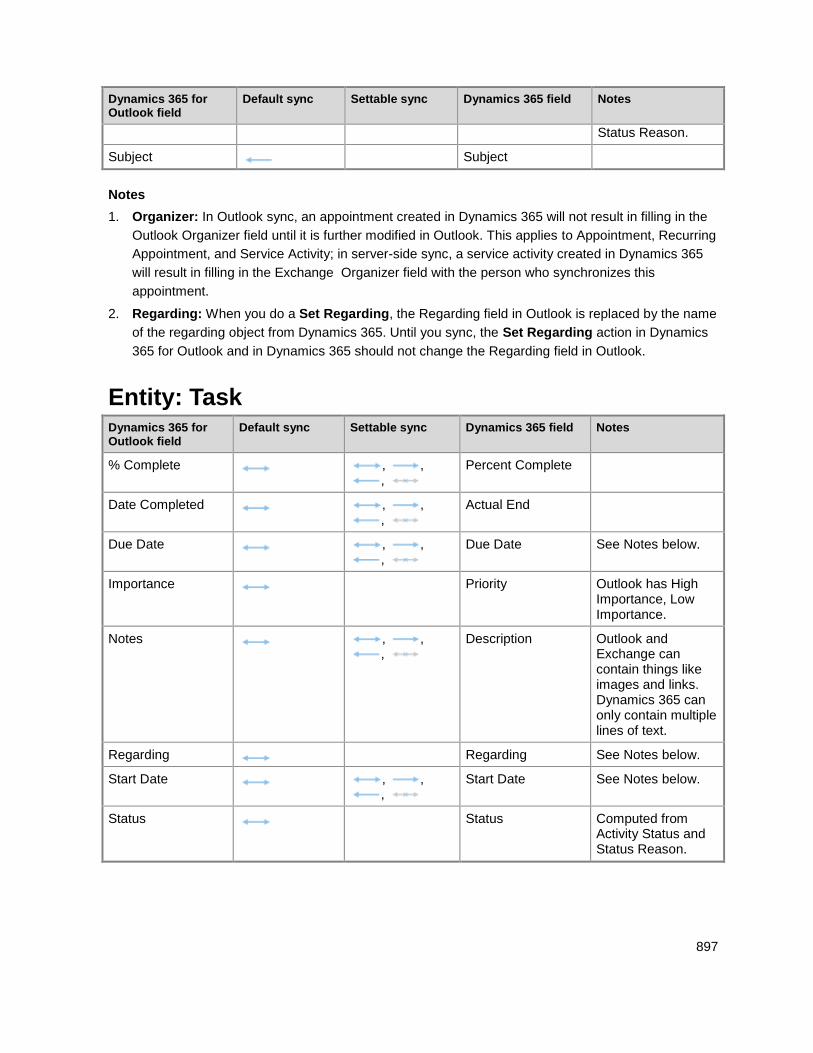
897
Dynamics 365 for Outlook field
Default sync Settable sync Dynamics 365 field Notes
Status Reason.
Subject Subject
Notes
1. Organizer: In Outlook sync, an appointment created in Dynamics 365 will not result in filling in the
Outlook Organizer field until it is further modified in Outlook. This applies to Appointment, Recurring
Appointment, and Service Activity; in server-side sync, a service activity created in Dynamics 365
will result in filling in the Exchange Organizer field with the person who synchronizes this
appointment.
2. Regarding: When you do a Set Regarding, the Regarding field in Outlook is replaced by the name
of the regarding object from Dynamics 365. Until you sync, the Set Regarding action in Dynamics
365 for Outlook and in Dynamics 365 should not change the Regarding field in Outlook.
Entity: Task Dynamics 365 for Outlook field
Default sync Settable sync Dynamics 365 field Notes
% Complete , , ,
Percent Complete
Date Completed , , ,
Actual End
Due Date , , ,
Due Date See Notes below.
Importance Priority Outlook has High Importance, Low Importance.
Notes , , ,
Description Outlook and Exchange can contain things like images and links. Dynamics 365 can only contain multiple lines of text.
Regarding Regarding See Notes below.
Start Date , , ,
Start Date See Notes below.
Status Status Computed from Activity Status and Status Reason.
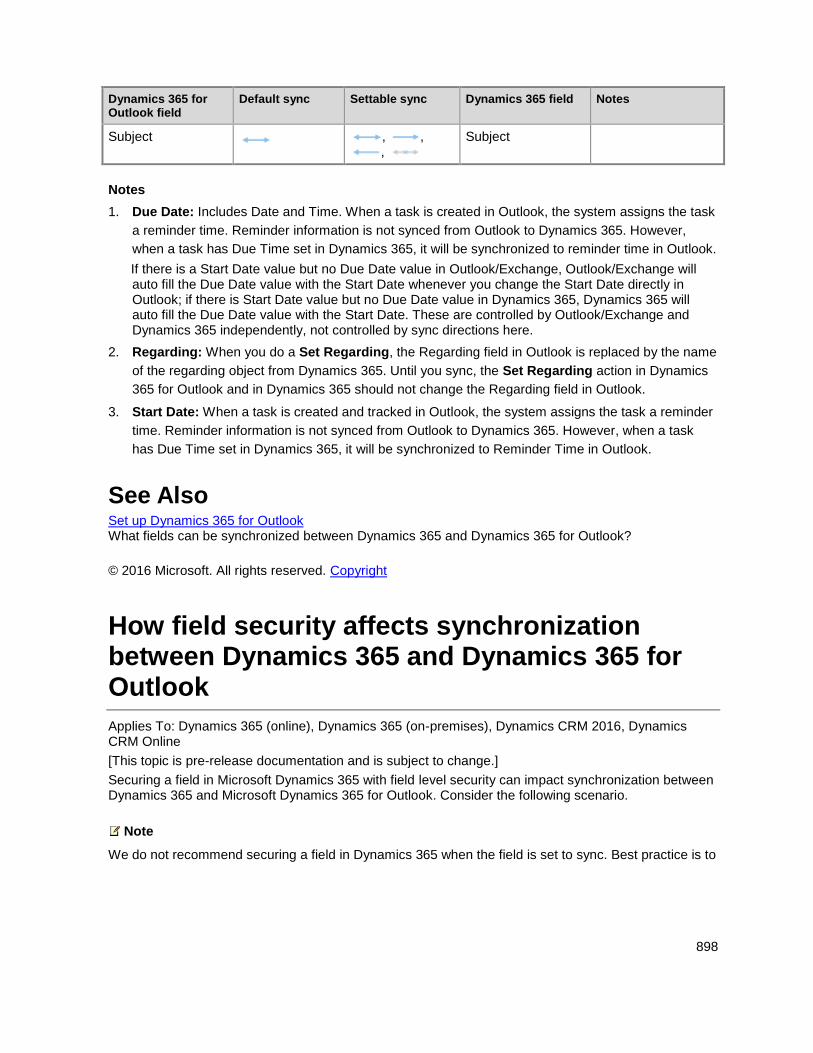
898
Dynamics 365 for Outlook field
Default sync Settable sync Dynamics 365 field Notes
Subject , , ,
Subject
Notes
1. Due Date: Includes Date and Time. When a task is created in Outlook, the system assigns the task
a reminder time. Reminder information is not synced from Outlook to Dynamics 365. However,
when a task has Due Time set in Dynamics 365, it will be synchronized to reminder time in Outlook.
If there is a Start Date value but no Due Date value in Outlook/Exchange, Outlook/Exchange will auto fill the Due Date value with the Start Date whenever you change the Start Date directly in Outlook; if there is Start Date value but no Due Date value in Dynamics 365, Dynamics 365 will auto fill the Due Date value with the Start Date. These are controlled by Outlook/Exchange and Dynamics 365 independently, not controlled by sync directions here.
2. Regarding: When you do a Set Regarding, the Regarding field in Outlook is replaced by the name
of the regarding object from Dynamics 365. Until you sync, the Set Regarding action in Dynamics
365 for Outlook and in Dynamics 365 should not change the Regarding field in Outlook.
3. Start Date: When a task is created and tracked in Outlook, the system assigns the task a reminder
time. Reminder information is not synced from Outlook to Dynamics 365. However, when a task
has Due Time set in Dynamics 365, it will be synchronized to Reminder Time in Outlook.
See Also Set up Dynamics 365 for Outlook What fields can be synchronized between Dynamics 365 and Dynamics 365 for Outlook?
© 2016 Microsoft. All rights reserved. Copyright
How field security affects synchronization between Dynamics 365 and Dynamics 365 for Outlook
Applies To: Dynamics 365 (online), Dynamics 365 (on-premises), Dynamics CRM 2016, Dynamics CRM Online
[This topic is pre-release documentation and is subject to change.]
Securing a field in Microsoft Dynamics 365 with field level security can impact synchronization between Dynamics 365 and Microsoft Dynamics 365 for Outlook. Consider the following scenario.
Note
We do not recommend securing a field in Dynamics 365 when the field is set to sync. Best practice is to
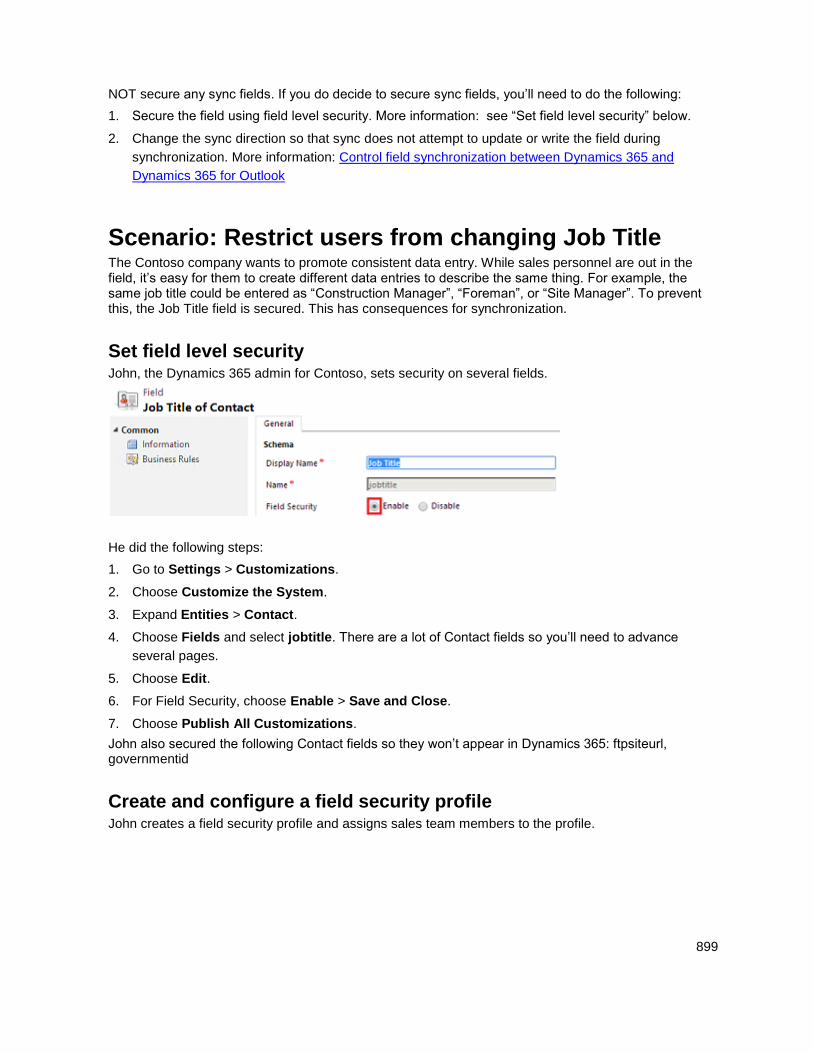
899
NOT secure any sync fields. If you do decide to secure sync fields, you’ll need to do the following:
1. Secure the field using field level security. More information: see “Set field level security” below.
2. Change the sync direction so that sync does not attempt to update or write the field during
synchronization. More information: Control field synchronization between Dynamics 365 and
Dynamics 365 for Outlook
Scenario: Restrict users from changing Job Title The Contoso company wants to promote consistent data entry. While sales personnel are out in the field, it’s easy for them to create different data entries to describe the same thing. For example, the same job title could be entered as “Construction Manager”, “Foreman”, or “Site Manager”. To prevent this, the Job Title field is secured. This has consequences for synchronization.
Set field level security John, the Dynamics 365 admin for Contoso, sets security on several fields.
He did the following steps:
1. Go to Settings > Customizations.
2. Choose Customize the System.
3. Expand Entities > Contact.
4. Choose Fields and select jobtitle. There are a lot of Contact fields so you’ll need to advance
several pages.
5. Choose Edit.
6. For Field Security, choose Enable > Save and Close.
7. Choose Publish All Customizations.
John also secured the following Contact fields so they won’t appear in Dynamics 365: ftpsiteurl, governmentid
Create and configure a field security profile John creates a field security profile and assigns sales team members to the profile.
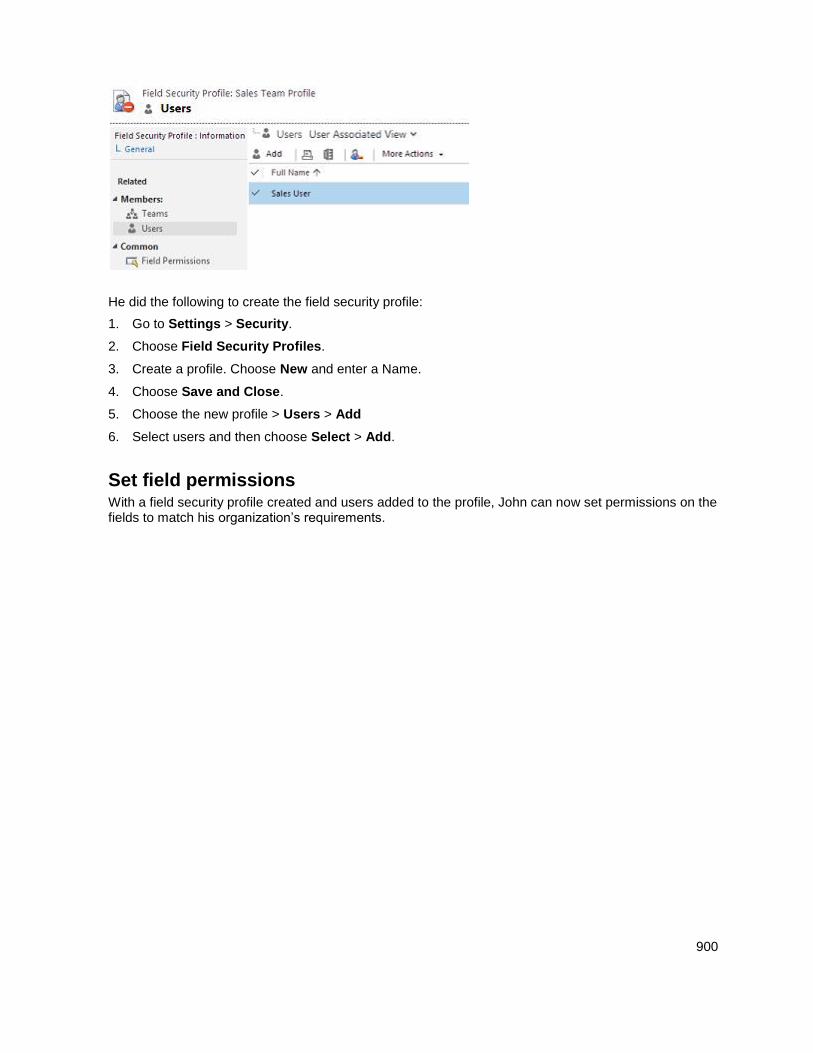
900
He did the following to create the field security profile:
1. Go to Settings > Security.
2. Choose Field Security Profiles.
3. Create a profile. Choose New and enter a Name.
4. Choose Save and Close.
5. Choose the new profile > Users > Add
6. Select users and then choose Select > Add.
Set field permissions With a field security profile created and users added to the profile, John can now set permissions on the fields to match his organization’s requirements.
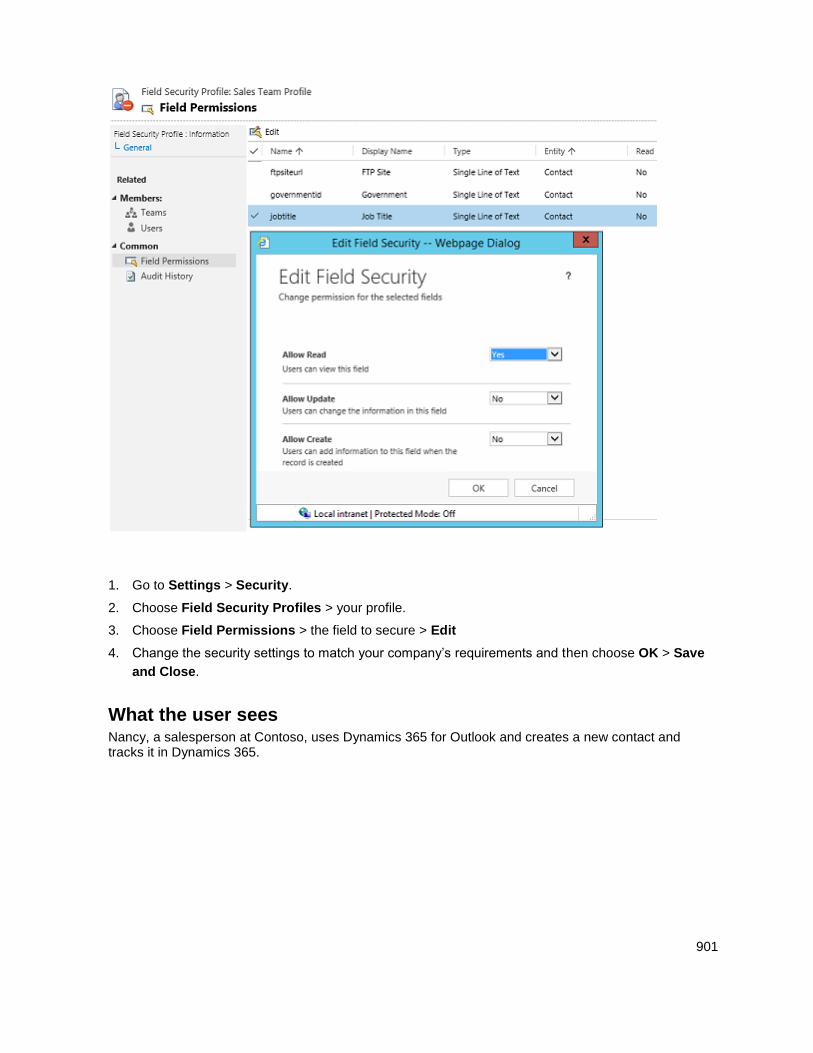
901
1. Go to Settings > Security.
2. Choose Field Security Profiles > your profile.
3. Choose Field Permissions > the field to secure > Edit
4. Change the security settings to match your company’s requirements and then choose OK > Save
and Close.
What the user sees Nancy, a salesperson at Contoso, uses Dynamics 365 for Outlook and creates a new contact and tracks it in Dynamics 365.
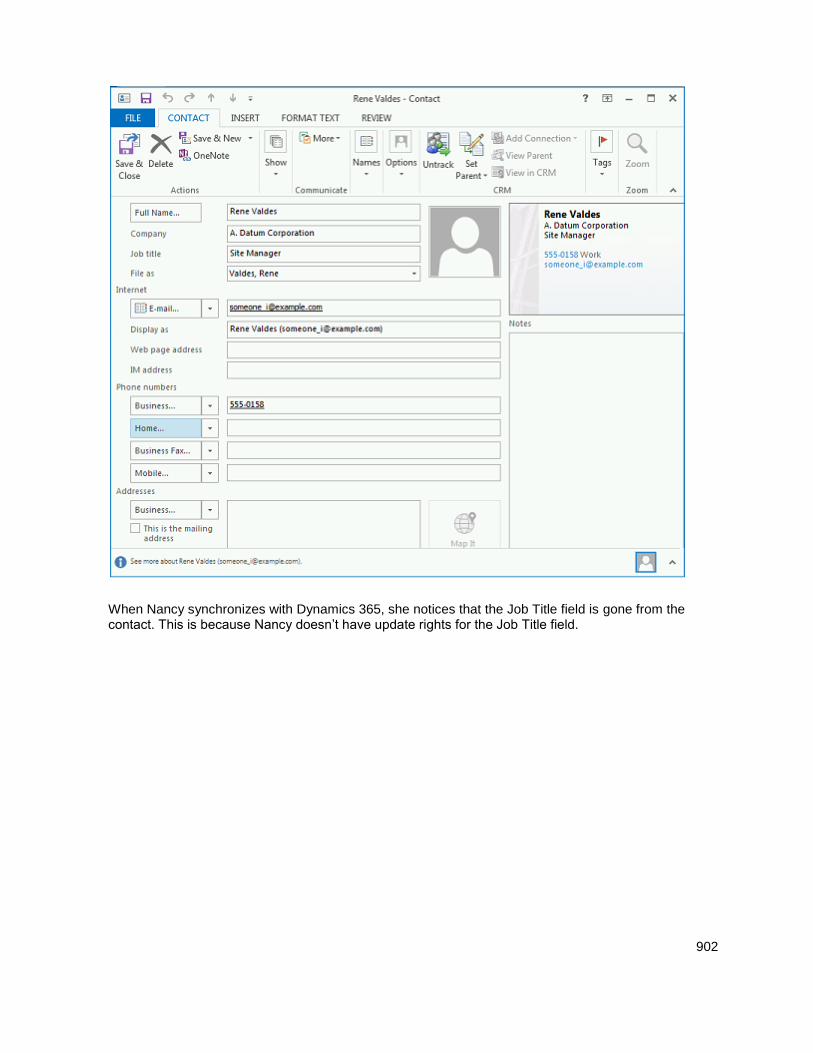
902
When Nancy synchronizes with Dynamics 365, she notices that the Job Title field is gone from the contact. This is because Nancy doesn’t have update rights for the Job Title field.
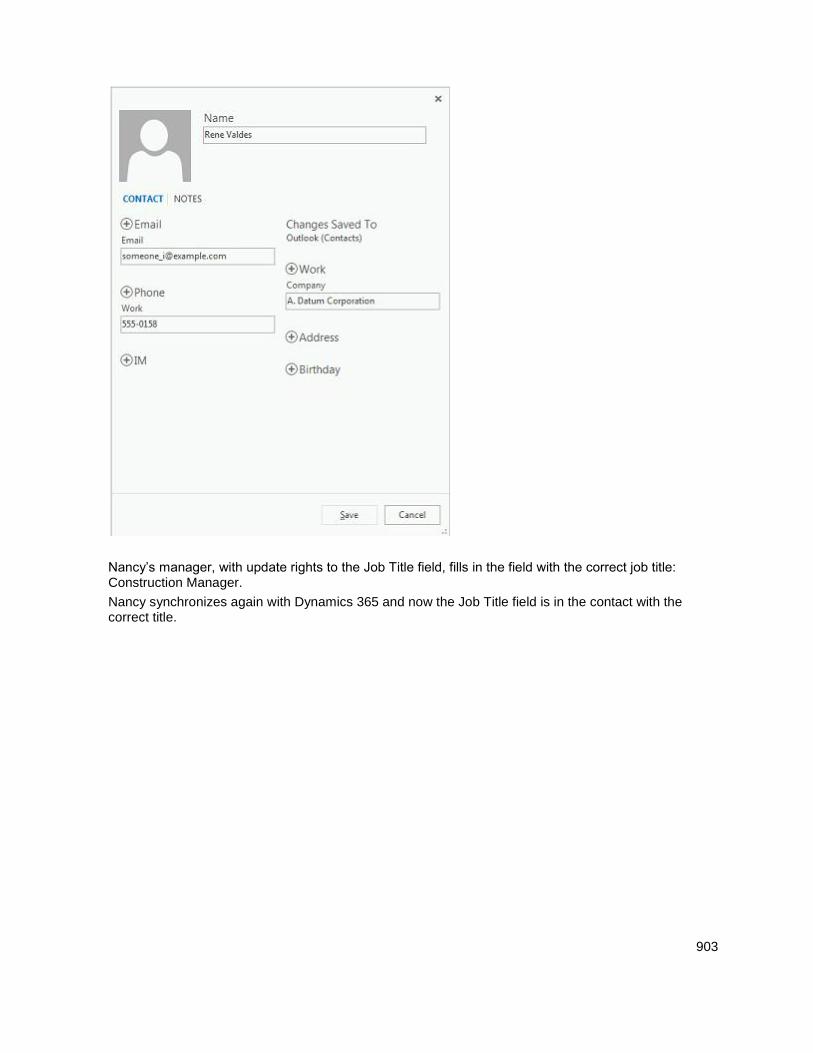
903
Nancy’s manager, with update rights to the Job Title field, fills in the field with the correct job title: Construction Manager.
Nancy synchronizes again with Dynamics 365 and now the Job Title field is in the contact with the correct title.
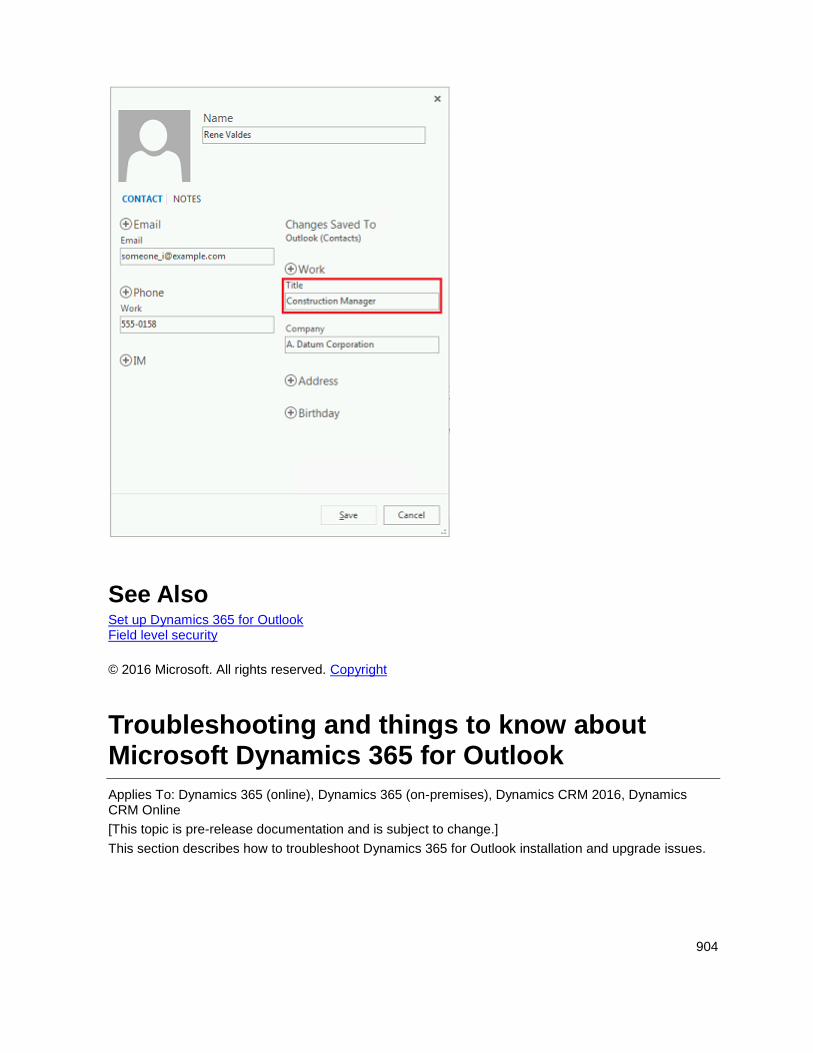
904
See Also Set up Dynamics 365 for Outlook Field level security
© 2016 Microsoft. All rights reserved. Copyright
Troubleshooting and things to know about Microsoft Dynamics 365 for Outlook
Applies To: Dynamics 365 (online), Dynamics 365 (on-premises), Dynamics CRM 2016, Dynamics CRM Online
[This topic is pre-release documentation and is subject to change.]
This section describes how to troubleshoot Dynamics 365 for Outlook installation and upgrade issues.
905
Tip
If you encounter an issue installing, connecting, or enabling Dynamics 365 for Outlook with your Dynamics 365 (online) organization, use the Microsoft Support and Recovery Assistant to diagnose and fix the issue. You’ll need to sign in to the diagnostics tool with your Dynamics 365 (online) credentials.
In This Topic Potential issues and resolutions
Microsoft Dynamics 365 (online) with Office 365
Log files
Event Viewer
Disable the Dynamics 365 for Outlook notification bar on the Web application
Potential issues and resolutions
Assigned tasks not updated in Outlook after updated in Dynamics 365 Consider the following scenario:
In Outlook, User 1 assigns Outlook task to User 2.
In Outlook, User 2 accepts and tracks the task.
In Dynamics 365, User 2 opens the task and makes a change such as changing the subject or
marking the task complete.
Result: for User 1, in Outlook, the task status remains unchanged.
To force a status change: User 2, in Outlook, can open the Outlook task and click Send Status Report to update User 1’s Outlook with the latest information.
Enabling the following settings in Outlook Task options (Home tab > New Items > Task > Assign Task) do not impact this issue:
Keep an updated copy of this task on my task list.
Send me a status report when this task is complete.
This is a known issue and is not supported.
Some Outlook add-ins can cause issues Some Outlook add-ins can cause issues like connection failure and slow program startup and might be incompatible with Dynamics 365 for Outlook. Try disabling suspect add-ins to see if that resolves your issue.
906
Problem when using a proxy auto-config (PAC) file Dynamics 365 for Outlook might have authentication and connection issues when using a proxy PAC file configured in workstation browsers. For resolution, see Microsoft Dynamics CRM for Outlook client crashes when using a Proxy PAC file.
Can’t add a related record type when offline If you’re offline, you can’t add a related record type by using the Add button (+). Add the related record type while you’re online, and then go offline.
Inserted picture replaced by text after sync Inserting a picture from a file into an appointment is not supported.
Some fields synchronize data when an activity is created despite synchronization settings When an activity is created, such as a task, some fields may synchronize even if field synchronization is set to not sync. This is a known issue as some fields cannot have an empty value.
Users in a different domain cannot install Dynamics 365 for Outlook If the user domain account is in a domain different from the Dynamics 365 organization, the user will receive an error message (see below) when installing Dynamics 365 for Outlook. This is not a supported scenario.
Error message
There is a problem communicating with the Microsoft Dynamics 365 server. The server might be unavailable. Try again later. If the problem persists, contact your system administrator.
The caller was not authenticated by the service.
Synchronization support for Cached Exchange Mode Outlook synchronization is not supported if Cached Exchange Mode is turned off in Outlook. See: Turn on Cached Exchange Mode
Server-side synchronization is supported if Cached Exchange Mode is turned off in Outlook. See: Turn on Cached Exchange Mode
Automatic email tagging off by default This setting is in the Microsoft Dynamics 365 Diagnostics tool included with Dynamics 365 for Outlook. Click Start > All Programs > Microsoft Dynamics 365 > Diagnostics > Synchronization Troubleshooting tab.
Automatic email tagging is set to be off by default. If you enable this setting but reinstall Dynamics 365 for Outlook, automatic email tagging will be off.
907
Service Appointments and Activities don’t synchronize from Outlook to Dynamics 365 Changes made to Service Appointments and Activities in Dynamics 365 will update in Dynamics 365 for Outlook when you synchronize, but the reverse is not true. When you make changes to Service Appointments or Activities in Dynamics 365 for Outlook, the changes are not synchronized to Dynamics 365.
Different time value in date and time fields with User Local or Time-Zone Independent behavior If you have system out-of-the box or custom date and time fields with User Local or Time-Zone Independent behavior, the date/time information for years before 1900 won’t display as entered when viewing in the list of records and reading pane in Dynamics 365 for Outlook. The date and time values are correct in the database and will appear as expected in the Dynamics 365 web application.
Microsoft Dynamics 365 (online) with Office 365 When you try to connect to an organization that is part of your Microsoft Office 365 subscription by using the Configuration Wizard or Microsoft Dynamics 365 for Outlook, you cannot connect. To resolve this issue, verify, and if necessary, correct the following:
Make sure that you can connect to the organization by using Internet Explorer. There may be
incomplete information with your Microsoft Online Services account that is preventing you from
authenticating with the service. The URL for the organization is provided in the invitation email
message you should have received from Microsoft Online Services, and is typically in the form of
https://OrganizationName.onmicrosoft.com or https://OrganizationName.crm.dynamics.com. If you
are not certain of the URL, contact your system administrator
Log files When you install and configure Dynamics 365 for Outlook, the system creates log files that you can use for troubleshooting.
By default, the location of the Setup log files (including crmsetup.log and crm60clientmsi.log files), where User is the account of the user who ran Setup, is as follows:
Windows 10, Windows 8, and Windows 7:
SystemDrive:\Users\<User>\AppData\Local\Microsoft\MSCRM\Logs
By default, the location of the configuration log files (including crm50clientconfig.log), where User is the account of the user who ran Configuration Wizard, is as follows:
Windows 10, Windows 8, and Windows 7:
SystemDrive:\Users\<User>\AppData\Local\Microsoft\MSCRM\Logs
Important
By default, the AppData folder is hidden. To view the AppData folder, use Folder Options in Control Panel to enable viewing for hidden files and folders.
908
Tip
You can use the shortcut path to access the AppData folder, %LocalAppData%\Microsoft\MSCRM\Logs.
Event Viewer To access event logging information for Dynamics 365 for Outlook, open Event Viewer from the client computer where Dynamics 365 for Outlook is installed, and then view the entries in the Application log.
To view the Application log in Event Viewer:
1. On the computer where Dynamics 365 for Outlook is installed, start Event Viewer.
2. In the navigation pane, expand Windows Logs and then click Application.
3. To make it easier to locate events that apply to Dynamics 365 for Outlook, use Create Custom
View or Filter Current Log and then select the following Event sources:
Event sources that begin with MSCRM (such as MSCRMAddin and MSCRMAddressBook)
MSSQL$Dynamics 365
Disable the Dynamics 365 for Outlook notification bar on the Web application By default, if a user does not have Dynamics 365 for Outlook installed and configured, the Microsoft Dynamics 365 web application displays a Get Dynamics 365 for Outlook button on the notification bar. This button provides a link for users to download and install software features that configure a local Microsoft SQL Server Express data store. If you do not want users to have this capability, you can remove the button.
Remove the Get Dynamics 365 for Outlook button from the Microsoft Dynamics 365 web application
1. With a security role that has read and write permissions (for example, the System Administrator
role), start the Microsoft Dynamics 365 web application.
2. Go to Settings > Administration.
3. Click System Settings.
4. Click the Outlook tab.
5. Set the value for Users see “Get Dynamics 365 for Outlook” option displayed in the message
bar to No.
6. Click OK to close System Settings.
909
See Also Planning and installing Dynamics 365 for Outlook for Microsoft Dynamics 365 and Dynamics 365 Online Blog: Microsoft Dynamics CRM for Outlook Configuration Diagnostic Troubleshooting and monitoring server-side synchronization
© 2016 Microsoft. All rights reserved. Copyright
Set incoming and outgoing email synchronization
Applies To: Dynamics 365 (online), Dynamics 365 (on-premises), Dynamics CRM 2016, Dynamics CRM Online
[This topic is pre-release documentation and is subject to change.]
You have several options for synchronizing email messages with Microsoft Dynamics 365. Use the following information to deploy the best option for your company.
Set the synchronization method You can set the default synchronization method applied to all newly created user mailboxes:
1. Go to Settings > Email Configuration
2. Click the Email Configuration Settings > Email tab.
You can set the synchronization method for individual mailboxes:
1. Go to Settings > Email Configuration
2. Click Mailboxes > select a mailbox.
For information on picking a synchronization method, see Integrate (synchronize) your email system with Microsoft Dynamics 365.
Incoming email messaging options The available incoming email configurations that you can use when a user or a queue receives Microsoft Dynamics 365 email messages are as follows:
None. Use this option for users or queues that do not use Microsoft Dynamics 365 to track received
email messages.
Microsoft Dynamics 365 for Outlook. This option is available for users and requires that
Microsoft Office Outlook be installed on the user's computer. This option does not require the Email
Router component and is not available for queues.
Server-Side Synchronization or Email Router. When you select this option, the server-side
synchronization or Email Router will process Microsoft Dynamics 365 email messages directly from
the user's or queue's inbox, without using a forward or a sink mailbox. Although this option does not
910
require a sink mailbox, it does make troubleshooting server-side synchronization or Email Router
issues more complex for larger user bases (10 or more users) because each incoming email
message is processed by the server-side synchronization or Email Router in every user's mailbox
instead of in a single dedicated mailbox.
Forward Mailbox. To use this option, you must install the Email Router. This option requires a sink
mailbox, which is a dedicated mailbox that collects email messages transferred from each Microsoft
Dynamics 365 user's mailbox by a server-side rule. Although this option does not require users to
run Outlook, it does require that the rule be deployed for each user. You use the Rule Deployment
Wizard to deploy rules to each Microsoft Dynamics 365 user mailbox.
Outgoing email messaging options The available outgoing email configurations that you can use when users or queues send Microsoft Dynamics 365 email messages are as follows:
None. Use this option for users or queues that do not use Microsoft Dynamics 365 to send email
messages.
Microsoft Dynamics 365 for Outlook. This option is available for users and requires that
Microsoft Office Outlook be installed on the user's computer. This option does not require the Email
Router component and is not available for queues.
Server-Side Synchronization or Email Router. This option delivers Microsoft Dynamics 365
email messages by using the server-side synchronization or Email Router component. The email
system must be SMTP-compliant. The server-side synchronization or Email Router can be installed
on the SMTP server or on a different computer that has a connection to the SMTP server.
See Also Integrate (synchronize) your email system with Microsoft Dynamics 365 Forward mailbox vs. individual mailboxes
© 2016 Microsoft. All rights reserved. Copyright
Monitor email processing errors
Applies To: Dynamics 365 (online), Dynamics 365 (on-premises), Dynamics CRM 2016, Dynamics CRM Online
[This topic is pre-release documentation and is subject to change.]
Microsoft Dynamics 365 generates alerts if errors occur while email is being processed. An error can be classified based on the nature of the error and on whether the error is for an email, a mailbox, or an email server profile.
The following table lists the distinction between permanent and transient errors.
911
Permanent Errors Transient Errors
These are of permanent nature and can occur when the transient errors aren’t fixed after a few attempts.
These are of temporary nature and may get fixed automatically after a few attempts.
When these errors occur, email processing for the affected mailboxes is stopped. These require a corrective action by the mailbox owner or a Dynamics 365 administrator.
These errors don’t necessarily require a corrective action by a Dynamics 365 user, but we recommend that you look at these.
The administrators and users are alerted on their alert walls to take action and start email processing.
The administrators and users are notified on the alerts wall about these errors but no action is required for these errors.
The following table will help you distinguish between email-level, mailbox-level, and email server profile-level errors and whether a corrective action is needed.
Email-level errors Mailbox-level errors Email server profile-level errors
These are errors specific to an email message.
These are error specific to a mailbox.
These errors may occur for one or more mailboxes.
These don’t have impact on the processing of other email.
The owner of the mailbox is notified on the alerts wall and the owner is required to take a corrective action.
The owner of the associated email server profile is notified on the alerts wall and the owner is required to take a corrective action.
The alerts for these are displayed in the alerts section of the email form.
The alert is also displayed in the respective mailbox form.
The owners of the mailbox that are affected are also notified on the alerts wall but no action is required by them.
View alerts The alerts are shown on the Alerts wall or the Alerts section in the mailbox or email server profile records. The following table shows how to view the alerts and the actions you can take on these alerts.
To Do this
View all alerts Go to Sales > Alerts.
To delete all alerts at once, click or tap the
Delete all alerts icon on the alerts wall.
To view just errors, warnings, or information,
click or tap Errors, Warnings, or Information
respectively.
If you are also synchronizing appointments, contacts, and tasks through server-side synchronization, you’ll see alerts for the following:
912
To Do this
When one or more duplicate records are found
in Microsoft Dynamics 365 when saving a
record from Exchange to Microsoft Dynamics
365.
When a scheduling conflict is found when
saving an appointment from Exchange to
Microsoft Dynamics 365 because a mailbox is
unavailable at the time.
When previously linked items are found for a
specific mailbox.
You’ll be prompted to take actions on the errors about the appointment, contacts, and tasks synchronization.
View alerts specific to mailbox 1. Go to Settings > Email Configuration.
2. Click Mailboxes.
3. Open a mailbox record, and on the left
navigation bar, under Common, click or tap
Alerts.
View alerts specific to an email server profile 1. Go to Settings > Email Configuration.
2. Click Email Server Profiles.
3. Open an email server profile record, and on
the left navigation bar, under Common, click
or tap Alerts.
Note
If you don’t wish to get alerts, you can disable them from the Help & Training: System Settings dialog box – Email tab by clearing the check boxes for alerts.
See Also Integrate (synchronize) your email system with Microsoft Dynamics 365 Set up server-side synchronization of email, appointments, contacts, and tasks
© 2016 Microsoft. All rights reserved. Copyright
913
Email message filtering and correlation
Applies To: Dynamics 365 (online), Dynamics 365 (on-premises), Dynamics CRM 2016, Dynamics CRM Online
[This topic is pre-release documentation and is subject to change.]
Server-side synchronization, Microsoft Dynamics 365 for Outlook, or the Email Router can automatically create email activities in Microsoft Dynamics 365, which are based on received email messages. This type of automation is known as email message tracking. Users can select a filtering option that determines what email messages will be tracked in Microsoft Dynamics 365. Filtering is set on the Email tab of the Set Personal Options dialog box in the Microsoft Dynamics 365 client applications. Users can set the following options:
All email messages. All email messages received by the user are tracked (will have activities
created).
Email messages in response to Dynamics 365 email. Only replies to email messages that have
already been tracked will be saved as email activities. This option uses What is smart matching?, a
correlation method that uses the existing properties contained in the email to relate email
messages to activities.
Email messages from Dynamics 365 Leads, Contacts, and Accounts. Only email messages
sent from leads, contacts, and accounts in the Microsoft Dynamics 365 database are saved as
activities.
Email messages from Microsoft Dynamics 365 records that are email enabled. Email
messages are tracked from any record type that contains an email address, including customized
record types (entities).
By default, the Email messages in response to Dynamics 365 email option is enabled. Correlation occurs after an email message is filtered. System administrators can turn off all message tracking for a particular user by setting the Email Access Type - Incoming value to None on the General tab on the User form.
Email correlation is set on the Email tab of the System Settings page and can be enabled or disabled for the entire Microsoft Dynamics 365 organization. Microsoft Dynamics 365 uses two kinds of correlation, tracking tokens and smart matching. By default, both correlation types are enabled.
Important
Tracking tokens are the only supported correlation method that can be used when you use Dynamics 365 for Outlook connected to an SMTP server and send email to a non-Exchange recipient. In this situation, if tracking tokens are not enabled, then correlation events, such as the automatically creating records based on the regarding object, may not work.
How Microsoft Dynamics 365 uses tracking tokens Tracking tokens increase the probability for email identification and matching. You can use the tracking token feature to improve email message tracking. A tracking token is an alphanumeric string generated by Microsoft Dynamics 365 and appended to the end of an email subject line. It matches email activities with email messages.

914
Tracking tokens add an additional correlation component to smart matching. When Microsoft Dynamics 365 generates an outgoing email activity, a resulting email response arriving in the Microsoft Dynamics 365 system is then correlated to the originating activity.
By default, the tracking token feature is turned on.
Tracking token structure By default, Microsoft Dynamics 365 uses the following token structure, that consists of a 4 character prefix and a 7 digit identifier.
The following table lists tracking token parts and descriptions.
Part Description
Prefix Configurable from 1-20 characters. The default value is Dynamics 365:. The prefix can be unique for each organization or Microsoft Dynamics 365 (online) instance. For example, in a multi-tenant deployment of Microsoft Dynamics 365, we recommend that each organization configure and use a unique prefix.
Deployment base tracking number Configurable from 0-2,147,483,647. Default value is 0. Can be used as an identifier for a specific instance, organization, or deployment of Microsoft Dynamics 365.
User number digit range Configurable from 1-9. The default range is three (3) digits. This value determines how many digits to use when Microsoft Dynamics 365 generates the numeric identifier for the Microsoft Dynamics 365 user who generated the email activity.
Incremental message counter digit range Configurable from 1-9. Default range is three (3) digits. This value determines how many digits to use when Microsoft Dynamics 365 generates the numeric identifier for the email activity (not the individual messages that the activity contains). If you use the default value to generate a token with a three-digit number, it will increment the number

915
Part Description
through 999, and then restart the number at 000. You can use a larger order of digits to reduce the possibility of assigning duplicate tokens to active email threads.
Although we don’t recommend it because it can significantly reduce the probability for accurate email activity to email message correlation, you can turn tacking tokens off. To enable, disable, or configure tracking tokens, do the following:
1. On the nav bar, choose Microsoft Dynamics 365 > Settings. Then click or tap Administration >
System Settings.
2. Click or tap the Email tab.
3. In the Configure email correlation area you can disable, enable, or change the default tracking
token structure.
What is smart matching? When an incoming email message is processed by the Email Router, the system extracts information associated with the email message subject, sender address, and recipients’ addresses that link the email activity to other Microsoft Dynamics 365 records. This correlation process, also known as smart matching, uses the following criteria to match received email message information to email activities:
Subject matching. Prefixes, such as RE: or Re:, and letter case are ignored. For example, email
message subjects with Re: hello and Hello would be considered a match.
Sender and recipient matching. The system calculates the number of exact sender and recipient
email addresses in common.
When the matching process is complete, the system selects the owner and the object of the incoming email message.
By default, smart matching is turned on.
Note
You can disable, enable, and tune smart-matching settings in the Help & Training: System Settings dialog box – Email tab.
See Also Integrate (synchronize) your email system with Microsoft Dynamics 365 Forward mailbox vs. individual mailboxes
© 2016 Microsoft. All rights reserved. Copyright
916
Forward mailbox vs. individual mailboxes
Applies To: Dynamics 365 (online), Dynamics 365 (on-premises), Dynamics CRM 2016, Dynamics CRM Online
[This topic is pre-release documentation and is subject to change.]
You can use mailbox monitoring to poll one or more mailboxes for incoming email messages, and then determine what actions Microsoft Dynamics 365 will take based on the email message, such as create or update records in the system. You can configure server-side synchronization or the Email Router to monitor either of the following:
A forward mailbox. This is a single, central mailbox.
The mailbox for each user or queue.
If you administer an organization that has to monitor a large number of mailboxes, you should consider using a forward mailbox to reduce the administrative effort. Monitoring many mailboxes can sometimes require maintaining access credentials in many incoming configuration profiles.
By using a forward mailbox, you shift the administrative effort to the task of deploying a server-side forwarding rule to each user mailbox. The forwarding rule forwards all incoming email messages as attachments to the centralized forward mailbox. For Microsoft Exchange Server only, you can use the Rule Deployment Wizard (installed with the Microsoft Dynamics CRM Email Router) to deploy forwarding rules. This can significantly reduce administration and maintenance requirements because the Rule Deployment Wizard can deploy forwarding rules to multiple Microsoft Dynamics 365 users at the same time.
Important
To use a forward mailbox with a Microsoft Dynamics 365 deployment that interfaces with a POP3-
compliant email system, the email system must be able to forward email messages as attachments.
For POP3 e-mail servers and Exchange Online, you cannot use the Rule Deployment Wizard.
Instead, you must create the rules manually. For instructions, see Bookmark link
'BKMK_DeployInboxRules' is broken in topic '{"project_id":"d1ee8af7-0e8f-4e94-9793-
0d06bbfa9b16","entity_id":"c578a81c-1b30-4ff3-b392-
6ff1b78ce6e0","entity_type":"Article","locale":"en-US"}'. Rebuilding the topic
'{"project_id":"d1ee8af7-0e8f-4e94-9793-0d06bbfa9b16","entity_id":"c578a81c-1b30-4ff3-b392-
6ff1b78ce6e0","entity_type":"Article","locale":"en-US"}' may solve the problem..
You can configure users and queues in different ways within the same Microsoft Dynamics 365 deployment. For example, you may want to configure some user or queue mailboxes to be monitored directly on one email server, and configure others to use a forward mailbox on a different email server.
Monitor a forward mailbox When you use forward mailbox monitoring, incoming email messages are processed by Microsoft Exchange Server or the POP3 server and Microsoft Dynamics 365 in the following sequence:
1. An email message is received by a Microsoft Dynamics 365 user or queue mailbox, on either the
Exchange Server or the POP3 server.
917
2. A rule in the user's mailbox sends a copy of the message, as an attachment, to the forward
mailbox.
3. Microsoft Dynamics 365 (by using server-side synchronization or Email Router) retrieves the
message from the forward mailbox and creates the appropriate records.
See Also Integrate (synchronize) your email system with Microsoft Dynamics 365
© 2016 Microsoft. All rights reserved. Copyright
Recover from Exchange Server failure
Applies To: Dynamics 365 (online), Dynamics 365 (on-premises), Dynamics CRM 2016, Dynamics CRM Online
[This topic is pre-release documentation and is subject to change.]
The process to restore a Microsoft Exchange Server computer that is used by Microsoft Dynamics 365 depends on how that instance of Exchange Server is being used. The only time Microsoft Dynamics 365-related data exists on Exchange Server occurs when you use a forward mailbox with the Microsoft Dynamics CRM Email Router or server-side synchronization. Microsoft Dynamics 365 doesn’t directly use Exchange Server mailboxes.
Restore Exchange Server in a Microsoft Dynamics 365 environment 1. Restore Exchange Server.
2. If the Email Router was installed on the computer that is running Exchange Server (not
recommended), reinstall the Email Router.
3. Restore the Microsoft.Crm.Tools.EmailAgent.xml file. By default, this file is located in the
C:\Program Files\Microsoft Dynamics 365 Email\Service folder on the computer where the Email
Router is installed. If this file isn’t available, you must reconfigure the profiles, settings, users,
queue, and forward-mailbox information by running the Email Router Configuration Manager.
For more information about Microsoft Exchange Server 2013 backup and recovery, see Backup, restore, and disaster recovery.
For more information about Microsoft Exchange Server 2010 backup and recovery, see Understanding Backup, Restore and Disaster Recovery.
See Also Integrate (synchronize) your email system with Microsoft Dynamics 365
918
© 2016 Microsoft. All rights reserved. Copyright
Extend Dynamics 365 with integration and solutions
Applies To: Dynamics 365 (online), Dynamics 365 (on-premises), Dynamics CRM 2016, Dynamics CRM Online
[This topic is pre-release documentation and is subject to change.]
Extend Microsoft Dynamics 365 with a rich set of interoperability and connectivity features.
In This Section Manage your documents using SharePoint
Skype for Business and Skype integration with Microsoft Dynamics 365
Set up knowledge management in Microsoft Dynamics 365
Connect to Microsoft Social Engagement
Connect Microsoft Dynamics 365 to Yammer
Control social data
Manage Bing Maps for your organization
Deploy packages using Dynamics 365 Package Deployer and Windows PowerShell
Use Power BI with Microsoft Dynamics 365
Install or remove a preferred solution
See Also Administering Dynamics 365
© 2016 Microsoft. All rights reserved. Copyright
Manage your documents using SharePoint
Applies To: Dynamics 365 (online), Dynamics 365 (on-premises), Dynamics CRM 2016, Dynamics CRM Online
[This topic is pre-release documentation and is subject to change.]
With Microsoft Dynamics 365, you can set up folders to save and manage your documents, specify permissions for managing tasks, and ensure that the SharePoint site URLs are correct.
In This Section SharePoint Document Management software requirements for Microsoft Dynamics 365
919
Important considerations for server-based SharePoint integration
Set up SharePoint integration with Microsoft Dynamics 365
Permissions required for document management tasks
Validate and fix SharePoint site URLs
Connect to OneDrive for Business
See Also Administering Dynamics 365
© 2016 Microsoft. All rights reserved. Copyright
SharePoint Document Management software requirements for Microsoft Dynamics 365
Applies To: Dynamics 365 (online), Dynamics 365 (on-premises), Dynamics CRM 2016, Dynamics CRM Online
[This topic is pre-release documentation and is subject to change.]
If you want to use Microsoft SharePoint document management functionality with Microsoft Dynamics 365 (online) or Dynamics 365 (on-premises), you must meet the requirements listed in this topic.
In This Topic Use document management in Microsoft Dynamics 365 (online)
Use document management in Microsoft Dynamics 365 (on-premises)
Server-based SharePoint integration
Microsoft Dynamics CRM List Component for Microsoft SharePoint
Use document management in Microsoft Dynamics 365 (online) If you are using server-based integration with SharePoint, you can use Microsoft SharePoint Online or Microsoft SharePoint 2013 SP1 on-premises (or a later version).
If you are using the Microsoft Dynamics CRM 2016 List Component for Microsoft SharePoint, one of the following versions of Microsoft SharePoint must be available:
Microsoft SharePoint 2013 or Microsoft SharePoint 2013 SP1
Microsoft SharePoint 2010 SP1 or SP2
Microsoft SharePoint Online
A SharePoint site collection. You also need to have at least one site collection configured and available for Microsoft Dynamics 365.
920
Either Server-based SharePoint integration (recommended) or Microsoft Dynamics CRM List Component must be enabled.
The list component, which is a SharePoint solution, is not required if you use server-based SharePoint integration. Although the Microsoft Dynamics CRM List Component is the default document management configuration option, we recommend you enable server-based SharePoint integration. More information: Server-based SharePoint integration
Important
The document management feature requires that Microsoft Dynamics 365 (online) and SharePoint Online subscriptions be under the same tenant.
SharePoint Foundation versions aren’t compatible with Microsoft Dynamics 365 document management.
Users who access SharePoint from Dynamics 365 must have appropriate permissions on the SharePoint site collection where the document management components are installed. For more information about how to grant membership on a site collection, see the SharePoint Help.
Use document management in Microsoft Dynamics 365 (on-premises) If you are using server-based integration with SharePoint, you can use Microsoft SharePoint Online or Microsoft SharePoint 2013 SP1 on-premises (or a later version).
If you are using the Microsoft Dynamics CRM 2016 List Component for Microsoft SharePoint, one of the following versions of Microsoft SharePoint must be available:
Microsoft SharePoint 2013 or Microsoft SharePoint 2013 SP1
Microsoft SharePoint 2010 SP1 or SP2
Microsoft SharePoint Online
A SharePoint site collection. You also need at least one site collection configured and available for Microsoft Dynamics 365.
Either Server-based SharePoint integration (recommended) or Microsoft Dynamics CRM List Component, must be enabled.
The Microsoft Dynamics CRM List Component is a SharePoint solution. you must download and install. More information: Microsoft Dynamics CRM List Component for Microsoft SharePoint
Important
SharePoint Foundation versions aren’t supported for use with Microsoft Dynamics 365 document management.
Users who access SharePoint from Dynamics 365 must have appropriate permissions on the SharePoint site collection where the document management components are installed. For more information about how to grant membership on a site collection, see the SharePoint Help.
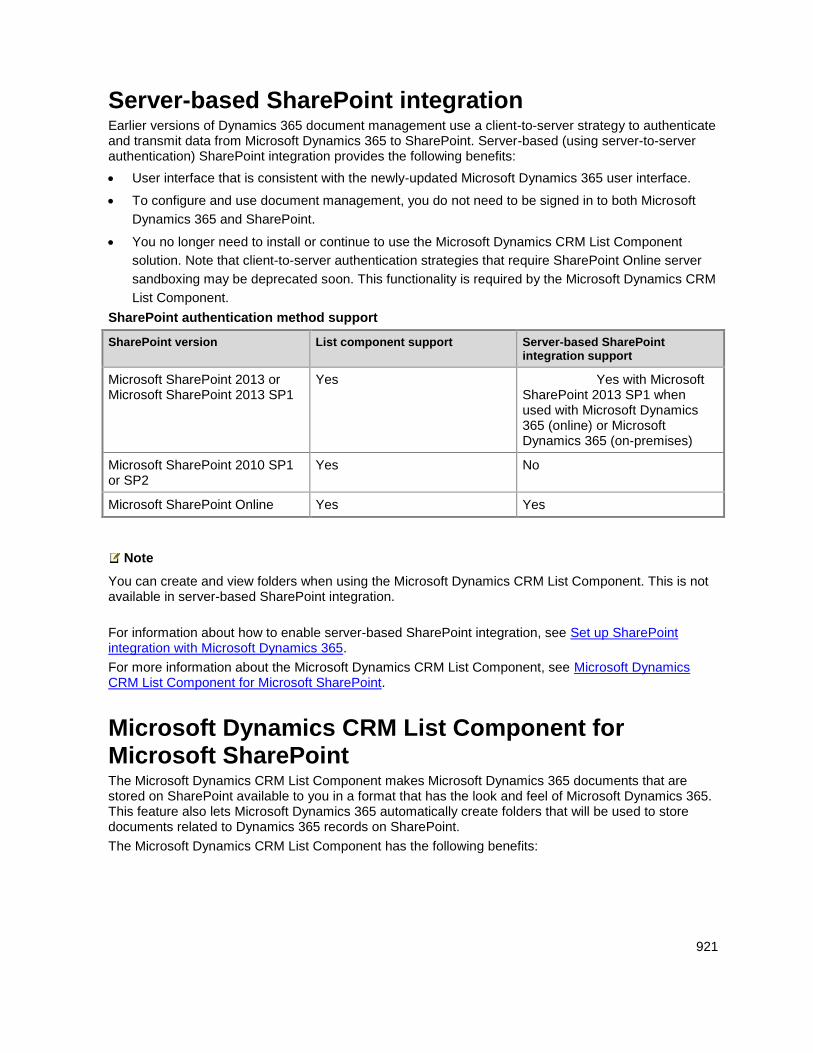
921
Server-based SharePoint integration Earlier versions of Dynamics 365 document management use a client-to-server strategy to authenticate and transmit data from Microsoft Dynamics 365 to SharePoint. Server-based (using server-to-server authentication) SharePoint integration provides the following benefits:
User interface that is consistent with the newly-updated Microsoft Dynamics 365 user interface.
To configure and use document management, you do not need to be signed in to both Microsoft
Dynamics 365 and SharePoint.
You no longer need to install or continue to use the Microsoft Dynamics CRM List Component
solution. Note that client-to-server authentication strategies that require SharePoint Online server
sandboxing may be deprecated soon. This functionality is required by the Microsoft Dynamics CRM
List Component.
SharePoint authentication method support
SharePoint version List component support Server-based SharePoint integration support
Microsoft SharePoint 2013 or Microsoft SharePoint 2013 SP1
Yes Yes with Microsoft SharePoint 2013 SP1 when used with Microsoft Dynamics 365 (online) or Microsoft Dynamics 365 (on-premises)
Microsoft SharePoint 2010 SP1 or SP2
Yes No
Microsoft SharePoint Online Yes Yes
Note
You can create and view folders when using the Microsoft Dynamics CRM List Component. This is not available in server-based SharePoint integration.
For information about how to enable server-based SharePoint integration, see Set up SharePoint integration with Microsoft Dynamics 365.
For more information about the Microsoft Dynamics CRM List Component, see Microsoft Dynamics CRM List Component for Microsoft SharePoint.
Microsoft Dynamics CRM List Component for Microsoft SharePoint The Microsoft Dynamics CRM List Component makes Microsoft Dynamics 365 documents that are stored on SharePoint available to you in a format that has the look and feel of Microsoft Dynamics 365. This feature also lets Microsoft Dynamics 365 automatically create folders that will be used to store documents related to Dynamics 365 records on SharePoint.
The Microsoft Dynamics CRM List Component has the following benefits:
922
Users can create and view folders when using document management within Microsoft Dynamics
365.
Users can create custom content types such as a Sales Contract content type.
Important
Notice that the Microsoft Dynamics CRM List Component isn’t required when you use server-based
integration with SharePoint. More information: Server-based SharePoint integration
Cient-to-server authentication strategies that require SharePoint server sandboxing, like those used
with the Microsoft Dynamics CRM List Component, may be deprecated soon.
There are two versions of the Microsoft Dynamics CRM List Component:
Microsoft Dynamics CRM 2016 List Component for Microsoft SharePoint Server 2010.
This version doesn’t work with SharePoint 2013.
Microsoft Dynamics CRM 2016 List Component for Microsoft SharePoint Server 2013.
This version doesn’t work with SharePoint 2010.
See Also Download: Microsoft Dynamics CRM 2016 List Component for Microsoft SharePoint Server 2013 or Microsoft SharePoint Server 2010 Manage your documents using SharePoint Set up and manage phones and tablets
© 2016 Microsoft. All rights reserved. Copyright
Important considerations for server-based SharePoint integration
Applies To: Dynamics 365 (online), Dynamics 365 (on-premises), Dynamics CRM 2016, Dynamics CRM Online
[This topic is pre-release documentation and is subject to change.]
Before you move to server-based SharePoint integration, review the following table to see some of the differences you’ll experience between client-based versus server-based SharePoint integration.
923
Area Client-based SharePoint integration
Server-based SharePoint integration
For those moving to Server-based SharePointintegration
Sign in Must sign in to both Microsoft Dynamics 365 and SharePoint to be able to view the document grid.
Only need to sign in to Dynamics 365.
List component
Must download list component and upload directly to SharePoint site before connecting site to Dynamics 365.
No list component required.
Support lifecycle
This approach relies on the sandboxed solutions functionality on SharePoint. SharePoint plans to deprecate this functionality. If the
This approach relies on server-to-server authentication and won’t be affected by the deprecation of the sandboxed solutions functionality in SharePoi
More information: Deprecation of Custom Code in Sandboxed Solutions
924
Area Client-based SharePoint integration
Server-based SharePoint integration
For those moving to Server-based SharePointintegration
sandboxed functionality isn’t available for a SharePoint site, this integration won’t work.
nt.
SharePoint commands
Includes:
Alert
Me
Down
load
a
Copy
Copy
Short
cut
Send
Short
cut
View
Prop
erties
Versi
on
Histo
ry
Does not include the SharePoint commands listed in the client-based integration column.
The client-based actions can be accessed directly in SharePoint with server-based integration. Select Open SharePoint to view the document location directly in SharePoint and access the actions.
Custom content types
Can create new custom content types.
Can’t create new custom content types.
Previously created custom content types can still be viewed and edited but to create a new custom content type you’ll need to create it directly in SharePoint using Open SharePoint.
925
Area Client-based SharePoint integration
Server-based SharePoint integration
For those moving to Server-based SharePointintegration
Absolute URLs
Supported
Unsupported
Users moving from the client-based approach to the server-based approach need to convert their absolute URLs to relative URLs. This will only work if the absolute URL provided is in a SharePoint site valid for server-based SharePoint integration.
Folder navigation
Users can create SharePoint folders while in Dynamics 365. Folders are displayed in a grid that users can navigate through.
Users can’t create folders in Dynamics 365 and the folders aren’t displayed in Dynamics 365.
All documents under subfolders are displayed in the Dynamics 365 grid. Relative URLs are displayed to show users where the document is located relative to the parent folder. SharePoint document views can be customized so users see only documents in a specific folder or subfolder.
More information: "Validation Error" when you try to configure server-based SharePoint integration for Microsoft Dynamics CRM Online and SharePoint Online
Online vs. on-premises support
Can connect:
Dyna
mics
365
(onlin
e)
with
Shar
ePoin
t
Onlin
e
Dyna
mics
365
(onlin
e)
with
Can connect:
Dyna
mics
365
(onlin
e)
with
Shar
ePoin
t
Onlin
e if
the
Shar
ePoin
t site
is
under
926
Area Client-based SharePoint integration
Server-based SharePoint integration
For those moving to Server-based SharePointintegration
Shar
ePoin
t
Serv
er
(on-
premi
ses)
Dyna
mics
365
on-
premi
ses
with
Shar
ePoin
t
Onlin
e
Dyna
mics
365
on-
premi
ses
with
Shar
ePoin
t
Serv
er
(on
premi
ses)
the
same
Offic
e 365
tenan
t as
Dyna
mics
365
(onlin
e).
Dyna
mics
365
(onlin
e)
with
Shar
ePoin
t on-
premi
ses.
Dyna
mics
365
on-
premi
ses
with
Shar
ePoin
t
Onlin
e
Dyna
mics
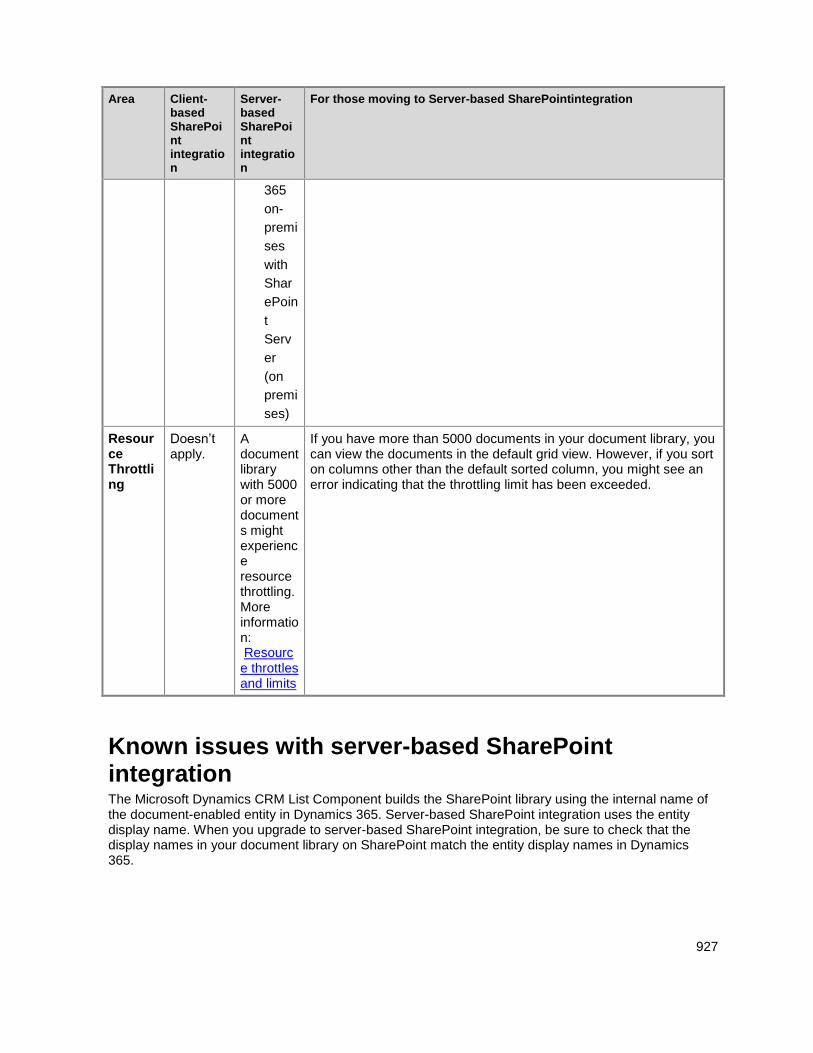
927
Area Client-based SharePoint integration
Server-based SharePoint integration
For those moving to Server-based SharePointintegration
365
on-
premi
ses
with
Shar
ePoin
t
Serv
er
(on
premi
ses)
Resource Throttling
Doesn’t apply.
A document library with 5000 or more documents might experience resource throttling. More information: Resource throttles and limits
If you have more than 5000 documents in your document library, you can view the documents in the default grid view. However, if you sort on columns other than the default sorted column, you might see an error indicating that the throttling limit has been exceeded.
Known issues with server-based SharePoint integration The Microsoft Dynamics CRM List Component builds the SharePoint library using the internal name of the document-enabled entity in Dynamics 365. Server-based SharePoint integration uses the entity display name. When you upgrade to server-based SharePoint integration, be sure to check that the display names in your document library on SharePoint match the entity display names in Dynamics 365.

928
These names should match.
More information: Error message when using the new server-based SharePoint integration for Microsoft Dynamics CRM Online and SharePoint Online: "List Does Not Support This Operation"
See Also Referenced topic '9f201f30-245a-458e-b15f-961a9d049ea7' is only available online. Set up SharePoint integration with Microsoft Dynamics 365 Permissions required for document management tasks
© 2016 Microsoft. All rights reserved. Copyright
Set up SharePoint integration with Microsoft Dynamics 365
Applies To: Dynamics 365 (online), Dynamics 365 (on-premises), Dynamics CRM 2016, Dynamics CRM Online
929
[This topic is pre-release documentation and is subject to change.]
With Microsoft Dynamics 365, you can use the document management capabilities of Microsoft SharePoint from within Dynamics 365. You can store and manage documents in the context of a Dynamics 365 record on a SharePoint Server, and leverage the SharePoint infrastructure to share, manage, and collaborate efficiently. Because the documents are stored on a SharePoint Server, non-Microsoft Dynamics 365 users can directly access the documents on the SharePoint Server, provided they have the appropriate permissions.
For document management functionality, you either enable server-based SharePoint integration (recommended) or install the Microsoft Dynamics CRM List Component, a SharePoint solution, on a site collection in SharePoint. Server-based SharePoint integration is recommended instead of the Microsoft Dynamics CRM List Component for the following reasons.
Users sign-in once and do not have to sign-in to both Microsoft Dynamics 365 and SharePoint.
With the list component, users must sign in to both.
The list component is a SharePoint sandboxed solution. Sandboxed solutions are being deprecated
and will no longer be available for both Microsoft SharePoint Online and later versions of
SharePoint on-premises. More information: Sandboxed solutions overview
No additional software is required to install on SharePoint.
SharePoint documents will display in Microsoft Dynamics 365 lists.
Users can perform SharePoint actions from the Dynamics 365 command bar.
In This Section Switching from the list component or changing the deployment
Configure server-based authentication with Dynamics 365 Online and SharePoint Online
Configure server-based authentication with Dynamics 365 Online and SharePoint on-premises
Configure server-based authentication with Microsoft Dynamics 365 (on-premises) and SharePoint Online
Configure server-based authentication with Microsoft Dynamics 365 (on-premises) and SharePoint on-premises
Troubleshooting server-based authentication
Configure SharePoint integration using the list component
See Also Manage your documents using SharePoint Permissions required for document management tasks Validate and fix SharePoint site URLs Enable Document Management on Entities
© 2016 Microsoft. All rights reserved. Copyright
930
Switching from the list component or changing the deployment
Applies To: Dynamics 365 (online), Dynamics 365 (on-premises), Dynamics CRM 2016, Dynamics CRM Online
[This topic is pre-release documentation and is subject to change.]
Follow the steps described here to switch from the list component to server-based authentication or if you change the Microsoft SharePoint deployment type, such as moving from SharePoint on-premises to SharePoint Online.
In This Topic Switch from list component to server-based authentication
Changing the SharePoint deployment type
Switch from list component to server-based authentication If your organization is already using the list component with Microsoft SharePoint for document management with Microsoft Dynamics 365, you can switch to server-based authentication by following these steps.
1. Follow the steps to set up server-based SharePoint integration that best fits your deployment type.
For more information, see the See Also topics below.
Note
If you've made changes to SharePoint, such as new SharePoint servers, new site collections, or migrated from SharePoint on-premises to Microsoft SharePoint Online, consider deactivating outdated SharePoint site records. When you run the Enable Server-Based SharePoint Integration wizard, the wizard will attempt to validate all active SharePoint sites. More information: Deactivate a site
2. Although it is not required for server-based authentication, we recommend that you deactivate and
then delete the list component SharePoint solution from the SharePoint site collection. To do this,
after you have confirmed that server-based authentication is enabled, in a web browser sign-in to
the site collection, click the Settings button in the top-right corner, then Site Settings, and then
under Web Designer Galleries, click Solutions. Choose crmlistcomponent, and then on the tool
bar click Deactivate. Choose the crmlistcomponent again, and then on the tool bar click Delete.
Changing the SharePoint deployment type 1. After the migration of Microsoft SharePoint to either online or on-premises is completed, deactivate
the outdated SharePoint site records. You must do this because, when you run the Enable Server-
931
Based SharePoint Integration wizard, the wizard will attempt to validate all active SharePoint sites.
More information: Deactivate a site
2. Follow the steps to set up server-based SharePoint integration that best fits your deployment type.
For more information, see the See Also topics below.
Deactivate a site
1. Go to Settings > Document Management.
2. Click SharePoint Sites.
3. Select the SharePoint site you want to remove, and then on the tool bar select Deactivate.
4. Repeat step three for all sites that you want to deactivate.
See Also Configure server-based authentication with Dynamics 365 Online and SharePoint Online Configure server-based authentication with Dynamics 365 Online and SharePoint on-premises Configure server-based authentication with Microsoft Dynamics 365 (on-premises) and SharePoint Online Configure server-based authentication with Microsoft Dynamics 365 (on-premises) and SharePoint on-premises Set up SharePoint integration with Microsoft Dynamics 365
© 2016 Microsoft. All rights reserved. Copyright
Configure server-based authentication with Dynamics 365 Online and SharePoint Online
Applies To: Dynamics 365 (online), Dynamics 365 (on-premises), Dynamics CRM 2016, Dynamics CRM Online
[This topic is pre-release documentation and is subject to change.]
Microsoft Office 365 Global administrators can enable document management functionality by using server-based SharePoint integration. Server-based SharePoint integration allows Microsoft Dynamics 365 (online) and Microsoft SharePoint Online to perform a server-to-server connection. Server-based SharePoint integration requires no additional software.
Important
Once you enable server-based SharePoint integration, you won't be able to revert to the previous client-based authentication method. Therefore, you can’t use the Microsoft Dynamics CRM List Component after you have configured your Dynamics 365 organization for server-based SharePoint
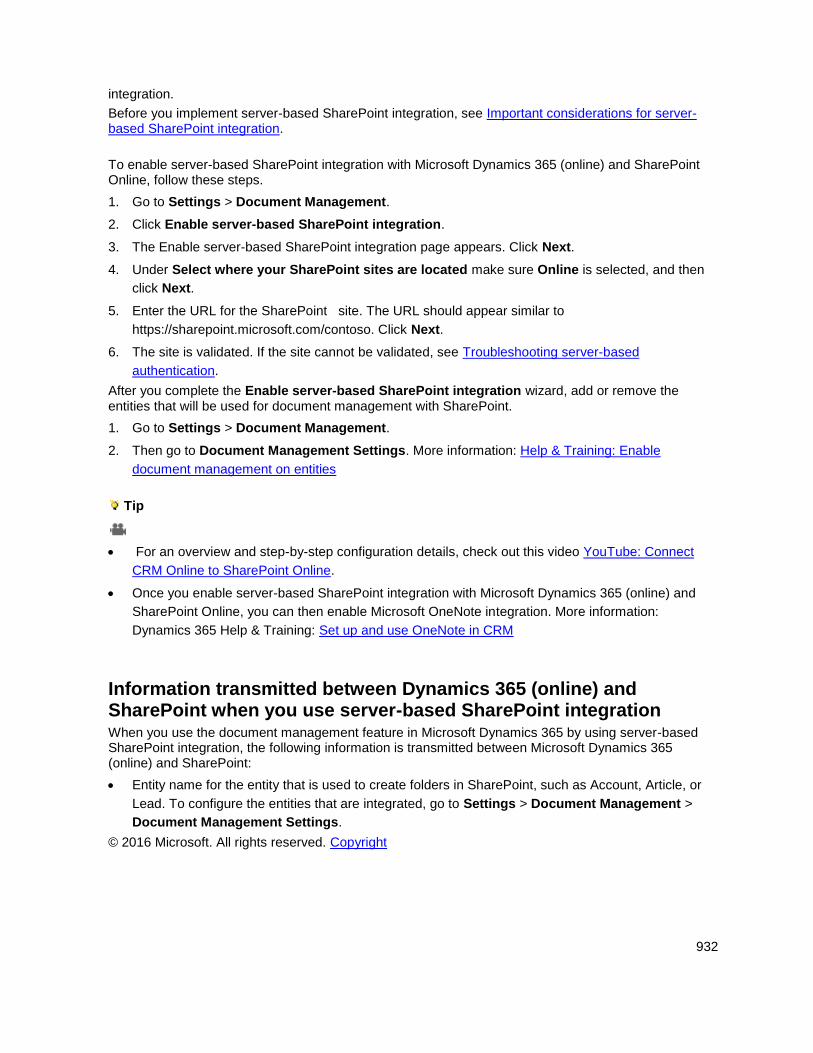
932
integration.
Before you implement server-based SharePoint integration, see Important considerations for server-based SharePoint integration.
To enable server-based SharePoint integration with Microsoft Dynamics 365 (online) and SharePoint Online, follow these steps.
1. Go to Settings > Document Management.
2. Click Enable server-based SharePoint integration.
3. The Enable server-based SharePoint integration page appears. Click Next.
4. Under Select where your SharePoint sites are located make sure Online is selected, and then
click Next.
5. Enter the URL for the SharePoint site. The URL should appear similar to
https://sharepoint.microsoft.com/contoso. Click Next.
6. The site is validated. If the site cannot be validated, see Troubleshooting server-based
authentication.
After you complete the Enable server-based SharePoint integration wizard, add or remove the entities that will be used for document management with SharePoint.
1. Go to Settings > Document Management.
2. Then go to Document Management Settings. More information: Help & Training: Enable
document management on entities
Tip
For an overview and step-by-step configuration details, check out this video YouTube: Connect
CRM Online to SharePoint Online.
Once you enable server-based SharePoint integration with Microsoft Dynamics 365 (online) and
SharePoint Online, you can then enable Microsoft OneNote integration. More information:
Dynamics 365 Help & Training: Set up and use OneNote in CRM
Information transmitted between Dynamics 365 (online) and SharePoint when you use server-based SharePoint integration When you use the document management feature in Microsoft Dynamics 365 by using server-based SharePoint integration, the following information is transmitted between Microsoft Dynamics 365 (online) and SharePoint:
Entity name for the entity that is used to create folders in SharePoint, such as Account, Article, or
Lead. To configure the entities that are integrated, go to Settings > Document Management >
Document Management Settings.
© 2016 Microsoft. All rights reserved. Copyright
933
Configure server-based authentication with Dynamics 365 Online and SharePoint on-premises
Applies To: Dynamics 365 (online), Dynamics 365 (on-premises), Dynamics CRM 2016, Dynamics CRM Online
[This topic is pre-release documentation and is subject to change.]
Introduced with Microsoft Dynamics CRM Online 2015 Update 1, server-based Microsoft SharePoint integration for document management can now be used to connect Microsoft Dynamics 365 (online) with SharePoint on-premises. When using server-based authentication, Azure AD Domain Services is used as the trust broker and users do not need to sign in to SharePoint. Additionally, the list control, which requires the deprecated SharePoint sandboxing feature, is not required to display SharePoint documents in Microsoft Dynamics 365 views.
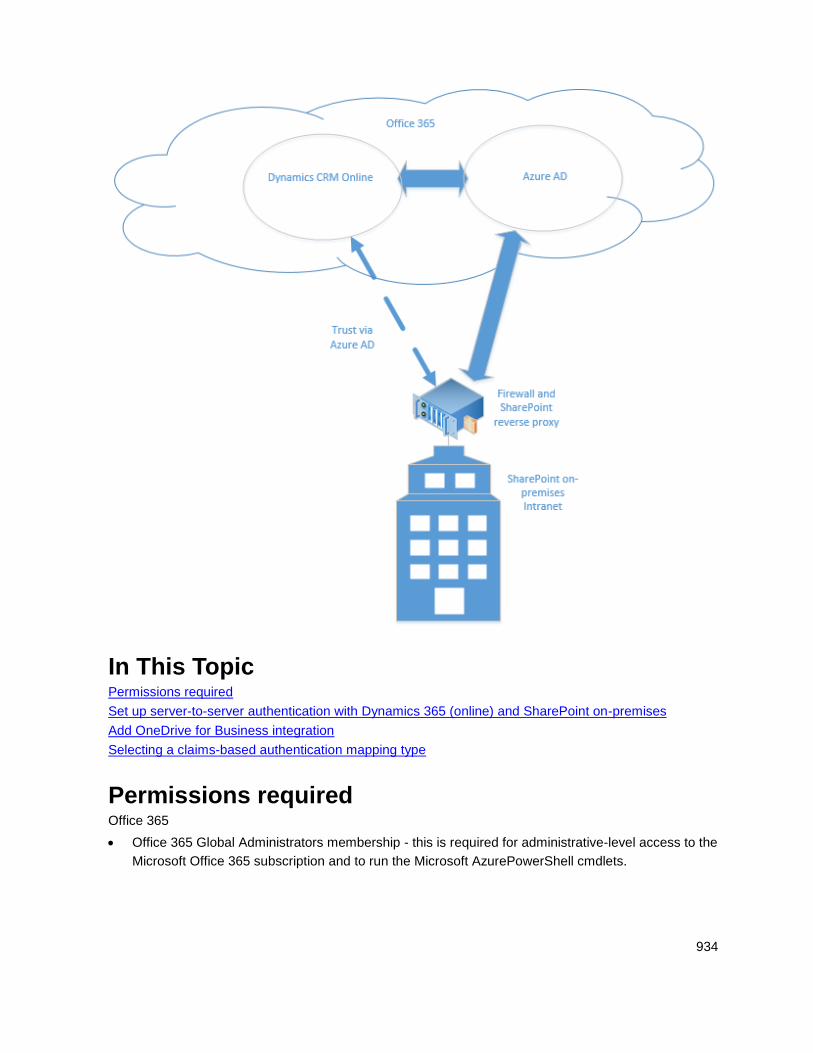
934
In This Topic Permissions required
Set up server-to-server authentication with Dynamics 365 (online) and SharePoint on-premises
Add OneDrive for Business integration
Selecting a claims-based authentication mapping type
Permissions required Office 365
Office 365 Global Administrators membership - this is required for administrative-level access to the
Microsoft Office 365 subscription and to run the Microsoft AzurePowerShell cmdlets.
935
Microsoft Dynamics 365 (online)
Run SharePoint Integration Wizard privilege. This is required to run the Enable Server-based
Authentication wizard in Microsoft Dynamics 365.
By default, the System Administrator security role has this permission.
SharePoint on-premises
Farm Administrators group membership - this is required to run most of the PowerShell commands
on the SharePoint server.
Set up server-to-server authentication with Dynamics 365 (online) and SharePoint on-premises Follow the steps in the order provided to set up Dynamics 365 (online) with SharePoint 2013 on-premises.
Important
The steps described here must be completed in the order provided. If a task is not completed, such
as a PowerShell command that returns an error message, the issue must be resolved before you
continue to the next command, task, or step.
Once you enable server-based SharePoint integration, you won't be able to revert to the previous
client-based authentication method. Therefore, you can’t use the Microsoft Dynamics CRM List
Component after you have configured your Dynamics 365 organization for server-based
SharePoint integration.
Verify prerequisites Before you configure Microsoft Dynamics 365 (online) and SharePoint on-premises for server-based authentication, the following prerequisites must be met:
SharePoint prerequisites
Microsoft SharePoint 2013 (on-premises) with Service Pack 1 (SP1) or later version
Important
Microsoft SharePoint Foundation 2013 versions aren’t supported for use with Microsoft Dynamics 365 document management.
Hotfix KB2883081 for SharePoint Foundation 2013 August 12, 2014 (Sts-x-none.msp)
Important
The following updates are prerequisites to KB2883081 and may also be required.
936
http://support2.microsoft.com/kb/2768000
http://support.microsoft.com/kb/2767999
http://support.microsoft.com/kb/2880963
SharePoint configuration
SharePoint must be configured for a single farm deployment only.
SharePoint website must be accessible via the Internet. A reverse proxy may also be required
for SharePoint authentication. More information: Configure a reverse proxy device for
SharePoint Server 2013 hybrid
SharePoint website must be configured to use SSL (HTTPS) and the certificate must be issued
by a public root Certificate Authority. More information: SharePoint: About Secure Channel SSL
certificates
A reliable user property to use for claims-based authentication mapping between SharePoint
and Microsoft Dynamics 365. More information: Selecting a claims-based authentication
mapping type
For document sharing, the SharePoint search service must be enabled. More information:
Create and configure a Search service application in SharePoint Server
For document management functionality when using the Microsoft Dynamics 365 mobile apps,
the on-premises SharePoint server must be available through the Internet.
Other prerequisites
SharePoint Online license. Microsoft Dynamics 365 (online) to SharePoint on-premises server-
based authentication must have the SharePoint service principal name (SPN) registered in Azure
Active Directory. To achieve this, at least one SharePoint Online user license is required. The
SharePoint Online license can derive from a single user license and typically comes from one of the
following:
A SharePoint Online subscription. Any SharePoint Online plan is sufficient even if the license
isn’t assigned to a user.
An Office 365 subscription that includes SharePoint Online. For example, if you have Office
365 E3, you have the appropriate licensing even if the license isn’t assigned to a user.
For more information about these plans, see Office 365: Select a plan and Compare SharePoint options
The following software features are required to run the PowerShell cmdlets described in this topic.
Microsoft Online Services Sign-In Assistant for IT Professionals Beta
Azure Active Directory Module for Windows PowerShell (64-bit version)
Important
At the time of this writing, there is an issue with the RTW version of Microsoft Online Services Sign-In Assistant for IT Professionals. Until the issue is resolved, we recommend that you use the Beta
937
version. More information: Microsoft Azure Forums: Cannot install Azure Active Directory Module for Windows PowerShell. MOSSIA is not installed.
A suitable claims-based authentication mapping type to use for mapping identities between
Microsoft Dynamics 365 (online) and SharePoint on-premises. By default, email address is used.
More information: Grant Microsoft Dynamics 365 permission to access SharePoint and configure
the claims-based authentication mapping
Update the SharePoint Server SPN in Azure Active Directory Domain Services On the SharePoint on-premises server, in the SharePoint 2013 Management Shell, run these PowerShell commands in the order given.
1. Prepare the PowerShell session.
The following cmdlets enable the computer to receive remote commands and add Office 365 modules to the PowerShell session. For more information about these cmdlets see Windows PowerShell Core Cmdlets.
Enable-PSRemoting -force
New-PSSession
Import-Module MSOnline -force
Import-Module MSOnlineExtended -force
2. Connect to Office 365.
When you run the Connect-MsolService command, you must provide a valid Microsoft account that has Office 365 Global Administrator membership for the SharePoint Online license that is required.
For detailed information about each of the Azure Active DirectoryPowerShell commands listed here, see MSDN: Manage Azure AD using Windows PowerShell
$msolcred = get-credential
connect-msolservice -credential $msolcred
3. Set the SharePoint host name.
The value that you set for the variable HostName must be the complete host name of the SharePoint site collection. The hostname must be derived from the site collection URL and is case sensitive. In this example, the site collection URL is https://SharePoint.constoso.com/sites/salesteam, so the hostname is SharePoint.contoso.com.
$HostName = "SharePoint.contoso.com"
4. Get the Office 365 object (tenant) id and SharePoint Server Service Principal Name (SPN).
938
$SPOAppId = "00000003-0000-0ff1-ce00-000000000000"
$SPOContextId = (Get-MsolCompanyInformation).ObjectID
$SharePoint = Get-MsolServicePrincipal -AppPrincipalId $SPOAppId
$ServicePrincipalName = $SharePoint.ServicePrincipalNames
5. Set the SharePoint Server Service Principal Name (SPN) in Azure Active Directory.
$ServicePrincipalName.Add("$SPOAppId/$HostName")
Set-MsolServicePrincipal -AppPrincipalId $SPOAppId -ServicePrincipalNames
$ServicePrincipalName
After these commands complete do not close the SharePoint 2013 Management Shell, and continue to the next step.
Update the SharePoint realm to match that of SharePoint Online On the SharePoint on-premises server, in the SharePoint 2013 Management Shell, run this Windows PowerShell command.
The following command requires SharePoint farm administrator membership and sets the authentication realm of the SharePoint on-premises farm.
Caution
Running this command changes the authentication realm of the SharePoint on-premises farm. For applications that use an existing security token service (STS), this may cause unexpected behavior with other applications that use access tokens. More information: Set-SPAuthenticationRealm.
Set-SPAuthenticationRealm -Realm $SPOContextId
Create a trusted security token issuer for Azure Active Directory on SharePoint On the SharePoint on-premises server, in the SharePoint 2013 Management Shell, run these PowerShell commands in the order given.
The following commands require SharePoint farm administrator membership.
For detailed information about these PowerShell commands, see Use Windows PowerShell cmdlets to administer security in SharePoint 2013.
939
1. Enable the PowerShell session to make changes to the security token service for the SharePoint
farm.
$c = Get-SPSecurityTokenServiceConfig
$c.AllowMetadataOverHttp = $true
$c.AllowOAuthOverHttp= $true
$c.Update()
2. Set the metadata endpoint.
$metadataEndpoint = "https://accounts.accesscontrol.windows.net/" + $SPOContextId +
"/metadata/json/1"
$issuer = "00000001-0000-0000-c000-000000000000@" + $SPOContextId
$issuer = "00000007-0000-0000-c000-000000000000@" + $SPOContextId
3. Create the new token control service application proxy in Azure Active Directory.
New-SPAzureAccessControlServiceApplicationProxy -Name "Internal" -
MetadataServiceEndpointUri $metadataEndpoint -DefaultProxyGroup
Note
The New- SPAzureAccessControlServiceApplicationProxy command may return an error message indicating that an application proxy with the same name already exists. If the named application proxy already exists, you can ignore the error.
4. Create the new token control service issuer in SharePoint on-premises for Azure Active Directory.
$ = New-SPTrustedSecurityTokenIssuer –Name "Internal" –IsTrustBroker:$true –
MetadataEndpoint $metadataEndpoint -RegisteredIssuerName $issuer
Grant Microsoft Dynamics 365 permission to access SharePoint and configure the claims-based authentication mapping On the SharePoint on-premises server, in the SharePoint 2013 Management Shell, run these PowerShell commands in the order given.
The following commands require SharePoint site collection administration membership.
940
1. Register Microsoft Dynamics 365 with the SharePoint site collection.
Enter the SharePoint on-premises site collection URL. In this example, https://sharepoint.contoso.com/sites/crm/ is used.
Important
To complete this command, the SharePoint App Management Service Application Proxy must exist and be running. For more information about how to start and configure the service, see the Configure the Subscription Settings and App Management service applications subtopic in Configure an environment for apps for SharePoint (SharePoint 2013).
$site = Get-SPSite "https://sharepoint.contoso.com/sites/crm/"
Register-SPAppPrincipal -site $site.RootWeb -NameIdentifier $issuer -DisplayName
"crm"
2. Grant Microsoft Dynamics 365 application access to the SharePoint site. Replace
https://sharepoint.contoso.com/sites/crm/ with your SharePoint site URL.
Note
In the following example, the Dynamics 365 application is granted permission to the specified SharePoint site collection by using the –Scope site collection parameter. The Scope parameter accepts the following options. Choose the scope that is most appropriate for your SharePoint configuration.
site. Grants the Dynamics 365 application permission to the specified SharePoint website only.
It doesn’t grant permission to any subsites under the named site.
sitecollection. Grants the Dynamics 365 application permission to all websites and subsites
within the specified SharePoint site collection.
sitesubscription. Grants the Dynamics 365 application permission to all websites in the
SharePoint farm, including all site collections, websites, and subsites.
$app = Get-SPAppPrincipal -NameIdentifier $issuer -Site
"https://sharepoint.contoso.com/sites/crm/"
Set-SPAppPrincipalPermission -AppPrincipal $app -Site $site.Rootweb -Scope
"sitecollection" -Right "FullControl"
3. Set the claims-based authentication mapping type.
Important
By default, the claims-based authentication mapping will use the user’s Microsoft account email address and the user’s SharePoint on-premises work email address for mapping. When you use

941
this, the user’s email addresses must match between the two systems. For more information, see Selecting a claims-based authentication mapping type.
$map1 = New-SPClaimTypeMapping -IncomingClaimType
"http://schemas.xmlsoap.org/ws/2005/05/identity/claims/emailaddress" -
IncomingClaimTypeDisplayName "EmailAddress" -SameAsIncoming
Run the Enable server-based SharePoint integration wizard In the Microsoft Dynamics 365 app, follow these steps:
1. Go to Settings > Document Management.
2. In the Document Management area, click Enable server-based SharePoint integration.
3. Review the information and then click Next.
4. For the SharePoint sites, click On-premises, and then Next.
5. Enter the SharePoint on-premises site collection URL, such as
https://sharepoint.contoso.com/sites/crm. The site must be configured for SSL.
6. Click Next.
7. The validate sites section appears. If all sites are determined valid, click Enable. If one or more
sites are determined invalid, see Troubleshooting server-based authentication.
Select the entities that you want to include in document management By default, Account, Article, Lead, Product, Quote, and Sales Literature entities are included. You can add or remove the entities that will be used for document management with SharePoint in Document Management Settings in Microsoft Dynamics 365. Go to Settings > Document Management. More information: Customer Center: Enable document management on entities
Add OneDrive for Business integration After you complete Microsoft Dynamics 365 and SharePoint on-premises server-based authentication configuration, you can also integrate OneDrive for Business. With Microsoft Dynamics 365 and OneDrive for Business integration, Dynamics 365 users can create and manage private documents using OneDrive for Business. Those documents can be accessed in Dynamics 365 once the system administrator has enabled OneDrive for Business.
Enable OneDrive for Business On the Windows Server where SharePoint Server on-premises is running, open the SharePoint Management Shell and run the following commands:
Add-Pssnapin *
942
# Access WellKnown App principal
[Microsoft.SharePoint.Administration.SPWebService]::ContentService.WellKnownAppPrincipals
# Create WellKnown App principal
$ClientId = "00000007-0000-0000-c000-000000000000"
$PermissionXml = "<AppPermissionRequests AllowAppOnlyPolicy=""true""><AppPermissionRequest
Scope=""http://sharepoint/content/tenant"" Right=""FullControl"" /><AppPermissionRequest
Scope=""http://sharepoint/social/tenant"" Right=""Read"" /><AppPermissionRequest
Scope=""http://sharepoint/search"" Right=""QueryAsUserIgnoreAppPrincipal""
/></AppPermissionRequests>"
$wellKnownApp= New-Object -TypeName
"Microsoft.SharePoint.Administration.SPWellKnownAppPrincipal" -ArgumentList ($ClientId,
$PermissionXml)
$wellKnownApp.Update()
Selecting a claims-based authentication mapping type By default, the claims-based authentication mapping will use the user’s Microsoft account email address and the user’s SharePoint on-premises work email address for mapping. Note that whatever claims-based authentication type you use, the values, such as email addresses, must match between Microsoft Dynamics 365 (online) and SharePoint. Office 365 directory synchronization can help with this. More information: Deploy Office 365 Directory Synchronization (DirSync) in Microsoft Azure To use a different type of claims-based authentication mapping, see Define custom claim mapping for SharePoint server-based integration.
Important
To enable the Work email property, SharePoint on-premises must have a User Profile Service Application configured and started. To enable a User Profile Service Application in SharePoint, see Create, edit, or delete User Profile service applications in SharePoint Server 2013. To make changes to a user property, such as Work email, see Edit a user profile property. For more information about the User Profile Service Application, see Overview of the User Profile service application in SharePoint Server 2013.
943
See Also Troubleshooting server-based authentication Set up SharePoint integration with Microsoft Dynamics 365
© 2016 Microsoft. All rights reserved. Copyright
Configure server-based authentication with Microsoft Dynamics 365 (on-premises) and SharePoint Online
Applies To: Dynamics 365 (on-premises), Dynamics CRM 2016
[This topic is pre-release documentation and is subject to change.]
This topic describes how to configure server-based authentication between Dynamics 365 (on-premises) and Microsoft SharePoint Online. The following diagram illustrates the communication between Dynamics 365 (on-premises), Azure AD Domain Services, and SharePoint Online.
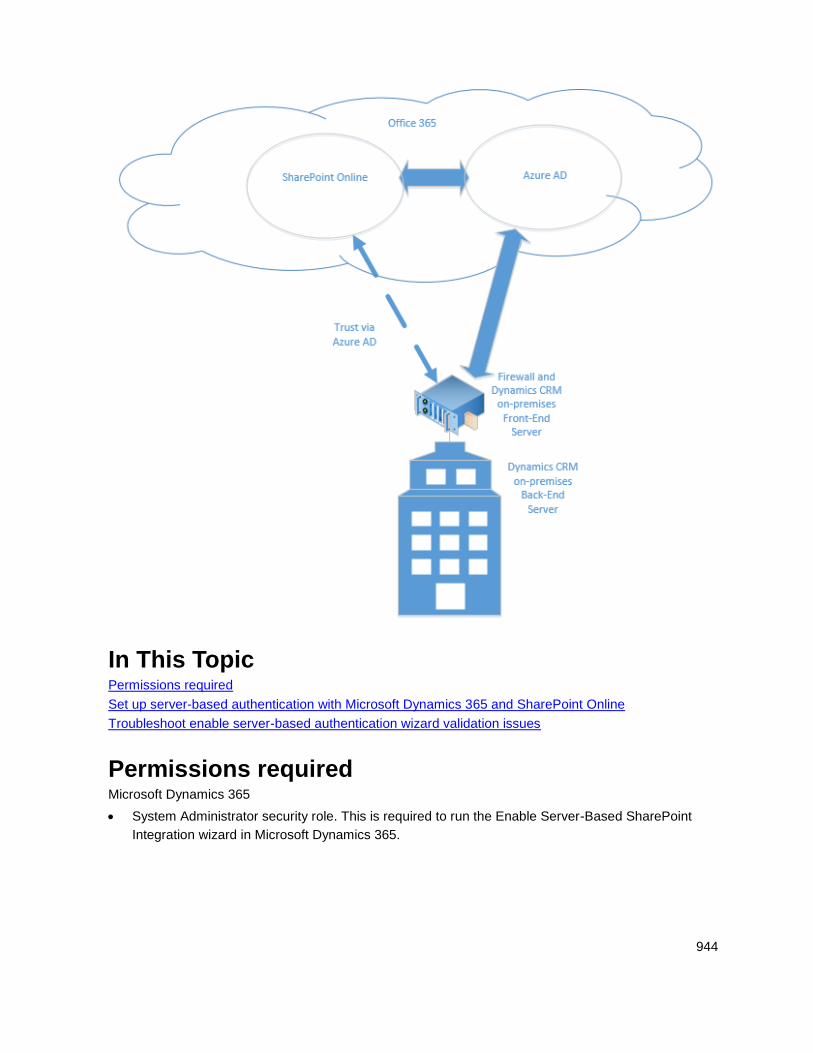
944
In This Topic Permissions required
Set up server-based authentication with Microsoft Dynamics 365 and SharePoint Online
Troubleshoot enable server-based authentication wizard validation issues
Permissions required Microsoft Dynamics 365
System Administrator security role. This is required to run the Enable Server-Based SharePoint
Integration wizard in Microsoft Dynamics 365.
945
If you are using a self-signed certificate for evaluation purposes, you must have local
Administrators group membership on the computer where Microsoft Dynamics 365 Server is
running.
SharePoint Online
Office 365 Global Administrators membership. This is required for administrative-level access to the
Office 365 subscription and to run the Microsoft AzurePowerShell cmdlets
Set up server-based authentication with Microsoft Dynamics 365 and SharePoint Online Follow the steps in the order provided to set up Dynamics 365 (on-premises) with SharePoint Online.
Important
The steps described here must be completed in the order provided. If a task is not completed, such
as a Windows PowerShell command that returns an error message, the issue must be resolved
before you continue to the next command, task, or step.
After you enable server-based SharePoint integration, you can’t revert to the previous client-based
authentication method. This means you can’t use the Microsoft Dynamics CRM List Component
after you have configured your Dynamics 365 organization for server-based SharePoint integration.
To connect multiple Dynamics 365 (on-premises) organizations in the same Dynamics 365
deployment to more than one SharePoint Online site, the SharePoint Online sites must be in the
same Microsoft Office 365 tenant.
Verify prerequisites Before you configure Dynamics 365 (on-premises) and SharePoint Online for server-based authentication, the following prerequisites must be met:
The Dynamics 365 (on-premises) deployment must already be configured and available through
the Internet. More information: Referenced topic 'eee528fb-ef2f-4a77-ad0f-3d29bcb42351' is only
available online.
Microsoft Dynamics 365 Hybrid Connector. The Microsoft Dynamics 365 Hybrid Connector is a free
connector that lets you use server-based authentication with Dynamics 365 (on-premises) and
SharePoint Online. More information: Microsoft Dynamics CRM Hybrid Connector
An x509 digital certificate issued by a trusted certificate authority that will be used to authenticate
between Dynamics 365 (on-premises) and SharePoint Online. If you are evaluating server-based
authentication, you can use a self-signed certificate.
The following software features are required to run the Windows PowerShell cmdlets described in this topic.
Microsoft Online Services Sign-In Assistant for IT Professionals Beta
946
Azure Active Directory Module for Windows PowerShell (64-bit version)
Important
At the time of this writing, there is an issue with the RTW version of Microsoft Online Services Sign-In Assistant for IT Professionals. Until the issue is resolved, we recommend that you use the Beta version. More information: Microsoft Azure Forums: Cannot install Azure Active Directory Module for Windows PowerShell. MOSSIA is not installed.
Set up server-based authentication
1. On the Microsoft Dynamics 365 Server where the deployment tools server role is running, start the
Azure Active Directory Module for Windows PowerShell.
Important
The computer where you run the following PowerShell commands must have the prerequisite software features described earlier in Verify prerequisites.
2. Prepare the certificate.
$CertificateScriptWithCommand = “.\CertificateReconfiguration.ps1 -certificateFile
c:\Personalcertfile.pfx -password personal_certfile_password -updateCrm -
certificateType S2STokenIssuer -serviceAccount contoso\CRMAsyncService -storeFindType
FindBySubjectDistinguishedName”
Invoke-Expression -command $CertificateScriptWithCommand
3. Prepare the PowerShell session.
The following cmdlets enable the computer to receive remote commands and add Office 365 modules to the PowerShell session. For more information about these cmdlets see Windows PowerShell Core Cmdlets.
Enable-PSRemoting -force
New-PSSession
Import-Module MSOnline -force
Import-Module MSOnlineExtended -force
4. Connect to Office 365.
When you run the Connect-MsolService command, you must provide a valid Microsoft account that has Office 365 Global Administrator membership for the SharePoint Online license that is required.
For detailed information about each of the Azure Active DirectoryPowerShell commands listed here, see MSDN: Manage Azure AD using Windows PowerShell.
$msolcred = get-credential
947
connect-msolservice -credential $msolcred
5. Set the certificate.
$STSCertificate = New-Object
System.Security.Cryptography.X509Certificates.X509Certificate2 -ArgumentList
c:\Personalcertfile.pfx, personal_certfile_password
$PFXCertificateBin = $STSCertificate.GetRawCertData()
$Certificate = New-Object
System.Security.Cryptography.X509Certificates.X509Certificate2
$Certificate.Import(“c:\Personalcertfile.cer”)
$CERCertificateBin = $Certificate.GetRawCertData()
$CredentialValue = [System.Convert]::ToBase64String($CERCertificateBin)
6. Set the Azure Active Directory Service Principal Name (SPN) in SharePoint.
Replace *.contoso.com with the domain name where Microsoft Dynamics 365 Server is located.
$RootDomain = “*.contoso.com”
$CRMAppId = "00000007-0000-0000-c000-000000000000"
New-MsolServicePrincipalCredential -AppPrincipalId $CRMAppId -Type asymmetric -Usage
Verify -Value $CredentialValue
$CRM = Get-MsolServicePrincipal -AppPrincipalId $CRMAppId
$ServicePrincipalName = $CRM.ServicePrincipalNames
$ServicePrincipalName.Remove("$CRMAppId/$RootDomain")
$ServicePrincipalName.Add("$CRMAppId/$RootDomain")
Set-MsolServicePrincipal -AppPrincipalId $CRMAppId -ServicePrincipalNames
$ServicePrincipalName
7. Configure the Microsoft Dynamics 365 Server for server-based authentication with SharePoint.
Add-PSSnapin Microsoft.Crm.PowerShell
$setting = New-Object "Microsoft.Xrm.Sdk.Deployment.ConfigurationEntity"
$setting.LogicalName = "ServerSettings"
$setting.Attributes = New-Object "Microsoft.Xrm.Sdk.Deployment.AttributeCollection"
$attribute1 = New-Object "System.Collections.Generic.KeyValuePair[String, Object]"
("S2SDefaultAuthorizationServerPrincipalId", "00000001-0000-0000-c000-000000000000")
$setting.Attributes.Add($attribute1)
948
$attribute2 = New-Object "System.Collections.Generic.KeyValuePair[String, Object]"
("S2SDefaultAuthorizationServerMetadataUrl",
"https://accounts.accesscontrol.windows.net/metadata/json/1")
$setting.Attributes.Add($attribute2)
Set-CrmAdvancedSetting -Entity $setting
Run the Enable Server-Based SharePoint Integration Wizard
1. In the Microsoft Dynamics 365 app, go to Document Management.
2. In the Document Management area, choose Enable server-based SharePoint integration.
3. Review the information and then click Next.
4. For the SharePoint sites, click Online, and then click Next.
5. On the Prepare Sites stage, enter the following information.
Enter the SharePoint Online site collection URL, such as
https://contoso.sharepoint.com/sites/salesteam.
Enter the tenant ID. More information: Get the SharePoint online tenant ID
6. Click Next.
7. The validate sites section appears. If all sites are determined to be valid, click Enable. If one or
more sites are determined to be invalid, see Troubleshooting Dynamics 365 Server on-premises to
SharePoint Server on-premises server-based integration.
Get the SharePoint online tenant ID
Use PowerShell
1. In the Azure Active Directory module for Windows PowerShell shell, run the following commands.
$CRMContextId = (Get-MsolCompanyInformation).ObjectID
$CRMContextId
2. Copy the GUID that is displayed to the clipboard.
Use site settings
1. Sign in to the SharePoint site collection that you will use for document management with Microsoft
Dynamics 365.
2. Go to Site settings > Site app permissions.
The tenant ID is displayed under App Identifier, to the right of the @ sign. Copy and paste in only the GUID. Do not paste in any part of the identifier to the left of @.
949
Troubleshoot enable server-based authentication wizard validation issues Failed Authentication. This error can be returned when the certificate used for server-to-server authentication is missing or invalid.
See Also Set up SharePoint integration with Microsoft Dynamics 365 Troubleshooting server-based authentication
© 2016 Microsoft. All rights reserved. Copyright
Configure server-based authentication with Microsoft Dynamics 365 (on-premises) and SharePoint on-premises
Applies To: Dynamics 365 (on-premises), Dynamics CRM 2016
[This topic is pre-release documentation and is subject to change.]
This topic describes how to configure server-based integration between Microsoft Dynamics 365 on-premises and Microsoft SharePoint on-premises.
In This Topic Set up server-based integration with Dynamics 365 and SharePoint
Add OneDrive for Business integration
Troubleshooting Dynamics 365 Server on-premises to SharePoint Server on-premises server-based integration
About claims-based authentication mapping
Working with digital certificates
Get the SharePoint realm ID
Set up server-based integration with Dynamics 365 and SharePoint Follow the steps, in the order provided, to set up Dynamics 365 (on-premises) with Microsoft SharePoint Server (on-premises).

950
Important
If a task isn’t completed, for example, if a PowerShell command returns an error message, the
issue must be resolved before you continue to the next command, task, or step.
Once you enable server-based SharePoint integration, you won't be able to revert to the previous
client-based authentication method. Therefore, you can’t use the Microsoft Dynamics CRM List
Component after you have configured your Dynamics 365 organization for server-based
SharePoint integration.
Verify prerequisites Before you configure Dynamics 365 (on-premises) and SharePoint (on-premises) for server-based integration, the following permissions are required and prerequisites must be met.
Permissions required
Microsoft Dynamics 365
System Administrator security role - this is required to run the Enable Server-Based SharePoint
Integration wizard in Microsoft Dynamics 365.
If you are using a self-signed certificate for evaluation purposes, you must have local
Administrators group membership on the computer where Microsoft Dynamics 365 Server is
running.
SharePoint on-premises
Farm Administrators group membership - this is required to run most of the Windows PowerShell
commands on the SharePoint server.
SharePoint prerequisites
One of the following SharePoint versions:
Microsoft SharePoint 2013 (on-premises) with Service Pack 1 (SP1) or later version with the
following updates.
Hotfix KB2883081 for SharePoint Foundation 2013 August 12, 2014 (Sts-x-none.msp)
The following updates are prerequisites to KB2883081 and may also be required.
http://support2.microsoft.com/kb/2768000
http://support.microsoft.com/kb/2767999
http://support.microsoft.com/kb/2880963
SharePoint configuration
SharePoint must be configured for a single farm deployment only.
In order to use the default claims-based authentication mapping, the Active Directory domain
where the SharePoint server and Microsoft Dynamics 365 server are located must be the
951
same, or the domain where the SharePoint server is located must trust the domain where the
Microsoft Dynamics 365 Server is located. More information: About claims-based
authentication mapping
The SharePoint website must be configured to use TLS/SSL (HTTPS) and the certificate must
be issued by a public root Certificate Authority. More information: SharePoint: About Secure
Channel SSL certificates
The App Management Service Application Proxy must be created and started. More
information: Configure an environment for apps for SharePoint
A User Profile Service Application must be configured and started. More information: Create,
edit, or delete User Profile service applications in SharePoint Server 2013
For document sharing, the SharePoint search service must be enabled. More information:
Create and configure a Search service application in SharePoint Server
For document management functionality when using Microsoft Dynamics 365 mobile apps, the
on-premises SharePoint server must be available through the Internet.
To allow users the ability to create SharePoint document libraries from Dynamics 365, the
following permissions and configurations are required:
The Dynamics 365 user Active Directory account must be a member of the Site Members
group on the SharePoint site collection where the documents are stored.
By default, the claims-based authentication mapping will use the user’s Dynamics 365
primary email address and the user’s SharePoint on-premises work email address for
mapping. When this mapping is used, the user’s email addresses must match between the
two systems. More information: About claims-based authentication mapping
Other prerequisites and limitations
X509 digital certificate to be used for server-based authentication between Microsoft Dynamics 365
Server and the SharePoint server. The certificate keys must have a minimum of 2048-bit
encryption. In most cases this certificate must be issued by a trusted certificate authority, but for
evaluation purposes you can use a self-signed certificate.
If you use Microsoft SharePoint 2013, for each SharePoint farm, only one Microsoft Dynamics 365
organization can be configured for server-based integration.
Prepare Microsoft Dynamics 365 Server for server-based integration The CertificateReconfiguration.ps1 is a Windows PowerShell script that installs a certificate to the local certificate store, grants the specified Microsoft Dynamics 365 Asynchronous Processing Service identity access to the certificate, and updates Microsoft Dynamics 365 Server to use the certificate.
952
Add the server-to-server certificate to the local certificate store and Microsoft Dynamics 365 configuration database
1. Open a PowerShell command prompt on the server where Microsoft Dynamics 365 Server is
installed. For server role deployments, this is the server where the Deployment Tools server role is
running.
2. Change your location to the <drive>:\Program Files\Microsoft Dynamics CRM\Tools folder.
3. Run the CertificateReconfiguration.ps1 Windows PowerShell script where:
certificateFile path\Personalcertfile.pfx . Required parameter that specifies the
full path to the personal information exchange file (.pfx). More information: Working with digital
certificates
password personal_certfile_password. Required parameter that specifies the private certificate
password.
certificateType S2STokenIssuer. Required parameter that specifies the type of certificate. For
Microsoft Dynamics 365 and SharePoint server-based integration, only S2STokenIssuer is
supported.
serviceAccount 'contoso\CRMAsyncService' or ‘Network Service’. Required parameter that
specifies the identity for the Microsoft Dynamics 365 Asynchronous Processing Service. The
identity is either a domain user account or Network Service. The identity will be granted
permission to the certificate.
updateCrm. Adds the certificate information to the Microsoft Dynamics 365 configuration
database.
storeFindType FindBySubjectDistinguishedName. Specifies the type of certificate store. By
default, this value is FindBySubjectDistinguishedName and is recommended when you run the
script.
Important
Although the updateCrm and StoreFindType parameters are optional to run the command, these parameters are required for server-based SharePoint integration so that certificate information is added to the certification database.
Example
.\CertificateReconfiguration.ps1 -certificateFile c:\Personalcertfile.pfx -password
personal_certfile_password -updateCrm -certificateType S2STokenIssuer -serviceAccount
contoso\CRMAsyncService -storeFindType FindBySubjectDistinguishedName
Prepare the SharePoint farm for server-based integration
953
Get the Dynamics 365 Realm Id
1. Start the Enable Server-Based SharePoint Integration wizard. Go to Settings > Document
Management.
2. Click Next, click On-Premises, and then Next.
3. The Id is displayed next to Dynamics 365 Realm Id on the page.
Tip
Save the Dynamics 365 Realm Id in a text file on a secure network share or cloud-based storage. Then you can easily retrieve it from the location where you run the Enable Server-Based SharePoint Integration wizard.
On the SharePoint on-premises server, in the SharePoint Management Shell, run these PowerShell commands in the order given.
Prepare the SharePoint server for Dynamics 365 Server authentication
1. If you are using a PowerShell management shell that is not the SharePoint Management Shell, you
must register the SharePoint module using the following command:
Add-PSSnapin Microsoft.SharePoint.PowerShell
Enable the PowerShell session to make changes to the security token service for the SharePoint farm.
$c = Get-SPSecurityTokenServiceConfig
$c.AllowMetadataOverHttp = $true
$c.AllowOAuthOverHttp= $true
$c.Update()
2. Create the trusted security token service object, where OrganizationName is the unique name of
the Microsoft Dynamics 365 organization and CrmServer is the name of the IIS web server where
the Microsoft Dynamics 365 web application server role is installed, and -Name “crm” is used to
name the security token server (STS).
Important
Connecting more than one Microsoft Dynamics 365 organization to a single SharePoint server
is not supported.
When you run the New-SPTrustedSecurityTokenIssuer PowerShell command you must specify
HTTPS for the Microsoft Dynamics 365 metadata endpoint when the Microsoft Dynamics 365
application web site has only HTTPS or both HTTPS and HTTP bindings, like the following
example:
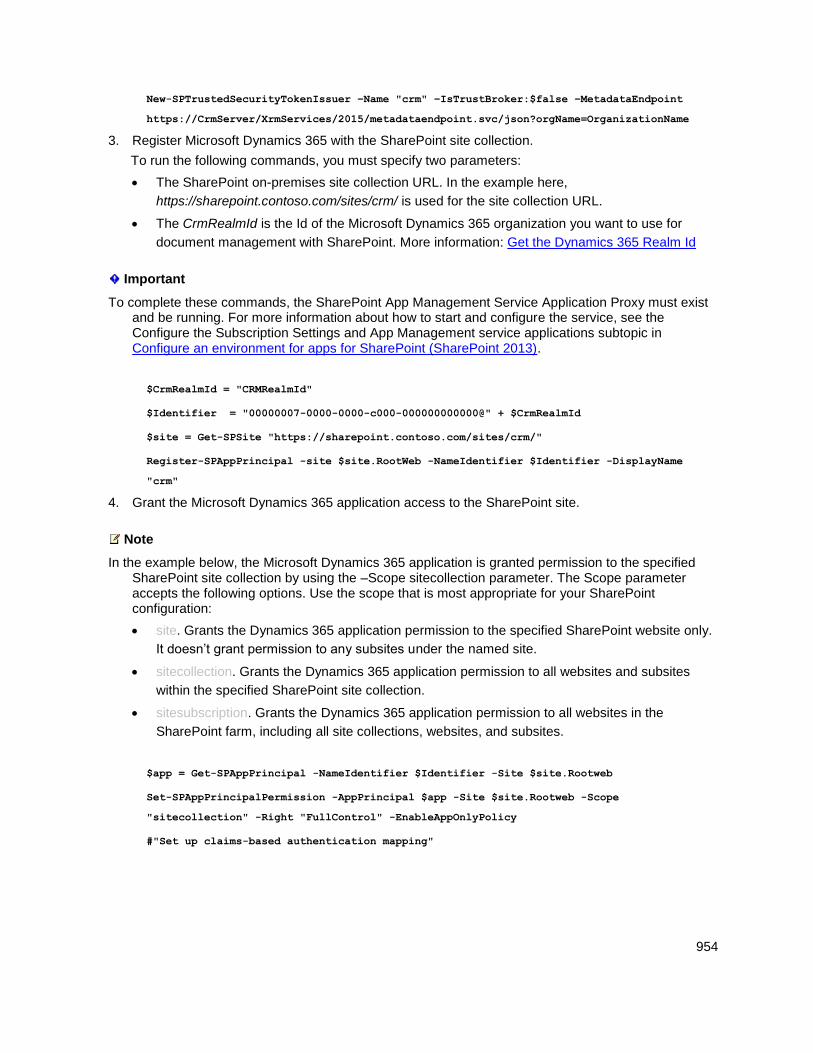
954
New-SPTrustedSecurityTokenIssuer –Name "crm" –IsTrustBroker:$false –MetadataEndpoint
https://CrmServer/XrmServices/2015/metadataendpoint.svc/json?orgName=OrganizationName
3. Register Microsoft Dynamics 365 with the SharePoint site collection.
To run the following commands, you must specify two parameters:
The SharePoint on-premises site collection URL. In the example here,
https://sharepoint.contoso.com/sites/crm/ is used for the site collection URL.
The CrmRealmId is the Id of the Microsoft Dynamics 365 organization you want to use for
document management with SharePoint. More information: Get the Dynamics 365 Realm Id
Important
To complete these commands, the SharePoint App Management Service Application Proxy must exist and be running. For more information about how to start and configure the service, see the Configure the Subscription Settings and App Management service applications subtopic in Configure an environment for apps for SharePoint (SharePoint 2013).
$CrmRealmId = "CRMRealmId"
$Identifier = "00000007-0000-0000-c000-000000000000@" + $CrmRealmId
$site = Get-SPSite "https://sharepoint.contoso.com/sites/crm/"
Register-SPAppPrincipal -site $site.RootWeb -NameIdentifier $Identifier -DisplayName
"crm"
4. Grant the Microsoft Dynamics 365 application access to the SharePoint site.
Note
In the example below, the Microsoft Dynamics 365 application is granted permission to the specified SharePoint site collection by using the –Scope sitecollection parameter. The Scope parameter accepts the following options. Use the scope that is most appropriate for your SharePoint configuration:
site. Grants the Dynamics 365 application permission to the specified SharePoint website only.
It doesn’t grant permission to any subsites under the named site.
sitecollection. Grants the Dynamics 365 application permission to all websites and subsites
within the specified SharePoint site collection.
sitesubscription. Grants the Dynamics 365 application permission to all websites in the
SharePoint farm, including all site collections, websites, and subsites.
$app = Get-SPAppPrincipal -NameIdentifier $Identifier -Site $site.Rootweb
Set-SPAppPrincipalPermission -AppPrincipal $app -Site $site.Rootweb -Scope
"sitecollection" -Right "FullControl" -EnableAppOnlyPolicy
#"Set up claims-based authentication mapping"
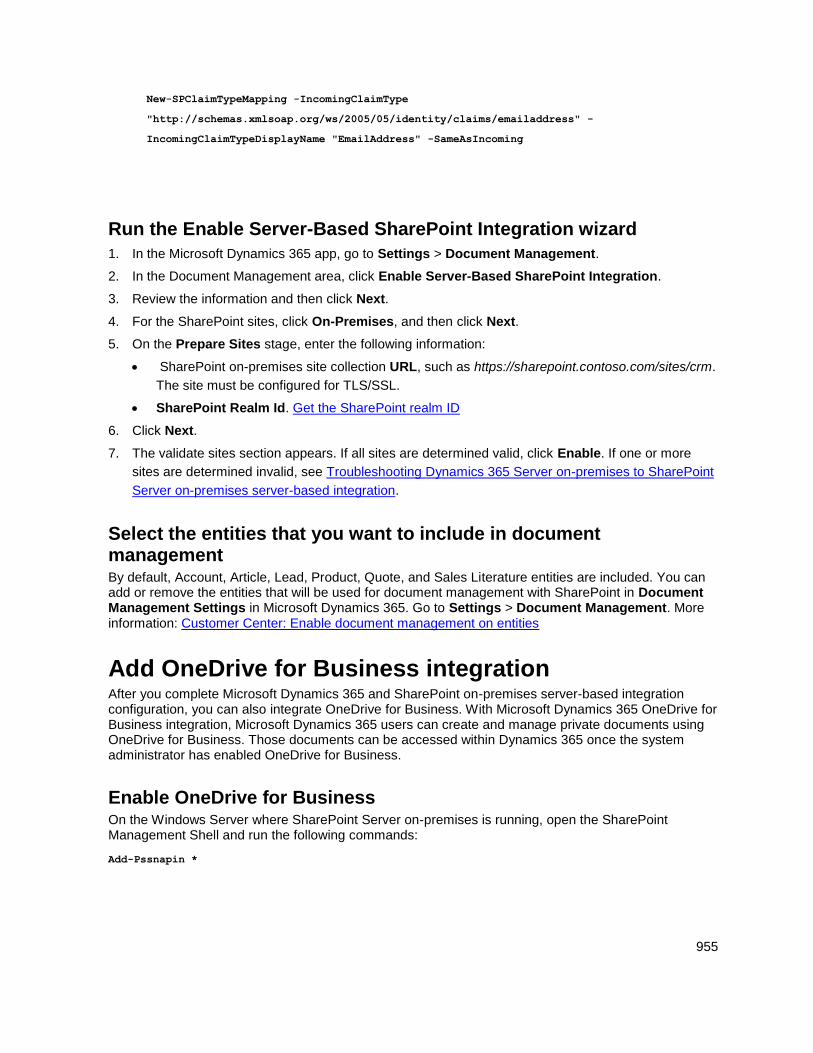
955
New-SPClaimTypeMapping -IncomingClaimType
"http://schemas.xmlsoap.org/ws/2005/05/identity/claims/emailaddress" -
IncomingClaimTypeDisplayName "EmailAddress" -SameAsIncoming
Run the Enable Server-Based SharePoint Integration wizard
1. In the Microsoft Dynamics 365 app, go to Settings > Document Management.
2. In the Document Management area, click Enable Server-Based SharePoint Integration.
3. Review the information and then click Next.
4. For the SharePoint sites, click On-Premises, and then click Next.
5. On the Prepare Sites stage, enter the following information:
SharePoint on-premises site collection URL, such as https://sharepoint.contoso.com/sites/crm.
The site must be configured for TLS/SSL.
SharePoint Realm Id. Get the SharePoint realm ID
6. Click Next.
7. The validate sites section appears. If all sites are determined valid, click Enable. If one or more
sites are determined invalid, see Troubleshooting Dynamics 365 Server on-premises to SharePoint
Server on-premises server-based integration.
Select the entities that you want to include in document management By default, Account, Article, Lead, Product, Quote, and Sales Literature entities are included. You can add or remove the entities that will be used for document management with SharePoint in Document Management Settings in Microsoft Dynamics 365. Go to Settings > Document Management. More information: Customer Center: Enable document management on entities
Add OneDrive for Business integration After you complete Microsoft Dynamics 365 and SharePoint on-premises server-based integration configuration, you can also integrate OneDrive for Business. With Microsoft Dynamics 365 OneDrive for Business integration, Microsoft Dynamics 365 users can create and manage private documents using OneDrive for Business. Those documents can be accessed within Dynamics 365 once the system administrator has enabled OneDrive for Business.
Enable OneDrive for Business On the Windows Server where SharePoint Server on-premises is running, open the SharePoint Management Shell and run the following commands:
Add-Pssnapin *
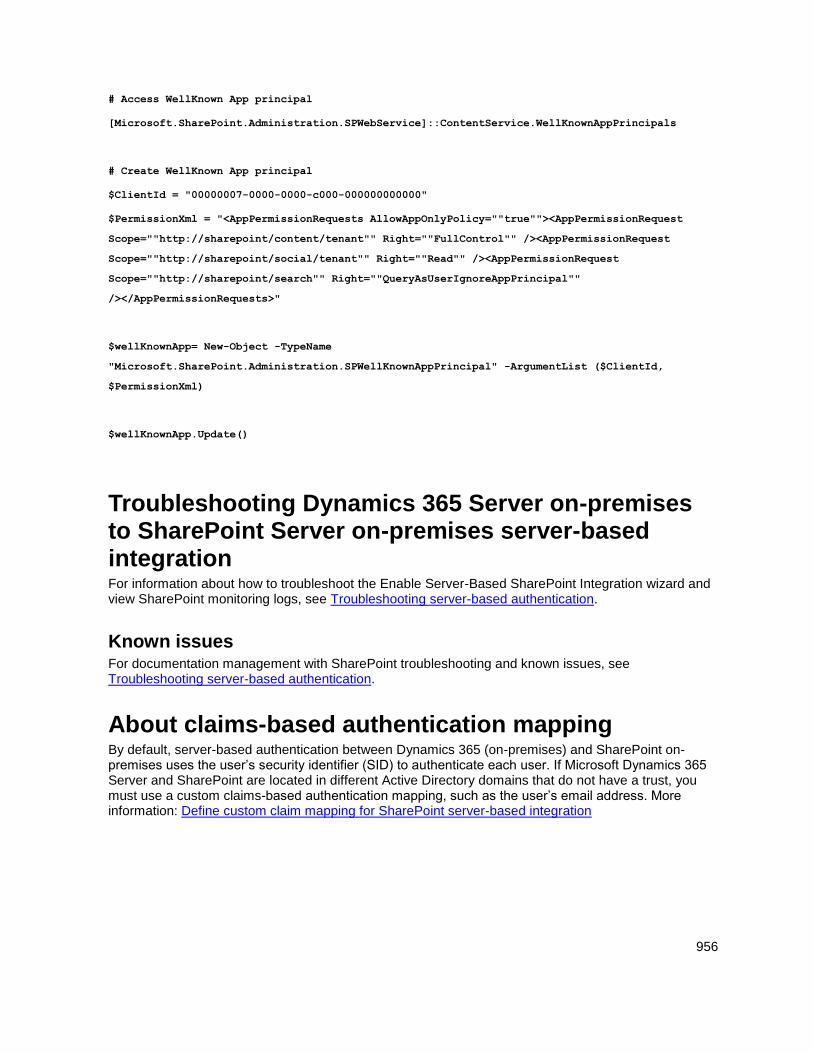
956
# Access WellKnown App principal
[Microsoft.SharePoint.Administration.SPWebService]::ContentService.WellKnownAppPrincipals
# Create WellKnown App principal
$ClientId = "00000007-0000-0000-c000-000000000000"
$PermissionXml = "<AppPermissionRequests AllowAppOnlyPolicy=""true""><AppPermissionRequest
Scope=""http://sharepoint/content/tenant"" Right=""FullControl"" /><AppPermissionRequest
Scope=""http://sharepoint/social/tenant"" Right=""Read"" /><AppPermissionRequest
Scope=""http://sharepoint/search"" Right=""QueryAsUserIgnoreAppPrincipal""
/></AppPermissionRequests>"
$wellKnownApp= New-Object -TypeName
"Microsoft.SharePoint.Administration.SPWellKnownAppPrincipal" -ArgumentList ($ClientId,
$PermissionXml)
$wellKnownApp.Update()
Troubleshooting Dynamics 365 Server on-premises to SharePoint Server on-premises server-based integration For information about how to troubleshoot the Enable Server-Based SharePoint Integration wizard and view SharePoint monitoring logs, see Troubleshooting server-based authentication.
Known issues For documentation management with SharePoint troubleshooting and known issues, see Troubleshooting server-based authentication.
About claims-based authentication mapping By default, server-based authentication between Dynamics 365 (on-premises) and SharePoint on-premises uses the user’s security identifier (SID) to authenticate each user. If Microsoft Dynamics 365 Server and SharePoint are located in different Active Directory domains that do not have a trust, you must use a custom claims-based authentication mapping, such as the user’s email address. More information: Define custom claim mapping for SharePoint server-based integration
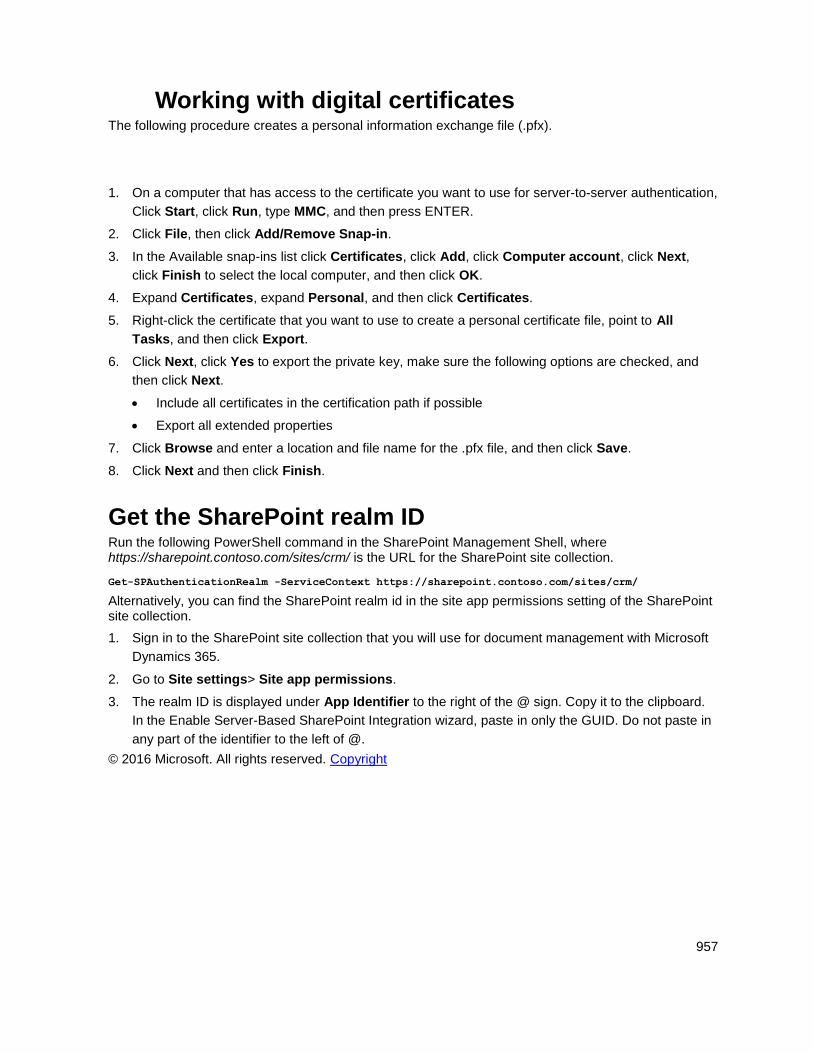
957
Working with digital certificates The following procedure creates a personal information exchange file (.pfx).
1. On a computer that has access to the certificate you want to use for server-to-server authentication,
Click Start, click Run, type MMC, and then press ENTER.
2. Click File, then click Add/Remove Snap-in.
3. In the Available snap-ins list click Certificates, click Add, click Computer account, click Next,
click Finish to select the local computer, and then click OK.
4. Expand Certificates, expand Personal, and then click Certificates.
5. Right-click the certificate that you want to use to create a personal certificate file, point to All
Tasks, and then click Export.
6. Click Next, click Yes to export the private key, make sure the following options are checked, and
then click Next.
Include all certificates in the certification path if possible
Export all extended properties
7. Click Browse and enter a location and file name for the .pfx file, and then click Save.
8. Click Next and then click Finish.
Get the SharePoint realm ID Run the following PowerShell command in the SharePoint Management Shell, where https://sharepoint.contoso.com/sites/crm/ is the URL for the SharePoint site collection.
Get-SPAuthenticationRealm -ServiceContext https://sharepoint.contoso.com/sites/crm/
Alternatively, you can find the SharePoint realm id in the site app permissions setting of the SharePoint site collection.
1. Sign in to the SharePoint site collection that you will use for document management with Microsoft
Dynamics 365.
2. Go to Site settings> Site app permissions.
3. The realm ID is displayed under App Identifier to the right of the @ sign. Copy it to the clipboard.
In the Enable Server-Based SharePoint Integration wizard, paste in only the GUID. Do not paste in
any part of the identifier to the left of @.
© 2016 Microsoft. All rights reserved. Copyright
958
Troubleshooting server-based authentication
Applies To: Dynamics 365 (online), Dynamics 365 (on-premises), Dynamics CRM 2016, Dynamics CRM Online
[This topic is pre-release documentation and is subject to change.]
In This Topic Troubleshooting the Enable server-based SharePoint Integration wizard
Troubleshooting SharePoint
Known issues with server-based authentication
Troubleshooting the Enable server-based SharePoint Integration wizard Review the error log for information about why the site doesn’t validate. To do this, click Error Log in the Enable Server-Based SharePoint Integration wizard after the validate sites stage is completed.
The enable server-based SharePoint integration validation check can return one of the following four types of failures.
Failed Connection
This failure indicates that the SharePoint server could not be accessed from where the validation check was run. Verify that the SharePoint URL that you entered is correct and that you can access the SharePoint site and site collection by using a web browser from the computer where the Enable Server-Based SharePoint Integration wizard is running. More information: TechNet: Troubleshooting hybrid environments (SharePoint)
Failed Authentication
This failure can occur when one or more of the server-based authentication configuration steps were not completed or did not complete successfully. More information: Set up SharePoint integration with Microsoft Dynamics 365
This failure can also occur if an incorrect URL is entered in the Enable Server-Based SharePoint Integration wizard or if there is a problem with the digital certificate used for server authentication.
Failed Authorization
This failure can occur when the claims-based authentication types do not match. For example, in a hybrid deployment such as Microsoft Dynamics 365 (online) to SharePoint on-premises, when you use the default claims-based authentication mapping, the Microsoft account email address used by the Microsoft Dynamics 365 (online) user must match the SharePoint user’s Work email. More information: Selecting a claims-based authentication mapping type
959
SharePoint Version Not Supported
This failure indicates that the SharePoint edition, version, required service pack, or required hotfix are missing. For more information, see SharePoint Version Not Supported
Troubleshooting SharePoint Issues that affect server-based authentication can also be recorded in SharePoint logs and reports. For more information about how to view and troubleshoot SharePoint monitoring, see the following topics. View reports and logs in SharePoint 2013 and Configure diagnostic logging in SharePoint 2013
Known issues with server-based authentication This section describes the known issues that may occur when you set up or use Microsoft Dynamics 365 and SharePoint server-based authentication.
Failed authentication is returned when validating a SharePoint site even though you have appropriate permission Applies to: Microsoft Dynamics 365 (online) with Microsoft SharePoint Online, Microsoft Dynamics 365 (online) with Microsoft SharePoint on-premises
This issue can occur when the claims-based authentication mapping that is used provides a situation where the claims type values don’t match between Microsoft Dynamics 365 and SharePoint. For example, this issue can occur when the following items are true:
You use the default claims-based authentication mapping type, which for Microsoft Dynamics 365
(online) to SharePoint Online server-based authentication uses the Microsoft account unique
identifier.
The identities used for Microsoft Office 365, Microsoft Dynamics 365 (online) administrator, or
SharePoint Online administrator don’t use the same Microsoft account, therefore the Microsoft
account unique identifiers don’t match.
"Exchange Online Security Certificate Expiration" error message displayed in Dynamics 365 On-premises or Dynamics 365 for Outlook. Applies to Microsoft Dynamics 365 Server configured with a connection to Exchange Online or SharePoint Online. The message states "Please update your certificate or Exchange Online integration will stop functioning in <number> days."
To resolve this issue, update the x509 digital certificate issued by a trusted certificate authority used to authenticate between Dynamics 365 (on-premises) and Exchange Online or SharePoint Online.
960
“Private key not found” error message returned when you run the CertificateReconfiguration.ps1 Windows PowerShell script Applies to: Microsoft Dynamics 365 (online) with Microsoft SharePoint on-premises, Microsoft Dynamics 365 on-premises with SharePoint Online, Microsoft Dynamics 365 on-premises with SharePoint on-premises
This issue can occur when there are two self-signed certificates located in the local certificate store that have the same subject name.
Notice that this issue should only occur when you use a self-signed certificate. Self-signed certificates should not be used in production environments.
To resolve this issue, remove the certificates with the same subject name that you don’t need using the Certificate Manager MMC snap-in and note the following.
Important
It can take up to 24 hours before the SharePoint cache will begin using the new certificate. To use the certificate now, follow the steps here to replace the certificate information in Microsoft Dynamics 365.
To resolve this issue by following the steps in this article, the existing certificate cannot be expired.
Replace a certificate that has the same subject name
1. Use an existing or create a new and self-signed certificate. The subject name must be unique to
any certificate subject names that are registered in the local certificate store.
2. Run the following PowerShell script against the existing certificate, or the certificate that you
created in the previous step. This script will add a new certificate in Microsoft Dynamics 365, which
will then be replaced in a later step. For more information about the
CertificateReconfiguration.ps1PowerShell script see, Prepare Microsoft Dynamics 365 Server for
server-based integration.
CertificateReconfiguration.ps1 -certificateFile <Private certificate file (.pfx)> -
password <private-certificate-password> -updateCrm -certificateType
AlternativeS2STokenIssuer -serviceAccount <serviceAccount> -storeFindType
FindBySubjectDistinguishedName
3. Remove the AlternativeS2STokenIssuer type certificate from the Dynamics 365 configuration
database. To do this, run these PowerShell commands.
Add-PSSnapin Microsoft.Crm.PowerShell
$Certificates = Get-CrmCertificate;
$alternativecertificate = "";
foreach($cert in $Certificates)
{ if($cert.CertificateType -eq "AlternativeS2STokenIssuer") {
$alternativecertificate = $cert;}
961
Remove-CrmCertificate -Certificate $alternativecertificate
You receive “The remote server returned an error: (400) Bad Request” and “Register-SPAppPrincipal: The requested service, 'http://wgwitsp:32843/46fbdd1305a643379b47d761334f6134/AppMng.svc' could not be activated” error messages Applies to: SharePoint on-premises versions used with Microsoft Dynamics 365.
The remote server returned an error: (400) Bad Request error message can occur after the certificate installation, such as when you run the CertificateReconfiguration.Ps1 script.
The Register-SPAppPrincipal: The requested service, 'http://wgwitsp:32843/46fbdd1305a643379b47d761334f6134/AppMng.svc' could not be activated error message can occur when you grant Microsoft Dynamics 365 permission to access SharePoint by running the Register-SPAppPrincipal command.
To resolve both of these errors after they occur, restart the web server where the Microsoft Dynamics 365 web application is installed. More information: Start or Stop the Web Server (IIS 8)
“Something went wrong while interaction with SharePoint” error message received Applies to: All Microsoft Dynamics 365 versions when used with Microsoft SharePoint Online
This error can be returned to the user who doesn’t have site permissions or the user has had permissions removed from the SharePoint site where Microsoft Dynamics 365 document management is enabled. Currently, this is a known issue with SharePoint Online where the error message that is displayed to the user doesn’t indicate that the user’s permissions are not sufficient to access the site.
See Also Set up SharePoint integration with Microsoft Dynamics 365 Permissions required for document management tasks
© 2016 Microsoft. All rights reserved. Copyright
Configure SharePoint integration using the list component
Applies To: Dynamics 365 (online), Dynamics 365 (on-premises), Dynamics CRM 2016, Dynamics CRM Online
[This topic is pre-release documentation and is subject to change.]
If you can’t use server-based SharePoint integration, you must install the Microsoft Dynamics CRM List Component to get document management functionality. The Microsoft Dynamics CRM List Component is a SharePoint solution that you upload and activate on a SharePoint site collection. This feature uses a client-to-SharePoint Server strategy to authenticate and transmit data.
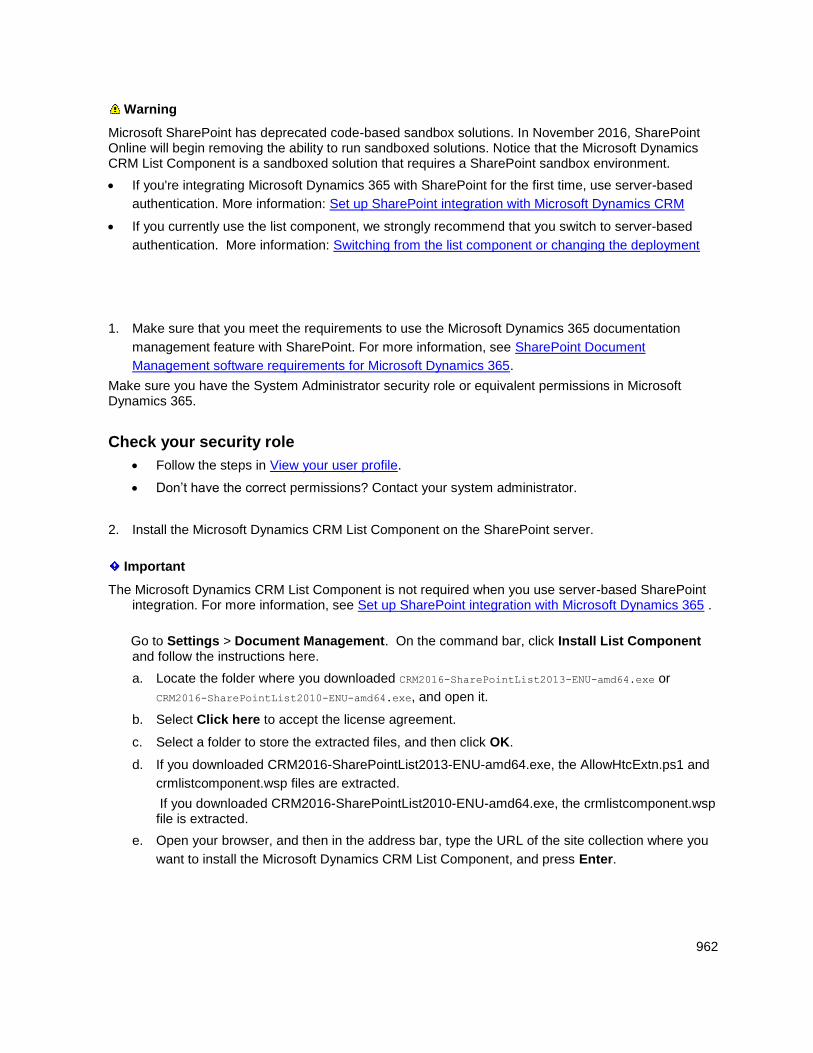
962
Warning
Microsoft SharePoint has deprecated code-based sandbox solutions. In November 2016, SharePoint Online will begin removing the ability to run sandboxed solutions. Notice that the Microsoft Dynamics CRM List Component is a sandboxed solution that requires a SharePoint sandbox environment.
If you're integrating Microsoft Dynamics 365 with SharePoint for the first time, use server-based
authentication. More information: Set up SharePoint integration with Microsoft Dynamics CRM
If you currently use the list component, we strongly recommend that you switch to server-based
authentication. More information: Switching from the list component or changing the deployment
1. Make sure that you meet the requirements to use the Microsoft Dynamics 365 documentation
management feature with SharePoint. For more information, see SharePoint Document
Management software requirements for Microsoft Dynamics 365.
Make sure you have the System Administrator security role or equivalent permissions in Microsoft Dynamics 365.
Check your security role
Follow the steps in View your user profile.
Don’t have the correct permissions? Contact your system administrator.
2. Install the Microsoft Dynamics CRM List Component on the SharePoint server.
Important
The Microsoft Dynamics CRM List Component is not required when you use server-based SharePoint integration. For more information, see Set up SharePoint integration with Microsoft Dynamics 365 .
Go to Settings > Document Management. On the command bar, click Install List Component and follow the instructions here.
a. Locate the folder where you downloaded CRM2016-SharePointList2013-ENU-amd64.exe or
CRM2016-SharePointList2010-ENU-amd64.exe, and open it.
b. Select Click here to accept the license agreement.
c. Select a folder to store the extracted files, and then click OK.
d. If you downloaded CRM2016-SharePointList2013-ENU-amd64.exe, the AllowHtcExtn.ps1 and
crmlistcomponent.wsp files are extracted.
If you downloaded CRM2016-SharePointList2010-ENU-amd64.exe, the crmlistcomponent.wsp file is extracted.
e. Open your browser, and then in the address bar, type the URL of the site collection where you
want to install the Microsoft Dynamics CRM List Component, and press Enter.
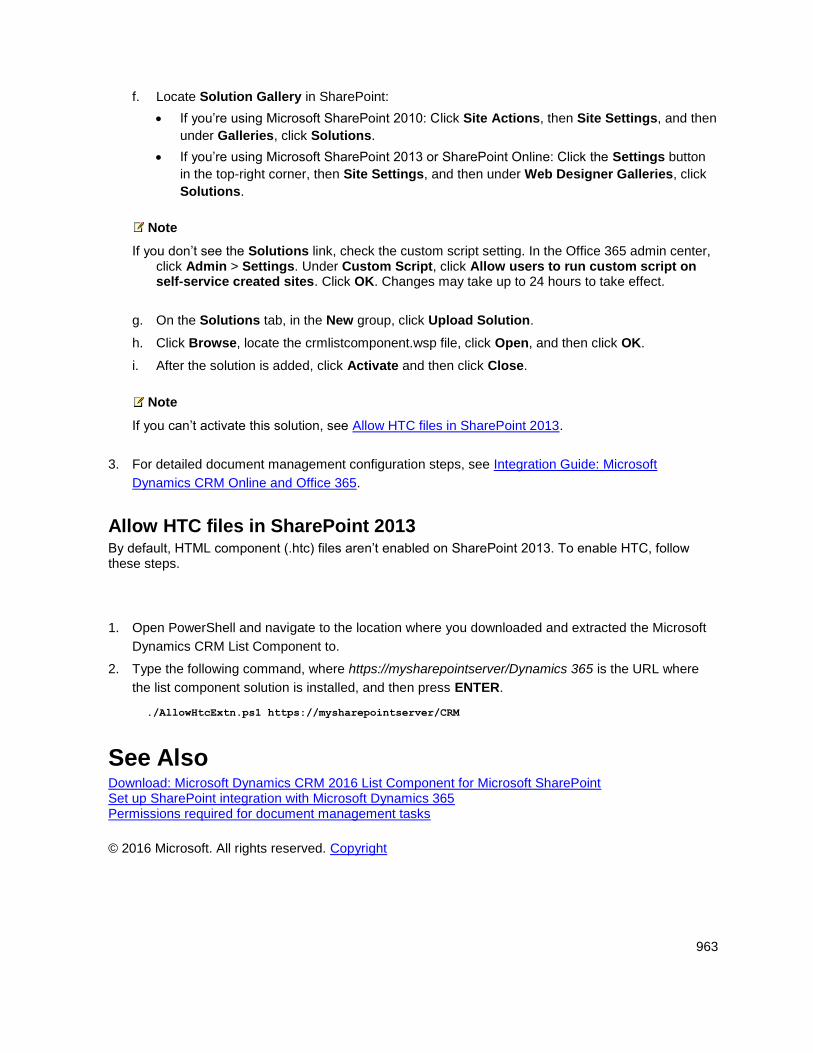
963
f. Locate Solution Gallery in SharePoint:
If you’re using Microsoft SharePoint 2010: Click Site Actions, then Site Settings, and then
under Galleries, click Solutions.
If you’re using Microsoft SharePoint 2013 or SharePoint Online: Click the Settings button
in the top-right corner, then Site Settings, and then under Web Designer Galleries, click
Solutions.
Note
If you don’t see the Solutions link, check the custom script setting. In the Office 365 admin center, click Admin > Settings. Under Custom Script, click Allow users to run custom script on self-service created sites. Click OK. Changes may take up to 24 hours to take effect.
g. On the Solutions tab, in the New group, click Upload Solution.
h. Click Browse, locate the crmlistcomponent.wsp file, click Open, and then click OK.
i. After the solution is added, click Activate and then click Close.
Note
If you can’t activate this solution, see Allow HTC files in SharePoint 2013.
3. For detailed document management configuration steps, see Integration Guide: Microsoft
Dynamics CRM Online and Office 365.
Allow HTC files in SharePoint 2013 By default, HTML component (.htc) files aren’t enabled on SharePoint 2013. To enable HTC, follow these steps.
1. Open PowerShell and navigate to the location where you downloaded and extracted the Microsoft
Dynamics CRM List Component to.
2. Type the following command, where https://mysharepointserver/Dynamics 365 is the URL where
the list component solution is installed, and then press ENTER.
./AllowHtcExtn.ps1 https://mysharepointserver/CRM
See Also Download: Microsoft Dynamics CRM 2016 List Component for Microsoft SharePoint Set up SharePoint integration with Microsoft Dynamics 365 Permissions required for document management tasks
© 2016 Microsoft. All rights reserved. Copyright
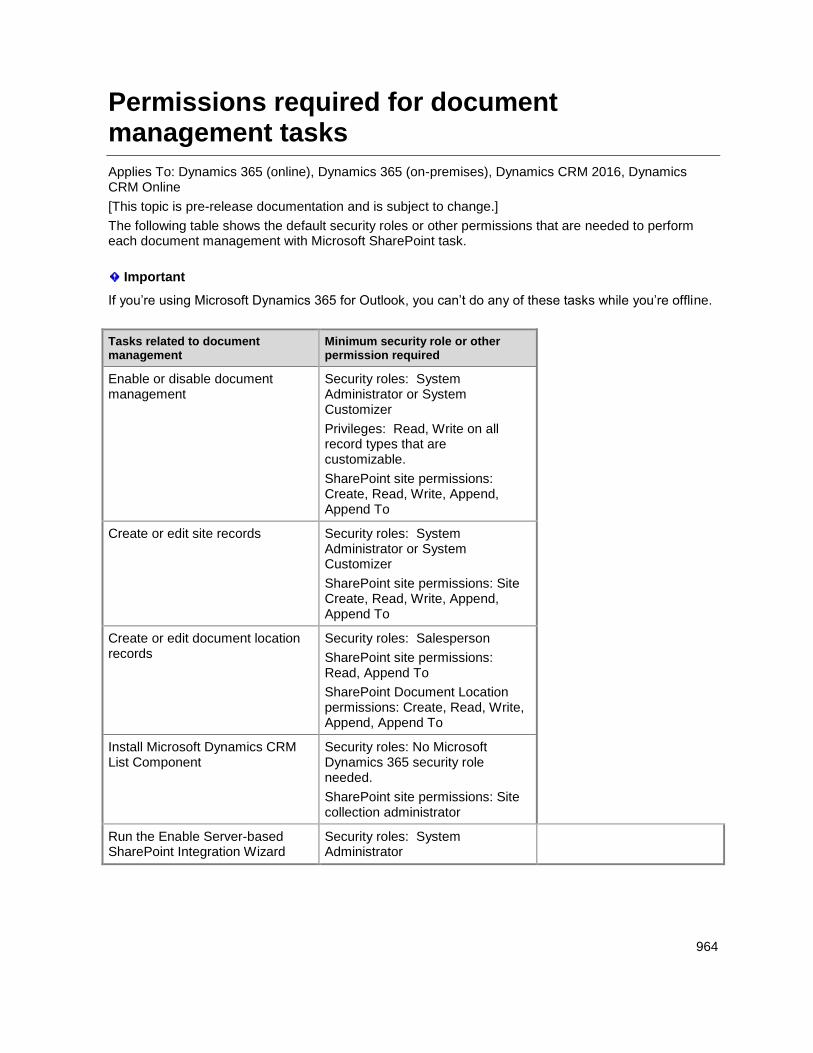
964
Permissions required for document management tasks
Applies To: Dynamics 365 (online), Dynamics 365 (on-premises), Dynamics CRM 2016, Dynamics CRM Online
[This topic is pre-release documentation and is subject to change.]
The following table shows the default security roles or other permissions that are needed to perform each document management with Microsoft SharePoint task.
Important
If you’re using Microsoft Dynamics 365 for Outlook, you can’t do any of these tasks while you’re offline.
Tasks related to document management
Minimum security role or other permission required
Enable or disable document management
Security roles: System Administrator or System Customizer
Privileges: Read, Write on all record types that are customizable.
SharePoint site permissions: Create, Read, Write, Append, Append To
Create or edit site records
Security roles: System Administrator or System Customizer
SharePoint site permissions: Site Create, Read, Write, Append, Append To
Create or edit document location records
Security roles: Salesperson
SharePoint site permissions: Read, Append To
SharePoint Document Location permissions: Create, Read, Write, Append, Append To
Install Microsoft Dynamics CRM List Component
Security roles: No Microsoft Dynamics 365 security role needed.
SharePoint site permissions: Site collection administrator
Run the Enable Server-based SharePoint Integration Wizard
Security roles: System Administrator
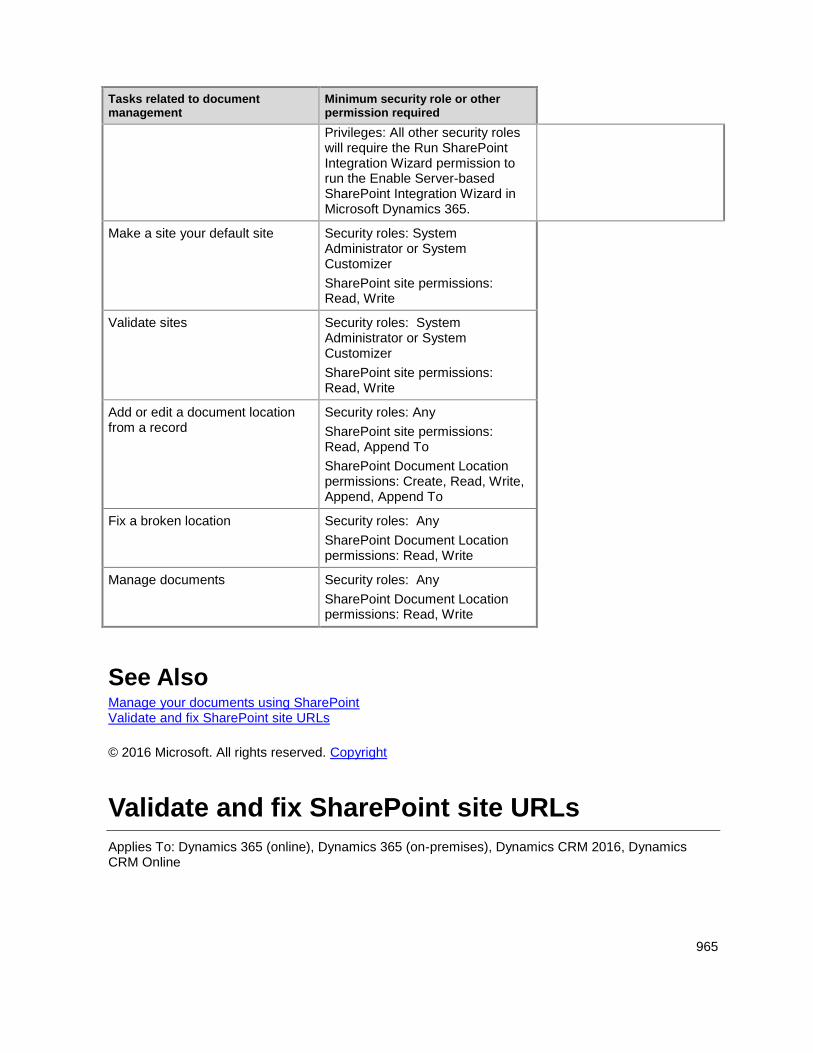
965
Tasks related to document management
Minimum security role or other permission required
Privileges: All other security roles will require the Run SharePoint Integration Wizard permission to run the Enable Server-based SharePoint Integration Wizard in Microsoft Dynamics 365.
Make a site your default site
Security roles: System Administrator or System Customizer
SharePoint site permissions: Read, Write
Validate sites
Security roles: System Administrator or System Customizer
SharePoint site permissions: Read, Write
Add or edit a document location from a record
Security roles: Any
SharePoint site permissions: Read, Append To
SharePoint Document Location permissions: Create, Read, Write, Append, Append To
Fix a broken location Security roles: Any
SharePoint Document Location permissions: Read, Write
Manage documents Security roles: Any
SharePoint Document Location permissions: Read, Write
See Also Manage your documents using SharePoint Validate and fix SharePoint site URLs
© 2016 Microsoft. All rights reserved. Copyright
Validate and fix SharePoint site URLs
Applies To: Dynamics 365 (online), Dynamics 365 (on-premises), Dynamics CRM 2016, Dynamics CRM Online
966
[This topic is pre-release documentation and is subject to change.]
In Microsoft Dynamics 365, SharePoint site and document location records contain links to site collections, site, document libraries, and folders in SharePoint. These site and document location records are associated with Dynamics 365 records so that the documents for Dynamics 365 records can be stored in SharePoint.
When the links between Microsoft Dynamics 365 and SharePoint break, you must validate and fix the links so that the Dynamics 365 records continue to point to the correct document libraries and folders for managing the documents.
Make sure you have the System Administrator security role or equivalent permissions in Microsoft Dynamics 365.
Check your security role
Follow the steps in View your user profile.
Don’t have the correct permissions? Contact your system administrator.
Find and fix the URLs. To do this, follow these steps.
a. Go to Settings > Document Management.
b. Click SharePoint Sites.
c. Select the site URLs that you want to validate, and then click or tap Validate.
1. Microsoft Dynamics 365 validates all the selected site URLs and their immediate subordinate site
and document library URLs. It then displays the results in Validating Sites.
2. To fix a URL, open the site record, and enter the correct URL. More information: Help & Training:
Create or edit site records.
3. Click Save & Close.
See Also Help & Training: Create or edit site records Manage your documents using SharePoint Set up SharePoint integration with Microsoft Dynamics 365 Help & Training: Set up SharePoint document management
© 2016 Microsoft. All rights reserved. Copyright
967
Connect to OneDrive for Business
Applies To: Dynamics 365 (online), Dynamics 365 (on-premises), Dynamics CRM 2016, Dynamics CRM Online
[This topic is pre-release documentation and is subject to change.]
Users can create and manage private documents with OneDrive for Business. Those documents can be accessed within Dynamics 365 after the system administrator has enabled OneDrive for Business.
Requirements The following are required to use OneDrive for Business with Microsoft Dynamics 365 Server.
Note
This topic applies to organizations deploying on-premises versions of OneDrive for Business and Dynamics 365 or an online/on-premises mix of these products. For information on integrating OneDrive for Business online with Dynamics 365 (online), see: Enable OneDrive for Business.
Set up SharePoint integration with Microsoft Dynamics 365 and have at least one team site.
Set up permission on the root SharePoint team site for all users who will use OneDrive for Business
in Dynamics 365. More information: Plan sites and manage users
For SharePoint on-premises, enable the Search service to access shared documents from other
users. It is enabled by default on SharePoint Online but not on SharePoint on-premises. More
information: Create and configure a Search service application in SharePoint Server 2013
Enable OneDrive for Business You enable OneDrive for Business as follows:
1. Click Settings > Document Management > Enable OneDrive for Business
2. Click Enable OneDrive for Business to enable it, and then click OK.
If you’re running SharePoint Server on-premises, on the Windows Server where SharePoint Server is running, open the SharePoint Management Shell and run the following commands to set up permissions between SharePoint and Microsoft Dynamics 365 Server.
Note
You might have already set up permissions and can skip the following if you completed the steps in Configure server-based authentication with Dynamics 365 Online and SharePoint on-premises or Configure server-based authentication with Microsoft Dynamics 365 (on-premises) and SharePoint on-premises.
Add-Pssnapin *
968
# Access WellKnown App principal
[Microsoft.SharePoint.Administration.SPWebService]::ContentService.WellKnownAppPrincipals
# Create WellKnown App principal
$ClientId = "00000007-0000-0000-c000-000000000000"
$PermissionXml = "<AppPermissionRequests AllowAppOnlyPolicy=""true""><AppPermissionRequest
Scope=""http://sharepoint/content/tenant"" Right=""FullControl"" /><AppPermissionRequest
Scope=""http://sharepoint/social/tenant"" Right=""Read"" /><AppPermissionRequest
Scope=""http://sharepoint/search"" Right=""QueryAsUserIgnoreAppPrincipal""
/></AppPermissionRequests>"
$wellKnownApp= New-Object -TypeName
"Microsoft.SharePoint.Administration.SPWellKnownAppPrincipal" -ArgumentList ($ClientId,
$PermissionXml)
$wellKnownApp.Update()
Controlling access to OneDrive for Business in Dynamics 365 You can toggle availability of OneDrive in Dynamics 365 for end users through the OneDrive for Business privilege.
1. Click Settings > Security > Security Roles
2. Choose a security role, and then click the Core Records tab.
3. Under Miscellaneous Privileges, toggle the OneDrive for Business privilege to the desired
availability.
Note
This privilege is visible in the Security Roles dialog only after OneDrive for Business is enabled.
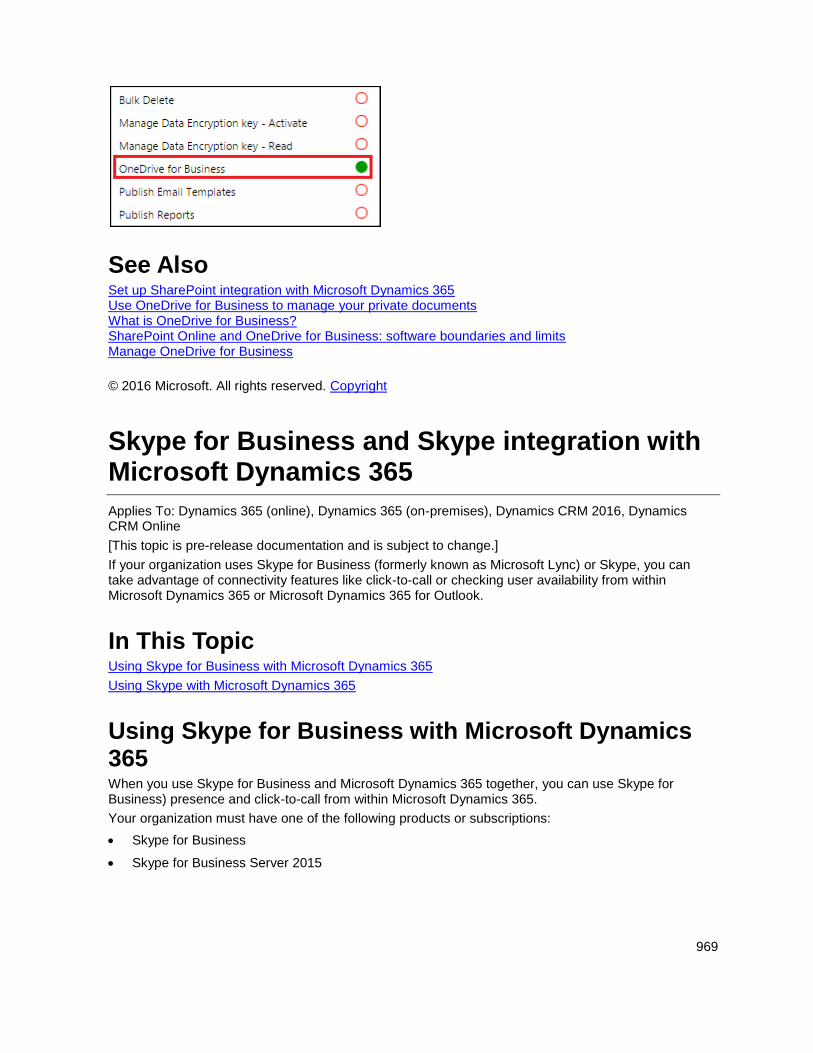
969
See Also Set up SharePoint integration with Microsoft Dynamics 365 Use OneDrive for Business to manage your private documents What is OneDrive for Business? SharePoint Online and OneDrive for Business: software boundaries and limits Manage OneDrive for Business
© 2016 Microsoft. All rights reserved. Copyright
Skype for Business and Skype integration with Microsoft Dynamics 365
Applies To: Dynamics 365 (online), Dynamics 365 (on-premises), Dynamics CRM 2016, Dynamics CRM Online
[This topic is pre-release documentation and is subject to change.]
If your organization uses Skype for Business (formerly known as Microsoft Lync) or Skype, you can take advantage of connectivity features like click-to-call or checking user availability from within Microsoft Dynamics 365 or Microsoft Dynamics 365 for Outlook.
In This Topic Using Skype for Business with Microsoft Dynamics 365
Using Skype with Microsoft Dynamics 365
Using Skype for Business with Microsoft Dynamics 365 When you use Skype for Business and Microsoft Dynamics 365 together, you can use Skype for Business) presence and click-to-call from within Microsoft Dynamics 365.
Your organization must have one of the following products or subscriptions:
Skype for Business
Skype for Business Server 2015
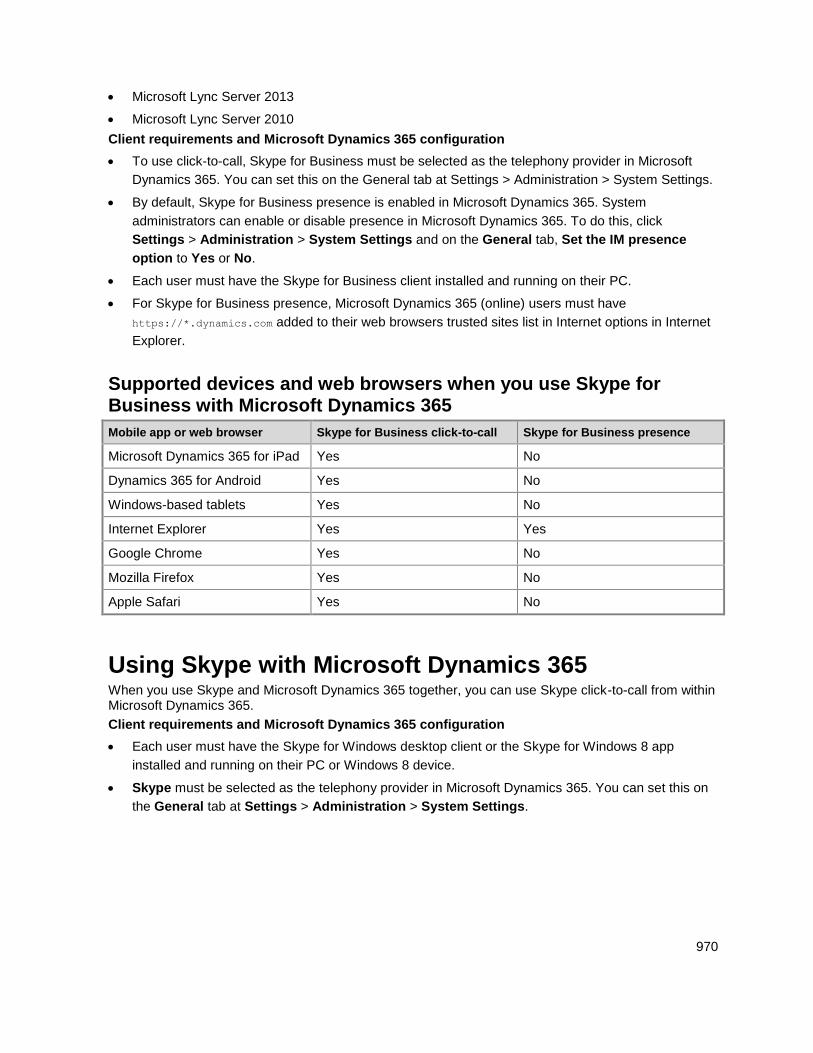
970
Microsoft Lync Server 2013
Microsoft Lync Server 2010
Client requirements and Microsoft Dynamics 365 configuration
To use click-to-call, Skype for Business must be selected as the telephony provider in Microsoft
Dynamics 365. You can set this on the General tab at Settings > Administration > System Settings.
By default, Skype for Business presence is enabled in Microsoft Dynamics 365. System
administrators can enable or disable presence in Microsoft Dynamics 365. To do this, click
Settings > Administration > System Settings and on the General tab, Set the IM presence
option to Yes or No.
Each user must have the Skype for Business client installed and running on their PC.
For Skype for Business presence, Microsoft Dynamics 365 (online) users must have
https://*.dynamics.com added to their web browsers trusted sites list in Internet options in Internet
Explorer.
Supported devices and web browsers when you use Skype for Business with Microsoft Dynamics 365
Mobile app or web browser Skype for Business click-to-call Skype for Business presence
Microsoft Dynamics 365 for iPad Yes No
Dynamics 365 for Android Yes No
Windows-based tablets Yes No
Internet Explorer Yes Yes
Google Chrome Yes No
Mozilla Firefox Yes No
Apple Safari Yes No
Using Skype with Microsoft Dynamics 365 When you use Skype and Microsoft Dynamics 365 together, you can use Skype click-to-call from within Microsoft Dynamics 365.
Client requirements and Microsoft Dynamics 365 configuration
Each user must have the Skype for Windows desktop client or the Skype for Windows 8 app
installed and running on their PC or Windows 8 device.
Skype must be selected as the telephony provider in Microsoft Dynamics 365. You can set this on
the General tab at Settings > Administration > System Settings.
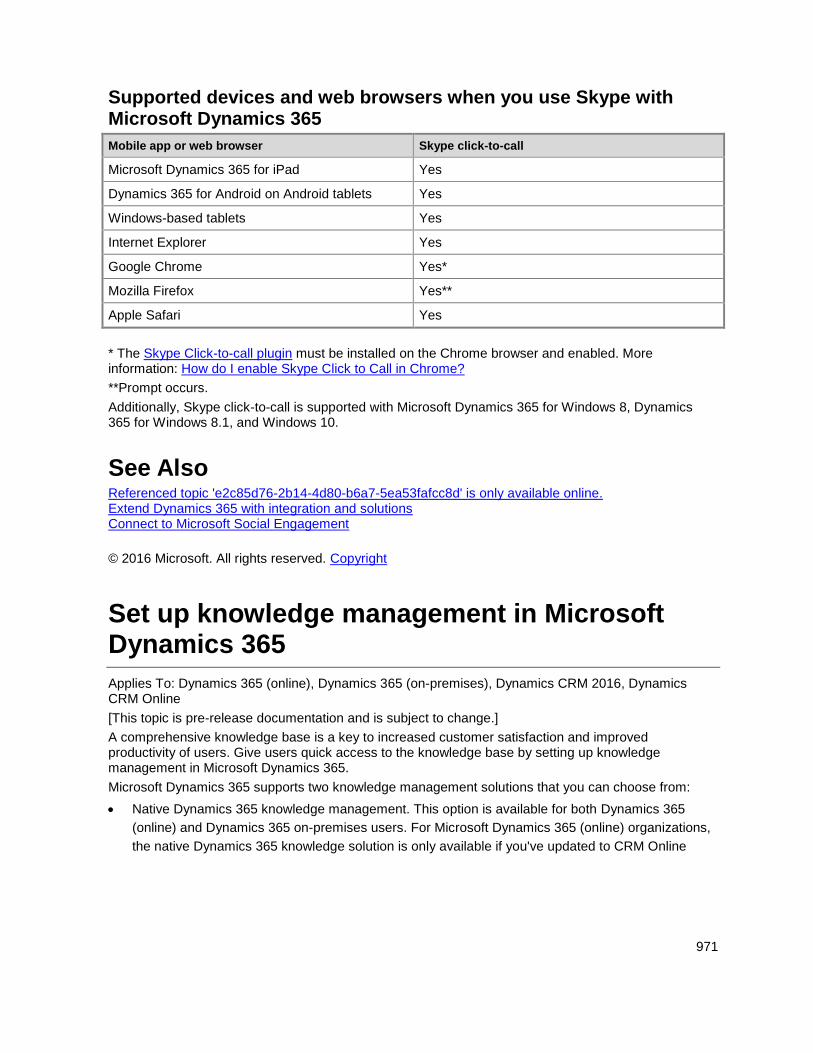
971
Supported devices and web browsers when you use Skype with Microsoft Dynamics 365
Mobile app or web browser Skype click-to-call
Microsoft Dynamics 365 for iPad Yes
Dynamics 365 for Android on Android tablets Yes
Windows-based tablets Yes
Internet Explorer Yes
Google Chrome Yes*
Mozilla Firefox Yes**
Apple Safari Yes
* The Skype Click-to-call plugin must be installed on the Chrome browser and enabled. More information: How do I enable Skype Click to Call in Chrome?
**Prompt occurs.
Additionally, Skype click-to-call is supported with Microsoft Dynamics 365 for Windows 8, Dynamics 365 for Windows 8.1, and Windows 10.
See Also Referenced topic 'e2c85d76-2b14-4d80-b6a7-5ea53fafcc8d' is only available online. Extend Dynamics 365 with integration and solutions Connect to Microsoft Social Engagement
© 2016 Microsoft. All rights reserved. Copyright
Set up knowledge management in Microsoft Dynamics 365
Applies To: Dynamics 365 (online), Dynamics 365 (on-premises), Dynamics CRM 2016, Dynamics CRM Online
[This topic is pre-release documentation and is subject to change.]
A comprehensive knowledge base is a key to increased customer satisfaction and improved productivity of users. Give users quick access to the knowledge base by setting up knowledge management in Microsoft Dynamics 365.
Microsoft Dynamics 365 supports two knowledge management solutions that you can choose from:
Native Dynamics 365 knowledge management. This option is available for both Dynamics 365
(online) and Dynamics 365 on-premises users. For Microsoft Dynamics 365 (online) organizations,
the native Dynamics 365 knowledge solution is only available if you've updated to CRM Online
972
2016 Update. For on-premises organizations, this feature is only available if you've upgraded to
CRM 2016.
Parature knowledgebase. This option is available only for Dynamics 365 (online) users. This
feature was introduced in CRM Online 2015 Update 1.
Interested in getting this feature? Find your Dynamics 365 administrator or support person.
After knowledge management is set up, users will be able to:
Search for relevant KB articles in Parature right from Microsoft Dynamics 365 as they're working on
a record.
See the content of the KB article inline, including images and videos.
Give timely and consistent information to customers when working on their cases by using actions
like opening the article and sharing the information or emailing the article link to customers.
In This Topic Prerequisites
Set up knowledge management
Prerequisites If you want to use Parature knowledgebase, before setting up knowledge management in Microsoft Dynamics 365, do this:
Set up a Parature account in the same Microsoft Office 365 tenant as your Dynamics 365 (online)
organization.
Add your Dynamics 365 organization to the list of allowed URLs in the CORS settings in Parature.
To do this, in Parature Service Desk, go to Setup > Department Management > CORS Settings
and add your Dynamics 365 organization URL.
Note
Any Microsoft Dynamics 365 (online) user with a Professional user subscription license can use the knowledge base integration capability without any additional set up in Parature. If a Microsoft Dynamics 365 (online) user with an Enterprise user subscription license wants to use knowledge base integration capability, you’ll need to assign the user a Parature license and then create a CSR with a Knowledgebase View Only role in Parature. More information: Assign Parature licenses to Microsoft Dynamics 365 users
973
Set up knowledge management
1. Make sure that you have the System Administrator or System Customizer security role or
equivalent permissions. You must also be the tenant administrator of Microsoft Office 365.
2. Go to Settings > Service Management.
3. Under Knowledge Base Management, click Embedded Knowledge Search.
4. In the Knowledge Base Management Settings wizard, in Record Types, select the record types
you want to turn on knowledge management for. The list will include all entities that are available
for an N:N relationship. Knowledge management is enabled for case entity by default.
5. Under Knowledge Source, in the Knowledge Solution field, select between the Dynamics 365
native knowledge solution and Parature knowledgebase.
Important
The Knowledge Solution field is available only if your organization has installed CRM Online 2015 Update 1 or later. For on-premises organizations, Parature knowledgebase isn’t supported so the Knowledge Solution field isn’t available.
6. If you’re using Native Dynamics 365 knowledge solution, in the Support Portal Connection
section, enter the following:
Use an external portal. You can integrate an external portal for publishing knowledge articles.
If your organization uses one, select this check box.
URL Format. Type the portal URL that will be used to create external (public-facing) portal
links for knowledge articles, which the service agents can share with the customers. The
external URL is created in the following format: http://<support portal URL>/kb/{kbnum}
The placeholder "{kbnum}" is replaced by an actual knowledge article number.
7. If you want to use the Parature knowledgebase, in Parature Connection Details, enter the
following:
a. Parature Instance. Select the Parature instance to connect to. The drop-down list by default
shows the instance present in your Microsoft Office 365 subscription.
b. Parature URL. This is automatically filled and shows the URL of the selected Parature instance
in the tenant.
c. Account ID. This is automatically filled and shows the ID of the account as it is set up in
Parature for the selected Parature instance.
d. Parature Department ID. Specify the department ID for the selected Parature instance. Every
department in an organization can have their own knowledge base. So you must specify the ID
of the department you want to connect to. You can connect to only one department at a time.
To find the department ID, sign in to Parature, and on the Setup tab, click System Overview.
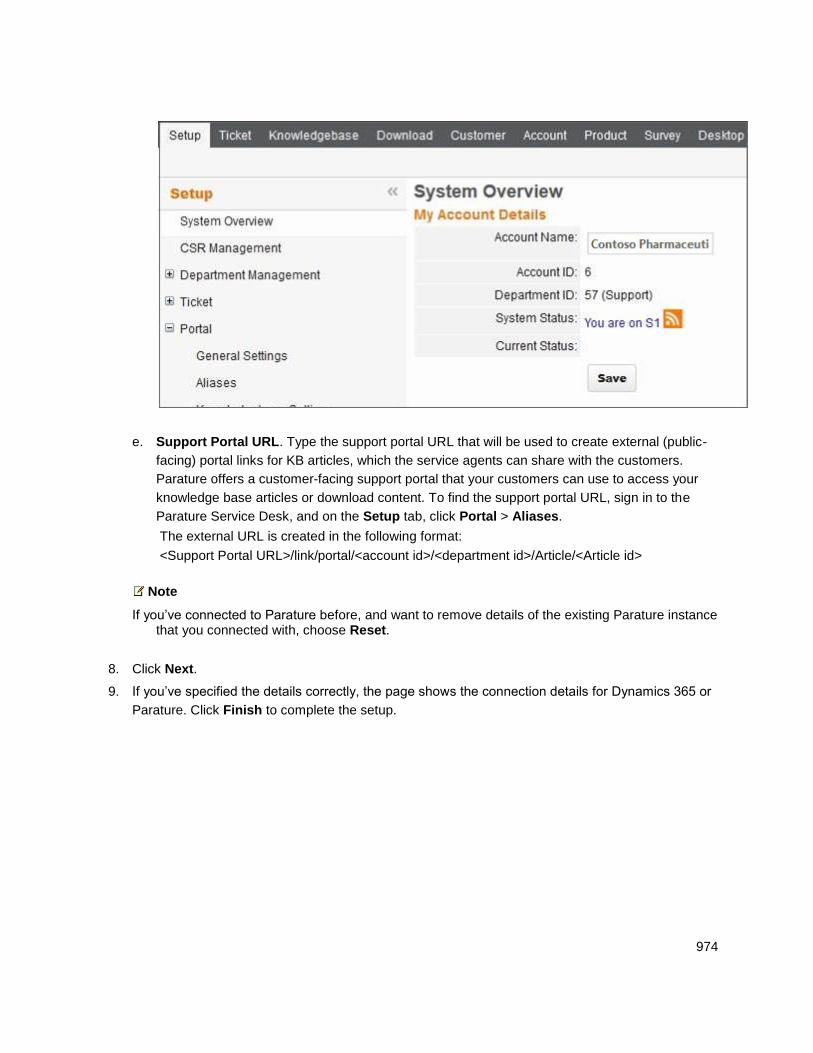
974
e. Support Portal URL. Type the support portal URL that will be used to create external (public-
facing) portal links for KB articles, which the service agents can share with the customers.
Parature offers a customer-facing support portal that your customers can use to access your
knowledge base articles or download content. To find the support portal URL, sign in to the
Parature Service Desk, and on the Setup tab, click Portal > Aliases.
The external URL is created in the following format:
<Support Portal URL>/link/portal/<account id>/<department id>/Article/<Article id>
Note
If you’ve connected to Parature before, and want to remove details of the existing Parature instance that you connected with, choose Reset.
8. Click Next.
9. If you’ve specified the details correctly, the page shows the connection details for Dynamics 365 or
Parature. Click Finish to complete the setup.
975
See Also Add the Knowledge Base Search control to Microsoft Dynamics 365 forms Assign Parature licenses to Microsoft Dynamics 365 users
© 2016 Microsoft. All rights reserved. Copyright
Add the Knowledge Base Search control to Microsoft Dynamics 365 forms
Applies To: Dynamics 365 (online), Dynamics 365 (on-premises), Dynamics CRM 2016, Dynamics CRM Online
[This topic is pre-release documentation and is subject to change.]
Add a Knowledge Base Search control to Microsoft Dynamics 365 forms to make it easy for users in your organization to find knowledge articles so they can answer common customer questions and resolve their issues right from Microsoft Dynamics 365 records, without having to switch to a different application.
You can configure the Knowledge Base Search control to:
Show automatic suggestions in search results based on certain fields, or based on text analytics.
The text analytics feature in only available for Microsoft Dynamics 365 (online).
Define filters that users can use on search results.
Choose from a set of predefined contextual actions the users can take on an article
Add the control on any section of any entitythat is enabled for knowledge management, including
the activity wall, and also in custom entities. The control can be added to both the Main and Main -
Interactive experience forms. The control is added by default to the Case form of type Main -
Interactive experience.
Note
The Knowledge Base Search control can be used on Microsoft Dynamics 365 for tablets and Microsoft Dynamics 365 for phones. However, some actions like Pop Out, Email Link, and Email Content aren't supported.
Microsoft Dynamics 365 supports two knowledge management solutions:
Native Dynamics 365 knowledge management: This option is available for both Dynamics 365
(online and on-premises) users. For Microsoft Dynamics 365 (online) organizations, the native
Dynamics 365 knowledge solution is introduced in CRM Online 2016 Update. For on-premises
Dynamics 365 organizations, this feature is introduced in CRM 2016.
Parature knowledgebase: This option is available only for Dynamics 365 (online) users. This
feature was introduced in CRM Online 2015 Update 1.
Interested in getting this feature? Find your Dynamics 365 administrator or support person.
976
Depending on the knowledge solution you choose while setting up knowledge management, some of the settings for the Knowledge Base Search control will change.
In This Topic Prerequisites
Add the Knowledge Base Search control to the Main forms for use in the Dynamics 365 web application
Add the search control to the activity wall of the Main form in the Dynamics 365 web application
Add the search control to a reference panel in an interactive form
Prerequisites Before you add the Knowledge Base Search control, make sure to:
Set up knowledge management in Microsoft Dynamics 365. More information: Set up knowledge
management in Microsoft Dynamics 365
Select the entity you want to enable knowledge management on while setting up knowledge
management.
Add the Knowledge Base Search control to the Main forms for use in the Dynamics 365 web application
1. Make sure that you have the System Administrator or System Customizer security role or
equivalent permissions.
2. Go to Settings > Customizations.
3. Choose Customize the System.
4. In the solution explorer, choose the entity you want to add the search control to, and under
Communication & Collaboration, make sure the Knowledge Management check box is
selected.
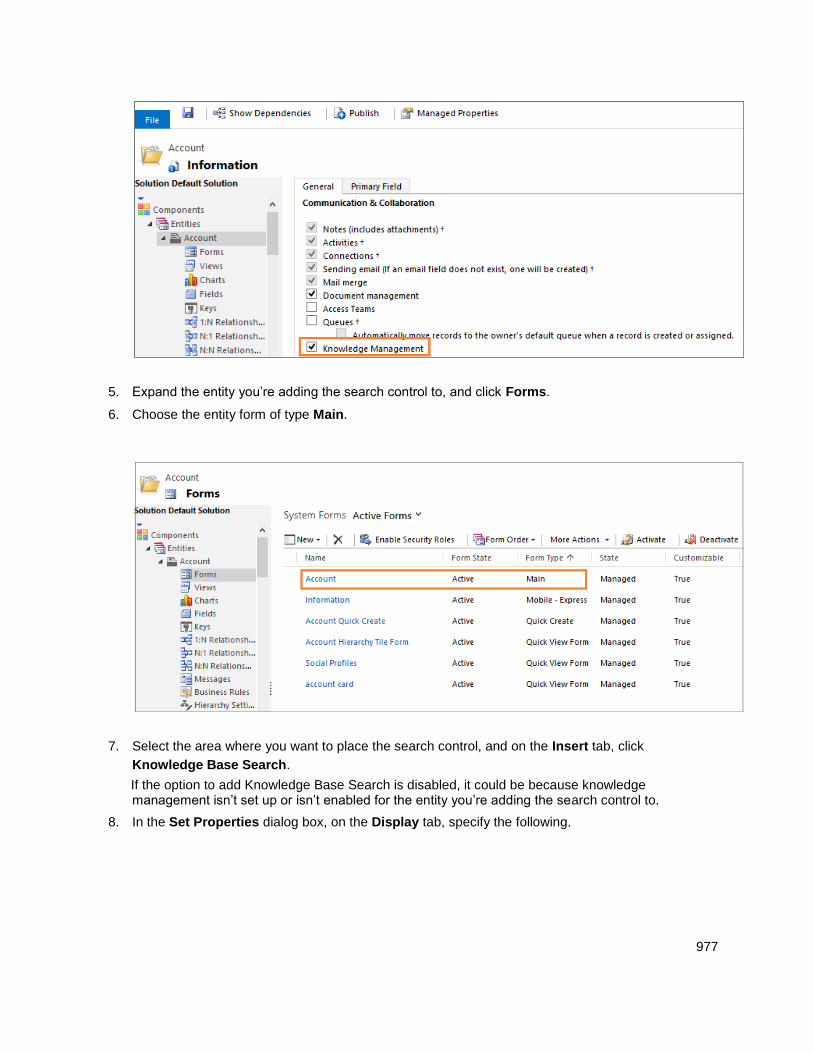
977
5. Expand the entity you’re adding the search control to, and click Forms.
6. Choose the entity form of type Main.
7. Select the area where you want to place the search control, and on the Insert tab, click
Knowledge Base Search.
If the option to add Knowledge Base Search is disabled, it could be because knowledge management isn’t set up or isn’t enabled for the entity you’re adding the search control to.
8. In the Set Properties dialog box, on the Display tab, specify the following.

978
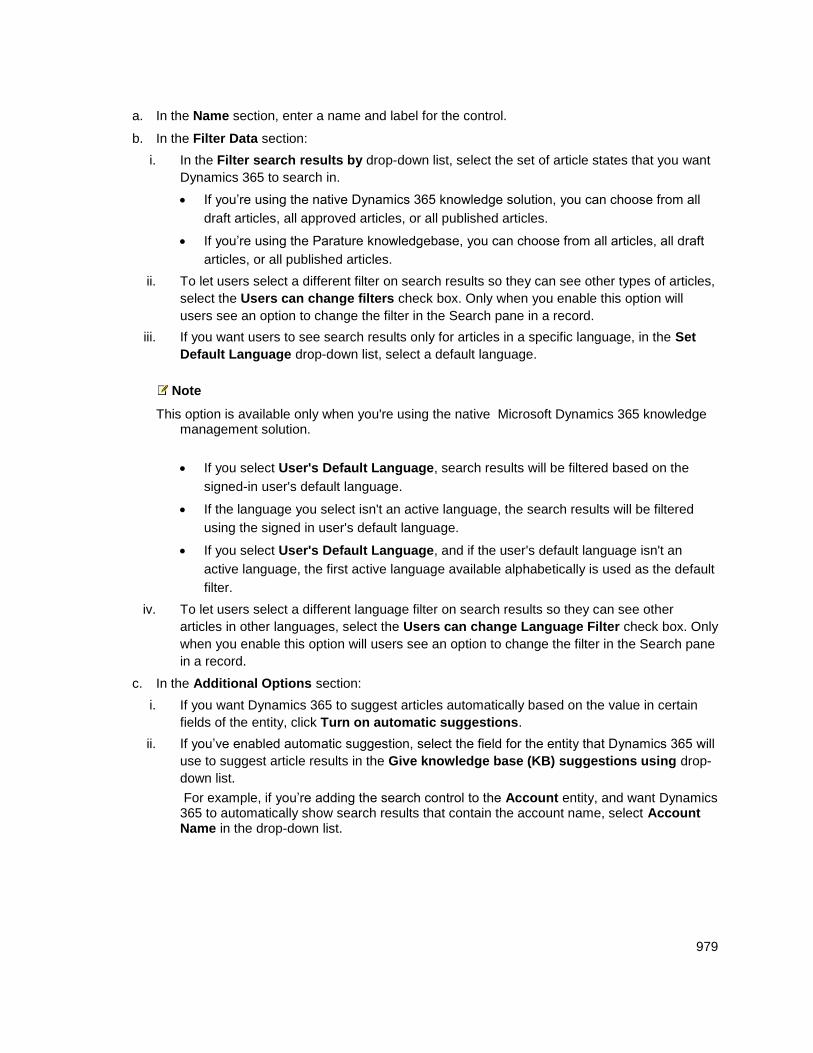
979
a. In the Name section, enter a name and label for the control.
b. In the Filter Data section:
i. In the Filter search results by drop-down list, select the set of article states that you want
Dynamics 365 to search in.
If you’re using the native Dynamics 365 knowledge solution, you can choose from all
draft articles, all approved articles, or all published articles.
If you’re using the Parature knowledgebase, you can choose from all articles, all draft
articles, or all published articles.
ii. To let users select a different filter on search results so they can see other types of articles,
select the Users can change filters check box. Only when you enable this option will
users see an option to change the filter in the Search pane in a record.
iii. If you want users to see search results only for articles in a specific language, in the Set
Default Language drop-down list, select a default language.
Note
This option is available only when you're using the native Microsoft Dynamics 365 knowledge management solution.
If you select User's Default Language, search results will be filtered based on the
signed-in user's default language.
If the language you select isn't an active language, the search results will be filtered
using the signed in user's default language.
If you select User's Default Language, and if the user's default language isn't an
active language, the first active language available alphabetically is used as the default
filter.
iv. To let users select a different language filter on search results so they can see other
articles in other languages, select the Users can change Language Filter check box. Only
when you enable this option will users see an option to change the filter in the Search pane
in a record.
c. In the Additional Options section:
i. If you want Dynamics 365 to suggest articles automatically based on the value in certain
fields of the entity, click Turn on automatic suggestions.
ii. If you’ve enabled automatic suggestion, select the field for the entity that Dynamics 365 will
use to suggest article results in the Give knowledge base (KB) suggestions using drop-
down list.
For example, if you’re adding the search control to the Account entity, and want Dynamics 365 to automatically show search results that contain the account name, select Account Name in the drop-down list.
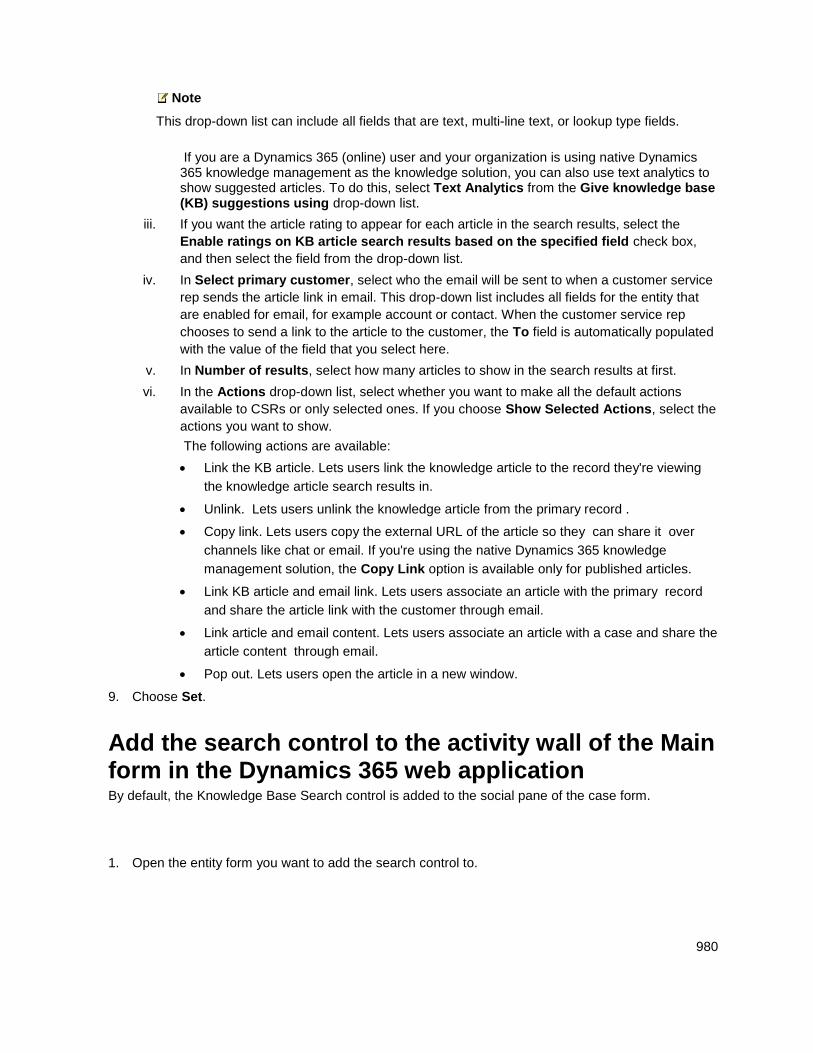
980
Note
This drop-down list can include all fields that are text, multi-line text, or lookup type fields.
If you are a Dynamics 365 (online) user and your organization is using native Dynamics 365 knowledge management as the knowledge solution, you can also use text analytics to show suggested articles. To do this, select Text Analytics from the Give knowledge base (KB) suggestions using drop-down list.
iii. If you want the article rating to appear for each article in the search results, select the
Enable ratings on KB article search results based on the specified field check box,
and then select the field from the drop-down list.
iv. In Select primary customer, select who the email will be sent to when a customer service
rep sends the article link in email. This drop-down list includes all fields for the entity that
are enabled for email, for example account or contact. When the customer service rep
chooses to send a link to the article to the customer, the To field is automatically populated
with the value of the field that you select here.
v. In Number of results, select how many articles to show in the search results at first.
vi. In the Actions drop-down list, select whether you want to make all the default actions
available to CSRs or only selected ones. If you choose Show Selected Actions, select the
actions you want to show.
The following actions are available:
Link the KB article. Lets users link the knowledge article to the record they're viewing
the knowledge article search results in.
Unlink. Lets users unlink the knowledge article from the primary record .
Copy link. Lets users copy the external URL of the article so they can share it over
channels like chat or email. If you're using the native Dynamics 365 knowledge
management solution, the Copy Link option is available only for published articles.
Link KB article and email link. Lets users associate an article with the primary record
and share the article link with the customer through email.
Link article and email content. Lets users associate an article with a case and share the
article content through email.
Pop out. Lets users open the article in a new window.
9. Choose Set.
Add the search control to the activity wall of the Main form in the Dynamics 365 web application By default, the Knowledge Base Search control is added to the social pane of the case form.
1. Open the entity form you want to add the search control to.
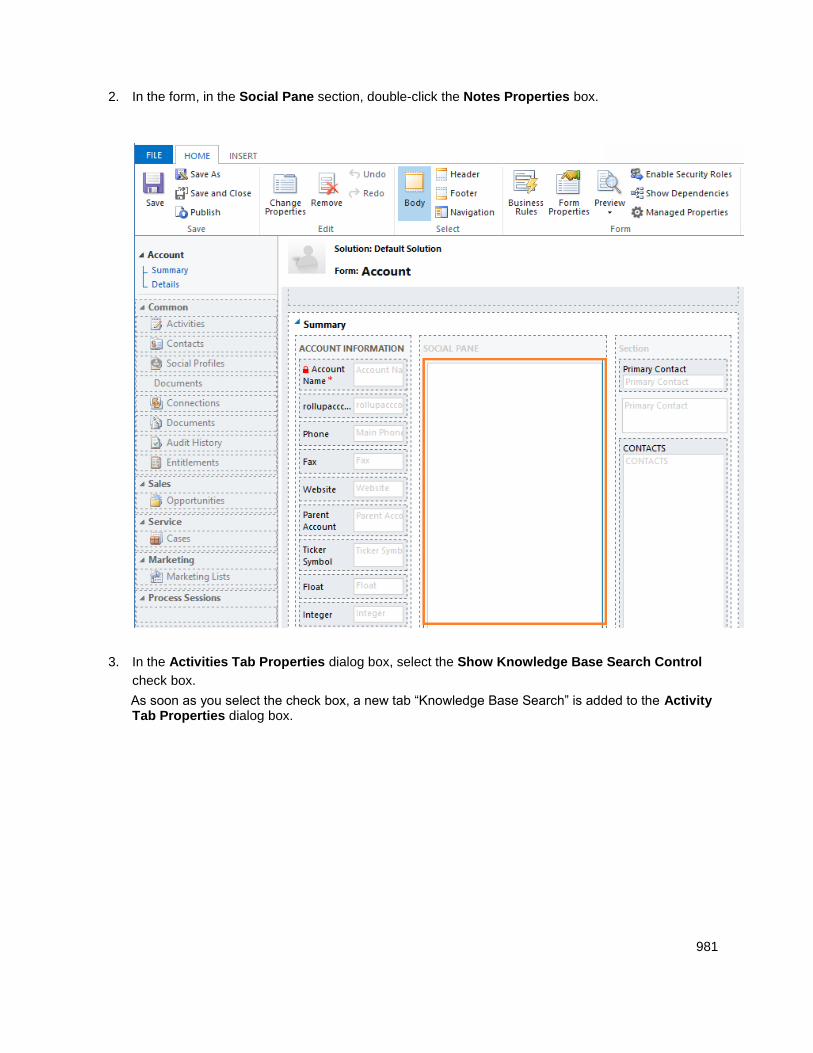
981
2. In the form, in the Social Pane section, double-click the Notes Properties box.
3. In the Activities Tab Properties dialog box, select the Show Knowledge Base Search Control
check box.
As soon as you select the check box, a new tab “Knowledge Base Search” is added to the Activity Tab Properties dialog box.
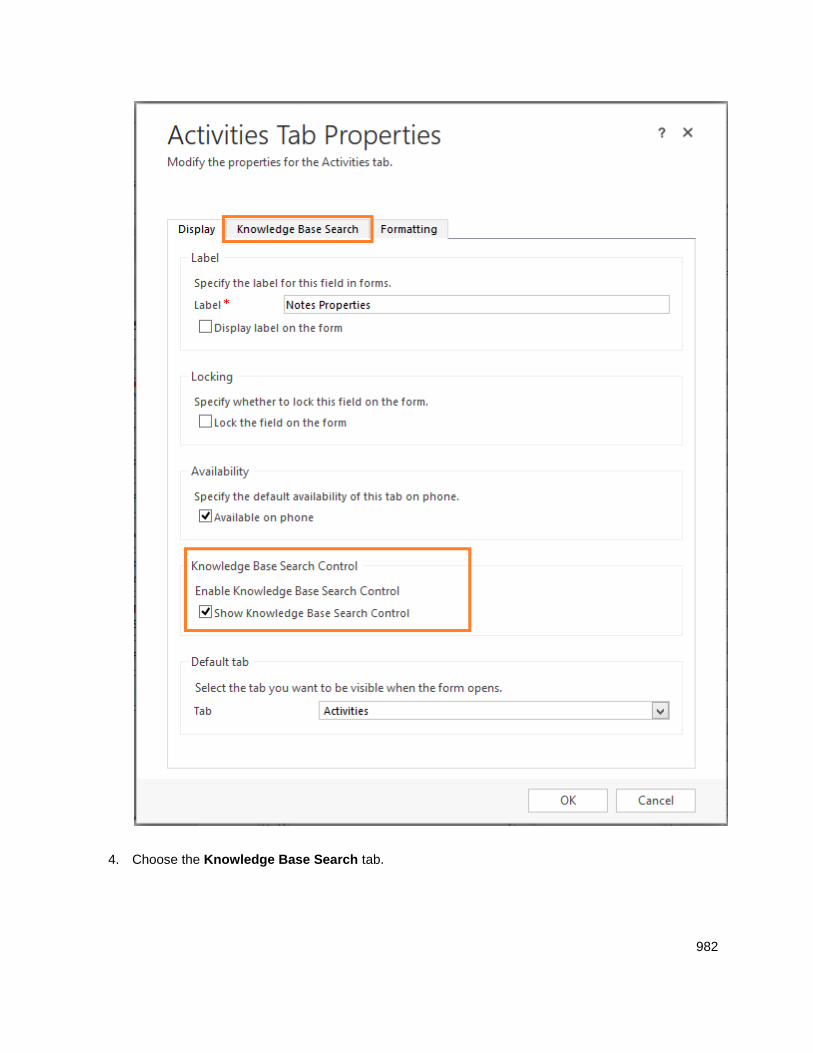
982
4. Choose the Knowledge Base Search tab.
983
5. Follow steps 8 and 9 as described previously.
Tip
You can set up the Knowledge Base Search tab as the default tab so whenever users open the form, the Knowledge Base tab is open on the activity wall. To do this, in the Activity Tab Properties dialog box, in the Default tab section, select Knowledge Base Search.
Add the search control to a reference panel in an interactive form You can add the Knowledge Base search control to any section of the Main - Interactive experience form. Main - Interactive experience forms are used in the interactive service hub. The Knowledge Base Search control is already added by default to the reference panel of the Case form of type Main - Interactive experience. When you add the Knowledge Base Search control to a reference panel, it appears as a vertical tab at runtime.
Important
Because the interactive service hub does not support Parature knowledge base,. make sure you choose native Dynamics 365 knowledge solution so users can search for records in the interactive service hub. If you choose Parature while setting up knowledge management, users will see an error in the Knowledge Base Search pane at runtime.
1. Make sure that you have the System Administrator or System Customizer security role or
equivalent permissions.
2. Go to Settings > Customizations.
3. Choose Customize the System.
4. In the solution explorer, choose the entity you want to add the search control to, and under
Communication & Collaboration, make sure the Knowledge Management check box is
selected.
5. Expand the entity you’re adding the search control to, and then click Forms.
6. Choose the entity form of type Main - Interactive experience.
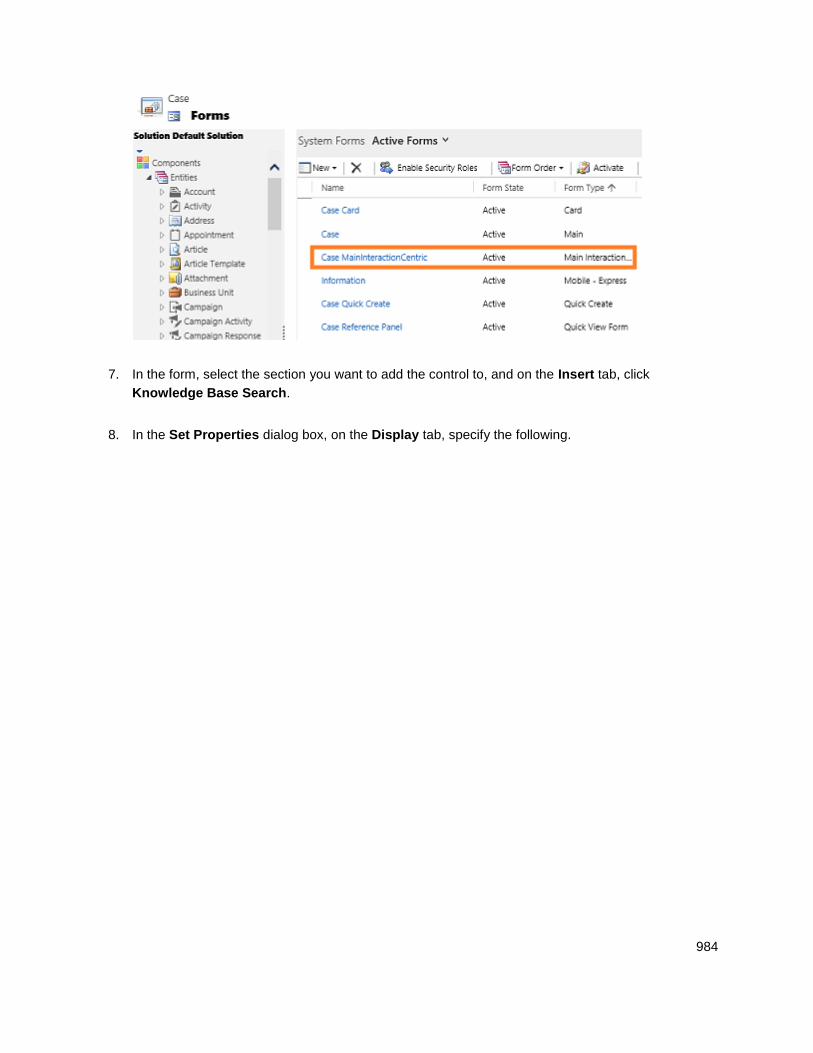
984
7. In the form, select the section you want to add the control to, and on the Insert tab, click
Knowledge Base Search.
8. In the Set Properties dialog box, on the Display tab, specify the following.
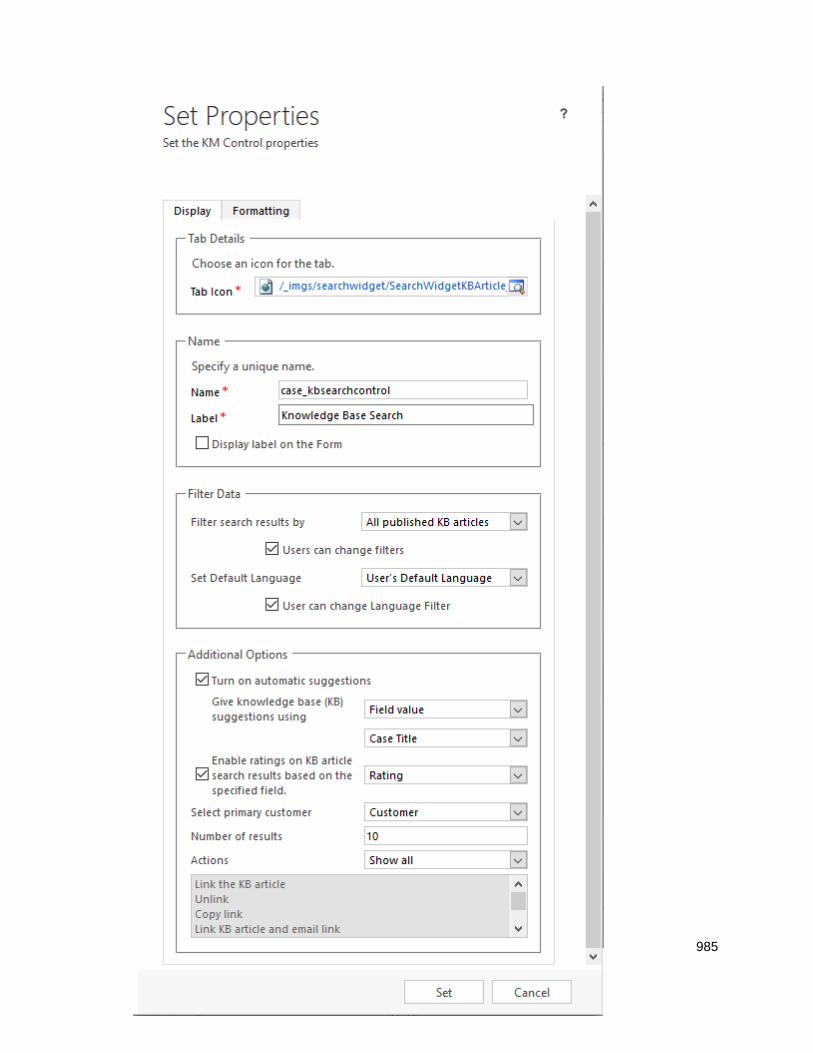
985
986
a. In the Name section, enter a name and label for the control.
b. In the Filter Data section:
i. In the Filter search results by drop-down list, select the set of article states that want
Dynamics 365 to search in.
If you choose native Dynamics 365 knowledge management as your solution, you can choose to show all draft articles, all approved articles, or all published articles.
This will be used as the default filter for the search results shown to the users.
ii. To let users select a different filter on search results so they can see other types of articles,
select the Users can change filters check box. Only when you enable this option will
users see an option to change the filter in the Search pane in a record.
iii. If you want users to see search results only for articles in a specific language, in the Set
Default Language drop-down list, select a default language.
Note
This option is available only when you're using the native Microsoft Dynamics 365 knowledge management solution.
If you select User's Default Language, search results will be filtered based on the
signed-in user's default language.
If the language that you select isn't an active language, the search results will be
filtered using the signed in user's default language.
If you select User's Default Language, and if the user's default language isn't an
active language, the first active language available alphabetically is used as a default
filter.
iv. To let users select a different language filter on search results so they can see other
articles in other languages, select the Users can change Language Filter check box. Only
when you enable this option will users see an option to change the filter in the Search pane
in a record.
c. In the Additional Options section:
i. If you want Dynamics 365 to suggest articles automatically based on the value in certain
fields of the entity, select Turn on automatic suggestions.
ii. If you’ve enabled automatic suggestions, select the field of the entity that Dynamics 365 will
use to suggest article results in the Give knowledge base (KB) suggestions using drop-
down list.
For example, if you’re adding the search control to the Account entity, and want Dynamics 365 to automatically show search results that contain the account name, select Account Name in the drop-down list.
Note
This drop-down list can include all the fields that are text, multi-line text, or lookup type fields.

987
Although you’ll see an option to choose Text Analytics in the Give knowledge base (KB) suggestions using drop-down list, it is not supported, and will not work at runtime.
iii. If you want the article rating to appear for each article in in the search results, select the
Enable ratings on KB article search results based on the specified field, check box,
and then select the field from the drop-down list.
iv. In Select primary customer, select who the email will be sent to when a customer service
rep chooses to send the article link in an email. This drop-down list includes all fields for the
entity that are enabled for email, for example account or contact. When the customer
service rep chooses to send an article link to the customer, the To field is automatically
populated with the value of the field you select here.
v. In Number of results, select how many articles to show in the search results at first.
vi. In the Actions drop-down list, select whether you want to make all default actions available
to CSRs or only selected ones. If you choose Show Selected Actions, select the actions
you would like to show.
The following actions are available:
Link the KB article. Lets users link the knowledge article to the record they're viewing
the knowledge article search results in.
Unlink. Lets users unlink the knowledge article from the primary record .
Copy link. Lets users copy the external URL of the article so they can share it over
channels like chat or email. If you're using the native Dynamics 365 knowledge
management solution, the Copy Link option is available only for published articles.
Link KB article and email link. Lets users associate an article with the primary record
and share the article link through email.
Link article and email content. Lets users associate an article with a case and share the
article content through email.
Pop out. Lets users open the article in a new window.
Note
Although, the Pop out option is available for selection in the drop-down list, it isn’t supported at runtime in the interactive service hub.
See Also Set up knowledge management in Microsoft Dynamics 365
© 2016 Microsoft. All rights reserved. Copyright
988
Assign Parature licenses to Microsoft Dynamics 365 users
Applies To: Dynamics 365 (online), Dynamics 365 (on-premises), Dynamics CRM 2016, Dynamics CRM Online
[This topic is pre-release documentation and is subject to change.]
Any Microsoft Dynamics 365 (online) user with a Professional user subscription license can use the knowledge management capability in Dynamics 365 without any additional setup in Parature, from Microsoft.
If a Microsoft Dynamics 365 (online) user with an Enterprise user subscription license wants to use knowledge management capability, you’ll need to assign a Parature license to the user, and then assign this user a “Knowledgebase View Only” role in Parature.
Note
The instructions in this topic are applicable to you only if your organization is using the Parature knowledgebase.
To assign and verify Parature licenses, use the Office 365 admin portal.
1. Browse to the Office 365 admin portal (https://portal.office.com) and sign in using Global
administrator credentials.
2. Click Users > Active Users and select a user to assign a license.
3. On the right side of the page, under Assigned license, click Edit.

989
4. Click the Microsoft Dynamics 365 (online) Enterprise drop-down arrow, and then select the
check box for Parature Enterprise.
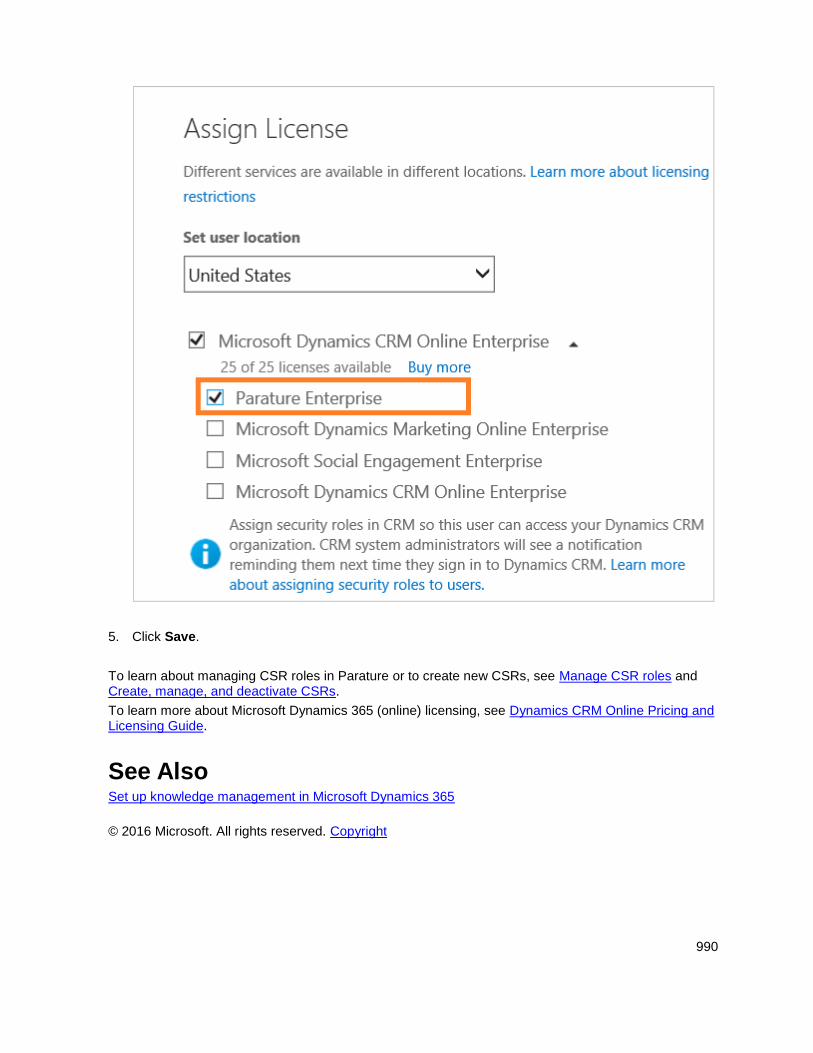
990
5. Click Save.
To learn about managing CSR roles in Parature or to create new CSRs, see Manage CSR roles and Create, manage, and deactivate CSRs.
To learn more about Microsoft Dynamics 365 (online) licensing, see Dynamics CRM Online Pricing and Licensing Guide.
See Also Set up knowledge management in Microsoft Dynamics 365
© 2016 Microsoft. All rights reserved. Copyright
991
Connect to Microsoft Social Engagement
Applies To: Dynamics 365 (online), Dynamics 365 (on-premises), Dynamics CRM 2016, Dynamics CRM Online
[This topic is pre-release documentation and is subject to change.]
Your customers and stakeholders are talking about you on Facebook, Twitter, or blogs. How do you learn about it? In Microsoft Dynamics 365, you can get powerful social insights by connecting Microsoft Dynamics 365 to Microsoft Social Engagement. Microsoft Social Engagement collects data from social media websites and presents it to you in charts and graphs that you can use to spot emerging trends in people’s comments, whether they’re positive, negative, or neutral. You can drill down into the data and see who is mentioning you, where they posted the comment, and exactly what they said. Armed with these insights, you can pinpoint what you’re doing right, and address potential issues before bigger problems arise.
With social insights, you bring social media data directly into Dynamics 365 dashboards and entity forms. As an administrator, you configure the connection to Microsoft Social Engagement and add the Social Insights controls to the entity forms and system dashboards. You use the Social Insights controls to specify what social data you want to see and in what form you want this data to be presented to you. When you set up the Social Insights controls, you choose a search topic or search topic category and visuals. For the search topic you may choose your company name to listen to what is said in social media about your company or your product. Or, you may want to know what is being said about your accounts; if so, choose the Accounts search topic category. After you choose the search topic or search category, you pick the visuals. It can be a graph or chart, or some other visual representation of data. You can find a lot of interesting, useful, and easy to follow information about social listening and social insights in Dynamics 365 in this book: eBook: Microsoft Social Engagement for CRM.
Note
Before you can set up the Social Insights controls in Dynamics 365, you have to add search topic categories and visuals for your Dynamics 365 organization in Microsoft Social Engagement. You can add search topics in Microsoft Social Engagement directly from within Dynamics 365. See the Microsoft Social Engagement Help Center
In This Topic Connect Dynamics 365 (online) to Microsoft Social Engagement for Social Insights
Connect Dynamics 365 on-premises to Microsoft Social Engagement for Social Insights
Reset Social Insights
Add the Social Insights control to a Dynamics 365 entity form
Add and set up Social Insights controls on the system dashboards
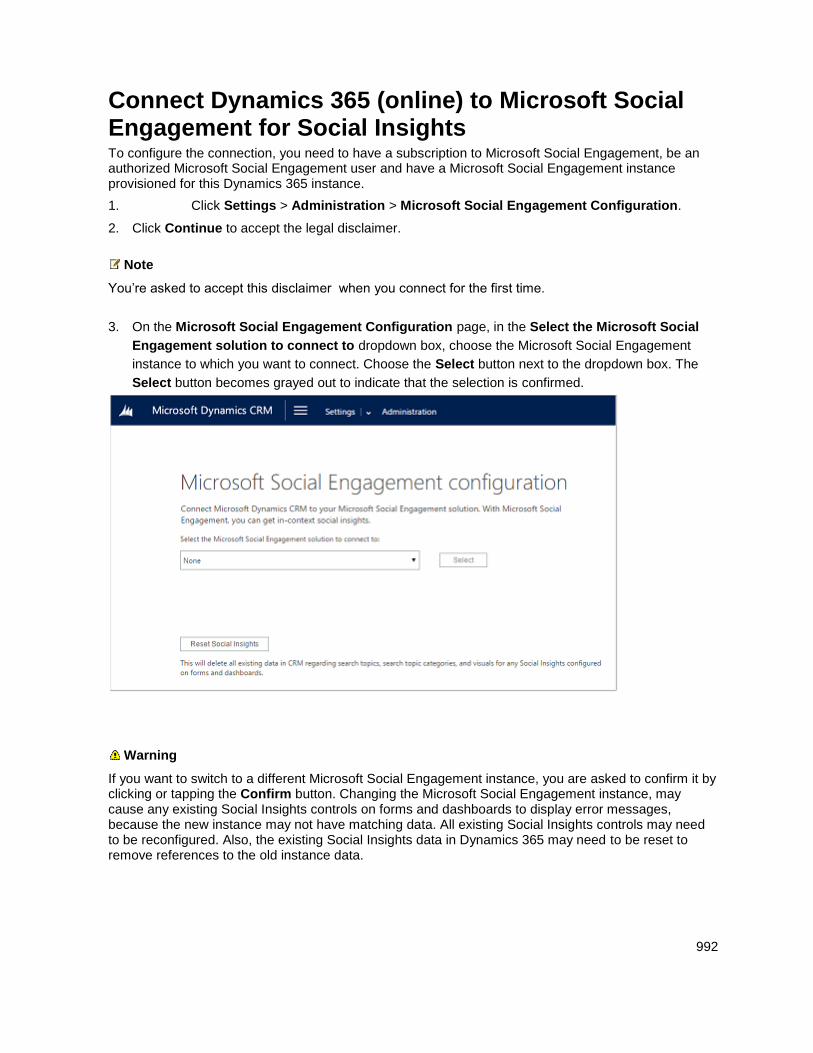
992
Connect Dynamics 365 (online) to Microsoft Social Engagement for Social Insights To configure the connection, you need to have a subscription to Microsoft Social Engagement, be an authorized Microsoft Social Engagement user and have a Microsoft Social Engagement instance provisioned for this Dynamics 365 instance.
1. Click Settings > Administration > Microsoft Social Engagement Configuration.
2. Click Continue to accept the legal disclaimer.
Note
You’re asked to accept this disclaimer when you connect for the first time.
3. On the Microsoft Social Engagement Configuration page, in the Select the Microsoft Social
Engagement solution to connect to dropdown box, choose the Microsoft Social Engagement
instance to which you want to connect. Choose the Select button next to the dropdown box. The
Select button becomes grayed out to indicate that the selection is confirmed.
Warning
If you want to switch to a different Microsoft Social Engagement instance, you are asked to confirm it by clicking or tapping the Confirm button. Changing the Microsoft Social Engagement instance, may cause any existing Social Insights controls on forms and dashboards to display error messages, because the new instance may not have matching data. All existing Social Insights controls may need to be reconfigured. Also, the existing Social Insights data in Dynamics 365 may need to be reset to remove references to the old instance data.

993
Note
In Microsoft Dynamics CRM Online Spring ‘14, only one Microsoft Social Engagement instance is provided for connection to the Dynamics 365 instance.
Connect Dynamics 365 on-premises to Microsoft Social Engagement for Social Insights To configure the connection, you need to have a subscription to Microsoft Social Engagement and be an authorized Microsoft Social Engagement user.
1. Click Settings > Administration > Microsoft Social Engagement Configuration.
2. Click Continue to accept the legal disclaimer.
Note
You’re asked to accept this disclaimer when you connect for the first time.
3. Follow the directions on the Microsoft Social Engagement Configuration page.

994
Warning
If you want to switch to a different Microsoft Social Engagement instance, you are asked to confirm it by choosing the Confirm button. Changing the Microsoft Social Engagement instance, may cause any existing Social Insights controls on forms and dashboards to display error messages, because the new instance may not have matching data. All existing Social Insights controls may need to be reconfigured. Also, the existing Social Insights data in Dynamics 365 may need to be reset to remove references to the old instance data.
Note
In Microsoft Dynamics CRM Online Spring ‘14, only one Microsoft Social Engagement instance is provided for connection to the Dynamics 365 instance.
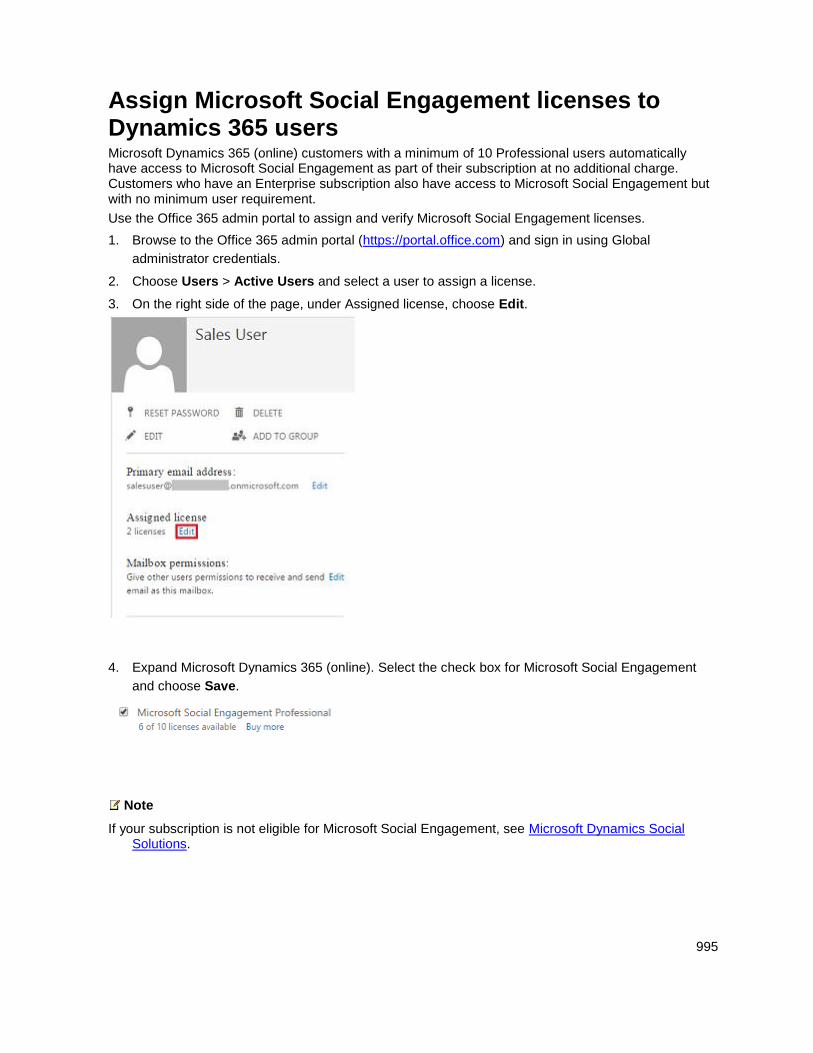
995
Assign Microsoft Social Engagement licenses to Dynamics 365 users Microsoft Dynamics 365 (online) customers with a minimum of 10 Professional users automatically have access to Microsoft Social Engagement as part of their subscription at no additional charge. Customers who have an Enterprise subscription also have access to Microsoft Social Engagement but with no minimum user requirement.
Use the Office 365 admin portal to assign and verify Microsoft Social Engagement licenses.
1. Browse to the Office 365 admin portal (https://portal.office.com) and sign in using Global
administrator credentials.
2. Choose Users > Active Users and select a user to assign a license.
3. On the right side of the page, under Assigned license, choose Edit.
4. Expand Microsoft Dynamics 365 (online). Select the check box for Microsoft Social Engagement
and choose Save.
Note
If your subscription is not eligible for Microsoft Social Engagement, see Microsoft Dynamics Social Solutions.
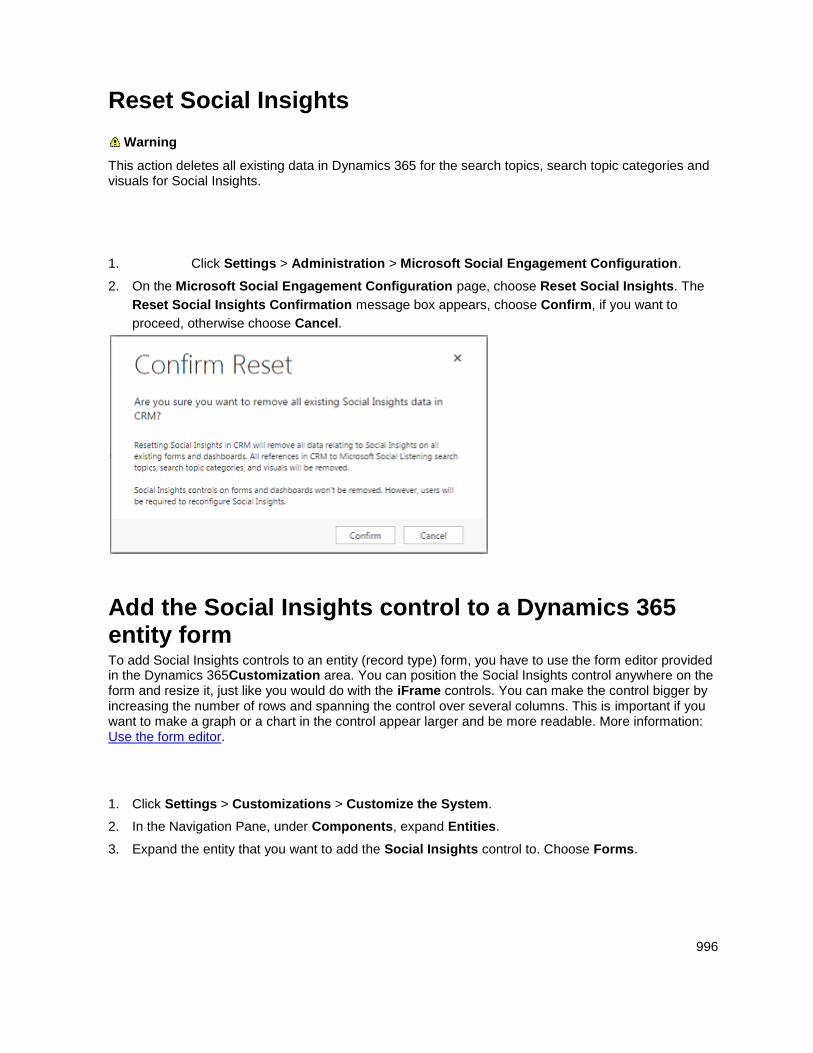
996
Reset Social Insights
Warning
This action deletes all existing data in Dynamics 365 for the search topics, search topic categories and visuals for Social Insights.
1. Click Settings > Administration > Microsoft Social Engagement Configuration.
2. On the Microsoft Social Engagement Configuration page, choose Reset Social Insights. The
Reset Social Insights Confirmation message box appears, choose Confirm, if you want to
proceed, otherwise choose Cancel.
Add the Social Insights control to a Dynamics 365 entity form To add Social Insights controls to an entity (record type) form, you have to use the form editor provided in the Dynamics 365Customization area. You can position the Social Insights control anywhere on the form and resize it, just like you would do with the iFrame controls. You can make the control bigger by increasing the number of rows and spanning the control over several columns. This is important if you want to make a graph or a chart in the control appear larger and be more readable. More information: Use the form editor.
1. Click Settings > Customizations > Customize the System.
2. In the Navigation Pane, under Components, expand Entities.
3. Expand the entity that you want to add the Social Insights control to. Choose Forms.
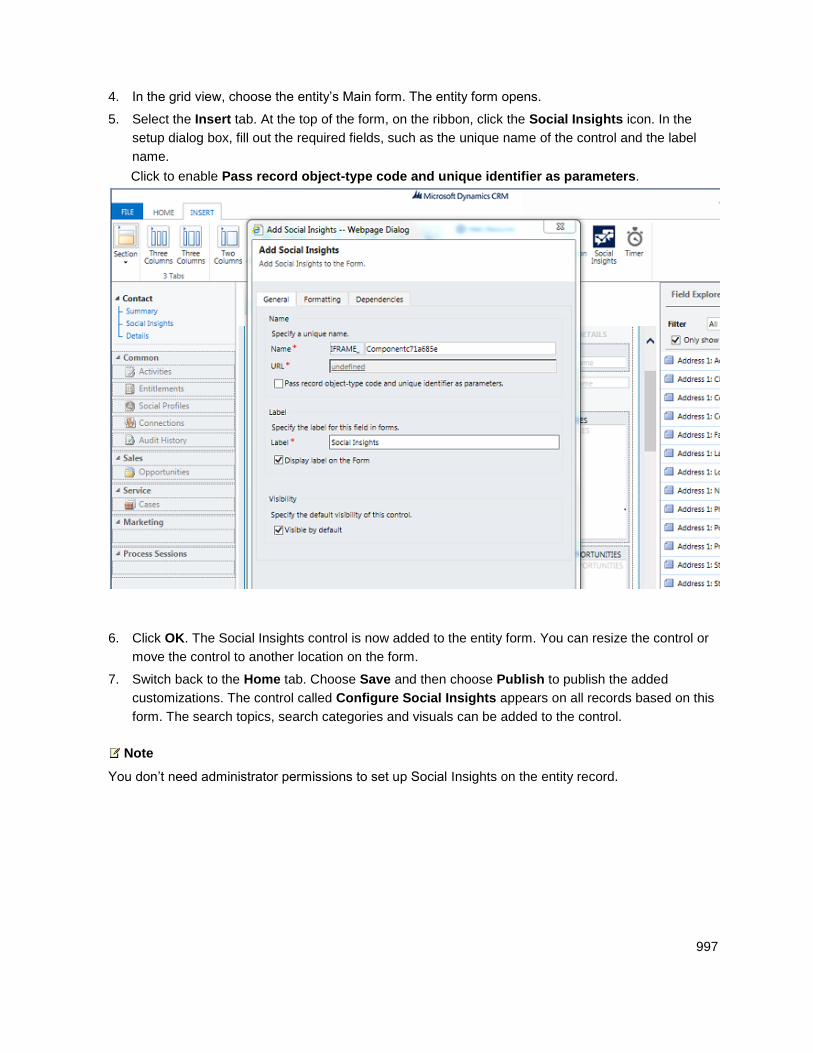
997
4. In the grid view, choose the entity’s Main form. The entity form opens.
5. Select the Insert tab. At the top of the form, on the ribbon, click the Social Insights icon. In the
setup dialog box, fill out the required fields, such as the unique name of the control and the label
name.
Click to enable Pass record object-type code and unique identifier as parameters.
6. Click OK. The Social Insights control is now added to the entity form. You can resize the control or
move the control to another location on the form.
7. Switch back to the Home tab. Choose Save and then choose Publish to publish the added
customizations. The control called Configure Social Insights appears on all records based on this
form. The search topics, search categories and visuals can be added to the control.
Note
You don’t need administrator permissions to set up Social Insights on the entity record.

998
Add and set up Social Insights controls on the system dashboards
Note
You don’t need administrator permissions to add and set up Social Insights controls on the personal dashboard.
You can add the Social Insights controls to the existing system dashboards or to a new dashboard. Let’s create a new dashboard and add the Social Insights control to it. We’ll use the Set Up Social Insights wizard to lead us through the setup. Shortly after the setup is finished and customizations are published, the charts and graphs with social data will appear on your dashboard.
1. Click Settings > Customizations > Customize the System.
2. In the Navigation Pane, under Components, choose Dashboards.
3. Choose New on the command bar. Choose a layout and choose Create.
4. On the dashboard form, enter the name of the dashboard in the Name text box and choose Save.
5. To add the control, choose Insert Social Insights icon in the center of the section on the
dashboard form, or choose More Commands ( ) on the command bar and then choose Social
Insights in the dropdown list. Set Up Social Insights wizard appears.
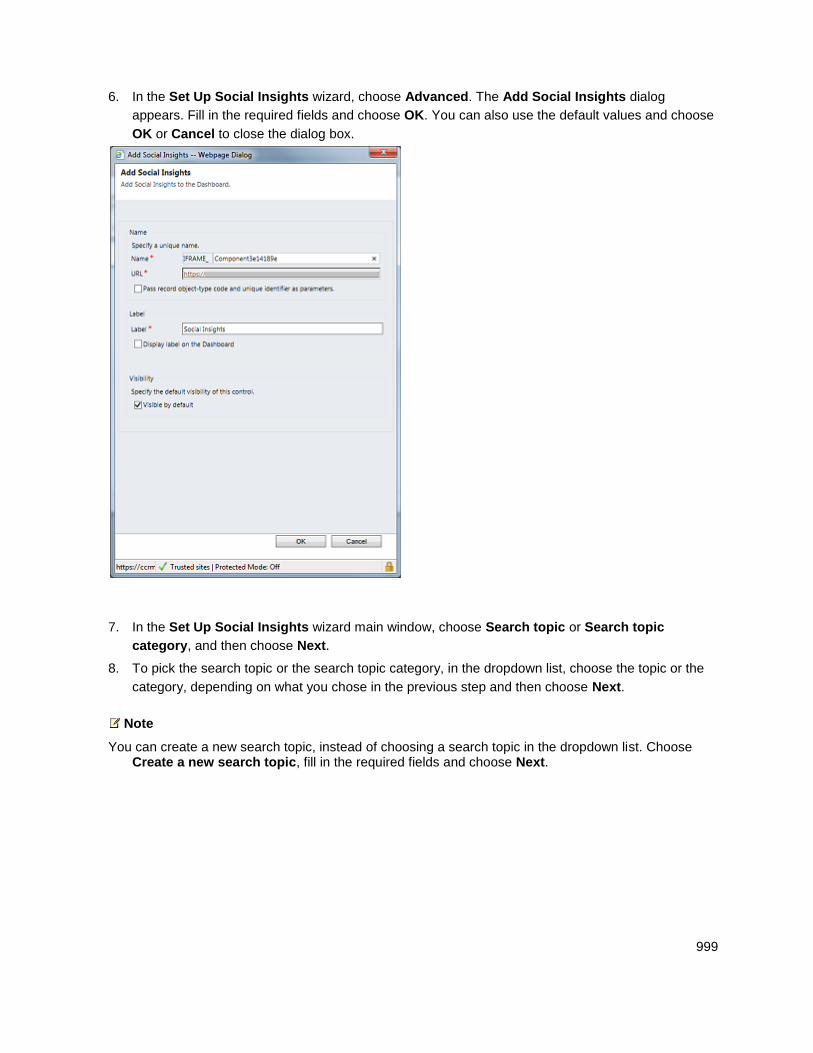
999
6. In the Set Up Social Insights wizard, choose Advanced. The Add Social Insights dialog
appears. Fill in the required fields and choose OK. You can also use the default values and choose
OK or Cancel to close the dialog box.
7. In the Set Up Social Insights wizard main window, choose Search topic or Search topic
category, and then choose Next.
8. To pick the search topic or the search topic category, in the dropdown list, choose the topic or the
category, depending on what you chose in the previous step and then choose Next.
Note
You can create a new search topic, instead of choosing a search topic in the dropdown list. Choose Create a new search topic, fill in the required fields and choose Next.
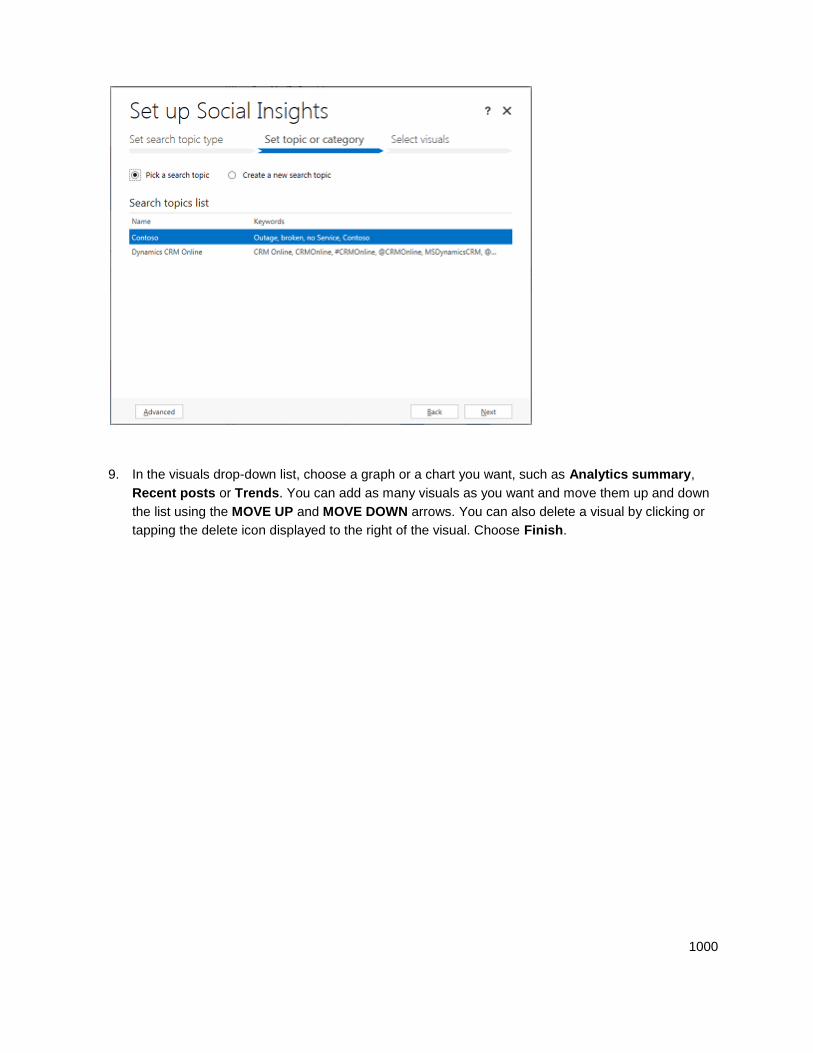
1000
9. In the visuals drop-down list, choose a graph or a chart you want, such as Analytics summary,
Recent posts or Trends. You can add as many visuals as you want and move them up and down
the list using the MOVE UP and MOVE DOWN arrows. You can also delete a visual by clicking or
tapping the delete icon displayed to the right of the visual. Choose Finish.
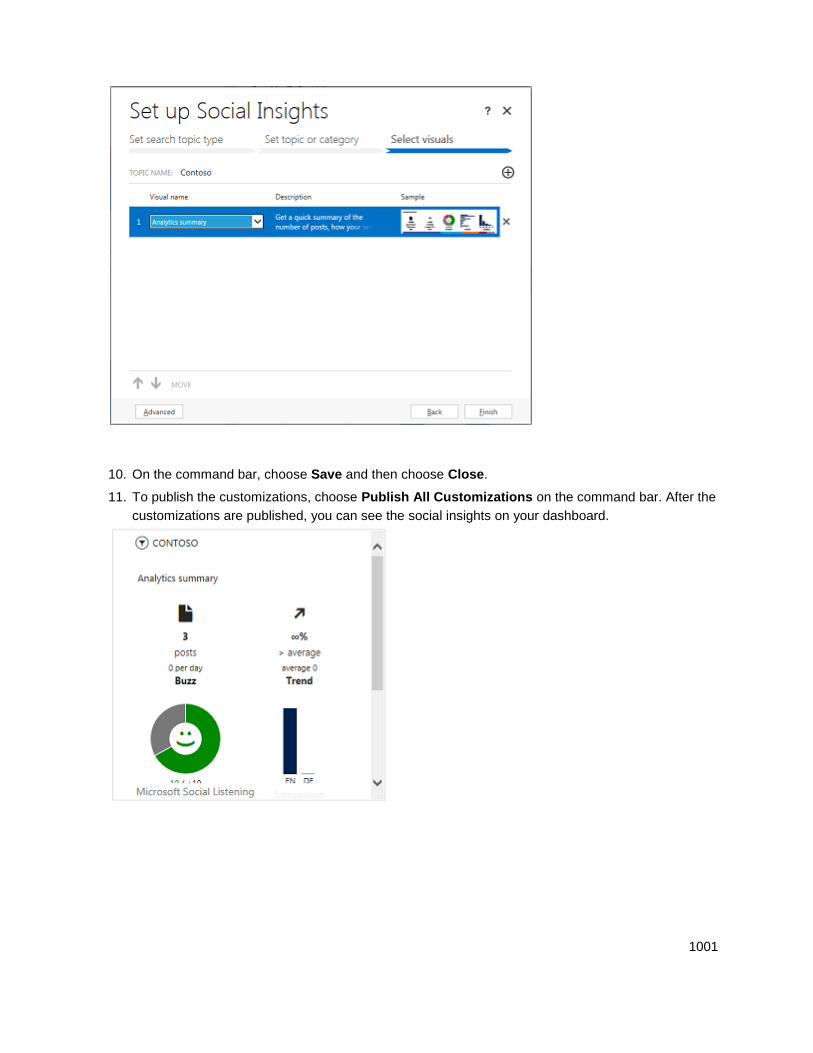
1001
10. On the command bar, choose Save and then choose Close.
11. To publish the customizations, choose Publish All Customizations on the command bar. After the
customizations are published, you can see the social insights on your dashboard.
1002
Privacy notice By enabling Social Engagement, you consent to share your data with an external system. Data that is imported from external systems into Microsoft Dynamics 365 (online) is subject to our privacy statement, which you can access here.
See Also Administering Dynamics 365 Microsoft Social Engagement Help and Training Control social data eBook: Microsoft Social Engagement for CRM Microsoft Social Engagement Help Center
© 2016 Microsoft. All rights reserved. Copyright
Connect Microsoft Dynamics 365 to Yammer
Applies To: Dynamics 365 (online), Dynamics 365 (on-premises), Dynamics CRM 2016, Dynamics CRM Online
[This topic is pre-release documentation and is subject to change.]
Yammer gives colleagues at your organization a central place to have conversations, create and edit documents, and share information without sending a single email or attending any meetings.
After you set up your organization to work with Yammer, employees will see posts in a newsfeed on their Microsoft Dynamics 365 dashboard whenever people update customer info, and they’ll be able to join in the conversation with their own posts.
Check out the following videos:
CRM + Yammer - Light a Fire Under Your Business (4:05)
Yammer Integration – Introduction (11:03)
Yammer Integration - Activity Feeds Replacement (5:18)
Yammer Integration – Configuration (8:07)
Yammer Integration – Features (6:25)
Yammer Integration – Architecture (3:03)
Yammer Integration – Troubleshooting (2:00)
Though the videos describe Yammer and Dynamics 365 (online), the content applies to Dynamics 365 (on-premises), as well.
Connect your organization to Yammer
Prepare a Dynamics 365 on-premises edition
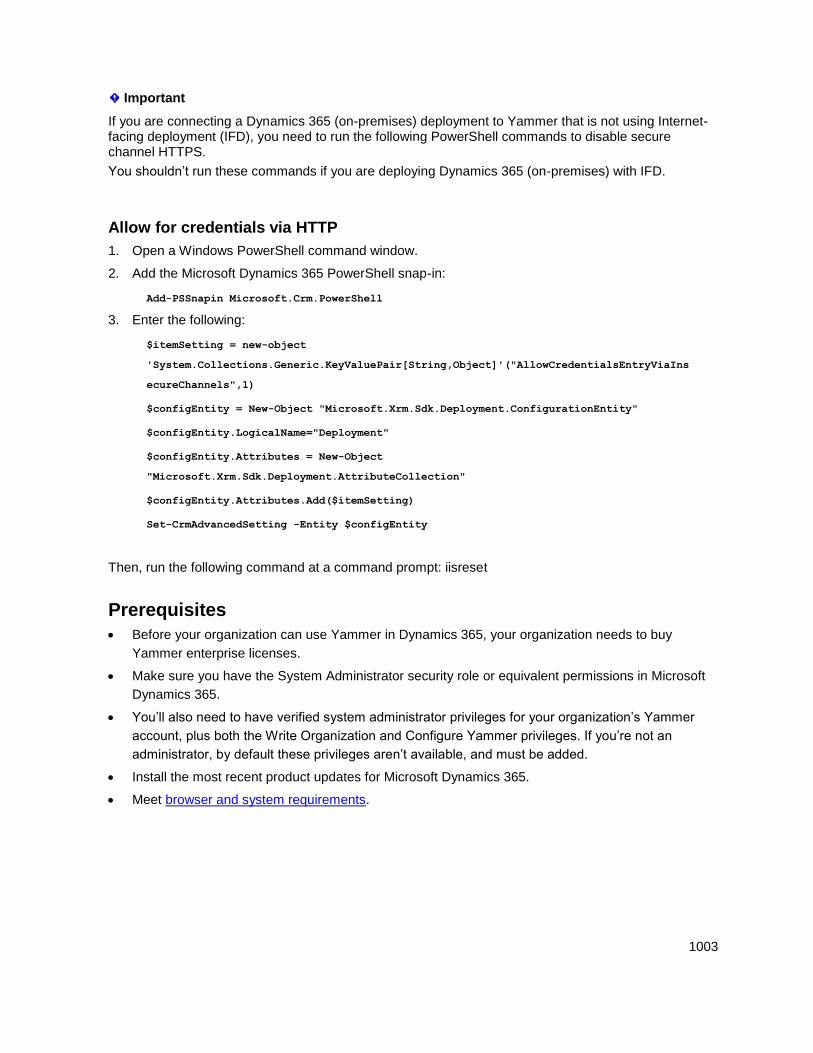
1003
Important
If you are connecting a Dynamics 365 (on-premises) deployment to Yammer that is not using Internet-facing deployment (IFD), you need to run the following PowerShell commands to disable secure channel HTTPS.
You shouldn’t run these commands if you are deploying Dynamics 365 (on-premises) with IFD.
Allow for credentials via HTTP
1. Open a Windows PowerShell command window.
2. Add the Microsoft Dynamics 365 PowerShell snap-in:
Add-PSSnapin Microsoft.Crm.PowerShell
3. Enter the following:
$itemSetting = new-object
'System.Collections.Generic.KeyValuePair[String,Object]'("AllowCredentialsEntryViaIns
ecureChannels",1)
$configEntity = New-Object "Microsoft.Xrm.Sdk.Deployment.ConfigurationEntity"
$configEntity.LogicalName="Deployment"
$configEntity.Attributes = New-Object
"Microsoft.Xrm.Sdk.Deployment.AttributeCollection"
$configEntity.Attributes.Add($itemSetting)
Set-CrmAdvancedSetting -Entity $configEntity
Then, run the following command at a command prompt: iisreset
Prerequisites
Before your organization can use Yammer in Dynamics 365, your organization needs to buy
Yammer enterprise licenses.
Make sure you have the System Administrator security role or equivalent permissions in Microsoft
Dynamics 365.
You’ll also need to have verified system administrator privileges for your organization’s Yammer
account, plus both the Write Organization and Configure Yammer privileges. If you’re not an
administrator, by default these privileges aren’t available, and must be added.
Install the most recent product updates for Microsoft Dynamics 365.
Meet browser and system requirements.
1004
Connect Dynamics 365 to Yammer
1. Sign up for a Yammer Enterprise account, and note the name of the network you receive. More
information: Visit the Yammer website
2. Go to Settings > System.
3. Choose Administration > Yammer Configuration
4. Read the disclaimer, and then choose Continue.
5. Choose Authorize Microsoft Dynamics 365 (online) (or Dynamics 365) to connect to Yammer.
6. Sign in to your enterprise Yammer account using your administrator credentials.
7. Follow the on-screen instructions to accept the Yammer terms of service, note which Yammer
network has been set up for you, and connect your organization to it. After your organization is
connected, you’ll see a confirmation message at the bottom of the screen.
Note
Dynamics 365 only supports connecting to the primary Yammer network. Connecting to External Networks in Yammer is not supported.
8. If desired, stay signed in to your Yammer account and set your organization’s preferences for
Yammer posts.
Set your organization’s preferences for Yammer posts (optional)
1. Make sure you’re signed in to your enterprise Yammer account using your administrator
credentials.
2. If desired, select whether Yammer posts are public (everyone sees Microsoft Dynamics 365 posts
in the newsfeed, or private (people must “follow” a record to see posts about that record in the
newsfeed).
3. If desired, select the default group where you would like Microsoft Dynamics 365 posts to appear.
4. If desired, select which record types trigger automatic posts to the Yammer newsfeed.
Enable Dynamics 365 entities for Yammer Once you’ve connected Dynamics 365 to Yammer, you need to specify which Dynamics 365 entities are enabled for use with Yammer. Enabled entities can be followed by users
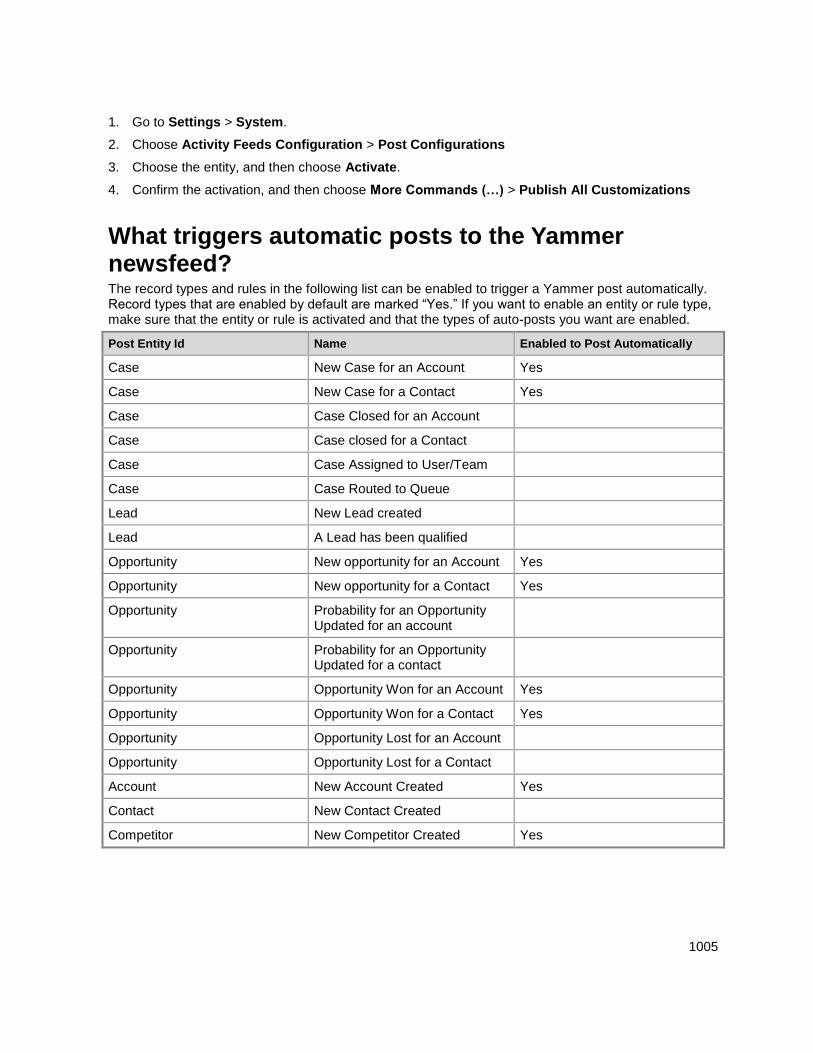
1005
1. Go to Settings > System.
2. Choose Activity Feeds Configuration > Post Configurations
3. Choose the entity, and then choose Activate.
4. Confirm the activation, and then choose More Commands (…) > Publish All Customizations
What triggers automatic posts to the Yammer newsfeed? The record types and rules in the following list can be enabled to trigger a Yammer post automatically. Record types that are enabled by default are marked “Yes.” If you want to enable an entity or rule type, make sure that the entity or rule is activated and that the types of auto-posts you want are enabled.
Post Entity Id Name Enabled to Post Automatically
Case New Case for an Account Yes
Case New Case for a Contact Yes
Case Case Closed for an Account
Case Case closed for a Contact
Case Case Assigned to User/Team
Case Case Routed to Queue
Lead New Lead created
Lead A Lead has been qualified
Opportunity New opportunity for an Account Yes
Opportunity New opportunity for a Contact Yes
Opportunity Probability for an Opportunity Updated for an account
Opportunity Probability for an Opportunity Updated for a contact
Opportunity Opportunity Won for an Account Yes
Opportunity Opportunity Won for a Contact Yes
Opportunity Opportunity Lost for an Account
Opportunity Opportunity Lost for a Contact
Account New Account Created Yes
Contact New Contact Created
Competitor New Competitor Created Yes
1006
When you have Yammer set up, keep these things in mind:
All user posts (conversations) are stored in Yammer, not in Microsoft Dynamics 365.
All system posts are stored in Microsoft Dynamics 365.
If the Post to Yammer Activity Stream rule (or posttoyammer attribute) is set to True in Post Rules
Configuration, that activity will post to Yammer.
Additional considerations
When connecting Dynamics 365 with a federated Yammer If you have configured Yammer to use single sign-on, you’ll need to generate and use a temporary password to connect Dynamics 365 to Yammer.
1. Sign in to Yammer with the single sign-on credentials.
2. Choose More commands (…) > Apps
3. Scroll to the bottom of the page to the All Apps section.
4. Choose the Yammer tab, and then choose an app like Windows Phone. The app must support
generating a temporary password.
5. Complete the process to obtain a temporary user name and password.
6. Use the temporary user name and password to complete the Dynamics 365 to Yammer connection
configuration.
Add Yammer sites to the browser as trusted Add your Yammer sites to your browser as trusted. For example, for Dynamics 365 (online), add the following:
https://*.crm.dynamics.com
https://*.yammer.com
https://*.assets-yammer.com
Privacy notice By enabling Yammer, you consent to share your data with an external system. Data that is imported from external systems into Microsoft Dynamics 365 (online) is subject to our privacy statement, which you can access here.
1007
See Also Collaborate and communicate with Yammer Visit the Yammer website
© 2016 Microsoft. All rights reserved. Copyright
Control social data
Applies To: Dynamics 365 (online), Dynamics 365 (on-premises), Dynamics CRM 2016, Dynamics CRM Online
[This topic is pre-release documentation and is subject to change.]
You can enable or disable your ability to receive social data in Microsoft Dynamics 365.
Enable or disable social engagement By default, social engagement is enabled and social data is received.
Note
If you disable social engagement, you can no longer create or update social data in Dynamics 365. If you try to convert a social activity to a case while social engagement is disabled, you’ll get an error message. The error occurs because the Convert To Case action tries to update the social activity Regarding field. The same error occurs if you try to assign a social activity record or a social profile record to another user.
1. Go to Settings > Administration.
2. Choose System Settings.
3. Under Disable Social Engagement, select Yes to stop receiving social data in Dynamics 365. To
receive data, select No.
4. Choose OK.
See Also Administering Dynamics 365 Connect to Microsoft Social Engagement Receive social data in Microsoft Dynamics CRM
© 2016 Microsoft. All rights reserved. Copyright
1008
Manage Bing Maps for your organization
Applies To: Dynamics 365 (online), Dynamics 365 (on-premises), Dynamics CRM 2016, Dynamics CRM Online
[This topic is pre-release documentation and is subject to change.]
Learn how you can manage Bing Maps for your entire Microsoft Dynamics 365 organization. When Bing Maps is turned on, people see a map of a customer’s location when they view contacts, leads, or accounts.
Important
Dynamics 365 (on-premises) organizations may need to enter a Bing Maps Enterprise Key to use the maps feature. Go to the Bing Maps licensing page for details on how to get a key.
Enter a Bing Maps license key (on-premises only) Go to the Bing Maps licensing page for details on how to get a key.
1. Go to Settings > Administration.
2. Choose System Settings.
3. On the General tab, scroll down to Enable Bing Maps > Please enter Bing Maps key, and enter
the license key.
4. Choose OK.
Turn Bing Maps on or off for your organization
1. Go to Settings > Administration.
2. Choose System Settings.
3. On the General tab, scroll down to Enable Bing Maps > Show Bing Maps on forms, and then
select Yes or No.
4. Choose OK.
Languages supported in Microsoft Dynamics 365 for viewing Bing Maps The following table contains a list of all languages supported in Dynamics 365 for viewing Bing maps. If the language is listed, the Bing map is shown on the form, such as account, contact or lead, in your
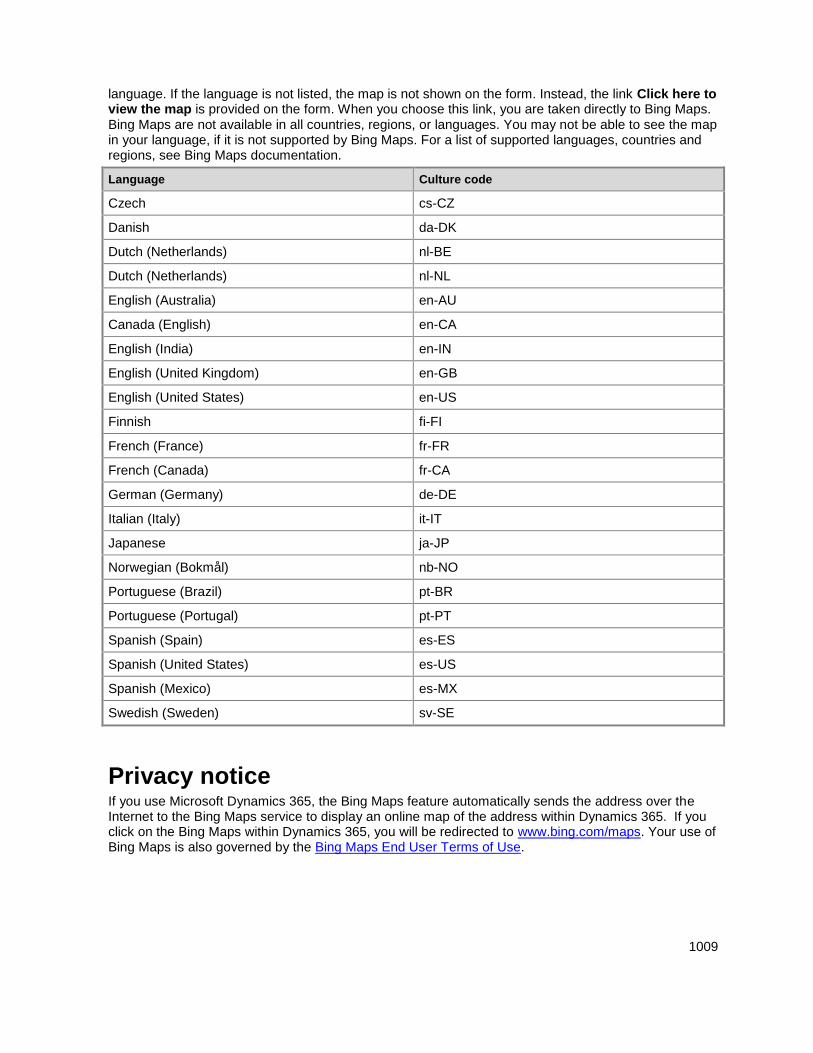
1009
language. If the language is not listed, the map is not shown on the form. Instead, the link Click here to view the map is provided on the form. When you choose this link, you are taken directly to Bing Maps. Bing Maps are not available in all countries, regions, or languages. You may not be able to see the map in your language, if it is not supported by Bing Maps. For a list of supported languages, countries and regions, see Bing Maps documentation.
Language Culture code
Czech cs-CZ
Danish da-DK
Dutch (Netherlands) nl-BE
Dutch (Netherlands) nl-NL
English (Australia) en-AU
Canada (English) en-CA
English (India) en-IN
English (United Kingdom) en-GB
English (United States) en-US
Finnish fi-FI
French (France) fr-FR
French (Canada) fr-CA
German (Germany) de-DE
Italian (Italy) it-IT
Japanese ja-JP
Norwegian (Bokmål) nb-NO
Portuguese (Brazil) pt-BR
Portuguese (Portugal) pt-PT
Spanish (Spain) es-ES
Spanish (United States) es-US
Spanish (Mexico) es-MX
Swedish (Sweden) sv-SE
Privacy notice If you use Microsoft Dynamics 365, the Bing Maps feature automatically sends the address over the Internet to the Bing Maps service to display an online map of the address within Dynamics 365. If you click on the Bing Maps within Dynamics 365, you will be redirected to www.bing.com/maps. Your use of Bing Maps is also governed by the Bing Maps End User Terms of Use.
1010
Your administrator can turn the Bing Maps feature on or off in the Settings > Administration > System Settings area. Turning the Bing Maps app off disables the feature within Dynamics 365. Information sent to Bing Maps is subject to the Bing Maps Privacy Statement.
See Also Administering Dynamics 365 Help & Training: Use Bing Maps to view a location
© 2016 Microsoft. All rights reserved. Copyright
Deploy packages using Dynamics 365 Package Deployer and Windows PowerShell
Applies To: Dynamics 365 (online), Dynamics 365 (on-premises), Dynamics CRM 2016, Dynamics CRM Online
[This topic is pre-release documentation and is subject to change.]
Microsoft Dynamics CRM Package Deployer enables administrators to deploy packages on a Dynamics 365 (on-premises) or Microsoft Dynamics 365 (online) instance. A “package” can consist of any or all of the following:
One or more Dynamics 365 solution files.
Flat files or exported data files from the Configuration Migration tool. For information about the
Configuration Migration tool, see Manage configuration data.
Custom code that can run during or after the package is deployed to Microsoft Dynamics 365.
HTML content specific to the package that can display at the beginning and end of the package
deployment process. This can be useful to provide a description of the solutions and files that are
deployed in the package.
Developers create packages by using the package deployment template in Microsoft Visual Studio. More information: MSDN: Create packages for the CRM Package Deployer
After a package is created, you can deploy it either by running CRM Package Deployer or by using Windows PowerShell cmdlets for the tool.
Important
Before you import and run a package to a production organization, test the package on a non-production organization that is a mirror image of the production organization.
Back up the production organization before you deploy a package.
1011
In This Topic Deploying packages using the Package Deployer tool
Use Windows PowerShell to deploy packages
Troubleshoot package deployment issues by using log files
Best practices for deploying packages
Deploying packages using the Package Deployer tool You can use the Package Deployer tool (packagedeployer.exe) to deploy packages in the following ways.
Use Package Deployer tool to deploy packages
Use Package Deployer tool at the command line
Use Package Deployer tool to deploy packages The Package Deployer tool can only process one package at a time. However, it provides users with the ability to select a package to deploy from multiple packages available in the Package Deployer tool directory. Some of the screens and actions in the tool differ based on the package definition. You do not have to install the Package Deployer tool. Just download and run it.
1. Obtain the package to be deployed. A package is a collection of files and folders that is created in
your Visual studio project folder (<Project>\Bin\Debug) when you build your package project in
Visual Studio. Copy the following from your project debug folder:
<PackageName> folder: This folder contains the solutions, import configuration, and the
contents for your package.
<PackageName>.dll: The assembly contains the code for your package. By default, the name
of the assembly is the same as your Visual Studio project name.
For detailed information about creating a package by using Visual Studio, see MSDN: Create a package for the Package Deployer tool.
For this topic, let us assume that the package folder and assembly from the Visual Studio project debug folder (<Project>\Bin\Debug) are copied to the c:\DeployPackage folder.
2. Download the Microsoft Dynamics CRM SDK. Then run the downloaded executable file to extract
the contents of the package.
3. Browse to the SDK\Tools\PackageDeployer folder, and copy the package folder and assembly from
the c:\DeployPackage to the SDK\Tools\PackageDeployer folder.
4. After the files are copied, run the tool by double-clicking the PackageDeployer.exe file in the
SDK\Tools\PackageDeployer folder.
5. Click Continue on the main screen of the tool.
6. In the Connect to Microsoft Dynamics 365 screen, provide authentication details to connect to
your Dynamics 365 server where you want to deploy the package. If you have multiple
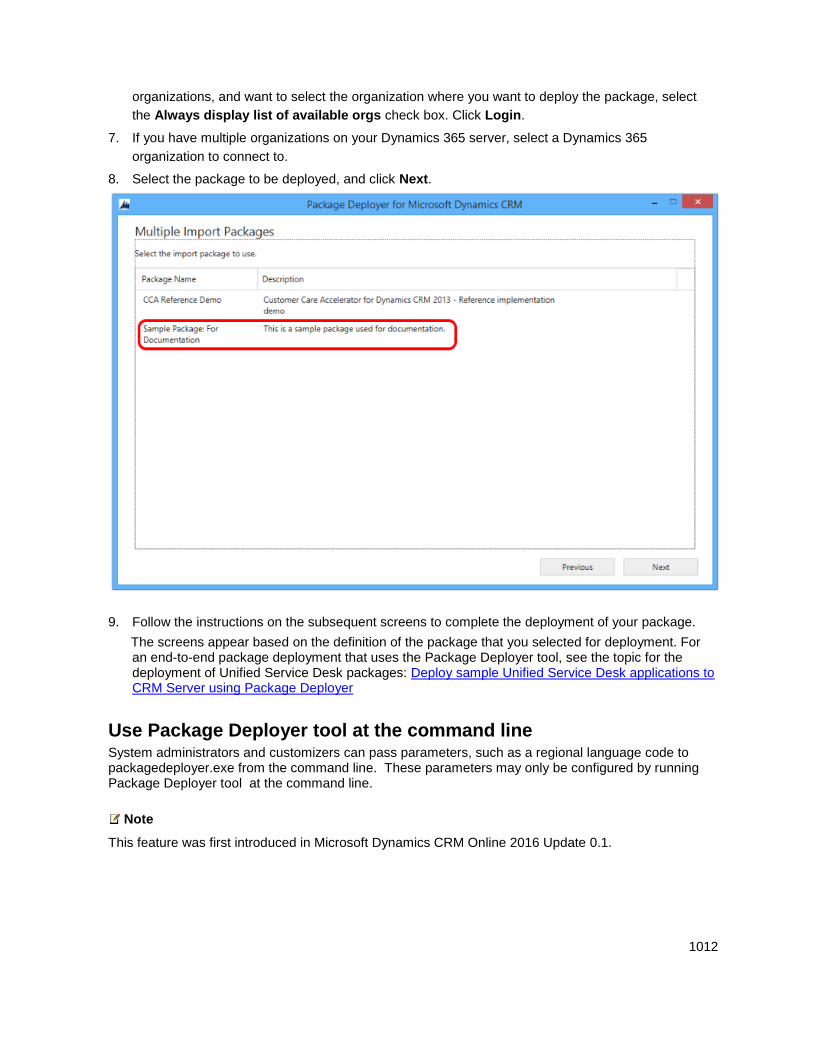
1012
organizations, and want to select the organization where you want to deploy the package, select
the Always display list of available orgs check box. Click Login.
7. If you have multiple organizations on your Dynamics 365 server, select a Dynamics 365
organization to connect to.
8. Select the package to be deployed, and click Next.
9. Follow the instructions on the subsequent screens to complete the deployment of your package.
The screens appear based on the definition of the package that you selected for deployment. For an end-to-end package deployment that uses the Package Deployer tool, see the topic for the deployment of Unified Service Desk packages: Deploy sample Unified Service Desk applications to CRM Server using Package Deployer
Use Package Deployer tool at the command line System administrators and customizers can pass parameters, such as a regional language code to packagedeployer.exe from the command line. These parameters may only be configured by running Package Deployer tool at the command line.
Note
This feature was first introduced in Microsoft Dynamics CRM Online 2016 Update 0.1.
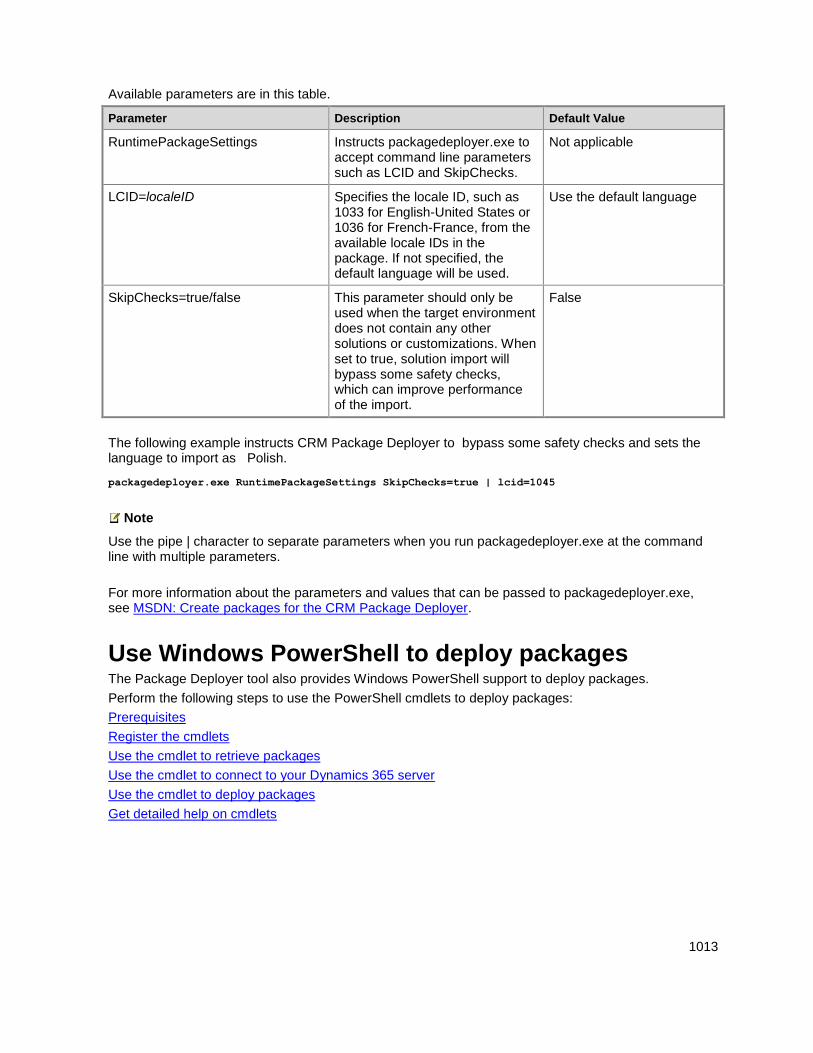
1013
Available parameters are in this table.
Parameter Description Default Value
RuntimePackageSettings Instructs packagedeployer.exe to accept command line parameters such as LCID and SkipChecks.
Not applicable
LCID=localeID Specifies the locale ID, such as 1033 for English-United States or 1036 for French-France, from the available locale IDs in the package. If not specified, the default language will be used.
Use the default language
SkipChecks=true/false This parameter should only be used when the target environment does not contain any other solutions or customizations. When set to true, solution import will bypass some safety checks, which can improve performance of the import.
False
The following example instructs CRM Package Deployer to bypass some safety checks and sets the language to import as Polish.
packagedeployer.exe RuntimePackageSettings SkipChecks=true | lcid=1045
Note
Use the pipe | character to separate parameters when you run packagedeployer.exe at the command line with multiple parameters.
For more information about the parameters and values that can be passed to packagedeployer.exe, see MSDN: Create packages for the CRM Package Deployer.
Use Windows PowerShell to deploy packages The Package Deployer tool also provides Windows PowerShell support to deploy packages.
Perform the following steps to use the PowerShell cmdlets to deploy packages:
Prerequisites
Register the cmdlets
Use the cmdlet to retrieve packages
Use the cmdlet to connect to your Dynamics 365 server
Use the cmdlet to deploy packages
Get detailed help on cmdlets
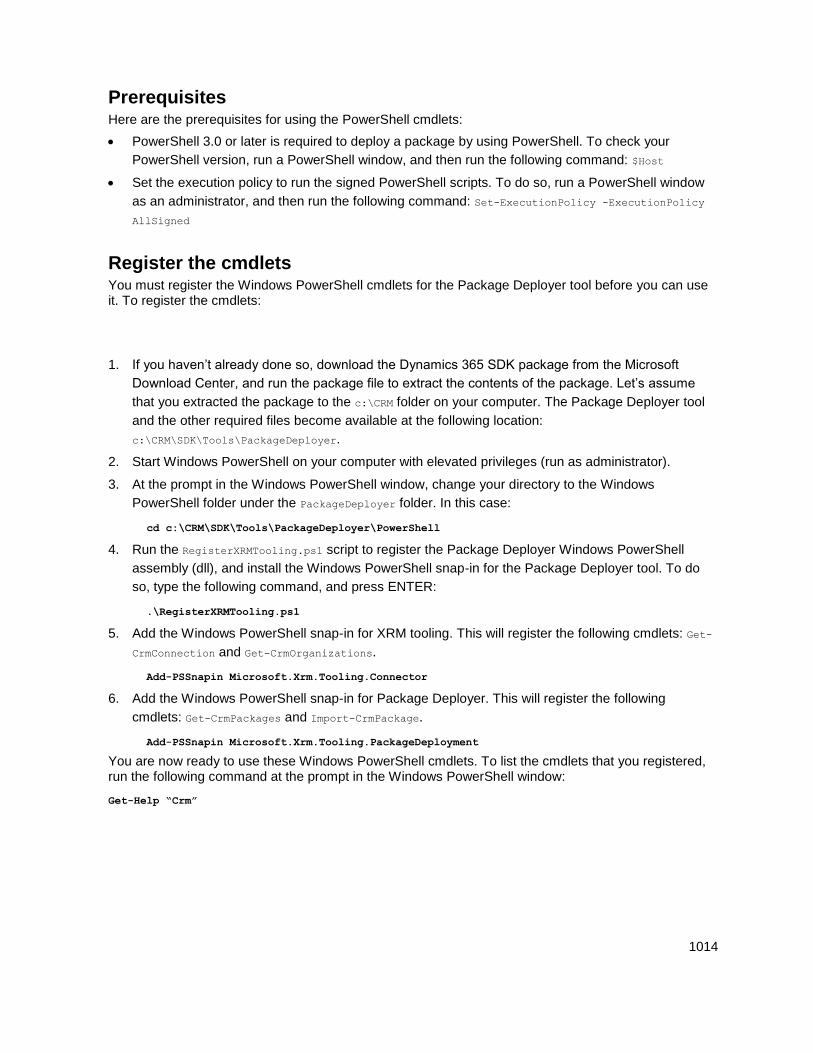
1014
Prerequisites Here are the prerequisites for using the PowerShell cmdlets:
PowerShell 3.0 or later is required to deploy a package by using PowerShell. To check your
PowerShell version, run a PowerShell window, and then run the following command: $Host
Set the execution policy to run the signed PowerShell scripts. To do so, run a PowerShell window
as an administrator, and then run the following command: Set-ExecutionPolicy -ExecutionPolicy
AllSigned
Register the cmdlets You must register the Windows PowerShell cmdlets for the Package Deployer tool before you can use it. To register the cmdlets:
1. If you haven’t already done so, download the Dynamics 365 SDK package from the Microsoft
Download Center, and run the package file to extract the contents of the package. Let’s assume
that you extracted the package to the c:\CRM folder on your computer. The Package Deployer tool
and the other required files become available at the following location:
c:\CRM\SDK\Tools\PackageDeployer.
2. Start Windows PowerShell on your computer with elevated privileges (run as administrator).
3. At the prompt in the Windows PowerShell window, change your directory to the Windows
PowerShell folder under the PackageDeployer folder. In this case:
cd c:\CRM\SDK\Tools\PackageDeployer\PowerShell
4. Run the RegisterXRMTooling.ps1 script to register the Package Deployer Windows PowerShell
assembly (dll), and install the Windows PowerShell snap-in for the Package Deployer tool. To do
so, type the following command, and press ENTER:
.\RegisterXRMTooling.ps1
5. Add the Windows PowerShell snap-in for XRM tooling. This will register the following cmdlets: Get-
CrmConnection and Get-CrmOrganizations.
Add-PSSnapin Microsoft.Xrm.Tooling.Connector
6. Add the Windows PowerShell snap-in for Package Deployer. This will register the following
cmdlets: Get-CrmPackages and Import-CrmPackage.
Add-PSSnapin Microsoft.Xrm.Tooling.PackageDeployment
You are now ready to use these Windows PowerShell cmdlets. To list the cmdlets that you registered, run the following command at the prompt in the Windows PowerShell window:
Get-Help “Crm”
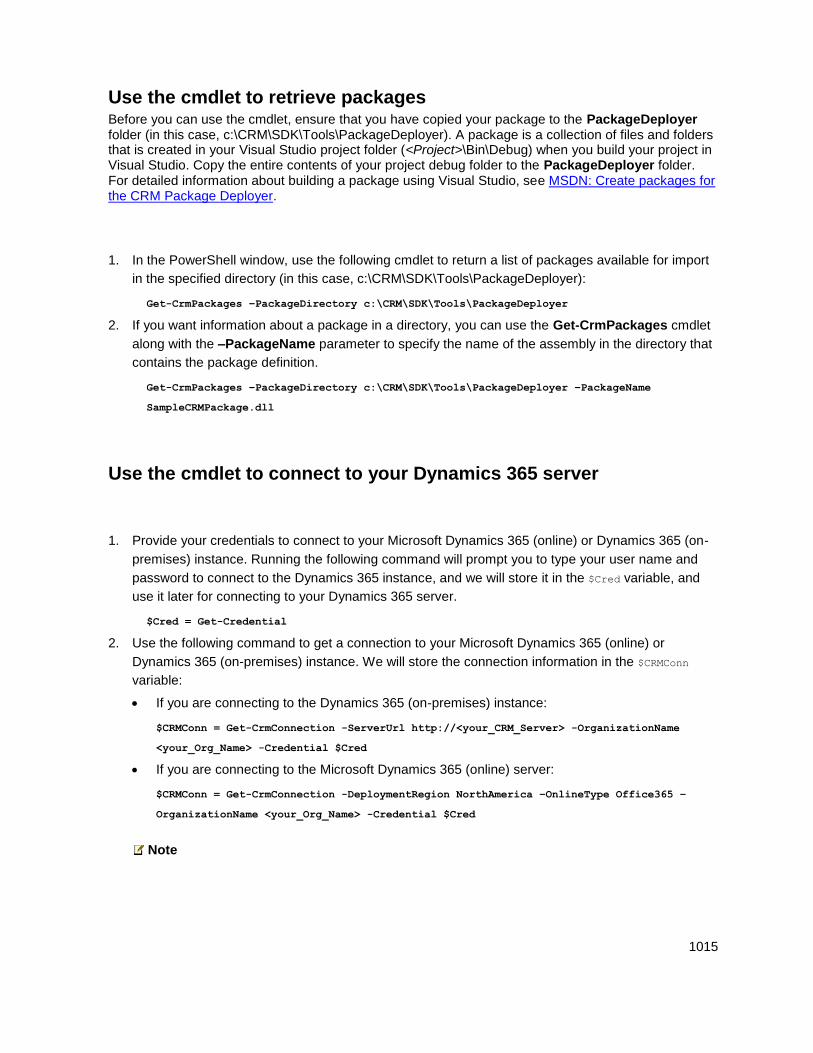
1015
Use the cmdlet to retrieve packages Before you can use the cmdlet, ensure that you have copied your package to the PackageDeployer folder (in this case, c:\CRM\SDK\Tools\PackageDeployer). A package is a collection of files and folders that is created in your Visual Studio project folder (<Project>\Bin\Debug) when you build your project in Visual Studio. Copy the entire contents of your project debug folder to the PackageDeployer folder. For detailed information about building a package using Visual Studio, see MSDN: Create packages for the CRM Package Deployer.
1. In the PowerShell window, use the following cmdlet to return a list of packages available for import
in the specified directory (in this case, c:\CRM\SDK\Tools\PackageDeployer):
Get-CrmPackages –PackageDirectory c:\CRM\SDK\Tools\PackageDeployer
2. If you want information about a package in a directory, you can use the Get-CrmPackages cmdlet
along with the –PackageName parameter to specify the name of the assembly in the directory that
contains the package definition.
Get-CrmPackages –PackageDirectory c:\CRM\SDK\Tools\PackageDeployer –PackageName
SampleCRMPackage.dll
Use the cmdlet to connect to your Dynamics 365 server
1. Provide your credentials to connect to your Microsoft Dynamics 365 (online) or Dynamics 365 (on-
premises) instance. Running the following command will prompt you to type your user name and
password to connect to the Dynamics 365 instance, and we will store it in the $Cred variable, and
use it later for connecting to your Dynamics 365 server.
$Cred = Get-Credential
2. Use the following command to get a connection to your Microsoft Dynamics 365 (online) or
Dynamics 365 (on-premises) instance. We will store the connection information in the $CRMConn
variable:
If you are connecting to the Dynamics 365 (on-premises) instance:
$CRMConn = Get-CrmConnection -ServerUrl http://<your_CRM_Server> -OrganizationName
<your_Org_Name> -Credential $Cred
If you are connecting to the Microsoft Dynamics 365 (online) server:
$CRMConn = Get-CrmConnection -DeploymentRegion NorthAmerica –OnlineType Office365 –
OrganizationName <your_Org_Name> -Credential $Cred
Note
1016
For the DeploymentRegion parameter, valid values are NorthAmerica, EMEA,
APACSouthAmerica, Oceania, JPN, and NorthAmerica2. For the OnlineType parameter, valid values are Office365 and LiveID.
3. Your supplied credentials are validated when you run the command in step 2.
Use the cmdlet to deploy packages Next, use the Dynamics 365 connection information stored in the $CRMConn variable to deploy packages to the Dynamics 365 instance. Run the following command to deploy your package.
Import-CrmPackage –CrmConnection $CRMConn –PackageDirectory c:\CRM\SDK\Tools\PackageDeployer –
PackageName SampleCRMPackage.dll –UnpackFilesDirectory c:\UnpackedFiles -Verbose
Note
CrmConnection, PackageDirectory, and PackageName parameters are mandatory.
For the PackageName parameter, you have to specify the name of the assembly that contains the
package definition.
You do not need to specify the UnpackFilesDirectory parameter if your package does not unpack
files during package deployment. While defining a package in Visual Studio, you specify whether to
unpack files using the agentdesktopzipfile parameter in the ImportConfig.xml file. More
information: MSDN: Create packages for the CRM Package Deployer
The Verbose parameter is optional, and is used to display a detailed log of the activities performed
during the package deployment process.
The optional RuntimePackageSettings parameter can be used together with the following
parameters.
The LCID=localeID parameter specifies the locale ID, such as 1033 for English-United States or
1036 for French-France, from the available locale IDs in the package. If not specified, the
default language will be used.
The
SkipChecks=true/false parameter should only be used when the target environment does not contain any other solutions or customizations. When set to true, solution import will bypass some safety checks, which can improve performance of the import.
The following example command imports a package named SampleCRMPackage and specifies English-United States (1033) as the language to import the package.
Import-CrmPackage –CrmConnection $CRMConn –PackageDirectory c:\CRM\SDK\Tools\PackageDeployer –
PackageName SampleCRMPackage.dll –UnpackFilesDirectory c:\UnpackedFiles –RuntimePackageSettings
LCID=1033
1017
Get detailed help on cmdlets In the PowerShell window, use the Get-Help cmdlet with a cmdlet name to view a detailed help for the
cmdlet. For example, to get detailed help for the Import-CrmPackage cmdlet:
Get-Help Import-CrmPackage -full
To view the online help for the cmdlets, see CRM PowerShell Reference.
Troubleshoot package deployment issues by using log files The Package Deployer tool provides logging support to get detailed information about errors that can occur when someone signs in to the Microsoft Dynamics 365 instance using the tool and deploying packages. The tool generates three log files that are available at the following location on the computer where you run the tool: c:\Users\<UserName>\AppData\Roaming\Microsoft\Microsoft Dynamics CRM Package Deployer\<Version>.
Login_ErrorLog.log: Provides information about the issues that occurred when you use the tool to
sign in to the Dynamics 365 instance. If there are any issues during sign in, a message appears on
the tool’s login screen with a link to this log file. The message states that an error occurred while
processing the login request and the user can view the error log. You can click the link in the
message to view this log file. The log file is created the first time you encounter any sign-in issues
in the tool. Thereafter, the log file is used to log information about a sign-in issue, whenever it
occurs.
PackageDeployer.log: Provides detailed information about each task performed in the tool during
the deployment of the packages. You can view the log file from the tool by clicking the View Log
File link at the bottom of the screen.
ComplexImportDetail.log: Provides detailed information about the data imported in the last
deployment by using the tool. Each time you deploy a package using this tool, the existing details
from the log file are moved to a file called ComplexImportDetail._old.log in the same directory, and
the ComplexImportDetail.log file displays information about the latest import done using the tool.
Best practices for deploying packages While deploying packages, Dynamics 365 administrators must:
Insist on a signed package assembly so that they can track an assembly back to its source.
Test the package on a pre-production instance (preferably a mirror image of the production
instance) before running it on a production server.
Back up the production instance before deploying a package.
1018
See Also MSDN: Create packages for the CRM Package Deployer Administering Dynamics 365
© 2016 Microsoft. All rights reserved. Copyright
Use Power BI with Microsoft Dynamics 365
Applies To: Dynamics 365 (online), Dynamics 365 (on-premises), Dynamics CRM 2016, Dynamics CRM Online
[This topic is pre-release documentation and is subject to change.]
The Power BI for Office 365 cloud service works with Microsoft Dynamics 365 to provide a self-service analytics solution. Power BI automatically refreshes the Microsoft Dynamics 365 (online) data displayed. With Power BI Desktop or Microsoft Office Excel Power Query for authoring reports and Power BI for sharing dashboards and refreshing data from Microsoft Dynamics 365 (online), sales, marketing, and service personnel in your organization have a powerful new way to work with Dynamics 365 data.
In this topic Get started using Microsoft Power BI with Microsoft Dynamics 365 (online)
Embed Power BI visualizations on personal dashboards
Use Power BI Desktop to connect directly to your Microsoft Dynamics 365 (online) instance
Use Power BI with Microsoft Dynamics 365 (on-premises)
Get started using Microsoft Power BI with Microsoft Dynamics 365 (online) The Microsoft Dynamics 365 content packs for Power BI cloud service allow you to easily access and analyze your sales, service, or marketing data.
To create a Power BI dashboard using a content pack, follow these instructions.
1. If you haven't already done so, register with Microsoft Power BI.
2. After you have signed in to Power BI, in the Datasets area click Get Data, under Services click
Get, and then select from the following content packs.
Microsoft Dynamics 365 (online) Sales Manager
Microsoft Dynamics 365 (online) Service Manager
Microsoft Dynamics Marketing
3. For the Sales Manager and Service Manager content packs, enter the URL of your Microsoft
Dynamics 365 (online) instance, such as https://OrganizationName.crm.dynamics.com, where
1019
OrganizationName is the organization name of your instance of Microsoft Dynamics 365 (online),
and click Next.
Note
If your data center is outside of North America the crm.dynamics.com domain name may be different, such as crm2.dynamics.com, crm3.dynamics.com, crm4.dynamics.com, etc. To find the domain name, in the Dynamics 365 web app go to Settings > Customizations > Developer Resources. The URLs listed will indicate the correct domain name.
For the Marketing content pack, enter the URL as https://OrganizationName.marketing.dynamics.com/analytics, where OrganizationName is the organization name of your instance of Microsoft Dynamics 365 (online), and click Next
4. Under Authentication method, select oAuth2.
5. Your Microsoft Dynamics 365 (online) organization data is imported and several visualizations
become available.
Tip
If the content pack you select does not open in your web browser, in the left pane of your Power BI workspace click the content pack under Dashboards.
Note
The Microsoft Dynamics 365 content packs support the default out-of-box entities. However, you can customize the following content packs by downloading the .PBIX file and then using Power BI Desktop to customize the content pack before uploading it to the Power BI service.
Download the Microsoft Dynamics CRM Online Sales Manager .PBIX
Download the Microsoft Dynamics 365 (online) Service Manager .PBIX
Embed Power BI visualizations on personal dashboards Before users can embed Power BI visualizations on personal dashboards, the organization-wide setting must be enabled.
Note
This feature was first introduced in CRM Online 2016 Update 1.
By default, Power BI visualization embedding is disabled and must be enabled before users can embed them in personal dashboards.
1020
Enable Power BI visualizations in the organization
1. Sign-in to Microsoft Dynamics 365 as a user with the system administrator security role.
2. Go to Settings > Administration > System Settings.
3. On the Reporting tab in the Allow Power BI visualization embedding option, select Yes to
enable or No to disable.
4. Click OK.
To learn more about how to add Power BI tiles to personal dashboards in Microsoft Dynamics 365, see Embed Power BI tiles on your personal dashboard.
To learn more about how to add Power BI dashboards to personal dashboards in Microsoft Dynamics 365, see Add a Power BI dashboard on your personal dashboard.
Use Power BI Desktop to connect directly to your Microsoft Dynamics 365 (online) instance You can connect to Microsoft Dynamics 365 (online) with Power BI Desktop to create Dynamics 365 reports and dashboards for use with the Power BI service.
Requirements
Power BI service registration
Power BI Desktop.
Microsoft Dynamics 365 (online) instance
Connect to Dynamics 365 (online)
1. Start Power BI Desktop.
2. From the Home tab, click Get Data, and then click More.
3. In the Get Data list, select Dynamics 365 Online.
4. Enter the Dynamics 365 (online) OData endpoint URL. It should look similar to this URL, where
OrganizationName is the name of your Dynamics 365 (online) organization, and v8.1 is the version.
Click OK.
https://OrganizationName.api.crm.dynamics.com/api/data/v8.1
Tip
You can find your OData endpoint URL in the Microsoft Dynamics 365 web client. Go to Settings > Customizations > Developer Resources and locate the URL under Instance Web API.
5. In the Access an OData feed dialog click Organizational account, and then click Connect.
Note
1021
If you aren't signed in to your Microsoft Dynamics 365 (online) instance, click Sign-in on the Access OData feed dialog before you click Connect.
6. The organization database tables appear in the Power BI Desktop Navigator window. For more
information about creating reports with Power BI Desktop, see Power BI Support: Report View in
Power BI Desktop.
Tip
You can use similar steps to connect to Microsoft Dynamics 365 (online) using Microsoft Office Excel Power Query by selecting From Other Sources on the Power Query tab in Excel.
Use Power BI with Microsoft Dynamics 365 (on-premises) You can use Power BI with Dynamics 365 (on-premises) to create and publish rich visualizations that can be accessed from anywhere.
Requirements
Windows Server 2012 R2 with AD FS 3.0 (required for Internet-facing deployment (IFD).
For IFD, OAuth must be enabled on the Microsoft Dynamics 365 Server. This step is described in
the following section.
Microsoft Power BI account.
Note
Scheduled refresh of reports isn’t supported with Dynamics 365 (on-premises) datasets that are published to the Power BI service. You can refresh reports using in Microsoft Power BI Desktop or Microsoft Office Excel and then upload the reports to the Power BI service.
Configure Microsoft Dynamics 365 (on-premises) for Power BI
1. If you're connecting to the Dynamics 365 (on-premises) deployment internally, (not using IFD), skip
to step 4.
If the deployment is configured for IFD, enable OAuth on the Microsoft Dynamics 365 Server. To do this, open a Windows PowerShell window and run the following PowerShell commands.
Add-PSSnapin Microsoft.Crm.PowerShell
$fedurl = Get-CrmSetting -SettingType ClaimsSettings
$fedurl.FederationProviderType = 1
Set-CrmSetting $fedurl
1022
2. After you run the previous commands you need to restart IIS. In a command window, type
IISReset, and then press ENTER.
3. Register the Power BI Desktop OAuth 2.0 client with ADFS. To do this, open a Windows
PowerShell window and run the following PowerShell command on the PC where you are running
Power BI Desktop that will be used to publish your reports to the Power BI service.
Add-AdfsClient -ClientId "a672d62c-fc7b-4e81-a576-e60dc46e951d" -Name "Microsoft
Power BI" -RedirectUri @("https://de-users-preview.sqlazurelabs.com/account/reply/",
"https://preview.powerbi.com/views/oauthredirect.html") -Description "ADFS OAuth 2.0
client for Microsoft Power BI"
4. In Power BI Desktop sign in to Power BI, and then use the standard OData Feed connector to
connect to your Dynamics 365 (on-premises) system by using Windows or OAuth authentication.
To do this…
a. Connect to a data source in Power BI Desktop or Excel using the OData Feed connector.
b.
5. The organization database tables are loaded from which you can build reports.
6. Publish your reports to Power BI and build dashboards.
7. Refresh your reports by publishing them again with Power BI Desktop or Excel on a frequent basis.
See Also Extend Dynamics 365 with integration and solutions
© 2016 Microsoft. All rights reserved. Copyright
Install or remove a preferred solution
Applies To: Dynamics 365 (online), Dynamics 365 (on-premises), Dynamics CRM 2016, Dynamics CRM Online
[This topic is pre-release documentation and is subject to change.]
Install preferred solutions to gain added features and functionality for Microsoft Dynamics 365 (online).
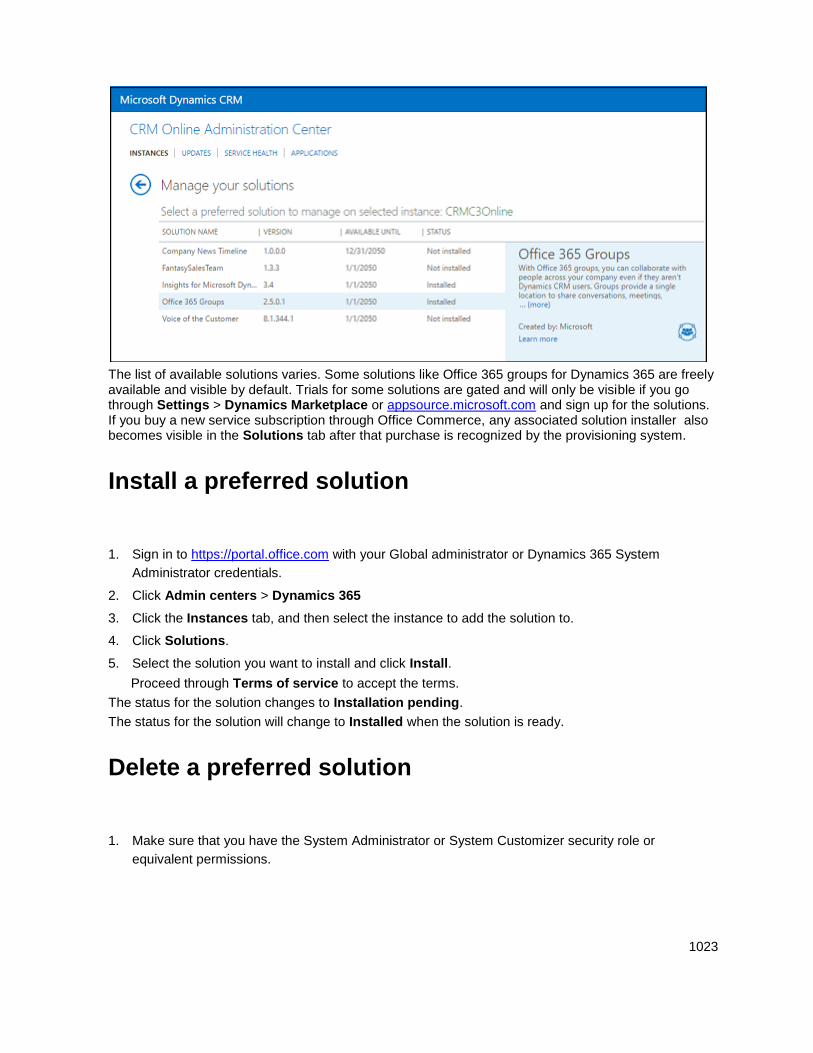
1023
The list of available solutions varies. Some solutions like Office 365 groups for Dynamics 365 are freely available and visible by default. Trials for some solutions are gated and will only be visible if you go through Settings > Dynamics Marketplace or appsource.microsoft.com and sign up for the solutions. If you buy a new service subscription through Office Commerce, any associated solution installer also becomes visible in the Solutions tab after that purchase is recognized by the provisioning system.
Install a preferred solution
1. Sign in to https://portal.office.com with your Global administrator or Dynamics 365 System
Administrator credentials.
2. Click Admin centers > Dynamics 365
3. Click the Instances tab, and then select the instance to add the solution to.
4. Click Solutions.
5. Select the solution you want to install and click Install.
Proceed through Terms of service to accept the terms.
The status for the solution changes to Installation pending.
The status for the solution will change to Installed when the solution is ready.
Delete a preferred solution
1. Make sure that you have the System Administrator or System Customizer security role or
equivalent permissions.

1024
2. Sign in to Dynamics 365.
3. Click Settings > Solutions.
4. Select a solution and click Delete.
See Also Extend Dynamics 365 with integration and solutions
© 2016 Microsoft. All rights reserved. Copyright
Azure Cognitive Services integration with Dynamics 365
Applies To: Dynamics 365 (online), Dynamics CRM Online
[This topic is pre-release documentation and is subject to change.]
This section describes how to integrate Azure Cognitive Services with several Dynamics 365 (online) features, such as to make product recommendations and suggest knowledge articles.
Note
Azure Cognitive Services integration with Dynamics 365 (online) is only available for instances in the North America (NA) region.
In this topic About Azure Cognitive Services
Set the text analytics connection
Set the recommendations connection
Create similar record suggestion rules
About Azure Cognitive Services Azure Cognitive Services includes several APIs that leverage the power of machine learning. Some Microsoft Dynamics 365 features can use the text analytics APIs to detect sentiment, key phrases, topics, and language from the text found in your Microsoft Dynamics 365 data. Similarly, using the recommendation API, Microsoft Dynamics 365 can automatically make product recommendations to your users.
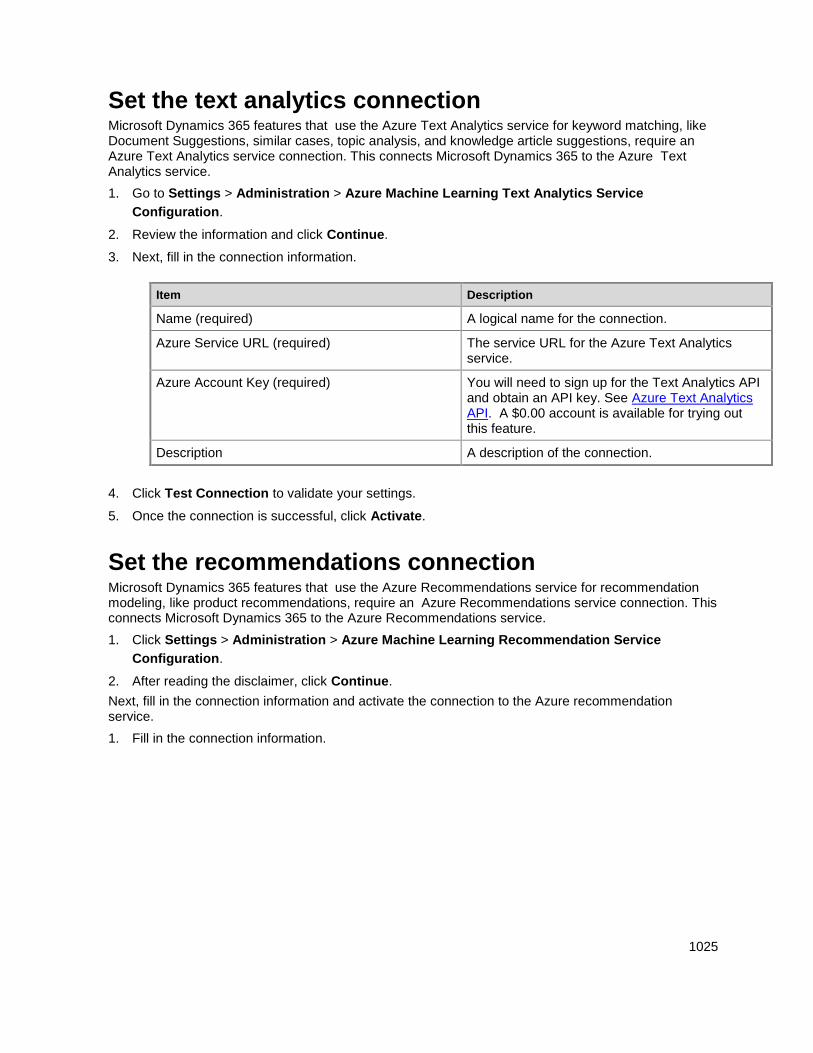
1025
Set the text analytics connection Microsoft Dynamics 365 features that use the Azure Text Analytics service for keyword matching, like Document Suggestions, similar cases, topic analysis, and knowledge article suggestions, require an Azure Text Analytics service connection. This connects Microsoft Dynamics 365 to the Azure Text Analytics service.
1. Go to Settings > Administration > Azure Machine Learning Text Analytics Service
Configuration.
2. Review the information and click Continue.
3. Next, fill in the connection information.
Item Description
Name (required) A logical name for the connection.
Azure Service URL (required) The service URL for the Azure Text Analytics service.
Azure Account Key (required) You will need to sign up for the Text Analytics API and obtain an API key. See Azure Text Analytics API. A $0.00 account is available for trying out this feature.
Description A description of the connection.
4. Click Test Connection to validate your settings.
5. Once the connection is successful, click Activate.
Set the recommendations connection Microsoft Dynamics 365 features that use the Azure Recommendations service for recommendation modeling, like product recommendations, require an Azure Recommendations service connection. This connects Microsoft Dynamics 365 to the Azure Recommendations service.
1. Click Settings > Administration > Azure Machine Learning Recommendation Service
Configuration.
2. After reading the disclaimer, click Continue.
Next, fill in the connection information and activate the connection to the Azure recommendation service.
1. Fill in the connection information.
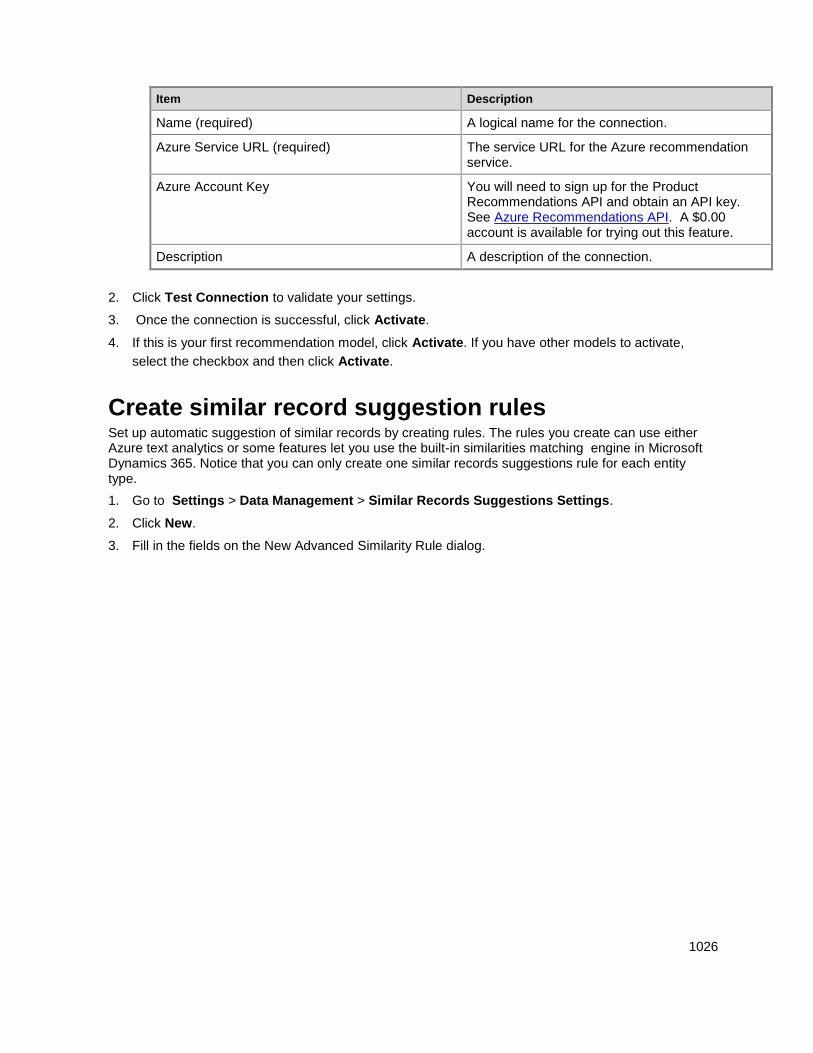
1026
Item Description
Name (required) A logical name for the connection.
Azure Service URL (required) The service URL for the Azure recommendation service.
Azure Account Key You will need to sign up for the Product Recommendations API and obtain an API key. See Azure Recommendations API. A $0.00 account is available for trying out this feature.
Description A description of the connection.
2. Click Test Connection to validate your settings.
3. Once the connection is successful, click Activate.
4. If this is your first recommendation model, click Activate. If you have other models to activate,
select the checkbox and then click Activate.
Create similar record suggestion rules Set up automatic suggestion of similar records by creating rules. The rules you create can use either Azure text analytics or some features let you use the built-in similarities matching engine in Microsoft Dynamics 365. Notice that you can only create one similar records suggestions rule for each entity type.
1. Go to Settings > Data Management > Similar Records Suggestions Settings.
2. Click New.
3. Fill in the fields on the New Advanced Similarity Rule dialog.
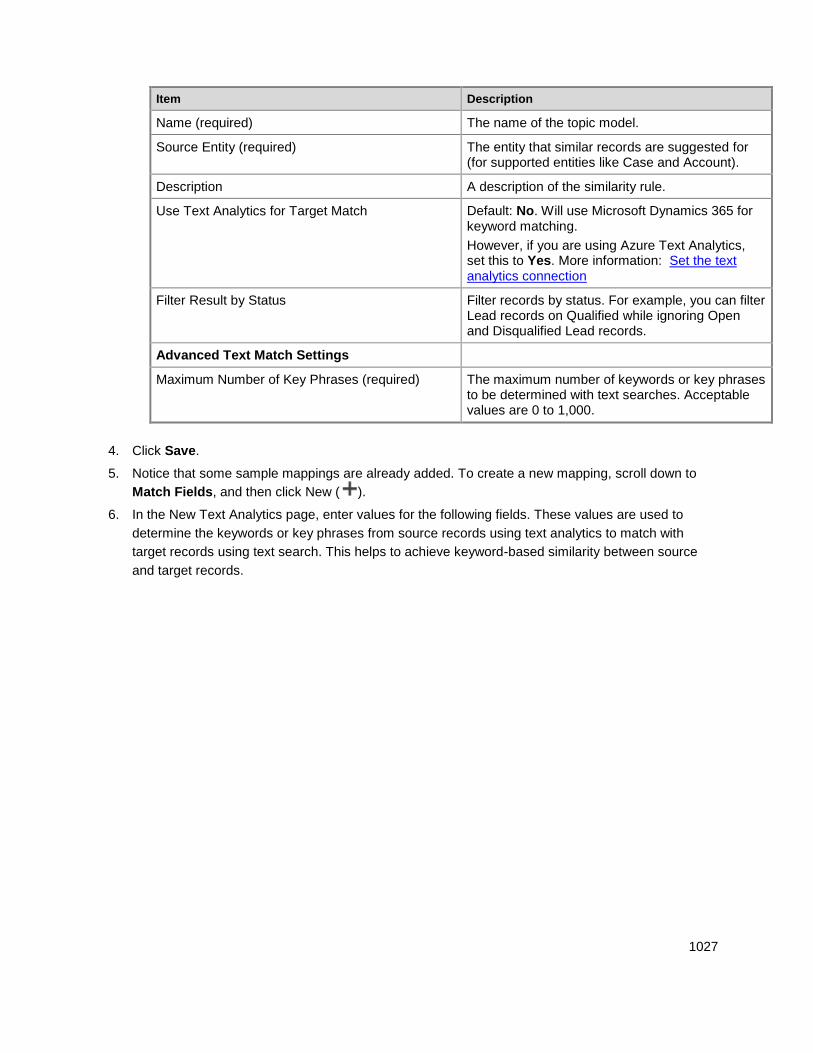
1027
Item Description
Name (required) The name of the topic model.
Source Entity (required) The entity that similar records are suggested for (for supported entities like Case and Account).
Description A description of the similarity rule.
Use Text Analytics for Target Match Default: No. Will use Microsoft Dynamics 365 for keyword matching.
However, if you are using Azure Text Analytics, set this to Yes. More information: Set the text analytics connection
Filter Result by Status Filter records by status. For example, you can filter Lead records on Qualified while ignoring Open and Disqualified Lead records.
Advanced Text Match Settings
Maximum Number of Key Phrases (required) The maximum number of keywords or key phrases to be determined with text searches. Acceptable values are 0 to 1,000.
4. Click Save.
5. Notice that some sample mappings are already added. To create a new mapping, scroll down to
Match Fields, and then click New ( ).
6. In the New Text Analytics page, enter values for the following fields. These values are used to
determine the keywords or key phrases from source records using text analytics to match with
target records using text search. This helps to achieve keyword-based similarity between source
and target records.
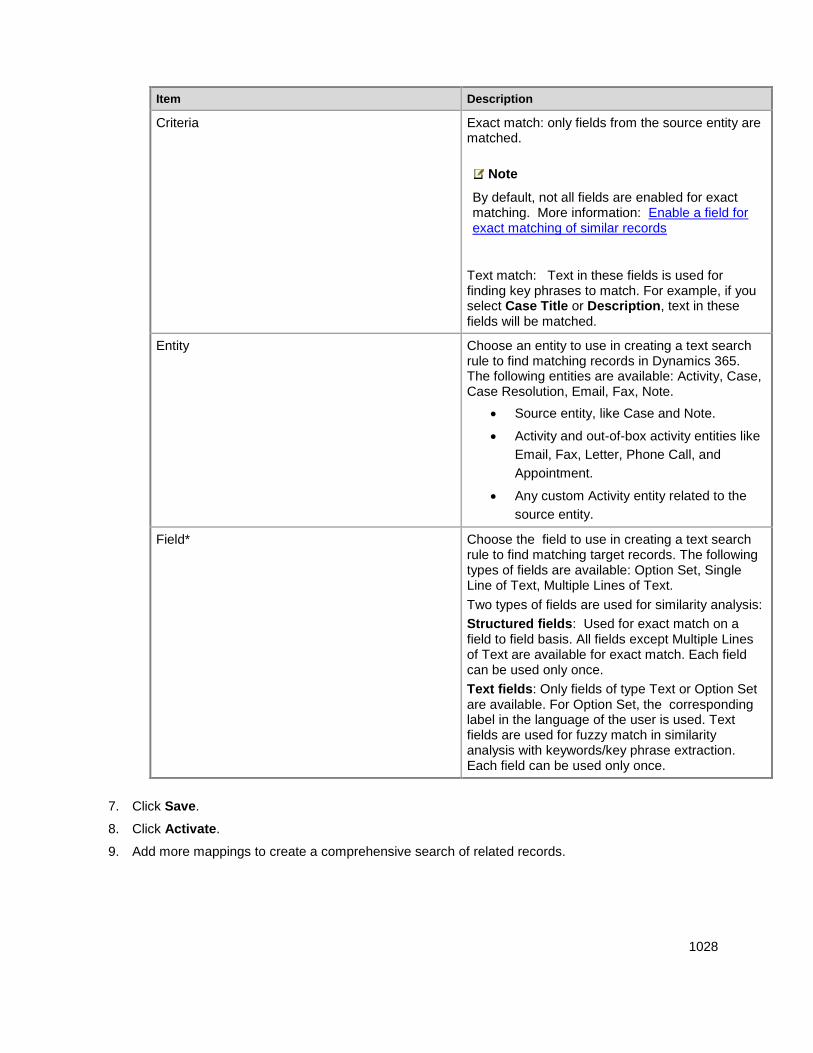
1028
Item Description
Criteria Exact match: only fields from the source entity are matched.
Note
By default, not all fields are enabled for exact matching. More information: Enable a field for exact matching of similar records
Text match: Text in these fields is used for finding key phrases to match. For example, if you select Case Title or Description, text in these fields will be matched.
Entity Choose an entity to use in creating a text search rule to find matching records in Dynamics 365. The following entities are available: Activity, Case, Case Resolution, Email, Fax, Note.
Source entity, like Case and Note.
Activity and out-of-box activity entities like
Email, Fax, Letter, Phone Call, and
Appointment.
Any custom Activity entity related to the
source entity.
Field* Choose the field to use in creating a text search rule to find matching target records. The following types of fields are available: Option Set, Single Line of Text, Multiple Lines of Text.
Two types of fields are used for similarity analysis:
Structured fields: Used for exact match on a field to field basis. All fields except Multiple Lines of Text are available for exact match. Each field can be used only once.
Text fields: Only fields of type Text or Option Set are available. For Option Set, the corresponding label in the language of the user is used. Text fields are used for fuzzy match in similarity analysis with keywords/key phrase extraction. Each field can be used only once.
7. Click Save.
8. Click Activate.
9. Add more mappings to create a comprehensive search of related records.
1029
Enable a field for exact matching of similar records To enable a field for exact match, add the field in the Quick find view of the corresponding entity.
1. Go to Settings > Customizations > Customize the System.
2. Expand Entities, expand the entity that you want to enable exact matching, such as the Account
entity, and then click Views.
3. Click Quick Find Active Accounts, click More Actions, and then click Edit.
4. Under Common Tasks, click Add Find Columns, and then select the field that you want to enable
exact matching.
5. Click OK, and then clickSave and Close on the Quick Find Active Accounts page.
6. Because adding a field to a view is a customization, you must publish the customization to enable
exact matching for the field. To do this, in the left navigation pane click the entity, such as Account,
and then click Publish. To publish all customizations, click Publish All Customizations.
Privacy notice
By enabling the Text Analytics feature, you enable dependent features within Dynamics 365 that leverage the Azure Cognitive Services Text Analytics API to offer advanced insights. These dependent features are:
Knowledge suggestions
Case topic analysis
Similar cases suggestions
An administrator can enable the Text Analytics feature under Settings > Administration > System Settings > Preview tab in the Microsoft Dynamics 365 organization.
By enabling the Text Analytics feature, when you set up text analytics–based knowledge suggestions within Microsoft Dynamics 365, the case and its related entities’ data is sent to the Azure Text Analytics API to extract keywords/phrases. No data is stored with the Azure Text Analytics API. Only configured fields in the Knowledge Article configuration are sent to the Azure Text Analytics API to extract the terms. The administrator or customizer does have the option to deactivate the Knowledge Article Configuration to stop making API calls to the Azure Text Analytics API. Also, the customizer can stop using Text Analytics–based suggestions by switching back to Field-based suggestions in the Case Entity Form configuration.
By enabling the Text Analytics feature, when you set up case topic analysis within Microsoft Dynamics 365, the case and its related entities data is sent to the Azure Text Analytics API for topic determination. No data is stored with the Azure Text Analytics API. Only configured fields in the Topic Model Configuration are sent to the Azure Text Analytics API to extract the topics. The administrator or customizer does have the option to deactivate the Topic Model to stop making Azure Text Analytics API calls.
1030
By enabling the Text Analytics feature, when you set up similar cases suggestions within Microsoft Dynamics 365, if the Advanced Text Analytics option is enabled in the Similarity Rule, then the case and its related entities’ data is sent to the Azure Text Analytics API to extract keywords and phrases. Only text fields configured in the Similarity Rule are sent to the Azure Text Analytics API. No data is stored with the Azure Text Analytics API. The administrator or customizer does have the option to deactivate the Similarity rule to stop making Azure Text Analytics API calls.
Azure components and services that are involved with Text Analytics–based features are detailed in the following sections.
Note:For more information about additional Azure service offerings, see the Microsoft Azure Trust Center.
Azure API App
The Azure API app triggers the Web jobs that read the data from the Dynamics 365 organization and send data to the Text Analytics API to do topic analysis. The Azure API App uses a Web job to do the actual data processing in the background and write the data output to Azure Blob Storage. The data is stored temporarily in Azure Blob Storage. Finally, data is deleted from Azure Storage once topic determination has been done.
Azure Scheduler
Azure Scheduler is used to trigger a Web job on a scheduled basis to perform topic analysis. Only the topic model build schedule is shared with the scheduler.
Azure Table
Azure Table is used for communicating the model version and organization context between the Azure API app and the Web job.
Azure Blob Storage
Web jobs temporarily store data in Azure Blob Storage and delete it once the Logic App pipeline has finished execution.
Azure Text Analytics API
The Azure Text Analytics API is sent data based on fields that are configured in active Knowledge Search fields or the Topic Model configuration or the Similarity Rule configuration. For example, case entity fields, such as title and description, plus the description field in related notes and activities, are configured in the Knowledge Search Field configuration.
Dynamics 365 Relevance Search
You can use Relevance Search, if it has been enabled by an administrator, to find similar records for cases. The text match fields and exact match fields used in the Similarity rule are used to invoke the Relevance Search API. Refer to the technical content for Dynamics 365 Relevance Search for data-handling details.
By enabling the Product Recommendations feature, when you build a recommendation model from within Microsoft Dynamics 365, the historical transaction data based on configured Basket Data entities and their filter will be sent to Azure and processed in Azure and stored temporarily in Azure Storage and finally sent to Azure Recommendations API to build the machine learning model. After the model has been built with Azure Recommendations API, data is deleted from Azure Storage. Note that only IDs (Account ID, Product ID, Transaction ID) are sent to Azure to build the recommendation model.
An administrator can enable the Product Recommendations feature under Settings > Administration > System Settings > Preview tab in the Microsoft Dynamics 365 organization. Data is sent to Azure Recommendations API only when a recommendation model is built. The system administrator does
1031
have the option to delete the existing model to delete data shared with the Azure Recommendations API. In addition, the system administrator can delete the connection to the Azure Recommendations API to stop building any recommendation models in the future.
Azure components and services that are involved with Product Recommendations are detailed in the following sections.
Note:For more information about additional Azure service offerings, see the Microsoft Azure Trust Center.
Azure Logic Apps
This provides the orchestrated data pipeline to synchronize product catalog and transaction data with the Recommendations API to build the recommendation model version. This pipeline executes as a multi-tenanted service with multiple API apps for communication between a Dynamics 365 organization and the Recommendations API. Logic apps are triggered from Dynamics 365 with minimal context, such as Model Version ID and the Dynamics 365 organization URL.
Azure API Apps
These are the web applications that trigger the Web jobs that read the data from the Dynamics 365 organization and send data to the Recommendations API to build the recommendation model. There are 3 API apps and corresponding Web jobs - one for reading product data, one for reading transaction data, and one for building a recommendation model. API apps use a Web job to do the actual data processing in the background and write the data output to Azure Blob Storage. The data is stored temporarily in Azure Blob Storage. Finally, data is deleted from Azure Storage once the model has been built.
Azure Table
Azure Table is used for communicating the model version and organization context between the API app and a Web job.
Azure Blob Storage
Data is stored temporarily in Azure Blob Storage by Web jobs and deleted once the Logic App pipeline has finished execution.
Azure Recommendations API
The Azure Recommendations API is sent with minimal data Product IDs, Transaction IDs, and Account IDs to build the recommendation model. Data is stored with the Recommendations API service until a corresponding model version exists.
See Also Preview feature: Create and manage models to make product recommendations Preview feature: Automatically suggest knowledge articles Preview feature: Topic analysis Preview feature: Suggest similar cases for a case Preview feature: Enable document suggestions
© 2016 Microsoft. All rights reserved. Copyright
1032
Preview feature: Create and manage models to make product recommendations
Applies To: Dynamics 365 (online), Dynamics CRM Online
[This topic is pre-release documentation and is subject to change.]
Imagine being able to make product recommendations to your customers when they select an item for purchase. When you connect Dynamics 365 (online) to the Azure Machine Learning recommendation service, this becomes available to you. You can use the Azure recommendation service to build an advanced machine learning model for automatic cross-sell product recommendations based on historical transaction data.
The Dynamics 365 Product Catalog has the basic modeling ability to link various products for cross-sell/up-sell/accessory recommendations. The limitation with these recommendations is that they require a customizer or business analyst to maintain these as hard links and often requires making specific assumptions about which products are likely to sell together. While these assumptions may be valid, they may not reflect the real world with users often buying other products together. Even if the customizer or analyst has specific data points for maintaining these links, they will keep evolving over time with new or retired products and services. It will be a constant overhead and complexity to maintain these links especially with analyzing how to rank the recommendations and imagining all possible combinations of products that can be sold together. There is a need to improve these recommendations so they can use the real world transactions as a basis to make these recommendations and can also evolve over time without requiring any maintenance overhead.
Machine learning techniques can help to eliminate this complexity by using transaction or behavioral data as the basis to make recommendations without requiring any manual intervention. Using real world transactions or interactions to find products that are sold or viewed together is the best way to make the right recommendations.
Once you add product recommendations capability in Dynamics 365 by using the Azure Machine Learning recommendation service, a native capability is added to Product Catalog to generate automatic recommendations by configuring connectivity to Azure Machine Learning service. In addition, you will set up the product catalog and synchronization to build a “machine learning based recommendation model”. You will then use this model to make recommendations in a ranked list at various places in Dynamics 365 such as Account, Opportunity or Order level to suggest additional cross-sell products and help improve total value of the deal.
This document walks you through the process of connecting Dynamics 365 (online) to the Azure recommendation service and how to build a product recommendation model.
Important
The Azure recommendation service feature is available as a preview feature for Microsoft
Dynamics 365 (online) organizations, if you’ve installed the Microsoft Dynamics CRM Online 2016
Update 1.
The Azure recommendation service feature is provided for the Microsoft Dynamics 365 (online)
web application.
We expect changes to this feature, so you shouldn’t use it in production. Use it only in test and
development environments.
A preview feature is a feature that is not complete, but is made available before it’s officially in a
1033
release so customers can get early access and provide feedback. Preview features aren’t meant for
production use and may have limited or restricted functionality.
Microsoft doesn't provide support for this preview feature. Microsoft Dynamics 365 Technical
Support won’t be able to help you with issues or questions. Preview features aren't meant for
production use and are subject to a separate supplemental terms of use.
The Azure Machine Learning recommendation service is also referred to as the Azure
Recommendations API.
Send us feedback
We'd love your feedback on the Azure Machine Learning recommendation service! To send us your feedback, register your account on the Microsoft Connect site, and then submit your feedback.
In this topic Requirements
Enable Dynamics 365 Cross-sell Product Recommendations
Connect Dynamics 365 (online) to the Azure Machine Learning recommendation service
The Product Recommendation Model page
Test your model
Activate your model
See the recommendations in action
See product recommendations in Dynamics 365 for phones and tablets
Requirements This feature requires December 2016 update for Microsoft Dynamics 365 (online) or later version.
An Azure Machine Learning Recommendations service connection configured in Microsoft
Dynamics 365.
Enable Dynamics 365 Cross-sell Product Recommendations To enable Cross-sell Product Recommendations, do the following:
1. Go to Settings > Administration.
2. Click System Settings and open the Previews tab.
3. Under Cross-sell Product Recommendations Preview, set the Enable Dynamics 365 Cross-
sell Product Recommendations Preview to Yes.
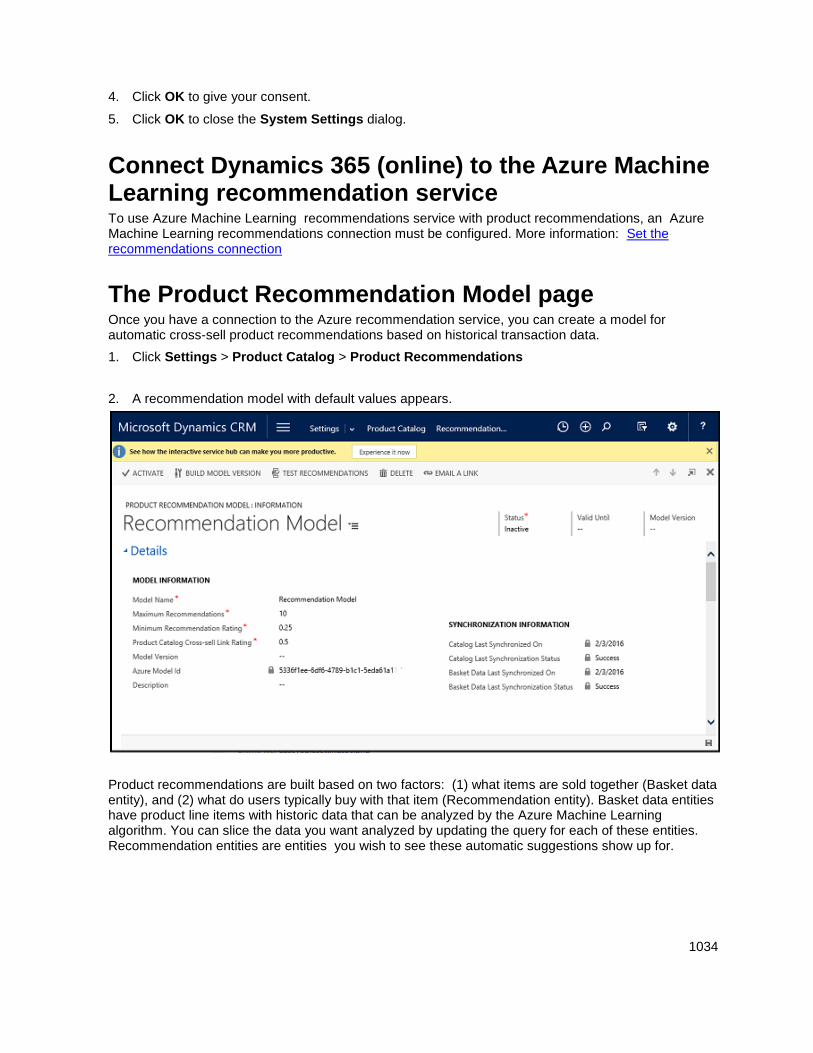
1034
4. Click OK to give your consent.
5. Click OK to close the System Settings dialog.
Connect Dynamics 365 (online) to the Azure Machine Learning recommendation service To use Azure Machine Learning recommendations service with product recommendations, an Azure Machine Learning recommendations connection must be configured. More information: Set the recommendations connection
The Product Recommendation Model page Once you have a connection to the Azure recommendation service, you can create a model for automatic cross-sell product recommendations based on historical transaction data.
1. Click Settings > Product Catalog > Product Recommendations
2. A recommendation model with default values appears.
Product recommendations are built based on two factors: (1) what items are sold together (Basket data entity), and (2) what do users typically buy with that item (Recommendation entity). Basket data entities have product line items with historic data that can be analyzed by the Azure Machine Learning algorithm. You can slice the data you want analyzed by updating the query for each of these entities. Recommendation entities are entities you wish to see these automatic suggestions show up for.
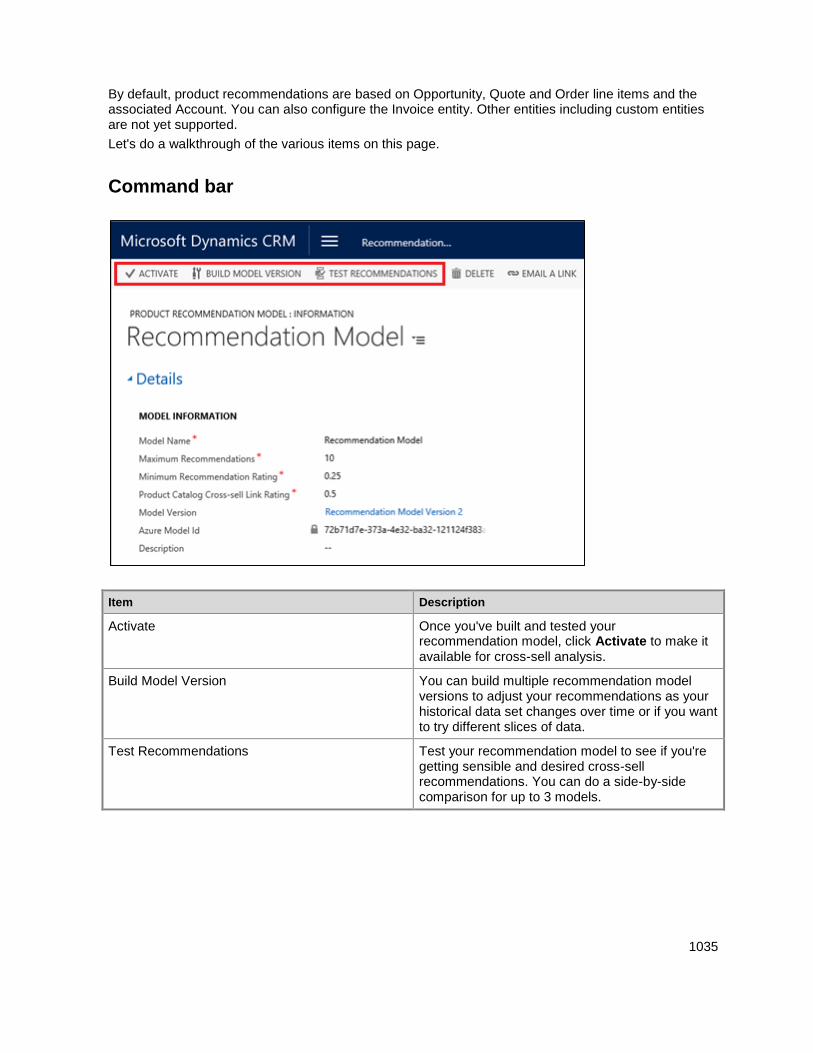
1035
By default, product recommendations are based on Opportunity, Quote and Order line items and the associated Account. You can also configure the Invoice entity. Other entities including custom entities are not yet supported.
Let's do a walkthrough of the various items on this page.
Command bar
Item Description
Activate Once you've built and tested your recommendation model, click Activate to make it available for cross-sell analysis.
Build Model Version You can build multiple recommendation model versions to adjust your recommendations as your historical data set changes over time or if you want to try different slices of data.
Test Recommendations Test your recommendation model to see if you're getting sensible and desired cross-sell recommendations. You can do a side-by-side comparison for up to 3 models.
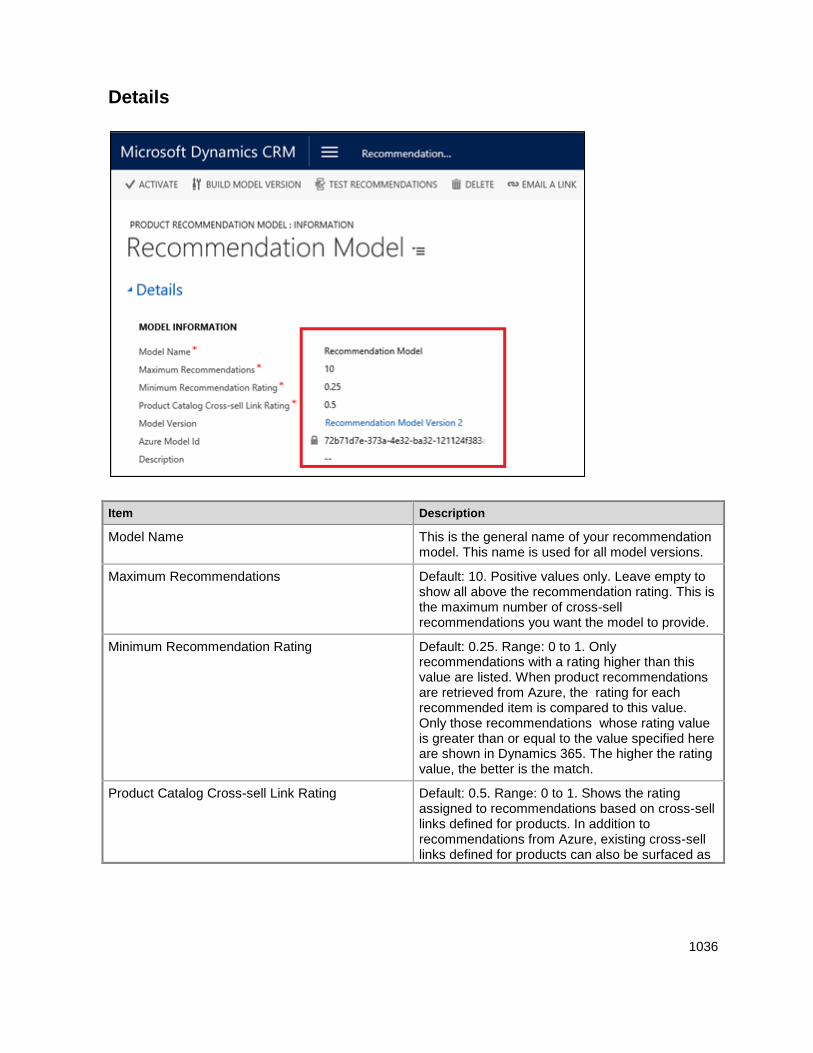
1036
Details
Item Description
Model Name This is the general name of your recommendation model. This name is used for all model versions.
Maximum Recommendations Default: 10. Positive values only. Leave empty to show all above the recommendation rating. This is the maximum number of cross-sell recommendations you want the model to provide.
Minimum Recommendation Rating Default: 0.25. Range: 0 to 1. Only recommendations with a rating higher than this value are listed. When product recommendations are retrieved from Azure, the rating for each recommended item is compared to this value. Only those recommendations whose rating value is greater than or equal to the value specified here are shown in Dynamics 365. The higher the rating value, the better is the match.
Product Catalog Cross-sell Link Rating Default: 0.5. Range: 0 to 1. Shows the rating assigned to recommendations based on cross-sell links defined for products. In addition to recommendations from Azure, existing cross-sell links defined for products can also be surfaced as
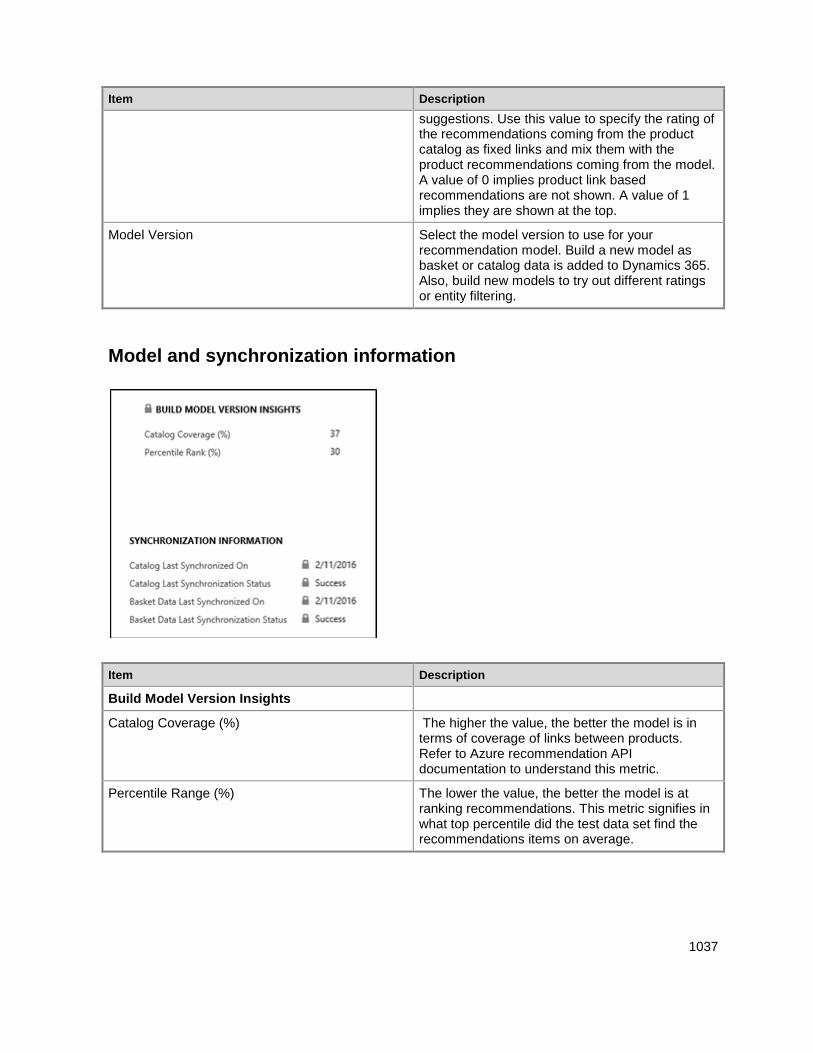
1037
Item Description
suggestions. Use this value to specify the rating of the recommendations coming from the product catalog as fixed links and mix them with the product recommendations coming from the model. A value of 0 implies product link based recommendations are not shown. A value of 1 implies they are shown at the top.
Model Version Select the model version to use for your recommendation model. Build a new model as basket or catalog data is added to Dynamics 365. Also, build new models to try out different ratings or entity filtering.
Model and synchronization information
Item Description
Build Model Version Insights
Catalog Coverage (%) The higher the value, the better the model is in terms of coverage of links between products. Refer to Azure recommendation API documentation to understand this metric.
Percentile Range (%) The lower the value, the better the model is at ranking recommendations. This metric signifies in what top percentile did the test data set find the recommendations items on average.
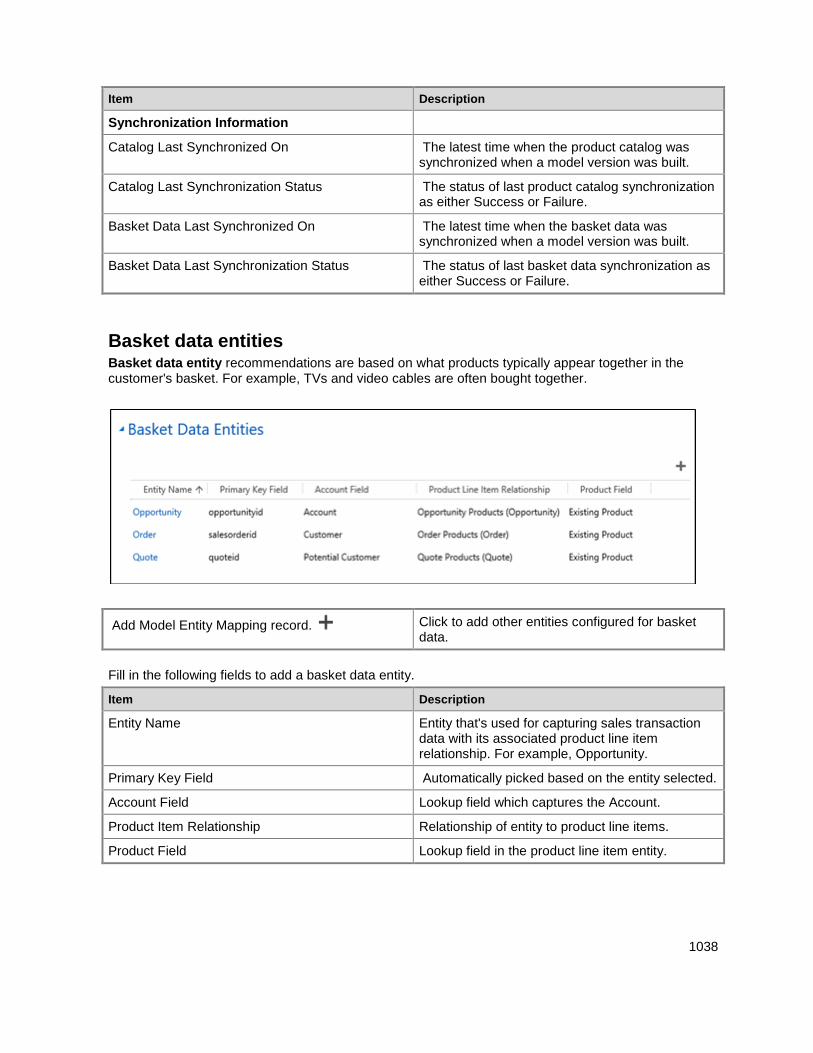
1038
Item Description
Synchronization Information
Catalog Last Synchronized On The latest time when the product catalog was synchronized when a model version was built.
Catalog Last Synchronization Status The status of last product catalog synchronization as either Success or Failure.
Basket Data Last Synchronized On The latest time when the basket data was synchronized when a model version was built.
Basket Data Last Synchronization Status The status of last basket data synchronization as either Success or Failure.
Basket data entities Basket data entity recommendations are based on what products typically appear together in the customer's basket. For example, TVs and video cables are often bought together.
Add Model Entity Mapping record. Click to add other entities configured for basket data.
Fill in the following fields to add a basket data entity.
Item Description
Entity Name Entity that's used for capturing sales transaction data with its associated product line item relationship. For example, Opportunity.
Primary Key Field Automatically picked based on the entity selected.
Account Field Lookup field which captures the Account.
Product Item Relationship Relationship of entity to product line items.
Product Field Lookup field in the product line item entity.
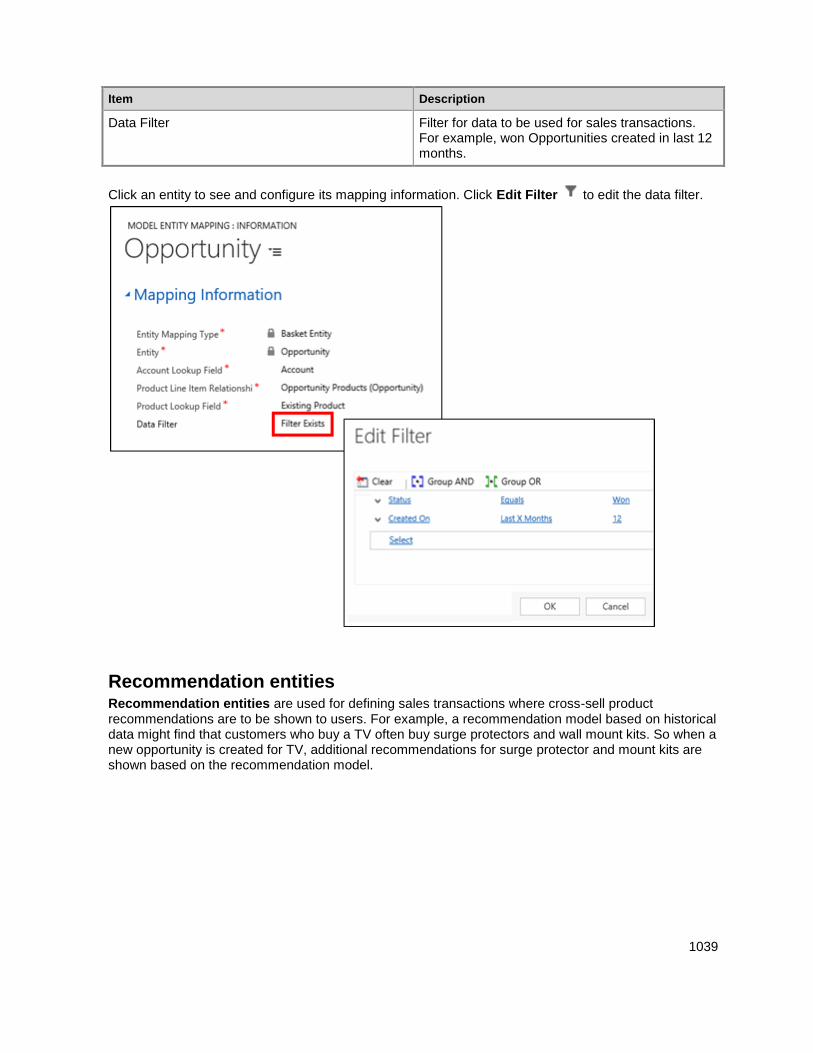
1039
Item Description
Data Filter Filter for data to be used for sales transactions. For example, won Opportunities created in last 12 months.
Click an entity to see and configure its mapping information. Click Edit Filter to edit the data filter.
Recommendation entities Recommendation entities are used for defining sales transactions where cross-sell product recommendations are to be shown to users. For example, a recommendation model based on historical data might find that customers who buy a TV often buy surge protectors and wall mount kits. So when a new opportunity is created for TV, additional recommendations for surge protector and mount kits are shown based on the recommendation model.
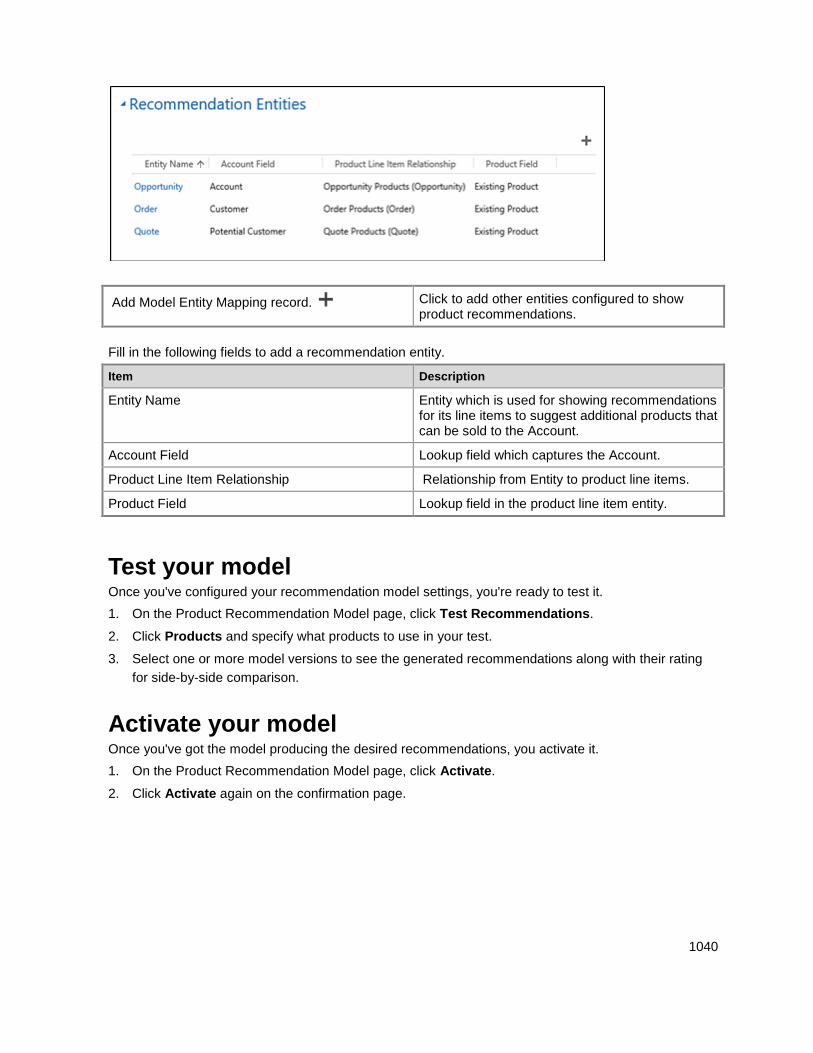
1040
Add Model Entity Mapping record. Click to add other entities configured to show product recommendations.
Fill in the following fields to add a recommendation entity.
Item Description
Entity Name Entity which is used for showing recommendations for its line items to suggest additional products that can be sold to the Account.
Account Field Lookup field which captures the Account.
Product Line Item Relationship Relationship from Entity to product line items.
Product Field Lookup field in the product line item entity.
Test your model Once you've configured your recommendation model settings, you're ready to test it.
1. On the Product Recommendation Model page, click Test Recommendations.
2. Click Products and specify what products to use in your test.
3. Select one or more model versions to see the generated recommendations along with their rating
for side-by-side comparison.
Activate your model Once you've got the model producing the desired recommendations, you activate it.
1. On the Product Recommendation Model page, click Activate.
2. Click Activate again on the confirmation page.
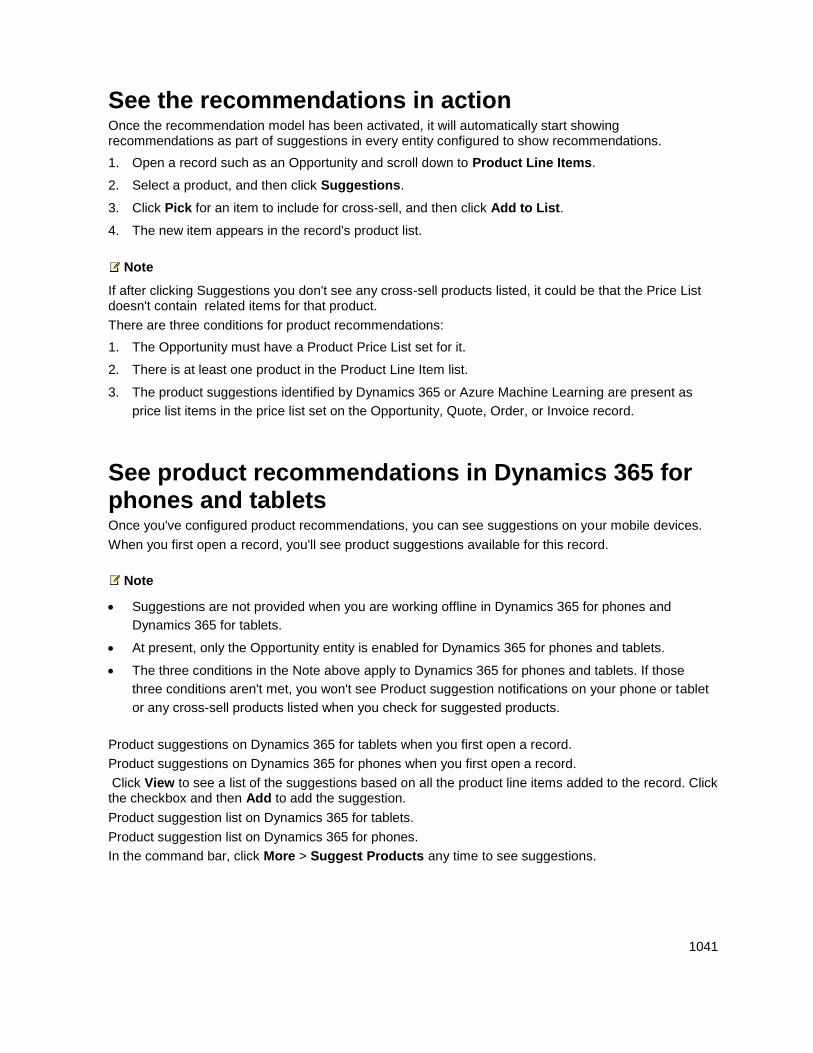
1041
See the recommendations in action Once the recommendation model has been activated, it will automatically start showing recommendations as part of suggestions in every entity configured to show recommendations.
1. Open a record such as an Opportunity and scroll down to Product Line Items.
2. Select a product, and then click Suggestions.
3. Click Pick for an item to include for cross-sell, and then click Add to List.
4. The new item appears in the record's product list.
Note
If after clicking Suggestions you don't see any cross-sell products listed, it could be that the Price List doesn't contain related items for that product.
There are three conditions for product recommendations:
1. The Opportunity must have a Product Price List set for it.
2. There is at least one product in the Product Line Item list.
3. The product suggestions identified by Dynamics 365 or Azure Machine Learning are present as
price list items in the price list set on the Opportunity, Quote, Order, or Invoice record.
See product recommendations in Dynamics 365 for phones and tablets Once you've configured product recommendations, you can see suggestions on your mobile devices.
When you first open a record, you'll see product suggestions available for this record.
Note
Suggestions are not provided when you are working offline in Dynamics 365 for phones and
Dynamics 365 for tablets.
At present, only the Opportunity entity is enabled for Dynamics 365 for phones and tablets.
The three conditions in the Note above apply to Dynamics 365 for phones and tablets. If those
three conditions aren't met, you won't see Product suggestion notifications on your phone or tablet
or any cross-sell products listed when you check for suggested products.
Product suggestions on Dynamics 365 for tablets when you first open a record.
Product suggestions on Dynamics 365 for phones when you first open a record.
Click View to see a list of the suggestions based on all the product line items added to the record. Click the checkbox and then Add to add the suggestion.
Product suggestion list on Dynamics 365 for tablets.
Product suggestion list on Dynamics 365 for phones.
In the command bar, click More > Suggest Products any time to see suggestions.
1042
See Also Help & Training: What are Preview features and how do I enable them? Azure Cognitive Services integration with Dynamics 365
© 2016 Microsoft. All rights reserved. Copyright
Preview feature: Automatically suggest knowledge articles
Applies To: Dynamics 365 (online), Dynamics CRM Online
[This topic is pre-release documentation and is subject to change.]
You want your customer service reps to quickly resolve cases with high customer satisfaction. By using the Azure Machine Learning text analytics service with Microsoft Dynamics 365, you can set up service case analysis to automatically provide your support staff with more relevant solutions from knowledge articles. They'll spend less time searching for answers and more time providing the correct response.
Important
The Azure Text Analytics service feature is available as a preview feature for Dynamics 365
organizations, if you’ve installed the Microsoft Dynamics CRM Online 2016 Update 1.
We expect changes to this feature, so you shouldn’t use it in production. Use it only in test and
development environments.
A preview feature is a feature that is not complete, but is made available before it’s officially in a
release so customers can get early access and provide feedback. Preview features aren’t meant for
production use and may have limited or restricted functionality.
Microsoft doesn't provide support for this preview feature. Microsoft Dynamics 365 Technical
Support won’t be able to help you with issues or questions. Preview features aren't meant for
production use and are subject to a separate supplemental terms of use.
Send us feedback
We'd love your feedback on the Azure Machine Learning Text Analytics service! To send us your feedback, register your account on the Microsoft Connect site, and then submit your feedback.
In this topic Enable Dynamics 365 Text Analytics
Connect Dynamics 365 (online) to the Azure Text Analytics service
Set up Knowledge Search field settings
Modify the Case form to include knowledge base suggestions
View automatic suggestions in a case
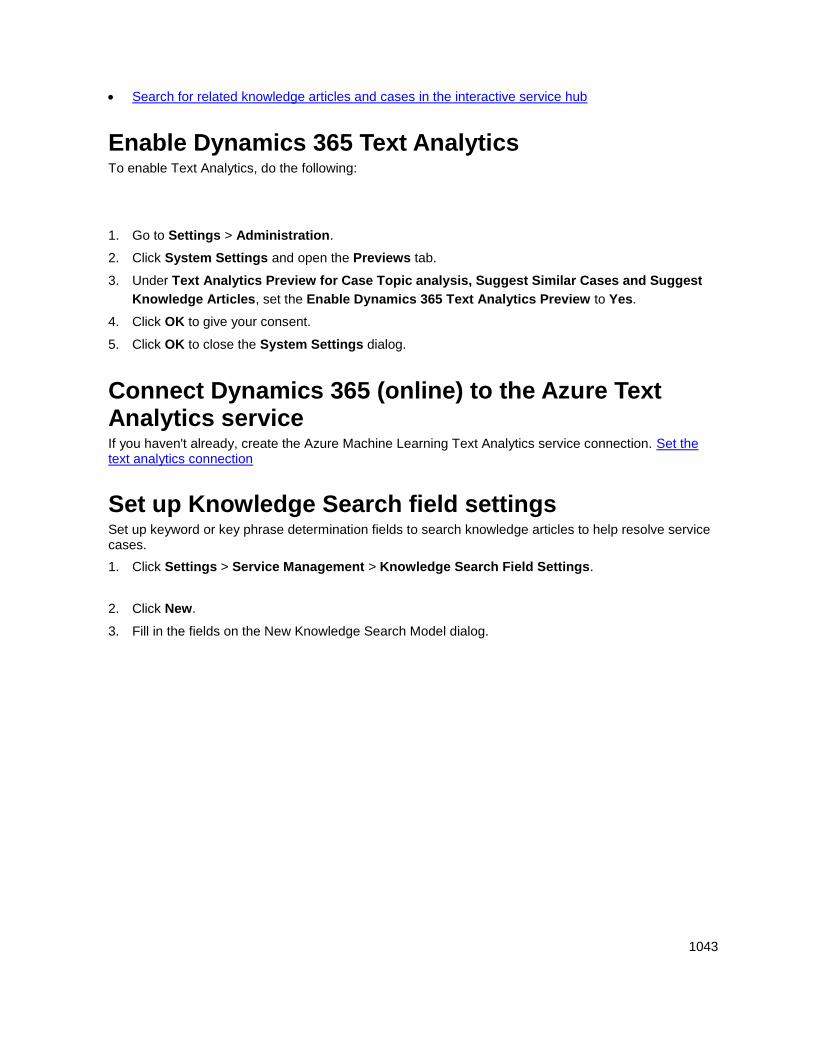
1043
Search for related knowledge articles and cases in the interactive service hub
Enable Dynamics 365 Text Analytics To enable Text Analytics, do the following:
1. Go to Settings > Administration.
2. Click System Settings and open the Previews tab.
3. Under Text Analytics Preview for Case Topic analysis, Suggest Similar Cases and Suggest
Knowledge Articles, set the Enable Dynamics 365 Text Analytics Preview to Yes.
4. Click OK to give your consent.
5. Click OK to close the System Settings dialog.
Connect Dynamics 365 (online) to the Azure Text Analytics service If you haven't already, create the Azure Machine Learning Text Analytics service connection. Set the text analytics connection
Set up Knowledge Search field settings Set up keyword or key phrase determination fields to search knowledge articles to help resolve service cases.
1. Click Settings > Service Management > Knowledge Search Field Settings.
2. Click New.
3. Fill in the fields on the New Knowledge Search Model dialog.
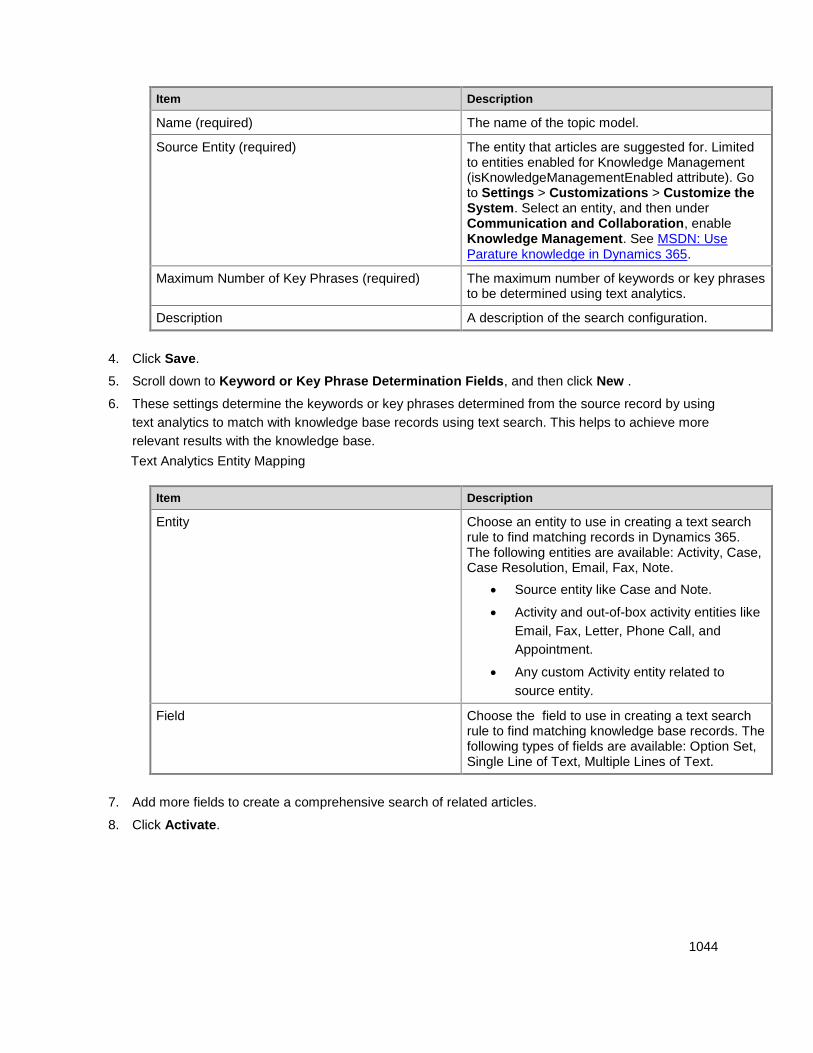
1044
Item Description
Name (required) The name of the topic model.
Source Entity (required) The entity that articles are suggested for. Limited to entities enabled for Knowledge Management (isKnowledgeManagementEnabled attribute). Go to Settings > Customizations > Customize the System. Select an entity, and then under Communication and Collaboration, enable Knowledge Management. See MSDN: Use Parature knowledge in Dynamics 365.
Maximum Number of Key Phrases (required) The maximum number of keywords or key phrases to be determined using text analytics.
Description A description of the search configuration.
4. Click Save.
5. Scroll down to Keyword or Key Phrase Determination Fields, and then click New .
6. These settings determine the keywords or key phrases determined from the source record by using
text analytics to match with knowledge base records using text search. This helps to achieve more
relevant results with the knowledge base.
Text Analytics Entity Mapping
Item Description
Entity Choose an entity to use in creating a text search rule to find matching records in Dynamics 365. The following entities are available: Activity, Case, Case Resolution, Email, Fax, Note.
Source entity like Case and Note.
Activity and out-of-box activity entities like
Email, Fax, Letter, Phone Call, and
Appointment.
Any custom Activity entity related to
source entity.
Field Choose the field to use in creating a text search rule to find matching knowledge base records. The following types of fields are available: Option Set, Single Line of Text, Multiple Lines of Text.
7. Add more fields to create a comprehensive search of related articles.
8. Click Activate.
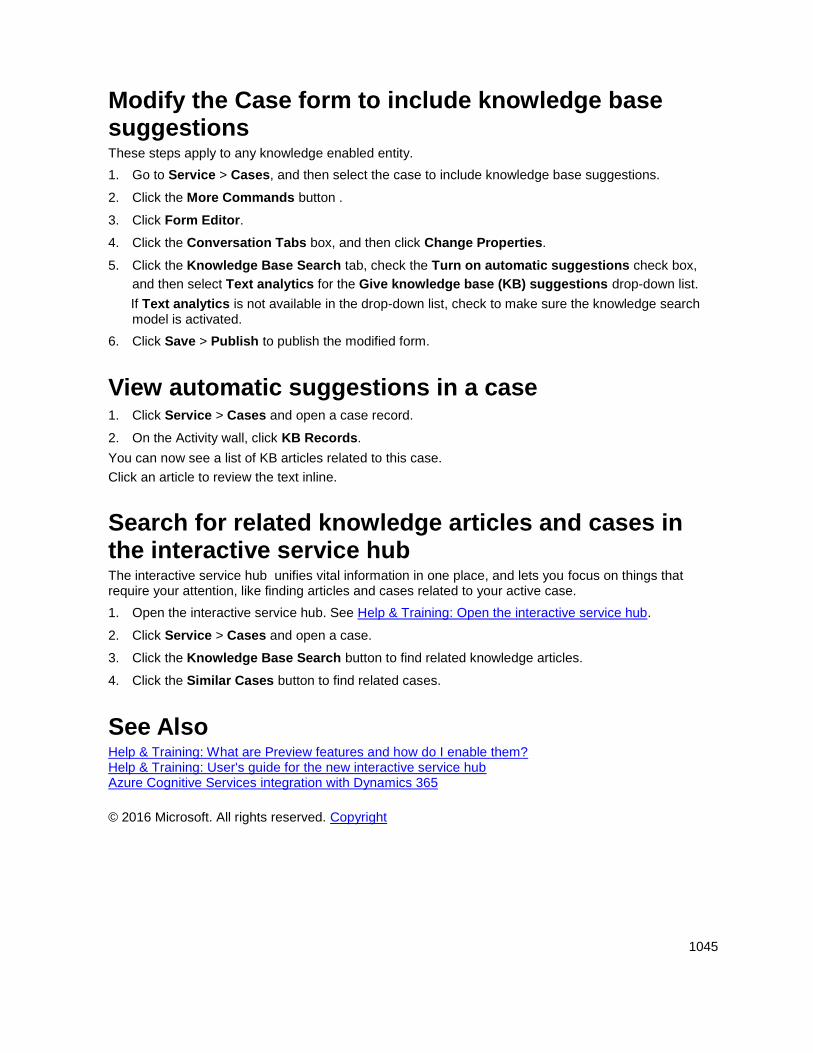
1045
Modify the Case form to include knowledge base suggestions These steps apply to any knowledge enabled entity.
1. Go to Service > Cases, and then select the case to include knowledge base suggestions.
2. Click the More Commands button .
3. Click Form Editor.
4. Click the Conversation Tabs box, and then click Change Properties.
5. Click the Knowledge Base Search tab, check the Turn on automatic suggestions check box,
and then select Text analytics for the Give knowledge base (KB) suggestions drop-down list.
If Text analytics is not available in the drop-down list, check to make sure the knowledge search model is activated.
6. Click Save > Publish to publish the modified form.
View automatic suggestions in a case 1. Click Service > Cases and open a case record.
2. On the Activity wall, click KB Records.
You can now see a list of KB articles related to this case.
Click an article to review the text inline.
Search for related knowledge articles and cases in the interactive service hub The interactive service hub unifies vital information in one place, and lets you focus on things that require your attention, like finding articles and cases related to your active case.
1. Open the interactive service hub. See Help & Training: Open the interactive service hub.
2. Click Service > Cases and open a case.
3. Click the Knowledge Base Search button to find related knowledge articles.
4. Click the Similar Cases button to find related cases.
See Also Help & Training: What are Preview features and how do I enable them? Help & Training: User's guide for the new interactive service hub Azure Cognitive Services integration with Dynamics 365
© 2016 Microsoft. All rights reserved. Copyright

1046
Preview feature: Topic analysis
Applies To: Dynamics 365 (online), Dynamics CRM Online
[This topic is pre-release documentation and is subject to change.]
You're a service manager responsible for handling service cases. You want to know what topics/issues are reported in service cases so you can take action to reduce future incidents of such cases. For example, you can create a new knowledge article or take feedback to the product team to fix a certain issue.
Important
The Azure text analytics service feature is available as a preview feature for Microsoft Dynamics
365 (online) organizations, if you’ve installed the Microsoft Dynamics CRM Online 2016 Update 1.
We expect changes to this feature, so you shouldn’t use it in production. Use it only in test and
development environments.
A preview feature is a feature that is not complete, but is made available before it’s officially in a
release so customers can get early access and provide feedback. Preview features aren’t meant for
production use and may have limited or restricted functionality.
Microsoft doesn't provide support for this preview feature. Microsoft Dynamics 365 Technical
Support won’t be able to help you with issues or questions. Preview features aren't meant for
production use and are subject to a separate supplemental terms of use.
Send us feedback
We'd love your feedback on the Azure Machine Learning Text Analytics service! To send us your feedback, register your account on the Microsoft Connect site, and then submit your feedback.
In This Topic Enable Dynamics 365 Text Analytics
Connect Dynamics 365 (online) to the Azure Text Analytics service
Create a topic model
View recent case topics
Enable Dynamics 365 Text Analytics To enable Text Analytics, do the following:
1. Go to Settings > Administration.
2. Click System Settings and open the Previews tab.
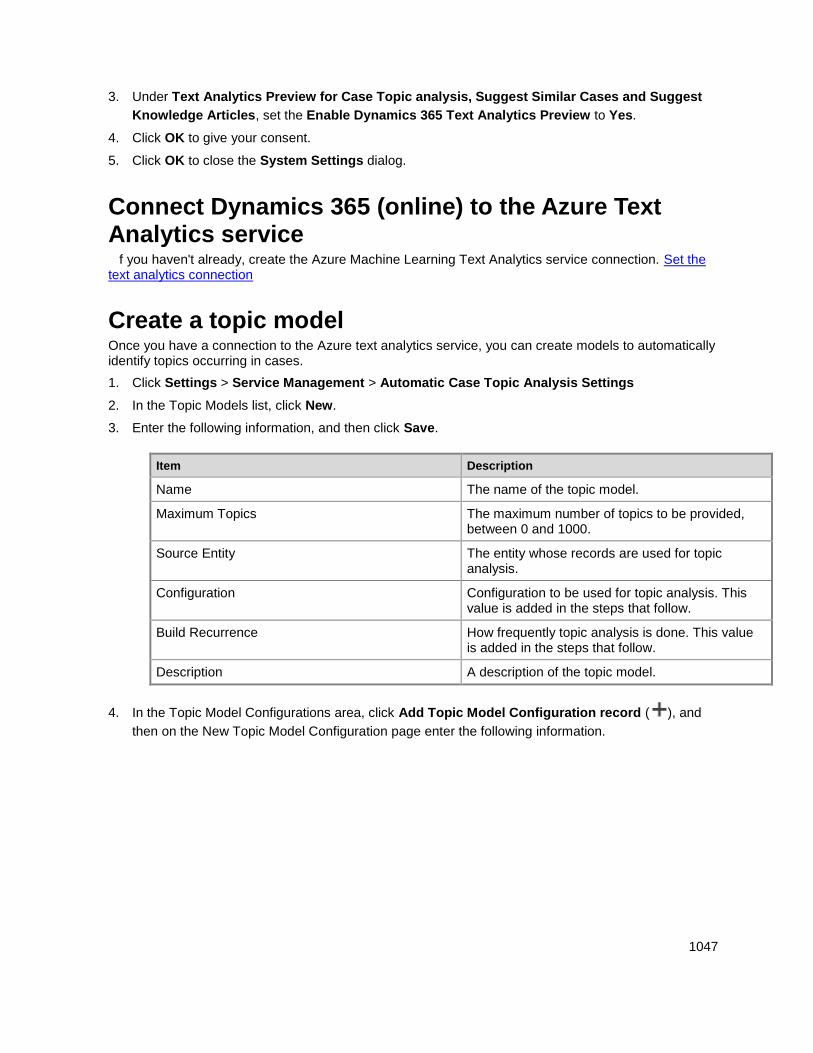
1047
3. Under Text Analytics Preview for Case Topic analysis, Suggest Similar Cases and Suggest
Knowledge Articles, set the Enable Dynamics 365 Text Analytics Preview to Yes.
4. Click OK to give your consent.
5. Click OK to close the System Settings dialog.
Connect Dynamics 365 (online) to the Azure Text Analytics service f you haven't already, create the Azure Machine Learning Text Analytics service connection. Set the text analytics connection
Create a topic model Once you have a connection to the Azure text analytics service, you can create models to automatically identify topics occurring in cases.
1. Click Settings > Service Management > Automatic Case Topic Analysis Settings
2. In the Topic Models list, click New.
3. Enter the following information, and then click Save.
Item Description
Name The name of the topic model.
Maximum Topics The maximum number of topics to be provided, between 0 and 1000.
Source Entity The entity whose records are used for topic analysis.
Configuration Configuration to be used for topic analysis. This value is added in the steps that follow.
Build Recurrence How frequently topic analysis is done. This value is added in the steps that follow.
Description A description of the topic model.
4. In the Topic Model Configurations area, click Add Topic Model Configuration record ( ), and
then on the New Topic Model Configuration page enter the following information.
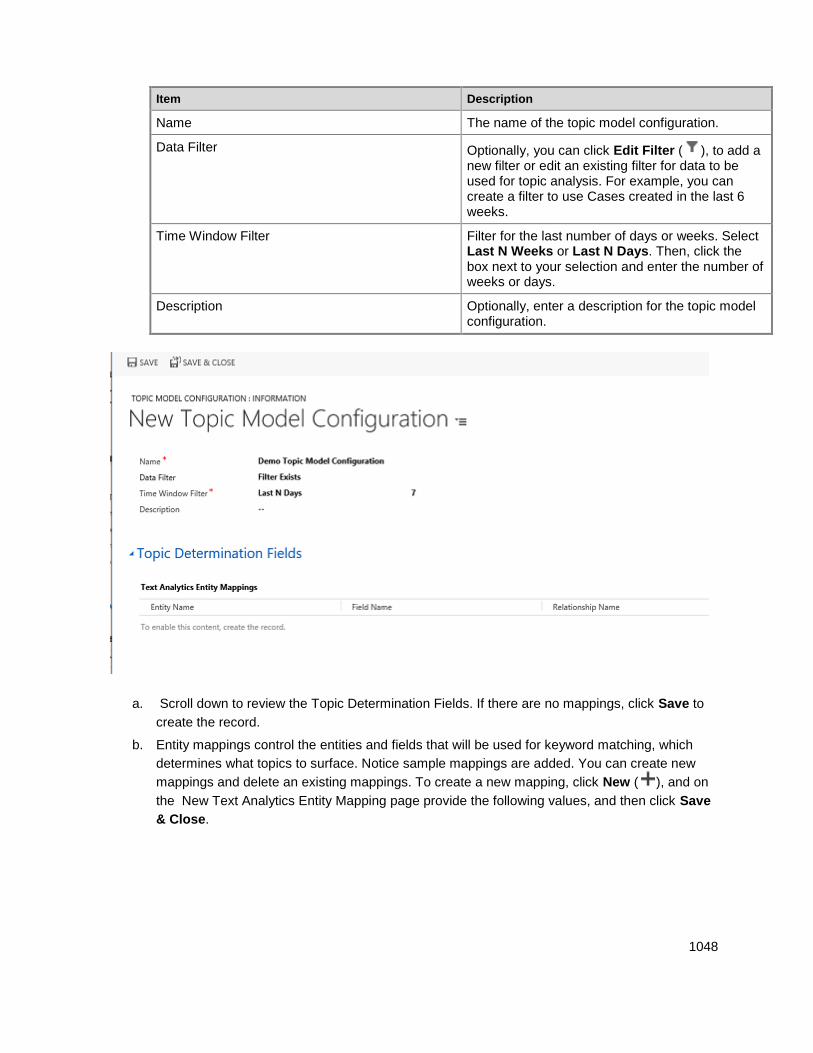
1048
Item Description
Name The name of the topic model configuration.
Data Filter Optionally, you can click Edit Filter ( ), to add a new filter or edit an existing filter for data to be used for topic analysis. For example, you can create a filter to use Cases created in the last 6 weeks.
Time Window Filter Filter for the last number of days or weeks. Select Last N Weeks or Last N Days. Then, click the box next to your selection and enter the number of weeks or days.
Description Optionally, enter a description for the topic model configuration.
a. Scroll down to review the Topic Determination Fields. If there are no mappings, click Save to
create the record.
b. Entity mappings control the entities and fields that will be used for keyword matching, which
determines what topics to surface. Notice sample mappings are added. You can create new
mappings and delete an existing mappings. To create a new mapping, click New ( ), and on
the New Text Analytics Entity Mapping page provide the following values, and then click Save
& Close.
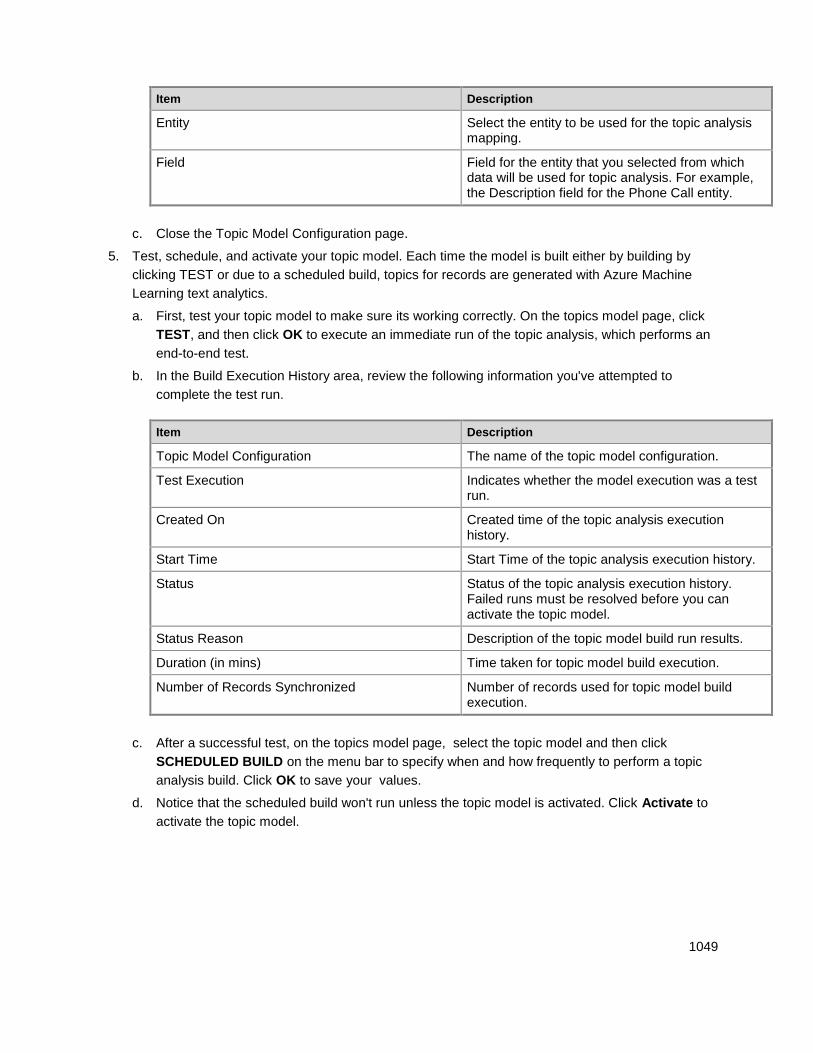
1049
Item Description
Entity Select the entity to be used for the topic analysis mapping.
Field Field for the entity that you selected from which data will be used for topic analysis. For example, the Description field for the Phone Call entity.
c. Close the Topic Model Configuration page.
5. Test, schedule, and activate your topic model. Each time the model is built either by building by
clicking TEST or due to a scheduled build, topics for records are generated with Azure Machine
Learning text analytics.
a. First, test your topic model to make sure its working correctly. On the topics model page, click
TEST, and then click OK to execute an immediate run of the topic analysis, which performs an
end-to-end test.
b. In the Build Execution History area, review the following information you've attempted to
complete the test run.
Item Description
Topic Model Configuration The name of the topic model configuration.
Test Execution Indicates whether the model execution was a test run.
Created On Created time of the topic analysis execution history.
Start Time Start Time of the topic analysis execution history.
Status Status of the topic analysis execution history. Failed runs must be resolved before you can activate the topic model.
Status Reason Description of the topic model build run results.
Duration (in mins) Time taken for topic model build execution.
Number of Records Synchronized Number of records used for topic model build execution.
c. After a successful test, on the topics model page, select the topic model and then click
SCHEDULED BUILD on the menu bar to specify when and how frequently to perform a topic
analysis build. Click OK to save your values.
d. Notice that the scheduled build won't run unless the topic model is activated. Click Activate to
activate the topic model.
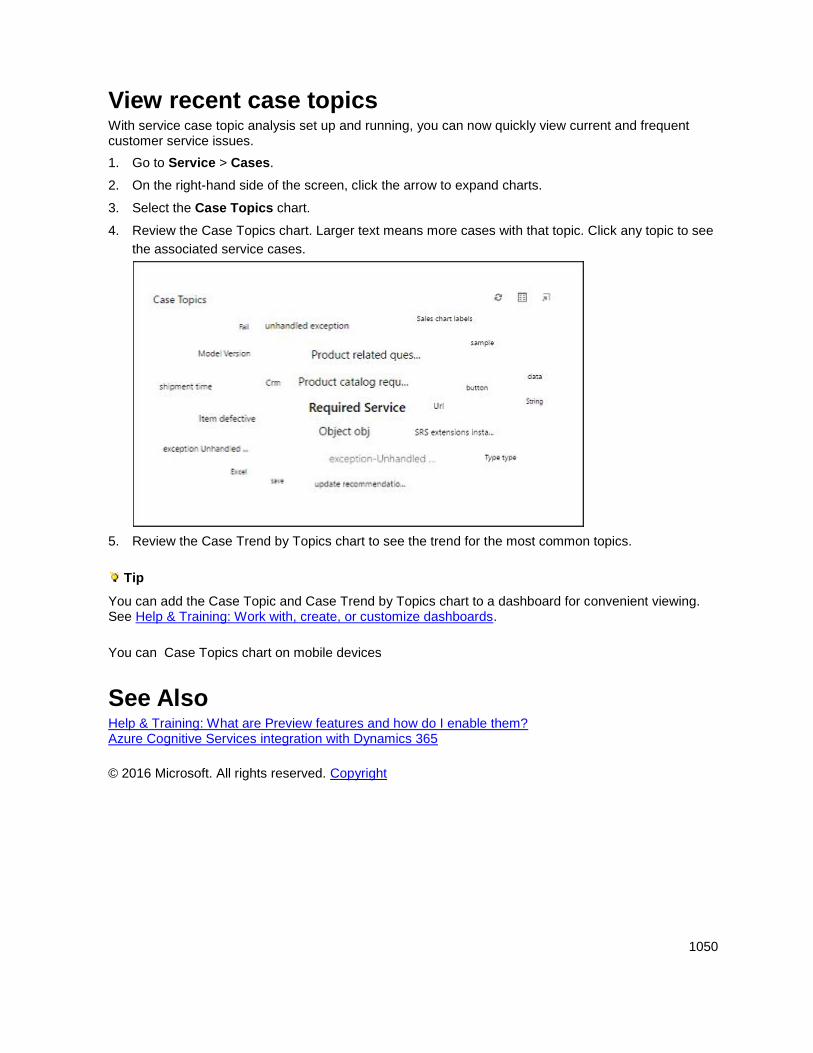
1050
View recent case topics With service case topic analysis set up and running, you can now quickly view current and frequent customer service issues.
1. Go to Service > Cases.
2. On the right-hand side of the screen, click the arrow to expand charts.
3. Select the Case Topics chart.
4. Review the Case Topics chart. Larger text means more cases with that topic. Click any topic to see
the associated service cases.
5. Review the Case Trend by Topics chart to see the trend for the most common topics.
Tip
You can add the Case Topic and Case Trend by Topics chart to a dashboard for convenient viewing. See Help & Training: Work with, create, or customize dashboards.
You can Case Topics chart on mobile devices
See Also Help & Training: What are Preview features and how do I enable them? Azure Cognitive Services integration with Dynamics 365
© 2016 Microsoft. All rights reserved. Copyright
1051
Preview feature: Suggest similar cases for a case
Applies To: Dynamics 365 (online), Dynamics CRM Online
[This topic is pre-release documentation and is subject to change.]
You're working on a support case and you wonder if there's a similar case that might help you resolve yours. With Microsoft Dynamics 365 and Azure Machine Learning Text Analytics, you can quickly find related cases and use them to resolve your current case. Keywords or key phrases in a service case are used to find similar cases.
Important
The Azure text analytics service feature is available as a preview feature for Microsoft Dynamics
365 (online) organizations, if you’ve installed the Microsoft Dynamics CRM Online 2016 Update 1.
We expect changes to this feature, so you shouldn’t use it in production. Use it only in test and
development environments.
A preview feature is a feature that is not complete, but is made available before it’s officially in a
release so customers can get early access and provide feedback. Preview features aren’t meant for
production use and may have limited or restricted functionality.
Microsoft doesn't provide support for this preview feature. Microsoft Dynamics 365 Technical
Support won’t be able to help you with issues or questions. Preview features aren't meant for
production use and are subject to a separate supplemental terms of use.
Send us feedback
We'd love your feedback on the Azure Machine Learning text analytics service! To send us your feedback, register your account on the Microsoft Connect site, and then submit your feedback.
In this topic To set up Dynamics 365 to automatically suggest similar cases, do the following:
Enable Dynamics 365 Text Analytics
Connect Dynamics 365 (online) to the Azure Machine Learning Text Analytics service
Define and activate similarity rules
See related cases
See related cases in the interactive service hub
Enable Dynamics 365 Text Analytics To enable Text Analytics, do the following:
1. Go to Settings > Administration.
1052
2. Click System Settings and open the Previews tab.
3. Under Text Analytics Preview for Case Topic analysis, Suggest Similar Cases and Suggest
Knowledge Articles, set the Enable Dynamics 365 Text Analytics Preview to Yes.
4. Click OK to give your consent.
5. Click OK to close the System Settings dialog.
Connect Dynamics 365 (online) to the Azure Machine Learning Text Analytics service If you haven't already, create the Azure Machine Learning Text Analytics service connection. Set the text analytics connection
Define and activate similarity rules If you have not already defined similarity rules, see Create similar record suggestion rules. For this feature, you need to select Case as the Source Entity for the similarity rule.
See related cases After configuring the Azure Text Analytics service and setting up similar records suggestions, you're ready to see cases related to the ones you're working on.
1. Click Service > Cases and open a case.
2. For similar cases, click Find.
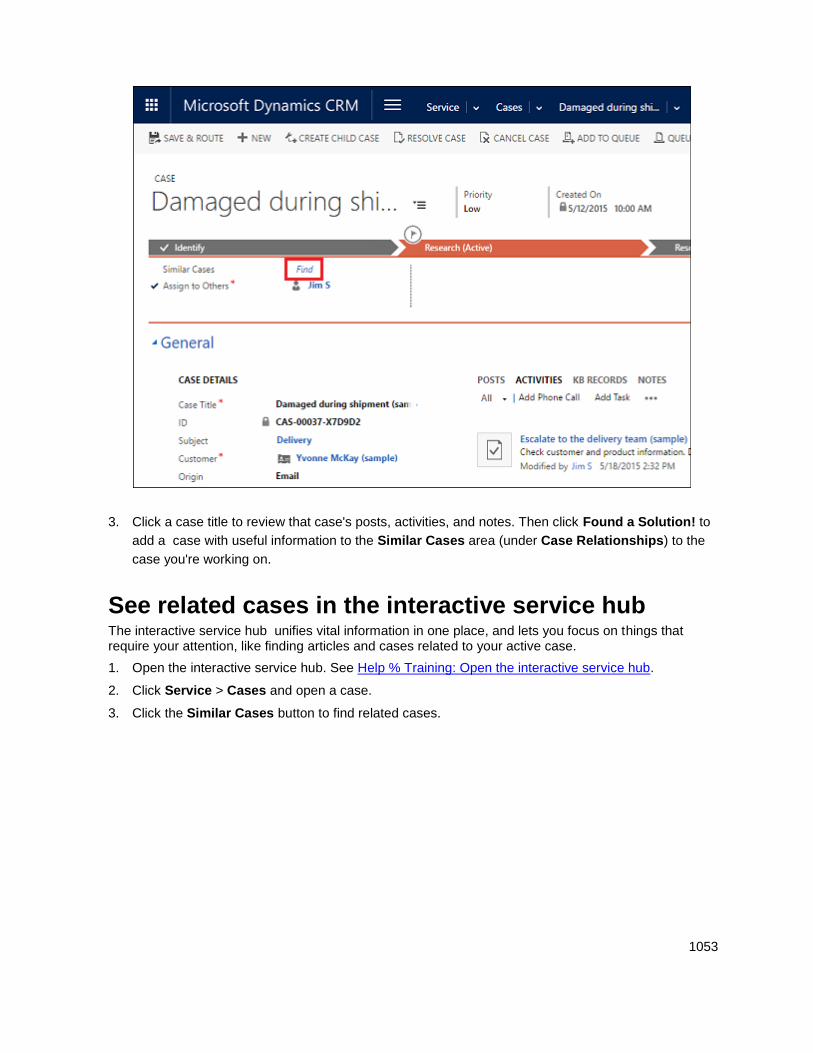
1053
3. Click a case title to review that case's posts, activities, and notes. Then click Found a Solution! to
add a case with useful information to the Similar Cases area (under Case Relationships) to the
case you're working on.
See related cases in the interactive service hub The interactive service hub unifies vital information in one place, and lets you focus on things that require your attention, like finding articles and cases related to your active case.
1. Open the interactive service hub. See Help % Training: Open the interactive service hub.
2. Click Service > Cases and open a case.
3. Click the Similar Cases button to find related cases.
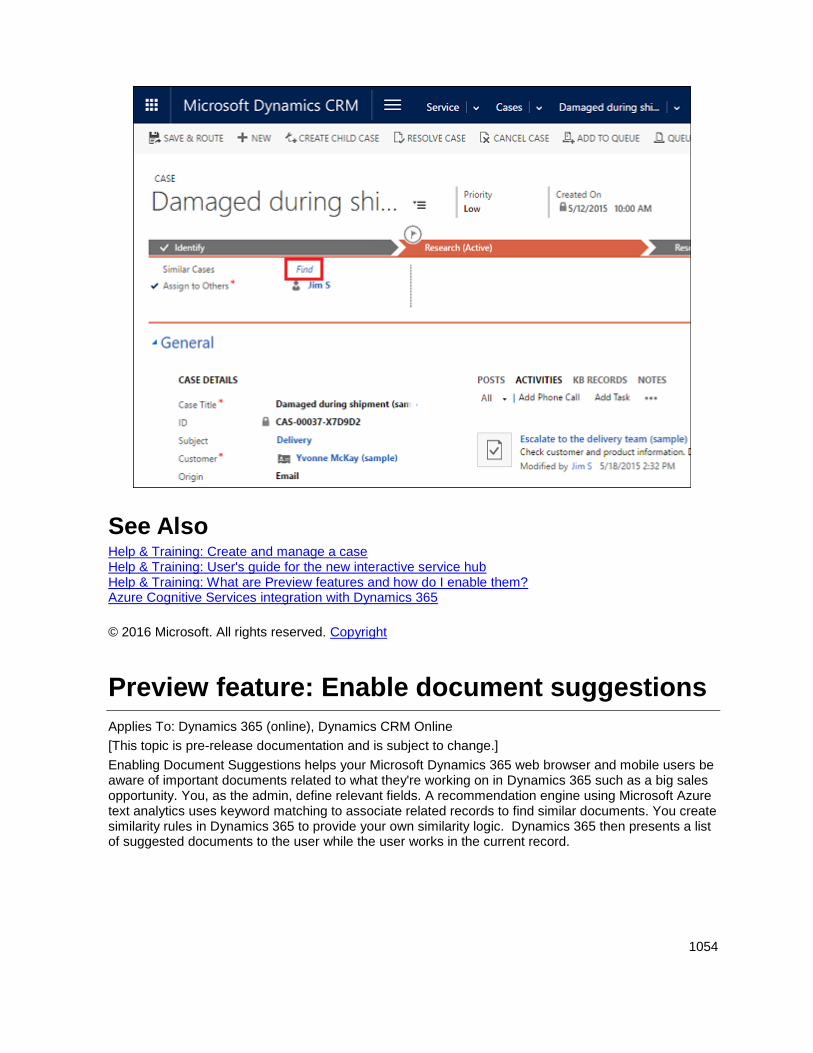
1054
See Also Help & Training: Create and manage a case Help & Training: User's guide for the new interactive service hub Help & Training: What are Preview features and how do I enable them? Azure Cognitive Services integration with Dynamics 365
© 2016 Microsoft. All rights reserved. Copyright
Preview feature: Enable document suggestions
Applies To: Dynamics 365 (online), Dynamics CRM Online
[This topic is pre-release documentation and is subject to change.]
Enabling Document Suggestions helps your Microsoft Dynamics 365 web browser and mobile users be aware of important documents related to what they're working on in Dynamics 365 such as a big sales opportunity. You, as the admin, define relevant fields. A recommendation engine using Microsoft Azure text analytics uses keyword matching to associate related records to find similar documents. You create similarity rules in Dynamics 365 to provide your own similarity logic. Dynamics 365 then presents a list of suggested documents to the user while the user works in the current record.
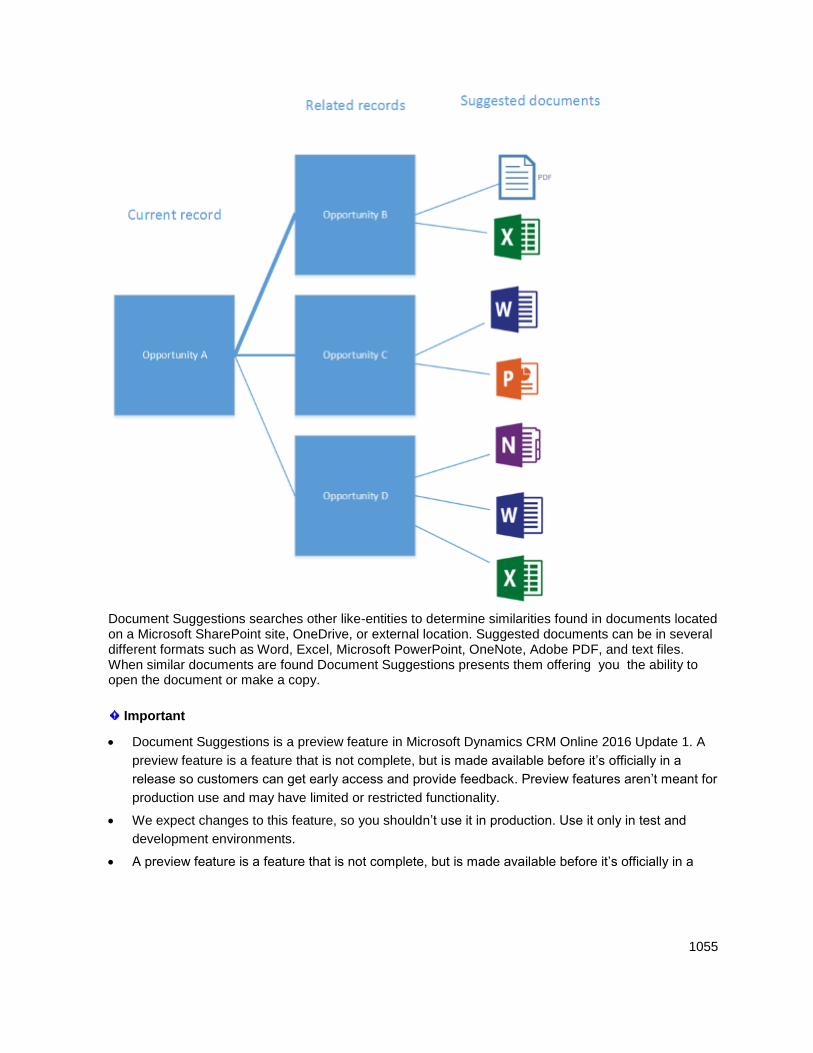
1055
Document Suggestions searches other like-entities to determine similarities found in documents located on a Microsoft SharePoint site, OneDrive, or external location. Suggested documents can be in several different formats such as Word, Excel, Microsoft PowerPoint, OneNote, Adobe PDF, and text files. When similar documents are found Document Suggestions presents them offering you the ability to open the document or make a copy.
Important
Document Suggestions is a preview feature in Microsoft Dynamics CRM Online 2016 Update 1. A
preview feature is a feature that is not complete, but is made available before it’s officially in a
release so customers can get early access and provide feedback. Preview features aren’t meant for
production use and may have limited or restricted functionality.
We expect changes to this feature, so you shouldn’t use it in production. Use it only in test and
development environments.
A preview feature is a feature that is not complete, but is made available before it’s officially in a
1056
release so customers can get early access and provide feedback. Preview features aren’t meant for
production use and may have limited or restricted functionality.
Microsoft doesn't provide support for this preview feature. Microsoft Dynamics 365 Technical
Support won’t be able to help you with issues or questions. Preview features aren't meant for
production use and are subject to a separate supplemental terms of use.
We'd love your feedback on the Document Suggestions feature. To send us your feedback, register your account on the Microsoft Connect site, and then submit your feedback.
Requirements The following are required to use Document Suggestions with Dynamics 365.
Dynamics 365 (online)
To suggest documents located on SharePoint:
Access to SharePoint Online, Microsoft SharePoint 2013, or SharePoint 2016.
Document management must be set up in Dynamics 365. See Set up SharePoint integration
with Microsoft Dynamics CRM
Relevance Search must be enabled. More information: Configure Relevance Search for the
organization
Document Suggestions works with Web browser, Microsoft Dynamics 365 for tablets and
Dynamics 365 for phones.
To use Azure text analytics with Document Suggestions:
An Azure subscription is required to use the Azure Text Analytics service.
A system administrator must enable the text analytics connection in Dynamics 365. More
information: Set the text analytics connection
A system administrator must define a similarity rule for each entity type that is to be included in
Document Suggestions. More information: Create similar record suggestion rules
How it works The entities that can use Document Suggestions are Contact, Opportunity, Lead, Account, Case, and custom entities.
You can use the built-in pattern matching that is included natively with the Document Suggestions feature, but we recommend that you use Azure Text Analytics service for more advanced keyword matching.
Document Suggestions searches only the locations and documents that the user has access to.
Locations where documents are found are searched in the following order:
1. SharePoint default site.
2. Other SharePoint sites.
3. OneDrive
1057
4. Office 365 Groups (when solution is installed).
5. External URL (when configured).
Currently, Document Suggestions does not search attachments that are added to Notes in Microsoft Dynamics 365 records.
Adding an external URL to search another site External sites, such as an on-premises SharePoint document library can be included in Document Suggestions by adding an external URL for the site to be searched.
Note
For the best results when using an external site for document suggestions, we recommend that you use Azure Text Analytics, which provides more advanced keyword matching logic. Set the text analytics connection
Once you add the external URL to the enabled document suggestions feature, here is what your users will experience.
Web browsers. When you run Microsoft Dynamics 365 from a Web browser, after clicking
Document Suggestions, users can then click Other Recommendations in the Document
Suggestions page to display another page that may include more document suggestions found on
the external site. Notice that the user may be prompted to sign in to the external site.
Mobile apps. For the Microsoft Dynamics 365 for tablets and Dynamics 365 for phones apps, after
clicking Document Suggestions, users can click Other Recommendations, which opens the
external site in the devices default web browser that may include more document suggestions
found on the external site. Notice that the user may be prompted to sign in to the external site.
Constructing the external URL
The external URL should be constructed in a format that is understood by the external site. For example, for sites that use a construct similar to https://contoso.com/search?{0}, where https://contoso.com/search? is the search URL structure and {0} is the keyword string, Document Suggestions passes the keywords in the {0} parameter. The keywords that are passed to the URL are derived from similar record rules that include entity mappings of Text Match. More information: Create similar record suggestion rules
The values found in the text fields of the similarity rule mappings are used as keywords to build the query that is passed to the external site, similar to the below URL, where keyword is the text values found in the similarity rules mappings and & represents a whitespace that Document Suggestions uses to separate each keyword.
https://contoso.com/search?keywordA&keywordB&keywordC
For an on-premises SharePoint server, you can add an external URL that points to a subsite similar to this, where mysharepoint is the web site name sites is the site name and subsitename is the subsite name.
https://mysharepoint/sites/subsitename/_layouts/15/osssearchresults.aspx?&k={0}
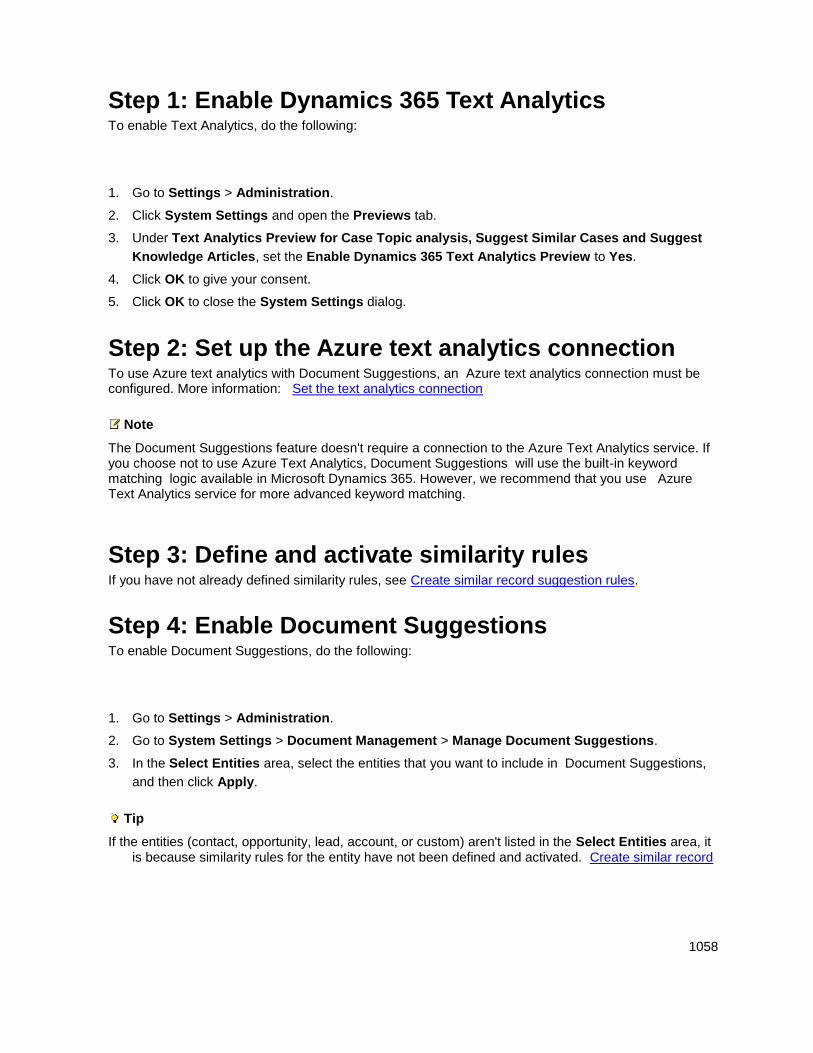
1058
Step 1: Enable Dynamics 365 Text Analytics To enable Text Analytics, do the following:
1. Go to Settings > Administration.
2. Click System Settings and open the Previews tab.
3. Under Text Analytics Preview for Case Topic analysis, Suggest Similar Cases and Suggest
Knowledge Articles, set the Enable Dynamics 365 Text Analytics Preview to Yes.
4. Click OK to give your consent.
5. Click OK to close the System Settings dialog.
Step 2: Set up the Azure text analytics connection To use Azure text analytics with Document Suggestions, an Azure text analytics connection must be configured. More information: Set the text analytics connection
Note
The Document Suggestions feature doesn't require a connection to the Azure Text Analytics service. If you choose not to use Azure Text Analytics, Document Suggestions will use the built-in keyword matching logic available in Microsoft Dynamics 365. However, we recommend that you use Azure Text Analytics service for more advanced keyword matching.
Step 3: Define and activate similarity rules If you have not already defined similarity rules, see Create similar record suggestion rules.
Step 4: Enable Document Suggestions To enable Document Suggestions, do the following:
1. Go to Settings > Administration.
2. Go to System Settings > Document Management > Manage Document Suggestions.
3. In the Select Entities area, select the entities that you want to include in Document Suggestions,
and then click Apply.
Tip
If the entities (contact, opportunity, lead, account, or custom) aren't listed in the Select Entities area, it is because similarity rules for the entity have not been defined and activated. Create similar record

1059
suggestion rules
4. Set external URL to include in Document Suggestions. By default, Document Suggestions
searches in Microsoft Office 365 services like SharePoint or OneDrive. If you want to search an
external site in addition to the available Office 365 services, such as an on-premise SharePoint site,
enter the base URL to the external system. Microsoft Dynamics 365 will append a search query
string to the base URL you provide. More information: Adding an external URL to search another
site
See Also Azure Cognitive Services integration with Dynamics 365 Add interoperation features to Microsoft Dynamics 365 (online)
© 2016 Microsoft. All rights reserved. Copyright
Add interoperation features to Microsoft Dynamics 365 (online)
Applies To: Dynamics 365 (online), Dynamics CRM Online
[This topic is pre-release documentation and is subject to change.]
Microsoft Dynamics 365 (online) integrates with a variety of different Microsoft Office and Microsoft Dynamics applications. This provides you with a familiar experience and can help to increase productivity
In This Section
Install Microsoft Dynamics 365 for Outlook
Deploy Office 365 Groups
Enable OneNote integration
Deploy Dynamics 365 App for Outlook
Enable OneDrive for Business
Enable Office Delve
© 2016 Microsoft. All rights reserved. Copyright
Install Microsoft Dynamics 365 for Outlook
Applies To: Dynamics 365 (online), Dynamics CRM Online
[This topic is pre-release documentation and is subject to change.]
1060
Many users find it easier and more convenient to work with Microsoft Dynamics 365 (online) data through Outlook, a familiar application interface that they may already be using. This section provides information about hardware and software requirements and about installing Microsoft Dynamics 365 for Outlook on a user’s computer.
Dynamics 365 for Outlook Requirements Dynamics 365 for Outlook is a free download that integrates Microsoft Dynamics 365 (online) into the Outlook interface so that a user can work efficiently with both email and Microsoft Dynamics 365 (online) data.
More information: Microsoft Dynamics 365 for Outlook hardware requirements and Microsoft Dynamics 365 for Outlook software requirements
Install Dynamics 365 for Outlook on a user’s computer A user can download Dynamics 365 for Outlook from within Microsoft Dynamics 365 (online) by clicking Get Dynamics 365 for Outlook on the message bar.
Administrators will find detailed installation instructions in Install Dynamics 365 for Outlook.
Tip
If you encounter problems installing or configuring Dynamics 365 for Outlook, see Troubleshooting and things to know about Microsoft Dynamics 365 for Outlook.
See Also Download: Microsoft Dynamics 365 2016 for Microsoft Office Outlook Deploy Dynamics 365 App for Outlook Add interoperation features to Microsoft Dynamics 365 (online)
© 2016 Microsoft. All rights reserved. Copyright
Deploy Office 365 Groups
Applies To: Dynamics 365 (online), Dynamics CRM Online
[This topic is pre-release documentation and is subject to change.]
Office 365 Groups, available with Dynamics 365 (online), provides a new environment for collaboration with Microsoft Office 365 users who don’t use Dynamics 365. For example, use Office 365 Groups when a sales team has a major opportunity requiring input from several people who don’t have access to Dynamics 365. Office 365 Groups provides a single location to share documents, conversations, meetings, and notes. You can enable Office 365 Groups for any entity.
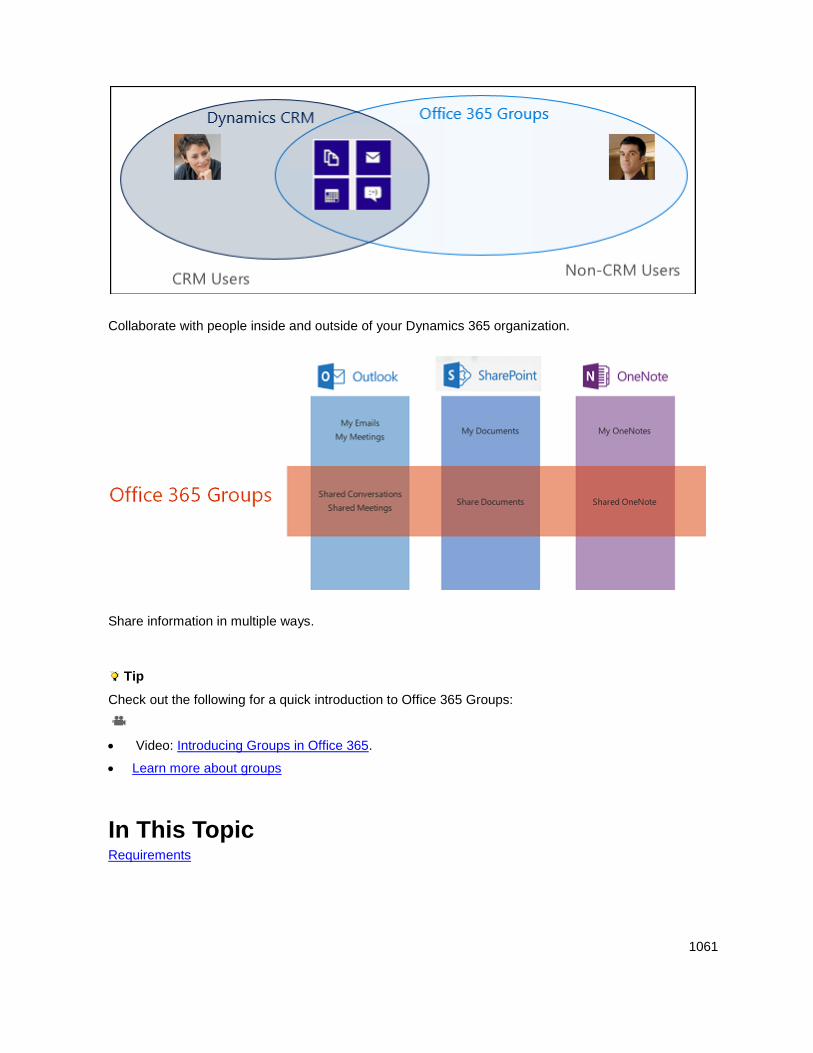
1061
Collaborate with people inside and outside of your Dynamics 365 organization.
Share information in multiple ways.
Tip
Check out the following for a quick introduction to Office 365 Groups:
Video: Introducing Groups in Office 365.
Learn more about groups
In This Topic Requirements

1062
Provision Office 365 Groups
Check required privileges
Configure Office 365 Groups
Use the Office 365 Connectors for Groups
Known issues
Requirements The following are required to use Office 365 Groups with Dynamics 365:
Dynamics 365 (online)
This feature requires that you have an Office 365 subscription or a subscription to an online service
such as SharePoint Online or Exchange Online. For more information, see What is Office 365 and
how does it relate to Dynamics 365 (online)?
For full Office 365 feature integration with Microsoft Dynamics 365 (online) and Dynamics 365 (on-premises), you'll need Office 365 Enterprise E3 or later. Skype for Business PSTN calling and conferencing requires Office 365 Enterprise E5. Other Office 365 plans are not supported. For more information on licensing and pricing, see: Licensing and Pricing Guide.
Exchange Online
To use document storage with Office 365 Groups, you will need SharePoint Online and access to
the group OneNote notebook.
Provision Office 365 Groups Office 365 Groups is a Dynamics 365 solution you provision from your Office 365 admin portal.
Note
Users must have an Exchange Online mailbox set up to use Office 365 Groups. Exchange Online is already properly configured for Microsoft Dynamics 365 (online) organizations as a part of Office 365. You also need to enable server-based SharePoint integration to see documents in an Office 365 Group; you don't have to use SharePoint integration, only set up the connection to SharePoint Online. Server-based SharePoint integration is also required to enable the group OneNote notebook.
More information: Configure server-based authentication with Dynamics 365 (online) and SharePoint Online
1. Browse to the Office 365 admin center and sign in using Office 365 Global administrator
credentials.
2. Click Admin centers > Dynamics 365.
3. Click the Instances tab.
4. Choose your instance, and then click Solutions.
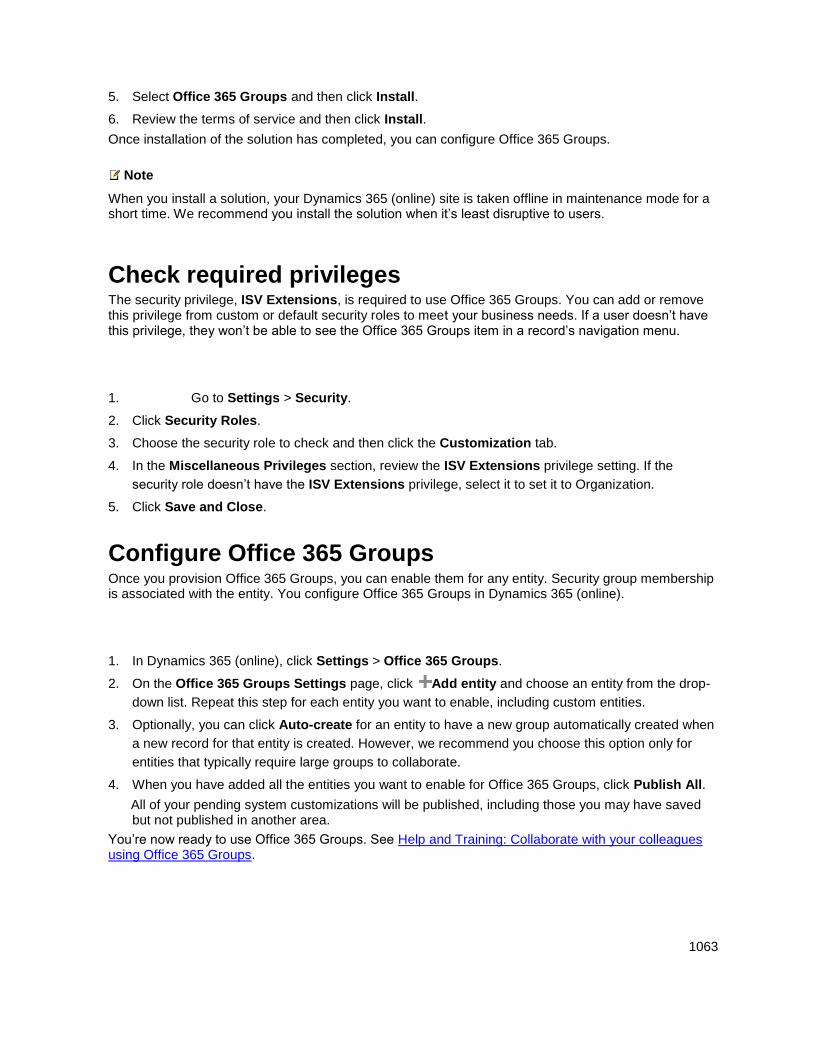
1063
5. Select Office 365 Groups and then click Install.
6. Review the terms of service and then click Install.
Once installation of the solution has completed, you can configure Office 365 Groups.
Note
When you install a solution, your Dynamics 365 (online) site is taken offline in maintenance mode for a short time. We recommend you install the solution when it’s least disruptive to users.
Check required privileges The security privilege, ISV Extensions, is required to use Office 365 Groups. You can add or remove this privilege from custom or default security roles to meet your business needs. If a user doesn’t have this privilege, they won’t be able to see the Office 365 Groups item in a record’s navigation menu.
1. Go to Settings > Security.
2. Click Security Roles.
3. Choose the security role to check and then click the Customization tab.
4. In the Miscellaneous Privileges section, review the ISV Extensions privilege setting. If the
security role doesn’t have the ISV Extensions privilege, select it to set it to Organization.
5. Click Save and Close.
Configure Office 365 Groups Once you provision Office 365 Groups, you can enable them for any entity. Security group membership is associated with the entity. You configure Office 365 Groups in Dynamics 365 (online).
1. In Dynamics 365 (online), click Settings > Office 365 Groups.
2. On the Office 365 Groups Settings page, click Add entity and choose an entity from the drop-
down list. Repeat this step for each entity you want to enable, including custom entities.
3. Optionally, you can click Auto-create for an entity to have a new group automatically created when
a new record for that entity is created. However, we recommend you choose this option only for
entities that typically require large groups to collaborate.
4. When you have added all the entities you want to enable for Office 365 Groups, click Publish All.
All of your pending system customizations will be published, including those you may have saved but not published in another area.
You’re now ready to use Office 365 Groups. See Help and Training: Collaborate with your colleagues using Office 365 Groups.
1064
Use the Office 365 Connectors for Groups Use the Office 365 Connectors for Groups to connect new or existing Office 365 Groups with Dynamics 365 (online) so the group is notified when new activities are posted. To set it up, follow these steps:
Tip
Check out the following Dynamics 365 Blog: Dynamics CRM Online connector for Office 365 Groups
1. Sign in to your Office 365 Outlook.
2. Create or choose an Office 365 Group.
3. Click Connectors.
4. Scroll down to Dynamics 365 Online, and then click Add.
5. If you have access to more than one Dynamics 365 (online) instance, choose which
instance to connect to this Office 365 Group. If you only have access to one Dynamics 365 (online)
instance, this step will be skipped and you will advance to the next step.
6. Choose the Dynamics 365 record you want to connect this Office 365 Group to, and then
click Save.
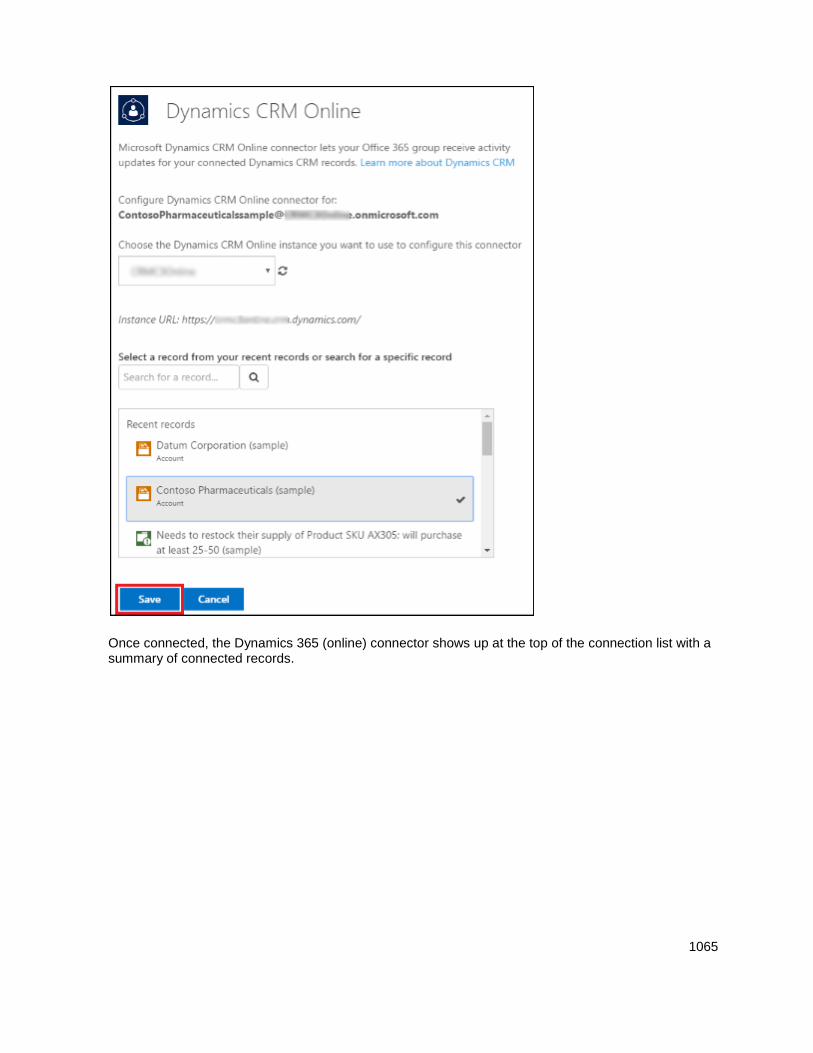
1065
Once connected, the Dynamics 365 (online) connector shows up at the top of the connection list with a summary of connected records.
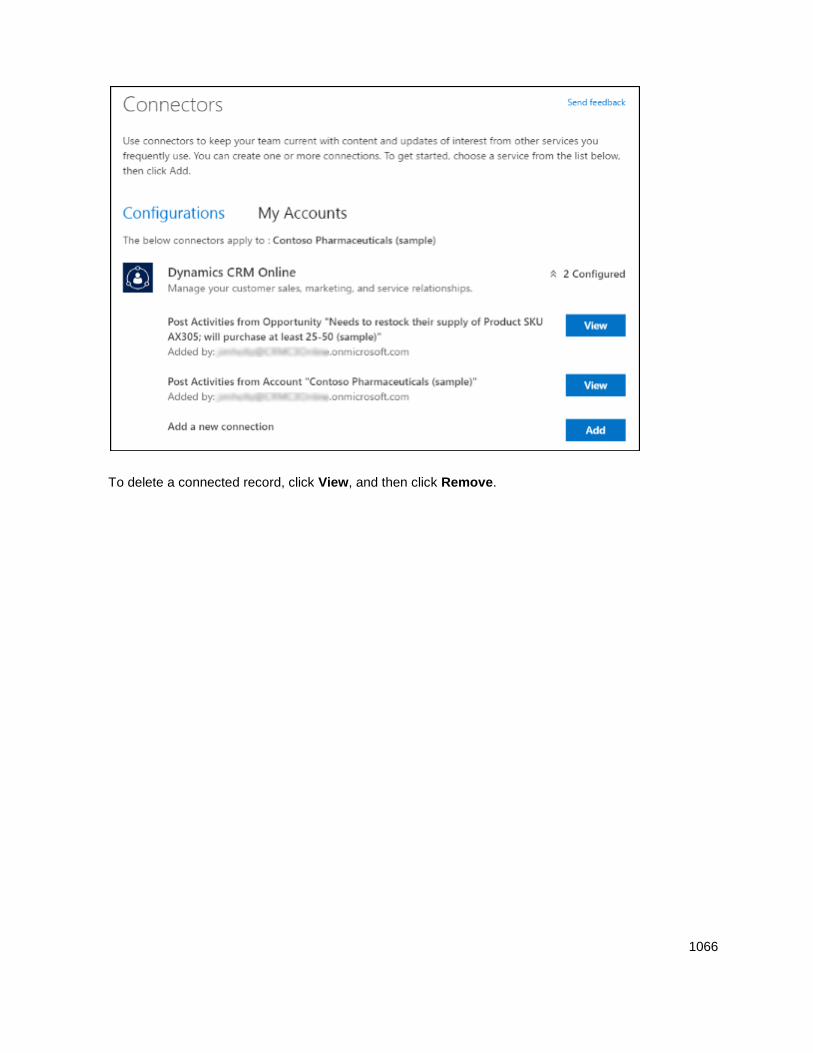
1066
To delete a connected record, click View, and then click Remove.
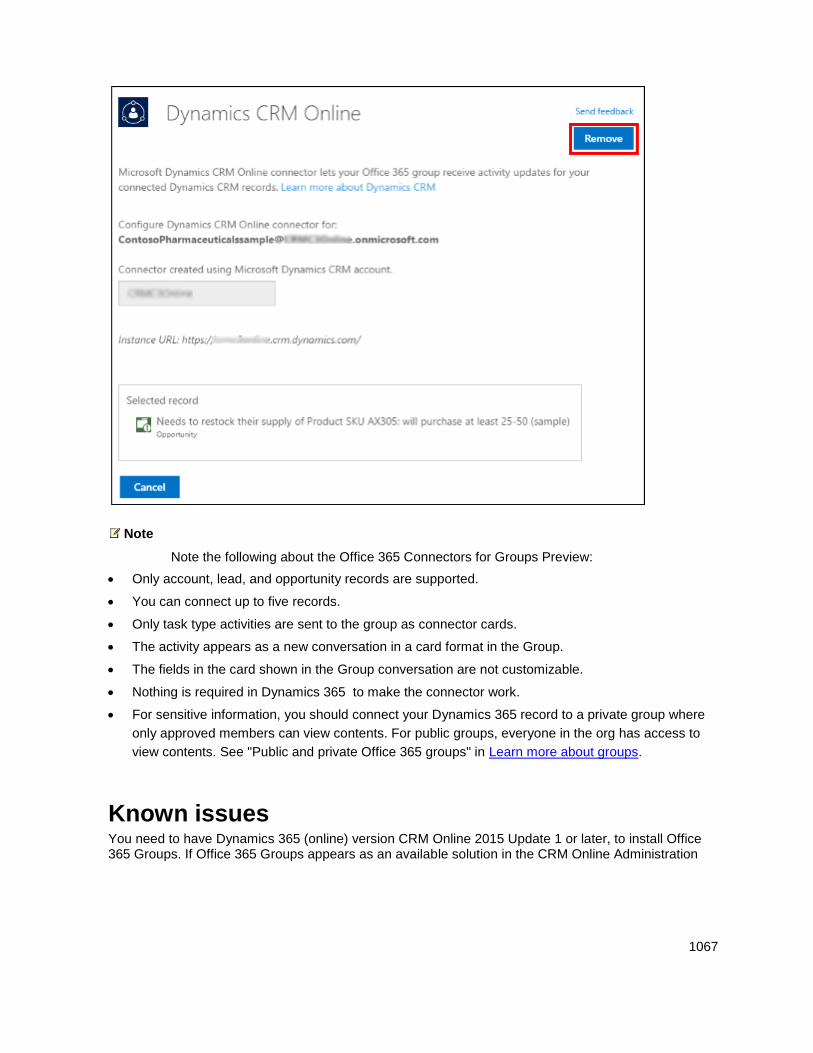
1067
Note
Note the following about the Office 365 Connectors for Groups Preview:
Only account, lead, and opportunity records are supported.
You can connect up to five records.
Only task type activities are sent to the group as connector cards.
The activity appears as a new conversation in a card format in the Group.
The fields in the card shown in the Group conversation are not customizable.
Nothing is required in Dynamics 365 to make the connector work.
For sensitive information, you should connect your Dynamics 365 record to a private group where
only approved members can view contents. For public groups, everyone in the org has access to
view contents. See "Public and private Office 365 groups" in Learn more about groups.
Known issues You need to have Dynamics 365 (online) version CRM Online 2015 Update 1 or later, to install Office 365 Groups. If Office 365 Groups appears as an available solution in the CRM Online Administration
1068
Center, but you receive the following error when trying to install: "Solution install failed. Please try again later. If the problem persists, contact customer support," you’ll need to update your instance of Dynamics 365 (online) before you can install Office 365 Groups.
Privacy notice When a user leverages the Office 365 Groups for Dynamics 365 feature to connect an Office Group to Microsoft Dynamics 365 (online), data (including new conversations and documents) will be stored on the Exchange and/or SharePoint system and shared with the members of that Office Group, even if they are not licensed or authorized Dynamics 365 users. Users will only be able to share the data that they have access to, and Administrators can limit the data that is shared by limiting the access privileges of their users.
See Also Collaborate with your colleagues using Office 365 Groups CRM Blog: Dynamics CRM Online connector for Office 365 Groups Set up Dynamics 365 (online) to use Exchange Online Blog: It's here - Office 365 Groups in CRM Online Office 365 Groups in Dynamics 365 FAQs
© 2016 Microsoft. All rights reserved. Copyright
Enable OneNote integration
Applies To: Dynamics 365 (online), Dynamics CRM Online
[This topic is pre-release documentation and is subject to change.]
For information about Microsoft OneNote integration in Microsoft Dynamics 365 (online), see Set up and use OneNote in Dynamics 365.
See Also Add Office 365 Online services OneNote is coming to CRM
© 2016 Microsoft. All rights reserved. Copyright
Deploy Dynamics 365 App for Outlook
Applies To: Dynamics 365 (online), Dynamics 365 (on-premises), Dynamics CRM Online
[This topic is pre-release documentation and is subject to change.]
People can use Microsoft Dynamics 365 App for Outlook to tap the power of Microsoft Dynamics 365 while using Outlook on the desktop, web, or tablet. For example, view information about email or
1069
appointment recipients, or link an Outlook email or appointment to a Microsoft Dynamics 365 record such as an opportunity, account, or case. To learn more about what Microsoft Dynamics 365 App for Outlook offers, see the Dynamics 365 App for Outlook User's Guide.
Important
Dynamics 365 App for Outlook isn’t the same thing as Dynamics 365 for Outlook. As of the December 2016 update for Dynamics 365 (online and on-premises), Microsoft Dynamics 365 App for Outlook paired with server-side synchronization is the preferred way to integrate Microsoft Dynamics 365 with Outlook. For information on the legacy Dynamics 365 for Outlook add-in, see the Dynamics 365 for Outlook User’s Guide.
In This Topic Requirements
Deploy Dynamics 365 App for Outlook
Explore the User’s Guide
Requirements The following are required to use Dynamics 365 App for Outlook:
Microsoft Dynamics CRM Online 2016 Update, or December 2016 update for Dynamics 365 (online
and on-premises)
Synchronization of incoming email through server-side synchronization. More information: Set up
server-side synchronization of email, appointments, contacts, and tasks
Required privileges as described below
Required privileges Microsoft Dynamics 365 provides access to Dynamics 365 App for Outlook through the Use Dynamics 365 App for Outlook privilege. If a user doesn’t have this privilege, they’ll receive the following error:
“You haven't been authorized to use this app. Check with your system administrator to update your settings.”
Users must also have read/write privileges for the following entities.
Business Management tab:
Mailbox
Customization tab:
Entity
Field
Relationship
1070
System Application Metadata
System Form
User Application Metadata
View
Set the privileges for a security role
1. Go to Settings > Security.
2. Click Security Roles.
3. Choose a security role, and then click the Business Management tab.
4. In the Entity section, review the Mailbox privileges settings. The security role should have User or
higher settings.
5. In the Privacy Related Privileges section, verify that Use Dynamics 365 App for Outlook is set
to Organization. If not, click Use Dynamics 365 App for Outlook.
Supported browsers for Outlook on the web You can use Dynamics 365 App for Outlook with Outlook on the web on the following browsers:
Internet Explorer 10, Internet Explorer 11, or Microsoft Edge
Google Chrome (latest version) on Windows
Firefox (latest version) on Windows
Apple Safari (version 9) on Mac or on OSX
Supported operating systems for Outlook on the desktop You can use Dynamics 365 App for Outlook on these versions of Outlook for the desktop:
Outlook 2013 and Outlook 2016 on Windows 7, Windows 8, Windows 8.1, Windows 8.1 RT
(Outlook 2013 only), or Windows 10.
Outlook for Mac* on Mac OS X , Yosemite or El Capitan.
*Exchange Server version 15.0.847.32 or greater is required.
Supported mobile devices You can use Dynamics 365 App for Outlook with Outlook on the web in the mobile browser on any of the following phones and operating systems:
AppleiPhone devices running iOS version 7, 8, or 9.
Android phones running Android 4.4 (KitKat) or 5.0 (Lollipop) or 6 (Marshmallow)
Windows Phone devices running Windows 8.1 or Windows 10.
1071
Supported languages Dynamics 365 App for Outlook supports the following languages:
Bulgarian (Bulgaria) - 1026
Chinese (People's Republic of China) - 2052
Chinese (Taiwan) - 1028
Croatian (Croatia) - 1050
Czech (Czech Republic) - 1029
Danish - 1030
Dutch - 1043
English - 1033
Estonian - 1061
Finnish - 1035
French - 1036
German - 1031
Greek - 1032
Hindi (India) - 1081
Hungarian - 1038
Indonesian - 1057
Italian - 1040
Japanese - 1041
Kazakh - 1087
Korean - 1042
Latvian - 1062
Lithuanian - 1063
Malaysian - 1086
Norwegian - 1044
Polish - 1045
Portuguese (Brazil) - 1046
Portuguese (Portugal) - 2070
Romanian - 1048
Russian - 1049
Serbian - 2074
Slovak - 1051
Slovenian - 1060
Spanish - 3082
1072
Swedish - 1053
Thai - 1054
Turkish - 1055
Ukrainian - 1058
Vietnamese - 1066
Deploy Dynamics 365 App for Outlook After setting up server-side synchronization and setting the required privileges, you can push Dynamics 365 App for Outlook to some or all users, or you can have users install it themselves as needed.
Note
If you're on Dynamics 365 (on-premises), see the section below: To deploy to Dynamics 365 on-premises users
To push the app to users
1. Go to Settings > Dynamics 365 App for Outlook.
2. In the Getting Started with Dynamics 365 App for Outlook screen, under Add for Eligible
Users (you may have to click Settings if you’re opening this screen for the second or subsequent
time), select the Automatically add the app to Outlook check box if you want to have users get
the app automatically. If a user has the required privileges and email is synchronized through
server-side synchronization, you won’t have to do anything more to push the app to them. For
example, if you add the required privileges to the Salesperson role, and then assign this role to a
new user, they’ll automatically get the app.
3. Do one of the following:
To push the app to all eligible users, click Add App for All Eligible Users.
To push the app to certain users, select those users in the list, and then click Add App to
Outlook.
Tip
If the list shows that a user is pending or hasn’t been added, you can click the Learn more link next to the user to find more information about status.
4. When you’re done, click Save.
To have users install the app themselves
1. Users click the Settings button , and then click Apps for Dynamics 365.
1073
2. In the Apps for Dynamics 365 screen, under Dynamics 365 App for Outlook, users click Add
app to Outlook.
To deploy to Dynamics 365 on-premises users Follow these steps if you're using Dynamics 365 on-premises.
Configure your Dynamics 365 server for Internet-facing deployment. See Configure IFD for
Microsoft Dynamics 365.
If you're connecting to Exchange on-premises, configure the OAuth provider and register client
apps. See Configure Windows Server 2012 R2 for Dynamics 365 applications that use OAuth.
Explore the User’s Guide To learn how to use Dynamics 365 App for Outlook, see the Dynamics 365 App for Outlook User’s Guide.
See Also Dynamics 365 App for Outlook User's Guide Set up server-side synchronization of email, appointments, contacts, and tasks Referenced topic '23612155-f92d-4871-a109-186419d5c19d' is only available online. Add interoperation features to Microsoft Dynamics 365 (online)
© 2016 Microsoft. All rights reserved. Copyright
Enable OneDrive for Business
Applies To: Dynamics 365 (online), Dynamics CRM Online
[This topic is pre-release documentation and is subject to change.]
This feature was introduced in CRM Online 2016 Update.
Users can create and manage private documents with OneDrive for Business. Those documents can be accessed in Microsoft Dynamics 365 (online) after the system administrator has enabled OneDrive for Business.
Requirements The following are required to use OneDrive for Business with Dynamics 365 (online):
Configure server-based authentication with Dynamics 365 (online) and SharePoint Online.
A OneDrive for Business license for each user. More information: What is OneDrive for Business?
A SharePoint license for each user. Users with a SharePoint license can use OneDrive for
Business. For SharePoint Online, Office 365 subscriptions come with SharePoint Online licenses.
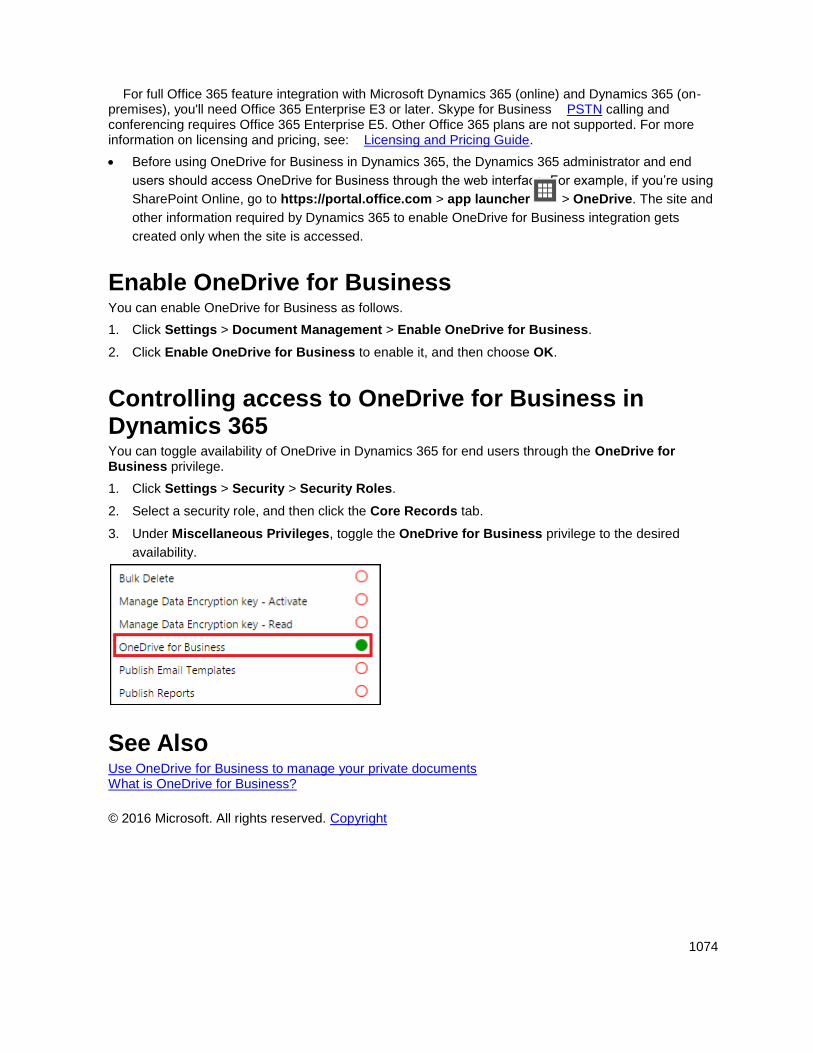
1074
For full Office 365 feature integration with Microsoft Dynamics 365 (online) and Dynamics 365 (on-premises), you'll need Office 365 Enterprise E3 or later. Skype for Business PSTN calling and conferencing requires Office 365 Enterprise E5. Other Office 365 plans are not supported. For more information on licensing and pricing, see: Licensing and Pricing Guide.
Before using OneDrive for Business in Dynamics 365, the Dynamics 365 administrator and end
users should access OneDrive for Business through the web interface. For example, if you’re using
SharePoint Online, go to https://portal.office.com > app launcher > OneDrive. The site and
other information required by Dynamics 365 to enable OneDrive for Business integration gets
created only when the site is accessed.
Enable OneDrive for Business You can enable OneDrive for Business as follows.
1. Click Settings > Document Management > Enable OneDrive for Business.
2. Click Enable OneDrive for Business to enable it, and then choose OK.
Controlling access to OneDrive for Business in Dynamics 365 You can toggle availability of OneDrive in Dynamics 365 for end users through the OneDrive for Business privilege.
1. Click Settings > Security > Security Roles.
2. Select a security role, and then click the Core Records tab.
3. Under Miscellaneous Privileges, toggle the OneDrive for Business privilege to the desired
availability.
See Also Use OneDrive for Business to manage your private documents What is OneDrive for Business?
© 2016 Microsoft. All rights reserved. Copyright
1075
Enable Office Delve
Applies To: Dynamics 365 (online), Dynamics CRM Online
[This topic is pre-release documentation and is subject to change.]
This feature was introduced in CRM Online 2016 Update.
Office Delve is powered by the Office Graph and shows users the most relevant content based on who they work with and what they’re working on. The information in Delve is tailored to each user. Delve doesn't change permissions and users will only see what they already have access to. As an admin, you can make sure that you allow your organization to access the Office Graph, and that you have set up other Office 365 services that Delve uses, for instance SharePoint Online and OneDrive for Business.
Requirements The following are required to use Delve with Dynamics 365:
Dynamics 365 (online)
This feature requires that you have an Office 365 subscription or a subscription to an online service
such as SharePoint Online or Exchange Online. For more information, see What is Office 365 and
how does it relate to Dynamics 365 (online)?
For full Office 365 feature integration with Microsoft Dynamics 365 (online) and Dynamics 365 (on-premises), you'll need Office 365 Enterprise E3 or later. Skype for Business PSTN calling and conferencing requires Office 365 Enterprise E5. Other Office 365 plans are not supported. For more information on licensing and pricing, see: Licensing and Pricing Guide.
SharePoint Online
To use email attachments, you will need Exchange Online.
Enable Server-Based SharePoint Integration and have at least one active SharePoint site.
Enable Delve System administrators can enable Delve as follows.
1. Click Settings > Document Management > Manage Office Graph Integration
2. Click Enable Office Graph integration to enable it, and then click Next.
3. Click Finish.
See Also View relevant and trending information with Office Delve What is Office Delve? How does Office Delve know what's relevant to me? Office Delve for Office 365 admins
© 2016 Microsoft. All rights reserved. Copyright
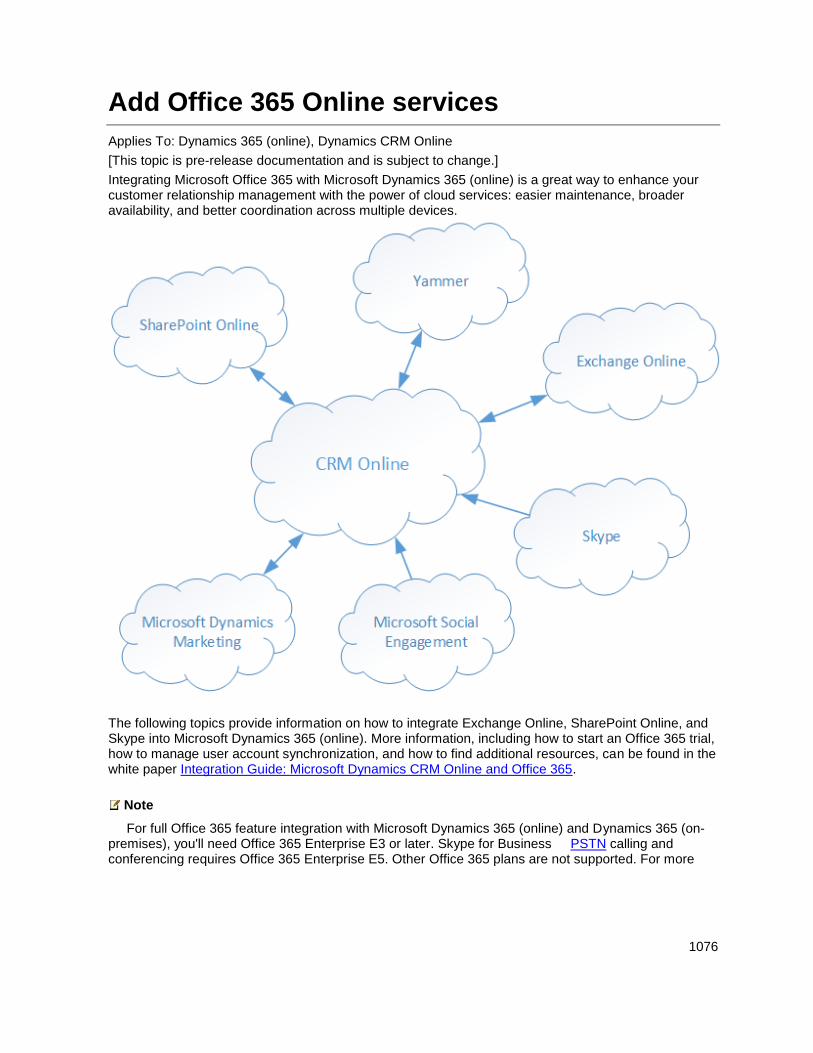
1076
Add Office 365 Online services
Applies To: Dynamics 365 (online), Dynamics CRM Online
[This topic is pre-release documentation and is subject to change.]
Integrating Microsoft Office 365 with Microsoft Dynamics 365 (online) is a great way to enhance your customer relationship management with the power of cloud services: easier maintenance, broader availability, and better coordination across multiple devices.
The following topics provide information on how to integrate Exchange Online, SharePoint Online, and Skype into Microsoft Dynamics 365 (online). More information, including how to start an Office 365 trial, how to manage user account synchronization, and how to find additional resources, can be found in the white paper Integration Guide: Microsoft Dynamics CRM Online and Office 365.
Note
For full Office 365 feature integration with Microsoft Dynamics 365 (online) and Dynamics 365 (on-premises), you'll need Office 365 Enterprise E3 or later. Skype for Business PSTN calling and conferencing requires Office 365 Enterprise E5. Other Office 365 plans are not supported. For more
1077
information on licensing and pricing, see: Licensing and Pricing Guide.
In This Section Set up Dynamics 365 (online) to use Exchange Online
Set up Dynamics 365 (online) to use SharePoint Online
Set up Dynamics 365 (online) to use Skype or Skype for Business
Set up Dynamics 365 (online) to use Social Engagement
Set up Dynamics 365 (online) to use Yammer
© 2016 Microsoft. All rights reserved. Copyright
Set up Dynamics 365 (online) to use Exchange Online
Applies To: Dynamics 365 (online), Dynamics CRM Online
[This topic is pre-release documentation and is subject to change.]
You know how important email is to your business and what happens when email stops flowing for even a short time. You can rid yourself of much of the stress of managing an email server by letting Microsoft Office 365 host your email service with Exchange Online. Then integrate Exchange Online with Microsoft Dynamics 365 (online) to take advantage of Dynamics 365 (online) email features.
One of the main reasons people use Microsoft Dynamics 365 is to store all customer email so anyone with the appropriate permissions can see all relevant customer communications in one place. For example, you can see all email associated with a particular contact or account, or for a particular opportunity or case.
To store email and other messaging records in Dynamics 365, you need to synchronize your email system with Dynamics 365. There are three ways to do this:
Server-side synchronization
Microsoft Dynamics 365 for Outlook
Microsoft Dynamics CRM Email Router
You can also use server-side synchronization together with Dynamics 365 for Outlook.
The preferred method: server-side synchronization
You can set synchronization of email messages, tasks, contacts, and appointments between Dynamics 365 (online) and Exchange Online. To use this functionality you don’t have to install and maintain a separate application. Setup is simpler and maintenance is easier compared to other deployment scenarios. Server-side synchronization is the preferred option for organizations with users who run Microsoft Dynamics 365 in a web browser or on mobile devices, such as tablets or smartphones.
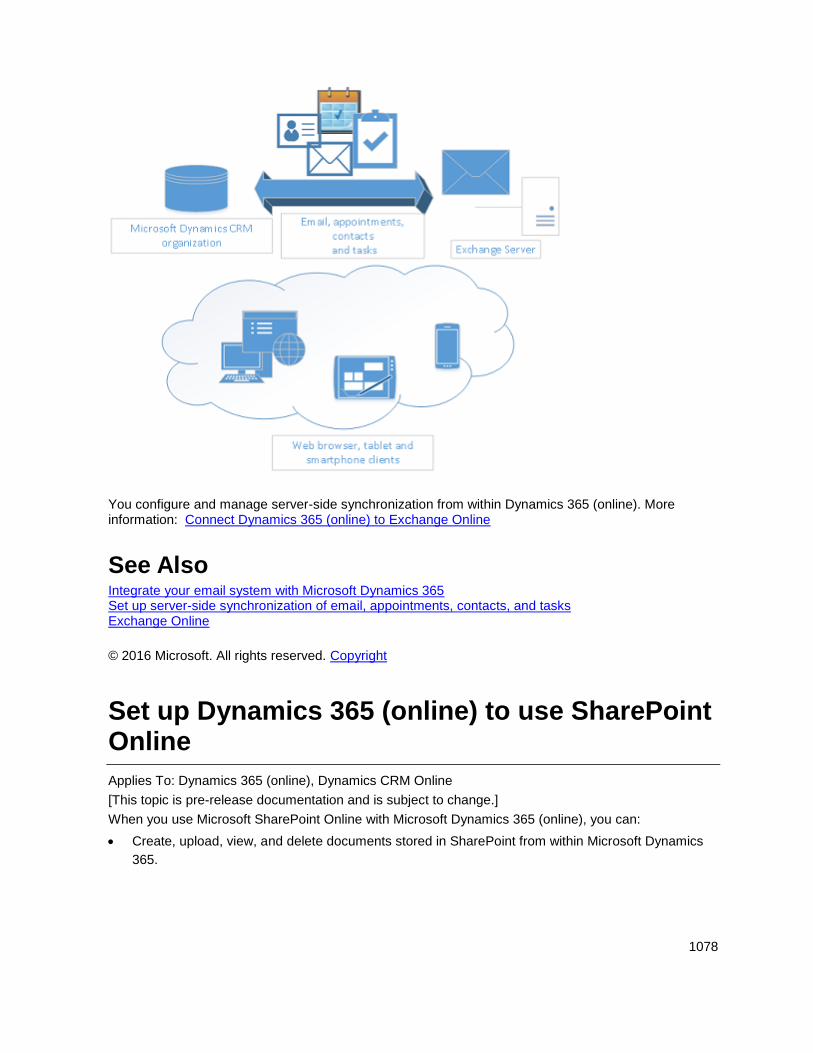
1078
You configure and manage server-side synchronization from within Dynamics 365 (online). More information: Connect Dynamics 365 (online) to Exchange Online
See Also Integrate your email system with Microsoft Dynamics 365 Set up server-side synchronization of email, appointments, contacts, and tasks Exchange Online
© 2016 Microsoft. All rights reserved. Copyright
Set up Dynamics 365 (online) to use SharePoint Online
Applies To: Dynamics 365 (online), Dynamics CRM Online
[This topic is pre-release documentation and is subject to change.]
When you use Microsoft SharePoint Online with Microsoft Dynamics 365 (online), you can:
Create, upload, view, and delete documents stored in SharePoint from within Microsoft Dynamics
365.
1079
Use the SharePoint document management abilities within Microsoft Dynamics 365, such as
checking the document in and out, viewing version history, and changing document properties.
Enable non-Microsoft Dynamics 365 users, such as customers who want to review a bid, to directly
access the SharePoint documents, provided they have the appropriate permissions.
Important
This topic is for organizations who wish to deploy for the first time or upgrade to server-based SharePoint integration. After you enable server-based SharePoint integration, you can’t revert to the previous client-based authentication method.
For some organizations, using the Microsoft Dynamics CRM List Component solution might be a better choice. More information: Configure SharePoint integration using the list component.
Tip
Check out the following video: Connect Dynamics 365 (online) to SharePoint Online
To set up Dynamics 365 (online) to use SharePoint Online, complete the following steps.
Assign user permissions to the Team SharePoint site Your Microsoft Dynamics 365 (online) and Microsoft Office 365 users are not automatically allowed access to your SharePoint sites. You must work within the SharePoint site to assign specific permission levels to individual users or groups.
Assign users to the Team site
1. Browse to the Office 365 admin center and sign in using Office 365 Global administrator
credentials.
2. Open the Office 365 app launcher, and then choose Sites.
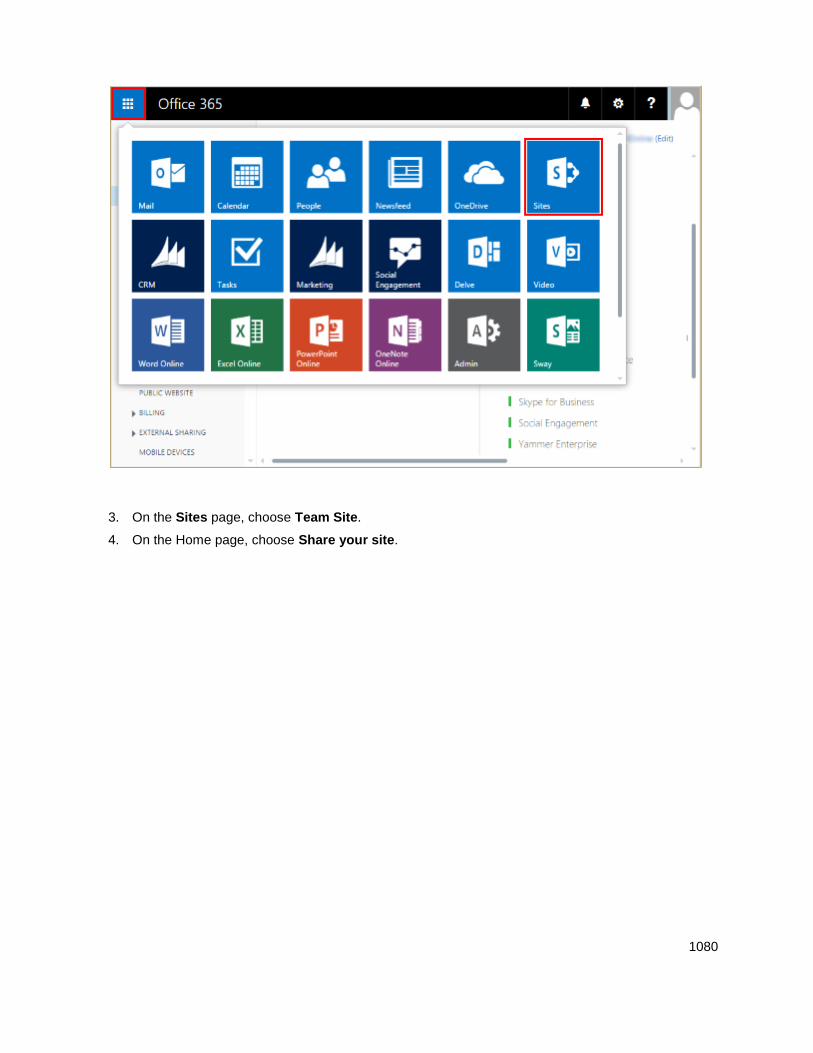
1080
3. On the Sites page, choose Team Site.
4. On the Home page, choose Share your site.
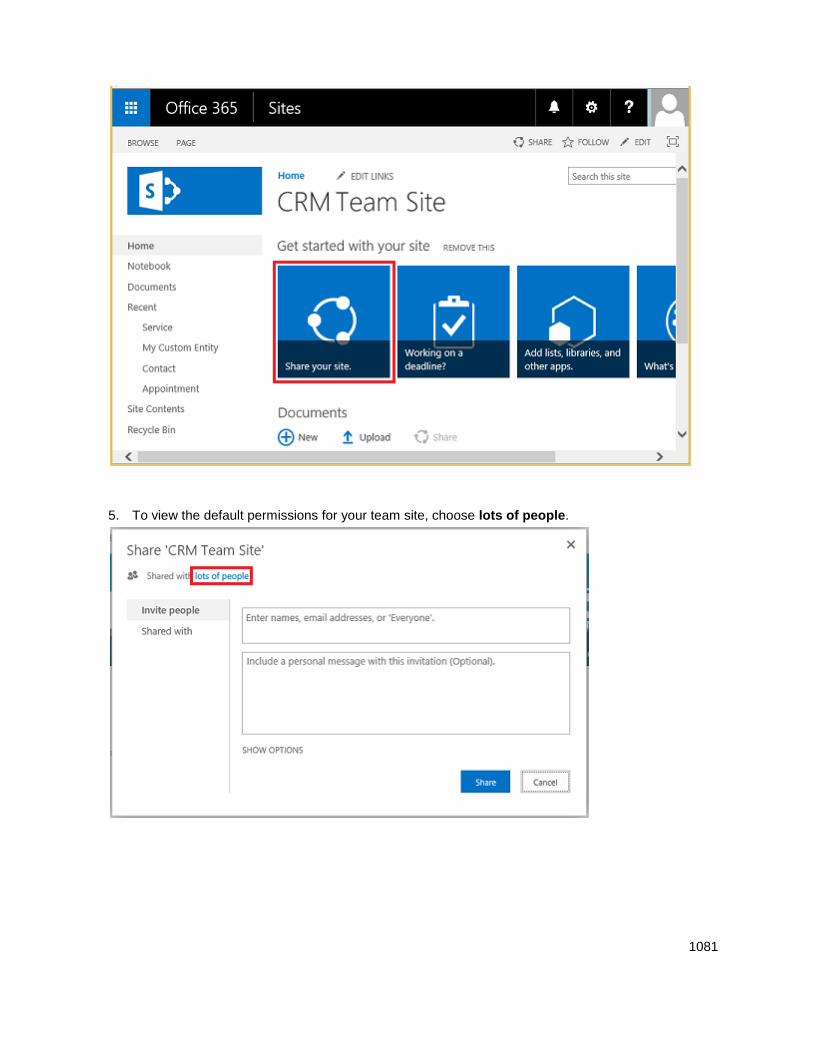
1081
5. To view the default permissions for your team site, choose lots of people.
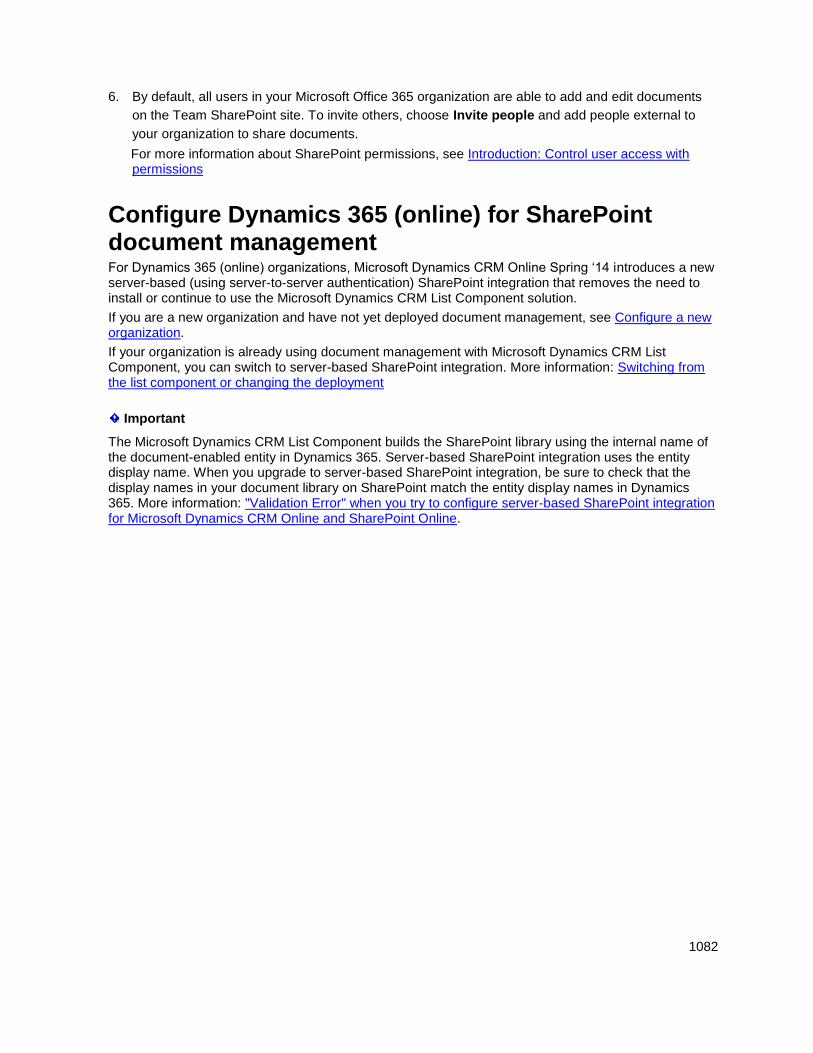
1082
6. By default, all users in your Microsoft Office 365 organization are able to add and edit documents
on the Team SharePoint site. To invite others, choose Invite people and add people external to
your organization to share documents.
For more information about SharePoint permissions, see Introduction: Control user access with permissions
Configure Dynamics 365 (online) for SharePoint document management For Dynamics 365 (online) organizations, Microsoft Dynamics CRM Online Spring ‘14 introduces a new server-based (using server-to-server authentication) SharePoint integration that removes the need to install or continue to use the Microsoft Dynamics CRM List Component solution.
If you are a new organization and have not yet deployed document management, see Configure a new organization.
If your organization is already using document management with Microsoft Dynamics CRM List Component, you can switch to server-based SharePoint integration. More information: Switching from the list component or changing the deployment
Important
The Microsoft Dynamics CRM List Component builds the SharePoint library using the internal name of the document-enabled entity in Dynamics 365. Server-based SharePoint integration uses the entity display name. When you upgrade to server-based SharePoint integration, be sure to check that the display names in your document library on SharePoint match the entity display names in Dynamics 365. More information: "Validation Error" when you try to configure server-based SharePoint integration for Microsoft Dynamics CRM Online and SharePoint Online.
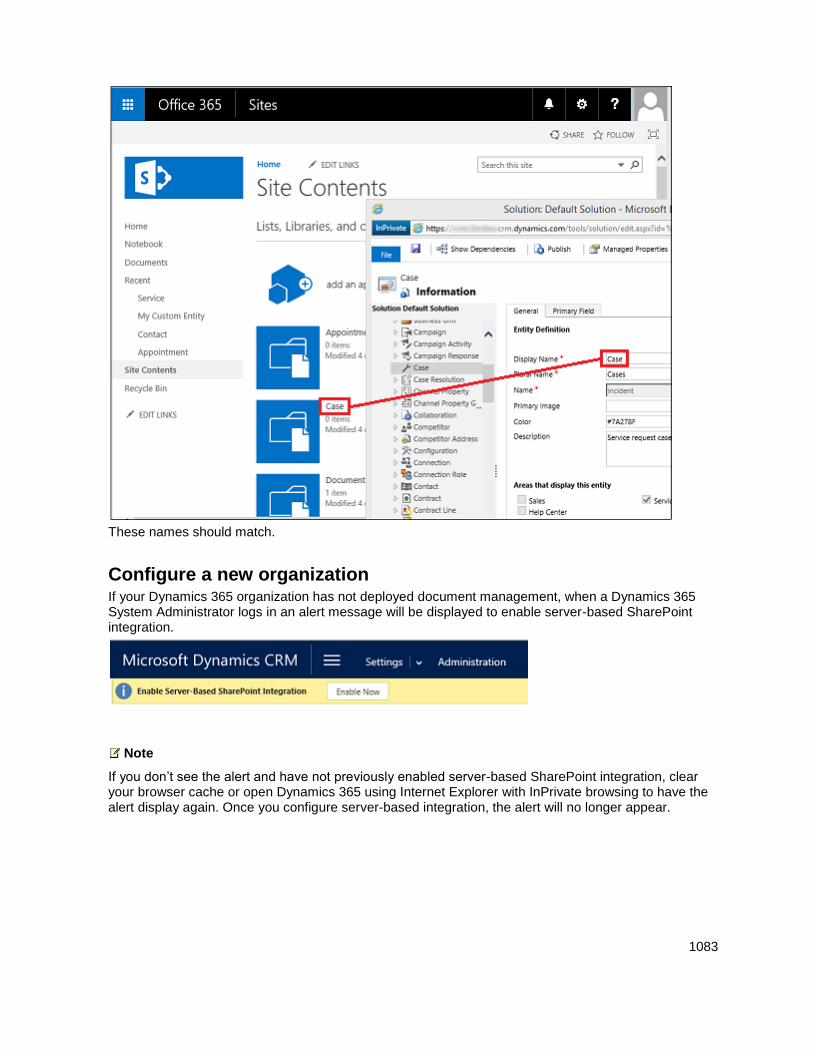
1083
These names should match.
Configure a new organization If your Dynamics 365 organization has not deployed document management, when a Dynamics 365 System Administrator logs in an alert message will be displayed to enable server-based SharePoint integration.
Note
If you don’t see the alert and have not previously enabled server-based SharePoint integration, clear your browser cache or open Dynamics 365 using Internet Explorer with InPrivate browsing to have the alert display again. Once you configure server-based integration, the alert will no longer appear.
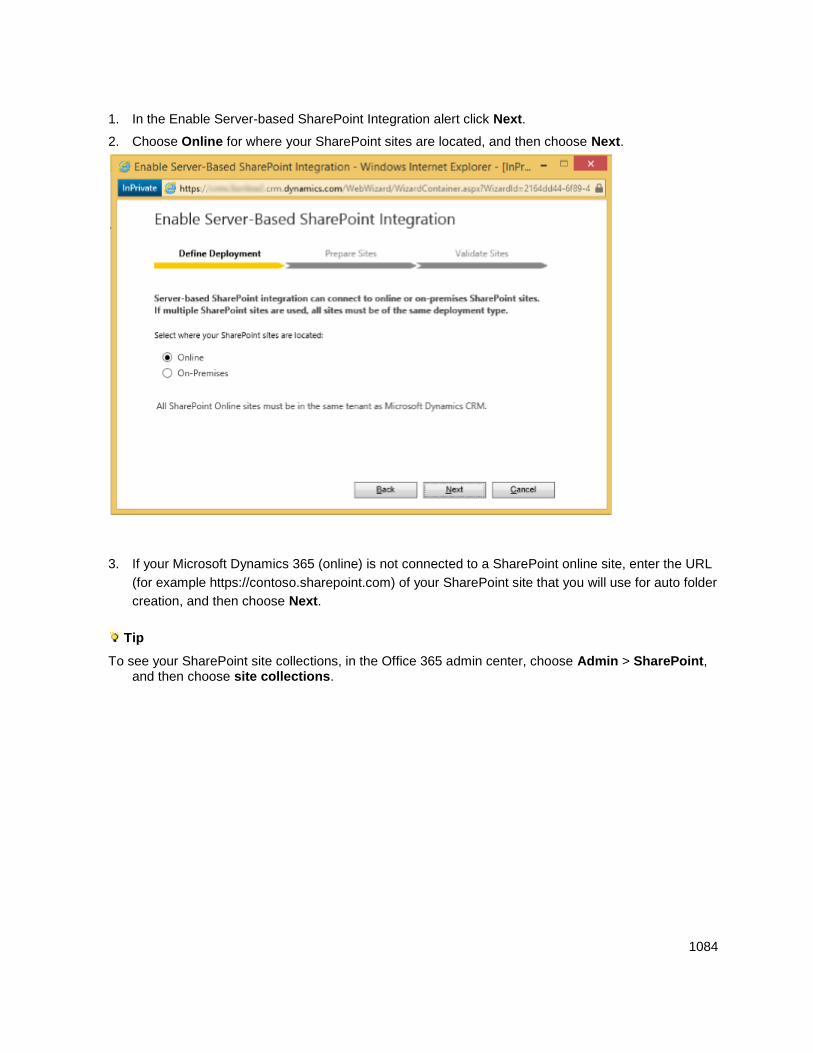
1084
1. In the Enable Server-based SharePoint Integration alert click Next.
2. Choose Online for where your SharePoint sites are located, and then choose Next.
3. If your Microsoft Dynamics 365 (online) is not connected to a SharePoint online site, enter the URL
(for example https://contoso.sharepoint.com) of your SharePoint site that you will use for auto folder
creation, and then choose Next.
Tip
To see your SharePoint site collections, in the Office 365 admin center, choose Admin > SharePoint, and then choose site collections.
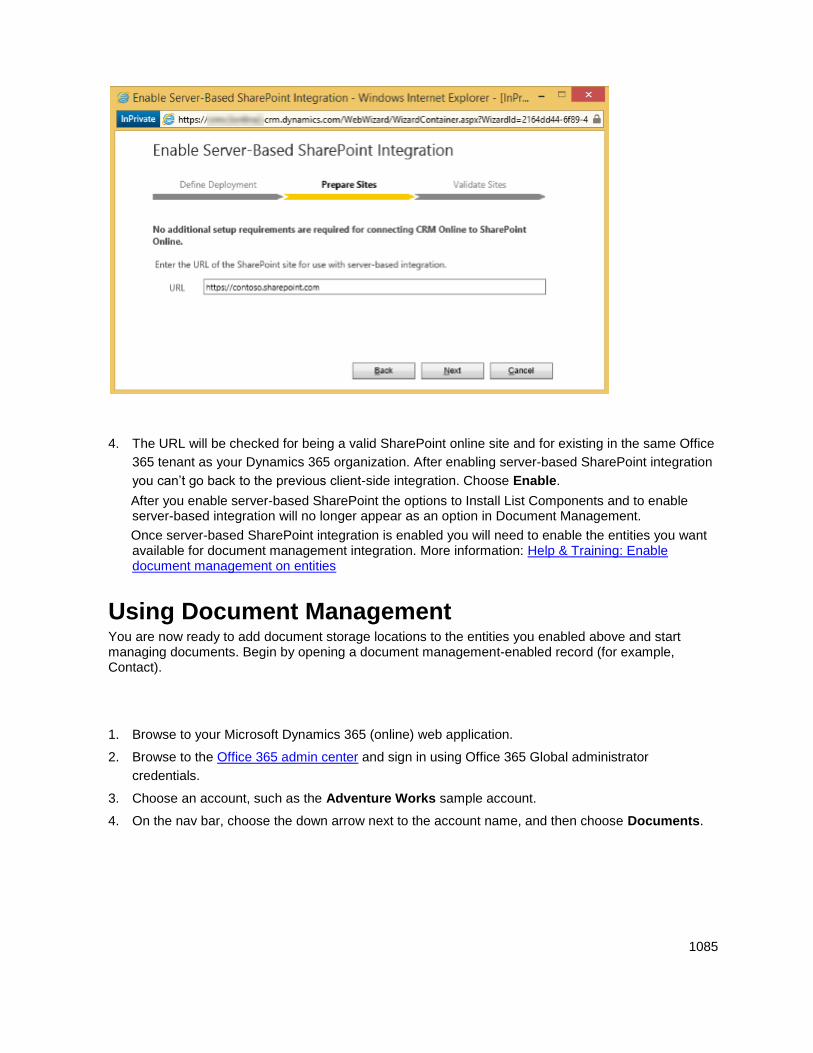
1085
4. The URL will be checked for being a valid SharePoint online site and for existing in the same Office
365 tenant as your Dynamics 365 organization. After enabling server-based SharePoint integration
you can’t go back to the previous client-side integration. Choose Enable.
After you enable server-based SharePoint the options to Install List Components and to enable server-based integration will no longer appear as an option in Document Management.
Once server-based SharePoint integration is enabled you will need to enable the entities you want available for document management integration. More information: Help & Training: Enable document management on entities
Using Document Management You are now ready to add document storage locations to the entities you enabled above and start managing documents. Begin by opening a document management-enabled record (for example, Contact).
1. Browse to your Microsoft Dynamics 365 (online) web application.
2. Browse to the Office 365 admin center and sign in using Office 365 Global administrator
credentials.
3. Choose an account, such as the Adventure Works sample account.
4. On the nav bar, choose the down arrow next to the account name, and then choose Documents.
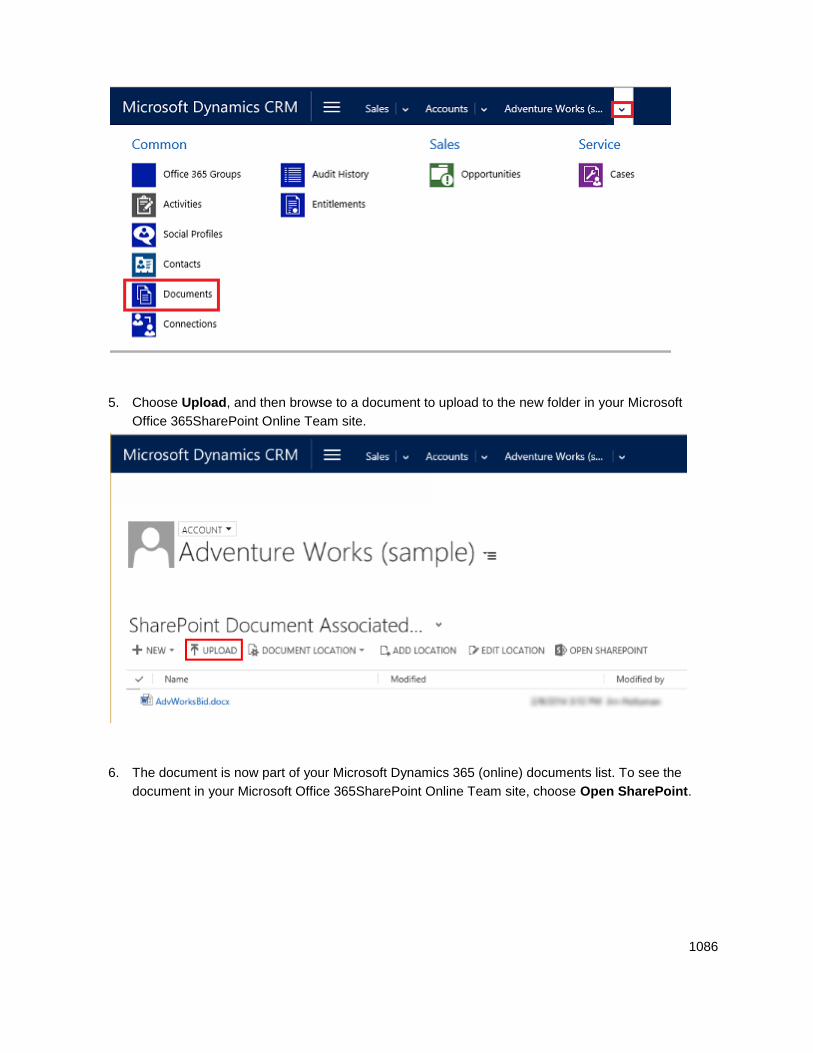
1086
5. Choose Upload, and then browse to a document to upload to the new folder in your Microsoft
Office 365SharePoint Online Team site.
6. The document is now part of your Microsoft Dynamics 365 (online) documents list. To see the
document in your Microsoft Office 365SharePoint Online Team site, choose Open SharePoint.
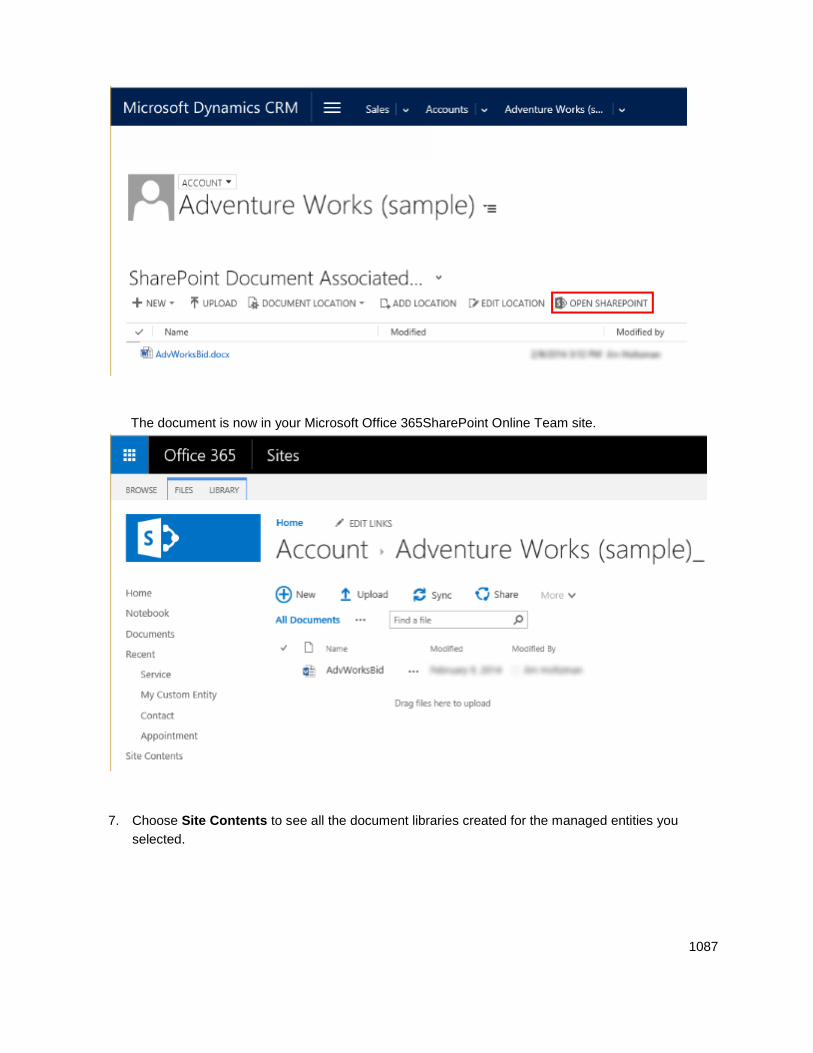
1087
The document is now in your Microsoft Office 365SharePoint Online Team site.
7. Choose Site Contents to see all the document libraries created for the managed entities you
selected.
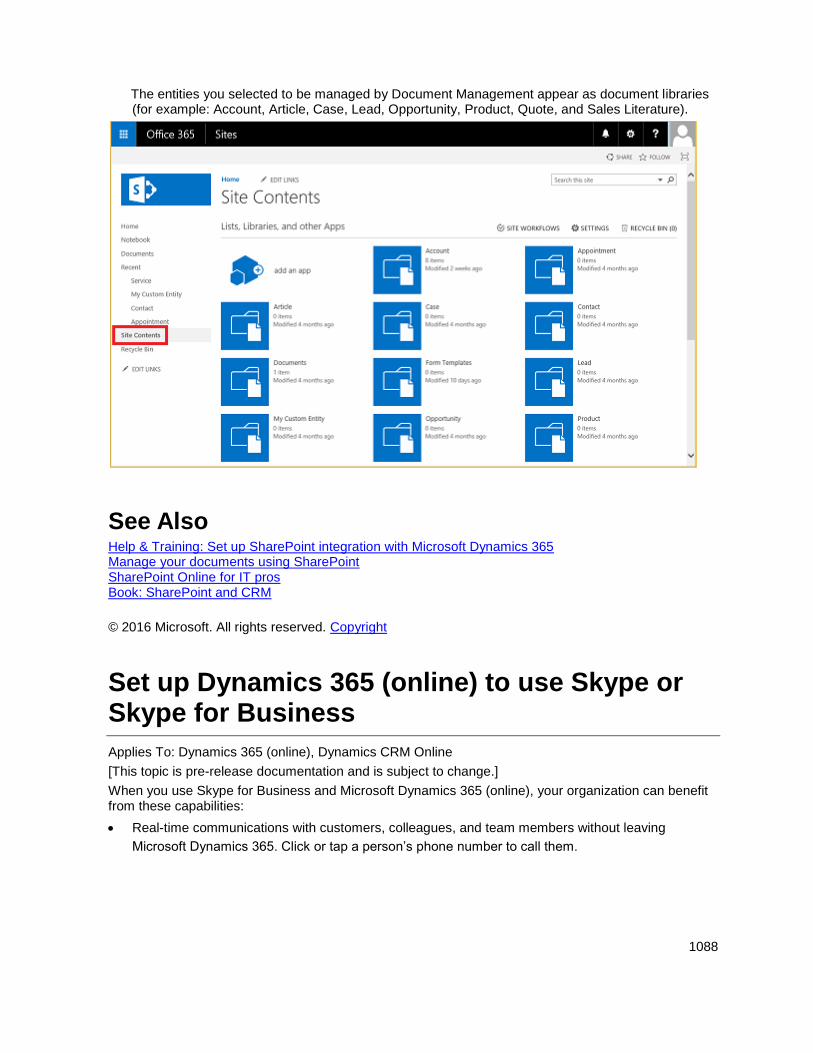
1088
The entities you selected to be managed by Document Management appear as document libraries (for example: Account, Article, Case, Lead, Opportunity, Product, Quote, and Sales Literature).
See Also Help & Training: Set up SharePoint integration with Microsoft Dynamics 365 Manage your documents using SharePoint SharePoint Online for IT pros Book: SharePoint and CRM
© 2016 Microsoft. All rights reserved. Copyright
Set up Dynamics 365 (online) to use Skype or Skype for Business
Applies To: Dynamics 365 (online), Dynamics CRM Online
[This topic is pre-release documentation and is subject to change.]
When you use Skype for Business and Microsoft Dynamics 365 (online), your organization can benefit from these capabilities:
Real-time communications with customers, colleagues, and team members without leaving
Microsoft Dynamics 365. Click or tap a person’s phone number to call them.
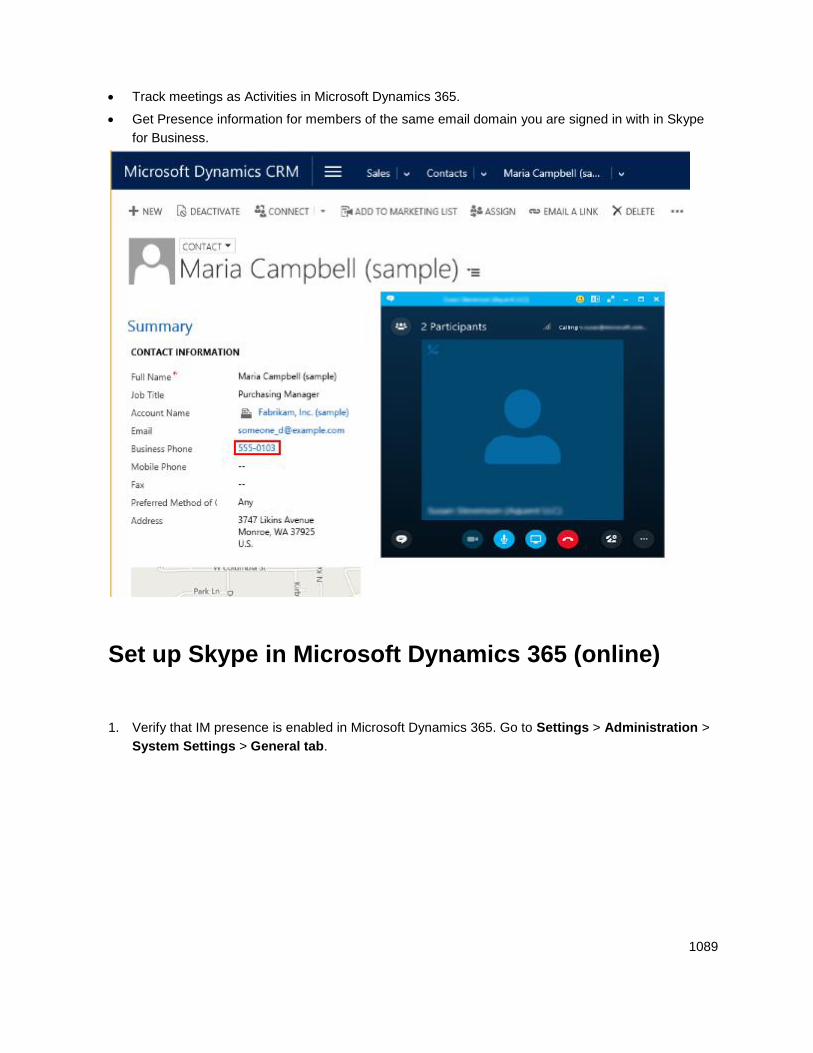
1089
Track meetings as Activities in Microsoft Dynamics 365.
Get Presence information for members of the same email domain you are signed in with in Skype
for Business.
Set up Skype in Microsoft Dynamics 365 (online)
1. Verify that IM presence is enabled in Microsoft Dynamics 365. Go to Settings > Administration >
System Settings > General tab.
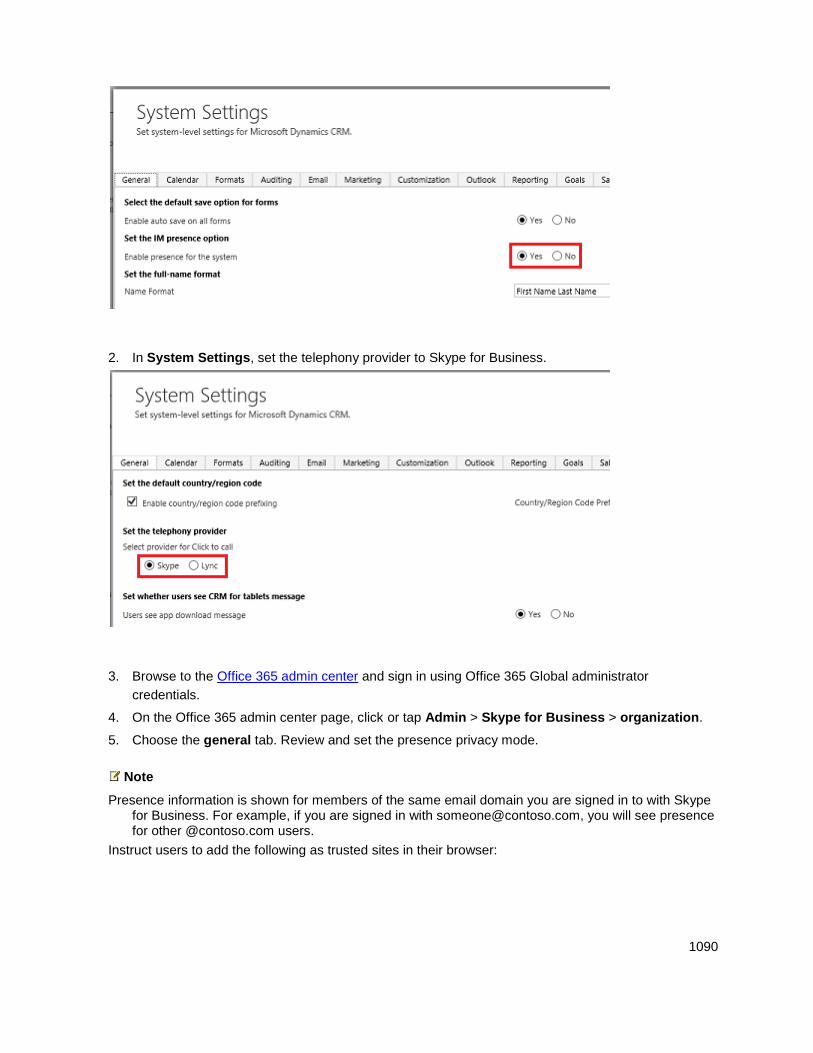
1090
2. In System Settings, set the telephony provider to Skype for Business.
3. Browse to the Office 365 admin center and sign in using Office 365 Global administrator
credentials.
4. On the Office 365 admin center page, click or tap Admin > Skype for Business > organization.
5. Choose the general tab. Review and set the presence privacy mode.
Note
Presence information is shown for members of the same email domain you are signed in to with Skype for Business. For example, if you are signed in with [email protected], you will see presence for other @contoso.com users.
Instruct users to add the following as trusted sites in their browser:
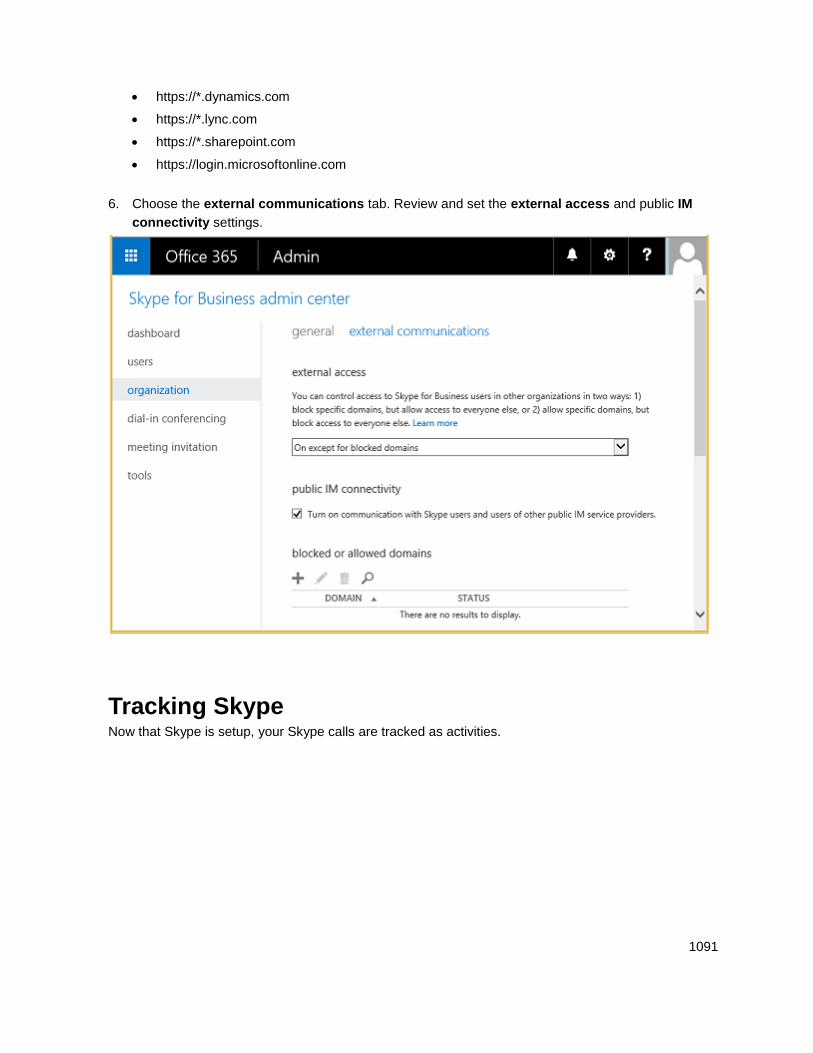
1091
https://*.dynamics.com
https://*.lync.com
https://*.sharepoint.com
https://login.microsoftonline.com
6. Choose the external communications tab. Review and set the external access and public IM
connectivity settings.
Tracking Skype Now that Skype is setup, your Skype calls are tracked as activities.
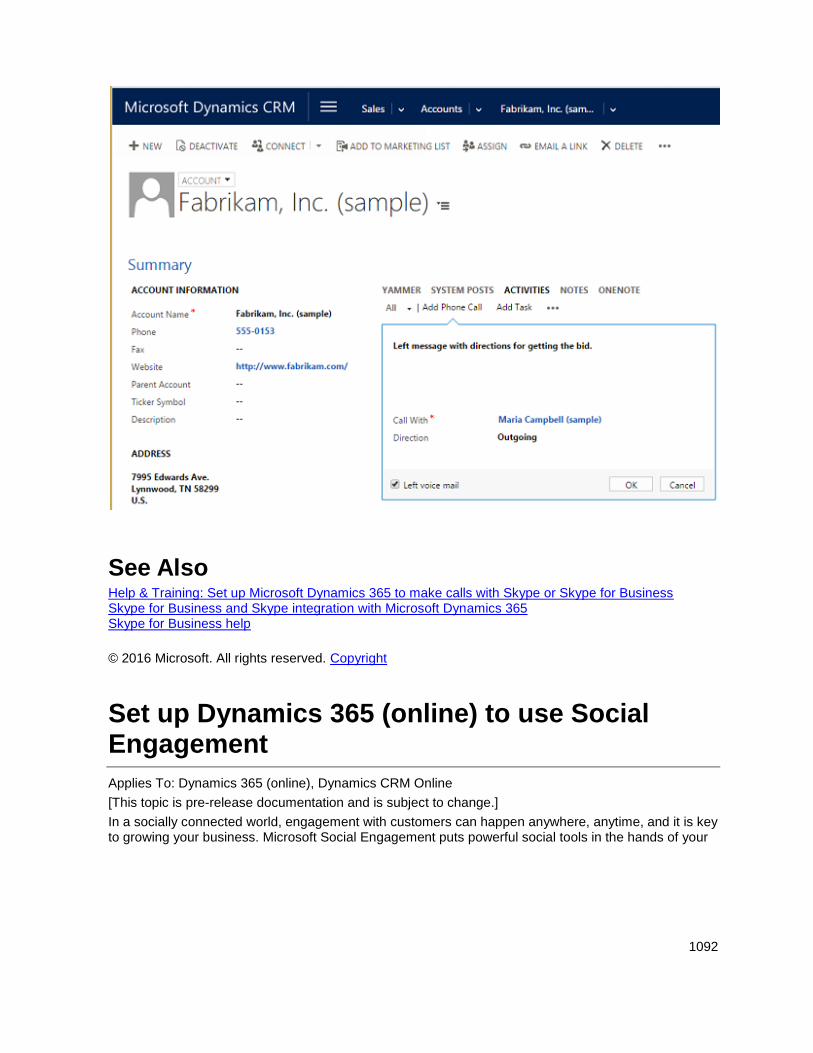
1092
See Also Help & Training: Set up Microsoft Dynamics 365 to make calls with Skype or Skype for Business Skype for Business and Skype integration with Microsoft Dynamics 365 Skype for Business help
© 2016 Microsoft. All rights reserved. Copyright
Set up Dynamics 365 (online) to use Social Engagement
Applies To: Dynamics 365 (online), Dynamics CRM Online
[This topic is pre-release documentation and is subject to change.]
In a socially connected world, engagement with customers can happen anywhere, anytime, and it is key to growing your business. Microsoft Social Engagement puts powerful social tools in the hands of your
1093
sales, marketing, and service teams—helping them to gain insight into how people feel about your business and to proactively connect on social media with customers, fans, and critics.
For information on integrating Microsoft Social Engagement with Dynamics 365 (online), see Connect to Microsoft Social Engagement and Social Engagement Help Center.
© 2016 Microsoft. All rights reserved. Copyright
Set up Dynamics 365 (online) to use Yammer
Applies To: Dynamics 365 (online), Dynamics CRM Online
[This topic is pre-release documentation and is subject to change.]
Yammer empowers employees to be more productive and successful by enabling them to collaborate easily, make decisions faster, and self-organize into teams to take on any business challenge. It’s a natural fit for Microsoft Dynamics 365 (online).
Note
A Yammer Enterprise subscription is required for Microsoft Dynamics 365. A Yammer Enterprise subscription is included with Compare Office 365 for business plans.
If your Microsoft Dynamics 365 (online) organization moves to a different global region (see Create and edit multiregional instances), you will need to reconfigure your Microsoft Dynamics 365 (online) and Yammer connection.
For more information, see Connect Microsoft Dynamics 365 to Yammer.
See Also Connect Microsoft Dynamics 365 to Yammer Pick your enterprise social network: Yammer or Newsfeed? Upgrade your network to Yammer Enterprise
© 2016 Microsoft. All rights reserved. Copyright
Help and additional resources for Microsoft Dynamics 365 (online)
Applies To: Dynamics 365 (online), Dynamics CRM Online
[This topic is pre-release documentation and is subject to change.]
There are several resources available to you covering planning, operating, and using Microsoft Dynamics 365 (online).
1094
In This Topic Service description
Security and service continuity
Microsoft Dynamics 365 (online) Trust Center
Microsoft Dynamics 365 (online) Security and Compliance Planning Guide
Integration Guide: Microsoft Dynamics 365 (online) and Office 365
Support and service status
Help for administrators
More self-service help resources
Service description Microsoft Dynamics 365 (online) Service Description describes the service, its capabilities, and requirements. This white paper is intended for business customers who are considering adopting a Dynamics 365 solution.
Security and service continuity When a business allows an external service provider to store and manage its data, key considerations must include security, data protection, privacy, and data ownership. Microsoft takes these concerns seriously and has applied its years of cloud and on-premises experience with security and privacy to delivery of the Microsoft Dynamics 365 (online) service. This focus is highlighted by the 99.9% uptime provision of the service-level agreement (SLA).
Microsoft Dynamics 365 (online) Trust Center The Microsoft Dynamics 365 (online) Trust Center describes the trust principles concerning security, privacy, service transparency, and compliance in Dynamics 365 (online).
Microsoft Dynamics 365 (online) Security and Compliance Planning Guide The Microsoft Dynamics 365 (online) Enterprise Planning Guide is designed to help readers understand the key compliance and security considerations associated with planning for a deployment of Dynamics 365 (online) in environments that may include enterprise directory integration services such as directory synchronization and single sign-on.
Integration Guide: Microsoft Dynamics 365 (online) and Office 365 The Integration Guide: Microsoft Dynamics 365 (online) and Office 365 demonstrates how to set up and use the interoperation between Office 365 and Dynamics 365 (online) to improve office collaboration, staff productivity, and make your organization more agile.

1095
Support and service status Office 365 admin portal
The Office 365 admin portal provides tools and resources that can assist you with key Office 365 online service information and tasks such as:
Open a new or review current service requests
Review the current service health of Office 365 instances including Microsoft Dynamics 365 (online)
Review planned maintenance
Microsoft Dynamics 365 (online) Service Blog
Find service status information specifically about the Dynamics 365 (online) service.
Microsoft Dynamics 365 (online) Service Blog
Help for administrators The following are useful resources for administering Microsoft Dynamics 365 (online):
Manage your Microsoft Dynamics 365 (online) subscription
Administering Dynamics 365
Microsoft Dynamics 365 IT Pro Center
Dynamics 365 Admin Best Bets
Billing Support
More self-service help resources Troubleshooting Microsoft Dynamics 365 for Outlook installation, configuration, and upgrade
View the Office 365 Service Health Dashboard
Search the Support Blog and Community Forum
Search the Microsoft Knowledge Base
See Also Add interoperation features to Microsoft Dynamics 365 (online)
© 2016 Microsoft. All rights reserved. Copyright
Troubleshooting: Unblock URLs required for Dynamics 365 (online)
Applies To: Dynamics 365 (online), Dynamics CRM Online
[This topic is pre-release documentation and is subject to change.]
1096
Microsoft Dynamics 365 (online) uses several Microsoft URLs to help provide security, services, and features. However, your computer or your organization’s computer network may block access to some of these URLs. Blocking any of the required URLs will cause Microsoft Dynamics 365 (online) to operate incorrectly or not at all.
You may see a network or server error message if your computer or your organization's network blocks the URLs you need. The error message might look like one of these:
"The specified Microsoft Dynamics 365 Server address (URL) is not responding. Ask your
administrator to verify that the server is turned on, and then try again."
"There is a problem communicating with the Microsoft Dynamics 365 Server. The server might be
unavailable."
You can unblock these URLs on your computer by adding them to a list of approved sites in your browser.
Important
If the following procedure doesn’t unblock the URLs required for Microsoft Dynamics 365, ask your system administrator to unblock the URLs on the organization’s network.
Unblock Dynamics 365 URLs in Internet Explorer 1. On the Explorer bar, click or tap the Tools icon (the white gear shape), and then click or tap
Internet options.
2. Click or tap the Security tab > Trusted sites > Sites.
3. In Add this website to the zone, type the URL for your Dynamics 365 (online) organization. For
example, https://contoso.crm.dynamics.com
4. Click or tap Add > Close > OK.
For a list of other URLs you may need to add to unblock, see Internet accessible URLs required for Microsoft Dynamics CRM 2011 or 2013 and connectivity
© 2016 Microsoft. All rights reserved. Copyright
Copyright
This document is provided "as-is". Information and views expressed in this document, including URL and other Internet Web site references, may change without notice.
Some examples depicted herein are provided for illustration only and are fictitious. No real association or connection is intended or should be inferred.
This document does not provide you with any legal rights to any intellectual property in any Microsoft product. You may copy and use this document for your internal, reference purposes.
The videos and eBooks might be in English only. Also, if you click the links, you may be redirected to a U.S. website whose content is in English.
© 2016 Microsoft. All rights reserved.

1097
Microsoft, Active Directory, ActiveX, Azure, Bing, Excel, Internet Explorer, Microsoft Dynamics, Microsoft Edge, Outlook, SharePoint, SQL Server, Windows, and Windows Server are trademarks of the Microsoft group of companies. All other trademarks are property of their respective owners.
Related Documents