Administering NetAct Configurator DN03453584 Issue 1-0 Nokia Siemens Networks is continually striving to reduce the adverse environmental effects of its products and services. We would like to encourage you as our customers and users to join us in working towards a cleaner, safer environment. Please recycle product packaging and follow the recommendations for power use and proper disposal of our products and their compo- nents. If you should have questions regarding our Environmental Policy or any of the environmental services we offer, please contact us at Nokia Siemens Networks for any additional information.

Welcome message from author
This document is posted to help you gain knowledge. Please leave a comment to let me know what you think about it! Share it to your friends and learn new things together.
Transcript

Administering NetAct Configurator
DN03453584
Issue 1-0
Nokia Siemens Networks is continually striving to reduce the adverse environmental effects of its products and services. We would like to encourage you as our customers and users to join us in working towards a cleaner, safer environment. Please recycle product packaging and follow the recommendations for power use and proper disposal of our products and their compo-nents.
If you should have questions regarding our Environmental Policy or any of the environmental services we offer, please contact us at Nokia Siemens Networks for any additional information.

2 DN03453584Issue 1-0
Administering NetAct Configurator
Id:0900d80580a02f7a
The information in this document is subject to change without notice and describes only the product defined in the introduction of this documentation. This documentation is intended for the use of Nokia Siemens Networks customers only for the purposes of the agreement under which the document is submitted, and no part of it may be used, reproduced, modified or transmitted in any form or means without the prior written permission of Nokia Siemens Networks. The documentation has been prepared to be used by professional and properly trained personnel, and the customer assumes full responsibility when using it. Nokia Siemens Networks welcomes customer comments as part of the process of continuous development and improvement of the documentation.
The information or statements given in this documentation concerning the suitability, capacity, or performance of the mentioned hardware or software products are given "as is" and all liability arising in connection with such hardware or software products shall be defined conclusively and finally in a separate agreement between Nokia Siemens Networks and the customer. However, Nokia Siemens Networks has made all reasonable efforts to ensure that the instructions contained in the document are adequate and free of material errors and omissions. Nokia Siemens Networks will, if deemed necessary by Nokia Siemens Networks, explain issues which may not be covered by the document.
Nokia Siemens Networks will correct errors in this documentation as soon as possible. IN NO EVENT WILL Nokia Siemens Networks BE LIABLE FOR ERRORS IN THIS DOCUMENTA-TION OR FOR ANY DAMAGES, INCLUDING BUT NOT LIMITED TO SPECIAL, DIRECT, INDI-RECT, INCIDENTAL OR CONSEQUENTIAL OR ANY LOSSES, SUCH AS BUT NOT LIMITED TO LOSS OF PROFIT, REVENUE, BUSINESS INTERRUPTION, BUSINESS OPPORTUNITY OR DATA,THAT MAY ARISE FROM THE USE OF THIS DOCUMENT OR THE INFORMATION IN IT.
This documentation and the product it describes are considered protected by copyrights and other intellectual property rights according to the applicable laws.
The wave logo is a trademark of Nokia Siemens Networks Oy. Nokia is a registered trademark of Nokia Corporation. Siemens is a registered trademark of Siemens AG.
Other product names mentioned in this document may be trademarks of their respective owners, and they are mentioned for identification purposes only.
Copyright © Nokia Siemens Networks 2013/9/10. All rights reserved
f Important Notice on Product SafetyThis product may present safety risks due to laser, electricity, heat, and other sources of danger.
Only trained and qualified personnel may install, operate, maintain or otherwise handle this product and only after having carefully read the safety information applicable to this product.
The safety information is provided in the Safety Information section in the “Legal, Safety and Environmental Information” part of this document or documentation set.
The same text in German:
f Wichtiger Hinweis zur Produktsicherheit Von diesem Produkt können Gefahren durch Laser, Elektrizität, Hitzeentwicklung oder andere Gefahrenquellen ausgehen.
Installation, Betrieb, Wartung und sonstige Handhabung des Produktes darf nur durch geschultes und qualifiziertes Personal unter Beachtung der anwendbaren Sicherheits-anforderungen erfolgen.
Die Sicherheitsanforderungen finden Sie unter „Sicherheitshinweise“ im Teil „Legal, Safety and Environmental Information“ dieses Dokuments oder dieses Dokumentations-satzes.

DN03453584Issue 1-0
3
Administering NetAct Configurator
Id:0900d80580a02f7a
Table of ContentsThis document has 106 pages.
1 About this document . . . . . . . . . . . . . . . . . . . . . . . . . . . . . . . . . . . . . . . 101.1 Environment variables . . . . . . . . . . . . . . . . . . . . . . . . . . . . . . . . . . . . . . 101.2 NetAct compatibility and capacity information . . . . . . . . . . . . . . . . . . . . 101.3 Terms. . . . . . . . . . . . . . . . . . . . . . . . . . . . . . . . . . . . . . . . . . . . . . . . . . . 10
2 Configuring BSC file-based upload, provisioning, and events . . . . . . . . 122.1 Checking and configuring user accounts for FTAM Unix Access service
type . . . . . . . . . . . . . . . . . . . . . . . . . . . . . . . . . . . . . . . . . . . . . . . . . . . . 122.2 Enabling Node Manager launch functionality. . . . . . . . . . . . . . . . . . . . . 132.3 Configuring BSC file-based events . . . . . . . . . . . . . . . . . . . . . . . . . . . . 132.3.1 Solving problems with the XML-based events and core files generated by
the zrnevhmx process . . . . . . . . . . . . . . . . . . . . . . . . . . . . . . . . . . . . . . 15
3 Configuring HTTP file transfer for RNC and WBTS. . . . . . . . . . . . . . . . 163.1 Checking and configuring user accounts for HTTPS Unix Access service
type . . . . . . . . . . . . . . . . . . . . . . . . . . . . . . . . . . . . . . . . . . . . . . . . . . . . 16
4 Configuring NetAct Configurator DNS management . . . . . . . . . . . . . . . 174.1 Prerequisites . . . . . . . . . . . . . . . . . . . . . . . . . . . . . . . . . . . . . . . . . . . . . 174.2 Overview of the operation . . . . . . . . . . . . . . . . . . . . . . . . . . . . . . . . . . . 174.3 Configuring the Primary Name Server . . . . . . . . . . . . . . . . . . . . . . . . . . 184.4 Configuring the p3nprxmx DDNS Proxy process. . . . . . . . . . . . . . . . . . 194.5 Creating and configuring the DDNS access . . . . . . . . . . . . . . . . . . . . . 204.6 Configuring LDAP for NetAct Configurator DNS management . . . . . . . 244.7 Configuring DNS management for the rehosting operation . . . . . . . . . . 244.7.1 Overview of the operation . . . . . . . . . . . . . . . . . . . . . . . . . . . . . . . . . . . 244.7.2 Creating shared secret key . . . . . . . . . . . . . . . . . . . . . . . . . . . . . . . . . . 254.7.3 Adding RAN zone name to LDAP . . . . . . . . . . . . . . . . . . . . . . . . . . . . . 264.7.4 Configuring BIND. . . . . . . . . . . . . . . . . . . . . . . . . . . . . . . . . . . . . . . . . . 264.7.5 Configuring NameSurfer . . . . . . . . . . . . . . . . . . . . . . . . . . . . . . . . . . . . 27
5 Configuring LDAP for NetAct Configurator . . . . . . . . . . . . . . . . . . . . . . 29
6 Configuring NE3S/WS Agent Port, URL path, Operation timeout and Re-sponse timeout . . . . . . . . . . . . . . . . . . . . . . . . . . . . . . . . . . . . . . . . . . . 30
7 Customizing NetAct Configurator applications. . . . . . . . . . . . . . . . . . . . 317.1 Enabling tracing for Connectivity Server services . . . . . . . . . . . . . . . . . 317.1.1 CM Bulk Data (blkdatmx). . . . . . . . . . . . . . . . . . . . . . . . . . . . . . . . . . . . 317.1.2 GSM Upload Mediator (uplnwmmx). . . . . . . . . . . . . . . . . . . . . . . . . . . . 317.1.3 NetAct Configurator CM BSC Mediation (cmmbscmx) . . . . . . . . . . . . . 327.2 Customizing the settings of CM Bulk Data subsystem . . . . . . . . . . . . . 327.3 Customizing the settings of CM Analyzer . . . . . . . . . . . . . . . . . . . . . . . 337.4 Enabling parameter level audit logging . . . . . . . . . . . . . . . . . . . . . . . . . 337.4.1 Enabling provisioning audit logging . . . . . . . . . . . . . . . . . . . . . . . . . . . . 347.4.2 Enabling automatic upload audit logging . . . . . . . . . . . . . . . . . . . . . . . . 347.5 Hiding Administrator operations from CM Operations Manager Operation
History view . . . . . . . . . . . . . . . . . . . . . . . . . . . . . . . . . . . . . . . . . . . . . . 34

4 DN03453584Issue 1-0
Administering NetAct Configurator
Id:0900d80580a02f7a
7.6 Customizing the settings of a folder object . . . . . . . . . . . . . . . . . . . . . . . 357.7 Enabling Inter-RAT UTRAN and Inter-RAT GERAN features auto manage-
ment in Plan Prepare . . . . . . . . . . . . . . . . . . . . . . . . . . . . . . . . . . . . . . . 357.8 Handling critical parameters in NetAct Configurator . . . . . . . . . . . . . . . . 367.9 Defining the maximum number of managed objects in one validation file for
LTE . . . . . . . . . . . . . . . . . . . . . . . . . . . . . . . . . . . . . . . . . . . . . . . . . . . . . 377.10 Defining the number of waiting operations per BSC, RNC and LTE OMS .
387.11 Enabling skipping BTS, Flexi Direct and/or LTE validation before pre-acti-
vation . . . . . . . . . . . . . . . . . . . . . . . . . . . . . . . . . . . . . . . . . . . . . . . . . . . 387.12 Enabling validation files saving . . . . . . . . . . . . . . . . . . . . . . . . . . . . . . . . 39
8 Managing the software version and options support . . . . . . . . . . . . . . . 408.1 Setting the RNC version and options . . . . . . . . . . . . . . . . . . . . . . . . . . . 408.2 Setting the MSC options . . . . . . . . . . . . . . . . . . . . . . . . . . . . . . . . . . . . . 408.3 Setting the MGW options . . . . . . . . . . . . . . . . . . . . . . . . . . . . . . . . . . . . 408.4 Setting the SGSN options . . . . . . . . . . . . . . . . . . . . . . . . . . . . . . . . . . . . 418.5 Setting the BSC version and options . . . . . . . . . . . . . . . . . . . . . . . . . . . 42
9 Maintaining the NetAct Configurator database using the NetAct Doctor 44
10 NetAct Parameter-based Licences . . . . . . . . . . . . . . . . . . . . . . . . . . . . . 45
11 Command line operations . . . . . . . . . . . . . . . . . . . . . . . . . . . . . . . . . . . . 4611.1 Scheduling command line operations . . . . . . . . . . . . . . . . . . . . . . . . . . . 4611.2 Uploading actual values . . . . . . . . . . . . . . . . . . . . . . . . . . . . . . . . . . . . . 4711.3 Provisioning plans. . . . . . . . . . . . . . . . . . . . . . . . . . . . . . . . . . . . . . . . . . 5111.3.1 GSM . . . . . . . . . . . . . . . . . . . . . . . . . . . . . . . . . . . . . . . . . . . . . . . . . . . . 5111.3.1.1 Validating BTS SC plan before pre-activation. . . . . . . . . . . . . . . . . . . . . 5111.3.1.2 Validating BSC RNW plan after pre-activation . . . . . . . . . . . . . . . . . . . . 5211.3.1.3 Pre-activating and activating GSM plan . . . . . . . . . . . . . . . . . . . . . . . . . 5211.3.1.4 Activating the pre-activated GSM plan . . . . . . . . . . . . . . . . . . . . . . . . . . 5411.3.2 WCDMA, Flexi Direct, LTE, and core . . . . . . . . . . . . . . . . . . . . . . . . . . . 5511.3.2.1 Validating WBTS SC and LTE plans before pre-activation. . . . . . . . . . . 5511.3.2.2 Pre-activating and activating plans for RNC RNW, RNC ATM/IP, AXC,
FTM, Flexi Direct, WBTS SC, core and LTE. . . . . . . . . . . . . . . . . . . . . . 5611.3.2.3 Validating RNC ATM/IP plan content after pre-activation . . . . . . . . . . . . 5911.3.2.4 Activating the pre-activated plan for RNC RNW, AXC, FTM, Flexi Direct,
WBTS SC and LTE . . . . . . . . . . . . . . . . . . . . . . . . . . . . . . . . . . . . . . . . . 6011.3.2.5 Activating the pre-activated RNC ATM/IP plan . . . . . . . . . . . . . . . . . . . . 6111.4 Exporting and importing plans, actual configuration and templates . . . . 6211.5 Deleting plans . . . . . . . . . . . . . . . . . . . . . . . . . . . . . . . . . . . . . . . . . . . . . 6611.6 Comparing plans. . . . . . . . . . . . . . . . . . . . . . . . . . . . . . . . . . . . . . . . . . . 6711.6.1 Comparing plans to actual configuration. . . . . . . . . . . . . . . . . . . . . . . . . 6711.7 Send To Network operations . . . . . . . . . . . . . . . . . . . . . . . . . . . . . . . . . 6711.8 Policy-Based Compare operations . . . . . . . . . . . . . . . . . . . . . . . . . . . . . 6811.9 Reference Configuration related command line operations . . . . . . . . . . 6911.9.1 Initializing Reference Configuration . . . . . . . . . . . . . . . . . . . . . . . . . . . . 7011.9.2 Generating delta . . . . . . . . . . . . . . . . . . . . . . . . . . . . . . . . . . . . . . . . . . . 7011.9.3 Exporting delta . . . . . . . . . . . . . . . . . . . . . . . . . . . . . . . . . . . . . . . . . . . . 71
DN03453584Issue 1-0
5
Administering NetAct Configurator
Id:0900d80580a02f7a
11.9.4 Merging plans to reference configuration. . . . . . . . . . . . . . . . . . . . . . . . 7111.9.5 Committing reference alignments . . . . . . . . . . . . . . . . . . . . . . . . . . . . . 7211.9.6 Committing network alignments. . . . . . . . . . . . . . . . . . . . . . . . . . . . . . . 7211.10 CM History related command line operations . . . . . . . . . . . . . . . . . . . . 7211.10.1 Initializing CM History configuration. . . . . . . . . . . . . . . . . . . . . . . . . . . . 7211.10.2 Synchronizing CM History configuration . . . . . . . . . . . . . . . . . . . . . . . . 7311.10.3 Generating CM History differences tabular report . . . . . . . . . . . . . . . . . 7311.10.4 Removing data from CM History . . . . . . . . . . . . . . . . . . . . . . . . . . . . . . 7511.11 Workflow related command line operations. . . . . . . . . . . . . . . . . . . . . . 7511.11.1 Creating workflow related plans. . . . . . . . . . . . . . . . . . . . . . . . . . . . . . . 7511.11.1.1 Creating a plan based on COCO. . . . . . . . . . . . . . . . . . . . . . . . . . . . . . 7511.11.1.2 Creating a new COCO reconfiguration plan . . . . . . . . . . . . . . . . . . . . . 7611.11.1.3 Creating a new transport reconfiguration plan . . . . . . . . . . . . . . . . . . . . 7611.11.1.4 Merging into selected modification plan the related _CocoAxcFtmPlan and
_CocoDeletion plan . . . . . . . . . . . . . . . . . . . . . . . . . . . . . . . . . . . . . . . . 7611.11.2 Provisioning workflow related plans. . . . . . . . . . . . . . . . . . . . . . . . . . . . 7711.11.2.1 Provisioning a plan generated from a COCO modification plan with the suf-
fix _CocoAxcFtmPlan. . . . . . . . . . . . . . . . . . . . . . . . . . . . . . . . . . . . . . . 7711.11.2.2 Provisioning in AXCs and FTMs the plan with the suffix _CocoAxcFtmPlan
7811.11.2.3 Provisioning a plan with the suffix _CocoDeletion in RNCs. . . . . . . . . . 7911.11.2.4 Provisioning a selected plan in RNCs . . . . . . . . . . . . . . . . . . . . . . . . . . 7911.12 Starting consistency checks. . . . . . . . . . . . . . . . . . . . . . . . . . . . . . . . . . 8011.13 3GPP operations . . . . . . . . . . . . . . . . . . . . . . . . . . . . . . . . . . . . . . . . . . 8211.14 Restoring AXC configurations . . . . . . . . . . . . . . . . . . . . . . . . . . . . . . . . 8411.15 Managing the Remote Electrical Tilt using command line . . . . . . . . . . . 8511.15.1 Command Line operations for RET management in WCDMA network . 8511.15.1.1 Upload . . . . . . . . . . . . . . . . . . . . . . . . . . . . . . . . . . . . . . . . . . . . . . . . . . 8511.15.1.2 Forced Upload . . . . . . . . . . . . . . . . . . . . . . . . . . . . . . . . . . . . . . . . . . . . 8511.15.1.3 Download. . . . . . . . . . . . . . . . . . . . . . . . . . . . . . . . . . . . . . . . . . . . . . . . 8511.15.1.4 Download vendor specific configuration file. . . . . . . . . . . . . . . . . . . . . . 8611.15.1.5 Calibration . . . . . . . . . . . . . . . . . . . . . . . . . . . . . . . . . . . . . . . . . . . . . . . 8611.15.2 Command Line operations for RET management in LTE network . . . . 8711.15.2.1 Upload (with Command Line) . . . . . . . . . . . . . . . . . . . . . . . . . . . . . . . . 8711.15.2.2 Download (with Command Line) . . . . . . . . . . . . . . . . . . . . . . . . . . . . . . 8711.16 Administering RNC RNW and LTE iOMS queues . . . . . . . . . . . . . . . . . 8711.16.1 Pausing/releasing an RNC RNW and LTE iOMS operation queue . . . . 8811.16.2 Provisioning a priority plan. . . . . . . . . . . . . . . . . . . . . . . . . . . . . . . . . . . 8911.16.3 Removing a hanging operation from the RNC RNW or LTE iOMS operation
queue . . . . . . . . . . . . . . . . . . . . . . . . . . . . . . . . . . . . . . . . . . . . . . . . . . . 8911.17 Command Manager command line operations . . . . . . . . . . . . . . . . . . . 9011.18 Zero touch BTS configuration command line operations . . . . . . . . . . . . 9111.19 BTS Configuration File Export command line operations . . . . . . . . . . . 9211.20 Plan provisioning to multiple core NEs . . . . . . . . . . . . . . . . . . . . . . . . . 9311.20.1 Plan provisioning to multiple NEs . . . . . . . . . . . . . . . . . . . . . . . . . . . . . 9311.21 eNB Cell Trace Restart command line operations. . . . . . . . . . . . . . . . . 94
12 Where to find more information . . . . . . . . . . . . . . . . . . . . . . . . . . . . . . . 97

6 DN03453584Issue 1-0
Administering NetAct Configurator
Id:0900d80580a02f7a
13 Appendix A: Parameters related to features under parameter-based li-cense . . . . . . . . . . . . . . . . . . . . . . . . . . . . . . . . . . . . . . . . . . . . . . . . . . . 98
Index . . . . . . . . . . . . . . . . . . . . . . . . . . . . . . . . . . . . . . . . . . . . . . . . . . . 105
DN03453584Issue 1-0
7
Administering NetAct Configurator
Id:0900d80580a02f7a
List of FiguresFigure 1 Overview of configuring the DDNS proxy for NetAct Configurator DNS
management . . . . . . . . . . . . . . . . . . . . . . . . . . . . . . . . . . . . . . . . . . . . . 18Figure 2 Overview of the operation . . . . . . . . . . . . . . . . . . . . . . . . . . . . . . . . . . . 25
8 DN03453584Issue 1-0
Administering NetAct Configurator
Id:0900d80580a02f7a
List of TablesTable 1 Environment variables used in this document . . . . . . . . . . . . . . . . . . . . 10Table 2 Terms . . . . . . . . . . . . . . . . . . . . . . . . . . . . . . . . . . . . . . . . . . . . . . . . . . . 10Table 3 Command line options for Q3 Version Manager usage . . . . . . . . . . . . . 14Table 4 Options for the Primary Name Server in Network Editor . . . . . . . . . . . . 19Table 5 Value definitions for the preferHiddenPrimary attribute . . . . . . . . . . . . . 19Table 6 Variable list . . . . . . . . . . . . . . . . . . . . . . . . . . . . . . . . . . . . . . . . . . . . . . 21Table 7 Variable list . . . . . . . . . . . . . . . . . . . . . . . . . . . . . . . . . . . . . . . . . . . . . . 21Table 8 Variable list . . . . . . . . . . . . . . . . . . . . . . . . . . . . . . . . . . . . . . . . . . . . . . 26Table 9 q3versmx command line options . . . . . . . . . . . . . . . . . . . . . . . . . . . . . . 42Table 10 Command line options for upload operations . . . . . . . . . . . . . . . . . . . . 47Table 11 Command line options for validating BTS SC plan. . . . . . . . . . . . . . . . . 51Table 12 Command line options for validating BSC RNW plan. . . . . . . . . . . . . . . 52Table 13 Command line options for provisioning . . . . . . . . . . . . . . . . . . . . . . . . . 53Table 14 Command line options for the Activate_Pre-Activation operations . . . . 54Table 15 Command line options for validating plan content . . . . . . . . . . . . . . . . . 56Table 16 Command line options for plan provisioning . . . . . . . . . . . . . . . . . . . . . 56Table 17 Command line options for the IPA_Validation operation . . . . . . . . . . . . 59Table 18 Command line options for activating the pre-activated plan . . . . . . . . . 60Table 19 Command line options for the IPA_Activation operations . . . . . . . . . . . 61Table 20 Command line options for the export and import operations . . . . . . . . . 63Table 21 Command line options for the plan delete operations . . . . . . . . . . . . . . 66Table 22 Command line options for the compare operations . . . . . . . . . . . . . . . . 67Table 23 Command line options for Send To Network operations . . . . . . . . . . . . 68Table 24 Command line options for running Policy-Based compare operation . . 68Table 25 Command line options for initializing Reference Configuration . . . . . . . 70Table 26 Command line options for generating delta . . . . . . . . . . . . . . . . . . . . . . 70Table 27 Command line options for exporting delta . . . . . . . . . . . . . . . . . . . . . . . 71Table 28 Command line options for merging plans to reference configuration . . . 71Table 29 Command line options for committing reference alignments . . . . . . . . . 72Table 30 Command line options for committing network alignments . . . . . . . . . . 72Table 31 Command line options for initializing CM History configuration . . . . . . . 72Table 32 Command line options for synchronizing CM History configuration with ac-
tual configuration or reference configuration . . . . . . . . . . . . . . . . . . . . . 73Table 33 Command line options for generating the CM History differences tabular
report. . . . . . . . . . . . . . . . . . . . . . . . . . . . . . . . . . . . . . . . . . . . . . . . . . . . 74Table 34 Command line options for removing irrelevant data from CM History
database . . . . . . . . . . . . . . . . . . . . . . . . . . . . . . . . . . . . . . . . . . . . . . . . 75Table 35 Workflow related command line operations for creating a plan based on
COCO . . . . . . . . . . . . . . . . . . . . . . . . . . . . . . . . . . . . . . . . . . . . . . . . . . 75Table 36 Workflow related command line operations for creating a new COCO? re-
configuration plan . . . . . . . . . . . . . . . . . . . . . . . . . . . . . . . . . . . . . . . . . . 76Table 37 Workflow related command line operations for creating a new transport re-
configuration plan . . . . . . . . . . . . . . . . . . . . . . . . . . . . . . . . . . . . . . . . . . 76Table 38 Workflow related command line operations for merging into selected mod-
ification plan the related _COCOdeletion plan . . . . . . . . . . . . . . . . . . . . 77Table 39 Workflow related command line operations for merging into selected mod-
ification plan with the suffix _CocoAxcFtmPlan . . . . . . . . . . . . . . . . . . . 77
DN03453584Issue 1-0
9
Administering NetAct Configurator
Id:0900d80580a02f7a
Table 40 Workflow related command line operations for provisioning in AXCs and FTMs the plan with the suffix _CocoAxcFtmPlan . . . . . . . . . . . . . . . . . 78
Table 41 Workflow related command line operations for provisioning the plan with the suffix _CocoDeletion in RNCs . . . . . . . . . . . . . . . . . . . . . . . . . . . . . 79
Table 42 Workflow related command line operations for provisioning selected plan in RNCs . . . . . . . . . . . . . . . . . . . . . . . . . . . . . . . . . . . . . . . . . . . . . . . . 79
Table 43 Command line options for consistency checking . . . . . . . . . . . . . . . . . 80Table 44 Command line options for 3GPP upload . . . . . . . . . . . . . . . . . . . . . . . . 83Table 45 Command line options for 3GPP download . . . . . . . . . . . . . . . . . . . . . 83Table 46 Command line options for restoring AXC configurations . . . . . . . . . . . 84Table 47 Command line options for Binary Download operation . . . . . . . . . . . . . 86Table 48 Command line options for Calibration operation . . . . . . . . . . . . . . . . . . 86Table 49 Command line options for pausing/releasing RNC RNW and iOMS opera-
tion queue . . . . . . . . . . . . . . . . . . . . . . . . . . . . . . . . . . . . . . . . . . . . . . . 88Table 50 Command line options for removing hanging operation from RNC RNW
and iOMS operation queue . . . . . . . . . . . . . . . . . . . . . . . . . . . . . . . . . . 89Table 51 Command line options for executing Command Manager operations . 90Table 52 Command line options for executing zero touch BTS configuration
operations . . . . . . . . . . . . . . . . . . . . . . . . . . . . . . . . . . . . . . . . . . . . . . . 92Table 53 Command line options for executing the BTS SEM Export operations . 93Table 54 Command line options for plan provisioning to multiple NEs . . . . . . . . 93Table 55 eNB Cell Trace Restart . . . . . . . . . . . . . . . . . . . . . . . . . . . . . . . . . . . . . 95Table 56 Parameters related to features under parameter-based license . . . . . . 99
10 DN03453584Issue 1-0
Administering NetAct Configurator
Id:0900d80580a02f79
About this document
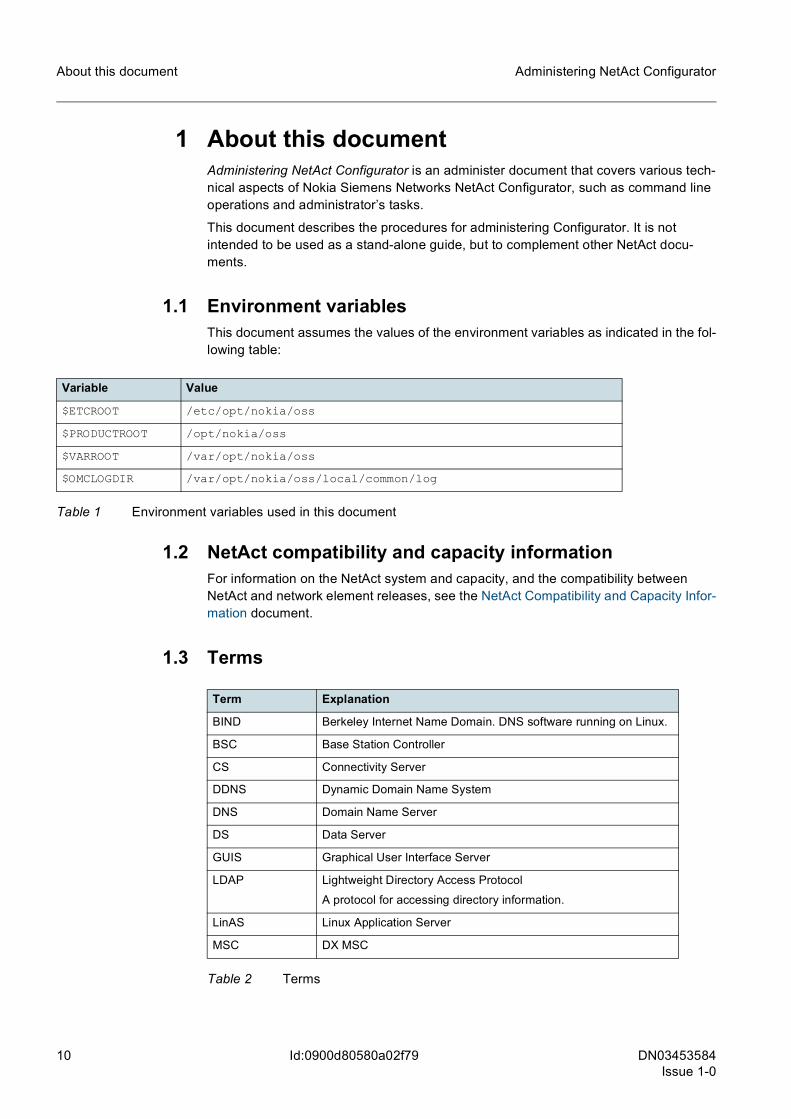
1 About this documentAdministering NetAct Configurator is an administer document that covers various tech-nical aspects of Nokia Siemens Networks NetAct Configurator, such as command line operations and administrator’s tasks.
This document describes the procedures for administering Configurator. It is not intended to be used as a stand-alone guide, but to complement other NetAct docu-ments.
1.1 Environment variablesThis document assumes the values of the environment variables as indicated in the fol-lowing table:
1.2 NetAct compatibility and capacity informationFor information on the NetAct system and capacity, and the compatibility between NetAct and network element releases, see the NetAct Compatibility and Capacity Infor-mation document.
1.3 Terms
Variable Value
$ETCROOT /etc/opt/nokia/oss
$PRODUCTROOT /opt/nokia/oss
$VARROOT /var/opt/nokia/oss
$OMCLOGDIR /var/opt/nokia/oss/local/common/log
Table 1 Environment variables used in this document
Term Explanation
BIND Berkeley Internet Name Domain. DNS software running on Linux.
BSC Base Station Controller
CS Connectivity Server
DDNS Dynamic Domain Name System
DNS Domain Name Server
DS Data Server
GUIS Graphical User Interface Server
LDAP Lightweight Directory Access Protocol
A protocol for accessing directory information.
LinAS Linux Application Server
MSC DX MSC
Table 2 Terms
DN03453584Issue 1-0
11
Administering NetAct Configurator About this document
Id:0900d80580a02f79
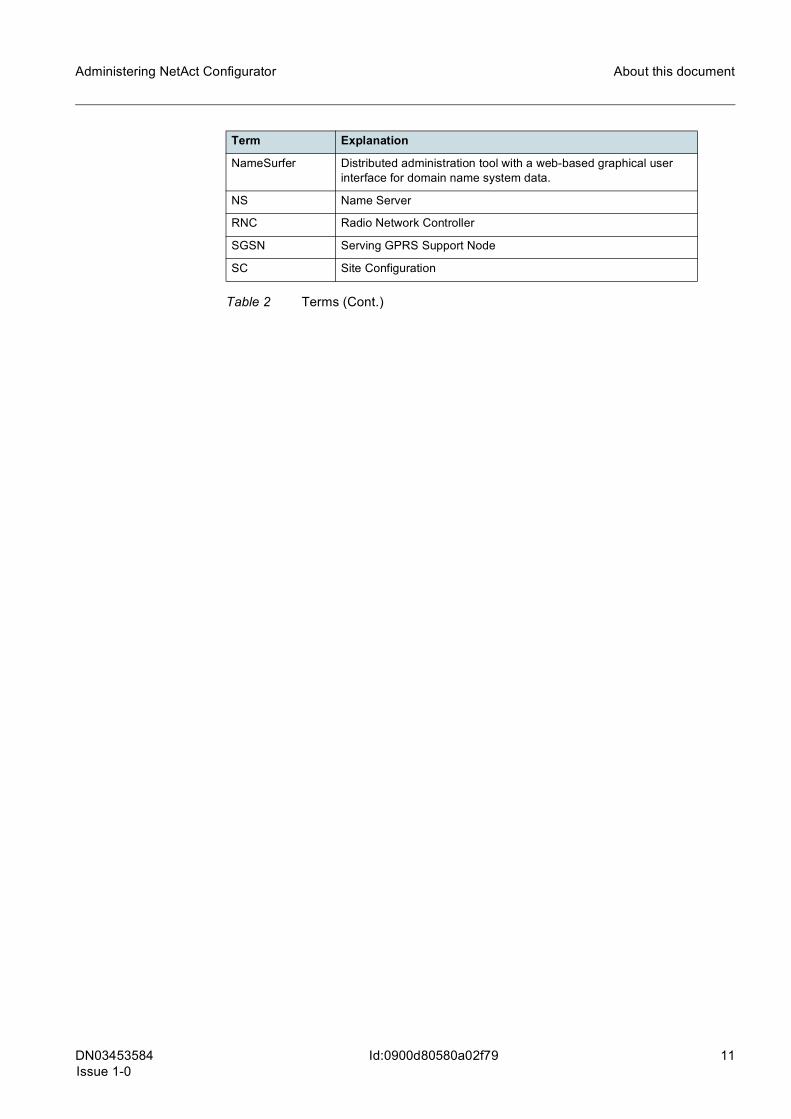
NameSurfer Distributed administration tool with a web-based graphical user interface for domain name system data.
NS Name Server
RNC Radio Network Controller
SGSN Serving GPRS Support Node
SC Site Configuration
Term Explanation
Table 2 Terms (Cont.)

12 DN03453584Issue 1-0
Administering NetAct Configurator
Id:0900d80580a02f79
Configuring BSC file-based upload, provisioning, and events
2 Configuring BSC file-based upload, provi-sioning, and eventsThis chapter gives instructions for configuring the BSC file-based upload and provision-ing feature with the FTAM file transfer service and configuring BSC XML file-based events.
2.1 Checking and configuring user accounts for FTAM Unix Access service typeThe following check is required before BSC file-based upload and provisioning can be used with the FTAM file transfer service.
Check the default FTAM Unix Access service type user in NetAct by using the following instructions:
To check the default FTAM Unix Access service type user in NetAct
1. Start the Service User Management application. For more information about this application, see Service User Management Help.
2. Select the service type as FTAM Unix Access.
3. Select the maintenance region which contains workstation objects (WS) for the NetAct cluster. The existing configured maintenance region service users for FTAM Unix Access service type are displayed in the bottom panel of the application window.
The user name has a maximum length of eight characters. If the existing configured FTAM Unix Access service type user has a name longer than eight characters, it must be replaced with a new user account with a shorter user name before NetAct Configu-rator BSC file-based upload and provisioning features with FTAM can be used.
To change the default FTAM Unix Access service type user in NetAct
1. Create a new user account user name (maximum length eight characters) and password (maximum length 15 characters) using the NetAct Account Manager application. See Creating users in Managing Users for instructions on creating new user accounts.
2. The new user account must be added to the sysop group using the NetAct Permis-sion Manager application. See Adding users to groups in NetAct Permission Manager Help for more information.
3. Create a new maintenance region service user for FTAM Unix Access service type using the Service User Management application. You must create this user in the maintenance region which includes the NetAct cluster workstation objects (WS) and you must have the same user name and password as the NetAct user account created in step 1. See Creating a maintenance region service user in Service User Management Help for more information.
4. Disconnect the NetAct user group sysop from the old existing maintenance region (MR) service user for FTAM Unix Access service type for the maintenance region containing NetAct cluster workstation objects (WS). See Disconnecting a user group from a maintenance region service user in Service User Management Help for more information.
DN03453584Issue 1-0
13
Administering NetAct Configurator Configuring BSC file-based upload, provisioning, andevents
Id:0900d80580a02f79
5. Connect the NetAct user group sysop to the new MR service user for FTAM Unix Access service type. See Connecting a user group to a maintenance region service user in Service User Management Help for more information.
2.2 Enabling Node Manager launch functionalityTo enable the NetAct Node Manager launch functionality, ensure that the following con-figuration changes have been done.
The sobriquet information needs to be present in the NetAct topology database. Updates need to be done with NetAct Doctor tool after BSCs have been uploaded to Configurator.
To update sobriquet information for all BSC objects currently present in the Configurator database, enter the following command as the omc user:
[omc]$ /opt/oss/bin/doctormx.sh -case --run CMSobriquets
Run this command when new TRE, DMR, DN2 or BSTE objects have been created for BSCs that are uploaded with file-based upload. The command can be configured to run automatically at scheduled times.
For more information about the NetAct Doctor cases, see Troubleshooting Configuration Management Problems document.
For NetAct Node Manager services, see Node Manager Administration Principles and Installing and Configuring Node Managers.
2.3 Configuring BSC file-based eventsBSC Q3 events are not anymore supported, therefore all BSCs have to be configured to send XML file-based events.
The enabling/disabling and configuration management of the XML file-based events handling in the BSC is possible by using Q3 Version Manager (q3versmx).
g Because Q3 events are not anymore supported, switching from XML based events to the Q3 based events is needed only in the following special cases:
• Resetting / modifying XML event parameters using q3versmx - this can be done only in the Q3 events mode. After modifying these parameters XML based events have to be switched on again.
• For troubleshooting purposes. For details, see section Solving problems with the XML-based events and core files generated by the zrnevhmx process.
It is strongly recommended to configure file-based events to use FTP when ever possi-ble. File-based events over FTAM may cause OSI stack overload and severely slow down all Q3 traffic between BSC and NetAct.
g Only the omc user is allowed to perform enabling/disabling and configuration manage-ment of the XML file-based events.
Q3 Version Manager command line structure and options are listed below:q3versmx [-allbscs] [-bscid <c-number>] [-bscintid <internal id>] -XMLevents | -Q3events [-dir <path>] [-compthr <value>] [-eventcoltime <value>] [-ip:port <ip_address>[:<port>]] -user <username> -pass <password>

14 DN03453584Issue 1-0
Administering NetAct Configurator
Id:0900d80580a02f79
Configuring BSC file-based upload, provisioning, and events
g XML event can be configured to use either FTP or FTAM. In case of FTP the ftpuse user should be used and in case of FTAM the trafadmi user should be used.
Example: To set XMLevents to FTP mode (when the value for ip:port is given it will be config-ured in FTP mode), enter the following command:
q3versmx –bscid 1234 –XMLevents –ip:port 10.125.97.51:21 –user ftpuse –pass useftp
The expected result is that BSC-1234 will send XML file-based events to the directory mentioned in the zrnconcmplamx.cf file using the FTP server with no compression.
Option Description
-allbscs Activate/deactivate XML file-based events to all BSCs.
-bscid C-number of BSC. Activate/deactivate XML file-based events to this BSC only.
-bscintid Internal ID of BSC. Activate/deactivate XML file-based events to this BSC only.
-XMLevents This option activates XML event file sending.
-Q3events This option deactivates the XML event file sending and activates Q3 event sending. This option is mutually exclusive with the -XMLevents option. BSC Q3 events are not anymore supported, therefore switching to the Q3 based events is needed only in the following special cases:
• Resetting / modifying XML event parameters using q3versmx - this can be done only in the Q3 events mode. After modifying these parameters XML based events have to be switched on again.
• For troubleshooting purposes. For details, see section Solving problems with the XML-based events and core files generated by the zrnevhmx process.
-dir The root path in NetAct where the folder for the events will be stored. By default the value is fetched from the configuration file at the location /opt/nokia/oss/conf/zrnconcmplamx.cf.
This option can be used only for testing purposes.
-compthr The size of the event (in Kbytes) above which the compression starts. If the size of the event is bigger, it will be compressed in the BSC.
Specific values:
• 0 - Always compression • 2147483647 - No compression
If this option is not used, the Q3 Version Manager will send as uncompressed to BSC.
-eventcoltime
Event Collection Time range is 5-120 seconds. It affects only the events ending time of File Based Plan Provisioning. Events are being sent immediately, if change is made with MML or Send to Network in CM Editor.
-ip:port The IP address and port of the FTP server to be used, from NetAct. IP address of rac package should be used. If this option is not used, the Q3 Version Manager will set the connection type to FTAM.
-user The access user name from NetAct.
-pass The access password from NetAct.
Table 3 Command line options for Q3 Version Manager usage

DN03453584Issue 1-0
15
Administering NetAct Configurator Configuring BSC file-based upload, provisioning, andevents
Id:0900d80580a02f79
Example: To set XMLevents to FTAM mode (when the value for ip:port is not given it will be configured in FTAM mode), enter the following command:
q3versmx –bscid 1234 –XMLevents –user trafadmi –pass allpassw
Example: To send the XMLevents for a collection time of 30sec, use the following command:
q3versmx -bscid 253972 -XMLevents -eventcoltime 30 -ip:port 10.9.222.18:21 -user ftpuse -pass Useftp12 -trace
2.3.1 Solving problems with the XML-based events and core files gener-ated by the zrnevhmx process
A lot of core dump files might be generated by the zrnevhmx process when the CM events flow via Q3-event pipe is in use instead of XML-event pipe for BSC S15 and S14 network elements.
Q3 event pipe is not supported for S15 and S14 BSC network elements, therefore switch on the XML-event pipe into use using the following procedure:
1. Switch on the XML-events back into use with the following command:
q3versmx –bscid <ID of BSC> -XMLevents –ip:port <ip address of rac package>:21 -user ftpuse -pass <password of ftpuse POSIX user>
2. In case core dump files are still generated, switch on the Q3-event pipe into use for a moment with the following command:
q3versmx -bscid <ID of BSC> -Q3events
and immediately after that switch on the XML-events back into use with the following command:
q3versmx –bscid <ID of BSC> -XMLevents –ip:port <ip address of rac package>:21 -user ftpuse -pass <password of ftpuse POSIX user>
16 DN03453584Issue 1-0
Administering NetAct Configurator
Id:0900d80580a02f79
Configuring HTTP file transfer for RNC and WBTS
3 Configuring HTTP file transfer for RNC and WBTS
3.1 Checking and configuring user accounts for HTTPS Unix Access service typeThe following check is required in NetAct Configurator before RNC RN4.0 and WBTS WN5.0 CM upload and provisioning can be used with the HTTP file transfer service. The HTTPS Unix Access service type is also needed for HTTP file transfer since both HTTP and HTTPS file transfer are using the same service type.
Check the default HTTPS Unix Access service type user in NetAct by using the following instructions:
To check the default HTTPS Unix Access service type user in NetAct
1. Start the Service User Management application. For more information about the application, see Service User Management Help.
2. Select the HTTPS Unix Access from the Service Type drop-down list on the right side of the application window.
3. From the Maintenance Region list, on the left side of the application window, select the maintenance region which contains workstation objects (WS) for the NetAct cluster.
Expected outcome:
The existing configured maintenance region service users for HTTPS Unix Access service type are displayed in the MR Service Users list at the bottom of the appli-cation window.
4. Click the Connect button in the toolbar.
Expected output:
The Connection Between a User Group and a Maintenance Region Service User dialog opens.
5. From the Maintenance Regions list in the Scope pane select the Maintenance Region which contains workstations and check that NetAct user group of the user used for CM upload and provisioning is connected to the service user for HTTPS Unix Access service type.
DN03453584Issue 1-0
17
Administering NetAct Configurator Configuring NetAct Configurator DNS management
Id:0900d80580a02f79
4 Configuring NetAct Configurator DNS man-agementThis chapter gives instructions for configuring the DDNS (Dynamic Domain Name System) proxy settings and DNS to facilitate communication between NetAct Configu-rator DNS management and the DNS. With Configurator DNS management, you can manage the IP address of the Routing Area in the DNS.
The DDNS proxy acts as the interface between the DNS and Configurator DNS man-agement. It uses the DDNS protocol for communication with the DNS. This protocol is an extension made to the DNS protocol to support dynamic names.
4.1 PrerequisitesTo ensure that NetAct Configurator DNS management works properly, the following pre-requisites must be met:
• The DNS has been configured correctly (that is, names have been resolved and zones have been found). For more information, see the document Managing the DNS in NetAct.
• The Primary Name Server has been configured and the necessary UNIX users have been created, with the rights to access the DDNS proxy. For more information on the required steps, see section Overview of the operation.
• Routing Area Object(s) for BSC exists in the database. You can check this, as well as create new Routing Area objects, using CM Editor. For more information, see Creating new managed objects in the network in CM Editor Help.
• The Packet Core integration has been done. • An IP address has been defined for the Routing Area Object for the BSC (the IP
address can also be empty, if not yet defined). The IP address is defined with CM Editor.
4.2 Overview of the operationThe following figure gives an overview of the steps for configuring NetAct Configurator DNS management. Click a process in the figure for more information.

18 DN03453584Issue 1-0
Administering NetAct Configurator
Id:0900d80580a02f79
Configuring NetAct Configurator DNS management
Figure 1 Overview of configuring the DDNS proxy for NetAct Configurator DNS management
4.3 Configuring the Primary Name ServerTo configure the Primary Name Server
1. Go to NetAct Start: <https://<linas-cluster-fqdn>/netact/>.
2. Log in as the omc user.
3. Start Network Editor either from Application Manager or from NetAct Start.
4. In Network Editor, search for the Name Server (NS) object for the Primary Name Server to see if it already exists in the PLMN/NS hierarchy.
If the NS object does not exist, create it as instructed in Step 5.
5. Create the NS object to the PLMN/NS hierarchy.
Use a Network Editor view where the Workstation (WS) object is present.
Assign the DDNS_ACCESS
service type to the user
Configure the Primary
Name Server
Grant the DDNS access to the user
Configure LDAP for Configurator
DNS management
Start
End
Create the DDNS
access service user
Configure the p3nprxmx
DDNS Proxy process

DN03453584Issue 1-0
19
Administering NetAct Configurator Configuring NetAct Configurator DNS management
Id:0900d80580a02f79
6. Get the IP address of the Primary Name Server from the /etc/resolv.conf file.
Use this IP address only when creating the NS object. Create the NS under the same maintenance region where the WS object is present.
7. Use the following values for the NE Type, IP and Hostname parameters:
g Make sure the Foreign Object check box is not selected.
8. Save the view and exit Network Editor.
4.4 Configuring the p3nprxmx DDNS Proxy process To configure the p3nprxmx DDNS Proxy process
1. Log in to the CS server as the omc user.
2. Copy p3nprxmxm.cf from /etc/opt/nokia/oss/dns/conf/ to /etc/opt/nokia/oss/custom/conf directory.
3. Open /etc/opt/nokia/oss/custom/conf/p3nprxmx.cf for editing.
4. Set the preferHiddenPrimary attribute according to the following table.
Example of the preferHiddenPrimary setup in the p3nprxmxm.cf file:
(processOptions "p3nprxmx.cf" ... # Define if Hidden Primary should be preferred (true/false) (p3nprxmx "" (preferHiddenPrimary "false") )
Field Value
NE Type DNS
IP The IP address of the Primary Server for the DNS.
Hostname If the Hostname is given instead of IP address, it should be one of the following servers:
• osscore package of this cluster if NameSurfer is the DNS primary
• the server’s own IP if BIND is the DNS primary • the IP address of your site’s DNS server • another cluster’s osscore package IP address or server
name.
Name The WS names must be unique under the same MR.
Table 4 Options for the Primary Name Server in Network Editor
Value Description
true Set if NameSurfer Hidden Primary DNS solution is in use in NetAct.
false Set if BIND primary DNS solution is in use in NetAct
Table 5 Value definitions for the preferHiddenPrimary attribute

20 DN03453584Issue 1-0
Administering NetAct Configurator
Id:0900d80580a02f79
Configuring NetAct Configurator DNS management
)
5. Save and close the file.
6. Check the PID for the p3nprxmx process and kill it with PID. Use the following com-mands:
root% ps -ef | grep p3nprxmx
root% kill -USR2 <PID of p3nprxmx>
g You need to wait until wpmana re-starts the process, since the p3nprxmx process is under wpmana supervision. You can use the ps -ef | grep p3nprxmx command again to check if the process is running.
7. Logout from the system.
4.5 Creating and configuring the DDNS accessThe DDNS access service user is a user who has access to write to the DDNS proxy. To check if this user already exists, look for the DDNS proxy user name from LDAP. See section Configuring LDAP for NetAct Configurator for more information. If the user does not exist, create it as instructed below.
To create the DDNS access
1. Start the NetAct Account Manager application to create the DDNS access service user and assign a password to it.
For instructions, see Creating users and Managing passwords in Managing Users.
g The default user name for the DDNS access service user is ddnsuser, but it can be changed. The password is not related to other NetAct passwords, so it can be set freely.
When creating users, reconciliation may be required to synchronize the account information between the NetAct Account Manager and the target repositories. For instructions, see Reconciling user account information in Managing Users.
2. Assign the created user to the dnsusr group.
• If this group already exists, follow the instructions in Modifying users’ primary group for POSIX account in Managing Users.
• If this group does not exist, create it by using NetAct Permission Manager and use dnsusr as the name of the group. See the instructions in Creating groups in NetAct Permission Manager Help.
3. Make sure that the dnsusr group, whether an existing or a newly created one, has the DDNS_ACCESS.Query permission.
g Network Administrator role has the DDNS_ACCESS.Query permission.
These can be checked in NetAct Permission Manager. For more information, see Managing permissions in Managing Users.
4. To enable the newly created user to access NetAct Configurator DNS management and other NetAct applications, grant the necessary rights with the User Group Profiles application. Add all the necessary views and profiles that are needed for the

DN03453584Issue 1-0
21
Administering NetAct Configurator Configuring NetAct Configurator DNS management
Id:0900d80580a02f79
Rehosting operation. For instructions, see Managing views/profiles in User Group Profiles Help.
To assign the DDNS_ACCESS service type to the userAfter the user has been created, the DDNS_ACCESS service type needs to be assigned to it. To do it, perform the following steps:
1. Log in as the omc user.
2. Enter the following command:
[omc]$ nuptummx -add DDNS_ACCESS -user <user> -password <password>
g The user name ddnsuser is the default user name, and it is also mentioned in the LDAP. If a different user name is given, remember to modify the value of the DDNS proxy user name in LDAP.
To grant the DDNS access to the userNext, configure the Name Server so that it is accessible for the user created in NetAct Account Manager (for example, ddnsuser).
The necessary zones must be modified in the /etc/named.conf file. From NetAct Configurator DNS management’s point of view, the zone string has the following format: mncxxxx.mccxxxx.gprs, where xxxx represents the hexadecimal values of MNC and MCC parameters of the Routing Area object. The length of the converted hexadec-imal value of MNC and MCC parameters should be 4.
t For example, if the MNC parameter value is 003 and the MCC parameter value is 106 for the RA object, the zone for which Configurator DNS management looks into the Name Server is mnc0003.mcc0106.gprs.
A key file is required to edit your zone files. It has to contain the same key as defined in the /etc/named.conf file. If you are modifying the key or creating it for the first time, generate the key file on the server. Also see section Controlling access to BIND DNS data and Controlling access to NameSurfer DNS data in the Managing the DNS in NetAct document for more information.
1. Log in to the Connectivity Server as the root user and enter the following command:
root% /opt/nokia/oss/bin/p3nkeymx.pl \-f <username> <password> <Primary_Name_Server_IP_address>
<user> the user name created in NetAct Account Manager; for example, ddnsuser
<password> the password assigned in NetAct Permission Manager for example, Omc0mc123
Table 6 Variable list
<username> the user name assigned in NetAct Account Manager, for example, ddnsuser
Table 7 Variable list

22 DN03453584Issue 1-0
Administering NetAct Configurator
Id:0900d80580a02f79
Configuring NetAct Configurator DNS management
As output, you are given the shared secret and the key file is generated. For example:
root% /opt/nokia/oss/bin/p3nkeymx.pl -f \ddnsuser Omc0mc123 10.8.65.4Shared secret in Base64 format (BIND and NameSurfer):ddnsuser 2bvUxmG1H1qt97Us6Xktuw==root%
2. Enter the shared secret as follows:
For BIND
a. The shared secret key must be entered to the server where the primary DNS is running. Enter the shared secret for BIND in the /etc/named.conf file under key definition. Also add the values for the Routing Area object under zone def-inition, as shown below:
key ddnsuser. {algorithm hmac-md5;secret "2bvUxmG1H1qt97Us6XKtuw==";};zone "mnc0003.mcc0106.gprs" {type master;file "db.mnc0003.mcc0106.gprs";allow-update { key ddnsuser. ;};};
g The allow-update { key ddnsuser. ;}; needs to be added in every zone of the/etc/named.conf file that is managed with Configurator tool.
b. Update the /etc/named.conf file in all secondary DNS servers as shown below:
zone "mnc0003.mcc0106.gprs" { type slave; file "db.mnc0003.mcc0106.gprs"; masters { 10.8.65.4 ; } ; };
c. Make sure that the file db.mnc0003.mcc0106.gprs exists in/var/named directory in the Primary Name Server. Also check that the file db.mnc0003.mcc0106.gprs has the entry of Primary Name Server (tehi.netact.noklab.net) as shown below:
<password> the password assigned in NetAct Permission Manager, for example, Omc0mc123
<Primary_Name_Server_IP_address>
the IP of your Primary Name Server for example, 10.8.65.4
Table 7 Variable list (Cont.)
$ORIGIN .
$TTL 3600 ; 1 hour
mnc0003.mcc0106.gprs IN SOA tehi.netact.noklab.net.
root.tehi.netact.noklab.net. (

DN03453584Issue 1-0
23
Administering NetAct Configurator Configuring NetAct Configurator DNS management
Id:0900d80580a02f79
d. Restart BIND name server with the following command:
# service named restart
For NameSurfer
a. Configure the primary NaSu Name Server with the following steps:
1. Open NameSurfer GUI in the primary Name Server.
2. Select Transaction keys from the left side menu.
3. Select the key you are about to modify, or select HMAC-MD5 from the left side menu when you are adding a new key.
4. Type the key name when adding new and modify the key information: copy the key string that was generated in step 1 of the procedure to Key secret part field.
5. Select Can be used for Dynamic DNS updates check box.
6. After modifications click OK and press Continue Submission in the appearing Security warning box.
Log in to the primary Name Server as the root user and insert the shared secret key to the bottom row of the file /opt/namesurfer/config/secrets behind the user name.
Syntax:
localhost d429ff3a8bc88d3345ef399a66b33c57
dchp.server 1ef399ab33c5766429ff3a8bc88d3345
<username> <hexadecimal_version_of_shared_secret>
For example:
localhost d429ff3a8bc88d3345ef399a66b33c57
dchp.server 1ef399ab33c5766429ff3a8bc88d3345
ddnsuser 2bvUxmG1H1qt97Us6XKtuw==
b. Configure the secondary Name Servers as slaves. The only difference is that a slave to NameSurfer also has a port specification (8054) in every masters state-ment as it is not using the default port 53. The following is an example of the content of the /etc/named.conf file:
2005092101 ; serial
28800 ; refresh (8 hours)
3600 ; minimum (1 hour)
1200 ; retry (20 minutes)
604800 ; expire (1 week)
3600 ; minimum (1 hour)
)
NS ohio.netact.noklab.net.
NS tehi.netact.noklab.net.
24 DN03453584Issue 1-0
Administering NetAct Configurator
Id:0900d80580a02f79
Configuring NetAct Configurator DNS management
options { directory "/var/named"; //running directory for named } ; zone "mnc0003.mcc0106.grs" { type slave; file " db.mnc0003.mcc0106.gprs"; masters port 8054 {10.8.65.4;}; };
c. Restart NameSurfer with the following command:
root# hamgrmx.pl start package dns
4.6 Configuring LDAP for NetAct Configurator DNS manage-mentPrerequisitesIt is important to ensure that the DNS has been configured and is working correctly, for example names have been resolved, zones have been found by the application and Packet Core integration has already been done.
UsersThe DDNSProxyUserName is inserted into the LDAP ossRacDNSManagerDDNSProxyUserName field.
Example: ossRacDNSManagerDDNSProxyUserName = ddnsuser
ossRacDNSManagerDDNSProxyUserName = NokiaOSS.local.services.subsystems.dnsirp.GenericServiceHome.
g The user group must have DDNS_ACCESS.Query operations defined for its role.
For more information on how to modify Configurator LDAP parameters, see section Configuring LDAP for NetAct Configurator.
4.7 Configuring DNS management for the rehosting operationThis section describes configuring DNS management for the rehosting operation.
4.7.1 Overview of the operationThe following figure gives an overview of the steps for configuring DNS management for the rehosting operation. Click a process in the figure for more information.

DN03453584Issue 1-0
25
Administering NetAct Configurator Configuring NetAct Configurator DNS management
Id:0900d80580a02f79
Figure 2 Overview of the operation
4.7.2 Creating shared secret keyA key file is required to edit your zone files. It has to contain the same key as defined in the /etc/named.conf file. If you are modifying the key or creating it for the first time, generate the key file on the server.
To create shared secret key
1. Log in to the Connectivity Server as the root user.
2. Execute the following command:
# /opt/nokia/oss/bin/p3nkaymx.pl \-f <username> <password> <Primary_Name_Server_IP_address>
BIND/NameSurfer ?
Start
End
Create shared secret key
Add ran zone to LDAP
Allow TSIG key signed
Dynamic DNS update
Restart BIND process
Run rehost operation
Clean up DNS setups
Allow TSIG key signed
Dynamic DNS update
Restart NameSurfer
Run rehost operation
BIND NameSurfer

26 DN03453584Issue 1-0
Administering NetAct Configurator
Id:0900d80580a02f79
Configuring NetAct Configurator DNS management
As an output, you are given the shared secret and the key file is generated. For example:
root% /opt/nokia/oss/bin/p3nkeymx.pl -f \ddnsuser OmcOmc123 10.8.65.4Shared secret in Base64 format (BIND and NameSurfer):ddnsuser 2bvUxmG1H1qt97Us6Xktuw==root%
4.7.3 Adding RAN zone name to LDAP
To add zone name to LDAP
1. Insert the zone name into the LDAP ossRacDefaultRANDomainSuffix field.
For example:
ossRacDefaultRANDomainSuffix = ran.netact.noklab.net
4.7.4 Configuring BINDTo configure BIND
1. Allow TSIG key signed Dynamic DNS updateThe shared secret key must be entered to the server where the primary DNS is running. Enter the shared secret for BIND to the /etc/named.conf file under key statement. Also add allow-update {<keyname>;} rows for the <ran domain suffix> under zone definition, as shown below:
key ddnsuser. { algorithm hmac-md5; secret " 2bvUxmG1H1qt97Us6XKtuw==";} ;
zone "ran.netact.noklab.net" { type master; file "db.ran.netact.noklab.net"; allow-update { key ddnsuser. ; } ;} ;
g If RAN zone is added to master DNS server, then update the /etc/named.conf file in all slave DNS servers as shown below:
Variable Description
<username> The user name assigned in NetAct Account Manager, for example, ddnsuser.
<password> The password assigned in NetAct Permission Manager, for example, OmcOmc 123.
<Primary_Name_Server_IP_address>
The IP of your Primary Name Server, for example, 10.8.65.4.
Table 8 Variable list

DN03453584Issue 1-0
27
Administering NetAct Configurator Configuring NetAct Configurator DNS management
Id:0900d80580a02f79
zone "ran.netact.noklab.net" {type slave;file "db.ran.netact.noklab.net";masters { 10.8.65.4; };} ;
2. Restart BINDTo restart BIND Name Server execute the following command:
omc% service named restart
3. Run rehost operationDNS update can be run successfully only if the allow-update row is modified. If the IP is changed, each WBTS IP address needs to be changed manually with Network Editor.
4. Clean up the DNS setupsTo clean up the DNS setups:
1. Clear all created DNS setups by removing all allow-update { <key name> ; } rows.Example of the zone statement:
zone "<RAN zone #1>" { ... allow-update { <key name> ; } ; ...} ;
2. Restart BIND Name Server process by executing the following command:root% rndc reload
4.7.5 Configuring NameSurferTo configure NameSurfer
1. Allow TSIG key signed Dynamic DNS update
1. Configure the Primary NaSu Name Server with the following steps:a) Open NameSurfer GUI in the Primary Name Server.b) Select Transaction keys from the left side menu.c) Select the key you are about to modify, or select HMAC-MD5 from the left
side menu when you are adding a new key.d) Type the key name when adding a new key and modify the key information.
Copy the key string generated in section Creating shared secret key to the Key secret part field.
e) Select Can be used for Dynamic DNS updates check box.f) Click OK after modifications and press Continue Submission in the
appearing Security warning box.g) Log in to the Primary Name Server as the root user and insert the shared
secret key to the bottom row of the /opt/namesurfer/config/secrets file behind the user name.Syntax:

28 DN03453584Issue 1-0
Administering NetAct Configurator
Id:0900d80580a02f79
Configuring NetAct Configurator DNS management
localhost d429ff3a8bc88d3345ef399a66b33c57dchp.server 1ef399ab33c5766429ff3a8bc88d3345<username><hexadecimal_version_of_shared_secret>
For example:localhost d429ff3a8bc88d3345ef399a66b33c57dchp.server 1ef399ab33c5766429ff3a8bc88d3345ddnsuser 2bvUxmG1H1qt97Us6XKtuw==
2. Configure the Secondary Name Servers as slaves.The only difference is that a slave to NameSurfer also has a port specification (8054) in every masters statement as it is not using the default port.The following is an example of the content of the/etc/named.conf file:options { directory "/var/named"; //running directory for named } ; zone "mnc0003.mcc0106.grs" { type slave; file " db.mnc0003.mcc0106.gprs";masters port 8054 {10.8.65.4;}; };
2. Restart NameSurferTo restart NameSurfer, execute the following command:
root# hamgrmx.pl start package dns
3. Run rehost operationIf the IP is changed, each WBTS IP address needs to be changed manually with Network Editor.
DN03453584Issue 1-0
29
Administering NetAct Configurator Configuring LDAP for NetAct Configurator
Id:0900d80580a02f79
5 Configuring LDAP for NetAct ConfiguratorNetAct uses LDAP (Lightweight Directory Access Protocol) for centralizing configuration data. The directory resides mainly in the Linux servers but there are also LDAP subsys-tems on the LinAS and GUIS servers. For general information about the LDAP directory, see LDAP directory management in System Administration Principles. The {basedn} is the default path included in the Jxplorer.
Initial LDAP configurations for NetAct Configurator are made during commissioning.
The locations for the Configurator parameters in the LDAP directory are:
• {basedn} → netact → regions → region-{id} → config → scconfig → rac for the racapplications object
• {basedn} → scconfig → rac for the racadaptations object.
The LDAP directory and Configurator-specific parameters can be modified using the JXplorer tool. For more information on the JXplorer tool see System platform user inter-face applications in System Platform Technical Reference Guide. For detailed informa-tion on Configurator LDAP parameters, see NetAct Configurator LDAP parameters in NetAct Configurator Technical Reference Guide.
g The LDAP user account is needed to access Configurator information in LDAP. For more information, see Default NetAct user accounts in System Administration Princi-ples.

30 DN03453584Issue 1-0
Administering NetAct Configurator
Id:0900d80580a02f79
Configuring NE3S/WS Agent Port, URL path, Opera-tion timeout and Response timeout
6 Configuring NE3S/WS Agent Port, URL path, Operation timeout and Response timeoutThe default configuration file for NE3S/WS SOAP endpoints and timeouts for CM NE3S Mediation (CMMNE3S) is present in
$ETCROOT/rac/conf/cmmne3s/ne3s_soap_endpoints.xml.
This file can be used for configuring NE3S/WS agent endpoints and timeouts for each adaptation supported by CMMNE3S.
If NE3S/WS agent default endpoints (port or URLpath) and timeouts(Operation timeout and response timeout) is changed, copy ne3s_soap_endpoints.xml file to $ETCROOT/custom/conf/rac/cmmne3s folder and configure the correct endpoints (port or URL path) and timeouts (Operation timeout and response timeout).
To configure NE3S/WS Agent Port, URL path, Operation timeout andResponse timeout
1. Log in to a Connectivity Server as the omc user.2. Check if ne3s_soap_endpoints.xml and ne3s_soap_endpoints.dtd fileex-
ists in the location:$ETCROOT/custom/conf/racIf the file does not exist, follow the instructions:1 Go to the location $ETCROOT/rac/conf by typing the command:
[omc]$ cd $ETCROOT/rac/conf
2 Copy a ne3s_soap_endpoints.xml and ne3s_soap_endpoints.dtd file to the following location:$ETCROOT/custom/conf/rac
3. Update the endpoints (port or URL path) and timeouts (Operation timeout and response timeout) in ne3s_soap_endpoints.xml file for corresponding adapta-tion. The exemplary entry is as follows:<adaptation id="NOKOMGW" port="9050" path="/NE3S/1.0" operationTimeout="60" responseTimeout="60"/>
4. After copying the file, restart RAC_cmmne3s service from the Websphere console.In Websphere Administration Console • select Applications -> Enterprise Applications • Select RAC_cmmne3s and press the ‘Stop’ button. • Once the service has stopped successfully, select RAC_cmmne3s and press the
‘Start’ button.
g Operation timeout and Response timeout must be given in seconds. Timeouts should not be zero or negative.
DN03453584Issue 1-0
31
Administering NetAct Configurator Customizing NetAct Configurator applications
Id:0900d80580a02f79
7 Customizing NetAct Configurator applica-tionsYou can customize the settings of NetAct Configurator applications by editing configu-ration files.
7.1 Enabling tracing for Connectivity Server servicesThis section contains information on the tracing procedure for Connectivity Server ser-vices.
7.1.1 CM Bulk Data (blkdatmx)
To enable blkdatmx trace:
1. Check if blkdatmx.properties exists in $ETCROOT/rac/conf/
If not, create new: blkdatmx.properties file using ASCII text editor.
2. Edit blkdatmx.properties
Add the following line: trace = true
g Check that there are no extra spaces at the end of the line.
3. Find the process id of NetAct Configurator CM Bulk Data (on the server where the Configurator package is running):
[omc]$ ps -ef | grep blkdatmx
123 ? 0:13 java1...
4. Kill the process:
[omc]$ kill -TERM <pid>.
The <pid> is the process ID number shown as 123 in the example in point 3.
5. Restart the process:
omc& kill -HUP <pid of wpmanamx of RAC package>
An example of pid can be found with the following command:
ll $VARROOT/local/common/ref/*wpmana* | grep rac
-rw-rw-r-- 1 omc sysop 5576 Sep 18 16:11 it15.rac.wpmanamx.21671
g Trace information is written to $OMCLOGDIR/info#blkdatmx#*.log
7.1.2 GSM Upload Mediator (uplnwmmx)
To enable uplnwmmx trace using the 2G Legacy Upload Mediator process:
1. Check if uplnnwmmx.cf already exists in $ETCROOT/rac/conf/
2. Edit uplnwmmx.cf and change the trace options to the following:
(TRACE "True"

32 DN03453584Issue 1-0
Administering NetAct Configurator
Id:0900d80580a02f79
Customizing NetAct Configurator applications
(LEVEL "detailed")
(REMOVE_TRACE_FILE_"True")
)
g The trace file is /var/opt/nokia/oss/tmp/trace/uplnwmmx.trc on the server where the NetAct Configurator package is running.
7.1.3 NetAct Configurator CM BSC Mediation (cmmbscmx)
To enable cmmbscmx trace:
1. Check if cmmbscmx.properties already exists in $ETCROOT/rac/conf
2. Edit cmmbscmx.properties and add the following line:
trace = true
g Check that there are no extra spaces at the end of the line.
3. Find the pid of NetAct Configurator CM BSC Mediation on the server where the Con-figurator package is running:
[omc]$ ps -ef | grep cmmbscmx
123 ? 0:19 java...
4. Kill the process:
[omc]$ kill -TERM <pid>.
The <pid> is the process ID number shown as 123 in the example in point 3.
5. Restart the process:
omc& kill -HUP <pid of wpmanamx of RAC package>
An example of pid can be found with the following command:
ll $VARROOT/local/common/ref/*wpmana*
-rw-rw-r-- 1 omc sysop 5576 Sep 18 16:11 it15rac.wpmanamx.21671
Trace information is written to $OMCLOGDIR/info#cmmbscmx#*.log
7.2 Customizing the settings of CM Bulk Data subsystemThe CM Bulk Data subsystem automatically cleans all log files of Downloading RNW Parameters (mtnmanmx, used from the command line only), if they are more than seven days old. You can change the timing of the cleanup by editing a configuration file. For example, if there are lots of GSM operations, you can shorten the cleanup period to decrease the number of mtnman logs in the $OMCLOGDIR directory. For correcting GSM operations over a longer period of time, it may be necessary to keep the log files for more than just one week.
To modify the default timing for the log cleanup
1. Log in to a Connectivity Server as the omc user.
2. Move to the correct directory:

DN03453584Issue 1-0
33
Administering NetAct Configurator Customizing NetAct Configurator applications
Id:0900d80580a02f79
[omc]$ cd $ETCROOT/rac/conf
3. Edit the blkdatmx.properties file.
4. Modify the default timing by changing the mtnman_log_del_time property.
5. Save the file.
6. Find the process ID of NetAct Configurator CM Bulk Data (on the server where the Configurator package is running):
[omc]$ ps -ef | grep cmbulk<pid> ? 0:13 java...
7. Kill the process:
[omc]$ kill -TERM <pid>
8. Restart the process:
omc& kill -HUP <pid of wpmana of RAC package>
An example of pid can be found with the following command:
ll $VARROOT/local/common/ref/*wpmana*
-rw-rwsr-- 1 omc sysop 5658 Sep 21 19:38 /var/opt/nokia/oss/ref/rc71rac.wpmanamx.22395
g Trace information is written to $OMCLOGDIR/info#blkdatmx#*.log
For more information on the blkdatmx.properties file, see system.properties (NetAct Configurator CM Bulk Data) in NetAct Configurator Technical Reference Guide.
7.3 Customizing the settings of CM AnalyzerEnabling email notifications for CM AnalyzerCM Analyzer sends email notifications about the completed consistency checks and includes the check results in these messages. To enable the notifications, information about the IP address of email server needs to be in the LDAP in the {basedn} > netact > regions > region-{id} > config > cluster > ossSmtpFQDN attribute. This is done during NetAct installation.
For instructions on how to activate email notifications on CM Analyzer’s user interface, see Notifying about the check results in CM Analyzer Help.
Validating and importing rulesFor more information on validating rules and importing them by copying, see Rule creation in Rules and Rule Syntax for NetAct Configurator.
7.4 Enabling parameter level audit loggingThis chapter describes enabling parameter level audit logging for BSC (S15), Ultra Site (AXC), Flexi Site (FTM), MGW and MSS.

34 DN03453584Issue 1-0
Administering NetAct Configurator
Id:0900d80580a02f79
Customizing NetAct Configurator applications
g To enable parameter level audit logging for both provisioning and automatic upload, the step Restart Mercury server does not need to be performed twice. One restart after finishing all actions is enough.
7.4.1 Enabling provisioning audit loggingTo enable plan file archiving:
1. In the WebSphere Administration Console select Servers → Application Servers → Process Definition → Java Virtual Machine → Custom Properties and add the following settings to the path:com.nokia.oss.configurator.rac.mediation.mld.files.automatic_cleanup = false
2. Repeat the step above for all LinAs nodes.3. Restart Mercury server.
7.4.2 Enabling automatic upload audit loggingTo enable parameter level audit logging for automatic upload:
1. Log in to a Connectivity Server as the omc user.2. Check if a configurator.properties file exists in the location:
$ETCROOT/custom/conf/rac
g If the file does not exist, follow the instructions:1. Go to the location $ETCROOT/rac/conf by typing the command:
[omc]$ cd $ETCROOT/rac/conf
2. Copy a configurator.properties file to the following location: $ETCROOT/custom/conf/rac
3. Add the following line to the configurator.properties file:AuditTrailAutomaticUpload = true
7.5 Hiding Administrator operations from CM Operations Manager Operation History viewTo hide Administrator operations from CM Operations Manager Operation History view:
1. Log in to a Connectivity Server as the omc user.2. Check if a configurator.properties file exists in the location:
$ETCROOT/custom/conf/rac
g If the file does not exist, follow the instructions:1. Go to the location $ETCROOT/rac/conf by typing the command:
[omc]$ cd $ETCROOT/rac/conf
2. Copy a configurator.properties file to the following location: $ETCROOT/custom/conf/rac
3. Add the following line to the configurator.properties file:hideAdminOperations=true

DN03453584Issue 1-0
35
Administering NetAct Configurator Customizing NetAct Configurator applications
Id:0900d80580a02f79
7.6 Customizing the settings of a folder objectFolder object is used in CM Editor and CM Operation Manager User Interface for object collection within the same object class. Size of the folder object is defined in LDAP. The parameter for the RAC application object is located in:
{basedn} netact → regions → region -{id} → config → scconfig → rac
The name of the parameter is ossRacFolderObjectLimits.
To check the current folder settings by Jxplorer or the command line tool:
1. Login to the Connectivity Server as the omc user.2. Execute the following command:
ldapacmx.pl -directQuery "(cn=racapplications)" | grep RacFolderThe default outcome is the following:ossRacFolderObjectLimits=default=30;nokaxc:axc=20;nokbsc:adce,nokbsc:adjw,nokrnc:adjg,nokrnc:adji,nokrnc:adjs,nokrnc:adjd=5;nokrnc:hops,nokrnc:hopi,nokrnc:hopg,nokrnc:fmcs,nokrnc:fmci=1For objects which are not included in the ssRacFolderObjectLimits parameter the default value is 30. Folder limits can be both modified and added. New folder limits need to be separated by a ; sign.To disable the folder object for some object, set the folder object's value to -1 as in the following example:nokbsc:bsc=-1
7.7 Enabling Inter-RAT UTRAN and Inter-RAT GERAN features auto management in Plan PrepareYou can enable / disable the automatic management of Inter-RAT UTRAN and GERAN relations which is performed by the Plan Prepare functionality of NetAct Configurator. If the automatic Inter-RAT UTRAN/GERAN management is enabled, the Plan Prepare functionality helps to complete the LTE Inter-RAT adjacency plan and to keep the adja-cency relations consistent.
For more information about LTE Inter-RAT UTRAN/GERAN adjacencies, see Inter-RAT LTE -> WCDMA adjacencies and Inter-RAT LTE -> GSM adjacencies in Managing Adja-cencies document.
To enable Inter-RAT UTRAN and Inter-RAT GERAN features auto management in Plan Prepare:
1. Log in to the Connectivity Server as the omc user.2. Check if the configurator.properties file exists in the
$ETCROOT/custom/conf/rac location.
g If the file does not exist, follow the below instruction:1. Go to the location $ETCROOT/rac/conf2. Copy a configurator.properties file to the following location:
$ETCROOT/custom/conf/rac

36 DN03453584Issue 1-0
Administering NetAct Configurator
Id:0900d80580a02f79
Customizing NetAct Configurator applications
3. Edit the configurator.properties file in the $ETCROOT/custom/conf/rac location and change the value of the anrInterRatUtranEnabled or/and anrInterRatGeranEnabled attributes to true like below:
• anrInterRatUtranEnabled=trueand/or • anrInterRatGeranEnabled=true
anrInterRatUtranEnabled entry is used to enable / disable the Inter-RAT UTRAN feature, and anrInterRatGeranEnabled is used to enable / disable the Inter-RAT GERAN feature.
To disable Inter-RAT UTRAN and Inter-RAT GERAN features auto management in Plan Prepare, set the values of above attributes to false.
7.8 Handling critical parameters in NetAct ConfiguratorNetAct Configurator can be configured so that the critical parameters can be provisioned to the network only by the users having the dedicated user permission: RAC.Cell_Power_Limitation. This permission is attached to the default role: Network Planning Engineer. When this feature is turned on, the parameters defined as critical can be planned by all NetAct Configurator users, but a special permission is needed for provisioning the plan containing these parameters changes. The same applies to the modification of the critical parameters using the Send to Network function. The critical parameters are, for example, output power parameters. NetAct Configurator provides the default list of the critical parameters that require a special permission for provisioning, but this list can be modified according to your needs by adding and / or removing desired parameters to / from the list. The list of critical parameters is defined as the LimitedEdit custom annotation. The feature of checking the required permission when provisioning the critical parame-ters to the network can be enabled / disabled by the Administrator.
To enable / disable the checking of a required permission when provisioning the critical parameters to the network
1. Log in to the Connectivity Server as the omc user.2. Check if the configurator.properties file exists in the
$ETCROOT/custom/conf/rac location.
g If the file does not exist, follow the below instruction:1. Go to the $ETCROOT/rac/conf location.2. Copy the configurator.properties file to the following location:
$ETCROOT/custom/conf/rac
3. Edit the configurator.properties file in the $ETCROOT/custom/conf/rac location and change the value of the cellPowerLimitation entry according to your needs (true or false). Set it to true to enable this feature or to false to disable it.
g The default value of the feature property is set to false (feature is turned off), meaning that the Configurator doesn't distinguish between casual parameters and critical parameters when provisioning a plan.
To customize the default list of the critical parameters

DN03453584Issue 1-0
37
Administering NetAct Configurator Customizing NetAct Configurator applications
Id:0900d80580a02f79
1. Log in to the Connectivity Server as the omc user.2. Copy the default critical parameters list file,
abstractattributes_limited_edit.xml from the $ETCROOT/rac/conf/abstraction/customannotations/ directory to the $ETCROOT/custom/conf/rac/abstraction/customannotations/ direc-tory and edit the already mentioned xml file adding the following line to the file:<anno:parameter qClassAbbreviation="<adaptation>:<MOC>:" name="<parameter>"/>
If such a file does not exist, create your own xml file in the $ETCROOT/custom/conf/rac/abstraction/customannotations/ direc-tory according to the below example:<?xml version="1.0" encoding="UTF-8"?><anno:customAnnotations xmlns:anno="http://www.nsn.com/schemas/private/cm/customannotations" xmlns:xsi="http://www.w3.org/2001/XMLSchema-instance" xsi:schemaLocation="http://www.nsn.com/schemas/private/cm/customannotations customannotations.xsd" version="1.0"> <anno:annotation name="LimitedEdit"> <anno:parameter qClassAbbreviation="NOKRNC:FMCI" name="InterFreqMaxMeasPeriod"/> </anno:annotation></anno:customAnnotations>
3. Copy the schema file, customannotations.xsd from the$ETCROOT/rac/conf/abstraction/customannotations/ directory to the$ETCROOT/custom/conf/rac/abstraction/customannotations/ direc-tory.
4. Restart Mercury server.
7.9 Defining the maximum number of managed objects in one validation file for LTEYou can define the number of the MRBTSs that are included in one validation file. If the number of the MRBTSs in a validated plan is greater than configured value, then multiple validation files are created and validated separately.
To define the maximum number of manage objects in one validation file
1. Log in to the Connectivity Server as the omc user.2. Check if the configurator.properties file exists in the
$ETCROOT/custom/conf/rac location.
g If the file does not exist, follow the below instruction:1. Go to the $ETCROOT/rac/conf location.2. Copy the configurator.properties file to the following location:
$ETCROOT/custom/conf/rac
3. Edit the configurator.properties file in the $ETCROOT/custom/conf/rac location and change the value of the validationFileMOLimit entry according to your needs.
g The default value is 1000.

38 DN03453584Issue 1-0
Administering NetAct Configurator
Id:0900d80580a02f79
Customizing NetAct Configurator applications
7.10 Defining the number of waiting operations per BSC, RNC and LTE OMSYou can define the maximum number of waiting operations per BSC, RNC and LTE OMS. For LTE OMS, upload operations for MRBTSs and OMSs and provisioning oper-ations for plans containing MRBTSs and/or PREBTSs from CM Operations Manager or command line, the Activate (combined Pre-activate and Activate), Pre-Activate and Upload operations are automatically queued when OMS is no longer accepting new CM operations.
g The Activate Pre-activated Plan -operations are not queued.
To define the maximum number of waiting operations per BSC, RNC and LTE OMS:
1. Log in to the Connectivity Server as the omc user.2. Check if the configurator.properties file exists in the
$ETCROOT/custom/conf/rac location.If the file does not exist, follow the below instruction:2.1 Go to the $ETCROOT/rac/conf location.2.2 Copy the configurator.properties file to the following location:
$ETCROOT/custom/conf/rac
3. Edit the configurator.properties file in the $ETCROOT/custom/conf/rac location and change the value of the ssRacBSCMaxNumberOfWaitingOperations (BSC), ossRacRNCMaxNumberOfWaitingOperations (RNC) and/or ossRacLTEMaxNumberOfWaitingOperations (MRBTS and LTE OMS) entry according to your needs.The default value is 20 for LTE OMS, and 5 for BSC and RNC.
7.11 Enabling skipping BTS, Flexi Direct and/or LTE validation before pre-activationThere is a possibility to skip the BTS, Flexi Direct and/or LTE data validation with unse-lecting Validate plan before pre-activation and BTS file generation (BTS and LTE tab) and Validate BTS plan before pre-activation (Flexi Direct tab) check box in the Provision dialog only if allowSkippingOfBTSDataValidation=true (for BTS and Flexi Direct) and/or allowSkippingOfLTEDataValidation=true (for LTE) proper-ties have been set in $ETCROOT/custom/conf/rac/configurator.properties file. When these properties are not set in configurator.properties file, BTS, Flexi Direct and LTE data validation is always selected and dimmed, so that it cannot be unse-lected and BTS, Flexi Direct and LTE data is always validated before pre-activation.
To enable the Validate plan before pre-activation and BTS file generation (BTS and LTE tab) and/or Validate BTS plan before pre-activation (Flexi Direct tab) check box in the Provision dialog in CM Operations Manager:
1. Log in to the Connectivity Server as the omc user.Check if the configurator.properties file exists in the $ETCROOT/custom/conf/rac location.If the file does not exist, follow the below instruction:1.1 Go to the $ETCROOT/rac/conf location.

DN03453584Issue 1-0
39
Administering NetAct Configurator Customizing NetAct Configurator applications
Id:0900d80580a02f79
1.2 Copy the configurator.properties file to the following location: $ETCROOT/custom/conf/rac.
2. Copy the configurator.properties file to the following location: $ETCROOT/custom/conf/rac.
3. Edit the configurator.properties file in the $ETCROOT/custom/conf/rac location and change the value of the allowSkippingOfBTSDataValidation=true (for BTS and Flexi Direct) and/or allowSkippingOfLTEDataValidation=true (for LTE) attribute (add the attri-bute if missing from the file) according to your needs (true or false). Set the value to true to enable Validate plan before pre-activation and BTS file generation (BTS and LTE tab) and/or Validate BTS plan before pre-activation (Flexi Direct tab) check box in the Provision dialog or to false to disable it.
7.12 Enabling validation files savingWhen a plan (for GSM, WCDMA, Flexi Direct or LTE BTS) has been validated, validation files are by default deleted after the operation has been finished. For troubleshooting purposes you can force the validation files to be stored in the file system by selecting the Save validation files option in the Provision dialog in CM Operations Manager. By default the Save validation files check box is disabled in the user interface, neverthe-less you can enable the check box by defining a new attribute in the configurator.properties file.
To enable the Save validation files check box in the Provision dialog in CM Oper-ations Manager
1. Log in to the Connectivity Server as the omc user.2. Check if the configurator.properties file exists in the
$ETCROOT/custom/conf/rac location.
g If the file does not exist, follow the below instruction:1. Go to the $ETCROOT/rac/conf location.2. Copy the configurator.properties file to the following location:
$ETCROOT/custom/conf/rac
3. Edit the configurator.properties file in the $ETCROOT/custom/conf/rac location and change the value of the allowSavingOfValidationFiles attribute (add the attribute if missing from the file) according to your needs (true or false). Set the value to true to enable saving the validation files option selected from the provisioning view or to false to disable it.
g This feature supports all operations where BTS plan is validated: Activate, Pre-Acti-vate, Validate, and Generate BTS configuration file. Notice that validation files remain in the file system until you delete them, therefore before enabling this feature make sure that there is enough free disk space available in the global disc since the validation files can be very large. Remove the validation files which are no longer needed for troubleshooting purposes in order to free disc capacity.

40 DN03453584Issue 1-0
Administering NetAct Configurator
Id:0900d80580a02f79
Managing the software version and options support
8 Managing the software version and options supportThe required procedures depend on whether you are bringing a completely new network element (BSC, MSC, MGW or SGSN) into use or updating the information in an old one. New network elements are created with Network Editor. For instructions, refer to Network Editor Help.
8.1 Setting the RNC version and optionsFor information on managing software versionand options support, see Adding the RNC to a network view in Integrating RNC to NetAct.
8.2 Setting the MSC optionsThe MSC options can be set using CM Editor.
To open CM Editor
1. Open the NetAct Start for the server.
2. Click on Configuration in the browser to the left.
3. Click on the CM Editor icon on the page.
To modify MSC options
1. Click on the MSC icon in the browser to the left. The MSC actual parameters are loaded.
2. Select the Modify Actual Value(s) check box in the parameter definition area.
3. Click on the Actual Value column for MSC Options parameter. A drop-down menu appears.
4. Click on Add. This adds a new row for MSC options.
5. Click on the newly added row to select the MSC option to be set.
6. To set another MSC option, repeat steps 3 to 5.
7. When you have finished modifying MSC options, right click on the MSC icon in the browser to the left and select Send to Network. This saves the MSC options to the NetAct database.
g This procedure only updates the values in the NetAct Configurator database, but does not make the changes in the network elements. Use MML commands to change the settings in the MSCs in the network.
8.3 Setting the MGW optionsThe MGW options can be set using CM Editor.
To open CM Editor
1. Open the NetAct Start for the server.
2. Click on Configuration in the browser to the left.

DN03453584Issue 1-0
41
Administering NetAct Configurator Managing the software version and options support
Id:0900d80580a02f79
3. Click on the CM Editor icon on the page.
To modify MGW options
1. Click on the MGW icon in the browser to the left. The MGW actual parameters are loaded.
2. Select the Modify Actual Value(s) check box in the parameter definition area.
3. Click on the Actual Value column for MGW Options parameter. A drop-down menu appears.
4. Click on Add. This adds a new row for MGW options.
5. Click on the newly added row to select the MGW option to be set.
6. To set another MGW option, repeat steps 3 to 5.
7. When you have finished modifying MGW options, right click on the MGW icon in the browser to the left and select Send to Network. This saves the MGW options to the NetAct database.
g This procedure only updates the values in the NetAct Configurator database, but does not make the changes in the network elements. Use MML commands to change the settings in the MGWs in the network.
8.4 Setting the SGSN optionsThe SGSN options can be set using CM Editor.
To open CM Editor
1. Open the NetAct Start for the server.
2. Click on Configuration in the browser to the left.
3. Click on the CM Editor icon on the page.
To modify SGSN options
1. Click on the SGSN icon in the browser to the left. The SGSN actual parameters is loaded.
2. Select the Modify Actual Value(s) check box in the parameter definition area.
3. Click on the Actual Value column for SGSN Options parameter. A drop-down menu appears.
4. Click on Add. This adds a new row for SGSN options.
5. Click on the newly added row to select the SGSN option to be set.
6. To set another SGSN option, repeat steps 3 to 5.
7. When you have finished modifying SGSN options, right-click on the SGSN icon in the browser to the left and select Send to Network. This saves the SGSN options to the NetAct database.
g This procedure only updates the values in the NetAct Configurator database, but does not make the changes in the network elements. Use MML commands to change the settings in the SGSNs in the network.

42 DN03453584Issue 1-0
Administering NetAct Configurator
Id:0900d80580a02f79
Managing the software version and options support
8.5 Setting the BSC version and optionsThis feature enables NetAct to set q3PreferredConf, which indicates the BSC software package related to Q3 primitive exchanging that NetAct wants BSC to emulate. For example, with value S14, BSC sends primitive exchange and events according to BSC S14 package Q3 specifications, with value S15 according to S15 Q3 specifications, and so on.
This process is for updating the version of the BSCs to the network element and to the NetAct database.
To set the BSC version
1. Log in to a Connectivity Server as the omc user.
2. Log in to the BSC by entering the following command:
[omc]$ ouimanmxvterm> hostvterm> open <BSC_ae_name>
In the command, <BSC_ae_name> refers to the application entity (AE) name of the BSC network element.
g An MML session to a network element can also be launched from the Top-level User Interface. Right-click the network element object and select MML session from the pop-up menu that is displayed.
3. Enter your user name and password when requested.
4. To find out the C-number of the BSC, type the following command and check the C-number from the displayed output:
ZQNI;
5. To find out the software version for the BSC, type the following command and check the version from the displayed output:
ZWQO:CR;
6. To set the BSC version, execute the following command:
[omc]$ q3versmx
and use the following command line options:
Options Explanation
-trace Writes trace. The default option is no trace.
-help Prints the help for q3versmx
-allbscs Sets the Q3 version and enables Q3 events for all BSCs.
-bscvers If you do not want to use the default version (S15), specify the Q3 version with this option.
Table 9 q3versmx command line options

DN03453584Issue 1-0
43
Administering NetAct Configurator Managing the software version and options support
Id:0900d80580a02f79
g You must enter either -allbscs, -bscid, or -bscintid. You cannot enter several of these.
For example, the following command line sets the default version S15 for the BSC iden-tified with the internal ID 23456789 in the NetAct database:
[omc]$ q3versmx -bscintid 23456789
The default value is BSC S15.
g The length of the version field is 5 characters.
g BCFs and BTSs must be included in the initial BSC upload, but adjacencies must be uploaded later in another upload.
Handling optional BSC featuresMany BSC features are optional, meaning that they are not included in the basic system and that the operator can acquire them separately.
Management of certain radio parameters is relevant only if the related optional feature is available in the network (BSCs) and the option is enabled in the BSCs. Information of optional feature usage (enabled or not) is stored per BSC in NetAct Configurator database (using CM Editor user interface and by uploading from the network).
Option-dependent parameters and commands are not available for users in the MML interface if the option is not enabled. At plan activation (download) from Configurator, option dependent parameters are skipped and they are not sent to BSCs.
Configurator applications such as CM Editor do not use option information. Instead, in CM Editor, user views can be configured so that the user interface includes/does not include parameters according to the user’s requirements. If user views are not used, all parameters are available to the user in the CM Editor window, even if the options are not available in the BSC or they are disabled. This is the case with the All parameters view.
Plan Editor does not use option information. User’s access/view to parameters is con-figured by views. Only relevant/wanted parameters can be edited and shown. Unneces-sary parameters are not displayed in the user interface. See Plan Editor Principles and Plan Editor Help for more information.
-bscid This option identifies the BSC with a C number. The Q3 version is set only for the identified BSC.
-bscintid This option identifies the BSC with an internal ID. The Q3 version is set only for the identified BSC.
Options Explanation
Table 9 q3versmx command line options (Cont.)

44 DN03453584Issue 1-0
Administering NetAct Configurator
Id:0900d80580a02f79
Maintaining the NetAct Configurator database using the NetAct Doctor
9 Maintaining the NetAct Configurator database using the NetAct DoctorThe NetAct Configurator Database can be checked and corrected in various situations using the NetAct Doctor command line tool in Linux environment. NetAct Doctor has the number of use cases for the regular customer use. These cases and their usage are described in more detail in the Troubleshooting Configuration Management Problems document.
g Do not run any other cases unless you have received a permission and instructions from Nokia Siemens Networks personnel
g It is recommend that you always run the report and view the current situation first, and then decide if running the case that corrects the situation is necessary.

DN03453584Issue 1-0
45
Administering NetAct Configurator NetAct Parameter-based Licences
Id:0900d80580a02f79
10 NetAct Parameter-based LicencesCM parameters related to the following licences can be managed by using NetAct Con-figurator tools only if a proper licence is purchased from Nokia Siemens Networks.
• NetAct Configurator functionality for basic HSPA • NetAct Configurator for HSPA QoS Management • NetAct Configurator for Native IP Management
If the proper parameter-based licence is not purchased for the CM parameters being under the licence, you cannot change the parameter values in the Network Element and get the actual values updated via the upload operation or events.
In order to check which CM parameters are related to the mentioned licences, see Appendix A: Parameters related to features under parameter-based license.
To check which parameter-based licences are purchased and installed in the system
1. Login to Connectivity Server as omc user.
2. Open lmdlicmx.dat license file by running the following command:
less /etc/opt/nokia/oss/common/conf/lmdlicmx.dat
The parameter-based licences have the following IDs in the file: • NetAct Configurator functionality for basic HSPA (CM_MGMT_HSPA) • NetAct Configurator for HSPA QoS Management (CM_MGMT_HSPA_QOS) • NetAct Configurator for Native IP Management (CM_MGMT_IPIU)
If you purchased one or more of these features and they are missing from the licence file, a new NetAct licence file containing the purchased licences need to be requested from OBS SW Maintenance and Delivery Support:
To install the needed parameter-based licences
1. Login to Connectivity Server as omc user.
2. Run the following command to take a backup copy of the existing licence file:
cp /etc/opt/nokia/oss/common/conf/lmdlicmx.dat /etc/opt/nokia/oss/common/conf/lmdlicmx_backup.dat
3. Run the following command to copy the received new licence file (here located in home directory of the omc user) to replace the existing NetAct licence file:
cp ~/lmdlicmx.dat /etc/opt/nokia/oss/common/conf/lmdlicmx.dat

46 DN03453584Issue 1-0
Administering NetAct Configurator
Id:0900d80580a02f79
Command line operations
11 Command line operationsThis chapter gives instructions for the command line usage of NetAct Configurator. Many of the commands are executed by using the racclimx.sh tool. This tool is by default defined in the user’s PATH environment variable in the following directory: $PRODUCTROOT/bin.
g The racclimx.sh tool can be run on the Connectivity Server of the NetAct clusters.
To run command line operations with the racclimx.sh tool
1. Log in to one of the Connectivity Servers as omc user.
2. Enter the following command:
[omc]$ racclimx.sh
and choose the command line options you want.
g If you enter only the command (racclimx.sh) without any options, all the options are displayed on the screen.
11.1 Scheduling command line operationsMost command line operations executed using the racclimx.sh tool can be sched-uled to be automatically executed at specific time and date with or without recurrence.
You can schedule command line operations by using -schedule option with proper arguments when running a command line operation.
g You can also schedule these operations by entering the command of your choice to a line in the crontab file in Linux. For more information on the cron scheduler, see Managing crontab files in Managing the Linux System.
Command line options/arguments for scheduling one-time operationTo execute this operation, add the following option to your command:
-schedule date=<date> <timeOfDay>
Where:
<date> - operation execution date given in the yyyy-mm-dd format optionally followed by a time in the THH:mm or THH:mm:ss format, for example, 2010-10-27T15:00
<timeOfDay> - operation execution hour given in the hh:mm format, for example, 15:00
Example:
[omc]$ racclimx.sh -op <operation> -schedule date=2010-10-27T15:00
Command line options/arguments for scheduling recurring operationTo execute this operation, add the following option to your command:
-schedule <timeOfDay> [daily | weekdays=<weekdays> | dayOfMonth=<dayOfMonth>] start=<startDate> end=<endDate>
Where:

DN03453584Issue 1-0
47
Administering NetAct Configurator Command line operations
Id:0900d80580a02f79
<timeOfDay> - operation execution hour given in the hh:mm format, for example, 15:00<weekdays> - specifies in which days of the week the scheduled operation should be executed; possible values: Mon, Tue, Wed, Thu, Fri, Sat, Sun; to specify more than one day in the week, list the days by using comma between them;<dayOfMonth> - specifies the number of the day within a month (1..31) when the scheduled operation should be executed<startDate> - date when the period of running recurrent operation starts<endDate> - date when the period of running recurrent operation ends
Examples:
1) Scheduling operation to be executed daily at 3 pm between 27.03.2013 and 28.03.2013
[omc]$ racclimx.sh -op <operation> -schedule 15:00 daily start=2013-03-27 end=2013-03-28
2) Scheduling operation to be executed at 3 pm every Monday and Wednesday between 27.03.2013 and 28.03.2013
[omc]$ racclimx.sh -op <operation> -schedule 15:00 weekdays=Mon, Wed start=2013-03-27 end=2013-03-28
3) Scheduling operation to be executed at 3 pm every 13th day of the month between 13.03.2013 and 15.04.2013
[omc]$ racclimx.sh -op <operation> -schedule 15:00 dayOfMonth=13 start=2013-03-13 end=2013-04-15
11.2 Uploading actual valuesThe command line racclimx.sh upload operation is used for uploading actual values from:
• GSM (BSC RNW, BTS SC), • WCDMA (RNC RNW, RNC ATM/IP, AXC, FTM, WBTS SC), • Flexi Direct, • LTE • Core (MSC, MGW), • OMC
to the NetAct Configurator database.
For more information on how to upload actual configurations with the CM Operations Manager user interface, see CM Operations Manager Help.
The upload operation is used for uploading actual values from GSM, RNC RNW, RNC ATM/IP, AXC, FTM, Flexi Direct, WBTS SC, LTE, and core network objects to the NetAct Configurator database.
The starting parameters Explanation
-op Choose Upload for this operation.
-v If this option is given, the feedback of the operation is printed on the screen.
Table 10 Command line options for upload operations

48 DN03453584Issue 1-0
Administering NetAct Configurator
Id:0900d80580a02f79
Command line operations
-DN Defines the scope of the operation (comma separated Dis-tinguished Names).
-feedbackLevel Specifies the level of feedback in the Upload operation:
• summaryLevel
• objectLevel
• parameterLevel
-ipContentInUse Specifies if IP-related objects of an RNC are handled with an upload operation. The default value is false. This argument is optional.
-bssRNWContentInUse Indicates if BSS related RNW objects are handled with a provisioning or upload operation. The default value is true. This argument is optional.
-btsContentInUse Indicates whether Site Configuration data is handled with a provisioning and upload operation. Applicable for RNC RN5.0 onwards, WCDMA FlexiBTS, WCDMA Ultra/MetroBTS, and WCDMA FlexiBTS transport data and BSC S15 onwards for GSM Flexi BTS. The default value is false. This argument is optional
-atmContentInUse Specifies if ATM-related objects of an RNC are handled with an upload operation. The default value is false. This argument is optional.
-rncAxcContentInUse Indicates if AXC Configuration data of RNC is handled with a provisioning or upload operation. The default value is true. This argument is optional.
-rnwContentInUse Specifies if RNW-related objects of an RNC are handled with an upload operation. The default value is true. This argument is optional.
-signalingContentInUse Indicates if Signaling related objects of an RNC are handled with a provisioning or upload operation. The default value is false. This argument is optional.
-ftmContentInUse Indicates if FTM related objects are handled with a provi-sioning or upload operation. Applies with RNC versions up to RN4.0. The default value is false. This argument is optional.
-lteContentInUse Indicates if LTE related objects are handled with provision-ing or upload operation. The default value is true. This argument is optional.
-ihspaBTSSCContentInUse Indicates if Flexi Direct related BTSSC objects are handled with a provisioning or upload operation. The default value is true. This argument is optional.
-onlyAutoconnDataForGOMS Uploads only PREBTS objects from GOMS database. PREBTSs are used for auto connection. The default value is false. This argument is optional.
-takeAMLFileBackups Specifies if AML files are stored as backup after upload. In RNC case this applies with versions starting from RN5.0. This argument is optional.
The starting parameters Explanation
Table 10 Command line options for upload operations (Cont.)
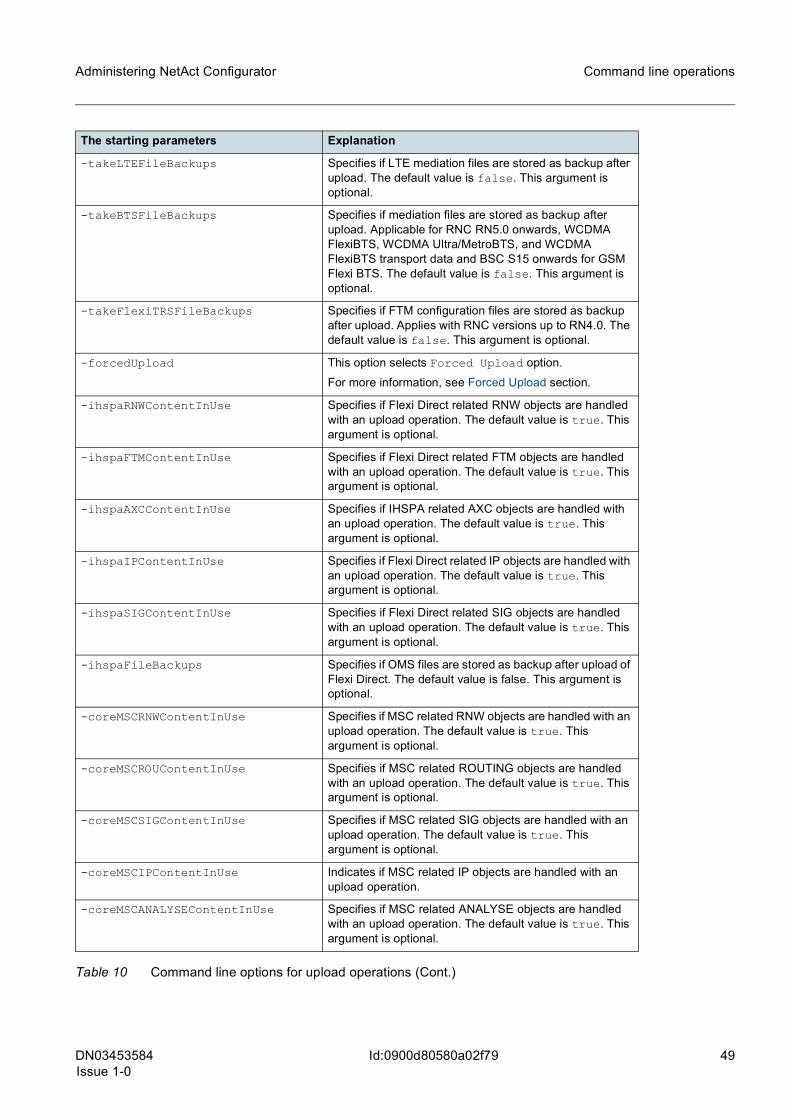
DN03453584Issue 1-0
49
Administering NetAct Configurator Command line operations
Id:0900d80580a02f79
-takeLTEFileBackups Specifies if LTE mediation files are stored as backup after upload. The default value is false. This argument is optional.
-takeBTSFileBackups Specifies if mediation files are stored as backup after upload. Applicable for RNC RN5.0 onwards, WCDMA FlexiBTS, WCDMA Ultra/MetroBTS, and WCDMA FlexiBTS transport data and BSC S15 onwards for GSM Flexi BTS. The default value is false. This argument is optional.
-takeFlexiTRSFileBackups Specifies if FTM configuration files are stored as backup after upload. Applies with RNC versions up to RN4.0. The default value is false. This argument is optional.
-forcedUpload This option selects Forced Upload option.
For more information, see Forced Upload section.
-ihspaRNWContentInUse Specifies if Flexi Direct related RNW objects are handled with an upload operation. The default value is true. This argument is optional.
-ihspaFTMContentInUse Specifies if Flexi Direct related FTM objects are handled with an upload operation. The default value is true. This argument is optional.
-ihspaAXCContentInUse Specifies if IHSPA related AXC objects are handled with an upload operation. The default value is true. This argument is optional.
-ihspaIPContentInUse Specifies if Flexi Direct related IP objects are handled with an upload operation. The default value is true. This argument is optional.
-ihspaSIGContentInUse Specifies if Flexi Direct related SIG objects are handled with an upload operation. The default value is true. This argument is optional.
-ihspaFileBackups Specifies if OMS files are stored as backup after upload of Flexi Direct. The default value is false. This argument is optional.
-coreMSCRNWContentInUse Specifies if MSC related RNW objects are handled with an upload operation. The default value is true. This argument is optional.
-coreMSCROUContentInUse Specifies if MSC related ROUTING objects are handled with an upload operation. The default value is true. This argument is optional.
-coreMSCSIGContentInUse Specifies if MSC related SIG objects are handled with an upload operation. The default value is true. This argument is optional.
-coreMSCIPContentInUse Indicates if MSC related IP objects are handled with an upload operation.
-coreMSCANALYSEContentInUse Specifies if MSC related ANALYSE objects are handled with an upload operation. The default value is true. This argument is optional.
The starting parameters Explanation
Table 10 Command line options for upload operations (Cont.)
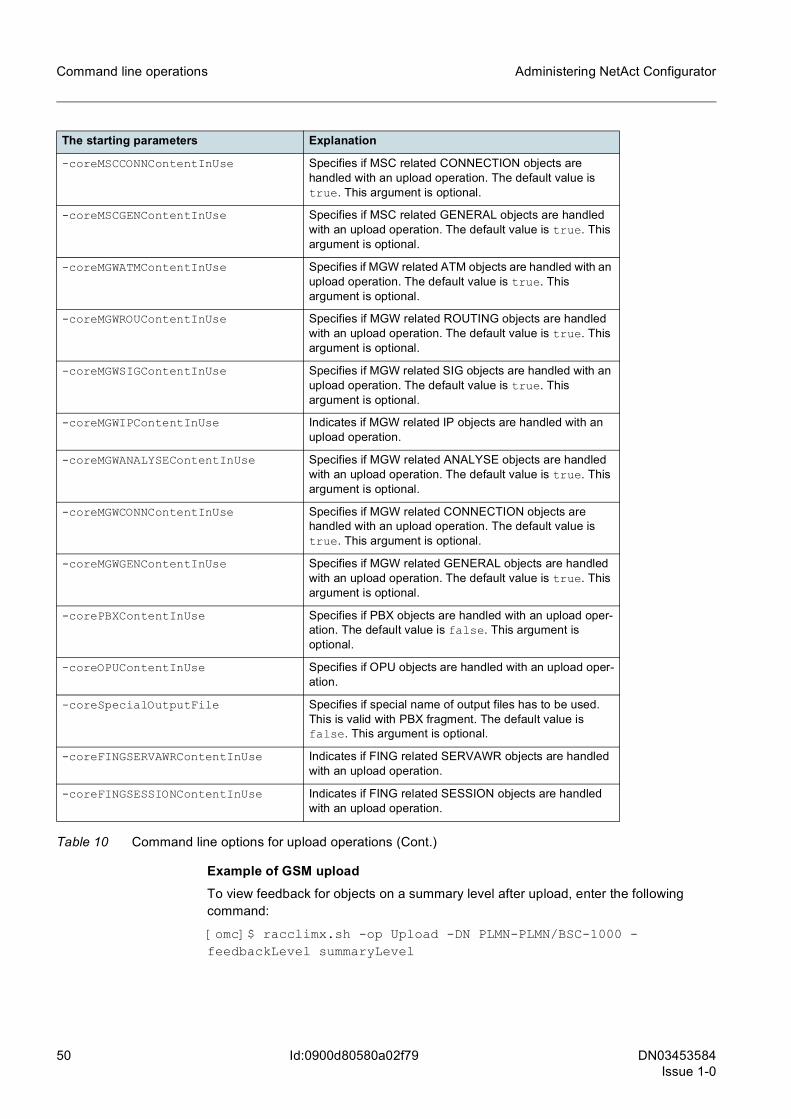
50 DN03453584Issue 1-0
Administering NetAct Configurator
Id:0900d80580a02f79
Command line operations
Example of GSM uploadTo view feedback for objects on a summary level after upload, enter the following command:
[omc]$ racclimx.sh -op Upload -DN PLMN-PLMN/BSC-1000 -feedbackLevel summaryLevel
-coreMSCCONNContentInUse Specifies if MSC related CONNECTION objects are handled with an upload operation. The default value is true. This argument is optional.
-coreMSCGENContentInUse Specifies if MSC related GENERAL objects are handled with an upload operation. The default value is true. This argument is optional.
-coreMGWATMContentInUse Specifies if MGW related ATM objects are handled with an upload operation. The default value is true. This argument is optional.
-coreMGWROUContentInUse Specifies if MGW related ROUTING objects are handled with an upload operation. The default value is true. This argument is optional.
-coreMGWSIGContentInUse Specifies if MGW related SIG objects are handled with an upload operation. The default value is true. This argument is optional.
-coreMGWIPContentInUse Indicates if MGW related IP objects are handled with an upload operation.
-coreMGWANALYSEContentInUse Specifies if MGW related ANALYSE objects are handled with an upload operation. The default value is true. This argument is optional.
-coreMGWCONNContentInUse Specifies if MGW related CONNECTION objects are handled with an upload operation. The default value is true. This argument is optional.
-coreMGWGENContentInUse Specifies if MGW related GENERAL objects are handled with an upload operation. The default value is true. This argument is optional.
-corePBXContentInUse Specifies if PBX objects are handled with an upload oper-ation. The default value is false. This argument is optional.
-coreOPUContentInUse Specifies if OPU objects are handled with an upload oper-ation.
-coreSpecialOutputFile Specifies if special name of output files has to be used. This is valid with PBX fragment. The default value is false. This argument is optional.
-coreFINGSERVAWRContentInUse Indicates if FING related SERVAWR objects are handled with an upload operation.
-coreFINGSESSIONContentInUse Indicates if FING related SESSION objects are handled with an upload operation.
The starting parameters Explanation
Table 10 Command line options for upload operations (Cont.)

DN03453584Issue 1-0
51
Administering NetAct Configurator Command line operations
Id:0900d80580a02f79
Example of WCDMA uploadTo view feedback for objects on a summary level after upload, enter the following command:
[omc]$ racclimx.sh -op Upload -DN PLMN-PLMN/RNC-1000 -feedbackLevel summaryLevel
To upload RNW changes (default true) and IP changes, enter the following command:
[omc]$ racclimx.sh -op Upload -DN PLMN-PLMN/RNC-1000 -ipContentInUse true
Example of Flexi Direct uploadThe following commands show the GOMS and IADA objects upload examples:
[omc]$ racclimx.sh -op Upload -DN PLMN-PLMN/GOMS-70 -ihspaFTMContentInUse false –v
[omc]$ racclimx.sh -op Upload -DN PLMN-PLMN/IADA-80 -ihspaIPContentInUse false -v
Example of core network uploadThe following commands show the MGW and MSC objects upload examples:
[omc]$ racclimx.sh -op Upload -DN PLMN-PLMN/MSC-50 -feedbackLevel summaryLevel -coreMSCSIGContentInUse false -coreMSCRNWContentInUse false –v
[omc]$ racclimx.sh -op Upload -DN PLMN-PLMN/MGW-60 -feedbackLevel summaryLevel -coreMGWSIGContentInUse false -coreMGWATMContentInUse false -coreMGWROUContentInUse false –v
g For more information on how to upload actual configurations with the CM Operations Manager user interface, see CM Operations Manager Help.
11.3 Provisioning plansThis chapter provides information on the command line options for plan provisioning.
11.3.1 GSMThis section provides information on the command line options for GSM file-based plan provisioning.
11.3.1.1 Validating BTS SC plan before pre-activationThe BTS SC plan is validated in NetAct before pre-activation.
The starting parameters Explanation
-op Choose Validate for this operation.
-DN Defines the scope of the operation (comma separated Distinguished Names).
-planName The name of the plan that is used in the operation.
Table 11 Command line options for validating BTS SC plan.

52 DN03453584Issue 1-0
Administering NetAct Configurator
Id:0900d80580a02f79
Command line operations
ExampleTo validate plan content in the BTS before pre-activation, enter the following command:
[omc]$ racclimx.sh -op Validate -DN PLMN-PLMN/BSC-1000/BTS-1 -planName PLMN_plan -btsContentInUse true
11.3.1.2 Validating BSC RNW plan after pre-activationThe validation operation checks the consistency of the plan that already exists in the BSC plan database. The separate validation operation is useful, for example, in case local changes have been done in BSC after the plan pre-activation.
Example of validating plan content in the BSCTo validate plan content in the BSC after pre-activation, enter the following command:
[omc]$ racclimx.sh -op Validate_BSC-v -planName PLMN_plan -localChangesBlocked
g For more information on provisioning plans with the CM Operations Manager user inter-face, see CM Operations Manager Help.
11.3.1.3 Pre-activating and activating GSM planThe Pre-activate operation performs the following operations on the BSC RNW plan:
1. Download the plan to BSC2. Validate the plan
The Pre-activate operation performs the following operation on the BTS SC plan:
-btsContentInUse Indicates whether Site Configuration data for WCDMA Flexi BTS and GSM Flexi BTS transport data is handled with a validation operation. Applicable for RNC RN5.0 onwards and BSC S15 onwards. Default value is false. The argument is optional.
The starting parameters Explanation
Table 11 Command line options for validating BTS SC plan. (Cont.)
The starting parameters Explanation
-op Choose Validate_BSC for this operation.
-v If this option is given, the feedback of the operation is printed on the screen.
-planName The name of the plan that is used in the operation.
-bssRNWContentInUse Indicates if BSC content in plan is validated. Note: this operation is valid only for the downloaded plan in BSC. The default value is false. This argument is optional.
-localChangesBlocked Specifies whether local changes must be blocked during BSC validation operation.
Table 12 Command line options for validating BSC RNW plan.

DN03453584Issue 1-0
53
Administering NetAct Configurator Command line operations
Id:0900d80580a02f79
1. Download the plan to BSC
The Activate operation performs the following operations on the BSC RNW plan:
1. Download the plan to BSC2. Activate the plan in BSC (including validation)
The Activate operation performs the following operations on the BTS SC plan:
1. Validate the plan2. Download the plan to BTS via BSC3. Activate the plan in BTS
The starting parameters Explanation
-op Choose Provision for this operation.
-v If this option is given, the feedback of the operation is printed on the screen.
-DN Defines the scope of the operation (comma separated Distinguished Names).
-planName The name of the plan that is used in the operation.
-provisioningOperation Defines a provisioning operation (activate/pre-activate). The default value is activate.
-detailedProvFBNeededForBsc Specifies whether user wants to see detailed feedback about BSC provisioning.
-serviceImpactLevel Specifies the service impact level for the activation oper-ation. Allowed values are 0-20. Value 0 means that the BSC activates simultaneously as many BCF objects as possible. Values 1-20 mean that the BSC activates 1-20% of the BCF objects simultaneously. A high number of BCF objects activated simultaneously means that the probability of dropped calls during the activation is higher. The default value is 5.
-fallbackInActivation Specifies whether a fallback must be taken during BSC activation operation.
-localChangesBlocked Specifies whether local changes must be blocked during BSC validation operation.
-gsmForcedHOTimeLimit Specifies the forced handover time limit between 1...500 seconds. The default value is 2 seconds.
-createBackupPlan Specifies whether backup plan is created or not. The default value is false. This parameter is not manada-tory.
-backupPlanName Specifies a backup plan name. The default value is Backup_plan. This parameter is not mandatory.
-btsContentInUse Indicates whether Site Configuration data is handled with Provisioning and Upload operation. Applica-ble for RNC RN5.0 onwards, WCDMA FlexiBTS, WCDMA Ultra/MetroBTS, and WCDMA FlexiBTS trans-port data and BSC S15 onwards for GSM Flexi BTS. Default value is false. This argument is optional.
Table 13 Command line options for provisioning

54 DN03453584Issue 1-0
Administering NetAct Configurator
Id:0900d80580a02f79
Command line operations
Example of provisioningTo activate a BSC RNW plan with file based plan provisioning to the 20% of the BSC sites at a time, enter the following command:
[omc]$ racclimx.sh -op Provision -provisioningOperation activate -serviceImpactLevel 20 -planName BSCRNW_plan
To activate BTS site configuration plan, enter the following command:
[omc]$ racclimx.sh -op Provision -provisioningOperation activate -btsContentInUse true -planName BTSSC_plan
g For more information on provisioning plans with the CM Operations Manager user inter-face, see CM Operations Manager Help.
11.3.1.4 Activating the pre-activated GSM planThe Activating the pre-activated plan operation performs the following operation on the BSC RNW plan:
1. Activate the plan that already exists in the BSC plan database
The Activating the pre-activated plan operation performs the following operations on the BTS SC plan:
1. Download the plan from BSC to BTS2. Activate the plan in BTS
-btsUploadAfterActivate Specifies whether Site Configuration data upload is needed after activation. Applicable for RNC RN5.0 onwards, WCDMA FlexiBTS, WCDMA Ultra/MetroBTS, and WCDMA FlexiBTS transport data and BSC S15 onwards for GSM Flexi BTS. Default value is true. This argument is optional.
-validateBeforePreactivation Specifies if validation is enabled for GSM and WCDMA-FlexiBTS plan before Activate and Pre-Activate provi-sioning operations. Default value is true. This argument is optional.
The starting parameters Explanation
Table 13 Command line options for provisioning (Cont.)
The starting parameters Explanation
-op Choose Activate_Pre-Activation for this opera-tion.
-v If this option is given, the feedback of the operation is printed on the screen.
-planName The name of the plan that is used in the operation.
-fallbackInActivation Specifies whether a fallback must be taken during BSC activation operation.
Table 14 Command line options for the Activate_Pre-Activation operations

DN03453584Issue 1-0
55
Administering NetAct Configurator Command line operations
Id:0900d80580a02f79
Example of activation after the pre-activationTo activate the plan after pre-activation in the BSC, enter the following command:[omc]$ racclimx.sh -op Activate_Pre-Activation-v -planName PLMN_plan -fallbackInActivation -serviceImpactLevel1
g For more information on provisioning plans with the CM Operations Manager user inter-face, see CM Operations Manager Help.
11.3.2 WCDMA, Flexi Direct, LTE, and core
11.3.2.1 Validating WBTS SC and LTE plans before pre-activationThe plan is validated using technology specified validation method.
g Validation of WBTS SC and LTE RNW, FTM and SC data is done before pre-activation (download) in NetAct.
-serviceImpactLevel Specifies the service impact level for the activation oper-ation. Allowed values are 0-20. Value 0 means that the BSC activates simultaneously as many BCF objects as possible. Values 1-20 mean that the BSC activates 1-20% of the BCF objects simultaneously. A high number of BCF objects activated simultaneously means that the probability of dropped calls during the activation is higher. The default value is 5.
-btsContentInUse Indicates whether Site Configuration data is handled with Provisioning and Upload operation. Applicable for RNC RN5.0 onwards, WCDMA FlexiBTS, WCDMA Ultra/MetroBTS, and WCDMA FlexiBTS transport data and BSC S15 onwards for GSM Flexi BTS. Default value is false. This argument is optional.
-gsmForcedHOTimeLimit Specifies the forced handover time limit between 1...500 seconds. The default value is 2 seconds.
-btsUploadAfterActivate Specifies whether Site Configuration data upload is needed after activation. Applicable for RNC RN5.0 onwards, WCDMA FlexiBTS, WCDMA Ultra/MetroBTS, and WCDMA FlexiBTS transport data and BSC S15 onwards for GSM Flexi BTS. Default value is true. This argument is optional.
-detailedProvFBNeededForBsc
Specifies whether user wants to see detailed feedback about BSC provisioning.
The starting parameters Explanation
Table 14 Command line options for the Activate_Pre-Activation operations (Cont.)

56 DN03453584Issue 1-0
Administering NetAct Configurator
Id:0900d80580a02f79
Command line operations
Example of validating WBTS SC data under specified scopeTo validate WBTS SC data under specified scope, enter the following command:
[omc]$ racclimx.sh -op Validate -planName plan1 -btsContentInUse true -DN PLMN-PLMN/RNC-123/WBTS-1
11.3.2.2 Pre-activating and activating plans for RNC RNW, RNC ATM/IP, AXC, FTM, Flexi Direct, WBTS SC, core and LTE
The starting parameters Explanation
-op Choose Validate for this operation.
-DN Specifies the scope of the operation (comma separated Distinguished Names without spaces). This argument is optional.
-planName Specifies a plan name.
-btsContentInUse Indicates if FlexiBTS Site Configuration and Transport data or Ultra/MetroBTS Site Configuration data of RNC are handled with a validation operation (this operation is valid only before download of the BTS plan). The default value is false. This argument is optional.
-ihspaBTSContentInUse Indicates whether Site Configuration data for WCDMA FlexiBTS transport data is handled with a validation oper-ation. Applicable for IADA IH3.0 onwards. The default value is false. This argument is optional.
-noFileCleanup Indicates if a configuration and feedback file should be left on disk after operation. The default value is false. This argument is optional.
-lteContentInUse Indicates if MRBTS and child objects are handled with a validation operation. Default value is false. This argument is optional.
-splitIntoSuccessfulAndFailedPlans
Specifies that separate plans are generated for success-ful and failed MRBTSs if errors are found during valida-tion. Applies to LTE objects only. The default value is false. This argument is optional.
Table 15 Command line options for validating plan content
The starting parameters Explanation
-op Choose Provision for this operation.
-v If this option is given, the feedback of the operation is printed on the screen.
-DN Defines the scope of the operation (comma separated Distinguished Names).
-planName The name of the plan that is used in the operation.
-provisioningOperation Defines a provisioning operation (activate/pre-activate). The default value is activate.
Table 16 Command line options for plan provisioning

DN03453584Issue 1-0
57
Administering NetAct Configurator Command line operations
Id:0900d80580a02f79
-lockingAllowed Specifies whether locking is allowed or not. Default value is true. This argument is optional.
-validateBeforePreactivation Specifies if validation is enabled for GSM and WCDMA-FlexiBTS plan before Activate and Pre-Activate provi-sioning operations. Default value is true. This argument is optional.
-axcUploadAfterActivation Specifies if AXC upload is needed after activation. The default value is true.
-btsUploadAfterActivate Specifies whether BTS site configuration data and Flexi transport data upload is needed after activation. Applies with RNC versions starting from RN5.0. The default value is true. This argument is optional.
-flexiTRSUploadAfterActivate Specifies if FTM upload is needed after activation. Applies with RNC versions up to RN4.0. The default value is true. This argument is optional.
-rncUploadAfterActivate Specifies if RNC upload is needed after activation. The default value is true.
-detailedProvFBNeeded Specifies whether user wants to see detailed feedback about WCDMA provisioning.
-atmContentInUse Specifies if ATM-related objects of an RNC are handled with a provisioning operation. The default value is false. This argument is optional.
-btsContentInUse Indicates if FlexiBTS Site Configuration and Transport data or Ultra/MetroBTS Site Configuration data of RNC are handled with a provisioning or upload operation. Applies with RNC versions starting from RN5.0. The default value is false. This argument is optional.
-ftmContentInUse Indicates if FTM related objects are handled with a pro-visioning or upload operation. Applies with RNC versions up to RN4.0. The default value is false. This argument is optional.
-ipContentInUse Specifies if IP-related objects of an RNC are handled with a provisioning operation. The default value is false. This argument is optional.
-rncAxcContentInUse Indicates if AXC Configuration data of RNC is handled with a provisioning or upload operation. The default value is true. This argument is optional.
-rnwContentInUse Specifies if RNW-related objects of an RNC are handled with a provisioning operation. The default value is true. This argument is optional.
-signalingContentInUse Indicates if Signaling related objects of an RNC are handled with a provisioning or upload operation. The default value is false. This argument is optional.
-lteContentInUse Indicates if LTE related objects are handled with a provi-sioning operation. The default value is true. This argument is optional.
The starting parameters Explanation
Table 16 Command line options for plan provisioning (Cont.)

58 DN03453584Issue 1-0
Administering NetAct Configurator
Id:0900d80580a02f79
Command line operations
-ihspaBTSSCContentInUse Indicates if Flexi Direct related BTSSC objects are handled with a provisioning or upload operation. The default value is true. This argument is optional.
-lteCellLockingNeeded Specifies if LTE automatic locking is performed when parameter modification requires object locking or BTS restart. Not valid for FTM modifications. The default value is true. This argument is optional.
-forceUploadAfterActivate Specifies if ATM/IP fragments in RNC are needed to be uploaded. The default value is false.
-MRBTSUploadAfterActivate Specifies if MRBTS upload is needed after LTE plan acti-vation. The default value is true. This argument is optional. Valid only for RL10.
-rnwActivationMode Specifies the RNW activation mode for RNW activation operation. The allowed values are 1, 2, and 3. Value 1 is Safe mode, 2 is Normal mode, and 3 is Fast mode. The default value is 1, Safe mode. This argument is optional.
-backupPlanName Specifies a backup plan name. Default value is Backup_plan. This argument is optional
-enablePriorityOperation Specifies whether operation is run with priority. Priority operations are allowed only for administrators and for RNC RNW Activate operations. Before running a priority operation RNC RNW operation queue must be paused and RNC must be free to handle the operation. The default value is false. This argument is optional.
-ihspaTransportUploadAfterActivate Specifies if upload of Flexi Direct fragments controlled by Transport Licences needed after activation. The default value is true.This argument is optional.
-coreUploadAfterActivateNeeded Specifies if core network upload is needed after activa-tion. The default value is true. This argument is optional.
-coreGenerateMmls Specifies if MML commands are generated to feedback. The default value is false. This argument is optional.
-coreStopAtFirstError Specifies if operation should stop after first error is encountered. The default value is true. This argument is optional.
-splitIntoSuccessfulAndFailedPlans Specifies that separate plans are generated for success-ful and failed MRBTSs if errors are found during valida-tion. The default value is false. This argument is optional.
-provisionOnlyAfterSuccessfulValidation
Specifies that MRBTSs are provisioned only after suc-cessful LTE validation. Applies to LTE objects only. The default value is false. This argument is optional.
-validateBeforePreactivationIHSPA Specifies if validation is enabled for Flexi Direct FlexiBTS plan before Activate and Pre-Activate provi-sioning operations. Default value is true. This argument is optional.
-validateBeforePreactivationForLTE Specifies if validation is enabled for LTE plan before Activate and Pre-Activate provisioning options. Default value is true. Argument is optional.
The starting parameters Explanation
Table 16 Command line options for plan provisioning (Cont.)

DN03453584Issue 1-0
59
Administering NetAct Configurator Command line operations
Id:0900d80580a02f79
Example of plan provisioningTo provision a plan to the entire network (PLMN-PLMN), with network elements locked during download, forced handover taking place within 120 seconds and GPRS disabled during download, enter the following command:
[omc]$ racclimx.sh -op Provision -gprsDisablingAllowed true -gsmForcedHOTimeLimit 120 -lockingAllowed true -planName PLMN_plan -v
To provision a plan to certain network elements without locking allowed:
[omc]$ racclimx.sh -op Provision -gprsDisablingAllowed false -DN PLMN-PLMN/RNC-120,PLMN-PLMN/RNC-2000,PLMN-PLMN/RNC-22 -lockingAllowed false -planName PLMN_plan -v
Example of Flexi Direct plan provisioningTo provision a plan to Flexi Direct elements without transport uploading after activation, enter the following command:
[omc]$ racclimx.sh -op Provision -ihspaTransportUploadAfterActivate false -DN PLMN-PLMN/GOMS-200, PLMN-PLMN/GOMS-300 -planName Ihspa_plan -v
Example of core network plan provisioningTo provision a plan to core network elements without uploading after activation, without stopping operation after first error, and with generating the MML commands to feed-back, enter the following command:
[omc]$ racclimx.sh -op Provision –coreUploadAfterActivateNeeded false –coreStopAtFirstError false –coreGenerateMmls true -DN PLMN-PLMN/MSC-200, PLMN-PLMN/MGW-300 -planName core_plan -v
g For more information on provisioning plans with the CM Operations Manager user inter-face, see CM Operations Manager Help.
11.3.2.3 Validating RNC ATM/IP plan content after pre-activationIt is necessary to validate the plan content in the RNC after pre-activation (download) to make sure that the plan can be activated, because local changes might have been made during the time between pre-activation and activation.
The starting parameters Explanation
-op Choose IPA_Validation for this operation.
-v If this option is given, the feedback of the operation is printed on the screen.
-planName The name of the plan that is used in the operation.
-ipContentInUse Specifies if IP-related objects of an RNC are handled with a validation operation. The default value is false. This argument is optional.
-atmContentInUse Specifies if ATM-related objects of an RNC are handled with a validation operation. The default value is false. This argument is optional.
Table 17 Command line options for the IPA_Validation operation

60 DN03453584Issue 1-0
Administering NetAct Configurator
Id:0900d80580a02f79
Command line operations
Example of RNC ATM/IP plan content validation in the RNCTo validate plan content in the RNC after pre-activation, enter the following command:
[omc]$ racclimx.sh -op IPA_Validation-v -planName <name_of_the_plan>
11.3.2.4 Activating the pre-activated plan for RNC RNW, AXC, FTM, Flexi Direct, WBTS SC and LTE
The starting parameters Explanation
-op Choose Activate_Pre-Activation for this operation.
-v If this option is given, the feedback of the operation is printed on the screen.
-DN Defines the scope of the operation (comma sepa-rated Distinguished Names).
-planName The name of the plan that is used in the operation.
-lockingAllowed Specifies whether locking is allowed or not. The default value is true. This argument is optional.
-btsContentInUse Indicates if FlexiBTS Site Configuration and Trans-port data or Ultra/MetroBTS Site Configuration data of RNC are handled with a provisioning or upload operation. Applies with RNC versions starting from RN5.0. The default value is false. This argument is optional.
-btsUploadAfterActivate Specifies whether BTS site configuration data and Flexi transport data upload is needed after activa-tion. Applies with RNC versions starting from RN5.0. The default value is true. This argument is optional.
-flexiTRSUploadAfterActivate Specifies if FTM upload is needed after activation. Applies with RNC versions up to RN4.0. The default value is true. This argument is optional.
-ftmContentInUse Indicates if FTM related objects are handled with a provisioning or upload operation. Applies with RNC versions up to RN4.0. The default value is false. This argument is optional.
-flexiTRSUploadAfterActivate Specifies if FTM upload is needed after activation. The default value is true. This argument is optional.
-rncAxcContentInUse Indicates if AXC Configuration data of RNC is handled with a provisioning or upload operation. The default value is true. This argument is optional.
-axcUploadAfterActivation Specifies if AXC upload is needed after activation. The default value is true.
Table 18 Command line options for activating the pre-activated plan

DN03453584Issue 1-0
61
Administering NetAct Configurator Command line operations
Id:0900d80580a02f79
Example of activating the pre-activated Flexi Direct planTo activate the pre-activated plan to Flexi Direct elements without uploading transport after activation, enter the following command:
[omc]$ racclimx.sh -op Activate_Pre-Activation -ihspaTransportUploadAfterActivate false -DN PLMN-PLMN/GOMS-200, PLMN-PLMN/GOMS-300 -planName Ihspa_plan -v
11.3.2.5 Activating the pre-activated RNC ATM/IP planWhen the RNC ATM/IP plan content in the RNC has been pre-activated (downloaded) and validated, it can then be activated.
-lteContentInUse Indicates if LTE related objects are handled with a provisioning or upload operation. This argument should be used only when creating or deleting objects, because of automatic locking feature when modifying objects. The default value is true. This argument is optional.
-MRBTSUploadAfterActivate Specifies if MRBTS upload is needed after LTE plan activation. The default value is true. This argument is optional. Valid only for RL10.
-ihspaTransportUploadAfterActivate
Specifies if upload of Flexi Direct fragments con-trolled by Transport Licence is needed after activa-tion. The default value is true. This argument is optional.
-rnwContentInUse Indicates if RNW related objects of an RNC are handled with a provisioning or upload operation. The default value is true. This argument is optional.
The starting parameters Explanation
Table 18 Command line options for activating the pre-activated plan (Cont.)
The starting parameters Explanation
-op Choose IPA_Activation for this operation.
-v If this option is given, the feedback of the operation is printed on the screen.
-planName The name of the plan that is used in the operation.
-ipContentInUse Specifies if IP-related objects of an RNC are handled with an activation operation. The default value is false. This argument is optional.
-atmContentInUse Specifies if ATM-related objects of an RNC are handled with an activation operation. The default value is false. This argument is optional.
-rnwContentInUse Specifies if RNW-related objects of an RNC are handled with an activation operation. The default value is false. This argument is optional.
Table 19 Command line options for the IPA_Activation operations
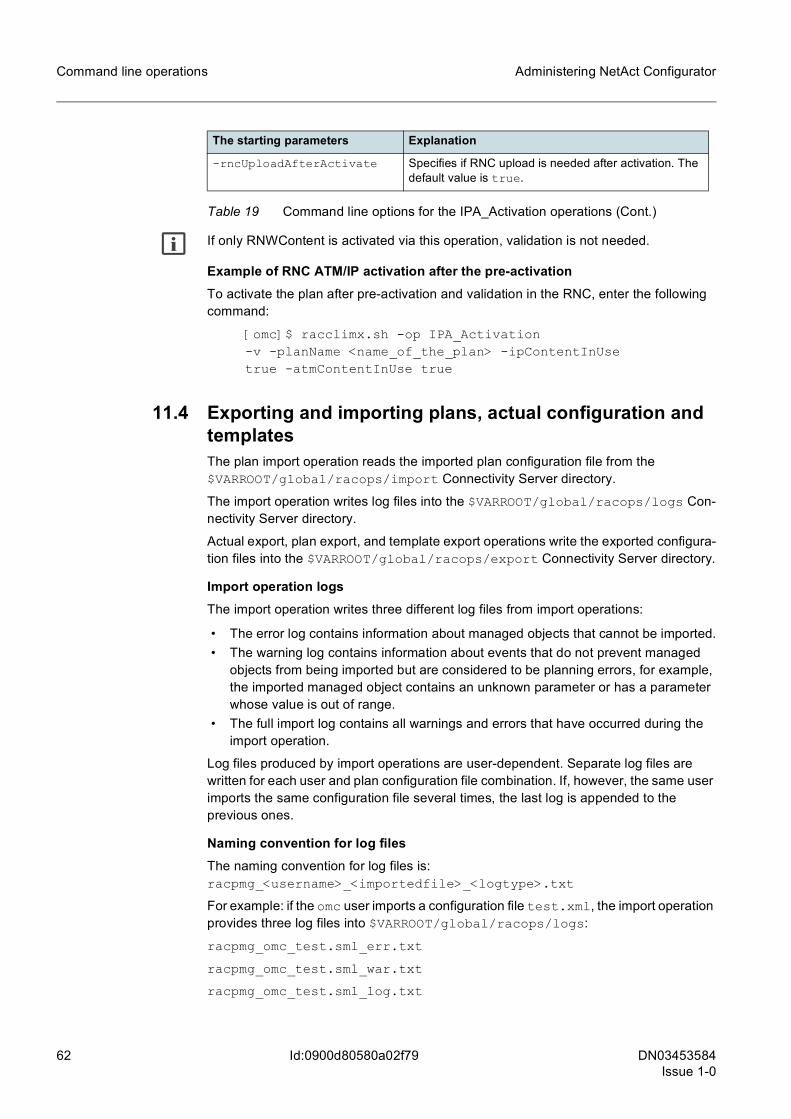
62 DN03453584Issue 1-0
Administering NetAct Configurator
Id:0900d80580a02f79
Command line operations
g If only RNWContent is activated via this operation, validation is not needed.
Example of RNC ATM/IP activation after the pre-activationTo activate the plan after pre-activation and validation in the RNC, enter the following command:
[omc]$ racclimx.sh -op IPA_Activation-v -planName <name_of_the_plan> -ipContentInUsetrue -atmContentInUse true
11.4 Exporting and importing plans, actual configuration and templatesThe plan import operation reads the imported plan configuration file from the $VARROOT/global/racops/import Connectivity Server directory.
The import operation writes log files into the $VARROOT/global/racops/logs Con-nectivity Server directory.
Actual export, plan export, and template export operations write the exported configura-tion files into the $VARROOT/global/racops/export Connectivity Server directory.
Import operation logsThe import operation writes three different log files from import operations:
• The error log contains information about managed objects that cannot be imported. • The warning log contains information about events that do not prevent managed
objects from being imported but are considered to be planning errors, for example, the imported managed object contains an unknown parameter or has a parameter whose value is out of range.
• The full import log contains all warnings and errors that have occurred during the import operation.
Log files produced by import operations are user-dependent. Separate log files are written for each user and plan configuration file combination. If, however, the same user imports the same configuration file several times, the last log is appended to the previous ones.
Naming convention for log filesThe naming convention for log files is: racpmg_<username>_<importedfile>_<logtype>.txt
For example: if the omc user imports a configuration file test.xml, the import operation provides three log files into $VARROOT/global/racops/logs:
racpmg_omc_test.sml_err.txt
racpmg_omc_test.sml_war.txt
racpmg_omc_test.sml_log.txt
-rncUploadAfterActivate Specifies if RNC upload is needed after activation. The default value is true.
The starting parameters Explanation
Table 19 Command line options for the IPA_Activation operations (Cont.)

DN03453584Issue 1-0
63
Administering NetAct Configurator Command line operations
Id:0900d80580a02f79
CSV profile file locationsProfile files for export are searched for from the following directories in the listed order:
$ETCROOT/custom/conf/rac/profiles$VARROOT/global/racops/export$ETCROOT/rac/conf/profiles
Profile files for import are searched for from the following directories in the listed order:
$ETCROOT/custom/conf/rac/profiles$VARROOT/global/racops/import$ETCROOT/rac/conf/profiles
Running the export and import operations
g Once active, the import and export operation status can be viewed from the CM Opera-tions Manager Operation History view. Operation feedback can also be seen from the Linux command line by adding the -v argument to the start command of an opera-tion.
g If a value such as a file name or plan name contains spaces, use quotation marks around it. For example, the plan name New Plan would be entered into a command as follows: -planName ”New Plan”
The starting parameters Explanation
-op Choose Import_Export for this operation.
-v If this option is given, the feedback of the operation is printed on the screen.
-DN Defines the scope of the operation (comma sepa-rated Distinguished Names).
-fileFormat The format of the import or export file: RAML2.0 (default) or CSV.
NOTE: CSV format is not supported for template export or template import operation.
-fileName Specifies a file name. In case of planImport or tem-plateImport this parameter or inputFile must be spec-ified.
The name of the import or export file.
Note: Before importing plans, make sure the files you want to import are stored in the following directory: $VARROOT/global/racops/import
The results of export are written to the following directory: $VARROOT/global/racops/export
-importExportOperation Defines the type of the import or export operation:
• planImport, templateImport • planExport, actualExport,
templateExport, referenceExport
See examples below the table.
Table 20 Command line options for the export and import operations

64 DN03453584Issue 1-0
Administering NetAct Configurator
Id:0900d80580a02f79
Command line operations
-inputFile Specifies a full file path for the planImport or tem-plateImport operation. This parameter or the fileName parameter must be filled. If both are present then the inputFile is used.
-csvProfile Specifies the name of the XML-formatted profile file that is used as the structure for CSV (Comma Sepa-rated Values) data files.
-includeSiteInfo Specifies if site information should be included in the operation. The default value is false.
-includeMaintenanceregionInfo Specifies if maintenance region information should be included in the operation.
-planner Specifies if Planner-specific parameters should be added to the operation. The default value is false.
-mergeImport Specifies if the imported plan should be merged to an existing plan. The default value is false.
-UIValues Specifies if file using user interface values in param-eters is imported or exported. If this parameter is not defined internal values are used. The value is true or false.
NOTE: user interface values are not supported for template export or template import operation.
-btsm Specifies if related BTSM objects are included in the operation. The default value is false.
-setSystemTemplate Specifies if the system template is assigned to imported objects when no other template is defined. The default value is true.
-planName The name of the plan that is used in the operation.
-templateName Specifies a list of template names that are included in the operation.
Multiple template names are comma-separated.
-templateClass Specifies a list of class abbreviations for the tem-plates to be included in the operation, if the -templateName argument is not given.
The abbreviations are comma-separated, for exam-ple:-templateClass NOKRNC:WCEL,NOKRNC:ADJS,NOKRNC:ADJI .
-classFilter Specifies a list of managed object class abbrevia-tions used to scope the operation.
Multiple managed objects are comma-separated, for example: -classFilter NOKRNC:WCEL,NOKRNC:ADJS,NOKRNC:ADJI
-sitesOnly Specifies if only site information is imported. The default value is false.
-incomingAdjacencies Specifies if incoming adjacencies are included in the operation. The default value is false.
The starting parameters Explanation
Table 20 Command line options for the export and import operations (Cont.)

DN03453584Issue 1-0
65
Administering NetAct Configurator Command line operations
Id:0900d80580a02f79
Example of exportThe following command exports actual configuration from the entire network to an XML file (RAML2.0):
g In commands, enter the file format as “RAML2” instead of “RAML2.0”.
[omc]$ racclimx.sh -op Import_Export -fileFormat RAML2 -importExportOperation actualExport -fileName ACTUAL_EXPORT_RESULT.xml
To export actual configuration from all managed objects under a WBTS:
[omc]$ racclimx.sh -op Import_Export -fileFormat RAML2 -importExportOperation actualExport -DN PLMN-PLMN/RNC-1000/WBTS-5 -fileName ACTUAL_EXPORT_RESULT.xml
To export actual configuration with all the WCELs and ADJSs from an RNC:
[omc]$ racclimx.sh -op Import_Export -fileFormat RAML2 -importExportOperation actualExport -DN PLMN-PLMN/RNC-1000 -classFilter NOKRNC:WCEL,NOKRNC:ADJS -fileName ACTUAL_EXPORT_RESULT.xml
To export a plan with all the WCELs and ADJSs from an RNC:
[omc]$ racclimx.sh -op Import_Export -fileFormat RAML2 -importExportOperation planExport -DN PLMN-PLMN/RNC-1000 -classFilter NOKRNC:WCEL,NOKRNC:ADJS -fileName ACTUAL_EXPORT_RESULT.xml -planName [PlanName]
CSV plan export command line example, using quoted plan name with spaces:
-validateAgainstReferenceConfiguration
Indicates that a plan is imported on the top of Refer-ence Configuration. Default value is false. This argument is optional.
-useQualifiedClassAbbreviation
Specifies whether qualified class abbreviations are used in export operation.
-siteTemplateImport Specifies if the plan import is treated as site template import. This argument is optional.
-skipExisting Specifies if existing objects are overwritten in create operation. This argument is optional.
-recreate Allow recreate objects in plan for core. This argument is optional.
-prioritizeRealCells Specifies if real cells are prioritized over external cells in cell identification. This argument is optional.
-showImportFeedbacks Specifies if import feedback should be displayed. This argument is optional.
-useObjectOperationDefinedInImportFile
If true, object operation (create, update, delete) is set like defined in import file. If true and operation is missing from import file, create operation is set. If false, object operation is set based on object exis-tence in NetAct database.
The starting parameters Explanation
Table 20 Command line options for the export and import operations (Cont.)

66 DN03453584Issue 1-0
Administering NetAct Configurator
Id:0900d80580a02f79
Command line operations
[omc]$ racclimx.sh -op Import_Export -fileFormat CSV -importExportOperation planExport -csvProfile myprofile.xml -fileName PlannedConfiguration_test.csv -planName “Mavu Test Plan 01”
To export XML template to a file:
[omc]$ racclimx.sh -op Import_Export -importExportOperation templateExport -templateName BTS_template -fileName TEMPLATE_EXPORT.xml -v
To export multiple XML templates to a file:
[omc]$ racclimx.sh -op Import_Export -importExportOperation templateExport -templateName BTS_template,TRX_template,ADCE_template -fileName TEMPLATE_EXPORT.xml -v
Example of importTo import an XML-formatted plan to a new plan:
[omc]$ racclimx.sh -op Import_Export -fileFormat RAML2 -importExportOperation planImport -fileName PlannedConfiguration_test.xml -planName [PlanName]
To merge an XML-formatted imported plan to an existing plan:
[omc]$ racclimx.sh -op Import_Export -fileFormat RAML2 -importExportOperation planImport -fileName PlannedConfiguration_test.xml -planName [PlanName] -mergeImport true
CSV plan import command line example, using quoted plan name with spaces:
[omc]$ racclimx.sh -op Import_Export -fileFormat CSV -importExportOperation planImport -csvProfile myprofile.xml -fileName PlannedConfiguration_test.csv -planName “Test Plan”
To import XML template from a file:
[omc]$ racclimx.sh -op Import_Export -importExportOperation templateImport -fileName ADCE_template.xml -v
g For more information on importing and exporting by using the CM Operations Manager user interface, see CM Operations Manager Help.
11.5 Deleting plans
The starting parameters Explanation
-op Choose planDeletion for this operation.
-planName Specifies the plan name in the NetAct Configurator database to be deleted.
-v If this option is given, the feedback of the operation is printed on the screen.
Table 21 Command line options for the plan delete operations

DN03453584Issue 1-0
67
Administering NetAct Configurator Command line operations
Id:0900d80580a02f79
g If a plan name contains spaces, use quotation marks around it. For example, the plan name New Plan would be entered into a command as follows: -planName “New Plan“.
Example of plan deletionThe following command deletes a plan from the Configurator database:
[omc]$ racclimx.sh -op planDeletion -planName Example_plan -v
g For more information on deleting plans using the CM Operations Manager user inter-face, see To delete a plan in CM Operations Manager Help.
11.6 Comparing plans
11.6.1 Comparing plans to actual configuration
Example of plan comparison against the actual configurationThe following command compares a plan against the actual configuration:
[omc]$ racclimx.sh -op Compare -planName Example_plan -deltaPlanName Delta_plan -feedbackLevel objectLevel -v
g For more information on comparing plans to actual configuration by using the CM Oper-ations Manager user interface, see CM Operations Manager Help.
11.7 Send To Network operationsThis operation is used to send changes specified in input file directly to the network. It is supported only for RNC RNW and Flexi Direct RNC RNW objects. Dependant objects (e.g. adjacencies) of the managed object are automatically created/deleted/updated, except for the adjacencies in the LTE BTS.
This operation requires Direct activation for RNC license and additionally you need to have Send to network permission to be able to perform it.
The starting parameters Explanation
-op Choose Compare for this operation.
-v If this option is given, the feedback of the operation is printed on the screen.
-planName Specifies a plan name.
-deltaPlanName Specifies a plan name that will be created from the differ-ences found when comparing the plan against the actual configuration. This argument is optional.
-feedbackLevel Specifies the level of feedback in the Compare opera-tion:
• summaryLevel
• objectLevel
• parameterLevel
The default value is Summary. This argument is optional.
Table 22 Command line options for the compare operations

68 DN03453584Issue 1-0
Administering NetAct Configurator
Id:0900d80580a02f79
Command line operations
If the planned parameter value equals to its actual value, no modification is sent to network. If the planned parameter value differs from its actual value, modification is sent to network.
The following table describes command line options for running Send To Network oper-ation.
The following example shows a valid RAML2 input file for Send to Network command line operation:
<?xml version="1.0" encoding="UTF-8"?><!DOCTYPE raml SYSTEM 'raml20.dtd'><raml version="2.0" xmlns="raml20.xsd">
<cmData type="plan" scope="all" name="test""><header>
<log dateTime="2010-09-24T13:40:04" action="created" appInfo="PlanExporter"/>
</header><managedObject class="NOKRNC:WCEL" version="RN5.0"
distName="PLMN-PLMN/RNC-100/WBTS-20/WCEL-1" operation="update"><p name="CodeTreeOptTimer">1</p>
</managedObject></cmData>
</raml>
11.8 Policy-Based Compare operationsThe following table describes command line operations for running Policy-Based Compare operation.
The starting parameters Explanation
-op Choose Send_To_Network for this operation.
-v If this option is given, the feedback of the operation is printed on the screen.
-fileName Specifies the name of the RAML2 file containing Managed Object(s) to be created/deleted/updated. The input file (xml) must contain only one managed object, but may contain multiple parameters. Parameter values must be of internal format (not user interface format). Qualified class abbreviations must be used (e.g. NOKRNC:WCEL instead of WCEL).
-path Specifies the directory of the input file.
Table 23 Command line options for Send To Network operations
Parameter Description
–op Choose Policy_Based_Compare for running Policy-Based Compare operation.
Table 24 Command line options for running Policy-Based compare operation

DN03453584Issue 1-0
69
Administering NetAct Configurator Command line operations
Id:0900d80580a02f79
Example of running Policy-Based Compare operation:[omc]$ racclimx.sh -op Policy_Based_Compare -DN PLMN-PLMN/RNC-14 -excludedItemsFile Excluded_Items.xml -deltaPlanName Delta_plan -feedbackLevel objectLevel
11.9 Reference Configuration related command line operationsThis chapter provides information on the command line operations for reference config-uration.
–DN Specifies the scope of the Policy-Based Compare operation (comma separated Distin-guished Names without spaces).
-targetConfiguration Specifies the target configuration of this opera-tion. Possible values are:
• actual • reference
The default value is actual. This argument is optional.
-excludedItemsFile Indicates the name of the file which specifies the templates, adaptations, MO classes and/or MO class parameters which should be excluded in the comparison operation.
This argument is optional.
-enableExceptions Indicates that MOs in exception plans are con-sidered in comparison.
The default value is true. This argument is optional.
-deltaPlanName Specifies a plan name that will be created of the found differences when comparing configuration against templates.
This argument is optional.
-feedbackLevel Specifies the level of feedback. Possible values are:
• summaryLevel • objectLevel
• parameterLevel
The default value is summaryLevel. This argument is optional.
Parameter Description
Table 24 Command line options for running Policy-Based compare operation (Cont.)

70 DN03453584Issue 1-0
Administering NetAct Configurator
Id:0900d80580a02f79
Command line operations
11.9.1 Initializing Reference Configuration
Example of initializing reference configurationTo initialize reference configuration which is identical with the actual configuration, enter the following command:
[omc]$ racclimx.sh -op Init_Reference_Conf -DN PLMN-PLMN/RNC-1000 -initOverwriteReference true
11.9.2 Generating delta
Example of generating deltaTo generate delta, enter the following command:
[omc]$ racclimx.sh -op Delta_Generation -DN PLMN-PLMN/RNC-1000
The starting parameters Explanation
-op Choose Init_Reference_Conf to initialize the refer-ence configuration for all the objects in actual configura-tion.
-DN Specifies the scope of the operation (comma separated Distinguished Names without spaces). This argument is optional.
-classFilter Specifies a list of class abbreviations (comma sepa-rated) that scopes the operation. This argument is optional.
-initOverwriteReference Choose true if a complete re-initialization is needed. After re-initialization the reference configuration is iden-tical with the actual configuration. Choose false to ini-tialize only objects which exist in actual configuration but not in reference configuration. No deletions or modifica-tions are done to existing objects in reference configura-tion then. Default value is false. This argument is optional.
Table 25 Command line options for initializing Reference Configuration
The starting parameters Explanation
-op Choose Delta_Generation to compare actual and reference configurations and to find out differences between them.
-DN Specifies the scope of the operation (comma separated Distinguished Names without spaces). This argument is optional.
Table 26 Command line options for generating delta

DN03453584Issue 1-0
71
Administering NetAct Configurator Command line operations
Id:0900d80580a02f79
11.9.3 Exporting delta
Example of exporting deltaTo export delta, enter the following command:
[omc]$ racclimx.sh -op Delta_Export -DN PLMN-PLMN/RNC-1000file_Name Example_file
11.9.4 Merging plans to reference configuration
Example of merging a plan to reference configurationTo merge a plan to reference configuration and to create a fallback plan for the merge, enter the following command:
[omc]$ racclimx.sh -op Merge_Plan -planName Example_plan -mergeNoFallback false
The starting parameters Explanation
-op Choose Delta_Export to export selected deltas to CSV file.
-DN Specifies the scope of the operation (comma separated Distinguished Names without spaces). This argument is optional.
-classFilter Specifies a list of qualified class abbreviations (comma separated) that scopes the operation. This argument is optional.
-fileName Specifies a file name.
Table 27 Command line options for exporting delta
The starting parameters Explanation
-op Choose Merge_Plan to merge a new configuration plan to reference configuration. This option creates new objects, removes deleted objects introduced in the plan, and updates existing objects with the new values to ref-erence configuration.
-planName Specifies a plan name.
-mergeNoFallback Specifies if the fallback plan is not needed for the merge. Default value is false. When merging a fallback plan choose true because a fallback plan cannot be created for another fallback plan. This argument is optional.
Table 28 Command line options for merging plans to reference configuration

72 DN03453584Issue 1-0
Administering NetAct Configurator
Id:0900d80580a02f79
Command line operations
11.9.5 Committing reference alignments
Example of committing reference alignmentsTo commit reference alignments, enter the following command:
[omc]$ racclimx.sh -op Commit_Align_Reference
11.9.6 Committing network alignments
Example of committing network alignmentsTo commit network alignments, enter the following command:
[omc]$ racclimx.sh -op Commit_Align_Network -planName PLMN_plan
11.10 CM History related command line operationsThis chapter provides information on the command line operations for CM History.
11.10.1 Initializing CM History configuration
The starting parameters Explanation
-op Choose Commit_Align_Reference to commit all ref-erence alignments done in CM Reference user interface by all users in the system.
-userName Specifies a user name.
Table 29 Command line options for committing reference alignments
The starting parameters Explanation
-op Choose Commit_Align_Network to create a plan containing all the network alignments done in CM Refer-ence user interface by all users in the system.
-planName The name of the plan that is used in the operation.
-userName Specifies a user name.
Table 30 Command line options for committing network alignments
The starting parameters Explanation
-op Choose Init_History to initialize the CM History configuration for all the objects in actual or reference configuration.
-v If this option is given, the feedback of the operation is printed on the screen.
Table 31 Command line options for initializing CM History configuration

DN03453584Issue 1-0
73
Administering NetAct Configurator Command line operations
Id:0900d80580a02f79
Example of initializing the CM History configurationTo initialize the CM History configuration for the reference configuration, enter the fol-lowing command:
[omc]$ racclimx.sh -op Init_History -configuration reference
11.10.2 Synchronizing CM History configurationThis operation synchronizes the current objects in the CM History with the objects of the given configuration.
Example of synchronizing the CM History configurationTo synchronize the CM History with the actual configuration, enter the following command:
[omc]$ racclimx.sh -op Synchronize_History -configuration actual
11.10.3 Generating CM History differences tabular reportThis operation generates the CM History differences tabular report for the selected con-figuration for the given period of time. The results are stored in the file.
-configuration Specifies if the CM History configuration is initialized for actual configuration or reference configuration. This argument is optional. Possible values are actual or reference. The default value is actual.
The starting parameters Explanation
Table 31 Command line options for initializing CM History configuration (Cont.)
The starting parameters Explanation
-op Choose Synchronize_History to synchronize the current objects in the CM History with the objects of the given configuration.
-DN Specifies the scope of the operation (comma separated Distinguished Names without spaces). This argument is optional.
-v If this option is given, the feedback of the operation is printed on the screen.
-configuration Specifies if the CM History configuration is synchronized with the actual configuration or reference configuration. This argument is optional. Possible values are actual or reference. The default value is actual.
Table 32 Command line options for synchronizing CM History configuration with actual configuration or reference configuration

74 DN03453584Issue 1-0
Administering NetAct Configurator
Id:0900d80580a02f79
Command line operations
Example of generating the CM History tabular reportTo generate the CM History tabular report for actual configuration, enter the following command:
[omc]$ racclimx.sh -op Diff_History -DN PLMN-PLMN/RNC-1 -configuration actual -periodStart 21/3/2011 -periodEnd 21/5/2011 -maintenanceRegion MR-NWI3 -changeOrigin example -fileName diff_report
The starting parameters Explanation
-op Choose Diff_History to generate the tabular report with the managed objects / parameters changes which occurred in the given period of time.
-DN Specifies the scope of the operation (comma separated Distinguished Names without spaces). This argument is optional.
-configuration Specifies if the tabular report is generated for the actual configuration or reference configuration. This argument is optional. Possible values are actual or reference. The default value is actual.
-classFilter Specifies a list of qualified class abbreviations (comma separated) that are taken into account in the tabular report. This argument is optional.
-periodStart Specifies the start date of the period for which the tabular report will be created.
-periodEnd Specifies the end date of the period for which the tabular report will be created.
-pastInterval Specifies period interval as a specified number of pastUnit. This argument is optional. Exclude using periodStart/periodEnd attribute. The pastInterval variable is mandatory if you specify pastUnit.
-pastUnit Specifies time period unit for pastInterval. The available values are [D | W | M | Y] for day/week/month/year. This argument is optional. Exclude using periodStart/periodEnd attribute.
-maintenanceRegion Specifies Maintenance Region ID which will be used in filtering changes. This argument is optional.
-site Site Admin ID which will be used in filtering changes. This argument is optional.
-changeOrigin Specifies a filter for changing origin. This argument is optional.
-dnContains Specifies part of the Distinguished Name. Scope of the operation will be Managed Objects whose DNs contain a given DN specified part. Exclude DN attribute. This argument is optional.
-fileName Specifies the name of the file where the tabular report result will be stored.
Table 33 Command line options for generating the CM History differences tabular report.

DN03453584Issue 1-0
75
Administering NetAct Configurator Command line operations
Id:0900d80580a02f79
11.10.4 Removing data from CM HistoryThis operation removes all irrelevant data from CM History database at a given time.
Example of removing irrelevant data from CM History databaseTo remove all irrelevant data from CM History database, enter the following command:
[omc]$ racclimx.sh -op Remove_History -time 2011-12-21
11.11 Workflow related command line operationsThis chapter provides information on workflow related command line operations.
g racclimx.sh process is not enough to call workflow related operations. To call workflow related operations additional workflow xml file have to be specified:
-opsFile $ETCROOT/rac/conf/opdefs/ops/workflow_ops.xml
11.11.1 Creating workflow related plans
11.11.1.1 Creating a plan based on COCO
Example of creating a plan based on COCO
To create a plan based on COCO, enter the following command:
[omc] $ racclimx.sh -op axc_ftm_reconfig -v -masterPlanName <plan_name> -fileChooser <file_location>
The starting parameters Explanation
-op Choose Remove_History to remove all irrelevant data from CM History database at a given time.
-time Specifies the time in which all irrelevant data will be removed from CM History database. This argument is mandatory.
Table 34 Command line options for removing irrelevant data from CM History database
The starting parame-ters Explanation
-op Choose axc_ftm_reconfig for this operation.
-v If this option is given, the feedback of the operation is printed on the screen.
-masterPlanName Specifies a plan name.
-fileChooser Browse File System to specify input file name. This argument is optional.
Table 35 Workflow related command line operations for creating a plan based on COCO
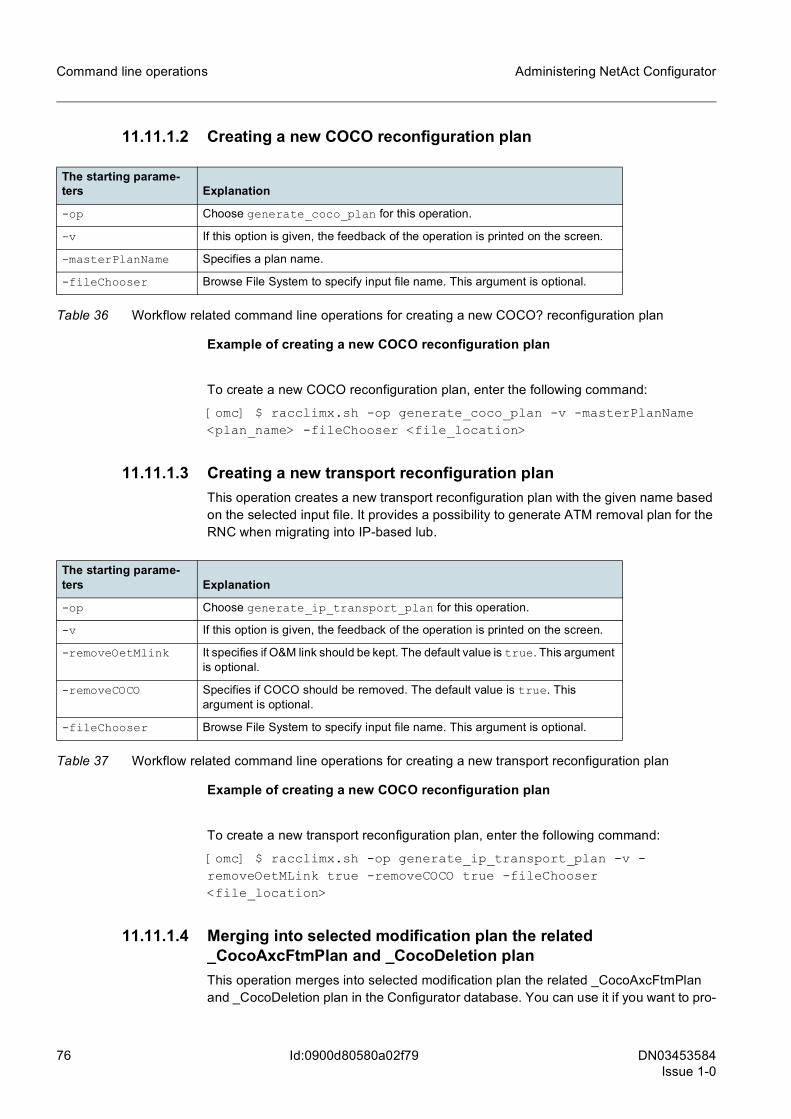
76 DN03453584Issue 1-0
Administering NetAct Configurator
Id:0900d80580a02f79
Command line operations
11.11.1.2 Creating a new COCO reconfiguration plan
Example of creating a new COCO reconfiguration plan
To create a new COCO reconfiguration plan, enter the following command:
[omc] $ racclimx.sh -op generate_coco_plan -v -masterPlanName <plan_name> -fileChooser <file_location>
11.11.1.3 Creating a new transport reconfiguration planThis operation creates a new transport reconfiguration plan with the given name based on the selected input file. It provides a possibility to generate ATM removal plan for the RNC when migrating into IP-based lub.
Example of creating a new COCO reconfiguration plan
To create a new transport reconfiguration plan, enter the following command:
[omc] $ racclimx.sh -op generate_ip_transport_plan -v -removeOetMLink true -removeCOCO true -fileChooser <file_location>
11.11.1.4 Merging into selected modification plan the related _CocoAxcFtmPlan and _CocoDeletion planThis operation merges into selected modification plan the related _CocoAxcFtmPlan and _CocoDeletion plan in the Configurator database. You can use it if you want to pro-
The starting parame-ters Explanation
-op Choose generate_coco_plan for this operation.
-v If this option is given, the feedback of the operation is printed on the screen.
-masterPlanName Specifies a plan name.
-fileChooser Browse File System to specify input file name. This argument is optional.
Table 36 Workflow related command line operations for creating a new COCO? reconfiguration plan
The starting parame-ters Explanation
-op Choose generate_ip_transport_plan for this operation.
-v If this option is given, the feedback of the operation is printed on the screen.
-removeOetMlink It specifies if O&M link should be kept. The default value is true. This argument is optional.
-removeCOCO Specifies if COCO should be removed. The default value is true. This argument is optional.
-fileChooser Browse File System to specify input file name. This argument is optional.
Table 37 Workflow related command line operations for creating a new transport reconfiguration plan

DN03453584Issue 1-0
77
Administering NetAct Configurator Command line operations
Id:0900d80580a02f79
vision the IP and ATM layer changes in one provisioning operation in the RNCs and AXCs/FTMs.
Example of merging into selected modification plan the related _CocoAxcFtmPlan and _CocoDeletion plan
To merge into selected modification plan the related _CocoAxcFtmPlan and _CocoDeletion plan, enter the following command:
[omc] $ racclimx.sh -op merge_atm_changes_with_ip_plan -v -keepOldPlans true -masterPlanName <plan_name> -omOverwrite<no>
11.11.2 Provisioning workflow related plans
11.11.2.1 Provisioning a plan generated from a COCO modification plan with the suffix _CocoAxcFtmPlanThis operation prepares and provisions in the AXC(s) and/or FTM(s) the plan generated from the COCO modification plan with the suffix _CocoAxcFtmPlan. It uploads the con-figuration from the AXC(s) and FTM(s) once the provisioning is finished.
The starting parame-ters Explanation
-op Choose merge_atm_changes_with_ip_plan for this operation.
-v If this option is given, the feedback of the operation is printed on the screen.
-keepOldPlans It specifies if old plans should be kept. The default value is true. This argument is optional.
-masterPlanName Specifies a plan name.
-moOverwrite If overlapping objects are found and the value of the attribute is no, the system leaves the merge undone and inform the user about the reason. Otherwise, the system complete the merge and overwrite the overlapping objects in the master plan. The default value is no.
Table 38 Workflow related command line operations for merging into selected modification plan the related _COCOdeletion plan
The starting parame-ters Explanation
-op Choose provision_axc_ftm_reconfig for this operation.
-v If this option is given, the feedback of the operation is printed on the screen.
-masterPlanName Specifies a plan name.
-feedbackLevel Specifies the level of feedback (summaryLevel/objectLevel/ parameterLevel). The default value is summaryLevel. This argument is optional.
Table 39 Workflow related command line operations for merging into selected modification plan with the suffix _CocoAxcFtmPlan

78 DN03453584Issue 1-0
Administering NetAct Configurator
Id:0900d80580a02f79
Command line operations
Example of provisioning a plan generated from a COCO modification plan with the suffix _CocoAxcFtmPlanTo provision a plan generated from a COCO modification plan with the suffix _CocoAxcFtmPlan, enter the following command:
[omc] $ racclimx.sh -op provision_axc_ftm_reconfig -v -masterPlanName <file_location> -feedbackLevel<summaryLevel>
11.11.2.2 Provisioning in AXCs and FTMs the plan with the suffix _CocoAxcFtmPlanThis operation provisions in AXCs and FTMs the plan with the suffix _CocoAxcFtmPlan. You can use it when "Merge ATM Changes with IP Transport Plan" was not run and you want to provision the ATM layer changes separately.
Example of provisioning in AXCs and FTMs a plan with the suffix_CocoAxcFtmPlanTo provision in AXCs and FTMs a plan with the suffix _CocoAxcFtmPlan, enter the fol-lowing command:
[omc] $ racclimx.sh -op provision_atm_removal_in_axc_ftm -v -masterPlanName <file_location> -feedbackLevel <summaryLevel> -ipContentInUse false -atmContentInUse false -rnwContentInUsefalse -ftmContentInUse true -provisionAXC true -provisionFTMtrue
The starting parame-ters Explanation
-op Choose provision_atm_removal_in_axc_ftm for this operation.
-v If this option is given, the feedback of the operation is printed on the screen.
-masterPlanName Specifies a plan name.
-feedbackLevel Specifies the level of feedback (summaryLevel/objectLevel/ parameterLevel). The default value is summaryLevel. This argument is optional.
-ipContentInUse Indicates if IP related objects of an RNC are handled with a provisioning or upload operation. The default value is false. This argument is optional.
-atmContentInUse Indicates if ATM related objects of an RNC are handled with a provisioning or upload operation. The default value is false. This argument is optional.
-rnwContentInUse Indicates if RNW related objects of an RNC are handled with a provisioning or upload operation. The default value is false. This argument is optional.
-ftmContentInUse Indicates if FTM related objects are handled with a provisioning or upload oper-ation. The default value is true. This argument is optional.
-provisionAXC It includes AXC. The default value is true. This argument is optional.
-provisionFTM It includes FTM. The default value is true. This argument is optional.
Table 40 Workflow related command line operations for provisioning in AXCs and FTMs the plan with the suffix _CocoAxcFtmPlan

DN03453584Issue 1-0
79
Administering NetAct Configurator Command line operations
Id:0900d80580a02f79
11.11.2.3 Provisioning a plan with the suffix _CocoDeletion in RNCsThis operation provisions in RNCs the plan with the suffix _CocoDeletion. You can use it when "Merge ATM Changes with IP Transport Plan" was not run and you want to pro-vision the COCO and O&M link deletions separately.
Example of provisioning a plan with the suffix _CocoDeletion in RNCsTo provision a plan with the suffix _CocoDeletion in RNCs, enter the following command:
[omc] $ racclimx.sh -op provision_atm_removal_in_rnc -v -masterPlanName <file_location> -feedbackLevel <summaryLevel> -ipContentInUse true -atmContentInUse true -rnwContentInUsetrue -ftmContentInUse false -provisionAXC false -provisionFTM false
11.11.2.4 Provisioning a selected plan in RNCsThis operation provisions the selected plan in the RNCs. The plan may contain RNW, IP and ATM layer data. In case "Merge ATM Changes with IP Transport Plan" operation has been run, COCO and O&M deletions are included in the plan. If not, COCO and O&M deletions are not included in the plan.
The starting parame-ters Explanation
-op Choose provision_atm_removal_in_axc_ftm for this operation.
-v If this option is given, the feedback of the operation is printed on the screen.
-masterPlanName Specifies a plan name.
-feedbackLevel Specifies the level of feedback (summaryLevel/objectLevel/ parameterLevel). The default value is summaryLevel. This argument is optional.
-ipContentInUse Indicates if IP related objects of an RNC are handled with a provisioning or upload operation. The default value is true. This argument is optional.
-atmContentInUse Indicates if ATM related objects of an RNC are handled with a provisioning or upload operation. The default value is true. This argument is optional.
-rnwContentInUse Indicates if RNW related objects of an RNC are handled with a provisioning or upload operation. The default value is true. This argument is optional.
-ftmContentInUse Indicates if FTM related objects are handled with a provisioning or upload oper-ation. The default value is false. This argument is optional.
-provisionAXC It includes AXC. The default value is false. This argument is optional.
-provisionFTM It includes FTM. The default value is false. This argument is optional.
Table 41 Workflow related command line operations for provisioning the plan with the suffix _CocoDeletion in RNCs
The starting parame-ters Explanation
-op Choose provision_rnc_plan for this operation.
-v If this option is given, the feedback of the operation is printed on the screen.
Table 42 Workflow related command line operations for provisioning selected plan in RNCs

80 DN03453584Issue 1-0
Administering NetAct Configurator
Id:0900d80580a02f79
Command line operations
Example of provisioning a selected plan in RNCsTo provision the selected plan in RNCs, enter the following command:
[omc] $ racclimx.sh -op provision_rnc_plan -v -masterPlanName <file_location> -feedbackLevel <summaryLevel> -ipContentInUse true -atmContentInUse true -rnwContentInUse true -ftmContentInUse false -provisionAXC false -provisionFTM false
11.12 Starting consistency checks
-masterPlanName Specifies a plan name.
-feedbackLevel Specifies the level of feedback (summaryLevel/objectLevel/ parameterLevel). The default value is summaryLevel. This argument is optional.
-ipContentInUse Indicates if IP related objects of an RNC are handled with a provisioning or upload operation. The default value is true. This argument is optional.
-atmContentInUse Indicates if ATM related objects of an RNC are handled with a provisioning or upload operation. The default value is true. This argument is optional.
-rnwContentInUse Indicates if RNW related objects of an RNC are handled with a provisioning or upload operation. The default value is true. This argument is optional.
-ftmContentInUse Indicates if FTM related objects are handled with a provisioning or upload oper-ation. The default value is false. This argument is optional.
-provisionAXC It includes AXC. The default value is false. This argument is optional.
-provisionFTM It includes FTM. The default value is false. This argument is optional.
The starting parame-ters Explanation
Table 42 Workflow related command line operations for provisioning selected plan in RNCs (Cont.)
The starting parame-ters Explanation
-op Choose the operation to be performed:
• Actual_Check for checking the actual configuration • Reference_Check for checking the reference configuration • Plan_Check for checking plans on top of the actual configuration
-v If this option is given, the feedback of the operation is printed on the screen.
-DN (For Actual_Check and Reference_Check) Defines the scope of the oper-ation (comma-separated Distinguished Names).
-planName (For Plan_Check.) The name of the plan that is used in the operation.
-checkName The name of the consistency check you want to run.
Table 43 Command line options for consistency checking
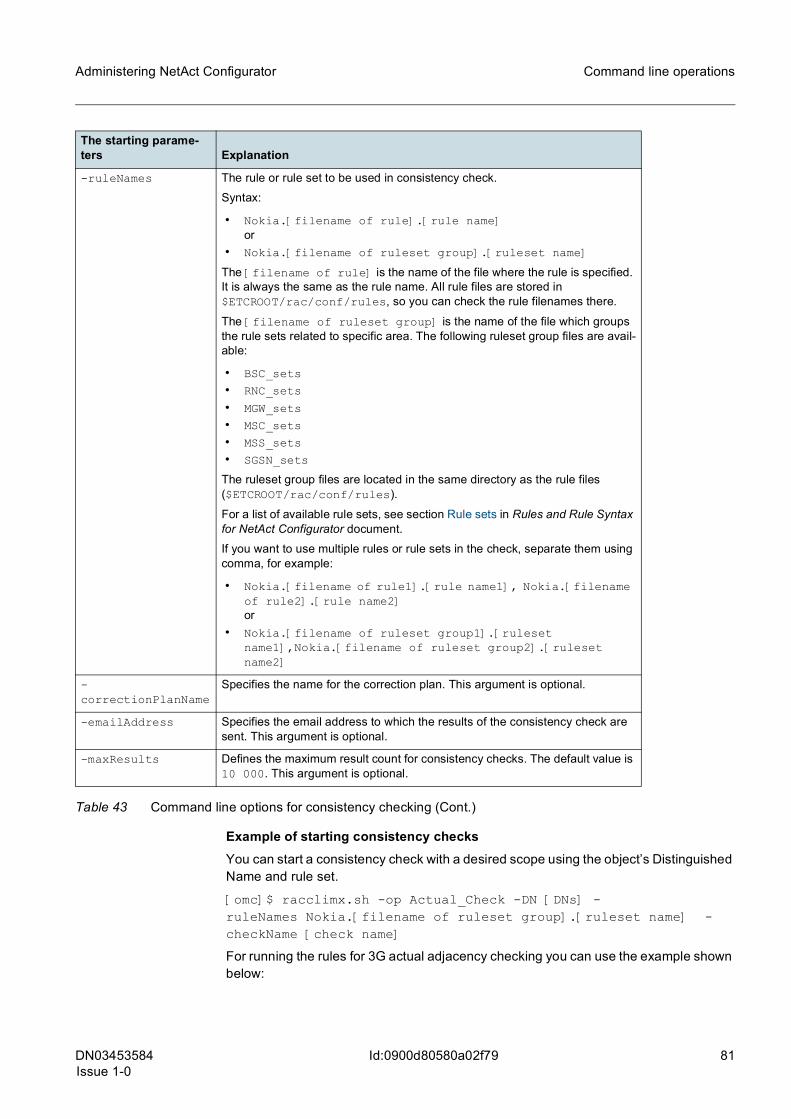
DN03453584Issue 1-0
81
Administering NetAct Configurator Command line operations
Id:0900d80580a02f79
Example of starting consistency checksYou can start a consistency check with a desired scope using the object’s Distinguished Name and rule set.
[omc]$ racclimx.sh -op Actual_Check -DN [DNs] -ruleNames Nokia.[filename of ruleset group].[ruleset name] -checkName [check name]
For running the rules for 3G actual adjacency checking you can use the example shown below:
-ruleNames The rule or rule set to be used in consistency check.
Syntax:
• Nokia.[filename of rule].[rule name]or
• Nokia.[filename of ruleset group].[ruleset name]
The [filename of rule] is the name of the file where the rule is specified. It is always the same as the rule name. All rule files are stored in $ETCROOT/rac/conf/rules, so you can check the rule filenames there.
The [filename of ruleset group] is the name of the file which groups the rule sets related to specific area. The following ruleset group files are avail-able:
• BSC_sets
• RNC_sets
• MGW_sets
• MSC_sets
• MSS_sets
• SGSN_sets
The ruleset group files are located in the same directory as the rule files ($ETCROOT/rac/conf/rules).
For a list of available rule sets, see section Rule sets in Rules and Rule Syntax for NetAct Configurator document.
If you want to use multiple rules or rule sets in the check, separate them using comma, for example:
• Nokia.[filename of rule1].[rule name1], Nokia.[filename of rule2].[rule name2]or
• Nokia.[filename of ruleset group1].[ruleset name1],Nokia.[filename of ruleset group2].[ruleset name2]
-correctionPlanName
Specifies the name for the correction plan. This argument is optional.
-emailAddress Specifies the email address to which the results of the consistency check are sent. This argument is optional.
-maxResults Defines the maximum result count for consistency checks. The default value is 10 000. This argument is optional.
The starting parame-ters Explanation
Table 43 Command line options for consistency checking (Cont.)

82 DN03453584Issue 1-0
Administering NetAct Configurator
Id:0900d80580a02f79
Command line operations
[omc]$ racclimx.sh -op Actual_Check -checkName myCheck -DN PLMNPLMN -ruleNames Nokia.RNC_sets.ActualAdjacencyChecking_3G
You can also define a correction plan where the corrections are done if errors are found during the consistency check:
When a single rule is used:
[omc]$ racclimx.sh -op Actual_Check -DN [DNs] -ruleNames Nokia.[filename of rule].[rule name] -checkName [check name] -correctionPlanName [name of the correction plan]
When a ruleset is used:
[omc]$ racclimx.sh -op Actual_Check -DN [DNs] -ruleNames Nokia.[filename of ruleset group].[ruleset name] -checkName [check name] -correctionPlanName [name of the correction plan]
Examples of checking the planned configuration against the actual configurationYou can check the target plan configuration on top of the actual configuration by using rule or rule set names and by defining the plan using the planName attribute. To do this, give the following command (the check is named by giving the <checkName> argu-ment):
When a single rule is used:
[omc]$ racclimx.sh -op Plan_check -planName [plan name] -ruleNames Nokia.[filename of rule].[rule name] -checkName [check name]
When a ruleset is used:
[omc]$ racclimx.sh -op Plan_check -planName [plan name] -ruleNames [filename of ruleset group].[ruleset name] -checkName [check name]
You can also check the target plan configuration on top of the actual configuration by defining a correction plan name:
When a single rule is used:
[omc]$ racclimx.sh -op Plan_check -planName [plan name] -ruleNames Nokia.[filename of rule].[rule name] -checkName [check name] -correctionPlanName [name of the corrections plan]
When a ruleset is used:
[omc]$ racclimx.sh -op Plan_check -planName [plan name] -ruleNames Nokia.[filename of ruleset group].[ruleset name] -checkName [check name] -correctionPlanName [name of the corrections plan]
g For more information on making consistency checks with the CM Analyzer user inter-face, see CM Analyzer Help.
11.13 3GPP operationsThis section contains information about 3GPP operations.
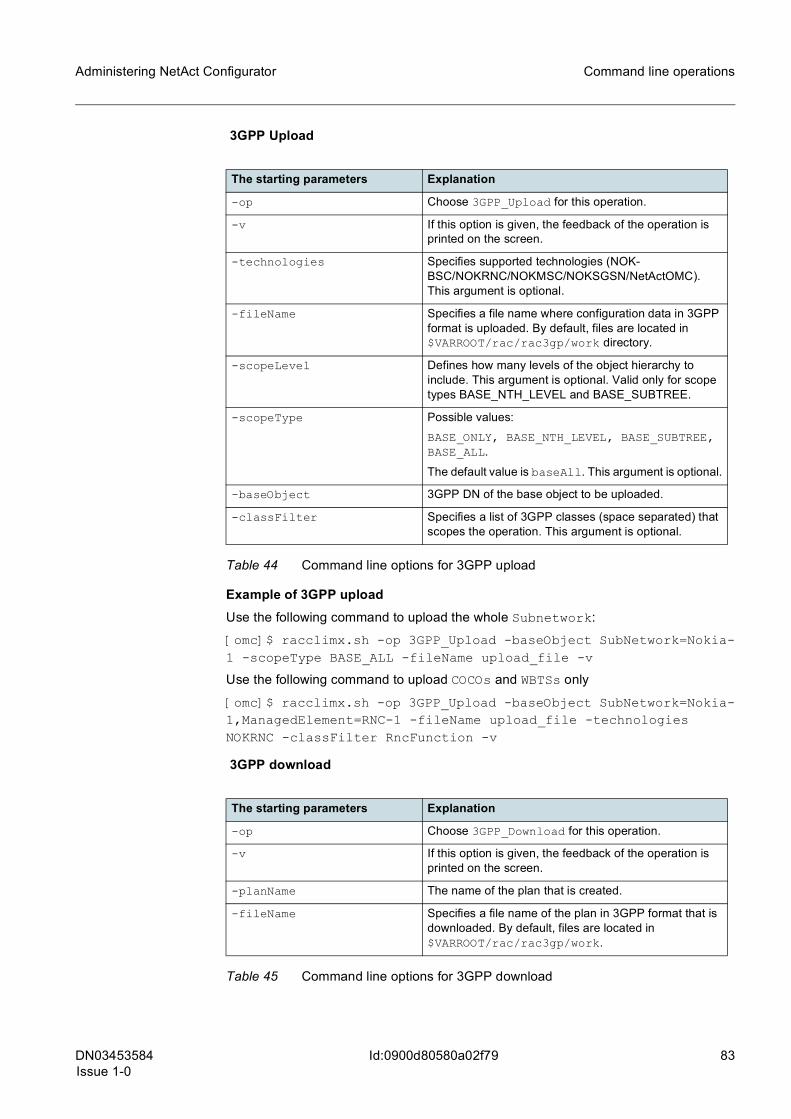
DN03453584Issue 1-0
83
Administering NetAct Configurator Command line operations
Id:0900d80580a02f79
3GPP Upload
Example of 3GPP uploadUse the following command to upload the whole Subnetwork:
[omc]$ racclimx.sh -op 3GPP_Upload -baseObject SubNetwork=Nokia-1 -scopeType BASE_ALL -fileName upload_file -v
Use the following command to upload COCOs and WBTSs only
[omc]$ racclimx.sh -op 3GPP_Upload -baseObject SubNetwork=Nokia-1,ManagedElement=RNC-1 -fileName upload_file -technologies NOKRNC -classFilter RncFunction -v
3GPP download
The starting parameters Explanation
-op Choose 3GPP_Upload for this operation.
-v If this option is given, the feedback of the operation is printed on the screen.
-technologies Specifies supported technologies (NOK-BSC/NOKRNC/NOKMSC/NOKSGSN/NetActOMC). This argument is optional.
-fileName Specifies a file name where configuration data in 3GPP format is uploaded. By default, files are located in $VARROOT/rac/rac3gp/work directory.
-scopeLevel Defines how many levels of the object hierarchy to include. This argument is optional. Valid only for scope types BASE_NTH_LEVEL and BASE_SUBTREE.
-scopeType Possible values:
BASE_ONLY, BASE_NTH_LEVEL, BASE_SUBTREE, BASE_ALL.
The default value is baseAll. This argument is optional.
-baseObject 3GPP DN of the base object to be uploaded.
-classFilter Specifies a list of 3GPP classes (space separated) that scopes the operation. This argument is optional.
Table 44 Command line options for 3GPP upload
The starting parameters Explanation
-op Choose 3GPP_Download for this operation.
-v If this option is given, the feedback of the operation is printed on the screen.
-planName The name of the plan that is created.
-fileName Specifies a file name of the plan in 3GPP format that is downloaded. By default, files are located in $VARROOT/rac/rac3gp/work.
Table 45 Command line options for 3GPP download
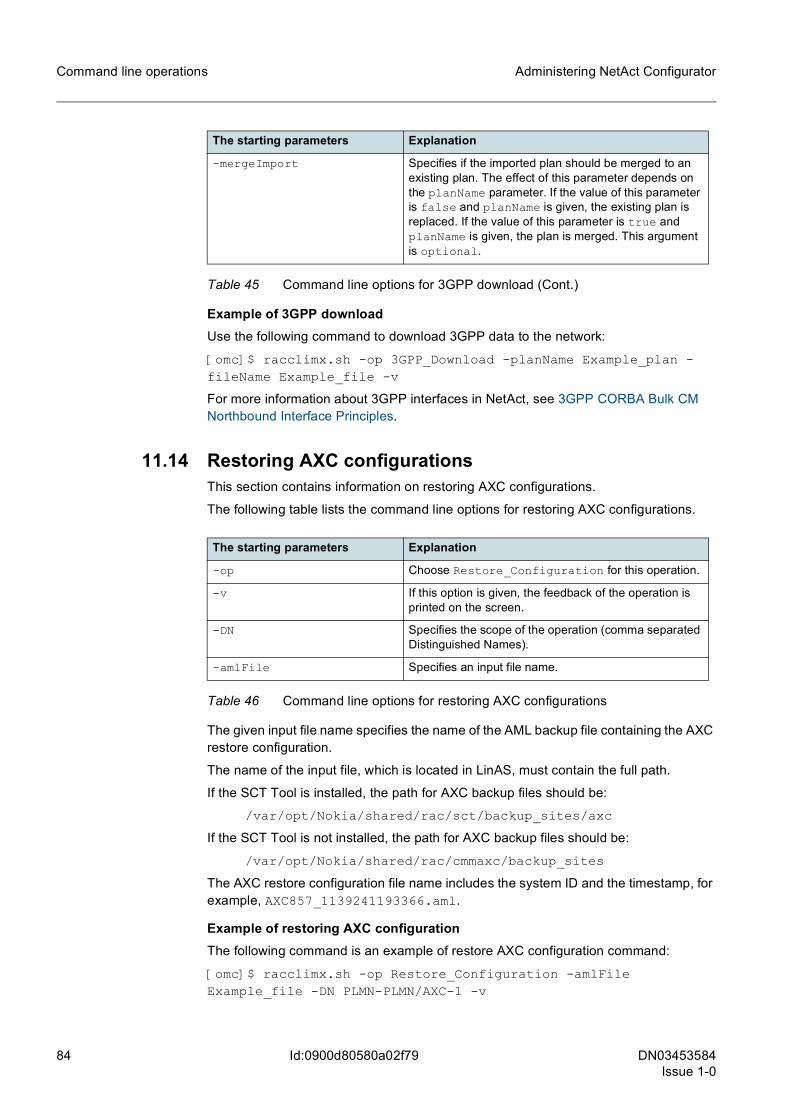
84 DN03453584Issue 1-0
Administering NetAct Configurator
Id:0900d80580a02f79
Command line operations
Example of 3GPP downloadUse the following command to download 3GPP data to the network:
[omc]$ racclimx.sh -op 3GPP_Download -planName Example_plan -fileName Example_file -v
For more information about 3GPP interfaces in NetAct, see 3GPP CORBA Bulk CM Northbound Interface Principles.
11.14 Restoring AXC configurationsThis section contains information on restoring AXC configurations.
The following table lists the command line options for restoring AXC configurations.
The given input file name specifies the name of the AML backup file containing the AXC restore configuration.
The name of the input file, which is located in LinAS, must contain the full path.
If the SCT Tool is installed, the path for AXC backup files should be:
/var/opt/Nokia/shared/rac/sct/backup_sites/axc
If the SCT Tool is not installed, the path for AXC backup files should be:
/var/opt/Nokia/shared/rac/cmmaxc/backup_sites
The AXC restore configuration file name includes the system ID and the timestamp, for example, AXC857_1139241193366.aml.
Example of restoring AXC configurationThe following command is an example of restore AXC configuration command:
[omc]$ racclimx.sh -op Restore_Configuration -amlFile Example_file -DN PLMN-PLMN/AXC-1 -v
-mergeImport Specifies if the imported plan should be merged to an existing plan. The effect of this parameter depends on the planName parameter. If the value of this parameter is false and planName is given, the existing plan is replaced. If the value of this parameter is true and planName is given, the plan is merged. This argument is optional.
The starting parameters Explanation
Table 45 Command line options for 3GPP download (Cont.)
The starting parameters Explanation
-op Choose Restore_Configuration for this operation.
-v If this option is given, the feedback of the operation is printed on the screen.
-DN Specifies the scope of the operation (comma separated Distinguished Names).
-amlFile Specifies an input file name.
Table 46 Command line options for restoring AXC configurations

DN03453584Issue 1-0
85
Administering NetAct Configurator Command line operations
Id:0900d80580a02f79
11.15 Managing the Remote Electrical Tilt using command lineThis section describes command line operations related to Remote Electrical Tilt (RET) feature. For more information about the feature, see Managing Remote Electrical Tilt document.
The following RET management commands can be run from the NetAct Configurator command line:
• -op Upload • -op Provision • -op Calibrate (only for RET management in WCDMA networks) • -op Binary_Download (only for RET management in WCDMA networks)
11.15.1 Command Line operations for RET management in WCDMA network
11.15.1.1 UploadThis operation uploads RET parameters during standard upload operation for the WBTS.
Example of upload operationThe following command uploads configuration without force option.
racclimx.sh -op Upload -DN PLMN-PLMN/RNC-190/WBTS-967 -btsContentInUse true
For more information about Upload operation, see Uploading actual values chapter.
For more information on how to upload actual configurations with the CM Operations Manager user interface, see CM Operations Manager Help.
11.15.1.2 Forced Upload This operation performs the ordinary upload preceded by synchronization of RETam data. This option may be used if there is a suspicion that the data in RETam database is not up to date.
The Forced Upload performs the Synchronization operation in background.
Example of Forced Upload operationWith the following command you can initialize upload configuration with force option.
racclimx.sh -op Upload -DN PLMN-PLMN/RNC-190/WBTS-967 -forcedUpload true -btsContentInUse true
For more information about Upload operation, see Uploading actual values chapter.
For more information on how to upload actual configurations with the CM Operations Manager user interface, see CM Operations Manager Help.
11.15.1.3 DownloadThis operation executes download of configuration file to RETam using plan file name. Provisioning RET plans is done by standard provisioning operation.
Example of provisioning operationThe following command provisions RET plans.

86 DN03453584Issue 1-0
Administering NetAct Configurator
Id:0900d80580a02f79
Command line operations
racclimx.sh -op Provision -planName RETplan
For more information about Provision operation, see Provisioning plans chapter.
For more information on how to upload actual configurations with the CM Operations Manager user interface, see CM Operations Manager Help.
11.15.1.4 Download vendor specific configuration fileThis operation downloads the vendor specific configuration file to the RET.
g This option is supported only by FlexiBTS.
Example of binary download operationracclimx.sh -op Binary_download -DN PLMN-PLMN/RNC-190/WBTS-967/BTSSC-1/RET-1 -binaryInputFile KA_739664_824-960.bin
11.15.1.5 CalibrationThis operation calibrates RET(s) under WBTS.
Example of calibration operationThe following command starts Calibration operation with scope provided as DN param-eter.
racclimx.sh -op Calibrate -DN PLMN-PLMN/RNC-190/WBTS-967/BTSSC-1/RET-1, PLMN-PLMN/RNC-190/WBTS-968/BTSSC-1/RET-1
Parameter Description
–op Choose Binary_Download for this operation.
–DN Specifies the scope of the operation (comma separated RET Distinguished Names without spaces).
–binaryInputFile Specifies the binary file name.
Table 47 Command line options for Binary Download operation
Parameter Description
–op Choose Calibrate for this operation.
–DN Specifies the scope of the operation (comma separated RET Distinguished Names without spaces).
Table 48 Command line options for Calibration operation

DN03453584Issue 1-0
87
Administering NetAct Configurator Command line operations
Id:0900d80580a02f79
11.15.2 Command Line operations for RET management in LTE network
11.15.2.1 Upload (with Command Line)This operation uploads RET parameters during standard Upload operation for the Flex-iMultiradio BTS (eNB).
Example of upload operationThe following command uploads the configuration.
racclimx.sh -op Upload -DN PLMN-PLMN/MRBTS-123
For more information about Upload operation, see Uploading actual values chapter.
For more information on how to upload actual configurations with the CM Operations Manager user interface, see CM Operations Manager Help.
11.15.2.2 Download (with Command Line) Provisioning RET plans is done by standard Provision operation.
Example of provisioning operationThe following command provisions RET plans.
racclimx.sh -op Provision -planName RETplan
For more information about Provision operation, see Provisioning plans chapter.
For more information on how to upload actual configurations with the CM Operations Manager user interface, see CM Operations Manager Help.
11.16 Administering RNC RNW and LTE iOMS queuesRNC RNW and LTE iOMS plan operations are queued before executing them to the network. There is one queue per each RNC/iOMS.
In case of LTE iOMS, configuration management operations to MRBTSs and PREBTSs are being queued.
The following operations are put to queue if RNC or iOMS is busy when user starts the operation:
• Activate • Pre-Activate • Upload
The following plan operations fail immediately if RNC or iOMS is busy when user starts the operation:
• Activate Pre-Activated Plan • Fall Back RNC RNW (for RNC RNW only)
Note that in case of RNC, the operations for the following configurations are not queued:
• RNC ATM/IP • AXC • FTM • WBTS Site Configuration
In case of LTE iOMS, operations to all fragments are queued.

88 DN03453584Issue 1-0
Administering NetAct Configurator
Id:0900d80580a02f79
Command line operations
11.16.1 Pausing/releasing an RNC RNW and LTE iOMS operation queueAdministrator can pause the RNC RNW and iOMS operation queue so that none of the queueing operations is started to RNC/iOMS. Pausing the queue does not affect to the currently ongoing operation in the RNC/iOMS. Configurator users can start new RNC RNW or iOMS operations which will be put at the end of the queue without any notifica-tion about the paused state of the queue. If scheduled RNC RNW or iOMS operations are started those will also be put to the end of the queue.
g After pausing the queue, statuses of all operations in the queue remain ‘Started’ in the Operation History tab of CM Operations Manager.
When Administrator releases the RNC RNW or iOMS operation queue the first operation in the queue will be started to RNC/iOMS and the queue will proceed normally.
The racopsopqctrl.sh command is used to run pause queue and resume queue operations. The following parameters are used for this operation:
Examples of the pause queue operations:[omc]$ racopsopqctrl.sh -operation pauseQueue -queueName PLMN-PLMN/RNC-123
[omc]$ racopsopqctrl.sh -operation pauseQueue -queueName LTE:PLMN-PLMN/OMS-1
Examples of the resume queue operations:[omc]$ racopsopqctrl.sh -operation resumeQueue -queueName PLMN-PLMN/RNC-123
[omc]$ racopsopqctrl.sh -operation resumeQueue -queueName LTE:PLMN-PLMN/OMS-1
When Administrator pauses/releases RNC RNW or iOMS operation queue, this opera-tion is visible in the CM Operations Manager Operation History views of all users. Paus-ing/releasing RNC RNW or iOMS operation queues can be configured to be hidden by
Parameter Description
–operation Specifies the type of the operation. Choose:
• pauseQueue - if you want to pause the queue
• resumeQueue - if you want to resume the queue
–queueName Specifies the name of the queue for which you want to perform the operation.
Example: PLMN-PLMN/RNC-123
g In case of the operation queue for iOMS, you have to add the “LTE:” prefix before the queue name, for example, LTE:PLMN-PLMN/OMS-1
Table 49 Command line options for pausing/releasing RNC RNW and iOMS opera-tion queue
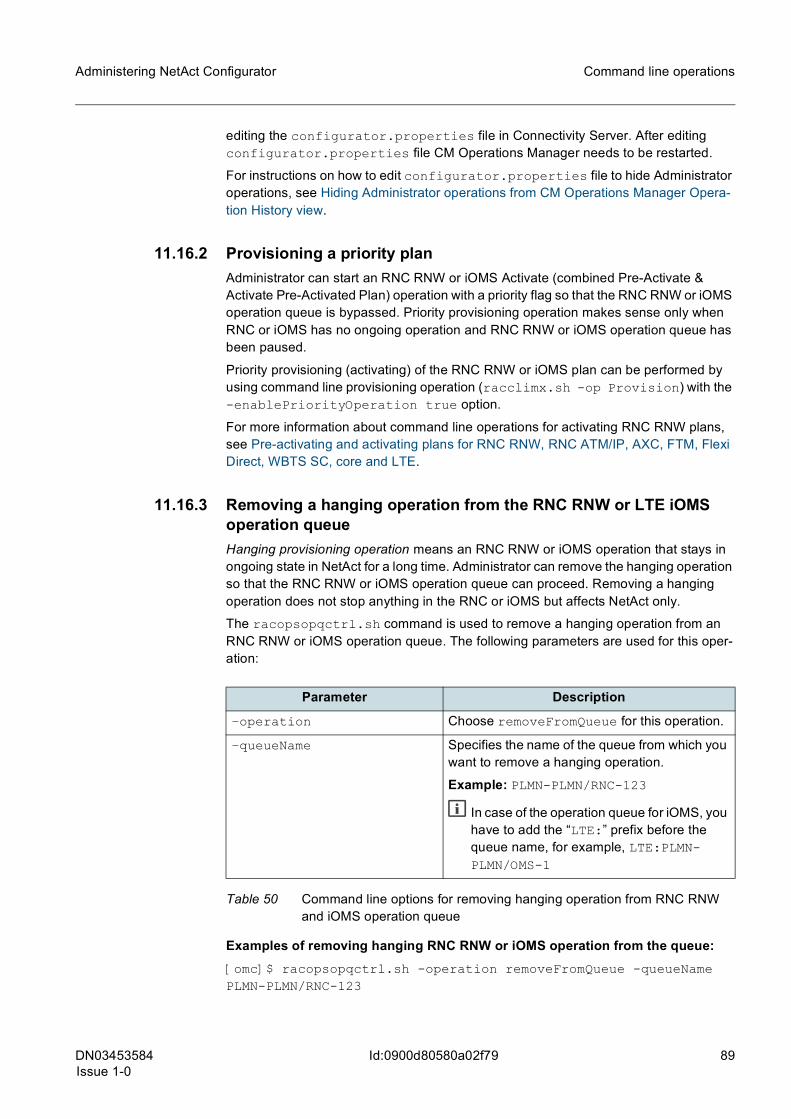
DN03453584Issue 1-0
89
Administering NetAct Configurator Command line operations
Id:0900d80580a02f79
editing the configurator.properties file in Connectivity Server. After editing configurator.properties file CM Operations Manager needs to be restarted.
For instructions on how to edit configurator.properties file to hide Administrator operations, see Hiding Administrator operations from CM Operations Manager Opera-tion History view.
11.16.2 Provisioning a priority planAdministrator can start an RNC RNW or iOMS Activate (combined Pre-Activate & Activate Pre-Activated Plan) operation with a priority flag so that the RNC RNW or iOMS operation queue is bypassed. Priority provisioning operation makes sense only when RNC or iOMS has no ongoing operation and RNC RNW or iOMS operation queue has been paused.
Priority provisioning (activating) of the RNC RNW or iOMS plan can be performed by using command line provisioning operation (racclimx.sh -op Provision) with the -enablePriorityOperation true option.
For more information about command line operations for activating RNC RNW plans, see Pre-activating and activating plans for RNC RNW, RNC ATM/IP, AXC, FTM, Flexi Direct, WBTS SC, core and LTE.
11.16.3 Removing a hanging operation from the RNC RNW or LTE iOMS operation queueHanging provisioning operation means an RNC RNW or iOMS operation that stays in ongoing state in NetAct for a long time. Administrator can remove the hanging operation so that the RNC RNW or iOMS operation queue can proceed. Removing a hanging operation does not stop anything in the RNC or iOMS but affects NetAct only.
The racopsopqctrl.sh command is used to remove a hanging operation from an RNC RNW or iOMS operation queue. The following parameters are used for this oper-ation:
Examples of removing hanging RNC RNW or iOMS operation from the queue:[omc]$ racopsopqctrl.sh -operation removeFromQueue -queueName PLMN-PLMN/RNC-123
Parameter Description
–operation Choose removeFromQueue for this operation.
–queueName Specifies the name of the queue from which you want to remove a hanging operation.
Example: PLMN-PLMN/RNC-123
g In case of the operation queue for iOMS, you have to add the “LTE:” prefix before the queue name, for example, LTE:PLMN-PLMN/OMS-1
Table 50 Command line options for removing hanging operation from RNC RNW and iOMS operation queue

90 DN03453584Issue 1-0
Administering NetAct Configurator
Id:0900d80580a02f79
Command line operations
[omc]$ racopsopqctrl.sh -operation removeFromQueue -queueName LTE:PLMN-PLMN/OMS-1
11.17 Command Manager command line operationsThis section provides information on executing Command Manager operations using the Command Line Interface.
For the list of supported network elements, see Command Manager in NetAct Configu-rator Principles.
The following table lists the command line options for executing MML commands or command files in network elements using the Command Line Interface:
The starting parameters Explanation
-op Choose MMLCommandExecution to execute a single command or command file to single or multiple network elements. Use below arguments to specify operation properties.
-DN Distinguished Name of the network element(s) to which you want to send a command or command file. Use comma separated values to specify multiple network ele-ments. This argument is mandatory.
-mmlCommand Specifies MML command that you want to execute in given network element(s).
g The MML command has to be enclosed within double quotes, for example, "ZUSI;".
If the MML command itself contains double quotes as a part of the command, then it has to be enclosed within single quotes.
This option is mutually exclusive with the -fileName option.
-fileName Specifies the file with the group of MML commands that you want to execute in given network element(s).
g Command file has to be stored in the /var/opt/nokia/oss/global/cmmmld/mmli
nput directory.
This option is mutually exclusive with the -mmlCommand option.
-coreStopAtFirstError Specifies if the command file execution is stopped when the first error occurs. This argument is optional. Possible values are: true or false. The default value is false.
-commandManagerConnectionTimeout
Specifies the connection timeout in seconds. This argument is optional. Argument range is 1..3600 seconds. The default value is 20.
Table 51 Command line options for executing Command Manager operations

DN03453584Issue 1-0
91
Administering NetAct Configurator Command line operations
Id:0900d80580a02f79
If the MML command or command file execution is successful, the MML printouts are stored in the following directory: /var/opt/nokia/oss/global/cmmmld/mmloutput
g There is no warning / confirmation for dangerous commands when executing Command Manager operations using the Command Line Interface.
Examples of Command Manager command line operations:Executing a single command on a single network element:
[omc]$ racclimx.sh -op MMLCommandExecution -coreStopAtFirstError <true or false> -DN <DN> -mmlCommand <“command”> -commandManagerConnectionTimeout <value> -coreIsToUpperCase <true or false>
Executing a command file on a single network element:
[omc]$ racclimx.sh -op MMLCommandExecution -coreStopAtFirstError <true or false> -DN <DN> -fileName <command_file_name> -commandManagerConnectionTimeout <value> -coreIsToUpperCase <true or false>
Executing a single command on multiple network elements:
[omc]$ racclimx.sh -op MMLCommandExecution -coreStopAtFirstError <true or false> -DN <DN1,DN2,..> -mmlCommand <“command”> -commandManagerConnectionTimeout <value> -coreIsToUpperCase <true or false>
Executing a command file on multiple network elements:
[omc]$ racclimx.sh -op MMLCommandExecution -coreStopAtFirstError <true or false> -DN <DN1,DN2,..> - fileName <command_file_name> -commandManagerConnectionTimeout <value> -coreIsToUpperCase <true or false>
11.18 Zero touch BTS configuration command line operationsThis section provides information on executing zero touch BTS configuration operations in LTE and WCDMA networks using the Command Line Interface.
For more information about automated site plan preparation in WCDMA and LTE networks using zero touch BTS configuration feature, see the Zero touch BTS configu-ration chapter in the Configuring WCDMA Flexi BTS Using Auto Connection and Auto Configuration document or the Zero touch BTS configuration chapter in the Configuring LTE Flexi Multiradio BTS Using Auto Connection and Auto Configuration document.
To execute zero touch BTS configuration operation using the Command Line Interface, run the following command:
-coreIsToUpperCase Specifies if the user input is converted to the upper case when sending MML commands to the network element. This argument is optional. Possible values are: true or false. The default value is true.
The starting parameters Explanation
Table 51 Command line options for executing Command Manager operations
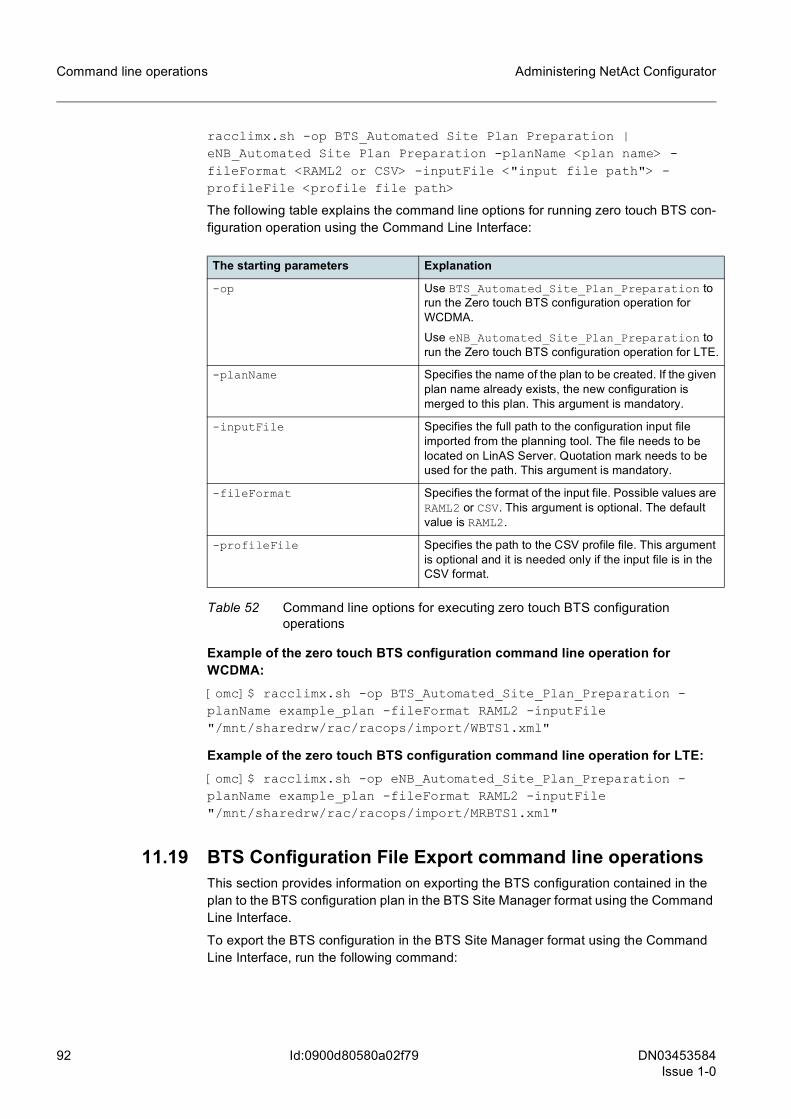
92 DN03453584Issue 1-0
Administering NetAct Configurator
Id:0900d80580a02f79
Command line operations
racclimx.sh -op BTS_Automated Site Plan Preparation | eNB_Automated Site Plan Preparation -planName <plan name> -fileFormat <RAML2 or CSV> -inputFile <"input file path"> -profileFile <profile file path>
The following table explains the command line options for running zero touch BTS con-figuration operation using the Command Line Interface:
Example of the zero touch BTS configuration command line operation for WCDMA:[omc]$ racclimx.sh -op BTS_Automated_Site_Plan_Preparation -planName example_plan -fileFormat RAML2 -inputFile "/mnt/sharedrw/rac/racops/import/WBTS1.xml"
Example of the zero touch BTS configuration command line operation for LTE:[omc]$ racclimx.sh -op eNB_Automated_Site_Plan_Preparation -planName example_plan -fileFormat RAML2 -inputFile "/mnt/sharedrw/rac/racops/import/MRBTS1.xml"
11.19 BTS Configuration File Export command line operationsThis section provides information on exporting the BTS configuration contained in the plan to the BTS configuration plan in the BTS Site Manager format using the Command Line Interface.
To export the BTS configuration in the BTS Site Manager format using the Command Line Interface, run the following command:
The starting parameters Explanation
-op Use BTS_Automated_Site_Plan_Preparation to run the Zero touch BTS configuration operation for WCDMA.
Use eNB_Automated_Site_Plan_Preparation to run the Zero touch BTS configuration operation for LTE.
-planName Specifies the name of the plan to be created. If the given plan name already exists, the new configuration is merged to this plan. This argument is mandatory.
-inputFile Specifies the full path to the configuration input file imported from the planning tool. The file needs to be located on LinAS Server. Quotation mark needs to be used for the path. This argument is mandatory.
-fileFormat Specifies the format of the input file. Possible values are RAML2 or CSV. This argument is optional. The default value is RAML2.
-profileFile Specifies the path to the CSV profile file. This argument is optional and it is needed only if the input file is in the CSV format.
Table 52 Command line options for executing zero touch BTS configuration operations
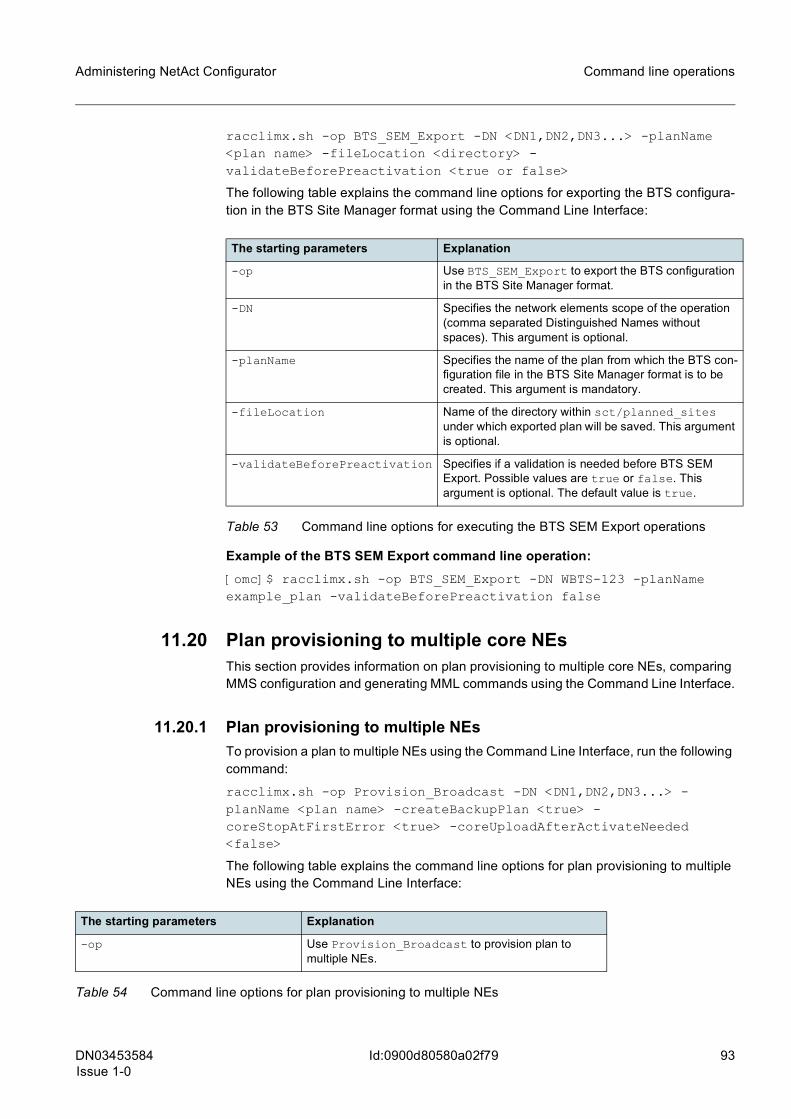
DN03453584Issue 1-0
93
Administering NetAct Configurator Command line operations
Id:0900d80580a02f79
racclimx.sh -op BTS_SEM_Export -DN <DN1,DN2,DN3...> -planName <plan name> -fileLocation <directory> -validateBeforePreactivation <true or false>
The following table explains the command line options for exporting the BTS configura-tion in the BTS Site Manager format using the Command Line Interface:
Example of the BTS SEM Export command line operation:[omc]$ racclimx.sh -op BTS_SEM_Export -DN WBTS-123 -planName example_plan -validateBeforePreactivation false
11.20 Plan provisioning to multiple core NEsThis section provides information on plan provisioning to multiple core NEs, comparing MMS configuration and generating MML commands using the Command Line Interface.
11.20.1 Plan provisioning to multiple NEsTo provision a plan to multiple NEs using the Command Line Interface, run the following command:
racclimx.sh -op Provision_Broadcast -DN <DN1,DN2,DN3...> -planName <plan name> -createBackupPlan <true> -coreStopAtFirstError <true> -coreUploadAfterActivateNeeded <false>
The following table explains the command line options for plan provisioning to multiple NEs using the Command Line Interface:
The starting parameters Explanation
-op Use BTS_SEM_Export to export the BTS configuration in the BTS Site Manager format.
-DN Specifies the network elements scope of the operation (comma separated Distinguished Names without spaces). This argument is optional.
-planName Specifies the name of the plan from which the BTS con-figuration file in the BTS Site Manager format is to be created. This argument is mandatory.
-fileLocation Name of the directory within sct/planned_sites under which exported plan will be saved. This argument is optional.
-validateBeforePreactivation Specifies if a validation is needed before BTS SEM Export. Possible values are true or false. This argument is optional. The default value is true.
Table 53 Command line options for executing the BTS SEM Export operations
The starting parameters Explanation
-op Use Provision_Broadcast to provision plan to multiple NEs.
Table 54 Command line options for plan provisioning to multiple NEs
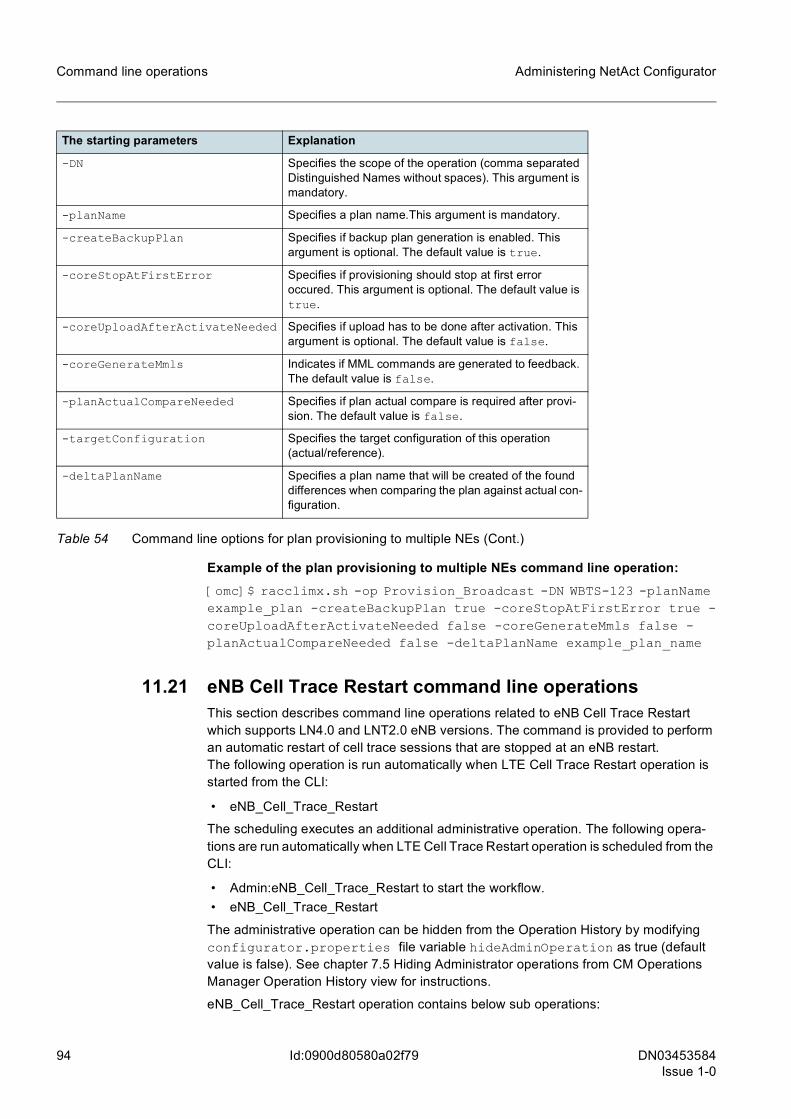
94 DN03453584Issue 1-0
Administering NetAct Configurator
Id:0900d80580a02f79
Command line operations
Example of the plan provisioning to multiple NEs command line operation:[omc]$ racclimx.sh -op Provision_Broadcast -DN WBTS-123 -planName example_plan -createBackupPlan true -coreStopAtFirstError true -coreUploadAfterActivateNeeded false -coreGenerateMmls false -planActualCompareNeeded false -deltaPlanName example_plan_name
11.21 eNB Cell Trace Restart command line operationsThis section describes command line operations related to eNB Cell Trace Restart which supports LN4.0 and LNT2.0 eNB versions. The command is provided to perform an automatic restart of cell trace sessions that are stopped at an eNB restart. The following operation is run automatically when LTE Cell Trace Restart operation is started from the CLI:
• eNB_Cell_Trace_Restart
The scheduling executes an additional administrative operation. The following opera-tions are run automatically when LTE Cell Trace Restart operation is scheduled from the CLI:
• Admin:eNB_Cell_Trace_Restart to start the workflow. • eNB_Cell_Trace_Restart
The administrative operation can be hidden from the Operation History by modifying configurator.properties file variable hideAdminOperation as true (default value is false). See chapter 7.5 Hiding Administrator operations from CM Operations Manager Operation History view for instructions.
eNB_Cell_Trace_Restart operation contains below sub operations:
-DN Specifies the scope of the operation (comma separated Distinguished Names without spaces). This argument is mandatory.
-planName Specifies a plan name.This argument is mandatory.
-createBackupPlan Specifies if backup plan generation is enabled. This argument is optional. The default value is true.
-coreStopAtFirstError Specifies if provisioning should stop at first error occured. This argument is optional. The default value is true.
-coreUploadAfterActivateNeeded Specifies if upload has to be done after activation. This argument is optional. The default value is false.
-coreGenerateMmls Indicates if MML commands are generated to feedback. The default value is false.
-planActualCompareNeeded Specifies if plan actual compare is required after provi-sion. The default value is false.
-targetConfiguration Specifies the target configuration of this operation (actual/reference).
-deltaPlanName Specifies a plan name that will be created of the found differences when comparing the plan against actual con-figuration.
The starting parameters Explanation
Table 54 Command line options for plan provisioning to multiple NEs (Cont.)

DN03453584Issue 1-0
95
Administering NetAct Configurator Command line operations
Id:0900d80580a02f79
• Preparing the Cell Trace Restart • Finding MTRACE MOI(s) with Cell trace mode (cellTrcMode) parameter set
FALSE in the scope of all operational eNBs that are managed by this NetAct • Creating temporary deletion plan eNB_Cell_Trace_Restart_deletion_<date and
time> for MTRACE MOI(s) • Creating temporary creation plan eNB_Cell_Trace_Restart_creation_<date and
time> for MTRACE MOI(s) • Provisioning the deletion plan to eNB(s) • Provisioning the creation plan to eNB(s) • Cell Trace Restart Verify checks that MTRACE objects are created with cellTrcMode
TRUE.
The status of the operation can be seen in the Operation History tab of CM Operations Manager. General operation row functionalities are supported in CM Operations Manager except restart. For more information, see CM Operations Manager Help.
g Note that:
• The operation makes the best effort to restart trace session by deleting and recreat-ing MTRACE object. Note that plan provisioning failure brings a potential risk that MTRACE object is lost from eNB. In case when Refresh operation fails, analyze an error using the CM Operations Manager feedbacks. You can create an MTRACE object back using the create plan that the operation has generated e.g. with the help of plan actual compare tool,
• you can run only one operation at a time. If several Restart operations are running in parallel there is a potential risk of the loss of MTRACE objects,
• you can keep the scheduled interval not more frequently than on every 60 minutes to avoid an extensive system load caused by the various operation tasks that will be executed. Also possible parallel operations for eNBs may cause delayed provisions extending the execution time, thus allowing the consequent executions to be run in parallel and causing a loss of Traces and erroneous executions. The recommended interval is preferably several hours or daily interval. For an additional info, please see the Scheduling command line operations chapter.
• you can use interrupt from the CM Operation Manager Operation History tab only if the eNB Cell Trace command is jammed and is not proceeding. Operation interrup-tion in the wrong place can cause the loss of MTRACE objects.
g You can search MTRACE MOI(s) with cellTrcMode FALSE using the Search and modify functionality in CM Editor. For more information, see the Searching managed objects from the database section in CM Editor Help.
The starting parameters Explanation
-op Choose eNB_Cell_Trace_Restart for this operation.
-v If this option is given, the feedback of the operation is printed on the screen.
-schedule Enter a date in format yyyy-MM-dd for starting/stopping the operation and the interval in format hhh:mm.
Table 55 eNB Cell Trace Restart

96 DN03453584Issue 1-0
Administering NetAct Configurator
Id:0900d80580a02f79
Command line operations
Example of eNB cell trace restartTo print out cell trace help, enter the following command:
[omc]$ racclimx.sh –op eNB_Cell_Trace_Restart –h
To run cell trace immediately, enter the following command:
[omc]$ racclimx.sh –op eNB_Cell_Trace_Restart
To schedule a command to be run in 1 hour interval, enter the following command:
[omc]$ racclimx.sh -op eNB_Cell_Trace_Restart -schedule start=2012-09-21 end=2012-09-22 interval=001:00
For more information, see Scheduling command line operations.
-opsName With this option you can define the user specific opera-tion name.
The starting parameters Explanation
Table 55 eNB Cell Trace Restart (Cont.)

DN03453584Issue 1-0
97
Administering NetAct Configurator Where to find more information
Id:0900d80580a02f79
12 Where to find more informationFor more information on checking and correcting the NetAct Configurator database, refer to the Troubleshooting Configuration Management Problems document.
For more technical information, such as descriptions of Configurator user interface applications, processes and configuration files, see NetAct Configurator Technical Ref-erence Guide.
For information on DNS management in the NetAct system, see Managing the DNS in NetAct.
For general principles for system administration in NetAct, see System Administration Principles.
For more information on user management and setting user permissions, see Managing Users.
For more information on crontab files, see Managing crontab files in Managing the Linux System.
For information about creating BTS Sites, see Creating BTS Sites.
For more information on server roles and server configurations, see NetAct hardware in NetAct System Principles.

98 DN03453584Issue 1-0
Administering NetAct Configurator
Id:0900d80580a02f79
Appendix A: Parameters related to features under pa-rameter-based license
13 Appendix A: Parameters related to features under parameter-based license

DN03453584Issue 1-0
99
Administering NetAct Configurator Appendix A: Parameters related to features under pa-rameter-based license
Id:0900d80580a02f79
Sales itemParameter-based
license nameManaged
Object Parameters under license
HSPA Parameter Man-agement
CM_MGMT_HSPA RNC ActivityFactorForHSPA
AMRLCBufMaxOverbook2NRT
AMRLCBufMaxOverbook3NRT
AMRLCOnEDCHOfNRTPSCount
AMRLCOnEDCHOfNRTPSMaxDAT
AMRLCOnEDCHOfNRTPSMaxMRW
AMRLCOnEDCHOfNRTPSMaxRST
AMRLCOnEDCHOfNRTPSPeriodMax
AMRLCOnEDCHOfNRTPSPeriodMin
AMRLCOnEDCHOfNRTPSPollPDU
AMRLCOnEDCHOfNRTPSPollSDU
AMRLCOnEDCHOfNRTPSPollWindow
AMRLCOnEDCHOfNRTPSTriggers
AMRLCOnHSDSCHOfNRTPSCount
AMRLCOnHSDSCHOfNRTPSFilterReTX
AMRLCOnHSDSCHOfNRTPSMaxDAT
AMRLCOnHSDSCHOfNRTPSMaxMRW
AMRLCOnHSDSCHOfNRTPSMaxRST
AMRLCOnHSDSCHOfNRTPSPeriodMax
AMRLCOnHSDSCHOfNRTPSPeriodMin
AMRLCOnHSDSCHOfNRTPSPollPDU
AMRLCOnHSDSCHOfNRTPSPollSDU
AMRLCOnHSDSCHOfNRTPSPollWindow
AMRLCOnHSDSCHOfNRTPSTriggers
AMRWithEDCH
AMRWithHSDSCH
DCHSlopeOfTheCurve
DRRCForHSDPALayerServices
DirectedRRCForHSDPALayerEnhanc
DisablePowerInHSDPALayeringDecision
EDCHQOSClasses
FactorEDCHMaxBitRate
HappyBitDelayConditionEDCH
HSDPACPICHAveWindow
HSDPACPICHCTSRepPer
HSDPACPICHEcNoThreshold
HSDPAChaTypeSwitchWindow
HSDPAFlowControlLowThresholdDedicatedVCC
HSDPAMaxCellChangeRepetition
HSDPAPriority
Table 56 Parameters related to features under parameter-based license

100 DN03453584Issue 1-0
Administering NetAct Configurator
Id:0900d80580a02f79
Appendix A: Parameters related to features under pa-rameter-based license
HSDPARRCdiversity
HSDSCHQoSclasses
HSPDSCHAdjustPeriod
HSUPACtrlChanAdjPeriod
HsdschGuardTimerHO
IurPriority
MACdflowutilRelThr
MaxBitRateNRTMACDFlow
MaxReWaitTime
ServicesToHSDPALayer
StepSizeForDCHBLER
StepSizeForEDCHBLER
TGPLAMRHSDPAInterFreq
TGPLHSDPAInterFreq
ThresholdMaxEDPDCHSR1920kbps
ThresholdMaxEDPDCHSR3840kbps
ThresholdMaxEDPDCHSR960kbps
WBTS BTSSupportForHSPACM
DelayThresholdMax
DelayThresholdMid
DelayThresholdMin
HSDPACCEnabled
MaxNumberEDCHLCG
ProbabilityFactorMax
WinLCHSDPA
WinLCHSUPA
Sales itemParameter-based
license nameManaged
Object Parameters under license
Table 56 Parameters related to features under parameter-based license (Cont.)

DN03453584Issue 1-0
101
Administering NetAct Configurator Appendix A: Parameters related to features under pa-rameter-based license
Id:0900d80580a02f79
WCEL CellWeightForHSDPALayering
DirectedRRCForHSDPALayerEnabled
EDCHCapability
EDCHMinimumSetETFCI
EDCHOpState
HSDPA64UsersEnabled
HSDPAFmcgIdentifier
HSDPAFmciIdentifier
HSDPAFmcsIdentifier
HSDPALayeringCommonChEnabled
HSDPAMPOHSDPAMaxBitrateUL
HSDPAcapability
HSDPAenabled
HSPAFmcsIdentifier
HSPA72UsersPerCell
HSPDSCHCodeSet
HSUPAEnabled
HspaMultiNrtRabSupport
MaxNumberEDCHCell
MaxNumberHSDPAUsers
MaxNumberHSDSCHMACdFlows
MaxTotalUplinkSymbolRate
NonHSEventECommMeas
NumberEDCHReservedSHOBranchAdditions
OCULNRTDCHGrantedMinAllocT
PrxLoadMarginEDCH
PrxMaxTargetBTS
PrxTargetPSMax
PrxTargetPSMin
PrxTargetPSStepDown
PtxHighHSDPAPwr
PtxMaxEHICH
PtxMaxHSDPA
PtxOffsetEAGCH
PtxOffsetEAGCHDPCCH
PtxOffsetEHICHDPCCH
PtxOffsetERGCH
PtxOffsetERGCHDPCCH
PtxOffsetExxCH2ms
PtxOffsetExxCHSHO
Sales itemParameter-based
license nameManaged
Object Parameters under license
Table 56 Parameters related to features under parameter-based license (Cont.)
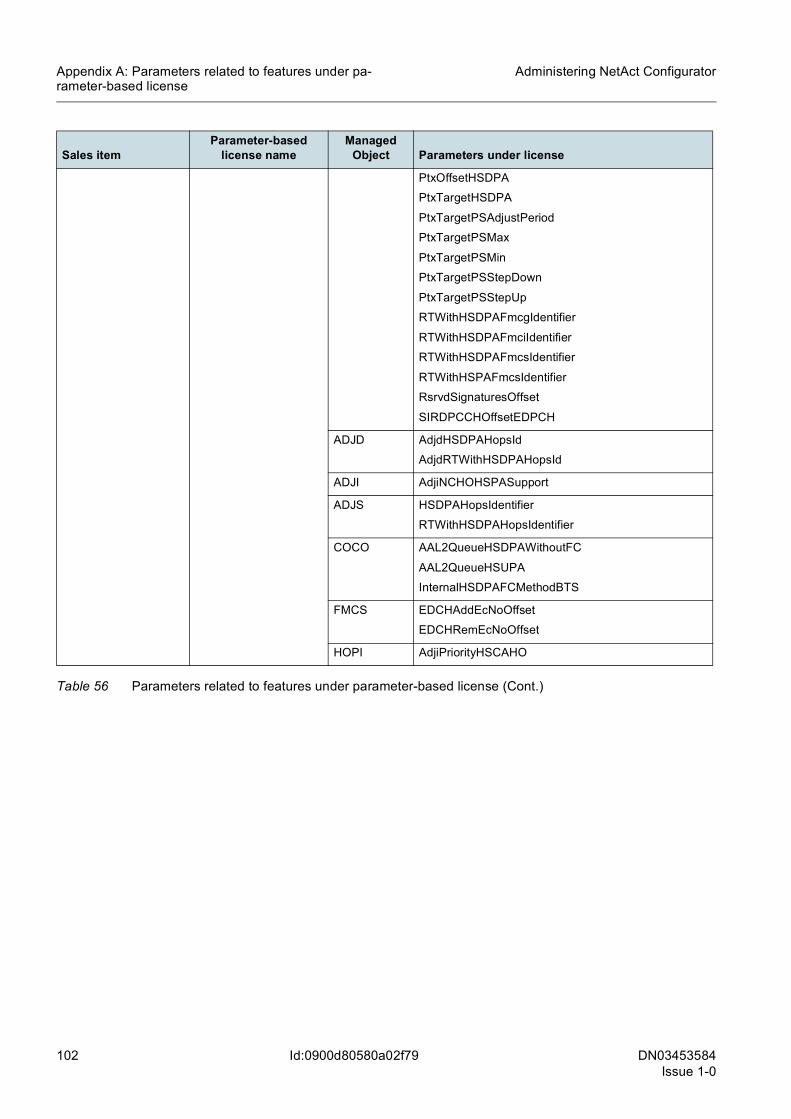
102 DN03453584Issue 1-0
Administering NetAct Configurator
Id:0900d80580a02f79
Appendix A: Parameters related to features under pa-rameter-based license
PtxOffsetHSDPA
PtxTargetHSDPA
PtxTargetPSAdjustPeriod
PtxTargetPSMax
PtxTargetPSMin
PtxTargetPSStepDown
PtxTargetPSStepUp
RTWithHSDPAFmcgIdentifier
RTWithHSDPAFmciIdentifier
RTWithHSDPAFmcsIdentifier
RTWithHSPAFmcsIdentifier
RsrvdSignaturesOffset
SIRDPCCHOffsetEDPCH
ADJD AdjdHSDPAHopsId
AdjdRTWithHSDPAHopsId
ADJI AdjiNCHOHSPASupport
ADJS HSDPAHopsIdentifier
RTWithHSDPAHopsIdentifier
COCO AAL2QueueHSDPAWithoutFC
AAL2QueueHSUPA
InternalHSDPAFCMethodBTS
FMCS EDCHAddEcNoOffset
EDCHRemEcNoOffset
HOPI AdjiPriorityHSCAHO
Sales itemParameter-based
license nameManaged
Object Parameters under license
Table 56 Parameters related to features under parameter-based license (Cont.)

DN03453584Issue 1-0
103
Administering NetAct Configurator Appendix A: Parameters related to features under pa-rameter-based license
Id:0900d80580a02f79
HSPA Quality of Service Parameter Management
CM_MGMT_HSPA_QOS
RNC EDCHStrPSCount
EDCHStrPSDiscardTime
EDCHStrPSMaxDAT
EDCHStrPSMaxMRW
EDCHStrPSMaxRST
EDCHStrPSPeriodMax
EDCHStrPSPeriodMin
EDCHStrPSPollPDU
EDCHStrPSPollSDU
EDCHStrPSPollWindow
EDCHStrPSTriggers
HSDSCHStrDiscardTime
HSDSCHStrPSCount
HSDSCHStrPSFilterReTX
HSDSCHStrPSMaxDAT
HSDSCHStrPSMaxMRW
HSDSCHStrPSMaxRST
HSDSCHStrPSPeriodMax
HSDSCHStrPSPeriodMin
HSDSCHStrPSPollPDU
HSDSCHStrPSPollSDU
HSDSCHStrPSPollWindow
HSDSCHStrPSTriggers
EDCHMACdflowtputStrTtT
EDCHMaxHARQReTxStr
FreePtxSafetyMarginStr
HSDPAInitialBRULStrNRT
HSDPAMinBRULStrNRT
NBRForPri0DL
NBRForPri0UL
NBRForPri10DL
NBRForPri10UL
NBRForPri11DL
NBRForPri11UL
NBRForPri12DL
NBRForPri12UL
NBRForPri1DL
NBRForPri1UL
NBRForPri2DL
NBRForPri2UL
Sales itemParameter-based
license nameManaged
Object Parameters under license
Table 56 Parameters related to features under parameter-based license (Cont.)
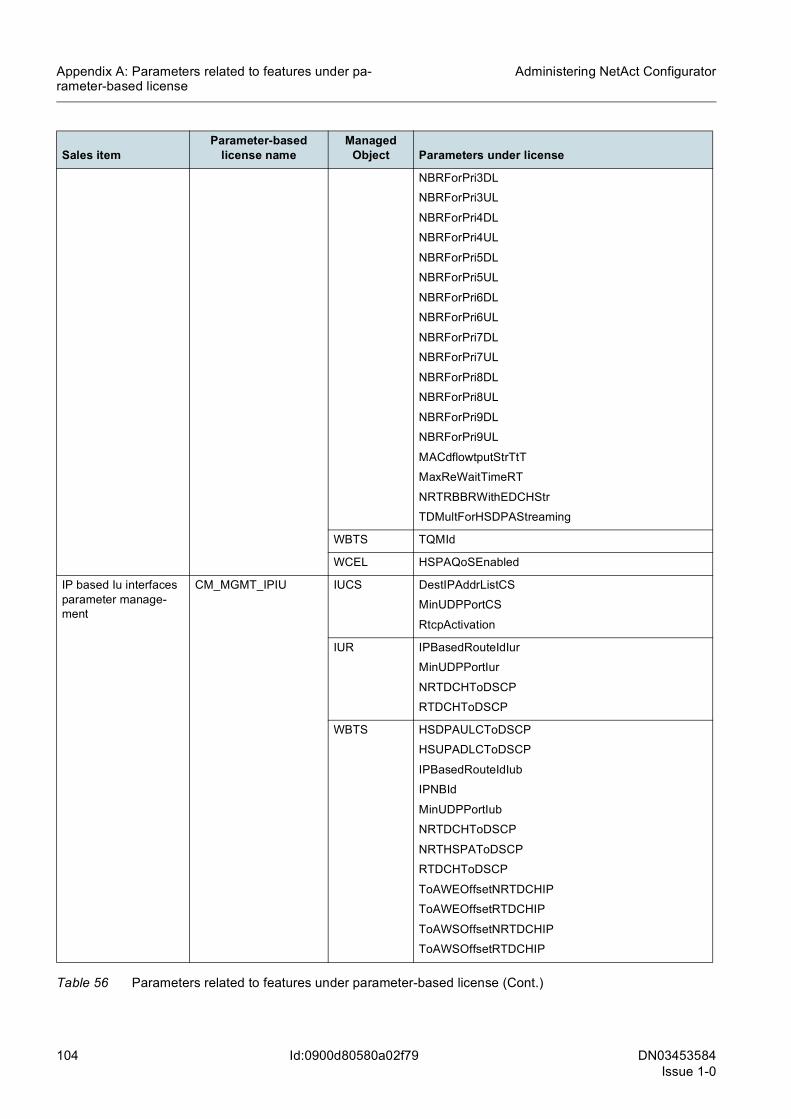
104 DN03453584Issue 1-0
Administering NetAct Configurator
Id:0900d80580a02f79
Appendix A: Parameters related to features under pa-rameter-based license
NBRForPri3DL
NBRForPri3UL
NBRForPri4DL
NBRForPri4UL
NBRForPri5DL
NBRForPri5UL
NBRForPri6DL
NBRForPri6UL
NBRForPri7DL
NBRForPri7UL
NBRForPri8DL
NBRForPri8UL
NBRForPri9DL
NBRForPri9UL
MACdflowtputStrTtT
MaxReWaitTimeRT
NRTRBBRWithEDCHStr
TDMultForHSDPAStreaming
WBTS TQMId
WCEL HSPAQoSEnabled
IP based Iu interfaces parameter manage-ment
CM_MGMT_IPIU IUCS DestIPAddrListCS
MinUDPPortCS
RtcpActivation
IUR IPBasedRouteIdIur
MinUDPPortIur
NRTDCHToDSCP
RTDCHToDSCP
WBTS HSDPAULCToDSCP
HSUPADLCToDSCP
IPBasedRouteIdIub
IPNBId
MinUDPPortIub
NRTDCHToDSCP
NRTHSPAToDSCP
RTDCHToDSCP
ToAWEOffsetNRTDCHIP
ToAWEOffsetRTDCHIP
ToAWSOffsetNRTDCHIP
ToAWSOffsetRTDCHIP
Sales itemParameter-based
license nameManaged
Object Parameters under license
Table 56 Parameters related to features under parameter-based license (Cont.)

DN03453584Issue 1-0
105
Administering NetAct Configurator
Id:0900d80580a02f7a
Index
AApplication Manager 18applications
CM Editor 43CM Operations Manager 47, 51, 52, 54, 55, 59, 66, 67DNS management 20Plan Editor 43Radio Network Manager 43
BBSC optional features 43BSC version and options 42
CC -number
BSC 42checking
actual configuration 80plans 80
cleaning up log files 32CM Editor 43CM Operations
Manager 47, 51, 52, 54, 55, 59, 66, 67command line operations 46configuration files
system.properties 33zrnconcmplamx.cf 24
configuringDDNS proxy 17Name Server 21zones 21
CSV 63customizing
CM Bulk Data subsystem 32
DDDNS access user 17, 20DDNS proxy 17defining
email notifications in LDAP 33DNS management 20, 24
Ffeedback levels for upload 48, 67
Iimporting
rules 33
IP address 33
Kkey files 21
LLDAP 29, 33Lightweight Directory Access Protocol 29
MMGW version and options 40, 41MML 40, 41, 42, 43MSC version and options 40
Nnaamanmx.cf 33Name Server 21NetAct Permission Manager 20NetAct Start 18Network Editor 18, 40
Pparameters in LDAP 29Plan Editor 43Primary Name Server 17, 22
QQ3 version 42Q3 Version Control
syntax of 42
Rracclimx.sh 46Radio Network Manager 43RAML2.0 63RNC version and options 40Routing Area object 21, 22rules
importing 33validating 33
Sscripts
racclimx.sh 46servers
Name Server 21Primary Name Server 17, 22

106 DN03453584Issue 1-0
Administering NetAct Configurator
Id:0900d80580a02f7a
setting version and optionsRNC 40
SGSN options 41shared secret 22system.properties file 33
TTop -level User Interface 42
UUser Group Profiles 20user management applications
NetAct Permission Manager 20User Group Profiles 20
usersDDNS access user 17
Vvalidating rules 33
Zzones 21
Related Documents