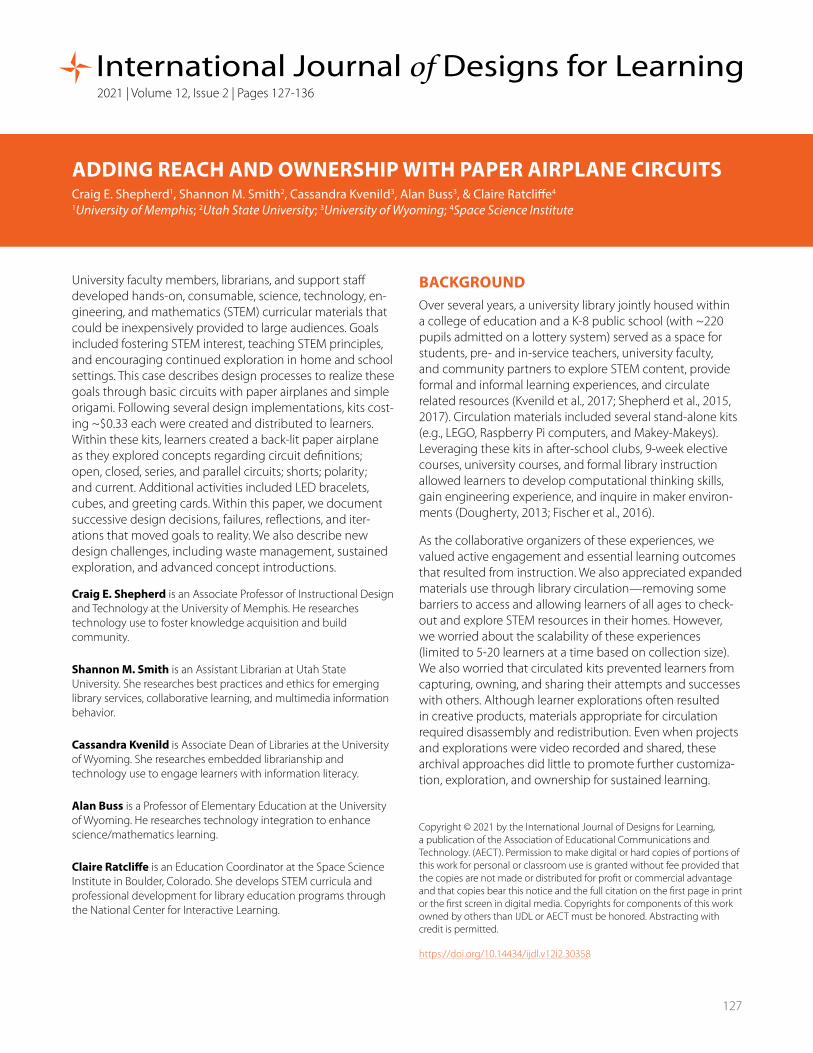
127 ADDING REACH AND OWNERSHIP WITH PAPER AIRPLANE CIRCUITS Craig E. Shepherd 1 , Shannon M. Smith 2 , Cassandra Kvenild 3 , Alan Buss 3 , & Claire Ratcliffe 4 1 University of Memphis; 2 Utah State University; 3 University of Wyoming; 4 Space Science Institute University faculty members, librarians, and support staff developed hands-on, consumable, science, technology, en- gineering, and mathematics (STEM) curricular materials that could be inexpensively provided to large audiences. Goals included fostering STEM interest, teaching STEM principles, and encouraging continued exploration in home and school settings. This case describes design processes to realize these goals through basic circuits with paper airplanes and simple origami. Following several design implementations, kits cost- ing ~$0.33 each were created and distributed to learners. Within these kits, learners created a back-lit paper airplane as they explored concepts regarding circuit definitions; open, closed, series, and parallel circuits; shorts; polarity; and current. Additional activities included LED bracelets, cubes, and greeting cards. Within this paper, we document successive design decisions, failures, reflections, and iter- ations that moved goals to reality. We also describe new design challenges, including waste management, sustained exploration, and advanced concept introductions. Craig E. Shepherd is an Associate Professor of Instructional Design and Technology at the University of Memphis. He researches technology use to foster knowledge acquisition and build community. Shannon M. Smith is an Assistant Librarian at Utah State University. She researches best practices and ethics for emerging library services, collaborative learning, and multimedia information behavior. Cassandra Kvenild is Associate Dean of Libraries at the University of Wyoming. She researches embedded librarianship and technology use to engage learners with information literacy. Alan Buss is a Professor of Elementary Education at the University of Wyoming. He researches technology integration to enhance science/mathematics learning. Claire Ratcliffe is an Education Coordinator at the Space Science Institute in Boulder, Colorado. She develops STEM curricula and professional development for library education programs through the National Center for Interactive Learning. BACKGROUND Over several years, a university library jointly housed within a college of education and a K-8 public school (with ~220 pupils admitted on a lottery system) served as a space for students, pre- and in-service teachers, university faculty, and community partners to explore STEM content, provide formal and informal learning experiences, and circulate related resources (Kvenild et al., 2017; Shepherd et al., 2015, 2017). Circulation materials included several stand-alone kits (e.g., LEGO, Raspberry Pi computers, and Makey-Makeys). Leveraging these kits in after-school clubs, 9-week elective courses, university courses, and formal library instruction allowed learners to develop computational thinking skills, gain engineering experience, and inquire in maker environ- ments (Dougherty, 2013; Fischer et al., 2016). As the collaborative organizers of these experiences, we valued active engagement and essential learning outcomes that resulted from instruction. We also appreciated expanded materials use through library circulation—removing some barriers to access and allowing learners of all ages to check- out and explore STEM resources in their homes. However, we worried about the scalability of these experiences (limited to 5-20 learners at a time based on collection size). We also worried that circulated kits prevented learners from capturing, owning, and sharing their attempts and successes with others. Although learner explorations often resulted in creative products, materials appropriate for circulation required disassembly and redistribution. Even when projects and explorations were video recorded and shared, these archival approaches did little to promote further customiza- tion, exploration, and ownership for sustained learning. Copyright © 2021 by the International Journal of Designs for Learning, a publication of the Association of Educational Communications and Technology. (AECT). Permission to make digital or hard copies of portions of this work for personal or classroom use is granted without fee provided that the copies are not made or distributed for profit or commercial advantage and that copies bear this notice and the full citation on the first page in print or the first screen in digital media. Copyrights for components of this work owned by others than IJDL or AECT must be honored. Abstracting with credit is permitted. https://doi.org/10.14434/ijdl.v12i2.30358 2021 | Volume 12, Issue 2 | Pages 127-136 127

Welcome message from author
This document is posted to help you gain knowledge. Please leave a comment to let me know what you think about it! Share it to your friends and learn new things together.
Transcript
127
ADDING REACH AND OWNERSHIP WITH PAPER AIRPLANE CIRCUITSCraig E. Shepherd1, Shannon M. Smith2, Cassandra Kvenild3, Alan Buss3, & Claire Ratcliffe4 1University of Memphis; 2Utah State University; 3University of Wyoming; 4Space Science Institute
University faculty members, librarians, and support staff developed hands-on, consumable, science, technology, en-gineering, and mathematics (STEM) curricular materials that could be inexpensively provided to large audiences. Goals included fostering STEM interest, teaching STEM principles, and encouraging continued exploration in home and school settings. This case describes design processes to realize these goals through basic circuits with paper airplanes and simple origami. Following several design implementations, kits cost-ing ~$0.33 each were created and distributed to learners. Within these kits, learners created a back-lit paper airplane as they explored concepts regarding circuit definitions; open, closed, series, and parallel circuits; shorts; polarity; and current. Additional activities included LED bracelets, cubes, and greeting cards. Within this paper, we document successive design decisions, failures, reflections, and iter-ations that moved goals to reality. We also describe new design challenges, including waste management, sustained exploration, and advanced concept introductions.
Craig E. Shepherd is an Associate Professor of Instructional Design and Technology at the University of Memphis. He researches technology use to foster knowledge acquisition and build community.
Shannon M. Smith is an Assistant Librarian at Utah State University. She researches best practices and ethics for emerging library services, collaborative learning, and multimedia information behavior.
Cassandra Kvenild is Associate Dean of Libraries at the University of Wyoming. She researches embedded librarianship and technology use to engage learners with information literacy.
Alan Buss is a Professor of Elementary Education at the University of Wyoming. He researches technology integration to enhance science/mathematics learning.
Claire Ratcliffe is an Education Coordinator at the Space Science Institute in Boulder, Colorado. She develops STEM curricula and professional development for library education programs through the National Center for Interactive Learning.
BACKGROUNDOver several years, a university library jointly housed within a college of education and a K-8 public school (with ~220 pupils admitted on a lottery system) served as a space for students, pre- and in-service teachers, university faculty, and community partners to explore STEM content, provide formal and informal learning experiences, and circulate related resources (Kvenild et al., 2017; Shepherd et al., 2015, 2017). Circulation materials included several stand-alone kits (e.g., LEGO, Raspberry Pi computers, and Makey-Makeys). Leveraging these kits in after-school clubs, 9-week elective courses, university courses, and formal library instruction allowed learners to develop computational thinking skills, gain engineering experience, and inquire in maker environ-ments (Dougherty, 2013; Fischer et al., 2016).
As the collaborative organizers of these experiences, we valued active engagement and essential learning outcomes that resulted from instruction. We also appreciated expanded materials use through library circulation—removing some barriers to access and allowing learners of all ages to check-out and explore STEM resources in their homes. However, we worried about the scalability of these experiences (limited to 5-20 learners at a time based on collection size). We also worried that circulated kits prevented learners from capturing, owning, and sharing their attempts and successes with others. Although learner explorations often resulted in creative products, materials appropriate for circulation required disassembly and redistribution. Even when projects and explorations were video recorded and shared, these archival approaches did little to promote further customiza-tion, exploration, and ownership for sustained learning.
Copyright © 2021 by the International Journal of Designs for Learning, a publication of the Association of Educational Communications and Technology. (AECT). Permission to make digital or hard copies of portions of this work for personal or classroom use is granted without fee provided that the copies are not made or distributed for profit or commercial advantage and that copies bear this notice and the full citation on the first page in print or the first screen in digital media. Copyrights for components of this work owned by others than IJDL or AECT must be honored. Abstracting with credit is permitted.
https://doi.org/10.14434/ijdl.v12i2.30358
2021 | Volume 12, Issue 2 | Pages 127-136127

IJDL | 2021 | Volume 12, Issue 2 | Pages 127-136 128
Prior to this project, the library leveraged various electronics resources for educational purposes (e.g., Snap Circuits, littleBits, Arduino kits, conductive dough). Each had their advantages and limitations. For instance, littleBits highlight-ed component functionality but did little to help learners understand circuit paths and polarity. Snap circuits displayed individual paths but did little to explain them beyond construction schematics. Arduino kits included breadboards and the ability to program circuits but intimidated novices (and some instructors) with their parts, coding requirements, and path visualizations.
DESIRED OWNERSHIP Although learners could make projects with circulating STEM kits, they could not keep them. Projects were disassembled and returned for continued circulation within a few days of check-out. We worried that lack of ownership would reduce enthusiasm and diminish maker mindsets over time as explorations ceased, projects were disassembled, and com-ponents returned (Shepherd et al., 2017). Exploration was also limited to the availability and included components of commercial kits. Although several kits provided attachments so users could add Lego® bricks and expand creative options, actual use was limited. Outside of the library environment, few individuals mixed components or added home-made materials to projects. Furthermore, while kits were placed in circulation, some parents expressed concern about taking responsibility for the numerous components and potential replacement costs (see also Cook,
2015; Fisher et al., 2016). We also balked at high prices charged for simple circuit components in most STEM kits. Components that cost a few pennies online commanded steep prices when housed in proprietary enclosures. These prices meant that some learners could not afford kits if they became interested in circuitry. While we planned to continue kit use during instruction, we wanted additional activities
that learners could keep; complete with parents, room-mates, and friends; spark continued exploration; and share. We wanted activities that were consumable (or low cost), portable, and scalable for several learners simultaneously. After multiple discussions, we began designing activities with basic components readily available online (e.g., CR2032 batteries, aluminum foil, LEDs, transparent tape). These activ-ities were piloted in 9-week electives and after school clubs (see Shepherd et al., 2017 for details on the piloted activities).
CIRCUIT PICTURES AND COLLAGESLow-cost, paper circuit explorations began with collag-es. Provided with paper, aluminum foil, LED lights, and transparent tape, learners created complete circuits using components that formed a picture--often decorating them further with colored paper designs and shapes. An early example was an aluminum foil castle cutout. The foil castle acted as part of the wiring to light up LEDs in the windows. The battery and most aluminum foil wires were placed on the backside of the collage in a parallel circuit. To simplify instruction, we omitted resistors entirely.
Removing resistors from circuit construction increased the possibility for blown components, but eased entry into circuitry conversations and activities. Thus far, we have never experienced blown-out components based on insufficient resistors with 3V batteries. We believed that circuit collages would be a great entry into greeting cards and later projects that required switches, moving parts, and so forth. Although collages were fun, learners found them to be somewhat complex. “Wires” were often attempted by smooshing foil into worm-like bands connected with transparent tape. This approach resulted in loose connections and shorts. Attempting to troubleshoot, learners often added more foil and tape, furthering the problem. The unreliability of smooshed foil circuits also frustrated instructors. Some proj-ects functioned perfectly while others appeared identical
FIGURE 1. Origami cubes lit with individual LEDs.
IJDL | 2021 | Volume 12, Issue 2 | Pages 127-136 129
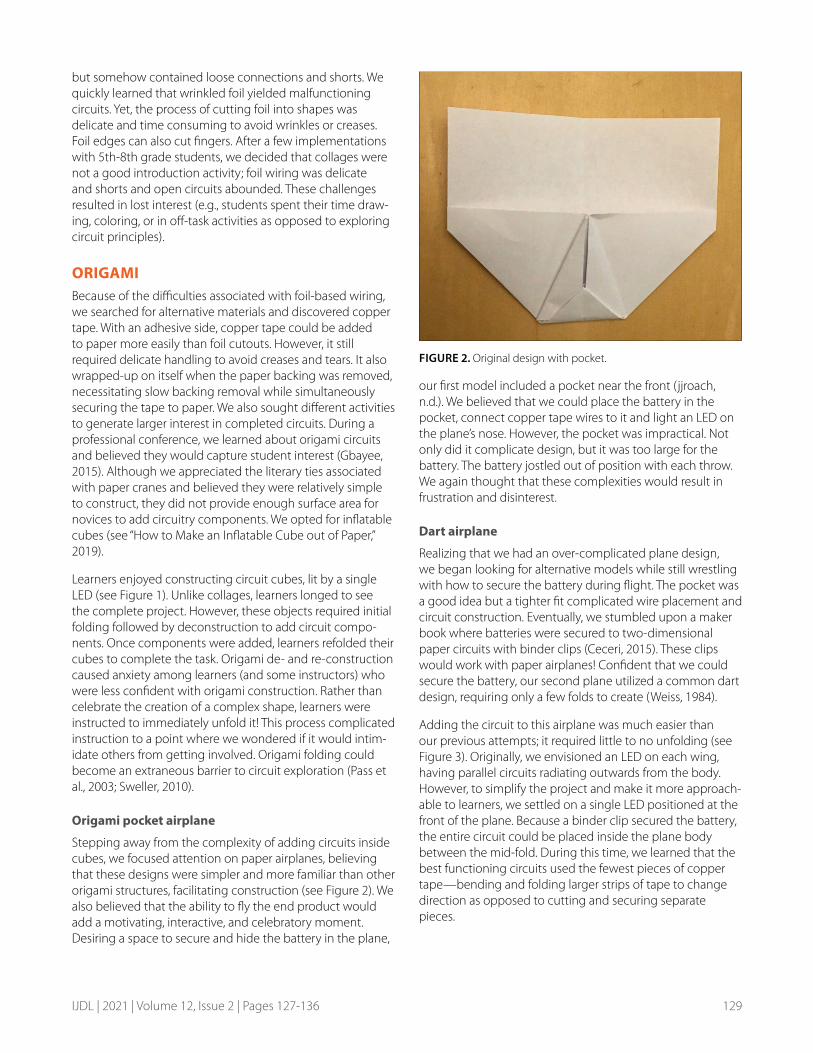
but somehow contained loose connections and shorts. We quickly learned that wrinkled foil yielded malfunctioning circuits. Yet, the process of cutting foil into shapes was delicate and time consuming to avoid wrinkles or creases. Foil edges can also cut fingers. After a few implementations with 5th-8th grade students, we decided that collages were not a good introduction activity; foil wiring was delicate and shorts and open circuits abounded. These challenges resulted in lost interest (e.g., students spent their time draw-ing, coloring, or in off-task activities as opposed to exploring circuit principles).
ORIGAMIBecause of the difficulties associated with foil-based wiring, we searched for alternative materials and discovered copper tape. With an adhesive side, copper tape could be added to paper more easily than foil cutouts. However, it still required delicate handling to avoid creases and tears. It also wrapped-up on itself when the paper backing was removed, necessitating slow backing removal while simultaneously securing the tape to paper. We also sought different activities to generate larger interest in completed circuits. During a professional conference, we learned about origami circuits and believed they would capture student interest (Gbayee, 2015). Although we appreciated the literary ties associated with paper cranes and believed they were relatively simple to construct, they did not provide enough surface area for novices to add circuitry components. We opted for inflatable cubes (see “How to Make an Inflatable Cube out of Paper,” 2019).
Learners enjoyed constructing circuit cubes, lit by a single LED (see Figure 1). Unlike collages, learners longed to see the complete project. However, these objects required initial folding followed by deconstruction to add circuit compo-nents. Once components were added, learners refolded their cubes to complete the task. Origami de- and re-construction caused anxiety among learners (and some instructors) who were less confident with origami construction. Rather than celebrate the creation of a complex shape, learners were instructed to immediately unfold it! This process complicated instruction to a point where we wondered if it would intim-idate others from getting involved. Origami folding could become an extraneous barrier to circuit exploration (Pass et al., 2003; Sweller, 2010).
Origami pocket airplane
Stepping away from the complexity of adding circuits inside cubes, we focused attention on paper airplanes, believing that these designs were simpler and more familiar than other origami structures, facilitating construction (see Figure 2). We also believed that the ability to fly the end product would add a motivating, interactive, and celebratory moment. Desiring a space to secure and hide the battery in the plane,
our first model included a pocket near the front (jjroach, n.d.). We believed that we could place the battery in the pocket, connect copper tape wires to it and light an LED on the plane’s nose. However, the pocket was impractical. Not only did it complicate design, but it was too large for the battery. The battery jostled out of position with each throw. We again thought that these complexities would result in frustration and disinterest.
Dart airplane
Realizing that we had an over-complicated plane design, we began looking for alternative models while still wrestling with how to secure the battery during flight. The pocket was a good idea but a tighter fit complicated wire placement and circuit construction. Eventually, we stumbled upon a maker book where batteries were secured to two-dimensional paper circuits with binder clips (Ceceri, 2015). These clips would work with paper airplanes! Confident that we could secure the battery, our second plane utilized a common dart design, requiring only a few folds to create (Weiss, 1984).
Adding the circuit to this airplane was much easier than our previous attempts; it required little to no unfolding (see Figure 3). Originally, we envisioned an LED on each wing, having parallel circuits radiating outwards from the body. However, to simplify the project and make it more approach-able to learners, we settled on a single LED positioned at the front of the plane. Because a binder clip secured the battery, the entire circuit could be placed inside the plane body between the mid-fold. During this time, we learned that the best functioning circuits used the fewest pieces of copper tape—bending and folding larger strips of tape to change direction as opposed to cutting and securing separate pieces.
FIGURE 2. Original design with pocket.

IJDL | 2021 | Volume 12, Issue 2 | Pages 127-136 130
Copper tape was placed in straight lines on either side of the midline within the body (see Figure 3). At the nose, an LED was secured to both copper tape wires with transparent tape. Transparent tape was then placed over one copper tape wire (except where the battery connected) to insulate it and avoid shorts. The battery was secured near the center of the plane with a binder clip on the outside of the body (see Figure 4). To avoid interference with the wings, binder clip prongs were often removed after securing the battery.
As mentioned, our plans placed the LED at the nose of the plane. This decision was unconscious and possibly based on the utility of front automobile headlights to illuminate the path ahead. Regardless, this decision was a mistake. The pointed nose of the dart is fragile. It is also the first part of the plane that meets the ground, wall, or other objects post-flight. Thus, the LED was often jostled forcefully at the end of each flight, bending leads, ripping tape, and opening the circuit. During beta tests, we realized this placement was not viable. Even without circuit components, nose bending rendered the plane less effective after a few flights.
Nakamura lock airplane
Discarding dart planes as too fragile, we selected another design where the nose was reinforced and did not end in a point (Weiss, 1984). This secured the nose for additional flights and allowed for easier LED placement (see Figure 5). Again, our design placed the complete circuit inside the body. The battery was placed about half-way down the body and copper tape wires extended on either side of the mid-fold to the front of the plane. LED leads were secured to copper tape wires with transparent tape. One “wire” was also covered in transparent tape (except at the battery connec-tion) to avoid shorts.
When the body was folded together with the battery, the circuit closed and the LED lit. The battery was then secured for flight by adding a binder clip to the underside of the plane.
However, front LED placement remained a problem. The nose was much sturdier than the dart model but the LED sustained impact damage on landings. After a few imple-mentations, we moved the LED to the back of the plane for better protection. This change resulted in fewer repairs and serendipitously made the light more visible to creators—who always stand behind planes when throwing them (see Figure 6).
Regardless of front or rear placement, the trickiest part of making the plane was securing the LED leads to copper tape wires. The design dictated that the circuit be complete when the midline folded together. With the midline unfolded, one lead could be secured with transparent tape. This left a gap between the other lead and the strip of copper tape on the other side of the body. However, closing that gap removed the space needed to secure the lead with another piece of transparent tape. So, the plane had to be opened again
FIGURE 3. Dart plane with complete circuit inside the body. Transparent tape insulates one section of copper wire to prevent shorts.
FIGURE 4. Dart plane with lit LED and battery secured with binder clip sans prongs.
FIGURE 5. Early prototype with front-facing LED, parallel wires, and battery location marked in pen.

IJDL | 2021 | Volume 12, Issue 2 | Pages 127-136 131
FIGURE 6. Plan for rear-facing LED.
FIGURE 7. Rotated copper tape wires to facilitate battery and LED placement.
IJDL | 2021 | Volume 12, Issue 2 | Pages 127-136 132
while bending the lead apart to tape it. Once taped, the lead was carefully bent back to its original position so the body could close at the midline. Connecting the LED to the circuit often led to participant confusion. They asked for guidance or taped both leads to the same piece of copper tape (as opposed to closing the circuit).
To fix this problem, we explored alternative placements. At first, we moved both pieces of copper tape to one side of the body. This alteration facilitated LED placement because leads were no longer involved with airplane folds. Additionally, because copper tape wires never touched each other, one piece of copper tape did not have to be insulated to prevent shorts. Yet, the change complicated battery connections—requiring the end of one piece of copper tape to remain separate from the plane so it could be folded on top of the battery. Because the battery was secured with a binder clip, the flap of tape complicated clip placement. Having copper tape on either side of the mid-fold had assisted battery connection in prior iterations. We therefore wondered if circuit placement could simplify both battery and LED connections.
Through continued experimentation, the answer came by rotating copper tape placement ~15° (see Figure 7). This
design allowed each wire to begin on either side of the mid-fold, easing battery connection.
One wire would then travel across the fold and end 1-inch below the other, easing LED placement. Additionally, separate copper tape wires only overlapped at battery placement—eliminating the need for insulating tape.
Lastly, we replaced binder clips with paperclips. Although binder clips secured the battery, they were heavy, included prongs that interfered with wing placement and flight, and cost ~$0.06 each. Wanting our designs to be consumable, every penny counted. After testing a few paperclip sizes (~1.75-inch, ~1.25-inch, ~1-inch), we found that 1.25-inch clips with non-skid grooves secured the battery well (see Table 1).
To participate in our activity, individuals needed materials and instructions regarding circuit construction and paper folding. Required supplies, aside from those found in almost any home or classroom (e.g., transparent tape, piece of pa-per) were amassed in a small envelope. A template for circuit placement was developed and a QR code (with shortened URL) was printed on the envelope so learners could access it. A Google site (Shepherd et al., n.d.) housed instructions. QR codes and shortened URLs on the template allowed learners to access these instructions (as well as mini lessons
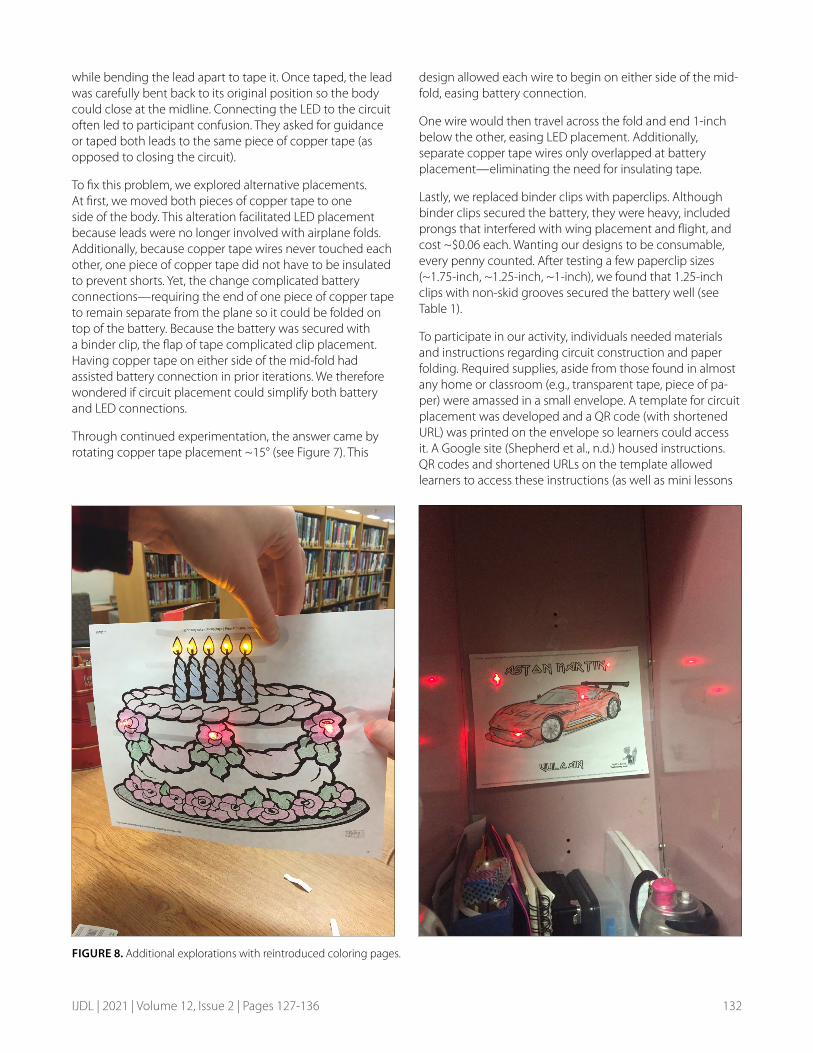
FIGURE 8. Additional explorations with reintroduced coloring pages.

IJDL | 2021 | Volume 12, Issue 2 | Pages 127-136 133
about series, parallel, short circuits, and polarity (see Figure 7). Because 77% of Americans, 69% of 12 year-olds, and 92% of 19-29 year-olds own smartphones (Rideout & Robb, 2019; Smith, 2017), we assumed most households could access these instructions. Links were strategically placed within the paper template so they would not be visible during flight. We also included a challenge following initial circuit construction to add another LED to the front of the plane (in parallel) using included copper tape or other household materials (e.g., twist ties, aluminum foil).
Envelope bundles facilitated distribution. Packets were placed on the library circulation desk where interested parties could take them at no charge. They were also com-pleted in 9-week electives, preservice teacher technology integration courses and at professional conferences. Interest skyrocketed. K-8 learners unable to attend elective courses clamored for packets. Preservice teachers constructed and considered their design during technology integration courses. Even inservice teachers shared stories and pictures of their home-built LED airplanes.
CHALLENGES AND OPPORTUNITIESAlthough we achieved design goals by reducing cost, pro-viding ownership, and scaling distribution, other challenges
emerged, predominantly component waste. Users often equated consumable activities with disposable activities. After users flew their planes and completed the additional LED challenge, circuits ended up in trash cans. This initially resulted in librarians and instructors sifting through waste to salvage batteries, LEDs, and binder/paper clips. Shortly after-ward, we asked participants to return components if they did not want to keep their planes. Returned components also created storage challenges. While LEDs, binder and paper-clips could be returned to original boxes, batteries drained electricity from each other. To prevent this, transparent or masking tape was placed around each battery terminal before they were stored together.
However, batteries and components eventually fail. Scaling distribution ultimately means scaling waste. We wondered how these activities contribute to environmental waste and have considered introducing this concept during circuit lessons. By engaging students in the topics of waste, reuse, and recycling, we hope to extend maker mindsets with these components and encourage their reuse beyond a few projects. One CR2032 battery can power an LED continu-ously for about one week. Therefore, tossed components also equated to wasted opportunities for additional circuit exploration.
FIGURE 9. Boys and girls enjoyed making bracelets.

IJDL | 2021 | Volume 12, Issue 2 | Pages 127-136 134
To maintain momentum, we began introducing additional activities, ironically leveraging previous failed attempts. Following paper airplanes, learners desired to create circuit collages, coloring pages, greeting cards, and inflatable cubes. Creations often decorated student lockers (see Figure 8). Building upon prior activities, we asked learners to include switches, moving parts, and circuit arrangements in three dimensions or across multiple layers of paper.
For example, learners might add parallel circuits on multiple cube faces. This activity pushed learners to consider paper folds, and how folds might introduce shorts. We also asked them to light two or more origami cubes with a single bat-tery (e.g., build a lit snowperson) by cutting small incisions
into the cubes and stringing copper tape (or conductive thread) between them. This forced learners to consider layers associated with origami, how to insulate wires to prevent shorts and how to place LEDs and batteries.
We also continued to focus on brief, inexpensive, consum-able activities to be completed at home. The “power brace-let” was popular among learners (see Figure 9). This activity focused on creating a parallel circuit on the underside of a paper bracelet. Time normally spent on origami folding was replaced with time for bracelet design. Power bracelets could be completed in less time than paper airplane circuits and had fewer barriers to entry (as folding was not required). Thus, some instructors felt more comfortable introducing
ITEM LOCATION QUANTITY COST PIECES PER KIT
PRICE PER KIT
CR2032, CR2025, or CR1625 3V batteries
Amazon 100 $24.99 1 $0.25*
3mm light emitting diodes (LED) Amazon 1000 $9.99 2 $0.02
3.5” piece of ¼-inch copper tape Amazon 1 roll $2.99 4 $0.02**
8.5 x 11-inch paper Dollar Stores 200 sheets $2.50 1 $0.01
1.25-inch (#1 size) paperclip Dollar Stores 100 $1.00 1 $0.01
1” piece of transparent tape Dollar Stores 2 Rolls $1.00 4 $0.01
small envelope Dollar Stores 160 $2.00 1 $0.01
Total $44.47 $0.33
Note: *These prices were accurate at the time of submission. Of greater importance is the cost per unit. Search for similar or better prices. We’ve seen batteries as low as $0.11 each! **21.8 yards of copper tape yields ~56 kits.
TABLE 1. Cost per Paper Airplane Kit.
FIGURE 10. Personalized airplanes and power bracelets.

IJDL | 2021 | Volume 12, Issue 2 | Pages 127-136 135
this activity. They also provided space to include switches and served as an entry-point into wearable circuits—where the same activity was replicated with felt and hand-stitched conductive thread (Buechley & Qiu, 2014).
REFLECTIONSDuring our explorations, we captured tips and ideas that helped us successfully address our goals. First, we learned to value all circuitry components, regardless of cost. Although we already had experience circulating kits with small parts, our approach to creating inexpensive kits resulted in waste. Even at a small scale, the amount of usable material being thrown out was troublesome—environmentally, fiscally, and in the use of team member’s time. We recognized that these issues will only compound as project materials are distribut-ed and used more widely. As part of the circuit process, we learned to work with our learners to recognize each materi-als’ value and potential for use in future projects.
Second, we learned to focus on projects that were portable, in the sense that they can be completed in any setting. Particularly, we wanted learners to recognize that they can create projects at home using simple designs and materials, without reliance on schools. To accomplish this, we needed to provide self-contained instructional materials that would promote discovery and success without providing cookbook solutions. This is an on-going challenge.
Finally, we learned many things about engagement and process. For starters, keep things simple! Creating complex origami shapes can be discouraging. Integrating even simple circuits adds another layer of complexity and uncertainty that can cause frustration in learners to the point of quitting. Simple, yet interactive designs are effective for sparking interest. Additionally, do not underestimate the power of decorative flourishes. Female engagement was not always present with paper airplane instruction. However, interest was piqued when they were provided with time to decorate planes (see Figure 10). Also, while building paper airplane circuits may sound simple, there are pitfalls. We learned that not everyone knows how to fold a paper airplane and had to backtrack a bit in our instructional plans. We also learned to be patient as students discovered how frail LEDs, aluminum foil strips, and copper tape can be. Most importantly, we learned that it is possible to create, distribute, store and redistribute simple, engaging paper-based circuit learning activities.
NEXT STEPS AND FURTHER WORKProjects thus far have focused on simple circuits, which do not stretch learner’s understanding of electricity and electronics. For instance, most activities lack resistors, limiting opportunities to discuss Ohm’s Law or associations between
current, voltage, and resistance. These simplistic applications may leave learners with unrealistic expectations about the ease of making electronic objects. This may reduce persistence and grit when challenges arise. We plan to scaffold learning through a series of tasks and activities that increase complexity and difficulty. This will be accomplished by adding more sophisticated elements to activities and continue expanding components used in circuit construc-tion. Building off the current airplane activity, for example, we added a photoresistor (also known as a photoconductive cell) so LED lights will only turn on at specific light levels. These components are relatively inexpensive (~$0.08 each), reusable, and provide an entry-point into resistance, Ohm’s Law, voltage dividers, and other concepts. We also plan to develop activities associated with transistors, capacitors, and other basic components, balanced by our focus to provide inexpensive, consumable activities that draw learners of all ages into circuit explorations. We hope that these activities will sustain learner interest in circuitry exploration and act as entry points for related projects (e.g., wearables, programming circuits, protoboards). We also realize that paper-based circuits cannot fully replace traditional circuit exploration approaches. Experimenting with paper circuits can be time consuming and wasteful. Breadboards are better suited for sustained experimentation because they allow for temporary, prototyping constructions. Thus, although paper circuits may capture learner interest, and provide impetus for personal creations, they are meant to complement tradition-al approaches and kits.
Finally, this project was conceived and conducted pre-COVID-19 pandemic. However, it provides valuable insights into how home-based learners can engage in STEM/STEAM design and creation activities with parents and family members using low-cost, easily accessible materials.
ACKNOWLEDGMENTSThe authors acknowledge the Pat McClurg Fellowship for providing discretionary funds that helped make this work possible.
REFERENCESBuechley, L., & Qiu, K. (2014). Sew electric: A collection of DIY projects that combine fabric, electronics, and programming. HLT Press.
Ceceri, K. (2015). Make: Paper inventions: Machines that move, drawings, that light up, wearables and structures you can cut, fold, and roll. Maker Media, Inc.
Cook, D. (2015, November 12-15). Leveling the playing field: Creating an emerging technology loan program. [Paper presentation]. Library and Information Technology Association Forum, Minneapolis, MN, United States.
Dougherty, D. (2013). The Maker Mindset. In M. Honey & D. Kanter (Eds.), Design, make, play: Growing the next generation of STEM innovators (pp. 7-11). Routledge.

IJDL | 2021 | Volume 12, Issue 2 | Pages 127-136 136
Fisher, K., Sedik, S. & Zhao, B. (2016, June 23-28). Circulating STEM kits for youth: Getting to the root of the matter. [Paper presentation]. American Library Association Annual Meeting, Orlando, FL, United States.
Gbayee, A. P. (2015, September 28-29). Electronic origami. [Paper presentation]. e-Volution: Innovations in Learning Environments Annual Meeting, Laramie, WY, United States.
jjroach. (n.d.). How to make an aerobatic paper airplane. instructables. https://www.instructables.com/ id/How-to-make-an-aerobatic-paper-airplane/
Kvenild, C., Smith, S. M., Shepherd, C. E., & Thielk, E. G. (2017). Making Friends and Buying Robots: How to leverage collaborations and collections to support STEM learning. Knowledge Quest, 45(3), 62-69.
How to make an inflatable cube out of paper. (2019, November 22). In wikiHow. https://www.wikihow.com/ Make-an-Inflatable-Cube-Out-of-Paper
Pass, F., Tuovinen, J. E., Tabbers, H., & Van Gerven, P. W. M. (2003). Cognitive load measurement as a means to advance cognitive load theory. Educational Psychologist, 38(1), 63-71. https://doi.org/10.1207/s15326985ep3801_8
Rideout, V., & Robb, M. B. (2019). The Common Sense census: Media use by tweens and teens, 2019. Commons Sense Media. https://www.commonsensemedia.org/sites/default/files/uploads/research/2019-census-8-to-18-full-report-updated.pdf
Shepherd, C. E., Dousay, T., Kvenild, C, & Meredith, T. (2015). Fostering technology-rich serving learning experiences between school librarians and teacher education programs. Knowledge Quest, 44(2), 44-52
Shepherd, C., Kvenild, C., Smith, S.M., & Buss, A. (2017). The Unspace Case: Developing a Maker Movement in a Multipurpose, Flexible Space, Library Setting. International Journal of Designs for Learning, 8(1). https://doi.org/10.14434/ijdl.v8i1.22658
Shepherd, C. E., Smith, S. M., & Buss, A. (n.d.). Glowing paper airplane. Origami Circuits. https://sites.google.com/view/origamicircuits/paper-airplane-directions
Smith, A. (2017, January 17). Record shares of Americans now own smartphones, have home broadband. Pew Research Center. https://www.pewresearch.org/fact-tank/2017/01/12/evolution-of-technology/
Sweller, J. (2010). Element interactivity and intrinsic, extraneous, and germane cognitive load. Educational Psychology Review, 22, 123−138. https://doi.org/10.1007/s10648-010- 9128-5
Weiss, S. (1984). Wings and things: Origami that flies. St. Martins Press. https://archive.org/ details/WingsThingsOrigamiThatFlies
Related Documents