SISTEMAS INFORMAƵTICOS 2013/2014 FACULTAD DE INFORMAƵTICA UNIVERSIDAD COMPLUTENSE DE MADRID ACIDE Debugging Realizado por: Juan Jesús Marqués Ortiz Fernando Ordás Lorente Semíramis Gutiérrez Quintana Dirigido por: Prof. Fernando Sáenz Pérez Dpto. Ingeniería del Software e Inteligencia Artificial

Welcome message from author
This document is posted to help you gain knowledge. Please leave a comment to let me know what you think about it! Share it to your friends and learn new things together.
Transcript

SISTEMASINFORMATICOS2013/2014
FACULTADDEINFORMATICA
UNIVERSIDADCOMPLUTENSEDEMADRID
ACIDEDebugging
Realizadopor:
JuanJesúsMarquésOrtiz
FernandoOrdásLorente
SemíramisGutiérrezQuintana
Dirigidopor:
Prof.FernandoSáenzPérez
Dpto.IngenieríadelSoftwareeInteligenciaArtificial

SistemasInformáticos2013‐2014 2

SistemasInformáticos2013‐2014 3
INDICEDECONTENIDOSÍndicedecontenidos...........................................................................................................................3
1. Autorización.................................................................................................................................7
2. Resumendelproyecto.............................................................................................................8
3. Abstract.......................................................................................................................................10
4. Estadodelarte.........................................................................................................................11
5. Estándares.................................................................................................................................16
5.1. Controldeversiones..................................................................................................16
5.2. Documentación............................................................................................................17
5.3. Códigofuente................................................................................................................19
6. Gestióndelaconfiguración................................................................................................23
7. Gestiónderequisitos.............................................................................................................25
7.1. Requisitosgenerales.................................................................................................25
7.2. Depuración....................................................................................................................26
7.2.1. Componentesdelaaplicación................................................................................26
7.2.2. Iniciodelaaplicación................................................................................................27
7.2.3. PanelBasededatosasertada.................................................................................27
7.2.3.1. Barrainferior..........................................................................................................28
7.2.3.2. Panel...........................................................................................................................28
7.2.4. PanelTrazaDatalog...................................................................................................29
7.2.4.1. BarraInferior..........................................................................................................29
7.2.4.2. Panel...........................................................................................................................30
7.2.5. PanelTrazaSQL...........................................................................................................30

SistemasInformáticos2013‐2014 4
8. Planificación.............................................................................................................................31
8.1. Primerarelease............................................................................................................32
8.2. Segundarelease...........................................................................................................33
8.3. Tercerarelease............................................................................................................34
8.4. Cuartarelease...............................................................................................................35
8.5. Quintarelease...............................................................................................................36
9. Tareasrealizadas....................................................................................................................38
9.1. PDG...................................................................................................................................38
9.2. Consola............................................................................................................................40
9.3. Basededatosasertada..............................................................................................42
9.4. Basesdedatos..............................................................................................................45
9.4.1. Tablas..............................................................................................................................45
9.4.1.1. Nodotabla.................................................................................................................46
9.4.1.2. Nodocolumna..........................................................................................................46
9.4.1.3. Nodosrestricciones...............................................................................................47
9.4.2. Vistas................................................................................................................................48
9.4.2.1. Nodovista..................................................................................................................48
9.4.3. Vistadedatos................................................................................................................50
9.4.3.1. Menúver....................................................................................................................51
9.4.3.2. Tabladedatos..........................................................................................................53
9.4.4. Ventanaderestricciones..........................................................................................55
9.4.4.1 Claveprimaria(PK)...............................................................................................56

SistemasInformáticos2013‐2014 5
9.4.4.2 Clavecandidata(CK).............................................................................................57
9.4.4.3 Claveforánea(FK).................................................................................................57
9.4.4.4 NoNulo(NN)............................................................................................................59
9.4.4.5 Dependenciafuncional(FD)..............................................................................59
9.4.4.6 RestriccionesdeIntegridad(IC).......................................................................60
9.4.5 Otros................................................................................................................................61
9.5. EditordeTextos..........................................................................................................61
9.5.1 Comentar/Descomentar..........................................................................................62
9.5.2 Sangrado........................................................................................................................63
9.5.3 CambiarMayúsculas/Minúsculas.........................................................................64
9.5.4 Selección........................................................................................................................66
9.6. Depuración....................................................................................................................66
9.6.1. TrazaDatalog...............................................................................................................67
9.6.2. TrazaSQL.......................................................................................................................69
9.7. Tareasgenerales.........................................................................................................71
9.8. Actualizacióndelmanualdeusuario..................................................................73
9.9. Objetivoscumplidos..................................................................................................74
9.9.1. PDG............................................................................................................................................74
9.9.2. Depuración.............................................................................................................................74
9.9.3. Basededatosasertada......................................................................................................75
9.9.4. Consola.....................................................................................................................................75
9.9.5. Editordetextos.....................................................................................................................76

SistemasInformáticos2013‐2014 6
9.9.6. Basededatos.........................................................................................................................76
9.9.7. Tareasdecaráctergeneral...............................................................................................77
9.9.8. Ampliacióndelmanualdeusuario...............................................................................78
9.10. Objetivosnocumplidos.............................................................................................79
9.11. Conclusiones.................................................................................................................81
10. Posiblesampliaciones.....................................................................................................83
11. Listadepalabrasclaves..................................................................................................84
12. Bibliografía...........................................................................................................................85
13. Referencias...........................................................................................................................86
14. Informacióndecontacto.................................................................................................88
Apéndice:ManualdeUsuario......................................................................................................89

SistemasInformáticos2013‐2014 7
1. AUTORIZACIONSe autoriza a la Universidad Complutense a difundir y utilizar con fines
académicos no comerciales y mencionando expresamente a sus autores, tanto la
propiamemoria,comoelcódigo,ladocumentacióny/oelprototipodesarrollado.
FernandoOrdásLorente
JuanJesúsMarquésOrtiz
SemíramisGutiérrezQuintana

SistemasInformáticos2013‐2014 8
2. RESUMENDELPROYECTODuranteelpresentecursoacadémico,elgrupoformadoporJuanJesúsMarquésOrtiz,
Fernando Ordás Lorente y Semíramis Gutiérrez Quintana se ha encargado del
desarrollo de “ACIDE: A Configurable IDE” para la asignatura de Sistemas
Informáticos.
ACIDEesunentornodedesarrollo integradoquepuedeser fácilmenteconfigurado
paracasicualquierintérprete,compiladorosistemadebasesdedatos.
Esteproyectonohaempezadoestecurso, sinoqueha sidodesarrolladoencursos
anteriorespordiferentesgruposdealumnosenlaasignaturaSistemasInformáticos.El
primerañoenelque se llevóacabo fueenelcursoacadémico2006‐2007porDiego
Cardiel Freire, Juan José Ortiz Sánchez y Delfín Rupérez Cañas. Durante el curso
académico 2007‐2008 el desarrollo fue continuado por Miguel Martín Lázaro. La
siguiente iteración en el desarrollo de ACIDE fue en el curso 2010‐2011 por Javier
SalcedoGómez.Duranteelcursoacadémico2012‐2013eldesarrollodeACIDEsiguióen
manosdePabloGutiérrezGarcía‐Pardo,ElenaTejeiroPérezdeÁgredayAndrésVicente
delCura,quienesdejaronACIDEenelestadodedesarrolloenelquenuestrogruposelo
encontró.EsteproyectofuedirigidosiempreporFernandoSáenzPérez.
Elobjetivoal iniciar estanueva etapa enACIDEque comprende elpresente curso
académicoeramejorar laaplicaciónañadiendonuevascaracterísticas, siendo lamás
importante la implementacióndeherramientasdedepuracióndeSQLyDatalog.Para
ello se ha integrado enACIDEunnuevo panel que permite la depuración gráfica de
consultasSQLyobjetivosDatalog.
Todos los detalles sobre el desarrollo en anteriores cursos académicos pueden
encontrarse en las memorias realizadas por los grupos antes mencionados, cuyas
memoriasseencuentranlistadasenlasección[1],[2],[3]y[4]delcapítuloReferencias.
Laversiónqueheredamosdelproyectoanterior(versión0.11)teníauncódigofuente
estandarizado y un comportamiento estable en cuanto a la gestión de proyectos,
creación y edición de ficheros de texto en diferentes lenguajes de programación,
conexióntantoconODBCcomoconDES(DatalogEducationalSystem)[5].

SistemasInformáticos2013‐2014 9
DES es una implementación basada en Prolog de un Sistema de bases de datos
deductivas.
Durante el presente curso académico hemos añadido funcionalidades a las ya
existentes como las ya comentadas antes y hemos desarrollado algunas nuevas o
pendientesdecursosanteriores.

SistemasInformáticos2013‐2014 10
3. ABSTRACTDuring the currentacademic year, theworkinggroup formedby Juan JesúsMarqués
Ortiz,FernandoOrdásLorenteandSemíramisGutiérrezQuintanahastakenthedutyto
develop“ACIDE:AConfigurableIDE”asprojectof“ComputingSystems”.
ACIDE isan integrateddevelopmentenvironmenteasilyconfigurable foralmostall
theinterpreters,compilersordatabasesystems.
ThisdevelopmentisbasedinpreviousversionofACIDE;theseversionsweremadeby
someworking groups as projects of “Computing Systems”. The first time ACIDEwas
developedwasduringtheacademicyear2006‐2007byDiegoCardielFreire,JuanJosé
Ortiz SánchezandDelfínRupérezCañas.After that,during theacademic year 2007‐
2008thedevelopmentMiguelMartínLázarocontinuedwithACIDE.Thenextphasewas
madebyJavierSalcedoGómezduringthe2010‐2011academicyear.Thelastiteration
wasimplementedbyPabloGutiérrezGarcía‐Pardo,ElenaTejeiroPérezdeÁgredaand
AndrésVicentedelCuraduringthe2012‐2013academicyear.Thisprojectwasalways
managedbyFernandoSáenzPérez.
Themain goal in this new periodwas to improve the application by adding new
features.Themost important featurewasthedevelopmentofdebuggingtools forSQL
andDatalog.
Details about the development in previous academic years can be found in the
reportsmadebytheaforementionedworkinggroups.Thesereportsarelistedinsection
[1],[2],[3]and[4]intheReferenceschapter.
We started from the version 0.11, it had a standardized source code and a stable
performance in terms of projects management, creating and editing text files in
different programming languages and connection with ODBC and DES (Datalog
EducationalSystem)[5].

SistemasInformáticos2013‐2014 11
4. ESTADODELARTEParaentenderlaevolucióndeACIDE,primerovamosamostrarunresumensobre
elestadodelarteenlaspublicaciones[1],[2]y[3],esteresumenfuerealizadoenla
publicación [4] ymuestra con detalle el estado de arte de ACIDE durante los tres
primeros cursos que estuvo en desarrollo. Una vez mostrado este resumen, se
describeelestadodelarteen[4]ysefinalizaelcapítulolistandolasreferenciasque
sehanseguidoduranteelpresentecursoacadémico.
En[1]comenzóeldesarrollodelproyectoACIDE–AConfigurableIDE,enelcual
sebuscabacrearunIDEconfigurableparadistintos lenguajesdeprogramacióny lo
bastante sencillo como para no asustar al usuario con demasiadas opciones y
complejidad.Entreloseditoresdetextoconsultados,seencuentranCrimsonEditor
[6] y JEdit [7].Ambos soneditoresde texto sencillosquepermitenel resaltadode
palabras reservadas, seleccionadas de varios listados procedentes de diferentes
lenguajes.Además,JEditpermiteconfigurarlosmenús,unaideamuyatractivaparael
tipodeIDEqueseperseguíadesarrollar.

SistemasInformáticos2013‐2014 12
Entre los entornos de desarrollo integrados, se pueden distinguir dos grandes
grupos, los orientadosaun lenguajedeprogramaciónen concretoy losque tienen
diferentes configuraciones para distintos lenguajes. La principal ventaja del primer
grupoesquepermitenmayorespecializaciónyposeenherramientasmásespecíficas.
EnestaprimeraopciónsedestacaronJBuilder[8],JCreator[9]yC++Builder[10].
LosdosprimerosestánespecializadosenprogramaciónenJava,siendoJBuildermás
completo que JCreator, ya que ofrece la posibilidad de programar los botones del
interfaz, posee un interfaz gráfico para la creación de elementos Swing y ofrece
depuración.C++Builderesdelamismacasaqueesteúltimo,ofrecefuncionalidades
similaresperoparaellenguajeC++.

SistemasInformáticos2013‐2014 13
En el grupo de programas no orientados exclusivamente a un lenguaje, se
encuentra el gran conocido Eclipse [11]. Posee gran cantidad de opciones de
configuraciónparamuchoslenguajes.Sugraninconvenienteesquesuconfiguración
requiere una larga descarga de plugins, y solo para los lenguajes que sus
desarrolladoresnosofrezcan,nosepuedeconfiguraramano.Porotraparte,aveces
sehacedemasiadocomplicadoparaloquesebuscabaenACIDE–AConfigurableIDE.
Apesardelasdesventajasenumeradas,nodejadeserunprogramamuycompletoy
recomendablealahoradetomarlocomoreferencia.
Eneldocumento[2],elúnicoprogramaquesemencionaesVisualStudioShell
[12].SetratadelconocidoVisualStudiodeMicrosoft,peroreducidoasuestructura
básica,detalformaqueelusuariopuedaadaptarloparaprogramarconunlenguaje
propioycrearherramientaspersonalizadas.
Encuantoalestadodelarteen[3],semencionaqueparaesaversióndeACIDE–A
Configurable IDE se han seguido tomando como referencia los programas JEdit[7],
CrimsonEditor[8]yEclipse[11].AdemássehanañadidocomoreferenciaWinEdt
[13]yNetBeans[14].

SistemasInformáticos2013‐2014 14
En[4]laprioridaderaconseguirconectarlaconsolaconODBCyDES,paraellose
tomócomoreferencialosentornosgráficosdeSistemasGestoresdeBasesdeDatosde
lospropiosfabricantesMSAccess[15],Oracle[16],Postgres[17]ylaherramienta
TOra[18]paralaadicióndenuevaspropiedadesyfuncionalidadesenlamejoradel
proyecto.
En [4] tambiénse incluye laaparicióndeunnuevosoftwareconcaracterísticas
similaresaACIDEllamadoASPIDE[19]quetambiénsetomócomoreferencia.

SistemasInformáticos2013‐2014 15
En esta versión del proyecto se ha seguido trabajando en aumentar la
funcionalidad del proyecto partiendo del estado anterior del mismo [4]
aprovechandosuconexiónconelsistemaDES[5]yelsistemaODBCcreandonuevos
panelesqueinteractúanconlaconsolayagregandonuevasfuncionesenlospaneles
existentes.Sehanseguidoutilizando lasreferenciasantesmencionadas,destacando
CrimsonEditor[6]delcualsehansacadofuncionalidadesparaACIDEútilesparael
usuario.

SistemasInformáticos2013‐2014 16
5. ESTANDARESCuandoempezamoselproyecto,nosdimoscuentaqueen los cursosanteriores,
losgruposquetrabajaronenesteproyectohabíaninvertidomuchotiempoyesfuerzo
en la estandarización del código fuente, los comentarios y la documentación. La
estandarización es muy importante en este proyecto por la naturaleza de código
abierto del mismo y ha sido una de nuestras prioridades a la hora de desarrollar
código, comentarlo y escribir la documentación. Estaprioridadha venido impuesta
como un deseo del propio grupo de poder ofrecer un código lo más limpio y
entendible posible, tanto a futuros grupos de la asignatura Sistemas Informáticos,
comoatodaaquellapersonainteresadaenconsultarelcódigoquemueveaACIDE.
A continuación se explican los estándares seguidos, puede consultarse más
información sobre los estándares seguidos en las memorias correspondientes a
ACIDEdeañosanteriores[1],[2],[3]y[4].
5.1. CONTROLDEVERSIONES
Se ha llevado a cabo el control de versiones utilizando el cliente subversión
TortoiseSVN[22]yelrepositoriogratuitoAssembla[21].
Cada semana se ha entregado una nueva versión de la aplicación al director
Fernando Sáenz Pérez que consistía en un archivo ZIP y el documento TODO de
tareas.DentrodelarchivoZIPseencontrabaelejecutabledelproyecto.Cadaarchivo
semanal seguía el siguiente convenio de nomenclatura: “año_mes_dia_ACIDE.zip”
expresando el año, mes y día en forma numérica. De esta forma podíamos ir
almacenandotodoelconjuntodeversionesquesehanidoentregando,yexaminarla
evolucióntemporaldelproyectosinlugaralaconfusión.
ElrepositorioenAssemblasiguelasiguienteestructura:
svn:eseldirectorioprincipaldelproyecto.
o branches: este directorio contiene las versiones más importantes
que se han comportado de forma estable en el desarrollo del
proyecto.Esdecir,loquesehaconsideradounaversiónentregable.

SistemasInformáticos2013‐2014 17
o tags: aquí se encuentra la documentación del proyecto. Todos los
documentosconlistasdetareasquesehanelaboradosemanalmente
seencontrabanenestedirectorio.
o trunk:aquíseencuentraelcódigofuentedelproyecto.
o wiki: este directorio no ha sido usado, ya que en teoría estaba
dedicadoaladocumentaciónacercadelproyecto.Sinembargo,dada
la comunicación constante entre alumnos y director, no ha sido
finalmentenecesarioestedirectorio.
5.2. DOCUMENTACIÓN
Enlacomunicaciónentrealumnosyprofesordurantelarealizacióndelproyecto,
se ha llevado a cabo el seguimientode una serie de documentos de tareas escritos
periódicamente.Estetipodedocumentosdetareasseenviabasemanalmentejuntoa
cada entregable, para su corrección y actualización, siendo entregada la nueva
versióndeldocumentoa losalumnos,con lastareasacorregiryrealizardurante la
siguientesemana.
Para llevar correctamente el control de estos documentos y evitar confusiones
entre distintos entregables, se ha establecido una nomenclatura normalizada para
cada documento semanal: “año_mes_día_TODO_ACIDE.docx”, siendo expresados
año,mesydíaenformanumérica.
En cuanto al contenido, estos documentos se han dividido en dos secciones
principales:TareasRealizadasyTareasPendientes. Estas categorías se dividen a su
vez en secciones basándose en las diversas funcionalidades de la aplicación. Se
establecendosnivelesdeprioridad:tareasurgentesyfuturasfuncionalidades.
Se ha creado una leyenda para mejorar la comprensión de estos documentos,
explicando el significado de cada color de fuente utilizado en la redacción de las
tareas:
Verde:Implementacióncompletayfuncionamientocorrecto.
Azul:Implementaciónnocompleta.
Rojo:Sinimplementar.

SistemasInformáticos2013‐2014 18
Negro:Comentariosdelprofesor.
Naranja:Aclaraciones/preguntasdelosalumnos.
Los estándares aplicados en estosdocumentosde tareashan sido losmismos
queencursosanterioresysonlossiguientes:
ElestilodetextoNormaleneldocumentoestácompuestoporfuenteArial,
contamaño12pt,párrafojustificado,sangríade0,5cmenlaprimeralínea,
color negro, interlineado de 1,5pt y espaciado anterior y posterior al
párrafode6pt.
El estilo deTítulo1 está compuesto por fuente Calibri, con tamaño 26pt,
párrafo justificado, color “AzulOscuro,Texto2”, estiloVersales, espaciado
anterior24ptyposterior15ptalpárrafo.
El estilo deTítulo2 está compuesto por fuente Calibri, con tamaño 16pt,
párrafo justificado, sangría francesade0,63cm,color “AzulOscuro,Texto
2”, estilo negrita y Versales, espaciado anterior 24pt y posterior 10pt al
párrafo.
ElformatodelpiedepáginaestácompuestoporfuenteArial,tamaño12pt,
colornegro.Elpiedepáginacontieneeltexto“SistemasInformáticos2012‐
2013” y a la derecha el número de página en estilo negrita. Una línea de
colorazulseparaelpiedepáginadelrestodetexto.
Laslistasdeenumeracionessehanrealizadomediantelaherramientapara
enumeracionesdeMicrosoftWord2010.
El presente documento y el manual de usuario han seguido los mismos
estándares:
El estilo de texto Normal en el documento está compuesto por fuente
Cambria, con tamaño 12pt, párrafo justificado, sangría de 0,5 cm en la
primera línea, color negro, interlineado de 1,5pt y espaciado anterior y
posterioralpárrafode6pt.
ElestilodeTítulo1estácompuestoporfuenteCambria,contamaño26pt,
párrafo justificado, color “AzulOscuro,Texto2”, estiloVersales, espaciado
anterior24ptyposterior15ptalpárrafo.

SistemasInformáticos2013‐2014 19
ElestilodeTítulo2estácompuestoporfuenteCambria,contamaño16pt,
párrafo justificado, sangría francesade0,63cm,color “AzulOscuro,Texto
2”, estilo negrita y Versales, espaciado anterior 24pt y posterior 10pt al
párrafo.
ElestilodeTítulo3estácompuestoporfuenteCambria,contamaño14pt,
párrafo justificado, sangría francesade0,63cm,color “AzulOscuro,Texto
2”,estilonegritayVersales,espaciadoanterior10pt.
Elformatoparaescribirelcódigofuenteenestedocumentoestácompuesto
por la fuente Courier New, con tamaño 11pt, alineación a la izquierda y
bordenegro.
El formatodel pie depágina está compuestopor fuenteCambria, tamaño
12pt,colornegro.Elpiedepáginacontieneeltexto“SistemasInformáticos
2012‐2013”yaladerechaelnúmerodepáginaenestilonegrita.Unalínea
decolorazulseparaelpiedepáginadelrestodetexto.
Elencabezadocontienelasimágenesdellogodelaaplicación,elsímbolode
la Facultad de Informática y el escudo de la Universidad Complutense de
Madrid.
Laslistasdeenumeracionessehanrealizadomediantelaherramientapara
enumeracionesdeMicrosoftWord2010.
5.3. CÓDIGOFUENTE
Como se ha comentado anteriormente, se ha hecho un gran esfuerzo por
mantenerelcódigoenformaestandarizada.Sehanseguidolasnormasestablecidas
encursosanterioresyquepasamosalistaracontinuación:
Todoelcódigoestáeninglés.
En cada una de las clases del código se encuentra el código de licencia
públicaGPLv3,alcomienzodelasmismas:
/* • ACIDE – A Configurable IDE * Official web site: http://acide.sourceforge.net * • Copyright © 2007-2014

SistemasInformáticos2013‐2014 20
• Authors: * - Fernando Sáenz Pérez (Team Director). * - Version from 0.1 to 0.6: * - Diego Cardiel Freire. * - Juan José Ortiz Sánchez. * - Delfín Rupérez Cañas. * - Version 0.7: * - Miguel Martín Lázaro. * - Version 0.8: * - Javier Salcedo Gómez. * - Version from 0.9 to 0.11: * - Pablo Gutiérrez García-Pardo. * - Elena Tejeiro Pérez de Ágreda. * - Andrés Vicente del Cura. * - Version from 0.12 to 0.16 * - Semíramis Gutiérrez Quintana * - Juan Jesús Marqués Ortiz * - Fernando Ordás Lorente * • This program is free software: you can redistribute it and/or * modify it under the terms of the GNU General Public License as * published by the Free Software Foundation, either version 3 of * the License, or (at your option) any later version. * * This program is distributed in the hope that it will be * useful, but WITHOUT ANY WARRANTY; without even the implied * warranty of MERCHANBILITY or FITNESS FOR A PARTICULAR PURPOSE. * See the GNU General Public License for more details. * * You should have received a copy of the GNU General Public * License along with this program. If not, see * http://www.gnu.org/licenses/ *>
Comentarios Javadoc, simples y multilínea. Se ha procurado introducir
comentariosencadaunadelaslíneasdecódigoparahacermásentendible
yamigableensudistribuciónelcódigo.
// Updates the log AcideLog.getLog().info(AcideLanguageManager.getInstance(). getLabels().getString(“s555”)); //Loads the ACIDE – A Configurable IDE workbench configuration AcideWorkbenchConfiguration.getInstance().load();
Por cada clase Javaenel códigopara los comentarios Javadoc se sigueel
siguienteformato:
/** * Descripción de la clase. * * @version 0.11
SistemasInformáticos2013‐2014 21
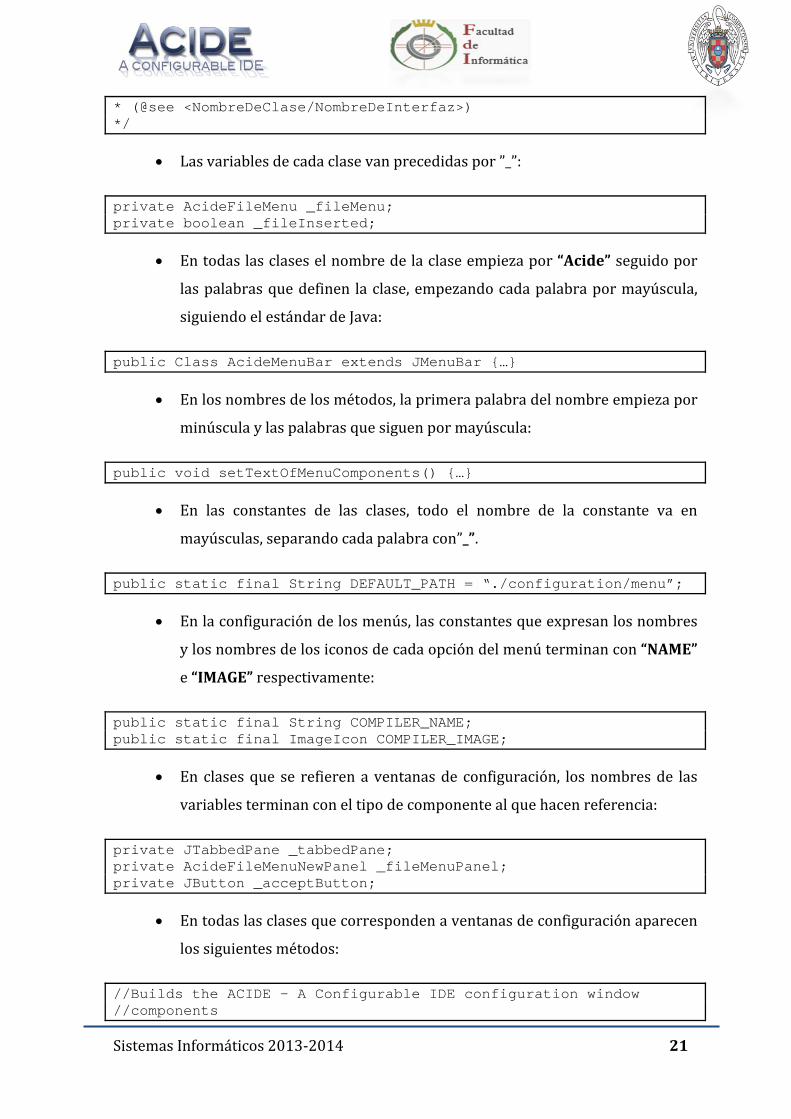
* (@see <NombreDeClase/NombreDeInterfaz>) */
Lasvariablesdecadaclasevanprecedidaspor”_”:
private AcideFileMenu _fileMenu; private boolean _fileInserted;
Entodaslasclaseselnombredelaclaseempiezapor“Acide”seguidopor
laspalabrasquedefinen laclase,empezandocadapalabrapormayúscula,
siguiendoelestándardeJava:
public Class AcideMenuBar extends JMenuBar {…}
Enlosnombresdelosmétodos,laprimerapalabradelnombreempiezapor
minúsculaylaspalabrasquesiguenpormayúscula:
public void setTextOfMenuComponents() {…}
En las constantes de las clases, todo el nombre de la constante va en
mayúsculas,separandocadapalabracon”_”.
public static final String DEFAULT_PATH = “./configuration/menu”;
Enlaconfiguracióndelosmenús,lasconstantesqueexpresanlosnombres
ylosnombresdelosiconosdecadaopcióndelmenúterminancon“NAME”
e“IMAGE”respectivamente:
public static final String COMPILER_NAME; public static final ImageIcon COMPILER_IMAGE;
Enclasesque se refierenaventanasde configuración, losnombresde las
variablesterminanconeltipodecomponentealquehacenreferencia:
private JTabbedPane _tabbedPane; private AcideFileMenuNewPanel _fileMenuPanel; private JButton _acceptButton;
Entodaslasclasesquecorrespondenaventanasdeconfiguraciónaparecen
lossiguientesmétodos:
//Builds the ACIDE – A Configurable IDE configuration window //components

SistemasInformáticos2013‐2014 22
private void initComponents() {…} //Adds the components to the ACIDE – A Configurable IDE to the //configuration window private void addComponents() {…} //Sets the ACIDE – A Configurable IDE configuration window //configuration private void setWindowConfiguration() {…} //Sets the listeners of the configuration window components. private void setListeners() {…} //Closes the window private void closeWindow() {…}
En todas las clases que corresponden a la barra de menús y menús
contextualesaparecenobligatoriamenteestosmétodos:
//Builds the ACIDE – A Configurable IDE configuration window //components private void buildComponents() {…} //Adds the components to the ACIDE – A Configurable IDE to the //configuration window private void addComponents() {…} //Sets the text of the ACIDE – A Configurable IDE class components //with the labels in the selected language to display private void setTextOfMenuComponents() {…} //Updates the ACIDE – A Configurable IDE class components //visibility with the menu configuration private void updateComponentsVisibility() {…} //Sets the listeners of the configuration window components. private void setListeners() {…}

SistemasInformáticos2013‐2014 23
6. GESTIONDELACONFIGURACIONTodoslosarchivosdelproyecto,tantolosarchivosdedocumentacióncomolos
archivosde código sonobjetode controlde lagestiónde la configuración. Seha
seguidoconlaconfiguracióndelagestióndescritaenlasmemorias[1],[2],[3]y
[4].
Alelegirlosnombresdedocumentosydeclasesenelcódigofuenteseutilizarán
siemprenombresqueseandescriptivosdelainformaciónquecontienen.Comose
hacomentadoen laseccióndeestándares,paracadaclaseenelcódigofuentese
indicalaversiónalaqueperteneceenelcomentarioprevioaliniciodelaclase.El
controldeversionesenelcódigofuentesehacedeformaautomáticagraciasaluso
delclienteTortoiseSVN[22].
Paralacomunicaciónentrelosdiferentesmiembrosdelproyectosehantenido
que tomar medidas especiales, ya que Semíramis ha disfrutado de una beca
erasmus durante el transcurso del curso académico completo, por lo que la
comunicación con Semíramis se ha realizado vía email, chat o videoconferencia,
pese a esta situación anómala, no ha habido problemas en la comunicación del
grupo de trabajo y se ha podido realizar el desarrollo del proyecto sin ningún
contratiempo,asícomolacoordinaciónentrelosmiembrosdelgrupodetrabajoha
podidorealizarsedemaneracorrecta.
Pormotivos de seguridad, se han hecho backups regulares del código fuente,
éstascopiaseranguardadasporlosmiembrosdelgrupoenDropbox[23].Deesta
manera teníamos un respaldo del trabajo realizado disponible para todos los
miembrosdelgrupo.
Para la documentación, cadamiembro ha trabajado con una copia local de la
sección o documento que estuviera modificando. En Google Drive[20] se ha
mantenido la documentación para que pudiera ser accesible por todos los
miembros.Tambiénseguardabaladocumentacióndemaneralocalportodoslos
miembrosdel grupoy enDropboxdemodoqueestuviera seguraante cualquier
tipo de incidente, Los documentos de tareas generados semanalmente, eran
guardadosyactualizadosporcadaunode losmiembros,al finalizarunatarea,el

SistemasInformáticos2013‐2014 24
miembrodelequipodebíaenviaruncorreoelectrónico informandoa losdemás.
Uno de los miembros se encargaba de ir actualizando el documento que sería
entregado la semana siguiente al profesor para indicar el progreso durante la
semanadetrabajo.
Hemosutilizadoelsiguientesoftwareparalarealizacióndelproyecto:
Eclipse SDK versión 4.3 [11] para el desarrollo del código fuente en
lenguajeJava.
GoogleDrive[20]paralacomparticióndediversosdocumentosdeinterés
entrelosmiembrosdelgrupo.
MicrosoftOffice2010paraladocumentaciónfinaldelproyecto.
Assembla[20]comorepositoriodecódigofuente.
TortoiseSVN[22]paralainteracciónconelrepositoriodedatos.
WinRar[24] y7zip[25] para la generación de los archivos comprimidos
quecontienenelejecutabledelaaplicación.
GIMP[26]paralaedicióndelosiconos,logotipoeimágenesdelproyecto.
Notepad++[27]paralacreaciónyedicióndelosarchivosdeconfiguración.
Skype[28]hafacilitadolacomunicaciónentrelosmiembrosdelgrupode
trabajo.
Dropbox[23]paraguardarycompartirdocumentosgeneradosduranteel
curso.
Virtualbox[29]paralavirtualización.Útilparahacerpruebasendiferentes
sistemasoperativos.

SistemasInformáticos2013‐2014 25
7. GESTIONDEREQUISITOSAl principio se ha respetado la gestión de requisitos consultada en [4], sin
embargo, ésta se ha idomodificando conforme el proyecto se iba desarrollando y
surgíannuevasposibilidades.
Traslaprimeratomadecontacto,antesdelcomienzodeldesarrollodelproyecto,
losrequisitosfundamentaleseranlossiguientes:
Eliminacióndeerroresexistentes.
Aumentodelasfuncionalidadesrequeridas.
Comosemencionaen[3]y[4],laestandarizaciónyoptimizacióndelcódigofuente
seha seguido cuidando.Al seruna aplicaciónde libredistribución, es fundamental
queelcódigopublicadosealegibleportercerosdemaneraquepuedancontribuiral
desarrollodelmismo.
7.1. REQUISITOSGENERALES
En laaplicación sedebenusar losnombrese identificadoresexactamente
comoseindicaenestecapítuloderequisitos.Enparticularsedebeprestar
especialatenciónalusodemayúsculasyminúsculas.
Todos los cuadros de diálogo con botón Cancelar (Cancel) deben aceptar
paralamismafunciónlapulsacióndelateclaEsc.
Alcerraruncuadrodediálogoconelbotónrojodelaspasedebeaplicarla
misma función del botón Cancelar (Cancel) o la función predeterminada
paracerrarelcuadrosinolohubiere.
TodosloscuadrosdediálogodebenaceptarlapulsacióndelateclaENTER
pararealizarlaacciónpredeterminada.Porejemplo,lapulsacióndelbotón
Aceptar(OK).
Todoslosrótulosdebenestargestionadosporlalocalización(dependiendo
del idioma seleccionado en la aplicación semostrarán los rótulos en ese
idioma).Enestedocumentosolosemuestranlosidiomasespañoleinglés,
peropuedehabermás.

SistemasInformáticos2013‐2014 26
Sedebeprobarlaaplicaciónendistintasplataformas:Windows,Linux,Mac
OS.
Todos los identificadores SQL que se envíen a DES deben aparecer
encerradosentredelimitadores.
EleditordetextoquecorrespondaalaVistaDiseñodeunavistadebeestar
sincronizadoconlaselecciónenelárboldelExploradordebasesdedatos.Es
decir, se debe seleccionar el nodo del árbol que corresponda cuando el
editortengaelfoco(ydeseleccionarelnododelExploradordeproyecto,sin
olvidarquesedebevolveraseleccionaradecuadamentecuandoselleveel
focoaotroeditordearchivo).
El cierre de cualquier ventana se podrá realizar con la combinación de
teclasdeaccesodirectoAlt+F4.
Lasventanasdebenserredimensionables.
Todos los menús y barras de comando deben ser parametrizables por
archivodeconfiguración.
7.2. DEPURACIÓN
Enesteapartadosevaaexplicardetalladamenteeldocumento“DES‐Debug”.Este
documentodescribelosrequisitosdelaaplicaciónDES‐ACIDEintegradaenACIDE:A
Configurable IDE referentes a la depuración SQL yDatalog y que ha centrado gran
partede losesfuerzosdedesarrolloduranteelcursoypor laquenuestroproyecto
llevaelnombreDebuggingACIDE.
Acontinuaciónsedescribiránlosrequisitosquesedebencumplireneldesarrollo
delaaplicacióndedepuracióndeclarativaintegradaenACIDE.
7.2.1. COMPONENTESDELAAPLICACIÓN
Laaplicacióntienedospartesprincipales:
TrazadeconsultasDatalogyvistasSQL
DepuracióndeconsultasDatalogyvistasSQL

SistemasInformáticos2013‐2014 27
Latrazapermite,apartirdeunaconsultaDatalogovistaSQL,inspeccionarsusub‐
PDG (grafo de dependencias restringido transitivamente a las de un nodo en
particular) examinando sus nodos. Para cada nodo se debe poder ver las tuplas
calculadasparaél(enunaventanaDataView)eiluminarlasfilasquecontenganlas
reglas o consultas de su definición. Este contenido puede estar repartido entre
distintosarchivosdetextoydelabasededatosasertada.
7.2.2. INICIODELAAPLICACIÓN
Para acceder a la aplicación de depuración en ACIDE‐DES, se deben añadir los
siguienteselementosnuevosalmenúVer:
Basededatosasertada
Traza
o Datalog
o SQL
Depuración
o Datalog
o SQL
7.2.3. PANELBASEDEDATOSASERTADA
Alseleccionar“Ver”(“View”)‐>“Basededatosasertada”(”AssertedDatabase”)se
debemostrarunpanel con las reglasyhechosde labasededatosasertada (reglas
introducidasporconsolaenlugardeprocesadasoconsultadasdearchivo)ordenados
por predicado (nombre/aridad: las reglas de los predicados de igual nombre pero
distintaaridadsemuestrandemenoramayoraridad)yconunabarra inferiorcon
distintoscontroles.
Al abrir este panel se deben rellenar automáticamente sus contenidos como se
indicaenelsiguienteapartado.

SistemasInformáticos2013‐2014 28
7.2.3.1. BARRAINFERIOR
Labarrainferiorcontienelossiguientescontrolesyetiquetas:
“R”<<Button>>“C”<<Button>>Filtro<<CheckBox>>Núm.<<Label>>
Botón“R”:
o Uso:permiteactualizarloscontenidosdelpaneldelabasededatos
asertada.
o Pulsación:Actualizacióndelpaneldelabasededatosasertada.
o Atajo:F5.
o ComandosTAPI:
Paraobtenerlospredicados:/tapi/pdg
Para obtener las reglas de la definición de cada predicado:
/tapi /listing_asserted Name/Arity. Se debe emitir este
comando por cada uno de los nodos del PDG, anotando
internamente las reglas del panel que correspondan a cada
predicado.
Botón“C”(“Clear”):
o Uso:permitequitarelresalte.
o Pulsación:Quitarresalte.
LacasilladeverificaciónFiltro,siestáactivada,muestrasololasreglasdel
nodoseleccionado.Siestádesactivada,muestratodaslasreglasdelabase
dedatosasertada.
Etiqueta“Núm”:
o Uso:Muestraelnúmerodereglasobservandoelnúmero.
7.2.3.2. PANEL
Elpanelmuestracadareglaasertada,separándolasentresívisualmente.Sepuede
resaltarunconjuntodelíneas(consecutivas)comoresultadodeunainteraccióncon
elpaneldedepuraciónodetraza.

SistemasInformáticos2013‐2014 29
7.2.4. PANELTRAZADATALOG
Alseleccionar“Vista”(“View”)‐>“Traza”(“Trace”)‐>“Datalog”semuestraelpanel
“Traza Datalog” (“Trace Datalog”), que mostrará el sub‐PDG restringido a una
consulta,yunabarrainferiorcondistintoscontroles.Elpanelnomuestranadahasta
quenosehayaintroducidolaconsulta.
7.2.4.1. BARRAINFERIOR
Labarrainferiorcontienelossiguientescontrolesyetiquetas,ademásdelosque
yaconteníalabarrainferiordelpanelPDG:
“ConsultaDatalog:”(“DatalogQuery:”)<<TextBox>>“R”<<Button>>
“<‐”<<Button>>“‐>”<<Button>>“Mostrarreglas”(“Showrules”)<<CheckBox>>
Elcuadrodetexto“ConsultaDatalog:”admiteescribirunaconsultaDatalog
sobrelaqueseefectuarálatraza.
Intro:Reiniciodelatraza.Seseleccionaautomáticamenteelprimernodoen
elrecorrido.
Comando TAPI: /tapi /trace_datalog Query, donde “Query” es el valor
introducidoenelcuadrodetexto.Devuelveelrecorridodenodos.
Elbotón“R”permitereiniciarlatraza(similaraunbotón“Actualizar”).Este
comportamientoreemplazaelcomportamientodelbotón“R”delpanelPDG
delquehereda.
Comando TAPI: /tapi /trace_datalog Query, donde “Query” es el valor
introducidoenelcuadrodetexto.
Elbotónflechaalaizquierda“<‐”permiteseleccionarelnodoanteriordel
sub‐PDG en el orden de recorrido que devuelve el comando /tapi
/trace_datalogQuery.Sisepulsasobreelnodoqueeselprimeroeneste
orden,seseleccionaráelúltimo.
Elbotónflechaaladerecha“‐>”hacelopropioconelnodoposterior.Sise
pulsasobreelnodoqueeselúltimoenelorden,seseleccionaráelprimero.

SistemasInformáticos2013‐2014 30
Lacasilladeverificación“Mostrarreglas”,siestáactivada,provocaquese
resalteautomáticamentelasreglasenloseditoresyelpaneldelabasede
datosasertada.
7.2.4.2. PANEL
El panel de traza es similar al panel del PDG al que se le añaden nuevas
funcionalidades:
Selección de un nodo (Clic sobre el nodo): seleccionar las reglas de su
predicado,quepuedenestarrepartidasentreuneditordearchivoyelpanel
“AssertedDatabase”.El comando/tapi/list_sourcesName/Arity lista los
archivosynúmerosde líneapara lasreglasconsultadas,yelmomentode
las asertadas. Para saber en qué editor y líneas se encuentran las
consultadasparaseleccionarlassehacemedianteestecomando.Parasaber
lasreglasaseleccionarenelpaneldelabasededatosasertadasehaceuso
delainformaciónqueseobtuvoparaconstruirsuscontenidos.
Dobleclicsobreunnodo:abrirel“DataView”delnodo.Elcomando/tapi
/list_etName/Aritydevuelve loscontenidosde latabladeextensiónpara
lasrespuestascalculadasparaelnodoName/Arity.
7.2.5. PANELTRAZASQL
Esequivalentealpanel“TrazaDatalog”.Aligualqueeste,noserellenahastaque
no se elija la vista a trazar. Comodiferencia, en lugarde seleccionar las reglasque
definen un predicado, se selecciona la definición de la vista (consulta SQL de la
instruccióndecreacióndevista).

SistemasInformáticos2013‐2014 31
8. PLANIFICACIONLaplanificaciónsehallevadoacaboeniteracionessemanales.Undíaalasemana
noshemosreunidoconeldirectorFernandoSáenzPérez.Duranteestasreunionesse
han evaluado los progresos y el trabajo realizado durante esa semana y se han
propuestotareasyobjetivosparalasemanasiguiente.
Parallevaracaboestaplanificación,sehadispuestodeundocumentodetareas,
encadareunión,elgrupollevabaeldocumentoactualizadoconlastareasrealizadas,
lastareasquehabíansupuestoalgunadificultad,olasdudasrelativasaunatareaen
concretoy la aplicaciónconel trabajodeesa semana.En la reunión se repasabael
documento,realizandopruebasunitariassobrelastareasrealizadasyresolviendolas
dudasquehabíansurgidodurantelasemana.Unavezsehabíarevisadoeldocumento
ysegúnelresultadodelarevisión,seplanificabanlastareasdelasemanasiguiente.
La asignación de tareas se ha intentado llevar a cabo de un modo que los
miembros del grupo pudieran trabajar en partes independientes de la aplicación
duranteesasemana,deestemodosehaintentadoeliminarenlamaneradeloposible
las dependencias entre el trabajo de los desarrolladores. Se ha creído correcto
trabajarasíparaquecadamiembrodelgrupopudieragestionarsutiempoypudiera
compatibilizareltrabajoenelproyectoconelrestodeasignaturasoconlaactividad
laboral,sinqueelprogresoenlaresolucióndetareassevieraafectado.
Durante el ciclo de vida del desarrollo se pueden observar cinco hitos
importantes. Cada uno de estos hitos corresponde a una nueva publicación de la
aplicación.Estaspublicacionessehanrealizadocuandosehatenidounconjuntode
funcionalidadesimplementadasyestables.Durantelasemanapreviaalapublicación
se hacían pruebas exhaustivas para buscar posibles bugs que se pudieran haber
introducido al desarrollar algún componente o que ya estuvieran presentes en la
aplicaciónynohubieransidodetectadosanteriormente.Encasodeencontraralgún
bug,estesecorregíademanerainmediata,parapoderpublicarversionesestablesy
libres de errores. Junto con una publicación se realizaba también el trabajo de
actualizacióndelmanualdeusuarioylapublicacióndelcódigofuente.

SistemasInformáticos2013‐2014 32
8.1. PRIMERARELEASE
El desarrollo de la primera release queda delimitado entre el inicio del
proyectoyel18dediciembrede2013.
Duranteesteperiodolaprincipaltareadelosmiembrosdelgrupodetrabajo
hasidofamiliarizarseconlaaplicación,configurarelentornodetrabajoybuscary
resolverposiblesbugsquepudieranhabersidoarrastradosdeañosanterioresy
quenohubieransidodetectadosantes.
Unavezque losmiembrosdelgrupode trabajo teníanelentornode trabajo
preparadoyconfiguradosedispusoalaresolucióndelasprimerastareas.
Algunasdelasmejorasintroducidasenestaiteraciónson:
Integrar un nuevo panel, el panel gráfico, en la estructura actual de
paneles de la aplicación. Al incluirlo se ha incluido la funcionalidad
necesaria para que el usuario pueda mostrarlo y ocultarlo, tal como
sucedíaenlosotrospaneles.
Generación del grafo de dependencias. Este grafo es generado por
DES[5]ysemuestraenelpanelgráfico.
Interacciónconelpanelgráfico.Elusuariopuedemoverelgrafodentro
delpanel,losnodosdemaneraindividualyhacerzoomsobreelgrafo.
Personalización del grafo de dependencias. Selección del color de los
nodos,arcosyformadelaspuntasdelosarcos.
Adicióndebarrasdemenúenlospaneles,conlainclusióndeunbotón
quepermiteocultarlospanelessinnecesidaddeaccederalabarrade
menú.
Añadida la funcionalidaddearrastrarysoltaren lospaneles.Através
de la barra demenú incluida en los paneles, comentada en el punto
superior,elusuariopuedeintercambiarlasposicionesdelosdiferentes
paneles,paraquepuedapersonalizarsuentornodetrabajo.
Actualizacióndelmanualdeusuario.
Estandarizacióndelnuevocódigoparasupublicación.

SistemasInformáticos2013‐2014 33
Conlafinalizacióndeestaiteraciónsepublicólaversión0.12delaaplicación,
conlasnuevasfuncionalidadessobrelasquesehabíatrabajadooperativas.
8.2. SEGUNDARELEASE
Lasegundaiteraciónempezóeldía18dediciembrede2013yduróhastael
3defebrerode2014.
En esta fase se trabajó en el panel gráfico, para conseguir que el usuario
pudiera tener unamejor experiencia con el panel gráfico, también semejoró la
funcionalidad de recolocación de paneles. Se añadieron nuevas opciones en el
editordetextos,laconsolayelpaneldebasesdedatos.
Algunasdelasmejorasintroducidasenestareleasefueron:
Implementar elmecanismo de doble buffer paramejorar el dibujado
delPDG.
Funcionalidad del sangrado multilínea en el editor de textos con el
tabulador, y configuración del tamaño de la sangrado y el tipo de
sangrado(espaciosotabuladores).
Funcionalidaddecomentarydescomentarlíneaseneleditordetextos.
Particióndelíneasañadidoenlaconsola,paraevitarlaaparicióndela
barradedesplazamientohorizontal.
Guardarelestadodelospanelesenlosarchivosdeconfiguraciónpara
quesemantengaalvolveraabrirlaaplicación.
AñadirdobleclicparaabrirlaVistadeDatosparalastablasenelpanel
debasesdedatos.
Opciónparaocultaromostrardetallessobrelascolumnasdeunatabla
enelpaneldebasesdedatos.
AñadirlaposibilidaddecopiarypegarenlaVistadeDatosdelpanelde
basesdedatos,consuscorrespondientesatajosdeteclado.

SistemasInformáticos2013‐2014 34
Nuevaentradaenelmenúcontextualdelpaneldebasesdedatospara
lamodificaciónderestricciones.
ArreglarbugsenelpanelPDGalredimensionareltamañodelosnodos
alhacerzoom.
AñadirunspinnerparaindicarycontrolarelniveldezoomenelPDG.
Añadido el panel de depuración, aunque sin funcionalidad por el
momento.
CambiarelnombredelpanelgráficoporPDG.
Arregladosbugsenlafuncionalidaddearrastrarysoltarpaneles.
Actualizacióndelmanualdeusuario.
Estandarizacióndelcódigoparasupublicación.
Al final de esta fase se consiguiómejorar el funcionamientodel PDGyde la
recolocacióndepaneles.Tambiénseañadiófuncionalidadimportantealeditorde
textos, la consola y el panel de bases de datos. Todas estas mejoras fueron
publicadasenlaversión0.13deACIDE.
8.3. TERCERARELEASE
Estaiteraciónquedadelimitadaentrelasfechas3defebrerode2014y12de
marzode2014.DuranteestafasesesiguiómejorandoelPDG,eleditordetextos,
laVistadeDatosenelpaneldeBasesdeDatosyladisposicióndealgúnelemento
delainterfazdeusuarioparahacerlamássencillaalusuario.
Esteeselsiguienteresumendelastareasdurantelatercerarelease:
Creaciónde los ficherosde idiomaparaqueseanconfigurablesporel
usuario.
Mejoras tantoen lageneracióndelPDGcomoen ladisposiciónde los
nodos.
Mejora en el botón “play” para enviar tanto un fichero entero a la
consola,comounaseccióndetextoseleccionadoeneleditordetextos.

SistemasInformáticos2013‐2014 35
AñadidafuncionalidadparabuscarejecutablesenelPATHdelsistema
operativosintenerqueintroducirlarutaamano.
Implementadas opciones de menú para aplicar cambios de estilo
mayúscula/minúscula sobreun texto. Los atajosde tecladopara cada
opcióntambiénañadidos.
Solucionadobugqueañadíalaextensiónalficherodeconfiguraciónde
proyectoaunqueestayaestuvieraincluidaenelnombredelarchivo.
Mejoras sobre las nuevas funcionalidades introducidas en la anterior
release.
MejorasgeneralesenelpaneldeBasesdeDatos.
MejorasgeneralesenlaVistadeDatos.
Actualizacióndelmanualdeusuario.
Estandarizacióndelnuevocódigoparasupublicación.
Se concluyó esta fase con la publicación de la versión 0.14 y con mejoras
generalesentodaslasfuncionalesañadidasenlaspublicacionesanteriores.
8.4. CUARTARELEASE
Lacuartaiteracióncomprendedesdeeldía12demarzode2014hastael28
deabrilde2014.
El objetivo durante esta fase fue implementar funcionalidad en el panel de
depuración y la creación de la ventana de la base de datos asertada. Aunque el
objetivo prioritario era el ya comentado, también se implementaron otras
funcionalidades.
Acontinuaciónselistaslasprincipalestareas:
Añadirlasfuncionalidadesdelpaneldedepuración,conlainclusiónde
lavistadelatrazaDatalogySQL.
Creacióndelaventanadelabasededatosasertada.

SistemasInformáticos2013‐2014 36
MejoraenlaconstruccióndelgrafodedependenciasPDGalrealizarse
ensegundoplano.
Implementadalaselecciónindividualymúltiplehaciendoclicsobreel
panelnumeradodeleditordetextos.
Diferenciareltipodeorigendeunavista,SQLoRA,ygenerarsunodo
detextocorrespondienteenbaseaello.
Mostrar por defecto en la VistaDiseño la sentencia de origen de una
vista.
PermitirlaedicióndelosnodosTextoSQLyTextoRA.
Añadido lasaccionescopiarypegarparamúltiples filasen laVistade
datosdeunatabla.
MejorasgeneralesenelpaneldeBasesdeDatos.
Extender las implementaciones del manager para poder realizar las
accionesdelaVistaDiseño:
o Añadiryeliminarcolumnas.
o Cambiarnombresytiposdelascolumnas.
o Cambiarlasrestricciones(claveprimariaynonulos).
o Recuperarelestadoanteriordelatablasiseproduceunerror.
o Nopermitirmodificarlosesquemasdetablasnovacías.
Actualizacióndelmanualdeusuario.
Estandarizacióndelnuevocódigoparasupublicación.
Conlafinalizacióndeestaiteraciónpublicamoslaversión0.15deACIDE.
8.5. QUINTARELEASE
Estaúltima iteraciónabarcadesde lapublicaciónde la anterior releaseel28de
abrilde2014hastaelfinaldelcursoacadémico,correspondiendoconlaentrega
finaldeunIDEestableydistribuible.

SistemasInformáticos2013‐2014 37
Éstaeslalistadetareasrealizadasdurantelaúltimafase:
Implementación de interfaz gráfica para la gestión de creación,
modificaciónyeliminaciónderestricciones.
Implementacióndemenúcontextualpara losnodosColumnadeunatabla
que permita crea y eliminar algunos tipos de restricciones sobre dicha
columnadeformadirecta
Mejora en el funcionamiento de creación, modificación y eliminación de
restriccionesatravésdemenúcontextual.
Permitirseleccionareltipodeordenacióndelascolumnasdeunatablaen
laVistadeDatos.
Dotara lascolumnasdeuna tablaen laVistadeDatosconunmenúpara
elegireltipodeordenaciónaaplicarsobrelacolumnaseleccionada.
PermitircopiarypegartablasyvistasenelpaneldeBasesdeDatos.
MejorasgeneralesenelpaneldeBasedeDatos.
Añadirlosbotonesparairalprimeryalúltimodelgrafodetrazanodoenel
paneldedepuración.
Añadir el botónmostrar para enseñar el texto del nodo seleccionado del
paneltrazaDatalogeneleditordeficheros.
Añadir la nueva distribución de nodos a los grafos paneles de traza y al
grafodelpanelPDG.
Añadir la funcionalidad paramostrar el nodo Texto SQL al seleccionar el
nododeunavistaenelgrafodetrazaSQL.
Actualizacióndelmanualdeusuario.
Estandarizacióndelnuevocódigoparasupublicación.
Estaiteraciónfinalizaconlapublicacióndelaversión0.16,siendolapublicación
finalrealizadaporelpresentegrupodetrabajo.

SistemasInformáticos2013‐2014 38
9. TAREASREALIZADASA continuación se describen en detalle las tareas realizadas separadas en los
diferentesmódulosdelaaplicación:
9.1. PDG
Desdeelprincipiosetuvomuchointerésenincluirenelprogramaunpanelnuevo
dondesemuestredeformagráficalasdependenciasfuncionalesentreloselementos
(tablasyvistas)delabasededatos.Dichasdependenciassemuestranmedianteuna
estructurade grafo en el cual se losnodos representan a cadaunode losdistintos
elementos mientras que las dependencias funcionales en sí se representa con la
conexióndelosnodosmediantearcos.
Este panel semuestramediante una nueva entrada dentro delmenú Ver de la
barrademenúsdelaaplicación,tambiénsepuedeocultarmediantelamismaentrada
delmenúobiendesdeel botón con formadeaspaen labarrade títulodelpropio
panel.

SistemasInformáticos2013‐2014 39
Paralapersonalizacióndelmismosehaagregadounanuevaentradaalmenúde
configuración creado específicamente para este panel dentro del cual el usuario
puedepersonalizardistintosaspectosdelaaparienciadelgrafo,talescomoelcolor,el
tamaño o la forma de los nodos, así como el color y la forma de los arcos del
grafo para estarmás cómodo trabajando con este. Elmenú también contiene una
entradadondeelusuariodecidesiquieremostraronolasetiquetasdelosnodoscon
elnombreylaaridaddelelementodelabasededatos.
En el propio panel se han añadidos varios componentes con funcionalidades
modificarlarepresentacióndelgrafo.Estoscomponentesestánagrupadosenlabarra
deaccionesquesepuedeobservarenlaparteinferiordelpanel.Ladescripcióndelas
distintasaccionesselistaacontinuación:
Actualizar: Vuelve a generar el grafo de dependencias con el contenido
actualdesistemadebasesdedatos.
Niveldezoom:Pequeñocuadrodondesemuestraysepuedemanipularel
niveldezoomdelgrafo.
Etiquetas:Muestrauocultalasetiquetasconelnombreylaaridaddelos
nodos.
Aumentodezoom:Aumentaelniveldezoomdelgrafo.
Disminucióndezoom:Disminuyeelniveldezoomdelgrafo.

SistemasInformáticos2013‐2014 40
9.2. CONSOLA
Laconsolaesunaherramientaenlaquesehabíandepositadomuchosesfuerzos
durante cursos anteriores, y que tenía un comportamiento correcto y estable, pero
todavía le quedaban funcionalidades que implementar y algunos aspectos que se
podríanmejorar
Lastareasrealizadasenlaconsolasonlaslistadasacontinuación:
Funcionalidad de partir líneas (line wrapping) en la consola. Es
funcionalidad ya estaba implementada en el editor de textos, siendo su
comportamientocorrecto,porloqueseintentóimplementarunaestrategia
similarparalaconsola.Losprimerosintentosfueroninfructuososdebidoa
lasdiferenciasexistentesentrelosdospanelesporloquetrasunalaborde
investigación se dio con un snippet de código funcional. Es conveniente
agradecer al creador de este snippet su trabajo ya que hizo posible
conseguirelcomportamientobuscadoenlaconsola.Sepuedeencontrarun
enlacealawebdelautorenlasecciónReferencias,punto[30].Paraqueel
usuario pueda activar o desactivar esta funcionalidad, se añadieron las
entradascorrespondientesenelmenúdeconfiguracióndelaconsolayenel
menúcontextualdelaconsola.
BúsquedadelaconsolaenelPATHdelsistemaoperativo.Éstahasidouna
tareaimportante,yaqueproporcionaunafuncionalidadmuyútilalusuario
ypermitealaaplicaciónunamayorintegraciónconelentornoenelquese
estáejecutando.Parasurealizaciónfuenecesaria la investigaciónsobre la
diferencia sobre el funcionamientodedeterminadas característicasde los
diferentes sistemas operativos sobre los que funciona ACIDE y unmayor
esfuerzoenlaspruebasrealizadasaltenerquehacerlassobrelosmismos.
Usodevariablesdeentornodelsistemaoperativoparalaconfiguraciónde
laconsola.Ésta tarea también fueconsiderada importantepor lasmismas
razones expuestas en el punto anterior y ha requerido también cierta
investigación para poder hacerla funcionar en los distintos sistemas
operativossobrelosquefuncionaACIDE.

SistemasInformáticos2013‐2014 41
Mejoraenlaidentificacióndeerroresenlaconfiguracióndelaconsola.Esta
tarea se ha realizadopara evitar la posibilidad de configurar una consola
errónea,loquecausaquelaaplicaciónperdieralaconfiguraciónantiguade
la consola. Al perder la configuración de la consola, cuando el usuario
quería volver a configurar la consola, se encontraba con que toda la
informaciónguardadadelaconsolahabíadesaparecido.Setomóladecisión
de diseño de que, si no se habían introducido todos los parámetros
obligatorios necesarios para la configuración de la consola o si alguno de
estosfueraincorrecto,nosepermitiríaqueelsistemaintentaraconfigurar
laconsola,esdecir,sehicierantodaslascomprobacionesnecesariasantes
de cerrar la ventana de configuración de la consola, se comprobaran los
parámetrosnecesariosyunavezcomprobadoqueéstoserancorrectos,se
procedealaconfiguracióndelaconsola.
Cerrar la consola ahora no causa la pérdida de la configuración de la
consola.Antesdeestamejora,sielusuariodecidíacerrarlaconsola,alabrir
la ventana de configuración se había perdido la información de
configuración,teniendoqueinsertarladenuevo,ahoraesposiblecerrarla
consola sin perder la configuración, por lo que si se quiere volver a
configurarlaconsolaconlamismainformación,puederealizarsesintener
quevolveraintroducirlosparámetrosdeconfiguraciónmanualmente.
Interrupción de la ejecución de la consola. Para esta tarea se buscaba la
posibilidaddeenviarunaseñalde interrupcióna laconsola.Éstatareaha
quedado medio implementada, estando funcionando en Linux y Mac OS,
peronohapodidoserllevadaacaboenWindowspesealesfuerzo,tiempoe
investigaciónqueselehadedicado.Seproporcionamásinformaciónenla
secciónObjetivosnocumplidos.

SistemasInformáticos2013‐2014 42
9.3. BASEDEDATOSASERTADA
Unodelosaspectosimportanteseralainclusióndelabasededatosasertada.La
base de datos asertada es un panel que se ha desarrollado nuevo, en el cual están
incluidos las reglas introducidas por consola, en lugar de reglas procesadas o
consultadasdearchivo.Labasededatosasertadamuestralasreglasordenadaspor
predicado,encasodequeelnombrecoincidaperonolaaridad,semostraránprimero
lospredicadosdemenoraridad.
Debidoalacantidaddepanelesquesemuestranenlaactualidadenlaaplicación,
se tomó ladecisióndeque semostraraenunanuevaventana.La integraciónde la
basededatosasertadaenelesquemadepanelesactualhaquedadocomounatarea
pendientecomosedescribemásadelanteenapartadoObjetivosnocumplidos.
Labasededatosasertadatienecontienelabarradecontrolesenlaparteinferior,
enestabarraseincluyenlasaccionesquepuederealizarelusuarioconlaventana.

SistemasInformáticos2013‐2014 43
Actualizar:estebotónseencargadeactualizarelcontenidodelaventana
de la base de datos asertadas,mostrando las nuevas reglas que pudieran
habersidoasertadasenlaconsola.
Limpiar: limpia la selección de las reglas que estén seleccionadas en ese
momento. Su funcionamiento con el panel de depuración se detalla a
continuación.
Filtro:filtralasreglasmostradasdelabasededatosasertadas,conaquellas
correspondientes al nodo actualmente seleccionado en el panel de
depuración. Su funcionamiento con el panel de depuración se detalla a
continuación.
Indicador de reglas: muestra el número de reglas que se muestran
actualmenteenlabasededatosasertada.
Comosehaindicado,labasededatosasertadasecomunicaconlatrazaDatalogy
SQL. A continuación semuestran algunos ejemplos de la comunicación entre estos
doscomponentes.
Enlasiguientecapturasepuedeobservarlacomunicaciónentrelatraza(eneste
ejemplo SQL) con la base de datos asertada, al seleccionar el nodo “employee” las
reglasquecoincidenconesenodoquedanmarcadasautomáticamenteencolorverde.
Éstaselecciónpuedequitarseconlaaccióndelimpiar.

SistemasInformáticos2013‐2014 44
Lasiguientecapturamuestracómofuncionael filtrodereglas,paramostraresta
funcionalidadsevaacontinuarconelmismoejemploexpuestoarriba.
En este caso, después de limpiar la selección mostrada anteriormente, se ha
habilitado el filtro, por lo que la base de datos asertada solo muestra las reglas
relacionadasconelnodoactualmenteseleccionadoenlatraza.

SistemasInformáticos2013‐2014 45
9.4. BASESDEDATOS
En esta nueva versión el panel de Bases de datos ha experimentado cambios y
mejoras tanto en su interfaz gráfica como en su funcionalidad. Además, se han
corregidociertosbugsdeversionesanterioresqueafectabanalbuenfuncionamiento
delpanel.
Sibienelpanelconservalaestructurayrepresentaciónoriginal, loscambiosmás
significativosvienendelamanodelainclusióndenuevasfuncionalidadesenelmenú
contextualdelosnodosqueconformanelárbol.
A continuación se detallan las modificaciones realizadas para cada uno de los
nodosprincipalesdelárbol.
9.4.1. TABLAS
Estenodocuentaconunmenúpropioenelcualademásdelasopcionesexistentes
sehaañadidolaopción“Mostrardetalles”lacualpermitealusuarioelegirlacantidad
deinformaciónquedebemostrarseporcadanodotabla,esdecir,sidebemostrarse
solo el nombre de la misma, el nombre y las columnas, o por último el nombre,
columnasytipodeéstas.

SistemasInformáticos2013‐2014 46
9.4.1.1. NODOTABLA
Las opciones relacionadas con la creación de restricciones que hasta la versión
anterior se mostraban de forma individual, para esta nueva versión, se han
condensadoenunaúnicaopcióndenominada“Restricciones”lacualofrecealusuario
unaformamáságileintuitivadecrearymanejarrestriccionesmedianteunainterfaz
gráfica.
Enestanuevaversiónestambiénposiblerealizarelcopiadoypegadodetablas,ya
sea usando el menú destinado a tal propósito o mediante atajos de teclado. Una
particularidadesqueelpegadomedianteel atajode tecladoCtrl+Vsepuedehacer
tantosielnododedestinoseleccionado eselnodoTablascomosieselnodode la
propiatablaquesehacopiado.
La composición y funcionalidad de la ventana de Restricciones se detalla más
adelante.
9.4.1.2. NODOCOLUMNA
Los nodos columna que hasta la última versión eran meramente informativos,
ahora incluyen nuevas funcionalidades que facilitan su manejo en cuanto a
restriccionesserefiere.Asípues,cadanodocolumnadeunadeterminadatabla,posee
unmenúdesdeelcualsepuedeoptarahacerque lacolumnaseleccionadaseauna
claveprimaria,unaclaveforáneaoquenopuedacontenerunvalornulo.
SistemasInformáticos2013‐2014 47
Deteneréxitolaoperación,deformaautomática, lascolumnasapareceránenlos
respectivosnodospropiosdelatabla:PK,FKoNNsegúnseaelcaso.
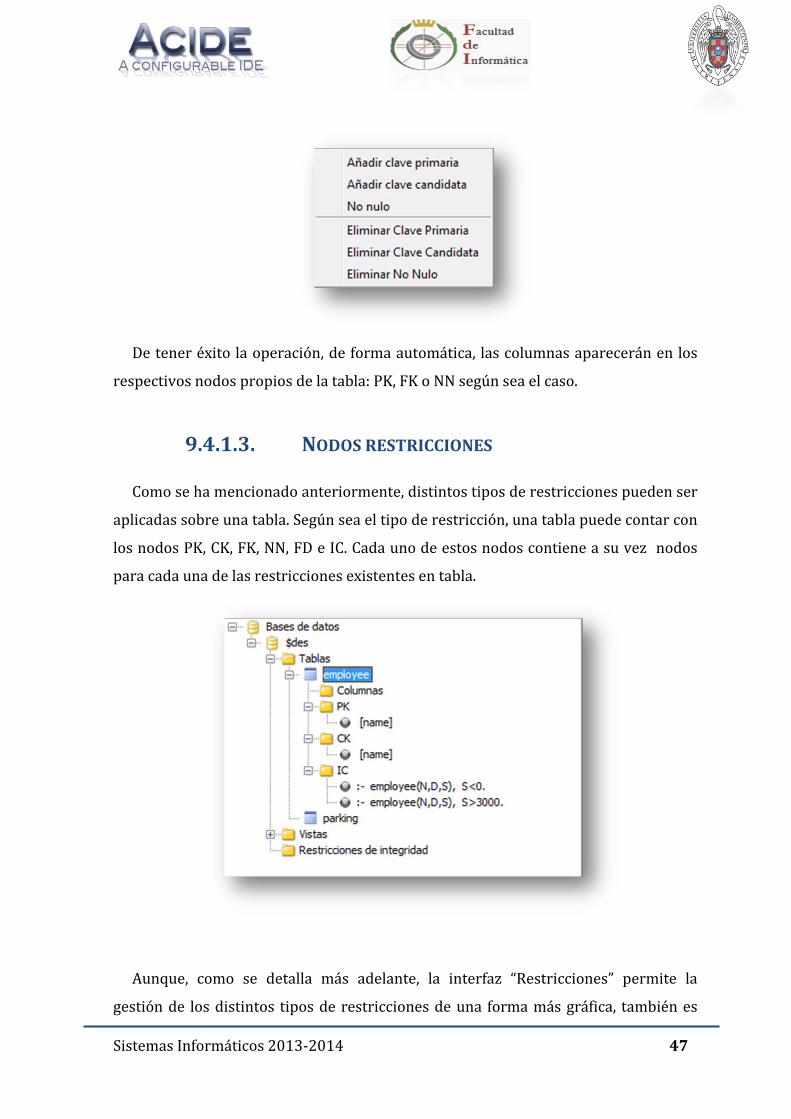
9.4.1.3. NODOSRESTRICCIONES
Comosehamencionadoanteriormente,distintostiposderestriccionespuedenser
aplicadassobreunatabla.Segúnseaeltipoderestricción,unatablapuedecontarcon
losnodosPK,CK,FK,NN,FDeIC.Cadaunodeestosnodoscontieneasuveznodos
paracadaunadelasrestriccionesexistentesentabla.
Aunque, como se detalla más adelante, la interfaz “Restricciones” permite la
gestiónde losdistintos tiposderestriccionesdeuna formamásgráfica, tambiénes

SistemasInformáticos2013‐2014 48
posiblemodificaryeliminarcadarestricciónexistentedeformadirectamedianteun
menúpropio.
9.4.2. VISTAS
AligualqueelnodoTablas,elmenúdeestenodosehavistoalteradoparaañadir
la opción de “Mostrar detalles” con la misma funcionalidad mencionada
anteriormente,conladiferenciadequeseaplicasobrelosnodosvista.
Enestanuevaversiónestambiénposiblerealizarelcopiadoypegadodevistas,ya
sea, usando el menú destinado a tal propósito o mediante atajos de teclado. Una
particularidadesqueelpegadomedianteelusodelatajodetecladoCtrl+Vsepuede
hacertantosielnododedestinoseleccionadoeselnodoVistascomosieselnodode
lapropiavistaquesehacopiado.
9.4.2.1. NODOVISTA
Una modificación importante en este nodo se ha realizado sobre los subnodos
TextoSQL,TextoRAyTextoDatalog.

SistemasInformáticos2013‐2014 49
Enéstanuevaversiónsetieneencuentael tipodesentenciausadaparacrear la
vista,pudiendoseréstadetipoSQLoRA.Dependiendodeltiposemostraráunnodo
TextoRAounnodoTextoSQLconsurespectivasentencia.ElnodoTextoDataloges
comúnenamboscasos.
Acontinuaciónsemuestralosnodosdelatabla“parent”encasosuorigenseade
tipoRAenlugardeSQL.
Delamismaforma,laventana“VistaDiseño”quepermitemodificarlavista,ahora
muestrapordefectolasentenciasegúneltipodelamisma,SQLoRA.
Mediante la opción “Mostrar” de los nodos Texto SQL y Texto RA se permite la
modificacióndelavistaaltenerlamismafuncionalidadque“VistaDiseño”.

SistemasInformáticos2013‐2014 50
Esta opción sehadesactivadopara el nodoTextoDatalog al ser éste generadopor
defecto,yporlotanto,noeditable.
9.4.3. VISTADEDATOS
Aunquenosetratadeunnododelabasededatos,esunainterfazmuyimportante
de la misma y por ello sus modificaciones y mejoras se tratan en este apartado
independiente.
Se ha implementado la posibilidad de abrir esta ventana haciendo doble clic de
ratón sobre el nodo tabla de la cual se desean visualizar los datos.No obstante, se
conserva la opción de menú “Vista Datos” para tal propósito. A diferencia de la
versión anterior, ahora no es posible abrir múltiples ventanas Vista Datos de una
mismatabla.SiemprequeseintenteabrirunaVistaDatosnueva,semostraráencaso
deexistir yaunaventanacreada, éstaúltima.LaventanaVistaDatosenmodosolo
lecturasereservaúnicayexclusivamenteparalavisualizacióndedatosdeunavista.

SistemasInformáticos2013‐2014 51
Conrespectoalaversiónanteriorseharespetadolarepresentacióngráficadeesta
ventana.Acontinuaciónsedetalla lasmodificacionesefectuadassobresusmenúsy
componentes.
9.4.3.1. MENÚVER
Sehaincorporadolaopción“Mostrar/OcultarColumnas”,lacualcomosunombre
indica,permiteseleccionarlascolumnasquesedeseamostrar/ocultar.
SiseseleccionalaopciónMostrar/Ocultarcolumnasseabrelasiguienteventana
contantasfilascomocolumnastengalatabladedatos:

SistemasInformáticos2013‐2014 52
Encasodeexistircolumnasocultas,elusuarioesinformadomedianteunmensaje
enlaparteinferiordelaventanaVistaDatosdelaexistenciadelasmismas.
Otramodificaciónrealizadaenestemenúrecaesobrelaopción“Ordenarpor”que
ahora ofrece una interfaz más completa para la gestión de ordenación de las
columnasycomointervienenéstasenlamisma.

SistemasInformáticos2013‐2014 53
Mediante este panel el usuario es capaz de elegir las columnas que deben
intervenir en la ordenación, el tipo de ordenación que se desea para cada una y el
ordenenquesedebehacerlasolicitud.
Paraestepropósitosedebenseleccionarlascolumnasenelmismoordenenquese
deseaquesehagalaordenación,estoes,empezandodearribahaciaabajo.Asímismo,
sedebenmarcarlascasillasdeestascolumnasparaqueformenpartedelaconsulta.
Porúltimo,sedebeelegirel tipodeordenaciónparacadaunadeellas,deentre las
tresdisponibles:ascendente,descendenteyninguno.
9.4.3.2. TABLADEDATOS
Sehaprocedidoamejorarelfuncionamientoasícomoafacilitarlainteraccióndel
usuario con esta tablamediante la incorporación de nuevas funcionalidades sobre
algunosdesuscomponentes.

SistemasInformáticos2013‐2014 54
Columnas: Cada una de las columnas que conforman la tabla ahora
disponendeunmenúpropioquepermiteseleccionardemaneradirectael
tipodeordenaciónquesedeseaparaunacolumnadeterminadauocultarla.
Paravisualizarelmenú, sedebehacerclicderechosobreelnombrede la
columna que se desea ordenar u ocultar. Se mantiene, sin embargo, la
funcionalidad anteriorde cambiar el ordenactual deuna columnapor el
inverso al hacer clic sobre el nombre de la misma. Cabe destacar que si
previamentesehabíarealizadoalgunaaccióndeordenamientomedianteel
menú“Ordenarpor”,éstaúltimaseráreemplazadaporlanuevaordenación
de la columna seleccionada y ésta pasará a ser el único parámetro que
intervenga en la ordenación. Los cambios son también reflejados en la
ventana“Ordenarpor”.
Insertar:Sibienlainserciónyaeraposibledesdeversionesanteriores,en
esta nueva versión se ha mejorado el proceso de la misma. Es posible
procesar nuevas inserciones y su posterior actualización de manera más

SistemasInformáticos2013‐2014 55
rápidapresionandolatecla“Enter”sinnecesidaddehacerclicsobrelafila
conelasterisco.
Copiar y pegar datos: Esta nueva funcionalidad permite, valga la
redundancia,copiarypegardatosdentrodeunamismatablaasícomoen
otras tablas siempre y cuando coincidan los tipos de las columnas de las
tablas fuente y destino. El usuario puede realizar esta acción ya sea
mediante los menús contextuales dispuestos para tal fin o mediante los
atajosdetecladoCtrl+CyCtrl+V. Esposible lamultiselección,esdecir,se
puedencopiarypegarvariasfilasycolumnasenunasolaacción.Paraello
solobastaconseleccionareláreadecopiadoantesderealizarunaacción.
Encasodequesedeseepegarunnúmerodecolumnasy/ofilassuperioral
número de columnas y/o filas disponibles en la tabla, el usuario será
notificado de la imposibilidad de realizar esta acción y la misma será
abortada. El área de pegado es calculado a partir de la celda donde se
posicionaelcursor.Siseposicionaen laprimeracolumna, tieneelmismo
efecto que posicionarse sobre la columna que contiene el asterisco.
Asimismo,sisedeseapegarmásdeunafilaalfinaldelatabla,estoes,lafila
conelasterisco,noesnecesariorealizarningunaacciónespecialyaquede
forma automática se añadirán tantas filas como filas tengan los datos a
pegar.Sehaintentadoimplementarestasaccioneslomásparecidoposible
a cómose llevana caboenundocumentoExcelparahacer laexperiencia
delusuariomásfácileintuitiva.
9.4.4. VENTANADERESTRICCIONES
Al igual que sucede con la ventana Vista Datos, la ventana Restricciones se
explicaconmásdetalleenesteapartado.
Esta interfazpretendefacilitaralusuario lasaccionesdecreaciónymodificación
derestricciones.Pormediodepestañas,cadaunadedicadaauntipoderestricciónen
particular,elusuariopuedeelegireltipoderestricciónquedeseaasícomogestionar
posiblesmodificaciones.

SistemasInformáticos2013‐2014 56
Acontinuaciónsedetallanlascaracterísticasdecadapestaña:
9.4.4.1 CLAVEPRIMARIA(PK)
Enestapestañasemuestraunatabladetrescolumnascontantasfilascomo
atributostengalatablasobrelacualseaplicaránlasrestricciones.Laprimera
columnamuestralosnombresdecadaatributodelatabla,lasegundaindicael
tipo de cada atributo y la tercera consta de una casilla de verificación para
cadafilaquepermitehabilitarodeshabilitaraundeterminadoatributocomo
claveprimaria.

SistemasInformáticos2013‐2014 57
9.4.4.2 CLAVECANDIDATA(CK)
El panel de Claves Candidatas aunque muy similar al panel de Claves
Primarias,añadeunpaneldenavegaciónenlapartesuperior,elcualpermite
al usuario navegar por las claves candidatas existentes en la tabla a la que
correspondelaventanaderestricciones.Aligualqueenlosdemáspaneles,las
casillas de verificación permiten la modificación y eliminación de una
restricción existente. Para crear una nueva clave candidata se ha
implementadoelbotón“NuevaCK”.
9.4.4.3 CLAVEFORÁNEA(FK)
Unaclave foráneaestableceunarelaciónentre losatributosdedostablas,
digamos,unafuenteyotradestino.Latablafuenteserálatablaparalacualse
hayaabierto laventanarestricciones.Cadaatributode la tabla fuentecuenta
con un botón en la cuarta columna que en caso de existir restricciones
asociadas almismo semuestra como “Mostrar Tablas”. Si no existe ninguna
relaciónconningúnotroatributodeotratablaentonceselbotónasociadoaél
semuestracomo“NuevaTabla”.

SistemasInformáticos2013‐2014 58
Al presionar un botón con la etiqueta “Nueva Tabla” se abre una nueva
ventanaquecontieneunlistadodelastablasexistentesenlabasededatos.Es
necesariousuarioqueelijalatablaconlacualsedeseaestablecerlarelación.
Una vez elegida, de abre una nueva ventana en la cual el usuario puede
elegir el atributo que se desea que sea clave foránea marcando la casilla
destinadaparatalpropósito.
Siseseleccionaunbotóncon laetiqueta“MostrarTablas”semuestrauna
nuevaventanaconunmenúdenavegaciónquepermitealusuarionavegarpor
todas las relaciones existentes para el atributo de la tabla fuente al cual
correspondeelbotón.
SistemasInformáticos2013‐2014 59
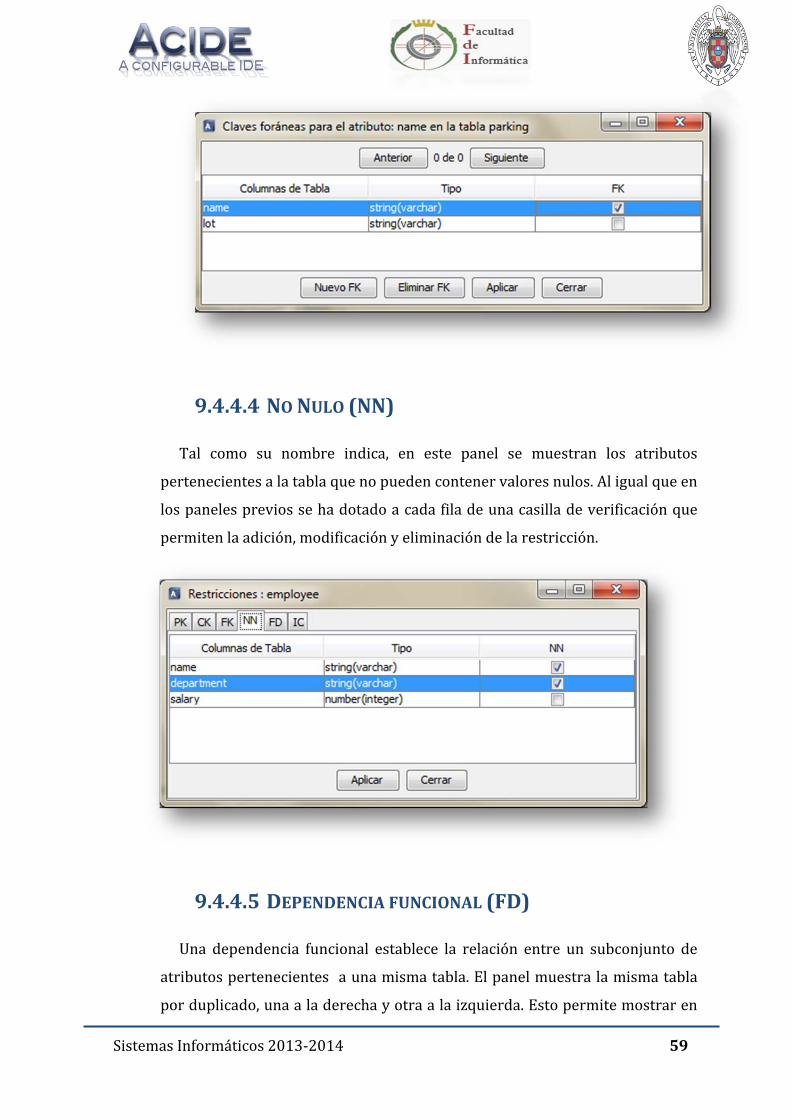
9.4.4.4 NONULO(NN)
Tal como su nombre indica, en este panel se muestran los atributos
pertenecientesalatablaquenopuedencontenervaloresnulos.Aligualqueen
lospanelespreviossehadotadoacadafiladeunacasilladeverificaciónque
permitenlaadición,modificaciónyeliminacióndelarestricción.
9.4.4.5 DEPENDENCIAFUNCIONAL(FD)
Una dependencia funcional establece la relación entre un subconjunto de
atributospertenecientesaunamismatabla.Elpanelmuestralamismatabla
porduplicado,unaaladerechayotraalaizquierda.Estopermitemostraren

SistemasInformáticos2013‐2014 60
latabladeladerechatodoslosatributosquecomponenlapartederechadela
dependencia funcionalmientrasqueen la tabla izquierda semuestran todos
losatributosquecomponenlaparteizquierdadedichadependenciafuncional.
Pueden existir varias dependencias funcionales asociadas a una misma
tabla por lo que se ha implementado un panel de navegación en la parte
superior que permite al usuario navegar por las distintas dependencias
funcionales existentes. Para crear una nueva dependencia funcional se ha
implementadoelbotón“NuevaFD”.
9.4.4.6 RESTRICCIONESDEINTEGRIDAD(IC)
Elusuariopuededeclararrestriccionesdeintegridadcreadasporelmismo.
ParaestepropósitoenelpanelICsehaintegradounatablacondoscolumnas.
Laprimerafilamuestralasrestriccionesdefinidasporelusuariomientrasque
la segunda contiene una casilla de verificación por cada fila. Las casillas de
verificacióncumplenlamismafuncionalidadqueenlospanelesanteriores.
Unarestricciónexistentepuedesermodificadamediantelaedicióndecelda
habilitadaen la tabla.Tambiénesposibleañadirunanuevarestricción,para
talpropósitosedisponedeunafilavacíaalfinaldelatabla.Unavezañadida,
automáticamente se genera una nueva fila vacía de modo que siempre es
posibleañadirmásrestricciones.

SistemasInformáticos2013‐2014 61
Cabe destacar que el usuario no necesita conocer las sentencias que generan y
modifican las restricciones. Si bien, un usuario con cierto nivel de conocimientos
podríadesenvolverseconrelativafacilidad,elobjetivodeestainterfazespermitirel
usoderestriccionesausuariosconcualquierniveldeconocimientos.
9.4.5 OTROS
Conel findemejorar lacomprensiónde losnodosderestriccionesporpartedel
usuario se han añadido etiquetas descriptivas en estos nodos. Para ello, el usuario
sólotienequepasarelratónporencimadeunodeellos.
Éstasymuchasotrasmodificaciones,aunquenoperceptiblesparaelusuario,yno
porellomenosimportantes,hansidorealizadasenelpaneldeBasesdeDatos.Alser
aniveldecódigonoseprocederáadetallarlasenestedocumento.
9.5. EDITORDETEXTOS
A lo largo de las diferentes versiones, el editor de texto ha ido incorporando
diversasfuncionalidadesparamejorarlaexperienciadelusuarioconelmismo.
Nuevasfuncionalidadesquecumplenconestepropósitohansidoañadidasenesta
versión,lascualessedetallanacontinuación:

SistemasInformáticos2013‐2014 62
9.5.1 COMENTAR/DESCOMENTAR
Comosupropionombreindica,estáfuncionalidadpermitealusuariocomentary
descomentar una o más líneas de texto. Para ello se ha añadido estas opciones al
menú“Edición”delaaplicación.
Además de las opciones “Comentar” y “Descomentar”, se ofrece una tercera
“Comentar/Descomentar”cuyoefectosobreeltextoseríacomentarloencasodeno
estaryacomentadoyviceversa.
Tambiénesposibleaccederaestasopcionesmedianteelmenúpopuppropiodel
editor,el cual seabrehaciendoclicderechoencualquierpuntodentrodeláreadel
editordetextos.

SistemasInformáticos2013‐2014 63
Algomásatenerencuentaesqueestaopciónseadaptaautomáticamentealtipo
dearchivosobreelcuálserealizalaedición.Estoes,siunarchivoesdetipoSQL,el
símboloempleadoparaindicarquesetratadeuncomentarioes“‐‐”mientrasquesi
porejemplosetratadeunarchivoRAelsímboloausares“%”.
Decaraafacilitarlainteraccióndelusuarioconeleditordetextossehaintentado
implementaresta funcionalidadlomásparecidoacomolohaceEclipseencuantoa
comentariosdelínea.
9.5.2 SANGRADO
Aligualqueenotroseditores,sehaincorporadolaopcióndepoderpersonalizarel
tipodesangradoquesedeseahacer.Estaopciónestádisponiblemedianteelmenú

SistemasInformáticos2013‐2014 64
“Preferencias”alqueseaccededesdeelmenú“Configuración”de labarrademenú
principaldelaaplicación.
Estemenúabreunaventanadondeelusuariopuedeestablecersuspreferenciasde
configuración.Sepuedeelegirentreconservarel formatopordefectooensu lugar,
queelespaciodesangradoseareemplazadoporciertonúmerodeespacios,el cual
tambiénesconfigurable.
Además de la personalización del sangrado, se han añadido otras características
talecomopermitirelsangradoenbloque.Paraello,bastaconseleccionarmúltiples
líneas y realizar el sangrado usando la tecla “Tab”. También es posible deshacer el
sangradomedianteelatajodetecladoMayús+Tabyaseaenbloqueounasolalínea.
9.5.3 CAMBIARMAYÚSCULAS/MINÚSCULAS
Otroelementocomúnenlamayoríadeeditoreseslaopcióndepodercambiarun
texto de mayúsculas a minúsculas o viceversa. En esta nueva versión hemos
incorporado ésta y un par más de funcionalidades mediante una nueva opción de
menú“Cambiarmayúsculasyminúsculas”delmenúEdicióndelaaplicación.

SistemasInformáticos2013‐2014 65
Lasopcionesdisponiblesdesdeestemenúsonlasquesedescribenacontinuación.
Mayúsculas:Transformauntextoenminúsculasaunoenmayúsculas.
Minúsculas:Transformauntextoenmayúsculasaunoenminúsculas.
Ponerenmayúsculascadapalabra:Adiferenciadeloquepareceindicar
sunombre,elefectorealsobreuntextoeseldehacerquelaprimeraletra
decadapalabraquecomponeuntextopaseasermayúsculas.
Alternar MAY/min: Las letras en minúsculas de un texto pasan a ser
mayúsculasylasmayúsculasaminúsculas.
Cadaunadeestossubmenústieneunacombinacióndeatajodetecladopropiaafin
deagilizarlaedición.
Unpuntoadestacarenestaimplementaciónesqueadiferenciadeotroseditores
que ofrecen estas mismas opciones, no es necesario seleccionar previamente una
palabra para poder aplicar los cambios deseados. El usuario simplemente debe
posicionarelcursorenalgúnpuntodelapalabradeseadaylaaplicaciónseencargará
deefectuarelcambiosobrelapalabraentera.

SistemasInformáticos2013‐2014 66
9.5.4 SELECCIÓN
Aunqueanteriormenteyasepermitía lamultiselección,enestanuevaversiónse
mejora la misma haciendo posible la selección de líneas desde el panel lateral
izquierdoquecontienelanumeracióndelaslíneasdeltexto.
Paraseleccionarunalíneabastaconhacerclicsobreelnúmerodelíneadeseado.Si
se quiere seleccionar varias líneas, se puede hacer arrastrando el ratón hasta el
últimonúmerodelíneaquesedeseaseleccionar.
9.6. DEPURACIÓN
Sehaañadidounnuevopaneldedepuraciónenel cual semuestrandosnuevos
paneles de traza Datalog y traza SQL en los cuales se muestra un grafo de
dependencias con apariencia similar al grafo de dependencias del panel PDG
restringido por una consulta introducida por el usuario. El grafo de estos paneles
además se ha implementado un mecanismo de manera que el usuario pueda
seleccionarunodelosnodosparaobtenerunamayorinformacióndelmismoenlos
distintospanelesdelaaplicación.Parapodermostrarlaambospanelesdetrazasin
añadirmáscargadepanelesa laaparienciade la interfazsemuestranmedianteun
mecanismodepestañasseleccionables.
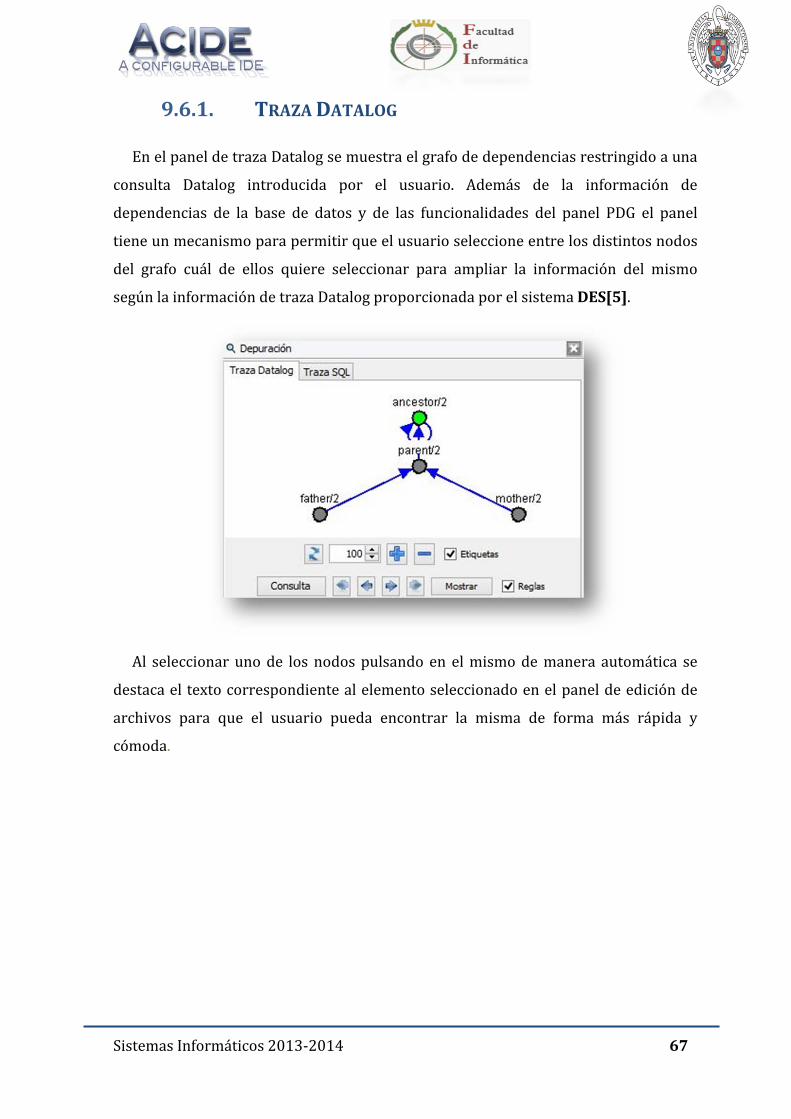
SistemasInformáticos2013‐2014 67
9.6.1. TRAZADATALOG
EnelpaneldetrazaDatalogsemuestraelgrafodedependenciasrestringidoauna
consulta Datalog introducida por el usuario. Además de la información de
dependencias de la base de datos y de las funcionalidades del panel PDG el panel
tieneunmecanismoparapermitirqueelusuarioseleccioneentrelosdistintosnodos
del grafo cuál de ellos quiere seleccionar para ampliar la información del mismo
segúnlainformacióndetrazaDatalogproporcionadaporelsistemaDES[5].
Al seleccionarunode losnodospulsando en elmismodemanera automática se
destacaeltextocorrespondientealelementoseleccionadoenelpaneldeediciónde
archivos para que el usuario pueda encontrar la misma de forma más rápida y
cómoda.

SistemasInformáticos2013‐2014 68
Ademásdeenel editor sedestacan las filasdelpaneldebasededatos asertada
correspondientes con el nodo seleccionado, como ya se explicó en la sección que
tratabasobrelabasededatosasertada.
Alpulsardosvecessobreeliconodeunodelosnodosseabredeformaautomática
laventanadevistadedatoscorrespondientealelementoseleccionado.
ParapoderintroducirlaconsultaDatalogquegeneraelgrafodedependenciasse
ha añadido el botón Consulta al panel el cual abre una ventana donde el usuario
puedeintroducirdemaneramanuallaconsulta.
Elpanelcontieneunabarradeherramientasenlaparteinferiorconlasacciones
quepuederealizarelusuario.

SistemasInformáticos2013‐2014 69
Actualizar: Vuelve a generar el grafo de dependencias restringido con el
contenidoactualdesistemadebasesdedatos.
Niveldezoom:Pequeñocuadrodondesemuestraysepuedemanipularel
niveldezoomdelgrafo.
Etiquetas:Muestra/oculta las etiquetas con el nombre y la aridad de los
nodos.
Aumentodezoom:Aumentaelniveldezoomdelgrafo.
Disminucióndezoom:Disminuyeelniveldezoomdelgrafo.
Consulta: Abre el cuadro de dialogo para que el usuario introduzca la
consultaDatalogparalacualquieregenerarelgrafo.
Primernodo:Seleccionaelprimernododelatraza.
Nodo anterior: Selecciona el nodo anterior al nodo seleccionado
actualmenteenelgrafodelatraza.
Siguiente nodo: Selecciona el nodo anterior al nodo seleccionado
actualmenteenelgrafodelatraza.
Últimonodo:Seleccionaelúltimonododelatraza.
Mostrar: Muestra el texto correspondiente la definición del nodo
seleccionadoeneleditordetextos.
Reglas:Activaodesactivaeldestacadodelasreglasdelnodoseleccionado
enlospanelesdeeditordeficherosyeldebasededatosasertada.
9.6.2. TRAZASQL
EnelpaneldetrazaSQLsemuestraelgrafodedependenciasrestringidoaunade
lasvistasquesecontienenactualmenteenelsistemadebasesdedatos.Ademásdela
informacióndedependenciasde labasededatosyde las funcionalidadesdelpanel
PDGelpanel tieneunmecanismoparapermitirqueelusuario seleccioneentre los
distintosnodosdelgrafocuáldeellosquiereseleccionarparaampliarlainformación
delmismosegúnlainformacióndetrazaSQLproporcionadaporelsistemaDES.

SistemasInformáticos2013‐2014 70
Al seleccionarunode losnodospulsando en elmismodemanera automática se
seleccionaelnododeTextoSQLenpaneldebasesdedatosdelainterfazencasode
queelnodosecorrespondaconunavistaobienseseleccionaelnododelatabladel
paneldebasesdedatossiestesecorrespondeconunatabla.
Alpulsardosvecessobreeliconodeunodelosnodosseabrelaventanadevista
dedatoscorrespondientealelementoseleccionado.
Para poder seleccionar la vista que genera el grafo de dependencias se ha
introducidoenelpanelunalistadesplegableconlasvistasquehayactualmenteenla
basededatos.
Elpanelcontieneunabarradeherramientasenlaparteinferiorconlasacciones
quepuederealizarelusuario.
Actualizar: Vuelve a generar el grafo de dependencias restringido con el
contenidoactualdesistemadebasesdedatos.
Niveldezoom:Pequeñocuadrodondesemuestraysepuedemanipularel
niveldezoomdelgrafo.

SistemasInformáticos2013‐2014 71
Etiquetas:Muestrauoculta lasetiquetasconelnombrey laaridaddelos
nodos.
Aumentodezoom:Aumentaelniveldezoomdelgrafo.
Disminucióndezoom:Disminuyeelniveldezoomdelgrafo.
Vista:Abreunalistadesplegableconlasvistasdelabasededatosparaque
elusuarioseleccioneaquellaapartirdelacualquieregenerarelgrafo.
Primernodo:Seleccionaelprimernododelatraza.
Nodo anterior: Selecciona el nodo anterior al nodo seleccionado
actualmenteenelgrafodelatraza.
Siguiente nodo: Selecciona el nodo anterior al nodo seleccionado
actualmenteenelgrafodelatraza.
Últimonodo:Seleccionaelúltimonododelatraza.
DefiniciónSQL:ActivaodesactivaeldestacadodelosnodosdeTextoSQL
ytablacorrespondientealnodoseleccionado.
9.7. TAREASGENERALES
Enestasecciónserecogenlastareasqueporsunaturalezanopuedenenglobarseen
lospuntosprevios.Estastareassonlassiguientes:
Se ha implementado la recolocación de paneles, esto permite al usuario la
posibilidad de arrastrar y recolocar los paneles, de manera que pueda
configurarse su entorno de trabajo de una manera personalizada. Una vez
implementado el mecanismo de recolocación de paneles, era importante
guardar esa información de manera persistente, de manera que el usuario,
cuandoempiezaunanuevasesióndetrabajoconACIDE,encuentresuentorno
comolaúltimavezquelousó.Paraelalmacenamientodeestainformación,el
grupodetrabajotomóladecisióndeguardarladisposicióndelospanelesen
elficherodeconfiguracióndeproyecto.Estadecisiónfuetomadaasíparaque
el usuario tenga asociada una disposición de paneles por cada proyecto, de
modo que al trabajar con proyectos diferentes, se muestre de manera
inmediatalaconfiguraciónóptimadeeseproyectoparaeseusuario.

SistemasInformáticos2013‐2014 72
Añadida funcionalidad para la gestión de idiomas en la aplicación. Antes de
realizar esta tarea, existían dos ficheros de idiomas dentro del código de la
aplicación,por loque la gestiónde los idiomasera invisiblepara elusuario.
Para poder realizar la tarea, se creó una nueva carpeta en la estructura de
directorio de ACIDE, donde se guardan los ficheros de idiomas. Ahora el
usuariopuedeañadirunnuevoficherode idiomasaesacarpeta,elcualserá
reconocido por ACIDE y añadido en la opción de la barra de menú
correspondiente.Delmismomodo,elusuariopuedequitartodoslosarchivos
deidiomaquenoleresultenútilesparaquenosemuestrenenACIDE.
CambioenlaestructuradedirectoriosdeACIDE.Afindetenerunaestructura
dedirectorioslomássencillaposible,secambiólalocalizacióndelmanualde
usuariodelacarpeta“resources”aunacarpeta“doc”.
Añadir indicadores de espera. Se han añadido indicadores de espera en
aquellasoperacionesquerequeríandetiempoparaprocesarse,demodoque
elusuariopuedaverquelaaplicaciónestárealizandooperacionesynoseha
quedadocolgada.
Mejoras en la interfazdeusuario. Sehanmejoradoalgunosde los iconosya
existentes para proporcionar unamejor experiencia visual. También se han
realizadocambiosen ladisposicióndealgunoscontrolesparaquela interfaz
seamássencilla.
Mantenimiento de la estandarización, como se ha indicado en la sección
Estándares,elproyectofueheredadoconunaseriedeestándaresquesehan
seguido usando, por lo que ha sido una tarea constante para todos los
miembrosdel grupo la continuaciónde los estándares recibidos, parapoder
tenertantouncódigocomounadocumentaciónlomáshomogéneaylimpia.

SistemasInformáticos2013‐2014 73
9.8. ACTUALIZACIÓNDELMANUALDEUSUARIO
Concadareleasealolargodelascincoversionesquesehanpublicadoduranteel
curso,seharealizadounatareaextra,laactualizacióndelmanualdeusuario.Hasido
unatareaquesehaconsideradocomofundamental,primero,portodoeltrabajoque
habían realizado los grupos de cursos anteriores al nuestro por tener un manual
completo y claro sobre la aplicación, y segundo, para ofrecer al usuario una guía
sencillaquelesirvaparapodersacartodoelpartidoaACIDEypoderexplotartodas
lasfuncionalidadesqueofrece.
Paralaactualizacióndelmanualdeusuariosehapartidodelmanualdeusuariode
la versión anterior, y se han añadido las nuevas características implementadas en
cadarelease.Sehanseguido todos losconveniosdeestandarizacióndescritosen la
seccióncorrespondientedelamemoriaconelfindequelamemoriaseahomogéneay
se ha procurado que todas las ampliaciones del manual fueran entendibles para
cualquierpersonaquesedispongaausarACIDEporprimeravez.

SistemasInformáticos2013‐2014 74
9.9. OBJETIVOSCUMPLIDOS
Losobjetivosquesehancumplidosatisfactoriamenteenesteproyectosonlosque
seenumeranacontinuación:
9.9.1. PDG
DotaraACIDE–AConfigurableIDEdeunnuevopanelgráficoparamostrar
elgrafodedependencias.
Permitirlapersonalizacióndelgrafodedependencias.
Implementaralgoritmosdecolocacióndenodosdemodoquealgenerarel
grafo de dependencias los nodos queden a una distancia apropiada y se
minimicenloscrucesconlasaristas
Permitirlacolocaciónmanualdelosnodos.
Añadircontrolesparaactualizarelgrafodedependencias.
Añadircontrolespararealizarzoomenelgrafodedependencias.
Generar el grafo en segundo plano para que no perder el control de la
aplicacióndurantelaconstruccióndelgrafo.
Habilitaropcionesparamostrarlasetiquetasdelosnodos.
9.9.2. DEPURACIÓN
DotaraACIDE–AConfigurable IDEdeunnuevopaneldedepuraciónque
muestre de manera gráfica las trazas restringidas a consultas, tanto de
DatalogcomodeSQL.
Permitirlacolocaciónmanualdelosnodos.
Añadircontrolesparaactualizarelgrafodedependencias.
Añadircontrolespararealizarzoomenelgrafodedependencias.
Hacerelgrafonavegable.
Añadircontrolesparanavegarenelgrafo.
Permitirnavegarenelgrafopulsandoenelmismo.
ResaltareltextoenloseditoresdearchivosalseleccionarunnodoDatalog.

SistemasInformáticos2013‐2014 75
Resaltarlasfilascorrespondientesenelpaneldebasededatosasertadaal
seleccionarunnodo.
SeleccionarelnodoSQLTextenelpaneldebasesdedatosalseleccionarun
nodocorrespondienteaunavista.
Abrir el panel de vista de datos correspondiente al nodo seleccionado al
pulsardosvecessobreelmismo.
9.9.3. BASEDEDATOSASERTADA
DotaraACIDE–AConfigurableIDEdeunaventanaquemuestrelabasede
datosasertada.
Añadircontrolesparaactualizarlabasededatosasertada.
Seleccionarlasreglasdelnodoseleccionadoenlatraza.
Habilitarfiltroparamostrarsololasreglasasociadasalnodoseleccionado
enlatraza.
Añadircontrolparalimpiarlaseleccióndereglas.
9.9.4. CONSOLA
PermitirlabúsquedadeconsolasenelPATHdelsistemaoperativo.
Permitir la configuración de consolas usando variables de entorno del
sistemaoperativo.
Noperderlaconfiguracióndelaconsolaalcerrarseesta.
Implementar el envío de señal de interrupción a través del sistema
operativoenLinux.
Habilitarydeshabilitar laopcióndepartir líneas(linewrapping)evitando
asílaaparicióndelabarradescrollhorizontal.
SistemasInformáticos2013‐2014 76
9.9.5. EDITORDETEXTOS
Permitir laseleccióndemúltiples líneasusando labarra lateralnumerada
deleditordetextos.
Permitir añadir y quitar marcas de comentario de forma individual o en
bloqueatravésdemenús.
Permitirrealizarlasoperacionesdecomentarydescomentarunalíneasin
necesidaddeselecciónprevia.
Permitirconfigurareltipodesangradoaaplicar.
Permitiraplicarsangradoenbloqueydeshacerelmismomedianteatajode
teclado.
Habilitarlaopcióndecambiardemayúsculasaminúsculasyviceversa,así
como otro tipo de cambios sobre un texto o palabra a través demenú y
atajosdeteclado.
Cambiarelcomportamientopordefectodelcursordespuésdeaplicaralgún
cambiodetipomayúsculaominúscula.
Permitir aplicar algún cambio de tipo mayúscula o minúscula sobre una
palabrasinnecesidaddeselecciónprevia.
9.9.6. BASEDEDATOS
Implementarmenúscontextualesparalosnodostipocolumnadelárbolque
permitanasignarrestriccionesadichacolumnadeformadirecta.
Añadirtooltipsalosnodosderestricciones.
Permitircopiarypegartablasyvistasatravésdeunmenúyatajosde
teclado.
Permitirmodificaryeliminarunarestricciónasociadaaunatablamediante
opcionesdemenú.
Diferenciareltipodesentenciadeorigendeunavista,SQLoRAyañadirel
subnodocorrespondienteTextoSQLoTextoRAsegúnseaelcaso.
Mostrarpordefectolasentenciadeorigendeunavistaalabrirlavista
diseñodeunavista.

SistemasInformáticos2013‐2014 77
DeshabilitarlaposibilidaddeedicióndelsubnodoTextoDatalogdeunnodo
vista.
Permitirlacreaciónderestriccionesdeintegridaddefinidasporelusuario.
Corregirerroresenlacreaciónderestricciones.
PermitirabrirlaVistadeDatosdeunatablaovistahaciendodobleclic
sobreelnododelamisma.
DeshabilitarlaposibilidaddeabrirmúltiplesVistasdeDatosenmodo
lecturaparaunatablareservandoestemodosóloparalasvistas.
Añadirlaopcióndepoderconfigurareldetallederepresentacióndelos
datosdeunatablayvistamediantemenú.
Implementarunainterfazgráficaquepermitalagestióndetodoslostipos
derestriccionesposiblesenunatabla.
Mejorarelfuncionamientoactualdelosmenúsdelosdistintostiposde
nodopresentesenelárbol.
Mejorarlavisualizacióndelosnodosquecomponenelárbol.
PermitirelcopiadoypegadomúltipledefilasycolumnasdelaVistade
Datosmedianteopcionesdemenúyatajosdeteclado.
MejorarlainsercióndedatosenlaVistadeDatos.
Permitirmostraryocultarcolumnasenlavistadedatosyadvertiral
usuarioencasohayacolumnasocultas.
Permitirordenarlascolumnasdelavistadedatosyaseadeforma
ascendenteodescendente.
Implementarmenúparalascolumnasdelatabladedatosconlasopciones
deordenaciónascendente,descendenteasícomodeocultarlacolumna.
MejorarelfuncionamientoyvisualizacióndelaVistadeDatos.
Mostraralusuariomensajesdeerrorencasodefallodealgunaoperación
realizadaenelpanel.
9.9.7. TAREASDECARÁCTERGENERAL
Permitir la compatibilidad en los sistemas operativos más ampliamente
utilizados(Windows,LinuxyMacOS).

SistemasInformáticos2013‐2014 78
AñadirelcursordeesperaentodaslasaccionesdeACIDE–AConfigurable
IDEsusceptiblesdetardar.
Crearlacarpetadeidiomasypermitirlaconfiguracióndenuevosidiomasa
travésdelosficherosdeidiomas.
Permitirlarecolocacióndepaneles.
Guardarlacolocacióndepanelesdelusuariodemanerapersistente.
Seguirconlosestándaresestipulados.
9.9.8. AMPLIACIÓNDELMANUALDEUSUARIO
Modificartodaslascapturasdepantallaexistentesendichomanual.
Añadirinformaciónsobretodaslasnuevasfuncionalidadesimplementadas.

SistemasInformáticos2013‐2014 79
9.10. OBJETIVOSNOCUMPLIDOS
Enelmomentoquecomenzamoseldesarrollodelproyecto,eldirectorFernando
Sáenz Pérez nos propuso una lista de objetivos para trabajar sobre la aplicación
apartede la conexióncon lasbasesdedatos.Unagranpartedel trabajoduranteel
cursosehacentradoenlaimplementacióndelosnuevospanelesPDG,traza,basede
datosasertadayenañadirnuevasfuncionalidadesalpaneldebasededatos.Dadaala
priorización de tareas no ha sido posible completar todas las tareas que se
planificaron desde el principio, el listado de las tareas que no han podido ser
completadassonlassiguientes:
PermitirenviarlaseñaldeinterrupciónCTRL+Calaconsolaenelsistema
operativo Windows. La tarea original era enviar esa señal en cualquier
sistema operativo, y se ha conseguido hacer para sistemas operativos no
Windows, esto es debido a que Windows no permite al desarrollador la
manipulacióndelaseñal.Sededicómuchoesfuerzoytiempoeninvestigar
posibles soluciones, se encontró una aplicación desarrollada por terceros
quepermitíaenviarlaseñalaunprocesoelegidoporeldesarrollador,pero
trasintegraresaaplicación,laspruebasnodieronbuenosresultados,porlo
quesedecidióeliminarestaopciónenWindowsydejarlaoperativaparael
restodesistemasoperativos.
Definir e implementar el análisis sintáctico para así poder aplicarlo en
ACIDE.
Definiryaplicarhilosen:
o Aperturadearchivoseneleditor.Deestaformaelusuariotendríael
controldelaaplicaciónmientrasqueseabrenarchivos.
o Apertura de proyectos en ACIDE. De forma similar al apartado
anterior, el usuario tendría el control de la aplicación mientras
terminalacargadeunproyecto.
o Aplicacióndel formato léxicoeneleditordearchivos,comoocurre
enMicrosoftWordcuandoestamosaplicandolaautocorrección.De
esta forma el usuario volvería a tener el control de la aplicación

SistemasInformáticos2013‐2014 80
mientrasquea losdocumentosse lesaplica la configuración léxica
correspondiente.
Opción de respetarmayúsculas/minúsculas en los reemplazamientos. Esta
erauna tareaqueexigíaunagrancantidaddeesfuerzoparaconseguirun
objetivomenosprioritario,porloquesedecidiódejarenbeneficiodeotras
consideradasmásimportantes.
Generar códigoSQLespecíficodel SistemaGestordeBasesdeDatospara
las conexiones ODBC de forma similar a como se hace con DES. Dado el
escasotiempoparaculminarotrastareasconprioridadmásalta,sedecidió
relegarestatareaparafuturasversiones.
Añadirautocompletarapartirdeldiccionarioléxico.Éstafueunatareaque
surgióenlasúltimassemanasdedesarrollo.Enestasfechascomenzaresta
tarea significaba iniciar el desarrollo de algo desde cero, y dada la
proximidaddelaentregaylanecesidaddesubsanarotroserrores,sedejó
estatareaparafuturasversiones.
No se ha implementado el panel de depuración. Se estableció como
prioridad implementarelpanelde trazay labasededatosasertada,yno
hubotiempoparapoderempezareldesarrollodelpaneldedepuración.El
paneldedepuracióndebíaserunpanelinteractivoqueguíeenlabúsqueda
de errores al usuario con el fin de encontrar resultados erróneos o no
esperados como se hace en DES[5] con los comandos /debug_sql y
/debug_datalog.

SistemasInformáticos2013‐2014 81
9.11. CONCLUSIONES
LoprimeroquehayquetenerencuentaalhablardeldesarrollodeACIDEesque
no es un proyecto que comienza a desarrollarse desde cero, mirando atrás en el
tiempo,durantelosprimerosdíasdetrabajodelproyecto,nosencontramosconuna
aplicacióngrande(sucódigofuente llegabaacasi300.000líneas)yestable.Estoha
hecho que nuestra metodología de trabajo se haya tenido que adaptar a las
circunstancias del proyecto, por lo que nuestra tarea no ha sido solo la de
implementarnuevasfuncionalidades,hemostenidoqueaprenderlaestructuradeun
proyecto de un tamaño considerable, el diseño de las diferentes partes de la
aplicación, cómo se integran esas partes, diseñar soluciones que se integren con el
códigoyadesarrolladoyunavezimplementadasesassoluciones,probarquelanueva
funcionalidad tieneuncomportamiento correctoyprobar tambiénque los cambios
realizados no introducen ningún efecto lateral que pueda provocar fallos o
comportamientosextrañosenelrestodelaaplicación.
Otro punto importante, es el hecho que ACIDE es una aplicación que ya estaba
publicada,siendousadapormuchaspersonasdedistintospaísesdelmundo.Todolo
quehemosidohaciendoduranteelcursohasidopublicadoperiódicamenteparalos
usuarios de la aplicación. Esto ha hecho que tuviéramos que poner un esfuerzo
añadidoparanoromperlaexperienciaqueselehaofrecidoalusuariodurantetoda
lavidadeACIDE,que tantoesfuerzo les costóconseguira los compañerosquehan
participadoenesteproyectoduranteañosanteriores.
Acontinuaciónsemuestranalgunasestadísticas interesantessobre lasdescargas
deACIDE.Desde la primera publicación se ha llegado a contabilizar un número de
descargas superior a 2.800, de las cuales se han producido durante el actual curso
académico688.

SistemasInformáticos2013‐2014 82
Saberqueungrannúmerodeusuariosestáusandolaaplicaciónquehemosestado
desarrollandohasidounamotivaciónyhaguiadonuestraformadetrabajar,nuestra
prioridad ha sido dar al usuario la mejor experiencia posible en el uso de ACIDE,
ofrecerlemás funcionalidadesyofrecerle tambiénopcionespara lapersonalización
desuentornodetrabajo.
Todo esto ha supuesto un gran reto y es por ello por lo que nos sentimos
satisfechos del trabajo realizado ya que hemos conseguido añadir funcionalidades
nuevasimportantesparaelusuariomientrasaprendíamosatrabajarenunproyecto
real,unproyectoquesaledelámbitoacadémicopara instalarseen losordenadores
detodosaquellosusuariosdeACIDEalosqueesperamosquepuedansacarprovecho
atodoeltrabajoquehemosrealizadoduranteestecurso.

SistemasInformáticos2013‐2014 83
10. POSIBLESAMPLIACIONESEnestasecciónselistanlasposiblesmejorasparalaaplicación:
Introducirenel ficherode idioma losatajosde teclado,deestemodo los
atajosquedaríanasociadosalidiomacargadoenlaaplicación.
Integrar en la pantalla principal la base de datos asertada en lugar de
mostrarlaenunaventanaaparte.
Permitir el uso de perspectivas como en Eclipse[11]. Debido a la gran
cantidad de paneles que semuestran en la pantalla principal, puede ser
interesante dar la posibilidad al usuario de configurar sus propias
perspectivas,conlospanelesconfiguradosconlaposiciónyeltamañoque
elusuariodesee.
Permitirarrastrar ficherosde textodelordenadordelusuarioy soltarlos
enACIDEparaqueseabranconeleditordetextos.
Permitir arrastrar ficherosde configuracióndeproyectoy soltarlosenel
panel del explorador de proyectos para que se abra el proyecto
automáticamente.
Dar laposibilidadalusuariodeordenar los ficherosdeunproyectoenel
exploradordeproyectosdemaneramanual.
Definir un archivo de log para la consola en el que se guarde todas las
entradasysalidasdelaconsola.

SistemasInformáticos2013‐2014 84
11. LISTADEPALABRASCLAVES DES.
Datalog.
Dataview.
Designview.
Configurable.
Entornodedesarrollointegrado(IDE).
Basededatos.
Editormulti‐archivo.
Búsquedaavanzada.
Consola.

SistemasInformáticos2013‐2014 85
12. BIBLIOGRAFIAParadesarrollarelpresenteproyectosehanseguidolassiguientesfuentes:
Explicacióndelasintaxisdelasrestriccionespk,fk,ck,etc.
o Datalog Educational System V3.1 User’s Manual. Fernando Sáenz
Pérez.UniversidadComplutensedeMadrid.2012.
Introducciónalaaplicaciónenelmanual:
o ACIDE: An Integrated Development Environment Configurable for
LATEX. Fernando Sáenz Pérez. The Practex Journal No3. 2007.
http://dw.tug.org/pracjourn/2007‐3/saenz_perez‐acide/saenz_perez‐
acide.pdf
SistemasInformáticos2013‐2014 86
13. REFERENCIAS[1]D.CardielFreire,J.J.OrtizSánchezyD.RupérezCañas.ACIDE:AConfigurableIDE.UniversidadComplutensedeMadrid.2007.
[2]M.MartínLázaro.ACIDE0.2:aconfigurableintegrateddevelopmentenvironment.UniversidadComplutensedeMadrid.2008.
[3]J.SalcedoGómez.ACIDE:AConfigurableIDE.DESGUIFront‐end.UniversidadComplutensedeMadrid.2011.
[4]PabloGutiérrezGarcía‐Pardo,ElenaTejeiroPérezdeÁgreda,AndrésVicentedelCura:AConfigurableIDE.DESGUIFront‐end.UniversidadComplutensedeMadrid.2013
[5]PáginaoficialdeDES:http://www.fdi.ucm.es/profesor/fernan/des/index.html
[6]PáginaoficialdeCrimsonEditor:http://www.crimsoneditor.com
[7]PáginaoficialdeJEdit:http://www.jedit.org
[8]PáginaoficialdeJBuilder:http://www.borland.com/jbuilder
[9]PáginaoficialdeJCreator:http://www.jcreator.com
[10]PáginaoficialdeC++Builder:http://www.borland.com/cppbuilder
[11]PáginaoficialdeEclipse:http://www.eclipse.org/
[12]PáginaoficialdeVisualStudioShell:http://msdn.microsoft.com/en‐us/library/vstudio/bb685691.aspx
[13]PáginaoficialdeWinEdt:http://www.winedt.com/
[14]PáginaoficialdeNetBeans:http//netbeans.org
[15]PáginaoficialdeMSAccess:http://office.microsoft.com/es‐es/access/
[16]PáginaoficialdeOracle:http://www.oracle.com
[17]PáginaoficialdePostgres:www.postgresql.org/
[18]PáginaoficialdeTOra:http://torasql.com/
[19]PáginaoficialdeASPIDE:http://www.mat.unical.it/ricca/aspide/
[20]PáginaoficialdeGoogleDrive:http://drive.google.com/
[21]PáginaoficialdeAssembla:http://www.assembla.com/
[22]PáginaoficialdeTortoiseSVN:http://tortoisesvn.net/
[23]PáginaoficialdeDropbox:http://www.dropbox.com/

SistemasInformáticos2013‐2014 87
[24]PáginaoficialdeWinrar:http://www.winrar.es/
[25]Páginaoficialde7zip:http://www.7‐zip.org/
[26]PáginaoficialdeGIMP:http://www.gimp.org/
[27]PáginaoficialdeNotepad++:http://www.notepad‐plus‐plus.org/
[28]PáginaoficialdeSkype:http://www.skype.com/
[29]PáginaoficialdeVirtualbox:https://www.virtualbox.org/
[30]Páginadereferenciaparalaimplementacióndellinewrapping:http://java‐sl.com/wrap.html

SistemasInformáticos2013‐2014 88
14. INFORMACIONDECONTACTOEsteproyectoescódigolibre.Portanto,todoelcódigofuenteyejecutablesestán
disponiblesenlassiguientesdireccionesdeinternet:
Ejecutable:http://www.fdi.ucm.es/profesor/fernan/ACIDE/
Códigofuente:http://sourceforge.net/projects/acide/files/acide/
Siquisieraponerseencontactoconalgunodelosdesarrolladoresdelproyecto
puedehacerloatravésdelassiguientesdireccionesdecorreoelectrónico:
JuanJesúsMarquésOrtiz:[email protected]
FernandoOrdásLorente:[email protected]
SemíramisGutiérrezQuintana:[email protected]

SistemasInformáticos2013‐2014 89
APENDICE:MANUALDEUSUARIO


USER’S MANUAL
VERSION0.16

User’sManual 2
SUMMARIZEDINDEXSummarizedindex...............................................................................................................................2
Indexofcontents..................................................................................................................................4
IndexofFigures..................................................................................................................................15
1. Systemrequisites...................................................................................................................20
1.1. User...................................................................................................................................20
1.2. Developer.......................................................................................................................21
1.3. ExecutingACIDE...........................................................................................................21
2. IntroducingACIDE.................................................................................................................22
2.1. Technology.....................................................................................................................22
2.2. TheMainGUI.................................................................................................................22
2.3. Projects...........................................................................................................................24
2.4. Configuration................................................................................................................24
3. Menubar....................................................................................................................................25
3.1. Filemenu........................................................................................................................25
3.2. Editmenu.......................................................................................................................27
3.3. Projectmenu.................................................................................................................34
3.4. Viewmenu.....................................................................................................................41
3.5. Configurationmenu....................................................................................................42
3.6. Helpmenu......................................................................................................................72
3.7. Insertedsubmenus.....................................................................................................73
3.8. Insertedmenuitems..................................................................................................74
4. Projectbrowserpanel..........................................................................................................75
5. Fileeditorpanel......................................................................................................................76
6. Toolbar.......................................................................................................................................78
7. Consolepanel...........................................................................................................................79
8. Databasepanel........................................................................................................................81
8.1. Databasesnode............................................................................................................81
8.2. Databasenode..............................................................................................................83

User’sManual 3
8.3. Tablesnode...................................................................................................................85
8.4. Tablenode.....................................................................................................................86
8.5. Childrenoftablenodes...........................................................................................116
8.6. Viewsnode..................................................................................................................118
8.7. Viewnode....................................................................................................................119
8.8. Columnsnodes...........................................................................................................120
8.9. SQLtextandDatalogtextnodes..........................................................................121
9. PDGpanel................................................................................................................................123
10. DebugPanel.......................................................................................................................124
10.1. Tracedatalogpanel..................................................................................................124
10.2. TraceSQLpanel.........................................................................................................126
11. AssertedDatabasePanel.............................................................................................128
12. Statusbar............................................................................................................................129
13. Accessibilityshortcuts..................................................................................................130
13.1. AccessibilityshortcutsinEnglish......................................................................130
13.2. AccessibilityshortcutsinSpanish.....................................................................133
14. ACIDEVariables...............................................................................................................136
15. ACIDEdefaultCommands...........................................................................................137
16. ConfigurationofACIDEbyconfigurationdocuments.....................................143
16.1. ManagersinXMLfiles.............................................................................................143
16.2. Propertiesconfiguration........................................................................................143
16.3. Workbenchconfiguration.....................................................................................145
16.4. Projectconfiguration..............................................................................................150
16.5. Configurationoflexicons.......................................................................................152
16.6. Commandshistory...................................................................................................154
17. RegularExpressions......................................................................................................155
17.1. Constructionofregularexpressions.................................................................155
17.2. Descriptionofregularexpressions....................................................................156

User’sManual 4
INDEXOFCONTENTSSummarizedindex...............................................................................................................................2
Indexofcontents..................................................................................................................................4
IndexofFigures..................................................................................................................................15
1. Systemrequisites...................................................................................................................20
1.1. User...................................................................................................................................20
1.2. Developer.......................................................................................................................21
1.3. ExecutingACIDE...........................................................................................................21
2. IntroducingACIDE.................................................................................................................22
2.1. Technology.....................................................................................................................22
2.2. TheMainGUI.................................................................................................................22
2.3. Projects...........................................................................................................................24
2.4. Configuration................................................................................................................24
3. Menubar....................................................................................................................................25
3.1. Filemenu........................................................................................................................25
3.1.1. New............................................................................................................................................25
3.1.2. Open...........................................................................................................................................25
3.1.3. Openrecentfiles...................................................................................................................25
3.1.4. Openallfiles...........................................................................................................................26
3.1.5. Closefile...................................................................................................................................26
3.1.6. Closeallfiles...........................................................................................................................26
3.1.7. Savefile.....................................................................................................................................26
3.1.8. Savefileas...............................................................................................................................26
3.1.9. Saveallfiles............................................................................................................................26
3.1.10. Printfile..............................................................................................................................26
3.1.11. Exit........................................................................................................................................26
3.2. Editmenu.......................................................................................................................27
3.2.1. Undo...........................................................................................................................................28

User’sManual 5
3.2.2. Redo...........................................................................................................................................28
3.2.3. Copy...........................................................................................................................................28
3.2.4. Paste..........................................................................................................................................28
3.2.5. Cut..............................................................................................................................................28
3.2.6. Togglecomment...................................................................................................................28
3.2.7. Makecomment......................................................................................................................28
3.2.8. Releasecomment.................................................................................................................28
3.2.9. Changecase............................................................................................................................29
3.2.9.1 Uppercase.........................................................................................................................29
3.2.9.2 Lowercase.........................................................................................................................29
3.2.9.3 Capitalize............................................................................................................................29
3.2.9.4 Invertcase.........................................................................................................................29
3.2.10. Selectall..............................................................................................................................29
3.2.11. Gotoline.............................................................................................................................29
3.2.12. Search..................................................................................................................................30
3.2.13. Replace................................................................................................................................31
3.3. Projectmenu................................................................................................................34
3.3.1. Newproject............................................................................................................................35
3.3.2. Openproject...........................................................................................................................36
3.3.3. Openrecentprojects..........................................................................................................36
3.3.4. Closeproject...........................................................................................................................36
3.3.5. Saveproject............................................................................................................................36
3.3.6. Saveprojectas.......................................................................................................................36
3.3.7. Newprojectfile.....................................................................................................................36
3.3.8. Addallopenedfiles.............................................................................................................36
3.3.9. Addfile.....................................................................................................................................36
3.3.10. Removefile........................................................................................................................36
3.3.11. Deletefile...........................................................................................................................36

User’sManual 6
3.3.12. Addfolder...........................................................................................................................37
3.3.13. Removefolder..................................................................................................................37
3.3.14. Compileproject................................................................................................................38
3.3.14.1. Compilationbasedon“Extension”..........................................................................38
3.3.14.2. Compilationbasedon“Markedfilesforcompilation”.....................................38
3.3.15. Executeproject................................................................................................................39
3.3.16. Setcompilablefile...........................................................................................................40
3.3.17. Unsetcompilablefile.....................................................................................................40
3.3.18. Setmainfile.......................................................................................................................41
3.3.19. Unsetmainfile.................................................................................................................41
3.4. Viewmenu.....................................................................................................................41
3.4.1. Showlog...................................................................................................................................41
3.4.2. Projectbrowser....................................................................................................................41
3.4.3. Console.....................................................................................................................................41
3.4.4. Database...................................................................................................................................42
3.4.5. PDG.............................................................................................................................................42
3.4.6. Debug........................................................................................................................................42
3.4.7. AssertedDatabase...............................................................................................................42
3.5. Configurationmenu....................................................................................................42
3.5.1. Lexiconconfiguration.........................................................................................................43
3.5.1.1. Newlexicon.......................................................................................................................43
3.5.1.2. Documentlexicon...........................................................................................................43
3.5.1.3. Modifylexicon..................................................................................................................43
3.5.1.3.1. Reservedwordsconfiguration.................................................................................44
3.5.1.3.2. Delimitersconfiguration.............................................................................................45
3.5.1.3.3. Remarksconfiguration................................................................................................46
3.5.1.4. Defaultlexicons...............................................................................................................47
3.5.2. Grammarconfiguration.....................................................................................................48

User’sManual 7
3.5.2.1. Newgrammar...................................................................................................................48
3.5.2.2. Loadgrammar..................................................................................................................50
3.5.2.3. Modifygrammar..............................................................................................................50
3.5.2.4. Savegrammar..................................................................................................................51
3.5.2.5. Savegrammaras.............................................................................................................51
3.5.2.6. Configurepaths...............................................................................................................51
3.5.3. Compiler..................................................................................................................................52
3.5.4. Fileeditorconfiguration...................................................................................................53
3.5.4.1. Preferences........................................................................................................................53
3.5.4.2. Fileeditordisplayoptionsconfiguration.............................................................54
3.5.4.3. Automaticindent............................................................................................................55
3.5.4.4. Linewrapping..................................................................................................................55
3.5.4.5. Maximumlinenumbertosendtoconsole...........................................................55
3.5.4.6. Sendtoconsoleconfirmation....................................................................................55
3.5.5. Consoleconfiguration........................................................................................................56
3.5.5.1. Configuration....................................................................................................................56
3.5.5.2. Executeexternalcommand........................................................................................57
3.5.5.3. Consoledisplayconfiguration...................................................................................58
3.5.5.4. Linewrapping..................................................................................................................59
3.5.5.5. Savecontentintofile.....................................................................................................59
3.5.5.6. Documentlexicon...........................................................................................................59
3.5.5.7. Find.......................................................................................................................................59
3.5.5.8. Closeconsole....................................................................................................................60
3.5.5.9. Resetconsole....................................................................................................................60
3.5.5.10. Clearconsolebuffer.......................................................................................................60
3.5.6. Databasepanelconfiguration.........................................................................................61
3.5.6.1. DESpanel...........................................................................................................................61
3.5.6.2. ODBCpanel........................................................................................................................61

User’sManual 8
3.5.6.3. Showdetails......................................................................................................................61
3.5.6.3.1. Name...................................................................................................................................61
3.5.6.3.2. Namefields.......................................................................................................................62
3.5.6.3.3. Namefieldstypes...........................................................................................................62
3.5.7. Graphpanelconfiguration................................................................................................62
3.5.7.1. Nodecolor..........................................................................................................................62
3.5.7.2. ShowLabels.......................................................................................................................62
3.5.7.3. Nodeshape........................................................................................................................62
3.5.7.4. Arrowcolor.......................................................................................................................63
3.5.7.5. Arrowshape......................................................................................................................63
3.5.8. Languageconfiguration.....................................................................................................63
3.5.9. Menuconfiguration.............................................................................................................64
3.5.9.1. New.......................................................................................................................................64
3.5.9.1.1. Buttonspanel...................................................................................................................65
3.5.9.1.2. Popupmenu.....................................................................................................................66
3.5.9.1.3. Keynavegation................................................................................................................68
3.5.9.2. Load......................................................................................................................................68
3.5.9.3. Modify..................................................................................................................................68
3.5.9.4. Save.......................................................................................................................................68
3.5.9.5. Saveas.................................................................................................................................69
3.5.10. Toolbarconfiguration...................................................................................................69
3.5.10.1. New.......................................................................................................................................69
3.5.10.2. Load......................................................................................................................................71
3.5.10.3. Modify..................................................................................................................................71
3.5.10.4. Save.......................................................................................................................................72
3.5.10.5. Saveas.................................................................................................................................72
3.6. Helpmenu......................................................................................................................72
3.6.1. Showhelp................................................................................................................................72

User’sManual 9
3.6.2. Aboutus...................................................................................................................................72
3.7. Insertedsubmenus.....................................................................................................73
3.8. Insertedmenuitems..................................................................................................74
4. Projectbrowserpanel..........................................................................................................75
5. Fileeditorpanel......................................................................................................................76
6. Toolbar.......................................................................................................................................78
7. Consolepanel...........................................................................................................................79
8. Databasepanel.........................................................................................................................81
8.1. Databasesnode............................................................................................................81
8.1.1. Open..........................................................................................................................................82
8.1.2. Refresh.....................................................................................................................................82
8.1.3. Close..........................................................................................................................................82
8.2. Databasenode..............................................................................................................83
8.2.1. Setasdefault..........................................................................................................................83
8.2.2. Close..........................................................................................................................................83
8.2.3. Refresh.....................................................................................................................................83
8.2.4. Executequery........................................................................................................................84
8.3. Tablesnode...................................................................................................................85
8.3.1. CreatetablewithDatalog.................................................................................................85
8.3.2. CreatetablewithDesignview........................................................................................85
8.3.3. CreatetablewithSQL.........................................................................................................86
8.3.4. Paste..........................................................................................................................................86
8.3.5. Showdetails...........................................................................................................................86
8.4. Tablenode.....................................................................................................................86
8.4.1. Drop...........................................................................................................................................87
8.4.2. Rename.....................................................................................................................................87
8.4.3. Copy...........................................................................................................................................87
8.4.4. Designview............................................................................................................................88
8.4.5. Dataview.................................................................................................................................88

User’sManual 10
8.4.5.1. Actionspermittedonthegrid....................................................................................89
8.4.5.2. Menubar.............................................................................................................................90
8.4.5.2.1. Filemenu...........................................................................................................................90
8.4.5.2.1.1. Export..............................................................................................................................90
8.4.5.2.1.2. Import.............................................................................................................................91
8.4.5.2.1.3. Executequery..............................................................................................................91
8.4.5.2.1.4. Print.................................................................................................................................91
8.4.5.2.1.5. Close.................................................................................................................................91
8.4.5.2.2. Editmenu..........................................................................................................................92
8.4.5.2.2.1. Undo.................................................................................................................................92
8.4.5.2.2.2. Redo.................................................................................................................................92
8.4.5.2.2.3. Copy.................................................................................................................................92
8.4.5.2.2.4. Paste.................................................................................................................................92
8.4.5.2.2.5. Cut.....................................................................................................................................93
8.4.5.2.2.6. Find..................................................................................................................................93
8.4.5.2.2.7. Replace............................................................................................................................93
8.4.5.2.3. Recordsmenu..................................................................................................................94
8.4.5.2.3.1. New..................................................................................................................................94
8.4.5.2.3.2. Delete...............................................................................................................................94
8.4.5.2.3.3. Refresh............................................................................................................................94
8.4.5.2.3.4. Goto.................................................................................................................................94
8.4.5.2.3.5. Selectrecord.................................................................................................................95
8.4.5.2.3.6. Selectall..........................................................................................................................95
8.4.5.2.4. Viewmenu........................................................................................................................95
8.4.5.2.4.1. Sortby.............................................................................................................................96
8.4.5.2.4.2. Sortbycolumn.............................................................................................................97
8.4.5.2.4.3. Filterbycontent..........................................................................................................97
8.4.5.2.4.4. Filterexcludingcontent...........................................................................................97

User’sManual 11
8.4.5.2.4.5. Discardfilter.................................................................................................................97
8.4.5.2.4.6. Hide/showcolumns..................................................................................................97
8.4.5.2.5. Helpmenu.........................................................................................................................98
8.4.5.2.5.1. Showhelp......................................................................................................................98
8.4.5.2.5.2. Aboutus.........................................................................................................................98
8.4.6. Constraints...........................................................................................................................100
8.4.6.1PrimaryKeyPanel(PK)....................................................................................................100
8.4.6.1.1Definingaprimarykey.................................................................................................101
8.4.6.1.2Modifyingaprimarykey..............................................................................................101
8.4.6.1.3Deletingaprimarykey..................................................................................................102
8.4.6.2Candidatekeypanel(CK).................................................................................................102
8.4.6.2.1Definingacandidatekey.............................................................................................103
8.4.6.2.2Modifyingacandidatekey...........................................................................................103
8.4.6.2.3Deletingacandidatekey...............................................................................................103
8.4.6.3Foreignkeypanel(FK)......................................................................................................104
8.4.6.3.1Definingaforeignkey...................................................................................................107
8.4.6.3.2Modifyingaforeignkey.................................................................................................108
8.4.6.3.3Deletingaforeignkey....................................................................................................108
8.4.6.4Notnullpanel(NN)............................................................................................................109
8.4.6.4.1Defininganotnullconstraint....................................................................................109
8.4.6.4.2Modifyinganotnullconstraint..................................................................................110
8.4.6.4.3Deletinganotnullconstraint.....................................................................................110
8.4.6.5Functionaldependencypanel(FD)..............................................................................110
8.4.6.5.1Definingafunctionaldependencyconstraint.....................................................111
8.4.6.5.2Modifyingafunctionaldependencyconstraint...................................................112
8.4.6.5.3Deletingafunctionaldependencyconstraint......................................................112
8.4.6.6Integrityconstraintspanel(IC).....................................................................................113
8.4.6.6.1Definingauserdefinedconstraint..........................................................................114

User’sManual 12
8.4.6.6.2Modifyingauserdefinedconstraint........................................................................114
8.4.6.6.3Deletingauserdefinedconstraint............................................................................115
8.5. Childrenoftablenodes..........................................................................................116
8.5.1. NodeColumns.....................................................................................................................116
8.5.2. NodeConstraints...............................................................................................................117
8.5.2.1. Drop...................................................................................................................................117
8.5.2.1.1. Modify..............................................................................................................................117
8.6. Viewsnode..................................................................................................................118
8.6.1. Create.....................................................................................................................................118
8.6.2. Paste.......................................................................................................................................118
8.6.3. Showdetails........................................................................................................................119
8.7. Viewnode....................................................................................................................119
8.7.1. Drop........................................................................................................................................120
8.7.2. Rename..................................................................................................................................120
8.7.3. Copy........................................................................................................................................120
8.7.4. Paste.......................................................................................................................................120
8.7.5. Designview..........................................................................................................................120
8.7.6. Dataview..............................................................................................................................120
8.8. Columnsnodes..........................................................................................................120
8.9. SQLtext,RAtextandDatalogtextnodes........................................................121
9. PDGpanel.................................................................................................................................123
10. DebugPanel.......................................................................................................................124
10.1. Tracedatalogpanel.................................................................................................124
10.2. TraceSQLpanel........................................................................................................126
11. AssertedDatabasePanel..............................................................................................128
12. Statusbar............................................................................................................................129
13. Accessibilityshortcuts..................................................................................................130
13.1. AccessibilityshortcutsinEnglish......................................................................130
13.2. AccessibilityshortcutsinSpanish.....................................................................133

User’sManual 13
14. ACIDEVariables...............................................................................................................136
15. ACIDEdefaultCommands...........................................................................................137
16. ConfigurationofACIDEbyconfigurationdocuments.....................................143
16.1. ManagersinXMLfiles.............................................................................................143
16.2. Propertiesconfiguration........................................................................................143
16.3. Workbenchconfiguration.....................................................................................145
16.3.1. Menuconfiguration.....................................................................................................146
16.3.2. Toolbarconfiguration................................................................................................147
16.3.3. Fileeditorconfiguration...........................................................................................149
16.3.4. Consolepanelconfiguration...................................................................................150
16.3.5. lexiconAssignerconfiguration................................................................................150
16.4. Projectconfiguration..............................................................................................150
16.5. Configurationoflexicons.......................................................................................152
16.5.1. TokenTypeManager...................................................................................................153
16.5.2. validExtensionManager...........................................................................................153
16.5.3. delimitersManager.....................................................................................................154
16.6. Commandshistory...................................................................................................154
17. RegularExpressions......................................................................................................155
17.1. Constructionofregularexpressions.................................................................155
17.2. Descriptionofregularexpressions....................................................................156
17.2.1. TheDOT“.”.....................................................................................................................156
17.2.2. TheBACKSLASH“”......................................................................................................156
17.2.3. TheBRACKETS“[]”.....................................................................................................157
17.2.4. TheBAR“|”.....................................................................................................................157
17.2.5. TheDOLLARSIGN“$”................................................................................................158
17.2.6. TheCARET“^”..............................................................................................................158
17.2.7. Parentheses“()”...........................................................................................................158
17.2.8. TheQUESTIONmark“?”...........................................................................................159

User’sManual 14
17.2.9. TheBRACES“{}”...........................................................................................................159
17.2.10. TheASTERISK“*”.........................................................................................................159
17.2.11. ThePLUSsign“+”.........................................................................................................159

User’sManual 15
INDEXOFFIGURESFigure1:ACIDEMainGUI.................................................................................................................23
Figure2:FileMenu..............................................................................................................................25
Figure3:EditMenu.............................................................................................................................27
Figure4:ChangeCaseMenu............................................................................................................29
Figure5:Gotolinewindow.............................................................................................................30
Figure6:Searchwindow..................................................................................................................30
Figure7:Replacewindow................................................................................................................32
Figure8:Numberofreplacements...............................................................................................34
Figure9:Projectmenu.......................................................................................................................34
Figure10:Projectconfiguration....................................................................................................35
Figure11:Addfolder..........................................................................................................................37
Figure12:Compilationbyextension...........................................................................................38
Figure13:Markingfiles.....................................................................................................................39
Figure14:Compilationbymarkedfiles.....................................................................................39
Figure15:Executionmenu..............................................................................................................40
Figure16:Executionprocess..........................................................................................................40
Figure17:Viewmenu........................................................................................................................41
Figure18:Configurationmenu......................................................................................................42
Figure19:Lexiconmenu...................................................................................................................43
Figure20:Newlexicon......................................................................................................................43
Figure21:Reservedwords..............................................................................................................44
Figure22:Delimitersconfiguration.............................................................................................45
Figure23:Remarksconfiguration................................................................................................46
Figure24:Defaultlexicons...............................................................................................................47

User’sManual 16
Figure25:Grammarmenu...............................................................................................................48
Figure26:Newgrammar..................................................................................................................49
Figure27:Grammargenerationprocess...................................................................................50
Figure28:Modifygrammar.............................................................................................................51
Figure29:Setpaths.............................................................................................................................52
Figure30:Compilerconfiguration...............................................................................................52
Figure31:Fileeditorconfiguration.............................................................................................53
Figure32:Preferenceswindow.....................................................................................................54
Figure33:Fileeditordisplayoptions.........................................................................................54
Figure34:Maximumlinenumber................................................................................................55
Figure35:Consolemenu..................................................................................................................56
Figure36:Consoleconfiguration..................................................................................................57
Figure37:Executeexternalcommand.......................................................................................58
Figure38:Consoledisplayconfiguration..................................................................................58
Figure39:Consolesearchwindow..............................................................................................59
Figure40:Databasepanelmenu...................................................................................................61
Figure41:ShowDetailsMenu........................................................................................................61
Figure42:GraphPanelConfigurationmenu..........................................................................62
Figure43:Nodeshapemenu..........................................................................................................62
Figure44:Arrowcolormenu.........................................................................................................63
Figure45:Arrowshapemenu........................................................................................................63
Figure46:Languageconfigurationmenu.................................................................................63
Figure47:Menuconfigurationmenu..........................................................................................64
Figure48:Newmenu.........................................................................................................................64
Figure49:Objectmenupopupmenu..........................................................................................67
Figure50:Modifymenu....................................................................................................................68

User’sManual 17
Figure51:ToolBarconfigurationmenu....................................................................................69
Figure52:Newtoolbar.....................................................................................................................69
Figure53:Modifytoolbar................................................................................................................71
Figure54:Helpmenu.........................................................................................................................72
Figure55:Aboutuswindow...........................................................................................................73
Figure56:Exampleofinsertedsubmenu..................................................................................74
Figure57:Projectbrowserpanel..................................................................................................75
Figure58:Projectbrowserpopupmenu...................................................................................75
Figure59:Fileeditorpanel..............................................................................................................76
Figure60:Fileeditorpopupmenu...............................................................................................77
Figure61:Toolbar..............................................................................................................................78
Figure62:Consolepanel...................................................................................................................79
Figure63:Consolepanelpopupmenu.......................................................................................79
Figure64:Databasepanel................................................................................................................81
Figure65:Databasesnode...............................................................................................................81
Figure66:Databasesnodepopupmenu....................................................................................82
Figure67:Opendatabase.................................................................................................................82
Figure68:Databasenode.................................................................................................................83
Figure69:Databasenodepopupmenu......................................................................................83
Figure70:Executequery..................................................................................................................84
Figure71:Expandingdatabasenode..........................................................................................84
Figure72:Tablesnodepopupmenu...........................................................................................85
Figure73:Newtable...........................................................................................................................85
Figure74:ShowDetailsMenuTablesNode.............................................................................86
Figure75:Tablenode.........................................................................................................................87
Figure76:Tablenodepopupmenu.............................................................................................87

User’sManual 18
Figure77:Designview......................................................................................................................88
Figure78:Dataview...........................................................................................................................88
Figure79:Columnheaderpopup.................................................................................................89
Figure80:Dataviewfilemenu......................................................................................................90
Figure81:Executequery..................................................................................................................91
Figure82:Datavieweditmenu.....................................................................................................92
Figure83:Dataviewsearchwindow..........................................................................................93
Figure84:Dataviewreplacewindow........................................................................................93
Figure85:Dataviewnumberofreplacements.......................................................................94
Figure86:Dataviewrecordsmenu.............................................................................................94
Figure87:Dataviewgotomenu...................................................................................................95
Figure88:ViewmenuinDataView.............................................................................................96
Figure89:Dataviewsortbywindow.........................................................................................97
Figure90:Dataviewhide/showcolumns................................................................................98
Figure91:Dataviewhelpmenu....................................................................................................98
Figure92:Dataviewaboutuswindow......................................................................................99
Figure93:ConstraintsWindow...................................................................................................100
Figure94:PrimaryKeyPanel.......................................................................................................101
Figure95:CandidateKeyPanel...................................................................................................102
Figure96:ForeignKeyPanel........................................................................................................105
Picture97:TableChooserWindow...........................................................................................106
Figure98:Referencedrelationwindow..................................................................................106
Figure99:Referencedrelationswindow................................................................................107
Figure100:NotNullPanel.............................................................................................................109
Figure101:FunctionalDependencypanel.............................................................................111
Figure102:IntegrityConstraintsPanel...................................................................................113

User’sManual 19
Figure104:Childrenoftablenodes..........................................................................................116
Figure105:ViewsNodePopupMenu......................................................................................118
Figure106:Createviewwindow................................................................................................118
Figure107:ShowDetailsMenuViewsNode.........................................................................119
Figure108:Viewnode....................................................................................................................119
Figure109:Viewnodepopupmenu.........................................................................................120
Figure110:Columnsnodes..........................................................................................................121
Figure111:SQLandDatalogtextnodes.................................................................................121
Figure112:SQLtext.........................................................................................................................122
Figure113:Datalogtext.................................................................................................................122
Figure114:PDGPanel.....................................................................................................................123
Figure115:DebugPanel................................................................................................................124
Figure116:SelectedNode.............................................................................................................124
Figure117:Highlightedtext.........................................................................................................125
Figure118:Tracesqlpanel...........................................................................................................126
Figure119:Statusbar.....................................................................................................................129

User’sManual 20
1. SYSTEMREQUISITES
1.1. USER
ACIDE‐aConfigurableIDEdoesrequireneitherspecialsystemconfigurationsnor
specialsystemrequirementsbecausetheexecutablefileisattachedinitsdistribution,
making the execution of ACIDE ‐ A Configurable IDE easy and comfortable to the
users.
ACIDE – A Configurable IDE is cross‐platform and has been tested on MS
Windows XP/Vista/7, Ubuntu Linux 10.04.1, Ubuntu Linux 12.04, andMacOSX
SnowLeopard.Executablesforalloftheseoperatingsystemsareprovided.Theonly
mandatory requirement is the previous installation of the Java Virtual Machine
(JVM).TheuserwillhavetogettheJREinstallationfilewith1.6andlaterversions,
whichisavailableinthefollowinglink:
http://www.java.com/es/download/manual.jsp.
Only with this easy and fast step the user will be able to run ACIDE ‐ A
Configurable IDE on his computer without problems. However, in order to fully
enjoying all the features of the application such as ACIDE ‐ A Configurable IDE
grammarconfigurations,twoextratoolswillhavetobealsoinstalled:javac.exeand
jar.exe.
Those tools are available in the Java Development Kit (JDK) installation file,
whichisavailableinthefollowinglink:
http://www.oracle.com/technetwork/java/javase/downloads/index.html
Atlast,inordertovisualizethepresentdocument,itismandatoryfortheusersto
havepreviouslyinstalledanysoftwareforPDFfilesvisualization.

User’sManual 21
1.2. DEVELOPER
For developers, it is mandatory to have previously installed the Java
DevelopmentKit(JDK)with1.6andlaterversionsandanysoftwarefortheedition
ofthesourcecode.
ThesourcecodehasbeenfullyeditedwiththeEclipseIDEtoolwhichisavailable
in:
http://www.eclipse.org/
Furthermore,with theACIDE ‐AConfigurable IDE source code distribution, the
Eclipse project file is available. The developer has to import the project file into
Eclipseandstarttheedition,fastandsimple.
1.3. EXECUTINGACIDE
User has to unpack the distribution archive file into the directory he wants to
instal ACIDE – A Configurable IDE, which will be referred to as the distribution
directoryfromnow.Sinceit isaportableapplication, itneedstobestartedfromits
distributiondirectory,whichmeansthatthestart‐updirectoryoftheshortcutmust
bethedistributiondirectory.
ToexecuteACIDE–AConfigurableIDEonthedifferentSOs,useronlyhastorun
thedes_acide.jar file toopenan instanceof theapplicationpreconfigured towork
withDES.AtWindows, theuseronlyhavetododoubleclick in the file.Healsocan
createascriptoranaliasforexecutingthefileatthedistributionroot,typing:
java –jar des_acide.jar
or,toavoidthatconsoledependsonexecutable:
javaw –jar des_acide.jar
Linux and Linux the user can create a script or an alias for executing the file
des_acide.jaratthedistributionroot,typing:
java –jar des_acide.jar

User’sManual 22
2. INTRODUCINGACIDEACIDE – A Configurable IDE is a cross‐platform, open‐source Integrated
Development Environment (IDE). It has been developed by different teams of
students coursingComputing Systems and directed by Fernando Sáenz Pérez. Next,
ACIDE–AConfigurableIDEfeatureswillbefurtherexplained:
2.1. TECHNOLOGY
TheimplementationoftheapplicationhasbeencompletelydoneusingJavaunder
Eclipse.VersioncontrolwaskindlyprovidedbyTortoiseSVN.
2.2. THEMAINGUI
Figure1showsthemainGUIofACIDE.Itconsistsofsixmainpanels.Thetoppanel
ontheleftshowstheorganistationofthecurrentproject,thetoppanelinthemiddle
are theopened fileswhichmaybelong to theproject (filesmaybeopenedwithout
assigning them to the project), the top panel on the right side is the graph panel,
which shows the PD. Below, the left panel shows the databases system connected
withACIDE,whichallowsuser interaction.Beside, the consolepanel is shown.The
caseshownistheDESconsoleandontherightsidethedebugpanelisshown,which
allows the graphical debugging. The databases, console, project, graph and debug
panelscanbehidden.Also,thesepanelscanbeswitchedbyadraganddropaction.
Forthispurpose,themenubars(orthetabbedpaneintheFileEditor)inthepanels
canbeselectedusingtheleftmousebutton,afterthat,thepanelscanbedraggedand
released one in another. Moreover, there is no need to work with projects if this
flexibilityisnotneeded;aregularusermayusethesystemasis.ThestatusoftheGUI
isrememberedforthenexttimethetool isexecuted. If thetoolopensaproject, its
statuswhenitwaslastsavedisrestored.
Themenubarincludessomecommonentries:
File:Forfilerelatedoperations.

User’sManual 23
Edit: For clipboard related operations, Search, Replace, Undo, Toggle
Comment,MakeComment,ReleaseComment,ChangeCase, Redo,SelectAll
andGoToLine.
Project:Forprojectrelatedoperations.
View: For showing/hiding project, console, database, graph, debug and
asserteddatabasepanels,anddisplayingthelog.Windowarrangementsare
notpossibleuptonow,butusualfeaturesarecascadingandtilingwindows
bothverticallyandhorizontally.
Figure1:ACIDEMainGUI
Configuration:ThisentryallowstoconfigureLexicon(forsyntaxhighlight
ing.),Grammar(forparsingonthefly),Compiler(forcompilingtheproject),
FileEditor (for changing the display andbehavior of the editors),Console
(theconsoleintherightbottompanel),DatabasePanel(thedatabasepanel
in the left bottom panel), Graph Panel (then panel in the right side),
Language of the GUI,Menu (for the configuration of the menu bar) and
Toolbarforthecommands,whichcanbedisplayedeitherasiconsortextual
descriptions.Tooltipsfortoolbarcommandscanbeconfigured.
Help:ThisentrycontainsShowHelpandAboutACIDE.

User’sManual 24
Inaddition,thereisafixedtoolbar,whichincludescommonbuttonsforthefile
andproject relatedbasicoperations:New,Open,SaveandSaveAll (this lastone
onlyforfiles).Nexttothefixedtoolbar,thereistheconfigurabletoolbar.
Finally,thestatusbargivesinformationaboutsomeitems:Thecompletepath
of the selected file the selected grammar and lexicon, the line and column
numbers,CapsLock,ScrollLock,NumLockandcurrenttime.
Allthesecomponentswillbefurtherexplainedthroughoutthisdocument.
2.3. PROJECTS
A project contains the whole status of a session, which is defined by all the
possible configurations as well as the current display status. It consists of files
arranged in folders (with any tree depth), all the configurations for the session
(lexicon,grammar,compiler,console, language, fileeditor,menuandtoolbar),main
GUIarragement(panelsizes,andopenedfilesintheproject),andfileattributes.File
attributesidentifyafileinaprojectascompilableand/ormain.Ifafileiscompilable,
thenthecompilerconfigurationcanbesettocompileeachofthesefiles.Ifafileisa
main file (there is only one in the project), then it can be used in the compiler
configurationorinthetoolbarcommands.
Theprojectstructureshowninfoldersisalogicalviewwhichmaycoincidewith
thephysicalstructureoftheOS folders,butthisisnotneeded.Usercanincludeina
givenproject a filebelonging to another tree structure, therefore allowing to share
filesfordifferentprojects.
2.4. CONFIGURATION
The main objetive of this system is to be as highly configurable as possible,
keeping the configurations easy and portable by means of text files. The user can
configuretheLexicon,Grammar,Compiler,FileEditor,Console,DatabasePanel,Graph
Panel,Language,Menu andToolbar.These configurationswill be further explained
throughoutthisdocument.

User’sManual 25
3. MENUBARNextwefurtherdetaileachoneofthesubmenusthatACIDE–AConfigurableIDE
asdefault.As isexplained inChapter3.5.9 theusercan insertnewmenusubmenus
anditems.InChapter3.7andChapter0weexplainhowtousetheseobjects.Wealso
explainhowtoconfigurethismenuexternallywithXMLfilesinChapter16.3.1.
3.1. FILEMENU
Itcontainsthefollowingmenuitemsforthefilesmanagement:
Figure2:FileMenu
Next,allthepreviousmenuitemswillbefurtherexplained:
3.1.1. NEW
Createanewemptyfileinthefileeditor.
3.1.2. OPEN
Openapreviouslysavedfileintothefileeditor.
3.1.3. OPENRECENTFILES
Displayalistwhichcontainsallthefilesthathavebeenopenedpreviouslyinthe
fileeditorandtheoptiontosetthelisttoempty.

User’sManual 26
3.1.4. OPENALLFILES
Openallthefilesassociatedtothecurrentprojectinthefileeditor.
3.1.5. CLOSEFILE
Closetheactivefileinthefileeditor,askingtotheuserifhewantstosaveitifthe
filewaspreviouslymodified.
3.1.6. CLOSEALLFILES
Closealltheopenedfilesinthefileeditor,askingtotheuserifhewantstosave
themifthefileswerepreviouslymodified.
3.1.7. SAVEFILE
Savetheactivefileinthefileeditoratthesamepaththatitwaspreviouslysaved.
3.1.8. SAVEFILEAS
Savetheactivefileinthefileeditorintoadifferentpaththanitwassavedbefore.
3.1.9. SAVEALLFILES
Saveallfilesopenedinthefileeditor.
3.1.10. PRINTFILE
Printtheactivefileinthefileeditor.
3.1.11. EXIT
Close the application and if any changes have been encountered in the current
projectconfiguration,displaythefollowingdialogtotheuser:

User’sManual 27
Adittionally, ifanyoftheopenedfilesinthefileeditorhasbeenmodified, itwill
askedtotheuserforsavingthemwiththefollowingdialog:
Theusercanaborttheexitprocessinanytimebycancellinganyoftheprevious
dialogs.
3.2. EDITMENU
Containthefollowingmenuitemsforthecommonfileeditormanagement:
Figure3:EditMenu
Next,allthepreviousmenuitemswillbefurtherexplained:

User’sManual 28
3.2.1. UNDO
Undothechangesinthefileeditorsettingthefocusonthefilewhichistheowner
ofthechange.
3.2.2. REDO
Redothechangesinthefileeditorsettingthefocusonthefilethatistheownerof
thechange.
3.2.3. COPY
Copytheselectedtextintheactivefileinthefileeditororintheconsoleandputit
intothesystemclipboard.
3.2.4. PASTE
Pastethetextstoredinthesystemclipboardinthecurrentpositionoftheactive
fileinthefileeditororintheconsole.
3.2.5. CUT
Cuttheselectedtextintheactivefileinthefileeditororintheconsoleandputit
intothesystemclipboard.
3.2.6. TOGGLECOMMENT
Commentoruncommentthelineaccordingtowhetherthelineiscommentedor
not.
3.2.7. MAKECOMMENT
Commenttheselectedline.Incasethereisnoselection,commentthelinewhere
thecursorislocated.
3.2.8. RELEASECOMMENT
Uncomment the selected line. In case there is no selection, uncomment the line
wherethecursorislocated.

User’sManual 29
3.2.9. CHANGECASE
Containthefollowingmenuitemoptionsforthecustomizationoftexts:
Figure4:ChangeCaseMenu
3.2.9.1 UPPERCASE
Transformtouppercasetheselectedtext.Incasethereisnoselection,transform
thecurrentwordwherethecursorislocated.
3.2.9.2 LOWERCASE
Transformtolowercasetheselectedtext.Incasethereisnoselection,transform
thecurrentwordwherethecursorislocated.
3.2.9.3 CAPITALIZE
Capitalize the first letter of everyword in the selected text. In case there is no
selection,capitalizethecurrentwordwherethecursorislocated.
3.2.9.4 INVERTCASE
Transformtouppercasethelowercaselettersandviceversa.
3.2.10. SELECTALL
Selectallthecontentoftheactivefileinthefileeditor.
3.2.11. GOTOLINE
Displayadialoginwhichtheuserwilltypedownthenumberofthelinewherehe
wantstoplacethecaretcursorintheactivefileinthefileeditor:

User’sManual 30
Figure5:Gotolinewindow
3.2.12. SEARCH
Showthesearchtextwindowofthefileeditor:
Figure6:Searchwindow
Thenweproceedtodescribeeachcomponentofthewindow:
Textbox:Hereiswhereuserentersthesearchtext.
Special:Youcansearchforparagraphbreaksandtabsbythespecialmarks
^pand^t.Thesespecialmarkscanbewritteninthetextboxorselectedin
theSpecialcombomenu.

User’sManual 31
Recents: This combo menu displays a list which contains all the recent
searches that have been executed before. When user selects one, this
appearsintheTextbox.
Options:
o Case sensitive: this option is used to search for strings without
havingortakingintoaccounttheUpper/Lowercase.
o Regularexpressions:regularexpressionssearchassociatedwitha
search pattern. More information about Regular Expressions in
Chapter17.
o Wholewords:findwholewordsonly.
Scope:
o Selectedtext:searchwithinaselectedtext.
o Currentdocument:document‐searchstarting ina certainposition
oftheactivefileofFileEditor.
o Allopeneddocuments:searchinallopenedfilesonthefileeditor.
Direction:
o Forward: search from the current caret position to the end of the
fileinthesourcefileeditor.
o Backward: searchfromthecurrentcaretpositiontothebeginning
ofthefileinthesourcefileeditor.
o Cyclic:searchfromthecurrentcaretpositiontotheendofthefilein
thesourcefileeditor,andstarfromthebeginninguntilthestarting
position.
Progressbar:showstheprogressoftheactivesearch.
3.2.13. REPLACE
Displaythereplacetextwindowonthefileeditor:

User’sManual 32
Figure7:Replacewindow
Offerthesameoptionsthanthesearchwindowandalsothereplacebuttonsand
thereplacetextfieldtoselectthetexttouseforthereplacements:
Searchtextbox:Hereiswhereuserentersthesearchtext.
Special:Youcansearchforparagraphbreaksandtabsbythespecialmarks
^pand^t.Thesespecialmarkscanbewritteninthetextboxorselectedin
theSpecialcombomenu.
Recentssearches:Thiscombomenudisplaysalistwhichcontainsallthe
recentsearchesthathavebeenexecutedbefore.Whenuserselectsone,this
appearsintheTextbox.
Replacetextbox:Hereiswhereuserentersthereplacetext.
Special: You can replace with paragraph breaks and tabs by the special
marks ^p and ^t. These special marks can be written in the text box or
selectedintheSpecialcombomenu.

User’sManual 33
Recentsreplaces:Thiscombomenudisplaysalistwhichcontainsallthe
recentreplacementsthathavebeenexecutedbefore.Whenuserselectsone,
thisappearsinthereplacesTextbox.
Options:
o Casesensitive:thisoptionisusedtosearchforandreplacestrings
withouthavingortakingintoaccounttheUpper/Lowercase.
o Regularexpressions:regularexpressionssearchassociatedwitha
search pattern. More information about Regular Expressions in
Chapter17.
o Wholewords:findwholewordsonly.
Scope:
o Selectedtext:searchwithinaselectedtext.
o Currentdocument:document‐searchstarting ina certainposition
oftheactivefileofFileEditor.
o Allopeneddocuments:searchinallopenedfilesonthefileeditor.
Direction:
o Forward: search from the current caret position to the end of the
fileinthesourcefileeditor.
o Backward: searchfromthecurrentcaretpositiontothebeginning
ofthefileinthesourcefileeditor.
o Cyclic:searchfromthecurrentcaretpositiontotheendofthefilein
thesourcefileeditor,andstarfromthebeginninguntilthestarting
position.
Progressbar:showtheprogressoftheactivesearchorreplacement.
Whenageneralreplacementisperformed,displaythefollowingdialogtothe
userinformingofthenumberofreplacements:

User’sManual 34
Figure8:Numberofreplacements
3.3. PROJECTMENU
Containthemenuitemsrequiredfortheprojectconfigurationsmanagement:
Figure9:Projectmenu
Next,allthepreviousmenuitemswillbefurtherexplained:

User’sManual 35
3.3.1. NEWPROJECT
Configureanewprojectdisplayingthefollowingconfigurationwindow:
Figure10:Projectconfiguration
Next,thewindowoptionsarefurtherdescribed:
Name:indicatetheprojectname.
Folder: indicate the folder where the project file will be placed. If the
projectfilealreadyexistsinthefoldertheapplicationwillgivethechanceto
theusertooverwriteitornot:
Compiler/Interpreteroptions
o Compiler:selectthecompilerconfigurationforthenewproject.
o Interpreter: select the console panel configuratoin for the new
project.

User’sManual 36
3.3.2. OPENPROJECT
Openanexistingproject.
3.3.3. OPENRECENTPROJECTS
Displaya listwiththeprojectsthathavebeenalreadyopenedintheapplication
andtheoptiontosetthelisttoempty.
3.3.4. CLOSEPROJECT
Closethecurrentprojectandsetsthedefaultconfiguration.
3.3.5. SAVEPROJECT
Savethecurrentprojectconfigurationintoitsconfigurationfile.
3.3.6. SAVEPROJECTAS
Savesthecurrentprojectconfigurationintoadifferentconfigurationfile.
3.3.7. NEWPROJECTFILE
Create a new empty file in the file editor and adds it to the current project
configurationafteraskingtotheuserforitsfinaldestination.
3.3.8. ADDALLOPENEDFILES
Addalltheopenedfilesinthefileeditortothecurrentprojectconfiguration.Files
thatalreadybelongtotheprojectwillnotbeincludedagain.
3.3.9. ADDFILE
Addtheactivefileinthefileeditortotheprojectconfiguration.
3.3.10. REMOVEFILE
Removethefilefromtheprojectconfigurationbutdoesnotdeletesitfromdisk.
3.3.11. DELETEFILE
Remove the file from both project configuration and disk previous user
confirmation:

User’sManual 37
3.3.12. ADDFOLDER
Addanewfoldertotheprojectintheselectedlevelattheexplorertree,andcheck
thatitdoesnotexistanotherfolderwiththesamenamebeforeaddingit:
Figure11:Addfolder
If already exist another folder with the same name at the same level at the
explorertree,displaythefollowingmessageanddoesnotaddit:
3.3.13. REMOVEFOLDER
Removethefolderfromtheprojectconfigurationprevioususer’sconfirmation:

User’sManual 38
3.3.14. COMPILEPROJECT
The project is compiled with the selected parameters in the compiler
configurationwindow thatwill be further detailed in the following chapters of the
presentdocument.Next,weilustrateitsusagewithtwoexamples.
3.3.14.1. COMPILATIONBASEDON“EXTENSION”
Theprocesshasthefollowingsteps:
First,inthecompilerconfigurationwindowtheuserselectstheextensionof
thefilesthathewantstocompile:
Figure12:Compilationbyextension
Finally,theprojectiscompiledusingtheMenu/Project/Compilemenuitemoption.
3.3.14.2. COMPILATION BASED ON “MARKED FILES FOR
COMPILATION”
Theprocesshasthefollowingsteps:

User’sManual 39
First,theusermarksallthefilesthathewantstocompileinthefileeditor
orintheexplorertreeusingtheoptionforthispurpose:
Figure13:Markingfiles
Next,theuserconfiguresthecompileroptionsinthecompilerconfiguration
asfollows:
Figure14:Compilationbymarkedfiles
Finally,theuserselectstheMenu/Project/Compilemenuitemoption.
3.3.15. EXECUTEPROJECT
Itdisplaysthefollowingconfigurationwindow:

User’sManual 40
Figure15:Executionmenu
Next,wefurtherdetailallthewindowcomponents:
Executablepath:pathoftheselectedexecutable.
Executablearguments:argumentsfortheselectedexecutable.
The result of the execution is displayed in the following progress window:
Figure16:Executionprocess
3.3.16. SETCOMPILABLEFILE
Settheactivefileinthefileeditorascompilable.
3.3.17. UNSETCOMPILABLEFILE
Unsettheactivefileinthefileeditorascompilable.

User’sManual 41
3.3.18. SETMAINFILE
Settheactivefileinthefileeditorasmain.
3.3.19. UNSETMAINFILE
Unsettheactivefileinthefileeditorasmain.
3.4. VIEWMENU
Containthemenuitemsforthedisplayingmanagementofthevisiblepartsofthe
applicationandthelogvisualization:
Figure17:Viewmenu
Next,allthepreviousmenuitemswillbefurtherexplained:
3.4.1. SHOWLOG
Showtheapplicationloginthefileeditor.
3.4.2. PROJECTBROWSER
Hideorshowtheexplorerpanel.Thispanelcanbealsohiddenclickingthebutton
intheprojectbrowsermenubar.
3.4.3. CONSOLE
Hideorshowtheconsolepanel.Thispanelcanbealsohiddenclickingthebutton
intheconsolemenubar.

User’sManual 42
3.4.4. DATABASE
Hideorshowthedatabasepanel.Thispanelcanbealsohiddenclickingthebutton
inthedatabasemenubar.
3.4.5. PDG
Hideorshowthegraphpanel.Thispanelcanbealsohiddenclickingthebuttonin
thePDGmenubar.
3.4.6. DEBUG
Hideorshowthedebugpanel.Thispanelcanbealsohiddenclickingthebuttonin
thedebugmenubar.
3.4.7. ASSERTEDDATABASE
OpentheAssertedDatabasewindow.
3.5. CONFIGURATIONMENU
Contain all themenu item options for the configurationmanagement of all the
modulesoftheapplication:
Figure18:Configurationmenu

User’sManual 43
3.5.1. LEXICONCONFIGURATION
Contain all themenu itemoptions for the lexicon configurationmanagement of
theapplication:
Figure19:Lexiconmenu
WealsoexplainhowtoconfigurelexiconsexternallywithXMLfilesinChapter
16.5.Next,allthepreviouslymentionedoptionsarefurtherexplained:
3.5.1.1. NEWLEXICON
Createanewlexiconconfigurationwiththenamethattheusertypesdowninthe
followingwindowapplyingittotheactivefileinthefileeditor:
Figure20:Newlexicon
3.5.1.2. DOCUMENTLEXICON
LoadthelexiconconfigurationfilewithXMLextensionintheactivefileinthefile
editor.
3.5.1.3. MODIFYLEXICON
Openthelexiconconfigurationwindowthatcontainsthefollowingtabs:

User’sManual 44
3.5.1.3.1. RESERVEDWORDSCONFIGURATION
Figure21:Reservedwords
Next,wefurtherdescribeeachoneofitscomponentsasfollows:
Add:addanewtablereservedwordentry.
Delete:removeatablereservedwordentry.
Modify:modifieatablereservedwordentry.
Setdelimiterstyle:thedelimiterlistnowisalsotakenasreservedwords.
Table:containthelistwiththereservedwordsgroupsbytypesandcolors.
Note:itisnotallowedtomodifythetableentriesdirectlyonthetableitself
and the changes will not be applied until themodify button is pressed
down.

User’sManual 45
3.5.1.3.2. DELIMITERSCONFIGURATION
Figure22:Delimitersconfiguration
Next,allitscomponentsarefurtherdetailed:
Input new delimiter text field: the user inputs the name of the new
delimiter.
Addbutton:addtheinputdelimiterinthetextfieldtothetable.
Deletebutton:removeselecteddelimiterfromthetable.
Table:containthedelimiterlist,anditispossibletomodifyitdirectlyonit.

User’sManual 46
3.5.1.3.3. REMARKSCONFIGURATION
Figure23:Remarksconfiguration
Next,wefurtherdetailallitscomponents:
Commentsymboltextfield:forinputtheremarksymbol.
Casesensitivecheckbox:forspecifyiftheremarkiscasesensitiveornot.
Colorselectionbutton:forthecolorselectionoftheremarks.
Fontstylecombobox:forthefontstyleselection.
Previewtextfield:showapreviewoftheremarks.
Thelexiconconfigurationwindowhasinthebottomsidethefollowingbuttons:
Save as: save the current lexicon configuration in other path with XML
extension.

User’sManual 47
Apply: apply the changes to all the opened fileswith the current lexicon
configuration in the file editorand saves the changes in the configuration
filewithXMLextension.
Cancel: close the lexicon configuration window without applying the
changes.
Finally, if there are any changes in the current configuration in the previously
describedpanelsandtheuserclosesthewindowwiththeclosebuttonortheESCkey,
thefollowingdialogwillbedisplayed:
3.5.1.4. DEFAULTLEXICONS
Showthedefaultlexiconsconfigurationwindow:
Figure24:Defaultlexicons
Next,weexplaineachoneofitscomponents:

User’sManual 48
File editor configuration: contain the elements for the default lexicon
configurationsmanagementinthefileeditor:
o Addfiletype:addanewdefaultlexiconconfigurationtothetable.
o Remove filetype: removeadefault lexiconconfiguration fromthe
table.
o Table:containthefollowingcolumns:
Description.
Extensions: extensions list separed by “;”.Note: the format
“.txt”isnotavalidextension.
Defaultlexiconconfiguration.
Console configuration: contain the elements for the default lexicon
configurationsmanagementintheconsolepanel:
o Applylexiconconfigurationtotheconsole:indicateifthedefault
lexiconconfigurationhastobeappliedornottotheconsolepanel.
o Consolelexiconconfiguration.
3.5.2. GRAMMARCONFIGURATION
Containthemenuitemoptionsforthegrammarconfigurationmanagement:
Figure25:Grammarmenu
Next,wefurtherexplaineachoneofthepreviousmenuitemoptions:
3.5.2.1. NEWGRAMMAR
Create the new grammar configurations from lexicon categories and grammar
ruleswithEBNFformatinthefollowingconfigurationwindow:

User’sManual 49
Figure26:Newgrammar
Thewindowhasthefollowingcomponents:
Lexiconcategoriespanel:
o Lexicon categories text area: show the content of the lexicon
categoriesplaintextfilewithTXTextension.
o Loadbutton:loadthecontentofthelexiconcategoriesplaintextfile
withTXTextensionintothelexiconcategoriestextarea.
o Savebutton:savethecontentofthelexiconcategoriestextareainto
aplaintextfilewithTXTextension.
Grammarrulespanel:
o Textboxofgrammarrules:showthecontentofthegrammarrules
plaintextfilewithTXTextension.
o Loadbutton: load the content of the grammar rulesplain text file
withTXTextensionintothegrammarrulestextarea.
o Savebutton:savethecontentofthegrammarrulestextareaintoa
plaintextfilewithTXTextension.
Acceptbutton:initializethegrammarcreationprocess.
Cancelbutton:closethewindowwithoutapplyingthechanges.

User’sManual 50
In themoment that the new grammar is created, it is not saved until the user
selectsthesavemenuoption.Inthecasethattheuserclosestheapplicationwithout
savingit,thelastgrammarconfigurationwillbeloaded.
Iftheuserselectstoverbosethegrammarcreationprocess,thefollowingwindow
willbedisplayed:
Figure27:Grammargenerationprocess
3.5.2.2. LOADGRAMMAR
LoadagrammarconfigurationwithJARextension.
3.5.2.3. MODIFYGRAMMAR
DisplaythesamegrammarconfigurationwindowthantheNewGrammarmenu
itemoptionbutitcontainsthelexiconcategoriesandgrammarrulestextareasfilled
withtheirfilecontents:

User’sManual 51
Figure28:Modifygrammar
3.5.2.4. SAVEGRAMMAR
SavethecurrentgrammarconfigurationintoafilewithJARextension.
3.5.2.5. SAVEGRAMMARAS
Save the current grammar configuration into a file with JAR extension in a
differentpath.
3.5.2.6. CONFIGUREPATHS
For the creation, modification and grammar configurations to hand it is
mandatorytodefinetherequiredtoolspathsasitwasmentionedinthefirstchapter
ofthepresentdocument.
Displaythefollowingwindow:

User’sManual 52
Figure29:Setpaths
In each one of the text fields the user will select the path to each one of the
requiredtools.Thewindowalsocontainsthefollowingcomponents:
Checkbox:ifitisselectedtheapplicationwillusethepathselectedinthe
text field that corresponds; if it is disabled the application will use its
OperativeSystemCLASSPATH.
Explorerbuttons:openadialogwindowforthefilesselection.
3.5.3. COMPILER
Thefollowingwindowwillbedisplayed:
Figure30:Compilerconfiguration
Thewindowhasthefollowingcomponents:

User’sManual 53
Compilerconfigurationpanel:
o Executablepath:paththatcontainsthecompilerexecutablefile.
o Compilerarguments:argumentsforthecompiler.
Compileroptionspanel:
o Compile all the checked files: indicate if all the compilable files
havetobecompiledornot.
o File separator: file separator to separate each one of the files to
compile.
o Extension:fileextensionofthefilestocompile.
Acceptbutton:applythechanges.
Cancelbutton:closethewindowanddonotapplythechanges.
3.5.4. FILEEDITORCONFIGURATION
Containthemenuitemoptionsforthefileeditorconfigurationmanagement:
Figure31:Fileeditorconfiguration
Wealso explainhow to configure the file editor externallywithXML files in
Chapter 16.3.3. Next, we further detail each one of the previous menu item
options:
3.5.4.1. PREFERENCES
Displaythefollowingconfigurationwindow:

User’sManual 54
Figure32:Preferenceswindow
InthePreferenceswindow,theusercanconfigurethefollowingparameters:
TabSize:bydefaultthesizeoftabbingis8butthiscanbechangedfor
anyvaluebetween2and64.
UsespacesinplaceofTAB:everytimethetabkeyispressed,itis
replacedbythenumberofspaceswhichhasbeenspecifiedabove.
3.5.4.2. FILEEDITORDISPLAYOPTIONSCONFIGURATION
Displaythefollowingconfigurationwindow:
Figure33:Fileeditordisplayoptions
Intheconfigurationwindow,theusercanconfigurethefollowingparameters:

User’sManual 55
Fonttype.
Fontsize.
Fontstyle.
Foregroundcolor.
Backgroundcolor.
Restoredefaultvalues:applythedefaultconfiguration:
“Monospaced”font,plain,sizeof12,blackwithwhiteblackground.
3.5.4.3. AUTOMATICINDENT
Enableordisabletheautomaticindentinthefileeditor.
3.5.4.4. LINEWRAPPING
Enableordisablethelinewrappinginthefileeditor.
3.5.4.5. MAXIMUMLINENUMBERTOSENDTOCONSOLE
Ask to the user for themaximumnumber of lines to send to the console panel
fromtheactivefileinthefileeditor:
Figure34:Maximumlinenumber
3.5.4.6. SENDTOCONSOLECONFIRMATION
Ifthisoptionisselected,whentheusersendscontentsoftheactivefileinthefile
editortheapplicationwilldisplaythefollowingconfirmationmessage:

User’sManual 56
Ifthisoptionisnotselected,whentheusersendscontentsoftheactivefileinthe
fileeditortheapplicationsimplysendsthecontentstotheconsolepaneladdingeach
sentlineasaseparatecommandintheconsolepanelcommandrecord.
3.5.5. CONSOLECONFIGURATION
Containthemenuitemoptionsfortheconsolepanelconfigurationmanagement:
Figure35:Consolemenu
We also explain how to configure console panel externally with XML files in
Chapter16.3.4.
3.5.5.1. CONFIGURATION
Configuretheconsoleconfigurationsthatareloadedintheconsolepanel:

User’sManual 57
Figure36:Consoleconfiguration
Containthefollowingcomponents:
Executable:executablefilepath.
Parameters:consoleisconfiguredwiththeseparameters.
Changeexecutablepath:itisusedforespecifyingadifferentfolderwhere
theexecutablefileisplaced.
Executablepath:executablefilefolder.
Exitcommand:exitcommandforclosingthedatastream.
Commandecho:indicateifthecommandstypedintheconsolepanelhave
tobedisplayedornot.
3.5.5.2. EXECUTEEXTERNALCOMMAND
Executeacommandintoaconsoleanddisplaystheresult inaseparatewindow
thatlookslike:

User’sManual 58
Figure37:Executeexternalcommand
3.5.5.3. CONSOLEDISPLAYCONFIGURATION
Displaythefollowingconfigurationwindow:
Figure38:Consoledisplayconfiguration
Theusercanselect:
Fonttype.

User’sManual 59
Fontsize.
Fontcolor.
Backgroundcolor.
Maximum buffer size: specify the maximum number of lines that are
displayedintheconsolepanel.
Restore default configuration: apply the default configuration for the
consolepanel:
“Monospaced”font,plain,sizeof12,blackwithwhitebackground
3.5.5.4. LINEWRAPPING
Enableanddisabletheconsolelinewrapping.
3.5.5.5. SAVECONTENTINTOFILE
Savetheconsolecontentintoafile.
3.5.5.6. DOCUMENTLEXICON
LoadalexiconconfigurationwithXMLextensionintotheconsolepanel.
3.5.5.7. FIND
Displaythesearchtextwindowfortheconsolepanel:
Figure39:Consolesearchwindow

User’sManual 60
Thenweproceedtodescribeeachcomponentofthewindow:
Textbox:Hereiswhereuserentersthesearchtext.
Recents: This combo menu displays a list which contains all the recent
searches that have been executed before. When user selects one, this
appearsintheTextbox.
Options:
o Case sensitive: this option is used to search for strings without
havingortakingintoaccounttheUpper/Lowercase.
o Regularexpressions:regularexpressionssearchassociatedwitha
search pattern. More information about Regular Expressions on
Chapter17.
o Wholewords:findwholewordsonly.
Direction:
o Forward: search from the current caret position to the end of the
fileinthesourcefileeditor.
o Backward: searchfromthecurrentcaretpositiontothebeginning
ofthefileinthesourcefileeditor.
o Cyclic:searchfromthecurrentcaretpositiontotheendofthefilein
thesourcefileeditor,andstarfromthebeginninguntilthestarting
position.
3.5.5.8. CLOSECONSOLE
Closetheactiveconsoleintheconsolepanel.
3.5.5.9. RESETCONSOLE
Onlyavailableinthepopupmenuoftheconsolepanel.Resettheactiveconsolein
theconsolepanel.
3.5.5.10. CLEARCONSOLEBUFFER
Only available in thepopupmenu of the consolepanel. Clear the consolepanel
contentandleaveonlythelastlineofthepreviousbuffercontent.

User’sManual 61
3.5.6. DATABASEPANELCONFIGURATION
Containthemenuitemoptionsforthedatabasepanelconfigurationmanagement:
Figure40:Databasepanelmenu
Thenweproceedtodescribeeachcomponentofthemenu:
3.5.6.1. DESPANEL
When this item is selected, the database panel in the left lower corner is
connectedwithDES.
3.5.6.2. ODBCPANEL
When this item is selected, the database panel in the left lower corner is
connectedwithODBC.
3.5.6.3. SHOWDETAILS
Contain the optionmenu items to customize the visualization of the tables and
viewsintheDatabasePanel.
Figure41:ShowDetailsMenu
3.5.6.3.1. NAME
Showonlythenameoftablesandviews.

User’sManual 62
3.5.6.3.2. NAMEFIELDS
Showthenameandcolumnsoftablesandviews.
3.5.6.3.3. NAMEFIELDSTYPES
Showthename,columnsandtypeofeachcolumnoftablesandviews.
3.5.7. GRAPHPANELCONFIGURATION
Containtheconfigurationmenuoptionsforthegraphpanel:
Figure42:GraphPanelConfigurationmenu
3.5.7.1. NODECOLOR
Showawindowwheretheusercanchoosethedesiredcolorofthenodes.
3.5.7.2. SHOWLABELS
Showorhidesthelabelsofthenodesinthegraph.
3.5.7.3. NODESHAPE
Figure43:Nodeshapemenu
ShowthelistofavailablenodeshapesthatcanbeusedonthePDGgraph.

User’sManual 63
3.5.7.4. ARROWCOLOR
Figure44:Arrowcolormenu
Showawindow,wheretheusercanchoosethecolorofthearrowsonthePDG.
3.5.7.5. ARROWSHAPE
Figure45:Arrowshapemenu
ShowthelistofavailablepointsofarrowforthePDG.
3.5.8. LANGUAGECONFIGURATION
Showtheavailablelanguagelistoftheapplication:
Figure46:Languageconfigurationmenu
In this case, the user can choose only between the languages defined in the
languagefolder.

User’sManual 64
3.5.9. MENUCONFIGURATION
Containthemenuitemoptionsforthemenuconfigurationmanagement:
Figure47:Menuconfigurationmenu
Wealsoexplainhow to configuremenuexternallywithXML files inChapter
16.3.1.Next,wefurtherdescribeeachoneofthepreviousmenuitemoptions:
3.5.9.1. NEW
Displaythefollowingconfigurationwindow:
Figure48:Newmenu
DisplayalistoftabswiththenamesofthemenusintheMenubar.Foreachtab
thereisagridwithattributesofitsmenuobjects.
Theusercaneditdirectlyinthegridtheattributeshewantstochange,except
somethatarenoteditable.Thevalue it isnotassigneduntiluserhitsENTERor
changes to other attribute or object. Next, we further describe each one of the
menuobjectsoptions:
Row:thenumberoftherow.Itisnoteditable.

User’sManual 65
Type:thetypeofthemenuobjectinthisrow.ItcanbenItemorSubmenu.
Itisnoteditable,thisvalueisassignedwhentheobjectiscreated.
Name:thenameofthemenuobject.Itiseditable.
Visible:thisvaluesetsifthemenuobjectisvisibleintheMenubarornot.
Erasable: thisvalueindicatesifthismenuobjectisadefaultmenuobject
ornot.Itisnoteditable.Themenuobjectswitherasablevaluetofalseare
default menu objects. These objects have to be always in theMenu bar
configuration,altoughtheycanbenotvisible.Whentheapplicationbuilds
themenu,itchecksifallthedefaultmenuobjectsexitintheconfiguration.
Ifanymenuobjectdoesnotexit,theapplicationcreatesitattheendofits
submenu.Itcanexitsonlyoneofeachdefaultmenuobject.Theapplication
willdeletetherest.
Image: the path of the image icon of the menu item. The image icons
belongonlytomenuitems.
Path: indicate the location of the menu object inside the menu which
containsit.
Childrows: itisonlyformenusubmenus.Itindicatesthenumberofrow
oftheirchildern.
Command: it isonly formenu items. It sets thecommandthat themenu
item will run. The commands that start with a “$” sign are intern
commands for ACIDE – A Configurable IDE and they are explained on
Chapter15.Commandsthatnotstartwith“$”aresenttoconsole.
With parameters: it is only for menu items. Indicates the type of
parameterwhichthecommandneedstorun.
3.5.9.1.1. BUTTONSPANEL
Next,wefurtherdescribeeachofthebuttonsoftheconfigurationwindow:
Addnewmenu:Itwilldisplayawindowwhereusercantypedown
thenameofthenewmenuhewantstoinsert.Itwillbeinsertedattheend
ofthemenuslist.
Deletemenu:Itwilldeletethepresentmenubeforeaconfirmation
message.Thedefaultmenucanbedeleted.

User’sManual 66
Movemenu to the left:move thepresentmenu to the left in the
menuslist.
Movemenutotheright:movethepresentmenutotheleftinthe
menuslist.
:addanewsubmenutothemenuselected. If there isa
menusubmenuselected,thenewsubmenuwillbeinsertedinsideit.Ifthere
isamenuitemselected,thenewsubmenuwillbeinsertedafterit.Inother
case, the new submenuwill be inserted at the end of the list of the root
menu.
: add a newmenu item to themenu selected. If there is a
menusubmenuselected,thenewitemwillbeinsertedinsideit.Ifthereisa
menuitemselected,thenewitemwillbeinsertedafterit.Inothercase,the
newitemwillbeinsertedattheendofthelistoftherootmenu.
:deletetheselectedobjectafteraconfirmationmessage.The
objectsthatarenoterasablecannotbedeleted.
Moveobjecttoup:movetouptheselectedmenuobject.
Moveobjecttodown:movedowntheselectedmenuobject.
:setasvisibleallthemenuobjectsoftheMenuBar.
: set as no visible all themenu objects of theMenuBar. The
menuobjectsrelatedtomenuconfigurationalwayshavetobevisible.
:Applythechangesandclosesthewindow.
:Closethewindowwithoutapplyingthechanges.
3.5.9.1.2. POPUPMENU
Thepopupmenuofmenuobjectisasfollows:

User’sManual 67
Figure49:Objectmenupopupmenu
Next,wefurtherdescribeeachoftheoptions:
Loadimageicon:itwilldisplayaloadwindowwhereusercanselectthe
imagehewantstosetasiconofthemenuobject.
Addnewsubmenu:addanewsubmenutothemenuselected.Ifthereisa
menu submenu selected, the new submenu will be inserted inside it. If
thereisamenuitemselected,thenewsubmenuwillbeinsertedafterit.In
othercase, thenewsubmenuwillbe insertedat theendof the listof the
rootmenu.
Addnew item: addanewmenu item to themenu selected. If there is a
menusubmenuselected,thenewitemwillbeinsertedinsideit.Ifthereisa
menuitemselected,thenewitemwillbeinsertedafterit.Inothercase,the
newitemwillbeinsertedattheendofthelistoftherootmenu.
Deleteobject:deletetheselectedobjectafteraconfirmationmessage.The
objectsthatarenoterasablecannotbedeleted.
Moveitemorsubmenutoup:movetouptheselectedmenuobject.
Moveitemorsubmenutodown:movedowntheselectedmenuobject.
Sendtomenu:displayawindowwithalistofmenuswhereusercansend
theselectedmenuobject.
Insert insubmenu:display awindowwith a list of submenus inside the
presentmenuwhereusercaninserttheselectedmenuobject.

User’sManual 68
3.5.9.1.3. KEYNAVEGATION
Uparrow:selectpreviousobject.
Downarrow:selectnextobject.
Ctrl+Home:selectthefirstobject.
Ctrl+End:selectthelastobject.
Tab:selectnextattribute.
Tab+Shift:selectpreviousattribute.
Esc:deselecttheselectedobject.
3.5.9.2. LOAD
LoadamenuconfigurationwithXMLextension.
3.5.9.3. MODIFY
Selecting this option displays the following configuration window, similar to
creatinganewconfigurationwindow,butwithcorrespondingoptionsoftheloaded
menuandwiththenameoftheconfigurationinthewindowtitle:
Figure50:Modifymenu
ItsperformanceisequaltothenewmenuwindowexplainedonChapter3.5.9.1.
3.5.9.4. SAVE
Save the current menu configuration into a menu configuration file with XML
extension.

User’sManual 69
3.5.9.5. SAVEAS
Save the current menu configuration into a menu configuration file with XML
extensioninadifferentpath.
3.5.10. TOOLBARCONFIGURATION
Itcontainsthemenuitemoptionsforthetoolbarconfigurationmanagement:
Figure51:ToolBarconfigurationmenu
We also explain how to configure toolbar externallywith .toolbarConfig files in
Chapter16.3.2
3.5.10.1. NEW
Displaythefollowingconfigurationwindow:
Figure52:Newtoolbar
Thewindowhastwodifferentpanels:

User’sManual 70
Consolepanel:definethecommandsrelatedtotheconsolepaneltoolbar
thatareexecutedintheconsolepanel.
Externalapplicationspanel:definethecommandsrelatedtotheexternal
applicationstoolbarthatareexecutedoutoftheaplication.
Ineachoneofthepanels,theusercandothefollowingoperations:
Addbutton:addanewcommandtothecommandlistinthetable.
Removebutton:removetheselectedcommandfromthecommandlist.
Directeditiononthetables:theusercanmodifythecommandsbyediting
directly on the table. However, the changes will not be applied until the
focuschangesortheuserpressesdowntheENTERkey.
Intheconsolepaneltabthetablecontainsthefollowingparameters:
Name:texttodisplayinthebutton.Ifthisfieldisemptytheapplicationwill
assignitanumberasnamebydefault.
Command: command itself. It admits the insertion of ACIDE – A
ConfigurableIDEspecialvariablesthatarefurtherdetailedintheChapter14
ofthepresentdocument.
Helptext:hinttextofthebutton.
Image: imageforthebuttonwhichcanbeselectedbytheoptionavailable
inthepopupmenuofthecolumn.
Extra parameter: show a combo box with the following options:NONE,
TEXT,FILE,DIRECTORY.Eachoneofthepreviousoptionswillasktheuser
fortheselectedtypewithdifferentdialogwindows.
IsexecutedintheOSconsole:indicateifthecommandisexecutedinthe
OperativeSystemconsoleorintheloadedconsoleintheconsolepanel.
In the external applications panel tab the table contains the following
parameters:
Name:texttodisplayinthebutton.Ifthisfieldisemptytheapplicationwill
assignitanumberasnamebydefault.

User’sManual 71
Executablepath:executablepathofthecommandtoexecute.Itadmitsthe
insertion ofACIDE –A Configurable IDE special variables that are further
detailedinChapter14ofthepresentdocument.
Helptext:hinttextofthebutton.
Image: imageforthebuttonwhichcanbeselectedbytheoptionavailable
inthepopupmenuofthecolumn.
ThetoolbarconfigurationfileshavetoolbarConfigextension.
3.5.10.2. LOAD
LoadatoolbarconfigurationwithtoolbarConfigextension.
3.5.10.3. MODIFY
Displaythefollowingconfigurationwindow:
Figure53:Modifytoolbar
Contain the same options than the configuration window displayed by the
Configuration/Menu/New.
Inthiscase,thewindowdisplaysthecurrenttoolbarconfigurationloadedinthe
tablesandalsowithadifferentwindowtitlewhichcontainsthenameofthecurrent
configurationtomodify.

User’sManual 72
3.5.10.4. SAVE
Save the current tool bar configuration into a tool bar configuration file with
toolbarConfigextension.
3.5.10.5. SAVEAS
Save the current tool bar configuration into a tool bar configuration file with
toolbarConfigextensionandwithadifferentpath.
3.6. HELPMENU
Containthefollowingmenuitems:
Figure54:Helpmenu
Next,thepreviousmenuoptionsarefurtherexplained:
3.6.1. SHOWHELP
Linkdirectlytothepresentdocument.
3.6.2. ABOUTUS
Display the following window with some extra information about the
application:

User’sManual 73
Figure55:Aboutuswindow
3.7. INSERTEDSUBMENUS
Asexplained inchapters3.5.9 and16.3.1 ,usercan insertnewsubmenus inthe
toolbar.Then,insidethesesubmenusnewinsertedsubmenusandmenuitemscanbe
defined.Foreachinsertedsubmenutheattributesare:
Name:thenameofthesubmenu.
Visible:defineifthesubmenuisvisibleornotintheapplication.
Erasable:defineifthesubmenuisadefaultsubmenu(noterasable)ornot
(iserasable).Thevalueofthisattributecannotbeedited.
List:listofallthesubmenusandmenuitemsthatthesubmenucontains.
Image:forsubmenusthevalueofthisattributeisempty.
Anexampleofaninsertedsubmenuis:

User’sManual 74
Figure56:Exampleofinsertedsubmenu
In this examplewe can see an inserted submenu calledDESand defined in the
menubar.
3.8. INSERTEDMENUITEMS
Asexplainedinchapters3.5.9and16.3.1 ,usercaninsertnewmenuitemsinthe
toolbar.Foreachinsertedmenuitemtheattributesare:
Name:thenameofthemenuitem.
Visible:defineifthemenuitemisvisibleornotintheapplication.
Erasable:defineifthemenuitemisadefaultmenuitem(noterasable)or
not(iserasable).Thevalueofthisattributecannotbeedited.
Image:definethepathoftheimagewhichistheiconofthemenuitem.
Command: define the command that is sent to console when this menu
itemisclicked.
Parameter: define the typeofparameter that the commandof thismenu
itemneeds:None,Text,FileorDirectory.
Aexampleof insertedmenu itemscanbeseen inChapter3.7of thepresent
document.

User’sManual 75
4. PROJECTBROWSERPANELIn the project browser panel are displayed the folders and files of the active
project. Themain files appearwith a blue circle beside, the compilable files with a
greencircleandtherestwithagreycircle:
Figure57:Projectbrowserpanel
Thepopupmenuofeachfileandfolderisasfollow:
Figure58:Projectbrowserpopupmenu
AlltheseoptionshavebeenexplainedbeforeonChapter3.3.

User’sManual 76
5. FILEEDITORPANELIn the file editor panel are displayed all the opened files by tabs. Each tab is
namedbythenameofthefileitcontains:
Figure59:Fileeditorpanel
Whenafileismodifiedanditisnotsavedyet,itstabisasfollows:
witharedcrossbesidethetitleofthetab.
Whenafileissetascompilablefile,itstabisasfollows:
withagreenplaysignbesidethetitleofthetab.
Andfinally,whenafileissetasmainfile,itstabisasfollows:

User’sManual 77
Withablueplaysignbesidethetitleofthetab.
Thepopupmenuisasfollow:
Figure60:Fileeditorpopupmenu
AlltheseoptionshavebeenexplainedbeforeonChapter3.
The available accessibility shortcuts for File Editor will be further explained in
Chapter13.

User’sManual 78
6. TOOLBARIn the toolbar are displayed some items related with files and projects,
commandsdefinedbyusertoberuninconsoleandcommandsdefinedbyuserto
runexternalapplications:
Figure61:Toolbar
Next,wefurtherdescribeeachoneofthepreviouscomponents:
:Createsanewfile.
:Opensafile.
:Savescurrentfile.
:Savesallopenedfiles.
:Createsanewproject.
:Opensaproject.
:Savescurrentproject.
Thefollowingitemsarecommandsconfiguredbyuserthatruncommands
onconsole(explainedonchapters3.5.10and16.3.2).
:Sendsfilecontenttoconsole.
The following items are commands configured by user that run external
applications(explainedonchapters3.5.10and16.3.2).

User’sManual 79
7. CONSOLEPANELAtconsolepaneltheusercanworkwiththeconsoleheconnectstoACIDE–A
Configurable IDE (explained on Chapter 3.5.5). An example of console panel
connectedwithDES:
Figure62:Consolepanel
Thepopupmenuisasfollows:
Figure63:Consolepanelpopupmenu

User’sManual 80
AlltheoptionshavebeenexplainedbeforeinChapter3.
The user can send commands to the console in different ways. As explained
before,usercansendtheselectedtextorthecontentofafiletothesell.Alsohecan
configure the toolbar with buttons which send commands to console. A new
performanceofthisversionisthatusercanconfiguretheMenuBartobuildbuttons
thatsendcommandstoconsoleinthesamewaythatthetoolbarbuttons.Thedefault
buttons ofACIDE–AConfigurable IDE send special commands thatwill be further
explainedinChapter15.

User’sManual 81
8. DATABASEPANELThedatabase panel shows themetadata of your computer’s databases on the
lowerleftcornerofthescreen.
Figure64:Databasepanel
ThispanelcanbeconnectedwiththeDESorODBCconnectionsofyourcomputer.
The user can choose the connection in the configurationmenu, submenu database
panel.Nodescanbeexpandedwithdoubleclickorwithoneclickonthenodeandone
moreonthe“+”button.
8.1. DATABASESNODE
Thisistherootnodeofthedatabasepanel,belowitall thedatabasesconnected
willbeshowed.
Figure65:Databasesnode
Thepopupmenuofthisnodeisthenext:

User’sManual 82
Figure66:Databasesnodepopupmenu
Nextwefurtherdetaileachoneofthecomponentsofthepopupmenu:
8.1.1. OPEN
With this optionuser can connect the panelwith other database.The following
windowisdisplayed:
Figure67:Opendatabase
8.1.2. REFRESH
All the database panel will be refreshed and userwill see all themodifications
madewithit.
8.1.3. CLOSE
Thedatabasepanelwillbeclosed.

User’sManual 83
8.2. DATABASENODE
Figure68:Databasenode
Allthedatabasesopenedonthispanelareshowedinthis levelofthetree.With
thecontextualmenuusercandothefollowingactions:
Figure69:Databasenodepopupmenu
8.2.1. SETASDEFAULT
If the console is connected to DES, this option will set this database as the
databaseinuseforthefollowingcommands.
8.2.2. CLOSE
Itwillclosetheconnectionwiththedatabase.
8.2.3. REFRESH
Itwillrefreshthedatabasenode.

User’sManual 84
8.2.4. EXECUTEQUERY
DisplayawindowwithatextfieldtoinputqueriesinSQLinthedatabase.
Figure70:Executequery
Whenuserclickson “OK”button theresultsareshowedon theDataView.Data
ViewwillbefurtherexplainedinChapter8.4.5.
Expanding this node there will be three folders below it: tables, views, and
integrityconstraints.
Figure71:Expandingdatabasenode

User’sManual 85
8.3. TABLESNODE
The children of this node will be all the tables of this database. Its popup
menuis:
Figure72:Tablesnodepopupmenu
8.3.1. CREATETABLEWITHDATALOG
ThisoptionisonlyenabledifthepanelisconnectedwithDES.Theusercancreate
atablewithaDatalogcommandinawindowsimilartothewindowofExecutequery
action(Chapter8.2.4).
8.3.2. CREATETABLEWITHDESIGNVIEW
With this option theuser can create a new table usign a design tablewith four
columnstochoose:nameofthefield,type,primarykeyandnotnull:
Figure73:Newtable
Withthe“*”newrowscanbeinsertedinthedesigntable.Ifyouwanttomakea
field part of the primary key you have tomark the checkbox of that column. This
optionmakeimpossibletomarktheDisallownullsoption.
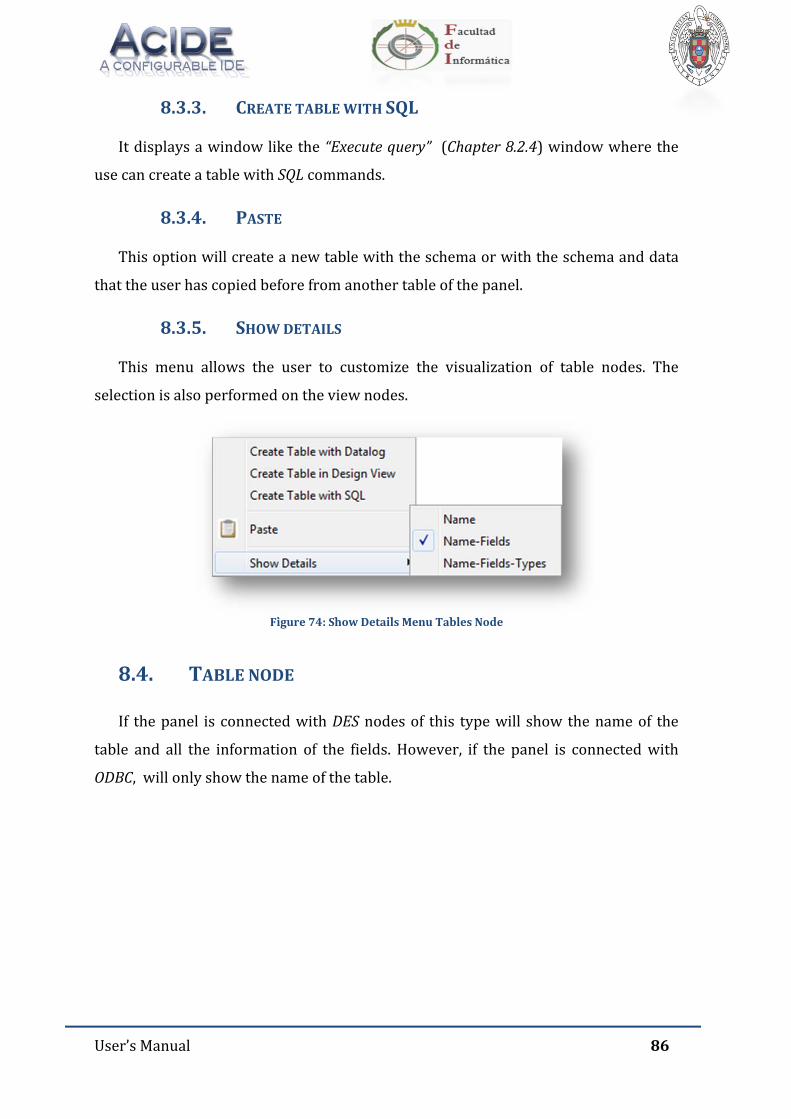
User’sManual 86
8.3.3. CREATETABLEWITHSQL
Itdisplaysawindowlikethe“Executequery” (Chapter8.2.4)windowwherethe
usecancreateatablewithSQLcommands.
8.3.4. PASTE
Thisoptionwillcreateanewtablewiththeschemaorwiththeschemaanddata
thattheuserhascopiedbeforefromanothertableofthepanel.
8.3.5. SHOWDETAILS
This menu allows the user to customize the visualization of table nodes. The
selectionisalsoperformedontheviewnodes.
Figure74:ShowDetailsMenuTablesNode
8.4. TABLENODE
If thepanel is connectedwithDESnodesof this typewill showthenameof the
table and all the information of the fields. However, if the panel is connectedwith
ODBC,willonlyshowthenameofthetable.

User’sManual 87
Figure75:Tablenode
Withthecontextualmenuofthisnodeyoucanmakethefollowingactions:
Figure76:Tablenodepopupmenu
8.4.1. DROP
Thisactionwilldropthetable.
8.4.2. RENAME
Theusercanchangethenameofthetablewiththismenuitem.
8.4.3. COPY
Withthisoptiontheusercanchoosebetweencopyingonlytheschemaorcopying
theschemaandthedata.

User’sManual 88
8.4.4. DESIGNVIEW
DisplaytheDesignviewoftheselectedtablewheretheusercanmakechangeson
it,addcolumns,changetheprimarykeyandsoon.
Figure77:Designview
Clickingon“OK”button,changeswillbeapplied.Ifanerroroccurs,thetablewill
berestoredtoitspreviousschema.
8.4.5. DATAVIEW
Display the following window which shows the data contained in the selected
tableorview,wherethesymbol“►”indicatesthecurrentrecord.
Figure78:Dataview
Ifitisopenedforaview,themodificationisnotallowed.Itcanalsobeopennedby
clickingtwiceonatable.

User’sManual 89
8.4.5.1. ACTIONSPERMITTEDONTHEGRID
Keynavegation:
o Uparrow:selectpreviousrecord.
o Downarrow:selectnextrecord.
o Ctrl+Home:selectthefirstrecord.
o Ctrl+End:selectthelastrecord.
o Tab:selectnextfield.
o Tab+Shift:selectpreviousfield.
Sort:
o By clicking with the left button on a column header, rows will be
sortedascending: the firstrecorddisplayedwillbetherecordwith
thelowestvalueforthisfield.Pressingsuccessivelyonthesamefield
willchangethesortingdirection.
o By clicking with the right button on a column header, its popup
menushowsup.
Figure79:Columnheaderpopup
Selection:
o The user is able to selectmultiple rows by clicking on the column
thatcontainstheasteriskandthendraggingthemousetilltheend
oftheselection.
Presentation:
o The user is able to move the columns by clicking on the column
nameanddraggingittoitsnewlocation.

User’sManual 90
8.4.5.2. MENUBAR
8.4.5.2.1. FILEMENU
Containthefollowingmenuitemsforthefilesmanagement:
Figure80:Dataviewfilemenu
Next,allthepreviousmenuitemswillbefurtherexplained:
8.4.5.2.1.1. EXPORT
Containthefollowingmenuitemsforthefilesmanagement:
Comma‐delimitedCSV:openadialogboxtoselectafile.Atextfilewillbe
createdwithalltherecordsofthegridandalltheirfieldsintheorderthey
appearinthegrid,separatedbycommas.
Tab‐delimited CSV: same as comma‐delimited CSV, but the separator
characterbetweenfieldsisthetab.
CSV:openadialogboxwhereuser canwrite the separator characterand
proceedtoselectthefileandsavethedata.
XML:openadialogboxtoselectafile.AXML filewillbecreatedwiththe
followingstructure:
<DATA> <ROW> <col>value</col> </ROW> </DATA>

User’sManual 91
8.4.5.2.1.2. IMPORT
Containthesamemenuitemsas“Export”menuitem:
Comma‐delimitedCSV:openadialogboxtoselecta file.Foreach lineof
thetextfilethevaluethatcorrespondstothefieldappearsinthegrid.Each
linewillbeinsertedinthetableasdescribedbefore.
Tab‐delimited CSV: same as comma‐delimited CSV but the separator
characterbetweenfieldsisthetab.
CSV:openadialogboxwhereuser canwrite the separator characterand
proceedtoselectthefileandloadthedata.
XML: open a dialog box to select a file. Itwill read theXML filewith the
structureindicatedabove.EachrowofdataoftheXMLfilewillbeinserted
inthetable.
8.4.5.2.1.3. EXECUTEQUERY
Displayadialoginwhichtheuserwilltypedownthequeryhewantstoperform:
Figure81:Executequery
8.4.5.2.1.4. PRINT
Displaytheprintwindowtoprintthegrid.
8.4.5.2.1.5. CLOSE
Closethedataviewwindow.Italsocanbeclosedwiththekeycombination“Alt+
F4”.

User’sManual 92
8.4.5.2.2. EDITMENU
Containthefollowingmenuitemsforthecommongrideditormanagement:
Figure82:Datavieweditmenu
8.4.5.2.2.1. UNDO
Undotheupdatesinthegrid.Italsocanbedonewiththekeycombination“Ctrl+
Z”.
8.4.5.2.2.2. REDO
Redotheupdatesinthegrid.Italsocanbedonewiththekeycombination“Ctrl+
Y”.
8.4.5.2.2.3. COPY
CopytheselectedtextfromthegridandputitintotheSystemclipboard.Italso
canbedonewiththekeycombination“Ctrl+C”orwiththeicon oftheiconbar.
8.4.5.2.2.4. PASTE
PastethetextstoredintheSystemclipboardinthecurrentpositionofthecursor
inthegrid. Italsocanbedonewiththekeycombination“Ctrl+V”orwiththe icon
oftheiconbar.

User’sManual 93
8.4.5.2.2.5. CUT
CuttheselectedtextactivefieldfromthegridandputitintotheSystemclipboard.
Italsocanbedonewiththekeycombination“Ctrl+X”orwiththeicon oftheicon
bar.
8.4.5.2.2.6. FIND
Displaythesearchtextwindowforthedataview.
Figure83:Dataviewsearchwindow
Italsocanbedonewiththekeycombination“Ctrl+F”orwiththeicon ofthe
iconbar.
8.4.5.2.2.7. REPLACE
Displaythereplacetextwindowofthedataview:
Figure84:Dataviewreplacewindow
Whenageneralreplacementisperformed,itdisplaysthefollowingdialogtothe
userinformingofthenumberofreplacements:

User’sManual 94
Figure85:Dataviewnumberofreplacements
8.4.5.2.3. RECORDSMENU
Containthefollowingmenuitemsforthecommongrideditormanagement:
Figure86:Dataviewrecordsmenu
Next,allthepreviousmenuitemswillbefurtherexplained:
8.4.5.2.3.1. NEW
Insertanewrecordinthegrid.Thevaluesofthenewrecordmustbewrittenat
thelastrowofthegrid.Italsocanbedoneclickinginthecellwiththe“*”icon.
8.4.5.2.3.2. DELETE
Deletetheselecetdrecordfromthegrid.
8.4.5.2.3.3. REFRESH
Updatetheviewofthegrid.
8.4.5.2.3.4. GOTO
Containthefollowingmenuitemsforthecommongrideditormanagement:

User’sManual 95
Figure87:Dataviewgotomenu
Firstrecord:Gotothefirstrecord.Italsocanbedonewiththekey
combination“Ctrl+home”.
Last:Go to the last record. It also can be donewith the key combination
“Ctrl+end”.
Next:Gotonextrecord.Italsocanbedonewiththeuparrowkey.
Previous:Gotopreviousrecord.Italsocanbedonewiththedownarrow
key.
Gotorecord:displayadialogwindowwheretheuserwilltypedownthe
rownumberhewantsgoto.
8.4.5.2.3.5. SELECTRECORD
Selectthecurrentrecordfromthegrid.
8.4.5.2.3.6. SELECTALL
Selectalltherecordsfromthegrid.
8.4.5.2.4. VIEWMENU
Containthefollowingmenuitemsforthecommongrideditormanagement:

User’sManual 96
Figure88:ViewmenuinDataView
Next,allthepreviousmenuitemswillbefurtherexplained.
8.4.5.2.4.1. SORTBY
Displaysawindowwithagridtoselectthetablefieldbywhichsortthetable,and
thecriteria“Ascending”,“Descending”or“None”.
Thefirstcolumnwiththecheckboxesallowstoincludeornottheattributeinthe
request. The second one holds a combobox per cell which allows to select the
attribute tobe shown in that cell and finally the third columnallows to choose the
typeofsorttobeapplied, this isdonebychoosingoneofthemfromthecombobox
embeddedineachcell.
Itisimportanttochoosetherightorderinwhichthesortmustbedone.Namely,
theresultantqueryforthesortshownintheFigure89isequivalentto:
SELECT*FROMemployeeORDERBYnameASC,departmentDESC

User’sManual 97
Figure89:Dataviewsortbywindow
Selectinganattributetwiceinaquerywillraiseanerror.
8.4.5.2.4.2. SORTBYCOLUMN
Containsthefollowingmenuitemsforthecommongrideditormanagement:
Ascending: itwillorderthegridascendingbytheselectedcolumn.Italso
canbedonewiththeicon oftheiconbar.
Descending:itwillorderthegridascendingbytheselectedcolumn.Italso
canbedonewiththeicon oftheiconbar.
8.4.5.2.4.3. FILTERBYCONTENT
Filterthegridbythecontentoftheselectedfield.Italsocanbedonewiththeicon
oftheiconbar.
8.4.5.2.4.4. FILTEREXCLUDINGCONTENT
Filterrecordsthatdonotcontainthecontentoftheselectedfield.
8.4.5.2.4.5. DISCARDFILTER
Removethefilter.Italsocanbedonewiththeicon oftheiconbar.
8.4.5.2.4.6. HIDE/SHOWCOLUMNS
Displayawindowwithagridtoselectthecolumnsvisibility:

User’sManual 98
Figure90:Dataviewhide/showcolumns
Incasetherearehiddencolumnsamessagewillbedisplayedatthebottomofthe
DataViewwindow.
8.4.5.2.5. HELPMENU
Containthefollowingmenuitems:
Figure91:Dataviewhelpmenu
Next,thepreviousmenuoptionsarefurtherexplained
8.4.5.2.5.1. SHOWHELP
Linkdirectlytotheuser’smanualofDES‐ACIDE.
8.4.5.2.5.2. ABOUTUS
Displays the following window with some extra information about the
application:

User’sManual 99
Figure92:Dataviewaboutuswindow

User’sManual 100
8.4.6. CONSTRAINTS
Displays a window that allows the management of constraints related to an
specificrelation.
Todefine,modifyanddeleteaconstraintinamoretraditionalwayitusedtobe
necessary the user to type the respective datalog commands to perform these
operations.Thismayturnout tobeacomplex taskas thecomplexityofcommands
increases.
Withthisinterface,theuserdoesnotneedtoknowanylongerthecommandsthat
performtheoperationstodefine,modifyanddeleteaconstraintofanytype.
Figure93:ConstraintsWindow
8.4.6.1PRIMARYKEYPANEL(PK)
Aprimarykeyconstraintspecifiesthatnotwotupleshavethesamevalues
foragivensetofcolumns.
Thispanelallowstheusertodefine,modifyanddeleteprimarykeys ina
givenrelation.

User’sManual 101
Figure94:PrimaryKeyPanel
Theattributesofarelationarerepresentedinarow,whichcanbeselected
ordeselectedbyselectingthecheckboxprovidedforeachofthem.
Thestepstoperformtheoperationsofdefining,modifyinganddeletinga
primarykeyareexplainedbelow.
8.4.6.1.1DEFININGAPRIMARYKEY
To define an attribute or a set of attributes as a primary key their
respectivecheckboxesmustbeselectedandthenapplythechanges.
Asareminder,itisimportanttopointoutthatiftwoormoreattributes
areselected,allofthemformasingleprimarykey.
Ifthereisalreadyaprimarykey,itisreplacedbythenewone.
Thissetofstepsreplacesthefollowingdatalogcommand:
:‐pk(name_of_the_relation,[column_name_list])
8.4.6.1.2MODIFYINGAPRIMARYKEY
Tomodifyanexistingprimarykey,theusermustselectordeselectthe
attribute or attributes that are target for modifications and apply the
changes.

User’sManual 102
This operation basically works deleting the original primary key and
thendefiningthenewone.
8.4.6.1.3DELETINGAPRIMARYKEY
To delete an existing primary key the user must deselect all the
attributesthatcompoundthekeyandthenapplythechanges.
8.4.6.2CANDIDATEKEYPANEL(CK)
Asaprimarykey, a candidatekey constraint specifies thatno two tuples
havethesamevaluesforagivensetofcolumns.
Figure95:CandidateKeyPanel
Although this panel is pretty similar to the PrimaryKey panel there is a
componentthatmakesitdifferent.Sinceseveralcandidatekeyscanbedefined
inarelation,thenavigationpanelocatedatthetopofthepanelallowstheuser
togothroughthedifferentscreenscontainingtheexistingcandidateskeys.
Thestepstoperformtheoperationsofdefining,modifyinganddeletinga
candidatekeyareexplainedbelow.

User’sManual 103
8.4.6.2.1DEFININGACANDIDATEKEY
Incasetherearenocandidatekeysdefinedforarelation,atablewith
unchecked checkboxes is created by default. On the other hand, if the
relationalreadycontainsoneormorecandidatekeys,theseareshownina
differenttableeachone.
As for the latter case, to define a new candidate key is necessary to
createanewemptytablefirst.ThiscanbeachievedbyclickingontheNew
CKbutton.
To define an attribute or a set of attributes as a candidate key their
respectivecheckboxesmustbeselectedandthechangesapplied.
Asareminder,itisimportanttopointoutthatiftwoormoreattributes
areselected,allofthemformasinglecandidatekey.
Thissetofstepsreplacesthefollowingdatalogcommand:
:‐ck(name_of_the_relation,[column_name_list])
8.4.6.2.2MODIFYINGACANDIDATEKEY
Tomodify an existing candidate key, the usermust select or deselect
theattributeorattributes thatare target formodificationsandapply the
changes.
Thisoperationbasicallyworksdeletingtheoriginalcandidatekeyand
thendefiningthenewone.
8.4.6.2.3DELETINGACANDIDATEKEY
Todeleteanexistingcandidatekeytheusercaneitherdeselectallthe
attributesthatcompoundthekeyorclickontheDropCKbutton.
It is important tokeep inmind thatuser changesonly affect to the table
shown in the current screen, namely, all changes performedmust be saved
beforeswitchingtoanyothercandidatekeyscreenbyusingthenavigation.

User’sManual 104
As an example of the multiple candidate keys that can be defined, the
picturebelowshowstheCKnodesthatareaddedtothetreeintheDatabase
Panel for the relation “employee” after defining some candidate keys as the
Figure95suggests.
8.4.6.3FOREIGNKEYPANEL(FK)
Aforeignkeyconstraintspecifiesthatthevaluesinagivensetofcolumns
of a relation must already exist in the columns declared as primary key
constraintofanotherrelation.
AsshownintheFigure96thispanelconsistsofatablewithfourcolumns
being the fourth one different to the other columns seen up to now in the
previouspanels.

User’sManual 105
Figure96:ForeignKeyPanel
Since a foreign key references to an attribute of a different relation and
severalforeignkeyscanbedefinedinarelation,thispanelprovidesasecond
window which allows the user to navigate through the different screens
containingalltherelationsreferencedbyanattributeinparticular.
This secondwindow isdisplayedbyclickingon thebuttonsof the fourth
column.Thesebuttonsshowtwotypeoflabels:ShowTablesandNewTable.
Thedifferencebetweenthoselabelslaysonthefactofthisattributebeinga
foreignkeyornot.Ifyes,thenthelabelsetisShowTables,otherwisethelabel
NewTableisset.
Beforegoingintodetailsabouttheoperationsthatcanbeperformedinthis
panel,thedifferenceofthebuttonsbehaviormustbedescribed.
NewTableButton:
Asexplainedabove,thislabelandthefactofitscorrespondingcheckboxis
uncheckedimpliesthatthecorrespondingattributeisnotaforeignkeyandin
ordertodefineitassuch,areferencerelationmustbechosenfirst.

User’sManual 106
Byclickingonthisbuttonanewsmallwindowshowsup.Thiswindowask
the user to choose a relation from the list that its embedded combobox
provides.
Picture97:TableChooserWindow
Oncearelationisselected,anewbiggerwindowisdisplayed,thiswindow
containsatablewithasmanyrowsasattributesthereferencedrelationhas.
Figure98:Referencedrelationwindow
Thenextstepistochoosetheattributewhichtheforeignkeyisgoingtobe
relatedwith.
ShowTablesButton:
This label in a button and the checked checkbox implies that the
correspondingattributeisalreadyaforeignkeyandthereforethereisatleast

User’sManual 107
one referenced relation. By clicking on this button the following window is
displayed.
Figure99:Referencedrelationswindow
Thiswindow shows that there are two referenced attributes of different
relations for the attribute “name”, beingoneof them the attribute “name” of
therelation“parking”.
Atthispointbothcasesconvergeandtheoperationsthatcanbeperformed
onthemfollowthesamesteps.
8.4.6.3.1DEFININGAFOREIGNKEY
Todefineanewcandidatekeyisnecessarytocreateanewemptytable
first.ThiscanbeachievedbyclickingontheNewFKbutton.
AsitwasexplainedfortheNewTablebutton,itismandatorytochoose
the referenced relation first. Thus, theTable Chooserwindow is the first
onetobedisplayedafterclickingontheNewFKbutton.
Inmediatelyafterchoosingareferencedrelation,anewtable isadded
totheReferencedrelationswindowdepictedinFigure99.Thefinalstepis
toselecttheattributetoberelatedwiththeforeignkey.
Thissetofstepsreplacesthefollowingdatalogcommand:

User’sManual 108
:‐
fk(name_of_the_target_relation,[name_of_the_column_foreign_key],name_of_s
ource_relation,[name_of_source_column]).
And the resultant constraint nodes added to the tree in theDatabase
Panelfortheexamplesusedabovewouldbe:
8.4.6.3.2MODIFYINGAFOREIGNKEY
Tomodifyanexistingforeignkey,theusermustselectordeselectthe
attributethatistargetformodificationsandapplythechanges.
This operation basically works deleting the original foreign key and
thendefiningthenewone.
8.4.6.3.3DELETINGAFOREIGNKEY
To delete an existing foreign key the user can either deselect the
attribute or click on the Drop FK button in the Referenced relations
window(Fig.99).
Thisactionwilldeleteonlythatspecificconstraintsbutnottheothers
incasetherearemore.
To delete all the existing relations associated to an attribute in the
ForeingKeyPanel,theusercaneitherdeselectitscorrespondingcheckbox

User’sManual 109
orclickontheDropFKbuttoninthispanel.Itscorrespondingbuttonwill
beupdatedandthelabelNewTablewillbeset.
It is important tokeep inmind thatuser changesonly affect to the table
shown in the current screen, namely, all changes performedmust be saved
beforeswitchingtoanyotherforeignkeyscreenorpanel.
8.4.6.4NOTNULLPANEL(NN)
ANotNullconstraintspecifiesthatthevaluesinagivensetofcolumnsofa
relationmustnotbenull.
As its name suggests, this panel allows the user to set the Not Null
restrictiontotheattributesofagivenrelation.
Figure100:NotNullPanel
8.4.6.4.1DEFININGANOTNULLCONSTRAINT
TodefineanattributeorasetofattributesasaNotNullconstrainttheir
respectivecheckboxesmustbeselectedandthenapplythechanges.
Asareminder,itisimportanttopointoutthatiftwoormoreattributes
areselected,allofthemformasingleNotNullconstraint.

User’sManual 110
IfthereisalreadyaNotNullconstraint,itisreplacedbythenewone.
Thissetofstepsreplacesthefollowingdatalogcommand:
:‐nn(name_of_the_relation,[column_name_list])
8.4.6.4.2MODIFYINGANOTNULLCONSTRAINT
To modify an existing Not Null constraint, the user must select or
deselect the attribute or attributes that are target for modifications and
applythechanges.
ThisoperationbasicallyworksdeletingtheoriginalNotNullconstraint
andthendefiningthenewone.
8.4.6.4.3DELETINGANOTNULLCONSTRAINT
TodeleteanexistingNotNullconstrainttheusermustdeselectallthe
attributesthatcompoundtheconstraintandthenapplythechanges.
8.4.6.5FUNCTIONALDEPENDENCYPANEL(FD)
Afunctionaldependencyconstraintspecifiesthat,givenasetofattributes
A1,ofarelationR,theyfunctionallydetermineanothersetA2,i.e.,eachtuple
ofvaluesofA1inRisassociatedwithpreciselyonetupleofvaluesA2inthe
sametupleofR.
Since a functional dependency associates different attributes in a same
relation,thispanelshowstherelationtwicesoallthecomponentsoftheright
sideofthefunctionaldependencyarelocatedintherighttableandthesameis
doneforthecomponentsoftheleftsideofthefunctionaldependency.

User’sManual 111
As shown in the Figure 101, several functional dependencies can be
defined for a relation.Due to this, thepanel contains anavigationpane that
allowstheusertonavigatethroughalltheexistingfunctionaldependencies.
Figure101:FunctionalDependencypanel
Operationssuchasdefining,modifyinganddeletingcanbeperformedinthispanel
byfollowingthestepsdescribedbelow.
8.4.6.5.1DEFININGAFUNCTIONALDEPENDENCYCONSTRAINT
Incasetherearenofunctionaldependenciesdefinedforarelation,two
tables representing the same relation with unchecked checkboxes is
createdbydefault.Ontheotherhand,if therelationalreadycontainsone
ormore functional dependencies, these are shown in a different screens
eachone.
As for the latter case, to define a new functional dependency is
necessarytocreateanewscreenwithtwoemptytablesfirst.Thiscanbe
achievedbyclickingontheNewFDbutton.
Todefineanattributeorasetofattributesasafunctionaldependency
their respective checkboxes in both tables must be selected and the
changesapplied.

User’sManual 112
Asareminder,itisimportanttopointoutthatiftwoormoreattributes
areselectedinoneofthetables,allofthemformeithertherightortheleft
sideofthefunctionaldependency.
Thissetofstepsreplacesthefollowingdatalogcommand:
:‐fd(name_of_the_relation,[column_name_list],[column_name_list])
8.4.6.5.2MODIFYINGAFUNCTIONALDEPENDENCYCONSTRAINT
Tomodify an existing functional dependency, the usermust select or
deselect the attribute or attributes that are target for modifications and
applythechanges.
This operation basically works deleting the original functional
dependencyconstraintandthendefiningthenewone.
8.4.6.5.3DELETINGAFUNCTIONALDEPENDENCYCONSTRAINT
To delete an existing functional dependency constraint the user can
eitherdeselectall theattributesthatcompoundtheconstraintorclickon
theDropFDbutton.
Itisimportanttokeepinmindthatuserchangesonlyaffecttothetable
showninthecurrentscreen,namely,allchangesperformedmustbesaved
before switching toanyother functionaldependency screenbyusing the
navigationpane.
As an example, the FD nodes generated and added to the tree in the
Database Panel for the relation “employee” due to the operations
performedinthisrelationastheFigure101suggests,wouldbe:

User’sManual 113
8.4.6.6INTEGRITYCONSTRAINTSPANEL(IC)
A integrity constraint is represented with a rule without head. The rule
body is an assertion that specifies incosistent data, i.e., should this body be
proved,anyinconsistencyisdetectedandreportedtotheuser.
This panel allows the user to define their own constraints in a given
relationaswellastoperformmodificationanddeleteoperations.
Figure102:IntegrityConstraintsPanel

User’sManual 114
Since the constraints are defined by the user these cannot be fit into a
specificstructureasseeninthepreviouspanels.Thus,thispanelimplementsa
table with two columns, the first one is intended to be filled with the user
definedconstraintsandthesecondonetovalidateanyoperationthatcanbe
performedonaconstraint.
The cells of the first column are editable, so the user can insert and edit
their constraints at any time. The only requeriment to validate these
operations is first to check the corresponding checkbox and after apply the
changes.
Several constraints can be defined in a relation for this reason there is
alwaysanemptyrowattheendofthetable.Everytimethisrowisfilledwitha
restriction a new empty row is generated letting the user to define more
constraintsinmediately.
8.4.6.6.1DEFININGAUSERDEFINEDCONSTRAINT
The cells of the first column are editable, so the user can insert their
constraints by clicking twice on an empty cell. The only requeriment to
validate this operation is first to check the corresponding checkbox and
afterapplythechanges.
Severalconstraintscanbedefinedinarelationforthisreasonthereis
alwaysanemptyrowattheendofthetable.Everytimethisrowis filled
witharestrictionanewemptyrowisgeneratedlettingtheusertodefine
moreconstraintsinmediately.
8.4.6.6.2MODIFYINGAUSERDEFINEDCONSTRAINT
Tomodify an existinguserdefined constraint theusermust select or
deselectthecorrespondingcheckboxoftheconstraintsthataretargetfor
modificationsandapplythechanges.
Previously,theconstraintmustbemodifiedbyclickingtwiceonitscell
containerandeditingitscontent.

User’sManual 115
8.4.6.6.3DELETINGAUSERDEFINEDCONSTRAINT
Todeleteanexistinguserdefinedconstrainttheusermustuncheckits
respectivecheckboxandthenapplythechanges.
AsaresultofaddingtheuserdefinedconstraintsshowninFigure102,the
nodes depicted in the picture below would be added to the tree in the
Databasepanelfortherelation“employee”.
Declaring such integrity constraints implies to change your mind w.r.t
usual consistency constraints as domain constraints in SQL. For instance, to
specifythatacolumncofatabletcantakevaluesbetweentwointegersone
canusetheSQLclauseCHECKinthecreationofthetableasfollows:
CREATETABLEt(cINTCHECK(cBETWEEN0AND10));

User’sManual 116
8.5. CHILDRENOFTABLENODES
Underthetablenodetheusercanseetheinformationofthecolumnsandallthe
constraintslikeprimarykey,foreignkeyandsoon.
Figure103:Childrenoftablenodes
8.5.1. NODECOLUMNS
Thisnodeshowsall theattributesorcolumnsofa relationrepresentedbya
leafnodethatspecifiesthenameandtypeofeachattribute.
Different constraints can be applied on each of these columns in a
straightforwardway.Thisisachievedbyselectinganyofthepossibleoperations
offeredinthepopupmenuofeachleafnode.
Figure104:Columnnodepopup

User’sManual 117
8.5.2. NODECONSTRAINTS
Intheprimarykeynode,andinallthenodeswhichdefineaconstraint(inthe
figure the node [department, name]), the user has these options in the popup
menu.
8.5.2.1. DROP
Itwilldroptherestriction.
8.5.2.1.1. MODIFY
Theusercanmodifytherestrictionwiththisaction.

User’sManual 118
8.6. VIEWSNODE
Thechildrenofthisnodearealltheviewsoftheselecteddatabase.Itspopupmenu
isthefollowing:
Figure105:ViewsNodePopupMenu
8.6.1. CREATE
With the next window the user can create a view, defining it with an SQL
command:
Figure106:Createviewwindow
8.6.2. PASTE
Anewviewwill be createdwith the same schema than the view that hadbeen
copiedbefore.
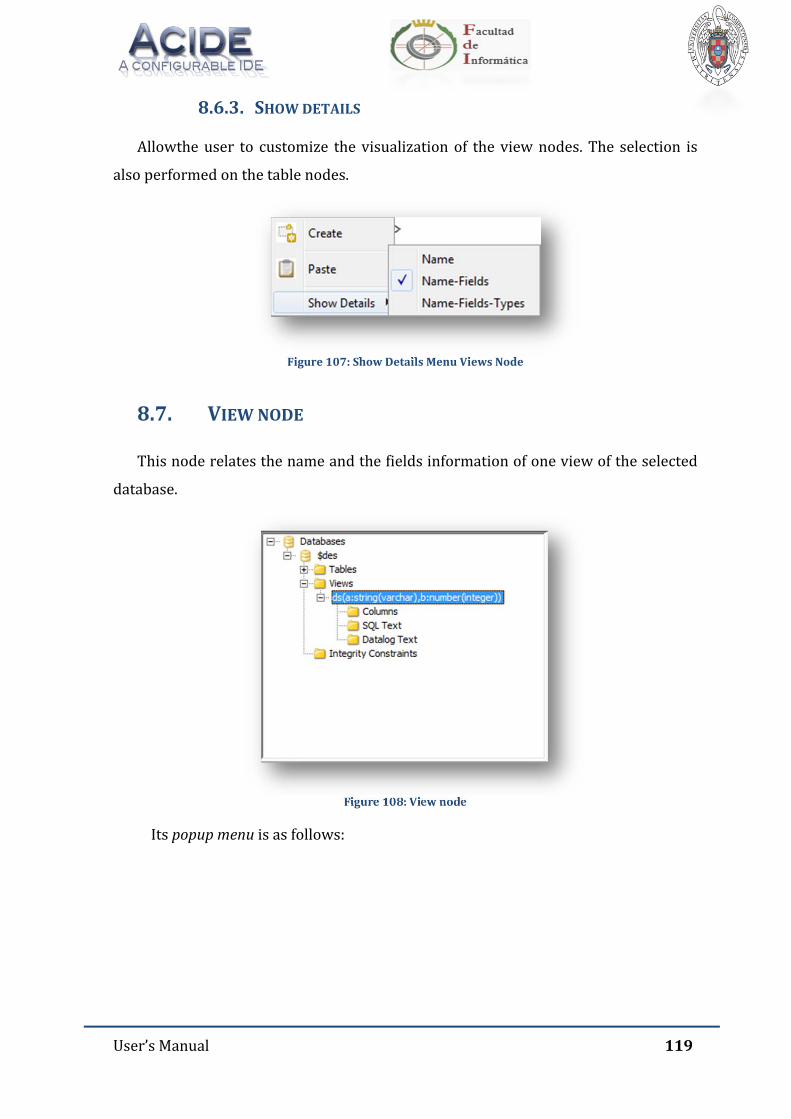
User’sManual 119
8.6.3. SHOWDETAILS
Allowtheuser to customize thevisualizationof theviewnodes.The selection is
alsoperformedonthetablenodes.
Figure107:ShowDetailsMenuViewsNode
8.7. VIEWNODE
Thisnoderelatesthenameandthefieldsinformationofoneviewoftheselected
database.
Figure108:Viewnode
Itspopupmenuisasfollows:

User’sManual 120
Figure109:Viewnodepopupmenu
8.7.1. DROP
Theviewwillbedeletedfromthedatabase.
8.7.2. RENAME
Theusercanchangethenameoftheviewwiththisaction.
8.7.3. COPY
Theschemaoftheselectedviewwillbecopiedtotheclipboard.
8.7.4. PASTE
Anewviewwith the schemaof the view copied in the clipboardbeforewill be
created.
8.7.5. DESIGNVIEW
AwindowwiththeSQLtextoftheviewwillbeshowed.
8.7.6. DATAVIEW
ItisalmostidenticaltoDataviewforTables,explainedbeforeonChapter8.4.5.
8.8. COLUMNSNODES
Thechildrenofthisnodeareallthecolumnsoftheselectedview.

User’sManual 121
Figure110:Columnsnodes
8.9. SQLTEXT,RATEXTANDDATALOGTEXTNODES
ThesenodesshowtheSQLorRAandDatalogcommandsoftheviewdefinition.
TheSQLTextorRATextnode is added to a viewdependingon the typeof the
view.IftheviewwasgeneratedwithaSQLstatementthenitwillcontainanSQLText
node,thesameisappliedtotheviewsgeneratedwithRAstatements.
Figure111:SQLandDatalogtextnodes
Theusercaneitherclick twiceon thenode that represents theSQL/RATextor
choosethe“Show”optionof itspopupmenu inordertodisplayawindowallowing
theusertoedititscontent.
Withthepopupmenuuserisalsoabletocopythedefinitiontext.

User’sManual 122
Thecontentofthewindowdependsonthetypeofnode,foraSQLTextnodeit
willcontainitsSQLstatementandthesameforRATextnodes.
Figure112:SQLtext
DatalogTextnodeisgeneratedbydefaultandisaddedtoaViewnodenomatter
the type of it, SQL or RA. Thus, its content cannot be edited and its window is
displayedinonlyreadmode.
Figure113:Datalogtext

User’sManual 123
9. PDGPANELShowthedependenciesgraphattachedtoadatalogfile.Anexampleofthegraph
panelisasfollows:
Figure114:PDGPanel
Thenodescanbelocatedbyclickinganddraggingthem.Thebuttonsinthebottom
ofthepanelareusedtozoominandoutthegraph.Thiseffectcanalsobeachieved
by scrolling the mouse wheel while pressing CTRL key. The graph can be
regeneratedbyclickingontherefreshbutton.Thelabelscanbeshownorhidden
byclickingontheshowlabelsbutton
Thisgraphishighlycustomized;theshapeofthenodes, thecolorandendofthe
arrowscanbeswitched(explainedinchapter3.5.5).

User’sManual 124
10. DEBUGPANELShow a navigable dependences graph of the database for a certain datalog
predicateorasqlview.
Figure115:DebugPanel
10.1. TRACEDATALOGPANEL
Show a navigable dependences graph of the database for a certain datalog
predicate.
Navigation between nodes corresponds to the output of the command /tapi
/trace_datalog for the graph’s generator query. The user can directly navigate to a
nodebyclickingonit.
Thedefinitionofthepredicatewillalsobehighlightedonthefileeditorpanel.
Figure116:SelectedNode

User’sManual 125
Figure117:Highlightedtext
If the user performs a double click on the node the data view window of the
databasetablecorrespondingtotheselectedpredicatewillbedisplayed.
Next,wefurtherexplainallthecomponents:
Refreshbutton:refreshthedependencesgraph.
Zoomslider:manipulatethezoomlevel.
Zoominbutton:increasethezoomlevel.
Zoomoutbutton:decreasethezoomlevel.
Labelscheckbox:hide/displaythelabelsofthenodes.
Querybutton:Openthequerywindowwheretheusercaninput
thepredicatetotrace.
Previous node button: Go to the previous node according to the
/trace_datalogcommand.
Nextnodebutton:Gotothenextnodeaccordingtothe/trace_datalog
command.
Firstnodebutton:Gotothefirstnodeaccordingtothe/trace_datalog
command.
Lastnodebutton:Gotothelastnodeaccordingtothe/trace_datalog
command.
Rulescheckbox:Highlight/unhighlightthetextonthefileeditor
panel.

User’sManual 126
Locatebutton:Showthetextcorrespondingtotheselectednode
ofthegraphonthefileeditorpanel.
10.2. TRACESQLPANEL
Showanavigabledependencesgraphofthedatabaseforacertainsqlview.
Navigation between nodes corresponds to the output of the command /tapi
/trace_sqlforthegraph’sgeneratorquery.Theusercandirectlynavigatetoanodeby
clickingonit.
Figure118:Tracesqlpanel
If the user performs a double click on the node the data view of the database
table/viewcorrespondingtotheselectednodewillbedisplayed.
Next,wefurtherexplainallthecomponents:
Refreshbutton:refreshthedependencesgraph.
Zoomslider:manipulatethezoomlevel.
Zoominbutton:increasethezoomlevel.
Zoomoutbutton:decreasethezoomlevel.

User’sManual 127
Labelscheckbox:hide/displaythelabelsofthenodes.
Viewlist:Displaytheviewslistwheretheusercantheoneto
trace.
Previous node button: Go to the previous node according to the
/trace_sqlcommand.
Next node button: Go to the next node according to the /trace_sql
command.
Firstnodebutton:Gotothefirstnodeaccordingtothe/trace_datalog
command.
Lastnodebutton:Gotothelastnodeaccordingtothe/trace_datalog
command.
SQlTextcheckbox:Activate, foraviewnode, theselectionof
the SQL Text node on the database panel corresponding to the selected
nodeofthegraph
.

User’sManual 128
11. ASSERTEDDATABASEPANELShowtheassertedrulesandfactsmadeontheasserteddatabase,sortedbypredicate.
Anexampleoftheasserteddatabasepanelisasfollows:
Next,wefurtherexplainallthecomponents:
Refresh button: refresh the asserted database panel, adding or
erasingrowsinthecurrenttableofpredicates.
Clearbutton:ifthereareanyrowsselected,removetheselection.
Filter check box:when the filter check box is enabled, take the
currentselectednodeinthedebugpanelandshowtheruleslinkedtothat
node.
Number of rules: show the number of rule in the asserted
database,thisfieldisjustinformational.

User’sManual 129
12. STATUSBARContainsomeinformationabouttheactivefile,thecurrentprojectandsoon.Itis
asfollows:
Figure119:Statusbar
Next,wefurtherdescribeallthecomponents:
Panel1:thestatusmessageisdisplayed.Itshowsthepathandnameofthe
activefileintheFileEditor.
Panel 2: the syntactic configuration shows the name of the grammar
appliedtothecurrentproject.
Panel3:thelexiconconfigurationshowsthenameofthelexiconappliedto
thecurrentproject.
Panel4:showsthelineandcolumnwherethecaretis.
Panel5:BLOQMAYUSstatus.
Panel5:BLOQNUMstatus.
Panel6:BLOQSCROLLstatus.
Panel7:writingmode:INSERTorOVERWRITE.
Panel8:theSystemclock.

User’sManual 130
13. ACCESSIBILITYSHORTCUTSThe application offers some accessibility shortcuts to wrapper common user
actionssuchas:
F3+Selectedtext:performstheforwardtextsearchwiththeselectedtext
inthefileeditor,intheconsolepanelorinthedataviewwindow.
F3 + Shift + Selected text: performs the backward text search with the
selected text in the file editor, in the console panel or in the data view
window.
Mousewheel:performstheverticalscrolllinebylineinthefileeditorand
consolepanel.
Control+mousewheel:performsthezoomeffectforthefontsizeinthe
fileeditor,consolepanelandgraphpanel.
Shift+Tab:incaseaTabactionhasbeenperformed,undotheaction.
Othersaccessibilityshortcutsdependsonthelanguageoftheapplication.
13.1. ACCESSIBILITYSHORTCUTSINENGLISH
ShortcutsinFilemenu:
Ctrl+N:Createnewfile.
Ctrl+O:Openafile.
Ctrl+S:Saveactivefileinthefileeditor.
Ctrl+Shift+S:Saveallfilesinthefileeditor.
Ctrl+P:Printactivefileinthefileeditor.
Alt+X:Closetheapplication.
ShortcutsinEditmenu:
Ctrl+Z:Undothelastaction.
Ctrl+Y:Redothelastchange.
Ctrl+C:CopytheselectedtexttotheSystemclipboard.

User’sManual 131
Ctrl+X:CuttheselectedtexttotheSystemclipboard.
Ctrl+V:PastethetestintheSystemclipboard.
Ctrl+E:Selectallthetextintheactivefileofthefileeditor.
Ctrl+F:Openthesearchwindow.
Ctrl+R:Openthereplacewindow.
Ctrl+U:Transformstouppercaseagiventext.
Ctrl+L:Transformstolowercaseagiventext.
Ctrl+Shift+U:Capitalizeeverywordinagiventext.
Ctrl+Shift+L:Alternatesbetweenuppercaseandlowercaseeveryword
inagiventext.
ShortcutsinProjectmenu:
Alt+Shift+N:Createanewproject.
Alt+Shift+O:Openaproject.
Alt+Shift+S:Savetheopenedproject.
Alt+Shift+A:Addafiletotheopenedproject.
Alt+C:Compiletheopenedproject.
Alt+E:Executetheopenedproject.
ShortcutsinViewmenu:
Alt+Shift+L:Showthelogtab.
ShortcutsinConfigurationmenu:
Ctrl+Shift+L:Documentslexicon.
Ctrl+Shift+X:Modifiythelexicon.
Ctrl+Shift+T:Createanewgrammar.
Ctrl+Shift+A:Activelinewrapping.
Ctrl+Shift+F:Openthesearchinconsolewindow.
ShortcutsinHelpmenu:
Ctrl+H:Showthisdocument.

User’sManual 132
ShortcutsinDataview:
Uparrow:Gotopreviousrecord.
Downarrow:Gotonextrecord.
Tab:Gotonextfield.
Shift+Tab:Gotopreviousfield.
Alt+F4:ClosetheDataviewwindow.
Ctrl+Z:Undotheupdatesinthegrid.
Ctrl+Y:Redothelastundointhegrid.
Ctrl+C:CopytheselecteddatafromthegridtotheSystemclipboard.
Ctrl + V: Paste the data stored in the System clipboard in the current
positionofthecursorinthegrid.
Ctrl + X: Cut the selected text active field from the grid to the System
clipboard.
Ctrl+F:ShowthesearchtextwindowfortheDataview.
F5:Refreshtheviewofthegrid.
Ctrl+home:Gotothefirstrecord.
Ctrl+end:Gotothelastrecord.
Ctrl+H:Linkdirectlytothepresentdocument.
ShortcutsinMenuconfiguration:
Uparrow:Selectpreviousobject.
Downarrow:Selectnextobject.
Ctrl+Home:Selectthefirstobject.
Ctrl+End:Selectthelastobject.
Tab:Selectnextattribute.
Tab+Shift:Selectpreviousattribute.
Esc:Deselecttheselectedobject.
Shorcutsinasserteddatabase:
Alt+F4:Closethewindow.
F5:Refreshtheasserteddatabasepanel.

User’sManual 133
C:Removethecurrentselectionoftherows.
Shortcutsindatabasepanel:
Supr:Deletesaselectedviewotable.
Ctrl+C:Copiestheselectednodeanditscontentifavailable.
Ctrl+V:Pastetheselecetednodeanditscontentifavailable.
13.2. ACCESSIBILITYSHORTCUTSINSPANISH
ShortcutsinFilemenu:
Ctrl+N:Createnewfile.
Ctrl+O:Openafile.
Ctrl+G:Saveactivefileinthefileeditor.
Ctrl+Shift+G:Saveallfilesinthefileeditor.
Ctrl+P:Printactivefileinthefileeditor.
Alt+X:Closetheapplication.
ShortcutsinEditmenu:
Ctrl+Z:Undothelastaction.
Ctrl+Y:Redothelastchange.
Ctrl+C:CopytheselectedtexttotheSystemclipboard.
Ctrl+X:CuttheselectedtexttotheSystemclipboard.
Ctrl+V:PastethetestintheSystemclipboard.
Ctrl+E:Selectallthetextintheactivefileofthefileeditor.
Ctrl+B:Openthesearchwindow.
Ctrl+R:Openthereplacewindow.
Ctrl+U:Transformstouppercaseagiventext.
Ctrl+L:Transformstolowercaseagiventext.
Ctrl+Mayús+U:Capitalizeeverywordinagiventext.
Ctrl+Mayús+L:Alternatesbetweenuppercaseandlowercaseeveryword
inagiventext.

User’sManual 134
ShortcutsinProjectmenu:
Alt+Shift+N:Createanewproject.
Alt+Shift+O:Openaproject.
Alt+Shift+S:Savetheopenedproject.
Alt+Shift+A:Addafiletotheopenedproject.
Alt+C:Compiletheopenedproject.
Alt+E:Executetheopenedproject.
ShortcutsinViewmenu:
Alt+Shift+L:Showthelogtab.
ShortcutsinConfigurationmenu:
Ctrl+Shift+L:Documentlexicon.
Ctrl+Shift+X:Modifiythelexicon.
Ctrl+Shift+T:Createanewgrammar.
Ctrl+Shift+A:Activelinewrapping.
Ctrl+Shift+F:Openthesearchinconsolewindow.
ShortcutsinHelpmenu:
Ctrl+H:Showthisdocument.
ShortcutsinDataview:
Uparrow:Gotopreviousrecord.
Downarrow:Gotonextrecord.
Tab:Gotonextfield.
Shift+Tab:Gotopreviousfield.
Alt+F4:ClosetheDataviewwindow.
Ctrl+Z:Undotheupdatesinthegrid.
Ctrl+Y:Redothelastundointhegrid.

User’sManual 135
Ctrl+C:CopytheselecteddatafromthegridtotheSystemclipboard.
Ctrl + V: Paste the data stored in the System clipboard in the current
positionofthecursorinthegrid.
Ctrl + X: Cut the selected text active field from the grid to the System
clipboard.
Ctrl+F:ShowthesearchtextwindowfortheDataview.
F5:Refreshtheviewofthegrid.
Ctrl+home:Gotothefirstrecord.
Ctrl+end:Gotothelastrecord.
Ctrl+H:Linkdirectlytothepresentdocument.
ShortcutsinMenuconfiguration:
Uparrow:Selectpreviousobject.
Downarrow:Selectnextobject.
Ctrl+Home:Selectthefirstobject.
Ctrl+End:Selectthelastobject.
Tab:Selectnextattribute.
Tab+Shift:Selectpreviousattribute.
Esc:Deselecttheselectedobject.
Shorcutsinasserteddatabase:
Alt+F4:Closethewindow.
F5:Refreshtheasserteddatabasepanel.
C:Removethecurrentselectionoftherows.
Shortcutsindatabasepanel:
Supr:Deletesaselectedviewotable.
Ctrl+C:Copiestheselectednodeanditscontentifavailable.
Ctrl+V:Pastetheselecetednodeanditscontentifavailable.

User’sManual 136
14. ACIDEVARIABLESThe application supports some variables in the Console Panel, External
ApplicationsToolBarandtheconsoleloadedintheconsolepanelsuchas:
$activeFile$:referencethecurrentactivefileinthefileeditorpanel.
$activeFileName$: reference just the current active name file in the file
editorpanel.
$activeFilePath$: reference just the current active path file in the file
editorpanelwithoutincludingneitherfilenamenorfileextension.
$activeFileExt$: reference just thecurrentactiveextension file in the file
editorpanel.
$mainFile$:referencethefileinthefileeditorpanelthathasbeenmarked
asMAINfile.
$mainFilePath$:referencethejustfilepathinthefileeditorpanelthathas
been marked hasMAIN file without including neither file name nor file
extension.
$mainFileExt$:referencejustthefileextensioninthefileeditorpanelthat
hasbeenmarkedasMAINfile.

User’sManual 137
15. ACIDEDEFAULTCOMMANDSAsexplainedinChapter3.5.9,withthemenuconfigurationtheusercanassignto
theapplicationtheactionsthatwillbeexecutedwhenmenuitemsarepresseddown.
All thesecommandsstartwith“$”.Thecommandsassignedbydefault toACIDE–A
ConfigurableIDEmenuitemsare:
Filemenu:
o $NEW_FILE:Createanewfileinthefileeditor.
o $OPEN_FILE:Openafileinthefileeditor.
o $OPEN_ALL_FILES:Openallthefilesoftheactiveproject.
o $CLOSE_FILE:Closetheactivefileinthefileeditor.
o $CLOSE_ALL_FILES:Closeallfilesinthefileeditor.
o $SAVE_FILE:Savetheactivefile.
o $SAVE_FILE_AS:Savetheactivefileinadifferentpath.
o $SAVE_ALL_FILES:Savealltheopenedfilesinthefileeditor.
o $PRINT_FILE:Printtheactivefileinthefileeditor.
o $EXIT_FILE:Closetheapplication.
Editmenu:
o $UNDO:Undothelastaction.
o $REDO:Redothelastundoneaction.
o $COPY:CopytheselectedtexttotheSystemclipboard.
o $PASTE:PastethetextintheSystemclipboard.
o $CUT:CuttheselectedtexttotheSystemclipboard.
o $TOGGLE_COMMENT: Commentoruncomment the line according
towhetherthelineiscommentedornot.
o $MAKE_COMMENT:Commentaline.
o $RELEASE_COMMENT:Uncommentaline.
o $SELECT_ALL:Selectallthetextintheactivefileofthefileeditor.
o $GO_TO_LINE: Open a window where user can type down the
numberoflinewhereheorshewantstogo.
o $UPPER_CASE:Transformlowercasetextintouppercase.
o $LOWER_CASE:Transformuppercasetextintolowercase.

User’sManual 138
o $CAPITALIZE: Transform to upper case the first letter of all the
wordsinatext.
o $INVERT_CASE:Transformtouppercasethelowercaselettersand
viceversa.
o $SEARCH:Openthesearchwindow.
o $REPLACE:Openthereplacewindow.
Projectmenu:
o $NEW_PROJECT:Createanewproject.
o $OPEN_PROJECT:Openaprojectintheapplication.
o $CLOSE_PROJECT:Closetheopenedprojectintheapplication.
o $SAVE_PROJECT:Savetheactiveprojectintheapplication.
o $SAVE_PROJECT_AS:Savetheactiveprojectintheapplicationwith
adifferentpath.
o $ADD_OPENED_FILES:Addallopenedfilesintheapplicationtothe
activeproject.
o $NEW_PROJECT_FILE: Create a new file and adds it to the active
project.
o $ADD_FILE:Addtheactivefileinthefileeditortocurrentproject.
o $REMOVE_FILE: Remove the active file in the file editor from the
currentproject.
o $DELETE_FILE:Delete the active file from the currentproject and
fromdisk.
o $ADD_FOLDER:Addafoldertothecurrentproject.
o $REMOVE_FOLDER: Remove the selected folder from the current
project.
o $COMPILE:Compilethecurrentproject.
o $EXECUTE:Executethecurrentproject.
o $SET_COMPILABLE_FILE:Setcompilabletheselectedfile.
o $UNSET_COMPILABLE_FILE:Unsetcompilabletheselectedfile.
o $SET_MAIN_FILE:Setasmainfiletheselectedfile.
o $UNSET_MAIN_FILE:Unsetasmainfiletheselectedfile.
Viewmenu:
o $SHOW_LOG_TAB:Showthelogtab.

User’sManual 139
o $SHOW_EXPLORER_PANEL:Showorhidetheexplorerpanel.
o $SHOW_CONSOLE_PANEL:Showorhidetheconsolepanel.
o $SHOW_DATABASE_PANEL:Showorhidethedatabasepanel.
o $SHOW_GRAPH_PANEL:Showorhidethegraphpanel.
o $SHOW_DEBUG_PANEL:Showorhidethedebugpanel.
o $SHOW_ASSERTED_DATABASE_PANEL: Open the asserted
databasepanel.
Configurationmenu:
o Lexiconsubmenu:
$NEW_LEXICON:Openawindowwhereusertypedownthe
nameforthenewlexicon.
$DOCUMENT_LEXICON: Load the lexicon configuration file
intheactivefileofthefileeditor.
$MODIFY_LEXICON:Openthelexiconconfigurationwindow.
$DEFAULT_LEXICON:Showthedefaultlexiconconfiguration
window.
o Grammarsubmenu:
$NEW_GRAMMAR: Open the new grammar configuration
window.
$LOAD_GRAMMAR:Loadagrammarconfiguration.
$MODIFY_GRAMMAR: Display the modify grammar
configurationwindow.
$SAVE_GRAMMAR:Savethecurrentgrammarconfiguration
intoafile.
$SAVE_GRAMMAR_AS: Save the current grammar
configurationintoafilewithadifferentpath.
$SET_PATHS:Displaythesetpathswindow.
o $COMPILER:Displaythecompilerconfigurationwindow.
o Fileeditorsubmenu:
$PREFERENCES:Displaythepreferenceswindow.
$FILE_EDITOR_DISPLAY_OPTIONS: Display the file editor
displayconfigurationwindow.

User’sManual 140
$AUTOMATIC_INDENT: Enable or disable the automatic
indentinthefileeditor.
$LINE_WRAPPING: Enable or disable the line wrapping in
thefileeditor.
$MAXIMUM_LINES: Ask to the user for the maximum
numberoflinestosendtotheconsolepanel.
$SEND_CONSOLE_CONFIRMATION: Enable or disable the
confirmation request when user sends contents to console
panel.
o Consolesubmenu:
$CONFIGURE_CONSOLE: Open the console configuration
window.
$CONSOLE_DISPLAY_OPTIONS:Display theconsoledisplay
configurationwindow.
$CONSOLE_LINE_WRAPPING:Enableordisabletheconsole
linewrapping.
$SAVE_CONSOLE_CONTENT:Savetheconsolecontentintoa
file.
$DOCUMENT_CONSOLE: Load a lexicon configuration into
theconsolepanel.
$SEARCH_CONSOLE:Openthesearchinconsolewindow.
$CLOSE_CONSOLE:Closetheconsole.
o Databasepanelsubmenu:
$DES_PANEL:SelecttheDESconectionindatabasepanel.
$ODBC_PANEL:SelecttheODBCconectionindatabasepanel.
$SHOW_NAME:Only thenameof table andviewnodes are
shownintheDatabasePanel.
$SHOW_NAME_FIELDS: Name and columns of table and
viewnodesareshownintheDatabasePanel.
$SHOW_NAME_FIELDS_TYPES:Name,columnsandthetype
of each column of table and view nodes are shown in the
DatabasePanel.
o PDGsubmenu:

User’sManual 141
$NODES_COLOR: Display a color selectionmenu to change
thecolorofthenodes.
$NODES_SIZE: Display a menu to change the size of the
nodes.
$NODES_SHAPE_CIRCLE:Changetheshapeofthenodestoa
circle.
$NODES_SHAPE_SQUARE:Changetheshapeofthenodesto
asquare.
$ARROW_SHAPE_LINE: Change the sahpe of the tip of the
arrowtolines.
$ARROW_SHAPE_POLYGON:Changetheshapeof thetipof
thearrowtoatriangle.
$ARROW_COLOR_DIRECT:Displayacolorselectionmenuto
changethecolorofthepositivedepencencesarrows.
$ARROW_COLOR_INVERSE: Display a color selectionmenu
tochangethecolorofthenegativedepencencesarrows.
$SHOW_LABELS:showorhidethelabelsofthenodes.
o Menusubmenu:
$NEW_MENU:Displaythenewmenuconfigurationwindow.
$LOAD_MENU: Loadamenu configurationandapplies it to
application.
$MODIFY_MENU: Display the menu configuration window
formodifying.
$SAVE_MENU:Savethecurrentmenuconfiguration.
$SAVE_MENU_AS:Savethecurrentmenuconfigurationwith
adifferentpath.
o Toolbarsubmenu:
$NEW_TOOLBAR: Display the new toolbar configuration
window.
$LOAD_TOOLBAR:Loadatoolbarconfigurationandapplies
ittoapplication.
$MODIFY_TOOLBAR: Display the tool bar configuration
windowformodifying.

User’sManual 142
$SAVE_TOOLBAR:Savethecurrenttoolbarconfiguration.
$SAVE_TOOLBAR_AS: Save the current tool bar
configurationwithadifferentpath.
Helpmenu:
o $SHOW_HELP:Openthisdocument.
o $SHOW_ABOUT_US:DisplaytheAboutUswindow.
Thesecommandscanbeassignedtoothermenuitemsthanarenotthedefault
menuitems.

User’sManual 143
16. CONFIGURATION OF ACIDE BYCONFIGURATIONDOCUMENTS
16.1. MANAGERSINXMLFILES
Frequently in XML configuration files we found labels of the form “…Manager”.
TheselabelscontainatypeofobjectcalledManagerthatisresponsibleforhandling
listsofdifferenttypesofobjects.InsidethelabelsofaManagerthereisanotherlabel
called “_list” and that in turn holds another label also called “_list”. It is inside this
labelwhereuserintroducesthelabelsoftheobjectsthatmakeupthelisthewantsto
handlewiththeManager(couldbealistofString,AcideLexiconTokenGroup,etc.).
There are java classes for each of the Managers in XML files, which provide
methods to manipulate the lists as adding, removing or getting items from them.
ManagerJavaclasseshaveanObjectListtypefield,whichinturnhasanArrayListfield
(whereuserstoresthelistofobjects)andmethodsformanipulatingthatlist.
Tointroduce,delete,reorder,etc.elementsofthelist,justmanuallyedittheXML
documentandoperateonthelabelsofeachobject.
16.2. PROPERTIESCONFIGURATION
ToconfigureseveralpropertiesofACIDE–AConfigurableIDEthereisafilecalled
configuration.propertiesstoredin./configuration.Inthisfilearestoredproperties
thatarenotspecifiedinotherfiles.Thestructureofthisfileisfixed;usercanonlyedit
thevaluesforeachfield,butheisnotabletoaddnewpropertiesordeleteanyofthe
existing.
Thefirstlineofthepropertiesconfigurationfileis:
#ACIDE Configuration
ThefollowinglineshowsthedateofthelasttimetheuserranthisissueofACIDE
–AConfigurableIDE.Displaysthefollowingformat:
#Mon May 27 18:16:32 CEST 2013

User’sManual 144
The following lines show the property name followed by a “=” and the value
assignedtothatpropertywiththefollowingstructure:
consolePanel.fontName=nameofthefontofconsolepanel.
workbenchConfiguration=pathtoXMLfilethatconfigurestheworkbench
(Chapter16.3)
lastOpenedFileDirectory=the folderwas last opened. Used to locate the
userinthesamefoldernexttime.
javacPath=pathofjavac.exe.
jarPath=pathofjar.exe.
consolePanel.exitCommand=exitcommandforconsole.
ed=
consolePanel.fontStyle=styleofthefontofconsolepanel.
consolePanel.bufferSize=sizeofbufferofconsolepanel.
previousMenuNewConfiguration=path to XML file that previously
configuredACIDE–AConfigurableIDEmenuwiththenewconfigurationof
version0.11(Chapter16.3.1)
consolePanel.backgroundColor=console panel background color
(numericvalor).
currentMenuConfiguration=path to .menuConfig file that was
configuratingACIDE –AConfigurable IDEmenuwith the configuration of
olderversions.
databasePanelMenuConfiguration.showDetails=Name
consolePanel.consoleDirectory=path to the folder where the .exe of
consoleconsoleisstored.
consolePanel.consolePath=pathtothe.exefileoftheconsole.
consolePanel.fontSize=sizeofthefontofconsole.
previousToolbarConfiguration=pathto .toolbarConfigfilethatpreviously
configuredACIDE–AConfigurableIDEtoolbar(Chapter16.3.2).
currentMenuNewConfiguration=pathtoXMLfilethatconfiguresACIDE–
A Configurable IDE menu with the new configuration of version 0.11
(Chapter16.3.1).

User’sManual 145
consolePanel.isechoCommand=true or false to define the behaviour of
echocommandatconsolepanel.
language=canbeEnglishorSpanish.
currentToolbarConfiguration=path to .toolbarConfig file that configures
ACIDE–AConfigurableIDEtoolbar(Chapter16.3.2)
previousMenConfiguration=path to .menuConfig file that previously
configuredACIDE–AConfigurableIDEmenuwiththeconfigurationofolder
versions.
lastOpenedProjectDirectory=the folderofprojectwas last opened.Used
tolocatetheuserinthesamefolderthenexttimehedisplaysaloadorsave
projectdialog.
javaPath=pathofjava.exe.
projectConfiguration=path to the .acideProject file used to configure
openedproject(explainedinChapter16.4).
consolePanel.foregroundColor=foreground color for console panel
(numericvalor).
consolePanel.parameters=parametersthatconsolepanelneeds.
16.3. WORKBENCHCONFIGURATION
Theworkbenchisallthespacewhereuserworkswithfiles.ItcontainstheMenu
Bar, the Tool Bar, the Explorer Panel, the File Editor, the Console Panel and the
DatabasePanel.
The XML file that configures the workbench must be saved in the path
./configuration/workbench.
Therootlabelofthisfileis:
<acide.configuration.workbench.AcideWorkbenchConfiguration>
toreferencetheJavaclassAcideWorkBenchConfiguration.
Insidethisrootlabeltherearesixbasiclabels:
<_workbenchLoaded>:withtruevalueidentifiesiftheconfigurationXML
filehasbeenloaded.

User’sManual 146
<fileEditorConfiguration>:insidethislabelthereareothersnestedlabels
withtheconfigurationofthefileeditor(explainedinChapter16.3.3).
<_consolePanelConfiguration>: inside this label there are others nested
labels with the configuration of the console panel (explained in Chapter
16.3.4.
<_lexiconAssignerConfiguration>: inside this label there are others
nestedlabelswiththeconfigurationoflexiconsfordifferentextensionsand
lexicon applied to console (lexiconAssignerConfiguration explained in
Chapter16.3.5).
<_recentFilesConfiguration>: insidethislabelthereisalist(insidea_list
label)ofStringswiththepathsoffilesopenedrecently.
<_recentProjectsConfiguration>: inside this label there isa list (insidea
_listlabel)ofStringswiththepathsofprojectsopenedrecently.
16.3.1. MENUCONFIGURATION
TheMenuBar is theelementsituatedatthetopofWorkbench. Itcontainsas
default the submenusFile,Edit,Project,View,ConfigurationandHelp. TheMenu
Bar provides user to do the most of actions that are provided in ACIDE – A
ConfigurableIDE.
Therootlabelofthisfileis:
<acide.configuration.menu.AcideMenuItemsConfiguration>
toreferencetheJavaclassAcideMenuItemsConfiguration.
Inside this label there isonlyonebasic label, _itemsManager.This labelhas two
nested _list labels. Inside of the most nested there are the
acide.configuration.menu.AcideMenuSubmenuConfiguration objects that define the
basicmenusthatexitonMenuBar.Theyhavethefollowingnestedlabels:
<_name>:thenameofthesubmenu.
<_visible>:withtrueorfalsevalue.Itsetsifsubmenuisvisibleornot.
<_erasable>:withtrueorfalsevalue.Itsetsifsubmenuiserasableornot
erasable(itisadefaultsubmenu).
<_image>:forsubmenusthislabelisempty.

User’sManual 147
<_itemsManager>: it is equal to root _itemsManager label. It contains all
themenuobjectsthatareinsidethesubmenu.
For themenu items the label isAcideMenuItemConfiguration. They have the
followingnestedlabel:
<_name>:thenameoftheitem.
<_visible>:withtrueorfalsevalue.Itsetsifitemisvisibleornot.
<_erasable>: with true or false value. It sets if item is erasable or not
erasable(itisadefaultitem).
<_image>:thepathofitsimageicon.
<_command>:thecommandwillberunwhenuserclickonthismenuitem.
<_parameter>:thetypeofparameterthatcommandneedstorun.Itcanbe
NONE,TEXT,FILE,orDIRECTORY.
User can insert, delete, reorder, etc. AcideMenuObjectConfiguration labels
(AcideMenuSubmenuConfiguration and AcideMenuItemConfiguration both are
subclassesofAcideMenuObjectConfiguration) insidetheroot label tomanagethe
configurationoftheMenuBar.
16.3.2. TOOLBARCONFIGURATION
The Tool Bar is situated below theMenu Bar. In the Tool Bar appear several
buttons for typicalactionswith filesandprojects. Italsocontainsbuttons thatuser
configurestosendcommandstoconsoleandtolaunchexternalapplications.
Toolbarconfigurationisdonein.toolbarConfigfiles.Thesefilesaredividedintwo
parts,onepartthatstoressettingsofbuttonsforthetoolbarthatpastecodeonthe
console to be run, and other part for configuration of buttons to launch external
applications.
To configure buttons to send commands to the console, each configuration of a
buttonshouldbeheadedbyacommentline(startingwith//)andconsistsofsixlines
withthefollowingstructure:
name=namedisplayed.
action=commandtorunontheconsole.

User’sManual 148
hintText=helptextdisplayedwhenuserputsmouseoverthebutton.
icon=pathoftheimageforthebutton.
parameterType = type of the parameter that the command uses on
console.Itcanbe:
o NONE
o TEXT
o FILE
o DIRECTORY
isExecutedInSystemConsole=ifisexecutedinthesystemornot.
Oncethelistofcommandbuttonsisended,userhastoenterthefollowingline
in the file, in order to indicate that the following settings are for buttons that
launchexternalapplications:
//End of Console Panel Tool Bar Button Configuration
Configurationsofbuttonsthatlaunchapplicationsmustbeheadedbyacomment
line(startingwith//)followedbyfourlinesofproperties:
name=namedisplayed.
path=pathtorun.
hintText=helptextdisplayedwhenuserputsthemouseoverthebutton.
icon=pathoftheimageforthebutton.
Oncethelistofcommandbuttonsisended,userhastoenterthefollowingline
inthefile, inorderto indicatethatconfigurationofbuttonsthat launchexternal
applicationsisended:
//End of External Applications Tool Bar Button Configuration

User’sManual 149
16.3.3. FILEEDITORCONFIGURATION
TheFileEditoriswhereusercaneditthecontentofthefiles.Itcontainsatabpane
wheretheopenedfilesaredisplayed.
The File Editor is configured by a label in the XML file that configures the
Workbench (explained on Chapter 16.3). Inside this label the user can find the
informationneededtoconfigureFileEditor.Thelabelsare:
_fileEditorConfigurationList: acts like aManager (explained on Chapter
16.1) including two nested _list labels with
AcideFileEditorPanelConfiguration objects.Theseobjects store information
about files which must be shown opened at File Editor next time the
applicationwillbeopened.
_selectedFileEditorPanelName:thenameofthefilewhichisshownatthe
FileEditor.
_fontName:thefontnameofthetextofFileEditor.
_fontStyle:fontstyleofthetextofFileEditor.
_fontSize:fontsizeofthetextofFileEditor.
_foregroundColor,backgroundColor:RGBcomponentsof font colorand
backgroundcolor.
_editionMode:withfalsevalue,editionmodeisINSERT,withtruevalueit
isOVERWRITE.
_automaticIndent: with true value, automatic indent, with false value,
manualindent.
_maximumLinesToConsole: the maximum number of lines that can be
senttotheconsoleatthesametime.
_lineWrapping: with true value, sets on line wrapping, with false value,
setsofflinewrapping.
_sendToConsoleConfirmation: with true value, system needs
confirmationtosendcontentoffiletoconsole.Withfalsevalue,filecontent
issentwithoutconfirmation.

User’sManual 150
16.3.4. CONSOLEPANELCONFIGURATION
AtConsolePanelcontentofconsoleconnectedwiththeapplicationisdisplayed.
Ithastwolabels:
_lexiconConfiguration:pathoflexiconwhichisusedatconsole.
_commandsConfiguration: path of XML file that contains commands
historywithwhichwewanttostarttheconsole(explainedinChapter16.6).
Sdvsvs
16.3.5. LEXICONASSIGNERCONFIGURATION
Ithasthreebasiclabels:
_list:actslikeaManager,insidethereisa_listlabelwithanother_listlabel
nested. It is a list ofAcideLexiconAssigner objects. These objects describe
possiblelexiconstouseatconsole.Theyhavethefollowingnestedlabels:
o _description:nameoflexicon.
o _extensionList: it has a group of nested String labels with the
possibleextensionsforthelexicons.
o _lexiconConfiguration:pathofXMLfilethatconfigureslexicon.
_consoleLexiconConfiguration: path of XML file that configures lexicon
whichiscurrentlyinuse.
_applyLexiconToConsole: with true value lexicon is applied to console,
withfalsevalueitisnotapplied.
16.4. PROJECTCONFIGURATION
Project configuration is edited in .acideProject files. In this type of files are
arranged in separate lines different project properties. These are, line by line, the
following:

User’sManual 151
1. Project Name 2. Project Path 3. Compiler Path 4. Compiler Arguments 5. Compiler All Files 6. File separator 7. File extensión 8. Executable path 9. Executable arguments 10. Console panel Console path 11. Console panel Console directory 12. Console panel exit command 13. Console panel is echo command 14. Console panel parameters 15. Console panel foreground color 16. Console panel background color 17. Console panel Font name 18. Console panel Font style 19. Console panel Font size 20. Console panel buffer size 21. Is explorer panel showed flag 22. Is console panel showed flag 23. Is database panel showed flag 24. Is graph panel showed flag 25. Is debug panel showed flag 26. ACIDE - A Configurable IDE main window width 27. ACIDE - A Configurable IDE main window height 28. ACIDE - A Configurable IDE main window x coordinate 29. ACIDE - A Configurable IDE main window y coordinate 30. ACIDE - A Configurable IDE main window vertical upper
left split 31. ACIDE – A Congigurable IDE main window vertical lower
left split 32. ACIDE – A Congigurable IDE main window vertical right
split 33. ACIDE – A Congigurable IDE main window horizontal left
split 34. ACIDE – A Congigurable IDE main window horizontal right
split 35. Language configuration 36. Database panel configuration 37. Menu configuration 38. Menu new configuration 39. Tool bar configuration 40. Panel contained in the upper left part of the window 41. Panel contained in the lower down part of the window 42. Panel contained in the upper part of the window 43. Panel contained in the lower part of the window 44. Panel contained in the upper right part of the window 45. Panel contained in the lower right part of the window 46. Number of files of the project

User’sManual 152
Thefollowinglinesshowthepropertiesoftheprojectfiles.Foreachfilethereare
sevenlinesoftextstoringthefileproperties.Therefore,therewillbemanygroupsof
sevenlinesintheconfigurationfileasindicatedatlinenumber34.Thepropertiesare
asfollows:
Absolutepath.
Name.
Parent.
Directoryflag.
Compilableflag.
Mainflag.
Openedflag.
16.5. CONFIGURATIONOFLEXICONS
LexiconscanbeconfiguredbymanuallyeditingXMLfilesthatdefinethem.
AXMLfilethatdefinesalexiconbeginswiththerootlabel:
<acide.configuration.lexicon.AcideLexiconConfiguration>
to reference the classAcideLexiconConfiguration. Inside this root label there are
sevenbasictags:
_name:definesthenameofthelexicon.
_path:indicatestherelativepathofthisfile.
_isCompiledOrInterpreted: a false value indicates that the lexicon is
compiledandtrueindicatesthatitisinterpreted.
_tokenTypeManager: it is aManager (explained on Chapter 16.1) of the
types of token there are in the lexicon. It consists of a list of objects
AcideLexiconTokenGroup.
_validExtensionsManager:itisaManagerofvalidextensionsoffilesatthe
lexicondefinedintheXMLdocument.TheextensionsareStringobjects.
_delimitersManager: it is a Manager of valid delimiters at the lexicon
definedintheXMLdocument.ThedelimitersareStringobjects.
User’sManual 153
_remarksManager: it isnota commonManager. Itdefines the symbol to
markalineasacommentinthelexicon.Ithasfournestedlabels:
o _symbol:definesthesymboltousetobeginacommentline.
o _isCaseSensitive:defines(trueorfalsevalue)ifitiscasesensitive.
o _color: defines colorof the comments. Ithas fournested tags (red,
blue,green,alpha)thatdefinetheRGBcomponentsandthedegreeof
opacityofthecomments.
o _fontStyle:definesthefontstyleofcomments.
16.5.1. TOKENTYPEMANAGER
This label has two nested _list labels. Inside of the most nested there are the
AcideLexiconTokenGroup objects that define the token types in the lexicon. The
AcideLexiconTokenGroupobjectshavefivenestedlabels:
_name:itisasummaryofthepropertiesdefinedbytheremaininglabels.It
hasthefollowingform:
o Color:[R:_,G:_,B:_],FontStyle:__,CaseSensitive:_
o Forcolorwilltakethevaluesdefinesinthelabel_color.InFontStyle
appears the name that corresponds to the number defined on the
label _fontStyle. In Case Sensitive value yes appears if the label ‐
_IsCaseSensitiveistrueandvaluenotifthelabel_IsCaseSensitivehas
valuefalse.
_color:samestructureasexplainedfor_colorlabelabove.
_fontStyle:itdefineswithanumberthefontstyle.
_isCaseSensitive:itdefinesbytrueorfalsevalueifitiscasesensitive.
_tokenList: contains a label called _list where appears the list of String
objectswhichdefinethetokenswiththepropertiesuserhasdescribedfor
this tokengroup.Adding, removingandediting thesestrings theuserwill
getthelistoftokens.
16.5.2. VALIDEXTENSIONMANAGER
AsaManager,ithastwonested_listlabels.InsidethelasttheusercanfindString
objectslabelswherehecandefineextensionsvalidforthelexicon.

User’sManual 154
16.5.3. DELIMITERSMANAGER
ItisaManagerwhoselistcontainsStringobjects.Withthestringstheuserdefines
thevaliddelimitersforthelexicon.
16.6. COMMANDSHISTORY
InACIDE–AConfigurableIDEispossibletoconfigureacommandshistorysothat
when user starts the application already exits this history, similar towhen he gets
commandsenteredearlierinthesamerun.
The XML file that contains the commands history must be saved in the path
./configuration/console.
Therootlabelofthisfileis:
<acide.configuration.console.AcideConsoleCommandsConfiguration>
toreferencetheAcideConsoleCommandsConfigurationclass.
Inside this label user has to define another label of Manager type called
_commandsManager.
AsusualatManagers,therearetwonested_list.Insidethelasttheuserdefinesby
Stringlabelsthecommandshewantstointroduceinthecommandshistory.Thefirst
commandatthelistactslikethelessrecentlyenteredattheconsole.

User’sManual 155
17. REGULAREXPRESSIONSAregularexpression,oftencalledpattern,isanexpressionthatdescribesasetof
strings without listing their elements. Most formalizations provide the following
constructors:aregularexpressionisawayofrepresentingregularlanguages(finite
or infinite) and is constructed using alphabet characters on which the language is
defined.Regularexpressionsprovideaflexiblewaytosearchorrecognizestrings.
17.1. CONSTRUCTIONOFREGULAREXPRESSIONS
Specifically, regular expressions are built using the operators union,
concatenationandKleeneclosure.
Alternation: A vertical bar separates alternatives. For example,
“red|brown“joinswithredorbrown.
Quantification:Aquantifierafteracharacterspecifiesthefrequencywith
whichthiscanoccur.Themostcommonquantifiers+,?and*:
o +:Theplussignindicatesthattheprecedingcharactermustappear
atleastonce.Forexample,hello+joinshello,helloo,hellooo,etc.
o ?: The question mark indicates that the preceding character can
appearatmostonce.Forexample,S?painjoinsSpainandpain.
o :Theasteriskindicatesthattheprecedingcharactercanappear
zero,one,ormoretimes.Forexample10 joins1,10,100,1000,
etc.
Grouping:Parenthesesmaybeusedtodefinethescopeandprecedenceof
otheroperators.Forexample, “(m|h)ouse” is thesameas“mouse|house”
and“(in)?sensitive”joinswithinsensitiveandsensitive.
Builderscanbefreelycombinedwithinthesameexpression,so“H(ae?|ä)del”is
thesameas“H(a|ae|ä)del”.
Itsmostobvioususeistodescribeasetofstrings,whichisusefulintexteditors
andapplicationsforsearchingandmanipulatingtext.

User’sManual 156
17.2. DESCRIPTIONOFREGULAREXPRESSIONS
17.2.1. THEDOT“.”
The dot is interpreted by the search engine as “any character”, looking for any
characterNOTincludinglinebreaks.
Thedot isusedas follows: Ifwesearch “g.t” in the string “gatgetgotgoot” the
searchenginewillfind“gat”“get”“got”.Notethatthesearchenginedon’tfind“goot”,
thisisbecausethedotrepresentsasinglecharacterandonlyone.
17.2.2. THEBACKSLASH“\”
Itisusedto“tag”thenextcharacterinthesearchexpressionsothatitacquiresa
special meaning or stop having him. The backslash is never used by itself, but in
combinationwithothercharacters.Usedforexample incombinationwiththepoint
“\.”,thishasnotitsnormalmeaningandbehavesasaliteralcharacter.
In the sameway, placing a backslash followed by any of the special characters
discussed below, these do not have special meaning and become literal search
characters.
As mentioned previously, the backslash can also give special meaning to
charactersthatdonot.Belowisalistofsomeofthesecombinations:
\t:representsatab.
\r:representsthecarriagereturnorreturntotop,theplacewheretheline
startsagain.
\n: represents the new line character through which a line begins.
RememberthatinWindowsisneededacombinationof\r\ntostartanew
line,whileUnixusesonly\nandclassicMacOSusesonly\r.
\a:representsabellorbeepthatoccurswhenyouprintthischaracter.
\e:representstheEscorEscape.
\f:representsapagebreak.
\v:representsaverticaltab.
\x:isusedtorepresentASCIIorANSIIcode.
\u:isusedtorepresentUNICODEcharacterswithitscode.

User’sManual 157
\d:representsadigitfrom0to9.
\w:representsanyalphanumericcharacter.
\s:representsablankspace.
\D:anycharacterotherthanadigitfrom0to9.
\W:representsanynon‐alphanumericcharacter.
\S:anycharacterotherthanablank.
\A:representsthebeginningofthestring.Notacharacterbutaposition.
\Z:representstheendofthestring.Notacharacterbutaposition.
\b:marksthebeginningandendofaword.
\B: marks position between two alphanumeric or non‐alphanumeric
characters.
17.2.3. THEBRACKETS“[]”
The function of the brackets in regular expressions is to represent “character
class”,groupingcharactersintogroupsorclasses.Theyareusefulwhenisneededto
findoneofagroupofcharacters.Withinthebracketsyoucanusethe“‐“ tospecify
rangesofcharacters.Additionally,themetacharacterslosetheirmeaningandbecome
literalwhentheyareinsidethebrackets.Forexample,asmentionedpreviously,“\d”
isuseful to findanycharacter that representsadigit.However, thisnamedoesnot
includethe“.”dividingthedecimalpartofanumber.Tosearchforanycharacterthat
representsadigitorapointwecanusetheregularexpression“[\d.]”.Asnotedabove,
withinthebrackets,thepointrepresentsaliteralcharacter,notametacharacter,soit
isnotnecessarytoprecedethebackslash.Theonlycharacterthatmustbepreceded
bythebackslashinsidethebracketsisthebackslash.
17.2.4. THEBAR“|”
Usedtoindicateoneofseveraloptions.Forexample,theregularexpression“a|e”
findall“a”or“e”inthetext.Theregularexpression“East|West|North|South”willfind
anyofthenamesofthecardinalpoints.Thebariscommonlyusedinconjunctionwith
otherspecialcharacters.

User’sManual 158
17.2.5. THEDOLLARSIGN“$”
Representstheendofthestringortheendofthelinewhenusingthemulti‐line
mode.There isnota special character,butaposition.Using the regularexpression
“\.$”theenginewillfindalltheplaceswherealineendswithadot,whichisusefulfor
movingbetweenparagraphs.
17.2.6. THECARET“^”
Thischaracterhasadualfunction,whichdifferswhenusedaloneandwhenused
inconjunctionwithotherspecialcharacters.Firstlyitsfunctionalityasanindividual
character: thecharacter“^”represents thebeginningof thechain(inthesameway
thatthedollarsign“$”representstheendofthestring).Therefore,usingtheregular
expression “^[a‐z]” the enginewill find all paragraphs beginningwith a lowercase
letter. When used in conjunction with the brackets, for example with the form
“[^\w]”, isusefultofindanycharacterthatisnot intheindicatedgroup.Theabove
expression can found any character that is not alphanumeric or a space, all
punctuationandotherspecialcharacters.
17.2.7. PARENTHESES“()”
Similarly to the brackets, parentheses are used to group characters. However,
there are several differences between groups established by brackets and groups
establishedbyparentheses:
Specialcharacterskeeptheirmeaningwithintheparentheses.
Groupsestablishedbyparenthesesmakealabel forthesearchenginethat
canbeusedlaterasdenotedbelow.
Usedinconjunctionwithbar“|”enablesoptionalsearches.Forexample,the
regularexpression“to(East|West|North|South)of”searchestextsgiving
instructions through cardinal points, while the regular expression “East |
West | North| South” find “east” in theword “beast”, failing to fulfill this
purpose.
Used in conjunction with other special characters listed below provide
additionalfunctionality.

User’sManual 159
17.2.8. THEQUESTIONMARK“?”
The question mark has several features in regular expressions. The first is to
specify which part of the search is optional. For example, the regular expression
“S?pain”can findboth“pain”and“Spain”. Inconjunctionwithparenthesesspecifies
thatalargersetofcharactersisoptional,forexample,“Nov(\.|ember|iembre)?”finds
both“Nov.”,“November”and“Noviembre”.Similarly,youcanusethequestionmark
with another meaning. Parentheses define groups “anonymous”, but the question
mark in conjunction with triangular brackets “<>” give name to such groups as
follows: “^(?<Day>\d\d)/(?<Month>\d\d)/(?<Year>\d\d\d\d)$” Whereupon it
specifiestothesearchenginethatthefirsttwodigitsfoundwillbelabeled“Day”,the
secondwillbelabeled“Month”andthelastfourdigitswillbelabeled“Year”.
17.2.9. THEBRACES“{}”
Usually the braces are literal characterswhich are used separately in a regular
expression.Tobeusedasmetacharacterstheyhavetoencloseoneormorenumbers
separatedbycommasandtobeplacedtotherightofanotherregularexpressionas
follows:“\d{2}”.Thisexpressionwillfindtwoadjacentdigits.Usingthisformula,the
example“^\d\d/\d\d/\d\d\d\d$”thatservedtovalidateadateformatwillbecome
to“^\d{2}/\d{2}/\d{4}$”forclarityinreadingtheexpression.
17.2.10. THEASTERISK“*”
The asterisk is used to find something that is repeated 0 or more times. For
example, using the expression “[a‐zA‐Z]\d*” will be possible to find both “H” and
“H1”,“H01”,“H100”and“H1000”,aletterfollowedbyaindefinitenumberofdigits.
17.2.11. THEPLUSSIGN“+”
Itisusedtofindastringthatisrepeatedoneormoretimes.Theexpression“[a‐
zA‐Z]\d+”willfind“H1”butwillnotfind“H”.
Related Documents


