52 GEARS October 2007 Choosing the Right Size Mic The first step in using a microm- eter is choosing the right size mic. Micrometers come in various sizes, but are only designed to measure within a range of about one inch. For example, the set shown in figure 1 includes three micrometers: • Zero to 1 inch • 1 to 2 inches • 2 to 3 inches The thing to remember is that the first digit in your measurement will always be the smaller of the two mea- surements in the range. That is, if you’re using a zero-to-one inch mic, the first digit will always be a zero: 0.xxxx" If you’re using a 1-to-2 inch mic, your first digit will always be a 1: 1.xxxx" How do you choose the right size mic? That’ll be pain- fully obvious the first time you try it: The right mic is the one that fits over the object you’re measuring, and adjusts tight enough to provide a measurement. If the thimble rotates past the sleeve measurements, and the part you’re mea- suring doesn’t fit snuggly between the anvil and spindle, you’re using the wrong mic. Reading the Scale Imperial (Inches) Now we’re ready to look at the scale. This is the part of using a mic that’s fairly consistent, regardless of what type of mic you’re using. Start by looking at the sleeve (fig- ure 2): It has a number of different-size graduations. The largest graduations are numbered, from zero to 9. Those each indicate a tenth of an inch, or 0.1000”. Each of those graduations is divided into four equal parts. So those smaller graduations are each equal to 0.0250”, because 4 x 0.0250” = 0.1000”. Now look at the thimble (figure 3). Each full rotation of the thimble is equal to one of the small graduations I n the last issue of GEARS, we looked at micrometers: What they are, basic terminology, and how to use them. In this issue, we’ll discuss how to read the scale on a micrometer, or mic. While there are many differ- ent types of mics, the scales are pretty much the same. As with the caliper, micrometers are available in a digital format, and can be had for a fairly reasonable price if you’re willing to shop around. For that matter, a digital caliper will prob- ably provide you with adequate accu- racy and resolution for most of your measurement needs. But assuming you’re willing to spend the time necessary, and want to be sure of the most accurate measure- ment possible, a micrometer may be the tool for you. Let’s look at how to read them, starting with a micrometer that’s calibrated for Imperial (inches) measurement. by Steve Bodofsky Reading a Micrometer ACCURATE MEASUREMENTS Figure 1: Micrometers come in a wide range of sizes, with a limited range of measurement. In virtually every case, the first digit of your measurement will be the lower range of the mic. Figure 2: Each of the numbered graduations on the sleeve is equal to a tenth of an inch. Those are divided into four smaller graduations, each equal to 0.0250”.

Welcome message from author
This document is posted to help you gain knowledge. Please leave a comment to let me know what you think about it! Share it to your friends and learn new things together.
Transcript

52 GEARSOctober2007
Choosing the Right Size Mic
The first step in using a microm-eter is choosing the right size mic. Micrometers come in various sizes, but are only designed to measure within a range of about one inch. For example, the set shown in figure 1 includes three micrometers:
• Zero to 1 inch• 1 to 2 inches• 2 to 3 inches
The thing to remember is that the first digit in your measurement will always be the smaller of the two mea-surements in the range. That is, if you’re using a zero-to-one inch mic, the first digit will always be a zero:
0.xxxx"If you’re using a 1-to-2 inch mic,
your first digit will always be a 1:1.xxxx"How do you choose the right size
mic? That’ll be pain-fully obvious the first time you try it: The
right mic is the one that fits over the object you’re measuring, and adjusts tight enough to provide a measurement. If the thimble rotates past the sleeve measurements, and the part you’re mea-suring doesn’t fit snuggly between the anvil and spindle, you’re using the wrong mic.
Reading the Scale Imperial (Inches)
Now we’re ready to look at the scale. This is the part of using a mic that’s fairly consistent, regardless of what type of mic you’re using.
Start by looking at the sleeve (fig-ure 2): It has a number of different-size graduations. The largest graduations are numbered, from zero to 9. Those each indicate a tenth of an inch, or 0.1000”.
Each of those graduations is divided into four equal parts. So those smaller graduations are each equal to 0.0250”, because 4 x 0.0250” = 0.1000”.
Now look at the thimble (figure 3). Each full rotation of the thimble is equal to one of the small graduations
In the last issue of GEARS, we looked at micrometers: What they are, basic terminology, and how to
use them. In this issue, we’ll discuss how to read the scale on a micrometer, or mic. While there are many differ-ent types of mics, the scales are pretty much the same.
As with the caliper, micrometers are available in a digital format, and can be had for a fairly reasonable price if you’re willing to shop around. For that matter, a digital caliper will prob-ably provide you with adequate accu-racy and resolution for most of your measurement needs.
But assuming you’re willing to spend the time necessary, and want to be sure of the most accurate measure-ment possible, a micrometer may be the tool for you. Let’s look at how to read them, starting with a micrometer that’s calibrated for Imperial (inches) measurement.
by Steve Bodofsky
Reading a MicrometerACCURATE MEASUREMENTS
Figure 1: Micrometers come in a wide range of sizes, with a limited range of measurement. In virtually every case, the first digit of your measurement will be the lower range of
the mic.
Figure 2: Each of the numbered graduations on the sleeve is equal to a tenth of an inch. Those are divided into four smaller
graduations, each equal to 0.0250”.

Parts for Automatic Transmissions
SEE YOU INLAS VEGAS!
Please call for an appointment with us:Phones: +49 171 3307071 or +49 151 12116705

54 GEARSOctober2007
on the sleeve, or 0.0250”. The thimble is divided into dif-ferent sized graduations, too. The longest graduations are numbered by fives; each of them is equal to 0.0050”.
Those graduations are divided again; how many times depends on the resolution of your micrometer. In this case, the larger graduations are each equal to 0.0010”; the small-er equal 0.0005”, or five ten-thousandths of an inch.
That’s pretty good, but it’s not the limit of our resolu-tion. Take another look at the sleeve. See those extra divi-sions, running perpendicular to the first set we discussed (figure 4)? That’s called the vernier scale; each graduation on the vernier scale is equal to 0.0001”. So this micrometer can provide measurements that resolve down to one ten-thousandth of an inch! The trick to reading the micrometer is to add the readings on each scale, to provide a single, complete measurement of the object.
TIP: Not all micrometers have a vernier scale; in fact, not all mics have a scale that reads down below 0.001” (figure 5). In that case, all you can do is estimate the ten-thousandths measurement, based on the position of the thimble in relation to the spindle.
Measuring with a Mic Imperial (Inches)
Now let’s see how to read the micrometer scales to measure an object. For this measurement, I’ve chosen a small adjustable wrench. To make the measurement (figure 6):
• Zero the micrometer.• Open the micrometer enough to allow the item to
fit between the anvil and spindle.• Close the micrometer against the area you want
to measure, using the ratchet to adjust it against the object without overtightening it.
• Lock the micrometer spindle using the locknut.If you’re unsure of any of these procedures, read
the Accurate Measurements article in the last issue of GEARS.
Now we’re ready to read the measurement. To make it easier to read and explain, I’ve decided to cheat just a bit: I’m using a flattened drawing of the micrometer scale, adjusted exactly the way the micrometer displayed its measurement (figure 7). This just makes it easier for you to read the display all at once, without having to rotate the micrometer to see all the different scales. Think of it like
Figure 3: A full rotation of the thimble equals one graduation on the sleeve. And the thimble is divided into smaller gradua-
tions; in this case, down to 0.0005”.
Figure 4: The vernier scale allows you to refine your measure-ment even further; down to just 0.0001”.
Figure 5: Not all mics have a vernier scale. If yours doesn’t, you can estimate the difference between the zero line and the
graduations on the thimble.
Figure 6: The procedure for measuring an object with an outside mic is always pretty much the same. If you’re
unsure of the procedures, read the Accurate Measurement column in the last issue of GEARS.
Reading a Micrometer
�
�
�
�
�
�
��� � � � � � � �
� �
�
�
Figure 7: This is a flattened version of a micrometer scale; like using a world map instead of a globe. The advantage is it lets you examine all of the scales at once, without having to rotate
the mic to see the rest of the scale — a big benefit in print!


56 GEARSOctober2007
using a map of the world instead of a globe; everything’s right there in front of you, instead of rotating it to see what’s on the back.
Since the micrometer we used was a zero-to-1 inch mic, the first digit will be a zero:
0.xxxx”
Next we look at the large, numbered graduations on the sleeve. The thimble is back far enough to reveal the third numbered graduation, so the measurement is at least three tenths of an inch. Here’s what we have so far:
0.3xxx”
A closer look at the sleeve reveals at least one smaller graduation is showing; maybe two. So which is it, one or two? It’s one; here’s how we know:
Look at the graduations on the thimble (figure 8). Notice we’re close to the 20; that is, we’re near the end of its scale. Remember, each rotation of the thimble is equal to one small graduation on the sleeve. So, since we’re near the end of the scale on the thimble, we’re just short of the sec-ond graduation on the sleeve. That’s why we can see a little of the next graduation, even though we haven’t reached the second graduation yet.
Okay, so we have one small graduation showing on the sleeve; that’s another 0.0250”:
0.3000”+ 0.0250” 0.3250”
Next, look at the graduations on the thimble (figure 9). The zero indicator line on the sleeve is lined up just a bit shy of 21. 21 would be 0.0210”; since this is less, it’d be 0.0200”. But there’s another, short graduation, between the 20 and 21. That’s 0.0005”, so the thimble reads 0.0205”. That’s how much we add to the formula:
0.3000” 0.0250”+ 0.0205” 0.3455”
But wait; there’s more! Notice that the zero indicator is just a tiny bit past the 0.0005” mark. This is where the ver-nier scale comes in. Look at the vernier scale, and find the graduation that lines up with a graduation on the thimble (figure 10). In this case, it’s the 3. That’s another 0.0003” to add to the total. So our final measurement is:
0.3000” 0.0250” 0.0205”+ 0.0003” 0.3458”
And that’s the final measurement in inches: 0.3458”.
Reading a Metric MicSome of you aren’t forced to fight with measuring
length in inches, feet, yards and miles. Some of you get to work in simple decimal equivalents, known as the Metric
�
�
�
�
�
�
��� � � � � � � �
� �
�
�
Reading a Micrometer
Figure 8: Are we seeing one graduation or two past the 3 on the sleeve? It has to be one, because we’re too close to the
high end of the scale on the thimble.
Figure 9: The graduations on the thimble tell you how much to add to your initial measurement. In this case, you’ll be
adding 0.0205”.
Figure 10: To refine your measurement even further, see which graduation on the vernier scale lines up with a graduation on the
thimble. Then add that number to the 1/10,000ths column.
�
�
�
�
�
�
��� � � � � � � �
� �
�
�
�
�
�
�
�
�
��� � � � � � � �
� �
�
�

New SuperFlow TransDyno SF-66KThe convenience, reliability, versatility and ability to test virtually every transmission on the road, including the new Allison models. Handles hydraulically and electrically shifted transmissions, foreign and domestic, in FWD, RWD and AWD confi gurations. Monitors and tests virtually every aspect of transmission performance, under simulated road load conditions, before the transmission is installed … supported by the accuracy and superior documentation of the exclusive TDAC (Transmission Data Acquisition & Control) System.
Check out converters BEFORE you ship or
install with HUB RUNOUT INSPECTION UNITS. And,
ensure your converter quality (after welding)
with AIR TEST STANDS for diagnosing leaks.
Valve Body TestersPrecision test valve bodies, solenoids and pressure transducers with actual transmission pressures and heated oil under toughest simulated driving conditions.
New! Improved!Torque Converter Balancernow with automatic weight indexing,runout compensa-tion mode, push buttom polishing and better accuracy and repeatability than ever before.
Single Gun Auto Weld AlignerStandard of the industry. And choice of the big three — Ford, GM, Daimler-Chrysler. Air-operated collets. Patented auto-tack and auto-weld.Do “bowl buildups” and weld on impeller hubs.TAC 12+ control panel lets you automatically control number of tacs and duration.
TCRS Torque Converter Test and Rebuild Systems Excellent profi t center for transmission repair shops or stand-alone startups …
and smartest way to save time and prevent costly comebacks.
Solenoid Testers A must for testing the weakest link … six at a time. Easy to use.
4060 Dixon Street • Des Moines IA 50313 • ph: 888-442-5546 or 515-254-1654 • fax: 515-254-1656
When you really need to know…
www.superfl ow.com
SuperShifterThe NEW Durable
In-Car TesterRugged design, solid
state electronics, impact-resistant housing.
Tests most late model transmissions. Controls the transmission from inside the car. Tests Solenoid
current/resistance. Operator ID and Date/Time stamp. Embedded Bluetooth for external device connectivity.
Hicklin Heavy-Duty Transmission Dynamometers
Shown with manual console.
SuperFlow Dynos and FlowbenchesRecognized world leader in fl owbench technology, plus a wide range of engine dynos, chassis dynos and software.Helps OEMs, high performance test engineers and engine builders take performance to the next level.
for trucks, mass transit, military, off-high-way. In-line v-drive … angle drive … Allison,
Renk, ZF, Voith and many others. Also ask about towing, axle and brake dynamometers
for medium- to heavy-duty trucks; and torque converter dynamometers for testing
under real-world, full-load conditions.
8354 Gears_TestCenterAd_Dec2006.1 1 12/13/06 4:27:02 PMsuperflow ad.indd 31superflow ad.indd 31 12/26/06 11:38:48 AM12/26/06 11:38:48 AM
58 GEARSOctober2007
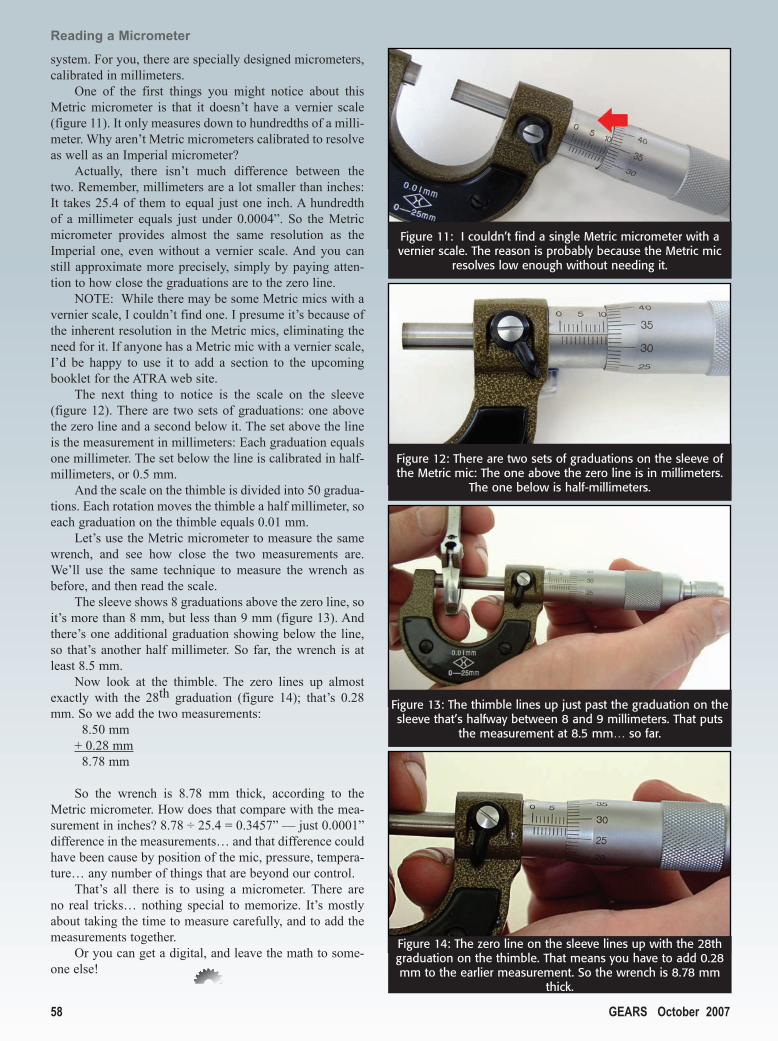
system. For you, there are specially designed micrometers, calibrated in millimeters.
One of the first things you might notice about this Metric micrometer is that it doesn’t have a vernier scale (figure 11). It only measures down to hundredths of a milli-meter. Why aren’t Metric micrometers calibrated to resolve as well as an Imperial micrometer?
Actually, there isn’t much difference between the two. Remember, millimeters are a lot smaller than inches: It takes 25.4 of them to equal just one inch. A hundredth of a millimeter equals just under 0.0004”. So the Metric micrometer provides almost the same resolution as the Imperial one, even without a vernier scale. And you can still approximate more precisely, simply by paying atten-tion to how close the graduations are to the zero line.
NOTE: While there may be some Metric mics with a vernier scale, I couldn’t find one. I presume it’s because of the inherent resolution in the Metric mics, eliminating the need for it. If anyone has a Metric mic with a vernier scale, I’d be happy to use it to add a section to the upcoming booklet for the ATRA web site.
The next thing to notice is the scale on the sleeve (figure 12). There are two sets of graduations: one above the zero line and a second below it. The set above the line is the measurement in millimeters: Each graduation equals one millimeter. The set below the line is calibrated in half-millimeters, or 0.5 mm.
And the scale on the thimble is divided into 50 gradua-tions. Each rotation moves the thimble a half millimeter, so each graduation on the thimble equals 0.01 mm.
Let’s use the Metric micrometer to measure the same wrench, and see how close the two measurements are. We’ll use the same technique to measure the wrench as before, and then read the scale.
The sleeve shows 8 graduations above the zero line, so it’s more than 8 mm, but less than 9 mm (figure 13). And there’s one additional graduation showing below the line, so that’s another half millimeter. So far, the wrench is at least 8.5 mm.
Now look at the thimble. The zero lines up almost exactly with the 28th graduation (figure 14); that’s 0.28 mm. So we add the two measurements:
8.50 mm+ 0.28 mm 8.78 mm
So the wrench is 8.78 mm thick, according to the Metric micrometer. How does that compare with the mea-surement in inches? 8.78 ÷ 25.4 = 0.3457” — just 0.0001” difference in the measurements… and that difference could have been cause by position of the mic, pressure, tempera-ture… any number of things that are beyond our control.
That’s all there is to using a micrometer. There are no real tricks… nothing special to memorize. It’s mostly about taking the time to measure carefully, and to add the measurements together.
Or you can get a digital, and leave the math to some-one else!
Reading a Micrometer
Figure 11: I couldn’t find a single Metric micrometer with a vernier scale. The reason is probably because the Metric mic
resolves low enough without needing it.
Figure 12: There are two sets of graduations on the sleeve of the Metric mic: The one above the zero line is in millimeters.
The one below is half-millimeters.
Figure 13: The thimble lines up just past the graduation on the sleeve that’s halfway between 8 and 9 millimeters. That puts
the measurement at 8.5 mm… so far.
Figure 14: The zero line on the sleeve lines up with the 28th graduation on the thimble. That means you have to add 0.28 mm to the earlier measurement. So the wrench is 8.78 mm
thick.
www.parker.com 1 800 582 276015750 NW 59th AvenueMiami Lakes, FL 33014
Seal Aftermarket Products utilizes Parker Seal Group manufacturing capabilities with market leading technology in developing aftermarket solutions. Seal Aftermarket Products offers kits and bulk components in over 20 different product categories; Our manufacturing capabilities include many of the best-known and most reliable products in the industry such as molded pistons, standard and custom o-ring seals, lip seals, lathe cut seals, Tefl on™ seals, and metal clad seals. Benefi t from the total Parker solution and get ready to move.
Together, we can move in a new direction. Park, Reverse, Neutral, Drive.
Seal Aftermarket Products allows you to shift into gear with OE technology from Parker’s Seal Group; our
strength is backed by 60 years of manufacturing experience dealing with customers demanding the best in
sealing technology. The Seal Group consistently adds manufacturing capabilities through strategic acquisitions
including Acadia Rubber, Wynns Precision and Goshen Rubber, just to name a few.
GEARS.indd 1 9/17/2007 4:14:06 PM
Related Documents