CHAPTE ONE: ORGANIZATION AN STRUCTURE ACCORDION organizational structures and responsibilities are similar to those utilized in the ACCORD trial. Seven Clinical Center Networks (CCNs) and a Coordinating Center (CoC) are contracted by the National Heart, Lung and Blood Institute to work together to successfully conduct the study. Each CCN is responsible for clinical sites within its network. In addition, there is a Central Chemistry Laboratory, and an ECG Reading Center. Names, addresses, telephone numbers, fax numbers, and email addresses can be found using a searchable directory on the ACCORDION web site at www.accordionstudy.org. 1.1 ORGANIZATIONAL STRUCTURE 1.1.1 Clinical Center Networks and Clinical Sites Each CCN consists of a network of clinical sites that are involved in the enrollment and follow-up of study participants. The CCNs responsible for the activities of their clinical sites and oversee clinical sites during the study on issues related to recruitment, protocol adherence, and quality control. While clinical sites interact principally through their CCNs, they will transmit their data directly to the CoC. 1.1.2 The Coordinating Center The CoC is responsible for coordinating the writing and updating of the protocol; coordinating development and distribution of the Manual of Procedures (MOP); training trial personnel in the standardized protocol implementation and data collection; providing rapid feedback to the CCNs and core laboratories on the quality of data submitted and proposing corrections; maintaining the trial database and web site; and analyzing all data. During the recruitment phases of the trial, the CoC is responsible for monitoring recruitment and provides reports to the CCNs, the Executive Committee, the Steering Committee, and the NHLBI Project Office. 1.1.3 ECG Center and Central Laboratory The ECG Center and the Central Laboratory provide central interpretation of resting ECGs, HbA1c and other blood measurements on study participants. Each core unit is responsible for development and distribution of specific measurement procedures, timely data gathering, and analysis. 1.1.4 NHLBI Project Office and Other Government Representatives

Welcome message from author
This document is posted to help you gain knowledge. Please leave a comment to let me know what you think about it! Share it to your friends and learn new things together.
Transcript

CHAPTE ONE ORGANIZATIONAN STRUCTURE
ACCORDION organizational structures and responsibilities are similar to those utilized in the ACCORD trial Seven Clinical Center Networks (CCNs)and a Coordinating Center (CoC)are contracted bythe National Heart Lungand BloodInstitute to work together to successfully conduct the study Each CCN isresponsible forclinical siteswithin itsnetwork In addition there is a Central Chemistry Laboratory and an ECG Reading Center
Names addresses telephone numbers fax numbers and emailaddresses can be found using a searchable directory on the ACCORDION web site at wwwaccordionstudyorg
11 ORGANIZATIONAL STRUCTURE
111 Clinical Center Networks andClinical Sites
Each CCN consists of a network of clinical sites that are involved in the enrollment and follow-upof study participants The CCNsresponsible forthe activitiesof theirclinical sitesand oversee clinical sites duringthe studyon issues related torecruitment protocol adherence and qualitycontrol While clinical sites interact principally through theirCCNs they will transmittheir data directlyto theCoC
112 The CoordinatingCenter
The CoC is responsible for coordinating the writing and updating of the protocol coordinating development and distributionof the Manual of Procedures (MOP)training trial personnel in the standardized protocol implementation and data collection providingrapid feedback to the CCNsand core laboratorieson the quality of data submitted and proposing corrections maintainingthe trial database and web site and analyzingall data
During the recruitment phases of the trial the CoC is responsible for monitoringrecruitment and providesreportsto the CCNs the Executive Committee the Steering Committee andthe NHLBI Project Office
113 ECGCenter and Central Laboratory
The ECGCenter and the Central Laboratory provide central interpretationof resting ECGs HbA1c and other blood measurements on study participants Each core unit is responsible for development and distributionof specific measurement procedures timely data gathering and analysis
114 NHLBI Project Office and Other Government Representatives
ACCORDION is sponsored by the National Heart Lung and Blood Institute (NHLBI) of the National Institutesof Health (NIH) The NHLBI Project Office isresponsible forthe administration and monitoringof the trial The National Eye Institute (NEI) NationalInstitute on Aging (NIA) National Institute of Diabetes and Digestive and Kidney Disease (NIDDK)and the Centers for Disease Control and Prevention (CDC)are also co-sponsorsof ACCORDION
12 ADMINISTRATIONAND GOVERNANCE
121 The ACCORDION Steering Committee
The ACCORDION SteeringCommittee provides the leadership for the studyand establishes scientific and administrative policy Itis composed of the seven CCN Principal Investigators (PIs) the CoC PIthe NHLBI Project Officerthe Steering Committee Chairand the Steering Committee Vice-Chair
The Steering Committee oversees the overall conduct of the study The committee alsoconsiders and adopts changes in study procedures as necessary during the course of the study Voting members include the seven CCN PIsthe CoCPIand the NHLBI Project OfficerThe Steering Committee Chair or Vice-Chair in his absence votes only tobreaka tie
There are three standing subcommitteesof the Steering Committee the OperationsRetention Subcommitteethe Morbidity and Mortality Subcommittee and the Papers andPresentations Subcommittee Subcommittees are responsible for monitoring specific portionsof the conduct of the study and providing periodic statusreportsto the SteeringCommittee
1211 Operations and Retention Subcommittee
The charge of this groupis to assure communicationamong the clinical sites with respect to overall studycoordination recruitment andimplementation of follow-up During the recruitment phase of the study thissubcommittee monitorsrecruitment and screening and assists the Clinical Center Networks experiencingrecruitment difficulties Duringthe follow-upphases of the trial this subcommittee monitors all aspects of participant retention including visit adherence The subcommittee is chaired bya CCN Coordinator and rotates annually
1212 Morbidity and Mortality Subcommittee
Using a representative sample of all outcomes reported in the study this Subcommittee will review information from the clinical centersand classify each event for quality control forascertainment and classification of these clinical events Duringthe datacollection phases of the trial this subcommittee oversees the work of the Event Classification WorkingGroup (made up of ACCORD investigators who may ormay not be onthe Morbidity andMortality Subcommittee) whowill meet on aregular basis and whouse the procedures and criteria
adopted bythe trial toclassifythe occurrence of clinical events in amasked fashion and tomonitor event ascertainmentclassification quality control
1213 Publications and Presentations Subcommittee
This subcommittee developed the policies and procedures by which ACCORD investigators will conduct analyses write papers and make presentations Included in theresponsibilities of this subcommittee are approval of analysespaperspresentations solicitation of writing group members and monitoring progressof all proposed papersto ensuretheir prompt completion and publication This subcommitteeis responsiblefor reviewing proposedancillarystudies andfor makingrecommendations tothe SteeringCommittee regarding the proposals
122 Executive Committee
The ACCORD Executive Committee is the operational arm of the Steering Committee and makes decisions on behalf of the Steering Committee on day-to-day operational issues requiring immediate action It makesrecommendationsto the Steering Committee forconsideration It meets at least biweekly by conference call to review trial progress and any study issuesthat may arise This committee also develops Steering Committee Meetingagendas and time lines for the accomplishment of tasks
The members of the Executive Committee include the Steering Committee Chair Steering Committee Vice-Chair CoC personnel Project Office personnel one CCN PI and the current Chair of the Operations andRetention Subcommittee The CCN PI position is rotatedannually
123 The Observational Safety MonitoringBoard
An independent Observational Safety Monitoring Board (OSMB) monitors data and participant safety Members of the OSMB appointed bythe Director of NHLBI are senior experts in theareas of cardiovascular medicine diabetes biostatistics and bioethics TheStudyChair the Vice-Chair the Principal Investigator andsenior staff of the CoCand representativesfrom sponsoring federal agenciesparticipate in OSMB calls as non-votingmembers The OSMB meets at least once ayear and will make recommendations toNHLBI regarding study continuation
CHAPTER 2 REGULATORYRESPONSIBILITIES
As an NIH-funded study ACCORDION willfollow applicable federalregulations (45CFR46) and international guidelines (ICHGCP) throughout the studyperiod Sites are expected tobe familiar with and adhere to all applicable international federal state and local lawsguidelines and policies
21 INSTITUTIONAL REVIEW BOARDRESEARCH ETHICS BOARD APPROVALS
IRBREB approval mustbe obtained ateach clinical site each CCN the Central Laboratory ECGReading Center and Coordinating Center Copies of IRBREBapprovals should be forwarded to the CoC as soon as they are available Study enrollment may not begin at a localsite untilthe localIRBREB approvalletter and copies ofapproved consent forms are received and reviewed by the CoC Website access will not be granted until all necessarydocuments are receivedby the CoC
22 SENDINGDOCUMENTS TOTHE COORDINATING CENTER
Sites are expected tosend copies of the followingregulatorydocuments tothe CoC
bull Initial IRBREB approval letter bull Blank (not signed) copies of IRBREB-approved consent forms bull Continuing IRBREB review approval (must be at least annually) bull IRBREB approval letters for protocol amendments as applicable
bull IRBREB approval letters for consentform changes as applicable
bull Local audit reports if findingsare specific to ACCORDION
bull Other significant IRBREB correspondence (eg withdrawal of approvalreinstatement of lapse approval etc)
23 ACCORDION REGULATORYBINDER
IRB approvals mustbe renewed annually and proof of all approvalsrenewals must be the submitted to the ACCORDION Coordinating Center
The Regulatory Binder serves as the regulatory record of a clinicrsquos participationinthe ACCORDstudy It should be kept current and available for review by the CCN Coordinators during site visits Thisbook should include current copiesof
bull The protocol and revisions bull Curriculum vitae for the investigators sub-investigator and study coordinator
bull IRBREB approvals renewals and correspondence
bull Copies of IRBREB approvedinformedconsent document(s) bull Research participant advertisements brochures pamphlets if used
bull Correspondence (may keep separate correspondence file) bull Site visit log
bull Enrolled participant log with pertinent identifier information(study number and acrostic)
Other study materials may be added in conjunction with local standard operating procedures
24 ADVERSE EVENTREPORTING
Because ACCORDION is not an interventional trial adverse events will not be systematically collected In the Code of Federal Regulations Serious Adverse Events(SAEs) are defined asbeing (1) unexpected (2) serious innature and (3)related to study drug Because there is no study drug inACCORD andall three criteria must be met to qualify anevent as reportable SAEswill not be collected centrally
Sites with local policies that donot match the federal guidelines should contact their IRBREB for specific reporting guidelines Itis possible thatevents will need local reporting despite not being collectedinACCORDION
CHAPTER THREE RECRUITMENT AND INFORMEDCONSENT
31 RECRUITMENTOF STUDYCOHORT
Participant recruitment is of prime importance to the success of this study Only former ACCORDparticipants may be enrolled in ACCORDION Listed below are points to consider on recruitingparticipants
bull The study provides a system of follow-up which parallels the participantrsquos privatecare but does not conflict with it Approach potential participants more than once if necessary unless they request no further contact
bull Emphasize the importance of the ACCORD resultsand therefore the importance of obtainingmore information
bull Be courteous and pleasant at all times bull Be professional and show interest and enthusiasm in the study bull Potential participants may be told ldquoWe donrsquot know the answers but here isa chance
to help medical sciencerdquo Some potential participants will be motivated by stressing thatthe results may benefittheir children and thatthey may have a chance to help society
311 Develop a Recruitment Plan
Developing a plan is vital tosuccessful recruitment in anystudy In addition tothis section sitesmay elect to revisit the ACCORD Survival Kit manual forspecific tipsand recruitment tools thatmay be helpful This manual was provided to each site as an additional reference during the ACCORD trial
1 Identify staff involved with recruitment review their responsibilities and setregularmeeting times
2 Determine the number of ACCORDparticipants needed to contact per week in order to successfully enroll the specified amount
3 Discuss your recruitment plan with your Project Coordinator and Network Team asthey can provide extra assistance as needed
4 Monitor your recruitment progress and revise your plan as needed 5 Meet weekly as a teamto discuss progress Review barriers andproblems and
revise the plan asnecessary 6 Maintain a log of all participants contacted 7 Stayinvolved and motivated
a Keep your Network team informed Share your ideas and problems b Keep your staff informed of your sitersquos progress and thank them for their
support and help
312 Recruitment Materials
Specific recruitment materials will not be distributed bythe CoC However clinical sites are free to develop such materials and tools to be used locally Allrecruitment materials should be approved by the local IRBREB before use (Copies are not needed at the CoC)
32 ELIGIBILITY
All former ACCORDparticipants are eligble to participate in ACCORDION This includes those who finished the main ACCORD trial butdid notparticipate in the phone-only Extension Unless a participant has refused further contact all living former ACCORD participants should be contacted
33 OBTAINING INFORMEDCONSENT
Clinical sites were given four consent documents for use in obtaining informedconsent Sites onlyneedto submit the documents they will be using to their IRBREB The documents distributedwere
bull Document for participation in ACCORDION
bull Addendum for participation in ACCORDION Eye
bull Addendum for participation in ACCORDION MIND
bull Addendum for participation inACCORDION MIND-MRI
Use of these model documents with limited locally-required revision only isstrongly encouraged Significant deviations must beapproved bytheCoC TheACCORDION protocol and all applicable consent documents must be approved bythe local IRBREB before enrollment can begin
Informed consentmustbe obtained from the participantor hisher Legally Authorized Representative (LAR) at or prior to the first ACCORDION visit Principles of informedconsent as detailed in ICHGCP Guidelines must be adhered to including but not limited to a complete description of expectations potential risks and benefits and confidentiality Potential participants shouldbe givenample time to review the document andaskany questions Local institutional policies regarding the consent process including the use of anLAR shouldbe followedat all times
Because approximately half of all ACCORDION participants will have a phone visit before their firstin-clinicvisit local sites may consent potential participants by mail Consenting by mail must be approved by the local IRBREB and sites should adhere to any localpolicies
Revisions to the model consent form documents if needed will be distributed from the CoC toall CCNs andclinical sites
CHAPTER FOUR IN-CLINIC VISIT PROCEDURES
41 VISIT SCHEDULE OF ACCORDION STUDY ACTIVITIES ndash 1ST CLINIC VISIT
1 Print all appropriate visit forms prior to the participant coming into the clinic This is done by
bull Login to the ACCORDION website (wwwaccordionstudyorg)
bull Click on Data ManagementRecruitment amp Consent
bull Find the Participant ID number from the pick list
bull Click on Print 24 M Forms 2 This visit should occur as close as possible to the target date For the first and last clinic visits
participants will be instructed to attend the clinic following an overnight fast (at least 8-10 hours) If a participant is not fasting the clinic should attempt to schedule a re-draw If the participant is unwilling or unable to come back for a re-draw all specimens should be obtained and a comment on the form should be made (ie Participant Non-Fasting) The HbA1c and urine ALBCreatinine specimen are not affected by a participantrsquos status However the Lipid Profile is affected because the triglycerides values will be increased A code will be made at the Central Lab if a participant is non-fasting The code will be reported on the results sent to the clinics
3 For all clinic visits participants should be instructed to bring any medications theyrsquove taken in the last two weeks with them to the clinic They should not take their glycemia or lipid (if applicable) medications on the morning of this clinic visit but should take their blood pressure medication (with water) prior to coming to clinic If the participant has not taken their BP medication but has brought the medication with them have the participant take the medication and then measure their study BP 2-3 hours following the administration of the medication During the visit the following procedures will be conducted
4 Verify that the main study consent form has been reviewed and signed If participant is also in the MIND andor Eye Substudy verify that the appropriate consent form has been obtained and signed
5 Update the Participant Contact Information at this clinic visit and check the participantrsquos medical release of information
6 Inquire about any outcome events that have occurred or procedures that were performed since the last time event data were collected and record dates on the In-Clinic Follow-up Form If the participant has had a reportable event make sure that a medical release of information has been obtained in order to be able to collect the additional information to complete the Death Report Form Myocardial Infarction Report Form Stroke Report Form Unstable Angina Report Form andor Miscellaneous Cardiovascular Outcome Report Form Upon completion these forms and supporting documentation are mailed or faxed to the Coordinating Center (Please
note medical records are not required for the Miscellaneous Cardiovascular Outcome Report Form)
7 Review the Concomitant Medications list (located in the Clinic Follow-up Form) with participant to document medications currently taking
8 Perform the physical exam including weight height waist circumference and foot exam Using the appropriate technique for the Omron device obtain blood pressure and pulse (See MOP Chapter 7 Section 72 and Section 733)
9 Additional procedures to be completed only at the first and last clinic visit include a Blood samples and urine samples will be obtained processed and shipped to the
ACCORD Central Lab for measurement of HbA1c total cholesterol VLDL-C LDL-C HDL-C triglycerides serum creatinine ALT urine creatinine and urine microalbuminuria (See Central Chemistry Lab MOP for details)
b A standard 12-lead ECG will be obtained using the Heart Square and the measurements sent electronically to the ECG Reading Center Retain a copy for the participantrsquos research records (See ECG MOP for details) In regard to the site PIrsquos responsibility for ldquoAlertrdquo ECGs PIs need to use good clinical practice and judgment This process is aimed to provide a safety net for the participants during the ECG exam
c Electrocardiograms for the ACCORDION study should always be transmitted to EPICARE electronically In the rare occasion when it is not possible the following steps should be followed by the field clinic to get the original hard copy ECG to EPICARE ECG Reading Center
bull Immediately notify the ECG Reading Center by email ( copying
the CoC ( ) The reason for sending the hard copy should be stated in the email and the measures taken to prevent this from happening again in the future
bull The field clinic should make a good copy of the ECG to keep in the participantrsquos chart
bull The original hardcopy ECG should be sent to the ECG Reading Center using either UPS or FedEx so shipment can be tracked to ensure the safety of the ECGrsquos
bull The shipment should be sent to the ECG Reading Center using the following address
d Participants will be given the Health Utilities Index Form and the HRQL form and instructed on how to complete it Verify that the participant completes all items before end of visit and review for suicide risk (Refer to MOP Chapter 5 Section 522)
10 At the first clinic examination for consenting MIND participants complete cognitive test battery 11 Obtain a medical release covering the next 12 months 12 Schedule next 6 month contact 13 Complete the following forms and data enter as required
a Participant Contact Information Form (as necessary) b Encounter and Disposition Form c In-Clinic Follow-up Form d HUI e HRQL f Lab Shipment Form (send to Central Lab no data entry necessary) g Study Status Form (as necessary)
14 Complete the following forms (as needed) and send to the CoC for data entry a Death Report Form b MI Report Form c Stroke Report Form d Unstable Angina Report Form e Miscellaneous CV Event Form
42 Visit Schedule of ACCORDION Study Activities ndash 2st Clinic Visit
1 Print all appropriate visit forms prior to the participant coming into the clinic This is done by
bull Login to the ACCORDION website (wwwaccordionstudyorg)
bull Click on Data ManagementRecruitment amp Consent
bull Find the Participant ID number from the pick list
bull Click on Print M Forms ( denotes the visit month) 2 This visit should occur as close as possible to the target date 3 Update the Participant Contact Information at this clinic visit and check the participantrsquos medical
release of information 4 Inquire about any outcome events that have occurred or procedures that were performed since
the last time event data were collected and record dates on the In-Clinic Follow-up Form If the participant has had a reportable event make sure that a medical release of information has been obtained in order to be able to collect the additional information to complete the Death Report Form Myocardial Infarction Report Form Stroke Report Form Unstable Angina Report Form or Miscellaneous Cardiovascular Outcome Report Form Upon completion these forms and supporting documentation are mailed or faxed to the Coordinating Center (Please note medical records are not required for the Miscellaneous Cardiovascular Outcome Report Form)
5 Review the Concomitant Medications list (located in the Clinic Follow-up Form) with participant to document medications currently taking
6 Perform the physical exam including weight height waist circumference and foot exam Using the appropriate technique for the Omron device obtain blood pressure and pulse (See MOP Chapter 7 Section 72 and Section 733)
7 Obtain a medical release covering the next 12 months 8 Schedule next 6 month contact 9 Complete the following forms and data enter as required
a Participant Contact Information Form (as necessary) b Encounter and Disposition Form c In-Clinic Follow-up Form d Study Status Form (as necessary)
10 Complete the following forms (as needed) and send to the CoC for data entry a Death Report Form b MI Report Form c Stroke Report Form d Unstable Angina Report Form e Miscellaneous CV Event Form
43 Visit Schedule of ACCORDION Study Activities ndash 3rd Clinic Visit
1 Print all appropriate visit forms prior to the participant coming into the clinic This is done by
bull Login to the ACCORDION website (wwwaccordionstudyorg)
bull Click on Data ManagementRecruitment amp Consent
bull Find the Participant ID number from the pick list
bull Click on Print M Forms ( denotes the visit month) 2 This visit should occur as close as possible to the target date For last clinic visit participants will
be instructed to attend the clinic following an overnight fast (at least 8 to 10 hours) If a participant is not fasting the clinic should attempt to schedule a re-draw If the participant is unwilling or unable to come back for a re-draw all specimens should be obtained and a comment on the form should be made (ie Participant Non-Fasting) The HbA1c and urine ALBCreatinine specimen are not affected by a participantrsquos status However the Lipid Profile is affected because the triglycerides values will be increased A code will be made at the Central Lab if a participant is non-fasting The code will be reported on the results sent to the clinics
3 Participants should be instructed to bring any medications theyrsquove taken in the last two weeks with them to the clinic They should not take their glycemia or lipid (if applicable) medications on the morning of this clinic visit but should take their blood pressure medication (with water) prior to coming to clinic If the participant has not taken their BP medication but has brought the medication with them have the participant take the medication and then measure their study BP 2-3 hours following the administration of the medication During the visit the following procedures will be conducted
4 Update the Participant Contact Information at this clinic visit and check the participantrsquos medical release of information
5 Inquire about any outcome events that have occurred or procedures that were performed since the last time event data were collected and record dates on the In-Clinic Follow-up Form If the participant has had a reportable event make sure that a medical release of information has been obtained in order to be able to collect the additional information to complete the Death
Report Form Myocardial Infarction Report Form Stroke Report Form Unstable Angina Report Form andor Miscellaneous Cardiovascular Outcome Report Form Upon completion these forms and supporting documentation are mailed or faxed to the Coordinating Center (Please note medical records are not required for the Miscellaneous Cardiovascular Outcome Report Form)
6 Review the Concomitant Medications list (located in the Clinic Follow-up Form) with participant to document medications currently taking
7 Perform the physical exam including weight height waist circumference visual acuity (last clinic visit only refer to MOP Chapter 7 Section 74) and foot exam Using the appropriate technique for the Omron device obtain blood pressure and pulse (See MOP Chapter 7 Section 72 and 733)
8 Additional procedures to be completed at the last clinic visit include a Blood samples and urine samples will be obtained processed and shipped to the
ACCORD Central Lab for measurement of HbA1c total cholesterol VLDL-C LDL-C HDL-C triglycerides serum creatinine ALT urine creatinine and urine microalbuminuria (See Central Chemistry Lab MOP for details)
b A standard 12-lead ECG will be obtained using the Heart Square and the measurements sent electronically to the ECG Reading Center Retain a copy for the participantrsquos research records (See ECG MOP for details) In regard to the site PIrsquos responsibility for ldquoAlertrdquo ECGs PIs need to use good clinical practice and judgment This process is aimed to provide a safety net for the participants during the ECG exam
c Electrocardiograms for the ACCORDION study should always be transmitted to EPICARE electronically In the rare occasion when it is not possible the following steps should be followed by the field clinic to get the original hard copy ECG to EPICARE ECG Reading Center
bull Immediately notify the ECG Reading Center by email ( ) copying
the CoC ( ) The reason for sending the hard copy should be stated in the email and the measures taken to prevent this from happening again in the future
bull The field clinic should make a good copy of the ECG to keep in the participantrsquos chart
bull The original hardcopy ECG should be sent to the ECG Reading Center using either UPS or FedEx so shipment can be tracked to ensure the safety of the ECGrsquos
bull The shipment should be sent to the ECG Reading Center using the following address
d Participants will be given the Health Utilities Index Form and the HRQL form and instructed on how to complete it Verify that the participant completes all items before end of visit and review for suicide risk (Refer to MOP Chapter 5 Section 522)
9 Obtain a medical release covering the next 12 months 10 Schedule next 6 month contact if there is another visit indicated on participant schedule 11 Complete the following forms and data enter as required
a Participant Contact Information Form (as necessary) b Encounter and Disposition Form c In-Clinic Follow-up Form d HUI e HRQL f Lab Shipment Form (send to Central lab no data entry necessary) g Study Status Form (as necessary)
11 Complete the following forms and data enter as required a Death Report Form b MI Report Form c Stroke Report Form d Unstable Angina Report Form e Miscellaneous CV Event Form
CHAPTER FIVE ASSESSMENT OF HEALTH RELATED QUALITY OF LIFE
(HRQL) IN ACCORDION
51 Introduction
The goal of the ACCORDION HRQL investigation is to assess the continued impact of the ACCORD interventions on well being in all participants enrolled in ACCORDION This assessment will address the effects on general health and well being
511 Short-Term
Medication-related effects on HRQL are assessed primarily with a symptom inventory developed and refined empirically from a database of multiple previous diabetes lipid and hypertension treatment trials Participant ratings of overall well-being will be assessed with a single-item ldquofeeling thermometerrdquo at each clinic visit
512 Long-Term
These HRQL outcomes largely involve general health states known to be influenced by macrovascular and microvascular disease processes and events Participant ratings will be assessed for general health (eg physical social and psychological wellbeing) using the depressive symptoms with Patient Health Questionnaire
52 The HRQL Instruments
Selection of the ACCORDION HRQL instruments was made based upon the following criteria 1 Must be relatively brief 2 Include the major dimensions shown in the literature to be effected by diabetes andor its treatment 3 Proven to be responsive to treatment-related changes in previous clinical trials of conventional diabetes
agents 4 Appropriate for diverse ages ethnicity groups and 5 Have been tested in diverse populations for ease of self-administration and measurement validity
521 Feeling Thermometer
This visual analog scale from the EQ5D (Euroqol instrument) rates how well the patient feels along a continuum of lsquoworst imaginable health statersquo to lsquobest imaginable health statersquo Recording the value marked along the 100-mm thermometer by the subject scores this single item The feeling thermometer takes less than 1 minute to complete
522 Depression Assessment and Alert
The Patient Health Questionnaire (PHQ) is a brief instrument designed to assess the presence and frequency of depression symptoms The PHQ assesses the frequency of 9 symptoms over the previous two weeks as ldquonot at allrdquo ldquoseveral daysrdquo ldquomore than half the daysrdquo or ldquonearly every dayrdquo and takes approximately 1-2 minutes to complete The PHQ is scored by counting as a positive symptom any item rated ldquomore than half the daysrdquo or ldquonearly every dayrdquo Five symptoms or more scored in this way yields a sensitivity of 73 and a specificity of 98 for the diagnosis of major depression in primary care populations
5221 Assessment of Depression-related Alerts
Scoring the PHQ questionnaire will result in classification of the participant into one of three risk levels (1) nonemdashnot currently at risk for depression or suicide (2) non-emergentmdashat risk for depression but not suicide or (3) emergentmdashdepressed or at risk for depression and possibly suicidal Classification into the first level requires no further follow-up Classification into either second (ldquonon-emergentrdquo) or third level (ldquoemergentrdquo) requires follow-up by clinical staff To assess participant risk of depression or suicide the following procedure should be followed
bull After the HRQL Questionnaire is completed (and before the participant leaves the clinic) it should be reviewed for completeness If any items are left blank ask the participant to re-read the item and mark a response Though designed as a self-administered instrument the questionnaire can be completed in an interview format for participants with physical visual or literacy problems (see section titled ldquoGuidelines for Use as an Interviewer Administered Questionnaire rdquo in section 54)
bull Once the questionnaire has been reviewed for completeness calculate the depression risk score by summing the coded responses (0 for ldquoNot at allrdquo 1 for ldquoSeveral daysrdquo 2 for ldquoMore than half the daysrdquo and 3 for ldquoNearly every dayrdquo)
bull If the response to question 9 (ldquoThoughts that you would be better off dead or of hurting yourself in some wayrdquo) is scored 2 or 3 (ie ldquoMore than half the daysrdquo or ldquoNearly every dayrdquo) an emergent action is required (see section 5222 below for instructions)
bull If the response to question 9 is scored 0 or 1 but the sum of all scores is greater than or equal to 15 then non-emergent action is required (see section 5222 below for instructions)
5222 Taking Emergent or Non-Emergent Action
After determining that action is required discuss questionnaire responses with participant to make sure heshe understood the questions and to verify that the intended responses were marked If it is determined that the participant is truly at risk for major depression or suicide (ie a response of 2 or 3 for question 17 accurately reflects the participantrsquos mental health state) promptly take whatever action is consistent with your clinicrsquos standard practice regarding urgent or emergency mental health concerns This action may include one or more of the following
bull Notifying the participantrsquos physician (if the participant has given permission to do so)
bull Making an appointment for the participant with an appropriate provider (eg a psychiatrist)
bull Electing to evaluate and treat the participant at the clinical site
In cases of emergent alert this action should be taken with 24 hours If the participant is determined to be depressed or at risk of depression (but not at risk of suicide) then any of the actions listed above (or other actions in keeping with your clinicrsquos usual practices upon determining a patient is depressed) should be taken within one week In both emergent and non-emergent cases notification in the form of a letter should be sent to the participantrsquos PCP (if the participant has given permission to contact hisher PCP) A copy of the letter and any other documentation of actions taken should be placed in the participantrsquos ACCORD study binder
Notification at Data Entry A notification system has been set up to alert site staff of emergent and non-emergent alerts Such notifications will automatically appear at the top of the form upon saving HRQL questionnaire data in the ACCORDION web data base This system serves as a failsafe reminder that action is required however since data entry is delayed in many instances for several days after completion of a clinic visit review of the completed HRQL instrument and calculation of the PHQ risk score must be performed at the time of visit
53 Data Collection
All of the ACCORDION HRQL instruments have been widely used in clinical studies involving patients with illnesses and have been shown to be easy to administer and adequately understood by the participant The collection time points are designed to capture both near-term medication mediated effects on well being and longer-term effects on well being mediated by potential variations in the progression of micro and macro-vascular disease processes produced by the ACCORD interventions and now being evaluated by ACCORDION While it is anticipated that most participants recruited in the study will be able to provide valid self-report information on HRQL a few individuals may require assistance completing the forms Please see Section 54 below for methods to conduct the interviewer administered HRQL form
54 Methods For Collecting ACCORDION HRQL Data
In the ACCORDION study the HRQL questionnaire will be completed by the participants (ie self-administered) However there may be particular circumstances when interviewer administration in the clinic is required Although it is not anticipated that these special situations will arise often there may be instances in which factors such as poor eyesight poor hand-eye coordination ill health weather or conflicting time commitments will necessitate a change in how the questionnaire is administered Suggestions are included below to assist the clinic staff in handling these situations and also provide instructions for interviewer-administration of the instruments
Specific Guidelines The way in which a questionnaire is administered to a study participant can affect the validity of the responses to the questionnaire items For this reason it is important to adhere to the following guidelines in administering study questionnaires
Step 1 Review the Study Protocol Prior to each administration of the questionnaire it is important that the clinic staff person review the study protocol and questionnaire to refresh hisher memory as to the correct procedures to follow This is particularly important in clinics where a small number of participants are to be recruited andor where more than one clinic staff member will be administering the questionnaires to the study participants
Step 2 The Data Collector The individual administering the questionnaire plays a critical role in the process of data collection There is the potential for the quality of the participantrsquos responses to be affected by the general attitudes and actions of the interviewer A relaxed and friendly manner puts the participant at ease and conveys the message that the interviewer considers the questionnaire an important part of the study Additionally the interviewer should dress in a neat clean and professional manner Dress and demeanor should convey that the interviewer is an appropriate representative of the research team
Step 3 The Setting The interviewer should be available to greet the participants as they arrive If your survey area is in an office that is difficult to locate or if you know that a participant has physical limitations arrange to meet the participant ahead of time and escort himher to the place where the survey will be administered Optimally the participant should have a comfortable and private place which is free from interruptions or distractions to complete the questionnaire In order to answer questions that may arise the data collector should be readily accessible to the respondent while the questionnaire is being completed The questionnaire should be completed in one sitting
Family members or friends of the participant should not be present when the patient is completing the questionnaire Oftentimes family members will offer to help participants complete the questionnaire but we do not want the participantsrsquo responses to be influenced by their families or friends If family membersfriends offer to help respondents complete the questionnaire politely decline their offer of help and indicate that you would prefer to have the patient complete the questionnaire alone The interviewer should explain the necessity of providing privacy and confidentiality to research participants and should be prepared to suggest a place where the family member(s) or friend(s) can wait comfortably while the participant completes the questionnaire The interviewer should be polite but firm
Step 4 Assessing the Physical Status of the Participant It is possible that the clinic staff will encounter a participant with vision problems or physical conditions which will make it difficult for himher to complete the questionnaire on hisher own Other participants
may have problems with literacyreading The interviewer should determine if the participant is able to complete the questionnaire without assistance In many cases the participantrsquos lsquofitnessrsquo will be readily apparent For example some patients may not be able to hold a pencil or may tell you that they are unable to read the questionnaire due to vision problems It may be harder to recognize participants with low literacy skills unless the participant verbalizes that heshe is unable to read at a level sufficient to complete the questionnaire Cues to low reading skills may include the participant asking many questions completing the measures very slowly glancing up and around appearing confused or checking off responses without clearly reading the items In these instances data will be poor Therefore while avoiding any embarrassment to the participant it is in the best interest of the study and the participant to determine if she is able to complete the questionnaire on her own If you suspect heshe is unable to read you may say to himher ldquoMany individuals prefer to have the questionnaire read to them Would you like me to read these questions to yourdquo If the answer is yes read the questions to the participant following the guidelines in the section for interviewer administration of the questionnaire Otherwise if the participant can complete the questionnaire on hisher own proceed using the guidelines for self-administration of the survey
Guidelines for Use as a Self-administered Questionnaire
Step 5 Answering Questions The individuals collecting the data should be thoroughly familiar with the questionnaire before it is given to the participants Interviewers will be unable to give assistance to participants if they do not have a working knowledge of the structure and content of the questionnaire Reading the instructions for use of the HRQL questionnaire will prepare the interviewer to give assistance on an individual question if asked
Some of the participants will have questions about items on the questionnaire In answering questions survey administrators must be careful not to bias the participants responses The data collector may read a question to a respondent define terms indicate where the answer is to be marked etc but they should not paraphrase questions unless it is absolutely necessary It is easy to alter the meaning of a question in this way Therefore the data collector should not suggest an answer for the participant In general most of the participants questions can be handled by reminding himher to follow the directions on the questionnaire or simply by rereading the statement to the respondent The interviewer should read the statement exactly as it is written The administrator should remind the participant that heshe should answer the question with the response that she believes is truer for himher at the present time
If a respondent tells the data collector which answer heshe has selected the interviewer should refrain from reacting to that answer or conveying either approval or disapproval of the participantrsquos choice The interviewer may indicate to the participant that there is no right or wrong answers to these questions and that the choice is hishers as to how to respond to the statement Under no circumstances should the survey administrator help the participant decide how to mark a questionnaire item
Step 6 Editing the Questionnaires An important role of the questionnaire administrator is to examine the completed surveys immediately after the participants have completed them If the participant has skipped questions andor filled the questionnaire out incorrectly the staff person needs to discuss this with the participant before heshe leaves the office Persons who have filled out the forms incorrectly should be asked to complete the questionnaires in the appropriate manner If an item is missing or incomplete the interviewer should ask the participant if heshe noticed the item and meant to leave it blank or simply overlooked it If the participant declines to provide the information when it is brought to hisher attention the interviewer should accept the participantrsquos refusal without comment
Step 7 Thank the Participants Always remember to thank the participant for hisher time and interest in completing the questionnaire Escort the participant back to their family or the waiting room if necessary
Step 8 Storing the Questionnaires Once a questionnaire has been completed by a participant and edited by the survey administrator the questionnaire should be stored in a secure place within the clinic The questionnaire should not be left unattended where non-research staff can review the participants responses Information collected for research purposes can only be shared with other members of the research team and the participants privacy must be protected at all times The data collector should never discuss any of the responses with anyone who is not directly involved in the study
Guidelines for Use as an Interviewer Administered Questionnaire The HRQL Questionnaire is designed to be self administered but can also be used in an interview format For a participant with physical visual or literacy problems the questionnaire can be administered by reading the questions aloud to the respondent If the interviewer has determined that the participant is unable to complete the questionnaire through self-administration heshe should use the following guidelines in administering the questionnaire to the participant
The Interviewer The interviewer plays a critical role in the process of data collection It is important that the interviewer does not influence the participants response to any question Since more than one interviewer may be administering the questionnaires the following guidelines should be used to standardize the administration so that each interviewer administers the questionnaires in the same way Variability in administration of the instruments introduces bias in data collection and reduces the quality of the data In the ideal situation the interviewers presence should not influence the participants perception or response to a question and different interviewers should be able to obtain the same responses from the same participant Recognizing the limitations inherent in this ideal there are methods that can enhance the neutrality of the interviewer Interviewers should not provide either verbal or non-verbal responses that could influence the participants responses For example an interviewer should not convey surprise pleasure or disapproval to any answer The interviewer role is to obtain honest uninfluenced responses to the questions
The interviewer should be thoroughly familiar with the questionnaire before interviewing the first participant This will ensure that the interviewer can easily address the participants questions or concerns Inexperienced interviewers should also practice completing an interview by practicing with someone who is pretending to be a participant This will help to reduce the mechanical style that sometimes results from reading unfamiliar material It is important that the interviewer conveys a sense of impartiality He or she should be gracious and adaptable to all participants regardless of whether their dress appearance style of speech or personal preferences are consistent with the interviewers values and preferences There is no right or wrong answers on the HRQL questionnaire It is often helpful to tell this to the respondent if uncertainty or hesitation is observed It is important to put the respondent at ease
Specific Guidelines
Steps 1-4 Follow Steps 1-4 of the self-administration of the questionnaire beginning on page 10
Step 5 Introducing the Study Questionnaire Introduce the questionnaire to the study participant by telling himher that the questionnaire contains questions about their general well being The interviewer should indicate that as a participant in the study we are asking them to complete this questionnaire because we are interested in knowing how diabetes may affect their daily life When introducing the HRQL questionnaire explain to the respondent that their responses to the measures will be kept completely confidential That is the respondents identity will be protected No one but the research staff will have access to patient names and data will be entered into the computer by identification number rather than a name Results will be calculated using large groups of patients and not individuals If results are published no patient names or other identifying characteristics will ever be used
Step 6 Administering the Questionnaire Read through the directions with the participant and ask himher if they clearly understand how the questions are to be answered If the participant has no questions proceed to read the statements to the respondents Read each statement to the respondents verbatim The wording has been carefully selected and tested in order to insure the validity of the participantrsquos responses Do not paraphrase or simplify the statements Even minor changes in wording can affect the validity of the results Read the questions to the respondent in the order in which they were written Do not skip over statements and then come back to them later Record the participants responses on the questionnaires as they are given Never depend on memory to mark the participants choices
Step 7 Answering Questions The interviewer should be thoroughly familiar with the questionnaire before interviewing the first participant This will ensure that the interviewer can easily address the participants questions or concerns The interviewer may repeat questions if the participant does not understand them The interviewer should also assume responsibility for faulty communication by saying that perhaps they didnt read the questions clearly enough etc Keep explanations to a minimum Dont interpret questions The interviewer may for example define a word but may not say I think they mean It is easy to alter the meaning of a question in this way In some instances it may be necessary to paraphrase or simplify a statement for a respondent but paraphrasing a question should only be done if absolutely necessary All questionnaire items have fixed response categories All items must be answered using one of the existing response choices or the respondents answers cannot be entered into the computer In an interview format if a respondent replies that none of the choices is correct suggest that the choice that comes closest be selected If the respondent still refuses note this on the questionnaire If the participants answer I dont know to a particular question give them a little more time to think Sometimes this response is given to cover momentary confusion and a meaningful answer will be forthcoming if a few moments are allowed for thought The interviewer may say something like Take a moment to think about your answer In the event a respondent gives an inappropriate response repeat the question and the response categories For example if the question asks the respondents to indicate how much they agree with a statement and a participant says thats truerdquo the interviewer could say Would you say you strongly agree agree etc If the respondent refuses to respond to a question for any reason accept the refusal without reaction Indicate the refusal on the questionnaire using the response categories listed on page N
General Reminders Interviewers should be patient and polite They should convey a sense that the respondents answers are important They should also allow plenty of time for the respondent to understand the questions Interviewers should never suggest an answer or disagree with a response The interviewers role is to obtain and record the respondents answers Interviewers should always ask the questions and give the response categories verbatim in the order they appear in the questionnaire The interviewer may at any point in the interview reassure the respondent that her answers will be kept confidential that there are no right or wrong answers and that the interview is going well
Step 8 Editing the Questionnaires After completing the interview with the participant the interviewer should glance back through the questionnaire to make sure that no questions were skipped unintentionally This will help limit problems with missing data
Step 9 Thank the Participants Interviewers should always remember to thank the participants for their time and interest in completing the questionnaire They should also escort the participant back to hisher family or the waiting room if necessary
Step 10 Storing the Questionnaires Once a questionnaire has been completed by a participant and edited by the survey administrator the questionnaire should be stored in a secure place within the clinic The questionnaire should not be left unattended where non-research staff can review the participants responses Information collected for research purposes can only be shared with other members of the research team and the participants privacy must be protected at all times The data collector should never discuss any of the responses with anyone who is not directly involved in the study
CHAPTER SIX OUTCOMEREPORTING
ACCORDION will collect information on speciAic outcomes that match the ACCORD trialoutcomes These include death by any cause stroke MI and miscellaneous cardiovascularevents
Clinical site personnel must be diligent in identifying events and collecting all relevant andrequested data including hospital data and information fromthe participant andor friends or family of the participant Since completion of most forms requires obtaining information frommedical records clinical sites should have each participant sign a local medical records releasea each visit
61 INITIALEVENTREPORTING
61a EVENTS REPORTED AT REGULARLY SCHEDULEDVISITS
Whenany eventof interestis reportedat a regularlyscheduledvisitth clinical sit shouldenter the information on the appropriate In-Clinic or Phone Follow-Up Form Sites shouldindicatewhichevent(s)theparticipant hasexperiencedandthedateo theevent(s)o theform In the case of multiple events check all relevant boxes and indicate the dates of theevents even if the events occurred on the same date
In addition to the Follow-Up Form the appropriate event-speciAic form(s) ie the DeathMyocardial Infarction (MI) Stroke Unstable Angina andor Miscellaneous Cardiovascular(MCV) Outcomes Report Forms should be completed and data entered Sites should collect anynecessary supporting documentation for the event(s) and send these materials with theappropriate Report Form(s) to the CoC within90 days of th dateth even was discovered
Materials may be e-mailed faxed or mailed to the Coordinating Center If mailed the clinicalsiteshouldphotocopytheentirepacketandstorethecopyi theparticipantrsquos studychart
61b EVENTS REPORTED BETWEEN REGULARLY SCHEDULEDVISITS
Whena eventis reported betweenregularly scheduled visits the site should complete anddata enter the appropriate event-speciAic Report Form(s) ie the DeathMyocardialInfarction(MI) Stroke Unstable Angina andor Miscellaneous Cardiovascular (MCV) Outcomes ReportForm At the next regularly scheduled visit the event should be included on the In-Clinic orPhone Follow-Up form ensuring that the date of event matches that previously entered on theevent Report Form Asecond event Report Formshould NOT be completed for a previously reportedevent
Materials may be e-mailed faxed or mailed to the Coordinating Center If mailed the clinicalsiteshouldphotocopytheentirepacketandstorethecopyi theparticipantrsquos studychart
version 10172012
62 ACCORDION DEATH REPORT FORM
An ACCORDIO Deat ReportForm must be completed and data entered whenever a participantdies
In addition to this form the clinical site should send supporting clinical documentation to theCoC with identifying information blacked out and the participant ID on each page Asapplicable documentation should include
bull DeathCertiAicate bull Hospital discharge summary bull Hospicenotesbull Admission history and physical bull Emergency roomnotes bull Autopsycoroner reports
If the participant dies outside the hospital and there are available medical records that wouldassist the Morbidity amp Mortality Subcommittee members in classifying the cause of death theserecords should be sent with the Death Report Form For example if a participant known tohave cancer died at home documentation of the cancer diagnosis should be sent Thisdocumentation could include previous hospital discharge summaries progress notes orpatholog notes
Please see section 51a of the ACCORD Protocol for speciAic deAinitions of death classiAicationsand the Death Report FormQxQs for speciAic instructions regarding formcompletion
63 ACCORDION MYOCARDIAL INFARCTIONREPORT FORM
For event classiAication purposes myocardial infarction (MI) in ACCORDION will be deAined aseither Q-wave MI non-Q-wave MI probable non-Q-wave MI MI after invasive cardiovascularintervention(s) or MI after coronary bypass graft surgery (CABG) Each of these classiAicationsis further deAined in the ACCORD Protocol section 51b
An ACCORDIO MyocardialInfarctionReportForm must be completed and data enteredwhenever a participant has an MI (heart attack) In addition to the MI Report Form the clinicalsite should send copies of supporting clinical documentation with identifying informationblacked out and the participant IDAcrostic on each page As applicable documentation shouldinclude
bull Emergency roomnotes bull Admission history and physical bull Cardiologyconsults bull Relevant ECGsbull Hospital discharge summary bull Cardiac enzyme data (indicate normal troponin andor CKMB values) ndashthemention of
cardiac enzymes elsewhereis not adequate Actual labreports areneeded and will berequested
bull Cardiacprocedurereports
version 10172012
Please see the Myocardial Report FormQxQs for speciAic instructions regarding formcompletion
64 ACCORDION STROKEREPORT FORM
For event classiAication purposes stroke in ACCORDION will be deAined as either deAiniteischemic stroke deAinite primary intracerebral hemorrhage subarachnoid hemorrhage andstroke of unknown etiology and non-fatal stroke after cardiovascular invasive interventions orafter non-cardiovascular surgery Each of these classiAications is further deAined in the ACCORDProtocolsection51c
An ACCORDIO StrokeReportForm must be completed and data entered whenever aparticipant has a stroke including a stroke that was not primarily due to a vascular cause (eg atumor) In addition to the Stroke Report Form the clinical site should send copies of supportingclinical documentation with identifying information blacked out and the participant IDAcrostic on each page As applicable documentation should include
bull Emergency roomnotes bull Admission history and physical bull Hospital discharge summary bull Neurologyconsult notes bull C scan reports bull MRI reports
Please see the Stroke Report FormQxQs for speciAic instructions regarding formcompletion
65 ACCORDION UNSTABLE ANGINAREPORT FORM
For event classiAication purposes Unstable Angina in ACCORDION will be deAined as new onsetexertional anginaacceleratedor rest anginao both FurtherdeAinitionsarelocatedi theACCORD Protocol section 53b
An ACCORDION Unstable Angina Report Form must be completed and data enteredwhenever a participant has an episode of unstable angina In addition to the Unstable AnginaReport Form the clinical site should send copies of supporting clinical documentation withidentifying information blacked out and the participant IDAcrostic on each page Asapplicable documentation should include
bull Emergency roomnotes bull Admission history and physical bull All relevant ECGs bull Cardiac enzyme lab reports (troponin andor CKMB values) themention of cardiac
enzymes elsewhereis not adequate Actual labreports areneeded and will berequested bull Cardiacprocedurereports bull Cardiologyconsult bull Hospital discharge summary
version 10172012
Please see the Unstable Angina Report FormQxQs for speciAic instructions regarding formcompletion
67 ACCORDION MISCELLANEOUSCARDIOVASCULAROUTCOMESREPORT FORM
Th ACCORDION MiscellaneousCardiovascular OutcomesReport Form must be completed whenever participantexperiences a therapeutic cardiovascular procedureor hospitalizationfor congestiveheart failurePleasenotethat proceduresshouldbetherapeuticin natureNOTdiagnosticandincludethefollowing
bull PTCA(balloon) bull PTCA(with stent only) bull CABG Surgery bull Carotidangioplastywithstent bull Carotid endarterectomy bull Peripheral angioplastywitho without stent bull Peripheral vascular surgery including aortic aneurysmrepair bull Limb amputation including partial or digit amputation due to vascular disease
Please see the Miscellaneous Cardiovascular Event Report FormQxQs for speciAic instructions regarding formcompletion Supporting documentation is NOT required for these events unlessthey are accompanied by an MI UA Stroke or Death
68 OUTCOMEEVENTTRACKING
SpeciAic reports for outcome tracking are available on the ACCORDION website to assist withmanagement of clinical events These reports detail what paper documentation has beenreceived at the Coordinating Center and what remains missing
If required documentation is not available the clinic should send written explanationmdashincluding documented attempts at obtaining informationmdashto the Coordinating Center beforethe eventwillbe cleared onthe trackingreport
version 10172012
CHAPTER SEVEN MEASUREMENT PROCEDURES
71 ANTHROPOMETRY
711 Background and Rationale
Body fat both the amount and distribution in the body is a significant predictor for the onset of diabetes and sub-clinical and clinically manifested cardiovascular disease Excessive body and abdominal obesity also hinders diabetes control and increases the likelihood of the development of cardiovascular disease in this participant population Successful management of Type 2 diabetes includes exercise and dietary modification with the goal of reducing total body fat particularly abdominal fat It is the intent of this study to gather data that will elucidate the impact of body fat and body composition on the course of cardiovascular disease among participants with diabetes without extreme burden to study participants and clinical investigators
Body mass index (BMI) measured as weight (kg)height (m) 2 is commonly used in clinical trials and population-based epidemiologic studies as an estimate of total body fat independent of height Guidelines are currently available for the determination of overweight and obesity based on BMI values BMI correlates well with adipose tissue composition measured by more burdensome procedures such as CT scan underwater weighing and bioelectrical impedance Similarly abdominal obesity as assessed by a measurement of waist circumference is an easily measured indicator which has been shown to be predictive of both of diabetes and cardiovascular disease risk
712 Methods
Anthropometric measures that will be gathered for this study include (1) standing height (2) weight and (3) waist circumference Measured values should be recorded immediately by the technician to ensure accuracy Calculations of BMI in the clinic are not necessary
713 Height
Equipment
1 Steel tape measure marked in centimeters to the nearest 01 cm hung vertically on the wall (with the tape at a right angle to the floor and installed accurately to zero at the base board ndash a floor and back board unit attached together is recommended) Commercial stadiometers are also acceptable
2 Headboard ndash a right triangle with an angle brace
Procedure 1 Bare feet are preferred Nylons or thin socks are acceptable Thick socks must be removed 2 The study participant should back up to the wall until their heels buttocks andor shoulder blades
touch the board (tape) with their eyes straight ahead The subjectrsquos head should be in the Frankfort (horizontal) plane Feet should be together with ankles touching or as close as possible
3 Place the headboard over the crown of the head with the headboard forming a right angle with the tape measure The headboard should touch the scalp lightly Have the subject take a full inspiration
4 Ask the subject to step out from under the headboard 5 Read the height to the nearest 05 cm or the nearest 025 inch
714 Weight
Equipment High-quality scales that are currently used in clinical practice (clinical staff should ensure that the scales used for this study are in good working order)
Procedure 1 Scales should be placed on a firm flat surface 2 Perform necessary calibration based on the specifications of the scale being used 3 Confirm that the scale is balanced (set on zero without a person or thing on the scales) Balance
scales if necessary 4 Subjects should wear as little clothing as possible removing shoes outerwear items in pockets etc 5 Have subject stand on scales with weight distributed equally on both feet 6 Record weight to nearest 01 kilogram or 025 pound
Special circumstances 1 Subjects with prosthetic limbs and breast prosthesis should be weighed with prosthesis in place 2 For frail and unsteady subjects weight should be taken by allowing subjects to be lightly steadied
Wheelchair bound subjects should not be measured and weight fields should be coded with -5 3 For subjects weighing over 150 kg an attempt should be made to obtain a weight on a scale that
exceeds the 150-kg maximum If not possible weight should be recorded on the form as -5 kg and entered into the computer as -5
715 Waist Circumference (WC)
Equipment The measuring tape should be made of material that is not easily stretched such as fiberglass
Procedure 1 The waist circumference is taken with the subject standing and recorded to the nearest 01
centimeter
2 Measure the waist circumference (WC) once To the extent possible WC should be taken with the help of an assistant
3 Waist (minimum) circumference should be measured at the smallest point between the 10th rib and the iliac crest over bare skin Check to see that the tape is level front and back and record the value in the source documentation and on the annual physical exam form
72 BLOOD PRESSUREPULSE
721 Background and Rationale
A standard automated blood pressure measurement device and a specific protocol in ACCORDION for the measurement of BP and pulse will be utilized
722 Definition
Seated BP and pulse are measured three times at each clinic visit The seated BP and pulse readings for ACCORDION are the averages of the three systolic and diastolic BPs and pulse rates measured by the OMRON HEM-907 automated blood pressure and pulse measurement device
723 Methods
This protocol is written for use with the OMRON HEM-907 automated blood pressure and pulse measurement device Special attention must be placed on assessment and maintenance of the instruments accuracy as per the manual that accompanies the instrument
The design and operation of the OMRON HEM-907 automated blood pressure measurement device are based upon the combined principles of compression of the brachial artery under an elastic inflatable cuff and estimation of the systolic and diastolic blood pressure levels by oscillimetric methods The observer places the correct size cuff on the participants arm pushes the button on the device and waits for the output
All readings will be recorded to the nearest digit
If an OMRON HEM-907 is non-functional and a replacement is not available a manual (preferably mercury) manometer can be used to obtain a BP measurement
Equipment bull One OMRON HEM-907 automated blood pressure measurement device bull BP cuffs in three sizes
Large 32-42 cm (13-17) Medium 22-32 cm (9-13) Small 17-22 cm (7-9)
bull Metric tape bull Black pen bull Preferably chair with arm support for blood pressure measurement or chair and table (table must
provide for a comfortable resting posture of the arm with mid-cuff at heart level) Chair must have a back for participants back to be supported during rest and BP determinations
bull Data collection form
Cuff Size Determination BP measurements should usually be taken in the right arm The left arm may be used if the BP is known to be higher in that arm or in the presence of an anomaly or other circumstance prohibiting use of the right arm
Proper cuff size must be used to avoid under or over-estimation of blood pressure Cuff size refers to the cuffs bladder not the cloth A copy of the chart below should be attached to the sphygmomanometer for easy reference
Cuff Size Indicated by Measured Arm Circumference
Arm Circumference Cuff
32-42 cm (13-17) Large 22-32 cm (9-13) Medium 17-22 cm (7-9) Small gt42 cm (gt17) Extra large or thigh (not available for Omron)
If the participants arm circumference is gt 42 cm the Omron will not be used for BP and pulse measurements In these participants a manual (preferably mercury) manometer will need to be used with an extra large or thigh sized cuff
bull Have the participant remove hisher upper garment (bare arm)
bull Have the participant stand holding forearm horizontal (parallel) to the floor
bull Measure arm length from the acromion (bony protuberance at the shoulder) to the olecranon (tip of the elbow) using a metric tape
bull Mark the midpoint on the dorsal surface of the arm
bull Have participant relax arm along side of the body
bull Draw the tape snugly around the arm at the midpoint mark NOTE Keep the tape horizontal Tape should not indent the skin
bull Use the criteria in the Table (above) for determining cuff size
Wrapping the Blood Pressure Cuff Around the Arm The participant should then be seated with back supported legs uncrossed in a quiet room with the elbow and forearm resting comfortably on the armrest of the blood pressure measurement chair (or the table) with the palm of the hand turned upward The area to which the cuff is to be applied must be bare
Locate the brachial artery by palpation and mark the skin with a little dot (The brachial artery is usually found at the crease of the arm under the muscle and slightly towards the body)
Place the appropriate cuff around the upper right arm so that a) The midpoint of the length of the bladder lies over the brachial artery and b) The mid-height of the cuff is at heart level
NOTE Confirm for yourself where the midpoint of the length of the bladder is by folding the bladder in two Do not trust the marking on the cuff
Place the lower edge of the cuff with its tubing connections frac12 to 1 inch above the natural crease across the inner aspect of the elbow
Wrap the cuff snugly about the arm with the palm of the participants hand turned upward Make sure that the long edges of the cuff lie on top of each other as you wrap the cuff around
Secure the wrapped cuff firmly by applying pressure to the locking fabric fastener over the area where it is applied to the cuff
Do not wrap the cuff too tightly around the arm but so that you can insert only one finger between the cuff and arm
Taking the Seated Blood Pressure and Pulse Measurements The participant should sit quietly for a period of 5 minutes before the first blood pressure is taken They should be seated comfortably feet flat on the floor with their back supported Ideally they should not have smoked nor had any caffeine within the last 30 minutes prior to the BP determinations For the baseline 12 month and 48 month exams when standing BP is measured the participant also should be fasting (at least 90 minutes since last meal)
The Omron may be preset (function F2) to wait 5 minutes before starting measurements after the start button is pushed so the 5-minute rest is automatically included Also set the Omron (F1) to take an average of 3 measurements and set the interval between measurements (F3) for 60 seconds
Push the button on the machine and wait for the output
Record the average of the 3 systolic and diastolic blood pressure and pulse readings from the OMRON BP device in the spaces provided on the In-Clinic Follow-up Form
7231 Principles of proper technique for participants with arms too large for the Omron (gt 42 cm circumference) or in other situations where the Omron cannot be used
The steps described below are in the usual order performed when approaching a participant for blood pressure and pulse measurements when the Omron device is not used In these cases a mercury manometer is preferred If a mercury manometer is unable to be used another properly calibrated sphygmomanometer may be used An alternative to the Omron device will be necessary in the situation where the arm circumference is gt42 cm since the Omron does not have that size cuff available There may be other rare situations where the Omron is not accurate such as in some participants with atrial fibrillation (See Section 732)
Arm measurement
The proper size cuff must be used to obtain accurate blood pressure (BP) readings See the table above for determination of proper cuff size
Applying the BP Cuff
1) Place the midpoint of the length of the bladder over the brachial artery and the midheight of the cuff at heart level
2) The lower edge of the cuff should be about 1 inch above the natural crease of the inner aspect of the elbow
3) Wrap the cuff snugly and secure firmly 4) The participant should rest with their palm turned upward
The participant should be allowed to sit quietly for 5 minutes They should be seated comfortably feet flat on the floor with their back supported Ideally they should not have smoked nor had any caffeine within the last 30 minutes prior to the BP determinations
Determination of Peak Inflation Level
The peak inflation level (pressure) should be determined to assure accurate measurement of the systolic blood pressure This pressure is determined by
1) Inflating the BP cuff while palpating the radial pulse and watching the mercury column 2) When sufficient pressure has been applied the pulse is no longer felt When the pulse
disappearance is detected note the level and continue to inflate the cuff another 20 mm Hg
3) Slowly deflate the cuff while watching the mercury column Note the level where the pulse reappears then quickly and completely deflate the cuff
4) Peak Inflation Level (PIL) = Pulse Obliteration Pressure (POP) + 20 mm Hg 5) All readings are made at the top of the meniscus Readings are made to the nearest even
digit Readings that fall exactly between markings should be read to the next marking immediately above
Pulse Measurement
Pulse measurements are obtained after the participant has rested 5 minutes and before the blood pressure is measured
1) Palpate the radial pulse for 30 seconds and multiply by 2 The product is recorded as the heart rate
Blood Pressure Readings
Blood Pressure Sounds
Systolic blood pressure (SBP) is the first of at least two regular tapping sounds heard when deflating the cuff
Diastolic blood pressure (DBP) is the level at which the last of the rhythmic sounds are heard
A single sound heard in isolation either before the SBP or after the DBP does not meet the BP criteria
Obtaining the BP Readings
1 Following determination of the peak inflation level or any other BP measurement wait 60 seconds after complete deflation of the cuff before re-inflating for the next reading
2 Place the diaphragm of the stethoscope over the brachial artery 3 Inflate the cuff at a rapid smooth continuous rate to the peak inflation level 4 At a slow and constant rate of 2 mm Hgsecond deflate the cuff listening throughout the
entire range of deflation to 10 mm Hg below the DBP (last regular sound heard) 5 Quickly and completely deflate the cuff 6 Record the reading 7 Wait at least 60 seconds between readings and repeat steps 2-6 two more times 8 Record the 3 readings in the source note and the average of the 3 on the case report form
All study personnel responsible for obtaining blood pressure readings must review and be familiar with the blood pressure measurement protocol Blood pressure techniques will be reviewed periodically by the network project coordinators during site visits
73 GUIDELINES FOR PROPER USE AND MAINTENANCE OF EQUIPMENT
731 Omron Calibration
The Omron unit has been validated to remain in calibration for up to 100000 measurements The units do not have to be calibrated before their first use
732 Atrial Fibrillation
Atrial fibrillation (AF) is not necessarily problematic with oscillometric devices However the presence of AF suggests that multiple measurements (three) be taken and averaged to provide a more accurate reading Functionally the OMRON IntelliSense unit is designed to take up to three measurements and average them automatically (in AVE Mode) An atrial fibrillation however could cause the OMRON IntelliSense unit to error and restart the measurement If this is the case the three readings should be taken in the SINGLE Mode and manually averaged If there is still a problem in obtaining the readings they should be taken manually with a mercury or other properly calibrated manometer
733 Troubleshooting
Refer to the OMRON HEM-907 IntelliSense Digital Blood Pressure Monitor Manual given out at the ACCORD Study Training Program for a list of error codes and how to correct them For any technical questions in regard to OMRON devices sites can call Consumer and Professional Services at 877-216-1336
In the event that sites need to order replacement cuffs or a replacement OMRON HEM 907XL (which is the newer model as the older device is no longer available) sites can call
directly and they can help sites with their need Sites are responsible for the replacement costs
74 EYE EXAM
741 Visual Acuity Measurements in ACCORDION
7411 Introduction
The measurement of visual acuity is an important endpoint in the ACCORDION Study The visual acuity will be performed at last in-clinic visit for all participants in the study Since changes in visual acuity are important endpoints it is essential for the visual acuity to be measured using the following standard protocol
742 Measurement of Visual Acuity
This technique should be used at the last in-clinic visit by the ACCORDION clinical coordinator or qualified staff member at each clinical site Training for the protocol procedure for clinical site staff that has not been trained previously can be conducted via a teaching video located on the ACCORDION website under the ldquoVideosrdquo link
Participants should be instructed to bring their current glasses with them for the final in-clinic visit All participants will be assessed for their ldquohabitual visionrdquo with their usual correction for the distance Visual acuity will be assessed utilizing the participants current distance glasses which may be bifocals trifocals or variable lens but not reading glasses Patients presently wearing contact lens will be assessed with their contact lens on Patients will be asked to read the letters on the Visual Acuity Chart They will be tested first for the right eye and then the left eye A visual acuity score will be calculated using a worksheet that can be printed form the website The visual acuity score can be recorded on the Visual Acuity data entry page
7421 Introduction
The visual acuity of patients will be measured using the R chart of the Lighthouse Distance Visual Acuity Test charts (second edition) which are modified ETDRS charts Visual acuity testing is required at a distance of 4 meters and for patients with sufficiently reduced vision at 1 meter This can be done in the hallway if necessary The 4-meter distance and 1-meter distance should be marked clearly and permanently the participant may sit or stand for the 4-meter test but should sit for the 1-meter test
7422 Visual Acuity Charts
The chart must be mounted at a height such that the top of the third row of letters is 49 + 2 inches from the floor
7423 Illumination
Room illumination should be between 50 and 125-foot candles as measured with a photometer held four feet from the floor and directed to the ceiling The chart should be evenly illuminated either in a visual acuity box or mounted on an evenly illuminated wall at the specified lighting levels
7424 4 and 1- meter Visual Acuity Lanes
A distance of exactly 4 meters (13 feet and 15 inches or 1575 inches) is required between the patients eyes and the visual acuity chart for the 4-meter test and a distance of exactly 1-meter (39 and 38 inches) is required for the 1-meter test
75 TESTING of ldquoHABITUALrdquo VISUAL TESTING
751 4- meter Test
TESTING OF ALL EYES BEGINS AT 4 METERS
First the right eye is tested and then the left The distance from the patients eyes to the visual acuity chart must be exactly 40 meters (13 feet and 15 inches or 1575 inches) The patient may stand or sit for the 4-meter visual acuity test If the patient is seated his or her back should fit firmly touching the back of the chair The examiner should ensure that the patient is standing or sitting comfortably that the head does not move forward or backward during the test and that the patients eyes remain at the 4-meter distance
The testing procedure for visual acuity is based on the principle that the objective is to test visual acuity and not intelligence or the ability to concentrate or follow or remember instructions (although all of these factors are involved) The patient should be told that the chart has letters only and no numbers If the patient forgets this instruction and reads a number he or she should be reminded that the chart contains no numbers and the examiner should request a letter in lieu of the number
The patient should be asked to read slowly (at a rate not faster than about one letter per second) in order to achieve the best identification of each letter and to not proceed until the patient has given a definite response It may be useful for the examiner to demonstrate the letter-a-second pace by reciting A B C rdquo If at any point the patient reads quickly he or she should be asked to stop and read slowly If the patient loses his or her place in reading or the examiner loses his or her place (possibly because the letters are read too quickly) the examiner should ask the patient to go back to where the place was lost Examiners should never point to the chart or to specific letters on the chart or read any of the letters during the test
Each letter is scored as right or wrong Once a patient has identified a letter with a definite single-letter response and has read the next letter a correction of the previous letter cannot be accepted If the patient changes a response aloud (eg That was a C not an O) before he or she has read aloud the next letter then the change should be accepted If the patient changes a response after beginning to read the next letter the change is not accepted
When the patient says he or she cannot read a letter he or she should be encouraged to guess If the patient identifies a letter as one of two or more letters he or she should be asked to choose one letter and if necessary to guess even if the next letter has already been read The examiner may suggest that the patient turn or shake his or her head in any manner if this improves visual acuity If the patient does this care must be taken to ensure that the fellow eye remains covered When it becomes evident that no further meaningful readings can be made despite urgings to read or guess the examiner should stop the test for that eye
752 1-meter Test
Eyes reading 19 or fewer letters correctly at 4 meters should be tested at 1 meter The patient may stand or sit for the 4-meter test but should sit for the 1-meter test The avoidance of any head movement forward or backward is particularly important during the 1-meter test The patient should be asked to read only the first six lines at 1 meter making 30 the maximum score attainable at that distance
753 Scoring Best-Corrected Visual Acuity
The examiner records each letter identified correctly by circling the corresponding letter on the Visual Acuity Worksheet A slash () can be used for letters read incorrectly and letters for which no guesses are made Each letter read correctly is scored as one point The score for each line (which is zero if no letters are read correctly) and the total score for each eye are recorded on the Visual Acuity Worksheet after testing is completed The test should continue and each line scored until the participant reaches a point where no letters are read correctly If testing at 1 meter is not required 30 points are automatically scored for the 1-meter test The total combined score (ie the sum of the 4- and 1-meter scores) and the approximate Snellen fraction which is determined based on the lowest line read with one or fewer mistakes are recorded on the Visual Acuity Worksheet
754 Referral of Participant with Visual Acuity Score 70 or Less
Participants whose visual acuity score is 70 or less (less than 2040) should be referred to an ophthalmologist
76 ACCORDION NEUROPATHY EXAMINATION FORM (FOOT EXAM)
As part of the physical examination at the in-clinic follow-up visits a specialized foot examination will be used to identify the presence andor development of diabetic peripheral neuropathy This examination has been adopted from the Michigan Neuropathy Screening Instrument
The examination has 5 parts amputationfoot inspection appearance of foot ulceration ankle reflexes and vibration perception at great toe and 10-gram filament Each foot is examined and scored separately Note If a participant has had an amputation indicate this on the form and skip the examination
761 The Clinical Examination
APPEARANCE OF FOOT (Foot Inspection) The feet are inspected for evidence of excessively dry skin callus formation fissures frank ulceration or deformities Deformities would include flat feet hammertoes overlapping toes hallux valgus joint subluxation prominent metatarsal head medial convexity (Charcot foot) and amputation Indicate on the form whether the foot appears abnormal or normal
ULCERATION On the form indicate whether ulcers were absent or present on the clinical examination
ANKLE REFLEXES (Muscle Stretch Reflexes) The ankle reflexes will be examined using an appropriate reflex hammer (eg Tromner or Babinski (European) or Queens Square or almost anything except a very light Taylors (tomahawk) because the ankle jerk is difficult to elicit with them) The ankle reflexes should be elicited in the sitting position with the foot dependent and patient relaxed For the reflex the foot should be passively positioned and the foot dorsiflexed slightly to obtain optimal stretch of the muscle The Achilles Tendon should be percussed directly If the reflex is obtained it is graded as
present If the reflex is absent the participant is asked to perform the Jendrassic Maneuver (ie locking the fingers together and pulling) Reflexes elicited with the Jendrassic Maneuver alone are designated as present with reinforcement If the reflex is absent even with Jendrassic Maneuver the reflex is designated as absent
VIBRATION PERCEPTION AT GREAT TOE (Vibration Sensation) Vibration sensation should be performed with the great toe unsupported Vibration sensation will be tested bilaterally using a 128 Hz tuning fork place over the dorsum of the great toe on the bony prominent of the DIP joint The participant (with eyes closed) is asked to indicate when heshe can no longer sense the vibration from the vibrating tuning fork
In general the examiner should be able to feel vibration from the hand-held tuning fork for 5 seconds longer on hisher distal forefinger than a normal participant can at the great toe (ie examinerrsquos DIP joint of the first finger versus the participantrsquos toe) If the examiner feels vibration for 10 or more seconds on herher finger then vibration is considered decreased The test should be given when the tuning fork is not vibrating to be certain the participant is responding to vibration and not to pressure or some other clue Vibration is scored present if the examiner senses the vibration on hisher finger for lt 10 seconds reduced if sensed for 10 or more seconds and absent if no vibration is detected
10 GRAM FILAMENT (Semmes-Weinstein Monofilament Examination) For this examination the foot should not be supported (no standing) The filament must be 507 and should be initially pre-stressed (4-6 perpendicular applications to the dorsum of the examinerrsquos first finger) The filament is then applied to the dorsum of the great toe midway between the nail fold and the DIP joint Do not hold the toe directly The filament is applied perpendicularly and briefly (for lt 1 second) with an even pressure When the filament bends the force of 10 grams has been applied The participant whose eyes are closed is asked to respond lsquoyesrsquo if he or she feels the filament This is done ten times on each big toe If there are 8 or more correct responses (out of 10 applications) this is considered present 1-7 correct responses is considered reduced sensation no correct responses is considered absent
762 Scoring the ACCORDION Neuropathy Screening Instrument
For each foot separately scores would be as follow
Appearance of Foot Normal=0 Abnormal=1
Ulceration Absent=0 Present=1
Ankle Reflexes Present=0 Present with Reinforcement=05 Absent=1
Vibration Perception Present=0 Reduced=05 Absent=1
10-gram Filament 8-10 Correct=0 1-7 Correct=05 None Correct=1
Calculate scores for each foot separately There are a possible 5 points per foot
Interpretation of Scores (Cross-sectionally and Longitudinally)
The following scores (out of a possible 10) from the clinical examination would denote presenceabsence of neuropathy
0 to 2 No Neuropathy
25 to 10 Neuropathic
Every increase over time of at least 1 point denotes progression of neuropathy
Chapter (16)
Electrocardiography Assessment Manual
ACCORD Follow On Study (ACCORDION)
The ACCORDION Central ECG Reading Center (CERC) Epidemiological Cardiology Research Center (EPICARE)
Division of Public Health Sciences Wake Forest University School of Medicine
Winston Salem NC
March 22 2011- Version 2
Table of Contents
I Introduction
II Background and Purpose
III Field Center Procedures III1 ECG Acquisition Procedures
III11 Electrocardiograph III12 Supplies III13 Preparation for ECG Recording III14Location of the ECG electrodes III15ECG recording
III2 Local ECG reading
III3 Data management procedure III31 Communications setup for transmission III32 Before transmitting ECGs to the CERC III33 Transmitting ECGs to the CERC III34 Directory management
VI Reading Center Technical Details
V Quality Control Procedures V1 Quality grades V2 CertificationRecertification procedures V3 Examples of common ECG quality problems and possible solutions
Appendix A The ACCORDION ECG reading center contact list B MAC 1200 programming and setup C Transmission of ACCORDION study ECGs to the CERC
I INTRODUCTION
The Epidemiological Cardiology Research Center (EPICARE) is the ACCORDION Central ECG Reading Center (CERC) It is located at Wake Forest University Health Sciences Winston Salem NC The CERC main contacts are listed in Appendix A
II BACKGROUND AND PURPOSE
A standard 12-lead ECG will be obtained for ACCORDION participants at the first and last of the three in-clinic visits and the ECGs will be sent electronically to the ECG Reading Center Along with the information regarding Q-waves ST depression ST elevation and T-waves ascertainment of the occurrence of a silent (unrecognized) MI will be identified The ACCORDION CERC will use the Minnesota ECG classification as basis for detection of myocardial infarction myocardial ischemia left ventricular hypertrophy arrhythmias and conduction defects A number of continuous ECG measurements that are known to be associated with a poor prognosis will be also detected from the study ECGs
III FIELD CENTER PROCEDURES
The field center procedures include ECG acquisition (section III1) and local ECG reading by the clinic physician (section III2)
III1 ECG ACQUISITION PROCEDURES
At each ACCORDION ECG examination visit a 12-lead ECG will be recorded for each participant in the fasting status (similar to ACCORD) That is the ECG must be recorded after an overnight fast (and checking this history in the clinic) and before any snack is given The ECGs should be transmitted to the CERC at least twice weekly
III11 Electrocardiograph
The electrocardiograph to be used for ECG recording and transmission in the ACCORDION study is the GE MAC 1200 electrocardiograph which is the same machine used previously in ACCORD The MAC1200 is a portable device and can easily be moved from one location to another bull Each machine will be configured specifically for the ACCORDION study ECG
acquisition and transmission bull The MAC1200 is to be used for resting ECG recording only bull It is not intended for use as a vital signs physiological monitor bull The MAC1200 has a customized menu specific to the ACCORDION study bull Appendix B includes the instructional charts that outline the SETUP for the
ACCORDION MAC 1200 ECG machines bull All of the ACCORDION ECG technicians should become familiar with the GE MAC
1200 Operatorrsquos Manual
III12 Supplies
Table 1 summarizes the equipment and supplies needed for recording and transmitting ECGs Always order supplies in advance
Table 1
bull GE MAC1200 Electrocardiograph bull Telephone jack cable bull Scissors bull HeartSquare bull Felt tip non-toxic washable markers bull The CERC contact list (Appendix A) bull Reference guides for ldquoPatient Data Entryrdquo (Table 2) bull Reference guide for ldquoTransmission of ECGrdquo (Appendix C) bull GE MAC1200 operation manual bull ECG paper bull Disposable silver chloride electrodes bull Alcohol swabs and gauze pads bull Cotton surgical tape bull Examining table disposable paper
III13 Preparation for ECG recording
bull Participant should be relaxed and comfortable in supine or semi-recumbent position bull Examination tablebed should be adequate to comfortably accommodate the
participant bull Supply drape for exposed upper torso bull An additional covering may be needed to prevent the participant from becoming
chilled bull Make sure ankles and wrists are accessible for electrode application bull ECG electrode placement should be performed with the technician standing to the
participantrsquos left side bull Reference guide for ldquoParticipant Data Entryrdquo instructions should be available to
insure accuracy bull Supplies needed for ECG acquisition should be assembled and arranged efficiently
III14 Location of the ECG electrodes
III141 Location of limb electrodes (Figure 1)
FIGURE 1 RIGHT LEG (RL) and LEFT LEG (LL) bull On the inner side of the right leg (RL) above
the ankle rub briskly an area about 1-2 inches in diameter with an alcohol swab using firm circular motions
bull Mark the position to place the electrode later bull Repeat this procedure for the left leg (LL) bull In amputees the leg lead electrode may be
placed higher up on the torso
RIGHT ARM (RA) AND LEFT ARM (LA) bull Rub the inner side of the right arm (RA) above
the wrist similar to what you did with the right and left legs
bull Mark the position to place the electrode later bull Repeat the process for the left arm (LA) bull In amputees the arm electrode may be placed
on the shoulder below the clavicle
III142 Location of chest electrodes
V1 and V2 bull First locate the sternal angle about the width of your 3 middle fingers below the sternal
notch (Figure 2) Mark a dot over the sterna angle bull Feel the sternal angle between the index and middle fingers of your right hand
keeping the fingers wide apart and moving your fingers firmly up and down While feeling the sternal angle move your fingers to the left side of the sternum and feel the 2nd rib between your fingers where it joins the sternal angle
bull Move your middle finger to the interspace below the second rib and with your index finger locate the interspace below the next rib (3rd) and again below the next (4th) rib This is the 4th intercostal space Mark an X at this level at the midsternal line X is the reference level for V1 and V2 Mark their locations at the right and left sternal border (Figures 2 and 3)
FIGURE 2
FIGURE 3
V4 and V6
bull From the location of V2 palpate with the middle finger of your right hand the intercostal space and follow it laterally outside the sternal border and at a slight angle down Feel the 5th rib between your index and middle fingers and then feel the 5th
intercostal space with your index finger bull At the level of the 5th intercostal space mark a + sign at the midsternal line below
your x mark for V1-V2 level This + is the reference level ldquoErdquo for V4 V5 and V6 (Figure 2 and Figure 4)
bull In overweight persons and in women with tender breast tissue it is often difficult to locate the 5th intercostal space In such a case mark the + sign for E point 1 frac14 in (3 cm) below your reference level X for V1 and V2 (in smaller adults 1 inch (25 cm) is enough)
FIGURE 4
APPROXIMATE LOCATION OF V6
bull Move the left elbow laterally without moving it anteriorly or posteriorly while observing the anterior and posterior axillary folds The left elbow must be supported properly
bull Follow a line exactly in the vertical midplane of the thorax (mid-axillary line - Figure 5) down where the line meets the horizontal plane of E point Using your marker make a vertical 1-2 inch long line there as an approximate location of V6 (Figure 6)
FIGURE 5
FIGURE 6
EXACT LOCATION OF V6
bull Exact location of V6 is determined by using the HeartSquare bull Place the HeartSquare horizontally with the wider arm (E arm) at level e point
(Figure 7) bull Slide the V6 arm of the HeartSquare towards the midaxillary line until the arrow
points to the mark at the midaxillary line Mark the exact location of V6 at the level of the arrow on the V6 arm Mark the exact location of V6
FIGURE 7
EXACT LOCATION OF V4
bull While keeping the HeartSquare in the horizontal position with the arrow on the V6 arm pointing toward the V6 position observe the reading at E point (Figure 7)
bull Use this e reading on the centimeter scale on the V6 arm and follow this same E reading along the 45 degree lines towards the torso to locate the exact position of V4
bull Now that you have located V6 and V4 secure the V6 arm with your thumb to prevent it from sliding Note the V6 reading which is the distance from the arrow on the V6 arm to where this arm intersects the E arm at right angles You may then remove the HeartSquare
bull Enter the E and V6 measurements as three digits Figure 8 shows that the E entry is 160 and the V6 entry is 120 for the readings of 160 cm and 120 cm respectively Enter the 160 for E in the height field of your Mac 1200 and 120 for the V6 measurement in the weight field (DO NOT ENTER THE HEIGHT AND WEIGHT OF THE PARTICIPANT)
bull If the HEARTSQUARE is too small for participant enter 000 as the E and V6 measurements
FIGURE 9
LOCATIONS OF V3 and V5
bull Mark V3 exactly halfway between V2 and V4 (Figure 10) bull Mark V5 exactly halfway between V4 and V6 (Figure 10)
FIGURE 10
III143 Attaching the electrodes
bull After you have marked electrodes positions and rubbed them with alcohol swabs you may apply the electrodes
bull Lower limb electrodes should be facing up while upper limb electrodes could be facing up or down
bull Do not place electrodes directly over bone bull Attach lead wires in the same correct order every time to establish routine and to
eliminate lead swaps bull Position the MULTI-LINK on the participantrsquos abdomen bull Grasp each lead at the MULTI-LINK attachment point bull Follow lead wire to the electrode attachment end bull Attach wire to electrode making sure clip is not in contact with electrode adhesive bull Make sure lead wires have some slack and are hanging loosely bull You may secure the lead wire to the skin by applying paper tape 1-inch below the
clip especially if the ECG shows baseline noise despite careful preparation
III15 ECG recording
bull Turn on the MAC1200 bull Allow the machine to go through the ldquoself-testrdquo Do NOT press ldquoRrdquo bull Press ldquoPat infordquo key to enter the participant information bull Use the participant data entry sheet as a reference guide (Table 2) bull Press the STARTSTOP key to return to the ECG screen on the ECG machine bull Press the STARTSTOP key again to record the ECG
Table 2 Participant Data Entry into the MAC1200 for the ACCORDION Study Category [What shows on MAC1200 screen]
Entry [What you Enter]
NEW PATIENT YES LAST NAME 1st three digits of Last Name plus 1st two digits of First Name
plus Middle Initial FIRST NAME Enter Visit Code (will be provided to you) DATE OF BIRTH MMDDYYYY PARTICIPANT ID Assigned ClinicCart plus Assigned CountryState plus
Assigned Suffix plus ID (example 112A12345 = Canada Clinic No 12 A group 12345 ID No)
SECONDARY ID Same as Participant ID PACEMAKER NO [YES IF PACEMAKER] GENDER M OR F HEIGHT (Do NOT Enter Height) E Measurement of HeartSquare (eg if E=160 enter 160) WEIGHT (Do NOT Enter Weight) V6 Measurement of HeartSquare (eg if V6=120 enter 120) RACE Use Other and enter defined race codes REFERRING PHYSICIAN No action required TECHNICIAN Use other and enter defined Tech ID LOCATION No action required Do not enter participantrsquos name
III2 Local ECG reading (Alert ECGs)
The computer statements on the clinic ECGs are often overstated ie incorrect Also many minor non-clinically significant ECG findings are found in a general population sample and most of these do not need immediate attention (of course all ECG findings along with other clinic results will be passed along to participants and their physicians at a later date) However certain ECG findings printed on the clinic ECGs need to be reviewed by the clinic physician before the participant leaves the clinic While the participant is in the clinic the ECG technician prints out a paper copy of the ECG and computer interpretation If the computer reading only has normal ECG sinus arrhythmia sinus bradycardia (rate gt40) sinus tachycardia (lt105) axis deviation PACs rare PVCs incomplete BBB first degree AV block or perhaps a few other items (to be determined over time by the clinic physician) the technician can tell the participant that the ECG ldquoappeared good but it will be reviewed by a physician laterrdquo If the ECG says ldquononspecific ST-T abnormalitiesrdquo ldquobundle branch blockrdquo ldquojunctional rhythmrdquo ldquolow voltage QRSrdquo or perhaps a few other items the technician may say ldquothe ECG does not show any MAJOR abnormality but it will be reviewed by a physician laterrdquo However clinic study physicians need to report on and technicians need to look out for ldquoalertrdquo ECGs at baseline or follow-up when the printout of a clinic recorded ECG on the MAC1200 electrocardiograph indicates one of the following conditions
a) Atrial fibrillation (Figure 11) b) Atrial flutter (Figure 12) c) Ventricular tachycardia (Figure 13) d) Acute myocardial infarction (Figure 14) e) Ventricular preexcitationWolff-Parkinson-White (WPW) ECG pattern (Figure 15) f) Complete atrioventricular block (Figure 16) g) Any statement which includes a reference to acute injury or ischemia
In the case of any of these alert statements take the tracing to the clinic physician who will decide if any further action is needed It is not advisable to alarm the participant by revealing these unconfirmed interpretative statements However it is helpful to casually inquire if the person has recently had chest pain or discomfort A negative answer does not mean that the alert can be ignored because heart attacks can be asymptomatic (silent) These ldquoasymptomatic alertsrdquo are most of the time not in the same category of possible urgency as alerts associated with recent chest pain or discomfort or fainting attacks
Figure 11 Atrial fibrillation Diagnosis key points irregular QRS complexes (heart rate) and absence of the P wave
Figure 12 Atrial flutter Diagnosis key points multiple P waves saw-teeth pattern (as in V1) mostly regular but could be irregular with a certain pattern (regular irregularity)
Figure 13 Ventricular tachycardia Diagnosis key points Wide complex tachycardia (HRgt110) with QRS not preceded by P wave The participant will be mostly restless
Figure 14 Acute inferior (upper panel) and acute anterior (lower panel) myocardial infarction Diagnosis key points Elevated ST segment in a group of adjacent leads with or without Q waves and with or without ST depression in other leads Patients usually will have chest pain
Figure15 Wolf Parkinson White Syndrome Diagnosis key points Short PR interval (below 120 ms) slurred upstroke of the R wave (delta wave) with wide QRS complex (mostly above 110 ms)
Figure 16 Complete (3rd degree) atrioventricular block Diagnosis key points Slow heart rate (around 40 beats per minute) with no relation between the P wave and the QRS
III3 Data management procedure
III31 Communications setup for transmission
Internal set up of the ECG machines must be done according to the instructions established by the CERC Correct internal set up should enable the clinics to transmit the study ECGs via a phone line to the reading center Adding 9 (or other number) to get an outside line andor adding an access code for long distance are taken into consideration [NOTE Contact the CERC any time with questions]
III32 Before transmitting ECGs to the CERC
bull Ensure that all previously transmitted ECGs are deleted bull Check to ensure that all IDs are valid
III33 Transmitting ECGs to the CERC
bull Secure the modem cable into the 9-pin connector found on the right side of the MAC1200 and the 25-pin connector found on the rear of the modem
bull Plug one end of the phone cable into the connector marked ldquoLINErdquo on the rear of the modem and the other end into any ldquoanalogrdquo (fax) phone line
bull Start at the 12-lead screen While holding the ldquoShiftrdquo key down press the ldquoStoreRetrieverdquo key Press the down arrow 3 times and then hold the shift key and the down arrow together to get to the desired ECG to be transmitted The screen will show black squares on the right and left sides of the ECG selected for transmission
bull To skip an ECG press the down arrow without using the shift key
bull Repeat this procedure until all ECGs that are to be transmitted have been selected bull Once selections are made press the ldquoEnterrdquo key This will return you to the top of the
screen bull Use the right arrow to highlight ldquoSendrdquo and press the ldquoEnterrdquo key bull Another screen will appear which states ldquoto start transmission press enterrdquo Once
transmission is complete press the ldquoStartStoprdquo key located on the far bottom right of the keyboard to return to the 12-lead screen
bull Delete transmitted ECGs ONLY after you have received email or verbal confirmation of receipt of ECGs from the ECG center
III34 Directory management
Keep your directory correct and current by doing the following bull BEFORE TRANSMISSION Delete all unwanted ECGs like those with flat lines poor
quality or duplicates Correct any errors in participant data entry like ID numbers bull AFTER TRANSMISSION Delete transmitted ECGs ONLY after confirming that
EPICARE has successfully received the ECGs
VI READING CENTER TECHNICAL DETAILS
Set-up of the machines is ONLY allowed to be done at the CERC or with assistance of one of the CERC staff or an authorized study personnel if it has to be done at the clinic It may be necessary to re-program the machine after the start of the study if a malfunction occurs or the battery has been allowed to become dead The machine set-up and programming instruction are listed in Appendix B All ACCORDION ECGs will be electronically transmitted to CERC The digital ECGs are stored in an electronic database at the ACCORDION CERC in a Marquette measurement matrix by participant ID This database will remain unaltered Additionally a second and third database will be created after technician editing of correct onset and offset of the waveforms These two databases are then transformed into Minnesota Code and Novacode categories by the EPICARE ECG coding program for later reporting The format and route of data transfer will be determined by agreement between the Coordinating Center (CC) and the CERC Monthly reports will be sent from the CERC to the CC All electronic ECGs will be processed and reported within 30 days from receipt
V QUALITY CONTROL PROCEDURES
V1 Quality grades
The ECG reading centre evaluates and ranks the ECG quality through an automated system with visual confirmation if needed There are 5 grades from 1 to 5 The best grade is 1 and the worst is 5 Generally grades 1 and 2 are difficult to separate visually and they are considered good Grades 3 and 4 are given to ECGs that have correctable problems ie the ECG problems could be adjusted for on reading them Grade 5 ECG are given for the ECGs that there have major problems which make it difficult to read them
V2 CertificationRecertification procedures
bull All ECG technicians must go through the certification process before they are allowed to acquire study ECGs
bull Each technician must acquire and successfully transmit 3 good quality ECGs bull The 3 ECGs should be approximately 20 minutes apart or recorded from 3 different
volunteers bull After evaluation of certification ECGs by EPICARE staff the technicians will be notified
of their certification status bull Recertification process (required every 2 years) is the same as the certification process bull The participant data entry should be done according to the instructions in table 3 after
pressing the ldquopat infordquo key on the MAC 1200 keyboard
Table 3 Entry into the MAC1200 for certification of technicians ONLY Category Entry New Patient YES Last name Enter technicianrsquos last name First name Enter technicians first name Date of birth Enter volunteerrsquos birth date (MMDDYY) Participant ID Enter 999999999 (Press ldquoShiftrdquo key to enter numbers) Secondary ID Enter 999999999 (Press Shift key to enter numbers) Pacemaker YES or NO Gender M or F HEIGHT E Measurement of HeartSquare (eg if E=160 enter 160) WEIGHT V6 Measurement of HeartSquare (eg if V6=120 enter 120) Race Choose ldquoOtherrdquo and choose defined race codes Referring physician No action required Technician Choose ldquoOtherrdquo and select technicianrsquos last name Location No action required
V3 Examples of common ECG quality problems and possible solutions
bull EXCESSIVE BASELINE DRIFT (Figure 17) This occurs if the participant is moving around or there is tension on the lead wires Ask the participant to lie still for a few seconds Drift in excess of 1 mm between baseline points (QRS onset) of any two successive complexes is a sign of significant drift
bull EXCESSIVE MUSCLE NOISE (Figure 18) The participant is either tense due to lack of body support or may be cold Use a wide bed and blanket to cover the participant
bull BASELINE DRIFT DUE TO TANGLED WIRES (Figure 19) Ensure that the wires are not pulling Be sure to establish a good electrode connection Lay a towel across the wires if necessary Adjusting the angle of the clip at the electrode often helps You may need to tape down the chest leads use only hypoallergenic medical tape to prevent allergic reactions Use a U loop (not a cross loop) with the electrode wires ie the wire should not cross but remain open like a U never crossover wires
bull LOOSE ELECTRODE CONNECTION (Figure 20) Loose electrode connection may cause a wavy baseline in some ECG leads Check each electrode to ensure that it is secure
bull SIXTY HZ NOISE (Figure 21) Periodic 60 HZ noise is sometimes visible in the record This may be caused by AC interference from a nearby machine Make a visual check of this before recording the ECG Unplug any unnecessary surrounding electric equipment Note Jewelry does not cause 60 HZ noise
bull MISSING LEADS AND LEAD REVERSAL (Figures 22-24) To minimize the chances of having lead reversal and missing leads always make sure that there are no flat lines in the ECG recording andor mainly positive QRS in aVR lead Also always have a second look at the connections before recording
Figure (17) Excessive baseline drift due to sudden movement of the participant
Figure (18) Excessive muscle noise
Figure (19) Baseline drift due to tangled wires
Figure (20) Wavy V1 baseline due to loose electrode
Figure (21) Sixty Hz electrical interference
Figure (22) Flat line due to missing V1 lead
Figure (23) Lead reversal denoted by positive aVR (upper panel) compared to the normal (lower panel)
Figure (24) Lead reversal denoted by flat line in one of the limb leads (upper panel) compared to the normal (lower panel)
Appendix B
MAC 1200 PROGRAMMING AND SETUP
Minor changes in the set up below may occur during the course of the study- Call EPICARE for assistance
In order to setup a MAC1200 for the ACCORDION study turn the ECG machine ON After the self-test completes the ECG machine will be at the 12-lead screen (3 flat lines) Press the ldquoSetuprdquo key Press ldquoEnterrdquo to select either12-lead setup system setup communication setup participant data setup or code setup To make a selection use the four arrow keys to highlight any selection and press ldquoEnterrdquo
12-Lead Setup
CATEGORY SELECTION
REPORT SEQUENCE [STANDARD]
RHYTHM LEADS [II]
GAIN [10]
REPORT FORMAT [4x25R1]
DETAILED RESULTS [NO]
MUSCLE FILTER [NO]
MUSCLE FILTER FREQUENCY [40 Hz]
AC FILTER [YES]
MANUAL COPY TO [HOST]
NO OF COPIES [1]
DELETE ECG AFTER TRANSMISSION [NO]
AUTOSAVE ECG [YES]
USE SCREENING CRITERIA [NO]
SUPPRESS NORMAL STATEMENTS [NO]
SUPPRESS ABNORMAL STATEMENTS [NO]
INTERPRETATION [YES]
PRINT INTERPRETATION [YES]
OVERRIDE FUNCTION [YES]
When finished press the STOP key
Press the Down Arrow key to highlight System Setup and press ENTER
System Setup
CATEGORY SELECTION
ORDERING PHYSICIAN No
REFERRING PHYSICIAN Highlight OTHERS press ENTER Press ENTER until the cursor is under the LAST NAME type ACCORDION Press ENTER until the cursor is under the FIRST NAME type the ACCORDION field unit location and number (2-03 Seattle)
TECHNICIAN Choose OTHERS press ENTER Press ENTER until the cursor is under the LAST NAME type the technicianrsquos LAST NAME then press ENTER Type the technicianrsquos FIRST NAME then press ENTER Press the Stop key
INSTITUTION NAME ACCORDION 2-03 (for ACCORDION field unit 2-03)
CART NUMBER (ACCORDION clinic ) for assigned Clinic (Ex 203) MUST BE NUMERIC
SITE NUMBER ENTER 4 This is EPICARErsquos Study Number for ACCORDION
LOCATION NUMBER Assigned Cart ID (2-03)
DATE (mmddyyyy) ENTER the correct date using the mmddyyyy format
TIME (hhmm) ENTER the correct time in the hhmm format
LEAD FAIL BEEP [NO]
HIGH HR BEEP [NO]
LEAD LABELS [AAMI]
PACE ENHANCEMENT [NO]
BASELINE ROLL FILTER [008]
DATE [MMDDYYYY]
TIME [24]
UNITS [Cm Kg]
MAINS [60 Hz]
LCD LIGHT OFF AFTER [5 MINS]- Time Out Mechanism
LOW BATTERY BEEP [0 sec]
DEFAULT MODE [12 LEAD]
LANGUAGE [ENGLISH]
ENABLE PASSWORD [NO]
TEST DATA [NO]
RESTORE DEFAULTS [NO]
PRINT SETUP LISTS [NO]
When finished press the STOP key
Press the Down Arrow key to highlight Communication and press ENTER
Communication Setup
CATEGORY SELECTION
BAUD RATE (PC) [9600]
PROTOCOL [CSI]
MODEM MultiTech 56k
DIAL MODE TONE
PHONE NO 13367161248 If an Access code is required to dial a long distance number enter the access code and the transmission telephone number at EPICARE the same way you would dial a long distance number from your institution (using your Access code) eg bull If the Access Code is needed AFTER entering the transmission number enter 133613367161248123456789 where 123456789 is the Access Code bull If the Access Code is needed BEFORE entering the transmission number enter 123456789 13367161248 where 123456789 is the Access Code Note Access codes are separated from the EPICARE transmission telephone number by three commas This allows the MAC1200 to pause before another telephone number is entered
OUTSIDE LINE If you need an outside line to obtain dial tone enter that digit here eg 9
When finished press the STOP key
Press the Down Arrow key to highlight Patient Data Setup and press ENTER
Participant Data Setup CATEGORY SELECTION
NEW PATIENT [YES]
PACEMAKER [YES]
GENDER [YES]
HEIGHT [YES]
WEIGHT [YES]
RACE [YES]
SYSTOLIC BP [NO]
DIASTOLIC BP [NO]
ORDERING PHYSICIAN [NO]
REFERRING PHYSICIAN [YES]
TECHNICIAN [YES]
PHONE NO [NO]
MEDICATION [NO]
COMMENTS [NO]
ID REQUIRED [YES]
PATIENT ID LENGTH 9
SECONDARY ID [YES]
SECONDARY ID REQUIRED [YES]
LAST NAME (Required) [YES]
FIRST NAME (Required) [YES]
LOCATION [NO]
ROOM [NO]
ORDER NUMBER [NO]
EXTRA QUESTIONS [Leave Blank]
When finished press the STOP key Press the STOP key once again to exit the Setup menu The Option Code Setup requires NO action
Appendix C
Transmission of ACCORDION study ECGs to the CERC
Before transmitting ECGs to the CERC
1 Ensure that all previously transmitted ECGs are deleted only after confirmation of receipt by the CERC
2 Check to ensure that all IDs are valid 3 You can correct any variable from your participant data information by doing the
following a While holding the ldquoShiftrdquo key down press the StoreRetrieve key b Move the cursor to the ID in question c Select ECG d Press ldquoEnterrdquo to return to top screen e Highlight ldquochangeeditrdquo f Proceed to correct information
Transmitting ECGs to the CERC
1 Plug one end of the phone cable into the connector marked ldquoLINErdquo on the rear of the modem and the other end into any ldquoanalogrdquo (fax) phone line
2 Start at the 12-lead screen 3 While holding the ldquoShiftrdquo key down press the ldquoStoreRetrieverdquo key 4 Use arrow keys to move the cursor to the ECG to be transmitted While holding down
uppercase key use up or down arrow key to select more ECGs (Black box will appear at either side of a selected ECG) Repeat this process until all ECGs that are to be transmitted have been selected
5 Press the enter key to start the transmission 6 Once transmission is complete press the ldquoStartStoprdquo key located on the far bottom
right of the keyboard to return to the 12-lead screen 7 You will receive email confirming receiving the ECGs Never delete an ECG before
confirmation of receipt Call the ECG center for confirmation anytime
Central Chemistry Laboratory
Manual of
Procedures
Specimen Collection Processing
Shipment
NORTHWEST LIPID METABOLISM AND DIABETES RESEARCH LABORATORIES
University of Washington School of Medicine
March 2010
This manual has been prepared by the Northwest Lipid Metabolism and Diabetes Research Laboratories for the exclusive use in the ACCORDION trial Reproduction of this manual entirely or in part for use outside of the study requires prior written approval from the Laboratory Director
TABLE of CONTENTS
ABOUT THE LABORATORY 2 A History 2 Vision Statement 3 Mission Statement 3 Introduction to the CCL Laboratory Manual 3
LABORATORY CONTACTS 4 SUPPLIES 5
Supplies Provided by the CCL 5 Equipment Supplies amp Facilities Provided By Clinical Sites 6
UNIVERSAL PRECAUTIONS 7 COLLECTION PROCEDURES 8
Blood Collection 8 Urine Collection 9
COLLECTION CHART 10 SPECIMEN COLLECTION 11 SPECIMEN LABELING 12 SPECIMEN PROCESSING 13 SPECIMEN CENTRIFUGTION 14
Refrigerated Centrifuge 14 Non-refrigerated Centrifuge 14
PREPARING SPECIMENS FOR SHIPMENT 15 SHIPPING INSTRUCTIONS 16
Shipment Forms 16 Shipping Containers and Coolant 16 Shipping Schedule 17 Holiday Schedule 18
ATTACHMENTS - FORMS 19
A Fax Notification B Supply Request C Shipping Guidelines (for reference only)
1
ABOUT THE LABORATORY
A History The Northwest Lipid Metabolism and Diabetes Research Laboratories (NWRL) was established in 1971 as one of twelve laboratories involved in the Lipid Research Clinics Program and subsequent Coronary Primary Prevention Study funded by the National Heart Lung and Blood Institute During the program this laboratory participated in the development and standardization of methods for the separation of lipoproteins and for the chemical quantification of their components and performance was monitored continually through the Lipoprotein Standardization Program of the Centers for Disease Control The laboratory is directed by Santica Marcovina PhD ScD Research Professor of Medicine Division of Metabolism Endocrinology amp Nutrition Department of Medicine University of Washington
The laboratory is an Abell Kendall reference network laboratory of the National Reference System for Cholesterol and participates in the lipid standardization programs offered by the National Heart Lung and Blood Institute Centers for Disease Control and the College of American Pathologists In addition the laboratory serves as the reference laboratory for the International Standardization of Apolipoproteins AI B and Lp(a) and monitors the stability of the World Health Organization International Reference Materials for Apo AI B and Lp(a)
For more than 25 years the laboratory has participated in studies to identify the prevalence of hyperlipidemia in the population and to evaluate the efficacy of intervention Reported in 1983 results of the Coronary Primary Prevention Study demonstrated that lowering cholesterol was effective in reducing the risk of premature heart disease this information was key in the development of treatment recommendations issued by the National Cholesterol Education Program To maintain a high level of accuracy and consistency in results we continue to perform the Beta Quantification procedure as outlined in the Manual of Laboratory Operations for the Lipid Research Clinics Program without introducing any technical change to the laborious and time-consuming technique The NWRL continues to provide analyses for the lipoprotein and apolipoprotein research performed at the University of Washington and has been involved in numerous and varied multi-center investigations throughout the United States and internationally We currently serve as the Central Laboratory for the following NIH-sponsored studies
ACCORDION - Action to Control Cardiovascular Risk in Diabetes Follow-Up AIM ndash HIGH - Atherothrombosis Intervention in Metabolic Syndrome CARDIA - Coronary Artery Risk Development in Young Adults CIT - Clinical Islet Transplantation Consortium DPPOS - Diabetes Prevention Program Outcome Study ITN018 027 028 041 amp 045AI - The Collaborative Network for Clinical Research in Immune Tolerance LABS - Longitudinal Assessment of Bariatric Surgery Look AHEAD - Action for Health in Diabetes NSABP - Breast Cancer Prevention Trial (BCPT) SEARCH III - Search for Diabetes in Youth SEARCH CVD - Cardiovascular Disease in Youth SNAS - Nutrition and Metabolic Status in Youth with Type 1 DM SEARCH Ancillary TEEN LABS - Adolescent Bariatric Assessing Health Benefits and Risks TODAY2 - Studies to Treat or Prevent Pediatric Type 2 Diabetes Trial Net - Natural HistoryOral InsulinCTLA4-IgMetabolic ControlGADNIPAntiIL-1Beta
2
Vision Statement To be a model organization thriving in a dynamic environment and respected as a leader in quality laboratory services with a strong commitment to continuous quality improvement
Mission Statement The mission of the Northwest Lipid Metabolism and Diabetes Research Laboratories is to continuously provide the highest standards of professional and technical expertise and organizational support Our commitment is to not only provide the utmost in quality analytical interpretative advisory and consultation services but is to offer comprehensive support as a central biochemistry laboratory for research and clinical trial studies Our pledge is to take the steps necessary whatever they may be to ensure the greatest success of the studies in which we are involved
Introduction to the CCL Laboratory Manual
This manual provides basic overviews in the areas of which you have already had training such as Universal Precautions and Phlebotomy Procedures but these are provided only as reminders and should be treated as such If you feel you need additional training in these areas we have provided some resources for you The sections covering specimen collection processing and shipping that are directly related to the ACCORDION Follow-Up Study
This detail is provided for a reason submission of proper specimens under optimum conditions is very important Once you have familiarized yourself with this manual and have repeatedly performed these procedures it will not be necessary for you to refer to the manual each time you collect and process blood However we ask that when in doubt please do refer to the manual or contact the CCL for problem resolution
Accurate analyses can
seldom be performed on
poor specimens
3
SUPPLIES Supplies Provided by the CCL
Specimen collection materials will be provided in ldquobulkrdquo shipments for the ACCORDION study The first bulk shipment will be made to the sites prior to the start of the study Additional supply shipments will be made at the sitersquos request by using the ACCORDION Supply Request Form
Your order should have enough
collection tubes to last 6 months because
these tubes typically have a 6 month expiration date
For Blood Collection
85 mL tiger-top SST (with inert gel separator)
20 mL purple-top (EDTA anticoagulant)
For Urine Collection
Antiseptic towelettes
Sterile urine collection cups
Disposable plastic transfer pipettes
Screw-cap sample vials 10 mL polypropylene
For Specimen Identification
Bar-coded labels for specimen tubes and shipment forms
For Specimen Shipping
Biohazard bags
Ziploc bags
Cold packs
Polyfoam tube holders with absorbent pad and outer sleeve
Polyfoam shipping containers with cardboard outer box
FedEx air waybills
ldquoEXEMPT HUMAN SPECIMENrdquo labels for shipping boxes
EXEMPT HUMAN
SPECIMEN
5
Equipment Supplies amp Facilities Provided By Clinical Sites
These are suggested supplies only clinics may use equivalent substitutions if desired
For Blood Collection Alcohol wipes Ammonia spirits ampules Band-Aids Cold compresses Disposable gloves (powder-free to avoid possible cross-contamination from powder) Needle (Vacutainer) holders Paper andor other dermatological tape Sterile and non-sterile gauze pads Sterile 21 gauge 1rdquo needles (multiple-sampling) Sterile 21 gauge butterfly needles (multiple-sampling) Tourniquets
For Blood ProcessingShippingStorage Tube racks Plastic-backed table covers Waterproof pens (such as laundry markers fine-point for scribing on labels) Centrifuge refrigerated (preferably) swinging-bucket type Refrigerator set to 4˚C Wide (2rdquo) packing tape for sealing shipping containers
For Specimen Handling Lab coat Goggles or face shield Paper towels Bleach decontaminant -1 part Clorox to 9 parts water stored in a labeled bottle Biohazard waste containers with orange or red-plastic liners Sharpsbiohazard containers - rigid red or orange plastic containers for sharps waste
The Phlebotomy Area should include a chair for the subject a table for blood collection supplies a bed exam table or treatment chair that flattens out and phone intercomphysical access to emergency equipment If possible a sitting area should be provided so that the subject can sit quietly in a chair for 5 minutes prior to any lipid blood draw as recommended by NCEP guidelines Additionally a conveniently located lavatory is required for urine specimen collection
6
UNIVERSAL PRECAUTIONS
Universal Precautions were mandated into standards December 6 1991 by the Occupational Safety and Health Administration (OSHA) in response to increasing public concern over possible transmission of the Acquired Immune Deficiency Syndrome (AIDS) virus and Hepatitis B virus This standard states that any health care worker who might potentially come into contact with body fluids should be educated in infection control and treat all body fluids as though they are potentially infectious
It is assumed that you have already had training in universal precautions The following is a summary of the basic knowledge required by health care workers and is not intended to be a complete picture of universal precautions but only the basics For a more complete overview of universal precautions you can visit the following web sites
httpwwwoshagov
httpwwwniehsnihgov
According to OSHA the following is the recommended protective barrier - gloves gown mask and goggles or face-shield and they should be used when handling any body fluids
A Gloves 1 Wear gloves for all patient contact when body fluids are involved 2 Change gloves between patients and when gloves are soiled or torn 3 Wash hands thoroughly after removing gloves 4 Remove gloves before touching telephones charts computers monitors doorknobs
refrigerator handles food penspencils and elevator buttons The only exception to this is telephones designated as contaminated
5 Carry spare non-sterile vinyl exam gloves in uniformlab coat pocket for use with unexpected contact with blood and body fluids
B Gowns Wear water-repellent gowns plastic disposable aprons etc when soiling with blood or body fluids is anticipated
C Face-Shields
Protect mucous membranes (eyes nose mouth) by wearing a mask andor glassesgoggles or use a counter-top splashguard etc when performing procedures where splashing of the face is likely to occur (uncapping decanting etc)
7
COLLECTION PROCEDURES Blood Collection
As with universal precautions it is assumed that you have already had training in blood collection and completed a phlebotomy course This section is designed as a brief review of the basics For a more complete overview of blood collection procedures you can visit a number of web sites These sites are suggested only and their usefulness must be determined individually To choose from a list of sites proceed to the following URL
httpphlebotomycomLinkshtm
It is understood that universal precautions will be employed during any specimen collection The following is a suggested method of performing blood specimen collection by venipuncture
1 Make positive patient identification
2 Gather necessary equipment
3 Wash your hands
4 Don non-sterile exam gloves
5 Explain planned procedure to patient
6 Position patients arm in comfortable position
7 Select appropriate collection site
8 Place the tourniquet above the selected collection site Do not leave tourniquet on for longer than one minute
9 Clean site with alcohol using circular motion from center outward allow to air dry (using a gauze pad may re-contaminate the area)
10 Grasp arm 1-2 inches below the site to decrease vein rolling
11 Enter the vein with the vacutainer needle bevel up at a 15 degree angle
12 Fill necessary blood tubes
13 Place sharps in puncture resistant sharps container
14 Apply gauze and tape holding pressure for 2 to 3 minutes to minimize the formation of a hematoma
15 Remove gloves and wash hands
8
Urine Collection
Urine collection procedures should be posted in the lavatory and explained to the participant The CCL provides these instructions in laminated form for this purpose
Note Urine collections for female participants should be re-scheduled if the participant is menstruating
Confirm that participants understand the following procedure
Female Holding the labial folds apart with one hand wipe once with the first wipe from front to back down the left fold and discard wipe wipe once with the second wipe from front to back down the right fold and discard wipe wipe once down the center from front to back and discard wipe Void a small amount of urine into the toilet Void urine into the sample collection cup without allowing the cup to contact anything but the flow of urine Cap quickly
Male Wipe the tip of the penis and discard wipe Void a small amount of urine into the toilet Void urine into sample collection cup without allowing the cup to contact anything but the flow of urine Cap quickly
Femmes En tenant les grandes legravevres eacutecarteacutees dune main essuyer une fois le long de la legravevre gauche drsquoavant en arriegravere avec la premiegravere lingette puis jeter la lingette essuyer une fois le long de la legravevre droite drsquoavant en arriegravere avec la seconde lingette puis jeter la lingette essuyer une fois entre les deux drsquoavant en arriegravere puis jeter la lingette Deacuteverser une petite quantiteacute drsquourine dans les toilettes Deacuteverser de lrsquourine dans le reacutecipient destineacute agrave recevoir leacutechantillon drsquourine en veillant agrave ce que rien mis agrave part le flot drsquourine nrsquoentre en contact avec le recipient Refermer rapidement
Hommes Essuyer le bout du peacutenis et jeter la lingette Deacuteverser une petite quantiteacute drsquourine dans les toilettes Deacuteverser de lrsquourine dans le reacutecipient destineacute agrave recevoir leacutechantillon drsquourine en veillant agrave ce que rien mis agrave part le flot drsquourine nrsquoentre en contact avec le reacutecipient Refermer rapidement
Hembra Sujetando el pliegue labial apaacutertelo con una mano liacutempiese una vez con el primer pantildeo desde la parte delantera hacia la parte trasera y hacia la izquierda del pliegue y deseche el pantildeo liacutempiese una vez con el segundo pantildeo desde la parte de delante hacia la parte trasera y hacia la derecha del pliegue y deseche el pantildeo liacutempiese una vez hacia el centro desde la parte delantera y hacia la parte trasera y deseche el pantildeo Vaciacutee una cantidad pequentildea de orina en el inodoro Vaciacutee la orina en el vaso de recoleccioacuten de muestras sin dejar el vaso en contacto con ninguacuten objeto excepto el fluido de la orina Taacutepelo raacutepidamente
Macho Liacutempiese la punta del pene y deseche el pantildeo Vaciacutee una cantidad pequentildea de orina en el inodoro Vaciacutee la orina en el vaso de recoleccioacuten de muestras sin dejar el vaso en contacto con ninguacuten objeto excepto el fluido de la orina Taacutepelo raacutepidamente
9
COLLECTION CHART
Follow the study protocol to determine which assessments must be made at each of the visits and use the tables below as a reference guide for specimen collection
VISITS FU1 amp FU2
Blood Fasting Visual
Analyses Label to Affix Collection Processing Condition Reference
Tube
HbA1c HbA1c Non-
fasting acceptable
20 mL Purple-top
Refrigerate Do Not Centrifuge Ship fresh
Lipids S Creatinine
ALTChemDBQ Fasting
85 mL Tiger-top
SST
20 - 30 Minutes at Room Temperature Centrifuge Ship fresh
Urine Albumin amp
Creatinine Urinalysis
Non-fasting
acceptable
Urine Cup amp
10mL transfer vial
Transfer 50mL urine into 10mL transfer tube
Ship fresh
10
SPECIMEN COLLECTION
Blood specimens collected will be shipped fresh to the CCL on cold pack refrigerant in their collection Vacutainers via Federal Express Overnight Courier Services within 24 hours of blood draw Urine specimens are shipped in transfer tubes along with the blood Keep all specimens in a refrigerated state prior to shipment To the right is a brief sequence of this process
TRANSFERING SERUM TO 10ML TUBE Some sites may elect to transfer the serum from the tiger-top collection tube into a 10mL screw cap transfer vial after the specimen is centrifuged When this is done the 10mL screw cap transfer vial must be labeled with the participant ID specific barcode label for the ChemDBQ sample A blank label should be used for the collection tube The participantrsquos ID number will have to be hand written on this label by the site After the serum has been transferred to the 10mL vial the cap should be tightly screwed onto the vial to avoid possible leakage during transit
Verify that the participant has reported as fasting for at least 8 hours
Label specimen vacutainers and urine collection cups
Collect Specimens
Centrifuge SST Tiger-top vacutainers
Transfer urine in appropriately labeled 10 mL plastic tubes
Refrigerate specimens if not shipped immediately
Complete shipment form and ship specimens to the CCL
11
SPECIMEN LABELING
The CCL will provide participant ID pre-printed labels Draw date information must be handwritten on the labels in the space provided with a permanent marker
Affix the appropriate label to each of the collection tubes and specimen transfer tubes
Label orientation is important for proper scanning of the barcode Please affix labels to collection tube and transfer tubes as shown here with the barcode number running vertically
Fine point Sharpies are
recommended for writing
the draw date on
labels
Correct Labeling Incorrect Labeling
These labels utilize barcode technology and are linked to one another as visit sets DO NOT mix label sets If for some reason a label becomes unusable such as by an accidental breakage of a tube use a provided blank label (which does not contain a barcode) and hand-write the analysis and participant id on the label The lab will manually enter that sample
12
SPECIMEN PROCESSING
As stated earlier we presume that all personnel performing this work have been trained in proper blood collection procedures Listed below are some important reminders
As you draw blood remember to
Mix each plasma blood tube 8-10 times immediately after collection by inverting the tube gently and evenly This assures adequate mixing with the anticoagulant
The same needs to be performed with the tiger-top tubes to assure adequate mixing of silica particles with the blood which is required to activate clot formation Gently invert these tubes 5 times
Avoid under-filling the collection tubes Purple-top collection tubes containing EDTA must be filled to at least 30 of the fill volume of the tube If the tube is not filled to at least 30 of fill volume there will be a dilutional effect from the anticoagulant and the specimen will be unsatisfactory for testing
Once blood has been collected and mixed
Transfer purple-top (for HbA1c analysis) tube to a refrigerator set at 4oC Do not centrifuge these tubes
To allow clot formation prior to their transfer to the centrifuge tiger-top SST tubes must stand upright at room temperature for at least 20 minutes but no longer than 30 minutes Prolonged standing can have a compromising effect on analyte levels
Urine Specimen
Instruct the study participant in the proper procedure for urine collection and provide himher with the necessary collection materials
Obtain the 10mL screw-cap vial labeled Urinalysis and use a clean transfer pipette to transfer at least 5mL of urine from the collection cup into the screw-cap vial Screw the cap on tightly and refrigerate at 4˚C unitl you are ready to prepare the shipment
Any remaining urine in the collection cup should be discarded in the toilet and the collection cup and lid discarded in a biohazard waste container
Due to the possibility of blood contamination
during collection participants who are
menstruating should not be asked to provide a
urine sample
13
--
SPECIMEN CENTRIFUGTION
After 20 to 30 minutes from sample collection transfer the tiger-top vacutainer to the centrifuge loading it according to the manufacturerrsquos instructions
Centrifuge at 1200 RCF (g) [~3000 RPM] for 10 minutes
(if swinging bucket type)
Or for 15 minutes (if fixed angle type)
This data pertains to general bench top centrifuges Use of a larger centrifuge may require different RPM settings to produce 1200 1300 RCF
Refrigerated Centrifuge If using a refrigerated centrifuge set the temperature to 4˚C Following centrifugation transfer the tubes to a refrigerator set at to 4˚C or prepare the tubes for shipment
Leaving blood samples in a non -refrigerated centrifuge or at room
temperature will compromise the
accuracy of analysis
Non-refrigerated Centrifuge If using a non-refrigerated centrifuge it is imperative that the blood tubes not be allowed to sit in the centrifuge after rotation has ceased Heat can build up in non-refrigerated centrifuges and cause hemolysis if specimens are not removed immediately after rotation has ceased We recommend that a timer pinned to the lab coat be used to alert you when tubes need to be removed from the centrifuge
The serum of well collected and well centrifuged blood samples should appear clear with no red cell layer between the gel and the specimen Invert the tube gently several times the gel barrier is good if the red cells are not contaminating the serum If the gel barrier appears to be compromised aliquot the serum to a transfer tube centrifuge again transfer the clean serum to another tube and ship to the laboratory
14
PREPARING SPECIMENS FOR SHIPMENT
Specimens collected for ACCORDION will be shipped fresh on cold packs to the CCL via Federal Express Overnight Courier within 24 hours of blood draw Keep all specimens in a refrigerated state prior to shipment If shipment cannot be made within 24 hours ship as soon as possible or call the CCL for instructions
Follow the instructions below for specimen shipment preparation Department of Transportation (DOT CFR 49) guidelines stipulate that the minimum requirements listed under item 6 below be observed for all airfreight packages containing diagnostic specimens
1 Obtain the participantrsquos labels sheet used during specimen collection
2 Obtain the Specimen Shipment Form (provided by the CoC)
3 Label the shipment form with the CCL bar-coded Shipment Form label Neatly write in participant ID and visit information on the form and affix a study-provided ID label
4 Obtain a polyfoam tube holder (with absorbent pad) and place it open on the work surface
5 Obtain the specimen tubes from the refrigerator and place them on the work surface preferably in a tube rack Check the tube labels inspect for hemolysis or red cells and verify the draw date and ID information Complete the shipment form checking-off the spaces corresponding to the specimens
6 Place the specimen tubes on their side in the open polyfoam tube holder (in the slots) Place the absorbent pad on top of the tubes(s) properly align the top-half and slide the holder into the cardboard sleeve Insert into a biohazard bag and seal You may ship multiple vacutainers in a single holder
Canadian Sites
Canadian sites must ship to the US following International Shipping Guidelines (IATA Packaging Instruction 602) These guidelines stipulate that shipments of diagnostic specimens must be made in specially rated containers with multiple layers of protection and full declaration of contents and packaging codes The CCL will provide these shipping materials to Canadian sites but they must check with their own organizations for proper usage
15
SHIPPING INSTRUCTIONS
Regulations implemented by the International Air Transport Association are for the packaging and shipping of diagnostic specimens The International Air Transport Association IATA regulations stipulate that it is the responsibility of each facility or organization to properly train personnel who will package and ship diagnostic specimens and to certify personnel who will be shipping infectious substances Therefore you must check with your institution concerning their policies and requirements and become trainedcertified in the procedures for shipping these materials
The CCL will provide you with shipping materials that meet the regulations as interpreted by our institution However if your institution deems it necessary to use alternate supplies you will be responsible for purchasing them independently
As attachment C of this manual we have included current shipping reference information for your use These general directions cover shipping diagnostic specimens dangerous goods and infectious substances Please use these secondary to your own institutional guidelines and training
Shipment Forms
The shipment form (provided by the CoC) is used to indicate the number and types of tubes included in the shipment the identity of the samples and pertinent clinic and visit information The forms are organized so that one form must be filled out per subject per shipment When a shipment is made a photocopy of the form should be produced and retained at the clinic The original is placed in a Ziploc bag and included with the specimens
Shipping Containers and Coolant
Polyfoam shipping containers with cardboard outer shells are provided Tube holders containing blood vacutainers and urine transfer tubes should be shipped on cold packs that have been frozen solidly at -20degC
Never freeze cold packs in a -70˚C
freezer Doing this may cause freezing of the blood during
transport
16
Shipping Schedule
Shipments should be made Monday through Thursday using Federal Express Priority Overnight Service Please keep this in mind when scheduling participant appointments for blood collection Specimens should be shipped on the day of specimen collection to assure quality results using fresh specimens No provisions for Saturday Delivery have been included for this study Specimens collected on Friday must be stored in a refrigerator set at 4˚C until shipments can be made on the following Monday
Air bills
The CCL will provide each site with FedEx shipping air waybills The air bills will have the CCLrsquos address and specific billing information pre-printed It is the clinical sites responsibility to fill in their contact name return address and telephone number in the spaces provided on the air bill Under no circumstances should a clinic use the FedEx account number on these air bills to make shipments to any location that is not the CCL
Ship Specimens To
ACCORDION-CCL
17
Northwest Lipid Metabolism and Diabetes Research Laboratories
FAX the CCL with the FedEx tracking number(s)
Any day a shipment is made FAX the CCL using a copy of the Shipment Notification Fax Form (attachment A) to alert of a shipmentrsquos pending arrival This will allow CCL personnel to investigate and track packages if there are delays or problems with the courier Make multiple copies of this form for your use since one will be used each day a shipment is made
Fax the completed form
Holiday Schedule
The CCL is officially closed on all US federal holidays and more importantly FedEx will NOT deliver on these days Therefore avoid shipping on any day preceding a US federal holiday (see calendar below)
When a holiday falls on a Monday or Tuesday the last day to ship samples is the Thursday of the preceding week The samples are expected to be delivered on Friday but if there is a delay we will receive the samples on Saturday When a holiday falls on a Friday the last day to ship samples is the Wednesday of that week The samples are expected to be delivered on Thursday
Due to the length of the Thanksgiving holiday the last day to ship samples is the Monday of Thanksgiving week The samples are expected to be delivered on Tuesday but if there is a delay we will receive the samples on Wednesday
Federal Holiday 2011 2012 2013
New Yearrsquos Day Fri December 31 Mon January 2 Tue January 1
MLK Jrrsquos Birthday Mon January 17 Mon January 16 Mon January 21
Presidentrsquos Day Mon Feruary 21 Mon February 18
Memorial Day Mon May 30 Mon May 28
Mon February 20
Mon May 27
Independence Day Mon July 4 Wed July 4 Thurs July 4
Labor Day Mon Septmenber 5 Mon September 3 Mon September 2
Veterans Day Fri November 11 Mon November 12 Mon Nov 11
Thanksgiving Thurs November 24 Fri November 25
Thurs November 22 Fri November 23
Thurs November 28 Fri November 29
Christmas Day Mon December 26 Tue December 25 Wed December 25
18
ATTACHMENTS - FORMS
A Fax Notification B Supply Request C Shipping Guidelines (for reference only)
19
FAX Northwest Lipid Metabolism amp Diabetes Research Laboratories
University of Washington
TO Specimen Processing FAX Phone
FROM ____________________________________
Phone ______________________________
Email _______________________________
PLEASE BE ADVISED OF THE FOLLOWING SHIPMENT ARRIVAL
Clinical Site ______________
Number of boxes shipped ______________
Date specimens shipped ______________
Fed Ex Tracking Numbers _____________________________
_____________________________
Comments
______________________________________________________________
______________________________________________________________
SUPPLY REQUEST FORM ALL REQUESTS FOR SUPPLIES SHOULD BE MADE AT LEAST TWO WEEKS PRIOR TO THEIR ANTICIPATED NEED
Site Number __________ Order Completed by ________________________ Phone _______________
Date Ordered _______________ Date Needed _______________ MM DD YY MM DD YY
Date Request Received by Lab _______________ Date Supplies Shipped from Lab _______________ MM DD YY MM DD YY
SUPPLY QUANTITY DESIRED
QUANTITY SHIPPED
QUANTITY PENDING
Specimen CollectionProcessing
85mL Tiger-top SST
20mL Purple-top
Urine Collection Cup
Antiseptic Towlette
Disposable Pipette
10mL Transfer tube
Specimen Shipment
Polyfoam Tube Holder with cardboard sleeve
Biohazard Bag
Polyfoam Shipping Container
Cold Packs
Ziploc Bags
FedEx Air Waybill
Participant Tube Labels Pat ID = _____________________
Other (specify)
Request Instructions 1 Fill in the amount of each item
desired in the table to the left
2 Fax the completed for to the lab
3 Your order will be processed and shipped to you with a copy of this form enclosed
4 Insure that the contents of your shipment exactly match the supplies specified on this form
5 If there are no discrepancies sign the form and fax back to the lab
If you have any questions please call
Comments
I have reviewed the contents of my shipment and confirm that all supplies listed have been received
Signed ___________________________ Date____________
Guidelines FOR SHIPPING PATIENT SPECIMENS
GENERAL INFORMATION Summary of Patient Specimen Exemptions Under IATA DGR 2007 Section 362236 permits certain types of patient specimens to be shipped with reduced documentation labeling and packaging if the specimens meet the standards for the exemption Specimens that meet the following definitions and other criteria are qualified for the exemption specimens that fail to meet the definition and other criteria must continue to be meet the 2007 rules
Specimen must meet the following definition pecimens are those collected directly from humans or animals including but not limited to excreta secreta blood and its components
hellipbeing transported for purposes such as research diagnosis investigational activities disease treatment and prevention
2 Minimal likelihood that the specimen contains a pathogen A patient hellipspecimen is considered exempt if there is a minimal likelihood that pathogens are present In determining whether a patient hellipspecimen has a minimal likelihood that pathogens are present an element of professional judgment is required to determine if a substance is exempt This judgment should be based on the known medical history symptoms and individual circumstances of the source hellipand endemic local conditions
Examples of specimens which MAY be transported under the exemption include the blood or urine tests to monitor cholesterol levels glucose levels or hormone levels helliptests required to monitor organ function such as heart liver or kidney function for humanshellipand antibody detection in humanshellip Patient hellipspecimens for which there is minimal likelihood that pathogens are present may utilize the exemption provided the specimen is in a packaging which will prevent any leakage The packaging must meet the following conditions 1 The packaging must consist of three components (a) a leak-proof primary receptacle(s) (b) a leak-proof secondary packaging and (c) an outer packaging of adequate strength for its capacity mass and intended use and with at least one surface having minimum dimensions of 100 mm x 100 mm 2 For liquids absorbent material in sufficient quantity to absorb the entire contents must be placed between the primary receptacle(s) and the secondary packaging so that during transport any release or leak of a liquid substance will not reach the outer packaging and will not compromise the integrity of the cushioning material 3 When multiple fragile primary receptacles are placed in a single secondary packaging they must be individually wrapped or separated to prevent contact between them DOCUMENTATION 1 If dry ice is used as a refrigerant mark Dry ice 9 UN1845 III on the air bill (check the dry ice checkbox on the FedEx air bill) 2 Check the no checkbox on the FedEx air bill in response to the question Does this shipment contain Dangerous Goods PACKAGING and LABELING
1 Place the ldquoExempt Human Specimenrdquo label on the outside of the shipping box if the specimen contains no known pathogen 2 DO NOT use the ldquoBiological Substance Category B UN3373rdquo label on the outer container unless you ARE aware the specimen contains a pathogen 3 If dry ice is used as a refrigerant place the standard Dry Ice label on the outside of the shipping box and complete the required information on it
Be certain to review these policies with your institution to assure compliance with your local policies or determinations The information provided here is our recommendation for clinical sites to expedite shipments in the most efficient manner while maintaining compliance with IATA regulations Affix ldquoExempt Human Specimenrdquo label on all shipments that have NO KNOWN PATHOGENS
EXEMPT
HUMAN SPECIMENS
Affix this label to the outside box ONLY when you are AWARE you are sending specimens that contain known pathogens
SHIPPING DRY ICE REFRIGERATING A NON-DANGEROUS COMMODITY1
Step 1 Understand that Dry ice is a listed Dangerous Good ldquoDry Icerdquo appears in bold print and is therefore a Proper Shipping Name (ldquoCarbon dioxide solidrdquo may also be used)
Step 2 As a listed dangerous good packaging must conform to Packing Instruction 904 The Special Provision in Column M (ldquoA48rdquo) states that packaging tests are not considered necessary (No UN packaging is required)
Step 3 The General Packing Requirements (See Below) must be followed but we may use any good strong non-spec outer packaging designed to allow the outflow of dry ice vapors The Shipperrsquos Declaration is not required for Dry ice and non-dangerous goods Dry ice may be included in an over pack provided the over pack meets the requirements of Packing Instruction 904
Step 4 Mark and label the package While you donrsquot need a UN specification package or a DDG the package must be marked and labeled Mark the outside of the outer package with the gross weight of dry ice inside
(See the arrows) then all you need to do is fill in the weight in Kg of the dry ice inside and list it in the encircled area
If you have one of these labels that has the proper shipping name and ID number pre-printed on it
If you use a regular class 9 label you will need to mark the box with the proper shipping name UN number and the weight of dry ice in kilograms
ldquoDry Icerdquo ldquoUN1845rdquo ldquo___ Kgrdquo
The Finished box should look like this
In the ldquoSpecial Handlingrdquo area of the waybill you need to check the ldquoDry Icerdquo box and list the number of packages and net quantity of dry ice per package
1 This information is intended to promote safe shipping and handling by the University of Washington and those entities that conduct business with the University of Washington It is not intended to meet any training requirements or to constitute a determination of compliance with the law Any non-University of Washington entity must make an independent determination of compliance with the law
- MOP-Ch 1 - Organization_and_Structure
- MOP-Ch 2 - Regulatory Responsibilities
- MOP-Ch 3 - Recruitment and Informed Consent
- MOP-Ch 4 - In-Clinic Visit Procedures
- MOP-Ch 5 - Assessment of Health Related Quality of Life (HRQL)
- MOP-Ch 6 - Outcome Reporting
- MOP-Ch 7 - Measurement Procedures
- MOP-ECG
- MOP-Laboratory Central Chemistry
-


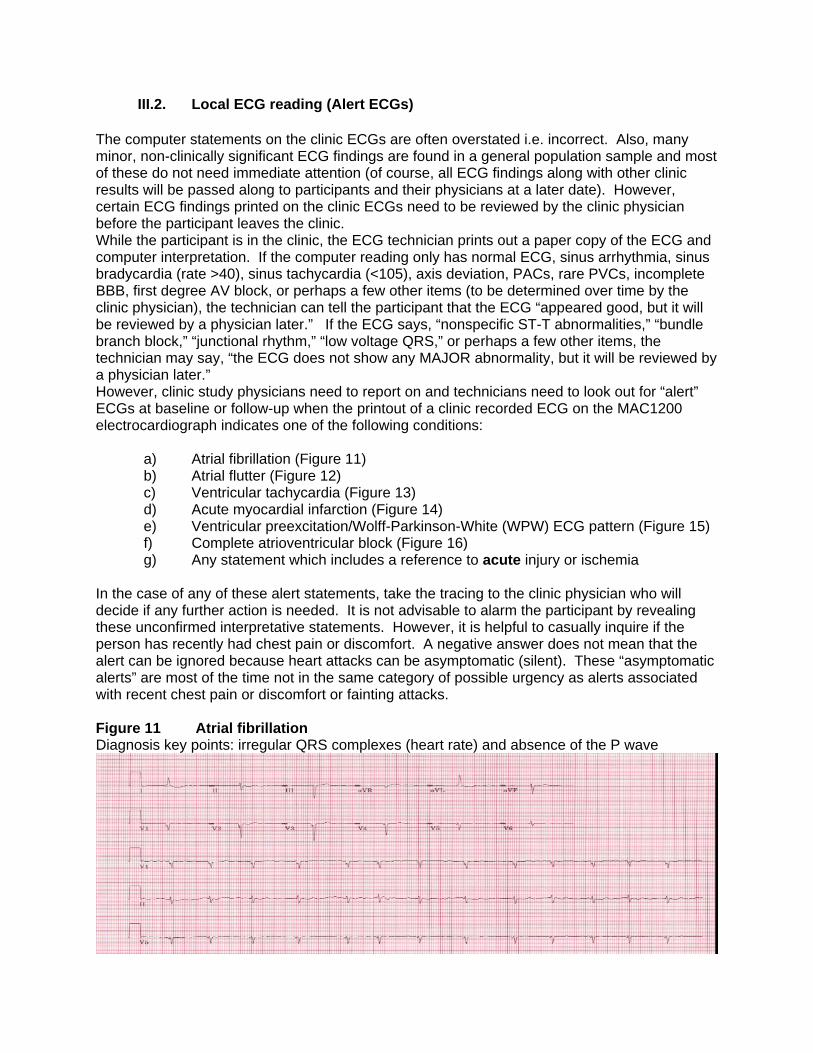


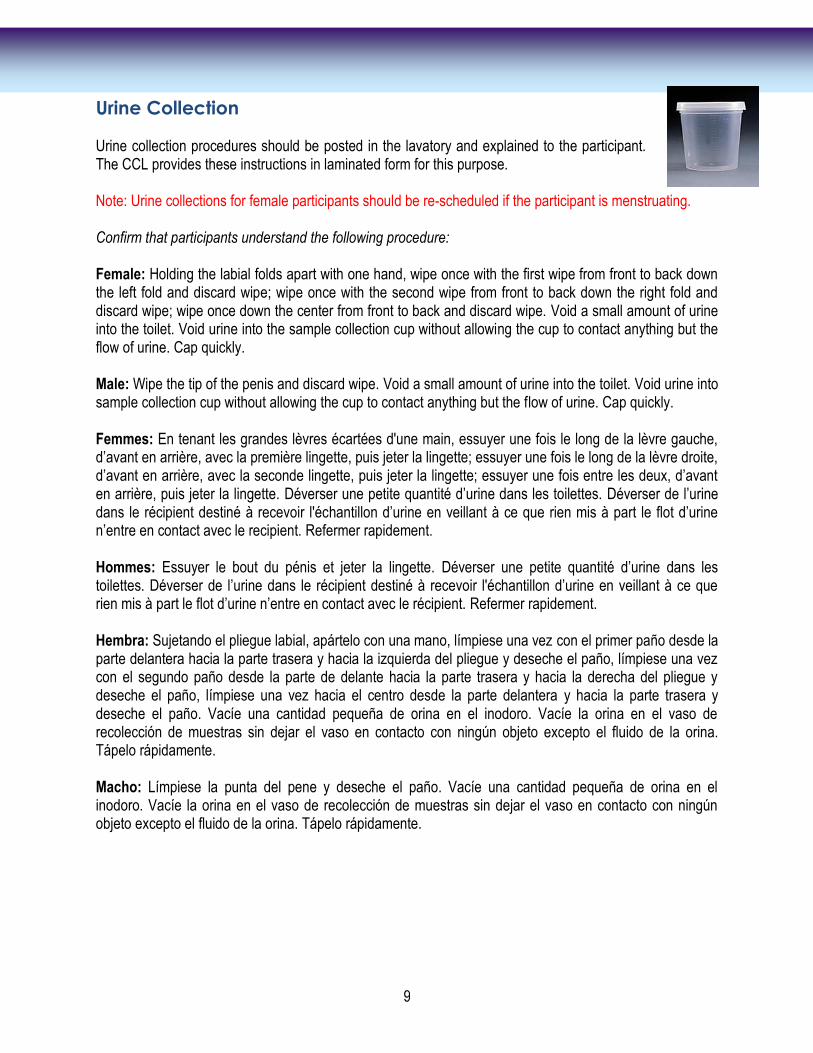


Related Documents


