1 By Paul Barnett

Welcome message from author
This document is posted to help you gain knowledge. Please leave a comment to let me know what you think about it! Share it to your friends and learn new things together.
Transcript
1
By Paul Barnett
2
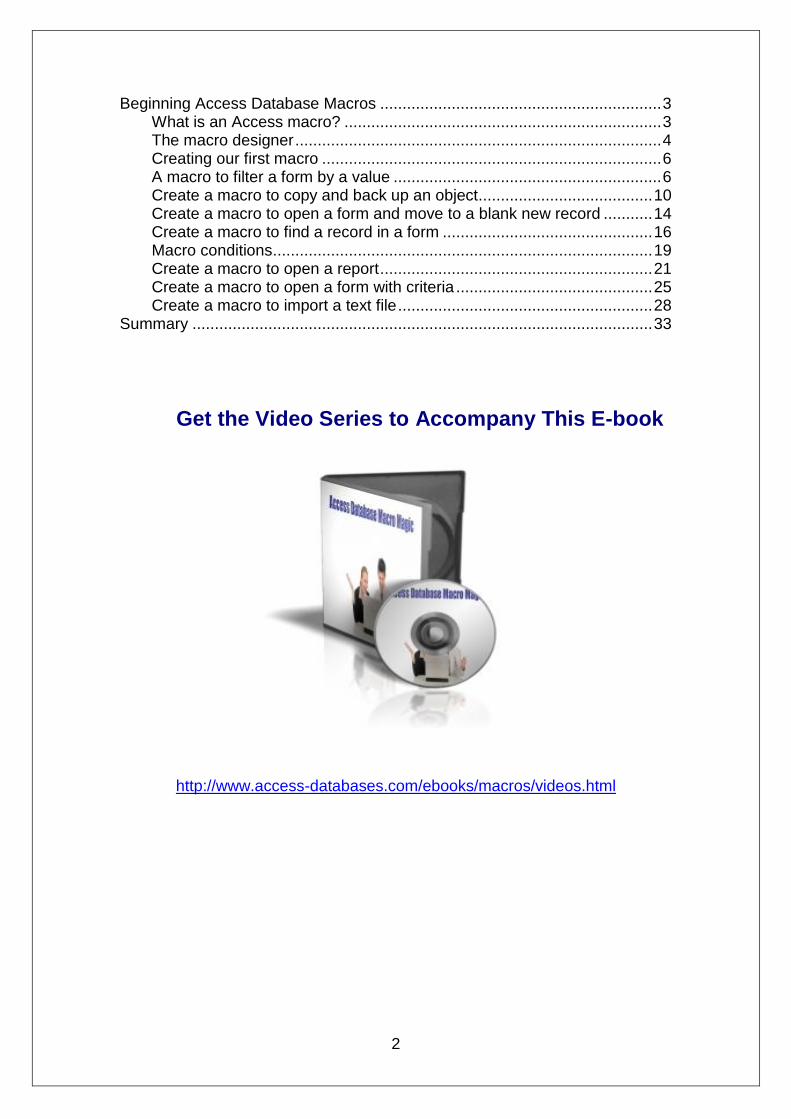
Beginning Access Database Macros ............................................................... 3 What is an Access macro? ....................................................................... 3 The macro designer .................................................................................. 4 Creating our first macro ............................................................................ 6
A macro to filter a form by a value ............................................................ 6 Create a macro to copy and back up an object....................................... 10 Create a macro to open a form and move to a blank new record ........... 14 Create a macro to find a record in a form ............................................... 16 Macro conditions ..................................................................................... 19
Create a macro to open a report ............................................................. 21 Create a macro to open a form with criteria ............................................ 25 Create a macro to import a text file ......................................................... 28
Summary ....................................................................................................... 33
Get the Video Series to Accompany This E-book
http://www.access-databases.com/ebooks/macros/videos.html
3
Beginning Access Database Macros For beginners of Microsoft Access databases VBA programming can be a daunting task. Fortunately Access offers an alternative in the shape of macros.
What is an Access macro?
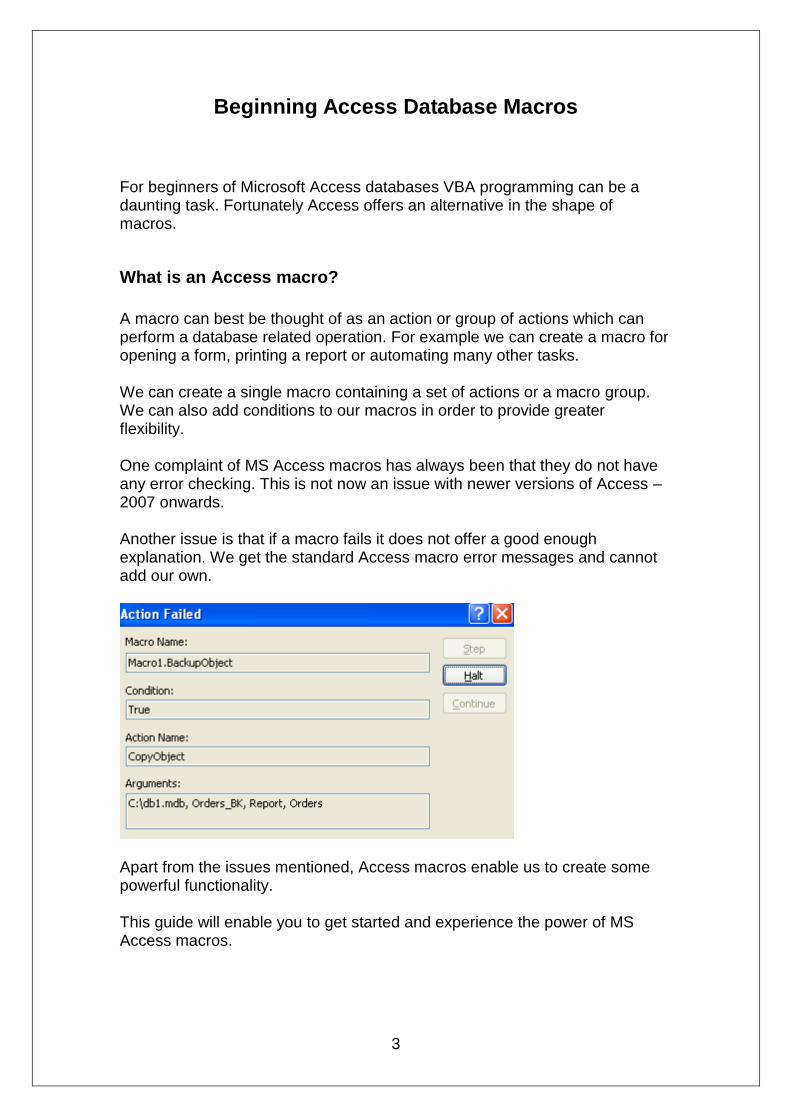
A macro can best be thought of as an action or group of actions which can perform a database related operation. For example we can create a macro for opening a form, printing a report or automating many other tasks. We can create a single macro containing a set of actions or a macro group. We can also add conditions to our macros in order to provide greater flexibility. One complaint of MS Access macros has always been that they do not have any error checking. This is not now an issue with newer versions of Access – 2007 onwards. Another issue is that if a macro fails it does not offer a good enough explanation. We get the standard Access macro error messages and cannot add our own.
Apart from the issues mentioned, Access macros enable us to create some powerful functionality. This guide will enable you to get started and experience the power of MS Access macros.

4
The macro designer
Let’s create a new macro. Go to the database window and select the ‘Macros’ option.
Now select the new option.
You will now see the macro designer window.
5
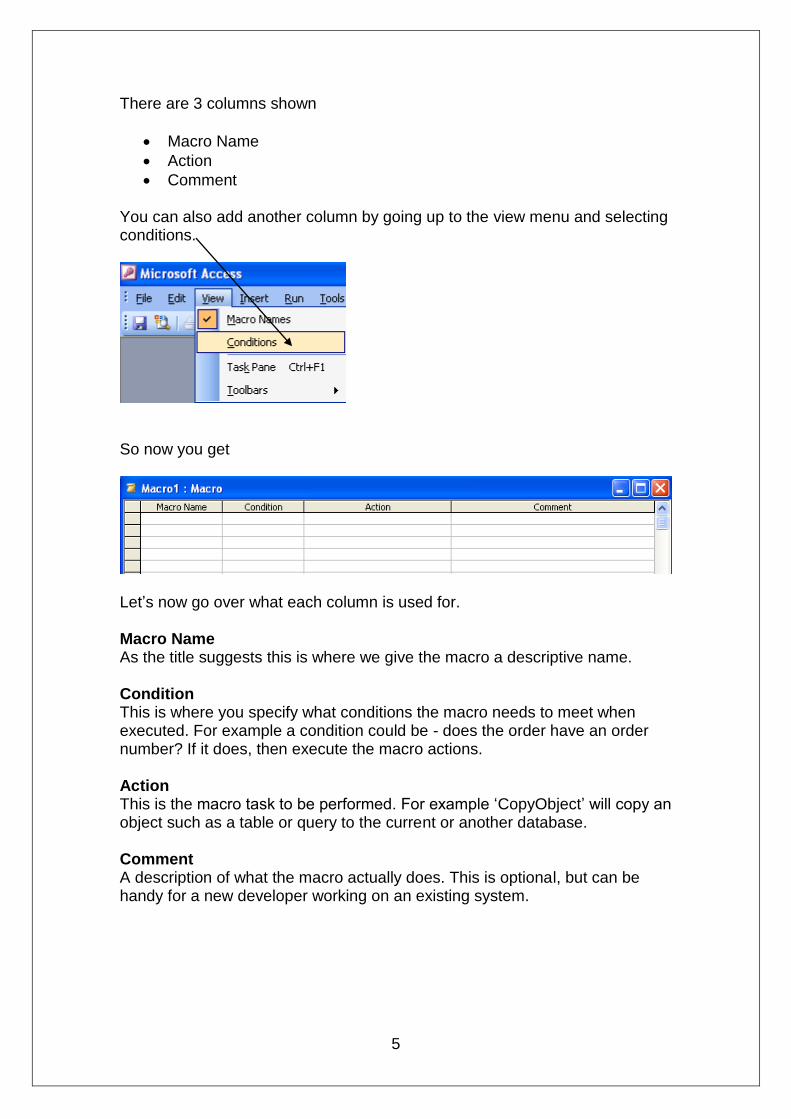
There are 3 columns shown
Macro Name
Action
Comment You can also add another column by going up to the view menu and selecting conditions.
So now you get
Let’s now go over what each column is used for. Macro Name As the title suggests this is where we give the macro a descriptive name. Condition This is where you specify what conditions the macro needs to meet when executed. For example a condition could be - does the order have an order number? If it does, then execute the macro actions. Action This is the macro task to be performed. For example ‘CopyObject’ will copy an object such as a table or query to the current or another database. Comment A description of what the macro actually does. This is optional, but can be handy for a new developer working on an existing system.
6
Creating our first macro
A macro to filter a form by a value
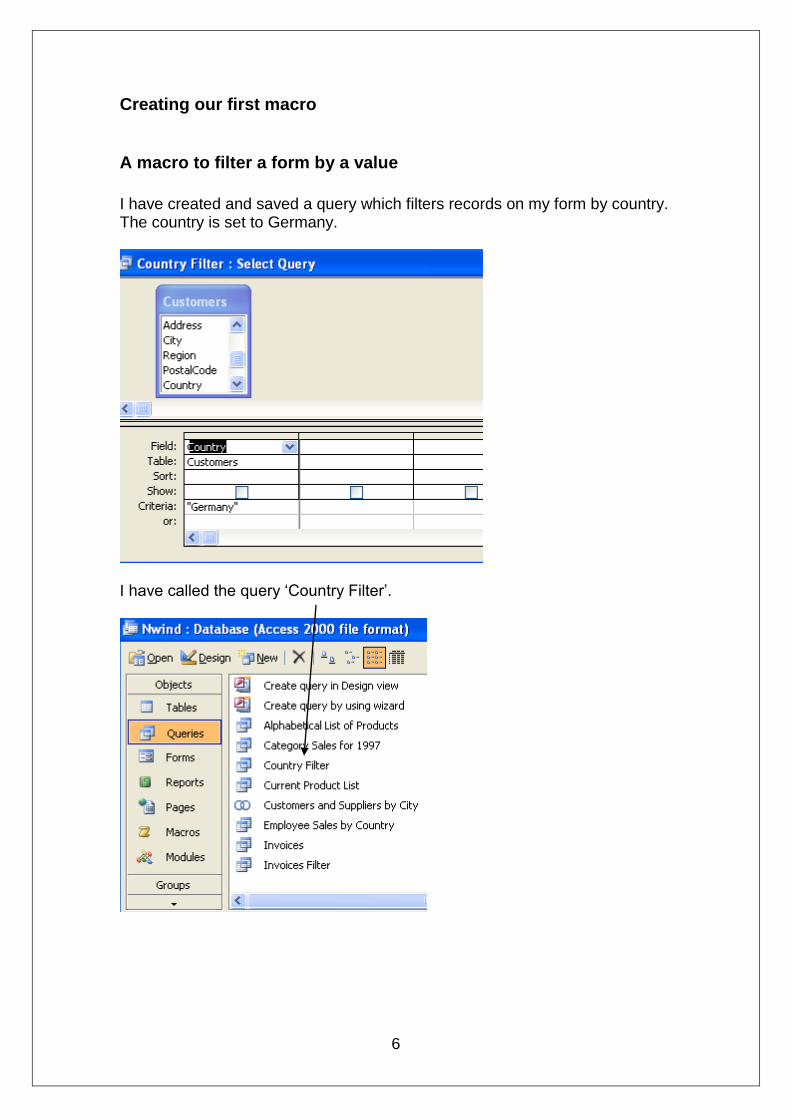
I have created and saved a query which filters records on my form by country. The country is set to Germany.
I have called the query ‘Country Filter’.
7
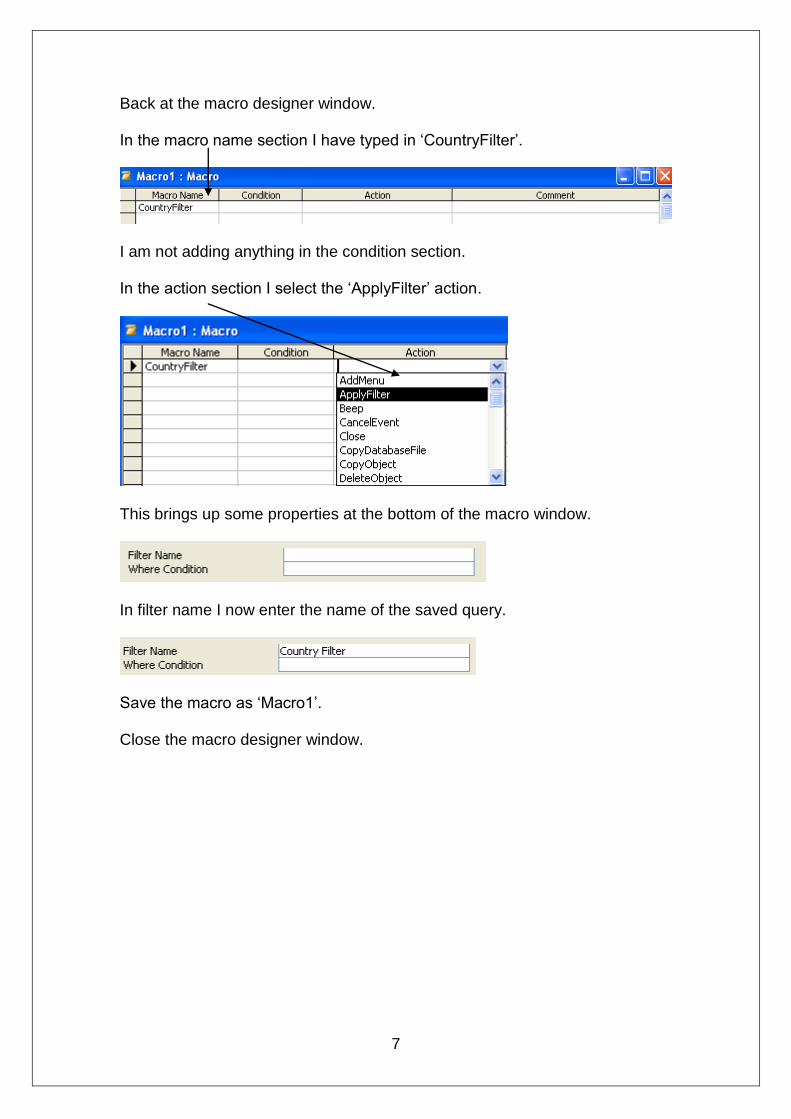
Back at the macro designer window. In the macro name section I have typed in ‘CountryFilter’.
I am not adding anything in the condition section. In the action section I select the ‘ApplyFilter’ action.
This brings up some properties at the bottom of the macro window.
In filter name I now enter the name of the saved query.
Save the macro as ‘Macro1’. Close the macro designer window.

8
On my form I create a new command button using the wizard. I select the miscellaneous category and the run macro action.
I now select the macro I want to use behind the button. Notice it gives the macro name and the action within it.
9
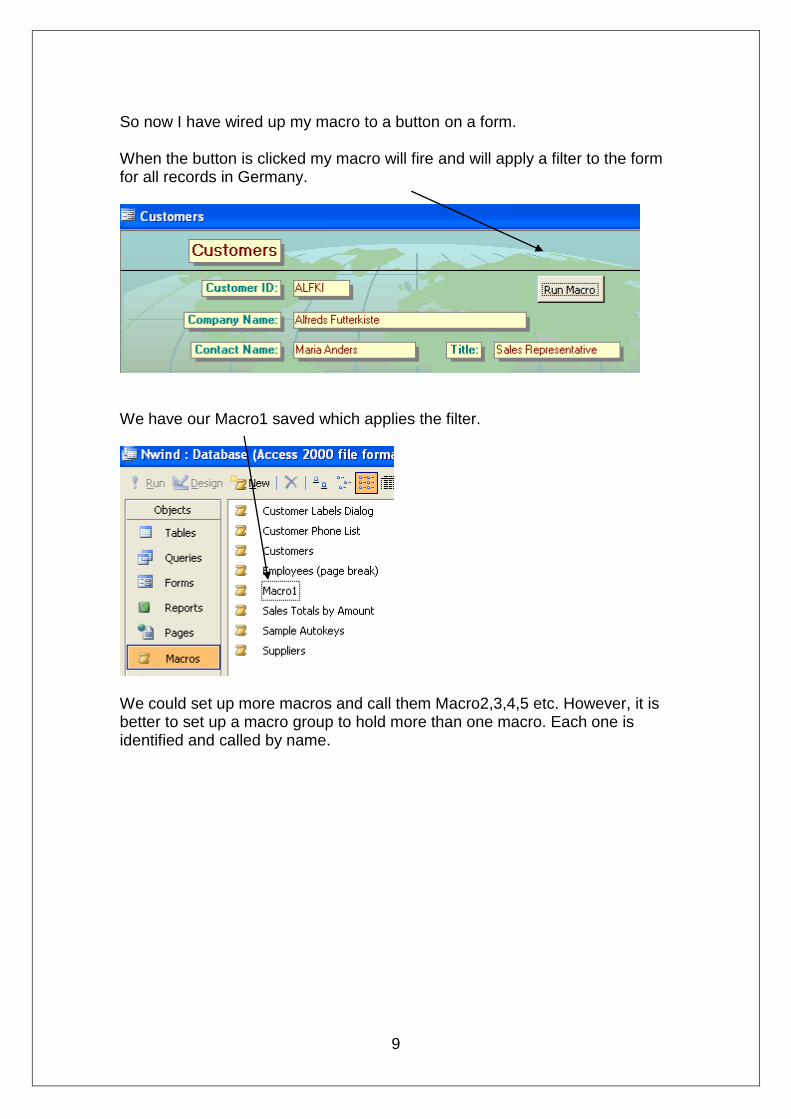
So now I have wired up my macro to a button on a form. When the button is clicked my macro will fire and will apply a filter to the form for all records in Germany.
We have our Macro1 saved which applies the filter.
We could set up more macros and call them Macro2,3,4,5 etc. However, it is better to set up a macro group to hold more than one macro. Each one is identified and called by name.
10
Create a macro to copy and back up an object
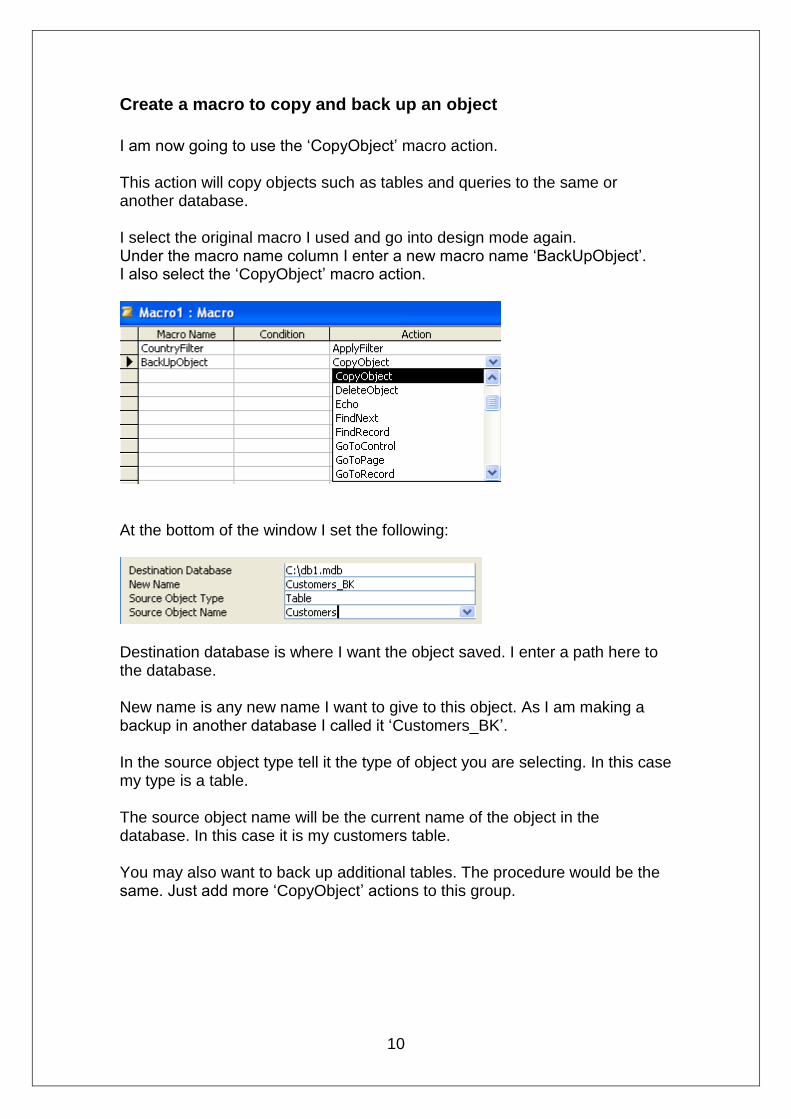
I am now going to use the ‘CopyObject’ macro action. This action will copy objects such as tables and queries to the same or another database. I select the original macro I used and go into design mode again. Under the macro name column I enter a new macro name ‘BackUpObject’. I also select the ‘CopyObject’ macro action.
At the bottom of the window I set the following:
Destination database is where I want the object saved. I enter a path here to the database. New name is any new name I want to give to this object. As I am making a backup in another database I called it ‘Customers_BK’. In the source object type tell it the type of object you are selecting. In this case my type is a table. The source object name will be the current name of the object in the database. In this case it is my customers table. You may also want to back up additional tables. The procedure would be the same. Just add more ‘CopyObject’ actions to this group.
11
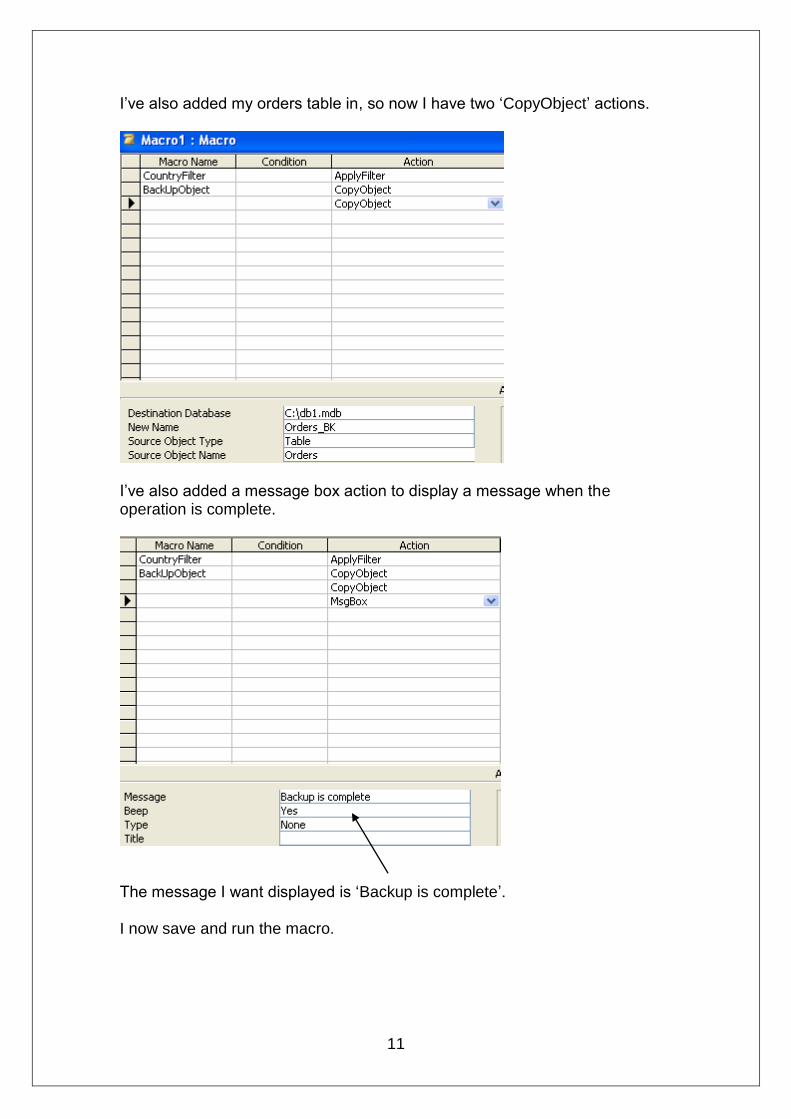
I’ve also added my orders table in, so now I have two ‘CopyObject’ actions.
I’ve also added a message box action to display a message when the operation is complete.
The message I want displayed is ‘Backup is complete’. I now save and run the macro.
12
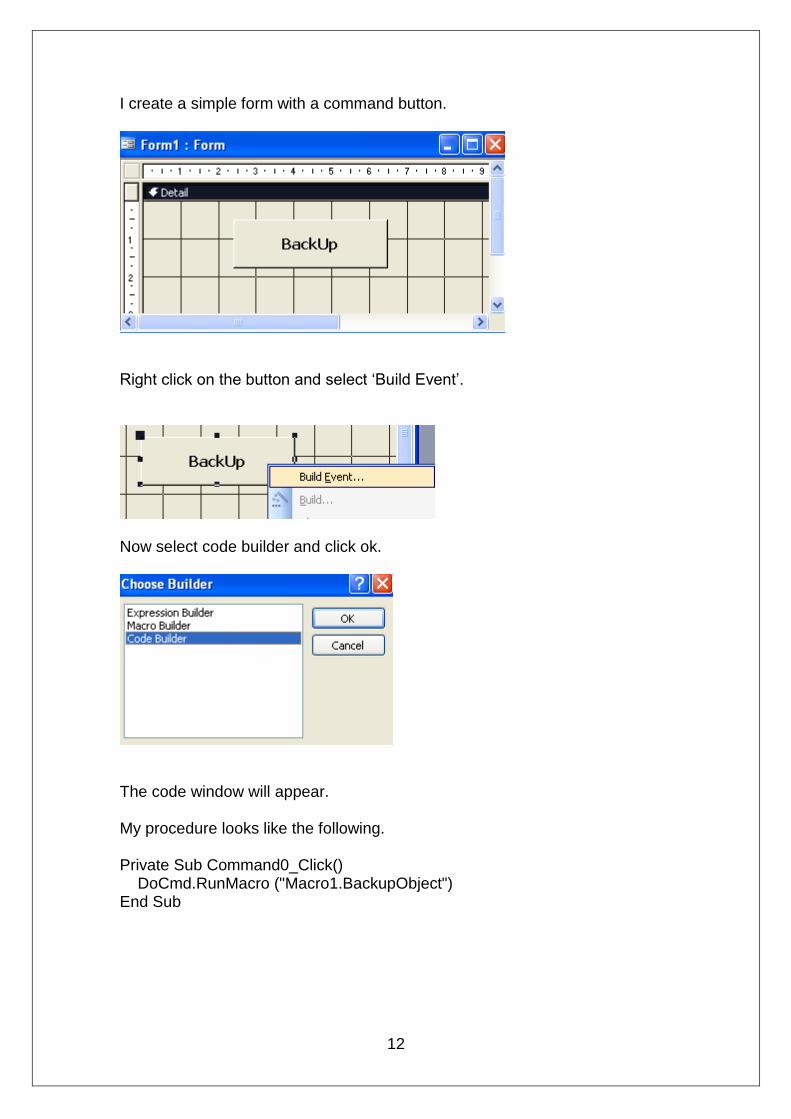
I create a simple form with a command button.
Right click on the button and select ‘Build Event’.
Now select code builder and click ok.
The code window will appear. My procedure looks like the following. Private Sub Command0_Click() DoCmd.RunMacro ("Macro1.BackupObject") End Sub
13
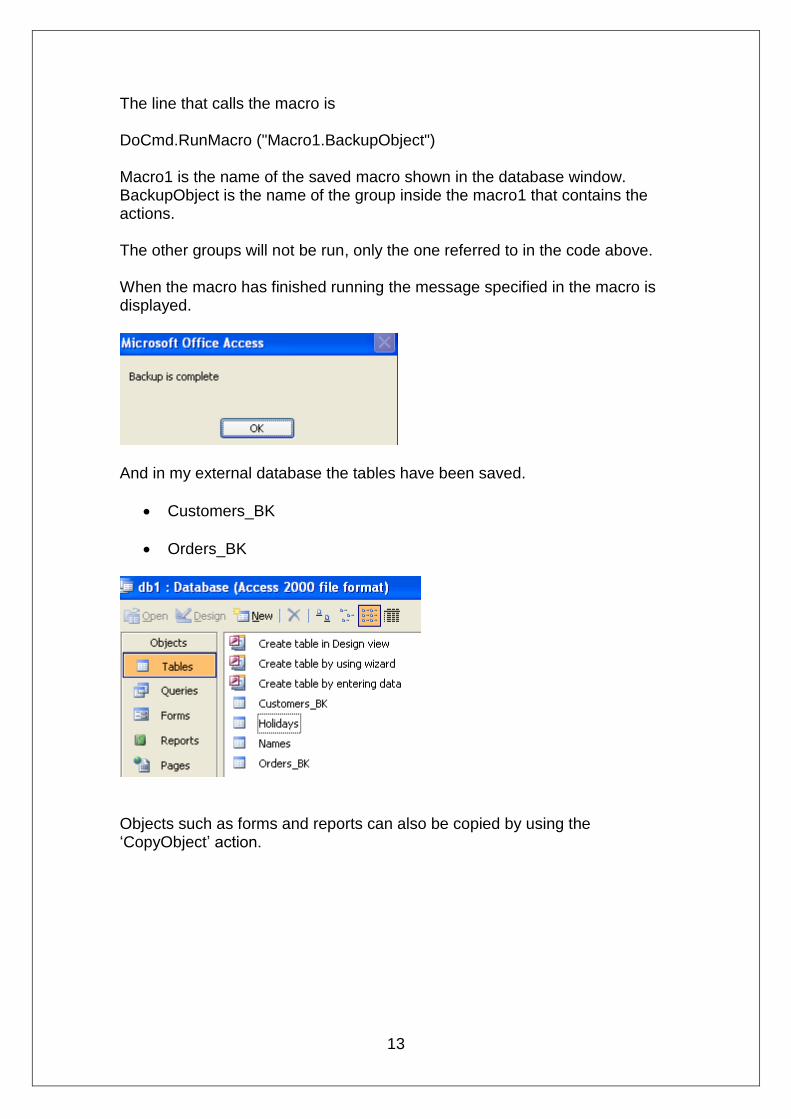
The line that calls the macro is DoCmd.RunMacro ("Macro1.BackupObject") Macro1 is the name of the saved macro shown in the database window. BackupObject is the name of the group inside the macro1 that contains the actions. The other groups will not be run, only the one referred to in the code above. When the macro has finished running the message specified in the macro is displayed.
And in my external database the tables have been saved.
Customers_BK
Orders_BK
Objects such as forms and reports can also be copied by using the ‘CopyObject’ action.
14
Create a macro to open a form and move to a blank new record
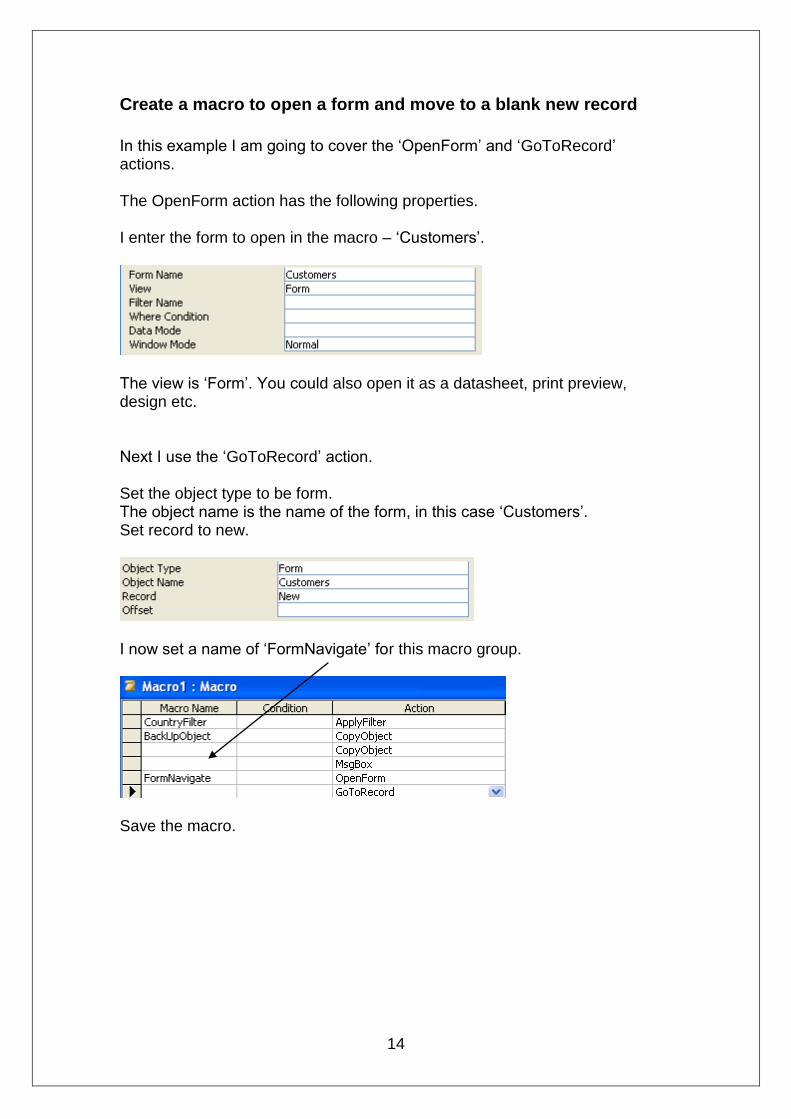
In this example I am going to cover the ‘OpenForm’ and ‘GoToRecord’ actions. The OpenForm action has the following properties. I enter the form to open in the macro – ‘Customers’.
The view is ‘Form’. You could also open it as a datasheet, print preview, design etc. Next I use the ‘GoToRecord’ action. Set the object type to be form. The object name is the name of the form, in this case ‘Customers’. Set record to new.
I now set a name of ‘FormNavigate’ for this macro group.
Save the macro.
15
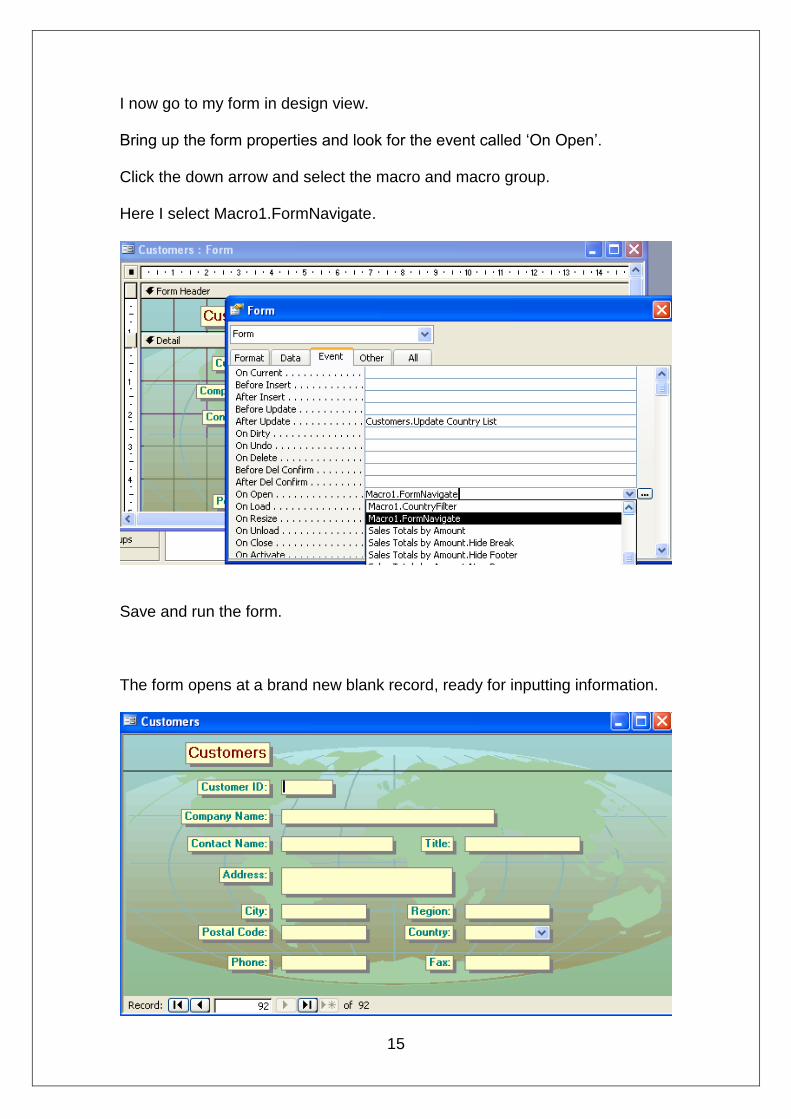
I now go to my form in design view. Bring up the form properties and look for the event called ‘On Open’. Click the down arrow and select the macro and macro group. Here I select Macro1.FormNavigate.
Save and run the form. The form opens at a brand new blank record, ready for inputting information.
16
Create a macro to find a record in a form
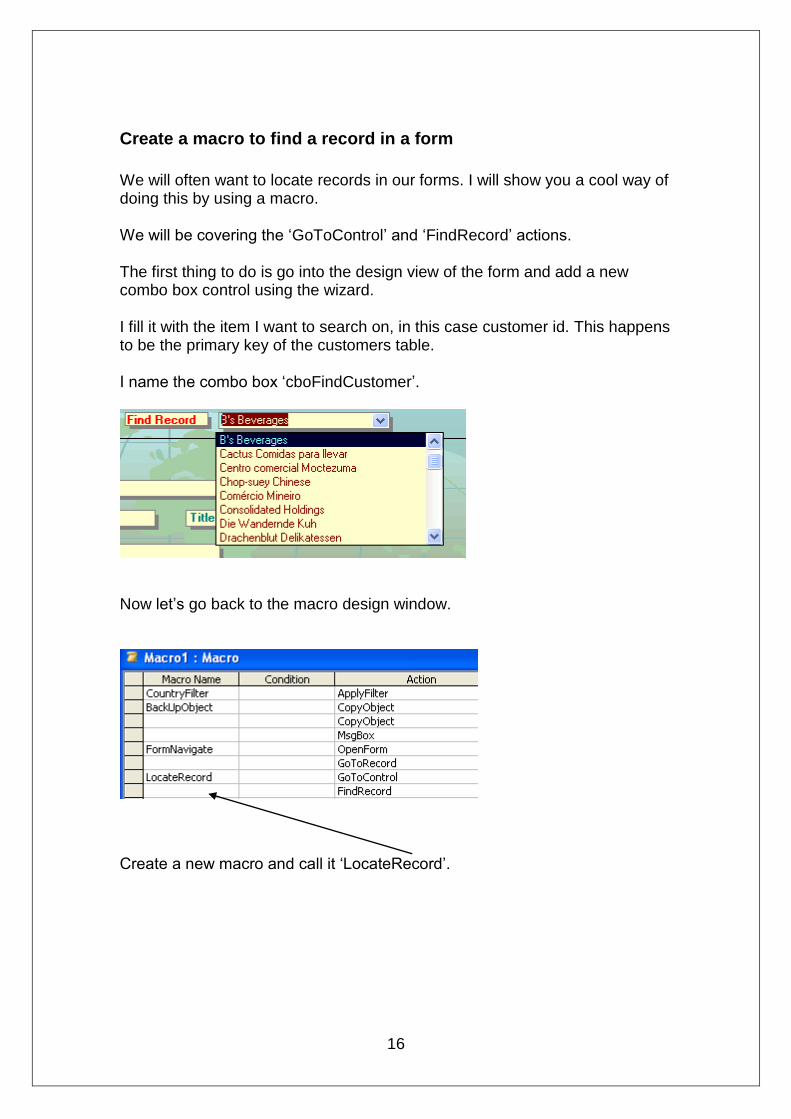
We will often want to locate records in our forms. I will show you a cool way of doing this by using a macro. We will be covering the ‘GoToControl’ and ‘FindRecord’ actions. The first thing to do is go into the design view of the form and add a new combo box control using the wizard. I fill it with the item I want to search on, in this case customer id. This happens to be the primary key of the customers table. I name the combo box ‘cboFindCustomer’.
Now let’s go back to the macro design window.
Create a new macro and call it ‘LocateRecord’.
17
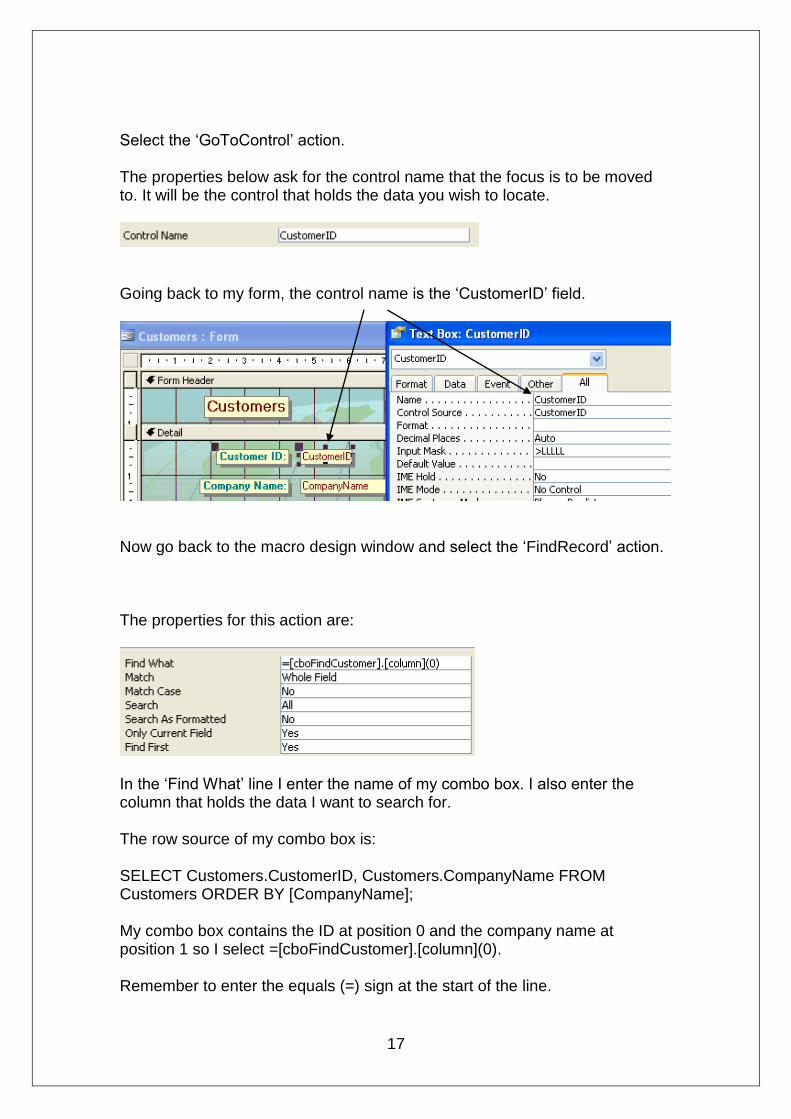
Select the ‘GoToControl’ action. The properties below ask for the control name that the focus is to be moved to. It will be the control that holds the data you wish to locate.
Going back to my form, the control name is the ‘CustomerID’ field.
Now go back to the macro design window and select the ‘FindRecord’ action. The properties for this action are:
In the ‘Find What’ line I enter the name of my combo box. I also enter the column that holds the data I want to search for. The row source of my combo box is: SELECT Customers.CustomerID, Customers.CompanyName FROM Customers ORDER BY [CompanyName]; My combo box contains the ID at position 0 and the company name at position 1 so I select =[cboFindCustomer].[column](0). Remember to enter the equals (=) sign at the start of the line.
18
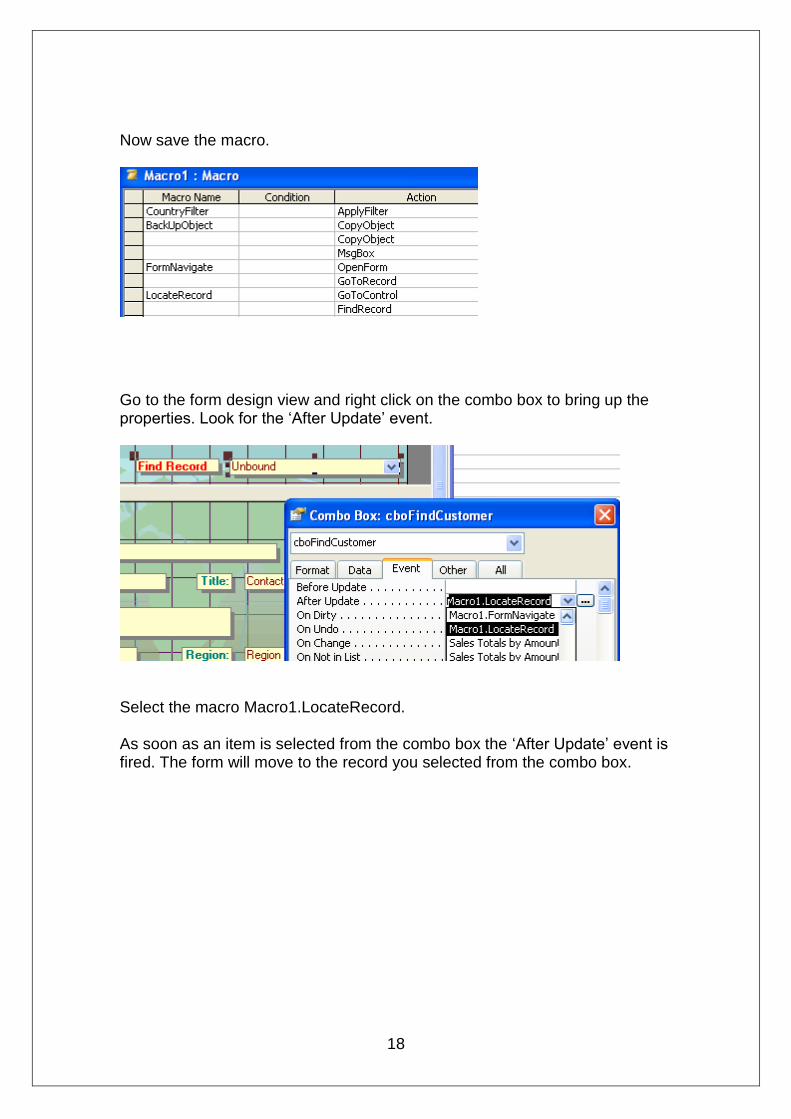
Now save the macro.
Go to the form design view and right click on the combo box to bring up the properties. Look for the ‘After Update’ event.
Select the macro Macro1.LocateRecord. As soon as an item is selected from the combo box the ‘After Update’ event is fired. The form will move to the record you selected from the combo box.
19
Macro conditions
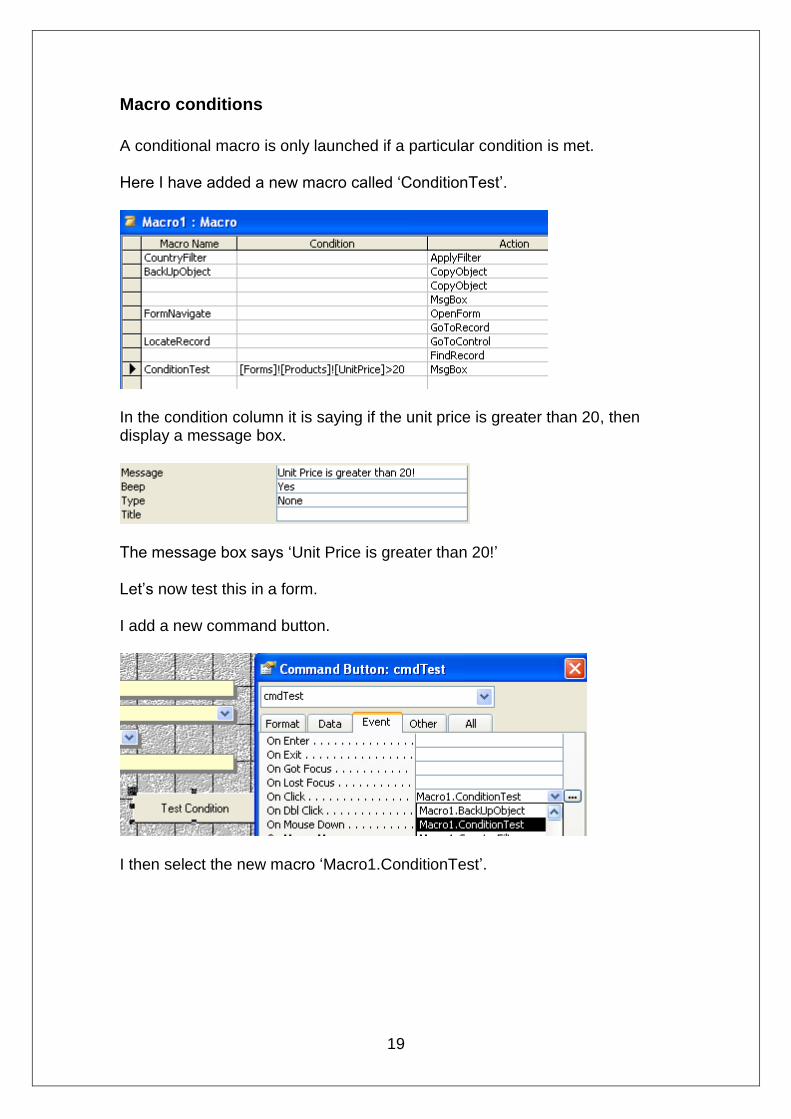
A conditional macro is only launched if a particular condition is met. Here I have added a new macro called ‘ConditionTest’.
In the condition column it is saying if the unit price is greater than 20, then display a message box.
The message box says ‘Unit Price is greater than 20!’ Let’s now test this in a form. I add a new command button.
I then select the new macro ‘Macro1.ConditionTest’.
20
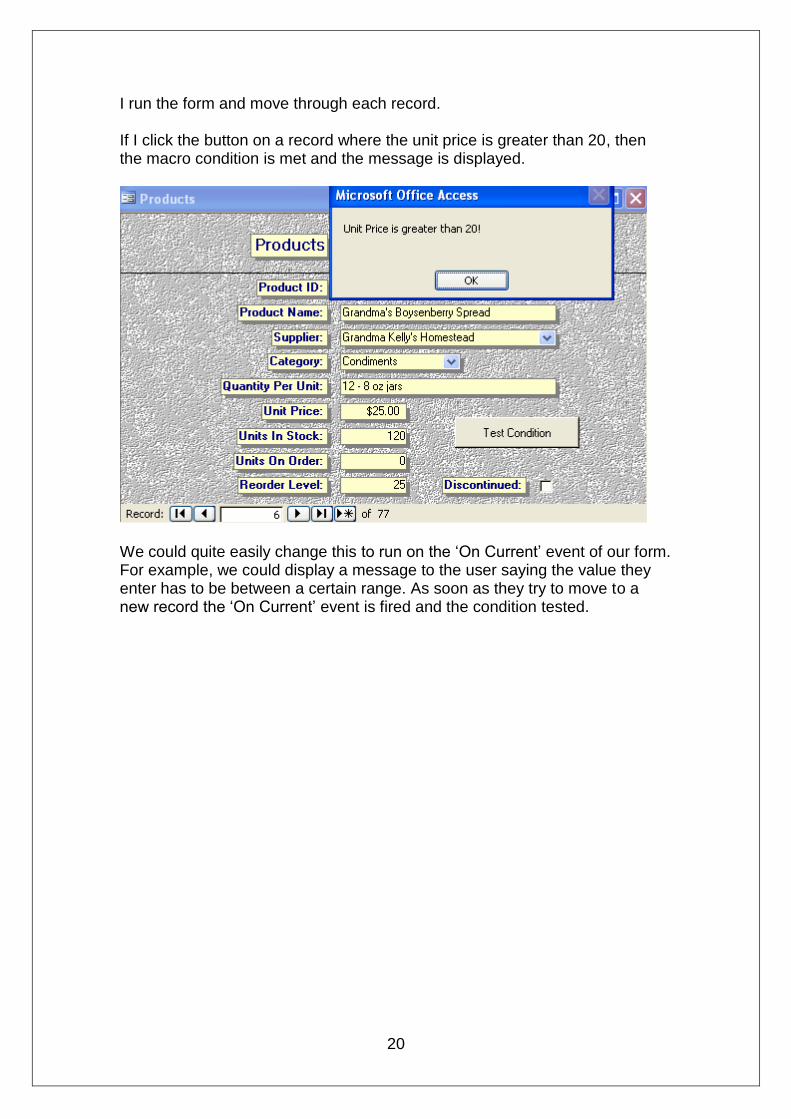
I run the form and move through each record. If I click the button on a record where the unit price is greater than 20, then the macro condition is met and the message is displayed.
We could quite easily change this to run on the ‘On Current’ event of our form. For example, we could display a message to the user saying the value they enter has to be between a certain range. As soon as they try to move to a new record the ‘On Current’ event is fired and the condition tested.
21
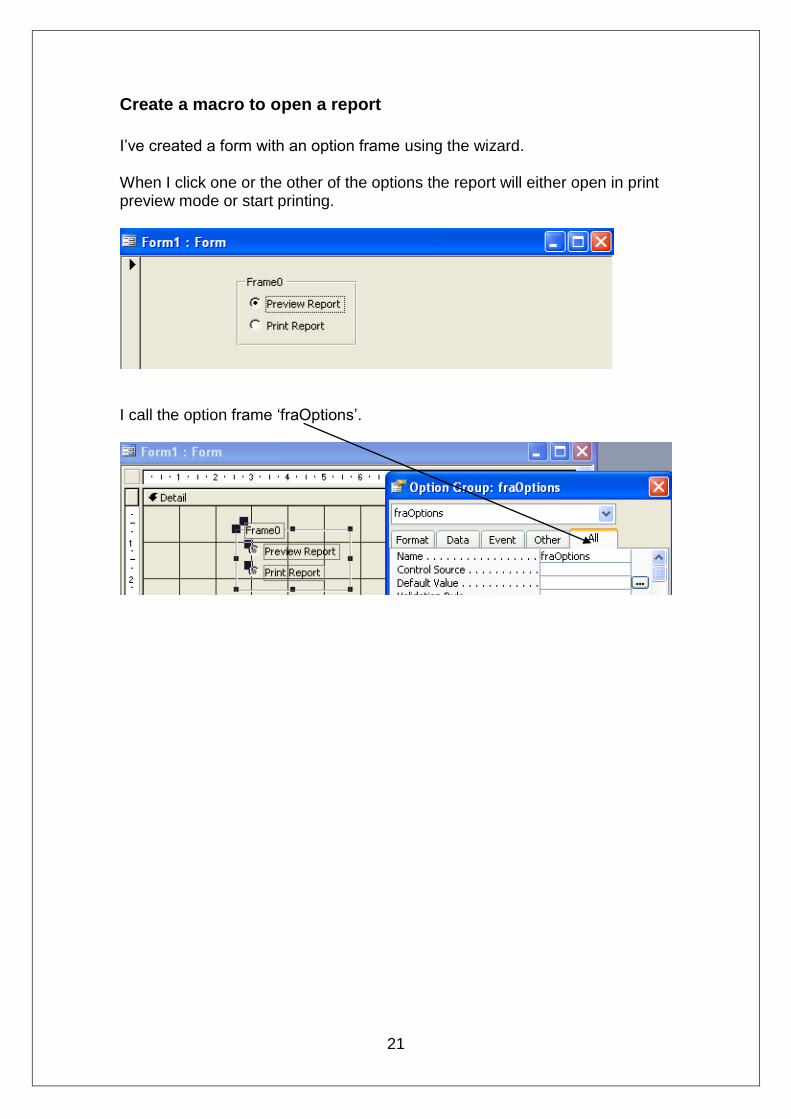
Create a macro to open a report
I’ve created a form with an option frame using the wizard. When I click one or the other of the options the report will either open in print preview mode or start printing.
I call the option frame ‘fraOptions’.
22
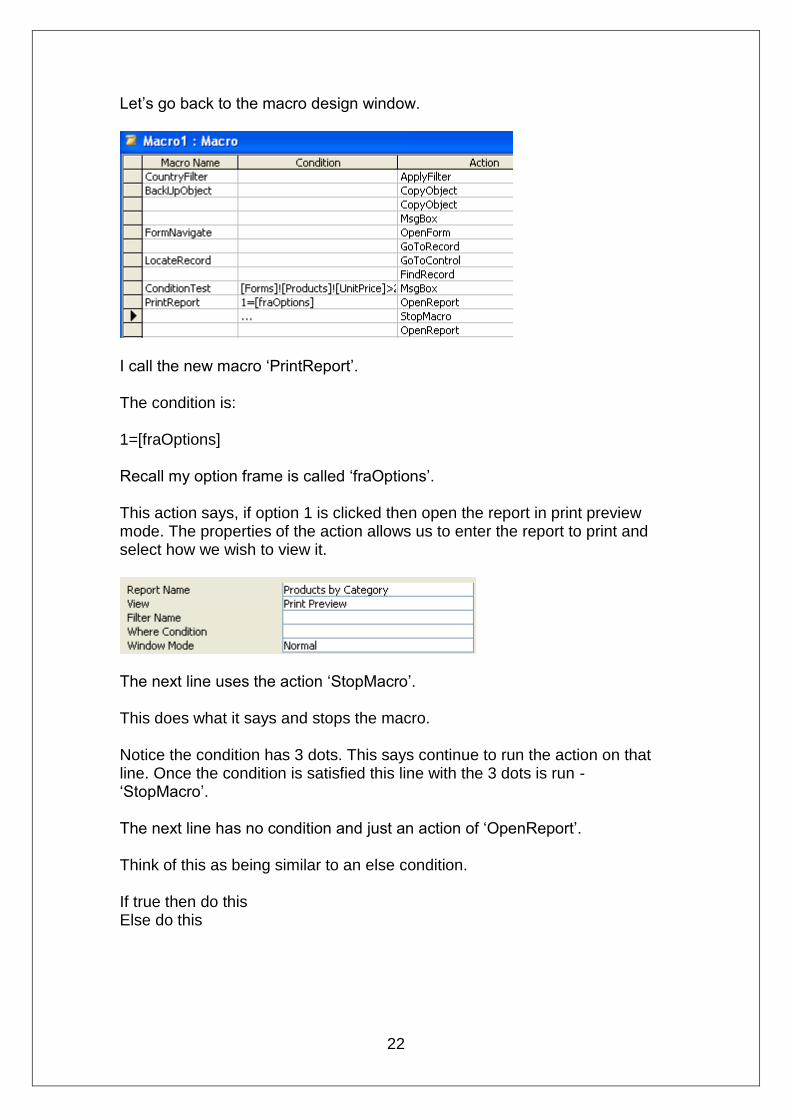
Let’s go back to the macro design window.
I call the new macro ‘PrintReport’. The condition is: 1=[fraOptions] Recall my option frame is called ‘fraOptions’. This action says, if option 1 is clicked then open the report in print preview mode. The properties of the action allows us to enter the report to print and select how we wish to view it.
The next line uses the action ‘StopMacro’. This does what it says and stops the macro. Notice the condition has 3 dots. This says continue to run the action on that line. Once the condition is satisfied this line with the 3 dots is run - ‘StopMacro’. The next line has no condition and just an action of ‘OpenReport’. Think of this as being similar to an else condition. If true then do this Else do this

23
What we are saying is, if the condition is met then execute the action, and the actions that have 3 dots next to them. Otherwise, if the condition is not met, go and execute the other action ‘OpenReport’. The other ‘OpenReport’ action opens the report for printing.
Back at the form design, right click the option frame and select the ‘On Click’ event. This is where the macro will be attached. Select the macro ‘Macro1.PrintReport’.
24
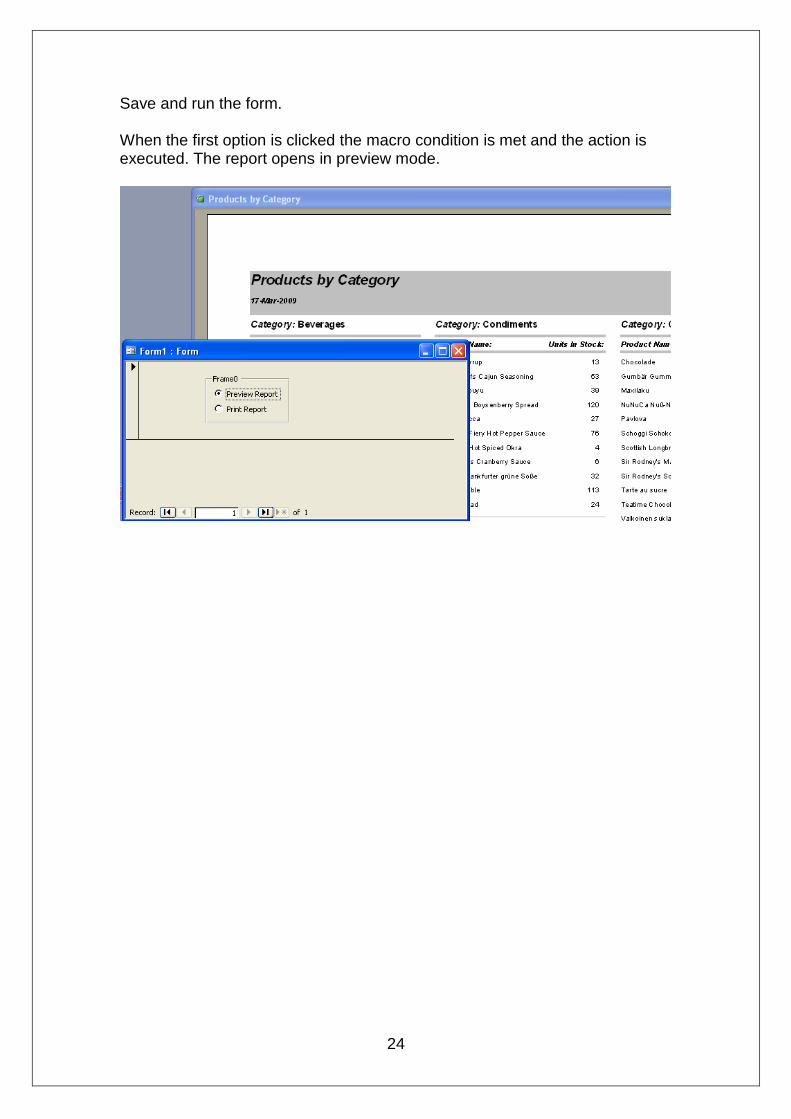
Save and run the form. When the first option is clicked the macro condition is met and the action is executed. The report opens in preview mode.
25
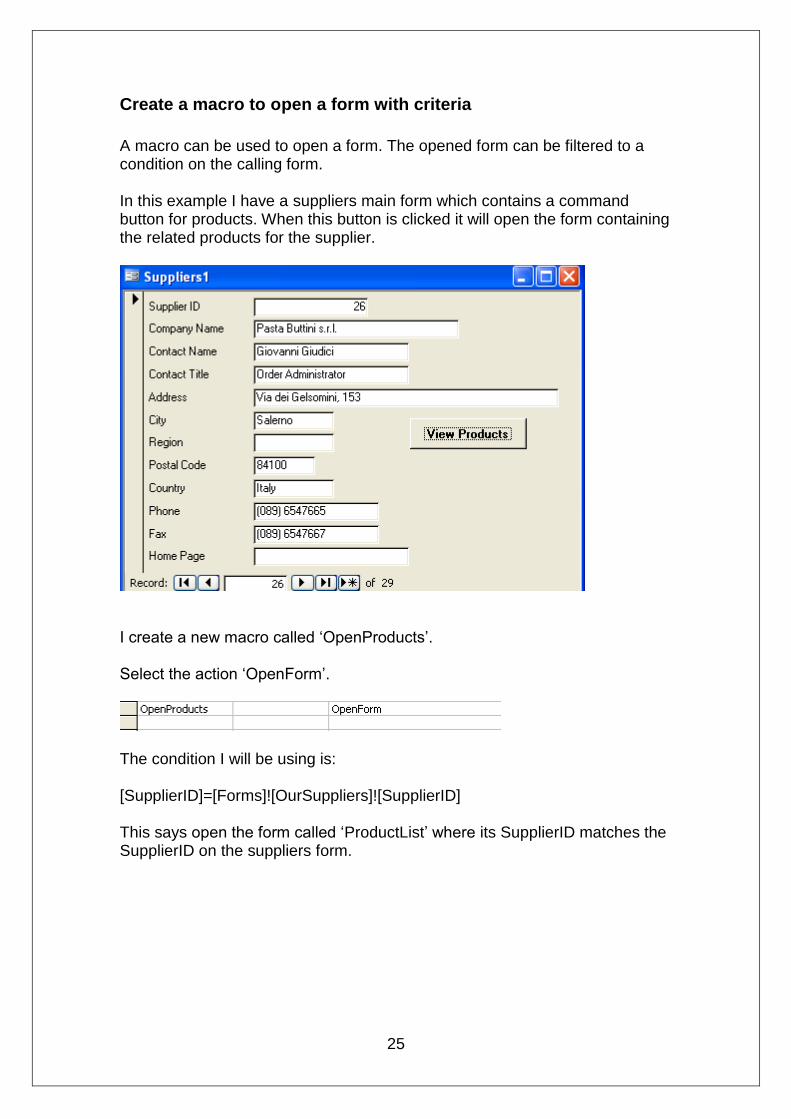
Create a macro to open a form with criteria
A macro can be used to open a form. The opened form can be filtered to a condition on the calling form. In this example I have a suppliers main form which contains a command button for products. When this button is clicked it will open the form containing the related products for the supplier.
I create a new macro called ‘OpenProducts’. Select the action ‘OpenForm’.
The condition I will be using is: [SupplierID]=[Forms]![OurSuppliers]![SupplierID] This says open the form called ‘ProductList’ where its SupplierID matches the SupplierID on the suppliers form.
26
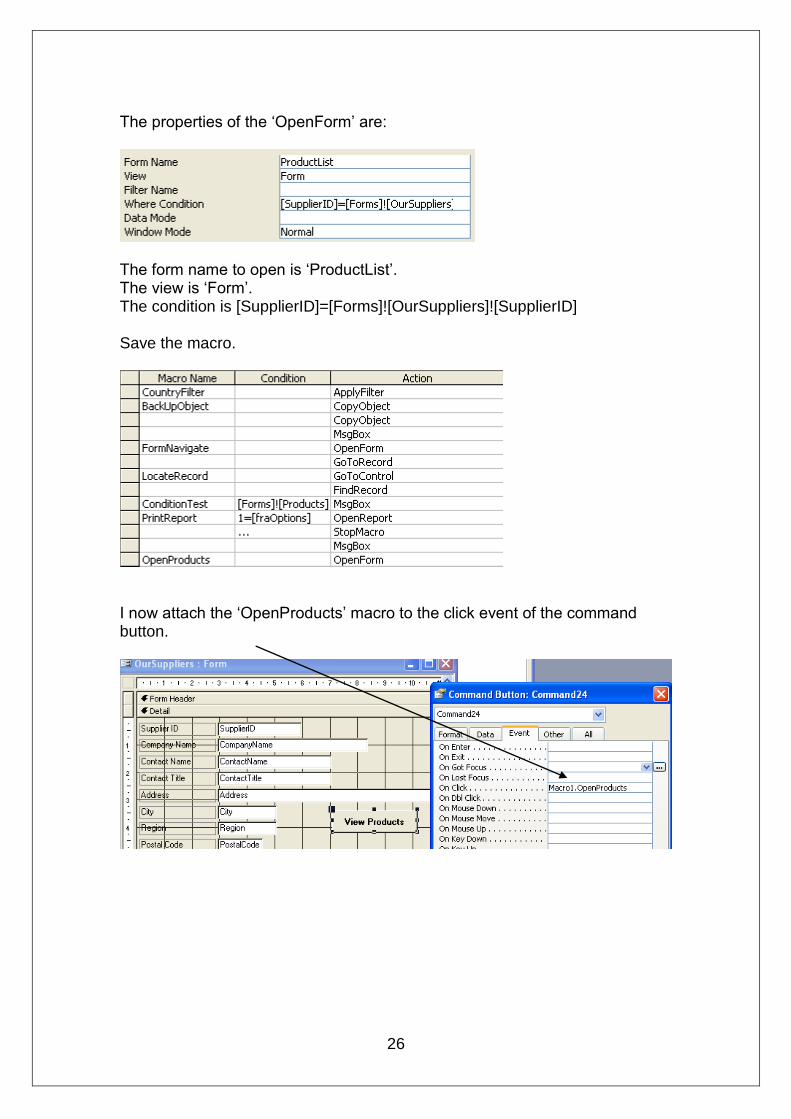
The properties of the ‘OpenForm’ are:
The form name to open is ‘ProductList’. The view is ‘Form’. The condition is [SupplierID]=[Forms]![OurSuppliers]![SupplierID] Save the macro.
I now attach the ‘OpenProducts’ macro to the click event of the command button.
27
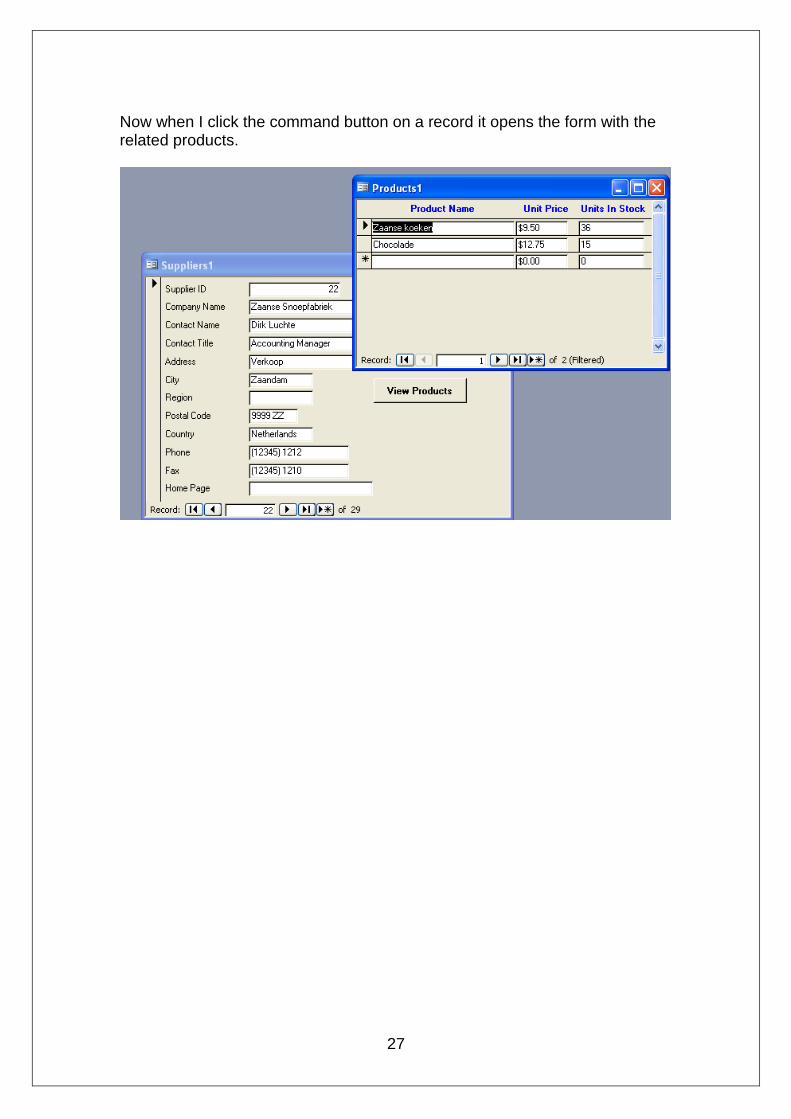
Now when I click the command button on a record it opens the form with the related products.
28
Create a macro to import a text file
Imagine you receive data in a text file format and want to bring it into an Access database. The file may arrive on your server overnight. Wouldn’t it be nice if Access could be used to import the file and have it ready for users to view in the morning? I’ll demonstrate a sequence of macro actions to import a text file.
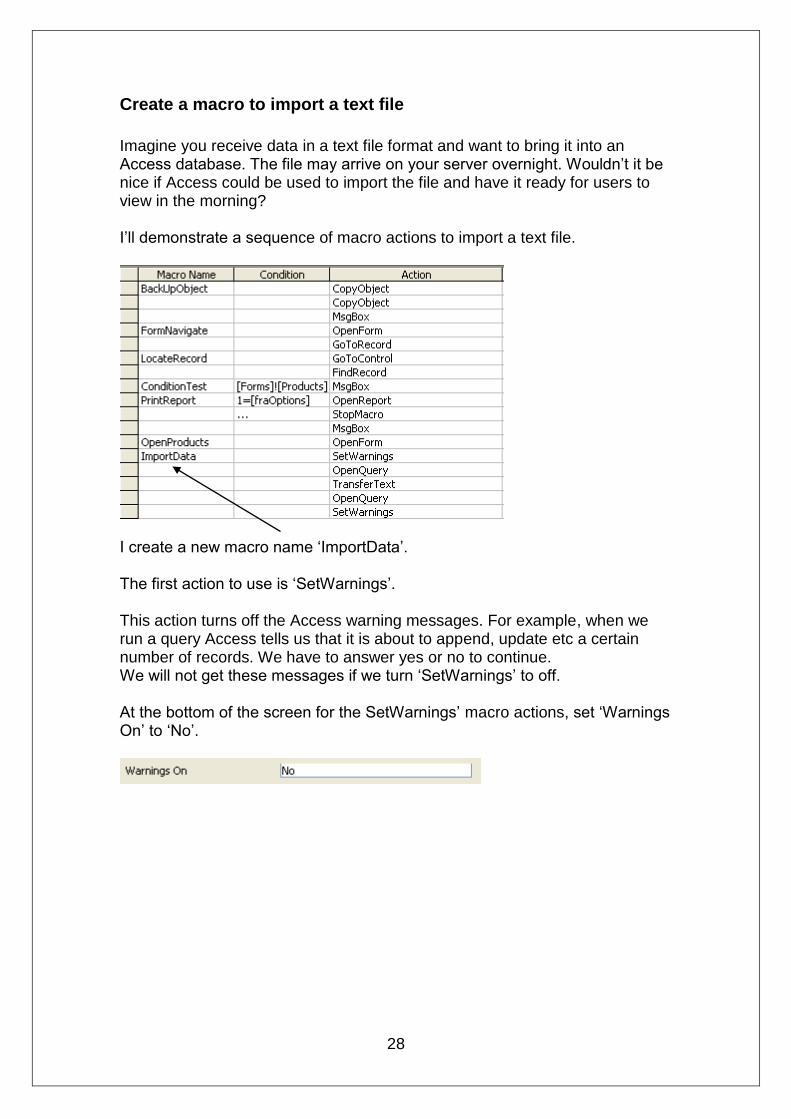
I create a new macro name ‘ImportData’. The first action to use is ‘SetWarnings’. This action turns off the Access warning messages. For example, when we run a query Access tells us that it is about to append, update etc a certain number of records. We have to answer yes or no to continue. We will not get these messages if we turn ‘SetWarnings’ to off. At the bottom of the screen for the SetWarnings’ macro actions, set ‘Warnings On’ to ‘No’.
29
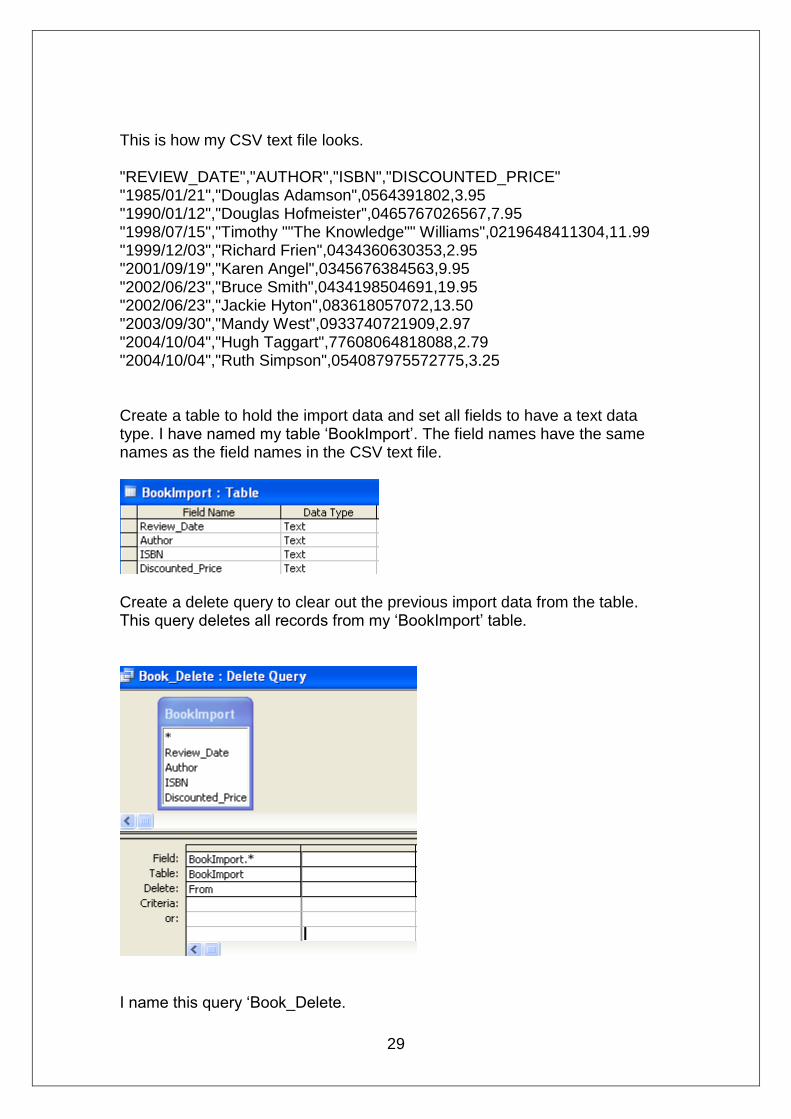
This is how my CSV text file looks. "REVIEW_DATE","AUTHOR","ISBN","DISCOUNTED_PRICE" "1985/01/21","Douglas Adamson",0564391802,3.95 "1990/01/12","Douglas Hofmeister",0465767026567,7.95 "1998/07/15","Timothy ""The Knowledge"" Williams",0219648411304,11.99 "1999/12/03","Richard Frien",0434360630353,2.95 "2001/09/19","Karen Angel",0345676384563,9.95 "2002/06/23","Bruce Smith",0434198504691,19.95 "2002/06/23","Jackie Hyton",083618057072,13.50 "2003/09/30","Mandy West",0933740721909,2.97 "2004/10/04","Hugh Taggart",77608064818088,2.79 "2004/10/04","Ruth Simpson",054087975572775,3.25 Create a table to hold the import data and set all fields to have a text data type. I have named my table ‘BookImport’. The field names have the same names as the field names in the CSV text file.
Create a delete query to clear out the previous import data from the table. This query deletes all records from my ‘BookImport’ table.
I name this query ‘Book_Delete.
30
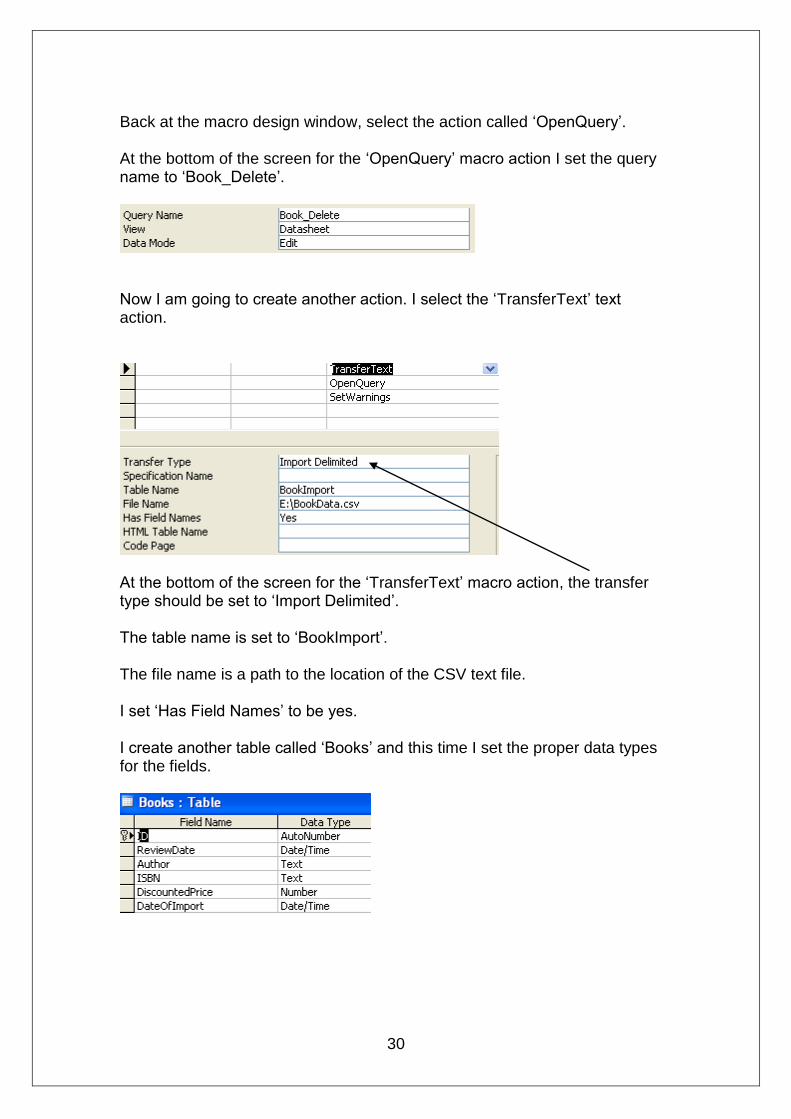
Back at the macro design window, select the action called ‘OpenQuery’. At the bottom of the screen for the ‘OpenQuery’ macro action I set the query name to ‘Book_Delete’.
Now I am going to create another action. I select the ‘TransferText’ text action.
At the bottom of the screen for the ‘TransferText’ macro action, the transfer type should be set to ‘Import Delimited’. The table name is set to ‘BookImport’. The file name is a path to the location of the CSV text file. I set ‘Has Field Names’ to be yes. I create another table called ‘Books’ and this time I set the proper data types for the fields.
31
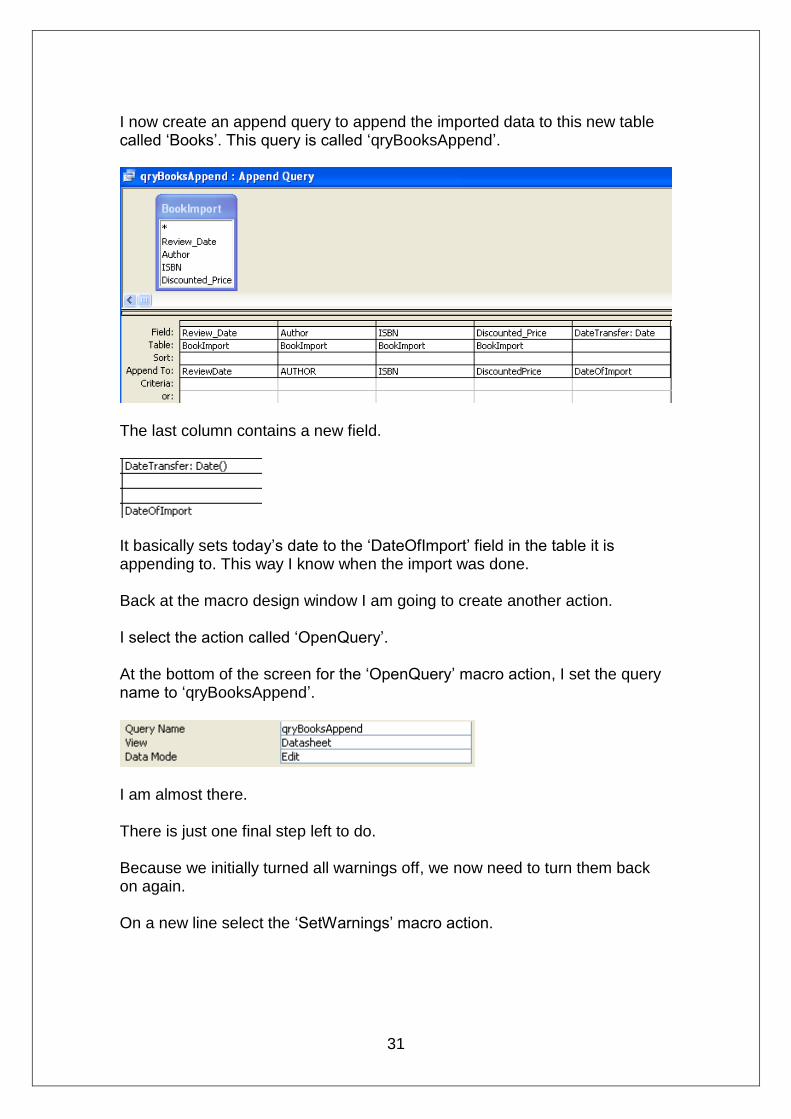
I now create an append query to append the imported data to this new table called ‘Books’. This query is called ‘qryBooksAppend’.
The last column contains a new field.
It basically sets today’s date to the ‘DateOfImport’ field in the table it is appending to. This way I know when the import was done. Back at the macro design window I am going to create another action. I select the action called ‘OpenQuery’. At the bottom of the screen for the ‘OpenQuery’ macro action, I set the query name to ‘qryBooksAppend’.
I am almost there. There is just one final step left to do. Because we initially turned all warnings off, we now need to turn them back on again. On a new line select the ‘SetWarnings’ macro action.
32
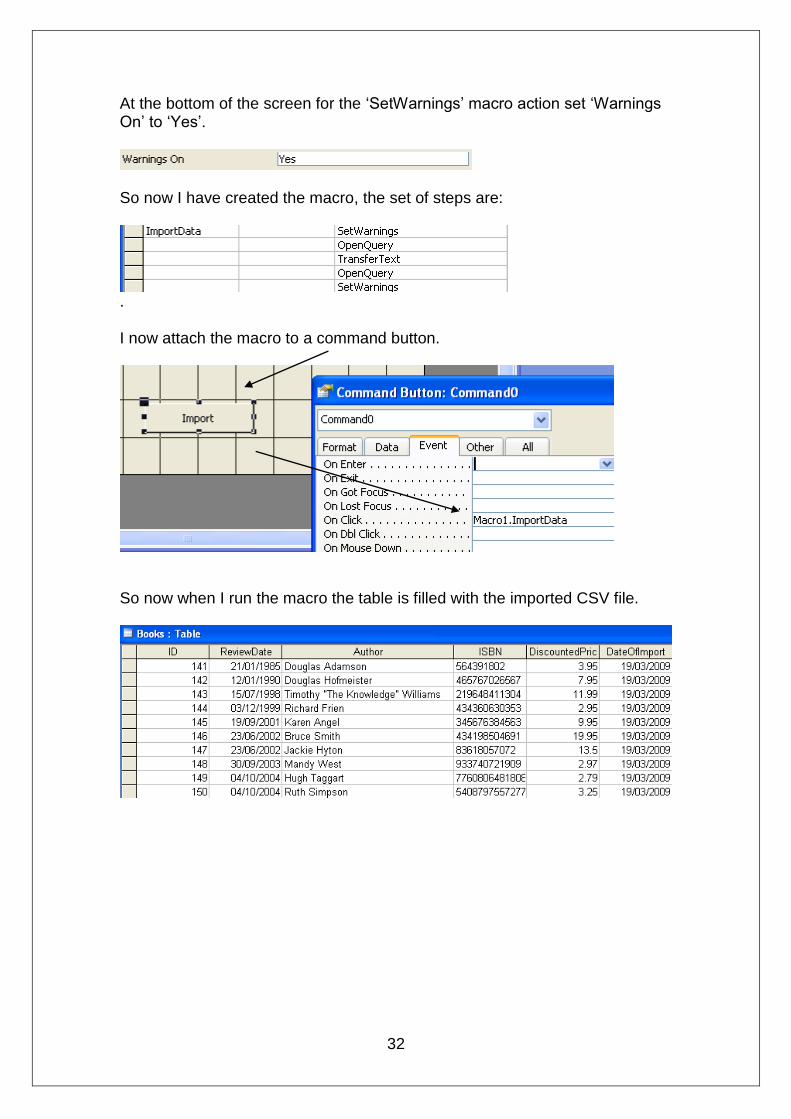
At the bottom of the screen for the ‘SetWarnings’ macro action set ‘Warnings On’ to ‘Yes’.
So now I have created the macro, the set of steps are:
. I now attach the macro to a command button.
So now when I run the macro the table is filled with the imported CSV file.
33
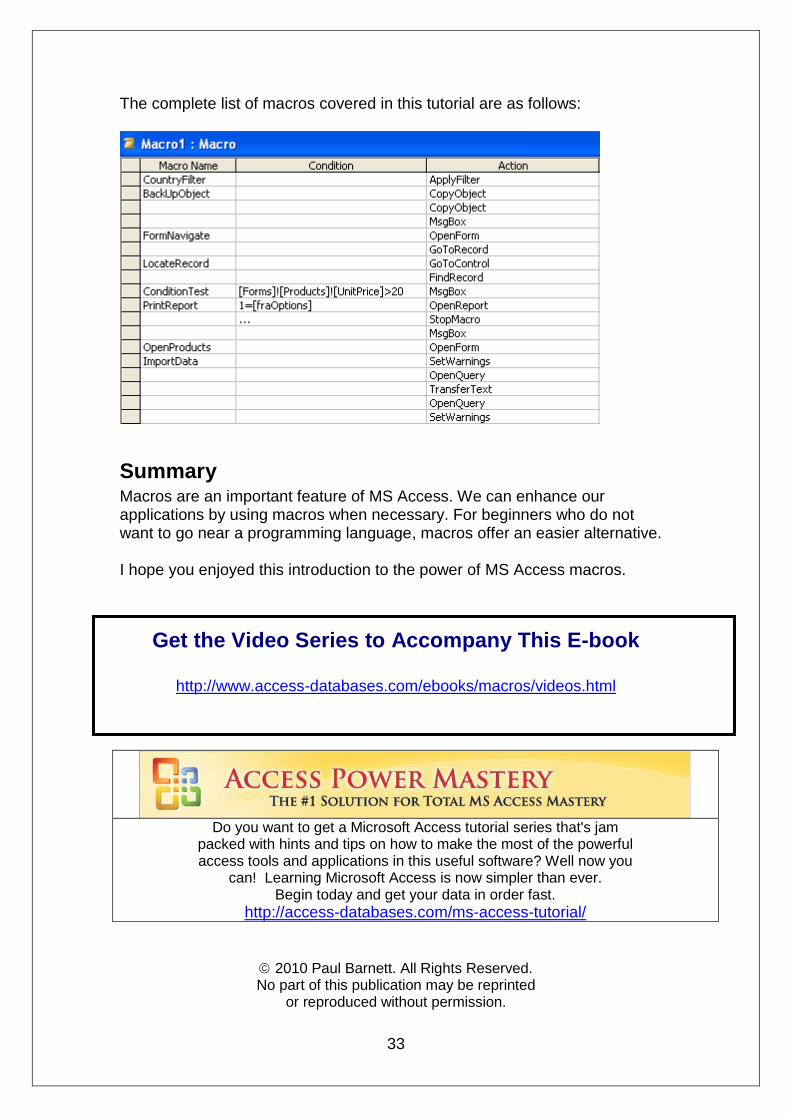
The complete list of macros covered in this tutorial are as follows:
Summary Macros are an important feature of MS Access. We can enhance our applications by using macros when necessary. For beginners who do not want to go near a programming language, macros offer an easier alternative. I hope you enjoyed this introduction to the power of MS Access macros.
Get the Video Series to Accompany This E-book
http://www.access-databases.com/ebooks/macros/videos.html
Do you want to get a Microsoft Access tutorial series that's jam
packed with hints and tips on how to make the most of the powerful access tools and applications in this useful software? Well now you
can! Learning Microsoft Access is now simpler than ever. Begin today and get your data in order fast.
http://access-databases.com/ms-access-tutorial/
2010 Paul Barnett. All Rights Reserved. No part of this publication may be reprinted
or reproduced without permission.
Related Documents