business “Everything you need to master Access 2007 forms, reports, and queries.’* —Charles Carr, Reviews Editor, Coinffutorlidge Mazarine Develop >-our Microsoft Access expertise instantly with Create Forms ht Business Ensure Data Entry Accuracy BuiW Elegant Form Interfaces Collect Data Vu Email Design fffectn* Business Reports Make an Invoke Report Create Mailing labels Extract Data Wort with Multiple Tables Calculate Discounts Analyie Data Microsoft Office Access 2007 Forms, Reports, and Queries Paul McFedries Contents at a Glance Introduction 1 ?usiness solutions Microsoft® Office Access 2007 Forms, Reports, and Queries Creating Forms Creating and Using a Form 7 Working with Form Controls 29 Designing Forms for Efficient and Accurate Data Entry 49 Designing Forms for Business Use 77 Creating Specialized Forms 95 Designing and Customizing Reports Creating and Publishing a Report 113 Designing Effective Business Reports 141 Designing Advanced Reports 157

Access 2007 Forms Reports and Queries 1-100 English Unform
Feb 18, 2016
fgg
Welcome message from author
This document is posted to help you gain knowledge. Please leave a comment to let me know what you think about it! Share it to your friends and learn new things together.
Transcript

business“Everything you need to master Access 2007 forms, reports, and queries.’*—Charles Carr, Reviews Editor, Coinffutorlidge Mazarine Develop >-our Microsoft Access expertise instantly with
Create Forms ht BusinessEnsure Data Entry AccuracyBuiW Elegant Form InterfacesCollect Data Vu EmailDesign fffectn* Business ReportsMake an Invoke Report Create Mailing labels Extract DataWort with Multiple Tables Calculate Discounts Analyie DataMicrosoft OfficeAccess 2007Forms, Reports, and Queries
Paul McFedries Contents at a GlanceIntroduction 1
?usiness solutionsMicrosoft® Office Access 2007 Forms, Reports, and QueriesCreating FormsCreating and Using a Form 7Working with Form Controls 29Designing Forms for Efficient and Accurate Data Entry 49Designing Forms for Business Use 77Creating Specialized Forms 95Designing and Customizing ReportsCreating and Publishing a Report 113Designing Effective Business Reports 141Designing Advanced Reports 157Creating Specialized Reports 177Creating Powerful QueriesCreating a Basic Query 199Building Criteria Expressions 231Working with Multiple-Table Queries 259

Creating Advanced Queries 287Creating PivotTable Queries 311Querying with SQL Statements 341Index 361
Paul McFedriescjue'800 E. 96th Street Indianapolis, Indiana 46240 Microsoft Office Access 2007 Forms,Reports,and QueriesCopyright © 2007 by Que PublishingAssociate PublisherGreg WiegandAcquisitions EditorLoretta YatesDevelopment EditorTodd BrakkeManaging EditorGina KanouseSenior Project EditorKristy HartCopy EditorChuck HutchinsonIndexerErika MillenProofreaderWater Crest PublishingTechnical EditorScott DiamondPublishing CoordinatorCindy TeetersBook DesignerAnne JonesCompositorNonie Ratcliff

All rights reserved. No part of this book shall be reproduced, stored in a retrieval system, or transmitted by any means, electronic, mechanical, photocopying, recording, or otherwise, without written permission from the publisher. No patent liability is assumed with respect to the use of the information contained herein. Although every precaution has been taken in the preparation of this book, the publisher and author assume no responsibility for errors or omissions. Nor is any liability assumed for damages resulting from the use of the information contained herein.International Standard Book Number: 0-7897-3669-1 Library of Congress Cataloging-in-Publication Data McFedries, Paul.Microsoft Office Access 2007 : forms, reports, and queries / Paul McFedries.p. cm.Includes index.ISBN 0-7897-3669-11. Database management. 2. Microsoft Access. I. Title.QA76.9.D3M395252 2007 005.75'65—dc222007010362Printed in the United States of America First Printing: May 2007 10 09 08 07 4 3 2 1TrademarksAll terms mentioned in this book that are known to be trademarks or service marks have been appropriately capitalized. Que Publishing cannot attest to the accuracy of this information. Use of a term in this book should not be regarded as affecting the validity of any trademark or service mark.Warning and DisclaimerEvery effort has been made to make this book as complete and as accurate as possible, but no warranty or fitness is implied. The information provided is on an “as is” basis. The author and the publisher shall have neither liability nor responsibility to any person or entity with respect to any loss or damages arising from the information contained in this book or from the use programs accompanying it.Bulk SalesQue Publishing offers excellent discounts on this book when ordered in quantity for bulk purchases or special sales.For more information, please contact:U.S. Corporate and Government Sales [email protected] sales outside of the U.S., please contact:International Sales [email protected] ContentsIntroduction 1What's in the Book 2This Book's Special Features 2The Examples Used in the Book 3I CREATING FORMS1 Creating and Using a Form 7Building a Basic Form 9Building a Standard Form9Building a Split Form 11
Building a Multiple Items Form 11Creating Simple Forms with the Form Wizard12Navigating a Form 14Creating a Form in Design View 15Displaying the Design View 15Changing the Record Source 15Understanding Form Controls 16Adding Fields to the Form 17Changing the Size of the Form 18Viewing the Form 18Assigning an AutoFormat in Design View 19Working with Form Properties 20Working with the Form Header and Footer 20Adding a Logo 22Adding a Title 23Formatting the Background 23Creating a Form Interactively in Layout View 25Case Study: Protecting the Form and Data from Other Users 26From Here 272 Working with Form Controls 29Manipulating Form Controls 29Inserting Controls on a Form 30Selecting Controls 30Formatting Controls 31Adding Conditional Formatting 31Sizing Controls 33Moving Controls 34Creating a Control Layout 36 Working with Control Margins 38Grouping Controls 38Ordering Overlapped Controls 39Converting an Unbound Control to a Bound Control 39Changing a Control's Type 40Setting the Tab Order 40Adding Labels to the Form 41Inserting a Label 41Editing the Label Caption 42Using Labels to Create Keyboard Shortcuts for Controls 42Adding Text Boxes to the Form 43Inserting a Text Box 43Using Text Boxes as Calculated Controls 44

Case Study: Creating a Mortgage Calculator 46From Here 483 Designing Forms for Efficient and Accurate Data Entry 49Preventing Errors by Validating Data 50Helping Users with Text Prompts 50Preventing Errors with Data Validation Expressions 51Using Input Masks for Consistent and Accurate Data Entry 52Using Controls to Limit Data Entry Choices 55Working with Yes/No Fields 56Using Option Buttons to Present a Limited Number of Choices 59Case Study: Using an Option Group to Select the Shipper 61Using Lists to Present a Large Number of Choices 62Entering Data with ActiveX Controls 67Entering Numbers Using a Spin Button 68Entering Numbers Using a Scrollbar 69Entering Dates Using a Calendar 71Collecting Form Data via Email 72Sending the Access Data Collection Email Message 72Replying to an Access Data Collection Email Message 74Managing the Access Data Collection Replies 75From Here 754 Designing Forms for Business Use 77Using Forms in a Business Context 77Why Collect the Data? 78What Is the Data? 78Who Are Your Users? 78Ten Design Guidelines for Business Forms 791. Make Forms Fast 792. Make Forms Foolproof 793. Mimic Paper Forms When Practical 794. Give Users What They Need and Then Stop 795. Don't Neglect the Keyboard 806. Watch the Field Order (and the Tab Order,Too) 807. Watch Your Screen Resolution 808. Make Form Text Readable 809. Go Easy on the Extras 8110. Organize Your Form Controls 81Organizing Controls on the Form 81Making Good Use of Lines and Rectangles 82Organizing with Option Groups 83Organizing with a Tab Control 84

Enhancing Form Text 86Formatting Text 87Text Formatting Tips and Guidelines 87Applying Fancier Form Formatting 88Working with Colors 88Adding Images to Your Forms 91Creating a Shadow Effect for Text 92From Here 935 Creating Specialized Forms 95Creating a Multiple-Table Form 95Understanding Subforms 95Creating a Form and Subform with the Form Wizard 96Creating a Subform in the Form Design View 98Working with Form Command Buttons 99Case Study: Creating a Switchboard Form 102Creating a Form Pop-Up Box or Dialog Box 103Creating a Pop-Up Form 103Creating a Modal Form 104Using a Custom Form with a Parameter Query 105Creating the Custom Form 105Adjusting the Parameter Query 106Using the Custom Form and Parameter Query 107Creating a Startup Form 107Creating a PivotChart Form 108From Here 110II DESIGNING AND CUSTOMIZING REPORTS6 Creating and Publishing a Report 113Creating a Basic Report 113Creating Simple Reports with the Report Wizard 114Creating a Report in Design View 116Displaying the Design View 116Changing the Record Source 117Understanding the Architecture of Access Reports 118Understanding Report Controls 119Adding Fields to the Report 120Adding Labels to the Report 120Adding a Logo 121Adding a Title 122Adding Page Numbers to the Report 122Adding the Date and Time to the Report 123Changing the Size of a Report Section 124
Previewing the Report 124Assigning an AutoFormat in Design View 125Working with Report Properties 126Formatting the Background 126Manipulating Report Controls 128Creating a Report Interactively in Layout View 136Publishing a Report 137Publishing on Paper 137Publishing to Email138Exporting to Word 138Exporting to PDF or XPS 139From Here 1407 Designing Effective Business Reports 141Using Reports in Business 141What's in the Report? 142What Is the Goal of the Report? 142Who Are Your Readers? 144Ten Design Guidelines for Business Reports 1451. Copy Legacy Reports When Practical 1452. Give Users What They Need,Then Stop: Part 1 1453. Give Users What They Need,Then Stop: Part 2 1454. Use Page Numbers 1465. Use Dates and Times 1466. Watch the Field Order 1467. Watch Your Screen Resolution 1468. Make Report Text Readable 1479. Always Sort and/or Group Data 14710. Organize the Report Layout 147Organizing Controls on the Report 147Making Good Use of Lines and Rectangles 148Creating Page Breaks 149Enhancing Report Text 150Formatting Text 150Text Formatting Tips and Guidelines 151Applying Fancier Report Formatting 152Working with Colors 152Adding Images to Your Reports 153Adding Special Effects 154Creating a Shadow Effect for Text 154From Here 1558 Designing Advanced Reports 157

Sorting and Grouping a Report 157Setting Up Sorting Options 158Setting Up Grouping Options 158Sorting and Grouping Using an Expression 161Adding Calculations to a Report 161Using the Totals List 162Inserting a Text Box 162Using Text Boxes as Calculated Controls 163Case Study: Creating an Invoice Report 165Using Advanced Methods to Launching a Report 167Launching a Report with a Command Button 167Launching a Report with a Macro 169Controlling Report Output 174Adding Page Breaks After Sections 174Starting Sections at the Top of a Row or Column 174Avoiding Widowed Records 175From Here 1759 Creating Specialized Reports 177Creating a Multiple-Column Report 177Setting Up the Report 178Tweaking the Page Setup178Troubleshooting Multiple Columns 180Case Study: Using Multiple Columns to Reduce Report Page Count 181Creating Mailing Labels 184Running the Label Wizard 185Creating a Custom Label 187Creating a Mail Merge Report 187Creating a Multiple-Table Report 189Understanding Subreports 190Creating a Report and Subreport with the Report Wizard 191Creating a Subreport in the Report Design View 192Creating a PivotChart Report 194From Here 195III CREATING POWERFUL QUERIES10 Creating a Basic Query 199Sorting Records 199Sorting on a Single Field 200Sorting on Multiple Fields 200Filtering Table Data 201Filtering by Selection 203Filtering Excluding Selection 203

Filtering in Place 204Applying Text,Numeric, and Date Filters 204Filtering by Form 206Learning About Filter Criteria 207Creating a Filter 208Working with Queries 210Creating a Query 210Creating a New Query Object 211Selecting the Fields to Include in the Query 212Entering the Query Criteria 213Excluding a Field from the Query Results 213Returning Only the Top N Values 213Setting Field Properties 214Running the Query 215Querying Notes for Business Users 216Case Study: Querying for a Mail Merge 217Querying the Customers Table 218Running the Mail Merge 219Creating Queries with the Query Wizards 220Creating Crosstab Queries 220Creating Find Duplicates Queries 222Setting Up a Find Unmatched Query 222Working with a Query Dynaset 223Understanding the Datasheet View 223Navigating Fields 224Entering Data 224Adding More Records 225Navigating Records 225Selecting a Record 226Copying a Record 226Deleting a Record 227Formatting the Datasheet 227Working with Query Properties 228From Here 22911 Building Criteria Expressions 231Using Operands in Criteria Expressions 232Literals 232Identifiers 232Functions 233Using Operators in Criteria Expressions 233Comparison Operators 233

Arithmetic Operators 234The Like Operator 235The Between...And Operator 235The In Operator 235The Is Null Operator 235Compound Criteria and the Logical Operators 236Using the Logical Operators 237Understanding Operator Precedence 238Setting Up a Calculated Column239Calculating Inventory Value 240Calculating Discounted Product Totals 241Using the Built-In Functions 241Using Text Functions 243Using Date and Time Functions 246Using Math Functions 251Using Financial Functions 253Working with the Expression Builder 256From Here 25712 Working with Multiple-Table Queries 259Relational Database Fundamentals 259The Pitfalls of a Nonrelational Design 259How a Relational Design Can Help 262Types of Relational Models 264The One-to-Many Model 264The One-to-One Model 265The Many-to-Many Model 265Enforcing Referential Integrity 266Establishing Table Relationships 267Understanding Join Lines 267Identifying Join Types 268Adding Tables to the Relationships Window 269Joining Tables 269Editing a Relationship 271Removing a Join 271Working with Multiple Tables in a Query 271Adding Multiple Tables to a Query 271Adding Fields from Multiple Tables 272Nesting Queries Within Queries 273Joining Tables Within the Query Design Window 274Creating Other Types of Joins 275Creating Outer Joins 275

Creating Self-Joins 278Creating Theta Joins 279Creating a Unique Values Query280Case Study: Drilling Down to the Order Details 282Adding a Subdatasheet to a Query 284Working with Query Subdatasheets 284From Here 28613 Creating Advanced Queries 287Creating a Totals Query 287Displaying the Total Row in the Design Grid 288Setting Up a Totals Query on a Single Field 289Setting Up a Totals Query on Multiple Fields 289Filtering the Records Before Calculating Totals 290Creating a Totals Query for Groups of Records 291Grouping on Multiple Fields 291Creating a Totals Query Using a Calculated Field 293Creating a Totals Query Using Aggregate Functions294Combining Aggregate Functions and Totals 295Creating Queries That Make Decisions 296Making Decisions with the IIf Function 297Making Decisions with the Switch Function 299Case Study: Calculating a Customer Discount Rate 300Calculating a Simple Discount Rate 300Calculating a Complex Discount Rate 301Running Parameter Queries 302Creating a Simple Query Parameter 302Specifying the Parameter Data Type 304 Running Action Queries 304Modifying Table Data with an Update Query 304Removing Records from a Table with a Delete Query 306Creating New Tables with Make-Table Queries 307Adding Records to a Table with an Append Query 309From Here 30914 Creating PivotTable Queries 311What Is a PivotTable? 311How PivotTables Work 312Some PivotTable Terms 313Creating a One-Dimensional PivotTable 314Display Data Field Details 314Displaying the Sum of the Data Field Values 316Hiding and Showing the Data Details 318

Inserting an AutoCalc Data Field Summary Calculation 318Changing the AutoCalc Calculation Type 320Creating a Calculated Field 321Removing a PivotTable Field 322Creating a Multiple-Field One-Dimensional PivotTable 322Creating a Two-Dimensional PivotTable 323Analyzing Customer Orders by Product Category 324Adding a Temporal Dimension to the PivotTable 326Filtering a PivotTable 332Using the PivotTable AutoFilters332Displaying Only the Top or Bottom Items 333Grouping Field Items 335Adding a Filter Field 335Pivoting a PivotTable 336Moving a Field to a Different Area 337Changing the Field Order 338Formatting a PivotTable 339From Here 33915 Querying with SQL Statements 341Viewing the SQL Statement 341Using SQL to Perform a Select Query 342Understanding the SELECT Statement 343Using SQL with Multiple-Table Queries 346Adding a Calculated Column to the SELECT Statement 349Using SQL to Total and Group Records350Using SQL to Set Up a Parameter Query 350The Full SQL SELECT Syntax 351Using SQL to Perform Action Queries 351Using SQL to Perform an Update Query 352Using SQL to Perform a Delete Query 352Using SQL to Perform a Make-Table Query 353Using SQL to Perform an Append Query 353Using SQL to Create Subqueries354Using a Subquery to Define a Field 355Determining Whether a Unit Price Is Greater Than the Average 355Using a Subquery to Define Criteria for a Field 356Using Subqueries That Return Dynasets 356In Predicate: Customers Who Have Placed Orders 357All Predicate: Products Cheaper Than All the Condiments 358Using SQL to Create Union Queries 359From Here 360

Index 361 About the AuthorPaul McFedries is the president of Logophilia Limited, a technical writing company. Now primarily a writer, Paul is well known as a teacher of Microsoft Office and Microsoft Windows, and has worked as a programmer, consultant, database developer, and website developer. He has written more than 50 books that have sold more than three million copies worldwide. These books include Tricks of the Microsoft Office 2007 Gurus (Que, 2007), Formulas and Functions with Microsoft Excel 2007 (Que, 2007), VBA for the 2007 Microsoft Office System (Que, 2007), and Windows Vista Unleashed (Sams, 2006).DedicationTo Karen and Gypsy. AcknowledgmentsWhen people ask me what I do for a living, I tell them that I write technical books. However, if my ego was just a tad smaller, what I’d really say is that I collaborate on technical books. Yes, it’s my name on the front cover (there’s that ego thing again), and the text you’re about to read was written by me, but a book like this comes together with the hard work and dedication of lots of people. You can see a list of them near the front of the book on the copyright page, and my heartfelt thanks go out to all of them. I’d also like to pass along extra thanks to those hard-working souls who I worked with directly: Acquisitions Editor Loretta Yates, Development Editor Todd Brakke, Project Editor Andy Beaster, Copy Editor Chuck Hutchinson, and Technical Editor Scott Diamond. We Want to Hear from You!As the reader of this book, you are our most important critic and commentator. We value your opinion and want to know what we’re doing right, what we could do better, what areas you’d like to see us publish in, and any other words of wisdom you’re willing to pass our way.As an associate publisher for Que Publishing, I welcome your comments. You can email or write me directly to let me know what you did or didn’t like about this book—as well as what we can do to make our books better.Please note that I cannot help you with technical problems related to the topic of this book. We do have a User Services group, however, where I will forward specific technical questions related to the book.When you write, please be sure to include this book’s title and author as well as your name, email address, and phone number. I will carefully review your comments and share them with the author and editors who worked on the book.Email: [email protected]: Greg WiegandAssociate Publisher Que Publishing 800 East 96th Street Indianapolis, IN 46240 USAReader ServicesVisit our website and register this book at www.quepublishing.com/register for convenient access to any updates, downloads, or errata that might be available for this book. This page intentionally left blank Introduction
INTRODUCTIONMicrosoft Access is a large, intimidating program.A

Unlike Word or Excel, where you can perform basic tasks without much in the way of training,Whats in the Book This Book's Special Features . . The Examples Used in the Book223Access presents challenges from the outset. Most users never progress beyond creating simple tables and using wizards to create basic forms and reports.At the same time, all users (— from managers to researchers to administrative assistants —) need information and know that what they seek is embedded somewhere in their Access tables. Without a more sophisticated knowledge of how to extract and present that data, they are forced to rely on office gurus and overworked IT people to provide canned reports or one-size-fits-all solutions.This book will change all that by giving you the skills required to extract the data you need (queries), build efficient front ends for that data (forms), and publish the results in an attractive and easy-to-read format (reports). To that end, this book shuns the big Access picture and instead focuses intently on queries, forms, and reports. This in-depth approach gives you the skills and understanding you need to get at the data and prove the old saying that knowledge is indeed power. And this book does all that with no-nonsense, step-by-step tutorials and lots of practical, useful examples aimed directly at business users.Even if you’ve never been able to get Access to do much beyond storing data in simple tables, you’ll still find this book to your liking. I show you how to build useful, powerful queries, forms, and reports from the ground up, so no experience with these aspects of Access is necessary. What's in the BookThis book isn’t meant to be read from cover to cover, although you’re certainly free to do just that if the mood strikes you. Instead, most of the chapters are set up as self-contained units that you can dip into at will to extract whatever nuggets of information you need. However, if you’re a relatively new Access user, I suggest starting the first one or two chapters in each of the book’s three main sections to ensure you have a thorough grounding in the fundamentals of Access queries, forms, and reports.The book is divided into three main parts. To give you the big picture before diving in, here’s a summary of what you’ll find in each part:Part I, Creating Forms: The five chapters in Part I show you how to build efficient and useful forms for inputting and editing data. Chapter 1, “Creating and Using a Form,” and Chapter 2, “Working with Form Controls,” give you the basic form know-how you need. From there, you learn about using data validation to ensure data entry accuracy, learn how to design forms for the business environment, and learn how to create specialized forms such as switchboards, dialog boxes, and startup screens.Part II, Designing and Customizing Reports: The four chapters in Part II tell you everything you need to know to create attractive and practical reports. Chapter 6, “Creating and Publishing a Report,” gives you the basics, and the subsequent chapters add to your knowledge by showing you the fundamentals of good report design and how to build advanced reports.Part III, Creating Powerful Queries: The six chapters in Part III give you a thorough grounding in the features and uses of Access queries. After learning some query fundamentals in Chapter 10, “Creating a Basic Query,” you move on to understanding criteria expressions; multiple-table queries; totals, parameter, and action queries; PivotTable queries; and SQL statements.This Book's Special FeaturesMicrosoft Office Access 2007 Forms, Reports, and Queries is designed to give you the information you need without making you wade through ponderous explanations and

interminable technical background. To make your life easier, this book includes various features and conventions that help you get the most out of the book and Access itself.Steps—Throughout the book, each Access task is summarized in step-by-step procedures.Things you type—Whenever I suggest that you type something, what you type appears in a bold font.Commands—I use the following style for Access Ribbon commands: Create, Form. This means that you click the Ribbon’s Create tab and then click the Form button. For the Office menu, I use the form Office, Open. This means that you pull down the Office menu and select the Open command.Dialog box controls—Dialog box controls have underlined accelerator keys: Close.This book also uses the following boxes to draw your attention to important (or merely interesting) information.I" The Note box presents asides that give you more information about the topic under discussion. ® These tidbits provide extra insights that give you a better understanding of the task at hand.I^ The Tip box tells you about Access methods that are easier, faster, or more efficient than the stan- l_ dard methods.CAUTION The all-important Caution box tells you about potential accidents waiting to happen.There are always ways to mess things up when you're working with computers.These boxes help you avoid at least some of the pitfalls.^ These cross-reference elements point you to related material elsewhere in the book.CASE STUDYYou’ll find these case studies throughout the book, and they’re designed to take what you’ve learned and apply it to projects and real-world examples.The Examples Used in the BookAn old saw tells us that “a good example has twice the value of good advice.” I tried to cram this book with as much good advice as I could think of, but just to make sure you get your money’s worth, I’ve also included tons of examples. I’ve found over the years that examples do the most good if the reader can follow along when the mood strikes. To that end, all the examples I use in this book are based on the sample database that comes with Access 2007: Northwind 2007, a database of products, employees, invoices, and much morefrom Northwind Traders, a fictitious food company. If you want to use this database while learning about Access forms, reports, and queries, here’s how to load it:1. Launch Access 2007 and, in the list of template categories that appears, click Sample. (If you already have Access 2007 started, choose Office, New to see the list of template categories.)2. Click the Northwind 2007 icon.3. Adjust the File Name, if desired.4. Click Download.5. If you see the Microsoft Office Genuine Advantage dialog box, click Continue. Access 2007 downloads and installs the database.6. If you see the Security Warning message bar, click Options, click Enable This Content, and then click OK.7. In the Login Dialog, click Login.

I This page intentionally left blank Creating and Using a Form
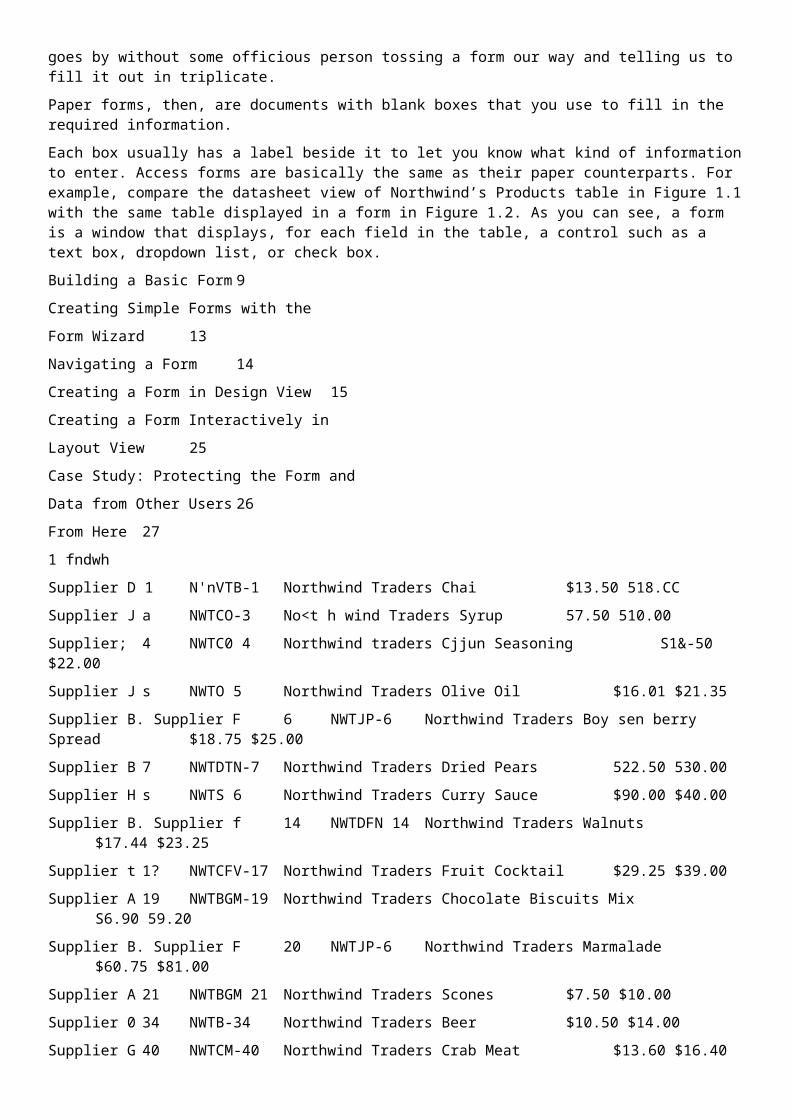
Data entry is the unglamorous side of Access. Sure, entering a record or two isn’t so bad, but entering dozens of records quickly becomes a chore you might do anything to avoid. The datasheet techniques presented later in this book in Chapter 10, “Creating a Basic Query,” can help, but the datasheet isn’t the most attractive way to get information into a table. You can take some of the drudgery out of data entry by using forms.In the real world, we deal with forms of various descriptions all the time—application forms, registration forms, license renewals, deposit slips, and traffic tickets (one of my specialties, unfortunately). It’s a rare day that goes by without some officious person tossing a form our way and telling us to fill it out in triplicate.Paper forms, then, are documents with blank boxes that you use to fill in the required information.Each box usually has a label beside it to let you know what kind of information to enter. Access forms are basically the same as their paper counterparts. For example, compare the datasheet view of Northwind’s Products table in Figure 1.1 with the same table displayed in a form in Figure 1.2. As you can see, a form is a window that displays, for each field in the table, a control such as a text box, dropdown list, or check box.Building a Basic Form 9Creating Simple Forms with theForm Wizard13Navigating a Form 14Creating a Form in Design View 15Creating a Form Interactively inLayout View 25Case Study: Protecting the Form andData from Other Users 26From Here 27 1 fndwhSupplier D 1 N'nVTB-1 Northwind Traders Chai $13.50 518.CCSupplier J a NWTCO-3 No<t h wind Traders Syrup 57.50 510.00Supplier; 4 NWTC0 4 Northwind traders Cjjun Seasoning S1&-50 $22.00Supplier J s NWTO 5 Northwind Traders Olive Oil $16.01 $21.35Supplier B. Supplier F 6 NWTJP-6 Northwind Traders Boy sen berry Spread
$18.75 $25.00Supplier B 7 NWTDTN-7 Northwind Traders Dried Pears 522.50 530.00Supplier H s NWTS 6 Northwind Traders Curry Sauce $90.00 $40.00

Supplier B. Supplier f 14 NWTDFN 14 Northwind Traders Walnuts $17.44 $23.25Supplier t 1? NWTCFV-17 Northwind Traders Fruit Cocktail $29.25 $39.00Supplier A 19 NWTBGM-19Northwind Traders Chocolate Biscuits Mix S6.90 59.20Supplier B. Supplier F 20 NWTJP-6 Northwind Traders Marmalade $60.75 $81.00Supplier A 21 NWTBGM 21 Northwind Traders Scones $7.50 $10.00Supplier 0 34 NWTB-34 Northwind Traders Beer $10.50 $14.00Supplier G 40 NWTCM-40 Northwind Traders Crab Meat $13.60 $16.40Supplier r 41 NWTSO-41 Northwind Traders Clam Chowder 57.24 $9.65Supplier C. Supplier 0 4 J NWTB 4 ) Northwind Traders Coffee $34.50 $44.00Supplier J OK NWTCA-48 Northwind Traders Chocolate $9.56 $12.75
Figure 1.2The first record of the Products table displayed in a form.
Figure 1.1The datasheet view of the Products table."iie« jo a aForms bring a number of advantages to the data entry table:■ Because the form shows only one record at a time, you can almost always see all the table fields at once. In contrast, you can usually see only four or five columns at a time in a datasheet.■ Controls such as drop-down lists reduce the possibility of data entry errors by giving the users a limited set of choices for a field.■ Access gives you a number of customization options. These features let you create Access forms that look exactly like paper forms, and you can add graphics and other objects to make the forms more interesting.■ You aren’t distracted by other data in the table, so you can give your full attention to the task at hand. This isn’t to say that you must always use a form whenever you want to enter data into an Access table. The datasheet is probably faster if you have just a few fields to fill in, and the datasheet is definitely the way to go if you want to refer to as many other records as possi¬ble when entering your data. When you do need a form, however, this chapter gives you the basics for building forms and then for using them to navigate and edit data.Building a Basic Form Form building in Access 2007 is easier than it has ever been. Yes, you can still access the Design view (as described later in this chapter) to build your forms. However, if your needs are simple or time is short, then you can build a great-looking form with just a few mouse clicks. The secret is that Access 2007 comes with three basic form layouts that you can apply to an existing table or query:
■ Form—This standard form layout shows the data from one record at a time, as well as records from another table that are related. See “Building a Standard Form,” next.■ Split Form—This layout has two sections: a form on top and a datasheet below. When you select a record in the datasheet, the record data appears in the form. See “Building a Split Form,” later in this chapter.■ Multiple Items—This tabular form layout shows the records in rows with the field names at the top. See “Building a Multiple Items Form,” later in this chapter.To learn how to build a PivotChart form, see “Creating a PivotChart Form,” p. 108. (Chapter 5)To learn how to build a modal dialog box, see “Creating a Form Pop-Up Box or Dialog Box,” p.103. (Chapter 5)Note that in all three form layouts, Access displays most text and numeric fields using a simple text box, and it displays Yes/No fields with a check box.Building a Standard FormRunning the Form command to build a standard form requires just two steps:I" Before you can follow the steps in this section,you need to have a database open. If you want to use ® the sample Northwind database, choose Office,New,click the Sample category, click the Northwind 2007 icon,and then click Download.1. In the Navigation pane, click the table or query you want to use as the form record source.2. Choose Create, Form. Figure 1.3 shows a form created from the Northwind Employees table.Figure 1.3A standard form built on the Northwind data¬base's Employees table.Sometimes when you run the Form command, the resulting form will be a bit more com¬plex. For example, take a look at the form in Figure 1.4, which I built using the Orders table as the record source. Figure 1.4A more complex form built on the Northwind database's Orders table.
In particular, notice the datasheet on the bottom of the form. This is called a subform, and it shows the current order’s related records from the Order Details table. I discuss creating forms based on multiple, related tables later in this book. For now, however, you should know that if the table has a field that’s used as the basis of a one-to-many relationship with another table and the current table is the “one” side of that relationship, the “many” table’s related records are displayed in a subform.Also notice in Figure 1.4 that some of the fields are displayed as drop-down lists instead of text boxes. In general, if the table has a field that is used as the basis of a one-to-many relationship with another table and the current table is the “many” side of that relationship, that field is displayed as a drop-down list that contains the values from the related table.For example, the Orders table is related to the Employees table, so the Employee dropdown list contains the names of all the people in the Employees table.If you’ve never used multiple, related tables before, don’t worry if the preceding two paragraphs don’t make much sense right now. I’ll explain everything in much more detail later.
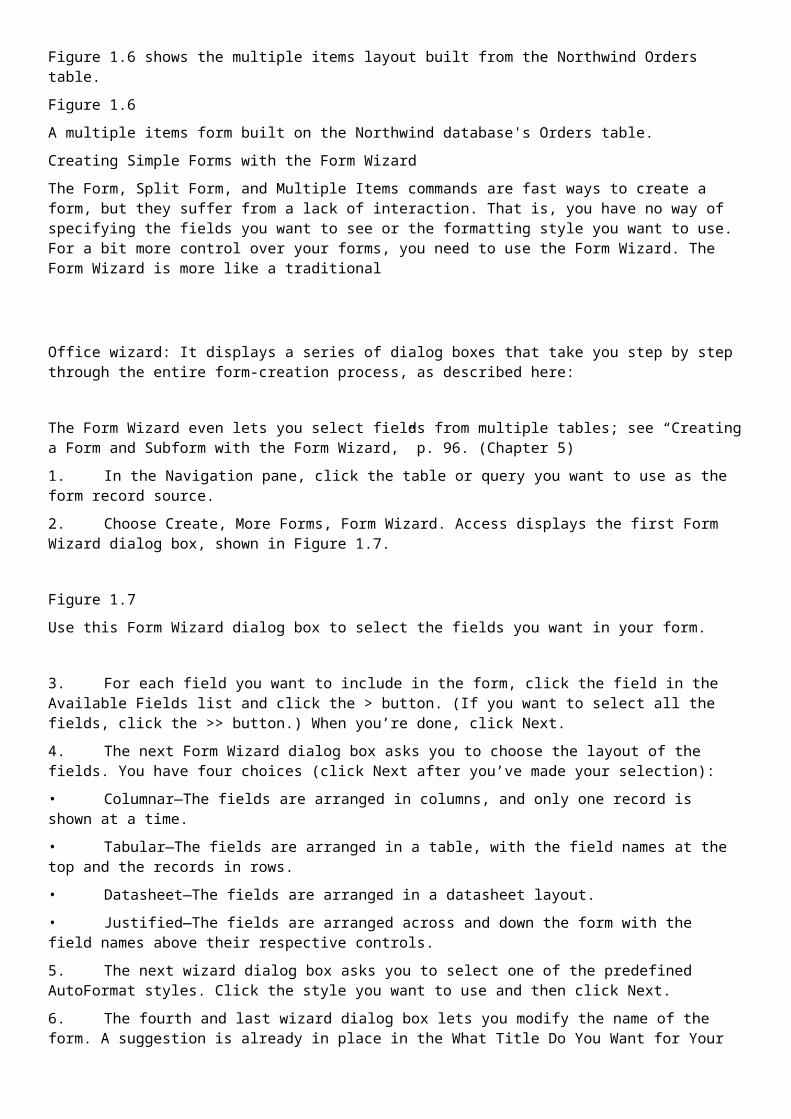
For the details on building a form from multiple, related tables, see “Creating a Multiple-Table Form,” p. 95. (Chapter 5)Building a Split FormOne of the advantages of viewing a table or query in a datasheet is that you can quickly navigate among the records by using the scrollbars or navigation keys such as Page Down and Page Up. A standard form shows just one record at a time, so getting to the record you want (particularly if the underlying table or query has many records) can be time-consuming.The advantage of a split form is that it combines the best of both worlds—the nicer layout of a form and the navigation speed of a datasheet. The split form accomplishes this by creating a form that’s split in two: The top half is a standard form and the bottom half is a datasheet. The idea is that you use the datasheet to find the record you want, and when you click anywhere inside the record, the record’s data appears in the form.As with the Form command, wielding the Split Form command takes but two steps:1. In the Navigation pane, click the table or query you want to use as the form record source.2. Choose Create, Split Form.Figure 1.5 shows a split form created from the Northwind Orders table.Building a Multiple Items FormThe multiple items form is another form/datasheet hybrid. In this case, the form is laid out using the same tabular layout as a datasheet, with the records in rows and the fields in columns, with the field headings along the top of the form. However, unlike a datasheet, which displays only a single line of data for each record, the multiple items form displays up to three lines of data.Here are the steps to follow to create a multiple items form:1. In the Navigation pane, click the table or query you want to use as the form record source.2. Choose Create, Multiple Items. Figure 1.5A split form built on the Northwind database's 1 Orders table. Figure 1.6 shows the multiple items layout built from the Northwind Orders table.Figure 1.6A multiple items form built on the Northwind database's Orders table.Creating Simple Forms with the Form WizardThe Form, Split Form, and Multiple Items commands are fast ways to create a form, but they suffer from a lack of interaction. That is, you have no way of specifying the fields you want to see or the formatting style you want to use. For a bit more control over your forms, you need to use the Form Wizard. The Form Wizard is more like a traditional Office wizard: It displays a series of dialog boxes that take you step by step through the entire form-creation process, as described here: The Form Wizard even lets you select fields from multiple tables; see “Creating a Form and Subform with the Form Wizard,” p. 96. (Chapter 5)

1. In the Navigation pane, click the table or query you want to use as the form record source.2. Choose Create, More Forms, Form Wizard. Access displays the first Form Wizard dialog box, shown in Figure 1.7. Figure 1.7Use this Form Wizard dialog box to select the fields you want in your form.
3. For each field you want to include in the form, click the field in the Available Fields list and click the > button. (If you want to select all the fields, click the >> button.) When you’re done, click Next.4. The next Form Wizard dialog box asks you to choose the layout of the fields. You have four choices (click Next after you’ve made your selection):• Columnar—The fields are arranged in columns, and only one record is shown at a time.• Tabular—The fields are arranged in a table, with the field names at the top and the records in rows.• Datasheet—The fields are arranged in a datasheet layout.• Justified—The fields are arranged across and down the form with the field names above their respective controls.5. The next wizard dialog box asks you to select one of the predefined AutoFormat styles. Click the style you want to use and then click Next.6. The fourth and last wizard dialog box lets you modify the name of the form. A suggestion is already in place in the What Title Do You Want for Your Form? text box; it’s based on the name of the underlying table or query, but you can enter any name that doesn’t conflict with an existing form. 17. If you want to use the form right away, leave the Open the Form to View or Enter Information option activated. Alternatively, click Modify the Form’s Design to open the form in Design view (see “Creating a Form in Design View,” later in this chapter).8. Click Finish to complete the form.This is the end of the Form Wizard. You can create a sophisticated and professional data entry form in a fraction of the time needed to create the form from scratch. The wizard isn’t as fast as the Form, Split Form, and Multiple Items commands, but it does allow a bit more flexibility in the customization.Navigating a FormNavigation in a form refers not just to the fields that appear on the form but also to the records within the form. When you’re working on a form, you can navigate the form using several methods. The first is to use the Enter key. The Enter key accepts the data that the user entered into the field and moves the focus to the next field. The Tab key performs the same action, but the user doesn’t need to enter any data. If shortcut keys are associated with buttons on the form, the user can hold down the Alt key and press the corresponding underlined letter. For moving between records, the easiest technique is to use the record navigation buttons that appear at the bottom of the form.To learn how to specify shortcut keys for form controls, see “Using Labels to Create Keyboard Shortcuts for Controls,” p. 42. (Chapter 2)Otherwise, to navigate fields and records in a form, you can use the keys outlined in Table 1.1.Table 1.1 Keys to Use When Navigating Fields and Records in a FormKey Description

Tab or right arrow Moves to the next field to the right; from the last field, moves down to the first field in the next record.Shift+Tab or left arrow Moves to the previous field to the left; from the last field, moves up to the first field in the previous record.Home Moves to the first field.End Moves to the last field.Page Down Moves to the same field in the next record.Page Up Moves to the same field in the previous record.Ctrl+Home Moves to the first field of the first record.Ctrl+EndMoves to the last field of the last record.
Creating a Form in Design ViewIAlthough the Form Wizard is a step up from the Form, Split Form, and Multiple Items commands in terms of control, the resulting forms still might not satisfy your needs. For example, you might want to build a custom form that mirrors as closely as possible an equivalent paper form. If the Access form resembles the paper form, the person using the form to enter data will feel more comfortable with it and will be less likely to make mistakes.For maximum form flexibility, you need to use the form design window, which gives you total control over the form, including the positioning of the controls, the formatting of the text, the colors, and much more.Displaying the Design ViewAccess forms have a Design view that you can use for your customization chores. How you display this view depends on whether you’re dealing with an existing form or a new one.To open an existing form in Design view, you have two choices:■ If the form isn’t open, right-click the form in the Navigation pane and then click Design View.■ If the form is already open, choose Home, click the lower half of the View split button, and then click Design View. (Alternatively, click the Design View button on the status bar; see Figure 1.8.)To start a new form, you have two choices:■ Choose Create, Blank Form. Then choose Format, click the lower half of the View split button, and then click Design View.■ Choose Create, Form Design.When you create a new form, it isn’t associated with a table or query, so you need to set the record source by hand. See “Changing the Record Source,” next.Figure 1.8 shows a new, blank form in Design view. Note that you place the form controls, including the table’s fields and their labels, in the Detail area.Changing the Record SourceThe fields available to the form depend on the table or query that you’ve defined as the form’s record source. If you’ve created a blank form, you need to specify the record source yourself. For an existing form, you might want to change the record source to a different table or query. Either way, you follow these steps to change the record source while you’re in Design view: 1. Select the form by clicking the form selector button (pointed out in Figure 1.8).

2. Choose Design, Property Sheet. The Property Sheet pane appears.3. Click the Data tab.4. Pull down the Record Source list and then click the table or query you want to associate with the form.5. Choose Design, Property Sheet. The Property Sheet pane disappears. Figure 1.8Use the Design view to design and customize all aspects of your form.
Understanding Form ControlsAn Access form can contain one of three types of controls: bound, unbound, or calculated. The following sections discuss the differences between these types.Bound Controls (Fields)You use bound controls to display and edit data from the form’s underlying record source. The term bound refers to the fact that the control is tied to a field of a table, query, or SQL SELECT statement. The most common type of bound control is the text box, but many other types of controls can operate as bound controls.A bound control inherits many of its formatting and text properties from the field to which it is bound (for example, Caption, Description, Input Mask, and Default Value). You can change these properties on the form by using the control’s property sheet, which you display as follows:I■ Click the control (the data control, not the associated label) and then choose Design, Property Sheet (or press Alt+Enter).■ Right-click the control and then click Properties.See “Adding Fields to the Form,” later in this chapter, to learn how to add a bound control to the form.Unbound ControlsAn unbound control is used to convey information to the user or to receive from the user input that won’t be stored in the underlying record source. In other words, unbound means that the control isn’t associated with (bound to) any field.Here are some examples of using unbound controls:■ A label for a text box that describes what the text box represents.■ Text boxes or drop-down list boxes that can be used to select different scenarios on a what-if form.■ A line used to separate different sections of the form.■ A company logo or other graphical effects.When you add a control to a form when the Control Wizard is activated, the control is automatically unbound.To learn about adding unbound controls and using the Control Wizard, see “Inserting Controls on a Form,” p. 30. (Chapter 2)Calculated ControlsCalculated controls use expressions to derive their data. Expressions are combinations of operators, fields, control names, functions, and constants. Although text boxes are the most common form of calculated controls, any control having the Control Source property can be a
calculated control. A calculated control can be used to compute sales tax on an order entry form, for example.To learn how to build calculated controls, see “Using Text Boxes as Calculated Controls,” p. 44. (Chapter 2)Adding Fields to the FormHere are the steps to follow to add a field (that is, a bound control) to your form:1. Choose Design, Add Existing Fields. Access displays the Field List pane.2. Double-click the field you want to add to the form.3. Repeat step 2 until you have added all the fields you need. When you add a field, Access creates a control for the field as follows (see Figure 1.9): ■ Most text or numeric fields use a text box.■ If the field is used as the basis of a one-to-many relationship with another table and the current table is the “many” side of that relationship, the field is displayed as a dropdown list that contains the values from the related table.■ Yes/No fields use a check box.Also, a label control is placed beside each field. The text of the label is the Caption property for the field to which the control is bound. Figure 1.9Some fields from the Products table added to the form.Labels FieldsForm View
Changing the Size of the FormIf you find that your form is either too small to hold all the fields or has too much empty space, you can change the size of the form as follows:■ To adjust the form’s height, move the mouse pointer to the bottom edge of the Detail area. Click and drag the edge of the form down (to make the form bigger) or up (to make the form smaller).■ To adjust the form’s width, move the mouse pointer to the right edge of the Detail area. Click and drag the edge of the form right (to make the form wider) or left (to make the form thinner).Viewing the FormAfter you’ve added at least one field, you can display the underlying record source in the form by switching to Form view. You have two choices: ■ Choose Design and then click the top half of the View split button. ■ In the status bar, click Form View (see Figure 1.9).Figure 1.10The Form view of the form design shown in Figure 1.9.Figure 1.10 shows the Form view of the design displayed in Figure 1.9."3 foiml>

Product Code: BESProduct Name: Northwind Traders ChaiOcbUlptlon:Standard Cost: $13.50List Price: S1B.00Category: Beverages [£j
El Discontinuedi* 1 45 *» • .
Assigning an AutoFormat in Design ViewYou learn how to change control fonts, colors, borders, and other formatting in Chapter 2, “Working with Form Controls.” For now, you can do some quick formatting by applying one of the 20 predefined form looks, called AutoFormats. Choose the Arrange tab (not, surprisingly, the Design tab), click AutoFormat to display the AutoFormat gallery, and then click the look you prefer.For the specifics of form formatting, see “Formatting Controls,” p. 31. (Chapter 2)For a bit more control, you can use the AutoFormat Wizard:1. Choose Arrange, AutoFormat, AutoFormat Windows to display the AutoFormat dialog box.2. In the Form AutoFormats list, click the AutoFormat you want to use.3. To control which layout attributes Access applies to the form, click Options to display the Attributes to Apply group and then activate or deactivate the following check boxes: Font, Color, and Border.4. Click OK.I" The default layout used by the Form Wizard is always the most recent layout that you selected in ® the AutoFormat dialog box.INote, too, that you can customize these AutoFormats to suit your taste. In the AutoFormat dialog box, click the Customize button to display the Customize AutoFormat dialog box that has three options: ■
■ Create a New AutoFormat Based on the Form ‘Form’—Choose this option to create a new AutoFormat template based on the formatting used in the current form.■ Update AutoFormat with Values from the Form ‘Form’—Choose this option to change the currently selected AutoFormat template based on the formatting used in the current form.■ Delete AutoFormat—Choose this option to delete the currently selected AutoFormat template.Working with Form PropertiesAny form object comes with a large number of properties that you can work with. Many of these are obscure and can be safely ignored, but there are a few that you might find useful. To work with the form properties, follow these steps:

1. Select the form by clicking the form selector button, pointed out earlier in Figure 1.8.2. Choose Design, Property Sheet (or press Alt+Enter) to display the Property Sheet pane.3. Modify the properties you want to work with.If; If you're not sure what a property does, click inside the property and then press F1.Access loads the l_ Help window and displays the Help topic for that property.4. Click the Close button (X) to activate the new settings.Working with the Form Header and FooterThe Detail section of a form is supposed to be a data-only area. That is, it’s supposed to contain only controls that are directly or indirectly related to the form’s underlying record source. What if you want to display a form title or the current date or some other information not related to the data? Although it’s possible to put such things in the Detail area, a better choice is to take advantage of the following sections:■ Form Header — This section appears above and separate from the Detail area, so it’s a good choice for the form title, a company logo, or any other items that you want displayed separately from the form data. Note that when you print the form, the Form Header appears only at the top of the first page. ■ Form Footer — This section appears below and separate from the Detail area. It’s a good place to add nondata items such as the current date or instructions on how to fill in the form. When you print the form, the Form Header only appears below the Detail section on the last page. To display the Form Header and Form Footer, choose the Arrange tab and then click the Form Header/Footer button in the Show/Hide group.Besides the Form Header and Form Footer, Access also defines separate Page Header and Page Footer sections, both of which appear only when you print the form:■ Page Header — This section appears at the top of each printed page (except for the first printed page, where it appears below the Form Header).■ Page Footer — This section appears at the bottom of each printed page.To display the Page Header and Page Footer, choose the Arrange tab and then click the Page Header/Footer button in the Show/Hide group.Figure 1.11 shows a form with the four header and footer sections added. Note that if you need to select a section (to format it, for example), you can do so by using either of the following techniques:■ Click the separator bar above the section you want to work with.■ Choose Design, Property Sheet and then use the Object list in the Property Sheet pane (pointed out in Figure 1.11) to choose the section you want.Figure 1.12 shows the Form view, which displays the Form Header and Form Footer sections.I" To change the height of any section, move the mouse pointer to the bottom edge of the section. ° Then click and drag up or down to resize the section. Figure 1.11A form with the Form Header, Form Footer, Page Header, and Page Footer.
j fo*ml XFORM HEADER

Product Code: SSLEProduct Name: Northwinfl Traders ChalDescription:Ui* Price: ti&oojStandard Cott: $1X30l ist Price: $18.00Category: Beverages [»] 3 DiscontinuedFORM FOOTER
(U<wd: i* 1 CMS *
Figure 1.12The Form view shows the Form Header and Form Footer sections.Adding a Logokfd- You can add visual appeal to a form by adding a logo to the form header. This will most often be a company logo, but you might also want to use different logos for different projects, teams, or departments. In previous versions of Access, you could insert a logo using the Image control, but you usually had to spend time resizing the resulting image. Access 2007 comes with a separate Logo command that automatically inserts the image into the Form Header section and adjusts the image’s dimensions to logo size (usually 0.6 inch square). The resulting image is an Auto_Logo object. Here are the steps to follow to insert a logo:I1. Choose Design, Logo. Access displays the Insert Picture dialog box.2. Navigate to the folder that contains the image you want to use as a logo.3. Click the image.4. Click OK. Access resizes the image and inserts it in the Form Header section. Adding a TitleAdding a title to your form is usually a good idea so that users have some idea what the form is used for. You can use a Label control to add a title, but Access 2007 comes with a new Title command that automatically inserts an Auto_Title object in the Form Header section.Here are the steps to follow to insert a title:1. Choose Design, Title (just to the right of the Logo button). Access adds the Auto_Title object to the Form Header.2. Type your title. (Note that the Auto_Title box expands automatically as you type your text.)3. Click outside the title.4. Move the title to the position you want.For information on moving controls, see “Moving Controls,” p. 34. (Chapter 2)Formatting the BackgroundMost of the formatting options apply to the controls, as you’ll see in Chapter 2. For the form itself, about the only thing you can do is change the look of the background for each section: You can change the background color, or you can display an image as the background, as described in the next two sections.Setting the Background Color

To change the background color of a form section, follow these steps:1. Click the section’s separator bar to select the section.2. On the Design tab, click the Fill/Back Color palette (see Figure 1.13) so that it drops down.3. Click the background color you want. CAUTION When choosing a background, make sure the color doesn't clash with the color of the field label text. For example, the default label text color is black, so any dark background will cause a problem. Either use a light color for the background or change the color of the label text (as described in Chapter 2). Figure 1.13Click the Fill/Back Color palette and then click the background color you want.
Setting the Background PictureA simple, solid-color background that contrasts well with the form text (for example, a white or light-colored background with black or dark-colored text) is often the safest bet in a business environment. However, you might feel the need to spice up your form a bit with a more interesting background treatment: an image. Access enables you to use either a single, large image as the background or smaller images that are stretched or tiled to cover the entire form.Follow these steps to set an image as a form’s background:1. Select the form.2. Choose Design, Property Sheet to open the Property Sheet pane.3. Click the Format tab.4. Click inside the Picture property and then click the ellipsis ... button. Access displays the Insert Picture dialog box.5. Find the file you want to use, click it, and then click OK. 6. Use the Picture Size Mode property to choose one of the following settings:I• Clip—The image is displayed using its actual dimensions. If the image is larger than the form, the edges of the image are clipped to fit.• Stretch—The image is stretched or shrunk vertically and horizontally so that it fills the entire form.• Zoom—The image is enlarged or reduced until it fills the form either vertically or horizontally; the image’s original proportions are maintained.• Stretch Horizontal—The image is stretched or reduced horizontally so that it fills the entire form width.• Stretch Vertical—The image is stretched or reduced vertically so that it fills the entire form height.7. Use the Picture Alignment property to specify how you want the image aligned within the form.8. If you selected either Clip or Zoom as the Picture Size Mode, use the Picture Tiling property to determine whether you want the image repeated (tiled) across the background so that it fills the entire form; select Yes for tiling; select No to display just a single image.

9. Close the property sheet.CAUTION As with the background color, be careful which image you choose for the background. A “busy” background can render label text unreadable.Creating a Form Interactively in Layout View The major problem with creating a form in Design view is that you don’t see data from the form’s record source until you switch to Form view. This means that you often have to switch back and forth to get the layout you prefer and to size the controls properly.Access 2007 helps you reduce much of this design drudgery by offering a new form view called Layout. This hybrid view shows you the data from the record source but also enables you to change many aspects of the form design. To switch to this view from Design view, choose Design, click the lower half of the View split button, and then click Layout View. (You can also click the Layout View button in the status bar.)As you can see in Figure 1.14, the form data appears, but you also have access the Ribbon’s Format and Arrange tabs, which enable you to change the font, add certain controls (such as a logo and title), add fields, apply an AutoFormat, and more. rv A "> • • * i«m Uravt ifrMt Northmnd 3007 Da1ib*l« (Access 20071 Microsoft Access _ O X
HIT C.«I* rmtt DaU DiUMu tooli PonMl J*i*m *hi CtUbnH / (J U Mm is, ‘ -§>-*£-• i Vt “.mm - piVHm Fort IHI Cldwfc —— *«/ 3
forml * nddtid Xnwtti'* lot Om «rw
ts Suppler KhProduct Code: NWTB1 DProduct Name: Norm wind Traders Chal rroduil CodeDescription: Dmnpton
SU<vOu«CMt
Rrwdrt Imi*£c ustPnee: Standard Coo: Sis.ooiUJO Quantity Per UnaOmntowlMMWI Art'dci QiMnuti* lilt Price: SIS.OO - uuihMnti2 Category: Beverages [*] 9 Discontinued UlMhuiMi f Of turn ARaMltMli IRIfP*
FORM FOOTERRMMtt « 10t«l » • (. trwn
mm* v*w NumlMt jQfl <Li,
Figure 1.14Use Access 2007's new Layout View to modify the form and see its data at the same time.CASE STUDYProtecting the Form and Data from Other UsersIn a business environment, it's common to build forms as front ends for other users. A properly designed form gives users easier access to the data and keeps them away from fields they don't need to see (such as primary key fields and sensitive data).As you'll see in the next few chapters, building good business forms takes a bit of extra work on your part. So if you go to all that trouble, the last thing you want is for the users to either change the form design (on purpose or inadvertently) or alter the data in some unacceptable way (such as deleting records).Access can help you protect both the form and the underlying data. The property sheet for a form contains a number of properties that enable you to restrict the actions that users can take with your form.You can protect the form design in the following ways:■ Preventing the form from being resized—In the form property sheet, click the Format tab and choose any Border Style setting other than Sizable (that is, None, Thin, or Dialog).■ Preventing the form from being maximized or minimized—In the Format tab, go to the Min MaxButtons property and choose None. If you want to prevent the form only from being maximized, choose Min Enabled; if you want to prevent the form only from being minimized, choose Max Enabled.■ Preventing the form from being moved—In the Format tab, choose No for the Moveable property.■ Disabling other form views—In the Format tab, choose No for each of the following views you want to disable:Allow Datasheet View, Allow PivotTable View, Allow PivotChart View, and Allow Layout View.You can protect the form data in the following ways:You can also set up validation rules to ensure data integrity. See “Preventing Errors by Validating Data,” p. 50 (Chapter 3) Preventing the user from editing data—In the form property sheet, display the Data tab and set the Allow Edits property to No.■■■■■■Preventing the user from deleting data—In the Data tab, set the Allow Deletions property to No.Preventing the user from adding records—In the Data tab, set the Allow Additions property to No.Preventing the user from seeing other data—In the Data tab, set the Data Entry property to Yes. This is different from Allow Additions in that when this feature is turned on, the form

automatically opens to a new, blank record. The user doesn't have the capability to view existing records. Note that the users cannot see existing records or add new data (in other words, they won't be able to do anything with the form data) if Allow Additions is set to No and Data Entry is set to Yes.Making form data read-only—In the Data tab, set the Recordset Type property to Snapshot. This is the same as setting the Allow Edits, Allow Deletions, and Allow Additions properties to No.Preventing multiple users from editing the same record simultaneously—In the Data tab, set the Record Locks property to Edited Record.(If you prefer that other users can't edit any record while one user has the form open, set Record Locks to All Records, instead.) From Here^ Unbound controls are the subject of Chapter 2,“Working with Form Controls. ”See p. 29. (Chapter 2)^ For the specifics of form formatting, see “Formatting Controls,” p. 31. (Chapter 2)^ To learn how to specify shortcut keys for form controls, see “Using Labels to Create Keyboard Shortcuts for Controls,” p. 42. (Chapter 2)^ To learn how to build calculated controls, see “Using Text Boxes as Calculated Controls,” p. 44. (Chapter 2)^ To learn how to set up validation rules to ensure data integrity, see “Preventing Errors by Validating Data,” p. 50. (Chapter 3)^ The Form Wizard even lets you select fields from multiple tables; see “Creating a Form and Subform with the Form Wizard,” p. 96. (Chapter 5)^ To learn how to build a PivotChart form, see “Creating a PivotChart Form,” p. 108. (Chapter 5)^ To learn how to build a modal dialog box, see “Creating a Form Pop-Up Box or Dialog Box,” p. 103. (Chapter 5)^ For the specifics of working with the PivotTable view fields, see “Creating PivotTable Queries,” p. 311. (Chapter 14) This page intentionally left blank Working with Form Controls If you want a form laid out in a certain way that either mimics the arrangement of a paper form or gives the form a design that you think will make sense for the users, the techniques you’ve seen so far haven’t given you the tools to do the job. For example, pre-fab form layouts and the Form Wizard, although easy and fast, arrange form controls in only a few basic designs. Using the Design view is better because you can at least click and drag the table fields and drop them anywhere you want on the form. However, if you’ve tried this, you’ve certainly noticed that the results are seldom perfect. The reason is that you still need to “fine- tune” the controls by moving them, sizing them, formatting them, and so on.These fine-tuning techniques are the subject of this chapter. You learn not only how to insert and manipulate form controls, but also how to get the most out of the two most common control types: labels and text boxes.Manipulating Form ControlsYou saw in Chapter 1, “Creating and Using a Form,” that when you add a field to a form, Access mostly uses text boxes, combo boxes, and check boxes to enable the user to insert and edit field data. Whether you stick with the controls that Access suggests, or you branch out to use other types of controls on your forms, your form-building duties will be much quicker and of higher quality if you get comfortable manipulating the controls to get them
exactly the way you want them. To that end, in the following sections you learn quite a few useful techniques that you can apply to any control. Inserting Controls on a Form As you learned in Chapter 1, you add bound controls to the form by double-clicking fields in the Field List pane. For unbound controls (or controls that you want to bind to a field later), you need to use the Design tab’s Controls group, which contains buttons for all the controls you can add to a form. Some of these controls—specifically, Option Group, Combo Box, List Box, Command Button, and Subform—also come with their own Control Wizard that takes you step by step through the process of creating and setting up the control. (For example, the Combo Box and List Box controls have wizards that help you define, among other things, the items that appear in each list.)Here are the basic steps to follow to add any control to the form:1. In the Design tab, use the Controls group to click the button you want to use.2. If the control type has an associated wizard, click the Use Control Wizards button (pointed out later, in Figure 2.1) to toggle the wizard on or off, as preferred.3. Move the mouse pointer into the form and position it where you want the top-left corner of the control to appear.4. Click and drag the mouse pointer. Access displays a dashed border indicating the outline of the control.5. When the control is the size and shape you want, release the mouse button. Access creates the control and gives it a default name (such as CheckBoxn, where n signifies that this is the nth check box you’ve created on this form).6. If the control has a wizard and you activated the Use Control Wizards button, the first wizard dialog box appears. Follow the wizard’s steps. (You learn the control wizards later in this chapter when I take you through the specifics of each control.)Note that sometimes Access also includes a label beside the control you insert. For example, when you add a text box, Access also inserts a label to the left of the text box.If you want to add multiple instances of the same type of control, double-click the appropriate button in the Controls group. The button remains pressed, and you can draw as many instances of the control as you need. When you're done, click the control's button to reset the control.Selecting ControlsBefore you can work with a control, you must select it. For a single control, you select it simply by clicking it. If you prefer to work with multiple controls, Access gives you a number of techniques:■ Hold down the Ctrl key and click each control.■ You also can “lasso” multiple controls by clicking and dragging the mouse. Move the mouse pointer to an empty part of the form, hold down the left button, and click and drag. Access displays a box with a dashed outline, and any control that falls within this box (in whole or in part) is selected.■ To select every control, choose Design, Select All in the Controls group (or press Ctrl+A).2To exclude a control from the selection, hold down the Ctrl key and click inside the control.After you’ve selected multiple controls, you can set properties for all the controls at once (choose Design, Property Sheet). Note, however, that the Property Sheet pane shows only those properties that are common to all the controls. Not only that, but if you size, move, copy, or delete one of the selected controls (as described in the next few sections), your action will apply to all the controls.
Formatting ControlsYou saw in Chapter 1 that you can format all the controls on a form by applying one of the predefined AutoFormat layouts. That’s an easy way to work, but if the layout isn’t quite what you want, or if you want to create your own AutoFormat layout, you need to format the controls by hand.To learn how to apply an AutoFormat, see “Assigning an AutoFormat in Design View,” p. 19. (Chapter 1)You can format any control by selecting it (you can work with multiple controls, if need be) and using the lists and buttons in the Design tab (see Figure 2.1):■ Use the lists and buttons in the Font group to format the control text as well as the background color of the control.■ Use the lists and buttons on the right side of the Controls group to format the control’s outline (the Line Thickness, Line Type, and Line Color lists) and its Special Effect (Flat, Raised, Sunken, and so on).^ After you apply formatting to a particular type of control, you might want Access to use the same formatting on all future controls of the same type that you add to that form. To set this up, click the control with the formatting you want to use, choose Design, and then click the Set Control Defaults button (it's in the Controls group).Adding Conditional FormattingAccess enables you to apply a particular font automatically when a control value meets a specified condition. This is called conditional formatting, and it’s a useful tool when you need to monitor one or more values. For example, if your form is used to input budget values, you may want to flag those values that are over a certain threshold (such as the original budget target). Similarly, if your form calculates a value—such as gross margin—you might want to flag results that come in below a target value. In both cases, you can set up the conditional formatting to display any anomalous values in, say, a red, bold font so that they stand out from the rest of the numbers.
Use Control WizardsFigure 2.1Use the lists and buttons in the Font and Controls groups to format the selected control.2

You apply conditional formatting by following these steps:1. Select the field to which you want the conditional format applied.2. Choose Design, Conditional. Access displays the Conditional Formatting dialog box, shown in Figure 2.2. Figure 2.2Use the Conditional Formatting dialog box to specify font formatting to apply to a control when a specific condition is met.3. If you want to specify the format to use when the condition is not met, use the formatting buttons in the Default Formatting group.4. Select the type of condition you want to use:• Field Value Is—The condition is applied to the current value of the field or unbound control. In this case, you construct the condition by selecting a comparison operator (such as Between or Less Than) in the second list and then entering one or two values (depending on the operator).• Expression Is—The condition is met when the logical expression you enter returns True. For example, if you enter Date()=#8/23/2007#, the formatting is applied only on August 23, 2007.• Field Has Focus—The condition is met when the field or unbound control has the focus (that is, when the cursor is inside the field). 5. Click the formatting buttons to specify the font formatting to apply to the control when the condition is met.6. If you want to apply another condition, click Add and repeat steps 4 and 5 for the new condition. 7. Click OK.Sizing ControlsAn invisible rectangular frame surrounds each control. When you select a control, Access displays selection handles at the frame’s corners and midpoints, as shown in Figure 2.3. Move handlesSize to Fit^ i-Size to GridFigure 2.3Selecting a control displays the control's selection handles.Selection handles
You can resize any control to change its shape or dimensions. The following procedure outlines the steps to work through:1. Select the object you want to size.2. Position the mouse pointer over the selection handle you want to move. The pointer changes to a two-headed arrow. To change the size horizontally or vertically, use the appropriate handle on the middle of a side. To change the size in both directions at once, use the appropriate corner handle.3. Click and drag the handle to the position you want.

4. Release the mouse button. Access redraws the object and adjusts the frame size.To reduce some of the drudgery of control sizing, Access also offers a number of automatic sizing techniques. The next few sections give you a quick tour of these techniques.Sizing to the GridWhen you draw a control on the form, Access normally sizes the control so that it automatically lines up with the nearest grid mark. You can turn off this behavior by deactivating the Arrange, Snap To Grid button. If you turn off the Snap To Grid feature, you can still adjust a control’s size to the grid by hand. To do this, follow these steps:1. Select the control. 2. Choose Arrange, Size To Grid (see Figure 2.3). Access adjusts the control’s frame to the nearest grid marks.Sizing to the Control's ContentAccess has an annoying habit of not making controls large enough to see the text they contain. This is particularly true when you click and drag fields from the Field list. Instead of sizing the fields or labels by hand, you can make a control automatically large enough to display its text by following these steps:1. Select the control.2. Choose Arrange, Size To Fit (see Figure 2.3).Making Controls the Same SizeIf you’ve added similar controls (such as command buttons), your form will look its best if these controls are the same size. Here’s the easiest way to get a uniform size height and/or width:1. Select the controls you want to make the same size.2. Choose the Arrange tab.3. In the Size group, click one of the following commands:• Size To Tallest—Adjusts the height of all the controls to match the height of the tallest control.• Size To Shortest—Adjusts the height of all the controls to match the height of the shortest control.• Size To Widest—Adjusts the width of all the controls to match the width of the widest control.• Size To Narrowest—Adjusts the width of all the controls to match the width of the narrowest control.Moving ControlsYou can move any control to a different part of the form by following these steps:1. Select the control you want to move.2. Position the mouse pointer as follows:• To move an individual control, place the pointer over the control’s frame, although not over a selection handle. When the pointer is positioned correctly, it turns into a four-headed arrow. • To move a paired control (that is, a control such as a text box or check box that also comes with a label), place the pointer over the frame of whichever control is selected (again, however, not over a selection handle).

• To move one control of a paired control, first notice that clicking any control in the pair displays a move handle in the upper-left corner of both controls, as shown earlier in Figure 2.3. Place the pointer over the move handle of the control you want to move. When the pointer is positioned correctly, it turns into a four-headed arrow.3. Click and drag the control to the position you want.4. Release the mouse button. Access redraws the control in the new position.If you just need to make subtle adjustments to the position of a control, select it and then press an arrow key. Whichever key you press, Access moves the control one grid mark in the arrow's direction. For even more fine-tuned control, hold down the Ctrl key while you press an arrow key. In this case, Access moves the control one pixel in the arrow's direction.As with sizing, Access also boasts quite a collection of commands that can adjust the position of one or more controls automatically. The next few sections give you the rundown.Aligning to the GridIf you’ve turned off the Arrange tab’s Snap To Grid command (which, when activated, causes Access to align moved controls to the grid marks), you can still align to the grid by hand:1. Select the control.2. Choose Arrange and then click To Grid in the Control Alignment group. Access moves the control to the nearest grid marks.Aligning Control EdgesForms look best when the controls are neatly aligned. The simplest way to align them is to use the buttons in the Control Alignment group. These buttons are similar to Size buttons discussed earlier in that they operate on multiple controls and let you align, say, their left edges.Note, however, that Access aligns the selected controls with a single base control, which is the control that is the farthest positioned in whatever direction you are aligning the controls. For example, if you want to align the controls on their right edges, the base control is the one that is farthest to the right. Here are the steps to follow:1. Arrange the controls you want to work with so that one of them is the base control.2. Select the controls you want to work with (including the base control). 3. Choose the Arrange tab.4. Choose one of the following commands in the Control Alignment group:• Left—Adjusts the horizontal position of all the selected controls so that they line up on the left edge of the base control. • Right—Adjusts the horizontal position of all the selected controls so that they line up on the right edge of the base control.• Top—Adjusts the vertical position of all the selected controls so that they line up on the top edge of the base control.• Bottom—Adjusts the vertical position of all the selected controls so that they line up on the bottom edge of the base control.Adjusting the Spacing Between ControlsIf you want to make your forms easy to read, the controls shouldn’t be crammed together edge to edge, nor should they be too far apart. Again, you can avoid making subtle spacing adjustments by hand thanks to a few more Access commands.To adjust the horizontal spacing between multiple controls, follow these steps:1. Select the controls.2. Choose Arrange.

3. Choose one of the following commands in the Position group:• Make Horizontal Spacing Equal—If you have three or more controls selected, use this command to adjust the horizontal spacing so that it’s the same between each control.• Increase Horizontal Spacing—This command increases the horizontal spacing between each control by one grid mark, relative to the base control.• Decrease Horizontal Spacing—This command decreases the horizontal spacing between each control by one grid mark, relative to the base control.• Make Vertical Spacing Equal—If you have three or more controls selected, use this command to adjust the vertical spacing so that it’s the same between each control.• Increase Vertical Spacing—This command increases the vertical spacing between each control by one grid mark, relative to the base control.• Decrease Vertical Spacing—This command decreases the vertical spacing between each control by one grid mark, relative to the base control.Creating a Control LayoutSo that you don’t have to fiddle with control sizes and alignments, Access 2007 gives you an easy way to arrange your form controls: the control layout. This simple layout acts as a kind of table, and your controls are slotted neatly into the layout’s rows and columns. There are two types of control layouts: • Stacked—The controls are arranged vertically in two columns, with field names in the left column and fields in the right column. (If you’re working with unbound controls, the labels appear in the left column and the controls appear in the right column.) Figure 2.4 shows an example of the stacked control layout.Figure 2.4A stacked control layout.Use this button to select and move the entire control layout Figure 2.5A tabular control layout.• Tabular—The controls are arranged horizontally in two rows, with field names in the top row (which appears in the Form Header section) and fields in the bottom row (which appears in the Detail section). (If you’re working with unbound controls, the labels appear in the top row and the controls appear in the bottom row.) Figure 2.5 shows an example of a tabular control layout. To create a control layout, follow these steps:1. Select the controls you want to work with.2. Choose the Arrange tab.3. In the Control Layout group, click either Tabular or Stacked. r you create the control layout, use any of the following techniques to work with it:To adjust the amount of space between controls, choose Arrange, Control Padding, and then click a padding command: None, Narrow, Medium, or Wide. (You can also choose Design, Property Sheet; click the Format tab in the Property Sheet pane; and then adjust the values (in inches) of the Top Padding, Bottom Padding, Left Padding, and Right Padding properties.)

To display gridlines between and around the controls, choose Design, Gridlines and then click a gridline style: Horizontal, Vertical, Both, and so on. You can also use the buttons in the Gridlines group to format the gridline Width, Style, and Color.To move the control layout, click any control within the layout and then click and drag the move handle that appears at the upper-left corner of the layout (pointed out in Figure 2.4).To remove the control layout, click any control in the layout and then choose Arrange, Remove. Working with Control MarginsBy default, Access leaves very little space between a control’s text and its border. This can make controls such as text boxes cramped-looking and harder to read. To fix this, Access 2007 now allows you to specify the control margin, which is the space that surrounds the text inside the control. There are two ways to adjust the margins for a selected control:■ Choose Arrange, Control Margins and then click a preset value: None, Narrow, Medium, or Wide.■ Choose Design, Property Sheet; click the Format tab in the Property Sheet pane; and then adjust the values (in inches) of the Top Margin, Bottom Margin, Left Margin, and Right Margin properties.Grouping ControlsAccess lets you create control groups. A group is a collection of controls you can format, size, and move together, similar to the way you format, size, and move a single control. To group two or more controls, follow these steps:1. Select the controls you want to include in the group.2. Choose Arrange, Group. Access treats a group as a single control with its own frame. To select an entire group, you just need to select one control from the group.To ungroup controls, follow these steps:1. Select the group. 2. Choose Arrange, Ungroup.Ordering Overlapped ControlsWhen you’re inserting controls, you’ll usually want to avoid overlapping the controls so that the user doesn’t become confused and so the captions don’t get mixed together. However, sometimes you might want controls to overlap. For example, if you’ve added two or more picture controls, you might be able to produce interesting effects by superimposing one picture on another.When you have two controls that overlap, the most recently created control covers part of the other control. The newer control is “in front” of the older one. The overlap order of these controls is called the Z-order. (Think of the Z-axis in a three-dimensional graph.)To change the Z-order, follow these steps:1. Select one of the overlapping controls.2. Choose the Arrange tab.3. In the Position group, click one of the following commands:• Bring To Front—Moves the control to the top of the Z-order, which places it in front of every other control.• Send To Back—Moves the control to the bottom of the Z-order, which places it behind every other control.

Converting an Unbound Control to a Bound ControlUnbound controls are useful for gathering information that you need only temporarily. For example, you might ask for the user’s name to customize the form, or you might want to ask for a value or two that you can use to filter the records.However, most of your form work will involve bound controls. If you’ve created an unbound control, you can convert it to a bound control by following these steps:1. Select the unbound control.2. Choose Design, Property Sheet. (You can also press Alt+Enter or double-click the control.) Access opens the control’s property sheet.3. Click the Data tab.4. Pull down the Control Source list and click the field name to which you want to bind the control.5. Close the control’s property sheet. CAUTION The one problem with converting an unbound control to a bound control is that this won't cause the control to inherit many of the field's properties. The exceptions are the Default Value, validation Ruie, and Validation Text properties, which are always enforced for the field.Changing a Control's TypeCertain controls can be changed to different control types. For example, a label can be changed to a text box, and a text box can be changed to a label, combo box, or list box. Follow these steps to convert a control from one type to another:1. Right-click the control.2. Click Change To.3. Choose the new type for the control.Setting the Tab OrderAs you know, you can navigate a form by pressing the Tab key. The order in which the controls are selected is called the tab order. Access sets the tab order according to the order you create the controls on the form. You’ll often find that this order doesn’t correspond to the “natural” order of the controls, so pressing Tab causes the focus to jump haphazardly around the form. To fix this, Access lets you control the tab order yourself. The following procedure shows you how it’s done:1. Choose Arrange, Tab Order. Access displays the Tab Order dialog box, shown in Figure 2.6.2. Use the Section list to click the form section you want to work with.3. In the Custom Order list, select the control you want to work with by clicking the selection button to the left of the control.4. Click and drag the control’s selection button to move the control up or down in the Custom Order list.5. Repeat steps 3 and 4 for other controls you want to move.6. Click OK. Selection buttons Figure 2.6Use the Tab Order dialog box to set the order in which the user navigates the form when pressing the Tab key.Tab Order

ibetsij Click to select a row, or didc and drag to select multiple rows, Drag selected row{s) to move them to desired tab order.Supplier IDs IDProduct Code Product NameDescriptionStandard Cost List Price Reorder Level Target Level Quantity Per Unit DiscontinuedMinimum Reorder QuantityCategoryAttachmentsChild28C jstom Order:
Adding Labels to the FormA label is a control that displays static text (that is, text that can’t be edited or copied by the user of the form). Labels are most often used to display the name of a field, but they have many other uses, as well:■ The name of an unbound control■ The form subtitle (this should go in the Form Header section, below the title)■ Explanatory text (instructions for filling out the form, shortcut keys, and so on)To learn how to add a title to the form, see “Adding a Title,” p. 23. (Chapter 1)Inserting a LabelAs I mentioned earlier, controls such as text boxes, check boxes, and option buttons come with their own labels. If you want to add a label for another type of control or just to add some text to the form, follow these steps:1. Choose the Design tab.2. In the Controls group, click Label.3. Draw the label on the form.4. Type the label text.5. Press Enter. lTo create a label with multiple lines of text, press Ctrl+Enter at the end of one line to start a new l_ line within the label.

Access assumes that each label must be associated with a control, so when you add a label on its own, Access displays a smart tag to warn you that the label is unassociated. (You see this smart tag only if you have at least one bound control already on the form.) If you’re using the label just to display text, you can remove the smart tag by clicking it and then clicking Ignore Error.Editing the Label CaptionIf you need to change the label text, you have two choices:■ Click the label to select it and then click the label again to edit the text. Press Enter when you’re done.■ Select the label; choose Design, Property Sheet; click the Format tab; and then edit the Caption property.Using Labels to Create Keyboard Shortcuts for ControlsWhen you work with dialog boxes in Access and most other Windows programs, each control has a shortcut key that enables you to select the control from the keyboard by holding down Alt and pressing the key. This key is usually underlined on the control’s label. For example, if you see a button named Yes and the Y is underlined, then you can select that button by pressing Alt+Y while the dialog box is displayed.You can give your users the same convenience by defining shortcut keys for the controls on your form. Here are the steps to follow:1. Assuming the control comes with a label automatically, insert the control. If the control already exists on the form, skip to step 2.2. Edit the associated label text by inserting the ampersand character (&) before the letter you want to use as the shortcut key. For example, if the label has the text Name, editing the text to &Name sets up the letter N as the shortcut key (meaning that Alt+N will select the control associated with the label; see Figure 2.7).If; If you want to associate another label with a control, first select the control's current label and l_ delete it. Add the new label (if you haven't done so already) and then click the smart tag that appears. In the menu, click Associate Label with a Control, use the Associate Label dialog box to click the control you want to use with the label, and then click OK. Figure 2.7Precede a letter with the ampersand character (&) to set up that letter as the control's shortcut key.N is the underlined shortcut keyAmpersand appears before N in the Caption 2CAUTION To avoid confusion, make sure each control on the form has a unique shortcut key. If you accidentally use the same shortcut on two controls, Access will display a smart tag on both labels notifying you of the problem. Click the smart tag and then click Change Caption to see some suggested alternatives for the shortcut key.If, for some reason, it's unavoidable that two controls use the same shortcut key, note that you can navigate to the second control by pressing the shortcut key combination twice. For example, suppose you have the label &Name and &Number on the form, in that order. Pressing Alt+N first selects the Name control, and pressing Alt+N again selects the Number control.Adding Text Boxes to the Form

Text boxes are versatile controls that let the user enter text, numbers, dates, and more. Text boxes are mostly used as input controls for entering field values, but they can also be used as unbound controls when you use a form to make calculations. Unbound text boxes can be used as follows:■ To display the results of an expression. (See “Using Text Boxes as Calculated Controls,” later in this chapter.)■ To accept input values that are used as part of an expression in another text box. (See “Case Study: Creating a Mortgage Calculator,” later in this chapter.)Inserting a Text BoxTo create a text box, follow these steps:1. Choose the Design tab.2. In the Controls group, click Text Box. 3. Draw the text box on the form. Access adds the text box and an associated label.4. Edit the label text, as necessary.l ^ If the text box is unbound or if it's bound to a Memo field, you can enter multiple lines of text by pressing Ctrl+Enter at the end of one line to start a new line within the text box.Here are a few useful properties of the text box control:■ Format (Format tab)—Defines the format used to display the text. You can either select a predefined format (such as General Date or Percent) or enter a format string.■ Decimal Places (Format tab)—Defines the number of decimal places to display for numeric values.■ Default Value (Data tab)—Specifies text that initially appears inside the text box.■ Name (Other tab)—Specifies the name of the text box. For unbound text boxes, this property is important only if you’ll be referencing the text box value as part of an expression in another calculated control.■ Status Bar Text (Other tab)—Specifies text that appears in the Access status bar when the user enters the text box.■ Enter Key Behavior (Other tab)—When this property is set to Default, pressing Enter moves the user to the next field; when it is set to New Line in Field, pressing Enter starts a new line within the text box.Using Text Boxes as Calculated ControlsIn Chapter 11, “Building Criteria Expressions,” you’ll see how to use an expression to build a calculated query column that, when you run the query, displays the result of the expression for each record in the query dynaset.For the details on constructing calculated columns in queries, see “Setting Up a Calculated Column,” p. 239. (Chapter 11)You can do something similar in your forms by setting up a text box to display the results of an expression. This expression can use any of the Access operators, operands, and functions, and it can use the values in both bound and unbound controls.Here are the steps to follow to create a calculated text box control:1. Choose the Design tab.2. In the Controls group, click Text Box.3. Draw the text box on the form. Access adds the text box and an associated label. 4. Click the text box to select it.

5. Choose Design, Property Sheet to display the control’s property sheet. (You can also press Alt+Enter or double-click the control.)6. Choose the Data tab. 7. Type the expression in the Control Source property. (You can also click ... to create your expression using the Expression Builder.)For the details on the Expression Builder, see “Working with the Expression Builder,” p. 256. (Chapter 11)To learn how to use the Access built-in functions, see “Using the Built-In Functions,” p. 241. (Chapter 11)8. Close the property sheet.For example, Figure 2.8 shows the property sheet for a text box that has the expression =Date() as its Control Source property. In the Form view in Figure 2.9, you can see that the text box displays the current date. (Note that I entered the format string mmmm d, yyyy in the text box’s Format property to get the date format shown in Figure 2.9.)Users can't edit the text in a calculated text box.They can move the insertion point cursor within the control and then can select and copy the control text, but if they try to edit the text, Access beeps the speaker and displays the following in the status bar (where expression is the expression in the Control Source property):Control can't be edited; it's bound to the expression 'expression'. Calculated text boxType the expression hereFigure 2.8To create a calculated control, enter an expression in a text box's Control Source property. Figure 2.9In the Form view, the text box displays the current date.
CASE STUDYCreating a Mortgage CalculatorTo demonstrate calculated text box controls, let's construct a form that uses nothing but unbound controls to implement a simple mortgage calculator.The calculator is divided into two sections:■ Principal Calculation—This section asks the user for the house price and the down payment and then uses a calculated text box to display the difference between these values, which is the mortgage principal.■ Payment Calculation—This section asks the user for the annual interest rate and the number of years in the term and then uses a calculated text box to display the monthly payment.I

" You can download the examples used in this book from my website: oz http://www.mcfedries.com/Access2007Forms/iFigure 2.10 shows the form in Design view with the Principal Calculation section added. Here are some notes about the controls:■ The House Price control is a text box named HousePrice.■ The Down Payment control is a text box named DownPayment.■ The Principal control is a calculated text box named Principal that uses the following expression as its Control Source property:=[HousePrice]-[DownPayment] Figure 2.11 shows the form with the Payment Calculation section added. Here are some notes about the controls:Figure 2.10The Payment Calculation section of the mortgage calculator.2■ The Interest Rate control is a text box named InterestRate.■ The Term control is a text box named Term.■ The Monthly Payment control is a calculated text box named MonthiyPayment that uses the following expression as its Control Source property:=Pmt([InterestRate] / 12, [Term] * 12, [Principal]) * -1Mortgage Calculator -♦ Form HeaderMortgage Calculator■9 DetailPrincipal Calculation | Payment CalculationHouse Price: Unbound Interest Rate: | Unbound per annumDown Payment: | Unbound Term: | Unbound yearsPrincipal: -[HousePrice]- Monthly Payment: | =Pmt([Interest|
■f Form FooterFigure 2.11 Figure 2.12 shows the result in Form view.Figure 2.12The running mortgage calculator.The Payment Calculation section added to the mortgage calculator. From Here^ To learn how to apply an AutoFormat, see “Assigning an AutoFormat in Design View,” p. 19. (Chapter 1)^ For the details on adding data validation to a form control, see “Preventing Errors by Validating Data,” p. 50. (Chapter 3)

^ For the specifics of check box and toggle buttons controls, see “Working with Yes/No Fields,” p. 56. (Chapter 3) ^ To learn how to use option groups and option buttons, see “Using Option Buttons to Present a Limited Number of Choices,” p. 59. (Chapter 3)^ To learn how to use list and combo boxes, see “Using Lists to Present a Large Number of Choices,” p. 62. (Chapter 3)^ To learn how to use ActiveX controls for data entry, see “Entering Data with ActiveX Controls,” p. 67. (Chapter 3)^ To learn how to use the Tab control, see “Organizing with a Tab Control,” p. 84. (Chapter 4)^ For the details on using subforms, see “Creating a Multiple-Table Form,” p. 95. (Chapter 5)^ For the details on constructing calculated column in queries, see “Setting Up a Calculated Column,” p. 239. (Chapter 11)^ To learn how to use the Access built-in functions, see “Using the Built-In Functions,” p. 241. (Chapter 11)^ For the details on the Expression Builder, see “Working with the Expression Builder,” p. 256. (Chapter 11) Designing Forms for Efficient and Accurate Data Entry
Data entry is one of those tasks that I describe as “dangerous” because it’s a chore that’s both tedious and important. It’s tedious because entering dozens or hundreds of records is no one’s idea of fun. It’s important because the data must be entered accurately; otherwise, any analysis of the data becomes at best misleading and at worst just plain wrong. The danger, then, lies in the fact that data entry is prone to errors but can’t afford to have any.As a forms designer, you can help to reduce this danger by setting up your forms so that data entry is both as efficient as possible and as accurate as possible. In some cases you can achieve both goals with a single technique. For example, asking someone to type a customer name manually is both slow and prone to misspellings. However, suppose you already have a Customers table with a CustomerName field. If you relate the current table with the Customers table (using, say, a common CustomerID field), Access adds the CustomerName field to the current form using a drop-down list that contains all the customers. This makes data entry more efficient (the users just select a name from the list instead of typing it) and more accurate (the users can’t misspell the customer name).Preventing Errors by Validating Data 50Using Controls to Limit Data Entry Choices 55Case Study: Using an Option Group to Select the Shipper 61Entering Data with ActiveX Controls 67Collecting Form Data via Email 72From Here 75

This chapter introduces you to several techniques that serve to either make data entry less of a chore, or to reduce or eliminate data entry errors (or both). Preventing Errors by Validating Data If, as the cooks say, a recipe is only as good as its ingredients, a database is only as good as its data. Viewing, summarizing, and analyzing the data are meaningless if the table you’re working with contains erroneous or improper data. For basic data errors (for example, entering the wrong date or transposing a number’s digits), there’s not a lot you can do other than exhorting yourself or the people who use your forms to enter data carefully. Fortunately, you have a bit more control when it comes to preventing improper data entry. By “improper,” I mean data that falls in either of the following categories:■ Data that is the wrong type. For example, entering a text string in a cell that requires a number. ■ Data that falls outside an allowable range. For example, entering 200 in a cell that requires a number between 1 and 100.To stress the importance of data entry, consider the story told to me by computer book author Greg Perry. Greg used to work for a large Fortune 500 company, and he says that the company made its data entry clerks enter all data twice: One clerk would enter the data in a file and then, when finished, another clerk would enter the same data. Then a comparison would be run to find exceptions where data didn't match, and that would then be reconciled. The lesson, he says, is that to the company, accuracy was far less costly than paying its employees to do the same job twice.The next few sections show you several techniques that can help you reduce these types of errors.Helping Users with Text PromptsYou can prevent improper entries to a certain extent by adding text that provides details on what is allowable inside a particular cell. You have two choices:■ Add status bar text. This is a string that appears in the Access status bar when users enter the field. You specify this text by opening the field’s property sheet, displaying the Other tab, and then entering the string in the Status Bar Text property.
■ Add a label. Place a Label control near the field and use it to enter text that describes the field’s data requirements or shortcut keys. For example, if the field requires a date, the label might say Press Ctrl+; to enter today's date.For example, Figure 3.1 shows the Mortgage Calculator form. Notice the labels added beside the Interest Rate and Term text boxes that specify to the users that they must enter the interest rate per annum and the term in years. Note, too, the status bar text that appears when the users enter the Interest Rate field. Figure 3.1Use form labels and status bar text to give the users text prompts about the data they must enter.
Preventing Errors with Data Validation ExpressionsThe problem with text prompts is they require other people to both read and act on the text. The better solution for preventing data entry errors is the Access data validation feature. With data validation, you create rules that specify exactly what kind of data can be entered and in what range that data can fall. You can also specify pop-up input messages that appear when a cell is selected, as well as error messages that appear when data is entered improperly.

Follow these steps to define the settings for a data validation rule:1. Display the property sheet of the field to which you want to apply the data validation rule.2. Click the Data tab.3. Click inside the Validation Rule property.4. Enter a formula that specifies the validation criteria. You can either enter the formula directly into the property box, or you can click the ellipsis (...) button and enter the formula using the Expression Builder.5. If you want a dialog box to appear when the users enter invalid data, click inside the Validation Text property and then specify the message that appears.6. Close the property sheet to apply the data validation rule.For example, suppose you want the users to enter an interest rate. This quantity should be positive, of course, but it should also be less than 1. (That is, you want users to enter 6% as0. 06 instead of 6.) Figure 3.2 shows the property sheet for a field named InterestRate that meets these criteria by defining the following expression in the Validation Rule property:>0 And <1 Figure 3.2 also shows a string in the Validation Text property. If the users enter invalid data (that is, any value for which the Validation Rule expression returns False), the Validation Text appears in a dialog box, as shown in Figure 3.3.Figure 3.2Use the Validation Rule property to enter a data validation expression for a field. Figure 3.3If the users enter invalid data in the field, Access displays a dialog box such as this one, which uses the string entered into the Validation Text property.3Using Input Masks for Consistent and Accurate Data EntryOne of the major headaches that database administrators have to deal with is data entered in an inconsistent way. For example, consider the following phone numbers:(123)555-6783 (123) 555-6783 (123)5556783 123555-6783 1235556783These sorts of inconsistencies might appear trivial, but they can cause all kinds of problems, from other users misreading the data to improper sorting to difficulties analyzing or querying the data. And it isn’t just phone numbers that cause these kinds of problems. You also see them with Social Security numbers, ZIP codes, dates, times, account numbers, and more.One way to avoid such inconsistencies is to add a label or status bar message that specifies the correct format to use. As with data validation, however, these prompts are not guaranteed to work every time (or even most of the time).A better solution is to apply an input mask to the field. An input mask is a kind of template that shows the users how to enter the data and prevents them from entering incorrect characters (such as a letter where a number is required). For example, here’s an input mask for a phone number:(_)_- Each underscore (_) acts as a placeholder for (in this case) a digit, and the parentheses and dash appear automatically as the user enters the number.Using the Input Mask Wizard

The easiest way to create an input mask is to use the Input Mask Wizard. Here are the steps to follow:1. Display the property sheet of the field to which you want to apply the input data.2. Click the Data tab.3. Click inside the Input Mask property.4. Click the ellipsis (...) button to start the Input Mask Wizard, shown in Figure 3.4.
Figure 3.4Use the Input Mask Wizard to choose a pre-defined input mask or to create your own input mask.3
5. In the Input Mask list, click the input mask you want (or that’s close to what you want) and then click Next.6. Use the Input Mask box to make changes to the mask (see “Creating a Custom Input Mask Expression,” next, for the specifics of which symbols to use); use the Placeholder Character list to choose the character you want to appear in the input mask as a placeholder; click Next.7. Click the option that matches how you want the field data stored in the table (click Next after you’ve made your choice):• With the Symbols in the Mask—Click this option if you want the extra symbols (such as the parentheses and dash in a phone number mask) stored along with the data.• Without the Symbols in the Mask—Click this option to store only the data.8. Click Finish. Creating a Custom Input Mask ExpressionIf your data doesn’t fit any of the predefined input masks, you need to create a custom mask that suits your needs. You do this by creating an expression that consists of three kinds of characters:

■ Data placeholders—These characters are replaced by the actual data typed by the users. The different placeholders specify the type of character the users must enter (such as a digit or letter) and whether the character is optional or required.■ Modifiers—These characters aren’t displayed in the mask; instead, they’re used to modify the mask in some way (such as converting all the entered characters to lowercase). ■ Literals—These extra characters appear in the mask the same as you enter them in the expression. For example, you might use parentheses as literals to surround the area code portion of a phone number.Table 3.1 lists the data placeholders you can use to build your input mask expressions.Table 3.1 Data Placeholders to Use for Custom Input MasksPlaceholder Data Type Description0 Digit (0-3) The character is required; the users are not allowed to include a plus sign (+) or minus sign (-).3 Digit or space The character is optional; the users are not allowed to include a plus sign (+) or minus sign (-).# Digit or space The character is optional; the users are allowed to include a plus sign (+) or minus sign (-).L Letter (a-z or A-Z) The character is required.? Letter (a-z or A-Z) The character is optional.a Letter or digit The character is required.A Letter or digit The character is optional.& Any character or space The character is required.C Any character or space The character is optional.
Table 3.2 lists the modifiers and literals you can use to build your input mask expressions.Table 3.2 Modifiers and Literals to Use for Custom Input MasksModifierDescription\ Displays the following character as a literal; for example, \( is displayed as (.“text" Displays the string text as a literal; for example, "MB" is displayed as MB.. Decimal separator. Modifier Description, Thousands separator.: ; - / Date and time separators.< Displays all the following letters as lowercase.> Displays all the following letters as uppercase.! Displays the input mask from right to left when you have optional data placeholderson the left.Password Displays the characters as asterisks so that other people can’t read the data. You can enter your input mask expressions directly into the Input Mask property, or you can modify a predefined input mask using the Input Mask Wizard.

For example, suppose your company uses account numbers that consist of four uppercase letters and four digits, with a dash (-) in between. Here’s an input mask suitable for entering such numbers:>aaaa\-0000Note, too, that input masks can contain up to three sections separated by semicolons (;): first;second;thirdfirst—This section holds the input mask expression.second—This optional section specifies whether Access stores the literals in the table when you enter data. Use 0 to include the literals; use 1 (or nothing) to store only the data.third—This optional section specifies the placeholder character. The default is the underscore (_).For example, here’s an input mask for a ZIP code that stores the dash separator and displays dots (.) as placeholders:00000\-3333;0;.Using Controls to Limit Data Entry ChoicesData entry always trips over two unfortunate facts of life: Humans are fallible creatures, and typing is an error-prone activity. Expert data entry operators can’t achieve 100% accuracy (although some come remarkably close), and the rest of us can only hope for the best. In short, if your form relies on other people (or yourself, for that matter) typing in field values, it’s death-and-taxes certain that your table will end up with errors.It stands to reason, then, that you can greatly reduce the number of errors by greatly reducing the amount of typing. The best way to do that is by taking advantage of controls to generate field values automatically. Here are some examples: ■ If you have a Yes/No field that uses a text box, the users must enter the unintuitive values -1 (for Yes) and 0 (for No). A more intuitive approach is to use a check box (or toggle button) that the users either activate (for Yes) or clear (for No).■ Suppose you have a field that can take only one of a small set of values (say, two to five values). For example, an invoice form might offer the users three choices for freight or four choices for credit cards. Again, instead of having the users type the freight choice or credit card name, you can populate the form with option buttons representing the choices. ■ Suppose you have a field that can take one of a relatively large set of values (more than five). For example, the field might hold a customer name or a product name. Instead of making the users look up (time-consuming) and then type (inaccurate) the value, it’s both faster and more accurate to place all the possible values in a drop-down list.The rest of this chapter shows you how to use check boxes, toggle buttons, option buttons, lists, and other controls to build faster and more accurate forms. In each case, the idea is to move the users away from typing values and toward selecting them via a familiar and easily used control.Another way to ensure data accuracy is to set up a field with a default value that Access enters into the field automatically when the user starts a new record. This can be a literal value such as 0 for a numeric field, or a formula such as =Date() for a date/time field. In the control's Property Sheet, display the Data tab and type the value in the Default Value property.CAUTION This is as good a place as any to warn you against what I call “form complacency.” This is the attitude (which I've succumbed to myself on more than one occasion) which assumes that once you are happy with your form's layout, format, and data validation, then other people will automatically be happy with those things, too. Probably not! Other people will almost certainly approach the form differently, and they'll almost always have trouble figuring out
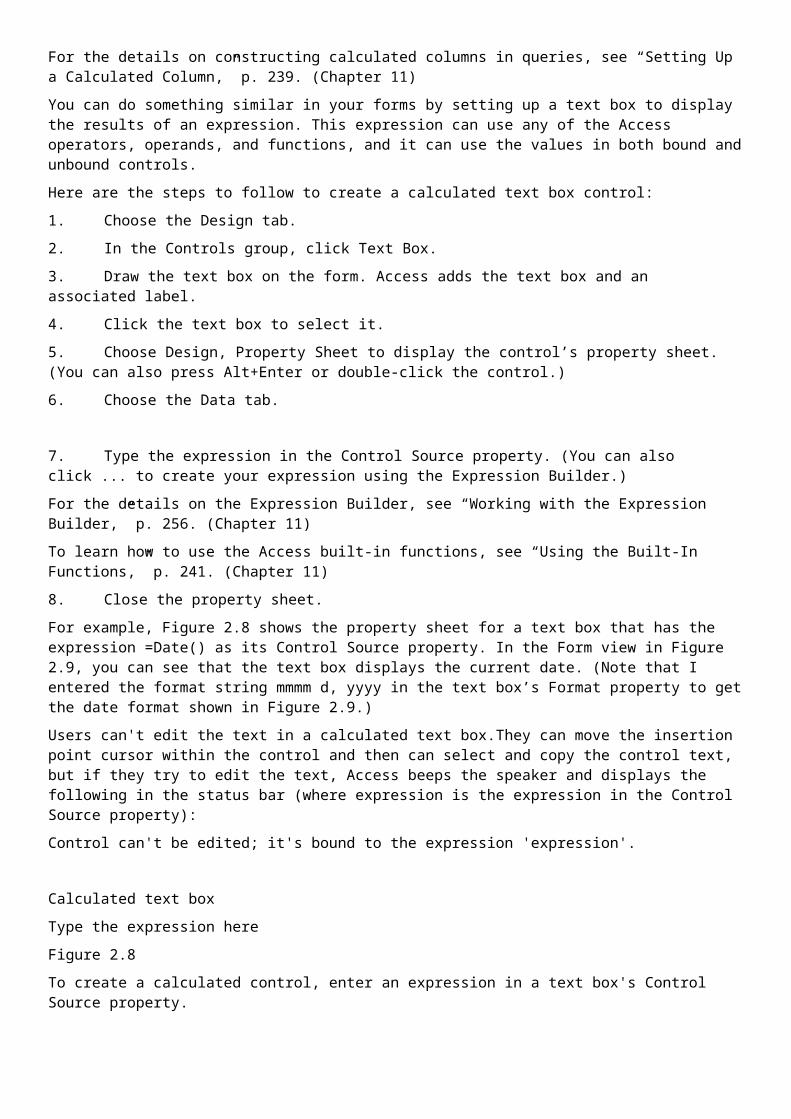
how it works and what's expected of them. In other words, always "test drive” your form by letting other users take their best shots at it.It only takes a little extra time, and the suggested changes they come up with (and there will be suggestions, believe me) will save you time in the long run.Working with Yes/No FieldsYou use Yes/No fields in tables when you have a quantity that you can represent in one of two states: on (Yes, True, or -1) or off (No, False, or 0).When you create a Yes/No field in the table Design view, the Display Control property (it’s in the Lookup tab) defaults to Check Box. This means that when you add a Yes/No field to a form, Access automatically represents the field with a check box control (along with a label that displays the name of the field or the field’s Caption property). However, it’s possible that the Display Control property has been set to Text Box, either by design or by accident. As I mentioned earlier, you want to avoid users having to enter -1 or 0 into a text box, so you should never use a text box for a Yes/No field on your forms. Instead, you have two choices:■ If you have access to the table’s design, change the Yes/No field’s Display Control property to Check Box. After you’ve done that, return to the form, delete the Yes/No field’s text box and label (if they’re already on the form), and then add the field back to the form to get the check box version.3■ If you can’t change the table design, use a check box or toggle button control bound to the Yes/No field. The next two sections show you how to do this.Using Check BoxesHere are the steps to follow to insert a check box and bind it to a Yes/No field:1. In the Design tab’s Controls group, click the Check Box button.2. Draw the check box on the form.3. Edit the text of the label control that Access adds to the right of the check box. (For clarity, it’s best to use the name of the Yes/No field.)4. Click the check box and then choose Design, Property Sheet to open the Property Sheet pane.5. In the Data tab, use the Control Source property to choose the name of the Yes/No field you want bound to the check box.6. In the Default Value property, enter the initial value for new records: Yes, True, or -1; or No, False, or 0.CAUTION Many form designers like to use an option group as a way of “framing” a number of related controls. This is often a good idea (I discuss it in more detail in Chapter 4,“Designing Forms for Business Use”), but you need to be careful: If you add the option group and then insert the check boxes within the group, Access treats the check boxes as mutually exclusive options. That is, the users can activate only one check box at a time. To avoid this situation, add the check boxes to the frame first and then draw the option group around them.It’s worth pointing out here that check boxes (and toggle buttons, discussed next) can insert only one of two values into a field: -1 or 0. You can’t use a check box for other two-state choices, such as "male" and "female" or "Pepsi" and "Coke". For fields that can take only one of two values other than 0 and -1 , use option buttons instead (as described later in this chapter). Using Toggle ButtonsA toggle button is a cross between a check box and a command button: Click it once, and the button stays pressed; click it again, and the button returns to its normal state. The button can display either a caption or a picture. Here are the steps to follow to insert a toggle button and bind it to a Yes/No field:

1. In the Design tab’s Controls group, click Toggle Button.2. Draw the toggle button on the form.3. Choose Design, Property Sheet to open the Property Sheet pane.4. In the Format tab, you have two choices that determine what appears on the face of the button: Caption—Use this property to specify text that appears on the face of the button. (For clarity, it’s best to use the name of the Yes/No field.)Picture—Use this property to specify an image that appears on the button face. Click the ellipsis button (...) to display the Picture Builder dialog box, shown in Figure 3.5. Either use the Available Pictures list to click an image or click Browse to choose an image from the Select Picture dialog box (although note that Access can only use BMP or icon files).CAUTIONFigure 3.5Use the Picture Builder dialog box to choose an image to appear on the face of the toggle button.EH Picture Builder You can choose a picture from the list or browse for a custom picture.Available Pictures: [ Cancel I [ Browse.■■5. In the Data tab, use the Control Source property to choose the name of the Yes/No field you want bound to the toggle button.6. In the Default Value property, enter the initial value for new records. For the “pressed” state, use Yes, True, or -1; for the “unpressed” state, use No, False, or 0.If you want to use a custom picture, bear in mind that if the image is larger than the toggle button, Access won't shrink the image to fit inside the button—it just centers the image in the button and displays as much as will fit. Therefore, always choose a bitmap or icon that's the same size or smaller than the toggle button. Using Option Buttons to Present a Limited Number of ChoicesOption buttons are a good choice if the underlying field accepts only a limited number of possible numbers: at least two but no more than about five or six. (If you have more possible values, use a list box or combo box, discussed later in this chapter.)
How does having multiple option buttons on a form enable you to store a single value in a field? There are two components to consider:■ The option buttons—You assign each option button a value from among the list of possible values that the field can take.I " Option button values must be numeric. Therefore, you can use option groups and option buttons ® only with numeric fields.I■ The option group—This is a separate control that you use to organize the option buttons. That is, if you insert multiple option buttons inside a group, Access allows the users to activate only one of the options at a time. (You can also use check boxes or toggle buttons, but option buttons are best because most users are familiar with them and know how to operate them.)
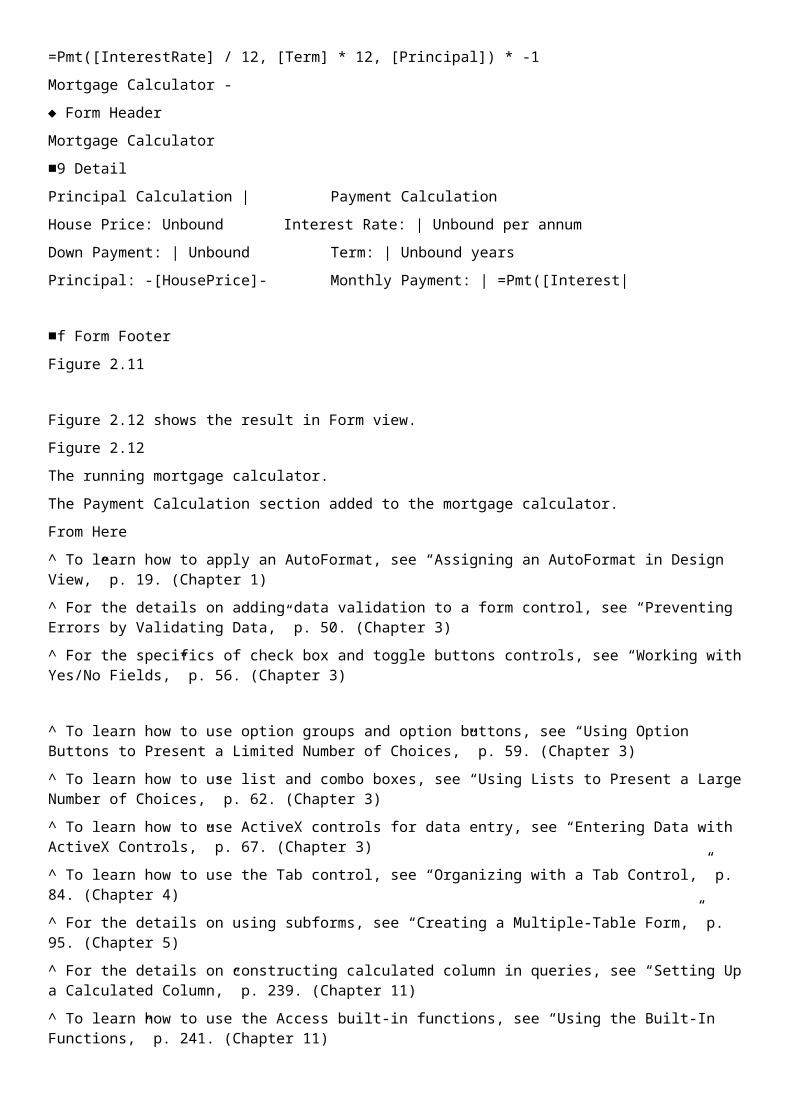
The option group is bound to the field in the underlying table. Therefore, when you activate an option button, the value assigned to that button is stored in the field. This form of data entry brings many advantages to the table (literally!):■ It’s quick. The users don’t have to look up the possible values elsewhere.■ It’s accurate. The field value is stored “behind the scenes,” so the users can’t enter the wrong value.■ It’s intuitive. The option button captions can be as long as you like (within reason), so you can provide users with a helpful description or title for each option.■ It’s familiar. All Windows users know how to operate option buttons, so no extra training is required.The next two sections show you how to create option buttons using a wizard and by hand.Running the Option Group WizardThe easiest way to create an option group and its associated option buttons is to use the Option Group Wizard, as described in the following steps:1. In the Design tab’s Controls group, make sure the Control Wizards button is activated and then click the Option Group button.2. Draw the option group on the form. Access launches the Option Group Wizard. 3. For each option button you want, type the label in the Label Names list and press Tab. When you’re done, click Next.4. To select a default choice (the option that Access activates automatically when the user starts a new record), leave the Yes, The Default Choice Is option activated and then choose the option label from the list. Click Next.5. Use the Values column to assign a numeric value for each option, as shown in Figure 3.6. Note that each value must be unique. Click Next when you’re done. Figure 3.6Use this Option Group Wizard dialog box to assign a unique numeric value to each option.
6. Specify where you want the option group value stored (click Next when you’re done):• Save the Value for Later Use—Click this option to have Access save the option group value. This is mostly used by VBA programmers—the current value of the option group is stored in the Frame object’s Value property.• Store the Value in This Field—Click this option and then select a field from the list to have Access store the option group value in the field.7. Click the type of control you want to use in the option group: Option Buttons, Check Boxes, or Toggle Buttons. You can also select the special effect used by the option group border (Etched, Flat, and so on). Click Next to continue.8. Edit the option group caption (the text that the users see along the top border of the option group frame; use the field name or something similar) and then click Finish to complete the wizard.
If you already have an "unframed” option button on your form, you can still insert it into an option group. Select the button, cut it to the Clipboard, select the option group (by clicking its frame), and paste. Access adds the button to the option group. Case Study: Using an Option Group to Select the Shipper 61Creating an Option Group By HandIf you’d rather create the option group yourself, here are the steps to follow:1. In the Design tab’s Controls group, make sure the Control Wizards button is deactivated and then click the Option Group button.2. Draw the option group on the form.3. In the Design tab’s Controls group, click Option Button.4. Draw the option button inside the option group.5. Choose Design, Property Sheet to display the option button’s property sheet.6. In the Data tab, use the Option Value property to specify the numeric value associated with the option.7. Use the drop-down list to choose the label associated with the option button. (It’s the control that is one number greater than the option button. For example, if the option button name assigned by Access is OptionlO, the associated label will be named Label'll.)8. In the Format tab, use the Caption property to specify text that appears alongside the option button.9. Repeat steps 3-8 for the other option buttons you want to add to the option group.10. Use the drop-down list to choose the option group (it’s named Framen, where n means it was the nth control added to the form).11. In the Data tab, use the Control Source property to choose the field in which you want the value of the selected option button stored.12. If you want one of the option buttons to be activated when the users start a new record, use the Default Value property to enter the value of the corresponding option button.13. Close the property sheet.CASE STUDYUsing an Option Group to Select the ShipperIn the Northwind 2007 database, the Orders table has a Shipper id field that specifies which shipping company to use. There are three shipping companies that the users can select: Shipping Company A, Shipping Company B, and Shipping Company C. (The person at Microsoft who put together the Northwind 2007 database was singularly uncreative when it came to names.) Option buttons can take only numeric values, so you can't use them to assign a text value such as "Shipping Company A" to the Shipper ID field. That's not a problem because the Shipper id field is designed to store a number: 1 for Shipping Company A, 2 for Shipping Company B, and 3 for Shipping Company C. These numbers correspond to the id field in the Shippers table. The Shipper and Orders tables have a one-to-many relation based on the id and Shipper id fields. A field that takes one of three numeric choices is perfect for an option group. You set things up as follows: ■ Create an option group and bind it to the Shipper ID field.^il Orders with Shipper Options XJ
Customer Company AAShip Name:Ship Address: 123 Any StreetShip City: Any City
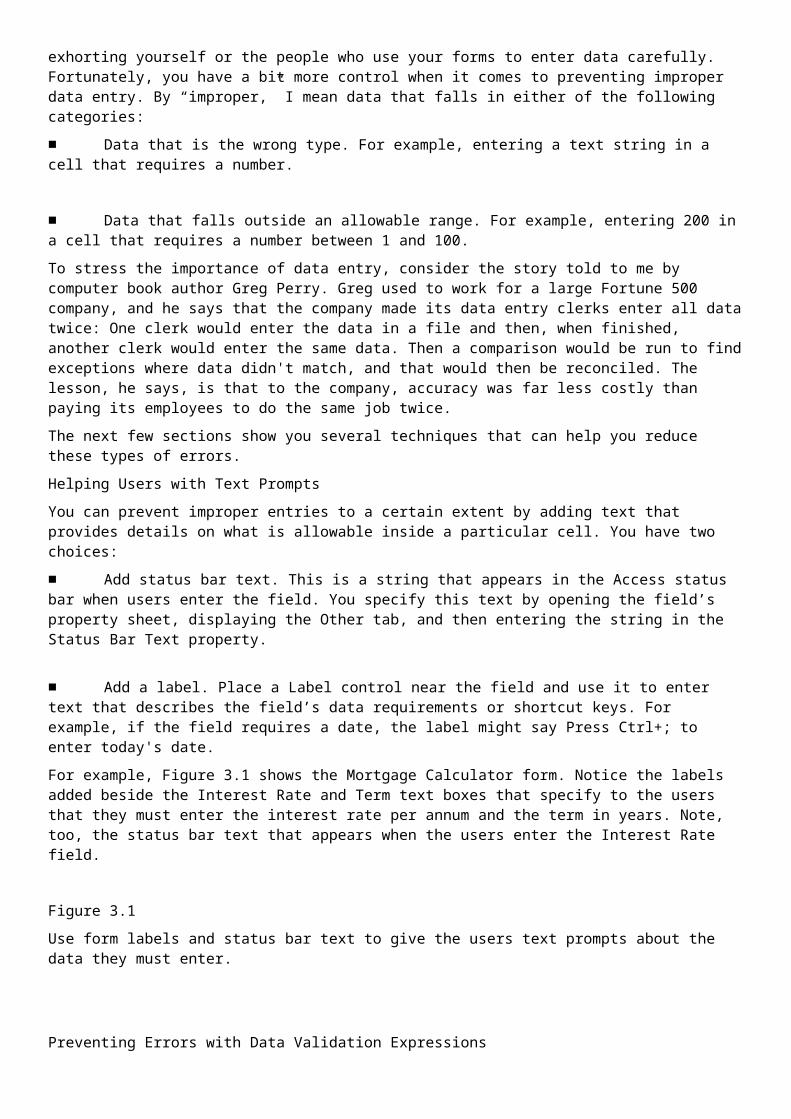
Ship State/Province: WAShip ZIP/Postal Code: 99999Ship Country/Region: USA
O Shipping Company A © [shipping Company B| O Shipping Company COrder ID: 30 Order Date: 1/15/2006Employee: Anne Hellung-Larsen [▼] Shipped Date: 1/22/2006
Record: H < 1 of 48 ► H er | |Seareh■ Add three option buttons for Shipping Company A, Shipping Company B, and Shipping Company C, and assign them the values 1,2,and 3, respectively. Figure 3.7 shows the resulting option group in the form.Figure 3.73This form uses an option group to choose the shipping method for each order.Using Lists to Present a Large Number of ChoicesOption buttons have three main disadvantages:■ If a field can take more than about five or six values, option buttons become too unwieldy and confusing for the users.■ Option buttons can’t work with non-numeric values.■ Users can’t enter unique values. This is normally a good thing, but in some instances you might want to give the users the flexibility to choose either a predefined value or to enter a different value.To solve all these problems, Access offers two different list controls that enable you to present the users with a list of choices:■ A list box presents a list of choices. These choices are static, meaning that users can’t enter any different values.■ A combo box enables users to either select a value from a drop-down list or (optionally) enter a different value using the associated text box. Case Study: Using an Option Group to Select the Shipper 63l" Another consideration you need to bear in mind when deciding between a list box and a combo box® is the size of each control on the form. A list box is usually large enough to show at least three orfour items in the list, whereas a combo box always shows only a single item (the users click the list to choose another).Therefore, the list box always takes up quite a bit more room than the combo box, so keep that in mind when designing your form. If you don't have much room, but you don't want the users to be able to add different values to the field, you'll see later that it's possible to restrict the combo box to just the values in the list. In both cases, the item the users choose from the list (or the item the users enter in the combo box) is the value that is stored in the bound field. This means that you can use list and combo boxes for any type of value, including numeric, string, and date values.It’s important to note that Access defaults to a combo box when you add to the form a field that is used as part of a relationship with another table. Specifically, if the relationship is one-to-many and the current table is the “many” side, adding the field that corresponds to the common field on the “one” side creates a list that contains all the values from that field.

For example, the Products table has a one-to-many relationship with the Order Details table via the common ID and Product ID fields, respectively. If you’re putting together a form based on the Order Details table and you add the Product ID field, Access creates a combo box list and populates it with the values from the Products table’s Product Name field. Why Product Name and not Product ID? The reason is that in the design for the Order Details table, the Product ID field’s Row Source property (in the Lookup tab) specifies an SQL statement that selects the Product Name field from the Products table:SELECT ID, [Product Name] FROM Products ORDER BY [Product Name]The next few sections show you various ways to work with both controls.Starting the List Box or Combo Box WizardThe List Box Wizard and Combo Box Wizard make it easy to create a bound list control. Here are the steps to follow to get started with these wizards:1. In the Design tab’s Controls group, make sure the Control Wizards button is activated.2. Click either Combo Box or List Box.3. Draw the box on the form. Access starts either the List Box Wizard or the Combo Box Wizard.These wizards work identically, but the steps you take vary dramatically depending on which option you choose in the initial dialog box. The next three sections take you through the details of each option. Getting List Values from a Table or Query FieldThe most common list scenario is to populate the list box or combo box with values from a field in a specified table or query. For example, if you’re putting together an orders form, you’ll probably want to include a list that contains all the customer names, so you’ll populate the list with the values from the Customers table’s Company field.The following steps show you how to continue with the List Box or Combo Box Wizard to populate a list with values from a table or query field:1.2.In the first wizard dialog box, click the I Want the List Box to Look Up the Values in a Table or Query option and then click Next. Click the table or query that contains the field you want to use for the list and then click Next.In the Available Fields list, select the field you want to use and then click > to add it to the Selected Fields list. Click Next.If you want the list sorted, use the drop-down list to choose the field you selected, click the Ascending (or Descending) toggle button, and then click Next.Click and drag the right edge of the column header to set the width of the list column and then click Next.6.7.To create a bound list box or combo box, select the Store That Value in This Field option, choose the field you want to use from the drop-down list, and then click Next.In the final wizard dialog box, use the text box to edit the label text that appears above the list and then click Finish.Specifying Custom List ValuesIf the items you want to appear in your list don’t exist in another table or query, you need to specify them by hand. Here are the steps to follow to continue with the List Box or Combo Box Wizard and populate a list with custom values:

1. In the first wizard dialog box, click the I Will Type in the Values That I Want option and then click Next.2. For each value you want to add, type the item text and press Tab. Click Next when you’re done.3. To create a bound list box or combo box, select the Store That Value in This Field option, choose the field you want to use from the drop-down list, and then click Next.4. In the final wizard dialog box, use the text box to edit the label text that appears above the list and then click Finish.Getting List Values from the Current TableSometimes the values you want in your list already exist in the form’s underlying table or query. For example, if your form uses the Customers table, you might want to set up a list for the Job Title field and use the unique values in that to populate the list. (This example illustrates when you might want to use a combo box, because a new customer contact could have a title other than the ones in the list.) Note, however, that the list you create using this method will always be an unbound control.The following steps show you how to continue with the List Box or Combo Box Wizard to populate a list with values from a field in the form’s current data source:1. In the first wizard dialog box, click the Find a Record on My Form Based on the Value I Selected in My Combo Box option and then click Next.2. In the Available Fields list, select the field you want to use and then click > to add it to the Selected Fields list. Click Next. 3. Click and drag the right edge of the column header to set the width of the list column and then click Next.4. In the final wizard dialog box, use the text box to edit the label text that appears above the list and then click Finish.Creating a Multiple-Column ListSometimes displaying a single column of values in a list might not be enough. For example, if you’re working with data from the Northwind 2007 Products table, displaying just the Product Name field might not give the users enough information. Instead, you might also want to show the users the corresponding Category or Supplier value (using an inner join query for the latter) for each product.To learn about inner joins, see “Establishing Table Relationships,” p. 267. (Chapter 12)You can do this by adding one or more columns to the list and then specifying which of those columns contains the value you want to store in your form’s bound field. Here are the steps to follow:1. Draw a list box or combo box on the form to launch the List Box or Combo Box Wizard.2. In the first wizard dialog box, select the I Want the List Box to Look Up the Values in a Table or Query option and then click Next. (Note that you can also display multiple columns using the Find a Record on My Form Based on the Value I Selected in My Combo Box option.)3. Select the table or query that contains the field you want to use for the list and then click Next.4. In the Available Fields list, for each field you want to display in the list, select the field and then click > to add it to the Selected Fields list. Click Next.5. You sort the list on multiple fields by using separate drop-down lists to choose each field and its sort order. Click Next. 6. Click and drag the right edge of each column header to set the width of the list columns. Note, too, that you can also change the column order by clicking and dragging the column headers left or right. Click Next.
7. To create a bound list box or combo box, select the Store That Value in This Field option, choose the field you want to use from the drop-down list, and then click Next.8. In the final wizard dialog box, use the text box to edit the label text that appears above the list and then click Finish.Figure 3.8 shows a form that uses a two-column combo box to display both the Product Name field and the Category field from the Products table. Figure 3.8This combo box uses multiple columns to display both the Product Name field and the corresponding Category field.=71 Products Or Hand ►Product Code: Product Name Standard Cost Qty On Hand:
-Northwind Traders Almonds Dried Fruit & Nuts ■Northwind Traders Beer Beverages JNorthwind Traders Boysenberry Spread Jams, PreservesNorthwind Traders Brownie Mix Baked Goods & MixesNorthwind Traders Cajun Seasoning CondimentsNorthwind Traders Cake Mix Baked Goods & MixesNorthwind Traders Chai BeveragesNorthwind Traders Cherry Pie Filling Canned Fruit & VegetablesNorthwind Traders Chicken Soup SoupsNorthwind Traders Chocolate CandyNorthwind Traders Chocolate Biscuits Mix Baked Goods & MixesNorthwind Traders Clam Chowder SoupsNorthwind Traders CoffeeBeveragesNorthwind Traders Corn Canned Fruit & VegetablesNorthwind Traders Crab Meat Canned MeatNorthwind Traders Curry Sauce Sauces -[ No Filter | Search |—31 of 49
Modifying List Box and Combo Box Properties

If you want a bit more control over the list layout and data, you need to tweak the control properties. Here’s a list of the properties to work with:■ Control Source (Data tab)—The field in which the selected list item will be stored.■ Row Source Type (Data tab)—Choose Table/Query for values that come from a table or query field; choose Value List for values that you enter by hand; choose Field List to populate the list with field names from a table or query.■ Row Source (Data tab)—This value depends on the Row Source Type value:• Table/Query—Enter an SQL SELECT statement that specifies the field you want to use to populate the list (along with any criteria you want to use). Alternatively, click the ellipsis button (...) and use the Query Builder to specify the table, field, and criteria. When you close the Query Builder, Access converts your selections into an SQL SELECT statement.• Value List—Enter the values with which you want to populate the list, separated by semicolons. • Field List—Enter the name of the table or query that contains the field names with which you want to populate the list.I" If you want to display a multiple-column list, specify each field that you want to include in the list ® after the SELECT verb in the SQL statement, as in this example:SELECT CategoryName, Description FROM Categories;Alternatively, use the Query Builder to add each field to the criteria grid.■ Bound Column (Data tab)—If Row Source Type is Table/Query and the Row Source SELECT statement specifies only a single field, the Bound Column value should always be 1. If the Row Source proeprty specifies two or more fields (for a multiple-column list), set Bound Column to the number of the field that contains the value you want to store in the current table (1 is the first field, 2 is the second field, and so on).■■■■■■Limit To List (Data tab)—This is a combo box-only property. When the value is Yes, the users can only select values from the list; when the value is No, the users can enter new values.Column Count (Format tab)—The number of columns in the list box.Column Heads (Format tab)—If this property is Yes, the list columns are displayed with headers, whereby each header contains the name of the field.Column Widths (Format tab)—The width, in inches, of each column, separated by semicolons.List Rows (Format tab)—This is a combo box-only property, and it specifies the number of items the users see when they click the list.Entering Data with ActiveX ControlsThe controls you see in the Design tab’s Controls group will likely satisfy most of your form needs. However, you might have noticed that some controls that are commonly seen in Windows dialog boxes aren’t available in the Controls group. For example, many Windows programs use spin buttons for entering numeric values, whereas others use a “calendar” control to enable users to choose dates via the mouse.

These and many other controls are available on your system as separate components that either come with the default Windows installation or are added to the system when youMulti Select (Other tab)— This is a list box-only property. If this property is None, users can select only one item at a time; if this value is Simple, users can select multiple items by clicking them; if this value is Extended, users must hold down the Ctrl key to select multiple items (or hold down Shift to select multiple items that appear consecutively in the list). install Microsoft Office. (Other programs might also add their own controls to the system.) There are dozens of these so-called ActiveX controls, although only a few are suitable to be used on an Access form. The next three sections show you how to use three of them: a spin button, a scrollbar, and a calendar control.Entering Numbers Using a Spin Button A spin button comes with up and down arrows that the users can click to increment or decrement a value. Most spin buttons have a text box control beside them to show the current value. In most cases, the text box also gives users the choice of entering the number directly or selecting the number by using the spin button arrows. However, as you’ll see, to use a spin button on an Access form, you can’t make the text box editable, so the users must use the spin button arrows. Therefore, this control is useful only for fields that require relatively small numbers (to minimize the amount of clicking the users must do to get the required value).Here are the steps required to add a spin button and companion text box to a form:1. In the Design tab’s Controls group, click the Insert ActiveX Control button. Access displays the Insert ActiveX Control dialog box.2. In the Select an ActiveX Control list, click Microsoft Forms 2.0 SpinButton and then click OK.3. Adjust the dimensions of the control as needed. Note that if you make the control taller than it is wide, you get up and down arrows; if you make the control wider than it is tall, you get left and right arrows.4. In the Design tab’s Controls group, click the Text Box button.5. Draw the text box on the form beside the spin button. Access adds the text box and an associated label. Make a note of the text box name because you need it later in these steps.6. Edit the text box label, as necessary.7. Click the spin button and choose Design, Property Sheet to display the control’s property sheet.8. In the Data tab, use the Control Source property to specify the field in which you want the spin button value stored.9. In the Other tab, customize the spin button using the following properties:• Min—Sets the minimum value of the spin button.• Max—Sets the maximum value of the spin button.• SmallChange—Sets the amount that the spin button value changes when the users click one of the arrows.10. Ensure that the text box gets updated with the new spin button value whenever the users click an arrow. To do this, right-click the spin button, click Build Event, click Code Builder, and then click OK. Access opens the Visual Basic Editor and adds a stub for the Updated event, which you can delete. In the procedure list (the one on the right at the top of the module), click Change.11. Inside the Change procedure, type the following statement, where TextBox is the name of the text box you added in step 6 (see Figure 3.9):TextBox.SetFocus

Figure 3.9Use a simple Visual Basic for Applications state¬ment to keep the text box updated with the current spin button value.
12. Choose File, Close and Return to Microsoft Office Access (or press Alt+Q or Alt+F11).13. Use the Property Sheet pane’s drop-down list to choose the text box.14. In the Data tab, set the text box value equal to the spin button value by using the Control Source to add the following expression (where SpinButton is the name of the spin button control):=SpinButton Figure 3.10 shows a form with a spin button and associated text box.Figure 3.10When you click the spin button arrows, the value displayed inside the text box changes accordingly.Entering Numbers Using a ScrollbarScrollbars are normally used to navigate windows, but by themselves you can use them to enter values between a predefined maximum and minimum. In this context, they are very similar to spin buttons, so the procedure for adding them to your form is more or less the same:15. Close the property sheet. 1. In the Design tab’s Controls group, click the Insert ActiveX Control button. Access displays the Insert ActiveX Control dialog box.2. In the Select an ActiveX Control list, click Microsoft Forms 2.0 ScrollBar and then click OK.3. Adjust the dimensions of the control as needed. Note that if you make the control taller than it is wide, you get a vertical scrollbar; if you make the control wider than it is tall, you get a horizontal scrollbar.4. In the Design tab’s Controls group, click the Text Box button, draw the text box on the form beside the scrollbar, and edit the label. Remember to make note of the text box name. 5. Click the scrollbar and choose Design, Property Sheet to display the control’s property sheet.6. In the Data tab, use the Control Source property to specify the field in which you want the scrollbar value stored.7. In the Other tab, customize the scrollbar using the following properties:• Min—Sets the minimum value of the scrollbar.• Max—Sets the maximum value of the scrollbar.• SmallChange—Sets the amount that the scrollbar value changes when the users click one of the scroll arrows.• LargeChange—Sets the amount that the scrollbar value changes when the users click between the scroll box and one of the scroll arrows.

8. Right-click the scrollbar, click Build Event, click Code Builder, and then click OK. Access opens the Visual Basic Editor and adds a stub for the Updated event,which youcan delete. In the procedure list (the one on the right at the top of the module), clickChange.9. Inside the Change procedure, type the following statement, where TextBox is name of the text box you added in step 4:TextBox.SetFocus10. Choose File, Close and Return to Microsoft Office Access (or press Alt+Q or Alt+F11).11. Use the property sheet drop-down list to choose the text box.12. In the Data tab, set the text box value equal to the scrollbar value by using the Control Source property to add the following expression (where ScrollBar is the name of the scrollbar control):=ScrollBar13. Close the property sheet. Figure 3.11 shows a form with a scrollbar and associated text box.m Scrollbar X► Reorder Level; ijj . * 1 1 -dRecord: H < 1 ofl H j Filter | {SearchFigure 3.11When you click the scrollbar arrows or drag the scroll box, the value displayed inside the text box changes accordingly.Entering Dates Using a CalendarEntering dates can be problematic because users might not use the proper format. For example, they might reverse the month and day, they might use an unrecognizable month abbreviation, they might leave out a date separator, and so on. To avoid these common data entry scenarios, you can add a calendar control to your form. The users enter a date by selecting the month and year and then just clicking the day of the month.Follow these steps to add a calendar control to your form:1. In the Design tab’s Controls group, click the Insert ActiveX Control button. Access displays the Insert ActiveX Control dialog box.2. In the Select an ActiveX Control list, click Calendar Control 12.0 and then click OK.3. Adjust the size and position of the control to ensure that the calendar is displayed properly.4. Click the calendar and choose Design, Property Sheet to display the control’s property sheet.5. In the Data tab, use the Control Source property to specify the date field in which you want the calendar value stored.6. In the Other tab, use properties such as DayFontColor and GridCellEffect to format the calendar.7. Close the property sheet.Figure 3.12 shows a form with a calendar control added.~3| Calendar Control X^ Select the Date:Figure 3.12Aug 2007 f Aug T| [2007 ▼

Sun Mon Tue Wed Thu Fri Sat23 30 31 1 3 45 6 7 8 10 1112 13 14 15 16 17 1619 20 21 22 24 2526 27 26 29 3D 31 12 3 4 5 7 6With the calendar control, use the drop-down lists to select a month and year and then click the date you want.Record: n 1 of 1 H > | 'y, 1 io Fi--j | j Search Collecting Form Data via EmailAlthough small databases are often managed by a single person, larger databases require input from multiple people. If those people are on your network, such collaboration is most easily achieved either by placing the database in a shared network location or by moving some or all of the data to a SharePoint site. However, what do you do if your collaborators don’t have network access? One solution would be to export the necessary tables and forms into another database and then email that database to the collaborators. When the data is returned, you could then import it back into your database. Such a solution is workable, but a little too unwieldy to be practical. Fortunately, Access 2007 comes with a new feature called Access Data Collection (ADC) that makes email- based data collection much easier. With this feature, you create a form that includes fields for the data you want to collect, place that form in an HTML email message, and then send that message to every person from whom you want to collect the data. Each person fills in the form and returns the message, which is then saved in a special Outlook folder called Access Data Collection Replies. You then synchronize Access (by hand or automatically) with those replies, and the data is added to the underlying table.CAUTION Many people set up their email clients to read messages in plain text, and that's not good for ADC. First, viewing the ADC message in plain text prevents the user from seeing the form at all. Second, even if the user converts the message to HTML (by clicking the Information bar and then clicking Display as HTML),Access will perceive this as a “change” to the form, and it won't process the reply. That is, in the Access Data Collection Replies folder, the Data Collection Status column for the reply will say the following:Failure: Cannot process this e-mail message. The form in this e-mail message is either corrupt or has been modified.The user must turn off the Outlook option to read messages in plain text (choose JoolsJrust Center, click E-mail Security, and then click to deactivate the Read All Standard Mail in Plain Text check box), reply to and fill in the ADC form, and then reset the plain text option.Sending the Access Data Collection Email MessageUnlike the other forms you’ve seen in this chapter, an ADC form cannot be created by hand. Instead, Access runs a wizard that builds the form step by step, as shown in the following procedure:1. Use the Navigation pane to click the table you want to use to store the collected data.2. Choose External Data, Create E-mail. Access starts the ADC Wizard. 3. In the initial wizard dialog box, click Next. The wizard asks whether you want to use an HTML form or an InfoPath form.4. Click HTML Form and then click Next.

5. If the table already contains data, the wizard asks whether you want to collect new information or update existing information. Click one of the following options and then click Next:• Collect New Information Only—Click this option to send a blank form for new data. • Update Existing Information—Click this option to send existing data for the recipient to edit. The record that contains the recipient’s address is the record the recipient will edit.6. For each field you want to include in the form, click the field and then click > (or click >> to add all the fields). Click Next.7. If you want Access to synchronize with Outlook automatically when the replies arrive, click to activate the Automatically Process Replies and Add Data to Table check box (where Table is the name of the table you chose in step 1) and then click Next.8. Choose how you want to specify the message recipients (click Next after you’ve made your choice):• Enter the E-mail Addresses in Microsoft Office Outlook—Click this option to enter the recipients by hand in the Outlook message window that appears later. Skip to step 10.• Use the E-mail Addresses Stored in a Field in the Database—Click this option if you have the recipients’ addresses stored in the current database. Proceed to step 9.9. Specify the addresses in the database using one of the following options (click Next when you are done):• The Current Table or Query—Click this option if the email addresses are stored in the table you’re using with ADC. Use the associated list to click the field that contains the addresses.• An Associated Table—Click this option if the addresses reside in another table that’s related to the current table. First, use the associated list to click the field in the current table upon which the relationship is based. Second, when Access displays a list of fields in the related table, use the list to click the field that contains the email addresses.10. Edit the message Subject and Introduction, as needed. If the addresses came from the Access database, click where you want the addresses added: the To Field, Cc Field, or Bcc Field. Click Next. 11. You now have two ways to proceed:• If you choose an Access field for the recipient addresses, click Next. Access displays a list of the recipients with check boxes for each address. Leave the check boxes activated for the recipients you want to receive the message. When you are done, click Send.• If you will be specifying recipients via Outlook, click Create to create the message, select the recipients, and then click Send.Replying to an Access Data Collection Email Message If you receive an ADC message, you need to fill in the fields and return the message. Here are the steps to follow:1. Click the Access Data Collection message and then click Reply. Access displays the message window.2. Scroll down the message body until you see the form, as shown in Figure 3.13. Figure 3.13When you reply to an ADC message, fill in each form field in the body of the reply.
3. Click inside a form field and type the data.

4. Repeat step 3 for each field.5. After you’ve filled in each field, click Send. From Here 75Managing the Access Data Collection RepliesAs I mentioned earlier, when you receive replies to your messages, they are automatically routed to the Access Data Collection Replies folder in Outlook. (This is a subfolder of the Inbox folder.) If you didn’t set up Access to handle the replies automatically, follow these steps to handle a reply manually:1. In Outlook, open the reply.2. Click Export to Access. Outlook asks you to confirm.3. Click OK. Outlook exports the data. 4. Click OK.From Here^ To learn how to work with the Label control, see “Adding Labels to the Form,”p.41. (Chapter 2)^ To learn how to work with the Text Box control, see “Adding Text Boxes to the Form,” p. 43. (Chapter 2)^ For the specifics of the Expression Builder, see “Working with the Expression Builder,” p. 256. (Chapter 11)^ To learn about inner joins, see “Establishing Table Relationships,” p. 267. (Chapter 12)^ For the details on building SQL select statements, see “Using SQL to Perform a Select Query,” p. 342. (Chapter 15) This page intentionally left blank Designing Forms for Business Use
You’ve seen so far that designing a basic form is not hard, whether you use a default form layout, the Form Wizard, or the Design view. And certainly if you’re the only person who will use the form, a quick-and-dirty job might be all that you need or have time to build.However, if other people are going to use the form, quick-and-dirty almost certainly won’t be good enough. You need to take a bit of extra time to build certain design elements into the form that make it easy to use, attractive, familiar, and, above all, conducive to accurate input. Taking the extra time to get the form just right might seem burdensome now, but you’ll save time in the long run because you’ll spend less time training users, answering their questions, troubleshooting problems, and dealing with data entry errors.And the good news is that knocking a basic form into shape doesn’t take all that long. With the concepts and techniques you learn in this chapter, you’ll be able to build attractive and usable forms without spending all day tweaking controls and fussing with formatting.Using Forms in a Business ContextIf you use Access in a business environment, forms are a necessity for one simple reason: They’re better than datasheets for entering, editing, and even analyzing data. A form is faster, easier, more flexible, less error-prone, less tiring, and less intimidating than a datasheet. Moreover, Access users generally expect to use a form to work with data. So you need to add “Form Designer” to the list of hats you wear at work. But before you dive in, you need to take a step or two back and survey the scene. You need, in short, to ask

yourself three simple questions to help get your bearings: Why collect the data in the first place? What exactly is the data you’re collecting? And who are the people collecting it?Why Collect the Data?An increasing percentage of Fortune 500 companies pay a hefty salary to someone they call the chief knowledge officer, or CKO. The ascendancy of the CKO is a reflection of the relative importance that business is putting on knowledge over mere information. The CKO is, in the simplest terms, the overseer of a company’s knowledge management—that is, the way the company creates, organizes, and shares its institutional knowledge. The CKO takes to heart the maxim of former Hewlett-Packard CEO Lew Platt: “If HP knew what HP knows, we would be three times as profitable.” The CKO finds out what his corporation knows by setting up “knowledge mining expeditions” where managers and “knowledge engineers” codify corporate know-how using technology such as—you guessed it— Microsoft Access. That’s why corporations collect data: to turn it into knowledge.IBut knowledge management isn’t solely the province of Fortune 500 behemoths. Even small- and medium-sized companies need to know what they know. And it’s this quest for knowledge that can have a subtle effect on your form design.For example, if the data is collected for business analysis, a PivotChart form will probably display the data in the best and most analytically flexible light. If the data is collected for marketing purposes, you’ll want your form to emphasize key areas such as addresses and demographic data.To learn how to work with PivotChart forms, see “Creating a PivotChart Form,” p. 108. (Chapter 5)What Is the Data?The content of the data is another important factor in form design. For example, a form that collects order data should almost certainly show extended subtotals for each item (units ordered multiplied by the price per unit), freight charges, taxes, the order total, and other calculated form fields. Similarly, if the data relies on existing information that sits in other tables—such as customer or product data—you need to populate your form with lists that enable the users to choose the correct data. Or if the underlying form table is the “one” side of a one-to-many relationship, you might want to add a subform that shows the related records from the “many” table.For the details of subforms, see “Creating a Multiple-Table Form,” p. 95. (Chapter 5)Ten Design Guidelines for Business Forms 79Who Are Your Users?Finally, and perhaps most importantly, you need to consider who will be using the form.Are they novice users? If so, you might need to add extra explanatory labels and take extra care with data validation. Are the users experienced data entry operators? If so, you need to design your form for speed, including making each field accessible via the keyboard. Will the form be used by people throughout the company? If so, you might have to build your form according to corporate design guidelines. Managers probably want forms that aid in data analysis (such as a PivotChart form or a form with calculated fields), whereas clerks probably want forms that let them enter data with a minimum of fuss.Ten Design Guidelines for Business FormsAnswering the three questions from the previous sections is only the first step toward creating a usable business form. The following sections offer a set of 10 guidelines that help you build usable and attractive forms for easy and accurate data entry and editing.1. Make Forms FastIMost, perhaps all, users of business forms are busy people with long to-do lists, and working with your form is only one item on those lists. These people don’t want to spend precious

minutes trying to determine how to use a form or what a particular field is supposed to represent. Make your control names clear, but not verbose; for tricky fields, add an explanatory label.2. Make Forms FoolproofBe sure to take advantage of list boxes, combo boxes, option buttons, and other controls that minimize typing. These tools are not only faster, but they reduce strain and increase accuracy, as explained in detail in Chapter 3, “Designing Forms for Efficient and Accurate Data Entry.”3. Mimic Paper Forms When PracticalIf your Access form replaces or is used in addition to a paper form, try to make the electronic version mimic its counterpart. At the very least, the fields should be in the same order so that people used to filling out the paper form will feel comfortable with the Access version. Size text boxes to match the original and use fonts, colors, boxes, and lines to make the Access form a carbon copy of the original, if that’s practical within the confines of the computer screen (see the discussion of screen resolution that follows).4. Give Users What They Need and Then StopAfter you’ve learned the ins and outs of form design, the temptation is to put your hard- won knowledge to good use by building in all kinds of bells and whistles to each form. Resist this temptation at all costs because nobody likes to use an overdesigned form. Don’t use a combo box for a two-state field; avoid toggle buttons that use ambiguous images instead of plain caption text; don’t use pop-up boxes or dialog boxes needlessly.To learn how to build pop-up boxes and dialog boxes, see “Creating a Form Pop-Up Box or Dialog Box,” p. 103. (Chapter 5) Also, don’t show the users fields that they’ll never need to fill in. This is certainly true of most AutoNumber fields, and it goes without saying that sensitive data should be displayed only to those with the authorization to see it.5. Don't Neglect the KeyboardWe tend to assume that Windows users are primarily mouse users and that therefore they prefer to select form fields and control values by clicking. That might be true some of the time, but many form users are in “typing mode,” so it’s faster and easier to keep their hands poised over the keyboard instead of making forays over to the mouse. This is particularly true for order takers and other professional data entry operators who are keyboarding exp erts. Therefore, be sure to edit labels to set up shortcuts for each field. Also, if a field rec¬ognizes a particular key combination (such as Ctrl+; for today’s date or Ctrl+: for the cur¬rent time), add a label to the form that lets the users know.6. Watch the Field Order (and the Tab Order, Too) I mentioned earlier that an Access form based on a paper form should display the fields in the same order as they appear in the paper version. Even if you’re not using a paper form as a model, form fields often have an internal logic. For example, an order form should always take the customer information before the order details. Similarly, address fields should always follow the standard street-city-region-country-postal code order. Always examine the underlying data to look for these “natural” field orders and then set up your form accordingly.After you’ve gone to this trouble, be sure to check the tab order (in Design view, choose Arrange, Tab Order). Few things are as frustrating to the users as pressing Tab and moving to some field other than the one that appears to be next on the form.7. Watch Your Screen ResolutionIt’s a common design mistake to build a form on a screen with the resolution set at 1,280x1,024 or even 1,600x1,200 and then realize that only part of the form shows up on a 1,024x768 display. You need to determine the lowest screen resolution that is used by a significant portion of your users and then build your form with your own screen set to that
screen area. In most offices today, 1,024x768 is a good design resolution (few people still run at 800x600).Finally, if your users have a uniform screen type—for example, 14-inch laptop screens or 17-inch monitor sizes—be sure to test your form on this screen before deploying it, particularly, if your own computer has a significantly larger screen size.8. Make Form Text ReadableFew things are as frustrating as screen text that is unreadable. This is particularly true for Access forms where the text is usually there for an important reason (such as naming a field or providing explanatory text). Therefore, take care when you apply font formatting to your forms. See “Enhancing Form Text,” later in this chapter, for some pointers on using fonts.9. Go Easy on the ExtrasYou see later in this chapter that you can spruce up a drab form with extras such as colors, images, and various special effects. When used judiciously, these goodies can add visual interest to a form. Watch out, though: if you overdo it, your form can easily become a hard-to-read, hard-to-navigate mess that distracts the users and either slows down data entry or causes data entry errors (or both). When it comes to form extras, moderation is always the key.10. Organize Your Form ControlsIMost forms have groups of related controls. For example, on an order form, one group might be the customer’s name and address data, another might be overall order data such as the shipping method and payment info, and another might be the order details. You can make data entry much easier if you use visual aids to emphasize these groupings. As you see in the next section, you can use lines, borders, option groups, and tab controls to achieve this.Organizing Controls on the FormA form that holds just three or four fields doesn’t require much in the way of organization. You can more or less just plop the fields onto the form, pretty them up a bit, and then move on. However, it’s a rare form that contains so few fields. It’s much more common for a form to contain 10, 15, even 20 controls, all vying for the user’s attention. Tossing all those controls onto the form willy-nilly is definitely not a good idea: Inexperienced form users are likely to get confused; busy users will resent the time it takes to determine what’s what; and expert operators will get frustrated by the inefficient and tiring layout.Proper control organization doesn’t imply anything elaborate. It just means three things:■ Grouping related controls together.■ Putting individual controls in a natural order and adjusting the tab order so that moving through the fields using the Tab key reflects this natural order.■ Making it clear which controls belong to which groups.The first two are a product of the underlying data, as described in the previous section. In the following sections, you learn a few visual aids that can help enclose controls into groups and separate these groups so that users can easily see the overall organization of the form. Making Good Use of Lines and RectanglesThe Form Design view’s Design tab contains two buttons in the Control group that create graphic elements on the form: Line and Rectangle. Here's how you use these tools to organize a form’s controls:■ Use a rectangle to organize a set of related controls into a group. Place the controls together on the form and then draw the rectangle around them.■ Use a line to separate groups and individual controls. Add a bit of extra space between the bottom (or right) of one control or group and the top (or left) of the next control or group. Then draw the line in this extra space.I

^ Most people find it a bit tricky to draw a straight line using the standard click-and-drag technique. I_ To ensure a perfectly straight line every time, hold down the Shift key and then click and drag. I Figure 4.1 shows a sample form that uses these techniques. Note, too, the use of two lines to represent the double line that often appears above a total.Figure 4.1Use rectangles to organize related controls into groups and use lines to separate individual controls and groups.In both cases, you click the button in the Controls group and then click and drag on the form to draw the line or rectangle.After you've drawn your line or rectangle, you can use the following Design tab lists to format the graphic:■ Fill/Back Color (Font group)—Click a color swatch in this list to set the color of the rectangle's background.I^ If you add a rectangle around a set of existing controls and then set the rectangle's background l_ color, the controls will be obscured by the nontransparent background. To fix this, select the rectangle and then choose Arrange, Send to Back. This changes the Z-order so that the rectangle is now “behind” the other controls.
■ Line Thickness (Controls group)—Click an item in this list to set the width of the line or the rectangle's border.■ Line Type (Controls group)—Click an item in this list to set the style (such as dotted or dashed) of the line or the rectangle's border.■ Line Color (Controls group)—Click a color swatch in this list to set the color of the line or the rectangle's border.

■ Special Effect (Controls group)—Click this list and then choose the effect you want to apply to the line or the rectangle's border: Flat, Raised, Sunken, Etched, Shadowed, or Chiseled.Organizing with Option GroupsYou saw in Chapter 3 that you can use an option group control to create a set of mutually exclusive choices using option buttons (or, less often, check boxes or toggle buttons). You use an option group to define the set because any option button within the group becomes one of the mutually exclusive options. For the details on creating option buttons within an option group, see “Using Option Buttons to Present a Limited Number of Choices,” p. 59. (Chapter 3)However, the option group itself is really just a rectangle with a label in the upper-left corner. That label is a handy thing because it enables you to supply the group with a name or short description, which adds to the readability and ease-of-use of the form. Not only that, but there are no rules against using option groups to organize other kinds of controls such as text boxes and lists.Here are the steps to follow to create an option group for organizing controls:1. Adjust the controls that form the group so that they reside in the same part of the form, with no other controls nearby.2. In the Design tab's Controls group, deactivate the Use Control Wizards button.3. In the Controls group, click the Option Group button.4. Draw the option group around the controls.5. Format the option group's background color, and color, width, and special effect of its border, as necessary. (If you set the background color, choose Design, Send to Back to bring the other controls on top of the option group.)6. Choose Design, Property Sheet to display the option group's property sheet.7. In the Other tab, change the Tab Stop property to No. (This prevents Access from selecting the option group when users are pressing Tab to navigate the form.)8. Close the property sheet.Figure 4.2 shows the Mortgage Calculator form that uses two option groups to organize the form's text boxes.

Related Documents


