Avigilon Control Center™ and Access Control Manager™ Unification Guide For ACC software version 7.14.8 and ACM physical or virtual version 6.30 or newer

Welcome message from author
This document is posted to help you gain knowledge. Please leave a comment to let me know what you think about it! Share it to your friends and learn new things together.
Transcript
Avigilon Control Center™ andAccess Control Manager™Unification GuideFor ACC software version 7.14.8 and ACM physical or virtualversion 6.30 or newer

© 2018 - 2022, Avigilon Corporation. All rights reserved. AVIGILON, the AVIGILON logo,AVIGILON CONTROL CENTER, ACC, AVIGILON APPEARANCE SEARCH, HDSM,ACCESS CONTROL MANAGER, and ACM, are trademarks of Avigilon Corporation. Intel and Intel Core aretrademarks of Intel Corporation or its subsidiaries in the U.S. and/or other countries. Other names or logosmentioned herein may be the trademarks of their respective owners. The absence of the symbols ™ and ® inproximity to each trademark in this document or at all is not a disclaimer of ownership of the relatedtrademark.
This document has been compiled and published using product descriptions and specifications available atthe time of publication. The contents of this document and the specifications of the products discussedherein are subject to change without notice. Avigilon Corporation reserves the right to make any suchchanges without notice. Neither Avigilon Corporation nor any of its affiliated companies: (1) guarantees thecompleteness or accuracy of the information contained in this document; or (2) is responsible for your use of,or reliance on, the information. Avigilon Corporation shall not be responsible for any losses or damages(including consequential damages) caused by reliance on the information presented herein.
Avigilon Corporationavigilon.com
PDF-ACC7ACM-U-G
Revision: 4 - EN
20220531
2
Table of Contents
Introduction 4
System Requirements 4
Avigilon Certified Solution 4
ACC Client Software Requirements 5
ACC Server Software and Workstation Requirements 5
ACC and ACM Unification Recommendations 6
ACC Site and ACM Sizing Recommendations 7
ACM™ and ACC™ Configuration 8
Configuring the ACM Appliance 8
Connecting the ACM Appliance to an ACC Site 10
Configuring ACM Features in ACC 11
Importing ACM Roles 11
Linking Doors to Cameras 12
Adding a Link 12
Editing and Deleting a Link 12
Adding Rules 13
Adding a Web Page 13
Monitoring Doors 15
Granting Door Access 15
Identity Verification 15
Identity Search 16
Identity Search Results 16
Refining Results 16
Saving Results 17
Browsing the ACM Appliance in the ACC Client 18
Rule Event and Action Descriptions 19
Rule Events 19
Rule Actions 21
Rule Conditions 22
For More Information 24
3
Introduction
The Avigilon Control Center (ACC) software can be combined with the Access Control Manager (ACM)appliance to provide enhanced security and surveillance for your organization.
This document describes how to configure your ACM appliance and your ACC software to interactseamlessly. Once your ACM appliance, roles, and identities are connected to the ACC software, you cancreate rules for access control events and grant door access and perform identity verification from ACC. Youcan bookmark, export, and archive video connected to ACM panels, subpanels, and inputs.
System RequirementsFor the best performance and full functionality, use the latest versions of the ACC Client and Server softwareand the ACM system.
To access the ACM appliance, you will need:
l An Internet connection.
l A web browser.
Avigilon Certified Solutionl Single ACM physical or virtual instance
l 2 Monitor or 4 Monitor Professional High Performance Remote Monitoring Workstationo Preloaded with ACC Client software.o Supports high resolution monitors.o Includes the adapters and accessories for quick deployment.o Includes Avigilon warranty and support.
l Servers — NVR Premium, Standard, or Valueo Optimized for video surveillance applications in a 24/7/365 environment.o ACC software is preinstalled, configured and enhanced for optimal system compatibility.o Certified for the Avigilon surveillance environment — ACC software, LPR, Web Endpoint,Analytics, HDSM™ and 1-30 MP cameras.
o High throughput of up to 1800 Mbps.o Documented network architecture for a wide-variety of applications.o Avigilon warranty and support included.o Access to Avigilon System Design Tool (SDT) to calculate storage requirements.
Introduction 4
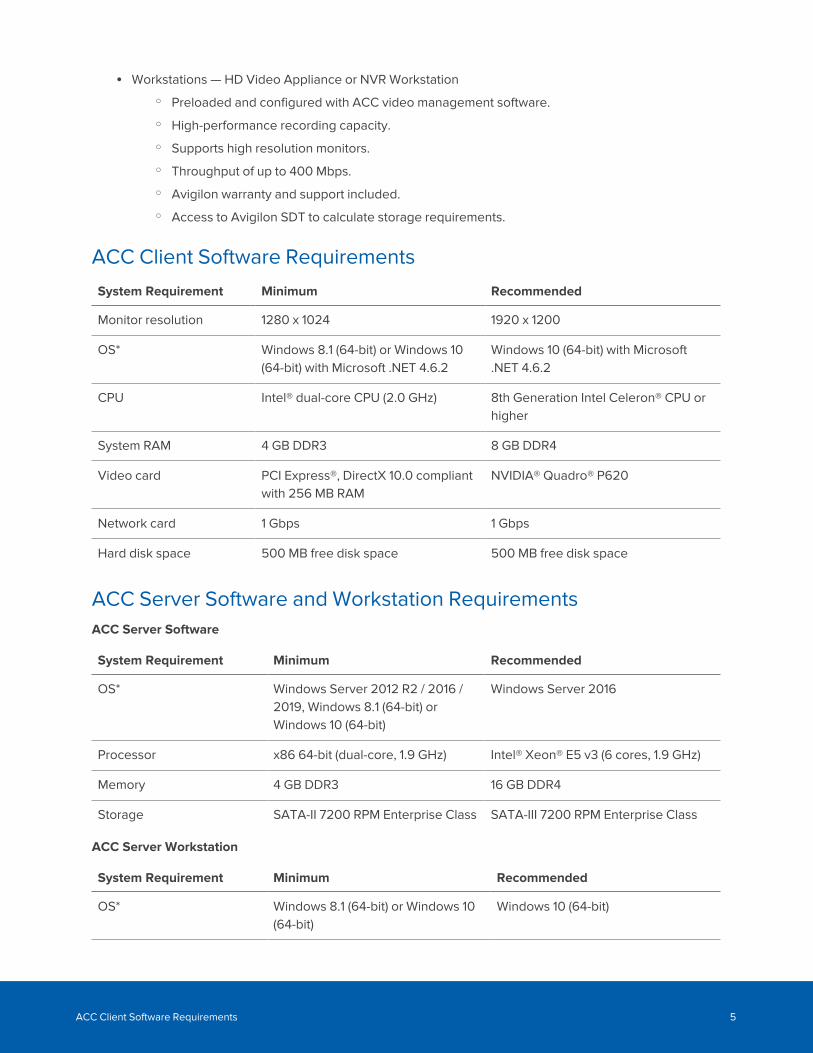
l Workstations — HD Video Appliance or NVR Workstationo Preloaded and configured with ACC video management software.o High-performance recording capacity.o Supports high resolution monitors.o Throughput of up to 400 Mbps.o Avigilon warranty and support included.o Access to Avigilon SDT to calculate storage requirements.
ACC Client Software Requirements
System Requirement Minimum Recommended
Monitor resolution 1280 x 1024 1920 x 1200
OS* Windows 8.1 (64-bit) or Windows 10(64-bit) with Microsoft .NET 4.6.2
Windows 10 (64-bit) with Microsoft.NET 4.6.2
CPU Intel® dual-core CPU (2.0 GHz) 8th Generation Intel Celeron® CPU orhigher
System RAM 4 GB DDR3 8 GB DDR4
Video card PCI Express®, DirectX 10.0 compliantwith 256 MB RAM
NVIDIA® Quadro® P620
Network card 1 Gbps 1 Gbps
Hard disk space 500 MB free disk space 500 MB free disk space
ACC Server Software and Workstation RequirementsACC Server Software
System Requirement Minimum Recommended
OS* Windows Server 2012 R2 / 2016 /2019, Windows 8.1 (64-bit) orWindows 10 (64-bit)
Windows Server 2016
Processor x86 64-bit (dual-core, 1.9 GHz) Intel® Xeon® E5 v3 (6 cores, 1.9 GHz)
Memory 4 GB DDR3 16 GB DDR4
Storage SATA-II 7200 RPM Enterprise Class SATA-III 7200 RPM Enterprise Class
ACC Server Workstation
System Requirement Minimum Recommended
OS* Windows 8.1 (64-bit) or Windows 10(64-bit)
Windows 10 (64-bit)
ACC Client Software Requirements 5
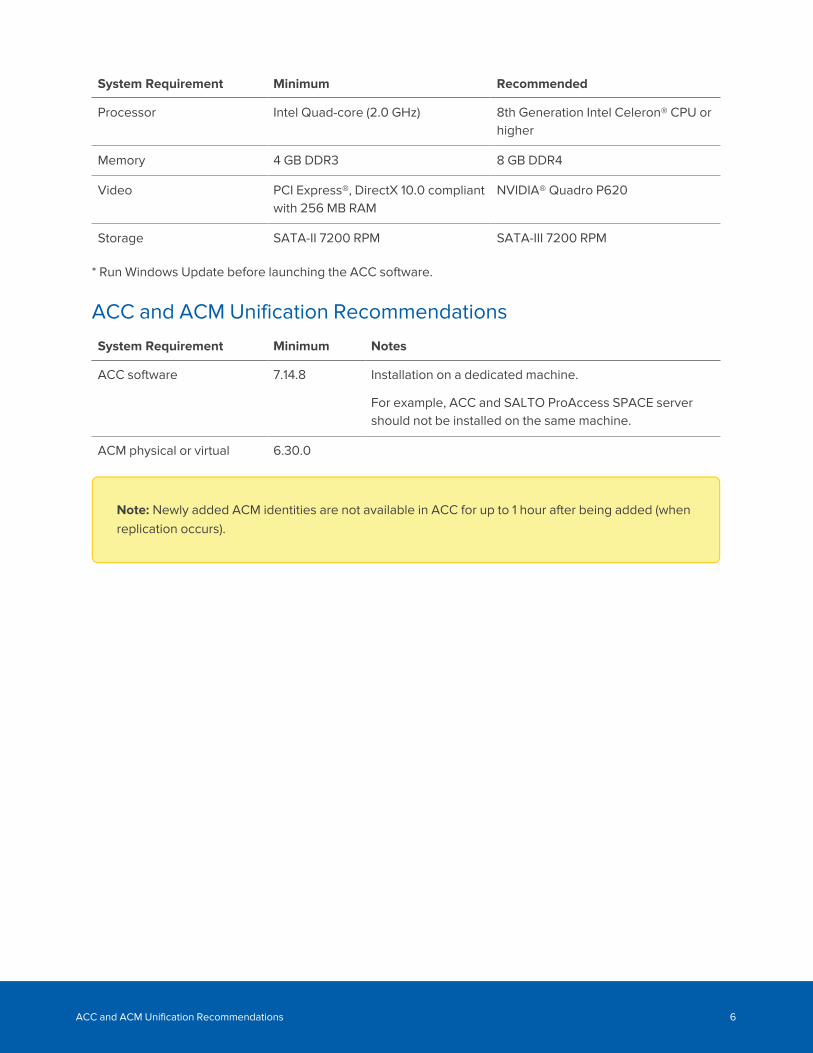
System Requirement Minimum Recommended
Processor Intel Quad-core (2.0 GHz) 8th Generation Intel Celeron® CPU orhigher
Memory 4 GB DDR3 8 GB DDR4
Video PCI Express®, DirectX 10.0 compliantwith 256 MB RAM
NVIDIA® Quadro P620
Storage SATA-II 7200 RPM SATA-III 7200 RPM
* Run Windows Update before launching the ACC software.
ACC and ACM Unification Recommendations
System Requirement Minimum Notes
ACC software 7.14.8 Installation on a dedicated machine.
For example, ACC and SALTO ProAccess SPACE servershould not be installed on the same machine.
ACM physical or virtual 6.30.0
Note: Newly added ACM identities are not available in ACC for up to 1 hour after being added (whenreplication occurs).
ACC and ACM Unification Recommendations 6
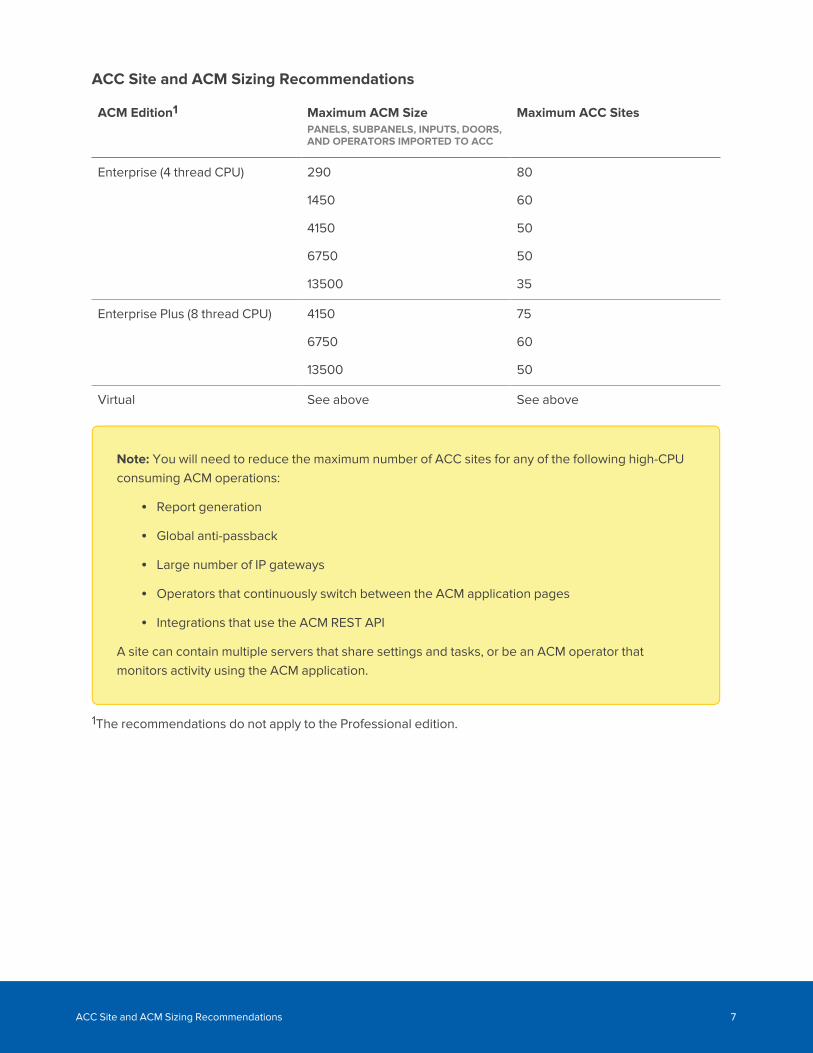
ACC Site and ACM Sizing Recommendations
ACM Edition1 Maximum ACM SizePANELS, SUBPANELS, INPUTS, DOORS,AND OPERATORS IMPORTED TO ACC
Maximum ACC Sites
Enterprise (4 thread CPU) 290
1450
4150
6750
13500
80
60
50
50
35
Enterprise Plus (8 thread CPU) 4150
6750
13500
75
60
50
Virtual See above See above
Note: You will need to reduce the maximum number of ACC sites for any of the following high-CPUconsuming ACM operations:
l Report generation
l Global anti-passback
l Large number of IP gateways
l Operators that continuously switch between the ACM application pages
l Integrations that use the ACM REST API
A site can contain multiple servers that share settings and tasks, or be an ACM operator thatmonitors activity using the ACM application.
1The recommendations do not apply to the Professional edition.
ACC Site and ACM Sizing Recommendations 7
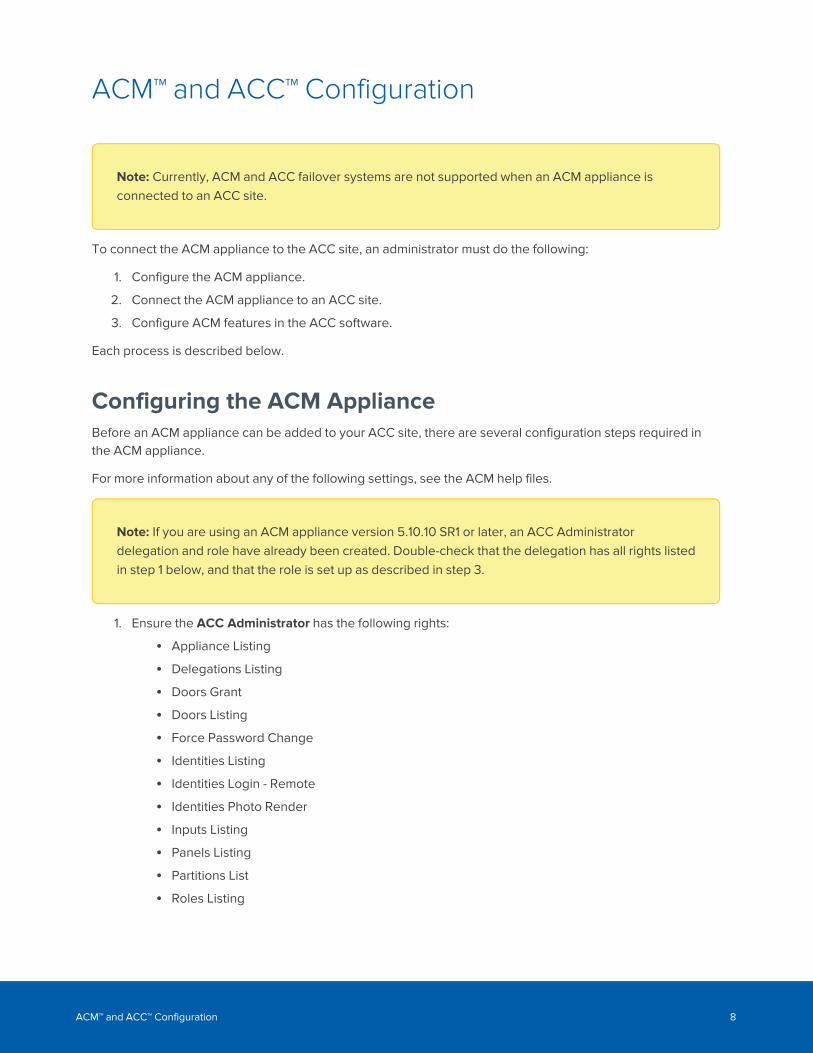
ACM™ and ACC™ Configuration
Note: Currently, ACM and ACC failover systems are not supported when an ACM appliance isconnected to an ACC site.
To connect the ACM appliance to the ACC site, an administrator must do the following:
1. Configure the ACM appliance.
2. Connect the ACM appliance to an ACC site.
3. Configure ACM features in the ACC software.
Each process is described below.
Configuring the ACM ApplianceBefore an ACM appliance can be added to your ACC site, there are several configuration steps required inthe ACM appliance.
For more information about any of the following settings, see the ACM help files.
Note: If you are using an ACM appliance version 5.10.10 SR1 or later, an ACC Administratordelegation and role have already been created. Double-check that the delegation has all rights listedin step 1 below, and that the role is set up as described in step 3.
1. Ensure the ACC Administrator has the following rights:
l Appliance Listing
l Delegations Listing
l Doors Grant
l Doors Listing
l Force Password Change
l Identities Listing
l Identities Login - Remote
l Identities Photo Render
l Inputs Listing
l Panels Listing
l Partitions List
l Roles Listing
ACM™ and ACC™ Configuration 8
l Subpanels Listing
l System Summary Listing
l REST Appliance Status Display
l REST Get Doors
l REST Get Identities
l REST Get Identity
l REST Get Inputs
l REST Get Panels
l REST Get Right Groups
l REST Get Roles
l REST Get Subpanels
2. Create a routing group to define events sent from the ACM appliance to the ACC software.
a. Specify the following for the group:
l Schedule: 24 Hours Active
l Schedule Qualifier: Appliance
l The Installed box must be checked
b. Add the following event types to the routing group:
l Door held open
l Forced Door
l Intrusion
l Invalid Credential
l Maintenance
l System
l Tamper
l Valid Credential
3. Create a role that allows the ACC software to communicate with the ACM appliance:
a. Keep the default Parent value (none).
b. Keep the default Start Date value (the current date).
c. In the Stop Date box, enter an appropriate date for this role to expire. By default, the role willstop working 1 year from its creation date.
d. Select the Installed checkbox and click Save.
Additional tabs will appear.
e. In the role's Delegate tab, assign only the ACC Administrator delegation that was created inthe preceding steps.
f. In the Routing tab, assign only the routing group that was created in the preceding steps.
Configuring the ACM Appliance 9
4. If you plan to import Active Directory identities to the ACM appliance or the ACC software, configure aLightweight Directory Access Protocol (LDAP) Collaboration. For Active Directory RemoteAuthentication, configure remote authentication from external domains.
5. Create a dedicated identity for interacting with the ACC software.
Note: To protect the security of the connection between the ACM appliance and the ACCsoftware, the dedicated identity should have only the permissions outlined in this procedure.Operators should not have access to this account.
l Assign a Last Name, Login, and Password for the identity. Uncheck the Force PasswordChange checkbox.
l The password should meet the minimum password strength requirements for your ACC site.
The password strength is defined by how easy it is for an unauthorized user to guess. It ishighly recommended that you select a password that uses a series of words that is easy for youto remember but difficult for others to guess.
l Under the identity's Roles tab, assign only the role that was created in the preceding step.
6. If your ACM appliance uses partitions, add the identity as a member of the partitions they will need toaccess from the ACC Client.
7. Configure the ACM appliance to use the same NTP Time Server as the ACC Server.
For Windows systems, the ACC Server gets its time from the operating system. For Avigilon HardenedOS appliances, the NTP Time Server can be configured through the device's web interface.
a. In the top-right corner, click the gear icon to open the Setup & Settings menu and selectAppliance.
b. In the Time Server box, enter the Time Server IP address.
Once these settings are applied, you can connect to the ACM appliance from the ACC Client.
Connecting the ACM Appliance to an ACC SiteConnect an ACM appliance to your ACC site and you can link doors controlled by the appliance to camerascontrolled by the ACC software. After doors and cameras are linked, you can configure rules that aretriggered by doors in the ACC software.
Connecting the ACM Appliance to an ACC Site 10

Note:Make sure you have the following before you begin.
l The hostname or IP address of the ACM appliance.
l The ACM port number is different from the default port (443).
l The username and password for the identity that was created to add the ACM appliance tothe ACC software.
1. In the New Task menu , click Site Setup.
2. Click .
3. Enter the required credentials.
4. ClickOK.
Confirm that the listed SHA-256 fingerprint ID is the same. Fingerprint information is typically listed onthe Appliance:Edit page, under the SSL Certificate tab.
5. If the fingerprints are the same, click Trust.
If they do not match, contact your system administrator.
The ACM appliance is now listed under the site as Hostname in the Setup tab.
Configuring ACM Features in ACC
Importing ACM Roles
Important: Usernames in the ACC software and ACM appliance must be unique. Duplicate nameswill not be imported.
Note:l Importing ACM Roles to a site will disable all Active Directory users in the ACC software.
l If your ACM appliance is partitioned, ensure identities are members of the appropriatepartitions so they can access unification features in the ACC Client.
Import Roles from the ACM appliance to give users access to cameras and doors. When you import a role,you also import the identities that are assigned to the role. Only identities with a username and password inthe ACM appliance will be imported.
Configuring ACM Features in ACC 11
1. In the New Task menu , click Site Setup.
2. Click the site name, then click Users and Groups .
3. In the External Directory tab, select Avigilon Access Control Manager from the drop-down list.
4. Click Add Group.
5. Select an existing group to use as a template then clickOK. You can edit the permissions for the grouplater.
6. Select all the roles that you want to import.
You can use the search bar to find specific roles.
7. ClickOK to add the roles.
Once imported, the roles are added to the External Directory list and the Groups list. All identities assigned tothe role are imported into the Users list.
Imported roles can be edited for ranks, feature privileges, and device access rights to the imported role. Youcannot assign ACC users to an ACM role from the ACC Client software.
Imported identities can be added to existing groups in addition to the role they were imported with.
Imported identity information, including login credentials, is maintained by the ACM appliance.
For more information on managing groups, see the ACC Client Help files.
Linking Doors to CamerasDoors that are installed and connected to installed panels or subpanels can be linked to any number ofcameras in your site. Once a link is created, authorized users can monitor doors, identities, and configurerules in the ACC software.
Adding a Link
1. In the New Task menu , click Site Setup.
2. Select the ACM appliance, then click .
3. Click Create Link.
4. In the Select a door drop-down list, select the checkbox beside a door.
Note: The available doors depend on your permissions in the ACM appliance.
5. In the Select one or more cameras drop-down list, select the checkbox beside all the cameras thatyou want to link to the door.
6. ClickOK.
Editing and Deleting a Link
You can change the cameras that are linked to a door.
Linking Doors to Cameras 12

1. In the New Task menu , click Site Setup.
2. Select the ACM appliance, then click .
3. Select a link then click Edit Link, or Delete Link.
4. ClickOK.
Adding RulesYou can create rules in the ACC software that are triggered by ACM appliance events. These events caninclude attempts at door access and badge readers, and can trigger live video that immediately displays onall user's screens.
For a list of ACM rules, actions, and conditions, see Rule Event and Action Descriptions on page 19.
1. In the New Task menu , click Site Setup.
2. Click , then click .
3. Select all the events that will trigger the rule.
If there is blue underlined text in the rule description, click on the text to further define the event.
When the trigger event is defined, click .
4. Select all the actions that will occur in response to the triggers.
If there is blue underlined text in the rule description, click on the text to further define the action.
When the action is defined, click .
5. Select one or more conditions that will cause the rule to run. To always run the rule, clear allconditions.
If there is blue underlined text in the rule description, click on the text to further define the condition.
When the condition is defined, click .
6. Enter a Rule Name:, Rule Description:, and assign a Schedule:.
7. Click to save the new rule.
Adding a Web PageIf you're connected to the internet, you can add web pages to a site in your System Explorer. Operators canuse these web pages for quick access to your ACM appliance or other pages related to your surveillancesystem.
Adding Rules 13

1. In the System Explorer, right-click a site or site folder and select New Web Page….
2. Enter a web page Name: and URL:.
3. Select a Zoom level: to view the web page inside an image panel.
4. If it is not displayed, click to display the Site View Editor and choose where the web page appearsin the System Explorer. By default, the web page is added to the site you initially selected.
l In the site directory, drag the web page up and down the right pane to set where it isdisplayed.
l If your site includes folders, select a location for the web page in the left pane. Theright pane updates to show what is stored in that directory.
5. ClickOK.
Adding a Web Page 14
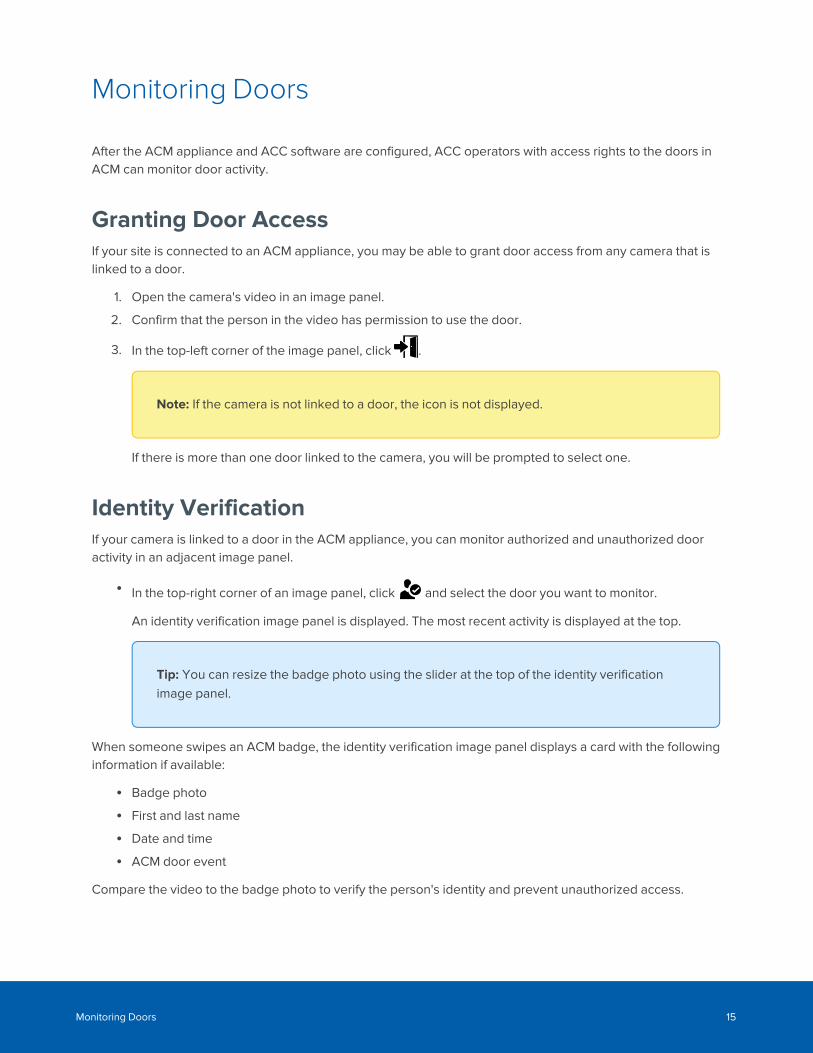
Monitoring Doors
After the ACM appliance and ACC software are configured, ACC operators with access rights to the doors inACM can monitor door activity.
Granting Door AccessIf your site is connected to an ACM appliance, you may be able to grant door access from any camera that islinked to a door.
1. Open the camera's video in an image panel.
2. Confirm that the person in the video has permission to use the door.
3. In the top-left corner of the image panel, click .
Note: If the camera is not linked to a door, the icon is not displayed.
If there is more than one door linked to the camera, you will be prompted to select one.
Identity VerificationIf your camera is linked to a door in the ACM appliance, you can monitor authorized and unauthorized dooractivity in an adjacent image panel.
l In the top-right corner of an image panel, click and select the door you want to monitor.
An identity verification image panel is displayed. The most recent activity is displayed at the top.
Tip: You can resize the badge photo using the slider at the top of the identity verificationimage panel.
When someone swipes an ACM badge, the identity verification image panel displays a card with the followinginformation if available:
l Badge photo
l First and last name
l Date and time
l ACM door event
Compare the video to the badge photo to verify the person's identity and prevent unauthorized access.
Monitoring Doors 15
Note:Theidentityverificationimagepaneldoesnotupdatewhileviewingrecordedvideooranothertab.
Identity SearchYou can search for an individual by their name or badge ID. This search displays door events using theperson's badge, as well as video from linked cameras.
1. In the New Task menu , click Identity .
2. Enter the person's name or badge ID and press Enter.
3. Select the person of interest.
4. Click Date Range to set the date and time of your search.
5. Click Doors to select the doors to include.
6. Click Search.
Up to 50 of the person of interest's most recent door events are displayed. Thumbnails of video fromlinked cameras are displayed under each door event. For more information, see Identity SearchResults below.
Identity Search ResultsA search result may show video from 5 seconds before or after a door event. This video may not alwaysmatch the person of interest, and some search results may not have video if the camera was not scheduled torecord at that time.
Review and refine your results as needed.
Refining Results
1. In the Identity Details area, select what types of door events to show.
2. In the top-left area, click Change Doors to add or remove doors from the search. Click to edit thedate range.
3. Click a thumbnail to view associated video in the image panel. Click to zoom in on the image fromthe video.
4. If you have cameras with the Avigilon Appearance Search feature enabled and linked to doors, selectAppearances Only.
Tip: Hover over the thumbnail and click to start an Avigilon Appearance Search query.
Identity Search 16

Saving Results
l Hover over a thumbnail and select the checkbox of all results you want to bookmark or export.o Click Bookmark to save the event for quick access.o Click Export to download a copy of the event.
For AVI video exports, select the Blur background checkbox to obscure everything except thedetected person.
Saving Results 17

Browsing the ACM Appliance in the ACC Client
If a web page for an ACM appliance was configured, ACC operators can access it in the ACC Client software.
Click and drag from the System Explorer to an image panel.
The web page will display in that image panel.
l ACC operators logged in with their ACM credentials will automatically be logged in to the ACMappliance.
l ACC operators without ACM credentials may see a certificate warning when they first open the webpage. Click Trust to continue to the log in page.
Note: If the ACM session times out, operators will need to log in again.
l ACC operators logged in with their ACM credentials will automatically be logged in againwhen they close the dialog box.
l Administrators can change an operator's timeout settings in the ACM appliance.
Browsing the ACM Appliance in the ACC Client 18
Rule Event and Action Descriptions
The following tables describe the trigger events, actions, and conditions that are available when you set up arule.
Note: Some actions are only available for ACC Enterprise edition software.
Rule EventsRule events are the events that trigger a rule.
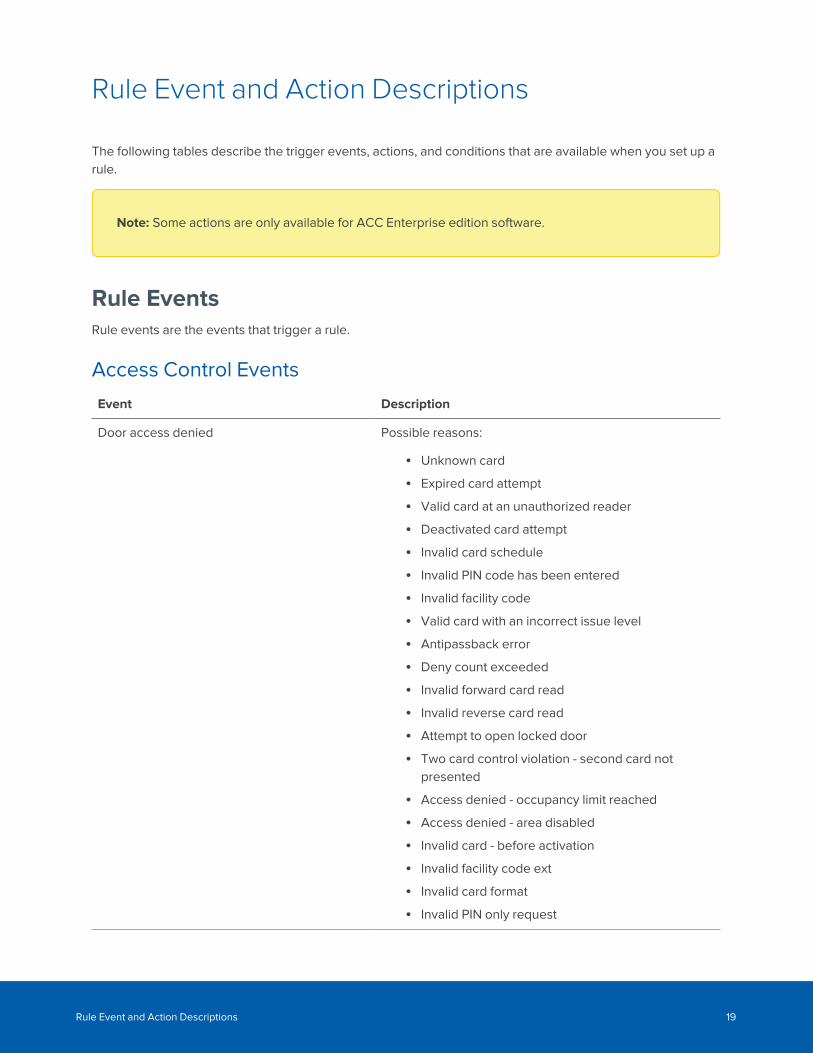
Access Control Events
Event Description
Door access denied Possible reasons:
l Unknown card
l Expired card attempt
l Valid card at an unauthorized reader
l Deactivated card attempt
l Invalid card schedule
l Invalid PIN code has been entered
l Invalid facility code
l Valid card with an incorrect issue level
l Antipassback error
l Deny count exceeded
l Invalid forward card read
l Invalid reverse card read
l Attempt to open locked door
l Two card control violation - second card notpresented
l Access denied - occupancy limit reached
l Access denied - area disabled
l Invalid card - before activation
l Invalid facility code ext
l Invalid card format
l Invalid PIN only request
Rule Event and Action Descriptions 19
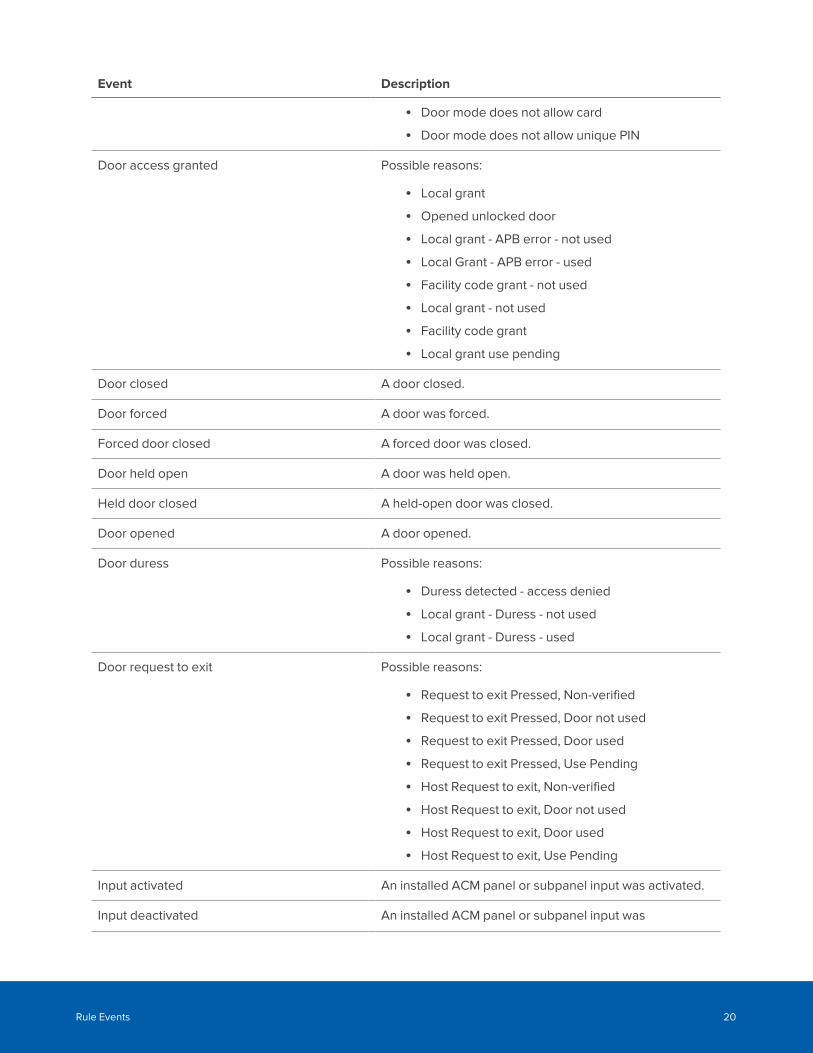
Event Description
l Door mode does not allow card
l Door mode does not allow unique PIN
Door access granted Possible reasons:
l Local grant
l Opened unlocked door
l Local grant - APB error - not used
l Local Grant - APB error - used
l Facility code grant - not used
l Local grant - not used
l Facility code grant
l Local grant use pending
Door closed A door closed.
Door forced A door was forced.
Forced door closed A forced door was closed.
Door held open A door was held open.
Held door closed A held-open door was closed.
Door opened A door opened.
Door duress Possible reasons:
l Duress detected - access denied
l Local grant - Duress - not used
l Local grant - Duress - used
Door request to exit Possible reasons:
l Request to exit Pressed, Non-verified
l Request to exit Pressed, Door not used
l Request to exit Pressed, Door used
l Request to exit Pressed, Use Pending
l Host Request to exit, Non-verified
l Host Request to exit, Door not used
l Host Request to exit, Door used
l Host Request to exit, Use Pending
Input activated An installed ACM panel or subpanel input was activated.
Input deactivated An installed ACM panel or subpanel input was
Rule Events 20

Event Description
deactivated.
Input fault detected An error was detected for an installed ACM panel orsubpanel input. Tampering may have occurred.
Input fault cleared An error detected for an installed ACM panel or subpanelinput has ended.
Rule ActionsRule actions are the response to an event.
User Notification Actions
Action Description
Display on-screen message An on-screen message is displayed about the event.
Send email An email notification is sent to the selected recipients.
Send notification to Central Monitoring Station A notification is sent to the central monitoring station.
Play a sound A notification sound is played in the ACC Client softwarewhen the event occurs.
Monitoring Actions
Action Description
Start live streaming The associated live video displays when the event occurs.
Video intercom call The video intercom call opens in a new image panel witha ring tone.
Focus of Attention The event video displays in the Focus of Attention tab if itis open.
Create Bookmark The event video is bookmarked.
Open a saved view The selected saved View automatically displays.
Start live streaming on a virtual matrix monitor The live video from the selected camera automaticallydisplays on the selected Virtual Matrix monitor.
Open a map on a virtual matrix monitor The selected map automatically displays on the selectedVirtual Matrix monitor.
Open a web page on a virtual matrix monitor The selected web page automatically displays on theselected Virtual Matrix monitor.
Rule Actions 21
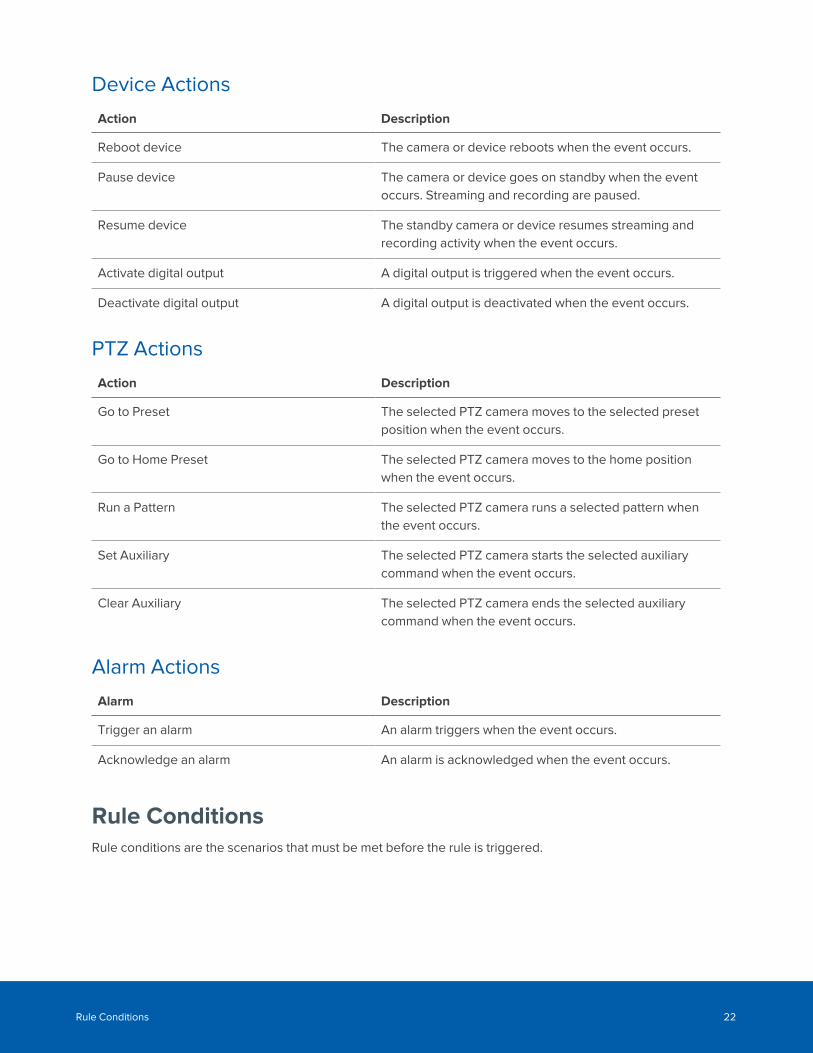
Device Actions
Action Description
Reboot device The camera or device reboots when the event occurs.
Pause device The camera or device goes on standby when the eventoccurs. Streaming and recording are paused.
Resume device The standby camera or device resumes streaming andrecording activity when the event occurs.
Activate digital output A digital output is triggered when the event occurs.
Deactivate digital output A digital output is deactivated when the event occurs.
PTZ Actions
Action Description
Go to Preset The selected PTZ camera moves to the selected presetposition when the event occurs.
Go to Home Preset The selected PTZ camera moves to the home positionwhen the event occurs.
Run a Pattern The selected PTZ camera runs a selected pattern whenthe event occurs.
Set Auxiliary The selected PTZ camera starts the selected auxiliarycommand when the event occurs.
Clear Auxiliary The selected PTZ camera ends the selected auxiliarycommand when the event occurs.
Alarm Actions
Alarm Description
Trigger an alarm An alarm triggers when the event occurs.
Acknowledge an alarm An alarm is acknowledged when the event occurs.
Rule ConditionsRule conditions are the scenarios that must be met before the rule is triggered.
Rule Conditions 22

Device Events
Condition Description
Digital input is active The rule is triggered if the connected digital input is activewhen the event occurs.
Digital input is not active The rule is triggered if the connected digital input isinactive when the event occurs.
Rule Conditions 23

For More Information
For additional product documentation and software and firmware upgrades, visit support.avigilon.com.
Technical SupportContact Avigilon Technical Support at support.avigilon.com/s/contactsupport.
For More Information 24
Related Documents