April 2016 Construcon Stormwater Field Guide

Welcome message from author
This document is posted to help you gain knowledge. Please leave a comment to let me know what you think about it! Share it to your friends and learn new things together.
Transcript

April 2016
ConstructionStormwaterField Guide

Copyright © 2016, Center for Environmental Excellence by AASHTO (American Association of State Highway and Transportation Officials). All Rights Reserved. This book, or parts thereof, may not be reproduced in any form without written permission of the publisher. Printed in the United States of America.This material is based upon work supported by the Feder-al Highway Administration under Cooperative Agreement No. DTFH61-07-H-00019. Any opinions, findings, and con-clusions or recommendations expressed in this publication are those of the author(s) and do not necessarily reflect the view of the Federal Highway Administration.

Table of Contents
Chapter 1. Introduction . . . . . . . . . . . . . . . . . . . . . . . . . . . . 2
Chapter 2. Pollution Prevention and General Housekeeping . . . . . . . . . . . . . . . . . . . . . . . . . . . . . . . . . . . 14
Material and Waste Management . . . . . . . . . . . . . . . . . 14
Street Cleaning . . . . . . . . . . . . . . . . . . . . . . . . . . . . . . . . 25
Protection of Permanent BMPs . . . . . . . . . . . . . . . . . . . 27
Illegal Discharges . . . . . . . . . . . . . . . . . . . . . . . . . . . . . . . 28
Paving and Concrete Construction . . . . . . . . . . . . . . . . 30
Non-Stormwater Management . . . . . . . . . . . . . . . . . . . 32
Chapter 3. Sediment Control . . . . . . . . . . . . . . . . . . . . . . 34
Perimeter Controls . . . . . . . . . . . . . . . . . . . . . . . . . . . . . 34
Dewatering . . . . . . . . . . . . . . . . . . . . . . . . . . . . . . . . . . . 45
Sediment Traps and Basins . . . . . . . . . . . . . . . . . . . . . . . 49
Chapter 4. Erosion Control . . . . . . . . . . . . . . . . . . . . . . . . . 52
Surface Roughening . . . . . . . . . . . . . . . . . . . . . . . . . . . . 52
Tackifier and Binders . . . . . . . . . . . . . . . . . . . . . . . . . . . 55
Hydroseeding . . . . . . . . . . . . . . . . . . . . . . . . . . . . . . . . . 59
Mulching . . . . . . . . . . . . . . . . . . . . . . . . . . . . . . . . . . . . . 61
Rolled Erosion Control Products . . . . . . . . . . . . . . . . . . 63
Chapter 5. Temporary Drainage Management . . . . . . . . . 68
Stream Crossing and Bank Stabilization . . . . . . . . . . . . 68
Temporary Berms . . . . . . . . . . . . . . . . . . . . . . . . . . . . . . 75
Storm Drain Inlet Controls . . . . . . . . . . . . . . . . . . . . . . . 78
Slope Drains . . . . . . . . . . . . . . . . . . . . . . . . . . . . . . . . . . . 81
Temporary Check Dams . . . . . . . . . . . . . . . . . . . . . . . . . 85
Outlet Protection . . . . . . . . . . . . . . . . . . . . . . . . . . . . . . 89
References . . . . . . . . . . . . . . . . . . . . . . . . . . . . . . . . . . . . . . 94
Table of Contents | 1

Ch. 1. Introduction | 2
Chapter 1. INTRODUCTION
Scope and Objective
Construction sites can be a source of sediment and other pollutants to waterways . Best management practices (BMPs) are devices and activities that reduce or eliminate pollution sources and can include silt fences, settling ba-sins, and even training .
This guide is a quick reference for inspectors and resident engineers in construction on topics related to installation, maintenance, and inspection of common BMPs . Using this guide helps departments of transportation (DOTs) stay in compliance with federal, state, and local regulations for improving stormwater quality and provides guidance where local publications may currently be lacking .
Fig. 1-1. Proper management of construction sites through the use of BMPs can dramatically reduce stormwater impacts. Source: RBF Consulting
Preface to Readers
This publication includes discussion of BMPs, organized by their use . Categorization of BMPs may vary from state to state; however the basic recommendations for field implementation remain consistent . The information

presented in this guide is based on techniques and control measures considered generally effective in many areas of the country . This guide is not meant to be a design manual or pollution prevention plan, nor is it meant to supersede, substitute, or make more stringent well-defined practices or regulatory standards .
Fig. 1-2. Construction sites should aim to produce no more sediment risk than the natural condition as this re-vegetated slope does.Source: Utah DOT
Federal Laws and Requirements
Federal water quality regulations require that construction sites disturbing one acre or more of land get coverage under a National Pollutant Discharge Elimination System (NPDES) permit . Permits may be issued by the United States Environ-mental Protection Agency (EPA) or at the state level .
The goal of the EPA is to prevent the construction site from causing or contributing to water pollution . Water pollution can result from most activities on a construction site if they are not correctly managed with BMPs .
BMPs use the following strategies to protect water quality:
I Reduce the time bare soil is exposed to rainfall by project sequencing and scheduling .
Ch. 1. Introduction | 3

I Use pollution prevention as a more practical and effective means compared to pollution removal . Do what is possible to prevent pollution contact with stormwater .
I Use effective combinations of erosion and sediment control measures on the construction site .
I Use buffers of natural vegetation when construction sites are next to environmentally sensitive areas or water bodies .
I Control the perimeter of the site with appropriate sediment controls .
I Reduce the volume of construction site runoff wherev-er feasible .
I Control offsite/onsite runoff during construction to protect slopes and disturbed areas .
I Avoid disturbing natural channels .
I Stabilize bare soil areas as soon as possible, to elimi-nate erosion .
The information discussed in this guide provides informa-tion on installing and maintaining BMPs so that they are effective .
Erosion Control FundamentalsYou need an understanding of the different types of ero-sion to maintain erosion control BMPs .
Splash erosion is the primary source of erosion . It results from rain drops striking bare soil directly .
Sheet erosion is the removal of a uniform thin layer of soil by raindrop splash or water runoff . It is characterized by a surface film of water 1/16”–1/8” deep .
Rill erosion results from sheet flow that becomes concen-trated into many small channels . Rill erosion areas are generally small enough to step across .
Gully erosion is easily identifiable by large (too far to step across), deep cuts in the soil . They are often found in areas
Ch. 1. Introduction | 4

without evidence of other erosion types . Rill erosion can easily progress to gully erosion if BMPs are not installed, installed correctly, or not maintained .
Fig. 1-3. Splash erosion is often very hard to see,
but it is a significant physical process.Source: http://www.dot.ca.gov (modified)
Fig. 1-4. Gully formation occurs when flows are not adequately controlled with the appropriate BMPs.Source: RBF Consulting
Ch. 1. Introduction | 5

Fig. 1-5. All forms of erosion can occur at a construction site. Here the rills and gullies will need repair and could have been prevented with proper BMPs. Source: RBF Consulting
General Tips
Assessment and Planning
You should perform a general site assessment and plan-ning before implementing BMPs . Things to be reviewed in the field include:
I Review the project’s stormwater pollution prevention plan (SWPPP) requirements .
I Identify and understand the basic drainage patterns of the project site—from where does runoff originate, where does it go, and how much is anticipated .
I Understand how the continuing sequence of project construction activities will change current drainage patterns based on grading, vegetation changes, pav-ing, and other physical features .
I Identify all areas where runoff will discharge from the site for all phases of construction .
I Identify the areas of the project site that are the most likely sources of sediment . Cover and contain construc-tion materials .
Ch. 1. Introduction | 6

I Select BMPs for runoff management, soil stabilization, and sediment control based on the project site condi-tions, geography, and typical precipitation patterns .
BMP Tool Box—Runoff Management
Runoff management approaches include tools to convey water into and through the site . In many instances, pru-dent runoff management strategies involve the diversion of clean water from offsite areas around the site .
Fig. 1-6. Planning flow chart—runoff management.
BMP Tool Box—Soil Stabilization
Erosion control BMPs include a range of cover options including spray-on binders, spray-on mulches, spray-on ma-trices, hydroseed, rolled erosion control products (RECPs), and others . They all share common function in that they keep soil from becoming mobile . The best approach for your site will depend on the intended design life, project slope, soil type, environmental requirements, and cost . In general, the original product used for erosion control will need to be reapplied as it becomes ineffective over time .
Ch. 1. Introduction | 7
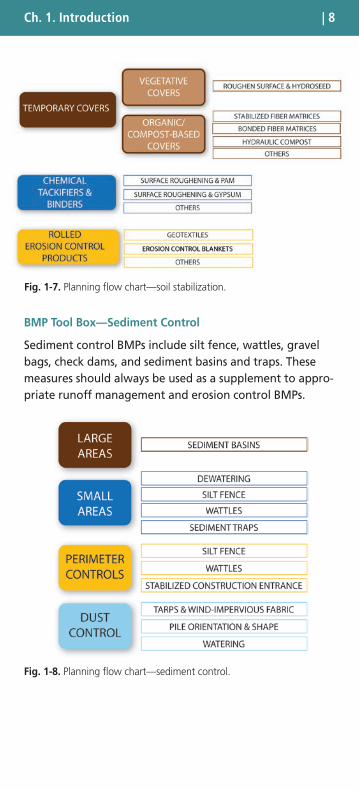
Fig. 1-7. Planning flow chart—soil stabilization.
BMP Tool Box—Sediment Control
Sediment control BMPs include silt fence, wattles, gravel bags, check dams, and sediment basins and traps . These measures should always be used as a supplement to appro-priate runoff management and erosion control BMPs .
Fig. 1-8. Planning flow chart—sediment control.
Ch. 1. Introduction | 8

Controlling Dust
Wind erosion control practices function by:
I Reducing wind effects on the soil surface by covering piles with a wind-impervious fabric or other material, or by changing pile orientation and shape and/or;
I Water or calcium chloride applications .
Special Considerations for Linear Projects
Linear projects such as highways present special challenges for installation and maintenance of BMPs . Safety con-siderations, along with limited work area for effectively managing erosion and sediment controls are two main challenges . The following are things to keep in mind when maintaining BMPs for linear projects:
I Avoid deep ponding areas that are not protected by temporary barriers .
I Do not allow water to pond in the clear recovery zone .
I Pay attention to sight distance obstructions when se-lecting controls . Do not use controls that may obstruct sight lines .
I Create a plan for maintenance . BMPs must be main-tained; provide access that does not require traffic control and keeps personnel safe .
I Do not use inlet protection BMPs that would cause flooding in the traveled way, or cause the flow spread to enter the traveled way .
I Use alternative control methods where standing water may create potential hazards .
I Large drainage areas present situations with high flow volumes but limited areas for proper controls . It is imperative to recognize these areas at the be-ginning of a project and identify BMPs intended to control large flows at the start and as construction progresses . And also:
– Look to provide diversions to bypass offsite water around the project area .
Ch. 1. Introduction | 9
– Use alternative BMPs or modify the traditional de-sign when limited work area is a concern .
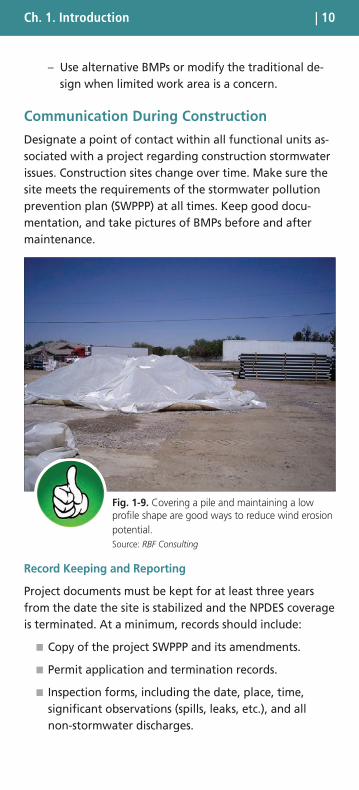
Communication During Construction
Designate a point of contact within all functional units as-sociated with a project regarding construction stormwater issues . Construction sites change over time . Make sure the site meets the requirements of the stormwater pollution prevention plan (SWPPP) at all times . Keep good docu-mentation, and take pictures of BMPs before and after maintenance .
Fig. 1-9. Covering a pile and maintaining a low profile shape are good ways to reduce wind erosion potential.Source: RBF Consulting
Record Keeping and Reporting
Project documents must be kept for at least three years from the date the site is stabilized and the NPDES coverage is terminated . At a minimum, records should include:
I Copy of the project SWPPP and its amendments .
I Permit application and termination records .
I Inspection forms, including the date, place, time, significant observations (spills, leaks, etc .), and all non-stormwater discharges .
| 10| 10Ch. 1. Introduction

I The corrective Action Log .
I Records of weather conditions (keeping a rain gage on site is highly recommended) .
I BMP maintenance activity and troubleshooting .
I Names of inspector(s) and other key members of the DOT, contractor, and sub-contractors .
Fig. 1-10. Establishing responsibility for regular inspection and maintenance of stormwater BMPs is an important part of work and communication management key to preventing failures as show here. Source: RBF Consulting
Work Management
Stormwater pollution prevention is typically handled by more than one person . Roles and responsibilities should be understood and documented within the project SWPPP including:
I Overall lead
I Spill response
I Weather monitoring
I Housekeeping and BMP installation and maintenance
I Record keeping and reporting
I Training
Ch. 1. Introduction | 11

General BMP Inspection and Troubleshooting
Each BMP presented in this guide has information on inspection, maintenance, and associated work . Many of the problems occurring in the field fall into the following general categories and are not associated specifically with any one BMP . A consideration for all is staff training .
Table 1-1. General BMP Troubleshooting
If Your BMP Experiences
Then Consider
Erosion• Additional erosion control/soil stabilization BM
Ps• Diversion of flow
around the area of concern using temporary runoff m
anagement practices
• Modifying your construction sequence or schedule
Turbid Discharge• M
aintenance or redesign
Sediment and Debris
Buildup
• Additional erosion control/soil stabilization BMPs
• More frequent m
aintenance and clean out• Diversion using tem
porary runoff managem
ent practices• M
odifying your construction sequence or schedule
Standing Water
• Inspection of inlets and pipes for blockage from trash and debris
• Limit the drainage area to the BM
P using runoff managem
ent practices• Increase the size (surface area) of your BM
P• Add erosion and sedim
ent control BMPs w
ithin the contributing drainage area
Bypass• Increase the size of your BM
P• Verify the size and physical adequacy of inflow
and outflow structures, conduits, etc.
Malfunction Due to
Design Deficiency
• Provide temporary runoff m
anagement controls to divert runoff aw
ay from problem
area• Use runoff controls to slow
the flow of runoff
• Contact the design engineer of record for solution
Trackout
• Perform m
aintenance or provide additional perimeter controls
• Verify that access points are controlled• Provide a tire cleaning area• Perform
street sweeping
| 12| 12Ch. 1. Introduction

Final Stabilization and Permit Termination
BMPs must be maintained until work is completed, the project site is stabilized, and the project is eligible to end NPDES permit coverage . Requirements vary based on lo-cation, but stabilization generally occurs when vegetation covers unpaved areas with a uniform density of at least 70 percent of the pre-project condition . NPDES permit cover-age also requires:
I Removal of trash and debris
I Removal of temporary BMPs and stabilization of resulting bare areas
I Repair and stabilization of areas showing erosion
I Permanent BMPs and drainage systems are in place and working
Fig. 1-11. Final stabilization is reached typically at 70 percent uniform cover. That percentage should be applied to the percent cover of pre-existing conditions.Source: RBF Consulting
Ch. 1. Introduction | 13

Chapter 2. POLLUTION PREVENTION AND GENERAL HOUSEKEEPING
Material and Waste Management
General Description
Building materials, including stockpiles, construction site wastes, sanitary wastes, and concrete wash water must be properly disposed of .
Implement and maintain the following:
I Protect stockpile areas with perimeter controls
I Cover and contain solid and liquid waste, including concrete washout areas and sanitary facilities
I Trash disposal and recycling
I Cover and contain materials
I Have a spill kit and clean up spills
Fig. 2-1. Trash and debris are among those most common pollutants at construction sites. Proximity to open storm drains is especially problematic.Source: RBF Consulting
Inspection and Maintenance
Inspect weekly or as required otherwise by local proce-dures or regulatory standards .
Ch. 2. Pollution Prevention and Housekeeping | 14

Stockpiles and Contaminated Zones
I Inspect covers, liners, perimeter controls, and contain-ment structures for tears or failure points . Repair as necessary to maintain proper function .
I Inspect perimeter controls for breaches or failure points .
I Check for signs of erosion or rilling on stockpiles .
I Inspect capacity of containment structures .
Fig. 2-2. This portable toilet shows no evidence of trash, debris, or drainage of liquid waste. Note the use of perimeter controls along the downward sides.Source: RBF Consulting
Solid and Liquid Waste Management
I Inspect concrete washout facility for torn liner, missing or damaged gravel bags, and sufficient remaining holding capacity .
I Provide signs for the concrete washout-area location .
I Inspect areas around dumpsters and drainage ways for trash and debris .
I Collect site trash daily . Cover trash containers at the end of each work day and when it is raining .
I If dumpsters are full, empty them immediately .
Ch. 2. Pollution Prevention and Housekeeping | 15

I Inspect areas in and around portable toilets for trash and debris or liquid waste .
Material Use, Storage, and Spills
I Keep temporary containment facilities free of cap-tured rainwater and spills .
I Keep supplies of spill control and cleanup materials onsite, especially near storage, unloading, and main-tenance areas .
I Keep Material Safety Data Sheets (MSDS) and the spill prevention and control plan up to date .
I Ensure SWPPP requirements are followed .
I Do periodic staff training on spill prevention and con-tainment methods .
Fig. 2-3. Paints should ideally be stored inside. When this is not possible, a tarp or cover is the next best option.Source: RBF Consulting
Other General Practices
Stockpiles and Contaminated Zones
DO install perimeter controls around stockpile to protect the pile from erosion and prevent sedimentation .
DO wet stockpiles to control dust during dry periods .
Ch. 2. Pollution Prevention and Housekeeping | 16

DO cover stockpiles with plastic sheeting to protect from rain and wind .
DO clean up contaminated zones .
DO NOT allow ground, surface, or stormwater to flow through contaminated zones .
DO NOT stockpile contaminated soils near stormdrains, waterways, wetlands, or low lying areas .
Fig. 2-4. Materials are being properly stored on pal-lets, and unused materials are covered with a tarp.Source: Colorado DOT
Solid and Liquid Waste Management
DO designate waste collection areas and sanitary facility areas that are level, paved, covered or in secondary containment, and provide easy access for servicing .
DO prevent stormwater from entering waste contain-ment areas .
DO treat and dispose of sanitary or septic wastes in ac-cordance with state and local requirements .
DO secure temporary sanitary facilities to prevent over-turning during high winds or by vandals .
Ch. 2. Pollution Prevention and Housekeeping | 17
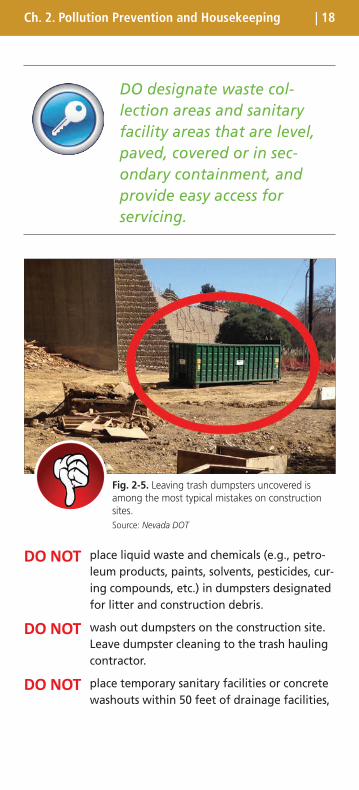
DO designate waste col-lection areas and sanitary facility areas that are level, paved, covered or in sec-ondary containment, and provide easy access for servicing.
Fig. 2-5. Leaving trash dumpsters uncovered is among the most typical mistakes on construction sites.Source: Nevada DOT
DO NOT place liquid waste and chemicals (e .g ., petro-leum products, paints, solvents, pesticides, cur-ing compounds, etc .) in dumpsters designated for litter and construction debris .
DO NOT wash out dumpsters on the construction site . Leave dumpster cleaning to the trash hauling contractor .
DO NOT place temporary sanitary facilities or concrete washouts within 50 feet of drainage facilities,
| 18Ch. 2. Pollution Prevention and Housekeeping

watercourses, and traffic circulation . Keep both away from concentrated storm flow .
DO NOT discharge or bury wastewater .
DO NOT discharge or bury wastewater.
Fig. 2-6. Careful inspection could have prevented this spill onto the roadway. Stormwater inlets near the areas should immediately be assessed for im-pact. Since the spill appears small, rags may prove effective for cleanup.Source: RBF Consulting
Material Use, Storage, and Spills
DO keep plenty of spill cleanup supplies available for the materials being stored or used onsite . Keep spill cleanup supplies near storage, unloading, and main-tenance areas .
DO designate an area(s) for material delivery and stor-age .
DO line and berm material storage areas if located on
| 19Ch. 2. Pollution Prevention and Housekeeping

bare soil . When available, place material storage areas in paved areas .
DO store chemicals in a storage shed or in water-tight containers with secondary containment .
DO store materials in original containers with legible product labels .
DO minimize the storage of hazardous materials onsite .
DO keep a list of potential non-visible pollutants at the site . Have authorized and trained personnel do sam-pling in accordance with requirements, if needed .
DO cover and protect spills from stormwater run-on during rainfall so long as it does not compromise cleanup activities .
DO use a rag for small spills on paved surfaces . Use a damp mop for general cleanup . Use absorbent mate-rial for larger spills .
DO keep a list of potential non-visible pollutants at the site. Have authorized and trained personnel do sam-pling in accordance with requirements, if needed.
DO use a rag for small spills on paved surfaces. Use a damp mop for general cleanup. Use absorbent ma-terial for larger spills.
DO NOT over-apply fertilizers, pesticides, and herbi-cides—follow manufacturer’s directions . Do not apply if rain is in forecast within three days .
| 20Ch. 2. Pollution Prevention and Housekeeping

DO NOT locate temporary storage areas near vehicular traffic .
DO NOT store bagged or boxed materials on the ground . Cover them and store on pallets .
DO NOT hose down or bury dry materials .
DO NOT locate material delivery and storage areas near waterways or any place with the poten-tial to come into contact with stormwater runoff .
Fig. 2-7. Waste and debris permitted to come into contact with large amounts of drainage represent a significantly greater environmental risk.Source: RBF Consulting
DO NOT locate material delivery and storage areas near waterways or any place with the potential to come into contact with stormwater runoff.
| 21Ch. 2. Pollution Prevention and Housekeeping

Fig. 2-8. Left—A concrete washout left unprotected.Source: Nevada DOT
Right—A concrete washout adequately covered.
Fig. 2-9. While there appears room in this concrete washout, it has reached the recommended 75 percent capacity and should be cleaned out.Source: RBF Consulting
| 22Ch. 2. Pollution Prevention and Housekeeping
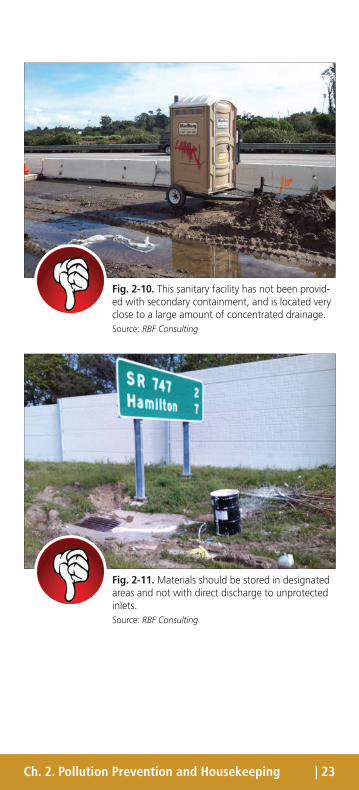
Fig. 2-10. This sanitary facility has not been provid-ed with secondary containment, and is located very close to a large amount of concentrated drainage.Source: RBF Consulting
Fig. 2-11. Materials should be stored in designated areas and not with direct discharge to unprotected inlets.Source: RBF Consulting
| 23Ch. 2. Pollution Prevention and Housekeeping

Fig. 2-12. Workers overlook placement of small amounts of waste material such as this in proper disposal areas.Source: RBF Consulting
Fig. 2-13. Equipment and vehicles should be inspected routinely for leaks. An ample supply of cleanup materials should be kept at all designated maintenance areas where leaks and spills are likely to occur.Source: Colorado DOT
| 24Ch. 2. Pollution Prevention and Housekeeping

Fig. 2-14. This picture depicts residue from cleanout of a concrete truck not performed in a controlled washout area.Source: RBF Consulting
Street Cleaning
General Description
The construction of streets, roads, highways, and parking lots can generate pollutants like sediment, debris, and trash, which can be controlled by street sweeping . Street sweeping involves the use of self-propelled or walk-behind equipment to remove sediment and other pollutants from paved surfaces .
Inspection and Maintenance
Inspect weekly for pollutant accumulation or as dictated otherwise by local procedures or regulatory standards .
I Inspect entrance and exit points for sediment tracking daily .
I Adjust brooms as necessary to get the best results .
| 25Ch. 2. Pollution Prevention and Housekeeping

Fig. 2-15. This sweeper is properly cleaning up a construction site.Source: Colorado DOT
Other General Practices
DO perform street cleaning more often based on traffic and inspection results .
DO properly dispose of wastes .
DO NOT rely on sweeping if it is ineffective due to soil type or moisture present .
DO NOT sweep up unknown substances or objects that may be hazardous .
DO perform street cleaning more often based on traffic and inspection results.
Other Associated Work
I If the sweeper is not picking up sediment, adjust the sweeper brooms or consider alternate attachments .
I If sweeping causes excessive dust, use a sweeper with water, air recirculation, or filtration .
| 26Ch. 2. Pollution Prevention and Housekeeping

Protection of Permanent BMPs
General Description
Permanent BMPs are used to treat stormwater after site development is completed . State and federal programs require public agencies engaged in new development or redevelopment activities to install permanent BMPs .
Some permanent BMPs can be used as temporary construc-tion BMPs if indicated by the plans . However, other perma-nent BMPs including infiltration, bioretention, and media filter BMPs must be protected from construction activities . This may be done with the use of diversion berms or ditch-es and fencing or roping off of future protected areas .
Inspection and Maintenance
Inspect weekly or as dictated otherwise by local procedures or regulatory standards .
I Check condition of construction fencing or roping around permanent BMP areas .
I Inspect diversion berms or ditches for possible breach or washout . Look for signs of sediment entering fu-ture infiltration areas .
I Do not allow construction site runoff to enter perma-nent BMPs unless the BMP has been designated for use during construction and approved by the Engi-neer .
I Remove sediment retained by diversion berms once it has reached one-half of the exposed height of the berm .
DO stabilize upstream drainage areas before construction of infiltration, bioretention, and media filter BMPs.
| 27Ch. 2. Pollution Prevention and Housekeeping

Other General Practices
DO stabilize upstream drainage areas before construc-tion of infiltration, bioretention, and media filter BMPs .
DO place diversion berms around edges of future infiltra-tion sites to prevent sediment from entering during construction .
DO NOT use retention/detention permanent BMPs as temporary construction BMPs unless designat-ed for temporary use on plans .
If permanent infiltration, bioretention, or media fil-ter BMP areas are clogged with sediment, they must be re-built.
Other Associated Work
If permanent infiltration, bioretention, or media filter BMP areas are clogged with sediment, they must be cleaned . Additional perimeter protection and soil stabilization mea-sures should be provided where appropriate .
Illegal DischargesGeneral Description
Illegal (a .k .a . “illicit”) discharges refer to unpermitted non-stormwater discharges and dumping of waste within the project site .
Inspection
Inspect weekly, following a runoff-producing event, or as dictated otherwise by local procedures or regulatory standards .
I Inspect site for illegal dumping before beginning the job .
| 28Ch. 2. Pollution Prevention and Housekeeping

I Inspect site during the job for illegal dumping or connections .
I Inspect the site perimeter for illegally dumped materi-al that may enter the job site .
I Inspect storm drain outfall locations and manholes for illicit connections . Signs of illicit connections include:
– Water flow during dry weather
– Ground staining
– Pungent odors
– Discoloration or oily substances in the water
– Excessive sediment deposits, especially next to or near other active construction projects
– Non-standard junction structures
– Broken concrete or other disturbances at or near junction structures
Fig. 2-16. Illegal dumping often occurs at the perimeter of the site, where access is hardest to control. Source: RBF Consulting
Other General Practices
DO treat unlabeled and unidentifiable material as haz-ardous .
DO notify your environmental division or section of illicit connections and illegal dumping or discharge events at the time of discovery .
| 29Ch. 2. Pollution Prevention and Housekeeping

DO notify the local stormwater management agency and state regulatory agency of illicit connections or discharges to the storm drain system .
DO notify the local law enforcement agency for illegal dumping .
DO NOT allow employees and subcontractors to dis-pose of non-job-related trash or materials at the construction site .
DO notify the local storm-water management agency of illicit connections or dis-charges to the storm drain system.
Paving and Concrete Construction
General Description
Paving and concrete construction activities include:
I Saw cutting and pavement demolition and grinding
I Pavement installation
I Concrete curing and finishing
I Tack coating and sealing
I Striping and pavement marking
General Practices
DO protect drainage inlet structures and manholes either with plastic covering or sediment barriers .
DO collect removed material by mechanical or manual methods (do not hose down areas) .
DO properly recycle or dispose of old, spilled, or broken asphalt .
| 30Ch. 2. Pollution Prevention and Housekeeping

DO protect drainage inlet structures and manholes either with plastic covering or sediment barriers.
DO collect and contain residue from grinding operations, including cooling water .
DO clean up leaks and spills with absorbent materials .
DO NOT apply seal coat, tack coat, slurry seal, or fog seal, if rain is predicted during the application or curing period .
DO NOT allow slurry, sweepings, or aggregate to enter storm drains or watercourses .
DO NOT allow sand or gravel placed over new asphalt to wash into storm drainage systems, streets, or watercourses .
DO NOT pre-heat, transfer, or load bituminous material near stormwater drainage systems or water-courses .
DO NOT fill pre-heaters or melting tanks beyond six inches from the top .
DO NOT apply seal coat, tack coat, slurry seal, or fog seal, if rain is predicted during the application or curing period.
| 31Ch. 2. Pollution Prevention and Housekeeping

Non-Stormwater Management
General Description
Non-stormwater management includes water conservation and management of potable water/irrigation . Non-storm-water must be fully contained and properly disposed of, unless discharges to the storm drain or off the site are explicitly permitted .
Inspection and Maintenance
Inspect daily for non-stormwater or as dictated otherwise by local procedures or regulatory standards .
I Inspect and verify that activity-based BMPs are in place before starting authorized non-stormwater discharges .
I Inspect irrigated areas within the construction limits for excess watering and overspray—correct problems .
I Inspect irrigated areas regularly for signs of erosion—correct problems .
I Maintain water equipment as needed to prevent unintended discharges . Water equipment includes water trucks, water reservoirs, irrigation systems, and hydrant connections .
Fig. 2-17. Vehicle leaks are a common non-storm-water discharge. They must be identified and fixed as soon as possible.Source: RBF Consulting
| 32Ch. 2. Pollution Prevention and Housekeeping

Other General Practices
DO stabilize water truck filling area .
DO repair water leaks promptly .
DO direct uncontaminated construction water runoff to areas where it can soak into the ground or be collect-ed and reused .
DO lock water tank valves to prevent unauthorized use .
DO direct uncontaminated construction water runoff to areas where it can soak into the ground or be col-lected and reused.
DO NOT allow washing of vehicles and equipment onsite .
DO NOT use water to clean construction areas . If water must be used, sweep and vacuum the surface first to remove dirt .
DO NOT use water to clean construction areas.
Other Associated Work
I Repair broken water lines as soon as possible .
I Shut off the water source to broken lines, sprinklers, or valves as soon as possible to prevent excess water flow .
| 33Ch. 2. Pollution Prevention and Housekeeping

Chapter 3. SEDIMENT CONTROL
Perimeter Controls
General Description
Perimeter controls are used to keep sediment-laden storm-water from entering or leaving a construction site and of-ten define limits of disturbance . Perimeter controls should be installed prior to beginning construction activities . Com-mon perimeter controls include silt fences, wattles, and stabilized construction entrances . It is worth noting that silt fences and wattles, although discussed within this section for organizational purposes, are effective controls that are also commonly applied within the interior of a site .
Fig. 3-1. Perimeter controls should clearly define the entrance/exit of the site. This is critical for sepa-rate projects in adjacent locations.Source: Nevada DOT
Silt Fence
A silt fence is a length of filter fabric stretched between anchoring posts spaced at regular intervals . Silt fences can be an effective barrier to prevent sediment transport in stormwater flow .
Ch. 3. Sediment Control | 34

Fig. 3-2. Isometric view of a silt fence installation.Source: Colorado DOT
Fig. 3-3. Notice the sediment within the gutter caused by lack of perimeter controls.Source: Nevada DOT
Fig. 3-4. Silt fence installation detail.Source: Utah DOT
Ch. 3. Sediment Control | 35
filter fabric
backfillrunoff
6 inchesminimum
6 inchesminimum

Fig. 3-5. Too much dirt can cause the silt fence to tip over or break.Source: Colorado DOT
Wattles
Wattles, also called fiber rolls, are biodegradable rolls of straw fibers or compost surrounded by natural fiber netting . Synthetic materials may be used, check the project requirements . They can be used at the perimeter of the construction area or on graded slopes . Wattles can slow down runoff and trap sediment .
Stabilized Construction Entrances
Fig. 3-6. This is a poor installation of a construction entrance. It lacks perimeter controls.Source: Colorado DOT
Ch. 3. Sediment Control | 36

Construction entrances can be stabilized with the use of gravel three to six inches in diameter or larger and geo-textile fabrics . As a vehicle exits, the stabilized entrance removes mud and dirt from the tires and undercarriage, reducing sediment transport off site .
PLAN
SECTION A-A
SECTION B-B
Crushed aggregate
Crushed aggregate
Filter fabric
Filter fabric
12 in. Min, unless otherwisespecified by a soils engineer
12 in. Min, unless otherwisespecified by a soils engineer
Sediment trappingdevice
Corrugated steel panels
Four times the circumferenceof the largest construction vehicle tire.
As required toaccomodateanticipatedtraffic.
MatchingExistingGrade
NOTE:Construct sediment barrierand channelize runoff tosediment trapping device
Corrugated steel panels
Varies
Varies
A A B
B
Varies
Ditc
h
EXIS
TIN
G P
AVED
RO
ADW
AY
Original grade
Original grade
Fig. 3-7. California Standard Plans.Source: Caltrans
Ch. 3. Sediment Control | 37

PLAN
MatchExistingGrade
Temporary pipe culvertas needed
Four times the circumferenceof the largest construction vehicle tire
Width asrequired toaccomodateanticipatedtraffic
Ditc
h
EX
ISTI
NG
PAV
ED
RO
AD
WAY
NOTE:Construct sediment barrierand channelize runoff tosediment trapping device
Fig. 3-8. California Standard Plans.Source: Caltrans
Inspection and Maintenance
Inspect weekly or as dictated otherwise by local procedures or regulatory standards .
Silt Fence
I Inspect for unprotected areas that may need silt fencing .
I Inspect for incorrect placement; specifically make sure fence is placed along contours and not in areas of concentrated flow .
Make sure silt fence is placed along contours and not in areas of concentrat-ed flow.
I Inspect for incorrect installation; specifically lack of entrenchment, breaches or end flanking, stakes on downslope side of fabric and fabric trenched in .
Ch. 3. Sediment Control | 38

I Inspect reinforcement and staking materials for un-dermining or structural failure .
I Inspect for over-accumulation of sediment and remove collected sediment when it reaches a critical height along fence as required .
I Inspect connections of silt fence sections to ensure ends are wrapped together and not gaps are present .
Wattles
I Inspect for sediment build up behind wattle . Remove sediment if it has collected to more than half the diameter of the wattle .
I Inspect for incorrect placement; specifically make sure wattles are placed along contours and not in areas of concentrated flow .
I Inspect for gaps between wattles or evidence that flow is going around the ends of the wattles .
I Inspect for missing stakes or damaged netting .
Inspect for sediment build-up behind wattle. Remove sediment if it has collected to more than half the diam-eter of the wattle.
Ch. 3. Sediment Control | 39

Fig. 3-9. This wattle is clearly trapping sediment, although removal of trapped sediment is required to maintain effectiveness.Source: Idaho Transportation Department
Note:Install fiber roll/wattlesalong a level contour
Stake spacing as required by contract
Stake depths as required by contract
Install a fiber roll/wattlesnear slope where it transitionsinto a steeper slope
fiber roll/wattle
Excavated material
Wood stake
Slope varies
TYPICAL FIBER ROLL/WATTLE INSTALLATION
ENTRENCHMENT DETAIL
Vertical spacing along face of the slope variesbetween 10 ft and 20 ft
Fiber roll/wattles
Fig. 3-10. California Standard Plans.Source: Caltrans
Ch. 3. Sediment Control | 40
Stabilized Construction Entrances
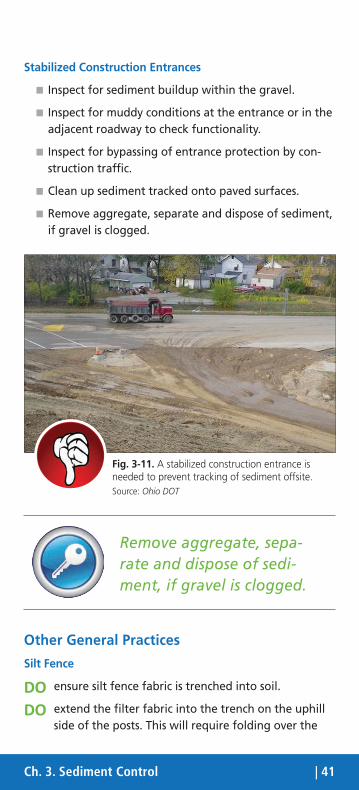
I Inspect for sediment buildup within the gravel .
I Inspect for muddy conditions at the entrance or in the adjacent roadway to check functionality .
I Inspect for bypassing of entrance protection by con-struction traffic .
I Clean up sediment tracked onto paved surfaces .
I Remove aggregate, separate and dispose of sediment, if gravel is clogged .
Fig. 3-11. A stabilized construction entrance is needed to prevent tracking of sediment offsite.Source: Ohio DOT
Remove aggregate, sepa-rate and dispose of sedi-ment, if gravel is clogged.
Other General Practices
Silt Fence
DO ensure silt fence fabric is trenched into soil .
DO extend the filter fabric into the trench on the uphill side of the posts . This will require folding over the
Ch. 3. Sediment Control | 41

first six inches of fabric so that is anchored under the trench backfill material .
DO reinforce standard strength filter fabric with wire mesh when placed at the base of steep slope in limit-ed work areas .
DO install J-Hooks to increase effectiveness at 12- to 18-foot vertical intervals along the base of the fence at no greater than 500-foot horizontal intervals .
DO NOT place across live streams or intermittently flowing channels or perpendicular to slopes .
Fig. 3-12. This picture shows an improperly installed silt fence (trenching, post and fence place-ment). This is a common problem with some bridge projects and limited work area. Silt fence backing or reinforced silt fence is recommended.Source: RBF Consulting
Wattles
DO ensure that wattles are installed in a shallow depres-sion along a level contour .
DO overlap ends of adjacent wattles .
DO NOT allow flow or sediment to pass under the wattle .
DO NOT damage netting while installing stakes .
Ch. 3. Sediment Control | 42

Stabilized Construction Entrances
DO construct at least to minimum agency dimensional standards .
DO construct with angular, clean, washed gravel at least three to six inches in diameter (or as required otherwise by local standards) . Increase rock size as equipment size increases .
Fig. 3-13. The size and placement of rock is ineffec-tive at controlling sediment at the project entrance. Larger rock combined with a filter fabric would help. Source: RBF Consulting
DO place geotextile fabric underneath the gravel to pre-vent it from being pressed into the underlying soil .
DO construct on level ground that is properly graded to prevent runoff .
DO use clearly visible physical barriers to guide vehicles to use the stabilized entrance/exit .
DO limit the speed of vehicles to five miles per hour or less to lessen dust .
DO place geotextile fab-ric underneath the gravel to prevent it from being pressed into the soil.
Ch. 3. Sediment Control | 43

Other Associated Work
Silt Fence
I Repair undercut silt fences by re-trenching and com-pacting .
I Repair or replace split, torn, weathered, or slumping fabric .
Wattles
I Repair or replace wattles that are torn or flattened .
I Replace wattles that have biodegraded . The typical life span for straw wattles is 12 months .
Fig. 3-14. This silt fence is poorly maintained. Ac-cumulated sediment should be removed. Silt fence should not be installed in a water course.Source: Colorado DOT
Stabilized Construction Entrances
I If construction entrance is muddy:
– Stone is too small . Install larger stone .
– Pad too thin . Install additional stone .
– Install additional filter fabric under pad to reduce migration of underlying soil into the stone and vice versa .
Ch. 3. Sediment Control | 44

I If sediment is washing onto road:
– Runoff control is inadequate . Improve up-gradient runoff control, as necessary .
– Entrance is too short for construction traffic . Extend the entrance beyond the minimum design standard .
– Entrance is not sufficiently flared at the road en-trance .
– Use a tire wash in combination with the stone entrance . Wash the tires of exiting vehicles with pres-surized water . Do not allow water to exit the site .
Fig. 3-15. Persistent sediment tracking may require street sweeping or a tire wash in combination with an entrance control (in this case, shaker plates).Source: Nevada DOT
Dewatering
General Description
Dewatering is used to draw down water in pits and trench-es that have been submerged from:
I Discharges of non-stormwater and stormwater
I Groundwater
I Water diversions
Dewatering structures settle and filter sediment-laden water using a variety of tanks and filters . The quantity and
Ch. 3. Sediment Control | 45

type of discharge from dewatering activities is regulated by NPDES permits . Construction staff should be familiar with these requirements and restrictions .
Inspection and Maintenance
For all dewatering systems:
I Ensure only clear water is discharged offsite
I Monitor operations to ensure prevention of offsite discharge or erosion .
When using filter bags for dewatering:
I Place the filter bag on flat ground for efficient operation .
I Replace the bag when it no longer filters sediment or stops passing water at a reasonable rate .
I Properly dispose of used filter bags and trapped sedi-ment offsite .
I Conduct pump refueling within a plastic containment structure or at a distance of over 100 feet from wet-lands or other bodies of water .
Fig. 3-16. Remember to stop dewatering when reaching capacity (filtering bags at right nearly submerged) or when bags fail to filter sediment.Source: RBF Consulting
Ch. 3. Sediment Control | 46

When using a weir tank or dewatering tank for dewatering:
I Clean periodically based on visual inspection or re-duced flow or reduced performance .
I Dispose of oil and grease using a licensed waste dis-posal company .
When using a media (sand, compost, activated carbon, perlite, etc.) filter for dewatering:
I Monitor the filter’s outflow daily while in use . Clean the filter when flow reaches target levels given by the vendor .
I If cleaned by backwashing, properly dispose of back-wash water as required . Backwash water may be re-turned to the start of filtration systems, in some cases .
When using a pressurized bag filter or cartridge filter for dewatering:
I Replace filter bags or cartridges when pressures reach manufacturer’s recommendations .
Fig. 3-17. This dewatering bag should not be locat-ed in a water course.Source: Colorado DOT
Ch. 3. Sediment Control | 47

Other General Practices
DO place dewatering bags on level ground that has been stabilized .
DO avoid dewatering discharges where possible by using the water for dust control if allowed by permit .
DO protect the discharge point from erosion .
DO NOT discharge water into wetlands, irrigation ditches, canals, or storm sewers unless allowed by regulatory permit .
DO NOT discharge water into sanitary sewers unless permitted by the municipality or owner of the sanitary sewer system .
Fig. 3-18. Direct discharge from dewatering opera-tions into bridge crossings or gutter areas can allow pollutants to enter into streams and rivers.Source: RBF Consulting
DO NOT discharge water into wetlands, irrigation ditches, canals, or storm sewers unless allowed by regulatory permit.
Ch. 3. Sediment Control | 48

Other Associated Work
I If discharge of treated water causes erosion, use outlet protection or an energy dissipation structure .
I If dewatering discharge flow is higher than expected, ensure that the rate is consistent with permit limita-tions .
I If water is not infiltrating fast enough for discharge to land, stop dewatering . Install a sediment treatment system and test discharge as necessary .
If dewatering discharge flow is higher than expect-ed, alter the treatment unit to handle increased flow. Notification of local officials may be necessary before resuming dewater-ing operations.
Sediment Traps and Basins
General Description
Sediment traps and basins are small impoundments that allow sediment to settle out of stormwater runoff . A sedi-ment trap can be an excavated depression or a dike made of stable materials . Sediment traps are usually used for ar-eas draining less than five acres . Sediment basins used for areas draining five acres or more may need to be designed by a registered civil engineer .
Inspection and Maintenance
Inspect weekly or as dictated otherwise by local procedures or regulatory standards .
Ch. 3. Sediment Control | 49

I Inspect inlet, outlet, embankment, and spillway struc-tures for erosion, damage, or obstructions .
I Inspect stability of rock, if used as outlet erosion protection .
I Check basin banks for seepage .
I Inspect for depth of sediment collected . Use of marked cleanout stakes is highly recommended .
I Remove sediment when the wet storage volume has been reduced by one half . Where float skimmers are used, inspect for clogging or blockage of intake, leaks around joints, and grounding .
I Check for proper drainage from the basin or trap .
Fig. 3-19. A typical installation of sediment trap is shown. Notice there are no signs of overflow, spot failures, or scour.Source: RBF Consulting
Other General Practices
DO install temporary sediment traps and basins before any land disturbance takes place in the drainage area .
DO use sediment traps and basins in combination with soil stabilization (erosion) controls .
Sediment Traps
DO underlay the rock outlet of a trap with geotextile fabric .
Ch. 3. Sediment Control | 50
DO use rock at the outlet to limit erosion and provide additional filtration .
Permanent Basins Used for Temporary BMP
DO use only when designated on plans and incorporated into the contractor’s SWPPP .
DO remove silt and debris and return the basin to its per-manent design specifications before project accep-tance .
DO NOT put traps or basins closer than 20 feet from a proposed building foundation or highway alignment .
DO NOT put traps in creeks, state or national waters, or other areas of flow .
DO NOT allow groundwater to mix with traps .
DO NOT allow overflows of ponded water to flood buildings, roadways, or other structures .
Other Associated Work
I Repair erosion problems immediately .
I If there is potential for an embankment failure, a competent geotechnical engineer shall design or review details or specifications .
Ch. 3. Sediment Control | 51

Chapter 4. EROSION CONTROL
Surface Roughening
General Description
Surface roughening is used as a temporary BMP to reduce the speed of runoff, increase infiltration, reduce erosion, trap sediment, and prepare the soil for seeding and plant-ing by capturing moisture for seed . Surface roughening may be accomplished by furrowing, scarifying, ripping, or disking the soil to create a two- to four-inch variation in soil surface .
Track walking is a method of surface roughening that involves roughening a bare soil with horizontal grooves using construction equipment .
Soil roughening can be done over an entire slope face or channel or just along the contour slope at regular intervals .
Fig. 4-1. Track walking is among the most common techniques used to roughen a slope. Grooves should be created along the slope contour line.Source: Utah DOT
Inspection and Maintenance
Inspect weekly or as dictated otherwise by local procedures or regulatory standards .
I Inspect for rills .
I Inspect for adequate depth of roughening .
Ch. 4. Erosion Control | 52

I Inspect for correct direction of tracking .
I Track slopes at the end of each work day .
Other General Practices
DO use surface roughening along the contour of slopes with other BMPs, including seed, mulch, or soil binders .
DO run track-mounted machinery up/down the slope to leave horizontal depressions in the soil running parallel to the slope contour .
DO roughen the soil at least three to six inches into the soil surface .
DO NOT back-blade during the final grading opera-tions .
Fig. 4-2. Track walking in the wrong direction increases rilling and erosion.Source: Utah DOT
DO run track-mounted ma-chinery up/down the slope to leave horizontal depres-sions in the soil running par-allel to the slope contour.
Ch. 4. Erosion Control | 53

Other Associated Work
Re-grade and re-seed and/or re-mulch if rills appear .
Fig. 4-3. Surface roughening is shown correct near the top of the slope; however shallow grooves in the lower half are in the wrong direction.Source: RBF Consulting
Fig. 4-4. Excellent example of proper tracking; tracks are perpendicular to the slope.Source: Colorado DOT
Ch. 4. Erosion Control | 54
Grooves should be parallel to slope

Fig. 4-5. Excellent example of proper tracking; tracks are perpendicular to the slope.Source: Colorado DOT
Tackifier and Binders
General Description
Tackifiers are synthetic bonding agents used to stick, or tack, hydraulic seeding and hay or straw mulch to the soil surface . Wind can blow hay and straw away, allowing rain to cause erosion . Tackifiers provide immediate and extend-ed protection of the hay or straw mulch from wind and rain to allow vegetation enough time to grow .
Soil binders are chemical stabilizers that provide tempo-rary soil stabilization for stockpiles, berms, haul roads, or when slopes cannot be seeded due to seasonal constraints . Soil binders are sprayed onto exposed soil surfaces to hold them in place and minimize wind and runoff erosion .
Common tackifiers and binders may include plant-based binders, poly-acrylamide (PAM), and gypsum .
Ch. 4. Erosion Control | 55

Inspection and Maintenance
Inspect weekly or as dictated otherwise by local procedures or regulatory standards .
I Inspect areas for signs of erosion .
I Inspect for signs that runoff has broken through the soil at the top of a slope treated with a soil stabilizer, causing undercutting of the stabilized soil layer and discharge at a point further down slope .
I Re-apply soil binder every 6 to 12 months or after the surface has been disturbed again . Follow manufactur-er’s guidance .
Inspect for signs that run-off has broken through the soil at the top of a slope treated with a soil stabiliz-er, causing undercutting of the stabilized soil layer and discharge at a point further down slope.
Fig. 4-6. Stockpiles left exposed need surface treatment.Source: Colorado DOT
Ch. 4. Erosion Control | 56

Other General Practices
DO roughen soil surface prior to applying soil binder .
DO use soil binder on stockpiles to reduce wind erosion .
DO apply tackifier and a binder per the manufacturer’s recommended application rates and pre-wetting conditions .
DO apply tackifier and binders with adequate drying time allowed before predicted rainfall, allowing a minimum of 24 hours of curing time .
DO direct runoff from binder-applied areas to a sedi-ment control BMP prior to discharge to a storm drain or water course .
DO roughen soil surface prior to applying soil binder.
DO NOT apply tackifier or binder during rain events, high winds, or over snow .
DO NOT use soil binder in areas with vehicular traffic, unless specifically recommended by manufac-turer .
DO NOT apply binders to frozen soil, areas with stand-ing water, or when the air temperature is be-low 40 degrees Fahrenheit during the curing period .
DO NOT overspray tackifier and binders onto roads, sidewalks, drainage channels, or existing vege-tation .
Ch. 4. Erosion Control | 57

Fig. 4-7. This is a good example of tackifier applica-tion using a fan nozzle.Source: Colorado DOT
DO NOT overspray tackifi-er and binders onto roads, sidewalks, drainage chan-nels, or existing vegetation.
Other Associated Work
I If the application is no longer performing, re-apply the soil binder .
Fig. 4-8. Spray-on binders such as PAM can offer quick response to exposed areas in advance of forecasted rain.Source: Colorado DOT
Ch. 4. Erosion Control | 58

Hydroseeding
General Description
Hydroseeding (hydraulic seeding) is the method by which temporary or permanent seed is applied to soil . Hydroseed-ing typically involves applying hydraulic mulch, seed, fer-tilizer, and stabilizing emulsion with a hydraulic mulcher . Hydroseeding ultimately protects soils from erosion by water and wind by providing a vegetation cover .
Hydroseeding is applied to:
I Disturbed areas requiring temporary protection until permanent vegetation is set .
I Disturbed areas that must be re-disturbed following an extended period of inactivity .
Inspection and Maintenance
Inspect weekly or as dictated otherwise by local procedures or regulatory standards .
I Inspect areas for signs of erosion .
I Areas of inadequate coverage .
I Re-apply hydroseed to areas of poor coverage or vegetation establishment, using not less than half the original application rates .
Fig. 4-9. Hydroseeding of large slopes is always more effective when done in combination with sediment control measures such as the fiber rolls shown here. Source: RBF Consulting
Ch. 4. Erosion Control | 59

Other General Practices
DO roughen the slope and fill area, with the furrows trending along the contours, before application .
DO use mulch or other erosion control cover after hydro-seeding to keep seeds in place and to moderate soil moisture and temperature until the seeds germinate and grow .
DO ensure hydroseeded areas will receive enough water to germinate .
DO NOT over-spray onto the roadway, sidewalks, drain-age channels, or existing vegetation .
DO NOT use hydroseeding as a stand-alone erosion control BMP . Combine hydroseeding with other BMPs, such as mulch or binder, until vegetation is established .
DO NOT use hydroseeding in areas of vehicular traffic .
DO NOT use hydroseeding as a stand-alone erosion control BMP. Combine hydroseeding with other BMPs, such as mulch or oth-er cover, until vegetation is established.
Other Associated Work
I When failure locations are found, re-seed, fertilize, and mulch the area within the planting season . Re-ap-ply using not less than half the original application rates .
Ch. 4. Erosion Control | 60

Mulching
General Description
Mulching consists of the application of a protective layer of certified weed-free straw, hay or other plant residue; compost or organic waste; wood mulch or synthetic mate-rial to the soil surface to provide short-term soil protection . Mulch can be applied by hand or with hydraulic machinery (hydraulic mulch) . Hydraulic mulch includes:
I Stabilized fiber matrices
I Bonded fiber matrix
I Hydraulic compost matrix
Fig. 4-10. Hydraulically applied straw mulch is an effective means to anchor temporary or permanent seeding to a highway slope.Source: Utah DOT
Inspection and Maintenance
Inspect weekly and following a runoff-producing event or as dictated otherwise by local procedures or regulatory standards .
I Ensure there is continuous, uniform coverage .
I Ensure rilling or gullying does not occur beneath tacked mulch .
Ch. 4. Erosion Control | 61

I Re-apply mulch to areas of poor coverage or vege-tation establishment and to maintain adequate soil protection .
I Repair or replace mulch, if washed or blown away .
Fig. 4-11. The mulch application shown here has properly avoided the adjacent channel area.Source: Utah DOT
Other General Practices
DO cover the entire site leaving no bare areas .
DO apply mulch as soon as possible after seeding .
DO anchor hay or straw mulch by mechanically crimping the hay or straw followed by mulch tackifier .
DO loosely spread hay and straw mulch to a uniform depth over unseeded areas at a rate directed by the engineer .
DO hydraulically apply mulch in a uniform manner over designated seeded areas at a rate directed by the engineer .
DO replace or repair mulch, if washed or blown away .
DO NOT apply mulch during windy conditions .
Ch. 4. Erosion Control | 62

DO NOT place mulch in drainage channels, on roads, sidewalks, or existing vegetation .
Fig. 4-12. This is a poor example of a spray-on mulch. There is uneven coverage and holes/uncov-ered areas. Source: Colorado DOT
Rolled Erosion Control Products
General Description
Rolled erosion control products (RECPs) are prefabricated blankets typically constructed from interlocking fibers of straw, coconut fiber (coir), excelsior, synthetic or similar material between biodegradable or photodegradable netting .
Inspection and Maintenance
Inspect weekly or as dictated otherwise by local procedures or regulatory standards .
I Inspect for signs of undercutting at the top of the slope .
I Inspect for erosion beneath the matting .
I Ensure blankets are trenched in at top and bottom of the slope .
I Ensure adequate staple checks are installed (refer to manufacturer’s or designer’s specifications) .
Ch. 4. Erosion Control | 63
I Ensure staples are driven flush with the soil surface and are preventing the blanket from lifting away from the soil .
I Ensure the entire blanket has good contact with the ground surface .
I Replace damaged blanket .
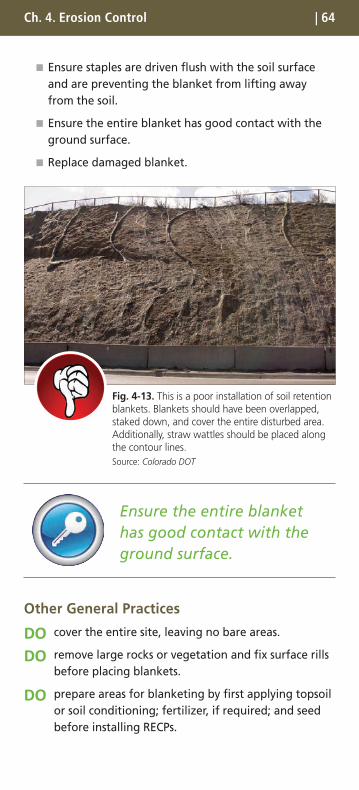
Fig. 4-13. This is a poor installation of soil retention blankets. Blankets should have been overlapped, staked down, and cover the entire disturbed area. Additionally, straw wattles should be placed along the contour lines.Source: Colorado DOT
Ensure the entire blanket has good contact with the ground surface.
Other General Practices
DO cover the entire site, leaving no bare areas .
DO remove large rocks or vegetation and fix surface rills before placing blankets .
DO prepare areas for blanketing by first applying topsoil or soil conditioning; fertilizer, if required; and seed before installing RECPs .
Ch. 4. Erosion Control | 64

Fig. 4-14. This is an excellent installation of soil retention blankets. The blanket is entrenched at the top and bottom of the slope.Source: Colorado DOT
DO place RECPs smoothly but loosely on the soil surface without stretching . Underlying surface must be rela-tively smooth .
DO trench in RECPs at the top, beyond the crest to avoid undercutting, and the bottom of slopes . Trench them in six inches wide by six inches deep, or as directed by the engineer or manufacturer .
DO install blankets up and down long slopes with over-lapping seams .
DO NOT stretch blankets .
DO NOT use on excessively rocky sites or on areas where the final vegetation will be mowed .
DO NOT track walk prior to blanket installation .
DO remove large rocks or vegetation and fix surface rills before placing blankets.
Ch. 4. Erosion Control | 65

Fig. 4-15. RECPs are an effective way to provide immediate stabilization to steep slopes.Source: Utah DOT
DO NOT track walk prior to blanket installation.
Other Associated Work
I If damaged by equipment, replace or patch blankets .
I If staples or blankets become dislodged, re-install with staples spaced per engineer’s or manufacturer’s directions .
I If the blanket is lifting away from the soil, check that the staples are driven flush with the soil surface .
Ch. 4. Erosion Control | 66

Fig. 4-16. Rolled erosion control product slope application detail.Source: Colorado DOT
Ch. 4. Erosion Control | 67

CHAPTER 5. TEMPORARY DRAINAGE MANAGEMENT
Stream Crossing and Bank Stabilization
General DescriptionThis section discusses BMPs related to stream crossings and bank stabilization . Clean Water Act Section 404 permitting may be required for work done in or near a stream .
It is preferred to span the stream but stream crossing pro-tections include:
I Installing turf reinforcement mats (TRMS) within per-manent streams
I Slope drains and energy dissipation in permanent streams
I Silt fence on stream banks (see perimeter controls)
I In-stream construction practices
I Temporary stream crossings
Fig. 5-1. Proper temporary stream crossings like this aggregate-only version incorporate swales to divert flow from the work zone away from the stream. Temporary stream crossings should also incorporate soil sta-bilization and sediment controls within disturbed slope areas as shown here. Source: Caltrans BMP Manual
TRMs within Permanent Streams
TRMs are composed of interwoven layers of non-degrad-able, geosynthetic materials for use on stream banks,
Ch. 5. Temporary Drainage Management | 68

swales, and other drainage channels where moving water is likely to cause scour and wash out new vegetation . They are also used in areas where the soil surface is disturbed and where existing vegetation has been removed . TRMs could impact wildlife so it may be necessary to consult with resource agencies before their use .
Slope Drains and Energy Dissipation in Permanent Streams
A slope drain intercepts and directs surface flow away from or down slope areas to protect slopes from erosion and entering the stream .
In-Stream Construction Practices
Water dams, diversions, silt barriers, and construction prac-tices can be used to minimize sediment suspension .
Fig. 5-2. A BMP configuration of silt fence and gravel bags helps stabilize this temporary drainage crossing.Source: RBF Consulting
Temporary Stream Crossings
A temporary steam crossing is used to provide a way for construction vehicle traffic to cross a watercourse . A bridge or culvert is the best choice for most temporary stream crossings . The materials used to construct most bridges and culverts can be salvaged after they are removed .
Ch. 5. Temporary Drainage Management | 69
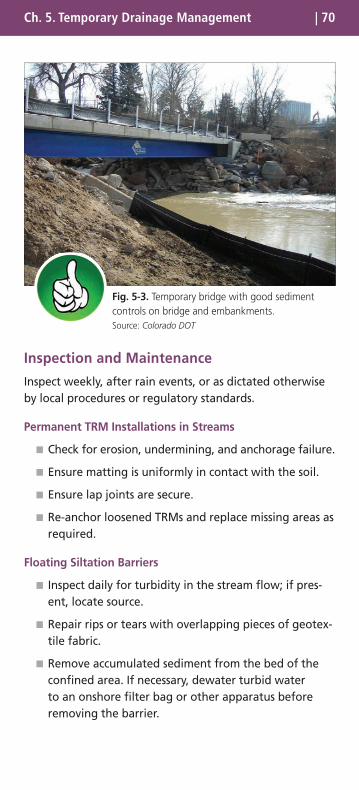
Fig. 5-3. Temporary bridge with good sediment controls on bridge and embankments.Source: Colorado DOT
Inspection and Maintenance
Inspect weekly, after rain events, or as dictated otherwise by local procedures or regulatory standards .
Permanent TRM Installations in Streams
I Check for erosion, undermining, and anchorage failure .
I Ensure matting is uniformly in contact with the soil .
I Ensure lap joints are secure .
I Re-anchor loosened TRMs and replace missing areas as required .
Floating Siltation Barriers
I Inspect daily for turbidity in the stream flow; if pres-ent, locate source .
I Repair rips or tears with overlapping pieces of geotex-tile fabric .
I Remove accumulated sediment from the bed of the confined area . If necessary, dewater turbid water to an onshore filter bag or other apparatus before removing the barrier .
Ch. 5. Temporary Drainage Management | 70

I Remove the barrier carefully when work is completed and after suspended sediments have been allowed sufficient time to settle out .
Fig. 5-4. This is a good application of a temporary culvert. Note the riprap approach to the culvert.Source: Colorado DOT
Temporary Stream Crossings
I Check for erosion of abutments, channel scour, riprap displacement, or piping in the soil .
I Check for structural weakening of the temporary crossings, such as cracks and undermining of foun-dations and abutments . Periodically remove silt from crossings .
I Replace lost or displaced aggregate from inlets and outlets of culverts .
I Remove temporary crossings after the structure is no longer needed .
Other General Practices
TRMs within Permanent Streams
DO always follow the manufacturer’s recommendations . Ensure that the physical conditions of the stream and
Ch. 5. Temporary Drainage Management | 71

Ch. 5. Temporary Drainage Management | 72
flow characteristics are appropriate for the product selected .
DO remove clods, large rocks, and vegetation before placing TRMs .
DO place TRMs smoothly but loosely on the surface with-out stretching .
DO trench the top of the TRM into the ground to pre-vent runoff from flowing under it .
DO overlap the ends of TRMs to prevent undercutting .
DO seed the area before blanket installation for erosion control and re-vegetation .
DO NOT use non-biodegradable geotextile fabrics in streams .
DO NOT drive tracked or heavy equipment over in-stalled TRMs .
DO NOT make sharp turns on the TRM .
DO NOT drive tracked or heavy equipment over installed TRMs.
In-Stream Construction Practices
DO perform work during the dry season when working in or near ephemeral streams .
DO use the following techniques to minimize total sus-pended solids (TSS):
I Padding—Padding laid in the stream below the work site may trap solids that are deposited in the stream during construction . After work is done, the padding is removed and placed on the bank to assist in re-vegetation .
I Clean, washed gravel—Using clean, washed gravel decreases solid suspension, as there are fewer small particles .

Ch. 5. Temporary Drainage Management | 73
I Excavation using a large bucket—Approximately the same amount of soil is suspended whether a small or large amount of soil is placed in the stream .
I Use of dozer for backfilling—Using a dozer instead of a backhoe follows the same principles .
I Partially dewatering a stream with a pump— reduces the amount of water that can suspend sediment .
DO use floating siltation barriers in streams under low-flow conditions, typically less than 2 .5 feet per second and a maximum depth of six feet .
DO locate floating siltation barriers away from equip-ment to avoid damage to the barrier itself .
DO NOT use floating siltation barriers to stop, divert, or filter water .
DO NOT use floating siltation barriers to stop, divert, or filter water.
DO construct during dry pe-riods to minimize stream dis-turbance and reduce costs.
Temporary Stream Crossings
DO place the temporary waterway crossing at right an-gles to the stream or as directed by the engineer .
DO construct during dry periods to minimize stream disturbance and reduce costs .

Ch. 5. Temporary Drainage Management | 74
DO construct pipe inlet at or near the natural elevation of the streambed to prevent potential flooding up-stream of the crossing .
DO construct to minimize scour . Cobbles used for tempo-rary water body crossings or encroachments should be clean, durable rock .
DO remove temporary crossings as soon as possible after the structure is no longer needed .
DO NOT introduce sediment or silt into the water-course by placing temporary artificial obstruc-tions within flowing water .
Fig. 5-5. Riprap with no fines should be installed at the approach to prevent sediment from entering the stream. If temporary, a silt fence could be used with sand bags anchoring the fabric on the culverts.Source: Colorado DOT
Other Associated Work
Riparian vegetation, when removed pursuant to the provisions of the work, should be cut off no lower than ground level to promote re-growth . Access roads and work areas built over riparian vegetation should temporarily be covered by a sufficient layer of cobble to prevent damage to the soil and root structure .

Ch. 5. Temporary Drainage Management | 75
Temporary Berms
General Description
A soil berm or diversion is a temporary compacted ridge of mulch, compost, or soil that slows and diverts stormwater or contains water or other fluids . Berms and ditches divert-ing clean uphill runoff around construction sites reduce erosion and sedimentation problems . Temporary berms help direct runoff to stormwater conveyances and are an effective means of protecting graded slopes during con-struction . A protective cover may be necessary to protect against wind or water erosion .
Fig. 5-6. This is an excellent berm. There are no breaks in the berm and the soil is compacted.Source: Colorado DOT
Inspection and Maintenance
Inspect weekly, following rain events, or as dictated other-wise by local procedures or regulatory standards .
I Ensure berm is properly keyed and compacted to avoid washout .
I Rebuild berm if breaches or washout occurs .
I Remove sediment retained by the berm once it has reached one-half of the exposed height of the berm .
I If temporary, remove the berms only after other per-manent BMPs are in place and the site is stabilized .
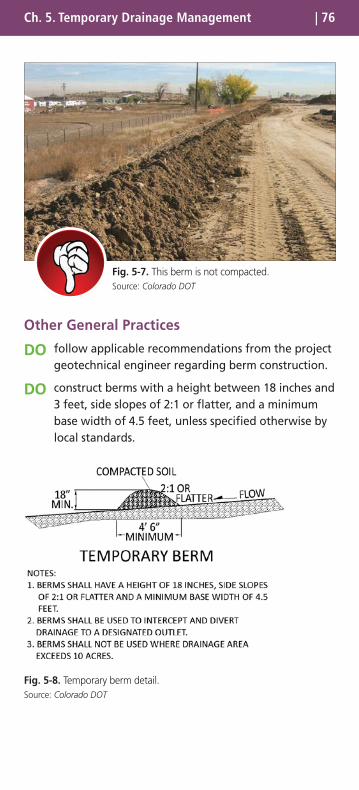
Fig. 5-7. This berm is not compacted.Source: Colorado DOT
Other General Practices
DO follow applicable recommendations from the project geotechnical engineer regarding berm construction .
DO construct berms with a height between 18 inches and 3 feet, side slopes of 2:1 or flatter, and a minimum base width of 4 .5 feet, unless specified otherwise by local standards .
Fig. 5-8. Temporary berm detail.Source: Colorado DOT
Ch. 5. Temporary Drainage Management | 76

DO locate berms so that stormwater flowing along their uphill face follows a gentle slope . Erosion control blankets or rock riprap might be needed for berms that channel water at an erosive rate .
DO extend the downhill end of the berm so it directs overland flow to well established vegetated areas or flat surfaces to promote infiltration .
DO NOT use berms with sediment-laden water; use sediment traps instead.
DO NOT use berms in high-traffic areas where they will be continually subject to traffic .
DO NOT run berms down a slope; watch for concen-trated flows when the berm directs water to one area .
DO NOT use sand and gravel or debris-laden material to build a berm .
DO NOT use berms with sediment-laden water; use sediment traps instead .
DO NOT use berms in high traffic areas where they will be continually subject to traffic.
Ch. 5. Temporary Drainage Management | 77

Storm Drain Inlet Controls
General Description
Inlet controls prevent sediment and debris from entering storm drain systems . Inlet protection is implemented at existing inlets prior to construction . New inlets are pro-tected as they are installed and brought on-line . Inlets are commonly protected with gravel bags but other products may be used depending on conditions .
Fig. 5-9. Use of gravel bags is among the most common approaches to inlet protection.Source: RBF Consulting
Inspection and Maintenance
Inspect weekly, following rain events, or as dictated other-wise by local procedures or regulatory standards .
I Check inlet protection during rain events to make sure they are not creating a flooding hazard .
I Remove accumulated sediment from curb inlet protec-tion after each rain event .
I Inspect gravel bags for damage and snags .
I Check gravel bags for proper arrangement and dis-placement .
Ch. 5. Temporary Drainage Management | 78

Fig. 5-10. Proper installation of stakes is critical to the performance of inlet protection measures such as silt fence. Also silt fence should not be placed in the path of concentrated flow, as shown here.Source: RBF Consulting
Other General Practices
DO place inlet protection prior to activities when debris may enter storm drain inlets .
DO extend inlet protection one foot past each end of the inlet, unless specified otherwise by local standards .
DO remove inlet protection devices as soon as possible after the site is stabilized, or when the inlet protec-tion is no longer needed .
Fig. 5-11. Gravel bags shown here are crushed, al-lowing leaves and other debris to build up. The filter fabric should not be used in this application.Source: RBF Consulting
Ch. 5. Temporary Drainage Management | 79

Gravel Bags
DO leave room upstream for water to pond and sedi-ment to settle .
DO place several layers of gravel bags—overlapping the bags and packing them tightly together .
DO leave gap of one bag on the top row to serve as a spillway .
Fig. 5-12. This is a good installation of inlet protec-tion using silt fence and straw bales.Source: Colorado DOT
Fig. 5-13. Instead of filter fabric held in place by the grate, silt fence, sand bags or other sediment controls should be used to keep silt away from grate. Source: RBF Consulting
Ch. 5. Temporary Drainage Management | 80
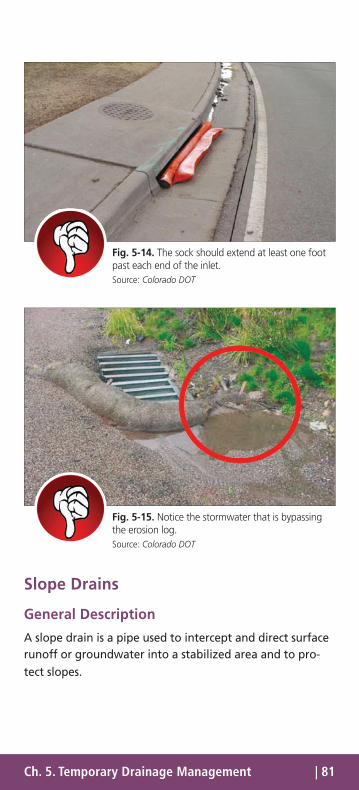
Fig. 5-14. The sock should extend at least one foot past each end of the inlet.Source: Colorado DOT
Fig. 5-15. Notice the stormwater that is bypassing the erosion log.Source: Colorado DOT
Slope Drains
General Description
A slope drain is a pipe used to intercept and direct surface runoff or groundwater into a stabilized area and to pro-tect slopes .
Ch. 5. Temporary Drainage Management | 81
Inspection and Maintenance
Inspect weekly and after runoff-producing events, or as dictated otherwise by local procedures or regulatory stan-dards .
I Inspect for erosion due to slope drain failure by over-topping, piping, or pipe separation .
I Inspect outlet for erosion and downstream scour .
I Repair pipe leaks .
I Check pipe anchors to ensure that the pipe remains anchored to the slope .
I Inspect inlets and slope drainage for accumulations of debris and sediment; remove debris and sediment to maintain flows .
I Flush drains if necessary; capture and settle out sedi-ment from discharge .
Fig. 5-16. The slope has eroded. This could have been prevented with the use of a slope drain.Source: Colorado DOT
Ch. 5. Temporary Drainage Management | 82

Other General Practices
DO securely anchor pipes on undisturbed or compacted soils .
DO use flexible pipe material that is at least 15 inches in diameter or larger, or as specified otherwise in local standards .
DO securely entrench and compact the soil around and under the entrance, outlet, and along the length of the pipe to prevent erosion .
DO install a flared end section at the inlet to improve flow into the slope drain and prevent erosion at the entrance .
DO fasten pipes to inlets and outlets with metal strap-pings or watertight collars .
DO protect the outlet with riprap or other energy dissi-pation device .
DO re-vegetate the area under and around the pipe to avoid erosion after pipe installation .
DO securely entrench and compact the soil around and under the entrance, outlet, and along the length of the pipe to prevent erosion.
DO NOT use on a slope greater than 2:1 (H:V) to main-tain energy dissipation effectiveness .
DO NOT use a single slope drain for a drainage area larger than 10 acres . For larger areas, use a rock-lined channel or a series of pipes .
Ch. 5. Temporary Drainage Management | 83

Ch. 5. Temporary Drainage Management | 84
DO NOT use a single slope drain for a drainage area larger than 10 acres. For larger areas, use a rock-lined channel or a series of pipes.
Other Associated Work
I If erosion occurs, repair the damage and install ad-ditional energy dissipation measures . If downstream erosion is occurring, it may be necessary to reduce flows being discharged into the channel unless other preventative measures are implemented .
I Restore damaged slopes .
I Install additional anchors if pipe movement is detected .
Fig. 5-17. This is an excellent example of a slope drain being used as an effective erosion control.Source: RBF Consulting
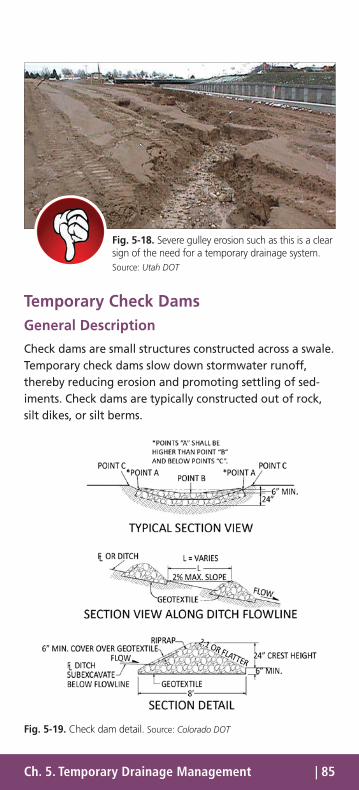
Ch. 5. Temporary Drainage Management | 85
Fig. 5-18. Severe gulley erosion such as this is a clear sign of the need for a temporary drainage system.Source: Utah DOT
Temporary Check DamsGeneral Description
Check dams are small structures constructed across a swale . Temporary check dams slow down stormwater runoff, thereby reducing erosion and promoting settling of sed-iments . Check dams are typically constructed out of rock, silt dikes, or silt berms .
Fig. 5-19. Check dam detail. Source: Colorado DOT
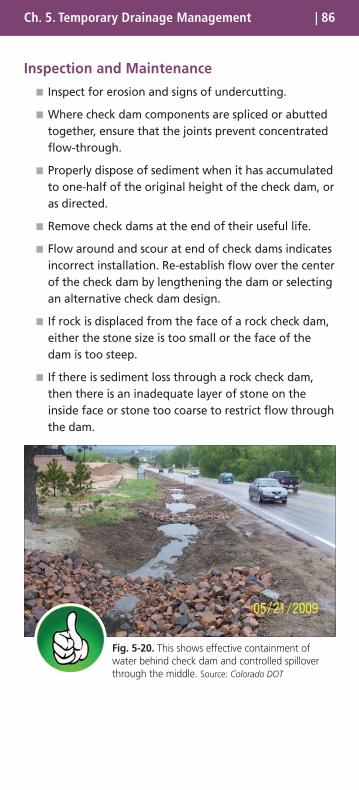
Inspection and Maintenance
I Inspect for erosion and signs of undercutting .
I Where check dam components are spliced or abutted together, ensure that the joints prevent concentrated flow-through .
I Properly dispose of sediment when it has accumulated to one-half of the original height of the check dam, or as directed .
I Remove check dams at the end of their useful life .
I Flow around and scour at end of check dams indicates incorrect installation . Re-establish flow over the center of the check dam by lengthening the dam or selecting an alternative check dam design .
I If rock is displaced from the face of a rock check dam, either the stone size is too small or the face of the dam is too steep .
I If there is sediment loss through a rock check dam, then there is an inadequate layer of stone on the inside face or stone too coarse to restrict flow through the dam .
Fig. 5-20. This shows effective containment of water behind check dam and controlled spillover through the middle. Source: Colorado DOT
Ch. 5. Temporary Drainage Management | 86
Other General Practices
DO use gravel bags in moderate-flow channels .
DO install check dams before excavating, filling, or grad-ing uphill areas .
Geotextile fabric below the rock is essential for proper function.
DO for rock check dams:
I The height of the check dam at the center should be a maximum of two feet or as specified other-wise by local standards . At the outside edges, the height should be a maximum of three feet or as specified otherwise by local standards .
I The check dam shall be wide enough to reach from bank to bank of the ditch or swale . Key the check dam into the ditch a minimum of 18 inches or as specified otherwise by local standards .
I Geotextile fabric below the rock is essential for proper function .
I The maximum spacing between dams should be such that the toe of the upstream check dam is at the same elevation as the controlled release point of the downstream dam .
The check dam shall be wide enough to reach from bank to bank of the ditch or swale. Key the check dam into the ditch a minimum of 18 inches or as specified oth-erwise by local standards.
Ch. 5. Temporary Drainage Management | 87

DO NOT place dams in grass-lined channels unless erosion is expected as the installation may damage vegetation .
DO NOT use straw bales or silt fence as check dams .
DO NOT use straw bales or silt fence as check dams.
Fig. 5-21. Silt fence should not be used as a tempo-rary check dam. Source: Ohio DOT
Fig. 5-22. Excessive spacing between check dams in this ditch and poor design and construction is causing flow to outflank the sides.Source: RBF Consulting
Ch. 5. Temporary Drainage Management | 88

Fig. 5-23. This picture shows a good example of fiber roll check dams promoting settlement of fine sediment. Source: Utah DOT
Outlet Protection
General Description
Outlet protection, also known as velocity dissipation, prevents local scour and erosion at the outlet of a channel or conduit by reducing the speed of stormwater . Outlet protection is typically made up of geotextile fabric and riprap . For low flow conditions, sumps, sod or seed and RECPs may be used .
Inspection and Maintenance
Inspect weekly, after rain events, or as dictated otherwise by local procedures or regulatory standards .
I Inspect for signs of scour, erosion, and stone displace-ment . Inspect the area at the outlet and immediately downstream .
I Inspect for presence of standing water
I If sediment builds up within the crevices of the outlet structure, clean out the sediment or add stone .
I If erosion occurs around apron and scour holes appear at outlet, foundation may not be excavated widely or deeply enough .
Ch. 5. Temporary Drainage Management | 89
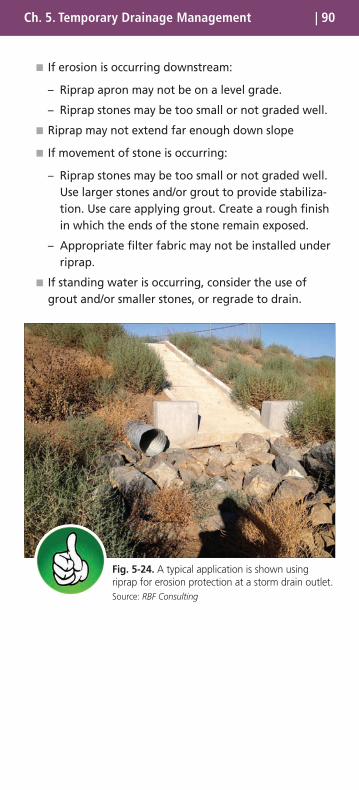
I If erosion is occurring downstream:
– Riprap apron may not be on a level grade .
– Riprap stones may be too small or not graded well .
I Riprap may not extend far enough down slope
I If movement of stone is occurring:
– Riprap stones may be too small or not graded well . Use larger stones and/or grout to provide stabiliza-tion . Use care applying grout . Create a rough finish in which the ends of the stone remain exposed .
– Appropriate filter fabric may not be installed under riprap .
I If standing water is occurring, consider the use of grout and/or smaller stones, or regrade to drain .
Fig. 5-24. A typical application is shown using riprap for erosion protection at a storm drain outlet.Source: RBF Consulting
Ch. 5. Temporary Drainage Management | 90
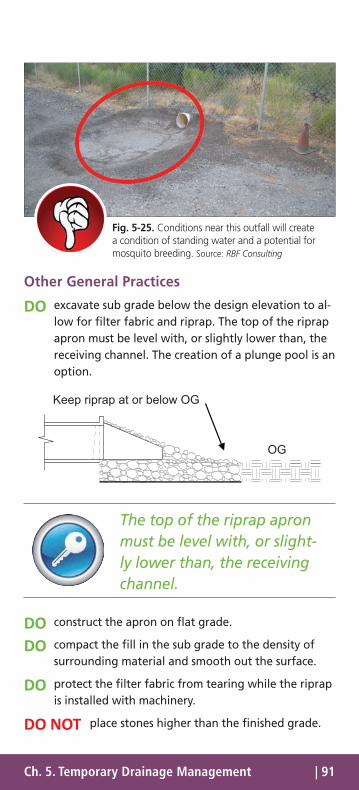
Fig. 5-25. Conditions near this outfall will create a condition of standing water and a potential for mosquito breeding. Source: RBF Consulting
Other General Practices
DO excavate sub grade below the design elevation to al-low for filter fabric and riprap . The top of the riprap apron must be level with, or slightly lower than, the receiving channel . The creation of a plunge pool is an option .
The top of the riprap apron must be level with, or slight-ly lower than, the receiving channel.
DO construct the apron on flat grade .
DO compact the fill in the sub grade to the density of surrounding material and smooth out the surface .
DO protect the filter fabric from tearing while the riprap is installed with machinery .
DO NOT place stones higher than the finished grade .
Ch. 5. Temporary Drainage Management | 91

DO construct the apron on flat grade.
DO NOT place stones higher than the finished grade.
Fig. 5-26. Stormwater is undercutting the existing rock. Geotextile should have been placed under the riprap, more rock could have been used, or the rock placed at or below finish grade. Source: Colorado DOT
Fig. 5-27. Riprap placement is incomplete and could result in erosion during a large event. Notice the lack of a filter fabric. Source: RBF Consulting
Ch. 5. Temporary Drainage Management | 92

Fig. 5-28. The fiber roll above the culvert helps prevent debris and dirt from falling into the outlet.Source: Colorado DOT
Fig. 5-29. Failure to effectively stabilize this pipe at the outlet, among other failures, leads to a larger slope erosion problem and sediment discharge into the gutter.Source: RBF Consulting
Ch. 5. Temporary Drainage Management | 93

References
California Stormwater Quality Association. Stormwater Best Management Practice Handbook: Construction, 2012.
Colorado Department of Transportation. Erosion Control and Stormwater Quality Field Guide, 2011.
Massachusetts Department of Transportation, Highway Division Construction Office. Erosion and Sediment Control Field Guide, (n.d.)
Nebraska Department of Roads. Construction Stormwater: Best Management Practices, 2008.
Nevada Department of Transportation. Construction Site Best Management Practices (BMPs) Field Manual, 2006.
RBF Consulting, University of Texas, Geosyntec Consultants, the Low Impact Development Center, & Venner Consulting. Long-Term Performance and Life Cycle Costs of Stormwater Best Management Practices (NCHRP Project 25-40). National Cooperative Highway Research Program, Transportation Re-search Board, Washington, DC, 2014.
State of California Department of Transportation. Construction Site Best Management Practice (BMP) Field Manual and Trou-bleshooting Guide, 2003.
U.S. Global Change Research Program. Global Climate Change Impacts in the United States, 2009.
United States Environmental Protection Agency. Developing Your Stormwater Pollution prevention plan: A Guide for Con-struction Sites, 2007.
Utah Department of Transportation. Erosion and Sediment Con-trol Field Guide, 2010.
Venner Consulting and Parsons Brinckerhoff. Environmental Stewardship Practices, Procedures, and Policies for Highway Construction and Maintenance, NCHRP Project 25-25, Task 4. National Cooperative Highway Research Program, Transporta-tion Research Board, Washington, DC, September 2004.
References | 94

Pub Code: FGCP-1ISBN: 978-1-56051-612-5
Related Documents