9100-127-3302-99 Rev. A Dialight, 1501 Route 34 South, Farmingdale, NJ, USA 07727 Tel: +1 732 919 3119 Fax: +1 732 751 5778 www.dialight.com Important Information: These instructions contain safety information; read and follow them carefully. Dialight will not accept any responsibility for injury, damage, or loss which may occur due to incorrect installation, operation, or maintenance. Operating Instructions Languages Page Number English 1 UL-1598 Rated LED High/Low Bay / Flood Light Luminaire Note: Save these instructions for future use

Welcome message from author
This document is posted to help you gain knowledge. Please leave a comment to let me know what you think about it! Share it to your friends and learn new things together.
Transcript

9100-127-3302-99 Rev. A
Dialight, 1501 Route 34 South, Farmingdale, NJ, USA 07727
Tel: +1 732 919 3119 Fax: +1 732 751 5778 www.dialight.com
Important Information:
These instructions contain safety information; read and follow them carefully. Dialight will not accept any
responsibility for injury, damage, or loss which may occur due to incorrect installation, operation, or
maintenance.
Operating Instructions
Languages Page Number
English 1
UL-1598 Rated LED High/Low Bay / Flood Light Luminaire
Note: Save these instructions for future use
use.
9100-127-3302-99 Rev. A
Dialight, 1501 Route 34 South, Farmingdale, NJ, USA 07727
Tel: +1 732 919 3119 Fax: +1 732 751 5778 www.dialight.com
UL-1598 Rated LED High/Low Bay / Flood Light Luminaire
Introduction
This High Bay / Low Bay / Flood light is designed
for illumination of industrial location and uses the
latest in solid state lighting technology for long
life, low maintenance, and high efficiency.
The unique optical design focuses light downward
to where it is needed, giving improved efficiency
over a conventional HID luminaire.
FOR MODELS: ******(2/A/E)*******
An internal switch-mode supply allows it to be used
from any nominal 100-277VAC or 347-480VAC
50/60Hz or 120-250VDC without any variation in light
output.
All models are suitable for use in dry locations per
UL-1598.
For models suitable for use in wet locations per UL-
1598 and Outdoor Type (Salt Water) per UL-1598A;
see outside label of unit.
Models with 4th character R, S, T, U, V, W, Y, Z are also
suitable for applications where high pressure wash-
down is used to clean and sanitize equipment.
To maintain seal integrity, a suitably rated cord grip
must be used in accordance with manufacturer
recommendations.
Recommended mounting height:
High Bay: 25-40ft [6-12m]
Low Bay: 12-25ft [3.5-6m]
General Mounting Information
For maximum long term reliability and light output,
the light must be installed in free air. The luminaire
design incorporates an over-temperature control
circuit that reduces input power should internal
temperatures reach a maximum level. As a result,
light output may be temporarily reduced at higher
ambient temperatures.
Mounting Information
Luminaires fitted with a mounting hook must be
hung from an appropriately sized mounting point.
Rear alignment mark should be observed when
installing model type ****(7/E)*********.
Pendent Mounting Information The High/Low Bay fixture is threaded for ¾”NPT in order to be assembled to conduit.
Calculate and measure required conduit length. Feed the power cable through the conduit and into the junction box. Attach the fixture to the conduit using conductive pipe sealant. Insert and tighten the ¼-20 anti-rotation screw to 40-45 in-lb in order to secure the fixture to the conduit.
Swivel Bracket/Stirrup Bracket
The ‘Stirrup Bracket’ is fixed into place using 2 bolts
and the threaded holes on the side of the luminaire.
When secured into the desired position the 2 bolts
should be tightened to 8.0 – 10.0Nm [6 – 8ft-lb].
Locking Bracket
-The locking bracket is fixed into place using a
bracket subassembly, 2 bolts for positioning, and 2
bolts for pivot and attachment.
-Ensure bracket subassembly bolts and nuts (4x) are
tight before adjusting main bracket position. Do not
loosen bracket subassembly bolts.
-Remove M6 bolts (2x) and loosen M8 bolts (2x).
Move main bracket to desired position and lock into
place by reinstalling M6 screws (2x). Tighten M8 bolts
to 14.0-16.0 Nm [11-12 ft-lb]. Tighten M6 bolts to 8.0-
10.0 Nm [6-7 ft-lb].
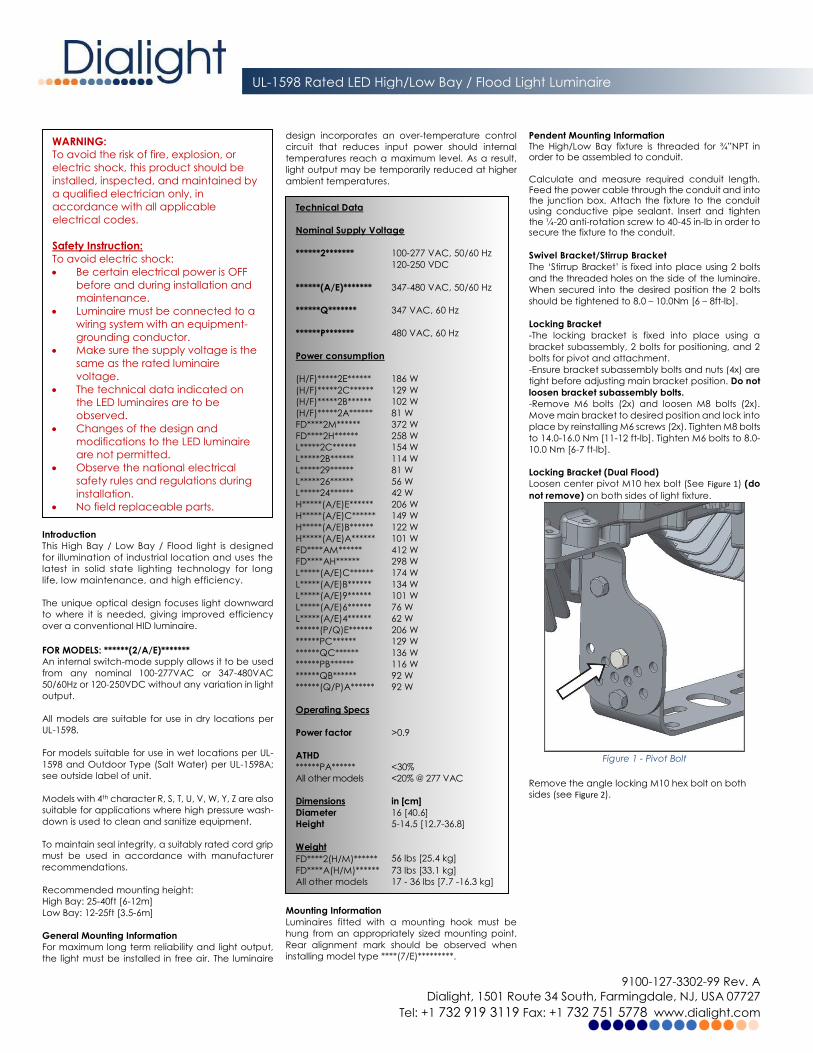
Locking Bracket (Dual Flood)
Loosen center pivot M10 hex bolt (See Figure 1) (do
not remove) on both sides of light fixture.
Figure 1 - Pivot Bolt
Remove the angle locking M10 hex bolt on both
sides (see Figure 2).
WARNING:
To avoid the risk of fire, explosion, or
electric shock, this product should be
installed, inspected, and maintained by
a qualified electrician only, in
accordance with all applicable
electrical codes.
Safety Instruction:
To avoid electric shock:
Be certain electrical power is OFF
before and during installation and
maintenance.
Luminaire must be connected to a
wiring system with an equipment-
grounding conductor.
Make sure the supply voltage is the
same as the rated luminaire
voltage.
The technical data indicated on
the LED luminaires are to be
observed.
Changes of the design and
modifications to the LED luminaire
are not permitted.
Observe the national electrical
safety rules and regulations during
installation.
No field replaceable parts.
Technical Data
Nominal Supply Voltage
******2******* 100-277 VAC, 50/60 Hz
120-250 VDC
******(A/E)******* 347-480 VAC, 50/60 Hz
******Q******* 347 VAC, 60 Hz
******P******* 480 VAC, 60 Hz
Power consumption
(H/F)*****2E****** 186 W
(H/F)*****2C****** 129 W
(H/F)*****2B****** 102 W
(H/F)*****2A****** 81 W
FD****2M****** 372 W
FD****2H****** 258 W
L*****2C****** 154 W
L*****2B****** 114 W
L*****29****** 81 W
L*****26****** 56 W
L*****24****** 42 W
H*****(A/E)E****** 206 W
H*****(A/E)C****** 149 W
H*****(A/E)B****** 122 W
H*****(A/E)A****** 101 W
FD****AM****** 412 W
FD****AH****** 298 W
L*****(A/E)C****** 174 W
L*****(A/E)B****** 134 W
L*****(A/E)9****** 101 W
L*****(A/E)6****** 76 W
L*****(A/E)4****** 62 W
******(P/Q)E****** 206 W
******PC****** 129 W
******QC****** 136 W
******PB****** 116 W
******QB****** 92 W
******(Q/P)A****** 92 W
Operating Specs
Power factor >0.9
ATHD
******PA****** <30%
All other models <20% @ 277 VAC
Dimensions in [cm]
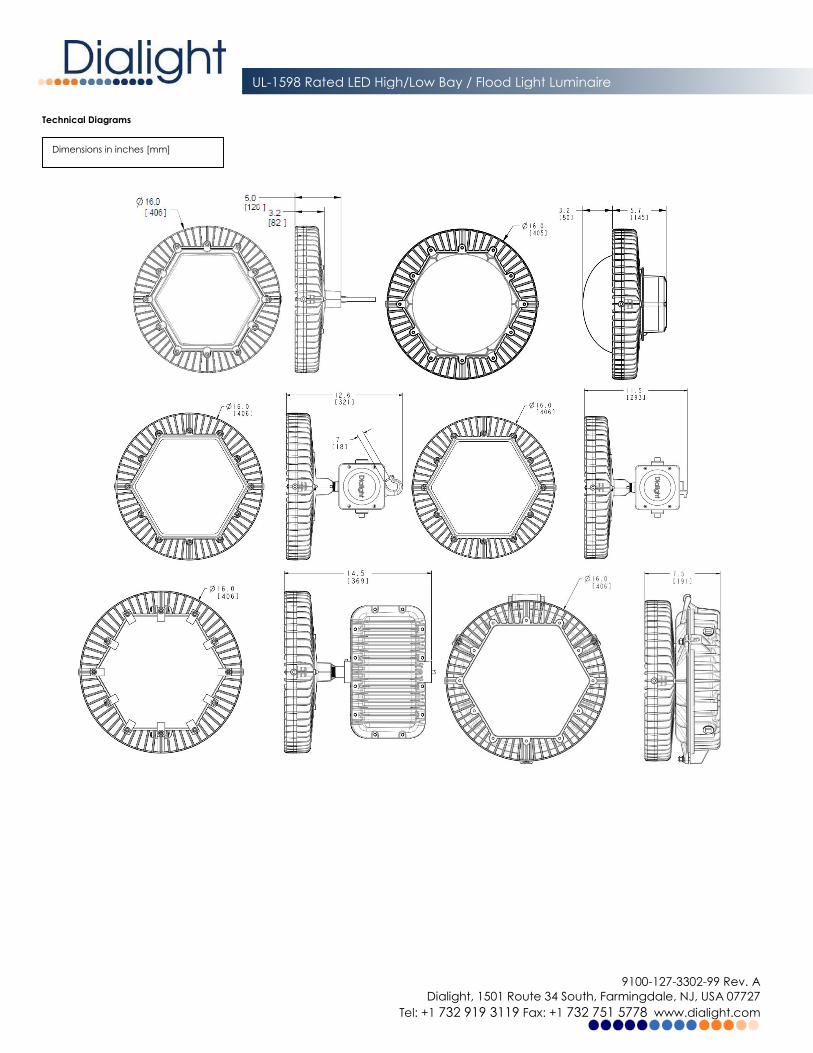
Diameter 16 [40.6]
Height 5-14.5 [12.7-36.8]
Weight
FD****2(H/M)****** 56 lbs [25.4 kg]
FD****A(H/M)****** 73 lbs [33.1 kg] All other models 17 - 36 lbs [7.7 -16.3 kg]

9100-127-3302-99 Rev. A
Dialight, 1501 Route 34 South, Farmingdale, NJ, USA 07727
Tel: +1 732 919 3119 Fax: +1 732 751 5778 www.dialight.com
UL-1598 Rated LED High/Low Bay / Flood Light Luminaire
Figure 2 - Angle Locking Bolt
Aim light fixture to desired angle (see Figure 3).
Figure 3 - Position Fixture
Reinstall angle locking bolts on both sides (see
Figure 2). Torque to 25 ft-lb [33.9Nm]
Tighten pivot bolts on both sides (see Figure 1).
Torque to 25 ft-lb [33.9Nm]
Installation of Luminaire (Electrical Connection)
The luminaire may be supplied with a 3 or 5 core
colored cable or have a factory installed wiring
compartment. Luminaires fitted with 5 core cable or
a factory installed wiring compartment are capable
of dimming. Luminaires fitted with a factory installed
wiring compartment (except Dual Flood) are
capable of interfacing with Dialight controls and
automation products; see controls and automation
product manuals for additional information.
0-10VDC Dimming
Dimming is controlled by means of a 0-10 VDC
signal (to be provided by the installer) to control
the level of dimming. At 10 volts, the output of the
unit is 100%; at 0 volts, the output will be
approximately 5%. The DC dimming voltage should
not exceed 15 VDC. Increasing the voltage from
10VDC to 15VDC will not result in additional light
output.
Important Notes
- The low voltage Dimming wires are connected to
the grounded output section of the driver inside
the light.
-Never connect either one to the Hot or Neutral
supply wires.
- Violet wire connects to DIM+
- Grey wire connects to DIM -
1) Variable Voltage Control
-An analog 0-10V active dimmer may be
connected to the two wires to control the light
output of the fixture. Multiple lights may be
connected to the same dimmer, as long as the
maximum current rating of the dimmer is not
exceeded.
-The dimmer must be capable of sinking 0.5mA per
light. Light output will vary approximately linearly
with control voltage, with 10V corresponding to
100% light output.
2) Step dimming
Simply shorting the two wires together will cause
the light to dim to a low level. When this is done,
the light will dim down to approximately 5% of its
full light output, with a corresponding decrease in
input power.
Power Input
For single phase units, 100-277VAC connecting the
fitted power cable conductors is as follows:
- Green wire connects to Safety Ground (Earth).
- Black wire connects to Live. - White wire connects to Neutral.
When using 208V (two 120V phases) connect the
black wire to one phase and the white wire to the
other phase. Since the light fixture does not have an
internal fuse on the white wire (as it is normally the
neutral), a fuse may be connected in series with the
white wire if required.
For 120-250VDC connecting the fitted power cable
conductors is as follows:
- Green wire connects to Safety Ground (Earth).
- White wire connects to Negative (-). - Black wire connects to Positive (+).
For single phase units, 347VAC connecting the fitted
power cable conductors is as follows:
- Green wire connects to Safety Ground (Earth).
- Black wire connects to Live. - White wire connects to Neutral.
For two phase units, 480VAC connecting the fitted
power cable conductors is as follows:
- Green wire connects to Safety Ground (Earth).
- Red (or White) wire connects to Line 1. - Black wire connects to Line 2.
Electrical Installation - Junction Box
The push terminal block (WAGO 862 series)* is
suitable for multi-stranded and single core cables
20-12 AWG, strip length 0.393”. Push down at the
‘cross point’, insert correct cable and release,
ensuring the cable has been securely retained.
Torque screws on rectangular junction box cover to
20 in-lb.
Torque screws on hexagonal junction box cover to
70 in-lb.
Terminal block positions are labeled to assist in
making the correct wire connections.
* All product names, logos, and brands are property
of their respective owners. All company, product
and service names used in this document are for
identification purposes only. Use of these names,
logos, and brands does not imply endorsement.
Electrical Installation - 347-480V Junction Box
- Green or Green/Yellow wire connects to Safety
Ground (Earth).
For 347V wiring:
-Red or White wire connects to Neutral. Remove
red wire leads from fuse block and connect directly
together using appropriate wire connector. (Lever
nut, wire nut, etc.)
-Black wire connects to Live.
For 480V wiring:
-Red or White wire connects to Line 2.
-Black wire connects to Line 1.
- Re-attach the Fuse Block Covers.
- Dimming (0-10V) can be connected to the violet
and grey wires using connectors (WAGO 222 series)*
provided.
-Torque all 3 wiring box locking nuts to 20 ft-lb [27 N-
m].
Interfacing to a PIR or Occupancy Sensor
The Dialight luminaire is ideally suited for control by an
occupancy sensor in order to maximize energy
savings based on its instant-on behavior and low
power consumption. Instructions for connecting the
High Bay fixture to an occupancy sensor are listed
below.
WARNING: To be installed and/or used in
accordance with appropriate electrical codes and
regulations.
WARNING: Controlling a load in excess of the
specified ratings of the occupancy sensor could
damage the unit and pose risk of fire, electric shock,
personal injury, or death. Check load ratings to
determine the unit’s suitability for your application.
WARNING: To avoid fire and electrical shock, turn off
power at circuit breaker or fuse and test that the
power is off before wiring.
The Dialight luminaire is also ideally suited for control by
an external occupancy sensor (not provided by
Dialight) in order to maximize energy savings based on
its instant-on behavior and low power consumption.
Instructions for connecting the luminaire to an
occupancy sensor are listed below.

9100-127-3302-99 Rev. A
Dialight, 1501 Route 34 South, Farmingdale, NJ, USA 07727
Tel: +1 732 919 3119 Fax: +1 732 751 5778 www.dialight.com
UL-1598 Rated LED High/Low Bay / Flood Light Luminaire
1) Install occupancy sensor as per sensor instructions
to provide desired coverage of area.
2) Connect luminaire wires as follows:
For 120-277VAC operation:
Black lead to load of the occupancy sensor, White
lead to the line (neutral), Green lead to earth ground.
Multiple luminaires may be connected to a sensor,
as long as the rated load of the sensor is not
exceeded.
For 347VAC operation:
Red lead to load of the occupancy sensor, black
lead to the line (neutral), green lead to earth
ground.
For 480VAC operation:
Red and black leads to load of occupancy sensor,
green lead to earth ground. Multiple fixtures may be
connected to a sensor, as long as the rated load of
the sensor is not exceeded.
3) Restore power at circuit breaker or fuse.
4) Verify operation of system. If the light will not turn
on, check the operation of the luminaire and sensor
individually and check that the wiring is done
correctly. If the light will not turn off or turns off and
on quickly, see the sensor’s installation instructions
for further guidance.
Maintenance
To avoid personal injury, disconnect power to the light and allow the unit to cool down before performing maintenance.
WARNING: No user serviceable parts inside of fixture.
Risk of electric shock. Removal of the lens will void
the warranty. Perform visual, mechanical, and electrical inspections on a regular basis. Dialight recommends checks to be made on a yearly basis. Frequency of use and environmental conditions, however should determine the frequency of checks. It is recommended to follow an Electrical Preventive Maintenance Program as described in NFPA 70B: Recommended Practice for Electrical Equipment.
The lens should be cleaned periodically, as needed, to ensure continued photometric performance.
Clean the lens with a damp, non-abrasive, and lint-free cloth. If not sufficient, use mild soap or a liquid cleaner. Do not use and abrasive, strong alkaline, or acid cleaners as damage may occur.
Inspect the cooling fins on the luminaire to ensure that they are free of any obstructions or contamination (i.e. excessive dust build-up). Clean with a non-abrasive cloth, if needed.
The light source of this luminaire is not replaceable;
when the light source reaches its end of life the
whole luminaire shall be replaced.
Secondary Retention
When using a safety cable for secondary retention,
ensure minimum slack (no greater than 1 foot) in
cable after installation. Connect safety cable to
outer band of fixture or accessory retention points.
Cable type, size, material, and attachment method
to meet customer application and to be
appropriate with all local and regional regulations.
Chemical Compatibility Guide
The chemical compatibility data referenced in this
manual was supplied by the raw material
manufacturers and is intended as a general guide.
The data represents the basic material properties
and does not necessarily represent the
performance of the final product due to
manufacturing process and design variations for
each final product. Chemical compatibility is highly
dependent on concentration, temperature,
humidity, and other environmental conditions and
therefore the customer assumes responsibility for
evaluation of gaseous or direct contact chemical
compatibility at their site prior to product
installation.
www.dialight.com/pubs/MDTFCHEMRFLX001.pdf
9100-127-3302-99 Rev. A
Dialight, 1501 Route 34 South, Farmingdale, NJ, USA 07727
Tel: +1 732 919 3119 Fax: +1 732 751 5778 www.dialight.com
UL-1598 Rated LED High/Low Bay / Flood Light Luminaire
Technical Diagrams
Dimensions in inches [mm]

9100-127-3302-99 Rev. A
Dialight, 1501 Route 34 South, Farmingdale, NJ, USA 07727
Tel: +1 732 919 3119 Fax: +1 732 751 5778 www.dialight.com
UL-1598 Rated LED High/Low Bay / Flood Light Luminaire
Official Statement
All statements, technical information, and recommendations contained herein are based on information and tests that
Dialight believes to be reliable. The accuracy or completeness thereof is not guaranteed. In accordance with Dialight
“Terms and Conditions of Sale” and since conditions of use are outside our control, the purchaser should determine the
suitability of the product for his or her intended use and assumes all risk and liability whatsoever in connection therewith.
Related Documents