A Quick Introduction to Video Game Design in Unity: The Pumpkin Toss Game Written by Jeff Smith for Unity 5, MonoDevelop and C# The game we’re going to create is a variation on the simple yet illustrative wall attack game described by Will Goldstone in his book (which I own) “Unity 3.x Game Development Essentials”. To learn more about Unity game design and C# scripting, I highly recommend the book which is available on Amazon. Basically, in “Pumpkin Toss”, the player will be able to fire projectiles (pumpkins) at a wall of blocks (cubes) and be scored on how successful he is at knocking those blocks down. This isn’t a great game that will be featured in the next issue of PC Gamer Magazine; it is a very simple 3D arcade style video game that will be a starting point for learning some core Unity concepts and, in the process, perhaps you’ll have a little fun. The Pumpkin Toss game can be developed with either the free or pro version of Unity, and the scripts will be written in C#. This brief introduction to Unity will cover: Creating and organizing Unity projects, understanding the Unity Editor, navigating 3D space without getting lost Core concepts such as scenes, cameras, colliders, transforms, materials, rigidbodies, components, meshes, images and textures, prefabs, frames and frame rates Adding lighting to your scene Adding audio sources Writing scripts in C#, compiling, using the MonoDevelop debugger, Start(), Update(), and OnGUI() methods Importing assets from the Unity Asset Store or TurboSquid Note: This introduction builds the final program in five stages, each one building on the last. I have included all the C# script source code in this article. Let’s Get Started Create a new project in Unity. You can name the project, objects, and script we create in this tutorial anything you’d like, but if you use the same names that I do, you’ll reduce the chance of making a mistake or getting confused in the process. I’m saving my project in the following directory (choose any directory you like—that shouldn’t matter):

Welcome message from author
This document is posted to help you gain knowledge. Please leave a comment to let me know what you think about it! Share it to your friends and learn new things together.
Transcript
A Quick Introduction to Video Game Design in Unity: The Pumpkin Toss Game
Written by Jeff Smith for Unity 5, MonoDevelop and C#
The game we’re going to create is a variation on the simple yet illustrative wall attack game described by Will Goldstone
in his book (which I own) “Unity 3.x Game Development Essentials”. To learn more about Unity game design and C#
scripting, I highly recommend the book which is available on Amazon.
Basically, in “Pumpkin Toss”, the player will be able to fire projectiles (pumpkins) at a wall of blocks (cubes) and be scored
on how successful he is at knocking those blocks down. This isn’t a great game that will be featured in the next issue of
PC Gamer Magazine; it is a very simple 3D arcade style video game that will be a starting point for learning some core
Unity concepts and, in the process, perhaps you’ll have a little fun. The Pumpkin Toss game can be developed with either
the free or pro version of Unity, and the scripts will be written in C#.
This brief introduction to Unity will cover:
Creating and organizing Unity projects, understanding the Unity Editor, navigating 3D space without getting lost
Core concepts such as scenes, cameras, colliders, transforms, materials, rigidbodies, components, meshes,
images and textures, prefabs, frames and frame rates
Adding lighting to your scene
Adding audio sources
Writing scripts in C#, compiling, using the MonoDevelop debugger, Start(), Update(), and OnGUI() methods
Importing assets from the Unity Asset Store or TurboSquid
Note: This introduction builds the final program in five stages, each one building on the last. I have included all the C#
script source code in this article.
Let’s Get Started
Create a new project in Unity. You can name the project, objects, and script we create in this tutorial anything you’d like,
but if you use the same names that I do, you’ll reduce the chance of making a mistake or getting confused in the process.
I’m saving my project in the following directory (choose any directory you like—that shouldn’t matter):

For this simple game, we won’t need to import any of the packages in the list, so just click the Create button. A new
project appears in Unity with a blank scene containing nothing but a Main Camera. There are three important areas of
the Unity Editor that warrant explaining: the Hierarchy, Project/Assets, and the Inspector.
When you create a new project in Unity, it initially has only one GameObject, the Main Camera.
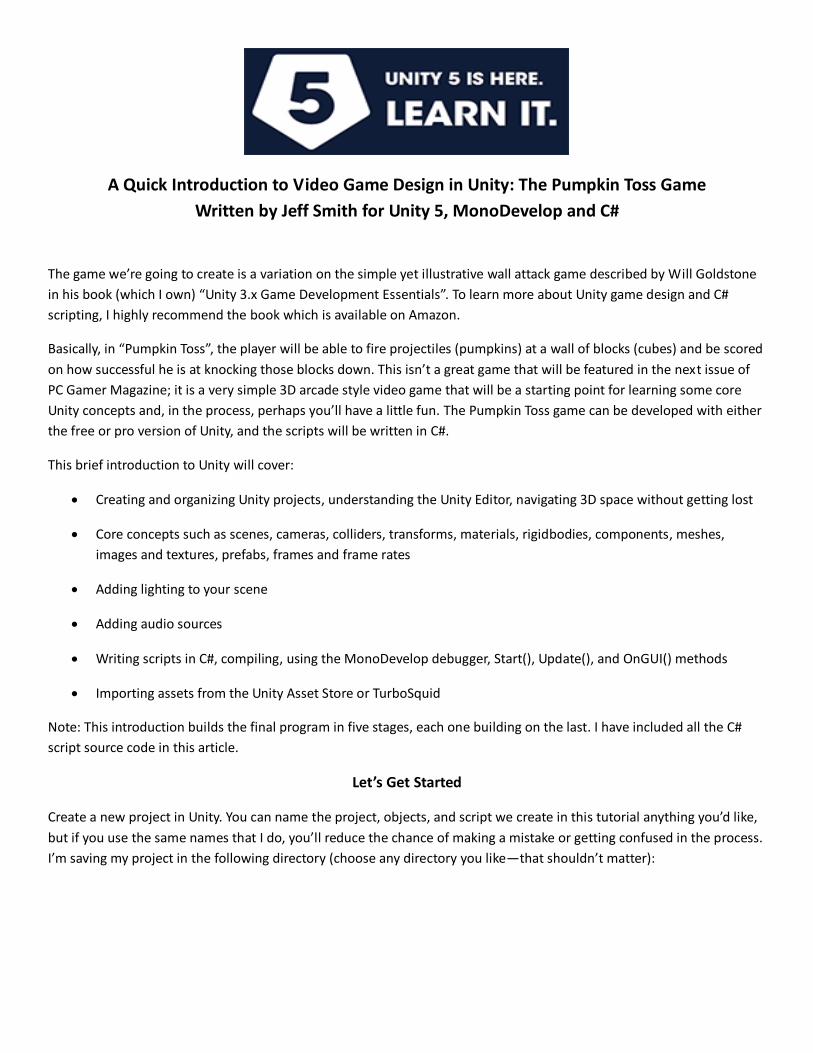
What is a camera?
The camera is your game player’s “view” of the action
taking place in the game. He only sees what the camera is
pointing at. First person games typically have a camera,
essentially acting as your eyes, that moves through the 3D
landscape. Third person games typically have the camera
slightly above and behind the character, following
him/her throughout the game’s 3D landscape.
The camera is a powerful feature that you essentially get “for free” (that is, without having to write a bunch of
complicated low-level visualization/rendering code yourself). Some games have multiple cameras: one camera to display
what the main character can see while a second camera shows a map view of the scene or perhaps the view of a second
character.
You can learn more about cameras here:
http://docs.unity3d.com/Documentation/ScriptReference/Camera.html
Let’s save our scene. That begs the following question:
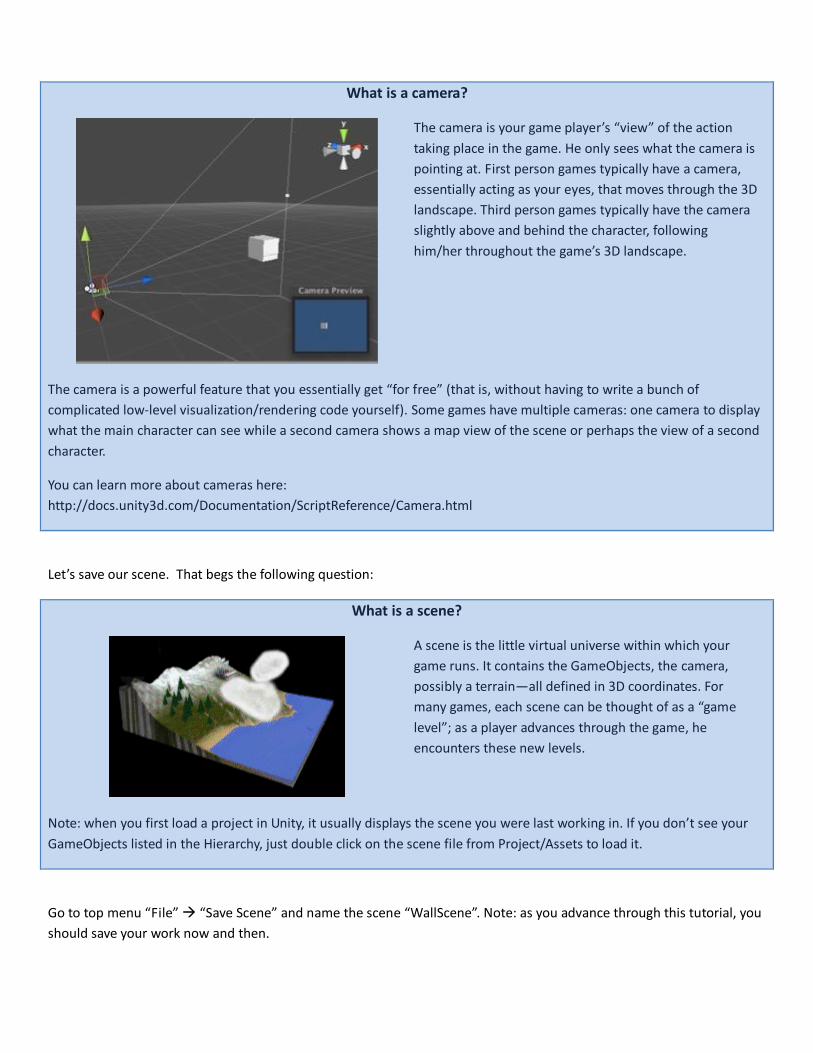
What is a scene?
A scene is the little virtual universe within which your
game runs. It contains the GameObjects, the camera,
possibly a terrain—all defined in 3D coordinates. For
many games, each scene can be thought of as a “game
level”; as a player advances through the game, he
encounters these new levels.
Note: when you first load a project in Unity, it usually displays the scene you were last working in. If you don’t see your
GameObjects listed in the Hierarchy, just double click on the scene file from Project/Assets to load it.
Go to top menu “File” “Save Scene” and name the scene “WallScene”. Note: as you advance through this tutorial, you
should save your work now and then.
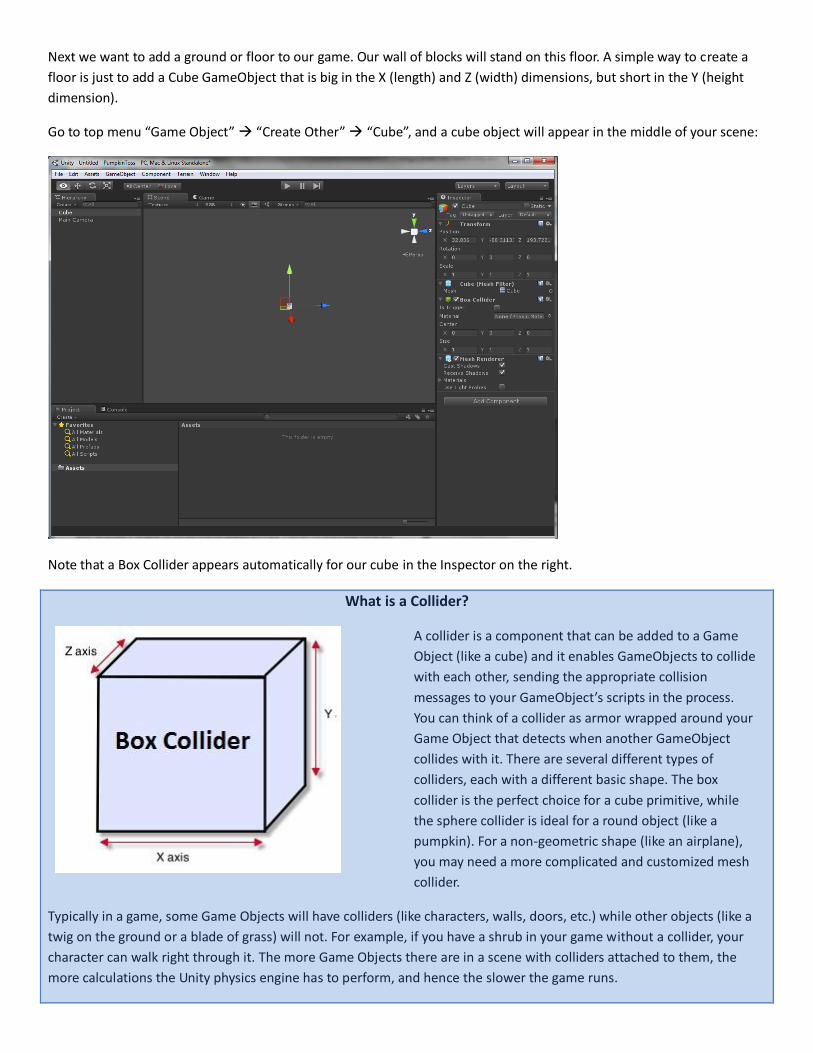
Next we want to add a ground or floor to our game. Our wall of blocks will stand on this floor. A simple way to create a
floor is just to add a Cube GameObject that is big in the X (length) and Z (width) dimensions, but short in the Y (height
dimension).
Go to top menu “Game Object” “Create Other” “Cube”, and a cube object will appear in the middle of your scene:
Note that a Box Collider appears automatically for our cube in the Inspector on the right.
What is a Collider?
A collider is a component that can be added to a Game
Object (like a cube) and it enables GameObjects to collide
with each other, sending the appropriate collision
messages to your GameObject’s scripts in the process.
You can think of a collider as armor wrapped around your
Game Object that detects when another GameObject
collides with it. There are several different types of
colliders, each with a different basic shape. The box
collider is the perfect choice for a cube primitive, while
the sphere collider is ideal for a round object (like a
pumpkin). For a non-geometric shape (like an airplane),
you may need a more complicated and customized mesh
collider.
Typically in a game, some Game Objects will have colliders (like characters, walls, doors, etc.) while other objects (like a
twig on the ground or a blade of grass) will not. For example, if you have a shrub in your game without a collider, your
character can walk right through it. The more Game Objects there are in a scene with colliders attached to them, the
more calculations the Unity physics engine has to perform, and hence the slower the game runs.

In the Pumpkin Toss game, both the pumpkins thrown as well as the cubes making up the wall, will have colliders
attached to them.
With the Cube selected in the Hierarchy, go to the Inspector on the right and underneath “Transform” change the Scale
to:
X: 100, Y:1, Z:100
What is a Transform?
A transform is a combination of a 3D
position, rotation, and scale. In the 2D
world of web and GUI development,
objects on the screen have an (X,Y) position
and a (width,height) scale. In a 3D
environment, game objects have an extra Z
component to their position, a rotation in
3D space, and an extra Z component to
their scale.
This will turn our cube into a flat panel that can act as a floor in our game. Click on the Cube in the Hierarchy window to
select it and then right click and select Rename (you can also rename by pressing the F2 key). Rename “Cube” to “Floor”.
If your view of the floor doesn’t look similar to the screen image above, use your mouse to change your viewing
perspective. The mouse scroll wheel “zooms” you in and out, pressing and holding the scroll wheel while moving the
mouse enables you to move the entire wall, and pressing/dragging the right mouse button enables you to rotate the wall
in your field of view.
Next, we’ll add another Cube that will make up one of the blocks in our game.

Go to top menu “Game Object” “Create Other” “Cube”
A cube appears—note that you may need to drag it upward (click/drag the green up arrow) to be seen above your floor.
We’ll leave this cube’s default scale alone (X: 1, Y:1, Z:1). Note that the cube doesn’t look very interesting for two
reasons. One, we haven’t given it material properties (e.g. red) so it stands out in the scene. Two, we haven’t added a
point light yet to illuminate the scene. We’ll address both of these shortcomings.
What is a Material?
A material is used to assign a Shader (a special script that configures how the graphics card will render the object in the
scene), along with the Shader’s material properties (e.g. its color, texture(s), bumpiness, etc.) to a GameObject. The
renderer then uses the Shader and material properties to render the GameObject in your scene. Textures can be either
images or videos.
Sometimes code examples can be helpful in understanding concepts. Here’s an example that simply sets a material’s
color (which in turn sets the color used by the material’s Shader).
GameObject sphere = GameObject.CreatePrimitive(PrimitiveType.Sphere);
sphere.renderer.material.color = Color.red;
Here’s a code example that assigns an (image) texture to a sphere GameObject:
Texture crosshairTexture = Resources.Load("crosshair") as Texture; //loads crosshair.png from resources folder
sphere.renderer.material.mainTexture = crosshairTexture;
In our simple Pumpkin Toss game, both the cube and pumpkin (sphere) GameObjects will have materials assigned to
them. The initial versions will just assign a color—later versions of Pumpkin Toss will assign textures (images).
Learn more about materials here:
http://docs.unity3d.com/Documentation/Components/class-Material.html
Shaders won’t be covered in this tutorial, but you can read more about them here:
http://docs.unity3d.com/Documentation/Manual/Shaders.html
In our Project window in the bottom left of the screen, we’ll add a “Materials” folder under “Assets”. We could just put
everything in the Assets folder, but for more complicated projects, it is preferable to have our assets (e.g. sound files,
images, etc) in convenient and separate folders.
Right click on “Assets” “Create” “Folder” and name the new folder “Materials”.
Now right click on “Materials” “Create” “Material” and name the new material “redMaterial”.
In the Inspector on the right, click on the “Main Color” and choose a red color like so:

Now that we have a red material, we need to apply it to our cube. Click on the “redMaterial” asset and drag it up to the
“Cube” in the Hierarchy window (upper left of screen). Your cube is now red. If your cube is underneath the floor, you
won’t be able to see it. If that’s the case, click on the Y axis arrow and drag it up above the floor. If you can’t find your
cube on the screen, select the Cube from the Hierarchy and then press the “F” key to Focus on it. It should appear in the
center of the scene view. You also have the option of selecting the cube and entering the (X,Y,Z) position to (32.83,-
86.77,193.5) manually in the Inspector, so your scene will look similar to mine.
If your cube seems tiny, use your mouse-wheel to zoom closer to it. Your Unity screen should look similar to this one by
this point in the process:
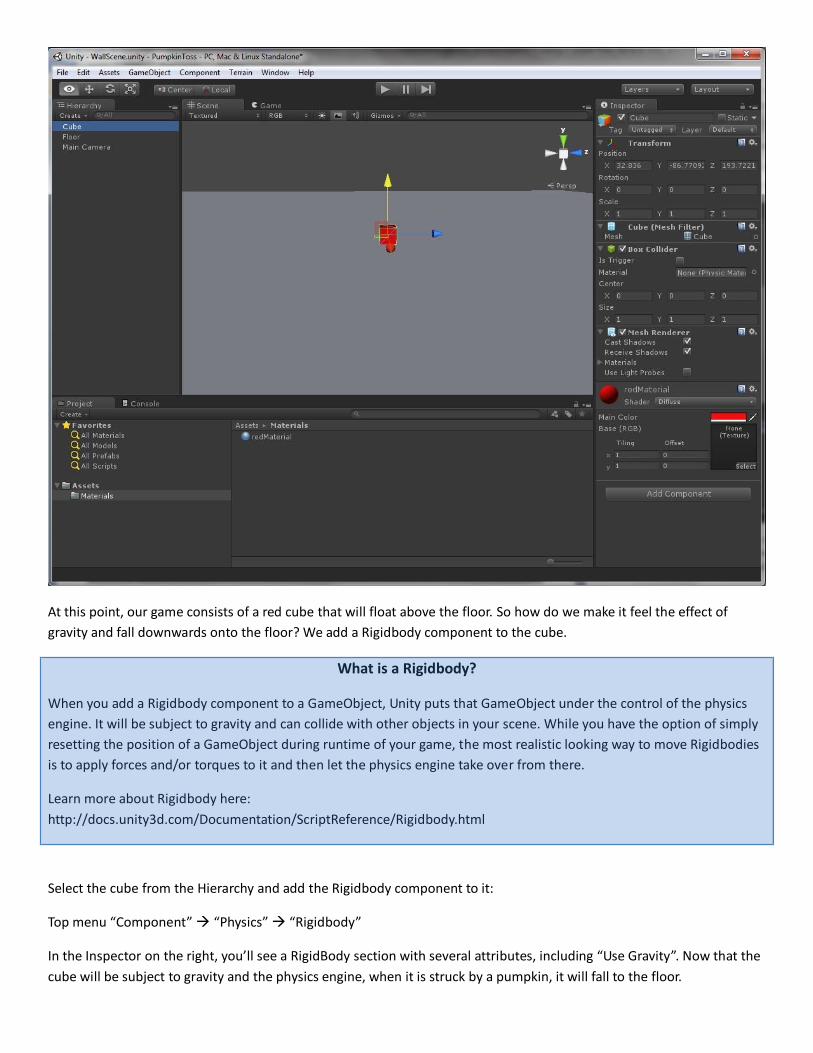
At this point, our game consists of a red cube that will float above the floor. So how do we make it feel the effect of
gravity and fall downwards onto the floor? We add a Rigidbody component to the cube.
What is a Rigidbody?
When you add a Rigidbody component to a GameObject, Unity puts that GameObject under the control of the physics
engine. It will be subject to gravity and can collide with other objects in your scene. While you have the option of simply
resetting the position of a GameObject during runtime of your game, the most realistic looking way to move Rigidbodies
is to apply forces and/or torques to it and then let the physics engine take over from there.
Learn more about Rigidbody here:
http://docs.unity3d.com/Documentation/ScriptReference/Rigidbody.html
Select the cube from the Hierarchy and add the Rigidbody component to it:
Top menu “Component” “Physics” “Rigidbody”
In the Inspector on the right, you’ll see a RigidBody section with several attributes, including “Use Gravity”. Now that the
cube will be subject to gravity and the physics engine, when it is struck by a pumpkin, it will fall to the floor.
What is a Component?
A component is an attribute of a Game Object (for example, a transform is a component of a Game Object) and the
Component class is the base class for everything attached to Game Objects. You can read more about components here:
http://docs.unity3d.com/Documentation/ScriptReference/Component.html
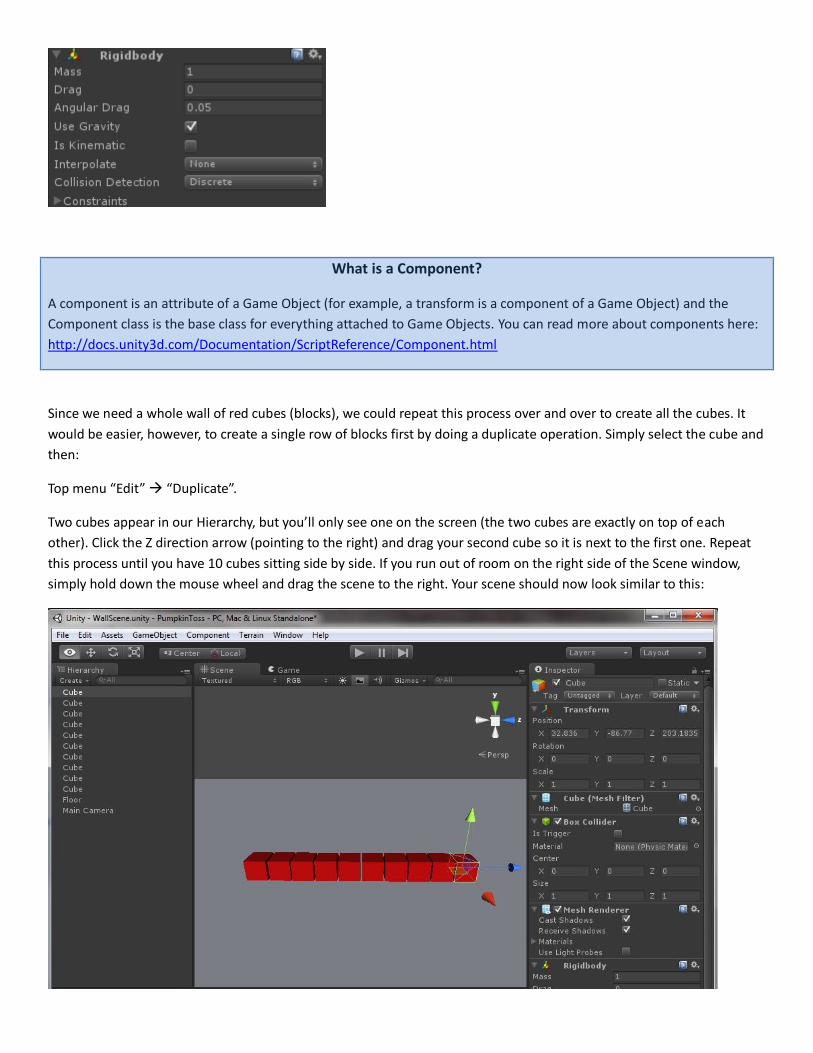
Since we need a whole wall of red cubes (blocks), we could repeat this process over and over to create all the cubes. It
would be easier, however, to create a single row of blocks first by doing a duplicate operation. Simply select the cube and
then:
Top menu “Edit” “Duplicate”.
Two cubes appear in our Hierarchy, but you’ll only see one on the screen (the two cubes are exactly on top of each
other). Click the Z direction arrow (pointing to the right) and drag your second cube so it is next to the first one. Repeat
this process until you have 10 cubes sitting side by side. If you run out of room on the right side of the Scene window,
simply hold down the mouse wheel and drag the scene to the right. Your scene should now look similar to this:

We want to create 8 rows of these blocks, so to achieve this, we’ll group them together and then make copies of this
group. While not strictly necessary for this game, it is a good practice to group objects together where logical to keep the
Hierarchy window as organized as possible. Top menu “GameObject” “Create Empty”
A new game object called “GameObject” will appear in the Hierarchy window. Rename this to “CubeHolder”. Now multi-
select all the Cube objects in the Hierarchy and drag them to the CubeHolder. Your screen should look similar to this:

Now click on “CubeHolder” and go to top menu “Edit” “Duplicate”.
Drag this new CubeHolder (row) up on top of the first row. Repeat this operation until you have 8 rows like so:
We have our wall! You may want to place your cubes more tightly together that you see in these screen images. If you
don’t, when you start your game they will settle and rock a bit as they encounter Unity “gravity”.

Save your scene and then test your game by clicking the “Play” control at the top. You may see something like this:
Why is my wall so tiny?
Our floor and wall appear tiny because the Main Camera is not in a good location (too far away). Click the “Play” button
again to stop running the game and then click on the Main Camera from the Hierarchy window.
Important Hint
Unity allows you to experiment with settings in the Inspector while a game is running (a useful feature), but any changes
you make are lost once the game stops. So stop your game before making any changes that you want preserved.
The little Camera Preview window within the scene shows you what the camera is “seeing”. Zoom away from the wall
(using the mouse wheel) until you can see the Main Camera in the scene:

Make sure the Main Camera is selected in the Hierarchy, and move it closer to the floor and wall by dragging the X, Y, Z
direction arrows. In this scene, if I drag the blue arrow (Z-axis) to the right, my camera moves to the right. If I drag the
green arrow (Y-axis) downwards, my camera will move downwards and closer to the Y coordinate of the “floor”. As I
adjust the camera’s position, note the changes in the Camera Preview window (lower right of the screen).
I decided to put my camera close to the floor and rotate it to face the wall. For people not familiar with Unity3D or other
3D environments, moving around and rotating in 3D space can be a technical hurdle to overcome. Coming from my own
3D challenged background in web and Java/Flash GUI development, when I first started working in the Unity IDE, I often
found myself lost.
Remember that three metrics: position, rotation, and scale combine to form a game object’s Transform. To adjust a
position, rotation, or scale, you can click on the corresponding toggle button on the upper left and then drag the arrows
or rotation angles to the desired settings.
(Position, Rotation, and Scale controls)

Alternatively, you can type in values for the Transform in the Inspector. I moved and rotated my camera like so:
Note, if you are struggling to get your camera into the right position/rotation, you can always type in the values that I
selected above for your camera’s position and rotation. Note that changing the camera’s scale doesn’t change the view
(cameras are unusual in that they don’t really have a scale), hence I’ll leave the scale at (X: 1, Y: 1, Z: 1). With the camera
transform (position/rotation) settings I have selected, the wall is prominently rendered in the Camera Preview window.
When I click the Play button again, my wall appears close enough and is centered in my game view:

Add A Light To Illuminate Your Scene
Note, however, how drab and gray the colors are. Why is that? I need to add a light, of course, to better illuminate my
scene! I’ll add a “point light”.
From the top menu, select “GameObject” “Create Other” point light
A point light has been added to the scene (note the halo of light that appears around it, illuminating some of the red
cubes). Drag your light in front of your wall, to a position that casts a favorable light. I moved my point light here:
Note how much brighter the blocks look. You can increase the light’s Range by changing the “Range” value to some
number greater than the default value of 10. You can also change the light’s intensity and color.
Feel free to experiment adding another point light, spotlight, or area light to your scene. In a sense Unity makes you the
director of your own movie (or game), enabling you to arrange and illuminate the scene in any manner you choose.
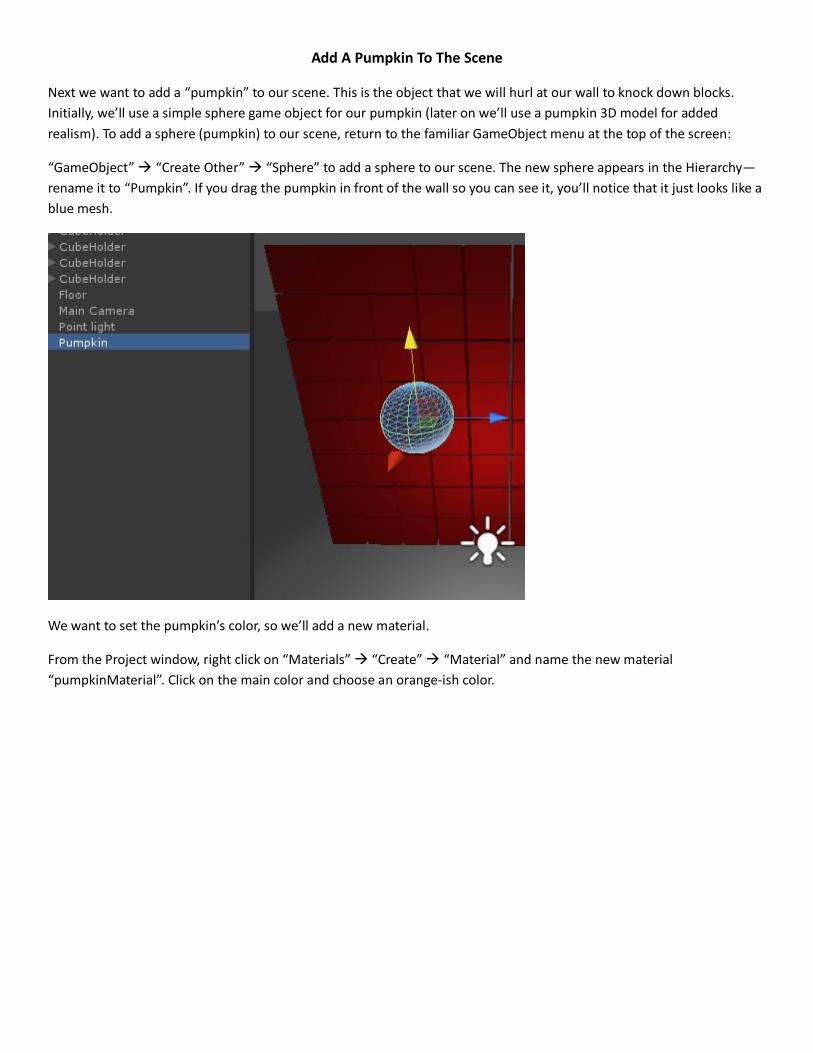
Add A Pumpkin To The Scene
Next we want to add a “pumpkin” to our scene. This is the object that we will hurl at our wall to knock down blocks.
Initially, we’ll use a simple sphere game object for our pumpkin (later on we’ll use a pumpkin 3D model for added
realism). To add a sphere (pumpkin) to our scene, return to the familiar GameObject menu at the top of the screen:
“GameObject” “Create Other” “Sphere” to add a sphere to our scene. The new sphere appears in the Hierarchy—
rename it to “Pumpkin”. If you drag the pumpkin in front of the wall so you can see it, you’ll notice that it just looks like a
blue mesh.
We want to set the pumpkin’s color, so we’ll add a new material.
From the Project window, right click on “Materials” “Create” “Material” and name the new material
“pumpkinMaterial”. Click on the main color and choose an orange-ish color.
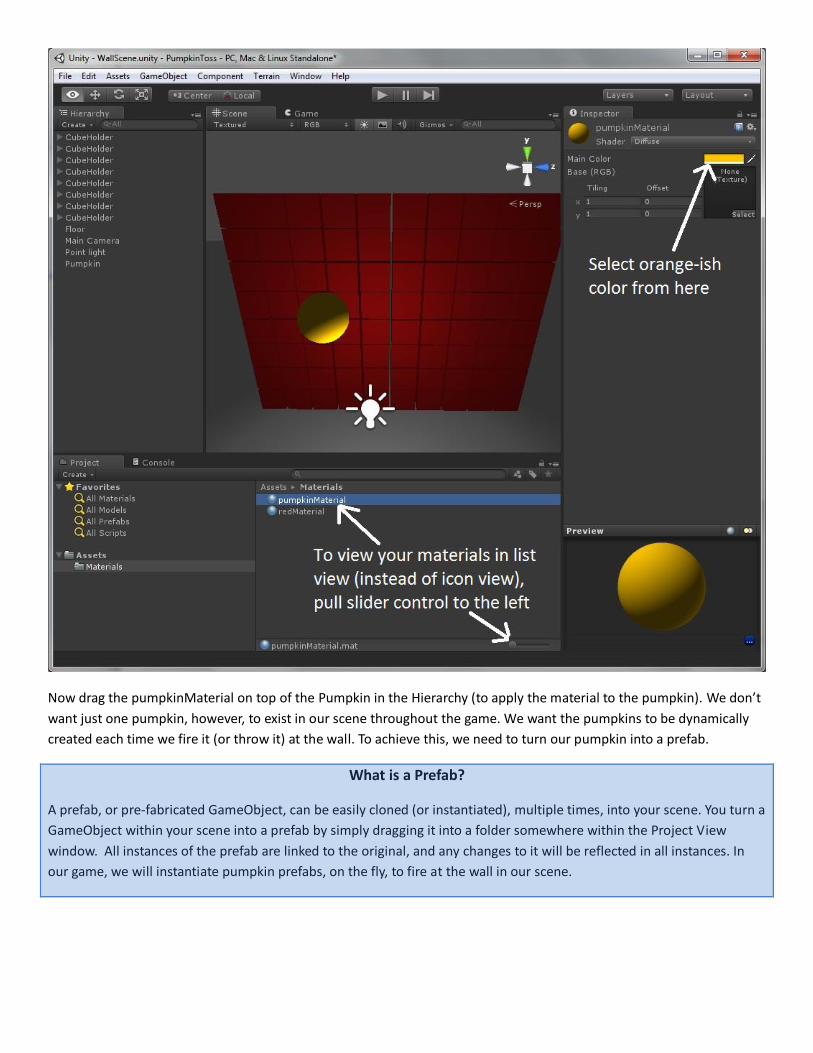
Now drag the pumpkinMaterial on top of the Pumpkin in the Hierarchy (to apply the material to the pumpkin). We don’t
want just one pumpkin, however, to exist in our scene throughout the game. We want the pumpkins to be dynamically
created each time we fire it (or throw it) at the wall. To achieve this, we need to turn our pumpkin into a prefab.
What is a Prefab?
A prefab, or pre-fabricated GameObject, can be easily cloned (or instantiated), multiple times, into your scene. You turn a
GameObject within your scene into a prefab by simply dragging it into a folder somewhere within the Project View
window. All instances of the prefab are linked to the original, and any changes to it will be reflected in all instances. In
our game, we will instantiate pumpkin prefabs, on the fly, to fire at the wall in our scene.
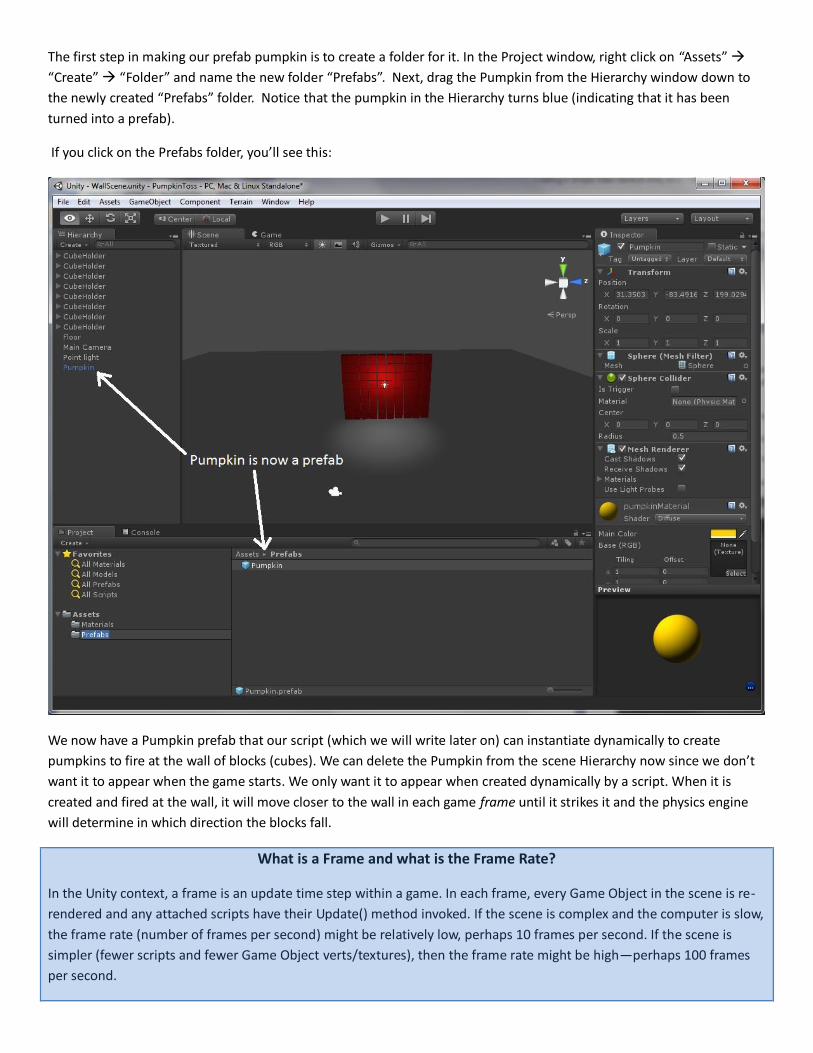
The first step in making our prefab pumpkin is to create a folder for it. In the Project window, right click on “Assets”
“Create” “Folder” and name the new folder “Prefabs”. Next, drag the Pumpkin from the Hierarchy window down to
the newly created “Prefabs” folder. Notice that the pumpkin in the Hierarchy turns blue (indicating that it has been
turned into a prefab).
If you click on the Prefabs folder, you’ll see this:
We now have a Pumpkin prefab that our script (which we will write later on) can instantiate dynamically to create
pumpkins to fire at the wall of blocks (cubes). We can delete the Pumpkin from the scene Hierarchy now since we don’t
want it to appear when the game starts. We only want it to appear when created dynamically by a script. When it is
created and fired at the wall, it will move closer to the wall in each game frame until it strikes it and the physics engine
will determine in which direction the blocks fall.
What is a Frame and what is the Frame Rate?
In the Unity context, a frame is an update time step within a game. In each frame, every Game Object in the scene is re-
rendered and any attached scripts have their Update() method invoked. If the scene is complex and the computer is slow,
the frame rate (number of frames per second) might be relatively low, perhaps 10 frames per second. If the scene is
simpler (fewer scripts and fewer Game Object verts/textures), then the frame rate might be high—perhaps 100 frames
per second.
What is a Script?
A script adds behaviors to GameObjects and it is split into different functions (or methods) that are invoked for different
events at runtime. Unity scripts are most often written in Javascript or C#, although Boo (a python-like language) can also
be used. C# is a true object oriented language, very similar to Java, and is generally (but not always) preferred by serious
Unity game designers. Scripts always extend the Unity MonoBehavior class, inheriting all its capabilities plus the
additional capabilities you add. Unity scripts typically implement at least two methods, Start() and Update(), that are
automatically invoked by Unity at runtime. The Start() method is invoked once (for Game Objects / scripts that have not
been deactivated), immediately before the first Update() call. The Update() method, on the other hand, is invoked once
per frame and thus must execute quickly or game performance will degrade.
Learn more about the MonoBehavior base class for scripts here:
http://docs.unity3d.com/Documentation/ScriptReference/MonoBehaviour.html
Time To Write The PumpkinTosser Script
At this point, our basic scene is finished. We now need to add a script to fire pumpkins at our wall when the user clicks
the left mouse button (or presses the Ctrl key). Before we add a new script, we’ll keep things better organized by adding
a new folder underneath Assets called “Scripts”.
From the Project window, right click on “Assets” “Create” “Folder” and name the new folder “Scripts”. We’ll put our
scripts in this folder.
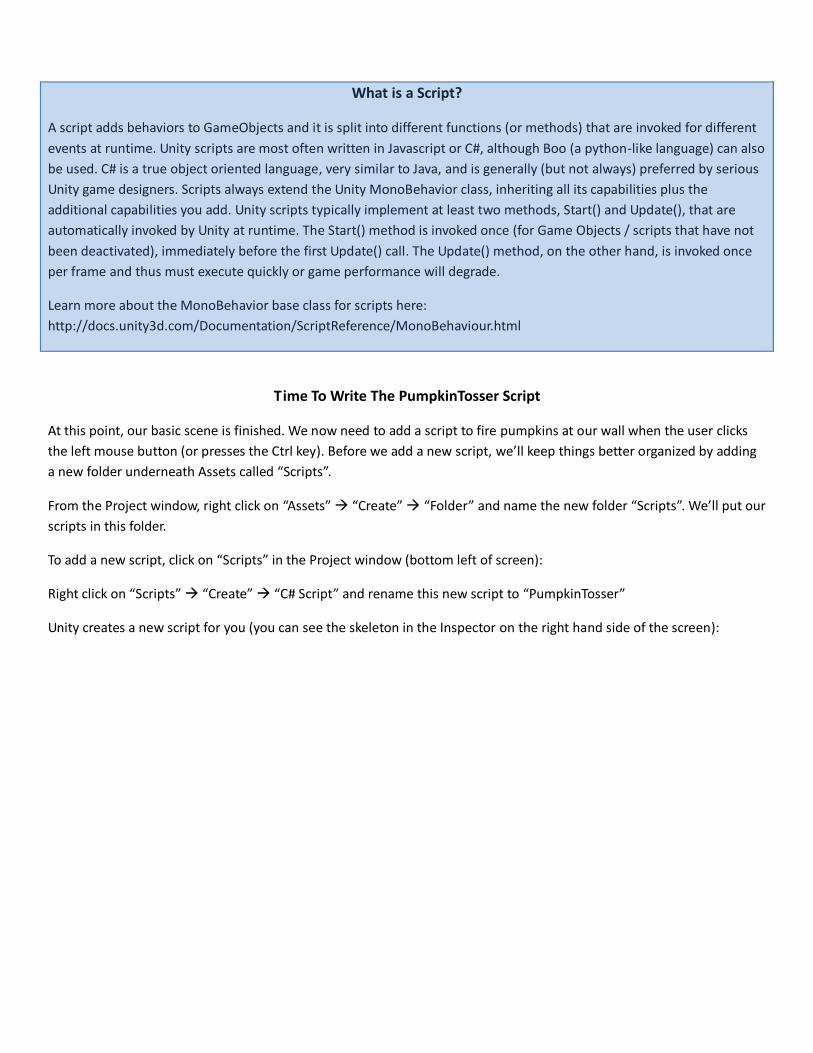
To add a new script, click on “Scripts” in the Project window (bottom left of screen):
Right click on “Scripts” “Create” “C# Script” and rename this new script to “PumpkinTosser”
Unity creates a new script for you (you can see the skeleton in the Inspector on the right hand side of the screen):
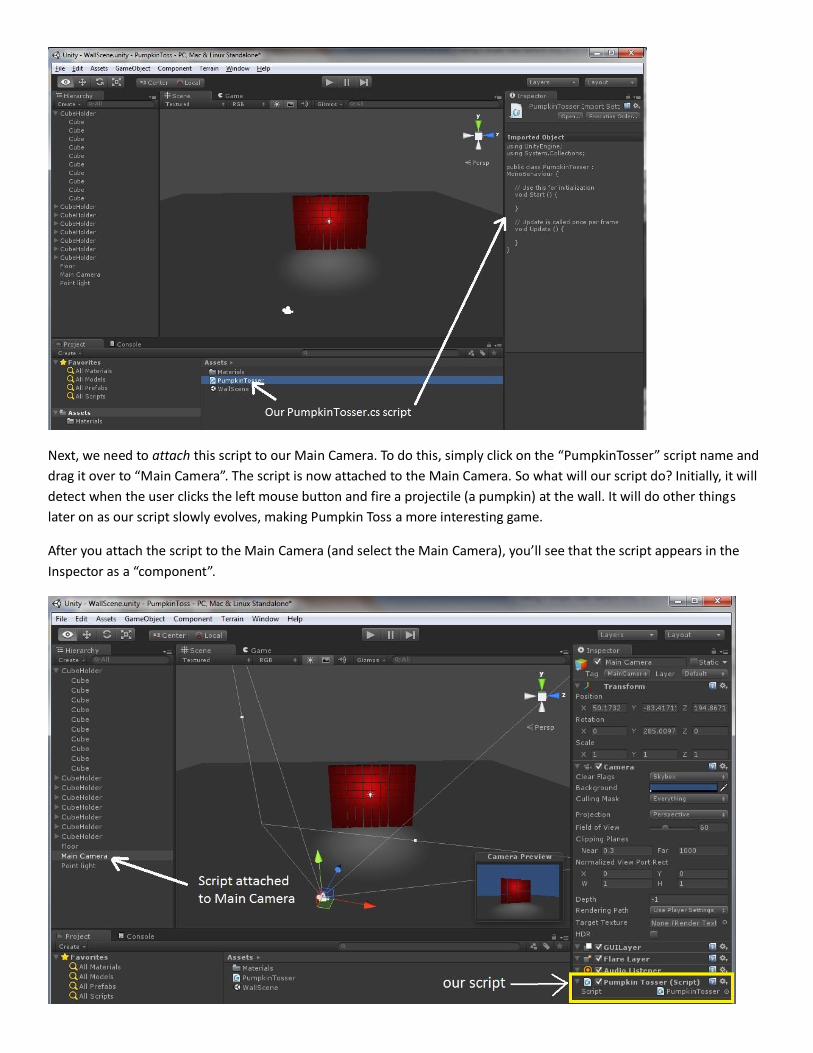
Next, we need to attach this script to our Main Camera. To do this, simply click on the “PumpkinTosser” script name and
drag it over to “Main Camera”. The script is now attached to the Main Camera. So what will our script do? Initially, it will
detect when the user clicks the left mouse button and fire a projectile (a pumpkin) at the wall. It will do other things
later on as our script slowly evolves, making Pumpkin Toss a more interesting game.
After you attach the script to the Main Camera (and select the Main Camera), you’ll see that the script appears in the
Inspector as a “component”.
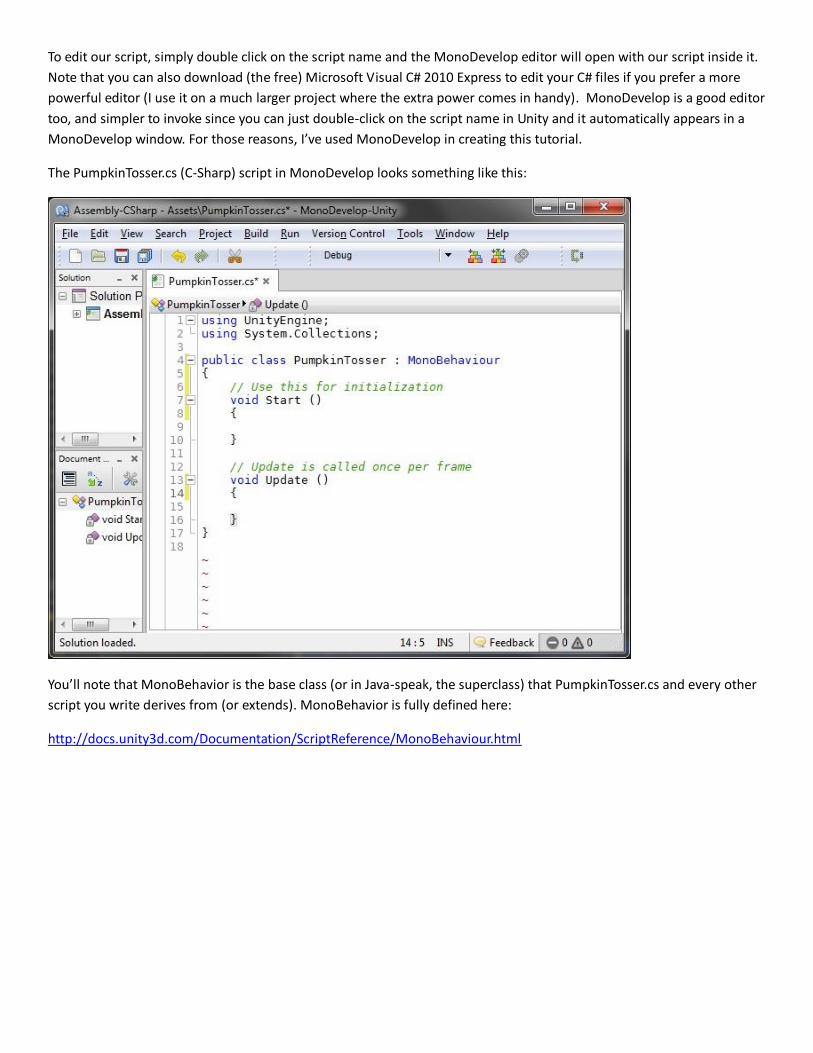
To edit our script, simply double click on the script name and the MonoDevelop editor will open with our script inside it.
Note that you can also download (the free) Microsoft Visual C# 2010 Express to edit your C# files if you prefer a more
powerful editor (I use it on a much larger project where the extra power comes in handy). MonoDevelop is a good editor
too, and simpler to invoke since you can just double-click on the script name in Unity and it automatically appears in a
MonoDevelop window. For those reasons, I’ve used MonoDevelop in creating this tutorial.
The PumpkinTosser.cs (C-Sharp) script in MonoDevelop looks something like this:
You’ll note that MonoBehavior is the base class (or in Java-speak, the superclass) that PumpkinTosser.cs and every other
script you write derives from (or extends). MonoBehavior is fully defined here:
http://docs.unity3d.com/Documentation/ScriptReference/MonoBehaviour.html
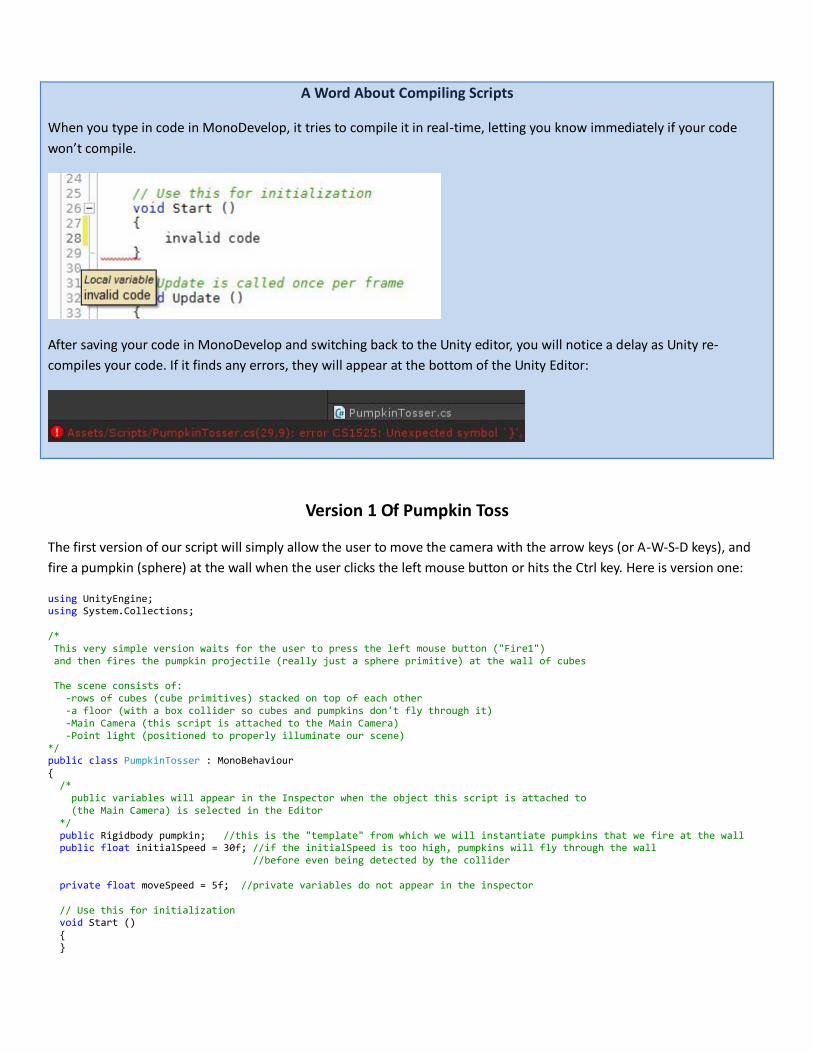
A Word About Compiling Scripts
When you type in code in MonoDevelop, it tries to compile it in real-time, letting you know immediately if your code
won’t compile.
After saving your code in MonoDevelop and switching back to the Unity editor, you will notice a delay as Unity re-
compiles your code. If it finds any errors, they will appear at the bottom of the Unity Editor:
Version 1 Of Pumpkin Toss
The first version of our script will simply allow the user to move the camera with the arrow keys (or A-W-S-D keys), and
fire a pumpkin (sphere) at the wall when the user clicks the left mouse button or hits the Ctrl key. Here is version one:
using UnityEngine; using System.Collections; /* This very simple version waits for the user to press the left mouse button ("Fire1") and then fires the pumpkin projectile (really just a sphere primitive) at the wall of cubes The scene consists of: -rows of cubes (cube primitives) stacked on top of each other -a floor (with a box collider so cubes and pumpkins don't fly through it) -Main Camera (this script is attached to the Main Camera) -Point light (positioned to properly illuminate our scene) */ public class PumpkinTosser : MonoBehaviour { /* public variables will appear in the Inspector when the object this script is attached to (the Main Camera) is selected in the Editor */ public Rigidbody pumpkin; //this is the "template" from which we will instantiate pumpkins that we fire at the wall public float initialSpeed = 30f; //if the initialSpeed is too high, pumpkins will fly through the wall //before even being detected by the collider private float moveSpeed = 5f; //private variables do not appear in the inspector // Use this for initialization void Start () { }

// Update is called once per frame void Update () { //allow user to move the camera in the scene using the arrow keys (or AWSD keys) float deltaX = Input.GetAxis("Horizontal") * Time.deltaTime * moveSpeed; float deltaY = Input.GetAxis("Vertical") * Time.deltaTime * moveSpeed; transform.Translate(deltaX, deltaY, 0); //deltaZ = 0 //if user "fired" then create a pumpkin and roughly aim it (forward) at the wall //Note: "Fire1" is mapped to both the left mouse button and the Ctrl key if (Input.GetButtonUp("Fire1")) { Rigidbody pumpkinInstance = Instantiate(pumpkin, transform.position, transform.rotation) as Rigidbody; Vector3 fwd = transform.TransformDirection(Vector3.forward); pumpkinInstance.AddForce(fwd * initialSpeed); } } }
Most of the code comments (in green) are self-explanatory, but I’ll explain the basic logic. We’ve declared two public
variables (or fields), “pumpkin” and “initialSpeed”, and initialized initialSpeed to 30f (“f” is for float as opposed to
double). If you set the initialSpeed too high, the pumpkins will fly through a cube without even being detected by the
cube’s collider. The “pumpkin” variable has been declared, but no value has been assigned to it yet. Since it is a public
variable (the highest level of variable visibility), its value can be set in the Unity Inspector.
To do so, go back to Unity and click on the Main Camera (which this PumpkinTosser.cs script is attached to) in the
Hierarchy. You’ll see the script variables appear in the Inspector. Drag the Pumpkin prefab over on top of the Pumpkin
script variable. Our script variable now has a value (see image below).

Once this prefab-to-script variable assignment is made, you can run your game. Click the mouse somewhere in your
scene and presto, a “pumpkin” is fired at the wall and the blocks will come tumbling down!
So what just happened?
The script fired a pumpkin (sphere) at the wall with this block of code in the Update() method (subroutine):
//if user "fired" then create a pumpkin and roughly aim it (forward) at the wall
//Note: "Fire1" is mapped to both the left mouse button and the Ctrl key
if (Input.GetButtonUp("Fire1"))
{
Rigidbody pumpkinInstance = Instantiate(pumpkin, transform.position, transform.rotation) as Rigidbody;
Vector3 fwd = transform.TransformDirection(Vector3.forward);
pumpkinInstance.AddForce(fwd * initialSpeed);
}
Update() gets called by the Unity engine once per frame, so if your computer is powerful enough to generate 60 Unity frames per second, this Update() code will be called 60 times per second. Each time it is called, the GetButtonUp method of the Input object is invoked and this method returns true only if the user either clicked the left mouse button or pressed the control key (Unity interprets either one as a “Fire1” message).
So if the user fires, the next line of code instantiates (creates) a new pumpkin in memory. The line after that creates a vector3 that points straight ahead (Vector3.forward), presumably towards your wall. The last line adds a force to the pumpkin—the vector of this force points to the wall and the magnitude (how fast) is determined by the initialSpeed variable. Thus when you “fire”, a pumpkin is created and launched towards the wall of blocks.
The Unity physics engine automatically takes over at this point. The mass, speed, and trajectory of the pumpkin dictate how much force is applied to the block(s) it impacts. If you look closely, Unity “gravity” slowly pulls down the pumpkin in an arc, and Unity “gravity” also pulls the dislodged blocks down to the floor after contact.
Unity colliders detected when the pumpkin impacted the blocks and the physics engine determined how the blocks should ricochet off the pumpkin. Colliders in the floor (also a cube if you remember) detected when the cubes impacted the floor and the physics engine prevented the cubes from flying through the floor.
And the Unity camera (and rendering engine) displays all of this to the player depending on the location and rotation of the camera. It’s very realistic looking and impressive if you think about it.
I’ll also explain this bit of code which is also in the Update() method:
//allow user to move the camera in the scene using the arrow keys (or AWSD keys)
float deltaX = Input.GetAxis("Horizontal") * Time.deltaTime * moveSpeed;
float deltaY = Input.GetAxis("Vertical") * Time.deltaTime * moveSpeed;
transform.Translate(deltaX, deltaY, 0); //deltaZ = 0
This code moves the camera when the player presses one of the arrow keys (either horizontal or vertical). If one of these
keys is pressed, the corresponding Input.GetAxis() method will return a non-zero value. This value is multiplied by
Time.deltaTime (the time in seconds since the last frame update) and moveSpeed to determine how far to move the
camera. Note that since we’re multiplying by Time.deltaTime, the camera will move at the same speed on a computer
with a high frame rate as it will on a computer with a slow frame rate. If the computer can only generate low frame rates
(perhaps 10 frames per second), the movement will appear “jerkier”. For this simple game, however, most computers
will have no trouble generating high frame rates. The camera’s transform (position, rotation, and scale in 3D space) is
thus translated (moved) in by deltaX and deltaY. To test this code, run your game and press the arrow keys.
So to summarize what we’ve done up to this point, we have:
Created a new Unity project
Created a scene with a floor, a bunch of cubes stacked on top of each other to make a wall, added a point light to better illuminate our scene, added a sphere that we converted into a prefab
Wrote a simple script, attached it to our Main Camera, and assigned the Pumpkin prefab to our Pumpkin script variable
Of course, this isn’t a real game yet since players can’t aim the pumpkins or see some kind of score on the screen, but those features are coming.
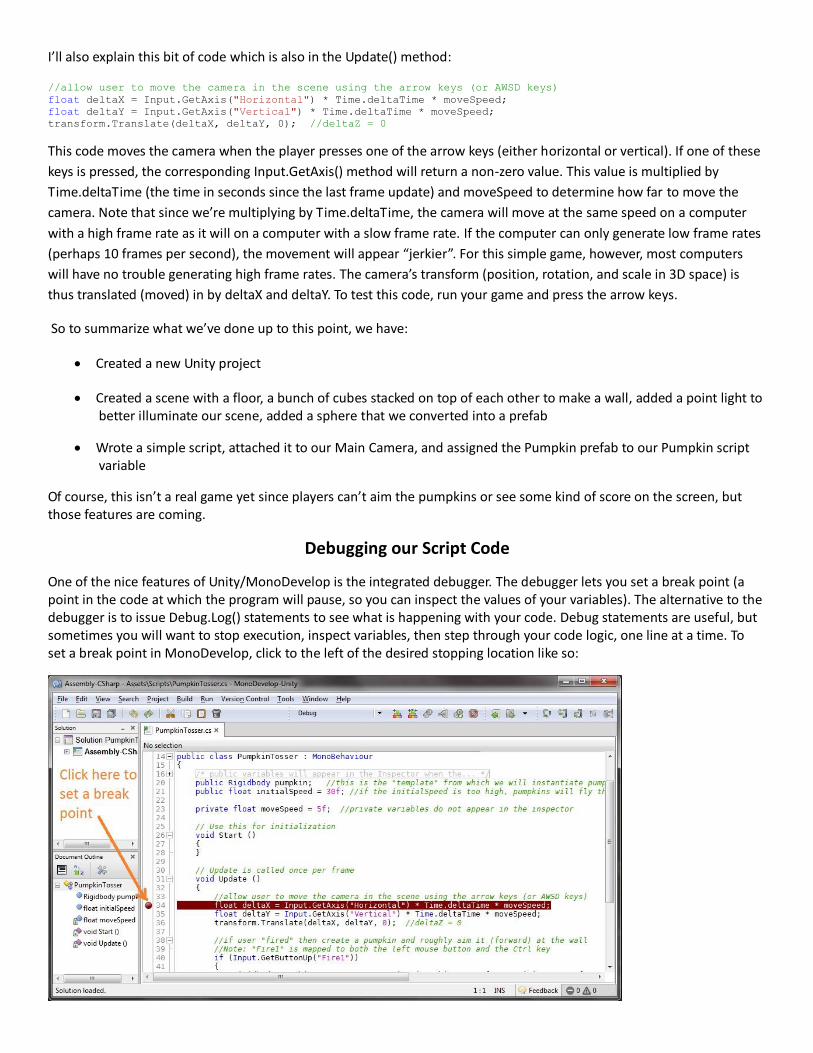
Debugging our Script Code
One of the nice features of Unity/MonoDevelop is the integrated debugger. The debugger lets you set a break point (a point in the code at which the program will pause, so you can inspect the values of your variables). The alternative to the debugger is to issue Debug.Log() statements to see what is happening with your code. Debug statements are useful, but sometimes you will want to stop execution, inspect variables, then step through your code logic, one line at a time. To set a break point in MonoDevelop, click to the left of the desired stopping location like so:

Next, you need to “attach” the debugger to the Unity process. Go to the Run menu Attach to Process…
Select the Unity Editor and click the Attach button:
Next, switch back to Unity and just run your program as usual--execution will automatically stop at your breakpoint:
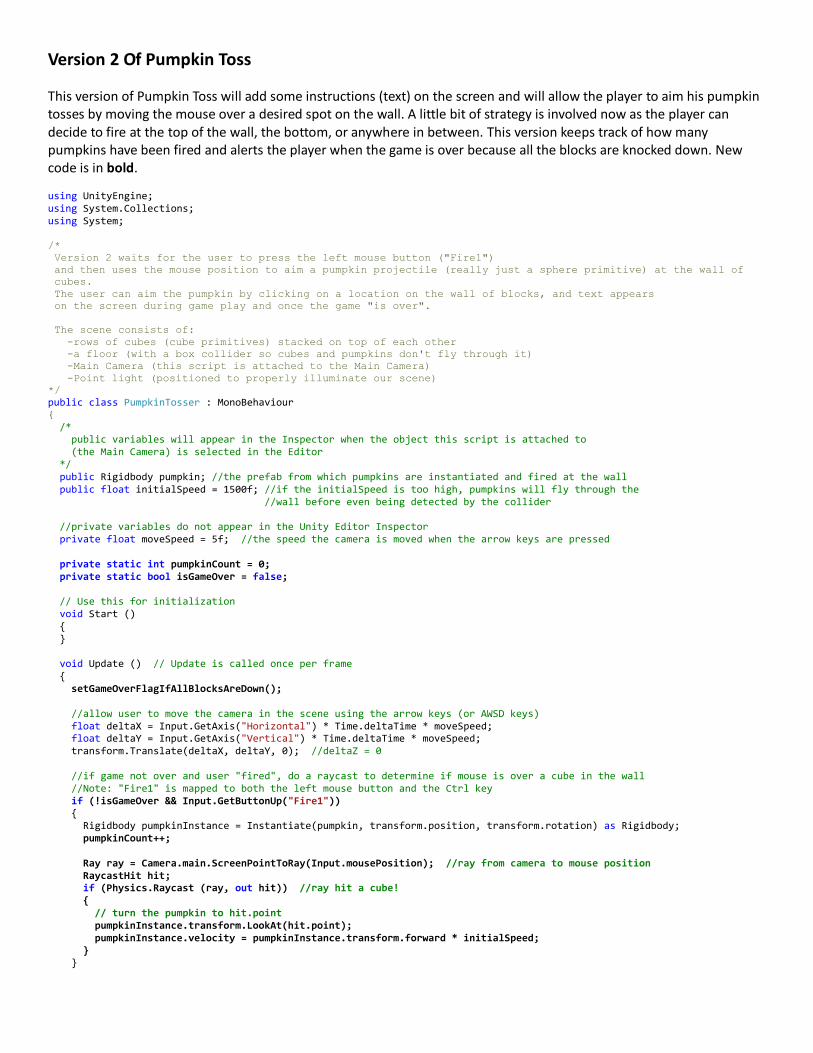
Version 2 Of Pumpkin Toss
This version of Pumpkin Toss will add some instructions (text) on the screen and will allow the player to aim his pumpkin tosses by moving the mouse over a desired spot on the wall. A little bit of strategy is involved now as the player can decide to fire at the top of the wall, the bottom, or anywhere in between. This version keeps track of how many pumpkins have been fired and alerts the player when the game is over because all the blocks are knocked down. New code is in bold.
using UnityEngine; using System.Collections; using System; /*
Version 2 waits for the user to press the left mouse button ("Fire1")
and then uses the mouse position to aim a pumpkin projectile (really just a sphere primitive) at the wall of
cubes.
The user can aim the pumpkin by clicking on a location on the wall of blocks, and text appears
on the screen during game play and once the game "is over".
The scene consists of:
-rows of cubes (cube primitives) stacked on top of each other
-a floor (with a box collider so cubes and pumpkins don't fly through it)
-Main Camera (this script is attached to the Main Camera)
-Point light (positioned to properly illuminate our scene)
*/
public class PumpkinTosser : MonoBehaviour {
/* public variables will appear in the Inspector when the object this script is attached to (the Main Camera) is selected in the Editor */ public Rigidbody pumpkin; //the prefab from which pumpkins are instantiated and fired at the wall public float initialSpeed = 1500f; //if the initialSpeed is too high, pumpkins will fly through the //wall before even being detected by the collider //private variables do not appear in the Unity Editor Inspector private float moveSpeed = 5f; //the speed the camera is moved when the arrow keys are pressed private static int pumpkinCount = 0; private static bool isGameOver = false; // Use this for initialization void Start () { } void Update () // Update is called once per frame { setGameOverFlagIfAllBlocksAreDown(); //allow user to move the camera in the scene using the arrow keys (or AWSD keys) float deltaX = Input.GetAxis("Horizontal") * Time.deltaTime * moveSpeed; float deltaY = Input.GetAxis("Vertical") * Time.deltaTime * moveSpeed; transform.Translate(deltaX, deltaY, 0); //deltaZ = 0 //if game not over and user "fired", do a raycast to determine if mouse is over a cube in the wall //Note: "Fire1" is mapped to both the left mouse button and the Ctrl key if (!isGameOver && Input.GetButtonUp("Fire1")) { Rigidbody pumpkinInstance = Instantiate(pumpkin, transform.position, transform.rotation) as Rigidbody; pumpkinCount++; Ray ray = Camera.main.ScreenPointToRay(Input.mousePosition); //ray from camera to mouse position RaycastHit hit; if (Physics.Raycast (ray, out hit)) //ray hit a cube! { // turn the pumpkin to hit.point pumpkinInstance.transform.LookAt(hit.point); pumpkinInstance.velocity = pumpkinInstance.transform.forward * initialSpeed; } }
}
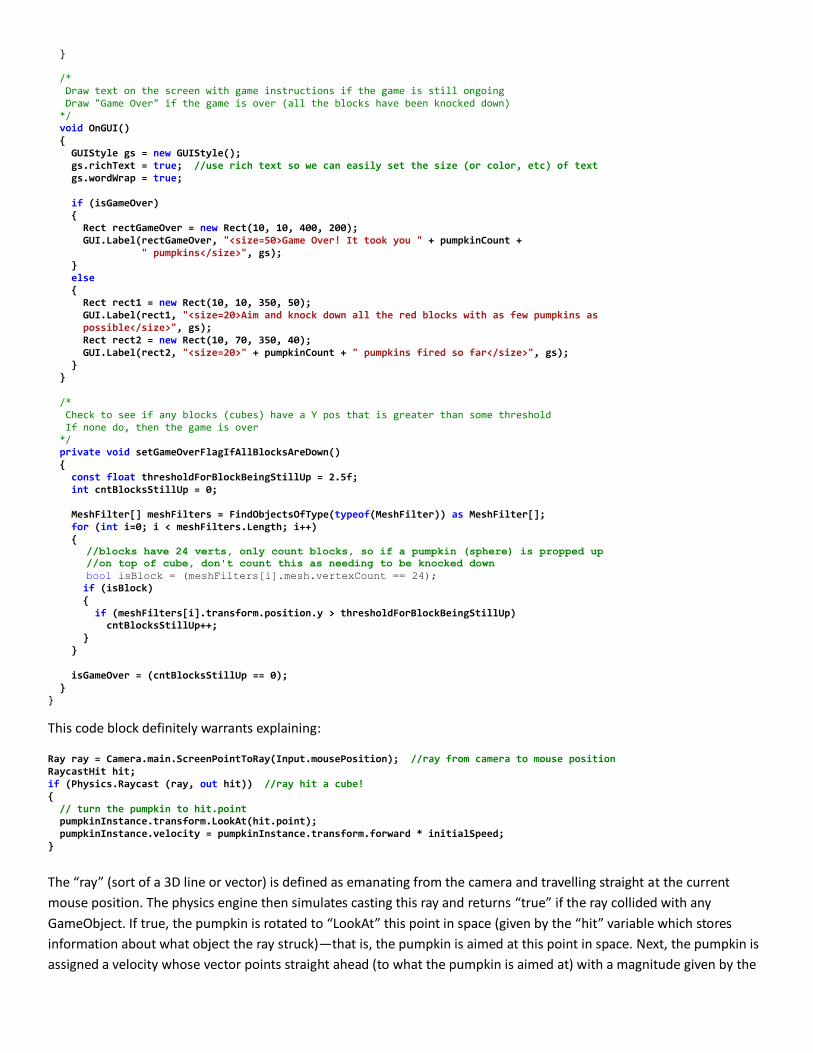
/* Draw text on the screen with game instructions if the game is still ongoing Draw "Game Over" if the game is over (all the blocks have been knocked down) */ void OnGUI() { GUIStyle gs = new GUIStyle(); gs.richText = true; //use rich text so we can easily set the size (or color, etc) of text gs.wordWrap = true; if (isGameOver) { Rect rectGameOver = new Rect(10, 10, 400, 200); GUI.Label(rectGameOver, "<size=50>Game Over! It took you " + pumpkinCount + " pumpkins</size>", gs); } else { Rect rect1 = new Rect(10, 10, 350, 50); GUI.Label(rect1, "<size=20>Aim and knock down all the red blocks with as few pumpkins as possible</size>", gs); Rect rect2 = new Rect(10, 70, 350, 40); GUI.Label(rect2, "<size=20>" + pumpkinCount + " pumpkins fired so far</size>", gs); } } /* Check to see if any blocks (cubes) have a Y pos that is greater than some threshold If none do, then the game is over */ private void setGameOverFlagIfAllBlocksAreDown() { const float thresholdForBlockBeingStillUp = 2.5f; int cntBlocksStillUp = 0; MeshFilter[] meshFilters = FindObjectsOfType(typeof(MeshFilter)) as MeshFilter[]; for (int i=0; i < meshFilters.Length; i++) { //blocks have 24 verts, only count blocks, so if a pumpkin (sphere) is propped up
//on top of cube, don't count this as needing to be knocked down
bool isBlock = (meshFilters[i].mesh.vertexCount == 24);
if (isBlock) { if (meshFilters[i].transform.position.y > thresholdForBlockBeingStillUp) cntBlocksStillUp++; } } isGameOver = (cntBlocksStillUp == 0); } }
This code block definitely warrants explaining:
Ray ray = Camera.main.ScreenPointToRay(Input.mousePosition); //ray from camera to mouse position RaycastHit hit; if (Physics.Raycast (ray, out hit)) //ray hit a cube! { // turn the pumpkin to hit.point pumpkinInstance.transform.LookAt(hit.point); pumpkinInstance.velocity = pumpkinInstance.transform.forward * initialSpeed; }
The “ray” (sort of a 3D line or vector) is defined as emanating from the camera and travelling straight at the current
mouse position. The physics engine then simulates casting this ray and returns “true” if the ray collided with any
GameObject. If true, the pumpkin is rotated to “LookAt” this point in space (given by the “hit” variable which stores
information about what object the ray struck)—that is, the pumpkin is aimed at this point in space. Next, the pumpkin is
assigned a velocity whose vector points straight ahead (to what the pumpkin is aimed at) with a magnitude given by the

initialSpeed variable. Once this code executes, the pumpkin is on its way and the Unity physics engine takes over as
described earlier.
Another block of code that bears explaining is this:
private void setGameOverFlagIfAllBlocksAreDown() { const float thresholdForBlockBeingStillUp = 2.5f; int cntBlocksStillUp = 0; MeshFilter[] meshFilters = FindObjectsOfType(typeof(MeshFilter)) as MeshFilter[]; for (int i=0; i < meshFilters.Length; i++) { //blocks have 24 verts, only count blocks, so if a pumpkin (sphere) is propped up
//on top of cube, don't count this as needing to be knocked down
bool isBlock = (meshFilters[i].mesh.vertexCount == 24);
if (isBlock) { if (meshFilters[i].transform.position.y > thresholdForBlockBeingStillUp) cntBlocksStillUp++; } } isGameOver = (cntBlocksStillUp == 0); }
This code checks to see if the game is over. If any block has a Y (vertical) height greater than 2.5f, then the block is
considered to still be “up” and needs to be knocked down by the player. Note that it is possible that a block has fallen but
landed on another block and is thus still too high to be considered down. In that case, the player will have to fire again to
knock it to the floor.
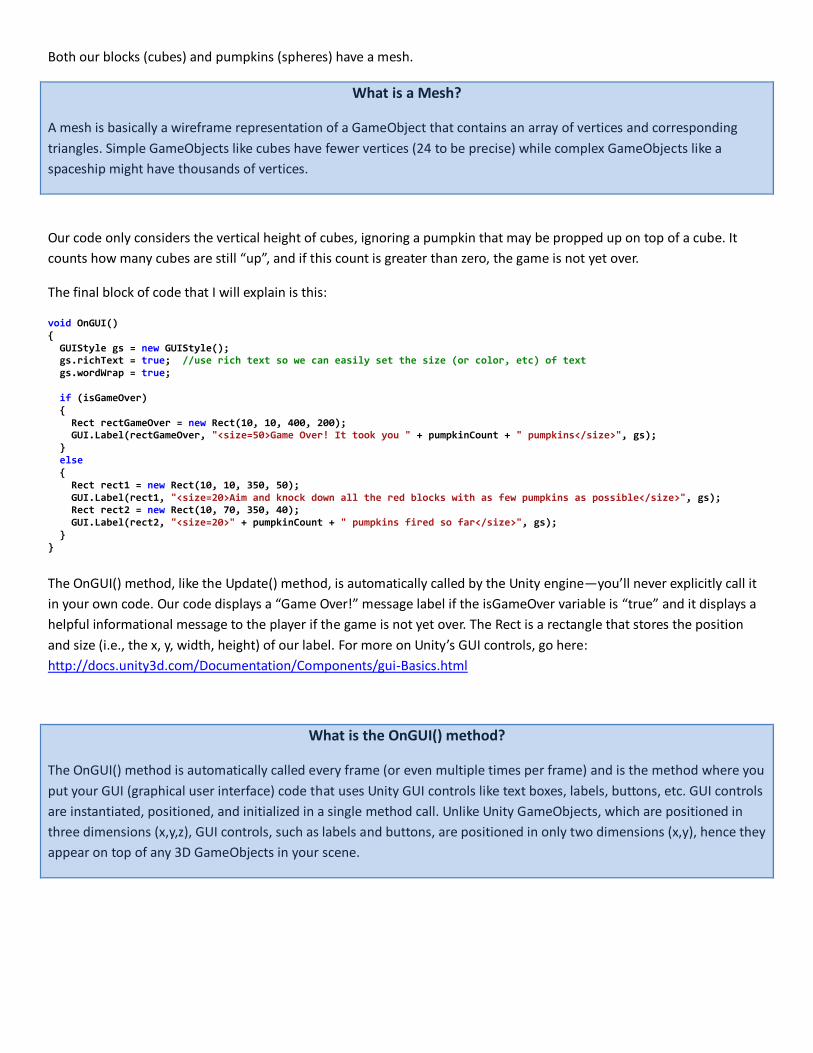
Both our blocks (cubes) and pumpkins (spheres) have a mesh.
What is a Mesh?
A mesh is basically a wireframe representation of a GameObject that contains an array of vertices and corresponding
triangles. Simple GameObjects like cubes have fewer vertices (24 to be precise) while complex GameObjects like a
spaceship might have thousands of vertices.
Our code only considers the vertical height of cubes, ignoring a pumpkin that may be propped up on top of a cube. It
counts how many cubes are still “up”, and if this count is greater than zero, the game is not yet over.
The final block of code that I will explain is this:
void OnGUI() { GUIStyle gs = new GUIStyle(); gs.richText = true; //use rich text so we can easily set the size (or color, etc) of text gs.wordWrap = true; if (isGameOver) { Rect rectGameOver = new Rect(10, 10, 400, 200); GUI.Label(rectGameOver, "<size=50>Game Over! It took you " + pumpkinCount + " pumpkins</size>", gs); } else { Rect rect1 = new Rect(10, 10, 350, 50); GUI.Label(rect1, "<size=20>Aim and knock down all the red blocks with as few pumpkins as possible</size>", gs); Rect rect2 = new Rect(10, 70, 350, 40); GUI.Label(rect2, "<size=20>" + pumpkinCount + " pumpkins fired so far</size>", gs); } }
The OnGUI() method, like the Update() method, is automatically called by the Unity engine—you’ll never explicitly call it
in your own code. Our code displays a “Game Over!” message label if the isGameOver variable is “true” and it displays a
helpful informational message to the player if the game is not yet over. The Rect is a rectangle that stores the position
and size (i.e., the x, y, width, height) of our label. For more on Unity’s GUI controls, go here:
http://docs.unity3d.com/Documentation/Components/gui-Basics.html
What is the OnGUI() method?
The OnGUI() method is automatically called every frame (or even multiple times per frame) and is the method where you
put your GUI (graphical user interface) code that uses Unity GUI controls like text boxes, labels, buttons, etc. GUI controls
are instantiated, positioned, and initialized in a single method call. Unlike Unity GameObjects, which are positioned in
three dimensions (x,y,z), GUI controls, such as labels and buttons, are positioned in only two dimensions (x,y), hence they
appear on top of any 3D GameObjects in your scene.
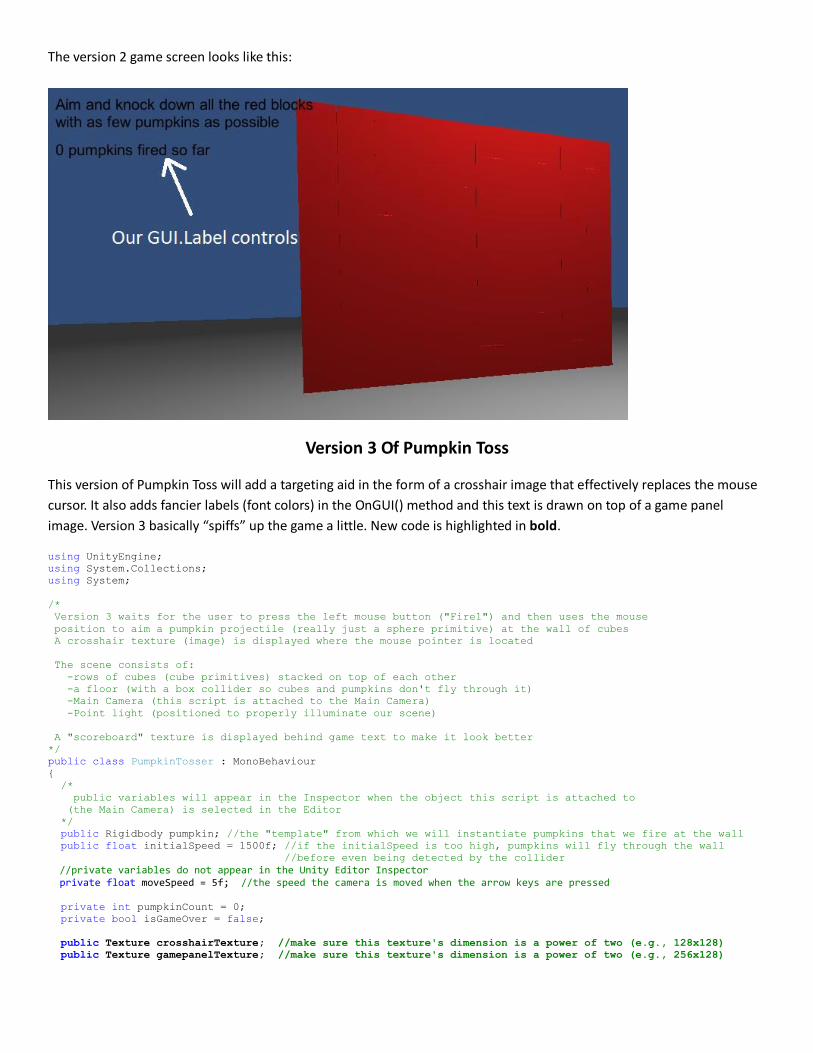
The version 2 game screen looks like this:
Version 3 Of Pumpkin Toss
This version of Pumpkin Toss will add a targeting aid in the form of a crosshair image that effectively replaces the mouse
cursor. It also adds fancier labels (font colors) in the OnGUI() method and this text is drawn on top of a game panel
image. Version 3 basically “spiffs” up the game a little. New code is highlighted in bold.
using UnityEngine;
using System.Collections;
using System;
/*
Version 3 waits for the user to press the left mouse button ("Fire1") and then uses the mouse
position to aim a pumpkin projectile (really just a sphere primitive) at the wall of cubes
A crosshair texture (image) is displayed where the mouse pointer is located
The scene consists of:
-rows of cubes (cube primitives) stacked on top of each other
-a floor (with a box collider so cubes and pumpkins don't fly through it)
-Main Camera (this script is attached to the Main Camera)
-Point light (positioned to properly illuminate our scene)
A "scoreboard" texture is displayed behind game text to make it look better
*/
public class PumpkinTosser : MonoBehaviour
{
/*
public variables will appear in the Inspector when the object this script is attached to
(the Main Camera) is selected in the Editor
*/
public Rigidbody pumpkin; //the "template" from which we will instantiate pumpkins that we fire at the wall
public float initialSpeed = 1500f; //if the initialSpeed is too high, pumpkins will fly through the wall
//before even being detected by the collider
//private variables do not appear in the Unity Editor Inspector private float moveSpeed = 5f; //the speed the camera is moved when the arrow keys are pressed
private int pumpkinCount = 0;
private bool isGameOver = false;
public Texture crosshairTexture; //make sure this texture's dimension is a power of two (e.g., 128x128)
public Texture gamepanelTexture; //make sure this texture's dimension is a power of two (e.g., 256x128)

// Use this for initialization
void Start ()
{
crosshairTexture = Resources.Load("crosshair") as Texture;
gamepanelTexture = Resources.Load("game-panel") as Texture;
}
void Update ()
{
if (!isGameOver)
Screen.showCursor = false;
setGameOverFlagIfAllBlocksAreDown();
//allow user to move the camera in the scene using the arrow keys (or AWSD keys)
float deltaX = Input.GetAxis("Horizontal") * Time.deltaTime * moveSpeed;
float deltaY = Input.GetAxis("Vertical") * Time.deltaTime * moveSpeed;
transform.Translate(deltaX, deltaY, 0); //deltaZ = 0
if (!isGameOver && Input.GetButtonUp("Fire1"))
{
Ray ray = Camera.main.ScreenPointToRay(Input.mousePosition); //ray is from camera to mouse position
RaycastHit hit;
if (Physics.Raycast (ray, out hit)) //ray hit a cube!
{
Rigidbody pumpkinInstance = Instantiate(pumpkin, transform.position, transform.rotation) as Rigidbody;
pumpkinCount++;
// turn the pumpkin to hit.point
pumpkinInstance.transform.LookAt(hit.point);
pumpkinInstance.velocity = pumpkinInstance.transform.forward * initialSpeed;
}
}
}
void OnGUI()
{
GUIStyle gs = new GUIStyle();
gs.richText = true; //use rich text so we can easily set the size (or color, etc) of text
gs.wordWrap = true;
gs.normal.textColor = Color.white;//has to be set to something other than black for the <color> tag to work
//draw game-panel
Rect rectPanel = new Rect(10, 10, gamepanelTexture.width, gamepanelTexture.height);
GUI.DrawTexture(rectPanel, gamepanelTexture);
if (isGameOver)
{
Rect rectGameOver = new Rect(32, 30, gamepanelTexture.width-22, 50);
GUI.Label(rectGameOver, "<color=#80cc80ff><size=36>Game Over!</size>\n<size=18>It took you " +
pumpkinCount + " shots to win.</size></color>", gs);
}
else
{
//draw game info text
Rect rect1 = new Rect(22, 22, gamepanelTexture.width-22, 50);
GUI.Label(rect1, "<size=18><color=#80cc80ff> Pumpkin Toss: knock down all the red blocks with as few shots as possible.</color></size>", gs);
Rect rect2 = new Rect(22, 100, gamepanelTexture.width-22, 40);
GUI.Label(rect2,"<size=18><color=#80cc80ff>Pumpkins fired so far: "+pumpkinCount+"</color></size>",gs);
//draw crosshairs
float x = Input.mousePosition.x - (crosshairTexture.width/2);
float y = Screen.height - (Input.mousePosition.y + (crosshairTexture.height/2));
Rect rectCrosshair = new Rect(x, y, crosshairTexture.width, crosshairTexture.height);
GUI.DrawTexture(rectCrosshair, crosshairTexture);
}
}
/*
Check to see if any blocks (cubes) have a Y pos that is greater than some threshold
If none do, then the game is over
*/
private void setGameOverFlagIfAllBlocksAreDown()
{
const float thresholdForBlockBeingStillUp = 2.5f;
int cntBlocksStillUp = 0;
MeshFilter[] meshFilters = FindObjectsOfType(typeof(MeshFilter)) as MeshFilter[];
for (int i=0; i < meshFilters.Length; i++)
{
//blocks have 24 verts, only count blocks, so if a pumpkin (sphere) is propped up
//on top of cube, don't count this as needing to be knocked down
bool isBlock = (meshFilters[i].mesh.vertexCount == 24);
if (isBlock)
{
if (meshFilters[i].transform.position.y > thresholdForBlockBeingStillUp)
cntBlocksStillUp++;
}
}
isGameOver = (cntBlocksStillUp == 0);
}
}
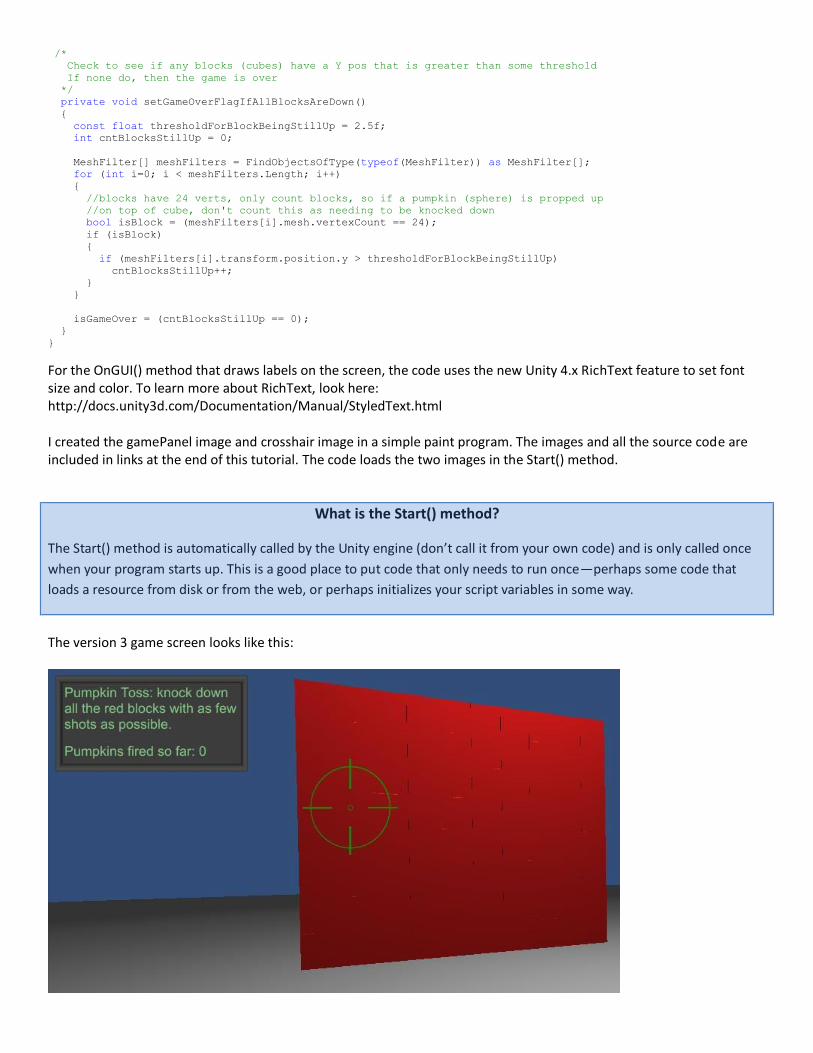
For the OnGUI() method that draws labels on the screen, the code uses the new Unity 4.x RichText feature to set font size and color. To learn more about RichText, look here: http://docs.unity3d.com/Documentation/Manual/StyledText.html I created the gamePanel image and crosshair image in a simple paint program. The images and all the source code are included in links at the end of this tutorial. The code loads the two images in the Start() method.
What is the Start() method?
The Start() method is automatically called by the Unity engine (don’t call it from your own code) and is only called once
when your program starts up. This is a good place to put code that only needs to run once—perhaps some code that
loads a resource from disk or from the web, or perhaps initializes your script variables in some way.
The version 3 game screen looks like this:
Version 4 Of Pumpkin Toss
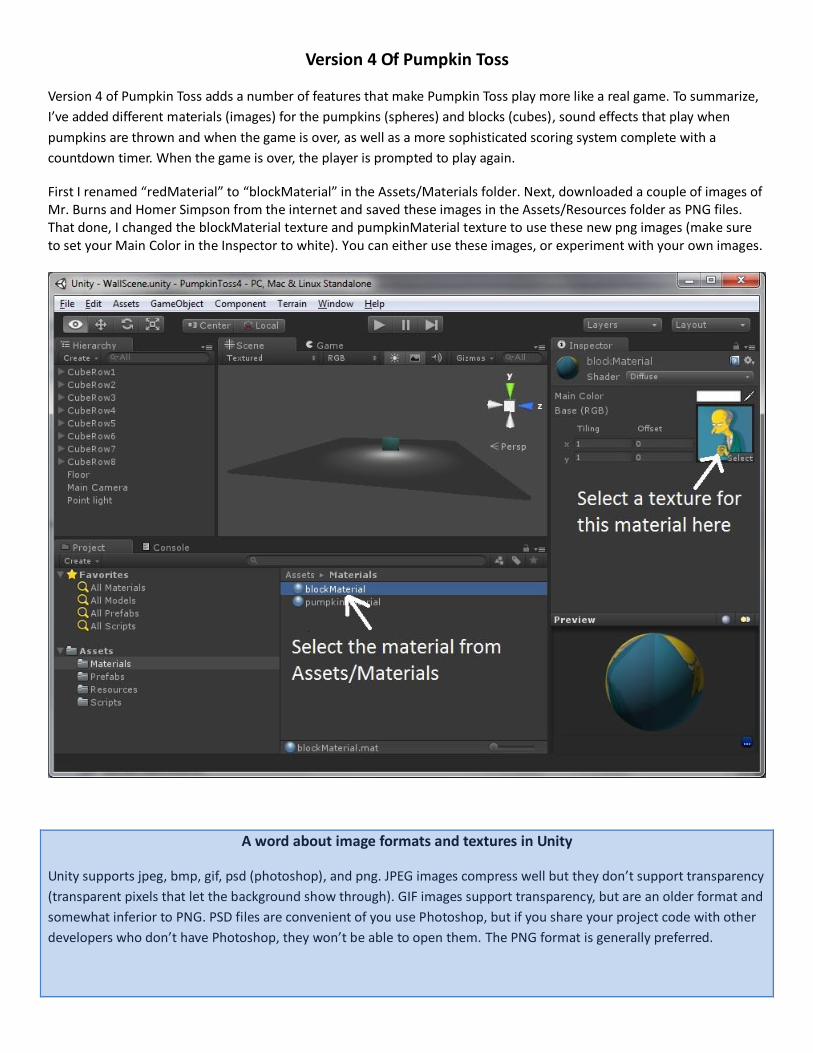
Version 4 of Pumpkin Toss adds a number of features that make Pumpkin Toss play more like a real game. To summarize,
I’ve added different materials (images) for the pumpkins (spheres) and blocks (cubes), sound effects that play when
pumpkins are thrown and when the game is over, as well as a more sophisticated scoring system complete with a
countdown timer. When the game is over, the player is prompted to play again.
First I renamed “redMaterial” to “blockMaterial” in the Assets/Materials folder. Next, downloaded a couple of images of Mr. Burns and Homer Simpson from the internet and saved these images in the Assets/Resources folder as PNG files. That done, I changed the blockMaterial texture and pumpkinMaterial texture to use these new png images (make sure to set your Main Color in the Inspector to white). You can either use these images, or experiment with your own images.
A word about image formats and textures in Unity
Unity supports jpeg, bmp, gif, psd (photoshop), and png. JPEG images compress well but they don’t support transparency
(transparent pixels that let the background show through). GIF images support transparency, but are an older format and
somewhat inferior to PNG. PSD files are convenient of you use Photoshop, but if you share your project code with other
developers who don’t have Photoshop, they won’t be able to open them. The PNG format is generally preferred.

A texture can be either an image or movie and can be displayed in 2D in the OnGUI method (like the gamePanel image
for displaying the score in Pumpkin Toss), or rendered in 3D, wrapped around a 3D GameObject (like the Mr Burns
texture wrapped around the blocks). The bigger the texture, of course, the more memory that is required to render it in
the scene. In previous versions of Unity, the width and height of textures needed to be dimensioned in powers of two
(sometimes shortened to POT), e.g. 512 x 256 pixels or 1024 x 32 pixels. If your texture was a non power-of-two size like
131 x 55, it might get automatically rescaled to the nearest power-of-two like 128 x 64. Since this distorts the image
somewhat, Unity game designers typically made sure their images conformed to this power-of-two rule. Starting with
Unity 4.1x, however, this requirement has been eliminated and odd sized images (textures) are no longer rescaled.
The other bit of code that deserves an explanation is the code that plays sound effects. I used the AudioSource.PlayClipAtPoint function to play a sound effect when pumpkins are tossed and when the game ends.
What is an AudioSource?
An AudioSource is attached to a GameObject and is used for playing sound effects (or music) in your Unity games.
Sounds can emanate from a 3D position of the GameObject to which it is attached, so if the GameObject is a character
off on the left hand side of the scene, the sound will come from that location as well. In Pumpkin Toss, the AudioSource
is simply attached to the main camera. Sound can also be “2D” (not originating from a 3D point in space)—for example,
background music for a game might be 2D so it sounds the same everywhere in the game.
You can learn more about AudioSources here:
http://docs.unity3d.com/Documentation/ScriptReference/AudioSource.html
For the sound effects, I downloaded a couple mp3 files off the internet, and also saved them in the Resources folder, making them available for playback during the game.
Next, I added two public AudioClip variables to my PumpkinTosser.cs script:
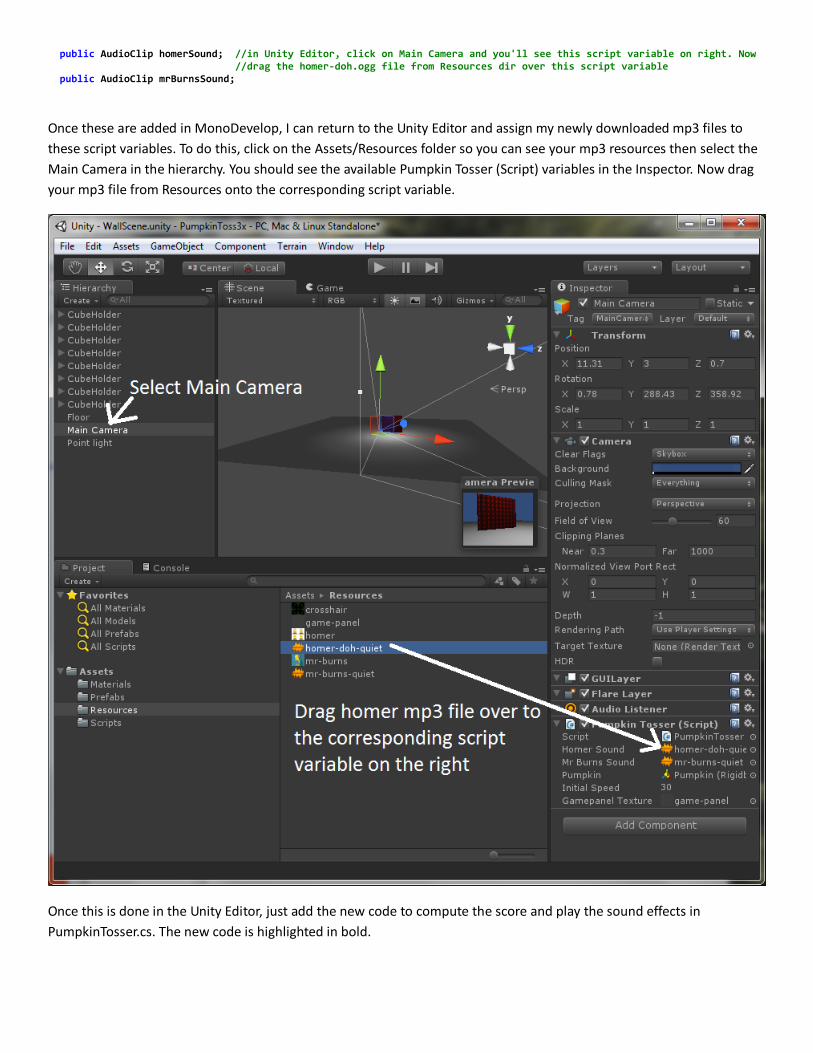
public AudioClip homerSound; //in Unity Editor, click on Main Camera and you'll see this script variable on right. Now //drag the homer-doh.ogg file from Resources dir over this script variable public AudioClip mrBurnsSound;
Once these are added in MonoDevelop, I can return to the Unity Editor and assign my newly downloaded mp3 files to
these script variables. To do this, click on the Assets/Resources folder so you can see your mp3 resources then select the
Main Camera in the hierarchy. You should see the available Pumpkin Tosser (Script) variables in the Inspector. Now drag
your mp3 file from Resources onto the corresponding script variable.
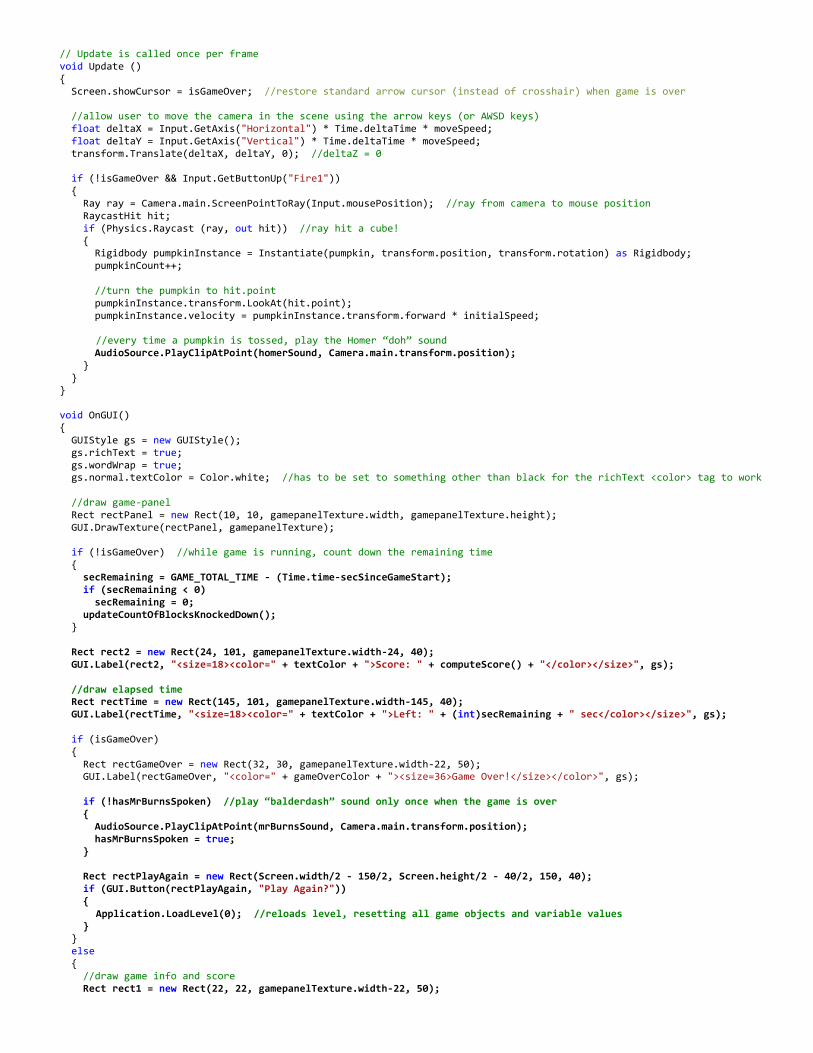
Once this is done in the Unity Editor, just add the new code to compute the score and play the sound effects in
PumpkinTosser.cs. The new code is highlighted in bold.

using UnityEngine; using System.Collections; using System; /* Version 4 waits for the user to press the left mouse button ("Fire1") and then uses the mouse position to aim a pumpkin projectile (really just a sphere primitive) at the wall of cubes A crosshair texture (image) is displayed where the mouse pointer is located The scene consists of: -rows of cubes (cube primitives) stacked on top of each other -a floor (with a box collider so cubes and pumpkins don't fly through it) -Main Camera (this script is attached to the Main Camera) -Point light (positioned to properly illuminate our scene) A "scoreboard" texture is displayed behind game text to make it look better A countdown timer adds a time element to the game Scoring is computed from both the number of pumpkins used and the time required to knock down the blocks Sound effects play when pumpkins are fired and when the game is over Textures (images) wrap around both the blocks and the pumpkins (spheres) */ public class PumpkinTosser : MonoBehaviour { public AudioClip homerSound; //in Unity Editor, click on Main Camera and you'll see this script variable on right. Now //drag the homer-doh.ogg file from Resources dir over this script variable public AudioClip mrBurnsSound; /* public variables will appear in the Inspector when the object this script is attached to (the Main Camera) is selected in the Editor */ public Rigidbody pumpkin; //this is the "template" from which we will instantiate pumpkins that we fire at the wall public float initialSpeed = 1500f; //if the initialSpeed is too high, pumpkins will fly through the wall before even //being detected by the collider //private variables do not appear in the Unity Editor Inspector private float moveSpeed = 5f; //the speed the camera is moved when the arrow keys are pressed private int pumpkinCount = 0; private bool isGameOver = false; private bool hasMrBurnsSpoken = false; private const float GAME_TOTAL_TIME = 20.0f; private float secRemaining = GAME_TOTAL_TIME; private float secSinceGameStart; //this private texture is dynamically set in Start(), make sure texture's X,Y dimensions are a power of two (e.g., // 128x128) private Texture crosshairTexture; //this texture is declared as public so it can be set in Unity inspector (click on MainCamera in heirarchy, //set variable value in Inspector) public Texture gamepanelTexture; private String textColor = "#bbbbbbff"; //rrggbbaa format, where aa=alpha (and alpha of ff=opaque) private String gameOverColor = "#ccccccff"; private int cntBlocksKnockedDown; private int cntBlocksStillUp; // Use this for initialization void Start() { crosshairTexture = Resources.Load("crosshair") as Texture; secSinceGameStart = Time.time; }
// Update is called once per frame void Update () { Screen.showCursor = isGameOver; //restore standard arrow cursor (instead of crosshair) when game is over //allow user to move the camera in the scene using the arrow keys (or AWSD keys) float deltaX = Input.GetAxis("Horizontal") * Time.deltaTime * moveSpeed; float deltaY = Input.GetAxis("Vertical") * Time.deltaTime * moveSpeed; transform.Translate(deltaX, deltaY, 0); //deltaZ = 0 if (!isGameOver && Input.GetButtonUp("Fire1")) { Ray ray = Camera.main.ScreenPointToRay(Input.mousePosition); //ray from camera to mouse position RaycastHit hit; if (Physics.Raycast (ray, out hit)) //ray hit a cube! { Rigidbody pumpkinInstance = Instantiate(pumpkin, transform.position, transform.rotation) as Rigidbody; pumpkinCount++; //turn the pumpkin to hit.point pumpkinInstance.transform.LookAt(hit.point); pumpkinInstance.velocity = pumpkinInstance.transform.forward * initialSpeed;
//every time a pumpkin is tossed, play the Homer “doh” sound AudioSource.PlayClipAtPoint(homerSound, Camera.main.transform.position); } } } void OnGUI() { GUIStyle gs = new GUIStyle(); gs.richText = true; gs.wordWrap = true; gs.normal.textColor = Color.white; //has to be set to something other than black for the richText <color> tag to work //draw game-panel Rect rectPanel = new Rect(10, 10, gamepanelTexture.width, gamepanelTexture.height); GUI.DrawTexture(rectPanel, gamepanelTexture); if (!isGameOver) //while game is running, count down the remaining time { secRemaining = GAME_TOTAL_TIME - (Time.time-secSinceGameStart); if (secRemaining < 0) secRemaining = 0; updateCountOfBlocksKnockedDown(); } Rect rect2 = new Rect(24, 101, gamepanelTexture.width-24, 40); GUI.Label(rect2, "<size=18><color=" + textColor + ">Score: " + computeScore() + "</color></size>", gs); //draw elapsed time Rect rectTime = new Rect(145, 101, gamepanelTexture.width-145, 40); GUI.Label(rectTime, "<size=18><color=" + textColor + ">Left: " + (int)secRemaining + " sec</color></size>", gs); if (isGameOver) { Rect rectGameOver = new Rect(32, 30, gamepanelTexture.width-22, 50); GUI.Label(rectGameOver, "<color=" + gameOverColor + "><size=36>Game Over!</size></color>", gs); if (!hasMrBurnsSpoken) //play “balderdash” sound only once when the game is over { AudioSource.PlayClipAtPoint(mrBurnsSound, Camera.main.transform.position); hasMrBurnsSpoken = true; } Rect rectPlayAgain = new Rect(Screen.width/2 - 150/2, Screen.height/2 - 40/2, 150, 40); if (GUI.Button(rectPlayAgain, "Play Again?")) { Application.LoadLevel(0); //reloads level, resetting all game objects and variable values } } else { //draw game info and score Rect rect1 = new Rect(22, 22, gamepanelTexture.width-22, 50);
GUI.Label(rect1, "<size=18><color=" + textColor + ">Try to knock down all the blocks as fast and with as few shots as possible.</color></size>", gs); //draw crosshairs float x = Input.mousePosition.x - (crosshairTexture.width/2); float y = Screen.height - (Input.mousePosition.y + (crosshairTexture.height/2)); Rect rectCrosshair = new Rect(x, y, crosshairTexture.width, crosshairTexture.height); GUI.DrawTexture(rectCrosshair, crosshairTexture); } } /* The score is determined by the number of pumpkins fired (the fewer the better) and the elapsed time (the quicker the better) */ private int computeScore() { const float cntBlocksOnBottomRow = 20; float score = ((cntBlocksKnockedDown - cntBlocksOnBottomRow - 1) * 1000) / (pumpkinCount+1); if (isGameOver) score = score + Mathf.Floor(secRemaining) * 1000; return((int)Mathf.Round(score)); } /* Check to see if any blocks (cubes) have a Y pos that is greater than some threshold. Blocks above this threshold still need to be knocked down by the player. If no blocks are above this threshold (i.e., they are all knocked down), then the game is over. The game is also over if secRemaining < 0.1f (the countdown timer has expired). */ private void updateCountOfBlocksKnockedDown() { const float thresholdForBlockBeingStillUp = 2.5f; cntBlocksKnockedDown = cntBlocksStillUp = 0; MeshFilter[] meshFilters = FindObjectsOfType(typeof(MeshFilter)) as MeshFilter[]; for (int i=0; i < meshFilters.Length; i++) { //how do we know if a mesh is a block (cube) or a pumpkin (sphere)? //blocks have 24 verts, only count blocks, so if a pumpkin //(sphere) is propped up on top of cube, don't count this as needing to be knocked down bool isBlock = (meshFilters[i].mesh.vertexCount == 24); if (isBlock) { if (meshFilters[i].transform.position.y < thresholdForBlockBeingStillUp) cntBlocksKnockedDown++; else cntBlocksStillUp++; } } isGameOver = (cntBlocksStillUp == 0) || (secRemaining < 0.1f); } }
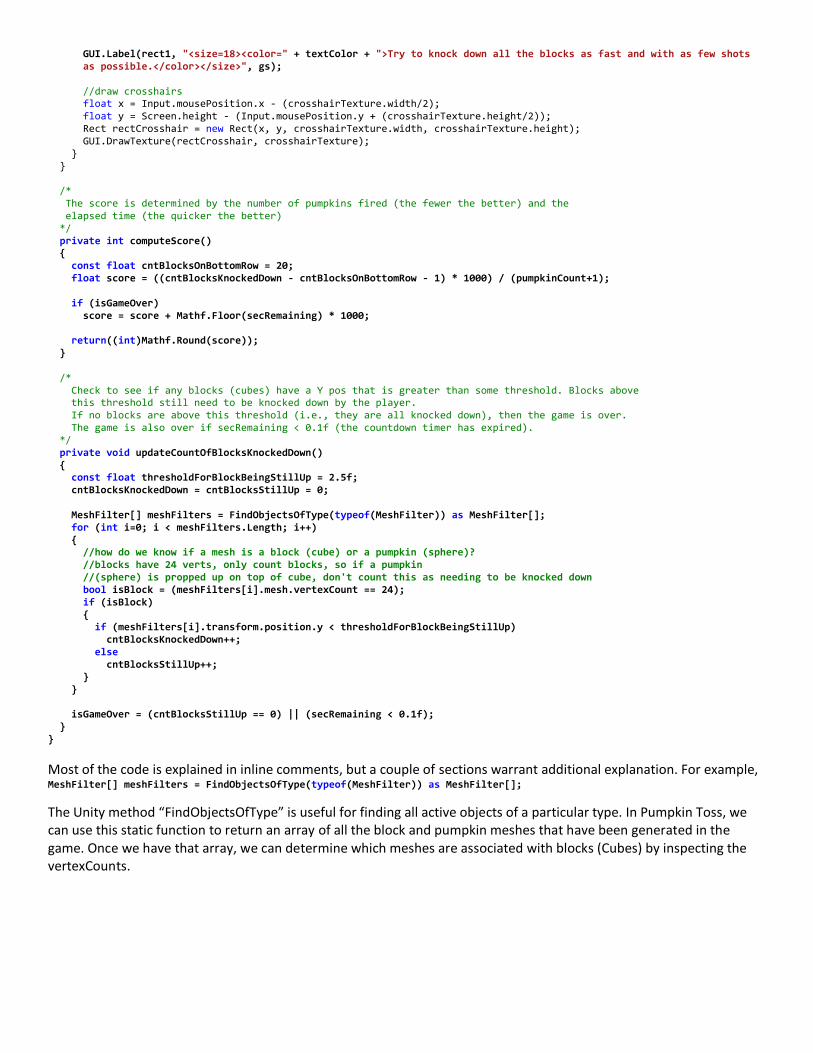
Most of the code is explained in inline comments, but a couple of sections warrant additional explanation. For example, MeshFilter[] meshFilters = FindObjectsOfType(typeof(MeshFilter)) as MeshFilter[];
The Unity method “FindObjectsOfType” is useful for finding all active objects of a particular type. In Pumpkin Toss, we can use this static function to return an array of all the block and pumpkin meshes that have been generated in the game. Once we have that array, we can determine which meshes are associated with blocks (Cubes) by inspecting the vertexCounts.
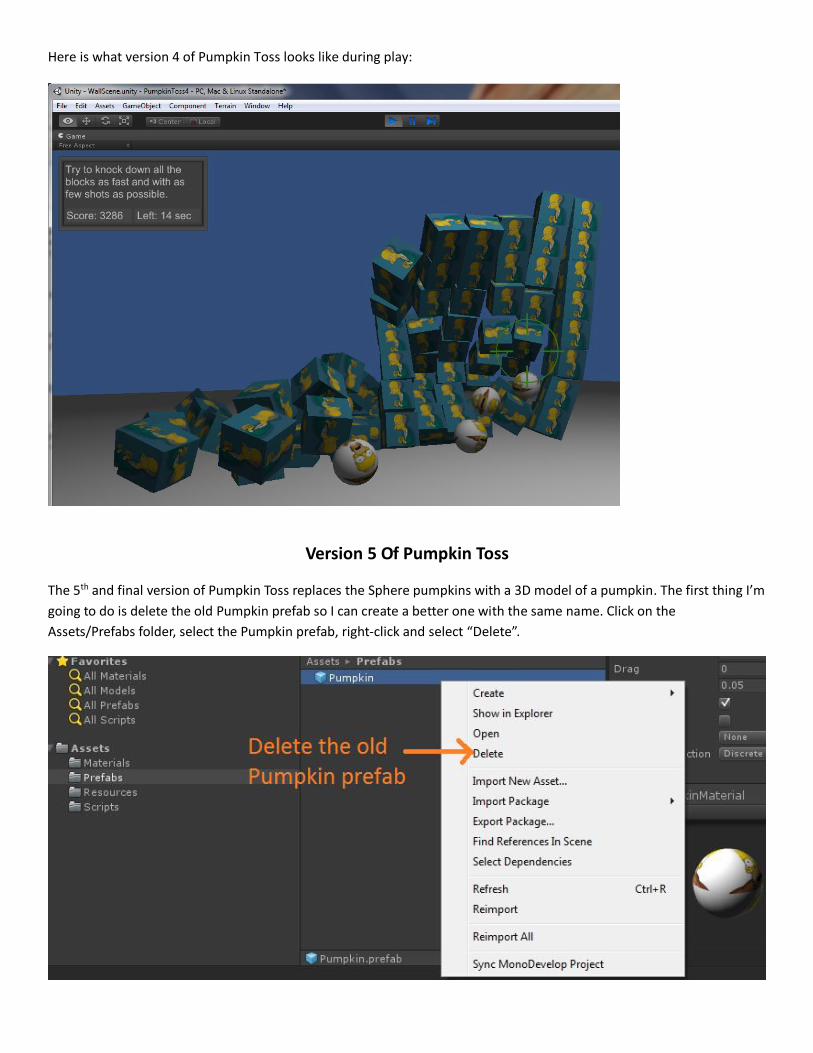
Here is what version 4 of Pumpkin Toss looks like during play:
Version 5 Of Pumpkin Toss
The 5th and final version of Pumpkin Toss replaces the Sphere pumpkins with a 3D model of a pumpkin. The first thing I’m
going to do is delete the old Pumpkin prefab so I can create a better one with the same name. Click on the
Assets/Prefabs folder, select the Pumpkin prefab, right-click and select “Delete”.
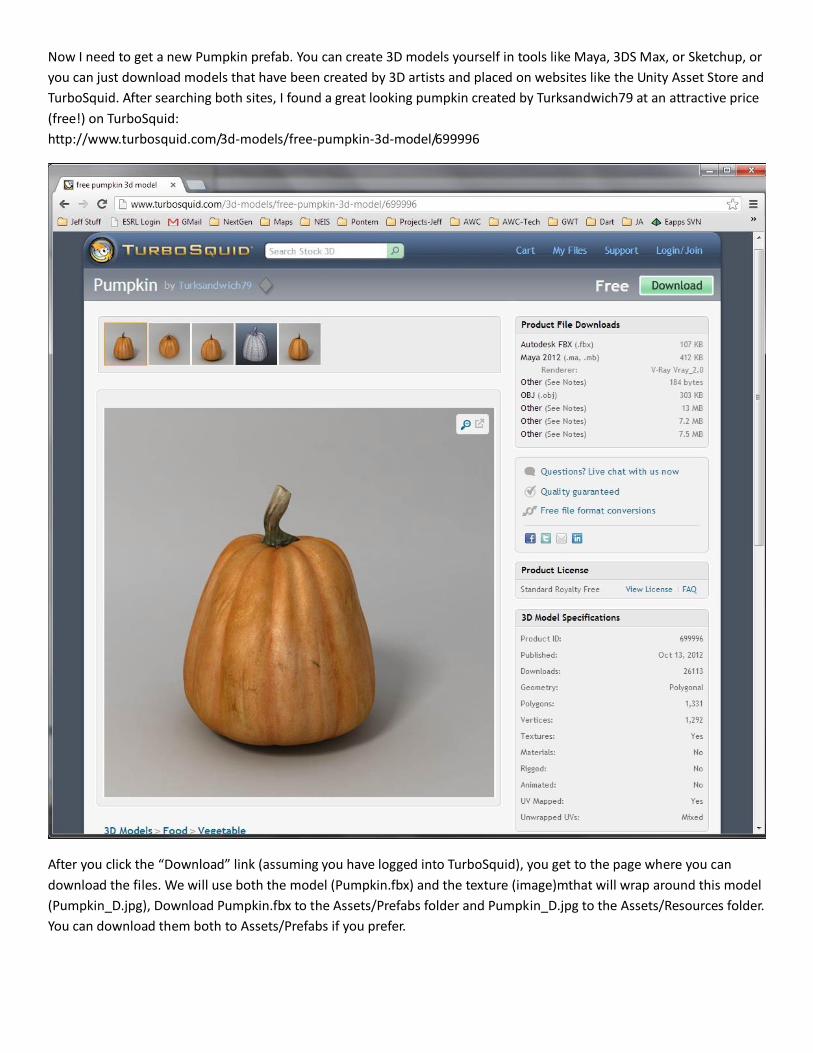
Now I need to get a new Pumpkin prefab. You can create 3D models yourself in tools like Maya, 3DS Max, or Sketchup, or
you can just download models that have been created by 3D artists and placed on websites like the Unity Asset Store and
TurboSquid. After searching both sites, I found a great looking pumpkin created by Turksandwich79 at an attractive price
(free!) on TurboSquid:
http://www.turbosquid.com/3d-models/free-pumpkin-3d-model/699996
After you click the “Download” link (assuming you have logged into TurboSquid), you get to the page where you can
download the files. We will use both the model (Pumpkin.fbx) and the texture (image)mthat will wrap around this model
(Pumpkin_D.jpg), Download Pumpkin.fbx to the Assets/Prefabs folder and Pumpkin_D.jpg to the Assets/Resources folder.
You can download them both to Assets/Prefabs if you prefer.
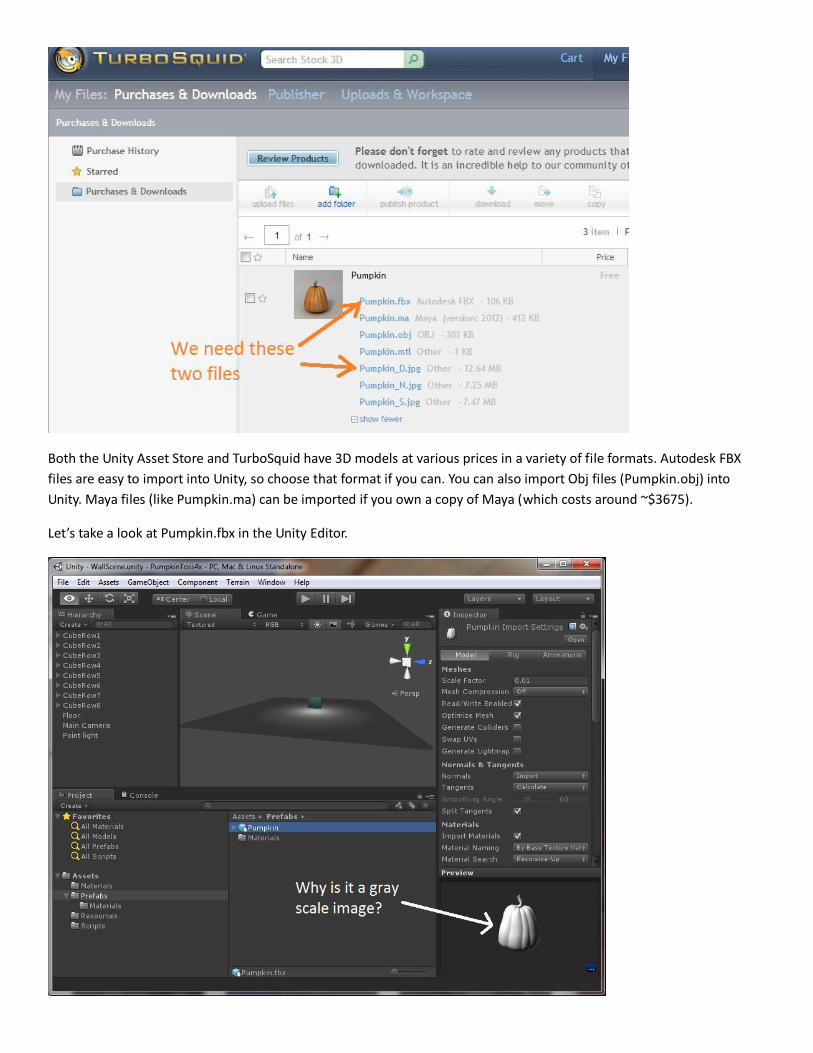
Both the Unity Asset Store and TurboSquid have 3D models at various prices in a variety of file formats. Autodesk FBX
files are easy to import into Unity, so choose that format if you can. You can also import Obj files (Pumpkin.obj) into
Unity. Maya files (like Pumpkin.ma) can be imported if you own a copy of Maya (which costs around ~$3675).
Let’s take a look at Pumpkin.fbx in the Unity Editor.

It’s a nice looking 3D model, but it is gray! This is what a 3D model looks like with no texture applied (wrapped around it).
Since I want an orange pumpkin, I need to apply the Pumpkin_D.jpg texture to this prefab. I can do this by dragging the
Pumpkin prefab to the scene hierarchy, then dragging Assets/Resources/Pumpkin_D.jpg on top of it.
Once this is done, let’s take a look at the pumpkin in our scene. Select the Pumpkin from the Hierarchy, move the mouse
to the Scene window and press the “F” key to focus on it. If you look at it in comparison to the cubes behind it, it is
almost too tiny to be seen. This is a general issue you’ll run into when importing external models into Unity—they are
occasionally much too small or large. To fix this, select the Pumpkin, and in the Inspector set the X:Y:Z scale to 33:33:33.
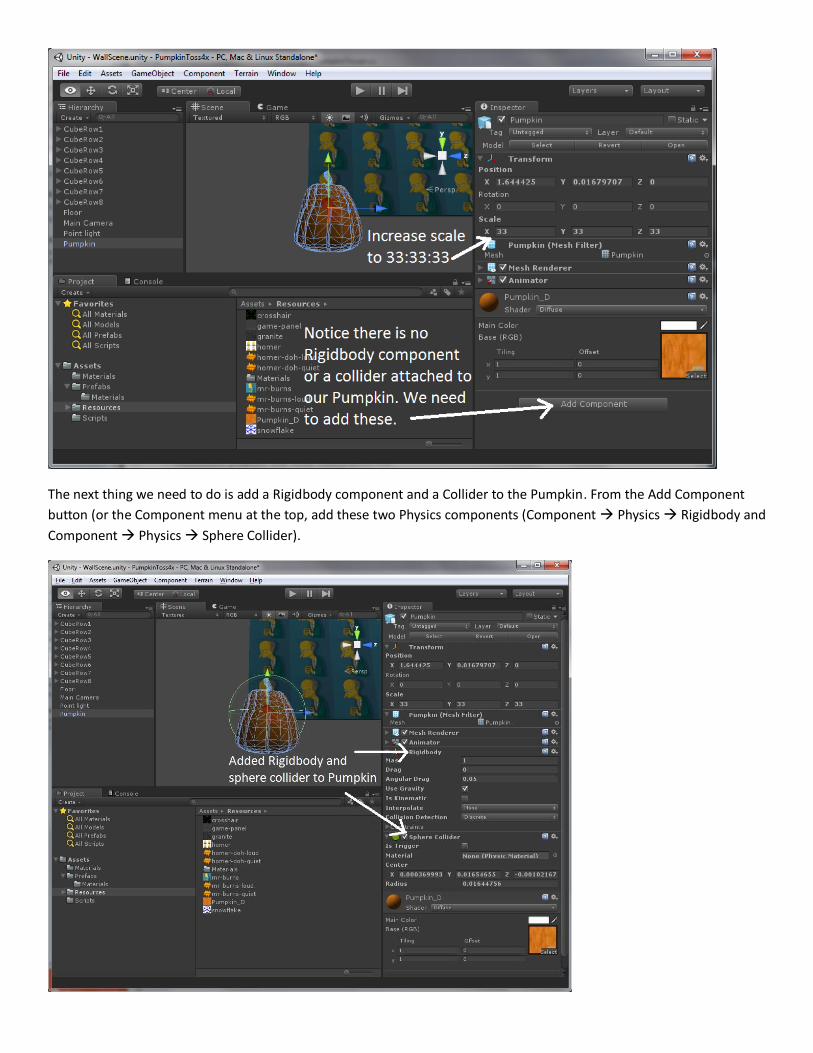
The next thing we need to do is add a Rigidbody component and a Collider to the Pumpkin. From the Add Component
button (or the Component menu at the top, add these two Physics components (Component Physics Rigidbody and
Component Physics Sphere Collider).

Next drag the Pumpkin from the Hierarchy back to the Assets/Prefabs folder and then delete the Pumpkin instance in the
scene Hierarchy (since we don’t want a pumpkin to appear when the game first starts).
Now that the new 3D model Pumpkin prefab has its texture, Rigidbody, and sphere collider, there is only one more step.
Click on the Main Camera in the Hierarchy, and you’ll see your PumpkinTosser.cs script variables in the Inspector. The
“Pumpkin” variable has a value of “Missing (Rigidbody)”. Drag your new Pumpkin prefab to this script variable and save
your scene.
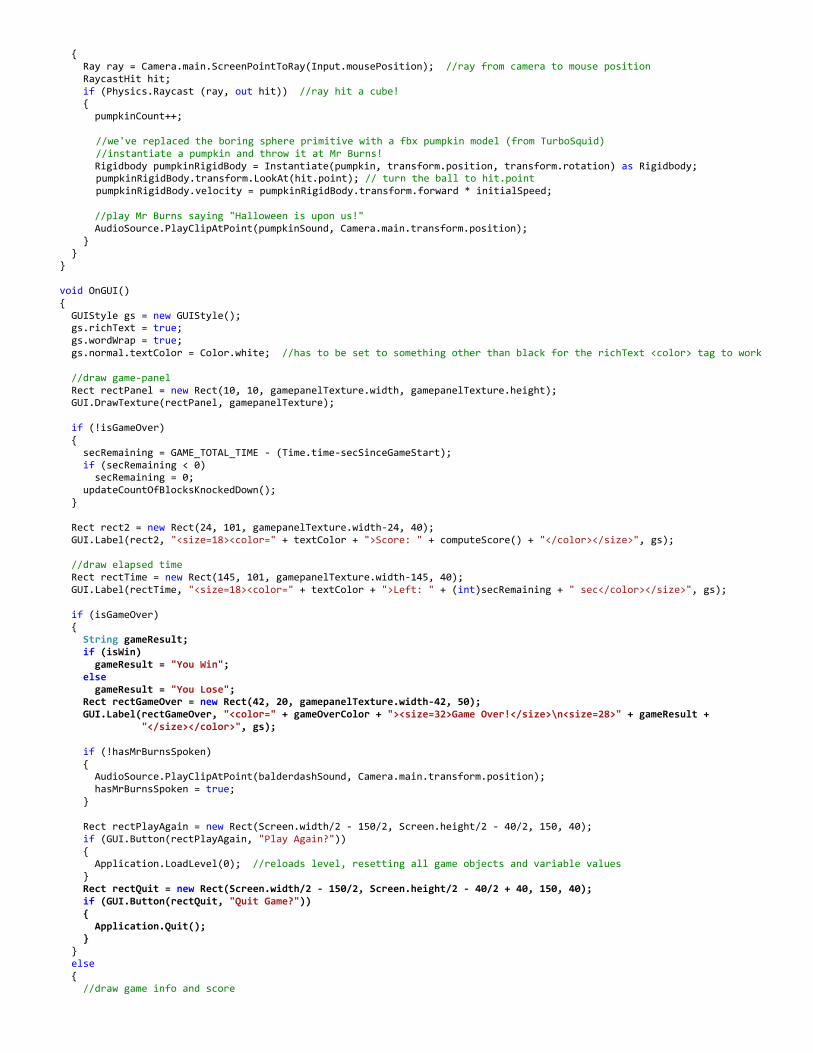
The 5th and final version of the PumpkinTosser.cs script has changed very little—the final win or lose message has
changed, and a Quit option has been added. New code is in bold.
using UnityEngine; using System.Collections; using System; /* This 5th and final version waits for the user to press the left mouse button ("Fire1") and then uses the mouse position to aim a pumpkin projectile (now a true pumpkin 3D model) at the wall of cubes A crosshair texture (image) is displayed where the mouse pointer is located The scene consists of: -rows of cubes (cube primitives) stacked on top of each other -a floor (with a box collider so cubes and pumpkins don't fly through it) -Main Camera (this script is attached to the Main Camera) -Point light (positioned to properly illuminate our scene) A "scoreboard" texture is displayed behind game text to make it look better A countdown timer adds a time element to the game Scoring is computed from both the number of pumpkins used and the time required to knock down the blocks Sound effects play when pumpkins are fired and when the game is over

Textures (images) wrap around the blocks The major improvement to this version is that our sphere pumpkin has been replaced with a snazzy pumpkin fbx model that I downloaded from TurboSquid (http://www.turbosquid.com/FullPreview/Index.cfm/ID/699996) A "Play Again?" button and a "Quit" button have been added as well */ public class PumpkinTosser : MonoBehaviour { //Sound effects //in Unity Editor, click on Main Camera and you'll see these script variables on right. //Drag the two .mp3 files from Resources dir over this script variable public AudioClip pumpkinSound; public AudioClip balderdashSound; /* public variables will appear in the Inspector when the object this script is attached to (the Main Camera) is selected in the Editor Private variables do not appear */ public float initialSpeed = 30f;//if speed’s too high, it flies through wall in less than 1 frame and isn’t detected public float moveSpeed = 5f; //the speed the camera is moved when the arrow keys are pressed /* downloaded pumpkin fbx from TurboSquid.com copied pumpkin.fbx into /Assets/Prefabs and copied pumpkin_D.jpg into /Assets/Resources dragged pumpkin onto scene then clicked on pumpkin_D.jpg and dragged that on top of pumpkin in scene (to apply the texture to the pumpkin) pumpkin scale was too small, so increased scale to 33/33/33 added Component/Physics/Rigidbody to pumpkin in scene added Component/Physics/SphereCollider to pumpkin in scene dragged pumpkin from Heirarchy to /Assets/Prefabs deleted pumpkin from scene finally clicked on Main Camera in Editor, then dragged the pumpkin from prefabs into to the script variable "pumpkin" */ public Rigidbody pumpkin; private int pumpkinCount = 0; private bool isGameOver = false; private bool isWin = false; private bool hasMrBurnsSpoken = false; private const float GAME_TOTAL_TIME = 20.0f; private float secRemaining = GAME_TOTAL_TIME; private float secSinceGameStart; //this texture is dynamically set in Start(), make sure texture's X,Y dimensions are a power of two (e.g., 128x128) private Texture crosshairTexture; //this texture is declared as public so it can be set in Unity inspector (click on MainCamera in heirarchy, //set variable value in Inspector) public Texture gamepanelTexture; private String textColor = "#bbbbbbff"; //rrggbbaa format, where aa=alpha (and alpha of ff=opaque) private String gameOverColor = "#ccccccff"; private int cntBlocksKnockedDown; private int cntBlocksStillUp; // Use this for initialization void Start() { crosshairTexture = Resources.Load("crosshair") as Texture; secSinceGameStart = Time.time; } // Update is called once per frame void Update () { Screen.showCursor = isGameOver; //allow user to move the camera in the scene using the arrow keys (or AWSD keys) float deltaX = Input.GetAxis("Horizontal") * Time.deltaTime * moveSpeed; float deltaY = Input.GetAxis("Vertical") * Time.deltaTime * moveSpeed; transform.Translate(deltaX, deltaY, 0); //deltaZ = 0 if (!isGameOver && Input.GetButtonUp("Fire1"))
{ Ray ray = Camera.main.ScreenPointToRay(Input.mousePosition); //ray from camera to mouse position RaycastHit hit; if (Physics.Raycast (ray, out hit)) //ray hit a cube! { pumpkinCount++; //we've replaced the boring sphere primitive with a fbx pumpkin model (from TurboSquid) //instantiate a pumpkin and throw it at Mr Burns! Rigidbody pumpkinRigidBody = Instantiate(pumpkin, transform.position, transform.rotation) as Rigidbody; pumpkinRigidBody.transform.LookAt(hit.point); // turn the ball to hit.point pumpkinRigidBody.velocity = pumpkinRigidBody.transform.forward * initialSpeed; //play Mr Burns saying "Halloween is upon us!" AudioSource.PlayClipAtPoint(pumpkinSound, Camera.main.transform.position); } } } void OnGUI() { GUIStyle gs = new GUIStyle(); gs.richText = true; gs.wordWrap = true; gs.normal.textColor = Color.white; //has to be set to something other than black for the richText <color> tag to work //draw game-panel Rect rectPanel = new Rect(10, 10, gamepanelTexture.width, gamepanelTexture.height); GUI.DrawTexture(rectPanel, gamepanelTexture); if (!isGameOver) { secRemaining = GAME_TOTAL_TIME - (Time.time-secSinceGameStart); if (secRemaining < 0) secRemaining = 0; updateCountOfBlocksKnockedDown(); } Rect rect2 = new Rect(24, 101, gamepanelTexture.width-24, 40); GUI.Label(rect2, "<size=18><color=" + textColor + ">Score: " + computeScore() + "</color></size>", gs); //draw elapsed time Rect rectTime = new Rect(145, 101, gamepanelTexture.width-145, 40); GUI.Label(rectTime, "<size=18><color=" + textColor + ">Left: " + (int)secRemaining + " sec</color></size>", gs); if (isGameOver) { String gameResult; if (isWin) gameResult = "You Win"; else gameResult = "You Lose"; Rect rectGameOver = new Rect(42, 20, gamepanelTexture.width-42, 50); GUI.Label(rectGameOver, "<color=" + gameOverColor + "><size=32>Game Over!</size>\n<size=28>" + gameResult + "</size></color>", gs); if (!hasMrBurnsSpoken) { AudioSource.PlayClipAtPoint(balderdashSound, Camera.main.transform.position); hasMrBurnsSpoken = true; } Rect rectPlayAgain = new Rect(Screen.width/2 - 150/2, Screen.height/2 - 40/2, 150, 40); if (GUI.Button(rectPlayAgain, "Play Again?")) { Application.LoadLevel(0); //reloads level, resetting all game objects and variable values } Rect rectQuit = new Rect(Screen.width/2 - 150/2, Screen.height/2 - 40/2 + 40, 150, 40); if (GUI.Button(rectQuit, "Quit Game?")) { Application.Quit(); } } else { //draw game info and score

Rect rect1 = new Rect(32, 22, gamepanelTexture.width-32, 50); GUI.Label(rect1, "<size=18><color=" + textColor + ">Try to knock down all the blocks as fast and with as few pumpkins as possible.</color></size>", gs); //draw crosshairs float x = Input.mousePosition.x - (crosshairTexture.width/2); float y = Screen.height - (Input.mousePosition.y + (crosshairTexture.height/2)); Rect rectCrosshair = new Rect(x, y, crosshairTexture.width, crosshairTexture.height); GUI.DrawTexture(rectCrosshair, crosshairTexture); } } /* The score is determined by the number of pumpkins fired (the fewer the better) and the elapsed time (the quicker the better) */ private int computeScore() { const float cntBlocksOnBottomRow = 20; float score = ((cntBlocksKnockedDown - cntBlocksOnBottomRow - 1) * 1000) / (pumpkinCount+1); if (isGameOver) score = score + Mathf.Floor(secRemaining) * 1000; return((int)Mathf.Round(score)); } /* Check to see if any blocks (cubes) have a Y pos that is greater than some threshold If none do, then the game is over. The game is also over if secRemaining < 0.1f. */ private void updateCountOfBlocksKnockedDown() { const float thresholdForBlockBeingStillUp = 2.5f; cntBlocksKnockedDown = cntBlocksStillUp = 0; MeshFilter[] meshFilters = FindObjectsOfType(typeof(MeshFilter)) as MeshFilter[]; for (int i=0; i < meshFilters.Length; i++) { //blocks have 24 verts, only count blocks, so if a pumpkin //(sphere) is propped up on top of cube, don't count this as needing to be knocked down bool isBlock = (meshFilters[i].mesh.vertexCount == 24); if (isBlock) { if (meshFilters[i].transform.position.y < thresholdForBlockBeingStillUp) cntBlocksKnockedDown++; else cntBlocksStillUp++; } } isGameOver = (cntBlocksStillUp == 0) || (secRemaining < 0.1f); isWin = (isGameOver && cntBlocksStillUp == 0); } }
Conclusion
This tutorial has introduced many 3D and Unity gaming concepts. Pumpkin Tosser is obviously a very simple
game that would bore most players in about 2 minutes, but it illustrates what it is possible to create, in a fairly
short amount of time, in Unity. Many improvements are possible: changing the Cube blocks into another 3D
model, such as bales of hay. Instead of a simple floor that is a flat plane, the game could be set in a landscape
with trees with perhaps a Halloween motif of scarecrows, a nighttime sky, and black crows that occasionally
land on the bales of hay. For an even more interactive game, an opponent could be introduced who throws
pumpkins back at the player (towards the camera), requiring that the player use the arrow keys to dodge
incoming projectiles. With Unity, just about anything is possible.
Related Documents