SOUS VIDE A BEGINNER’S GUIDE TO SIMPLE AND DELICIOUS SOUS VIDE COOKING JASON VESELAK 101

Welcome message from author
This document is posted to help you gain knowledge. Please leave a comment to let me know what you think about it! Share it to your friends and learn new things together.
Transcript

SOUS VIDE
A BEGINNER’S GUIDE TO SIMPLE AND DELICIOUS SOUS VIDE COOKING
JASON VESELAK
1 0 1

WHO I AM I am a home chef with a passion for preparing perfectly-cooked, gourmet meals at home – so naturally I became obsessed with cooking sous vide. This obsession led to a quest to find the perfect cooking time, temperature and techniques for every type of food I put in the bath. I am excited to share my pro-tips and favorite recipes to help make cooking sous vide an unforgettable experience for everyone.
WHY I WROTE THIS BOOK When I first received my sous vide, I purchased multiple books and scoured the internet for anything related to the cooking technique. I didn’t find much useful information. Many articles and blog posts I read started with the stuffy “Sous vide in French means ‘under vacuum’” intro. If you’re like me, this explanation means absolutely nothing. That is why I sought out to create this guide for beginners. I wanted to compile everything I’ve learned from my years of experience; to give real explanations to help people understand just what the heck this machine does. I wanted to teach people how to harness and maximize the power of sous vide. And here it is: my foolproof guide that will teach you everything I wish I had known at the beginning of my journey. A lay out of the foundations of cooking sous vide, so that you can hit the ground running.
MEET THE AUTHOR
@sousveezy @sousvideways @sousvideways sousvideways.com
FOLLOW ME
| PAGE 1 |

03Preface
17Essential Sous Vide Equipment
04Sous VideBasics
06The Sous Vide Process
18
24
How to Pronounce “Sous Vide” 04 What is Sous Vide? 05
Searing 12
Selecting a Time and Temperature 09
Packaging 06
Must Try Recipes
Time & Temperature Guide
Phase 1 Pat that meat dry Phase 2 Season generously Phase 3 Sear at high temperatures
Temperature Time
Vacuum Sealing Displacement Method
sousvideways.com
CONTENTS

Sous vide is a revolutionary cooking technique that has taken the world by storm within the past few years. It is a pretty much guaranteed method to cook your food to perfection every single time. By following some simple fundamentals, this technique will completely change food for you – from meal prepping to cooking, from hosting large parties to entertaining a few guests – sous vide will serve all of your needs and more. Want to impress your hot date by cooking a steak dinner on a Friday night? Cook it in a sous vide bath, and you’ll have a restaurant-quality steak that’ll be sure to seal the deal. Hosting a party for your in-laws and nervous you’ll ruin the chicken piccata? Drop the chicken in the bath and you’ll have succulent chicken that even Thomas Keller would be proud of. I think you’ve got the point – cooking sous vide is an absolute game changer, and better yet, it’s incredibly simple.
PREFACE
| PAGE 3 |

| PAGE 4 |
SOUS VIDE BASICS
HOW TO PRONOUNCE SOUS VIDE?
First things first, you may be wondering how the heck do you even pronounce
“sous vide”. I know I had no idea at first and was too embarrassed to ask.
To save you from the ridicule of all
your food snob friends, I’ll give you it to you straight: simply say “soo veed”.
Pronounce it right and you’ll sound like
someone who was raised on a château in Bordeaux eating the finest camembert
and coq au vin for every meal.

| PAGE 5 |
Now that we got that over with, let’s get into exactly what cooking sous vide means. Cooking
sous vide is the process of placing ingredients in an air-tight container or bag, then dropping it in a
temperature-controlled water bath. Sealing the ingredients in a bag retains juices and aromas that
otherwise would be lost in traditional methods such as grilling, baking and pan-frying. Also,
cooking food in a temperature-controlled bath offers complete control over whatever food you
are cooking, eliminating all guess work.
Air-tight bags and temperature-controlled baths may sound complicated at first, but cooking sous vide is an incredibly simple process. All you gotta
do is put your ingredients in a bag, determine a time and temperature, let the sous vide machine
work its sweet magic, then give it a good sear for a nicely browned crust. However, there are some
nuances in the process that can significantly impact the result of your cook. Below, I share my
pro tips in a detailed, step-by-step look at the process of cooking sous vide. Follow this and
you’ll be a sous vide sensei in no time.
SOUS VIDE BASICS
WHAT IS SOUS VIDE?

| PAGE 6 |
As mentioned above, an essential part of cooking sous vide is putting ingredients in an air-tight bag or container. The two most common techniques to package your ingredients are vacuum sealing and using the water displacement method. I prefer the displacement method over vacuum sealing, but we will get to that in a second.
PACKAGING
THE SOUS VIDE PROCESS
VACUUM SEALING A vacuum sealer removes all the air and seals the contents of a plastic bag through a vacuum. Vacuum sealers are convenient but not mandatory, for sous vide cooking, especially given the high price tag that comes with them. Most blogs and articles will tell you that they are a must, but many are just trying to make a quick buck off your expensive purchase. When I first started cooking sous vide, I followed the instructions of other blogs and bought a vacuum sealer thinking it would make a difference. Let’s just say it’s collecting dust in a bottom drawer.

| PAGE 7 |
DISPLACEMENT METHOD
You may be asking, “How can I manage to get all my ingredients in an air-tight bag then?” Well if you don’t want to spend hundreds of dollars on a vacuum sealer, I’ve got an incredibly easy and affordable solution for you. The water displacement method – your golden ticket to cooking sous vide without having to invest in a fancy vacuum sealer. The Displacement Method is a technique where you first place your food and marinades in a Ziploc double zipper, freezer bag. Note that using this specific type of bag is recommended, as it is BPA- and dioxin-free, and durable enough to endure lengthy cooks. Next, submerge your food in a container of water, and allow the pressure to force all the air out of the bag. Last, seal the bag up and voila, that’s all there is to it! Below I have provided a thorough step by step explanation with pictures included:
Place your food (including fresh herbs, olive oil and / or marinades) in a double zipper, freezer bag. Zip up 80% of the bag, only leaving one corner unzipped.
STEP 1
| PAGE 8 |
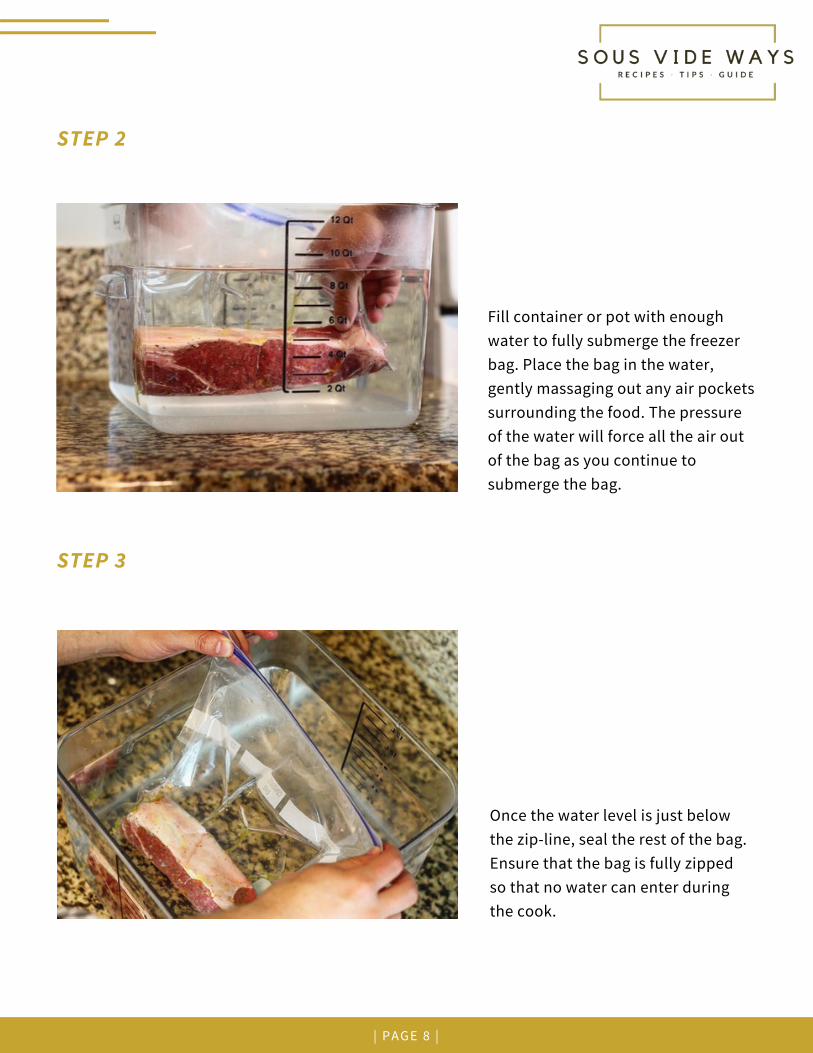
STEP 2
Fill container or pot with enough water to fully submerge the freezer bag. Place the bag in the water, gently massaging out any air pockets surrounding the food. The pressure of the water will force all the air out of the bag as you continue to submerge the bag.
Once the water level is just below the zip-line, seal the rest of the bag. Ensure that the bag is fully zipped so that no water can enter during the cook.
STEP 3

Before you can put the sous vide machine to work, there are two variables that you need to determine. The first is the total time of the cook, and the second is the temperature of the water. Both of these are massively important to cooking sous vide as they will determine the doneness, texture, and tenderness of your food. In short, temperature = doneness time = tenderness Once you select a time and temperature based on your preference, all you have to do is set the temperature of the sous vide machine and let it work its magic. Check out my foolproof guide at the back of this book to help you determine the ideal time and temperature for anything you are dropping in the bath. Below is an in-depth explanation of how to effectively determine the time and temperature so that you can nail every cook to perfection.
SELECTING A TIME AND TEMPERATURE
| PAGE 9 |

| PAGE 10 |
TEMPERATURE
The first variable is the temperature. The temperature of the sous vide bath controls the doneness of the food, meaning it will determine whether your eggs are poached or hard boiled, or if your steak is medium-rare or well-done. Think about cooking a steak on a barbecue. If you want a steak to be medium rare, you fire up your grill to 400F and cook it until your meat thermometer reads 131F. With a sous vide machine, you take a different approach. Rather than using a flaming hot grill to torch the outside of your steak to eventually reach a specific internal temperature, you simply heat the sous vide bath water to that desired temperature. By doing this, the entire steak is medium rare from edge to edge. The same logic applies to all different types of food, whether it is chicken, eggs, vegetables, or whatever else you want to cook.

| PAGE 11 |
TIME
The second variable is the time of the cook. The length of the cook controls the tenderness of food, and whether your food is completely cooked through. In my time and temperature guide, you’ll notice that there is a minimum and maximum amount of time recommended for each cook, depending on each specific food. The minimum amount of time ensures that the food is completely cooked through. I do not recommend cooking for less than that. The maximum amount of time ensures that the meat is not overly tender (yes, that is possible). The sous vide is very forgiving, so if you leave your food in the bath for an extra hour or two past the maximum the effect will be minimal. However, if you cook a 1 inch pork chop for 48 hours, the texture of the meat will start degrading and you will end up with pork mush.
The time in-between the minimum and the maximum is where the magic happens. Similar to cooking meat on a smoker, slow cooking a protein in a sous vide converts collagen into gelatin, which can significantly increase the tenderness. There is a lot of experimentation that can be done in between the minimum and maximum times, so I highly encourage you play around and find your favorites! *Note that certain foods like eggs have a very precise time and temperature. Since the texture of eggs can completely change with an extra 10 minutes, I recommend being very precise.

| PAGE 12 |
Searing is the most critical step in the sous vide process. When your meat is done cooking in the
water bath, it comes out with a pale color on the outside. Although the inside is cooked to
perfection, the outside is not visually appetizing to say the least. This is where searing comes in to
play. Getting a deep, rich sear can make your food look like it is Michelin star quality. Failing to do so will make your dinner guests wonder why they let you cook again. Not only is searing important for
aesthetics, it also seals in the juices and kills off any unwanted bacteria still present. This is why
searing is a major key for sous vide cooking, and can make or break your final product. If you
want an amazing sear, you’ve got to:
SEARING
1. Pat your meat completely dry 2. Season generously with salt
3. Sear at extremely high temperatures

| PAGE 13 |
PHASE 1 • PAT THE MEAT DRY
The first crucial step in achieving that perfect sear is getting the meat dry. When you remove your food from the bag post-cook, you’ll find that the meat is moist from cooking in its own juices. If you leave the moisture on the meat and tried to sear, all the liquid would have to evaporate before the meat can start to brown. This is not ideal since searing for a long duration negatively affects the quality of your perfect protein. Due to this, it is important to speed up this process by removing all the moisture from the meat. Accomplish this by patting down the meat with a paper towel or cloth until it is completely dry.

| PAGE 14 |
PHASE 2 • SEASON GENEROUSLY
Once your food is properly dry, it is time for some seasoning. To start, you are going to need a generous amount of salt. Adding salt will first off make your food taste better. The real kicker though is that it will be the base in forming a nice crust on your protein. Salt is essential, but feel free to add whatever spices and herbs you want to at this point to kick the flavor up a notch. If you’ve got a pre-made seasoning you love, feel free to liberally season with that! Just make sure to check the label to make sure there is salt (most will have it). Note that seasonings may not easily stick to sous vide food like it does when ingredients are raw. Make sure to thoroughly pat the seasonings into the your food to ensure it sticks.

| PAGE 15 |
PHASE 3 • SEAR AT HIGH TEMPERATURE
Now we can get into the good stuff: the actual process of searing. What we want to achieve here is called the Maillard reaction, which is the browning of meat due to the reaction that occurs when amino acids and sugars are exposed to high levels of heat. Essentially, the Maillard reaction occurs when the internal sugars and proteins of a meat react to being placed on a blazing hot skillet or grill. The result? That beautiful deep, rich sear on the outside of your meat, which adds flavor, texture, and beauty.

| PAGE 16 |
There are many ways to sear your meat after cooking sous vide – pan-searing, grilling, broiling and frying are among the most popular. But achieving an amazing sear all boils down to one key element: heat. So whatever method you decide to use, make sure it is piping hot before searing. If you are using a cast-iron skillet to sear, make sure that it is so hot it is smoking before you sear it (you might need to open a few windows before the sear). If you are grilling, crank all the burners to high and let it pre-heat for at least 5 minutes before you start searing. Moral of the story – the hotter it is, the quicker and better the sear will be. The objective is to get a beautiful sear on the outside in the shortest amount of time possible. As a rule of thumb, I would recommend searing for about one to two minutes on each side. On thin pieces of meat (1 -2 inches), a quick sear is important. Searing for too long will start negatively impacting the tenderness and texture of the meat. If you’ve got a thick roast (tri-tip, pork shoulder, etc.), you can get away with searing it a minute or two longer on each side.
BONUS • THE MAYO SEAR
If you want to get really crazy, try a mayo sear. It may sound nasty at first, but the absolute best sear comes from mayo. Mayo’s composition is essentially oil and egg yolk, which is the perfect combination for producing a beautiful, brown crust. Simply pat your meat dry, brush on a very thin layer of mayo on, and apply your seasonings. Then, sear your meat using one of the methods listed above and enjoy a photo- worthy crust.

| PAGE 17 |
The two best sous vide machines in the game right now are the Anova Precision Cooker andthe ChefSteps Joule. The main difference between the two is that with the Anova you cancontrol the device both manually and with a mobile device, and with the Joule you can onlycontrol the device by using your mobile device. Either way, both sous vide machines are topclass and you can’t go wrong with either choice.
SOUS VIDE MACHINE
Although you can use a basic stockpot for your sous vide cooking needs, I highly recommendbuying a large plastic container. They are inexpensive and spacious, so you won’t have toworry about cooking a big roast in a small pot. I recommend a 12 quart Rubbermaid container,as it is BPA free, sturdy and large enough for just about anything you will be cooking.
LARGE CONTAINER
ESSENTIAL SOUS VIDE EQUIPMENT
If you are going to buy a plastic container, I highly suggest buying a compatible lid for it. Whenyou sous vide for a long duration, the heat of the water causes evaporation. You’ll findyourself having to wake up at 5 AM refilling your container during long cooks. With a lid, iteliminates a majority of the evaporation so you can cook short ribs for 72 hours care-free.
CONTAINER LID
If you are looking to take your searing game to the next level, I recommend investing in a castiron skillet. By using a cast iron, you’ll achieve a deep browning on your protein that results inpicture-worthy sears. Lodge offers the best quality and price, which is why it is our favoritecast iron brand.
CAST IRON SKILLET
If you want to make sous vide desserts or egg bites, you are going to need yourself canningjars. We prefer using the king of mason jars, Ball, for the job. Ball mason jars are reliable, soyou can rest easy knowing the lid will remain sealed while submerged.
CANNING JARS
Since sous vide machines are fairly large, it is often difficult to find space for them in yourkitchen. Rather than tucking it away in that drawer you never open, conveniently displaythese beautiful machines on your counter. Brighto sous vide offers compact, hygieniccounter-top stands for all the leading sous vide brands.
SOUS VIDE STAND

| PAGE 18 |
MUST TRY RECIPES

| PAGE 19 |
INGREDIENTS
• 2 - 3 lb Tri Tip Roast
• 1 clove garlic, crushed
• Salt and pepper to taste
SOUS VIDE TRI TIP
PREPARATION
Set sous vide machine to 55C/131F. Salt and
pepper the tri tip to taste. Put the tri tip in a
freezer bag with crushed garlic and remove the
air through a vacuum sealer or the displacement
method. Drop tri tip in bath for 6 hours.
FINISHING
Remove bag from bath. Take chicken out of bag,
pat dry and season with salt and pepper to taste.
Heat pan on high and add oil. Sear for 1 to 2
minutes on each side. Slice tri tip against the
grain, top with fresh chimichurri or your favorite
BBQ sauce and enjoy!

| PAGE 20 |
INGREDIENTS
• 6 large eggs
• ¾ cup grated gruyere
• ¼ cup half and half
• 3 strips thick cut bacon
• Salt to taste
STARBUCKS COPYCAT EGG BITE
INSTRUCTION
Set sous vide machine at 77.5C/172F. Cook 3
strips of bacon in a skillet until crispy, or in the
oven at 400F for 16-20 minutes. Blend together
the eggs, gruyere, half and half and salt. Put half
a strip of bacon at the bottom of each jar. Pour an
equal amount of egg-blend in each canning jar,
and screw on the lid. Gently submerge the entire
jars in the bath, and set a timer for 1 hour.
Remove from bath and let rest for 10 minutes.
Once rested, enjoy the egg bites straight from the
jar, or gently slide a butter knife around the edges
to remove from jar. Store in refrigerator for up to
5 days.
This recipe is quick and easy and will change your morning routine forever.
SPECIAL EQUIPMENT
6 4 oz. canning jar with lid

| PAGE 21 |
INGREDIENTS
• 4 pork loin chops
• 2 Tbsp olive oil
• 4 Tbsp balsamic vinegar
• 2 Tbsp whole grain Dijon
mustard
• 2 cloves garlic, minced
• 5 fresh sage leaves
• Salt and pepper to taste
BALSAMIC AND SAGE PORK CHOPS
PREPARATION
Set sous vide machine to 58C/136F. In a bowl, mix
together olive oil, balsamic, garlic and Dijon. Salt
and pepper the pork chops. Put chops in freezer
bag with marinade and remove air through a
vacuum sealer or displacement method. Drop in
bath for 1 hour.
FINISHING
Remove bag from bath. Take chops out of bag,
pat dry and season with salt and pepper. Discard
sage from bag, and set marinade aside. Heat
large pan on high and add oil. Sear for 1 minute
each side. Remove from pan and let rest. Low the
heat to medium, add marinade and simmer for 5
minutes or until thickened. Place chops back in
pan and coat for a minute.

| PAGE 22 |
INGREDIENTS
• 4 bone-in, skin-on chicken
thighs
• 4 Tbsp unsalted butter
• ¼ cup fresh lemon juice
• ½ cup chicken stock
• ¼ cup brined capers, rinsed
• ¼ cup fresh Italian parsey,
chopped
• 1 Tbsp extra virgin olive oil
• Salt and pepper to taste
CHICKEN PICCATA
PREPARATION
Set sous vide machine to 74C/165F. Season
chicken thighs with salt and pepper to taste.
Place chicken in freezer bag with chicken stock,
2 Tbsp butter, lemon juice and capers. Remove
air through vacuum sealer or displacement
method. Drop bag in bath for 1 ½ hours.
FINISHING
Remove bag from bath. Take chicken out of bag
and pat dry. Set bag containing marinade to the
side. Heat up large skillet on medium high, add
1 Tbsp olive oil and 2 Tbsp butter. Once hot, sear
chicken for 1 minute each side. Remove chicken
thighs from skillet and let rest. Add marinade
from bag into skillet. Bring to a simmer and cook
for 2 minutes. Return chicken back to pan for 1
minute and baste chicken. Remove skillet from
heat, garnish with chopped parsley and enjoy!
| PAGE 23 |
INGREDIENTS
• 1 lb fresh salmon
• 3 cloves garlic, minced
• 2 ½ Tbsp fresh lemon juice
• ½ Tbsp honey
• ½ Tbsp sriracha
• 2 Tbsp unsalted butter
• 1 sprig rosemary
• 3 dashes cayenne pepper
• 1/8 tsp red chili flakes
• Salt and pepper to taste
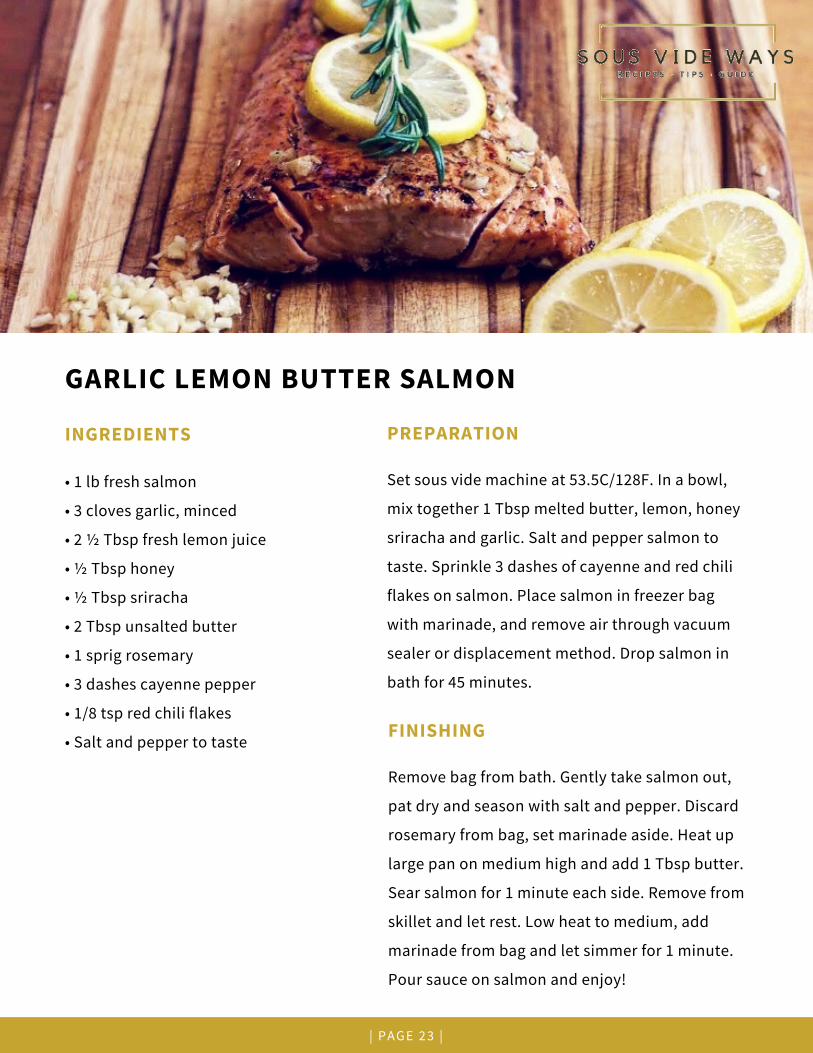
GARLIC LEMON BUTTER SALMON
PREPARATION
Set sous vide machine at 53.5C/128F. In a bowl,
mix together 1 Tbsp melted butter, lemon, honey
sriracha and garlic. Salt and pepper salmon to
taste. Sprinkle 3 dashes of cayenne and red chili
flakes on salmon. Place salmon in freezer bag
with marinade, and remove air through vacuum
sealer or displacement method. Drop salmon in
bath for 45 minutes.
FINISHING
Remove bag from bath. Gently take salmon out,
pat dry and season with salt and pepper. Discard
rosemary from bag, set marinade aside. Heat up
large pan on medium high and add 1 Tbsp butter.
Sear salmon for 1 minute each side. Remove from
skillet and let rest. Low heat to medium, add
marinade from bag and let simmer for 1 minute.
Pour sauce on salmon and enjoy!

| PAGE 24 |
TIME & TEMPERATURE GUIDE

| PAGE 25 |
BEEF, LAMB & GAME
Medium Rare
Medium
Medium Well
TEMPERATURE
DONENESS RANGE OUR FAVORITE
126 – 135F / 52 – 57C
136 – 145F / 57.5 – 62.5C 146 – 155F / 63 – 68C
131F/55C
140F/60C 149F/65C
Steak (NY Strip, Rib Eye, Sirloin)
Roast (Prime Rib, Tri Tip, Rib Roast)
Tough Cuts (Chuck, Brisket, Short Ribs)
TIME
CUT RANGE OUR FAVORITE
1 – 2 hours
6 – 14 hours
12 – 48 hours
1 1/2 hours
8 hours
24 hours

| PAGE 26 |
POULTRY
Tender and Soft (White Meat Only) Tender and Stringy (White Meat Only)
Firm and Juicy (White and Dark Meat)
TEMPERATURE
DONENESS RANGE
140 – 149F / 60 – 65C
150 – 159F / 65.5C – 70.5C
160 – 167F / 71 – 75C
White Meat (Breasts and Wings)
Dark Meat (Thighs and Drumstick)
TIME
CUT RANGE
1 – 3 hours
2 – 5 hours
OUR FAVORITE
140F / 60C
150F / 65.5C
165F / 74C
OUR FAVORITE
1 1/2 hours
3 hours

| PAGE 27 |
PORK
Medium Rare
Medium
Medium Well
TEMPERATURE
DONENESS RANGE OUR FAVORITE
134 – 140F / 56.5 – 60C
141 – 150F / 60.5 – 65.5C 151 – 158F / 66– 70C
136F/57.5C
145F/62.5C 154F/67.5C
Chops (Bone-in and Bonless)
Roast (Pork Loin Roast)
Tough Cuts (Pork Belly, Ribs, Shoulder)
TIME
CUT RANGE
1 – 3 hours
3 – 6 hours
8 – 24 hours
OUR FAVORITE
1 1/2 hours
6 hours
24 hours

| PAGE 28 |
FISH & SEAFOOD
Tender and Soft
Flaky Firm
TEMPERATURE
DONENESS RANGE OUR FAVORITE
104 – 114F / 40 – 45.6C
115 – 122F / 46 – 50C 123 – 131F / 50.5 – 55C
110F/43.5C
120F/49C 126F/52.5C
Fish (Salmon, Halibut and Tuna)
Shell Fish (Lobster, Scallops and Shrimp)
TIME
CUT RANGE OUR FAVORITE
30 minutes – 1 hour
20 – 45minutes
45 minutes
30 minutes

| PAGE 29 |
EGGS
Soft-Boiled
Poached Hard-Boiled
TEMPERATURE
DONENESS RANGE OUR FAVORITE
140 – 144F / 60 – 62C
145 – 149F / 62.5 – 65C 150 – 165F / 65.5 – 74C
140F/60C
145F/62.5C 160F/71C
45 minutes will give you the desired doneness for all the different eggs types listed above.
TIME
Related Documents